I present a two-minute video set to music of the April 8, 2024 total solar eclipse.
In my previous blog Chasing the Cross Continental Eclipse I told the tale of my chase to see the total eclipse of the Sun. I ended up under mostly clear skies in the Eastern Townships of Québec, Canada, not Texas, my original destination.
Here I present the result of shooting with four cameras that afternoon, taking still images, time-lapses, and a 4K movie.
Be sure to watch in 4K!
The site worked out very well, as the lower Sun in eastern Canada lent itself to views framing the eclipse over a landscape below, in this case a very wavy lake. But I was lucky to have open water as other lakes in the area were still frozen.
My post-eclipse selfie at the Lac Brome site in Quebec for the April 8, 2024 total eclipse of the Sun.
As it was, a snow storm a few days earlier left lots of snow in the area to be included in my post-eclipse selfie.
This was only the third total solar eclipse I’ve seen from Canada, after February 26, 1979 from Manitoba, and August 1, 2008 from the air out of Cambridge Bay, Nunavut in the Canadian Arctic. The next total eclipse from Canada passes over my home in Alberta. But it is not until August 22, 2044!
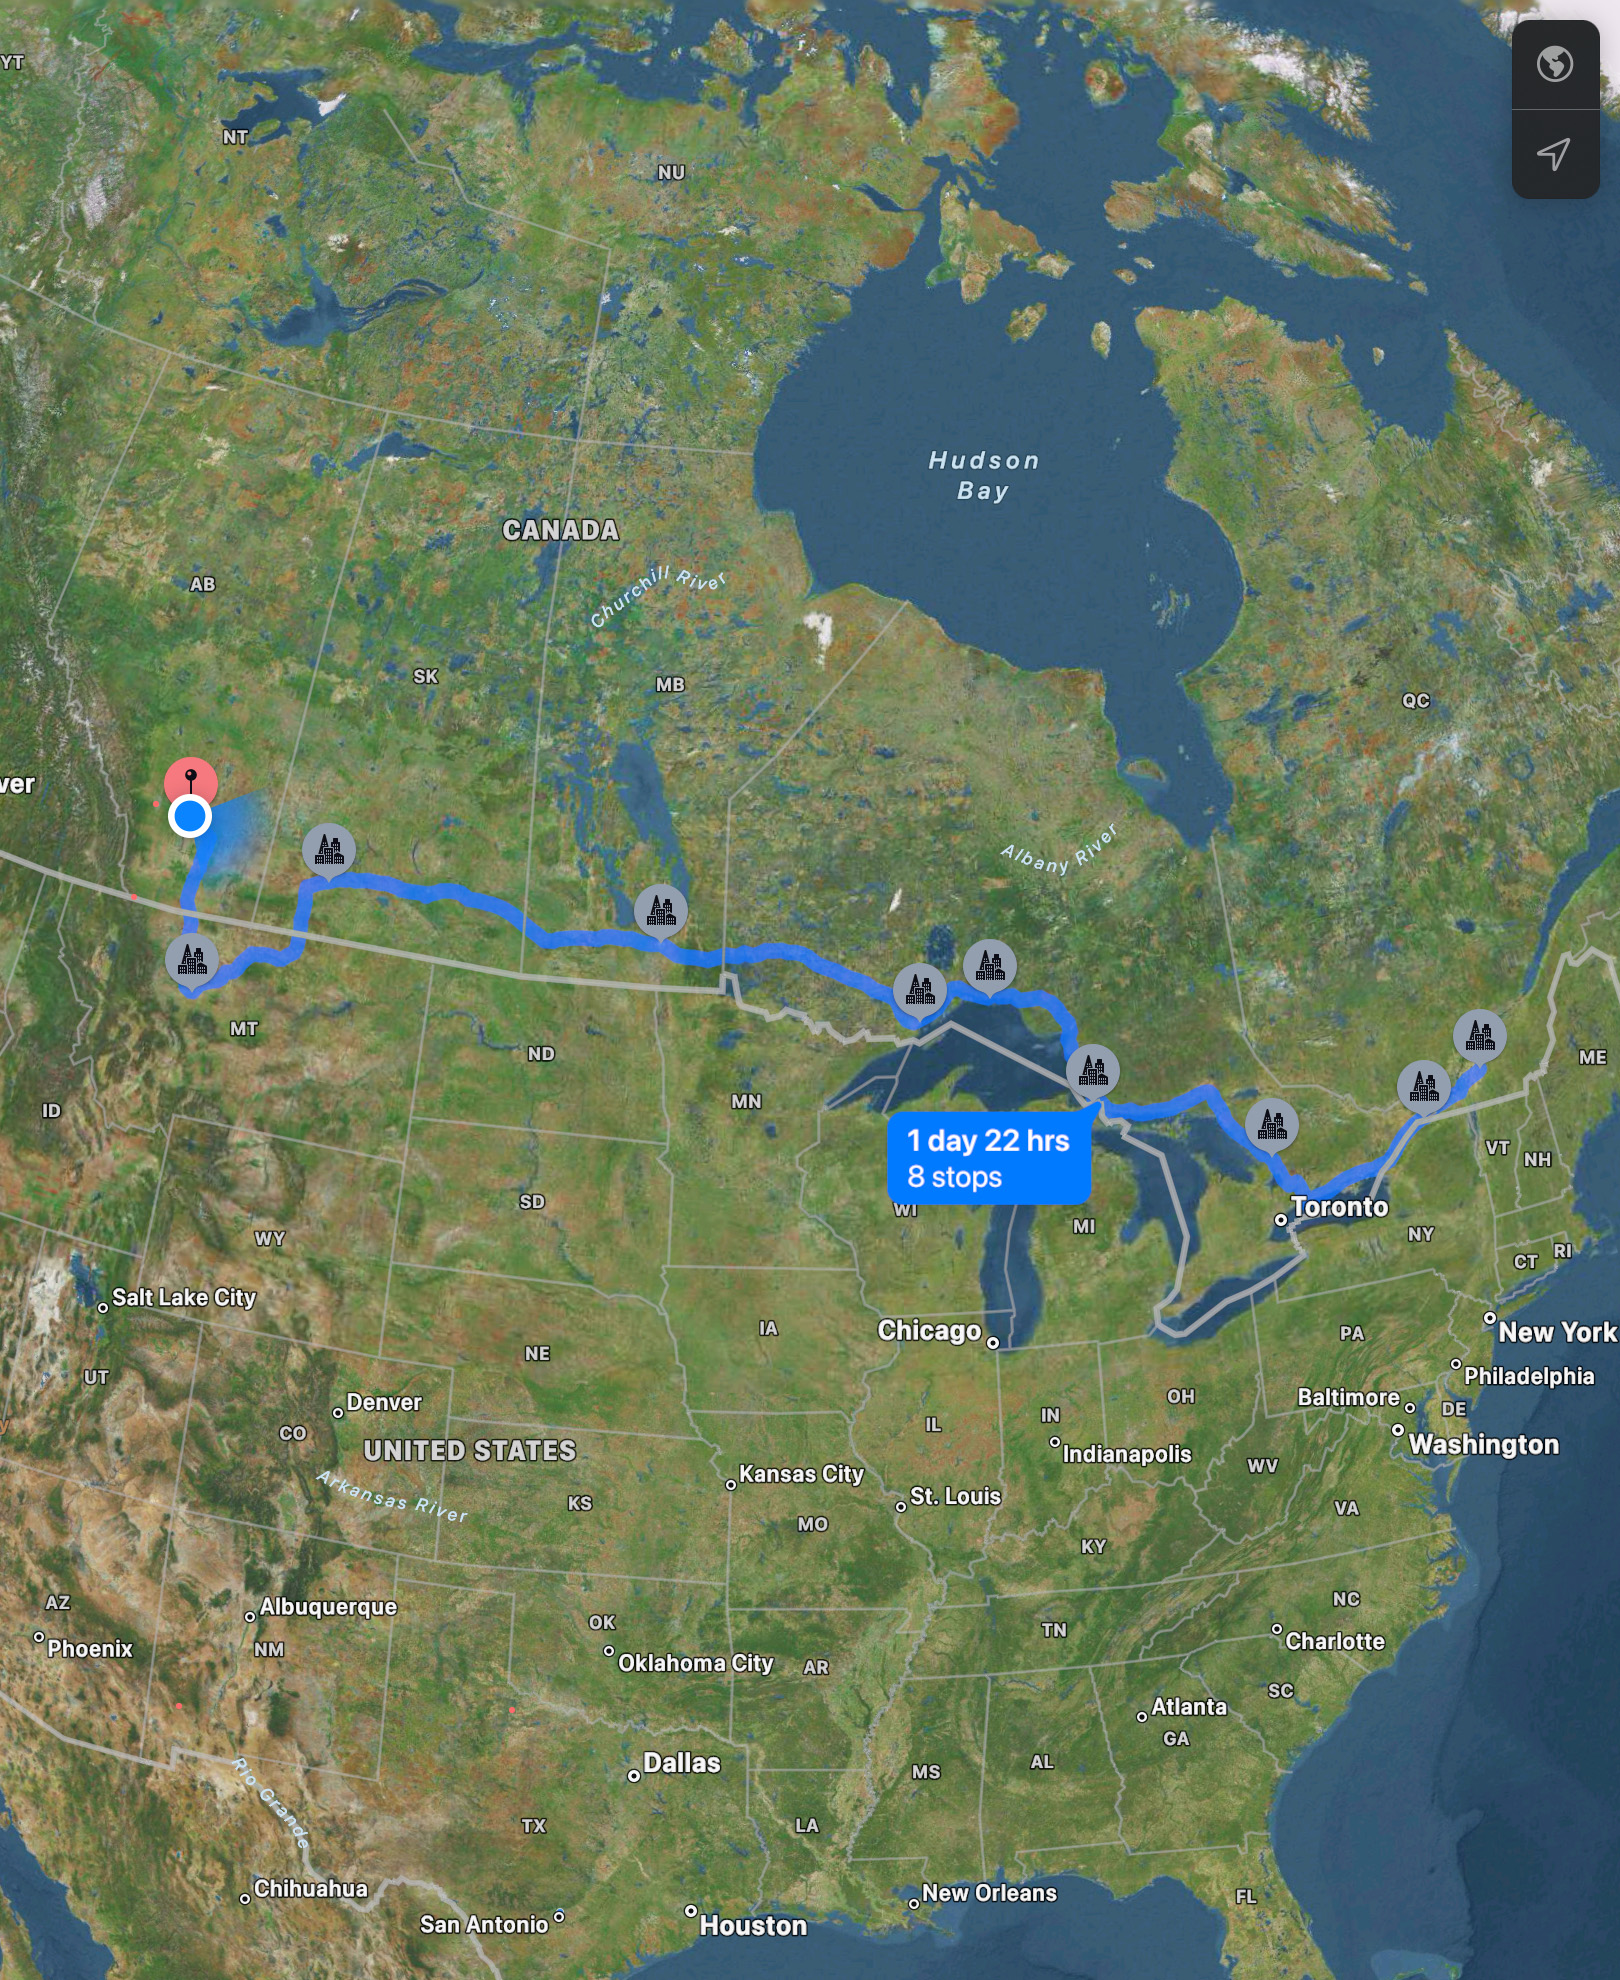
I had always planned to drive to the April 8, 2024 total eclipse of the Sun. But to where? I ended up on the other side of the continent than originally planned.
It is not often the path of the Moon’s shadow crosses your home country, let alone continent. Only once before in recent years, on August 21, 2017, did the narrow shadow path pass near enough to my home in Alberta to allow me to drive to a total eclipse. They almost always require flying.
Packed and ready to hit the highway for a long eclipse trip.
Yes, while I could drive to the April 8, 2024 eclipse, it was going to demand a much longer drive than in 2017. But driving allowed me to take a carload of telescope and camera gear. So that was the plan.
My destination was San Antonio, Texas. That’s where I had made a hotel booking more than a year earlier. The weather prospects in Texas were forecast to be best (at least according to the long-term averages) of any locations along the path in the U.S. or Canada. (I did not want to drive into Mexico.)
Where I was going! Where I ended up going!
On March 30, with some trepidation, I set out down I-15 heading south. I got as far as Great Falls, Montana, my stop for night one. But it was to be a move in the wrong direction.
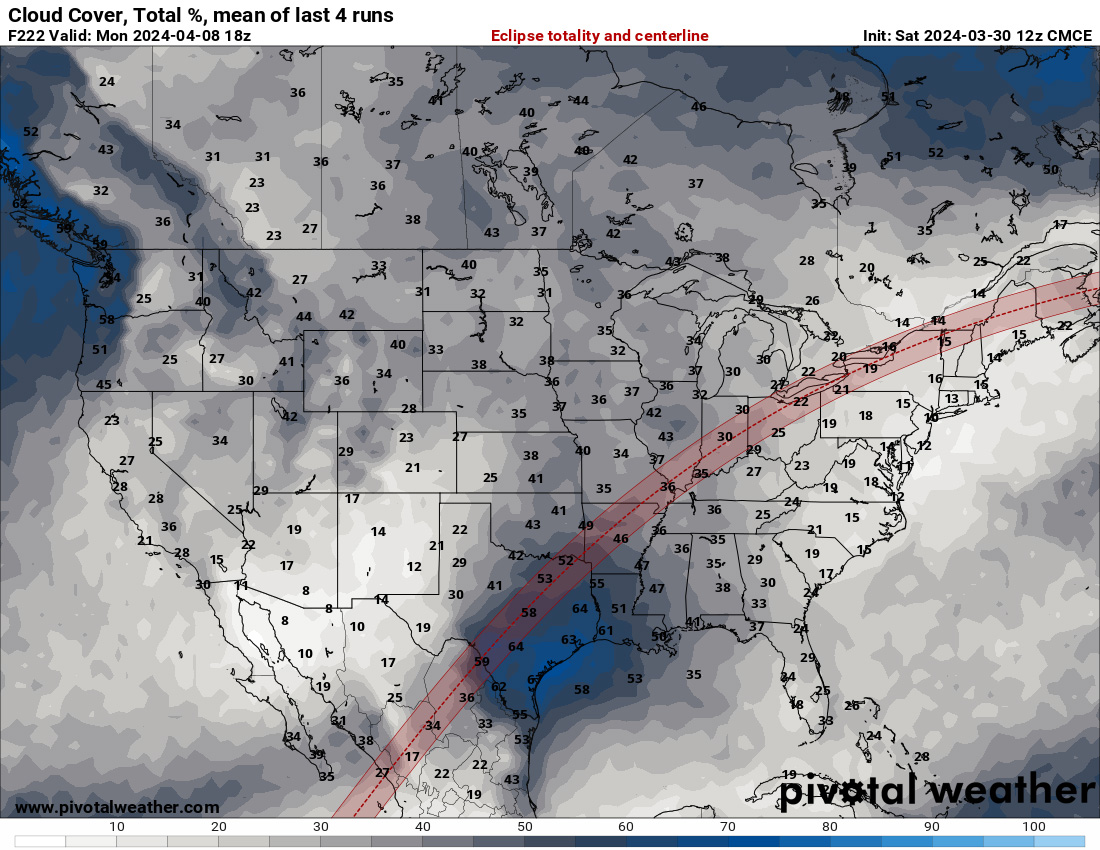
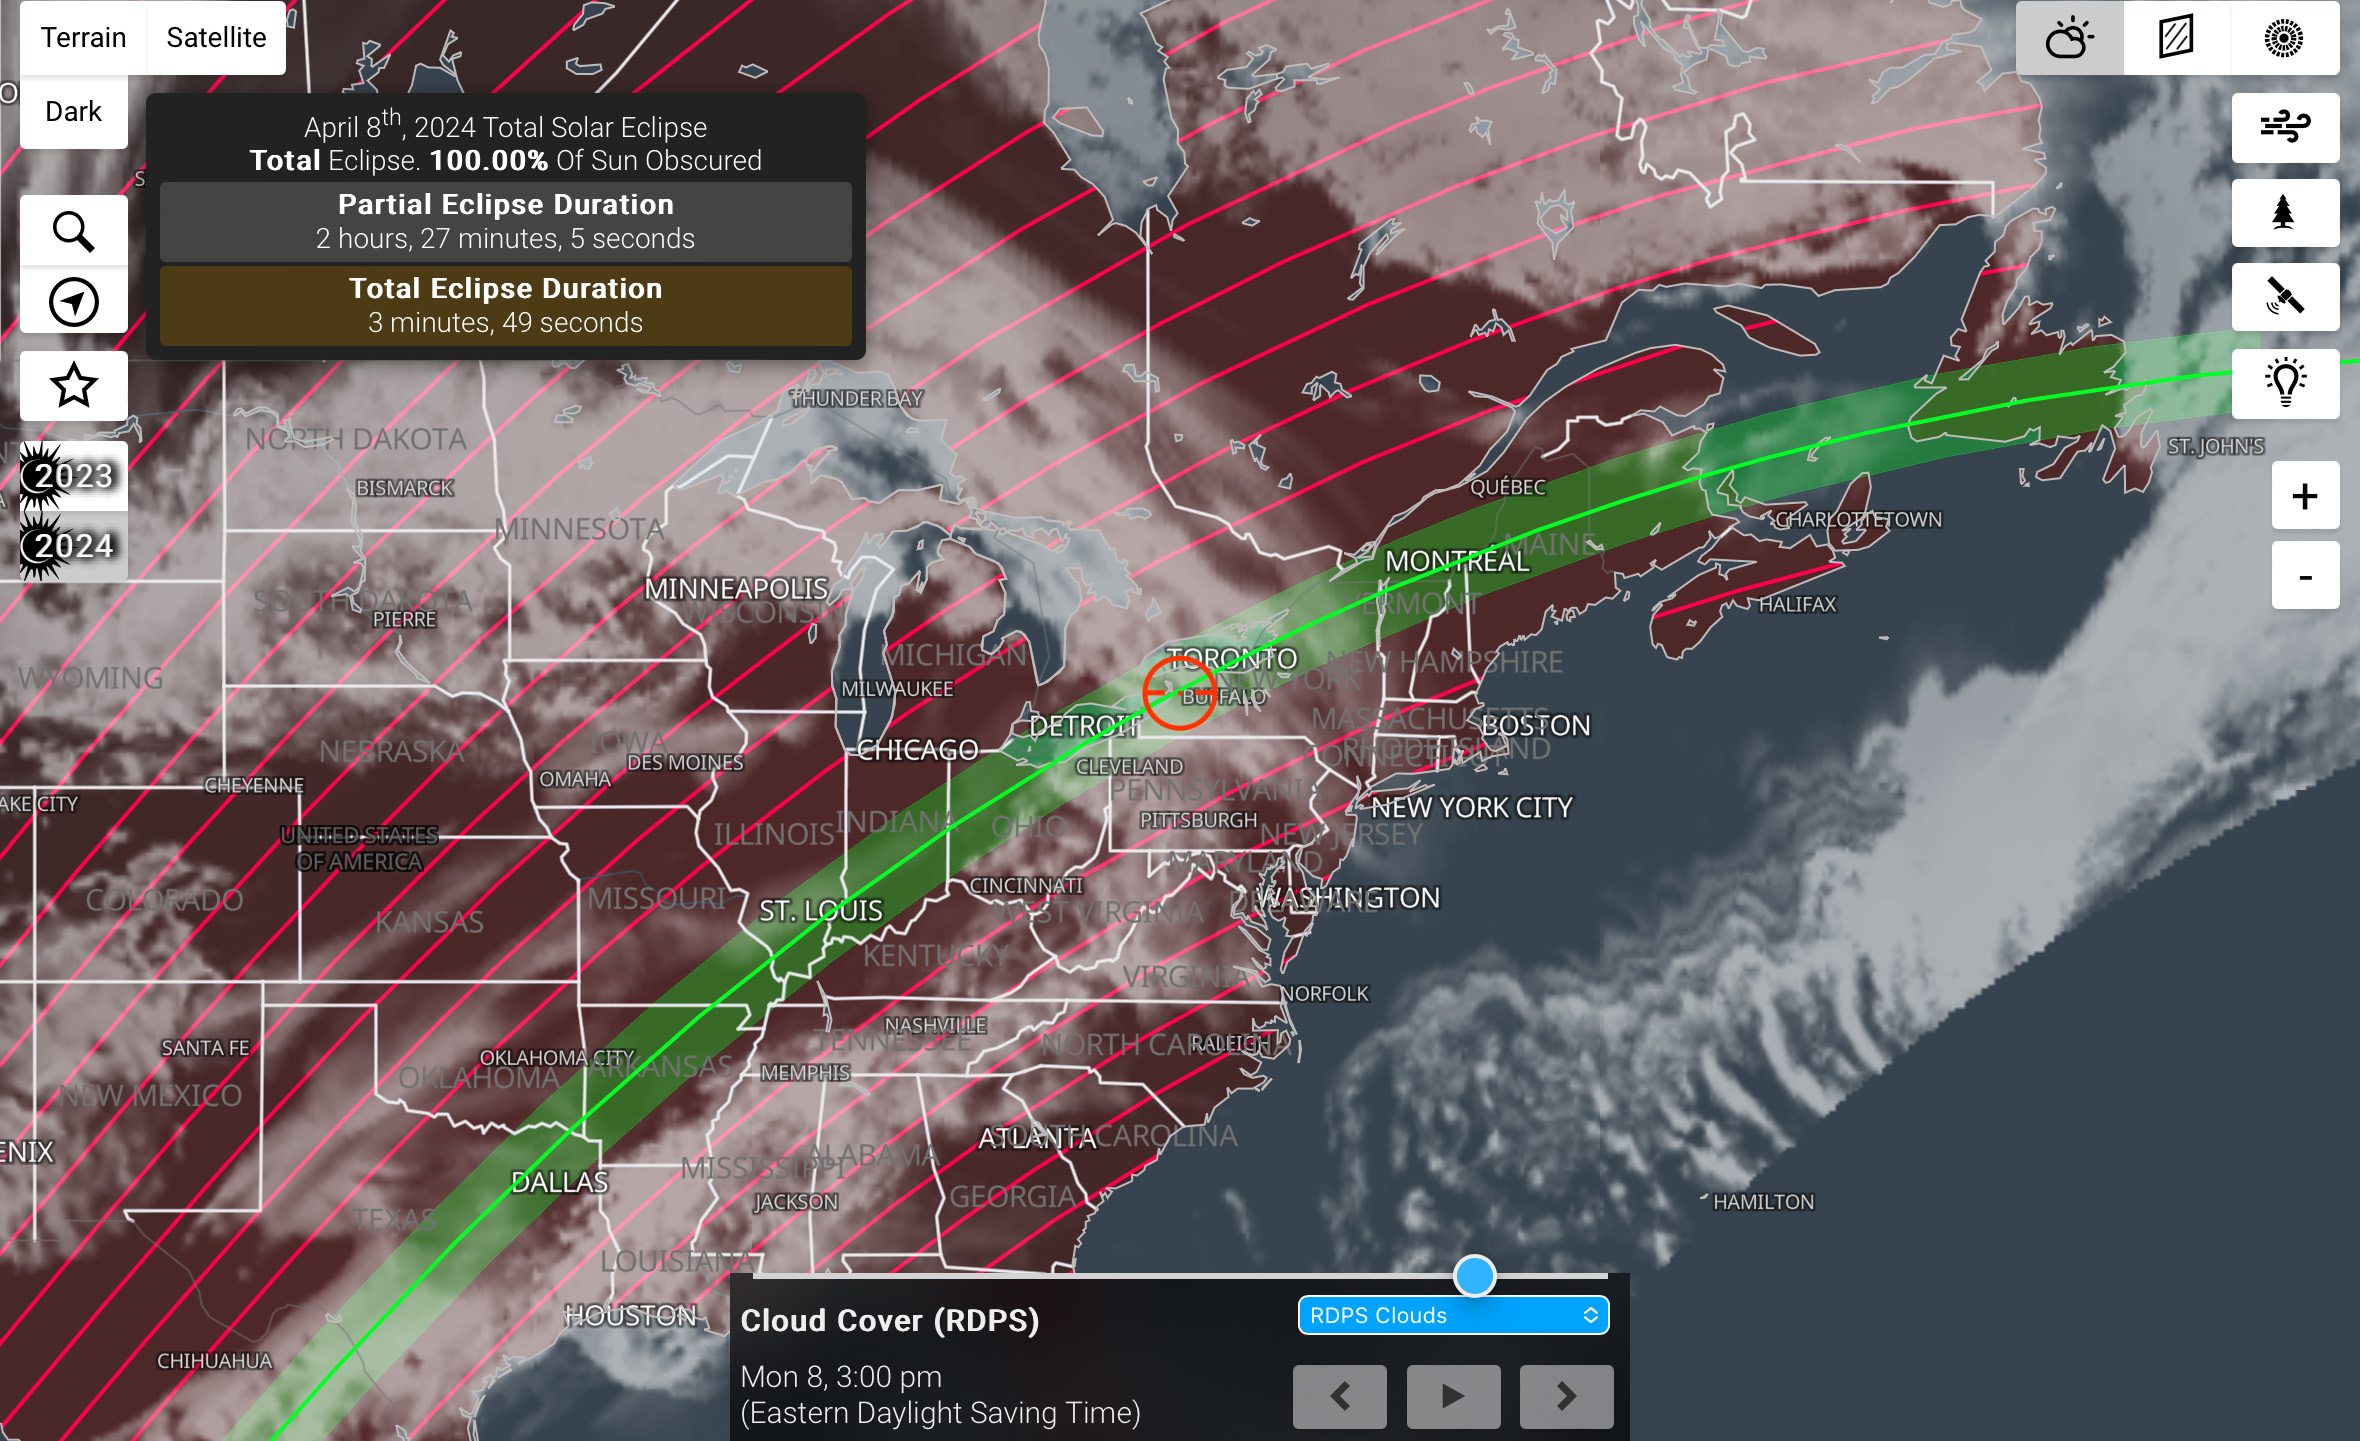
The forecast for Eclipse Day as of March 30. Blue is bad; white is good!
The various long-range weather models were all agreeing, even 10 days in advance, that Texas (covered in blue above) was looking poor for eclipse day. But eastern Canada looked good! That was the exact opposite of what had been expected.
So on Easter Sunday, I turned around and headed north, crossing back into Canada at a lonely border post in southwest Saskatchewan.
I proceeded east along the TransCanada, Highway 1. I decided against a route across the northern U.S. and around the southern end of Lake Michigan, to avoid severe weather forecast for the middle of the U.S.
One of my daily Facebook travelogue posts with a beer of the day.
Along the way I posted my beer-du-jour travel reports, as above from Day 8, that day from within the shadow path at last!
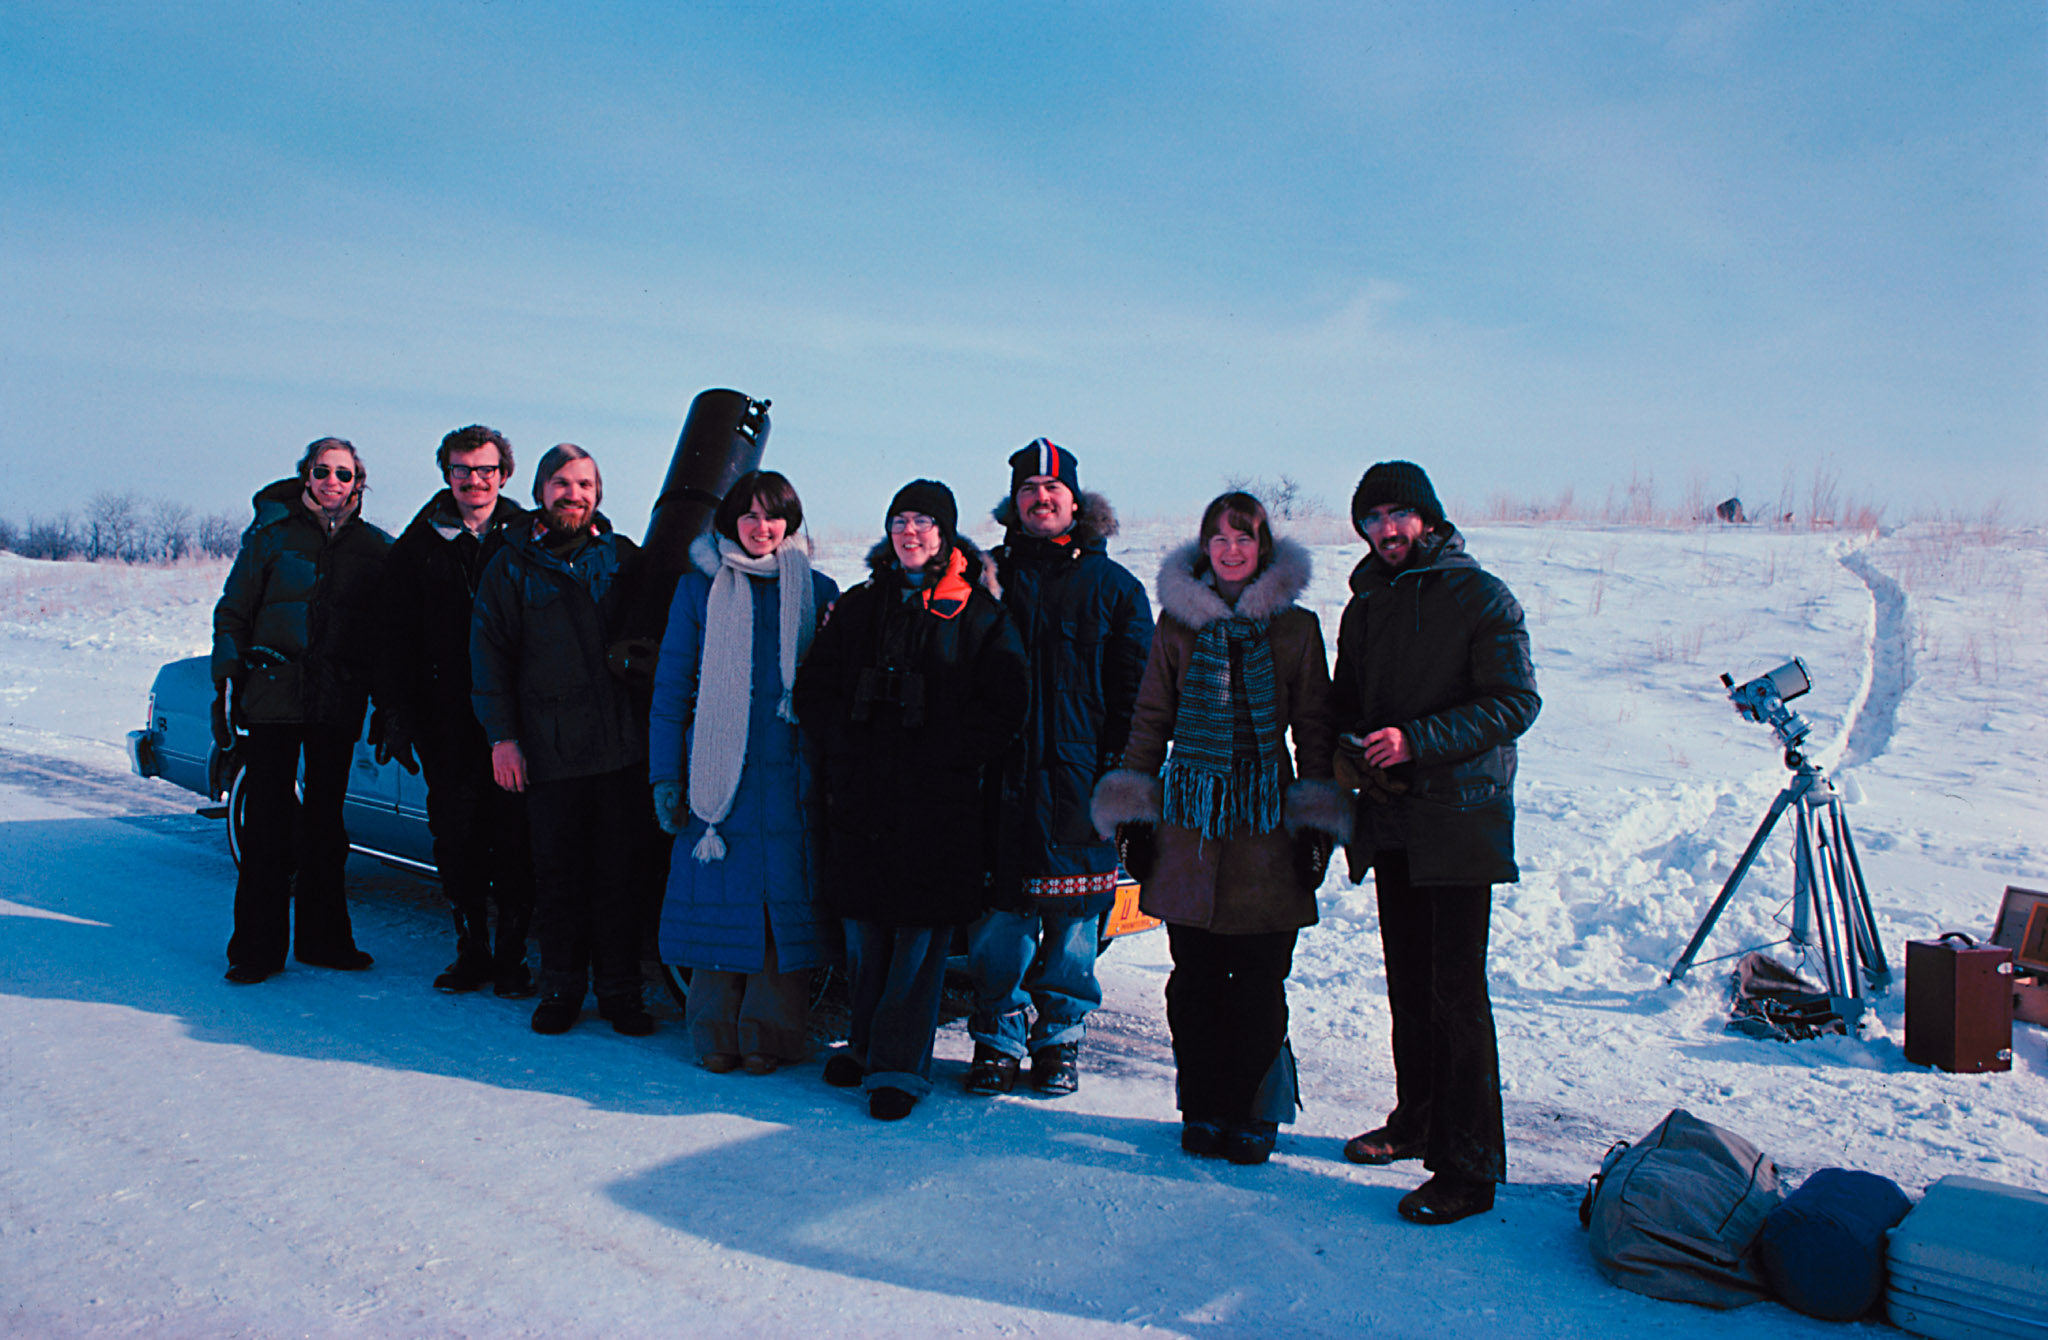
Our 1979 eclipse group in 1979.The 1979 eclipse site in 2024.The February 26, 1979 eclipse.
I also stopped at the only total eclipse site, of the 16 I had seen previously, I have ever been able to re-visit. On February 26, 1979 I and a small band of friends from Edmonton viewed the mid-winter eclipse (the last one visible from southern Canada) from a median road (Firdale Road as it is now called) on the TransCanada Highway near Carberry, Manitoba. I found the spot again, where I saw (and shot with my Questar telescope) my first total eclipse of the Sun.
However, a day after entering Ontario, the bad weather caught up with me, forcing an extra night north of Lake Superior while the only highway across the region, Highway 17, was cleared of snow and re-opened at Wawa, the usual cross-Canada choke point.
My new destination (after abandoning the site in the Texas Hill Country) was to be southern Ontario.
The weather prediction as of April 5.Southern Québec looking good!
However, as eclipse day approached and the weather predictions became more precise, it was apparent that Ontario would also be under some cloud. Southern Québec was looking better. So the Eastern Townships became my new Plan A site! I was running out of time!
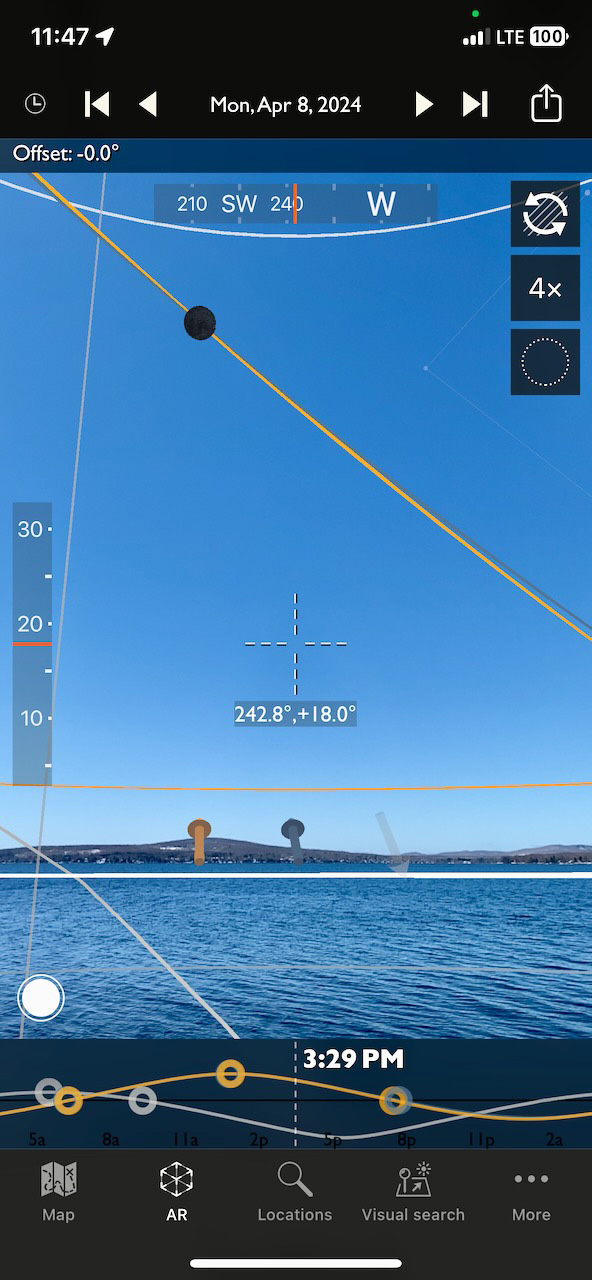
Using the TPE app to check the Sun’s location once on site, the day before the eclipse.
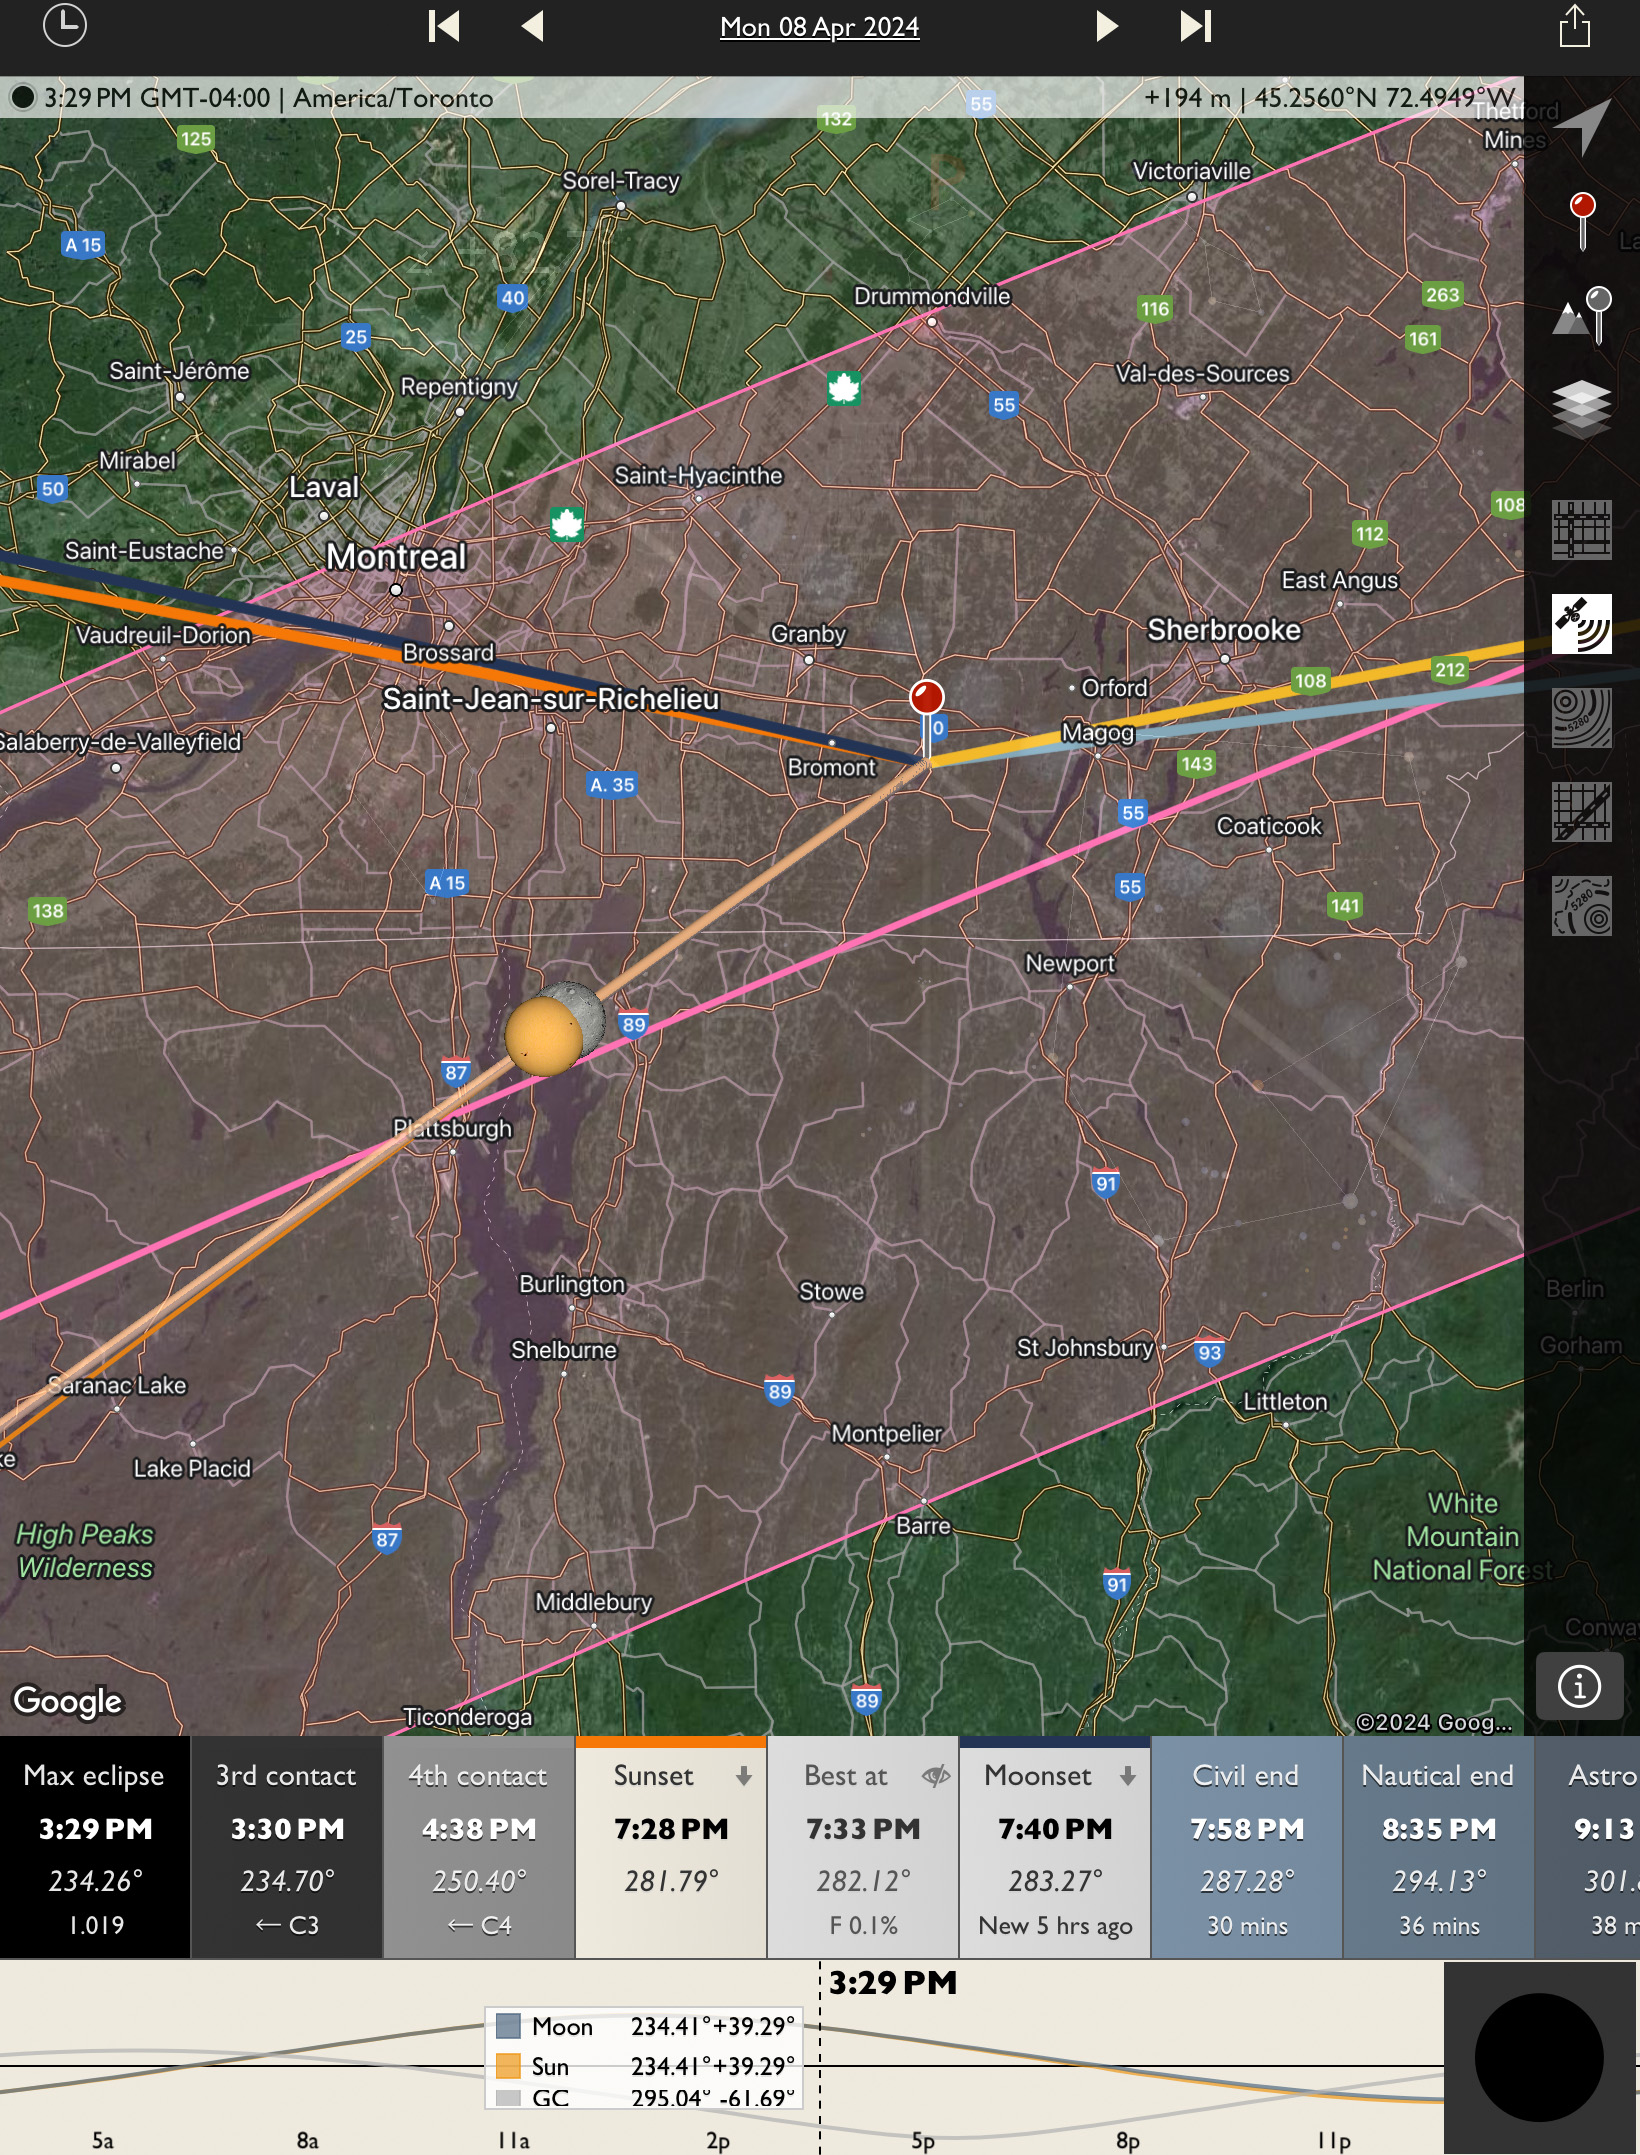
I arrived on site in Québec with only a day to spare to check out the location I had found by exploring Google maps.
With the Sun lower in the mid-afternoon sky in Québec compared to the high-noon Sun in Texas, I decided to shoot a wide-angle scene of the eclipse over a lake, preferably with open water, not ice! That required a site with public parking on an eastern lakeshore.
The Photographer’s Ephemeris (TPE) app to check Sun angles.Zooming in with TPE app for my chosen Lac Brome site. .
The site I found, then checked out on April 7, was on Lac Brome. It proved ideal — except for the thin cloud that was now predicted to drift through during the eclipse.
Sure enough, that’s just what happened. The cloud detracted from the eclipse only in preventing long-exposure images recording the outermost streamers in the Sun’s atmosphere.
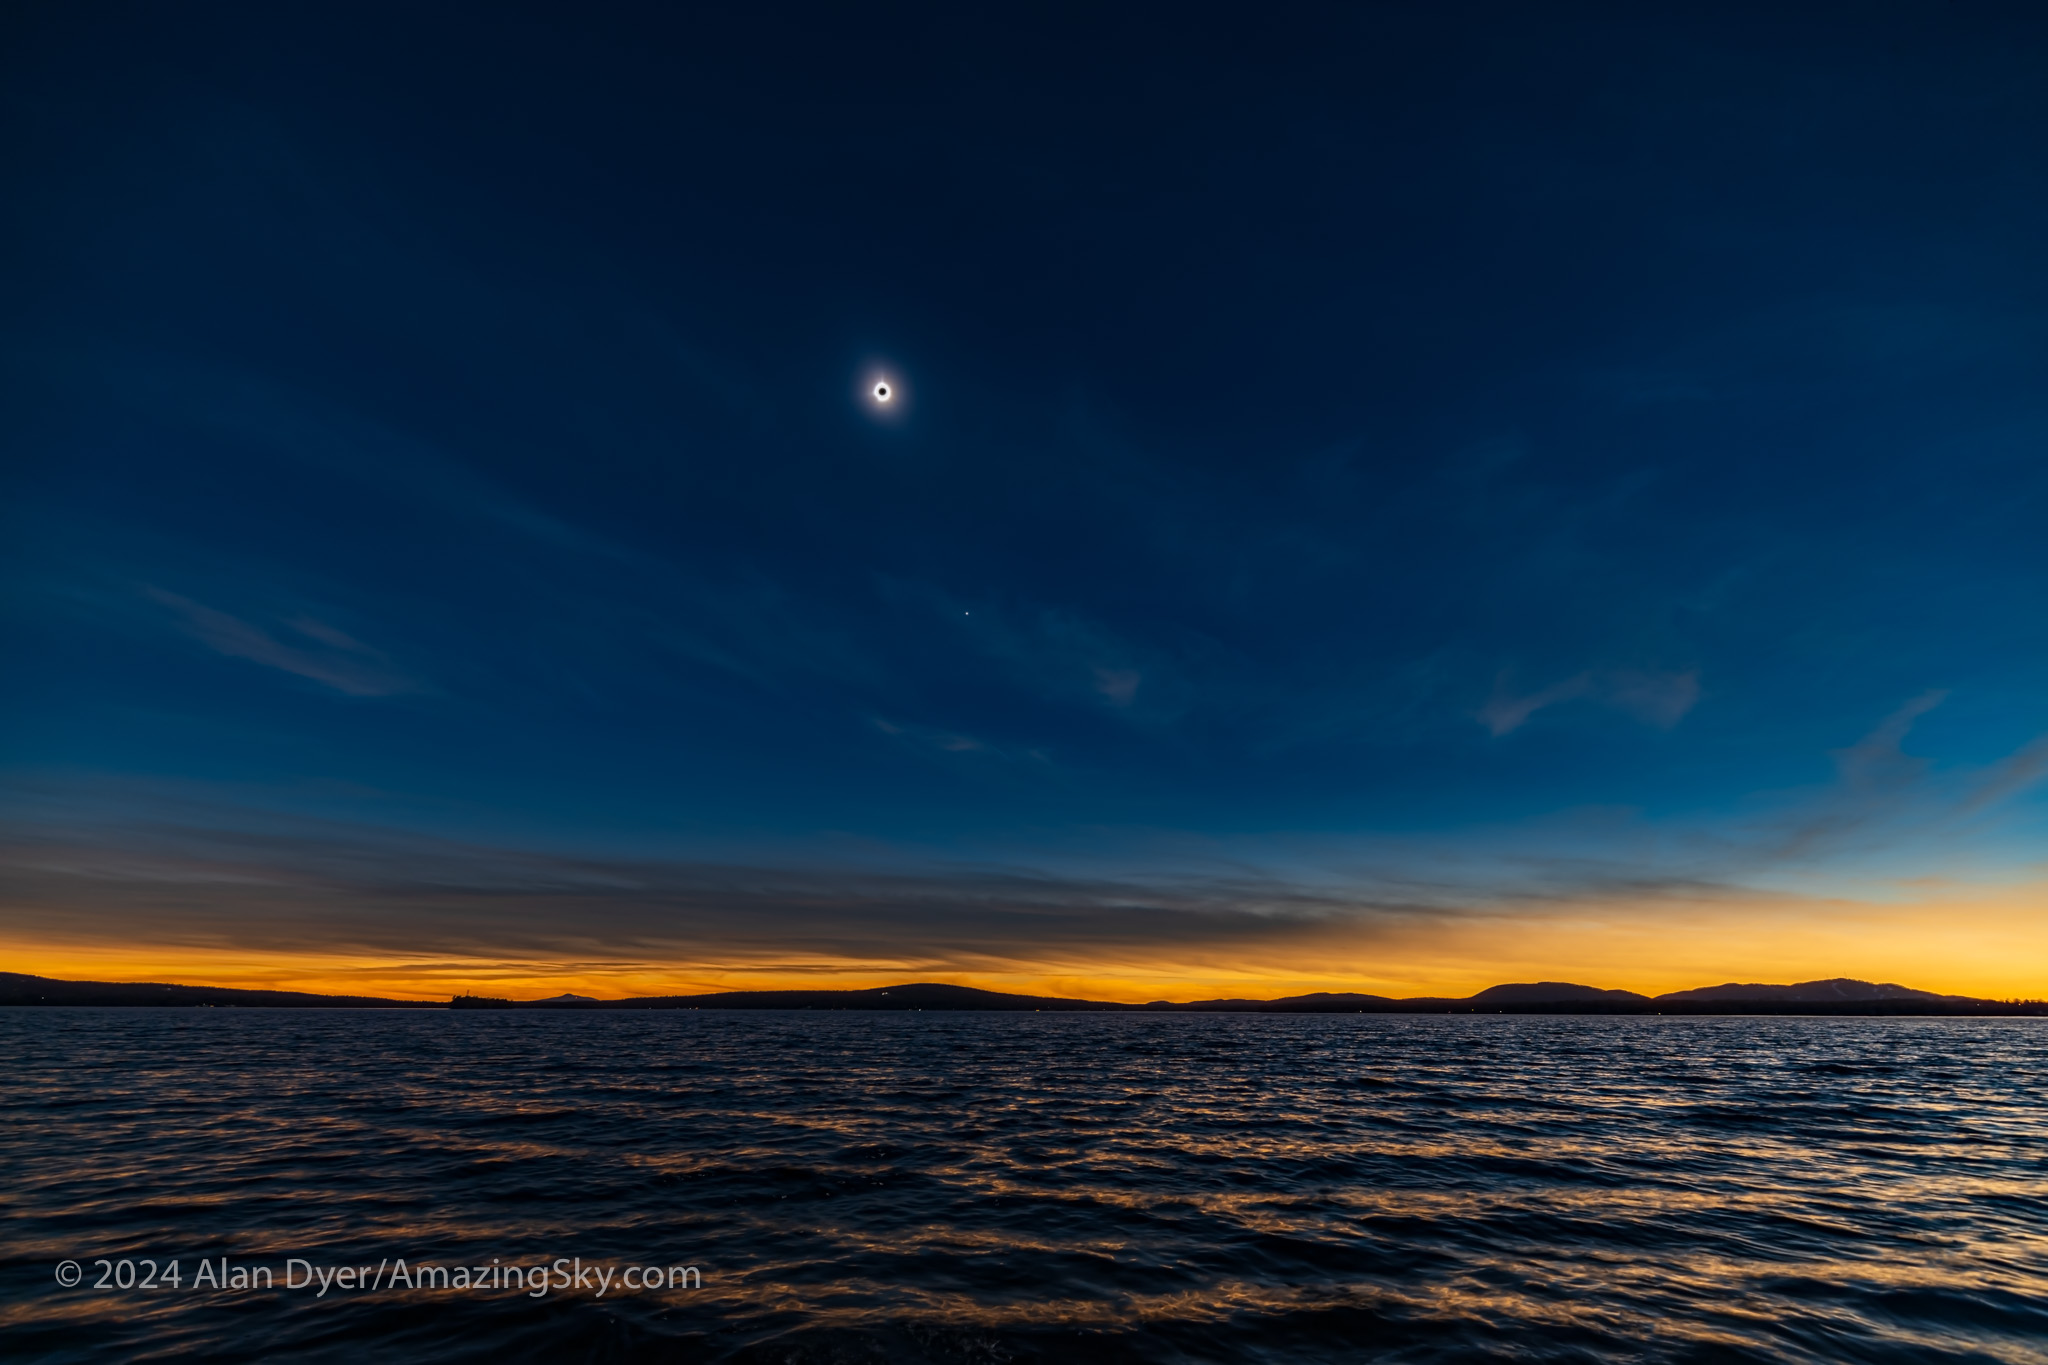
A wide-field view of the eclipse of the Sun, taking in the bright planets Jupiter (at top) and Venus (below) that were easily visible to the unaided eye during totality.
I could have sought out clearer skies by going even farther east, but I was in a crunch for time and hotel rooms! As it was I was able to get rooms everywhere I wanted and at normal “non-eclipse” rates!
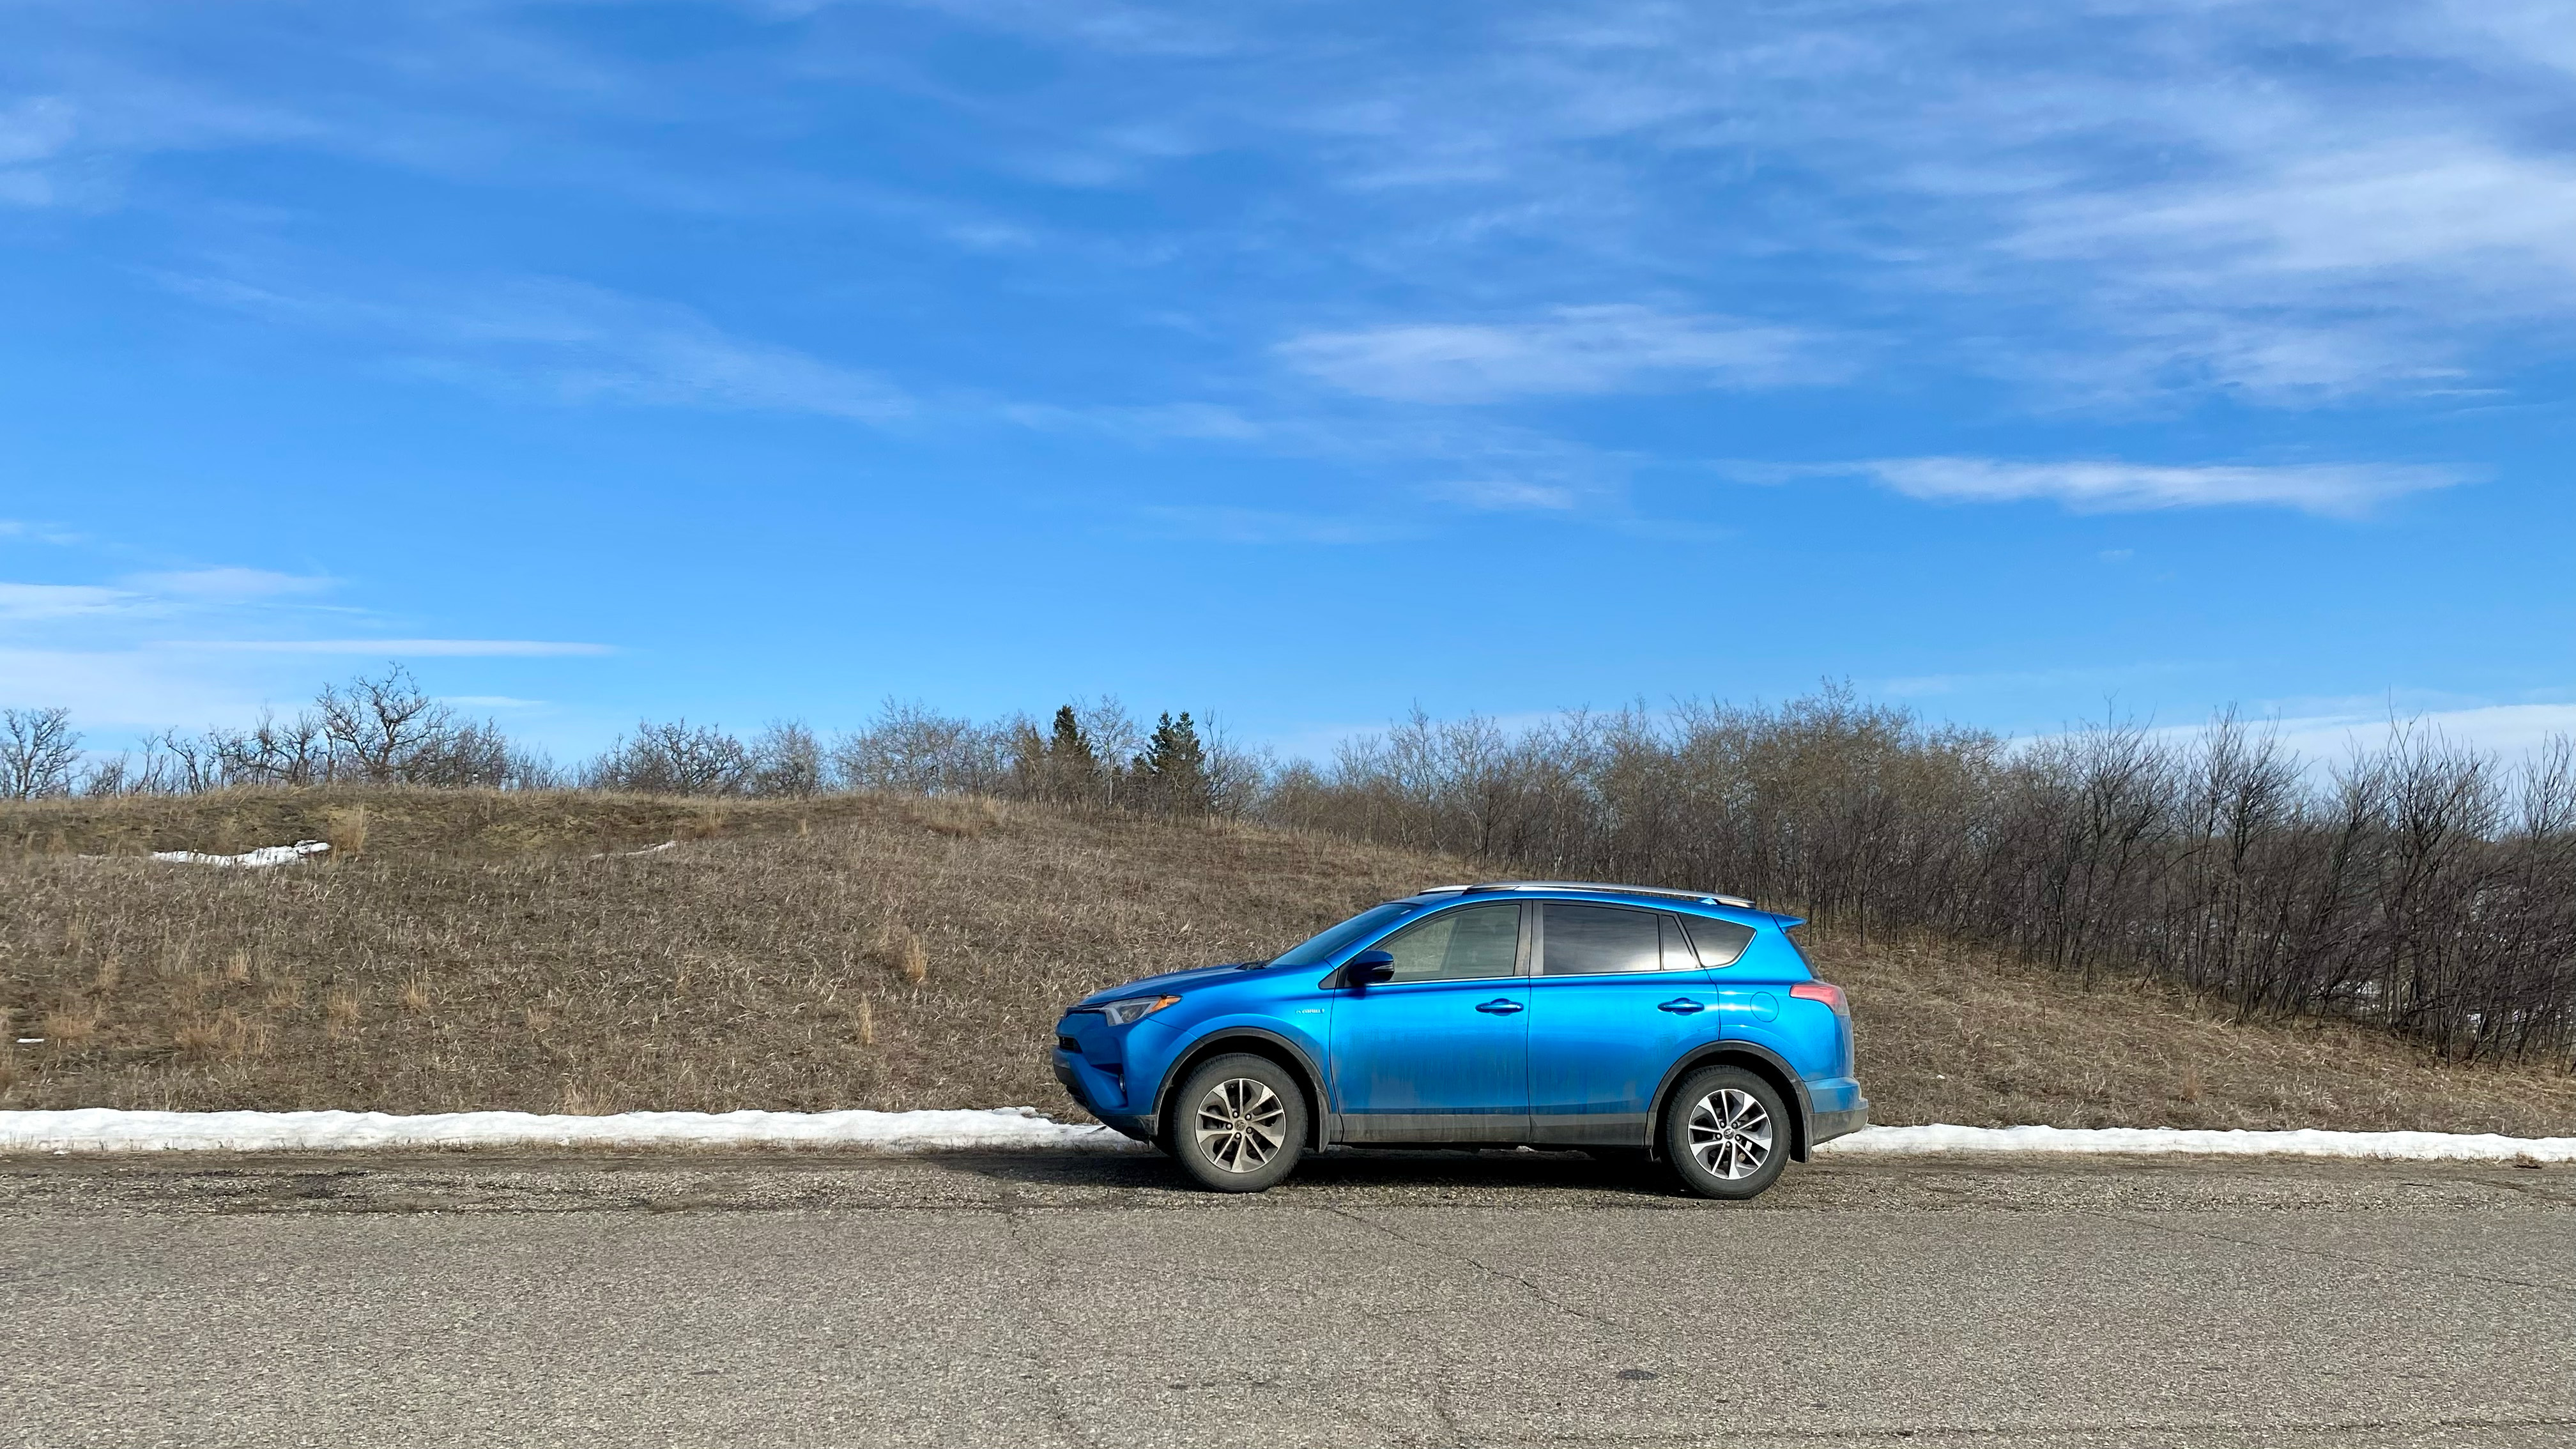
A panorama of the lakeside parking area at Lac Brome prior to the eclipse. My RAV4 and camera array, pre-eclipse.I shot with 4 cameras at the car and one set up lakeside.
The Lac Brome site filled with cars during the day, with people from Québec and Ontario, but also from Alberta, and from Pennsylvania, Massachusetts and Maine – at least those were the homes of the folks I enjoyed meeting on eclipse day.
Everyone had a great time and had a superb eclipse experience.
The total eclipse of the Sun over the waters of Lac Brome, in the Eastern Townships of Quebec, Canada. The twilight colours come from sunlight from outside the shadow path.
The lunar shadow arrived from the southwest, from the direction of the Sun, appearing as a dark cloud racing toward us. At the end of the eclipse the sky brightened first in that same direction, as the trailing edge of the shadow shot up across the sky. The clouds helped make the shadow edge more visible.
A time-lapse of the arrival and departure of the lunar shadow, made of 1200 frames each 1 second apart.
I shot with five cameras, just as I had done in 2017, possible only because I drove.
The main rig was my faithful Astro-Physics Traveler, a 105mm refractor telescope the company owner designed for his personal use at the 1991 eclipse in Mexico.
My main eclipse rig, with a 60mm visual scope on the 105mm photo scope, on an equatorial tracking mount.
My Traveler, bought in 1992, has lived up to its name, having now been to six central solar eclipses: the annular eclipses of 1994 (Arizona) and 2023 (Utah), and the total eclipses of 1998 (Curaçao), 2012 (Queensland, Australia), 2017 (Idaho), and now 2024 in Québec, Canada. I paired it with the wonderful matching AP400 mount, which I had only just brought back with me the month before from Australia, where it had spent the last two decades.
All the gear worked great. Unlike six months earlier for the October 14, 2023 annular eclipse in Utah, this time I remembered all the cables needed to have the telescope mount track the Sun.
I did mess up on a couple of settings (such as not framing the 4K movie camera as I should have – in pre-eclipse excitement I just forgot to check my chart). But none of the errors were serious.
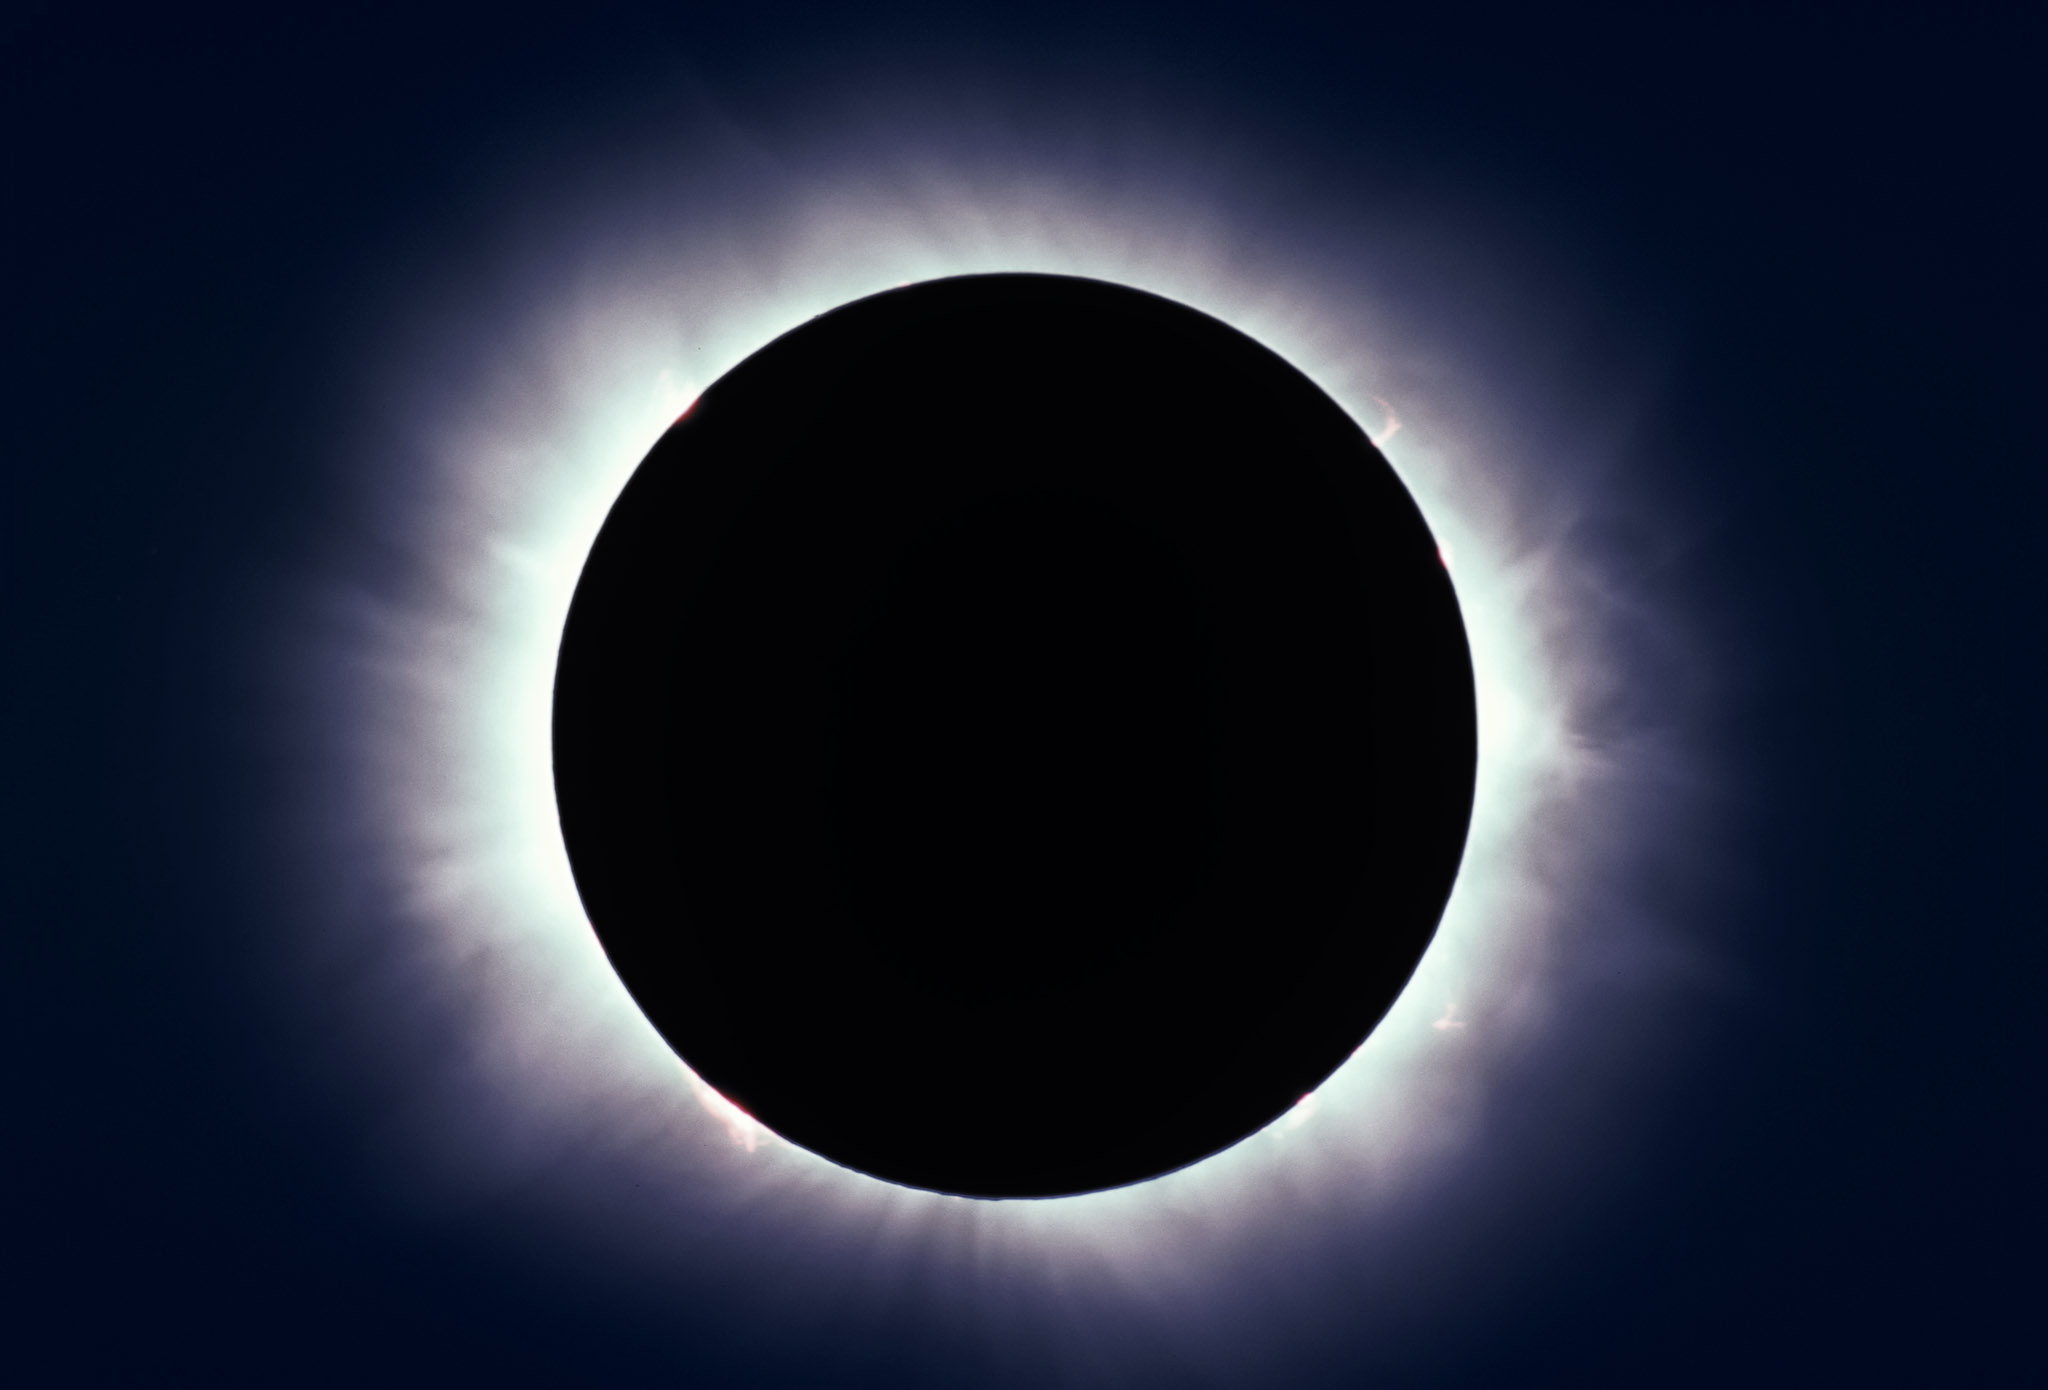
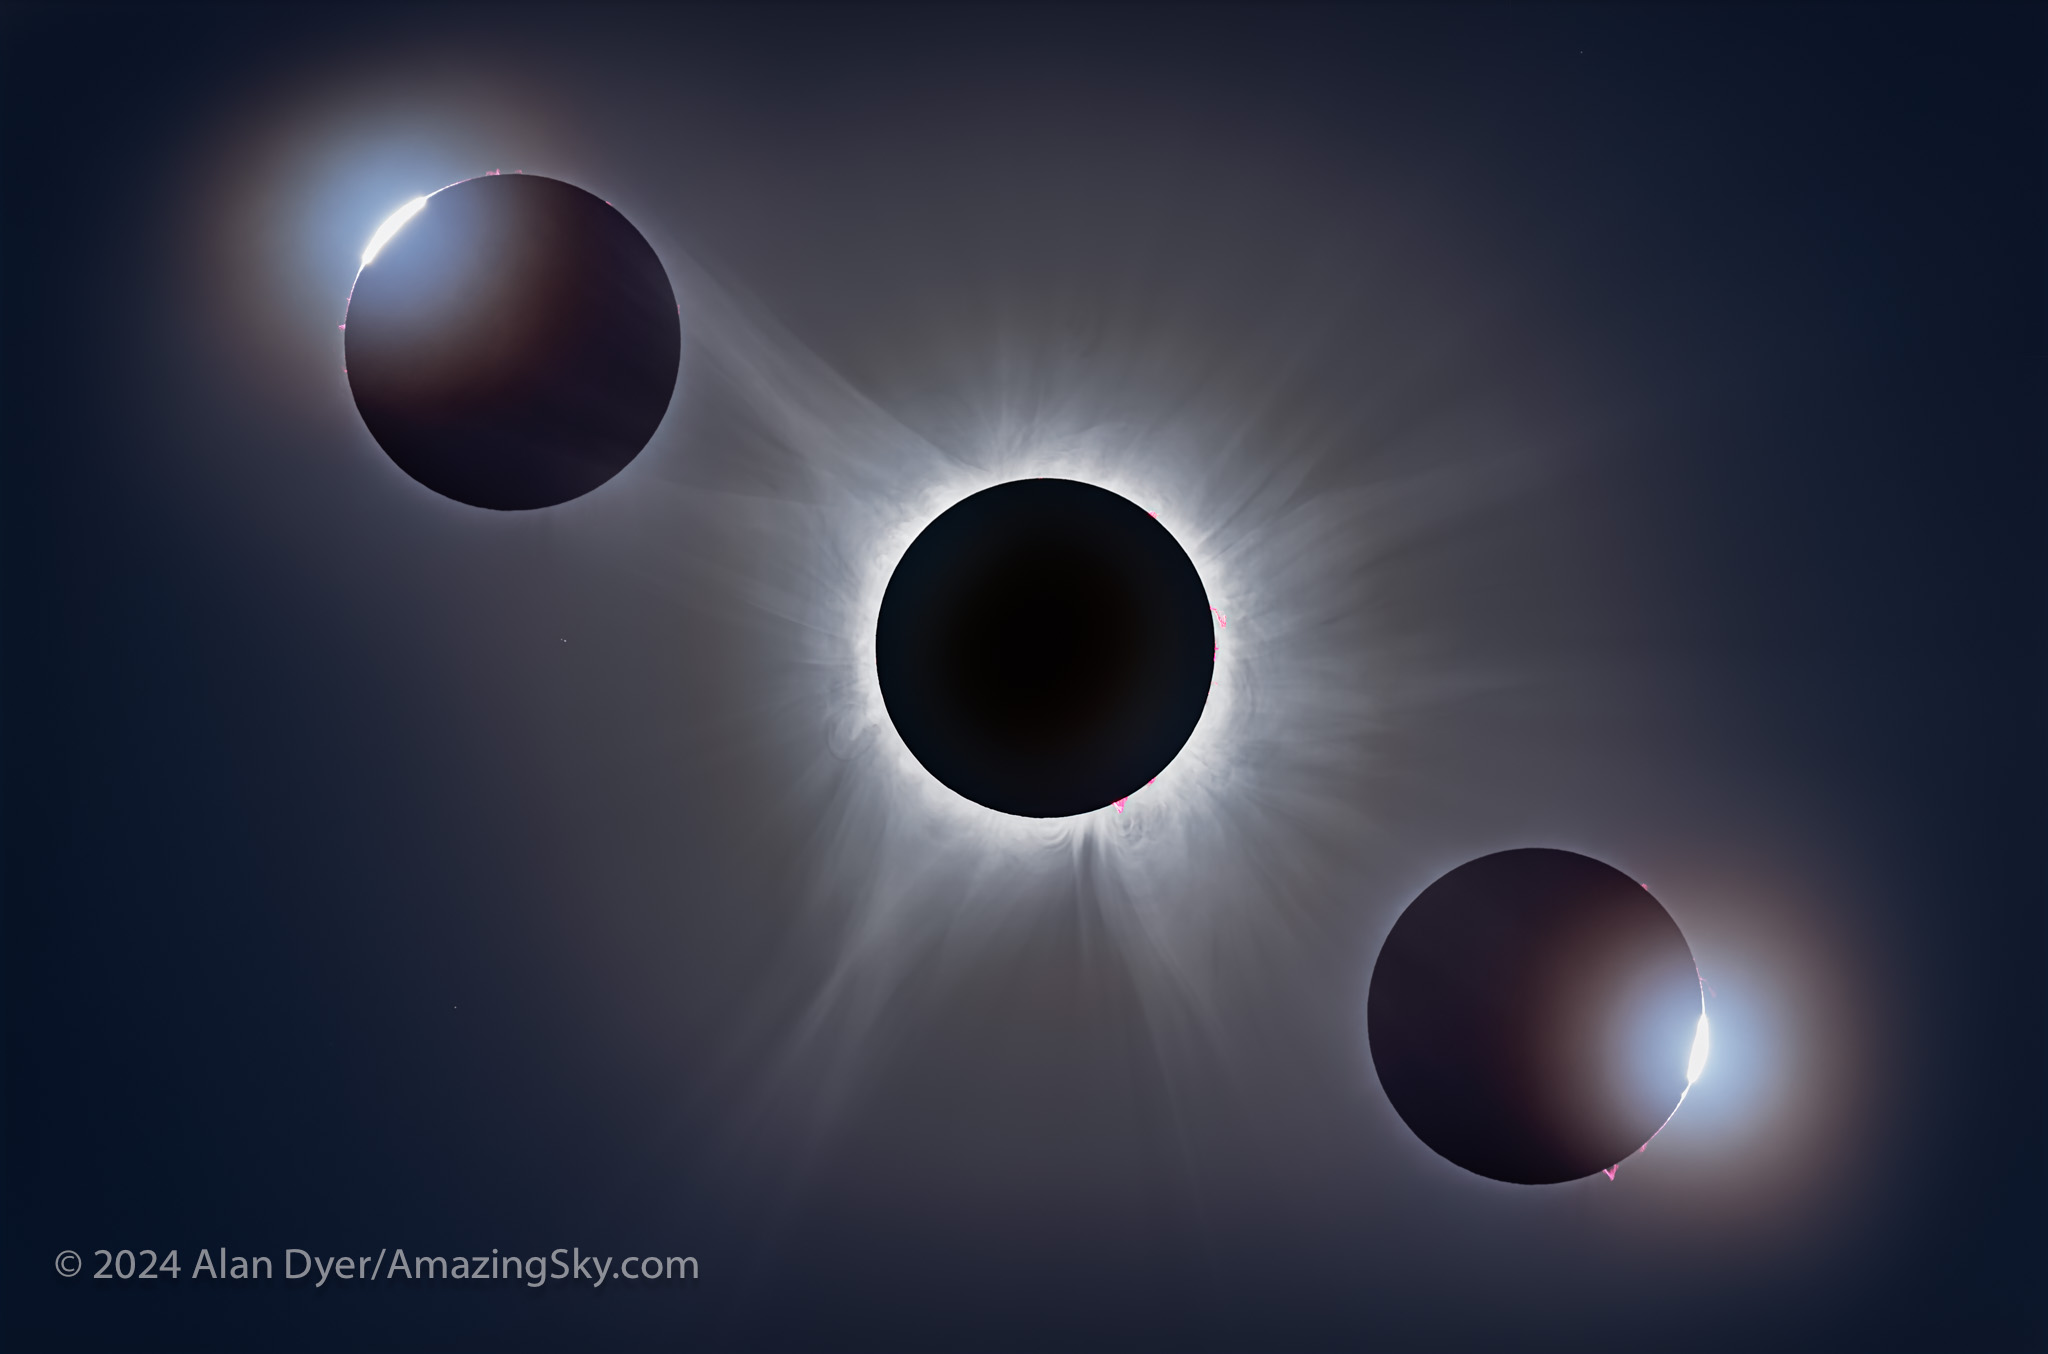
The eclipse in a blend of two exposures to display all the fiery pink prominences that were visible during totality around the lunar disk in one image, set against the bright inner corona of the Sun with the dark disk of the Moon in silhouette in front of the Sun.
Once started all my cameras, except for the one on the Traveler, ran unattended.
At this eclipse I was determined to get a good look at it through the small visual scope I had piggybacked onto the Traveler photo scope. While I had used a similar rig in 2017, I only thought to look through the visual scope 20 seconds before totality ended.
Not this year.
A telescopic close-up of the eclipsed Sun. Onto the central blend of images for totality I layered in single images of each of the diamond rings before and after totality. They are when the last or first burst of sunlight shines through lunar valleys. The first diamond ring is at top left, the last at bottom right, so time runs from left to right.
I got a great look at the eclipsed Sun, its corona structures, flaming pink prominences, and breakout of the red chromosphere layer just as totality ended. (You can’t easily see the chromosphere at the start of totality as it can be risky looking too soon through optics when the Sun’s blindingly bright photosphere is still in view.)
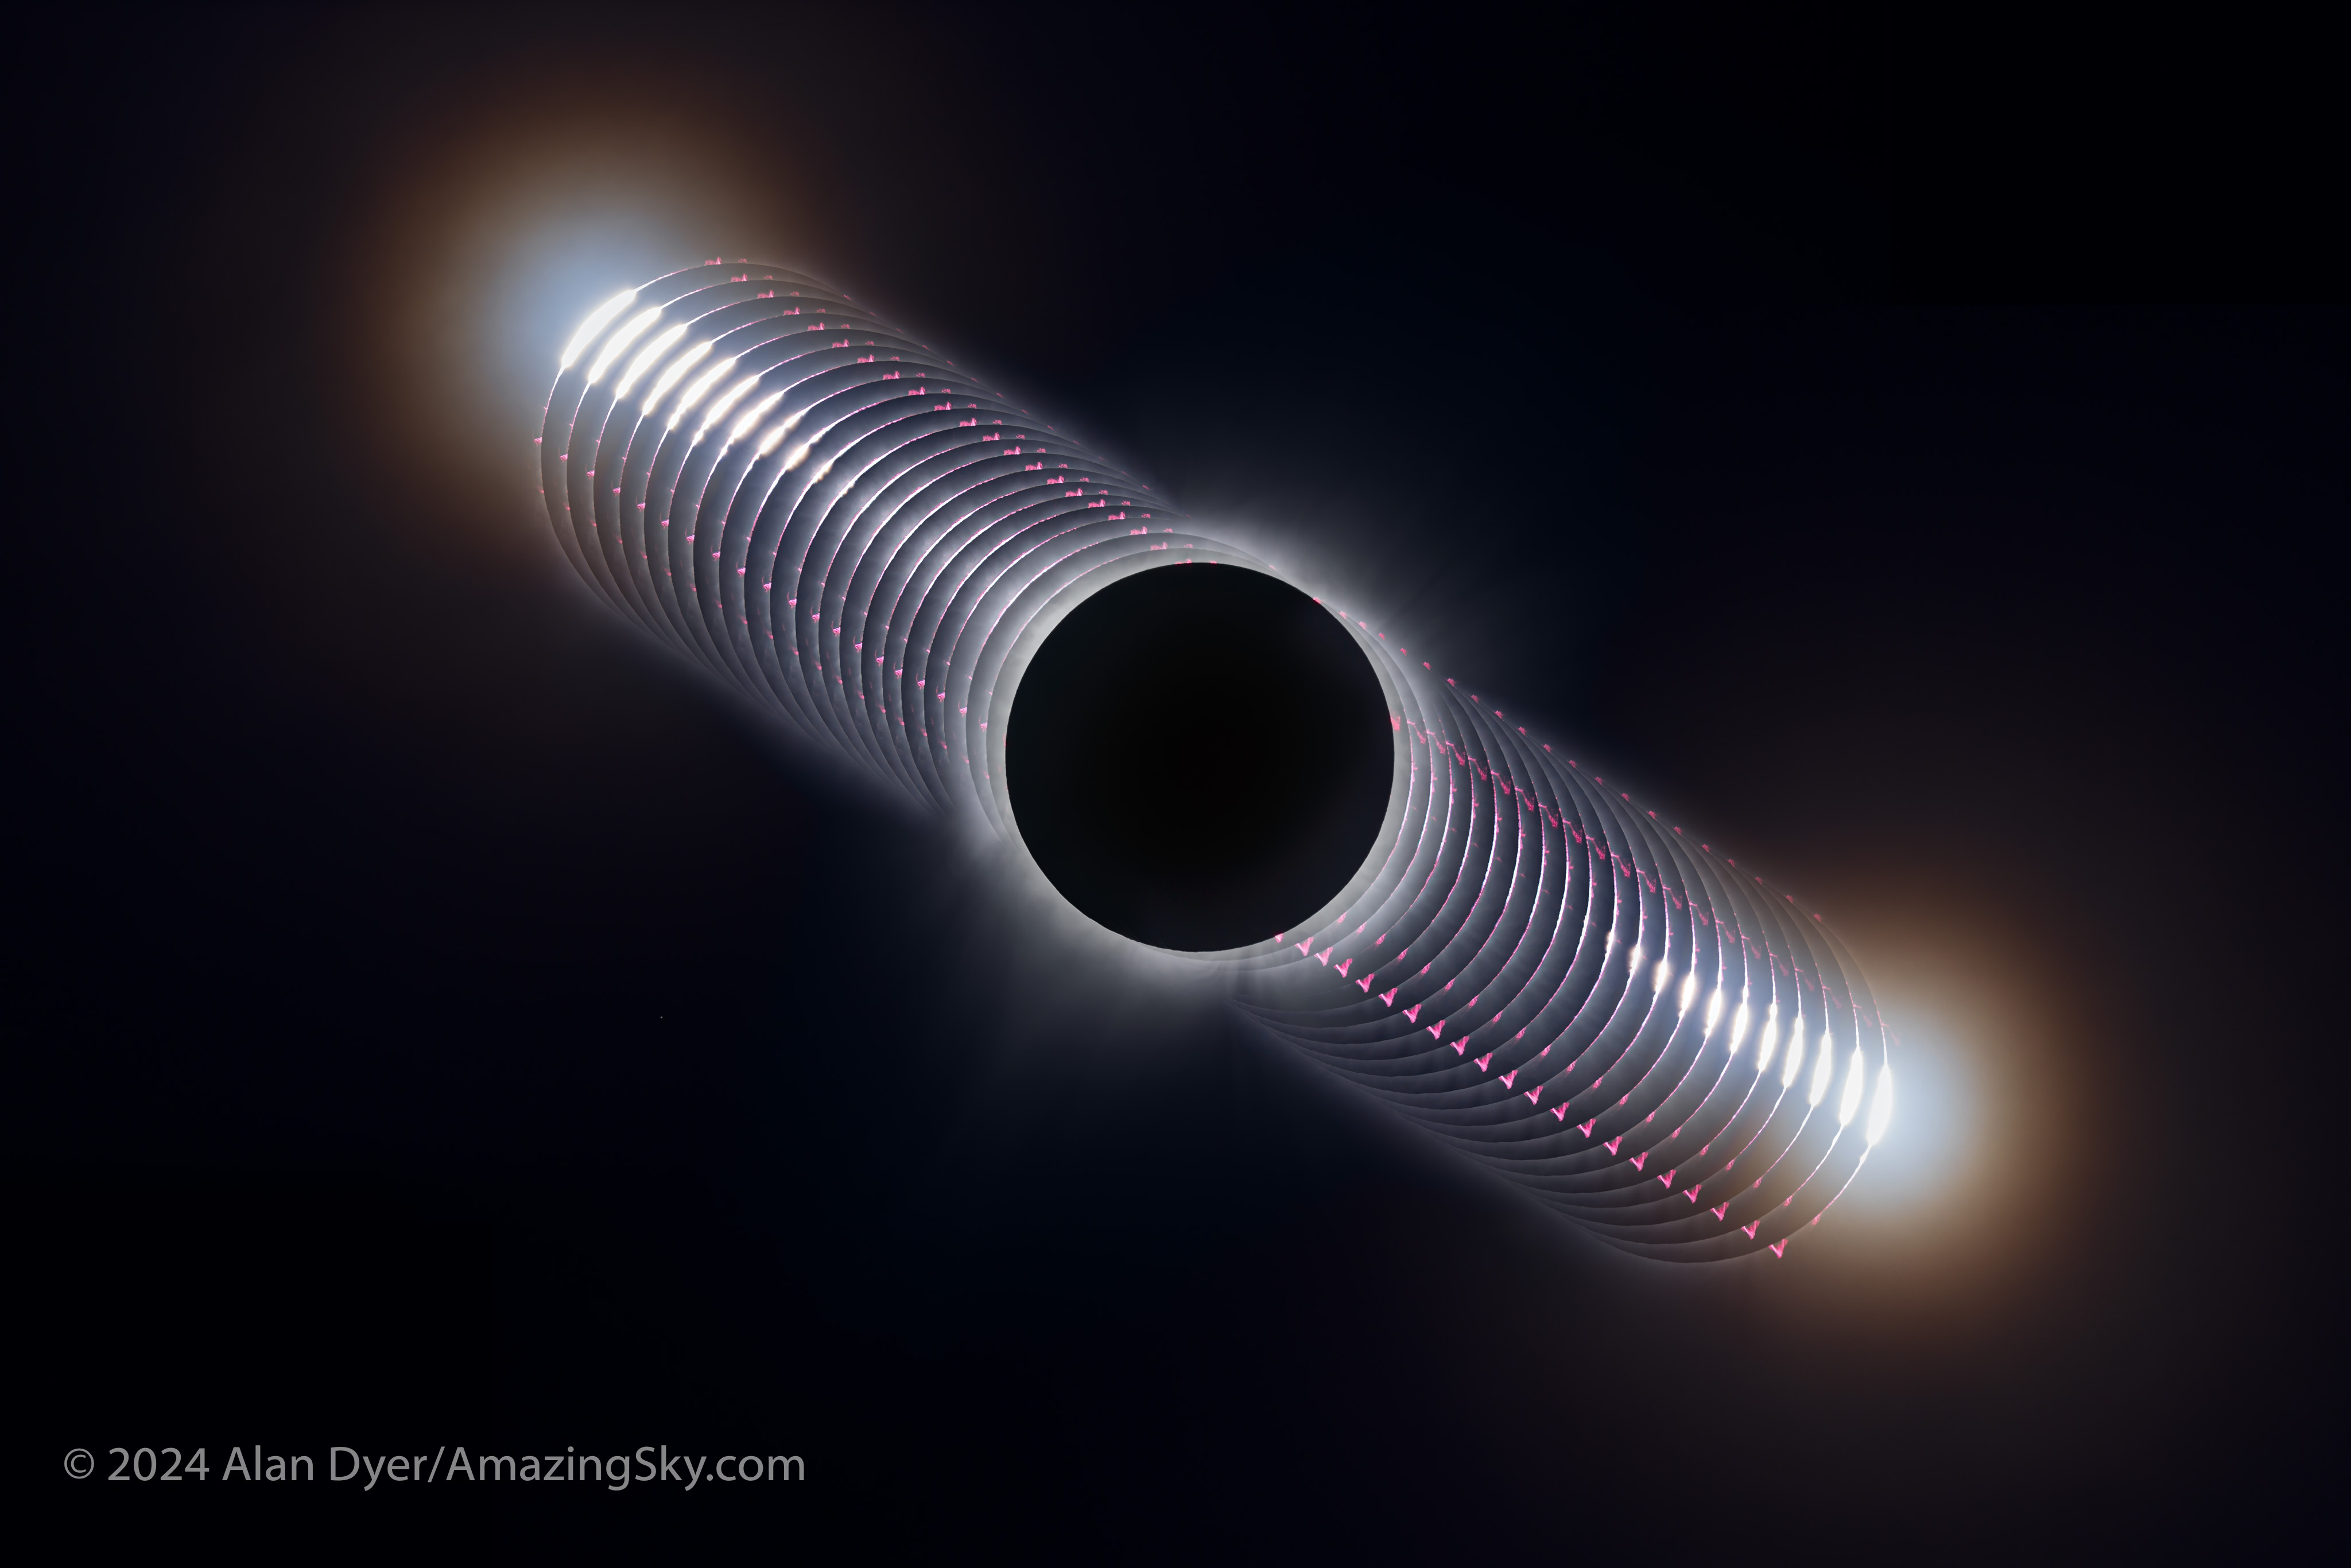
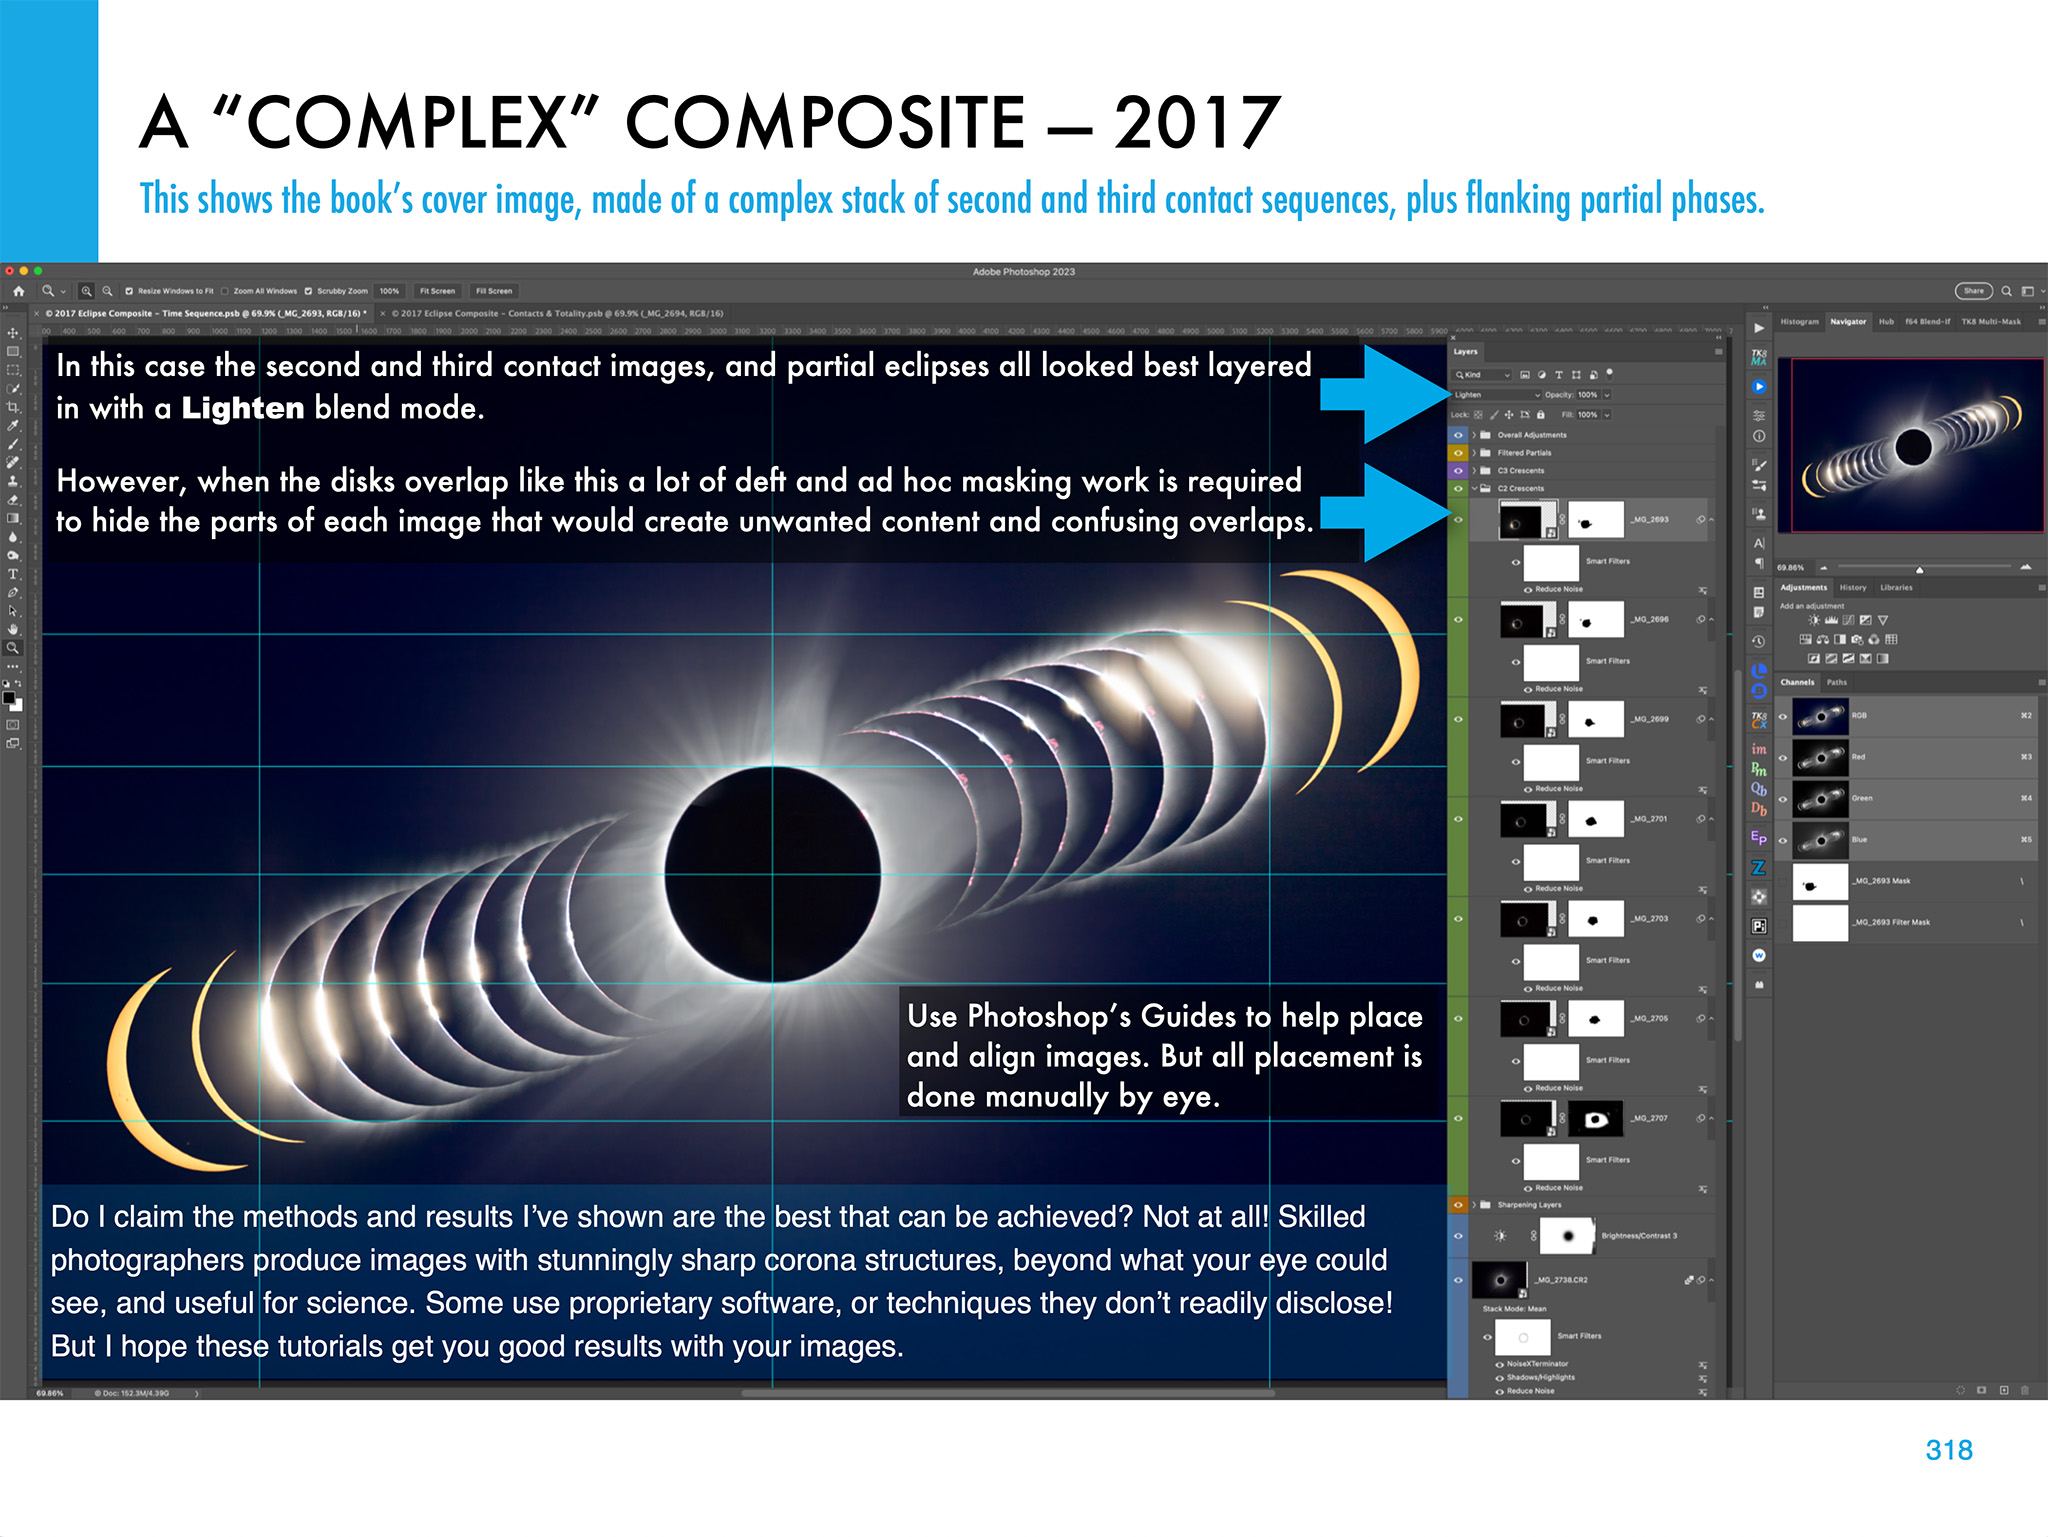
This is a composite showing the sequence of events surrounding totality, from just before totality (at upper left) to just after totality (at lower right), with totality in the middle. The contact images were taken 0.6 seconds apart.
And yet, as at all eclipses, I found the naked eye view the most compelling. The “black hole” Sun looked huge and unearthly. While I had binoculars handy, the same 12×36 image-stabilized binoculars I bring to most eclipses, I completely forgot to look though them, just as I forget at most eclipses!
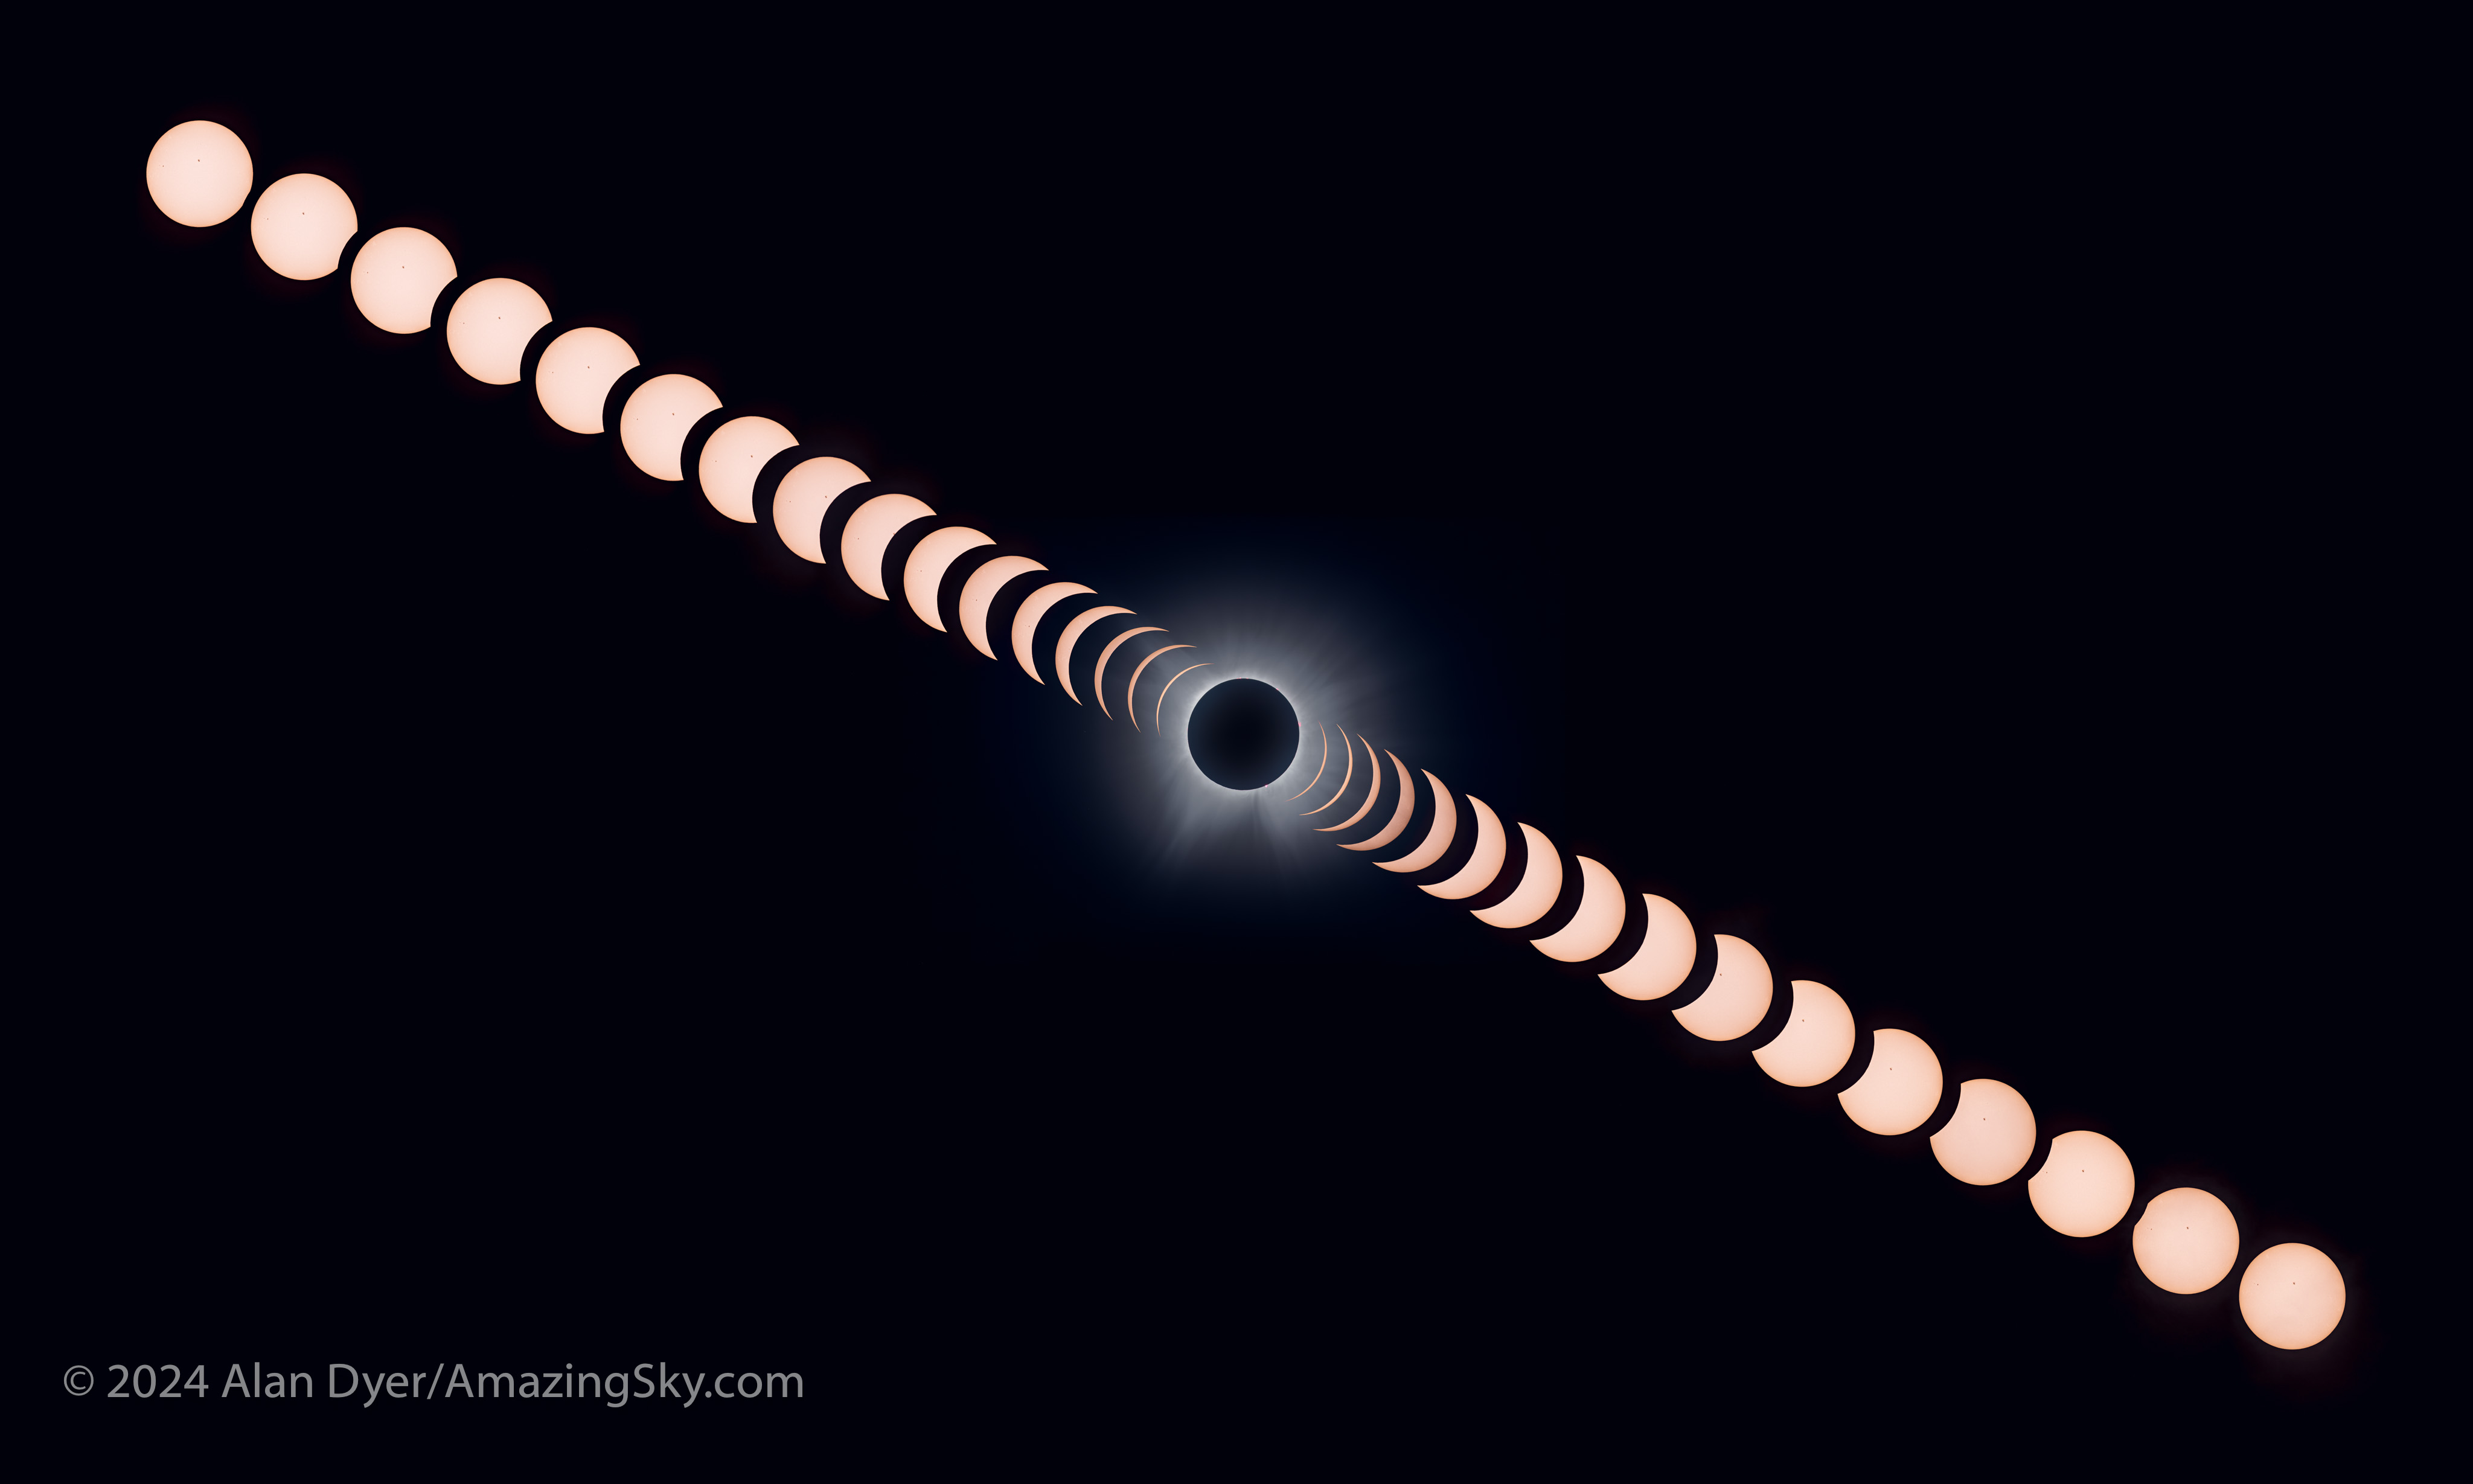
This is a composite showing the complete sequence of the April 8, 2024 eclipse of the Sun, from first contact (at upper left) to last contact (at lower right), with totality at mid-eclipse in the middle.
I shot all the images with the Astro-Physics Traveler 105mm refractor at 630mm focal length and f/6, with the Canon R5 at ISO 100. The partial phases are 1/800 or 1/400 second exposures through a Kendrick/Baader solar filter.
Wanting to record the full sequence, I shot the partial phases until the bitter end. But post-eclipse, people came over and had a look through my scope (I think mine was the only telescope on site). We had a great time exchanging impressions. The hand-held phone camera photos people showed me looked fabulous!
I looked for fleeting shadow bands just before and after totality (I laid out a white sheet on the ground for the purpose) but saw none, a negative observation confirmed by a fellow eclipse chaser at the site.
Time-lapse movies of the second and third contact (start and end of totality) diamond rings, shot through the telescope with the Canon R5 in continuous burst mode for hundreds of frames each.
I did two live interviews for CBC Radio, for the Edmonton and Calgary stations, but not until after the eclipse ended. By the time I did those and finished packing away my carload of gear, it was 6:30 p.m., three hours after totality.
I was the last to leave the site, with fishermen now arriving for an evening’s catch.
I was in that shadow as the Space Station flew over. Astronauts saw the elliptical shadow moving over eastern Canada.
The passage of the lunar shadow across the continent, showing where the clouds were. I was under the wispy clouds at upper right in Québec.
I faced no traffic jams heading back to the hotel at Ste. Helen-de-Bagot. I processed and posted one eclipse image that night. And I revised the price (down to $2.99 U.S.) and description of my How to Photograph the Solar Eclipses ebook, as now only the big processing chapter is of any value, post-eclipse. It continues to sell.
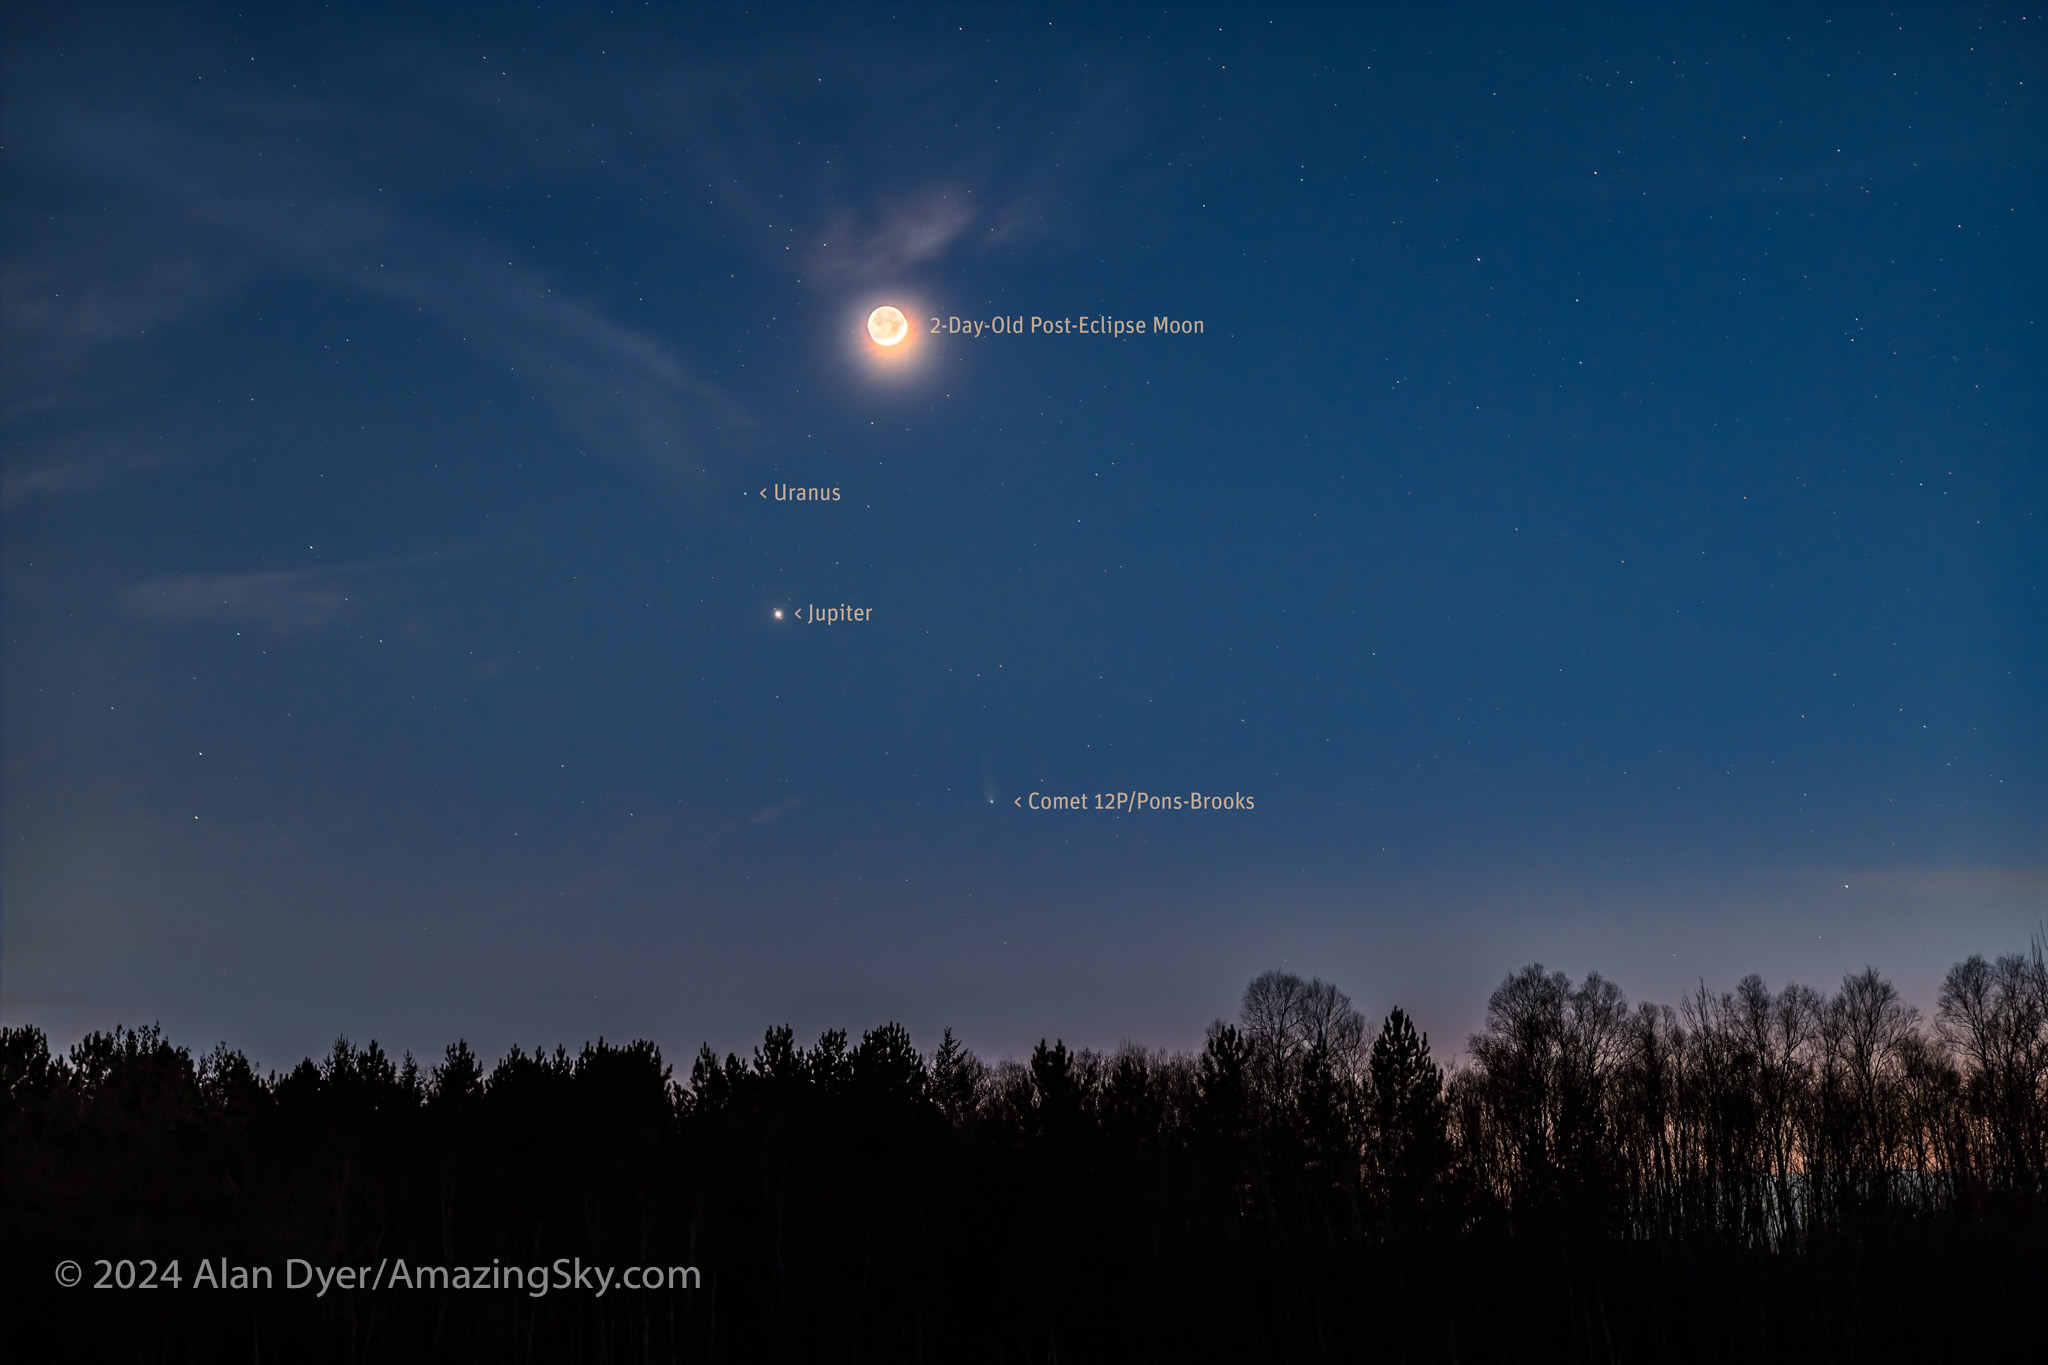
This is the waxing crescent Moon on April 10, 2024, two days after it eclipsed the Sun, and with it above the bright planet Jupiter, with it also near Uranus. Below the solar system worlds is the faint Comet 12P/Pons-Brooks, visible here as a fuzzy star with a stubby tail..
On the long drive back to Alberta, with the pressure of having to make time now gone, I spent pleasant evenings stopping to see friends and family on the road home. So I didn’t start work on the complex blends and composite images I show here until I got home a week after the eclipse.
The happy eclipse chaser having bagged his game!
The 17-day-long drive was nearly 9,000 km over 100 hours behind the wheel. Was it worth it? Of course!
Would I do it again? It’s a moot question as none of the upcoming eclipses allows for a cross-continent drive. Except perhaps in July 2028 in Australia. But I suspect just heading inland a day or two over the Great Dividing Range will be enough to get away from winter coastal cloud in New South Wales. (Sydney is in the path, but so is a cottage I rented last month near Coonabarabran for my superb March stay under the southern skies!)
The next total eclipse of the Sun visible from anywhere in Canada will be August 22, 2044. I won’t have to drive anywhere, as it passes right over my house! But I will have to live that long to enjoy a eclipse from my own backyard.
I suspect this was my last chance to see – and drive to – a total eclipse in Canada.
As eclipse day approaches here are some tips and video tutorials from me about how best to capture the total eclipse of April 8, 2024.
There are many ways to capture great images and movies of a total eclipse of the Sun. I outline them all in great detail in my 380-page ebook How to Capture the Solar Eclipses, linked to at right.
Originally published in June 2023, I revised the ebook following the October 14, 2023 annular eclipse of the Sun to include “lessons learned at the eclipse,” and some processing tutorials on assembling annular eclipse composites. I’ve also added new content on using software to control cameras and updated information about solar filters.
Brief Tips and Techniques
The August 21, 2017 total solar eclipse over the Grand Tetons as seen from the Teton Valley in Idaho, near Driggs. With the Canon 6D and 14mm SP Rokinon lens at f/2.5 for 1/10 second at ISO 100.
My breakdown of recommend methods, in order from simplest to most complex, and with increasing demands on your time, is generally this:
Use a Phone Camera for a Movie. While they can be used for a quick handheld grab shot during totality, a better method is to place a phone on a tripod using a clamp of some kind. Then a few minutes before totality aim and frame the scene, with no filter over the camera lens. Start it in movie mode to record video of the eclipse and sky changes, and the excited sounds of your group! Just remember to stop the video shortly after the end of totality and aim the phone away from the Sun. Never leave any unfiltered camera aimed at the Sun for a long time.
Shoot a Wide-Angle Time-Lapse. Using a DSLR or mirrorless camera and a wide-angle lens (it might need to be as wide as a 14mm at sites in Mexico and the southern U.S.) aim and frame the camera to include the Sun and landscape below. Focus the lens! And leave it on manual focus. But put the camera into Auto-Exposure Aperture Priority (Av) with wide-area metering and with it set to underexpose by -1 EV Exposure Compensation. With the camera at ISO 100 or 200, use either its internal intervalometer (if it has one) or an external intervalometer to take frames once per second. Start the sequence with no filter on the lens a few minutes before totality. Let it run on its own until a few minutes after totality. The result is hundreds of frames you can turn into a time-lapse movie of the lunar shadow approaching and receding, and of the changes in sky colours. Or you can extract single frames at key points to process individually, as I did for the image above from August 2017. The advantage, as with the phone camera movie method, is that the camera, once going, requires no further attention. You can enjoy the eclipse!
Shoot a Telephoto Video. Use a 300mm to 500mm lens on a DSLR or mirrorless camera to shoot a real-time close-up video of the eclipse. Start the video a minute or two before totality with the Sun positioned to the left of frame centre and with a solar filter over the lens. Use a slow ISO, the lens wide open (typically f/4 to f/5.6) and the camera on Auto-Exposure Aperture Priority (Av). Just be careful to focus precisely on the filtered Sun before starting the video. Poor focus is what spoils most eclipse images, not poor exposure. Just before totality (about 30 seconds prior to Second Contact) remove the filter. The auto-exposure will compensate and provide a proper exposure for the rest of totality. Just let the camera run and the Sun drift across the frame from left to right. Just remember to replace the filter, or cap the lens, and stop the video shortly (~30 seconds) after totality and Third Contact. The video will capture the diamond rings and a well-exposed corona. Vary the exposure compensation during totality if you wish, but that involves more work at the camera. Otherwise, you can just let the camera run. But, as I illustrate in my ebook, it’s important to plan and place the Sun correctly to begin with (using a planetarium app to plan the sequence), so it does not drift off the frame or close to the edge.
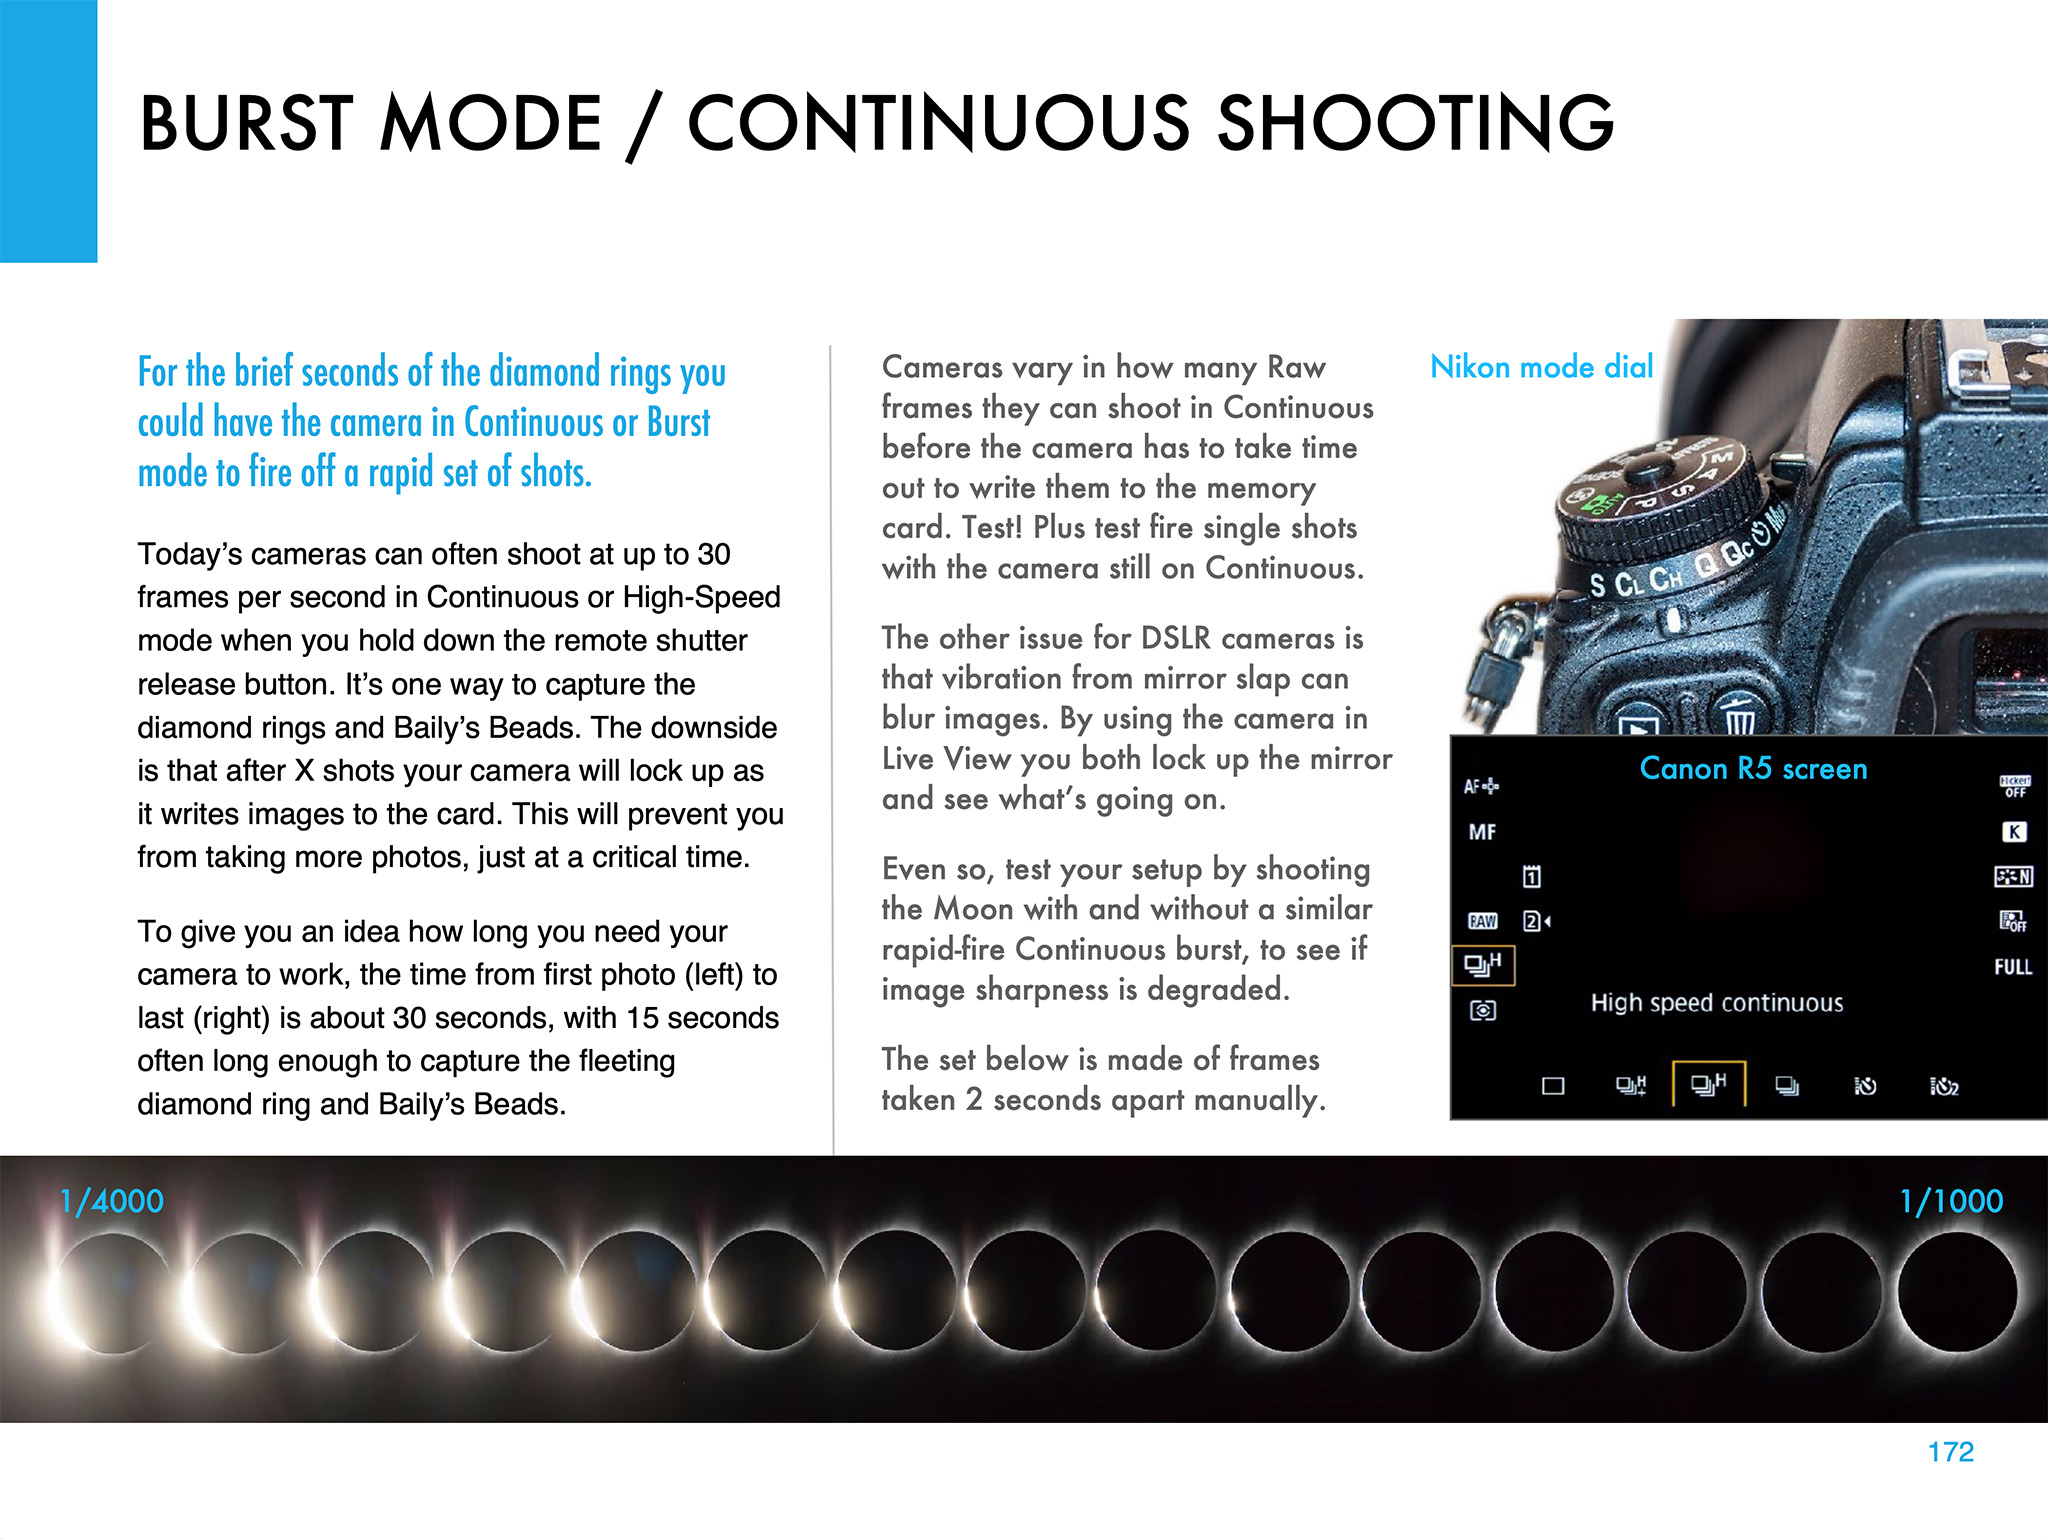
Shoot Telephoto Close-Up Stills. Use the same type of gear to shoot still images. While you could shoot stills on Auto-Exposure, it’s better to shoot still images over a range of exposures, from very short (~1/1000 second) for the diamond rings and prominences, to long (~1 second) for the outer corona. No one exposure can capture all that the eye can see during totality. This takes more work at the camera, and with the camera on a static tripod you might have to re-centre the Sun during totality, another thing to fuss with and where things can go wrong. Using the camera’s Auto-Bracketing mode can help automate the shooting, allowing the camera to automatically shoot a set of 7 to 9 exposures at say, one-stop increments in quick succession with just one press of the shutter button (by using the self-timer set to 2 seconds).
Shoot with a Telescope on a Tracking Mount. Telescopes (I like 60mm- to 100mm-aperture apochromatic refractors) allow longer focal lengths, though I would advise against shooting with any optics longer than 600mm to 800mm, so the image frames the corona well. Use similar settings as above, but with the telescope (or a telephoto lens) on a tracking mount to turn from east to west at the same rate as the sky moves. That will ensure the Sun stays centred on its own, provided you have at least roughly polar aligned the mount. (Set it to your site’s latitude and aim the polar axis as due north as you can determine from compass apps.)
Those are brief summaries of the methods I recommend, as they are ones I’ve used with success in the past and plan to use on April 8. My ebook contains much more information, and answers to most of the “But what about using ….?” questions. And I provide lots of information on what can go wrong! Some learned the hard way over 16 previous total solar eclipses.
Video Tutorials
For a video tutorial, check out the webinar I conducted as part of the Kalamazoo Astronomical Society’s excellent Eclipse Series here on YouTube. It is about a 1-hour presentation, plus with lots of Q&A at the end.
KAS Eclipse Series — Part 1: Shooting
Of course, once you have all your images, you need to process them. My ebook’s biggest chapter (at 80 pages) is the one on processing still images and time-lapses.
So, a month after I presented the above webinar on Shooting, I was back on-line again for a follow-up webinar on Processing. You can view that KAS Eclipse Series tutorial here on YouTube.
KAS Eclipse Series — Part 2: Processing
I cover processing single wide-angle images, a wide-angle time-lapse series, single-image close-ups, and blending multiple exposure composites.
A month later, I presented a further webinar to the Astronomical League as part of their AL Live series, again on shooting the eclipse, but now with an emphasis on techniques amateur astronomers and astrophotographers with typical telescope gear might use.
You can view the AL Live webinar here. My presentation begins at the 44-minute mark.
AL Live Webinar — Scrub ahead to 44 minutes
I emphasized that the kinds of gear astrophotographers use these days with great success on deep-sky objects might not work well for the eclipse. The specialized cameras, and software used to control them, are just not designed for the demands of a total eclipse, where exposures have to range over a wide array of settings and change very quickly. Images have to be taken and recorded in rapid succession.
I suspect a lot of ambitious and overly-confident astrophotographers will come away from the 2024 eclipse disappointed — and what’s worse, without having seen the eclipse because they were too wrapped up looking at laptop screens trying to get their high-tech gear working.
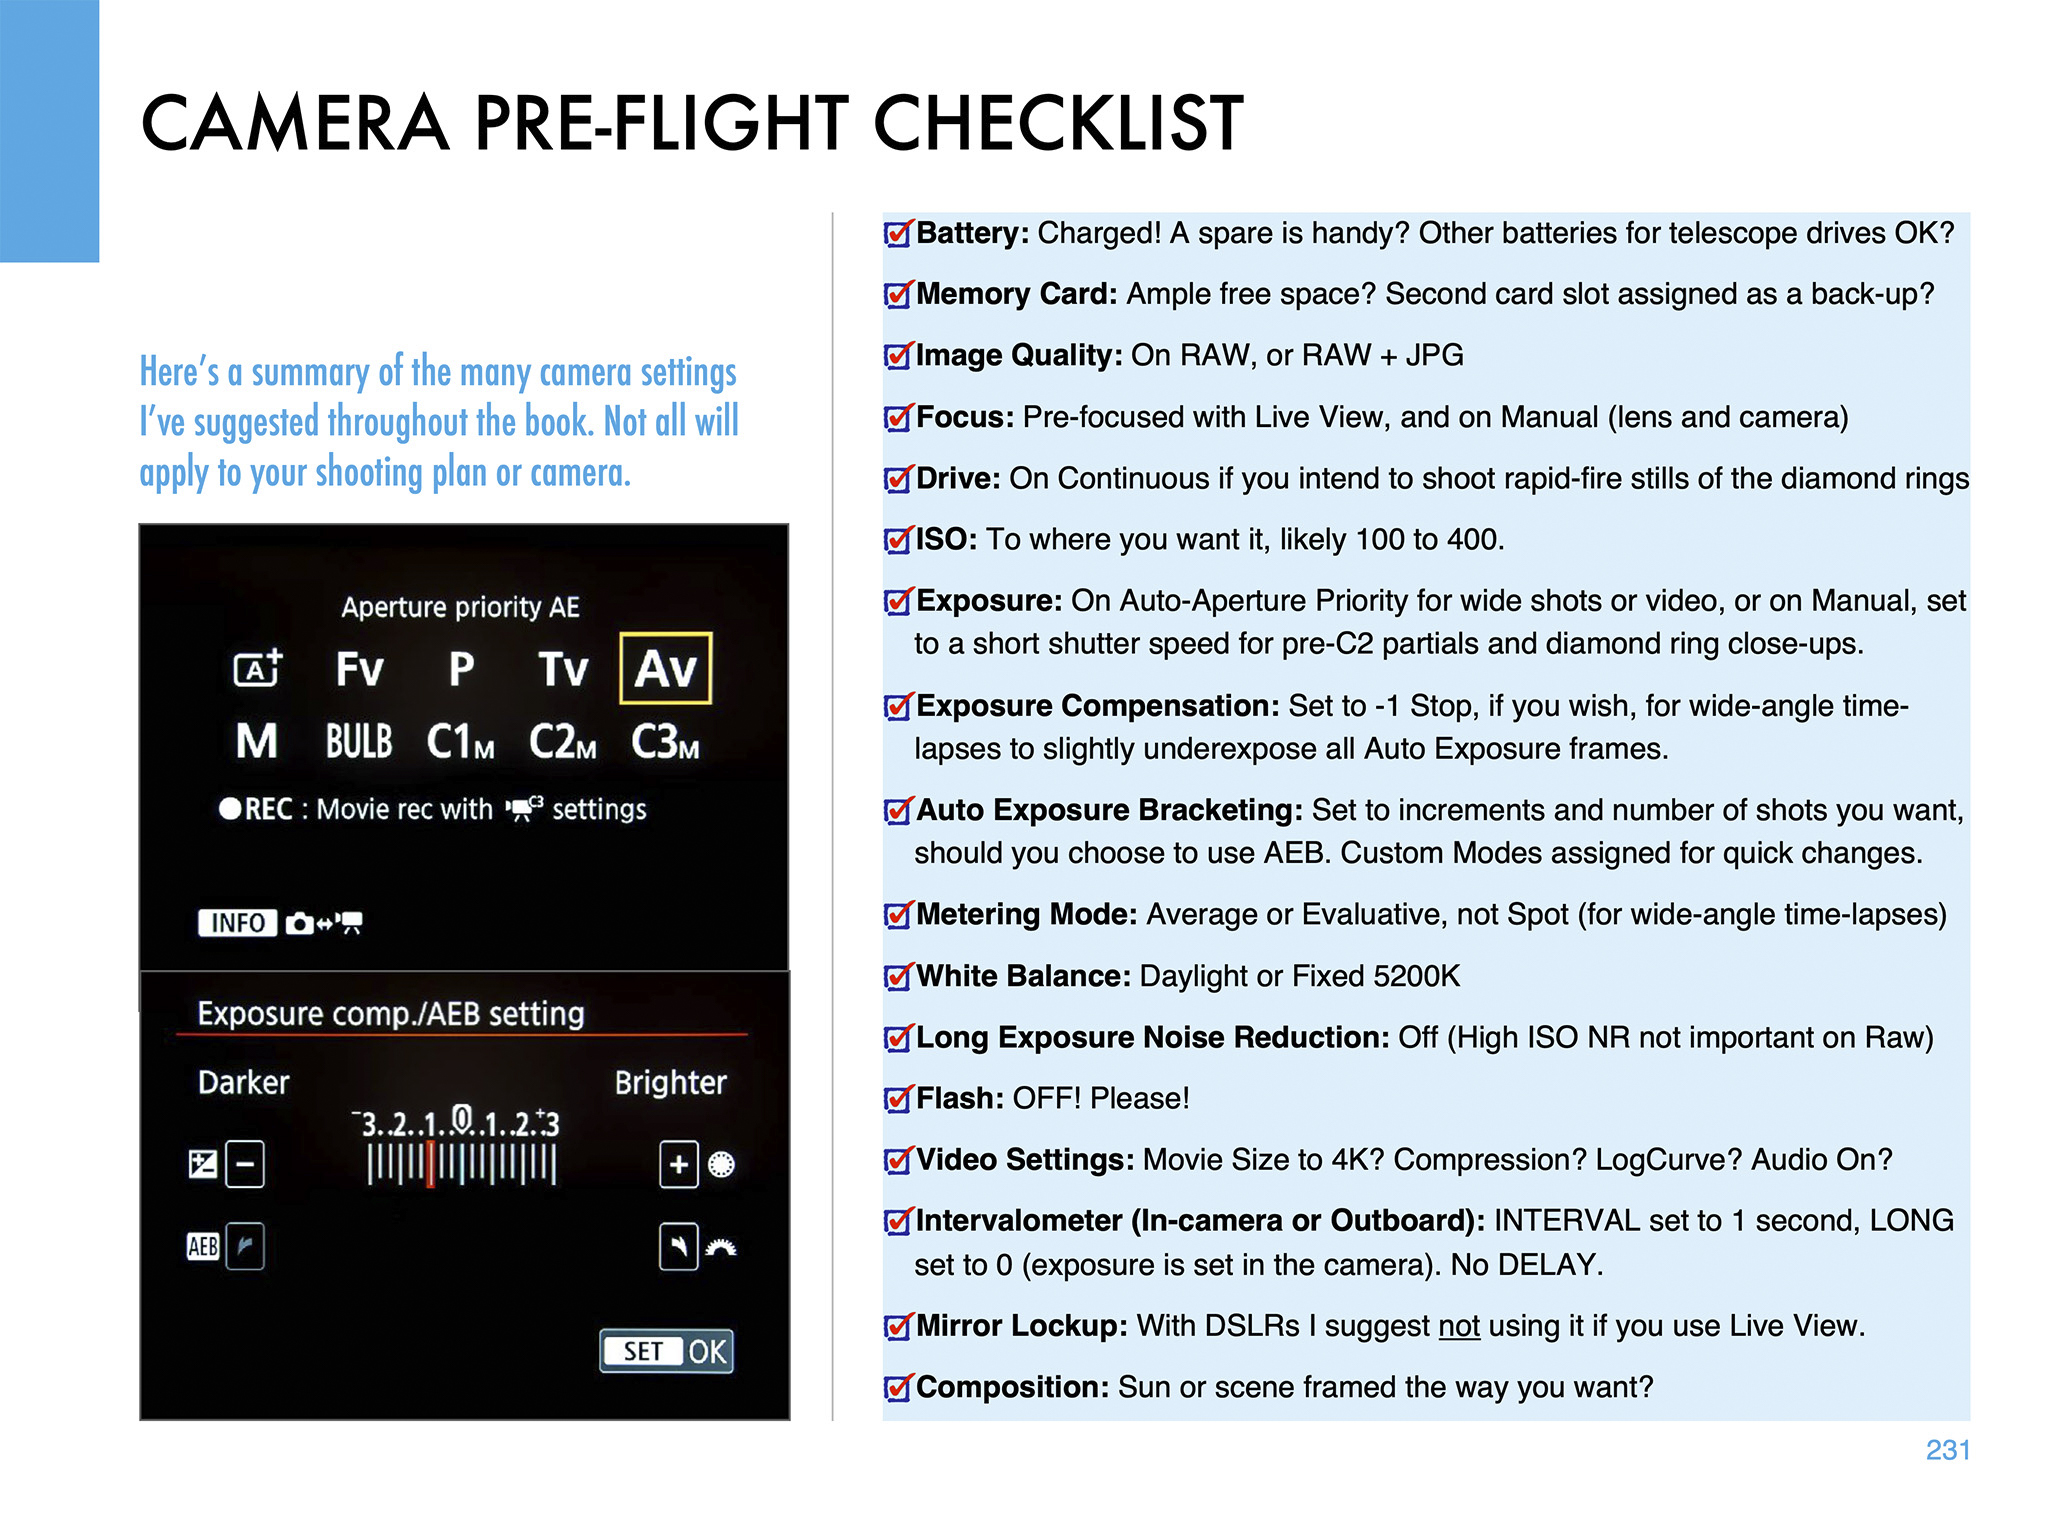
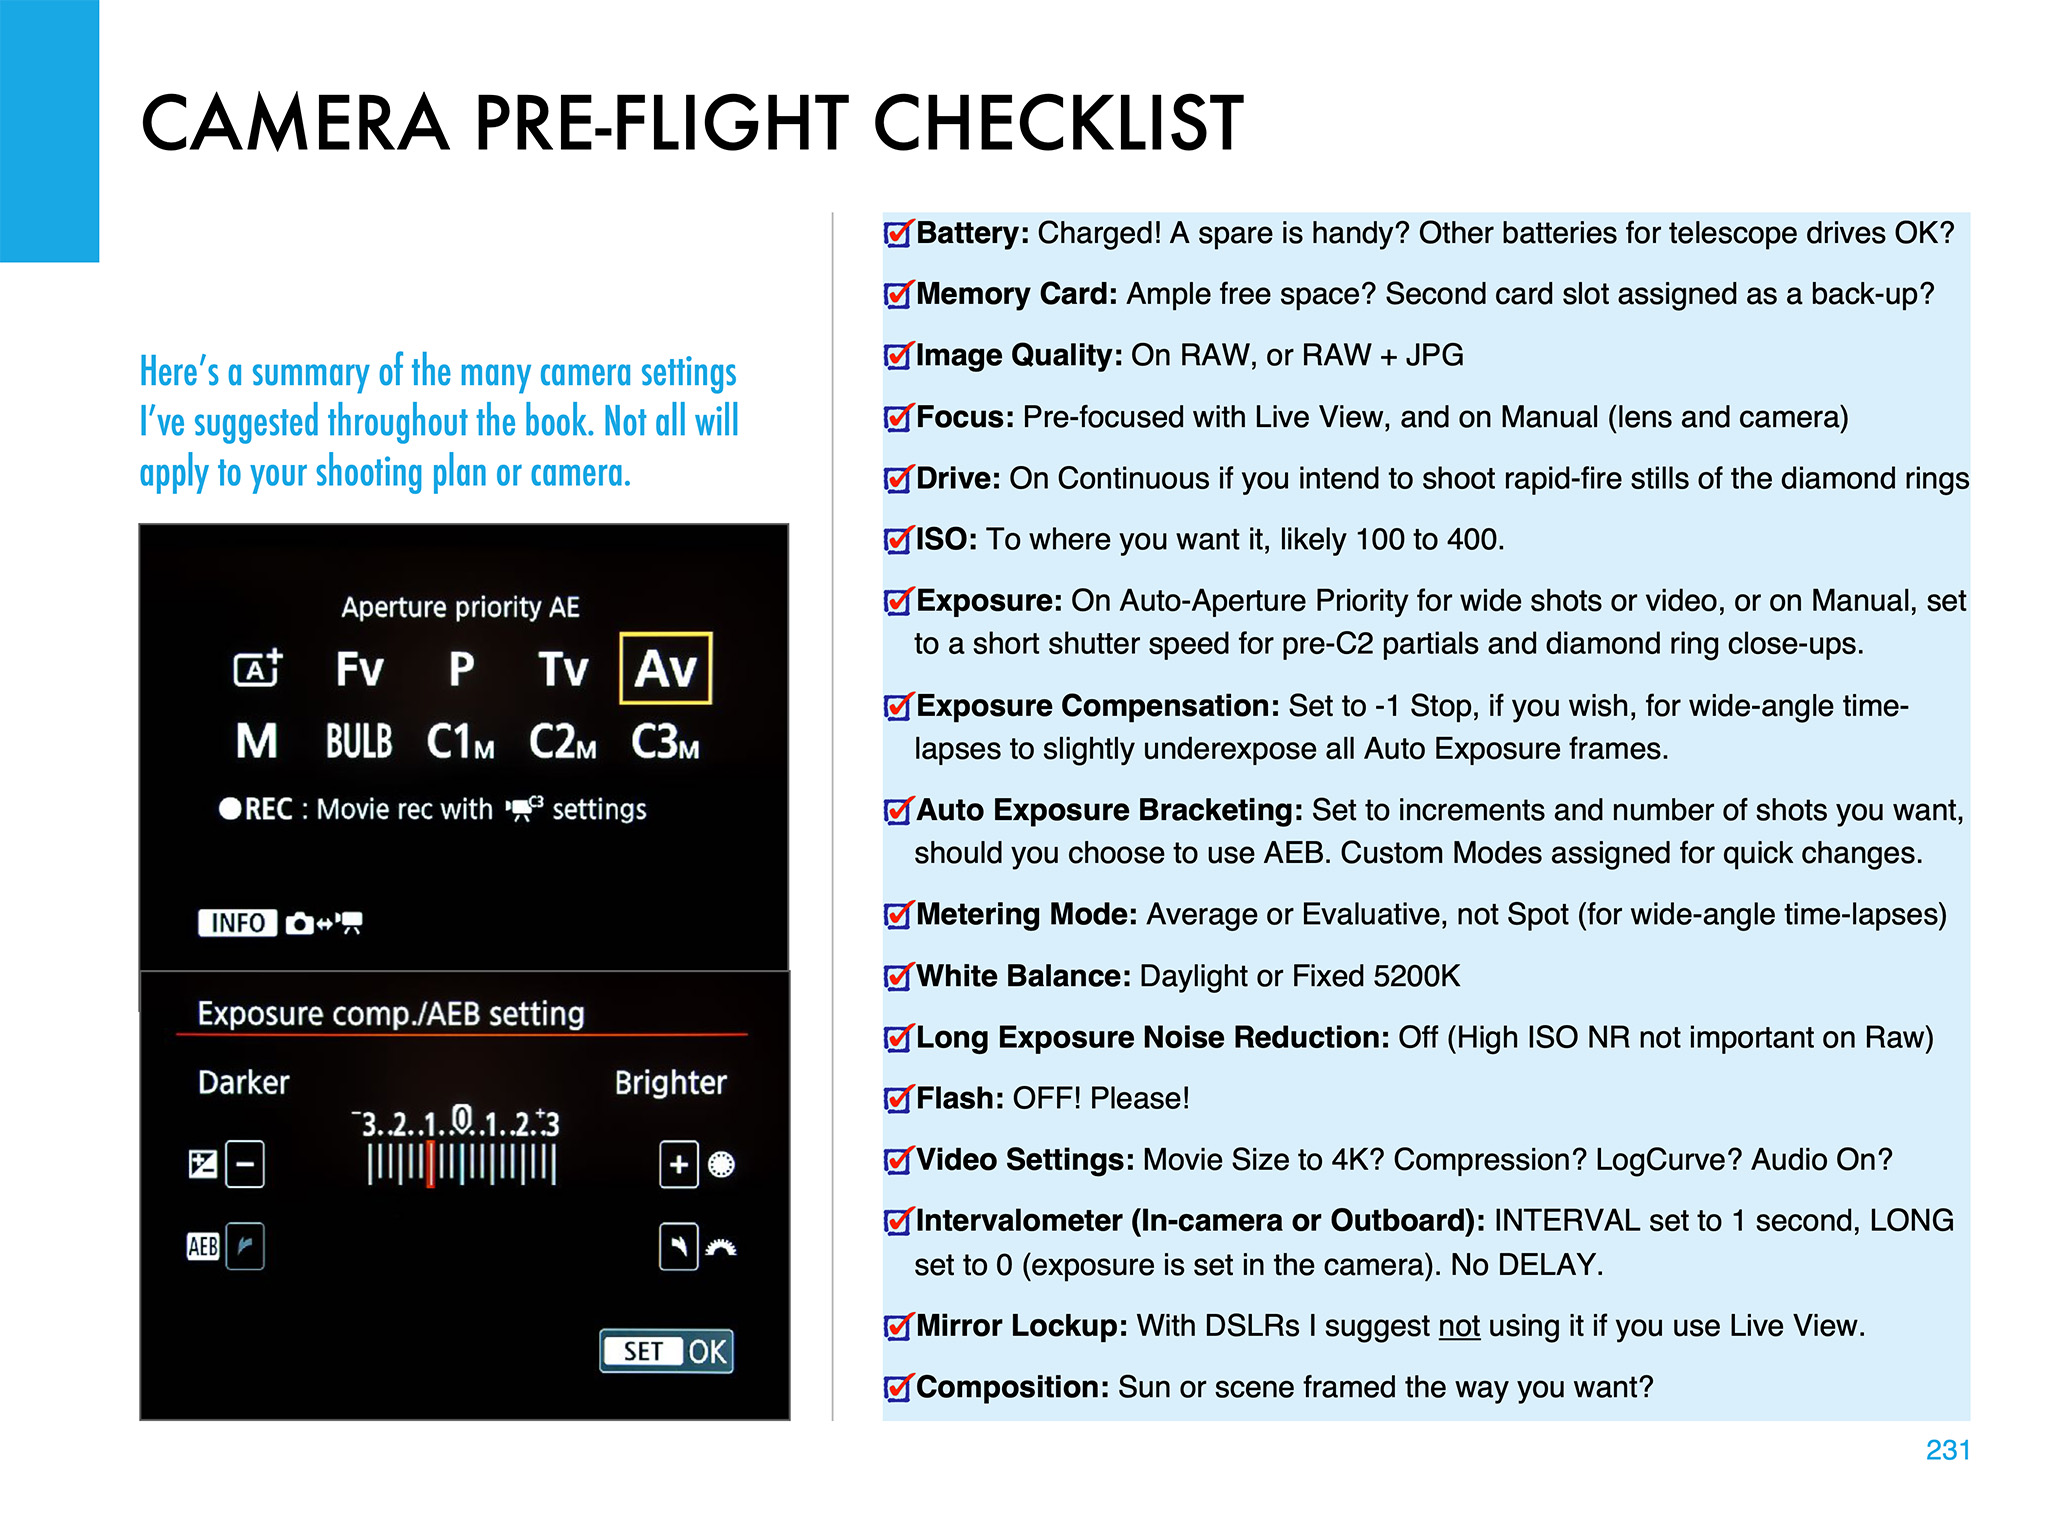
The Checklist page from my eBook
Practice, Practice, Practice
In these webinars and in my ebook, my common theme is the importance of practicing.
Don’t assume something will work. Practice with the gear you intend to use, on the Sun now (with proper filters) and on the Moon. The crescent Moon, with dim Earthshine lighting the lunar night side, is a great practice target because of its wide range of brightness. And it moves like the Sun will, to check maximum exposure times vs. image blurring from motion.
Practice with your tripod or mount aimed to the altitude and location in the sky where the Sun will be from the site you have chosen. Set a tracking mount to the latitude you will be at to be sure it will aim at and track the Sun without issues. Some telescope mounts stop tracking when they reach due south, exactly where the Sun will be at totality from southern sites. That’s a nasty surprise you do not want to encounter on eclipse day.
All this and much more is covered in my ebook, available for Apple Books and as a PDF for all platforms here from my website at https://www.amazingsky.com/EclipseBook
My latest ebook describes in detail the many techniques we can use to capture great still images and movies of the 2023 and 2024 eclipses of the Sun.
In the next few months we have two major eclipses of the Sun visible from North America.
On October 14, 2023 the Moon will cross the disk of the Sun creating a partial eclipse. But from along a narrow path in the western U.S. the Moon’s disk will be centered on the Sun’s disk but not be large enough to completely cover it. For a few minutes, viewers will see an “annular” eclipse, as above, as what remains of the Sun forms a brilliant ring of light around the dark disk of the Moon.
Six lunar months later, the Moon again crosses the Sun but is now large enough to completely cover the Sun’s bright disk. The result is the most spectacular celestial sight, a total eclipse of the Sun, on April 8, 2024. The last such total solar eclipse (TSE) in North America was on August 21, 2017, shown above. After 2024, the next TSE in southern North America will not be until August 23, 2044. (There’s a TSE in northern Alaska on March 30, 2033.)
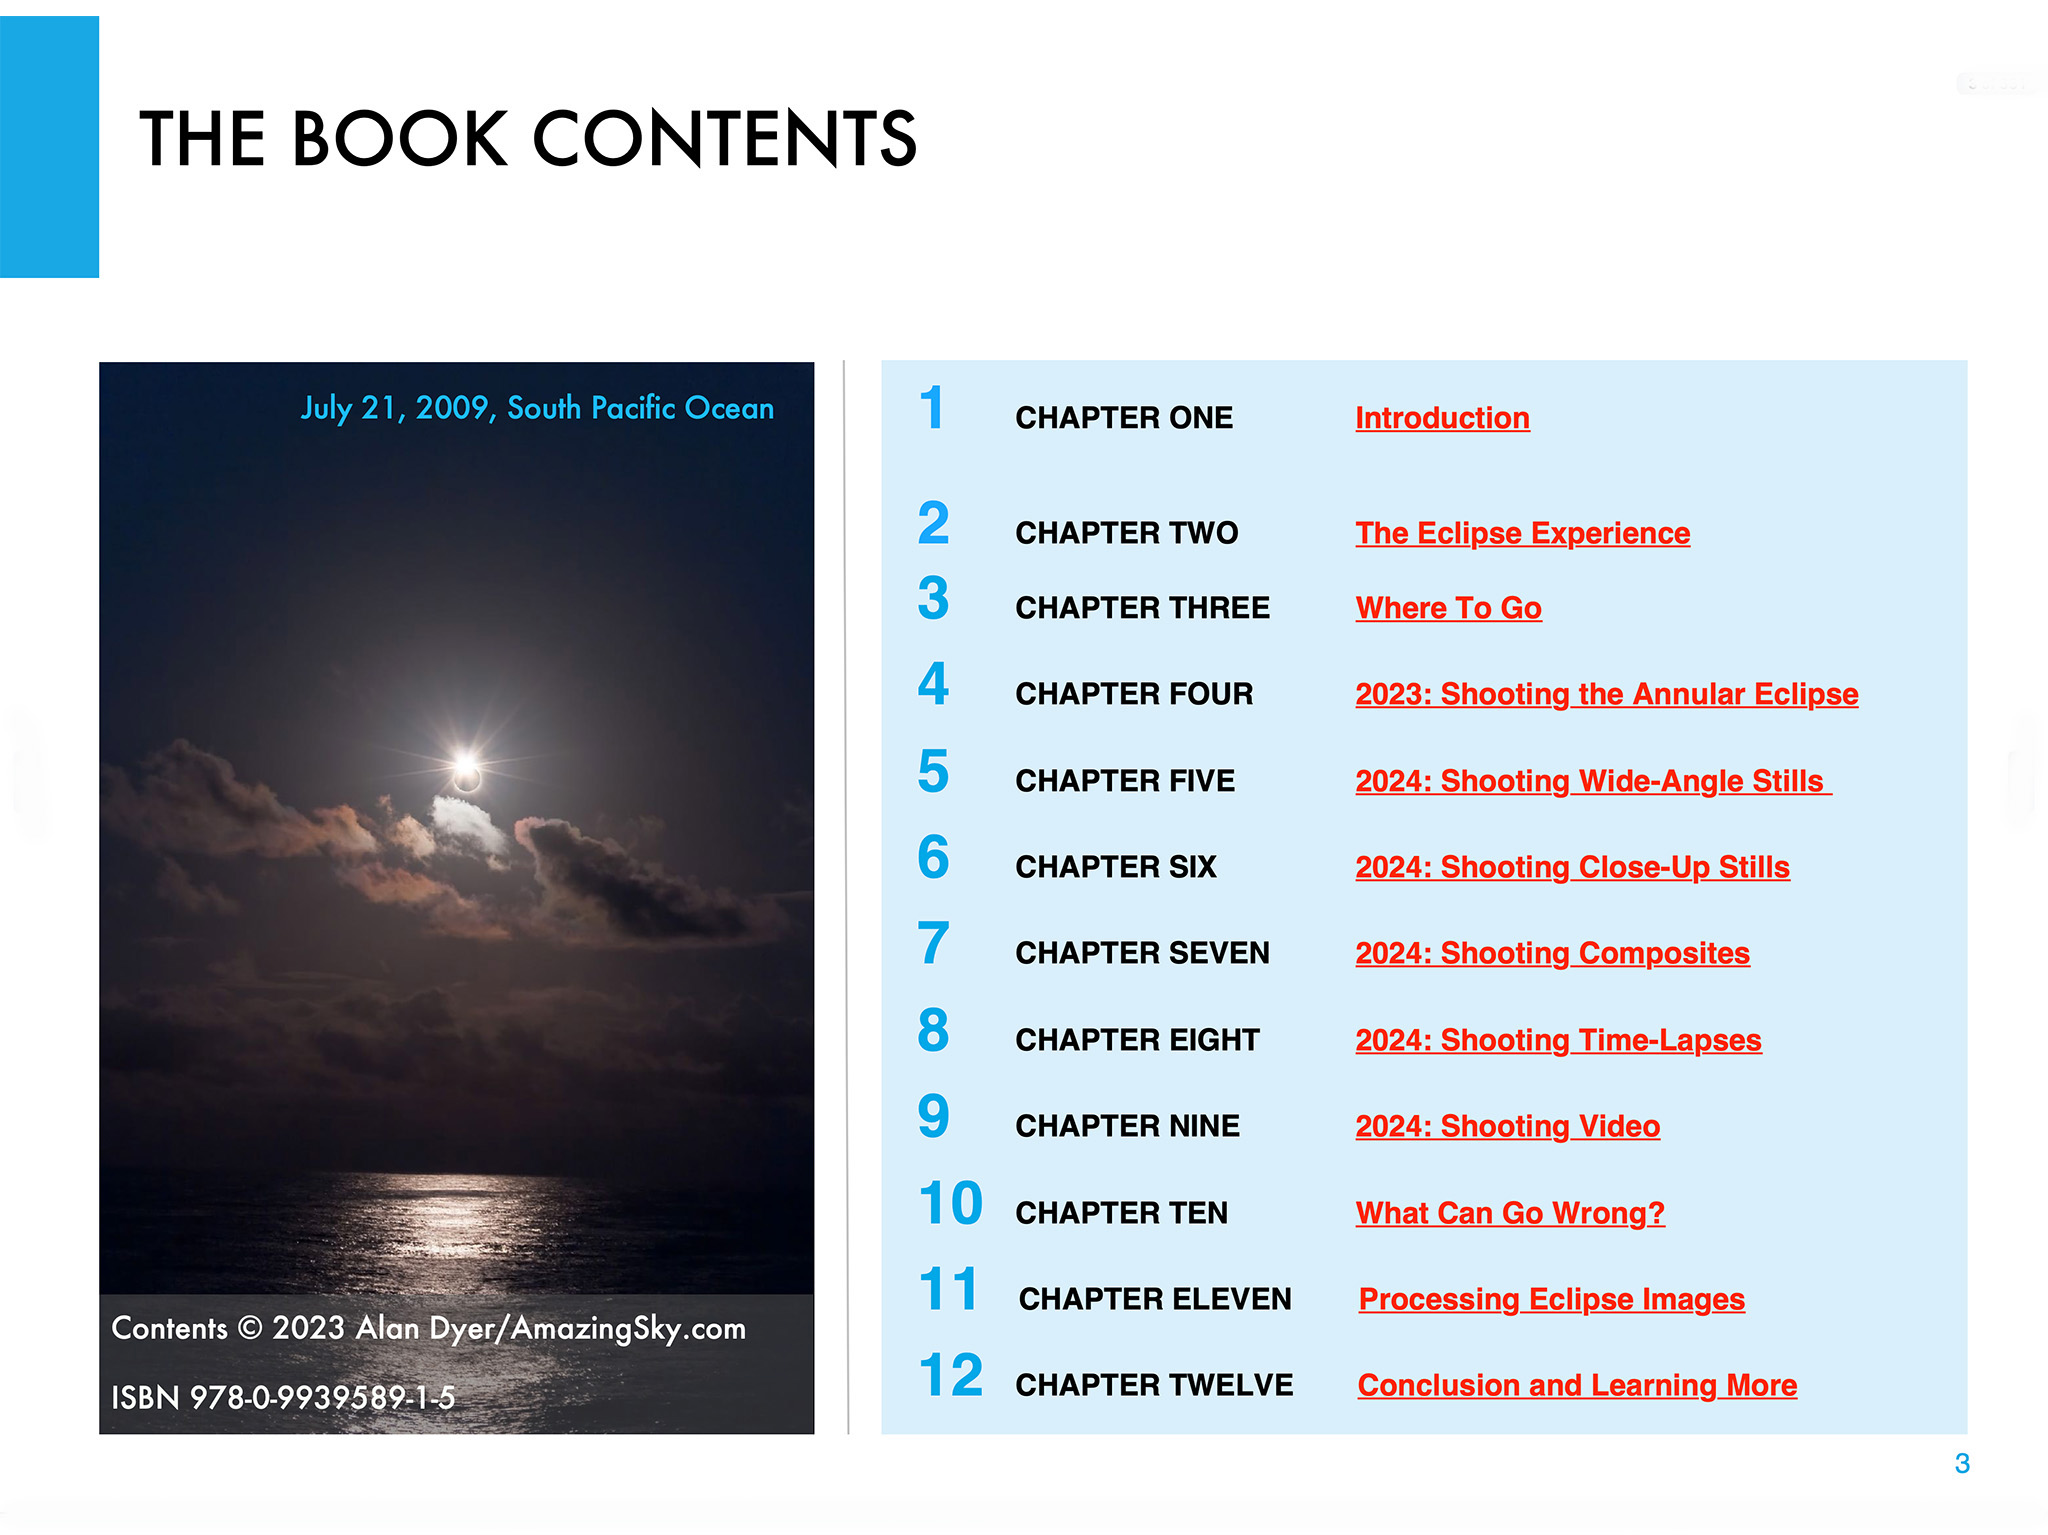
In 2017 I prepared an ebook about how to shoot that year’s total eclipse. This year I revised and expanded the book extensively to cover both the 2023 annular and 2024 total eclipses. The new 350-page ebook explains how to frame the eclipses depending on where you are along the paths. New information covers the advances in camera gear, with more details added on shooting video. Revised tutorials cover new software and processing techniques.
Above is the ebook’s Contents page, so you can see what topics it covers, over an extensive 350 pages. I provide not only advice on lots of techniques and gear, but also suggestions for what not to do, and what can go wrong!
The Fundamentals
I discuss the filters needed, comparing the various types available, and when to use them, and when to remove them. (A filter is always needed for the annular eclipse, but failing to remove the filter is a common failing at a total eclipse!)
For the 2023 annular eclipse I explain how to shoot close-ups, but also another type of image, the multiple exposure composite. Framing, timing and exposing correctly are crucial.
I do the same for the 2024 total eclipse, as a wide-angle shot of the eclipsed Sun over a landscape is one of the easiest ways to capture the event. It’s possible to set up a camera to take the images automatically, leaving you free to enjoy the view of the event without fussing with gear. I explain how best to do that.
For both eclipses, many people will want to shoot close-ups with telephoto lenses or telescopes. It takes more work and more can go wrong, but I show what’s required for equipment and exposures, and explain how to avoid the common flaws of fuzzy focus and trailed images.
But good exposure is also essential. However, for a total eclipse close-up, no one exposure is best. It takes a range of exposures to record the wide dynamic range of phenomena during totality. That demands work at the camera.
Setting Cameras
I show how we can use a camera’s auto-bracketing function to help automate the process of taking a set of exposures, from short exposures for the prominences, to long for the faint outer corona.
Another option is using a continuous burst mode to capture the fleeting moments of the diamond rings at the start and end of totality in 2024. But this can also be useful for capturing the “reverse Baily’s beads” that appear briefly as the Moon reaches the inner contact points at the start and end of the annular phase of the 2023 eclipse.
Using a tracking mount can help with shooting a set of images during totality. I describe the options for choosing the right mount and telescope, and how to set it up for accurate tracking. I discuss the advantages — and pitfalls — of using a tracking mount.
Shooting Video
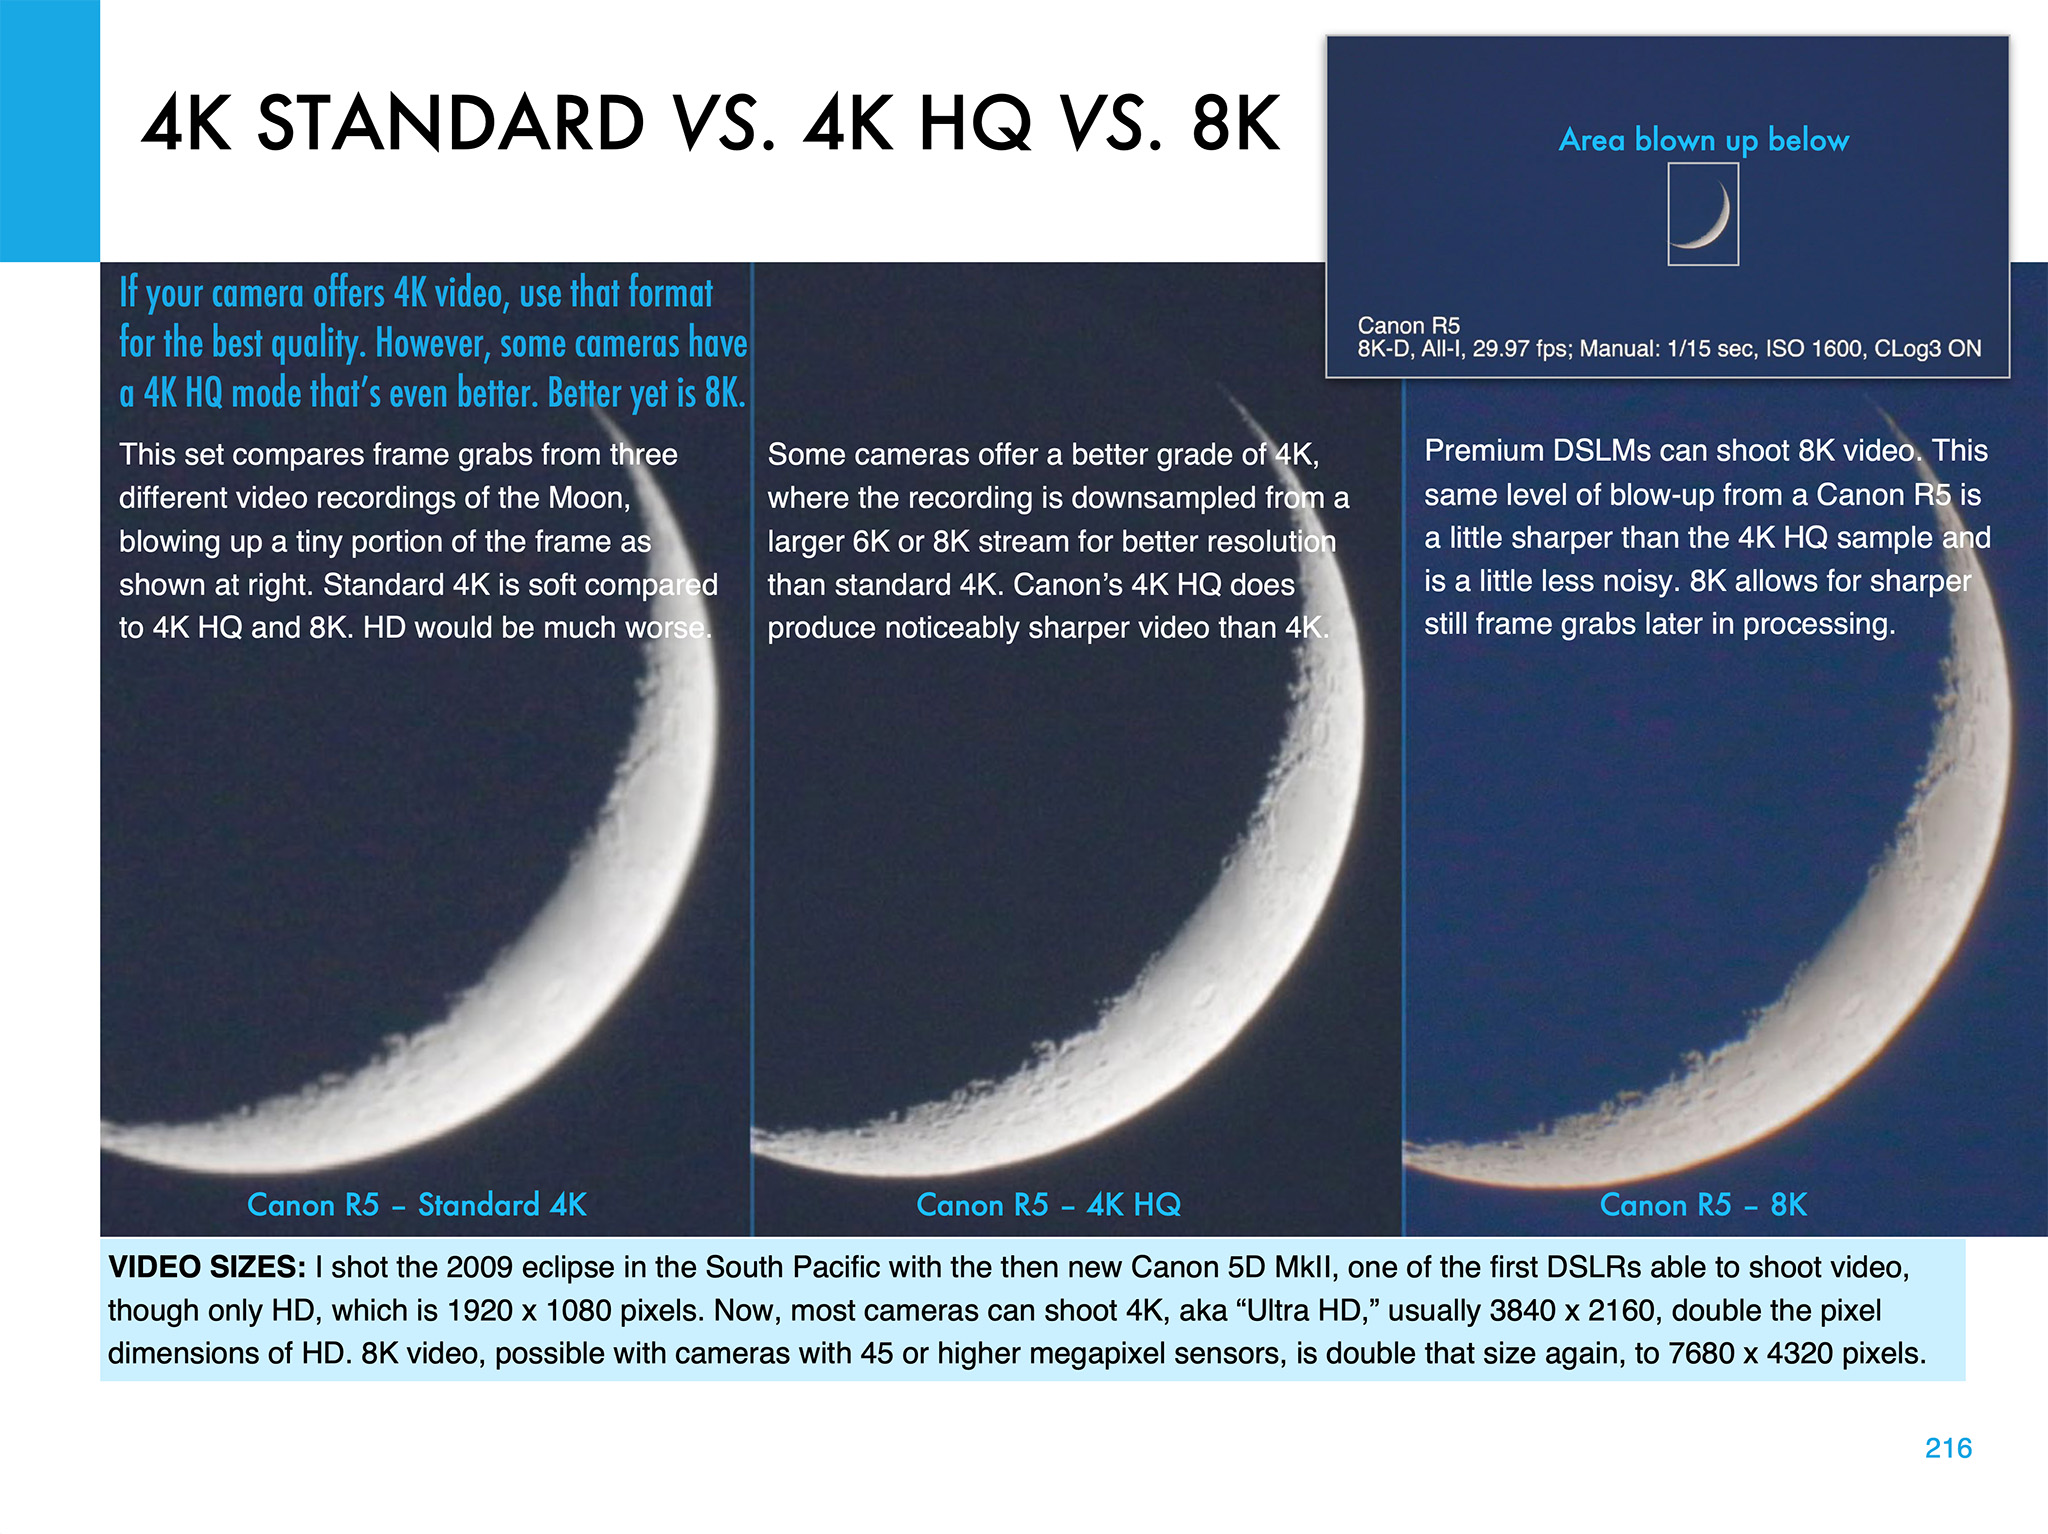
Video is now an important feature of many cameras. But the choices of formats and settings can be daunting! 4K, 8K, 4K HQ — what to use? I illustrate the differences, using the best practice target, the crescent Moon.
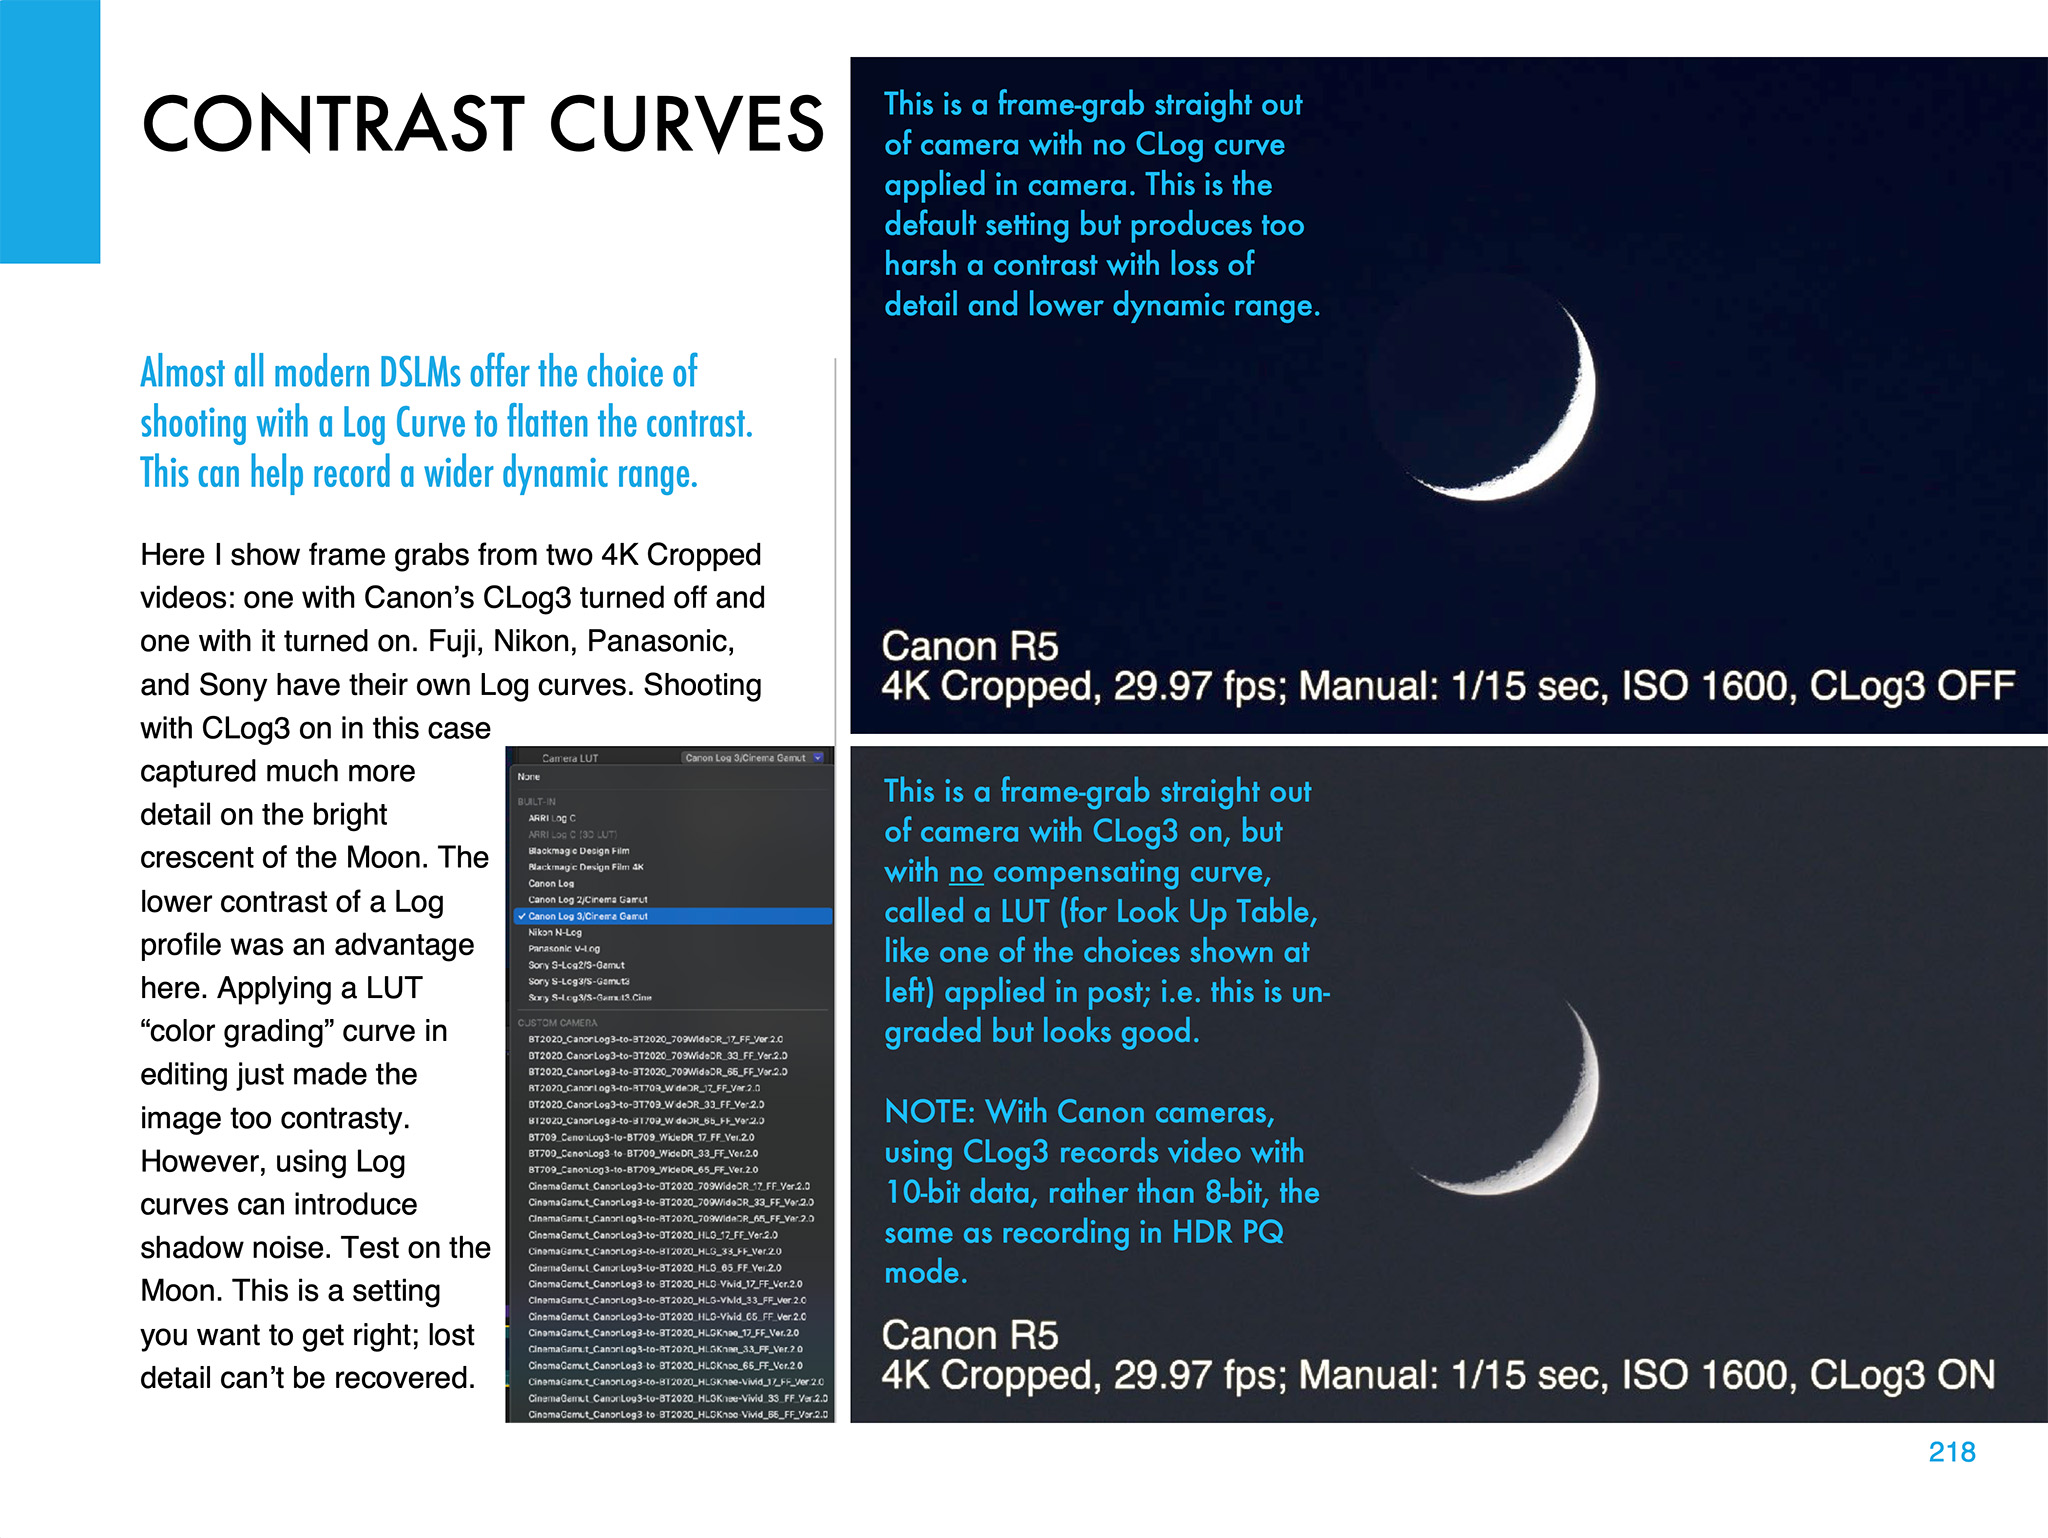
Choosing the right contrast curve for your video — such as CLog3 here — can also make a big difference to the final video quality. It’s important to get that right. You have only one chance!
I also devote a chapter to shooting time-lapses, with wide-angle lenses and telescopes.
Image Processing
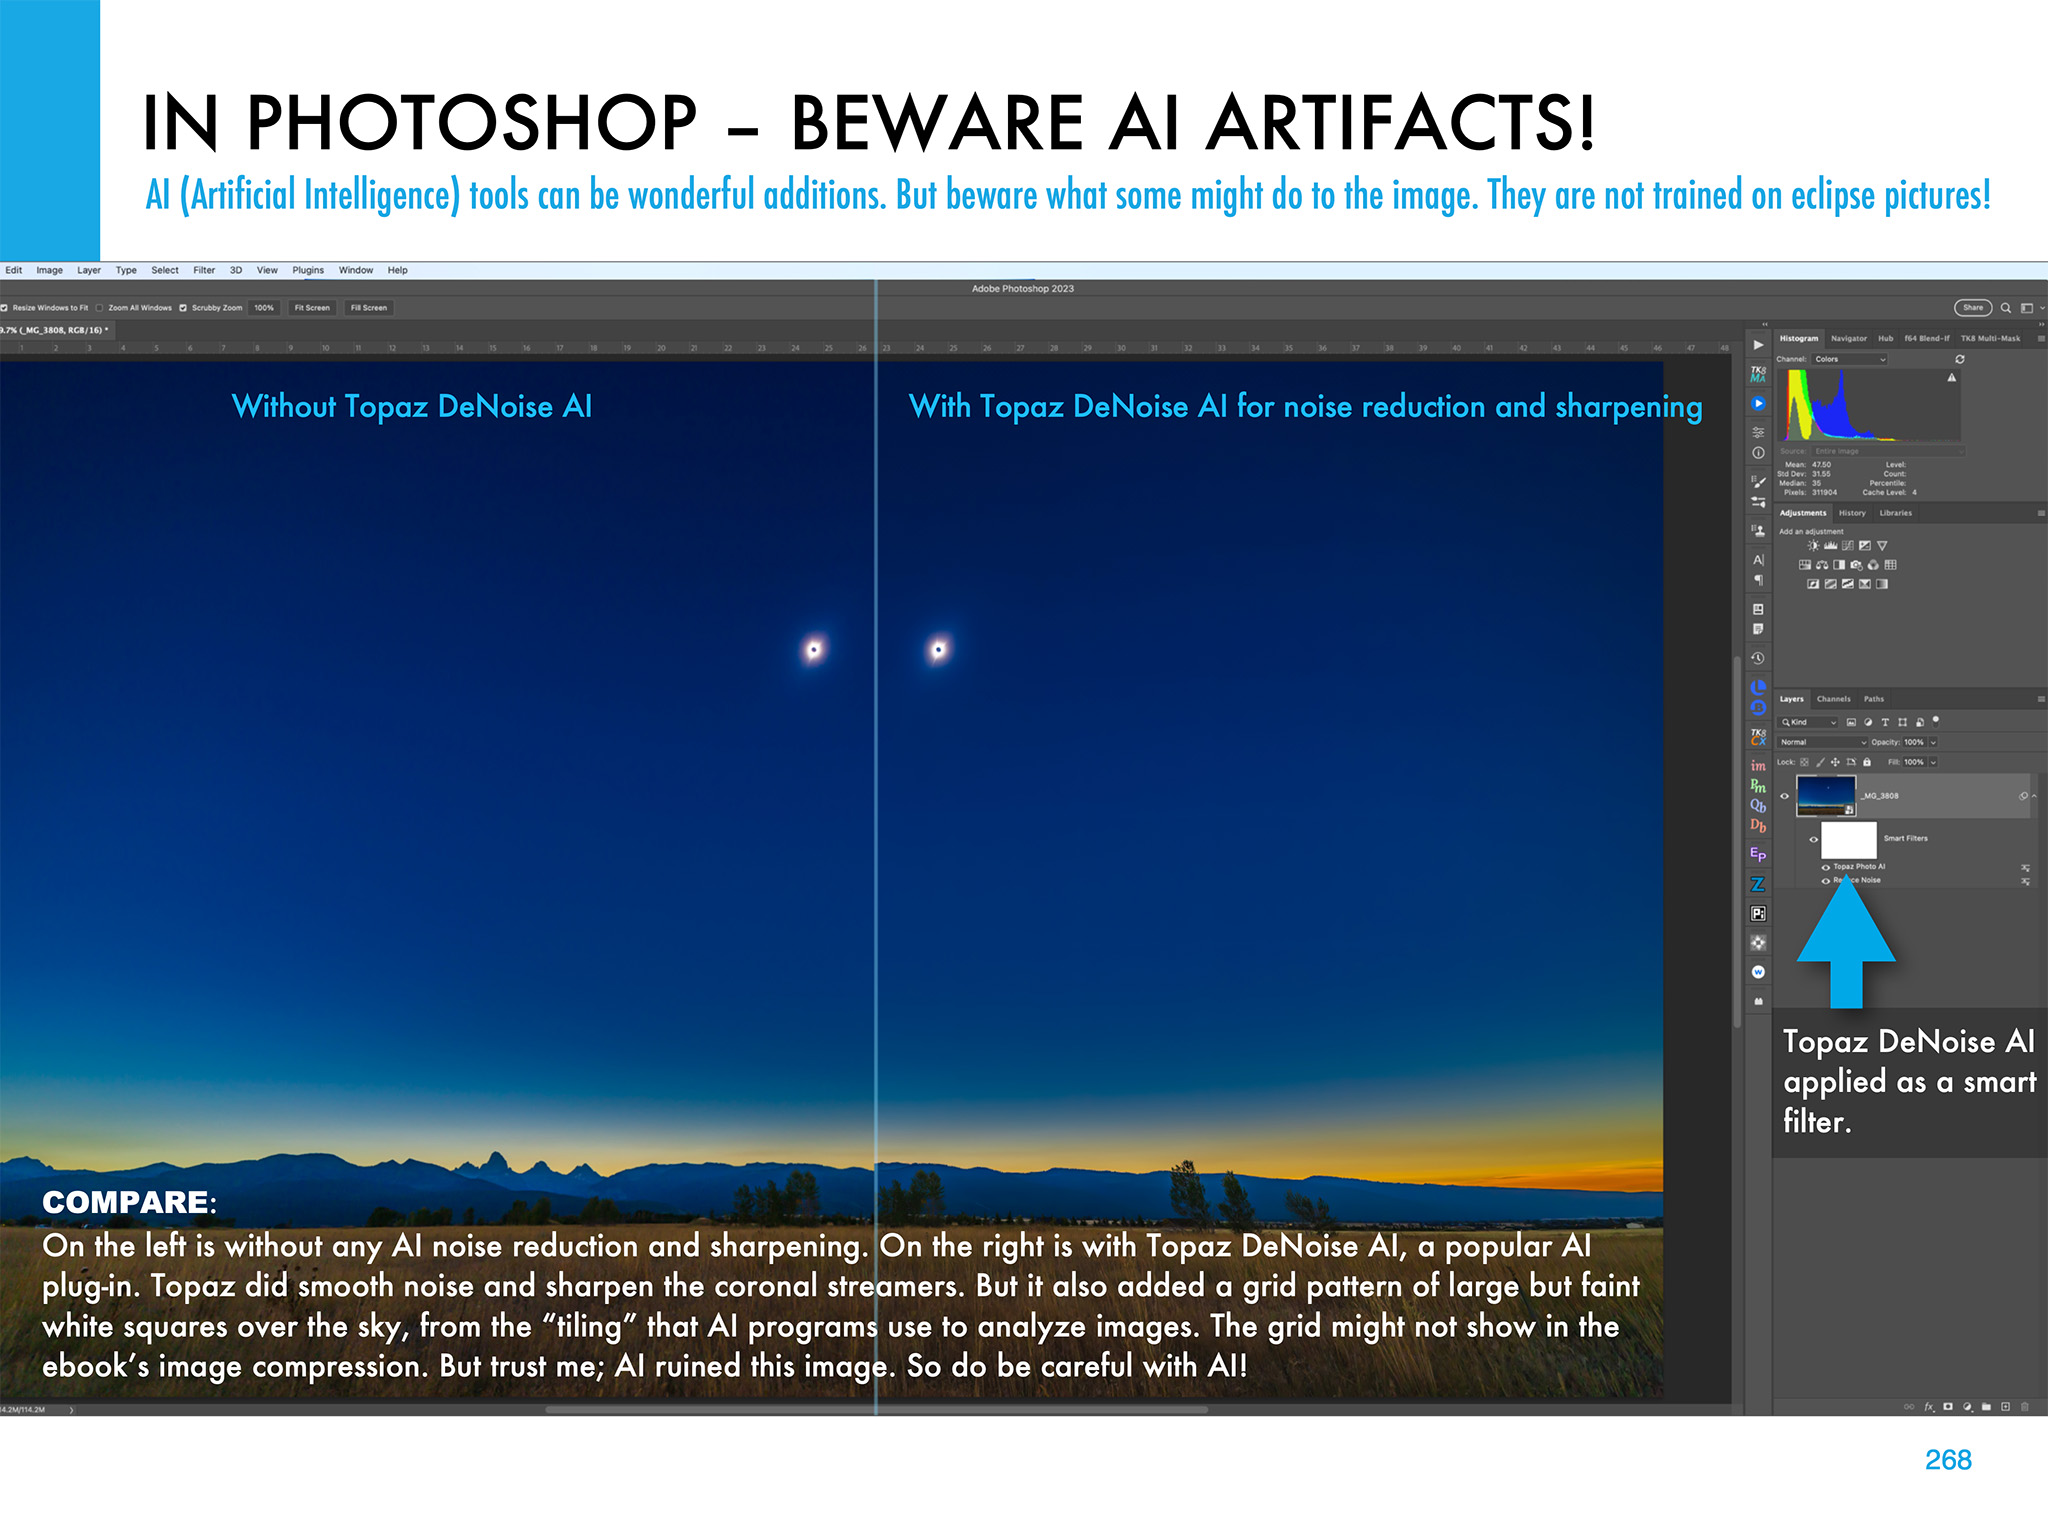
Chapter 11 is the biggest, with 68 pages of tutorials on how to process eclipse images, using the latest software. I show the benefit new AI tools can provide, but also the oddities they can impart to eclipse images.
I illustrate how to use HDR software (comparing sample results from several popular programs) to blend multiple exposures for greater dynamic range.
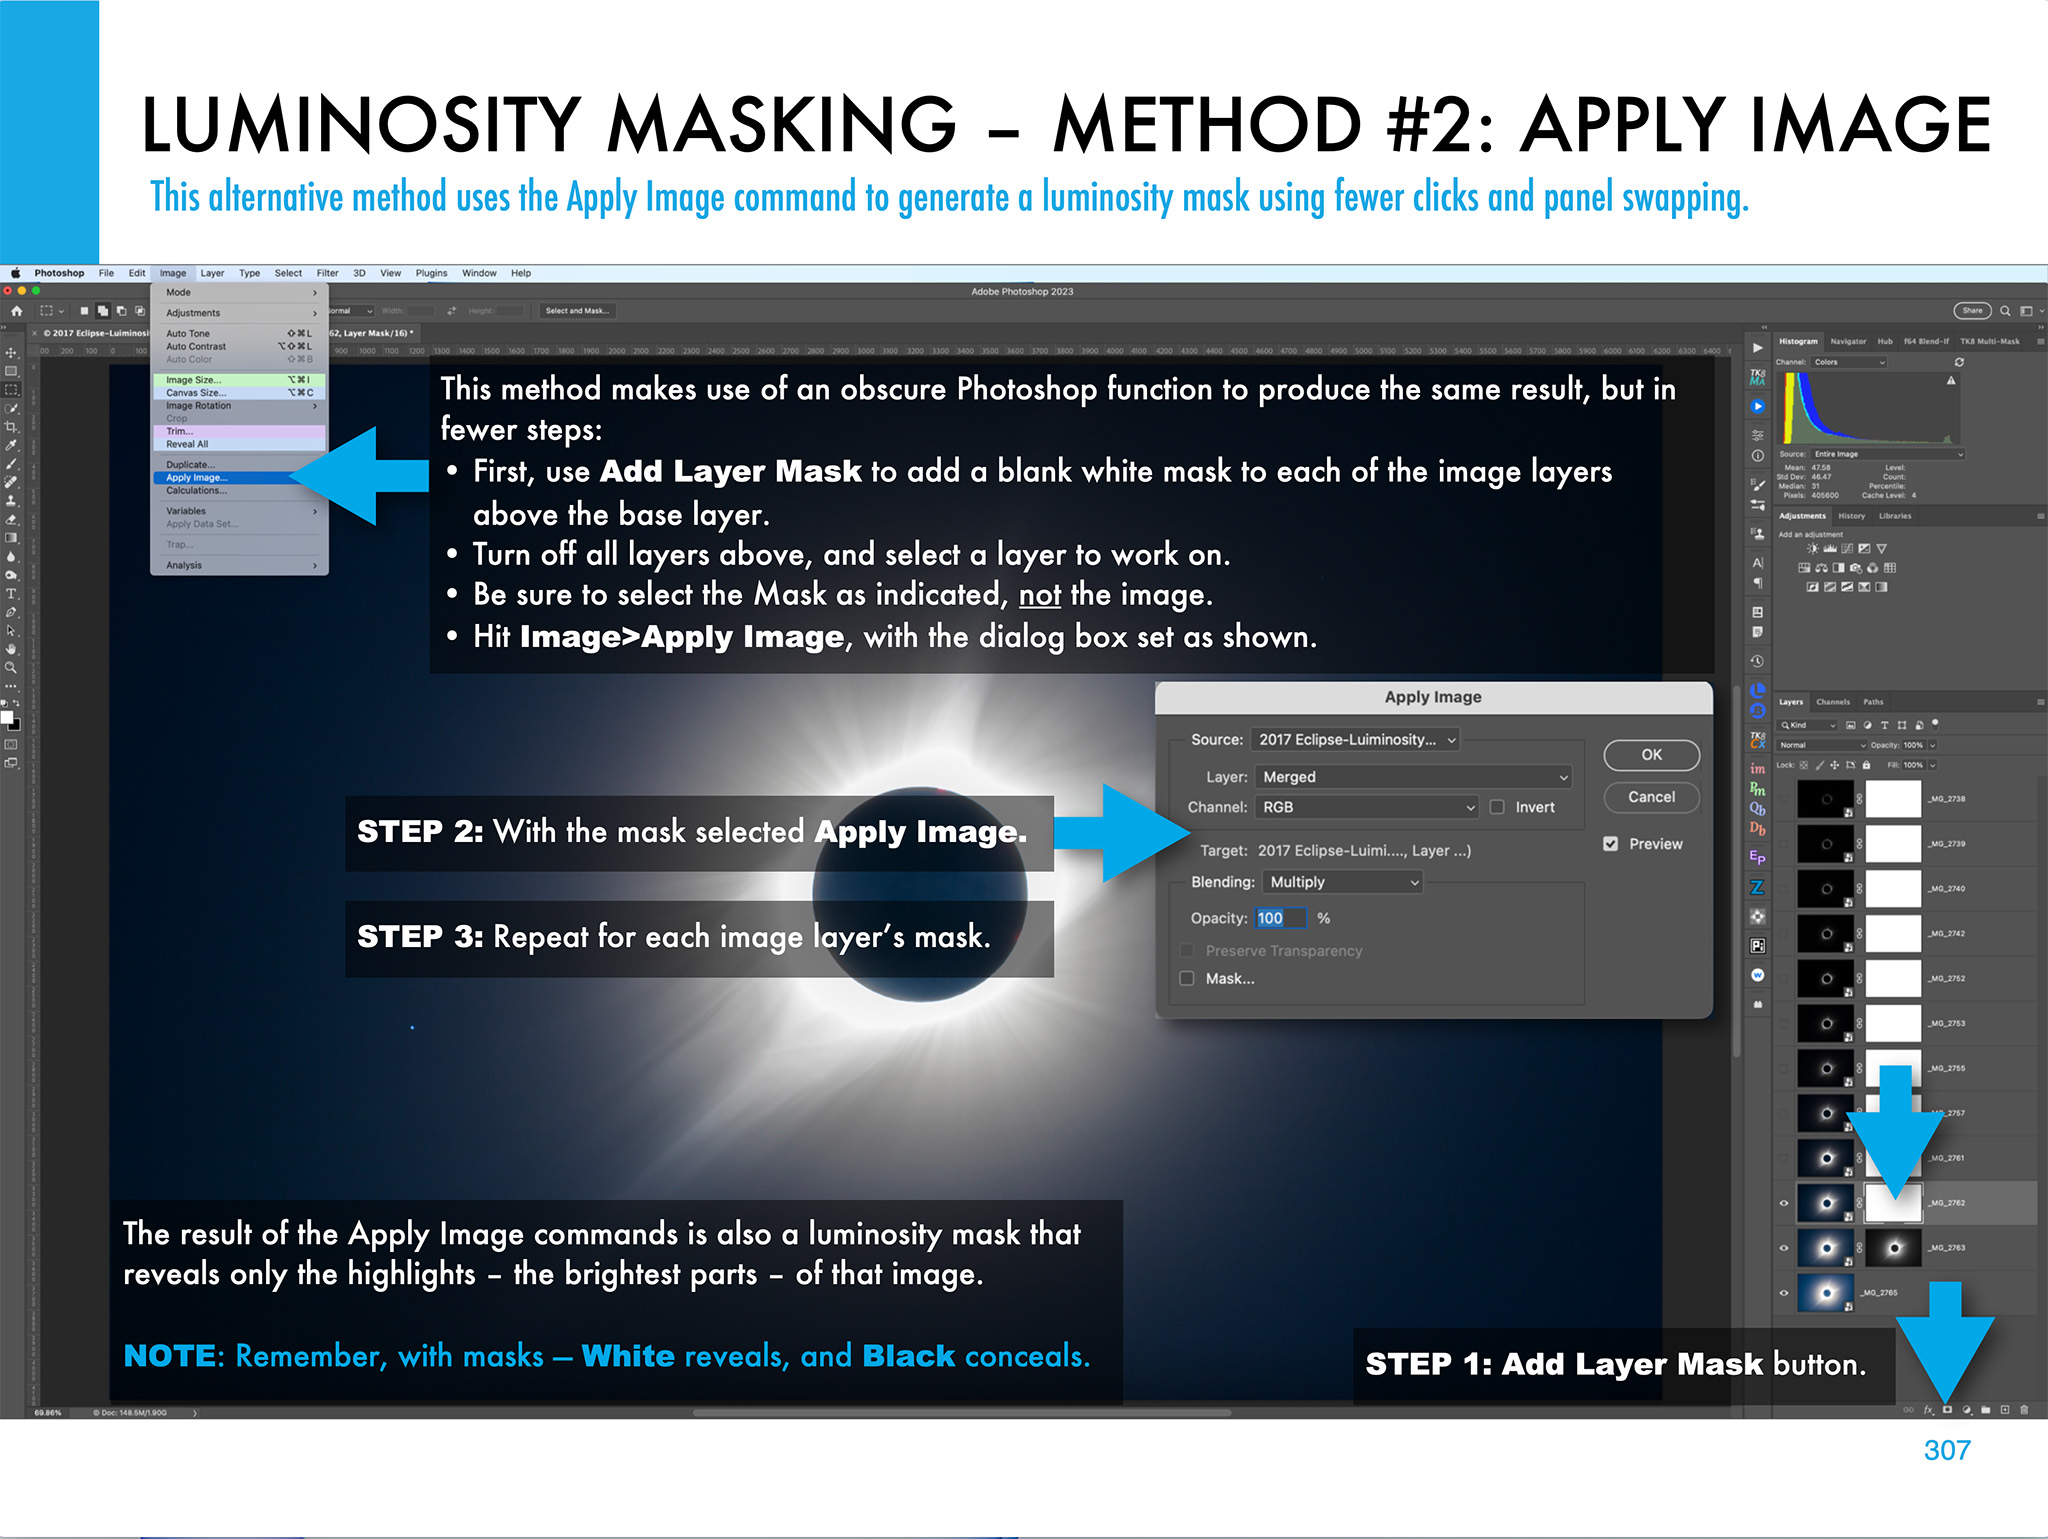
I illustrate other methods of stacking and blending exposure sets, such as luminosity masks and stack modes. Examples are all with Adobe products, but the methods are applicable to other layer-based programs such as Affinity Photo.
The processing chapter ends with illustrations on how to create layered composites from images taken at multiple stages of an eclipse.
What Can Go Wrong?
The ebook ends with advice for the ambitious (!) on how best to use several cameras to capture different aspects of the eclipse. And I includes lots of tips and checklists to ensure all goes well on eclipse day — or what to do for Plan B if all does not go well!
The ebook is available for Apple Books (for Macs and iPads) and as a PDF for all devices. Links to buy and more details on ebook content are at my website at www.amazingsky.com/EclipseBook.
I’ll be posting more eclipse “tips and techniques” blogs in the coming months, so be sure to subscribe.