
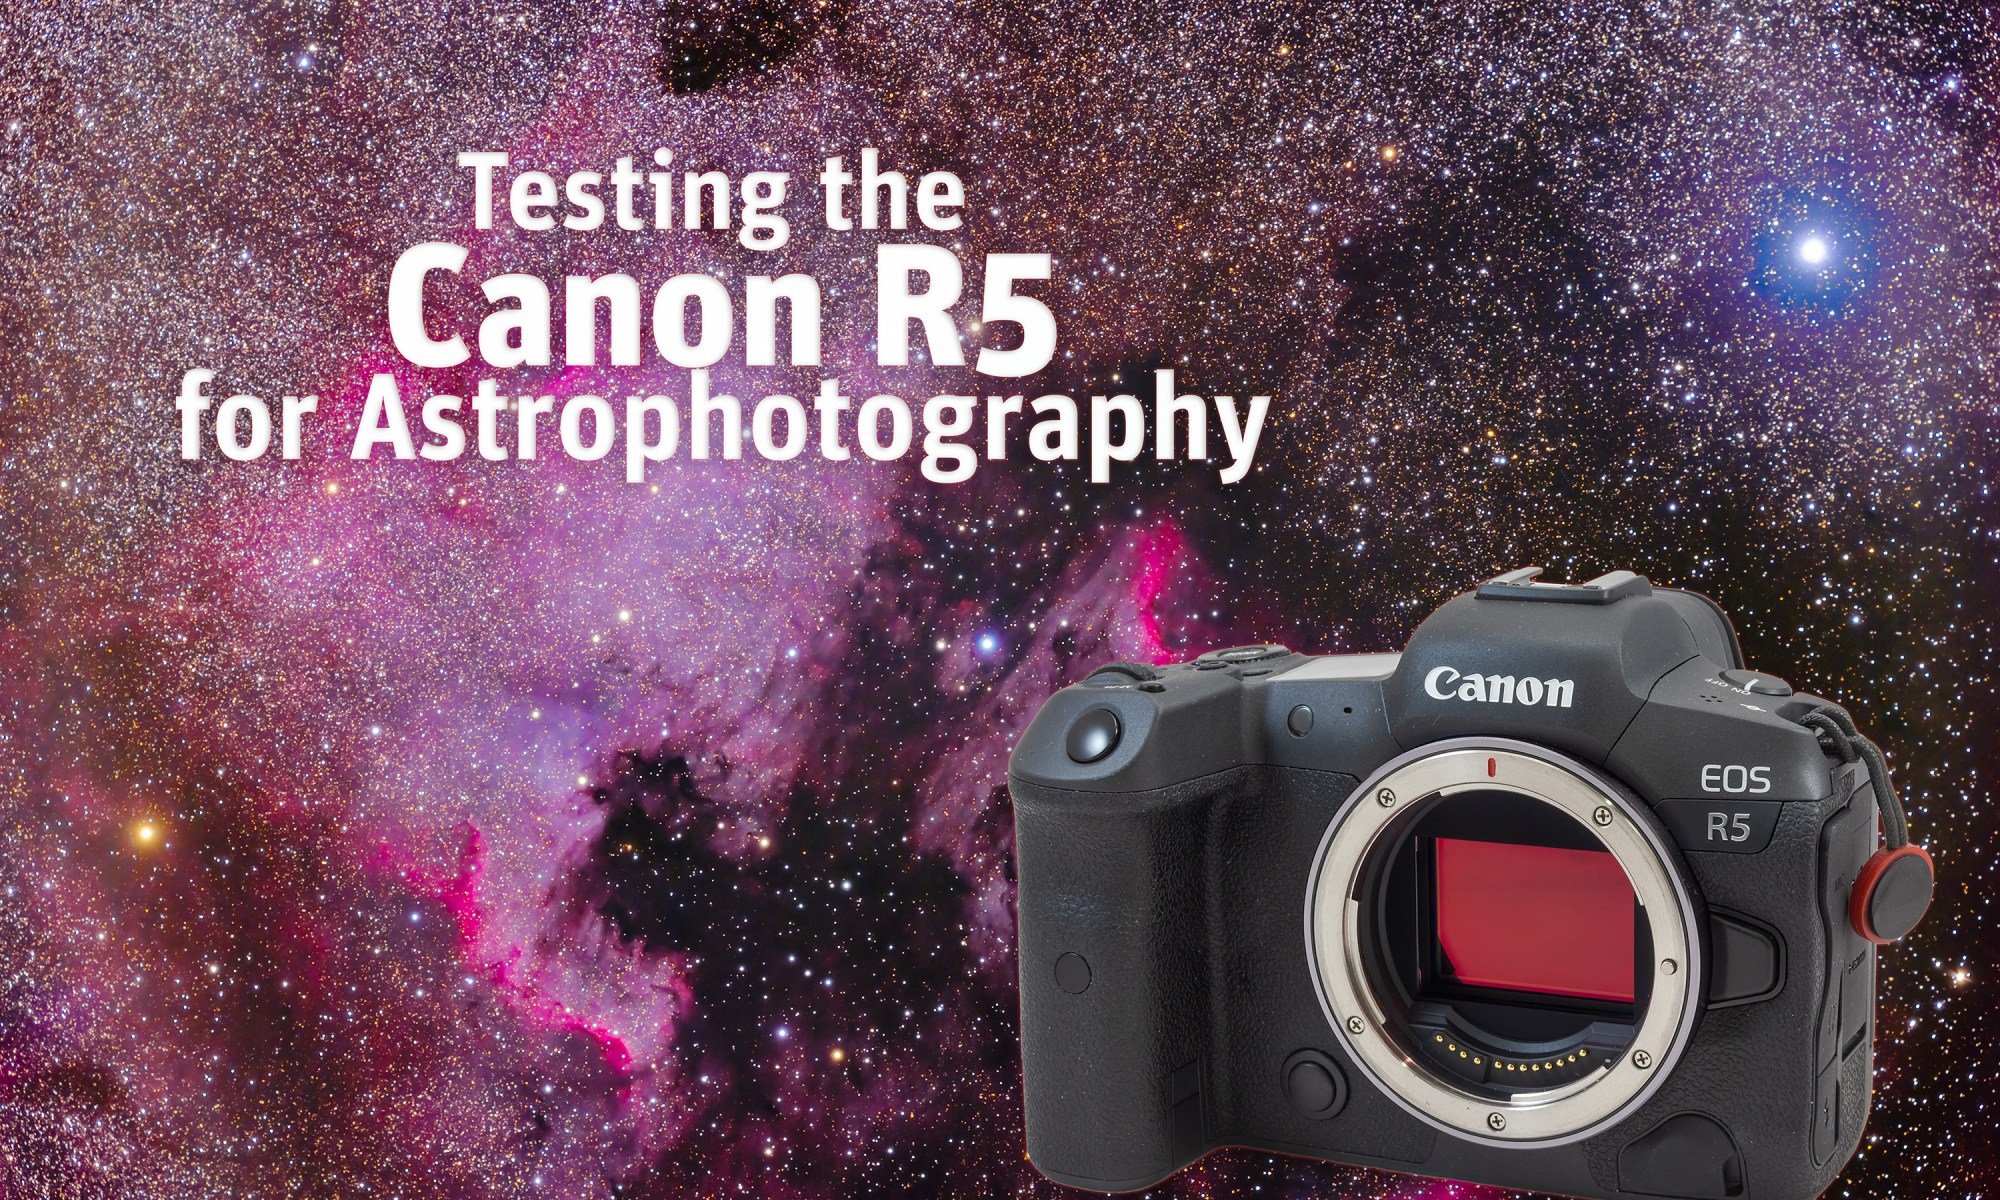

In a format similar to my other popular camera tests, I put the 45-megapixel Canon R5 mirrorless camera through its paces for the demands of astrophotography.
In a sequel to my popular post from September 2021 where I reviewed the Canon R6 mirrorless camera, here is a similar test of its higher-megapixel companion, the Canon R5. Where the R6 has a modest 20-megapixel sensor with relatively large 6.6-micron pixels, the R5 is (at present) Canon’s highest megapixel camera, with 45 megapixels. Each pixel is only 4.4 microns across, providing higher resolution but risking more noise.
Is the higher noise noticeable? If so, does that make the R5 less than ideal for astrophotography? To find out, I tested an R5 purchased locally in Calgary from The Camera Store in May 2022.
NOTE: CLICK orTAP on any image to bring it up full screen for closer inspection. The blog contains a lot of high-res images, so they may take a while to all load. Patience! Thanks!
All images are © 2022 by Alan Dyer/AmazingSky.com. Use without permission is prohibited.
TL;DR Summary
The Canon R5 proved to be surprisingly low in noise, and has worked very well for nightscape, lunar and deep-sky photography (as shown below), where its high resolution does produce a noticeable improvement to image detail, with minimal penalty from higher noise. Its 8K video capability has a place in shooting the Moon, Sun and solar eclipses. It was not so well suited to shooting videos of auroras.

R5 Pros
The Canon R5 is superb for its:
- High resolution with relatively low noise
- ISO invariant sensor performance for good shadow recovery
- Good live view display with ISO boost in Movie mode
- 8K video has its attraction for eclipse photography
- Good top LCD information screen missing in the R6
- No magenta edge “amp glow” that the R6 shows
- Higher 6x and 15x magnifications for precise manual focusing
- Good battery life
- Pro-grade Type N3 remote port
R5 Cons
The Canon R5 is not so superb for its:
- Noise in stills and movies is higher than in the R6
- Propensity for thermal-noise hot pixels in shadows
- Not so suitable for low-light video as the R6
- Overheating in 8K video
- Live View image is not as bright as in the R6’s Movie mode
- High cost!
CHOOSING THE R5
Since late 2019 my main camera for all astrophotography has been the Canon Ra, a limited-edition version of the original R, Canon’s first full-frame mirrorless camera that started the R series. The Ra had a special infra-red cutoff filter in front of the sensor that passed a higher level of visible deep-red light, making it more suitable for deep-sky astrophotography than a standard DSLR or DSLM (mirrorless) camera. The Ra was discontinued after two years on the market, a lifetime similar to Canon’s previous astronomical “a” models, the 20Da and 60Da.
I purchased the Canon R6 in late 2021, primarily to use it as a low-light video camera for aurora photography, replacing the Sony a7III I had used for several years and reviewed here. Over the last year, I sold all my non-Canon cameras, as well as the Canon 6D MkII DSLR (reviewed here), to consolidate my camera gear to just Canon mirrorless cameras and lenses.
The R6 has proven to be an able successor to the Sony for me, with the R6’s modest megapixel count and larger pixels making it excellent for low-light video. But the higher resolution of the R5 was still attractive. So I have now added it to my Canon stable. Since doing so, I have put it through several of my standard tests to see how suitable it is for the demands of astrophotography, both stills and video.
Here are my extensive results, broken down by various performance criteria. I hope you will find my review useful in helping you make a purchase decision.
LIVE VIEW FRAMING
First, why go mirrorless at all? For astrophotography, the big difference compared to even a high-end DSLR, is how much brighter the “Live View” image is when shooting at night. DSLM cameras are always in Live View – even the eye-level viewfinder presents a digital image supplied by the sensor.
And that image is brighter, often revealing more than what a DSLR’s optical viewfinder can show, a great advantage for framing nightscape scenes, and deep-sky fields at the telescope.
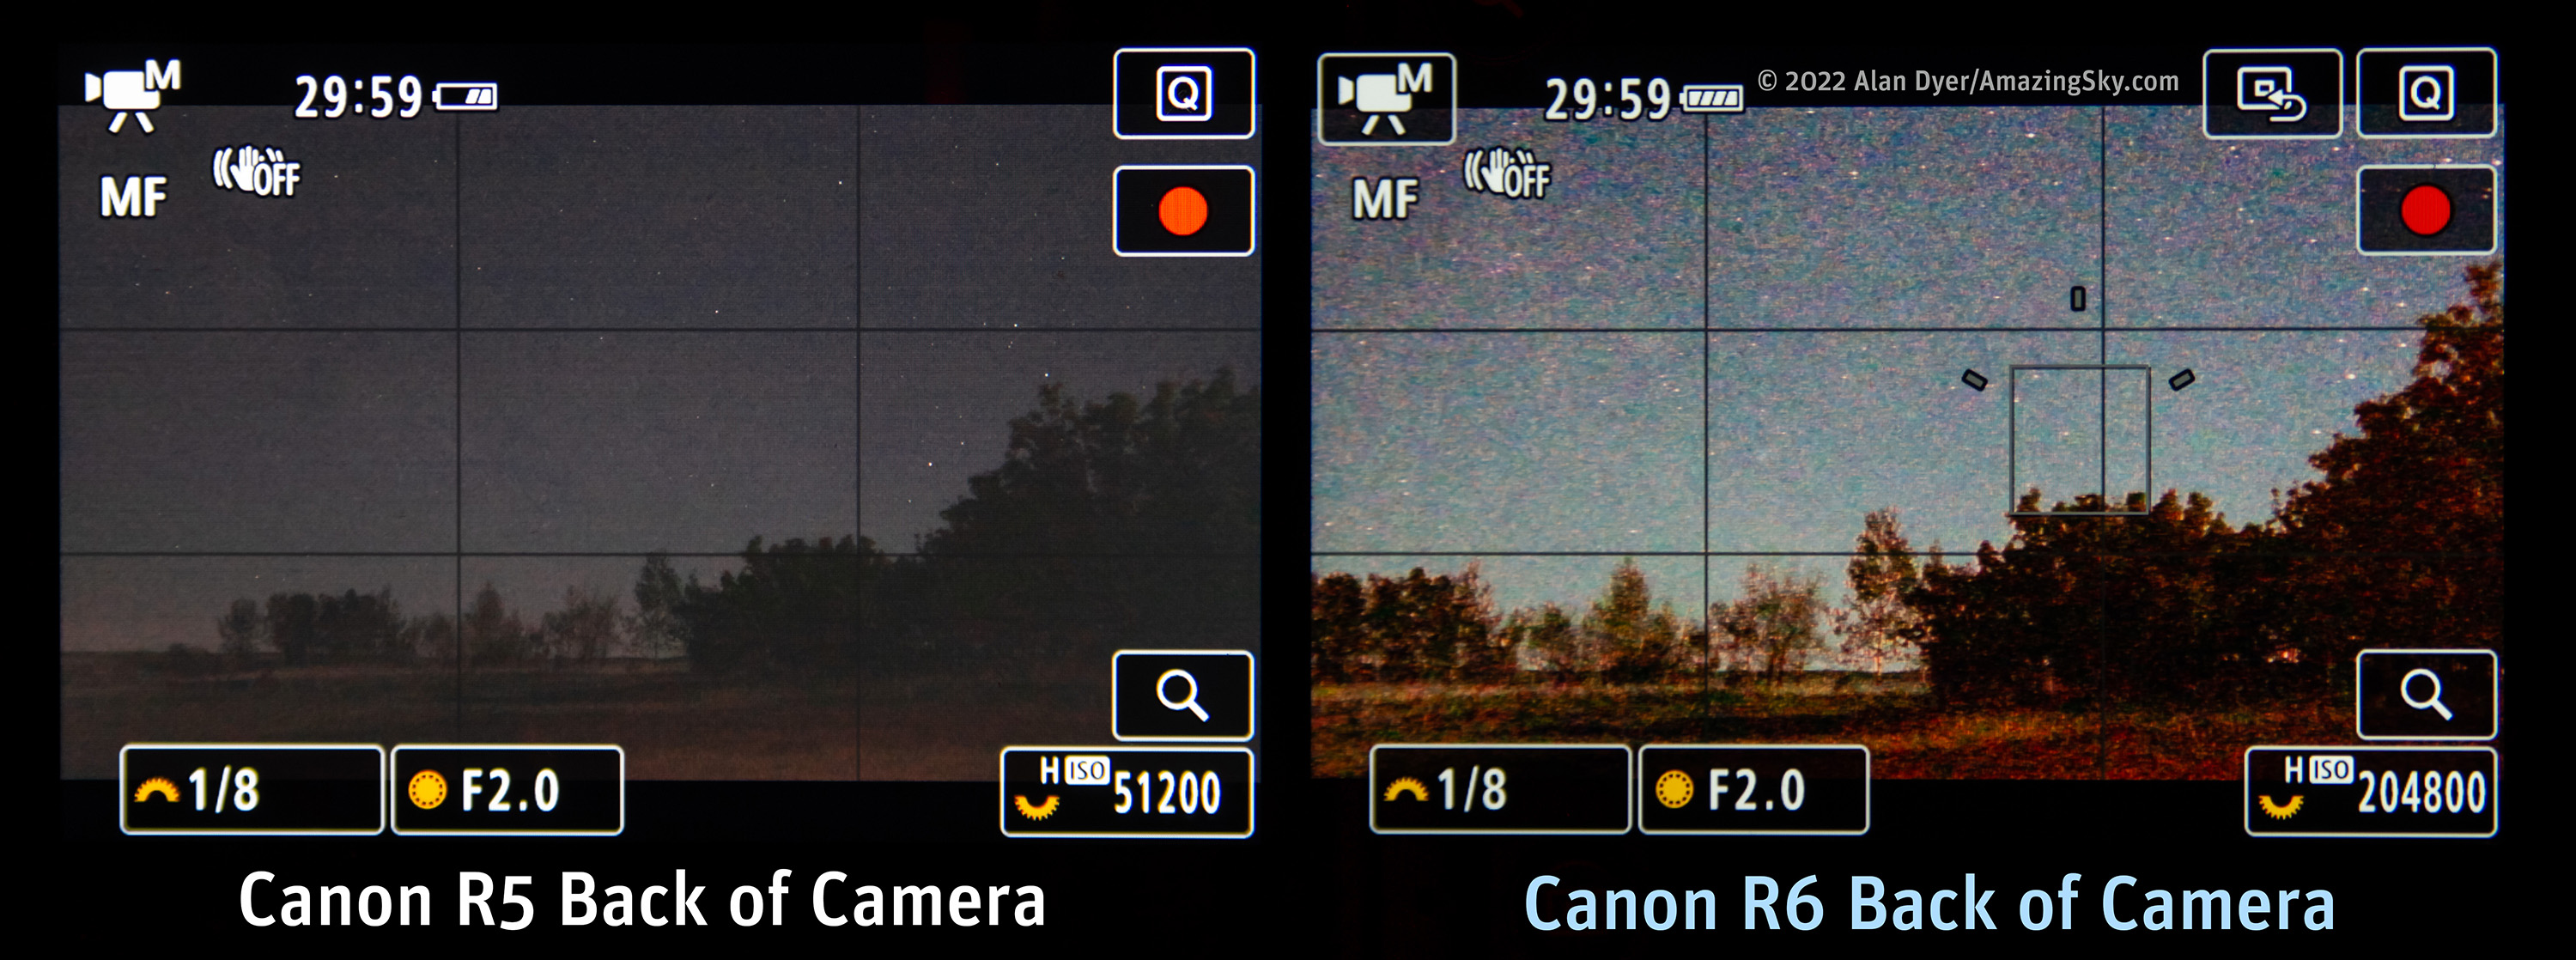
The R5 certainly presents a good live view image. However, it is not as bright nor as detailed as what the R6 can provide when placed in its Movie mode and with the ISO bumped up to the R6’s highest level of ISO 204,800, where the Milky Way shows up, live!
The R5 only goes as high as ISO 51,200, and so as I expected it does not provide as bright or detailed a preview at night as the R6 can. However, the R5 is better than the original R for live-view framing, and better than any Canon DSLR I’ve used.
LIVE VIEW FOCUSING
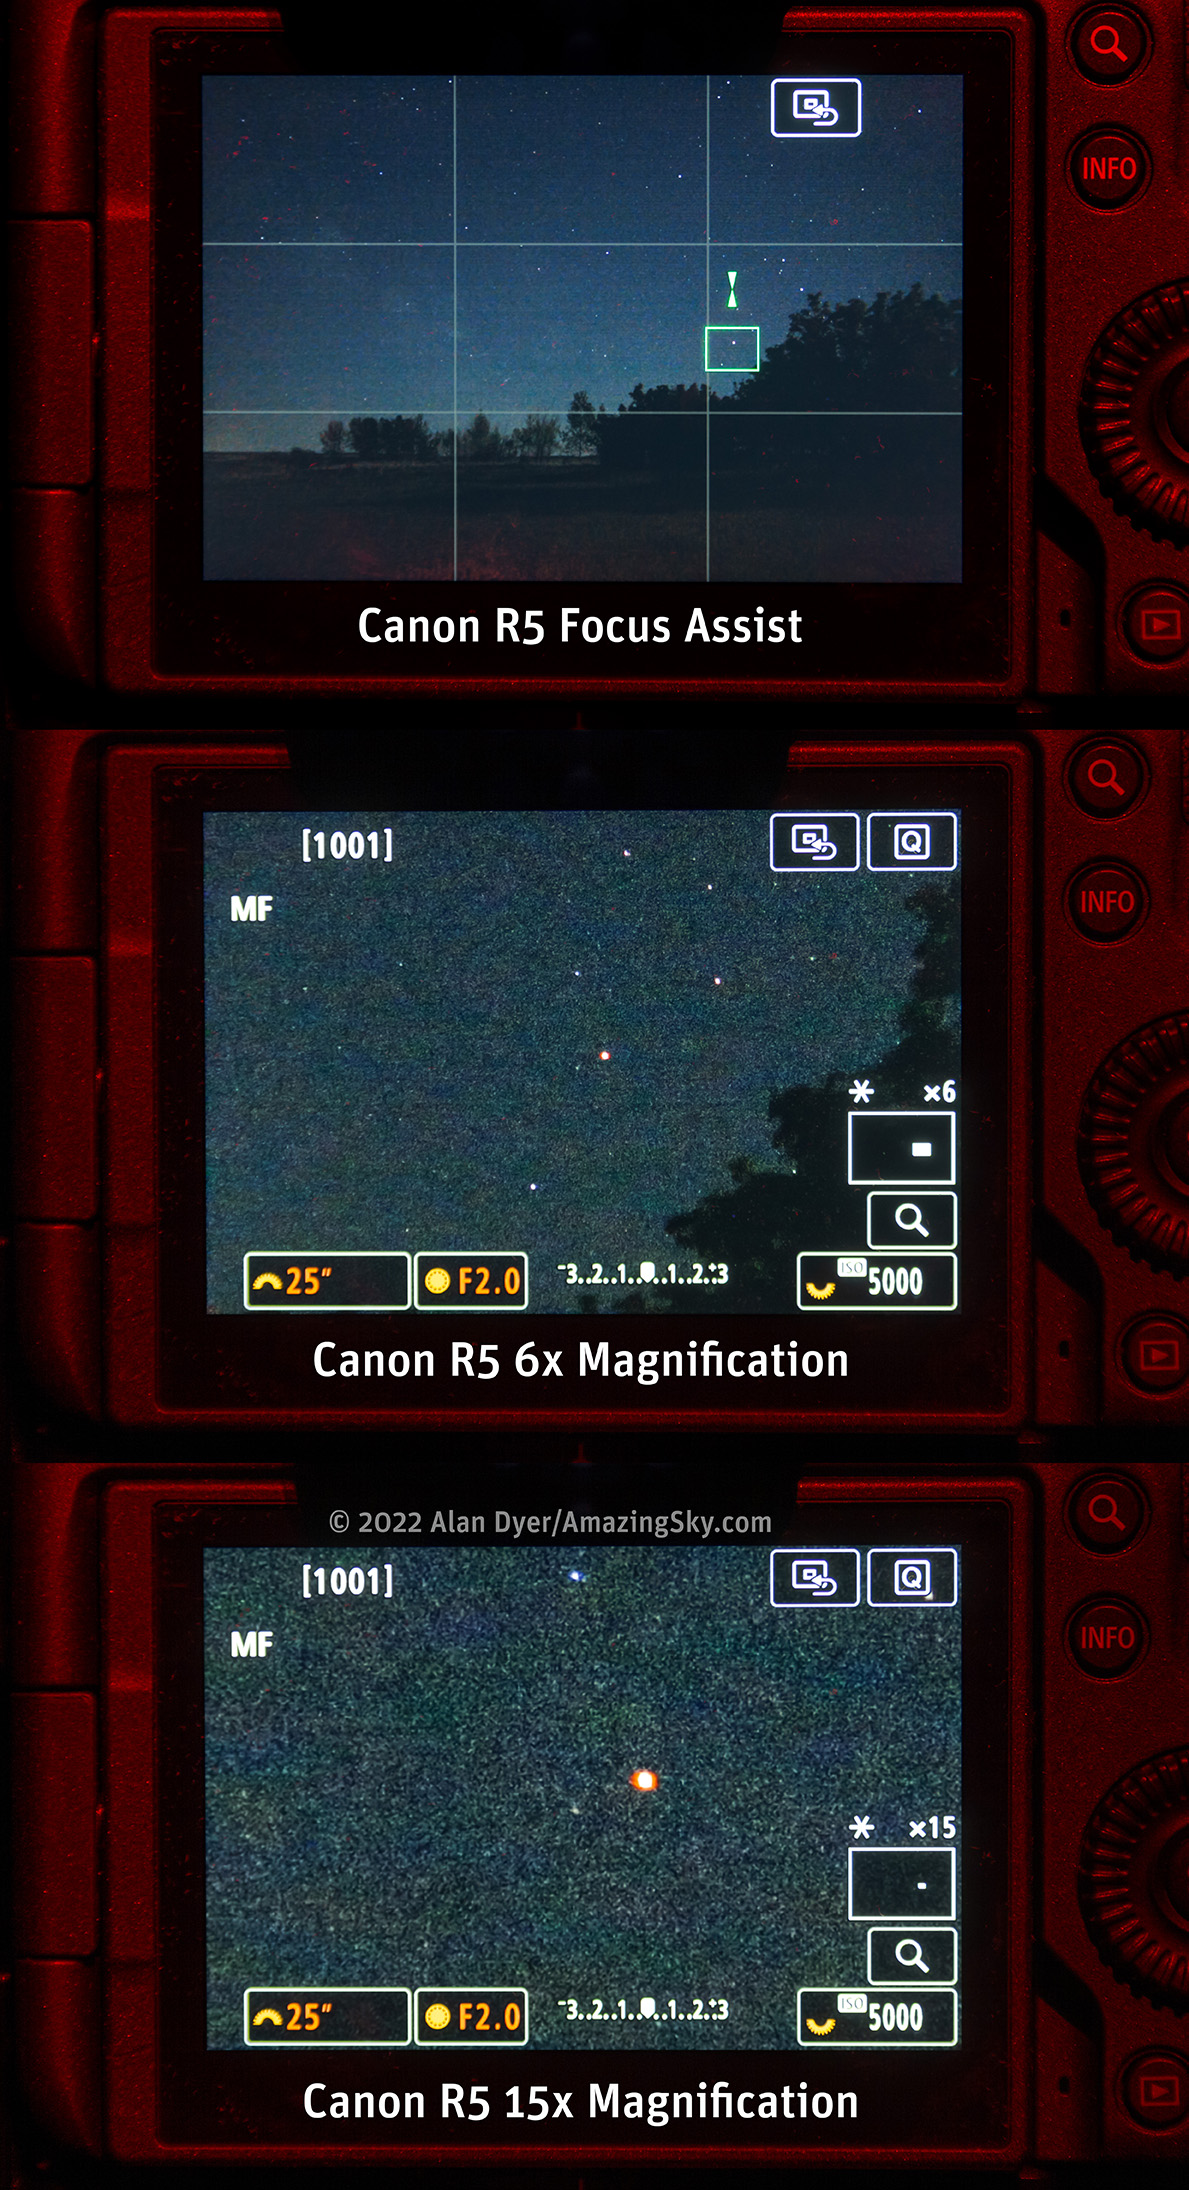
Like the R6, the R5 can autofocus accurately on bright stars and planets. By comparison, while the Ra can autofocus on distant bright lights, it fails on bright stars or planets.
Turning on Focus Peaking makes stars turn red, yellow or blue (your choice of colours) when they are in focus, as a reassuring confirmation.

In manual focus, an additional Focus Aid overlay, also found in the R6, provides arrows that close up and turn green when in focus on a bright star or planet.
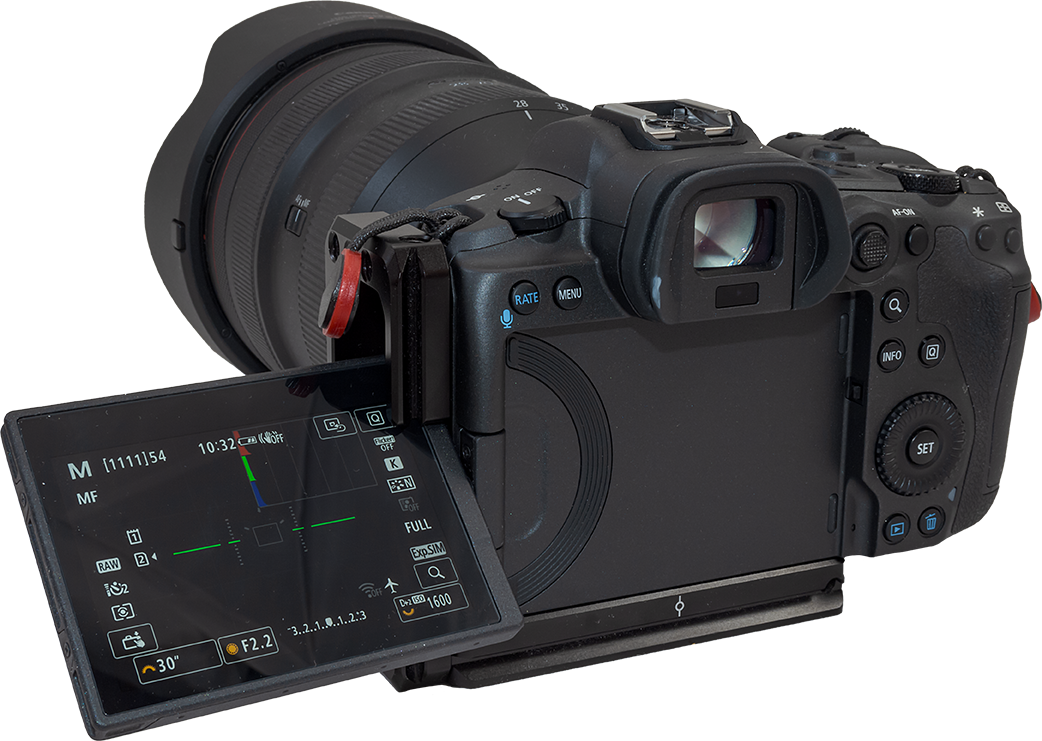
Or, as shown above, you can zoom in by 6x or 15x to focus by eye the old way by examining the star image. These are magnification levels higher than the 5x and 10x of the R6 and most other Canon cameras, and are a great aid to precise focusing, necessary to make full use of the R5’s high resolution, and the sharpness of Canon’s RF lenses. The 15x still falls short of the Ra’s 30x for ultra-precise focusing on stars, but it’s a welcome improvement nonetheless.
In all, while the R5 is not as good as the R6 for framing in low light, it is better for precise manual focusing using its higher 15x magnification.
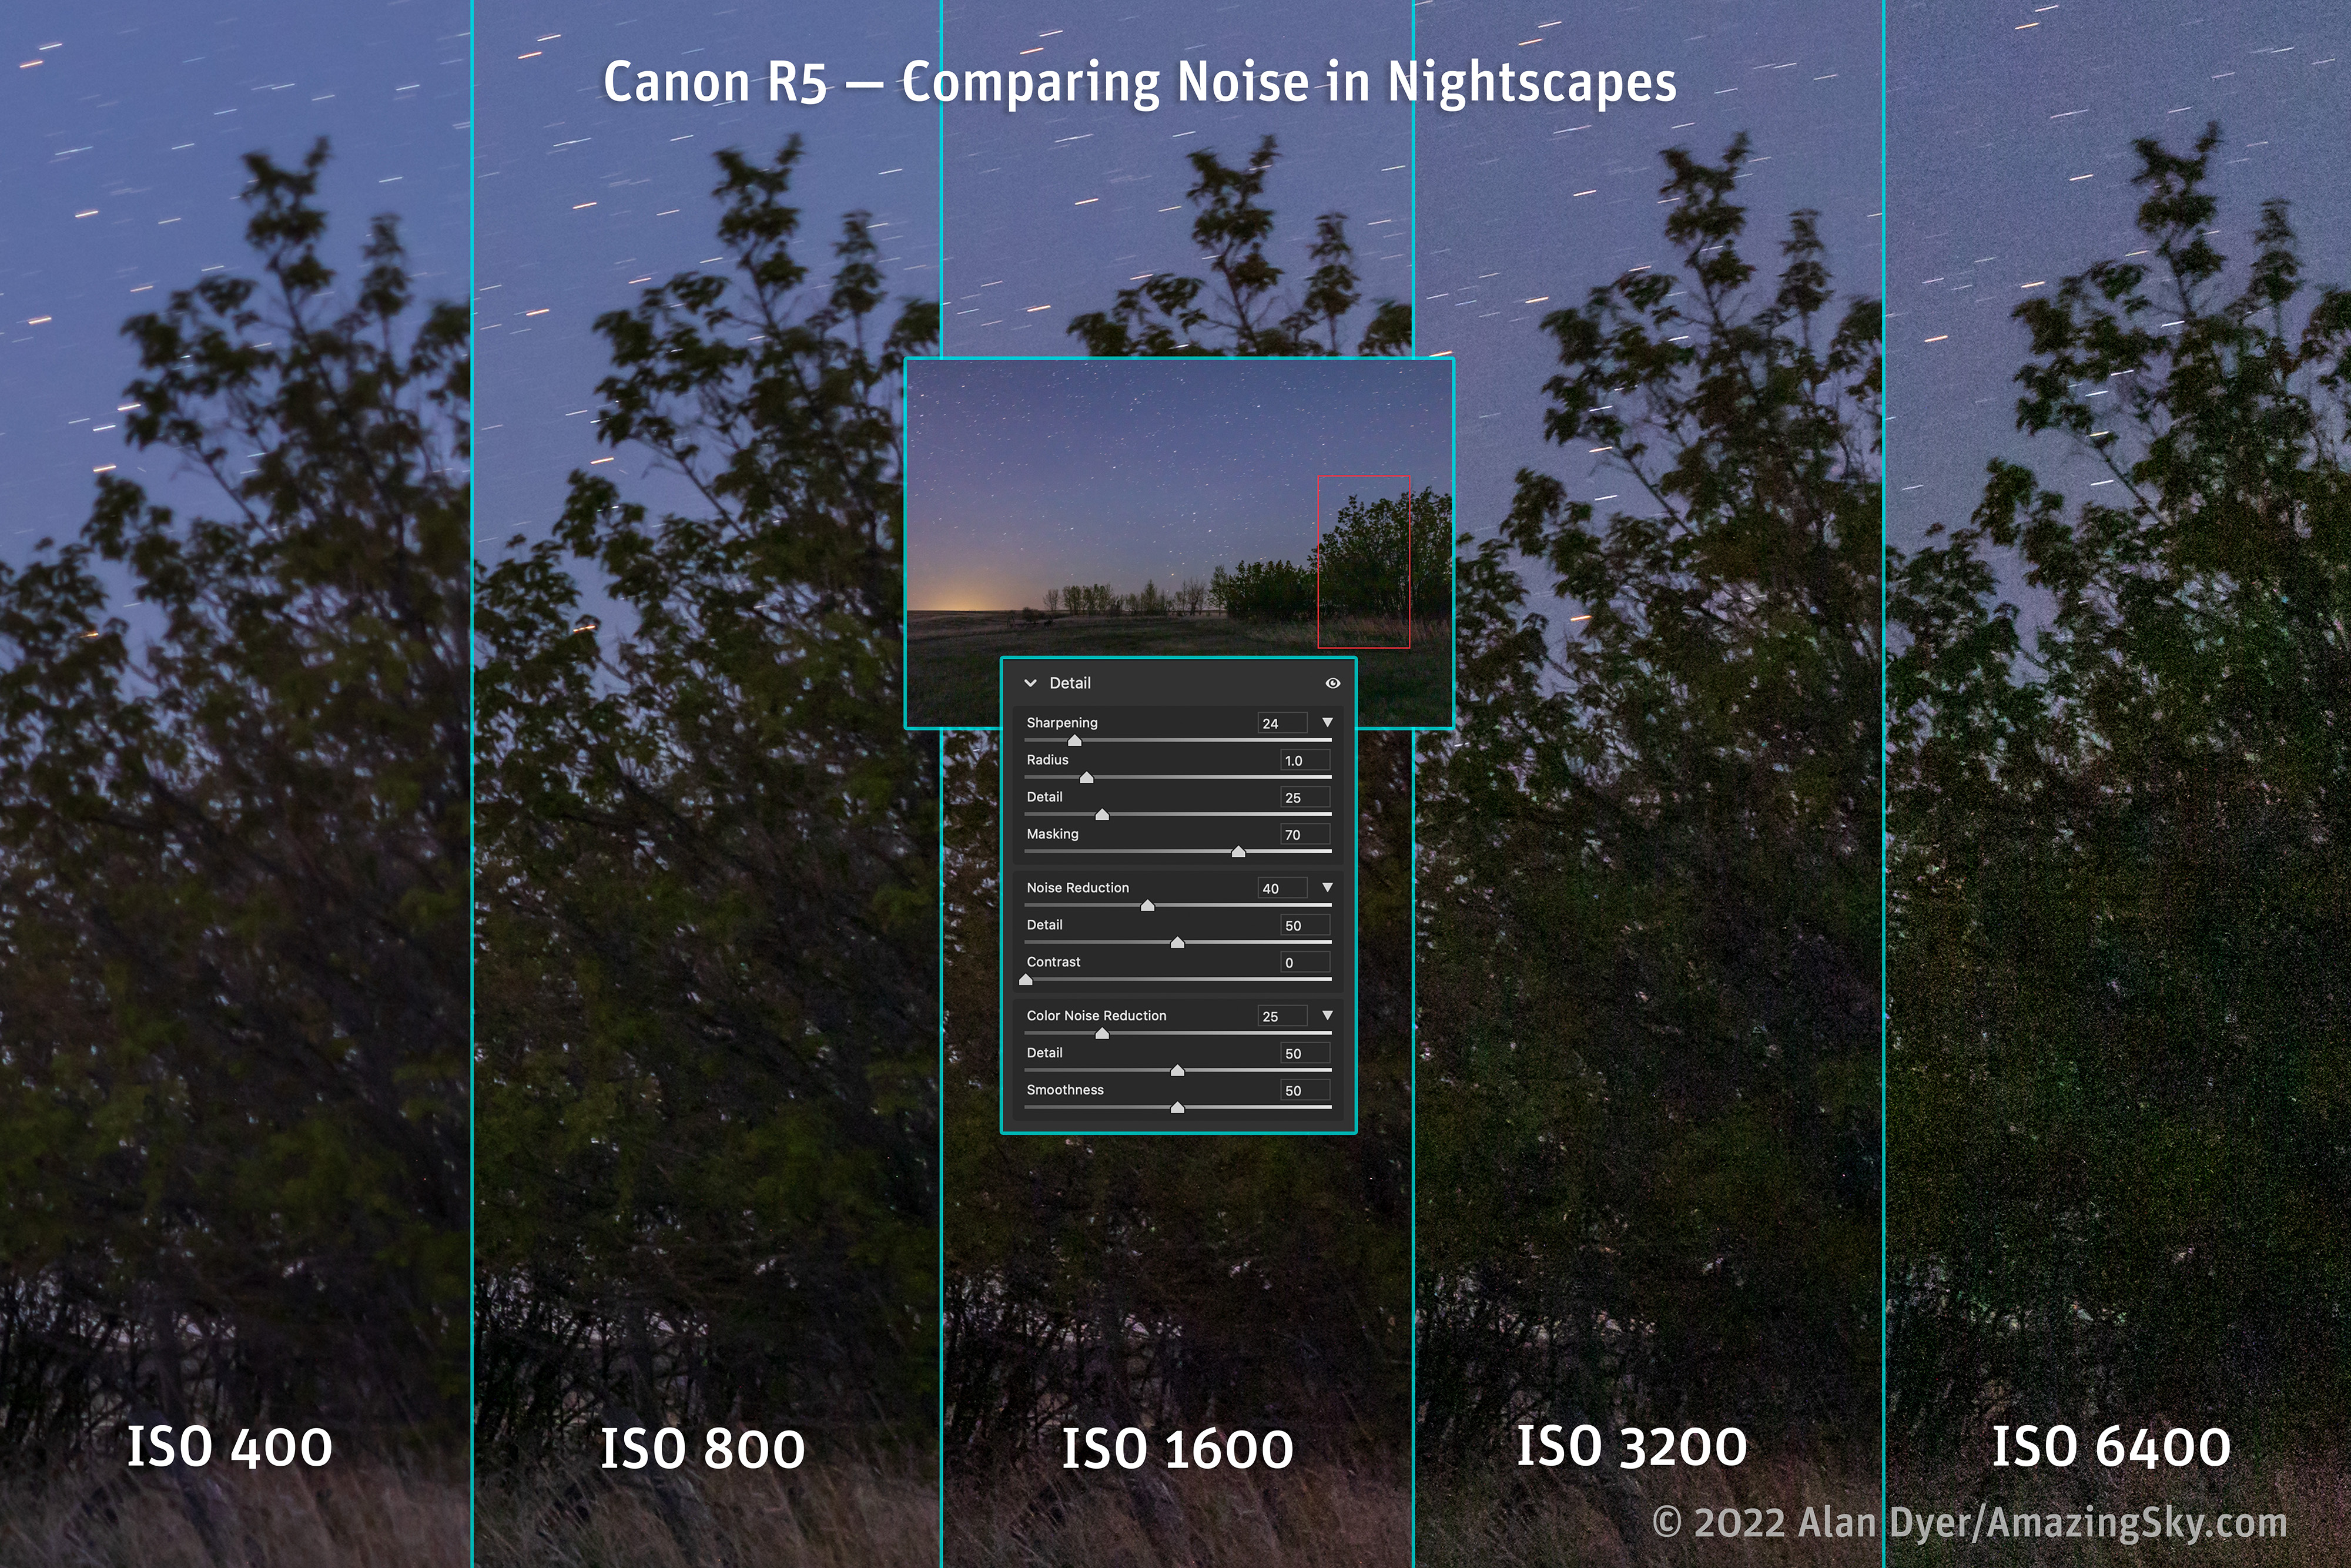
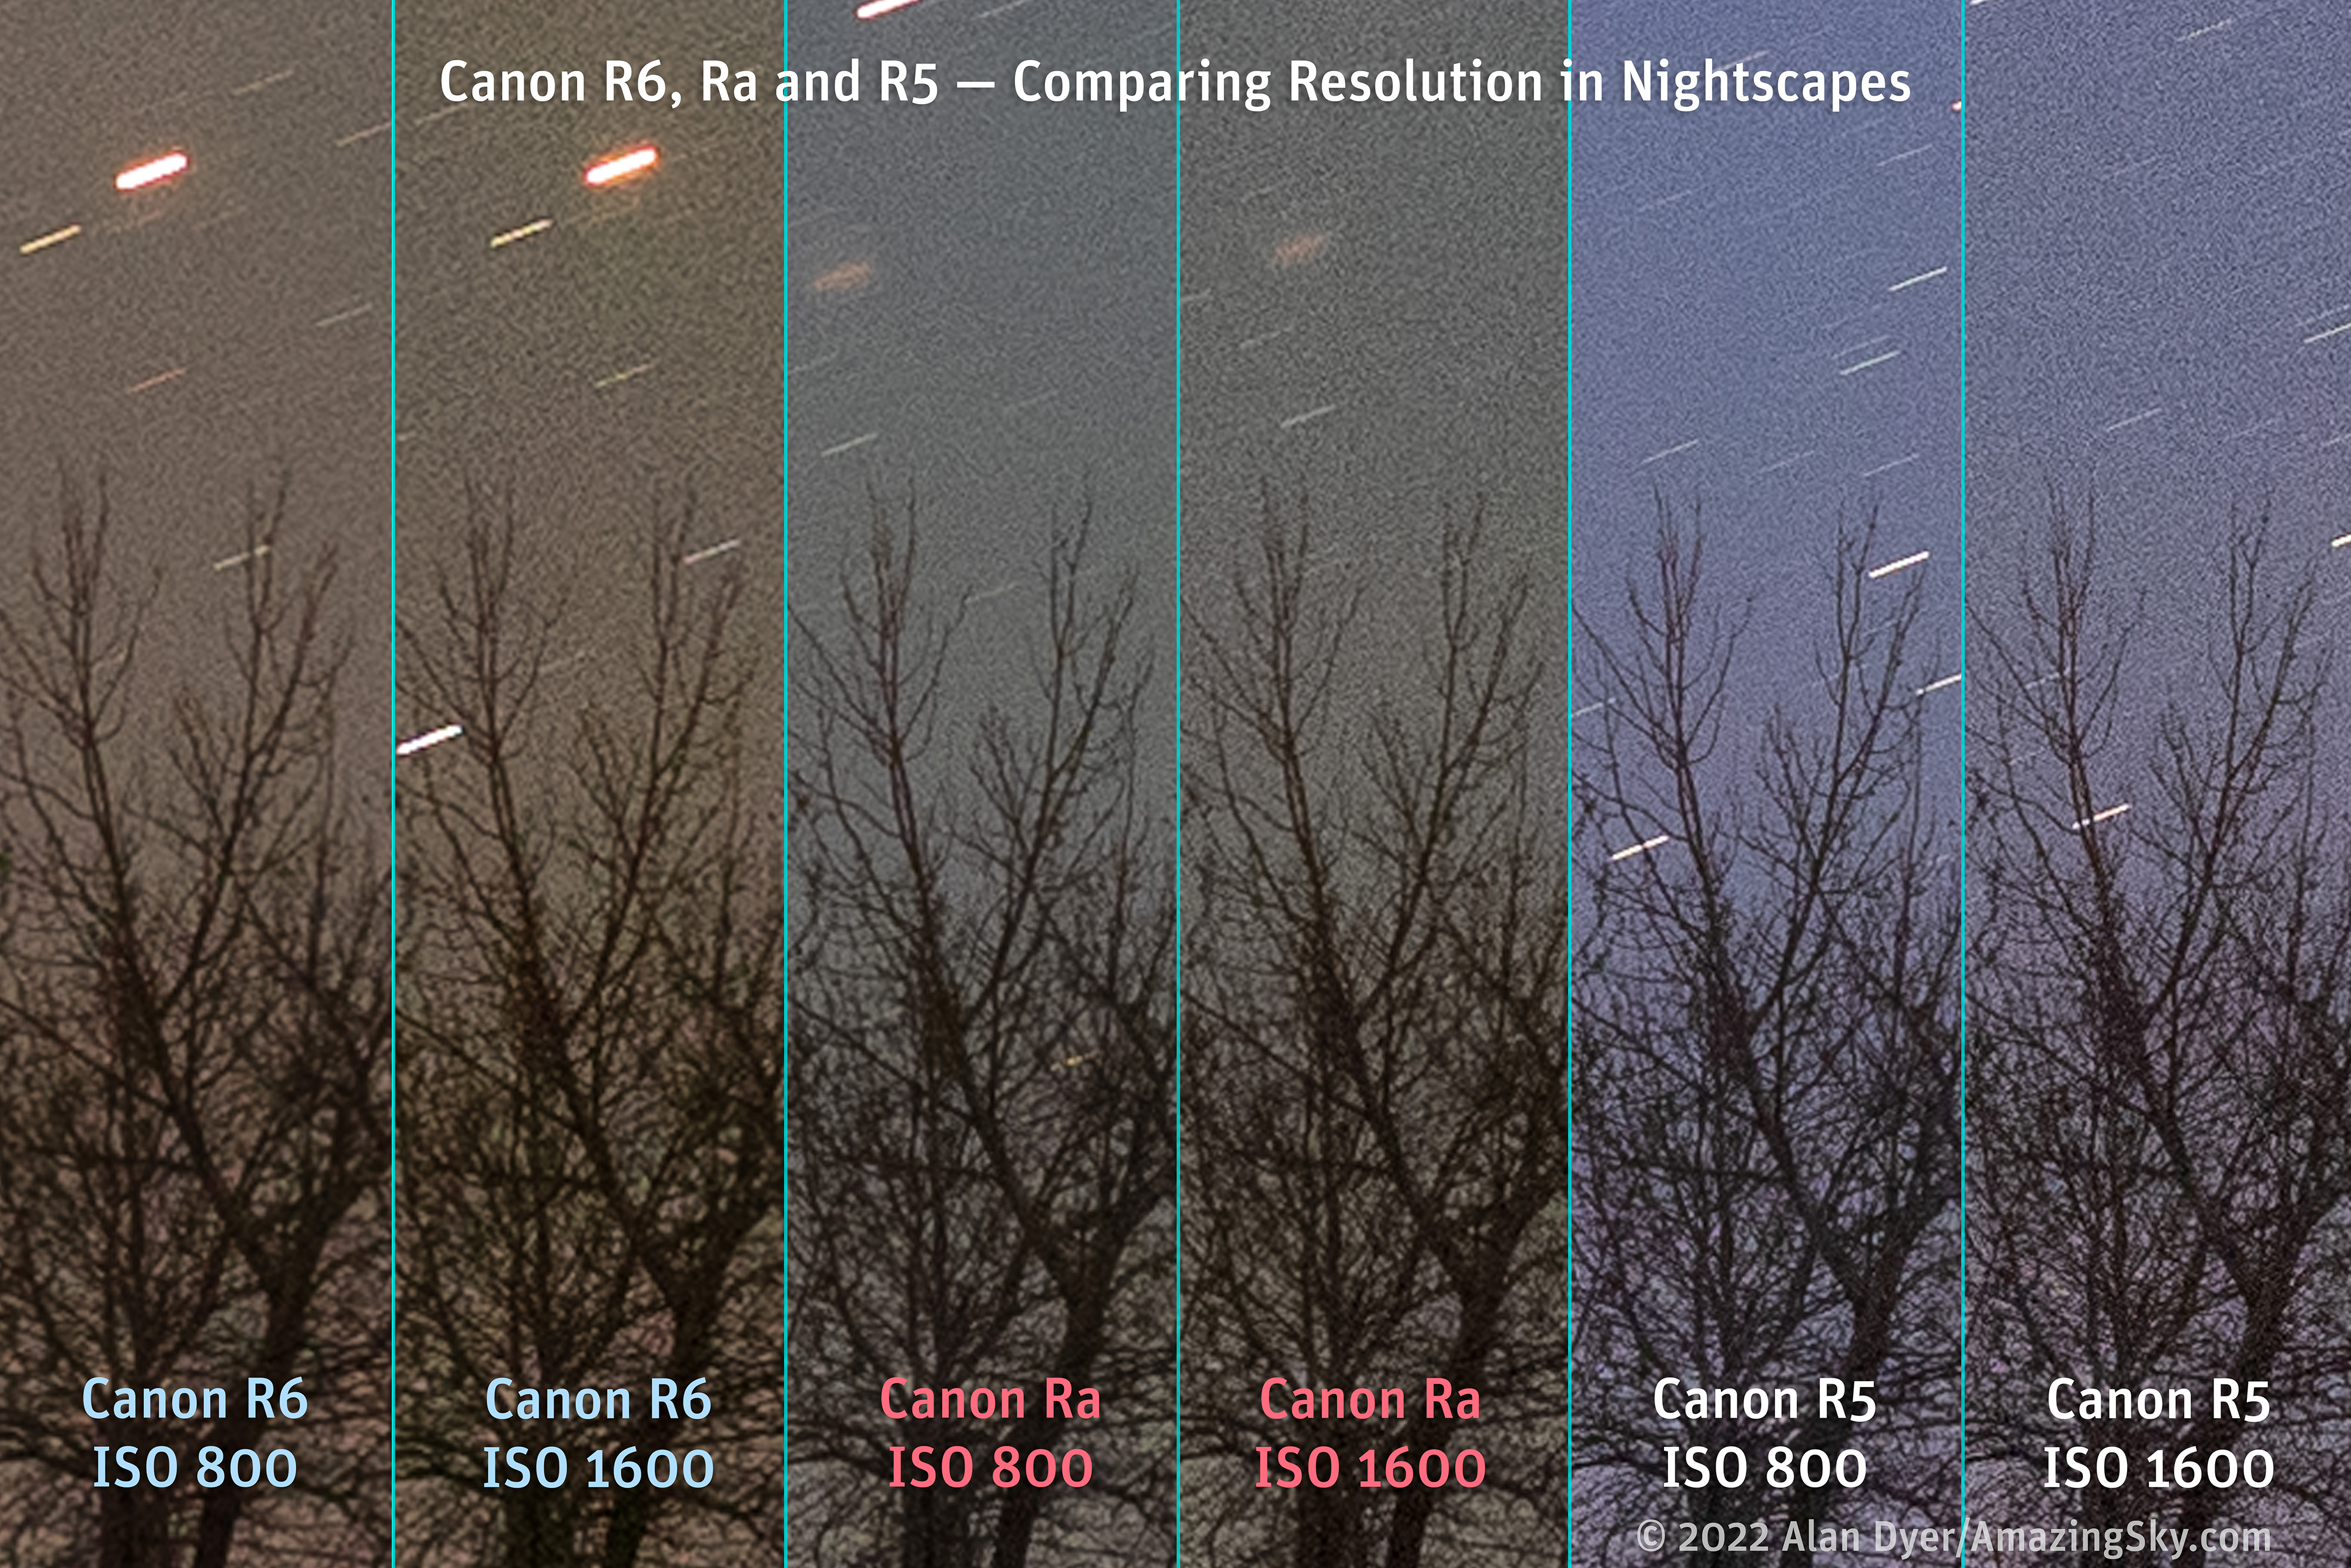
NOISE PERFORMANCE — NIGHTSCAPES
The key camera characteristic for astrophoto use is noise. There is no point in having lots of resolution if, at the high ISOs we use for most astrophotography, the detail is lost in noise. But I was pleasantly surprised that proved not to be the case with the R5.
As I show below, noise is well controlled, making the R5 usable for nightscapes at ISOs up to 3200, if not 6400 when needed in a pinch.
With 45 megapixels, at the upper end of what cameras offer today, the R5 has individual pixels, or more correctly “photosites,” that are each 4.4 microns in size, the “pixel pitch.”
This is still larger than the 3.7-micron pixels in a typical 24-megapixel cropped-frame camera like the Canon R10, or the 3.2-micron pixels found in a 32-megapixel cropped-frame camera like the Canon R7. Both are likely to be noisier than the R5, though will provide even higher resolution, as well as greater magnification with any given lens or telescope.
By comparison, the 30-megapixel full-frame R (and Ra) has a pixel pitch of 5.4 microns, while the 20-megapixel R6’s pixel pitch is a generous 6.6 microns. Only the 12-megapixel Sony a7SIII has larger 8.5-micron pixels, making it the low-light video champ.
The bigger the photosites (i.e. the larger the pixel pitch), the more photons each photosite can collect in a given amount of time – and the more photons they can collect, period, before they overfill and clip highlights. More photons equals more signal, and therefore a better signal-to-noise ratio, while the greater “full-well depth” yields higher dynamic range.
However, each generation of camera improves the signal-to-noise ratio by suppressing noise via its sensor design and improved signal processing hardware and firmware. The R5 and R6 each use Canon’s latest DIGIC X processor.

In nightscapes the R5 did show more noise at high ISOs, especially at ISO 6400, than the R6 and Ra, but the difference was not large, perhaps one stop at most, if that. What was noticeable was the presence in the R5 of more hot pixels from thermal noise, as described later.
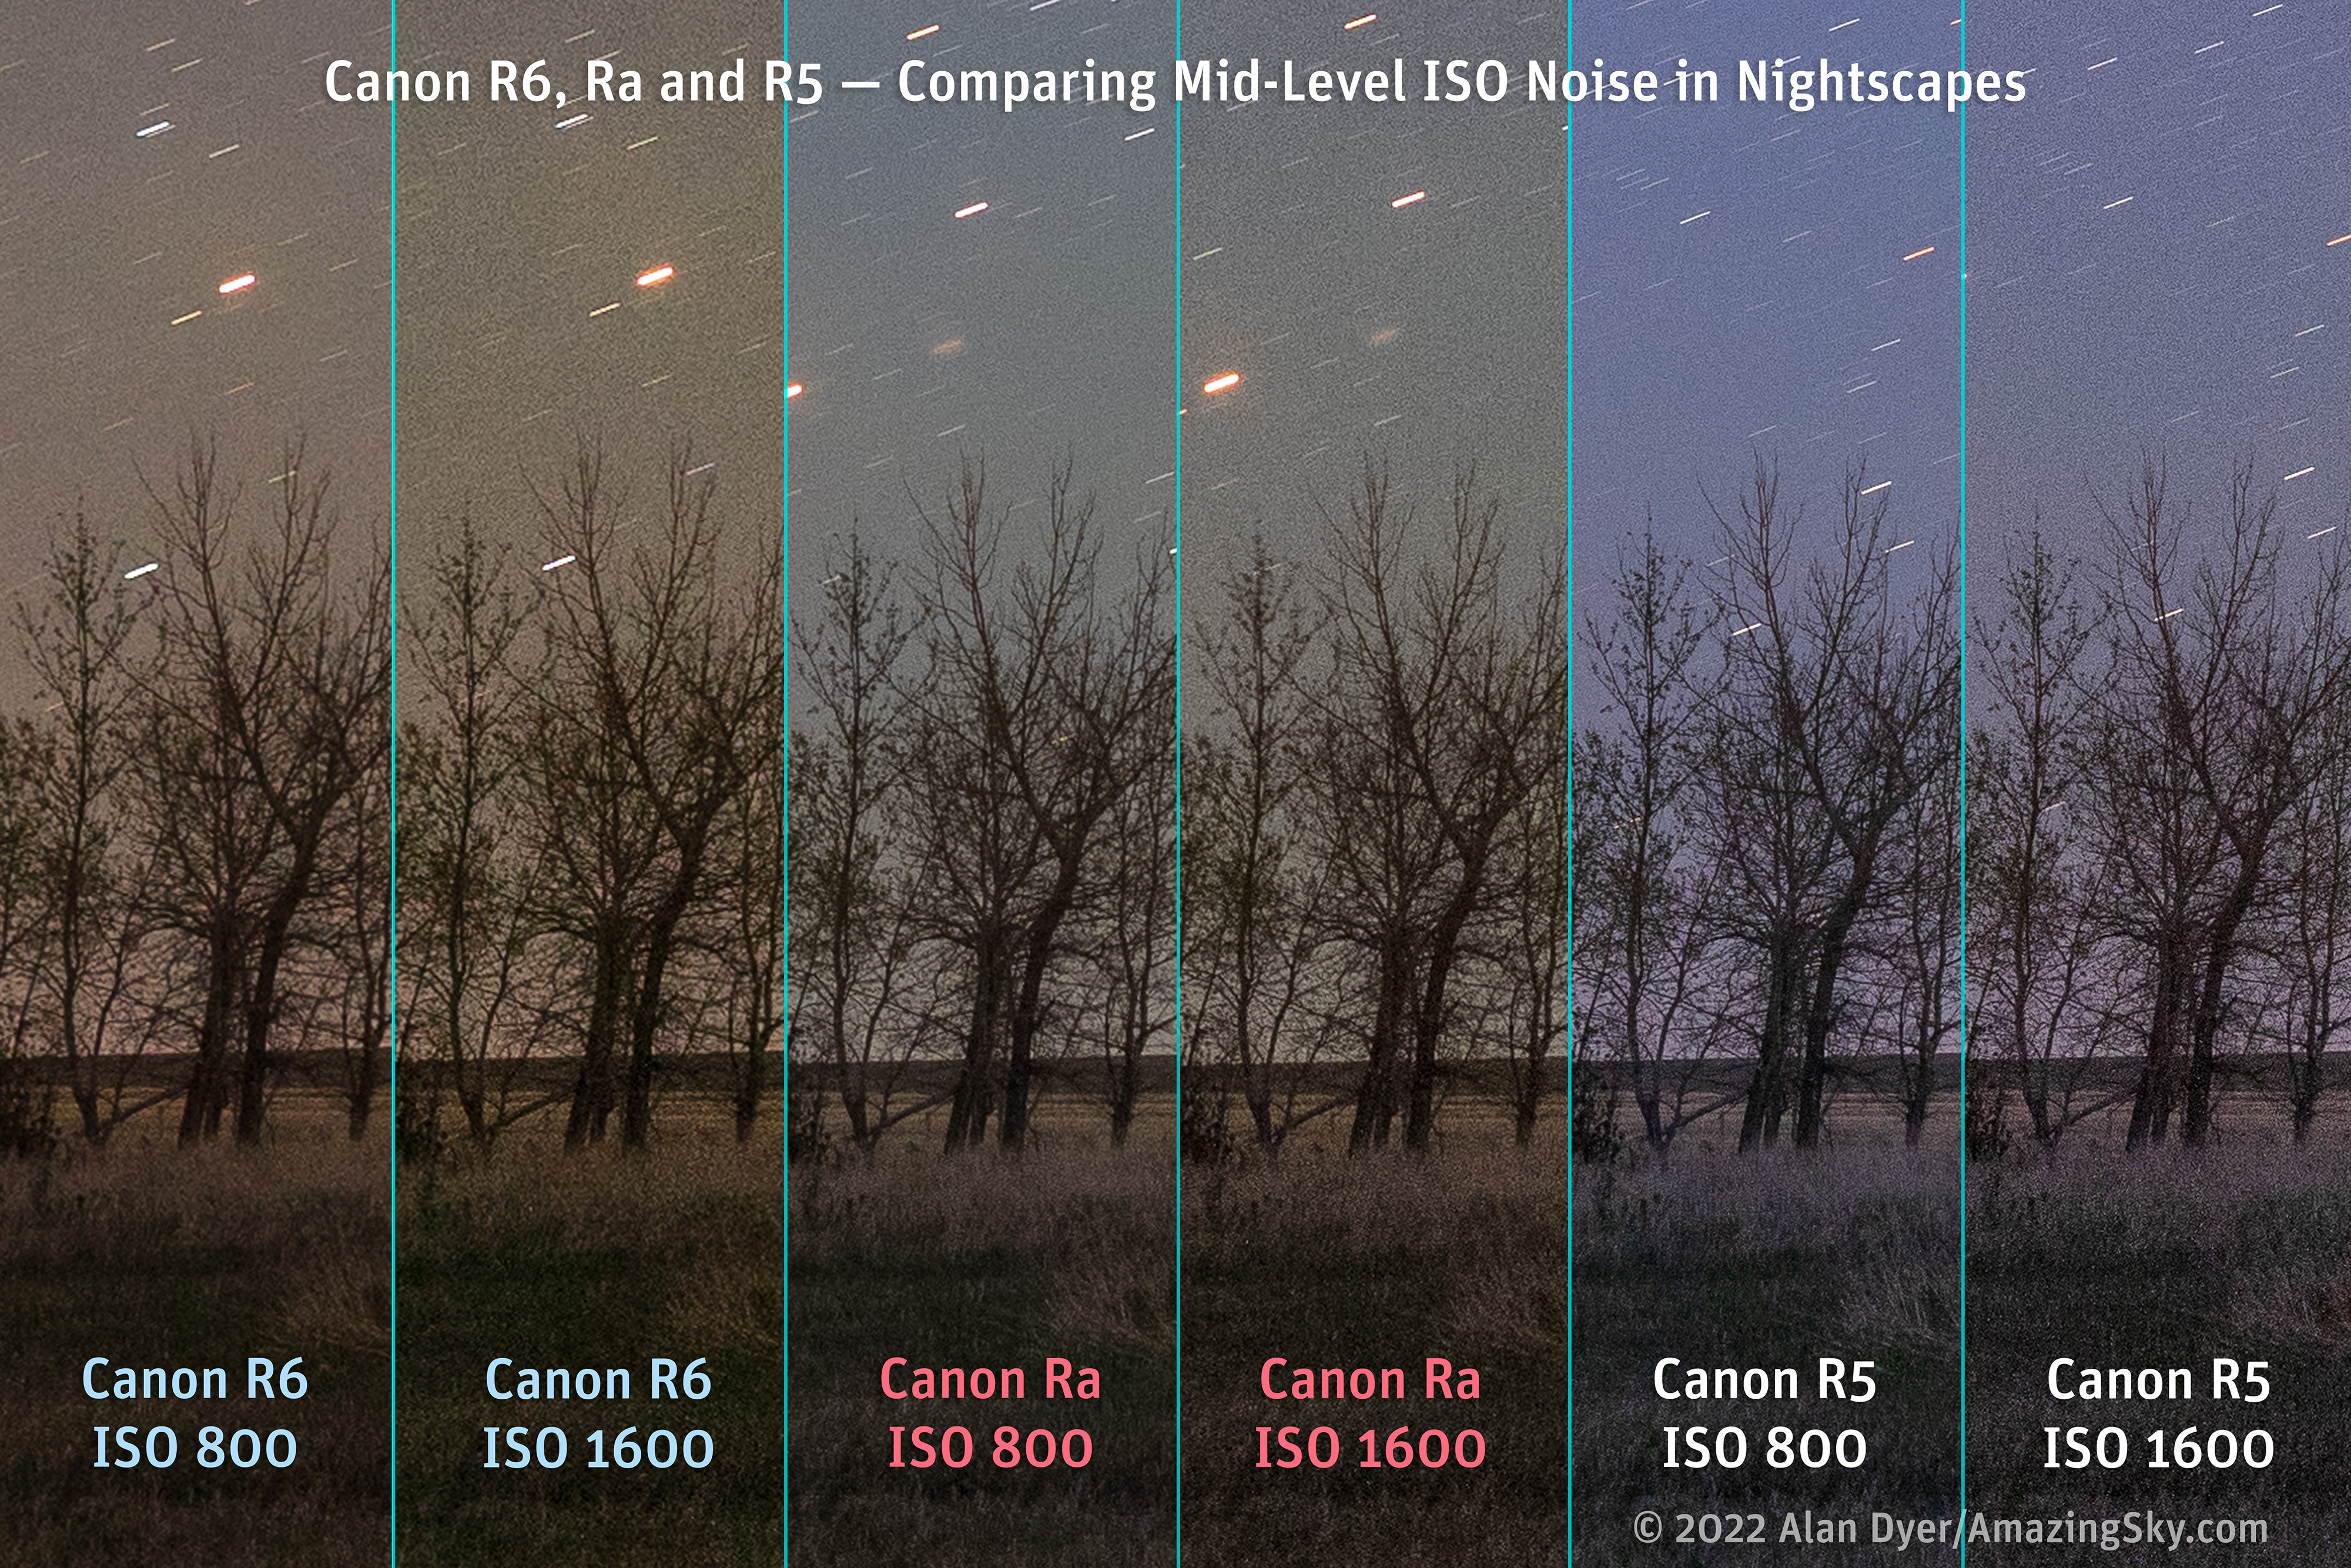
At slower ISOs the R5 showed a similar level of noise as the R6 and Ra, but a finer-grained noise than the R6, in keeping with the R5’s smaller pixels. In this test set, the R5 did not exhibit noticeably more noise than the other two cameras. This was surprising.
NOTE: In these comparisons I have not resampled the R5 images down to the megapixel count of the R6 to equalize them, as that’s not what you would do if you bought an R5. Instead, I have magnified the R6 and Ra’s smaller images so we examine the same area of each camera’s images.
As with the R6, I also saw no “magic ISO” setting where the R5 performed better than at other settings. Noise increased in proportion to the ISO speed. The R5 proved perfectly usable up to ISO 3200, with ISO 6400 acceptable for stills when necessary. But I would not recommend the R5 for those who like to shoot Milky Way scenes at ISO 12,800.
For nightscapes, a good practice that would allow using lower ISO speeds would be to shoot the sky images with a star tracker, then take separate long untracked exposures for the ground.
NOTE: In my testing I look first and foremost at actual real-world results. For those interested in more technical tests and charts, I refer you to DxOMark’s report on the Canon R5.
NOISE PERFORMANCE — DEEP-SKY
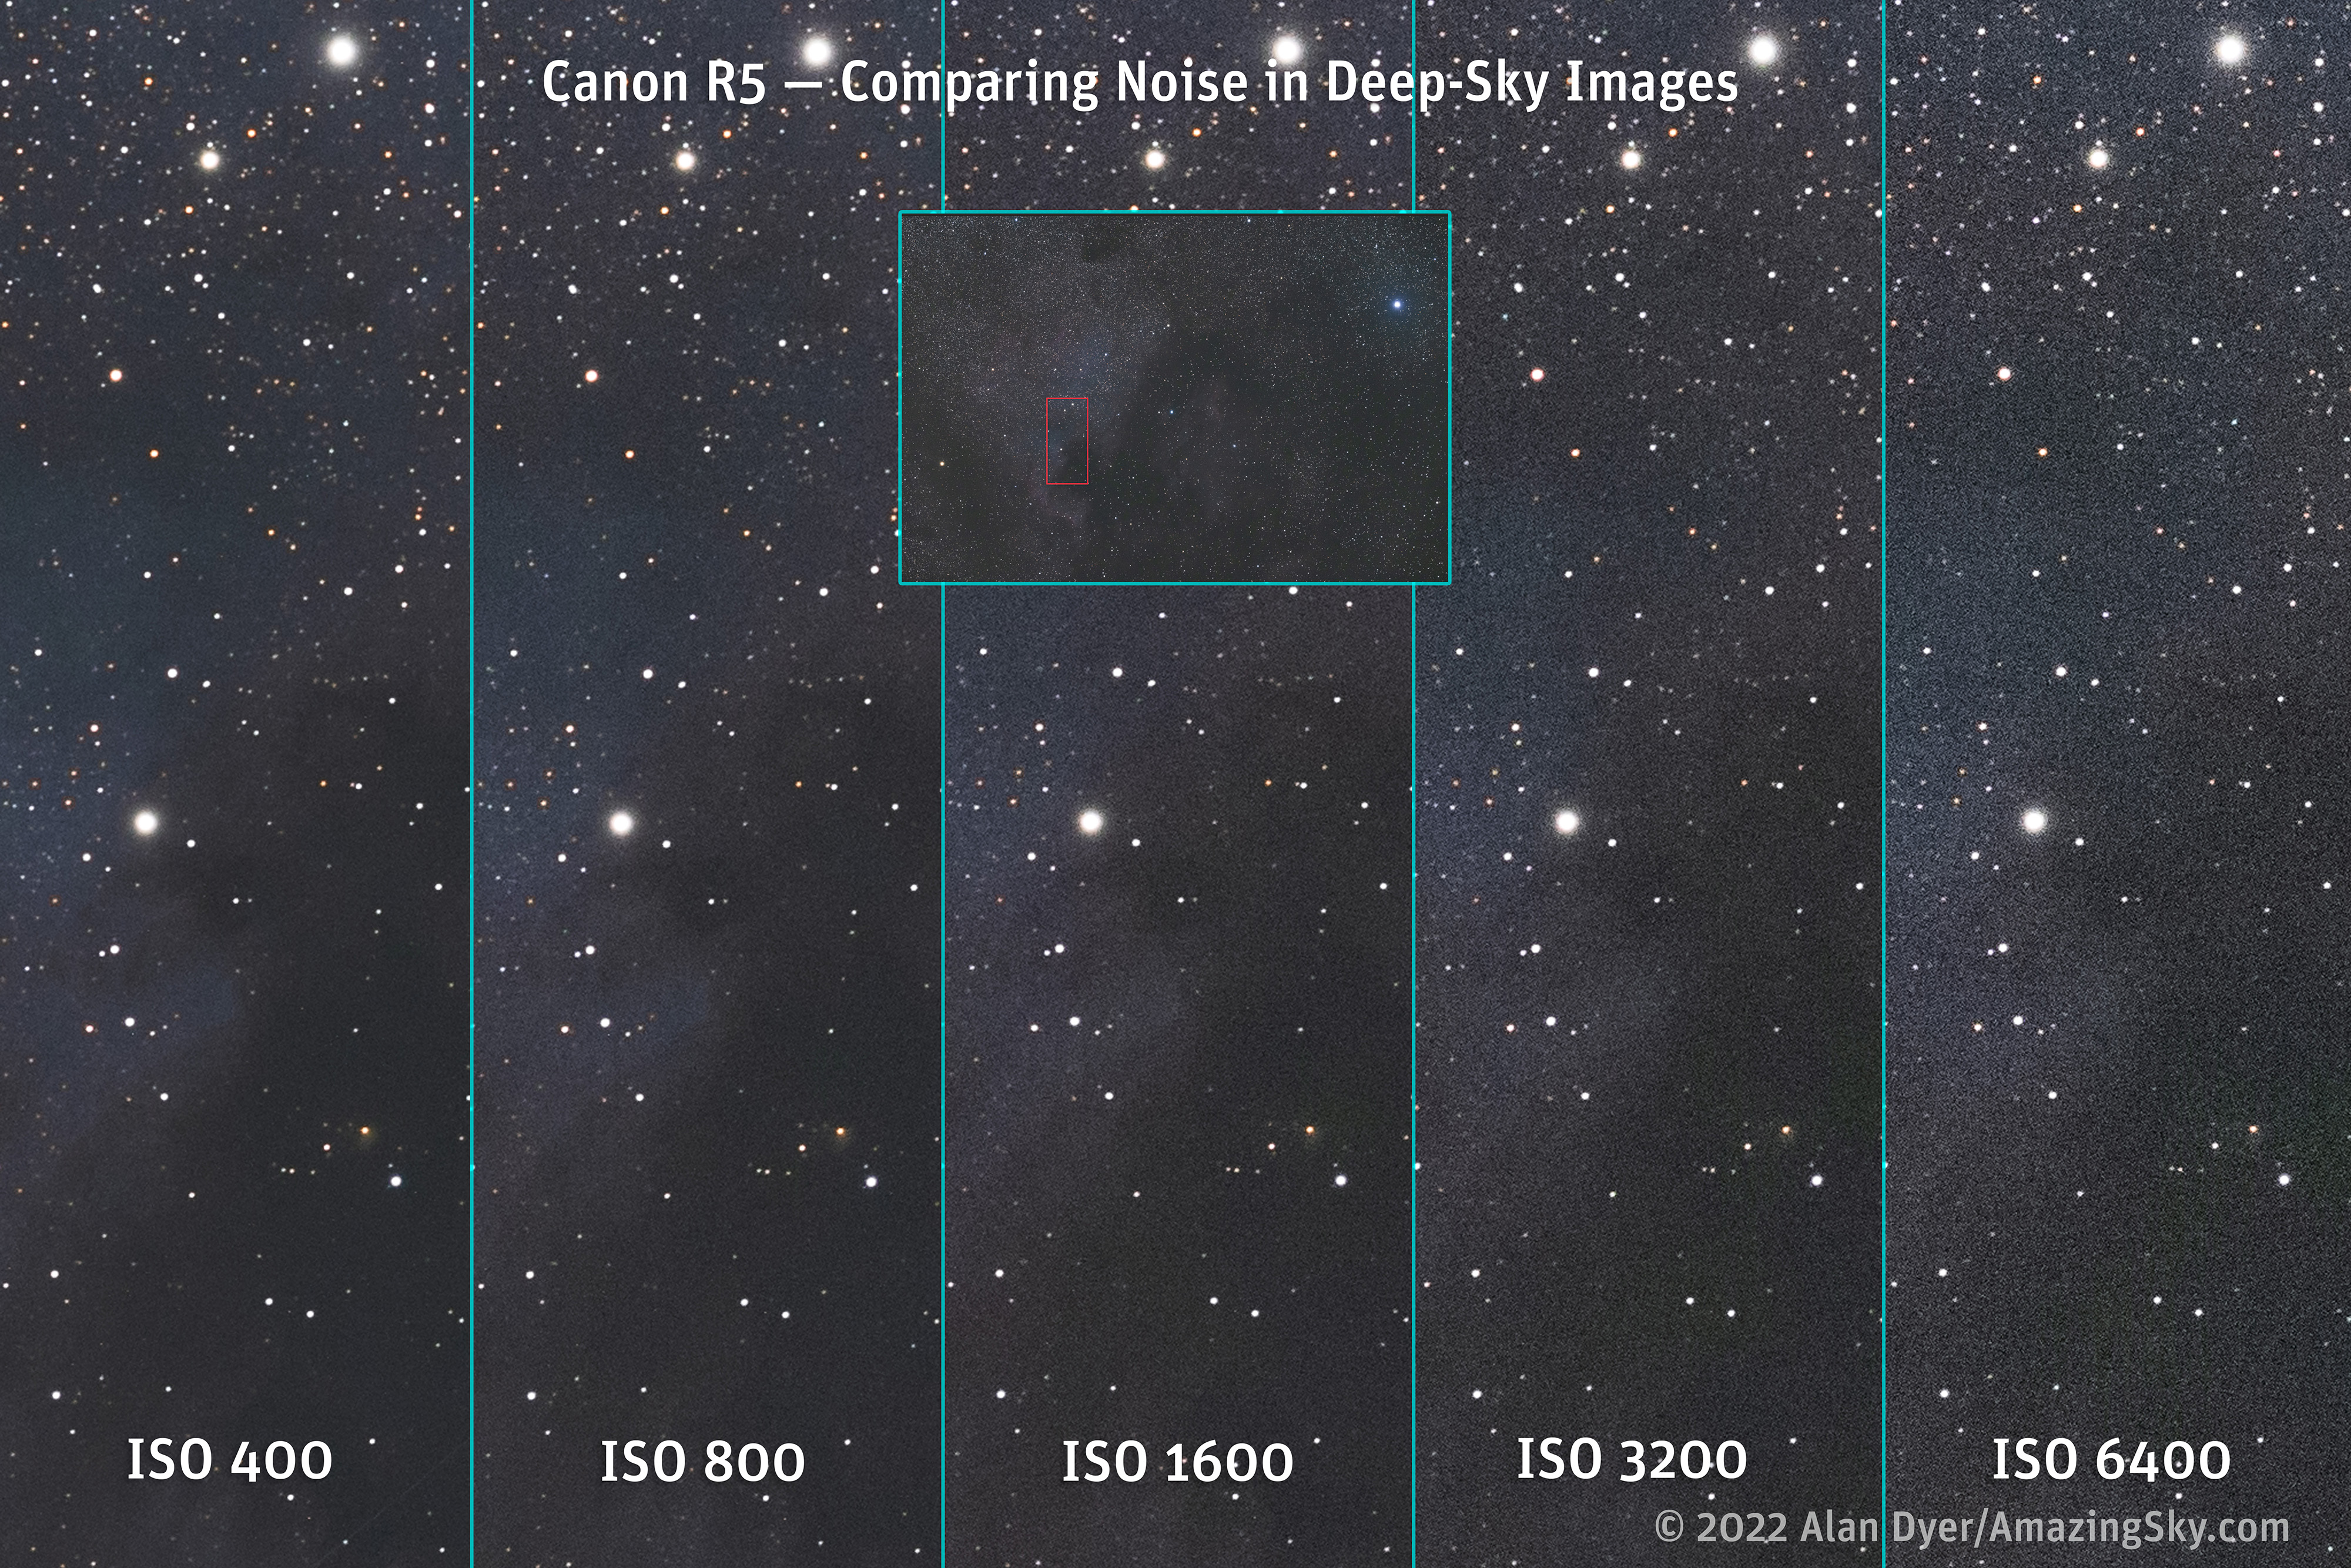
Deep-sky imaging with a tracking mount is more demanding, due to its longer exposures of up to several minutes for each “sub-frame.”
On a series of deep-sky exposures through a telescope, above, the R5 again showed quite usable images up to ISO 1600 and 3200, with ISO 6400 a little too noisy in my opinion unless a lot of noise reduction was applied or many images were shot to stack later.

As with the nightscape set, at high ISOs, such as at ISO 6400, the R5 did show more noise than the R6 and Ra, as well as more colour splotchiness in the dark sky, and lower contrast. The lower dynamic range of the R5’s smaller pixels is evident here.
Just as with nightscapes, the lesson with the R5 is to keep the ISO low if at all possible. That means longer exposures with good auto-guiding, but that’s a best practice with any camera.

At lower ISOs that provide better dynamic range, shown above, the difference in noise levels between the three cameras was not that obvious. Each camera presented very similar images, with the R6 having a coarser noise than the Ra and R5.
In all, I was surprised the R5 performed as well as it did for deep-sky imaging. See my comments below about its resolution advantage.
ISO INVARIANCY
The flaw in many Canon DSLRs, one documented in my 2017 review of the 6D Mark II, was their poor dynamic range due to the lack of an ISO invariant sensor design.
Canon R-series mirrorless cameras have largely addressed this weakness. As with the R and R6, the sensor in the R5 appears to be nicely ISO invariant.
Where ISO invariancy shows itself to advantage is on nightscapes where the starlit foreground is often dark and underexposed. Bringing out detail in the shadows in raw files requires a lot of Shadow Recovery or increasing the Exposure slider. Images from an ISO invariant sensor can withstand the brightening “in post” far better, with minimal noise increase or degradations such as a loss of contrast, added banding, or horrible discolourations.
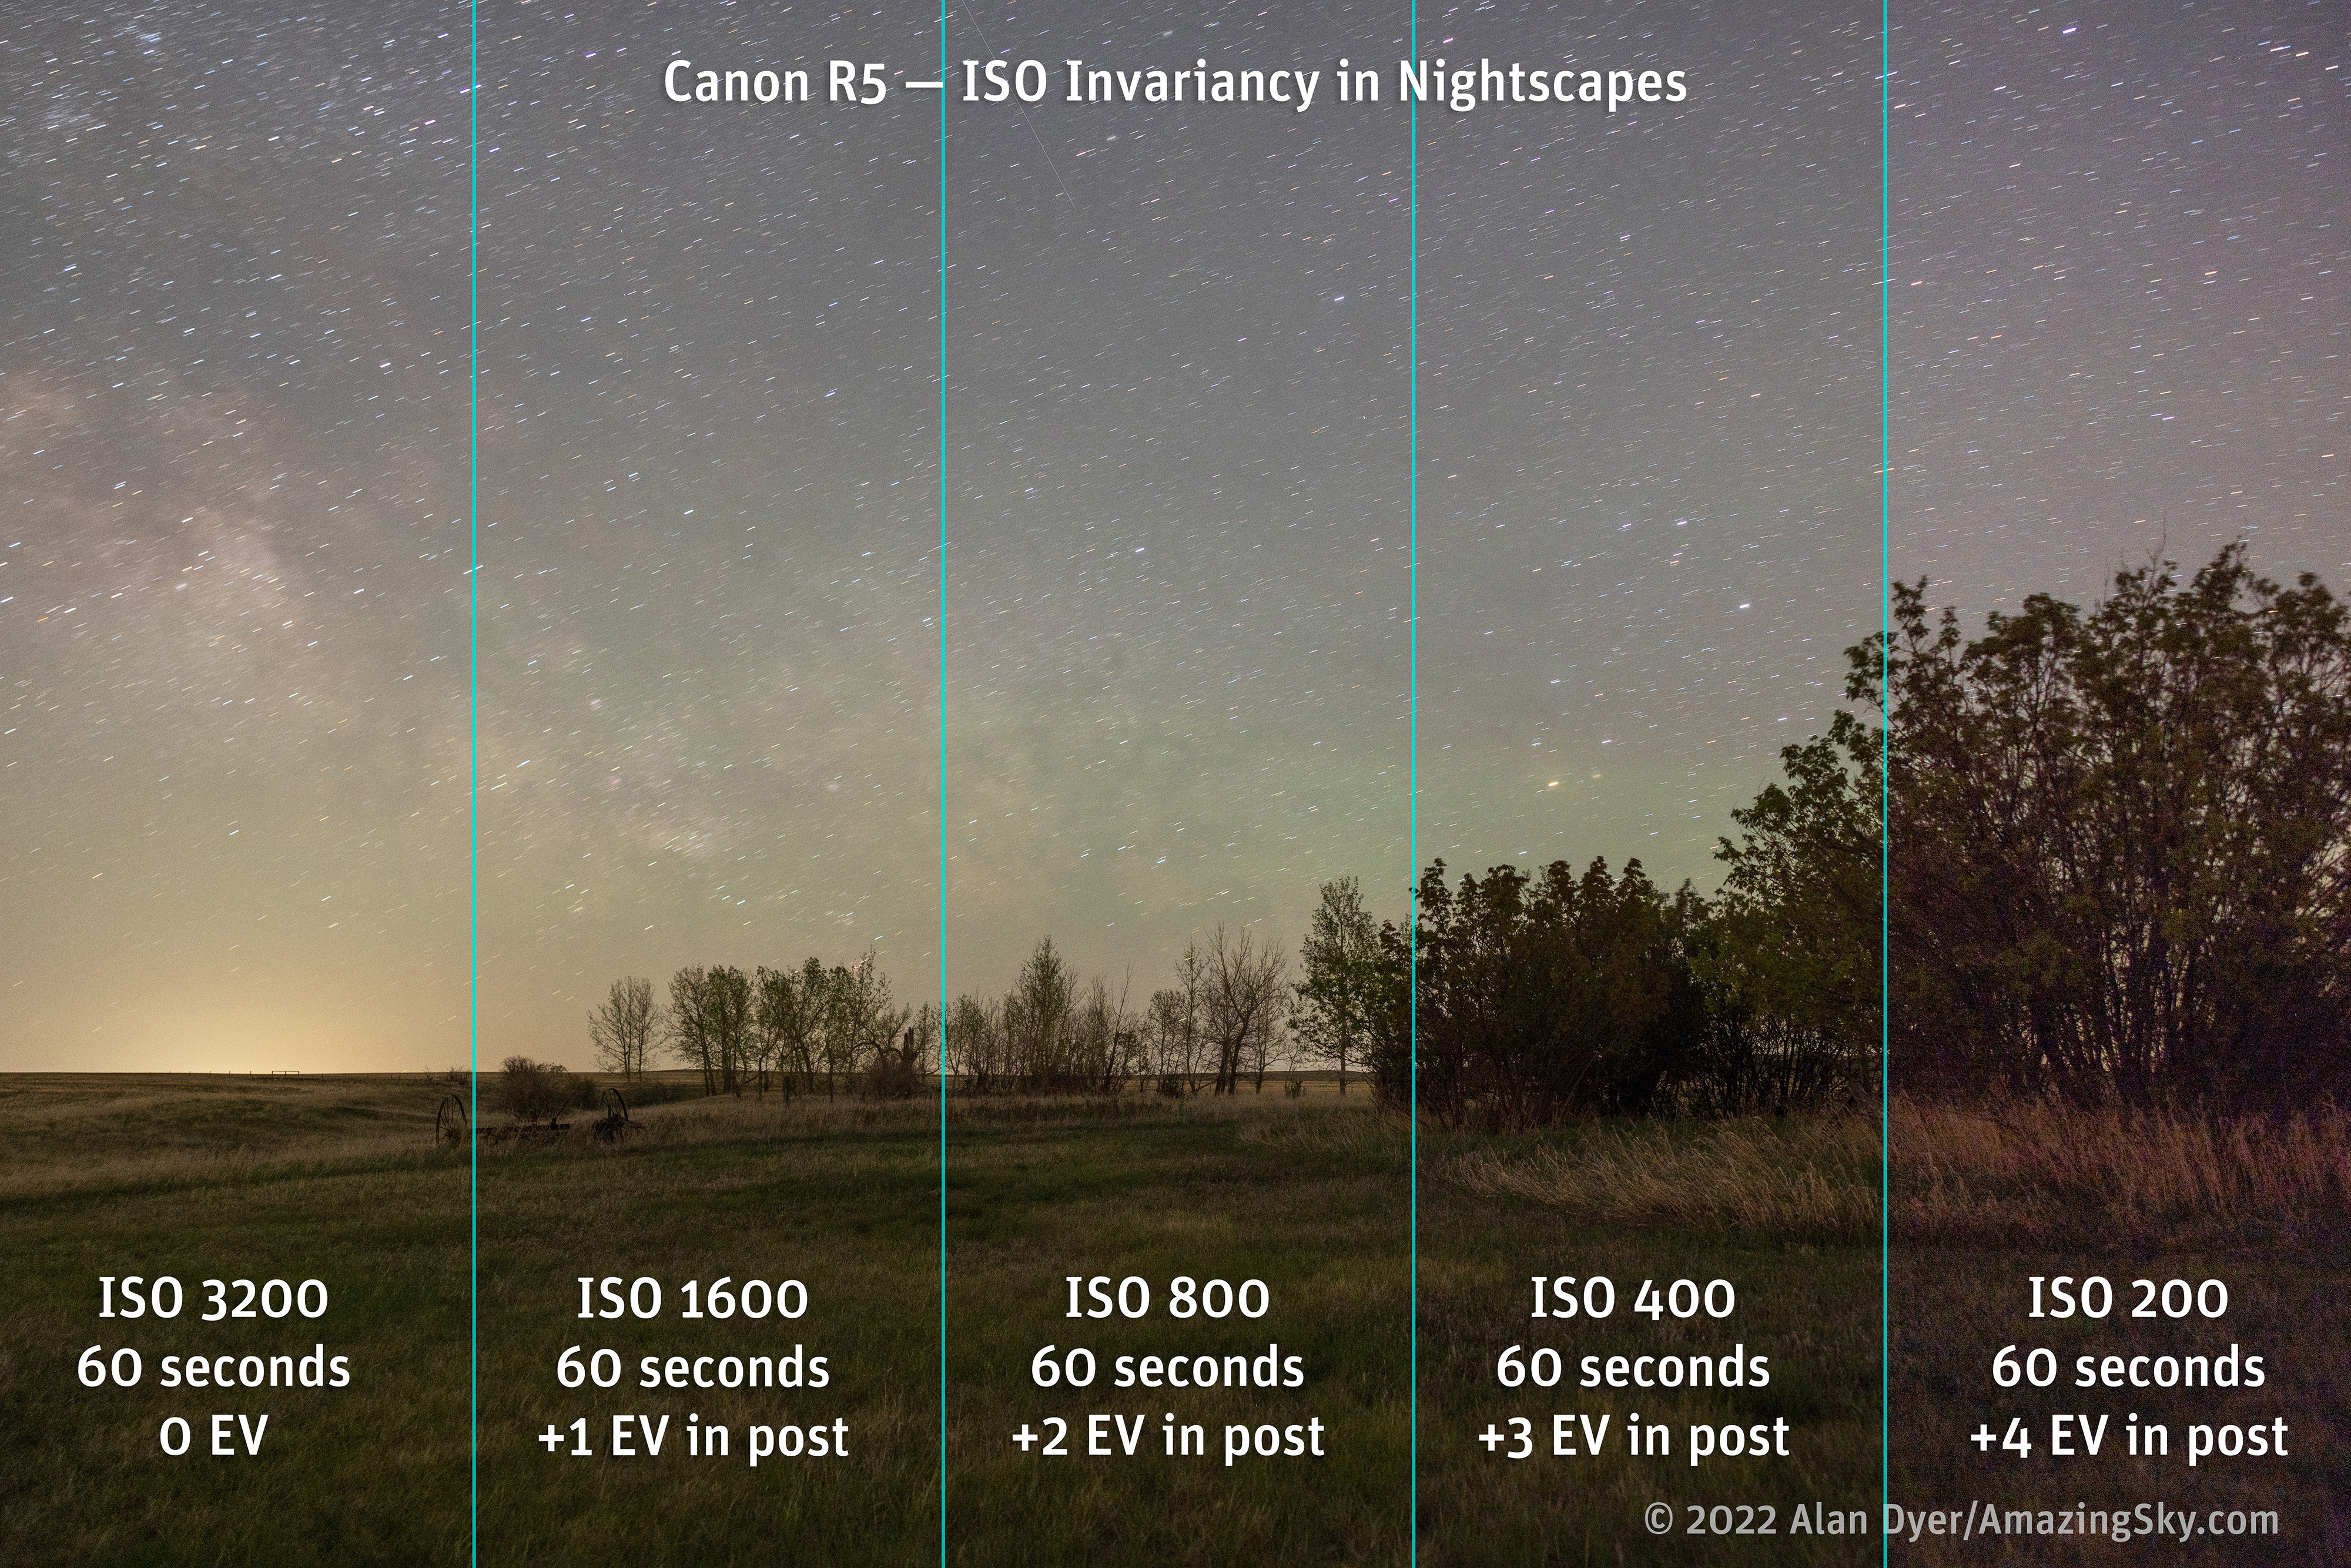
As I do for such tests, I shot sets of images at the same shutter speed, one well-exposed at a high ISO, then several at successively lower ISOs to underexpose by 1 to 4 stops. I then brightened the underexposed images by increasing the Exposure in Camera Raw by the same 1 to 4 stops. In an ideal ISO invariant sensor, all the images should look the same.
The R5 performed well in images underexposed by up to 3 stops. Images underexposed by 4 stops started to fall apart with low contrast and a magenta cast. This was worse performance than the R6, which better withstood underexposure by as much as 4 stops, and fell apart at 5 stops of underexposure.
While it can withstand underexposure, the lesson with the R5 is to still expose nightscapes as well as possible, likely requiring a separate longer exposure for the dark ground. Expose to the right! Don’t depend on being able to save the image by brightening “in post.” But again, that’s a best practice with any camera.
THERMAL NOISE
Here I repeat some of the background information from my R6 review. But it bears repeating, as even skilled professional photographers often misunderstand the various forms of noise and how to mitigate them.
All cameras will exhibit thermal noise in long exposures, especially on warm nights. This form of heat-induced noise peppers the shadows with bright or “hot” pixels, often brightly coloured.
This is not the same as the shot and read noise that adds graininess to high-ISO images and that noise reduction software can smooth out later in post.
Thermal noise is more insidious and harder to eliminate in processing without harming the image. However, Monika Deviat offers a clever method here at her website.

I found the R5 was prone to many hot pixels in long nightscape exposures where they show up in dark, underexposed shadows. I did not find a prevalence of hot pixels in well-exposed deep-sky images.
LONG EXPOSURE NOISE REDUCTION
With all cameras a setting called Long Exposure Noise Reduction (LENR) eliminates this thermal noise by taking a “dark frame” and subtracting it in-camera to yield a raw file largely free of hot pixels, and other artifacts such as edge glows.
The LENR option on the R5 did eliminate most hot pixels, though sometimes still left, or added, a few (or they might be cosmic ray hits). LENR is needed more on warm nights, and with longer exposures at higher ISOs. So the extent of thermal noise in any camera can vary a lot from shoot to shoot, and season to season.
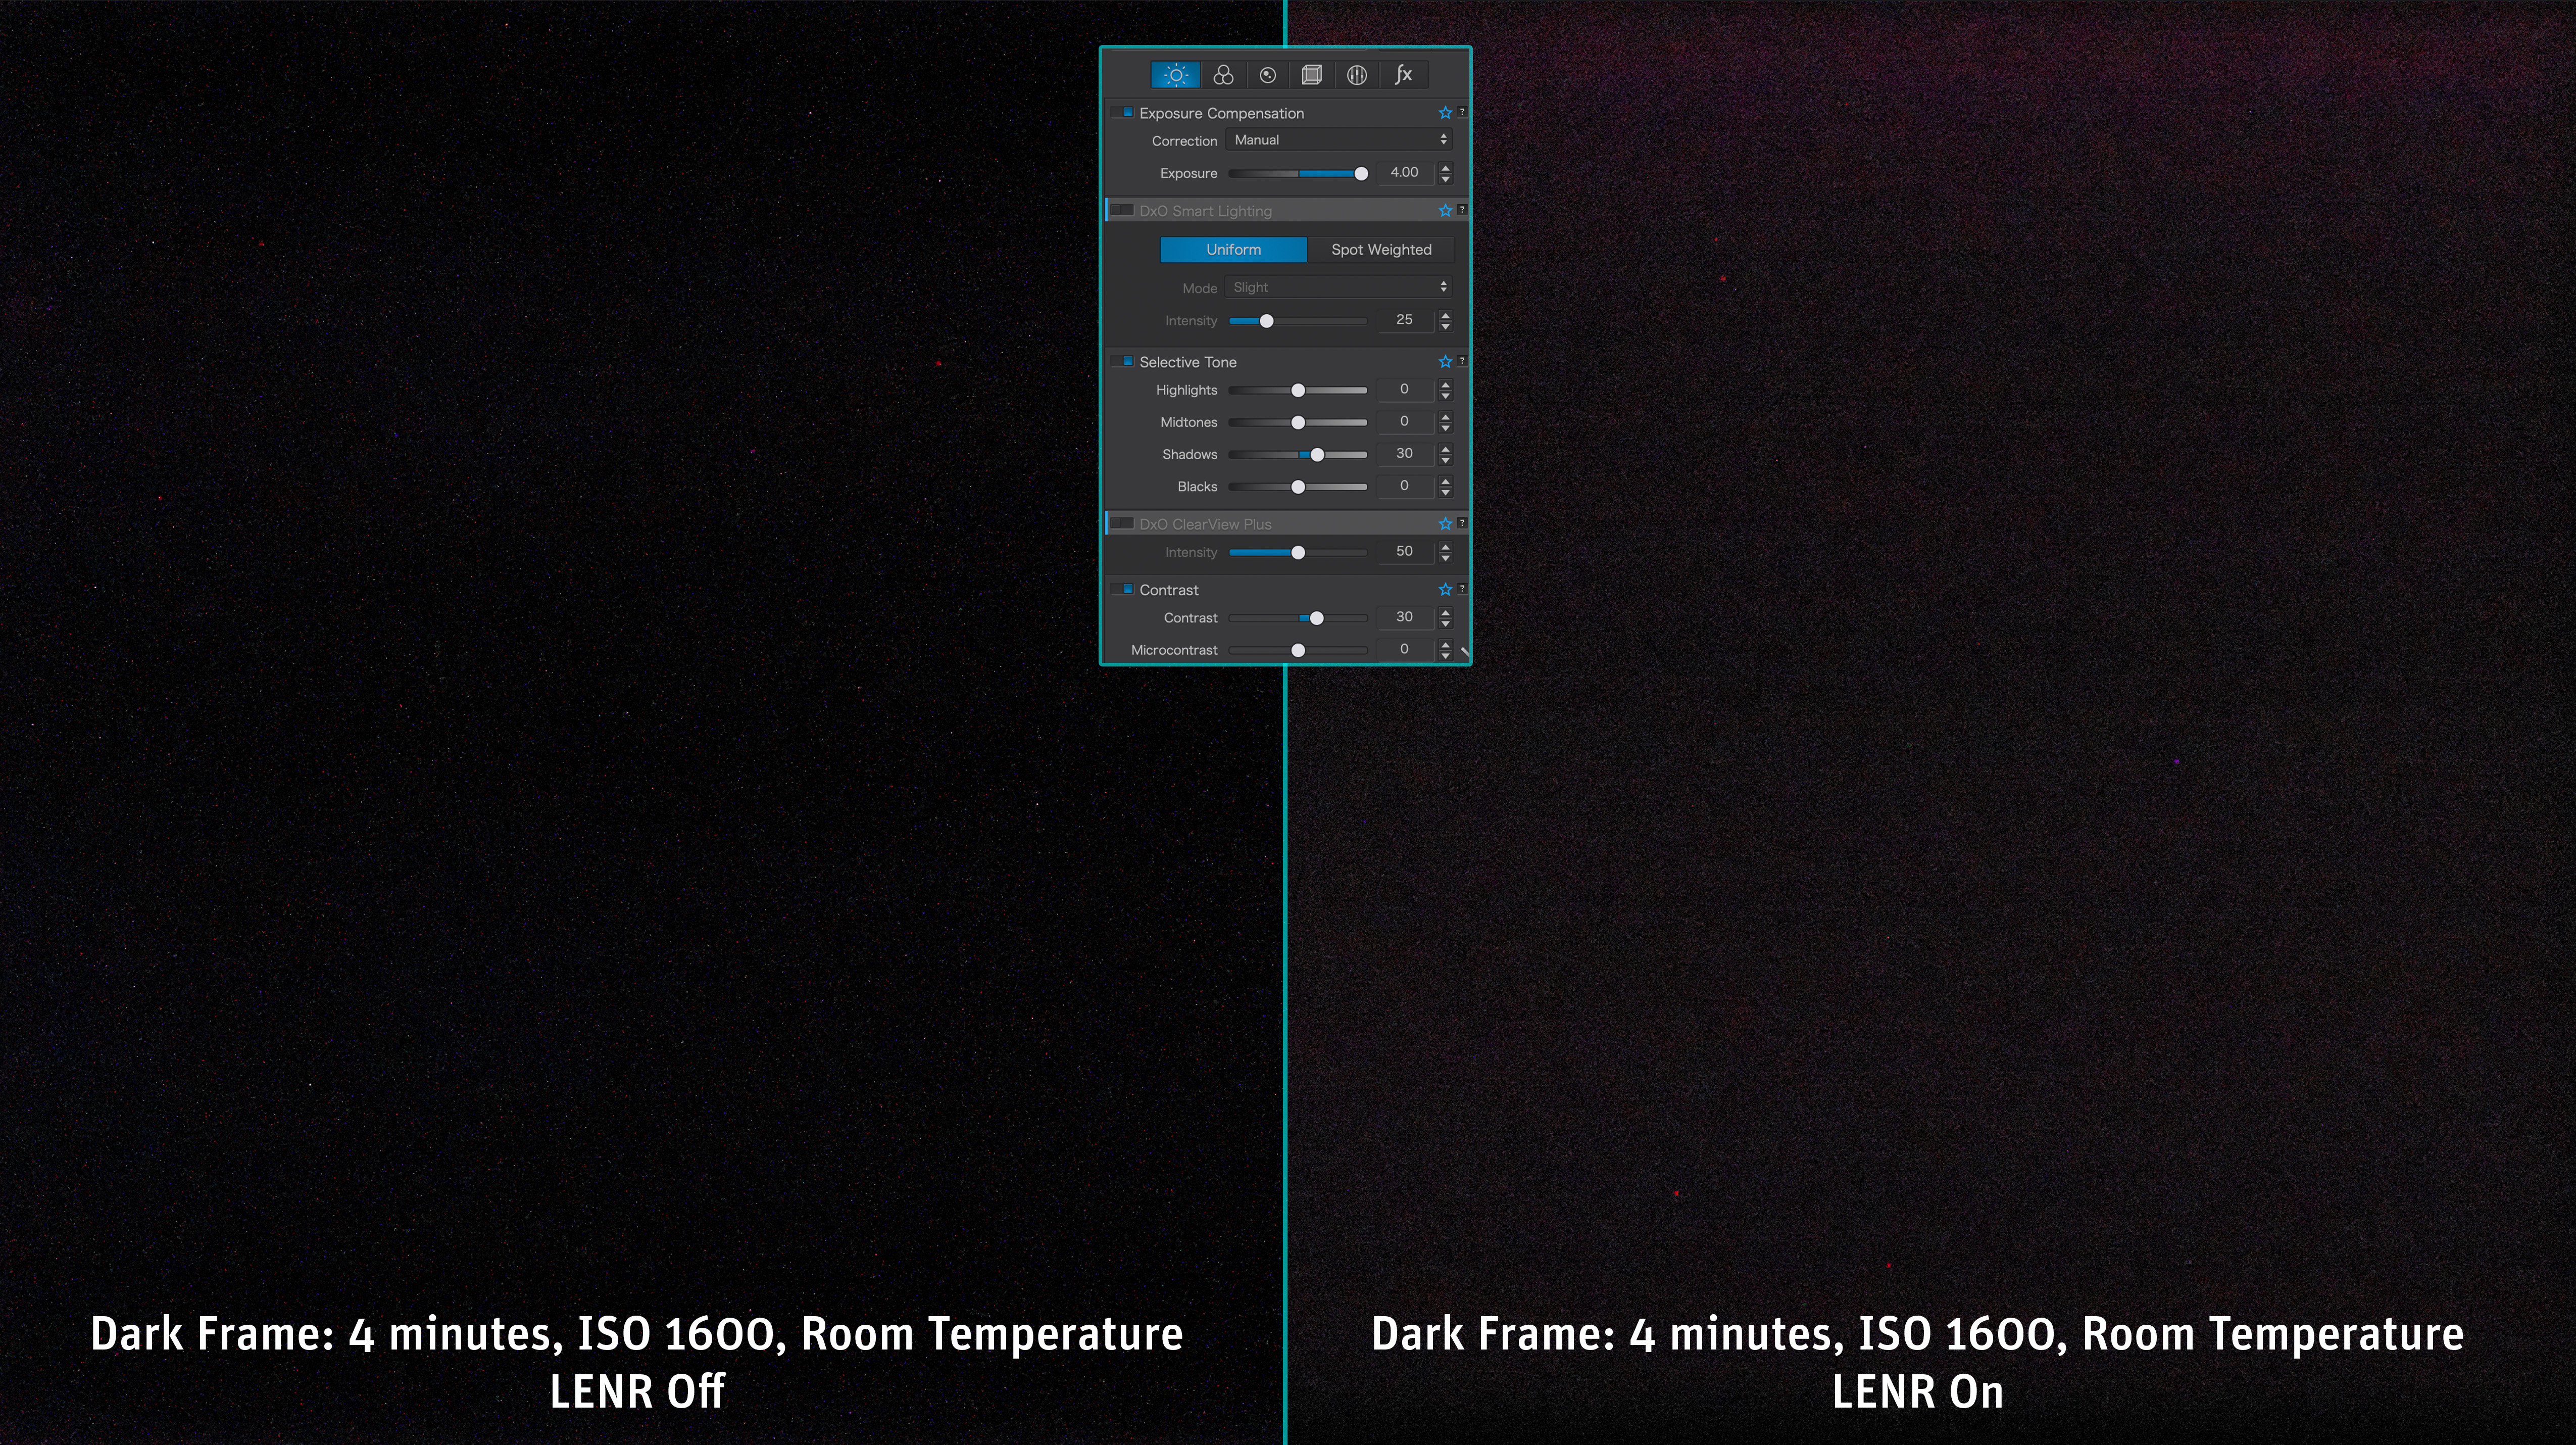
The comparison above shows just thermal noise in long exposures with and without LENR, to show its effectiveness. However, bear in mind in this demo the raw files have been boosted a lot in exposure and contrast (using DxO PhotoLab with the settings shown) to exaggerate the visibility of the noise.
Like the R6, when LENR is actively taking a dark frame, the R5’s rear screen indicates “Busy,” which is annoyingly bright at night, exactly when you would be employing LENR. To hide this display, the only option is to close the screen. Instead, the unobtrusive top LCD screen alone should be used to indicate a dark frame is in progress. It does with the Ra, though Busy also displays on its rear screen as well, which is unnecessary.
As with all mirrorless cameras, the R5 lacks the “dark frame buffer” present in Canon full frame DSLRs that allows several exposures to be taken in quick succession even with LENR on.
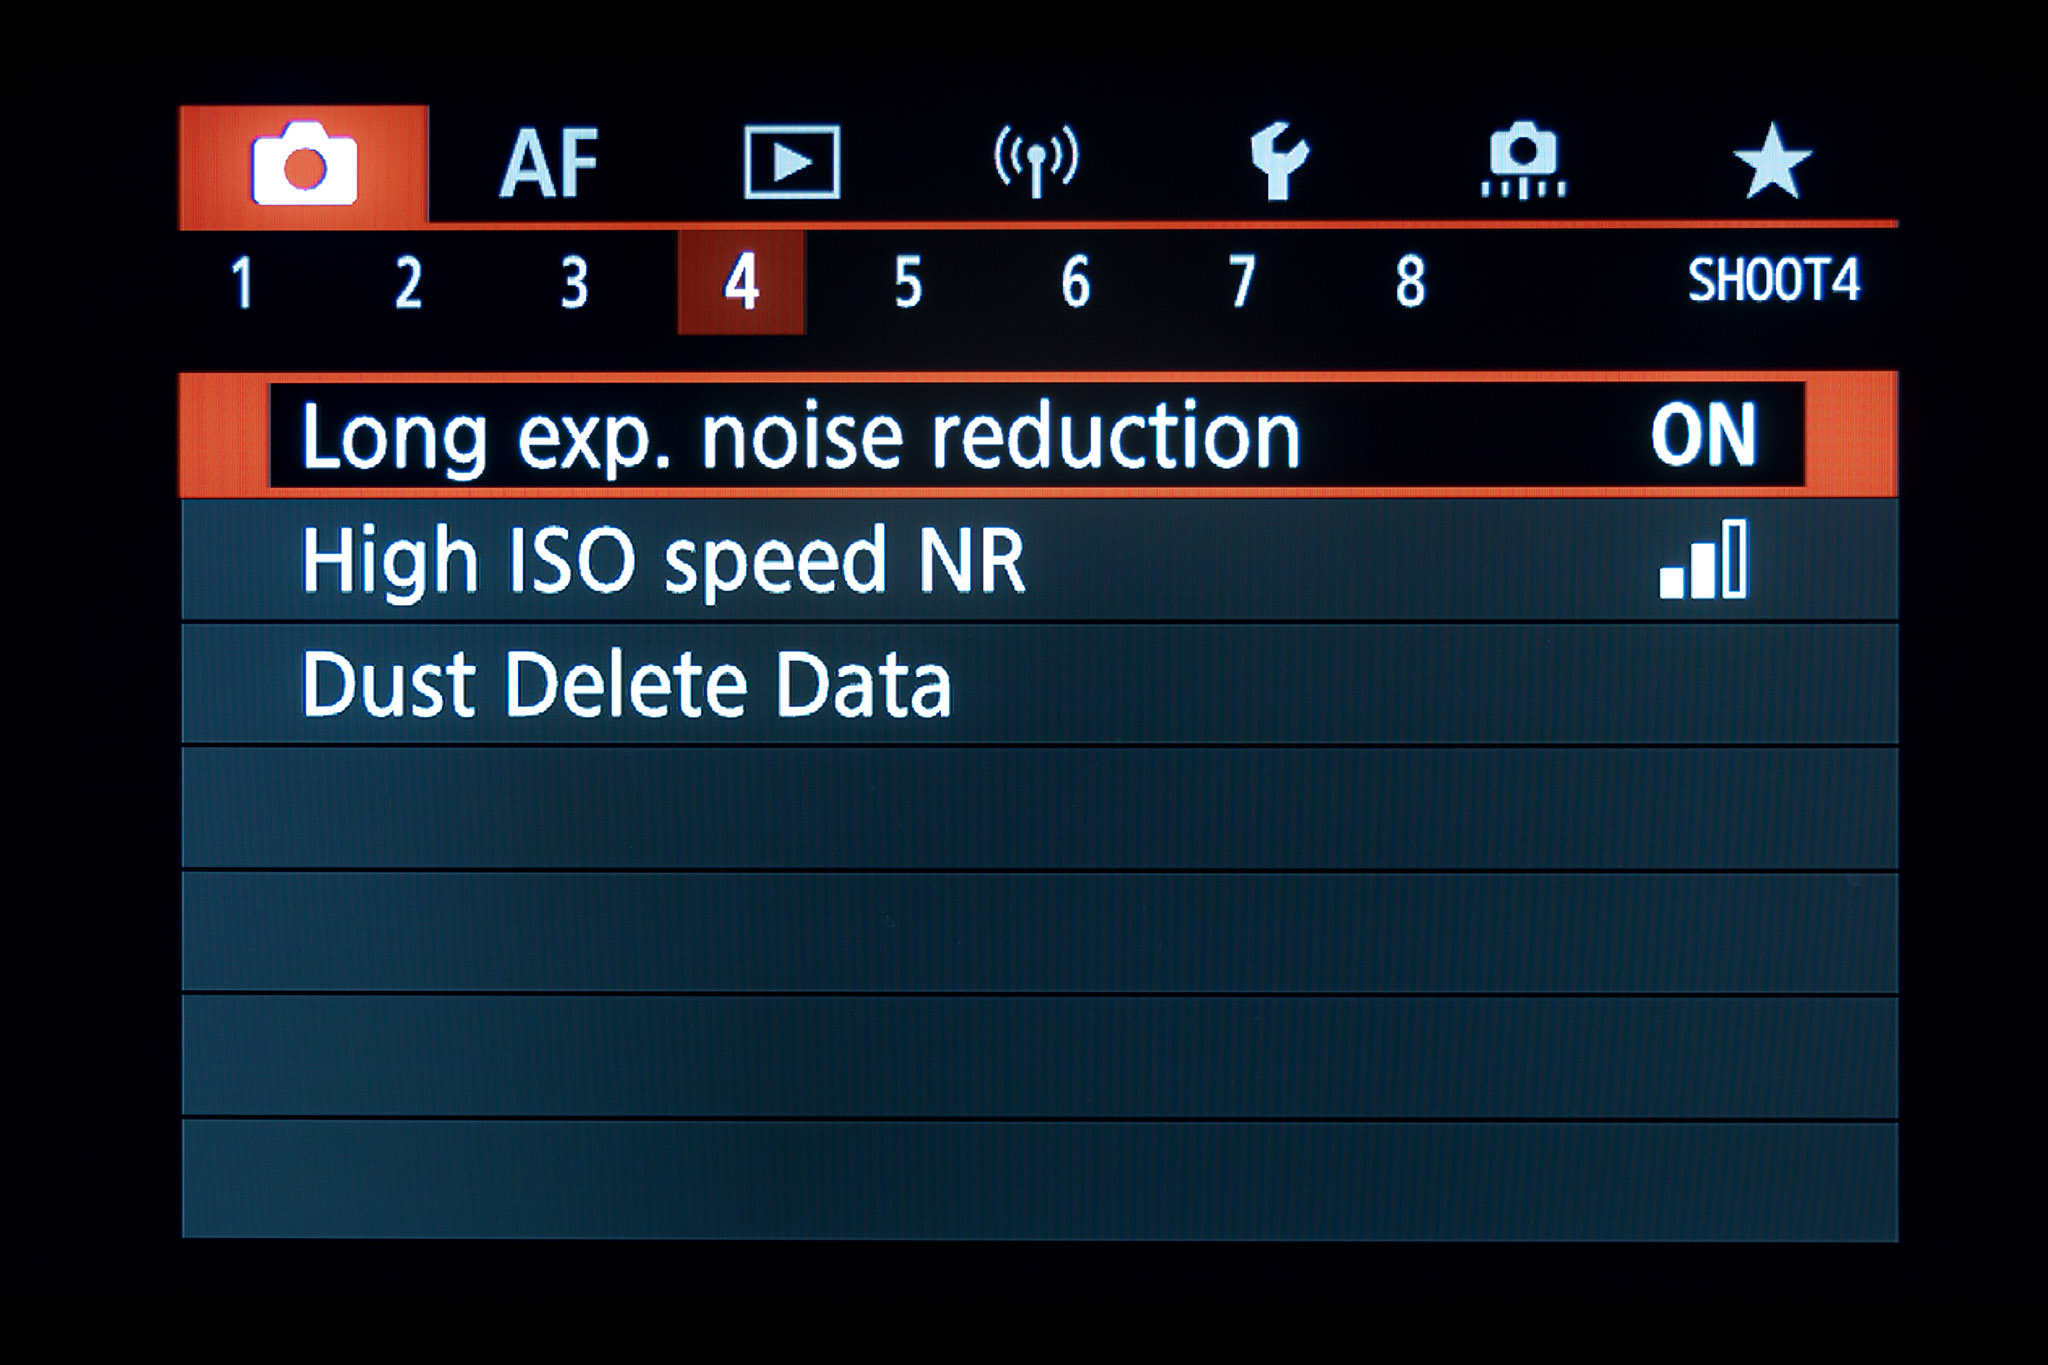
With all Canon R cameras, turning on LENR forces the camera to take a dark frame after every light frame, doubling the time it takes to finish every exposure. That’s a price many photographers aren’t willing to pay, but on warm nights I find it can be essential, and a best practice, for the reward of cleaner images out of camera. I found it is certainly a good practice with the R5.
TIP: If you find hot pixels are becoming more obvious over time, try this trick: turn on the Clean Manually routine for 30 seconds to a minute. In some cameras this can remap the hot pixels so the camera can better eliminate them.
STAR QUALITY
Using LENR with the R5 did not introduce any oddities such as oddly-coloured, green or wiped-out stars. Even without LENR I saw no evidence of green stars, a flaw that plagues some Sony cameras at all times, or Nikons when using LENR.

Canons have always been known for their good star colours, and the R5 maintains the tradition. According to DPReview the R5 has a mild low-pass anti-alias filter in front of its sensor. Cameras which lack such a sensor filter do produce sharper images, but stars that occupy only one or two pixels might not de-Bayer properly into the correct colours. I did not find that an issue with the R5.
As in the R6, I also saw no evidence of “star-eating,” a flaw Nikons and Sonys have been accused of over the years, due to aggressive in-camera noise reduction even on raw files. Canons have largely escaped charges of star-eating.
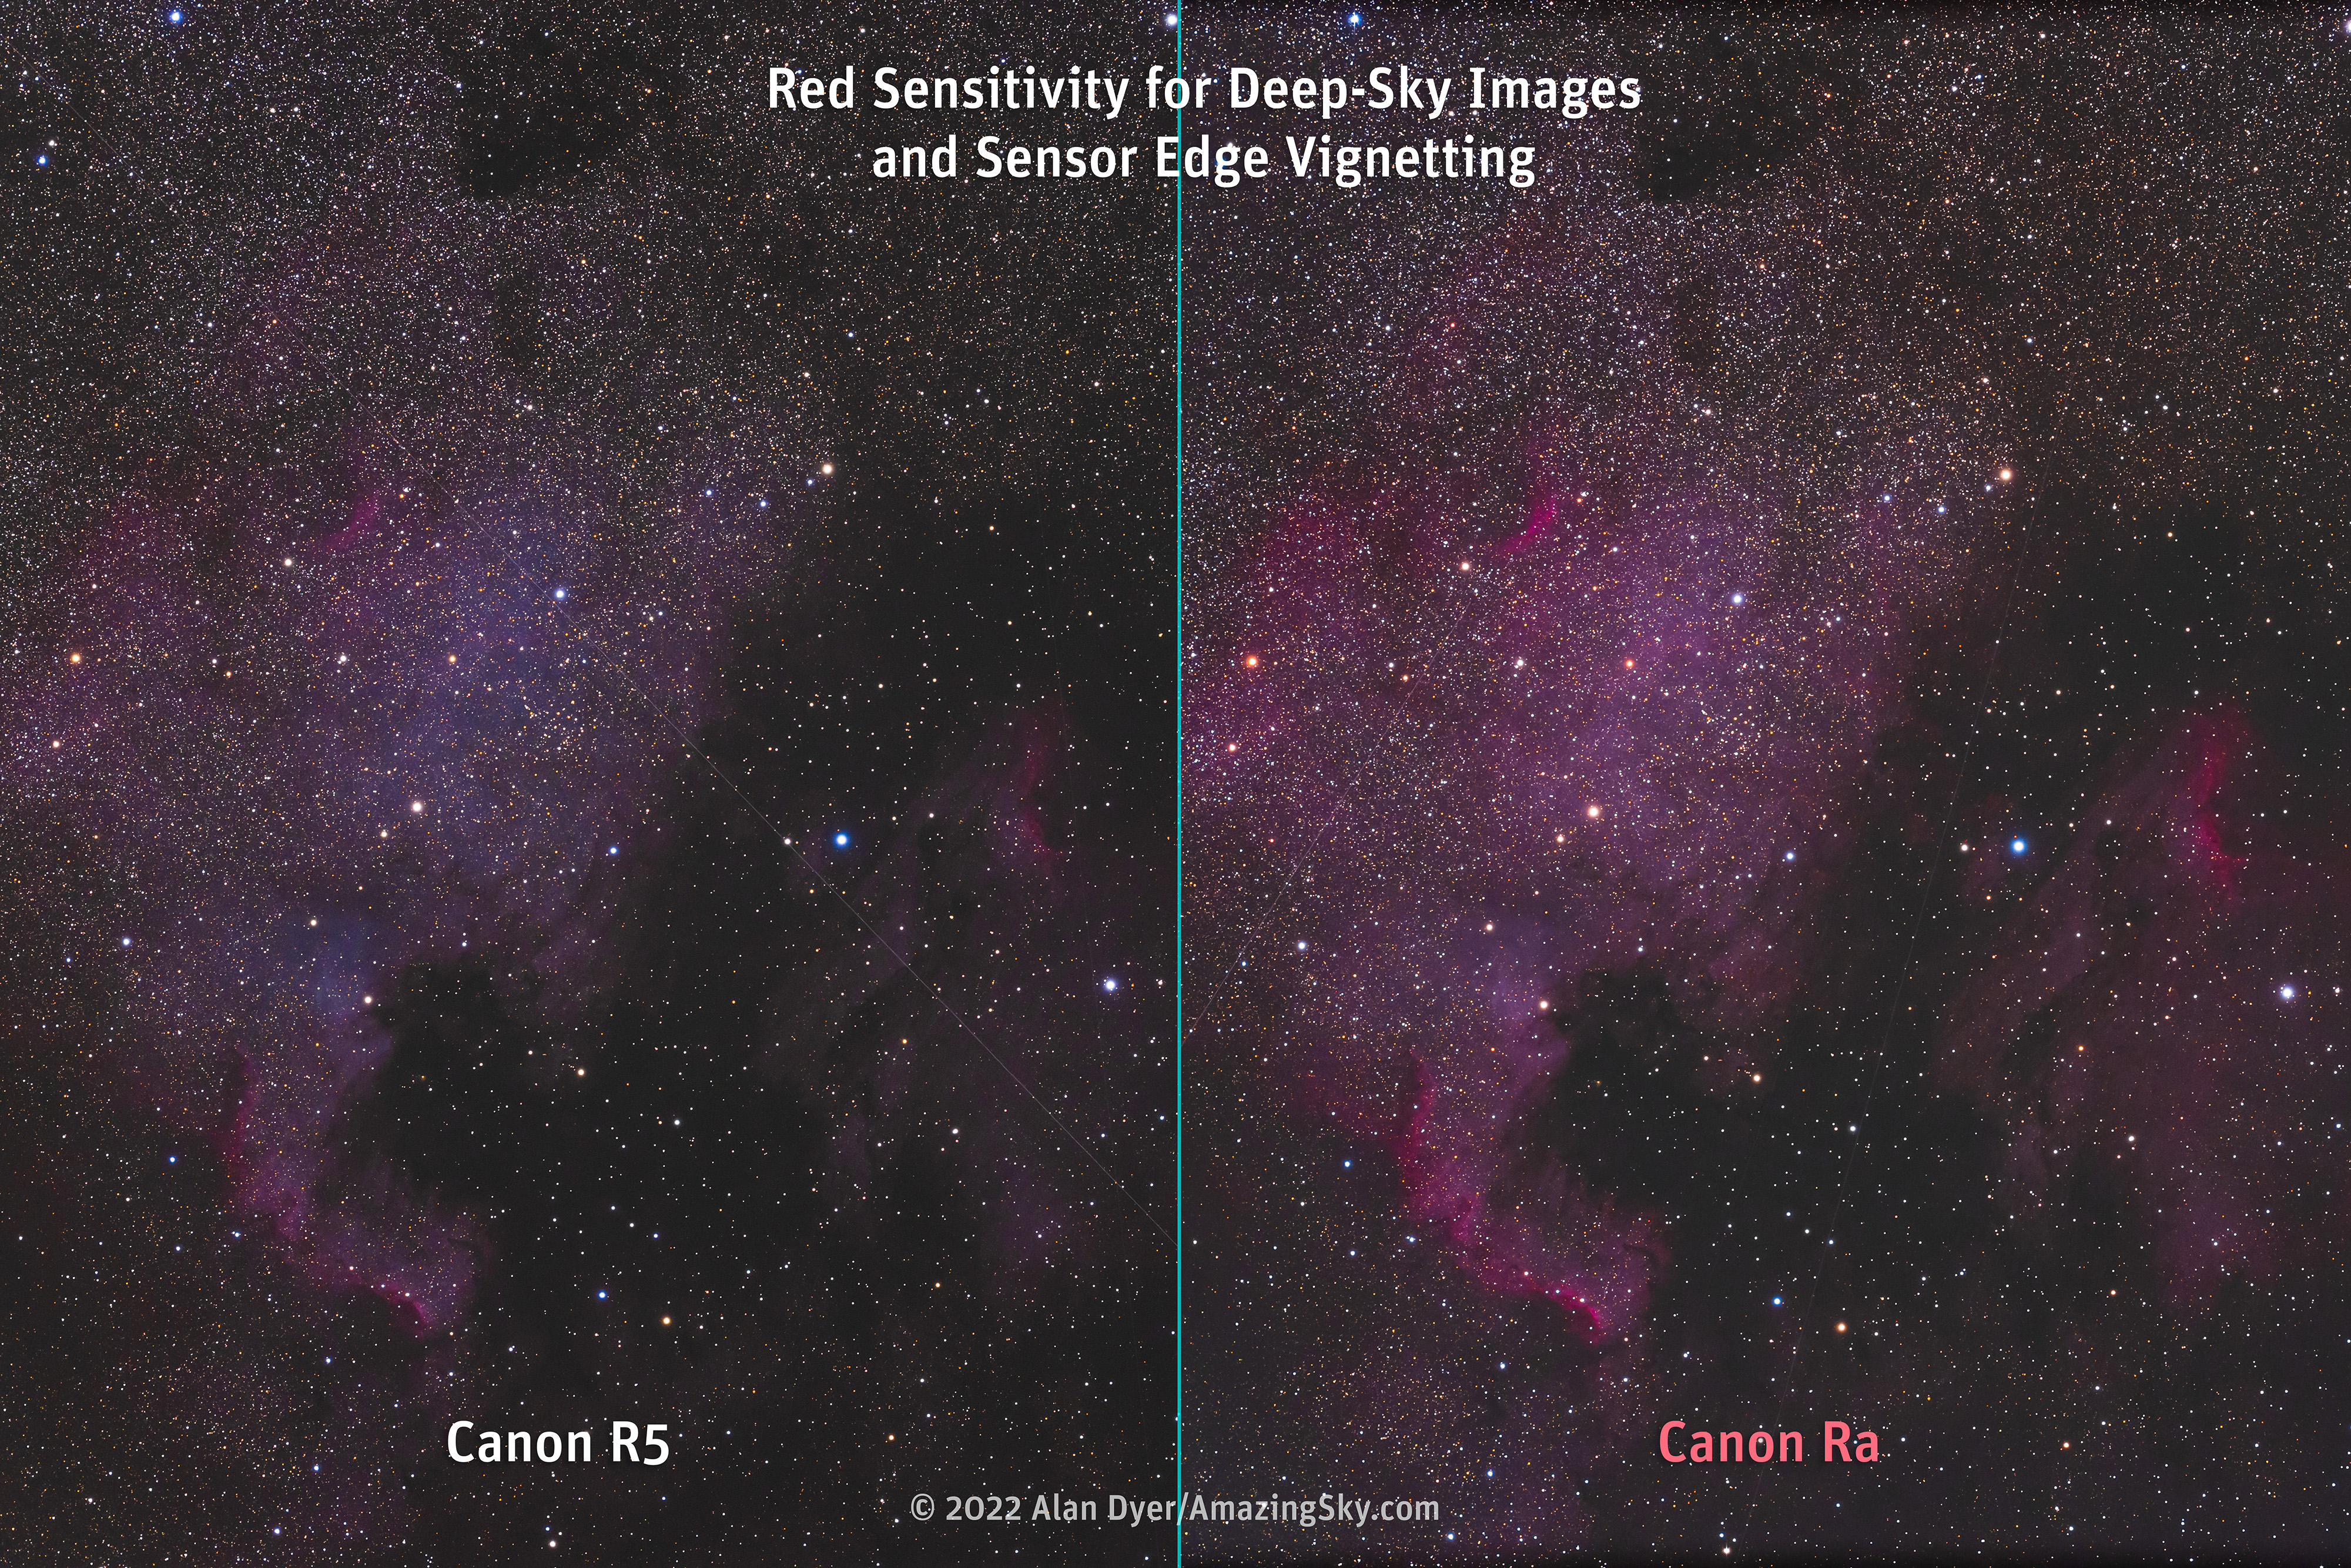
RED SENSITIVITY
The R5 I bought was a stock “off-the-shelf” model. It is Canon’s now-discontinued EOS Ra that was “filter-modified” to record a greater level of the deep-red wavelength from red nebulas in the Milky Way. As I show below, compared to the Ra, the R5 did well, but could not record the depth of nebulosity the Ra can, to be expected for a stock camera.
However, bright nebulas will still be good targets for the R5. But if it’s faint nebulosity you are after, both in wide-field Milky Way images and telescopic close-ups, consider getting an R5 “spectrum modified” by a third-party supplier. Or modifying an EOS R.
EDGE ARTIFACTS and EDGE GLOWS
DSLRs are prone to vignetting along the top and bottom of the frame from shadowing by the upraised mirror and mirror box. Not having a mirror, and a sensor not deeply recessed in the body, largely eliminates this edge vignetting in mirrorless cameras.
While the Ra shows a very slight vignetting along the bottom of the frame (visible in the example above), the R5 was clean and fully illuminated to the edges, as it should be.
I was also pleased to see the R5 did not exhibit any annoying “amp glows” — dim, often magenta glows at the edge of the frame in long exposures, created by heat emitted from sensor electronics adding infrared (IR) glows to the image.
I saw noticeable amp glows in the Canon R6 which could only be eliminated by taking LENR dark frames. It’s a flaw that has yet to be eliminated with firmware updates. Taking LENR darks is not required with the R5, except to reduce thermal hot pixels as noted above.
With a lack of IR amp glows, the R5 should work well when filter-modified to record either more visible Hydrogen-alpha red light, or deeper into the infrared spectrum.
Resolution — Nightscapes
Now we come to the very reason to get an R5, its high resolution. Is the difference visible in typical astrophotos? In a word, yes. If you look closely.
If people only see your photos on Facebook or Instagram, no one will ever see any improvement in your images! But if your photos are seen as large prints, or you are simply a stickler for detail, then you will be happy with the R5’s 45 megapixels. (Indeed, you might wish to wait for the rumoured even higher megapixel Canon 5S!)
Nightscapes, and indeed all landscape photos by day or by night, is where you will see the benefit of more megapixels. Finer details in the foreground show up better. Images are less pixelated. In test images with all three cameras, the R5 did provide sharper images to be sure. But you do have to zoom in a lot to appreciate the improvement.
Resolution — lunar imaging

The Moon through a telescope is another good test of resolution. The above comparison shows how the R5’s smaller 4.4-micron pixels do provide much sharper details and less pixelation than the R6.
Of course, one could shoot at an even longer focal length to increase the “plate scale” with the R6. But at that same longer focal length the R5 will still provide better resolution, up to the point where its pixels are sampling more than what the atmospheric seeing conditions permit to be resolved. For lunar and planetary imaging, smaller pixels are always preferred, as they allow you to reach the seeing limit with shorter and often faster optical systems.
Resolution — deep sky

On starfields, the difference is not so marked. As I showed in my review of the R6, with “only” 20 megapixels the R6 can still provide detailed deep-sky images.
However, in comparing the three cameras above, with images taken at a focal length of 420mm, the R5 does provide sharper stars, with faint stars better recorded, and with less blockiness (i.e. “square stars”) on all the star images. At that focal length the plate scale with the R5 is 2.1 arc seconds per pixel. With the R6 it is 3.2 arc seconds per pixel.
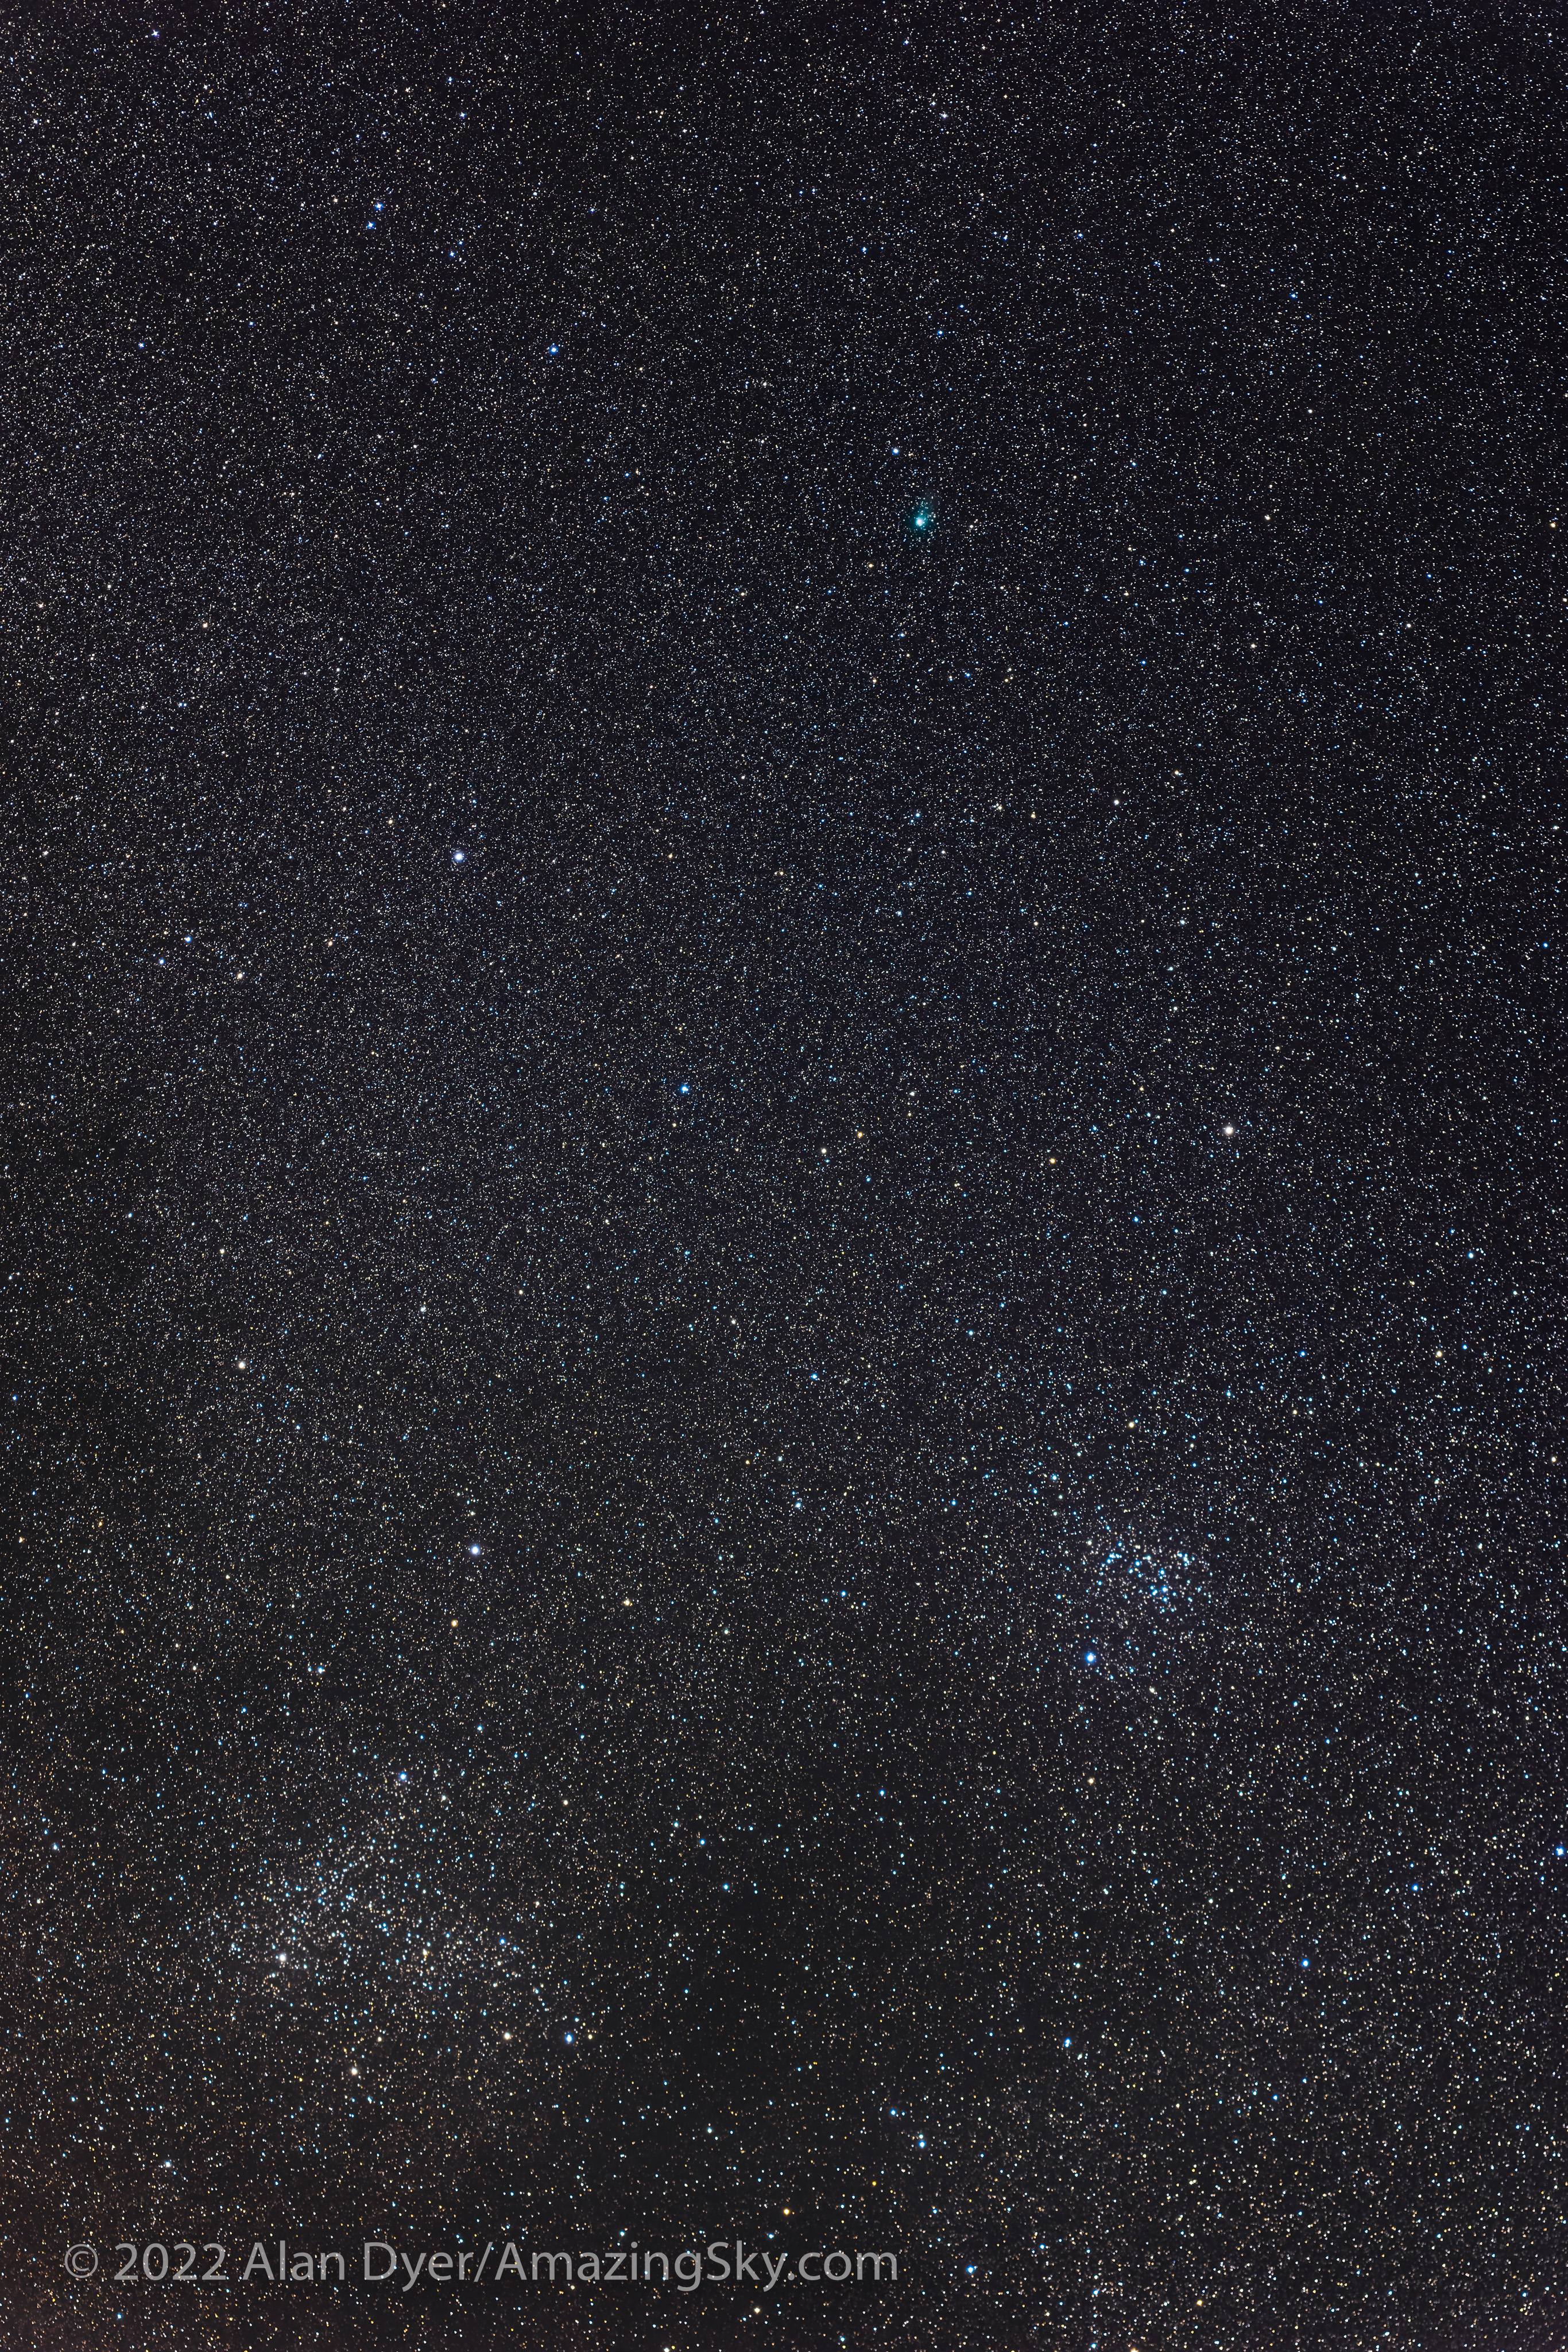
The R5 is a good choice for shooting open and globular star clusters, or any small targets such as planetary nebulas, especially with shorter focal length telescopes. Bright targets will allow using lower ISOs, mitigating any of the R5’s extra noise.
With an 800mm focal length telescope, the plate scale with the R5 will be 1.1 arc seconds per pixel, about the limit most seeing conditions will permit resolving. With even longer focal length telescopes, the R5’s small pixels would be oversampling the image, with little gain in resolution, at least for deep-sky subjects. Lunar and planetary imaging can benefit from plate scales of 0.5 arc seconds per pixel or smaller.
CAN YOU CreatE resolution?

Now, one can argue that today’s AI-driven scaling programs such as ON1 Resize AI and Topaz Gigapixel AI can do a remarkable job up-sizing images while enhancing and sharpening details. Why buy a higher-megapixel camera when you can just sharpen images from a lower-resolution model?
While these AI programs can work wonders on regular images, I’ve found their machine-learning seems to know little about stars, and can often create unwanted artifacts.
In scaling up an R6 image by 200%, ON1 Resize AI 2022 made a mess of the stars and sky background. Topaz Gigapixel AI did a much better job, leaving few artifacts. But using it to double the R6 image in pixel count still produced an image that does not look as sharp as an original R5 image, despite the latter having fewer pixels than the upsized R6 image.
Yes, we are definitely pixel-peeping! But I think this shows that it is better to have the pixels to begin with in the camera, and to not depend on software to generate sharpness and detail.
VIDEO Resolution
The R5’s 45-megapixel sensor also makes possible its headline selling point when it was released in 2020: 8K movie recording, with movies sized 8192 x 4320 (DCI standard) or 7680 x 4320 (UHD standard) at 29.97 frames per second, almost IMAX quality.
Where the R6’s major selling point for me was its low-light video capability, the R5’s 8K video prowess was less important. Or so I thought. With testing, I can see it will have its place in astrophotography, especially solar eclipses.


Unlike the original Canon R and Rp, the R5 and R6 can shoot 4K movies sampled from the full width of their sensors, so there is no crop factor in the field of view recorded with any lens.
However, like the R6, the R5 also offers the option of a Movie Crop mode which samples a 4K movie from the central 4096 (4K-D) or 3840 (4K-U) pixels of the sensor. As I show above, this provides a “zoomed-in” image with no loss of resolution, useful when wide field of view is not so important as is zooming into small targets, such as for lunar and solar movies.
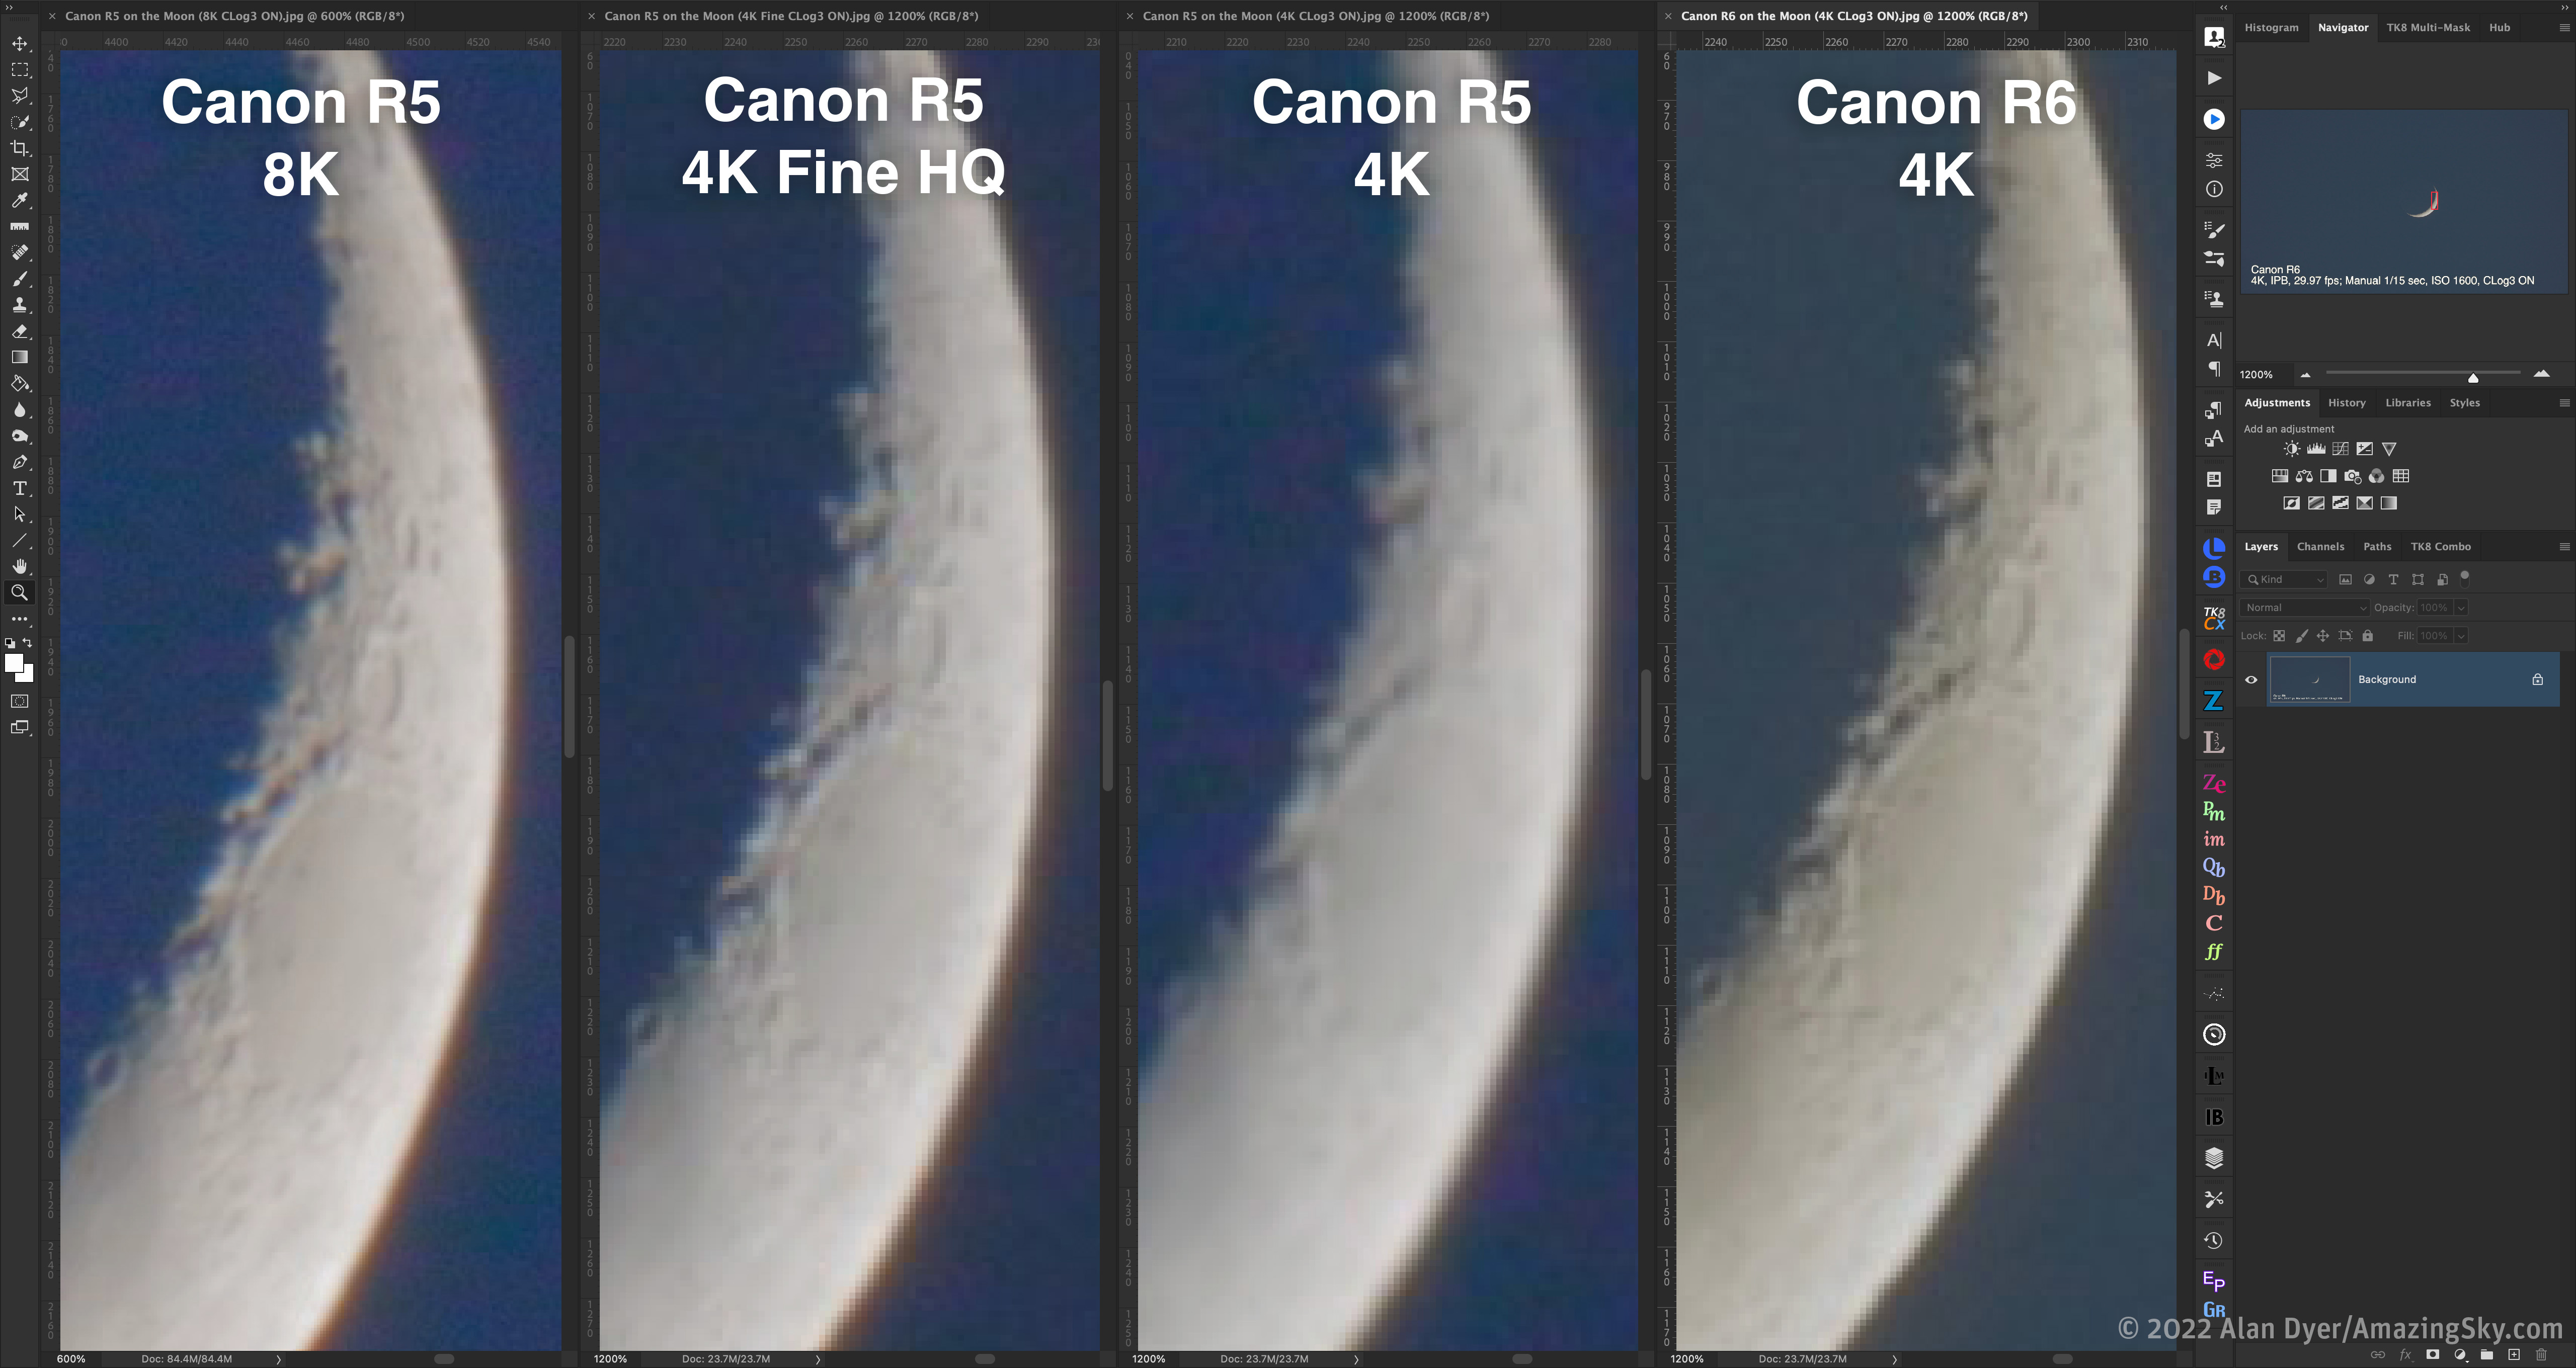
So what format produces the best resolution when shooting movies? As I show above, magnified frame grabs of the Moon demonstrate that shooting at 8K provides a much less pixelated and sharper result than either the 4K-Fine HQ (which creates a “High-Quality” 4K movie downsampled from 8K) or a standard 4K movie.
Shooting a 4K movie with the R6 also produced a similar result to the 4K movies from the R5. The slightly softer image in the R5’s 4K frame can, I think, be attributed more to atmospheric seeing.
Solar eclipse use
Shooting the highest resolution movies of the Moon will be of prime interest to astrophotographers when the Moon happens to be passing in front of the Sun!
That will happen along a narrow path that crosses North America on April 8, 2024. Capturing the rare total eclipse of the Sun in 8K video will be a goal of many. At the last total solar eclipse in North America, on August 21, 2017, I was able to shoot it in 4K by using a then state-of-the-art top-end Canon DSLR loaned to me by an IMAX movie production company!
And who knows, by 2024 we might have 100-megapixel cameras capable of shooting and recording the firehose of data from 12K video! But for now, even 8K can be a challenge.

However, do you need to shoot 8K to get sharp Moon, Sun or eclipse movies? The above shows the 8K frame-grab compared to the R5’s best quality full-frame 4K Fine, and the R5’s and R6’s 4K Movie Crop mode that doesn’t resample or bin pixels from the larger sensor to create a 4K movie. The Cropped movies look only slightly softer than the R5 at 8K, with less pixelation than the 4K Fine HQ movie.
When shooting the Sun or Moon through a telescope or long telephoto lens, the wide field of a full-frame movie might not be required, even to take in the two- or three-degree-wide solar corona around the eclipsed Sun.
However, if a wide field for the maximum extent of the outer corona, combined with sharp resolution is the goal, then a camera like the Canon R5 capable of shooting 8K movies will be the ticket.
And 8K will be ideal for wide-angle movies of the passage of the Moon’s shadow during any eclipse, or for moderate fields showing the eclipsed Sun flanked by Jupiter and Venus on April 8, 2024.
Canon CLOG3
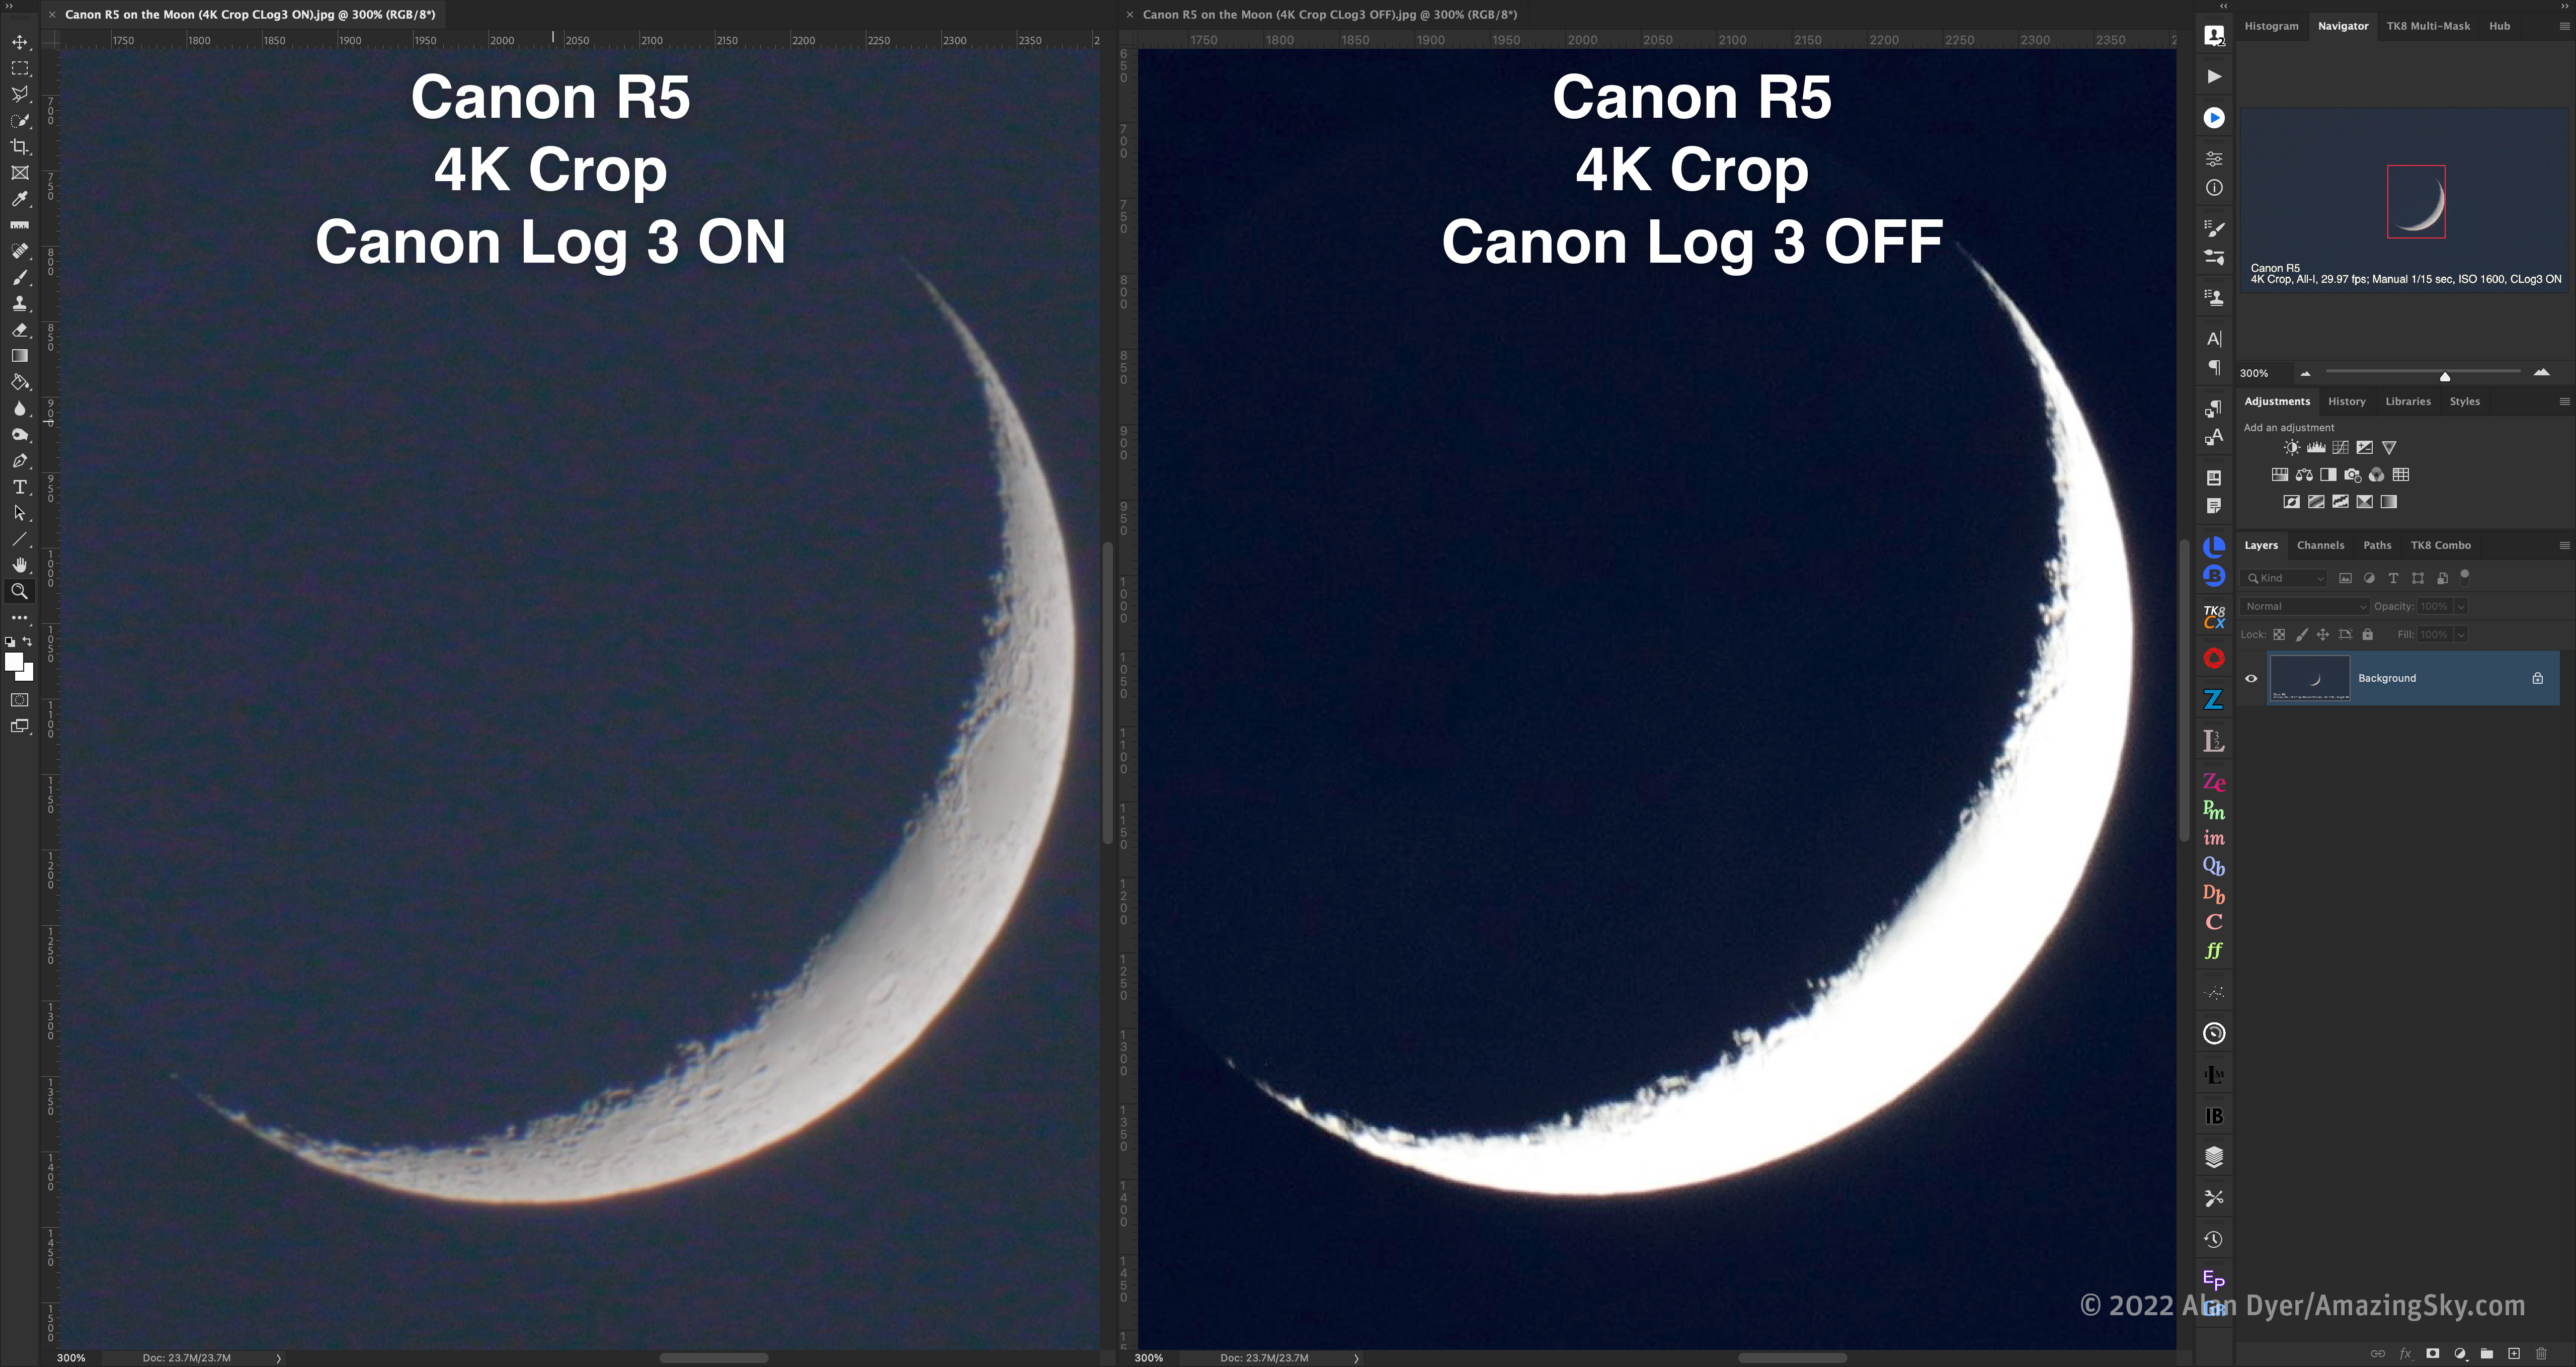
Like the R6, the R5 offers the option of shooting movies in Canon’s C-Log3 profile, which records internally in 10-bit, preserving more dynamic range in movies, up to 12 stops. The resulting movie looks flat, but when “colour graded” later in post, the movie records much more dynamic range, as I show above. Without C-Log3, the bright sunlit lunar crescent is blown out, as will be the Sun’s inner corona.
The bright crescent Moon with dim Earthshine is a good practice-run stand-in for the eclipsed Sun with its wide range of brightness from the inner to the outer corona.
Sample Moon Movies
For the full comparison of the R5 and R6 in my test shoot of the crescent Moon, see this narrated demo movie on Vimeo for the 4K movies, shot in various modes, both full-frame and cropped, with C-Log3 on and off.
Keep in mind that video compression in the on-line version may make it hard to see the resolution difference between shooting modes.
A “private link” 10-minute video on Vimeo demonstrating 4K video clips with the R5 and R6.
For a movie of the 8K footage, though downsized to 4K for the Vimeo version (the full sized 8K file was 29 Gigs!), see this sample movie below on Vimeo.
A “private link” video on Vimeo demonstrating 8K video clips with the R5.
LOw-Light VIDEO
Like the R6, the R5 can shoot at a dragged shutter speed as slow as 1/8-second. That slow shutter, combined with a fast f/1.4 to f/2 lens, and ISOs as high as 51,200 are the keys to shooting movies of the night sky.
Especially auroras. Only when auroras get shadow-casting bright can we shoot at the normal 1/30-second shutter speed of movies and at lower ISOs.
I was able to shoot a decent aurora one night from home with both the R5 and R6, and with the same fast TTArtisan 21mm f/1.5 RF lens. The sky and aurora changed in brightness from the time I shot with the R6 first to the R5 later. But even so, the movies serve as a look at how the two cameras perform for real-time aurora movies.
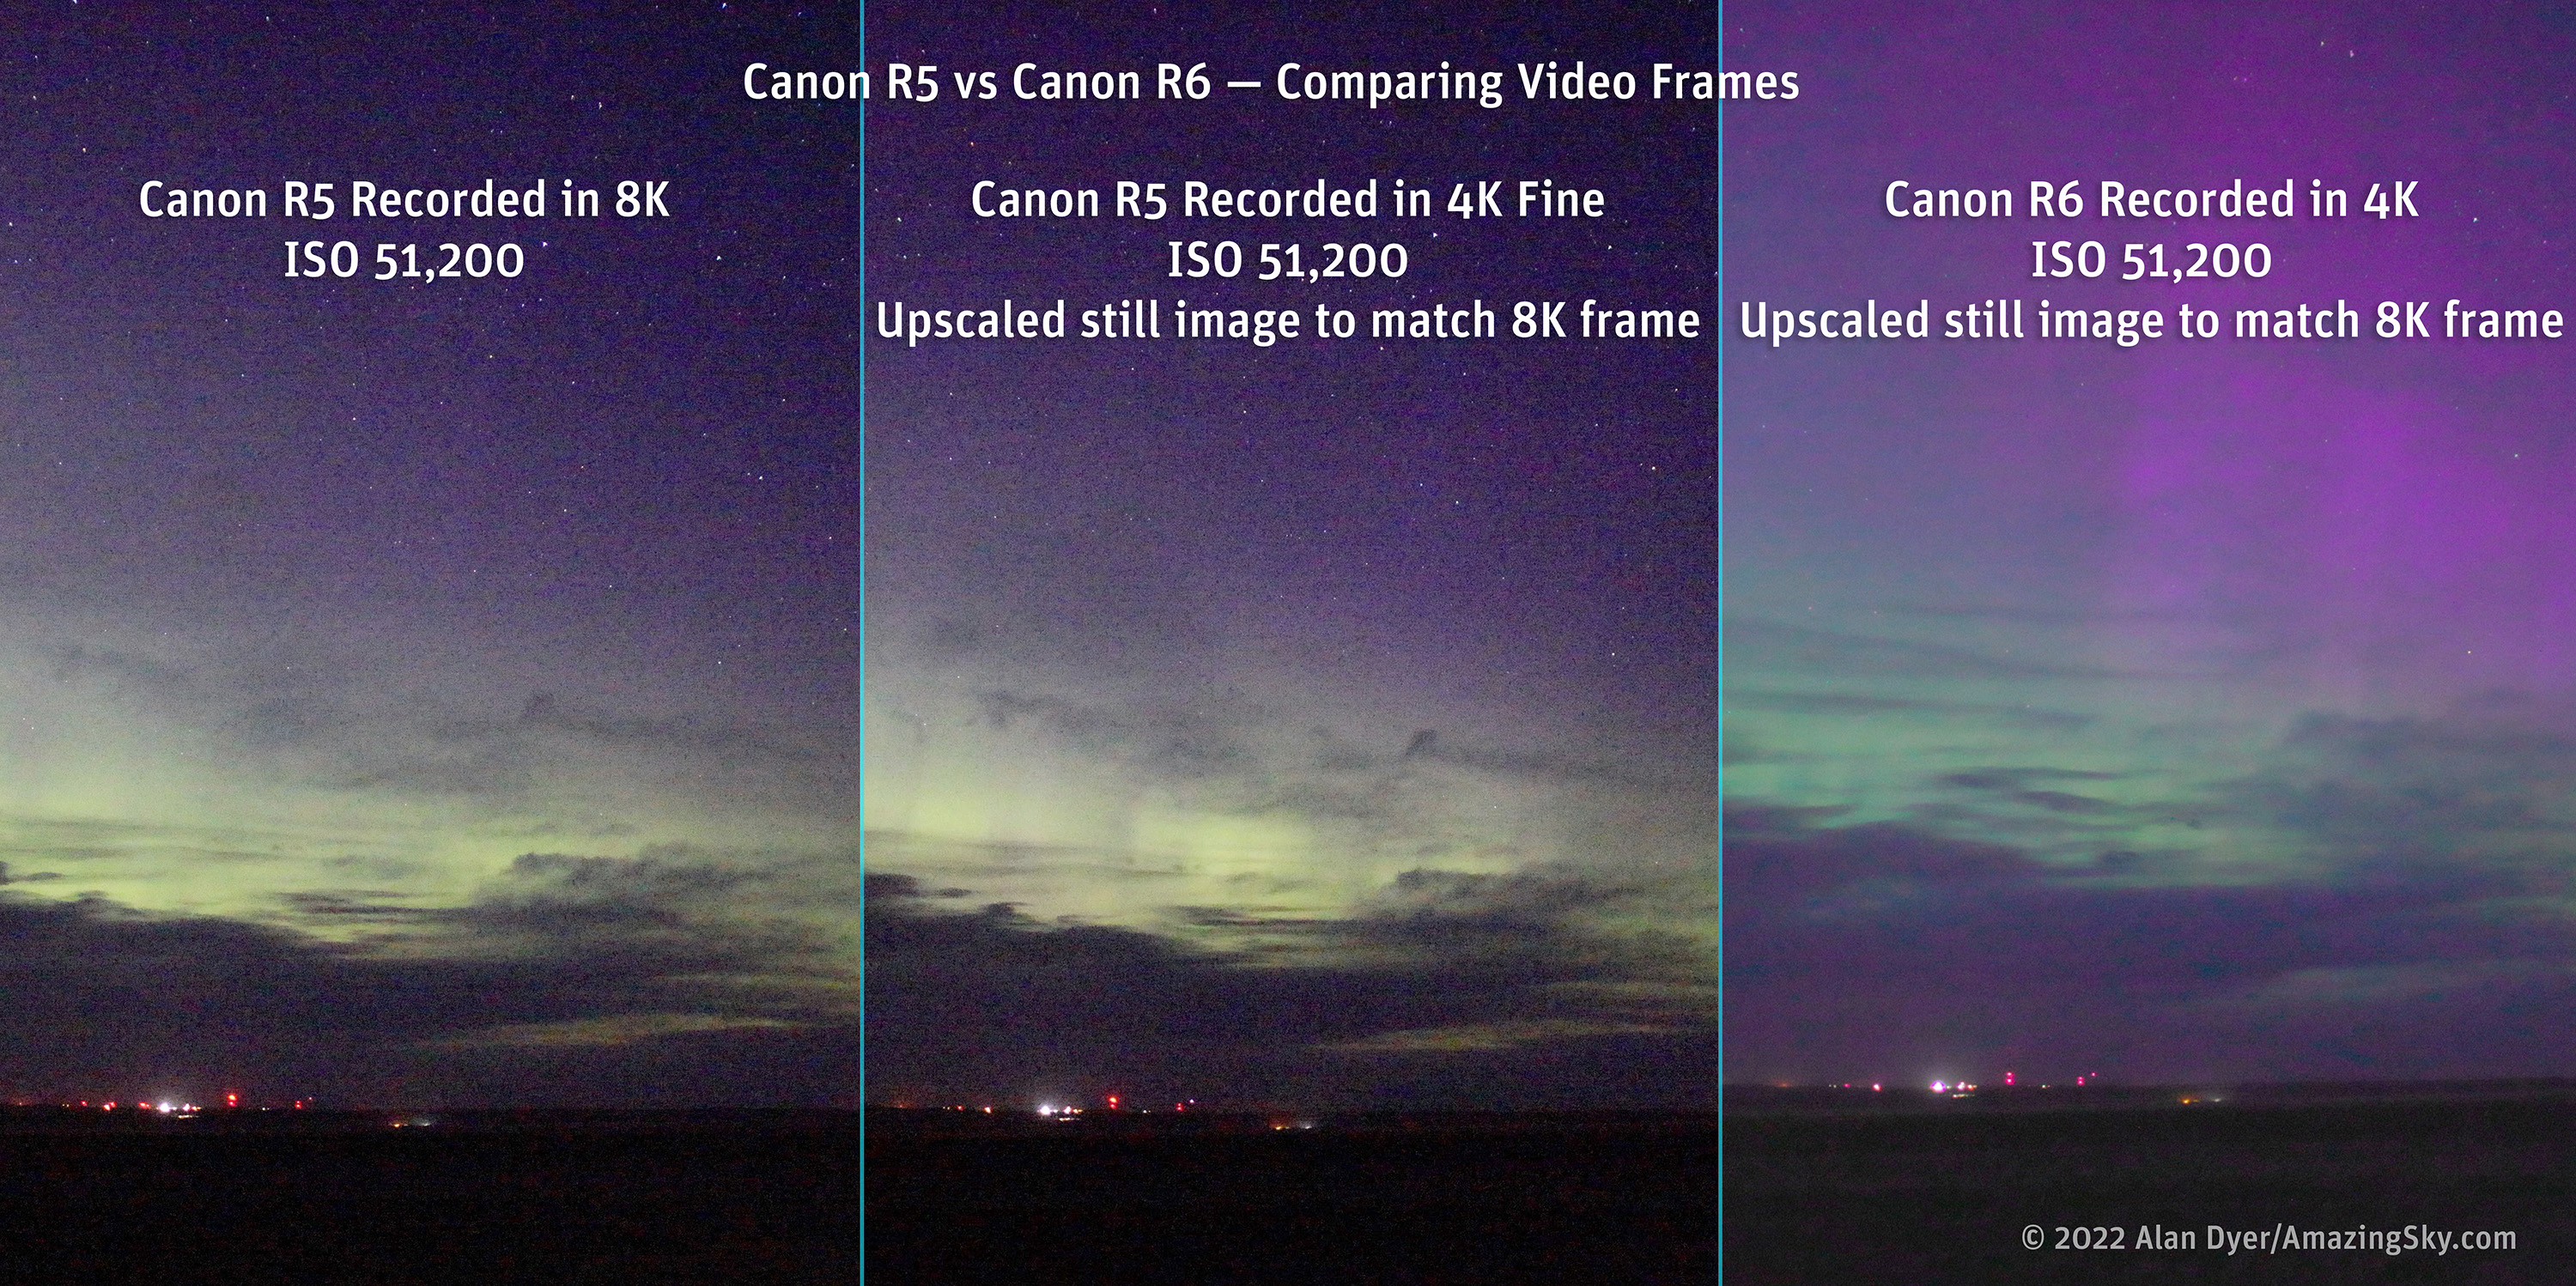
Auroras are where we need to shoot full-frame, for the maximum field of view, and at high ISOs. The R5’s maximum ISO is 51,200, while the R6 goes up to 204,800, though it is largely unusable at that speed for actual shooting, just for previewing scenes.
As expected, the R6 was much less noisy than the R5, by about two stops. The R5 is barely usable at ISO 51,200, while the R6 works respectably well at that speed. If auroras get very bright, then slower ISOs can be used, making the R5 a possible camera for low-light use, but it would not be a first choice, unless 8K auroras are a must-have.
Sample aurora Movies
For a narrated movie comparing the R5 and R6 at 4K on the aurora, stepping both through a range of ISO speeds, see this movie at Vimeo.
A “private link” video on Vimeo demonstrating 4K aurora clips with the R5 and R6.
For a movie showing the same aurora shot with the R5 at 8K, see this movie. However, it has been down-sized to 4K for on-line viewing, so you’ll see little difference between it and the 4K footage. Shooting at 8K did not improve or smooth noise performance.
A “private link” video on Vimeo demonstrating 8K aurora clips with the R5.
BATTERY LIFE — Stills and video
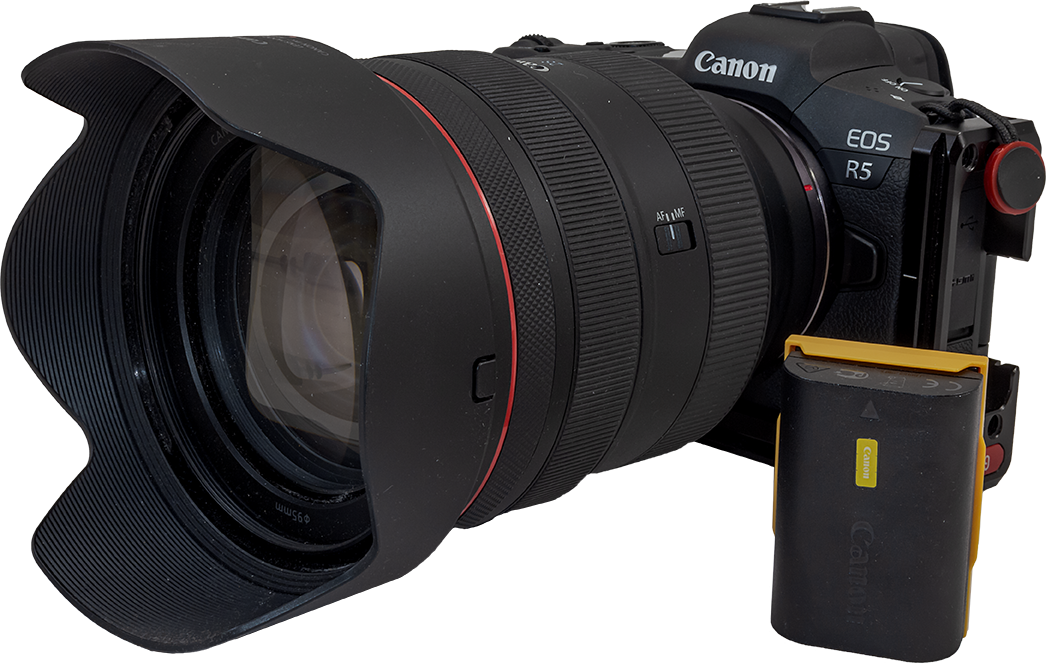
Canon’s new LP-E6NH battery supports charging through the USB-C port and has a higher 2130mAh capacity than the 1800mAh LP-E6 batteries. However, the R5 is compatible with the older batteries.
On mild nights, I found the R5 ran fine on one battery for the 3 to 4 hours needed to shoot a time-lapse sequence, or set of deep-sky images, with power to spare. Now, that was with the camera in “Airplane Mode,” which I always use regardless, to turn off the power-consuming WiFi and Bluetooth, which I never use on cameras.
As I noted with the R6, for demanding applications, especially in winter, the R5 can be powered by an outboard USB power bank that has Power Delivery or “PD” capability.
The exception for battery use is when shooting videos, especially 8K. That can drain a battery after an hour of recording, though it takes only 10 to 12 minutes of 8K footage to fill a 128 gigabyte card. While less than half that length will be needed to capture any upcoming total eclipse from diamond ring to diamond ring, the result is still a massive file.
OVERHEATING
More critically, the R5 is also infamous for overheating and shutting down when shooting 8K movies, after a time that depends on how hot the environment is. I found the R5 shot 8K or 4K Fine HQ for about 22 minutes at room temperature before the overheat warning first came on, then shut off recording two or three minutes later. Movie recording cannot continue until the R5 cools off sufficiently, which takes at least 10 to 15 minutes.
That deficiency might befoul unwary eclipse photographers in 2024. The answer for “no-worry” 8K video recording is the Canon R5C, the video-centric version of the R5, with a built-in cooling fan.
Features and usability
While certainly not designed with astrophotography in mind, the R5 has several hardware and firmware features that are astrophoto friendly.
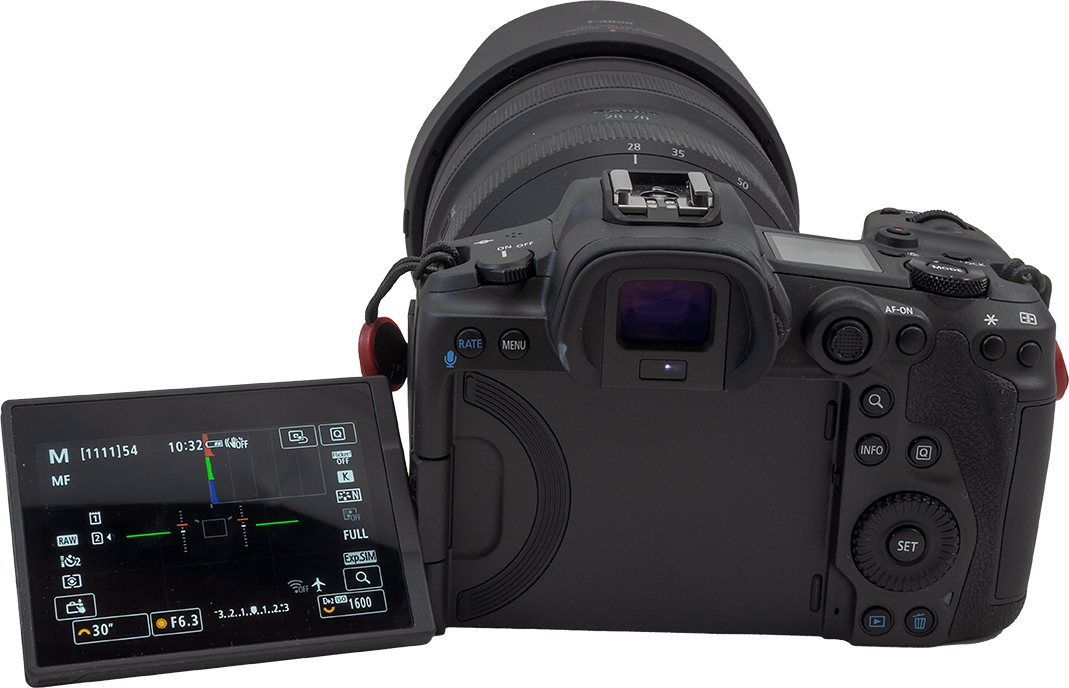
Like all Canon cameras made in the last few years, the R5 has Canon’s standard articulated screen, which can be angled up for convenient viewing when on a telescope. It is also a full touch screen, with all important camera settings and menus adjustable on screen, good for use at night.
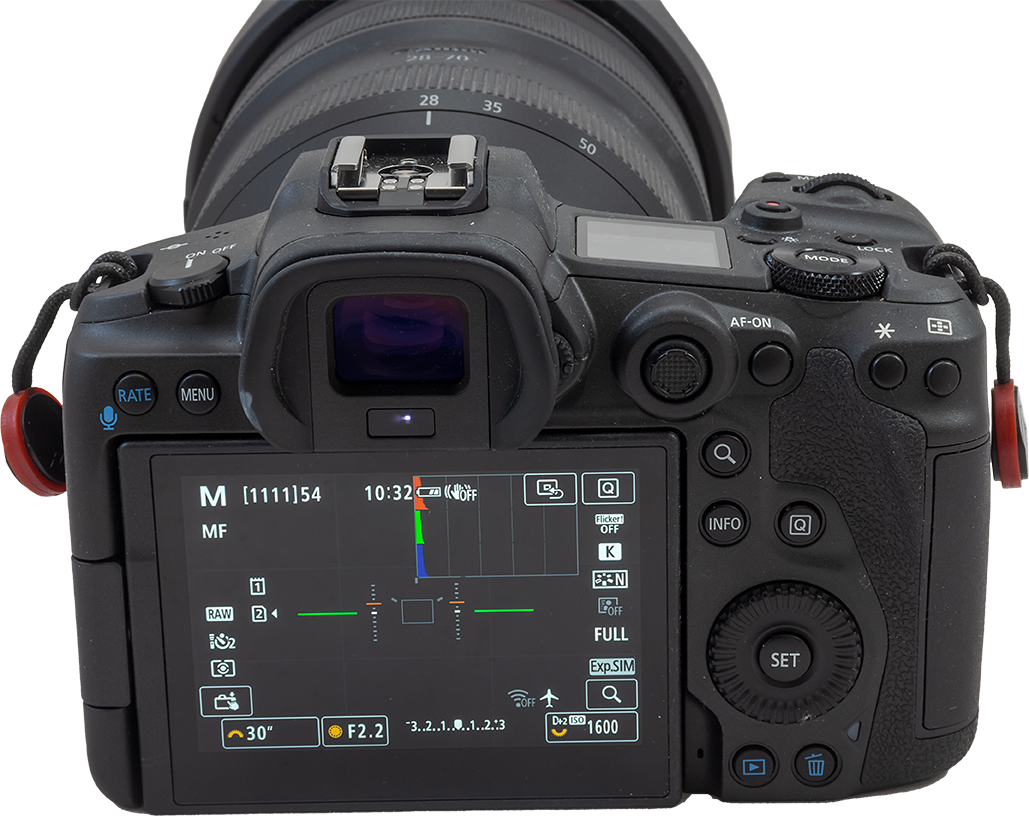
With 2.1 million dots, the R5’s rear screen has a higher resolution than the 1.62-million-dot screen of the R6, and much higher than the 1 million pixels of the Rp’s screen, but is the same resolution as in the R and Ra.

The R5, like the original R, has a top backlit LCD screen for display of current camera settings, battery level and Bulb timer. The lack of a top screen was one of my criticisms of the R6.
Yes, the hardware Mode dial of the R6 and Rp does make it easier to switch shooting modes, such as quickly changing from Stills to Movie. However, for astrophotography the top screen provides useful information during long exposures, and is handy to check when the camera is on a telescope or tripod aimed up to the sky, without spoiling dark adaptation. I prefer to have one.

The R5’s remote shutter port, used for connecting external intervalometers or time-lapse motion controllers, is Canon’s professional-grade three-pronged N3 connector. It’s sturdier than the 2.5mm mini-phono plug used by the Rp, R and R6. It’s a plus for the R5.
As with all new cameras, the R5’s USB port is a USB-C type. A USB-C cable is included.
Like the R6, the R5 has a dedicated magnification button on the back panel for zooming in when manually focusing or inspecting images. In the R and Ra, that button is only on the touch panel rear screen, where it has to be called up by paging to that screen, an inconvenience. While virtual buttons on a screen are easier to see and operate at night than physical buttons, I find a real Zoom button handy as it’s always there.
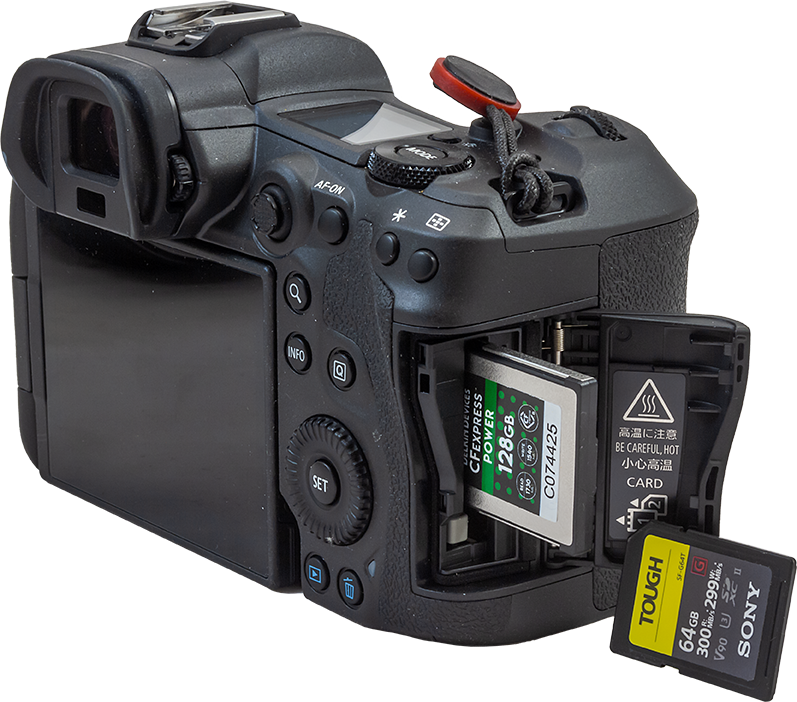
To handle the high data rates of 8K video and also 4K video when set to the high frame rate option of 120 fps, one of the R5’s memory card slots requires a CFexpress Type B card, a very fast but more costly format.
As I had no card reader for this format, I had to download movies via a USB cable directly from the camera to my computer, using Canon’s EOS Utility software, as Adobe Downloader out of Adobe Bridge refused to do the job. Plan to buy a card reader.
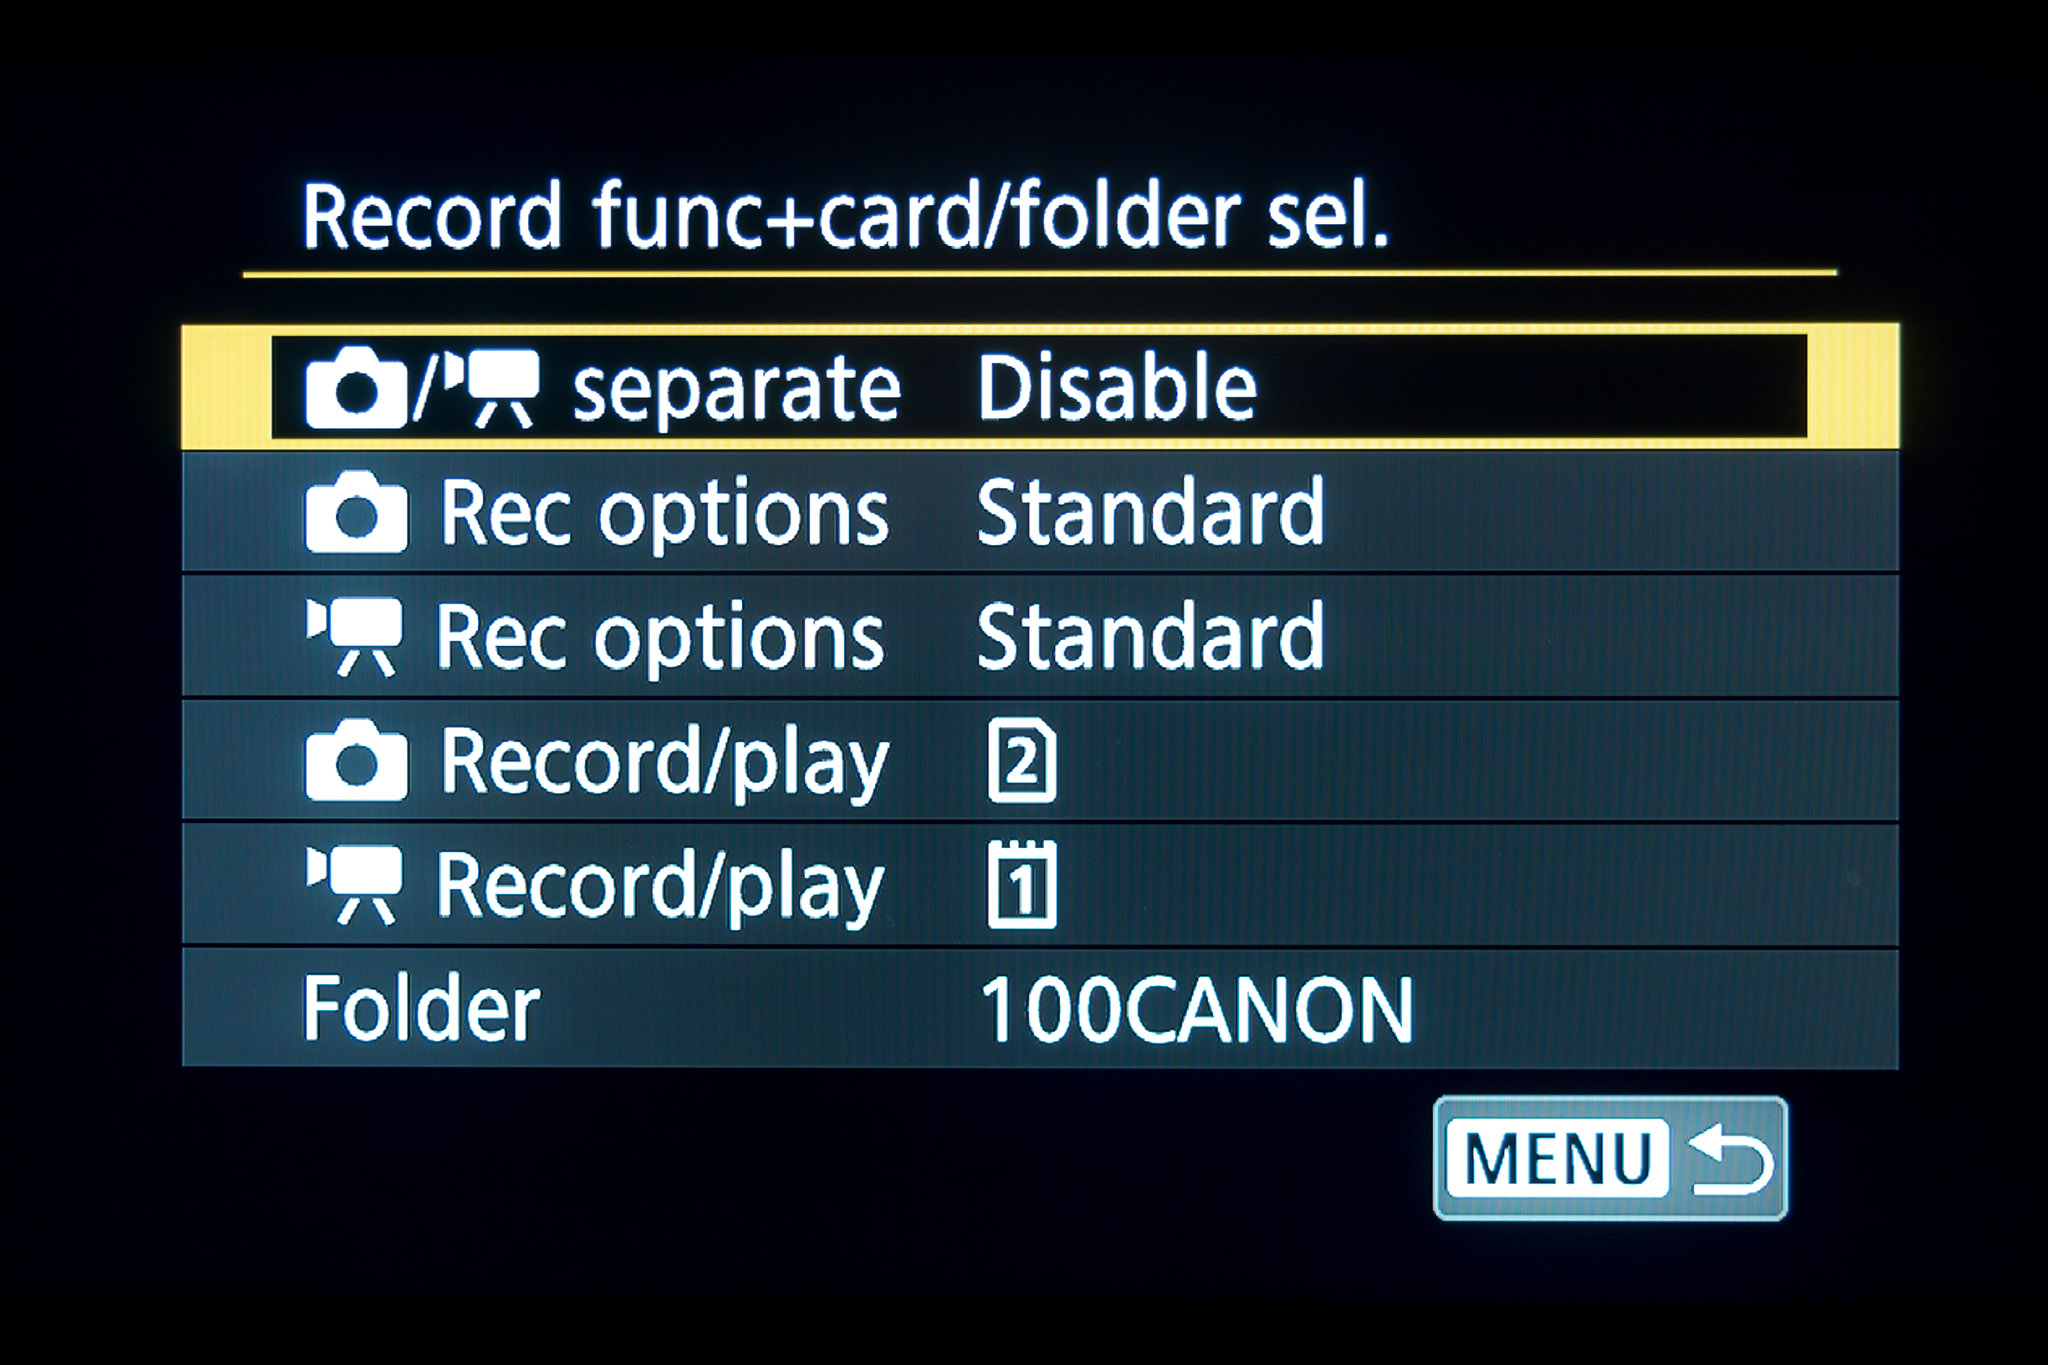
In the menus, you can choose to record video only to the CFexpress, and stills only to the SD card, or both stills and movies to each card for a backup, with the limitation that 8K and 4K 120fps won’t record to the SD card, even very fast ones.
FIRMWARE FEATURES
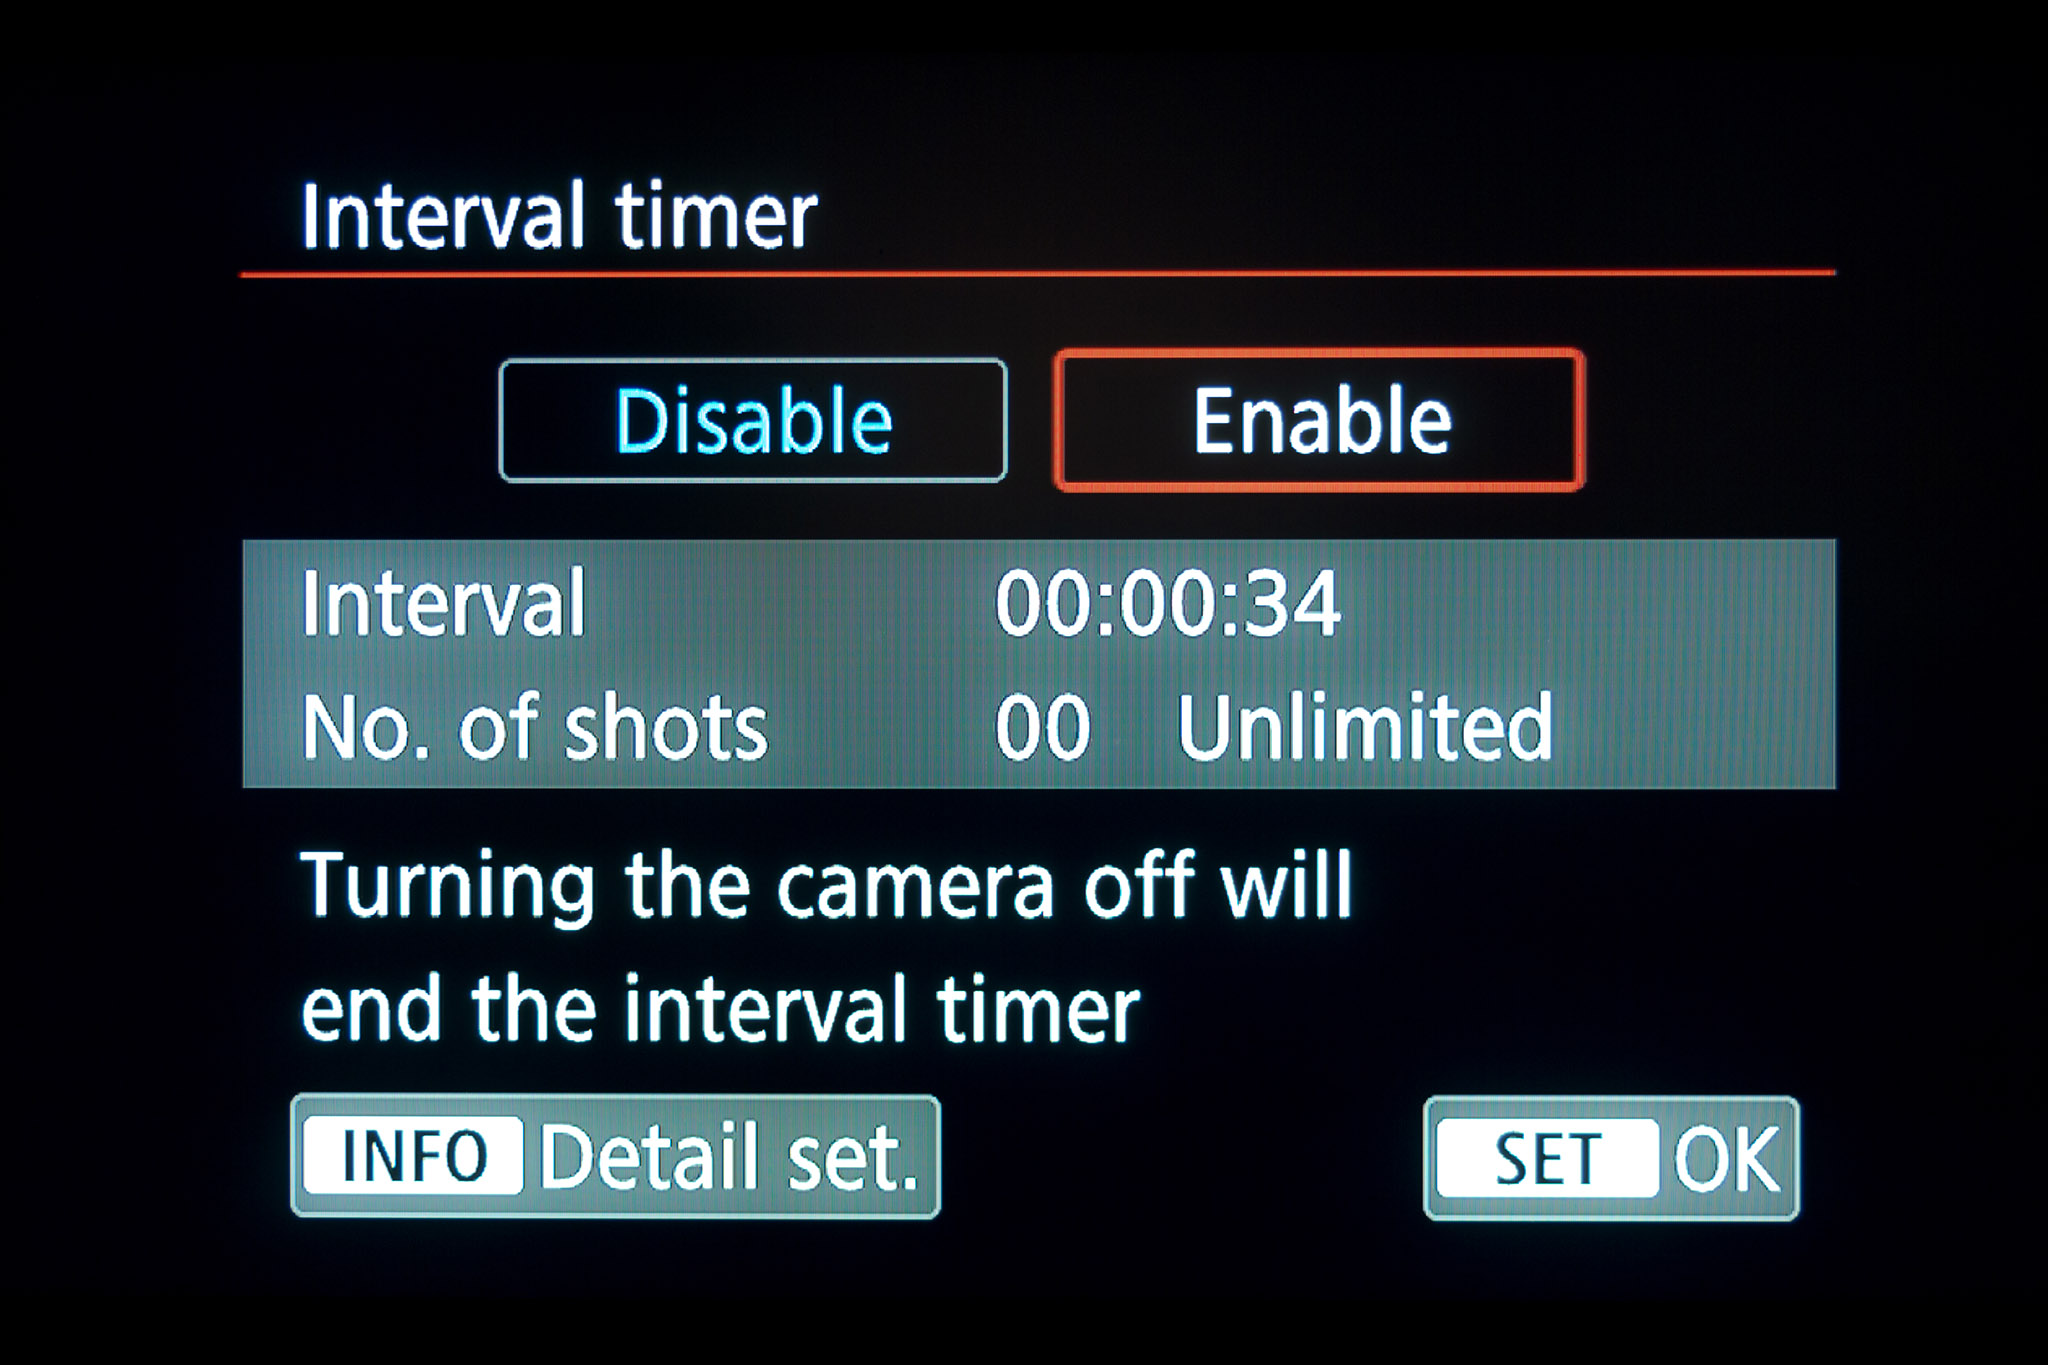
Unlike the Canon R and Ra (which both annoyingly lack a built-in intervalometer), but like the R6, the R5 has an Interval Timer in its firmware. This can be used to set up a time-lapse sequence, but with exposures only up to the maximum of 30 seconds allowed by the camera’s shutter speed settings, true of most in-camera intervalometers. Even so, this is a useful function for simple time-lapses.
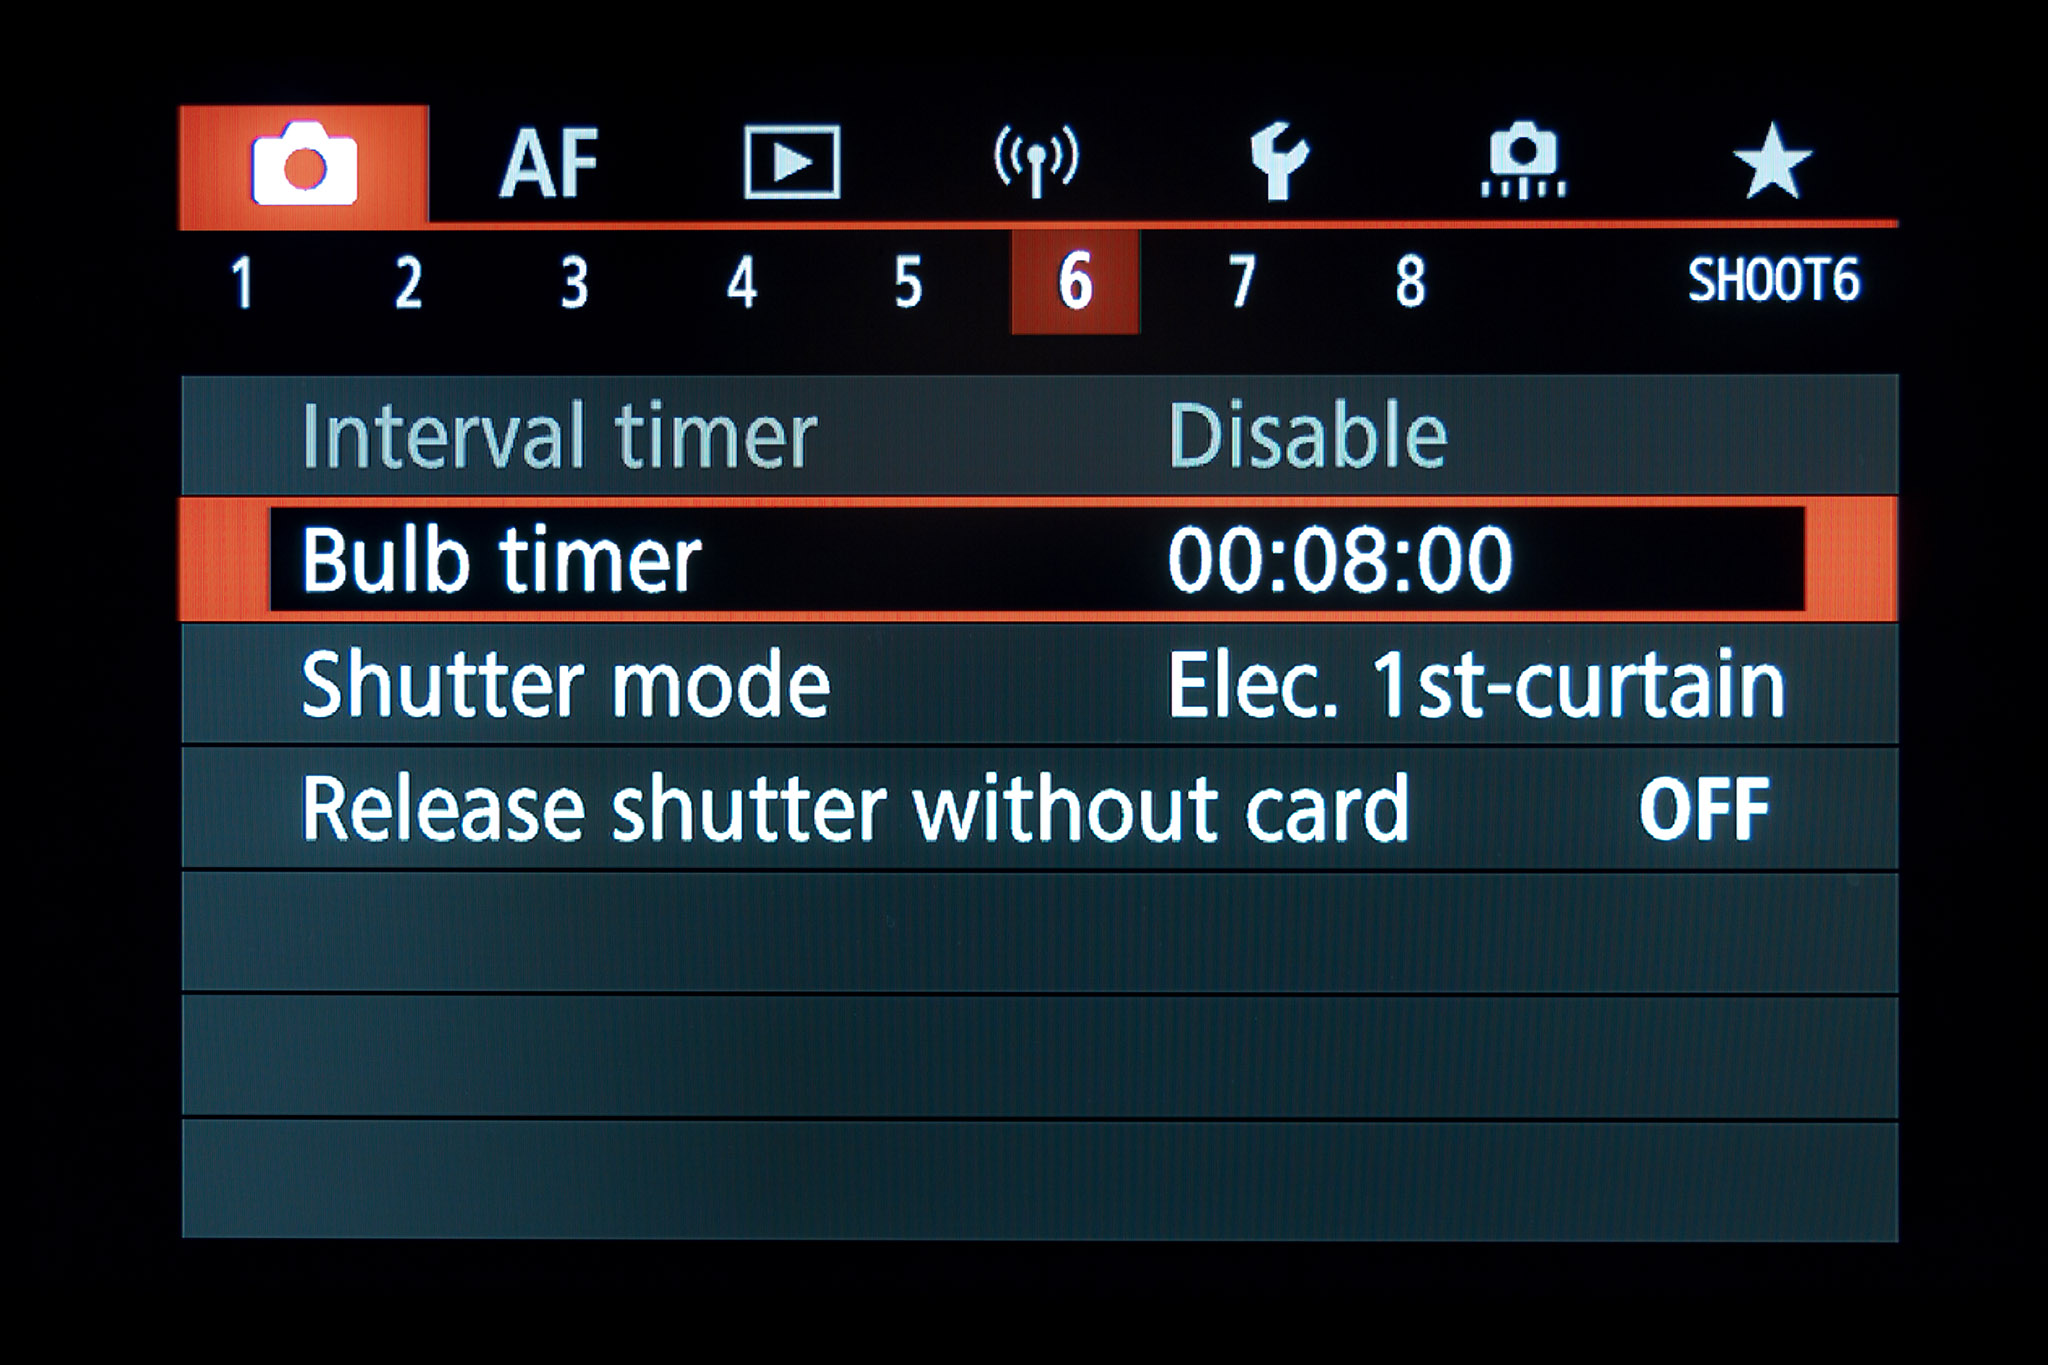
As with most recent Canon DSLRs and DSLMs, the R5 also includes a built-in Bulb Timer. This allows setting an exposure of any length (many minutes or hours) when the camera is in Bulb mode. However, it cannot be combined with the Interval Timer for multiple exposures; it is good only for single shots. Nevertheless, I find it useful for shooting long exposures for the ground component of nightscape scenes.
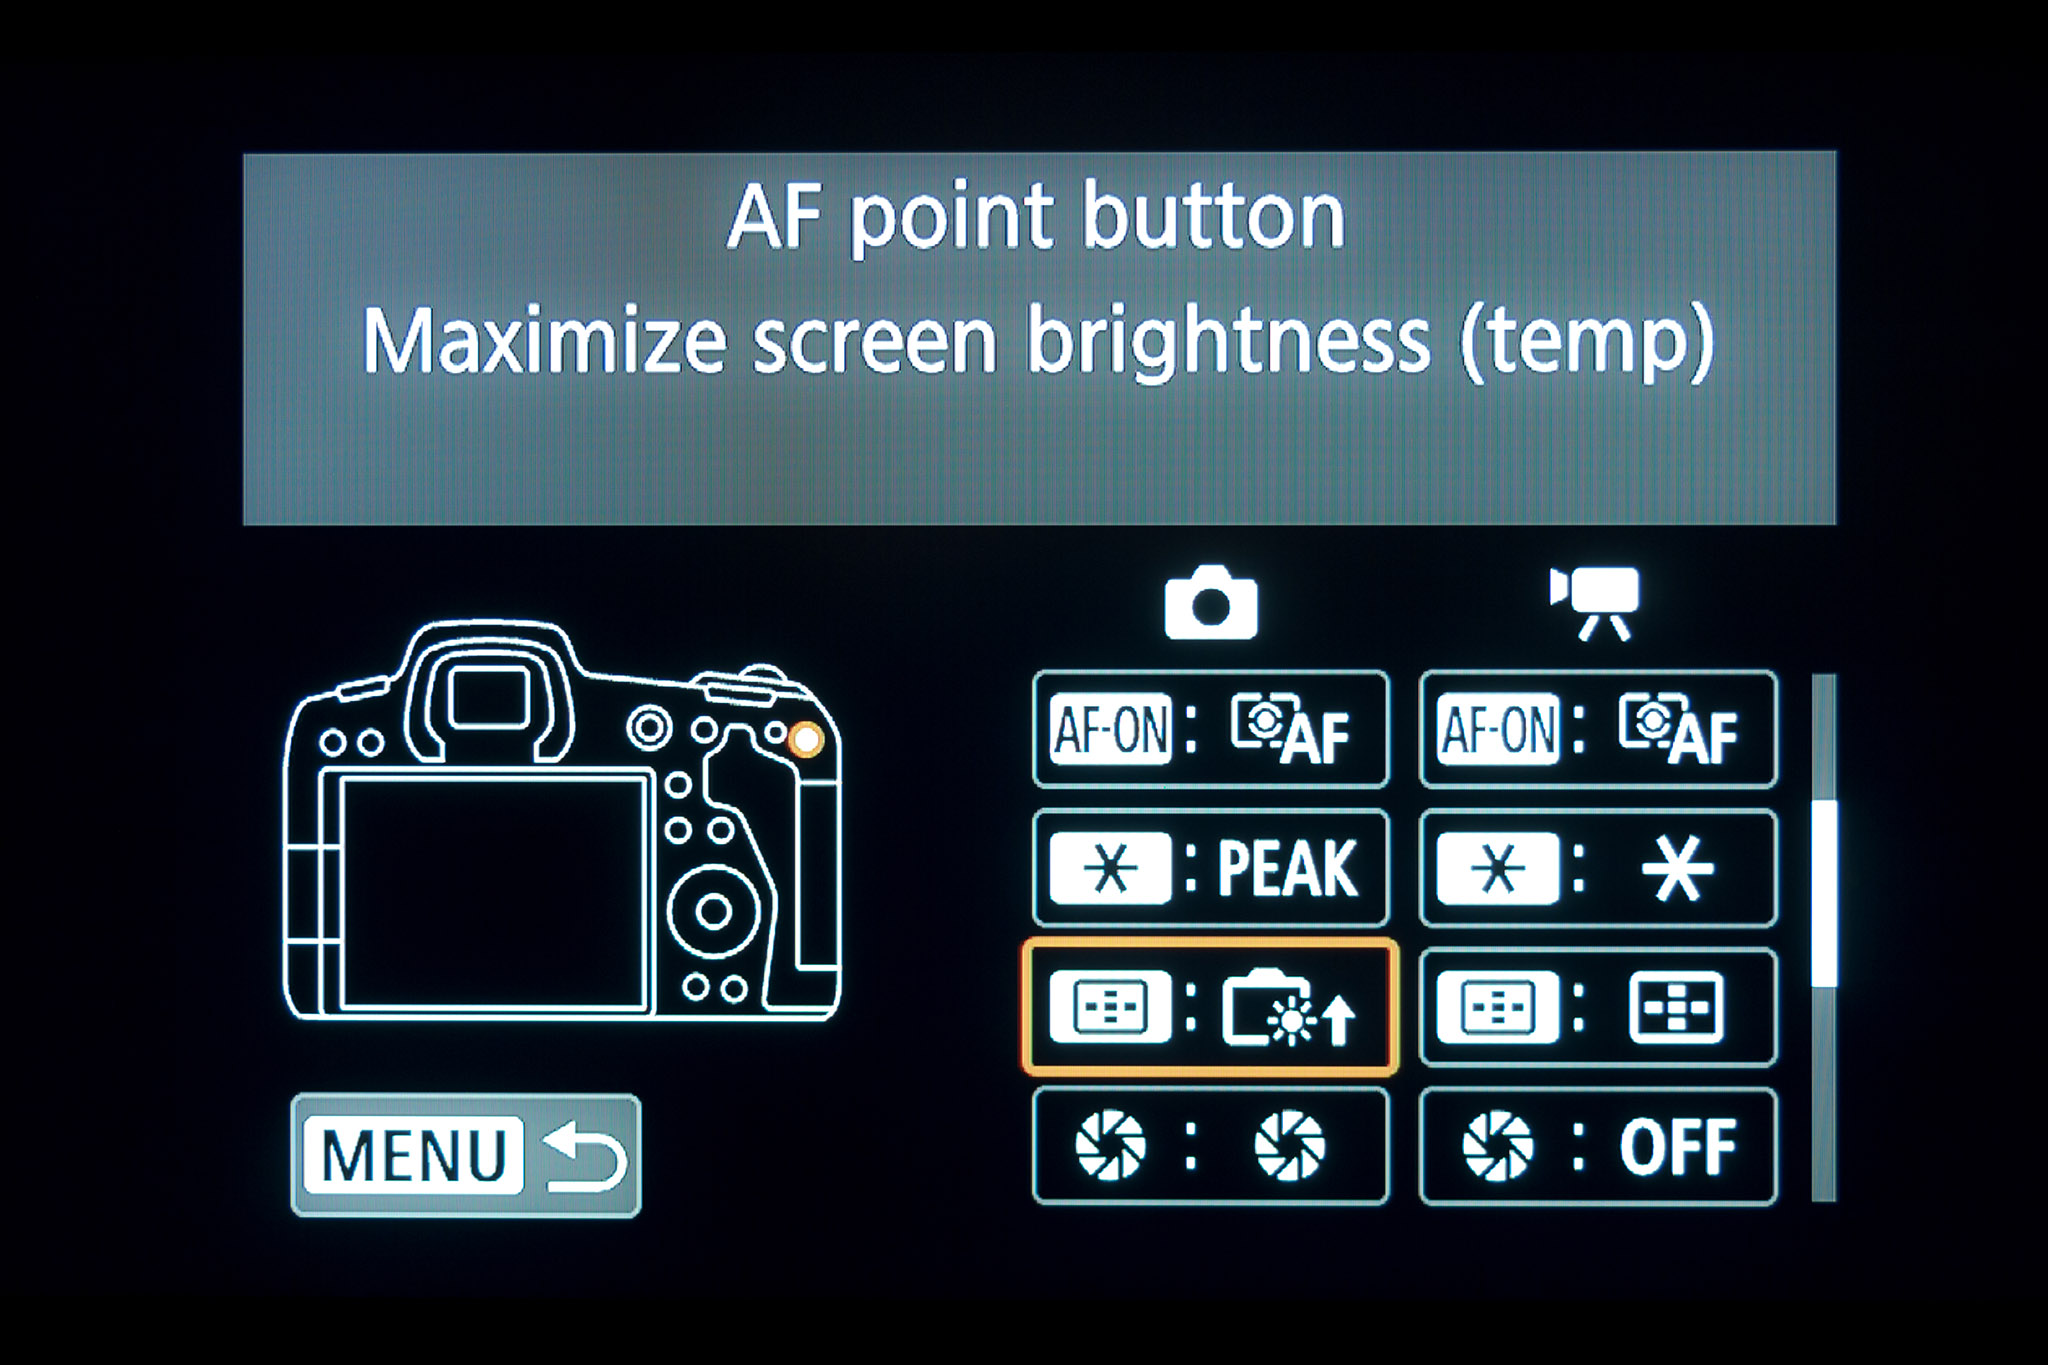
While Canon cameras don’t have Custom Function buttons per se (unlike Sonys), the R5’s various buttons and dials can be custom programmed to functions other than their default assignments. I assign the * button to turning on and off the Focus Peaking display and, as shown, the AF Point button to a feature only available as a custom function, one that temporarily brightens the rear screen to full, good for quickly checking framing at night.

A handy feature of the R5 is the ability to add an audio notation to images. You shoot the image, play it back, then use the Rate button (if so assigned) to record a voice memo of up to 30 seconds, handy for making notes in the field about an image or a shoot. The audio notes are saved as WAV files with the same file number as the image.

Like other EOS R cameras, the R5 has this notorious “feature” that trips up every new user who attaches their Canon camera to a telescope or manual lens, only to find the shutter suddenly doesn’t work. The answer is to turn ON “Release Shutter w/o Lens” found buried under Custom Functions Menu 4. Problem solved!
OTHER FEATURES
I provide more details of other features and settings of the R5, many of which are common to the R6, in my review of the R6 here.

CONCLUSION
No question, the Canon R5 is costly. Most buyers would need to have very good daytime uses to justify its purchase, with astrophotography a secondary purpose.
That said, other than low-light night sky videos, the R5 does work very well for all forms of astrophotography, providing a level of resolution that lesser cameras simply cannot.
Nevertheless, if it is just deep-sky imaging that is of interest, then you might be better served with a dedicated cooled-sensor CMOS camera, such as one of the popular ZWO models, and the various accessories that need to accompany such a camera.
But for me, when it came time to buy another premium camera, I still preferred to have a model that could be used easily, without computers, for many types of astro-images, particularly nightscapes, tracked wide-angle starfields, as well as telescopic images.
Since buying the R5, after first suspecting it would prove too noisy to be practical, it has in fact become my most used camera, at least for all images where the enhanced red sensitivity of the EOS Ra is not required. But for low-light night videos, the R6 is the winner.
However, to make use of the R5’s resolution, you do have to match it with sharp, high-quality lenses and telescope optics, and have the computing power to handle its large files, especially when stitching or stacking lots of them. The R5 can be just the start of a costly spending spree!
— Alan, June 23, 2022 / © 2022 Alan Dyer / AmazingSky.com

Thank you, very interesting article. I’m actually going to use an R5C during Apr8th Solar Eclipse..
I wonder if and how you have been able to separate the CRM raw video into frames.
A.
Hello-I have not tried that. It’s certainly an option if you can get it to work. Once you have the right plug in to read the CRM files in your video editing software can you not just export out individual video frames? But as what format? If they are Jpgs then that would not be ideal.
Thank you Alan for the answer,
being a .CRM file simply a container for all that raw sensor data, not debayered, I hoped to be able to separate it into raw frames, maybe in DNG or CR3 format. Another option could also be convert the video file in CinemaDNG format (that is natively a collection of sigle frames)
the interest in having single raw frames is that we can make photometry and measure light curves
Hey, just as an FYI, the R5C is not (at least at present) supported by Canon’s SDK, so it is definitely not ideal for astrophotography.
Hi Alan
What Lens did you use?
Did you use the Equatorial mount or Sky-Watcher Star Adventurer 2i Pro Pack or its equivalent Orion mount for long exposure?
Hello — I used a variety of lenses and telescopes for the test images. Some are identified in the text. For all the tracked images, I had the camera on one of my large equatorial mounts.
Mr Dyer,
Great article. I am still using my 5D Mk IV and 60d for my astro/landscape shooting. I am wondering if my current lens would not be good enough. So I too would be interested in your opinion on whether my EF mount, Sigma and Rokinon very-fast wide-angle prime lens and would hold back the image quality of the R5?
Hello, by all means use the lenses you have as they won’t cost you anything other than having to buy the EF-to-RF lens adapter which might come with an R5. The Rokinon 14mm f/2.5 SP is very sharp; not so the low cost 14mm f/2.8 Rokinon. The R5 will show any residual aberrations. The Sigma Arts are also great but from tests I’ve seen the new Art versions made for mirrorless are even better. I hope they come out for Canon RF.
Outstanding article, thank you! I just purchased an R5 after reading this and cannot wait to start using it for astrophotography.
Hi Alan
Thanks for this detailed and very informative review.
For Aurora Borealis shoot with Signa 14mm at 1.8 and owning an R5 do you think that an R6 or an R will help in getting better overall IQ?
I’m a little bit worried about my R5 noise at high ISO (I indend to shoot for sharp Aurora so maybe 1 to 3s max exposure, then ISO should climb arrouns 12’800).
What’s your experience in this topic?
Will downsempling my R5 pictures to R or R6 resoltion will led to equal or even better noise aspects compared to these bodies?
I hope that you could give your informed input on this matter, as I believe not to be the only one seeking for such an information.
Best Regards
AG
Hi, the R5 should work fine for aurora stills. I’ve been using it a lot for Milky Way nightscapes – see my later blog about mountain nights. Where it won’t be as good as for real time aurora movies. The R6 and maybe the R6 MkII (I haven’t tried one) are better for ultra high ISO 4K movies.
Alan,
Thanks for another excellent review! I’m wondering about the Ha performance you describe, and your opening image of the NA Nebula (12 x 5-minute ISO 800) that show a lot of nebulosity.
Your image comparing R5 and Ra (4-minute ISO 800) shows much less Ha red color than that opening shot. How did you boost the Ha component?
Thanks,
Ralph
Hi, thanks! It is possible to bump up the reds and magentas in unmodified cameras with the various colour adjustments in Raw developer software (HSL/Color Mixer and/or Calibration) and in programs such as Photoshop, notably Selective Color. But the result is never as rich as using a modified camera. But the R5 and R6 are pretty good for stock cameras.
Hi Alan:
Thanks agian for another review of desireable equipment. I will add it to my Christmas list.
Thanks! Stephen B and Ralph C and I just had an informal eclipse chasers get together at the virtual RASC GA. I was looking around to see if you were there!