I had always planned to drive to the April 8, 2024 total eclipse of the Sun. But to where? I ended up on the other side of the continent than originally planned.
It is not often the path of the Moon’s shadow crosses your home country, let alone continent. Only once before in recent years, on August 21, 2017, did the narrow shadow path pass near enough to my home in Alberta to allow me to drive to a total eclipse. They almost always require flying.
Packed and ready to hit the highway for a long eclipse trip.
Yes, while I could drive to the April 8, 2024 eclipse, it was going to demand a much longer drive than in 2017. But driving allowed me to take a carload of telescope and camera gear. So that was the plan.
My destination was San Antonio, Texas. That’s where I had made a hotel booking more than a year earlier. The weather prospects in Texas were forecast to be best (at least according to the long-term averages) of any locations along the path in the U.S. or Canada. (I did not want to drive into Mexico.)
Where I was going! Where I ended up going!
On March 30, with some trepidation, I set out down I-15 heading south. I got as far as Great Falls, Montana, my stop for night one. But it was to be a move in the wrong direction.
The forecast for Eclipse Day as of March 30. Blue is bad; white is good!
The various long-range weather models were all agreeing, even 10 days in advance, that Texas (covered in blue above) was looking poor for eclipse day. But eastern Canada looked good! That was the exact opposite of what had been expected.
So on Easter Sunday, I turned around and headed north, crossing back into Canada at a lonely border post in southwest Saskatchewan.
I proceeded east along the TransCanada, Highway 1. I decided against a route across the northern U.S. and around the southern end of Lake Michigan, to avoid severe weather forecast for the middle of the U.S.
One of my daily Facebook travelogue posts with a beer of the day.
Along the way I posted my beer-du-jour travel reports, as above from Day 8, that day from within the shadow path at last!
Our 1979 eclipse group in 1979.The 1979 eclipse site in 2024.The February 26, 1979 eclipse.
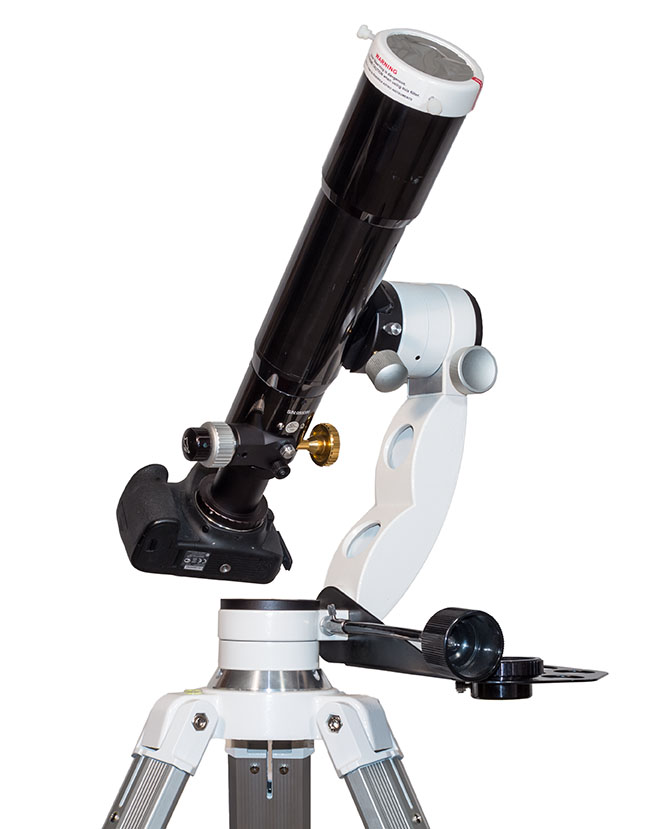
I also stopped at the only total eclipse site, of the 16 I had seen previously, I have ever been able to re-visit. On February 26, 1979 I and a small band of friends from Edmonton viewed the mid-winter eclipse (the last one visible from southern Canada) from a median road (Firdale Road as it is now called) on the TransCanada Highway near Carberry, Manitoba. I found the spot again, where I saw (and shot with my Questar telescope) my first total eclipse of the Sun.
However, a day after entering Ontario, the bad weather caught up with me, forcing an extra night north of Lake Superior while the only highway across the region, Highway 17, was cleared of snow and re-opened at Wawa, the usual cross-Canada choke point.
My new destination (after abandoning the site in the Texas Hill Country) was to be southern Ontario.
The weather prediction as of April 5.Southern Québec looking good!
However, as eclipse day approached and the weather predictions became more precise, it was apparent that Ontario would also be under some cloud. Southern Québec was looking better. So the Eastern Townships became my new Plan A site! I was running out of time!
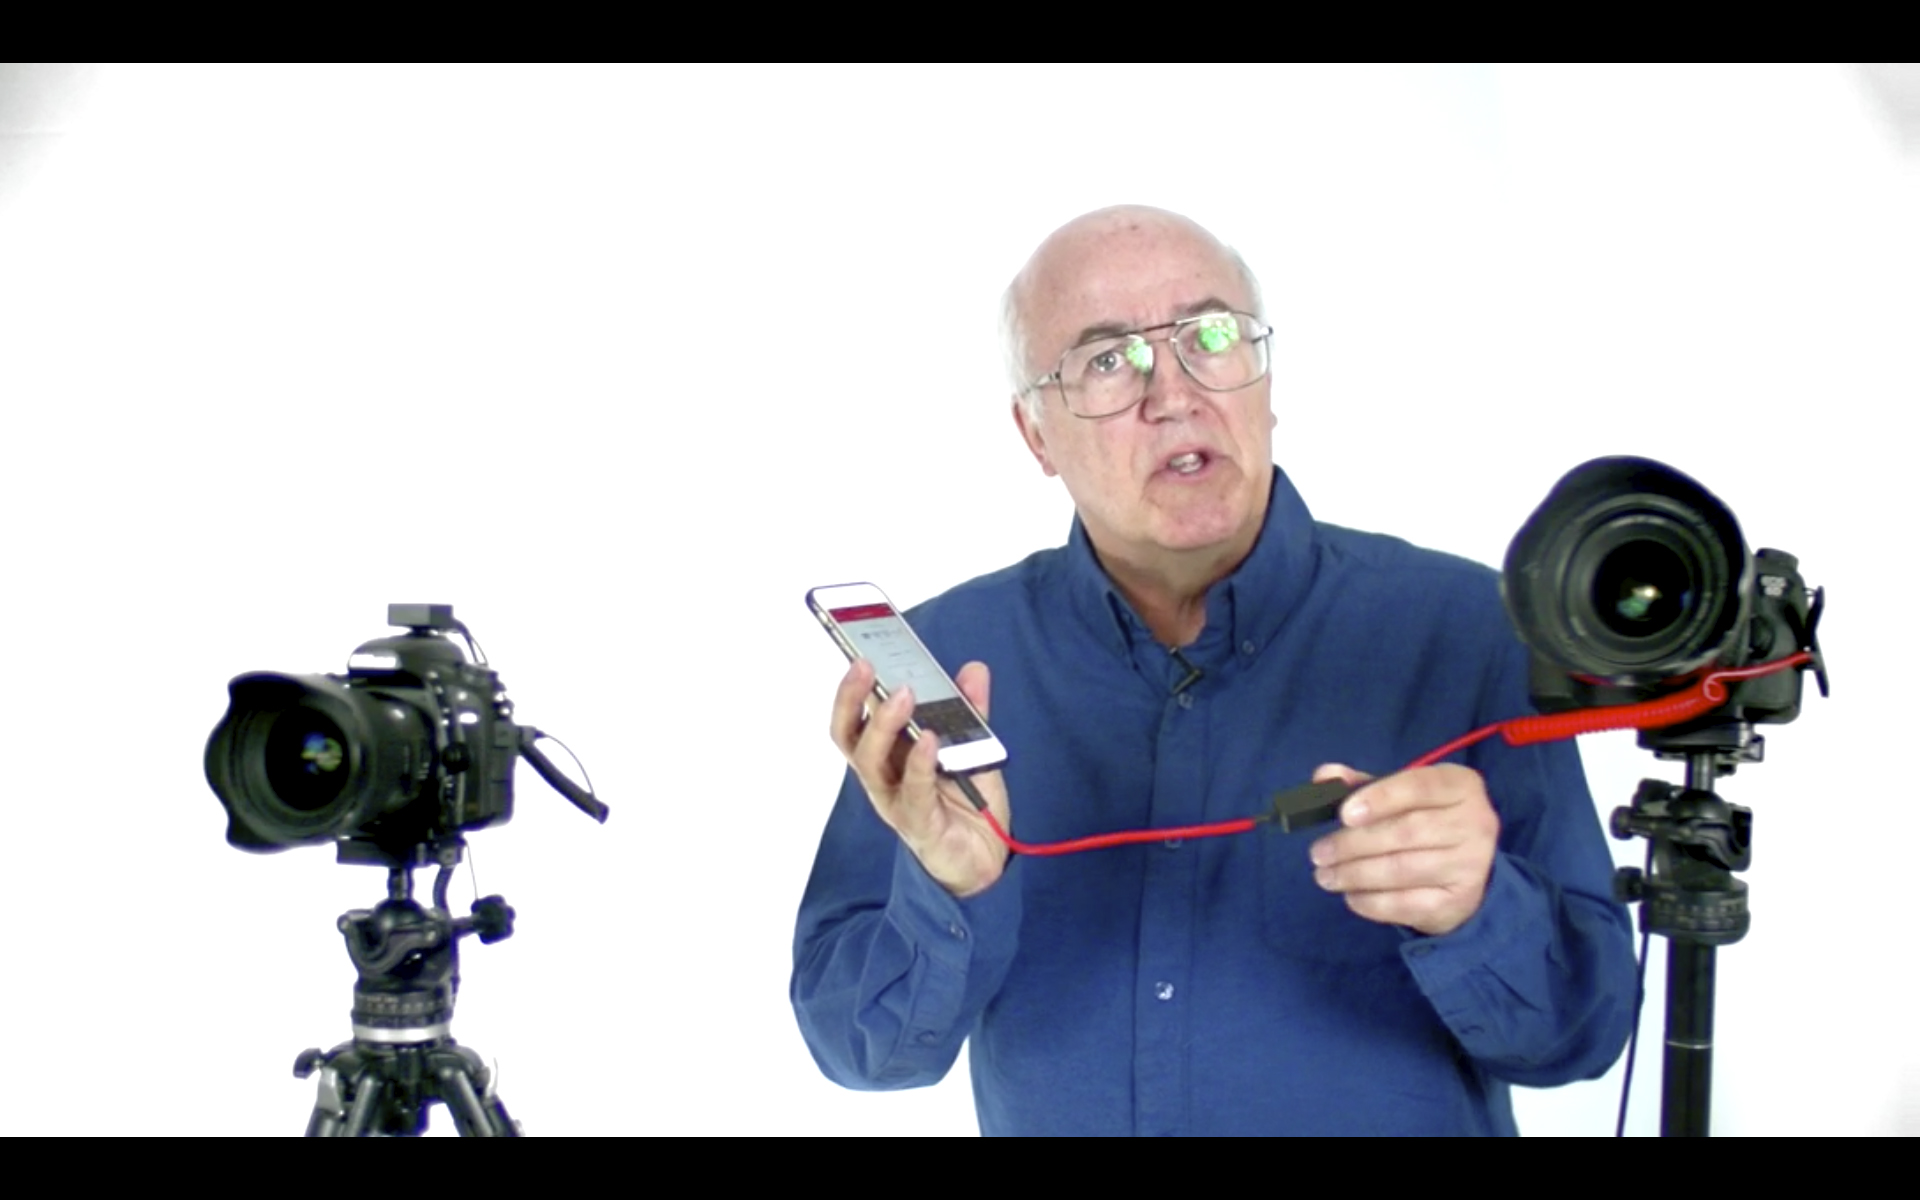
Using the TPE app to check the Sun’s location once on site, the day before the eclipse.
I arrived on site in Québec with only a day to spare to check out the location I had found by exploring Google maps.
With the Sun lower in the mid-afternoon sky in Québec compared to the high-noon Sun in Texas, I decided to shoot a wide-angle scene of the eclipse over a lake, preferably with open water, not ice! That required a site with public parking on an eastern lakeshore.
The Photographer’s Ephemeris (TPE) app to check Sun angles.Zooming in with TPE app for my chosen Lac Brome site. .
The site I found, then checked out on April 7, was on Lac Brome. It proved ideal — except for the thin cloud that was now predicted to drift through during the eclipse.
Sure enough, that’s just what happened. The cloud detracted from the eclipse only in preventing long-exposure images recording the outermost streamers in the Sun’s atmosphere.
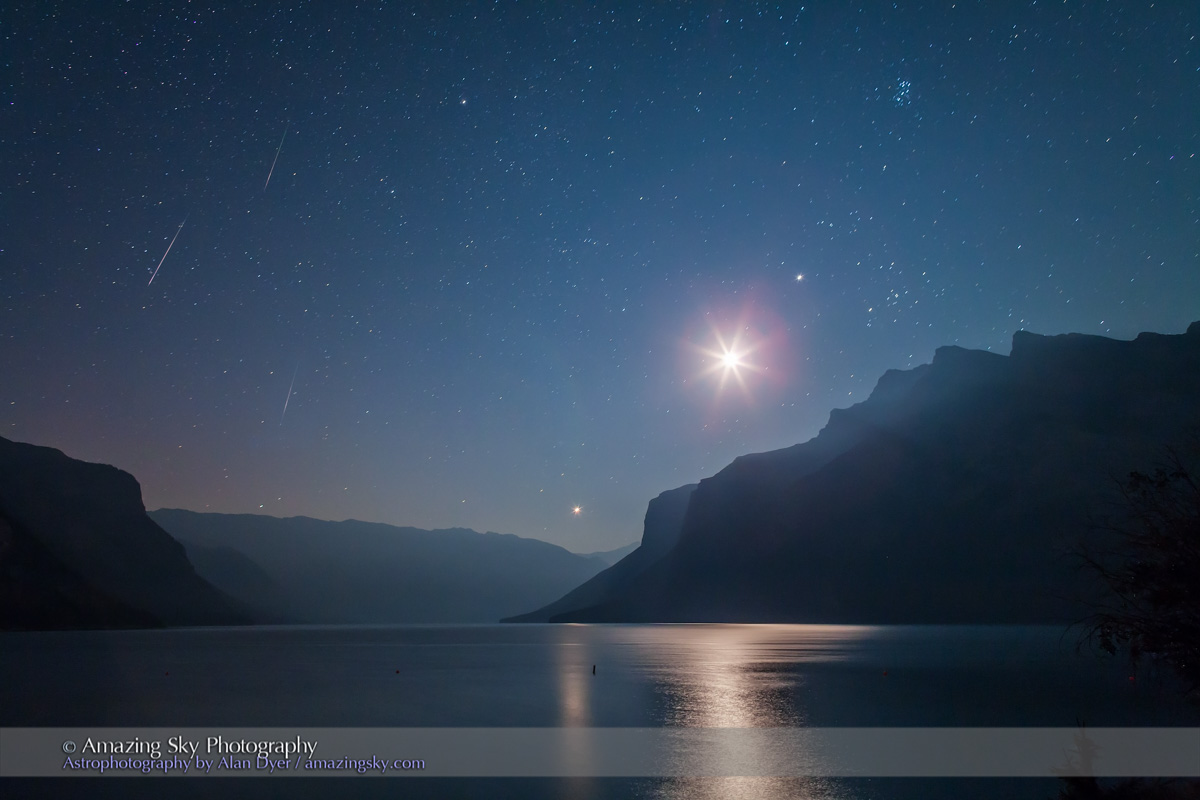
A wide-field view of the eclipse of the Sun, taking in the bright planets Jupiter (at top) and Venus (below) that were easily visible to the unaided eye during totality.
I could have sought out clearer skies by going even farther east, but I was in a crunch for time and hotel rooms! As it was I was able to get rooms everywhere I wanted and at normal “non-eclipse” rates!
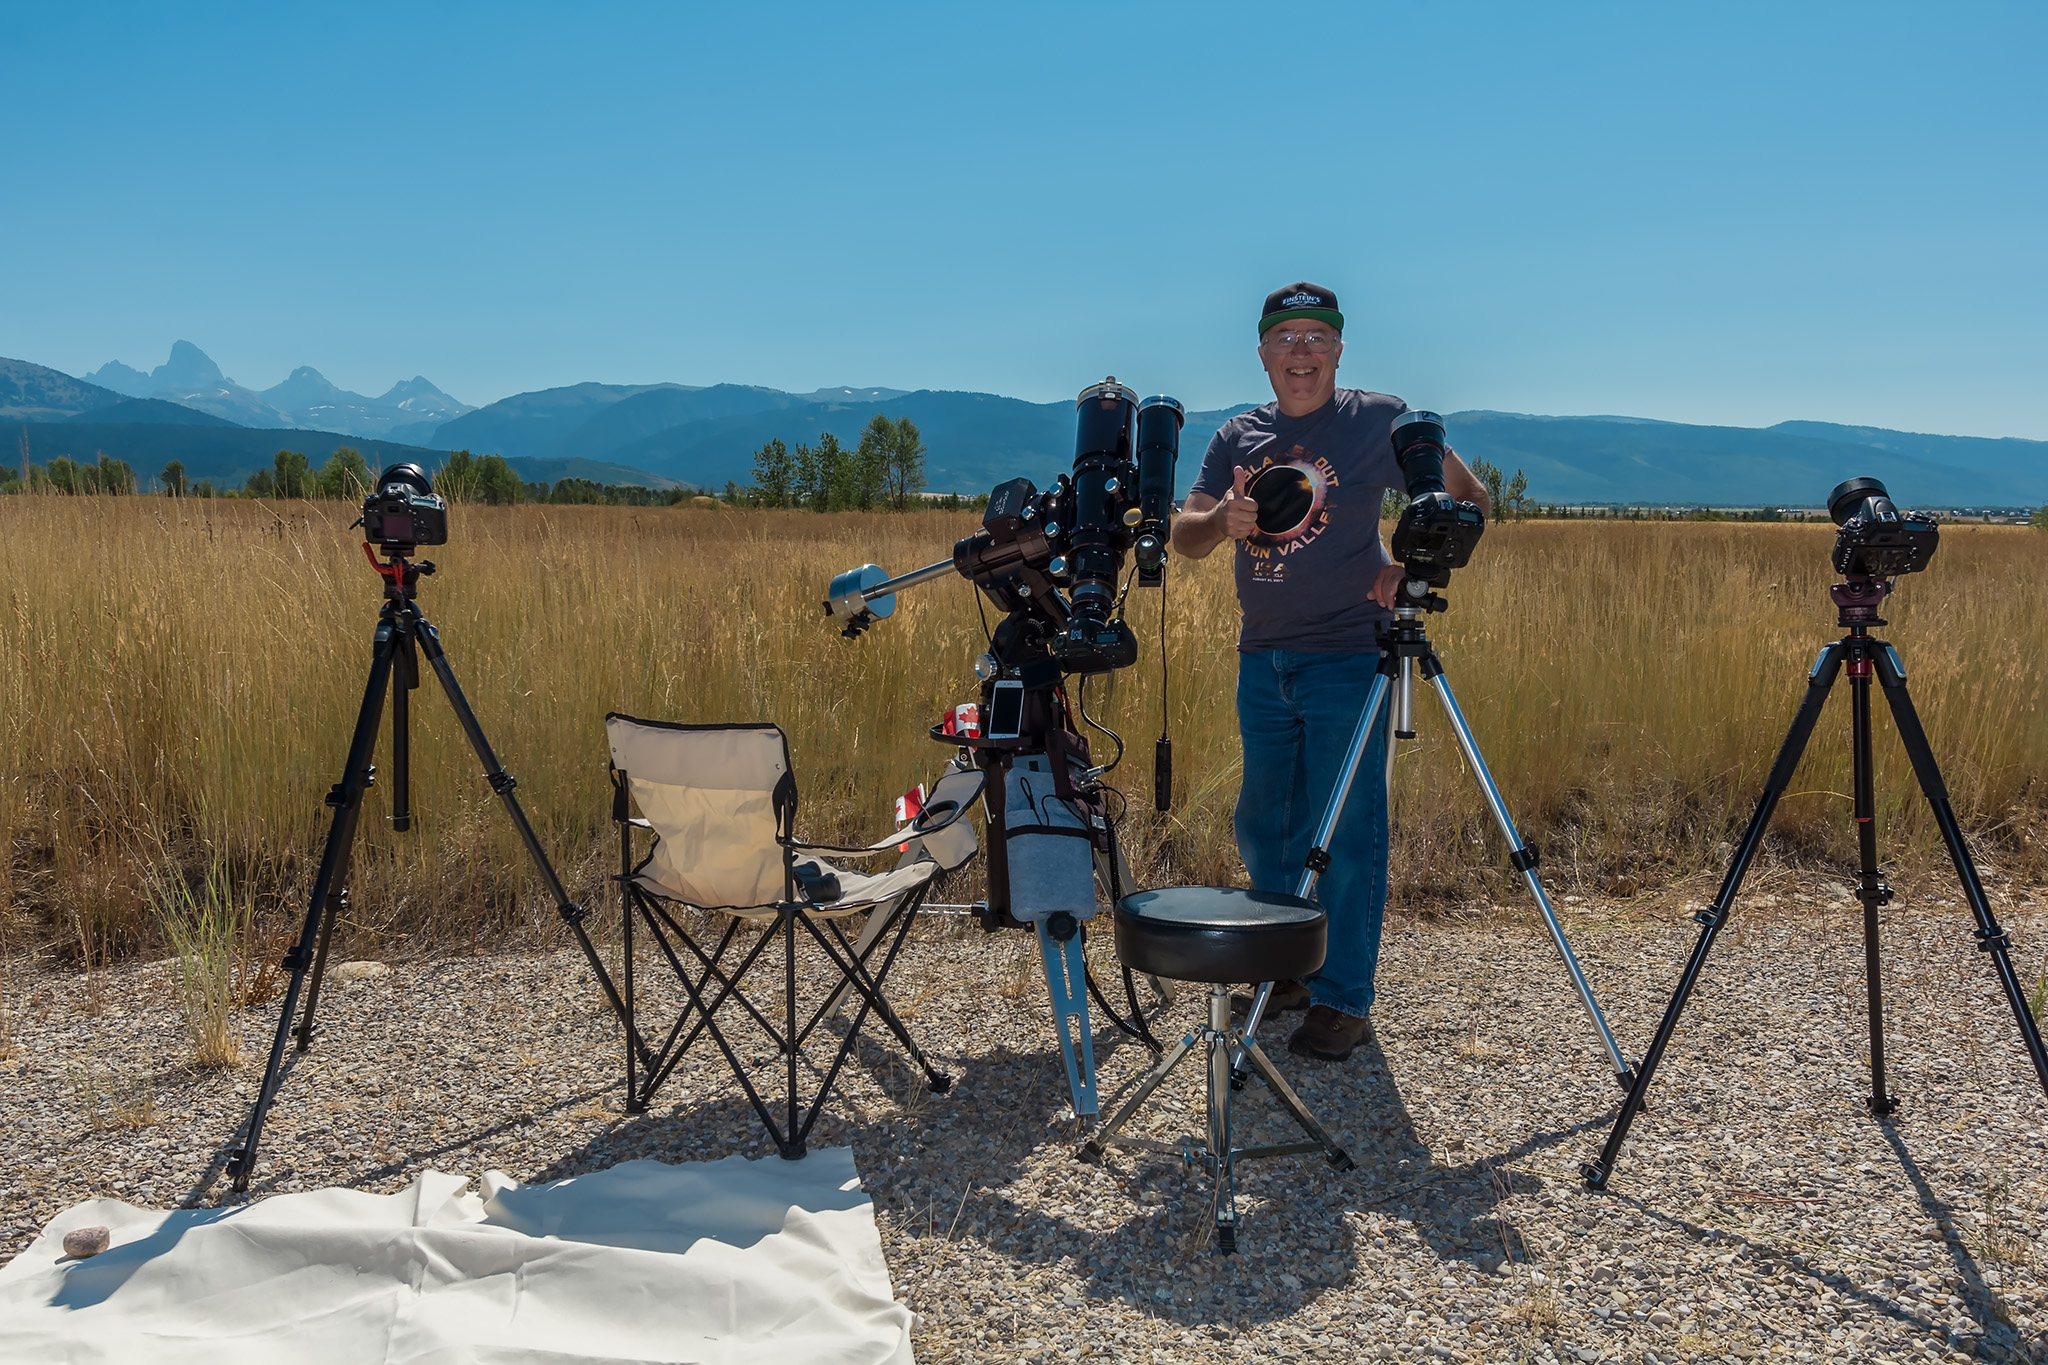
A panorama of the lakeside parking area at Lac Brome prior to the eclipse. My RAV4 and camera array, pre-eclipse.I shot with 4 cameras at the car and one set up lakeside.
The Lac Brome site filled with cars during the day, with people from Québec and Ontario, but also from Alberta, and from Pennsylvania, Massachusetts and Maine – at least those were the homes of the folks I enjoyed meeting on eclipse day.
Everyone had a great time and had a superb eclipse experience.
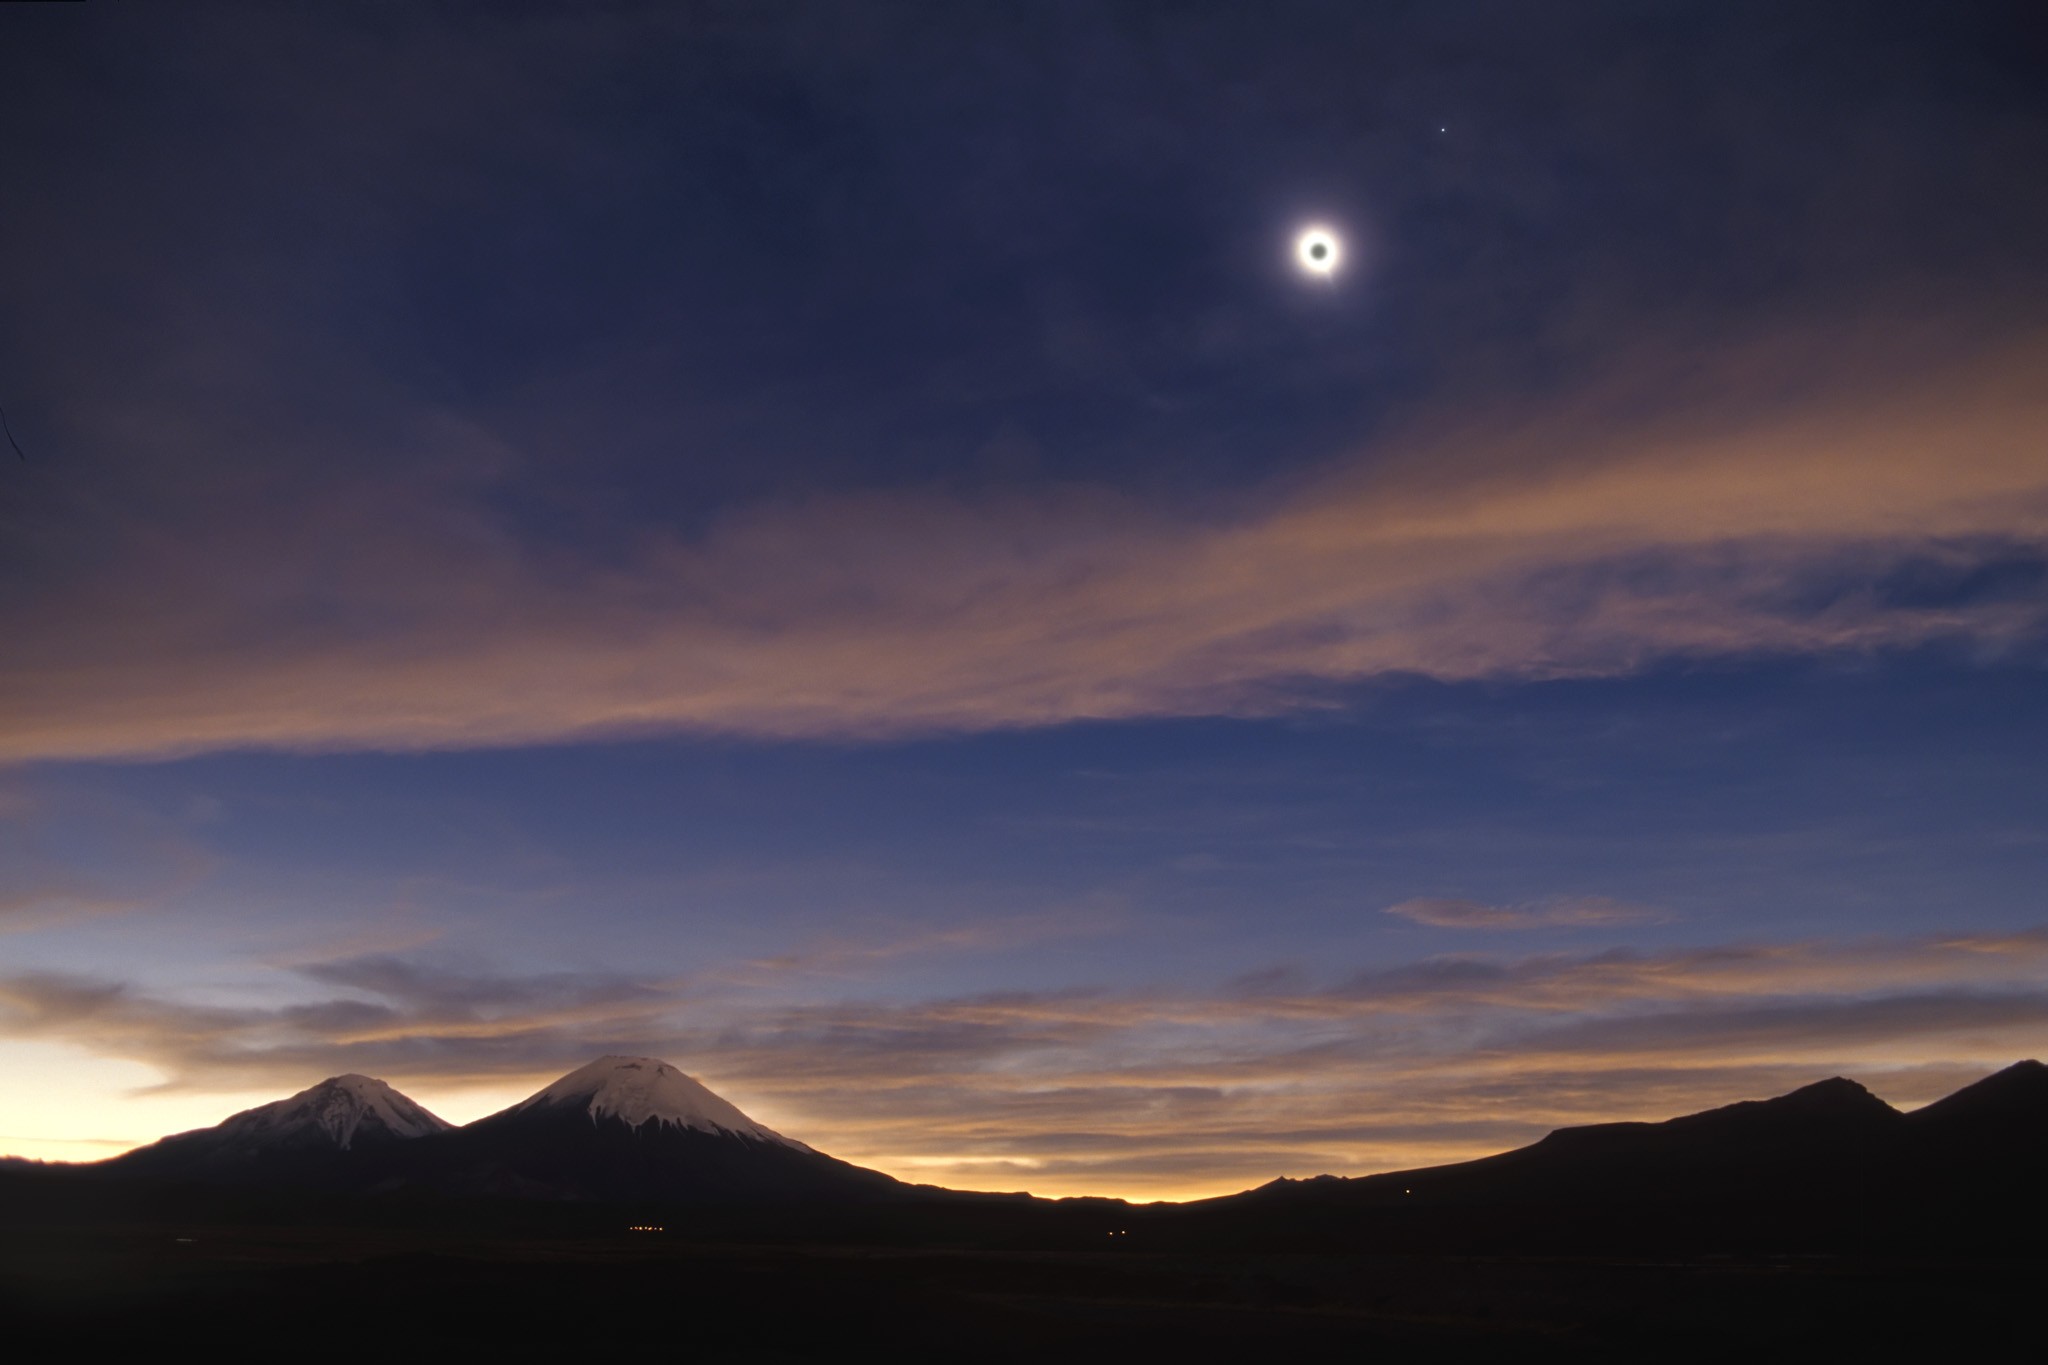
The total eclipse of the Sun over the waters of Lac Brome, in the Eastern Townships of Quebec, Canada. The twilight colours come from sunlight from outside the shadow path.
The lunar shadow arrived from the southwest, from the direction of the Sun, appearing as a dark cloud racing toward us. At the end of the eclipse the sky brightened first in that same direction, as the trailing edge of the shadow shot up across the sky. The clouds helped make the shadow edge more visible.
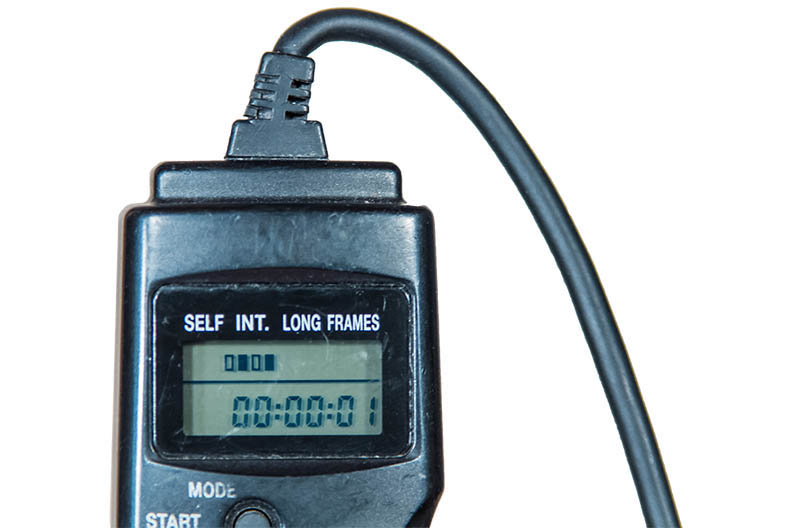
A time-lapse of the arrival and departure of the lunar shadow, made of 1200 frames each 1 second apart.
I shot with five cameras, just as I had done in 2017, possible only because I drove.
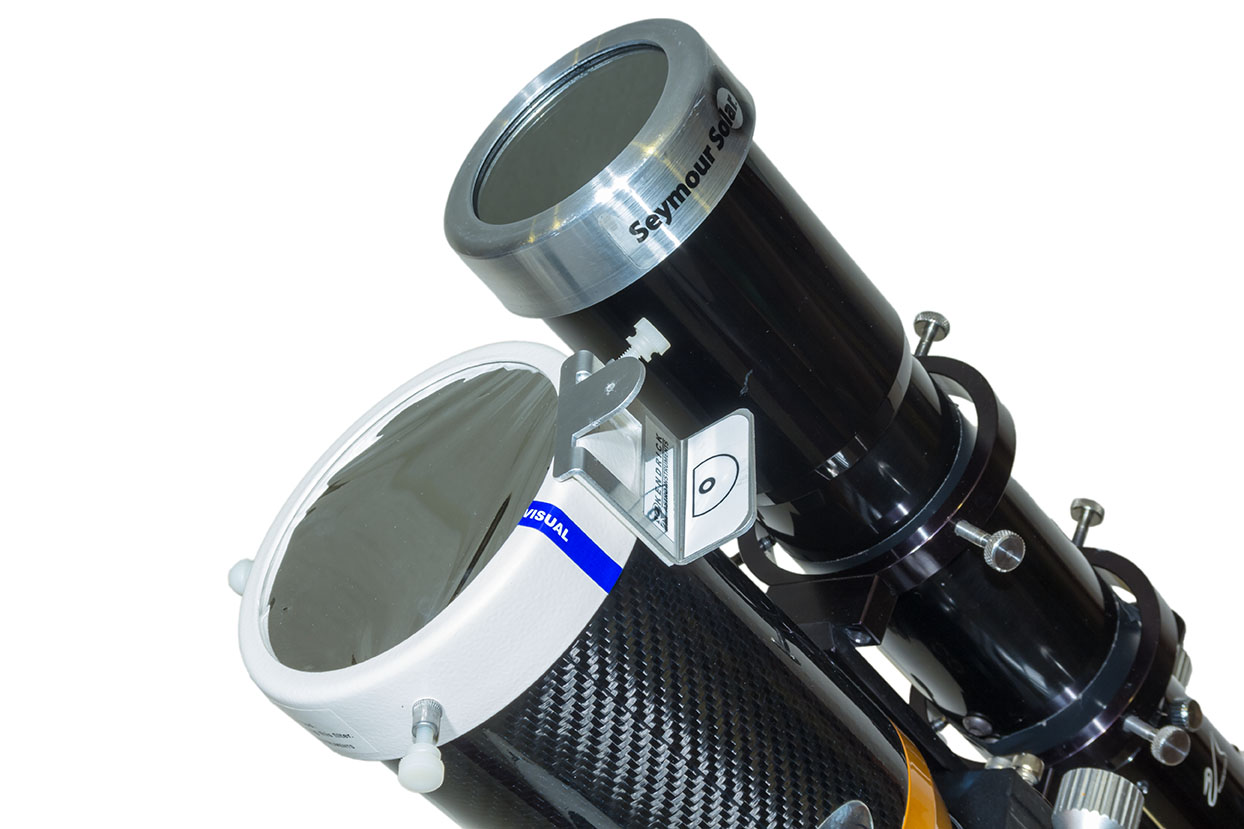
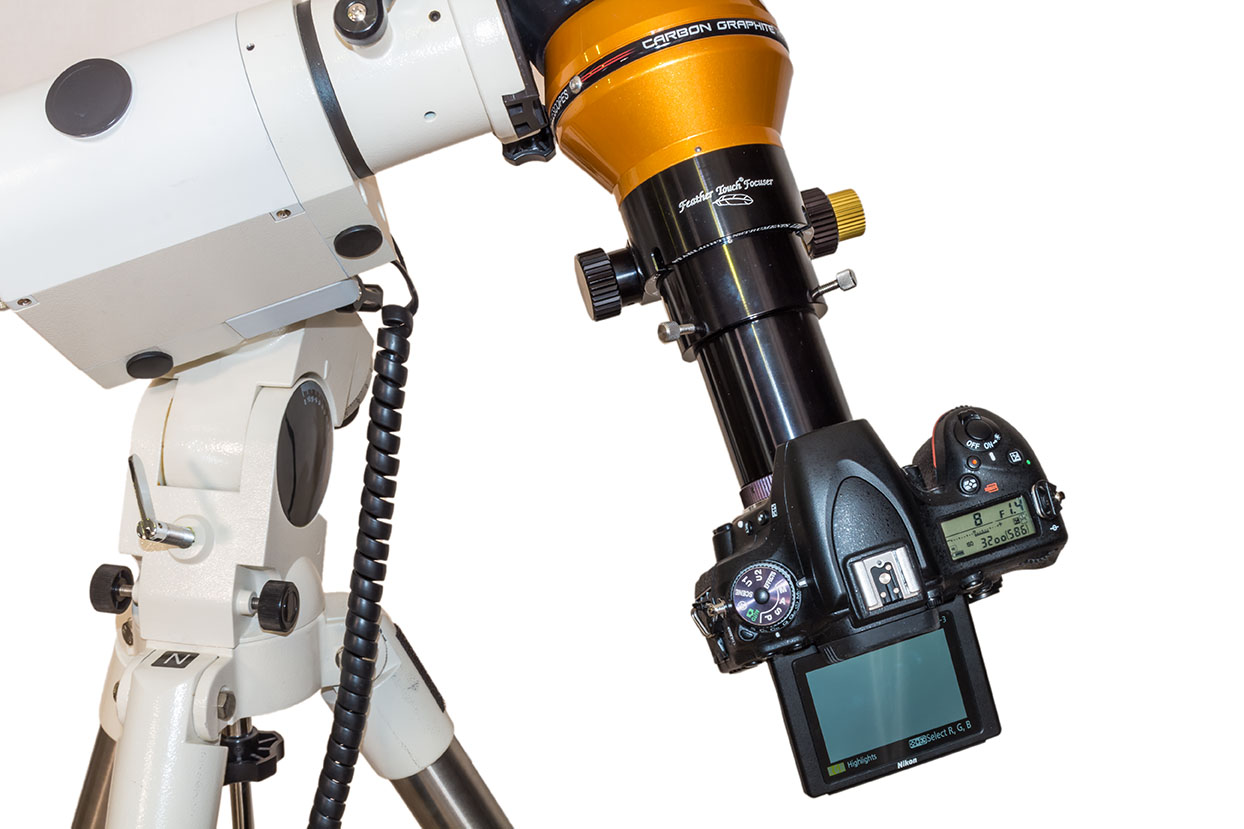
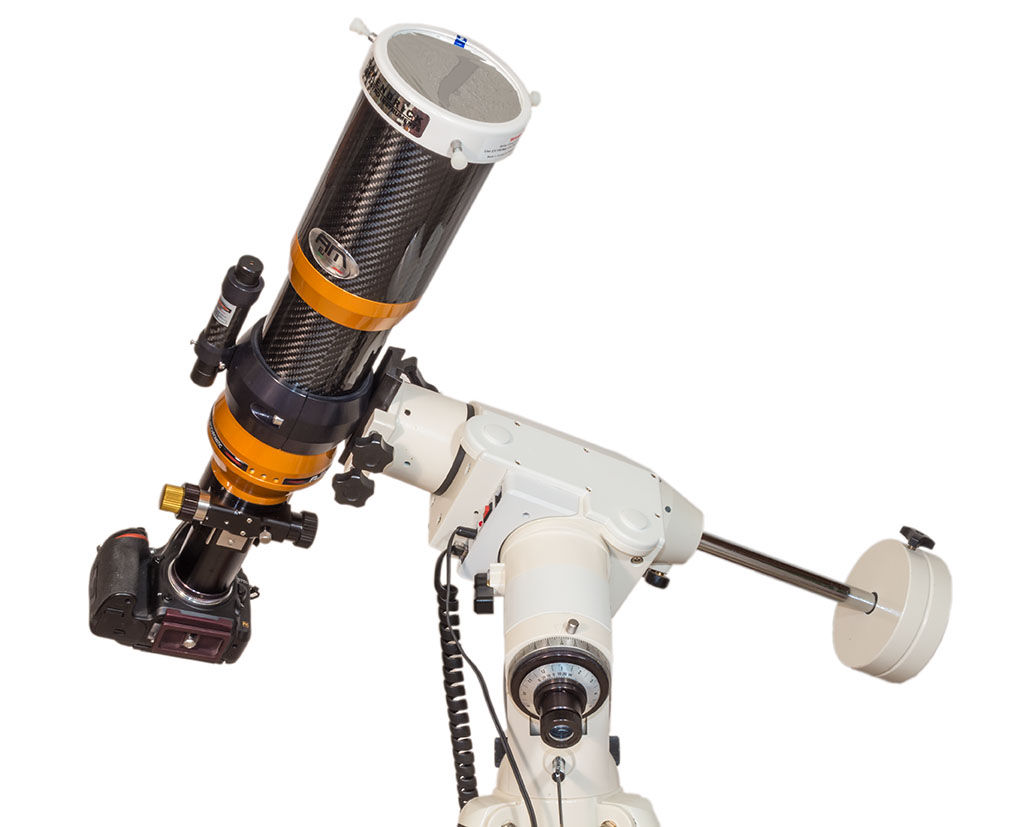
The main rig was my faithful Astro-Physics Traveler, a 105mm refractor telescope the company owner designed for his personal use at the 1991 eclipse in Mexico.
My main eclipse rig, with a 60mm visual scope on the 105mm photo scope, on an equatorial tracking mount.
My Traveler, bought in 1992, has lived up to its name, having now been to six central solar eclipses: the annular eclipses of 1994 (Arizona) and 2023 (Utah), and the total eclipses of 1998 (Curaçao), 2012 (Queensland, Australia), 2017 (Idaho), and now 2024 in Québec, Canada. I paired it with the wonderful matching AP400 mount, which I had only just brought back with me the month before from Australia, where it had spent the last two decades.
All the gear worked great. Unlike six months earlier for the October 14, 2023 annular eclipse in Utah, this time I remembered all the cables needed to have the telescope mount track the Sun.
I did mess up on a couple of settings (such as not framing the 4K movie camera as I should have – in pre-eclipse excitement I just forgot to check my chart). But none of the errors were serious.
The eclipse in a blend of two exposures to display all the fiery pink prominences that were visible during totality around the lunar disk in one image, set against the bright inner corona of the Sun with the dark disk of the Moon in silhouette in front of the Sun.
Once started all my cameras, except for the one on the Traveler, ran unattended.
At this eclipse I was determined to get a good look at it through the small visual scope I had piggybacked onto the Traveler photo scope. While I had used a similar rig in 2017, I only thought to look through the visual scope 20 seconds before totality ended.
Not this year.
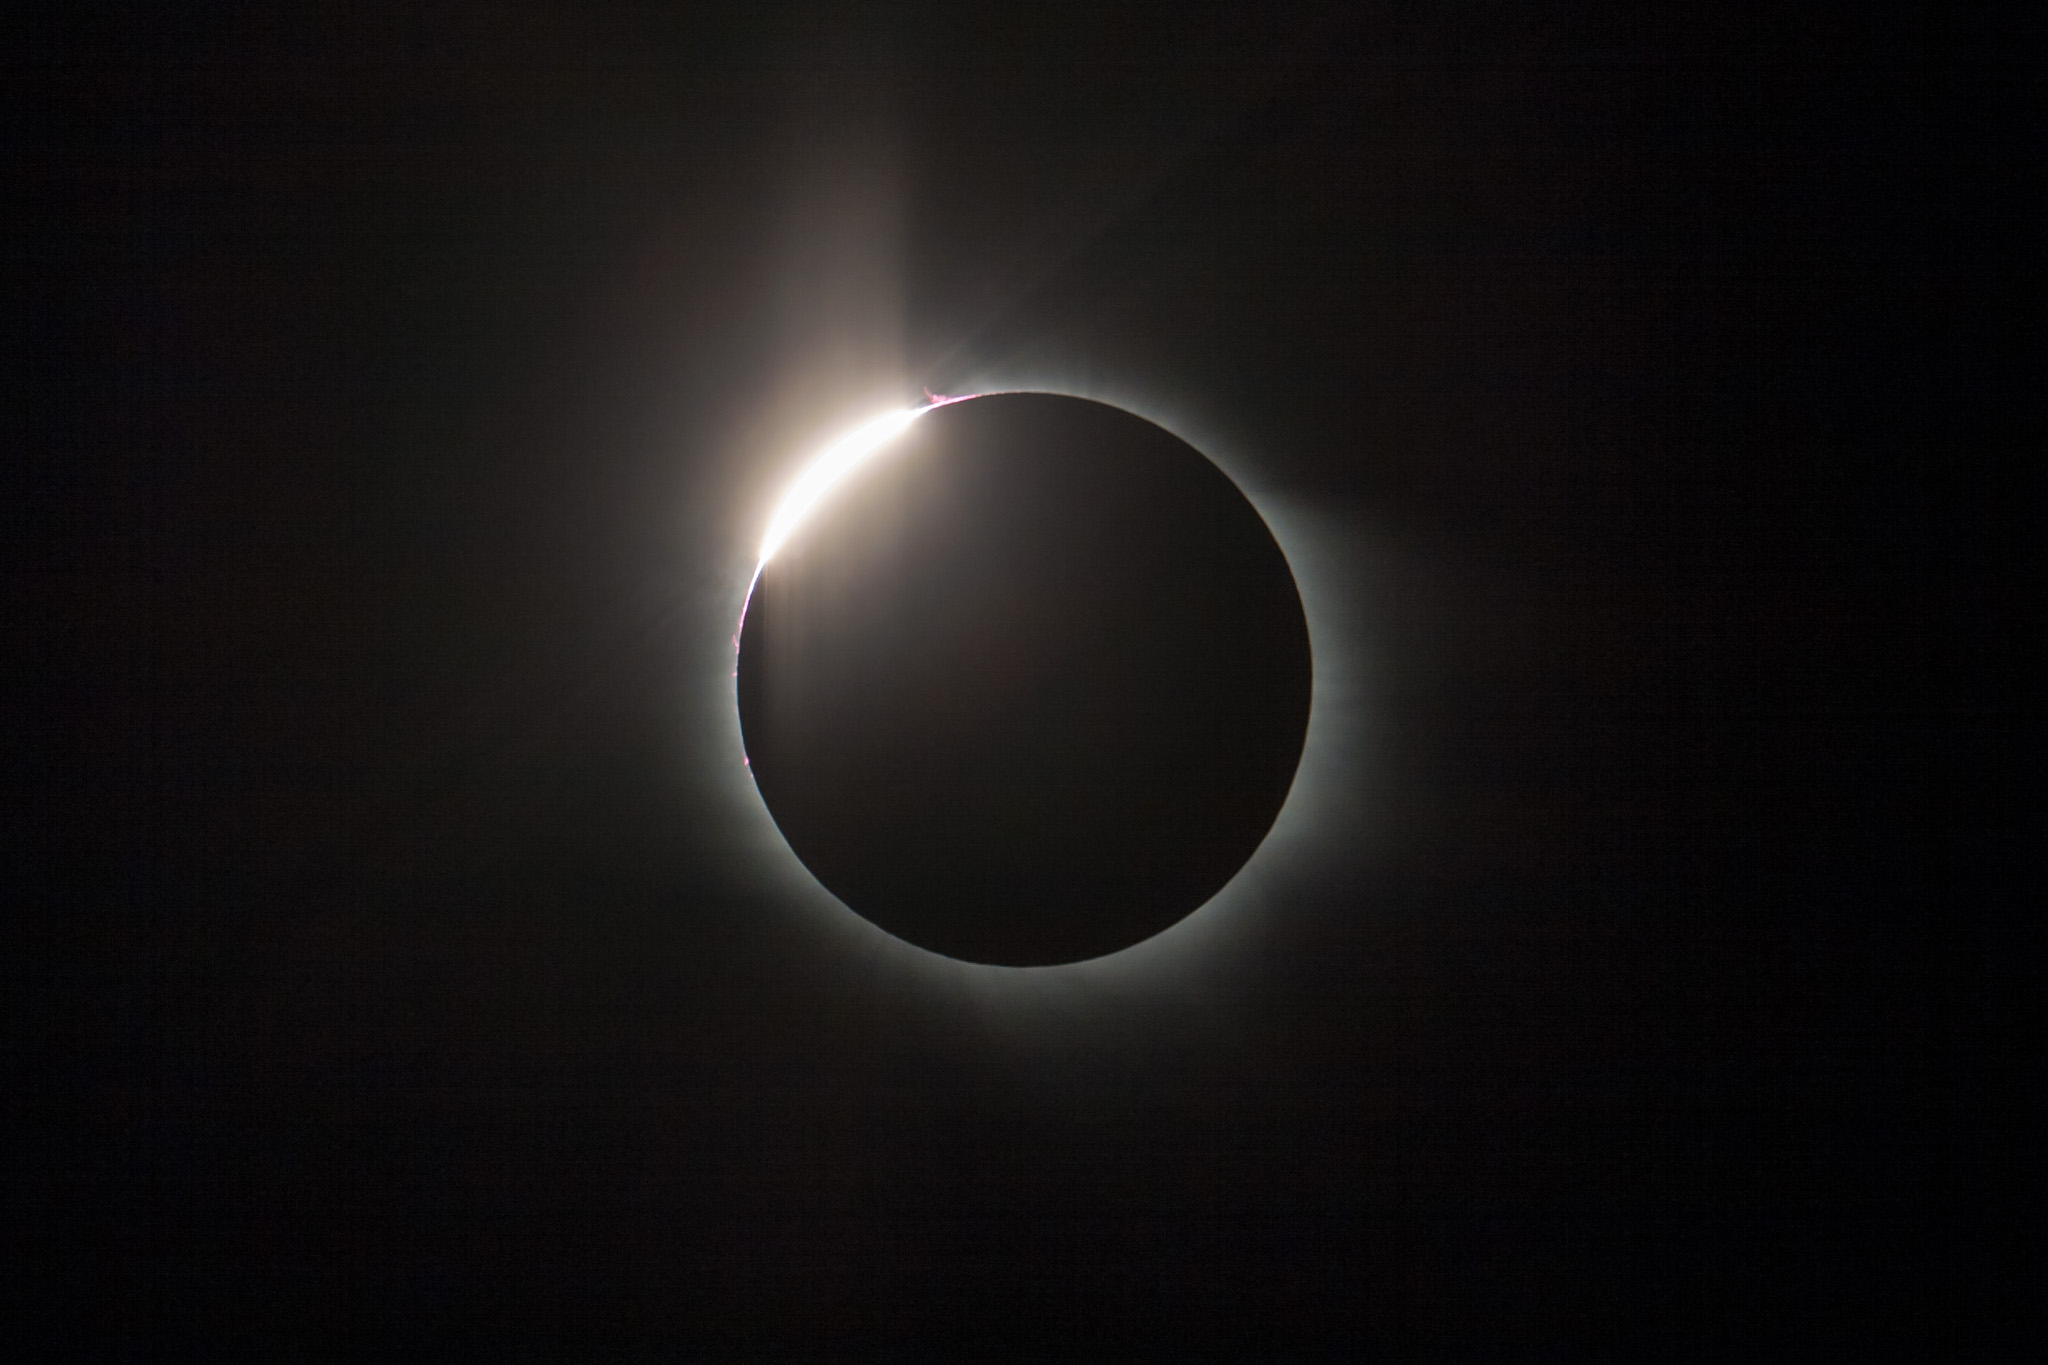
A telescopic close-up of the eclipsed Sun. Onto the central blend of images for totality I layered in single images of each of the diamond rings before and after totality. They are when the last or first burst of sunlight shines through lunar valleys. The first diamond ring is at top left, the last at bottom right, so time runs from left to right.
I got a great look at the eclipsed Sun, its corona structures, flaming pink prominences, and breakout of the red chromosphere layer just as totality ended. (You can’t easily see the chromosphere at the start of totality as it can be risky looking too soon through optics when the Sun’s blindingly bright photosphere is still in view.)
This is a composite showing the sequence of events surrounding totality, from just before totality (at upper left) to just after totality (at lower right), with totality in the middle. The contact images were taken 0.6 seconds apart.
And yet, as at all eclipses, I found the naked eye view the most compelling. The “black hole” Sun looked huge and unearthly. While I had binoculars handy, the same 12×36 image-stabilized binoculars I bring to most eclipses, I completely forgot to look though them, just as I forget at most eclipses!
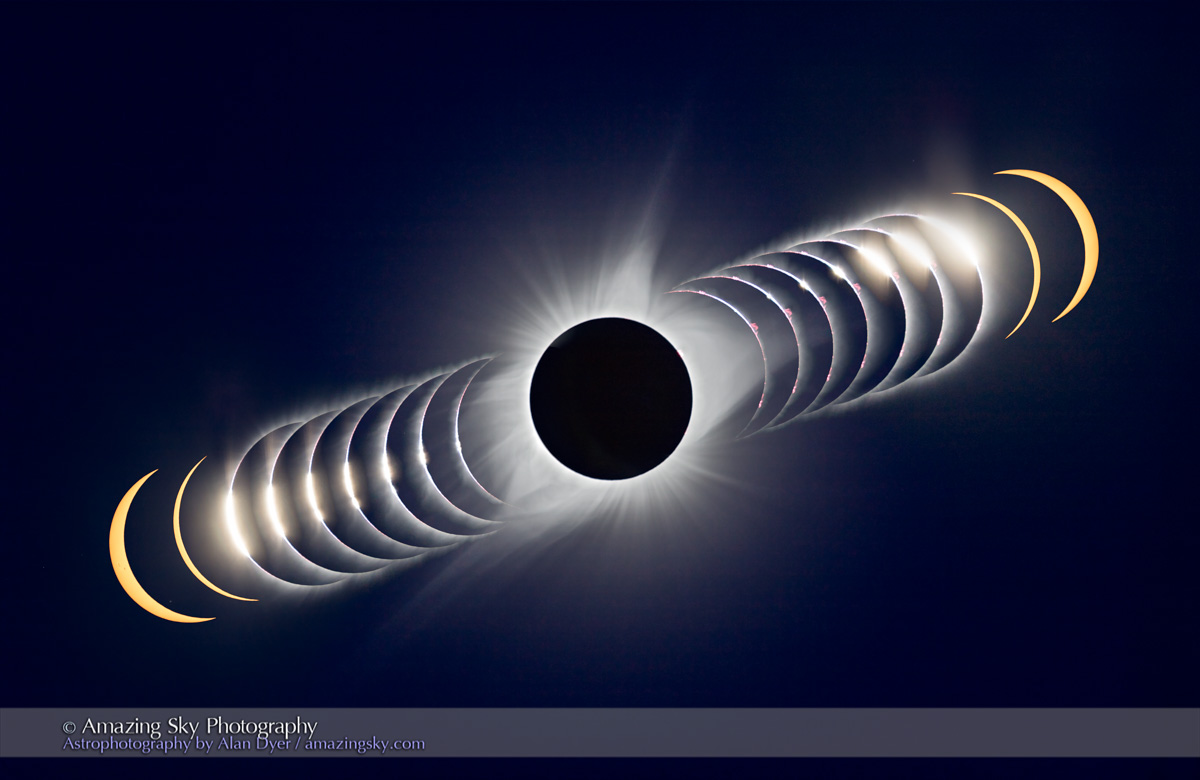
This is a composite showing the complete sequence of the April 8, 2024 eclipse of the Sun, from first contact (at upper left) to last contact (at lower right), with totality at mid-eclipse in the middle.
I shot all the images with the Astro-Physics Traveler 105mm refractor at 630mm focal length and f/6, with the Canon R5 at ISO 100. The partial phases are 1/800 or 1/400 second exposures through a Kendrick/Baader solar filter.
Wanting to record the full sequence, I shot the partial phases until the bitter end. But post-eclipse, people came over and had a look through my scope (I think mine was the only telescope on site). We had a great time exchanging impressions. The hand-held phone camera photos people showed me looked fabulous!
I looked for fleeting shadow bands just before and after totality (I laid out a white sheet on the ground for the purpose) but saw none, a negative observation confirmed by a fellow eclipse chaser at the site.
Time-lapse movies of the second and third contact (start and end of totality) diamond rings, shot through the telescope with the Canon R5 in continuous burst mode for hundreds of frames each.
I did two live interviews for CBC Radio, for the Edmonton and Calgary stations, but not until after the eclipse ended. By the time I did those and finished packing away my carload of gear, it was 6:30 p.m., three hours after totality.
I was the last to leave the site, with fishermen now arriving for an evening’s catch.
I was in that shadow as the Space Station flew over. Astronauts saw the elliptical shadow moving over eastern Canada.
The passage of the lunar shadow across the continent, showing where the clouds were. I was under the wispy clouds at upper right in Québec.
I faced no traffic jams heading back to the hotel at Ste. Helen-de-Bagot. I processed and posted one eclipse image that night. And I revised the price (down to $2.99 U.S.) and description of my How to Photograph the Solar Eclipses ebook, as now only the big processing chapter is of any value, post-eclipse. It continues to sell.
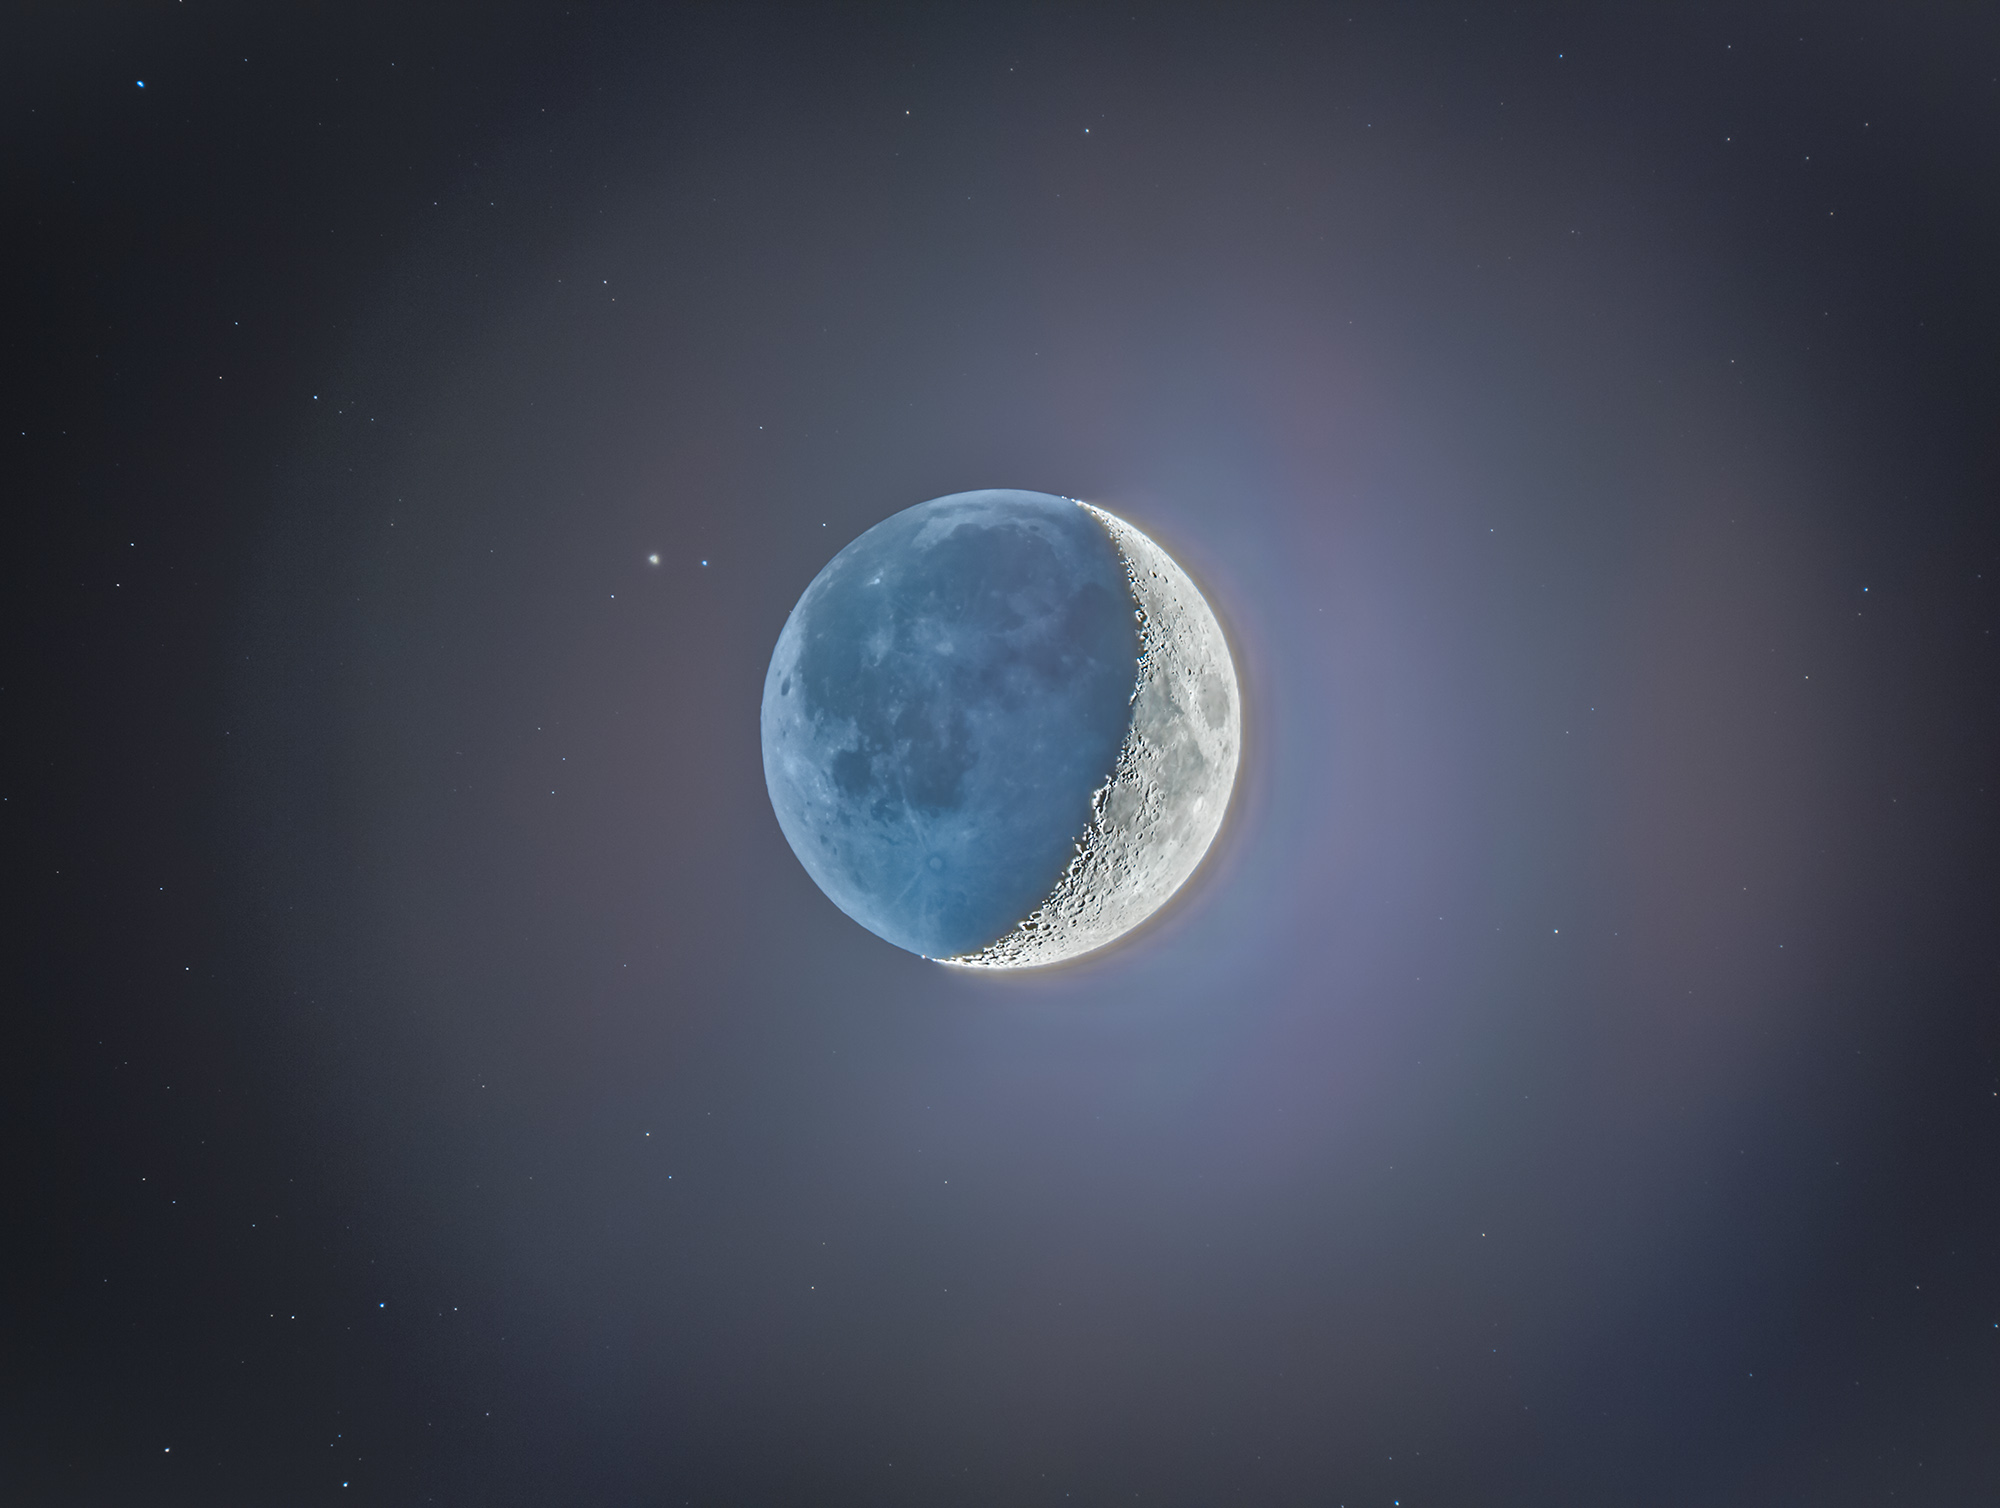
This is the waxing crescent Moon on April 10, 2024, two days after it eclipsed the Sun, and with it above the bright planet Jupiter, with it also near Uranus. Below the solar system worlds is the faint Comet 12P/Pons-Brooks, visible here as a fuzzy star with a stubby tail..
On the long drive back to Alberta, with the pressure of having to make time now gone, I spent pleasant evenings stopping to see friends and family on the road home. So I didn’t start work on the complex blends and composite images I show here until I got home a week after the eclipse.
The happy eclipse chaser having bagged his game!
The 17-day-long drive was nearly 9,000 km over 100 hours behind the wheel. Was it worth it? Of course!
Would I do it again? It’s a moot question as none of the upcoming eclipses allows for a cross-continent drive. Except perhaps in July 2028 in Australia. But I suspect just heading inland a day or two over the Great Dividing Range will be enough to get away from winter coastal cloud in New South Wales. (Sydney is in the path, but so is a cottage I rented last month near Coonabarabran for my superb March stay under the southern skies!)
The next total eclipse of the Sun visible from anywhere in Canada will be August 22, 2044. I won’t have to drive anywhere, as it passes right over my house! But I will have to live that long to enjoy a eclipse from my own backyard.
I suspect this was my last chance to see – and drive to – a total eclipse in Canada.
Like all eclipses, seeing the October 14 annular eclipse of the Sun was not a certainty. As good luck and planning would have it, the sky and location could not have been better!
Annular eclipses of the Sun don’t present the spectacle of a total eclipse. Because the Moon is near its farthest point from Earth, its disk is not large enough to completely cover the Sun. At mid-eclipse, as I show below, a ring of sunlight (dubbed a “ring of fire”) remains, still too bright to view without a solar filter.
The October 14, 2023 annular solar eclipse, in a single image captured at mid-eclipse, at 10:29 am MDT at the Ruby’s Inn Overlook on the rim of Bryce Canyon, Utah, a site well south of the centreline, with 3m03s of annularity.
While lacking the jaw-dropping beauty of a total, annular eclipses are rare and unique enough that every ardent skywatcher should make a point of seeing one.
Prior to October 14, I had seen only one, on May 10, 1994, from southeast Arizona, an event I captured on film of course back then.
My 1994 annular eclipse setup in ArizonaMy 2023 annular eclipse setup in Utah
A sunset annular on June 10, 2002 that I traveled to Puerto Vallarta, Mexico to see was mostly clouded out. The annular of May 20, 2012 traced a similar path across the U.S. Southwest as the 2023 eclipse. But work commitments at the science centre in Calgary kept me home for that one. A sunrise annular on June 10, 2021 in Northwestern Ontario was essentially out of reach due to COVID travel restrictions.
With no other annular eclipses within easy reach in North America until 2039 and 2046, this was my next, and perhaps last, opportunity to see one, unless I chose to travel the world.
Eclipse site and pathSite close upEclipse details at my final site
I had planned for several months to watch the annular eclipse from southern Utah, ideally from Bryce Canyon National Park, shown above. (Clicking on the images brings them up full screen.) I booked accommodations in January 2023, finding even then that popular hotels in the area were already sold out.
The final spot for the wide-angle composite shown below. The camera had to be next to that very fence post to frame the scene well.
The attraction was the landscape below the morning Sun, for a planned composite image of the eclipse over the hoodoos of Bryce. However, I had learned weeks earlier that traffic was going to be restricted to just park shuttle buses on eclipse day. Should Plan A not work out then Plan B was Kodachrome Basin, a state park nearby, which a park employee assured me would be open to cars well before sunrise on eclipse day.
Seen on I-15 past Salt Lake City. Eclipse ahead!
So I made my plans to drive south, taking with me a carload of telescope and camera gear, an array I would never be able to take to an overseas eclipse. The centrepiece was my venerable Astro-Physics Traveler 105mm (4-inch) refractor, a telescope created for the 1991 total eclipse in Mexico. Since I bought mine in 1992 I’ve used it for five central solar eclipses, including now two annulars. It’s in the 1994 and 2023 site images above.
A week before the eclipse (as above at left), the weather prospects for the entire southwest looked poor. It was to be clouds everywhere. I even considered Plan S – Stay Home! And watch the 60% partial eclipse from Alberta where skies were to be clear.
But undaunted, six days before the eclipse, I headed south on Interstate 15, checking the weather each day, and seeking out Plan C sites in New Mexico or Texas south of the projected mass of clouds. I checked where accommodation could be had at the last minute.
At my stop in Richfield, Utah, four days before the eclipse, I had a crossroads turning point: either continue south to Bryce down US-89 (above), or head east on I-70, then south into New Mexico or Texas, with enough time to get there if needed.
But by now the weather prospects were turning around. By three days out, and with the forecasts now much more reliable, it looked like southern Utah would be in the clear. I continued with my original plan to Bryce. But where exactly?
TPE site overview with anglesTPE 3D showing Sun pathGoogle Earth 3D
I had looked at possible sites on Google Earth and with the Sun-angle planning apps I use (such as The Photographer’s Ephemeris, or TPE) and found one just outside the Park that I hoped would be accessible to drive into.
Upon arriving in the area three days early, the first priority was to inspect the site in person. It looked perfect! Almost too good to be true!
A panorama of the Ruby’s Inn site with the eclipse in progress. My wide-angle camera is at left by that fencepost.
The site, known as the Ruby’s Inn Overlook, provided a great view toward the eclipse with a stunning landscape below, including a river! (Well, it was actually an irrigation channel called the Tropic Ditch.) And I could park right next to my wide-angle landscape camera, to keep an eye on it over the five hours of shooting, while setting up the scope gear next to my car.
I stayed at the Bryce View Lodge on eclipse eve, a hotel just a few hundred metres from the site. So no long pre-dawn drive on eclipse morn. However, the gated site was not going to be open until 7 a.m. on eclipse day. And admission was $20 per car, a cash donation to the Bryce Canyon City school sports teams. Fine!
As it turned out, by the time I got on site and setup the priority wide-angle camera for the base-image sunrise shots at 7:30 a.m., the sky was too bright to polar align the telescope mount on Polaris, for accurate tracking of the Sun across the sky.
It turned out that was the least of my concerns.
My three eclipse cameras: the wide-angle, the one on the 105mm refractor telescope (with a smaller 60mm scope on top for visual views with a Herschel Solar Wedge), and one with a 100-400mm lens on the tripod.
As I unpacked the carload of scope gear at 8 a.m. I realized I had forgotten a crucial cable to connect the mount to the drive electronics. So the mount was not going to be able to track anyway!
So much for my plans for a time-lapse through the scope. I had to manually centre the Sun every minute or so. I took lots of photos, but gave up on any effort to take them at a regular cadence. But I had enough images for the singles and composites shown here.
This is a composite of the October 14, 2023 annular solar eclipse with a sequence of six images showing the Moon advancing across a sunspot, the largest one visible on the Sun that day. The images are placed for a photogenic spacing, with time running forward from lower left to upper right, to reflect the Sun’s motion up across the morning sky.
Of course, once I got home the first thing I did was look downstairs in my scope room. Sure enough there was the cable, mixed up with the similar electronics from another mount I have from the same company, as I had been testing both prior to the eclipse. So much for my checklists! They’re only good if they list every critical bit, and if you use them.
So that was one big user error.
You don’t want to see this at an eclipse!
The other was a camera error, in fact Error70! I had set my main telescope camera to take rapid bursts of images (at up to 20 frames per second) at the crucial second and third contacts when annularity began and ended. With the Moon’s rough limb tangent to the inside edge of the Sun, you see beads of light rapidly form and disappear at the contacts.
This is a composite of the October 14, 2023 annular solar eclipse at second contact. It illustrates the irregular edge of the Moon breaking up the rim of sunlight as the dark disk of the Moon became tangent to the inner edge of the Sun at second contact at the start of annularity. 15 exposures taken over 20 seconds at second contact are combined with a single exposure taken about 1.5 minutes later at mid-annularity.
The camera worked great at second contact, shooting 344 frames over 20 seconds. A composite of 15 of those frames is above, layered to exaggerate the rough lunar limb and its mountain peaks. A time-lapse from those frames is below.
A time-lapse of second contact from 344 frames over ~20 seconds.
And it appeared to be working at third contact three minutes later. Until I looked down and saw the dreaded error message. In checking the camera later, none of the third contact images had recorded to either memory card.
It is a known but intermittent bug in Canon firmware that can happen when the camera is not connected to a Canon lens (it was on a telescope it cannot communicate with). I saw the error once in testing. And I had a hard time reproducing it to take the screen shot above once I got home. But if something can go wrong …!
This is a portrait of the October 14, 2023 annular eclipse of the Sun, captured in a sequence of images taken from the rim of Bryce Canyon, Utah, from sunrise until nearly the end of the eclipse before noon local time. This is a composite blend of unfiltered exposures taken at sunrise for the landscape lit by the rising Sun, and for the dawn sky. Onto the base panorama of the ground and sky I layered in 66 filtered images of the Sun, as it rose into the morning sky, and with the Moon moving across its disk over nearly 3 hours, reaching mid-eclipse at about 10:29 local MDT at upper right. It then appears as a ring, or annulus of light for one frame.
Despite the errors both human and machine, I count eclipse day as successful, considering a week earlier prospects had looked so poor. As it was, apart from some thin but inconsequential cloud that drifted through before mid-eclipse, the sky was perfect.
As was the site. I enabled me to get the main shot I was after, the wide-angle composite, above. It’s a winner! And it accurately depicts the size of the Sun and its motion across the sky, albeit set into a twilight sky taken at sunrise.
As it had been 29 years since my last annular, I wasn’t sure what to expect. But the darkening of the sky and eerie level of sunlight, despite a blazing Sun in the day sky, were impressive. The morning just looked strange! It was a taste of the total to come.
Venus at its widest angle west of the Sun was easy to spot in the deep blue sky. I regret not thinking to shoot even a phone camera image of that sight.
Projecting the solar crescents with a made-on-the-spot pinhole projection sign.
I had pleasant chats with other folks at the site, and enjoyed showing them telescopic views though the smaller visual scope I had piggybacked on the main scope, one that was just for looking through. Plus folks shot phone pix of my camera screen.
The October 14, 2023 annular solar eclipse, in a single image captured at second contact with the Moon tangent to the inside limb of the Sun, at 10:27 am MDT at the site I used.
But at the critical contacts, I was glued to that visual scope for the amazing sight of the horns of the crescent Sun rapidly wrapping around the Moon at second contact, then unwrapping at third contact.
The October 14, 2023 annular solar eclipse, in a series of images captured at second contact with the Moon tangent to the inside limb of the Sun, at 10:27 am MDT at the site I used. The 7 frames here were selected from a set of 344 shot in high-speed continuous mode at 20 frames per second.
The breakup of the rim of sunlight into beads of light along the cratered and mountainous edge of the Moon was also impressive. I was not at the optimum site for seeing those beads, as the landscape dictated my choice of location. But those that I saw at each of the internal contacts were a fine bonus to a memorable morning.
This is a composite that records the sequence around mid-eclipse of the October 14, 2023 annular eclipse of the Sun. This is a blend of 8 exposures each taken 2.25 minutes apart, about the minimum time to keep the disks separate and avoid them overlapping.
A third camera shooting a sequence with an untracked 400mm telephoto lens worked well. I used a subset of its images to create a still-image composite (above) and the full set for a time-lapse (below), with the position and motion of the Sun authentic, produced by the natural east-to-west motion of the sky. But against that you see the Moon’s orbital motion moving its dark disk down across the disk of the Sun.
A time-lapse from 300 frames taken at 4-second intervals with the sky’s motion carrying the Sun across the frame.
As soon as annularity ended, everyone else started to pack up and leave. For them the show was over. Understandably. On many total eclipse tours I’ve been on we’ve been on the road back to the hotel after totality and the requisite happy group shot.
Eclipse success! The trophy shot after everyone else had left.
But at this eclipse my shooting plan dictated that I stick it out. By the end of the eclipse I was the last one standing, alone to enjoy last contact and then lunch, killing time for any road congestion to diminish, as I had to head to another motel for the post-eclipse night, in nearby Panguitch.
I had a celebratory dinner and Moab-brewed beer that night at Cowboy’s, the best restaurant in Panguitch, sporting my Annular 2023 eclipse hat!
But the next day I started the drive north again, for the three-day trek back up I-15 to the border, then home.
Priority one upon getting home was to finish processing images, and to include them in a revised version of my ebook How to Photograph the Solar Eclipses. It is linked to above and here on the title. Images of some sample pages from the revised edition are in the slide show below.
Post-annular, the book’s title remains the same, but I revised the pages in Chapter 4 on planning for the 2023 eclipse with pages on “lessons learned!” And there were several!
I expanded Chapter 11 on processing to include tutorials on assembling annular eclipse composites, now that I actually have some!
Such as the composite of first- to last-contact telescopic close-ups below.
This is a composite of the various stages of the entire October 14, 2023 annular solar eclipse, from start (lower left) to end (upper right), with mid-eclipse at centre. So time runs forward from left to right, with the Suns positioned to reflect the approximate motion of the Sun in the morning sky when this eclipse occured at my site, with it rising higher through the progress of the eclipse. North is up in this image.
The new version of my ebook is 20 pages larger than the pre-annular edition.
An email has gone out from eJunkie to all buyers of the earlier-edition PDF to alert them to the new version, and with a download link. Apple Books readers should get a notice when they open the book on their Mac or iPad in the Books app that a new version is available.
I suspect that will be the last revision of my ebook before the big event – the total eclipse of the Sun on April 8, 2024.
Here’s wishing us all clear skies for that one! That eclipse will indeed require a drive to Texas. This time I’ll remember that damned cable!
In a format similar to my other popular camera tests, I put the 45-megapixel Canon R5 mirrorless camera through its paces for the demands of astrophotography.
In a sequel to my popular post from September 2021 where I reviewed the Canon R6 mirrorless camera, here is a similar test of its higher-megapixel companion, the Canon R5. Where the R6 has a modest 20-megapixel sensor with relatively large 6.6-micron pixels, the R5 is (at present) Canon’s highest megapixel camera, with 45 megapixels. Each pixel is only 4.4 microns across, providing higher resolution but risking more noise.
Is the higher noise noticeable? If so, does that make the R5 less than ideal for astrophotography? To find out, I tested an R5 purchased locally in Calgary from The Camera Store in May 2022.
NOTE: CLICK orTAP on any image to bring it up full screen for closer inspection. The blog contains a lot of high-res images, so they may take a while to all load. Patience! Thanks!
The Canon R5 uses a full-frame sensor offering 45 megapixels, producing images with 8192 x 5464 pixels, and making 8K video possible.
TL;DR Summary
The Canon R5 proved to be surprisingly low in noise, and has worked very well for nightscape, lunar and deep-sky photography (as shown below), where its high resolution does produce a noticeable improvement to image detail, with minimal penalty from higher noise. Its 8K video capability has a place in shooting the Moon, Sun and solar eclipses. It was not so well suited to shooting videos of auroras.
This is a stack of 12 x 5-minute exposures with a Sharpstar 94EDPH refractor at f/4.5 and the Canon R5 at ISO 800, taken as a test of the R5 for deep-sky imaging. No filters were employed. Close-ups of sub-frames from this shoot with the R5, and also with the R6 and Ra, are used throughout the review.
R5 Pros
The Canon R5 is superb for its:
High resolution with relatively low noise
ISO invariant sensor performance for good shadow recovery
Good live view display with ISO boost in Movie mode
8K video has its attraction for eclipse photography
Good top LCD information screen missing in the R6
No magenta edge “amp glow” that the R6 shows
Higher 6x and 15x magnifications for precise manual focusing
Good battery life
Pro-grade Type N3 remote port
R5 Cons
The Canon R5 is not so superb for its:
Noise in stills and movies is higher than in the R6
Propensity for thermal-noise hot pixels in shadows
Not so suitable for low-light video as the R6
Overheating in 8K video
Live View image is not as bright as in the R6’s Movie mode
High cost!
The flip-out screen of the R5 (and all recent Canon cameras) requires an L-bracket with a notch in the side (a Small Rig unit is shown here) to accommodate the tilting screen.
CHOOSING THE R5
Since late 2019 my main camera for all astrophotography has been the Canon Ra, a limited-edition version of the original R, Canon’s first full-frame mirrorless camera that started the R series. The Ra had a special infra-red cutoff filter in front of the sensor that passed a higher level of visible deep-red light, making it more suitable for deep-sky astrophotography than a standard DSLR or DSLM (mirrorless) camera. The Ra was discontinued after two years on the market, a lifetime similar to Canon’s previous astronomical “a” models, the 20Da and 60Da.
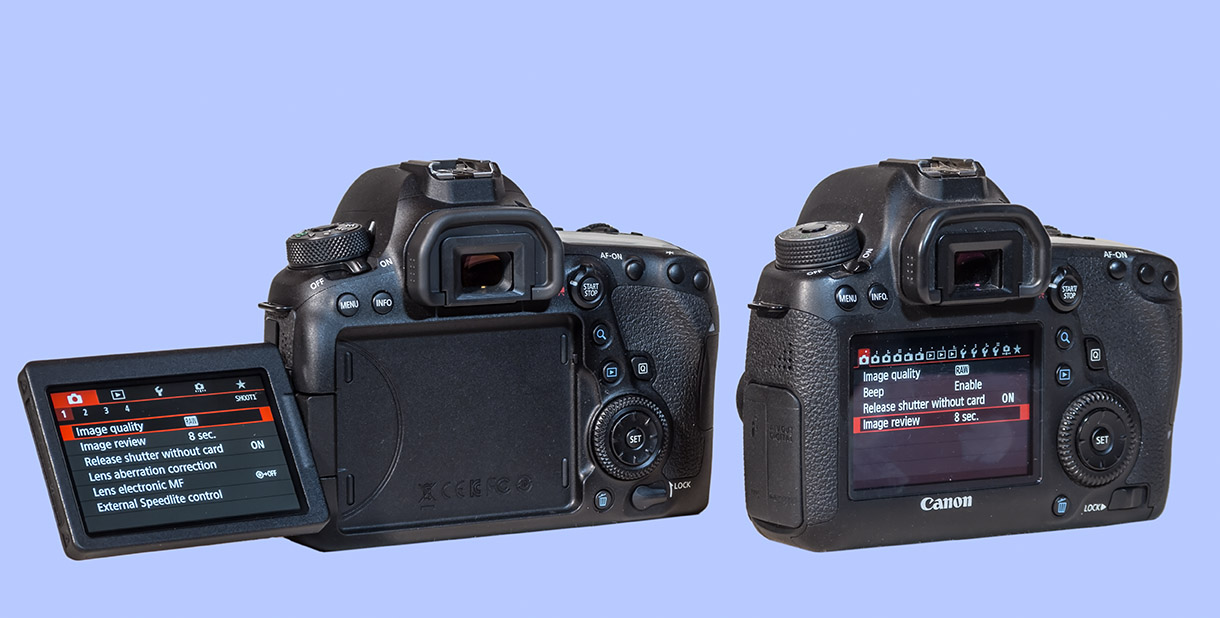
I purchased the Canon R6 in late 2021, primarily to use it as a low-light video camera for aurora photography, replacing the Sony a7III I had used for several years and reviewed here. Over the last year, I sold all my non-Canon cameras, as well as the Canon 6D MkII DSLR (reviewed here), to consolidate my camera gear to just Canon mirrorless cameras and lenses.
The R6 has proven to be an able successor to the Sony for me, with the R6’s modest megapixel count and larger pixels making it excellent for low-light video. But the higher resolution of the R5 was still attractive. So I have now added it to my Canon stable. Since doing so, I have put it through several of my standard tests to see how suitable it is for the demands of astrophotography, both stills and video.
Here are my extensive results, broken down by various performance criteria. I hope you will find my review useful in helping you make a purchase decision.
LIVE VIEW FRAMING
This compares the back-of-camera views of the R5 vs. the R6, with both set to their highest ISO in Movie mode for the brightest preview image.
First, why go mirrorless at all? For astrophotography, the big difference compared to even a high-end DSLR, is how much brighter the “Live View” image is when shooting at night. DSLM cameras are always in Live View – even the eye-level viewfinder presents a digital image supplied by the sensor.
And that image is brighter, often revealing more than what a DSLR’s optical viewfinder can show, a great advantage for framing nightscape scenes, and deep-sky fields at the telescope.
The R5 certainly presents a good live view image. However, it is not as bright nor as detailed as what the R6 can provide when placed in its Movie mode and with the ISO bumped up to the R6’s highest level of ISO 204,800, where the Milky Way shows up, live!
The R5 only goes as high as ISO 51,200, and so as I expected it does not provide as bright or detailed a preview at night as the R6 can. However, the R5 is better than the original R for live-view framing, and better than any Canon DSLR I’ve used.
LIVE VIEW FOCUSING
As with other Canon mirrorless cameras, the R5 offers a Focus Assist overlay (top) to aid manual focusing. It works on bright stars. It also has a 6x and 15x magnifications for even more precise focusing.
Like the R6, the R5 can autofocus accurately on bright stars and planets. By comparison, while the Ra can autofocus on distant bright lights, it fails on bright stars or planets.
Turning on Focus Peaking makes stars turn red, yellow or blue (your choice of colours) when they are in focus, as a reassuring confirmation.
Turning on Focus Guide provides the arrowed overlays shown above.
In manual focus, an additional Focus Aid overlay, also found in the R6, provides arrows that close up and turn green when in focus on a bright star or planet.
Or, as shown above, you can zoom in by 6x or 15x to focus by eye the old way by examining the star image. These are magnification levels higher than the 5x and 10x of the R6 and most other Canon cameras, and are a great aid to precise focusing, necessary to make full use of the R5’s high resolution, and the sharpness of Canon’s RF lenses. The 15x still falls short of the Ra’s 30x for ultra-precise focusing on stars, but it’s a welcome improvement nonetheless.
In all, while the R5 is not as good as the R6 for framing in low light, it is better for precise manual focusing using its higher 15x magnification.
NOISE PERFORMANCE — NIGHTSCAPES
The key camera characteristic for astrophoto use is noise. There is no point in having lots of resolution if, at the high ISOs we use for most astrophotography, the detail is lost in noise. But I was pleasantly surprised that proved not to be the case with the R5.
As I show below, noise is well controlled, making the R5 usable for nightscapes at ISOs up to 3200, if not 6400 when needed in a pinch.
This compares the noise on a dark nightscape at the typical ISOs used for such scenes. A level of noise reduction shown has been applied in Camera Raw.
With 45 megapixels, at the upper end of what cameras offer today, the R5 has individual pixels, or more correctly “photosites,” that are each 4.4 microns in size, the “pixel pitch.”
This is still larger than the 3.7-micron pixels in a typical 24-megapixel cropped-frame camera like the Canon R10, or the 3.2-micron pixels found in a 32-megapixel cropped-frame camera like the Canon R7. Both are likely to be noisier than the R5, though will provide even higher resolution, as well as greater magnification with any given lens or telescope.
By comparison, the 30-megapixel full-frame R (and Ra) has a pixel pitch of 5.4 microns, while the 20-megapixel R6’s pixel pitch is a generous 6.6 microns. Only the 12-megapixel Sony a7SIII has larger 8.5-micron pixels, making it the low-light video champ.
The bigger the photosites (i.e. the larger the pixel pitch), the more photons each photosite can collect in a given amount of time – and the more photons they can collect, period, before they overfill and clip highlights. More photons equals more signal, and therefore a better signal-to-noise ratio, while the greater “full-well depth” yields higher dynamic range.
However, each generation of camera improves the signal-to-noise ratio by suppressing noise via its sensor design and improved signal processing hardware and firmware. The R5 and R6 each use Canon’s latest DIGIC X processor.
This compares the R5 to the R6 and Ra cameras at the high ISOs of 3200 and 6400 often used for Milky Way nightscapes.
In nightscapes the R5 did show more noise at high ISOs, especially at ISO 6400, than the R6 and Ra, but the difference was not large, perhaps one stop at most, if that. What was noticeable was the presence in the R5 of more hot pixels from thermal noise, as described later.
This compares the R5 to the R6 and Ra cameras at the more moderate ISOs of 800 and 1600 used for brighter nightscapes.
At slower ISOs the R5 showed a similar level of noise as the R6 and Ra, but a finer-grained noise than the R6, in keeping with the R5’s smaller pixels. In this test set, the R5 did not exhibit noticeably more noise than the other two cameras. This was surprising.
NOTE: In these comparisons I have not resampled the R5 images down to the megapixel count of the R6 to equalize them, as that’s not what you would do if you bought an R5. Instead, I have magnified the R6 and Ra’s smaller images so we examine the same area of each camera’s images.
As with the R6, I also saw no “magic ISO” setting where the R5 performed better than at other settings. Noise increased in proportion to the ISO speed. The R5 proved perfectly usable up to ISO 3200, with ISO 6400 acceptable for stills when necessary. But I would not recommend the R5 for those who like to shoot Milky Way scenes at ISO 12,800.
For nightscapes, a good practice that would allow using lower ISO speeds would be to shoot the sky images with a star tracker, then take separate long untracked exposures for the ground.
NOTE: In my testing I look first and foremost at actual real-world results. For those interested in more technical tests and charts, I refer you to DxOMark’s report on the Canon R5.
NOISE PERFORMANCE — DEEP-SKY
This compares the R5 at the typical ISO settings used for deep-sky imaging, with no noise reduction applied to the raw files for this set. The inset shows the portion of the frame contained in the blow-ups.
Deep-sky imaging with a tracking mount is more demanding, due to its longer exposures of up to several minutes for each “sub-frame.”
On a series of deep-sky exposures through a telescope, above, the R5 again showed quite usable images up to ISO 1600 and 3200, with ISO 6400 a little too noisy in my opinion unless a lot of noise reduction was applied or many images were shot to stack later.
This compares the R5 to the R6 and Ra cameras at ISO 6400, higher than typically used for deep-sky imaging. No noise reduction was applied to the raw files.
As with the nightscape set, at high ISOs, such as at ISO 6400, the R5 did show more noise than the R6 and Ra, as well as more colour splotchiness in the dark sky, and lower contrast. The lower dynamic range of the R5’s smaller pixels is evident here.
Just as with nightscapes, the lesson with the R5 is to keep the ISO low if at all possible. That means longer exposures with good auto-guiding, but that’s a best practice with any camera.
This compares the R5 to the R6 and Ra cameras at the lower ISOs of 800 and 1600 best for deep-sky imaging, for better dynamic range. No noise reduction was applied to the raw files.
At lower ISOs that provide better dynamic range, shown above, the difference in noise levels between the three cameras was not that obvious. Each camera presented very similar images, with the R6 having a coarser noise than the Ra and R5.
In all, I was surprised the R5 performed as well as it did for deep-sky imaging. See my comments below about its resolution advantage.
ISO INVARIANCY
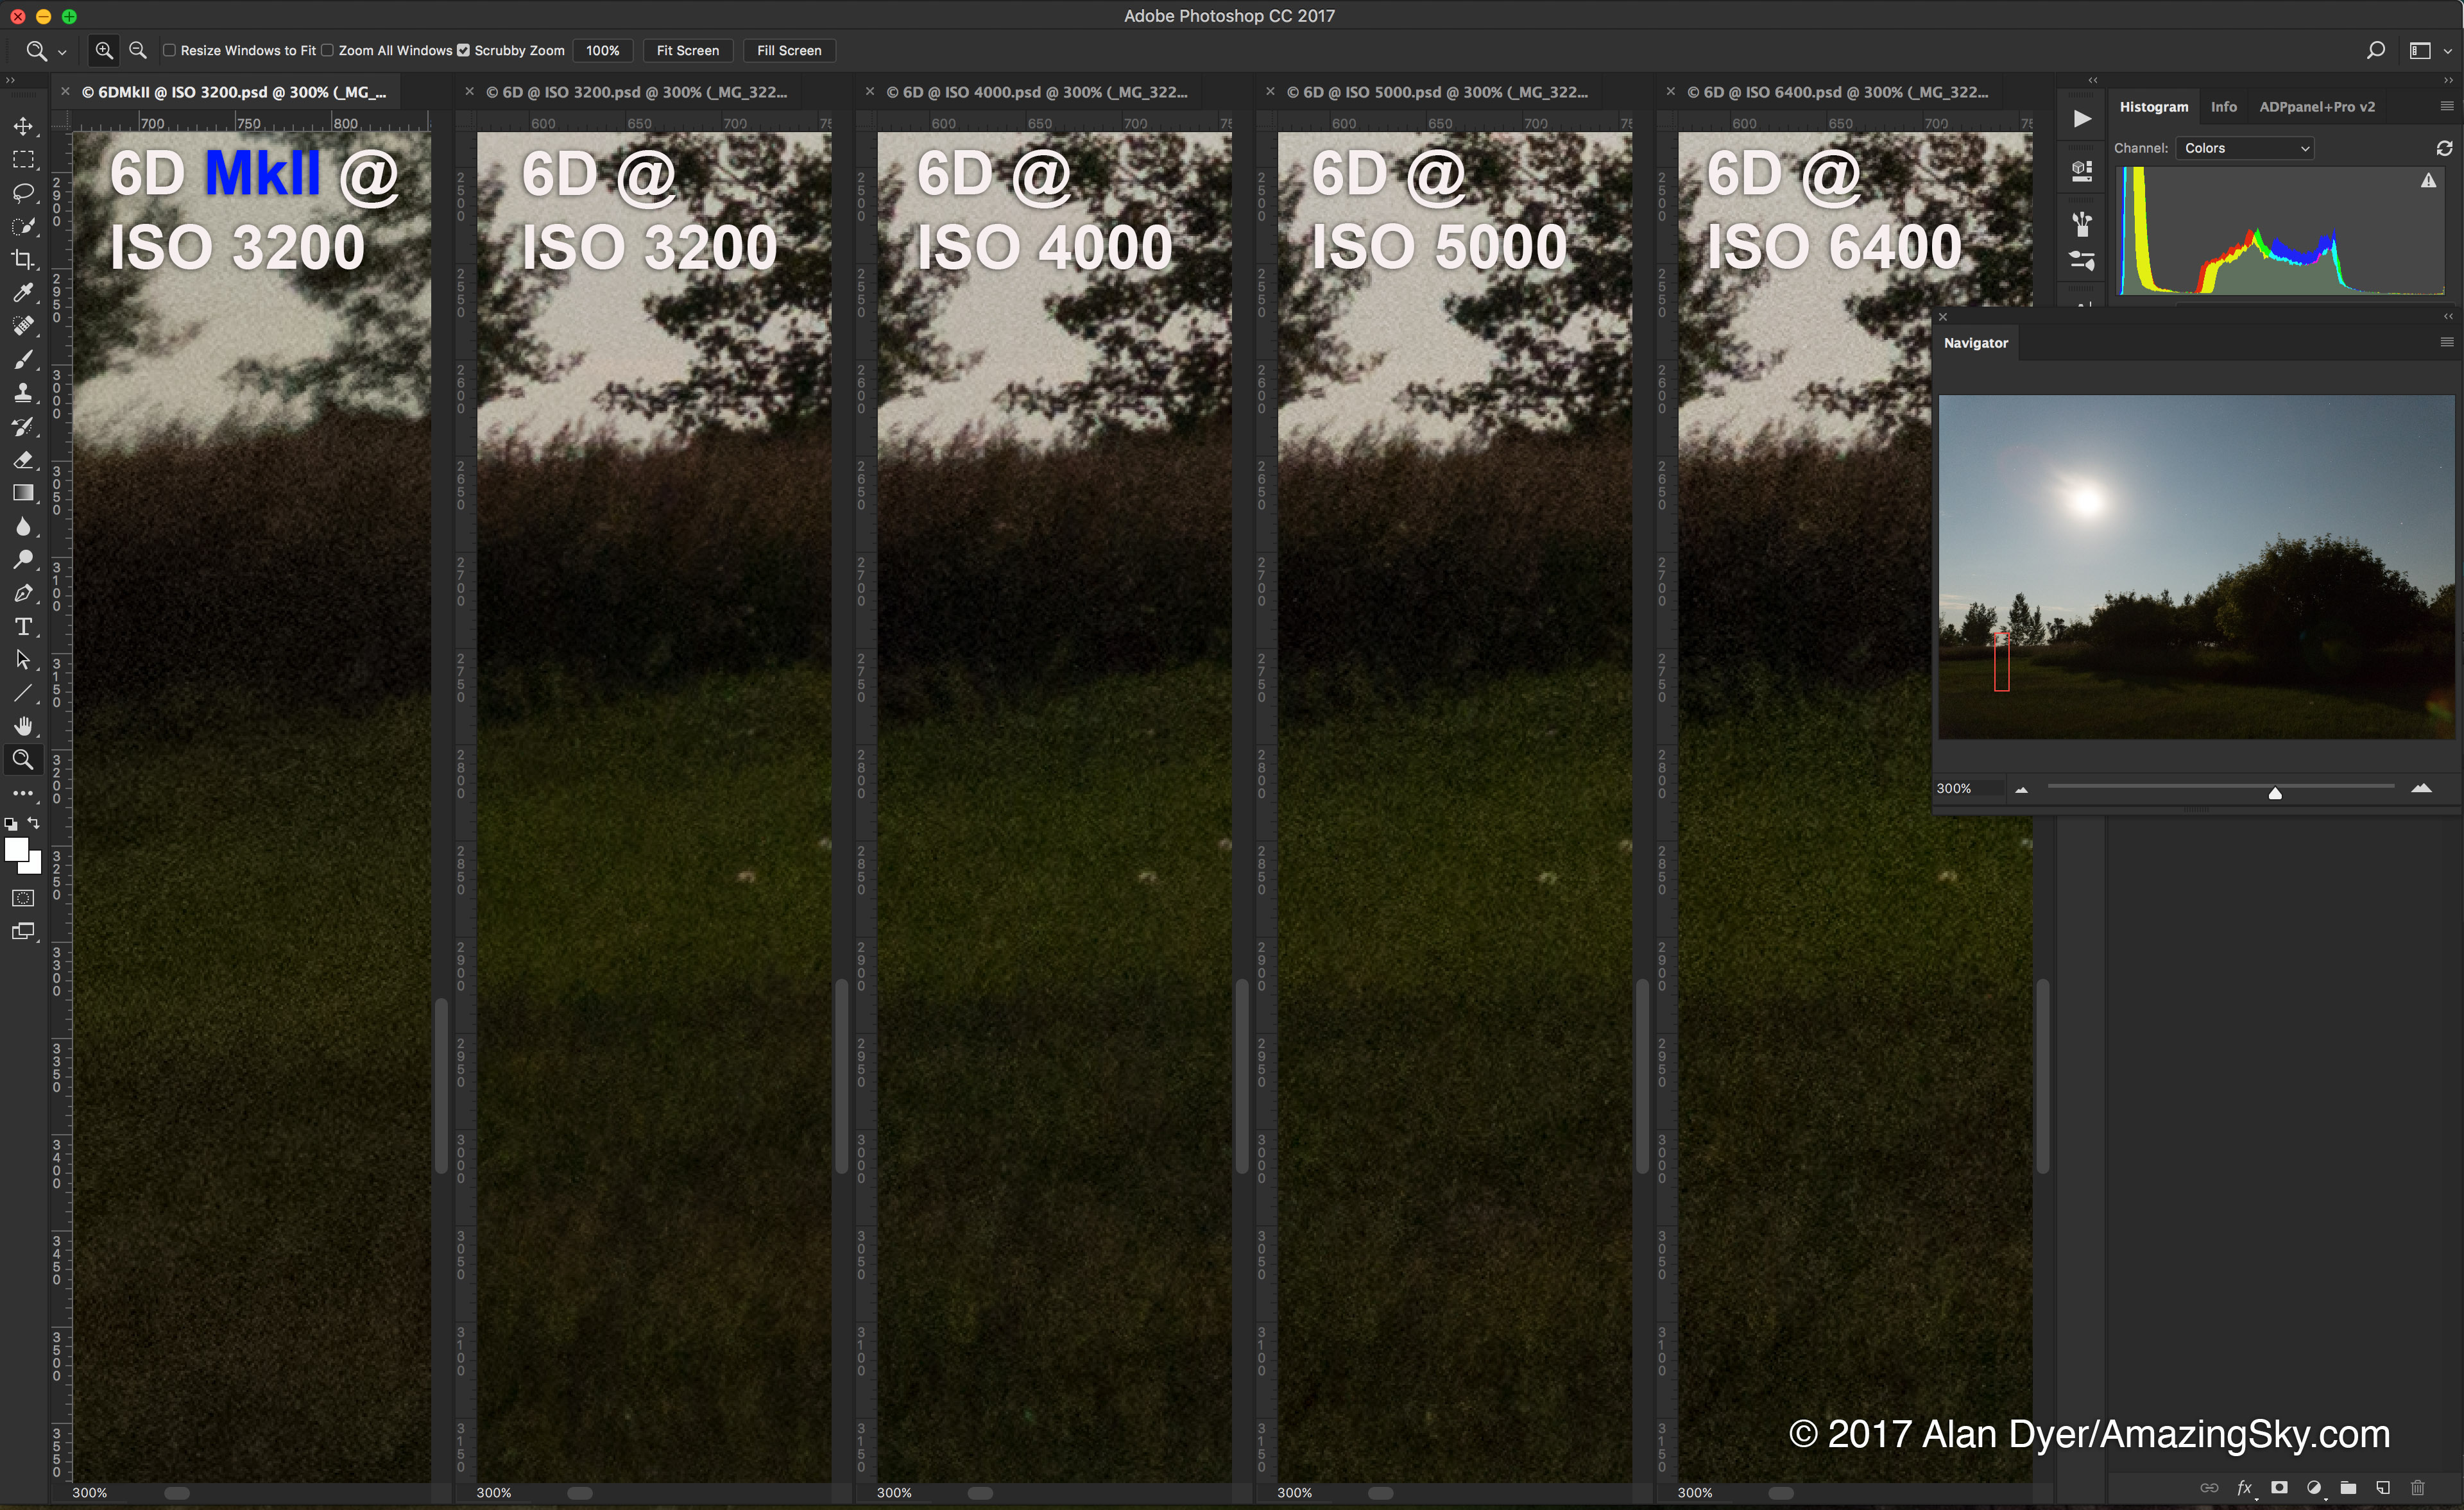
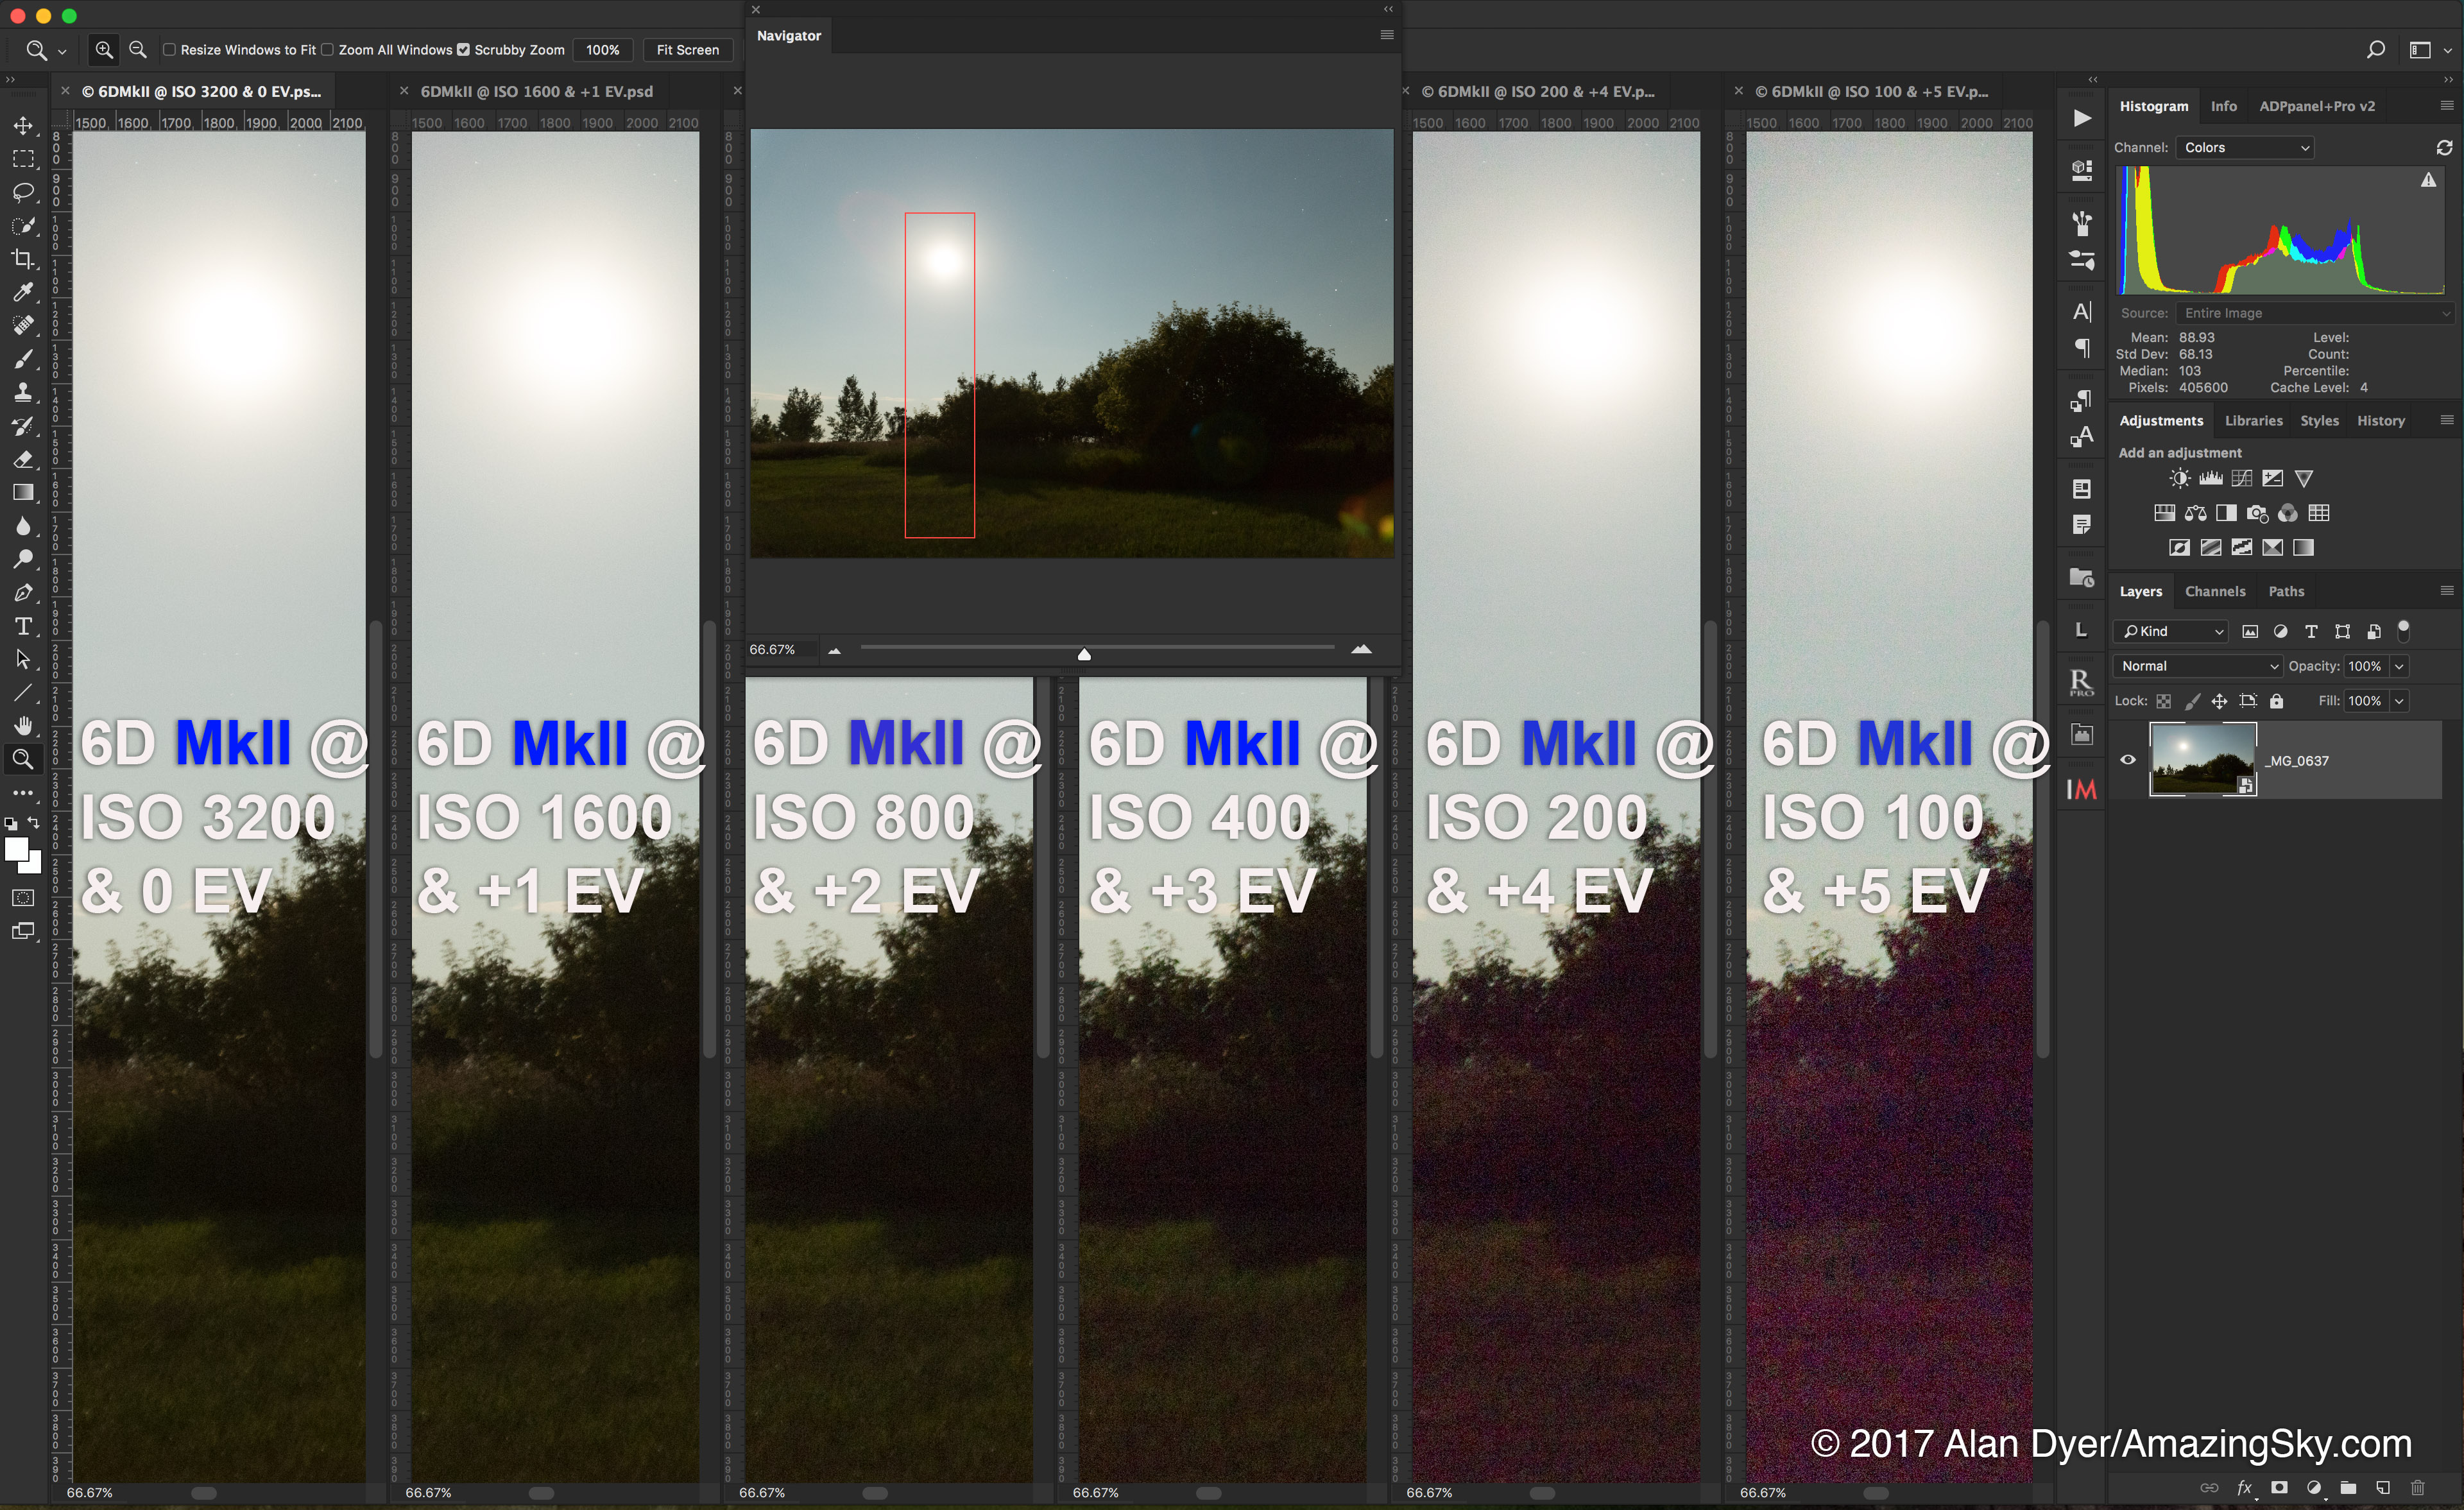
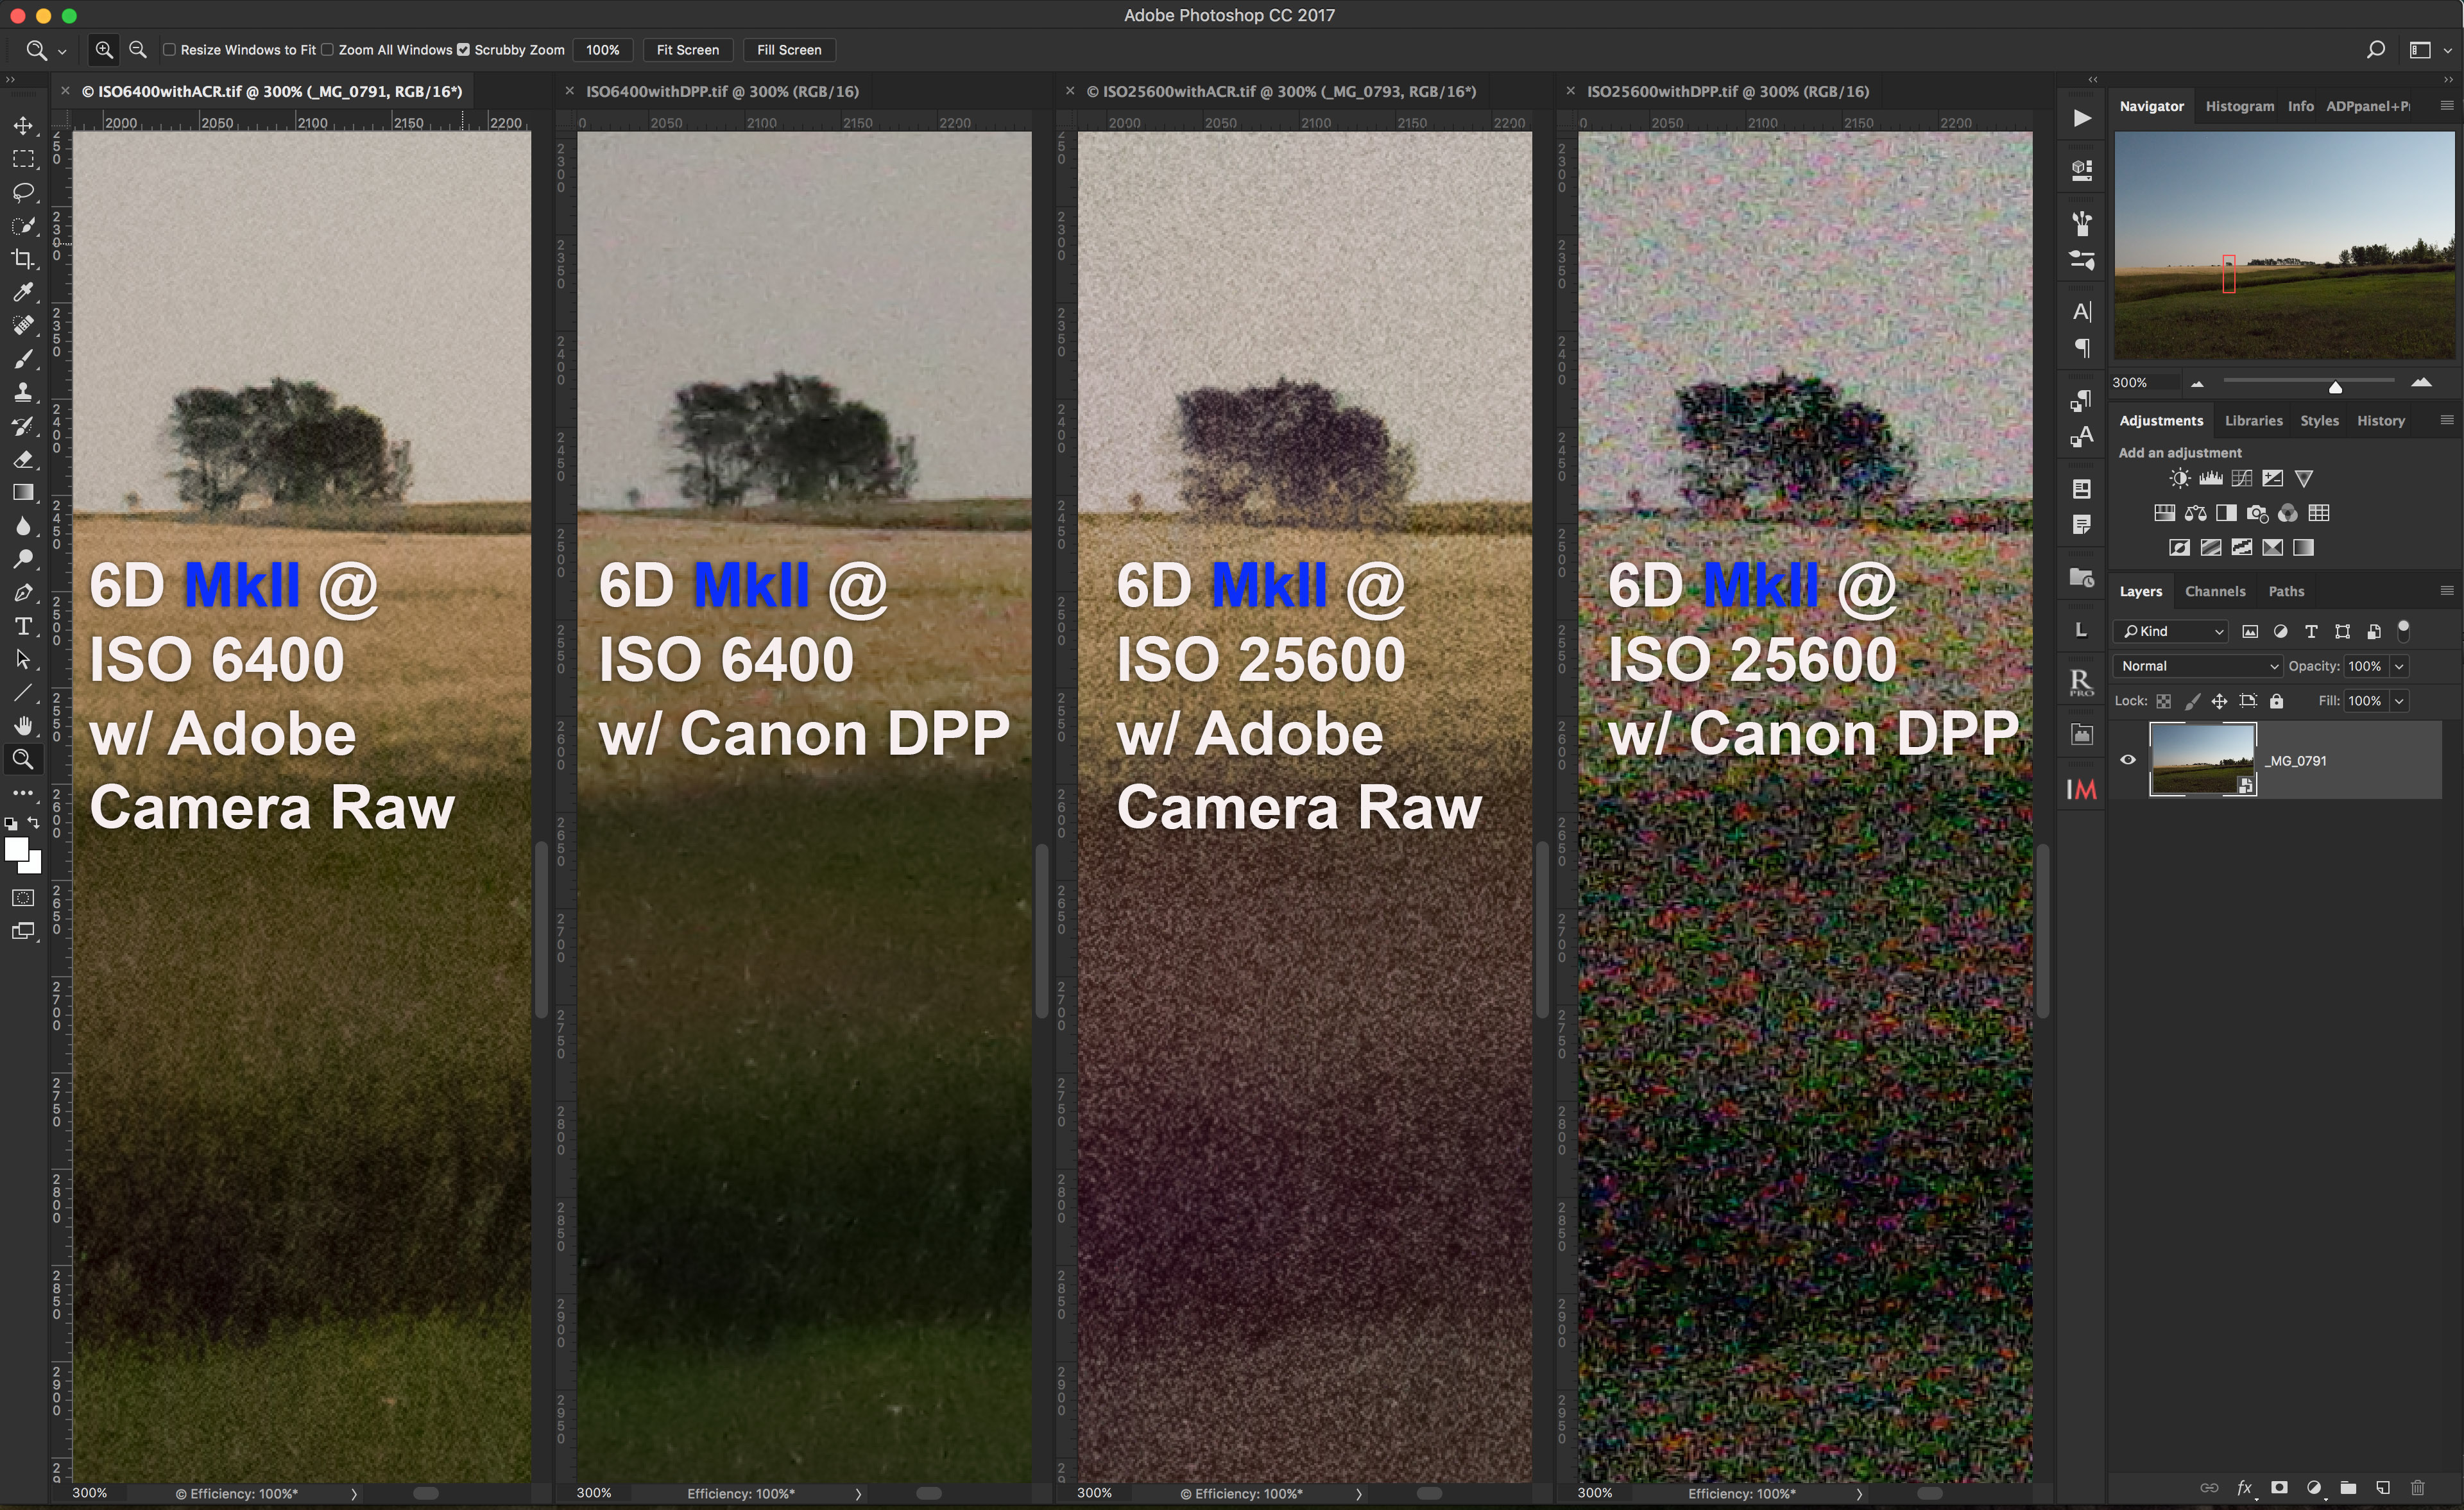
The flaw in many Canon DSLRs, one documented in my 2017 review of the 6D Mark II, was their poor dynamic range due to the lack of an ISO invariant sensor design.
Canon R-series mirrorless cameras have largely addressed this weakness. As with the R and R6, the sensor in the R5 appears to be nicely ISO invariant.
Where ISO invariancy shows itself to advantage is on nightscapes where the starlit foreground is often dark and underexposed. Bringing out detail in the shadows in raw files requires a lot of Shadow Recovery or increasing the Exposure slider. Images from an ISO invariant sensor can withstand the brightening “in post” far better, with minimal noise increase or degradations such as a loss of contrast, added banding, or horrible discolourations.
This shows the same scene with the R5 progressively underexposed by shooting at a lower ISO then boosted in exposure in Adobe Camera Raw.
As I do for such tests, I shot sets of images at the same shutter speed, one well-exposed at a high ISO, then several at successively lower ISOs to underexpose by 1 to 4 stops. I then brightened the underexposed images by increasing the Exposure in Camera Raw by the same 1 to 4 stops. In an ideal ISO invariant sensor, all the images should look the same.
The R5 performed well in images underexposed by up to 3 stops. Images underexposed by 4 stops started to fall apart with low contrast and a magenta cast. This was worse performance than the R6, which better withstood underexposure by as much as 4 stops, and fell apart at 5 stops of underexposure.
While it can withstand underexposure, the lesson with the R5 is to still expose nightscapes as well as possible, likely requiring a separate longer exposure for the dark ground. Expose to the right! Don’t depend on being able to save the image by brightening “in post.” But again, that’s a best practice with any camera.
THERMAL NOISE
Here I repeat some of the background information from my R6 review. But it bears repeating, as even skilled professional photographers often misunderstand the various forms of noise and how to mitigate them.
All cameras will exhibit thermal noise in long exposures, especially on warm nights. This form of heat-induced noise peppers the shadows with bright or “hot” pixels, often brightly coloured.
This is not the same as the shot and read noise that adds graininess to high-ISO images and that noise reduction software can smooth out later in post.
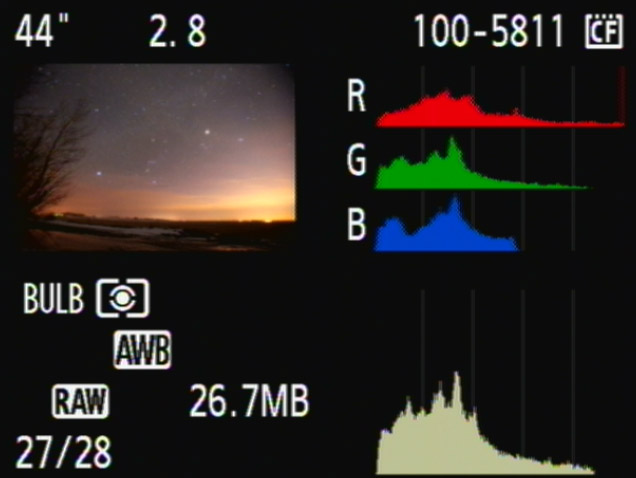
This shows a long-exposure nightscape scene both without and with Long Exposure Noise Reduction turned on. LENR eliminated most, though not all, of the hot pixels in the shadows.
I found the R5 was prone to many hot pixels in long nightscape exposures where they show up in dark, underexposed shadows. I did not find a prevalence of hot pixels in well-exposed deep-sky images.
LONG EXPOSURE NOISE REDUCTION
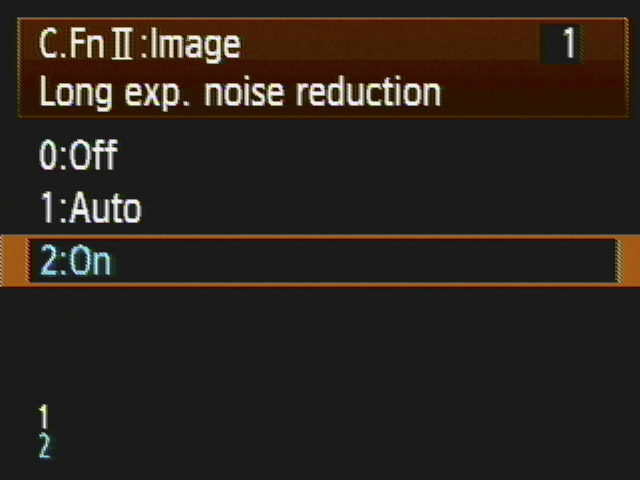
With all cameras a setting called Long Exposure Noise Reduction (LENR) eliminates this thermal noise by taking a “dark frame” and subtracting it in-camera to yield a raw file largely free of hot pixels, and other artifacts such as edge glows.
The LENR option on the R5 did eliminate most hot pixels, though sometimes still left, or added, a few (or they might be cosmic ray hits). LENR is needed more on warm nights, and with longer exposures at higher ISOs. So the extent of thermal noise in any camera can vary a lot from shoot to shoot, and season to season.
This compares a long exposure of nothing (with the lens cap on), both without LENR (left) and with LENR (right), to show the extent of just the thermal noise.
The comparison above shows just thermal noise in long exposures with and without LENR, to show its effectiveness. However, bear in mind in this demo the raw files have been boosted a lot in exposure and contrast (using DxO PhotoLab with the settings shown) to exaggerate the visibility of the noise.
Like the R6, when LENR is actively taking a dark frame, the R5’s rear screen indicates “Busy,” which is annoyingly bright at night, exactly when you would be employing LENR. To hide this display, the only option is to close the screen. Instead, the unobtrusive top LCD screen alone should be used to indicate a dark frame is in progress. It does with the Ra, though Busy also displays on its rear screen as well, which is unnecessary.
As with all mirrorless cameras, the R5 lacks the “dark frame buffer” present in Canon full frame DSLRs that allows several exposures to be taken in quick succession even with LENR on.
Long Exposure Noise Reduction is useful when the gap in time between exposures it produces is not critical.
With all Canon R cameras, turning on LENR forces the camera to take a dark frame after every light frame, doubling the time it takes to finish every exposure. That’s a price many photographers aren’t willing to pay, but on warm nights I find it can be essential, and a best practice, for the reward of cleaner images out of camera. I found it is certainly a good practice with the R5.
TIP: If you find hot pixels are becoming more obvious over time, try this trick: turn on the Clean Manually routine for 30 seconds to a minute. In some cameras this can remap the hot pixels so the camera can better eliminate them.
STAR QUALITY
Using LENR with the R5 did not introduce any oddities such as oddly-coloured, green or wiped-out stars. Even without LENR I saw no evidence of green stars, a flaw that plagues some Sony cameras at all times, or Nikons when using LENR.
This is a single developed raw frame from the stack of four minute exposures used to create the final image shown at the top. It shows sharp and nicely coloured stars, with no odd green stars.
Canons have always been known for their good star colours, and the R5 maintains the tradition. According to DPReview the R5 has a mild low-pass anti-alias filter in front of its sensor. Cameras which lack such a sensor filter do produce sharper images, but stars that occupy only one or two pixels might not de-Bayer properly into the correct colours. I did not find that an issue with the R5.
As in the R6, I also saw no evidence of “star-eating,” a flaw Nikons and Sonys have been accused of over the years, due to aggressive in-camera noise reduction even on raw files. Canons have largely escaped charges of star-eating.
RED SENSITIVITY
The R5 I bought was a stock “off-the-shelf” model. It is Canon’s now-discontinued EOS Ra that was “filter-modified” to record a greater level of the deep-red wavelength from red nebulas in the Milky Way. As I show below, compared to the Ra, the R5 did well, but could not record the depth of nebulosity the Ra can, to be expected for a stock camera.
However, bright nebulas will still be good targets for the R5. But if it’s faint nebulosity you are after, both in wide-field Milky Way images and telescopic close-ups, consider getting an R5 “spectrum modified” by a third-party supplier. Or modifying an EOS R.
This compares identically processed four-minute exposures at ISO 800 with the R5 vs. the red-sensitive Ra.
EDGE ARTIFACTS and EDGE GLOWS
DSLRs are prone to vignetting along the top and bottom of the frame from shadowing by the upraised mirror and mirror box. Not having a mirror, and a sensor not deeply recessed in the body, largely eliminates this edge vignetting in mirrorless cameras.
While the Ra shows a very slight vignetting along the bottom of the frame (visible in the example above), the R5 was clean and fully illuminated to the edges, as it should be.
I was also pleased to see the R5 did not exhibit any annoying “amp glows” — dim, often magenta glows at the edge of the frame in long exposures, created by heat emitted from sensor electronics adding infrared (IR) glows to the image.
I saw noticeable amp glows in the Canon R6 which could only be eliminated by taking LENR dark frames. It’s a flaw that has yet to be eliminated with firmware updates. Taking LENR darks is not required with the R5, except to reduce thermal hot pixels as noted above.
With a lack of IR amp glows, the R5 should work well when filter-modified to record either more visible Hydrogen-alpha red light, or deeper into the infrared spectrum.
Resolution — Nightscapes
Now we come to the very reason to get an R5, its high resolution. Is the difference visible in typical astrophotos? In a word, yes. If you look closely.
If people only see your photos on Facebook or Instagram, no one will ever see any improvement in your images! But if your photos are seen as large prints, or you are simply a stickler for detail, then you will be happy with the R5’s 45 megapixels. (Indeed, you might wish to wait for the rumoured even higher megapixel Canon 5S!)
This compares identically processed four-minute exposures at ISO 800 with the R5 vs. the red-sensitive Ra.
Nightscapes, and indeed all landscape photos by day or by night, is where you will see the benefit of more megapixels. Finer details in the foreground show up better. Images are less pixelated. In test images with all three cameras, the R5 did provide sharper images to be sure. But you do have to zoom in a lot to appreciate the improvement.
Resolution — lunar imaging
This compares blow-ups of images of the Moon taken through a 5-inch f/6 refractor (780mm focal length) with the R6 and R5.
The Moon through a telescope is another good test of resolution. The above comparison shows how the R5’s smaller 4.4-micron pixels do provide much sharper details and less pixelation than the R6.
Of course, one could shoot at an even longer focal length to increase the “plate scale” with the R6. But at that same longer focal length the R5 will still provide better resolution, up to the point where its pixels are sampling more than what the atmospheric seeing conditions permit to be resolved. For lunar and planetary imaging, smaller pixels are always preferred, as they allow you to reach the seeing limit with shorter and often faster optical systems.
Resolution — deep sky
This compares extreme blow-ups of images of the North America Nebula used for the other tests, shot with a 94mm f/4.5 refractor with the three cameras.
On starfields, the difference is not so marked. As I showed in my review of the R6, with “only” 20 megapixels the R6 can still provide detailed deep-sky images.
However, in comparing the three cameras above, with images taken at a focal length of 420mm, the R5 does provide sharper stars, with faint stars better recorded, and with less blockiness (i.e. “square stars”) on all the star images. At that focal length the plate scale with the R5 is 2.1 arc seconds per pixel. With the R6 it is 3.2 arc seconds per pixel.
This is dim green Comet PanSTARRS C/2017 K2, at top, passing above the star clusters IC 4756 at lower left and NGC 6633 at lower right on May 25-26, 2022. This is a stack of ten 5-minute exposures with a William Optics RedCat 51 at f/4.9 and the Canon R5 at ISO 800.
The R5 is a good choice for shooting open and globular star clusters, or any small targets such as planetary nebulas, especially with shorter focal length telescopes. Bright targets will allow using lower ISOs, mitigating any of the R5’s extra noise.
With an 800mm focal length telescope, the plate scale with the R5 will be 1.1 arc seconds per pixel, about the limit most seeing conditions will permit resolving. With even longer focal length telescopes, the R5’s small pixels would be oversampling the image, with little gain in resolution, at least for deep-sky subjects. Lunar and planetary imaging can benefit from plate scales of 0.5 arc seconds per pixel or smaller.
CAN YOU CreatE resolution?
This compares an original R6 image with the same image rescaled 200% in ON1 Resize AI and Topaz Gigapixel AI, and with those three compared to an original R5 image.
Now, one can argue that today’s AI-driven scaling programs such as ON1 Resize AI and Topaz Gigapixel AI can do a remarkable job up-sizing images while enhancing and sharpening details. Why buy a higher-megapixel camera when you can just sharpen images from a lower-resolution model?
While these AI programs can work wonders on regular images, I’ve found their machine-learning seems to know little about stars, and can often create unwanted artifacts.
In scaling up an R6 image by 200%, ON1 Resize AI 2022 made a mess of the stars and sky background. Topaz Gigapixel AI did a much better job, leaving few artifacts. But using it to double the R6 image in pixel count still produced an image that does not look as sharp as an original R5 image, despite the latter having fewer pixels than the upsized R6 image.
Yes, we are definitely pixel-peeping! But I think this shows that it is better to have the pixels to begin with in the camera, and to not depend on software to generate sharpness and detail.
VIDEO Resolution
The R5’s 45-megapixel sensor also makes possible its headline selling point when it was released in 2020: 8K movie recording, with movies sized 8192 x 4320 (DCI standard) or 7680 x 4320 (UHD standard) at 29.97 frames per second, almost IMAX quality.
Where the R6’s major selling point for me was its low-light video capability, the R5’s 8K video prowess was less important. Or so I thought. With testing, I can see it will have its place in astrophotography, especially solar eclipses.
The R5 offers the options of 8K and 4K movies each in either the wider DCI Digital Cinema standard (8K-D and 4K-D) or more common Ultra-High Definition standard (8K-U and 4K-U), as well as conventional 1080 HD.This shows the Moon shot with the same 460mm-focal length telescope, with full-width frame grabs from movies shot in 8K, 4K, and 4K Movie Crop modes.
Unlike the original Canon R and Rp, the R5 and R6 can shoot 4K movies sampled from the full width of their sensors, so there is no crop factor in the field of view recorded with any lens.
However, like the R6, the R5 also offers the option of a Movie Crop mode which samples a 4K movie from the central 4096 (4K-D) or 3840 (4K-U) pixels of the sensor. As I show above, this provides a “zoomed-in” image with no loss of resolution, useful when wide field of view is not so important as is zooming into small targets, such as for lunar and solar movies.
This compares close-ups of frame grabs of the Moon movies shown in full-frame above, as well as a frame from an R6 movie, to compare resolutions.
So what format produces the best resolution when shooting movies? As I show above, magnified frame grabs of the Moon demonstrate that shooting at 8K provides a much less pixelated and sharper result than either the 4K-Fine HQ (which creates a “High-Quality” 4K movie downsampled from 8K) or a standard 4K movie.
Shooting a 4K movie with the R6 also produced a similar result to the 4K movies from the R5. The slightly softer image in the R5’s 4K frame can, I think, be attributed more to atmospheric seeing.
Solar eclipse use
Shooting the highest resolution movies of the Moon will be of prime interest to astrophotographers when the Moon happens to be passing in front of the Sun!
That will happen along a narrow path that crosses North America on April 8, 2024. Capturing the rare total eclipse of the Sun in 8K video will be a goal of many. At the last total solar eclipse in North America, on August 21, 2017, I was able to shoot it in 4K by using a then state-of-the-art top-end Canon DSLR loaned to me by an IMAX movie production company!
And who knows, by 2024 we might have 100-megapixel cameras capable of shooting and recording the firehose of data from 12K video! But for now, even 8K can be a challenge.
This compares the R5 at 8K with it in the best quality 4K Fine HQ vs. the R5 and R6 in their 4K Movie Crop modes.
However, do you need to shoot 8K to get sharp Moon, Sun or eclipse movies? The above shows the 8K frame-grab compared to the R5’s best quality full-frame 4K Fine, and the R5’s and R6’s 4K Movie Crop mode that doesn’t resample or bin pixels from the larger sensor to create a 4K movie. The Cropped movies look only slightly softer than the R5 at 8K, with less pixelation than the 4K Fine HQ movie.
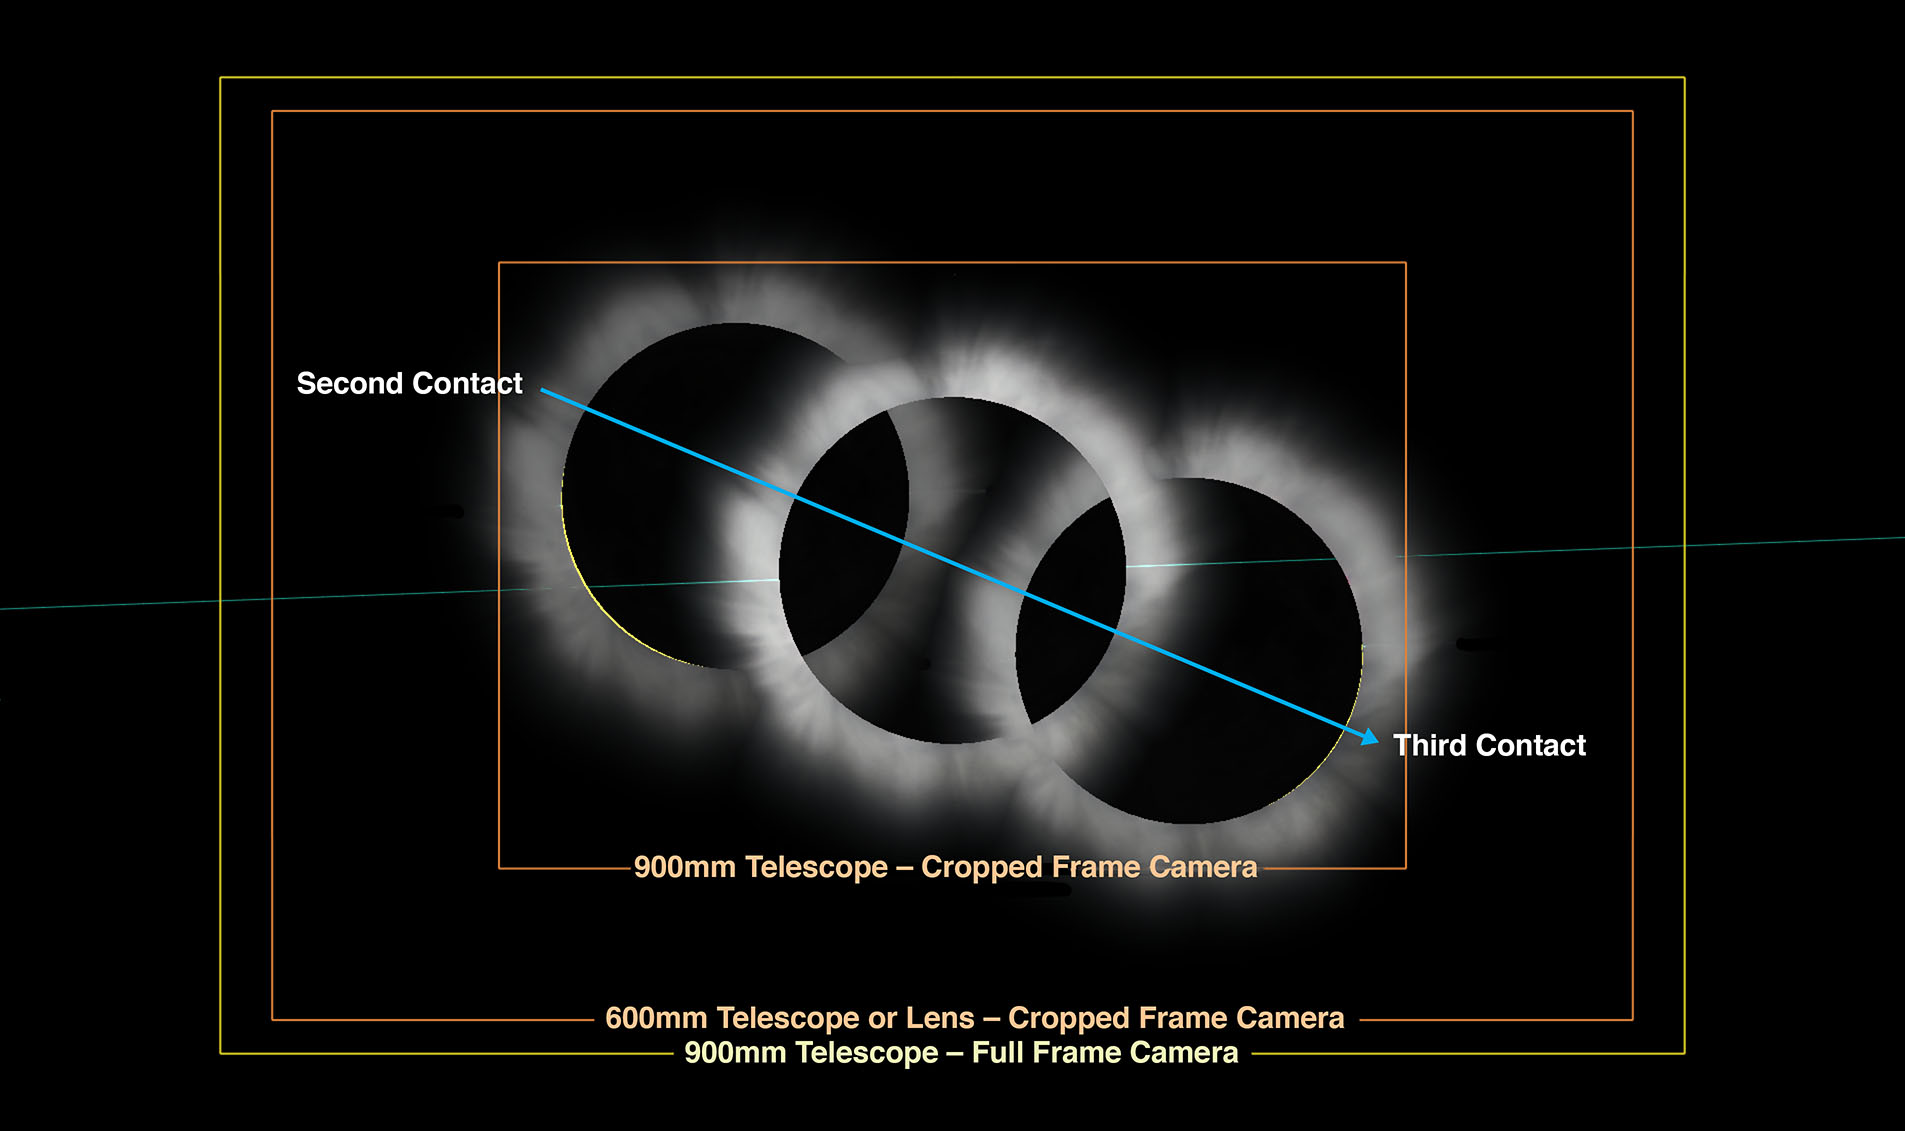
When shooting the Sun or Moon through a telescope or long telephoto lens, the wide field of a full-frame movie might not be required, even to take in the two- or three-degree-wide solar corona around the eclipsed Sun.
However, if a wide field for the maximum extent of the outer corona, combined with sharp resolution is the goal, then a camera like the Canon R5 capable of shooting 8K movies will be the ticket.
And 8K will be ideal for wide-angle movies of the passage of the Moon’s shadow during any eclipse, or for moderate fields showing the eclipsed Sun flanked by Jupiter and Venus on April 8, 2024.
Canon CLOG3
This shows the difference (using frame grabs from 4K movies) between shooting in Canon C-Log3 and shooting with normal “in-camera” colour grading. The exposures were the same.
Like the R6, the R5 offers the option of shooting movies in Canon’s C-Log3 profile, which records internally in 10-bit, preserving more dynamic range in movies, up to 12 stops. The resulting movie looks flat, but when “colour graded” later in post, the movie records much more dynamic range, as I show above. Without C-Log3, the bright sunlit lunar crescent is blown out, as will be the Sun’s inner corona.
The bright crescent Moon with dim Earthshine is a good practice-run stand-in for the eclipsed Sun with its wide range of brightness from the inner to the outer corona.
Sample Moon Movies
For the full comparison of the R5 and R6 in my test shoot of the crescent Moon, see this narrated demo movie on Vimeo for the 4K movies, shot in various modes, both full-frame and cropped, with C-Log3 on and off.
Keep in mind that video compression in the on-line version may make it hard to see the resolution difference between shooting modes.
A “private link” 10-minute video on Vimeo demonstrating 4K video clips with the R5 and R6.
For a movie of the 8K footage, though downsized to 4K for the Vimeo version (the full sized 8K file was 29 Gigs!), see this sample movie below on Vimeo.
A “private link” video on Vimeo demonstrating 8K video clips with the R5.
LOw-Light VIDEO
Like the R6, the R5 can shoot at a dragged shutter speed as slow as 1/8-second. That slow shutter, combined with a fast f/1.4 to f/2 lens, and ISOs as high as 51,200 are the keys to shooting movies of the night sky.
Especially auroras. Only when auroras get shadow-casting bright can we shoot at the normal 1/30-second shutter speed of movies and at lower ISOs.
This compares frame grabs of aurora movies shot the same night with the R5 at 8K and 4K with the Canon R6 at 4K, all at ISO 51,200.
I was able to shoot a decent aurora one night from home with both the R5 and R6, and with the same fast TTArtisan 21mm f/1.5 RF lens. The sky and aurora changed in brightness from the time I shot with the R6 first to the R5 later. But even so, the movies serve as a look at how the two cameras perform for real-time aurora movies.
Auroras are where we need to shoot full-frame, for the maximum field of view, and at high ISOs. The R5’s maximum ISO is 51,200, while the R6 goes up to 204,800, though it is largely unusable at that speed for actual shooting, just for previewing scenes.
As expected, the R6 was much less noisy than the R5, by about two stops. The R5 is barely usable at ISO 51,200, while the R6 works respectably well at that speed. If auroras get very bright, then slower ISOs can be used, making the R5 a possible camera for low-light use, but it would not be a first choice, unless 8K auroras are a must-have.
Sample aurora Movies
For a narrated movie comparing the R5 and R6 at 4K on the aurora, stepping both through a range of ISO speeds, see this movie at Vimeo.
A “private link” video on Vimeo demonstrating 4K aurora clips with the R5 and R6.
For a movie showing the same aurora shot with the R5 at 8K, see this movie. However, it has been down-sized to 4K for on-line viewing, so you’ll see little difference between it and the 4K footage. Shooting at 8K did not improve or smooth noise performance.
A “private link” video on Vimeo demonstrating 8K aurora clips with the R5.
BATTERY LIFE — Stills and video
Canon’s new LP-E6NH battery supports charging through the USB-C port and has a higher 2130mAh capacity than the 1800mAh LP-E6 batteries. However, the R5 is compatible with the older batteries.
Like the R6, the R5 comes with a new version of Canon’s standard LP-E6 battery, the LP-E6NH.
On mild nights, I found the R5 ran fine on one battery for the 3 to 4 hours needed to shoot a time-lapse sequence, or set of deep-sky images, with power to spare. Now, that was with the camera in “Airplane Mode,” which I always use regardless, to turn off the power-consuming WiFi and Bluetooth, which I never use on cameras.
As I noted with the R6, for demanding applications, especially in winter, the R5 can be powered by an outboard USB power bank that has Power Delivery or “PD” capability.
The exception for battery use is when shooting videos, especially 8K. That can drain a battery after an hour of recording, though it takes only 10 to 12 minutes of 8K footage to fill a 128 gigabyte card. While less than half that length will be needed to capture any upcoming total eclipse from diamond ring to diamond ring, the result is still a massive file.
OVERHEATING
More critically, the R5 is also infamous for overheating and shutting down when shooting 8K movies, after a time that depends on how hot the environment is. I found the R5 shot 8K or 4K Fine HQ for about 22 minutes at room temperature before the overheat warning first came on, then shut off recording two or three minutes later. Movie recording cannot continue until the R5 cools off sufficiently, which takes at least 10 to 15 minutes.
That deficiency might befoul unwary eclipse photographers in 2024. The answer for “no-worry” 8K video recording is the Canon R5C, the video-centric version of the R5, with a built-in cooling fan.
Features and usability
While certainly not designed with astrophotography in mind, the R5 has several hardware and firmware features that are astrophoto friendly.
The R5’s Canon-standard flip screen
Like all Canon cameras made in the last few years, the R5 has Canon’s standard articulated screen, which can be angled up for convenient viewing when on a telescope. It is also a full touch screen, with all important camera settings and menus adjustable on screen, good for use at night.
With 2.1 million dots, the R5’s rear screen has a higher resolution than the 1.62-million-dot screen of the R6, and much higher than the 1 million pixels of the Rp’s screen, but is the same resolution as in the R and Ra.
The R5’s top-mounted backlit LCD screen
The R5, like the original R, has a top backlit LCD screen for display of current camera settings, battery level and Bulb timer. The lack of a top screen was one of my criticisms of the R6.
Yes, the hardware Mode dial of the R6 and Rp does make it easier to switch shooting modes, such as quickly changing from Stills to Movie. However, for astrophotography the top screen provides useful information during long exposures, and is handy to check when the camera is on a telescope or tripod aimed up to the sky, without spoiling dark adaptation. I prefer to have one.
The R5’s front-mounted N3-style remote port
The R5’s remote shutter port, used for connecting external intervalometers or time-lapse motion controllers, is Canon’s professional-grade three-pronged N3 connector. It’s sturdier than the 2.5mm mini-phono plug used by the Rp, R and R6. It’s a plus for the R5.
As with all new cameras, the R5’s USB port is a USB-C type. A USB-C cable is included.
The R5’s back panel buttons and controls
Like the R6, the R5 has a dedicated magnification button on the back panel for zooming in when manually focusing or inspecting images. In the R and Ra, that button is only on the touch panel rear screen, where it has to be called up by paging to that screen, an inconvenience. While virtual buttons on a screen are easier to see and operate at night than physical buttons, I find a real Zoom button handy as it’s always there.
The R5’s twin cards, a CFexpress Type B and an SD UHS-II
To handle the high data rates of 8K video and also 4K video when set to the high frame rate option of 120 fps, one of the R5’s memory card slots requires a CFexpress Type B card, a very fast but more costly format.
As I had no card reader for this format, I had to download movies via a USB cable directly from the camera to my computer, using Canon’s EOS Utility software, as Adobe Downloader out of Adobe Bridge refused to do the job. Plan to buy a card reader.
Allocating memory card use
In the menus, you can choose to record video only to the CFexpress, and stills only to the SD card, or both stills and movies to each card for a backup, with the limitation that 8K and 4K 120fps won’t record to the SD card, even very fast ones.
FIRMWARE FEATURES
Setting the Interval Timer
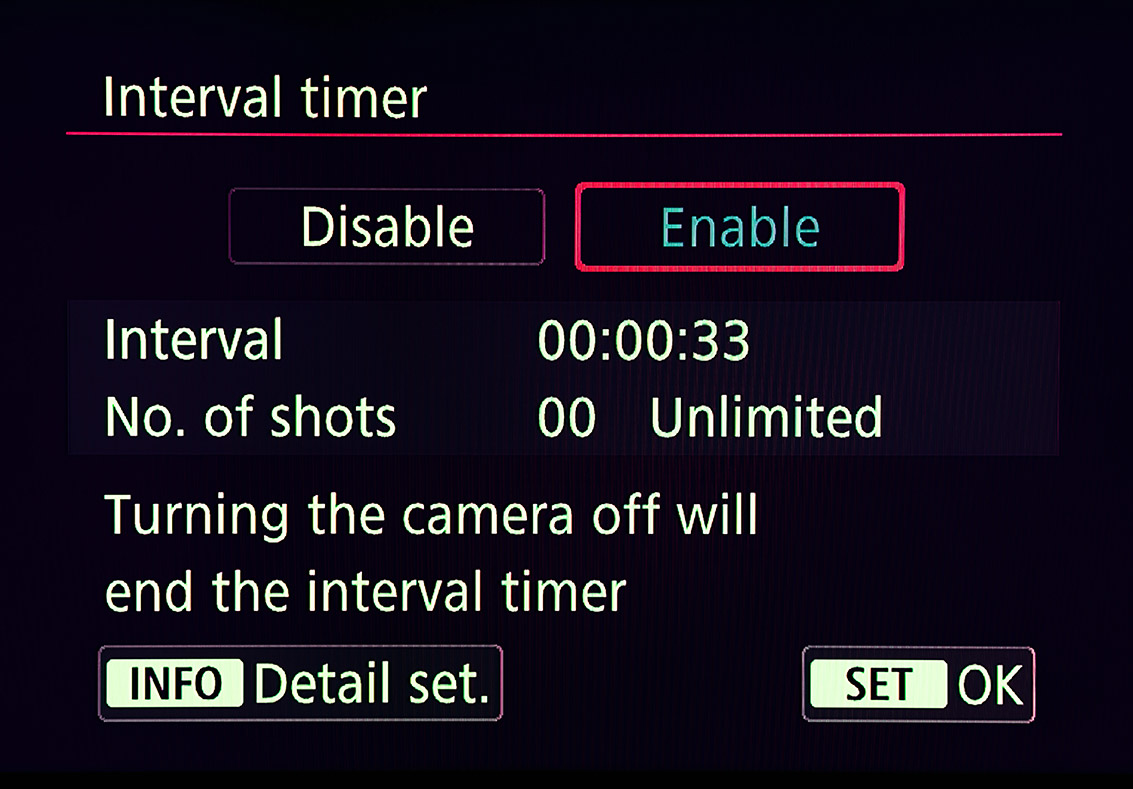
Unlike the Canon R and Ra (which both annoyingly lack a built-in intervalometer), but like the R6, the R5 has an Interval Timer in its firmware. This can be used to set up a time-lapse sequence, but with exposures only up to the maximum of 30 seconds allowed by the camera’s shutter speed settings, true of most in-camera intervalometers. Even so, this is a useful function for simple time-lapses.
Setting the Bulb Timer
As with most recent Canon DSLRs and DSLMs, the R5 also includes a built-in Bulb Timer. This allows setting an exposure of any length (many minutes or hours) when the camera is in Bulb mode. However, it cannot be combined with the Interval Timer for multiple exposures; it is good only for single shots. Nevertheless, I find it useful for shooting long exposures for the ground component of nightscape scenes.
Custom button functions
While Canon cameras don’t have Custom Function buttons per se (unlike Sonys), the R5’s various buttons and dials can be custom programmed to functions other than their default assignments. I assign the * button to turning on and off the Focus Peaking display and, as shown, the AF Point button to a feature only available as a custom function, one that temporarily brightens the rear screen to full, good for quickly checking framing at night.
Assigning Audio Memos to the Rate button
A handy feature of the R5 is the ability to add an audio notation to images. You shoot the image, play it back, then use the Rate button (if so assigned) to record a voice memo of up to 30 seconds, handy for making notes in the field about an image or a shoot. The audio notes are saved as WAV files with the same file number as the image.
The infamous Release Shutter Without Lens command
Like other EOS R cameras, the R5 has this notorious “feature” that trips up every new user who attaches their Canon camera to a telescope or manual lens, only to find the shutter suddenly doesn’t work. The answer is to turn ON “Release Shutter w/o Lens” found buried under Custom Functions Menu 4. Problem solved!
OTHER FEATURES
I provide more details of other features and settings of the R5, many of which are common to the R6, in my review of the R6 here.
Multi-segment panoramas with the R5, like this aurora scene, yield superb resolution but can become massive in size, pressing the ability of software and hardware to process them.
CONCLUSION
No question, the Canon R5 is costly. Most buyers would need to have very good daytime uses to justify its purchase, with astrophotography a secondary purpose.
That said, other than low-light night sky videos, the R5 does work very well for all forms of astrophotography, providing a level of resolution that lesser cameras simply cannot.
Nevertheless, if it is just deep-sky imaging that is of interest, then you might be better served with a dedicated cooled-sensor CMOS camera, such as one of the popular ZWO models, and the various accessories that need to accompany such a camera.
But for me, when it came time to buy another premium camera, I still preferred to have a model that could be used easily, without computers, for many types of astro-images, particularly nightscapes, tracked wide-angle starfields, as well as telescopic images.
Since buying the R5, after first suspecting it would prove too noisy to be practical, it has in fact become my most used camera, at least for all images where the enhanced red sensitivity of the EOS Ra is not required. But for low-light night videos, the R6 is the winner.
However, to make use of the R5’s resolution, you do have to match it with sharp, high-quality lenses and telescope optics, and have the computing power to handle its large files, especially when stitching or stacking lots of them. The R5 can be just the start of a costly spending spree!
The tradition continued of chasing clear skies to see a lunar eclipse.
It wouldn’t be an eclipse without a chase. Total eclipses of the Sun almost always demand travel, often to the far side of the world, to stand in the narrow path of the Moon’s shadow.
By contrast, total eclipses of the Moon come to you — they can be seen from half the planet when the Full Moon glides through Earth’s shadow.
Assuming you have clear skies! That’s the challenge.
Of the 14 total lunar eclipses (TLEs) visible from here in Alberta since 2000, I have seen all but one, missing the January 21, 2000 TLE due to clouds.
But of the remaining 13 TLEs so far in the 21st century, I watched only three from home, the last home lunar eclipse being in December 2010.
The total lunar eclipse of May 26, 2021 here in the initial partial phases with it embedded in thin cloud. The clouds add a glow of iridescent colours around the Moon, with the part of the Moon’s disk in the umbral shadow a very deep, dim red. A subtle blue band appears along the umbral shadow line, usually attributed to ozone in Earth’s upper atmosphere. With the Canon 60Da and 200mm lens.
I viewed three TLEs (August 2007, February 2008, and December 2011) from the Rothney Observatory south-west of Calgary as part of public outreach programs I was helping with.
In April 2014, I was in Australia and viewed the eclipsed Moon rising in the evening sky over Lake Macquarie, NSW.
A year later, in April 2015, I was in Monument Valley, on the Arizona-Utah border for the short total eclipse of the Moon at dawn.
But of the eclipses I’ve seen from Alberta since 2014, I have had to chase into clear skies for all of them — to Writing-on-Stone Provincial Park in both October 2014 and September 2015, to the Crowsnest Pass for January 2018, and to Lloydminster for January 2019.
A selfie of the successful eclipse chaser bagging his trophy, the total lunar eclipse of January 20, 2019. This was from a site south of Lloydminster on the Alberta-Saskatchewan border, but just over into the Saskatchewan side.
The total lunar eclipse on the morning of May 26, 2021 was no exception.
Leading up to eclipse day prospects for finding clear skies anywhere near home in southern Alberta looked bleak. The province was under widespread cloud bringing much-needed rain. Good for farmers, but bad for eclipse chasers.
Then, two days prior to the eclipse a hole in the clouds was predicted to open up along the foothills in central Alberta just at the right time, at 4 a.m. The predictions stayed consistent a day later.
Environment Canada predictions, as displayed by the wonderful Astrospheric app, showed Rocky Mountain House (the red circle) on the edge of the retreating clouds.
So trusting the Environment Canada models that had served me well since 2014, I made plans to drive north the day before the eclipse to Rocky Mountain House, a sizeable town on Highway 11 west of Red Deer, where the foothills begin. “Rocky” was predicted to be on the edge of the clearing, with a large swath of clear sky in the right direction, to the southwest where the Moon would be.
Fortunately, COVID restrictions are not so severe here as to demand stay-at-home orders. I could travel, at least within Alberta. Hotels were open, but restaurants only for takeaway.
The Starry Night desktop planetarium program provided a preview of the eclipsed Moon’s location and movement, plus the field of view of lenses, to plan the main shots with an 85mm lens (the time-lapse) and a 200mm lens (the close-ups over the horizon).
This was going to be a tough eclipse even under the best of sky conditions, as for us in Alberta the Moon would be low and setting into the southwest at dawn. The Moon would be darkest and in mid-eclipse just as the sky was also brightening with dawn twilight.
However, a low eclipse offers the opportunity of a view of the reddened Moon over a scenic landscape, in this case of the eclipsed Moon setting over the Rockies. That was the plan.
Unfortunately, Rocky Mountain House wasn’t the ideal destination as it lies far from the mountains. I was hoping for a site closer to the Rockies in southern Alberta. But a site with clear skies is always the first priority.
The task is then finding a spot to set up with a clear view to the southwest horizon, which from the area around Rocky is tough — it’s all trees!
This is where planning apps are wonderful.
The Photographer’s Ephemeris app showed possible side road sites and the position of the eclipsed Moon relative to the site terrain. The arc of spheres is the Milky Way.
I used The Photographer’s Ephemeris (TPE) to search for a side road or spot to pull off where I could safely set up and be away from trees to get a good sightline to the horizon and possibly distant mountains.
A site not far from town was ideal, to avoid long pre- and post-eclipse drives in the wee hours of the morning. The timing of this eclipse was part of the challenge — in having to be on site at 4 a.m.
TPE showed several possible locations and a Google street view (not shown here) seemed to confirm that the horizon in that area off Highway 11 would be unobstructed over cultivated fields.
But you don’t know for sure until you get there.
The PhotoPills AR mode overlays a graphic of the night sky on top of a live view from the phone’s camera, useful when on site to check the shooting geometry for that night. The Moon was in the right place!
So as soon as I arrived, I went to one site I had found remotely, only to discover power lines in the way. Not ideal.
I found another nearby side road with a clean view. From there I used the PhotoPills app (above) and its augmented reality “AR” mode to confirm, that yes, the Moon would be in the right place over a clear horizon at eclipse time the next morning.
The Theodolite app records viewing directions onto site images, useful for documenting sites for later use at night.
Another app I like for site scouting, Theodolite, also confirmed that the view toward the eclipsed Moon’s direction (with an azimuth of about 220°) would be fine from that site.
As a Plan B — it’s always good to have a Plan B! — I also drove west along Highway 11, the David Thompson Highway, toward the mountains, in search of a rare site away from trees, just in case the only clear skies lay to the west. I found one, some 50 km west of Rocky, but thankfully it was not needed. The Plan A site worked fine, and was just 5 minutes south of town, and bed!
My eclipse gear at work with the eclipse in progress in the morning twilight at 4:30 a.m.
I set up two tripods. One was for the Canon R6 with an 85mm lens for a “time-lapse” sequence of the Moon moving across the frame as it entered the Earth’s umbral shadow.
The other tripod I used for closeups of just the Moon using the Canon 60Da and 200mm lens, then switched to the Canon Ra and a 135mm lens, then the longer 200mm lens once the Moon got low enough to also be in frame with the horizon. Those were for the prime shot of the eclipse over the distant mountains and skyline.
A composite “time-lapse” blend of the setting Full Moon entering the Earth’s umbral shadow on the morning of May 26, 2021. This shows the Moon moving into Earth’s shadow and gradually disappearing in the bright pre-dawn sky. I shot images with the 85mm lens at 1-minute intervals but choose only every 5th image for this blend, so the Moons are spaced at 5-minute intervals.
It all worked! The sky turned out to be clearer than predicted, a pleasant surprise, with only some light cloud obscuring the Moon halfway through the partial phases (the first image at top).
The other surprise was how dark the shadowed portion of the Moon was. This was a very short total eclipse, with totality only 14 minutes long. With the Moon passing through the outer, lighter part of the umbral shadow, I would have expected a brighter eclipse, making the reddened Moon stand out better in the blue twilight.
As it was, in the minutes before the official start of totality at 5:11 a.m. MDT, the Moon effectively disappeared from view, both to the eye and camera.
The total lunar eclipse of May 26, 2021, here in the late partial phase about 15 minutes before totality began, with a thin arc of the Full Moon at the top of the disk still in sunlight. The rest is in the red umbral shadow of the Earth. The same pinkish-red light is beginning to light the distant Rocky Mountains in the dawn twilight. This is a single 1.3-second exposure with the 200mm lens and Canon Ra, untracked on a tripod. I did blend in a short 1/6-second exposure for just the bright part of the Moon to tone down its brightness.
My best shots were of the Moon still in partial eclipse but with the umbral shaded portion bright enough to show up red in the images. The distant Rockies were also beginning to light up pink in the first light of dawn.
The total lunar eclipse of May 26, 2021, taken at 5:01 a.m. MDT, about 10 minutes before the start of totality, with a thin arc of the Full Moon at the top of the disk still in sunlight. The rest is in the red umbral shadow of the Earth but the eclipsed portion of the Moon was so dim it was disappearing into the brightening twilight. This is a single 0.8-second exposure with the 200mm lens and Canon Ra.
My last view was of a sliver-thin Moon disappearing into Earth’s shadow just prior to the onset of totality. I packed up and headed back to bed with technically the Moon still up and in total eclipse, but impossible to see. Still I was a happy eclipse chaser!
It was another successful eclipse trip, thwarted not so much by clouds, but by the darkness of our planet’s shadow, which might have been due to widespread cloud or volcanic ash in the atmosphere of Earth.
The other factor at play was that this was a “supermoon,” with the larger Moon near perigee entering more deeply into the umbra than a normal-sized Moon.
A preview using Starry Night of the November 18/19, 2021 near-total lunar eclipse from the longitude and latitude of Alberta, with the Moon hight in the south west of the Milky Way.
The next lunar eclipse is six months later, on the night of November 18/19, 2021 when the Moon will not quite fully enter Earth’s umbral shadow, for a 97% partial eclipse. But enough of the Moon will be in the dark umbra for most of the Moon to appear red, with a white crescent “smile” at the bottom.
As shown above, from my location in Alberta the Moon will appear high in the south, in Taurus just west of the Milky Way. The winter stars and Milky Way will “turn on” and fade into view as the eclipse progresses.
We shall see if that will be a rare “home” eclipse, or if it will demand another chase to a clear hole in the clouds on a chilly November night.
I present my top 10 tips for capturing time-lapses of the moving sky.
If you can take one well-exposed image of a nightscape, you can take 300. There’s little extra work required, just your time. But if you have the patience, the result can be an impressive time-lapse movie of the night sky sweeping over a scenic landscape. It’s that simple.
Or is it?
Here are my tips for taking time-lapses, in a series of “Do’s” and “Don’ts” that I’ve found effective for ensuring great results.
But before you attempt a time-lapse, be sure you can first capture well-exposed and sharply focused still shots. Shooting hundreds of frames for a time-lapse will be a disappointing waste of your time if all the images are dark and blurry.
For that reason many of my tips apply equally well to shooting still images. But taking time-lapses does require some specialized gear, techniques, planning, and software. First, the equipment.
NOTE: This article appeared originally in Issue #9 of Dark Sky Travels e-magazine.
SELECTING EQUIPMENT
Essential Gear Time-lapse photography requires just the camera and lens you might already own, but on a solid tripod (a carbon-fibre Manfrotto with an Acratech ball-head is shown here), and with an intervalometer.
TIP 1 — DO: Use a solid tripod
A lightweight travel tripod that might suffice for still images on the road will likely be insufficient for time-lapses. Not only does the camera have to remain rock steady for the length of the exposure, it has to do so for the length of the entire shoot, which could be several hours. Wind can’t move it, nor any camera handling you might need to do mid-shoot, such as swapping out a battery.
The tripod needn’t be massive. For hiking into scenic sites you’ll want a lightweight but sturdy tripod. While a carbon fibre unit is costly, you’ll appreciate its low weight and good strength every night in the field. Similarly, don’t scrimp on the tripod head.
TIP 2 — DO: Use a fast lens
The All-Important Lens A fast lens is especially critical for time-lapses to allow capturing good sky and ground detail in each exposure, as compositing later won’t be feasible. This is the Sigma 20mm f/1.4 Art lens.
As with nightscape stills, the single best purchase you can make to improve your images of dark sky scenes is not buying a new camera (at least not at first), but buying a fast, wide-angle lens.
Ditch the slow kit zoom and go for at least an f/2.8, if not f/2, lens with 10mm to 24mm focal length. This becomes especially critical for time-lapses, as the fast aperture allows using short shutter speeds, which in turn allows capturing more frames in a given period of time. That makes for a smoother, slower time-lapse, and a shoot you can finish sooner if desired.
TIP 3 — DO: Use an intervalometer
Canon intervalometer functions
Nikon intervalometer functions
Automating the Camera The intervalometer is also key. For cameras without an internal intervalometer (screens from a Canon and a Nikon are shown above), an outboard unit like one of these, is essential. Be sure to get the model that fits your camera’s remote control jack.
Time-lapses demand the use of an intervalometer to automatically fire the shutter for at least 200 to 300 images for a typical time-lapse. Many cameras have an intervalometer function built into their firmware. The shutter speed is set by using the camera in Manual mode.
Just be aware that a camera’s 15-second exposure really lasts 16 seconds, while a 30-second shot set in Manual is really a 32-second exposure.
So in setting the interval to provide one second between shots, as I advise below, you have to set the camera’s internal intervalometer for an interval of 17 seconds (for a shutter speed of 15 seconds) or 33 seconds (for a shutter speed of 30 seconds). It’s an odd quirk I’ve found true of every brand of camera I use or have tested.
Alternatively, you can set the camera to Bulb and then use an outboard hardware intervalometer (they sell for $60 on up) to control the exposure and fire the shutter. Test your unit. Its interval might need to be set to only one second, or to the exposure time + one second.
How intervalometers define “Interval” varies annoyingly from brand to brand. Setting the interval incorrectly can result in every other frame being missed and a ruined sequence.
SETTING YOUR CAMERA
TIP 4 — DON’T: Underexpose
Expose to the Right When shooting, choose settings that will yield a histogram that is not slammed to the left, but is shifted to the right to minimize noise and lift details in the shadows.
As with still images, the best way to beat noise is to give the camera signal. Use a wider aperture, a longer shutter speed, or a higher ISO (or all of the above) to ensure the image is well exposed with a histogram pushed to the right.
If you try to boost the image brightness later in processing you’ll introduce not only the very noise you were trying to avoid, but also odd artifacts in the shadows such as banding and purple discolouration.
With still images we have the option of taking shorter, untrailed images for the sky, and longer exposures for the dark ground to reveal details in the landscape, to composite later. With time-lapses we don’t have that luxury. Each and every frame has to capture the entire scene well.
At dark sky sites, expose for the dark ground as much as you can, even if that makes the sky overly bright. Unless you outright clip the highlights in the Milky Way or in light polluted horizon glows, you’ll be able to recover highlight details later in processing.
After poor focus, underexposure, resulting in overly noisy images, is the single biggest mistake I see beginners make.
TIP 5 — DON’T: Worry about 500 or “NPF” Exposure Rules
Stills from a Sequence A stack of single frames from a time-lapse sequence can often make a good still image, such as this scene of the Space Station rising over Waterton Lakes National Park. The 30-second exposures were just within the “500 Rule” for the 15mm lens used here, but minor star trailing won’t be that noticeable in a final movie.
While still images might have to adhere to the “500 Rule” or the stricter “NPF Rule” to avoid star trailing, time-lapses are not so critical. Slight trailing of stars in each frame won’t be noticeable in the final movie when the stars are moving anyway.
So go for rule-breaking, longer exposures if needed, for example if the aperture needs to be stopped down for increased depth of field and foreground focus. Again, with time-lapses we can’t shoot separate exposures for focus stacking later.
Just be aware that the longer each exposure is, the longer it will take to shoot 300 of them.
Why 300? I find 300 frames is a good number to aim for. When assembled into a movie at 30 frames per second (a typical frame rate) your 300-frame clip will last 10 seconds, a decent length of time in a final movie.
You can use a slower frame rate (24 fps works fine), but below 24 the movie will look jerky unless you employ advanced frame blending techniques. I do that for auroras.
PhotoPills Calculator Apps such as PhotoPills offer handy calculators for juggling exposure time vs. the number of frames to yield the length of the time-lapse shoot.
Bonus Tip
How long it will take to acquire the needed 300 frames will depend on how long each exposure is and the interval between them. An app such as PhotoPills (via its Time lapse function) is handy in the field for calculating exposure time vs. frame count vs. shoot length, and providing a timer to let you know when the shoot is done.
TIP 6 — DO: Use short intervals
Mind the Gap! At night use intervals as short as possible to avoid gaps in time, simulated here (at top) by stacking several time-lapse frames taken at a one-second interval into one image. Using too long an interval, as demonstrated just above, yields gaps in time and jumps in the star motion, simulated here by stacking only every other frame in a sequence.
At night, the interval between exposures should be no more than one or two seconds. By “interval,” I mean the time between when the shutter closes and when it opens again for the next frame.
Not all intervalometers define “Interval” that way. But it’s what you expect it means. If you use too long an interval then the stars will appear to jump across the sky, ruining the smooth motion you are after.
In practice, intervals of four to five seconds are sometimes needed to accommodate the movement of motorized “motion control” devices that turn or slide the camera between each shot. But I’m not covering the use of those advanced units here. I cover those options and much, much more in 400 pages of tips, techniques and tutorials in my Nightscapes ebook, linked to above.
However, during the day or in twilight, intervals can be, and indeed need to be, much longer than the exposures. It’s at night with stars in the sky that you want the shutter to be closed as little as possible.
TIP 7 — DO: Shoot Raw
The Power of Raw Shooting raw, even for time-lapse frames that will eventually be turned into JPGs, allows for maximum control of shadows, highlights, colour balance, and noise reduction. “Before” is what came out of the camera; “After” is with the development settings shown applied in Camera Raw.
This advice also applies to still images where shooting raw files is essential for professional results. But you likely knew that.
However, with time-lapses some cameras offer a mode that will shoot time-lapse frames and assemble them into a movie right in the camera. Don’t use it. It gives you a finished, pre-baked movie with no ability to process each frame later, an essential step for good night time-lapses. And raw files provide the most data to work with.
So even with time-lapses, shoot raw not JPGs.
If you are confident the frames will be used only for a time-lapse, you might choose to shoot in a smaller S-Raw or compressed C-Raw mode, for smaller files, in order to fit more frames onto a card.
But I prefer not to shrink or compress the original raw files in the camera, as some of them might make for an excellent stacked and layered still image where I want the best quality originals (such as for the ISS over Waterton Lakes example above).
To get you through a long field shoot away from your computer buy more and larger memory cards. You don’t need costly, superfast cards for most time-lapse work.
PLANNING AND COMPOSITION
TIP 8 — DO: Use planning apps to frame
Planning the Shoot Apps such as The Photographer’s Ephemeris (shown here set for the author’s Waterton Lakes site for moonrise) help in planning where the Sun, Moon and Milky Way will be from your site during the shoot.
Simulating the Shoot The companion app to The Photographer’s Ephemeris, TPE 3D, shown above in the inset, exactly matches the real scene for the mountain skyline, placement of the Milky Way, and lighting from the rising Moon.
All nightscape photography benefits from using one of the excellent apps we now have to assist us in planning a shoot. They are particularly useful for time-lapses.
Apps such as PhotoPills and The Photographer’s Ephemeris are great. I like the latter as it links to its companion TPE 3D app to preview what the sky and lighting will look like over the actual topographic horizon from your site. You can scrub through time to see the motion of the Milky Way over the scenery. The Augmented Reality “AR” modes of these apps are also useful, but only once you are on site during the day.
For planning a time-lapse at home I always turn to a “planetarium” program to simulate the motion of the sky (albeit over a generic landscape), with the ability to add in “field of view” indicators to show the view your lens will capture.
You can step ahead in time to see how the sky will move across your camera frame during the length of the shoot. Indeed, such simulations help you plan how long the shoot needs to last until, for example, the galactic core or Orion sets.
Planetarium software helps ensure you frame the scene properly, not only for the beginning of the shoot (that’s easy — you can see that!), but also for the end of the shoot, which you can only predict.
Planetarium Planning An alternative is to use a planetarium program such as the free Stellarium, shown above, which can display lens fields of view. These scenes show the simulated vs. real images (insets) for the start (top) and end (bottom) of the Waterton Lakes time-lapse with a 35mm lens frame, outlined in red.
If your shoot will last as long as three hours, do plan to check the battery level and swap batteries before three hours is up. Most cameras, even new mirrorless models, will now last for three hours on a full battery, but likely not any longer. If it’s a cold winter night, expect only one or two hours of life from a single battery.
PROCESSING
TIP 9 — DO: Develop one raw frame and apply settings to all
Copy and Paste Settings Most raw developers or photo library programs (Adobe Bridge is shown here) offer the essential ability to copy settings from one image and paste them onto hundreds of others in a folder, developing all the time-lapse frames in a snap.
Processing the raw files takes the same steps and settings as you would use to process still images.
With time-lapses, however, you have to do all the processing required within your favourite raw developer software. You can’t count on bringing multiple exposures into a layer-based processor such as Photoshop to stack and blend images. That works for a single image, but not for 300.
I use Adobe Camera Raw out of Adobe Bridge to do all my time-lapse processing. But many photographers use Lightroom, which offers all the same settings and non-destructive functions as Adobe Camera Raw.
For those who wish to “avoid Adobe” there are other choices, but for time-lapse work an essential feature is the ability to develop one frame, then copy and paste its settings (or “sync” settings) to all the other frames in the set.
Not all programs allow that. Affinity Photo does not. Luminar doesn’t do it very well. DxO PhotoLab, ON1 Photo RAW, and the free Raw Therapee, among others, all work fine.
HOW TO ASSEMBLE A TIME-LAPSE
Once you have a set of raws all developed, the usual workflow is to export all those frames out as high-quality JPGs which is what movie assembly programs need. Your raw developing software has to allow batch exporting to JPGs — most do.
Photoshop Batch Export Raw developers usually have a batch export function. So does Photoshop, via its Image Processor utility, shown here (found under File>Scripts>Image Processor) that can export a folder of raws into JPGs or TIFFs, and re-size them, often needed for final 4K or HD movies.
However, none of the programs above (except Photoshop and Adobe’s After Effects) will create the final movie, whether it be from those JPGs or from the raws.
Assembling JPGs The author’s favourite assembly program is TimeLapse DeFlicker (TLDF). It can turn a folder of JPGs into movies as large as 8K and with ProRes codecs for the highest quality.
So for assembling the intermediate JPGs into a movie, I often use a low-cost program called TLDF (TimeLapse DeFlicker) available for MacOS and Windows (timelapsedeflicker.com). It offers advanced functions such as deflickering (i.e. smoothing slight frame-to-frame brightness fluctuations) and frame blending (useful to smooth aurora motions or to purposely add star trails).
While there are many choices for time-lapse assembly, I suggest using a program dedicated to the task and not, as many do, a movie editing program. For most sequences, the latter makes assembly unnecessarily difficult and harder to set key parameters such as frame rates.
TIP 10 — DO: Try LRTimelapse for more advanced processing
Working on Keyframes The advanced processing program LRTimelapse creates several keyframes through the sequence (seven are shown here in Adobe Bridge) which you develop so each looks its best. During this sequence, the Moon rose changing the lighting toward the end of the shoot (in the last three keyfames).
Get serious about time-lapse shooting and you will want — indeed, you will need — the program LRTimelapse (LRTimelapse.com). A free but limited trial version is available.
This powerful program is for sequences where one setting will not work for all the frames. One size does not fit all.
Instead, LRTimelapse allows you to process a few keyframes throughout a sequence, say at the start, middle, and end. It then interpolates all the settings between those keyframes to automatically process the entire set of images to smooth (or “ramp”) and deflicker the transitions from frame to frame.
LRTimelapse Ramping LRTimelapse reads your developed keyframe data and applies smooth transitions of all settings to each of the raw files between the keyframes. The result is a seamless and smooth final movie. The pink curve shows how the scene brightened at moonrise. The blue diamonds on the yellow line mark the seven keyframes.
This is essential for sequences where the lighting changes during the shoot (say, the Moon rises or sets), and for so-called “holy grails.” Those are advanced sequences that track from daylight or twilight to darkness, or vice versa, over a wide range of camera settings.
However, LRTimelapse works only with Adobe Lightroom or the Adobe Camera Raw/Bridge combination. So for advanced time-lapse work Adobe software is essential.
A Final Bonus Tip
Keep it simple. You might aspire to emulate the advanced sequences you see on the web, where the camera pans and dollies during the movie. I suggest avoiding complex motion control gear at first to concentrate on getting well-exposed time-lapses with just a static camera. That alone is a rewarding achievement.
But before that, first learn to shoot still images successfully. All the settings and skills you need for a great looking still image are needed for a time-lapse. Then move onto capturing the moving sky.
I end with a link to an example music video, shot using the techniques I’ve outlined. Thanks for reading and watching. Clear skies!
The Beauty of the Milky Way from Alan Dyer on Vimeo.
On November 11, I traveled to the near-flung corners of my backyard to observe the rare transit of Mercury across the Sun.
History is replete with tales of astronomers traveling to the far corners of the Earth to watch dark objects pass in front of the Sun — the Moon in eclipses, and Mercury and Venus in transits.
On November 11, to take in the last transit of Mercury until 2032, I had planned a trip to a location more likely to have clear skies in November than at home. A 3-day drive to southern Arizona was the plan.
But to attend to work and priorities at home I cancelled my plans. Instead, I decided to stay home and take my chances with the Alberta weather, perhaps making a run for it a day’s drive away if needed to chase into clear skies.
As it turned out, none of that was necessary. The forecast for clear, if cold, skies held true and we could not have had a finer day for the transit. Even the -20° C temperatures were no problem, with no wind, and of course sunshine!
Plus being only steps from home and a warming coffee helped!
As it turned out, the site in Arizona I had booked to stay was clouded out for the entire event. So I was happy with my decision!
For my site in Alberta, as for all of western North America, the Sun rose with the transit in progress. But as soon as the Sun cleared the horizon there was Mercury, as a small, if fuzzy, black dot on the Sun.
As the Sun rose the view became sharper, and was remarkable indeed — of a jet black dot of a tiny planet silhouetted on the Sun.
I shot through two telescopes, my 4-inch and 5-inch refractors, both equipped with solar filters of course. I viewed through two other telescopes, for white-light and hydrogen-alpha filtered views.
I was able to follow the transit for three hours, for a little more than half the transit, until Mercury exited the Sun just after 11 a.m. MST. The view below is from moments before Mercury’s exit, or “egress.”
I shot still frames every 15 seconds with each of the two cameras and telescopes, for a time-lapse, plus I shot real-time videos.
At this transit Mercury passed closer to the centre of the Sun’s disk than it will for any other transit in the 21st century, making this event all the more remarkable. That point is recorded above, from a shot taken at 8:19 a.m. MST.
Stacking a selection of the time-lapse frames, ones taken 1-minute intervals, produced this composite of the transit, from just before mid-transit until Mercury’s egress.
I assembled all the best images and 4K videos together into a movie, which I narrated live at the telescope as the transit was happening. I hope this provides a sense of what it was like to view this rare event.
The Transit of Mercury from Alan Dyer on Vimeo.
We won’t see another until 2032, but not from North America. The next transit of Mercury viewable from here at home is not until 2049! This was likely my last transit, certainly for a while!
P.P.S.: And for tech details on the images and videos in this blog, please click through to Vimeo and the video description I have there of cameras, scopes, and settings.
To Adobe or not to Adobe. That is the question many photographers are asking with the spate of new image processing programs vying to “kill Photoshop.”
I tested more than ten contenders as alternatives to Adobe’s image processing software, evaluating them ONLY for the specialized task of editing demanding nightscape images taken under the Milky Way, both for single still images and for time-lapses of the moving sky. I did not test these programs for other more “normal” types of images.
Also, please keep in mind, I am a Mac user and tested only programs available for MacOS, though many are also available for Windows. I’ve indicated these.
But I did not test any Windows-only programs. So sorry, fans of Paintshop Pro (though see my note at the end), Photoline, Picture Window Pro, or Xara Photo & Graphic Designer. They’re not here. Even so, I think you will find there’s plenty to pick from!
This review expands upon and updates mini-reviews I included in my Nightscapes and Time-Lapses eBook, shown at right.
If you are hoping there’s a clear winner in the battle against Adobe, one program I can say does it all and for less cost and commitment, I didn’t find one.
However, a number of contenders offer excellent features and might replace at least one member of Adobe’s image processing suite.
For example, only four of these programs can truly serve as a layer-based editing program replacing Photoshop.
The others are better described as Adobe Lightroom competitors – programs that can catalog image libraries and develop raw image files, with some offering adjustment layers for correcting color, contrast, etc. But as with Lightroom, layering of images – to stack, composite, and mask them – is beyond their ability.
For processing time-lapse sequences, however, we don’t need, nor can we use, the ability to layer and mask several images into one composite.
What we need for time-lapses is to:
Develop a single key raw file, then …
Copy its settings to the hundreds of other raw files in the time-lapse set, then …
Export that folder of raw images to “intermediate JPGs” for assembly into a movie.
Even so, not all these contenders are up to the task.
Here are the image processing programs I looked at. Costs are in U.S. dollars. Most have free trial copies available.
The Champion from Adobe
Adobe Camera Raw (ACR), Photoshop, Bridge, and Lightroom, the standards to measure others by
Cost: $10 a month by subscription, includes ACR, Photoshop, Bridge, and Lightroom
Adobe Camera Raw (ACR) is the raw development plug-in that comes with Photoshop and Adobe Bridge, Adobe’s image browsing application that accompanies Photoshop. Camera Raw is equivalent to the Develop module in Lightroom, Adobe’s cataloguing and raw processing software. Camera Raw and Lightroom have identical processing functions and can produce identical results.
Photoshop and Lightroom complement each other and are now available together, but only by monthly subscription through Adobe’s Creative Cloud service, at $10/month. Though $120 for a year is not far off the cost of purchasing many of these other programs and perhaps upgrading them annually, many photographers prefer to purchase their software and not subscribe to it.
Thus the popularity of these alternative programs. Most offered major updates in late 2017.
My question is, how well do they work? Are any serious contenders to replace Photoshop or Lightroom?
Lightroom Contenders: Five Raw Developers
ACDSee Photo Studio (current as of late 2017)
Cost: $60 to $100, depending on version, upgrades $40 to $60.
I tested the single MacOS version. Windows users have a choice of either a Standard or Professional version. Only the Pro version offers the full suite of raw development features, in addition to cataloging functions. The MacOS version resembles the Windows Pro version.
Capture One v11 (late 2017 release)
Cost: $299, and $120 for major upgrades, or by subscription for $180/year
As of version 11 this powerful raw developer and cataloguing program offers “Layers.” But these are only for applying local adjustments to masked areas of an image. You cannot layer different images. So Capture One cannot be used like Photoshop, to stack and composite images. It is a Lightroom replacement only, but a very good one indeed.
Here’s a low cost Lightroom replacement for image management and raw processing abilities. Noise reduction is “Perfectly Clear” from Athentech and works well.
The ELITE version of what DxO now calls “PhotoLab” offers DxO’s superb PRIME noise reduction and excellent ClearView contrast enhancement feature. While it has an image browser, PhotoLab does not create a catalog, so this isn’t a full Lightroom replacement, but it is a superb raw developer. DxO also recently acquired the excellent Nik Collection of image processing plug-ins, so we can expect some interesting additions and features.
This free open source program has been created and is supported by a loyal community of programmers. It offers a bewildering blizzard of panels and controls, among them the ability to apply dark frames and flat field images, features unique among any raw developer and aimed specifically at astrophotographers. Yes, it’s free, but the learning curve is precipitous.
Photoshop Contenders: Four Raw Developers with Layering/Compositing
These programs can not only develop at least single raw images, if not many, but also offer some degree of image layering, compositing, and masking like Photoshop.
However, only ON1 Photo RAW can do that and also catalog/browse images as Lightroom can. Neither Affinity, Luminar, or Pixelmator offer a library catalog like Lightroom, nor even a file browsing function such as Adobe Bridge, serious deficiencies I feel.
This is the lowest cost raw developer and layer-based program on offer here, and has some impressive features, such as stacking images, HDR blending, and panorama stitching. However, it lacks any library or cataloguing function, so this is not a Lightroom replacement, but it could replace Photoshop.
Macphun has changed their name to Skylum and now makes their fine Luminar program for both Mac and Windows. While adding special effects is its forte, Luminar does work well both as a raw developer and layer-based editor. But like Affinity, it has no cataloguing feature. It cannot replace Lightroom.
Of all the contenders tested here, this is the only program that can truly replace both Lightroom and Photoshop, in that ON1 has cataloguing, raw developing, and image layering and masking abilities. In fact, ON1 allows you to migrate your Lightroom catalog into its format. However, ON1’s cost to buy and maintain is similar to Adobe’s Creative Cloud Photo subscription plan. It’s just that ON1’s license is “perpetual.”
NOTE: Windows users might find Corel’s Paintshop Pro 2018 a good “do-it-all” solution – I tested only Corel’s raw developer program Aftershot Pro, which Paintshop Pro uses.
The “Pro” version of Pixelmator was introduced in November 2017. It has an innovative interface and many fine features, and it allows layering and masking of multiple images. However, it lacks some of the key functions (listed below) needed for nightscape and time-lapse work. Touted as a Photoshop replacement, it isn’t there yet.
The Challenge
This is the image I threw at all the programs, a 2-minute exposure of the Milky Way taken at Writing-on-Stone Provincial Park in southern Alberta in late July 2017.
NOTE: Click/tap on any of the screen shots to bring them up full screen so you can inspect and save them.
Original Raw Image Out of the Camera, BEFORE Development
The lens was the Sigma 20mm Art lens at f/2 and the camera the Nikon D750 at ISO 1600.
Thus the ground is blurred. Keep that in mind, as it will always look fuzzy in the comparison images. But it does show up noise well, including hot pixels. This image of the sky is designed to be composited with one taken without the tracker turning, to keep the ground sharp.
Raw Image AFTER Development in Adobe Camera Raw
Above is the image after development in Adobe Camera Raw (ACR), using sliders under its Basic, Tone Curve, Detail, HSL, Lens Corrections, and Effects tabs. Plus I added a “local adjustment” gradient to darken the sky at the top of the frame. I judged programs on how well they could match or beat this result.
Same Image Developed in Adobe Lightroom
Above is the same image developed in Adobe Lightroom, to demonstrate how it can achieve identical results to Camera Raw, because at heart it is Camera Raw.
Feature Focus
I have assumed a workflow that starts with raw image files from the camera, not JPGs, for high-quality results.
And I have assumed the goal of making that raw image look as good as possible at the raw stage, before it goes to Photoshop or some other bit-mapped editor. That’s an essential workflow for time-lapse shooting, if not still-image nightscapes.
However, I made no attempt to evaluate all these programs for a wide range of photo applications. That would be a monumental task!
Nor, in the few programs capable of the task, did I test image layering. My focus was on developing a raw image. As such, I did not test the popular free program GIMP, as it does not open raw files. GIMP users must turn to one of the raw developers here as a first stage.
If you are curious how a program might perform for your purposes and on your photos, then why not test drive a trial copy?
Instead, my focus was on these programs’ abilities to produce great looking results when processing one type of image: my typical Milky Way nightscape, below.
TIFF Exported from DxO PhotoLab … then Imported into Photoshop
Such an image is a challenge because…
The subject is inherently low in contrast, with the sky often much brighter than the ground. The sky needs much more contrast applied, but without blocking up the shadows in the ground.
The sky is often plagued by off-color tints from artificial and natural sky glows.
The ground is dark, perhaps lit only by starlight. Bringing out landscape details requires excellent shadow recovery.
Key to success is superb noise reduction. Images are shot at high ISOs and are rife with noise in the shadows. We need to reduce noise without losing stars or sharpness in the landscape.
I focused on being able to make one image look as good as possible as a raw file, before bringing it into Photoshop or a layer-based editor – though that’s where it will usually end up, for stacking and compositing, as per the final result shown at the end.
I then looked at each program’s ability to transfer that one key image’s settings over to what could be hundreds of other images taken that night, either for stacking into star trails or for assembling into a time-lapse movie.
Summary Conclusions
Results of 8 Programs compared to ACR (at left)
None of the programs I tested ticked all the boxes in providing all the functions and image quality of the Adobe products.
But here’s a summary of my recommendations:
For Advanced Time-Lapse
None of the non-Adobe programs will work with the third-party software LRTimelapse (www.lrtimelapse.com). It is an essential tool for advanced time-lapse processing. LRTimelapse works with Lightroom or ACR/Bridge to gradually shift processing settings over a sequence, and smooth annoying image flickering.
If serious and professional time-lapse shooting is your goal, none of the Adobe contenders will work. Period. Subscribe to Creative Cloud. And buy LRTimelapse.
For Basic Time-Lapse
However, for less-demanding time-lapse shooting, when the same settings can be applied to all the images in a sequence, then I feel the best non-Adobe choices are, in alphabetical order:
ACDSee
Capture One
Corel Aftershot Pro
DxO PhotoLab
ON1 Photo RAW
… With, in my opinion, DxO and Capture One having the edge for image quality and features. But all five have a Library or Browser mode with easy-to-use Copy & Paste and Batch Export functions needed for time-lapse preparation.
Also worth a try is PhotoDirector9 (MacOS and Windows), a good Lightroom replacement. Scroll to the end for more details and a link.
For Still Image Nightscapes
If you are processing just individual still images, perhaps needing only to stack or composite a few exposures, and want to do all the raw development and subsequent layering of images within one non-Adobe program, then look at (again alphabetically):
Affinity Photo
Luminar 2018
ON1 Photo RAW 2018
… With Affinity Photo having the edge in offering a readily-available function off its File menu for stacking images, either for noise smoothing (Mean) or creating star trails (Maximum).
However, I found its raw development module did not produce as good a result as most competitors due to Affinity’s poorer noise reduction and less effective shadow and highlight controls. Using Affinity’s “Develop Persona” module, I could not make my test image look as good as with other programs.
Luminar 2018 has better noise reduction but it demands more manual work to stack and blend images.
While ON1 Photo Raw has some fine features and good masking tools, it exhibits odd de-Bayering artifacts, giving images a cross-hatched appearance at the pixel-peeping level. Sky backgrounds just aren’t smooth, even after noise reduction.
To go into more detail, these are the key factors I used to compare programs.
Noise Reduction
Absolutely essential is effective noise reduction, of luminance noise and chrominance color speckles and splotches.
Ideally, programs should also have a function for suppressing bright “hot” pixels and dark “dead” pixels.
Here’s what I consider to be the “gold standard” for noise reduction, Adobe Camera Raw’s result using the latest processing engine in ACR v10/Photoshop CC 2018.
BEFORE and AFTER Noise Reduction with Adobe Camera Raw (ACR)
I judged other programs on their ability to produce results as good as this, if not better, using their noise reduction sliders. Some programs did better than others in providing smooth, noiseless skies and ground, while retaining detail.
BEFORE and AFTER Noise Reduction and Other Adjustments with DxO PhotoLab
For example, one of the best was DxO PhotoLab, above. It has excellent options for reducing noise without being overwhelming in its choices, the case with a couple of other programs. For example, DxO has a mostly effective dead/hot pixel removal slider.
ACR does apply such a hot pixel removal “under the hood” as a default, but often still leaves many glaring hot specks that must be fixed later in Photoshop.
Comparing Noise Reduction
300% Close-Ups to Compare Noise Reduction
Above are 8 of the contender programs compared to Camera Raw for noise reduction.
Missing from this group is the brand new Pixelmator Pro, for MacOS only. It does not yet have any noise reduction in its v1 release, a serious deficiency in imaging software marketed as “Pro.” For that reason alone, I cannot recommend it. I describe its other deficiencies below.
Lens Corrections
The wide-angle lenses we typically use in nightscape and time-lapse imaging suffer from vignetting and lens distortions. Having software that can automatically detect the lens used and apply bespoke corrections is wonderful.
Lens Corrections in Capture One
Only a few programs, such as Capture One (above), have a library of camera and lens data to draw upon to apply accurate corrections with one click. With others you have to dial in corrections manually by eye, which is crude and inaccurate.
Shadows and Highlights
All programs have exposure and contrast adjustments, but the key to making a Milky Way nightscape look good is being able to boost the shadows (the dark ground) while preventing the sky from becoming overly bright, yet while still applying good contrast to the sky.
Shadows and Highlight and other Enhancements in DxO PhotoLab
Of the contenders, I liked DxO PhotoLab best (shown above), not only for its good shadow and highlight recovery, but also excellent “Smart Lighting” and “ClearView” functions which served as effective clarity and dehaze controls to snap up the otherwise low-contrast sky. With most other programs it was tough to boost the shadows without also flattening the contrast.
On the other hand, Capture One’s excellent layering and local adjustments did make it easier to brush in adjustments just to the sky or ground.
However, any local adjustments like those will be feasible only for still images or time-lapses where the camera does not move. In any motion control sequences the horizon will be shifting from frame to frame, making precise masking impractical over a sequence of hundreds of images.
Therefore, I didn’t place too much weight on the presence of good local adjustments. But they are nice to have. Capture One, DxO PhotoLab, and ON1 win here.
Selective Color Adjustments
All programs allow tweaking the white balance and overall tint.
But it’s beneficial to also adjust individual colors selectively, to enhance red nebulas, enhance or suppress green airglow, bring out green grass, or suppress yellow or orange light pollution.
Some programs have an HSL panel (Hue, Saturation, Lightness) or an equalizer-style control for boosting or dialing back specific colors.
Color Adjustments in Capture One
Capture One (above) has the most control over color correction, with an impressive array of color wheels and sliders that can be set to tweak a broad or narrow range of colors.
And yet, despite this, I was still unable to make my test image look quite the way I wanted for color balance. ACR and DxO PhotoLab still won out for the best looking final result.
Copy and Paste Settings
Even when shooting nightscape stills we often take several images to stack later. It’s desirable to be able to process just one image, then copy and paste its settings to all the others in one fell swoop. And then to be able to inspect those images in thumbnails to be sure they all look good.
Some programs (Affinity Photo, Luminar, Pixelmator Pro) lack any library function for viewing or browsing a folder of thumbnail images. Yes, you can export a bunch of images with your settings applied as a user preset, but that’s not nearly as good as actually seeing those images displayed in a Browser mode.
Copy and Paste Settings in ON1 Photo RAW
What’s ideal is a function such as ON1 Photo RAW displays here, and that some other programs have: the ability to inspect a folder of images, work on one, then copy and paste its settings to all the others in the set.
This is absolutely essential for time-lapse work, and nice to have even when working on a small set to be stacked into a still image.
Batch Export
Once you develop a folder of raw images with “Copy and Paste,” you now have to export them with all those settings “baked into” the exported files.
This step is to create an intermediate set of JPGs to assemble into a movie. Or perhaps to stack into a star trail composite using third party software such as StarStaX, or to work on the images in another layer-based program of your choice.
Batch Export in ON1 Photo RAW
As ON1 Photo RAW shows above, this is best done using a Library or Browser mode to visually select the images, then call up an Export panel or menu to choose the image size, format, quality, and location for the exports.
Click Export and go for coffee – or a leisurely dinner – while the program works through your folder. All programs took an hour or more to export hundreds of images.
Design
Those functions were the key features I looked for when evaluating the programs for nightscape and time-lapse work.
Every program had other attractive features, often ones I wished were in Adobe Camera Raw. But if the program lacked any of the above features, I judged it unsuitable.
Yes, the new contenders to the Photoshop crown have the benefit of starting from a blank slate for interface design.
Luminar 2018’s Clean User Interface
Many, such as Luminar 2018 above, have a clean, attractive design, with less reliance on menus than Photoshop.
Photoshop has grown haphazardly over 25 years, resulting in complex menus. Just finding key functions can take many tutorial courses!
But Adobe dares to “improve” Photoshop’s design and menu structure at its peril, as Photoshop fans would scream if any menus they know and love were to be reorganized!
The new mobile-oriented Lightroom CC is Adobe’s chance to start afresh with a new interface.
Summary Table of Key Features
Click or tap to view and save full screen version.
Fair = Feature is present but doesn’t work as easily or produce as good a result
Partial = Program has lens correction but failed to fully apply settings automatically / DxO has a Browse function but not Cataloging
Manual = Program has only a manually-applied lens correction
– = Program is missing that feature altogether
Program-by-Program Results
I could end the review here, but I feel it’s important to present the evidence, in the form of screen shots of all the programs, showing both the whole image, and a close-up to show the all-important noise reduction.
ACDSee Photo Studio
ACDSee Full Screen
ACDSee Enlargement
PROS: This capable cataloging program has good selective color and highlight/shadow recovery, and pretty smooth noise reduction. It can copy and paste settings and batch export images, for time-lapses. It is certainly affordable, making it a low-cost Lightroom contender.
CONS: It lacks any gradient or local adjustments, or even spot removal brushes. Lens corrections are just manual. There is no dehaze control, which can be useful for snapping up even clear night skies. You cannot layer images to create composites or image stacks. This is not a Photoshop replacement.
Affinity Photo
Affinity Photo Full Screen
Affinity Photo Enlargement
PROS: Affinity supports image layers, masking with precise selection tools, non-destructive “live” filters (like Photoshop’s Smart Filters), and many other Photoshop-like functions. It has a command for image stacking with a choice of stack modes for averaging and adding images.
It’s a very powerful but low cost alternative to Photoshop, but not Lightroom. It works fine when restricted to working on just a handful of images.
CONS: Affinity has no lens correction database, and I found it hard to snap up contrast in the sky and ground without washing them out, or having them block up. Raw noise reduction was acceptable but not up to the best for smoothness. It produced a blocky appearance. There are no selective color adjustments.
Nor is there any library or browse function. You can batch export images, but only through an unfriendly dialog box that lists images only by file name – you cannot see them. Nor can you copy and paste settings visually, but only apply a user-defined “macro” to develop images en masse upon export.
This is not a program for time-lapse work.
Capture One 11
Capture One 11 Full Screen
Capture One 11 Enlargement
PROS: With version 11 Capture One became one of the most powerful raw developers, using multiple layers to allow brushing in local adjustments, a far better method than Adobe Camera Raw’s local adjustment “pins.” It can create a catalog from imported images, or images can be opened directly for quick editing. Its noise reduction was good, with hot pixel removal lacking in Camera Raw.
Its color correction options were many!
It can batch export images. And it can export files in the raw DNG format, though in tests only Adobe Camera Raw was able to read the DNG file with settings more or less intact.
CONS: It’s costly to purchase, and more expensive than Creative Cloud to subscribe to. Despite all its options I could never quite get as good looking an image using Capture One, compared to DxO PhotoLab for example.
It is just a Lightroom replacement; it can’t layer images.
Corel Aftershot Pro 3
Corel Aftershot Pro Full Screen
Corel Aftershot Pro Enlargement
PROS: This low-cost option has good noise reduction using Athentech’s Perfectly Clear process, with good hot pixel or “impulse” noise removal. It has good selective color and offers adjustment layers for brushing in local corrections. And its library mode can be used to copy and paste settings and batch export images.
Again, it’s solely a Lightroom alternative.
CONS: While it has a database of lenses, and identified my lens, it failed to apply any automatic corrections. Its shadow and highlight recovery never produced a satisfactory image with good contrast. Its local adjustment brush is very basic, with no edge detection.
DxO PhotoLab
DxO PhotoLab Full Screen
DxO PhotoLab Enlargement
PROS: I found DxO produced the best looking image, better perhaps than Camera Raw, because of its DxO ClearView and Smart Lighting options. It has downloadable camera and lens modules for automatic lens corrections. Its noise reduction was excellent, with its PRIME option producing by far the best results of all the programs, better perhaps than Camera Raw, plus with hot pixel suppression.
DxO has good selective color adjustments, and its copy and paste and batch export work fine.
CONS: There are no adjustment layers as such. Local adjustments and repairing are done through the unique U-Point interface which works something like ACR’s “pins,” but isn’t as visually intuitive as masks and layers. Plus, DxO is just a raw developer; there is no image layering or compositing. Nor does it create a catalog as such.
So it is not a full replacement for either Lightroom or Photoshop. But it does produce great looking raw files for export (even as raw DNGs) to other programs.
Luminar 2018
Luminar 2018 Full Screen
Luminar 2018 Enlargement
PROS: Luminar has good selective color adjustments, a dehaze control, and good contrast adjustments for highlights, mid-tones, and shadows. Adjustments can be added in layers, making them easier to edit. Noise reduction was smooth and artifact-free, but adjustments were basic. Many filters can be painted on locally with a brush, or with a radial or gradient mask.
CONS: It has no lens correction database; all adjustments are manual. The preview was slow to refresh and display results when adjusting filters. The interface is clean but always requires adding filters to the filter panel to use them when creating new layers. Its batch export is crude, with only a dialog box and no visual browser to inspect or select images.
Settings are applied as a user preset on export, not through a visual copy-and-paste function. I don’t consider that method practical for time-lapses.
ON1 Photo RAW 2018
ON1 Photo RAW Full Screen
ON1 Photo RAW Enlargement
PROS: ON1 is the only program of the bunch that can: catalog images, develop raw files, and then layer and stack images, performing all that Lightroom and Photoshop can do. It is fast to render previews in its “Fast” mode, but in its “Accurate” mode ON1 is no faster than Lightroom. It has good layering and masking functions, both in its Develop mode and in its Photoshop-like Layers mode.
Selective color and contrast adjustments were good, as was noise reduction. Developing, then exporting a time-lapse set worked very well, but still took as long as with Lightroom or Photoshop.
CONS: Despite promising automatic lens detection and correction, ON1 failed to apply any vignetting correction for my 20mm Sigma lens. Stars exhibited dark haloes, even with no sharpening, dehaze, or noise reduction applied. Its de-Bayering algorithm produced a cross-hatched pattern at the pixel level, an effect not seen on other programs.
Noise reduction did not smooth this. Thus, image quality simply wasn’t as good.
Pixelmator Pro
Pixelmator Pro Full Screen
Pixelmator Pro Enlargement
PROS: It is low cost. And it has an attractive interface.
CONS: As of version 1 released in November 2017 Pixelmator Pro lacks: any noise reduction (it’s on their list to add!), any library mode or copy and paste function, nor even the ability to open several images at once displayed together.
It is simply not a contender for “Photoshop killer” for any photo application, despite what click-bait “reviews” promise, ones that only re-write press releases and don’t actually test the product.
Raw Therapee v5.3
Raw Therapee Full Screen
Raw Therapee Enlargement – With and Without Noise Reduction
PROS: It’s free! It offers an immense number of controls and sliders. You can even change the debayering method. It detects and applies lens corrections (though in my case only distortion, not vignetting). It has good selective color with equalizer-style sliders. It has acceptable (sort of!) noise reduction and sharpening with a choice of methods, and with hot and dead pixel removal.
It can load and apply dark frames and flat fields, the only raw developer software that can. This is immensely useful for deep-sky photography.
CONS: It offers an immense number of controls and sliders! Too many! It is open source software by committee, with no one in charge of design or user friendliness. Yes, there is documentation, but it, too, is a lot to wade through to understand, especially with its broken English translations. This is software for digital signal processing geeks.
But worst of all, as shown above, its noise reduction left lots of noisy patches in shadows, no matter what combination of settings I applied. Despite all its hundreds of sliders, results just didn’t look as good.
What About …? (updated December 28)
No matter how many programs I found to test, someone always asks, “What about …?” In some cases such comments pointed me to programs I wasn’t even aware of, but subsequently tried out. So here are even more to pick from…
Billed as having “everything you need in an image editor,” this low-cost ($30) MacOS-only program is anything but. Its raw developer module is crude and lacks any of the sophisticated range of adjustments offered by all the other programs on offer here. It might be useful as a layer-based editor of images developed by another program.
Available for Mac and Windows for $150, this Lightroom competitor offers a good browser function, with the ability to “copy-from-one and paste-to-many” images (unlike some of the programs below), and a good batch export function for time-lapse work. It has good selective color controls and very good noise reduction providing a smooth background without artifacts like blockiness or haloes. Local adjustments, either through brushed-on adjustments or through gradients, are applied via handy and easy to understand (I think!) layers.
While it has auto lens corrections, its database seemed limited — it did not have my Sigma 20mm lens despite it being on the market for 18 months. Manual vignetting correction produced a poor result with just a washed out look.
The main issue was that its shadow, highlight, and clarity adjustments just did not produce the snap and contrast I was looking for, but that other programs could add to raw files. Still, it looks promising, and is worth a try with the trial copy. You might find you like it. I did not. For similar cost, other programs did a better job, notably DxO PhotoLab.
In the same ilk as Raw Therapee, I also tested out another free, open-source raw developer, one simply called “darktable,” with v2.2.5 shown below. While it has some nice functions and produced a decent result, it took a lot of time and work to use.
darktable RAW Developer
The MacOS version I tried (on a brand new 5K iMac) ran so sluggishly, taking so long to re-render screen previews, that I judged it impractical to use. Sliders were slow to move and when I made any adjustments often many seconds would pass before I would see the result. Pretty frustrating, even for free.
A similar crowd-developed raw processing program, Iridient Developer (above), sells for $99 US. I tested a trial copy of v3.2. While it worked OK, I was never able to produce a great looking image with it. It had no redeeming features over the competition that made its price worthwhile.
Paintshop Pro’s included but very basic Raw developer.
Using Parallels running Windows 10 on my Mac, I did try out this popular Windows-only program from Corel. By itself, Paintshop Pro’s raw developer module (shown above) is basic, crude and hardly up to the tax of processing demanding raw files. You are prompted to purchase Corel’s Aftershot Pro for more capable raw development, and I would agree – Aftershot would be an essential addition. However …
As I showed above, I did test the MacOS version of Aftershot Pro on my raw sample image, and found it did the poorest job of making my raw test image look good. Keep in mind that it is the ability of all these programs to develop this typical raw nightscape image that I am primarily testing.
That said, given a well-developed raw file, Paintshop Pro can do much more with it, such as further layering of images and applying non-destructive and masked adjustment layers, as per Photoshop. Indeed, it is sold as a low-cost (~ $60) Photoshop replacement. As such, many Windows users find Paintshop’s features very attractive. However, Paintshop lacks the non-destructive “smart” filters, and the more advanced selection and masking options offered by Photoshop, Affinity Photo, and ON1 Photo Raw. If you have never used these, you likely don’t realize what you are missing.
If it’s an Adobe alternative you are after, I would suggest Windows users would be better served by other options. Why not test drive Affinity and ON1?
PhotoDirector’s very Lightroom-like interface and controls.
This was a surprising find. Little known, certainly to me, this Windows and MacOS program from the Taiwanese company Cyberlink, is best described as a Lightroom substitute, but it’s a good one. Its regular list price is $170. I bought it on sale for $60.
Like Lightroom, working on any images with PhotoDirector requires importing them into a catalog. You cannot just browse to the images. Fine. But one thing some people complain about with Lightroom is the need to always import images.
I was impressed with how good a job PhotoDirector did on my raw test image. PhotoDirector has excellent controls for shadow and highlight recovery, HSL selective color, copying-and-pasting settings, and batch exporting. So it will work well for basic time-lapse processing.
Noise reduction was very good and artifact-free. While it does have automatic lens corrections, its database did not include the 2-year old Sigma 20mm Art lens I used. So it appears its lens data is not updated frequently.
PhotoDirector has good local adjustments and gradients using “pins” rather than layers, similar to Camera Raw and Lightroom.
After performing raw image “Adjustments,” you can take an image into an Edit module (for adding special effects), then into a Layers module for further work. However, doing so destructively “flattens” the image to apply the raw adjustments you made. You cannot go back and tweak the raw settings in the Adjustment module, as you can when opening a raw file as a “smart object” in Adobe Photoshop.
While PhotoDirector does allow you to layer in other images to make basic composites (such as adding type or logos), there is no masking function nor any non-destructive adjustment layers. So this is most assuredly not a Photoshop substitute, despite what the advertising might suggest. But if it’s a Lightroom replacement you are after, do check it out in a trial copy.
MacOS-only Picktorial v3, with its clean interface
This little-known MacOS-only program (only $40 on sale) for developing raw images looks very attractive, with good selective color, lots of local adjustments, and good masking tools, the features promoted on the website. It does have a browse function and can batch export a set of developed files.
However … its noise reduction was poor, introducing glowing haloes around stars when turned up to any useful level. Its shadows, highlights, and contrast adjustments were also poor – it was tough to make the test image look good without flattening contrast or blocking up shadows. Boosting clarity even a little added awful dark haloes to stars, making this a useless function. It has no lens correction, either automatic or manual. Like Topaz Studio, below, it cannot copy and paste settings to a batch of images, only to one image at a time, so it isn’t useful for time-lapse processing.
I cannot recommend this program, no matter how affordable it might be.
Popular among some camera manufacturers as their included raw developer, Silky Pix can be purchased separately ($80 list price for the standard version, $250 list price for the Pro version) with support for many cameras’ image files. It is available for MacOS and Windows. I tried the lower-cost “non-Pro” version 8. It did produce a good-looking end result, with good shadow and highlight recovery, and excellent color controls. Also on the plus side, Silky Pix has very good copy-and-paste functions for development settings, and good batch export functions, so it can be used to work on a folder of time-lapse frames.
On the down side, noise reduction, while acceptable, left an odd mottled pattern, hardly “silky.” The added “Neat” noise reduction option only smoothed out detail and was of little value except perhaps for very noisy images. Noise reduction did nothing to remove hot pixels, leaving lots of colored specks across the image. The program uses unorthodox controls whose purposes are not obvious. Instead of Highlights and Shadows you get Exposure Bias and HDR. Instead of Luminance and Color noise reduction, you get sliders labeled Smoothness and Color Distortion. You really need to read the extensive documentation to learn how to use this program.
I found sliders could be sticky and not easy to adjust precisely. The MacOS version was slow, often presenting long bouts of spinning beachballs while it performed some function. This is a program worth a try, and you might find you like it. But considering what the competition offers, I would not recommend it.
While Topaz Labs previously offered only plug-ins for Photoshop and other programs (their Topaz DeNoise 6 is very good), their Topaz Studio stand-alone program now offers full raw processing abilities.
It is for Mac and Windows. While it did a decent job developing my test Milky Way image (above), with good color and contrast adjustments, it cannot copy and paste settings from one image to a folder of images, only to one other image. Nor can it batch export a folder of images. Both deficiencies make it useless for time-lapse work.
In addition, while the base program is free, adding the “Pro Adjustments” modules I needed to process my test image (Noise Reduction, Dehaze, Precision Contrast, etc.) would cost $160 – each Adjustment is bought separately. Some users might like it, but I wouldn’t recommend it.
And … Adobe Photoshop Elements v18 (late 2017 release)
What about Adobe’s own Photoshop “Lite?” Elements is available for $99 as a boxed or downloadable one-time purchase, but with annual updates costing about $50. While it offers image and adjustment layers, it cannot do much with 16-bit images, and has very limited functions for developing raw files.
And its Lightroom-like Organizer module does not have any copy-and-paste settings or batch export functions, making it unsuitable for time-lapse production.
Photoshop Elements v18 – Showing its Version of Camera Raw Lite
Elements is for processing photos for the snapshot family album. Like Apple’s Photos and other free photo apps, I don’t consider Elements to be a serious option for nightscape and time-lapse work. But it can be pressed into service for raw editing and layering single images, especially by beginners.
However, a Creative Cloud Photo subscription doesn’t cost much more than buying, then upgrading Elements outright, yet gets you far, far more in professional-level software.
And Yet More…!
In addition, for just developing raw files, you likely already have software to do the job – the program that came with your camera.
Canon Digital Photo Professional v4
For Canon it’s Digital Photo Professional (shown above); for Nikon it’s Capture NX; for Pentax it’s Digital Camera Utility, etc.
These are all capable raw developers, but have no layering capabilities. And they read only the files from their camera brand. If theirs is the only software you have, try it. They are great for learning on.
But you’ll find that the programs from other companies offer more features and better image quality.
What Would I Buy?
Except for Capture One, which I tested as a trial copy, I did buy all the software in question, for testing for my Nightscapes eBook.
However, as I’ve described, none of the programs tick all the boxes. Each has strengths, but also weaknesses, if not outright deficiencies. I don’t feel any can fully replace Adobe products for features and image quality.
A possible non-Adobe combination for the best image quality might be DxO PhotoLab for raw developing and basic time-lapse processing, and Affinity Photo for stacking and compositing still images, from finished TIFF files exported out of DxO and opened and layered with Affinity.
But that combo lacks any cataloging option. For that you’d have to add ACDSee or Aftershot for a budget option. It’s hardly a convenient workflow I’d want to use.
ON1 De-Bayer Artifacts (Right) Compared to DxO PhotoLab (Left), at 400%
I’d love to recommend ON1 Photo RAW more highly as a single solution, if only it had better raw processing results, and didn’t suffer from de-Bayering artifacts (shown in a 400% close-up above, compared to DxO PhotoLab). These add the star haloes and a subtle blocky pattern to the sky, most obvious at right.
To Adobe or Not to Adobe
I’m just not anxious, as others are, to “avoid Adobe.”
I’ve been a satisfied Creative Cloud subscriber for several years, and view the monthly fee as the cost of doing business. It’s much cheaper than the annual updates that boxed Photoshop versions used to cost. Nor am I worried about Adobe suddenly jacking up the fees or holding us hostage with demands.
LRTimelapse at Work on a Time-Lapse Sequence
For me, the need to use LRTimelapse (shown above) for about 80 percent of all the time-lapse sequences I shoot means the question is settled. LRTimelapse works only with Adobe software, and the combination works great. Sold.
I feel Camera Raw/Lightroom produces results that others can only just match, if that.
Only DxO PhotoLab beat Adobe for its excellent contrast enhancements and PRIME noise reduction.
Yes, other programs certainly have some fine features I wish Camera Raw or Lightroom had, such as:
Hot and dead pixel removal
Dark frame subtraction and flat field division
Better options for contrast enhancement
And adding local adjustments to raw files via layers, with more precise masking tools
Among others!
But those aren’t “must haves.”
Using ACR or Lightroom makes it easy to export raw files for time-lapse assembly, or to open them into Photoshop for layering and compositing, usually as “smart objects” for non-destructive editing, as shown below.
Final Layered Photoshop Image
Above is the final layered image, consisting of:
A stack of 4 tracked exposures for the sky (the test image is one of those exposures)
And 4 untracked exposures for the ground.
The mean stacking smooths noise even more. The masking reveals just the sky on the tracked set. Every adjustment layer, mask, and “smart filter” is non-destructive and can be adjusted later.
I’ll work on recreating this same image with the three non-Adobe programs capable of doing so – Affinity, Luminar, and ON1 Photo RAW – to see how well they do. But that’s the topic of a future blog.
Making the Switch?
The issue with switching from Adobe to any new program is compatibility.
While making a switch will be fine when working on all new images, reading the terabytes of old images I have processed with Adobe software (and being able to re-adjust their raw settings and layered adjustments) will always require that Adobe software.
If you let your Creative Cloud subscription lapse, as I understand it the only thing that will continue to work is Lightroom’s Library module, allowing you to review images only. You can’t do anything to them.
None of the contender programs will read Adobe’s XMP metadata files to display raw images with Adobe’s settings intact.
Conversely, nor can Adobe read the proprietary files and metadata other programs create.
With final layered Photoshop files, while some programs can read .PSD files, they usually open them just as flattened images, as ON1 warns it will do above. It flattened all of the non-destructive editing elements created in Photoshop. Luminar did the same.
A Layered Photoshop PSB File Opened in Affinity Photo
Only Affinity Photo (above) successfully read a complex and very large Photoshop .PSB file correctly, honouring at least its adjustment and image layers. So, if backwards compatibility with your legacy Photoshop images is important, choose Affinity Photo.
However, Affinity flattened Photoshop’s smart object image layers and their smart filters. Even Adobe’s own Photoshop Elements doesn’t honor smart objects.
Lest you think that’s a “walled garden” created by “evil Adobe,” keep in mind that the same will be true of the image formats and catalogs that all the contender programs produce.
To read the adjustments, layers, and “live filters” you create using any another program, you will need to use that program.
Will Affinity, DxO, Luminar, ON1, etc. be around in ten years?
Yes, you can save out flattened TIFFs that any program can read in the future, but that rules out using those other programs to re-work any of the image’s original settings.
In Conclusion!
U-Point Local Adjustments in DxO PhotoLab
I can see using DxO PhotoLab (above) or Raw Therapee for some specific images that benefit from their unique features.
Or using ACDSee as a handy image browser.
Luminar 2018 as a Plug-In Within Photoshop
And ON1 and Luminar have some lovely effects that can be applied by calling them up as plug-ins from within Photoshop, and applied as smart filters. Above, I show Luminar working as a plug-in, applying its “Soft & Airy” filter.
In the case of Capture One and DxO PhotoLab, their ability to save images back as raw DNG files (the only contender programs of the bunch that can), means that any raw processing program in the future should be able to read the raw image.
DNG Raw File Created by Capture One Opened in ACR
However, only Capture One’s Export to DNG option produced a raw file readable and editable by Adobe Camera Raw with its settings from Capture One (mostly) intact (as shown above).
Even so, I won’t be switching away from Adobe any time soon.
But I hope my survey has given you useful information to judge whether you should make the switch. And if so, to what program.
My free Amazing Sky Calendar for 2018 is now available for download! Plan your astronomical year!
As in recent years, I have prepared a free 12-month Calendar listing loads of celestial events, Moon phases, highlighted space events, and with small charts to show what’s happening in the sky for the coming year. The monthly pages are illustrated with my favourite images from 2017.
You can download it as a 25-megabyte PDF at my website at
I present the final cut of my eclipse music video, from the Teton Valley, Idaho.
I’ve edited my images and videos into a music video that I hope captures some of the awe and excitement of standing in the shadow of the Moon and gazing skyward at a total eclipse.
Totality over the Tetons from Alan Dyer on Vimeo.
The video can be viewed in up to 4K resolution. Music is by the Hollywood session group and movie soundtrack masters, Audiomachine. It is used under license.
Me at the 2017 total solar eclipse celebrating post-eclipse with four of the camera systems I used, for close-up stills through a telescope, for 4K video through a telephoto lens, and two wide-angle time-lapse DSLRs. A fifth camera used to take this image shot an HD video selfie.Never before have I been able to shoot a total eclipse with so many cameras to capture the scene from wide-angles to close-ups, in stills, time-lapses, and videos, including 4K. Details on the setup are in the caption for the video on Vimeo. Click through to Vimeo.
I scouted this site north of Driggs, Idaho two years earlier, in April 2015. It was perfect for me. I could easily set up lots of gear, it had a great sightline to the Grand Tetons, and a clear horizon for the twilight effects. And I had the site almost to myself. Observing with a crowd adds lots of energy and excitement, but also distraction and stress. I had five cameras to operate. It was an eclipse experience I’ll likely never duplicate.
If you missed this eclipse, you missed the event of a lifetime. Sorry. Plain and simple.
A composite of the 2017 eclipse with time running from left to right, depicting the onset of totality at left, then reappearance of the Sun at right. Taken with the 4-inch telescope shown above.If you saw the eclipse, and want to see more, then over the next few years you will have to travel far and wide, mostly to the southern hemisphere between now and 2024.
But on April 8, 2024 the umbral shadow of the Moon once again sweeps across North America, bringing a generous four minutes of totality to a narrow path from Mexico, across the U.S., and up into eastern Canada.
It will be the Great North American Eclipse. Seven years to go!
In a technical blog I compare the new Canon 6D Mark II camera with its predecessor, the Canon 6D, with the focus on performance for nightscape astrophotography.
No pretty pictures in this blog I’m afraid! This is a blog for gear geeks.
The long-awaited Canon 6D Mark II camera is out, replacing the original 6D after that camera’s popular 5-year reign as a prime choice among astrophotographers for all kinds of sky images, including nightscapes and time-lapses.
As all new cameras do, the 6D Mark II is currently fetching a full list price of $2000 U.S. Eventually it will sell for less. The original 6D, introduced in 2012 at that same list price, might still be available from many outlets, but for less, likely below $1500 US.
Shown on the left, above, the 6D Mark II is similar in size and weight to the original 6D.
However, the new Mark II offers 6240 x 4160 pixels for 26 megapixels, a bump up in resolution over the 5472 x 3648 20-megapixel 6D. The pixel pitch of the Mark II sensor is 5.7 microns vs. 6.6 microns for the 6D.
One difference is that the port for a remote release is now on the front, but using the same solid 3-pin N3 connector as the 6D and other full-frame Canons. That makes it compatible with all external controllers for time-lapse shooting.
TESTING FOR THE NIGHT
My interest is in a camera’s performance for long-exposure astrophotography, with images taken at high ISO settings. I have no interest in auto-focus performance (we shoot at night with focus set manually), nor how well a camera works for high-speed sports shooting.
To test the Mark II against the original 6D I took test shots at the same time of a high-contrast moonlit scene in the backyard, using a range of ISO speeds typical of nightscape scenes.
The comparisons show close-ups of a scene shown in full in the smaller inset screen.
COMPARING NOISE
The key characteristic of interest for night work is noise. How well does the camera suppress the noise inherent in digital images when the signal is boosted to the high ISO settings we typically use?
6D Mark II noise at 5 ISO speeds
This set shows the 6D MkII at five ISOs, from ISO 1600 all the way up to the seldom-used ISO 25,600, all shot in Raw, not JPG. In all cases, no noise reduction was applied in later processing, so the results do look worse than what processed images would.
Click or tap on all images to expand each image to full screen for closer inspection.
6D noise at 5 ISO speeds
This set shows the same range of ISOs with the original 6D. All were taken at the same aperture, f/2.8, with a 35mm lens. Exposures were halved for each successive bump up in ISO speed, to ensure equally exposed images.
Comparing the sets, the 6D MkII shows a much greater tendency to exhibit a magenta cast in the shadows at very high ISOs, plus a lower contrast in the shadows at increasing ISOs, and slightly more luminance noise than the 6D.
How much more noise the 6D MkII exhibits is demonstrated here.
6D MkII noise at ISO 3200 compared to 6D
To me, visually, the MkII presents about 1/2 stop, or EV, worse noise than the 6D.
In this example, the MkII exhibits a noise level at ISO 3200 (a common nightscape setting) similar to what the 6D does if set between ISO 4000 and 5000 – about 1/2 stop worse noise.
Frankly, this is surprising.
Yes, the MkII has a higher pixel count and therefore smaller pixels (5.7 microns in this case) that are always more prone to noise. But in the past, advances to the in-camera signal processing has prevented noise from becoming worse, despite increasing pixel count, or has even produced an improvement in noise.
For example, the 2012-vintage 6D is better for noise than Canon’s earlier 2008-era 5D MkII model by about half a stop, or EV.
After five years of camera development I would have expected a similar improvement in the 6D MkII. After all, the 6D MkII has Canon’s latest DIGIC 7 processor, vs. the older 6D’s DIGIC 5+.
Instead, not only is there no noise improvement, the performance is worse.
That said, noise performance in the 6D MkII is still very good, and better than you’ll get with today’s 24 megapixel cropped-frame cameras with their even smaller 4 micron pixels. But the full frame 6D MkII doesn’t offer quite as much an improvement over cropped-frame cameras as does the five-year-old 6D.
ISO INVARIANCY
In the previous sets all the images were well-exposed, as best they could be for such a contrasty scene captured with a single exposure.
What happens when Raw images are underexposed, then boosted later in exposure value in processing?
This is not an academic question, as that’s often the reality for nightscape images where the foreground remains dark. Bringing out detail in the shadows later requires a lot of Shadow Recovery or increasing the Exposure. How well will the image withstand that work on the shadows?
To test this, I shot a set of images at the same shutter speed, but at successively slower ISOs, from a well-exposed ISO 3200, to a severely underexposed ISO 100. I then boosted the Exposure setting later in Raw processing by an amount that compensated for the level of underexposure in the camera, from a setting of 0 EV at ISO 3200, to a +5 EV boost for the dark ISO 100 shots.
This tests for a camera’s “ISO Invariancy.” If a camera has a sensor and signal processing design that is ISO invariant, a boosted underexposed image at a slow ISO should look similar to a normally exposed image at a high ISO.
You’re just doing later in processing what a camera does on its own in-camera when bumping up the ISO.
But cameras that use ISO “variant” designs suffer from increased noise and artifacts when severely underexposed images are boosted later in Raw processing.
The Canon 6D and 6D MkII are such cameras.
6D Mark II ISO Invariancy
This set above shows the results from the 6D Mark II. Boosting underexposed shadows reveals a lot of noise and a severe magenta cast.
These are all processed with Adobe Camera Raw, identical to the development engine in Adobe Lightroom.
6D ISO Invariancy
This set above shows the results from the 6D. The older camera, which was never great for its lack of ISO Invariancy performance, is still much better than the new Mark II.
Underexposed shadows show less noise and discolouration in the 6D. For a comparison of the Canon 6D with the ISO Invariant Nikon D750, see my earlier Nikon vs. Canon blog from 2015. The Nikon performs much better than the 6D.
Effectively, this is the lack of dynamic range that others are reporting when testing the 6D MkII on more normal daytime images. It really rears its ugly head in nightscapes.
The lesson here is that the Mark II needs to be properly exposed as much as possible.
Don’t depend on being able to extract details later from the shadows. The adage “Expose to the Right,” which I explain at length in my Nightscapes eBook, applies in spades to the 6D MkII.
DARK FRAME BUFFER
All the above images were taken with Long Exposure Noise Reduction (LENR) off. This is the function that, when turned on, forces the camera to take and internally subtract a dark frame – an image of just the noise – reducing thermal noise and discolouration in the shadows.
A unique feature of Canon full-frame cameras is that when LENR is on you can take several exposures in quick succession before the dark frame kicks in and locks up the camera. This is extremely useful for deep-sky shooting.
The single dark frame then gets applied to the buffered “light frames.”
The 6D Mark II, when in either Raw or in Raw+JPG can take 3 shots in succession. This is a downgrade from the 6D which can take 4 shots when in Raw+JPG. Pity.
ADOBE CAMERA RAW vs. DIGITAL PHOTO PROFESSIONAL
My next thought was that Adobe Camera Raw, while it was reading the Mark II files fine, might not have been de-Bayering or developing them properly. So I developed the same image with both Raw developers, Adobe’s and Canon’s latest version of their own Digital Photo Professional (DPP).
ACR vs. DPP
Here I did apply a modest and approximately similar level of noise reduction to both images:
In ACR: Color at 25, Luminosity at 40, with Sharpness at 25
In DPP: Chrominance at 8, Luminosity at 8, with Sharpness at 2
Yes, DPP did do a better job at eliminating the ugly magenta cast, but did a much worse job at reducing overall noise. DPP shows a lot of blockiness, detail loss, and artifacts left by the noise reduction.
Adobe Camera Raw and/or Lightroom remain among the best of many Raw developers.
IMAGE AVERAGING
A new feature the 6D Mark II offers is the ability to shoot and stack images in-camera. It can either “Add” the exposure values, or, most usefully, “Average” them, as shown here.
6D Mark II Multiple Exposure screen
Other newer Canon DSLRs also offer this feature, notably the 7D MkII, the 5D MkIV, the 5Ds, and even the entry-level 80D. So the 6D MkII is not unique. But the feature was not on the 6D.
Here’s the benefit.
6D Mark II Averaging results
The left image is a single exposure; the middle is an average stack of 4 exposures stacked in camera; the right image an average stack of 9 exposures, the maximum allowed.
Noise smooths out a lot, with less noise the more images you stack. The result is a single Raw file, not a JPG. Excellent!
While this kind of stacking can be done later in processing in Photoshop, or in any layer-based program, many people might find this in-camera function handy.
Except, as you can see, the sky will exhibit star trails, and not as well defined as you would get from stacking them with a “Lighten” blend mode, as all star trail stacking routines use.
So this averaging method is NOT the way to do star trails. The Mark II does not offer the Brighten mode some other new Canons have that does allow for in-camera star trail stacking. Again, a pity in a camera many will choose for astrophotography.
Nevertheless, the Average mode is a handy way to create foreground landscapes with less noise, which then have to be composited later with a sky image or images.
OTHER FEATURES
On the left, below, the Mark II has a nearly identical layout of buttons and controls to the 6D on the right. So owners of the older model will feel right at home with the Mark II. That’s handy, as we astrophotographers work in the dark by feel!
6D Mark II (left) and 6D rear views
Of course the big new feature, a first for Canon in a full-frame camera, is the Mark II’s fully articulated screen. It flips out, tilts, and even flips around to face forward. This is super-great for all astrophotography, especially when conducted by aging photographers with aching backs!
And the screen, as with the entry-level cropped-frame Canons, is a touch screen. For someone who hasn’t used one before – me! – that’ll take some getting used to, if only in just remembering to use it.
And it remains to be seen how well it will work in the cold. But it’s great to have.
INTERVAL TIMER
Like other late-model Canon DSLRs, the 6D MkII has a built-in intervalometer. It works fine but is useable only on exposures with internally set shutter speeds up to 30 seconds.
6D Mark II Interval Timer screen
However, setting the Interval so it fires the shutter with a minimal gap of 1 second between shots (our usual requirement for night time-lapses) is tricky: You have to set the interval to a value not 1 second, but 2 to 3 seconds longer than the shutter speed. i.e. an exposure of 30 seconds requires an interval of 33 seconds, as shown above. Anything less and the camera misses exposures.
Why? Well, when set to 30 seconds the camera actually takes a 32-second exposure. Surprise!
Other cameras I’ve used and tested with internal intervalometers (Nikon and Pentax) behave the same way. It’s confusing, but once you are used to it, the intervalometer works fine.
Except … the manual suggests the only way to turn it off and stop a sequence is to turn off the camera. That’s crude. A reader pointed out that it is also possible to stop a time-lapse sequence by hitting the Live View Start/Stop button. However, that trick doesn’t work on sequences programmed with only a second between frames, as described above. So stopping a night time-lapse is inelegant to say the least. With Nikons you can hold down the OK button to stop a sequence, with the option then of restarting it if desired.
Also, the internal Intervalometer cannot be used for exposures longer than 30 seconds. Again, that’s the case with all in-camera intervalometers in other models and brands.
BULB TIMER
As with many other new Canons, the Mark II has a Bulb Timer function.
6D Mark II Bulb Timer screen
When on Bulb you can program in exposure times of any length. That’s a nice feature that, again, might mean an external intervalometer is not needed for many situations.
PLAYBACK SCREEN
A new feature I like is the greatly expanded information when reviewing an image.
6D Mark II Playback screen
One of the several screens you can scroll to shows whether you have shot that image with Long Exposure Noise Reduction on or not.
Excellent! I have long wanted to see that information recorded in the metadata. Digital Photo Professional also displays that status, but not Adobe Camera Raw/Lightroom.
CONCLUSION
While this has been a long report, this is an important camera for us astrophotographers.
I wish the news were better, but the 6D Mark II is somewhat of a disappointment for its image quality. It isn’t bad. It’s just that it isn’t any better than than the older 6D, and in some aspects is worse.
The 6D Mark II as part of the rig for shooting the total solar eclipse. The articulated screen will be very nice!
Canon has clearly made certain compromise decisions in their sensor design. Perhaps adding in the Dual-Pixel Autofocus for rapid focusing in Movie Mode has compromised the signal-to-noise ratio. That’s something only Canon can explain.
But the bottom-line recommendations I can offer are:
If you are a Canon user looking to upgrade to your first full-frame camera, the 6D Mark II will provide a noticeable and welcome improvement in noise and performance over a cropped-frame model. But an old 6D, bought new while they last in stock, or bought used, will be much cheaper and offer slightly less noise. But the Mark II’s flip-out screen is very nice!
If you are a current 6D owner, upgrading to a Mark II will not get you better image quality, apart from the slightly better resolution. Noise is actually worse. But it does get you the flip-out screen. I do like that!
If you are not wedded to Canon, but want a full-frame camera for the benefits of its lower noise, I would recommend the Nikon D750. I have one and love it. I have coupled it with the Sigma Art series lenses. I have not used any of the Sony a7-series Mirrorless cameras, so cannot comment on their performance, but they are popular to be sure.
However, I hope this review aimed specifically at nightscape shooters will be of value. I have yet to test the 6D Mark II for very long-exposure tracked deep-sky images.
I present suggestions for how to ensure everything under your control will go well on eclipse day. The secret is: Practice, Practice, Practice!
The techniques I suggest practicing are outlined in my previous blog, Ten Tips for the Solar Eclipse. It’s prerequisite reading.
However, while you can read all about how to shoot the eclipse, nothing beats actually shooting to ensure success. But how do you do that, when there’s only one eclipse?
Here are my “Top 10” suggestions:
Total eclipse of the Sun, November 3, 2013 as seen from the middle of the Atlantic Ocean, from the Star Flyer sailing ship. I took this with a Canon 5D MkII and 16-35mm lens at 19mm for 1/40s at f/2.8 and ISO 800 on a heavily rolling ship.
Wide-Angle Shots – Shoot a Twilight Scene
The simplest way to shoot the eclipse is to employ a camera with a wide lens running on auto exposure to capture the changing sky colors and scene brightness.
Auto Exposure Check in Twilight
If you intend to shoot wide-angle shots of the eclipse sky and scene below, with anything from a mobile phone to a DSLR, practice shooting a time-lapse sequence or a movie under twilight lighting. Does your camera expose properly when set to Auto Exposure? If you are using a phone camera, does it have any issues focusing on the sky? How big a file does a movie create?
With Telephotos and Telescopes – Shoot the Filtered Sun
The toughest techniques involve using long lenses and telescopes to frame the eclipsed Sun up close. They need lots of practice.
Framing and Focusing
You’ll need to have your safe and approved solar filter purchased (don’t wait!) that you intend to use over your lens or telescope. With the filter in place, simply practice aiming your lens or telescope at the Sun at midday. It’s not as easy as you think! Then practice using Live View to manually focus on the edge of the Sun or on a sunspot. Can you get consistently sharp images?
The partial eclipse of the Sun, October 23, 2014, shot through thin cloud, but that makes for a more interesting photo than one in a clear sky. Despite the cloud, this was still shot through a Mylar filter, on the front of telescope with 450mm focal length, using the Canon 60Da for 1/25 sec exposure at ISO 100.
Exposure Times
Exposures of the filtered Sun will be the same as during the partial phases, barring cloud or haze, as above, that can lengthen exposure times. Otherwise, only during the thin crescent phases will shutter speeds need to be 2 to 3 stops (or EV steps) longer than for a normal Sun.
Solar filters that clamp around the front of lenses are easier to remove than ones that screw onto lenses. They will bind and get stuck!
Filter Removal
With the camera aimed away from the Sun (very important!), perhaps at a distant landscape feature, practice removing the filter quickly. Can you do it without jarring the camera and bumping it off target? Perhaps try this on the Moon at night as well, as it’s important to also test this with the camera and tripod aimed up high.
Articulated LCD screens are a great aid for framing and viewing the eclipse in Live View when the camera is aimed up high, as it will be!
Ease of Use
With the Sun up high at midday (as it will be during the eclipse from most sites), check that you can still look through, focus, and operate the camera easily. Can you read screens in the bright daylight? What about once it gets darker, as in twilight, which is how dark it will get during totality.
The east-to-west motion of the sky will carry the Sun its own diameter across the frame during totality, making consistent framing an issue with very long lenses and telescopes.
Sun Motion
If you are using an untracked tripod, check how much the Sun moves across your camera frame during several minutes. For videos you might make use of that motion. For still shots, you’ll want to ensure the Sun doesn’t move too far off center.
An equatorial mount like this is great but needs to be at least roughly polar aligned to be useful.
Aligning Tracking Mounts
If you plan to use a motorized equatorial mount capable of tracking the sky, “Plan A” might be to set it up the night before so it can be precisely polar aligned. But the reality is that you might need to move on eclipse morning. To prepare for that prospect, practice roughly polar aligning your mount during the day to see how accurate its tracking is over several minutes. Do that by leveling the mount, setting it to your site’s latitude, and aiming the polar axis as close as you can to due and true north. You don’t need precise polar alignment to gain the benefits of a tracking mount – it keeps the Sun centered – for the few minutes of totality.
The Full Moon is the same brightness as the Sun’s inner corona.
Telephotos and Telescopes – Shoot Full Moon Closeups
Exposure Check
Shoot the Full Moon around July 8 or August 7. If you intend to use Auto Exposure during totality, check how well it works on the Full Moon. It’s the same brightness as the inner corona of the Sun, though the Moon occupies a larger portion of the frame and covers more metering sensor points. This is another chance to check your focusing skill.
The crescent Moon has a huge range in brightness and serves as a good test object. Remember, the Moon is the same size as the Sun. That’s why we get eclipses!
Telescopes and Telescopes – Shoot Crescent Moon Closeups
Exposure Check
Shoot the waxing crescent moon in the evening sky during the last week of June and again in the last week of July. Again, test Auto Exposure with your camera in still or movie mode (if you intend to shoot video) to see how well the camera behaves on a subject with a large range in brightness. Or step through a range of exposures manually, from short for the bright sunlit crescent, to long for the dark portion of the Moon lit by Earthshine. It’s important to run through your range of settings quickly, just as you would during the two minutes of totality. But not too quickly, as you might introduce vibration. So …
Good focus matters for recording the fine prominences and sharp edge of the Moon.
Sharpness Check
In the resulting images, check for blurring from vibration (from you handling the camera), from wind, and from the sky’s east-to-west motion moving the Moon across the frame, during typical exposures of 1 second or less.
By practicing, you’ll be much better prepared for the surprises that eclipse day inevitably bring. Always have a less ambitious “Plan B” for shooting the eclipse simply and quickly should a last-minute move be needed.
However, may I recommend …
My 295-page ebook on photographing the August 21 total eclipse of the Sun is now available. See http://www.amazingsky.com/eclipsebook.html It covers all techniques, for both stills, time-lapses, and video, from basic to advanced, plus a chapter on image processing. And a chapter on What Can Go Wrong?! The web page has all the details on content, and links to order the book from Apple iBooks Store (for the best image quality and navigation) or as a PDF for all other devices and platforms.
For much more detailed advice on shooting options and techniques, and for step-by-step tutorials on processing eclipse images, see my 295-page eBook on the subject, available as an iBook for Apple devices and as a PDF for all computers and tablets.
I’m pleased to announce that after a year in production, our video tutorial series, Nightscapes and Time-Lapses: From Field to Photoshop, is now available.
It’s been quite a project! Over the last few years I’ve presented annual astrophoto workshops in conjunction with our local telescope dealer All-Star Telescope to great success.
However, we always had requests for the workshops on video. Attempts to video the actual workshops never produced satisfactory results. So we spent a year shooting in the field and in the studio to produce a “purpose-built” series of programs.
They are available now as a set of three programs, totalling 4 hours of instruction, for purchase and download at Vimeo at
For those wanting “hard copies” we will also be selling the programs on mailed USB sticks. See All-Star Telescope for info and prices. The downloaded version can also be ordered from there.
This series deals with the basics of capturing, then processing nightscape still images and time-lapse movies of the night sky and landscapes lit by moonlight and starlight.
Here’s the content outline:
Program 1 – Choosing Equipment (1 Hour)
• Tips for Getting Started • Essential Gear • Choosing A Camera • Photo 101 – Exposure Triangle • Setting Exposure • Expose to the Right • Setting a Camera – File Types • Photo 101 – Noise Sources • Setting a Camera – Noise Reduction • Setting a Camera – Focusing • Setting a Camera – Other Menus • Choosing Lenses • Choosing an IntervalometerSummary and Tips
Program 2 – Shooting in the Field (1 hour)
• Climbing the Learning Curve • Twilights • Astronomy 101 – Conjunctions • Shooting Conjunctions • Moonrises • Shooting Auroras • Astronomy 101 – Auroras • Photo 101 – Composing • Moonlit Nightscapes • Astronomy 101 – Where is the Moon? • Choosing a Location • Shooting the Milky Way • Astronomy 101 – Where is the Milky Way? • Astronomy 101 – Daily Sky Motion • Tracking the Sky • Shooting Star Trails • Shooting Time-Lapses • Calculating Time-Lapses • A Pre-Flight Checklist • Summary and Tips
Program 3 – Processing Nightscapes and Time-Lapses (2 hours)
• Workflows • Using Adobe Bridge – Importing and Selecting • Photo 101 – File Formats • Using Adobe Lightroom – Importing and Selecting • Adobe Camera Raw – Essential Settings • Adobe Camera Raw – Developing Raw Images • Adobe Lightroom – Develop Module • Adobe Photoshop – Introduction • Photoshop – Setup • Photoshop – Smart Filters • Photoshop – Adjustment Layers • Photoshop – Masking • Photoshop – Processing Star Trails & Time-Lapses • Stacking Star Trails • Assembling Time-Lapse Movies • Archiving • Summary & Finale
If this first introductory series is successful we may produce follow-up programs on more advanced techniques.
Here are my top tips for shooting terrific still-image nightscapes … and time-lapse movies of the night sky.
1. Go for pixel size, not pixel count
When choosing a camera for night sky scenes, the most important characteristic is not number of megapixels. Just the opposite.
The best cameras are usually models with more modest megapixel counts. Each of their individual pixels is larger and so collects more photons in a given exposure time, yielding higher a signal-to-noise ratio – or lower noise, critical for night shooting.
Cameras with pixels (the “pixel pitch”) 6 to 8 microns across are best. Many high-megapixel cameras have tiny 4-micron pixels.
Large-pixel cameras are often the full-frame models, such as the Canon 5D MkIII and 6D, the Nikon D610, D750, and Df, and the Sony a7s and a7S II.
Many “cropped-frame” cameras are now 18- to 24-megapixel models with smaller, noise-prone pixels. They can certainly be used, but will require more care in exposing well at lower ISOs, and in processing to smooth out noise without blurring detail.
2. Learn to fly on manual
While DSLRs and Compact System Cameras have amazing automatic functions we use none of them at night.
Instead, we use the camera on Manual or Bulb, dialling in shutter speed, aperture and ISO speed manually. We also have to focus manually, using Live View mode to focus on a bright star or distant light.
Learn the tradeoffs involved: Increasing ISO sensitivity of the sensor keeps exposure times down but increases noise. Opening up the lens aperture to f/2 or f/1.4 also keeps exposures short but introduces image-blurring aberrations, especially at the frame corners.
To prevent stars from trailing due to the sky’s motion adhere to the “500 Rule:” the maximum exposure time is roughly 500 divided by the focal length of your lens.
3. Expose to the right
At night, always give the sensor plenty of signal.
Use whatever combination of shutter speed, aperture and ISO will provide a well-exposed image. The image “histogram,” the graph of number of pixels at each brightness level shown above, should never be slammed to the left.
It should be a well-distributed “mountain range” of pixels, extending well to the right. If the 500 Rule restricts your shutter speed, and your desire for sharp images across the frame demands you shoot at f/2.8 or even slower, then don’t be afraid to bump up the ISO speed to whatever it takes to produce a good histogram and a well-exposed image.
Noise will look far worse if you underexpose, then try to boost the image brightness later in processing. Expose to the right!
4. Shoot Raw!
Shoot Raw. Period.
When comparing Raw and compressed JPG versions of the same image, you can be fooled into thinking the JPGs look better (i.e. smoother) because of the noise reduction the camera has applied to the JPG that is beyond your control. However, that smoothing has also wiped out fine detail, like stars.
By shooting Raw you get to control whatever level of noise reduction and sharpening the image needs later in processing.
JPGs are also 8-bit images with a limited tonal range – or palette – in which to record the subtle gradations of brightness and colour present in our images.
Imported Raw files are 16-bit, with a much wider tonal scale and colour palette. That’s critical for all astrophotos when, even with a well-exposed image, many tonal values are down in the dark end of the range. Processing Raw images makes it possible to extract detail in the shadows and highlights.
Even when shooting a time-lapse sequence, shoot Raw.
5. Take dark frames (sometimes!)
LENR reduces noise.
It’s a topic of some debate, but in my experience it is always better to turn on the camera’s Long Exposure Noise Reduction (LENR) function when shooting individual nightscape images. Doing so forces the camera to take a “dark frame,” an exposure of equal length but with the shutter closed.
It records just the noise, which the camera then subtracts from the image. Yes, it takes twice as long to acquire an image, but the image is cleaner, with fewer noisy pixels.
This is especially true when shooting on hot summer nights (the warmer the sensor the higher the noise). That said, you cannot use LENR when shooting frames for star trail composites or time-lapse movies.
For those, the interval between images should be no more than 1 to 5 seconds. Using LENR would introduce unsightly gaps in the trails or jumps in the star motion in time-lapses.
As an alternative, it is possible to take separate dark frames at the end of the night by simply covering the lens and taking exposures of the same duration and at the same ISO as your “light frames.”
Some stacking software, such as StarStax and the Advanced Stacker Actions have places to put these dark frames, to subtract them from the stack later in processing.
6. Use fast lenses
A fast lens is your best accessory.
While the “kit zoom” lenses that come with many DSLRs are great for shooting bright twilight or Full Moon scenes, they will prove too slow for dark starlit scenes with the Milky Way.
In addition to exposing to the right and shooting Raw, the secret to great nightscapes is to shoot with fast lenses, usually “prime” lenses with fixed focal lengths. They are usually faster and have better image quality than zooms.
Your most-used lens for nightscape and time-lapse shooting is likely to be a 14mm to 24mm f/2 to f/2.8 lens.
Fortunately, because we don’t need (and indeed can’t use) autofocus we can live happily with low-cost manual lenses, such as the models made in Korea and sold under brands such as Rokinon, Samyang and Bower. They work very well.
7. Get to know the Moon & Milky Way
For many nightscape and time-lapse shoots, the Moon is your light source for illuminating the landscape.
When the Moon is absent, the Milky Way is often your main sky subject.
Knowing where the Moon will be in the sky at its various phases, and when it will rise (in its waning phases after Full Moon) or set (in its waxing phases before Full) helps you a plan a shoot, so you’ll know whether a landscape will be well lit.
Astronomy apps for desktop computers and mobile devices are essential planning aids. A good one specifically for photographers is The Photographer’s Ephemeris.
Knowing in what season and time of night the Milky Way will be visible is essential if you want to capture it. Don’t try for Milky Way shots in spring – it isn’t up!
8. Keep it simple to start
Don’t be seduced by the fancy gear.
Time-lapse imaging has blossomed into a field replete with incredible gear for moving a camera incrementally during a shoot, and for automating a shoot as day turns to night.
I explain how to use all the fancy gear in my ebook, linked to below, however … Great time-lapses, and certainly still-frame nightscapes, can be taken with no more than a DSLR camera with a good fast lens and mounted on a sturdy tripod. Invest in the lens and don’t scrimp on the tripod.
Another essential for shooting multi-frame star trails and time-lapses is a hardware intervalometer ($50 to $150).
9. Learn the intricacies of intervals
For time-lapses, an intervalometer is essential.
Mastering exposure and focus in still images is essential for great time-lapse movies because they are simply made of hundreds of well-exposed still frames.
But move to time-lapses and you have additional factors to consider: how many frames to shoot and how often to shoot them. A good rule of thumb is to shoot 200 to 300 frames per sequence, shot with an interval of no more than 1 to 5 seconds between exposures, at least for starry night sequences.
However, most intervalometers (the Canon TC-80N3 is an exception) define their “Interval” setting to mean the time from when the shutter opens to when it opens again. In that case, you set the Interval to be a value 1 to 5 seconds longer than the exposure time you are using. That’s also true of the intervalometer function Nikon builds into their internal camera firmware.
Test first!
10. Go to beautiful places
While the gear can be simple, great shots demand an investment in time.
By all means practice at home and at nearby sites that are quick to get to. Try out gear and techniques at Full Moon when exposures are short (the Full Moon is bright!) and you can see what you are doing.
But beautiful images of landscapes lit by moonlight or starlight require you to travel to beautiful locations.
When you are on site, take the time to frame the scene well, just as you would during the day. Darkness is no excuse for poor composition!
While shooting nightscapes and time-lapses can be done with a minimal investment in hardware and software, it does require an investment in time – time to travel and spend nights shooting at wonderful places under the stars.
Enjoy the night!
I cover all these topics, and much more, in detail in my ebook How to Photograph & Process Nightscapes and Time-Lapses. Click the link below to learn more.
It’s Perseid meteor shower time. Here are tips for seeing and shooting the meteors.
What are the Perseids?
They are an annual meteor shower, perhaps the most widely observed of the year, that peak every year about August 12. They are caused by Earth passing through a dust stream left by Comet Swift-Tuttle, last seen near Earth in 1992.
Each “shooting star” is really a bit of comet dust burning up in our atmosphere as it ploughs into us at 200,000 kilometres an hour. They don’t stand a chance of surviving – and none do.
All Perseid particles burn up. None reach Earth.
Perseid meteor caught night of August 12-13 2009 from Cypress Hills Prov Park in Saskatchewan at the annual Saskatchewan Summer Star Party. One frame of 250 shot as part of a time-lapse movie. Taken with Canon 5D MkII and 24mm lens at f/2.5 for 30s at ISO1600.
When are the Perseids?
The peak night of the Perseids this year is the night of Wednesday, August 12 into the early morning hours of August 13, with the peak hour occurring about midnight Mountain Daylight Time or 2 a.m. on the 13th for Eastern Daylight Time.
For North America, this is ideal timing for a good show this year. However, a good number of meteors will be visible the night before and night after peak night.
Even better, the Moon is near New and so won’t interfere with the viewing by lighting up the sky.
In all, except for the mid-week timing, conditions this year in 2015 couldn’t be better!
Perseid meteor caught night of August 12-13 2009 from Cypress Hills Prov Park in Saskatchewan at the annual Saskatchewan Summer Star Party. One frame of 260 shot as part of a time-lapse movie. Taken with Canon 20Da and 15mm lens at f/2.8 for 45s at ISO1600.
What do they look like?
Any meteor looks like a brief streak of light shooting across the sky. The brightest will outshine the brightest stars and are sure to evoke a “wow!” reaction.
However, the spectacular Perseids are the least frequent. From a dark site, expect to see about 40 to 80 meteors in an hour of patient and observant watching, but of those, only a handful – perhaps only 1 or 2 – will be “wow!” meteors.
A pair of Perseid meteors shoot at left in the late night sky at the Upper Bankhead parking lot in Banff National Park. The waning crescent Moon is just rising above the trees. Taken the night of Saturday, August 11 into the wee hours of Sunday, August 12, 2012 with the Canon 7D and 10-22mm Canon lens. This is a stack of two exposures, one for each meteor, each for 60 seconds at ISO 1250 and f/4.
Where do I look?
All the meteors will appear to radiate from a point in the constellation of Perseus in the northeastern sky in the early hours of the night, climbing to high overhead by dawn.
So you can face that direction if you wish, but Perseids can appear anywhere in the sky, with the longest meteor trails often opposite the radiant point, over in the southwest.
Shows unusual Perseid meteor varying in brightness? Or is this a satellite that mimics Perseid for position (it comes right out of the radiant point). Taken at Saskatchewan Star Party, August 14, 2010, using Canon 5D MkII and 15mm lens.
How do I look?
Simple – just lie back on a comfy lawn chair or patch of grass and look up!
But … you need to be at a dark location away from city lights to see the most meteors. You’ll see very little in a city or light-polluted suburbs.
Head to a site as far from city lights as you can, to wherever you’ll be safe and comfortable.
How do I take pictures?
To stand any chance of capturing these brief meteors you’ll need a good low-noise camera (a DSLR or Compact System Camera) with a fast (f/2.8 or faster) wide-angle lens (10mm to 24mm).
Sorry, keep your point-and-shoot camera and phone camera tucked away in your pocket – they won’t work.
Set up you camera on a tripod, open the lens to f/2.8 (wide open perhaps) and the ISO to 800 to 3200) and take a test exposure of 20 to 40 seconds. You want a well-exposed image but not over-exposed so the sky is washed out.
Set your exposure time accordingly – most cameras allow a maximum exposure of 30 seconds. Exposures longer than 30 seconds require a separate intervalometer to set the exposure, with the camera set on Bulb (B).
Take lots of pictures!
To up your chances of catching a meteor, you need to set the camera to shoot lots of frames in rapid succession.
Use an intervalometer to take shots one after the other with as little time between as possible – because that’s when a meteor will appear!
Barring an intervalometer, if you have standard switch remote control, set the camera on High Speed Continuous, and the shutter speed to 30 seconds, then lock the remote’s switch to ON to keep the camera firing. As soon as one exposure ends it’ll fire another.
Twin Perseids in this photo? Or are these satellites? Taken at SSSP, August 14, 2010, using Canon 5D MkII and 15mm lens.
What else do I need to know?
• Focus the lens carefully so the stars are sharp – the Live Focus mode helps for this. Focus on a bright star or distant light.
• Aim the camera to take in a wide swath of the sky but include a well-composed foreground for the most attractive shot.
• Aim northeast to capture meteors streaking away from the radiant. But you can aim the camera to any direction that lends itself to a good composition and still capture a meteor.
• To increase your chances, shoot with two or more cameras aimed to different areas of the sky. Meteors always appear where your camera isn’t aimed!
• Be patient! Despite shooting hundreds of frames only a handful will record a meteor, as only the brightest will show up.
Can I track the sky?
If you have a motorized equatorial mount or a dedicated sky tracking device (the iOptron Sky Tracker and Sky-Watcher Star Adventurer, each about $400, are popular), you can follow the stars while taking lots of shots. This avoids the stars trailing and allows you to use longer exposures.
The video above shows a Star Adventurer tracking the sky as it turns about its polar axis which is aimed up to a point near Polaris. Click the Enlarge and HD buttons to view the video properly.
Polar align the tracker, but then perhaps aim the camera to frame the summer Milky Way overhead. Take lots of 1- to 3-minute exposures, again at f/2.8 and ISO 800 to 1600. Some exposures will pick up meteors – with luck!
Tracking then stacking
Later, in processing, because the sky has remained fixed on the frame, it’s then possible to stack the images (using a “Lighten” blend mode on each image layer) so that the final composite frame contains more meteors, for an image with lots of meteors captured over an hour or more of shooting.
While it is possible to stack shots taken on a static tripod to produce such a meteor composite, doing so requires a lot of manual cutting, pasting and aligning of meteor images by hand. The result is a bit of a fake, though I’ve done it myself – the image at top is an example, though with only a trio of meteors.

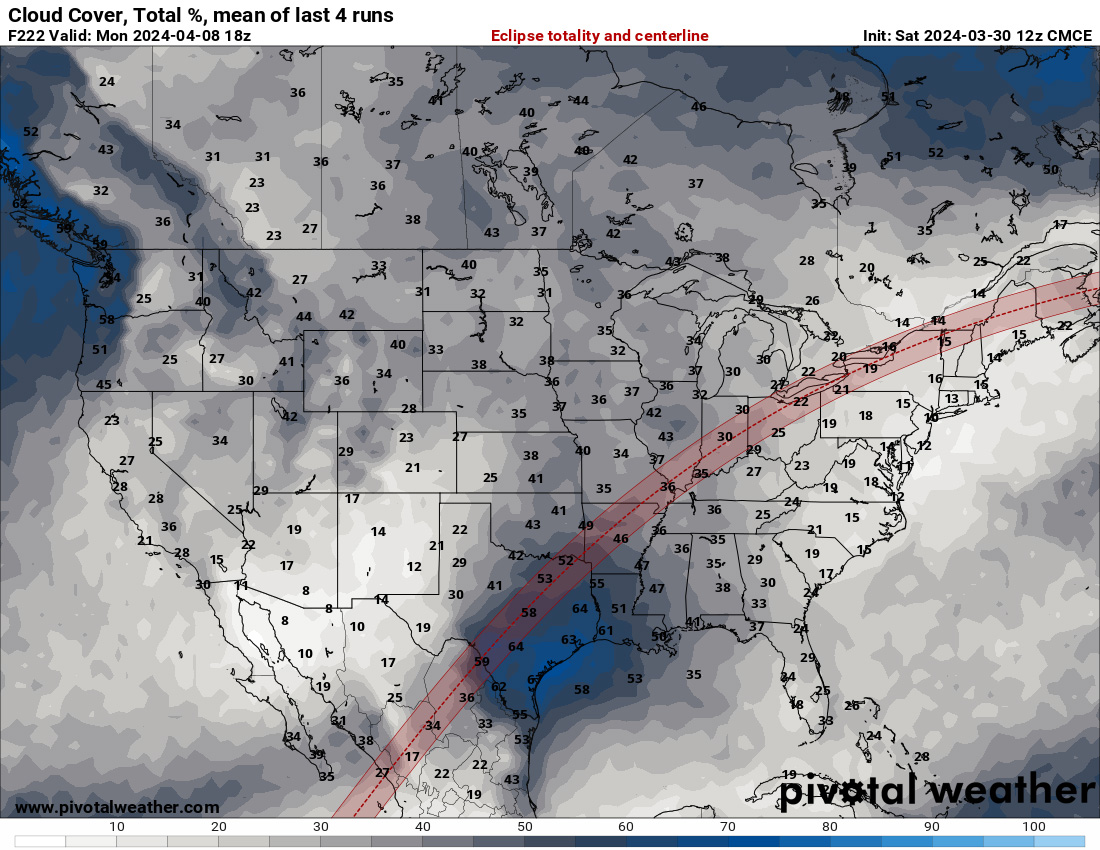

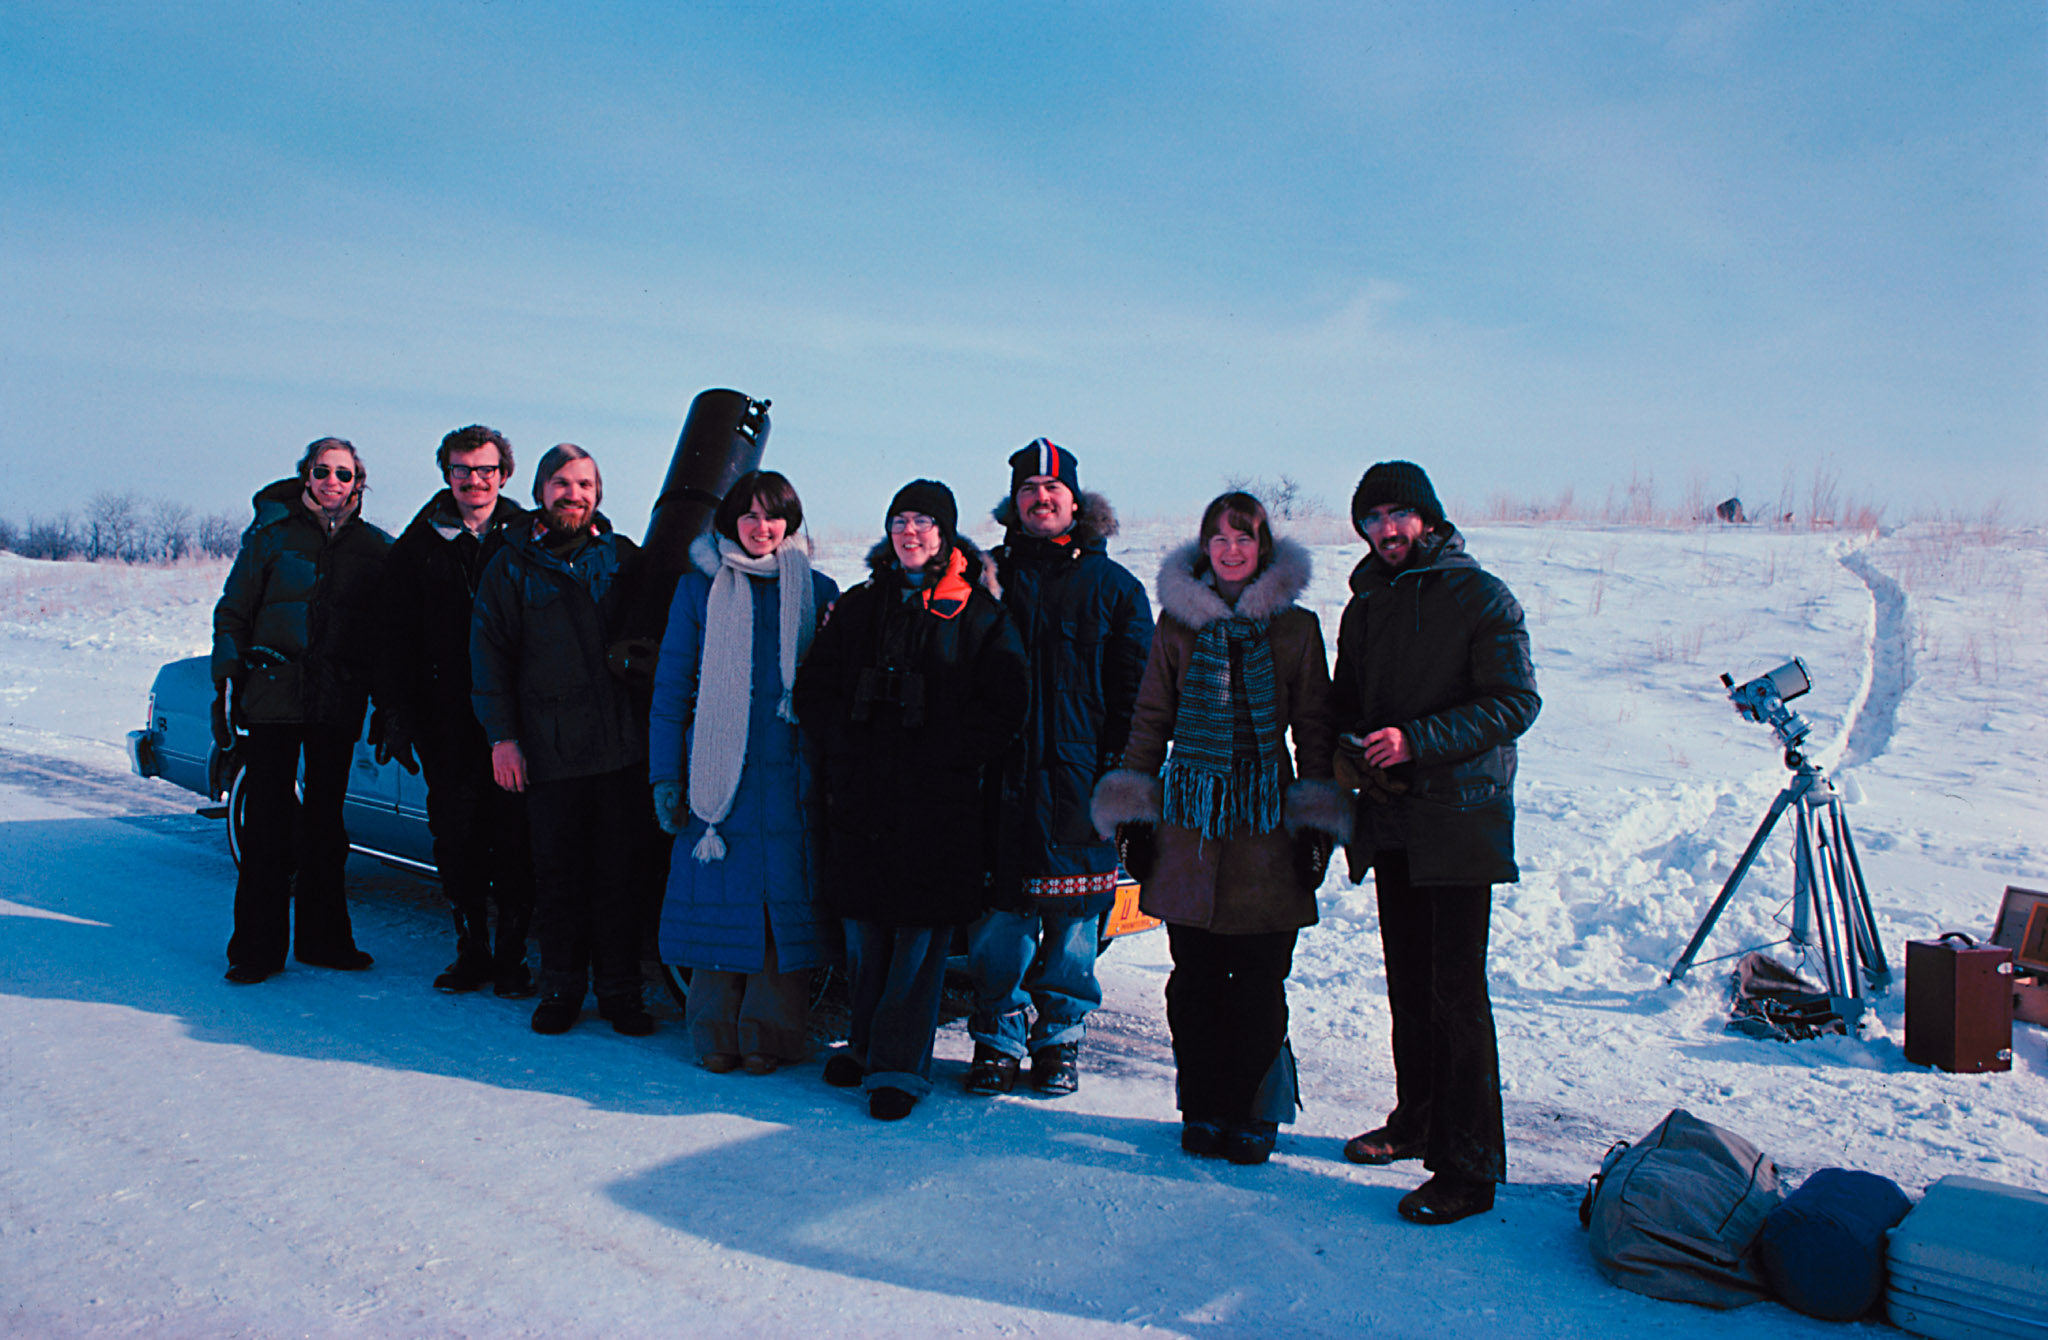
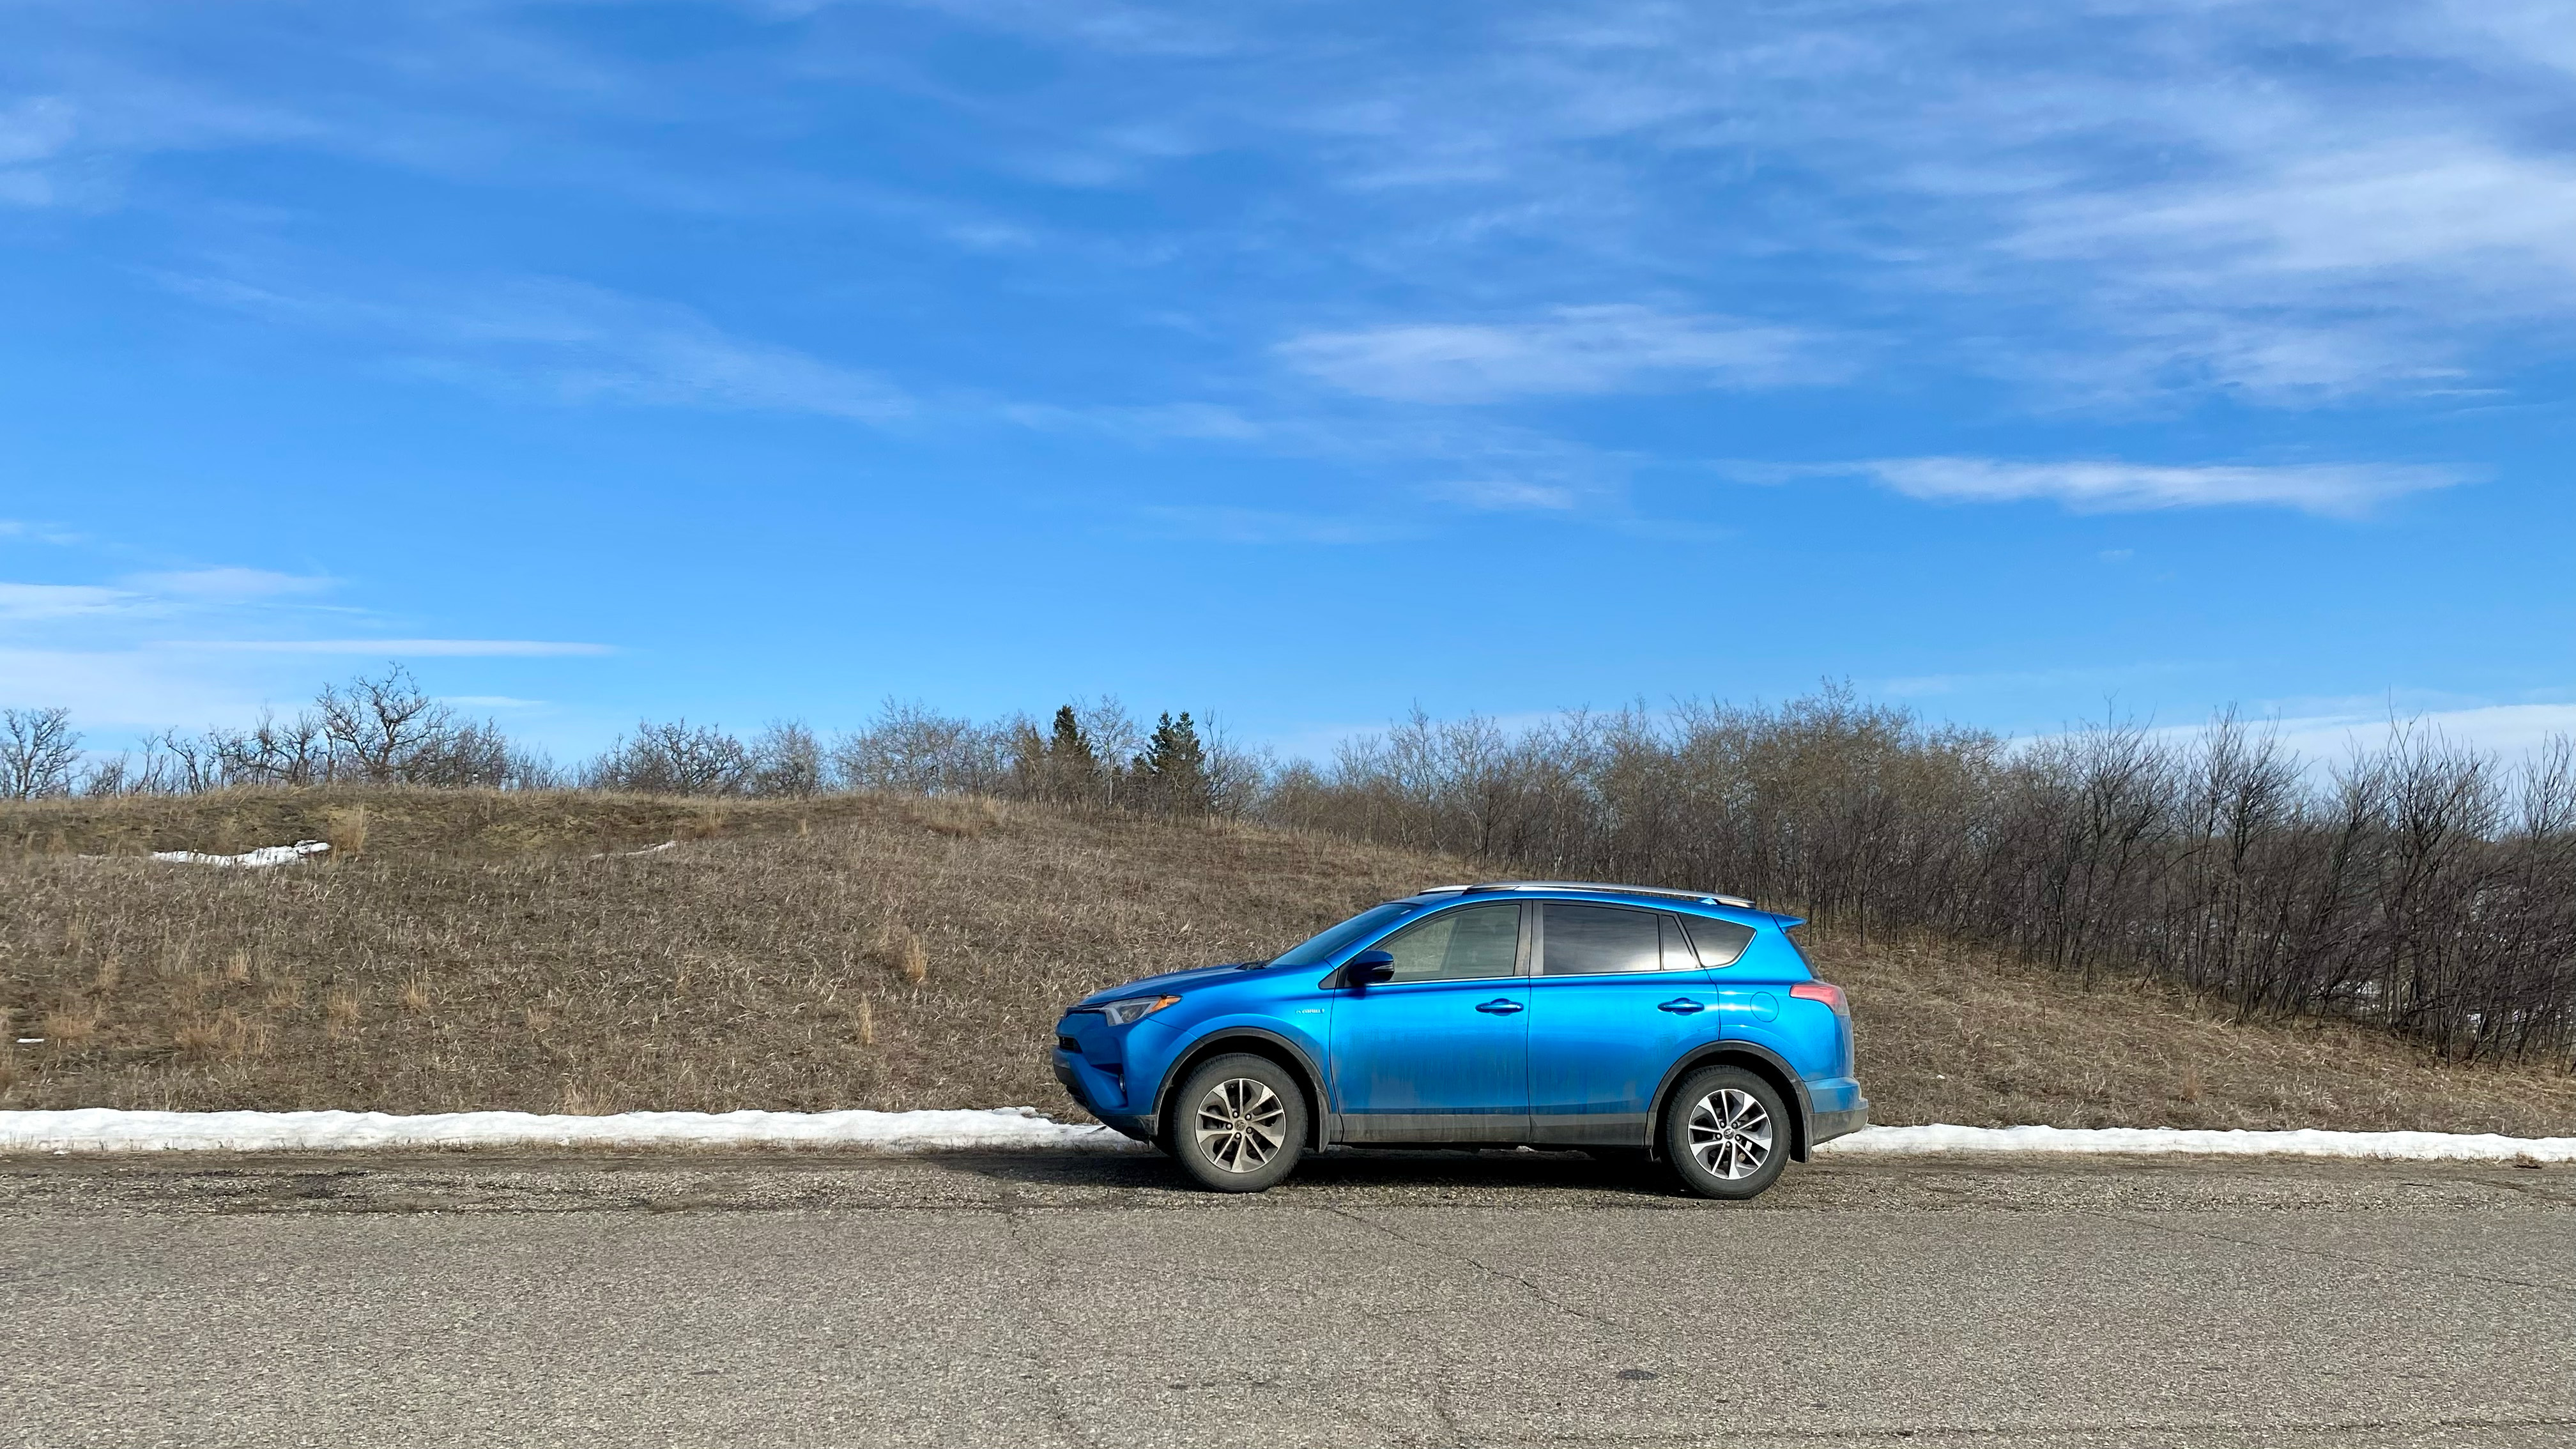
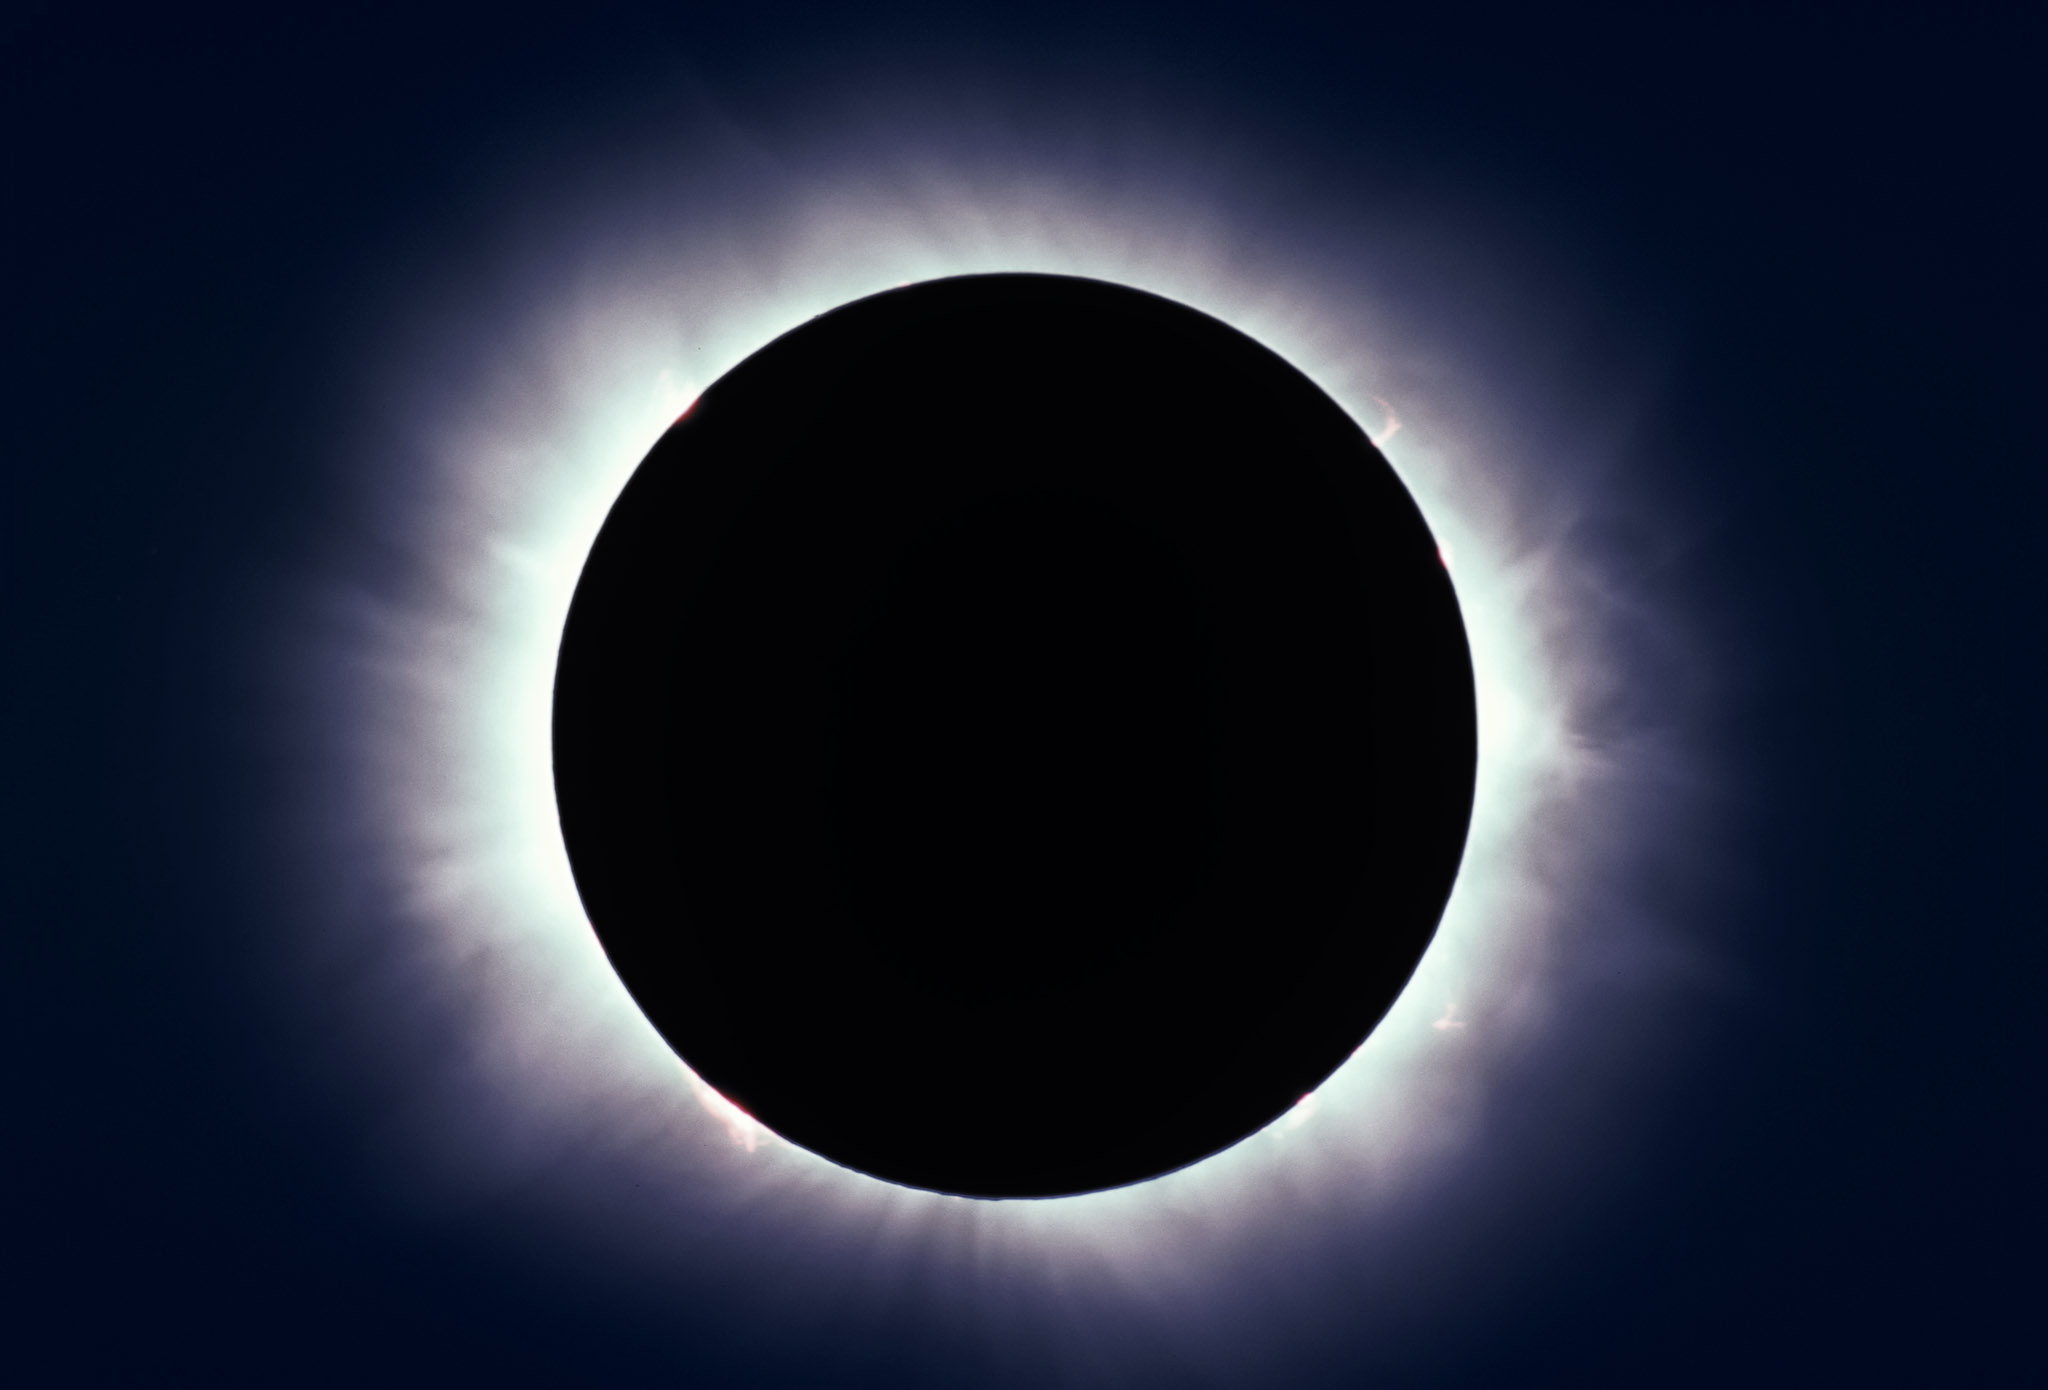
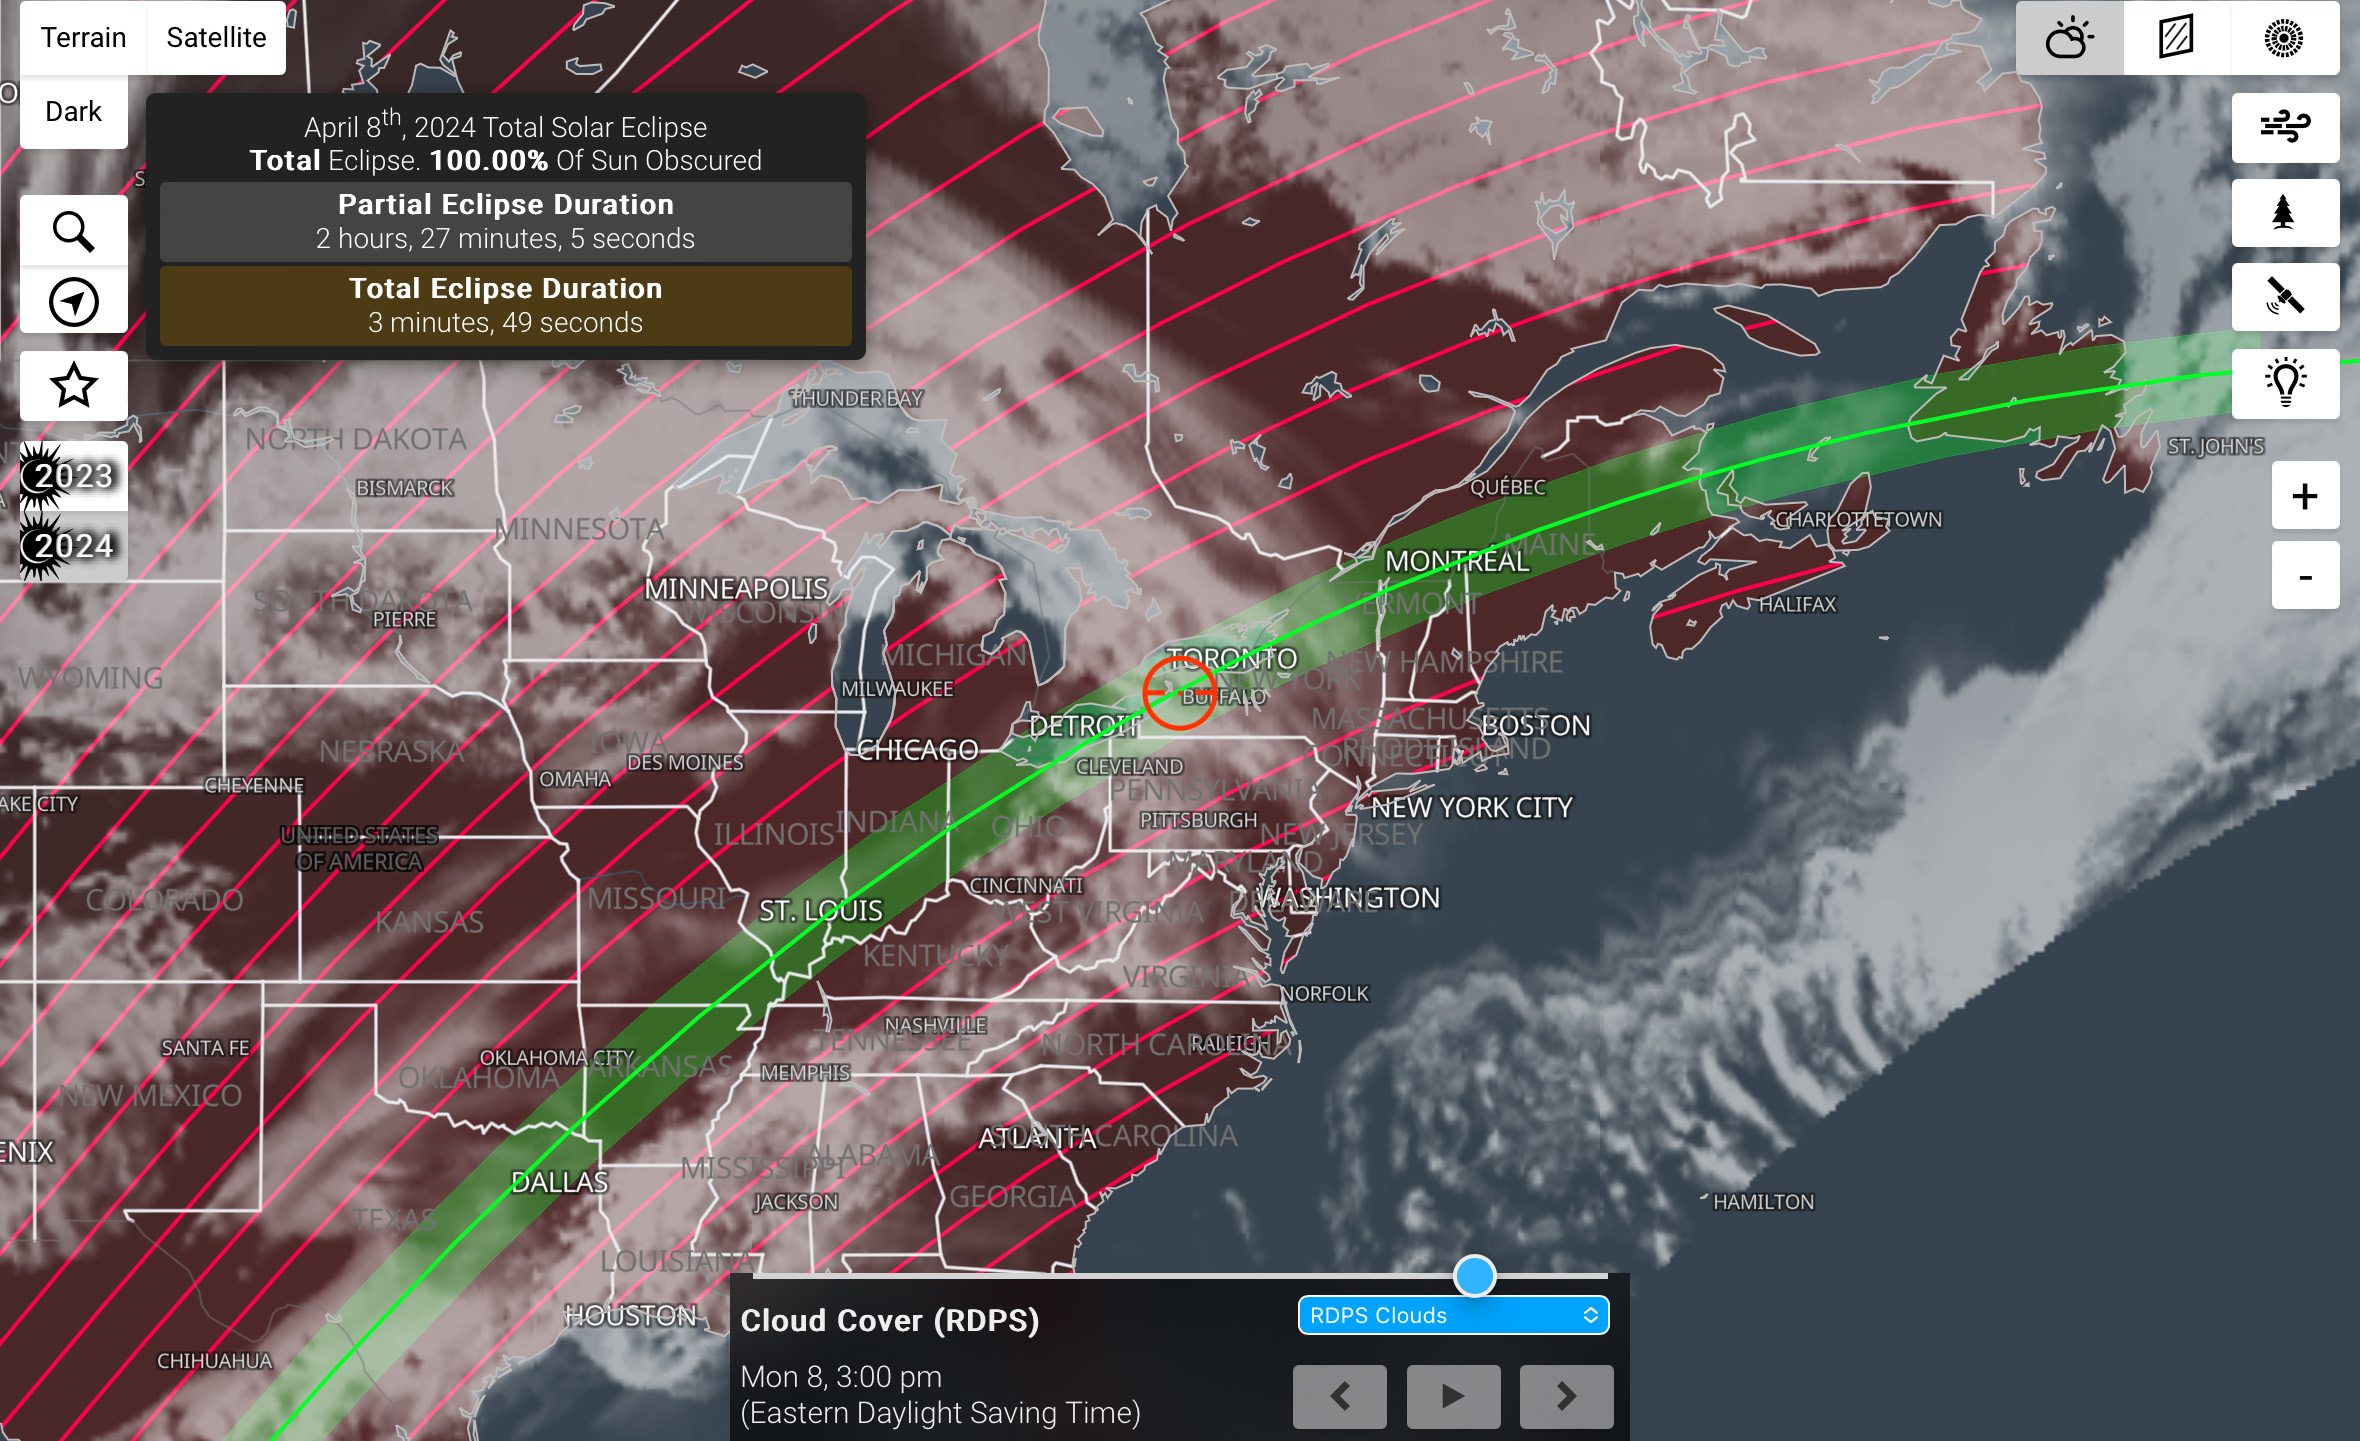

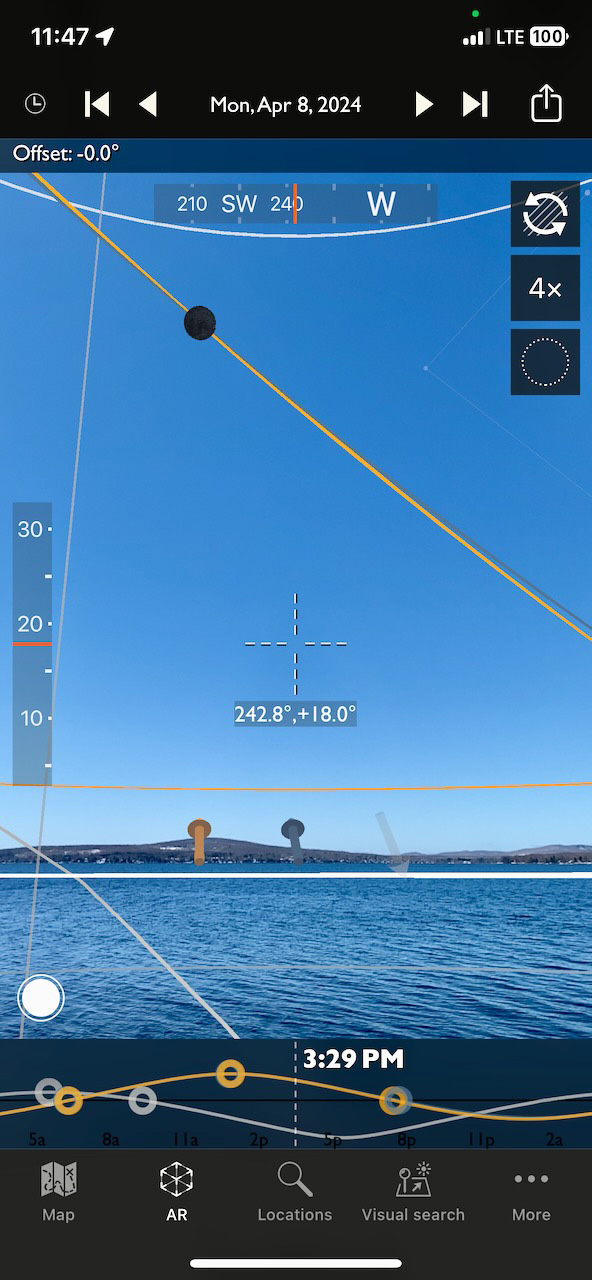
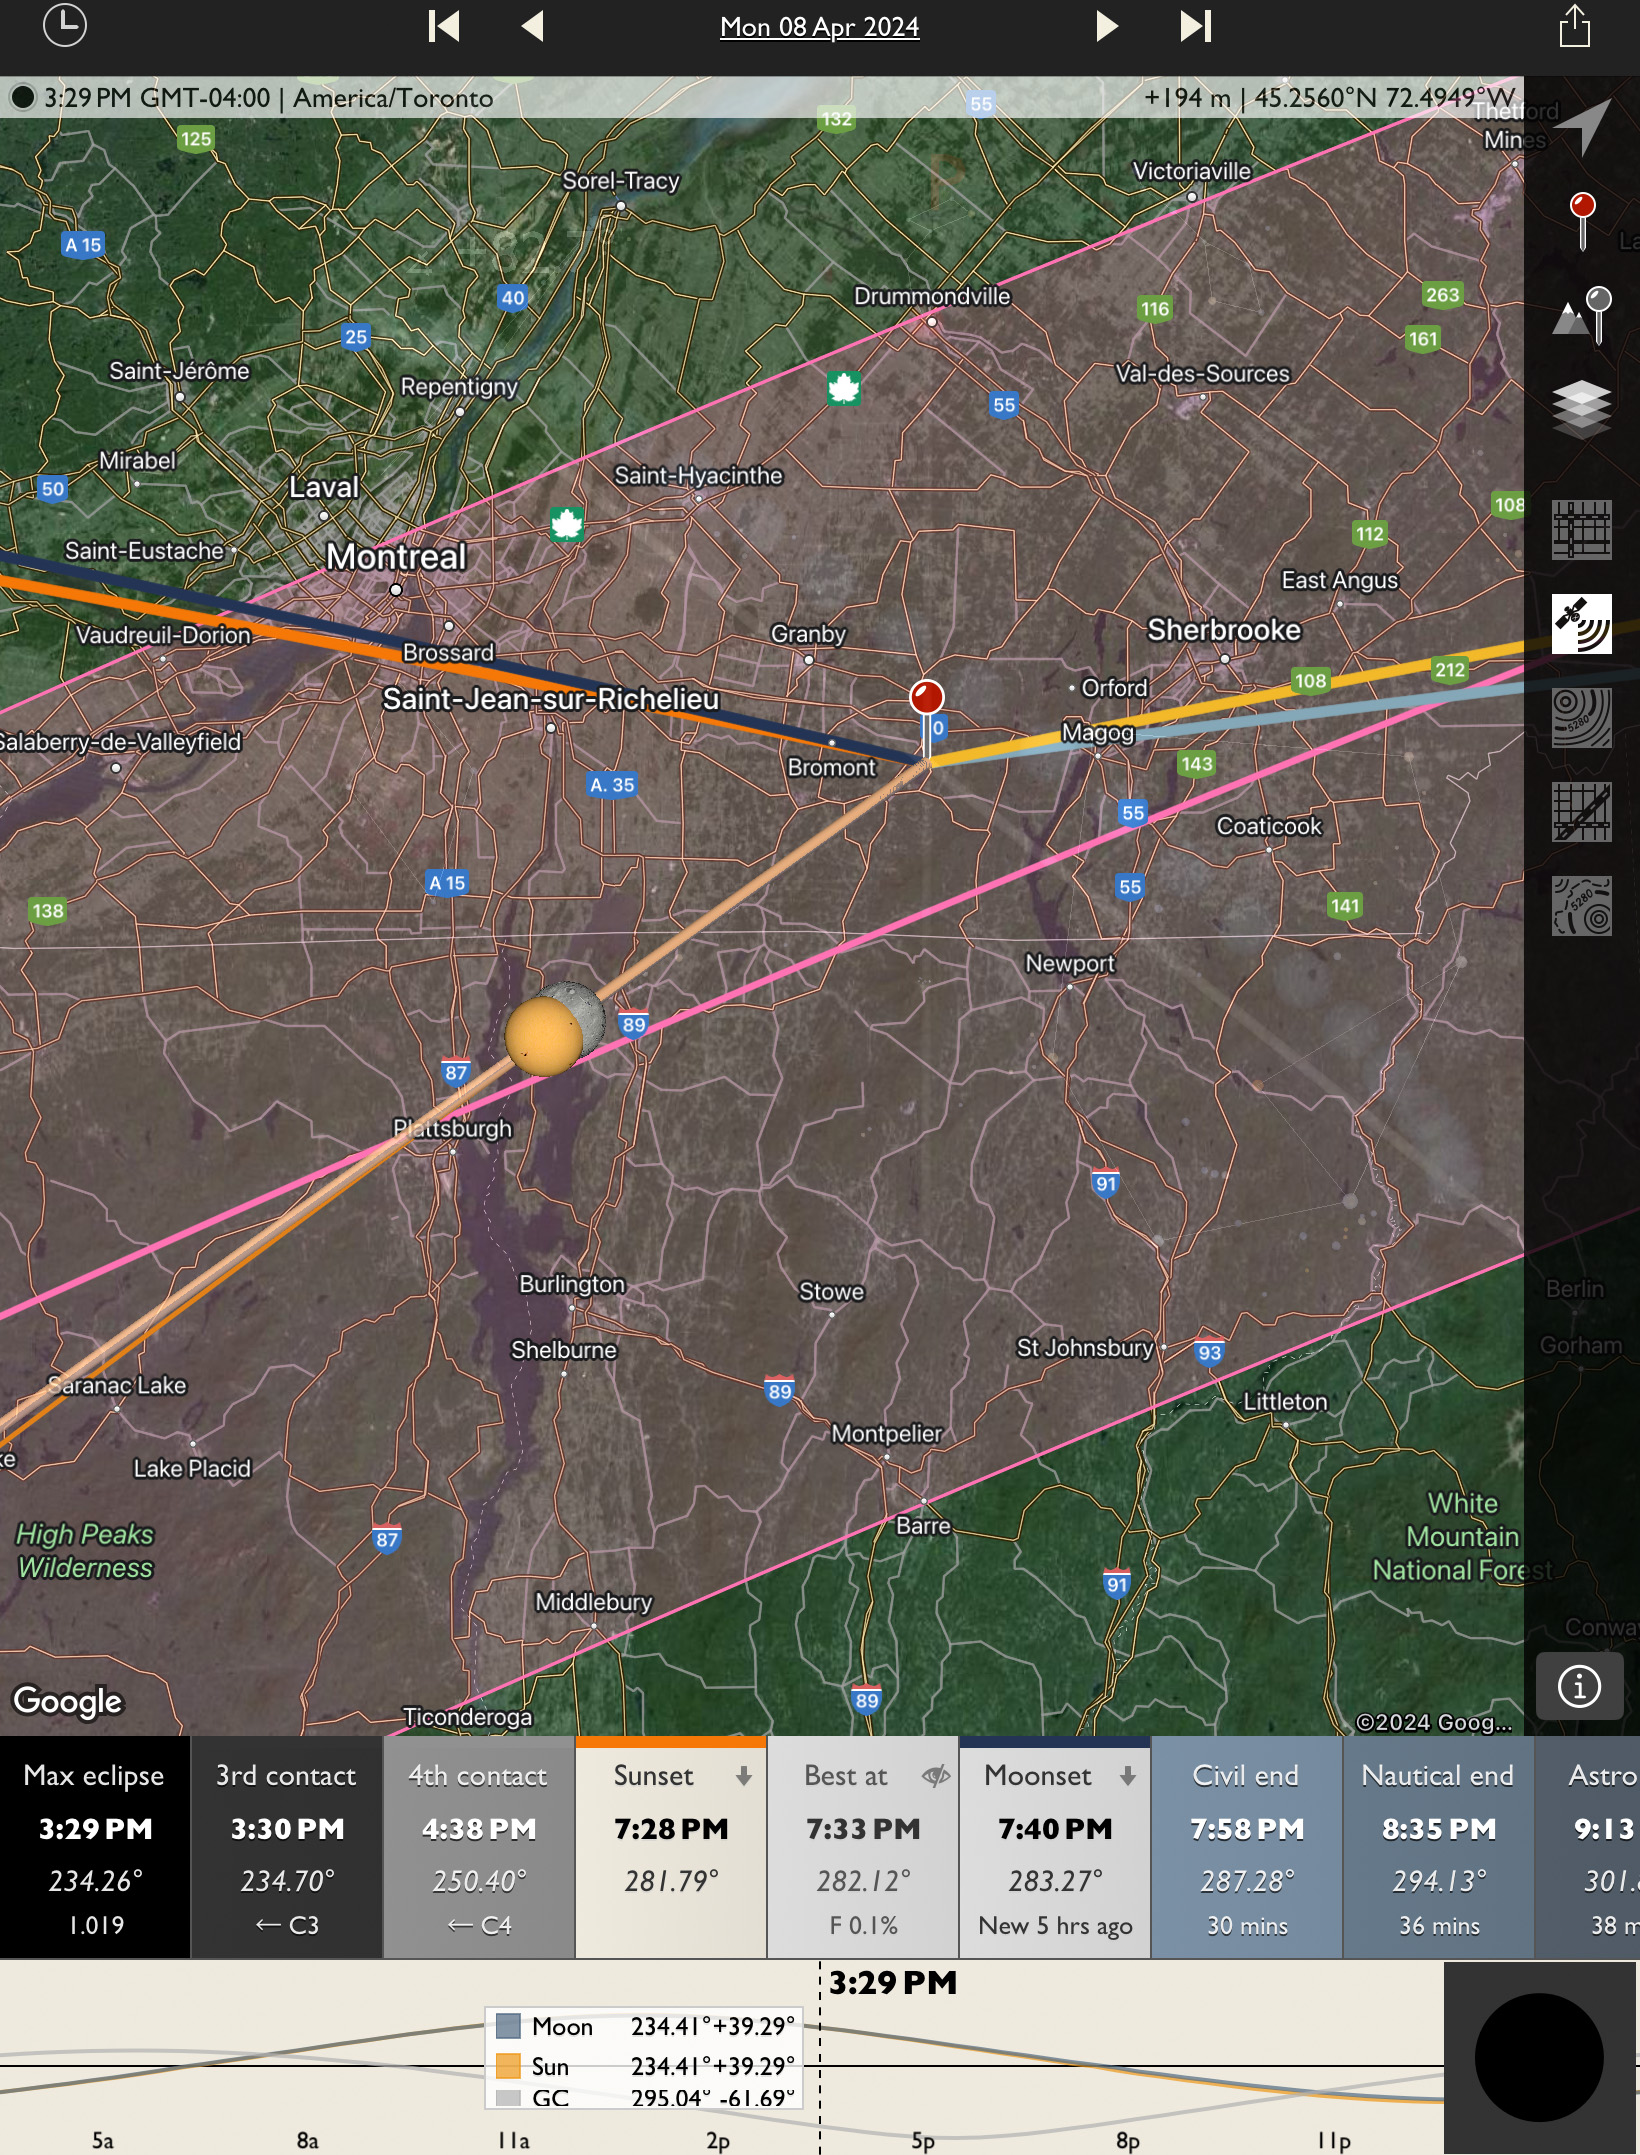
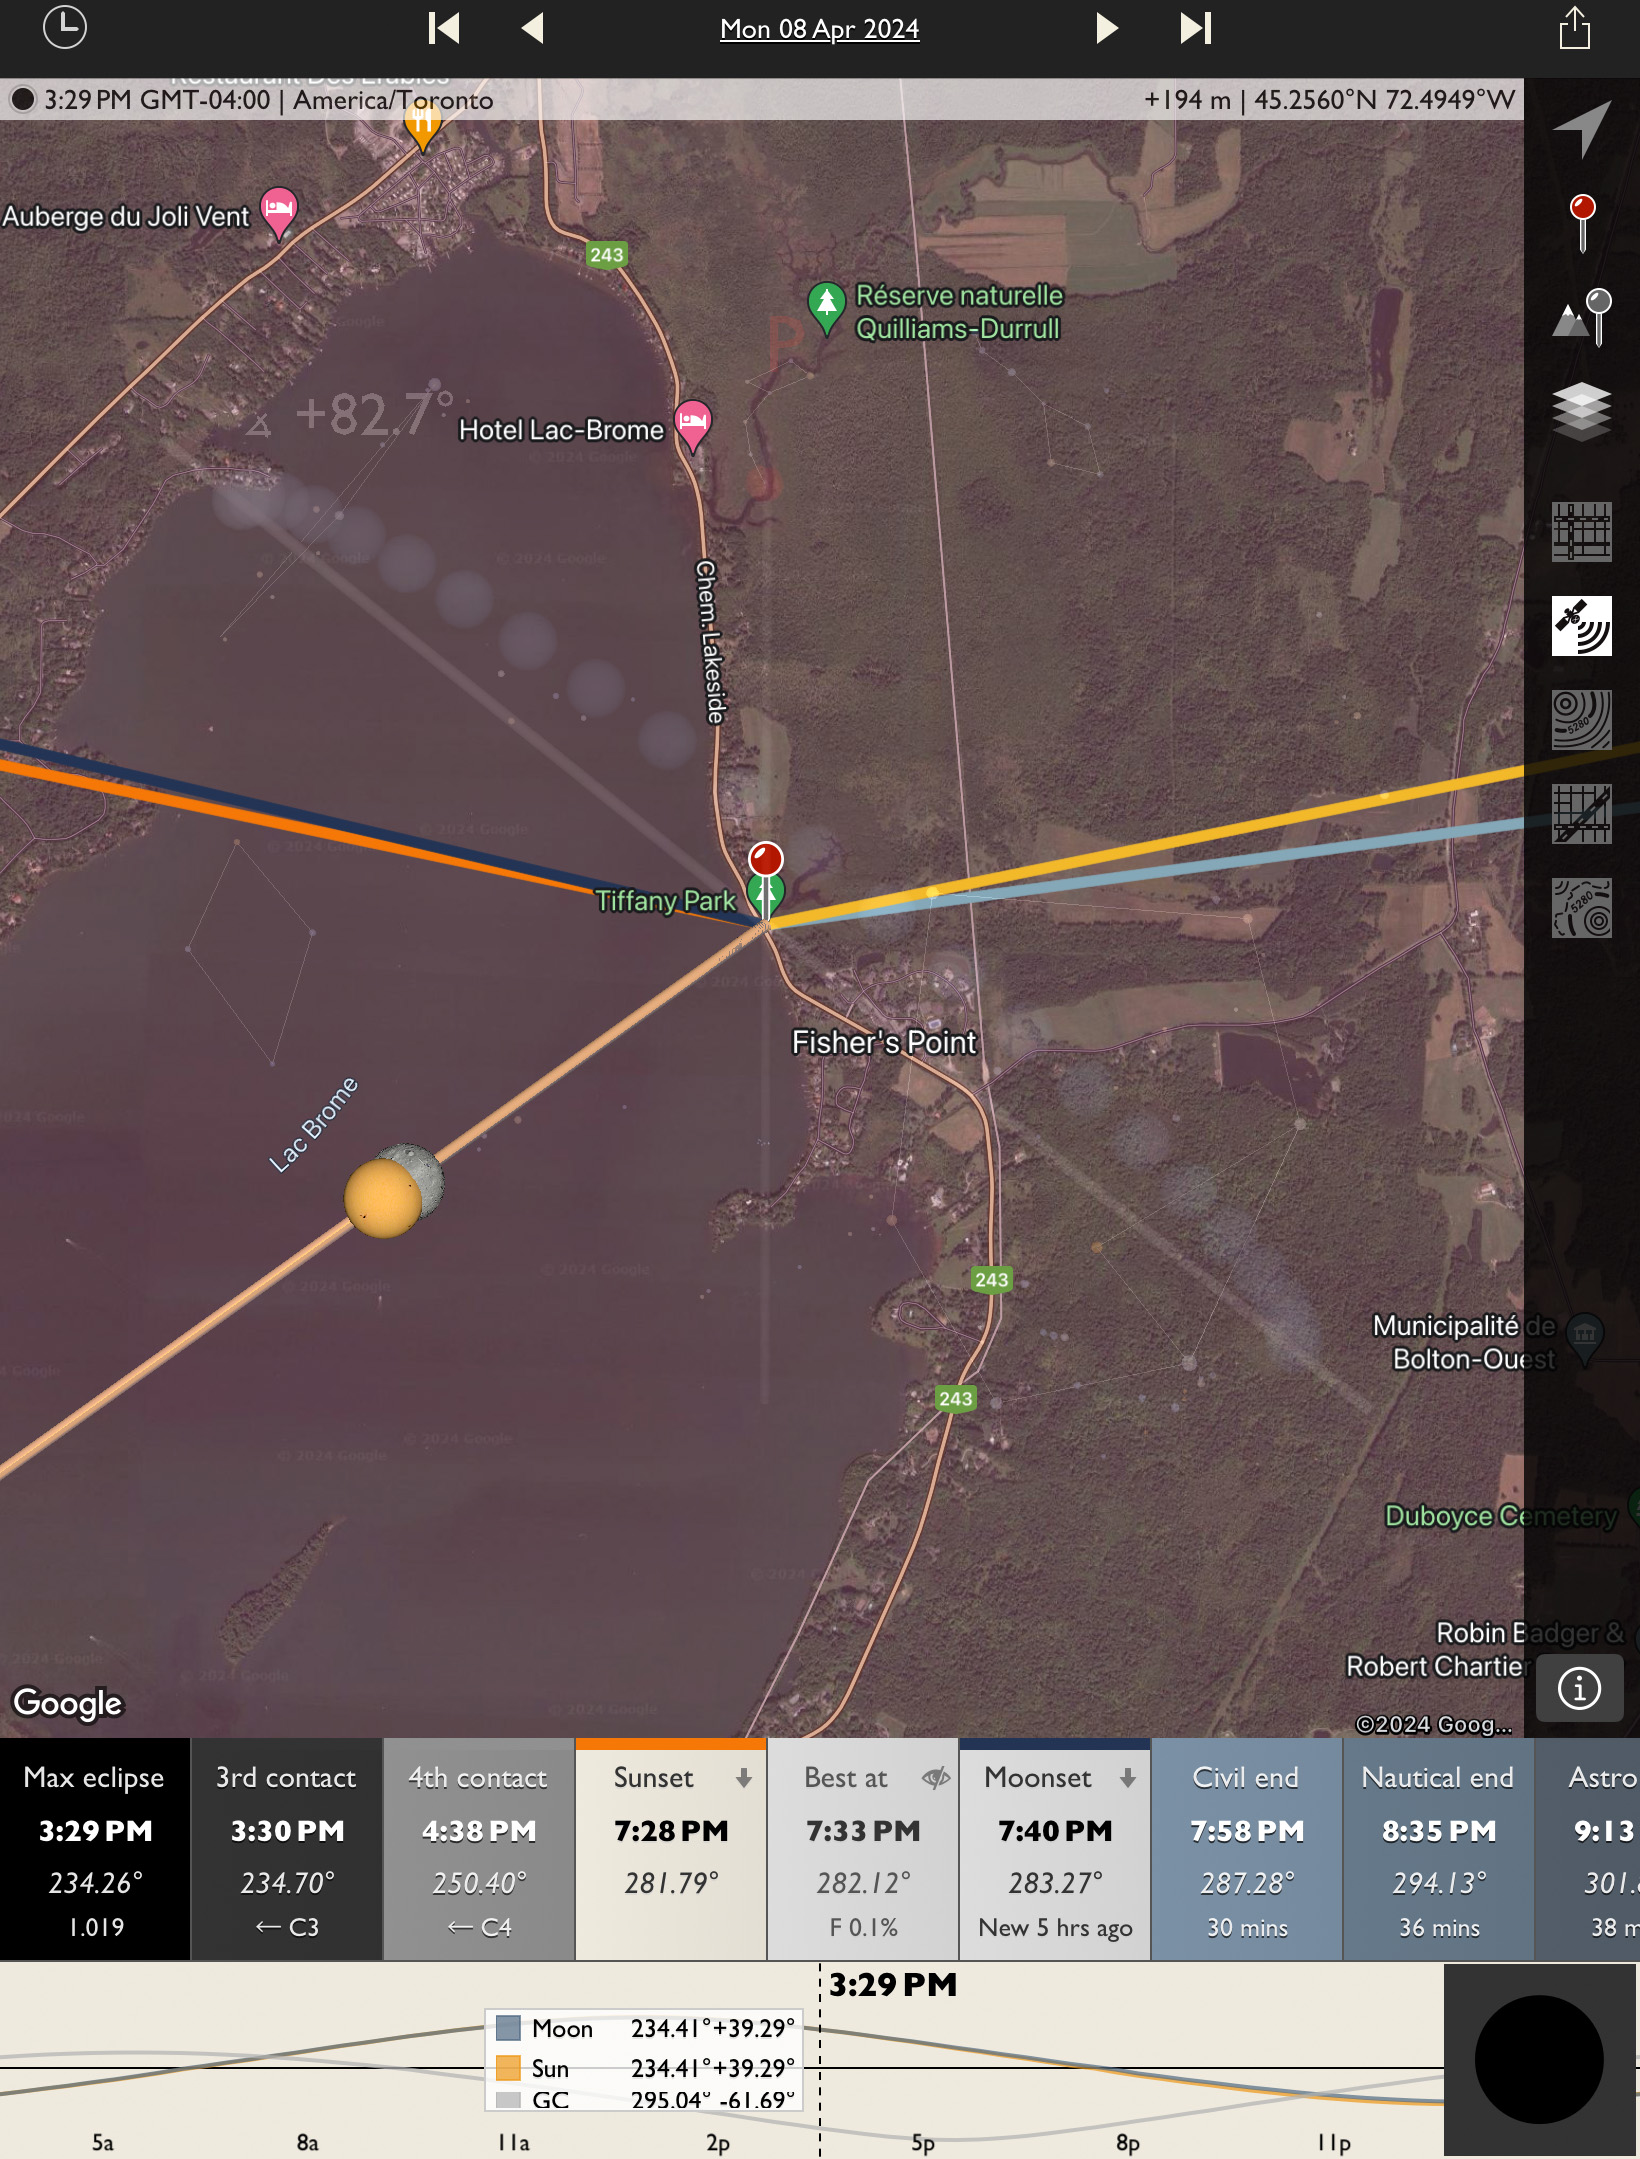


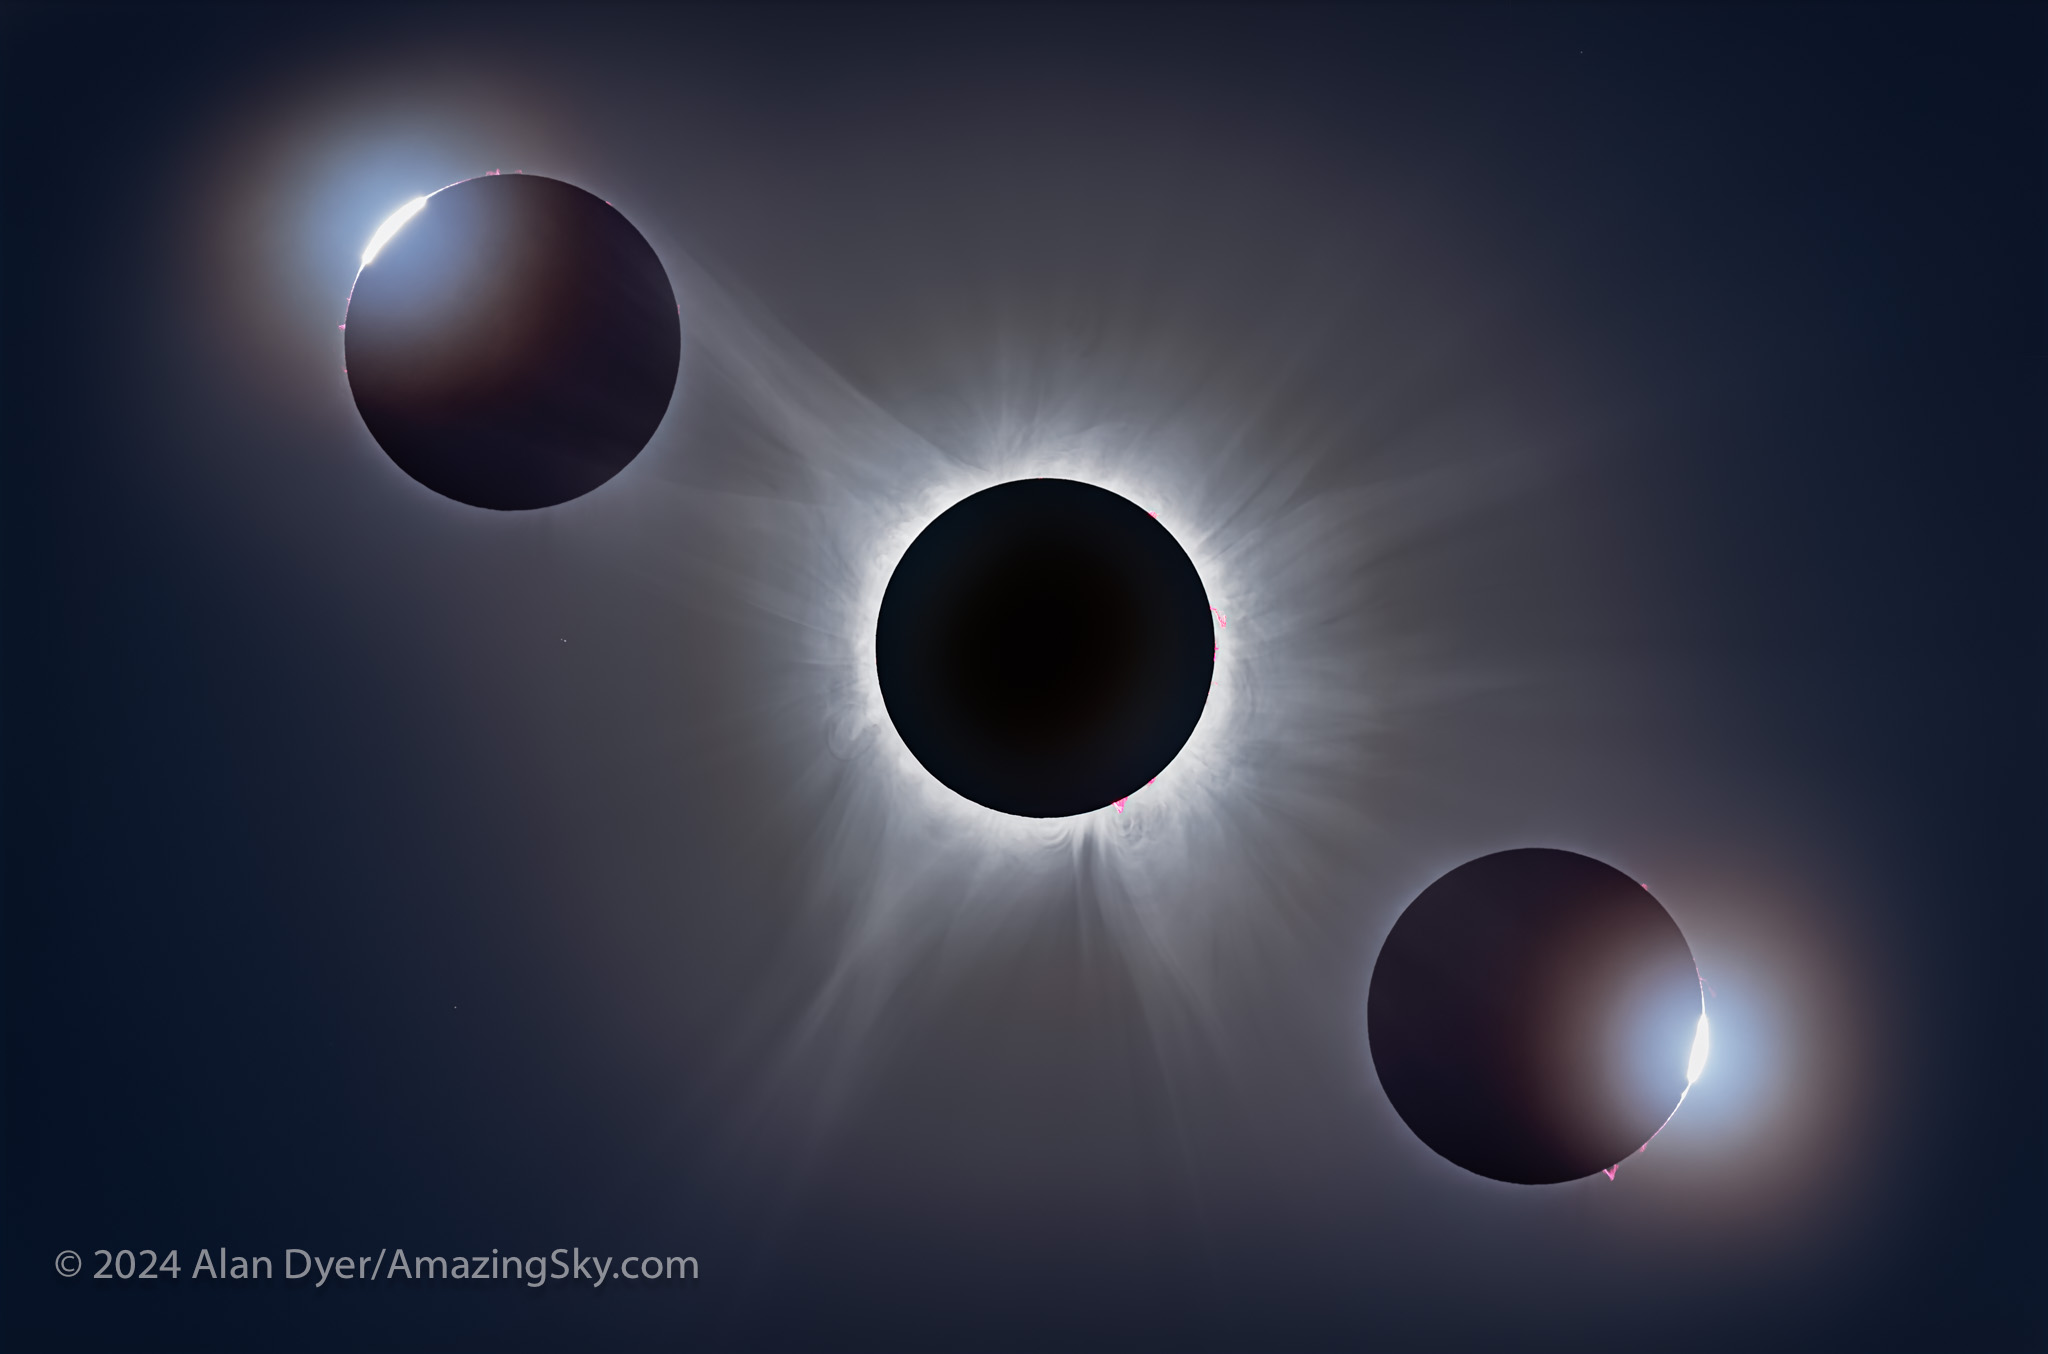
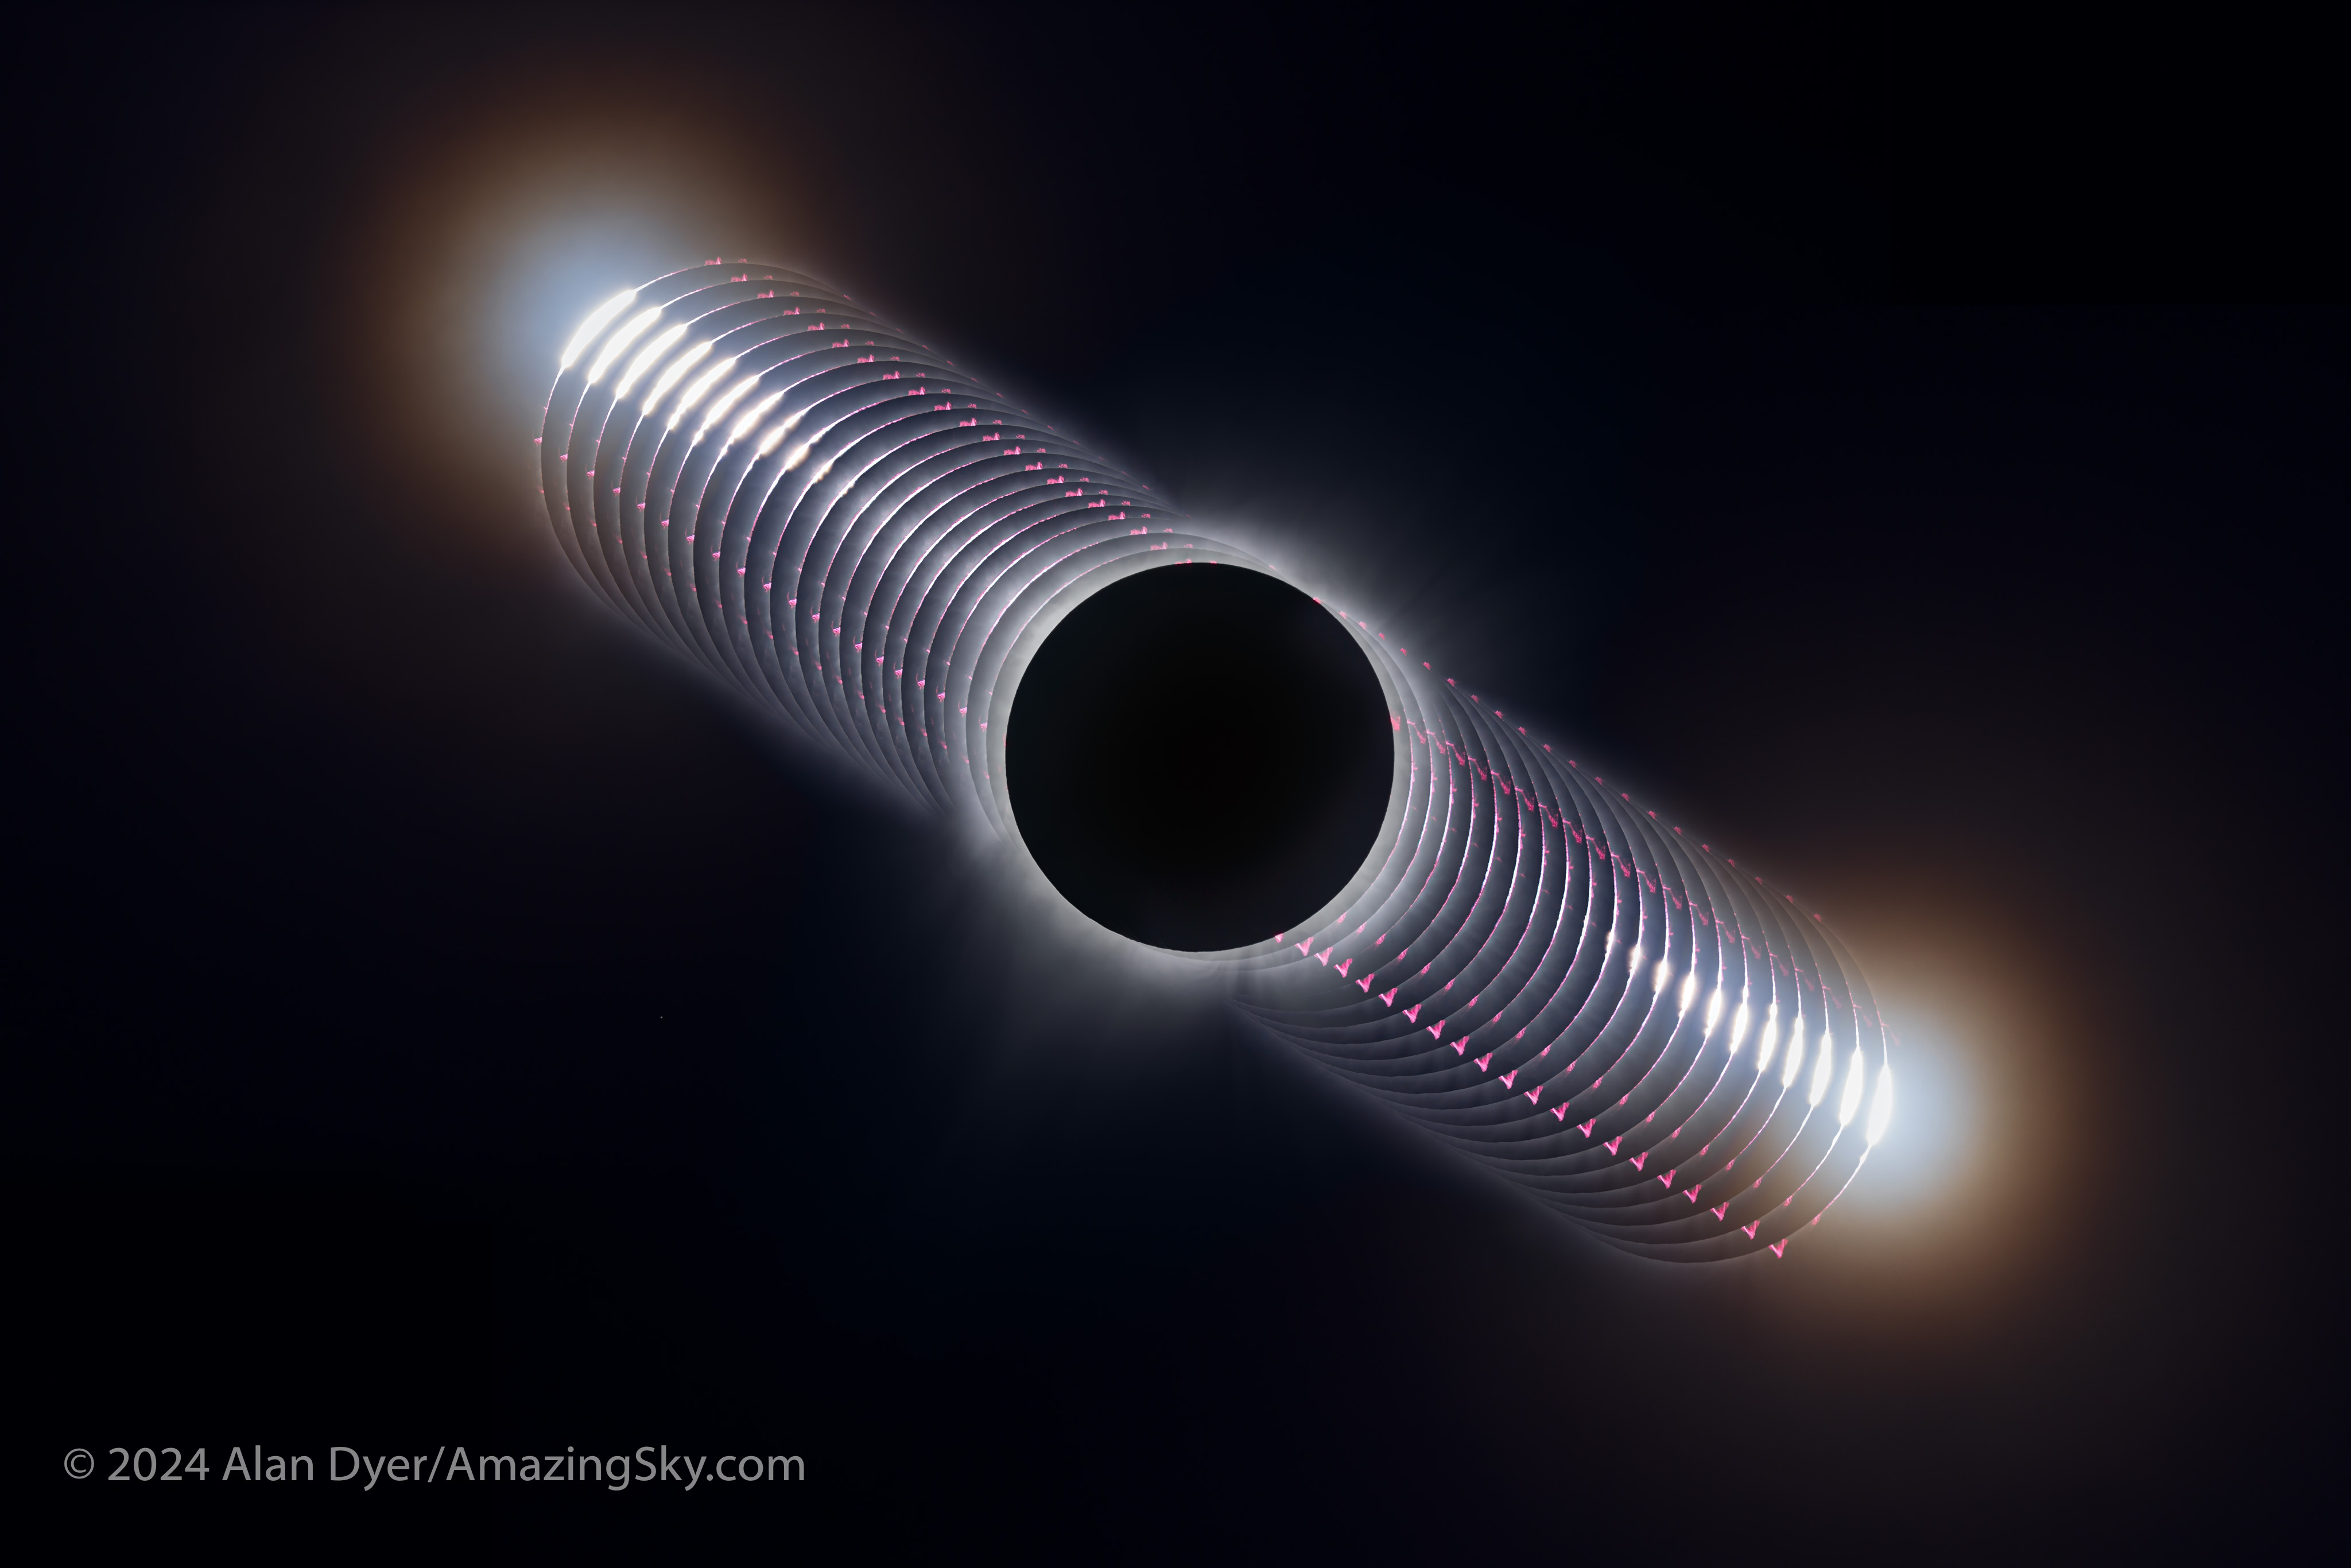
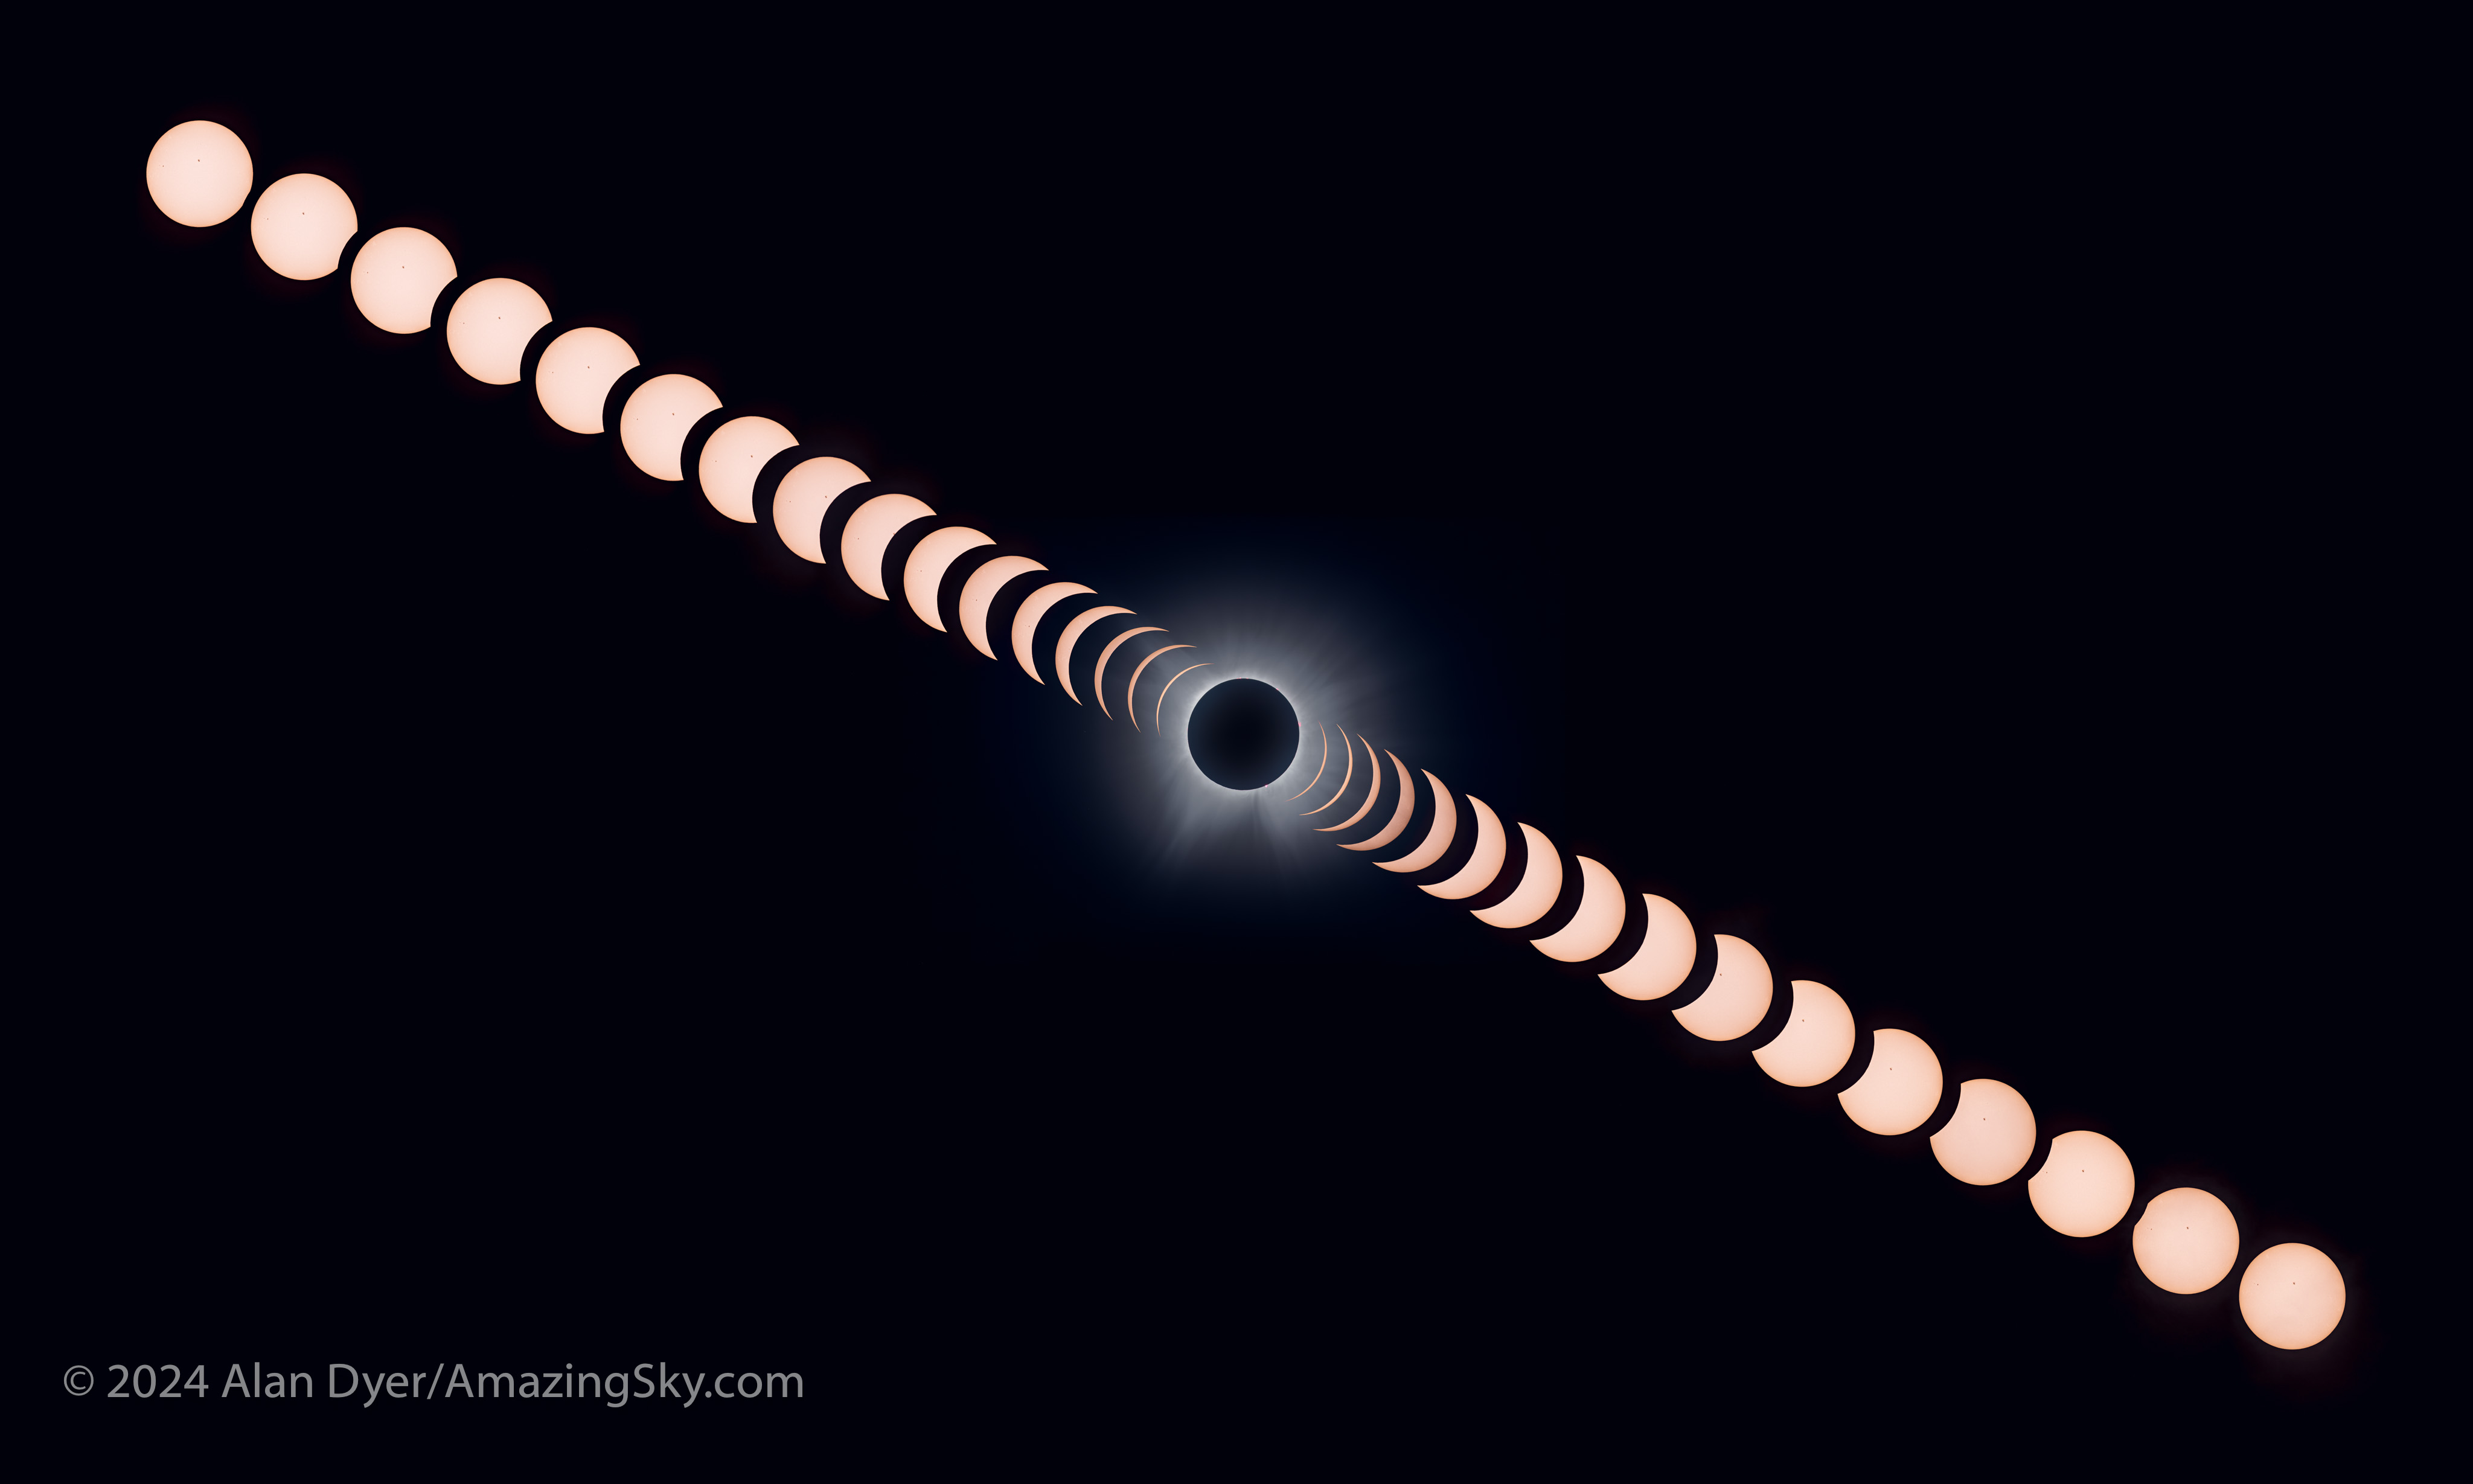

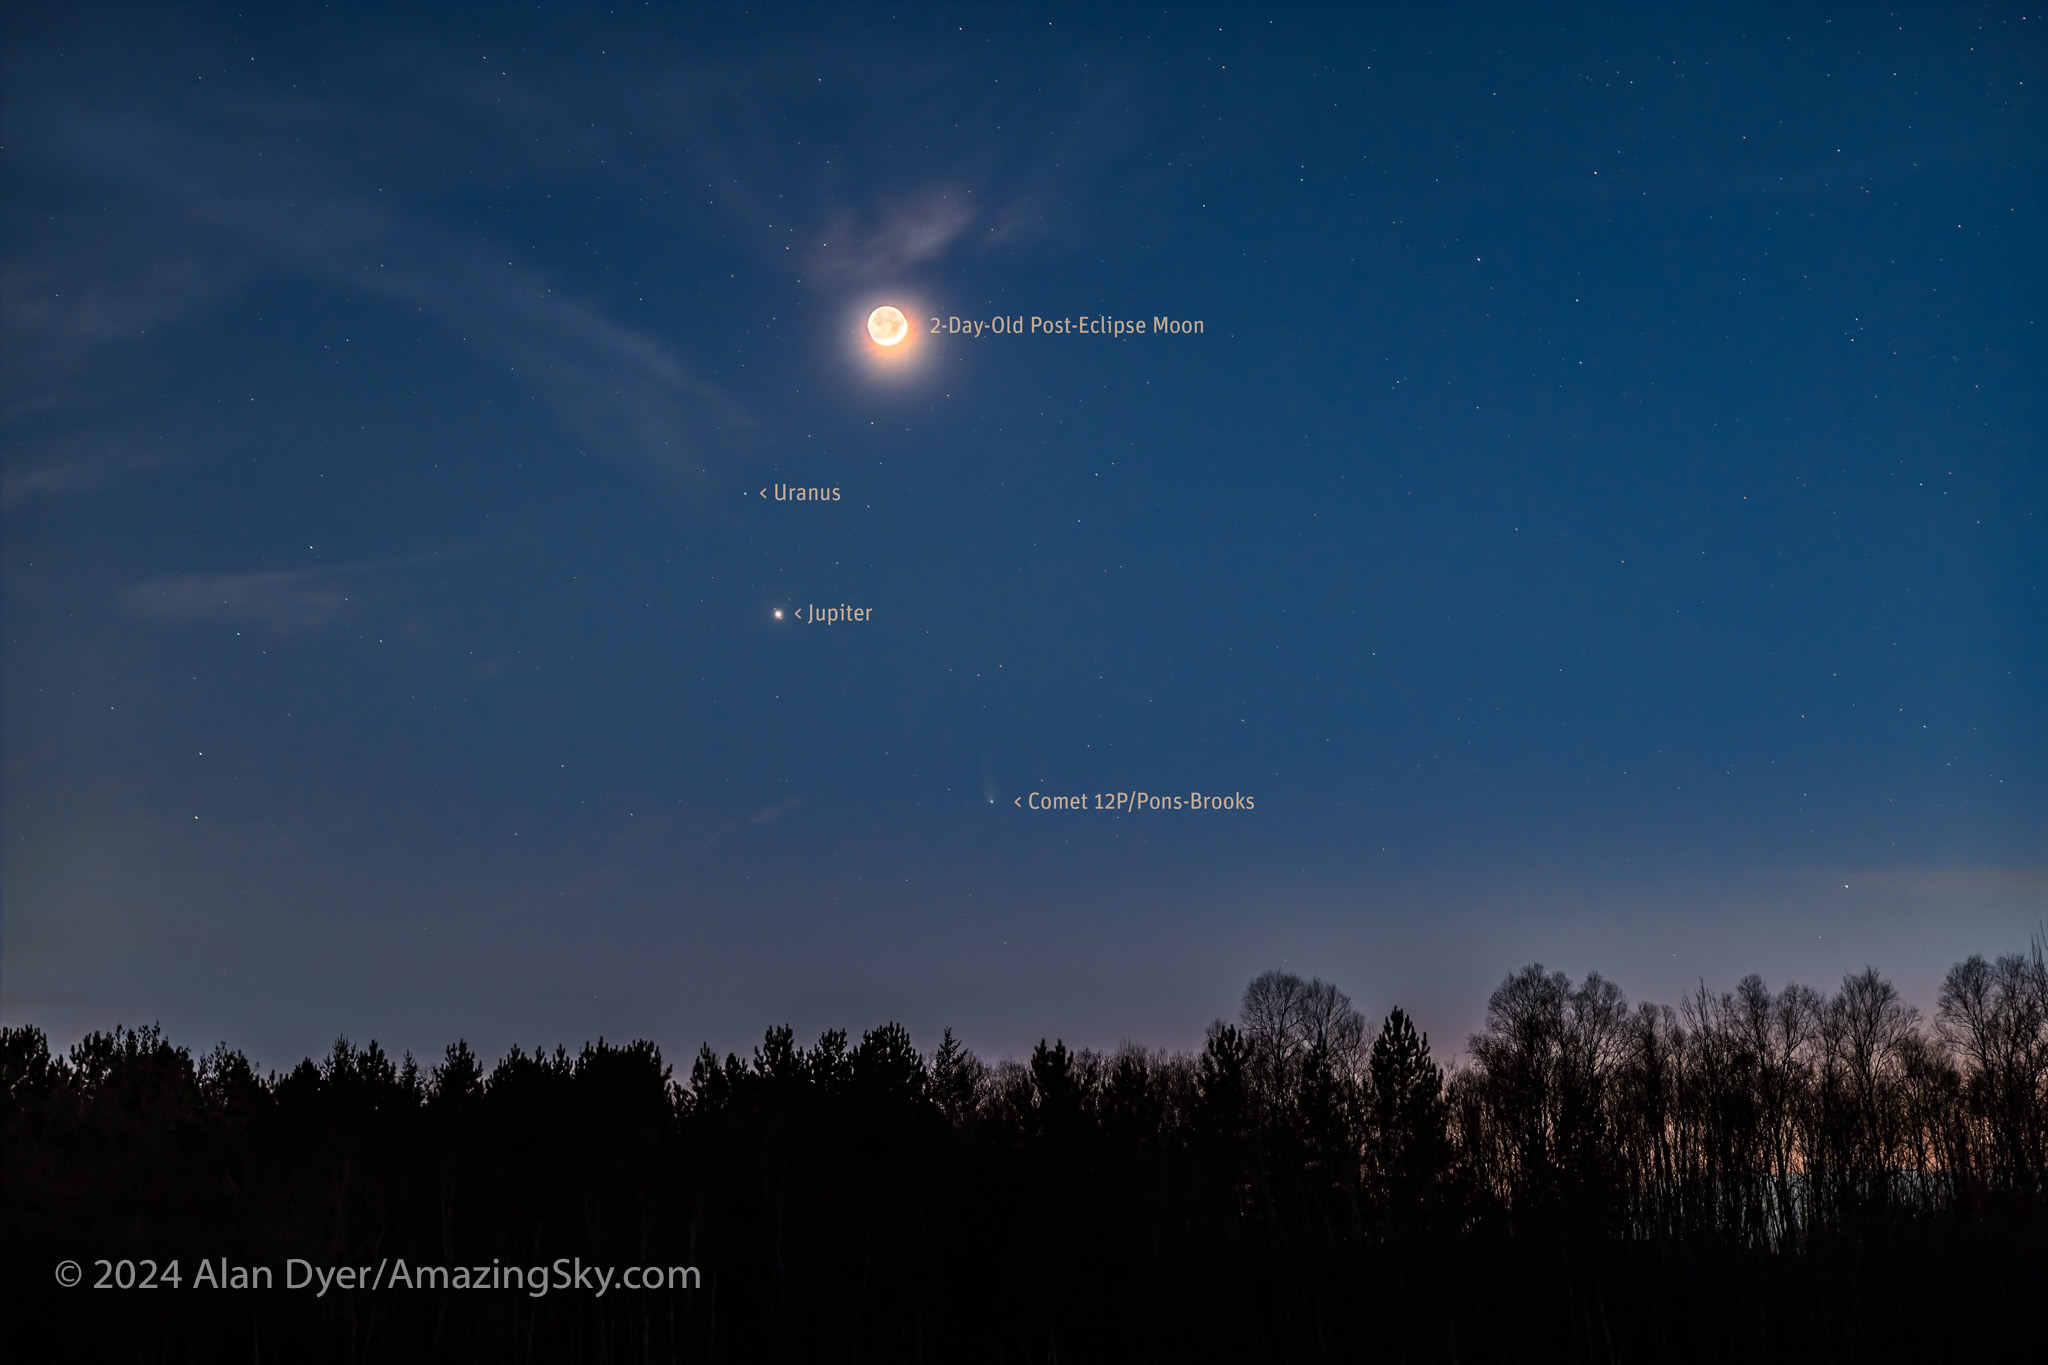
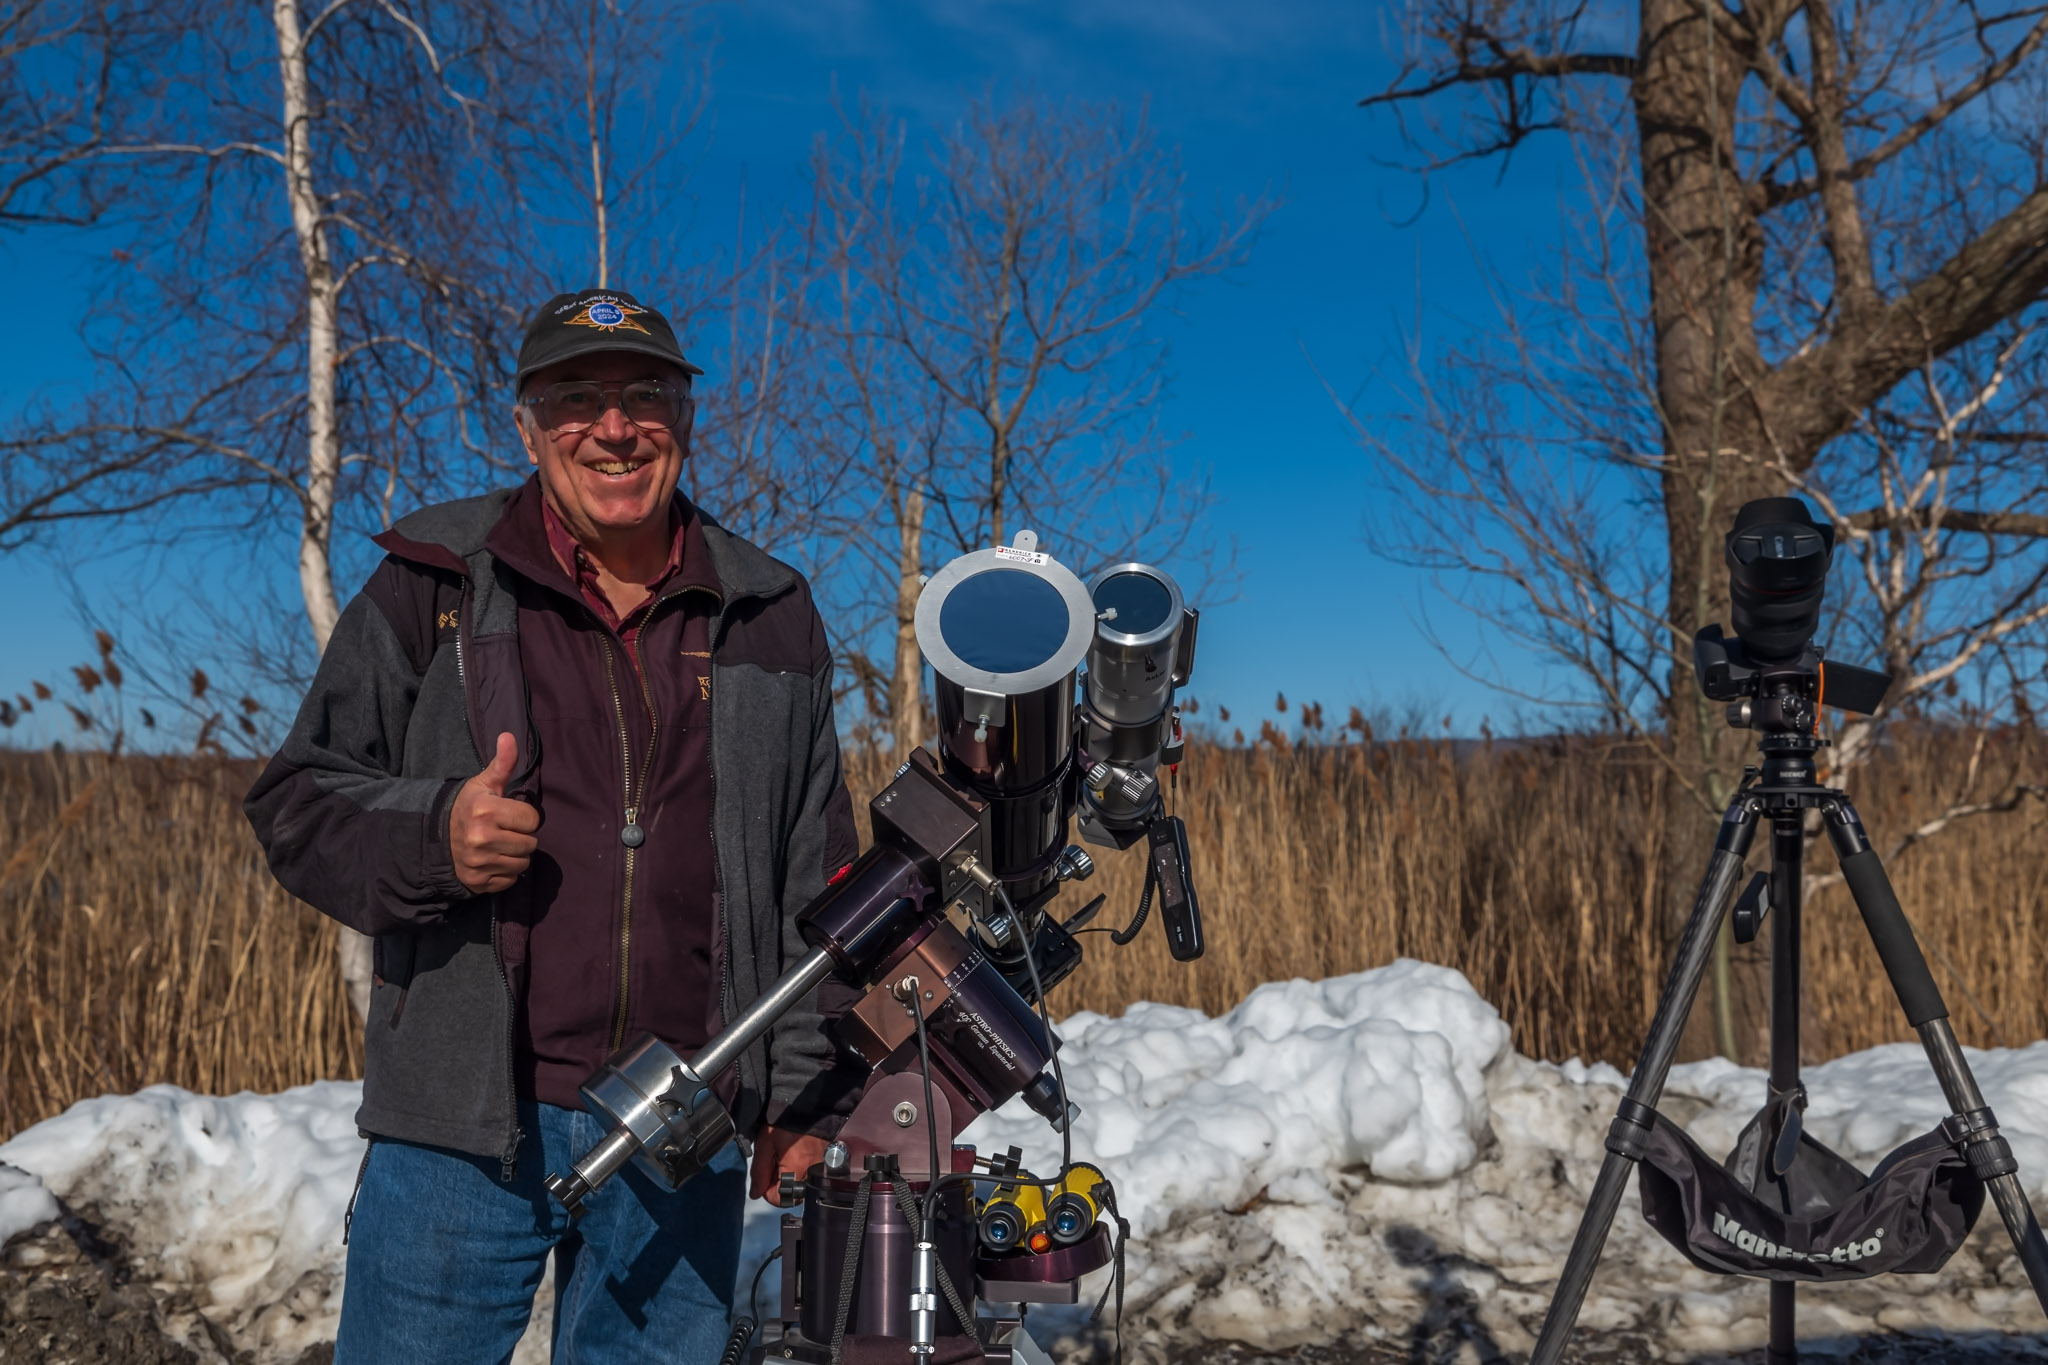


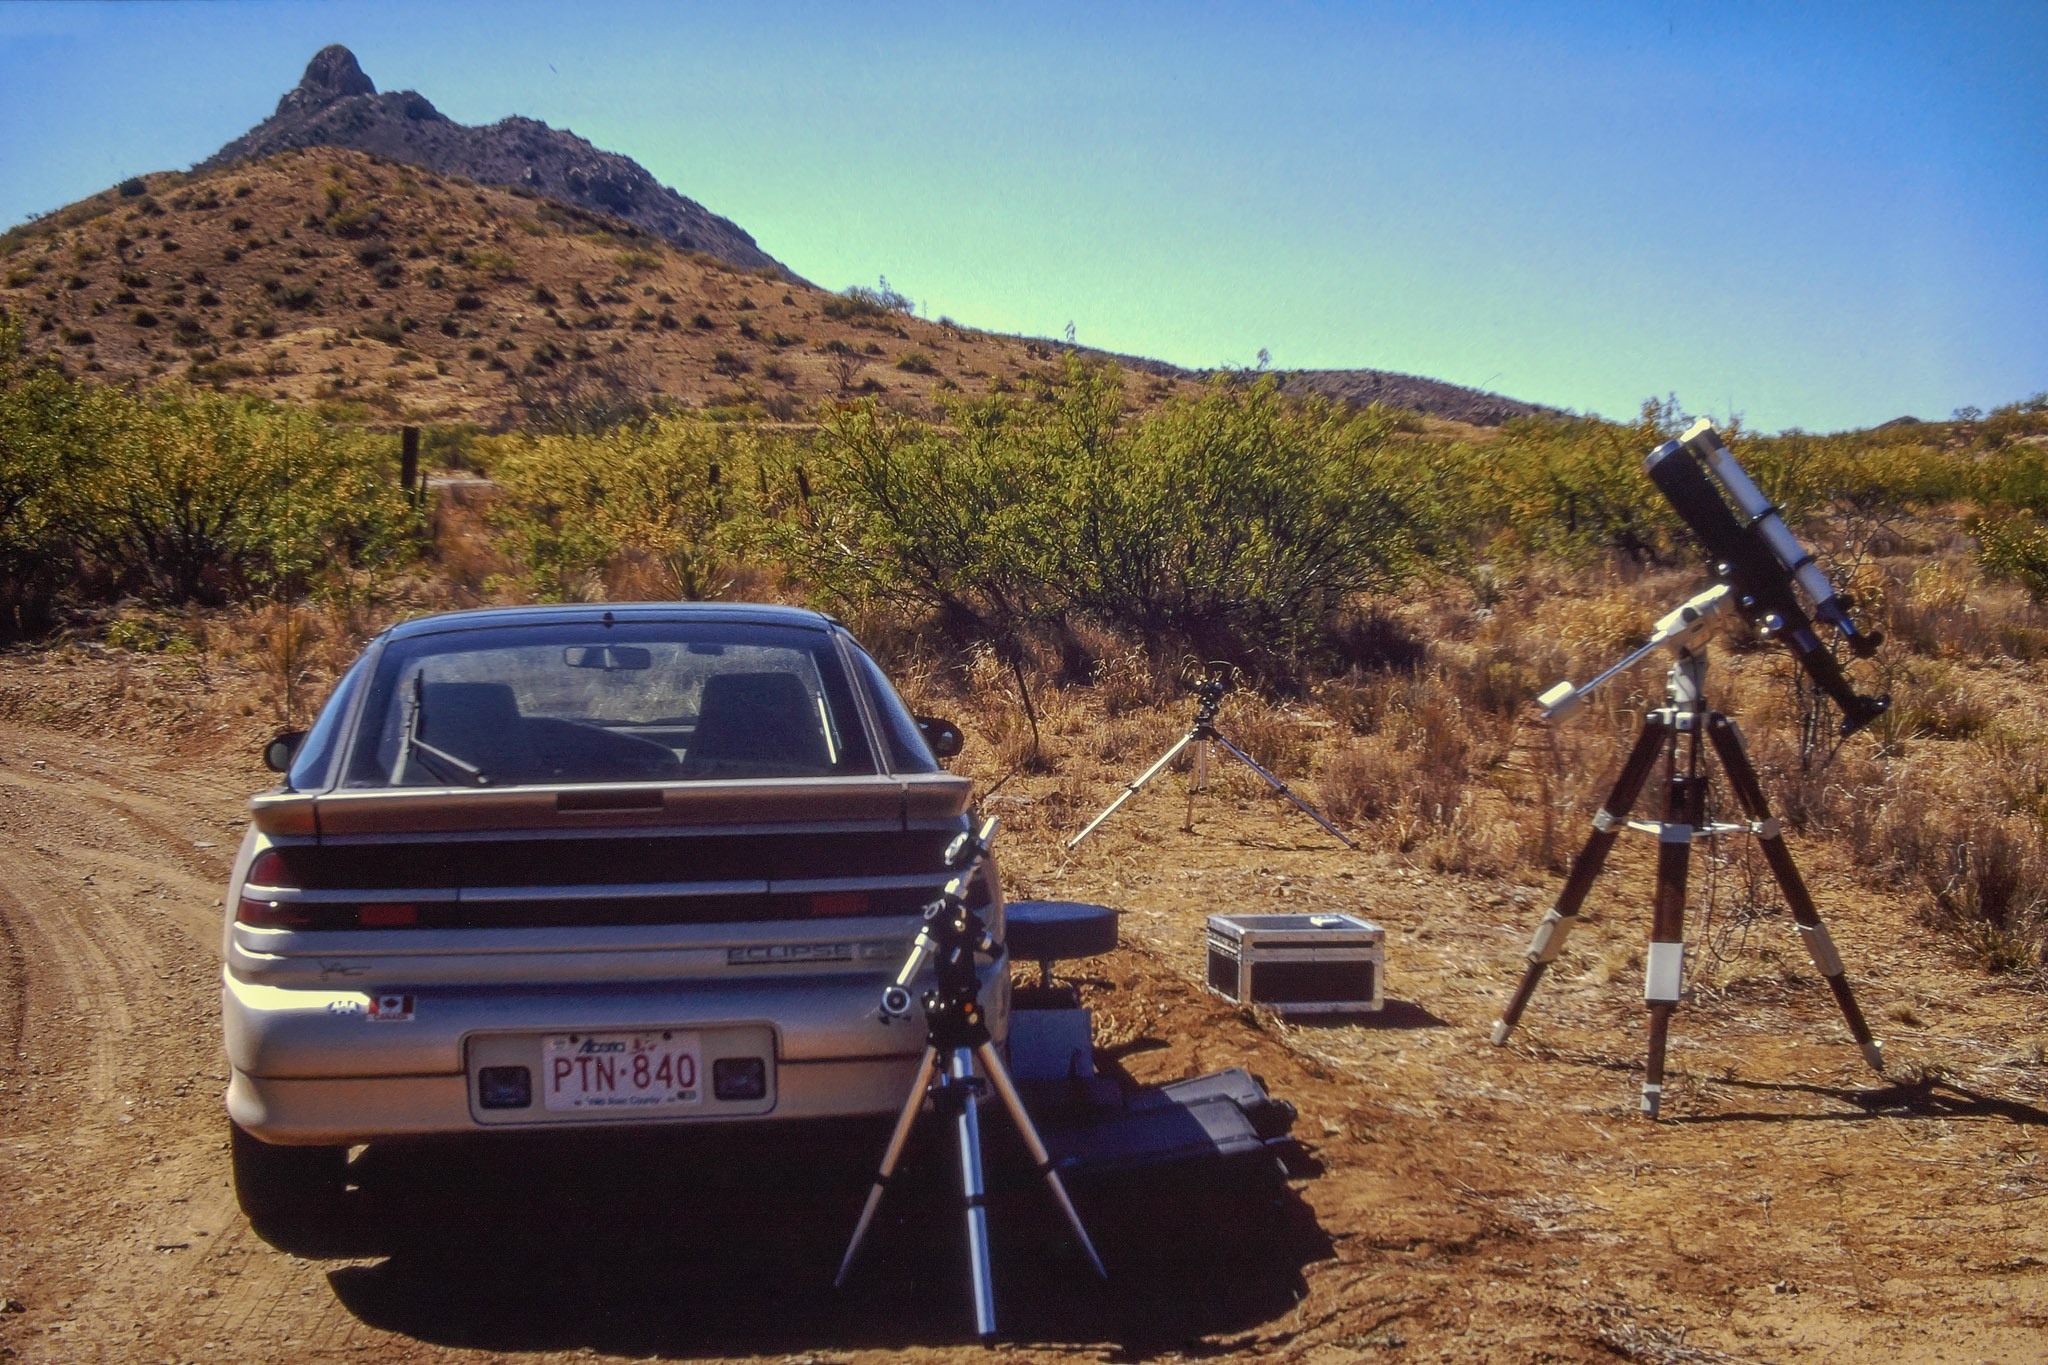
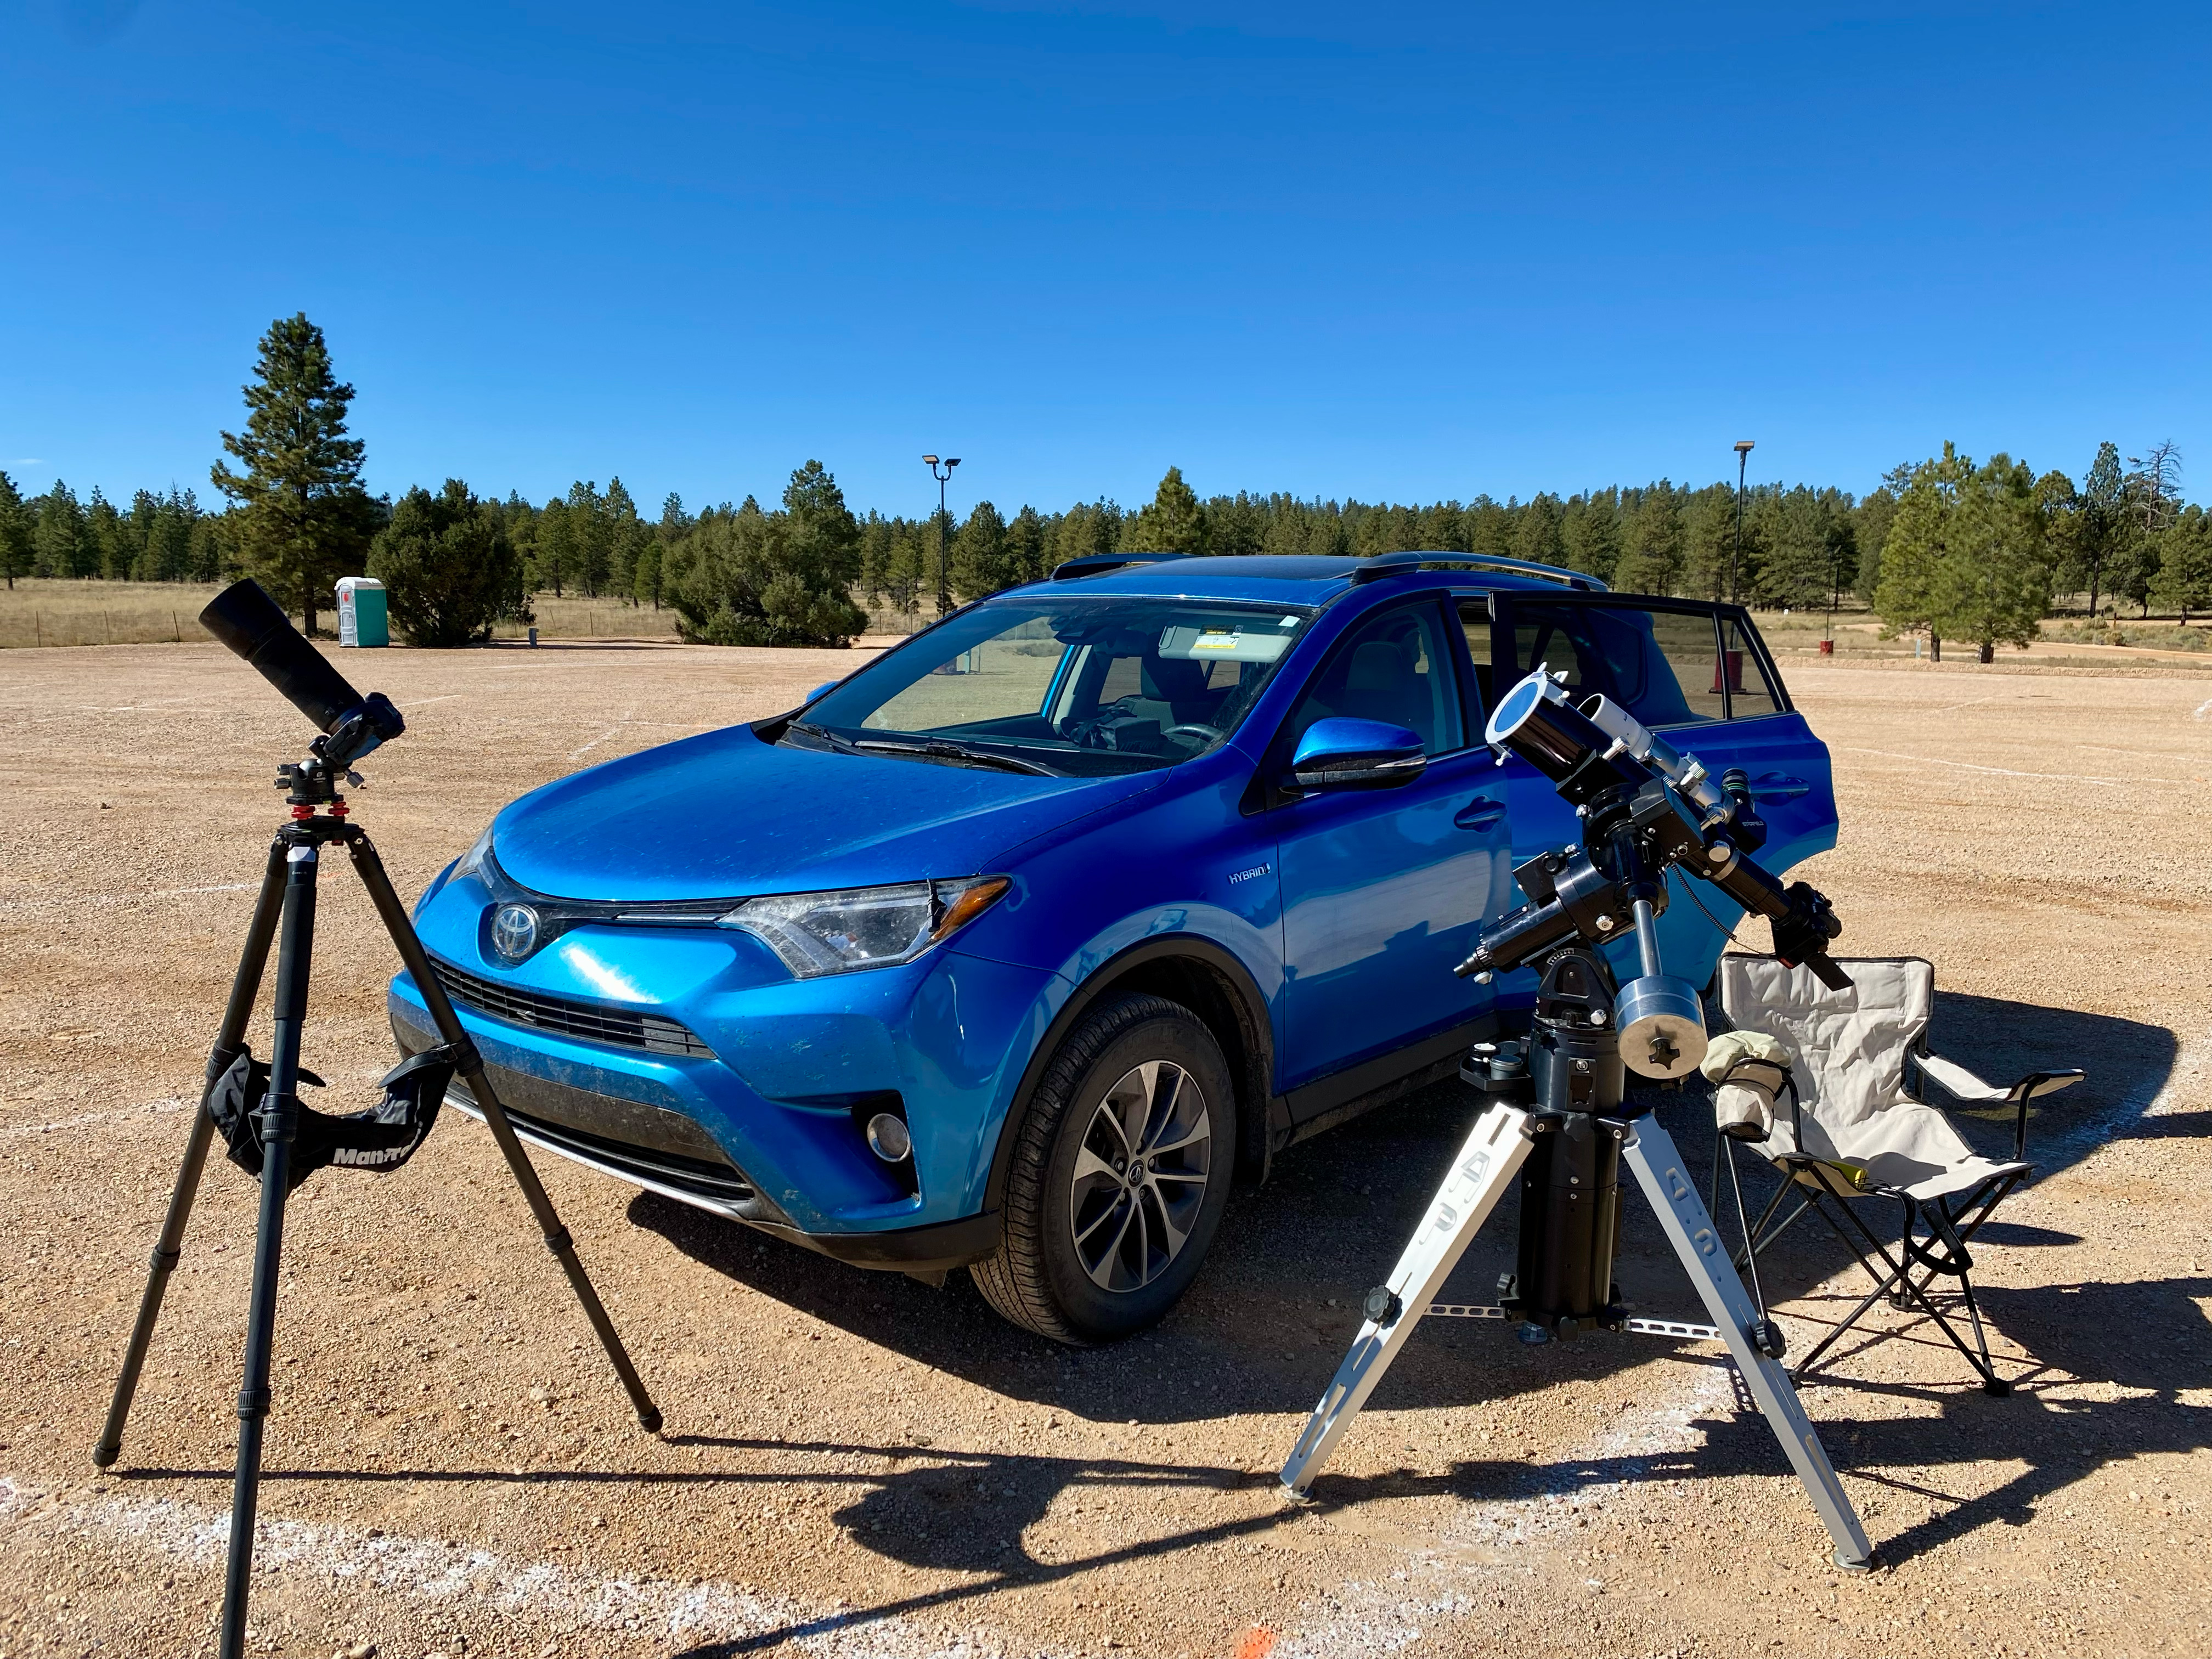

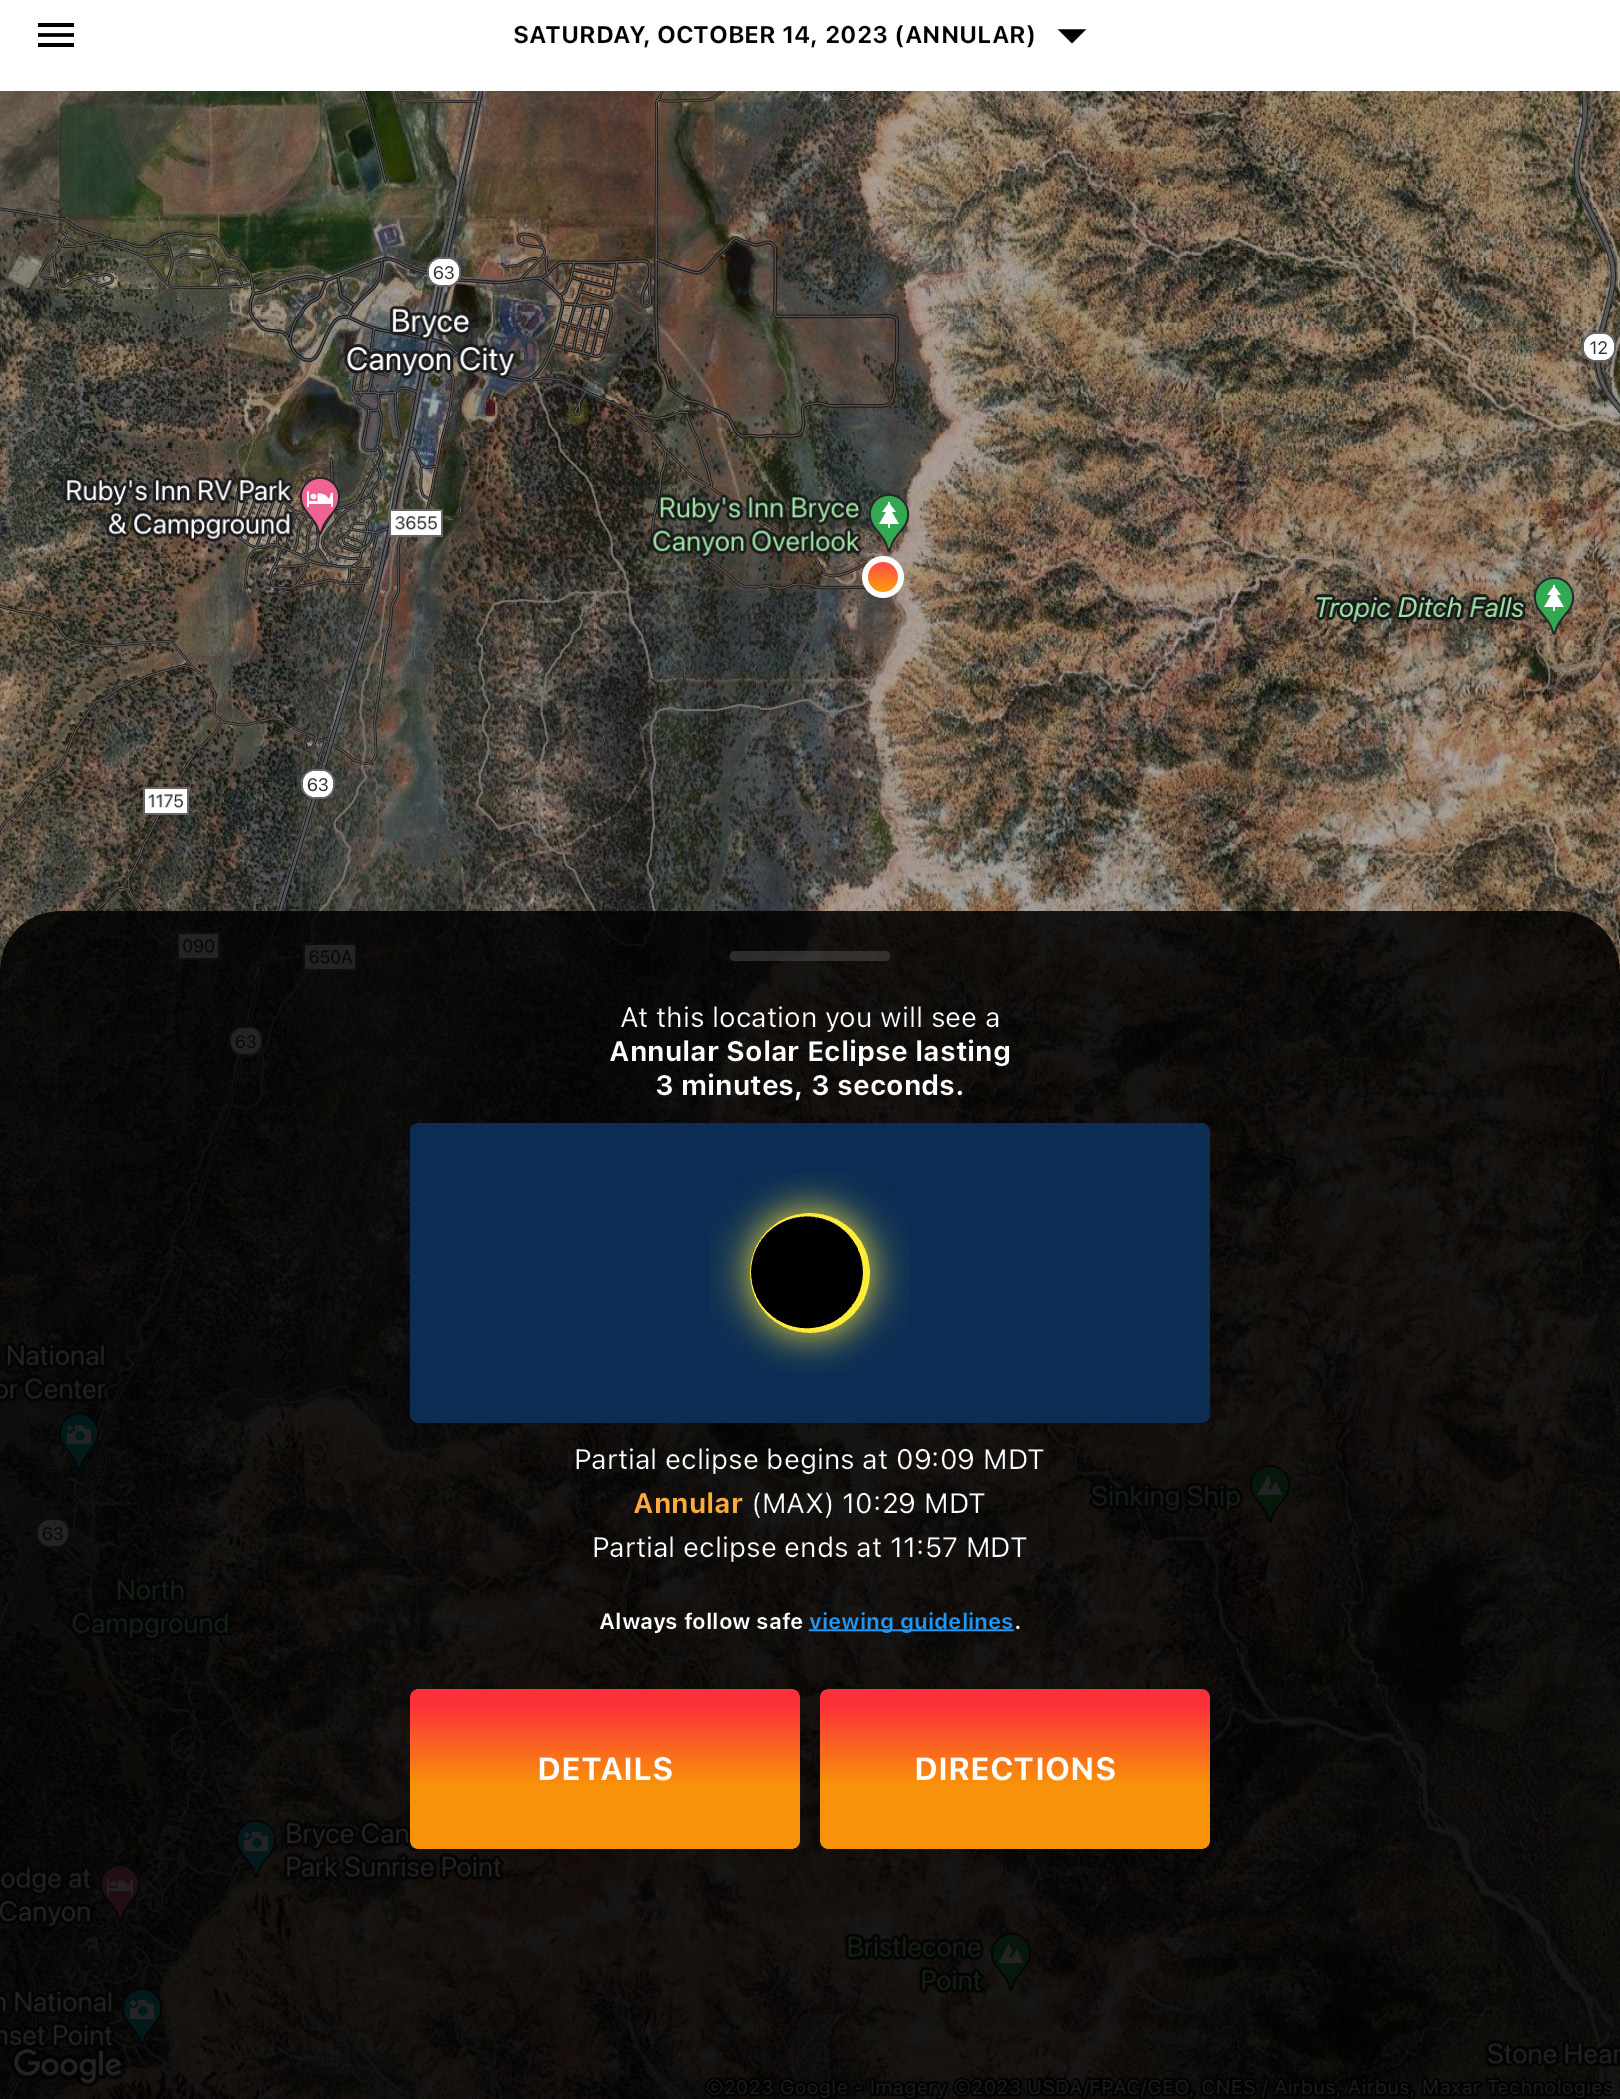


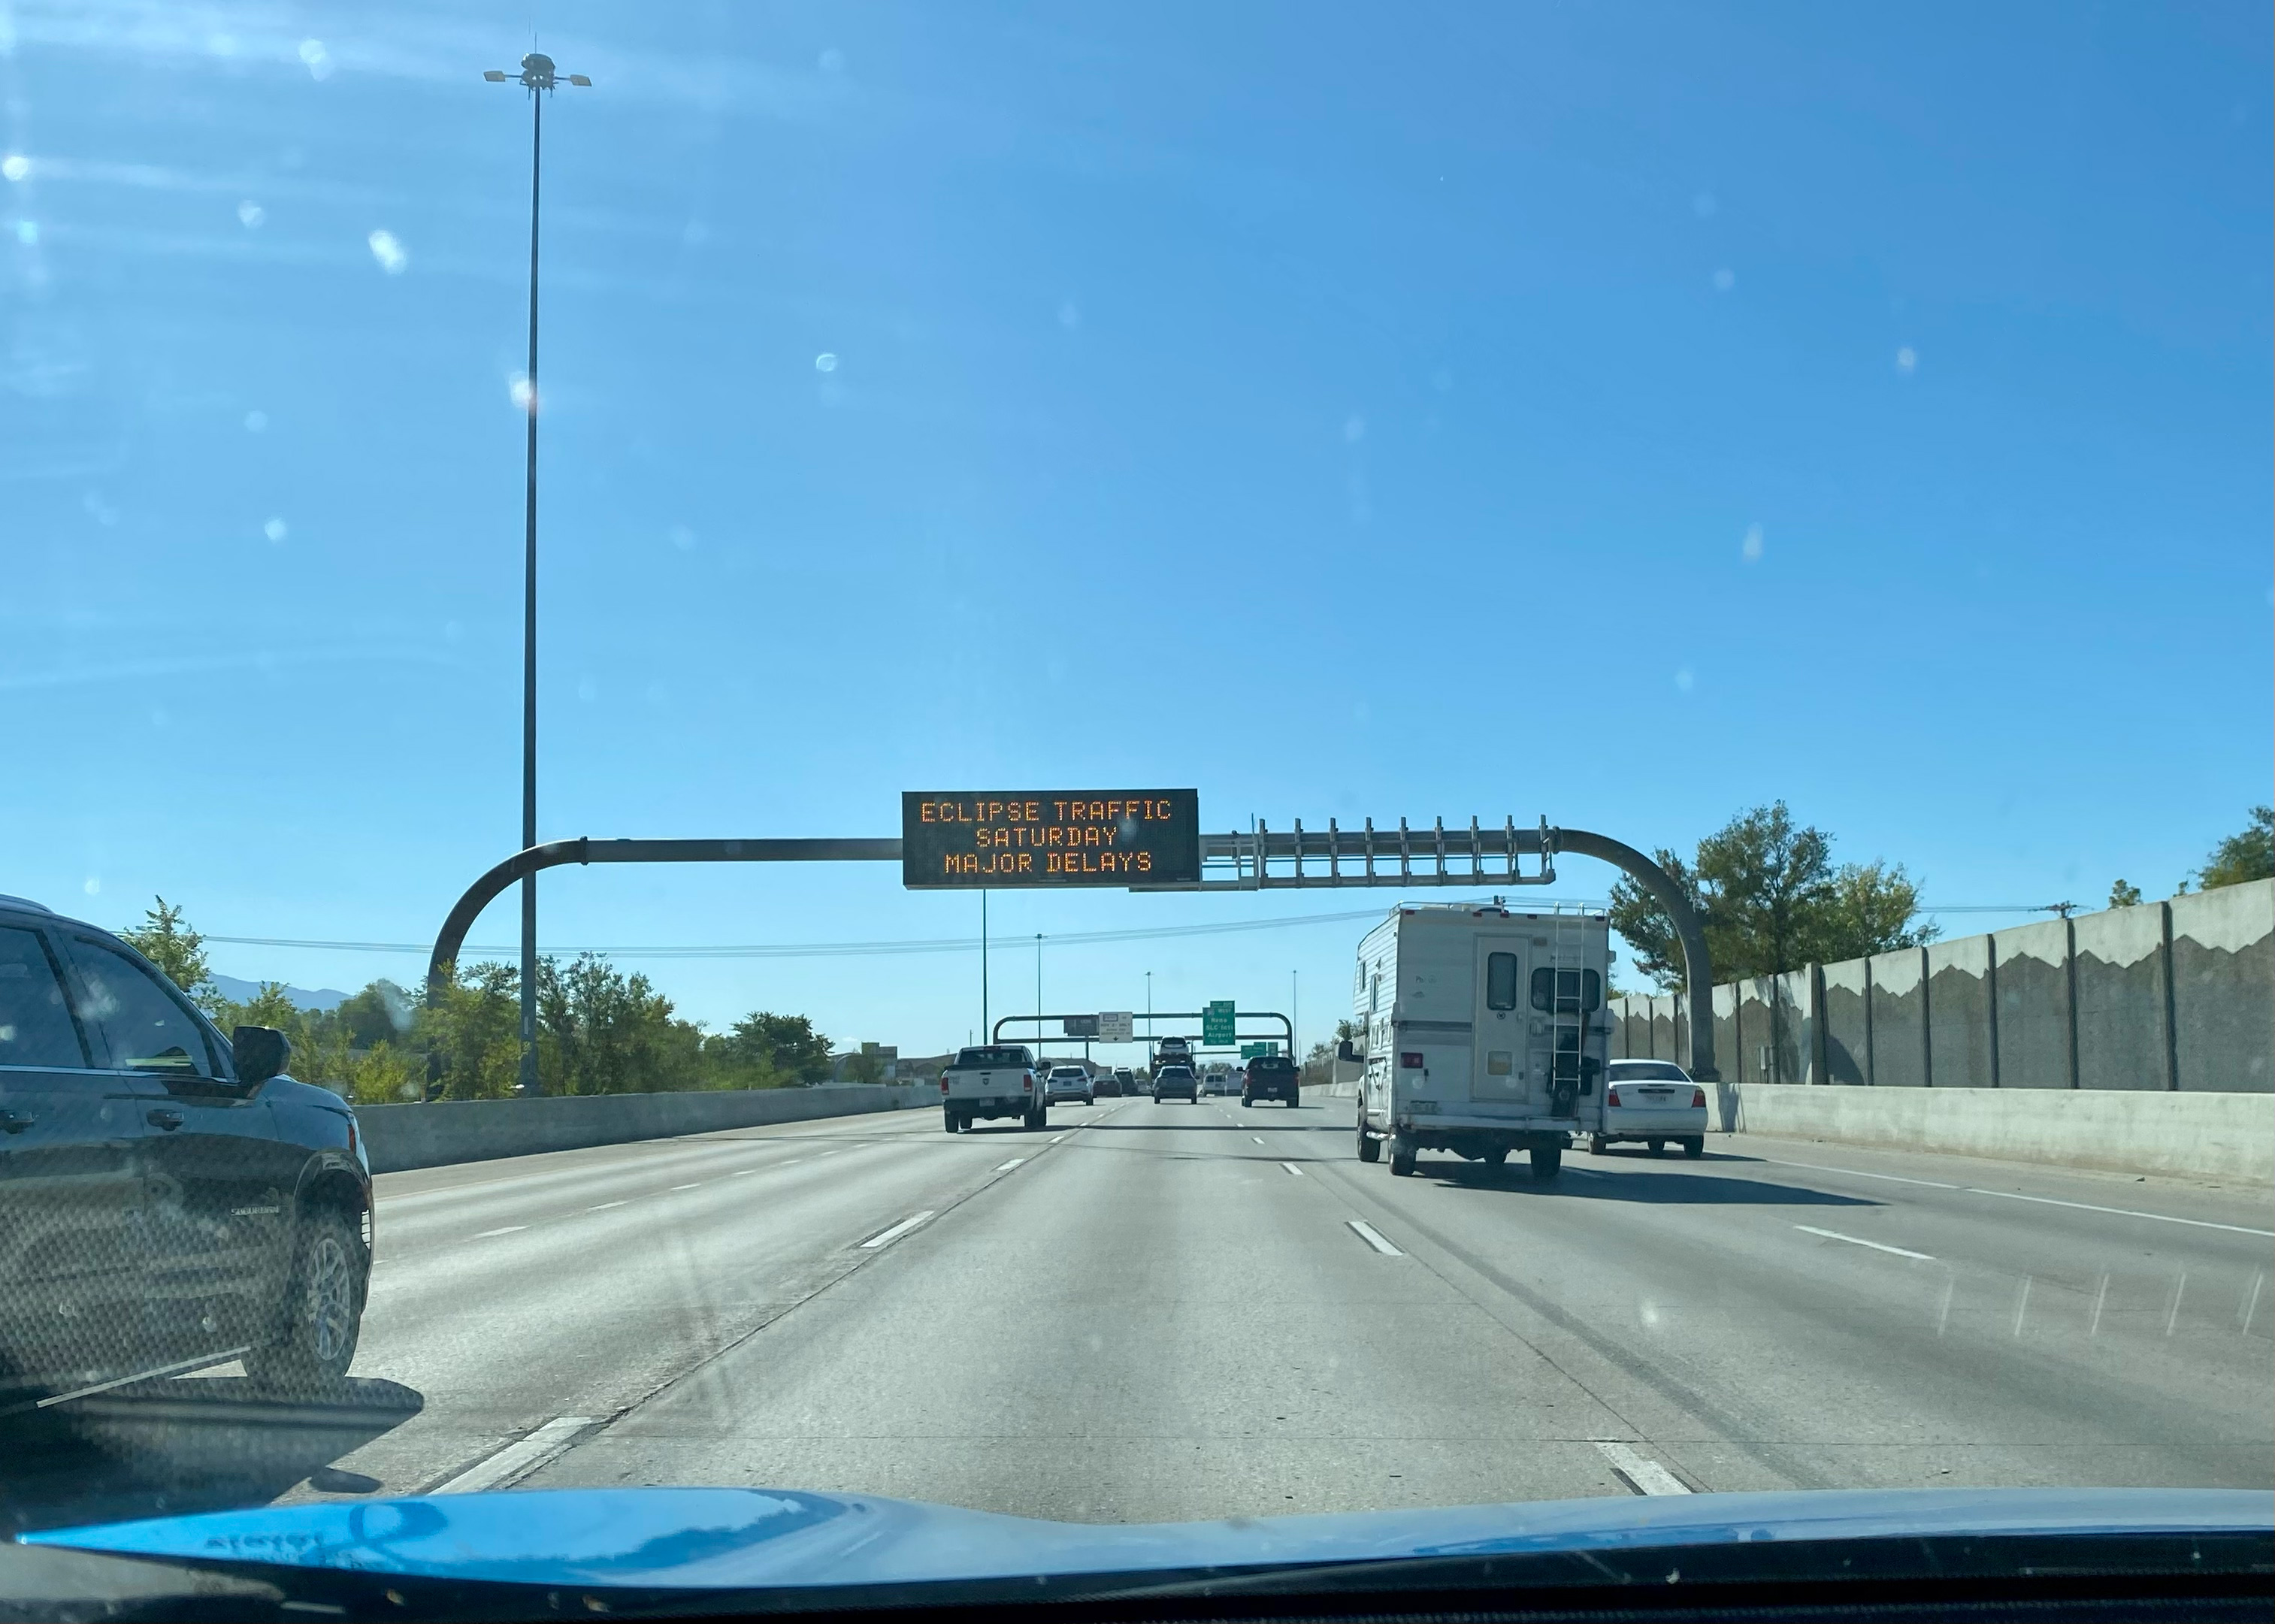
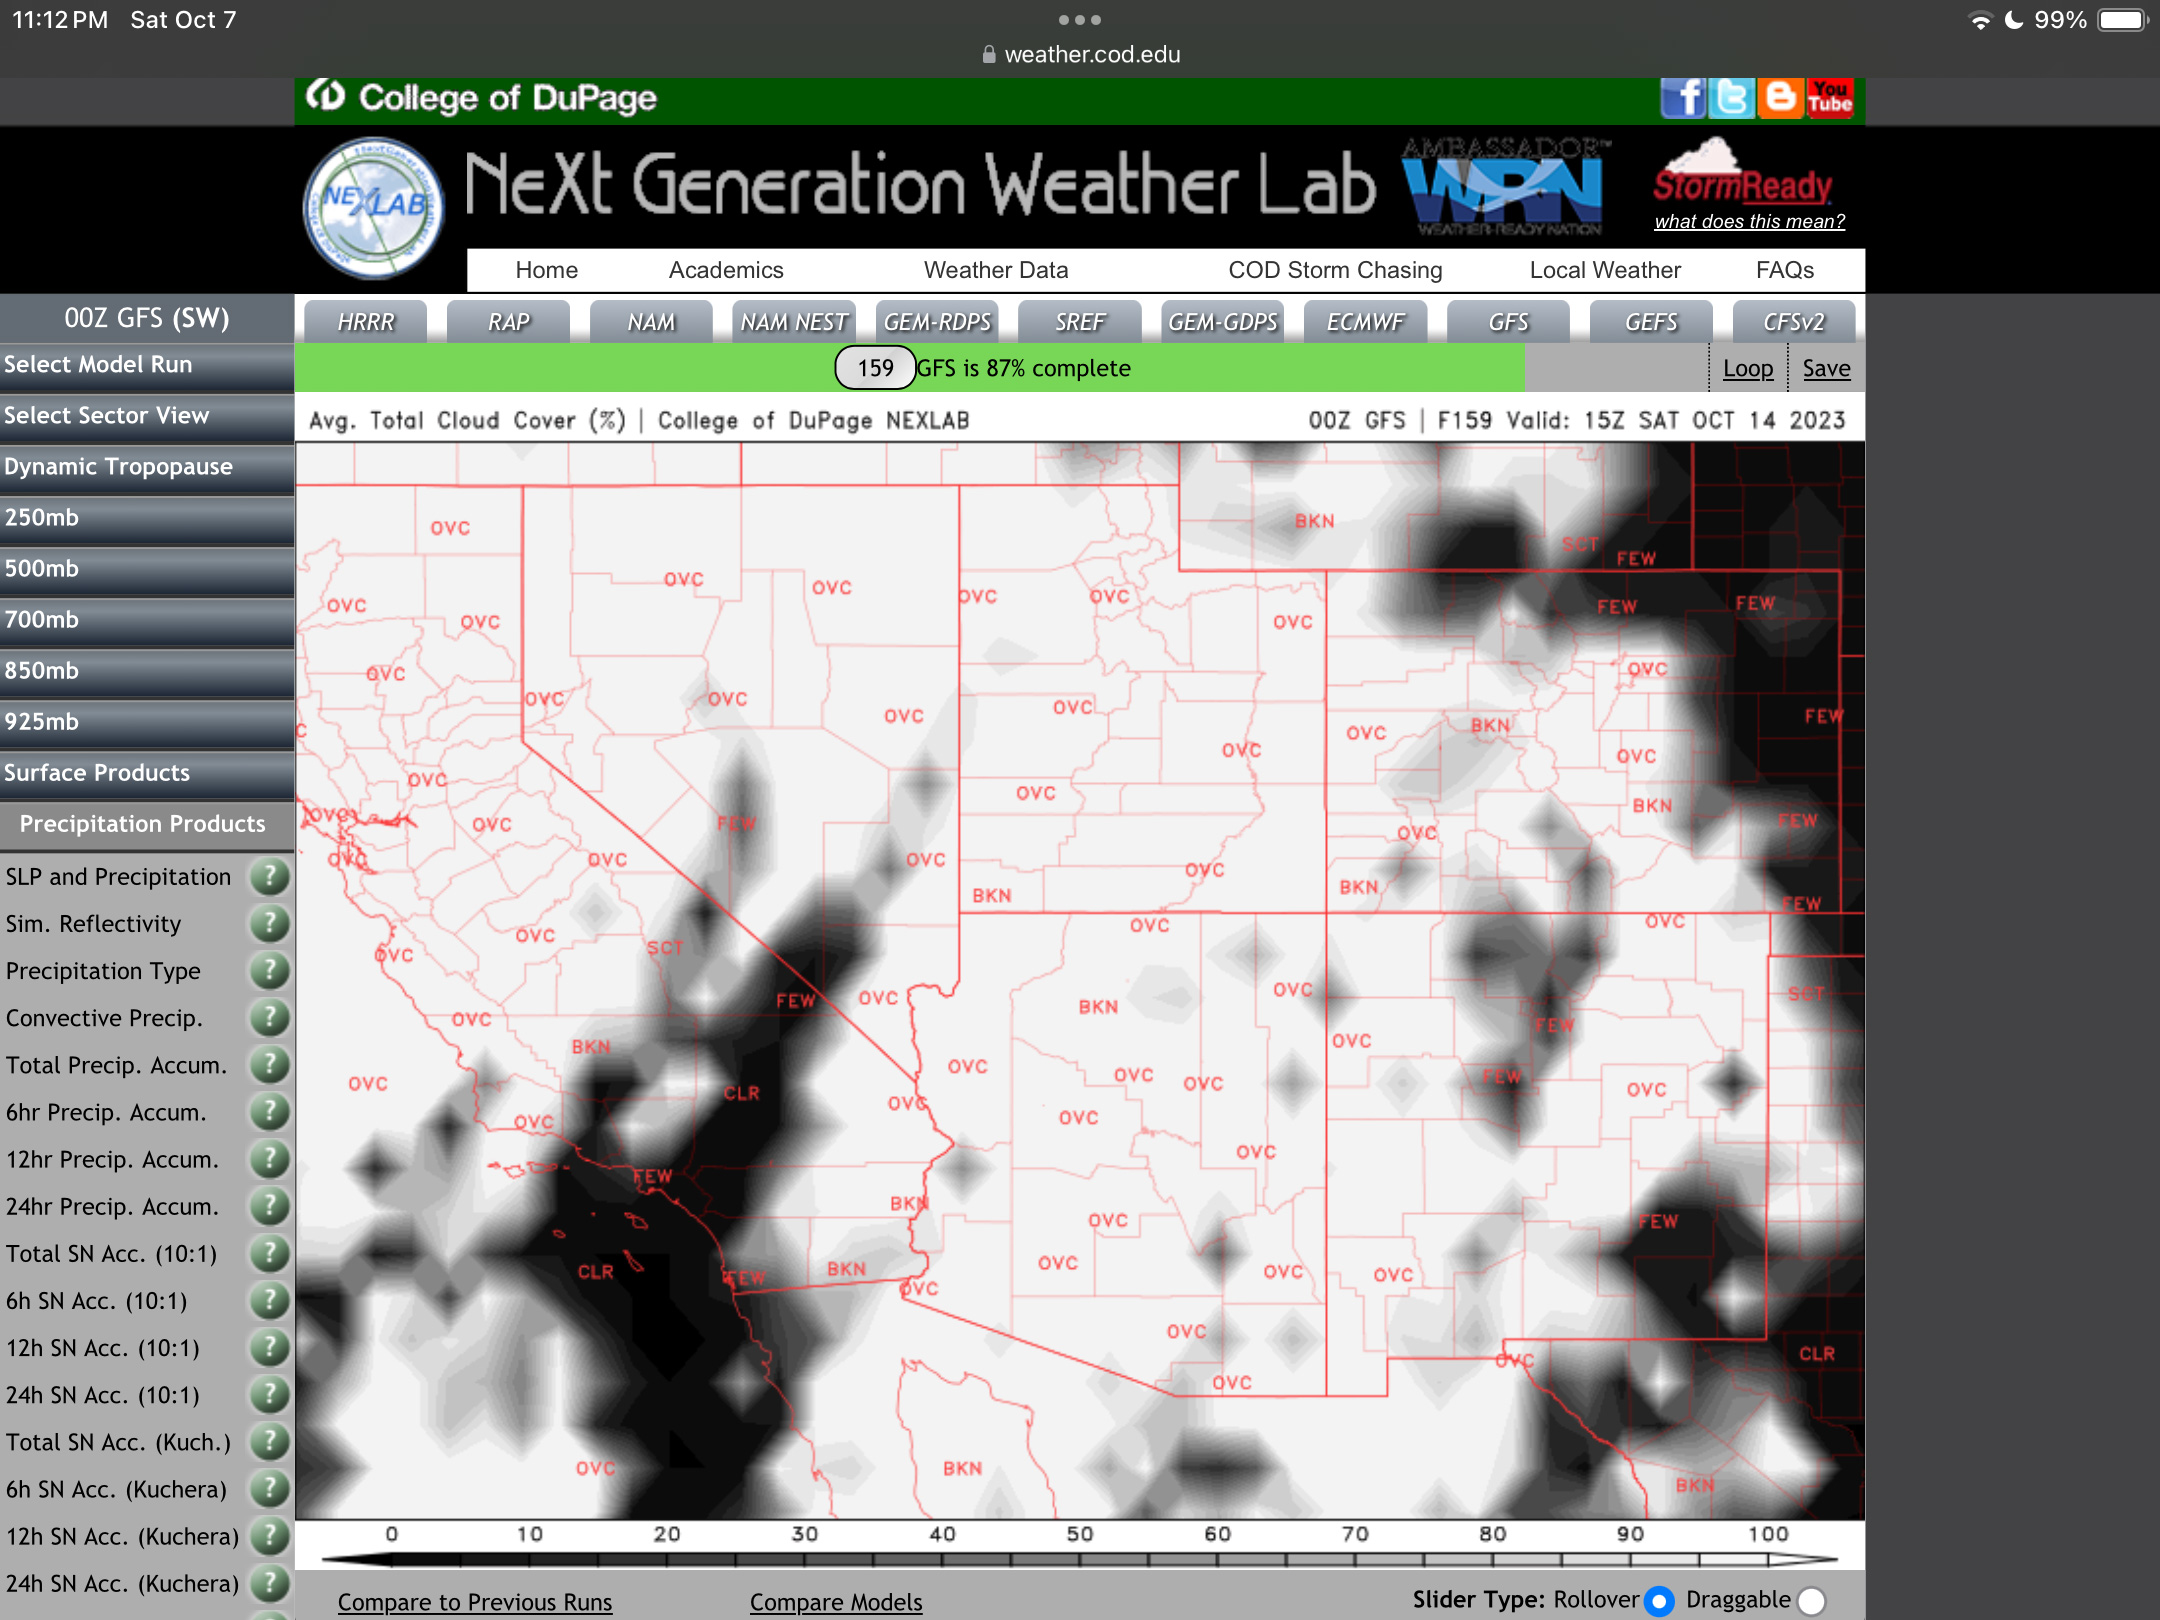
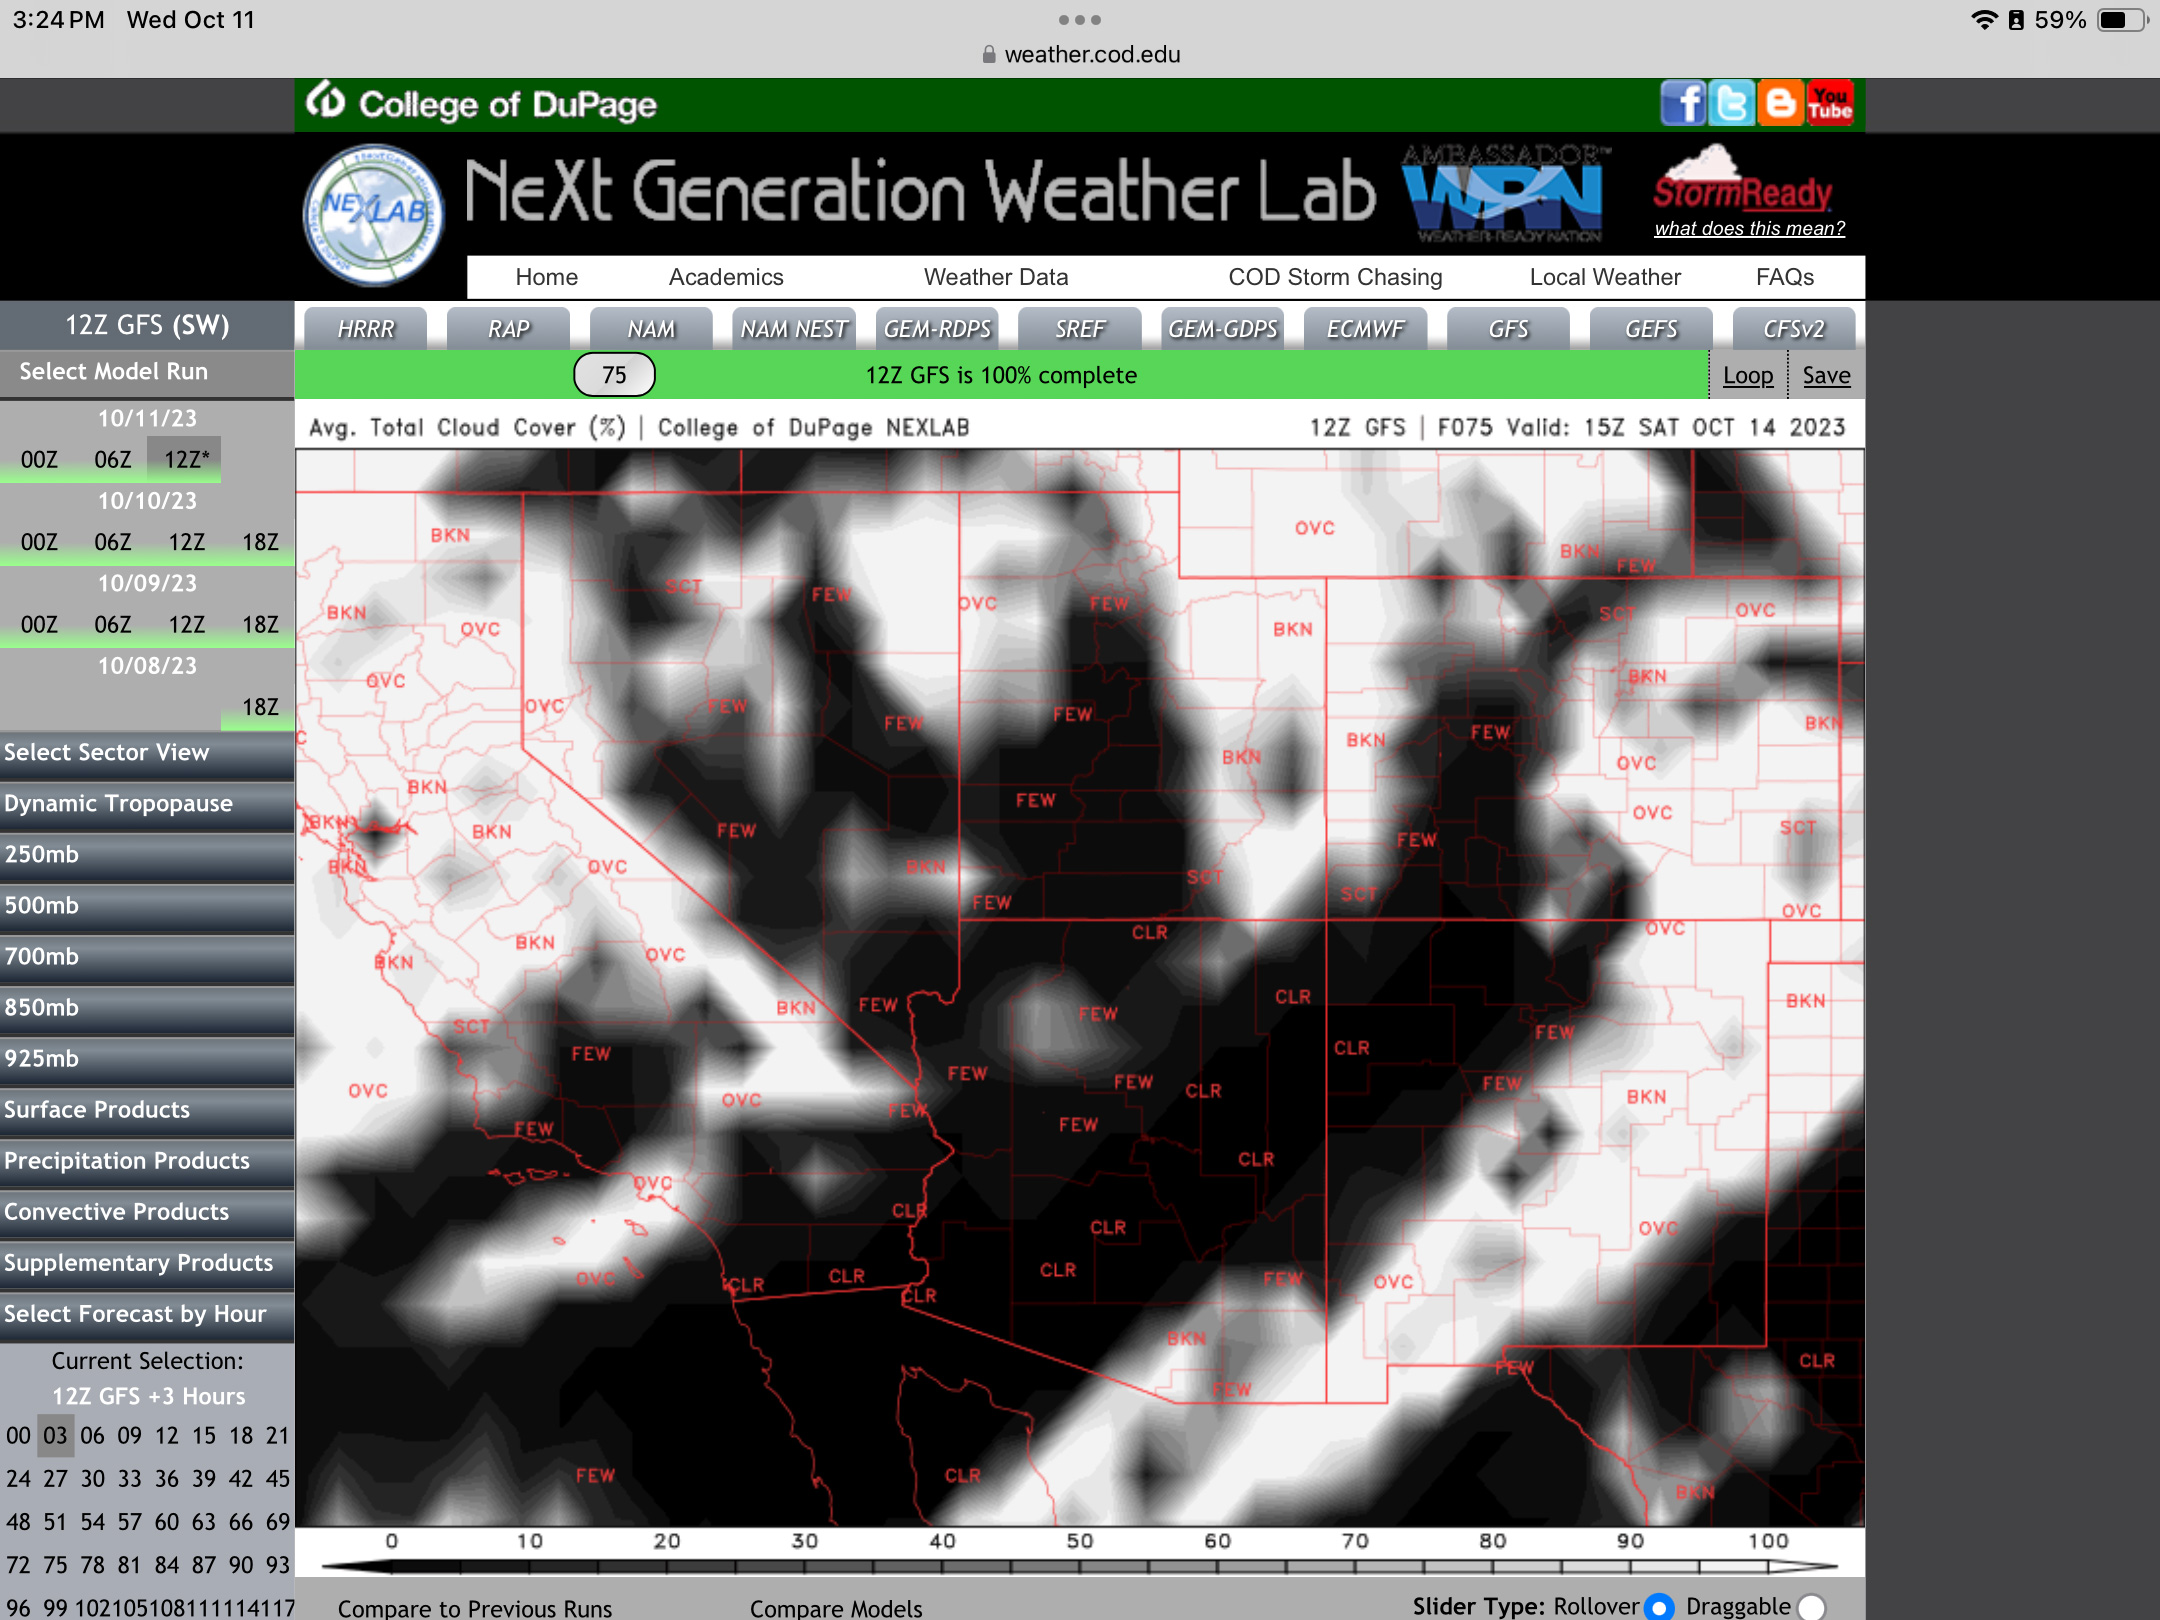
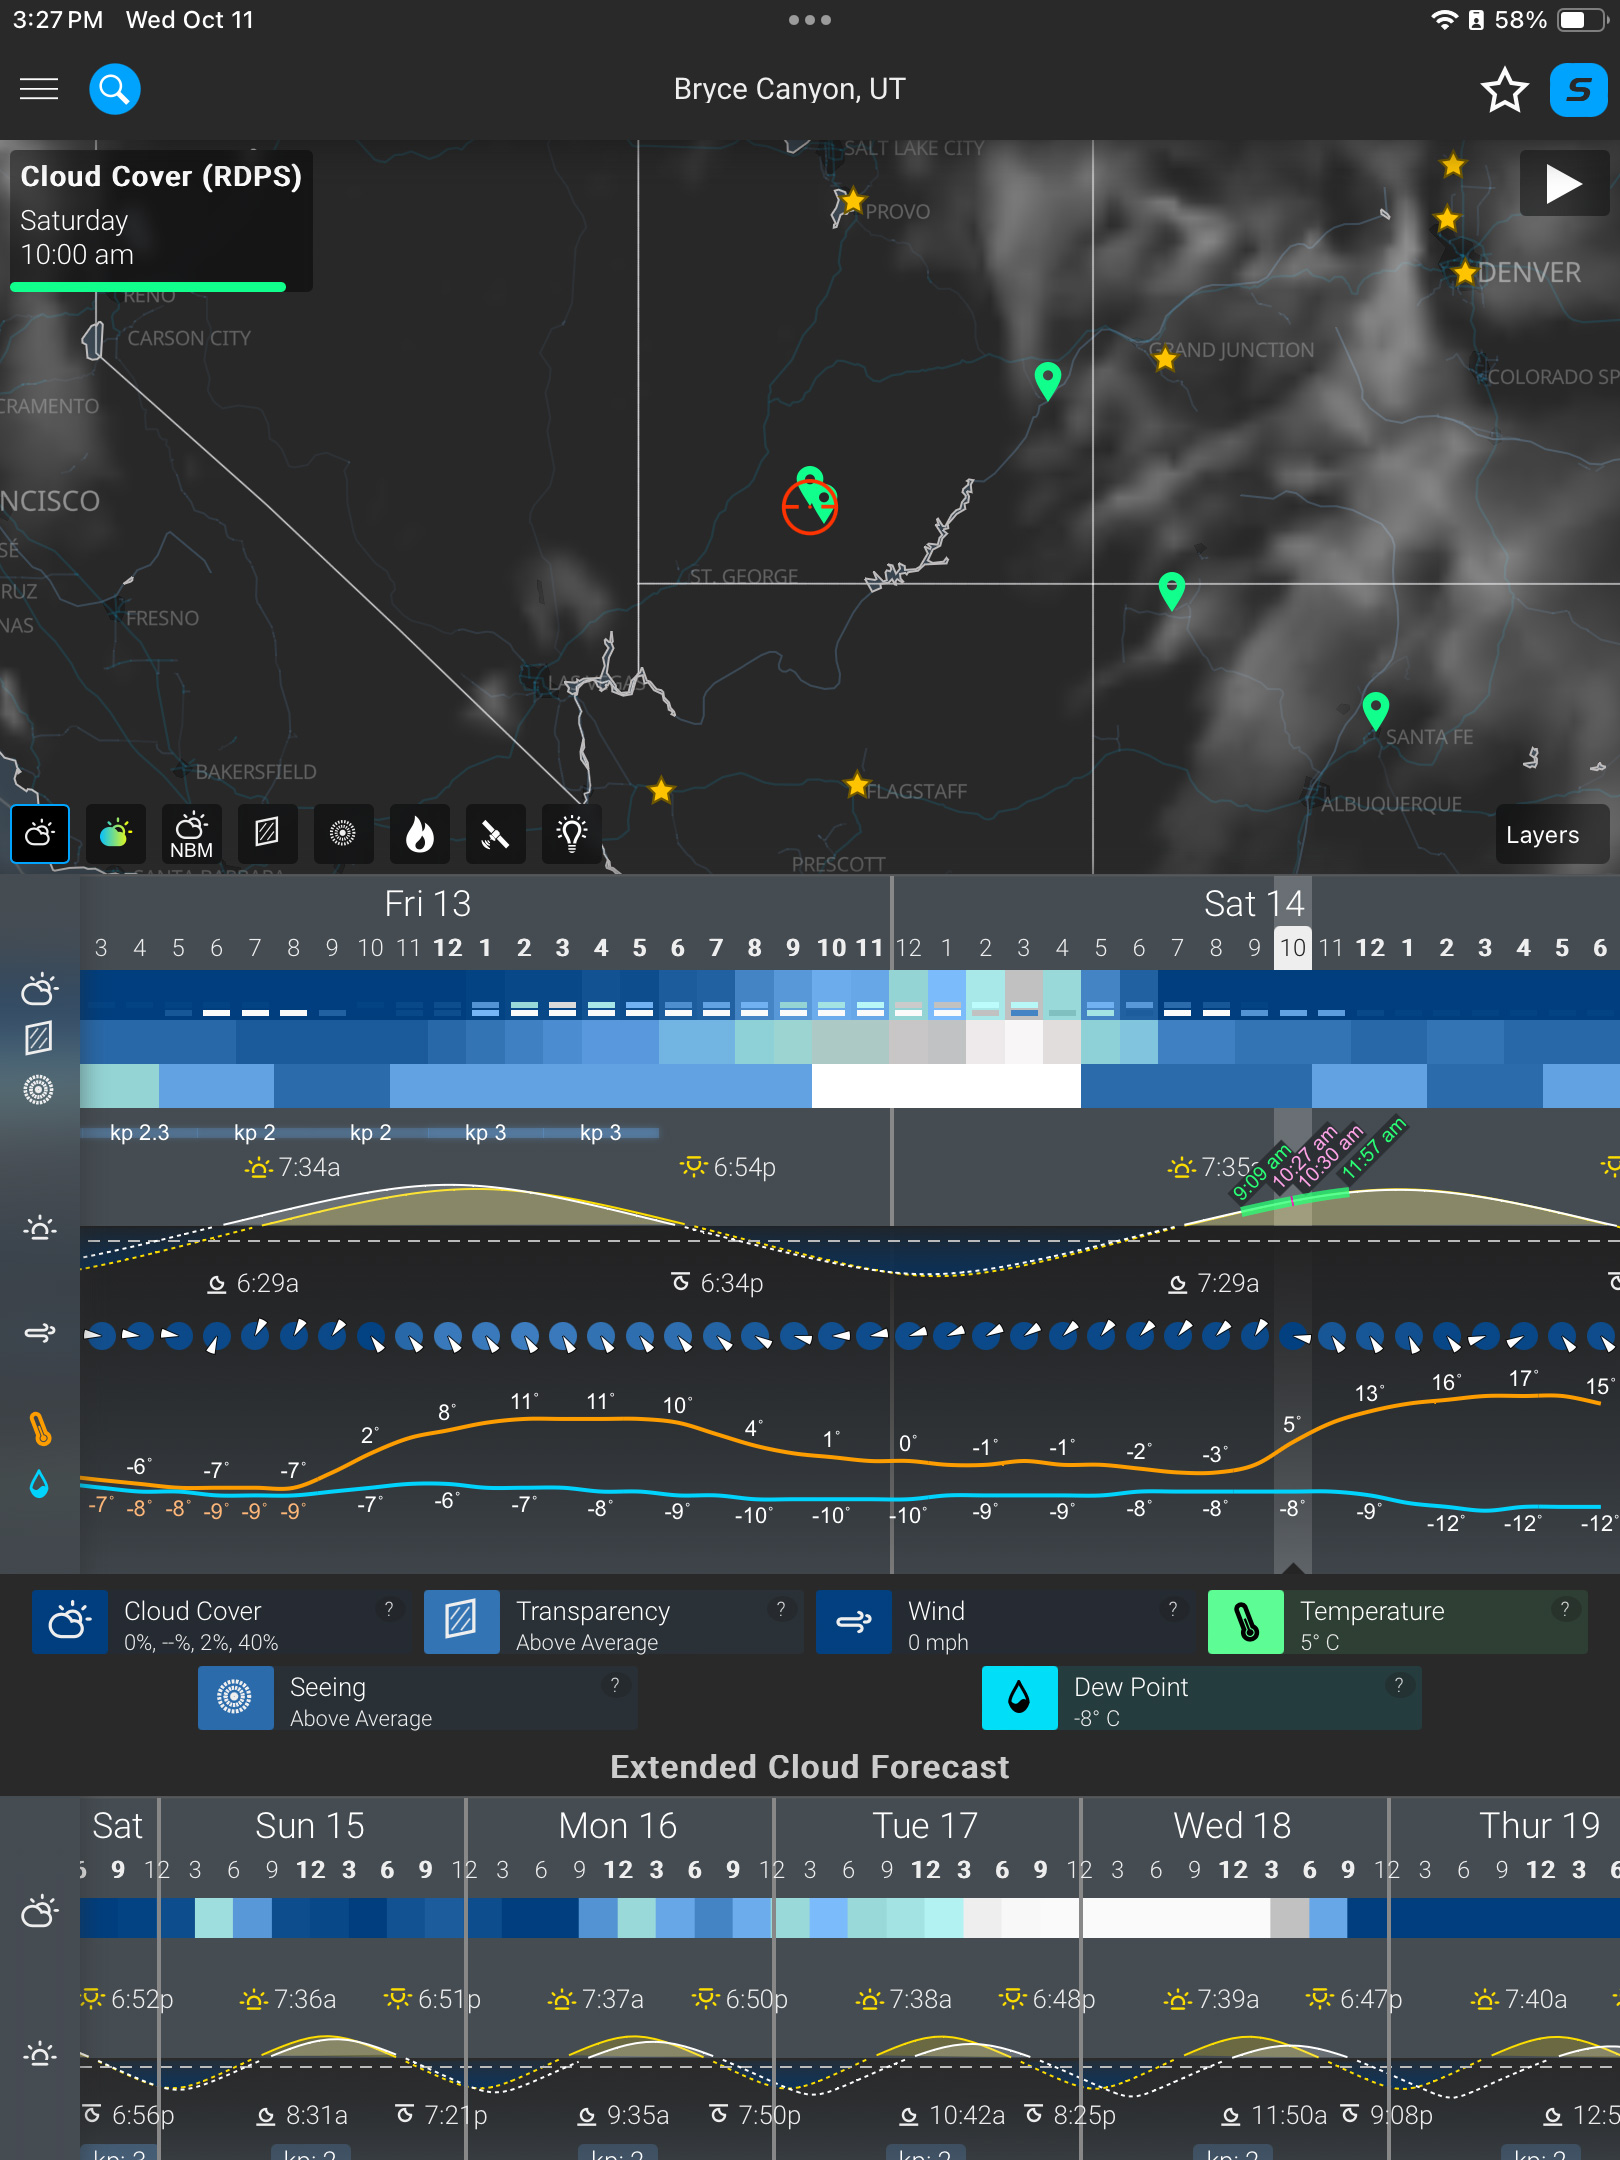

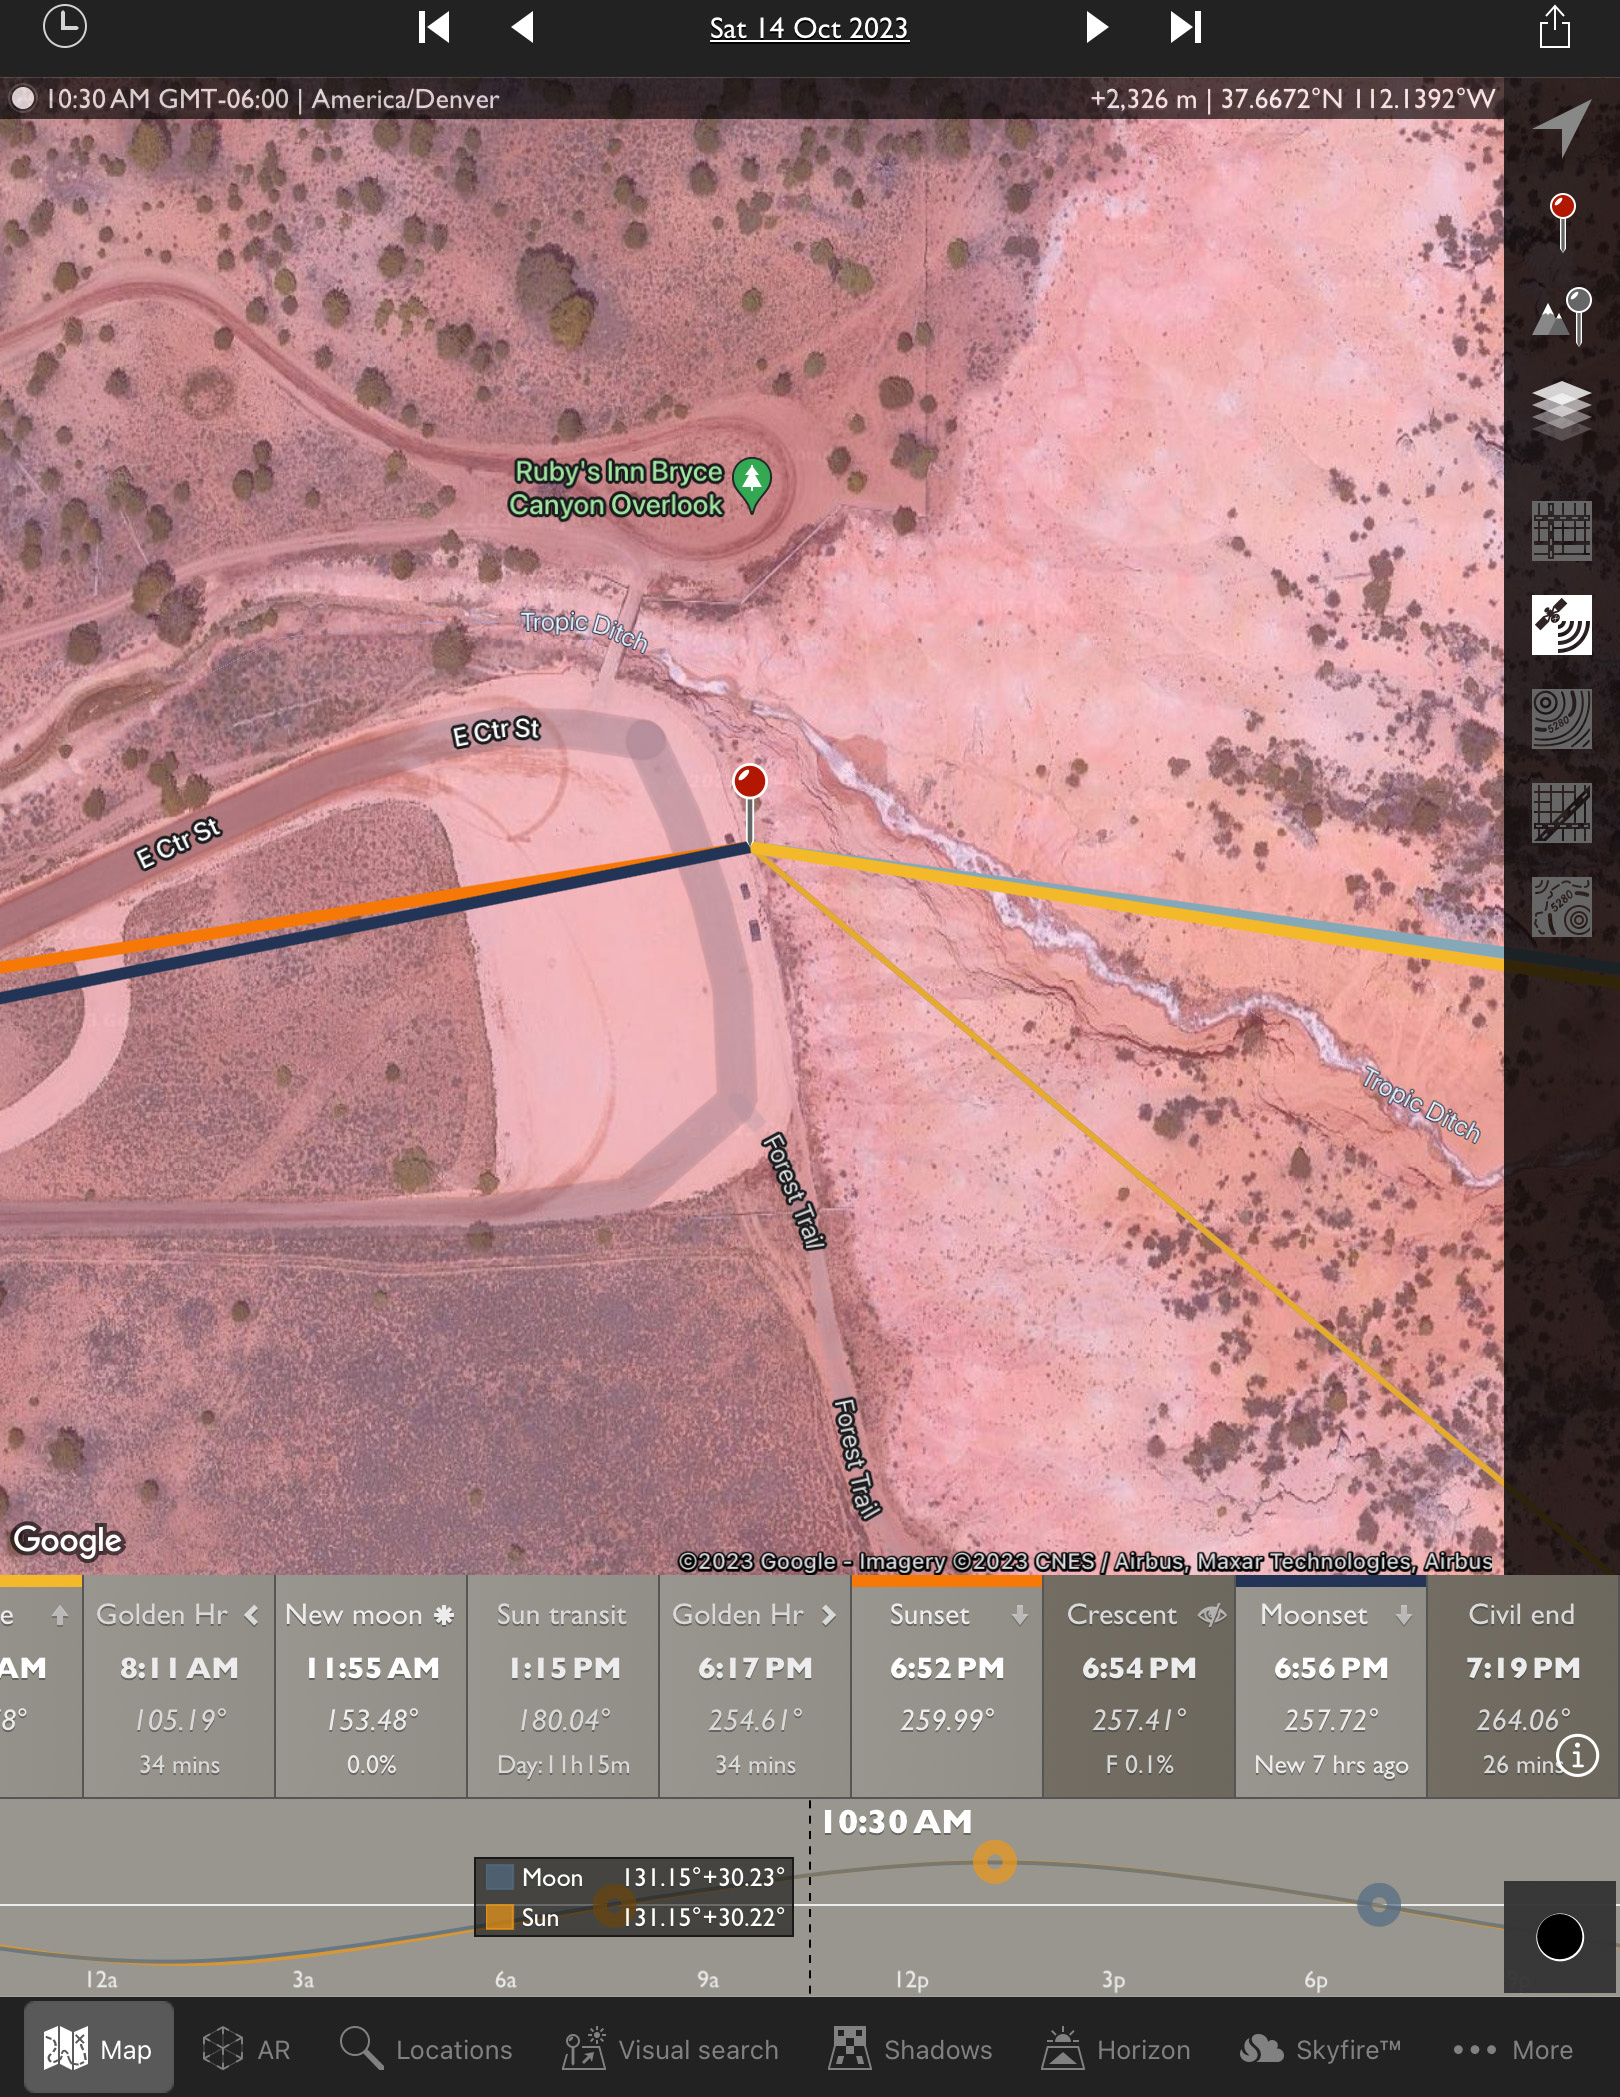
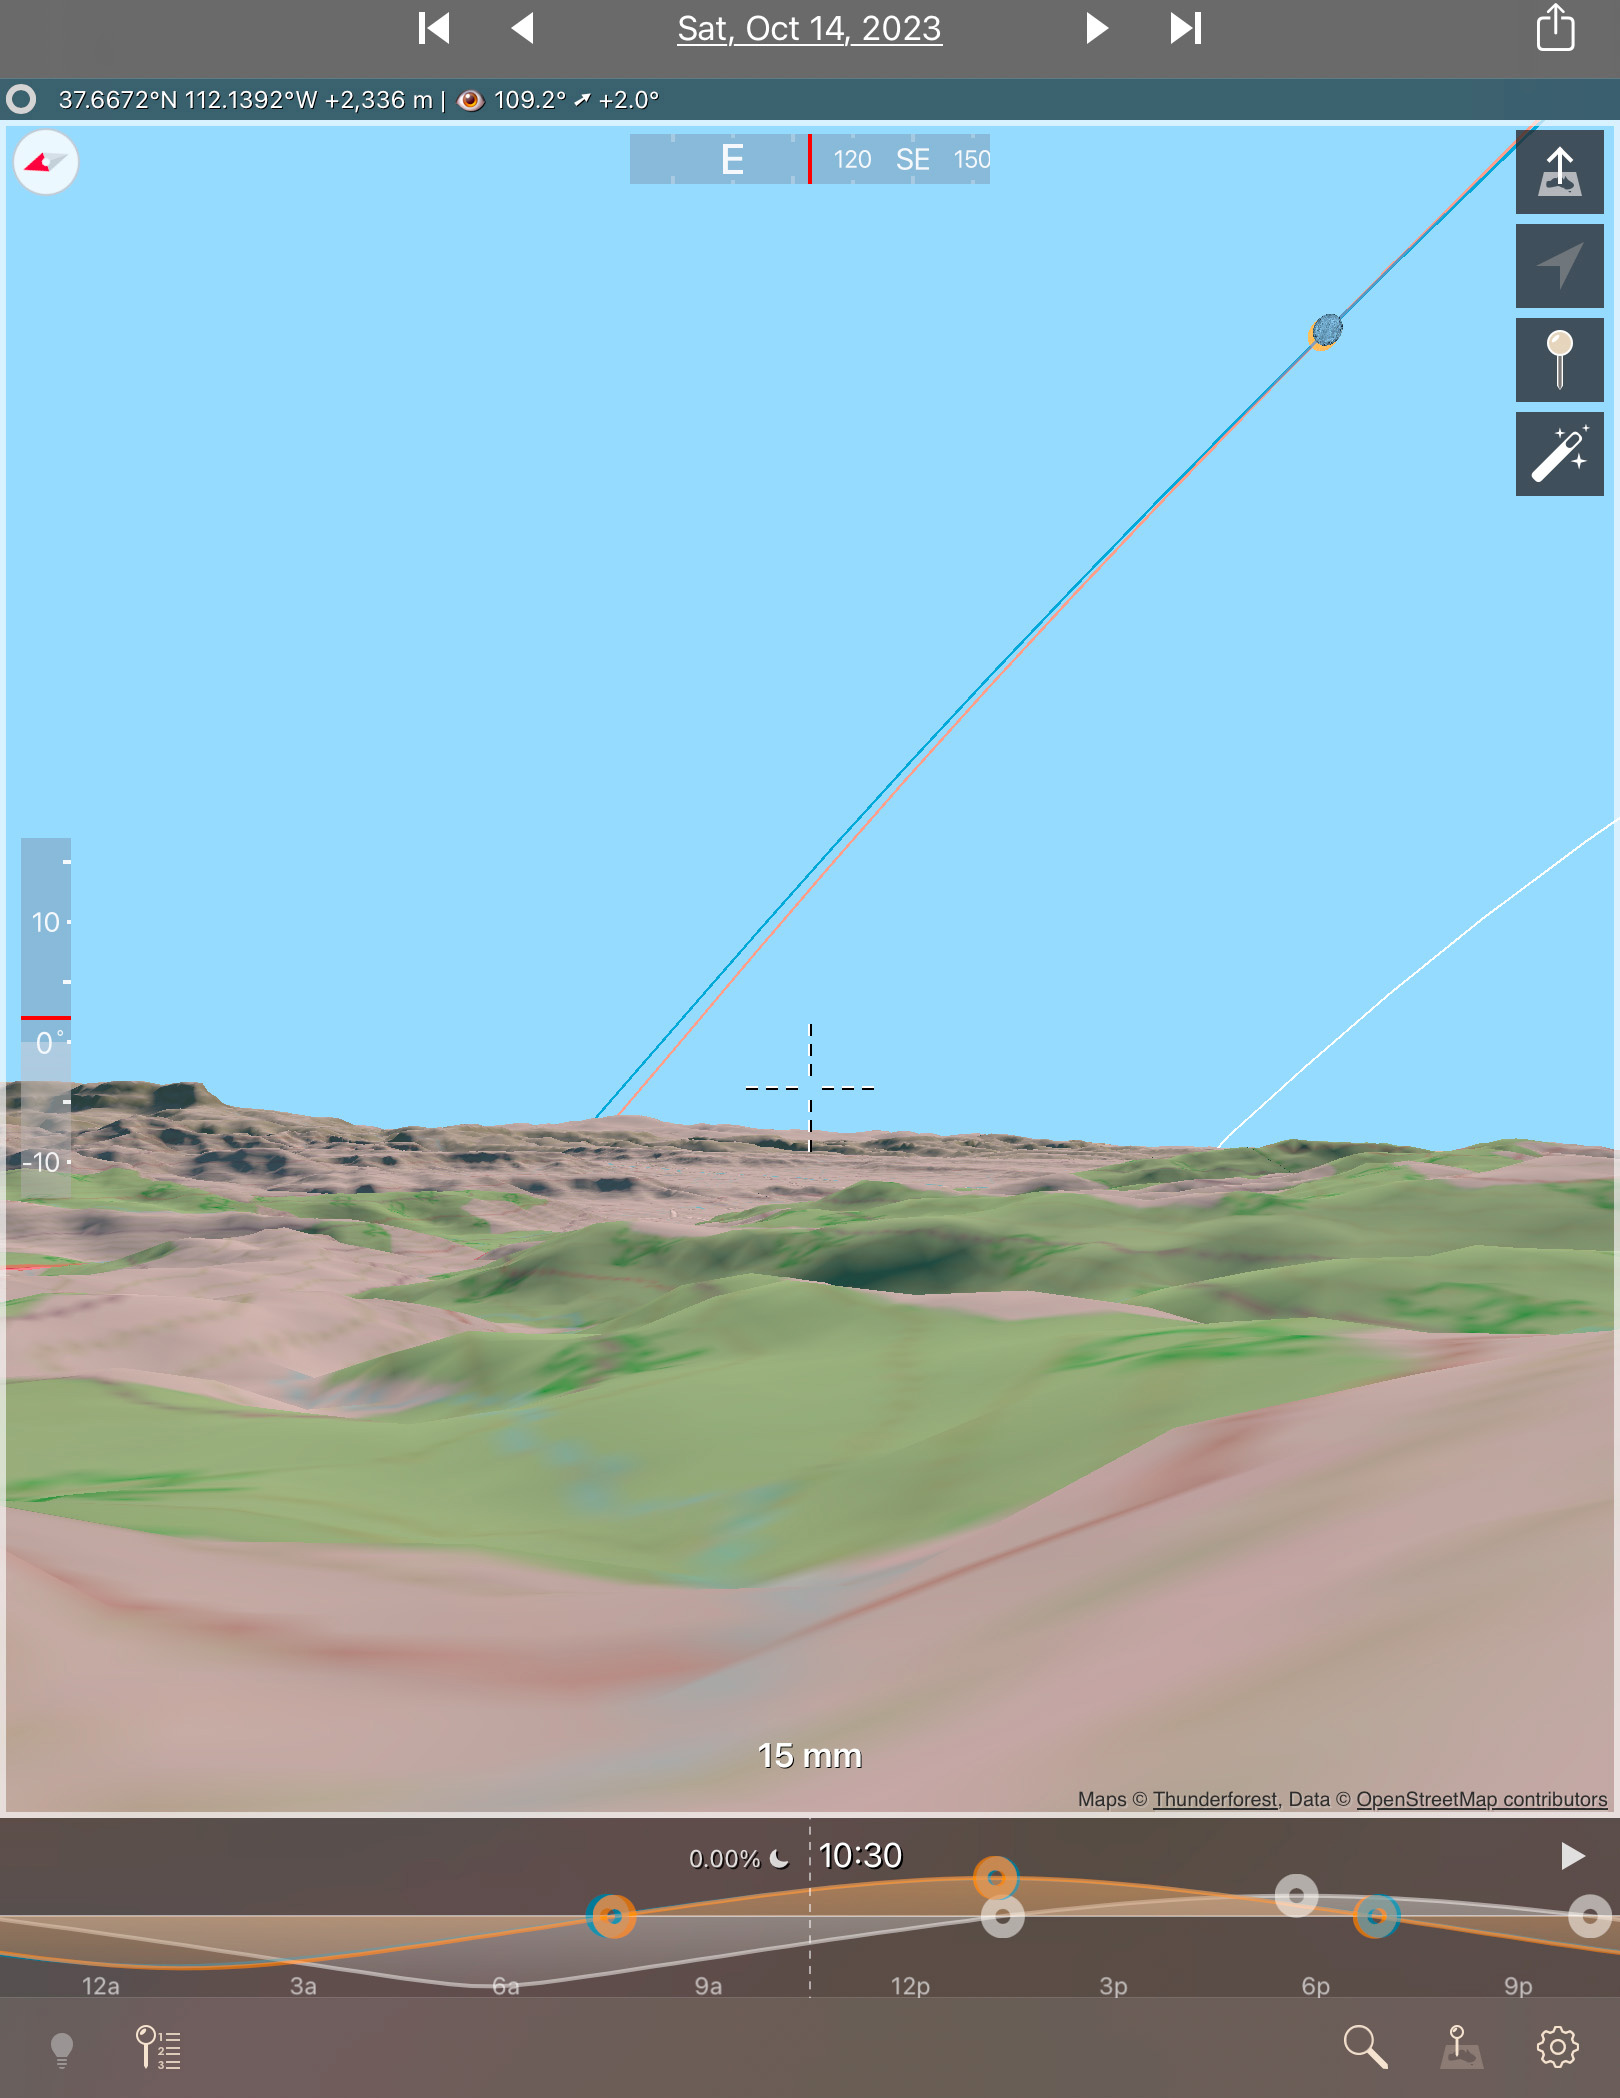
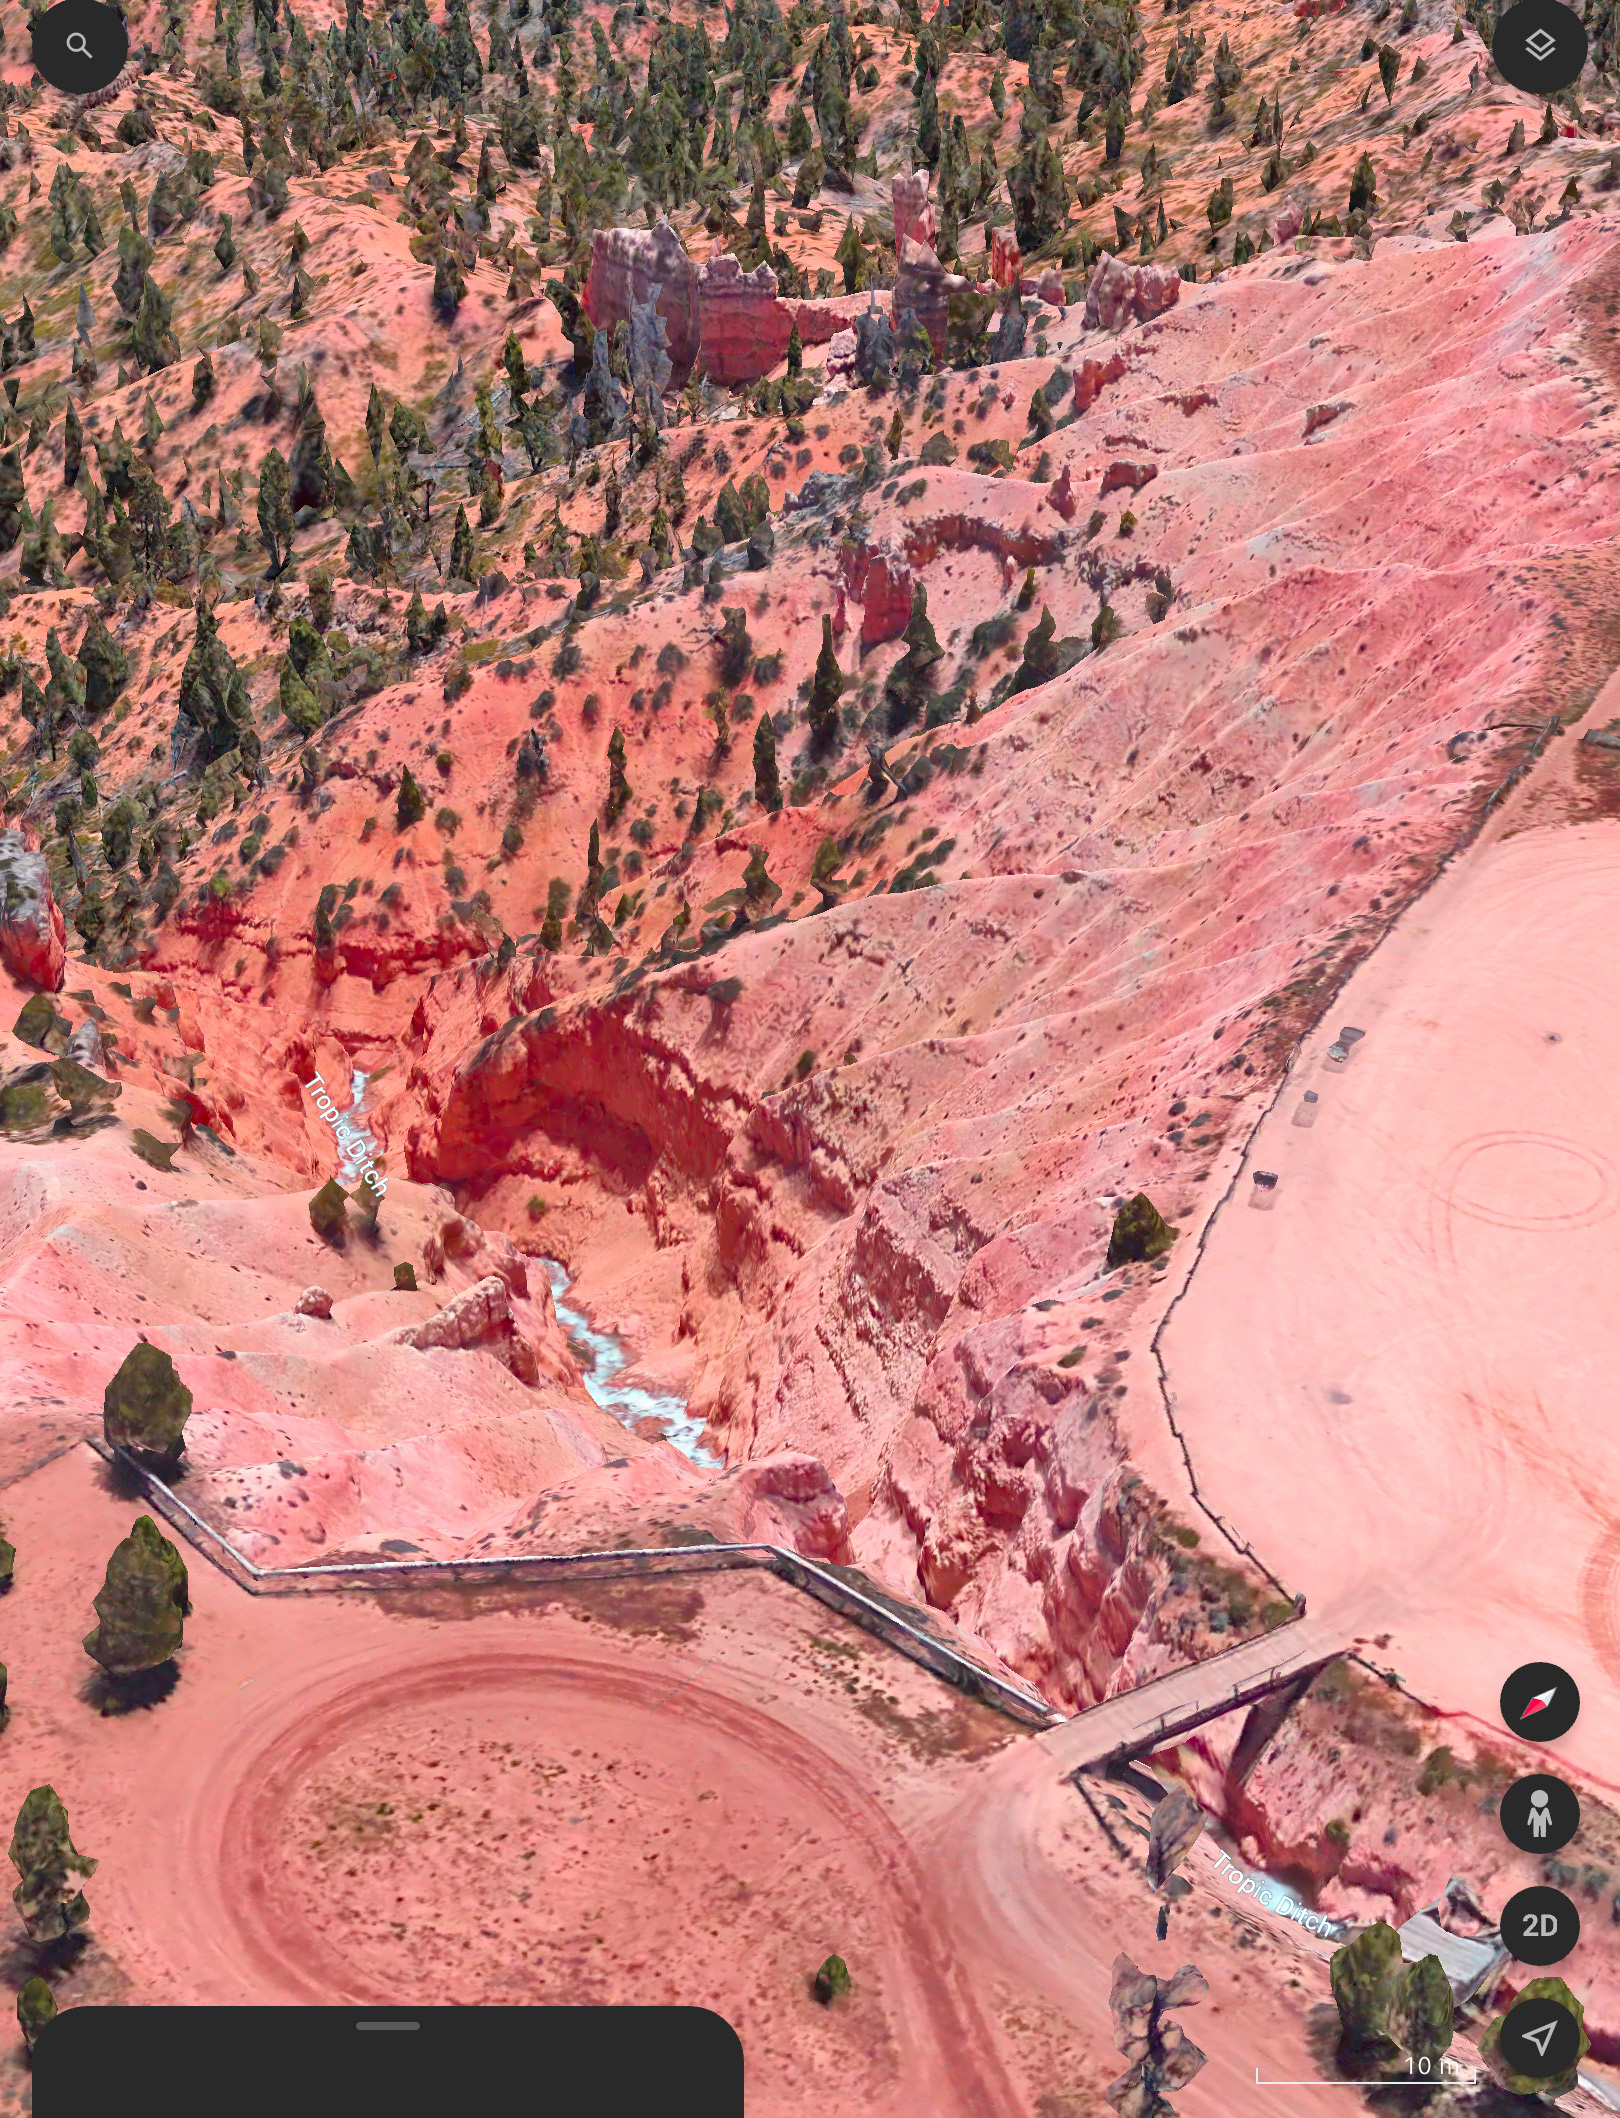


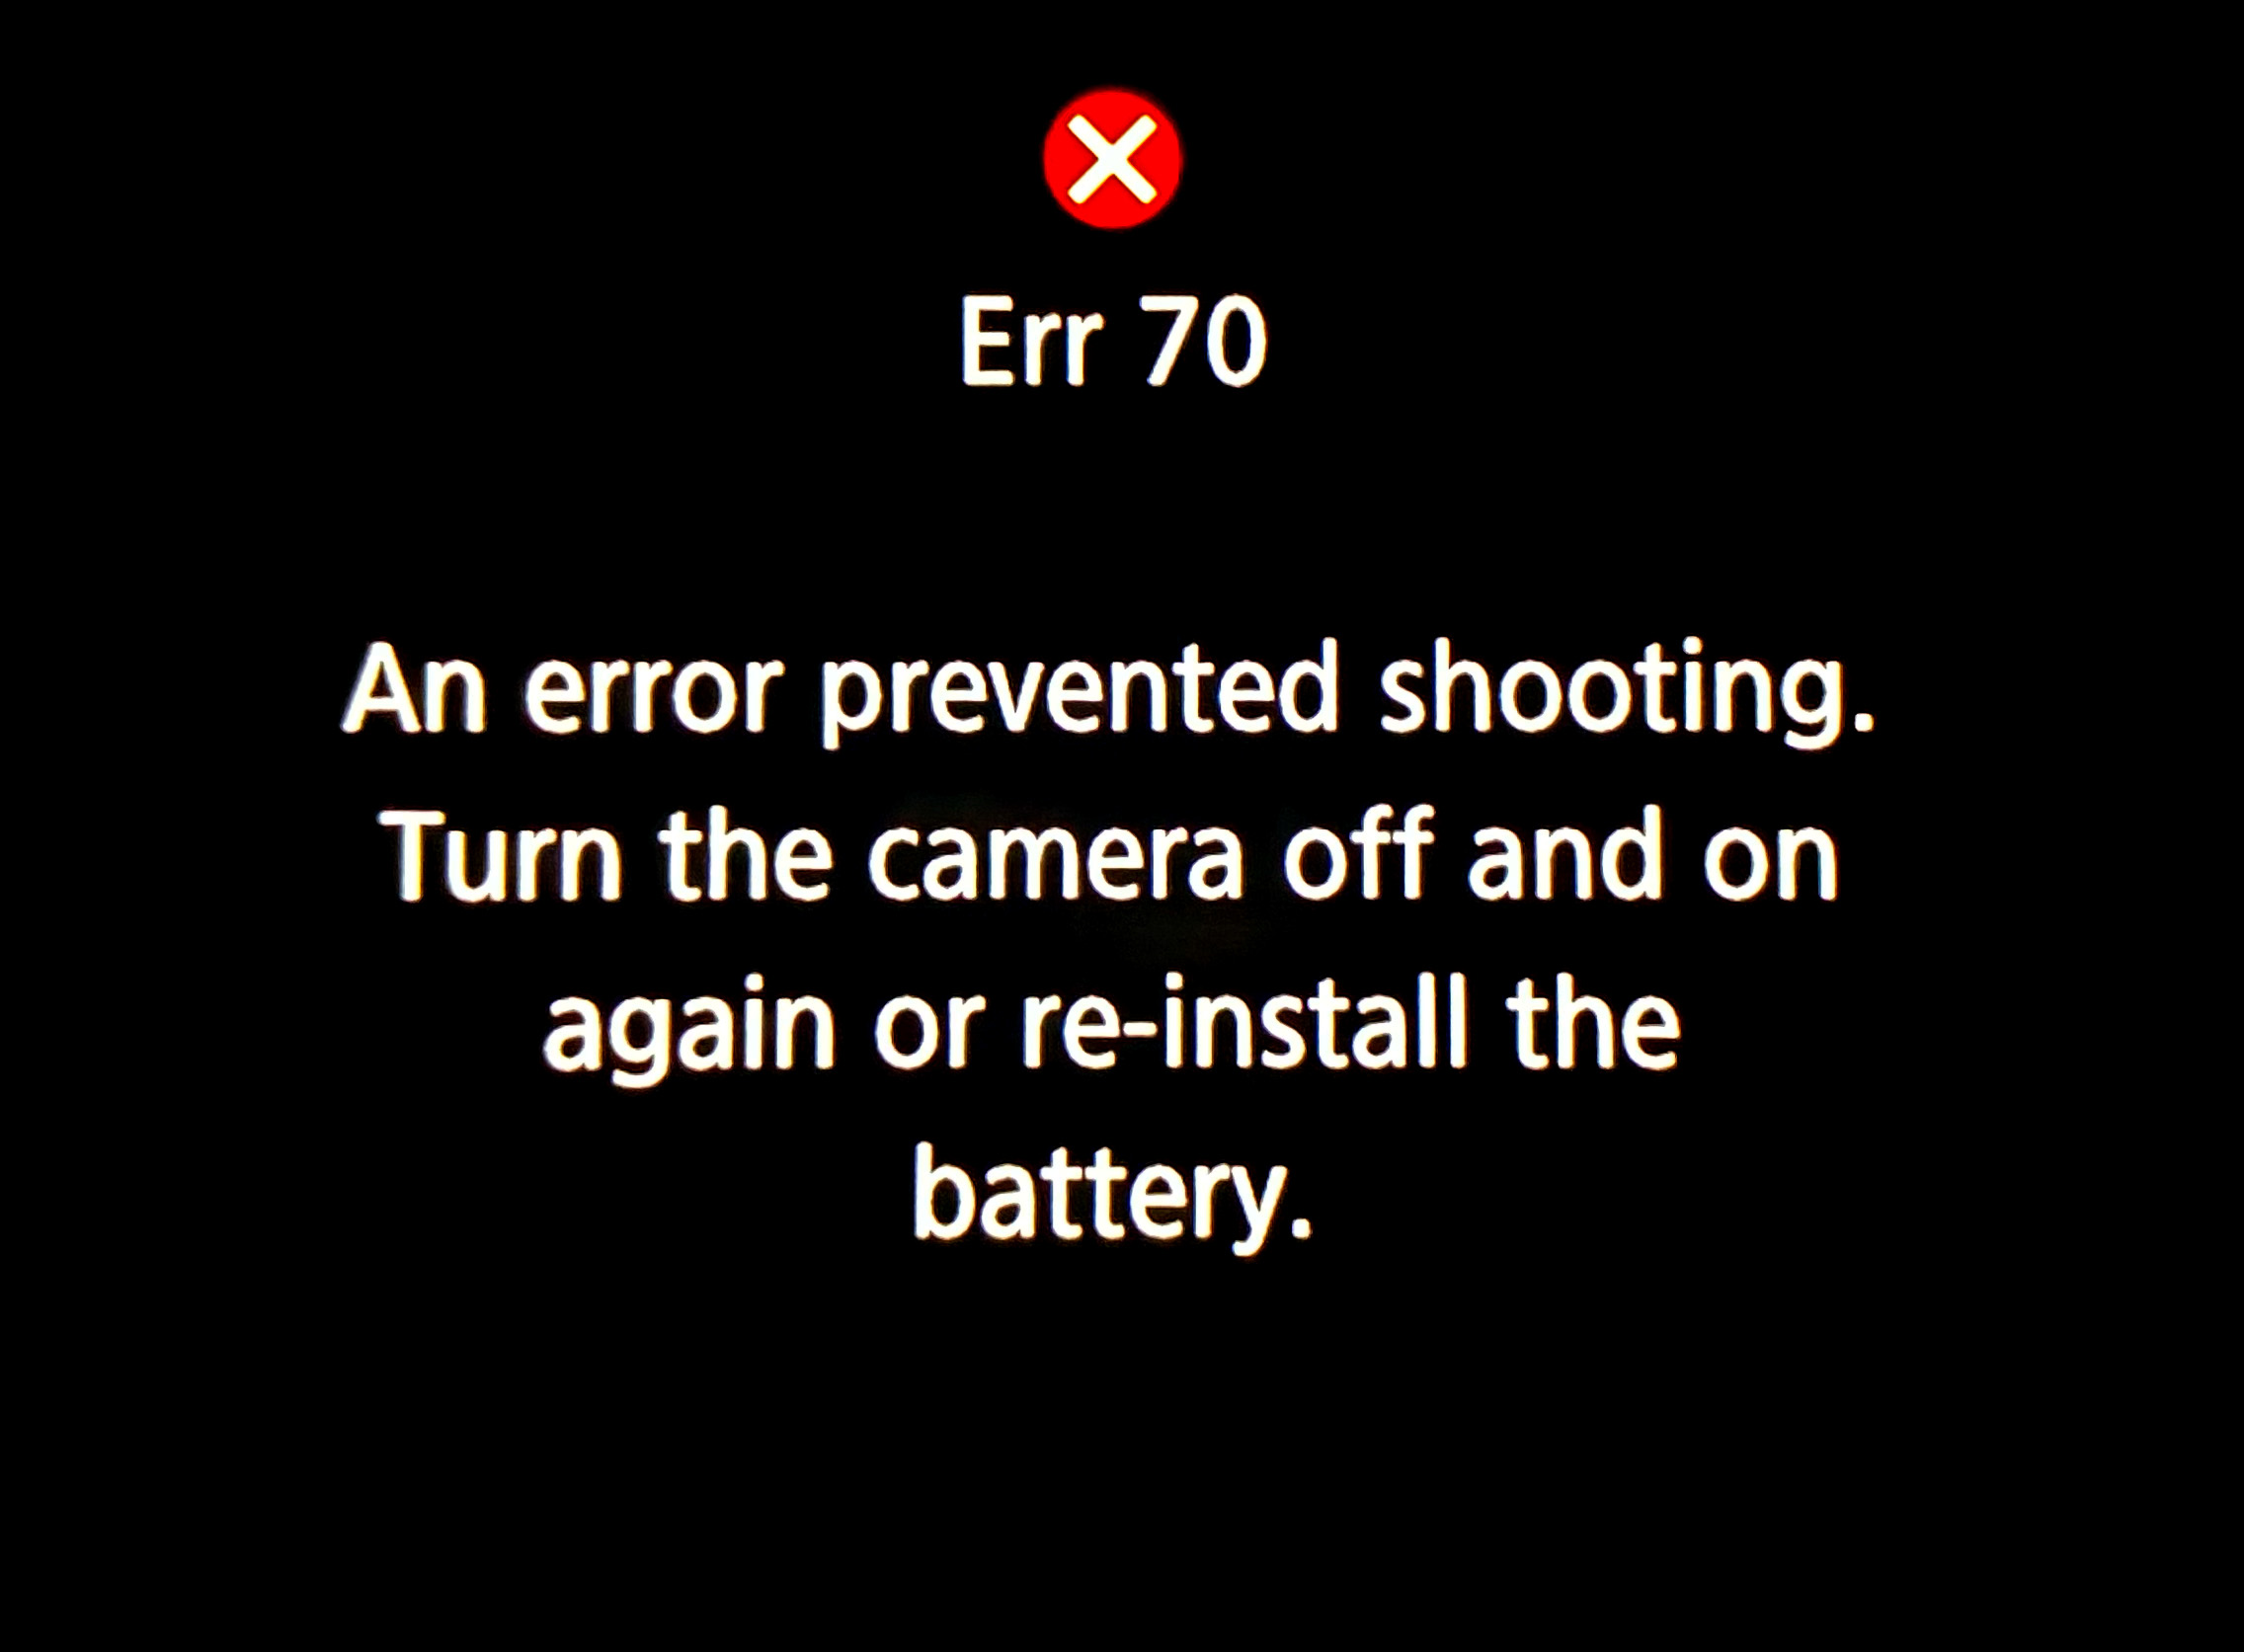

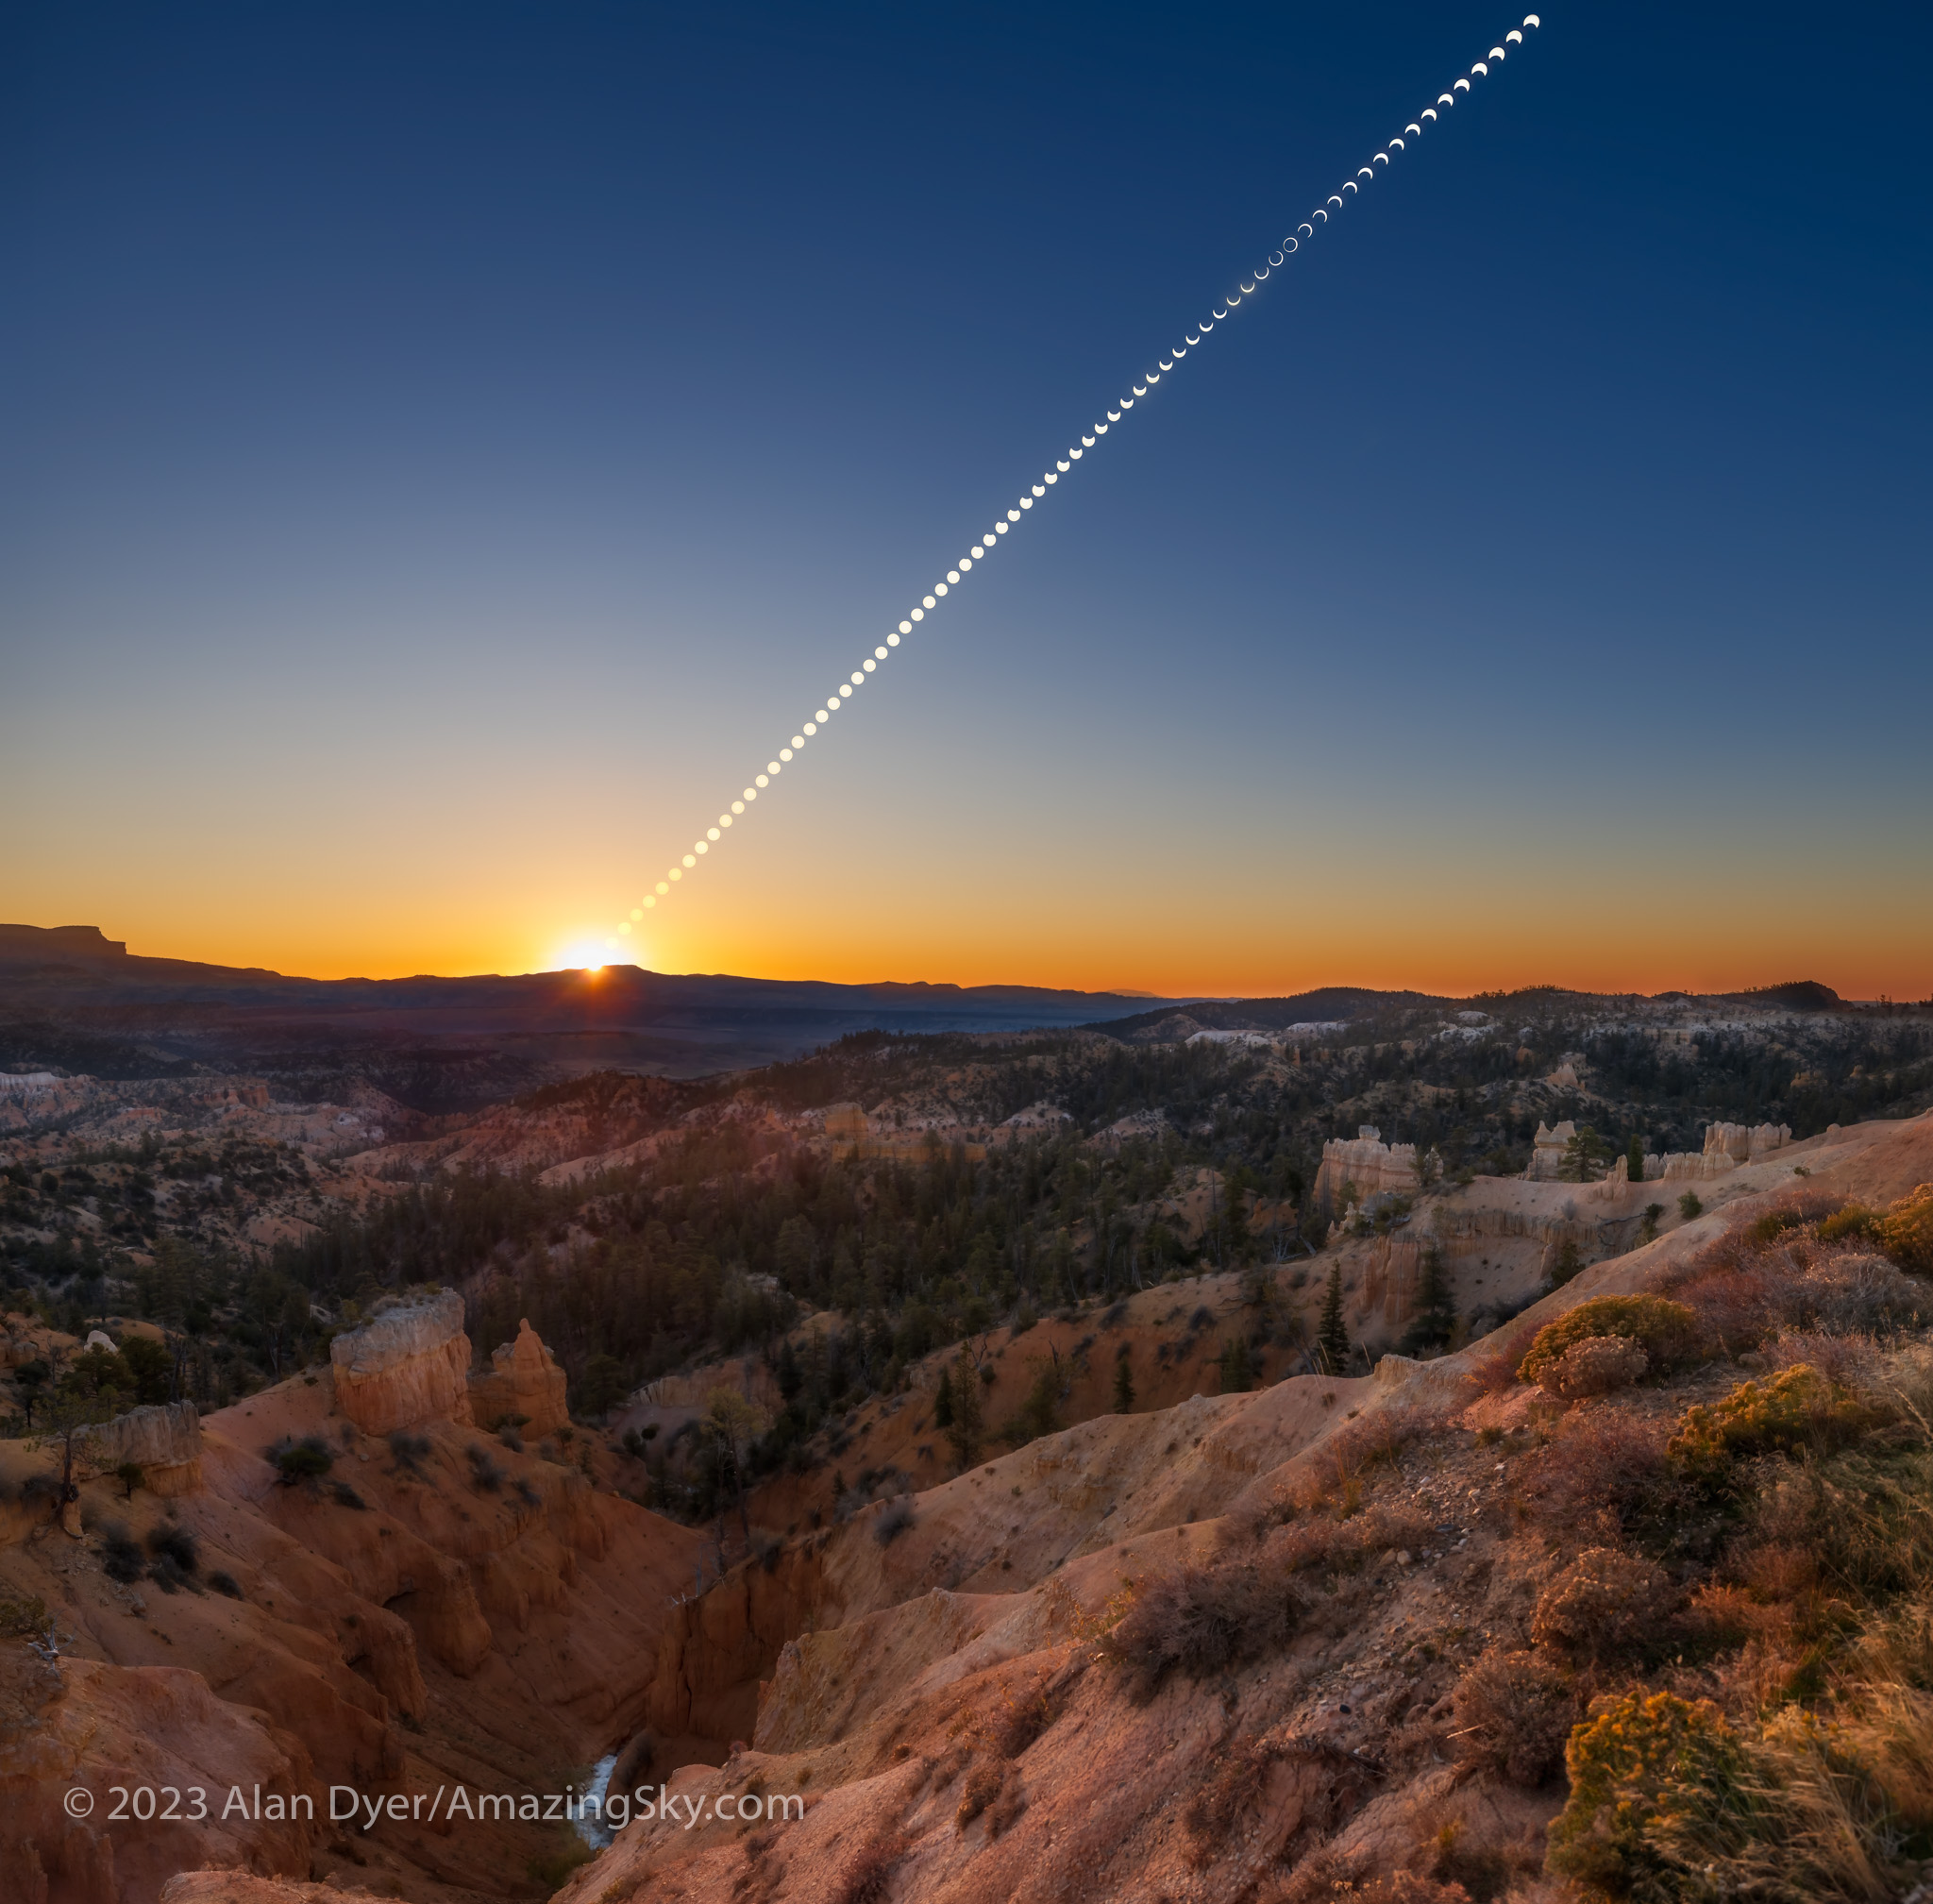
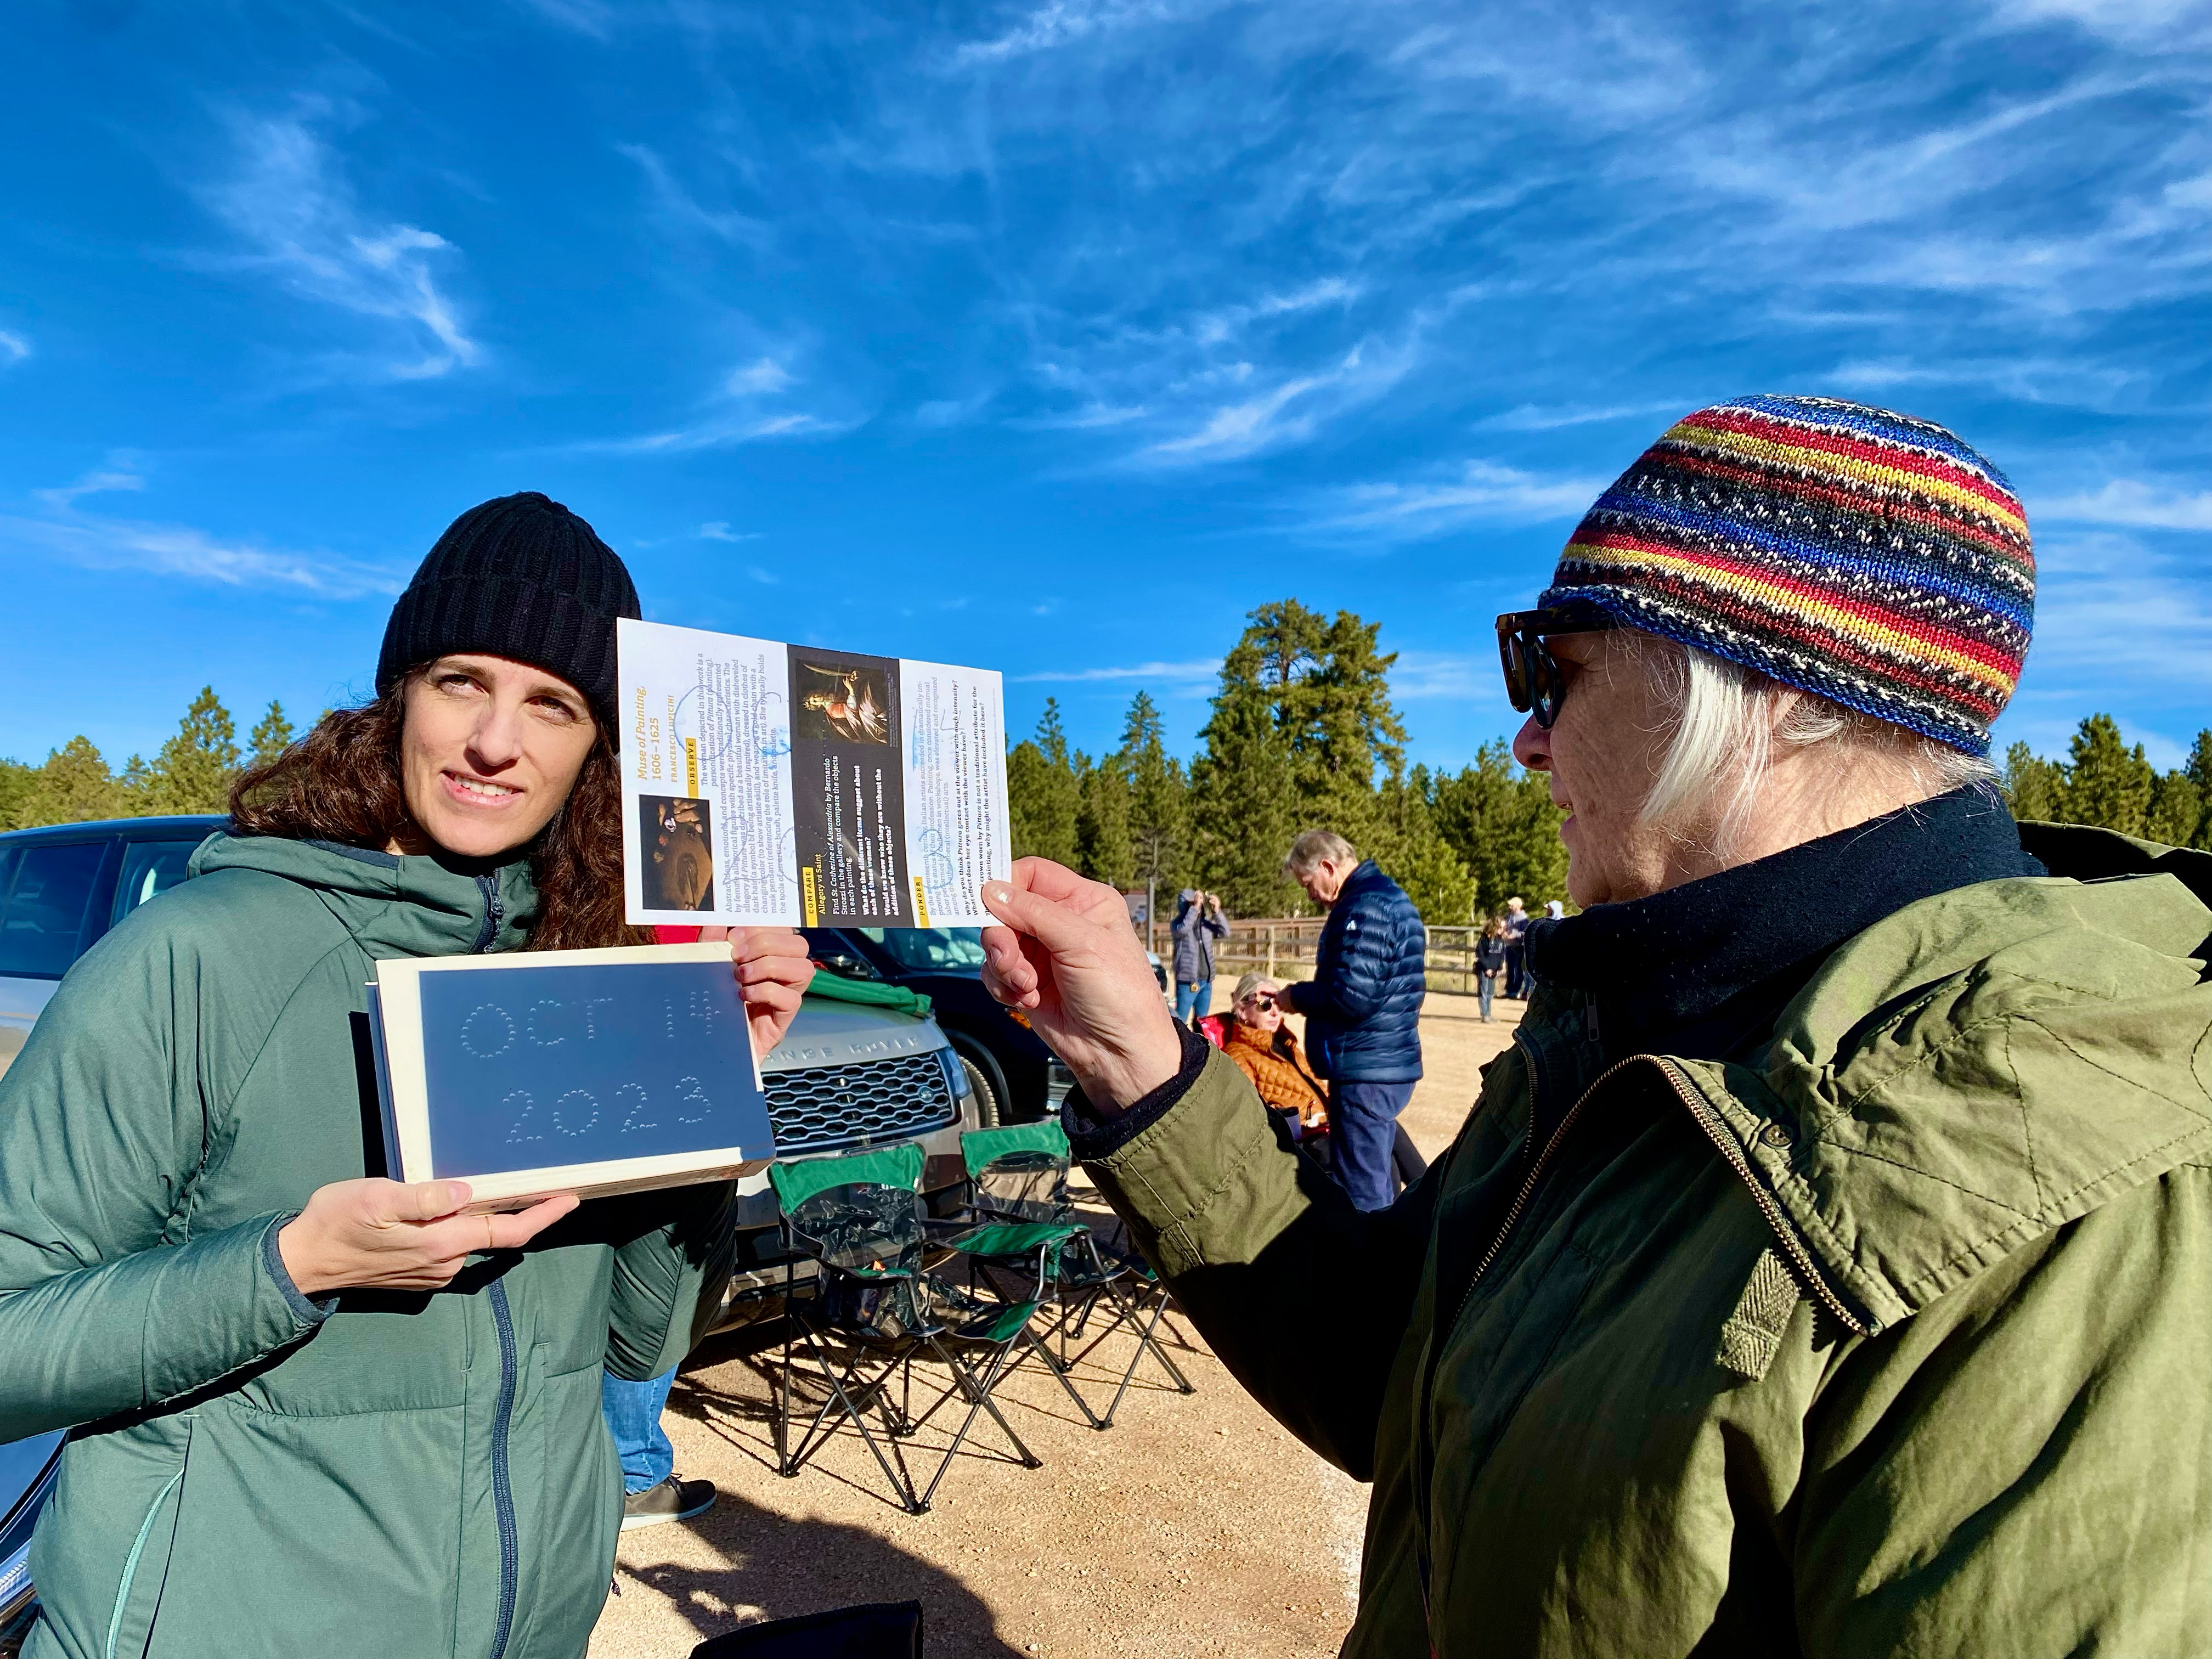
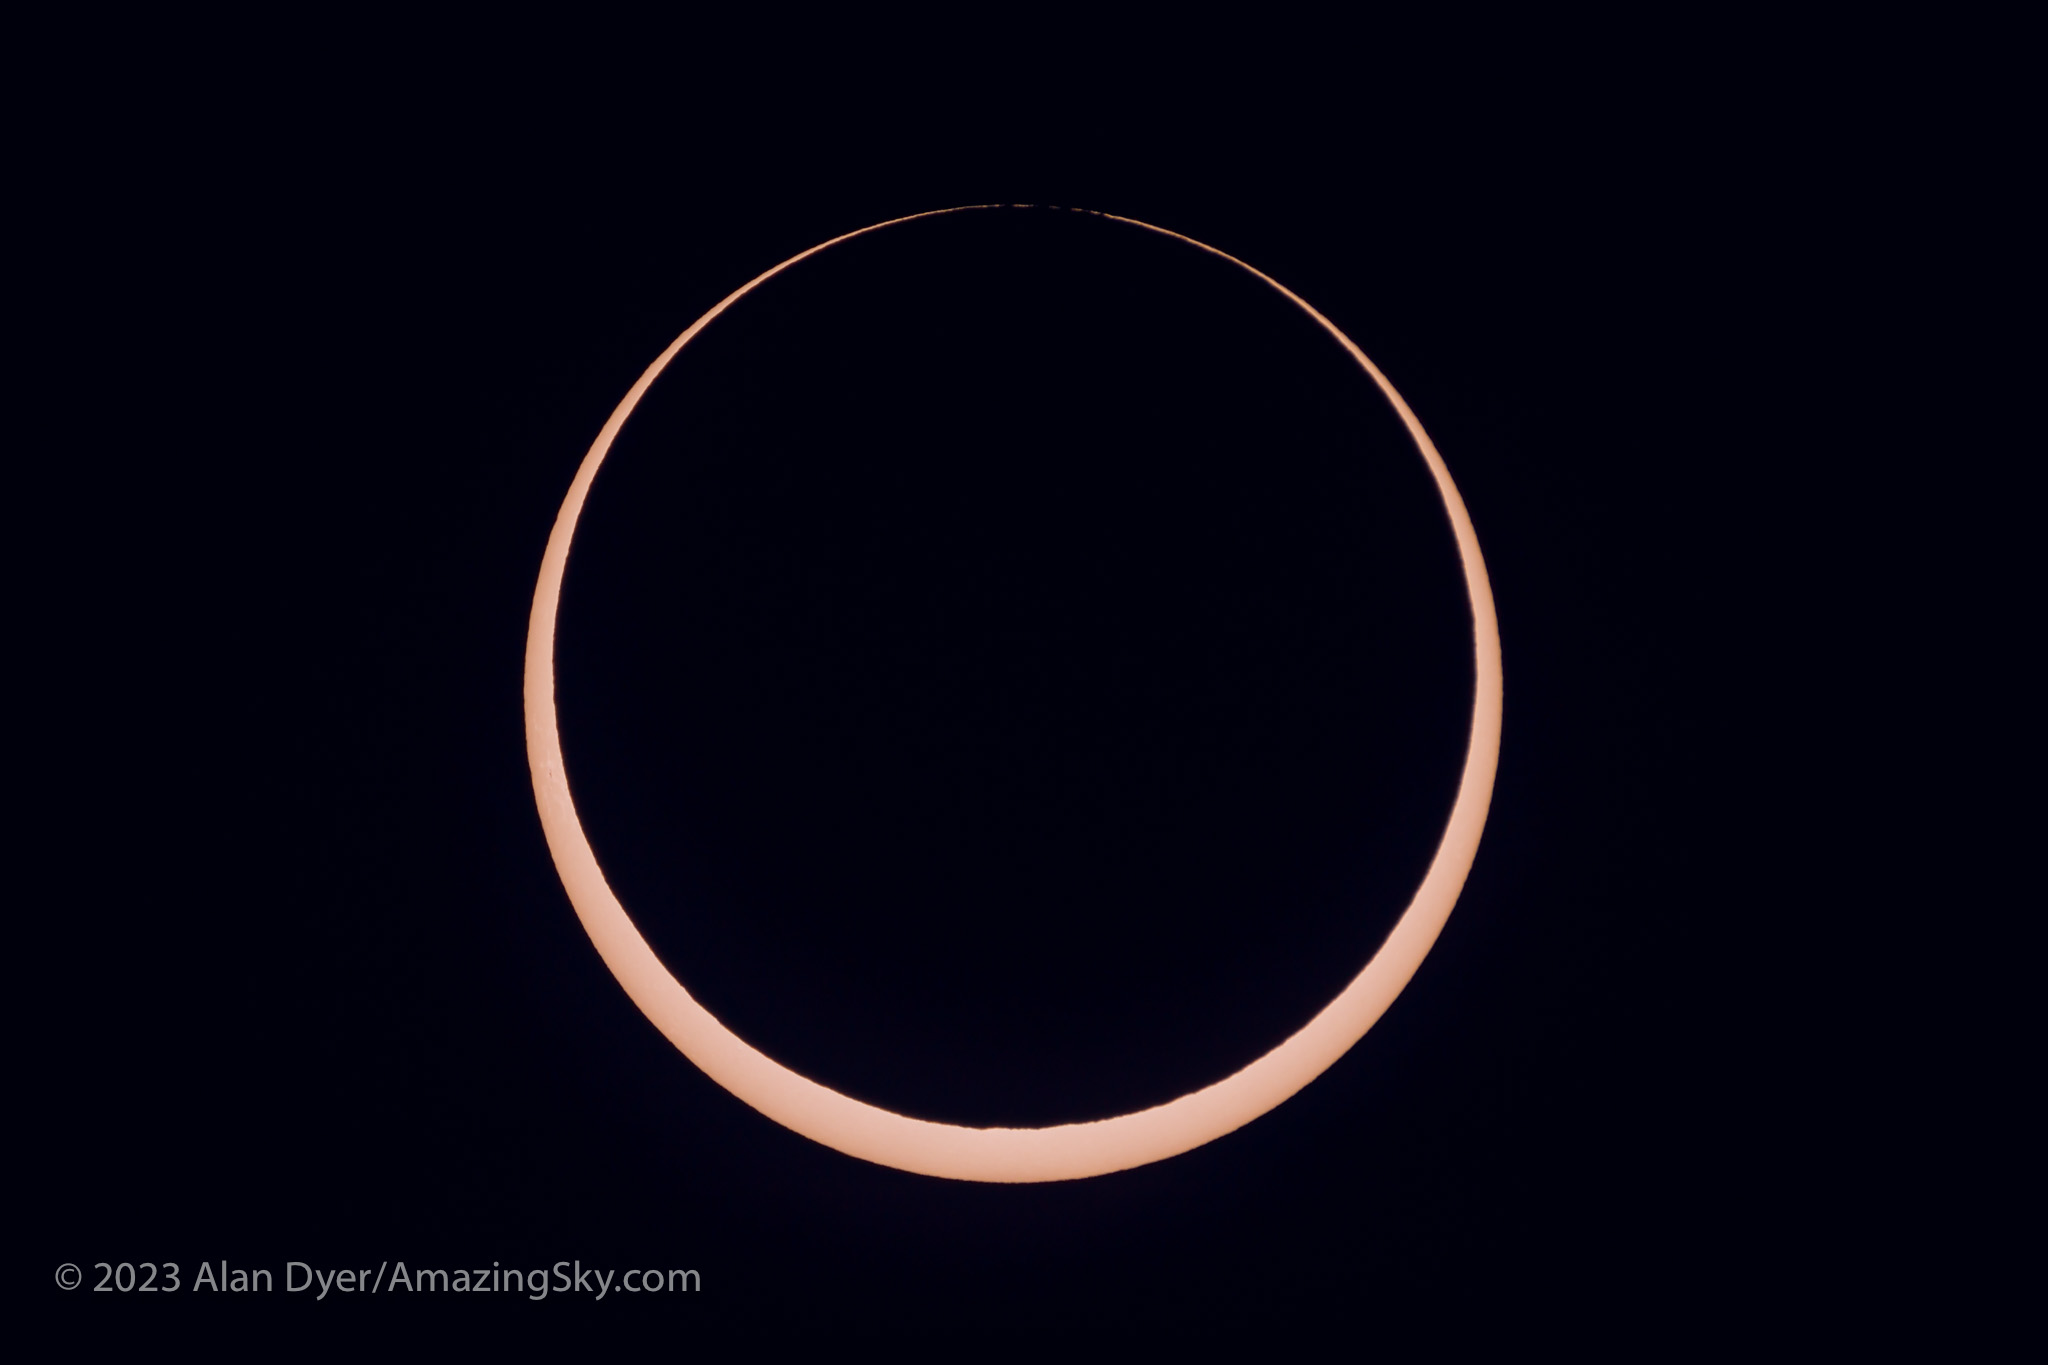

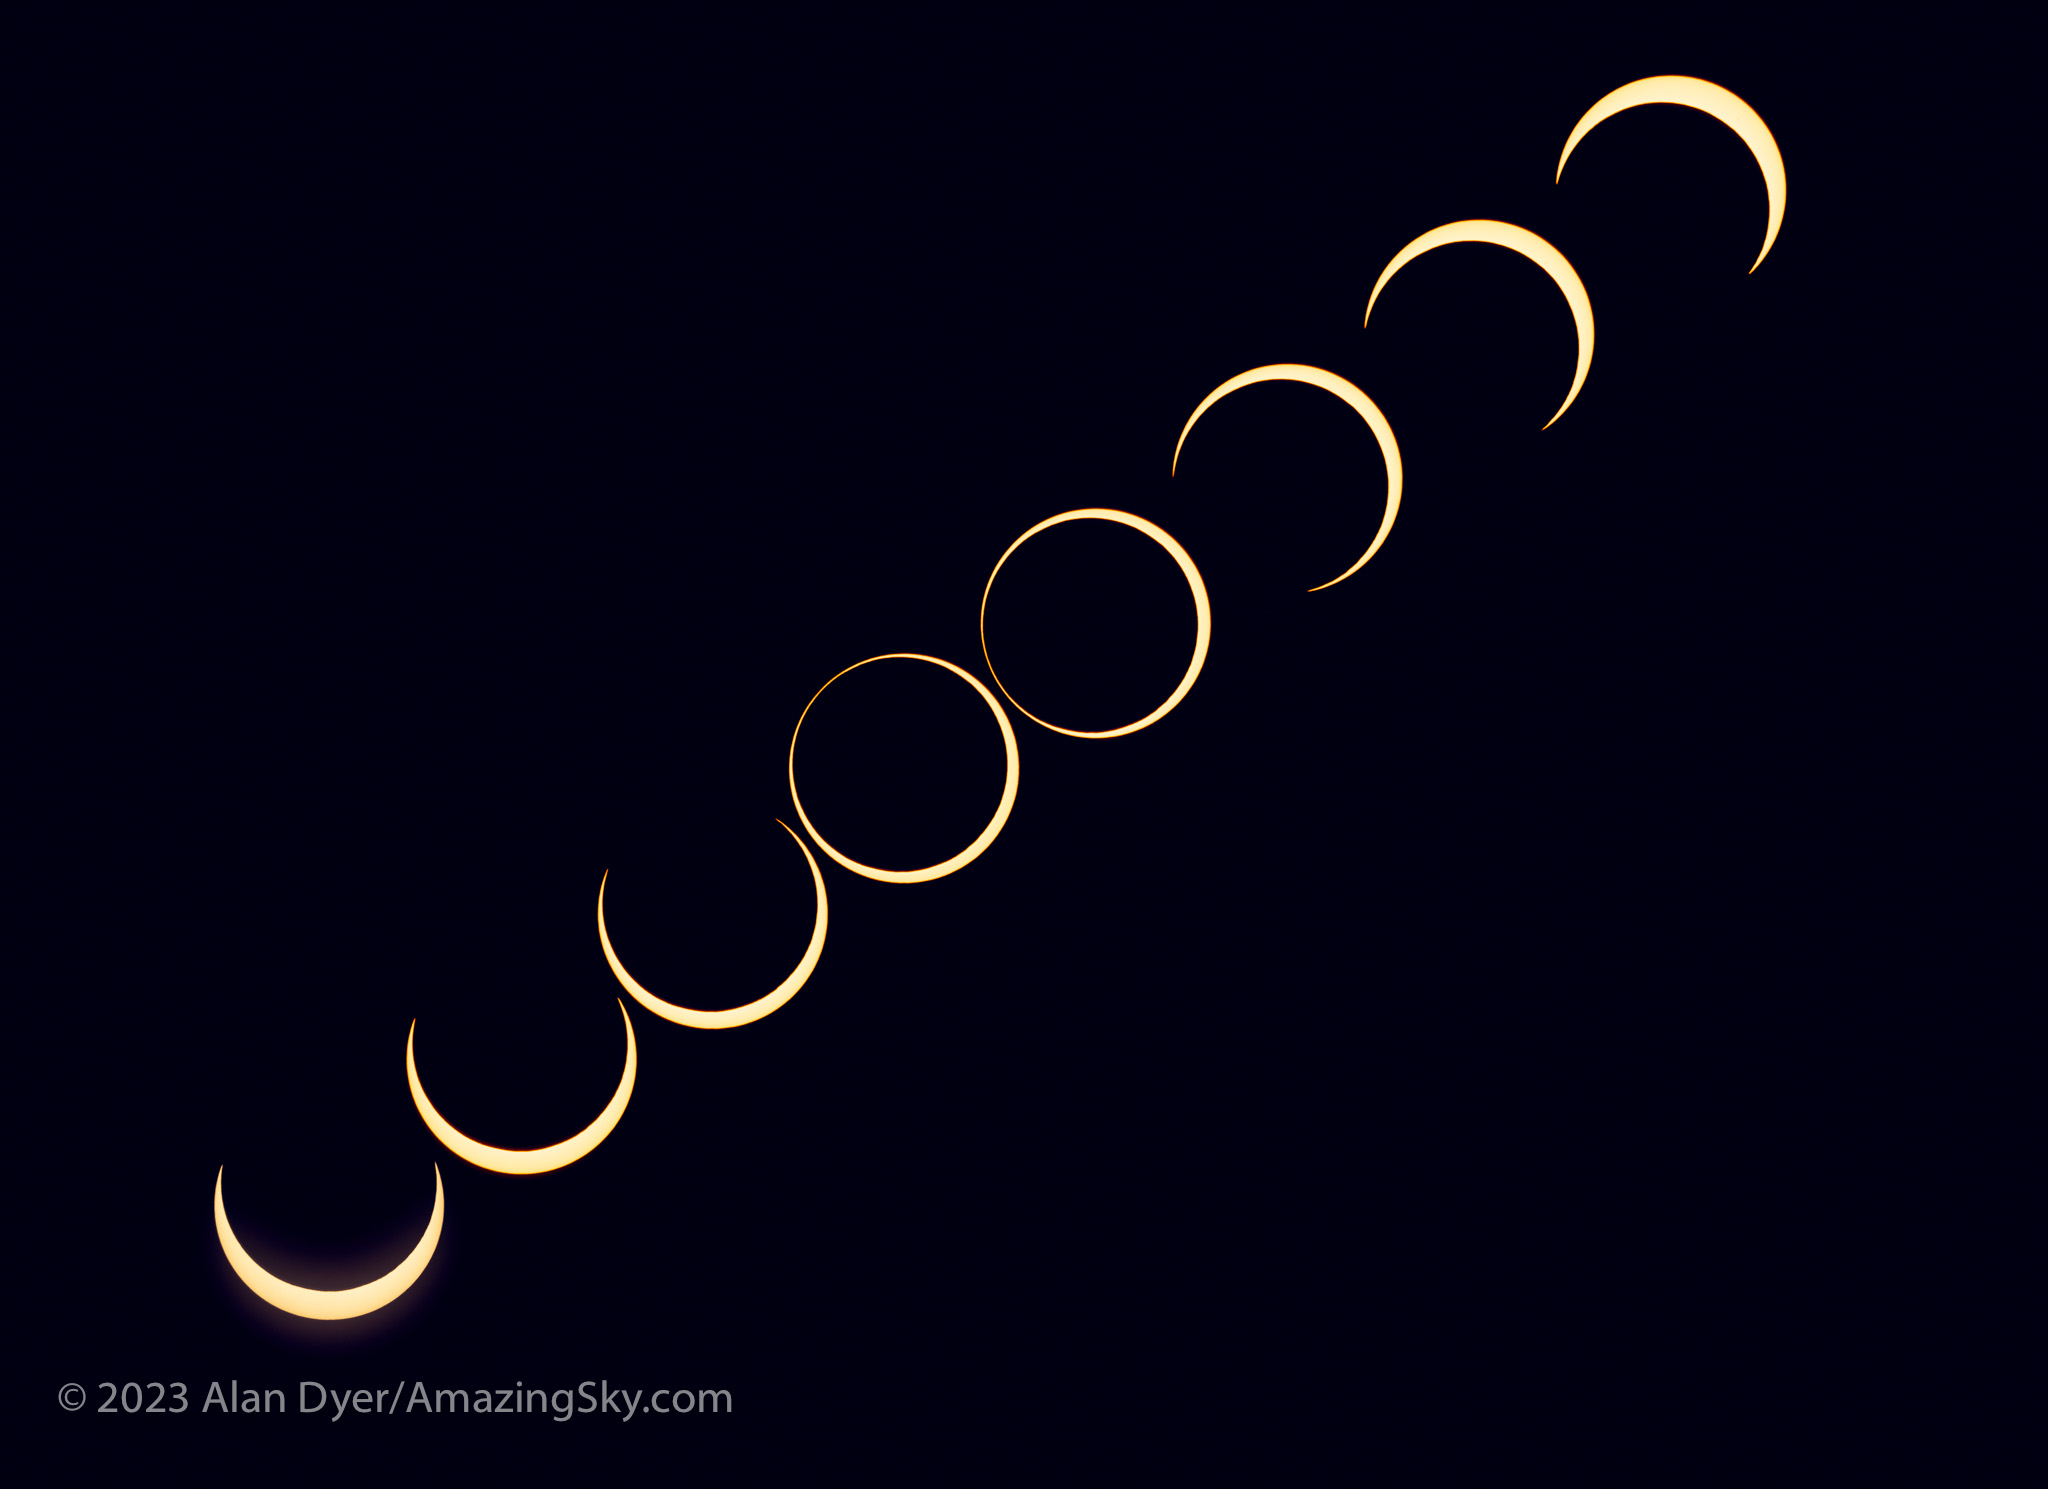
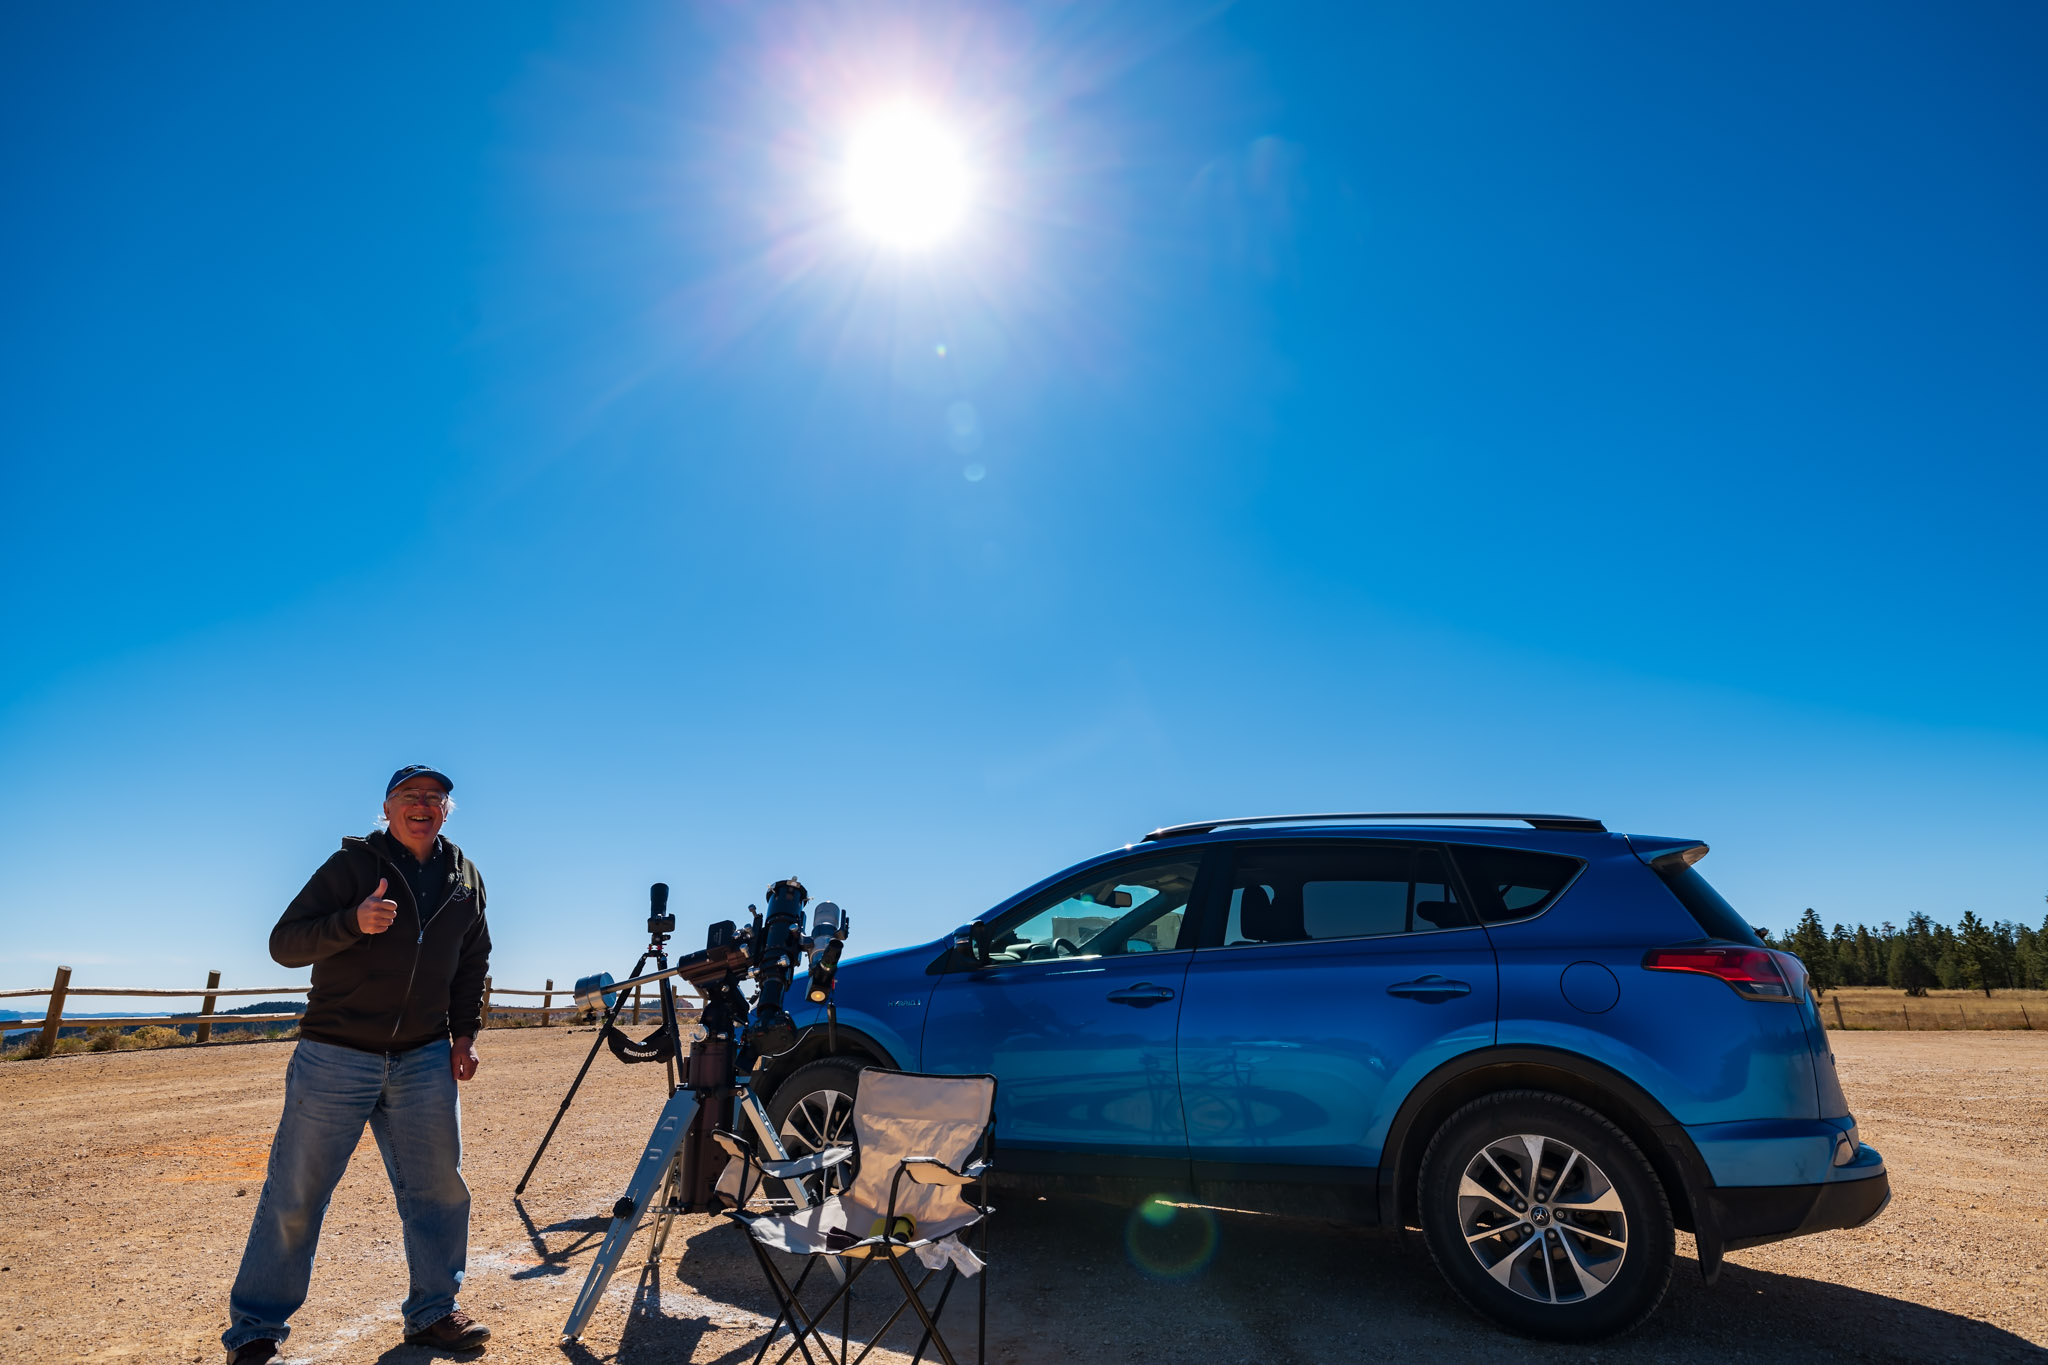

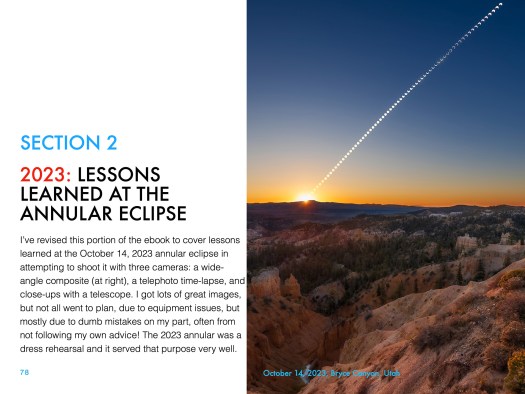

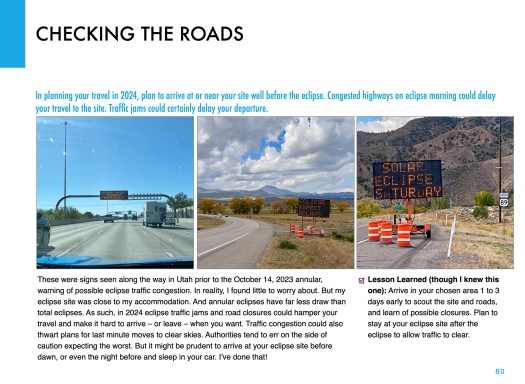

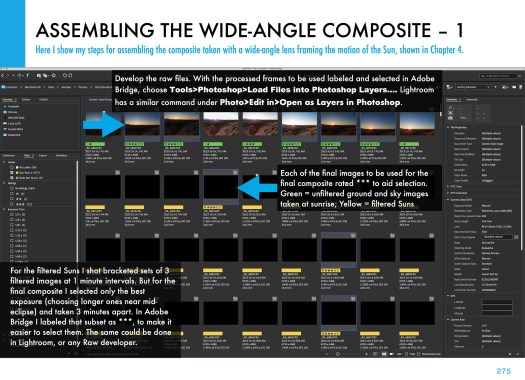


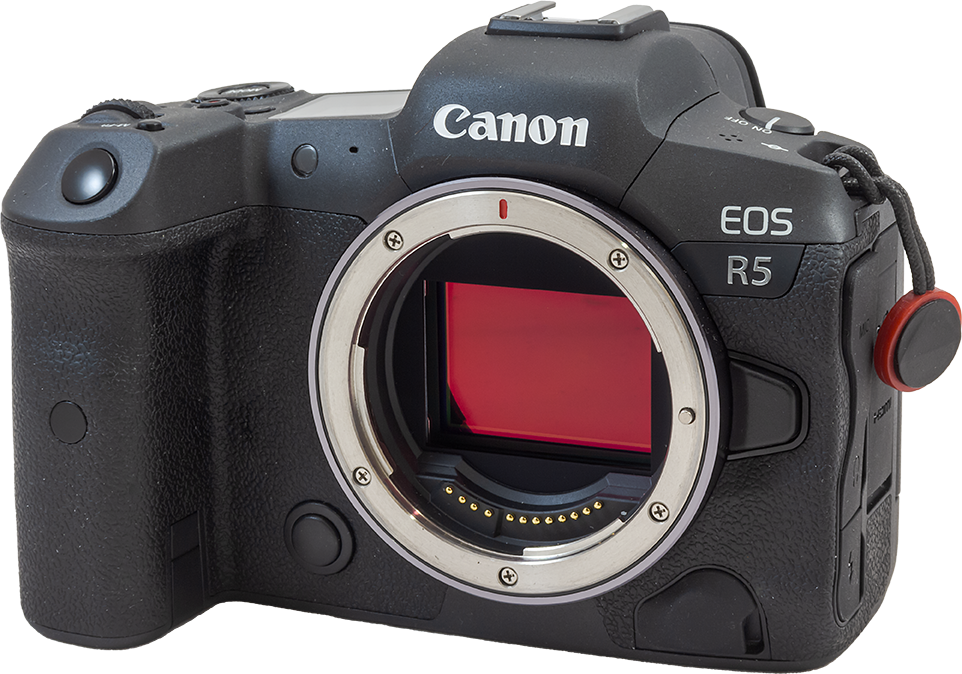

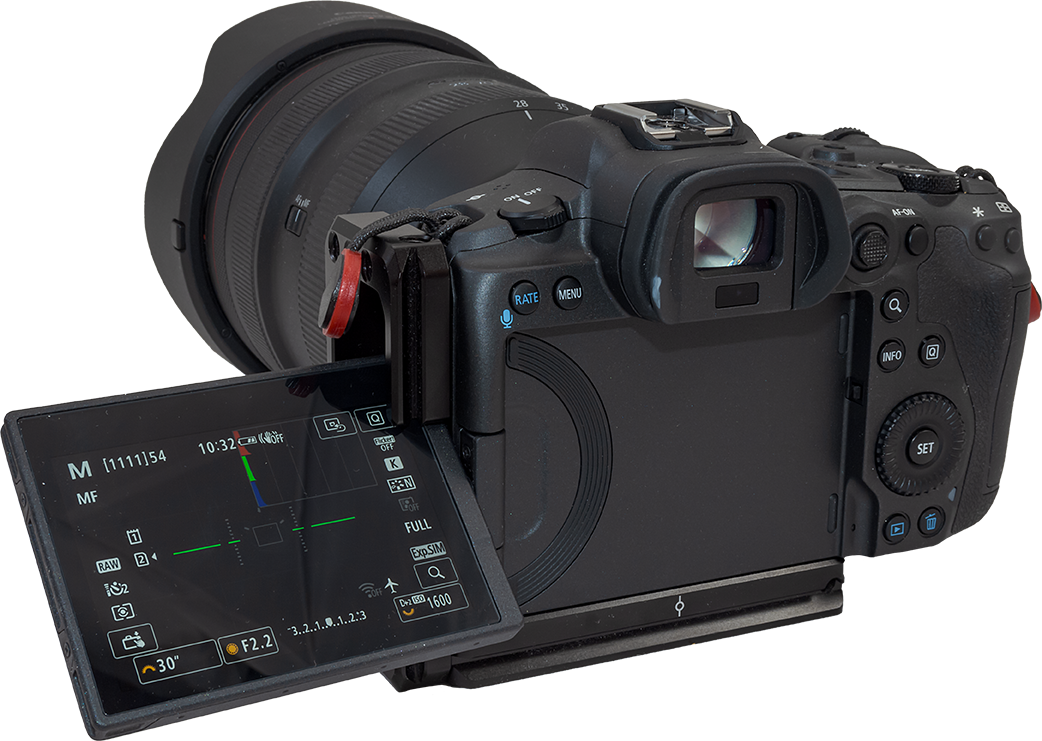
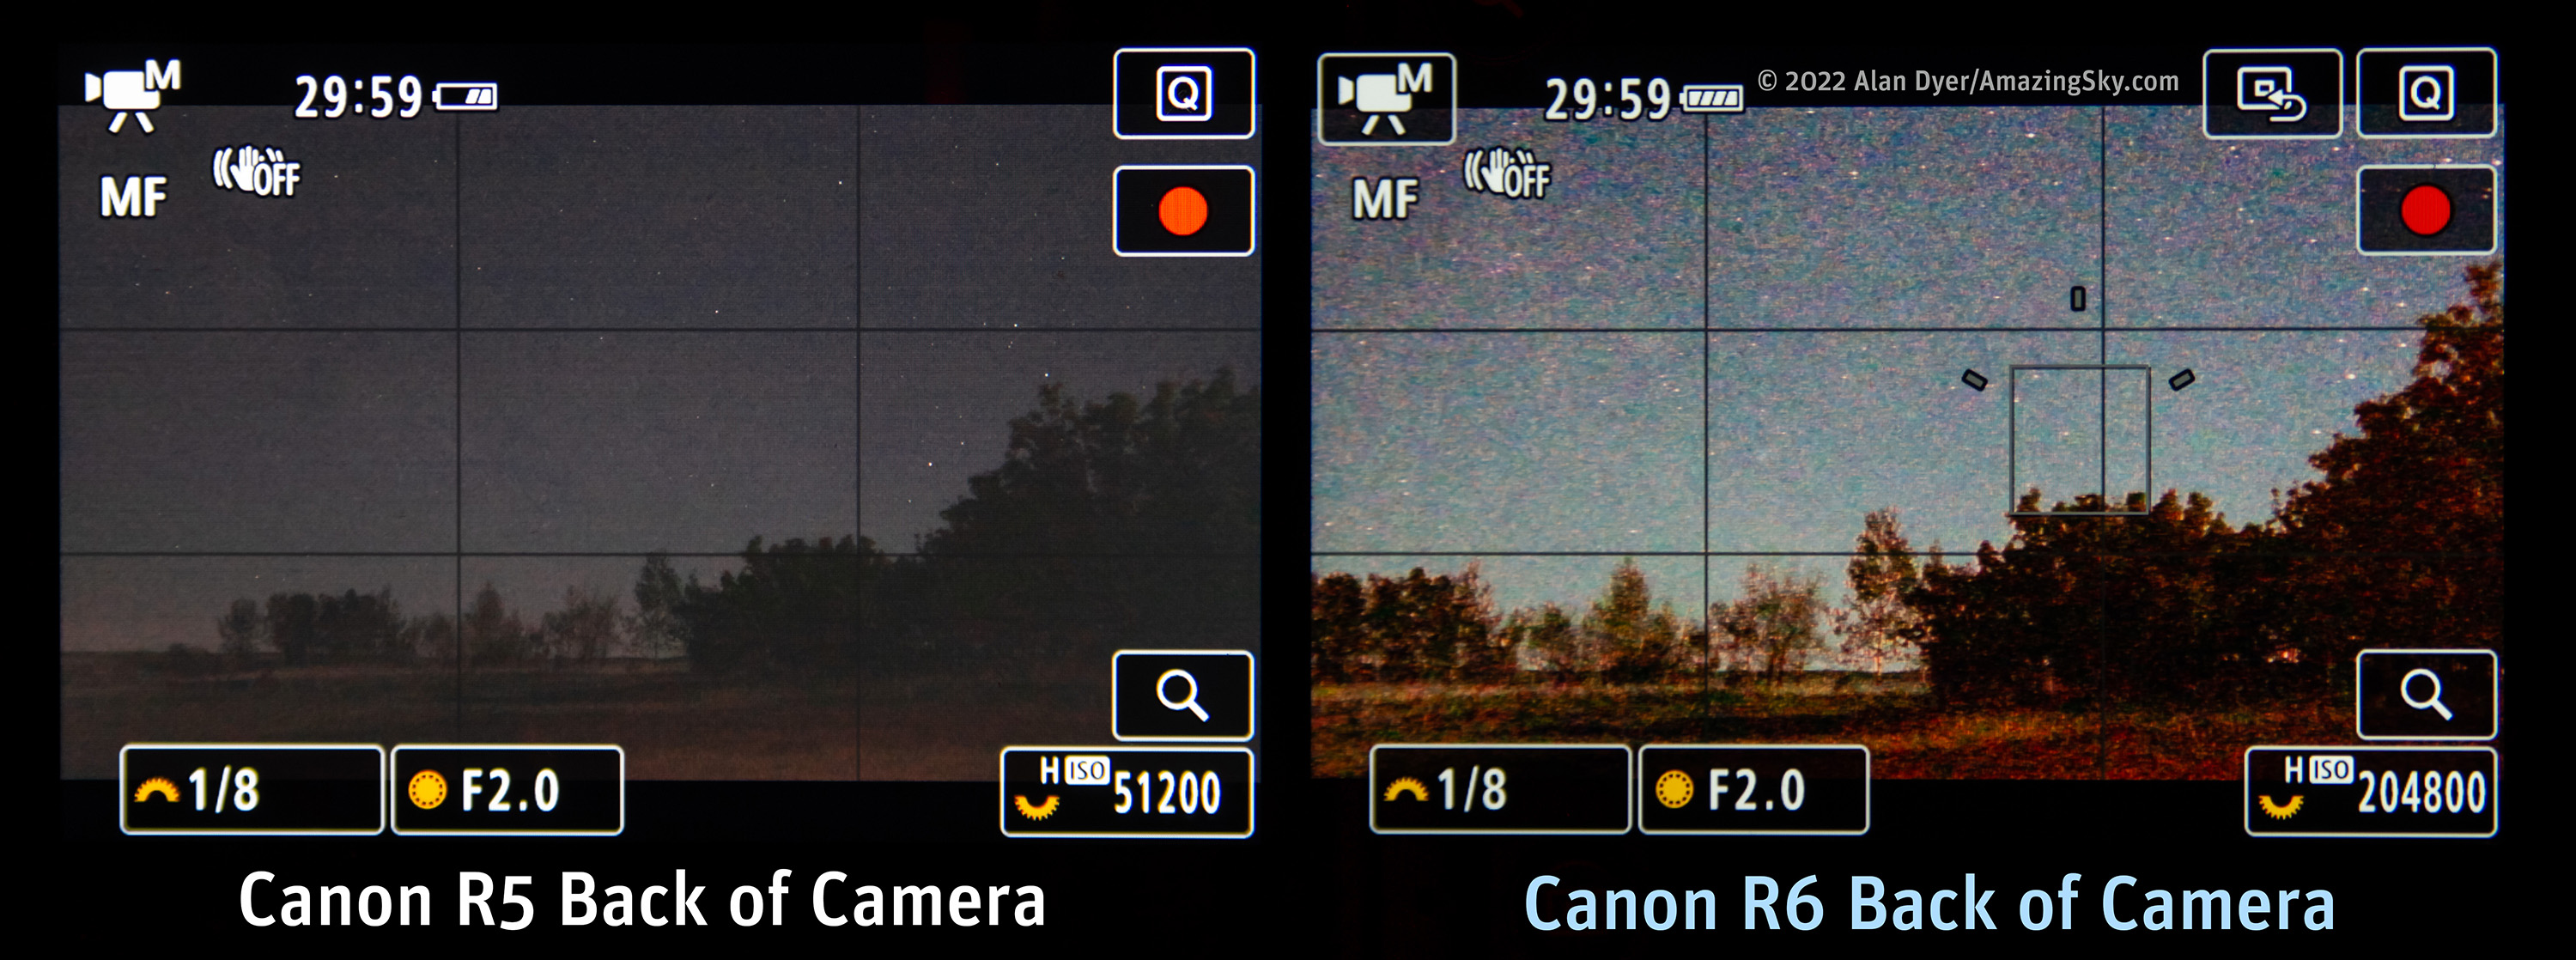
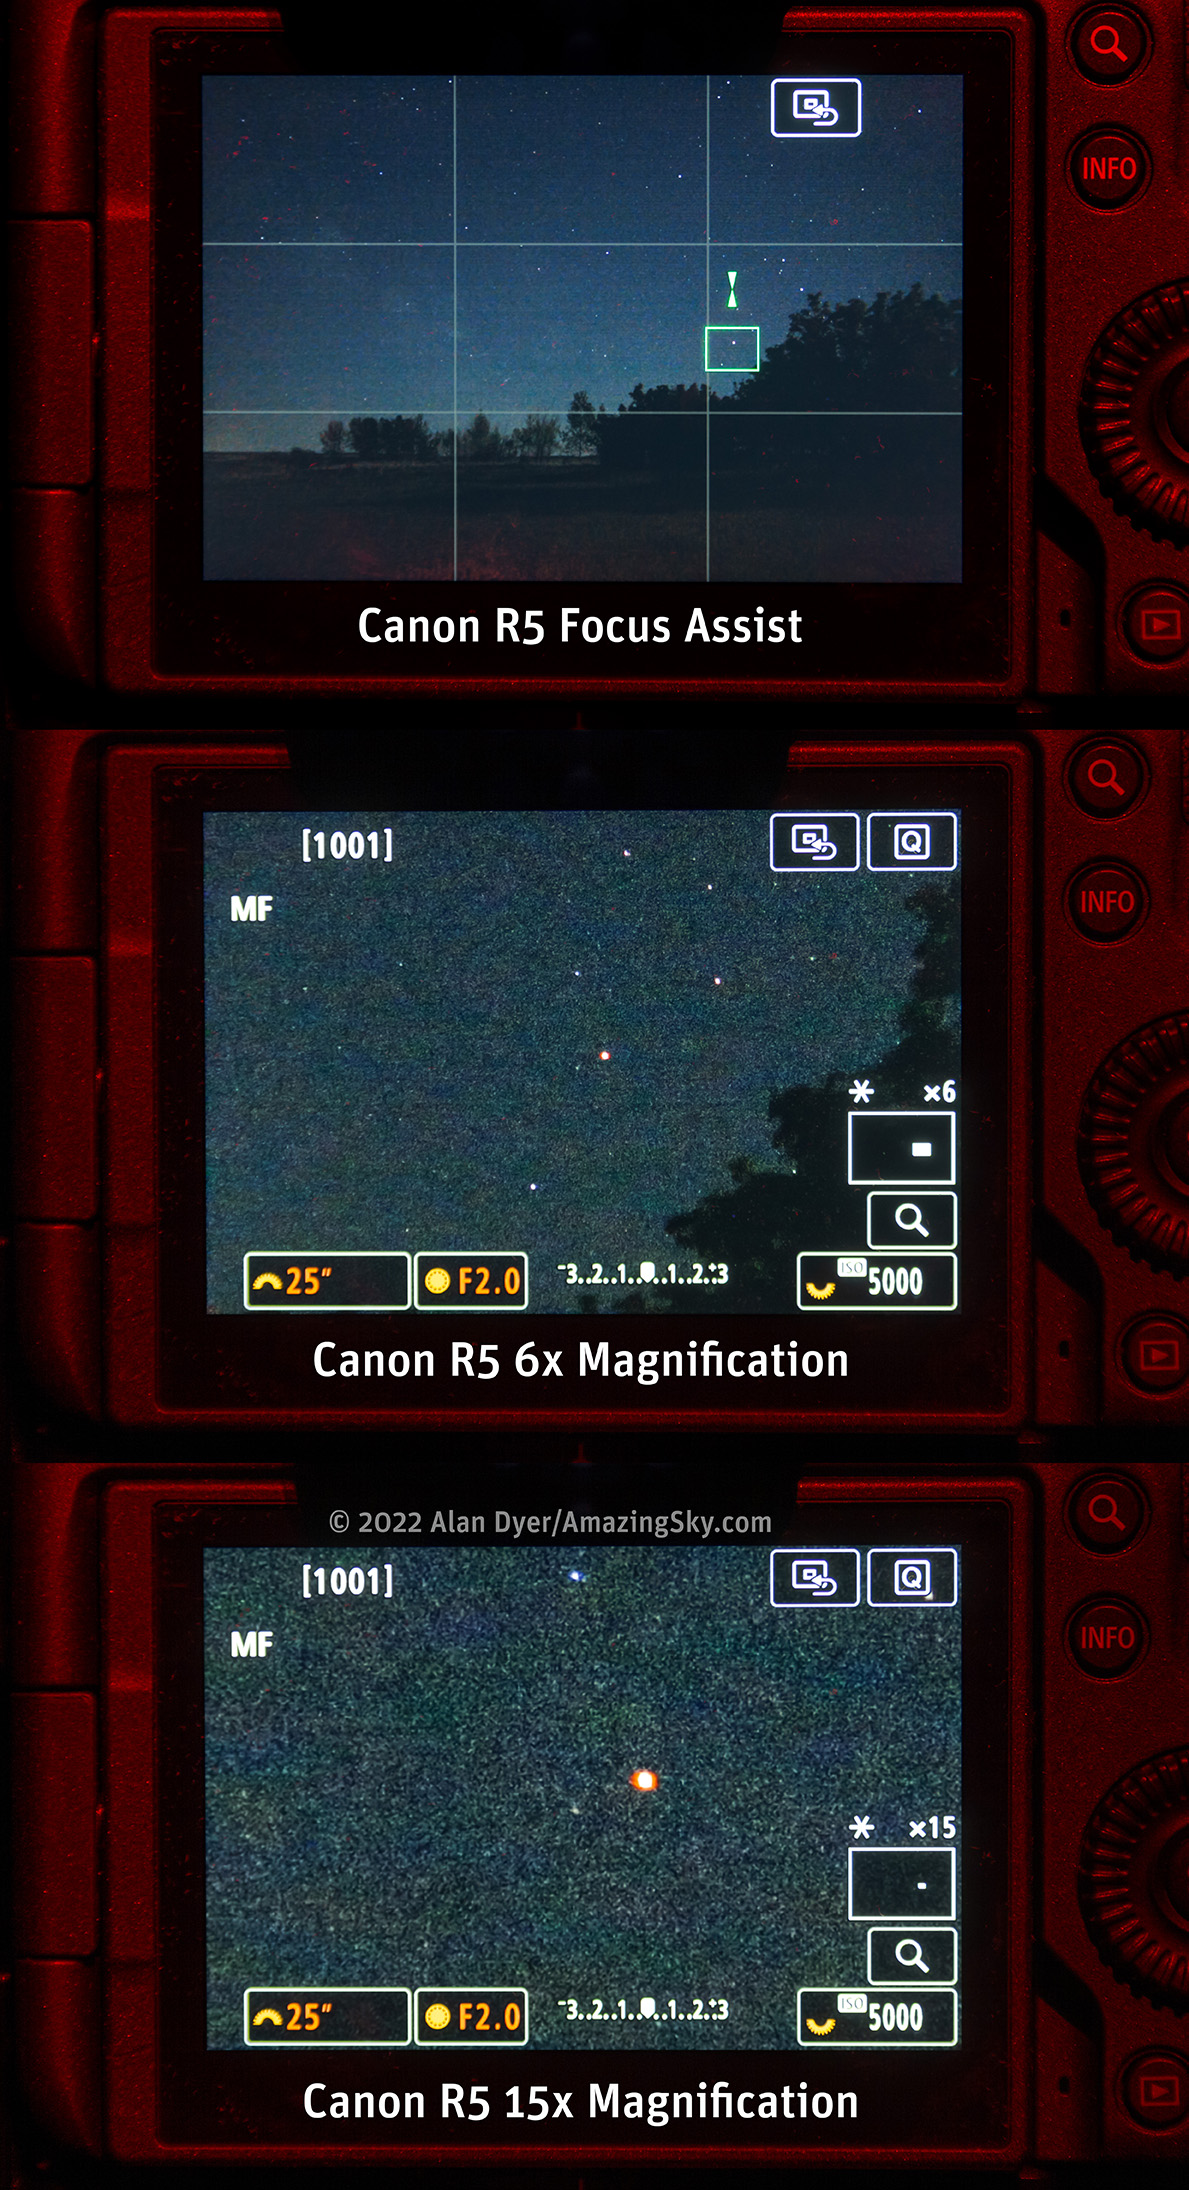

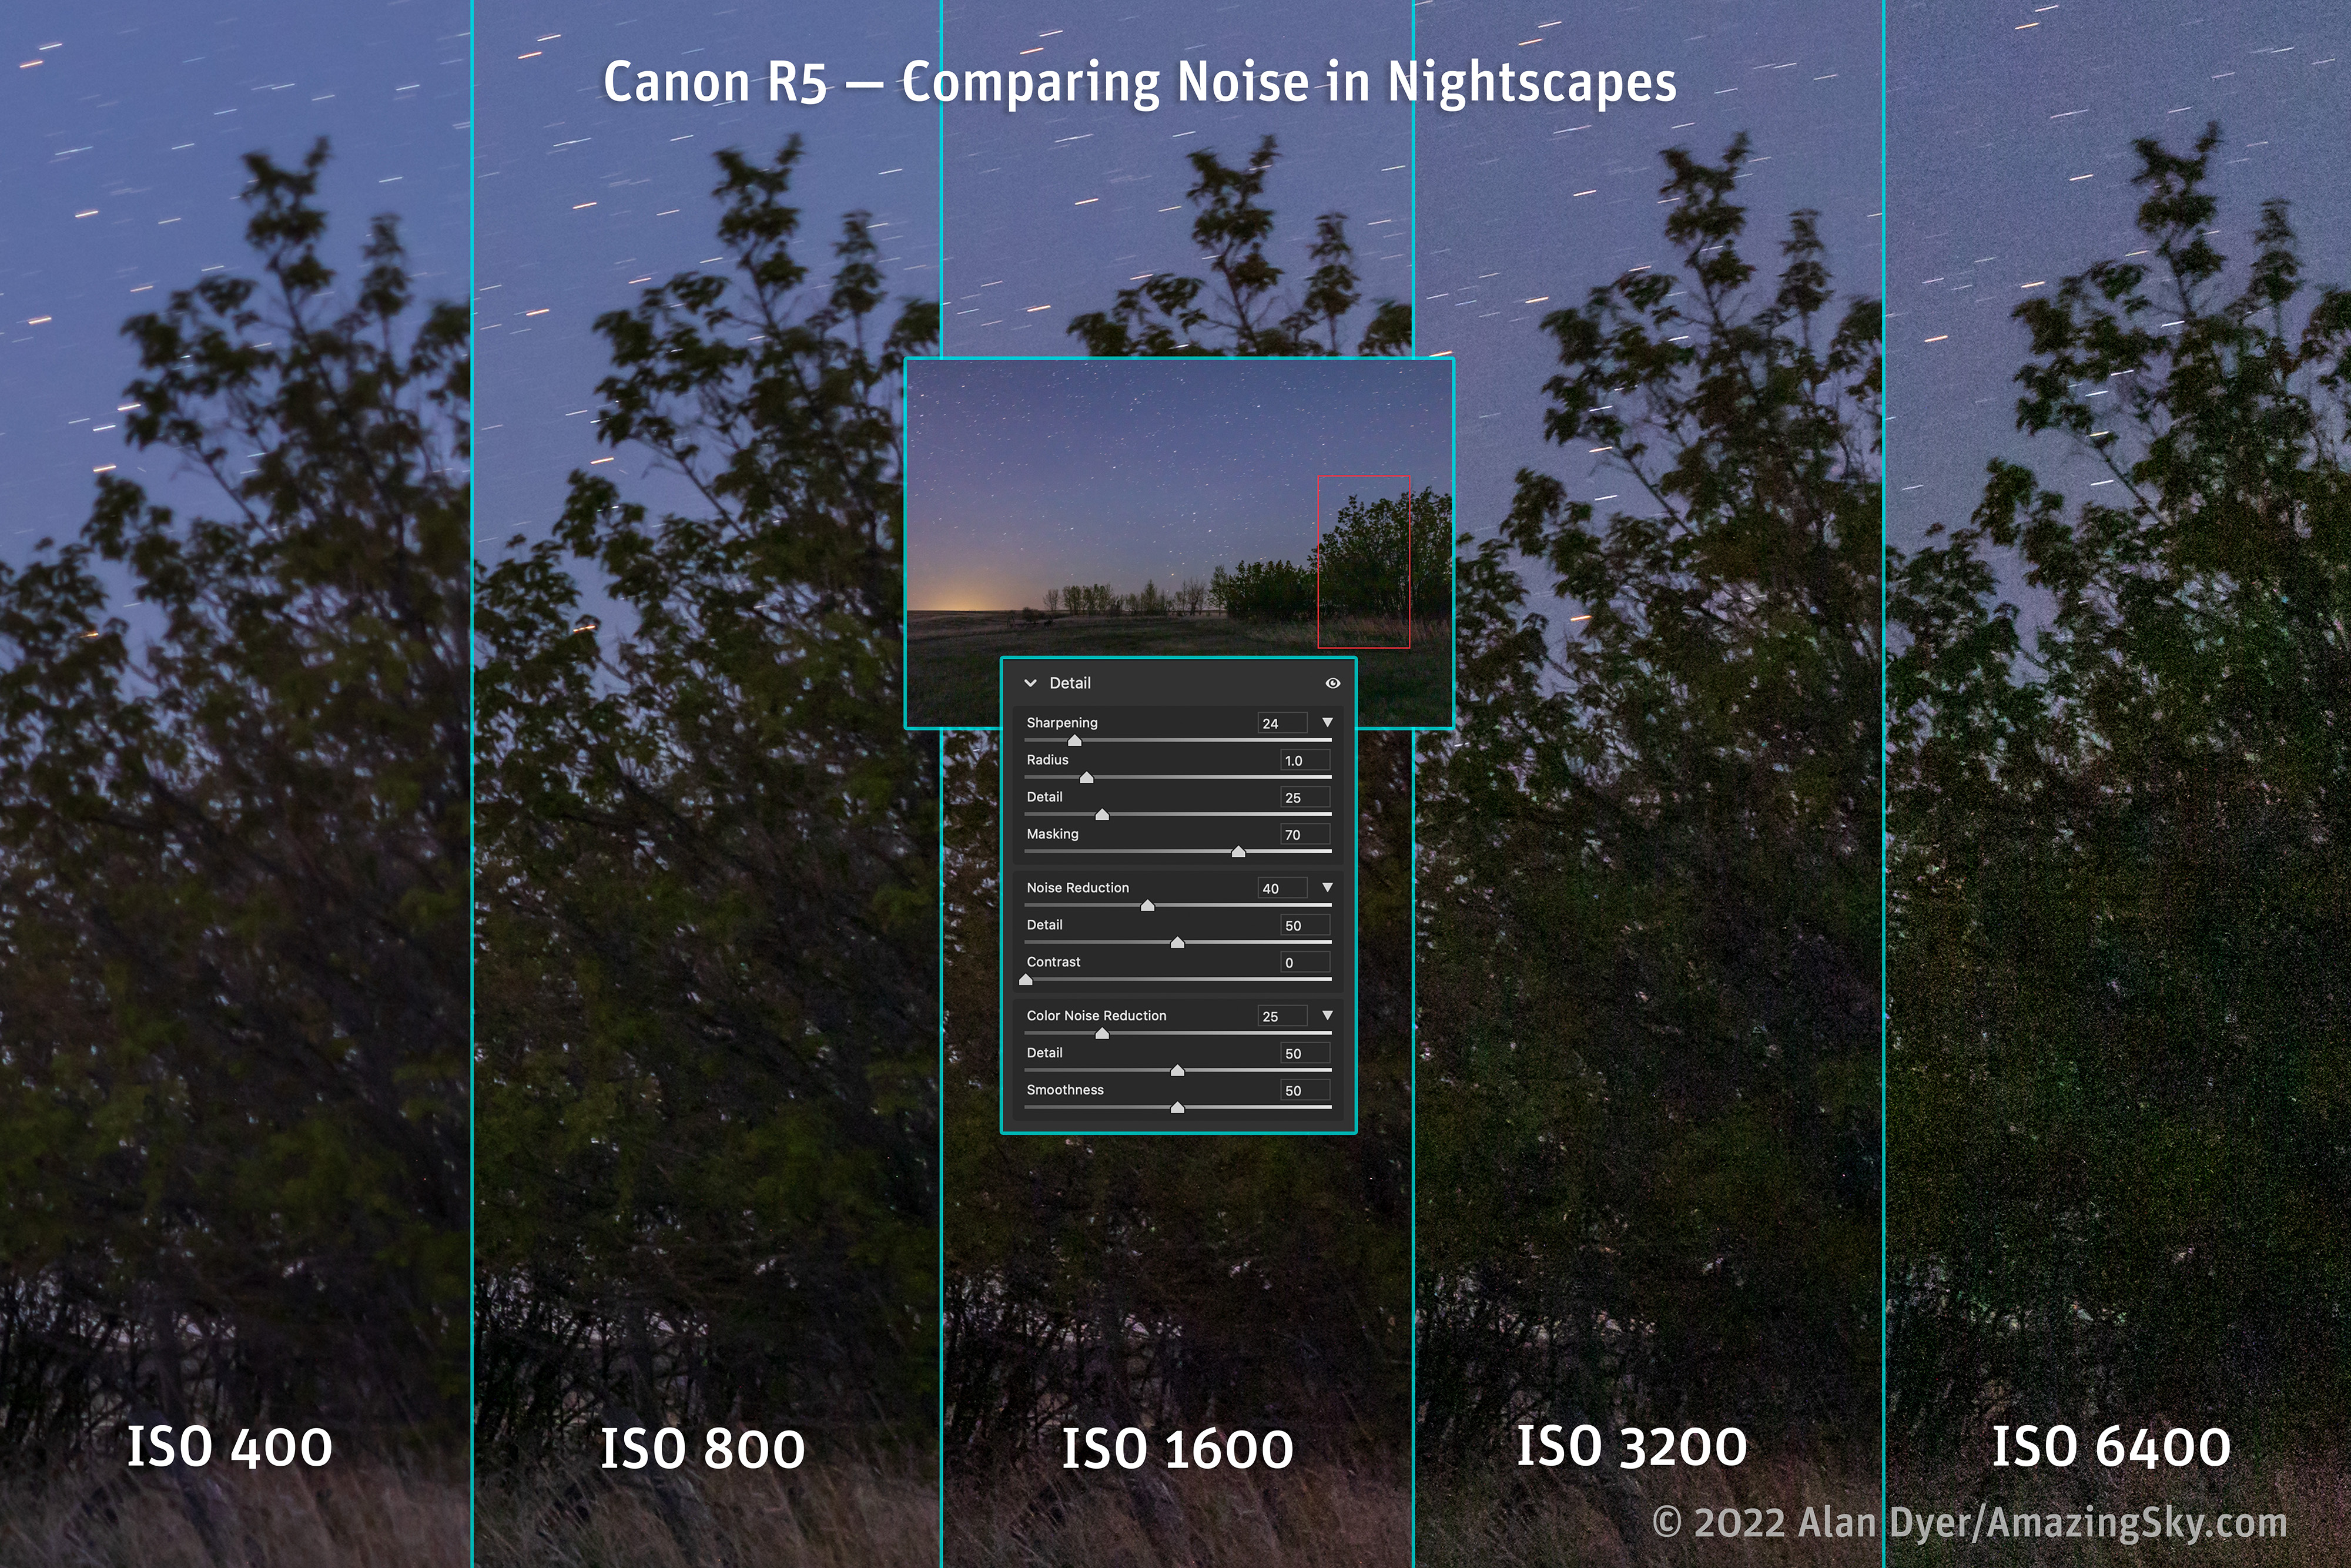

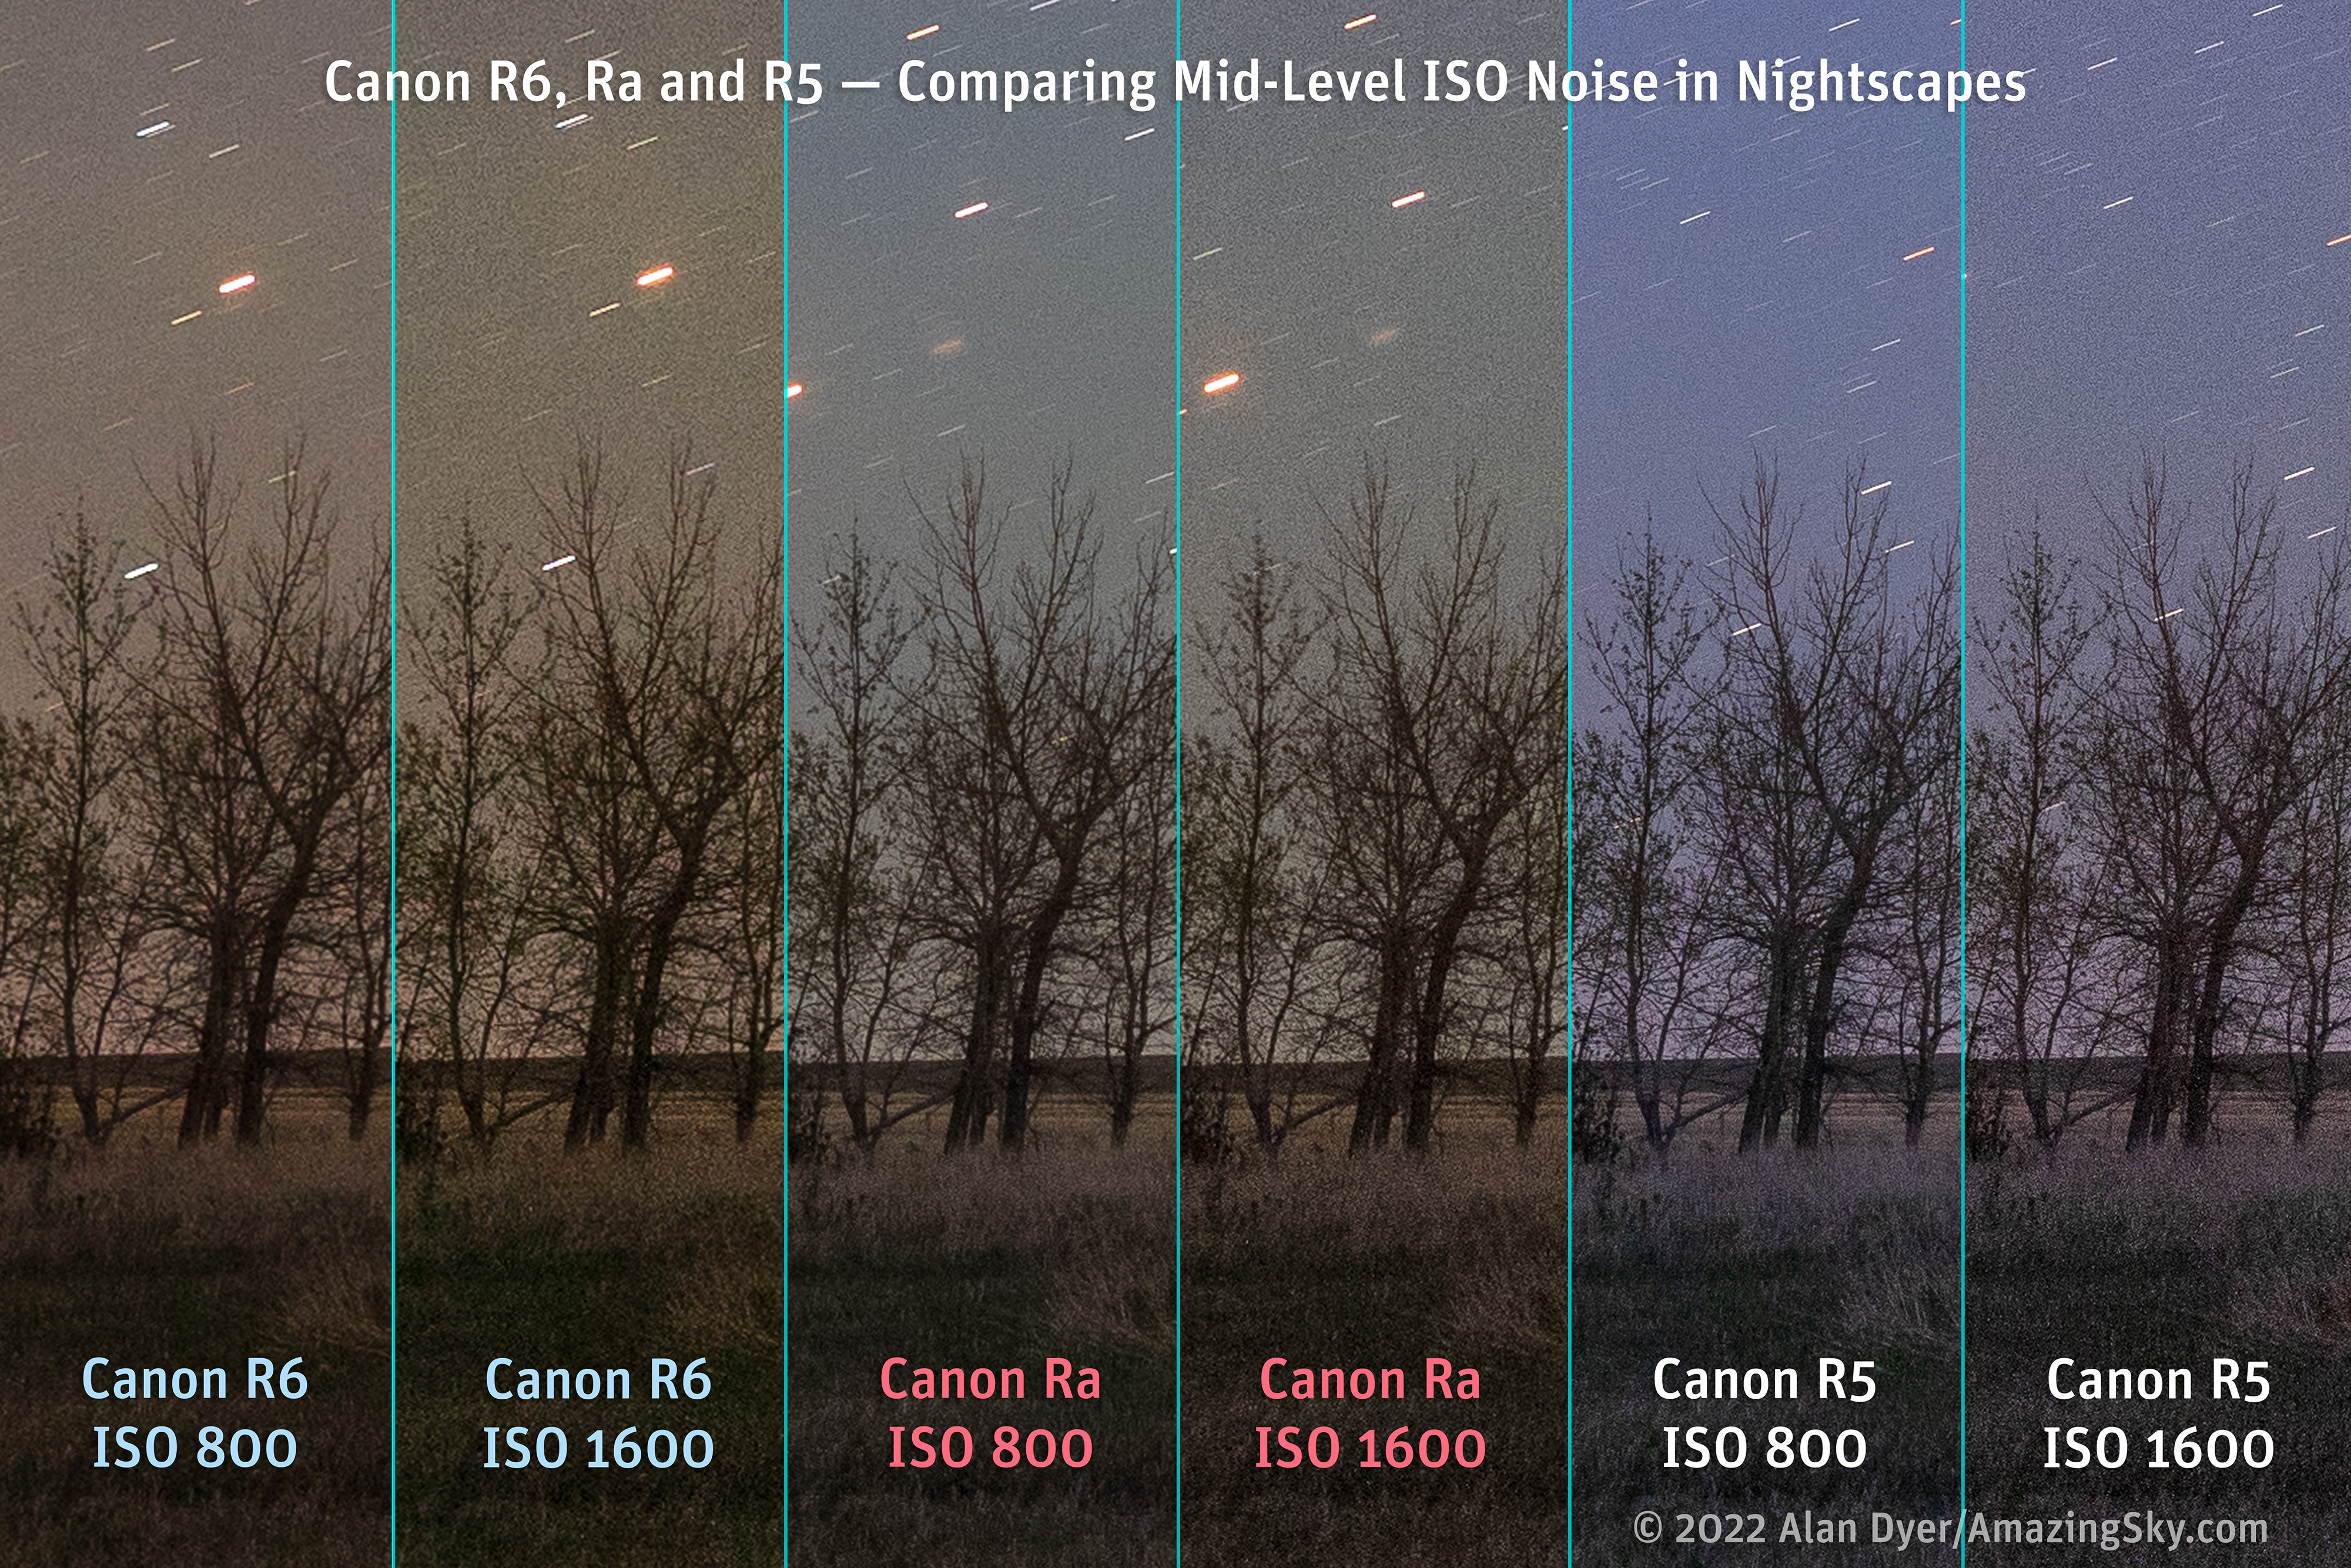
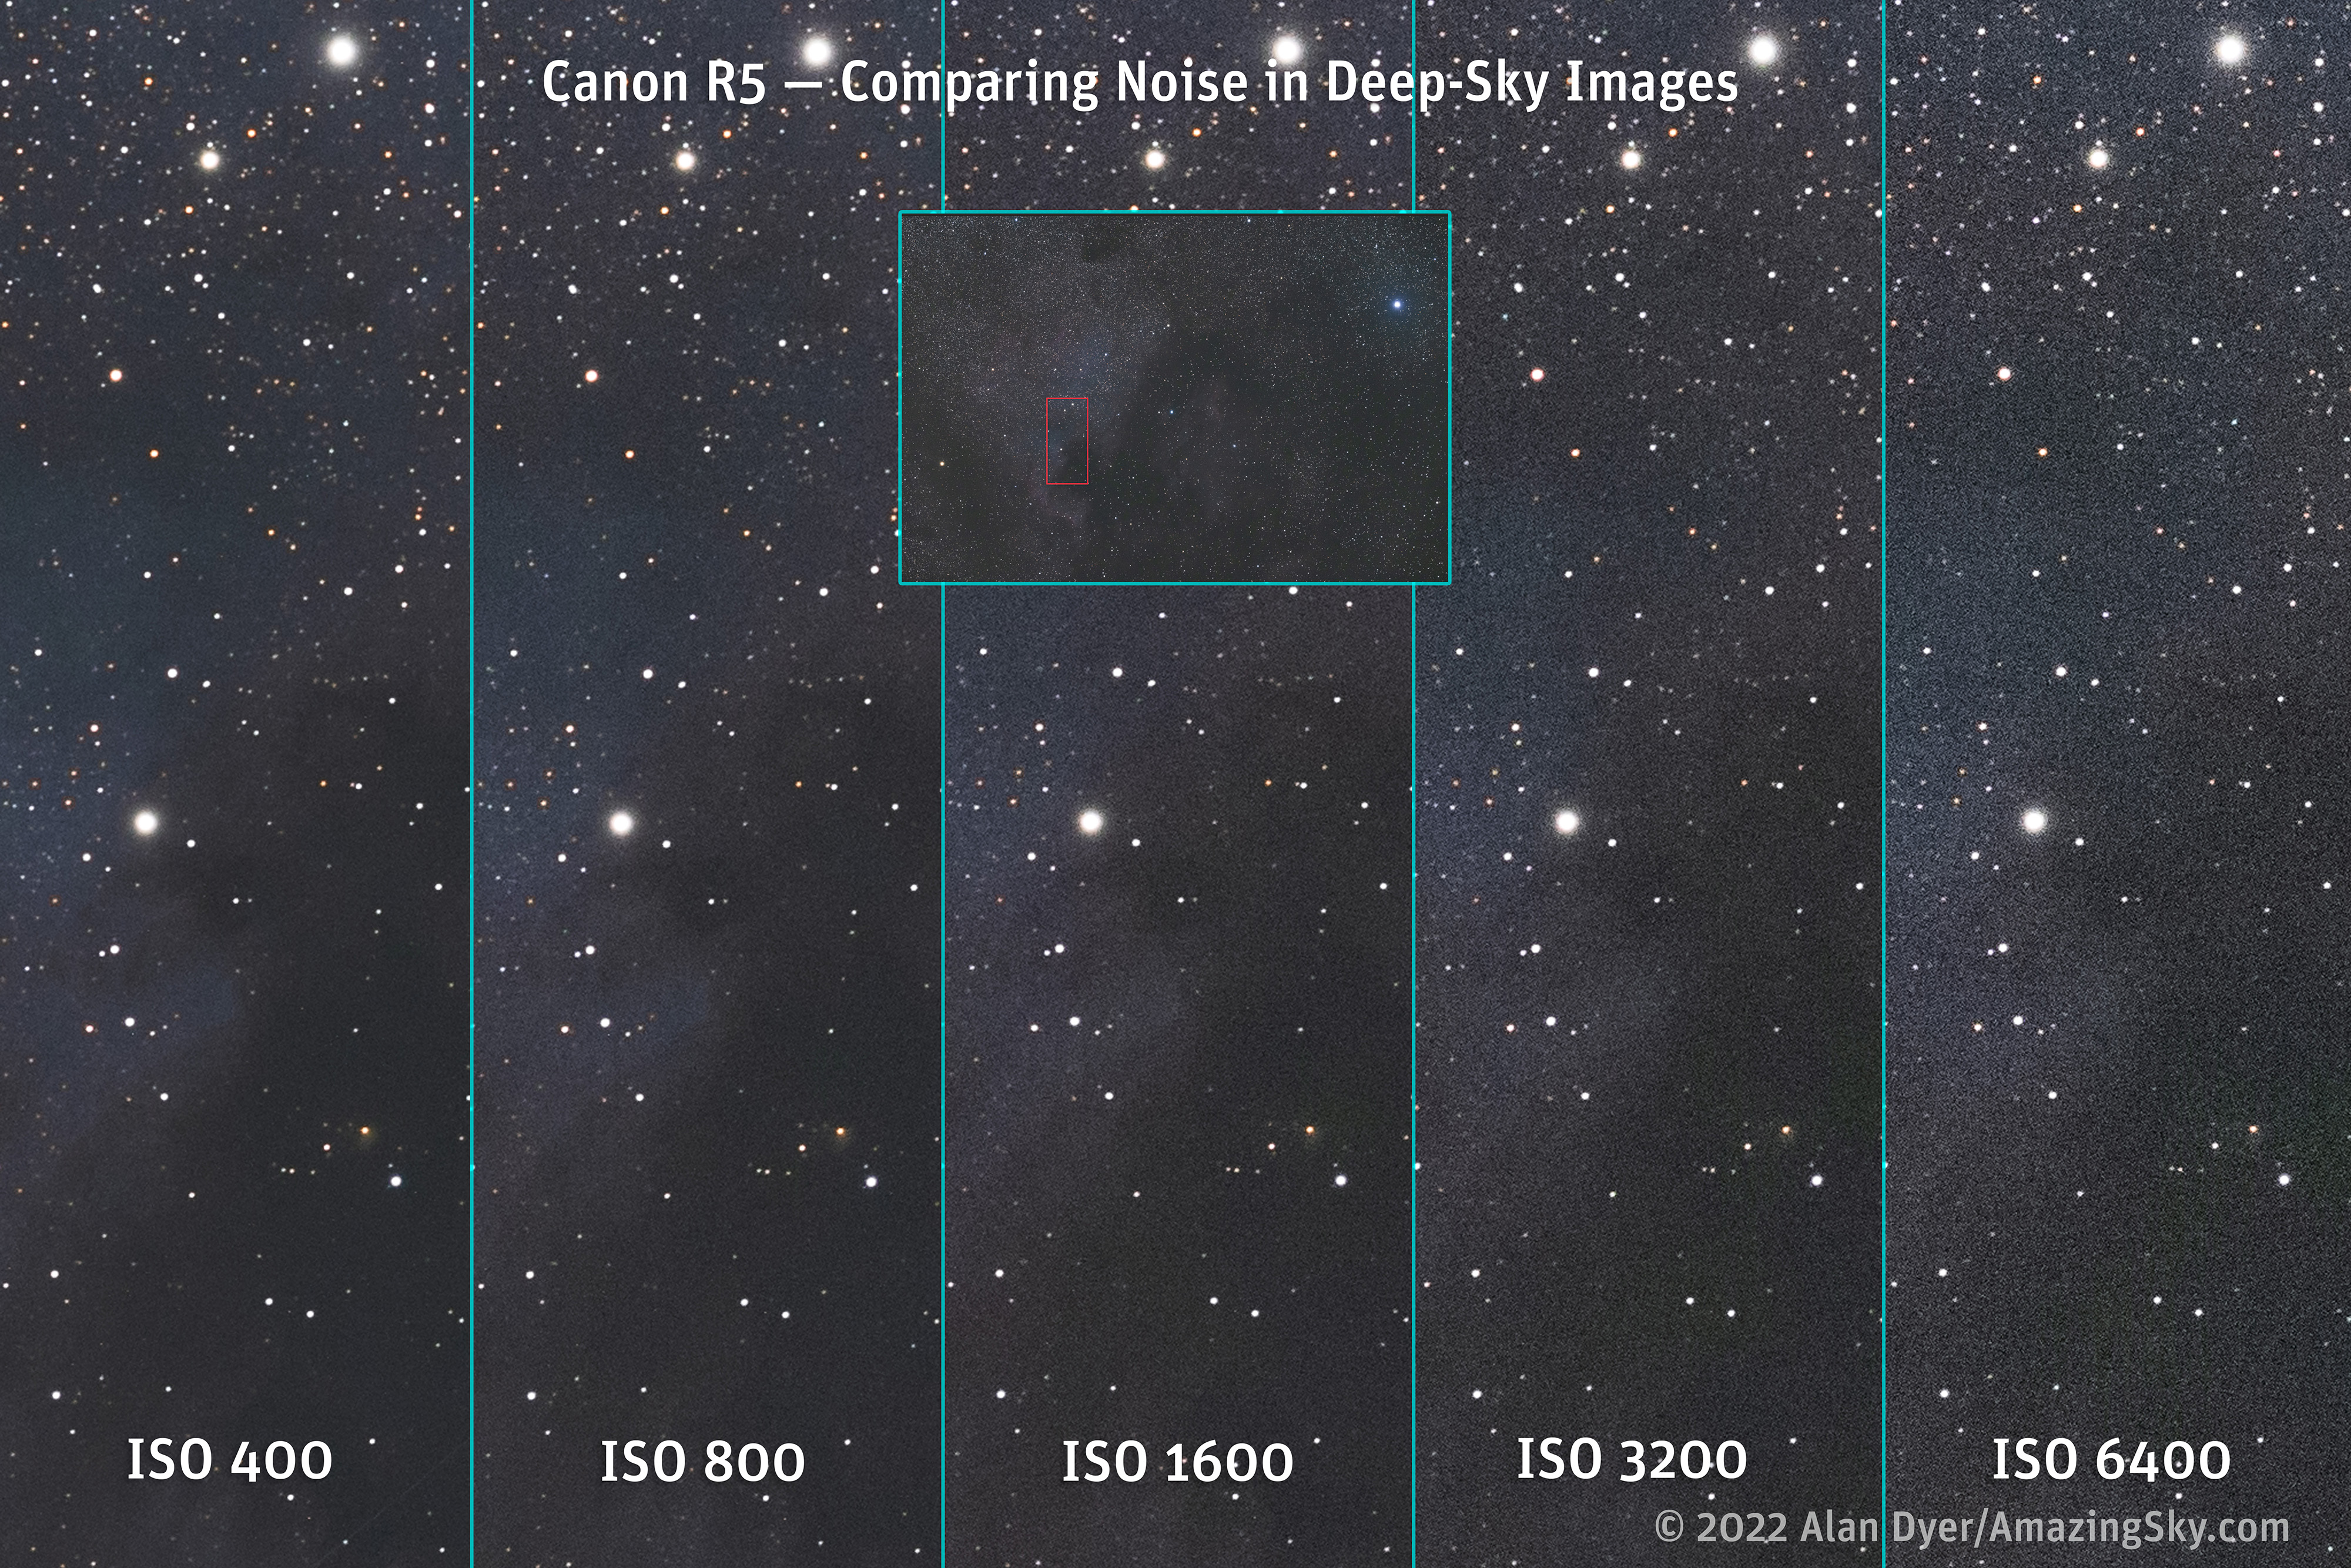


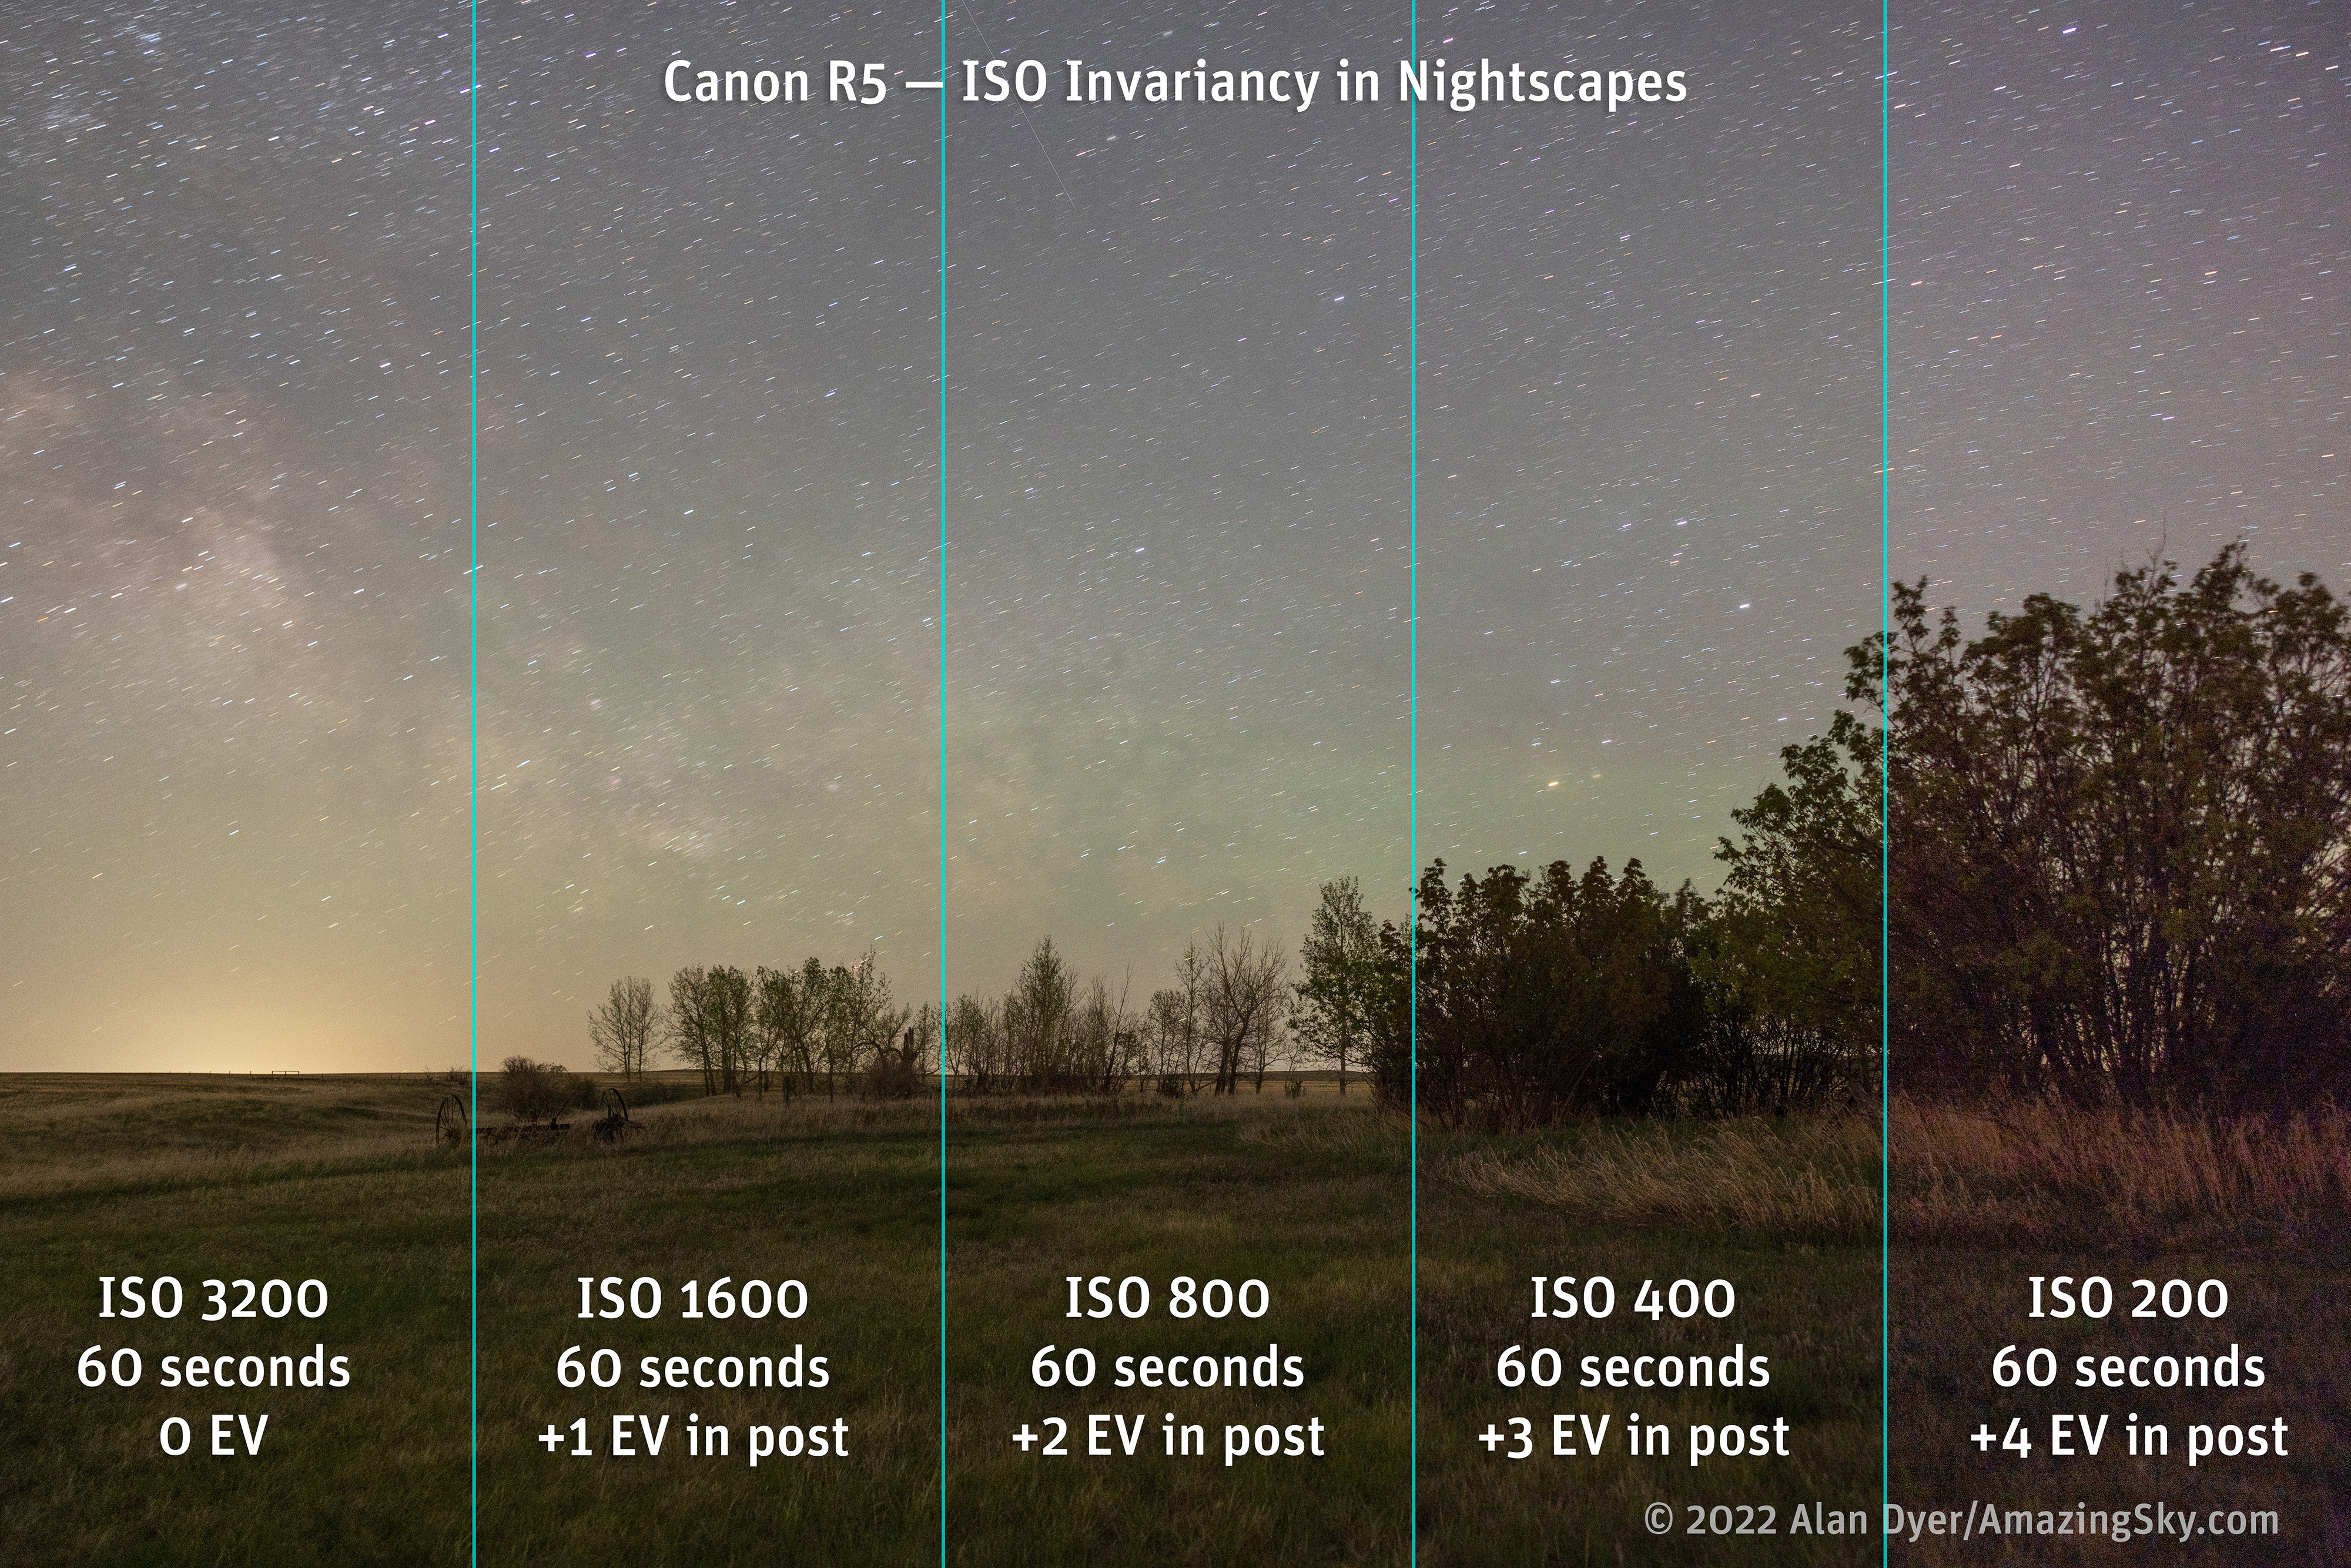

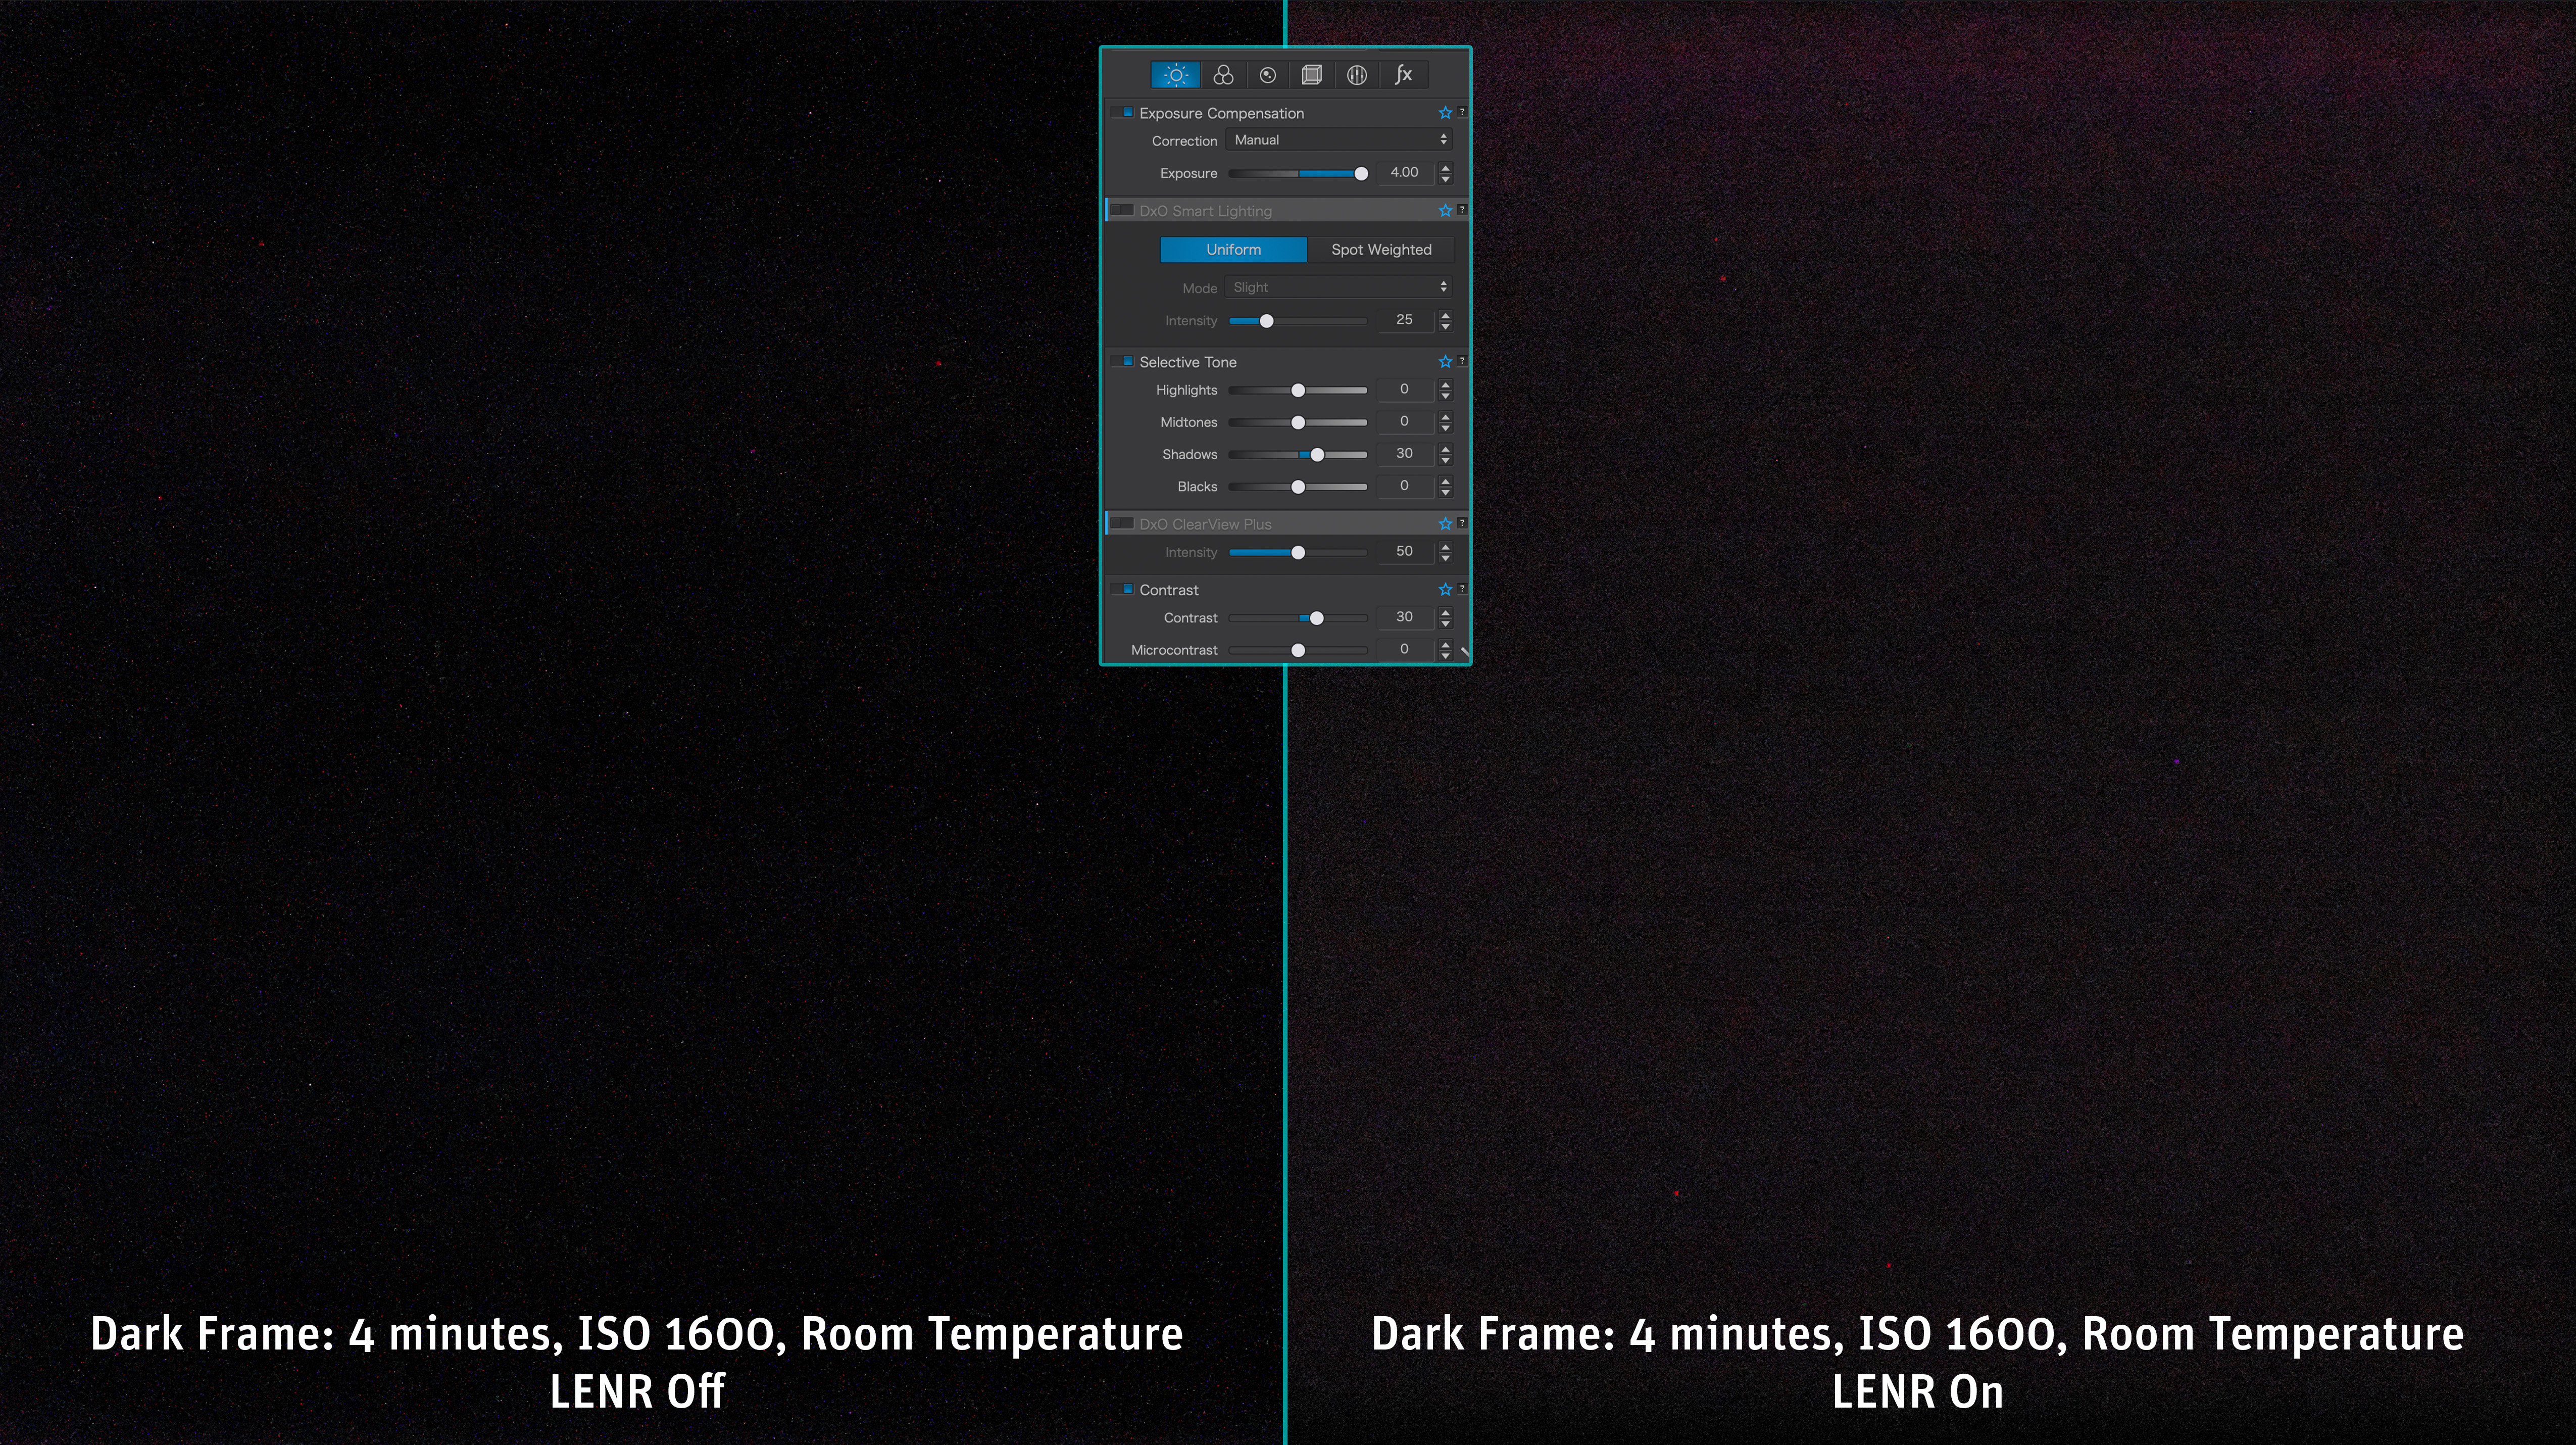
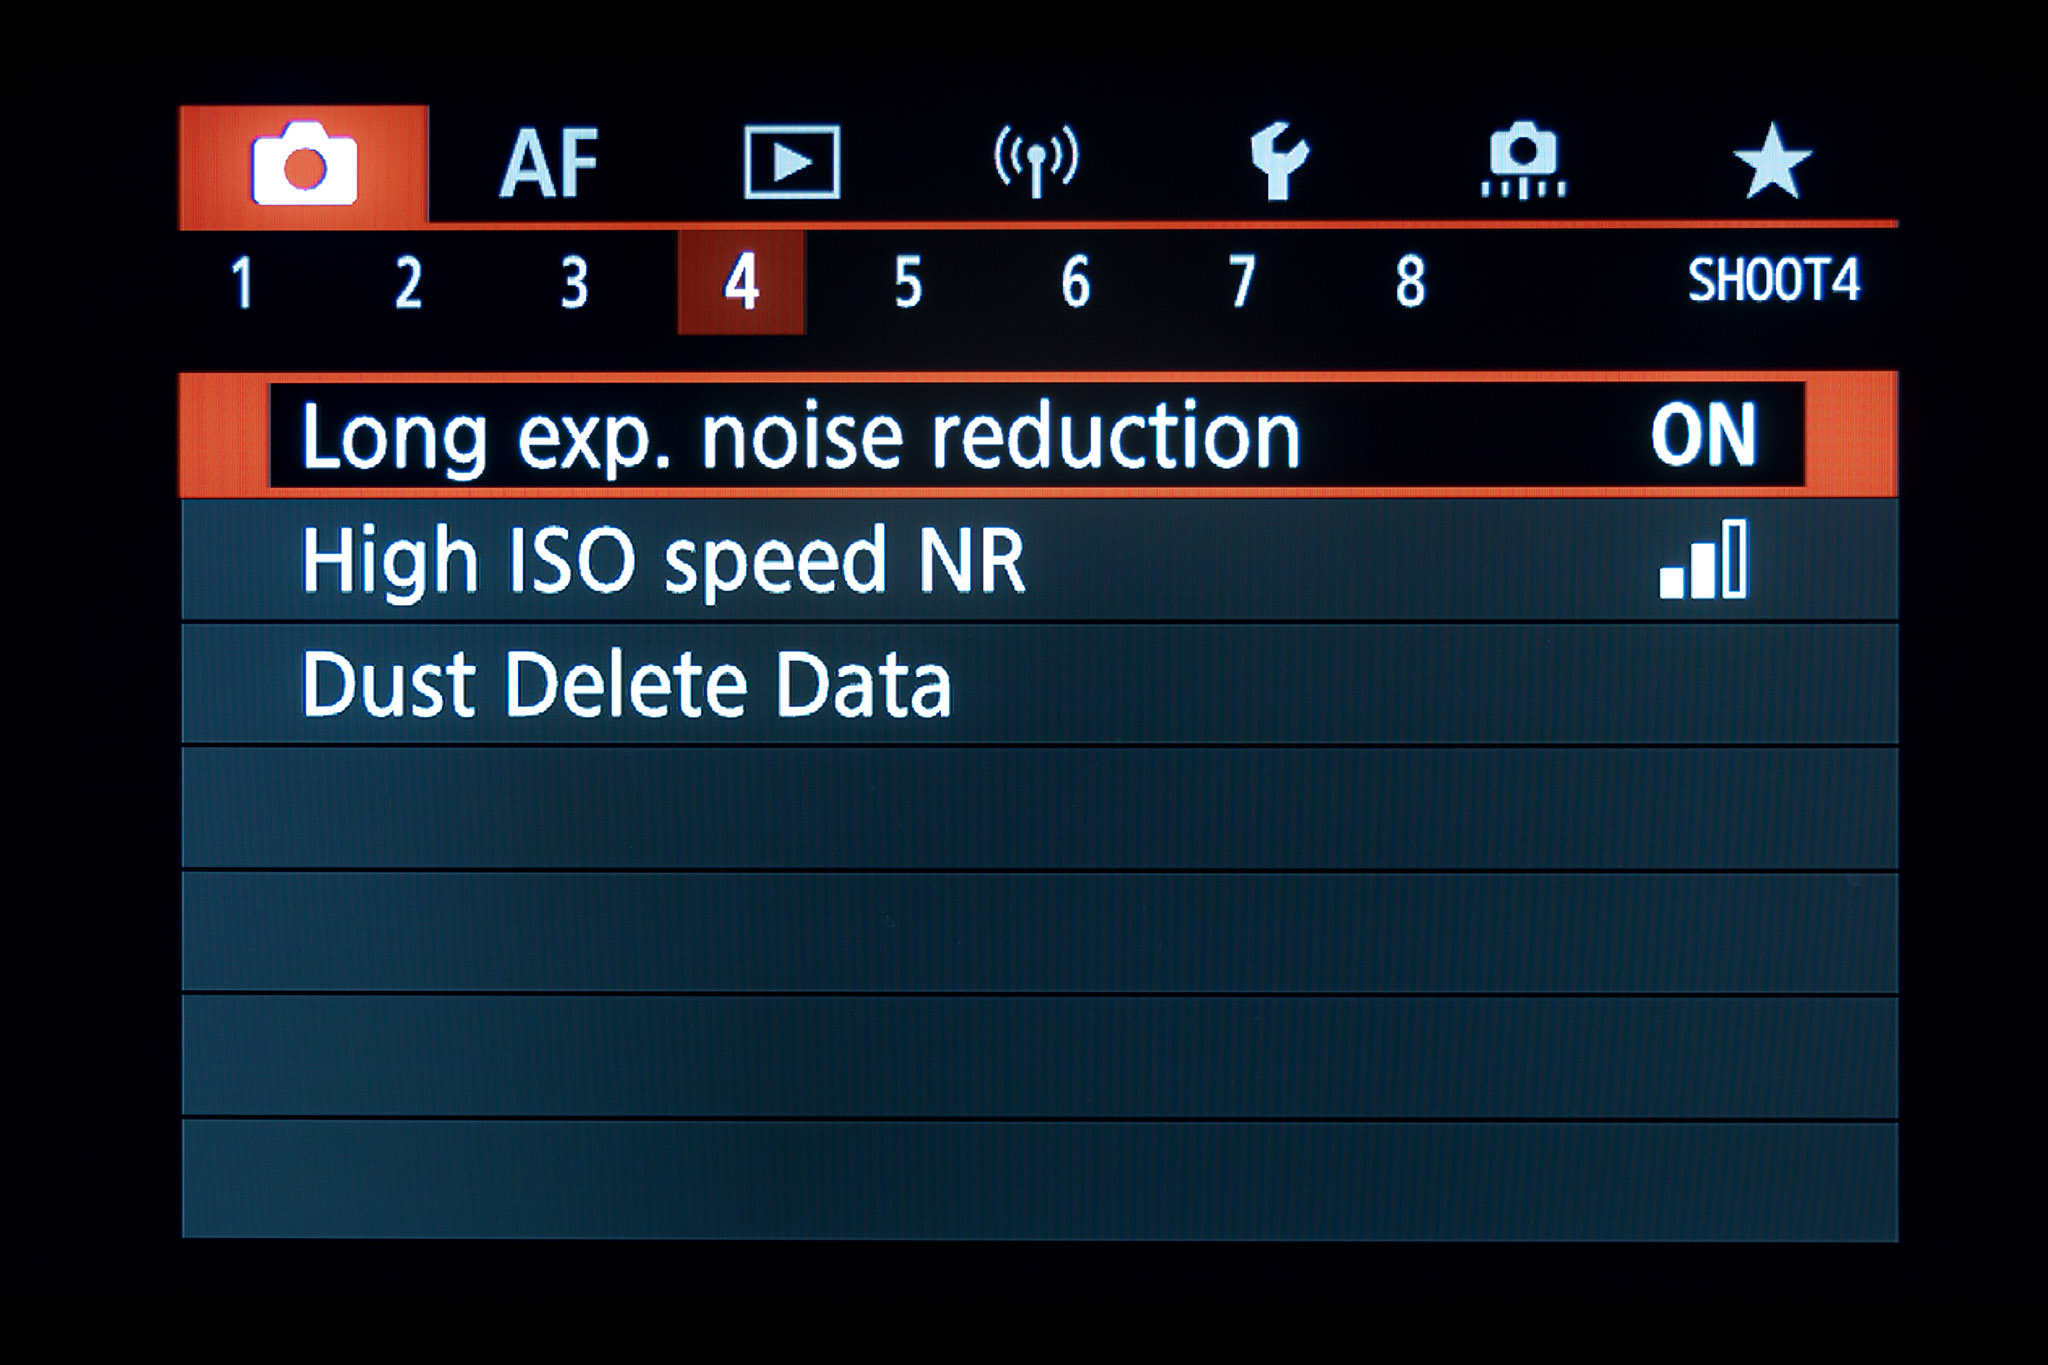

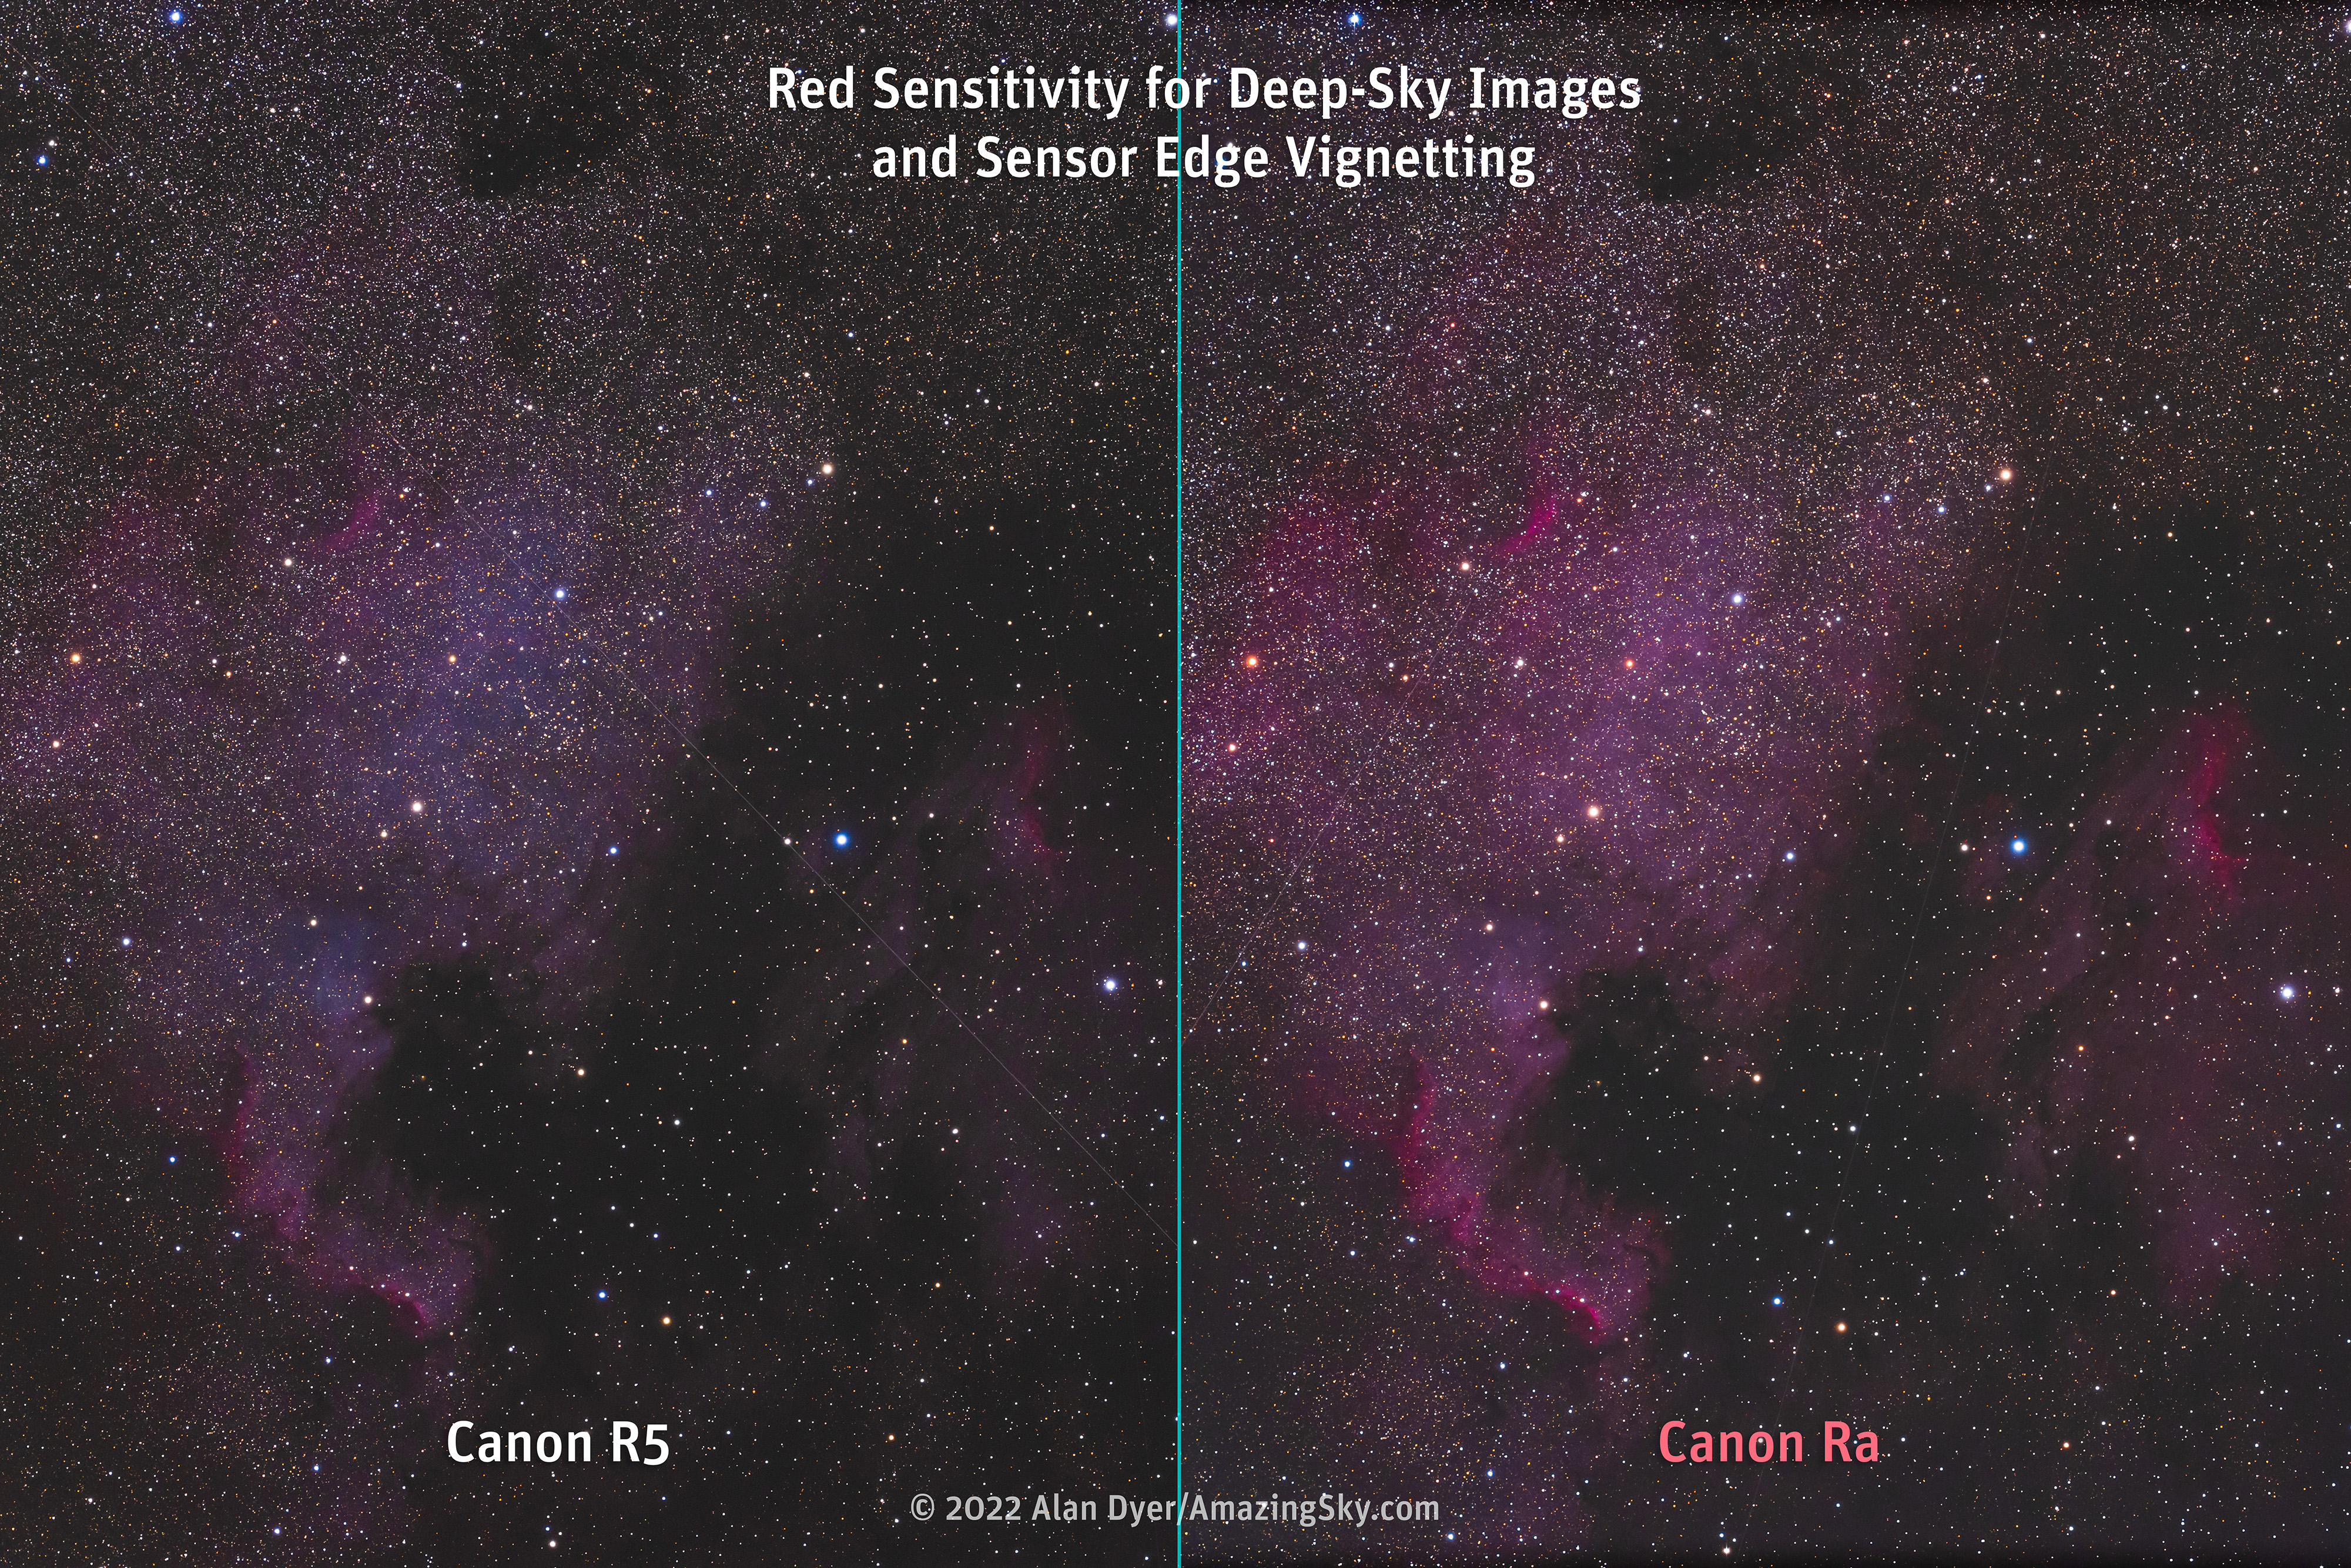
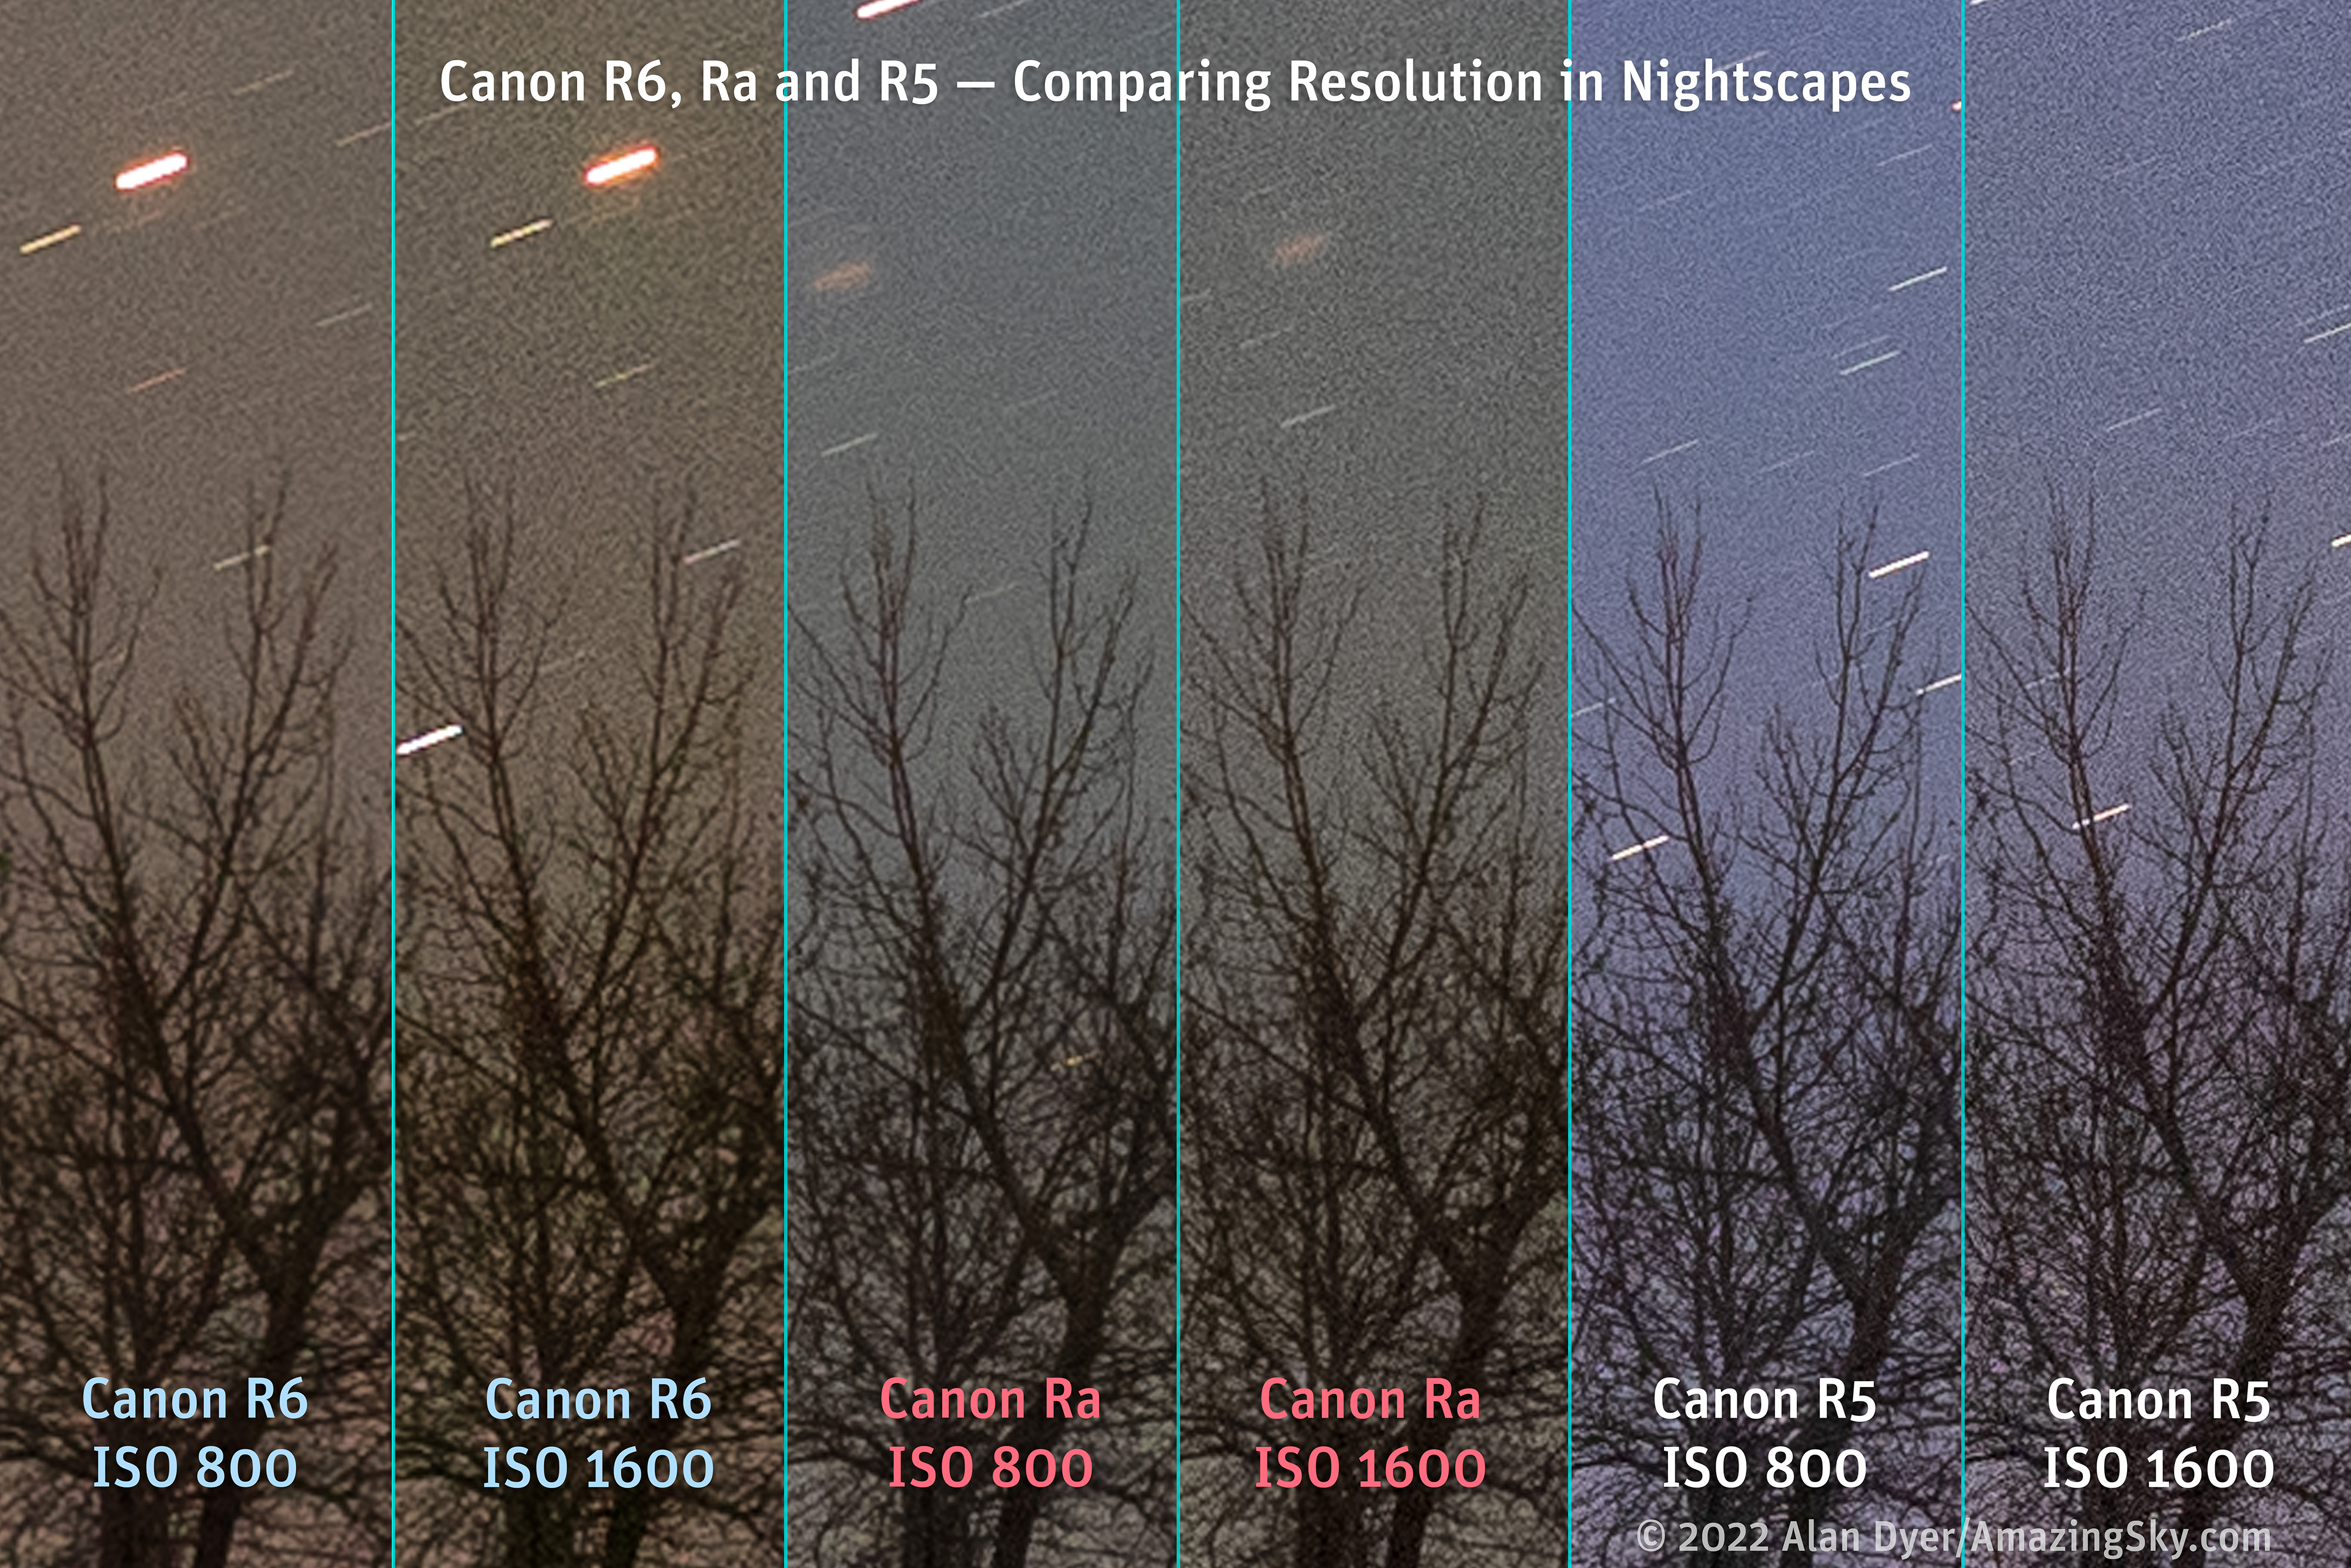


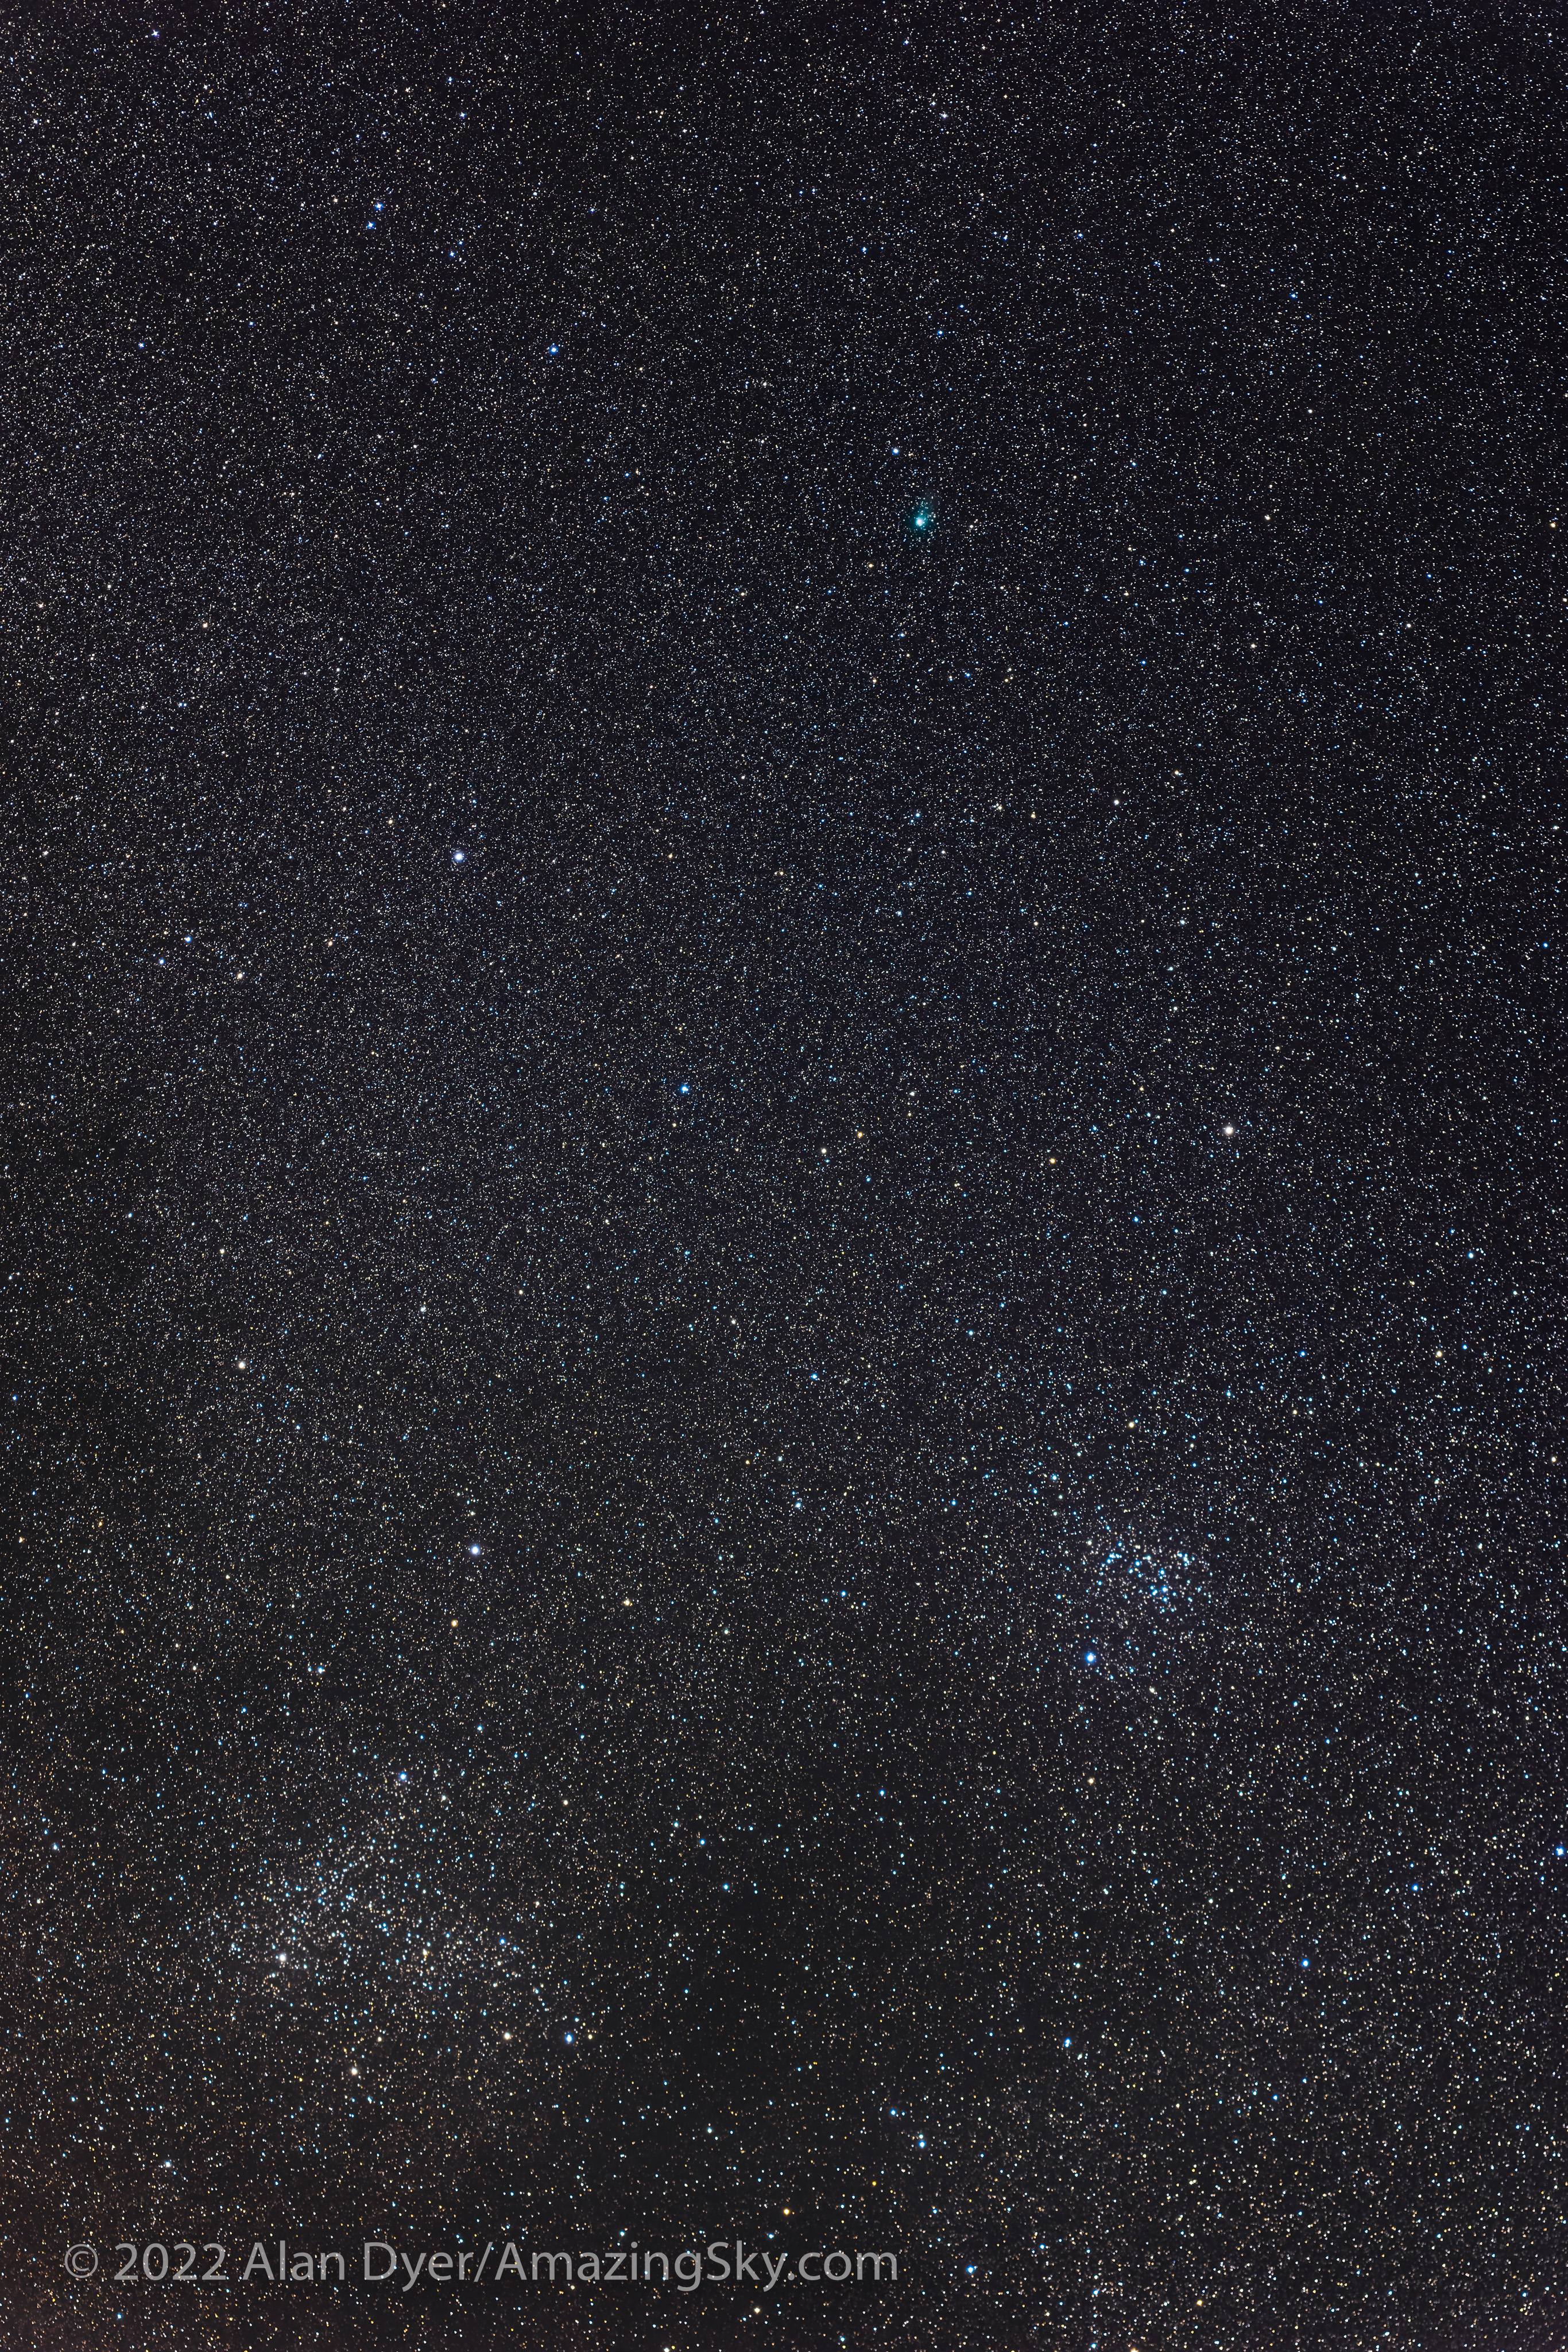


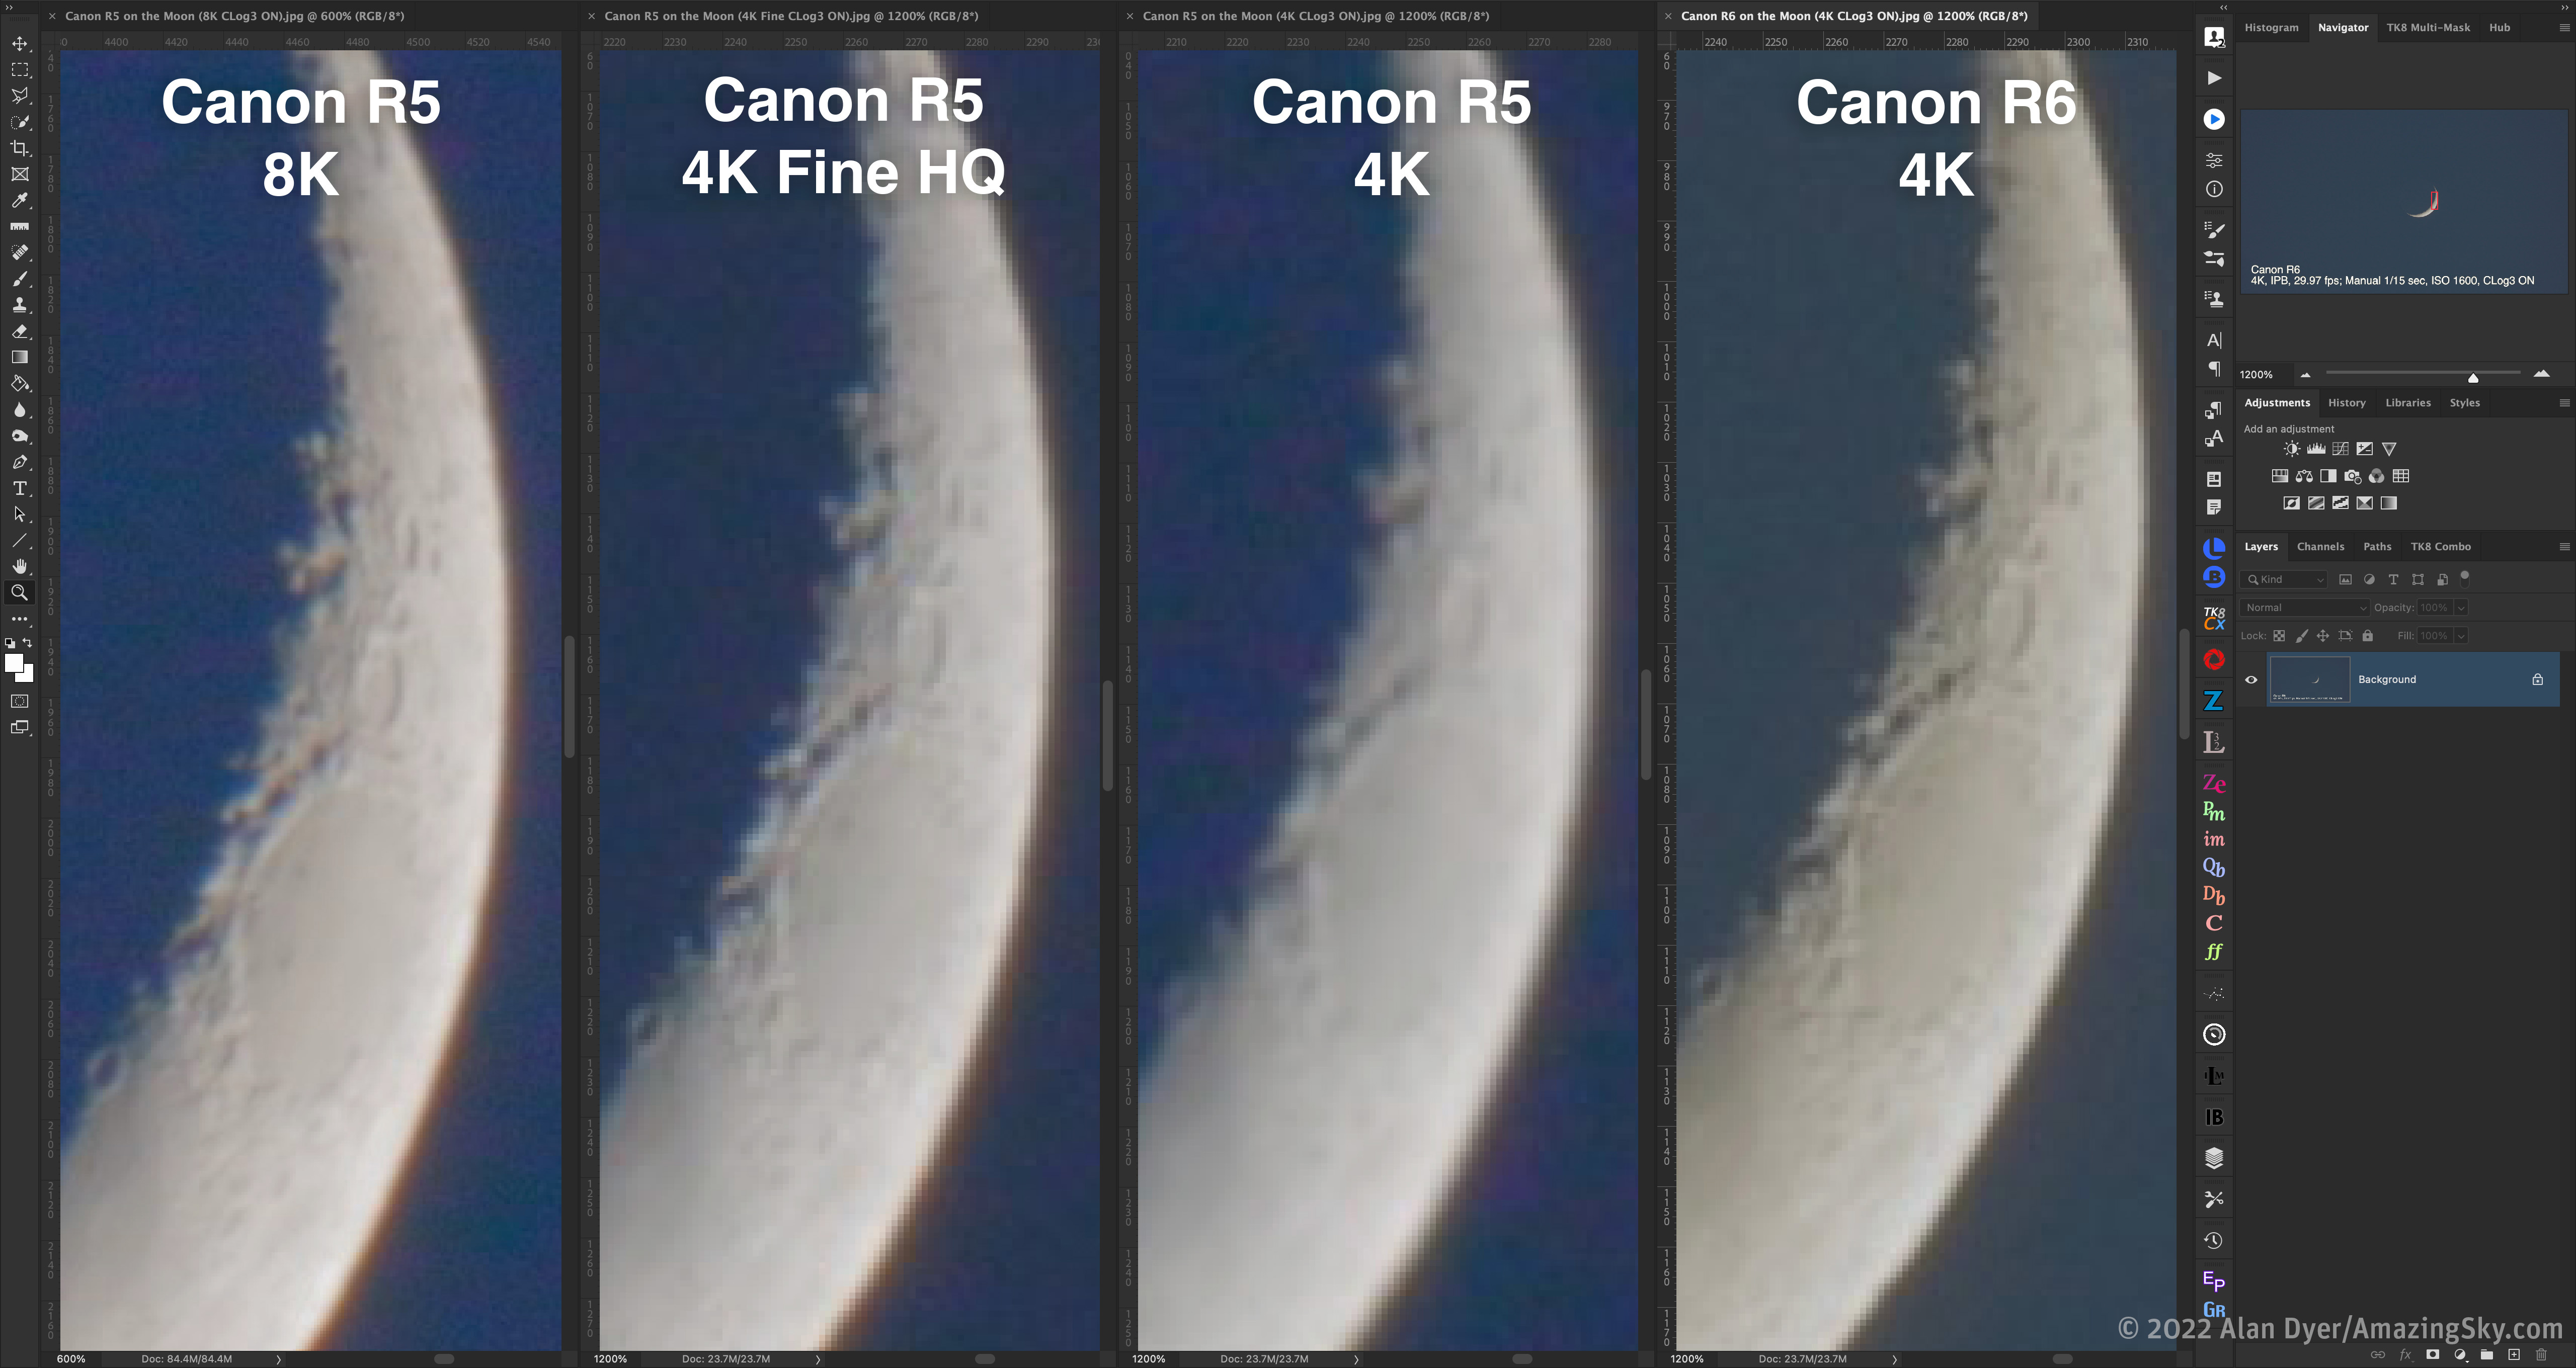

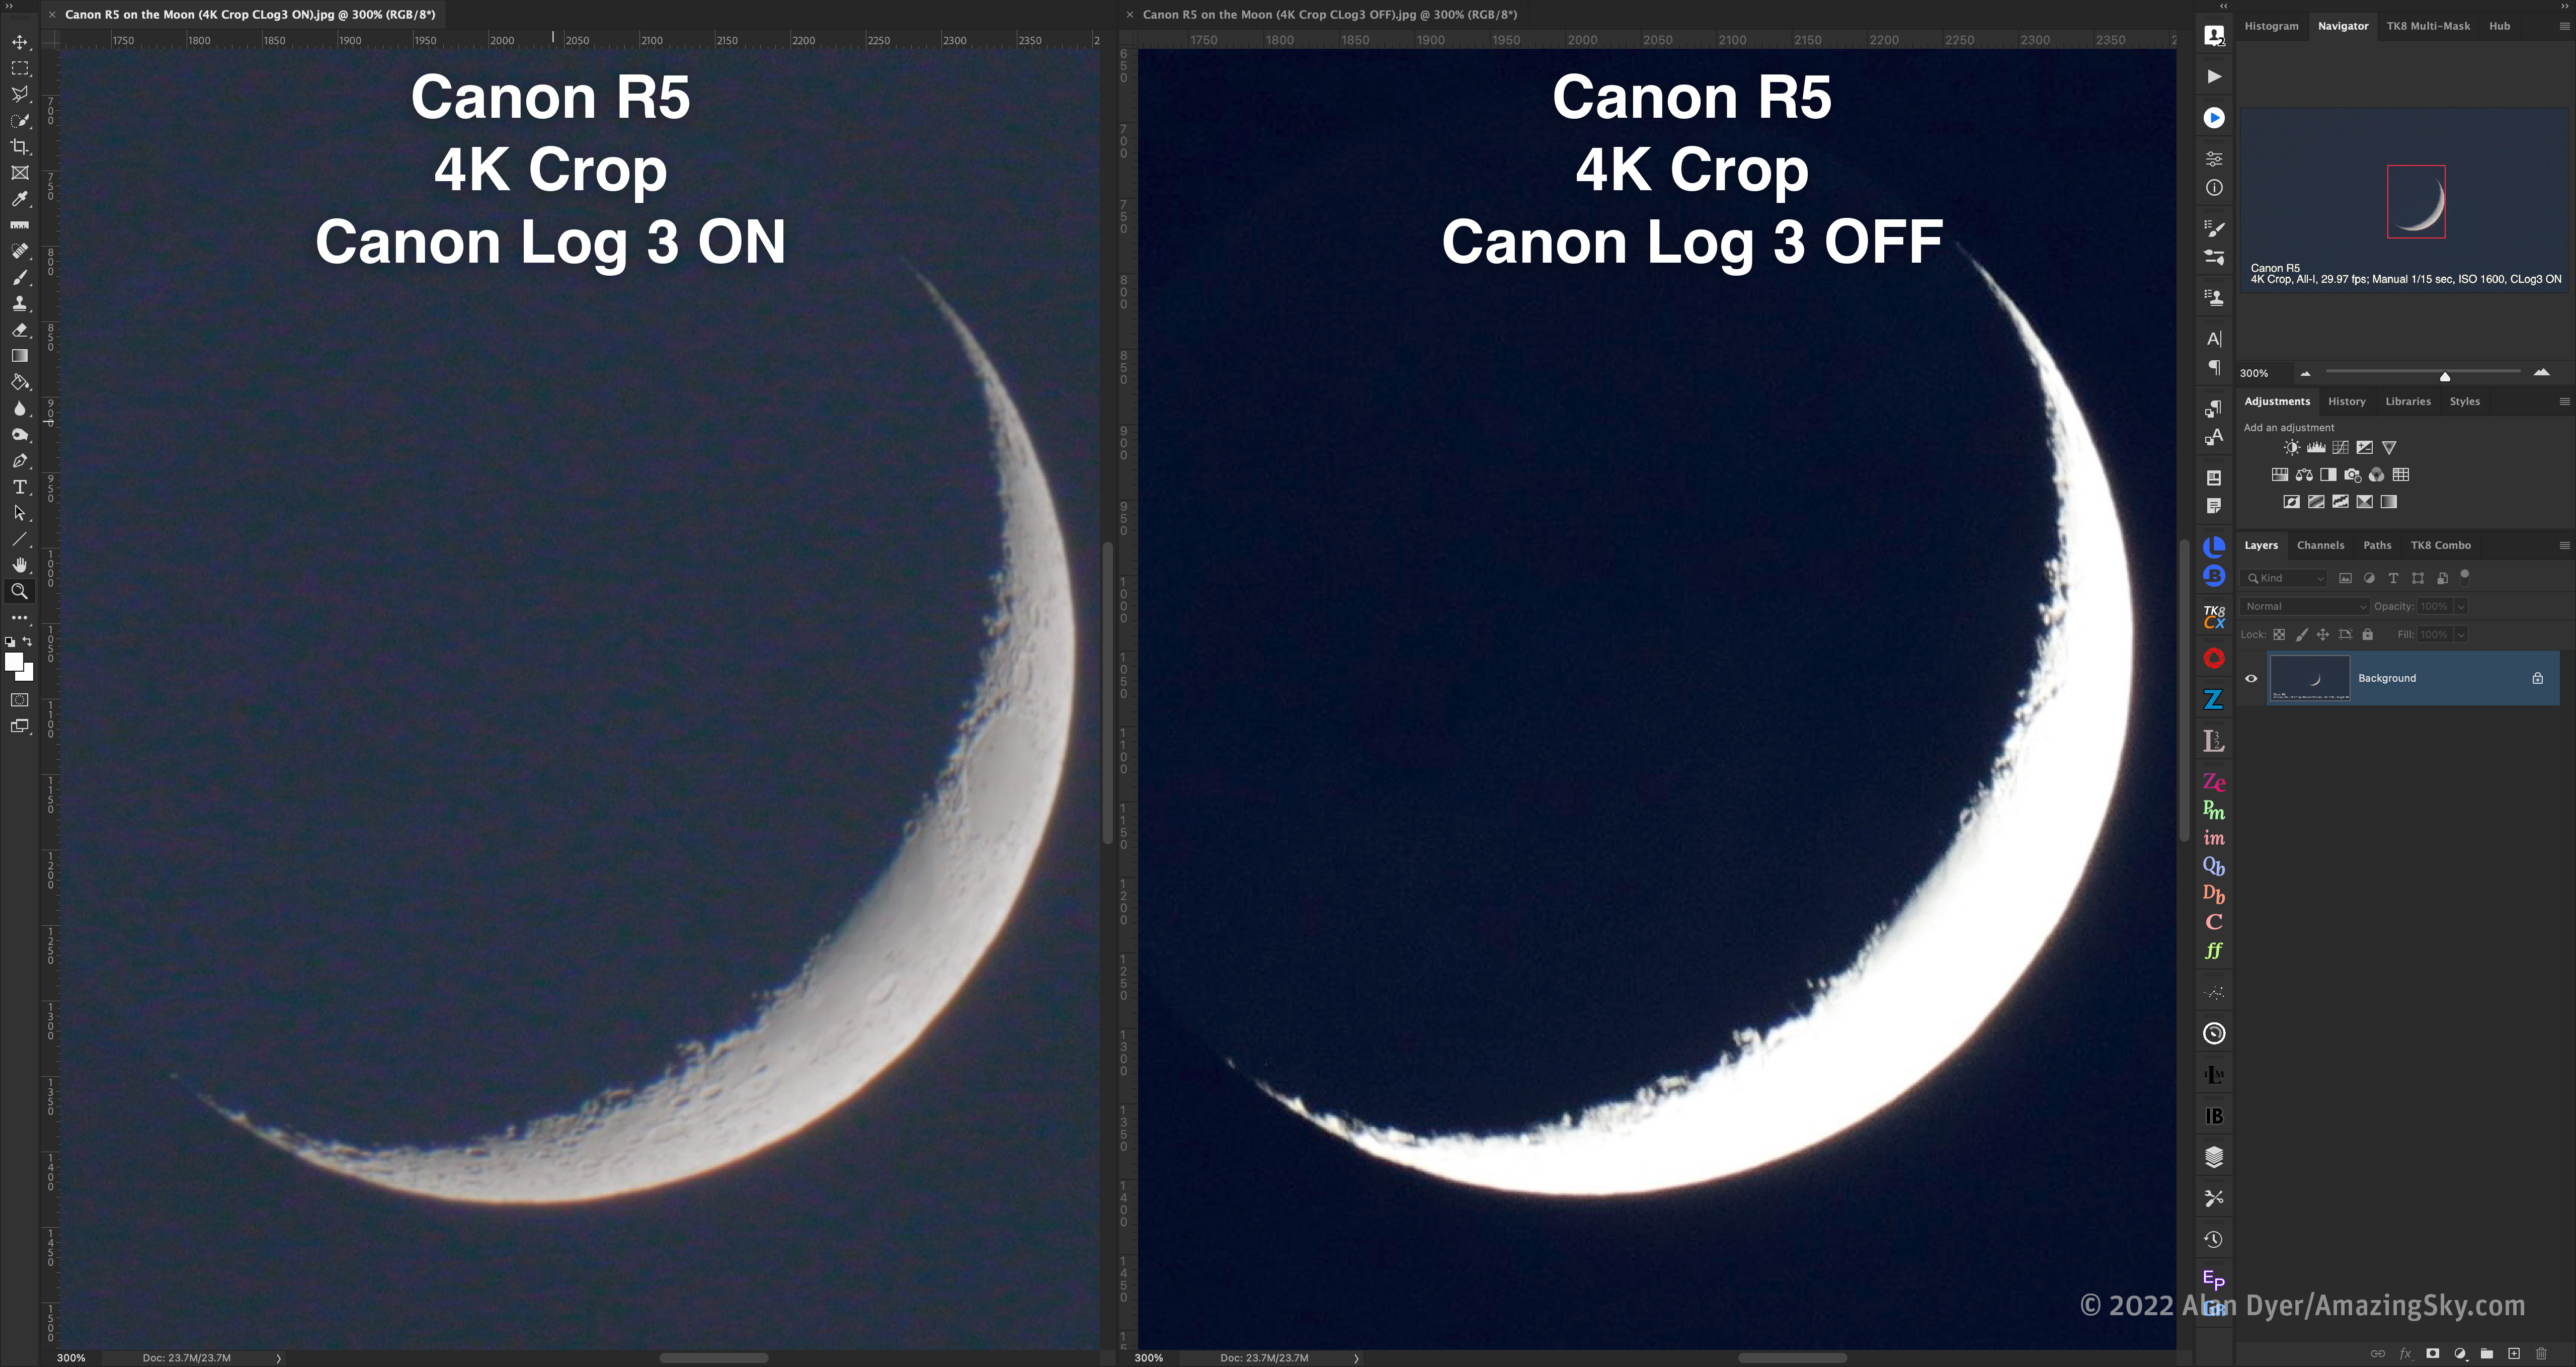
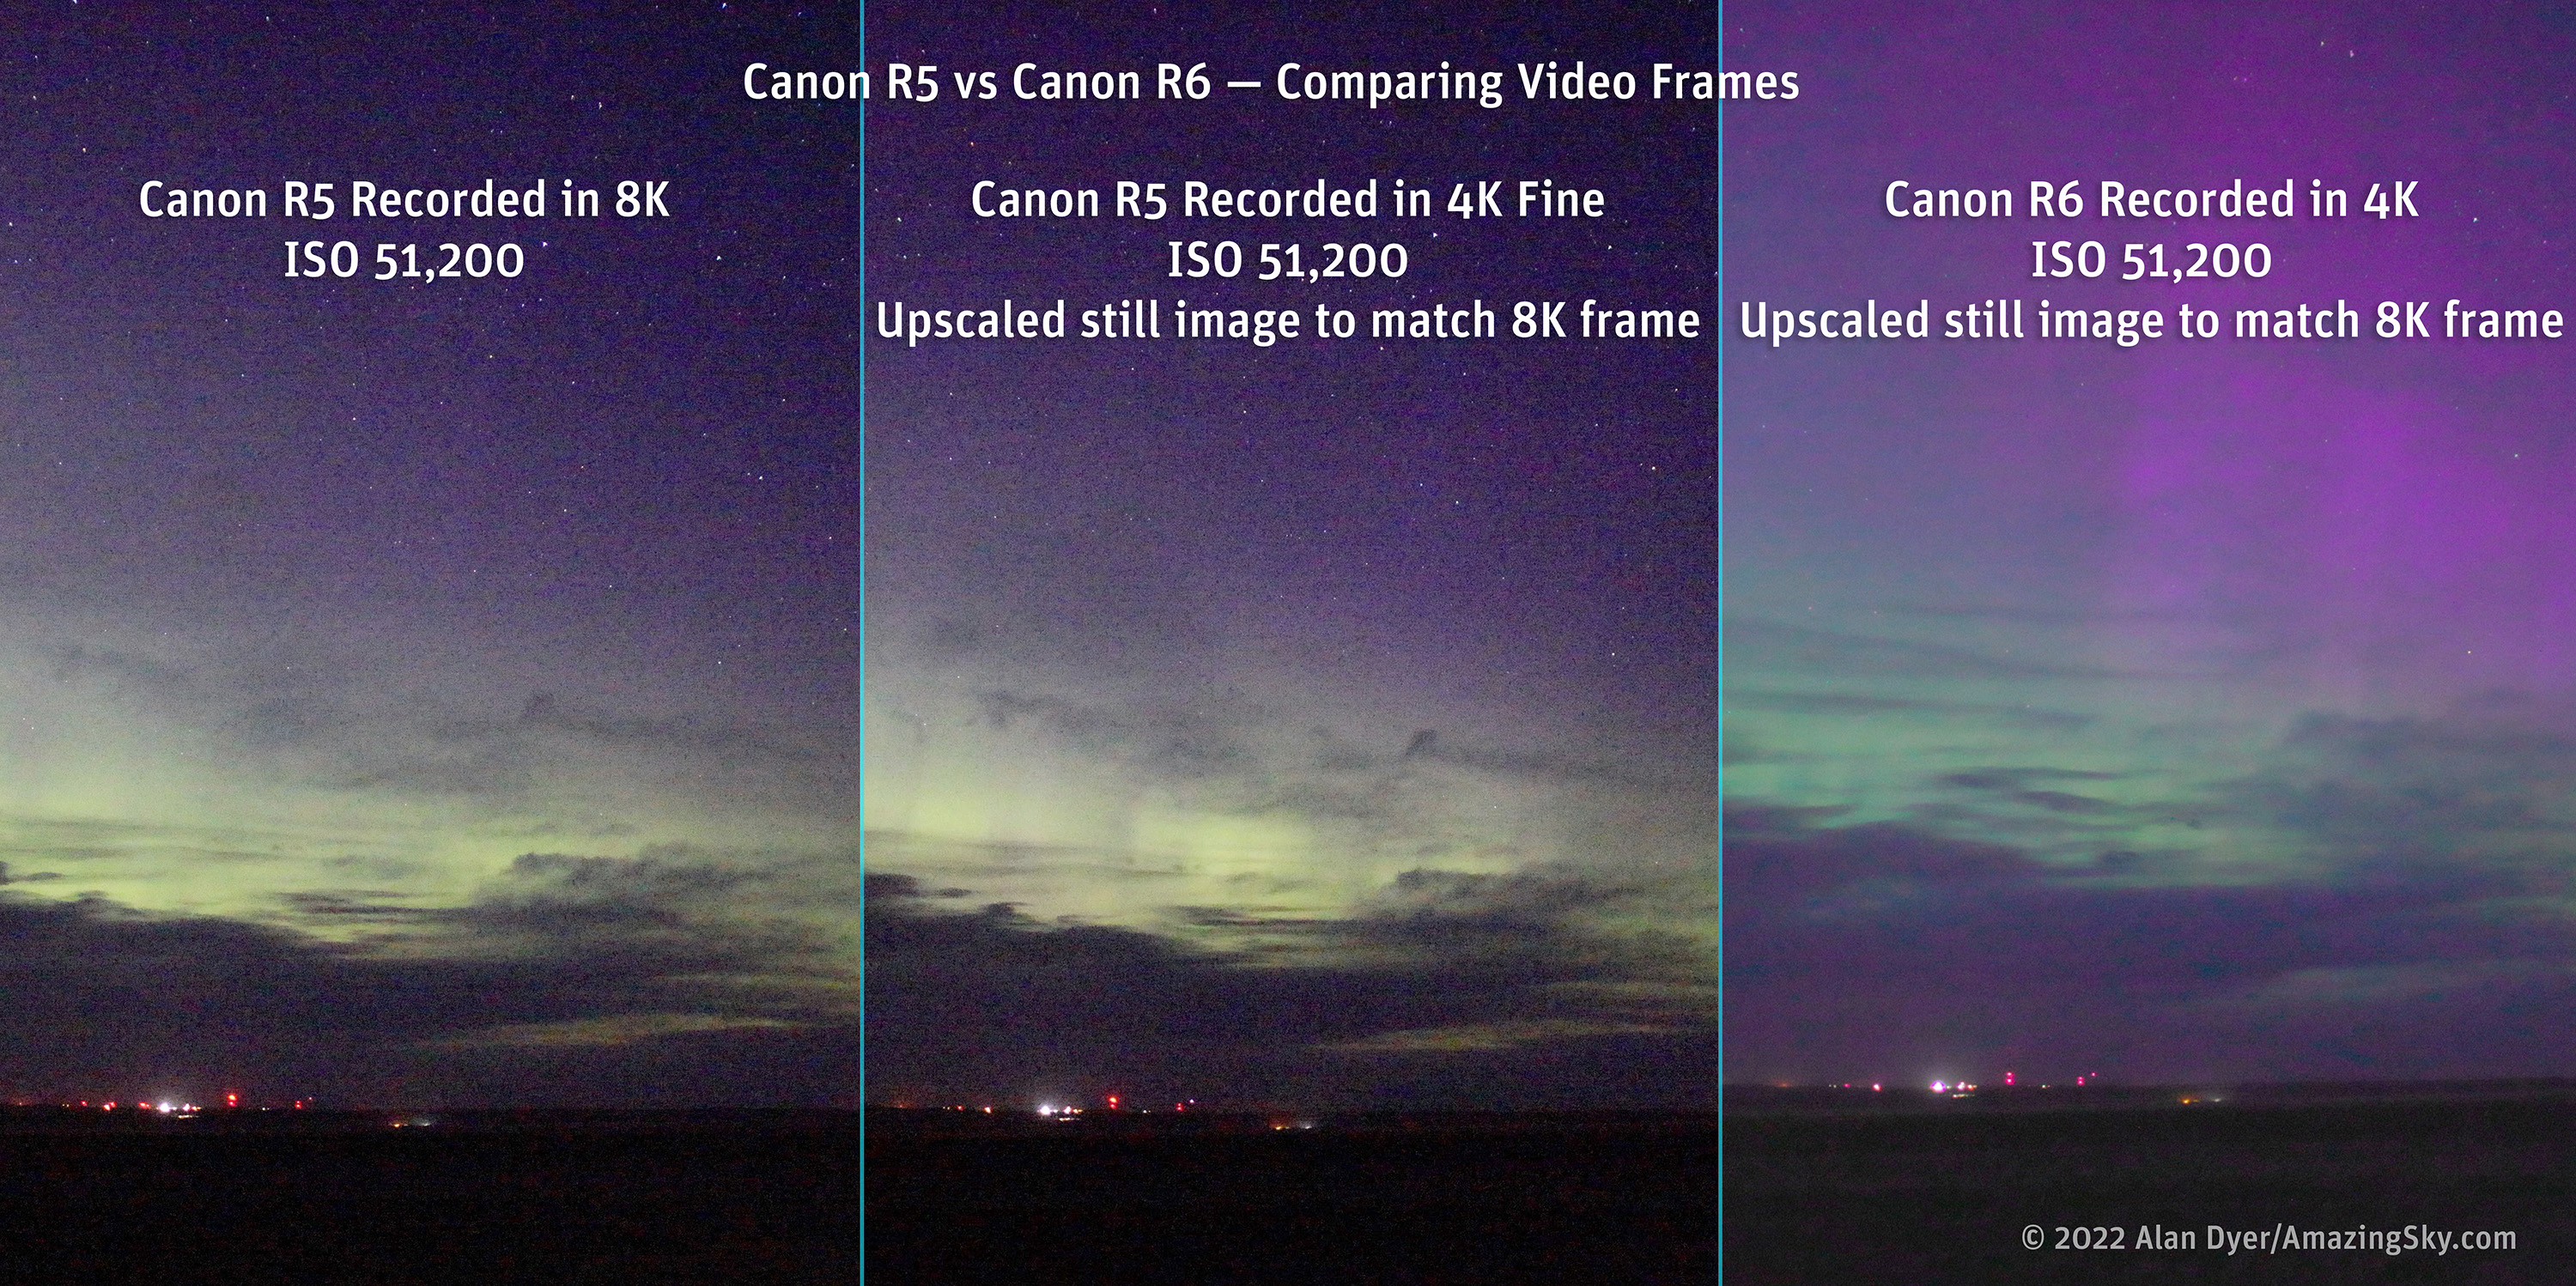
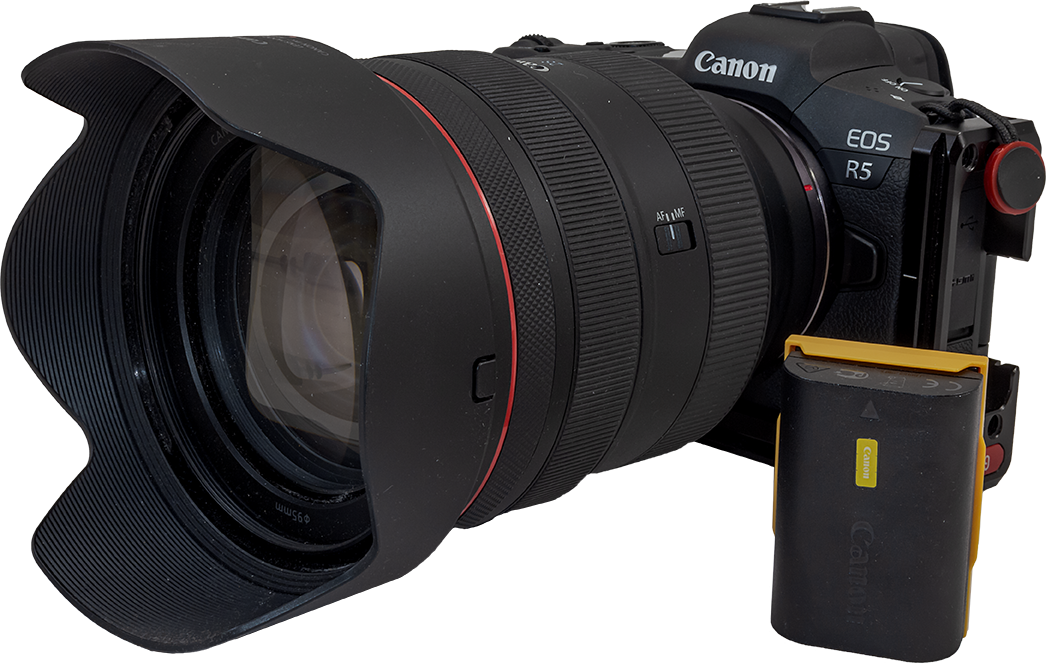
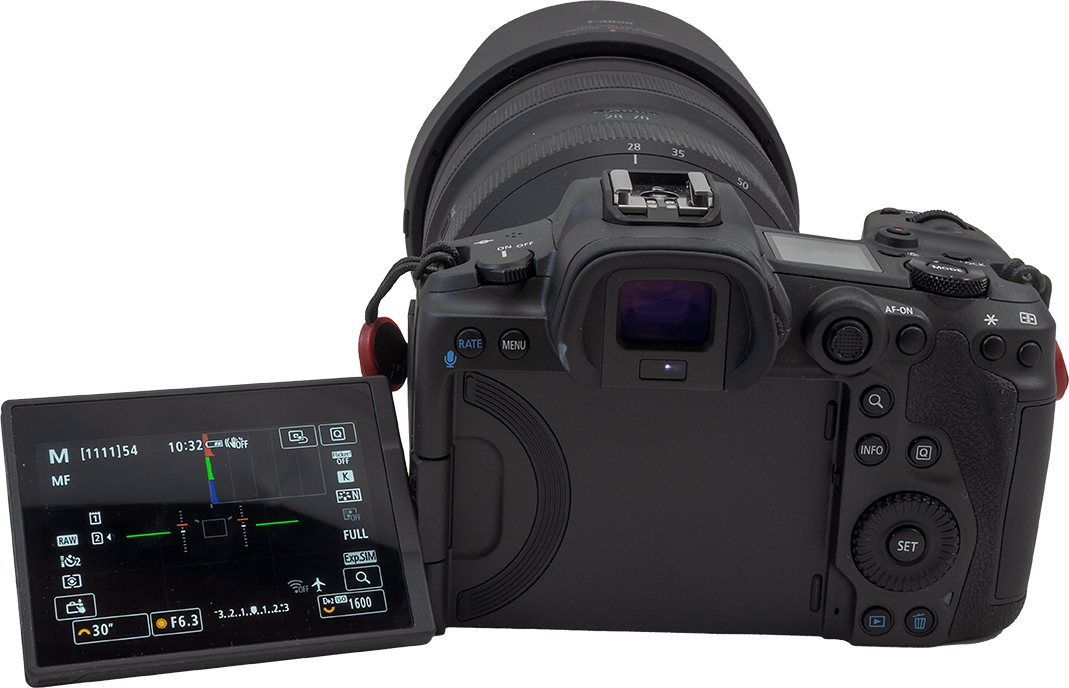


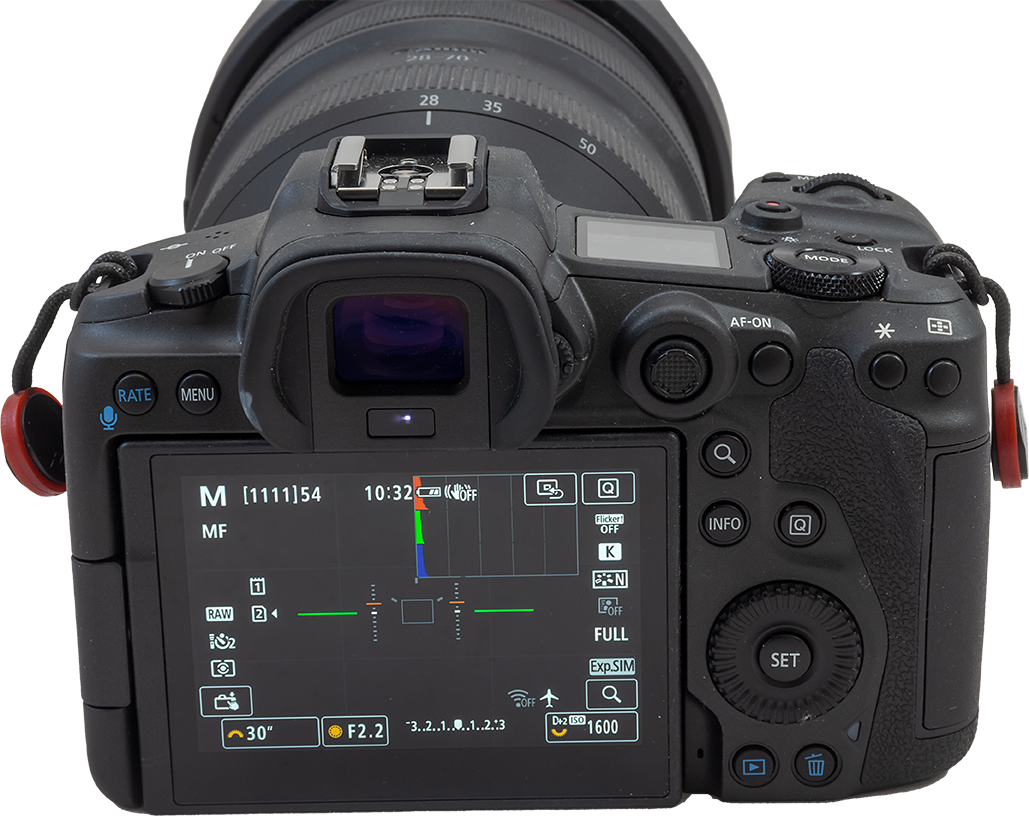
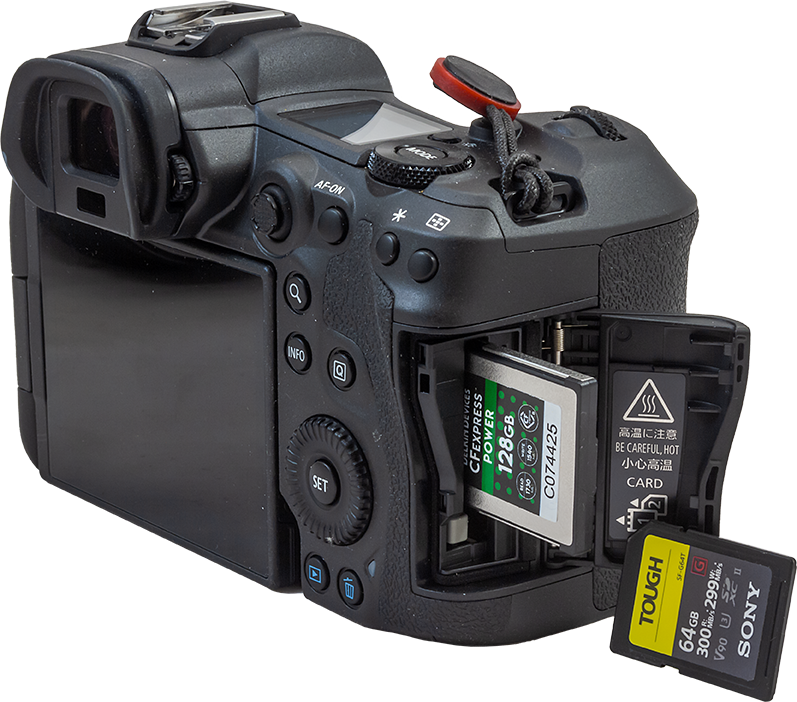
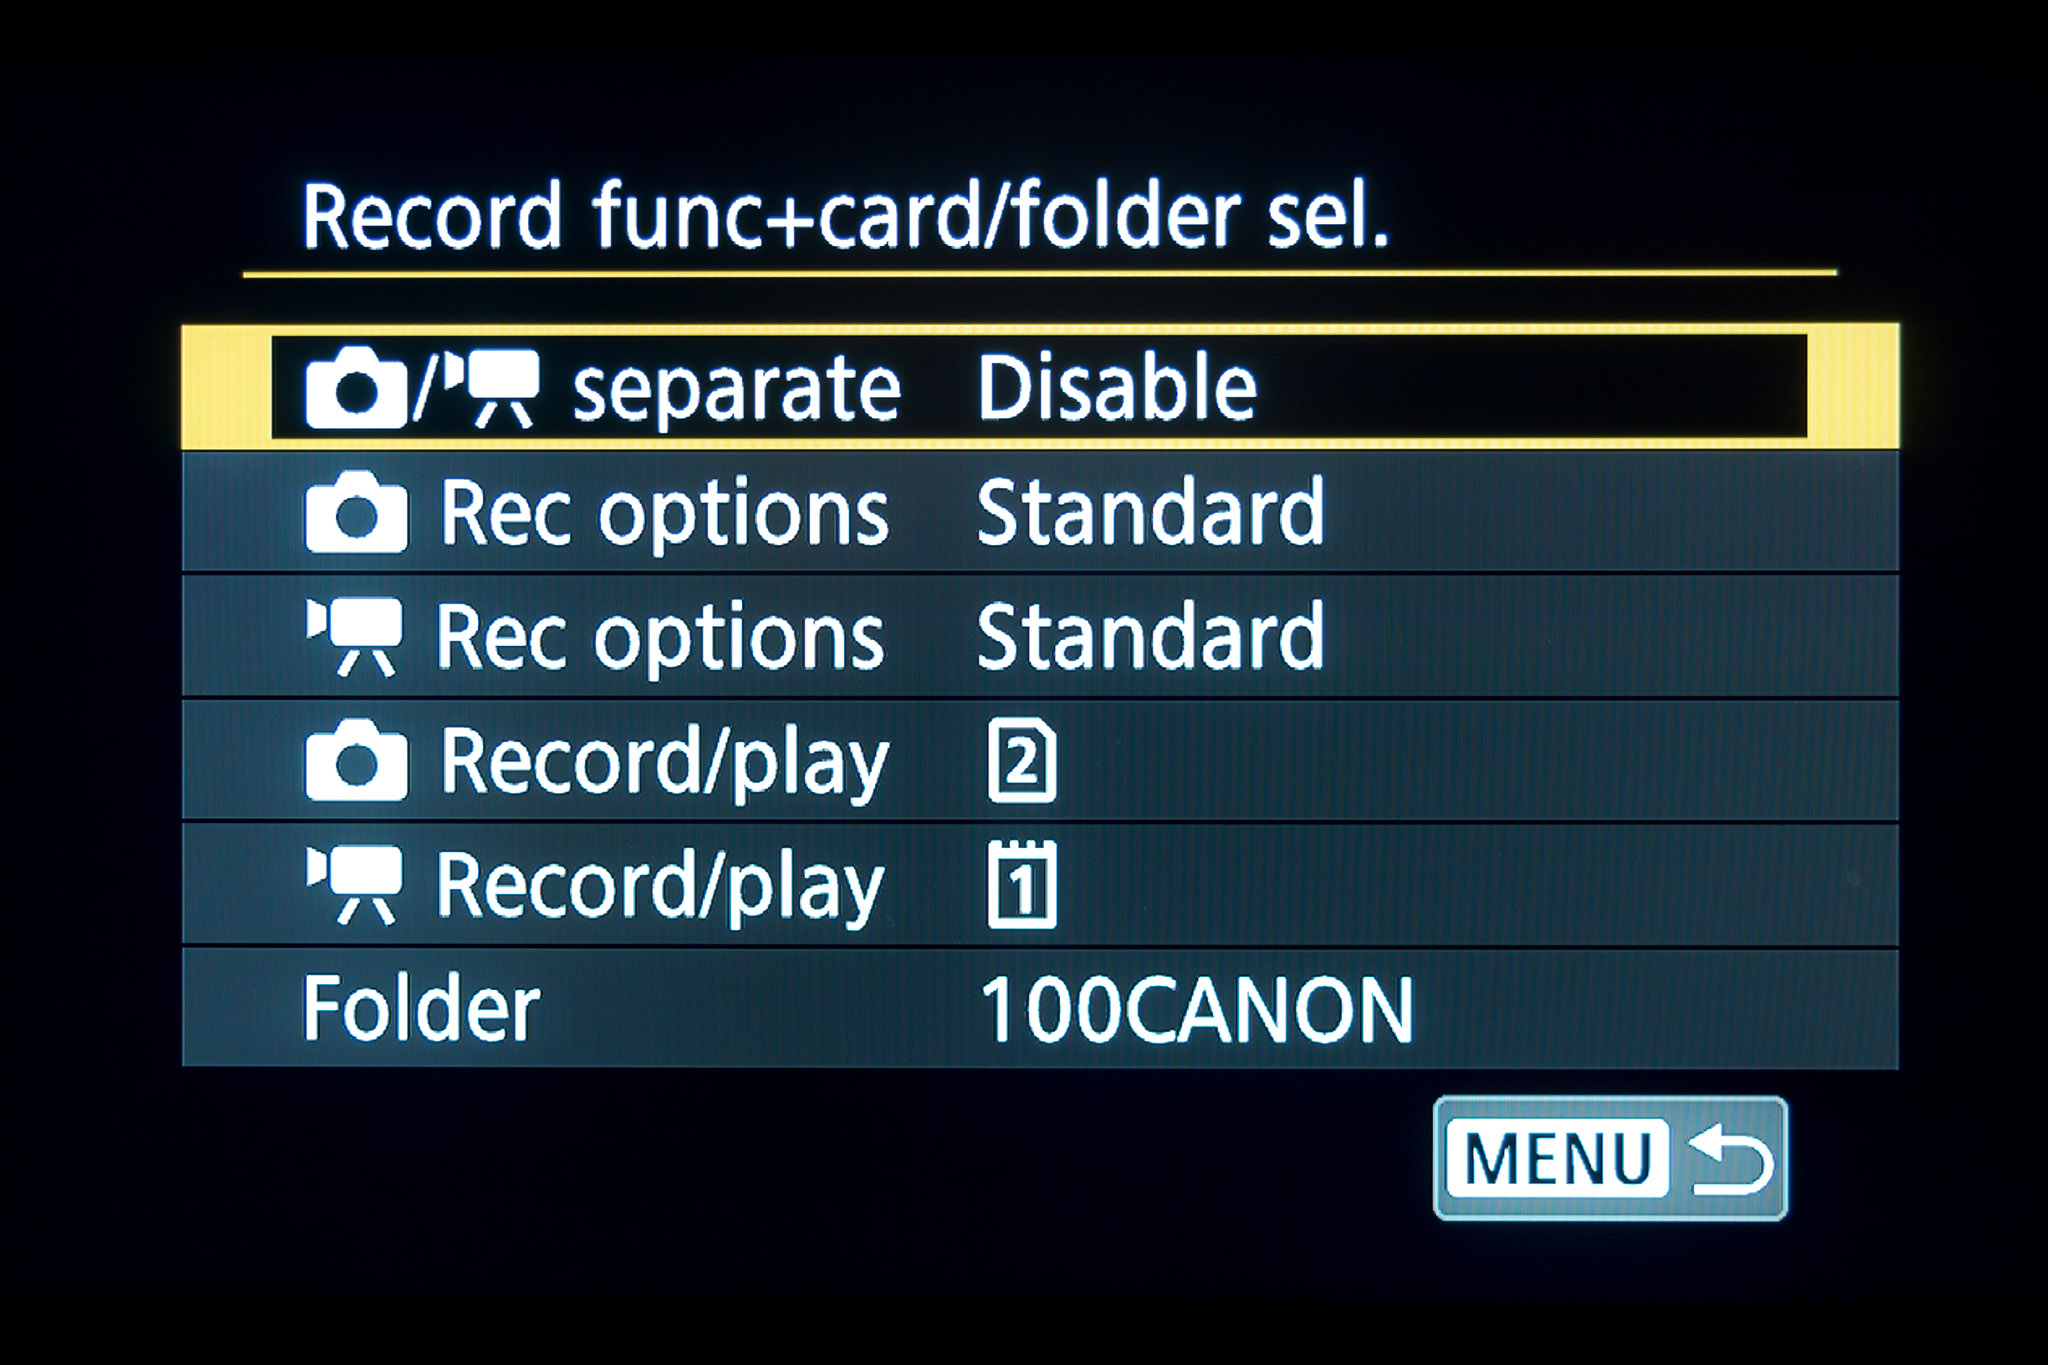
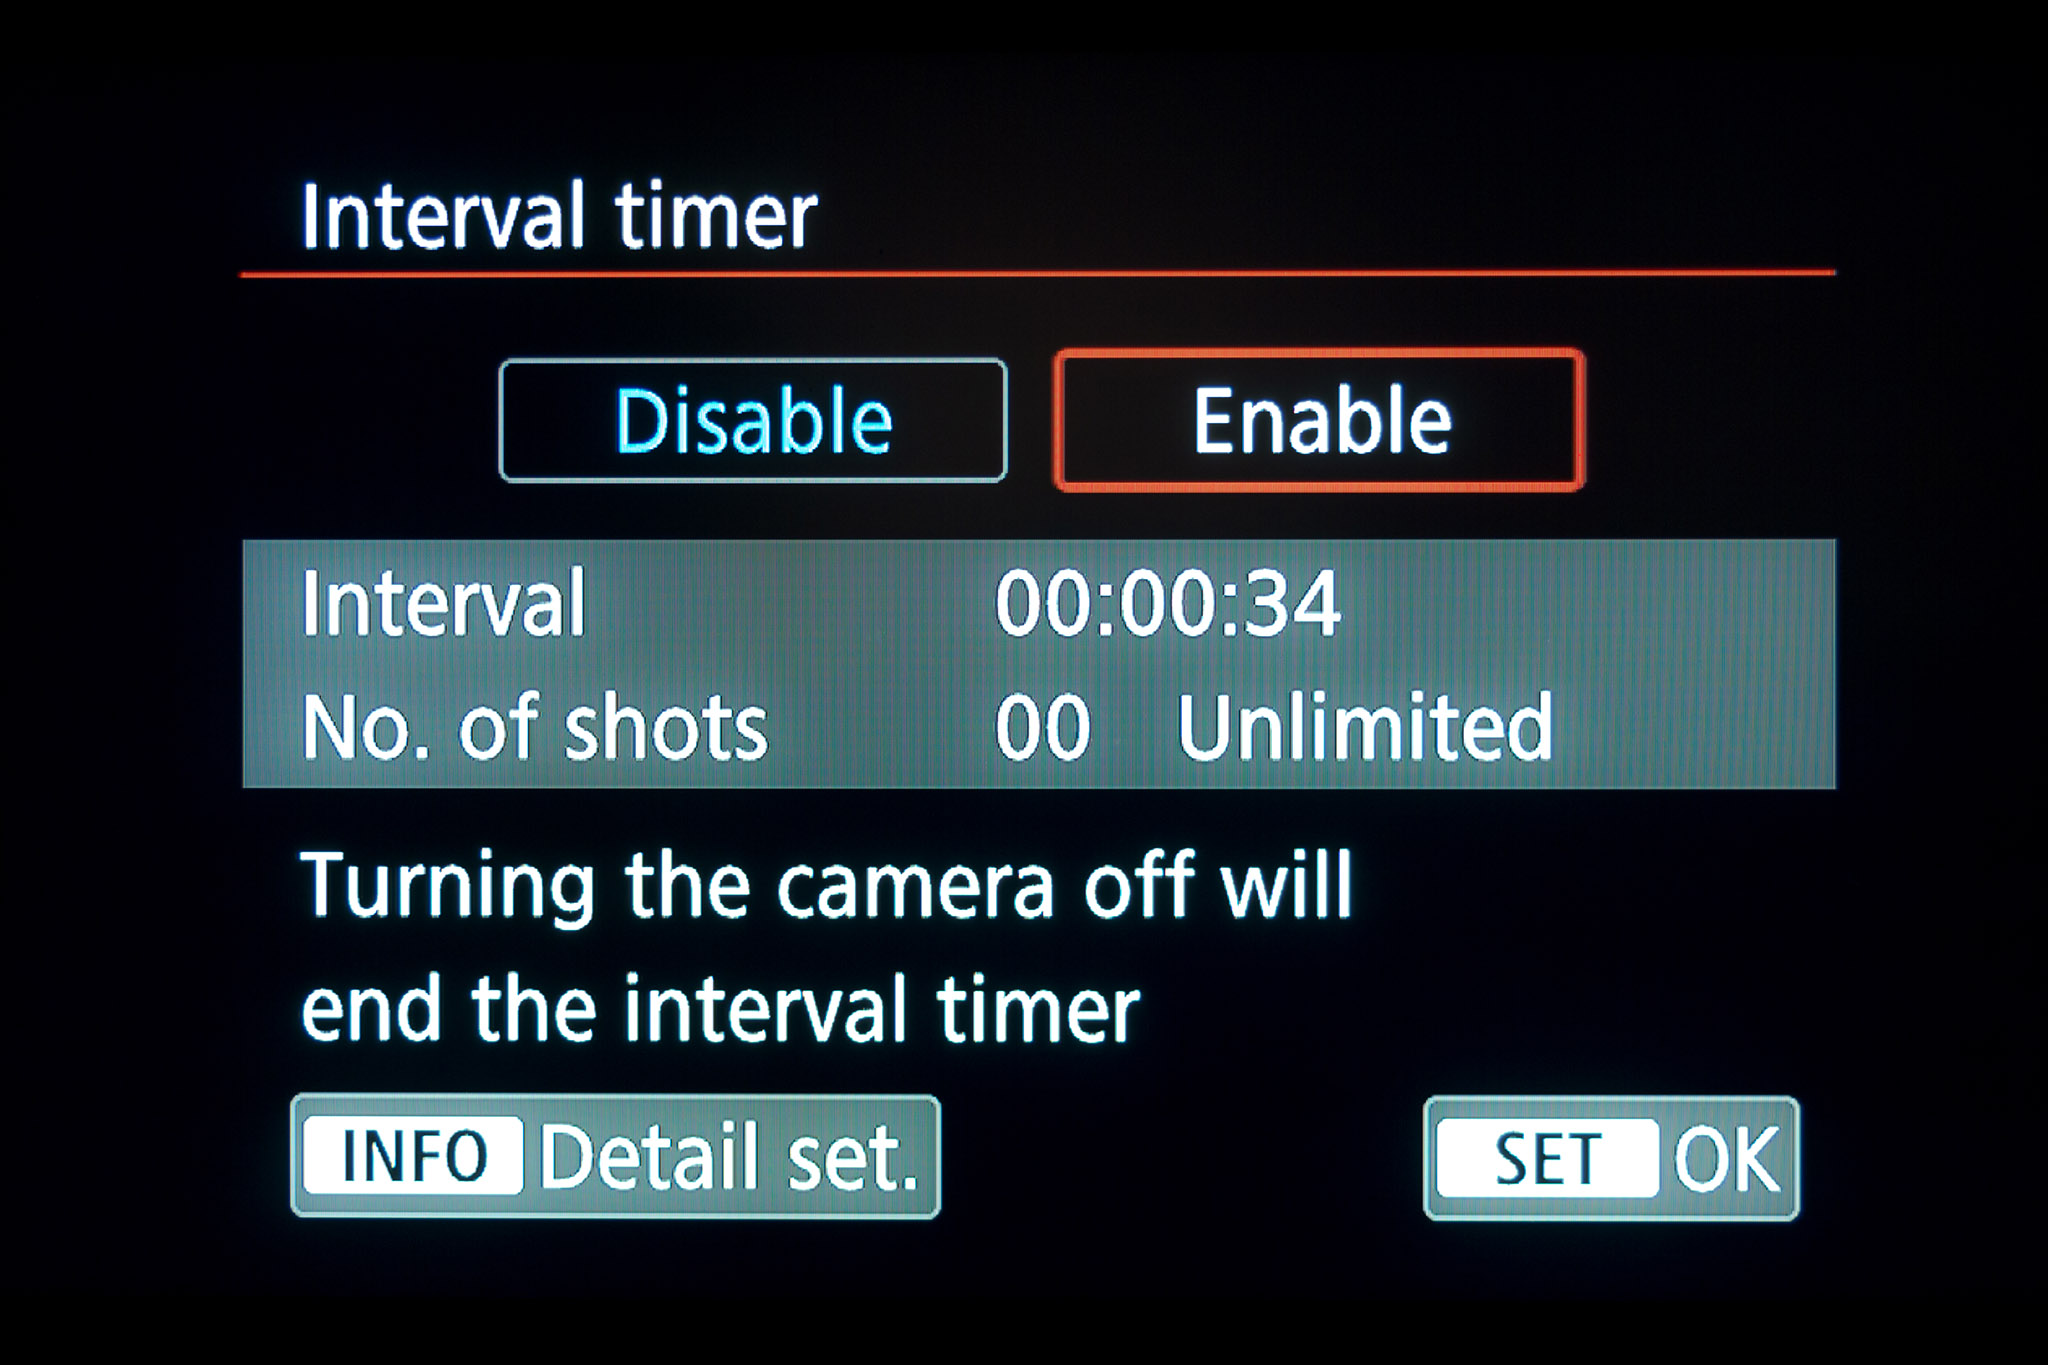
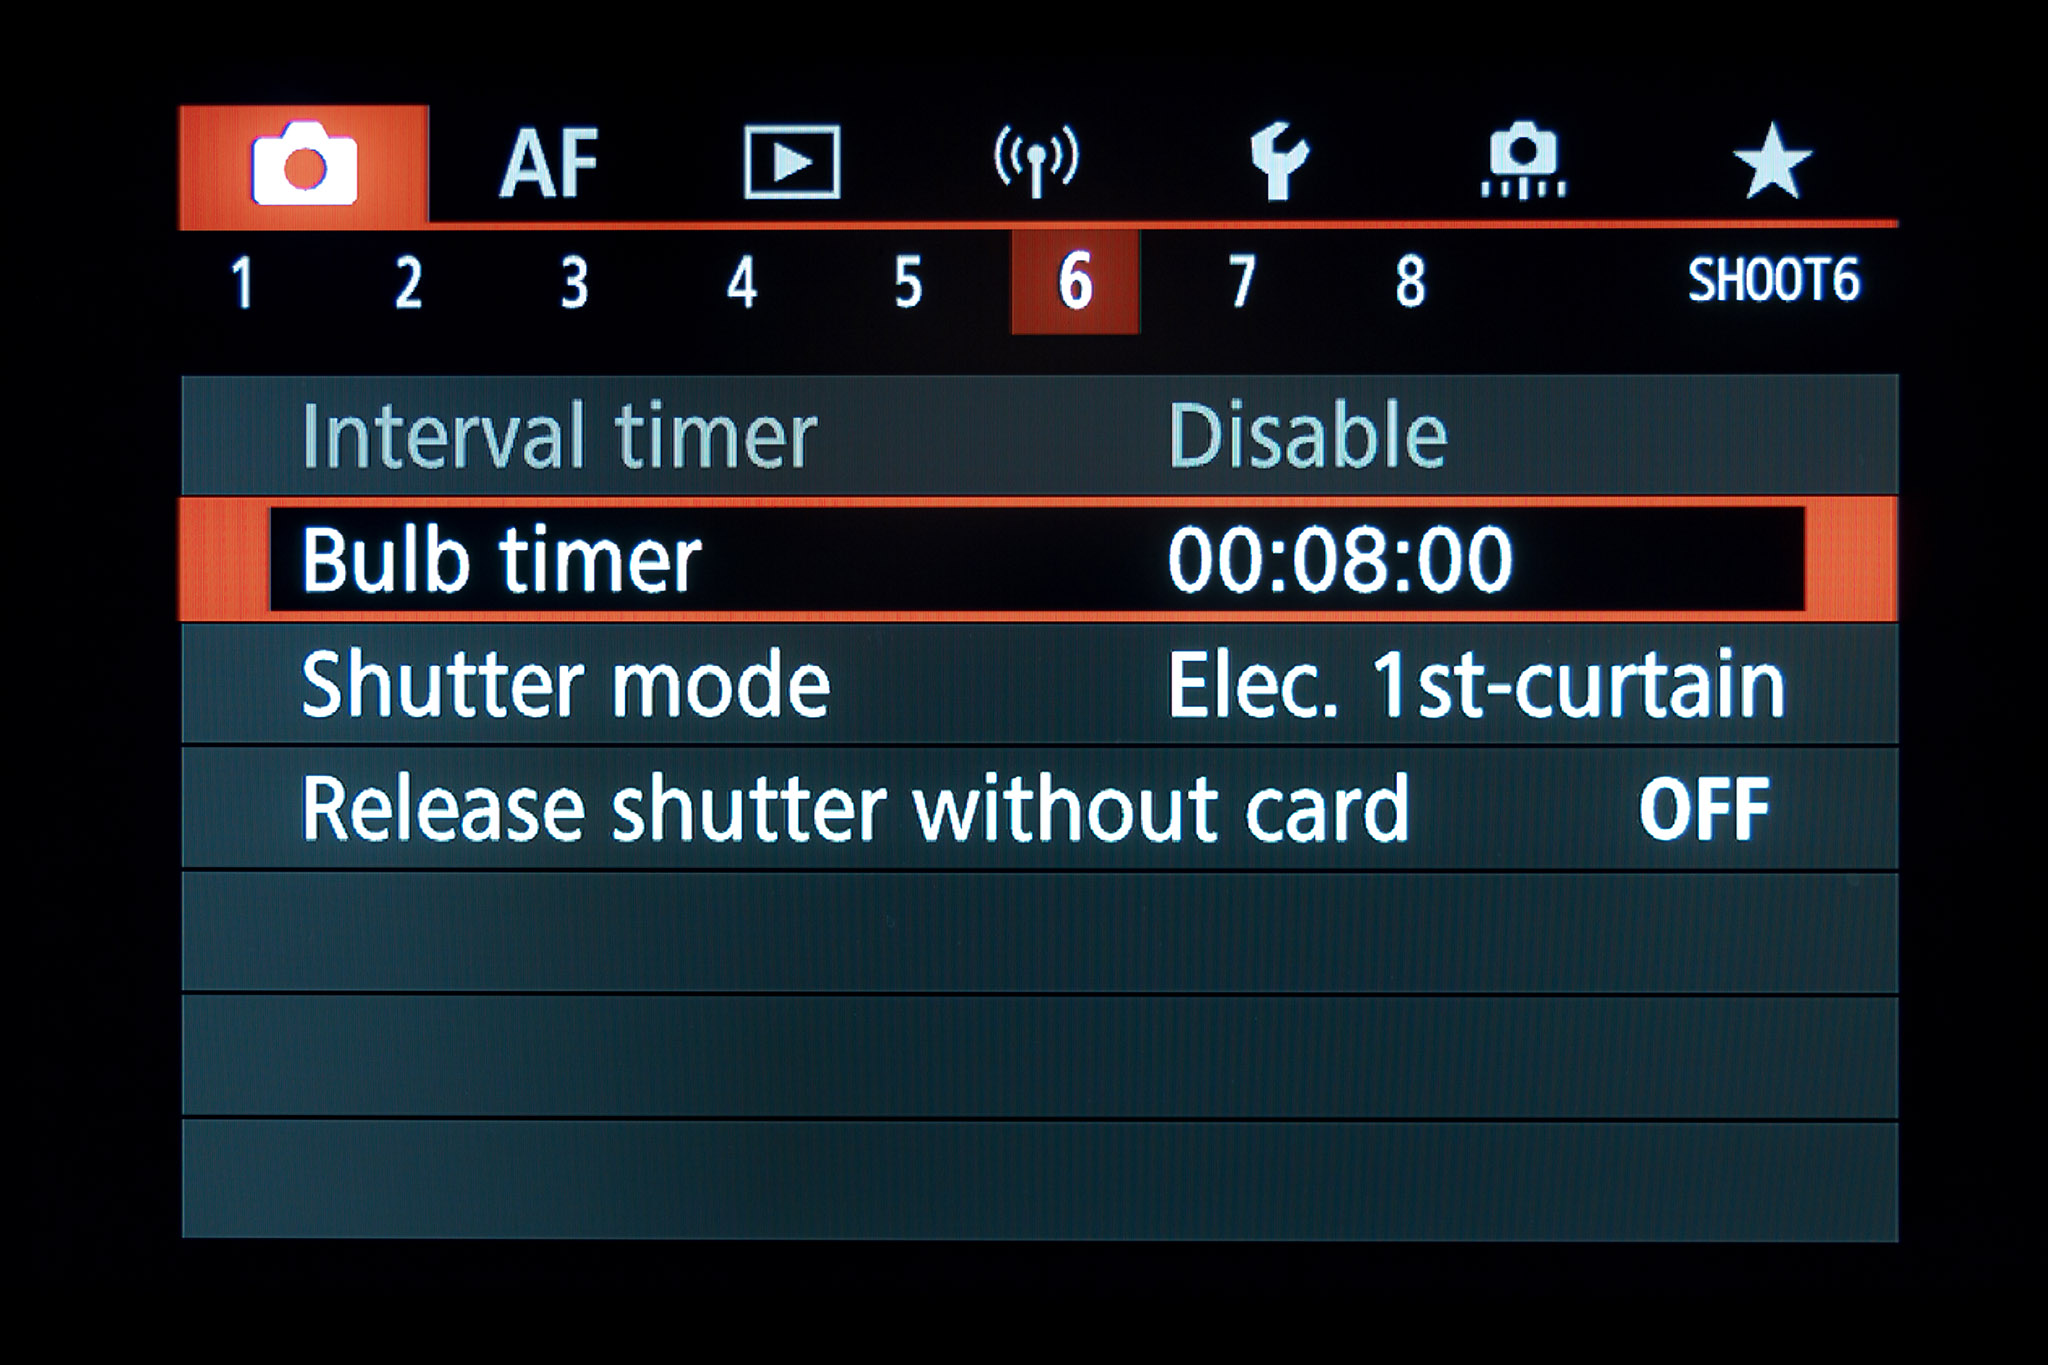
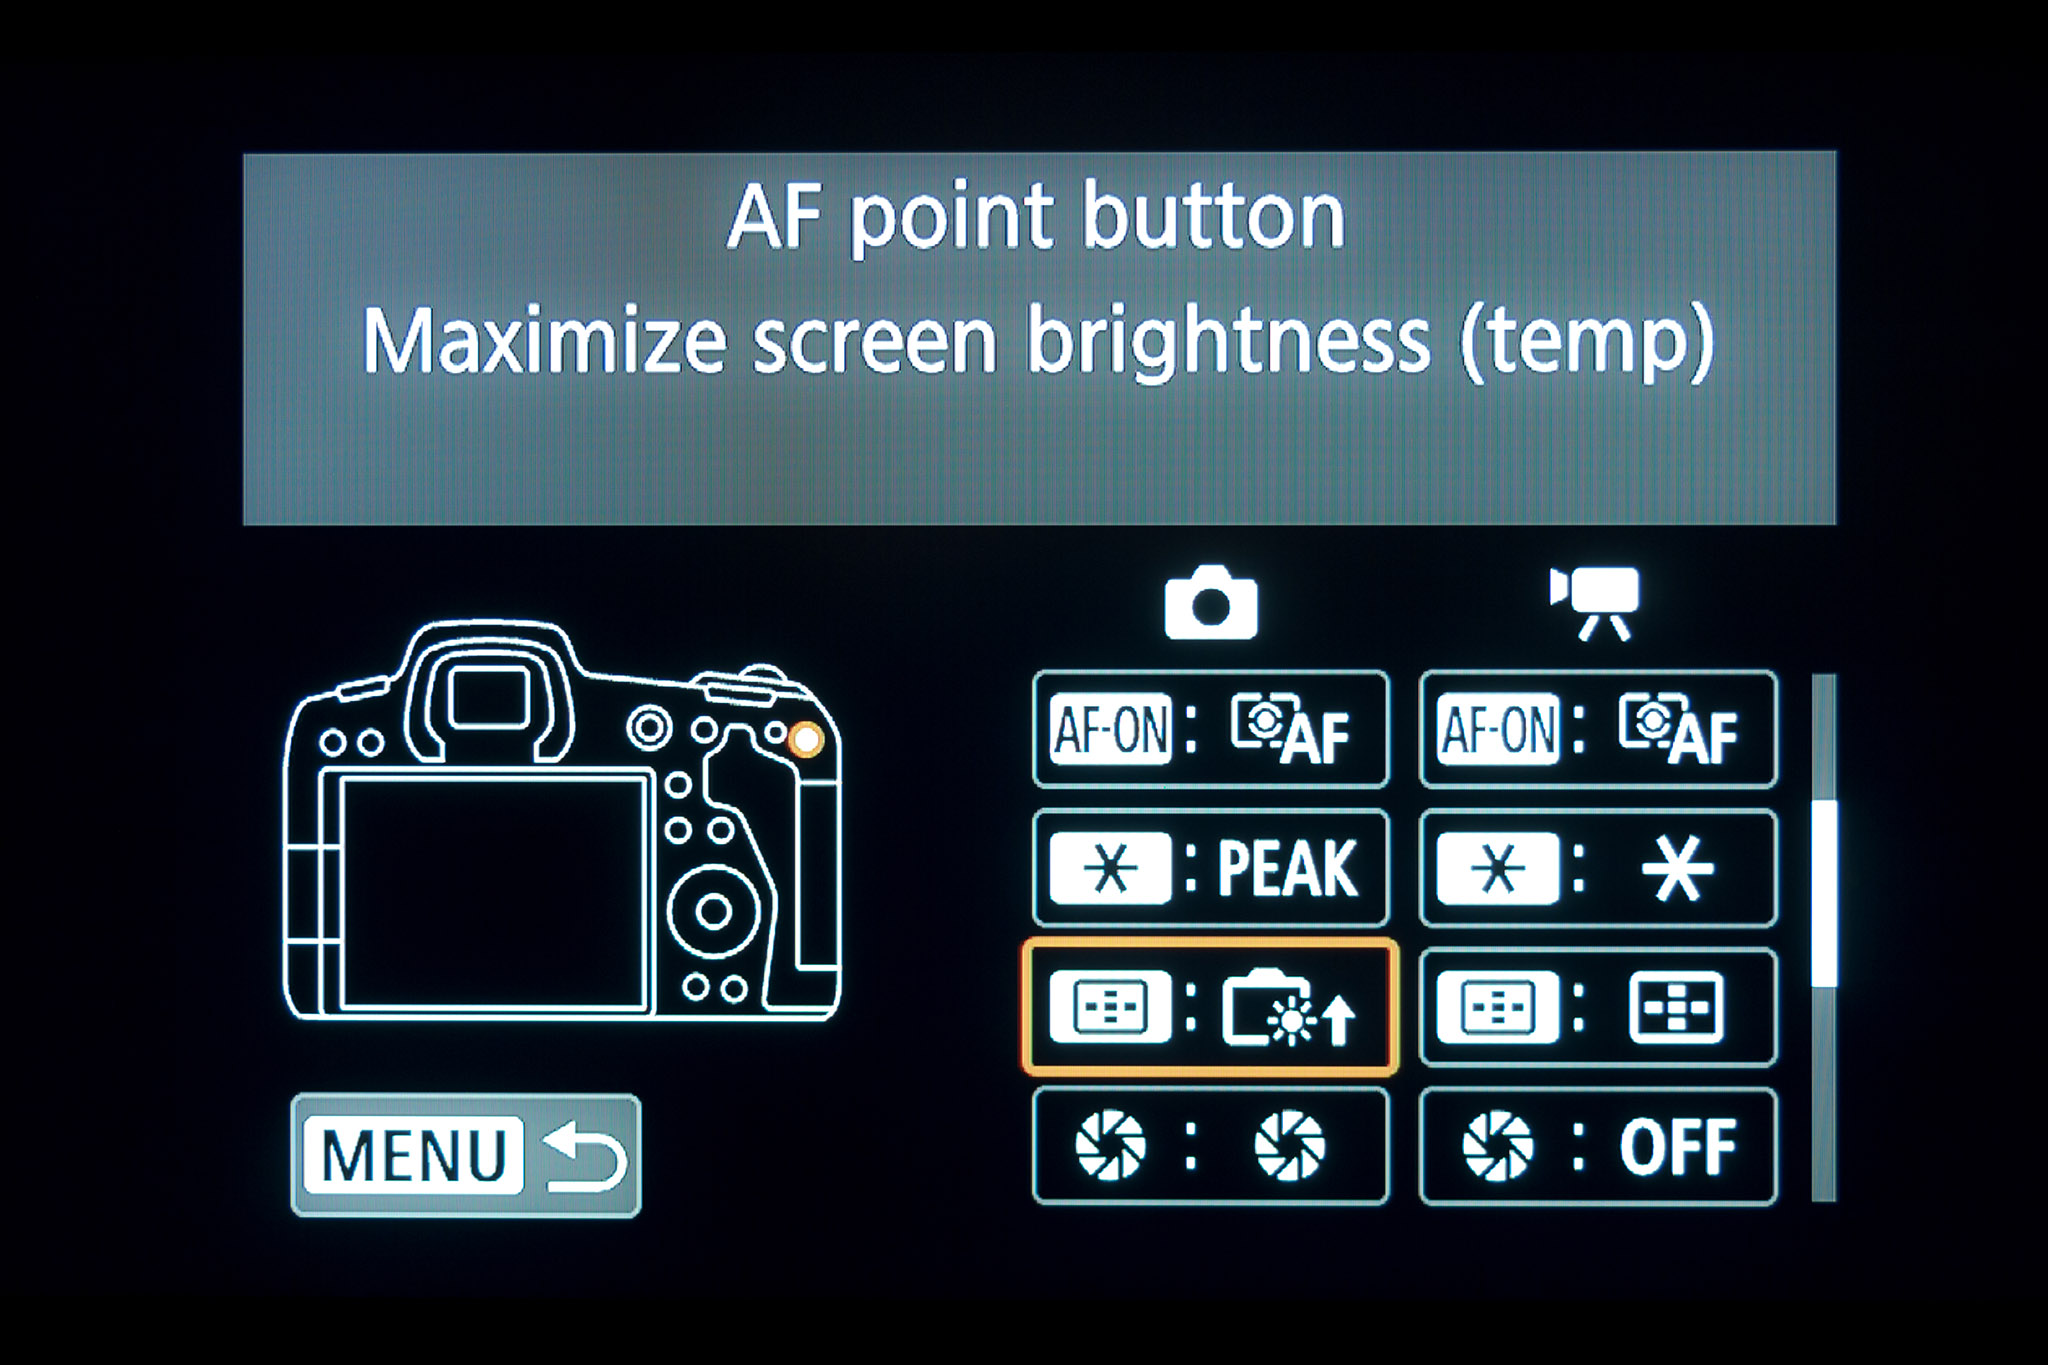


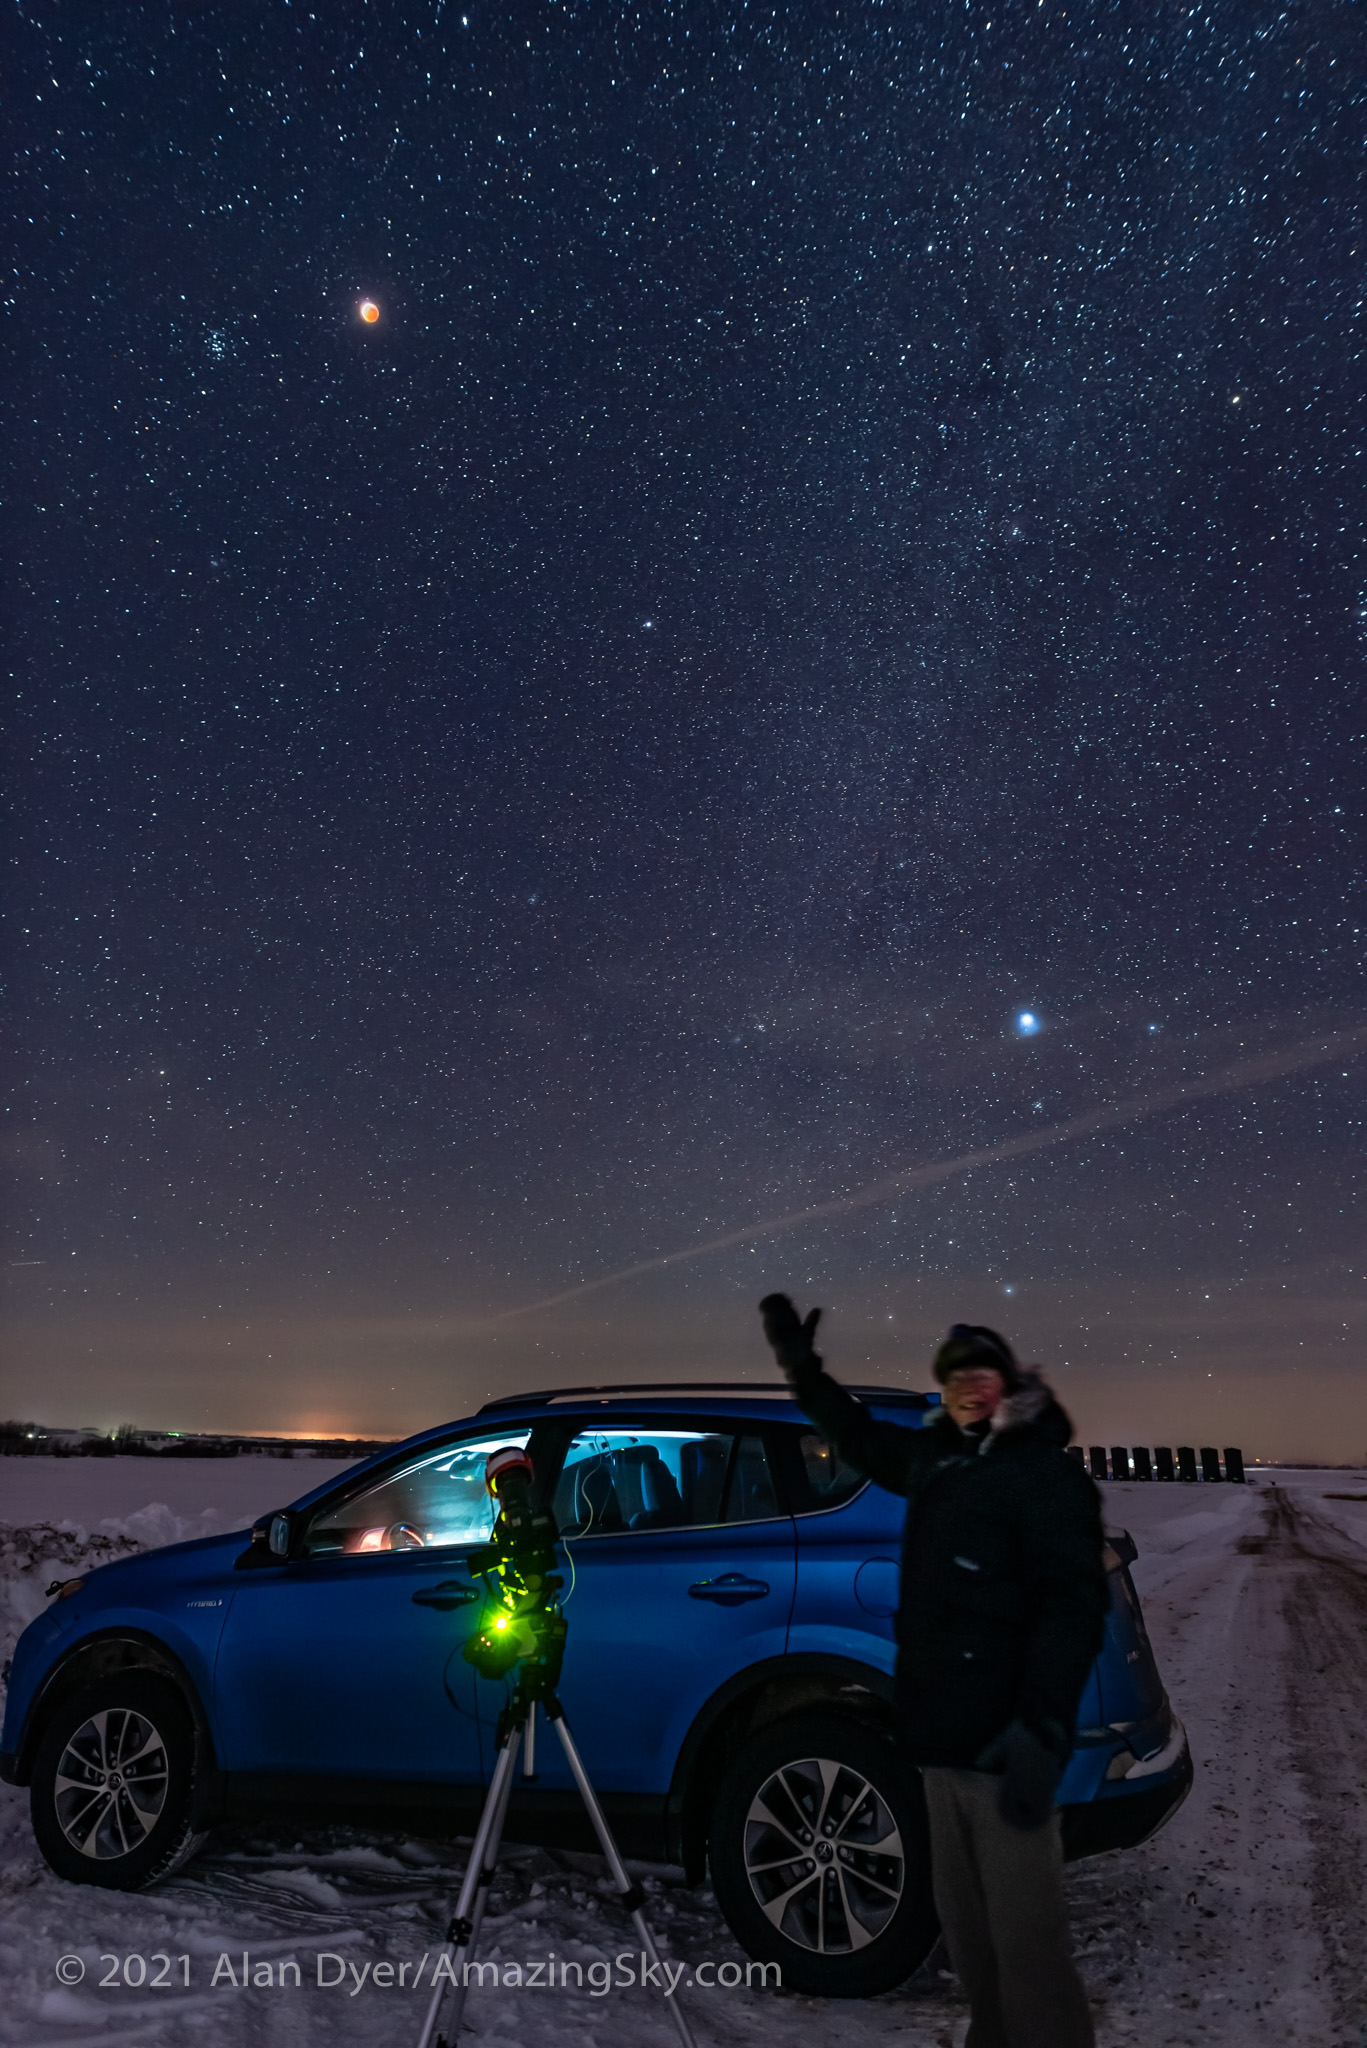
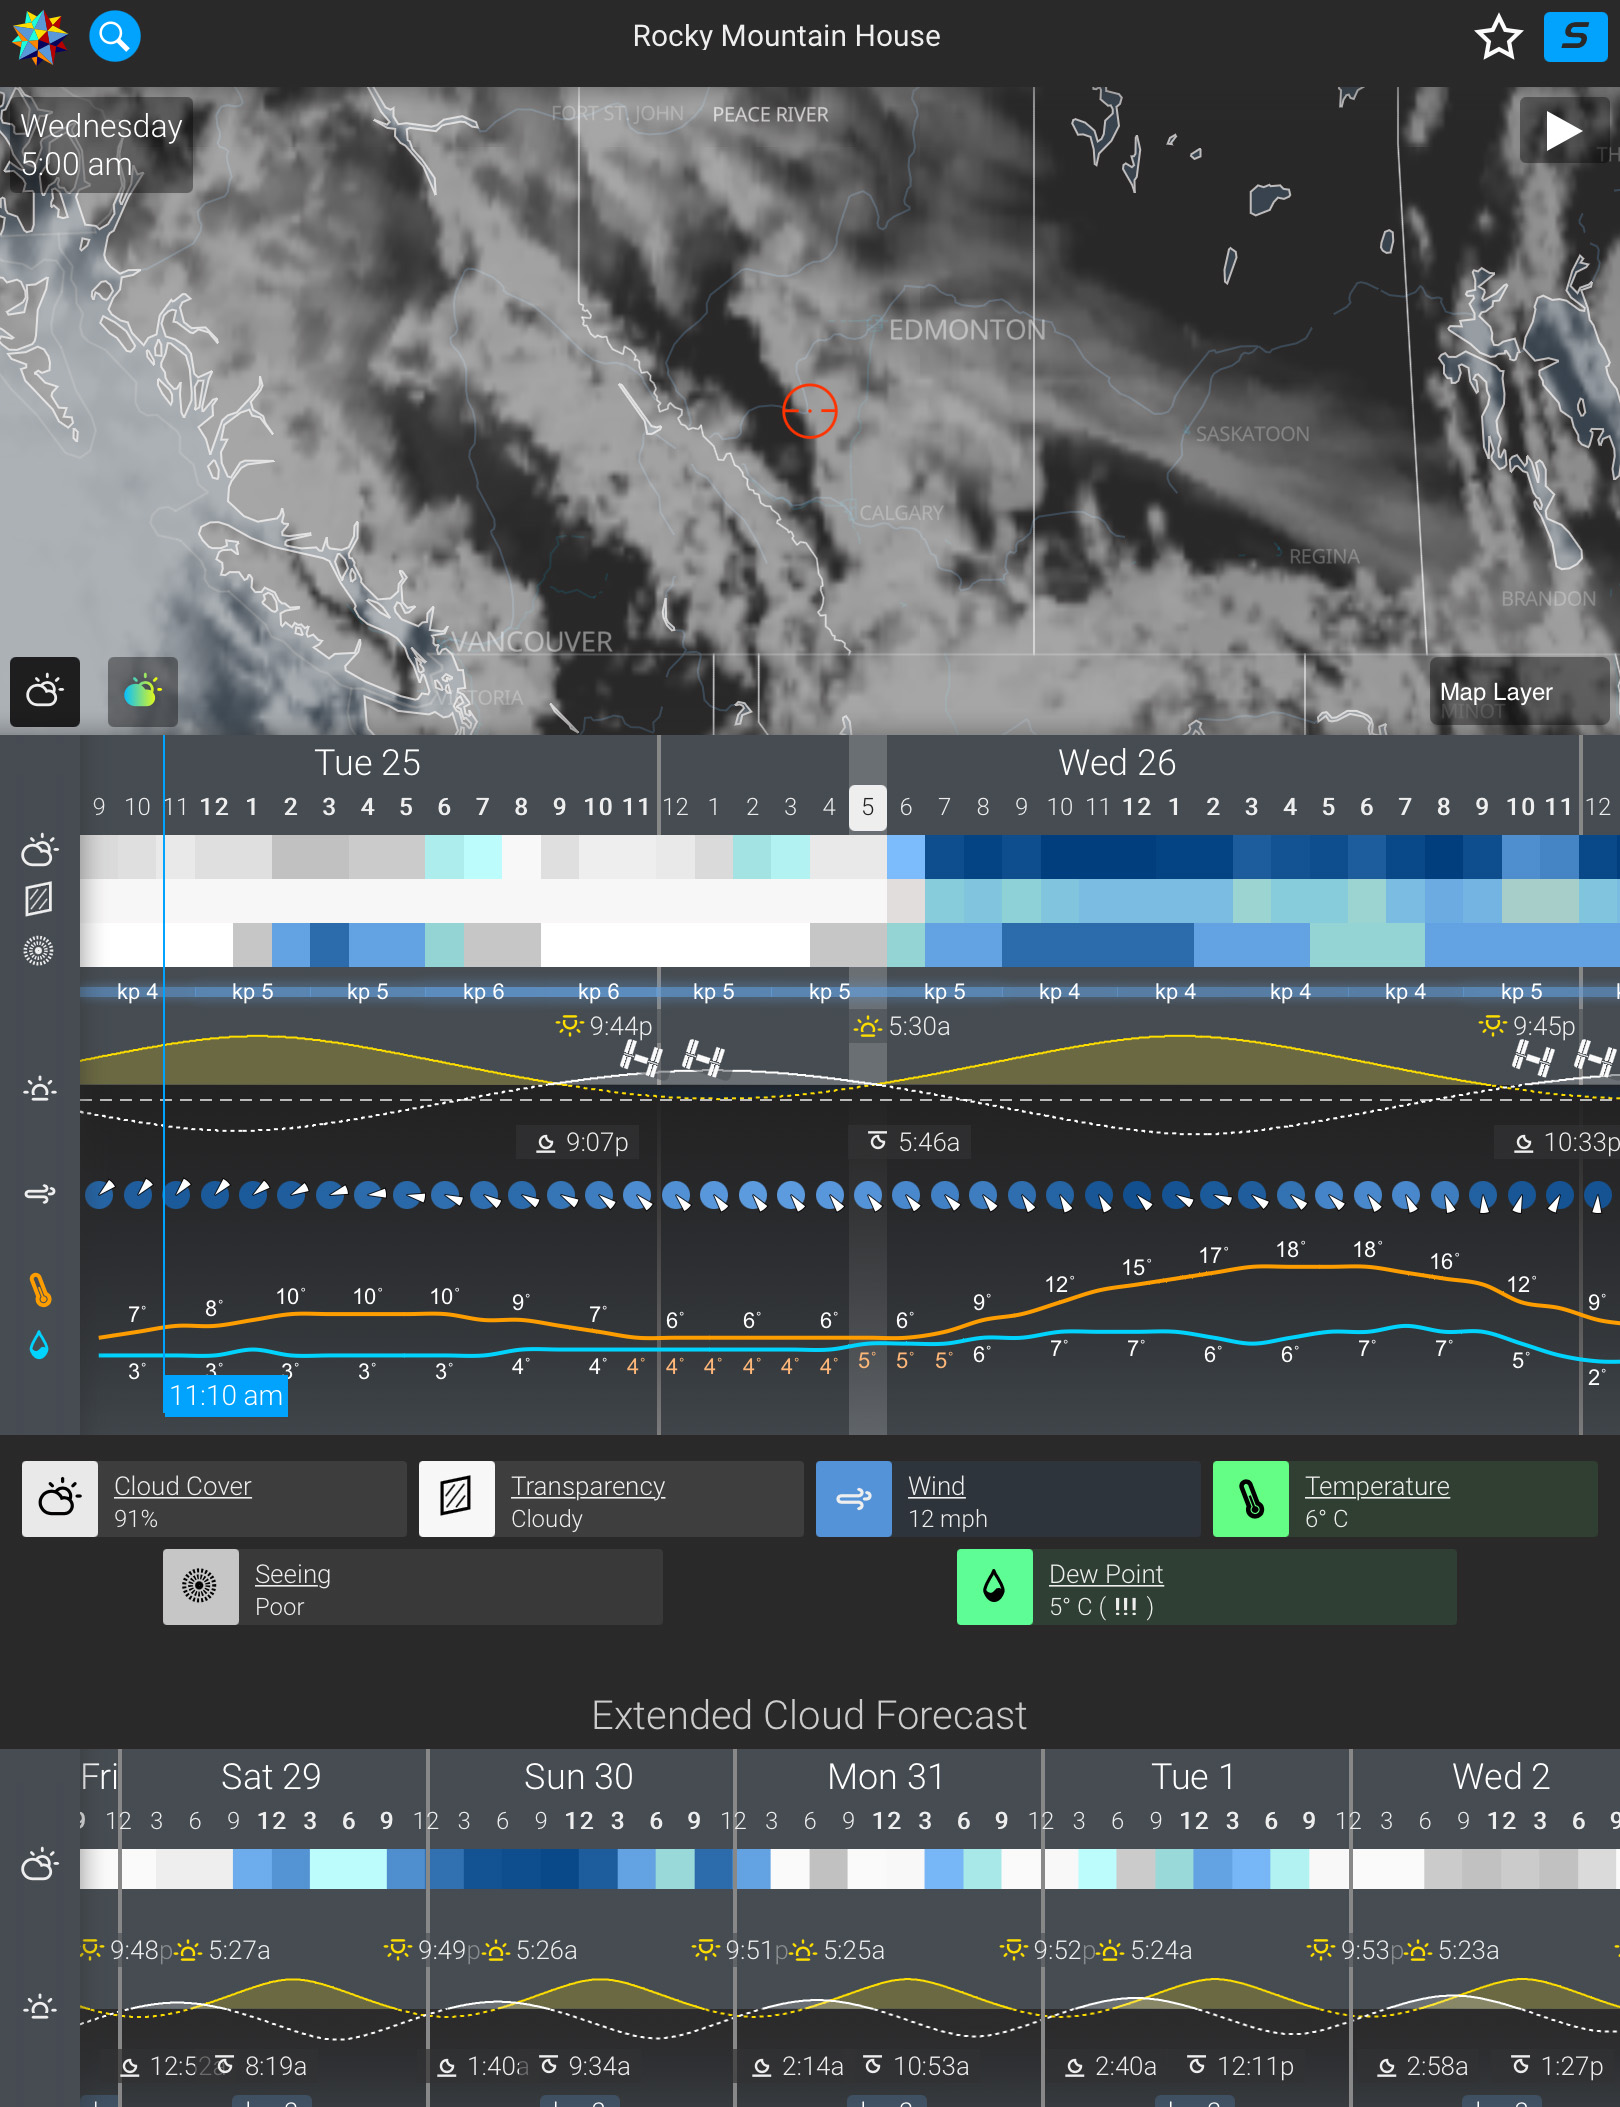
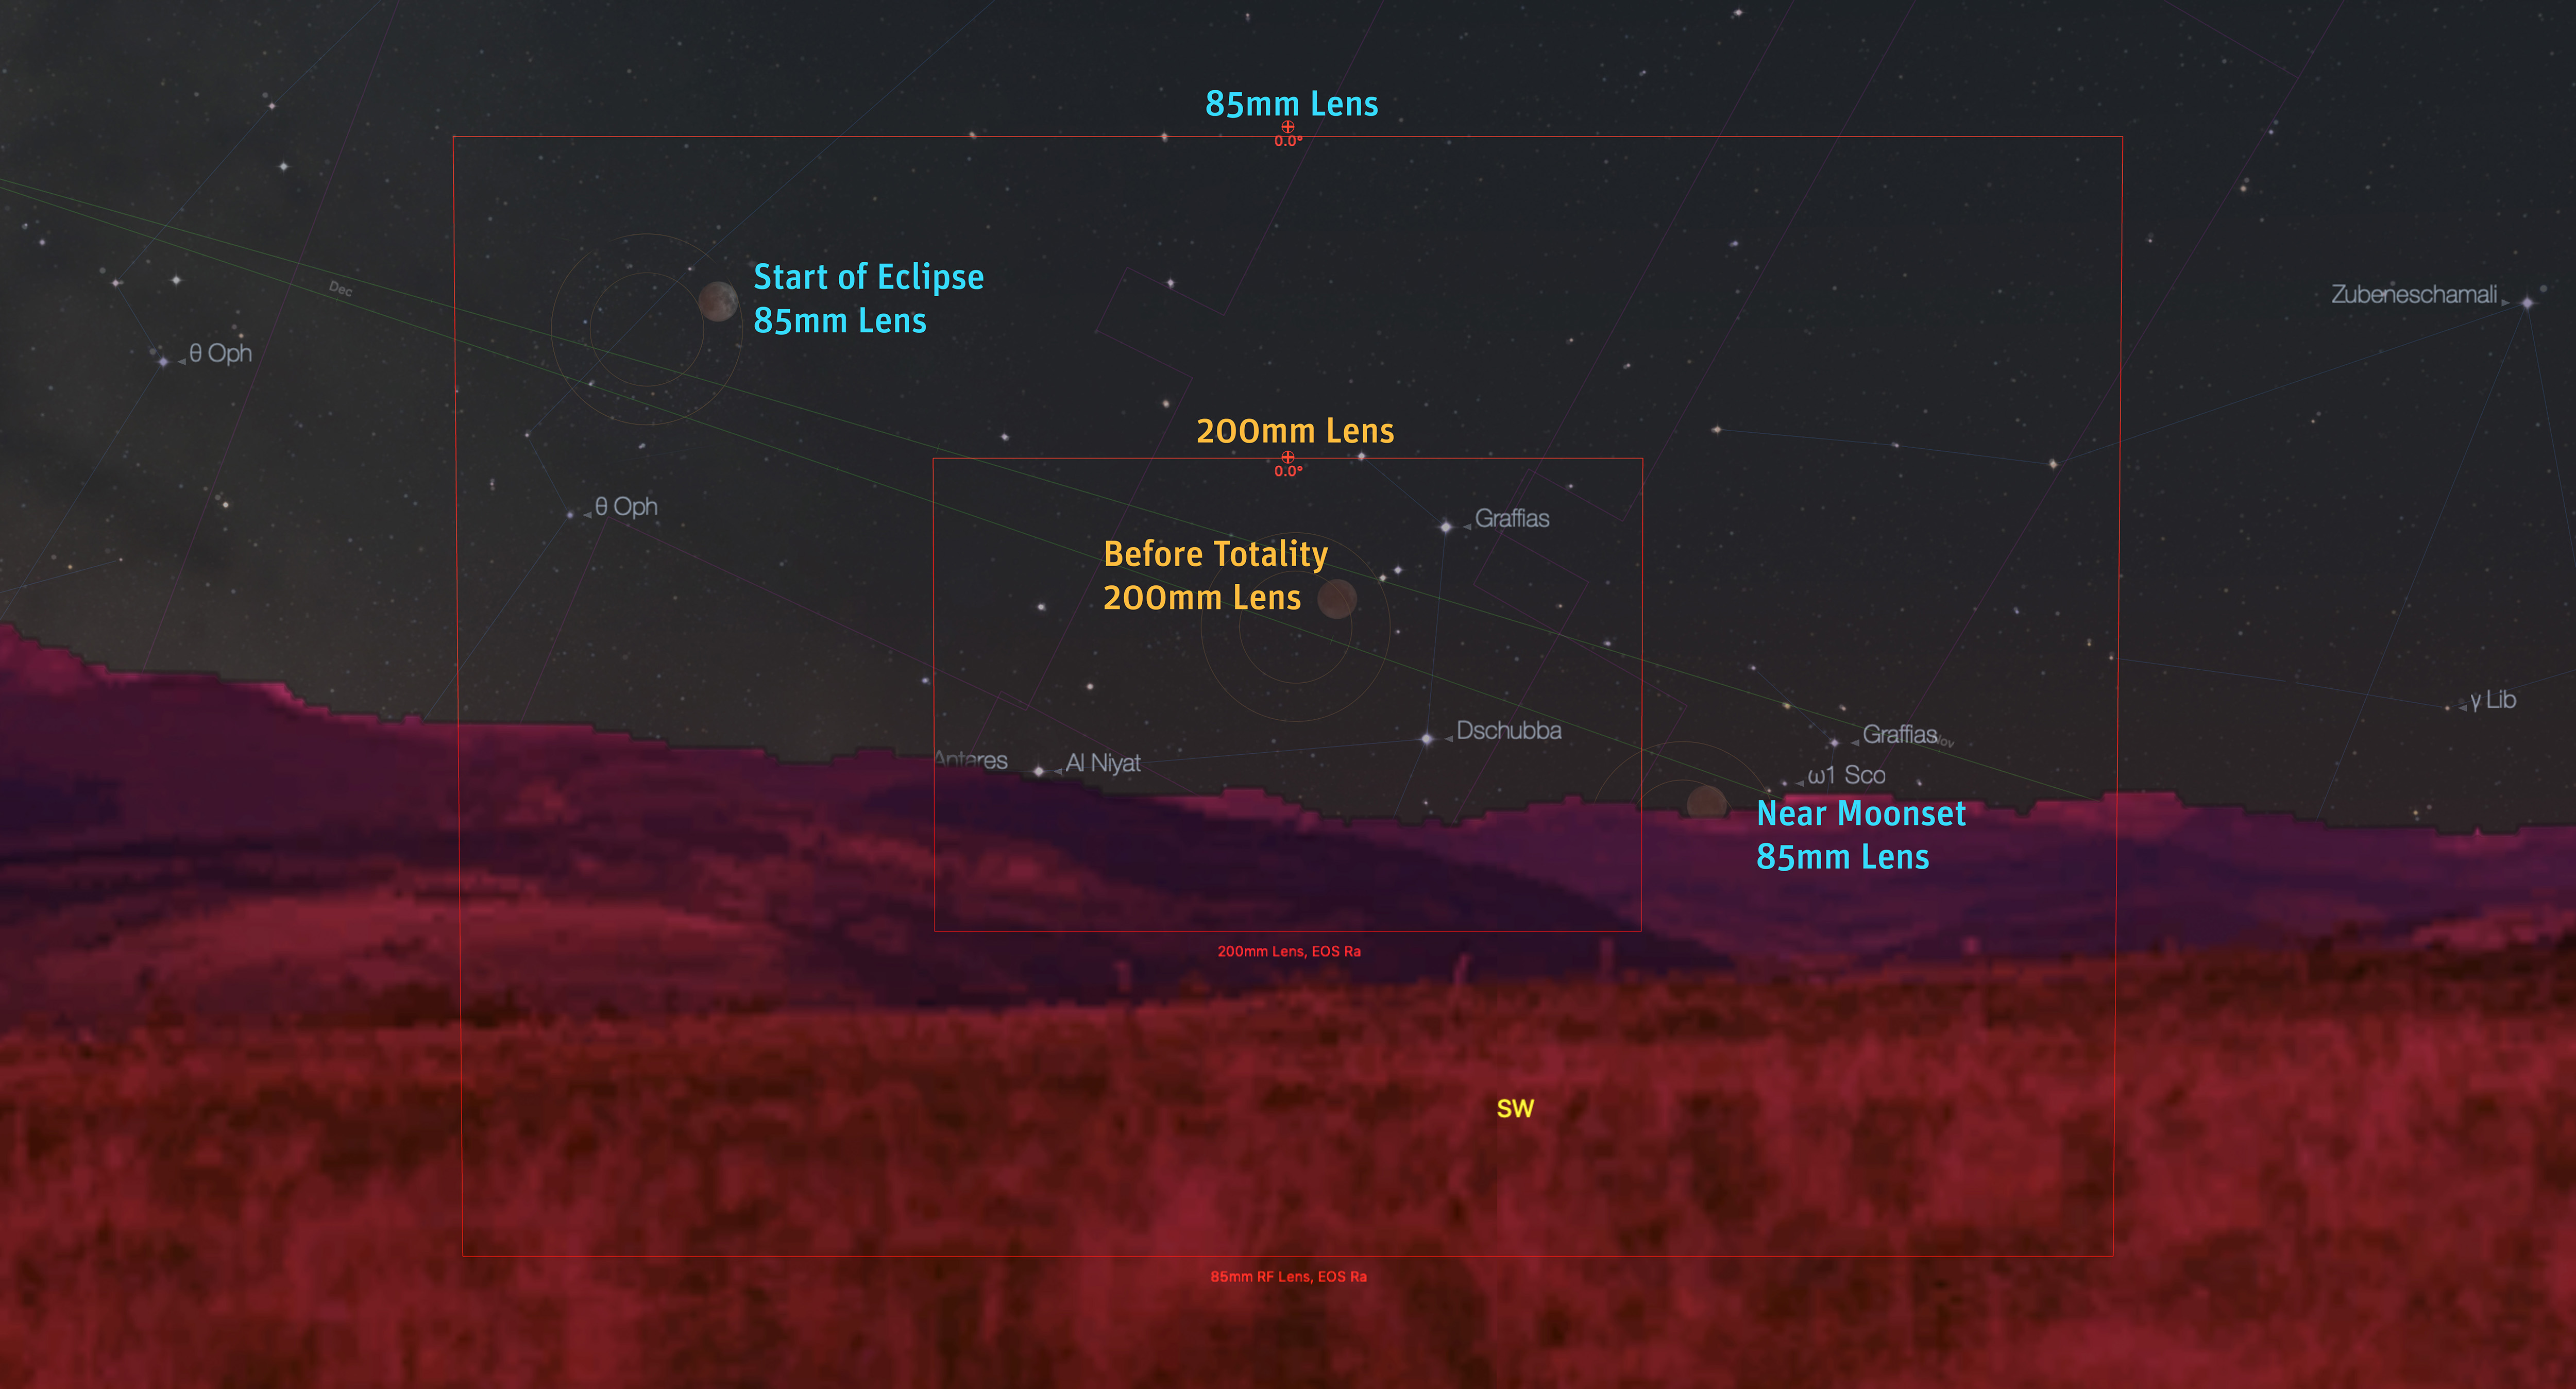
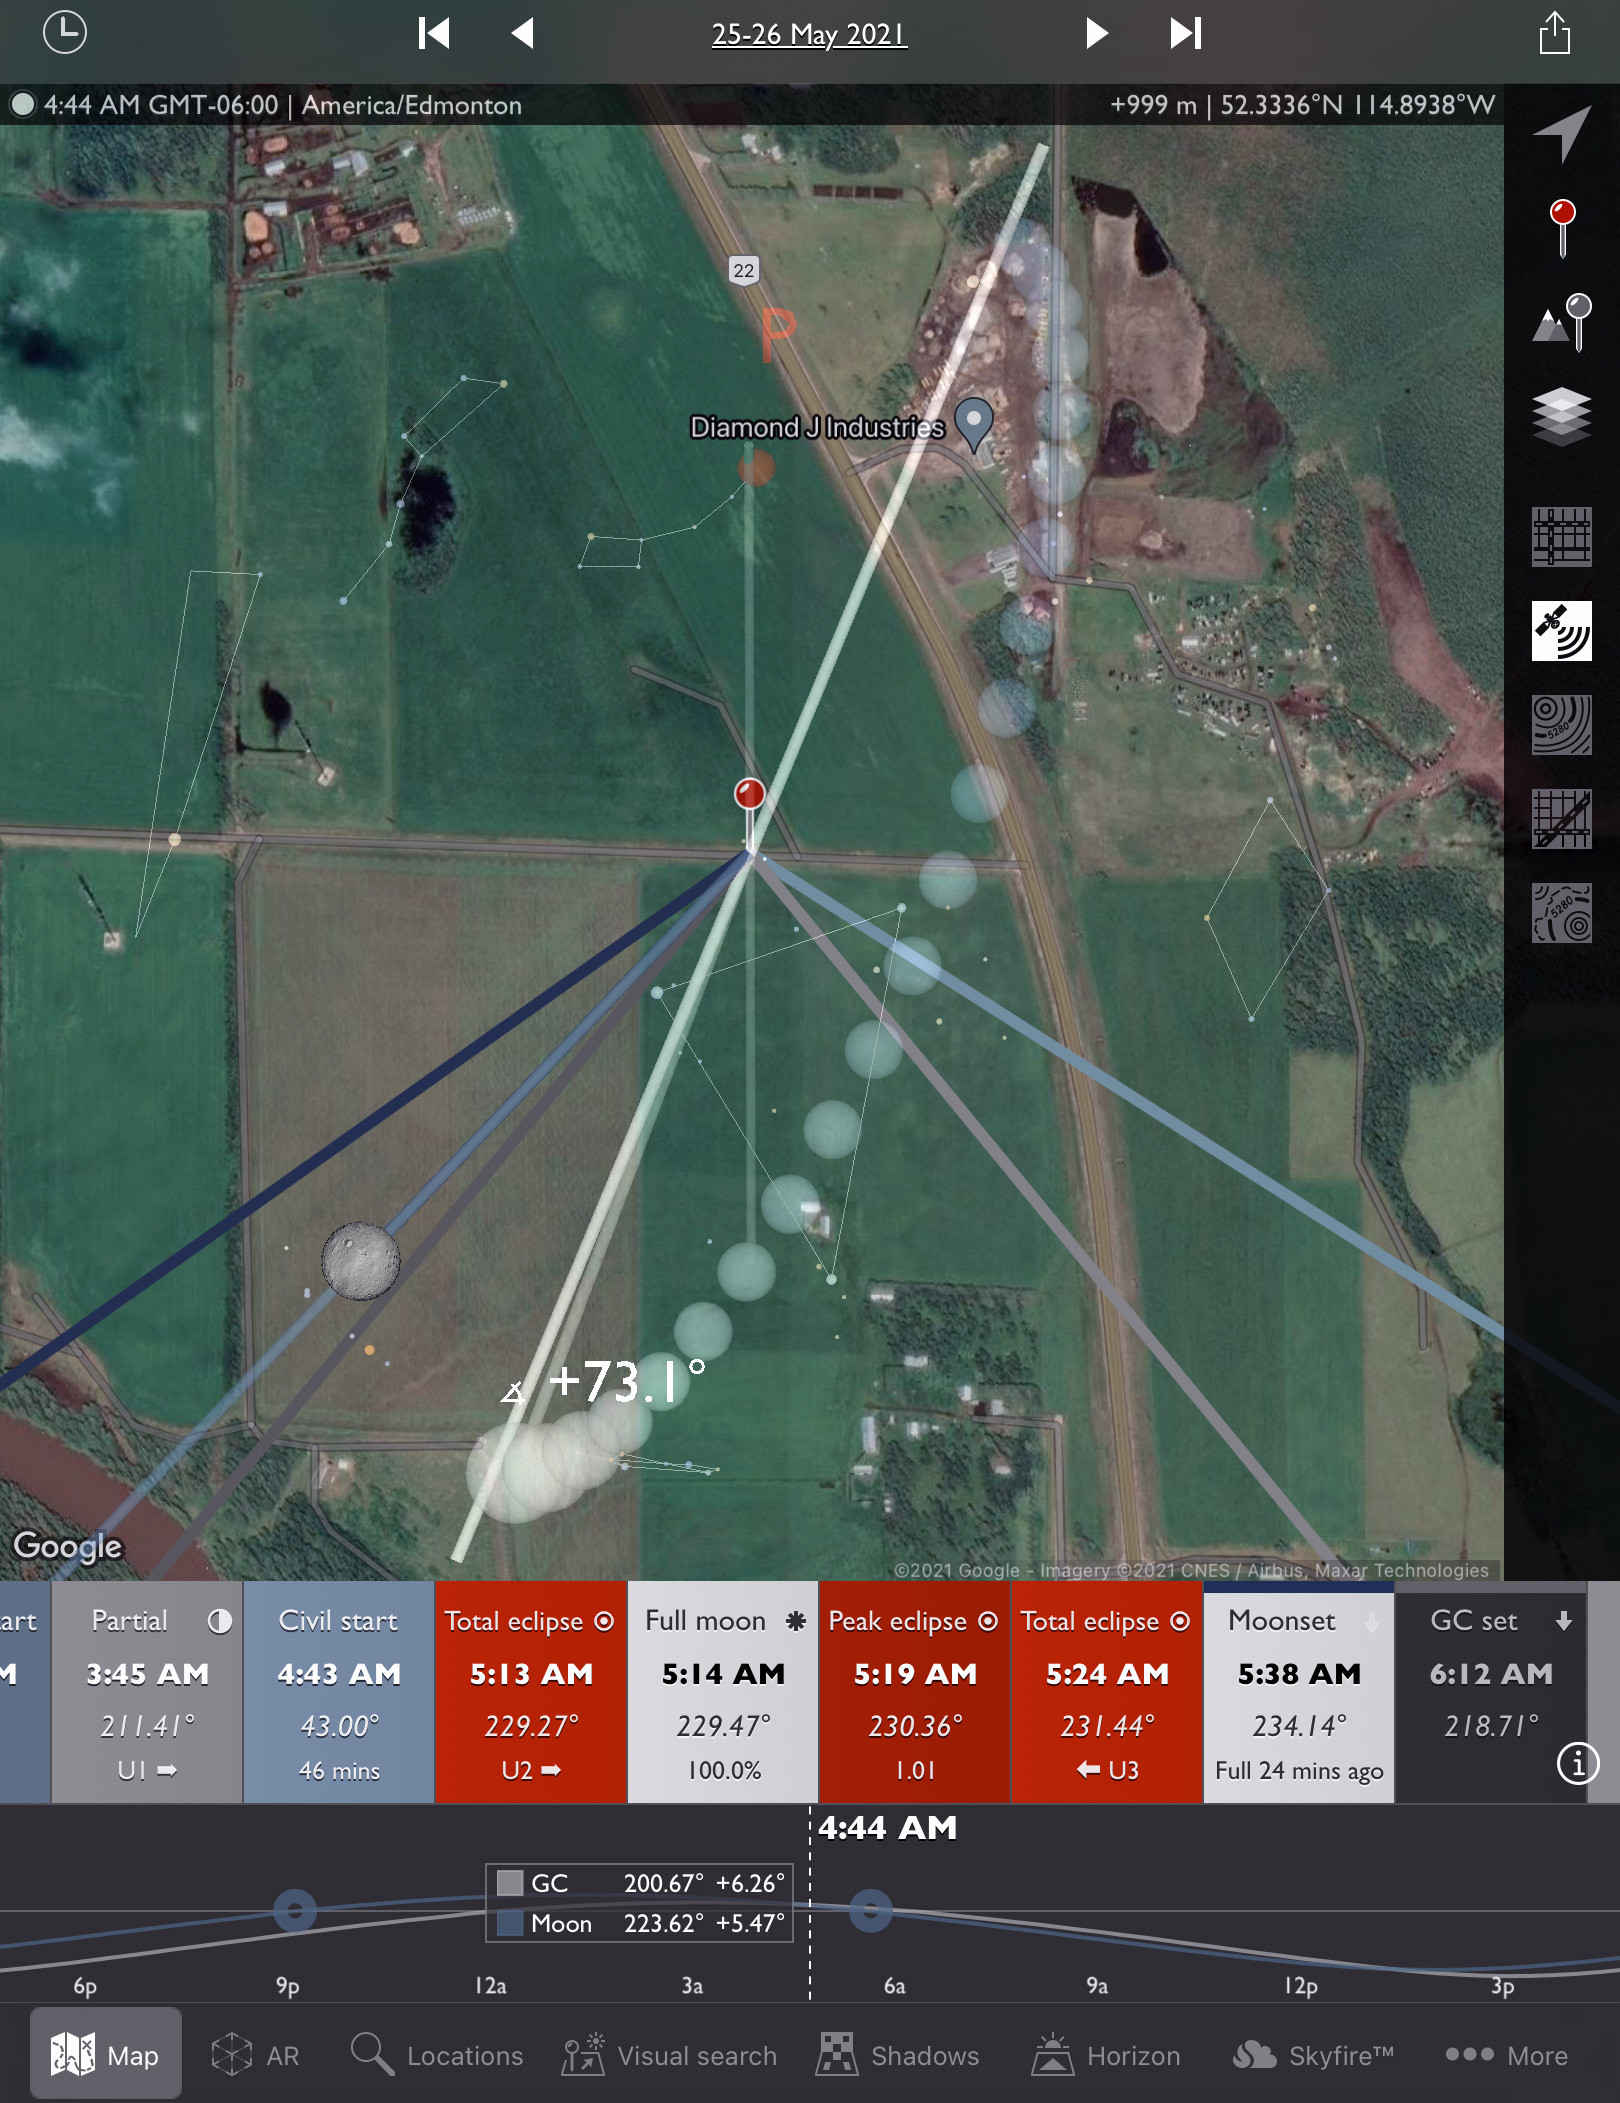

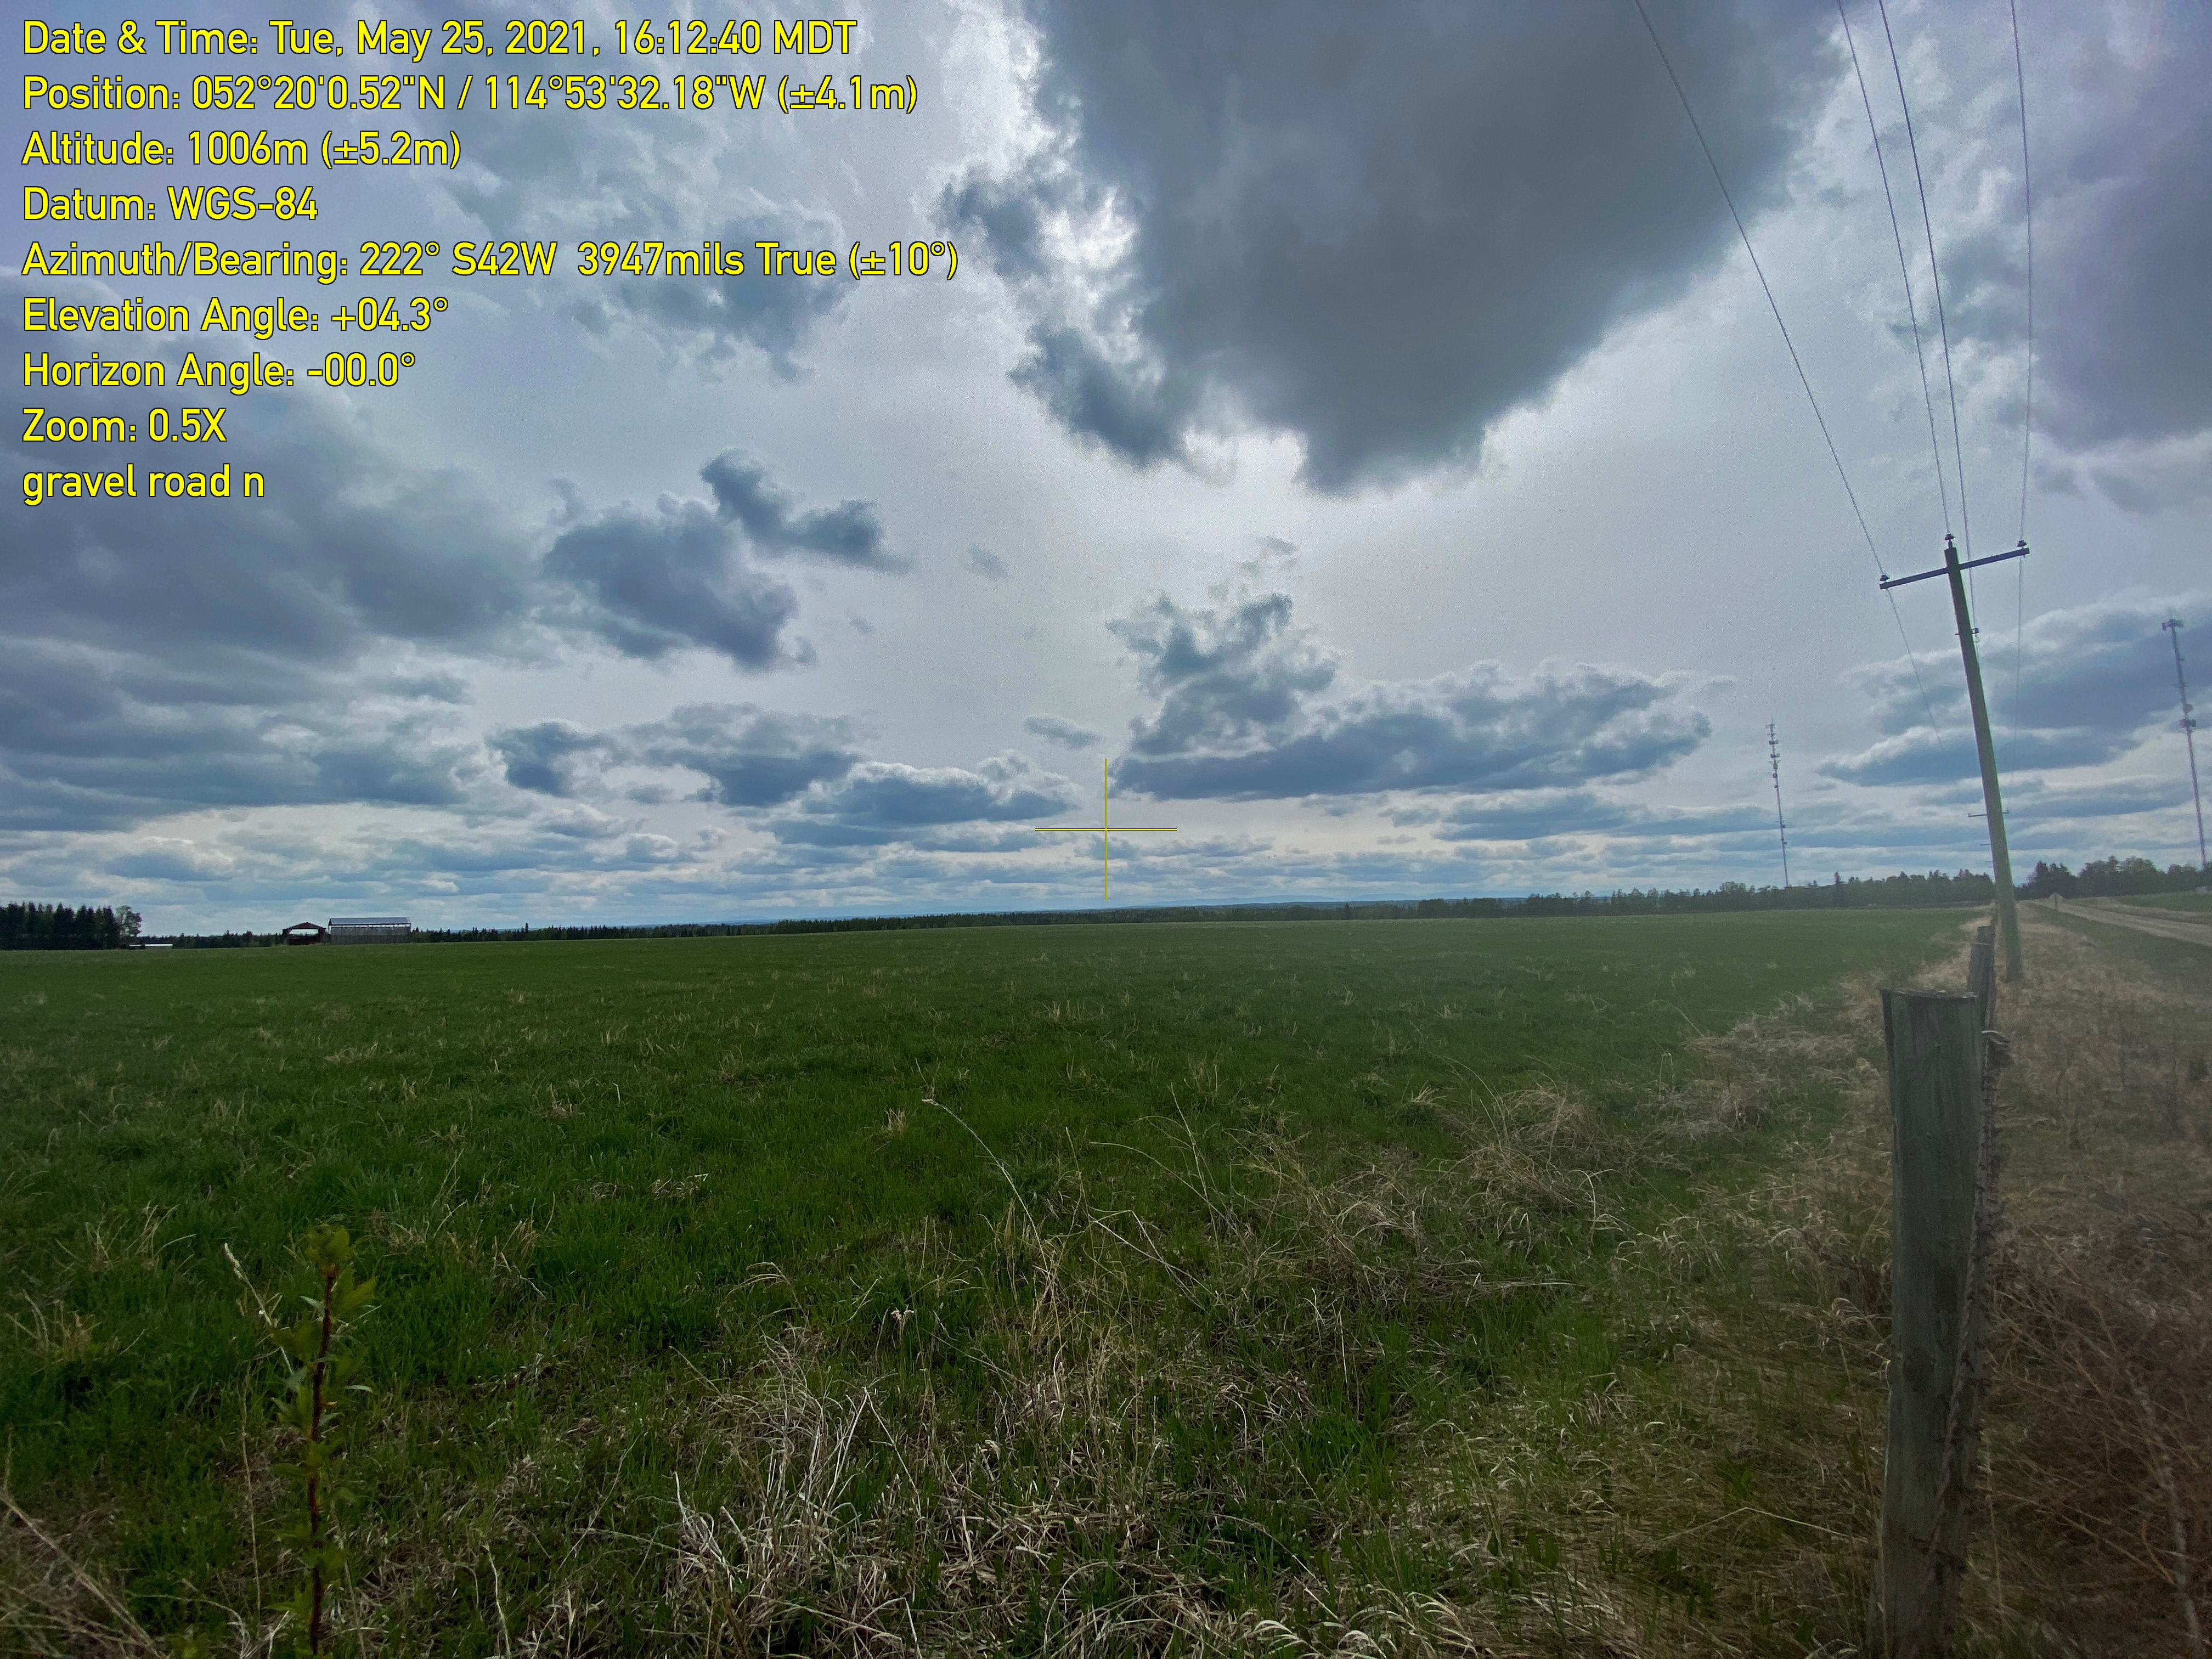


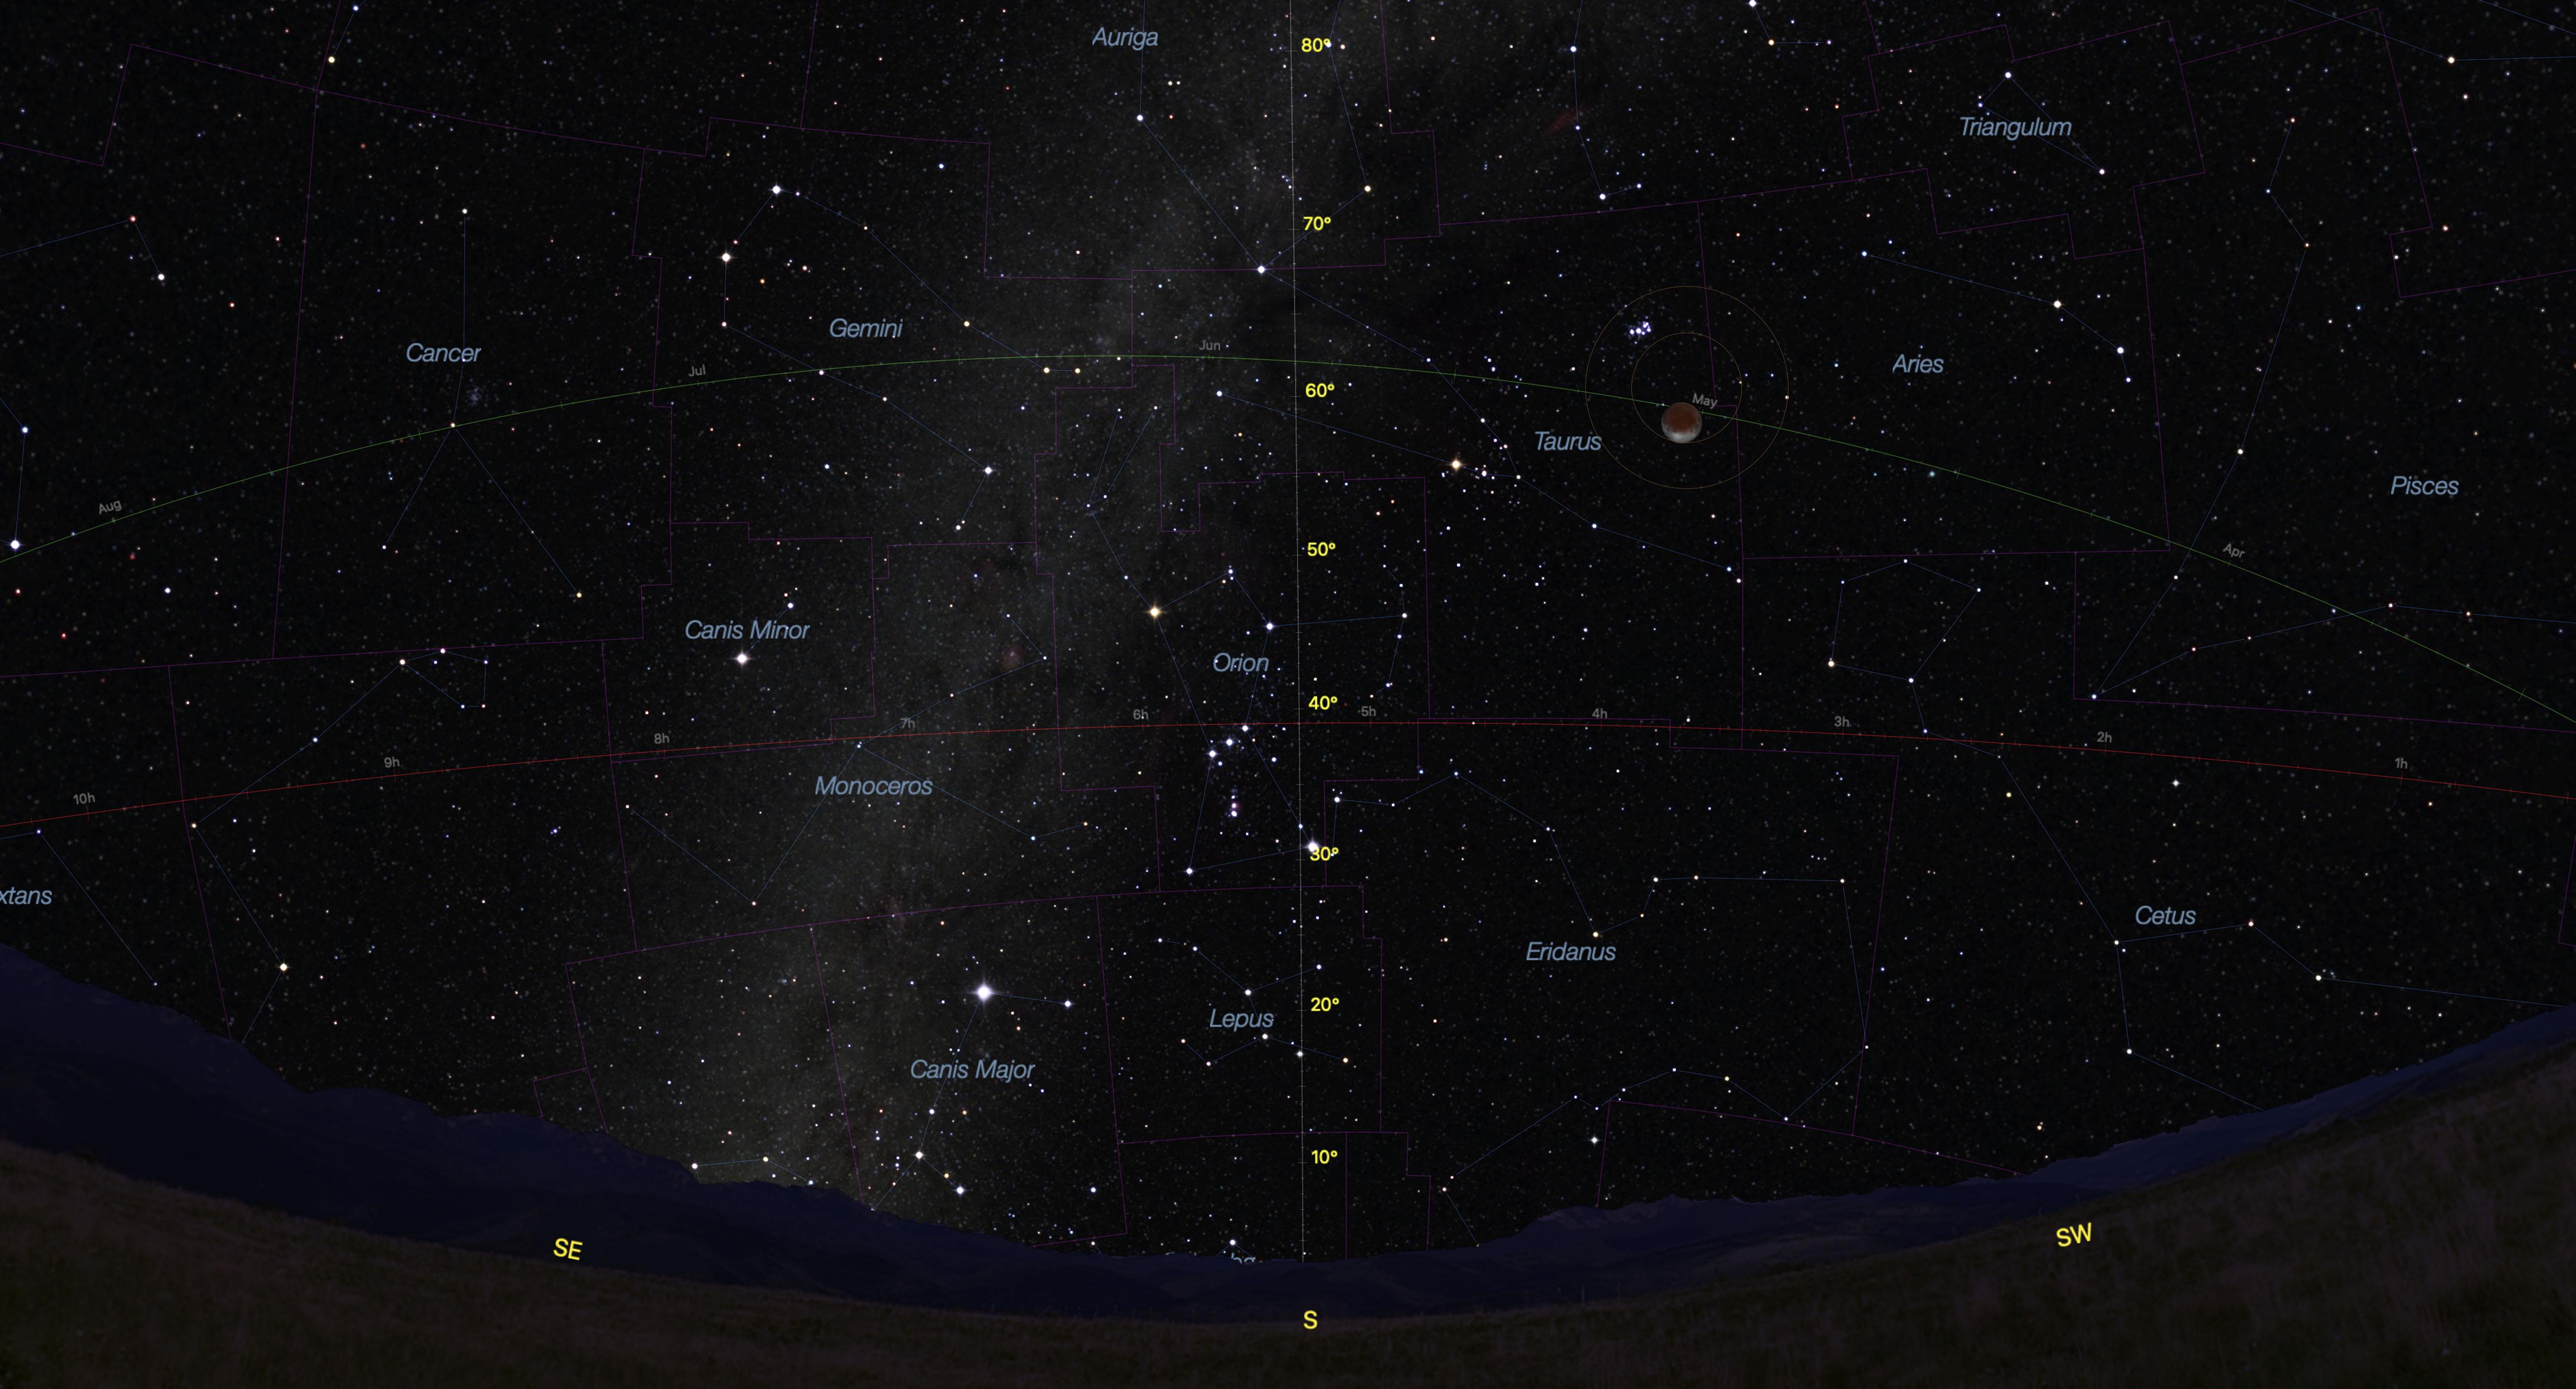
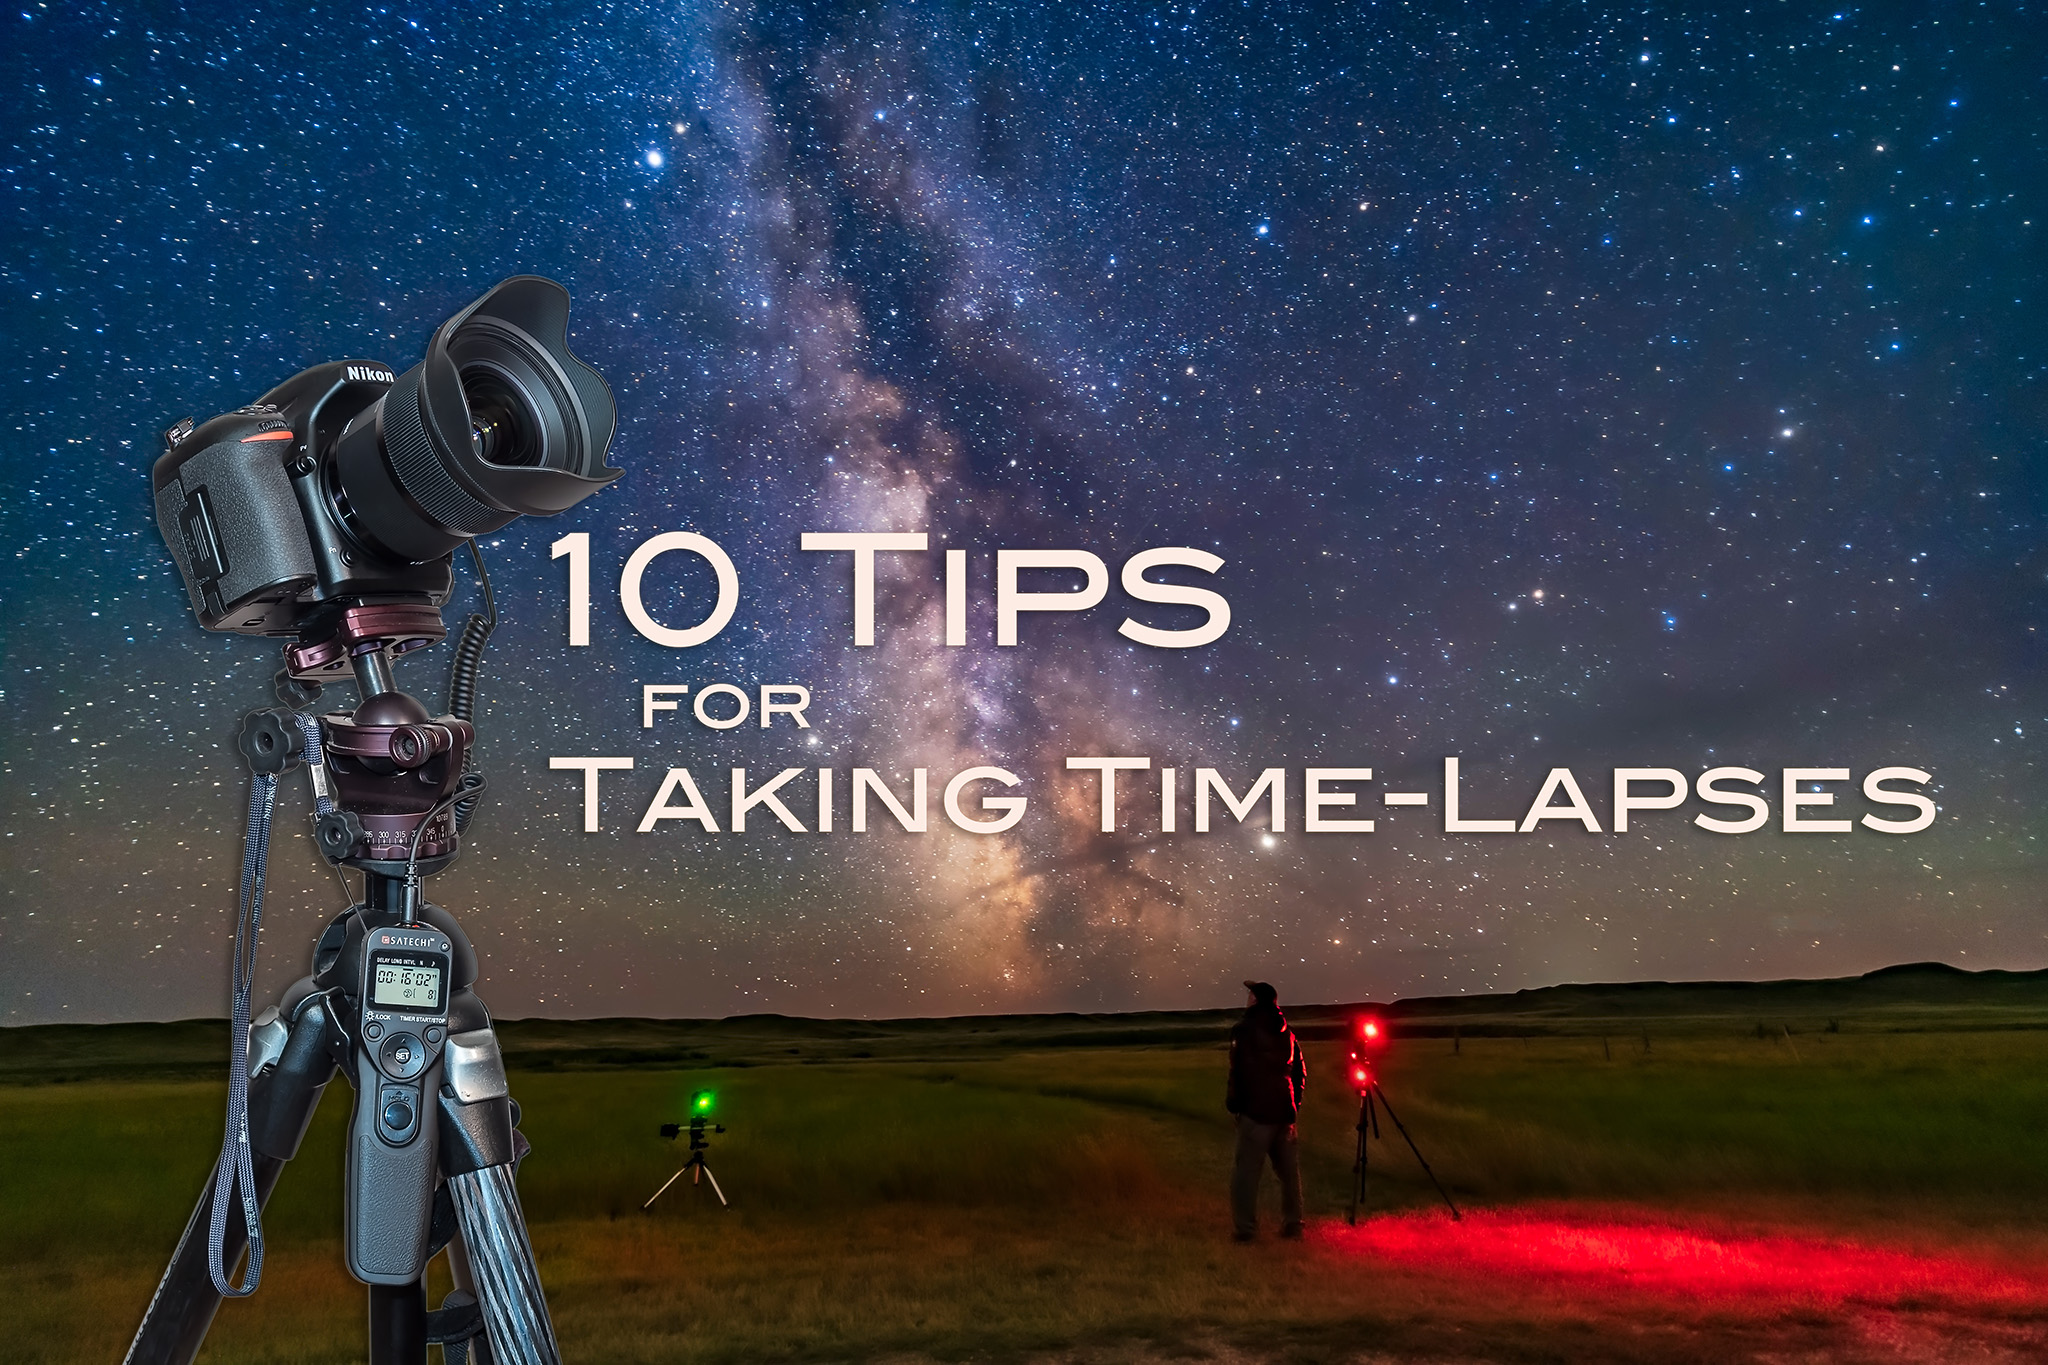
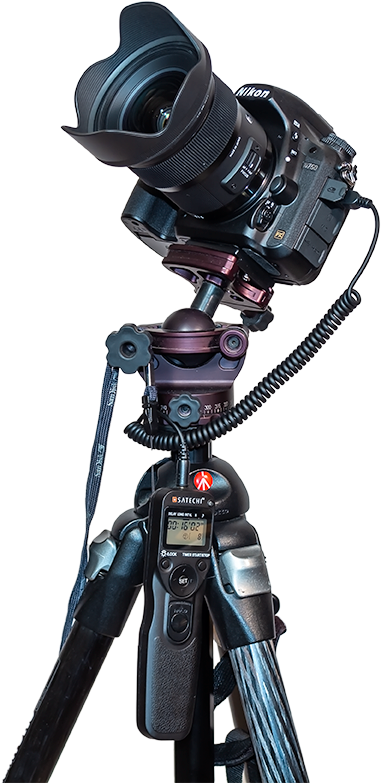
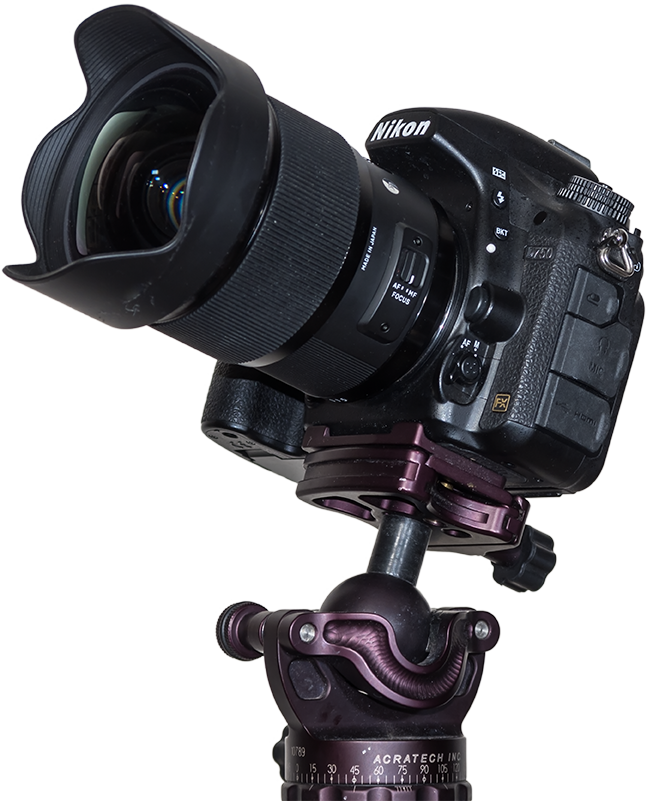
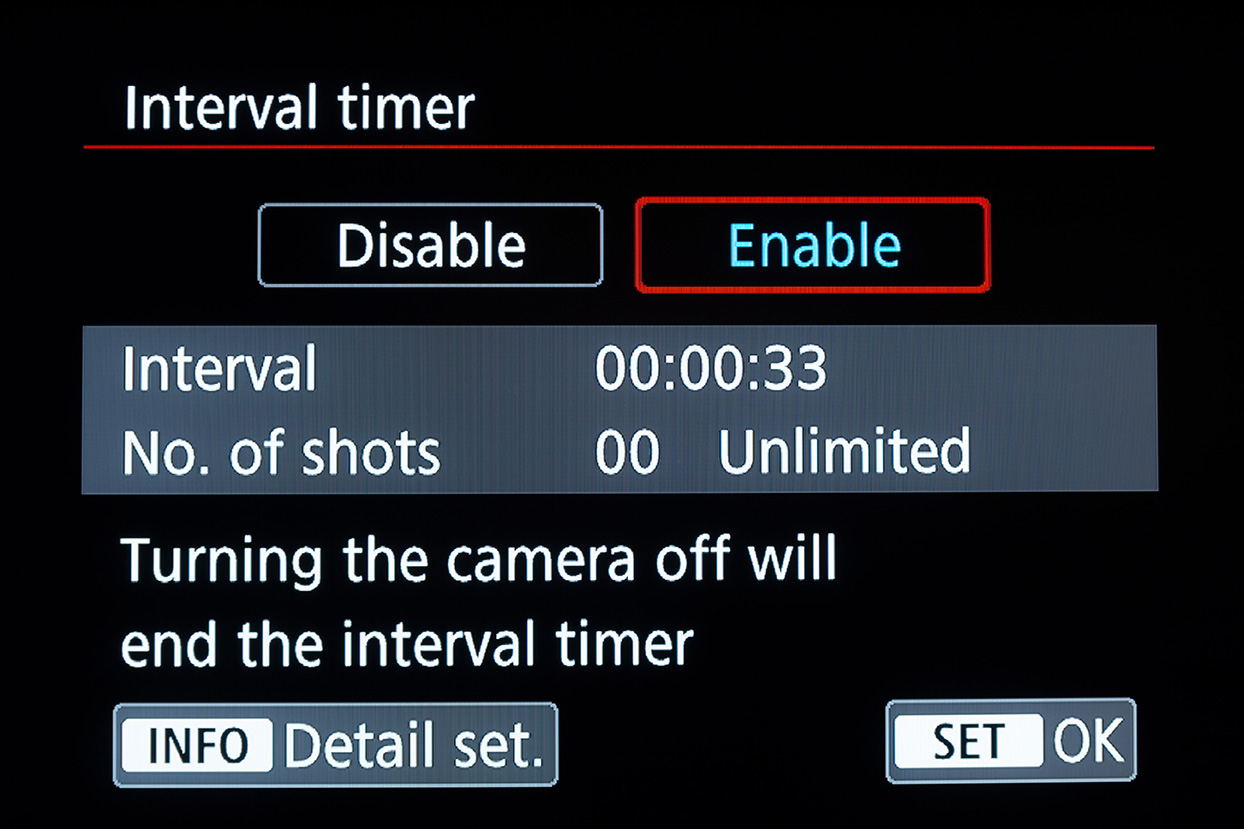
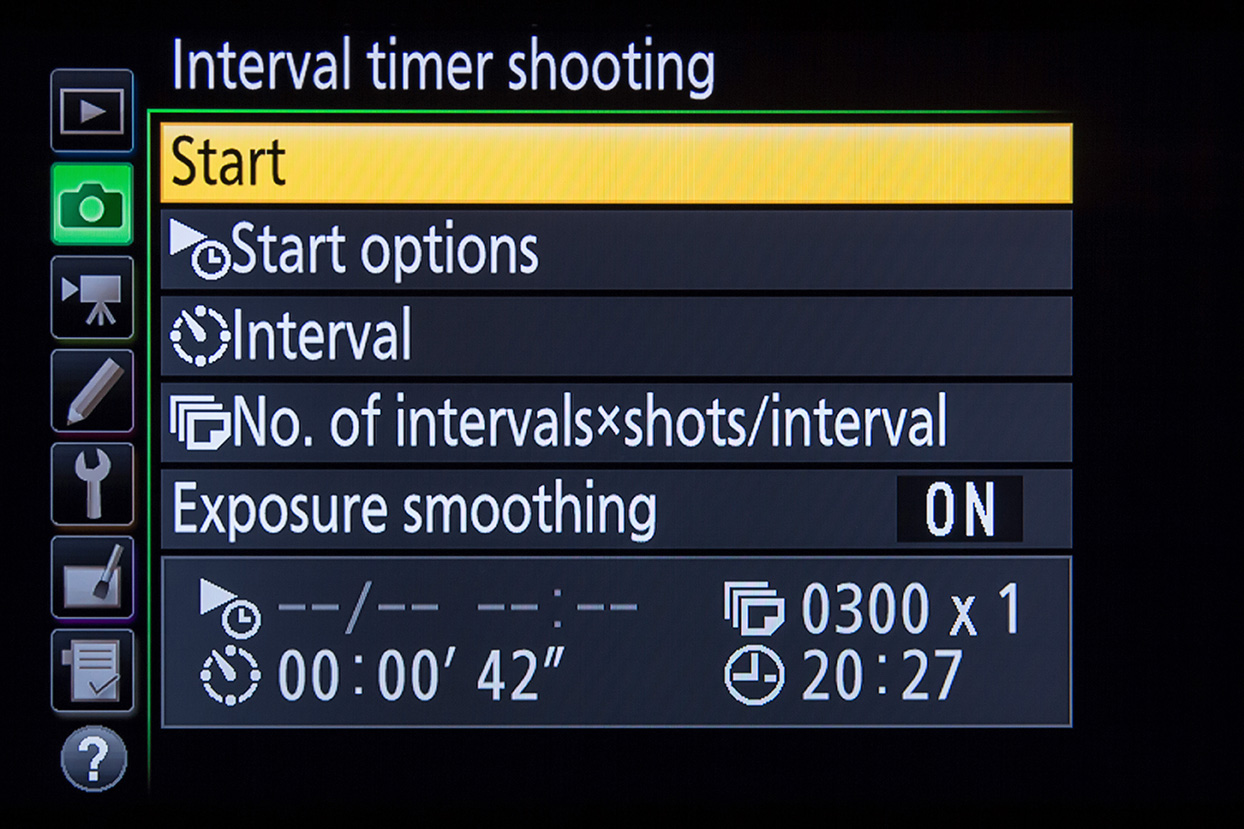
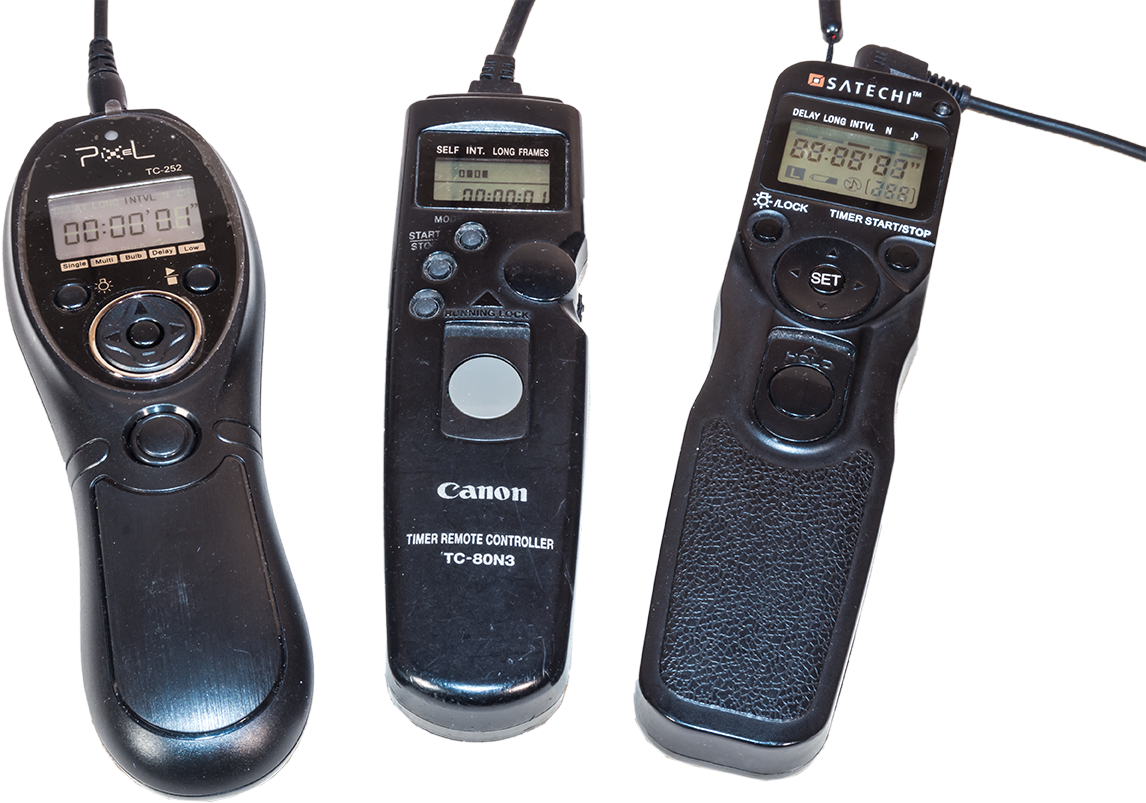
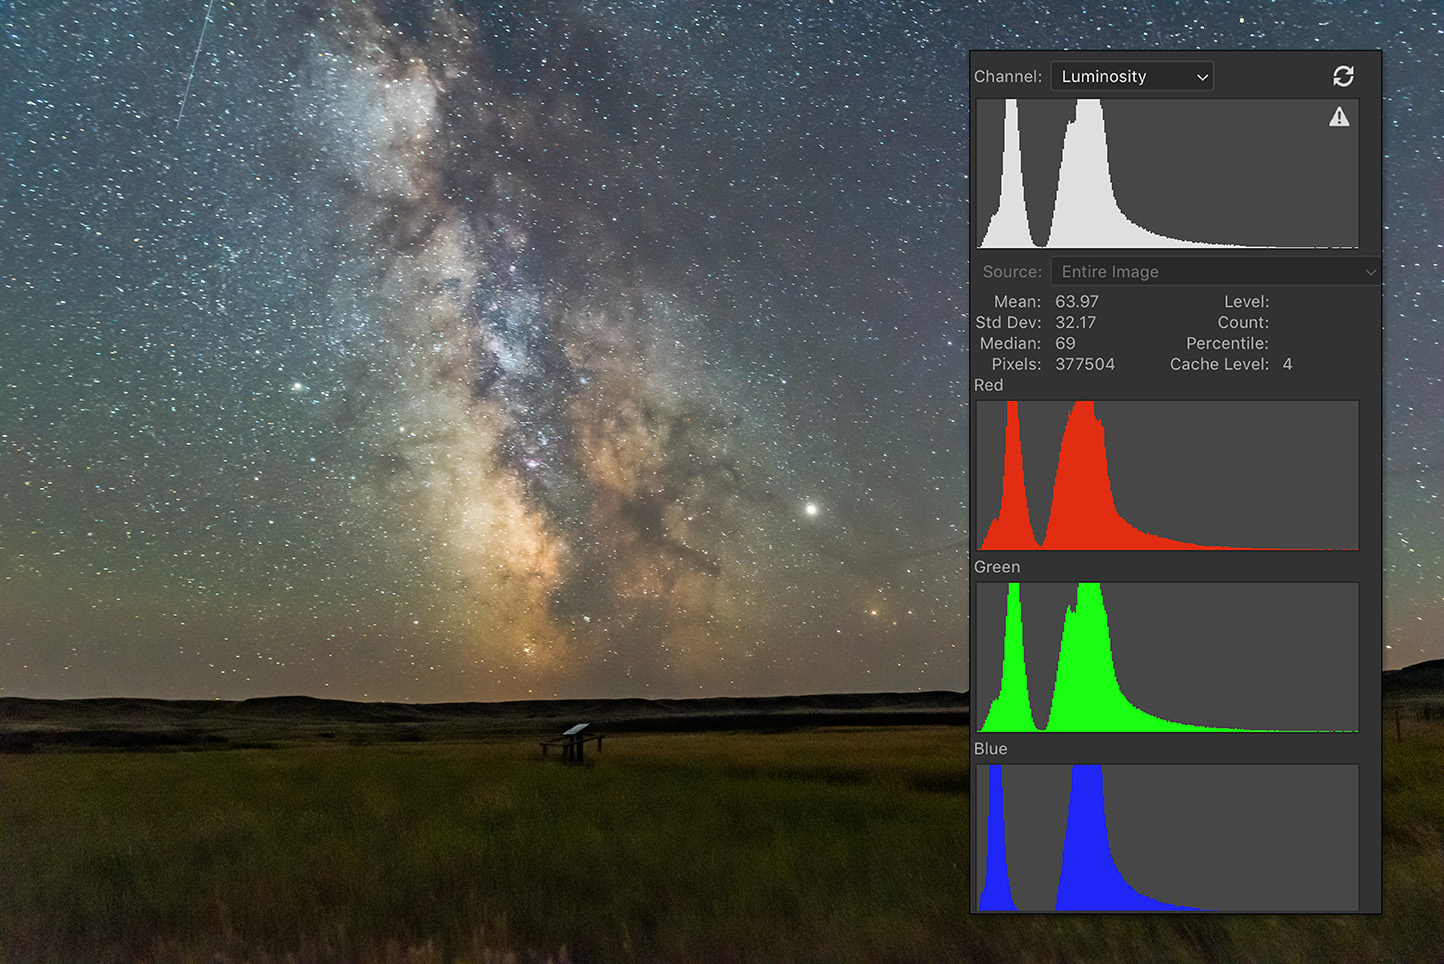
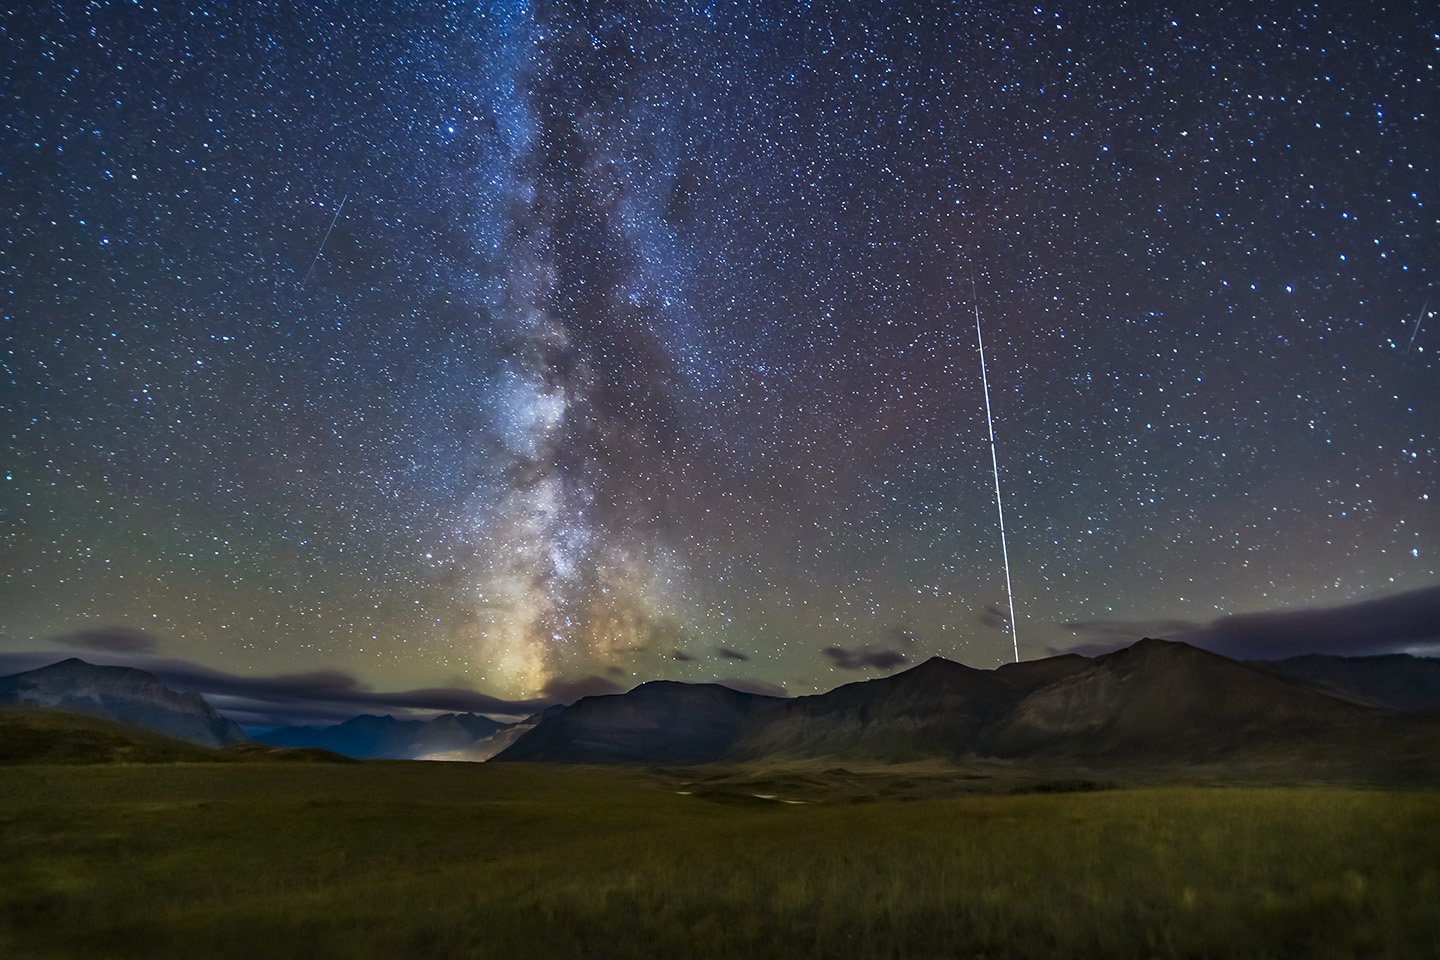
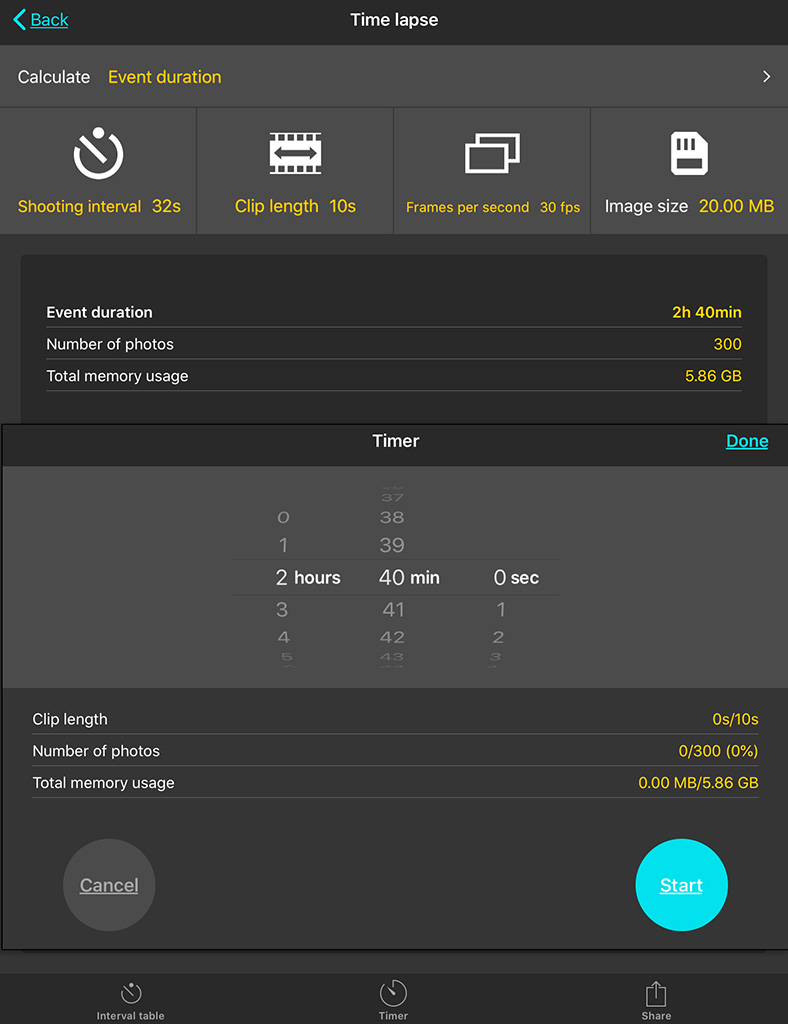
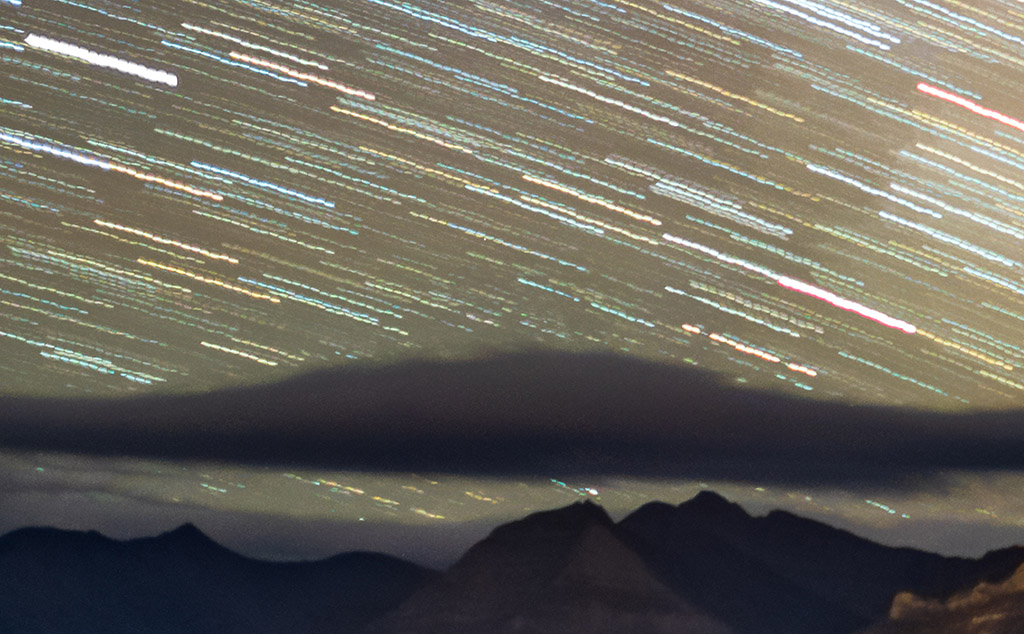
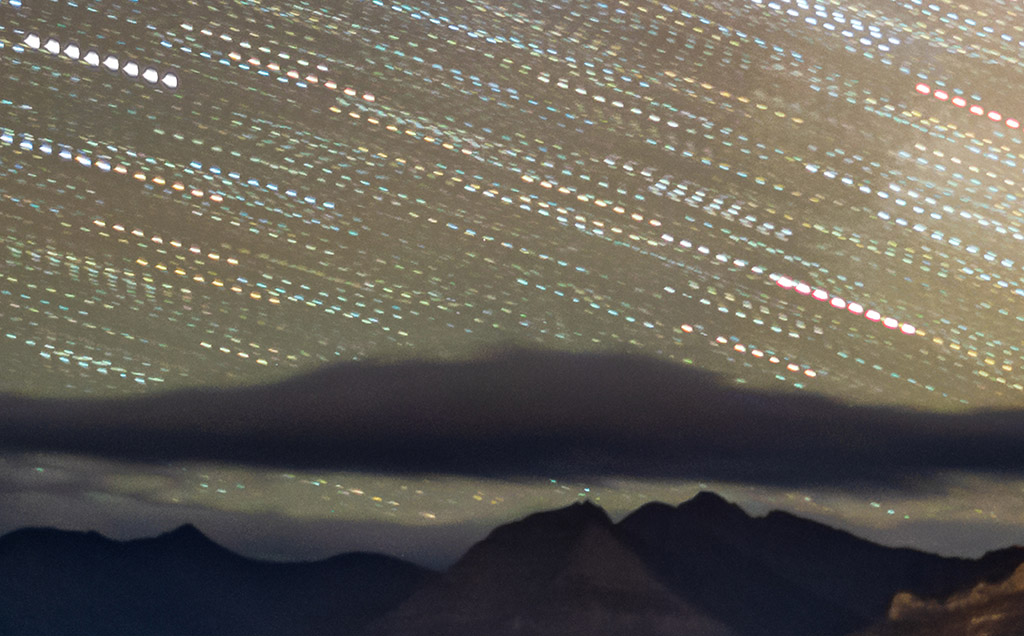
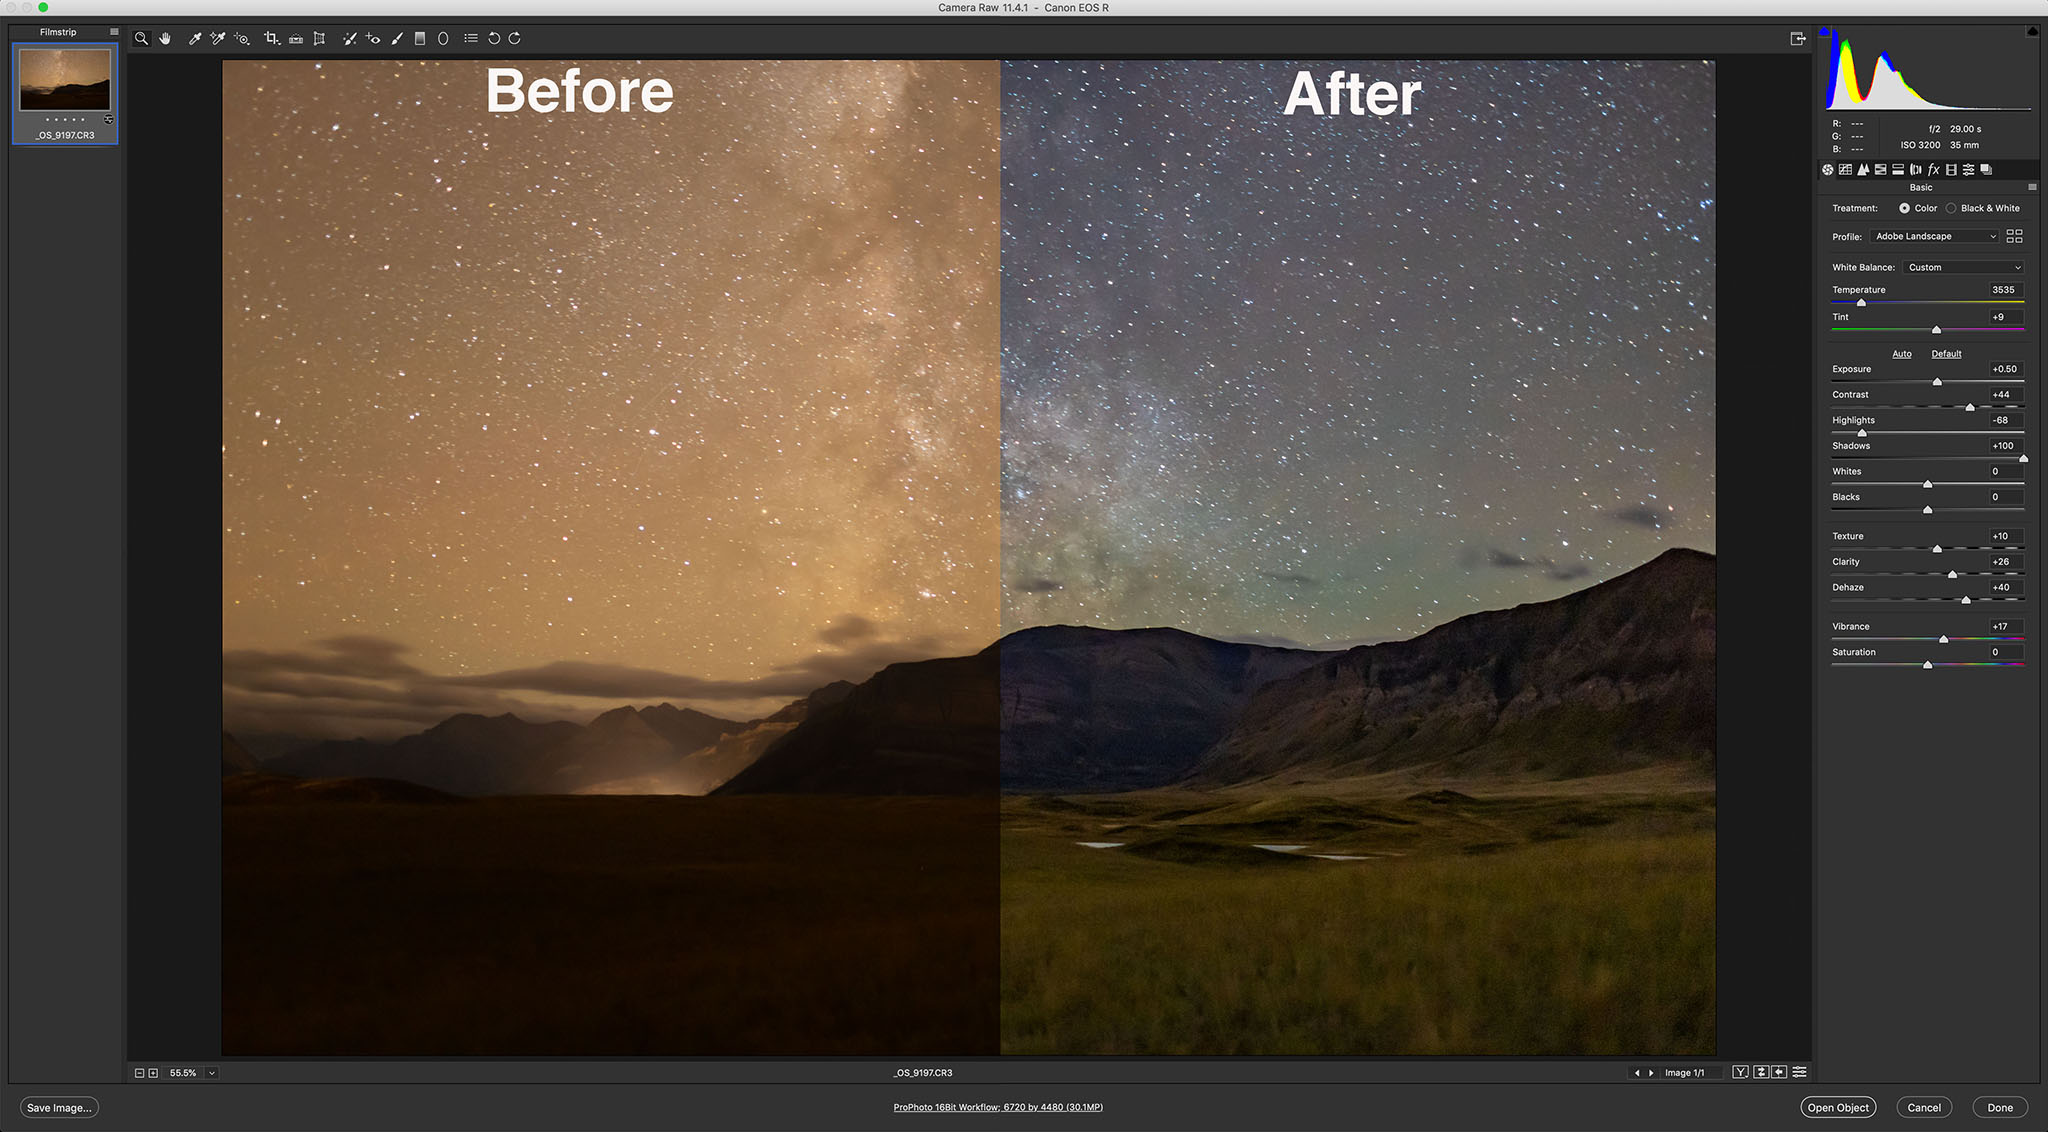

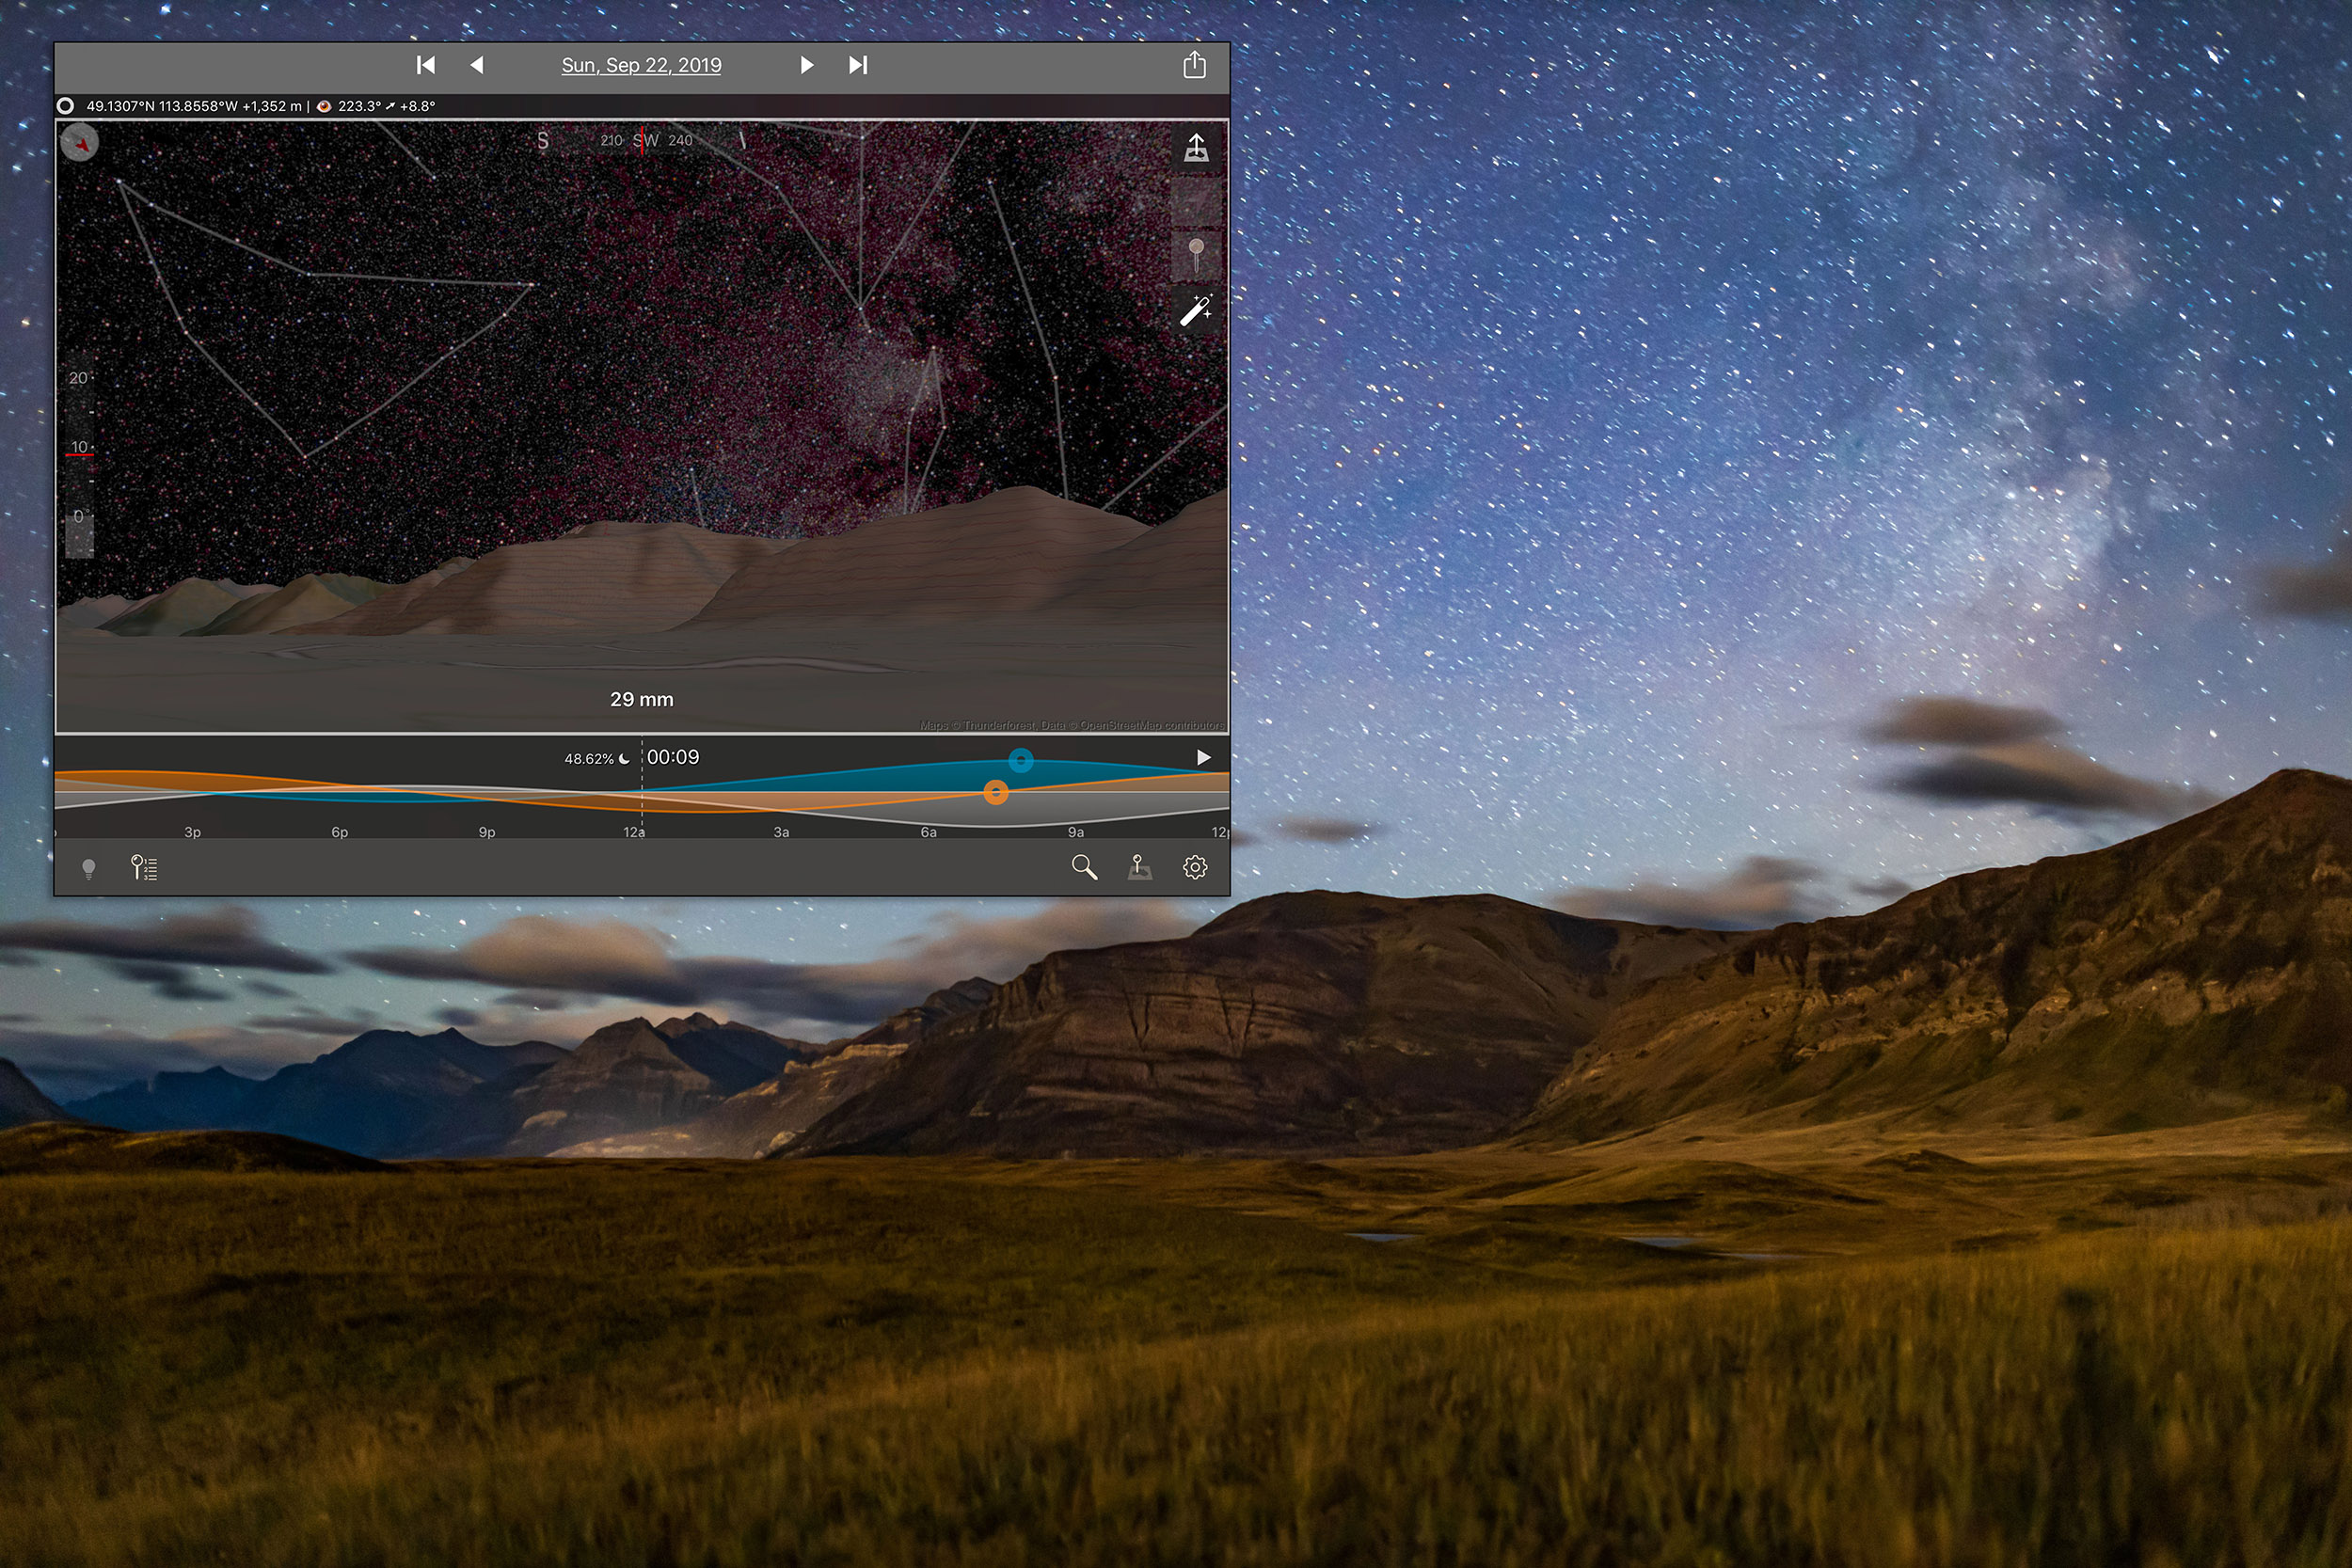
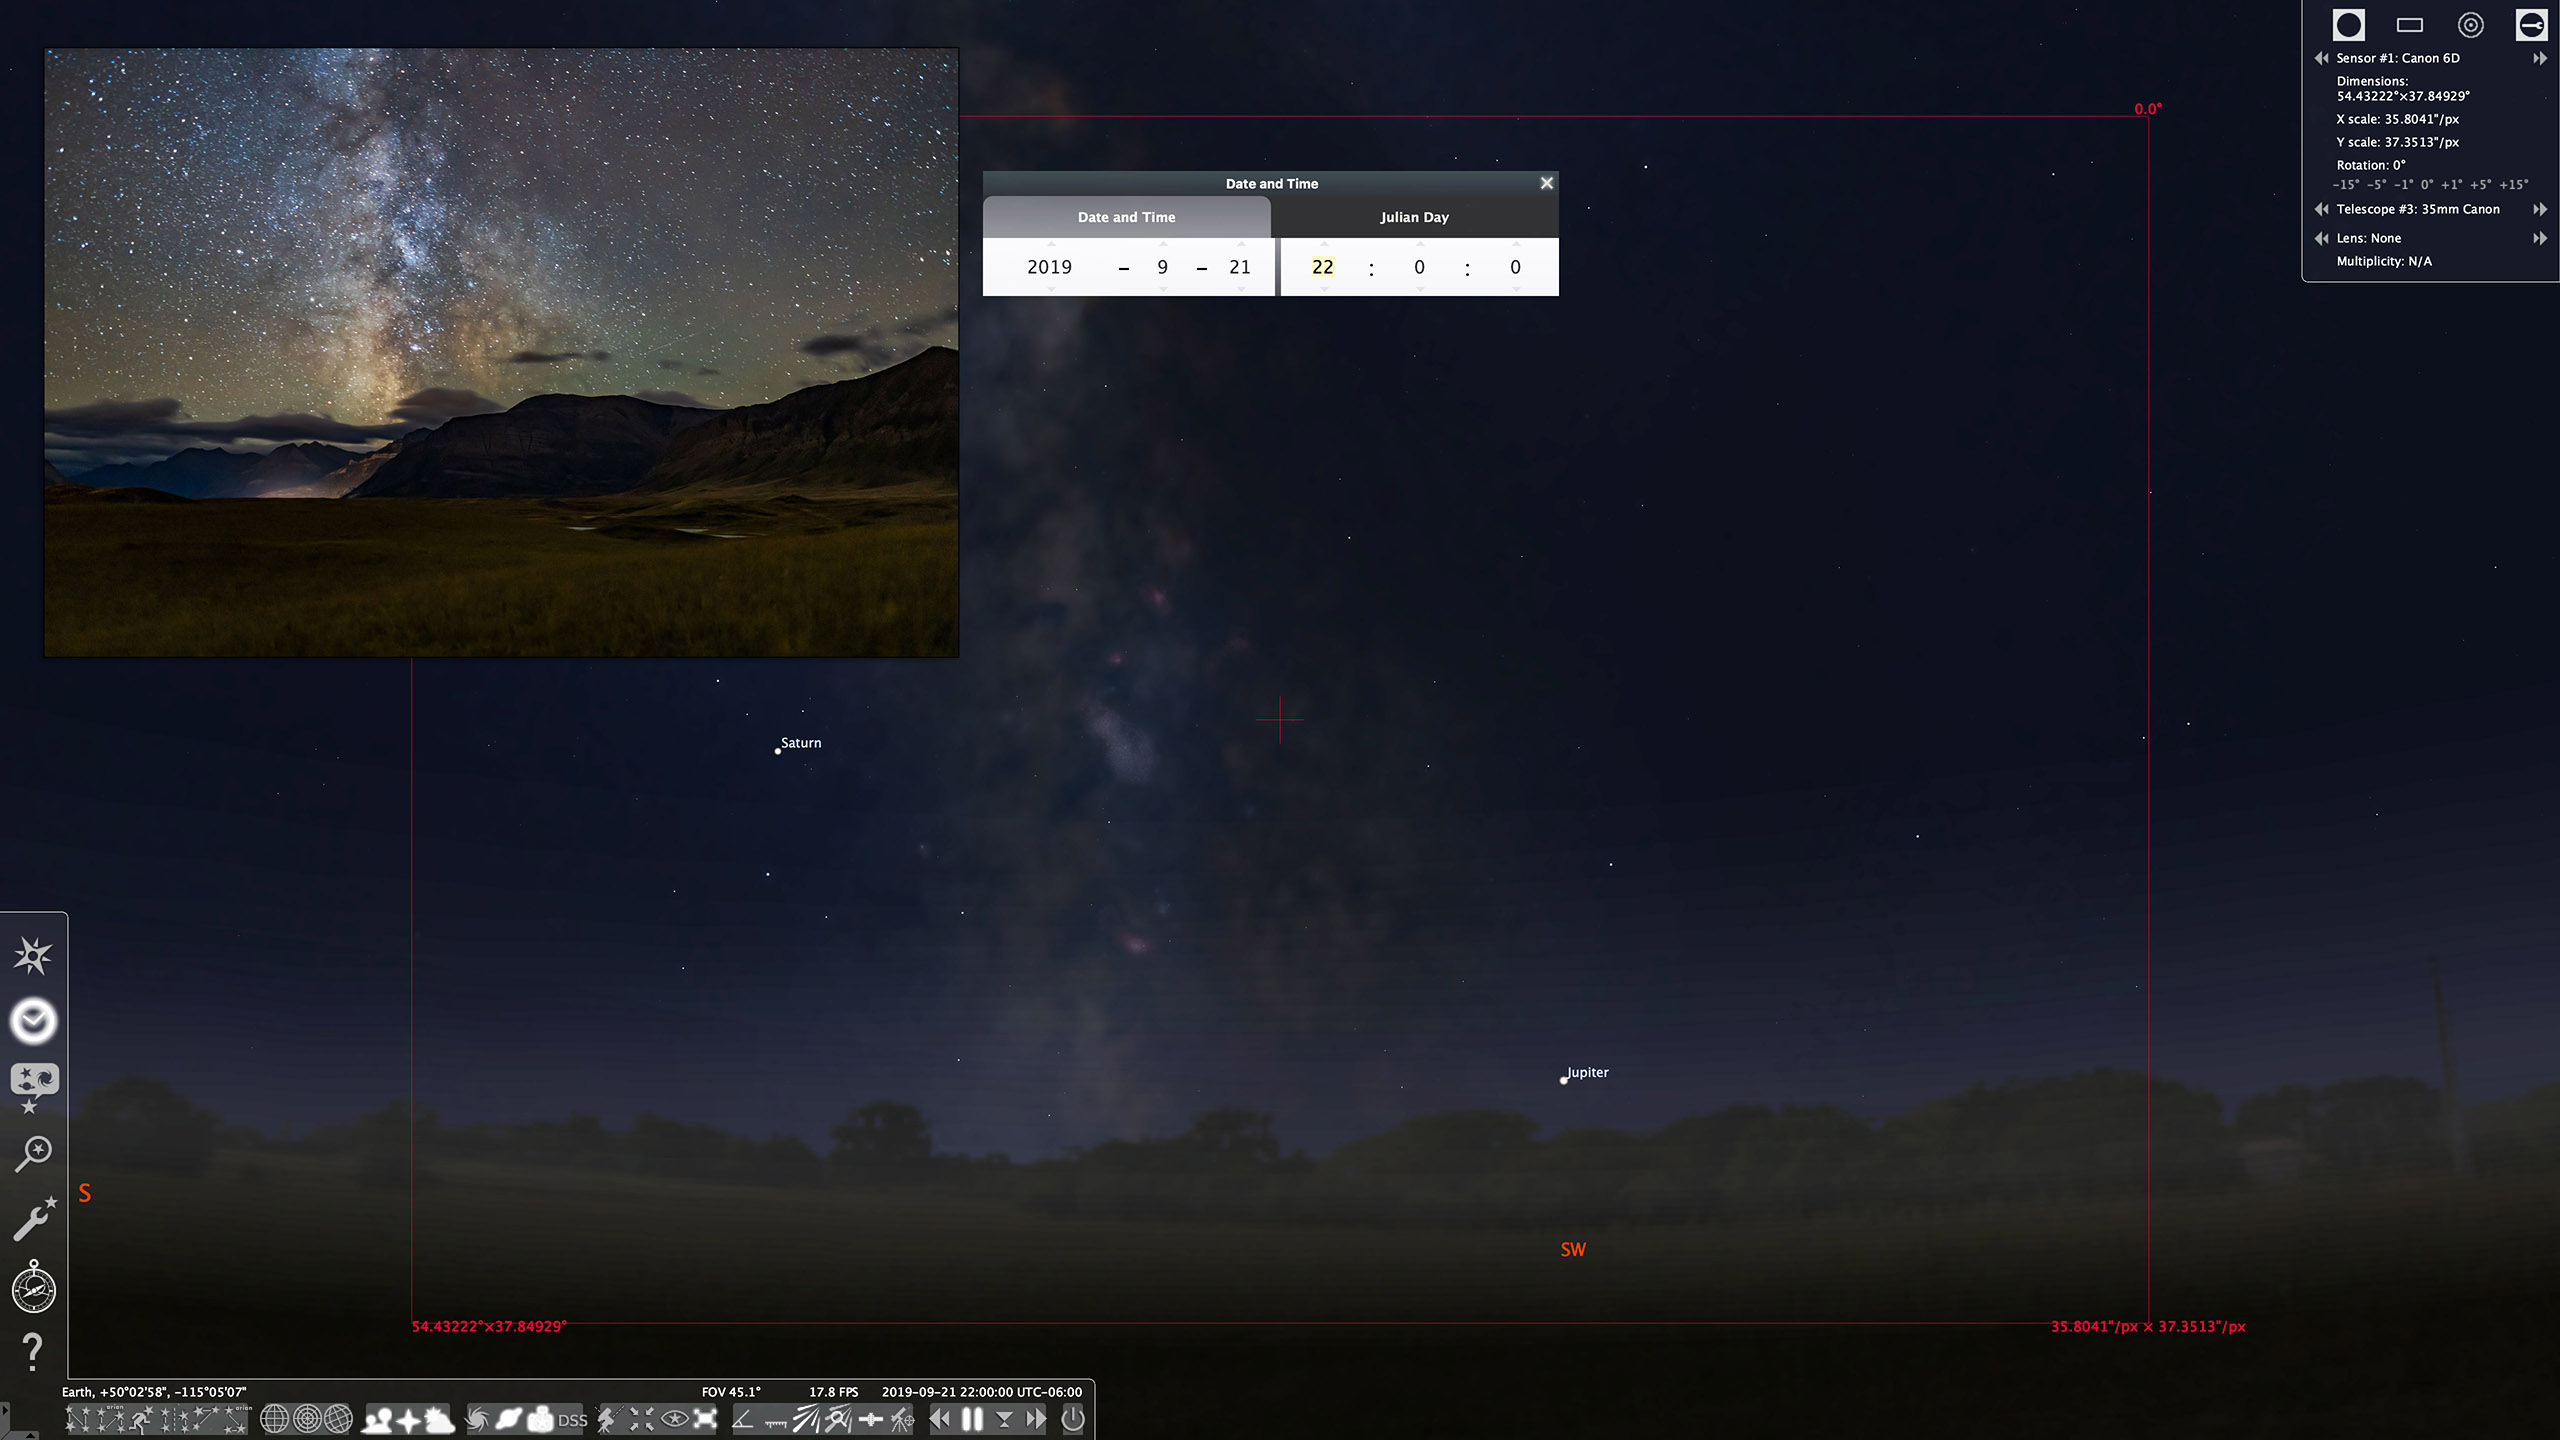
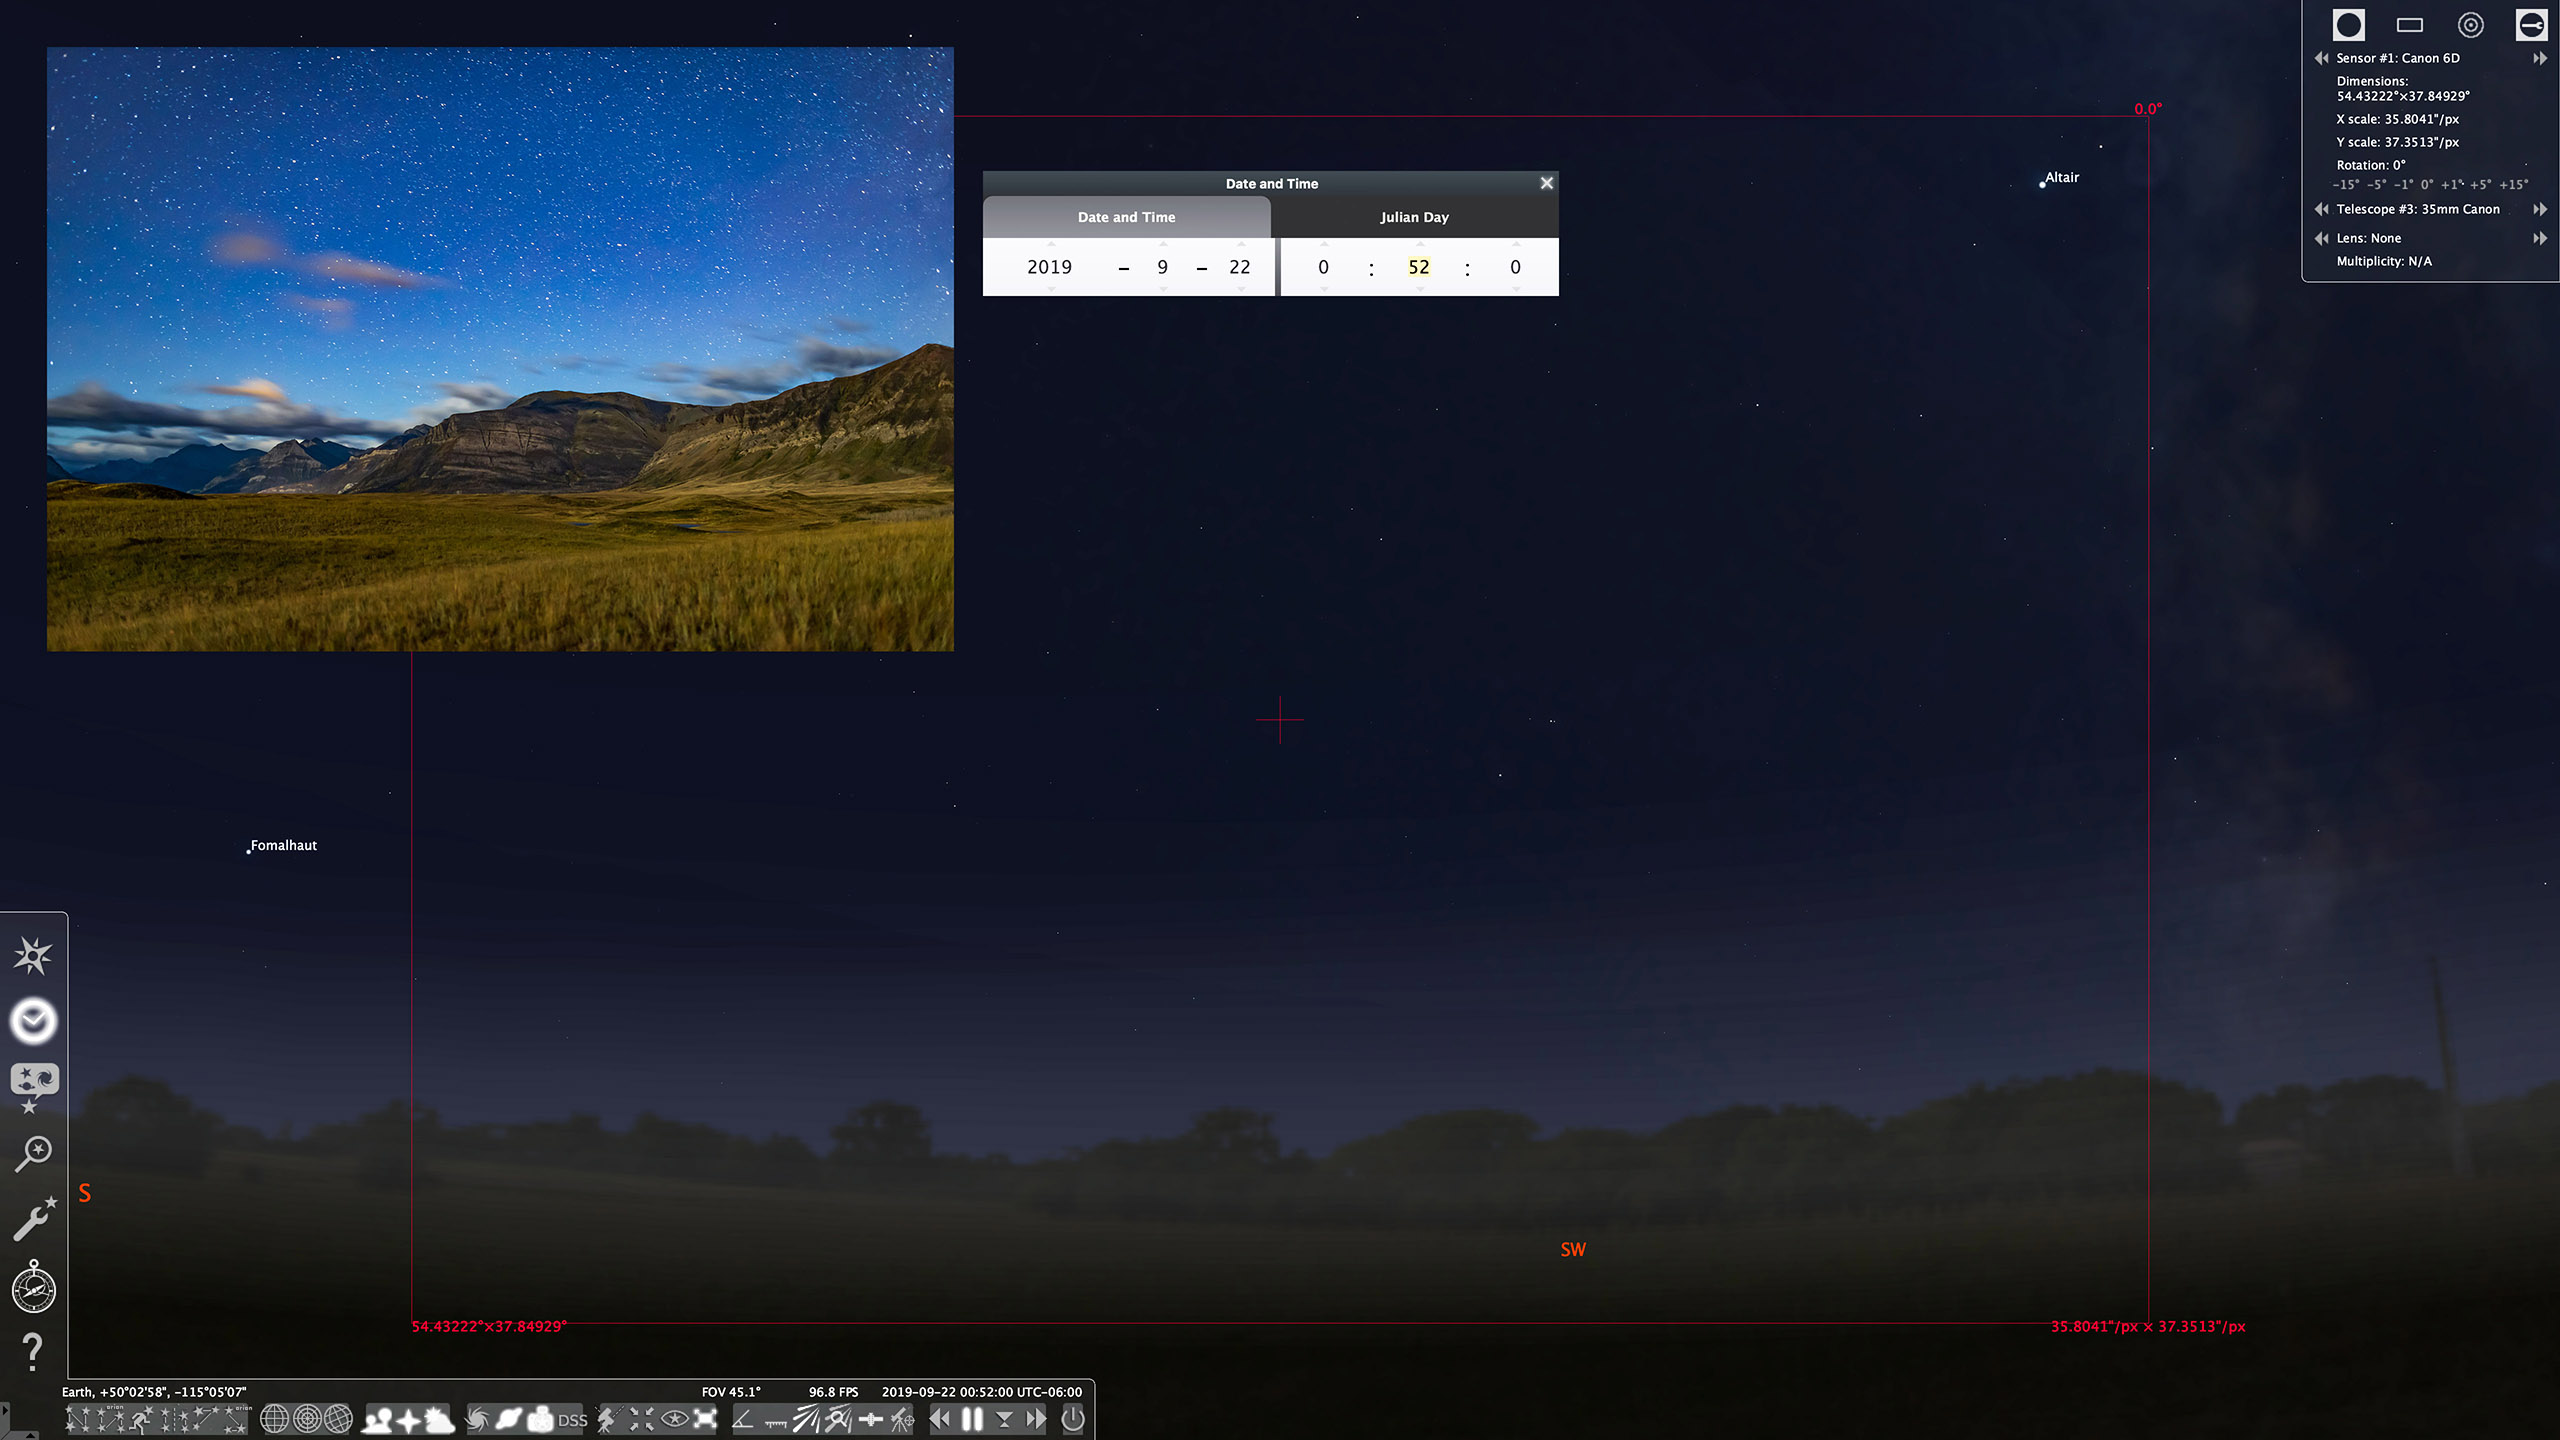
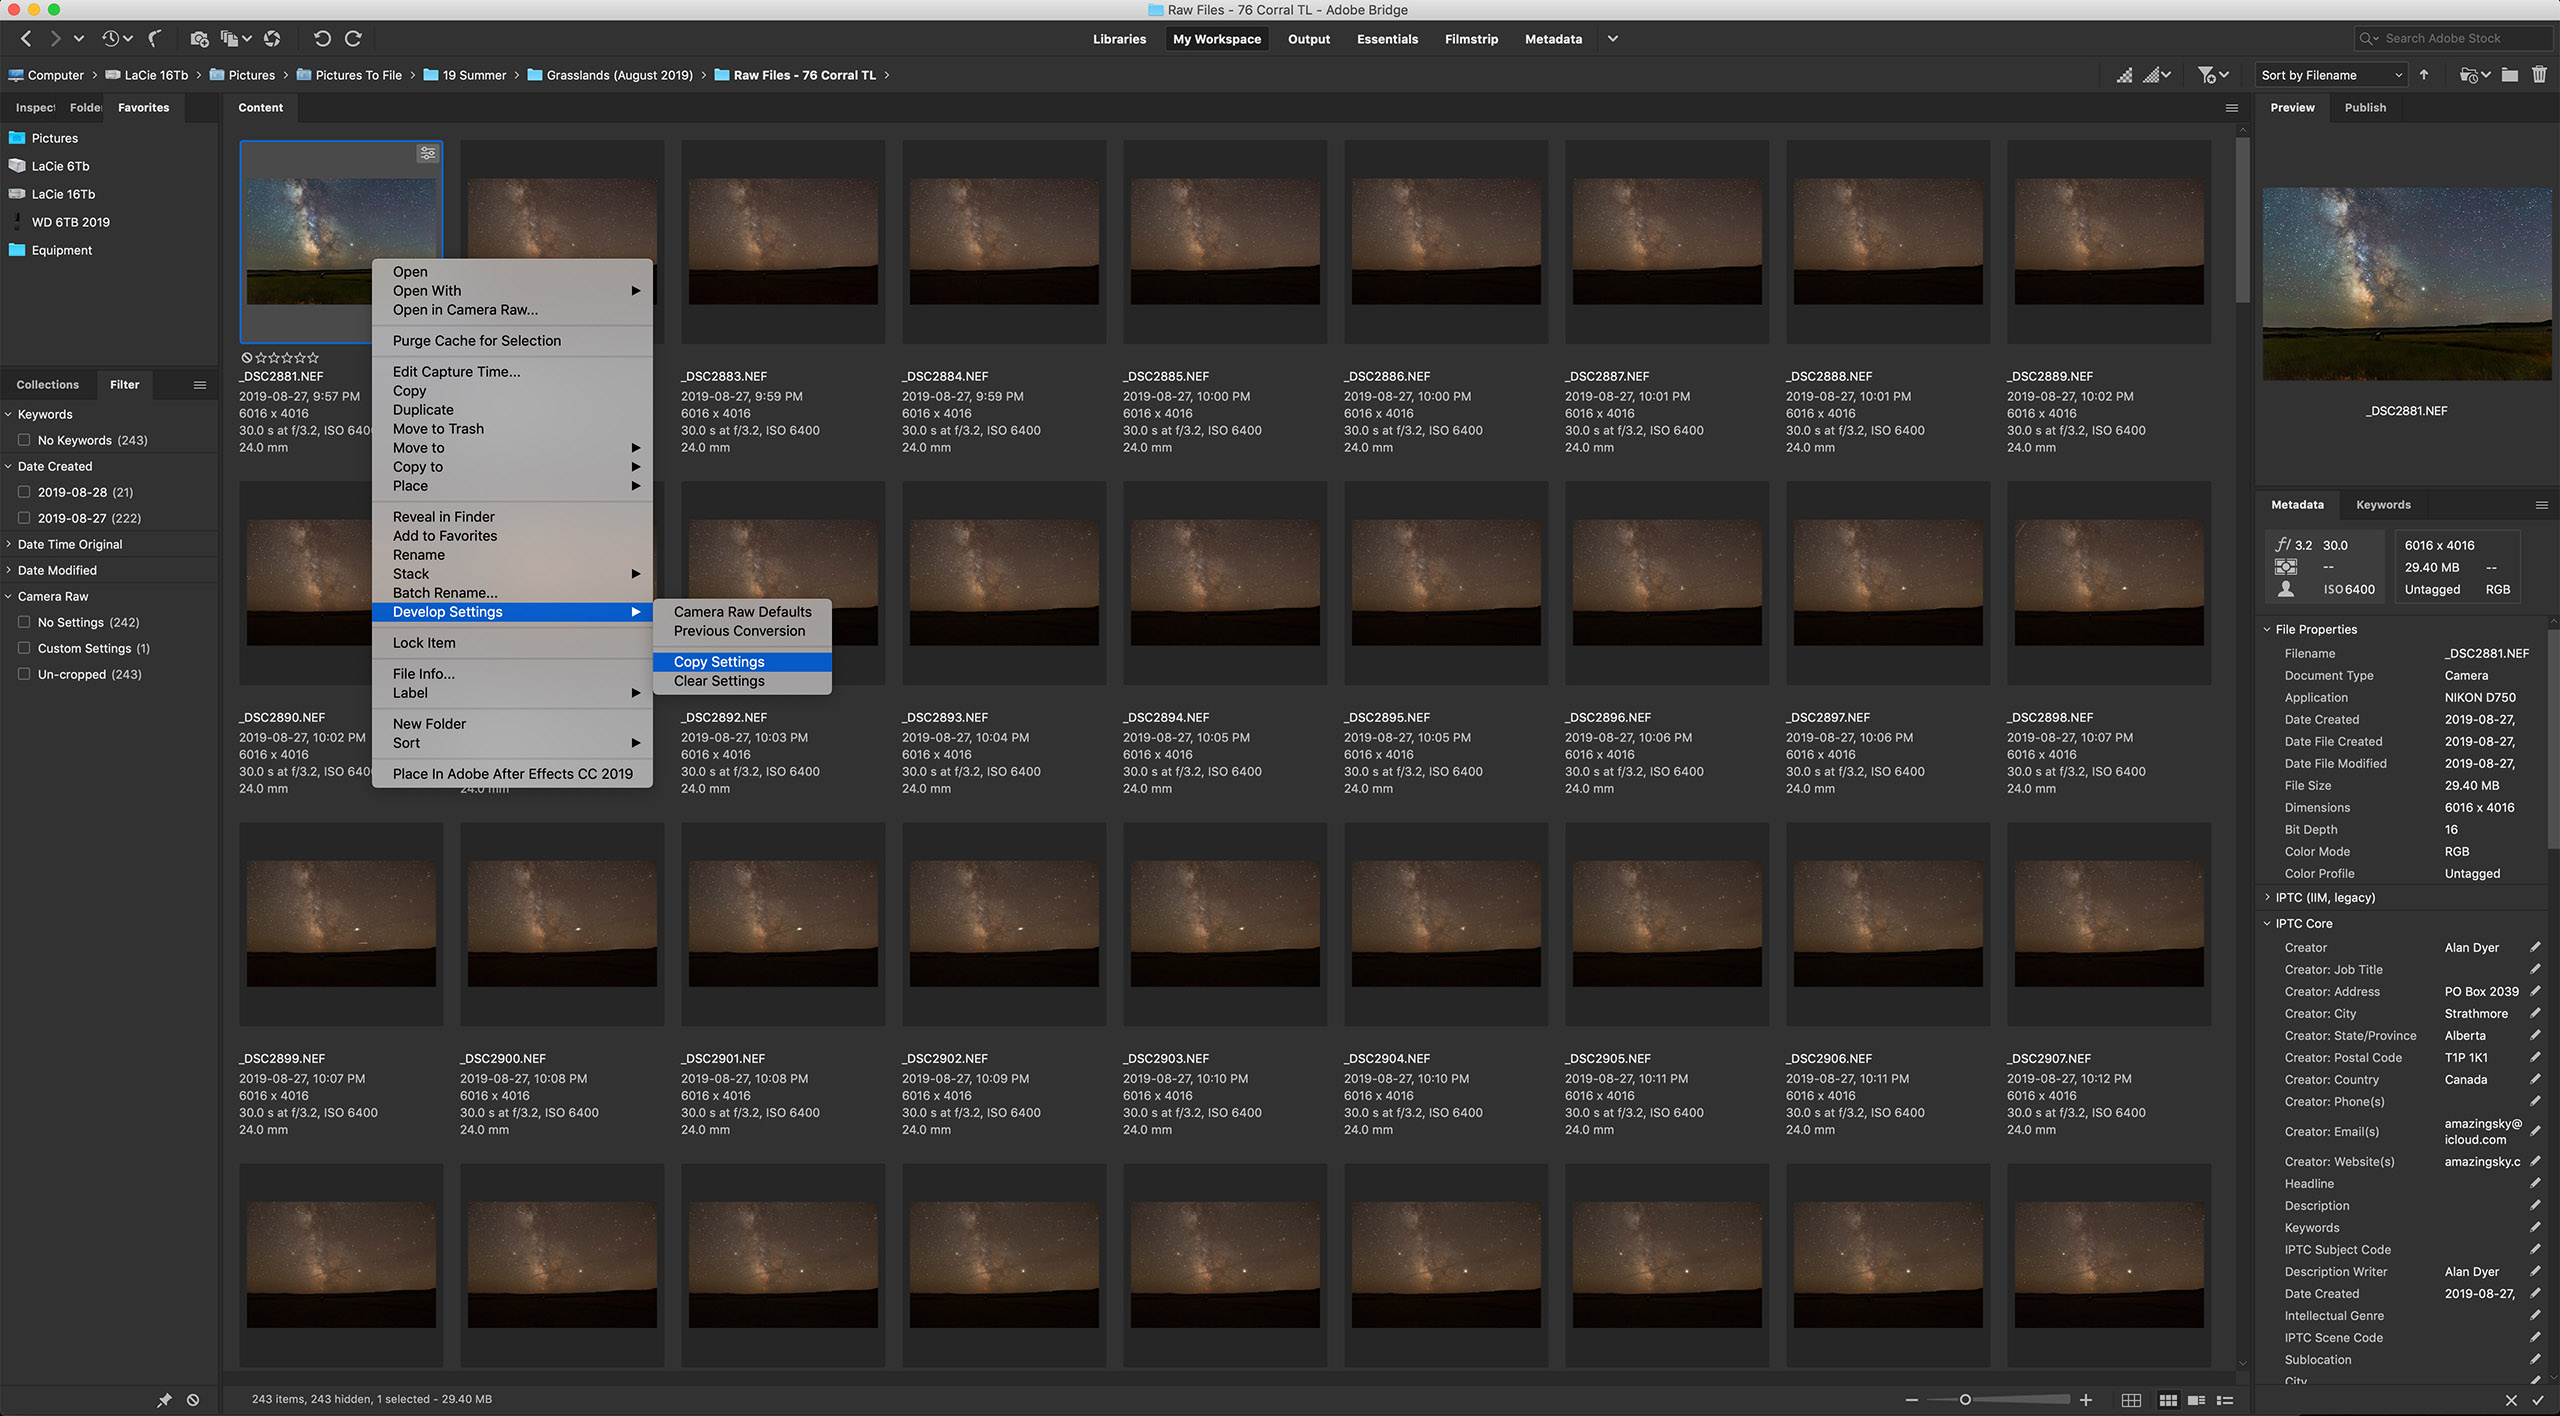
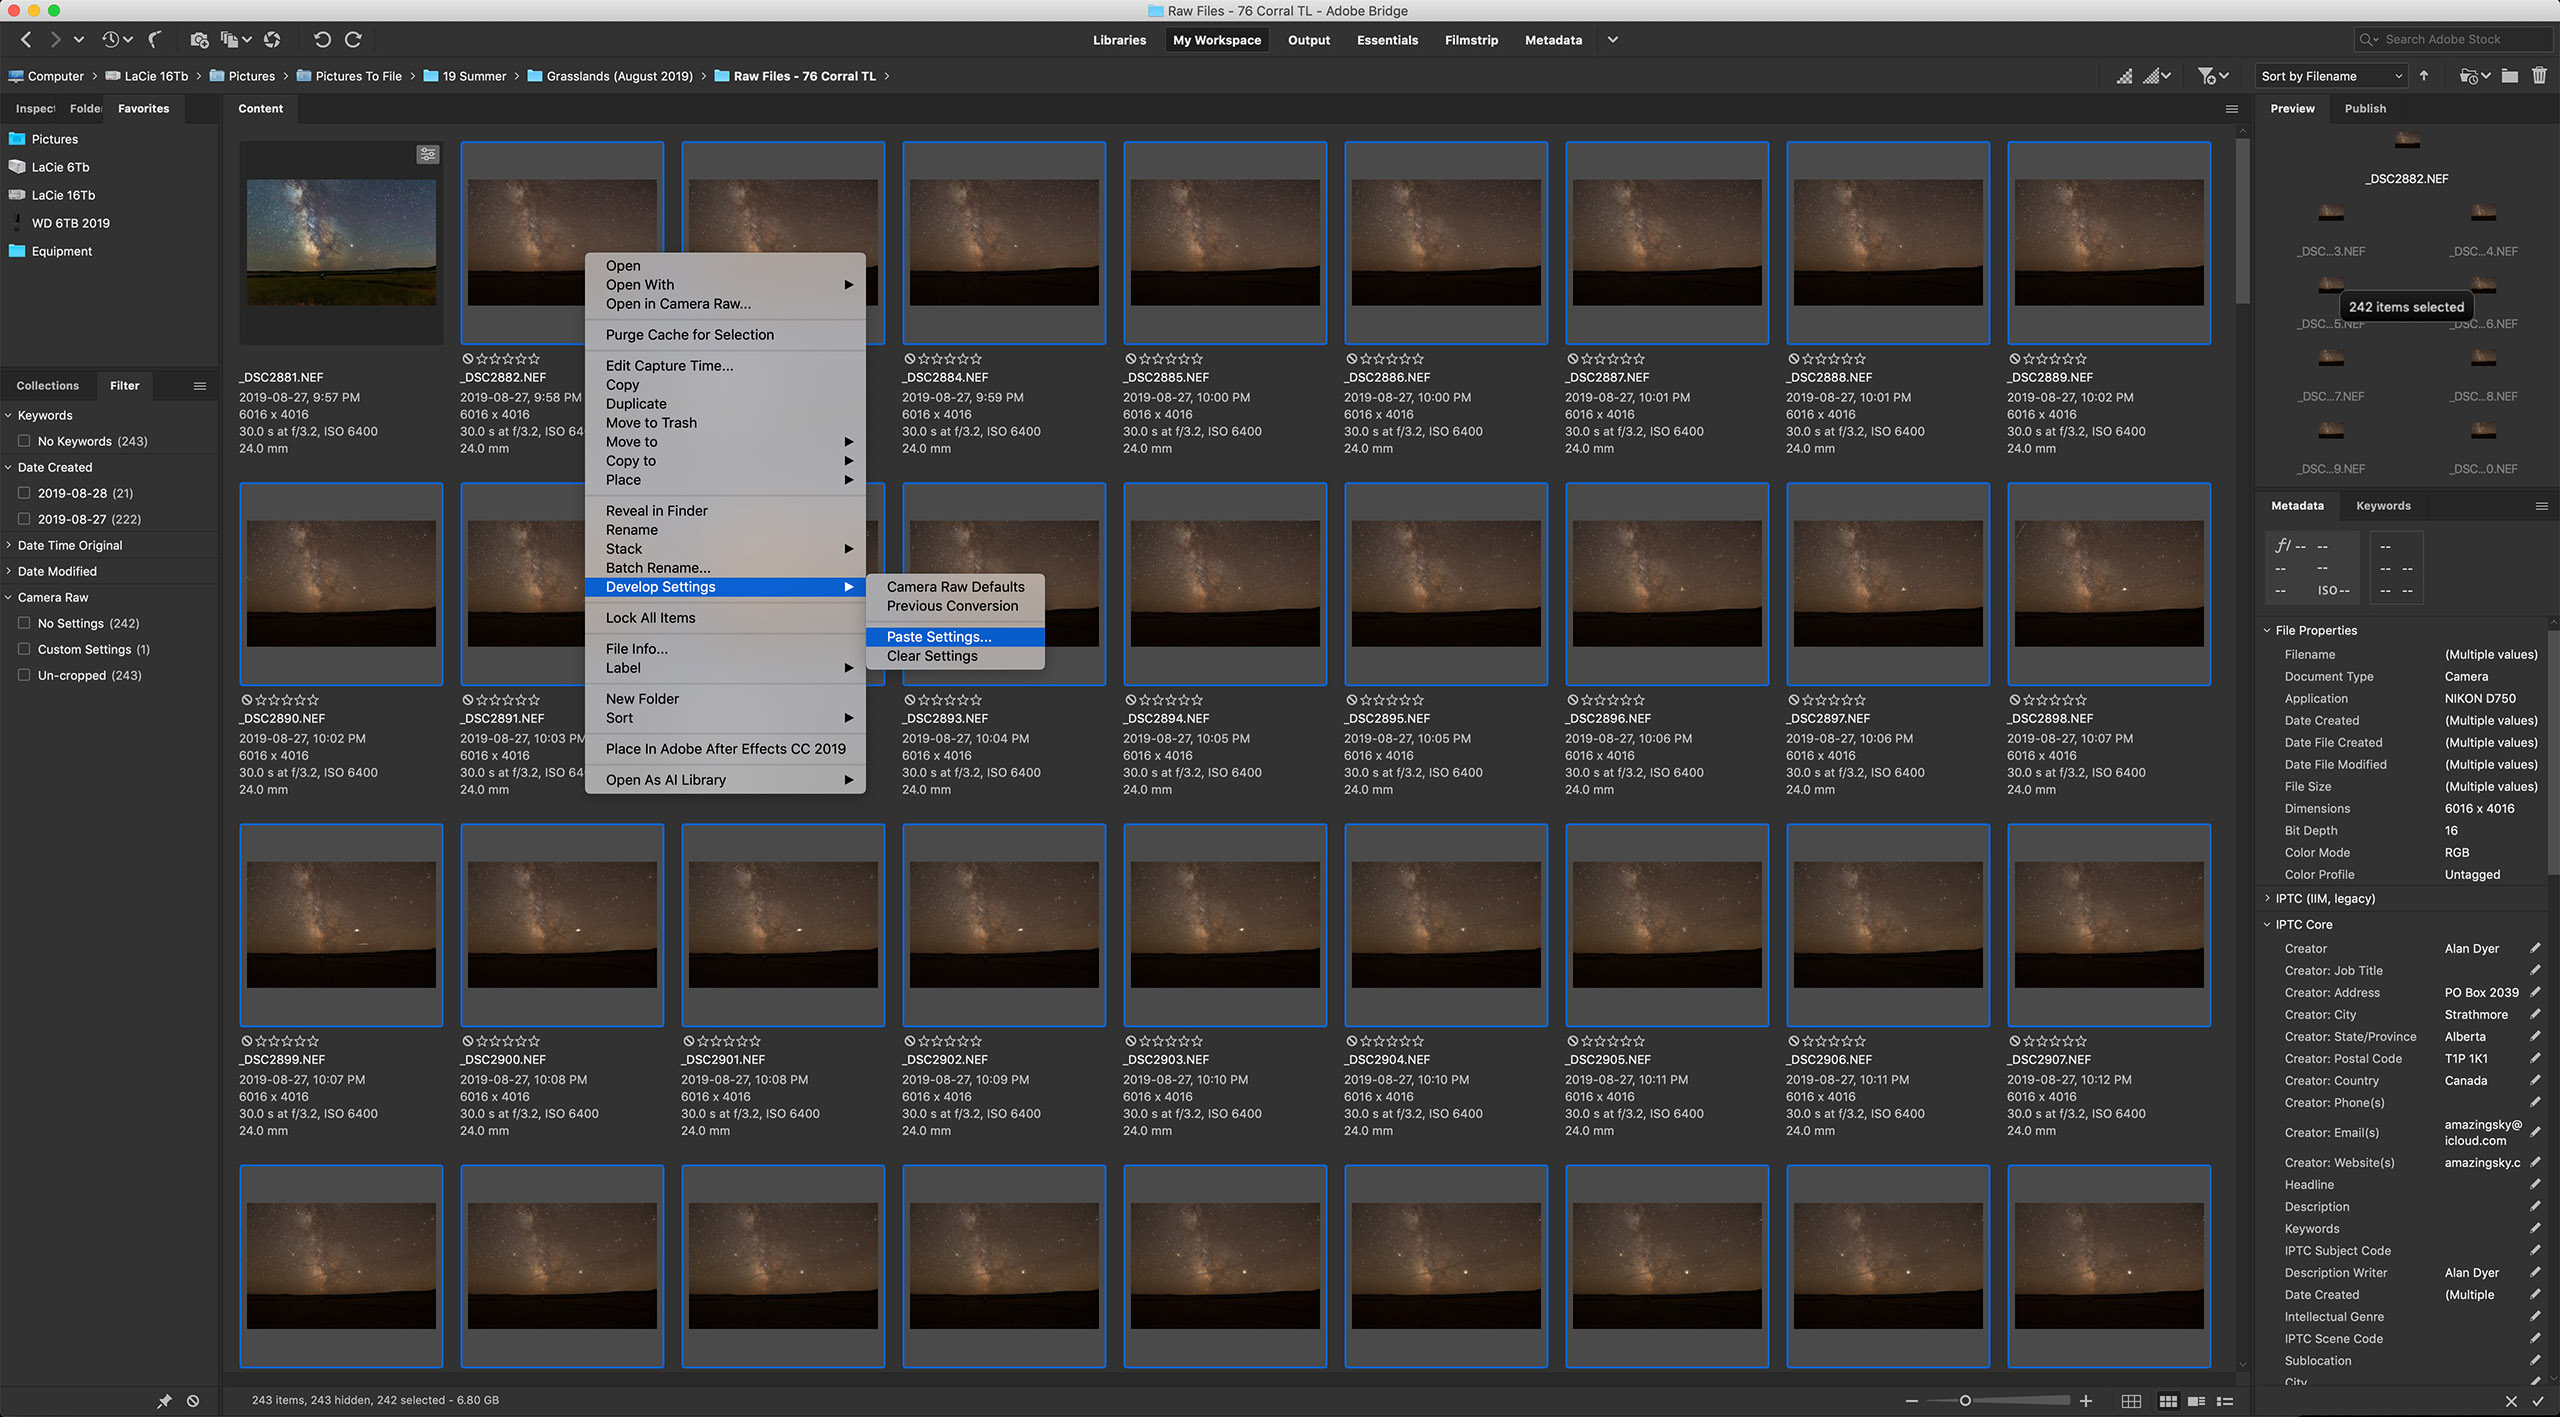
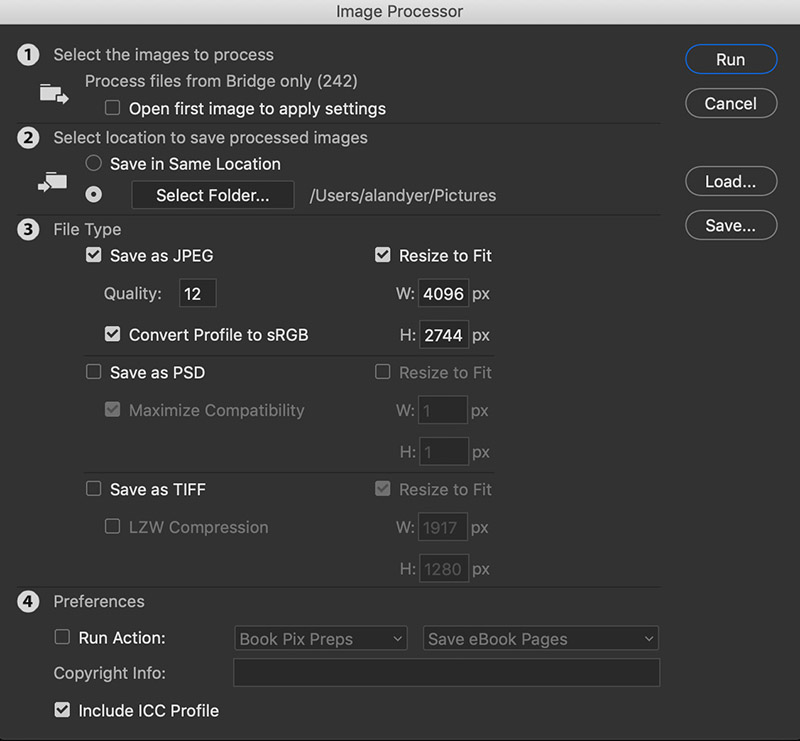
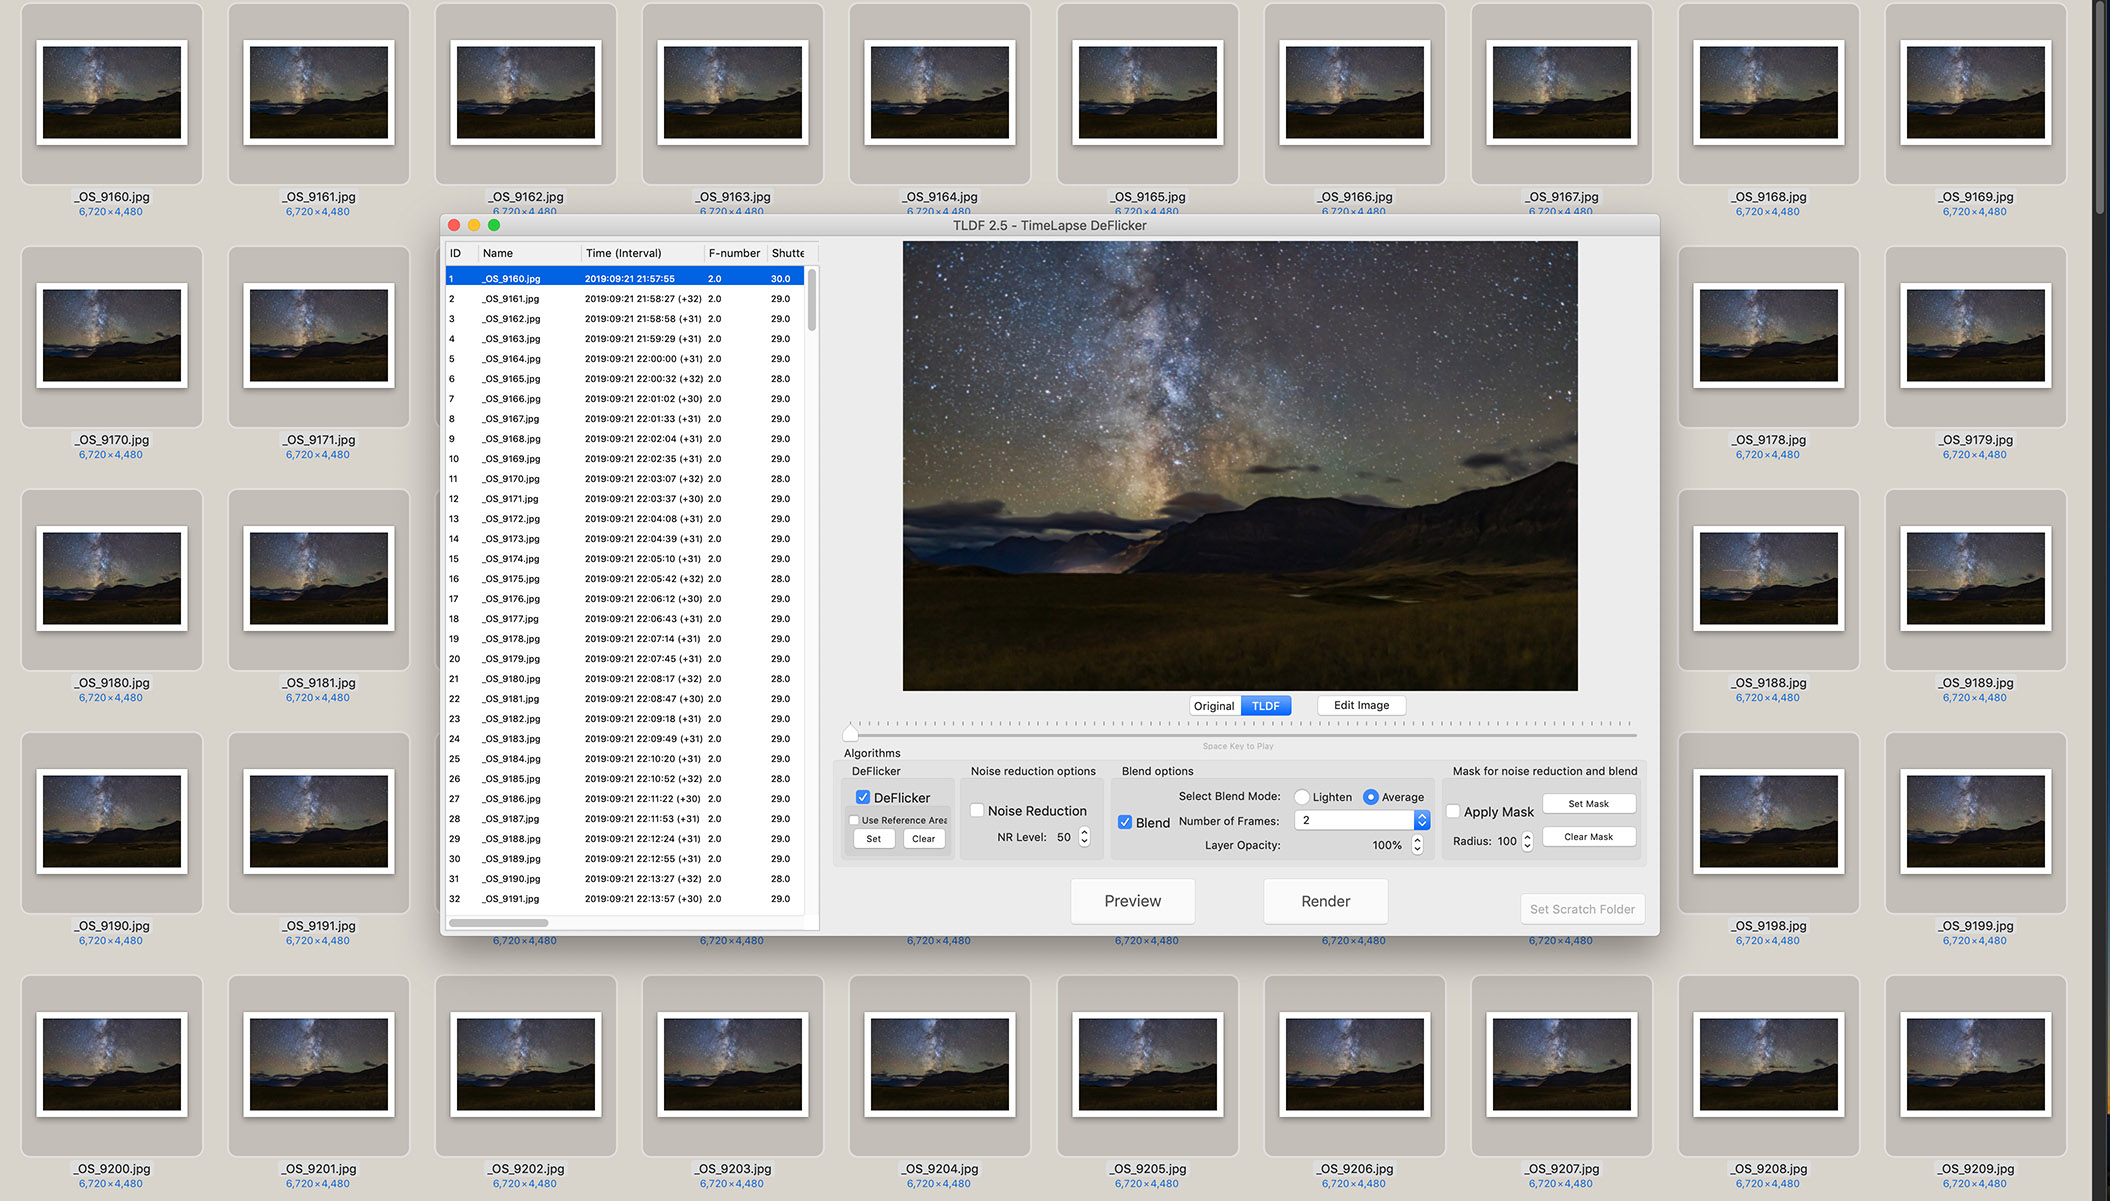
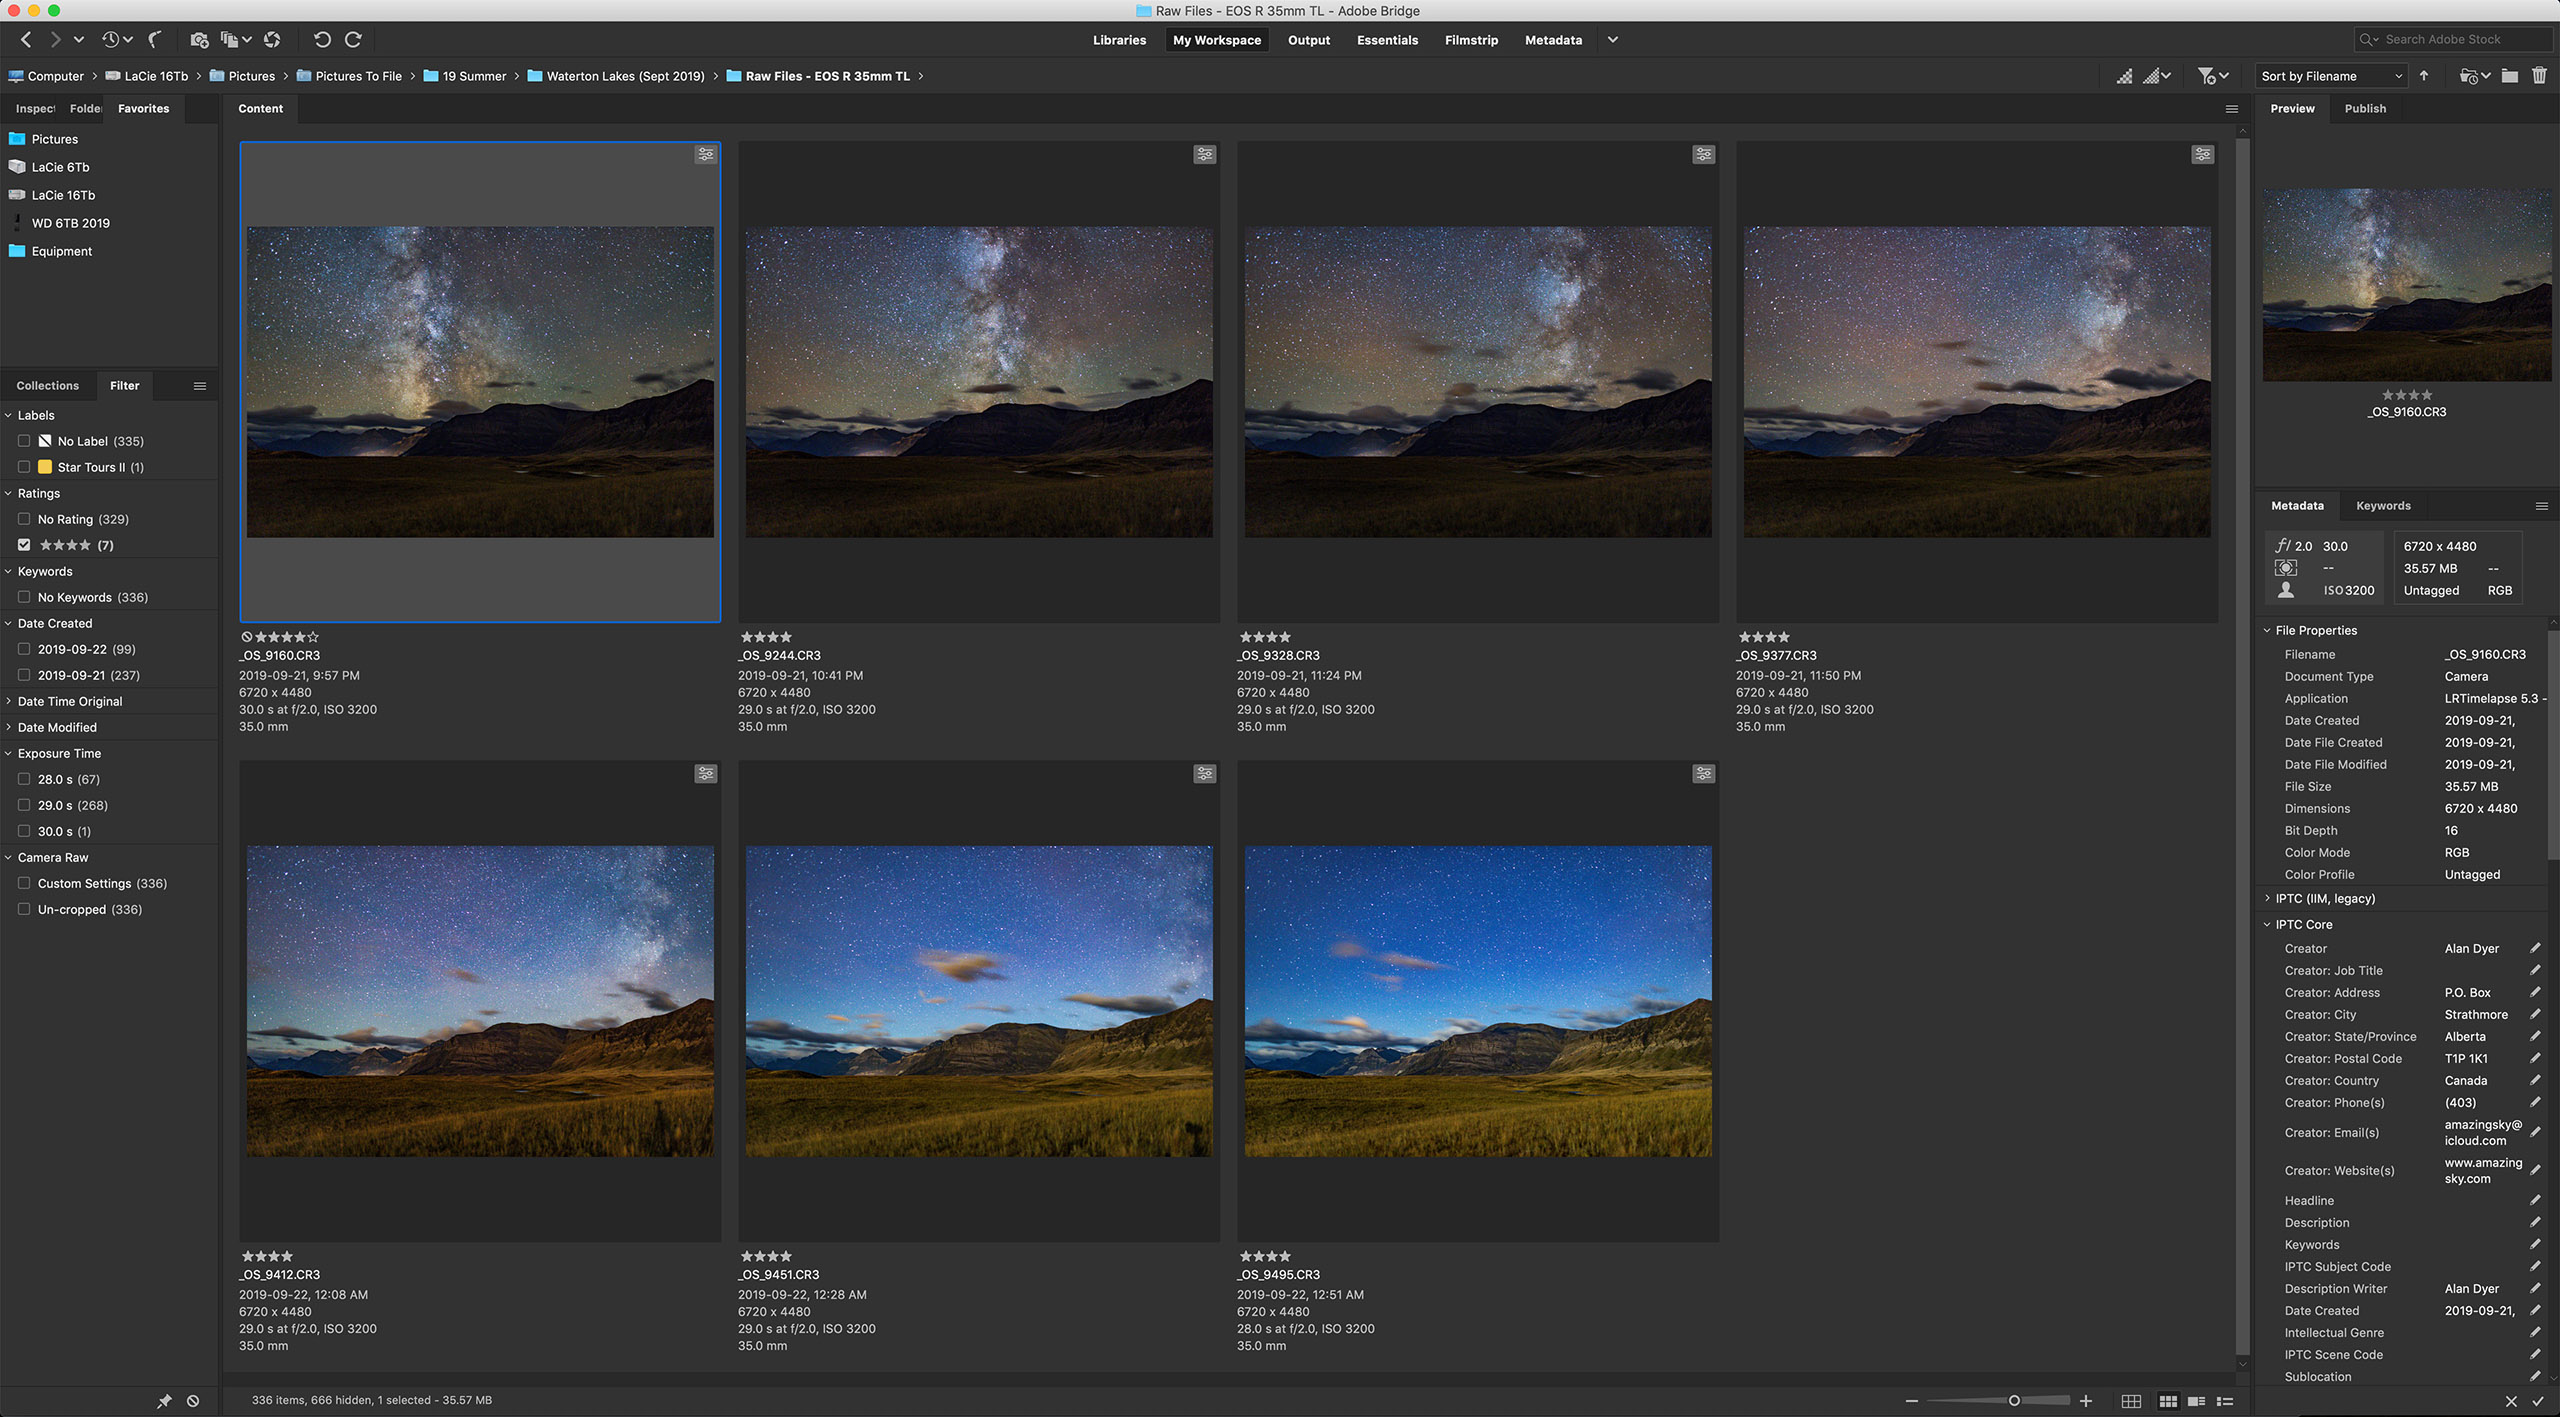
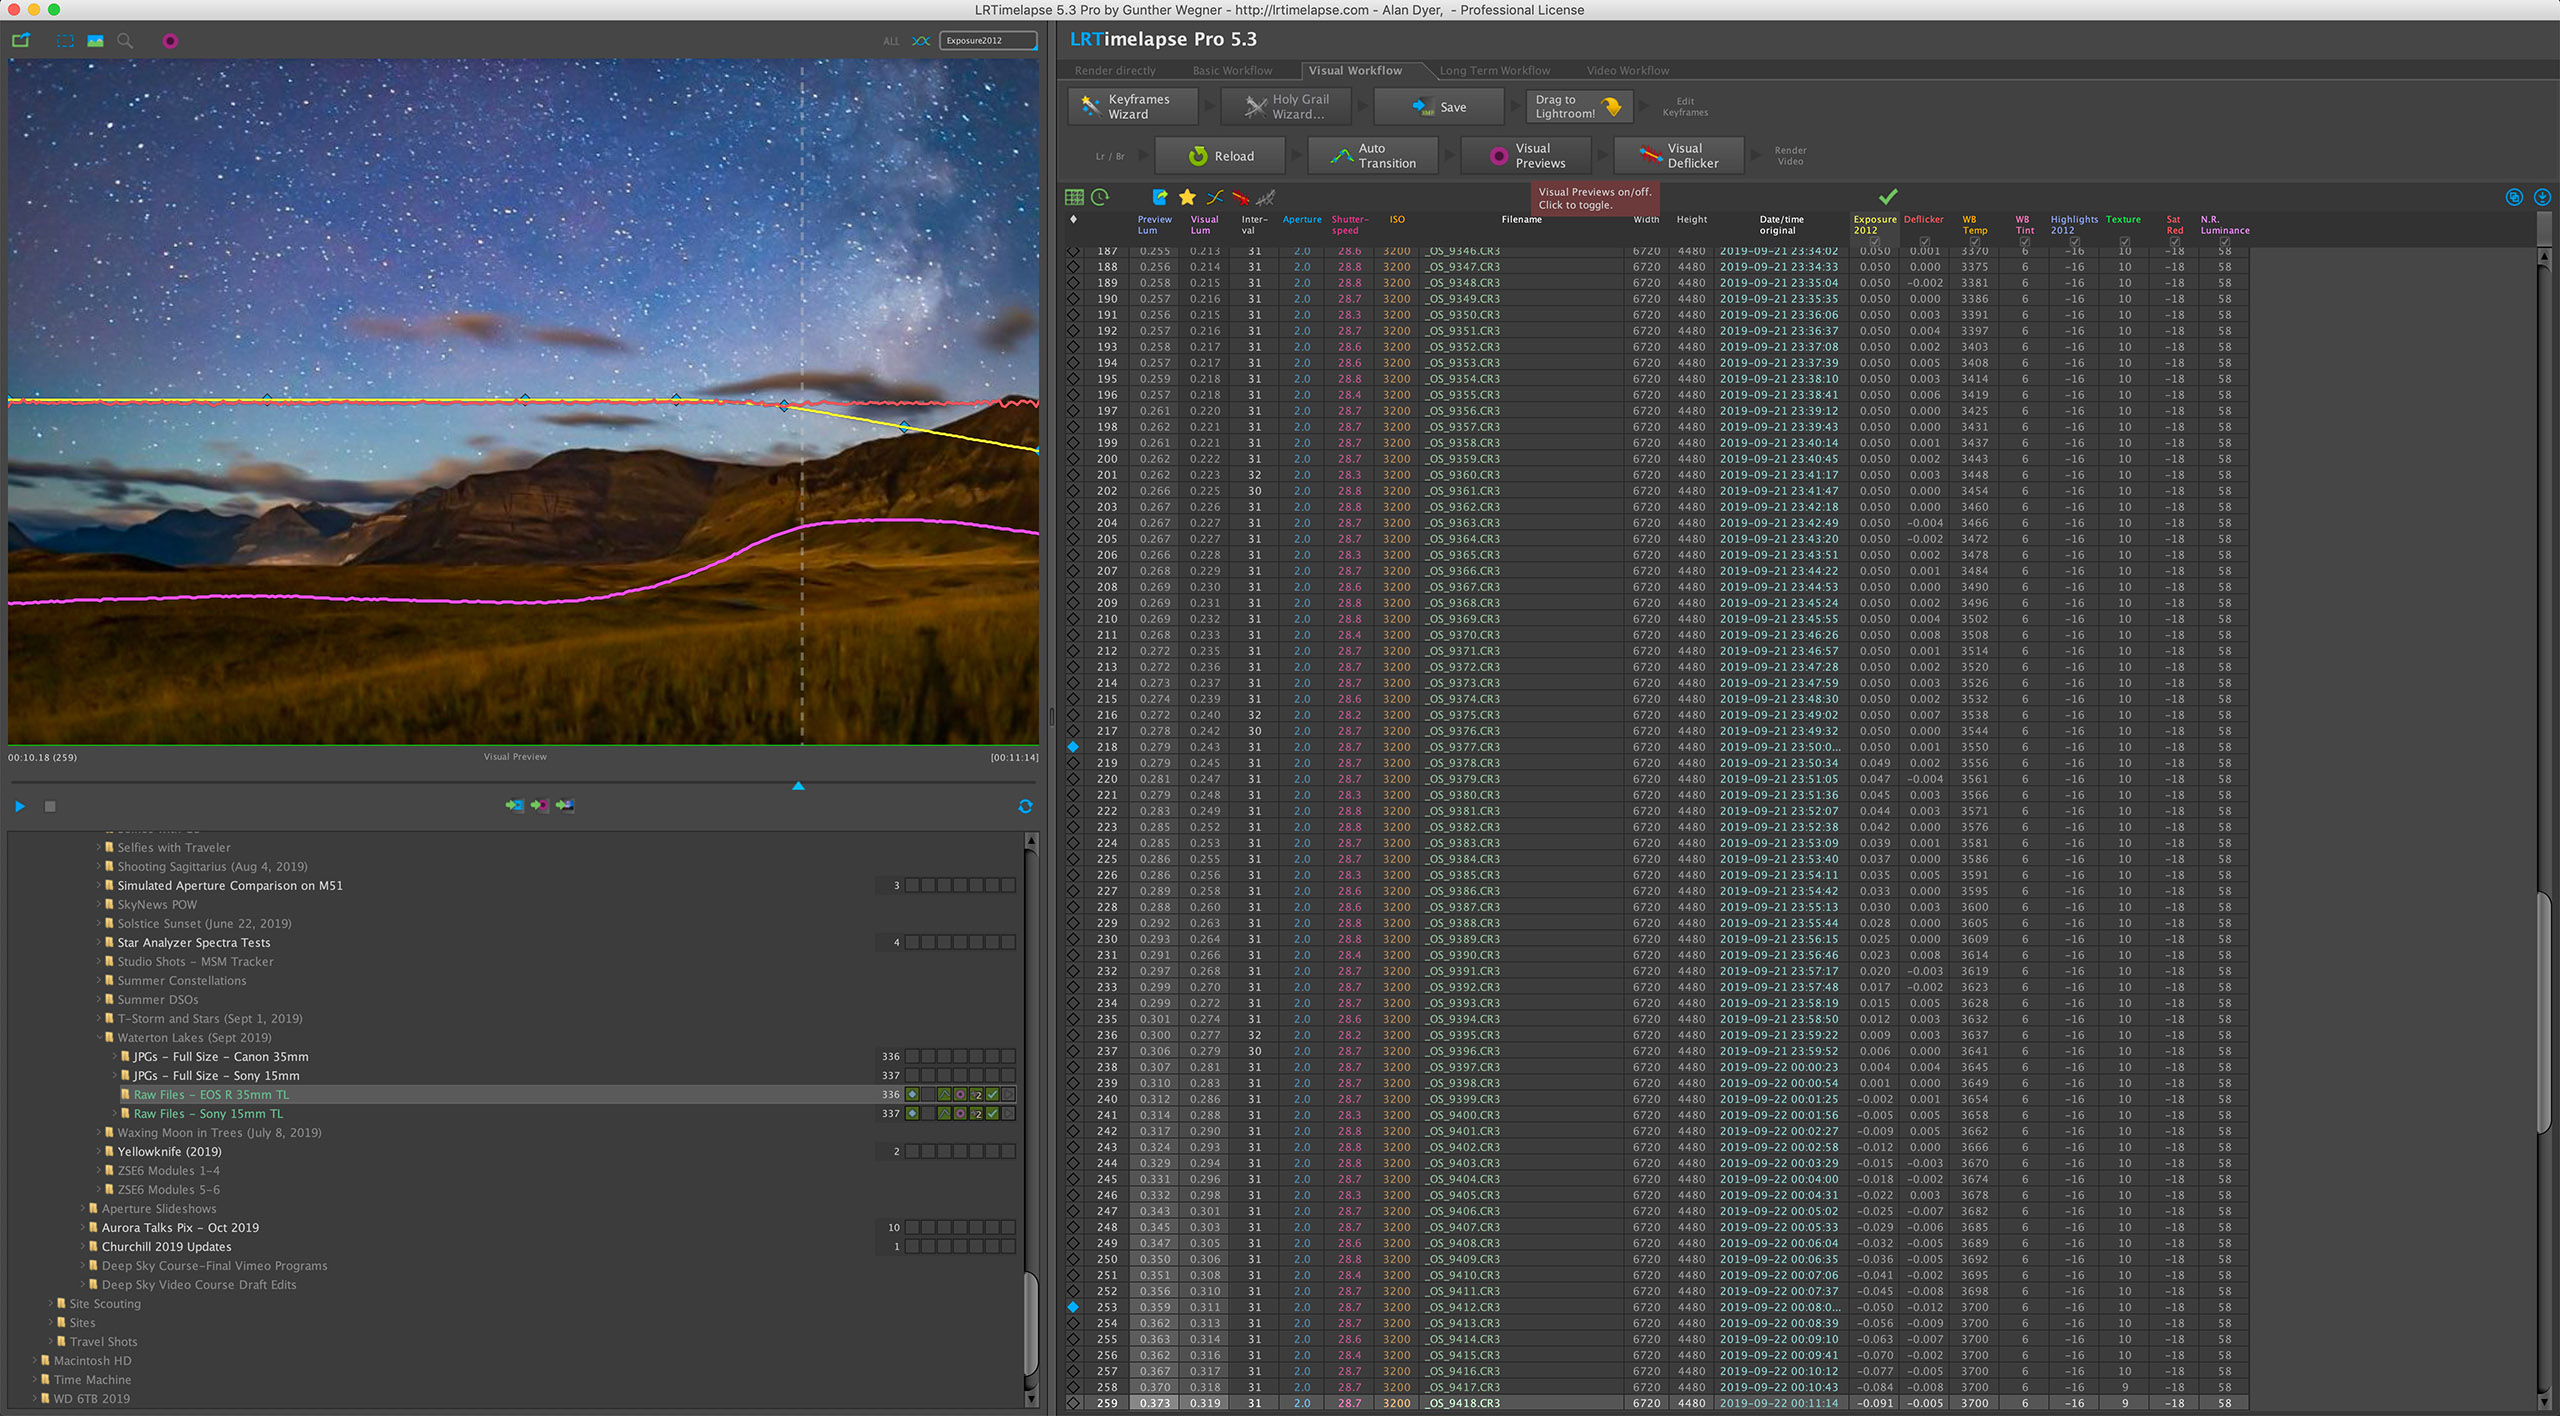
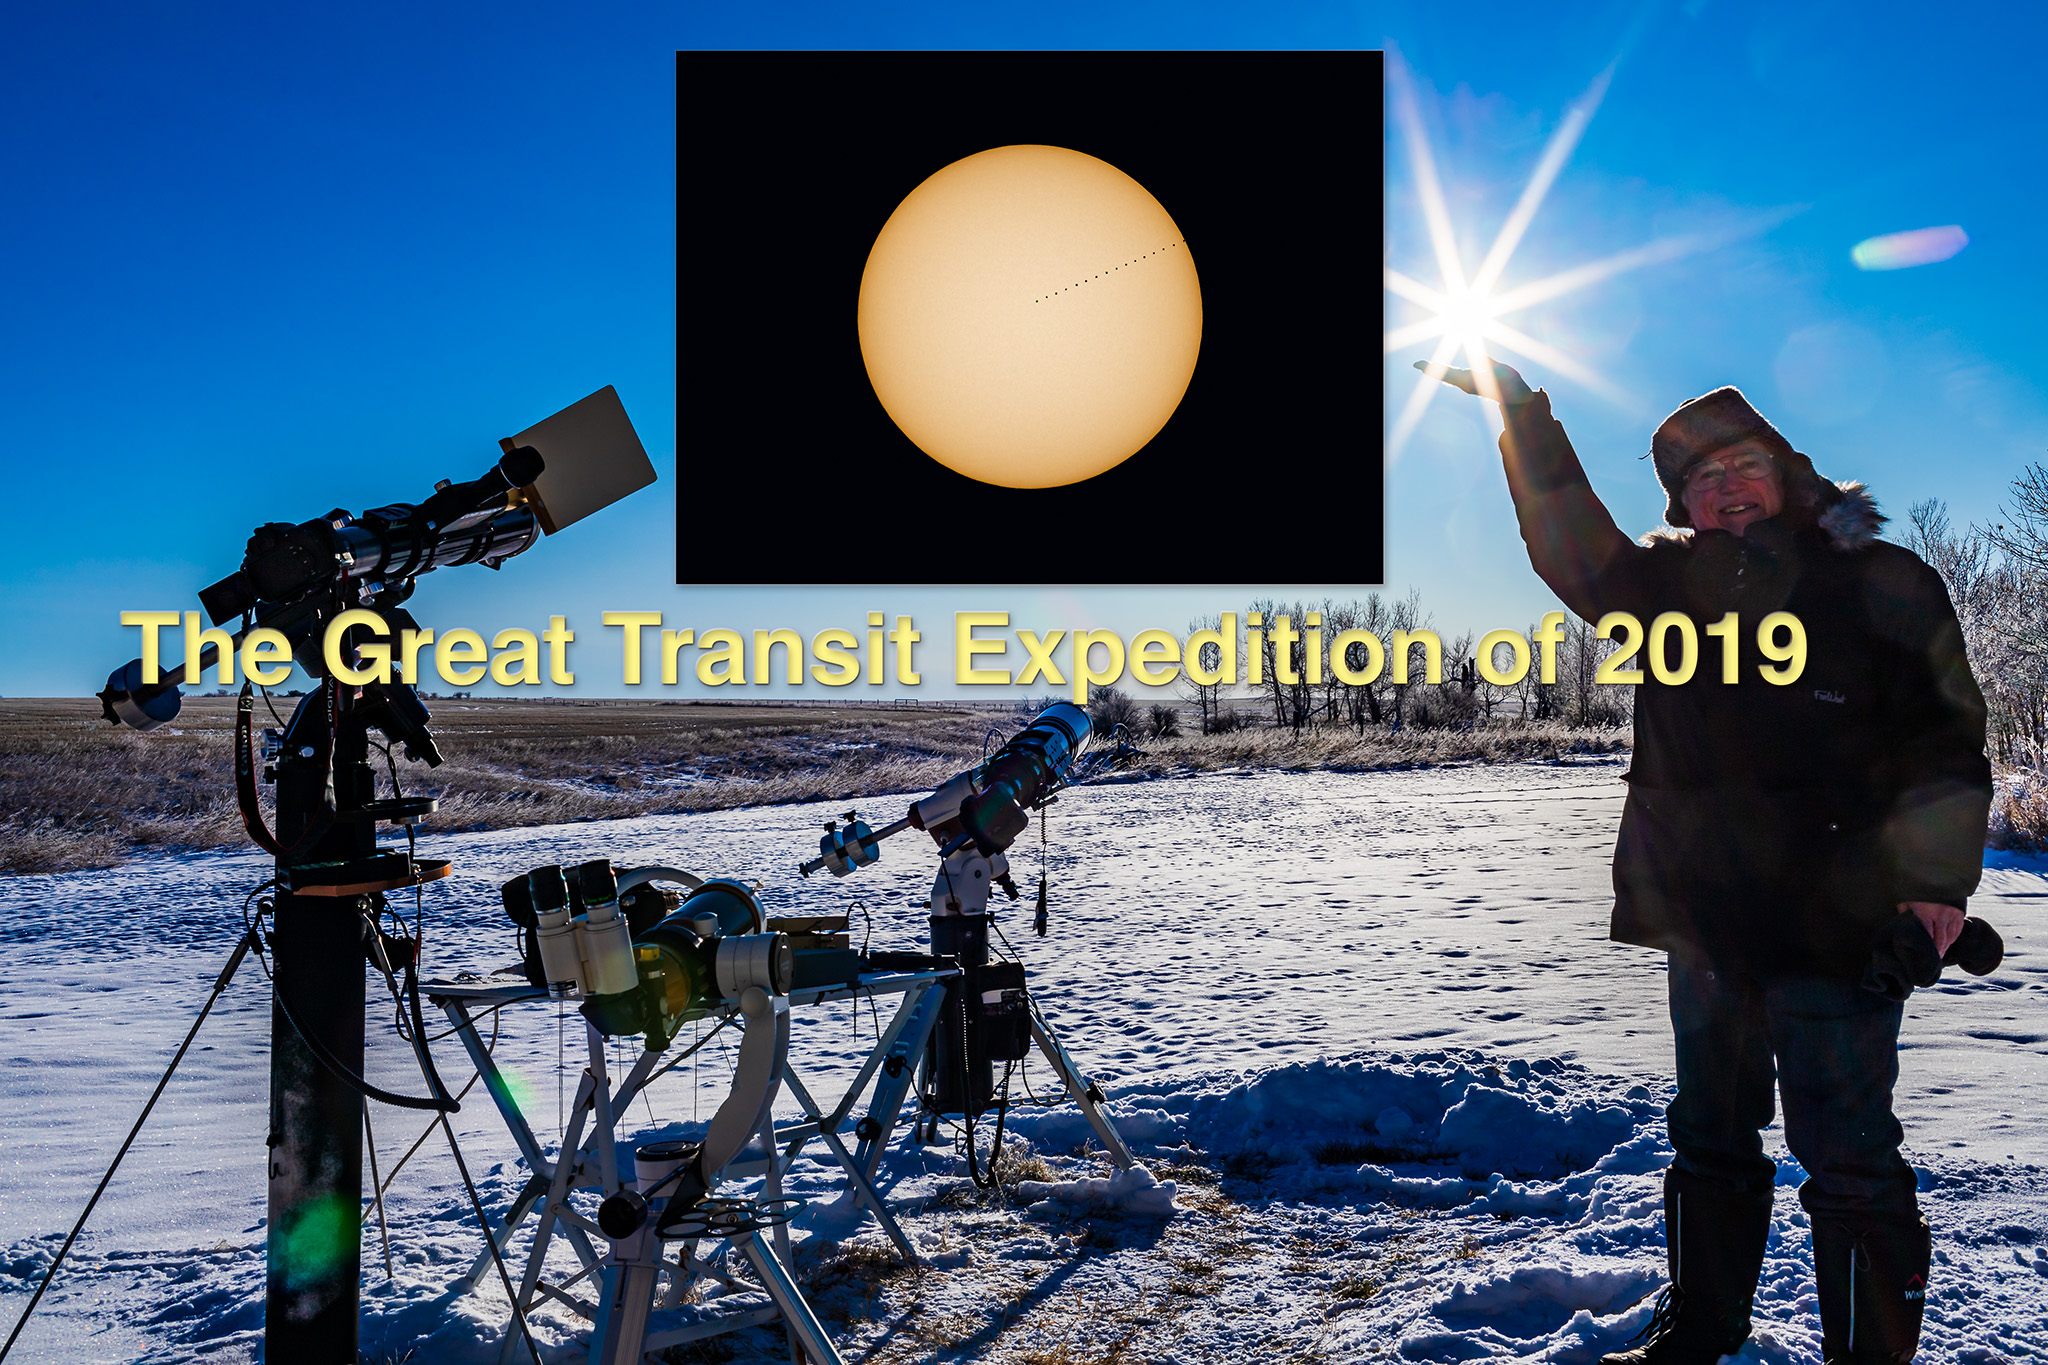
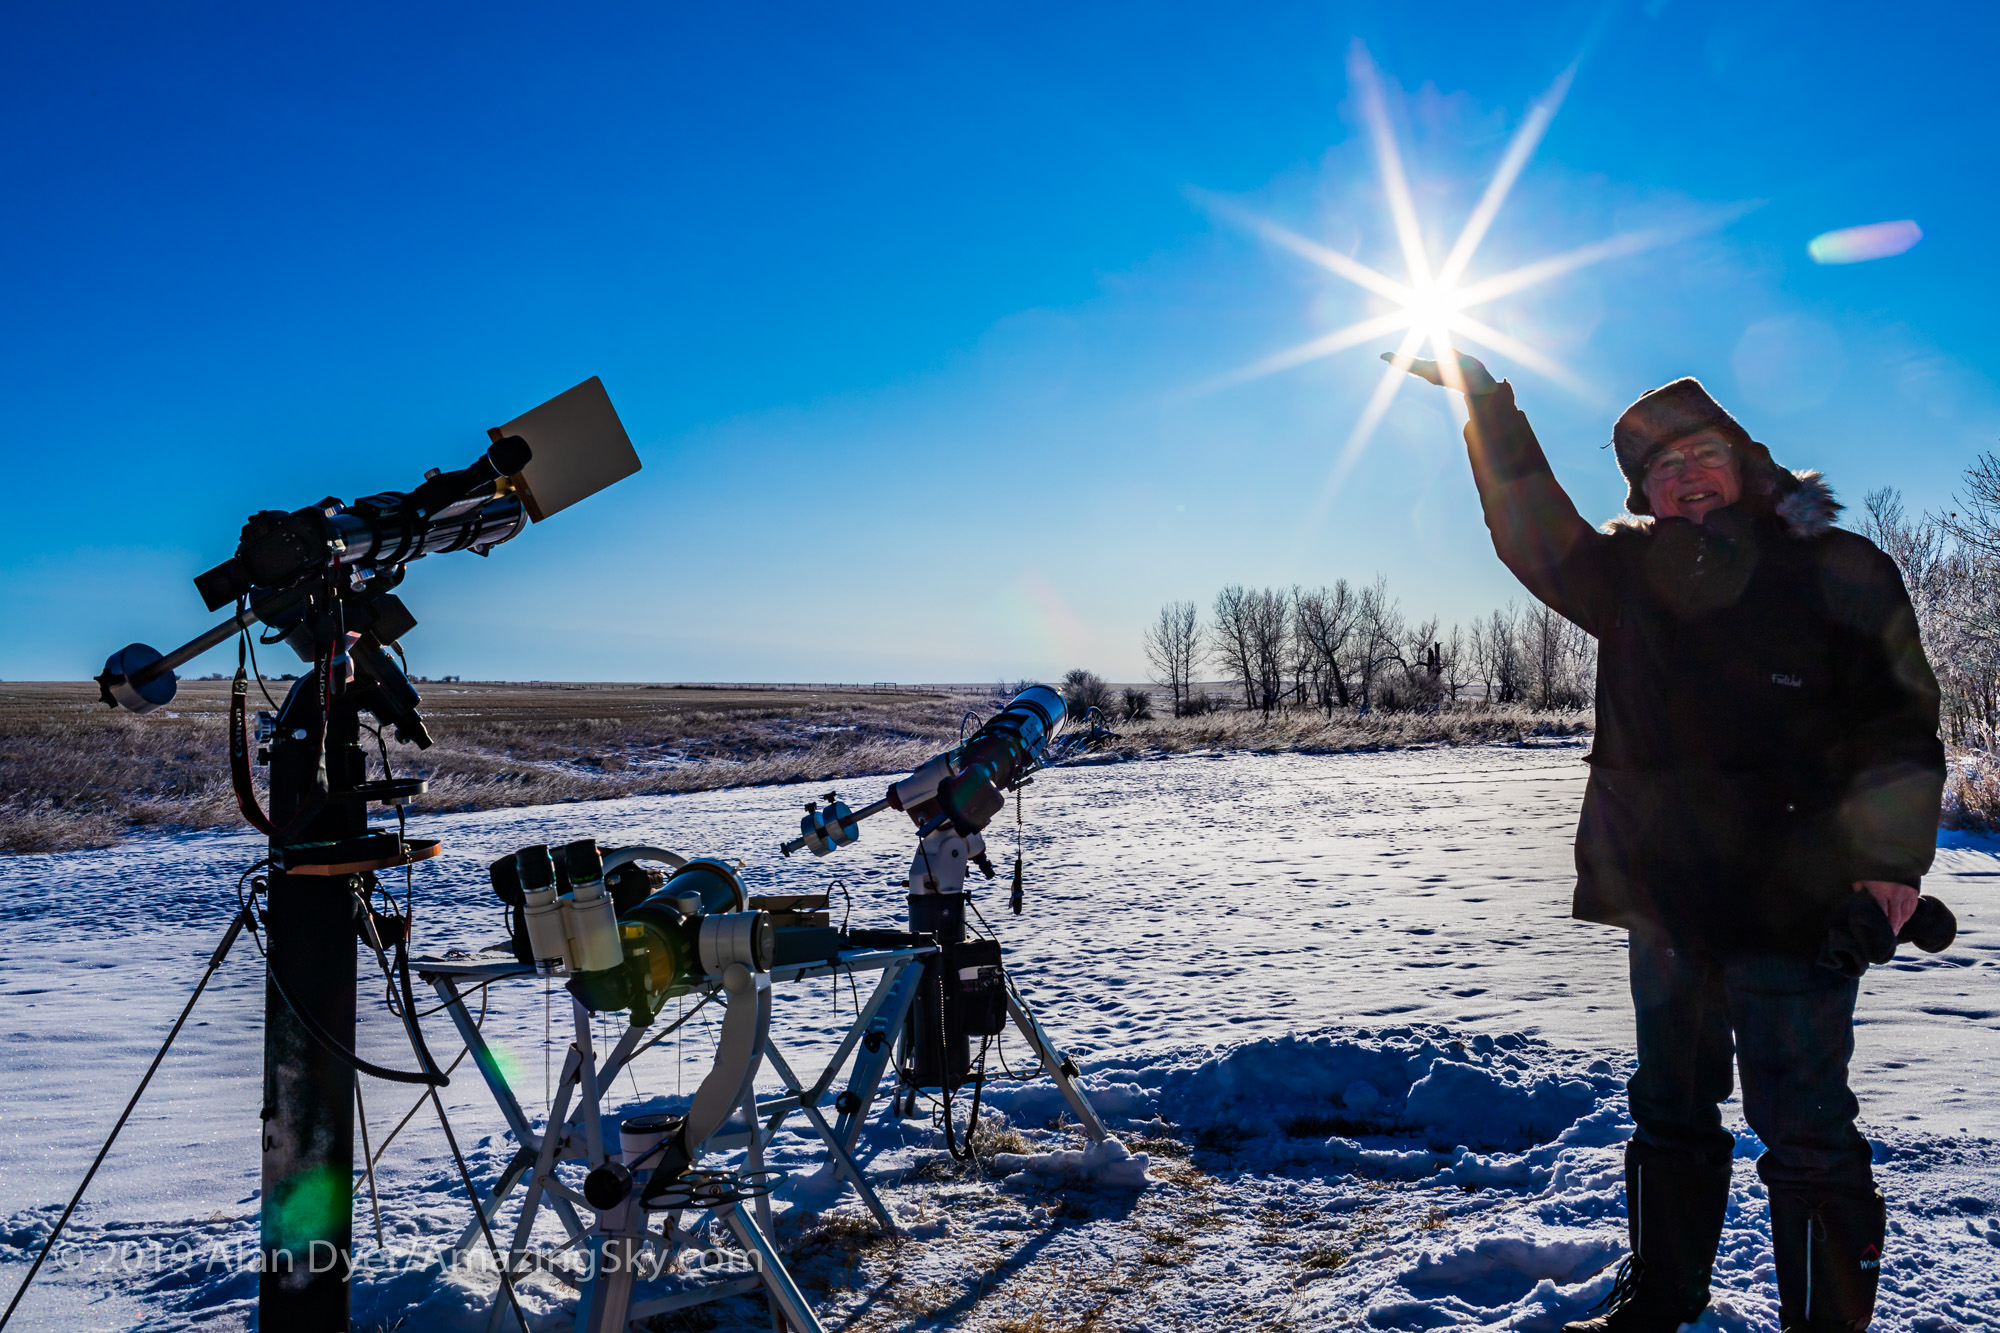
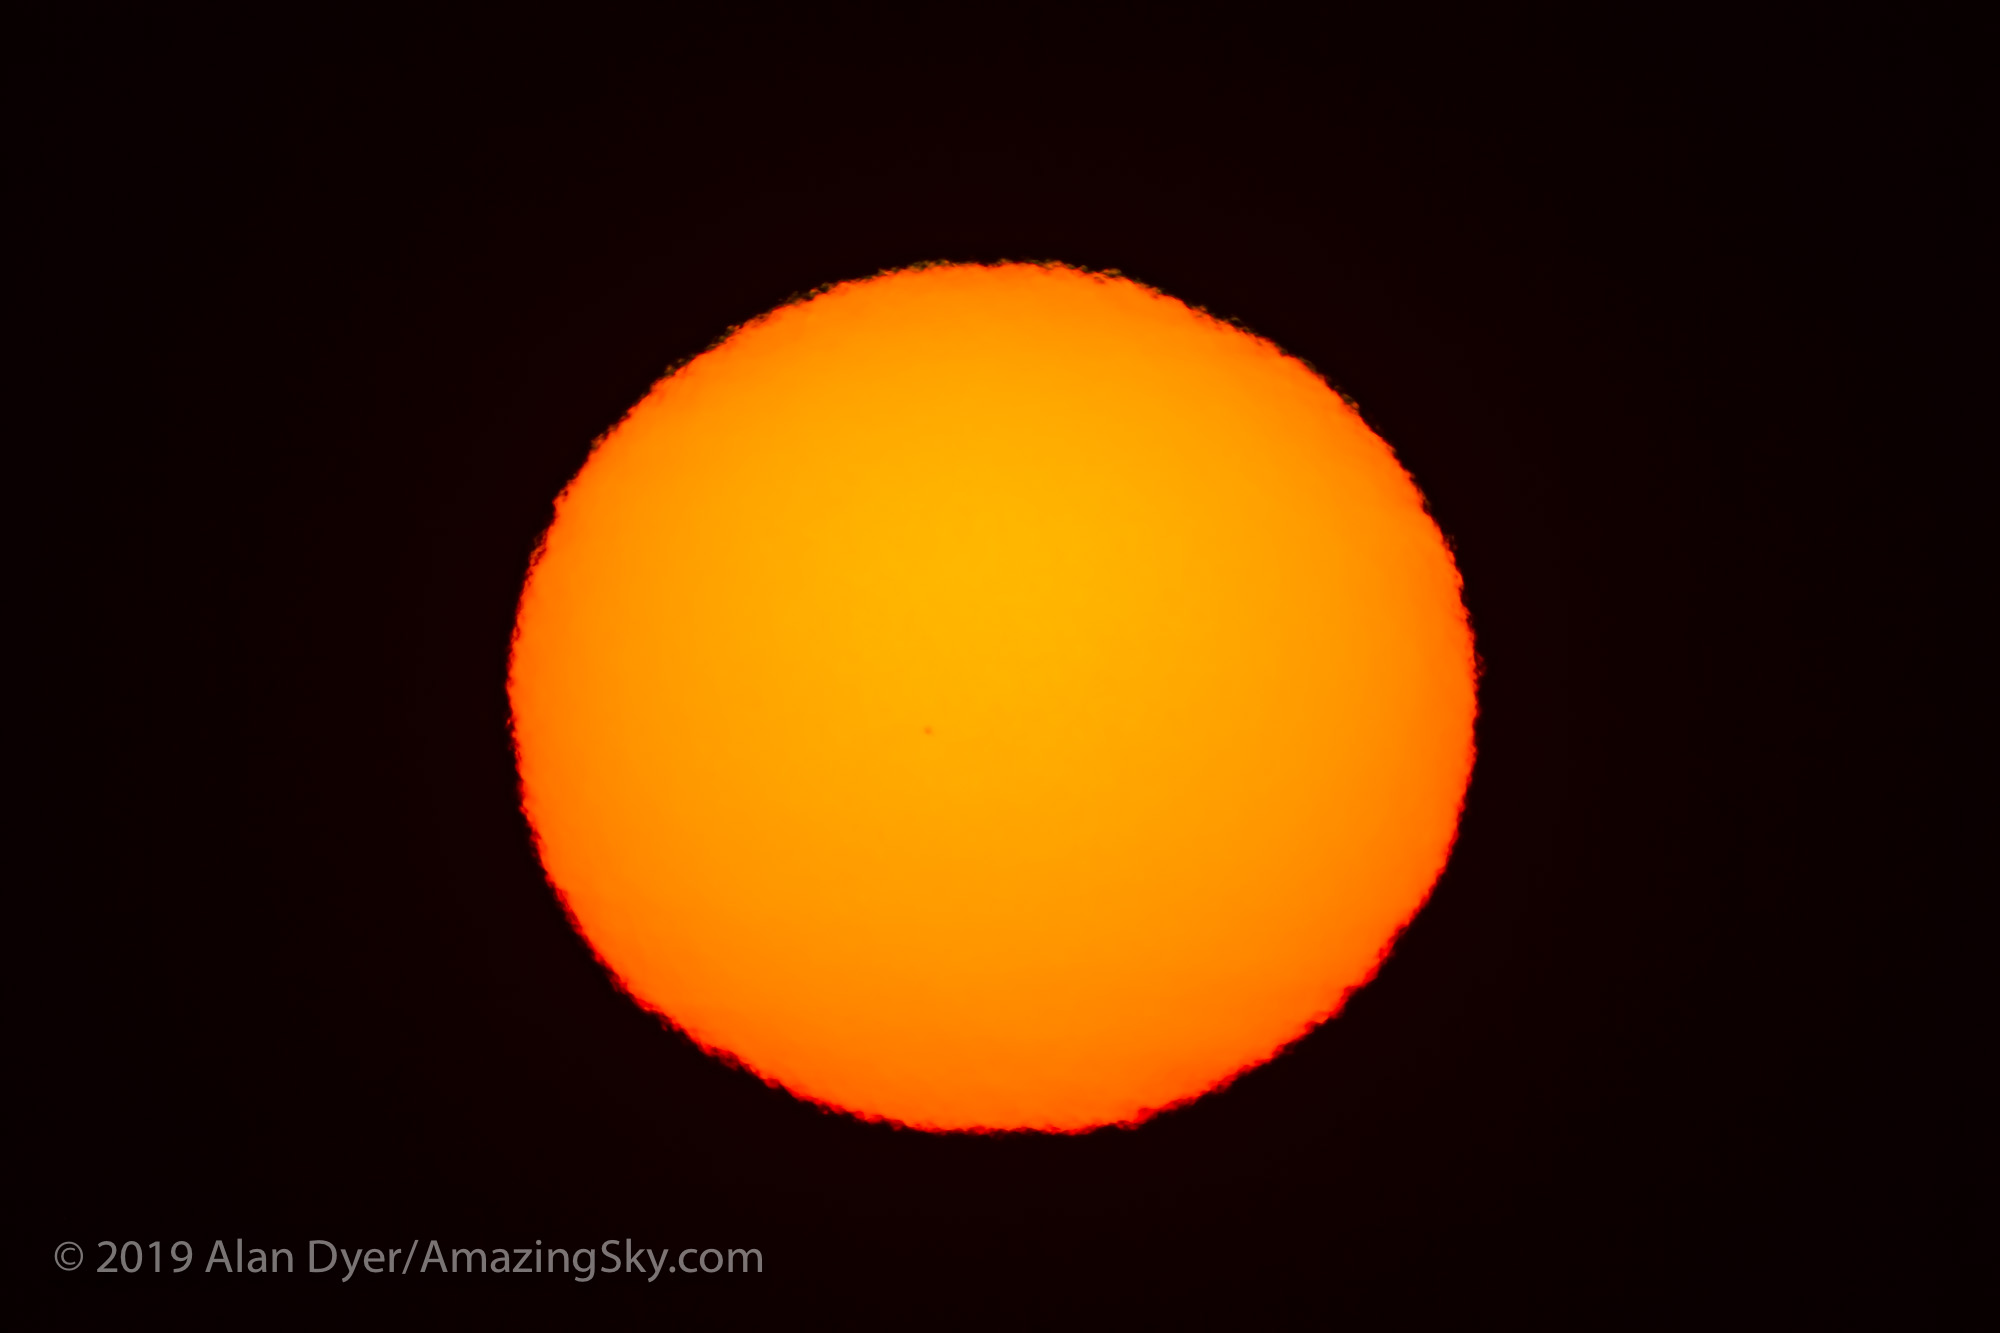
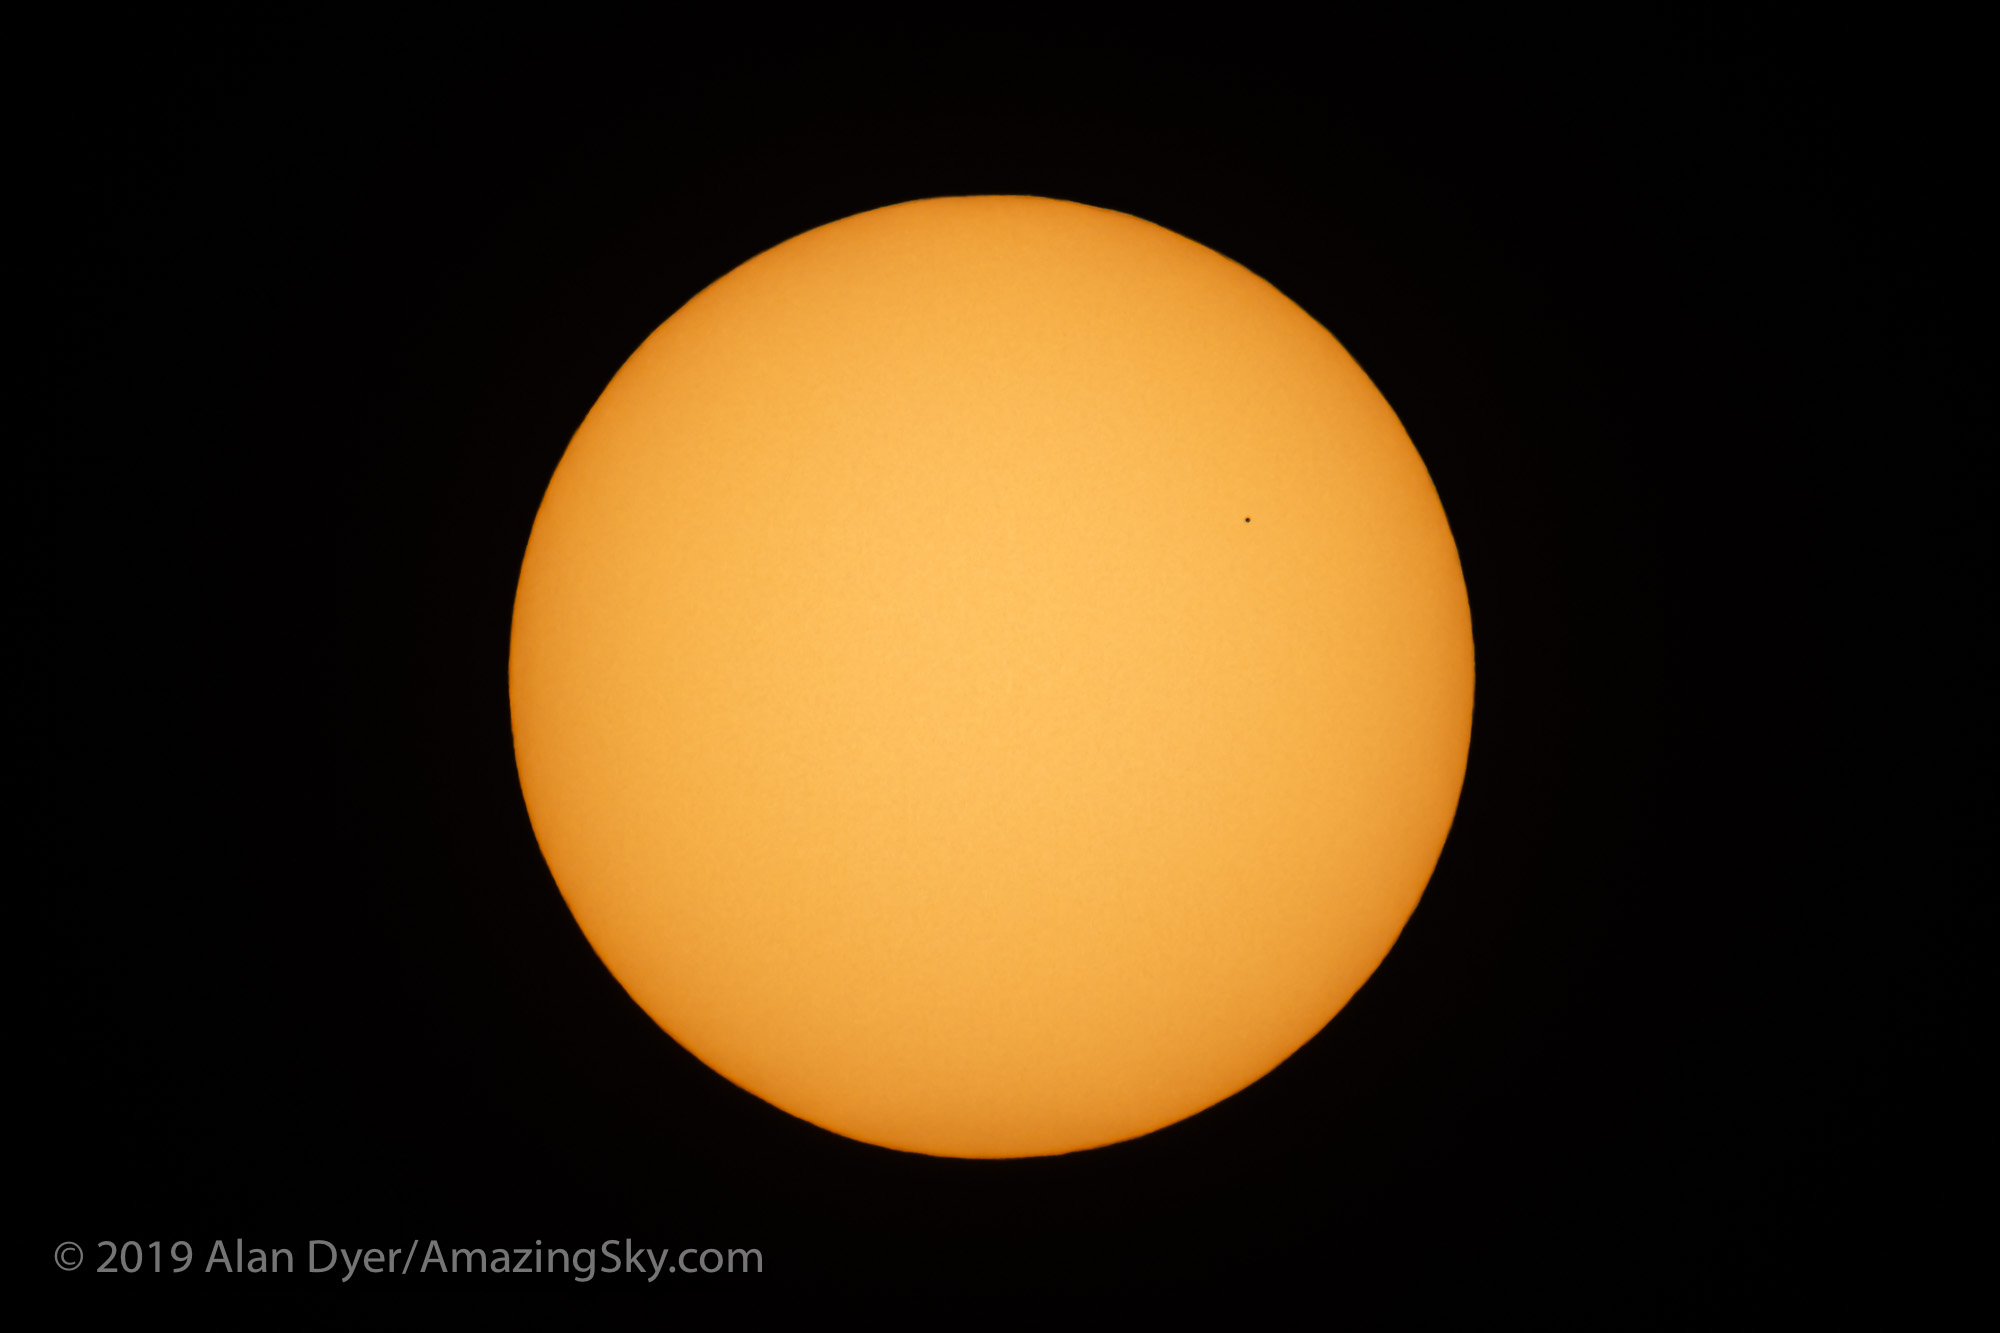
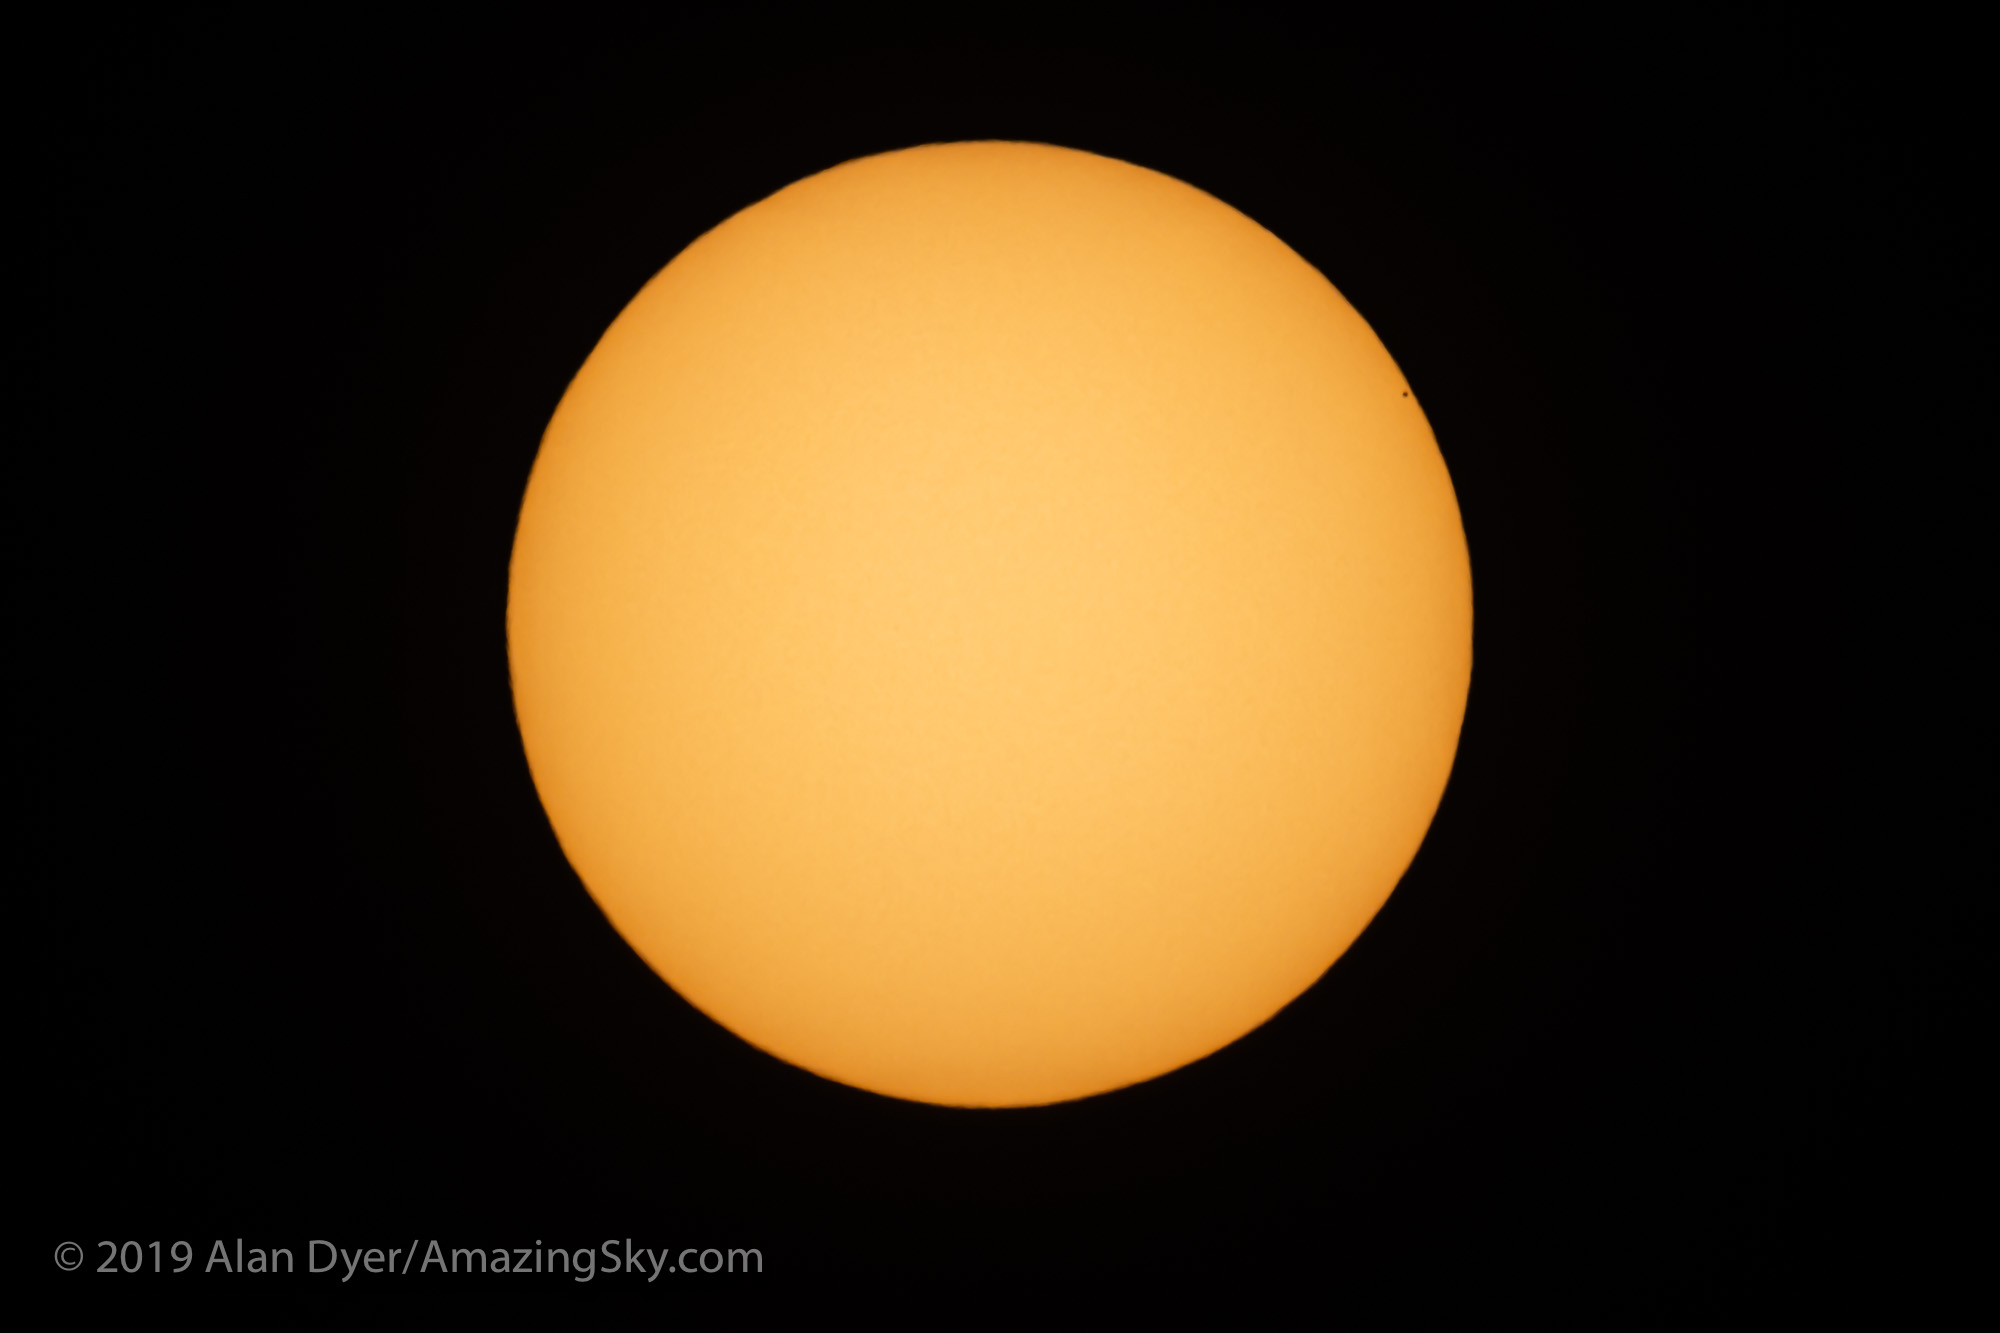
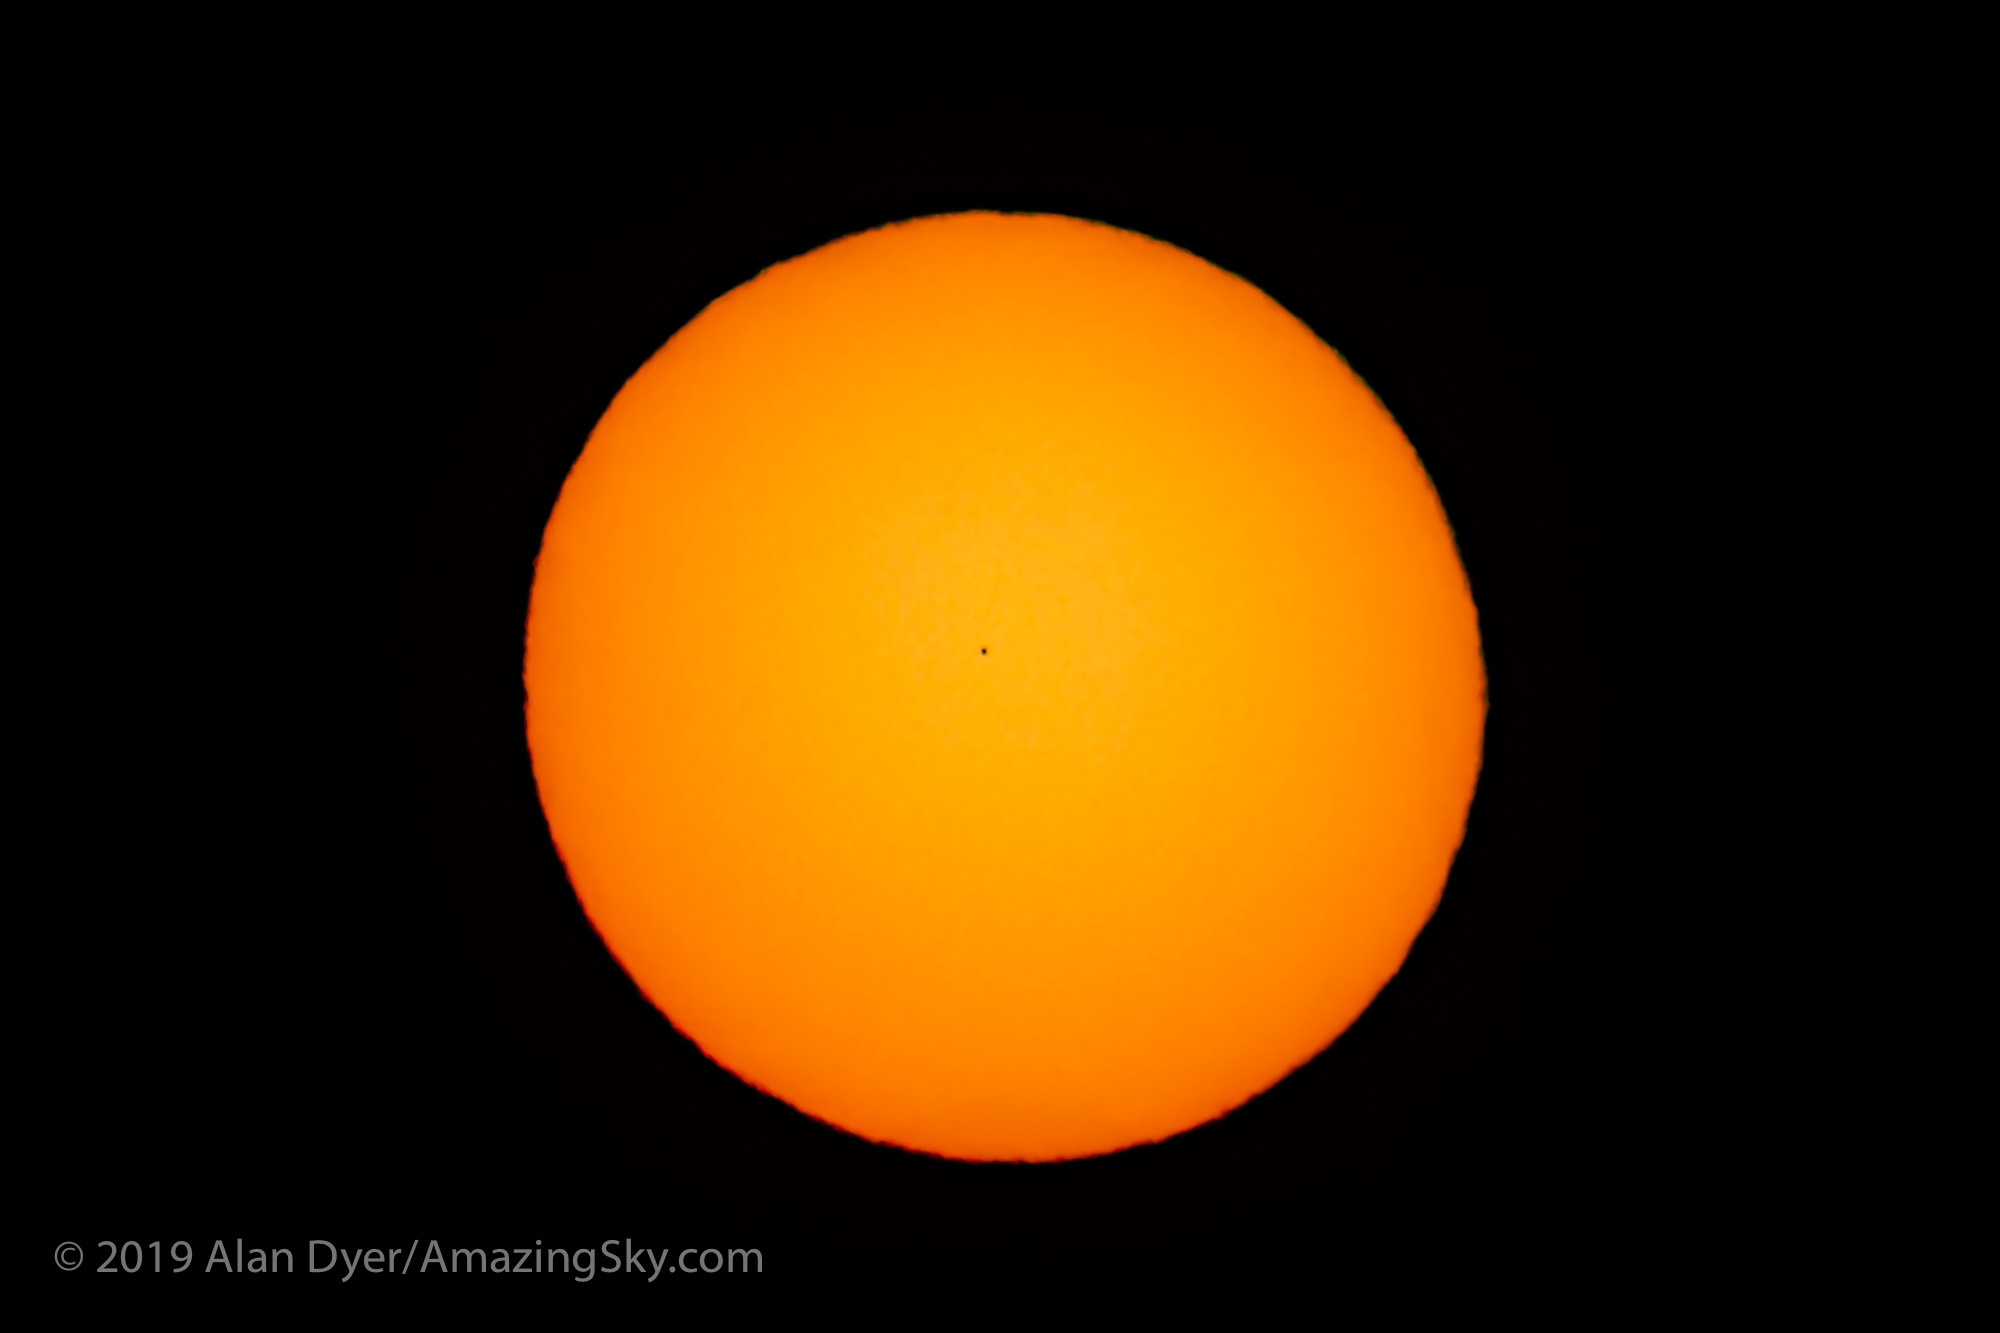
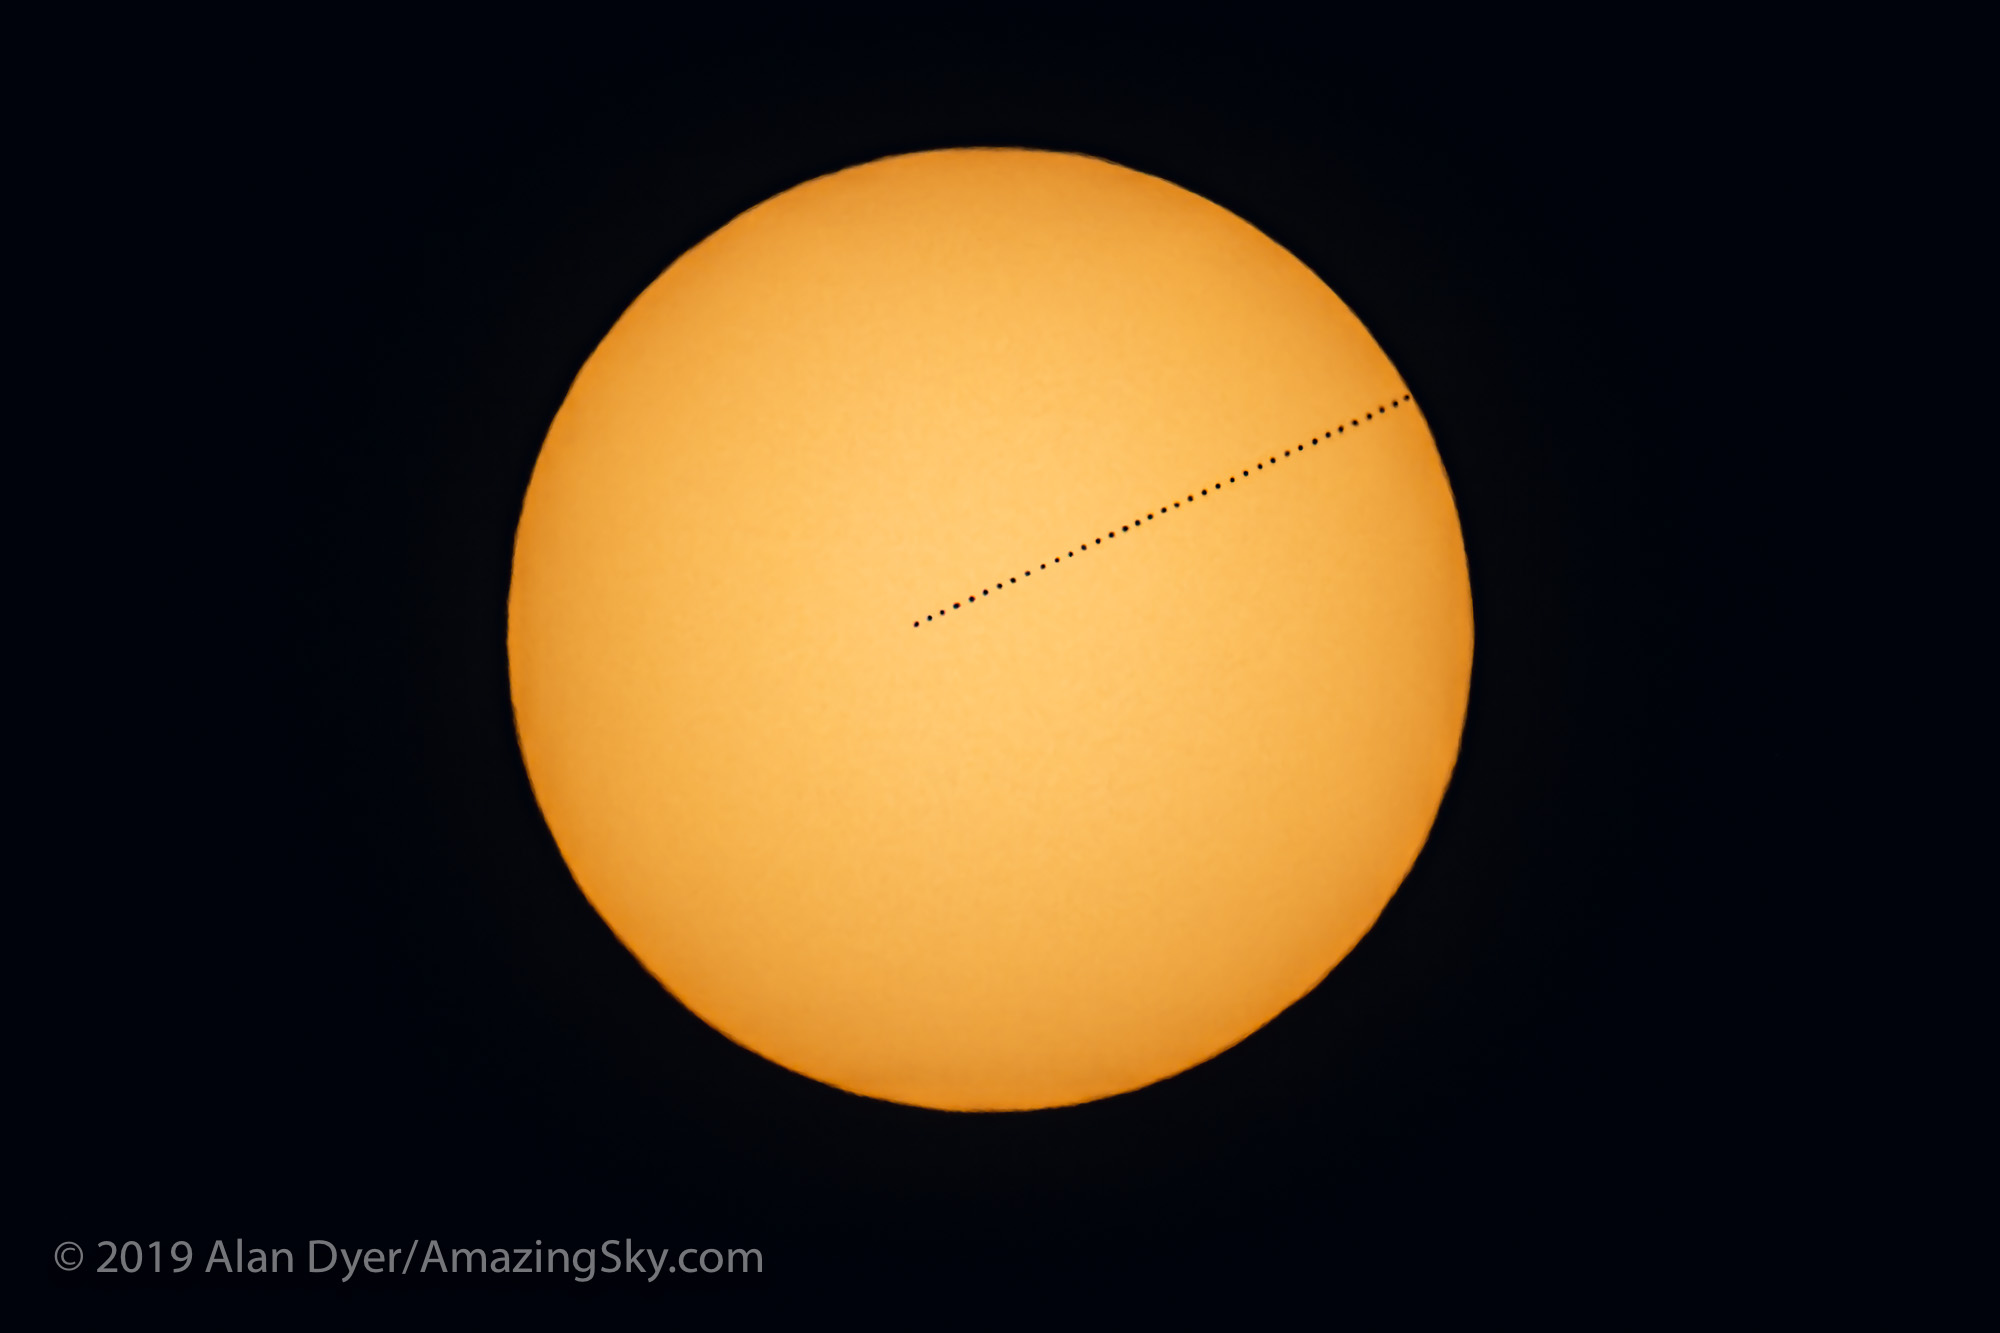

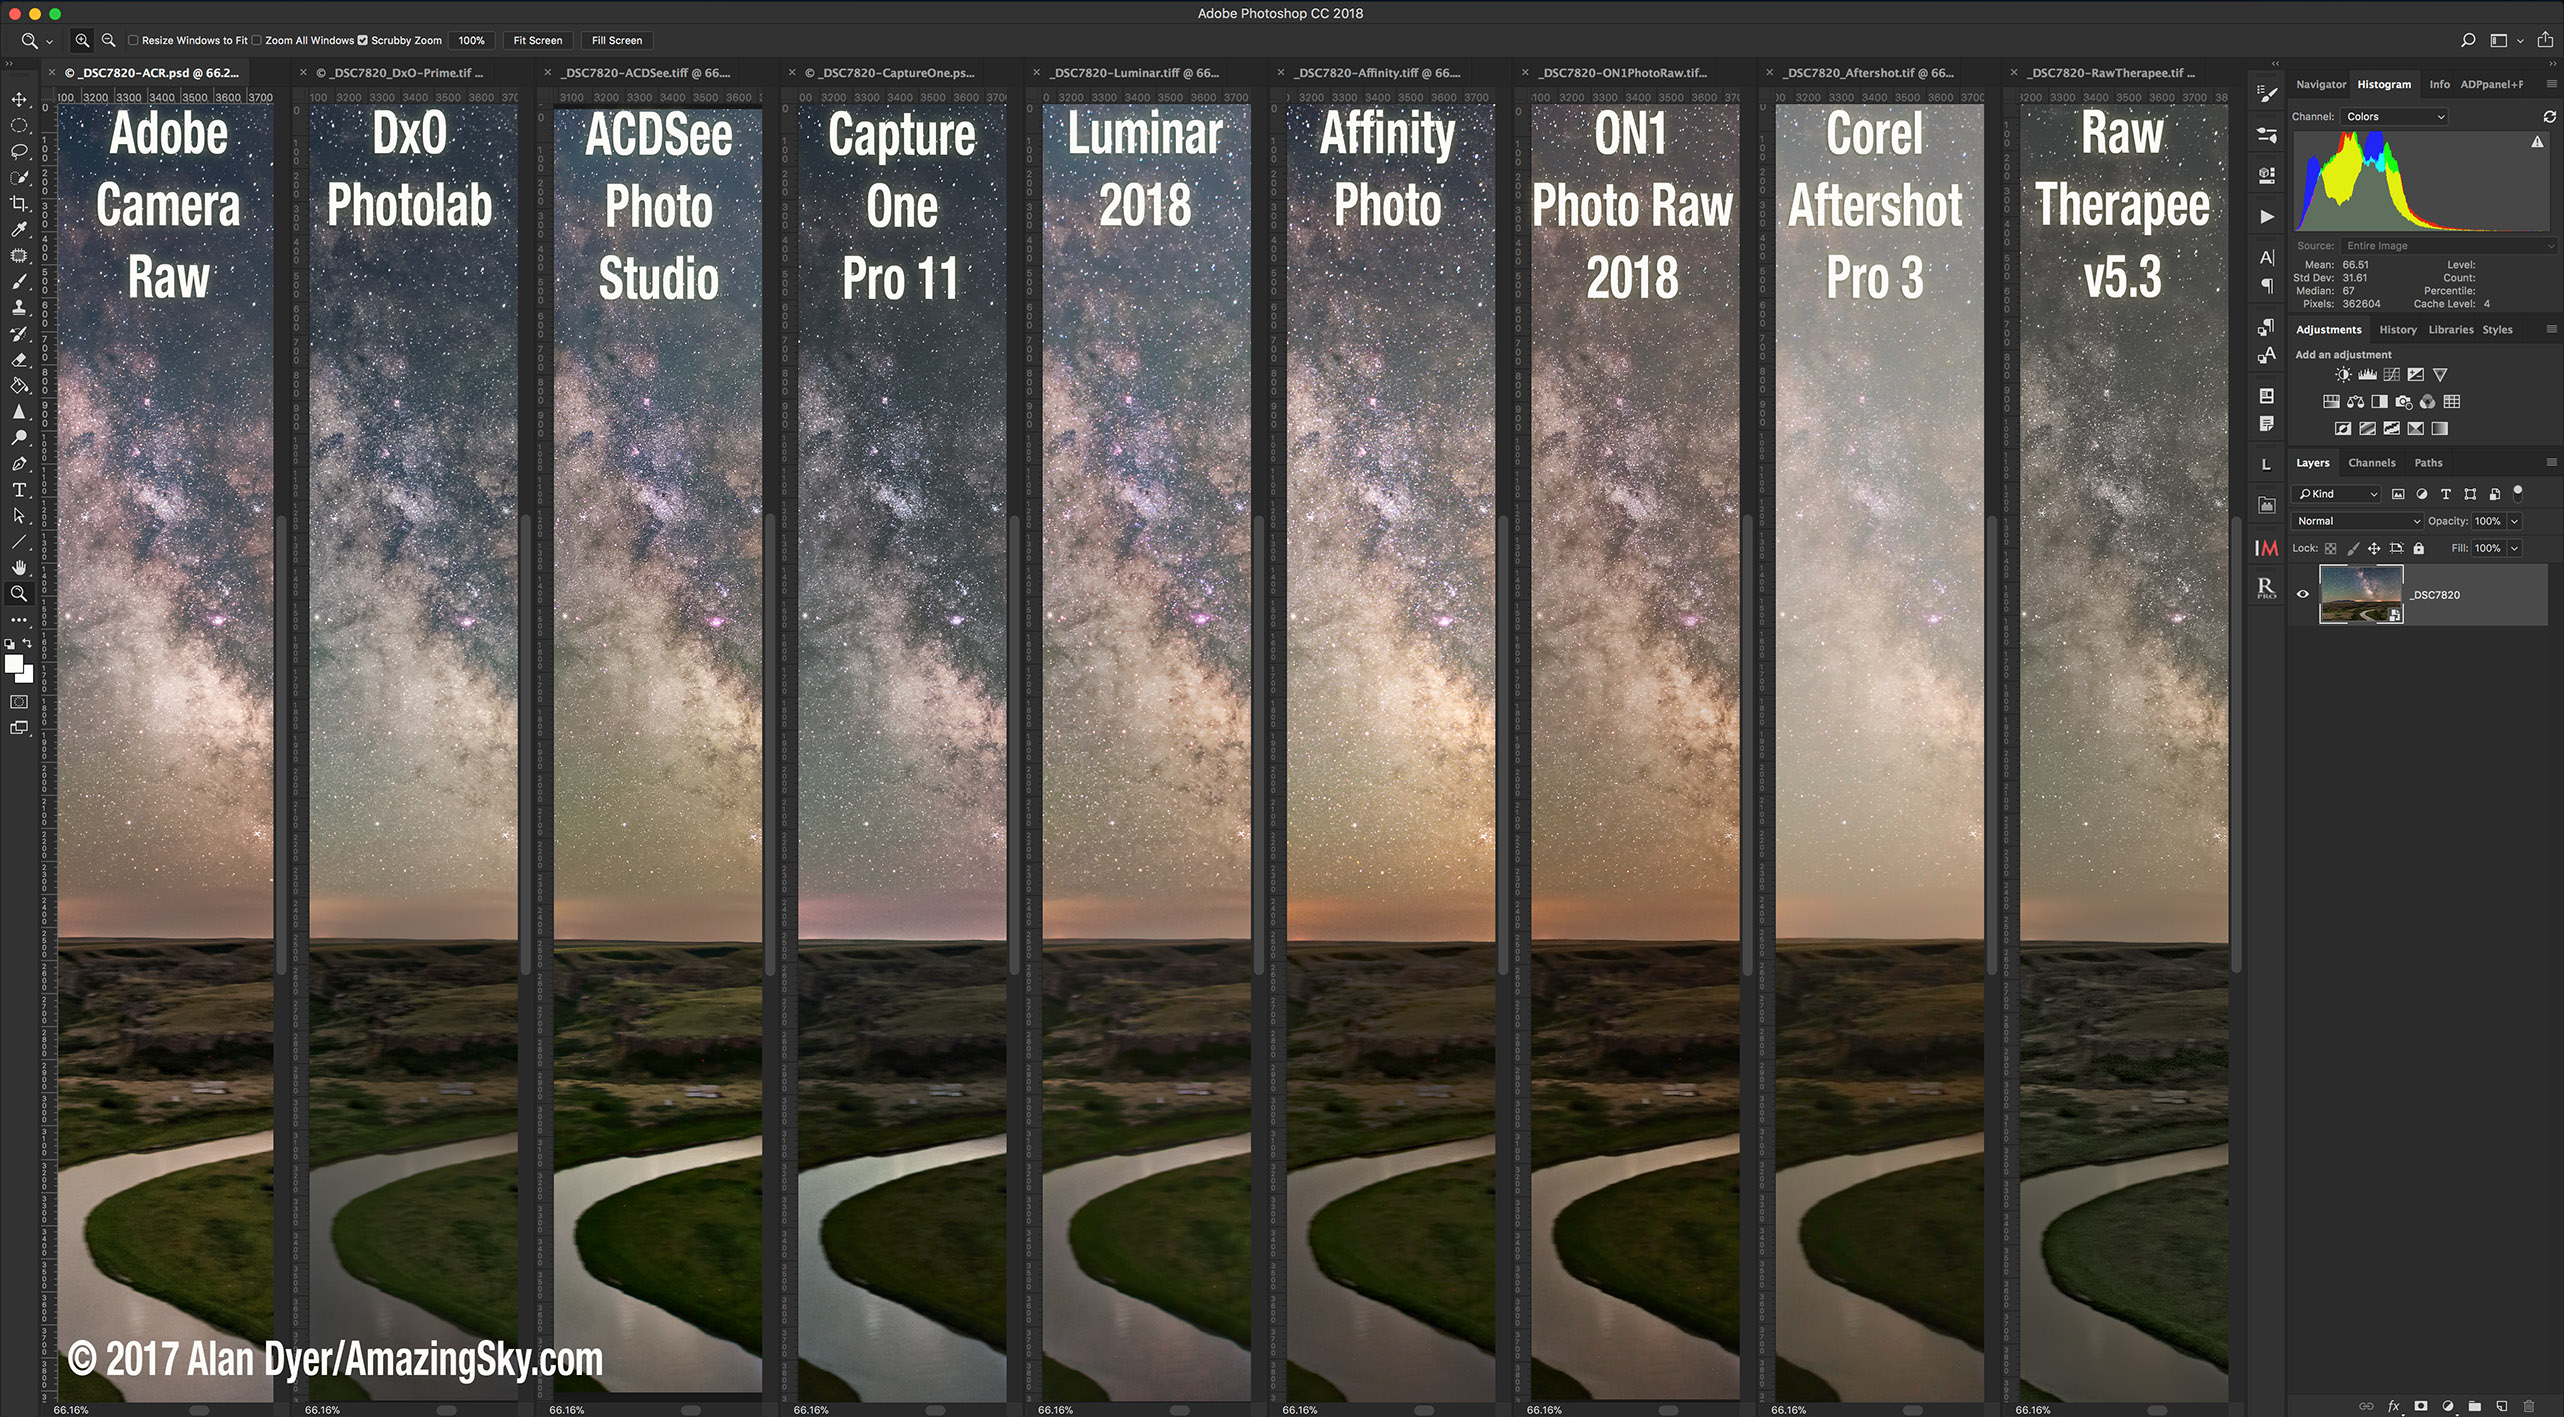


 Lightroom Contenders: Five Raw Developers
 Photoshop Contenders: Four Raw Developers with Layering/Compositing