


To Adobe or not to Adobe. That is the question many photographers are asking with the spate of new image processing programs vying to “kill Photoshop.”
I tested more than ten contenders as alternatives to Adobe’s image processing software, evaluating them ONLY for the specialized task of editing demanding nightscape images taken under the Milky Way, both for single still images and for time-lapses of the moving sky. I did not test these programs for other more “normal” types of images.
Also, please keep in mind, I am a Mac user and tested only programs available for MacOS, though many are also available for Windows. I’ve indicated these.
But I did not test any Windows-only programs. So sorry, fans of Paintshop Pro (though see my note at the end), Photoline, Picture Window Pro, or Xara Photo & Graphic Designer. They’re not here. Even so, I think you will find there’s plenty to pick from!
This review expands upon and updates mini-reviews I included in my Nightscapes and Time-Lapses eBook, shown at right.
If you are hoping there’s a clear winner in the battle against Adobe, one program I can say does it all and for less cost and commitment, I didn’t find one.

However, a number of contenders offer excellent features and might replace at least one member of Adobe’s image processing suite.
For example, only four of these programs can truly serve as a layer-based editing program replacing Photoshop.
The others are better described as Adobe Lightroom competitors – programs that can catalog image libraries and develop raw image files, with some offering adjustment layers for correcting color, contrast, etc. But as with Lightroom, layering of images – to stack, composite, and mask them – is beyond their ability.
For processing time-lapse sequences, however, we don’t need, nor can we use, the ability to layer and mask several images into one composite.
What we need for time-lapses is to:
- Develop a single key raw file, then …
- Copy its settings to the hundreds of other raw files in the time-lapse set, then …
- Export that folder of raw images to “intermediate JPGs” for assembly into a movie.
Even so, not all these contenders are up to the task.
Here are the image processing programs I looked at. Costs are in U.S. dollars. Most have free trial copies available.
The Champion from Adobe
Adobe Camera Raw (ACR), Photoshop, Bridge, and Lightroom, the standards to measure others by
Cost: $10 a month by subscription, includes ACR, Photoshop, Bridge, and Lightroom
Website: https://www.adobe.com
OS: Windows and Mac
Adobe Camera Raw (ACR) is the raw development plug-in that comes with Photoshop and Adobe Bridge, Adobe’s image browsing application that accompanies Photoshop. Camera Raw is equivalent to the Develop module in Lightroom, Adobe’s cataloguing and raw processing software. Camera Raw and Lightroom have identical processing functions and can produce identical results.
Photoshop and Lightroom complement each other and are now available together, but only by monthly subscription through Adobe’s Creative Cloud service, at $10/month. Though $120 for a year is not far off the cost of purchasing many of these other programs and perhaps upgrading them annually, many photographers prefer to purchase their software and not subscribe to it.
Thus the popularity of these alternative programs. Most offered major updates in late 2017.
My question is, how well do they work? Are any serious contenders to replace Photoshop or Lightroom?
 Lightroom Contenders: Five Raw Developers
ACDSee Photo Studio (current as of late 2017)
Cost: $60 to $100, depending on version, upgrades $40 to $60.
Website: http://www.acdsystems.com
OS: Windows and Mac
I tested the single MacOS version. Windows users have a choice of either a Standard or Professional version. Only the Pro version offers the full suite of raw development features, in addition to cataloging functions. The MacOS version resembles the Windows Pro version.
Capture One v11 (late 2017 release)
Cost: $299, and $120 for major upgrades, or by subscription for $180/year
Website: https://www.phaseone.com
OS: Windows and Mac
As of version 11 this powerful raw developer and cataloguing program offers “Layers.” But these are only for applying local adjustments to masked areas of an image. You cannot layer different images. So Capture One cannot be used like Photoshop, to stack and composite images. It is a Lightroom replacement only, but a very good one indeed.
Corel Aftershot Pro v3 (late 2017)
Cost: $80, and $60 for upgrades
Website: http://www.aftershotpro.com/en/
OS: Windows, Mac, and Linux
Here’s a low cost Lightroom replacement for image management and raw processing abilities. Noise reduction is “Perfectly Clear” from Athentech and works well.
DxO PhotoLab ELITE v1 (late 2017)
Cost: $199
Website: http://www.dxo.com/us/photography/photo-software/dxo-photolab
OS: Windows and Mac
The ELITE version of what DxO now calls “PhotoLab” offers DxO’s superb PRIME noise reduction and excellent ClearView contrast enhancement feature. While it has an image browser, PhotoLab does not create a catalog, so this isn’t a full Lightroom replacement, but it is a superb raw developer. DxO also recently acquired the excellent Nik Collection of image processing plug-ins, so we can expect some interesting additions and features.
Raw Therapee v5.3 (mid-2017 release)
Cost: Free
Website: http://rawtherapee.com
OS: Windows, Mac, and Linux
This free open source program has been created and is supported by a loyal community of programmers. It offers a bewildering blizzard of panels and controls, among them the ability to apply dark frames and flat field images, features unique among any raw developer and aimed specifically at astrophotographers. Yes, it’s free, but the learning curve is precipitous.
 Photoshop Contenders: Four Raw Developers with Layering/Compositing
These programs can not only develop at least single raw images, if not many, but also offer some degree of image layering, compositing, and masking like Photoshop.
However, only ON1 Photo RAW can do that and also catalog/browse images as Lightroom can. Neither Affinity, Luminar, or Pixelmator offer a library catalog like Lightroom, nor even a file browsing function such as Adobe Bridge, serious deficiencies I feel.
Affinity Photo v1.6 (late 2017)
Cost: $50
Website: https://affinity.serif.com
OS: Windows and Mac
This is the lowest cost raw developer and layer-based program on offer here, and has some impressive features, such as stacking images, HDR blending, and panorama stitching. However, it lacks any library or cataloguing function, so this is not a Lightroom replacement, but it could replace Photoshop.
Luminar 2018
Cost: $80, and $40 for major upgrades
Website: https://macphun.com
OS: Windows and Mac
Macphun has changed their name to Skylum and now makes their fine Luminar program for both Mac and Windows. While adding special effects is its forte, Luminar does work well both as a raw developer and layer-based editor. But like Affinity, it has no cataloguing feature. It cannot replace Lightroom.
ON1 Photo RAW 2018
Cost: $120, and $100 for major upgrades
Website: https://www.on1.com
OS: Windows and Mac
Of all the contenders tested here, this is the only program that can truly replace both Lightroom and Photoshop, in that ON1 has cataloguing, raw developing, and image layering and masking abilities. In fact, ON1 allows you to migrate your Lightroom catalog into its format. However, ON1’s cost to buy and maintain is similar to Adobe’s Creative Cloud Photo subscription plan. It’s just that ON1’s license is “perpetual.”
NOTE: Windows users might find Corel’s Paintshop Pro 2018 a good “do-it-all” solution – I tested only Corel’s raw developer program Aftershot Pro, which Paintshop Pro uses.
Pixelmator Pro v1 (late 2017 release)
Cost: $60
Website: http://www.pixelmator.com/pro/
OS: MacOS only
The “Pro” version of Pixelmator was introduced in November 2017. It has an innovative interface and many fine features, and it allows layering and masking of multiple images. However, it lacks some of the key functions (listed below) needed for nightscape and time-lapse work. Touted as a Photoshop replacement, it isn’t there yet.
The Challenge
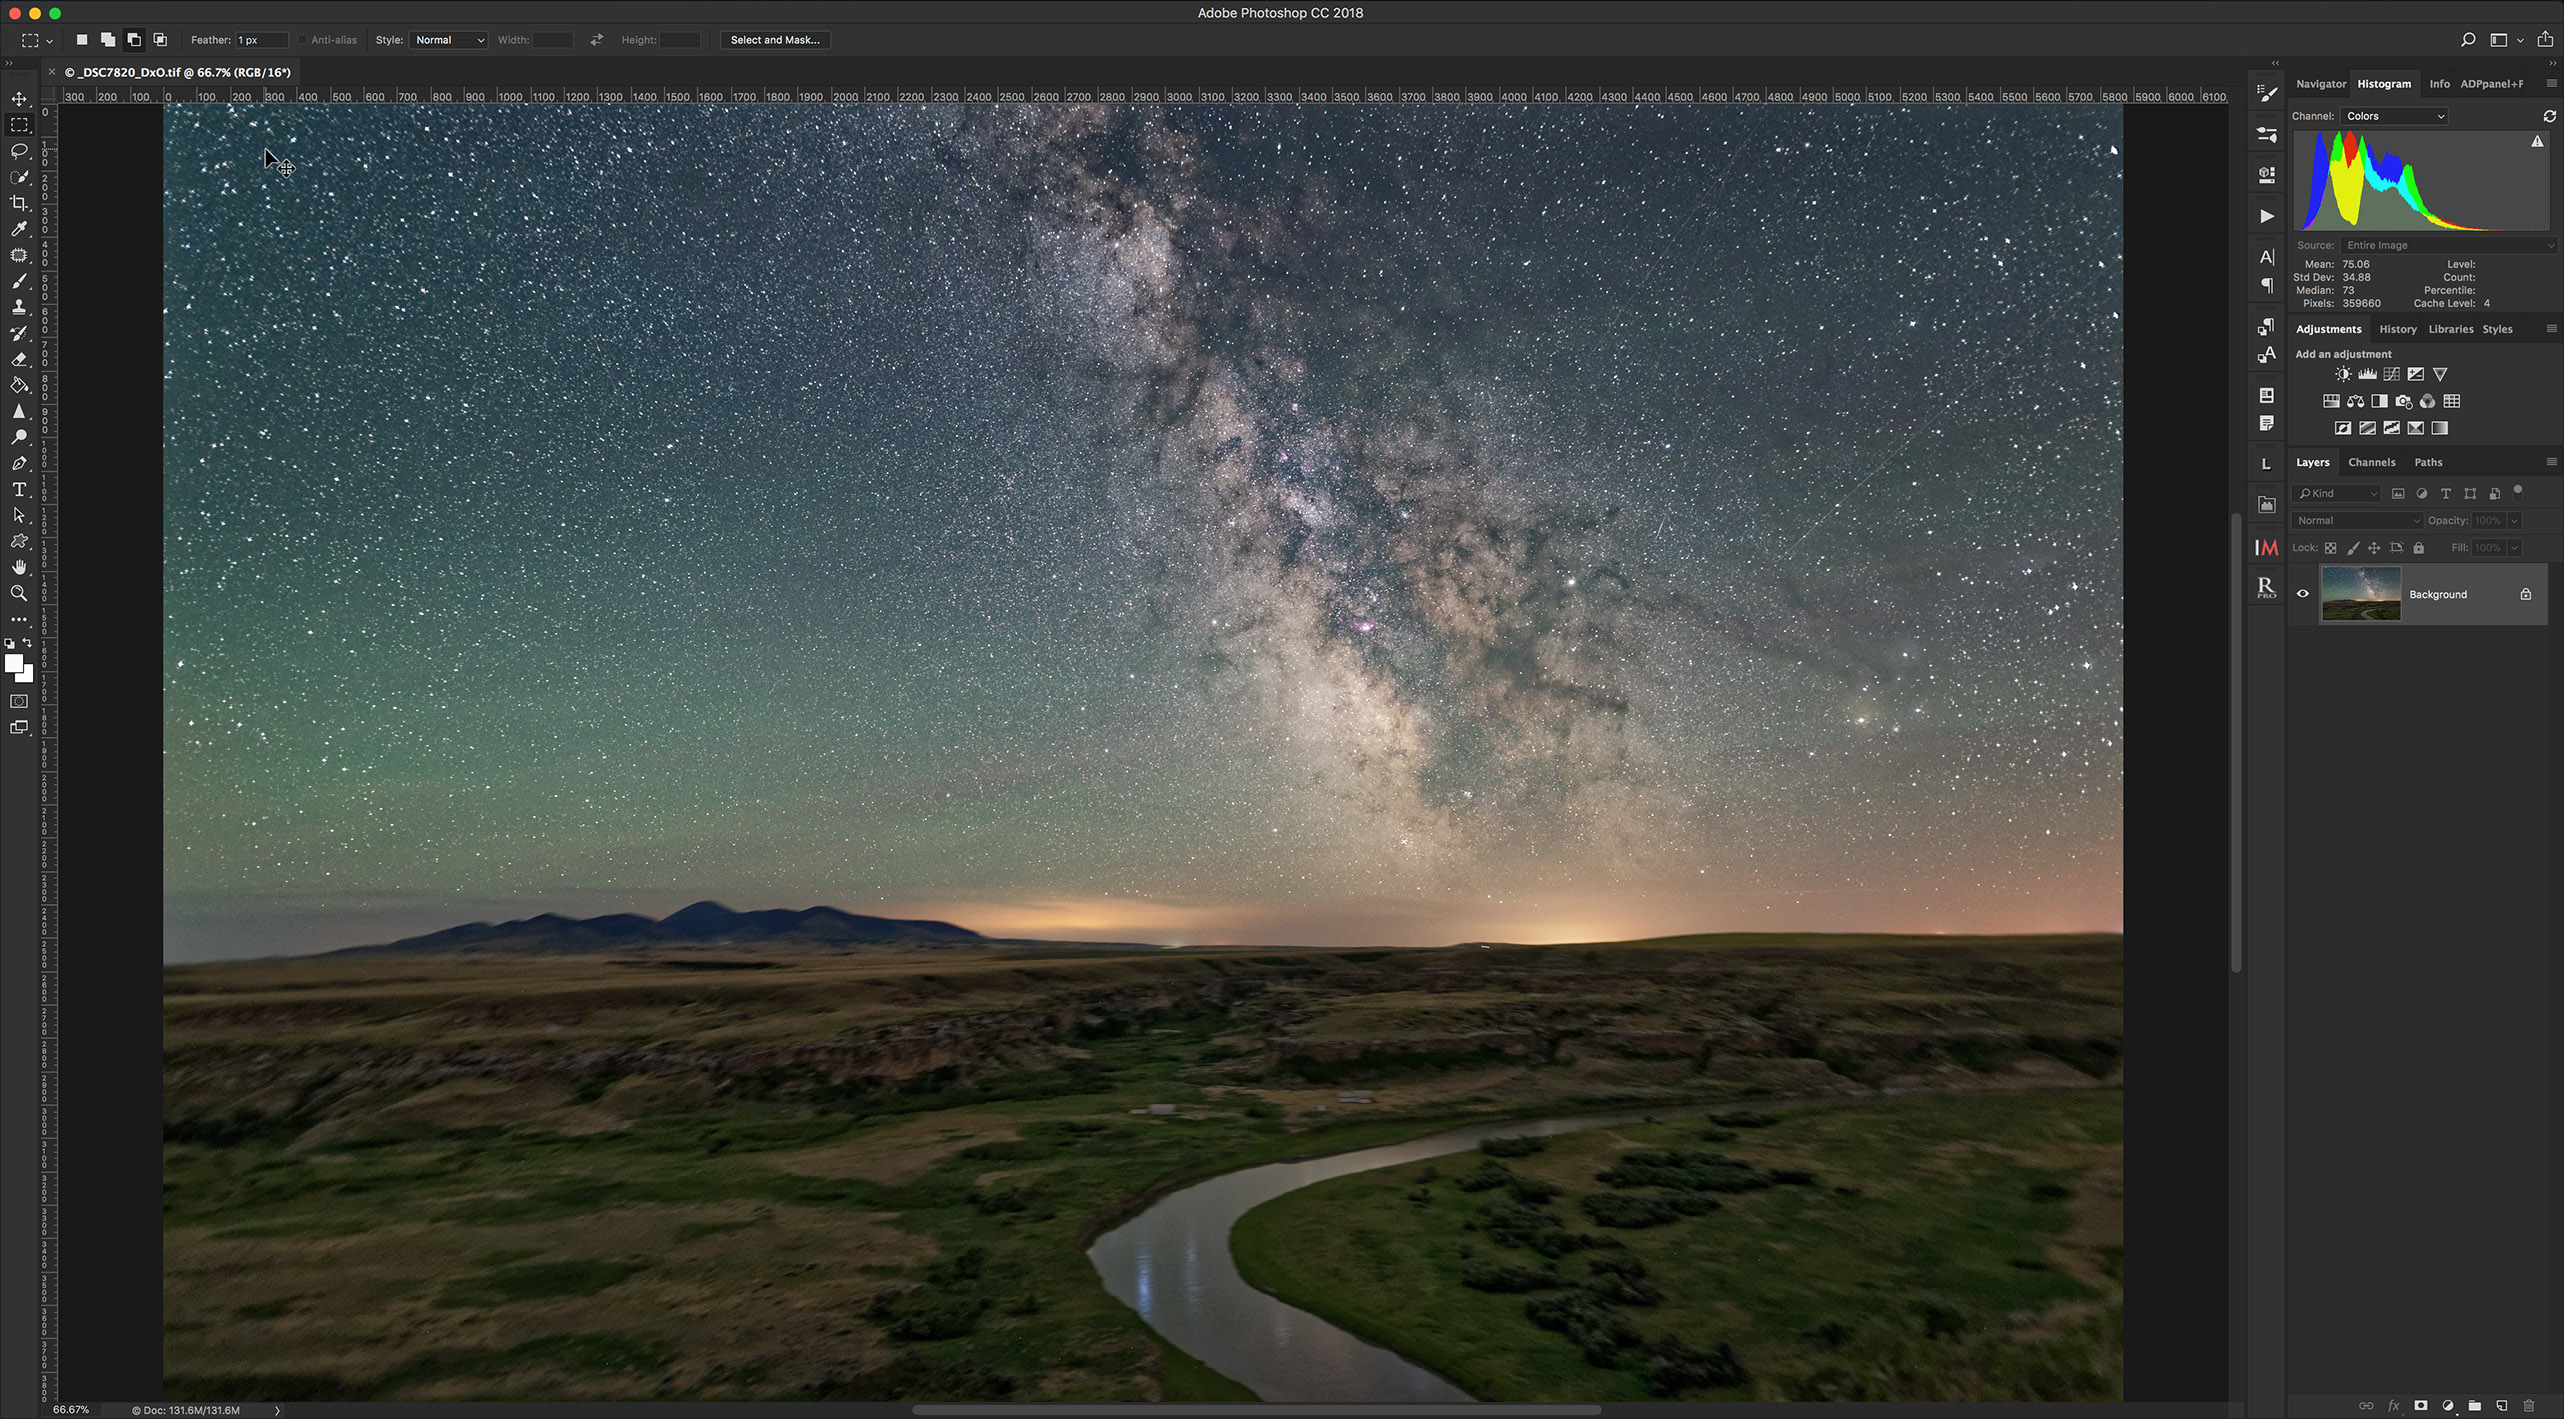
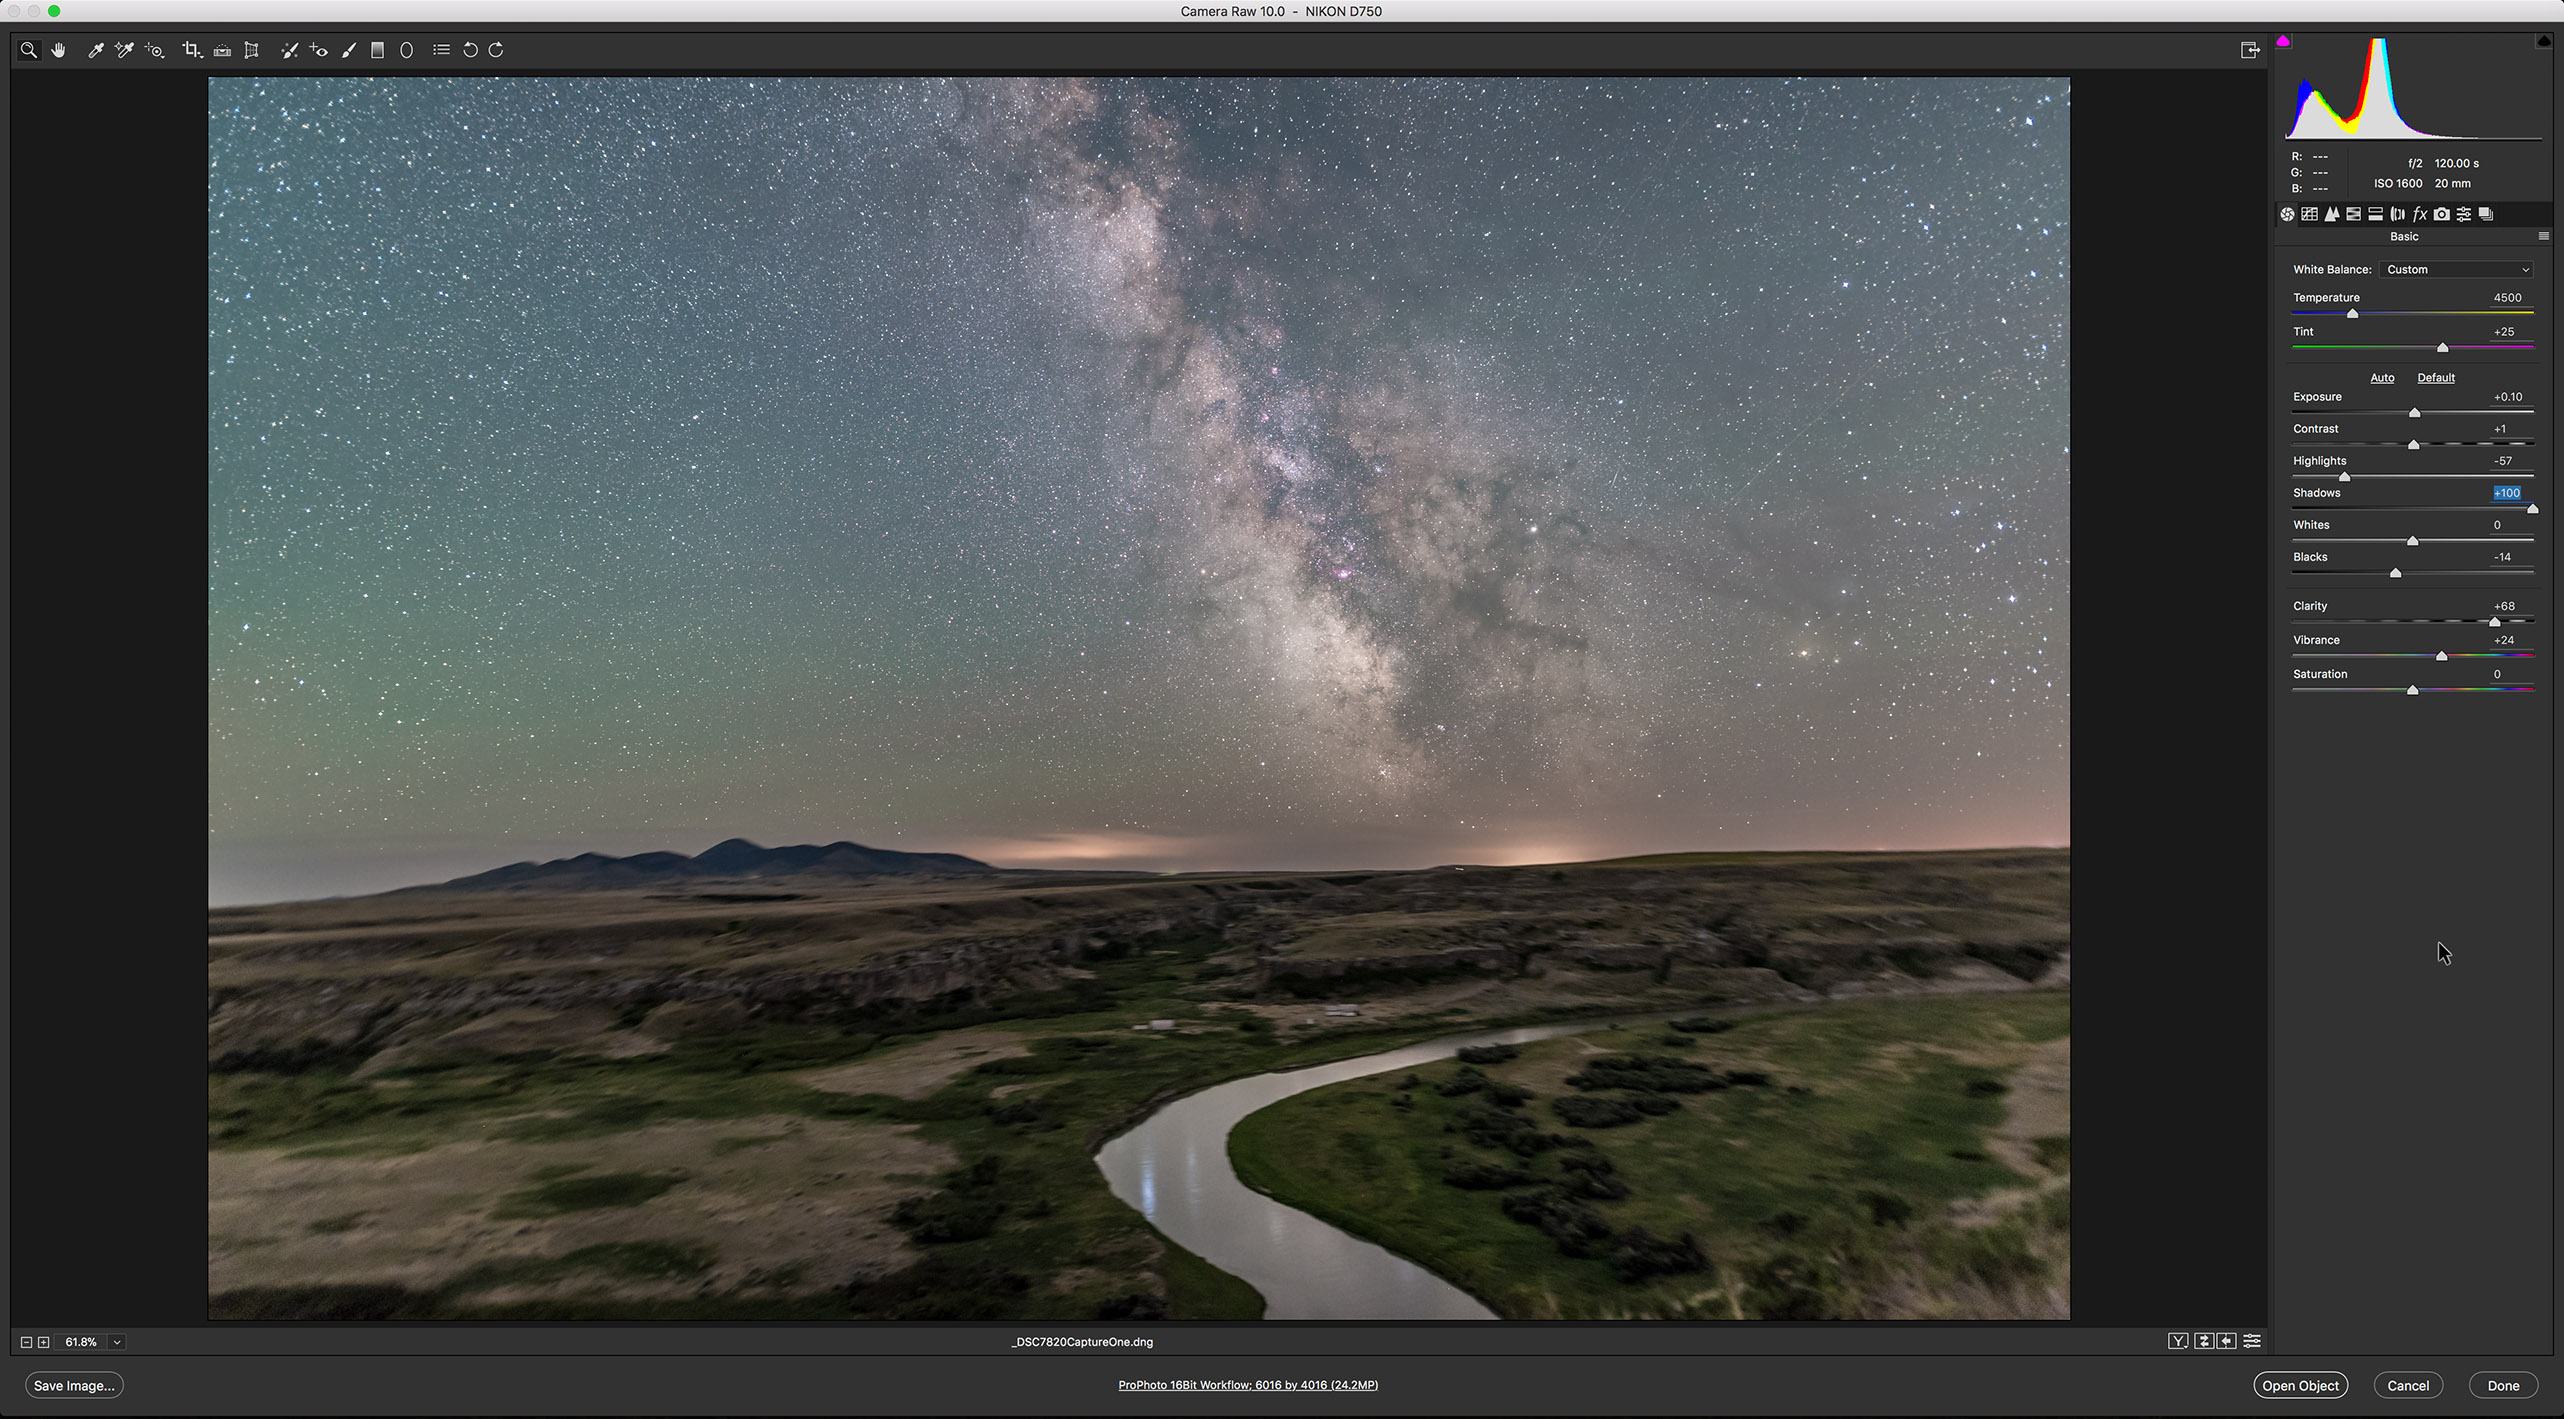
This is the image I threw at all the programs, a 2-minute exposure of the Milky Way taken at Writing-on-Stone Provincial Park in southern Alberta in late July 2017.
NOTE: Click/tap on any of the screen shots to bring them up full screen so you can inspect and save them.

The lens was the Sigma 20mm Art lens at f/2 and the camera the Nikon D750 at ISO 1600.
The camera was on a tracking unit (a Sky-Watcher Star Adventurer Mini) to keep stars pinpoints.
Thus the ground is blurred. Keep that in mind, as it will always look fuzzy in the comparison images. But it does show up noise well, including hot pixels. This image of the sky is designed to be composited with one taken without the tracker turning, to keep the ground sharp.
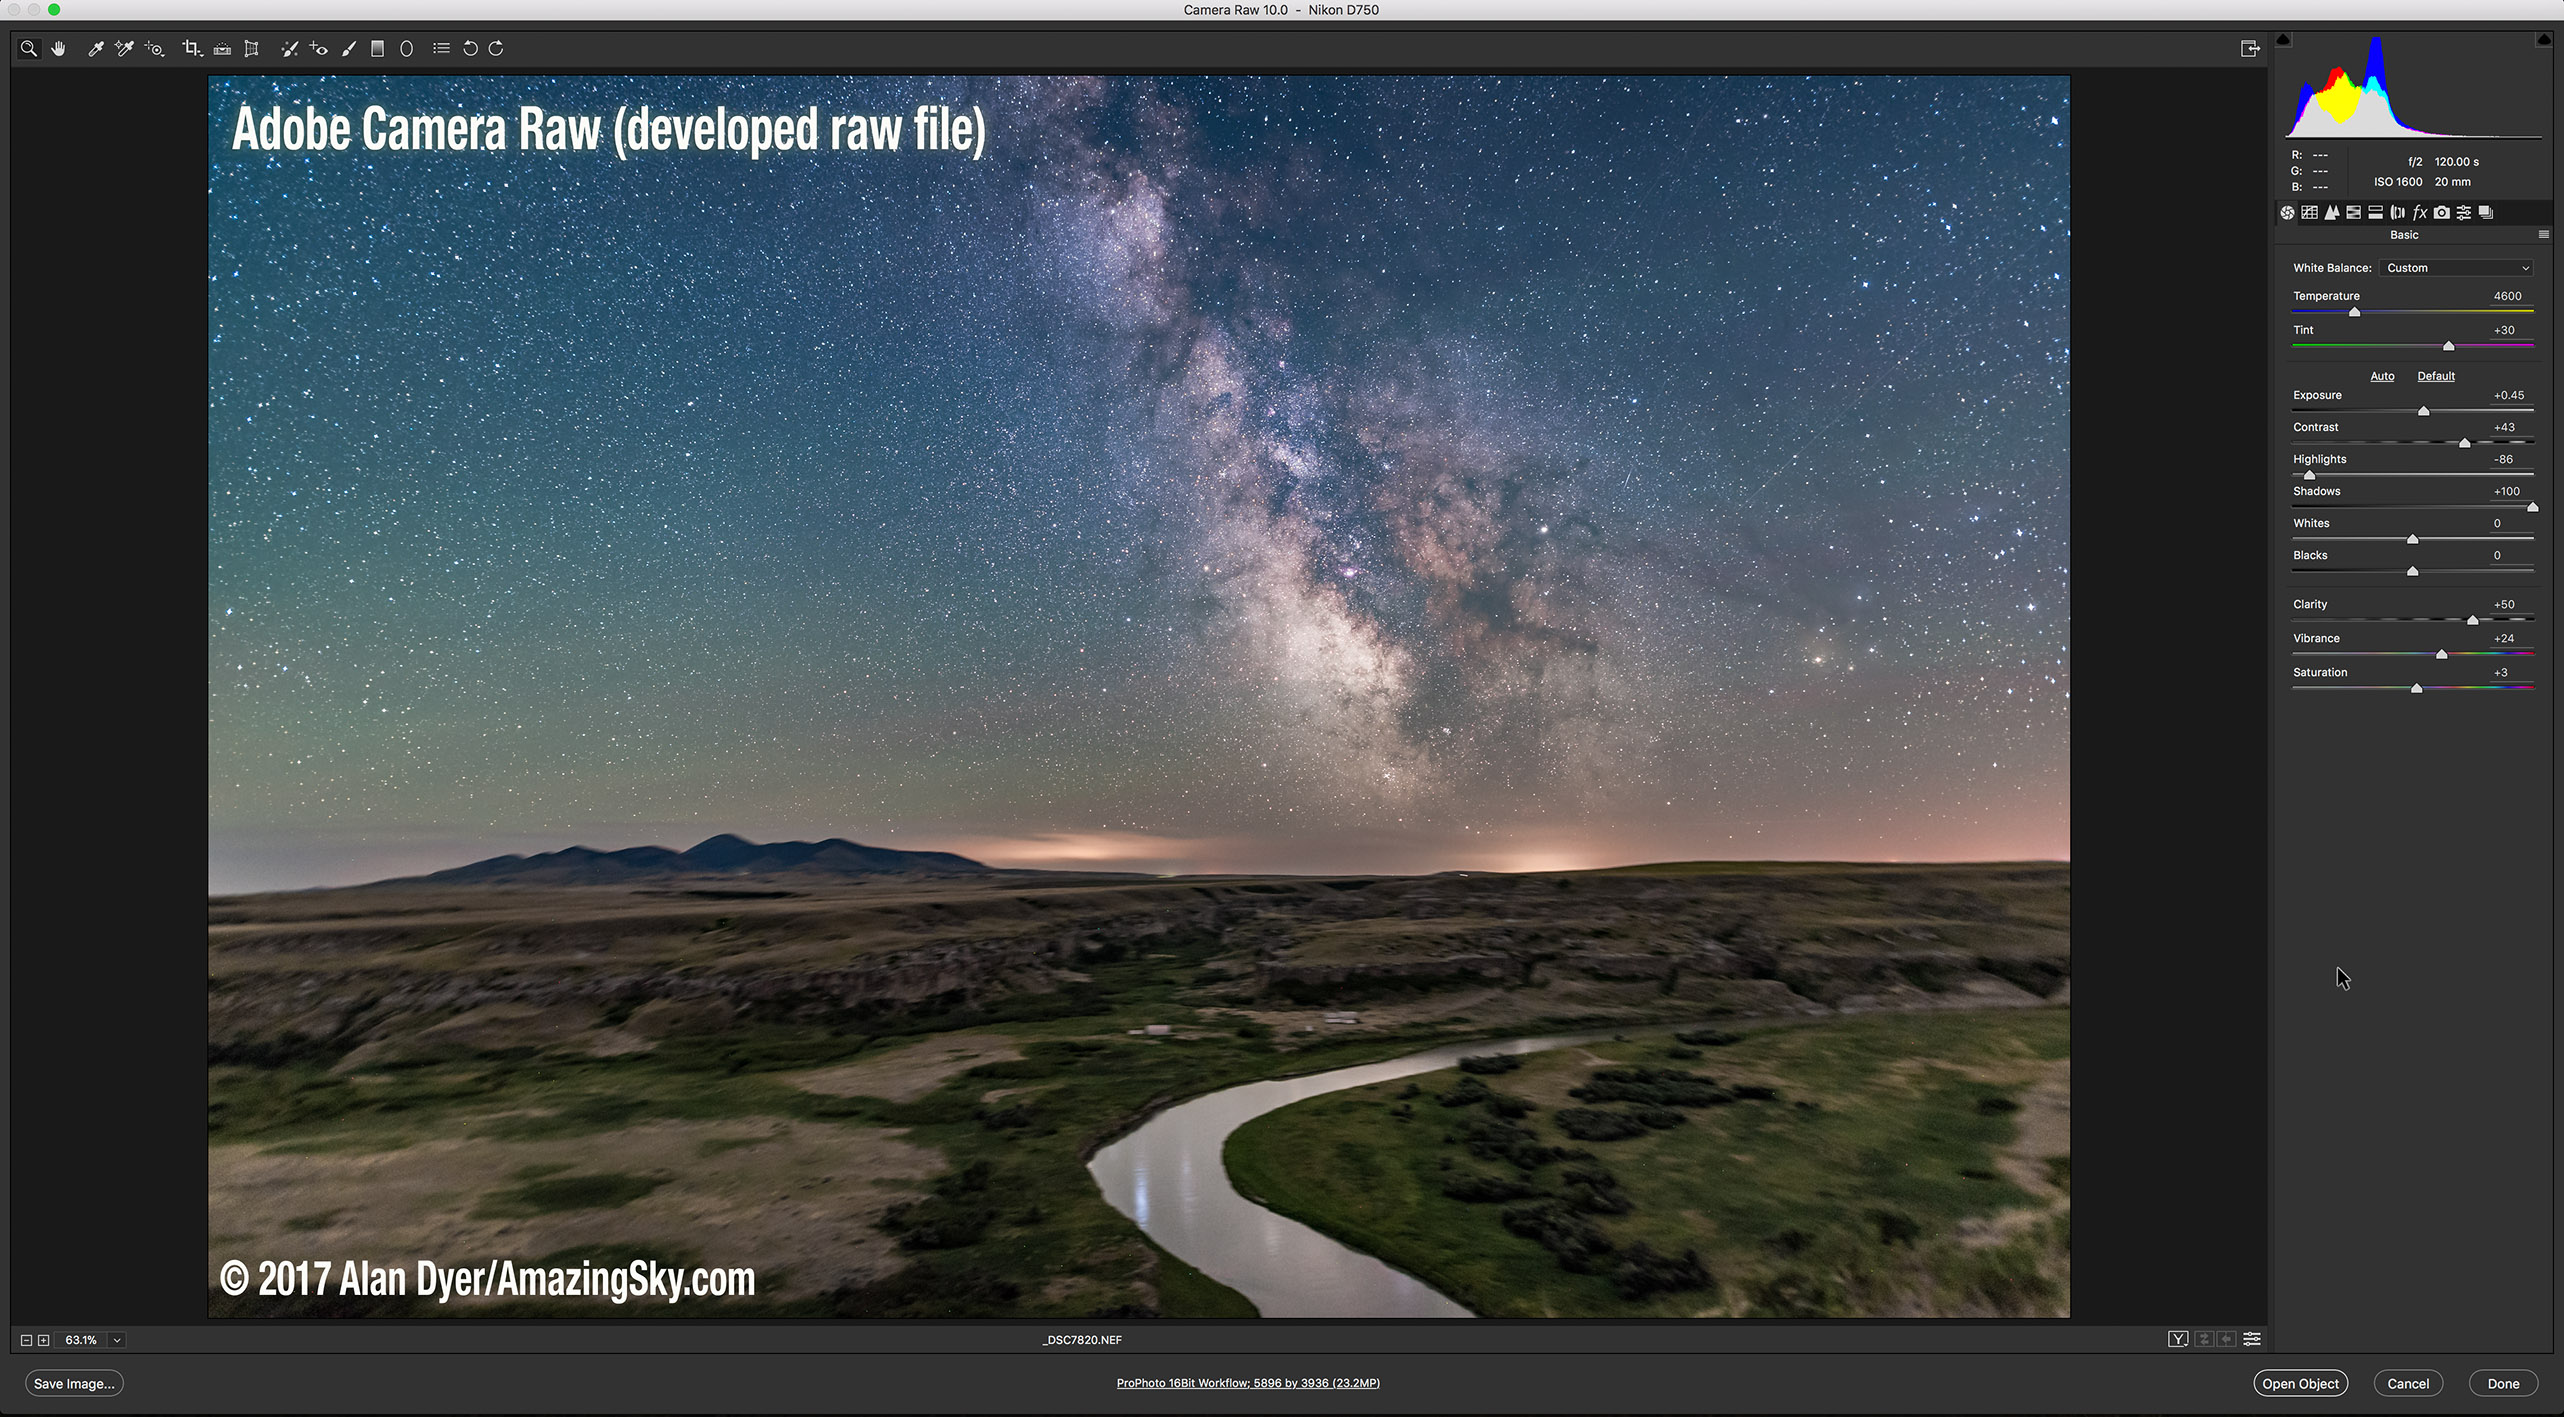
Above is the image after development in Adobe Camera Raw (ACR), using sliders under its Basic, Tone Curve, Detail, HSL, Lens Corrections, and Effects tabs. Plus I added a “local adjustment” gradient to darken the sky at the top of the frame. I judged programs on how well they could match or beat this result.

Above is the same image developed in Adobe Lightroom, to demonstrate how it can achieve identical results to Camera Raw, because at heart it is Camera Raw.
Feature Focus
I have assumed a workflow that starts with raw image files from the camera, not JPGs, for high-quality results.
And I have assumed the goal of making that raw image look as good as possible at the raw stage, before it goes to Photoshop or some other bit-mapped editor. That’s an essential workflow for time-lapse shooting, if not still-image nightscapes.
However, I made no attempt to evaluate all these programs for a wide range of photo applications. That would be a monumental task!
Nor, in the few programs capable of the task, did I test image layering. My focus was on developing a raw image. As such, I did not test the popular free program GIMP, as it does not open raw files. GIMP users must turn to one of the raw developers here as a first stage.
If you are curious how a program might perform for your purposes and on your photos, then why not test drive a trial copy?
Instead, my focus was on these programs’ abilities to produce great looking results when processing one type of image: my typical Milky Way nightscape, below.
Such an image is a challenge because…
- The subject is inherently low in contrast, with the sky often much brighter than the ground. The sky needs much more contrast applied, but without blocking up the shadows in the ground.
- The sky is often plagued by off-color tints from artificial and natural sky glows.
- The ground is dark, perhaps lit only by starlight. Bringing out landscape details requires excellent shadow recovery.
- Key to success is superb noise reduction. Images are shot at high ISOs and are rife with noise in the shadows. We need to reduce noise without losing stars or sharpness in the landscape.
I focused on being able to make one image look as good as possible as a raw file, before bringing it into Photoshop or a layer-based editor – though that’s where it will usually end up, for stacking and compositing, as per the final result shown at the end.
I then looked at each program’s ability to transfer that one key image’s settings over to what could be hundreds of other images taken that night, either for stacking into star trails or for assembling into a time-lapse movie.
Summary Conclusions
None of the programs I tested ticked all the boxes in providing all the functions and image quality of the Adobe products.
But here’s a summary of my recommendations:
For Advanced Time-Lapse
None of the non-Adobe programs will work with the third-party software LRTimelapse (www.lrtimelapse.com). It is an essential tool for advanced time-lapse processing. LRTimelapse works with Lightroom or ACR/Bridge to gradually shift processing settings over a sequence, and smooth annoying image flickering.
If serious and professional time-lapse shooting is your goal, none of the Adobe contenders will work. Period. Subscribe to Creative Cloud. And buy LRTimelapse.
For Basic Time-Lapse

However, for less-demanding time-lapse shooting, when the same settings can be applied to all the images in a sequence, then I feel the best non-Adobe choices are, in alphabetical order:
- ACDSee
- Capture One
- Corel Aftershot Pro
- DxO PhotoLab
- ON1 Photo RAW
… With, in my opinion, DxO and Capture One having the edge for image quality and features. But all five have a Library or Browser mode with easy-to-use Copy & Paste and Batch Export functions needed for time-lapse preparation.
Also worth a try is PhotoDirector9 (MacOS and Windows), a good Lightroom replacement. Scroll to the end for more details and a link.
For Still Image Nightscapes

If you are processing just individual still images, perhaps needing only to stack or composite a few exposures, and want to do all the raw development and subsequent layering of images within one non-Adobe program, then look at (again alphabetically):
- Affinity Photo
- Luminar 2018
- ON1 Photo RAW 2018
… With Affinity Photo having the edge in offering a readily-available function off its File menu for stacking images, either for noise smoothing (Mean) or creating star trails (Maximum).
However, I found its raw development module did not produce as good a result as most competitors due to Affinity’s poorer noise reduction and less effective shadow and highlight controls. Using Affinity’s “Develop Persona” module, I could not make my test image look as good as with other programs.
Luminar 2018 has better noise reduction but it demands more manual work to stack and blend images.
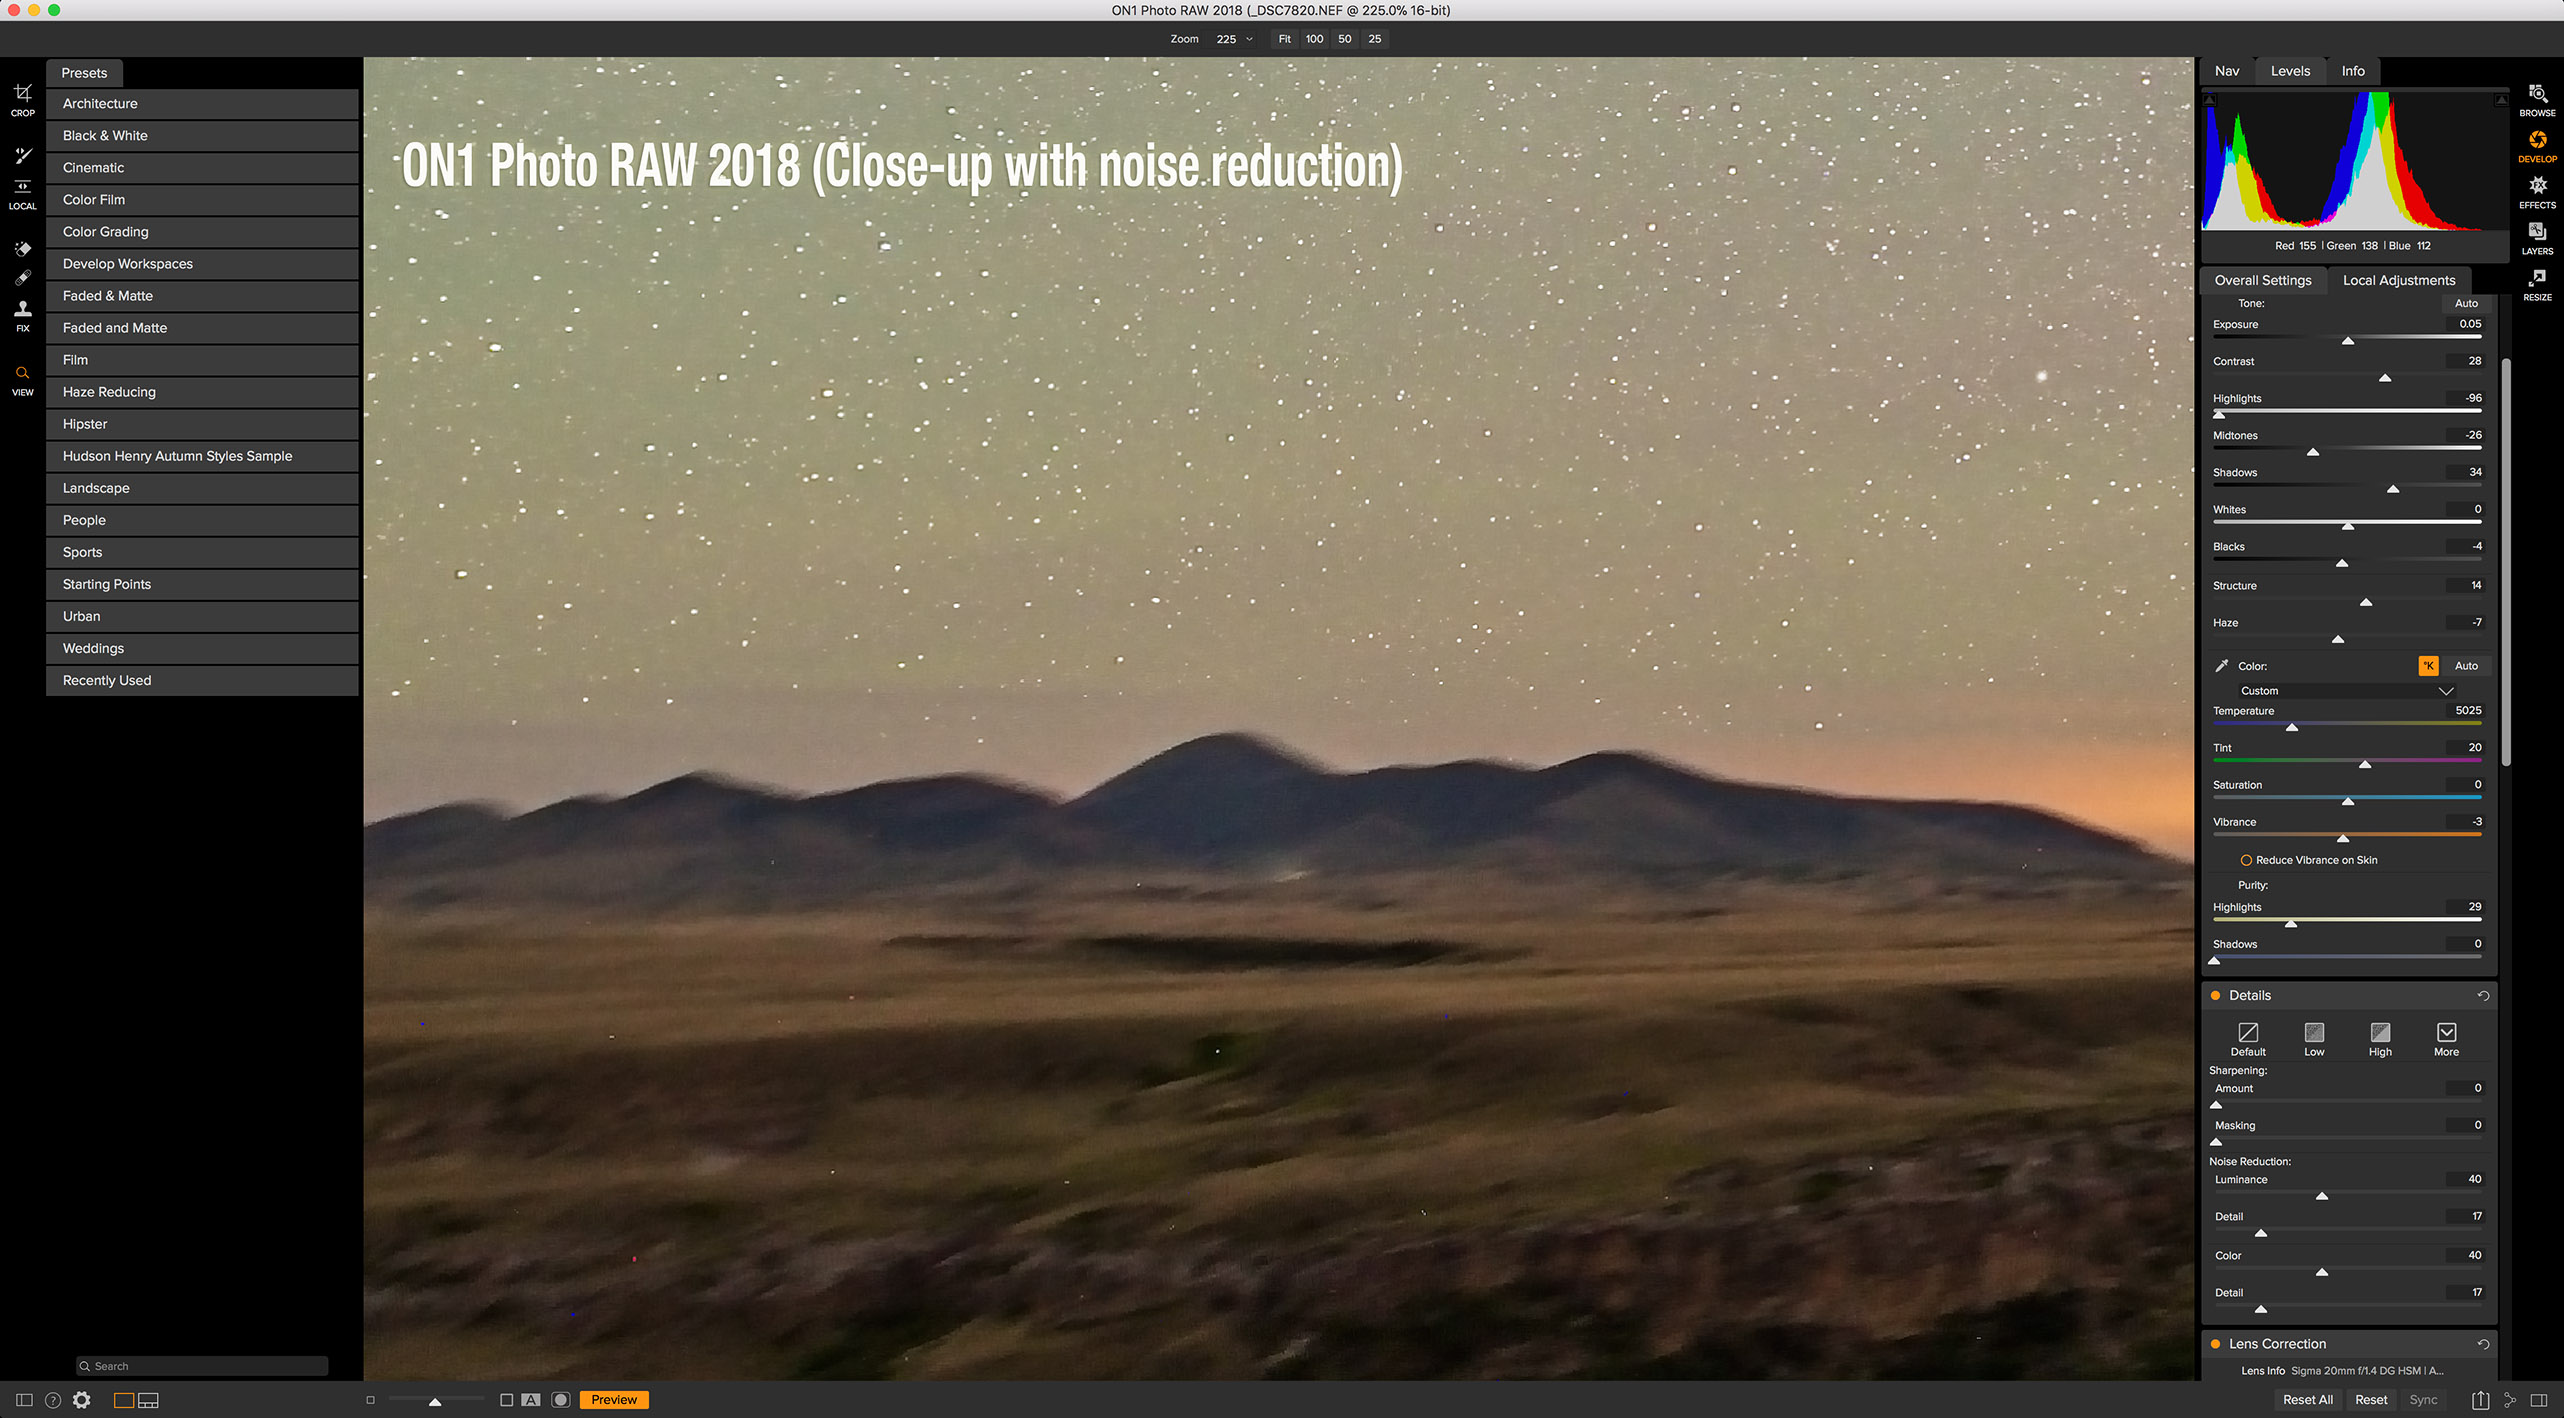
While ON1 Photo Raw has some fine features and good masking tools, it exhibits odd de-Bayering artifacts, giving images a cross-hatched appearance at the pixel-peeping level. Sky backgrounds just aren’t smooth, even after noise reduction.
To go into more detail, these are the key factors I used to compare programs.
Noise Reduction
Absolutely essential is effective noise reduction, of luminance noise and chrominance color speckles and splotches.
Ideally, programs should also have a function for suppressing bright “hot” pixels and dark “dead” pixels.
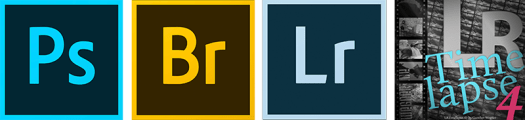
Here’s what I consider to be the “gold standard” for noise reduction, Adobe Camera Raw’s result using the latest processing engine in ACR v10/Photoshop CC 2018.
I judged other programs on their ability to produce results as good as this, if not better, using their noise reduction sliders. Some programs did better than others in providing smooth, noiseless skies and ground, while retaining detail.
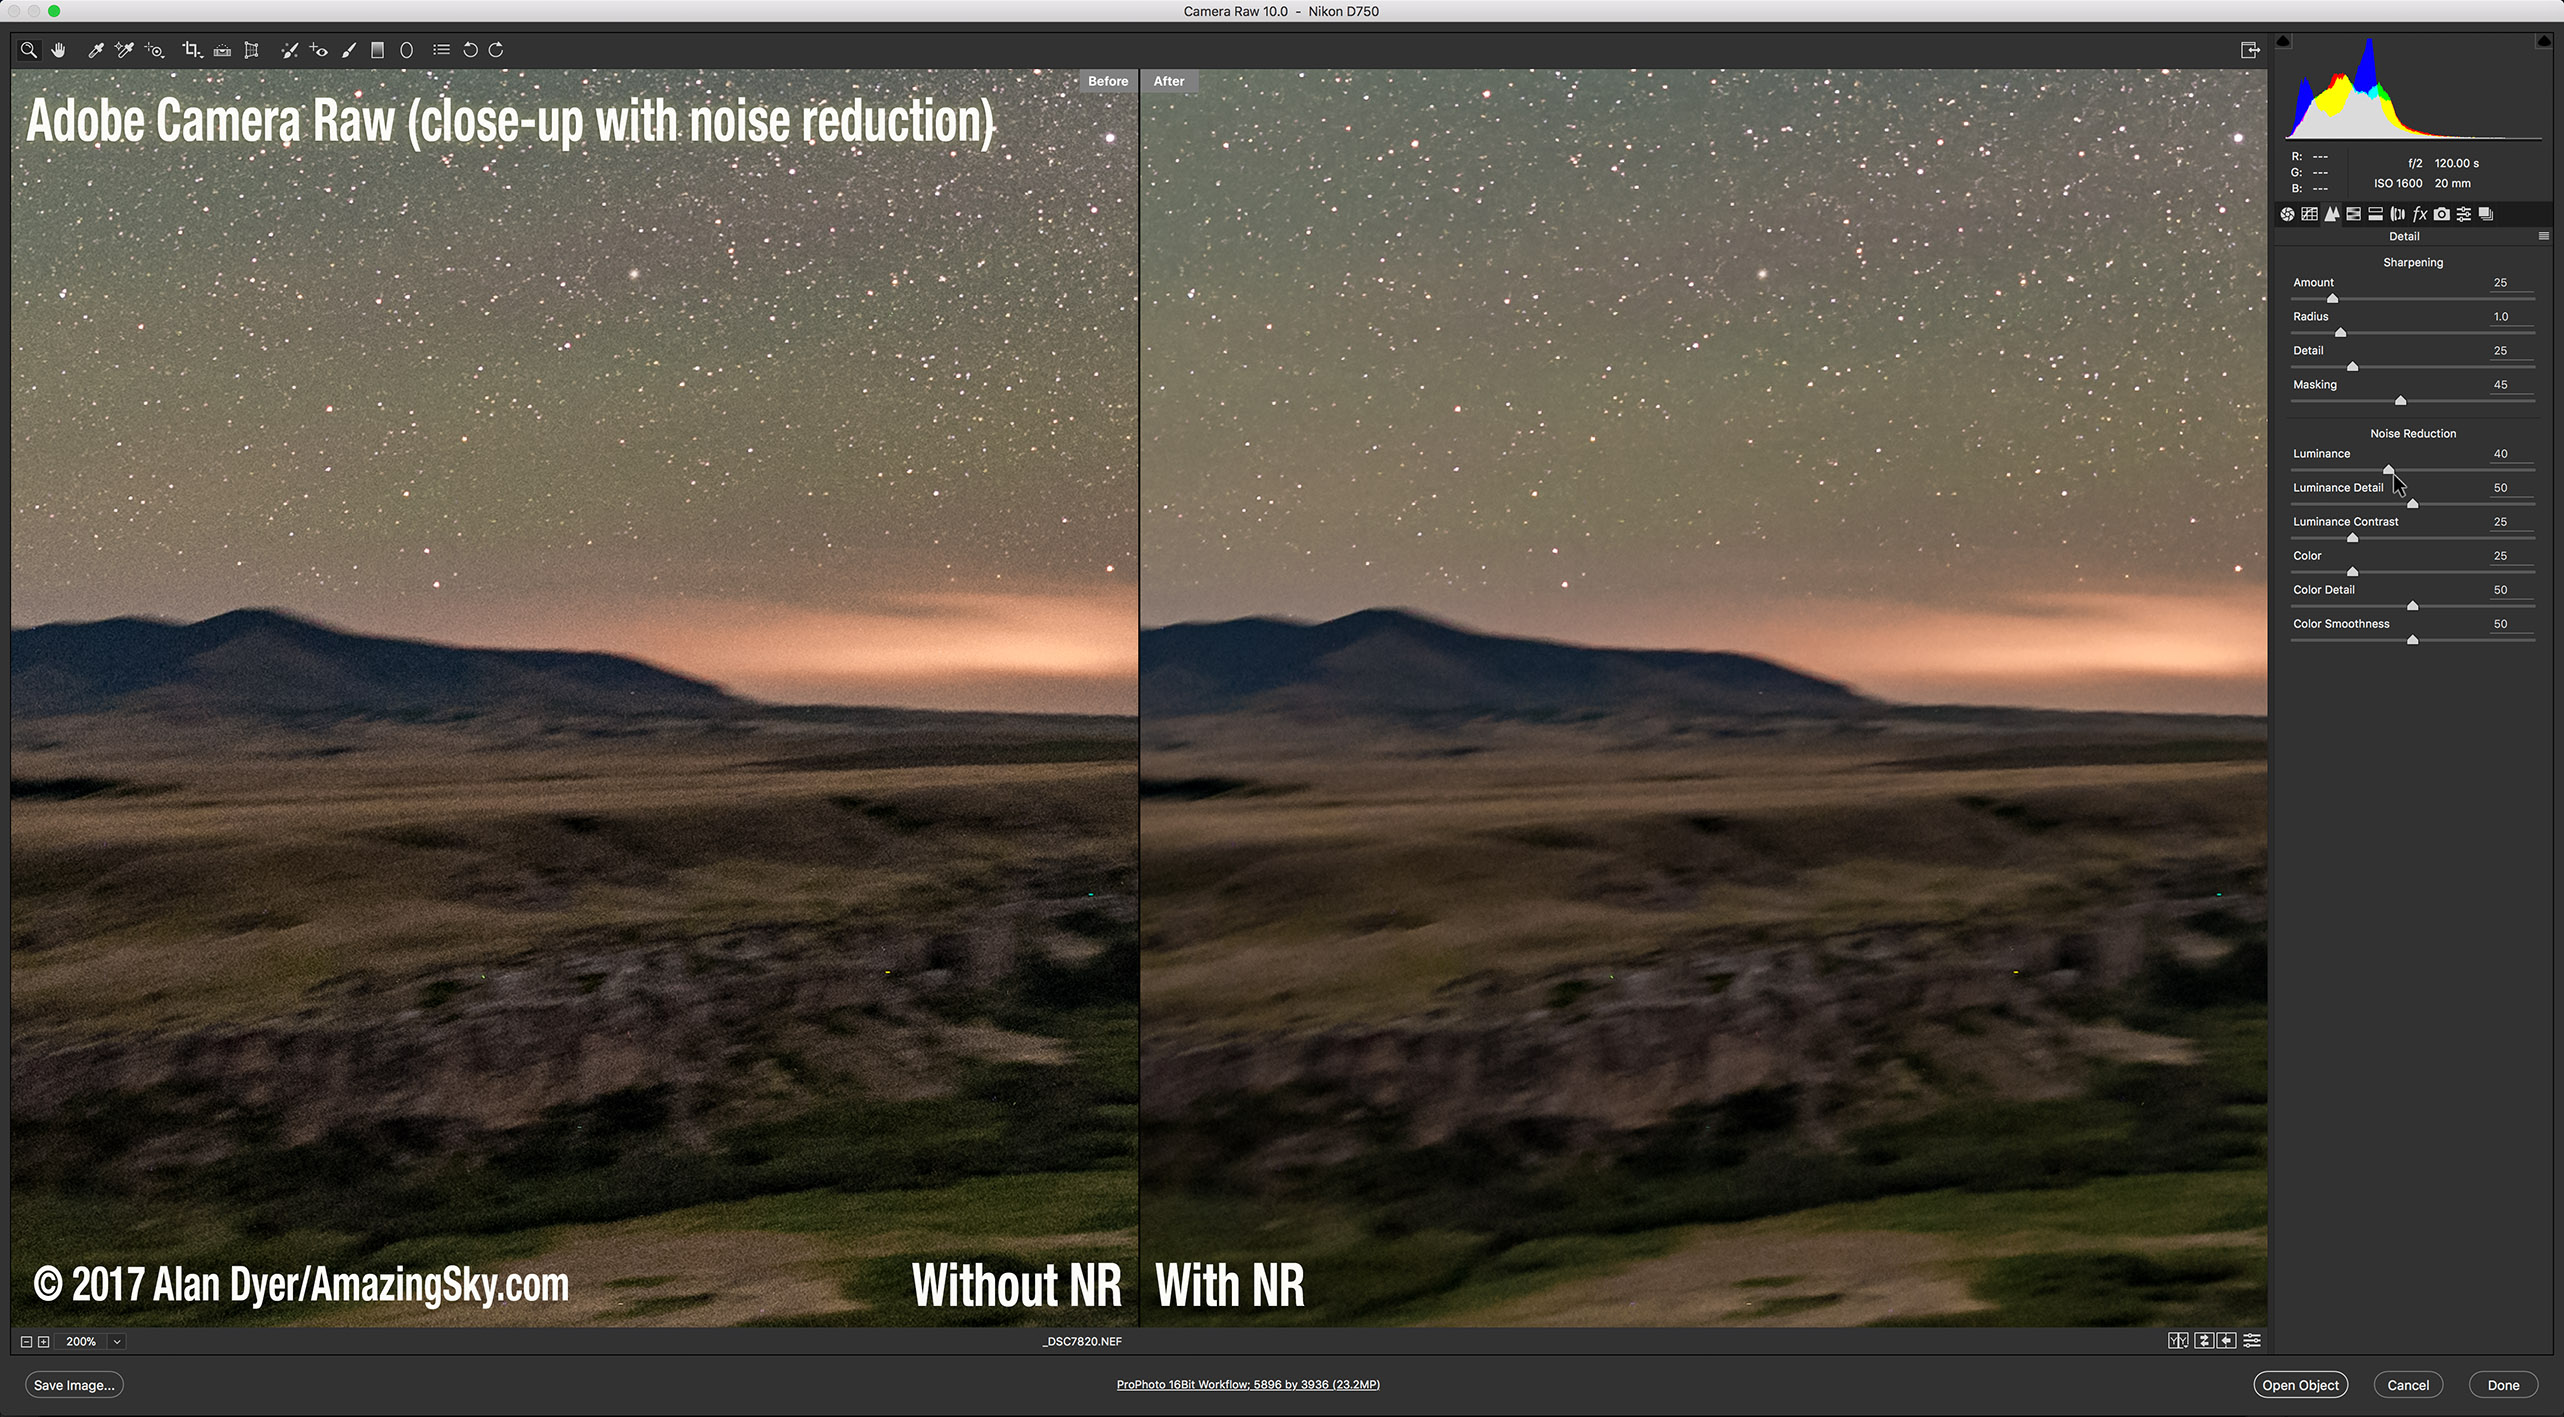
For example, one of the best was DxO PhotoLab, above. It has excellent options for reducing noise without being overwhelming in its choices, the case with a couple of other programs. For example, DxO has a mostly effective dead/hot pixel removal slider.
ACR does apply such a hot pixel removal “under the hood” as a default, but often still leaves many glaring hot specks that must be fixed later in Photoshop.
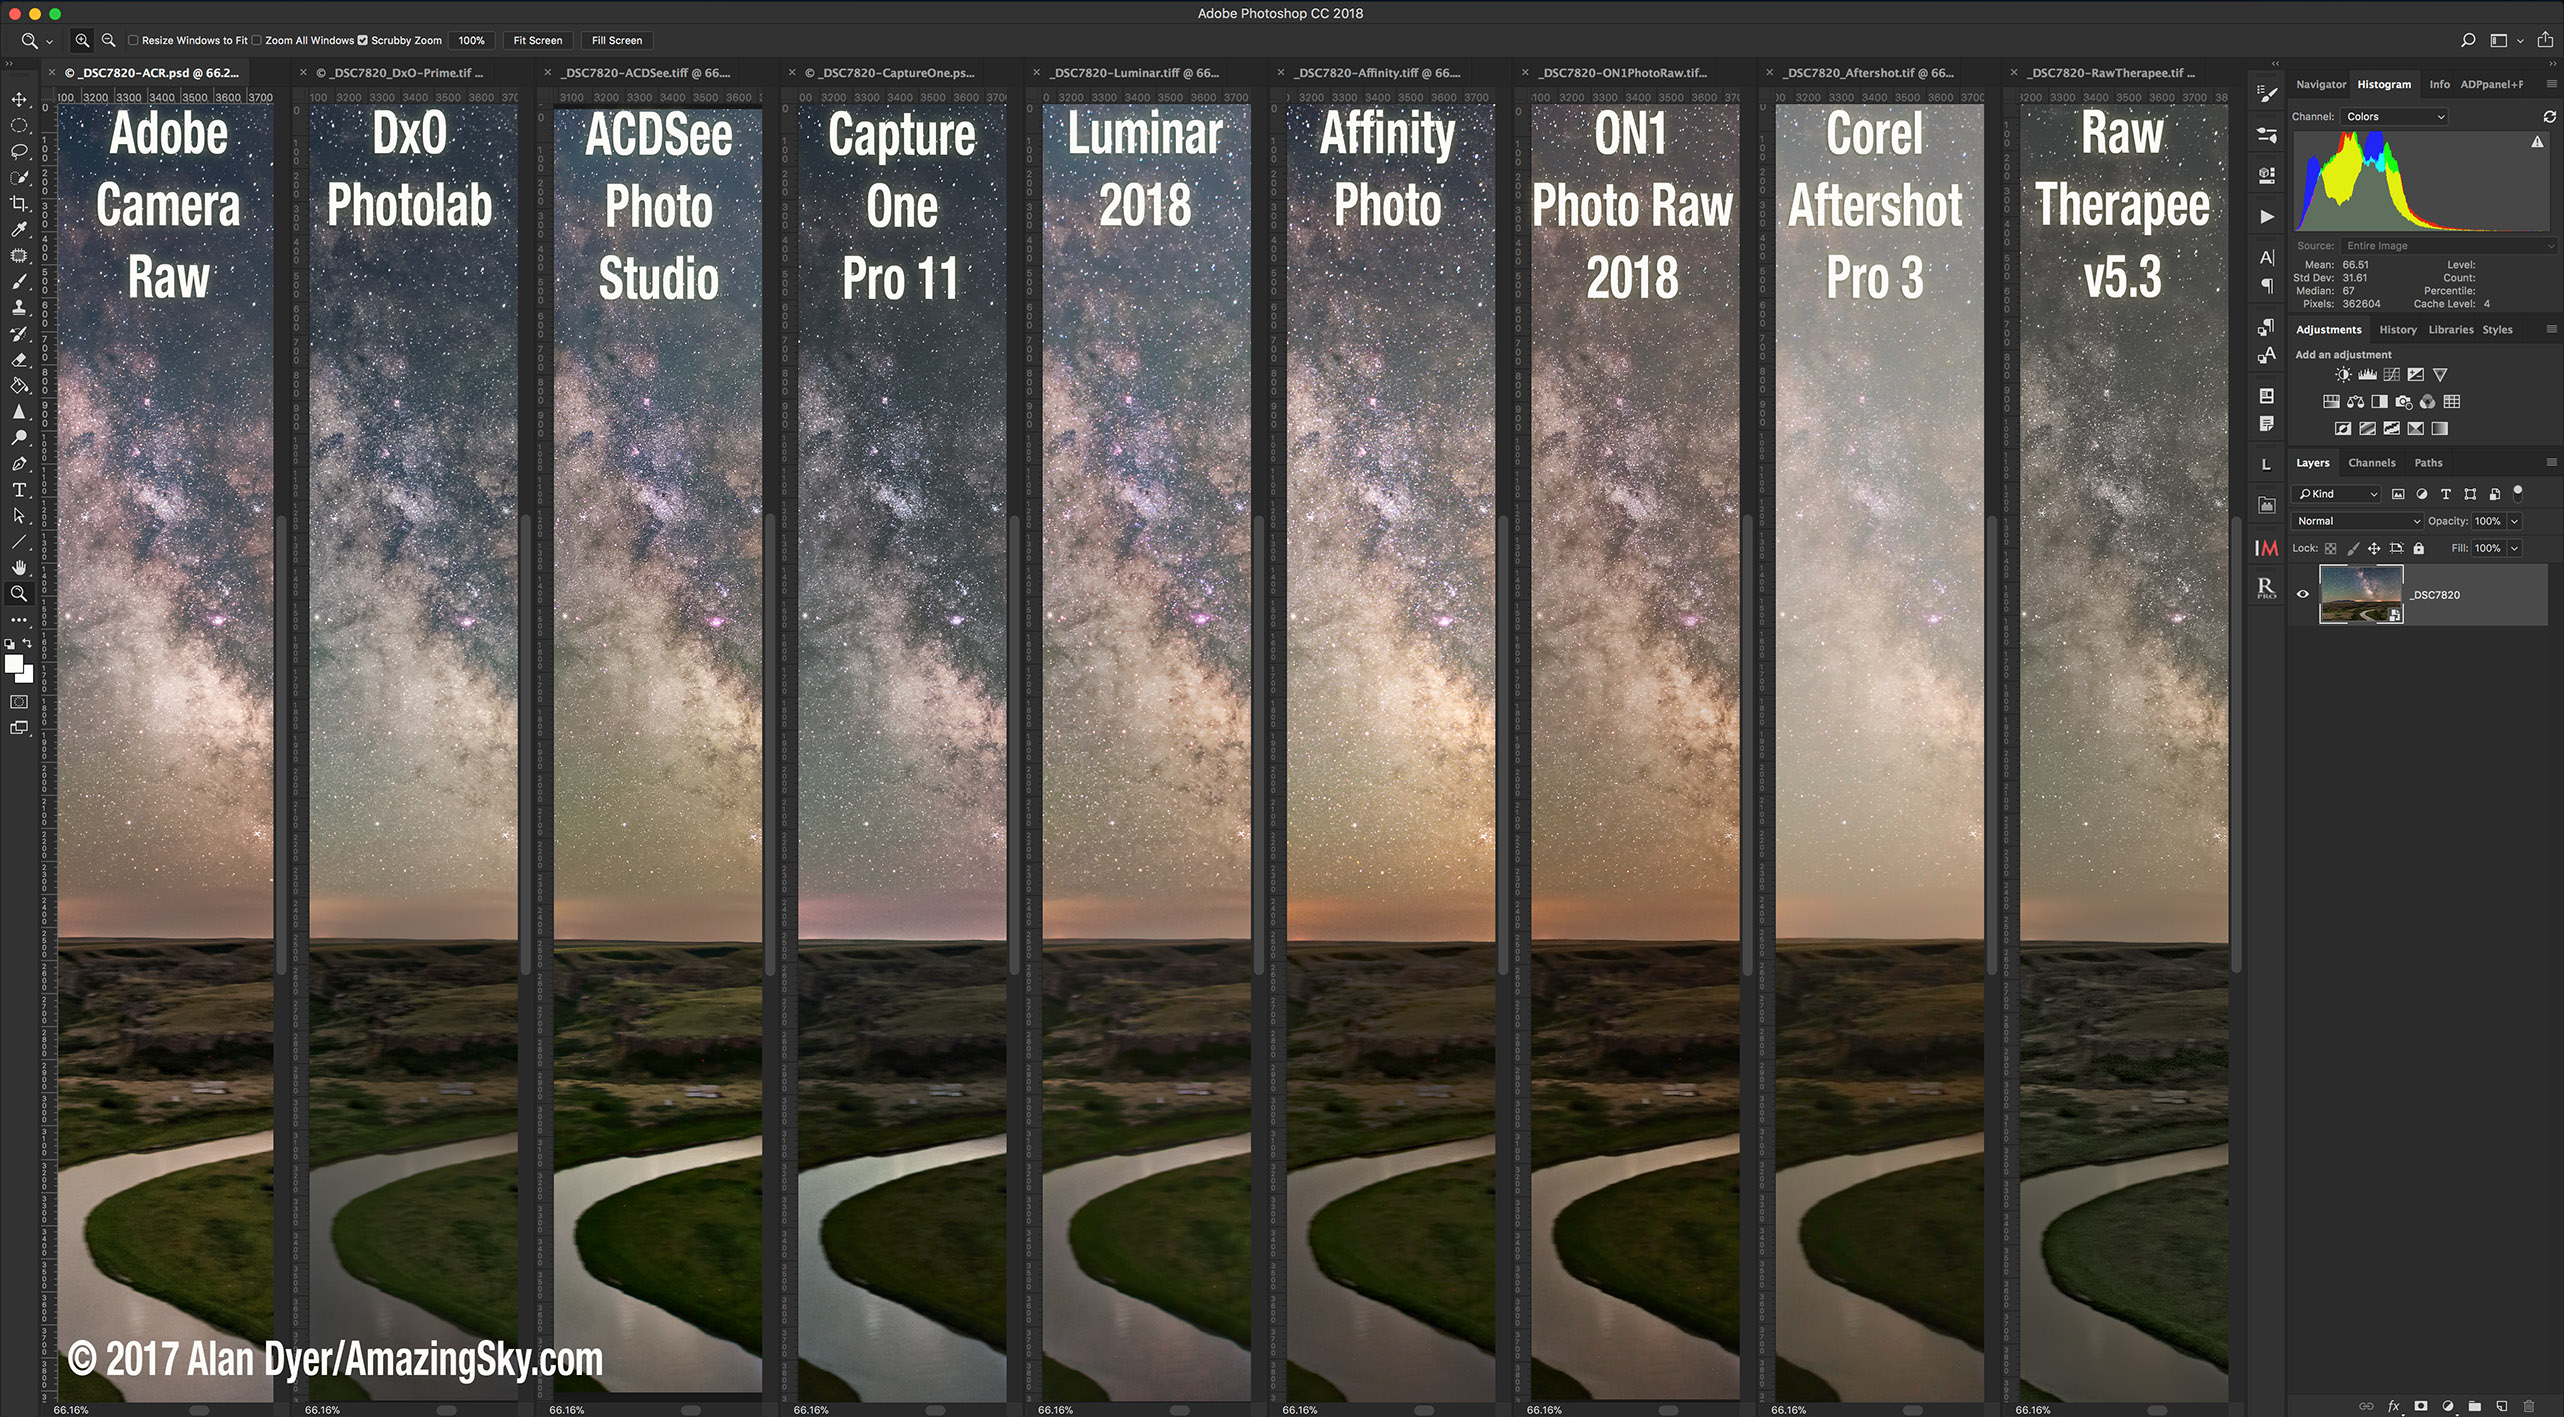
Comparing Noise Reduction

Above are 8 of the contender programs compared to Camera Raw for noise reduction.
Missing from this group is the brand new Pixelmator Pro, for MacOS only. It does not yet have any noise reduction in its v1 release, a serious deficiency in imaging software marketed as “Pro.” For that reason alone, I cannot recommend it. I describe its other deficiencies below.
Lens Corrections
The wide-angle lenses we typically use in nightscape and time-lapse imaging suffer from vignetting and lens distortions. Having software that can automatically detect the lens used and apply bespoke corrections is wonderful.
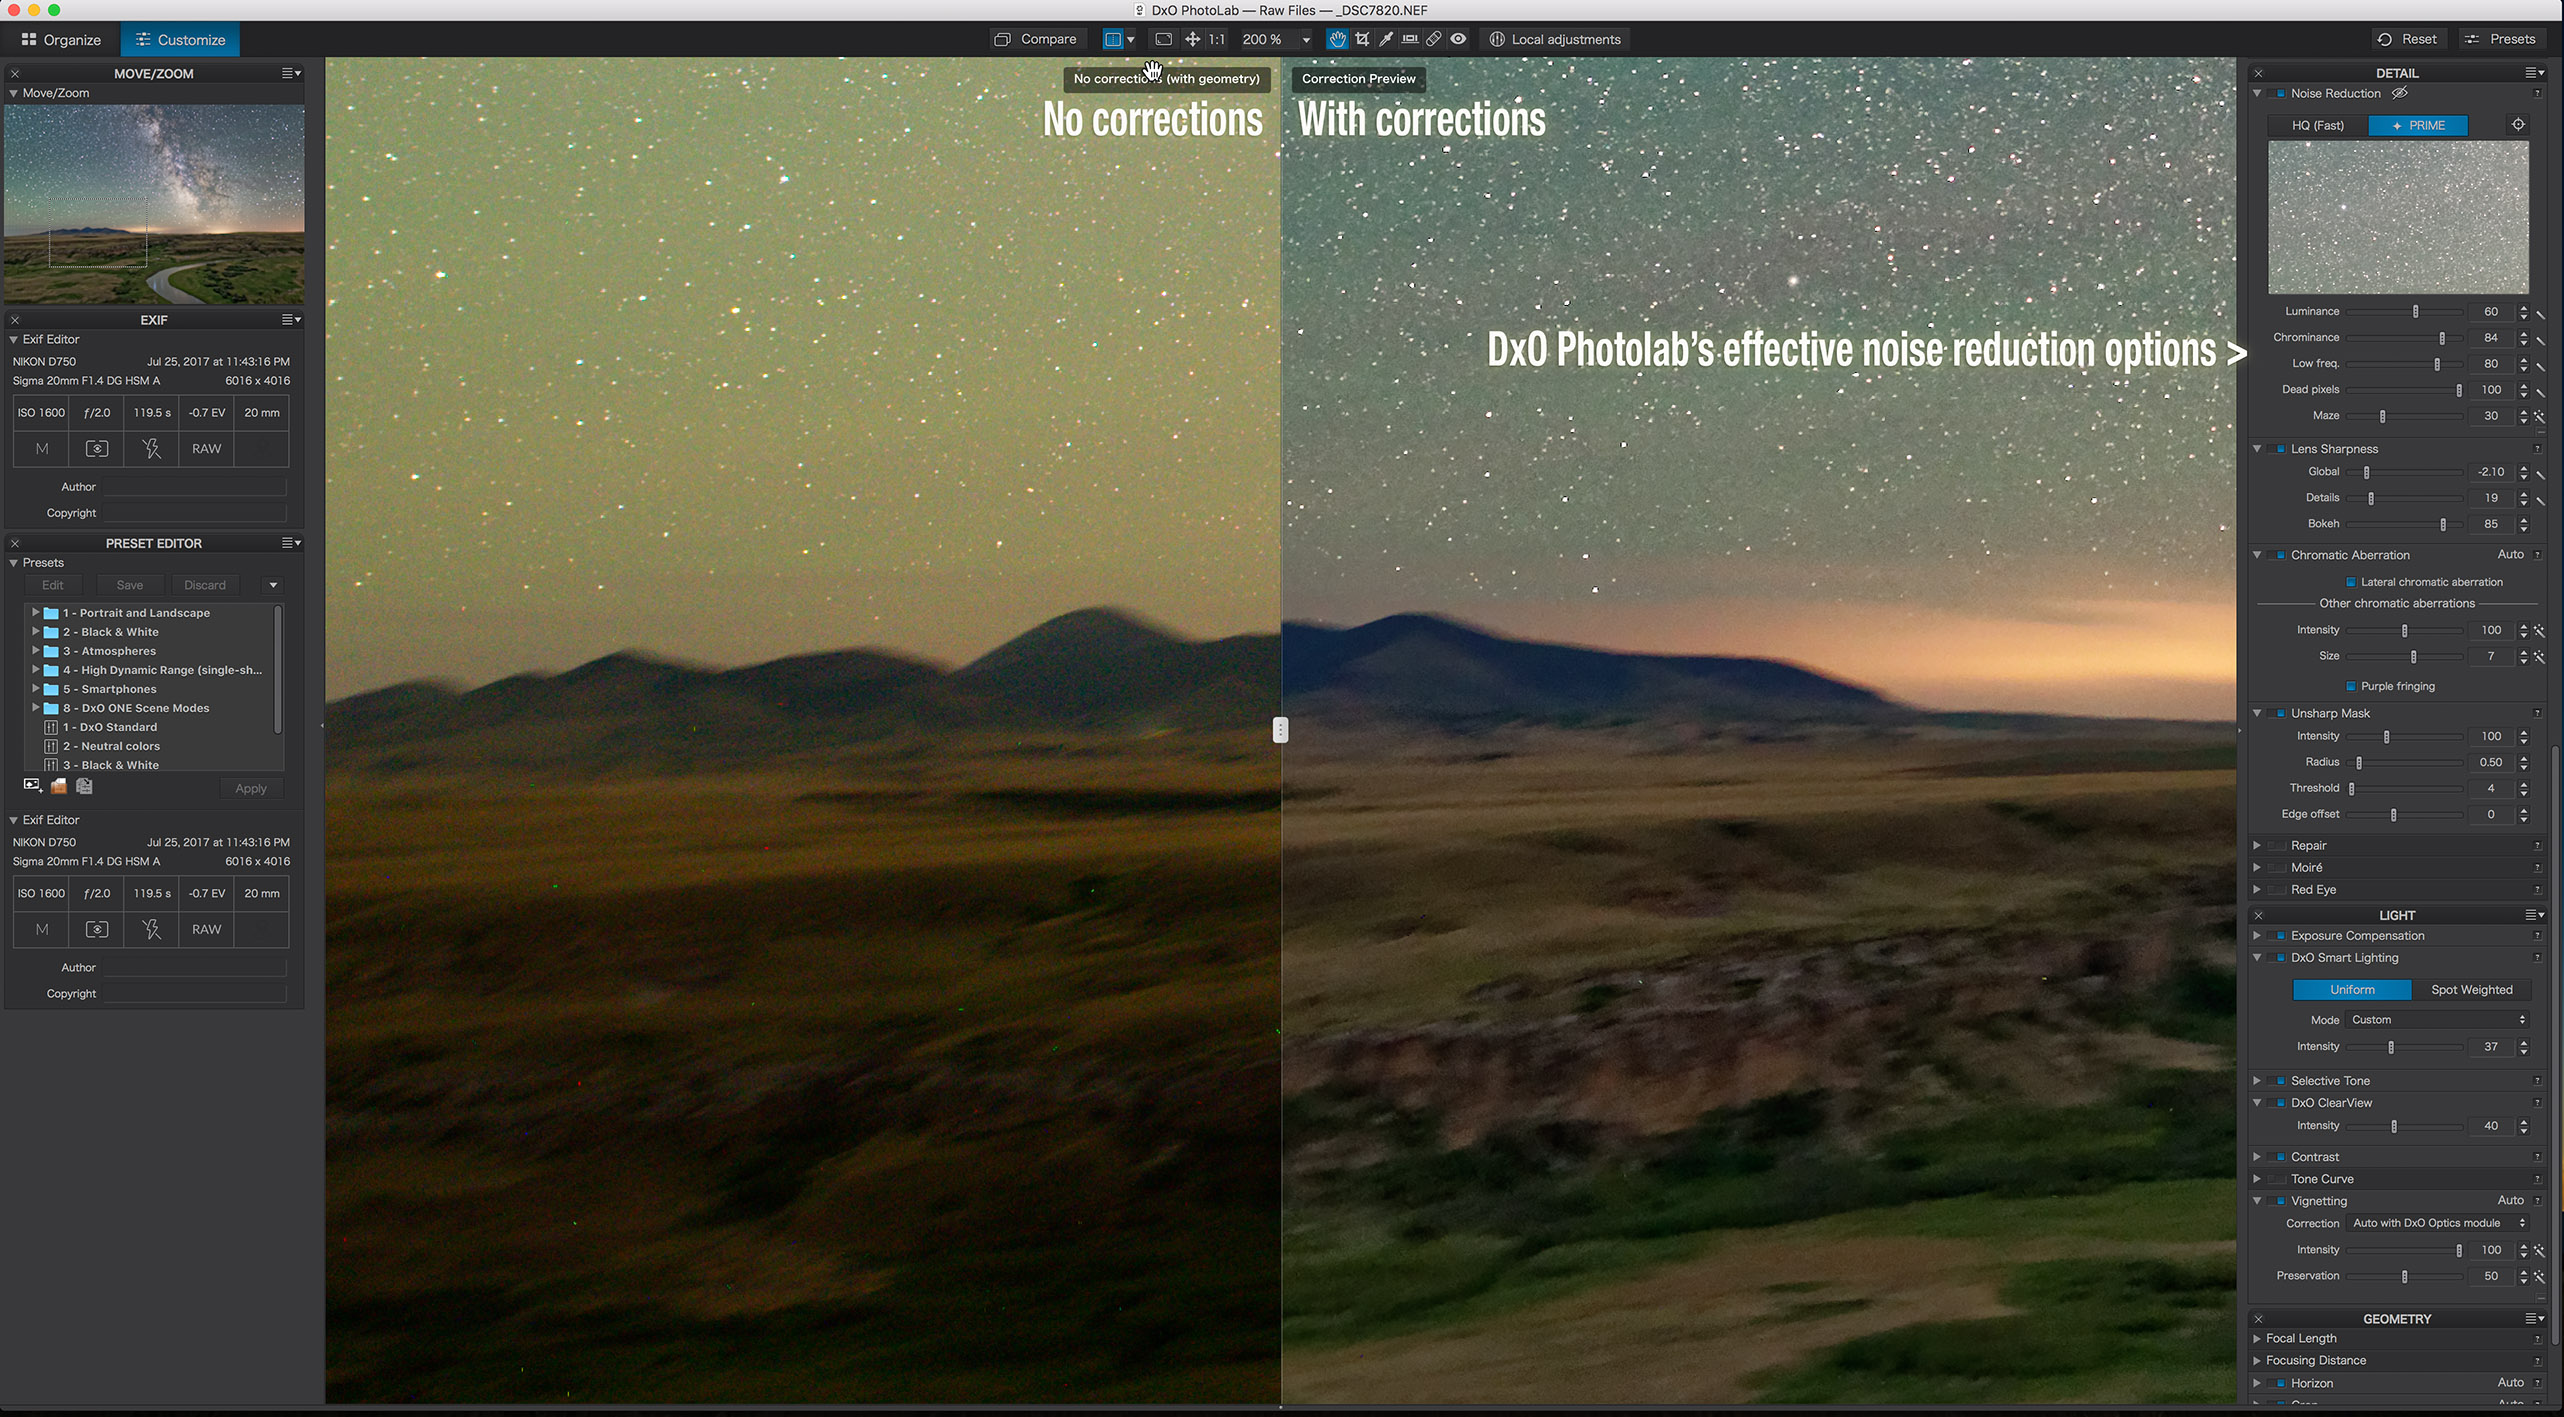
Only a few programs, such as Capture One (above), have a library of camera and lens data to draw upon to apply accurate corrections with one click. With others you have to dial in corrections manually by eye, which is crude and inaccurate.
Shadows and Highlights
All programs have exposure and contrast adjustments, but the key to making a Milky Way nightscape look good is being able to boost the shadows (the dark ground) while preventing the sky from becoming overly bright, yet while still applying good contrast to the sky.

Of the contenders, I liked DxO PhotoLab best (shown above), not only for its good shadow and highlight recovery, but also excellent “Smart Lighting” and “ClearView” functions which served as effective clarity and dehaze controls to snap up the otherwise low-contrast sky. With most other programs it was tough to boost the shadows without also flattening the contrast.
On the other hand, Capture One’s excellent layering and local adjustments did make it easier to brush in adjustments just to the sky or ground.
However, any local adjustments like those will be feasible only for still images or time-lapses where the camera does not move. In any motion control sequences the horizon will be shifting from frame to frame, making precise masking impractical over a sequence of hundreds of images.
Therefore, I didn’t place too much weight on the presence of good local adjustments. But they are nice to have. Capture One, DxO PhotoLab, and ON1 win here.
Selective Color Adjustments
All programs allow tweaking the white balance and overall tint.
But it’s beneficial to also adjust individual colors selectively, to enhance red nebulas, enhance or suppress green airglow, bring out green grass, or suppress yellow or orange light pollution.
Some programs have an HSL panel (Hue, Saturation, Lightness) or an equalizer-style control for boosting or dialing back specific colors.
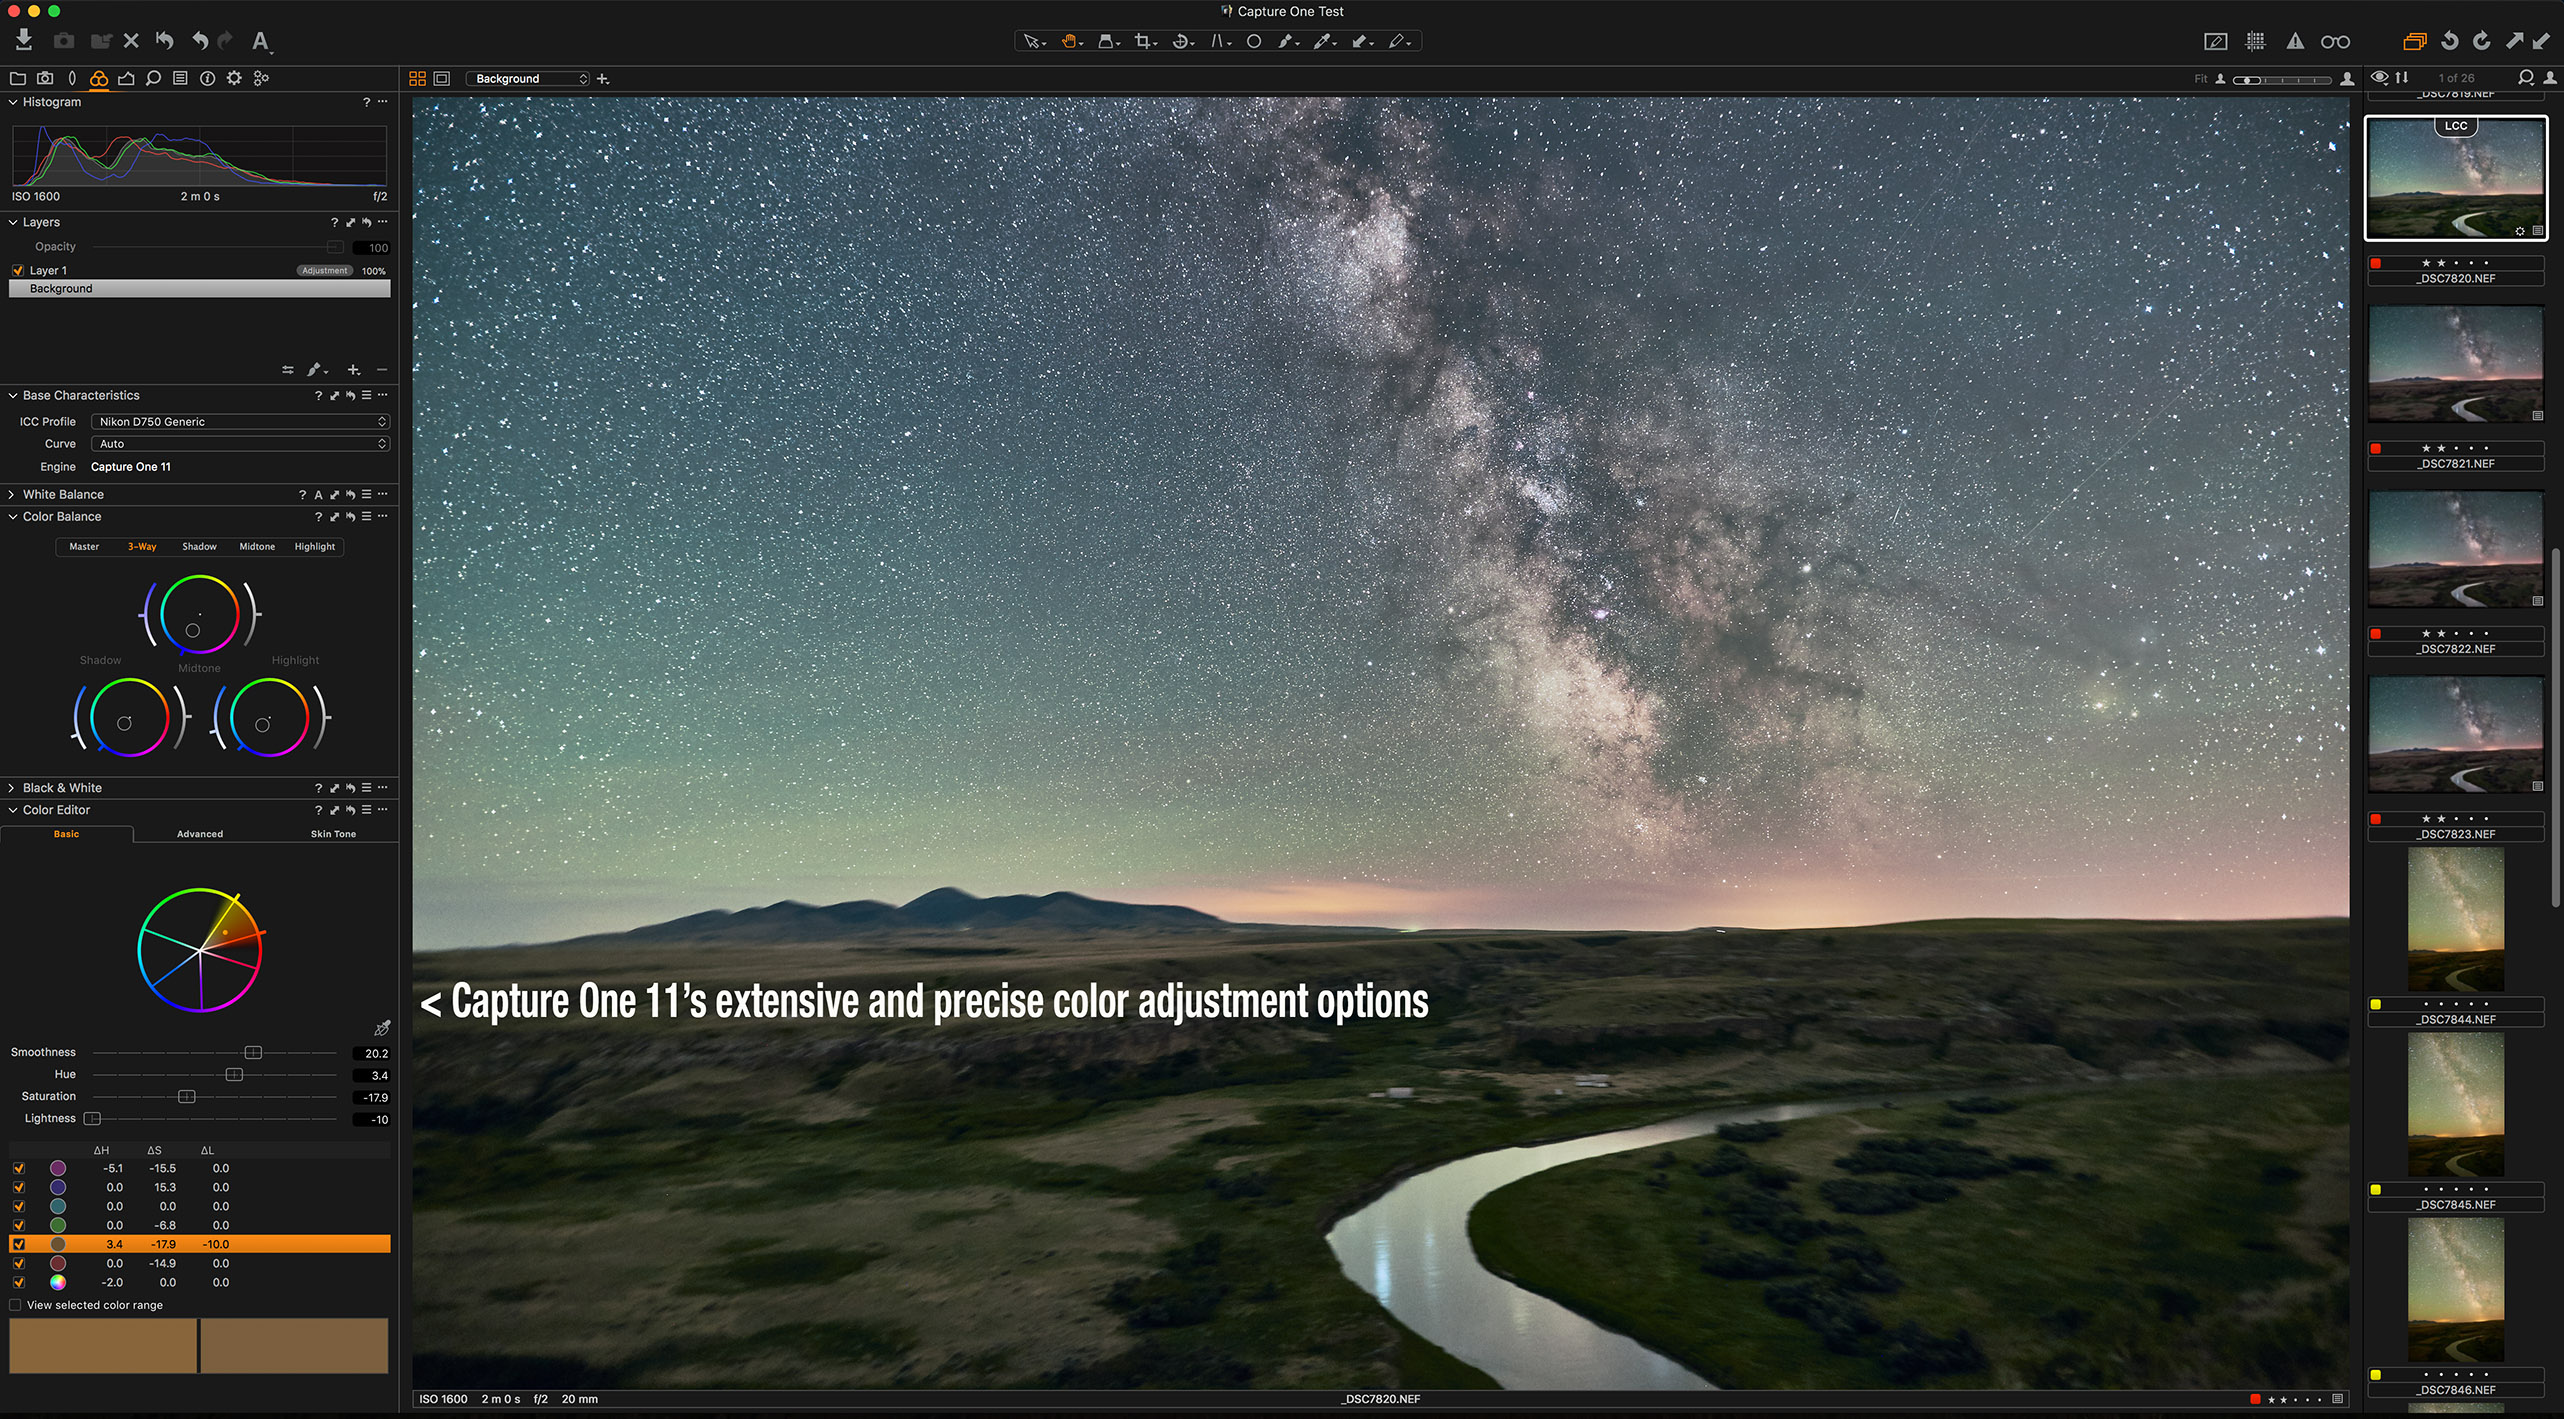
Capture One (above) has the most control over color correction, with an impressive array of color wheels and sliders that can be set to tweak a broad or narrow range of colors.
And yet, despite this, I was still unable to make my test image look quite the way I wanted for color balance. ACR and DxO PhotoLab still won out for the best looking final result.
Copy and Paste Settings
Even when shooting nightscape stills we often take several images to stack later. It’s desirable to be able to process just one image, then copy and paste its settings to all the others in one fell swoop. And then to be able to inspect those images in thumbnails to be sure they all look good.
Some programs (Affinity Photo, Luminar, Pixelmator Pro) lack any library function for viewing or browsing a folder of thumbnail images. Yes, you can export a bunch of images with your settings applied as a user preset, but that’s not nearly as good as actually seeing those images displayed in a Browser mode.

What’s ideal is a function such as ON1 Photo RAW displays here, and that some other programs have: the ability to inspect a folder of images, work on one, then copy and paste its settings to all the others in the set.
This is absolutely essential for time-lapse work, and nice to have even when working on a small set to be stacked into a still image.
Batch Export
Once you develop a folder of raw images with “Copy and Paste,” you now have to export them with all those settings “baked into” the exported files.
This step is to create an intermediate set of JPGs to assemble into a movie. Or perhaps to stack into a star trail composite using third party software such as StarStaX, or to work on the images in another layer-based program of your choice.
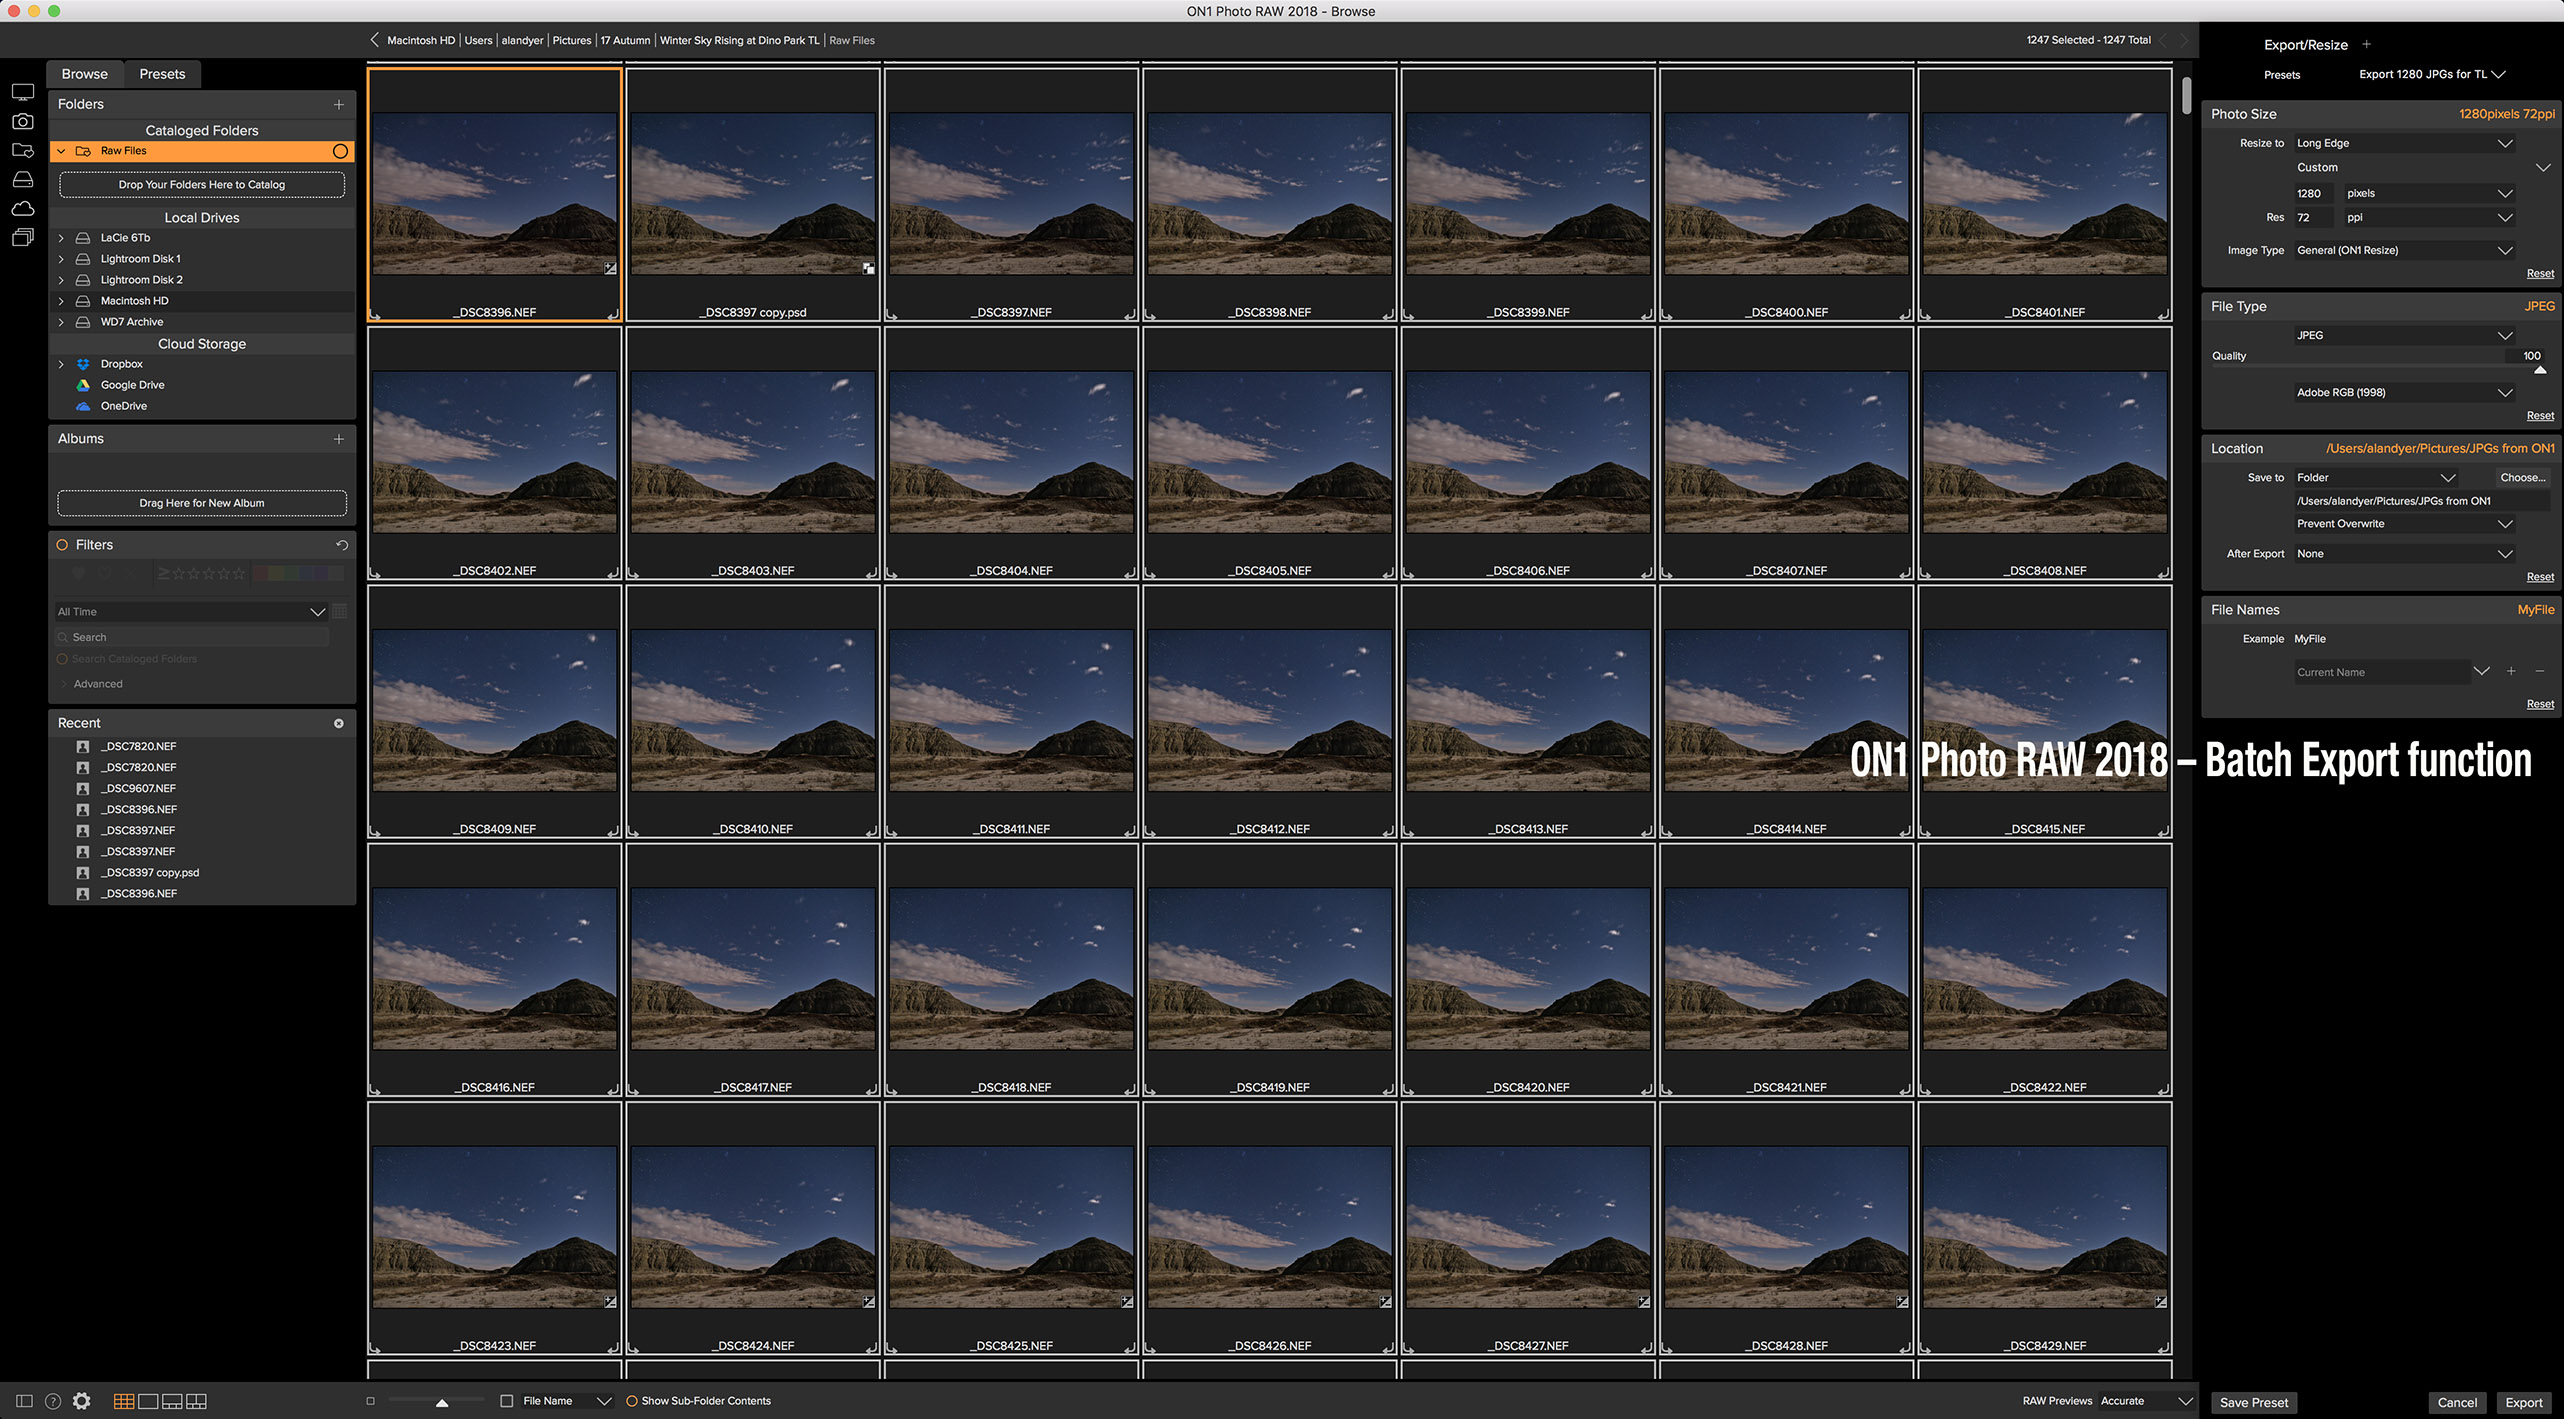
As ON1 Photo RAW shows above, this is best done using a Library or Browser mode to visually select the images, then call up an Export panel or menu to choose the image size, format, quality, and location for the exports.
Click Export and go for coffee – or a leisurely dinner – while the program works through your folder. All programs took an hour or more to export hundreds of images.
Design
Those functions were the key features I looked for when evaluating the programs for nightscape and time-lapse work.
Every program had other attractive features, often ones I wished were in Adobe Camera Raw. But if the program lacked any of the above features, I judged it unsuitable.
Yes, the new contenders to the Photoshop crown have the benefit of starting from a blank slate for interface design.
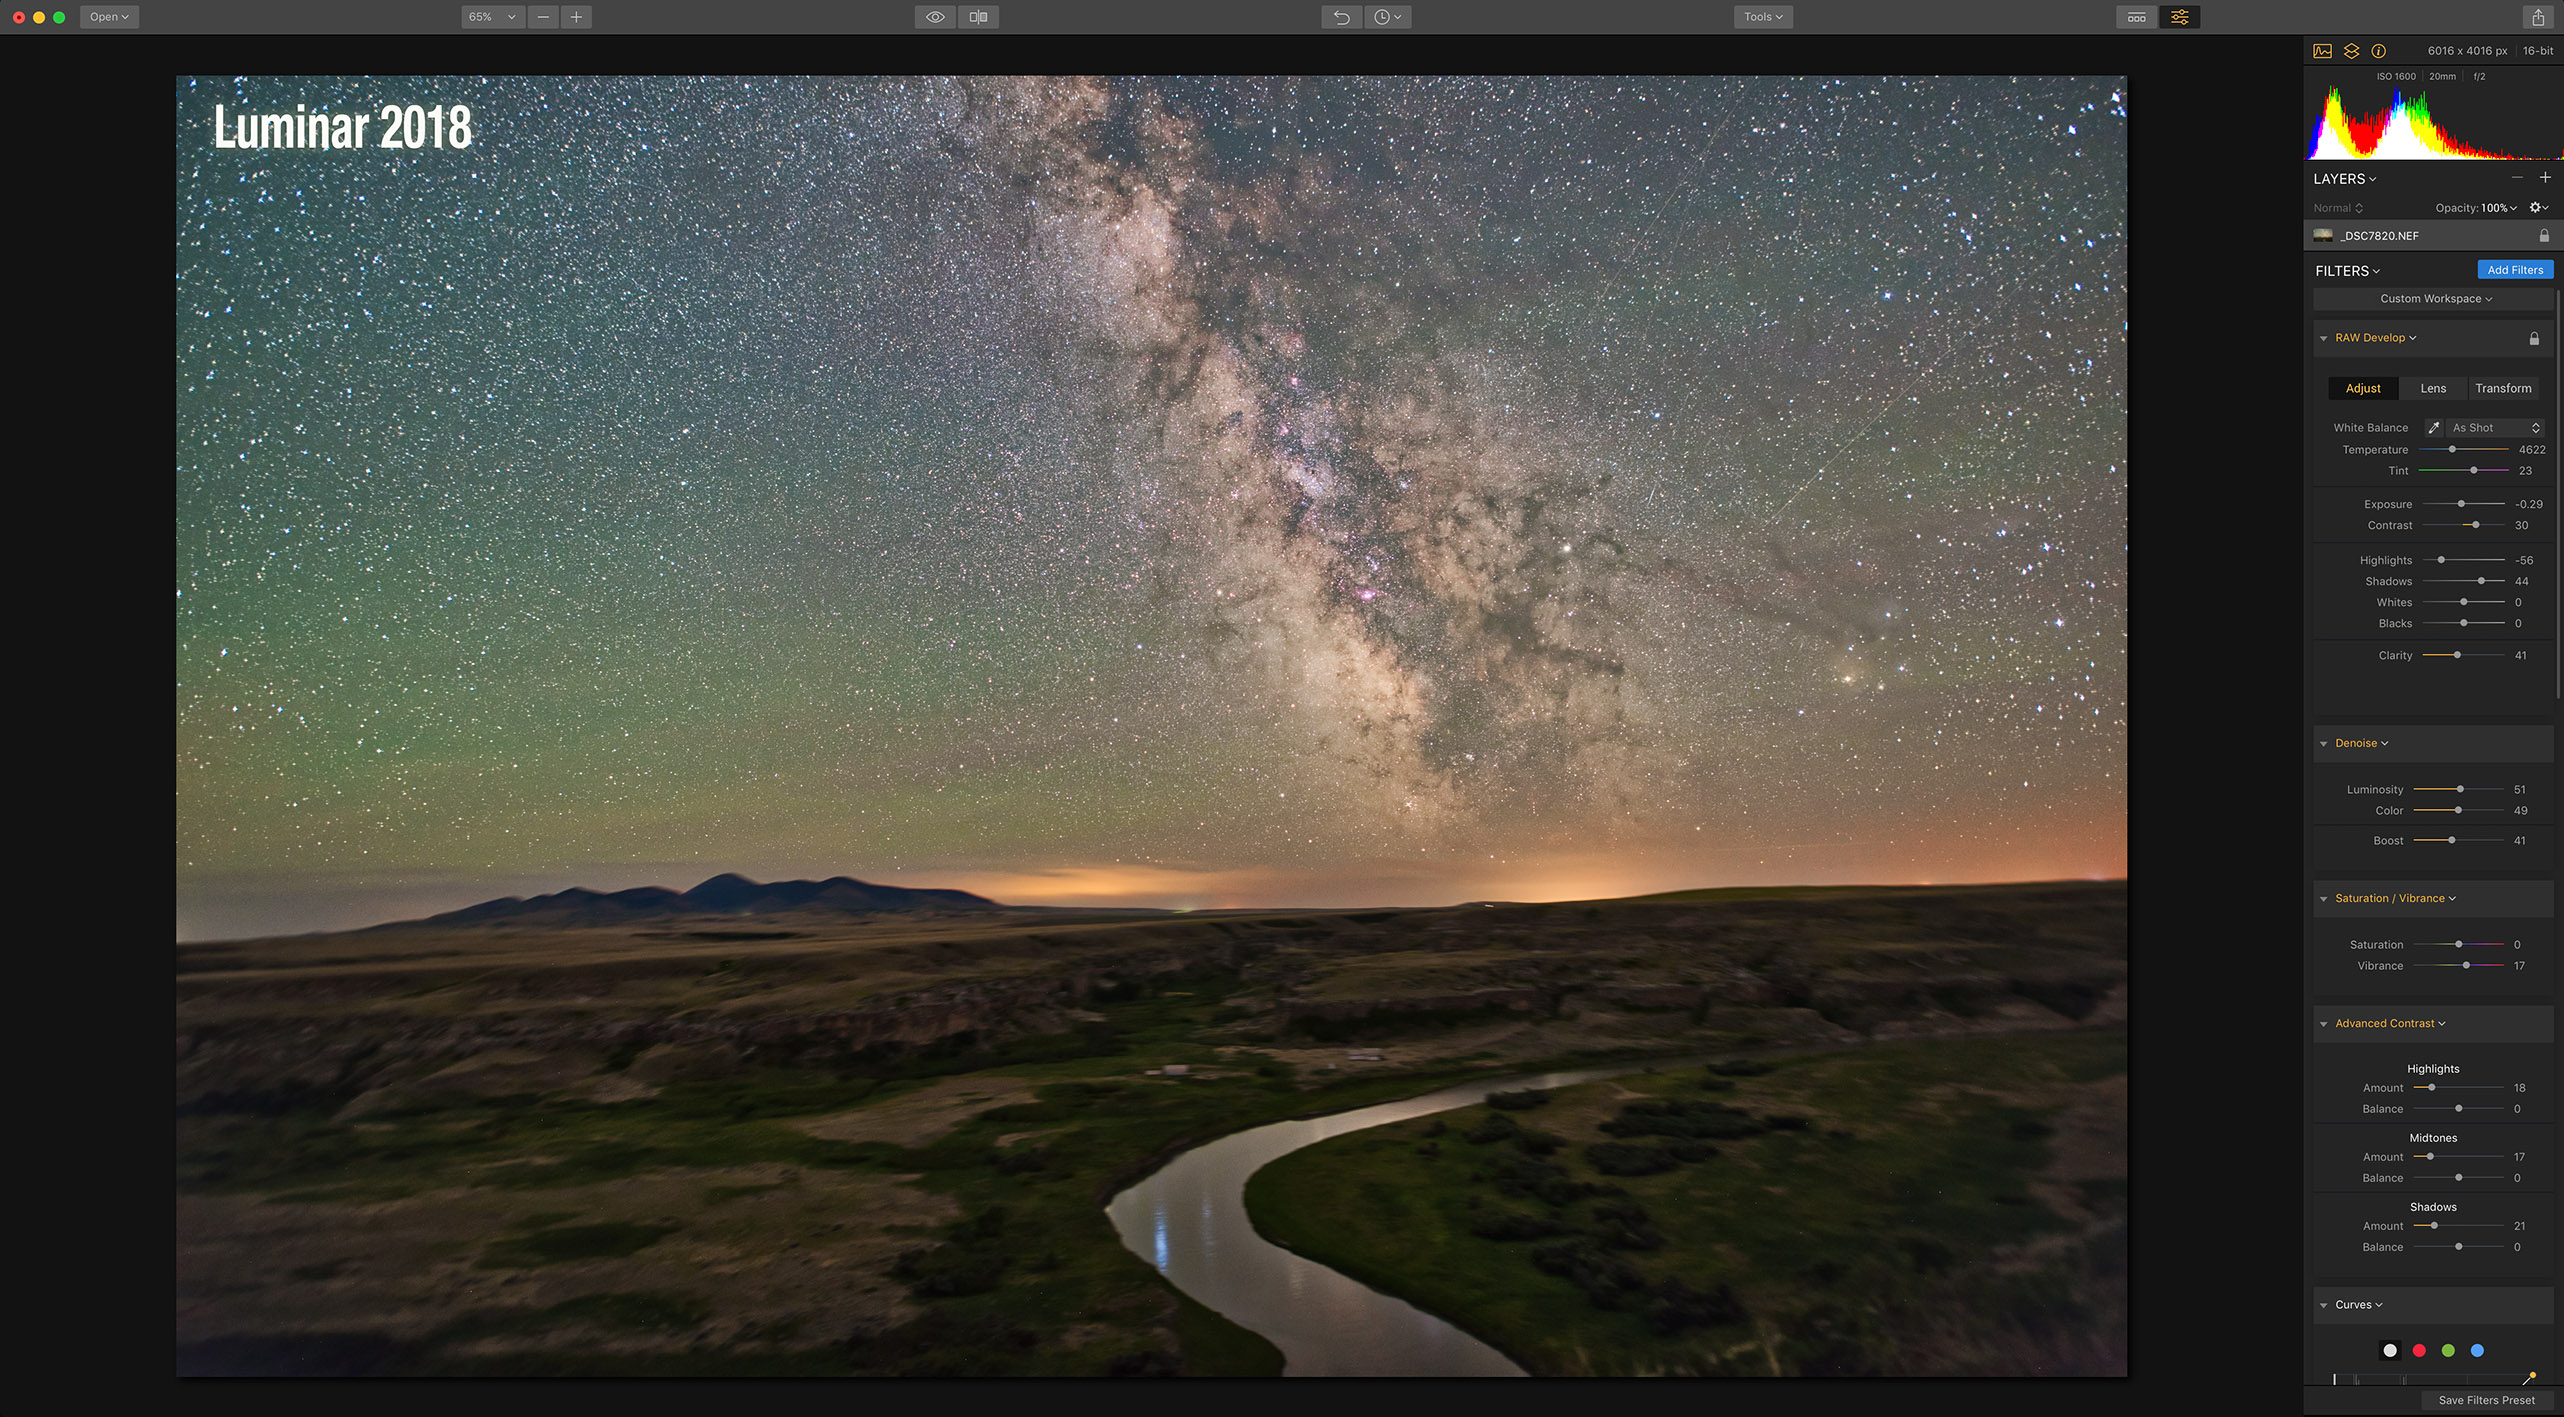
Many, such as Luminar 2018 above, have a clean, attractive design, with less reliance on menus than Photoshop.
Photoshop has grown haphazardly over 25 years, resulting in complex menus. Just finding key functions can take many tutorial courses!
But Adobe dares to “improve” Photoshop’s design and menu structure at its peril, as Photoshop fans would scream if any menus they know and love were to be reorganized!
The new mobile-oriented Lightroom CC is Adobe’s chance to start afresh with a new interface.
Summary Table of Key Features
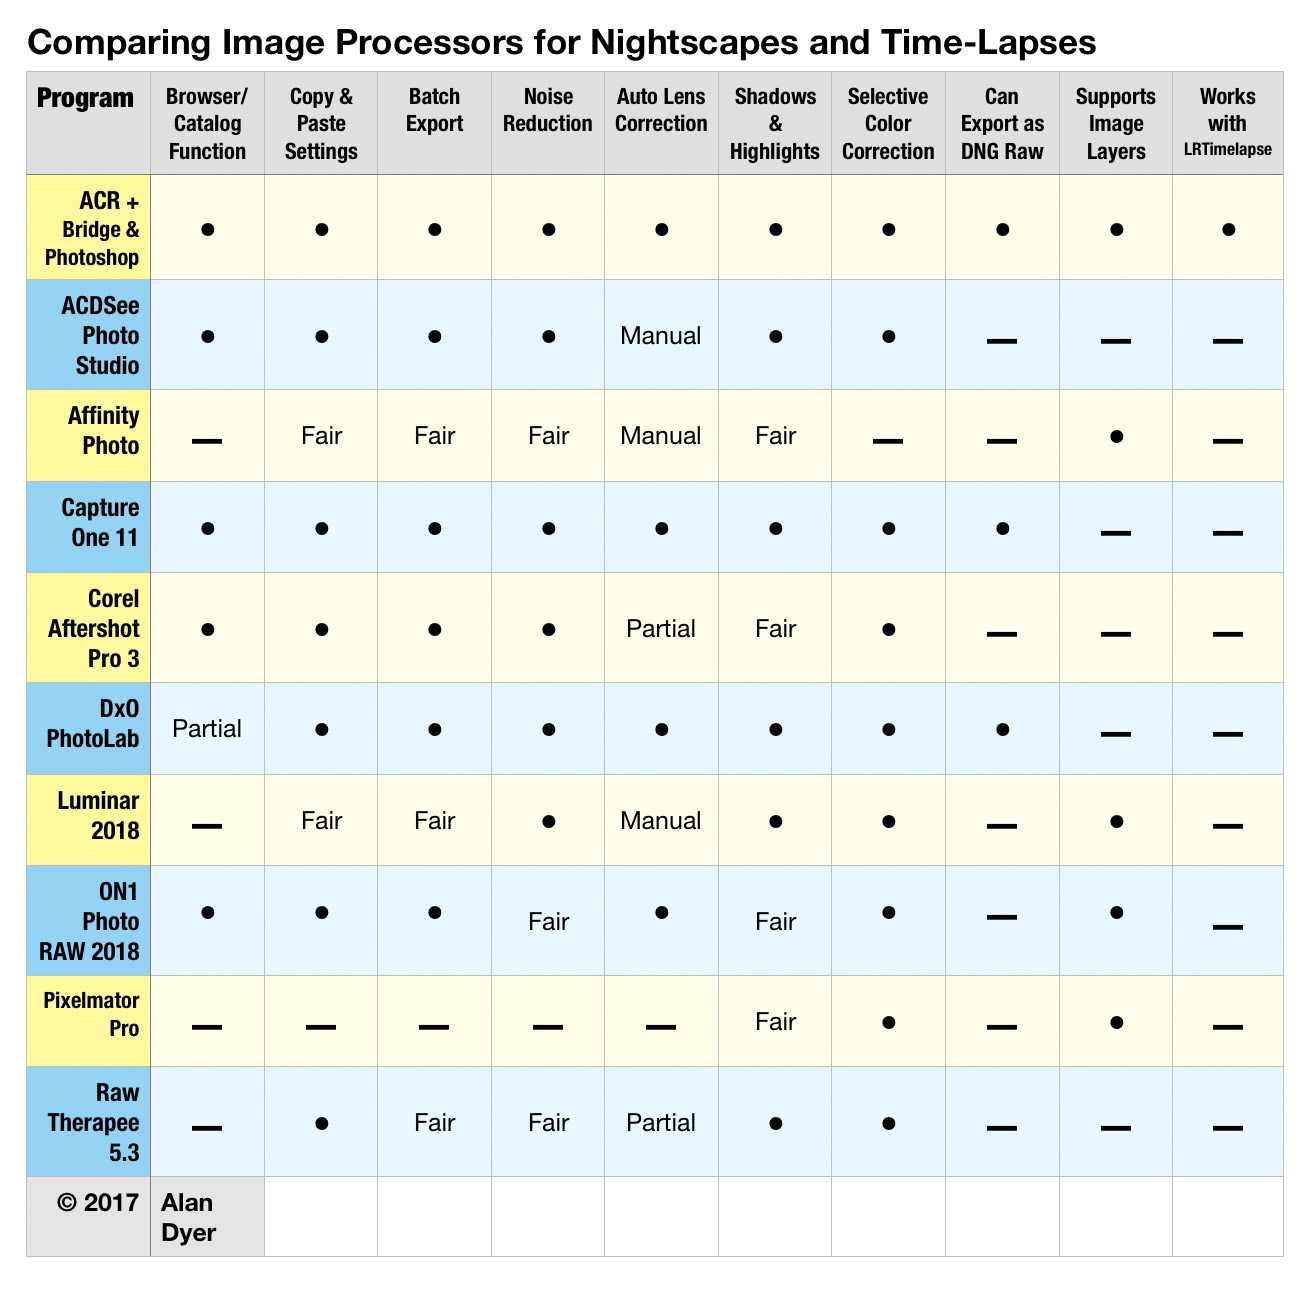
Fair = Feature is present but doesn’t work as easily or produce as good a result
Partial = Program has lens correction but failed to fully apply settings automatically / DxO has a Browse function but not Cataloging
Manual = Program has only a manually-applied lens correction
– = Program is missing that feature altogether
Program-by-Program Results
I could end the review here, but I feel it’s important to present the evidence, in the form of screen shots of all the programs, showing both the whole image, and a close-up to show the all-important noise reduction.
ACDSee Photo Studio


PROS: This capable cataloging program has good selective color and highlight/shadow recovery, and pretty smooth noise reduction. It can copy and paste settings and batch export images, for time-lapses. It is certainly affordable, making it a low-cost Lightroom contender.
CONS: It lacks any gradient or local adjustments, or even spot removal brushes. Lens corrections are just manual. There is no dehaze control, which can be useful for snapping up even clear night skies. You cannot layer images to create composites or image stacks. This is not a Photoshop replacement.
Affinity Photo
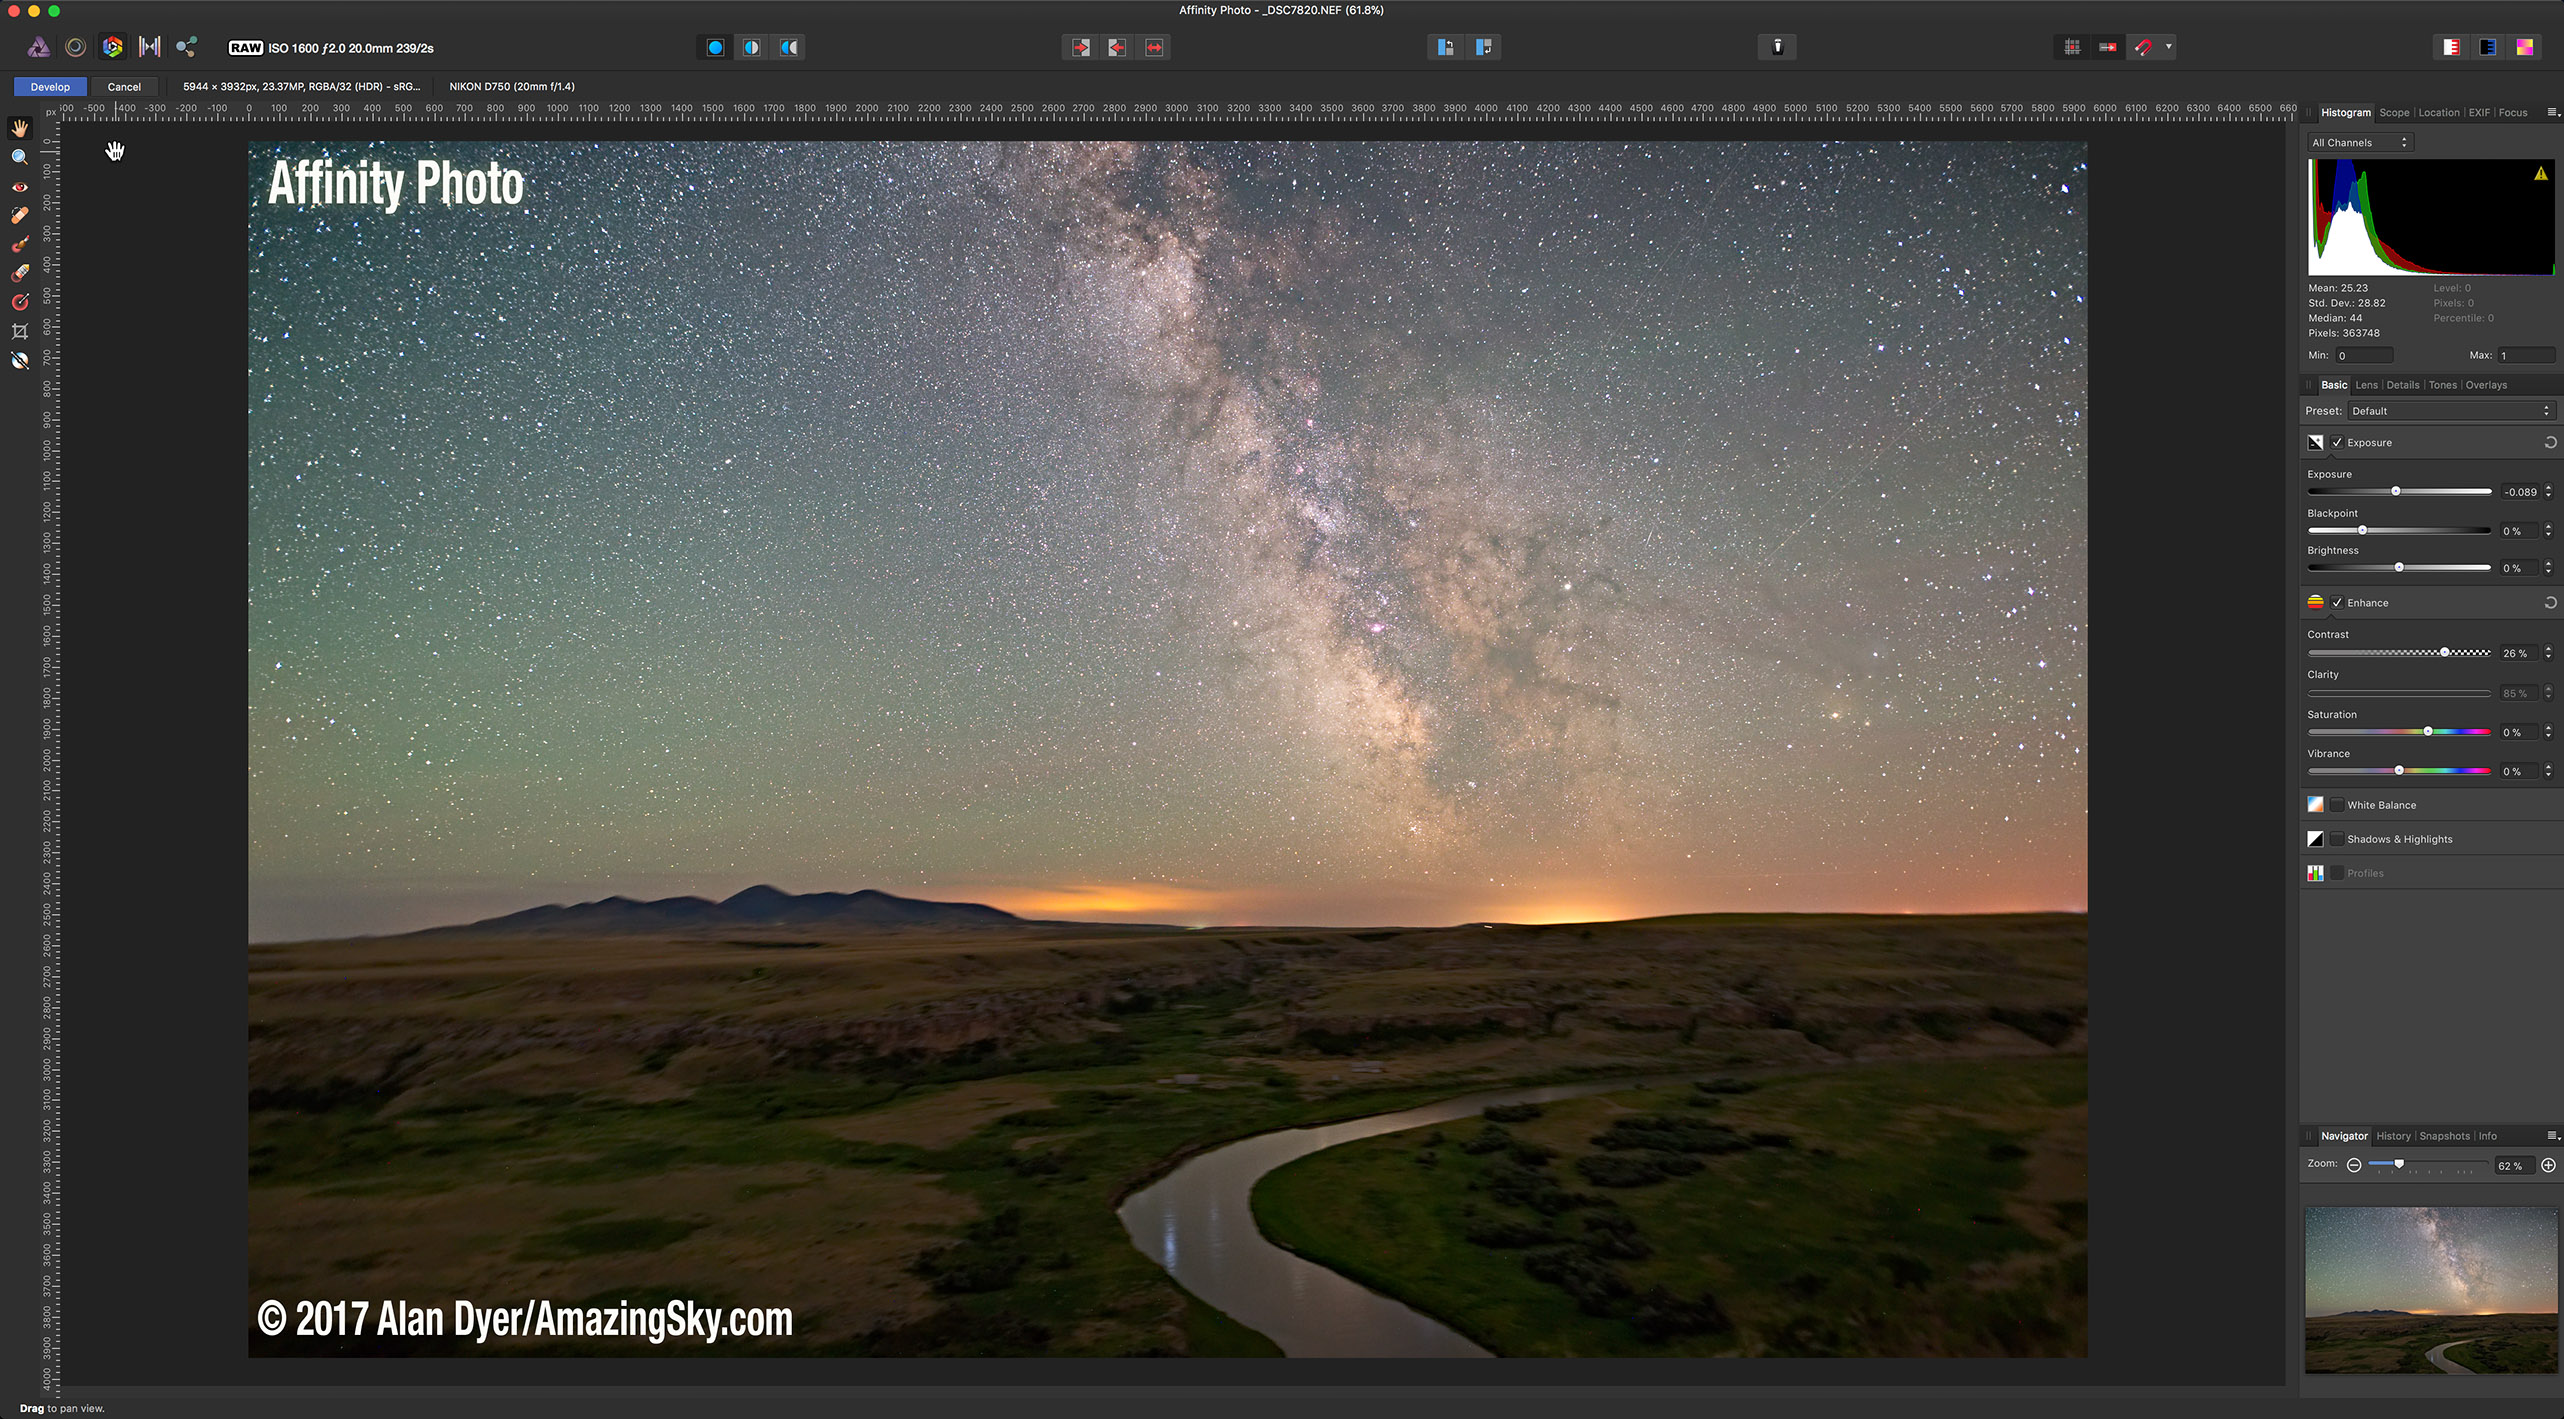

PROS: Affinity supports image layers, masking with precise selection tools, non-destructive “live” filters (like Photoshop’s Smart Filters), and many other Photoshop-like functions. It has a command for image stacking with a choice of stack modes for averaging and adding images.
It’s a very powerful but low cost alternative to Photoshop, but not Lightroom. It works fine when restricted to working on just a handful of images.
CONS: Affinity has no lens correction database, and I found it hard to snap up contrast in the sky and ground without washing them out, or having them block up. Raw noise reduction was acceptable but not up to the best for smoothness. It produced a blocky appearance. There are no selective color adjustments.
Nor is there any library or browse function. You can batch export images, but only through an unfriendly dialog box that lists images only by file name – you cannot see them. Nor can you copy and paste settings visually, but only apply a user-defined “macro” to develop images en masse upon export.
This is not a program for time-lapse work.
Capture One 11
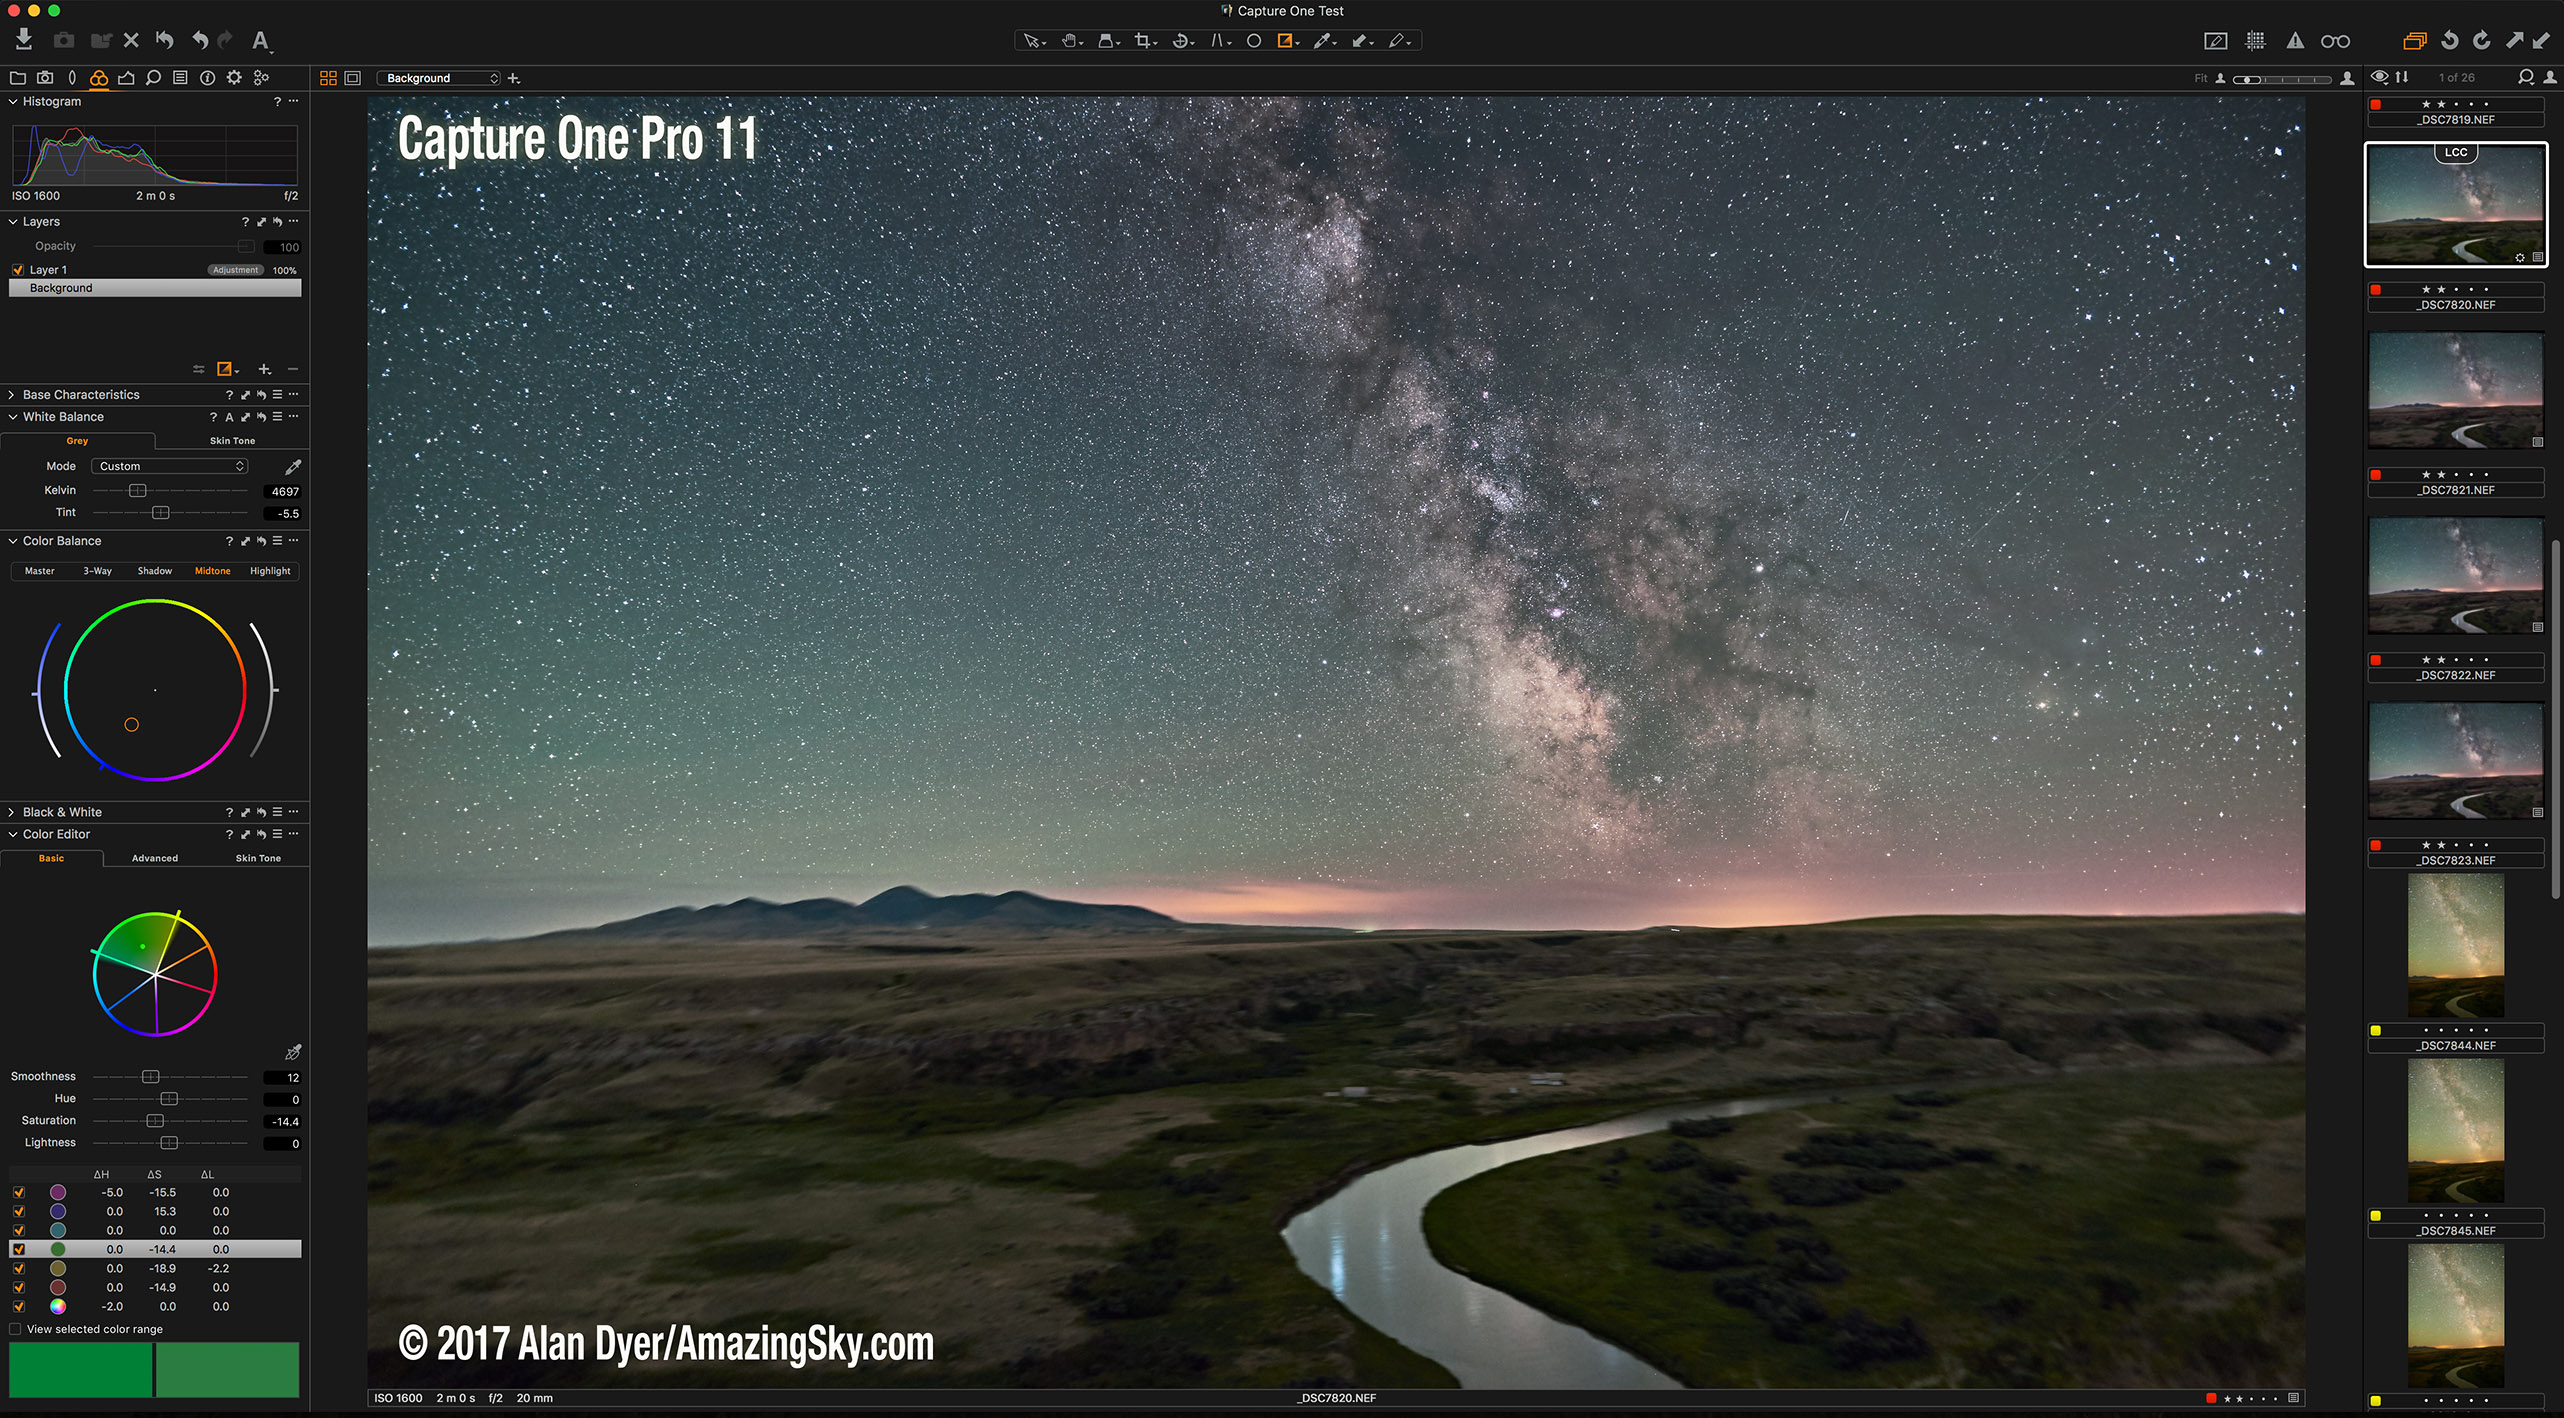
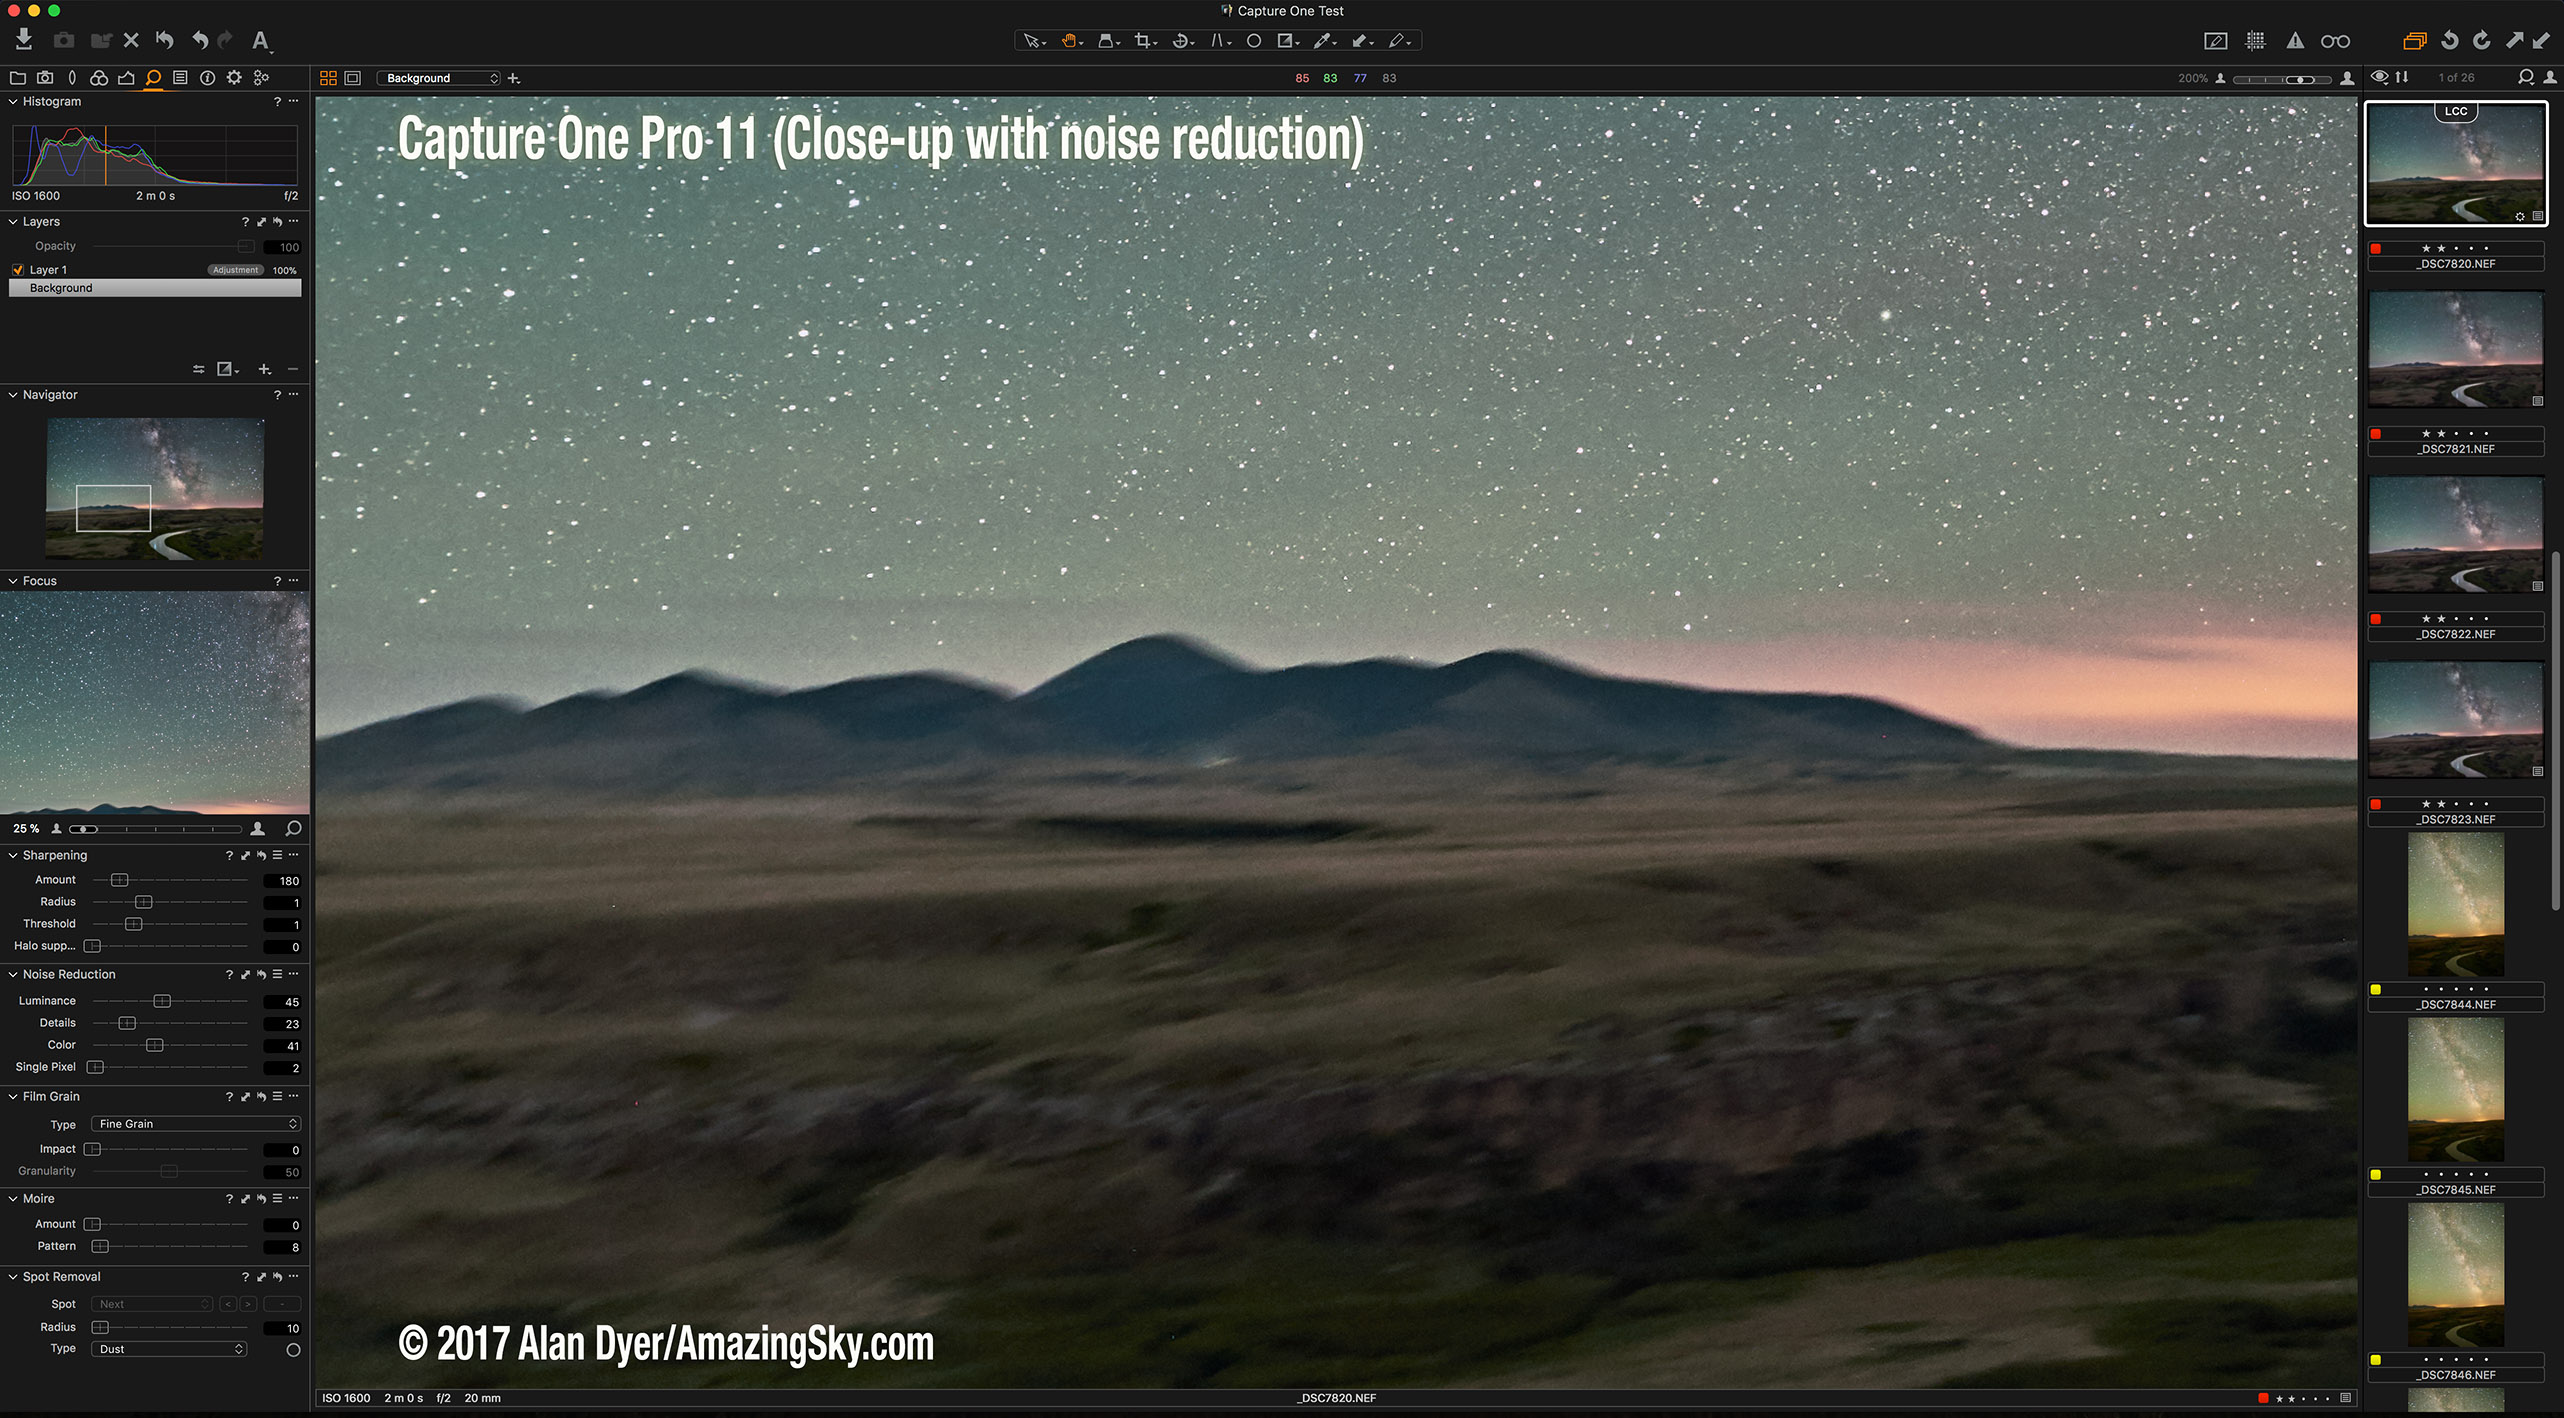
PROS: With version 11 Capture One became one of the most powerful raw developers, using multiple layers to allow brushing in local adjustments, a far better method than Adobe Camera Raw’s local adjustment “pins.” It can create a catalog from imported images, or images can be opened directly for quick editing. Its noise reduction was good, with hot pixel removal lacking in Camera Raw.
Its color correction options were many!
It can batch export images. And it can export files in the raw DNG format, though in tests only Adobe Camera Raw was able to read the DNG file with settings more or less intact.
CONS: It’s costly to purchase, and more expensive than Creative Cloud to subscribe to. Despite all its options I could never quite get as good looking an image using Capture One, compared to DxO PhotoLab for example.
It is just a Lightroom replacement; it can’t layer images.
Corel Aftershot Pro 3
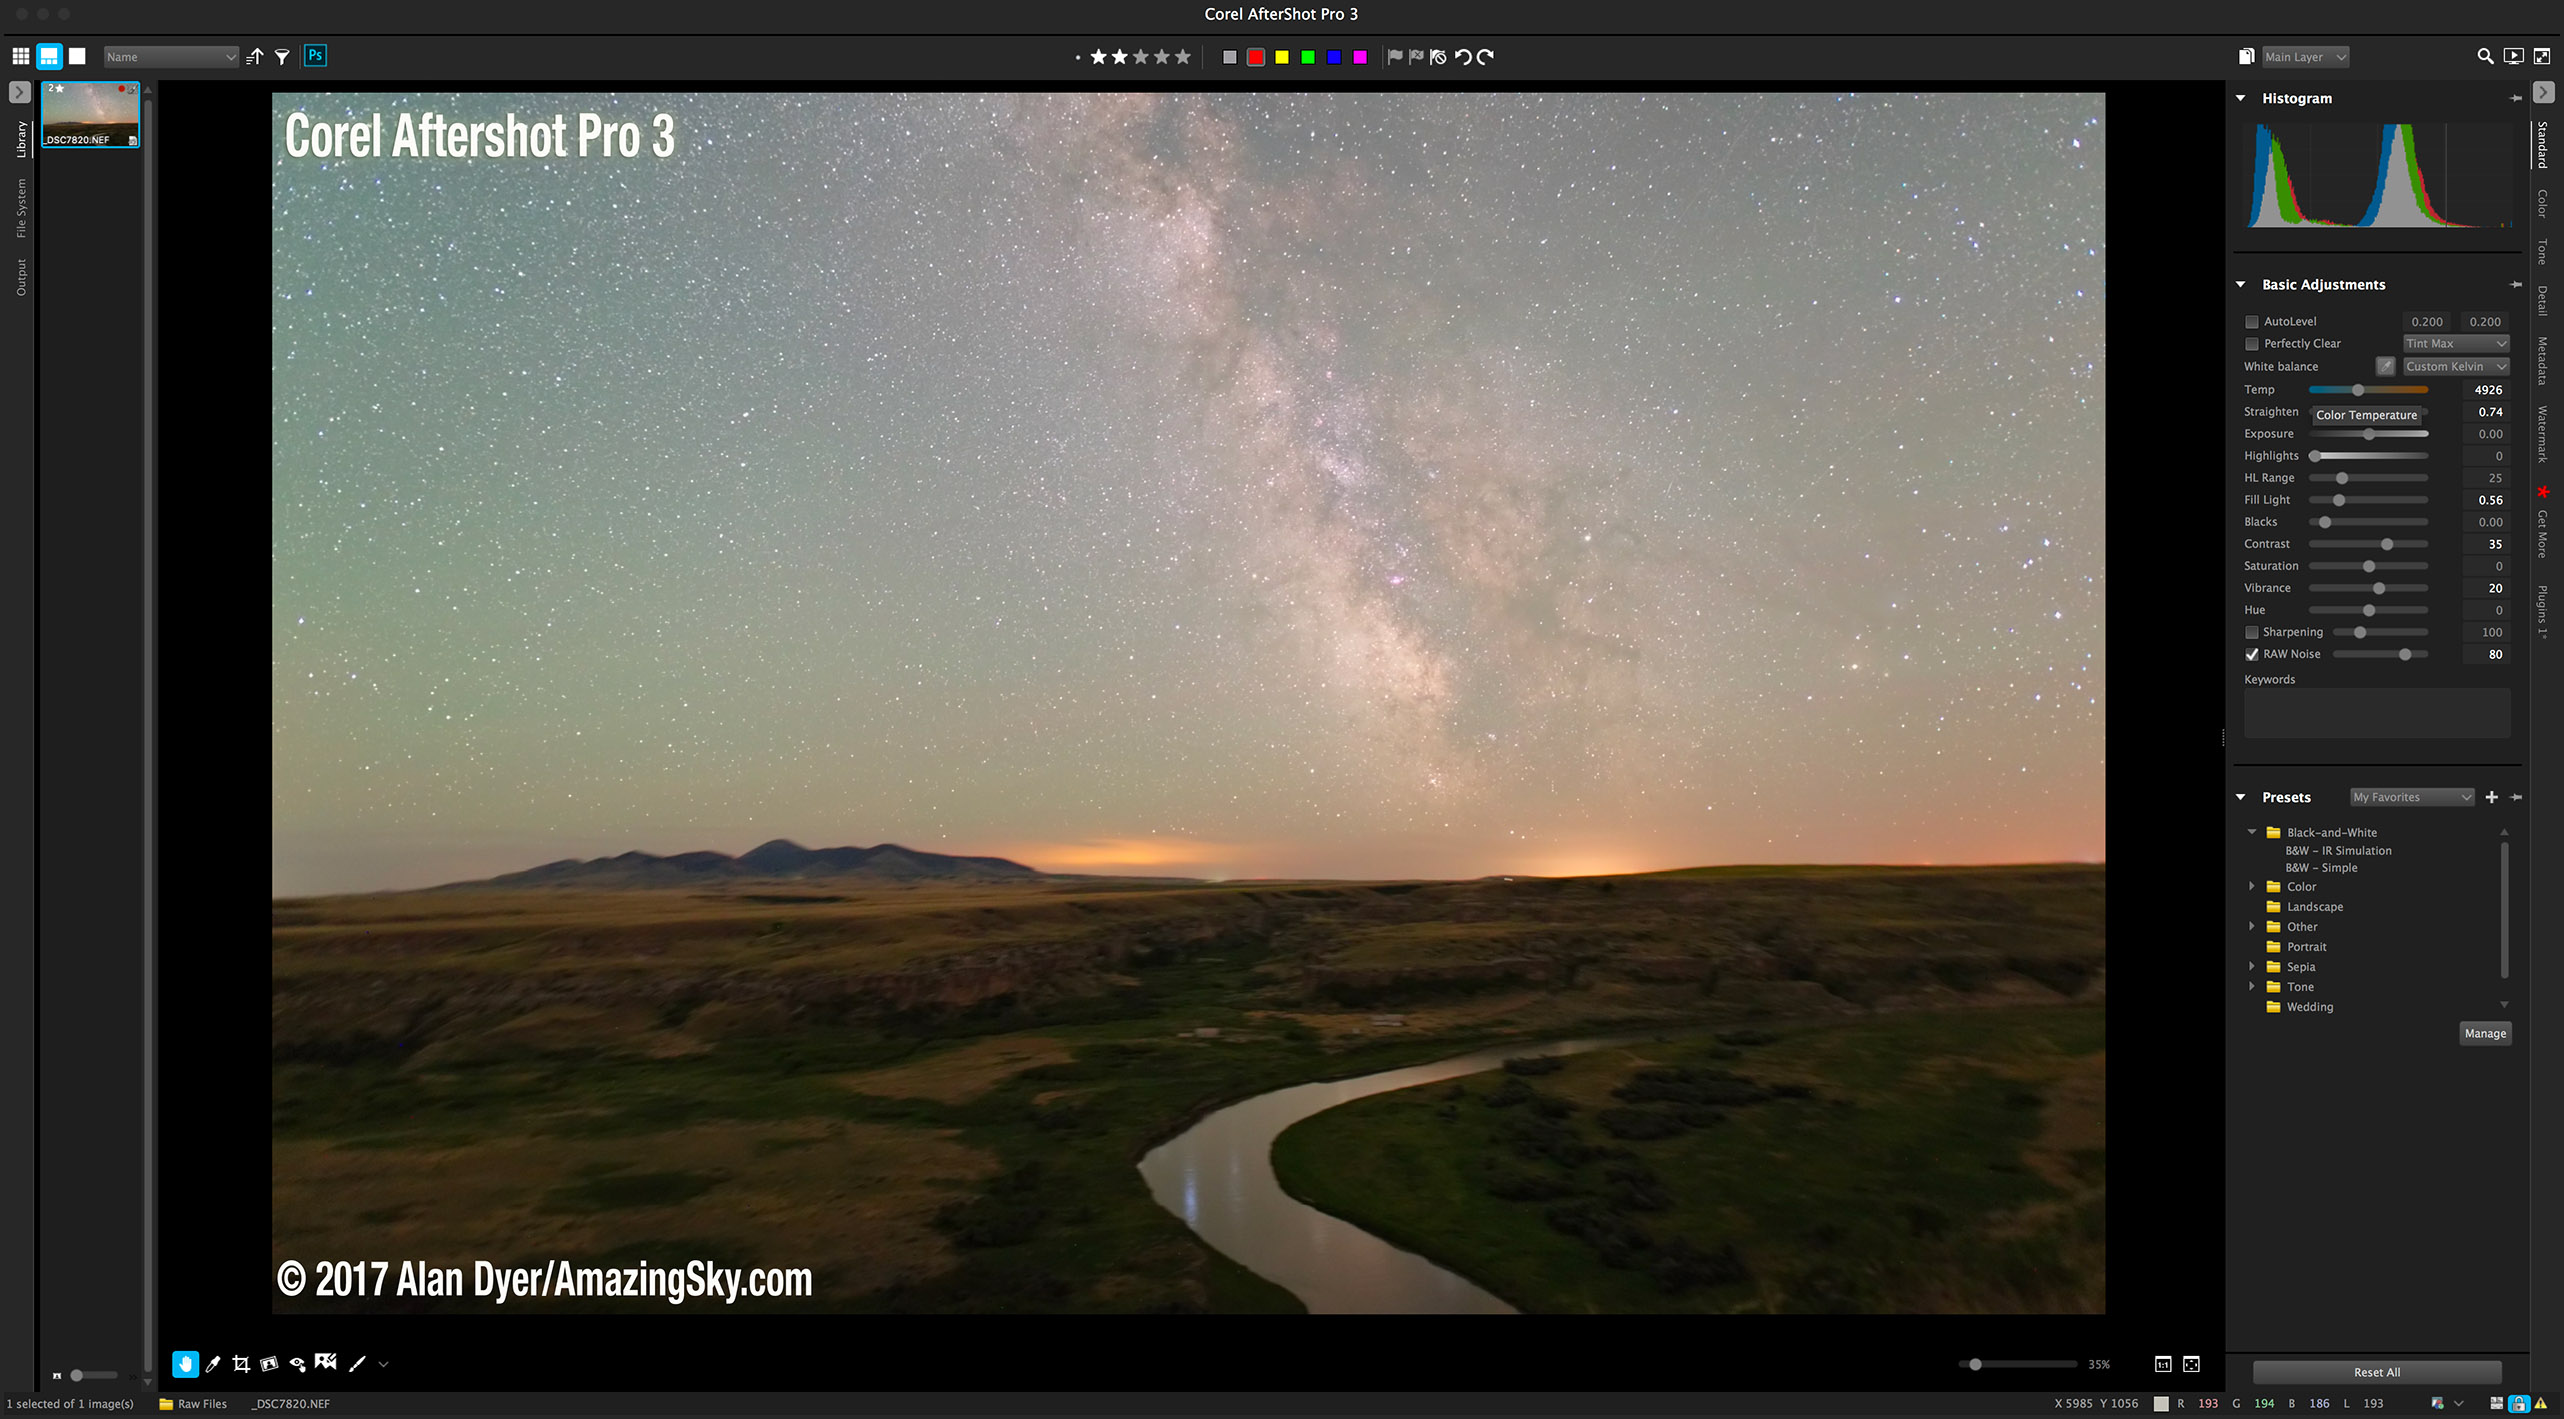

PROS: This low-cost option has good noise reduction using Athentech’s Perfectly Clear process, with good hot pixel or “impulse” noise removal. It has good selective color and offers adjustment layers for brushing in local corrections. And its library mode can be used to copy and paste settings and batch export images.
Again, it’s solely a Lightroom alternative.
CONS: While it has a database of lenses, and identified my lens, it failed to apply any automatic corrections. Its shadow and highlight recovery never produced a satisfactory image with good contrast. Its local adjustment brush is very basic, with no edge detection.
DxO PhotoLab


PROS: I found DxO produced the best looking image, better perhaps than Camera Raw, because of its DxO ClearView and Smart Lighting options. It has downloadable camera and lens modules for automatic lens corrections. Its noise reduction was excellent, with its PRIME option producing by far the best results of all the programs, better perhaps than Camera Raw, plus with hot pixel suppression.
DxO has good selective color adjustments, and its copy and paste and batch export work fine.
CONS: There are no adjustment layers as such. Local adjustments and repairing are done through the unique U-Point interface which works something like ACR’s “pins,” but isn’t as visually intuitive as masks and layers. Plus, DxO is just a raw developer; there is no image layering or compositing. Nor does it create a catalog as such.
So it is not a full replacement for either Lightroom or Photoshop. But it does produce great looking raw files for export (even as raw DNGs) to other programs.
Luminar 2018
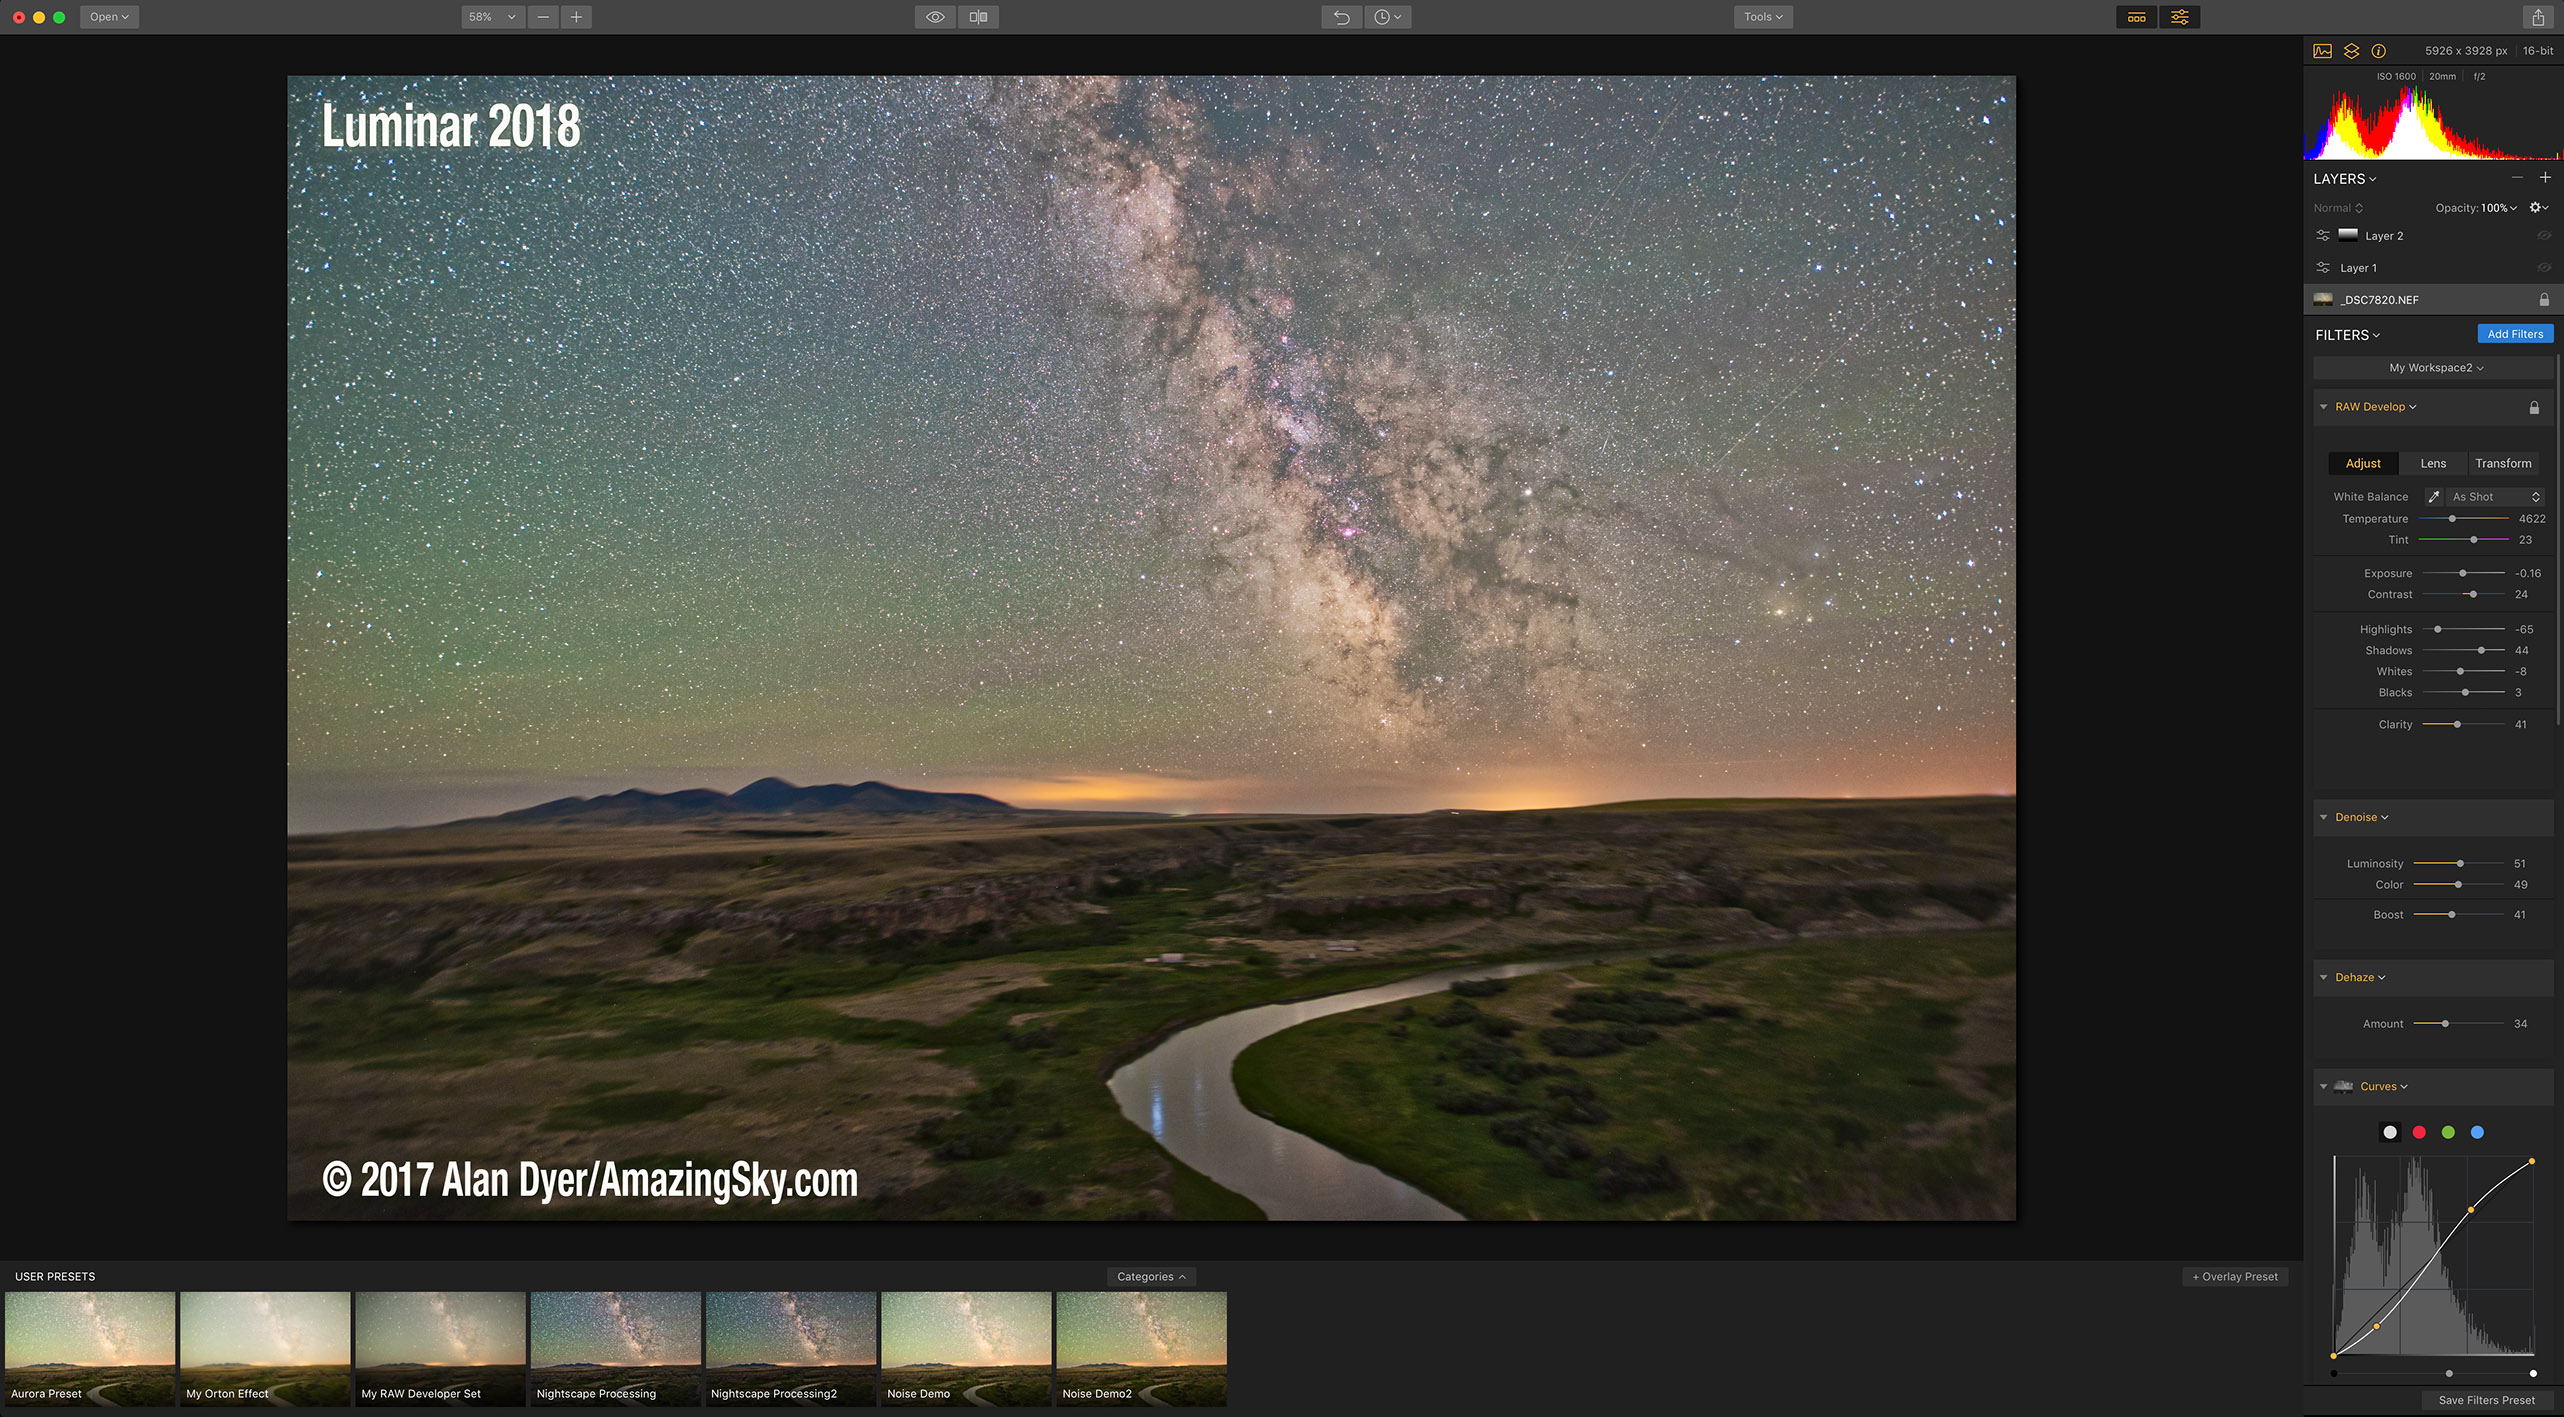
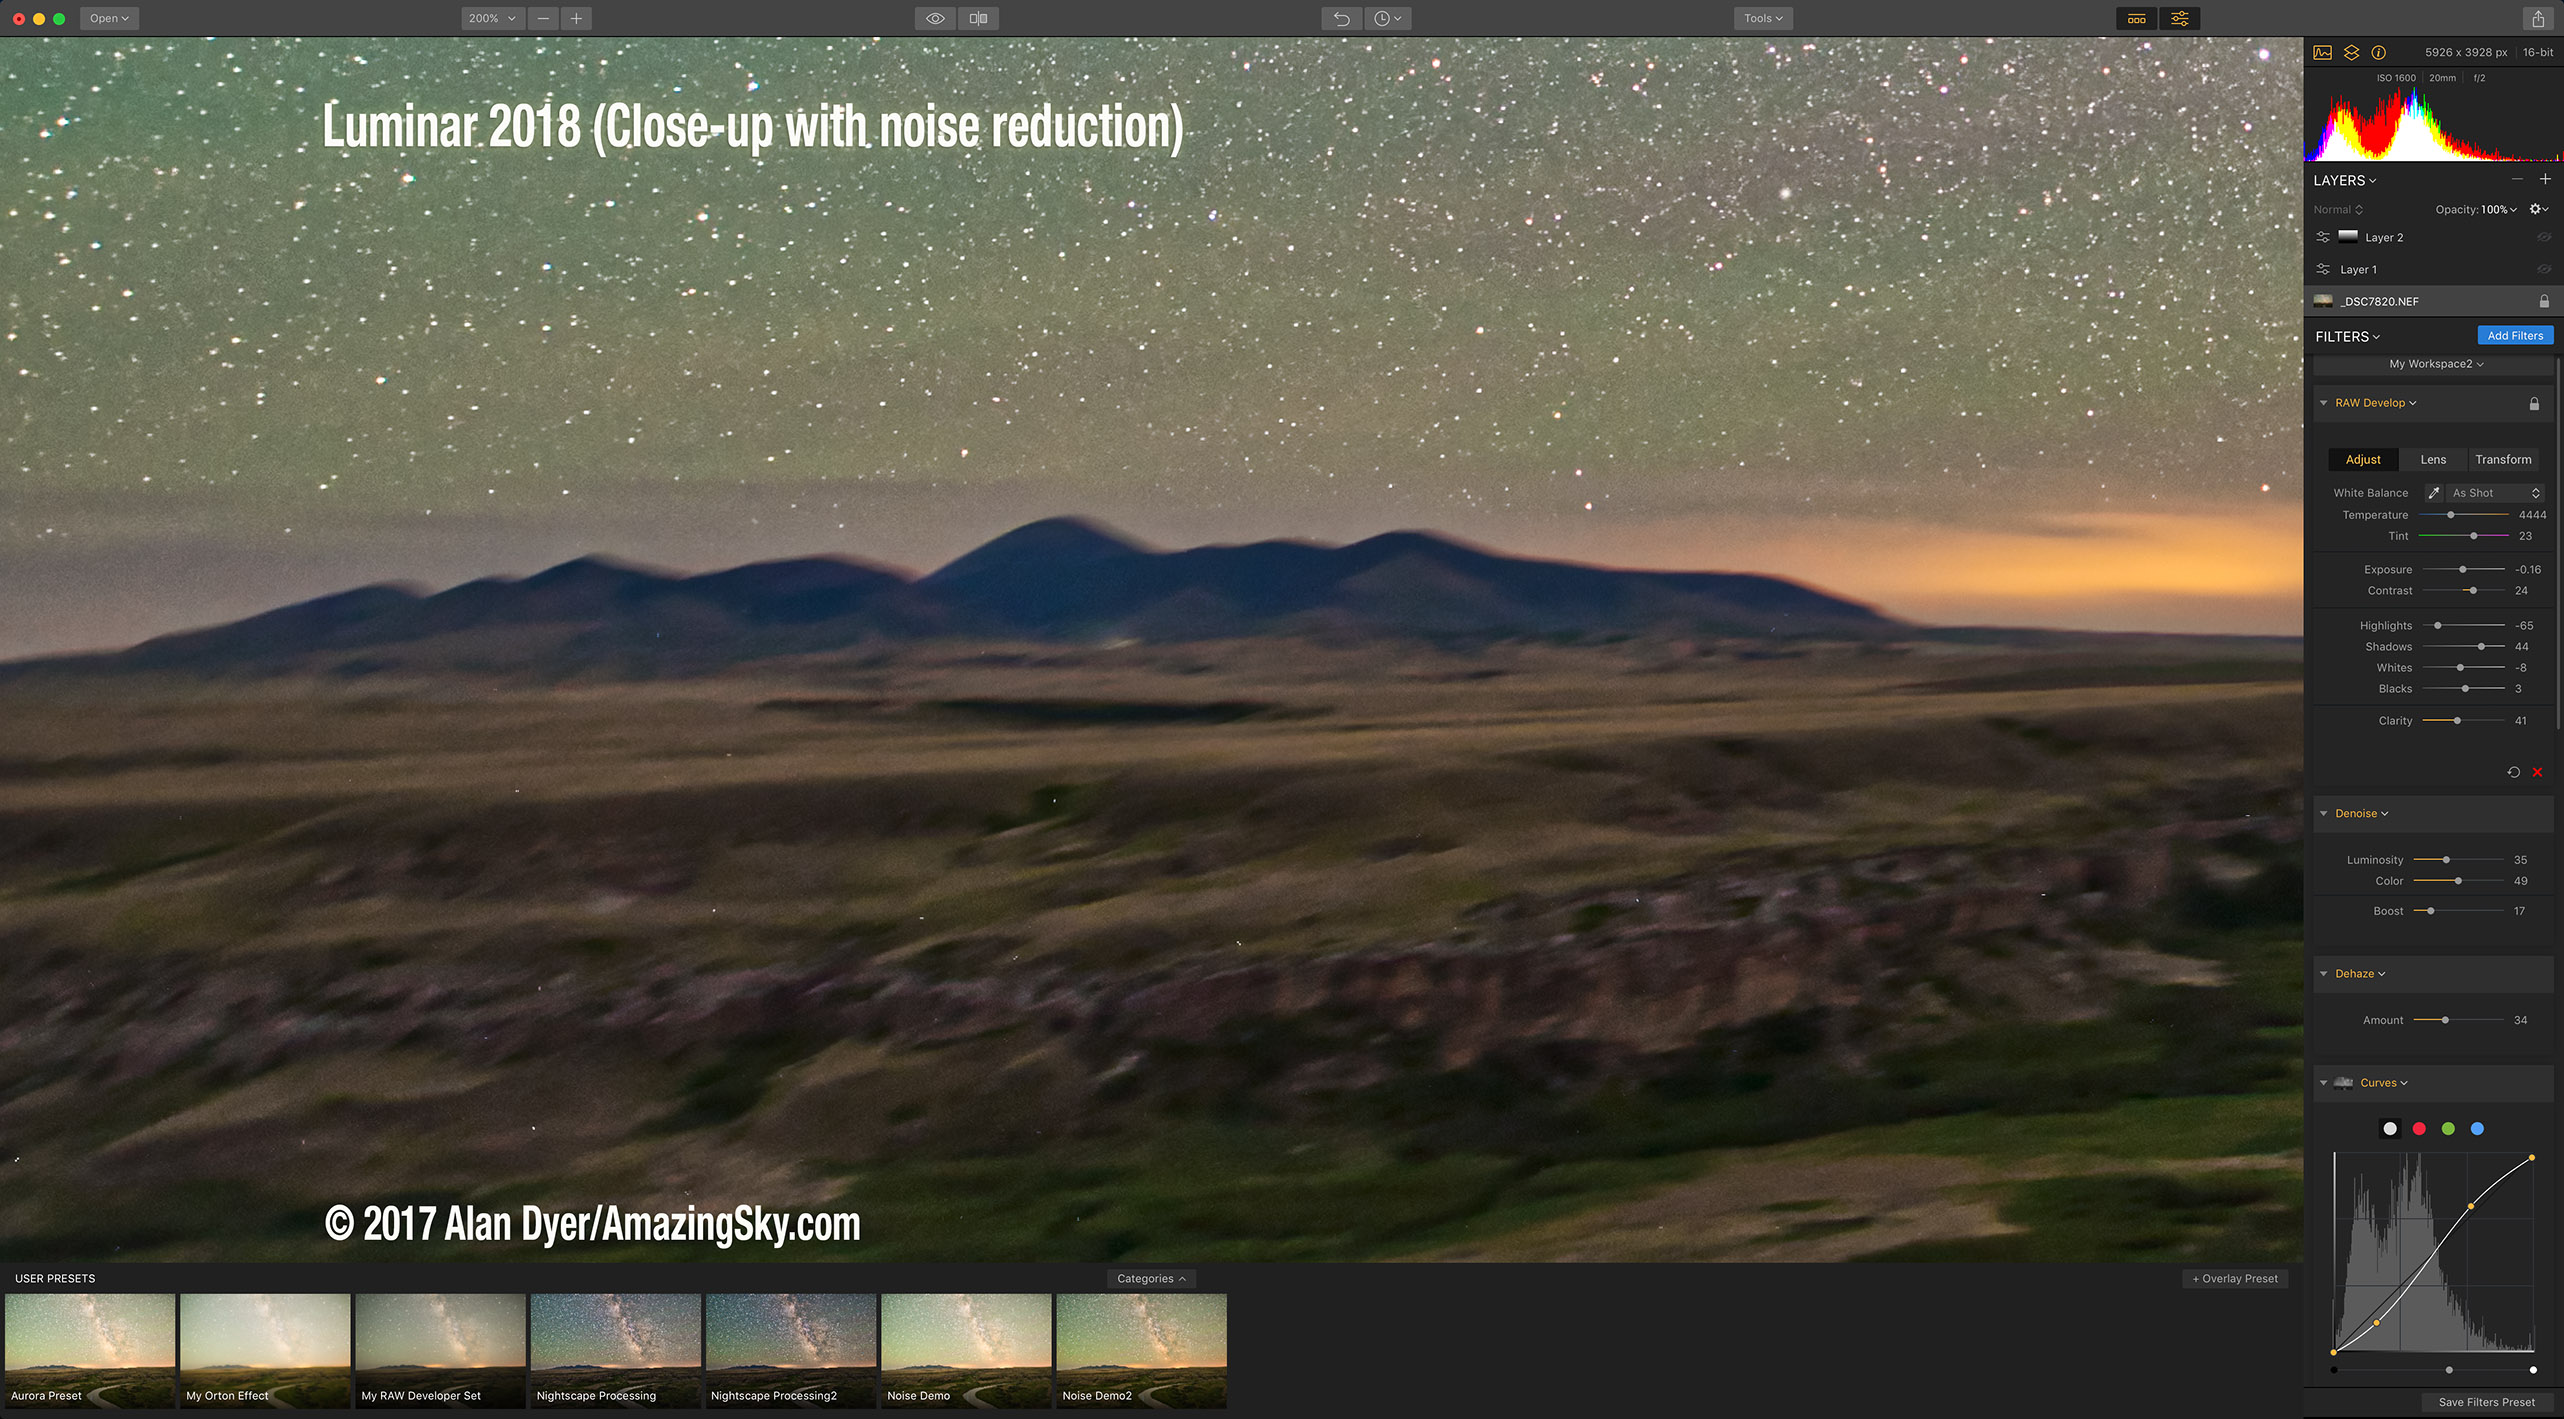
PROS: Luminar has good selective color adjustments, a dehaze control, and good contrast adjustments for highlights, mid-tones, and shadows. Adjustments can be added in layers, making them easier to edit. Noise reduction was smooth and artifact-free, but adjustments were basic. Many filters can be painted on locally with a brush, or with a radial or gradient mask.
CONS: It has no lens correction database; all adjustments are manual. The preview was slow to refresh and display results when adjusting filters. The interface is clean but always requires adding filters to the filter panel to use them when creating new layers. Its batch export is crude, with only a dialog box and no visual browser to inspect or select images.
Settings are applied as a user preset on export, not through a visual copy-and-paste function. I don’t consider that method practical for time-lapses.
ON1 Photo RAW 2018
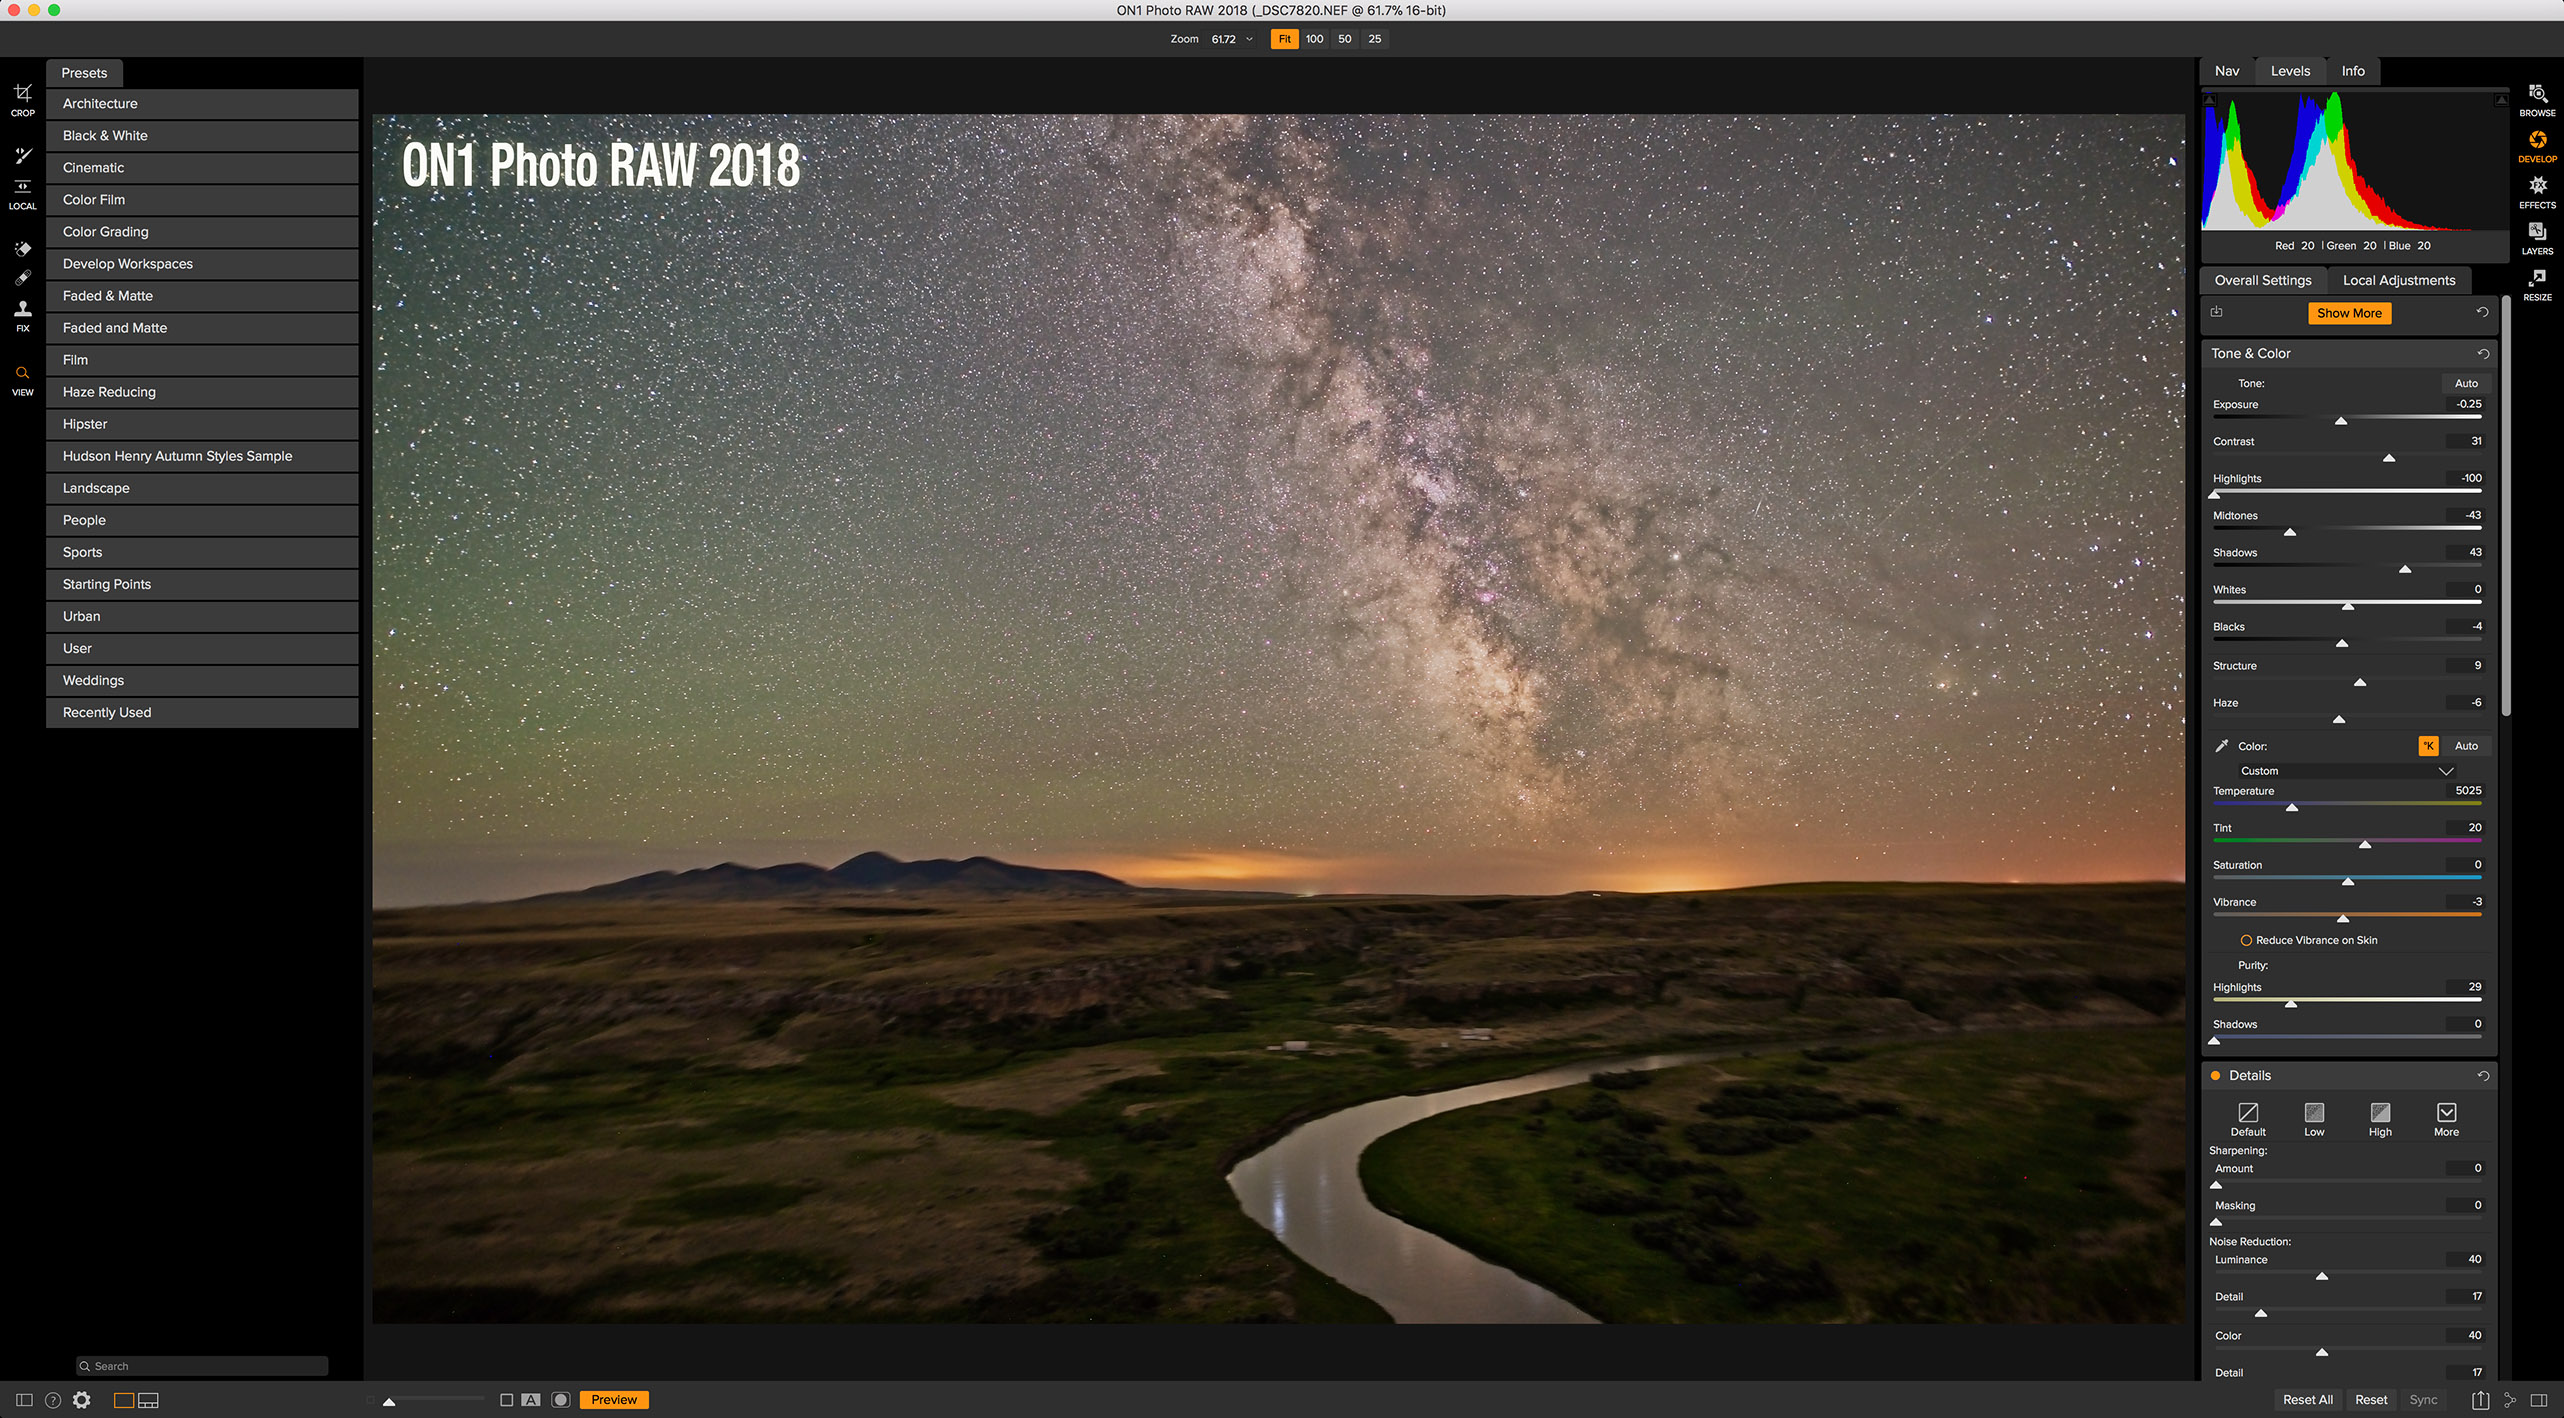
PROS: ON1 is the only program of the bunch that can: catalog images, develop raw files, and then layer and stack images, performing all that Lightroom and Photoshop can do. It is fast to render previews in its “Fast” mode, but in its “Accurate” mode ON1 is no faster than Lightroom. It has good layering and masking functions, both in its Develop mode and in its Photoshop-like Layers mode.
Selective color and contrast adjustments were good, as was noise reduction. Developing, then exporting a time-lapse set worked very well, but still took as long as with Lightroom or Photoshop.
CONS: Despite promising automatic lens detection and correction, ON1 failed to apply any vignetting correction for my 20mm Sigma lens. Stars exhibited dark haloes, even with no sharpening, dehaze, or noise reduction applied. Its de-Bayering algorithm produced a cross-hatched pattern at the pixel level, an effect not seen on other programs.
Noise reduction did not smooth this. Thus, image quality simply wasn’t as good.
Pixelmator Pro
PROS: It is low cost. And it has an attractive interface.
CONS: As of version 1 released in November 2017 Pixelmator Pro lacks: any noise reduction (it’s on their list to add!), any library mode or copy and paste function, nor even the ability to open several images at once displayed together.
It is simply not a contender for “Photoshop killer” for any photo application, despite what click-bait “reviews” promise, ones that only re-write press releases and don’t actually test the product.
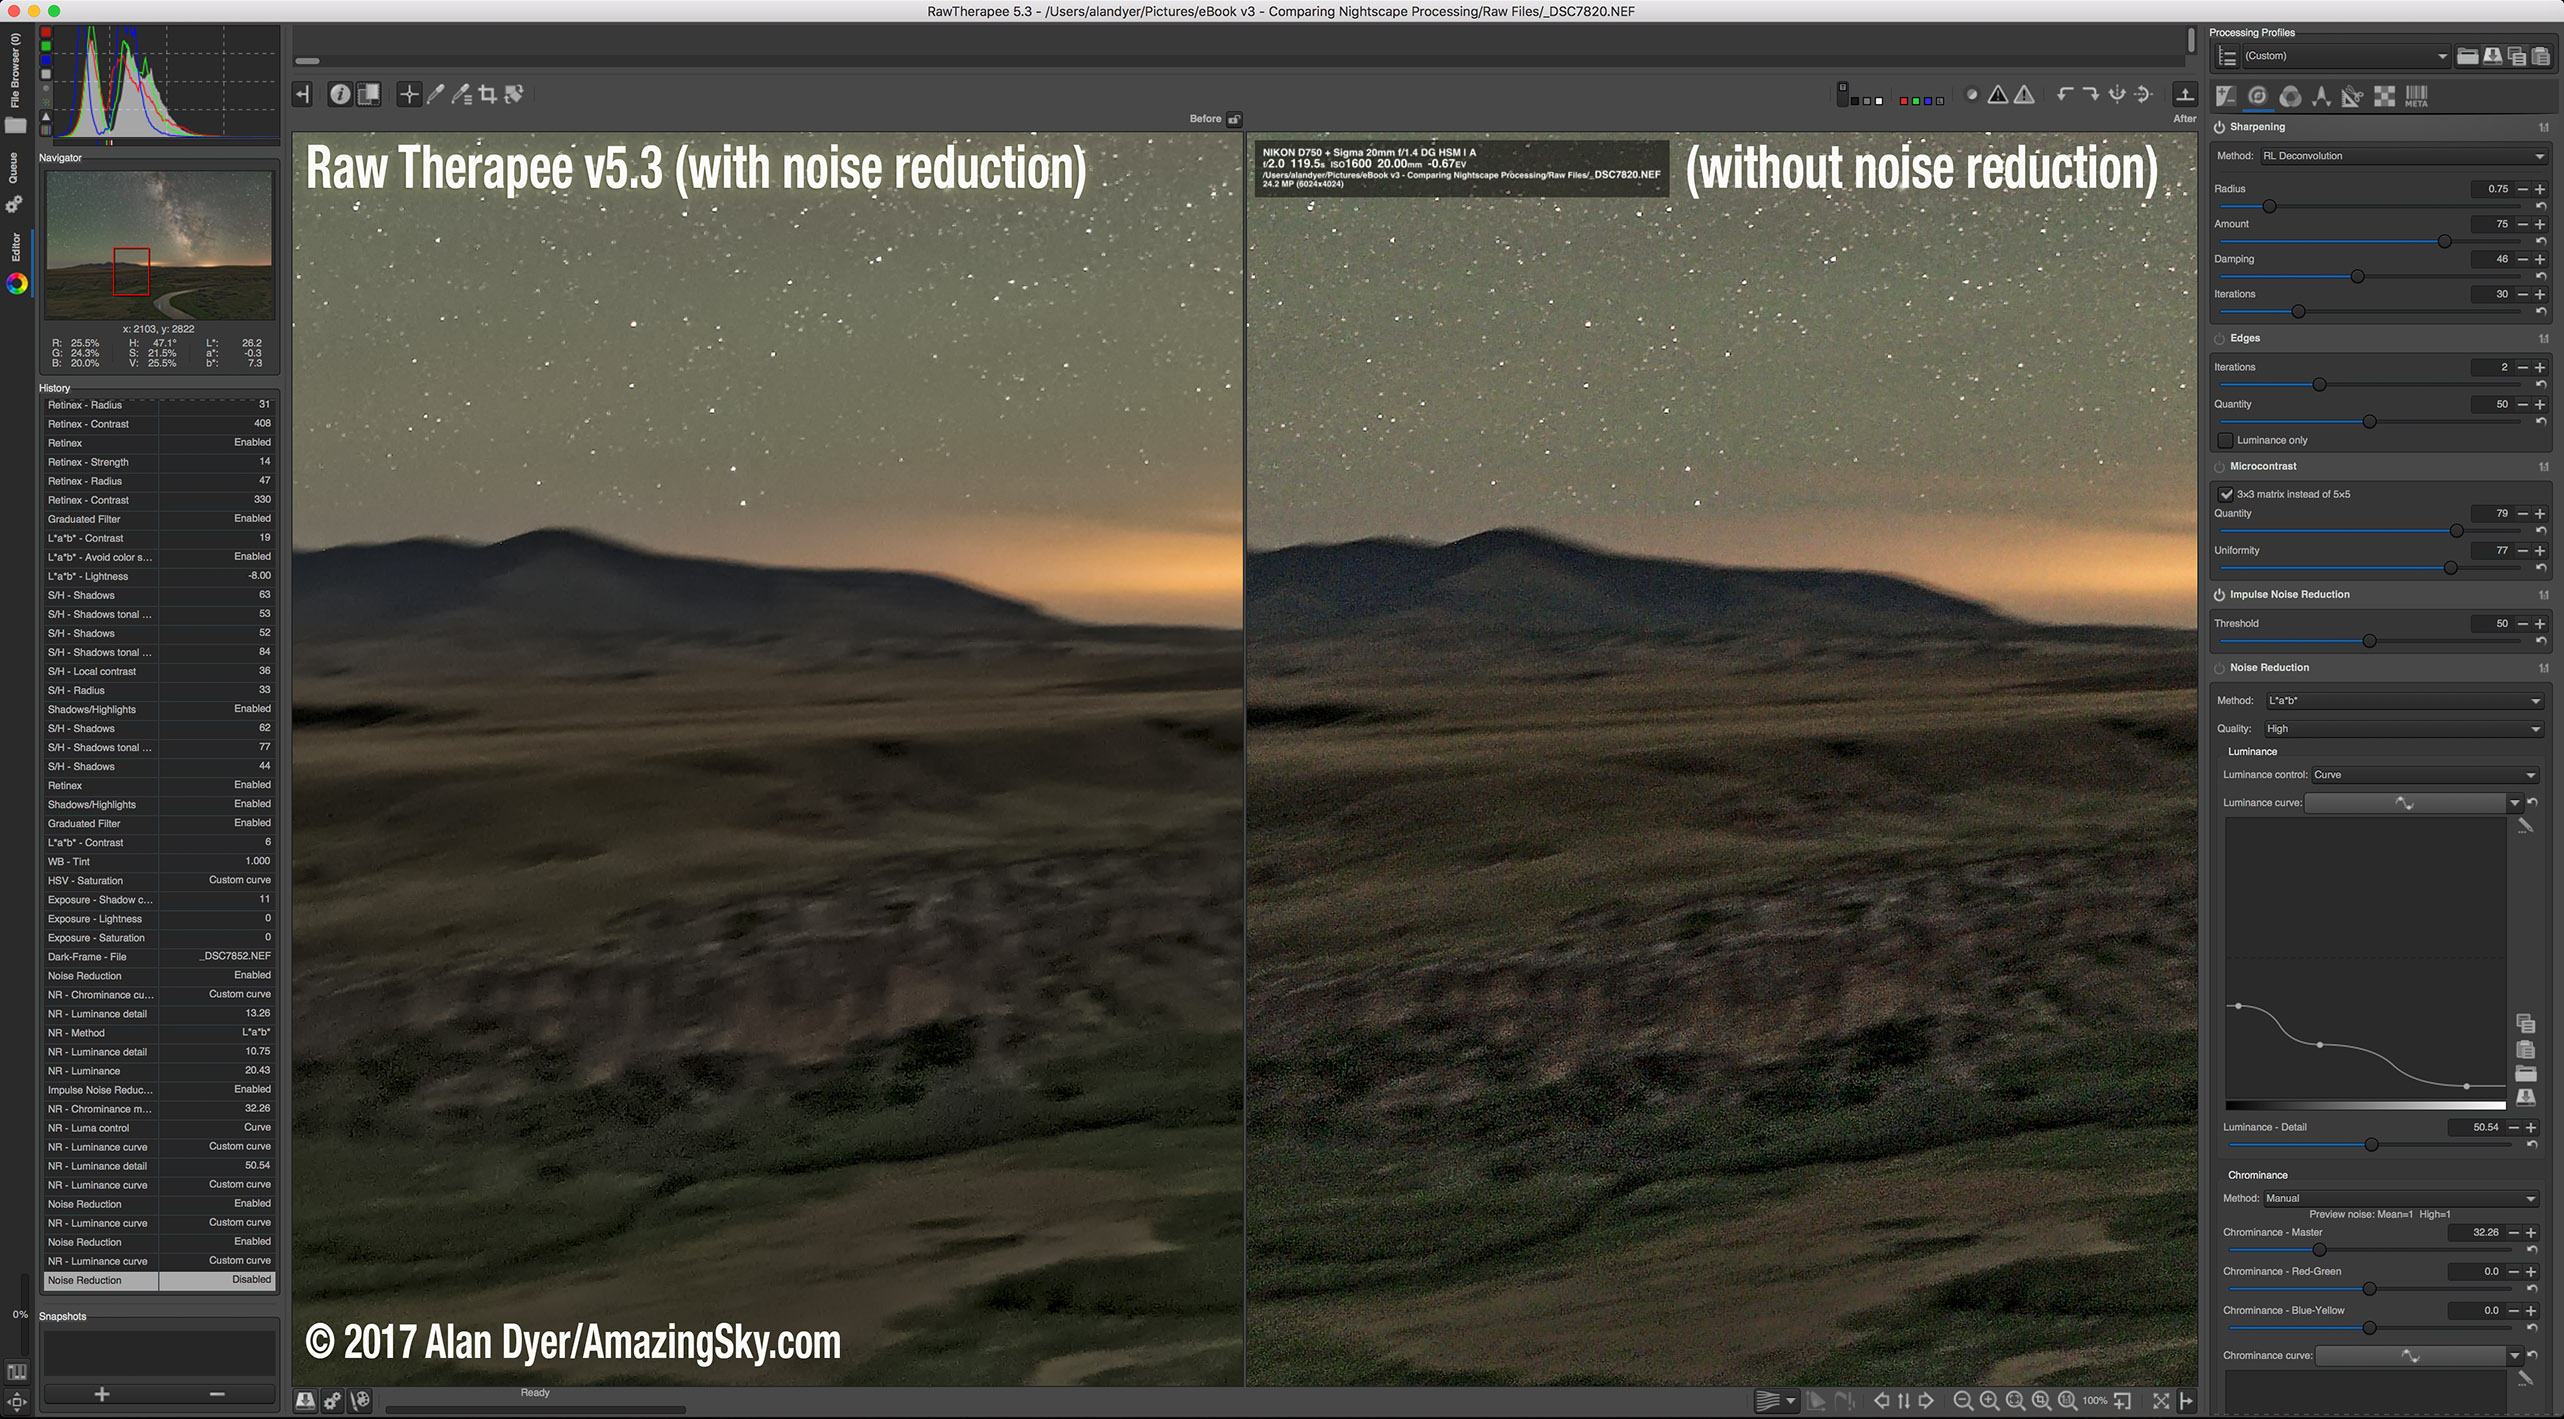
Raw Therapee v5.3
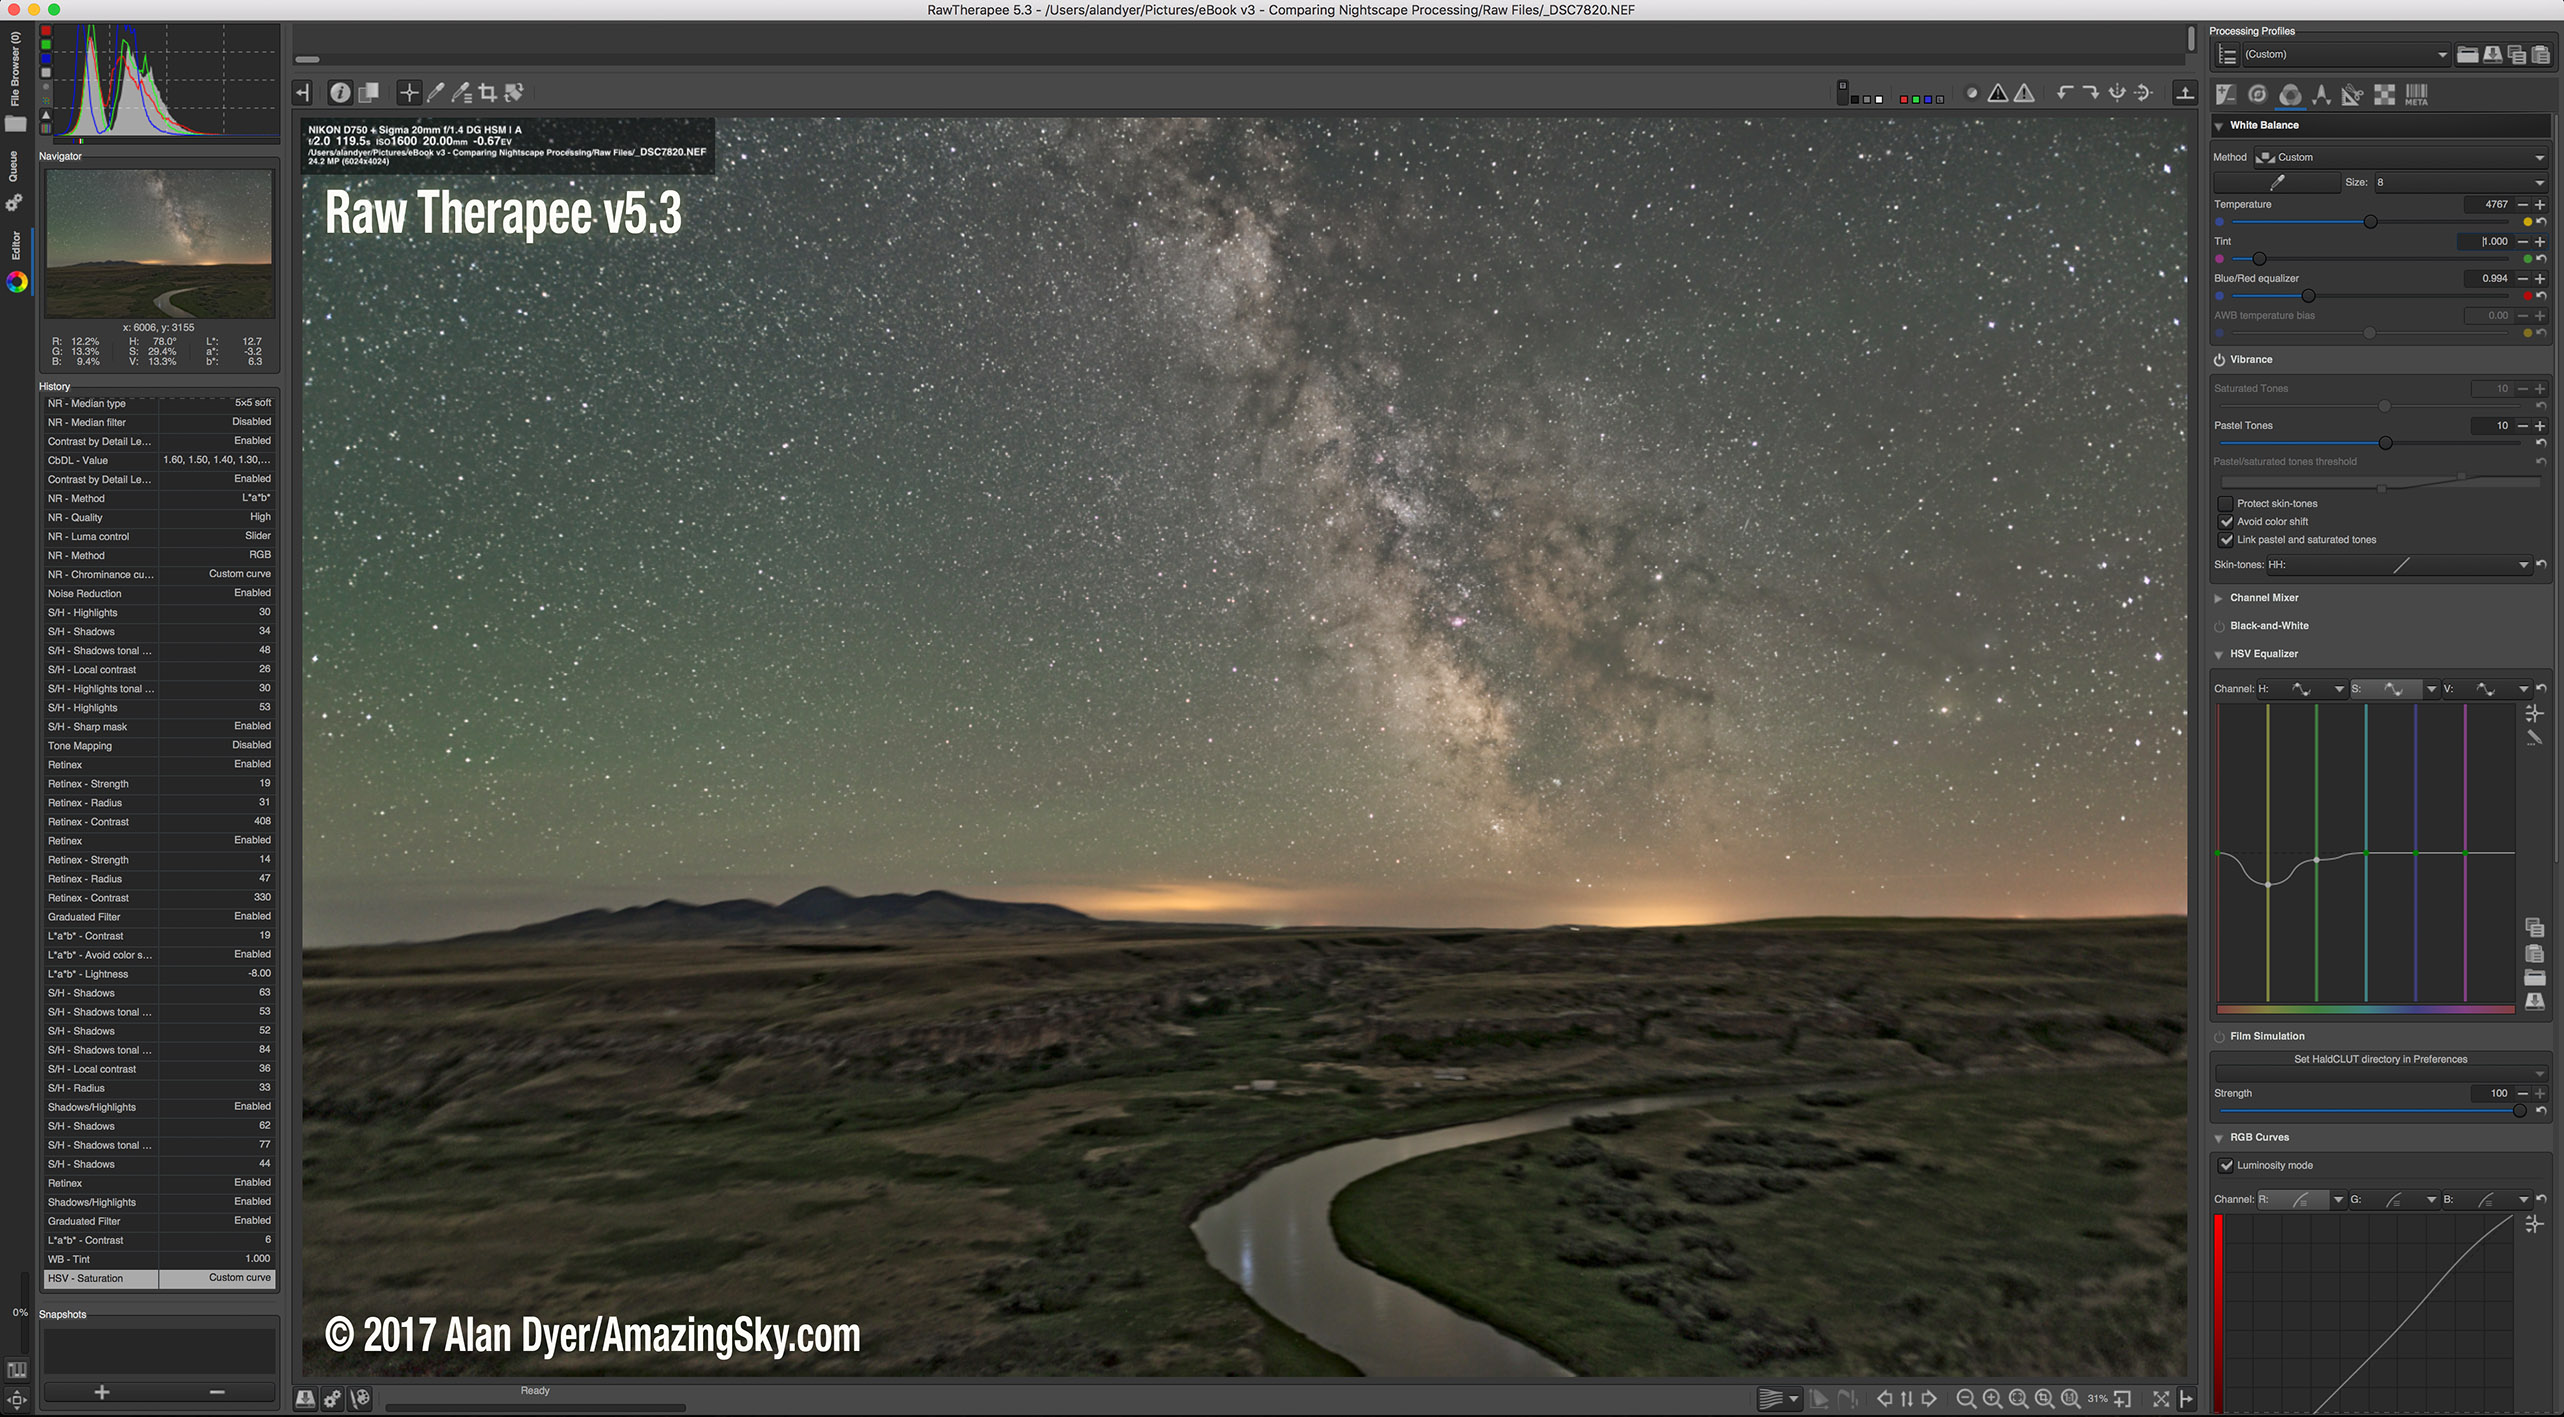
PROS: It’s free! It offers an immense number of controls and sliders. You can even change the debayering method. It detects and applies lens corrections (though in my case only distortion, not vignetting). It has good selective color with equalizer-style sliders. It has acceptable (sort of!) noise reduction and sharpening with a choice of methods, and with hot and dead pixel removal.
It can load and apply dark frames and flat fields, the only raw developer software that can. This is immensely useful for deep-sky photography.
CONS: It offers an immense number of controls and sliders! Too many! It is open source software by committee, with no one in charge of design or user friendliness. Yes, there is documentation, but it, too, is a lot to wade through to understand, especially with its broken English translations. This is software for digital signal processing geeks.
But worst of all, as shown above, its noise reduction left lots of noisy patches in shadows, no matter what combination of settings I applied. Despite all its hundreds of sliders, results just didn’t look as good.
What About …? (updated December 28)

No matter how many programs I found to test, someone always asks, “What about …?” In some cases such comments pointed me to programs I wasn’t even aware of, but subsequently tried out. So here are even more to pick from…
Acorn (https://flyingmeat.com/acorn/)
Billed as having “everything you need in an image editor,” this low-cost ($30) MacOS-only program is anything but. Its raw developer module is crude and lacks any of the sophisticated range of adjustments offered by all the other programs on offer here. It might be useful as a layer-based editor of images developed by another program.
Alien Skin Exposure x3 (https://www.alienskin.com)
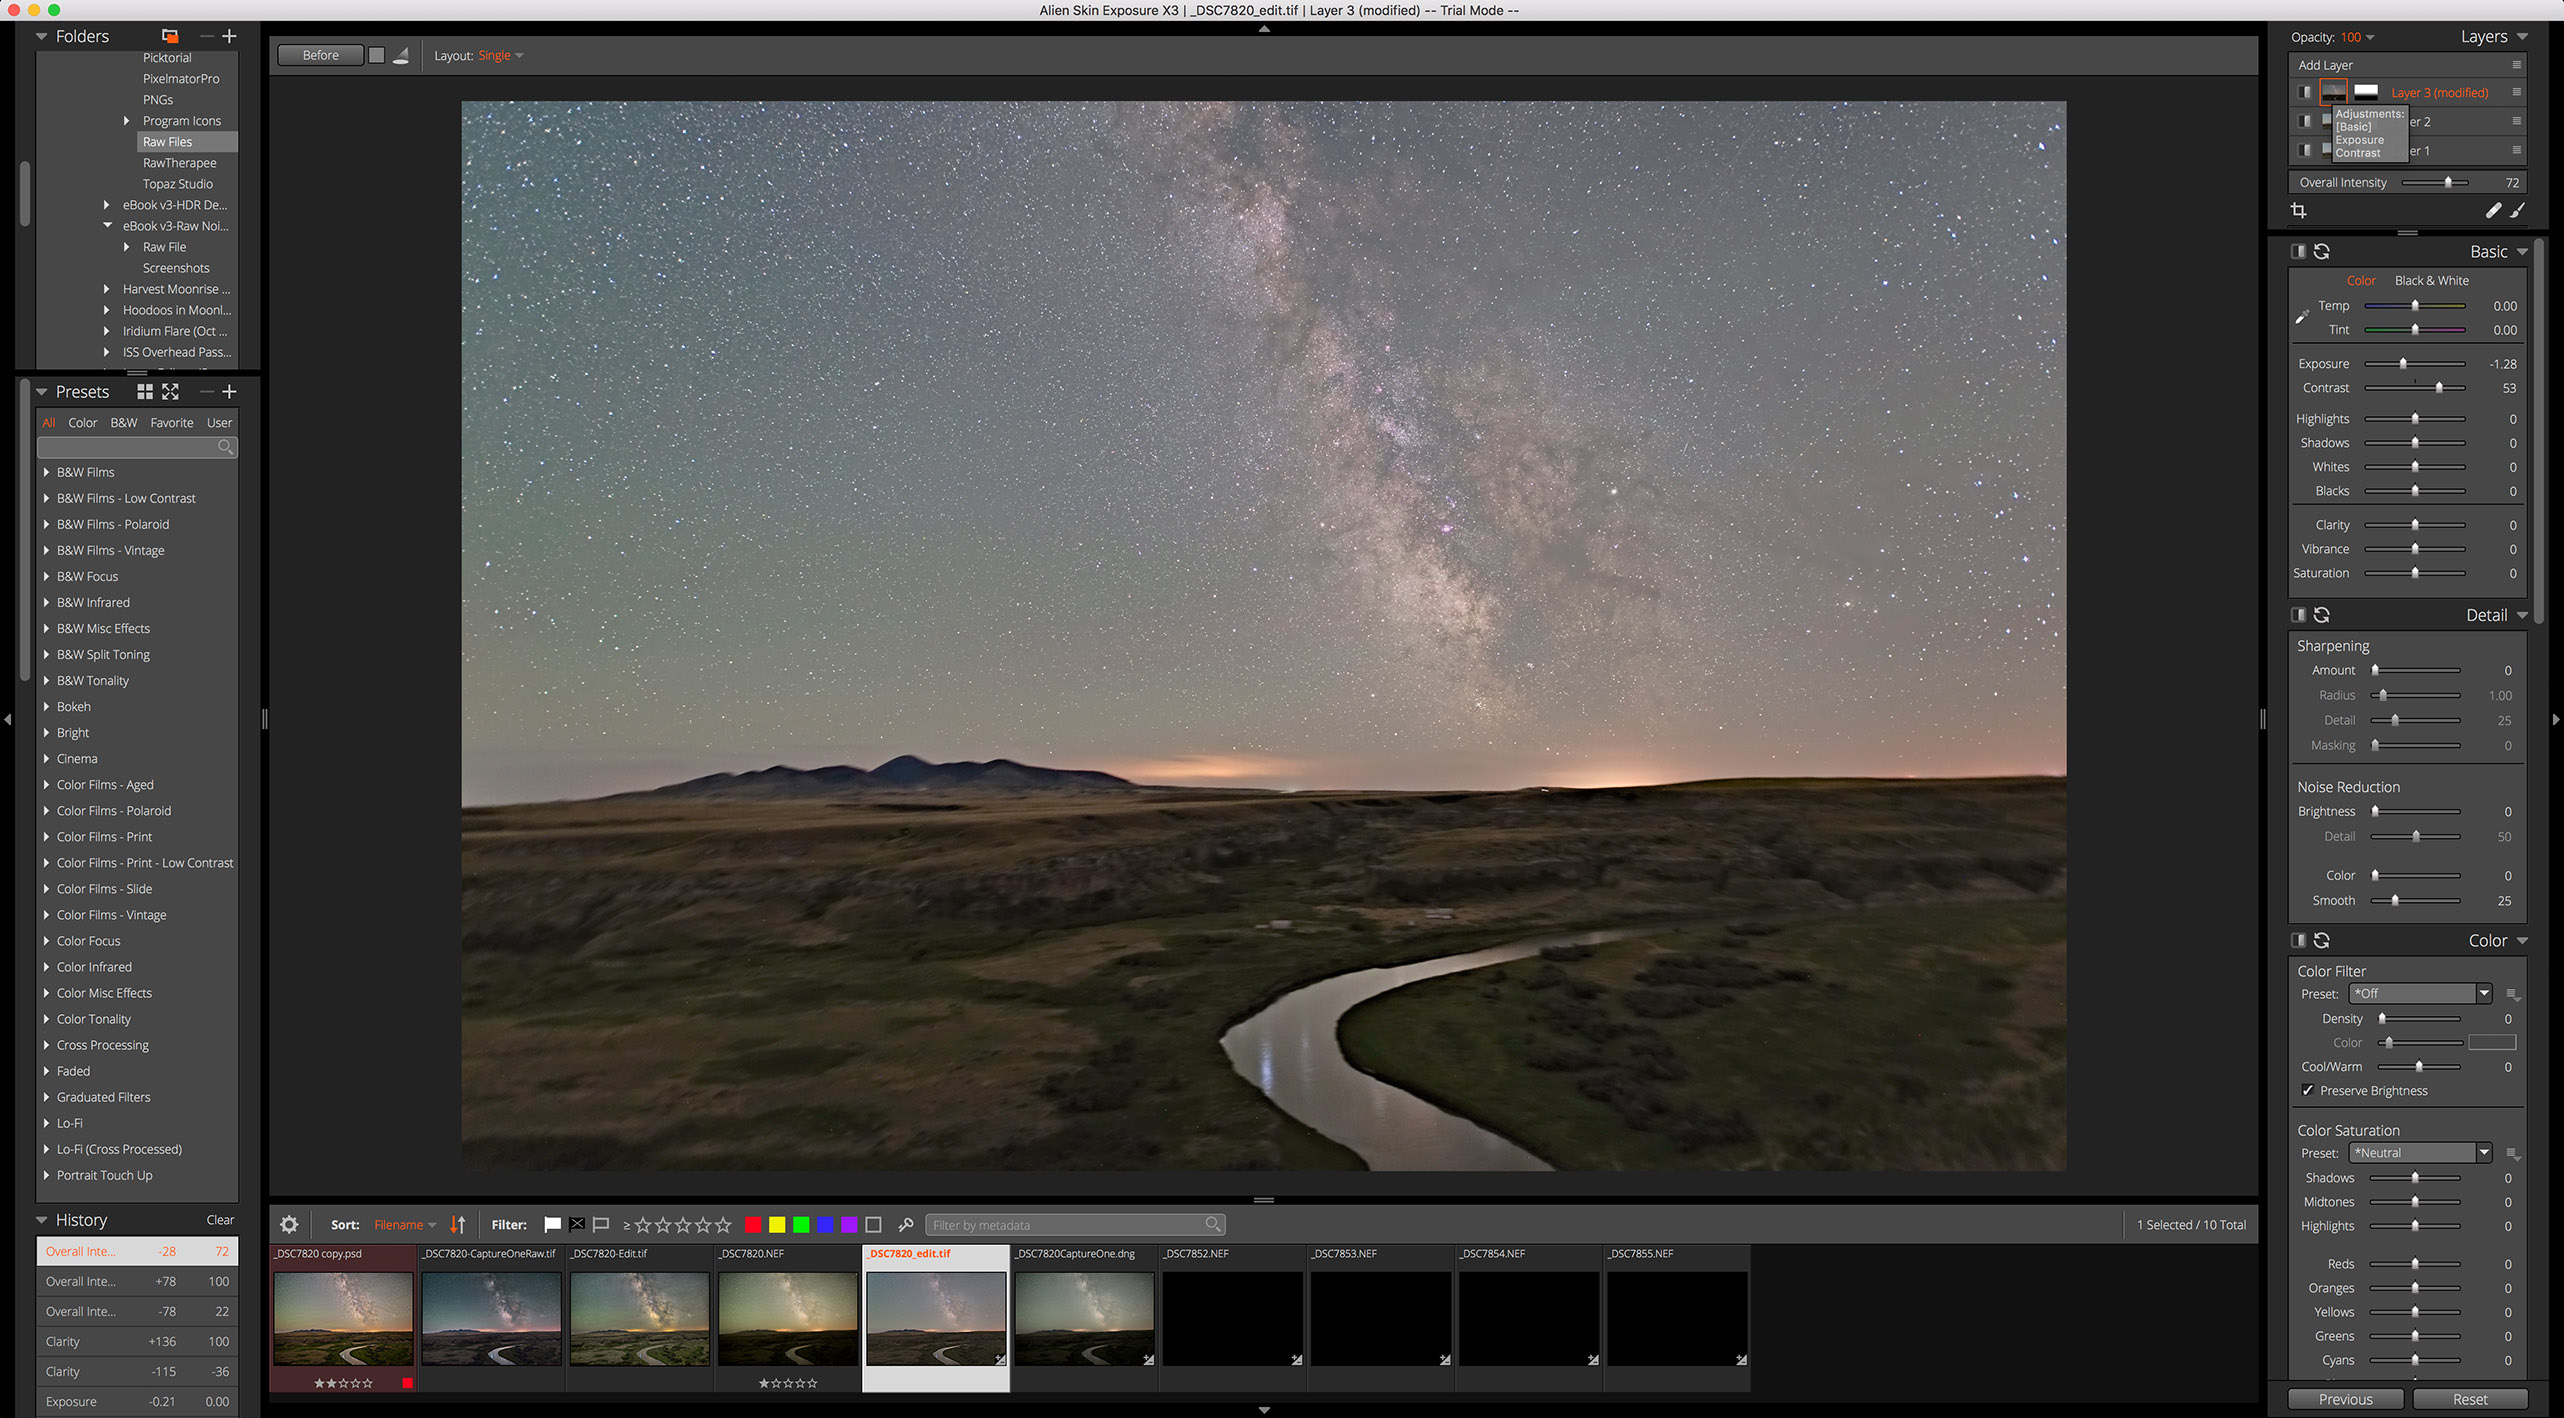
Available for Mac and Windows for $150, this Lightroom competitor offers a good browser function, with the ability to “copy-from-one and paste-to-many” images (unlike some of the programs below), and a good batch export function for time-lapse work. It has good selective color controls and very good noise reduction providing a smooth background without artifacts like blockiness or haloes. Local adjustments, either through brushed-on adjustments or through gradients, are applied via handy and easy to understand (I think!) layers.
While it has auto lens corrections, its database seemed limited — it did not have my Sigma 20mm lens despite it being on the market for 18 months. Manual vignetting correction produced a poor result with just a washed out look.
The main issue was that its shadow, highlight, and clarity adjustments just did not produce the snap and contrast I was looking for, but that other programs could add to raw files. Still, it looks promising, and is worth a try with the trial copy. You might find you like it. I did not. For similar cost, other programs did a better job, notably DxO PhotoLab.
darktable (http://www.darktable.org)
In the same ilk as Raw Therapee, I also tested out another free, open-source raw developer, one simply called “darktable,” with v2.2.5 shown below. While it has some nice functions and produced a decent result, it took a lot of time and work to use.
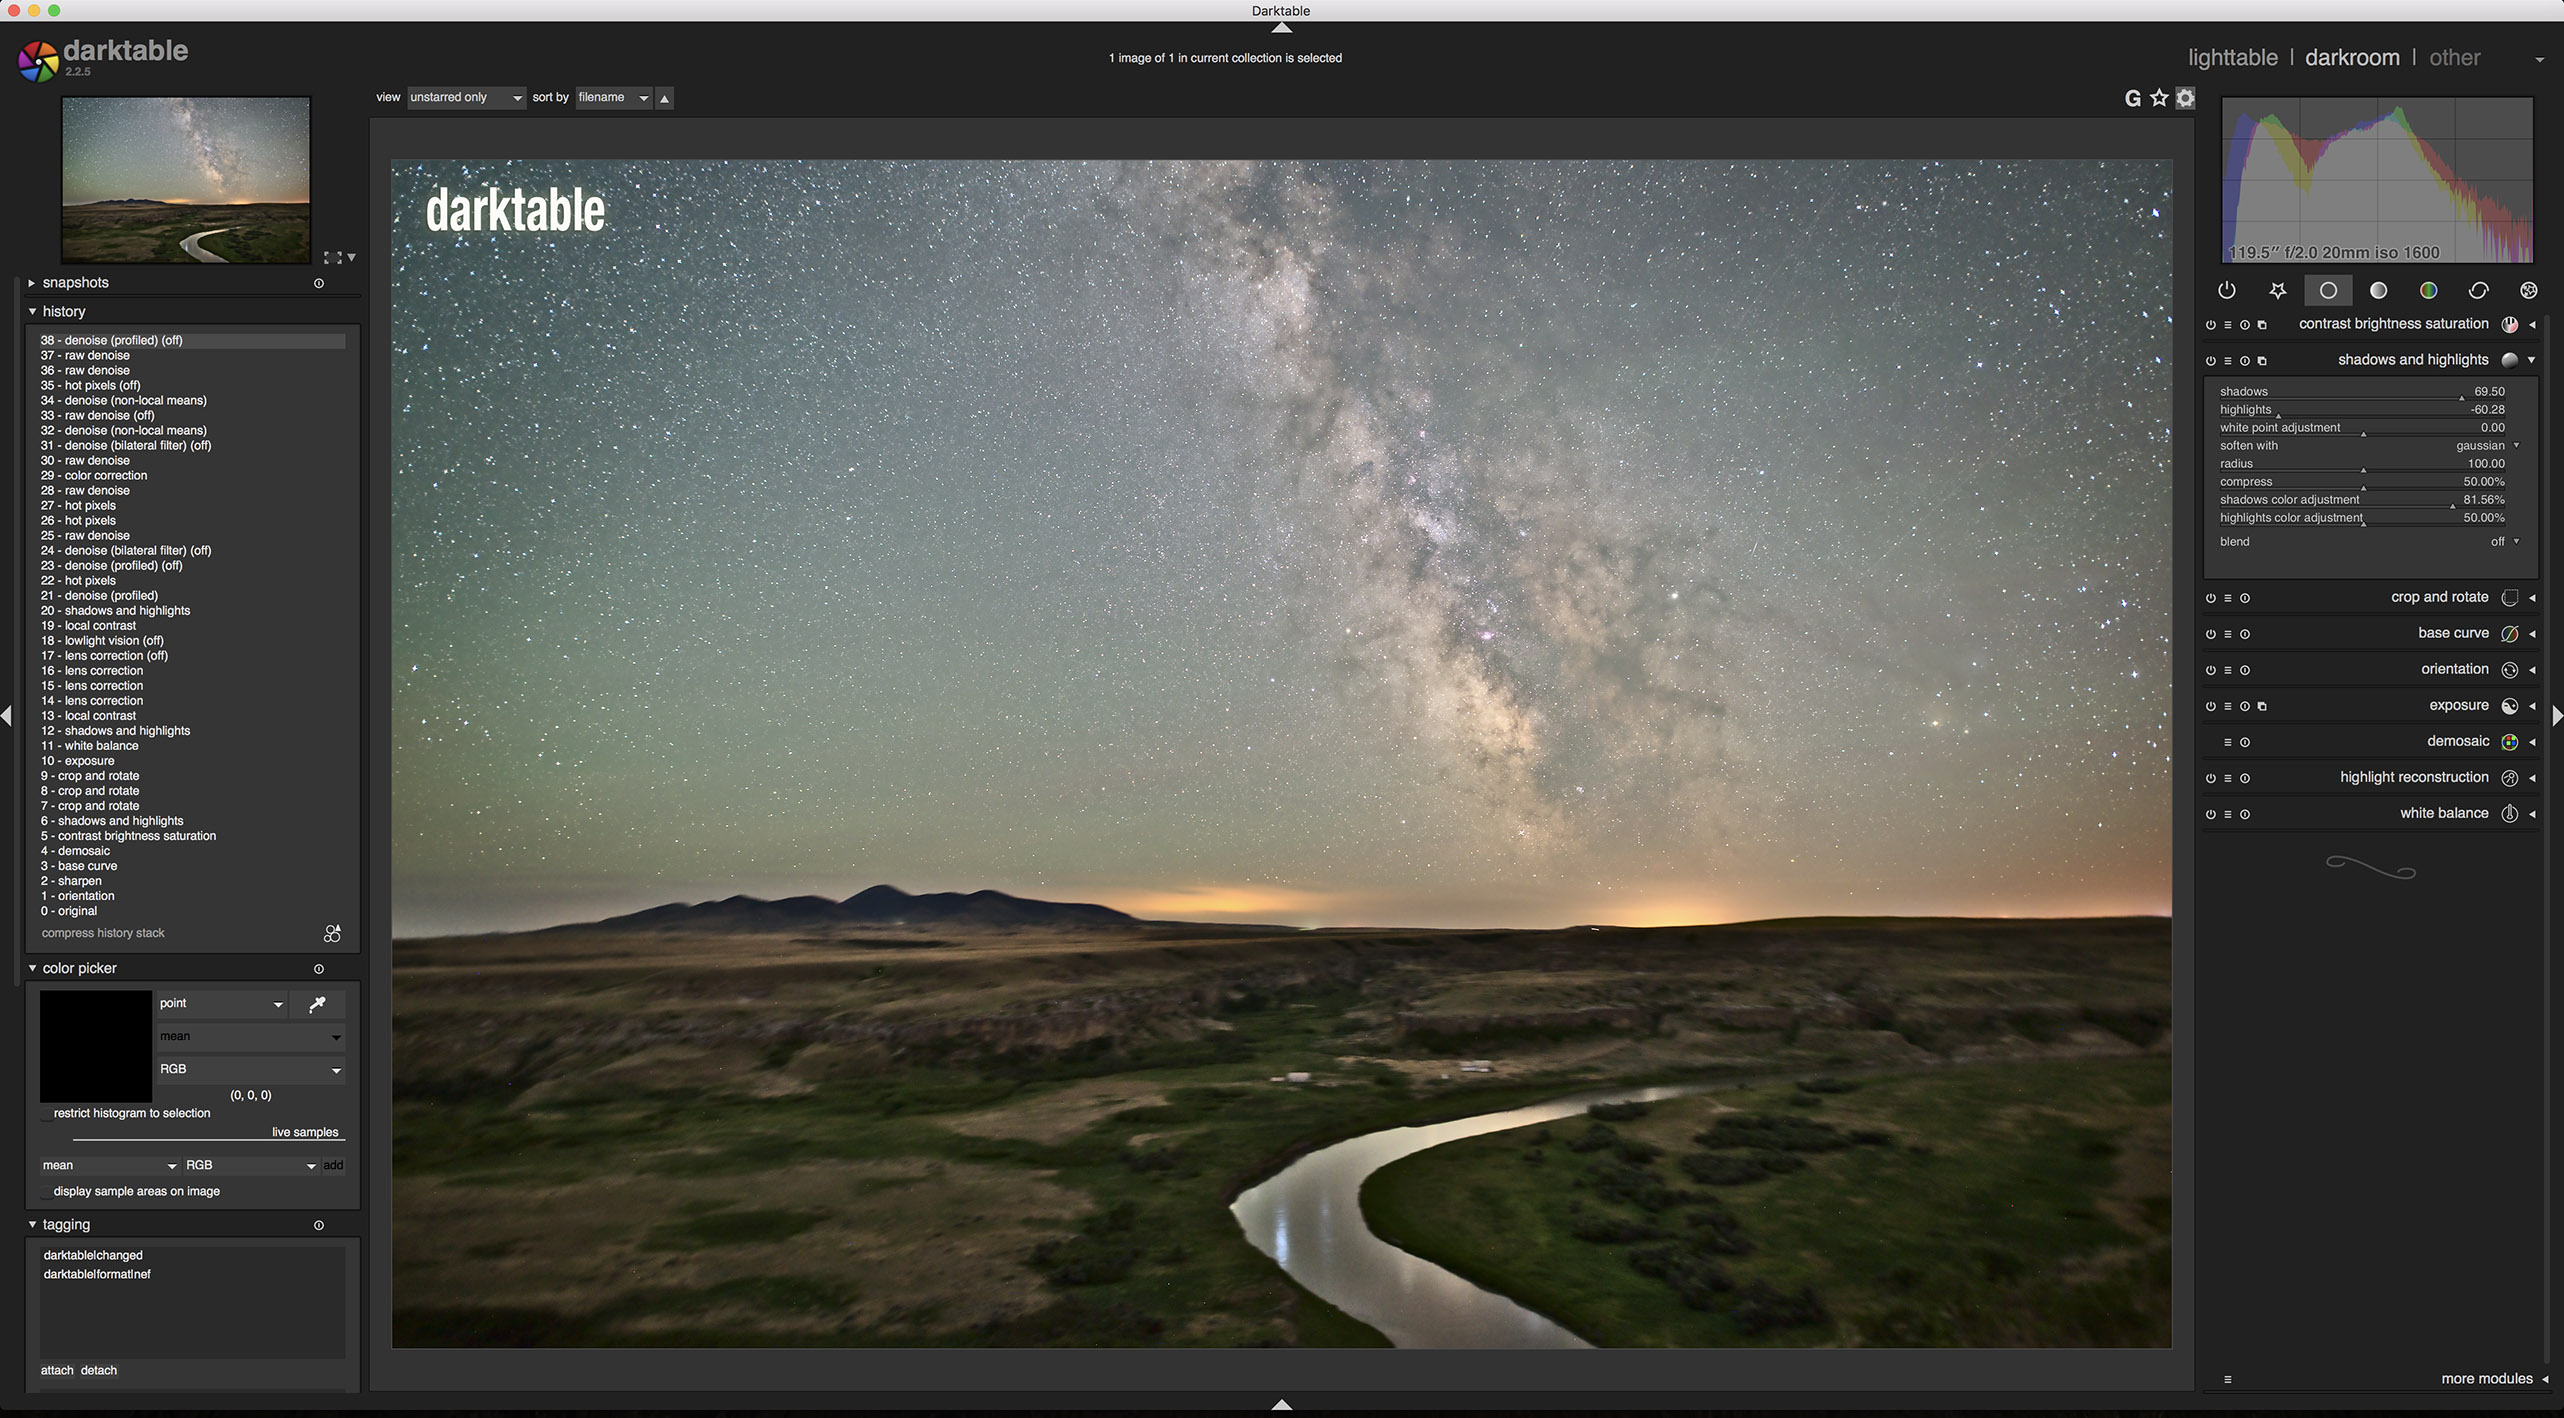
The MacOS version I tried (on a brand new 5K iMac) ran so sluggishly, taking so long to re-render screen previews, that I judged it impractical to use. Sliders were slow to move and when I made any adjustments often many seconds would pass before I would see the result. Pretty frustrating, even for free.
Iridient Developer (http://www.iridientdigital.com)
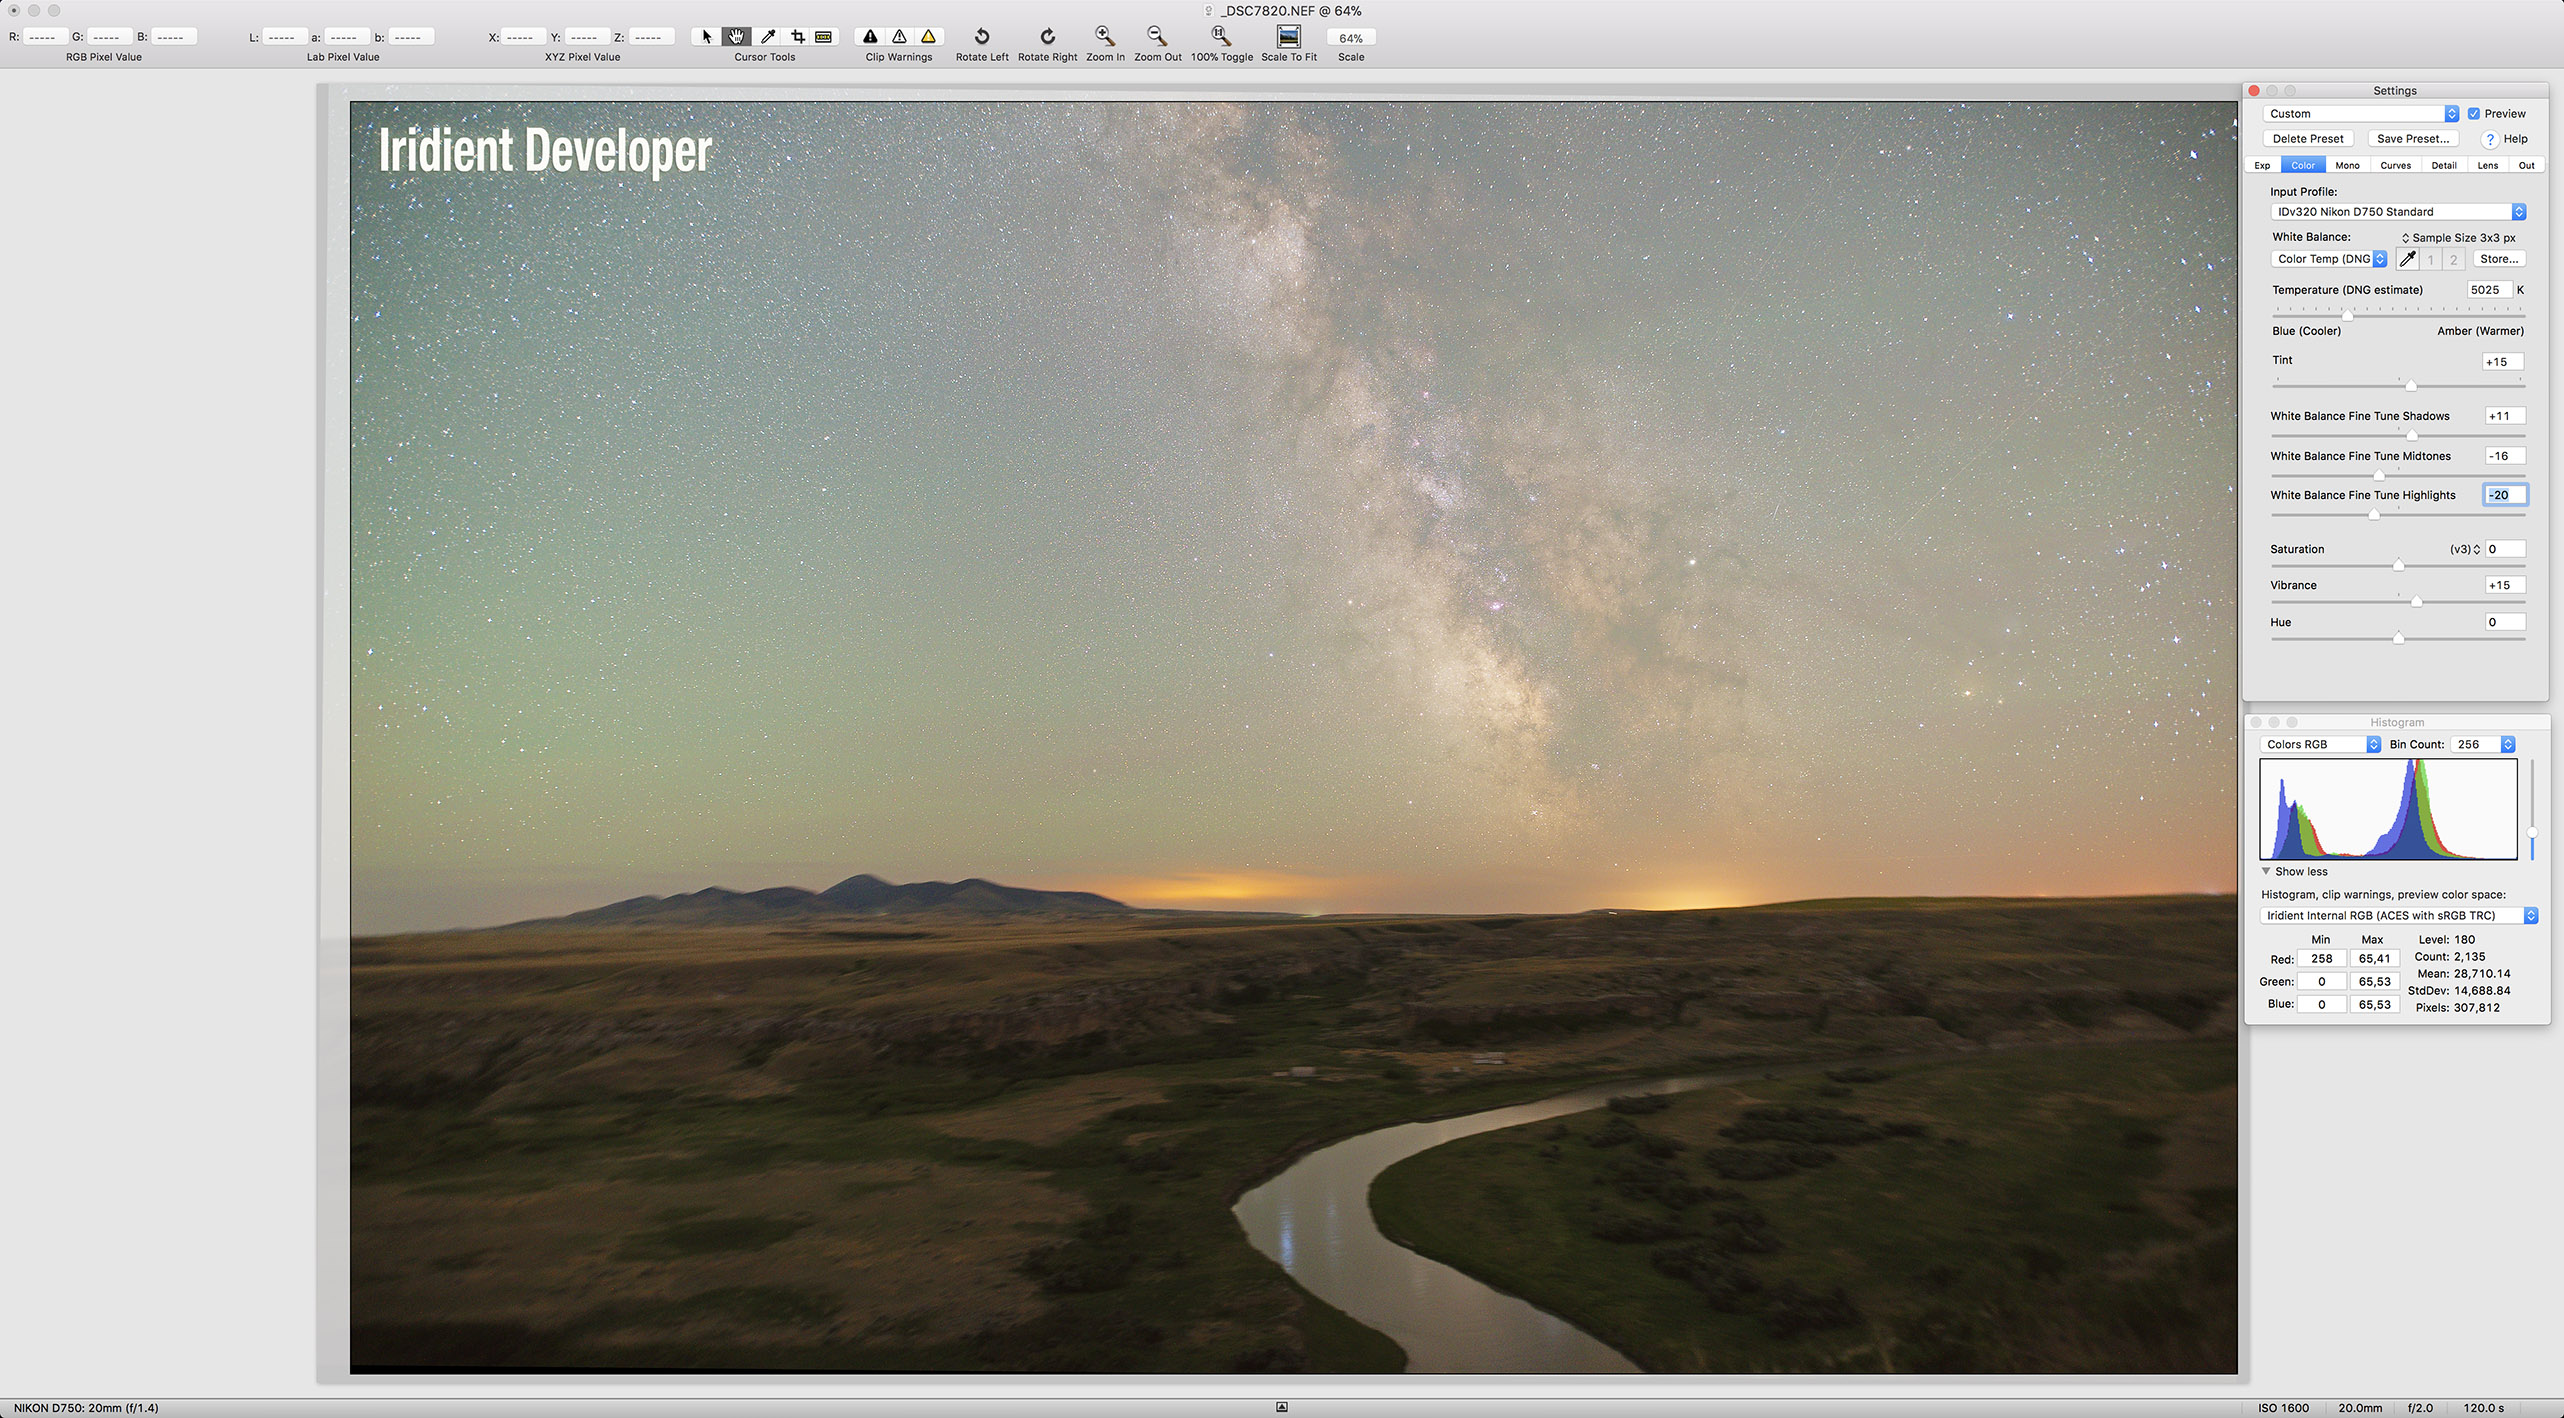
A similar crowd-developed raw processing program, Iridient Developer (above), sells for $99 US. I tested a trial copy of v3.2. While it worked OK, I was never able to produce a great looking image with it. It had no redeeming features over the competition that made its price worthwhile.
Paintshop Pro (https://www.paintshoppro.com/en/)
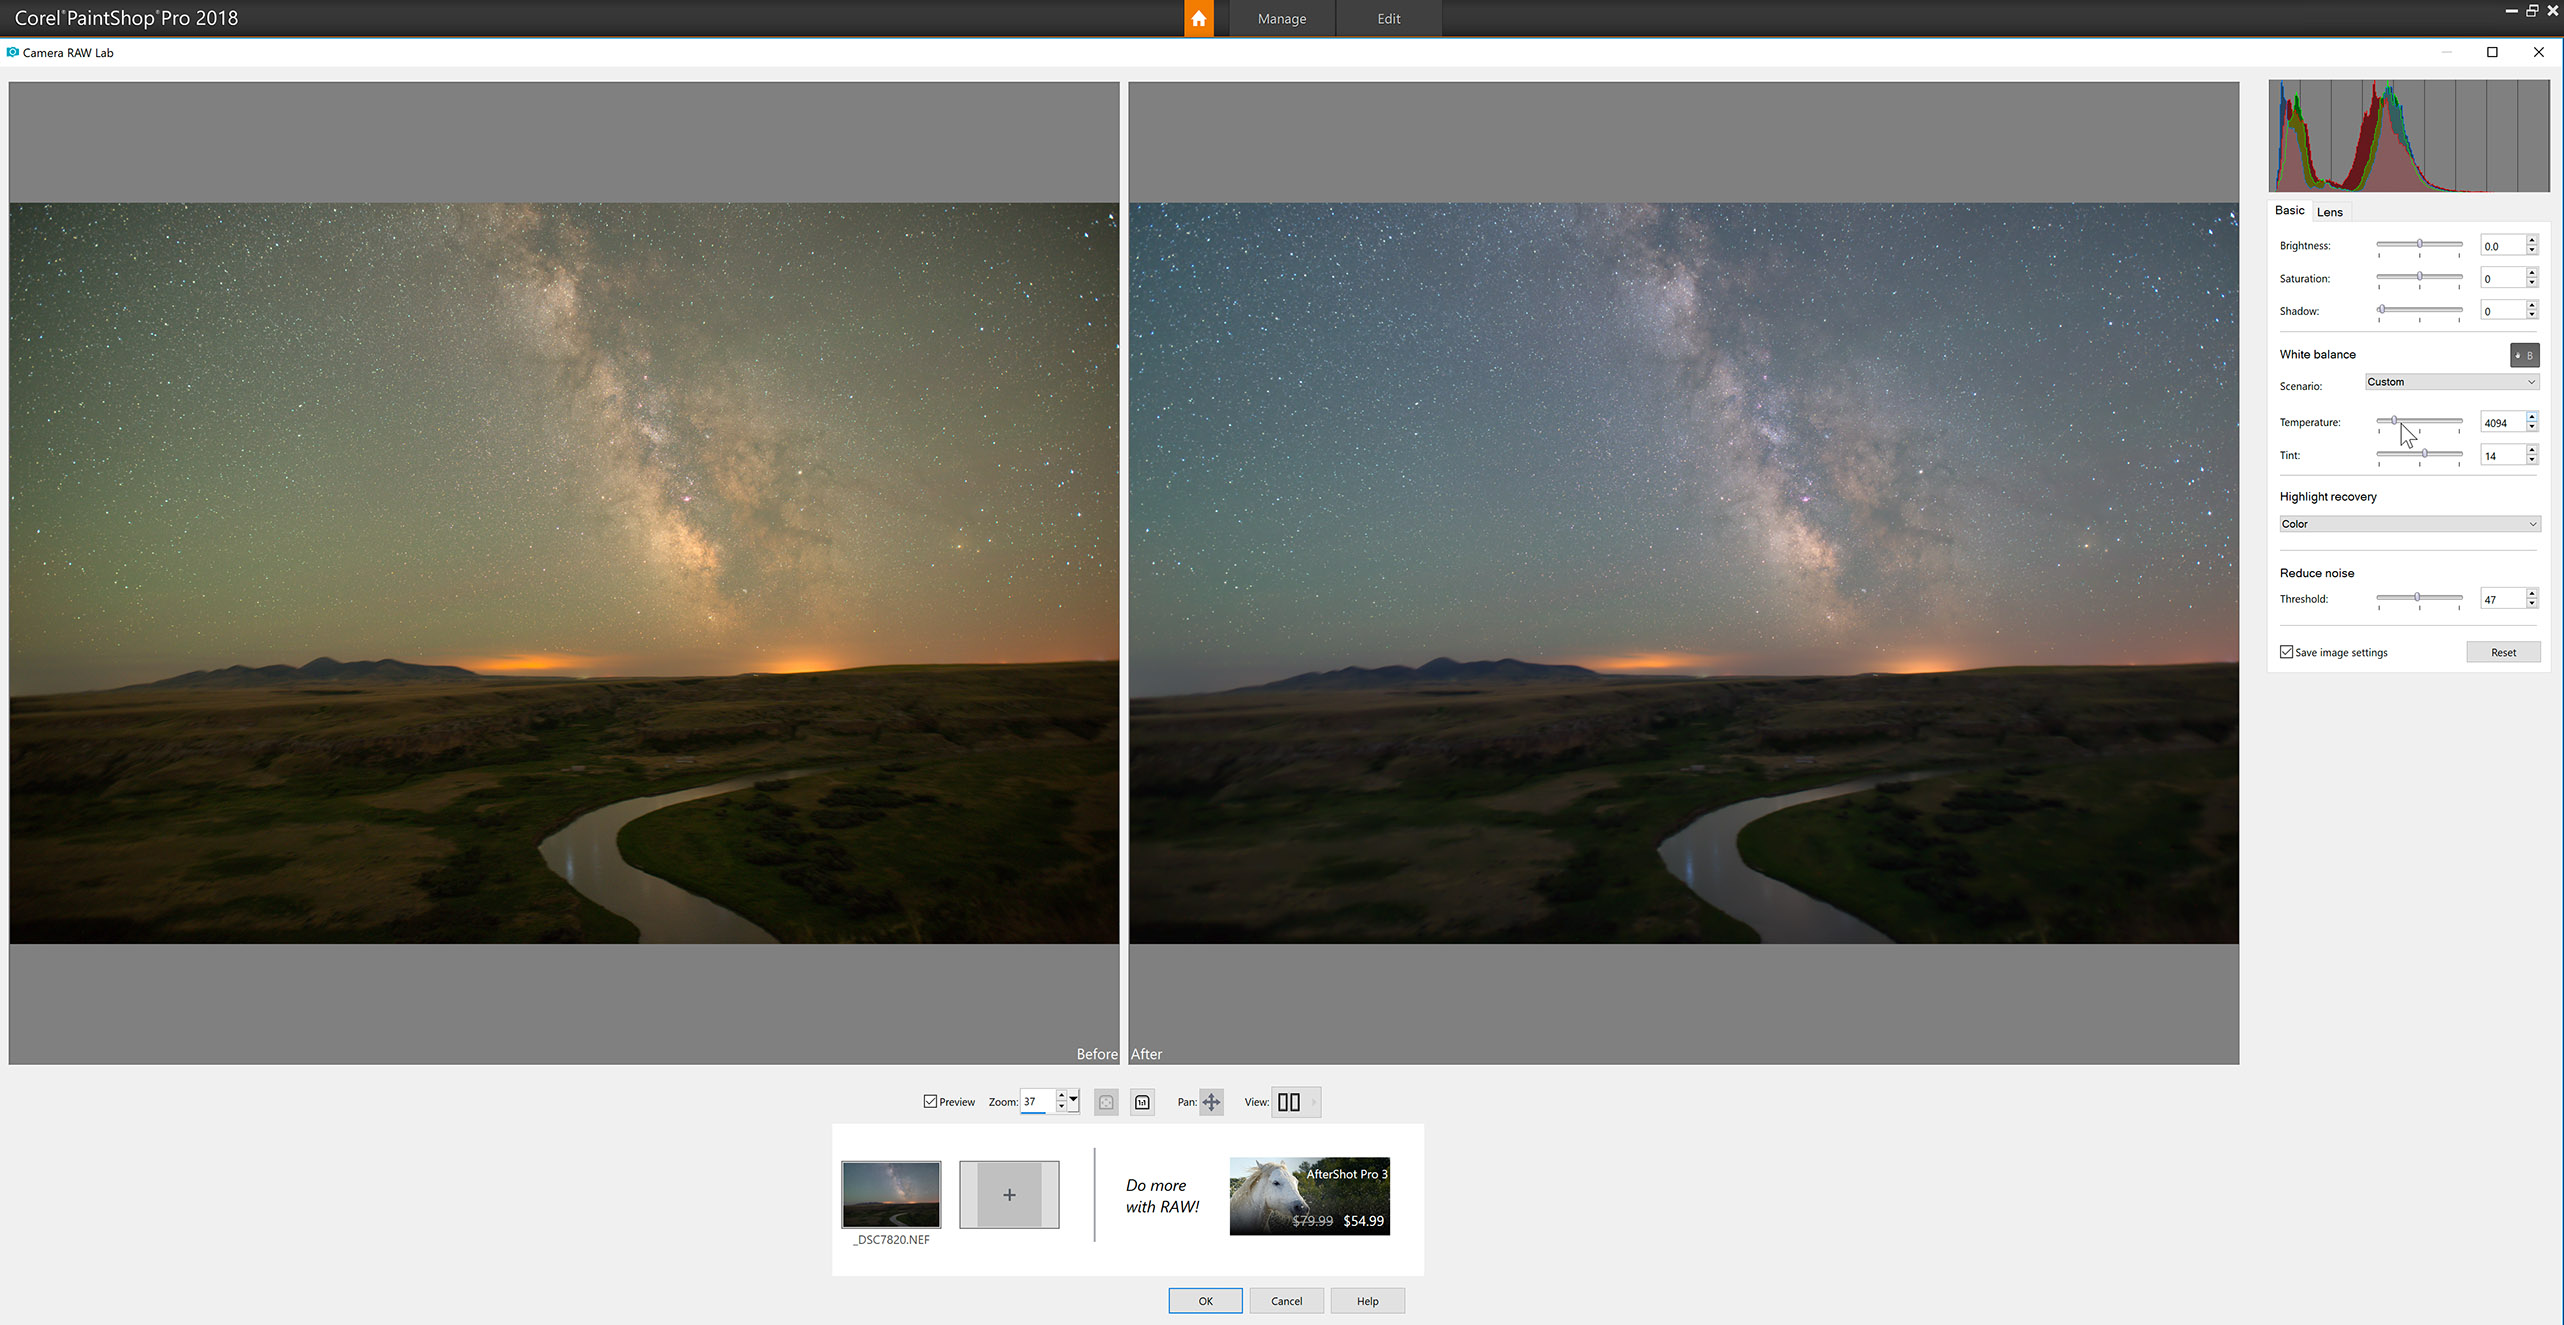
Using Parallels running Windows 10 on my Mac, I did try out this popular Windows-only program from Corel. By itself, Paintshop Pro’s raw developer module (shown above) is basic, crude and hardly up to the tax of processing demanding raw files. You are prompted to purchase Corel’s Aftershot Pro for more capable raw development, and I would agree – Aftershot would be an essential addition. However …
As I showed above, I did test the MacOS version of Aftershot Pro on my raw sample image, and found it did the poorest job of making my raw test image look good. Keep in mind that it is the ability of all these programs to develop this typical raw nightscape image that I am primarily testing.
That said, given a well-developed raw file, Paintshop Pro can do much more with it, such as further layering of images and applying non-destructive and masked adjustment layers, as per Photoshop. Indeed, it is sold as a low-cost (~ $60) Photoshop replacement. As such, many Windows users find Paintshop’s features very attractive. However, Paintshop lacks the non-destructive “smart” filters, and the more advanced selection and masking options offered by Photoshop, Affinity Photo, and ON1 Photo Raw. If you have never used these, you likely don’t realize what you are missing.
If it’s an Adobe alternative you are after, I would suggest Windows users would be better served by other options. Why not test drive Affinity and ON1?
PhotoDirector 9 (https://www.cyberlink.com/products/photodirector-ultra/features_en_US.html)
This was a surprising find. Little known, certainly to me, this Windows and MacOS program from the Taiwanese company Cyberlink, is best described as a Lightroom substitute, but it’s a good one. Its regular list price is $170. I bought it on sale for $60.
Like Lightroom, working on any images with PhotoDirector requires importing them into a catalog. You cannot just browse to the images. Fine. But one thing some people complain about with Lightroom is the need to always import images.
I was impressed with how good a job PhotoDirector did on my raw test image. PhotoDirector has excellent controls for shadow and highlight recovery, HSL selective color, copying-and-pasting settings, and batch exporting. So it will work well for basic time-lapse processing.
Noise reduction was very good and artifact-free. While it does have automatic lens corrections, its database did not include the 2-year old Sigma 20mm Art lens I used. So it appears its lens data is not updated frequently.
PhotoDirector has good local adjustments and gradients using “pins” rather than layers, similar to Camera Raw and Lightroom.
After performing raw image “Adjustments,” you can take an image into an Edit module (for adding special effects), then into a Layers module for further work. However, doing so destructively “flattens” the image to apply the raw adjustments you made. You cannot go back and tweak the raw settings in the Adjustment module, as you can when opening a raw file as a “smart object” in Adobe Photoshop.
While PhotoDirector does allow you to layer in other images to make basic composites (such as adding type or logos), there is no masking function nor any non-destructive adjustment layers. So this is most assuredly not a Photoshop substitute, despite what the advertising might suggest. But if it’s a Lightroom replacement you are after, do check it out in a trial copy.
Picktorial v3 (https://www.picktorial.com)
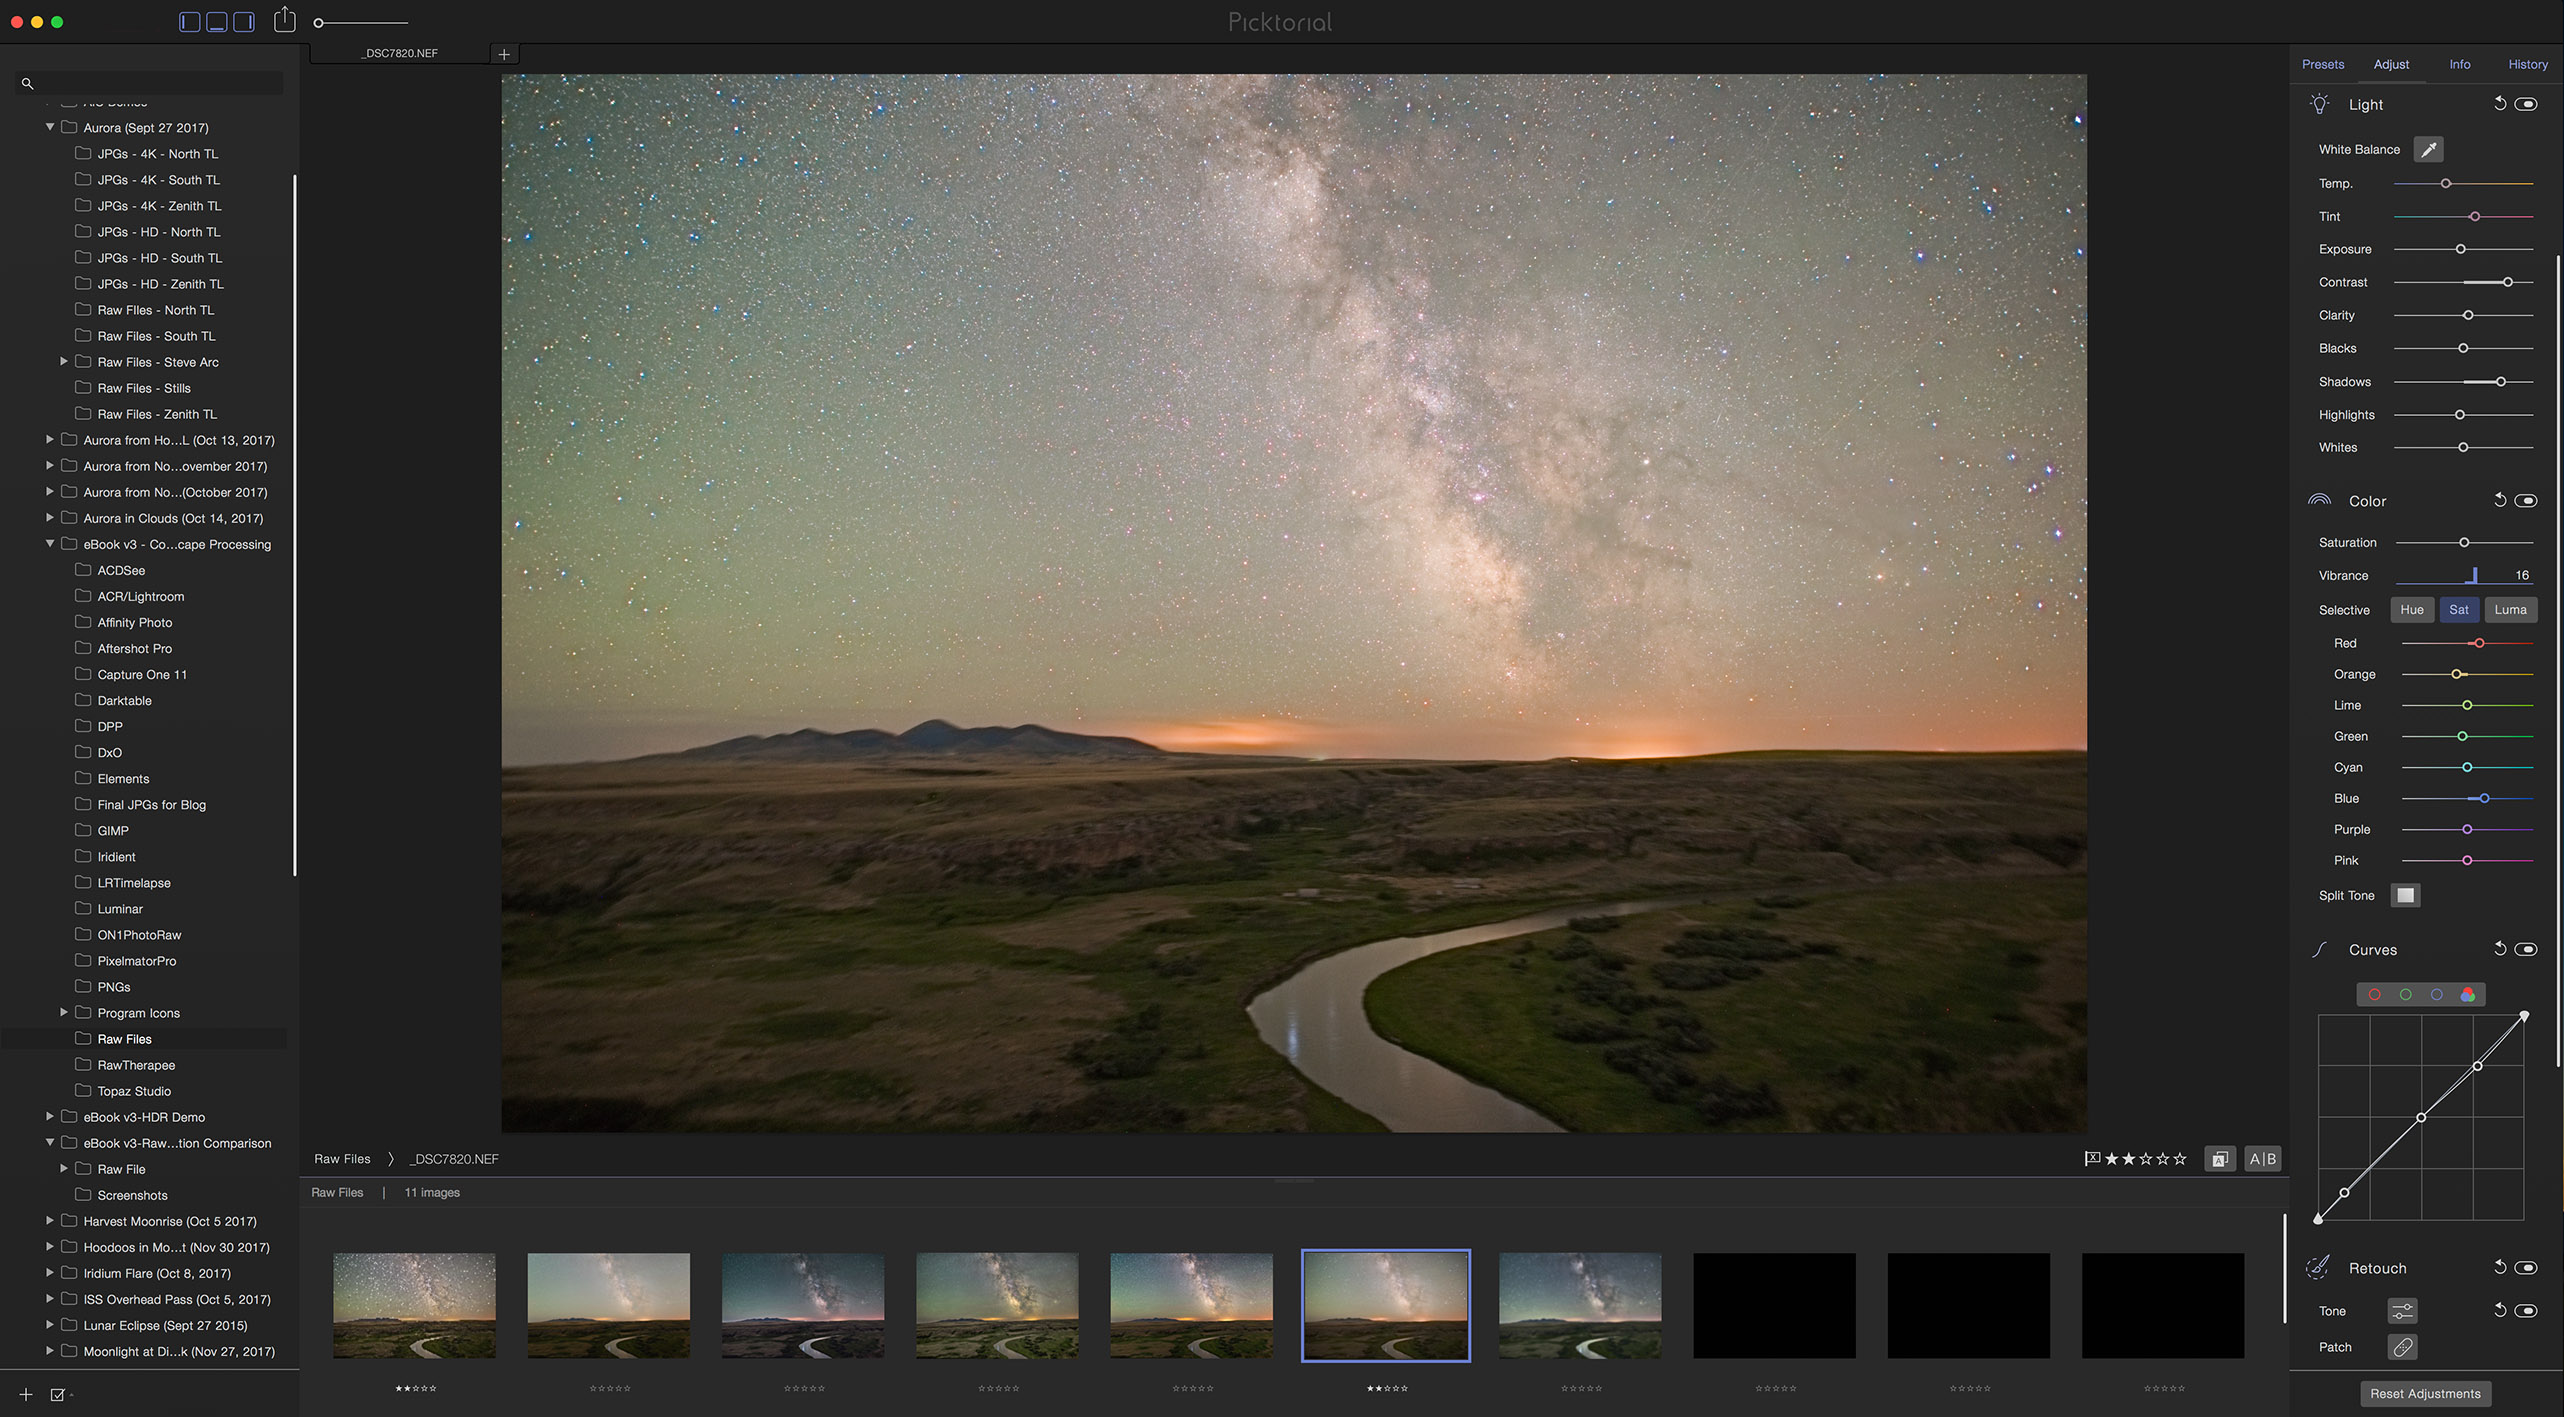
This little-known MacOS-only program (only $40 on sale) for developing raw images looks very attractive, with good selective color, lots of local adjustments, and good masking tools, the features promoted on the website. It does have a browse function and can batch export a set of developed files.
However … its noise reduction was poor, introducing glowing haloes around stars when turned up to any useful level. Its shadows, highlights, and contrast adjustments were also poor – it was tough to make the test image look good without flattening contrast or blocking up shadows. Boosting clarity even a little added awful dark haloes to stars, making this a useless function. It has no lens correction, either automatic or manual. Like Topaz Studio, below, it cannot copy and paste settings to a batch of images, only to one image at a time, so it isn’t useful for time-lapse processing.
I cannot recommend this program, no matter how affordable it might be.
Silky Pix Developer Studio 8 (http://www.silkypix.us)
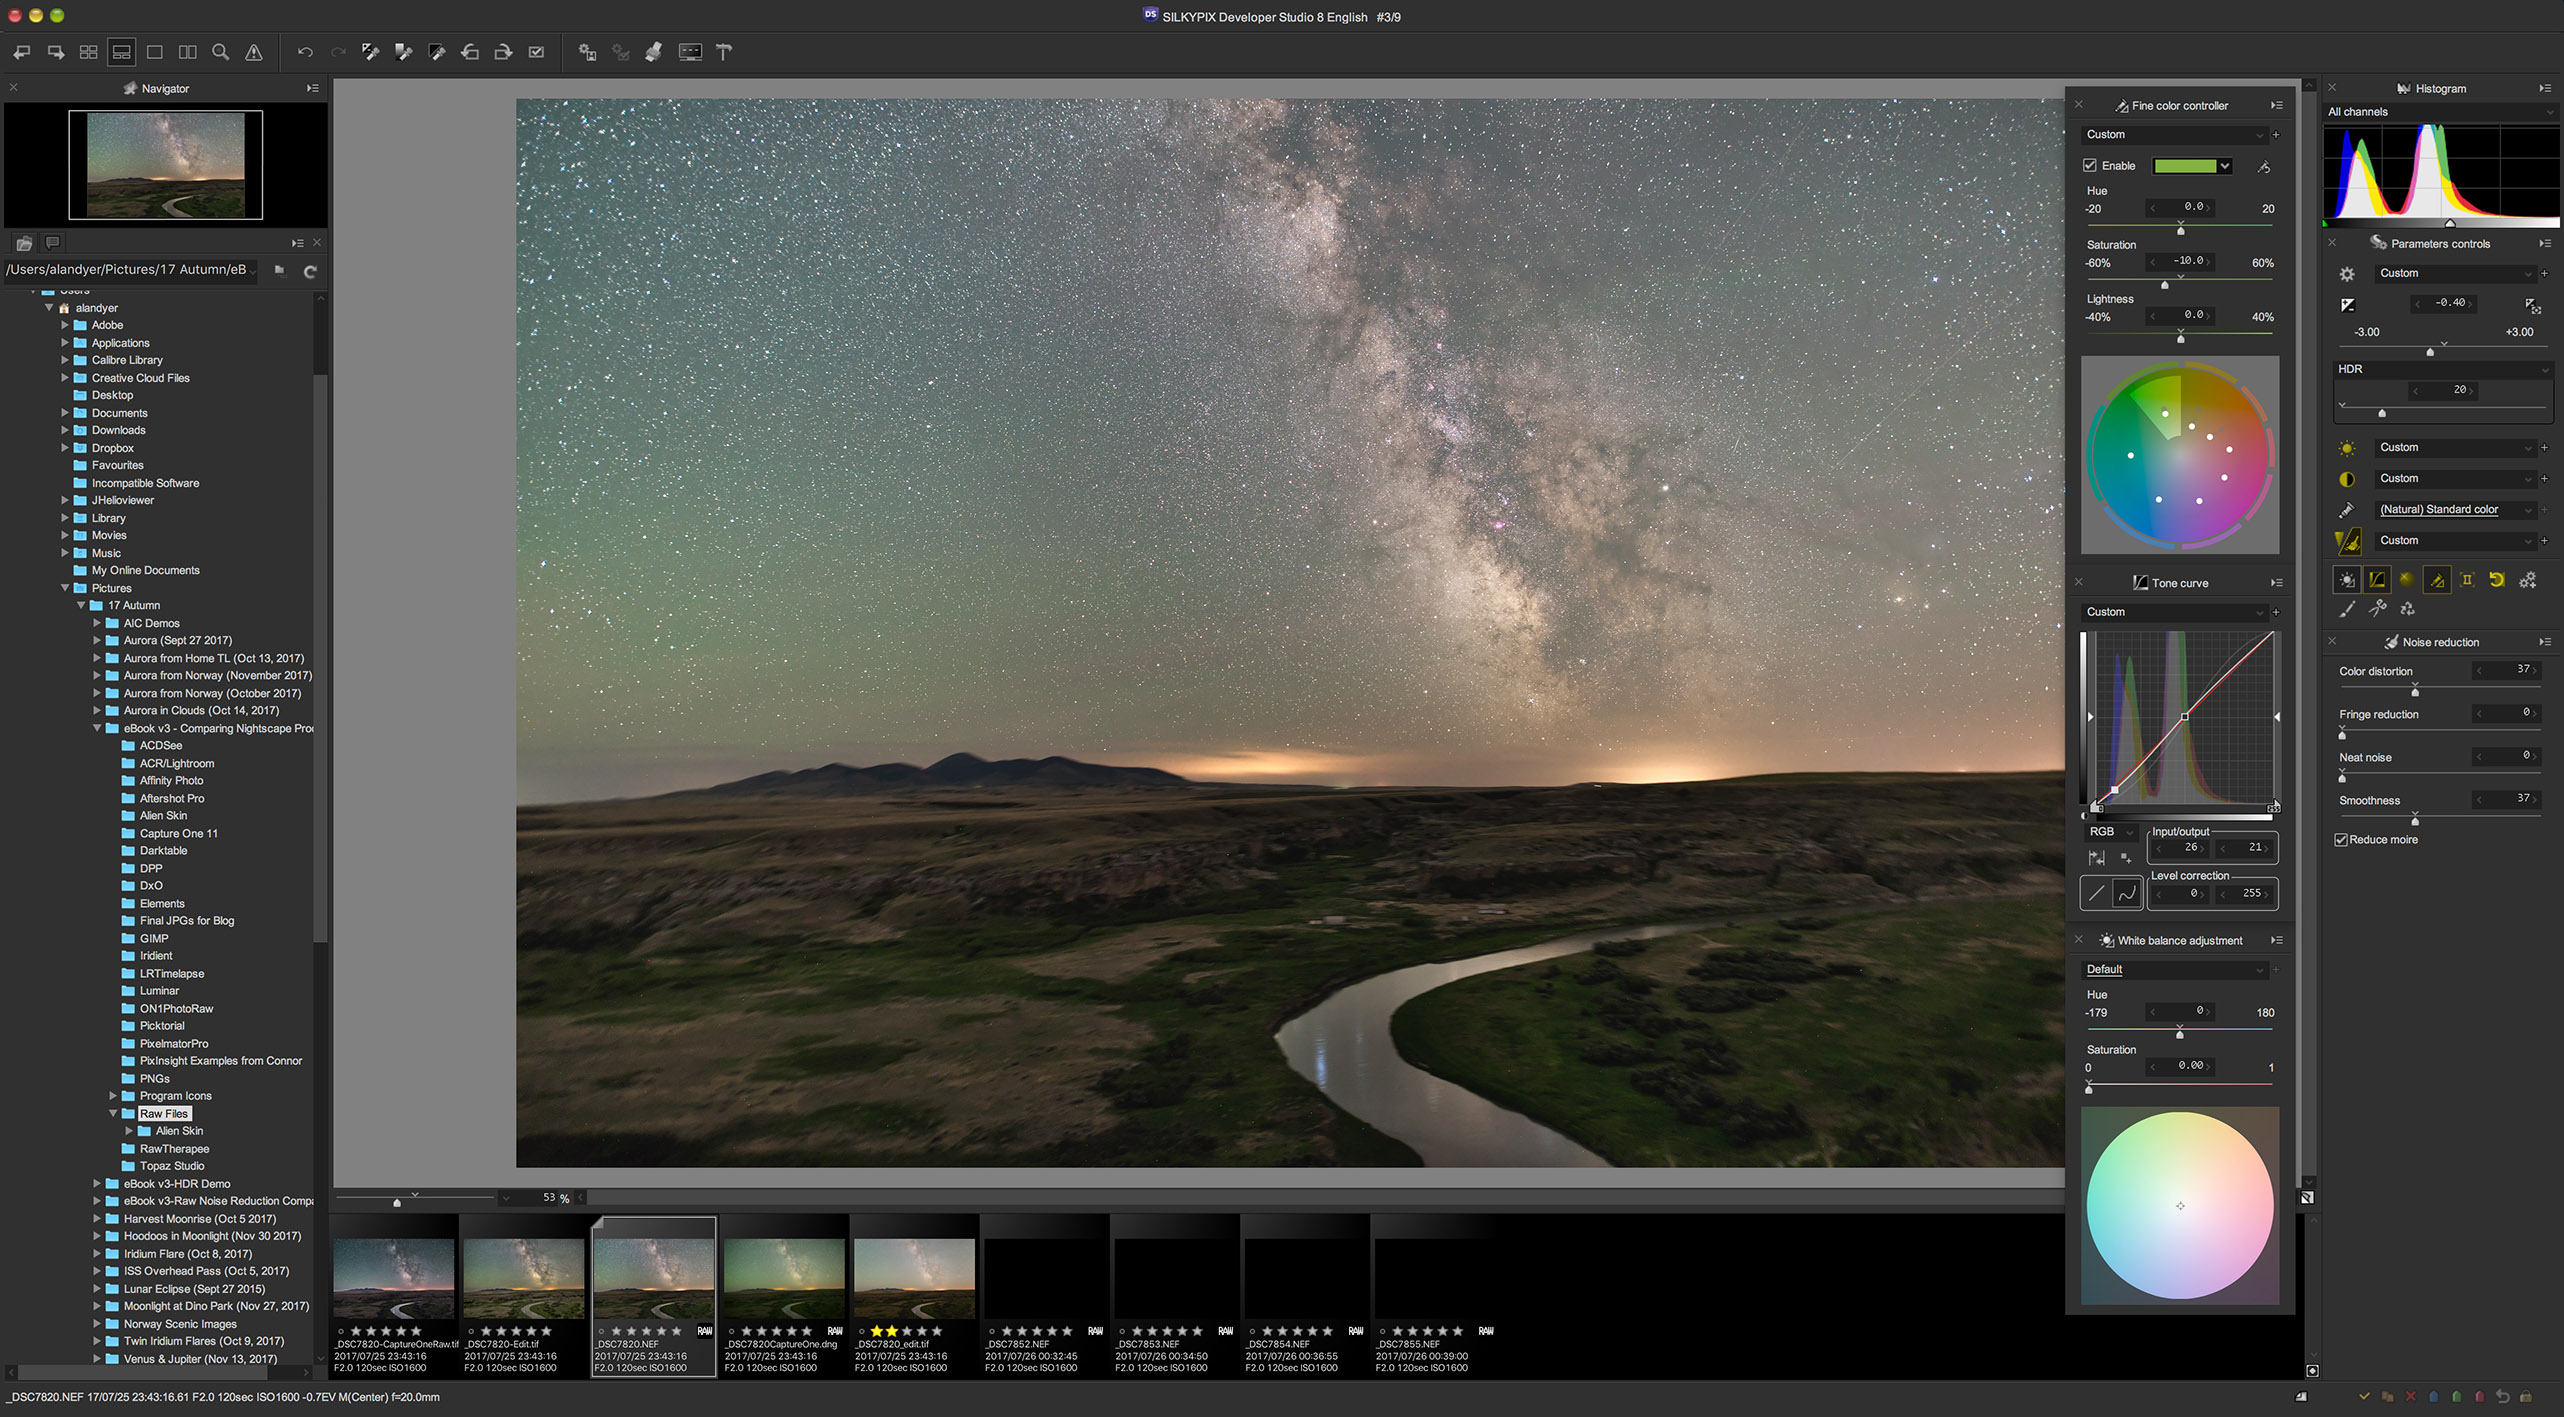
Popular among some camera manufacturers as their included raw developer, Silky Pix can be purchased separately ($80 list price for the standard version, $250 list price for the Pro version) with support for many cameras’ image files. It is available for MacOS and Windows. I tried the lower-cost “non-Pro” version 8. It did produce a good-looking end result, with good shadow and highlight recovery, and excellent color controls. Also on the plus side, Silky Pix has very good copy-and-paste functions for development settings, and good batch export functions, so it can be used to work on a folder of time-lapse frames.
On the down side, noise reduction, while acceptable, left an odd mottled pattern, hardly “silky.” The added “Neat” noise reduction option only smoothed out detail and was of little value except perhaps for very noisy images. Noise reduction did nothing to remove hot pixels, leaving lots of colored specks across the image. The program uses unorthodox controls whose purposes are not obvious. Instead of Highlights and Shadows you get Exposure Bias and HDR. Instead of Luminance and Color noise reduction, you get sliders labeled Smoothness and Color Distortion. You really need to read the extensive documentation to learn how to use this program.
I found sliders could be sticky and not easy to adjust precisely. The MacOS version was slow, often presenting long bouts of spinning beachballs while it performed some function. This is a program worth a try, and you might find you like it. But considering what the competition offers, I would not recommend it.
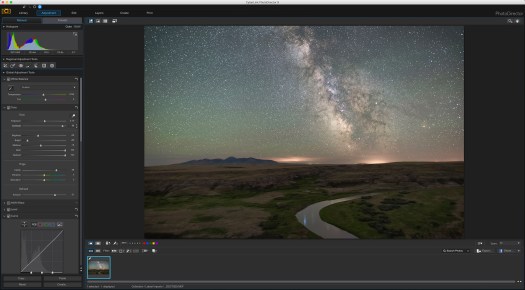
Topaz Studio (http://www.topazlabs.com)
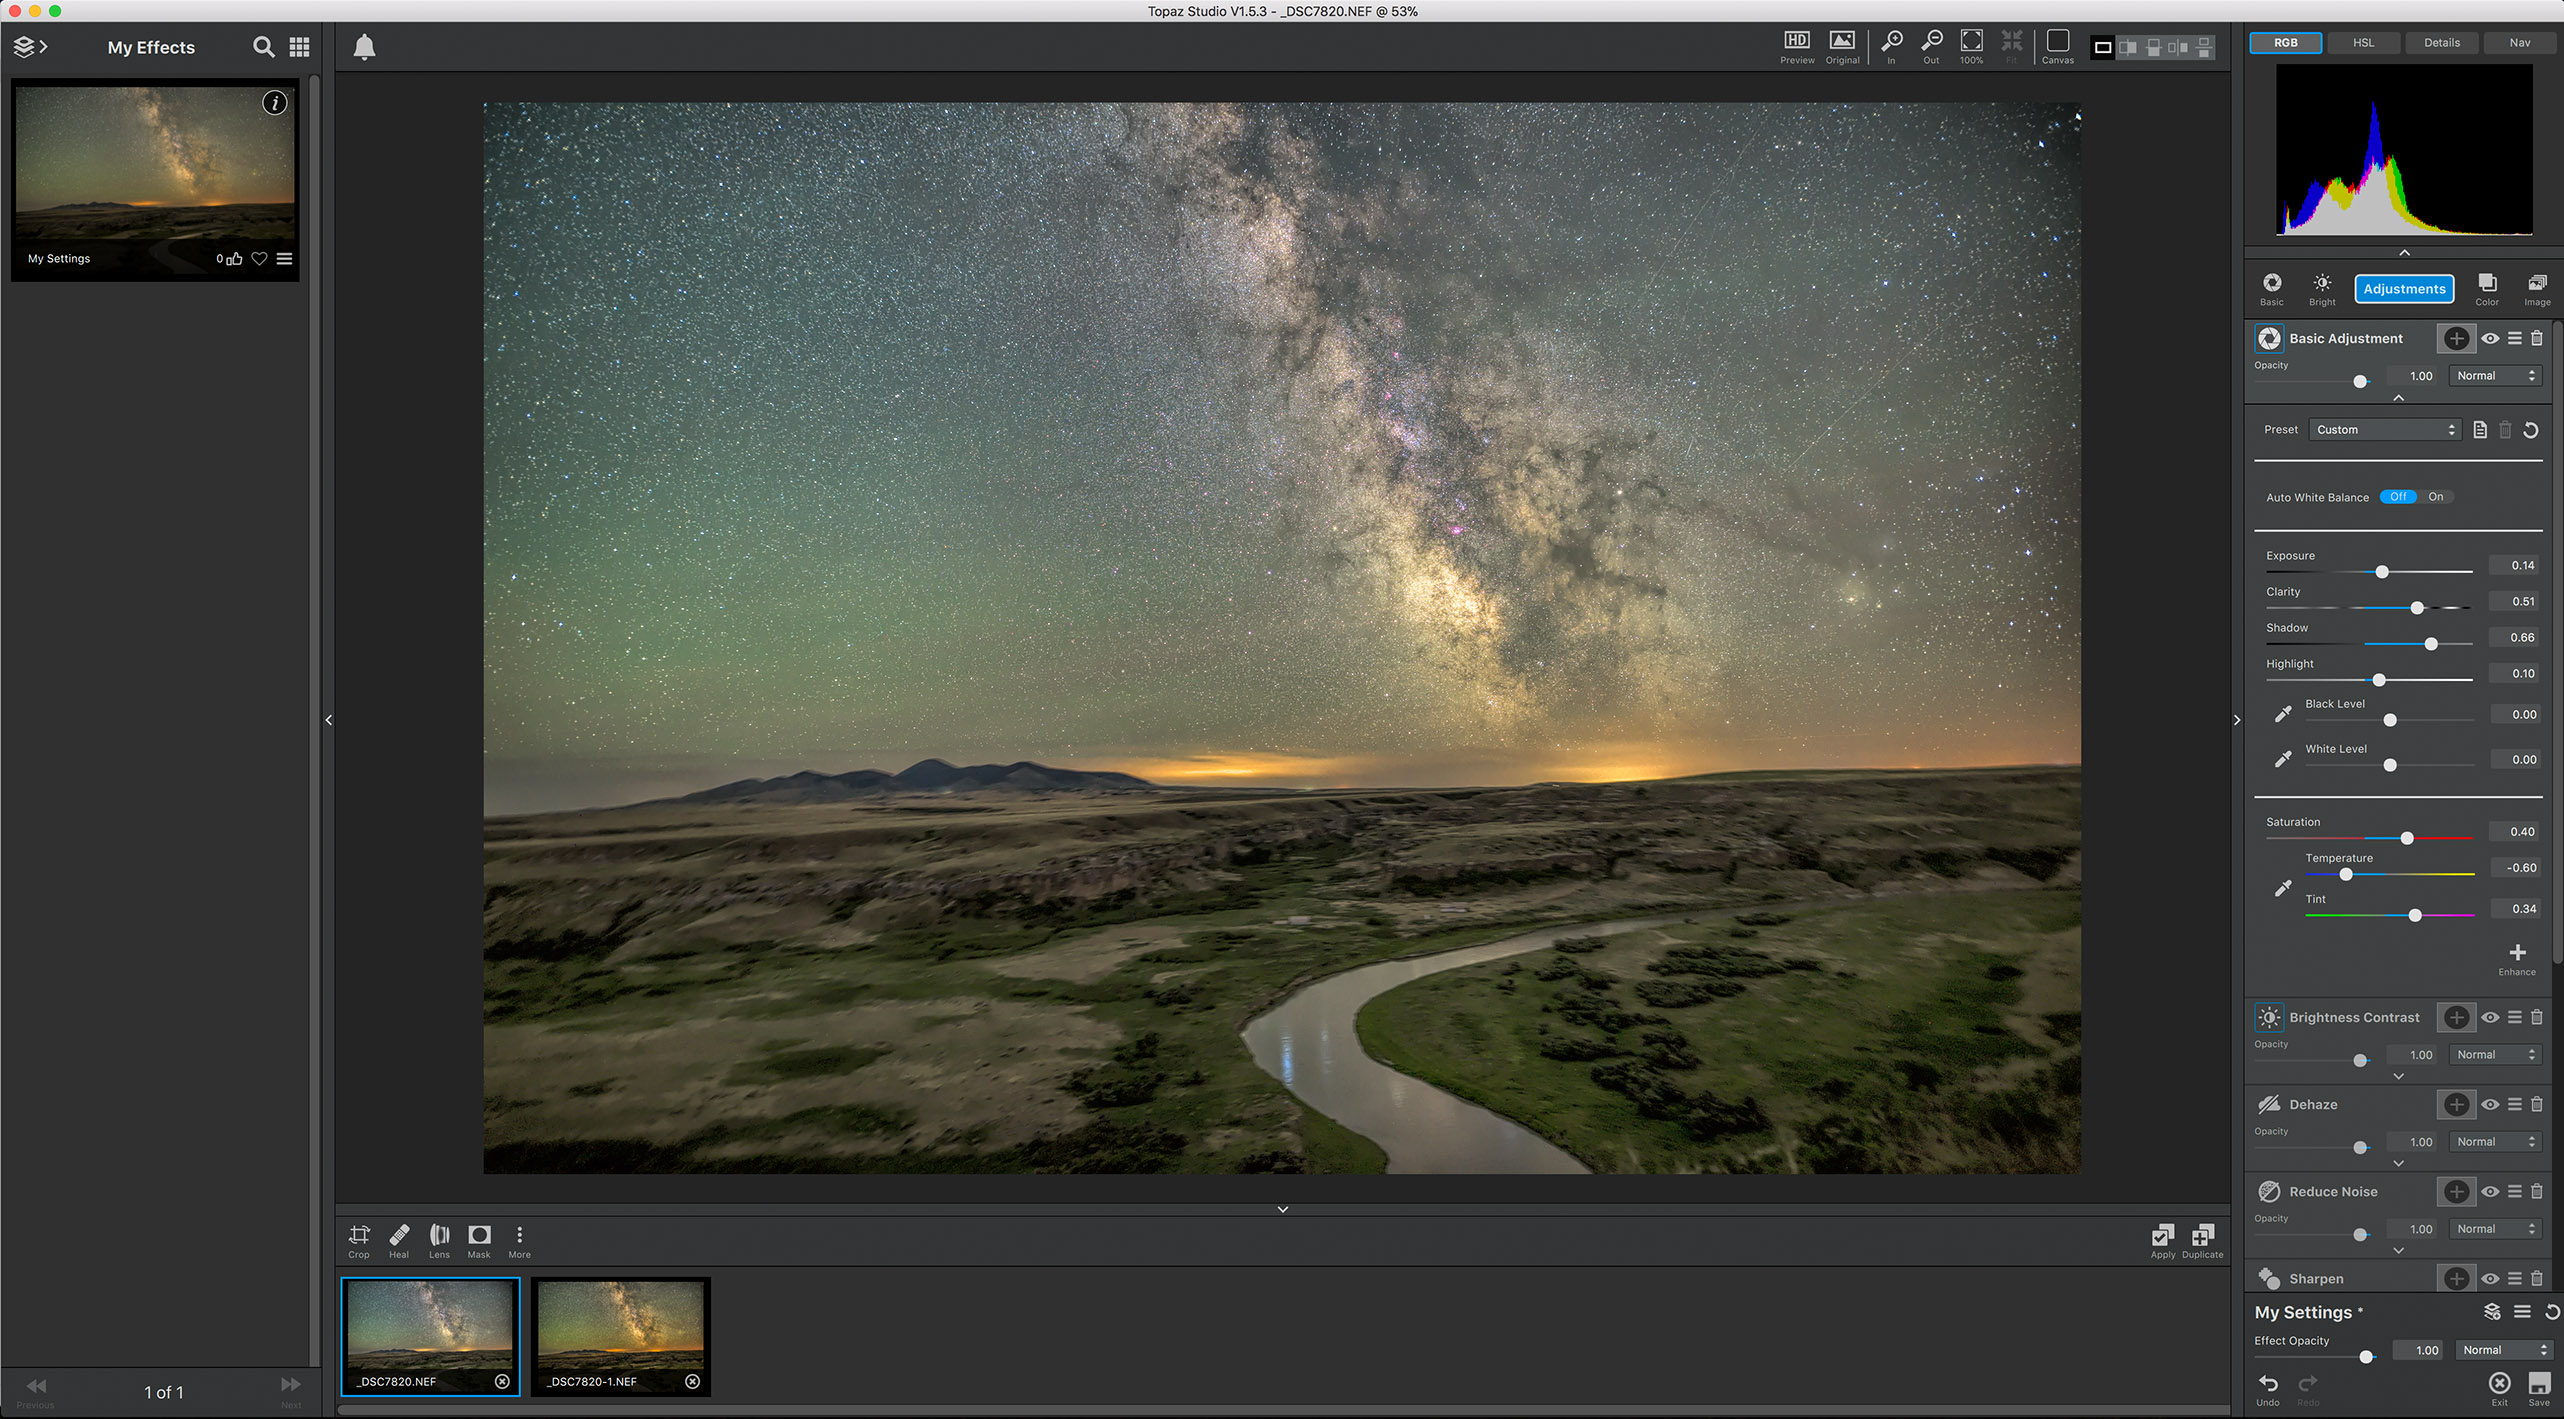
While Topaz Labs previously offered only plug-ins for Photoshop and other programs (their Topaz DeNoise 6 is very good), their Topaz Studio stand-alone program now offers full raw processing abilities.
It is for Mac and Windows. While it did a decent job developing my test Milky Way image (above), with good color and contrast adjustments, it cannot copy and paste settings from one image to a folder of images, only to one other image. Nor can it batch export a folder of images. Both deficiencies make it useless for time-lapse work.
In addition, while the base program is free, adding the “Pro Adjustments” modules I needed to process my test image (Noise Reduction, Dehaze, Precision Contrast, etc.) would cost $160 – each Adjustment is bought separately. Some users might like it, but I wouldn’t recommend it.
And … Adobe Photoshop Elements v18 (late 2017 release)
What about Adobe’s own Photoshop “Lite?” Elements is available for $99 as a boxed or downloadable one-time purchase, but with annual updates costing about $50. While it offers image and adjustment layers, it cannot do much with 16-bit images, and has very limited functions for developing raw files.
And its Lightroom-like Organizer module does not have any copy-and-paste settings or batch export functions, making it unsuitable for time-lapse production.
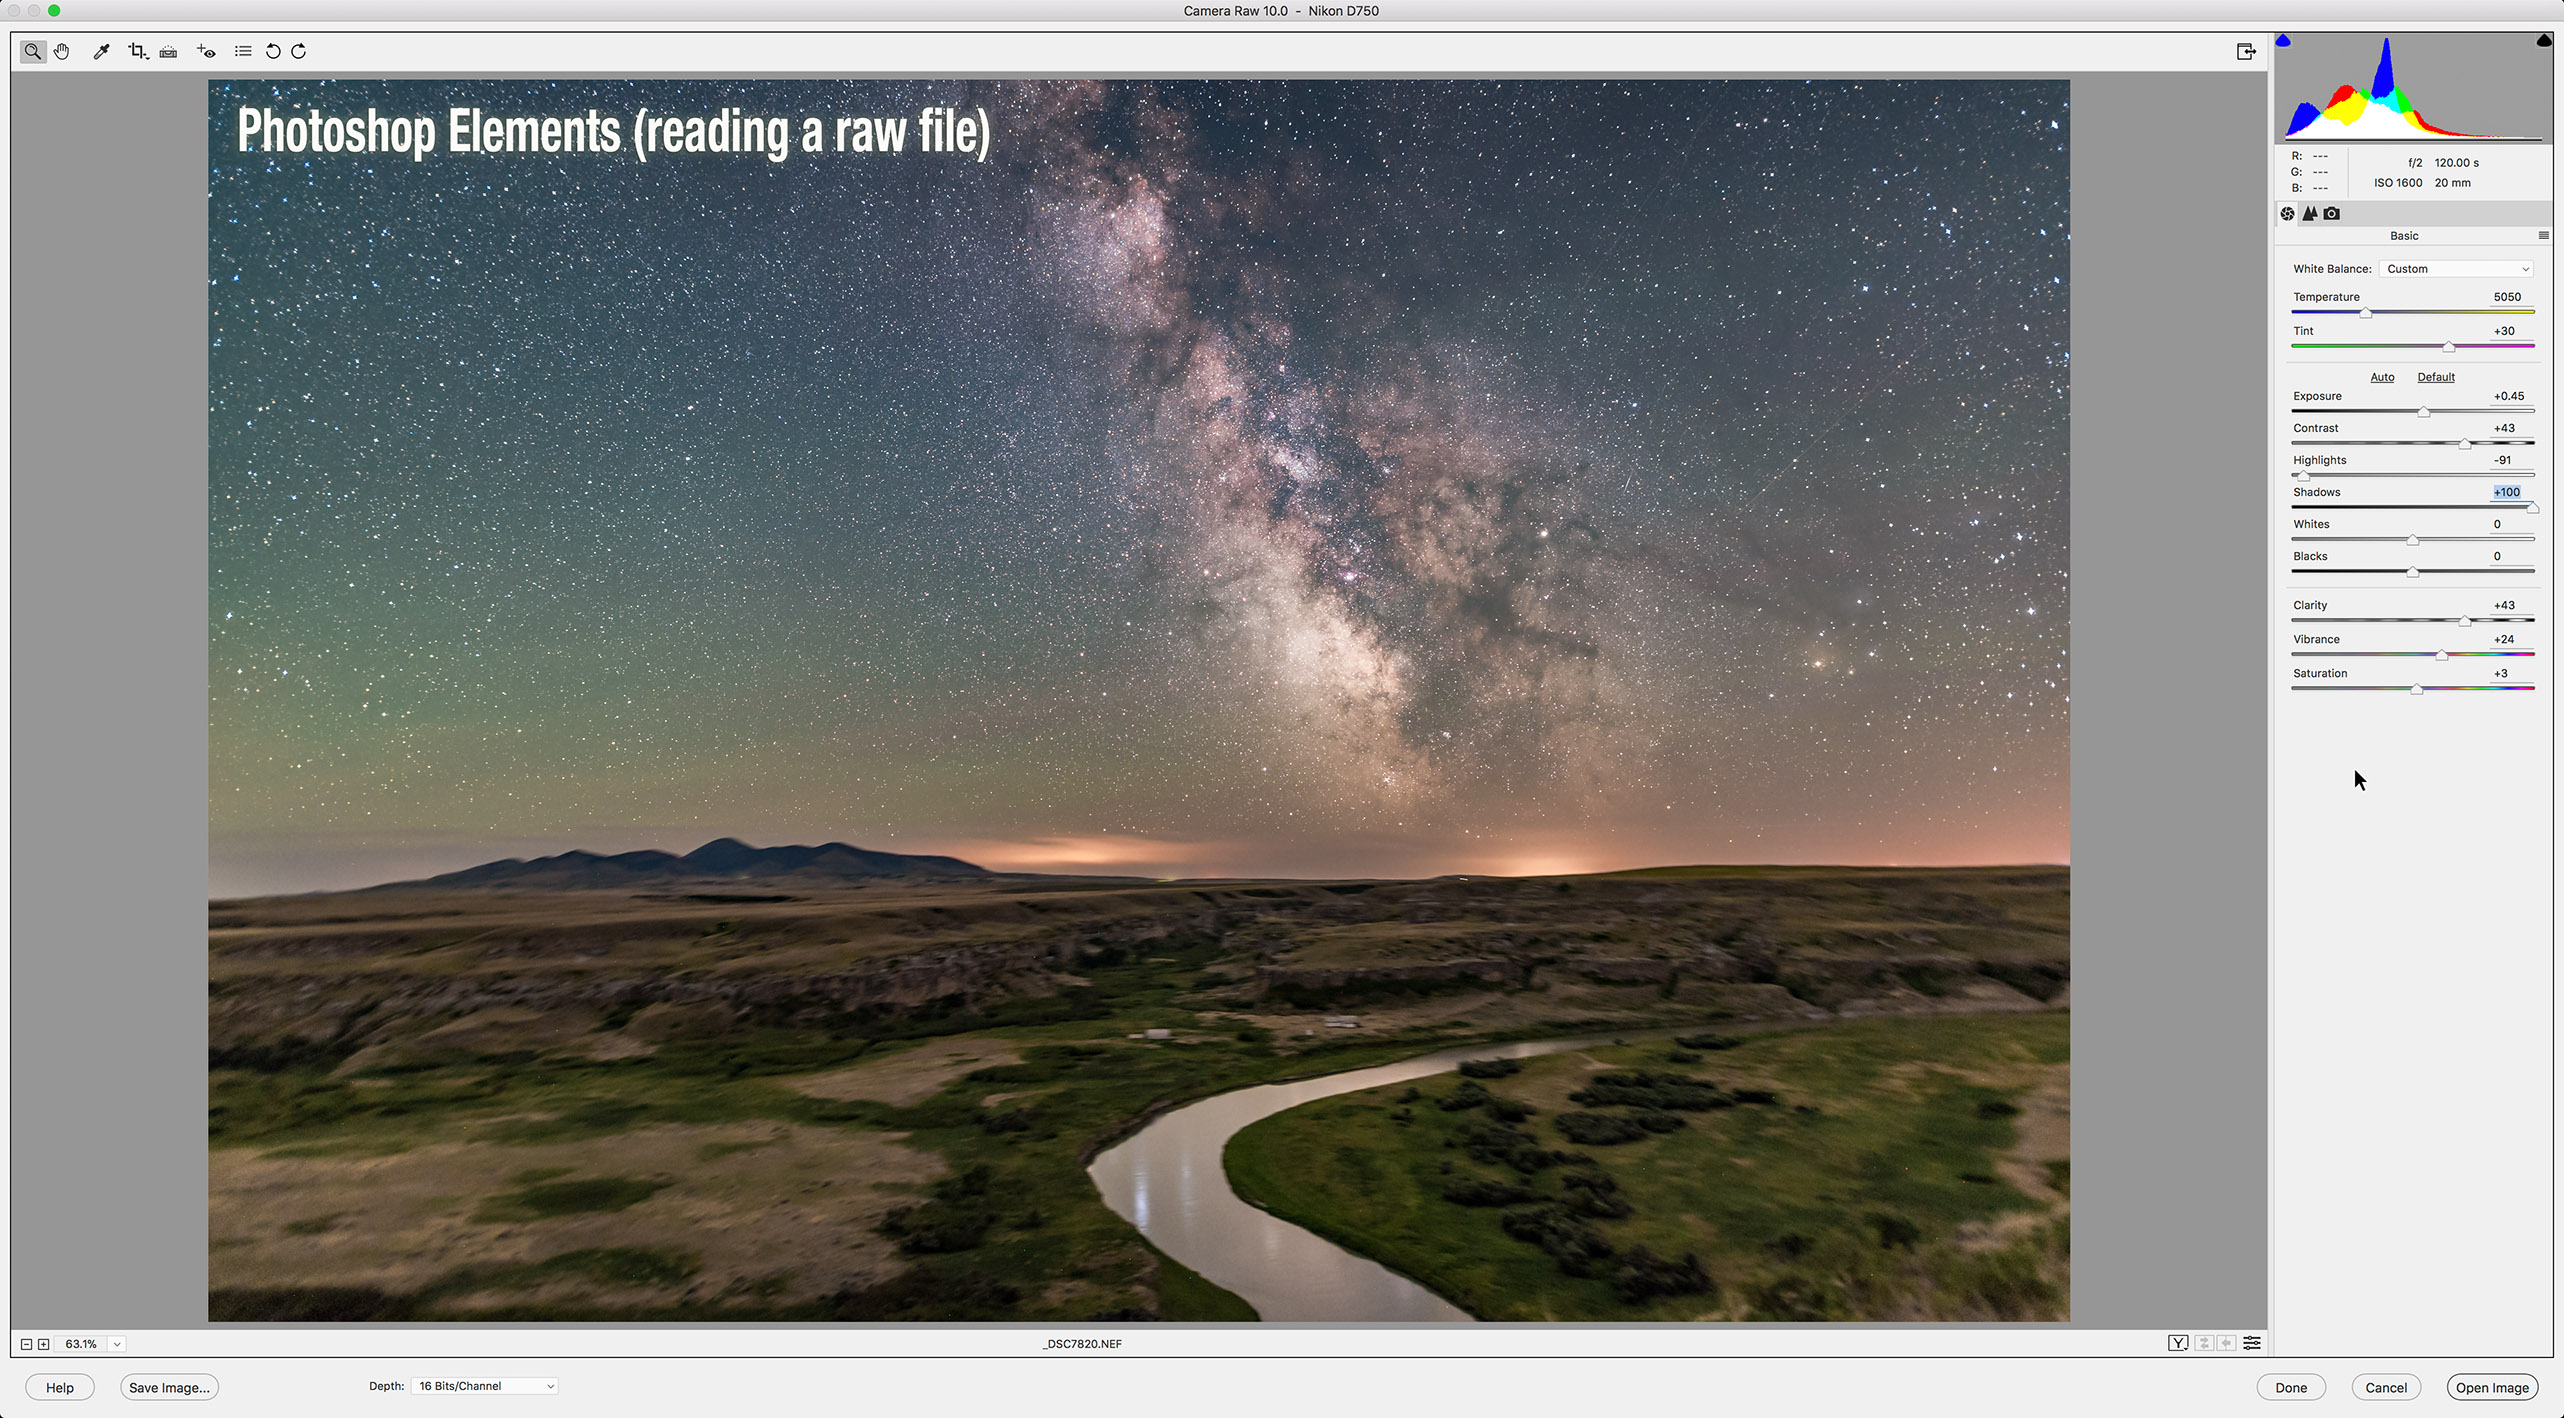
Elements is for processing photos for the snapshot family album. Like Apple’s Photos and other free photo apps, I don’t consider Elements to be a serious option for nightscape and time-lapse work. But it can be pressed into service for raw editing and layering single images, especially by beginners.
However, a Creative Cloud Photo subscription doesn’t cost much more than buying, then upgrading Elements outright, yet gets you far, far more in professional-level software.
And Yet More…!
In addition, for just developing raw files, you likely already have software to do the job – the program that came with your camera.

For Canon it’s Digital Photo Professional (shown above); for Nikon it’s Capture NX; for Pentax it’s Digital Camera Utility, etc.
These are all capable raw developers, but have no layering capabilities. And they read only the files from their camera brand. If theirs is the only software you have, try it. They are great for learning on.
But you’ll find that the programs from other companies offer more features and better image quality.
What Would I Buy?
Except for Capture One, which I tested as a trial copy, I did buy all the software in question, for testing for my Nightscapes eBook.
However, as I’ve described, none of the programs tick all the boxes. Each has strengths, but also weaknesses, if not outright deficiencies. I don’t feel any can fully replace Adobe products for features and image quality.

A possible non-Adobe combination for the best image quality might be DxO PhotoLab for raw developing and basic time-lapse processing, and Affinity Photo for stacking and compositing still images, from finished TIFF files exported out of DxO and opened and layered with Affinity.
But that combo lacks any cataloging option. For that you’d have to add ACDSee or Aftershot for a budget option. It’s hardly a convenient workflow I’d want to use.
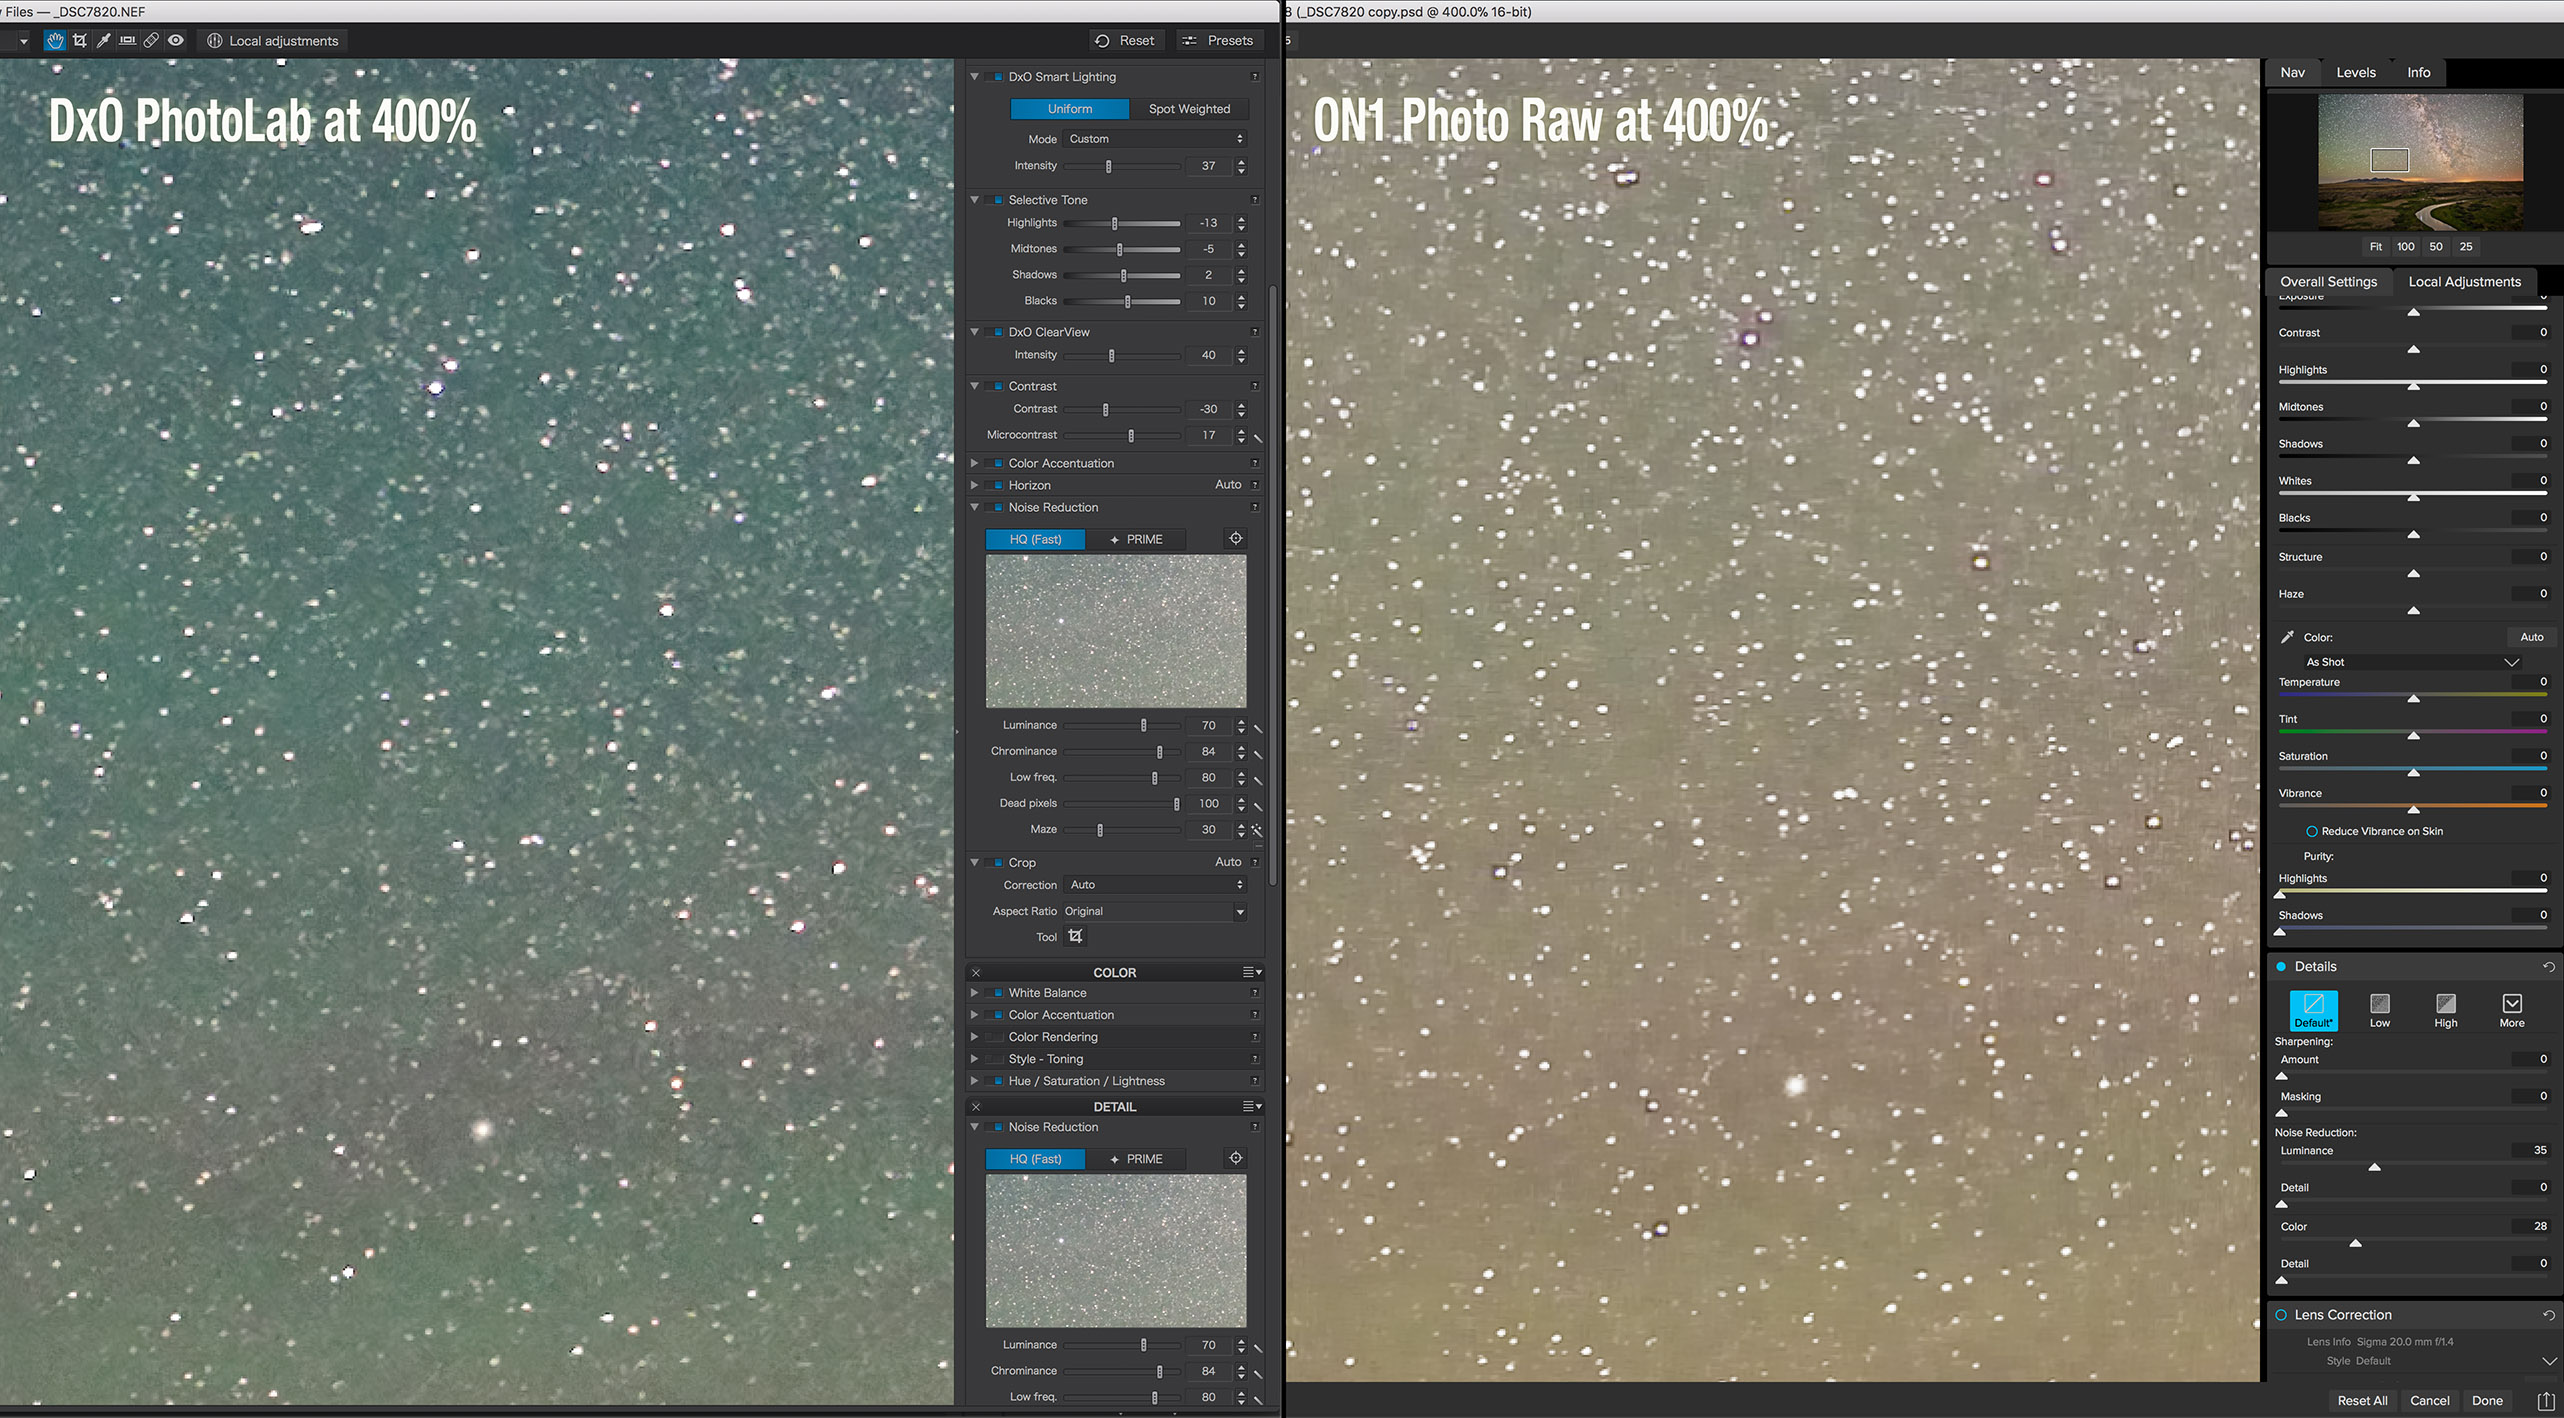
I’d love to recommend ON1 Photo RAW more highly as a single solution, if only it had better raw processing results, and didn’t suffer from de-Bayering artifacts (shown in a 400% close-up above, compared to DxO PhotoLab). These add the star haloes and a subtle blocky pattern to the sky, most obvious at right.
To Adobe or Not to Adobe
I’m just not anxious, as others are, to “avoid Adobe.”
I’ve been a satisfied Creative Cloud subscriber for several years, and view the monthly fee as the cost of doing business. It’s much cheaper than the annual updates that boxed Photoshop versions used to cost. Nor am I worried about Adobe suddenly jacking up the fees or holding us hostage with demands.
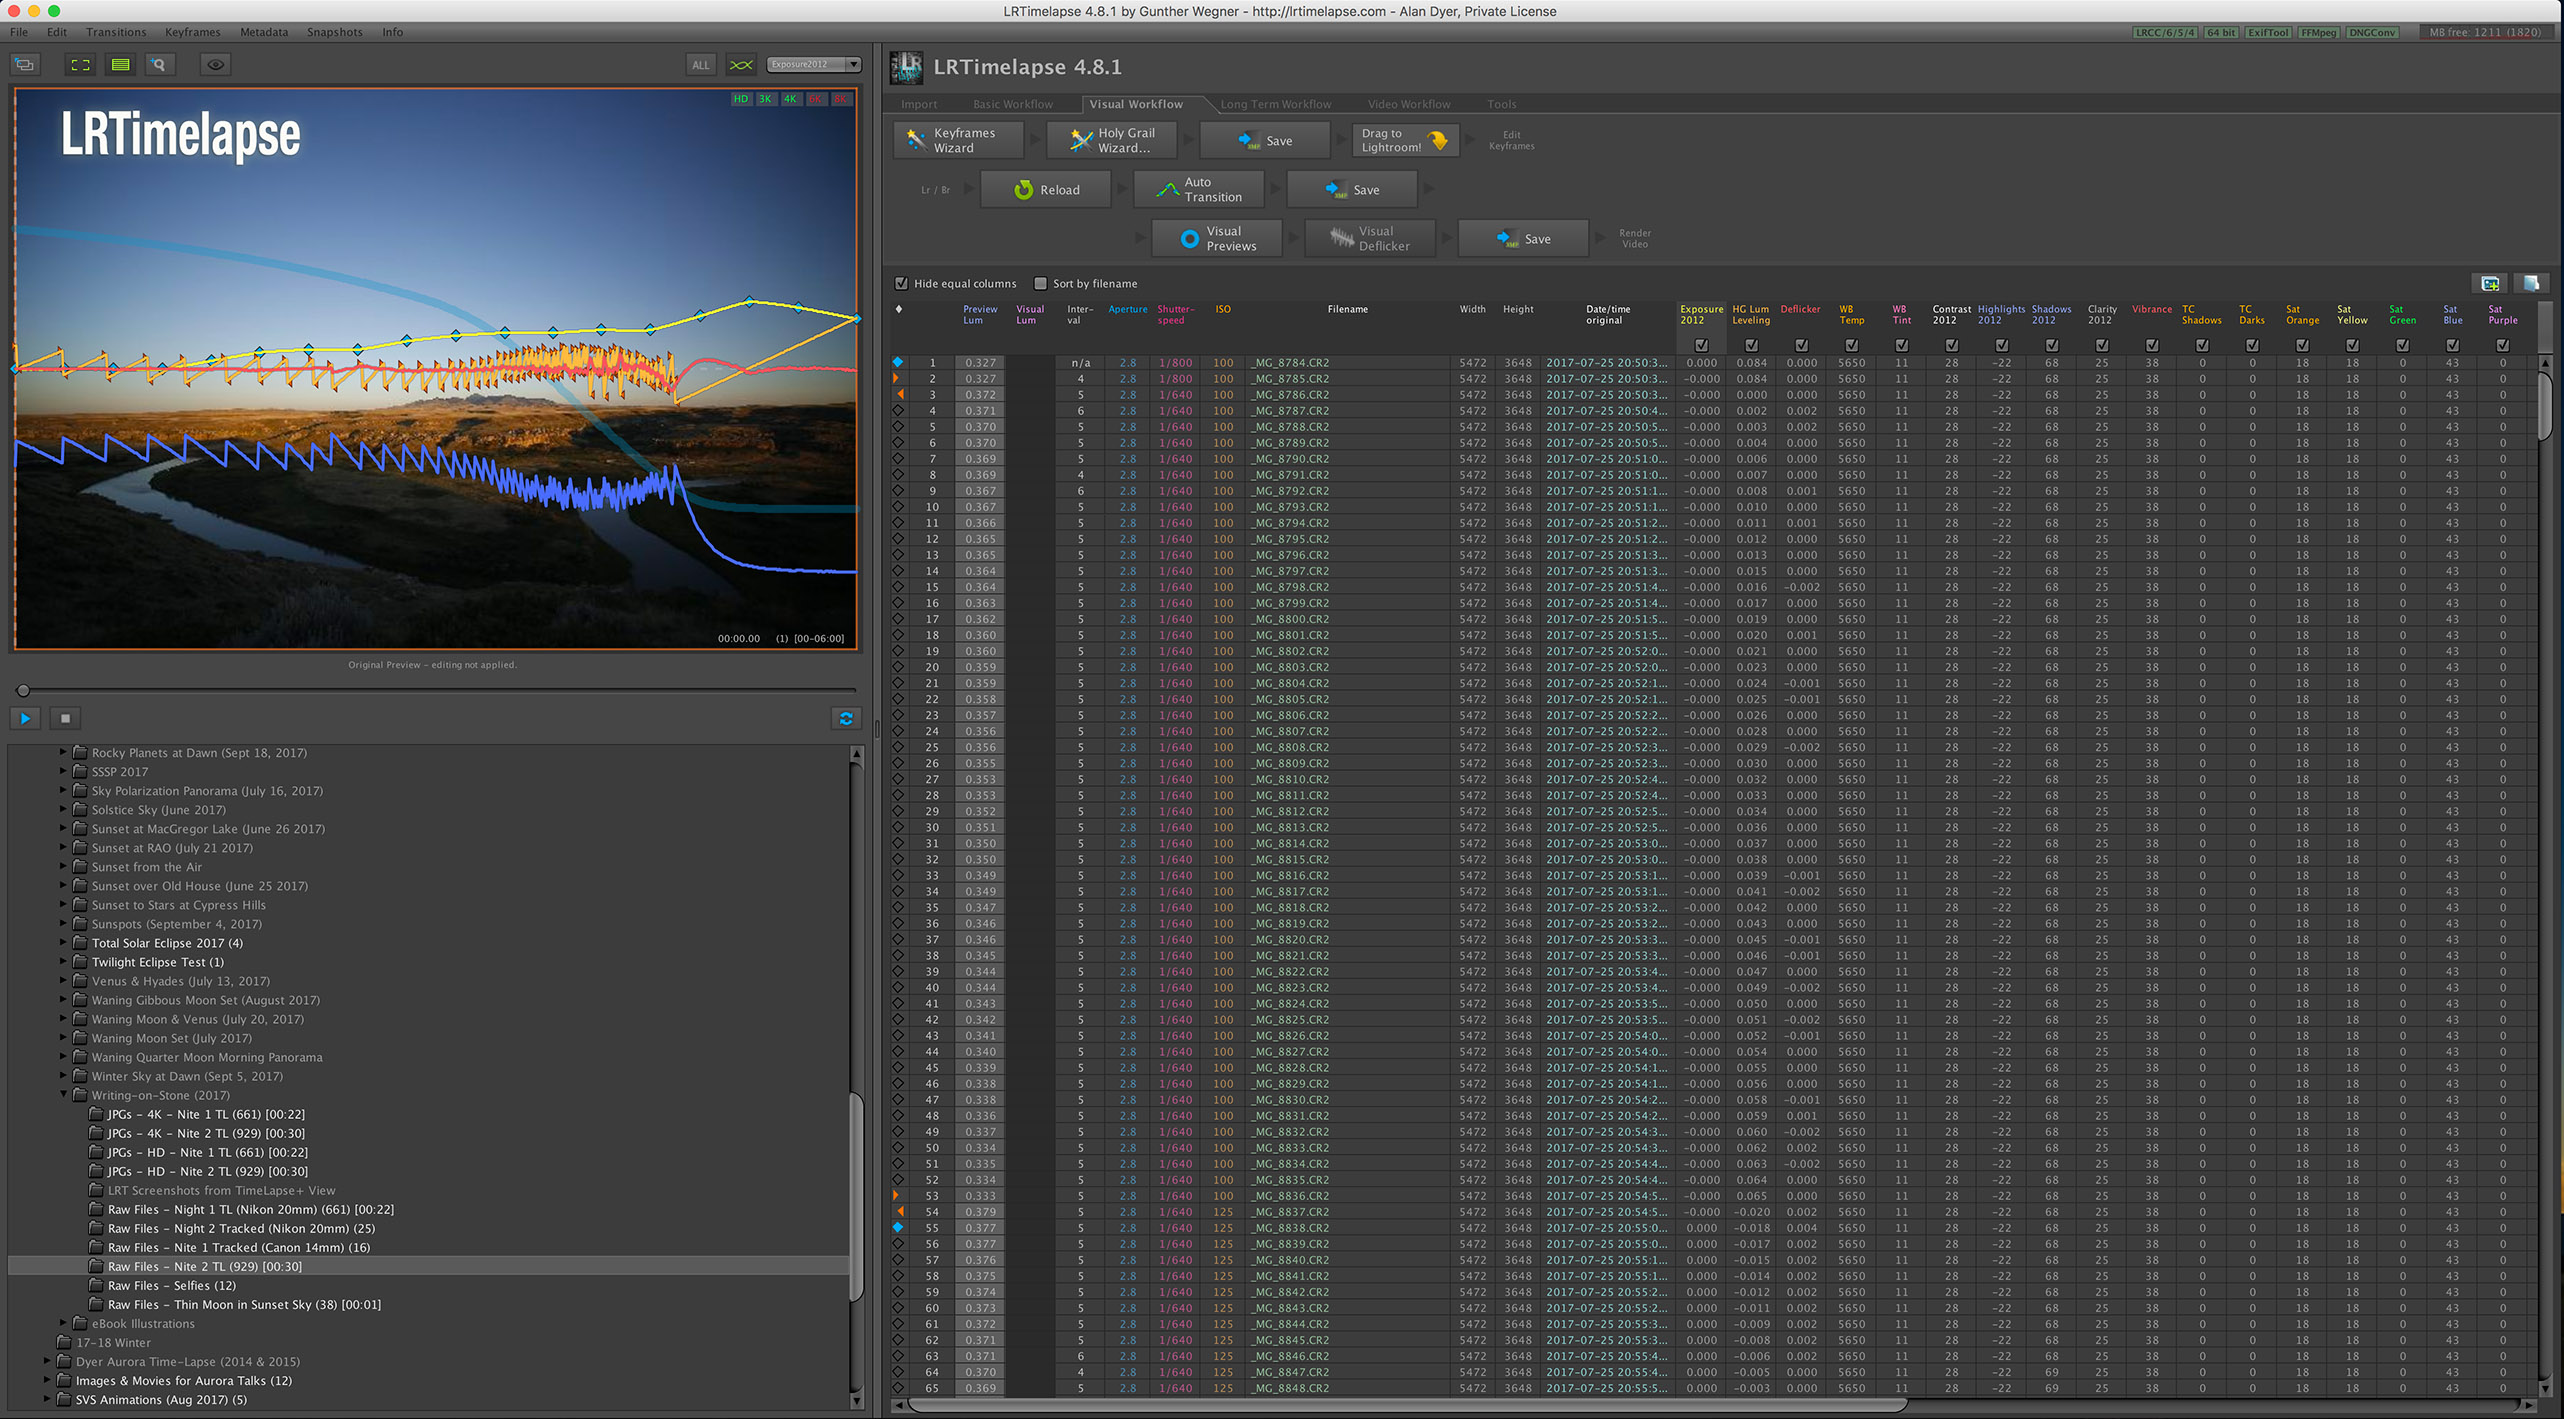
For me, the need to use LRTimelapse (shown above) for about 80 percent of all the time-lapse sequences I shoot means the question is settled. LRTimelapse works only with Adobe software, and the combination works great. Sold.
I feel Camera Raw/Lightroom produces results that others can only just match, if that.
Only DxO PhotoLab beat Adobe for its excellent contrast enhancements and PRIME noise reduction.
Yes, other programs certainly have some fine features I wish Camera Raw or Lightroom had, such as:
- Hot and dead pixel removal
- Dark frame subtraction and flat field division
- Better options for contrast enhancement
- And adding local adjustments to raw files via layers, with more precise masking tools
- Among others!
But those aren’t “must haves.”
Using ACR or Lightroom makes it easy to export raw files for time-lapse assembly, or to open them into Photoshop for layering and compositing, usually as “smart objects” for non-destructive editing, as shown below.
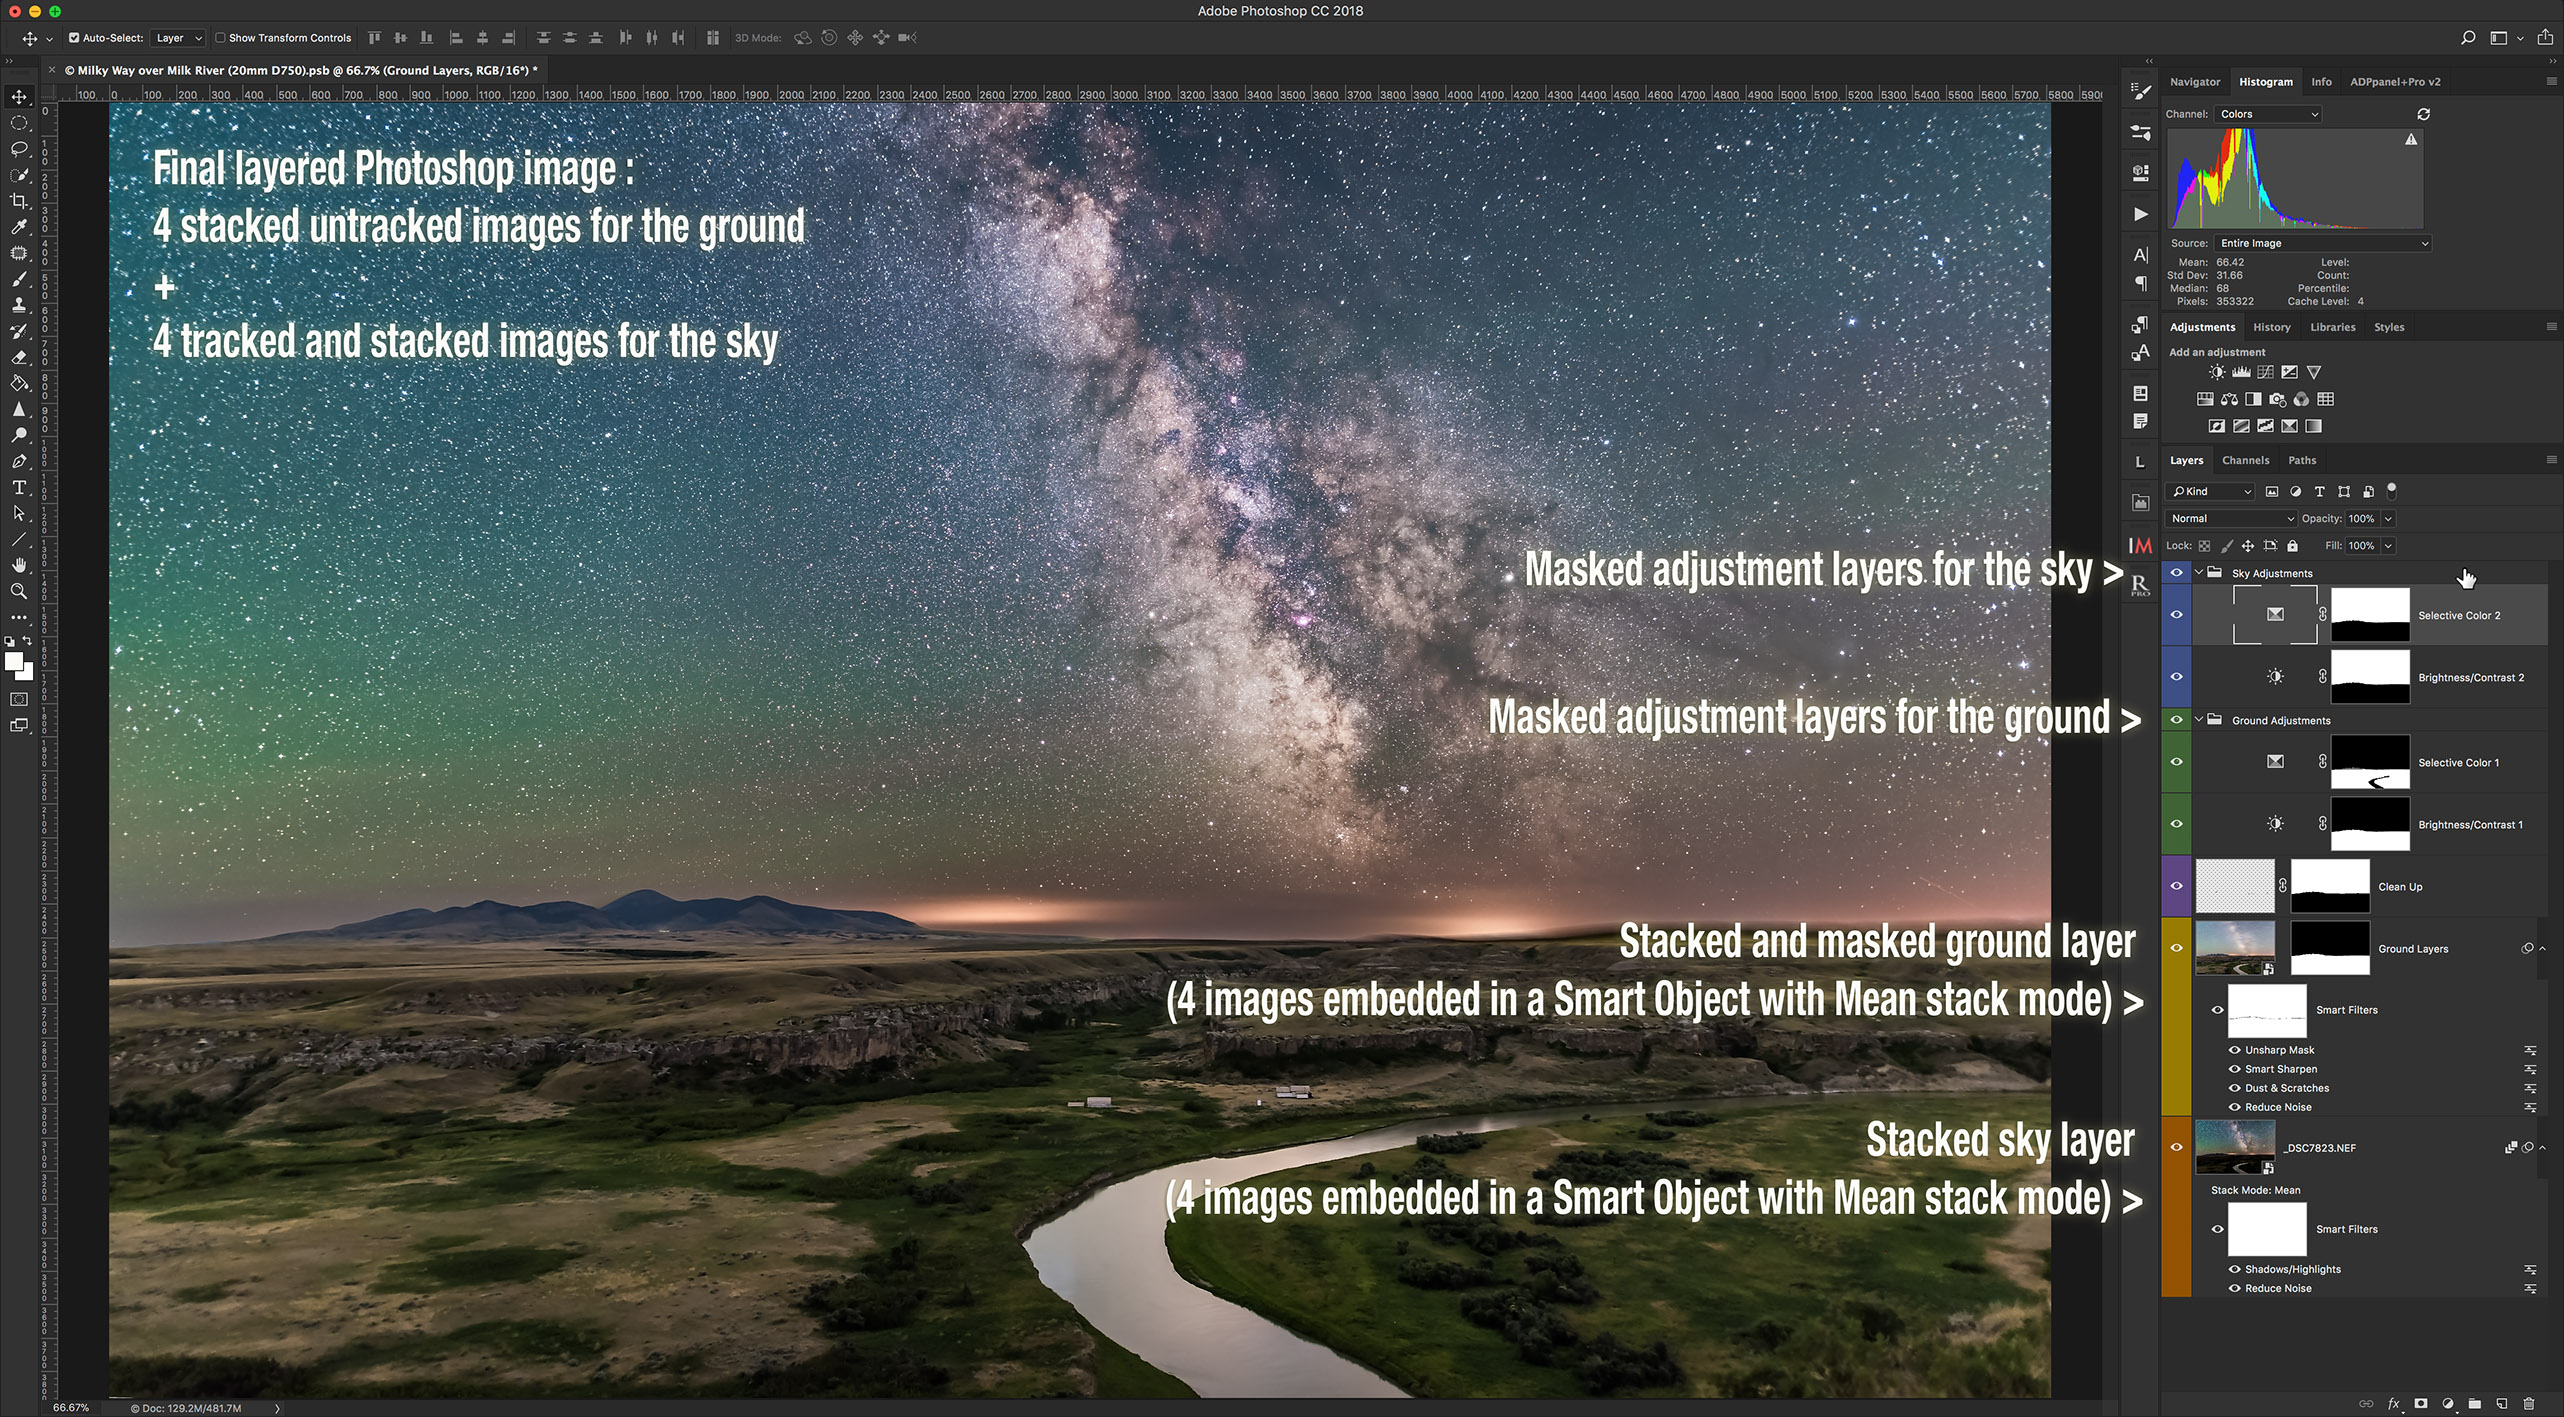
Above is the final layered image, consisting of:
- A stack of 4 tracked exposures for the sky (the test image is one of those exposures)
- And 4 untracked exposures for the ground.
The mean stacking smooths noise even more. The masking reveals just the sky on the tracked set. Every adjustment layer, mask, and “smart filter” is non-destructive and can be adjusted later.
I’ll work on recreating this same image with the three non-Adobe programs capable of doing so – Affinity, Luminar, and ON1 Photo RAW – to see how well they do. But that’s the topic of a future blog.
Making the Switch?
The issue with switching from Adobe to any new program is compatibility.
While making a switch will be fine when working on all new images, reading the terabytes of old images I have processed with Adobe software (and being able to re-adjust their raw settings and layered adjustments) will always require that Adobe software.
If you let your Creative Cloud subscription lapse, as I understand it the only thing that will continue to work is Lightroom’s Library module, allowing you to review images only. You can’t do anything to them.
None of the contender programs will read Adobe’s XMP metadata files to display raw images with Adobe’s settings intact.
Conversely, nor can Adobe read the proprietary files and metadata other programs create.
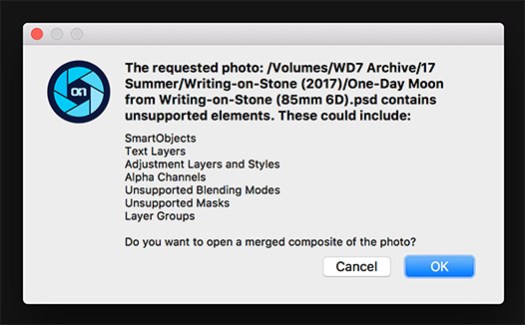
With final layered Photoshop files, while some programs can read .PSD files, they usually open them just as flattened images, as ON1 warns it will do above. It flattened all of the non-destructive editing elements created in Photoshop. Luminar did the same.
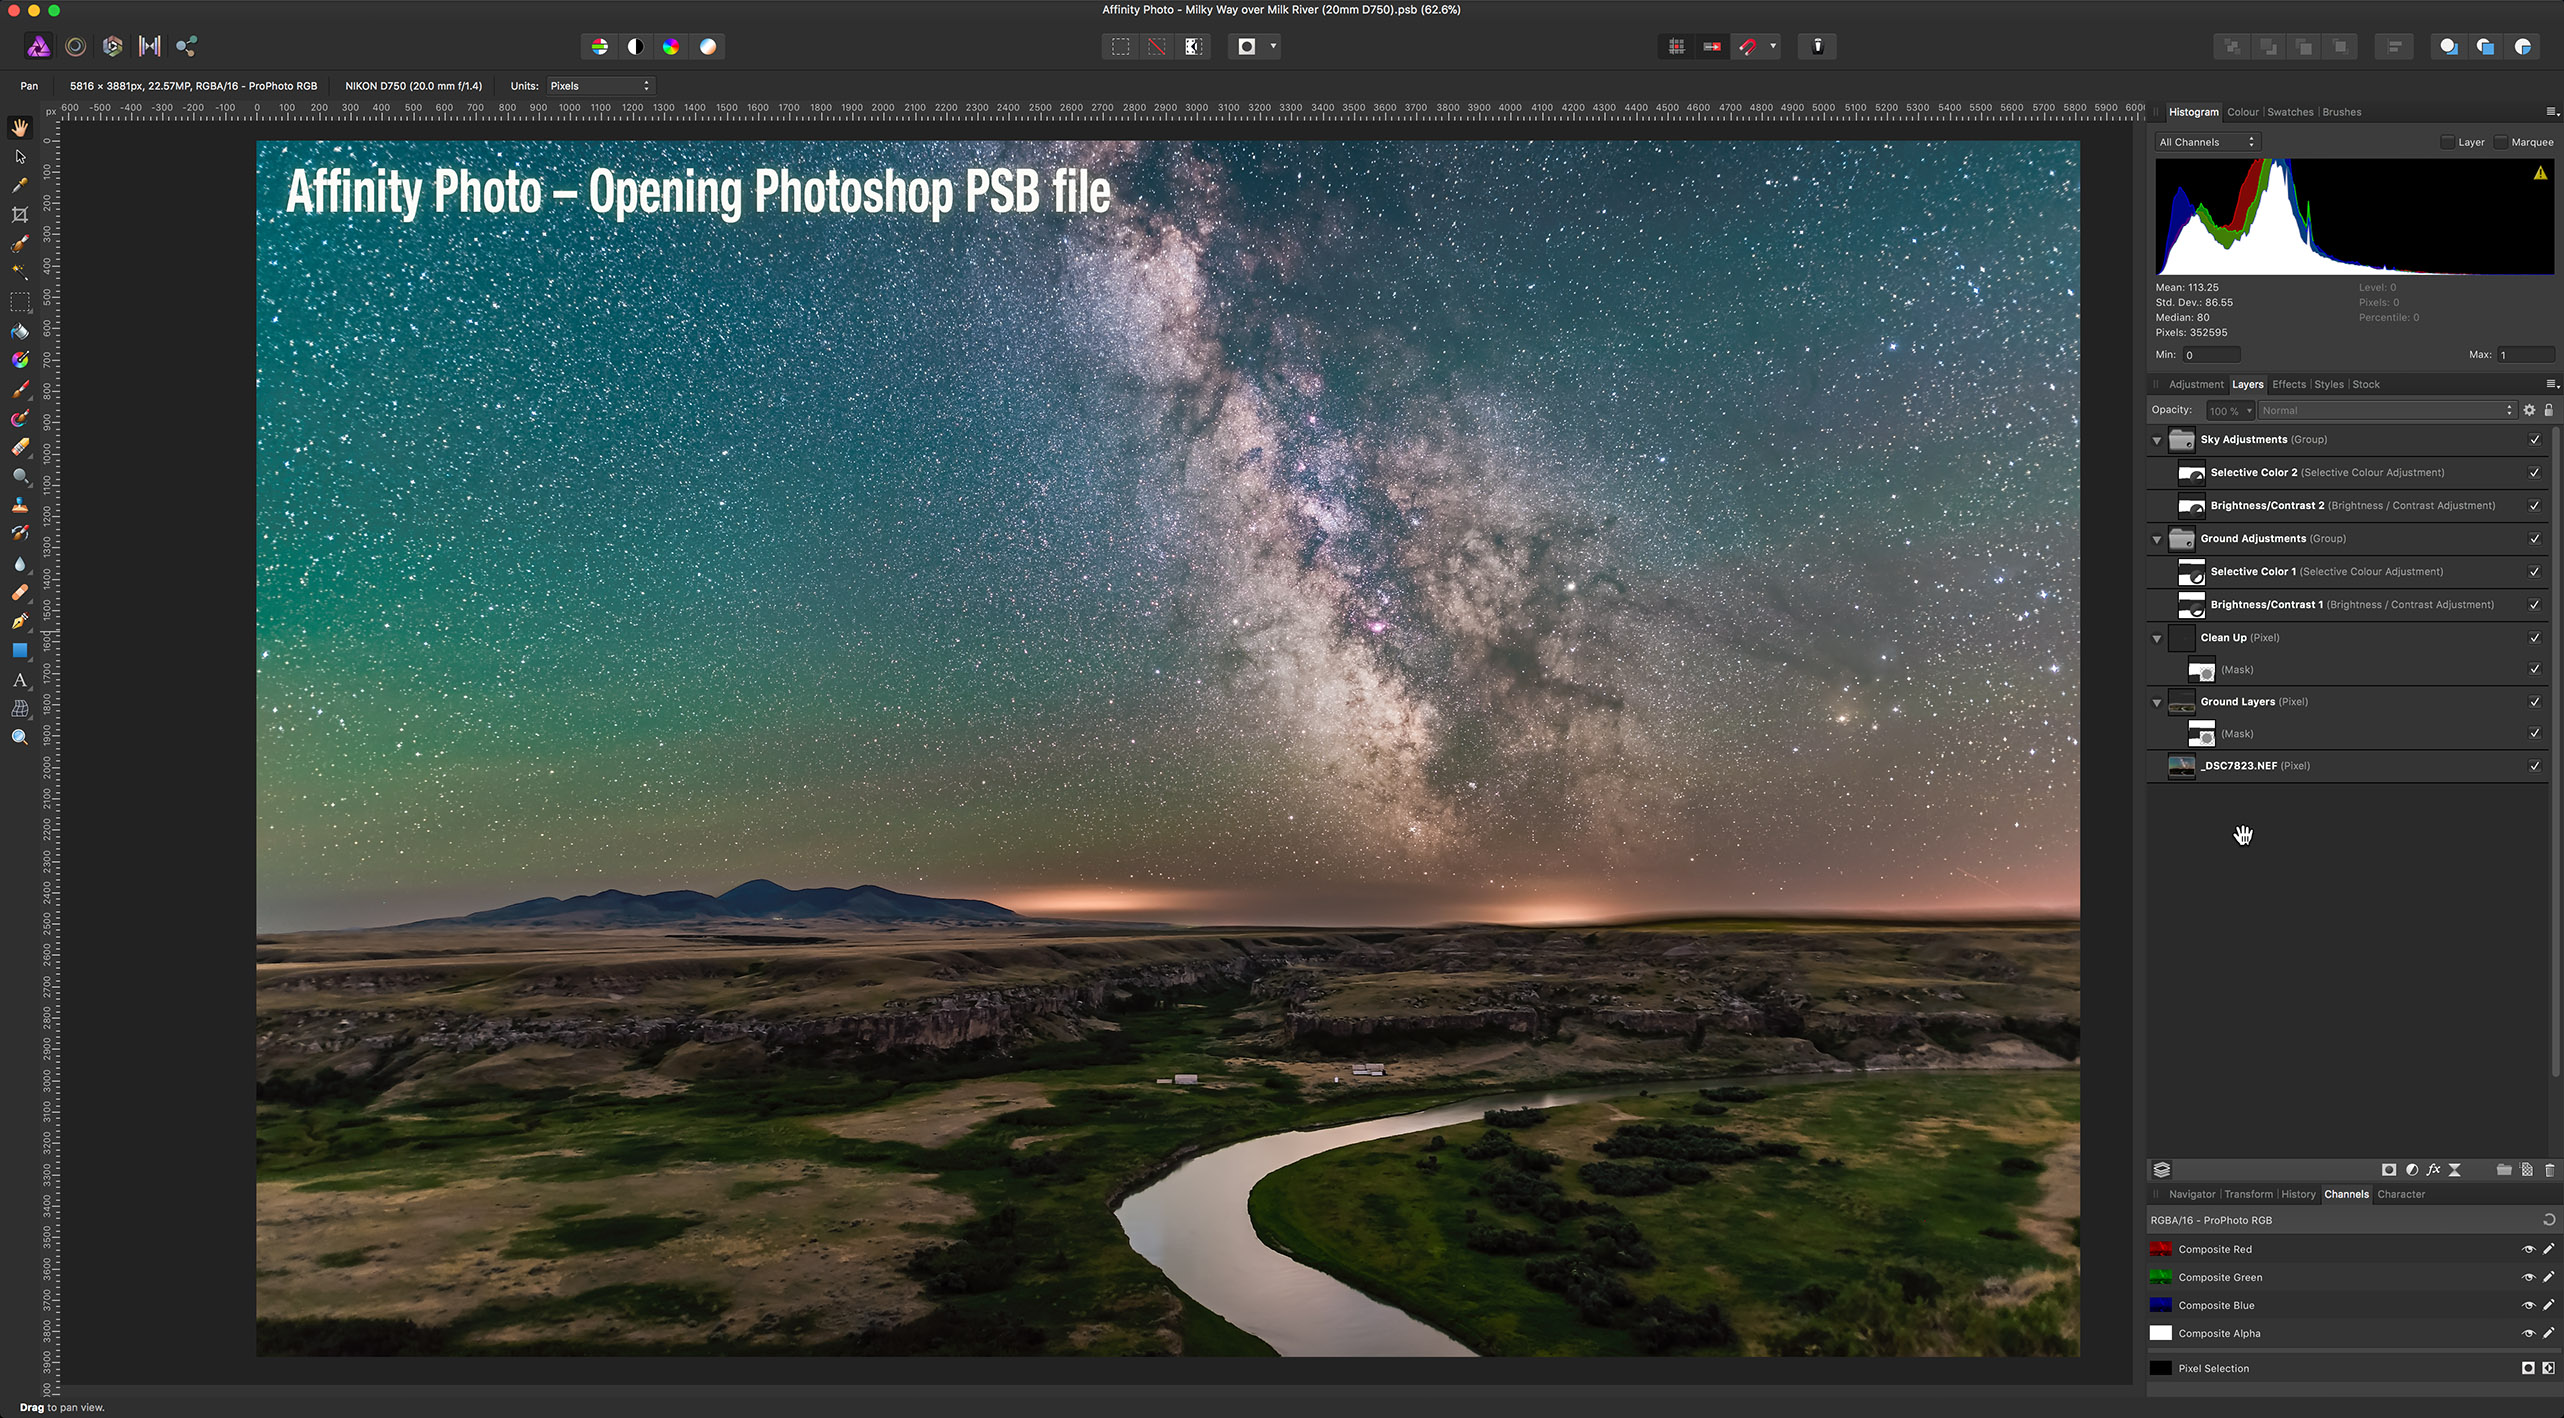
Only Affinity Photo (above) successfully read a complex and very large Photoshop .PSB file correctly, honouring at least its adjustment and image layers. So, if backwards compatibility with your legacy Photoshop images is important, choose Affinity Photo.
However, Affinity flattened Photoshop’s smart object image layers and their smart filters. Even Adobe’s own Photoshop Elements doesn’t honor smart objects.
Lest you think that’s a “walled garden” created by “evil Adobe,” keep in mind that the same will be true of the image formats and catalogs that all the contender programs produce.
To read the adjustments, layers, and “live filters” you create using any another program, you will need to use that program.
Will Affinity, DxO, Luminar, ON1, etc. be around in ten years?
Yes, you can save out flattened TIFFs that any program can read in the future, but that rules out using those other programs to re-work any of the image’s original settings.
In Conclusion!

I can see using DxO PhotoLab (above) or Raw Therapee for some specific images that benefit from their unique features.
Or using ACDSee as a handy image browser.
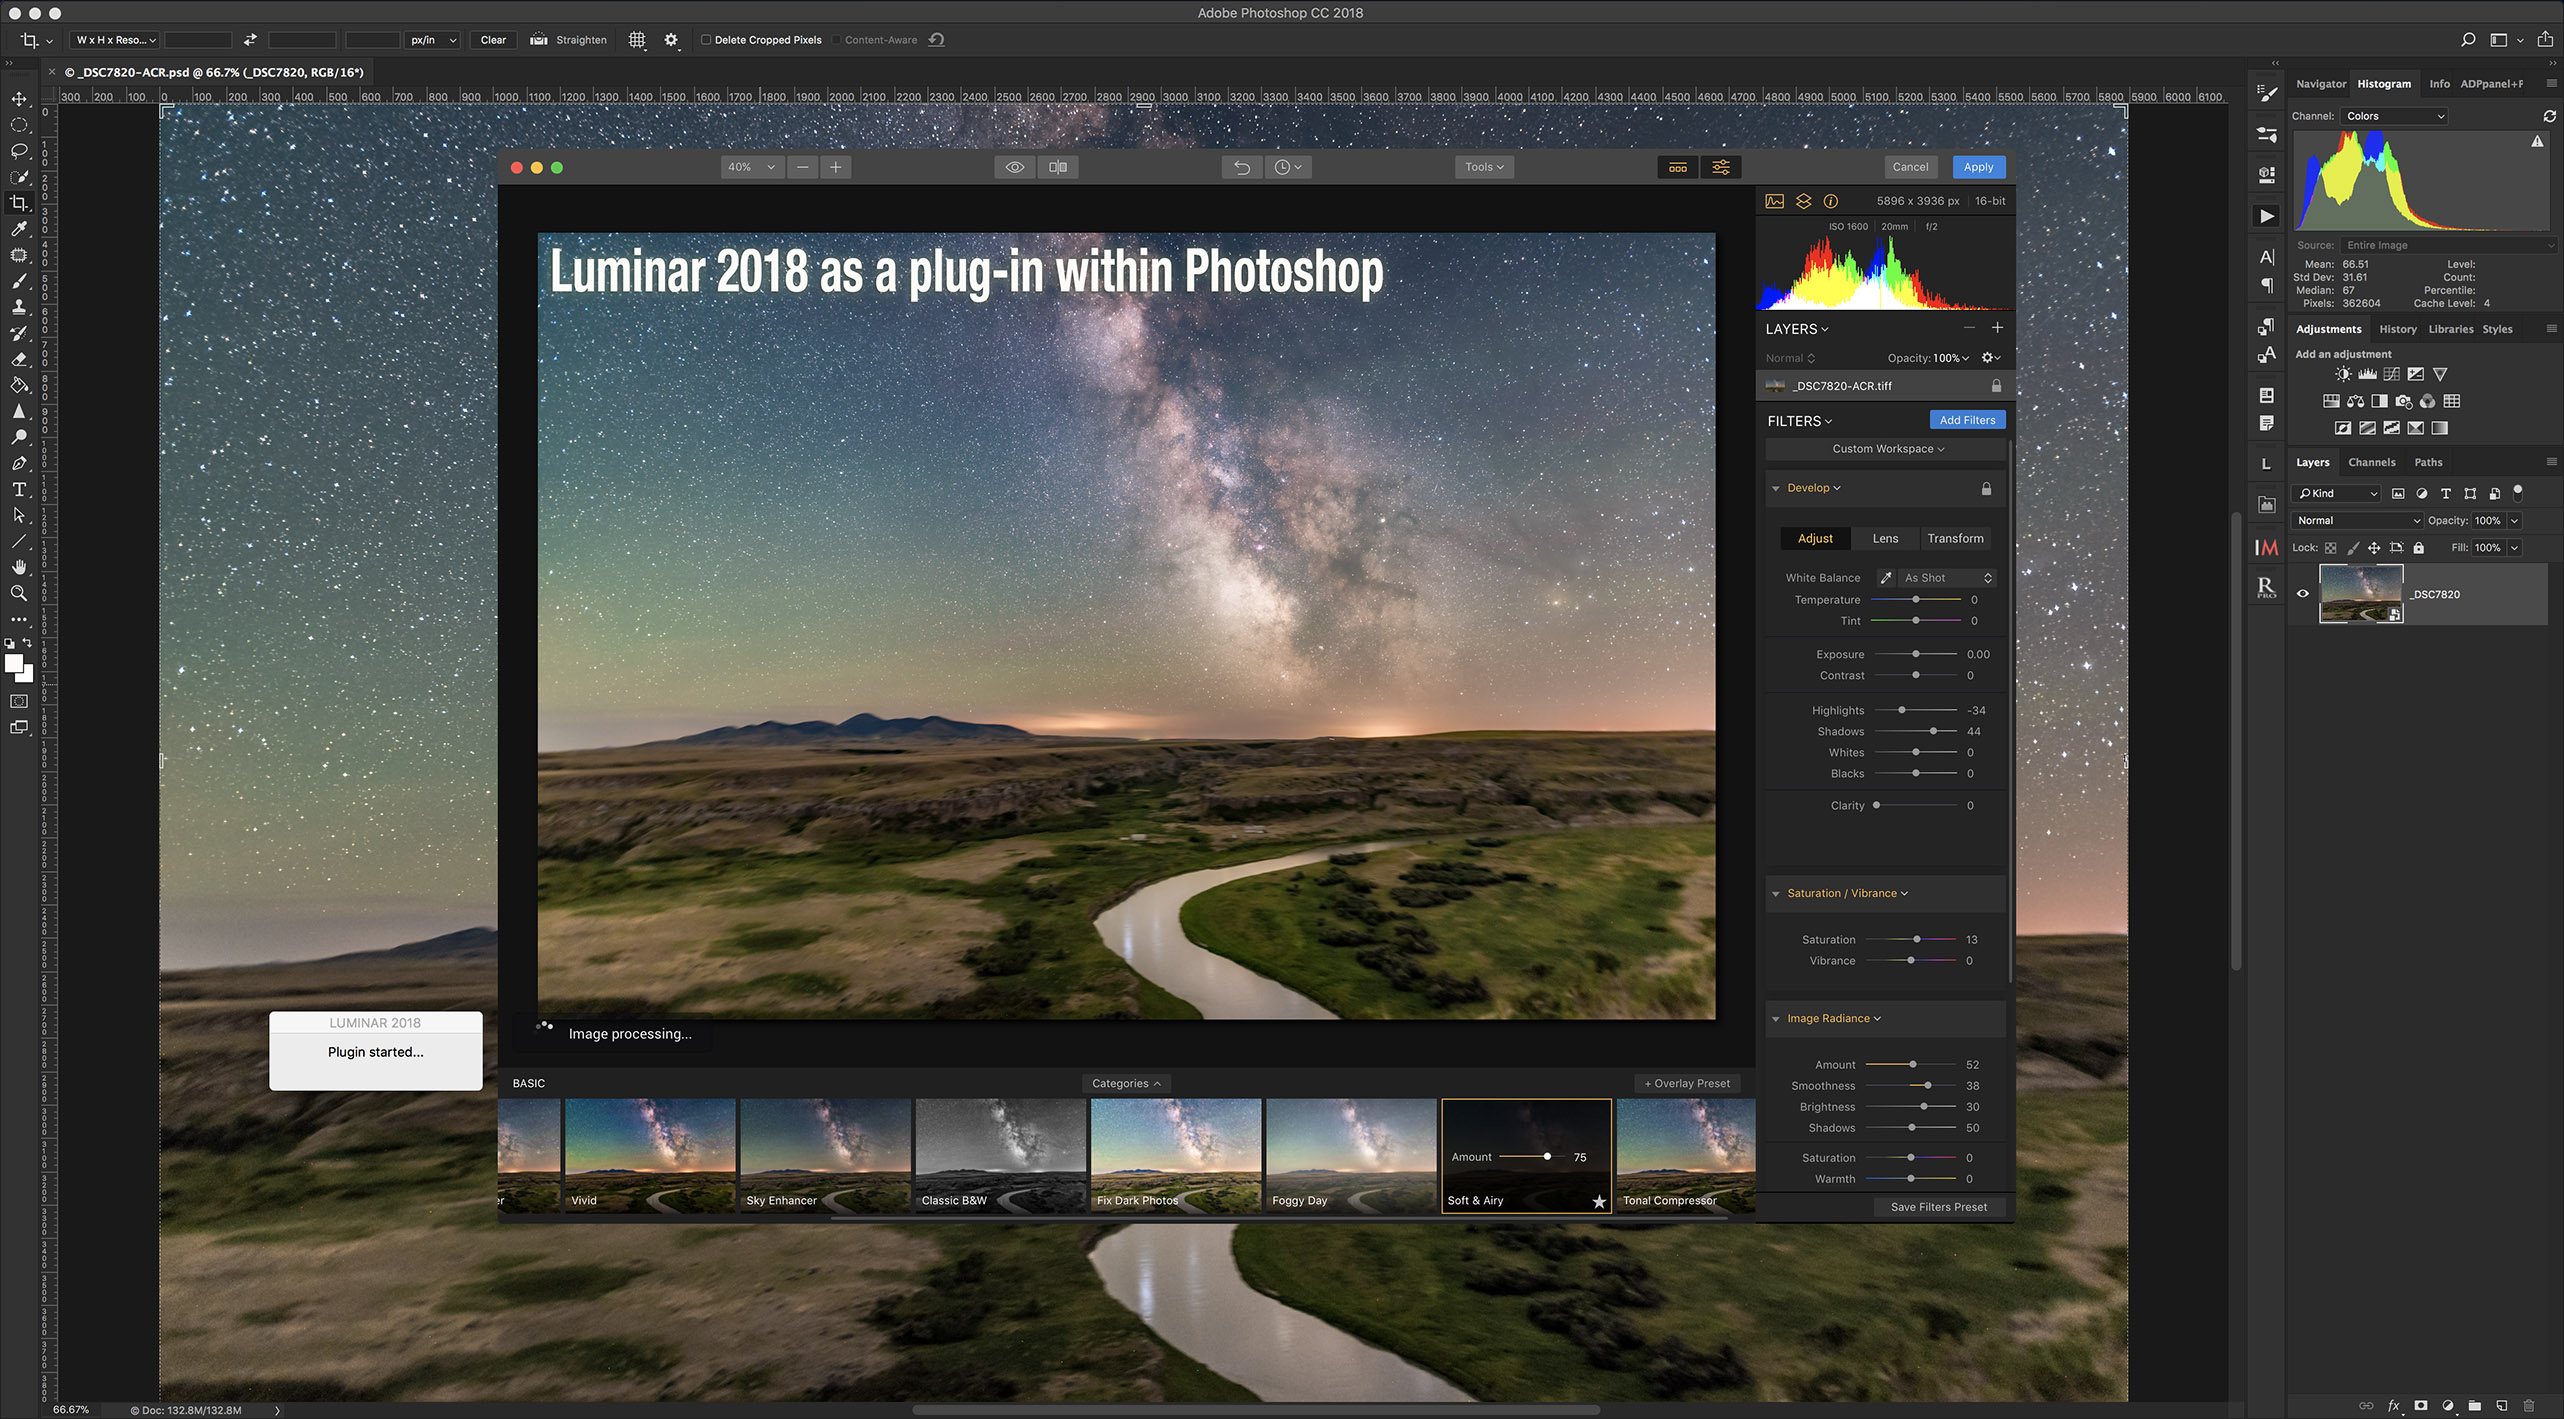
And ON1 and Luminar have some lovely effects that can be applied by calling them up as plug-ins from within Photoshop, and applied as smart filters. Above, I show Luminar working as a plug-in, applying its “Soft & Airy” filter.
In the case of Capture One and DxO PhotoLab, their ability to save images back as raw DNG files (the only contender programs of the bunch that can), means that any raw processing program in the future should be able to read the raw image.
However, only Capture One’s Export to DNG option produced a raw file readable and editable by Adobe Camera Raw with its settings from Capture One (mostly) intact (as shown above).
Even so, I won’t be switching away from Adobe any time soon.
But I hope my survey has given you useful information to judge whether you should make the switch. And if so, to what program.
Thanks!
— Alan, December 6, 2017 / © 2017 Alan Dyer / AmazingSky.com

Thank you very much for this article. It was the right information at the right time and at the right place. I find it challenging at times to find original tests/reviews/trials of software and here it was.
I have the Adobe CC subscription (which no doubt I barely touch the capabilities of) but can’t help but keep on looking over the fence for even more effective and user-friendly noise/sharpening -signal processing – arrangements.
Your article is so useful to me, thanks again.
You’re welcome! Happy processing!
Here is another program I believe would be perfect for astronomy:
Oloneo PhotEngine found here: http://www.oloneo.com
I have one small comment to add to your question “Will Affinity (…) be around in ten years?” While the current software titles Affinity Photo & Affinity Designer are only a couple of years old, the company which produces them (Serif Europe) has been producing successful PC-only photo, vector and page layout software since the early 1990s. They just haven’t been well known here in the Americas or in the Mac community at large until the Affinity suite came along.
You didn’t cover SILKYPIX DS Pro8? You can download it from silkypix.us. It often gets overlooked despite that a limited version is one of the most commonly bundled RAW photo products. There is an upgrade from the OEM version. Unfortunately, the Lightroom->SILKYPIX competitive upgrade offer just ended, but there are often other deals.
I’ve added a section on Silky Pix DS8. Not bad but slow and unresponsive at times.
Great work. Adobe is still a problem.
Hi Alan, thank you for a very thorough review! As a Mac user, you probably couldn´t review Zoner Photo Studio X, however for your Windows readers I believe this information could be useful: Zoner Photo Studio is a very comprehensive photo organizing and editing software, having Lightroom-like Develop module and Photoshop-like Editor module. Just recently it released full HEIF support as a globally first Win program (https://petapixel.com/2017/11/29/zoner-photo-studio-x-brings-heif-support-windows/). You can try the software for free in 30 days: http://www.zoner.com.
I hope the companies that make these products use your feedback, and act on it.
At the very least, Corel could produce a version of Paintshop Pro for the Mac. With luck, they could even consider adding compatibility with 3rd party plugins, namely LRTimelapse.
I think everyone would benefit from those improvements.
I hope so, too. But LRTimelapse is not a LR plug-in but a stand-alone program that hands metadata back and forth from LR or Bridge. There is a LR plug-in here at https://www.timelapseworkflow.com that does something similar and works well but as the developer admits, it is not the equal of LRTimelapse. But if third party plug-ins for LR could be made to work with other LR-like programs, it would be the one to use.
Alan, I’m testing a bunch of these and doing something similar myself. Have you tried AlienSkin’s Exposure X3 or Topaz Studio?
Just added Alien Skin, which I had forgotten about – I had the trial copy – and I added a note about Topaz earlier. So check the end of the blog again. Thanks!
Thanks Alan for your quick reply. My processing skills are pretty well non-existent unfortunately. I read these reviews trying to glean some tips, and PSP is the only program I own.
Jan
Hi,
Why did you leave out Paint Shop Pro? It is advertised as a direct competitor to Photoshop.
Thanks
Jan de Groot
I knew within minutes of publishing the review someone would ask — Why didn’t you test ….??? Paintshop is from Corel. I tested Corel’s AfterShot Pro — it is what Paintshop uses for its Raw development, which is what I was testing here, not using programs to do all the final layering and stacking. As I said that might be a future blog topic. Plus Aftershot is cross-platorm. I am on a Mac. Not Windows. Why don’t you test both and let me know what you think of the difference between Aftershot and Paintshop, if there is one.