In mid-October 2022 I enjoyed a rare run of five clear and mild nights in the Rocky Mountains for shooting nightscapes of the stars. Here’s a portfolio … and a behind-the-scenes look at its making.
Getting two perfectly clear nights in a row is unusual in the mountains. Being treated to five is a rare treat. Indeed, had I started my shooting run earlier in the week I could have enjoyed even more of the string of cloudless nights in October, though under a full Moon. But five was wonderful, allowing me to capture some of the scenes that had been on my shot list for the last few years.
Here is a portfolio of the results, from five marvelous nights in Banff and Jasper National Parks, in Alberta, Canada.
For the photographers, I also provide some behind-the-scenes looks at the planning and shooting techniques, and of my processing steps.
Night One — Peyto Lake, Banff National Park
Peyto Lake, named for pioneer settler and trail guide Bill Peyto who had a cabin by the lakeshore, is one of several iconic mountain lakes in Banff. Every tour bus heading along the Icefields Parkway between Banff and Jasper stops here. By day is it packed. By night I had the newly constructed viewpoint all to myself.
The stars of Ursa Major, the Great Bear, over the waters of Peyto Lake, Banff, in deep twilight. This is a stack of 6 x 30-second exposures for the ground and a single untracked 30-second exposure for the sky, all at f/2.8 with the Canon RF 15-35mm lens at 15mm, and Canon R5 at ISO 800.
I shot the classic view north in deep twilight, with the stars of Ursa Major and the Big Dipper low over the lake, as they are in autumn. A show of Northern Lights would have been ideal, but I was happy to settle for just the stars.
This is a blend of two panoramas: the first of the sky taken at or just before moonrise with the camera on a star tracker to keep the stars pinpoint, and the second taken for the ground about 20 minutes later with the tracker off, when the Moon was up high enough to light the peaks. Both pans were with the Canon RF15-35mm lens at 15mm and f/2.8, and Canon R5 at ISO 1600, with the sky pan being 7 segments for 1 minute each, and the untracked ground panorama being the same 7 segments for 2 minutes each.
The night was perfect, not just for the clarity of the sky but also the timing. The Moon was just past full, so was rising in late evening, leaving a window of time between the end of twilight and moonrise when the sky would be dark enough to capture the Milky Way. Then shortly after, the Moon would come up, lighting the peaks with golden moonlight — alpenglow, but from the Moon not Sun.
The above is blend of two panoramas, each of seven segments, the first for the sky taken when the sky was dark, using a star tracker to keep the stars pinpoints. The second for the ground I shot a few minutes later at moonrise with no tracking, to keep the ground sharp. I show below how I blended the two elements.
The Photographer’s Ephemeris
TPE 3D
To plan such shots I use the apps The Photographer’s Ephemeris (TPE) and its companion app TPE 3D. The screen shot above at left shows the scene in map view for the night in question, with the Big Dipper indicated north over the lake and the line of dots for the Milky Way showing it to the southwest over Peyto Glacier. Tap or click on the images for full-screen versions.
Switch to TPE 3D and its view at right above simulates the scene you’ll actually see, with the Milky Way over the mountain skyline just as it really appeared. The app even faithfully replicates the lighting on the peaks from the rising Moon. It is an amazing planning tool.
This is a blend of 5 x 20-second exposures stacked for the ground to smooth noise, and a single 20-second exposure for the sky, all with the Canon RF15-35mm lens at f/2.8 and Canon R5 at ISO 1600. All were untracked camera-on-tripod shots.
On the drive back from Peyto Lake to Saskatchewan River Crossing I stopped at another iconic spot, the roadside viewpoint for Mt. Cephren at Waterfowl Lakes. By this time, the Moon was well up and fully illuminating the peak and the sky, but still leaving the foreground dark. The sky is blue as it is by day because it is lit by moonlight, which is just sunlight reflecting off a perfectly neutral grey rock, the Moon!
This is from a set of untracked camera-on-tripod shots using short 30-second exposures.
Night Two — Pyramid Lake, Jasper National Park
By the next night I was up in Jasper, a destination I had been trying to revisit for some time. But poor weather prospects and forest fire smoke had kept me away in recent years.
The days and nights I was there coincided with the first weekend of the annual Jasper Dark Sky Festival. I attended one of the events, the very enjoyable Aurora Chaser’s Retreat, with talks and presentations by some well-known chasers of the Northern Lights. Attendees had come from around North America.
This is a blend of: a stack of 4 x 1-minute tracked exposures for the sky at ISO 1600 plus a stack of 7 x 2-minute untracked exposures at ISO 800 for the ground, plus an additional single 1-minute tracked exposure for the reflected stars and the foreground water. All were with the Canon RF15-35mm lens at 15mm and f/2.8 and Canon R5.
On my first night in Jasper I headed up to Pyramid Lake, a favorite local spot for stargazing and night sky photography, particularly from the little island connected to the “mainland” by a wooden boardwalk. Lots of people were there quietly enjoying the night. I shared one campfire spot with several other photographers also shooting the Milky Way over the calm lake before moonrise.
This is a blend of: a stack of 4 x 1-minute tracked exposures for the sky at ISO 1600 plus a stack of 6 x 3-minute untracked exposures at ISO 800 for the ground, all with the Canon RF15-35mm lens at 20mm and f/2.8 and Canon R5. The tracker was the Star Adventurer Mini.
A little later I moved to the north end of Pyramid Island for the view of the Big Dipper over Pyramid Mountain, now fully lit by the rising waning Moon, and with some aspens still in their autumn colours. A bright meteor added to the scene.
Night Three — Athabasca River Viewpoint, Jasper National Park
For my second night in Jasper, I ventured back down the Icefields Parkway to the “Goats and Glaciers” viewpoint overlooking the Athabasca River and the peaks of the Continental Divide.
This is a blend of three 3-section panoramas: the first taken with a Star Adventurer Mini for 3 x 2-minute tracked exposures for the sky at ISO 800; the second immediately afterward with the tracker off for 3 x 3-minutes at ISO 800 for the ground; and the third taken about an hour later as the Moon rose, lighting the peaks with warm light, for 3 x 2.5-minutes at ISO 1600. All with the Canon RF15-35mm lens at f/2.8 and 15mm and Canon R5,
As I did at Peyto Lake, I shot a panorama (this one in three sections) for the sky before moonrise with a tracker. I then immediately shot another three-section panorama, now untracked, for the ground while it was still lit just by starlight under a dark sky. I then waited an hour for moonrise and shot a third panorama to add in the golden alpenglow on the peaks. So this is a time-blend, bending reality a bit. See my comments below!
Night Four — Edith Lake, Jasper National Park
With a long drive back to Banff ahead of me the next day, for my last night in Jasper I stayed close to town for shots from the popular Edith Lake, just up the road from the posh Jasper Park Lodge. Unlike at Pyramid Lake, I had the lakeshore to myself.
This is a panorama of four segments, each 30 seconds untracked with the Canon RF15-35mm lens at 15mm and f/2.8 and Canon R5 at ISO 1000.
This would be a fabulous place to catch the Northern Lights, but none were out this night. Instead, I was content to shoot scenes of the northern stars over the calm lake and Pyramid Mountain.
This is a blend of a single tracked 2-minute exposure for the sky and water with the reflected stars, with a single untracked 4-minute exposure for the rest of the ground, both at f/2.8 with the Canon RF15-35mm lens at 17mm and Canon R5 at ISO 800.
This is a blend of a single tracked 2-minute exposure for the sky and water with the reflected stars, with a stack of two untracked 3-minute exposure for the rest of the ground, both at f/2.8 with the Canon RF15-35mm lens at 17mm and Canon R5 at ISO 1600. I shot this October 16, 2022.
The Moon was now coming up late, so the shots above are both in darkness with only starlight providing the illumination. Well, and also some annoying light pollution from town utility sites off the highway. Jasper is a Dark Sky Preserve, but a lot of the town’s street and utility lighting remains unshielded.
Night Five — Lake Louise, Banff National Park
On my last night I was at Lake Louise, as the placement of the Milky Way would be perfect.
This is a blend of two sets of exposures: – a stack of two untracked 2-minute exposures for the ground at ISO 800 – a stack of four tracked 1-minute exposures for the sky at ISO 1600 All with the Canon RF15-35mm lens at f/2.8 and 20mm and Canon R5, and with the camera and tripod not moving between image sets.
There’s no more famous view than this one, with Victoria Glacier at the end of the blue-green glacial lake. Again, by day the site is thronged with people and the parking lot full by early morning.
By night, there were just a handful of other photographers on the lakeshore, and the parking lot was nearly empty. I could park right by the walkway up to the lake.
The Photographer’s Ephemeris
TPE 3D
Again, TPE and TPE 3D told me when the Milky Way would be well-positioned over the lake and glacier, so I could complete the untracked ground shots first, to be ready to shoot the tracked sky segments by the time the Milky Way had turned into place over the glacier.
This is a blend of three vertical panoramas: the first is a set of three untracked 2-minute exposures for the ground at ISO 800 with the camera moved up by 15° from segment to segment; the second shot immediately afterward is made of 7 x 1-minute tracked exposures at ISO 1600 for the sky, also moved 15° vertically from segment to segment; elements of a third 3-section panorama taken about 90 minutes earlier during “blue hour” were blended in at a low level to provide better lighting on the distant peaks. All with the Canon RF15-35mm lens at f/2.8 and 20mm and Canon R5.
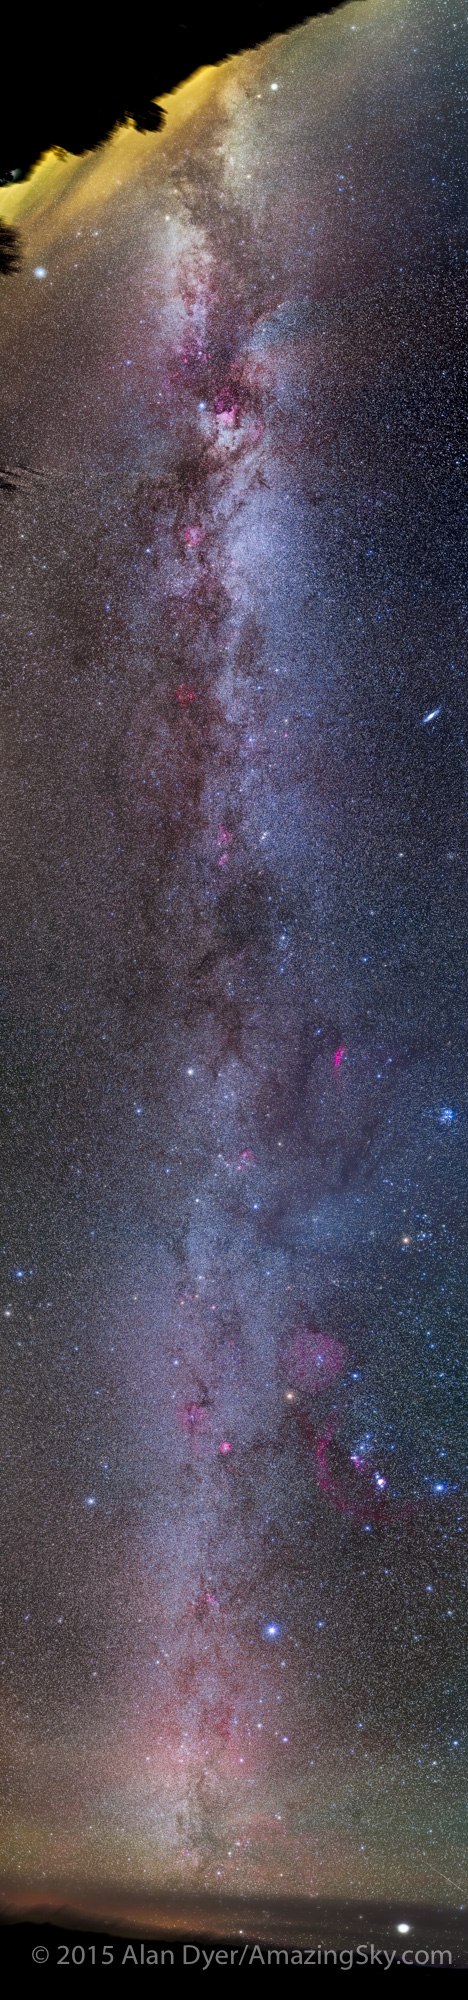
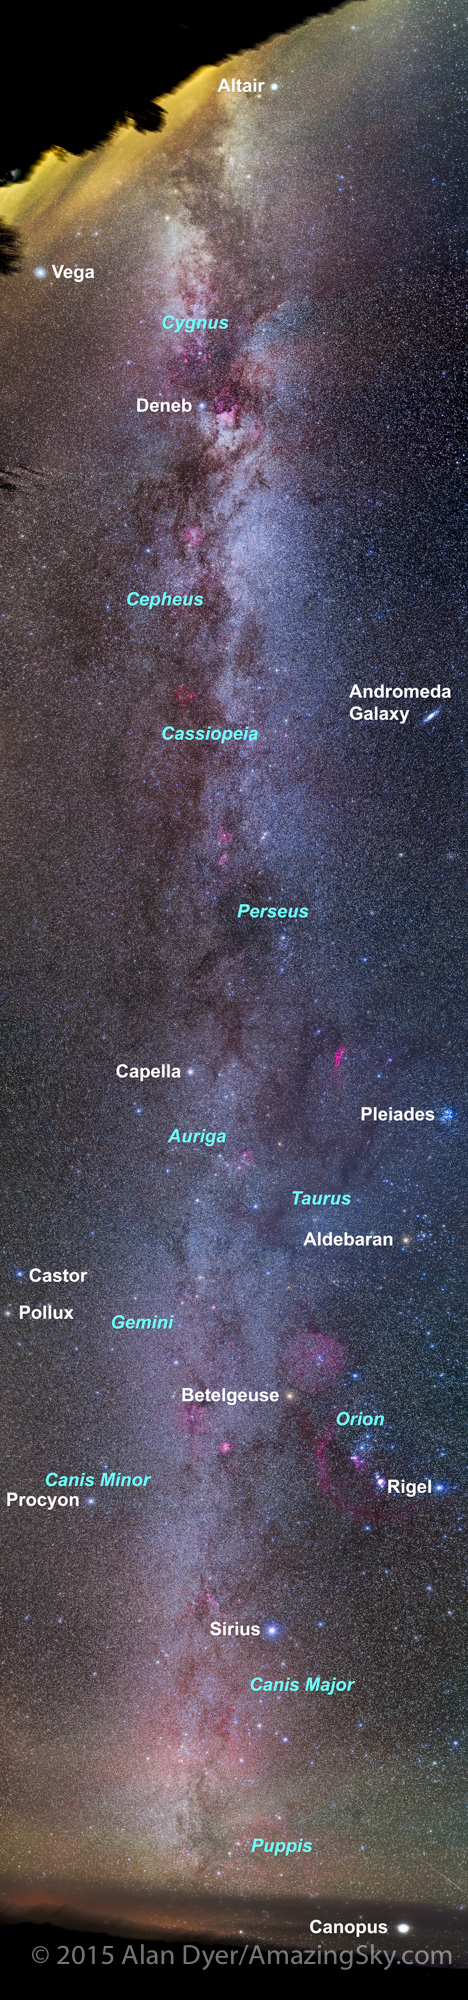
This image is also a panorama but a vertical one, made primarily of three untracked segments for the ground and seven tracked segments for the sky, panning up from the horizon to past the zenith overhead, taking in most of the summer and autumn Milky Way from Serpens up to Cassiopeia.
Nightscape Gear
As readers always want to know what gear I used, I shot all images on all nights with the 45-megapixel Canon R5 camera and Canon RF15-35mm lens, with exposures of typically 1 to 3 minutes each at ISOs of 800 to 1600. I had other cameras and lenses with me but never used them.
Star Adventurer Mini tracker with Alyn Wallace V-Plate and AcraTech Panorama Head
For a tracker for such images, I used the Sky-Watcher Star Adventurer Mini, a compact and lightweight unit that is easy to pack and carry to shooting sites. See my review of it here at AstroGearToday.
I use the Mini with a V-Plate designed by nightscape photographer Alyn Wallace and sold by Move-Shoot-Move. It is an essential aid to taking tracked panoramas, as it allows me to turn the camera horizontally manually from one pan segment to the next while the camera is tracking the stars. It’s easy to switch the tracker on (for the sky) and off (for the ground). The Mini tracks quite accurately and reliably. Turn it on and you can be sure it is tracking.
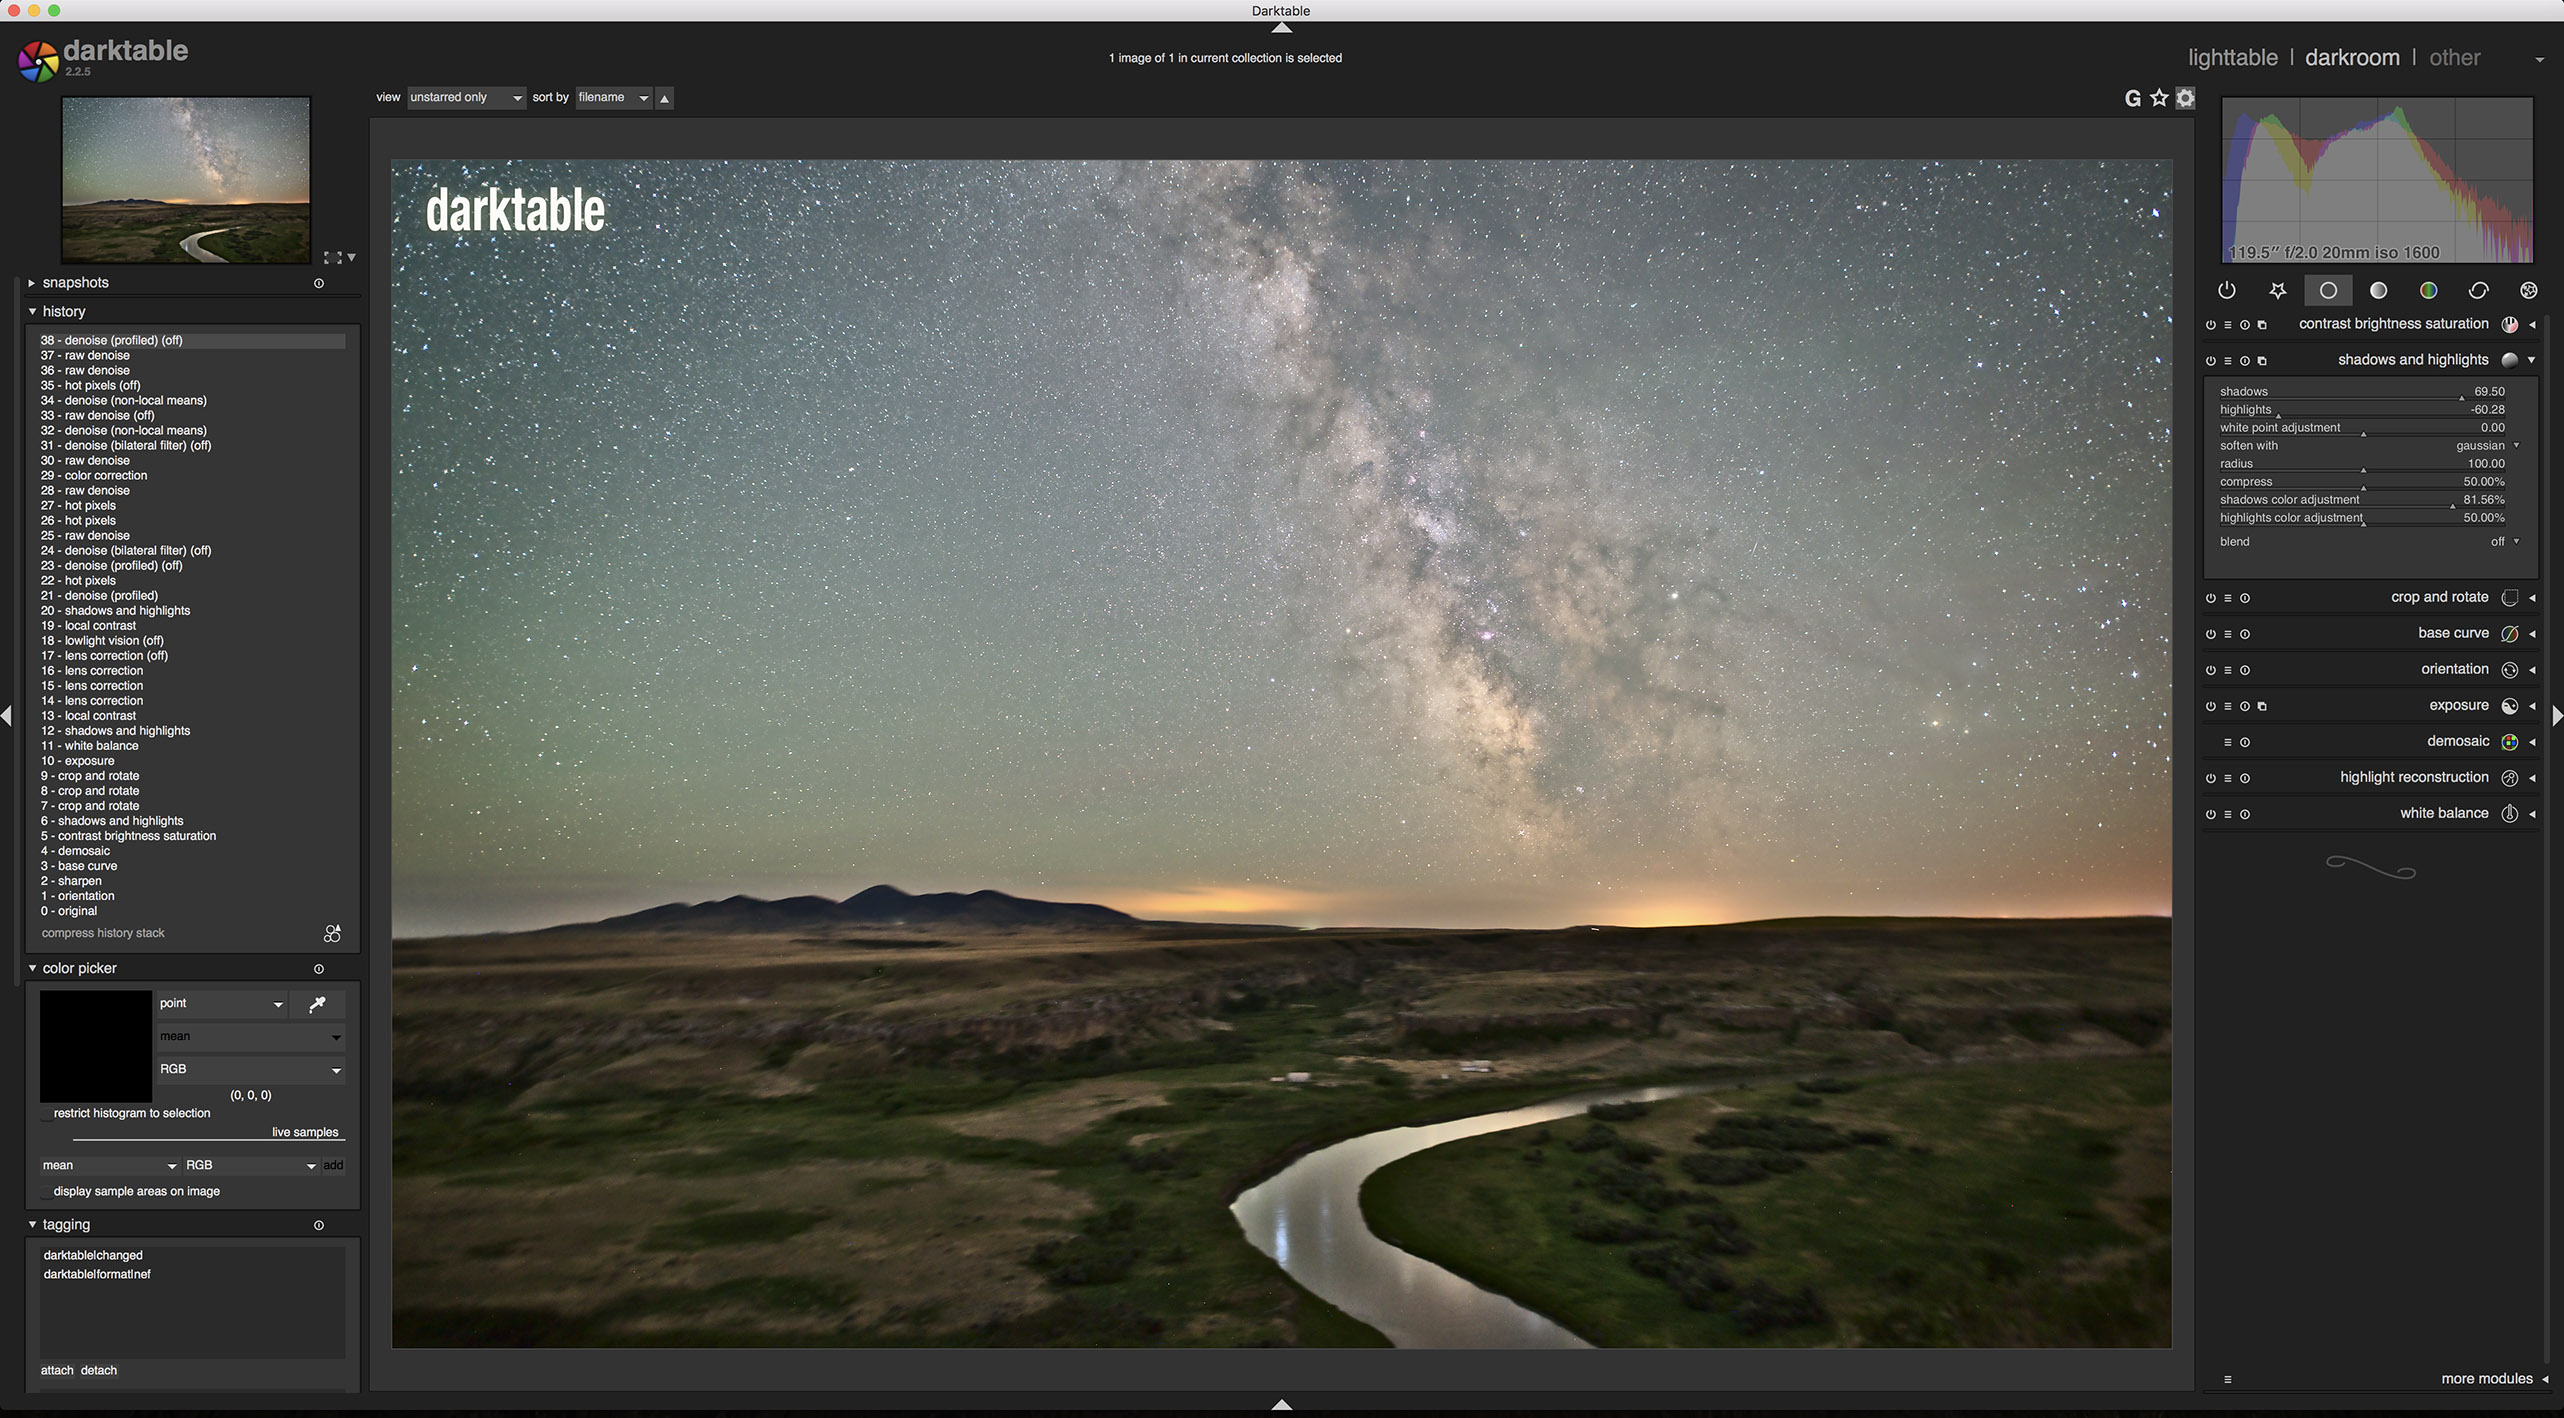
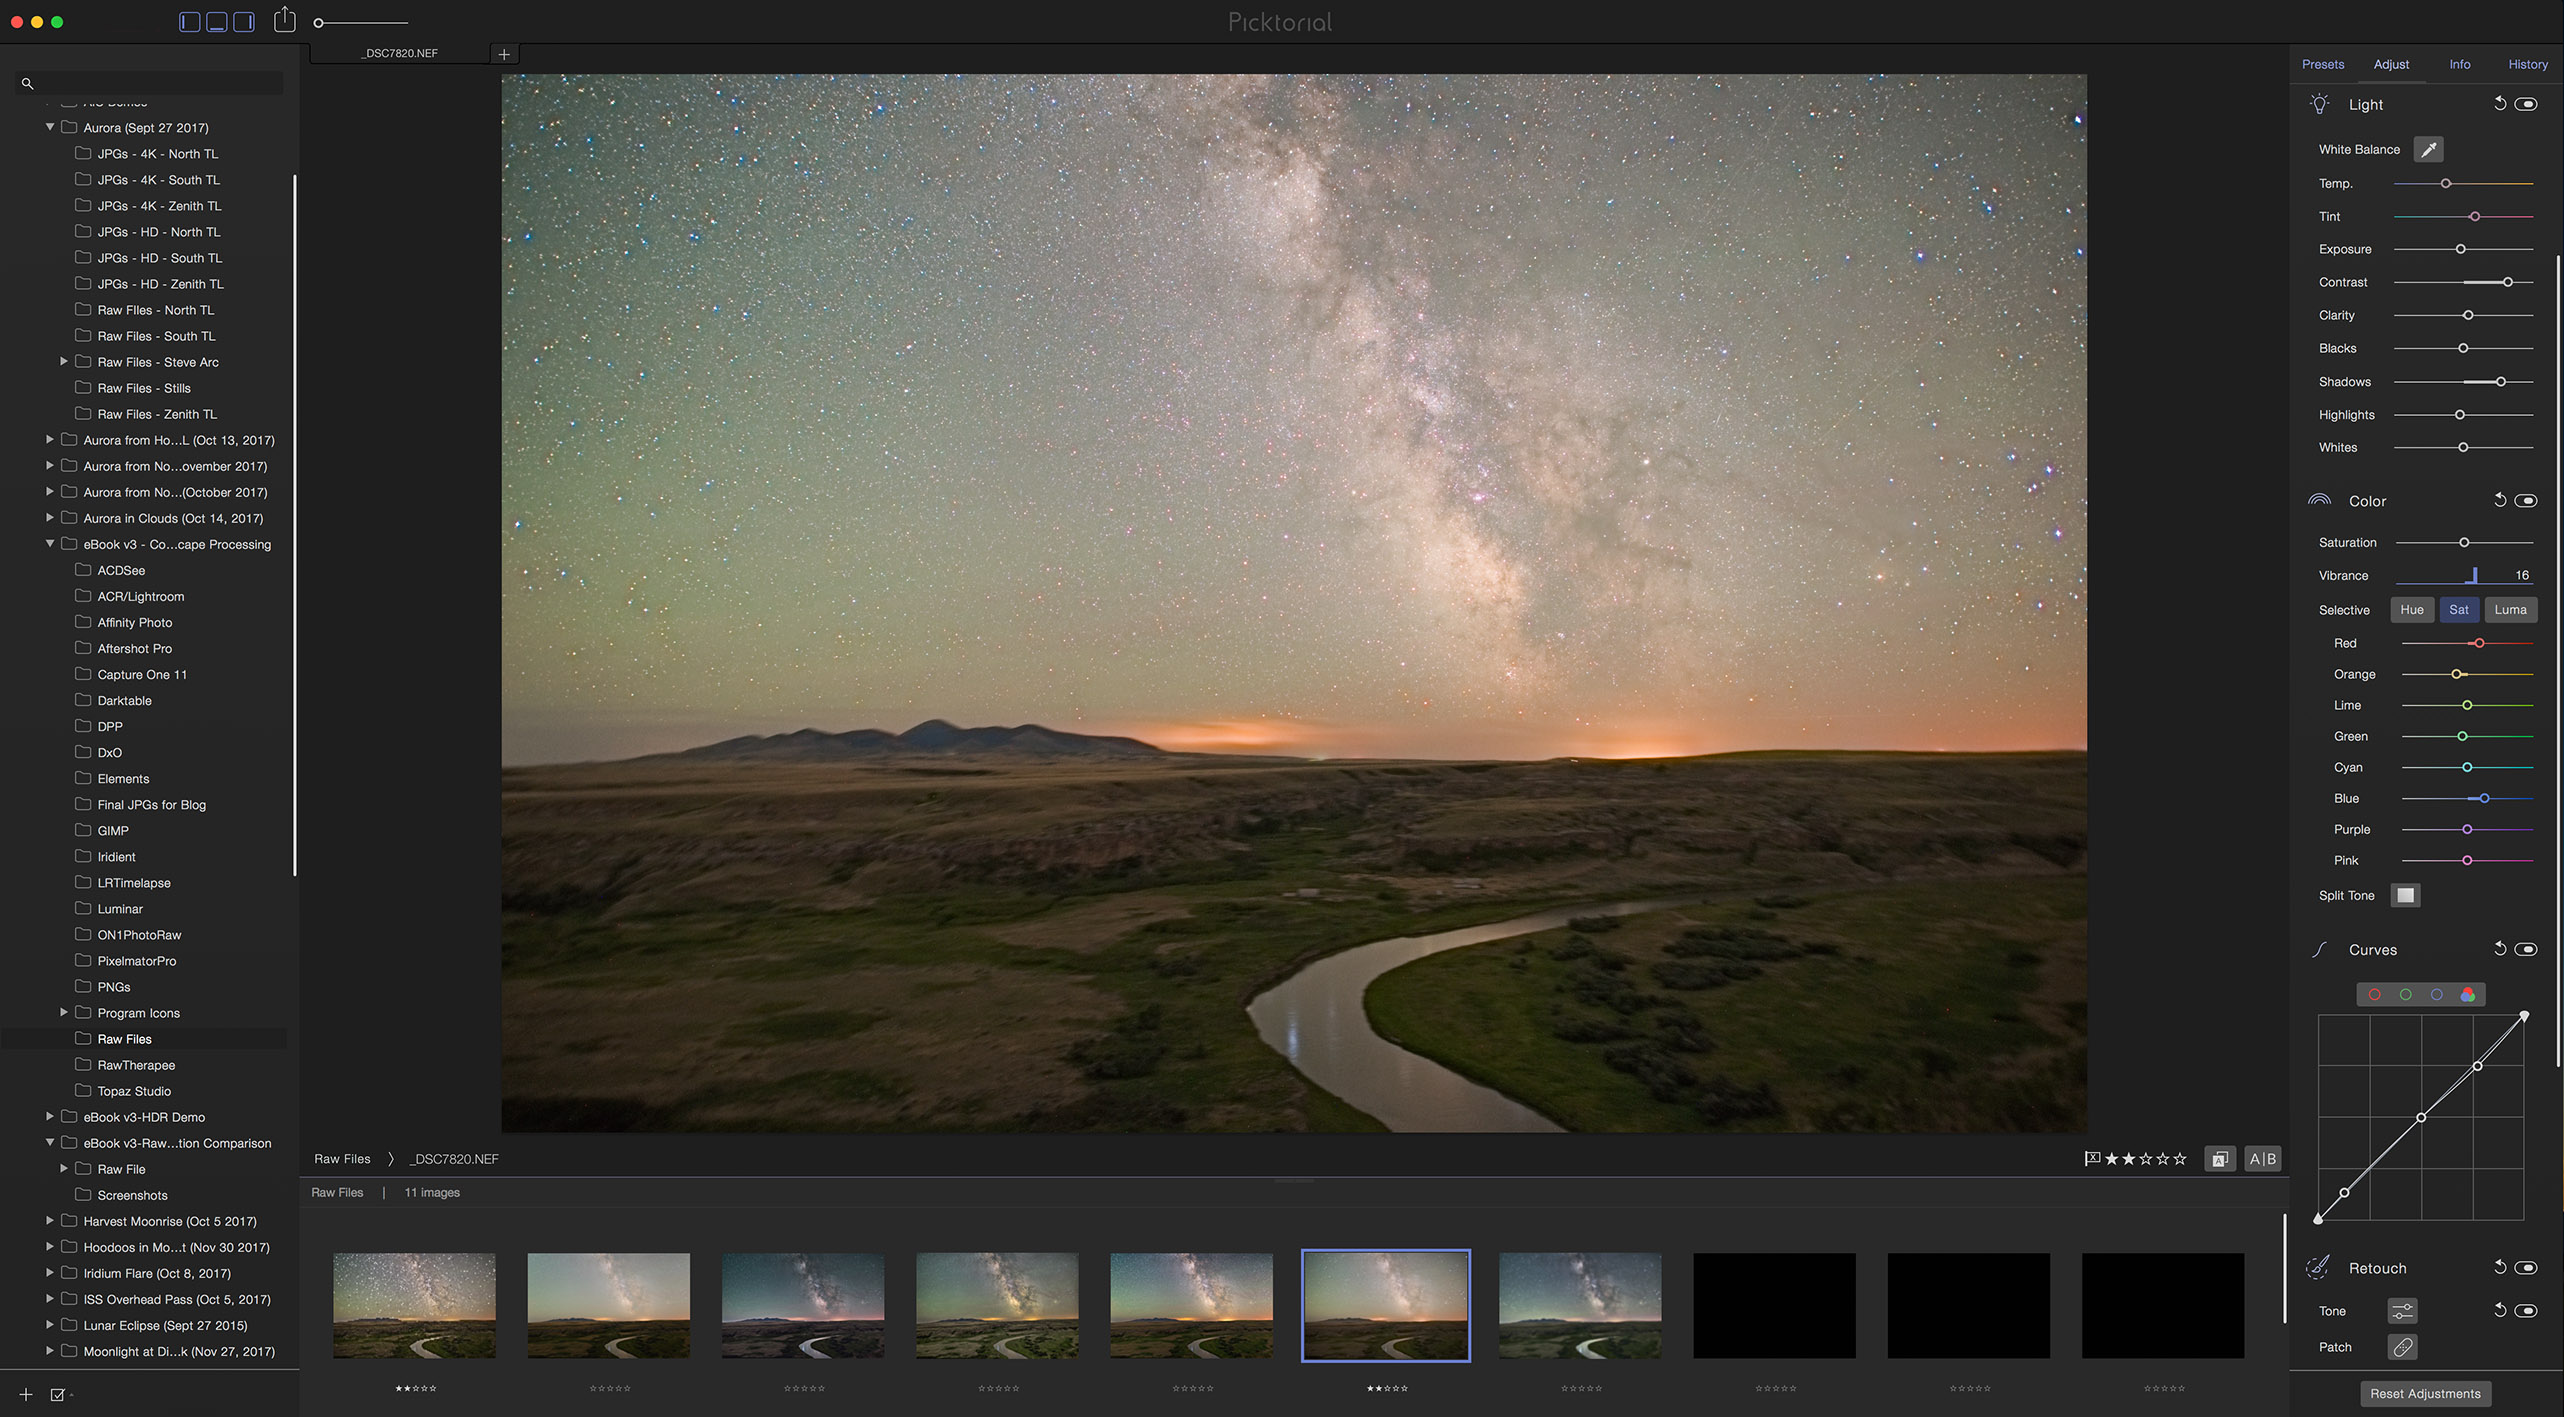
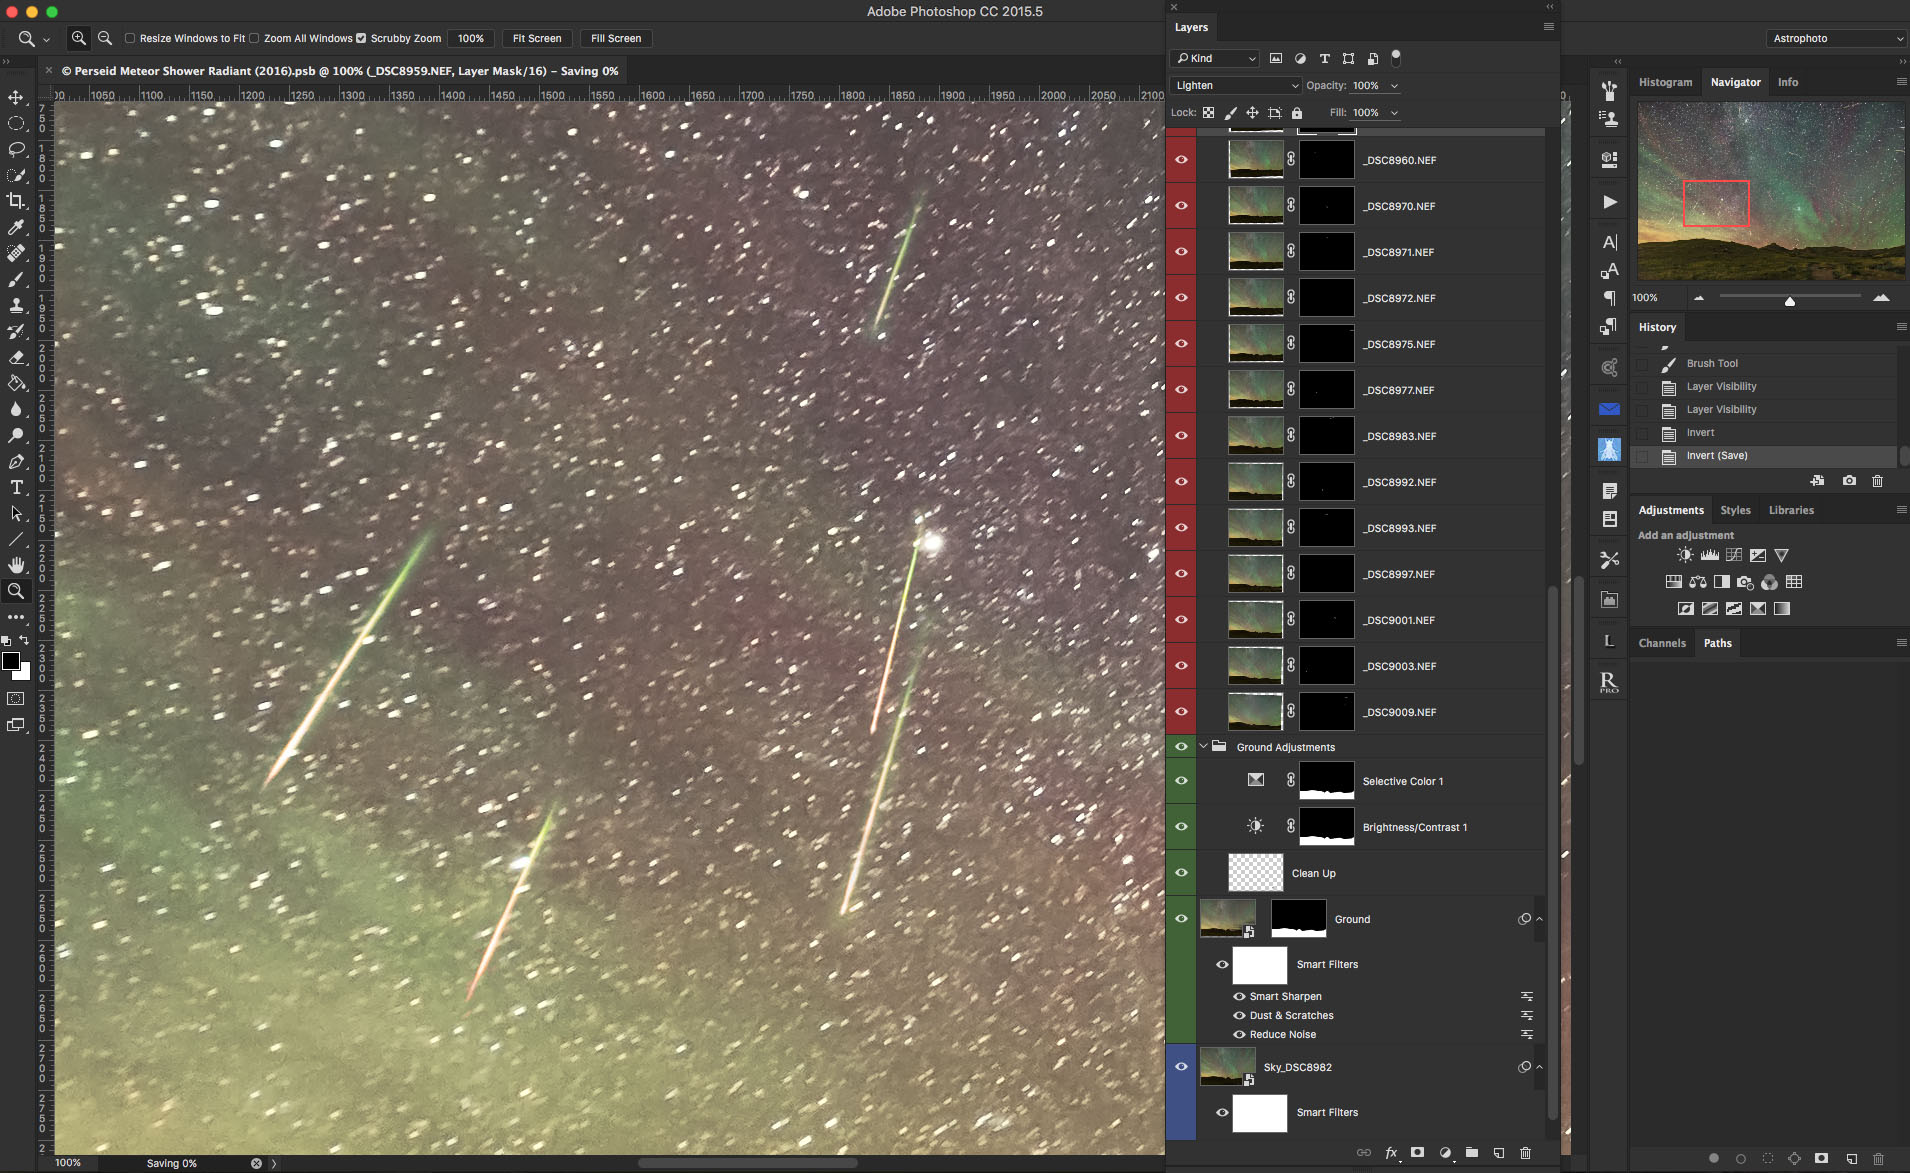
For those who are interested, here’s a look at how I processed and assembled the images, using the Peyto Lake panorama as an example. This is not a thorough tutorial, but shows the main steps involved. Tap or click on an image to download a full-size version.
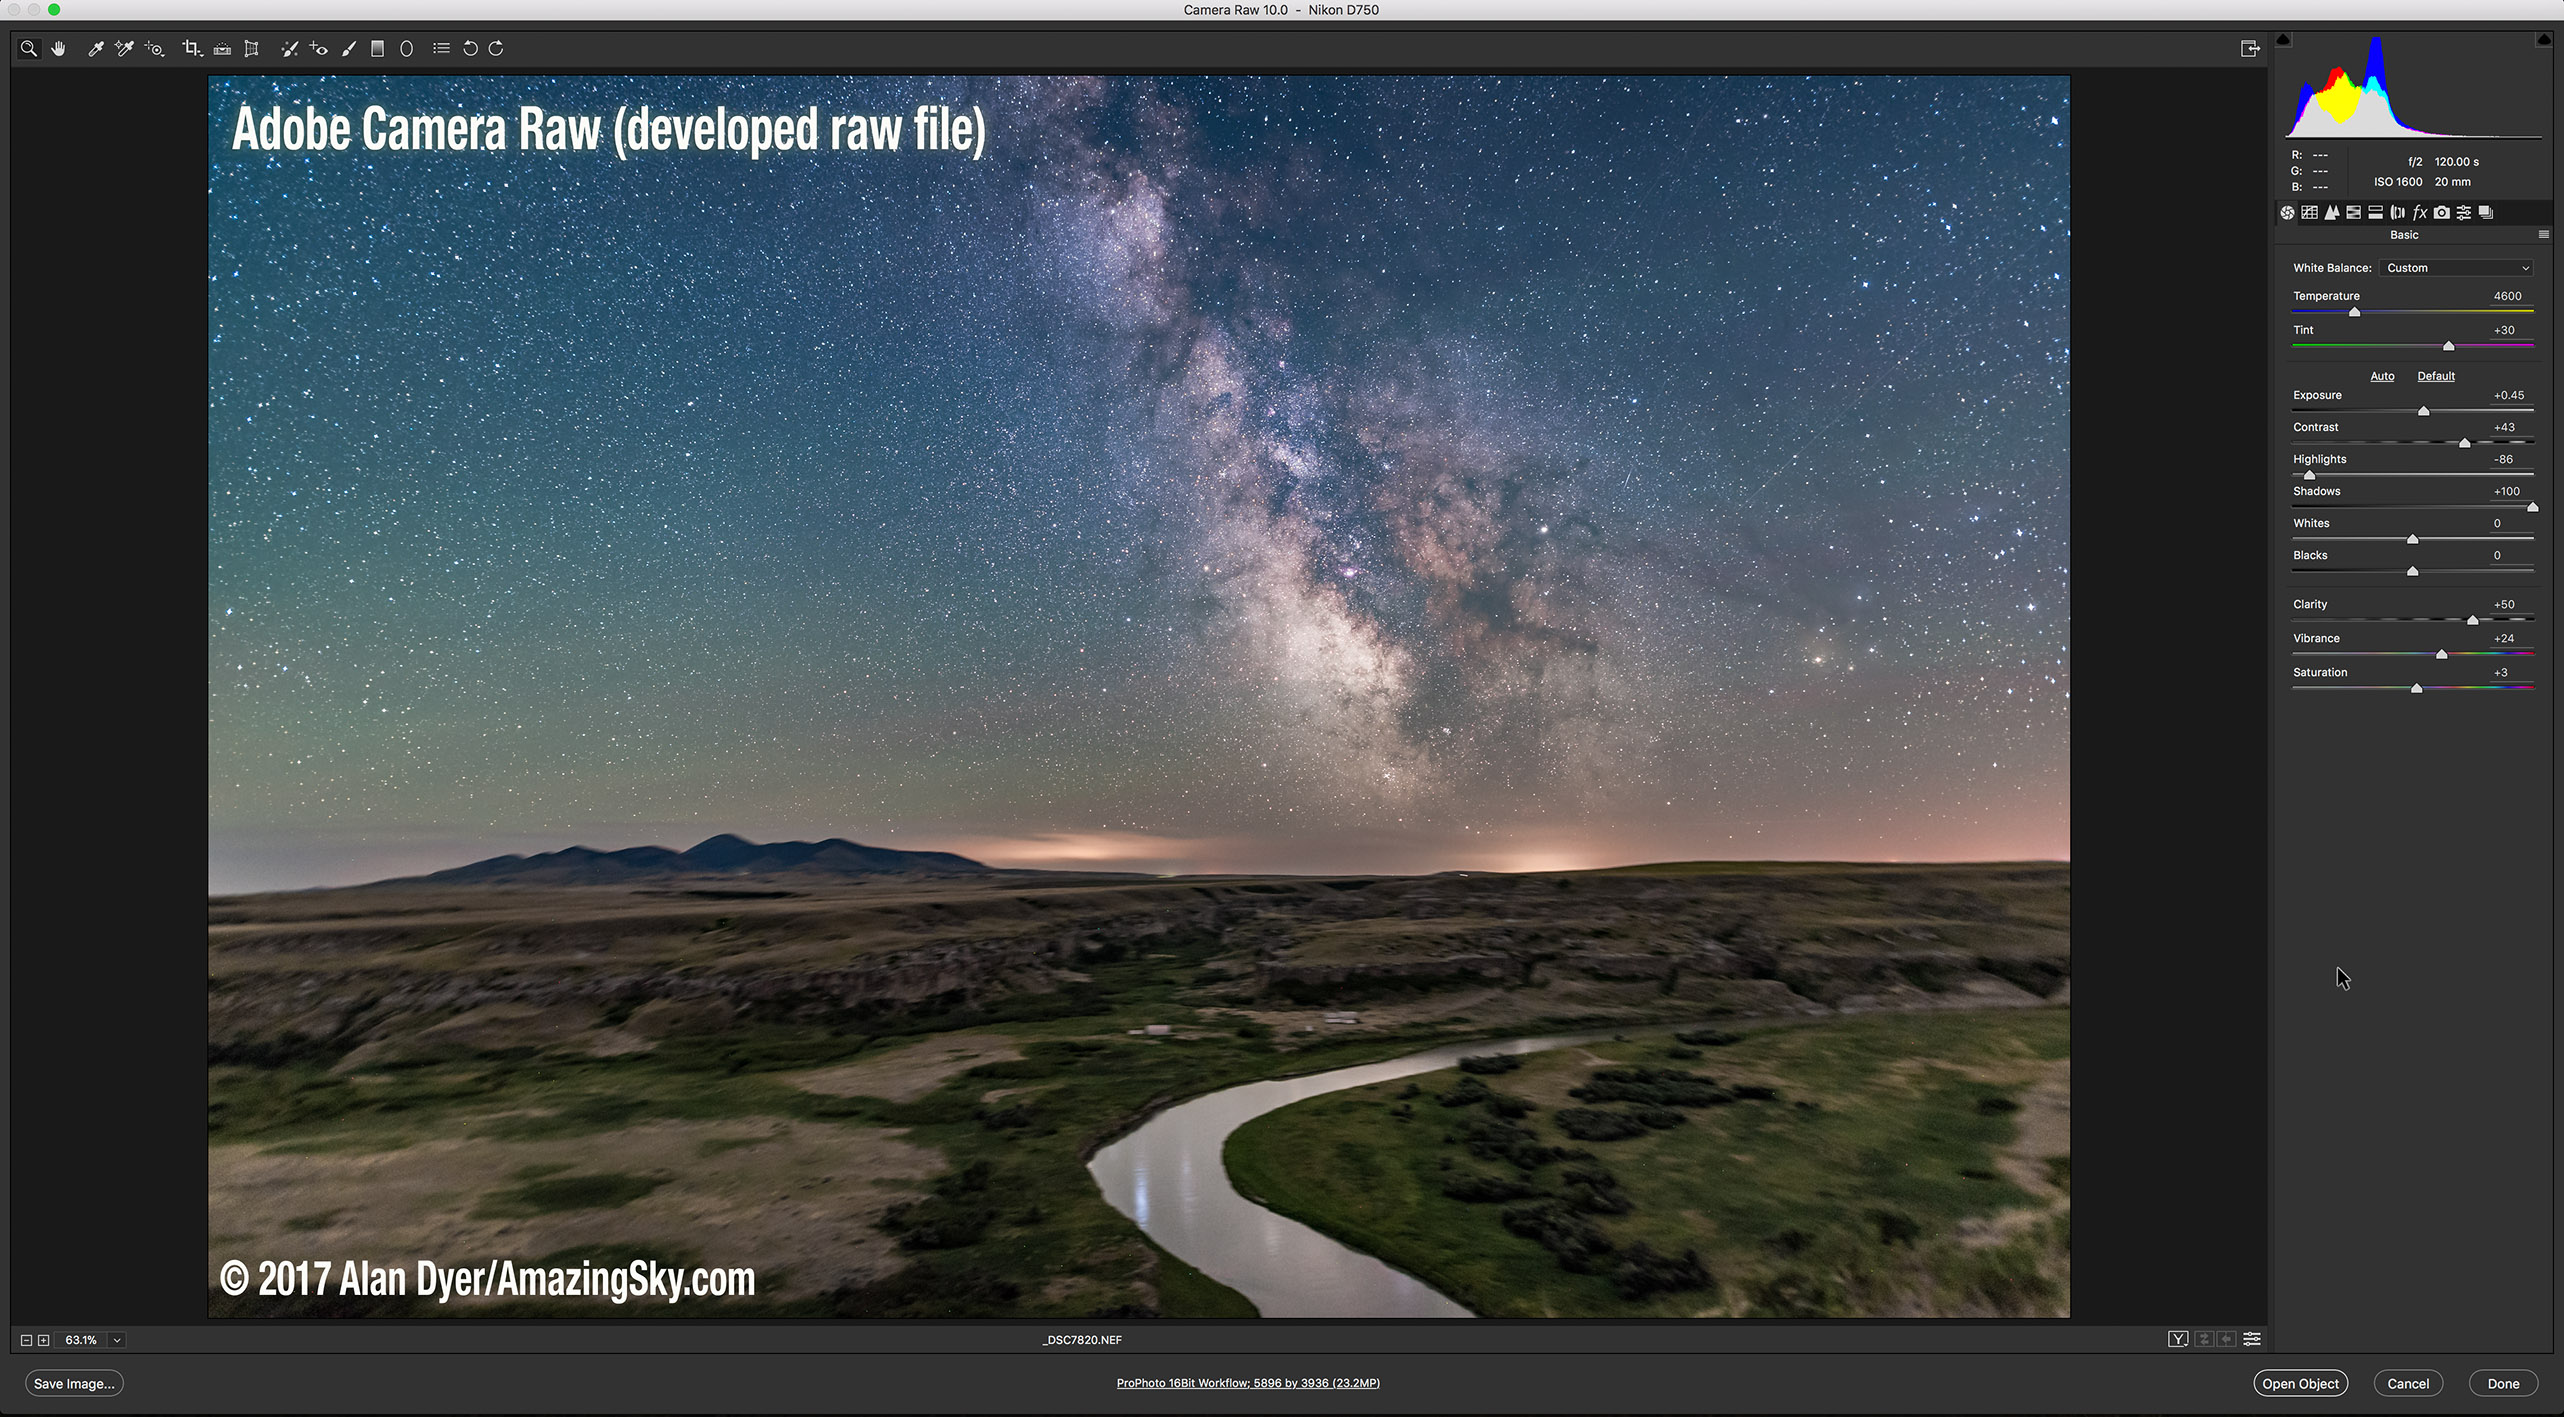
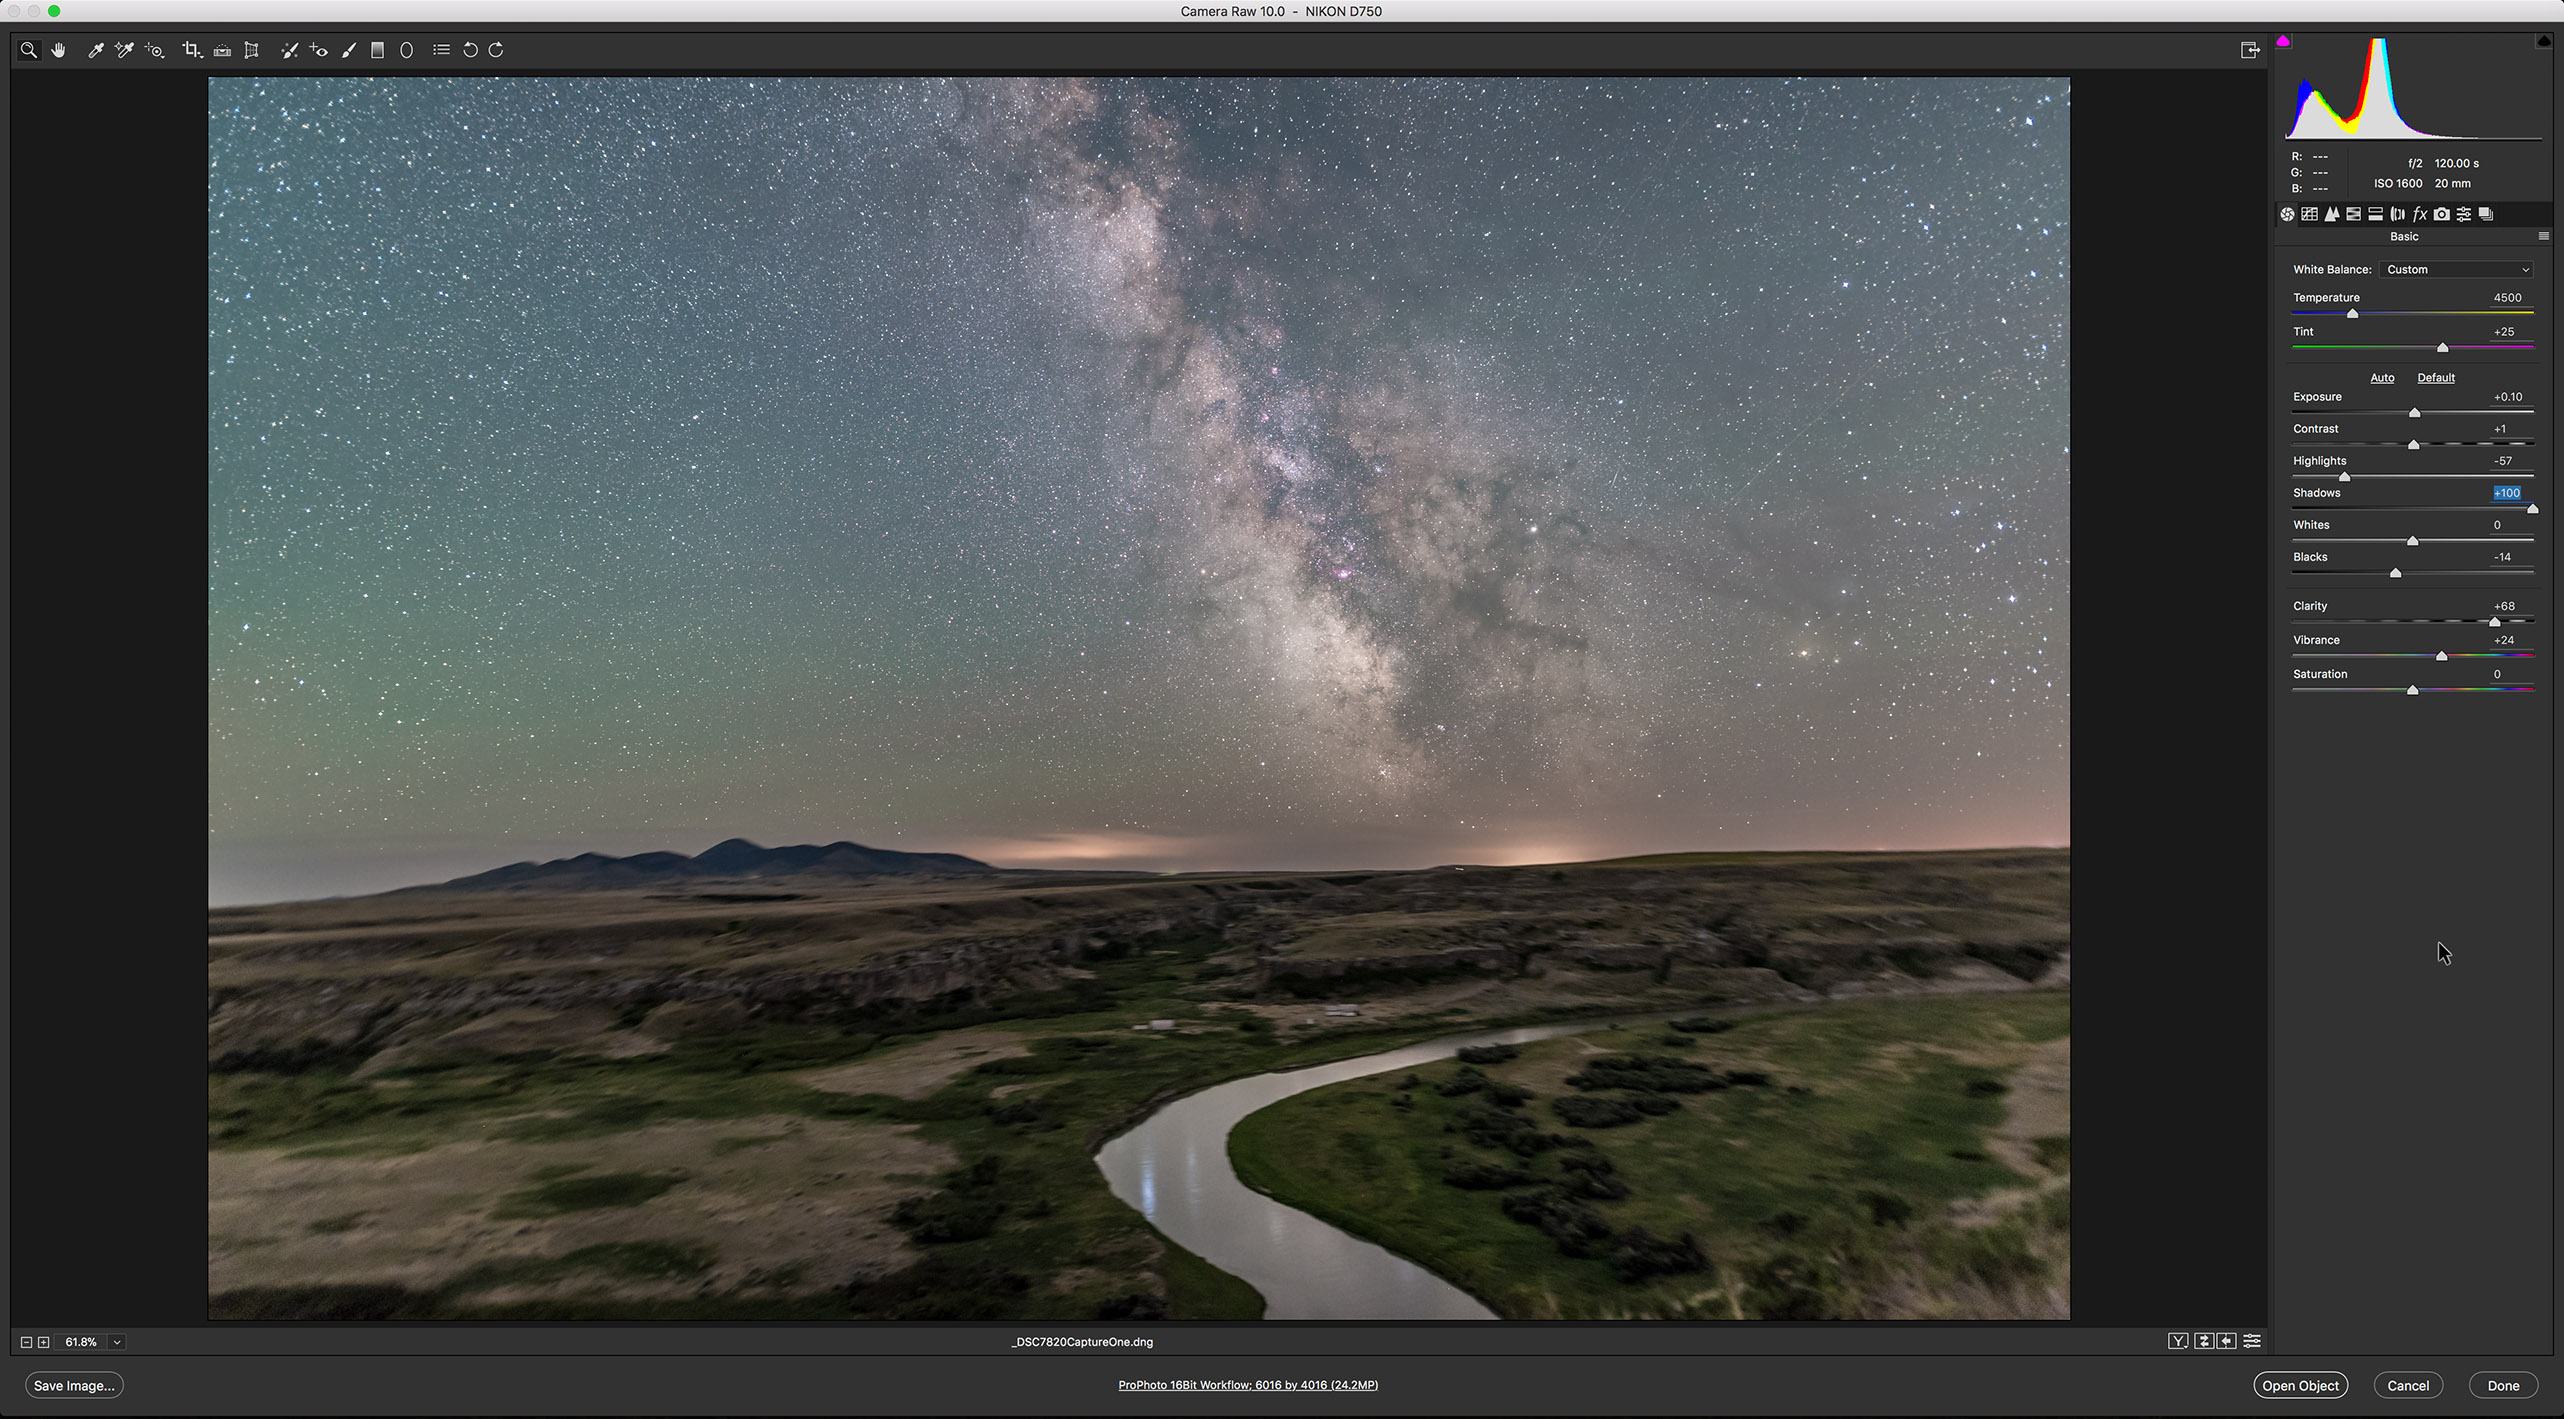
I first develop all the raw files (seven here) in Adobe Camera Raw, applying identical settings to make them look best for what they are going to contribute to the final blend, in this case, for the tracked sky with pinpoint stars and the Milky Way.
Camera Raw (as does Adobe’s Lightroom) has an excellent Merge to Panorama function which usually works very well on such scenes. This shows the stitched sky panorama, created with one click.
I develop and stitch the untracked ground segments to look their best for revealing details in the landscape, overexposing the sky in the process. Stars are also trailed, from the long exposures needed for the dark ground. No matter – these will be masked out.
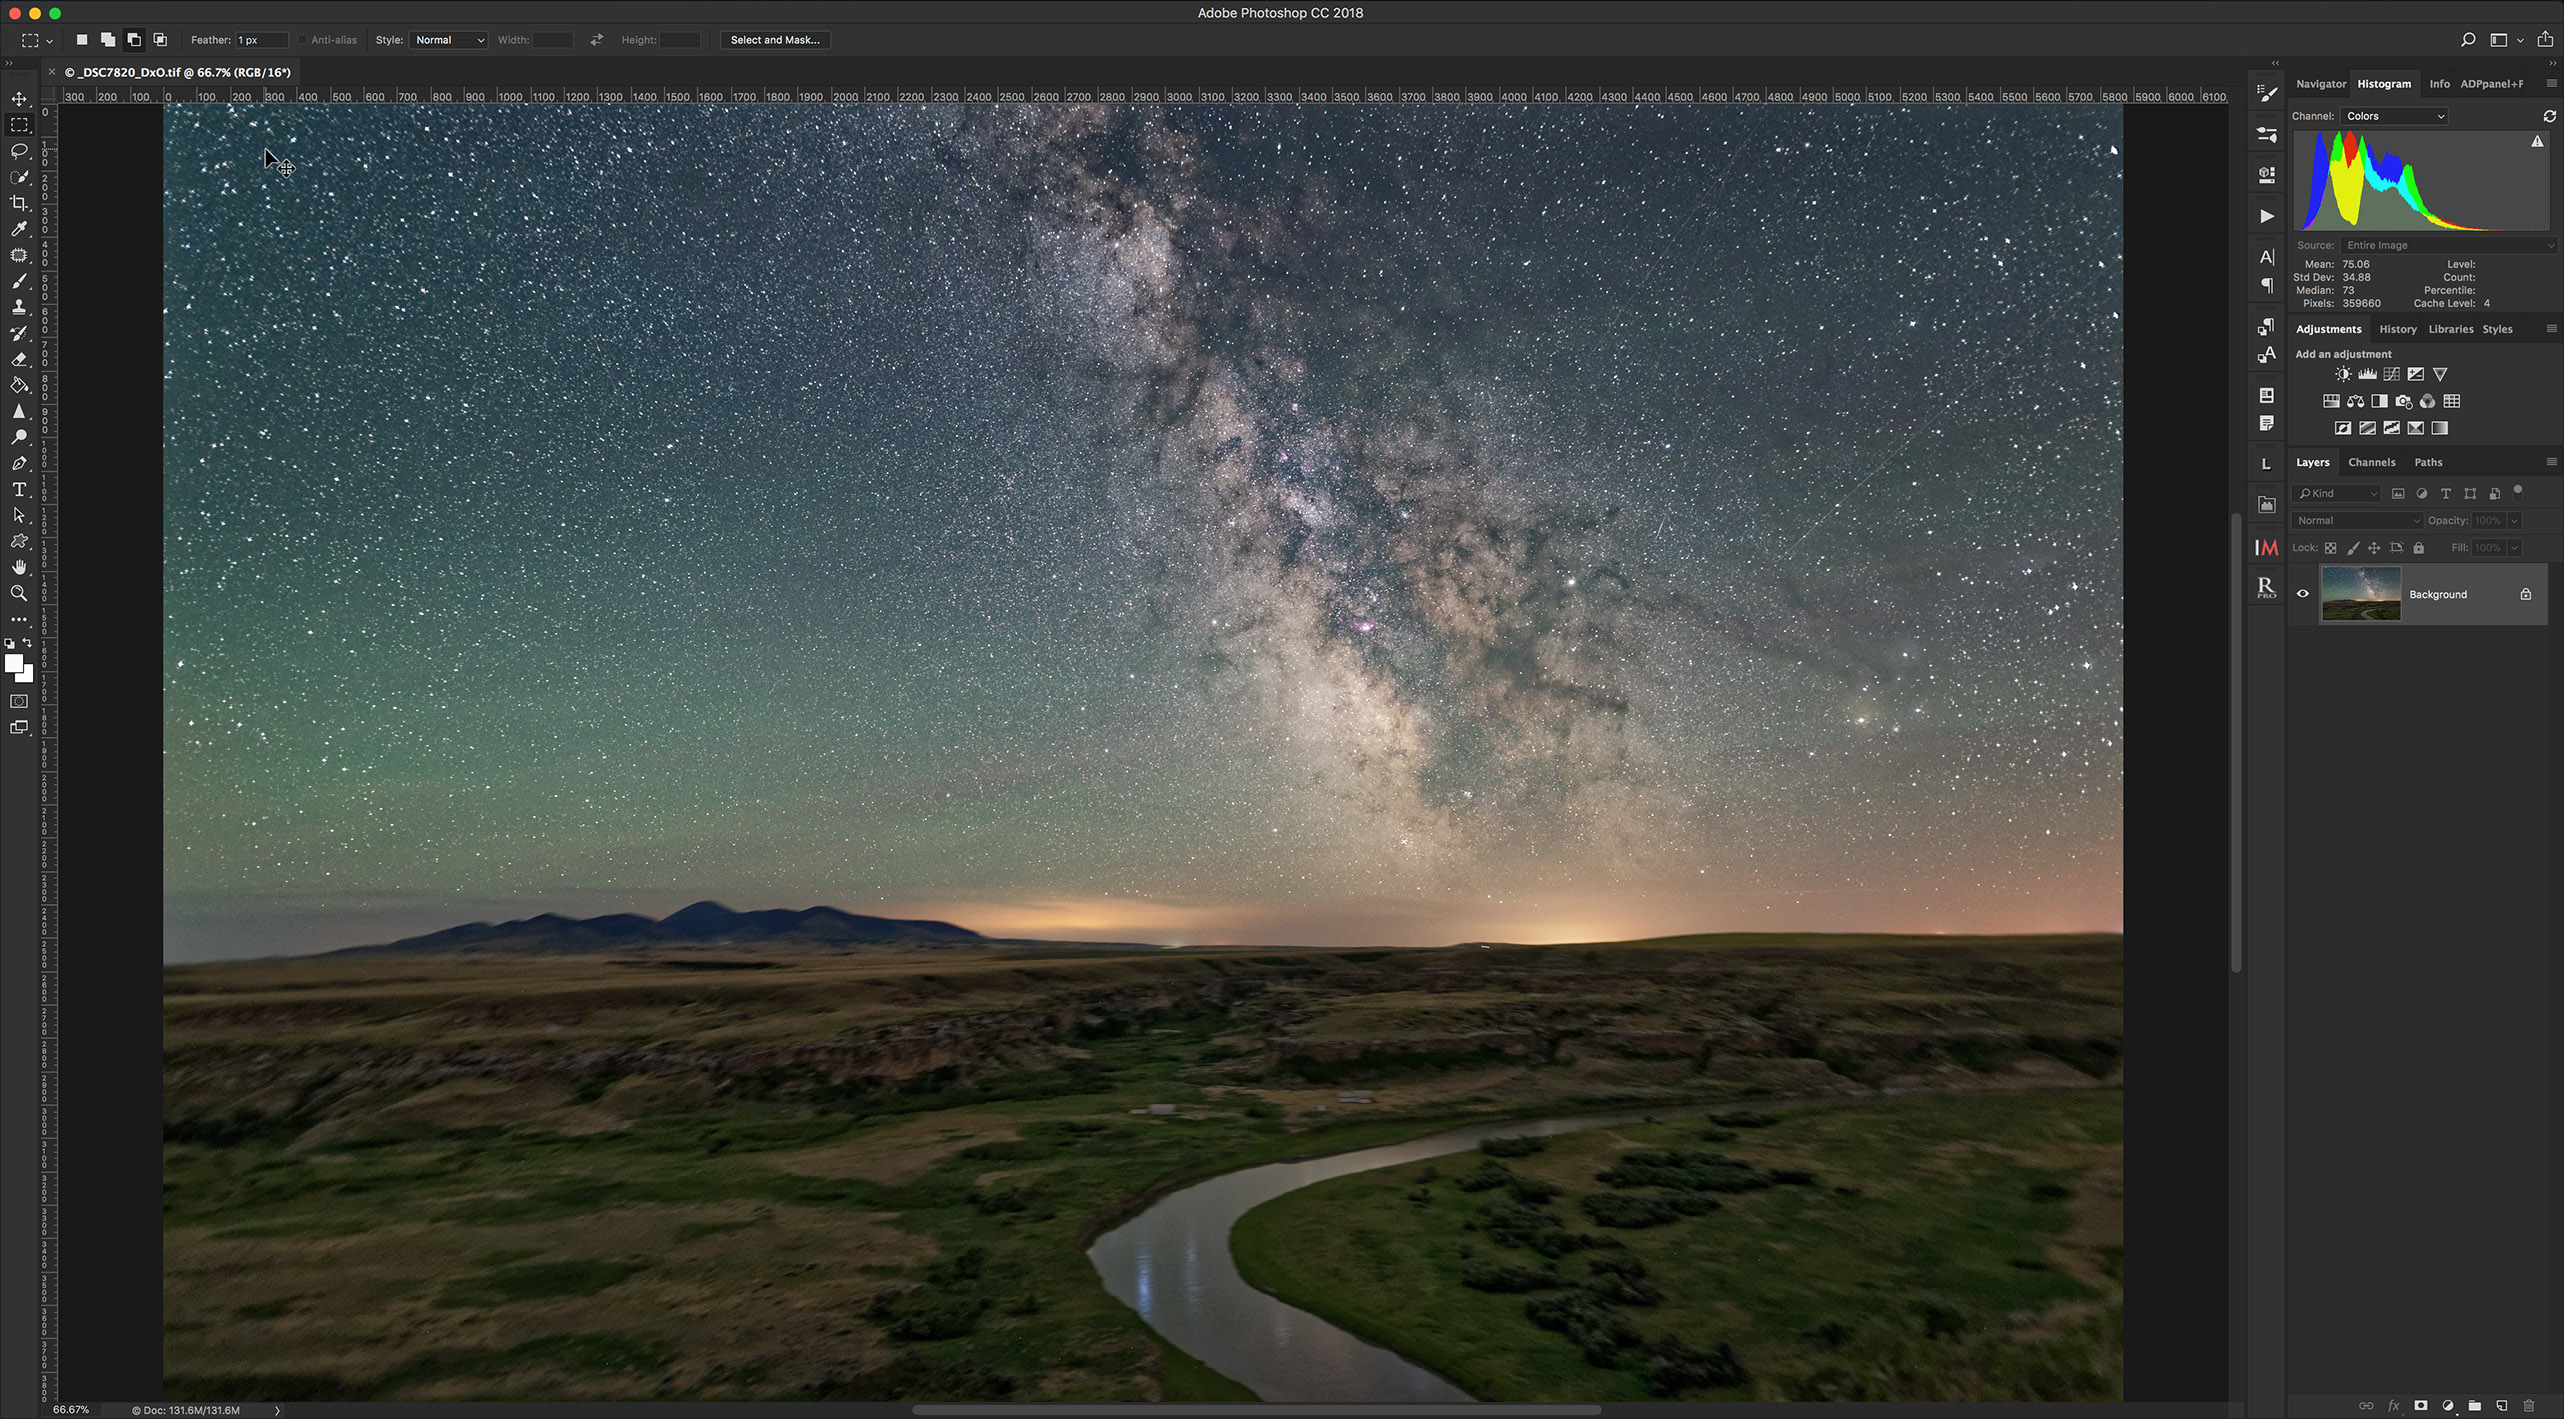
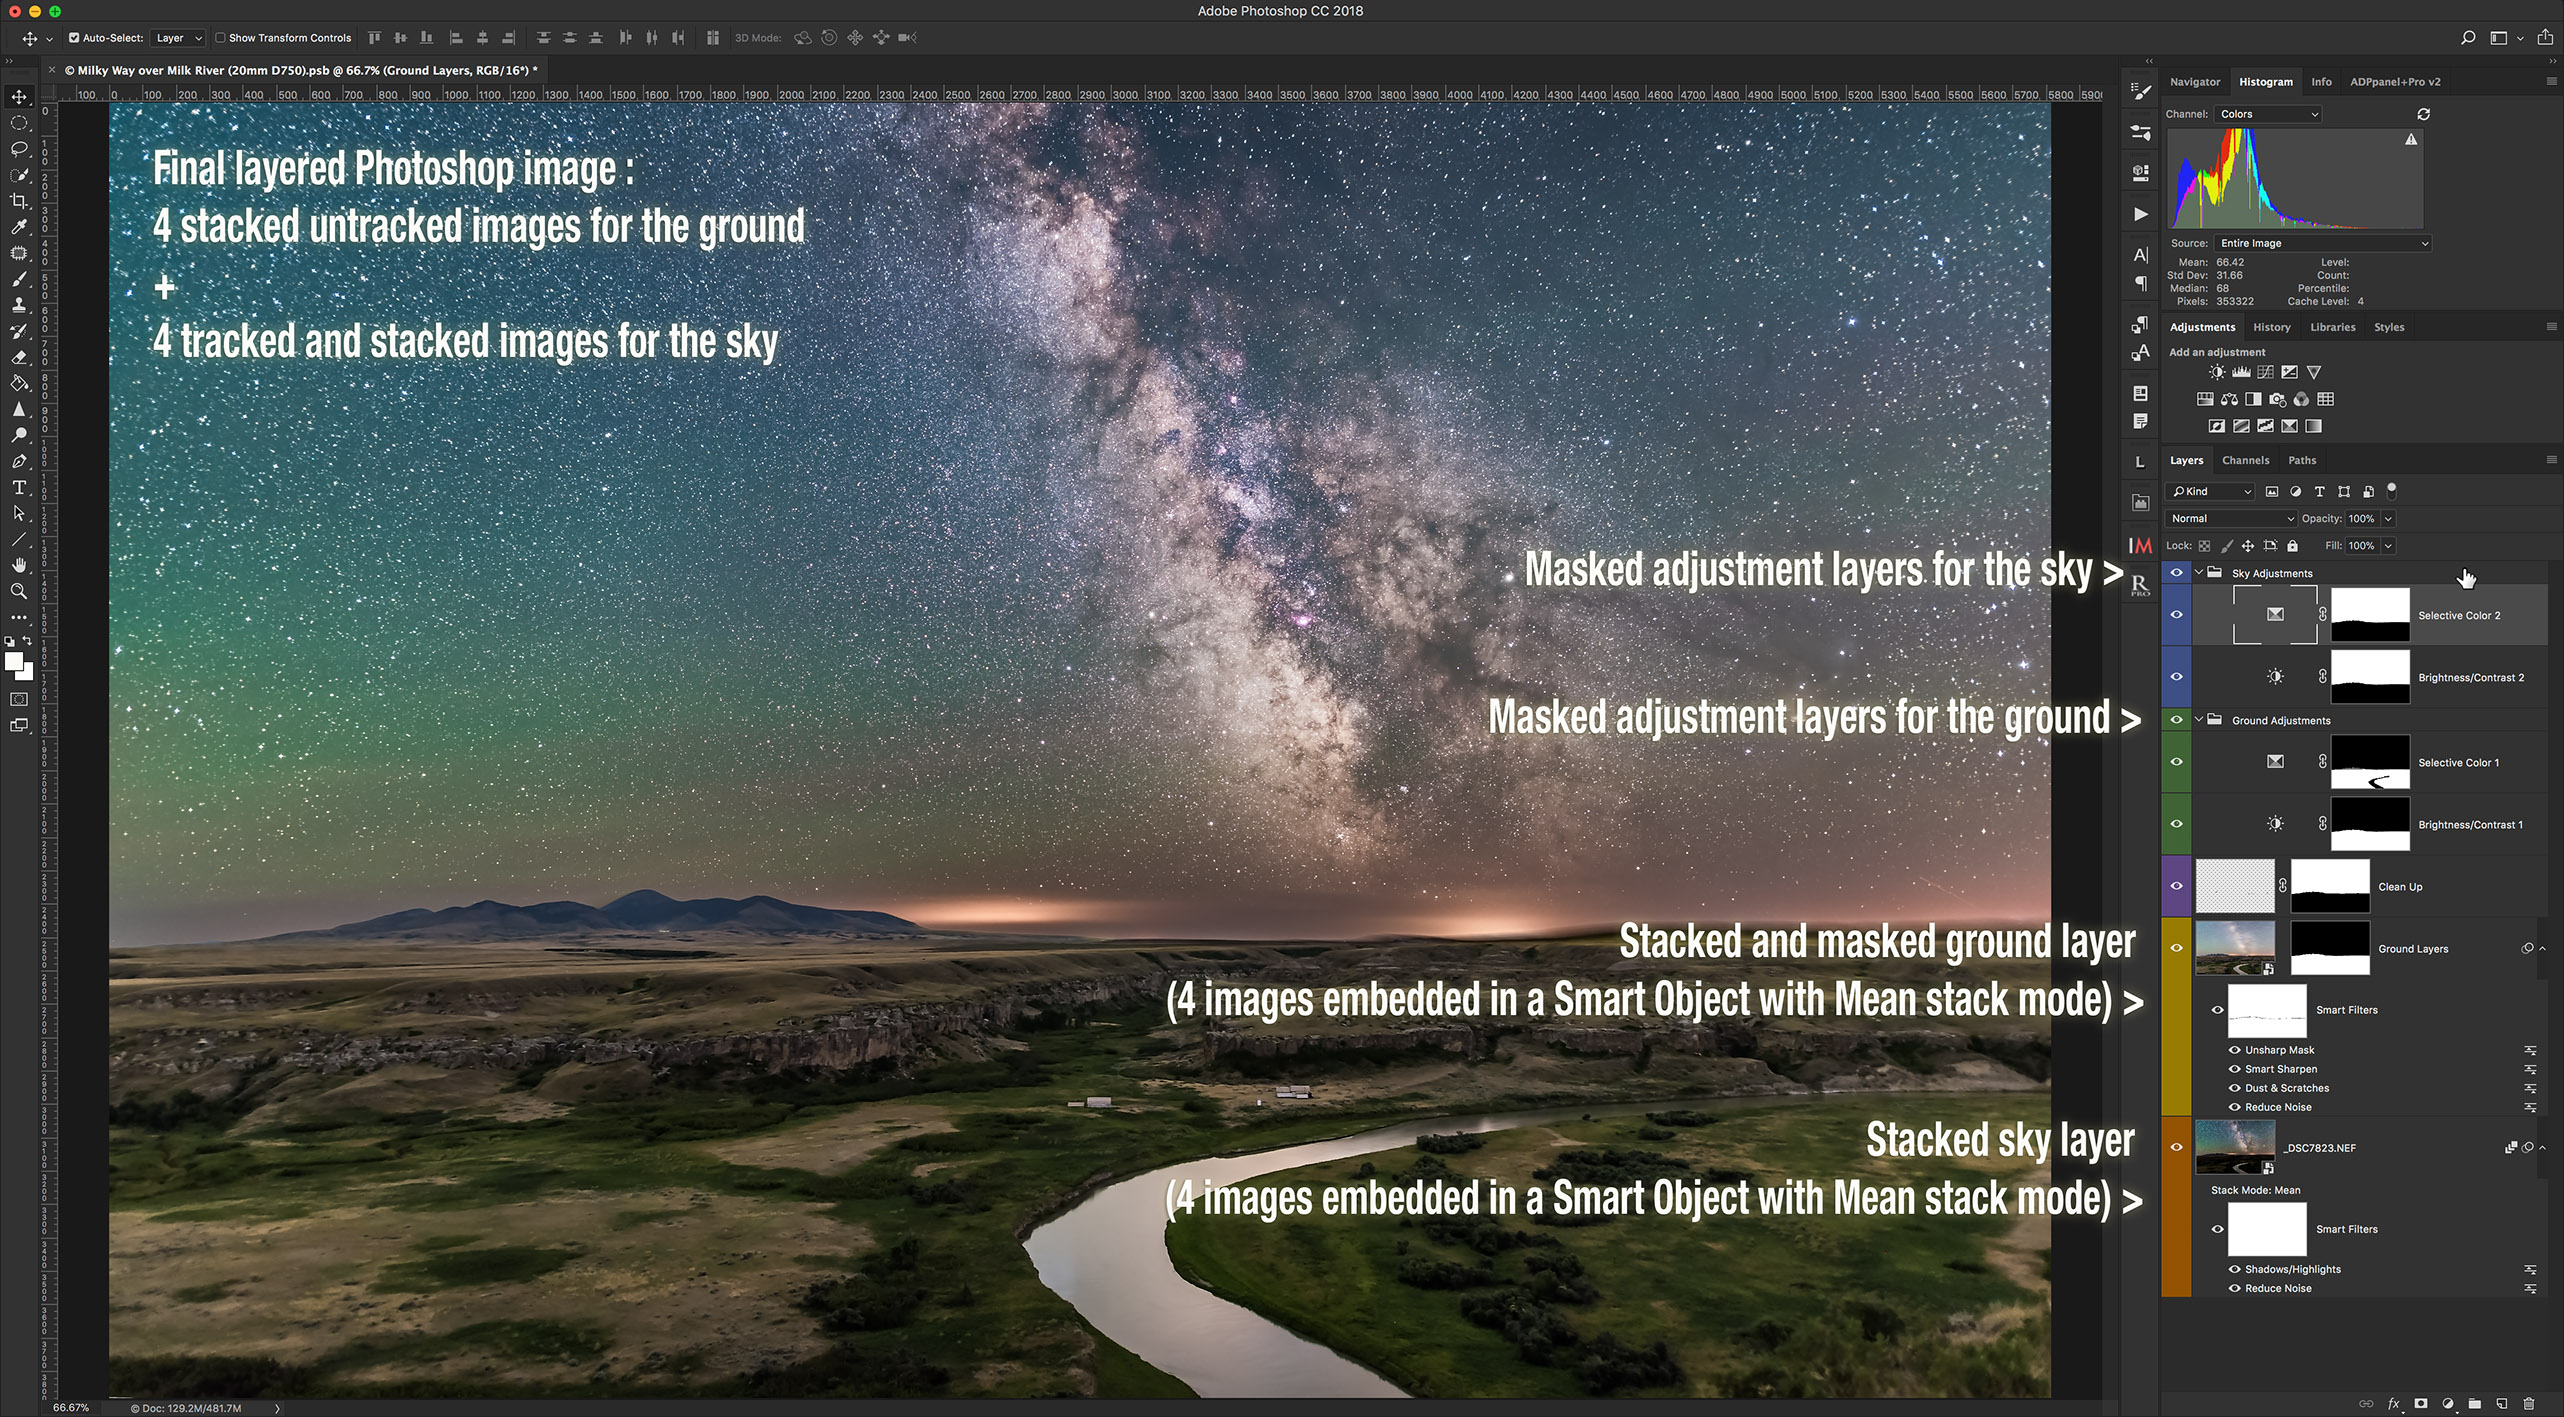
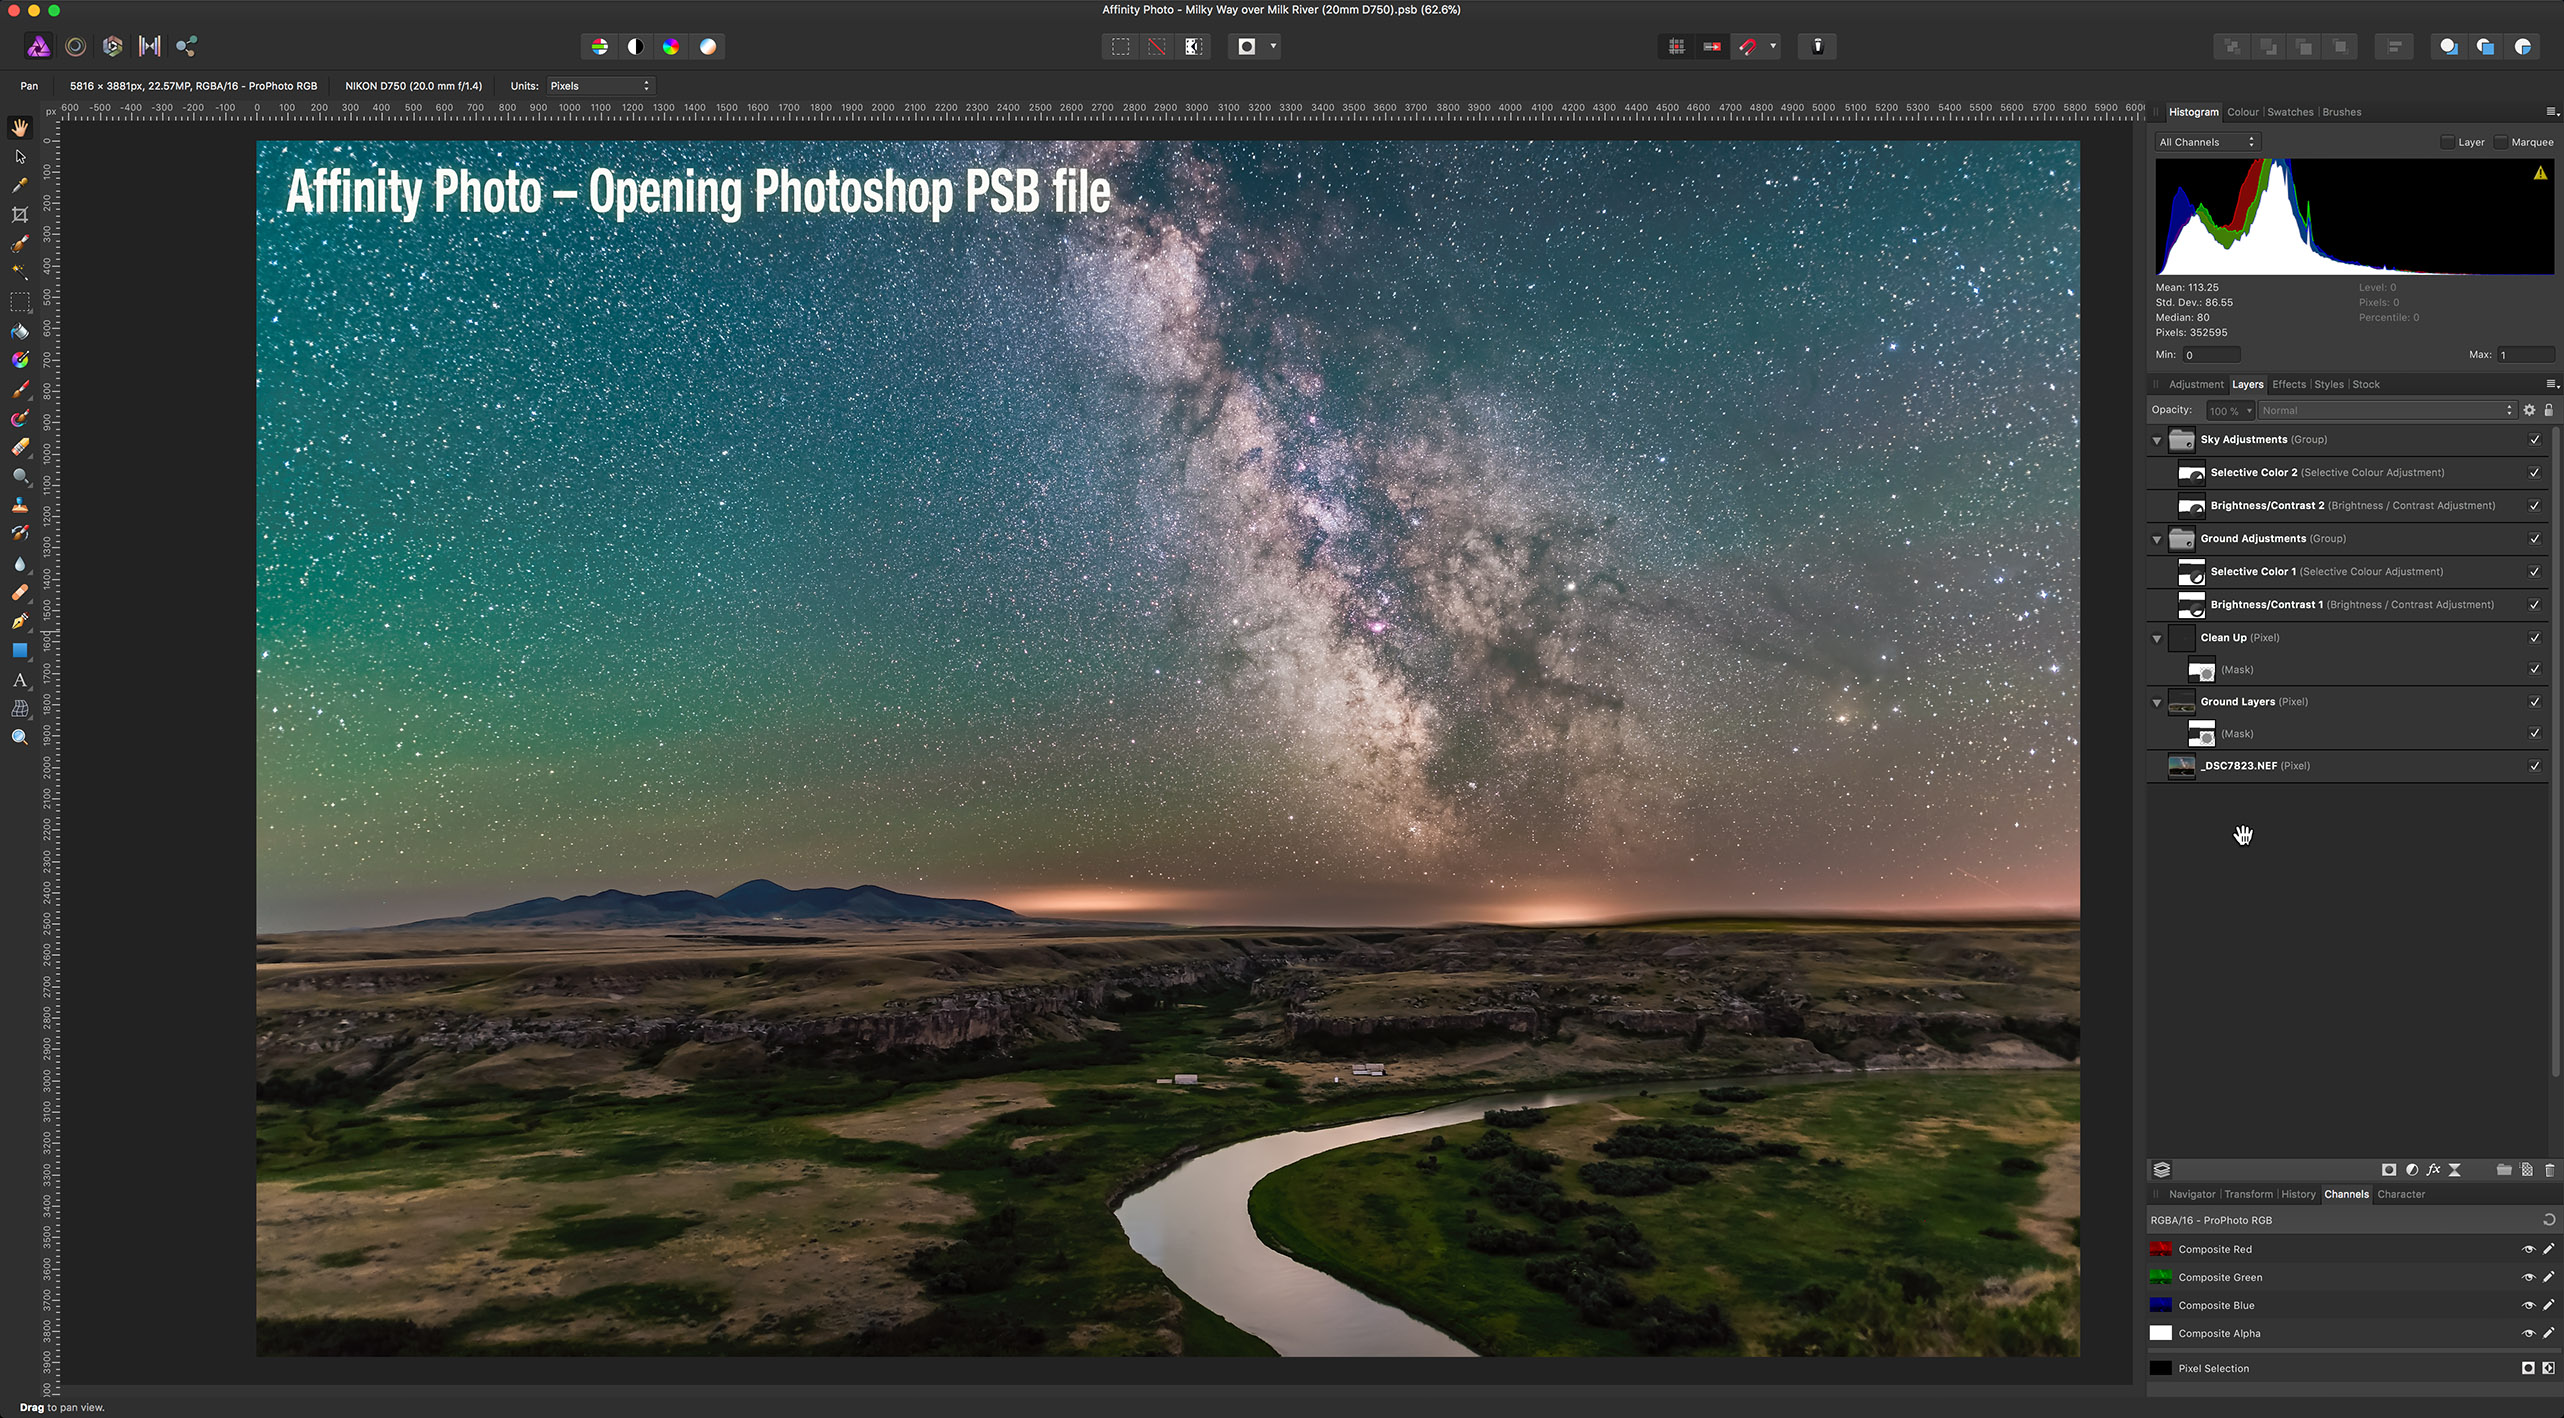
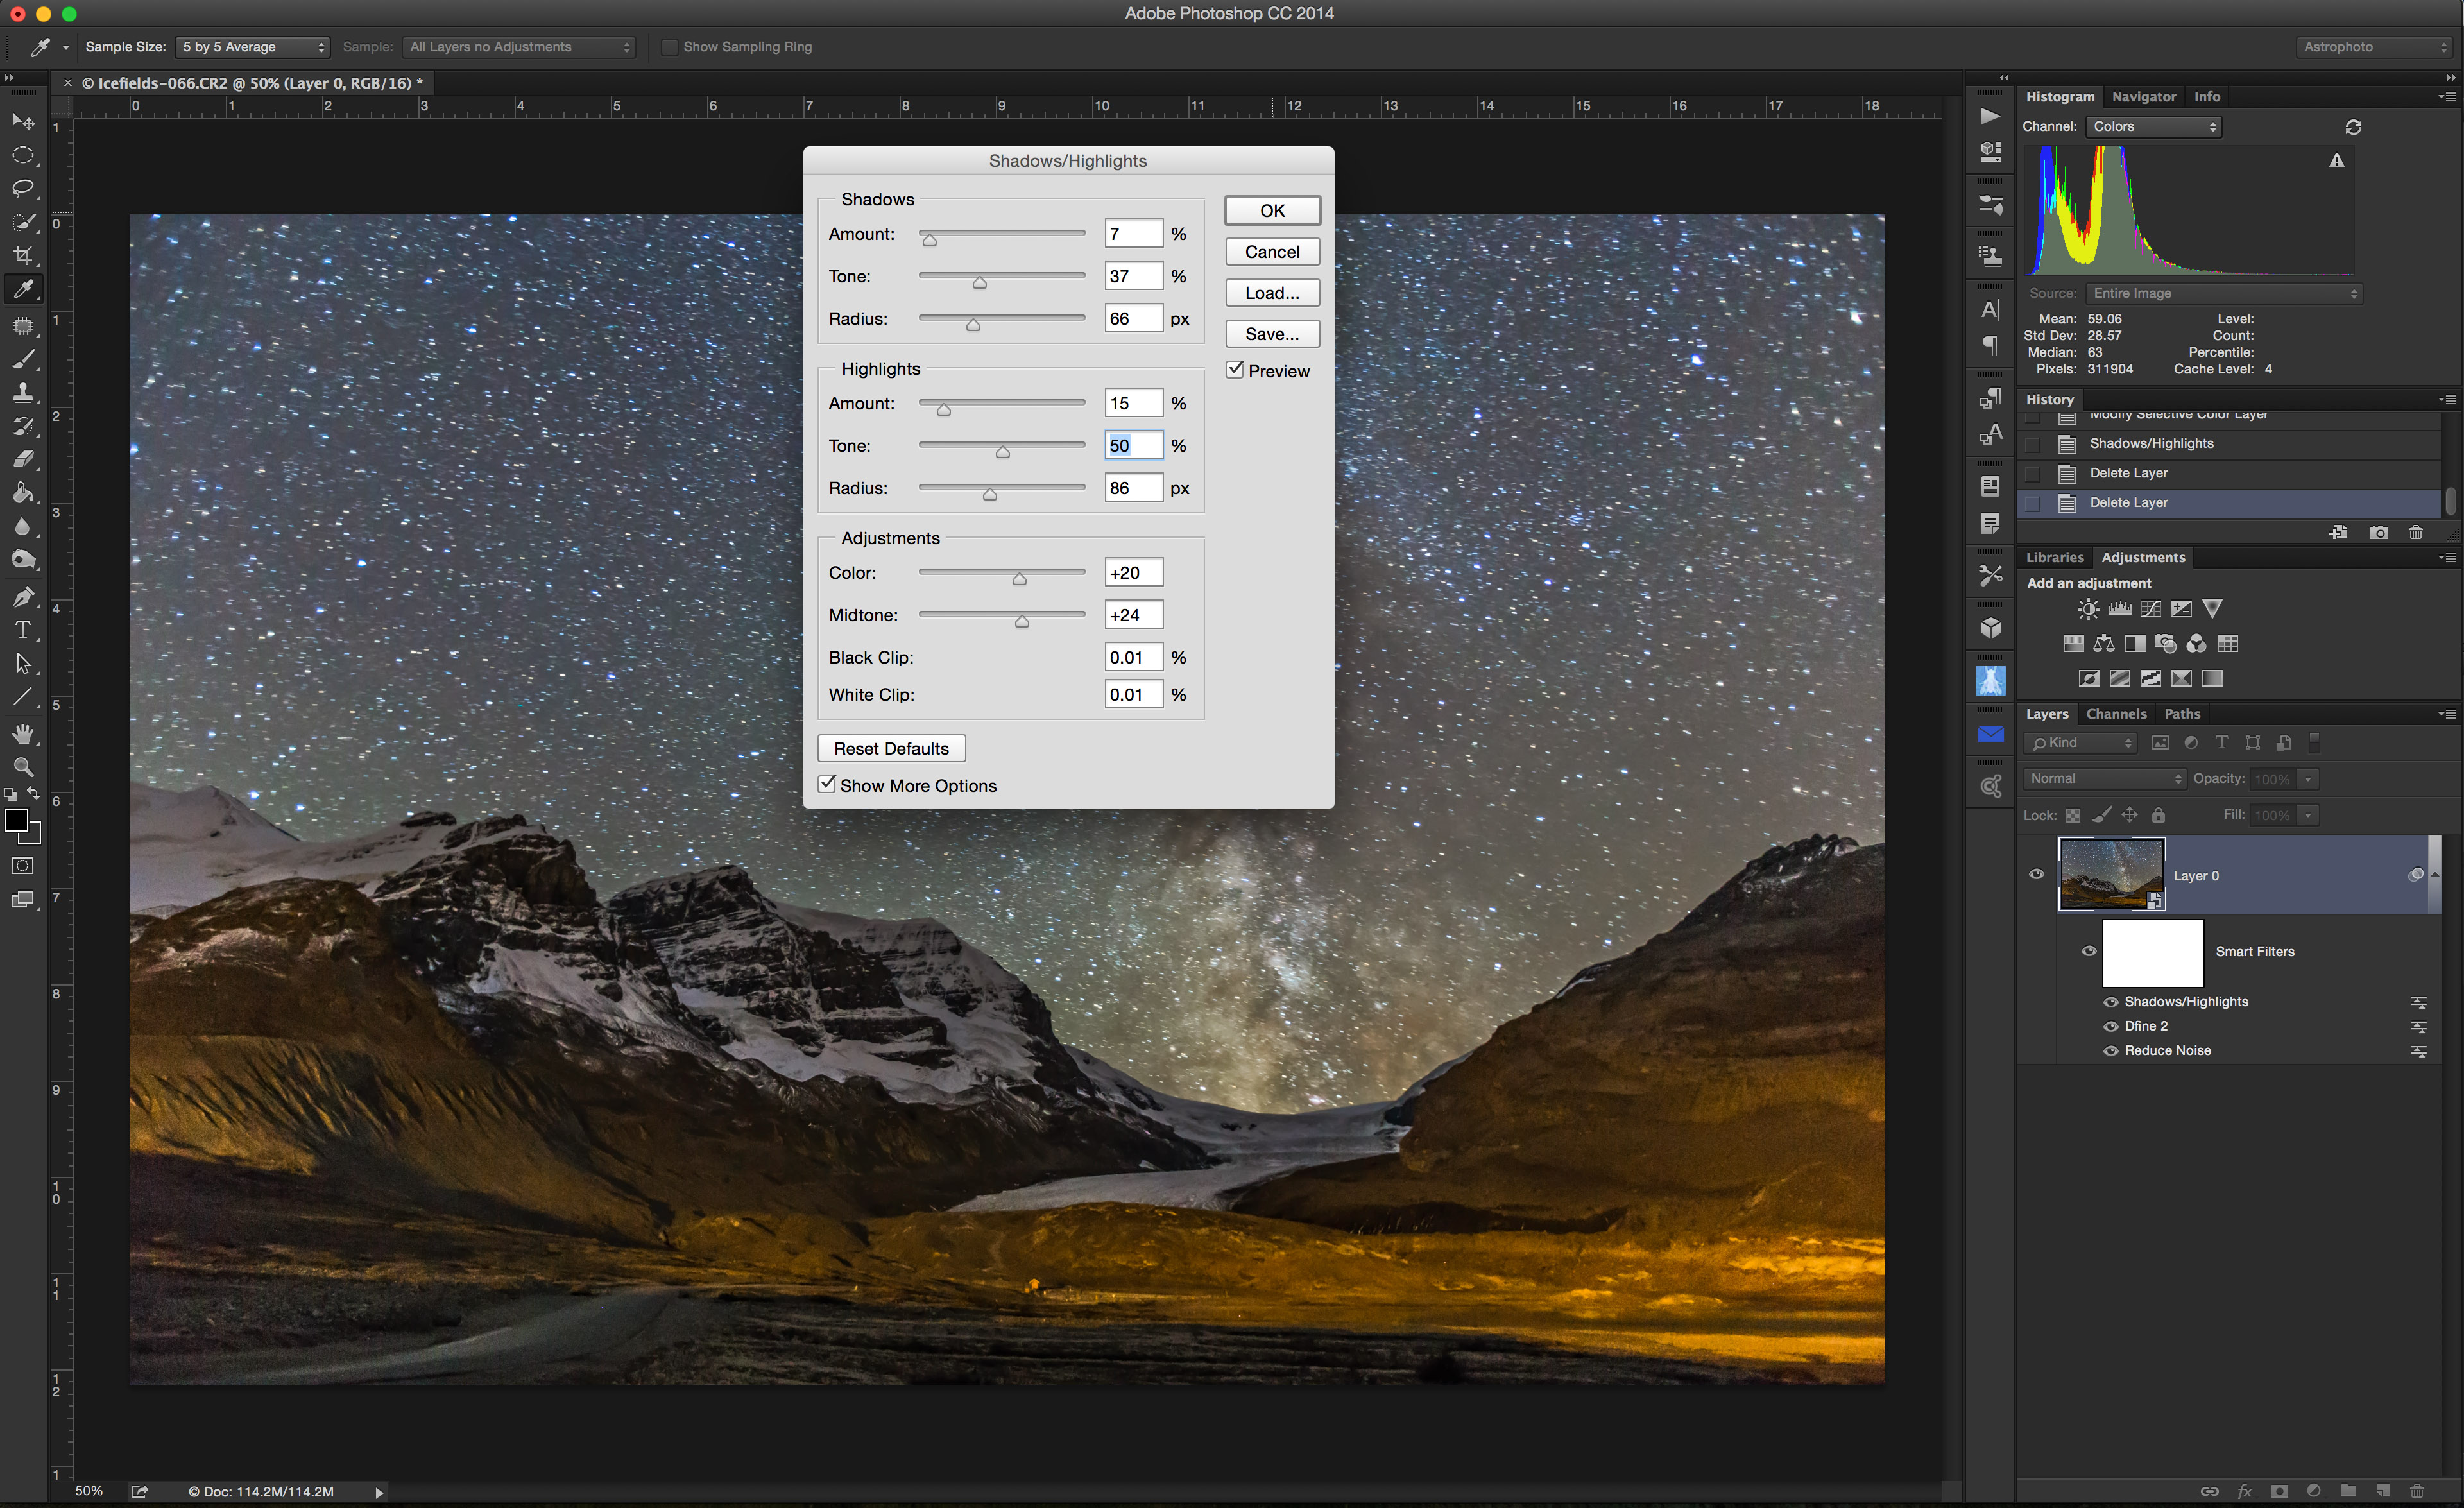
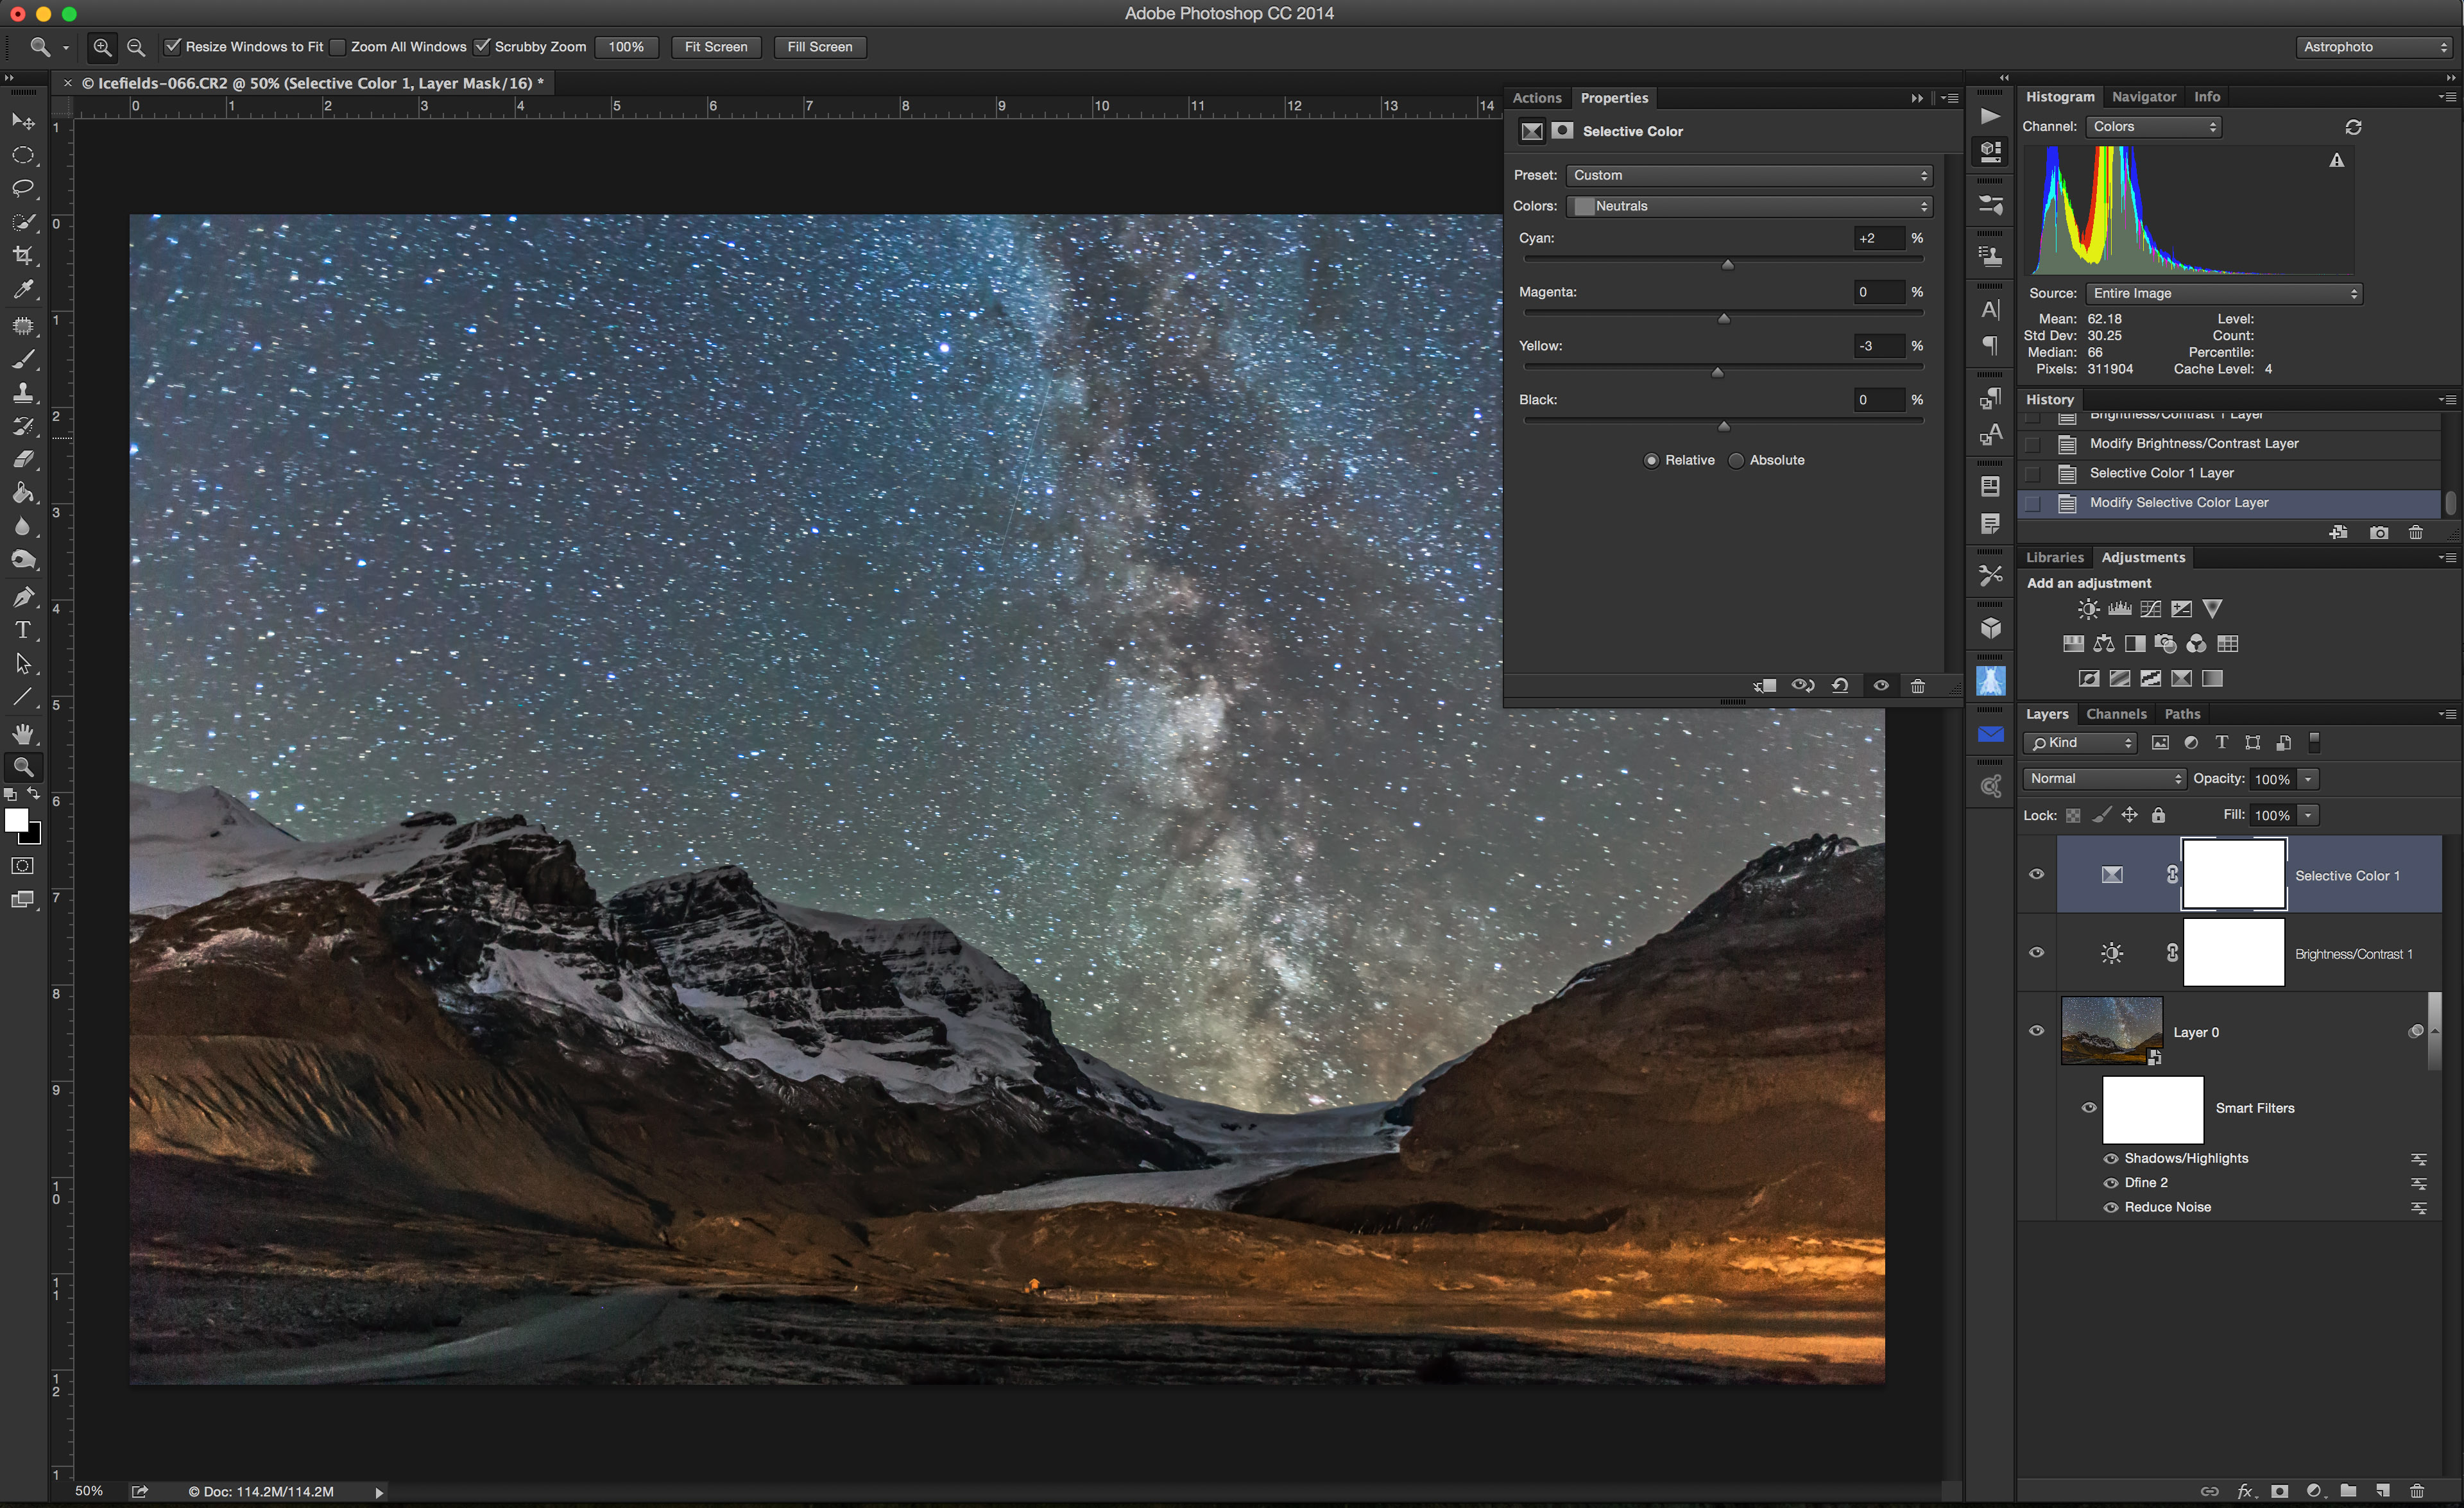
This shows the stack of images now in Adobe Photoshop, but here revealing just the layer for the sky panorama and its associated adjustment layers to further tweak color and contrast. I often add noise reduction as a non-destructive “smart filter” applied to the “smart object” image layer. See my review of noise reduction programs here.
This shows just the ground panorama layer, again with some adjustment and retouching layers dedicated to this portion of the image.
The sky has to be masked out of the ground panorama, to reveal the sky below. The Select Sky command in Photoshop usually works well, or I just use the Quick Selection tool and then Select and Mask to refine the edge. That method can be more accurate.
Aligning the two panoramas requires manually nudging the untracked ground, up in this case, to hide the blurred and dark horizon from the tracked sky panorama. Yes, we move the earth! The sky usually also requires some re-touching to clone out blurred horizon bits sticking up. Dealing with trees can be a bit messy!
The result is the scene above with both panorama layers and the masks turned on. While this now looks almost complete, we’re not done yet.
Local adjustments like Dodge and Burn (using a neutral grey layer with a Soft Light blend mode) and some luminosity masks tweak the brightness of portions of the scene for subtle improvements, to emphasize some areas while darkening others. It’s what film photographers did in the darkroom by waving physical dodging and burning tools under the enlarger.
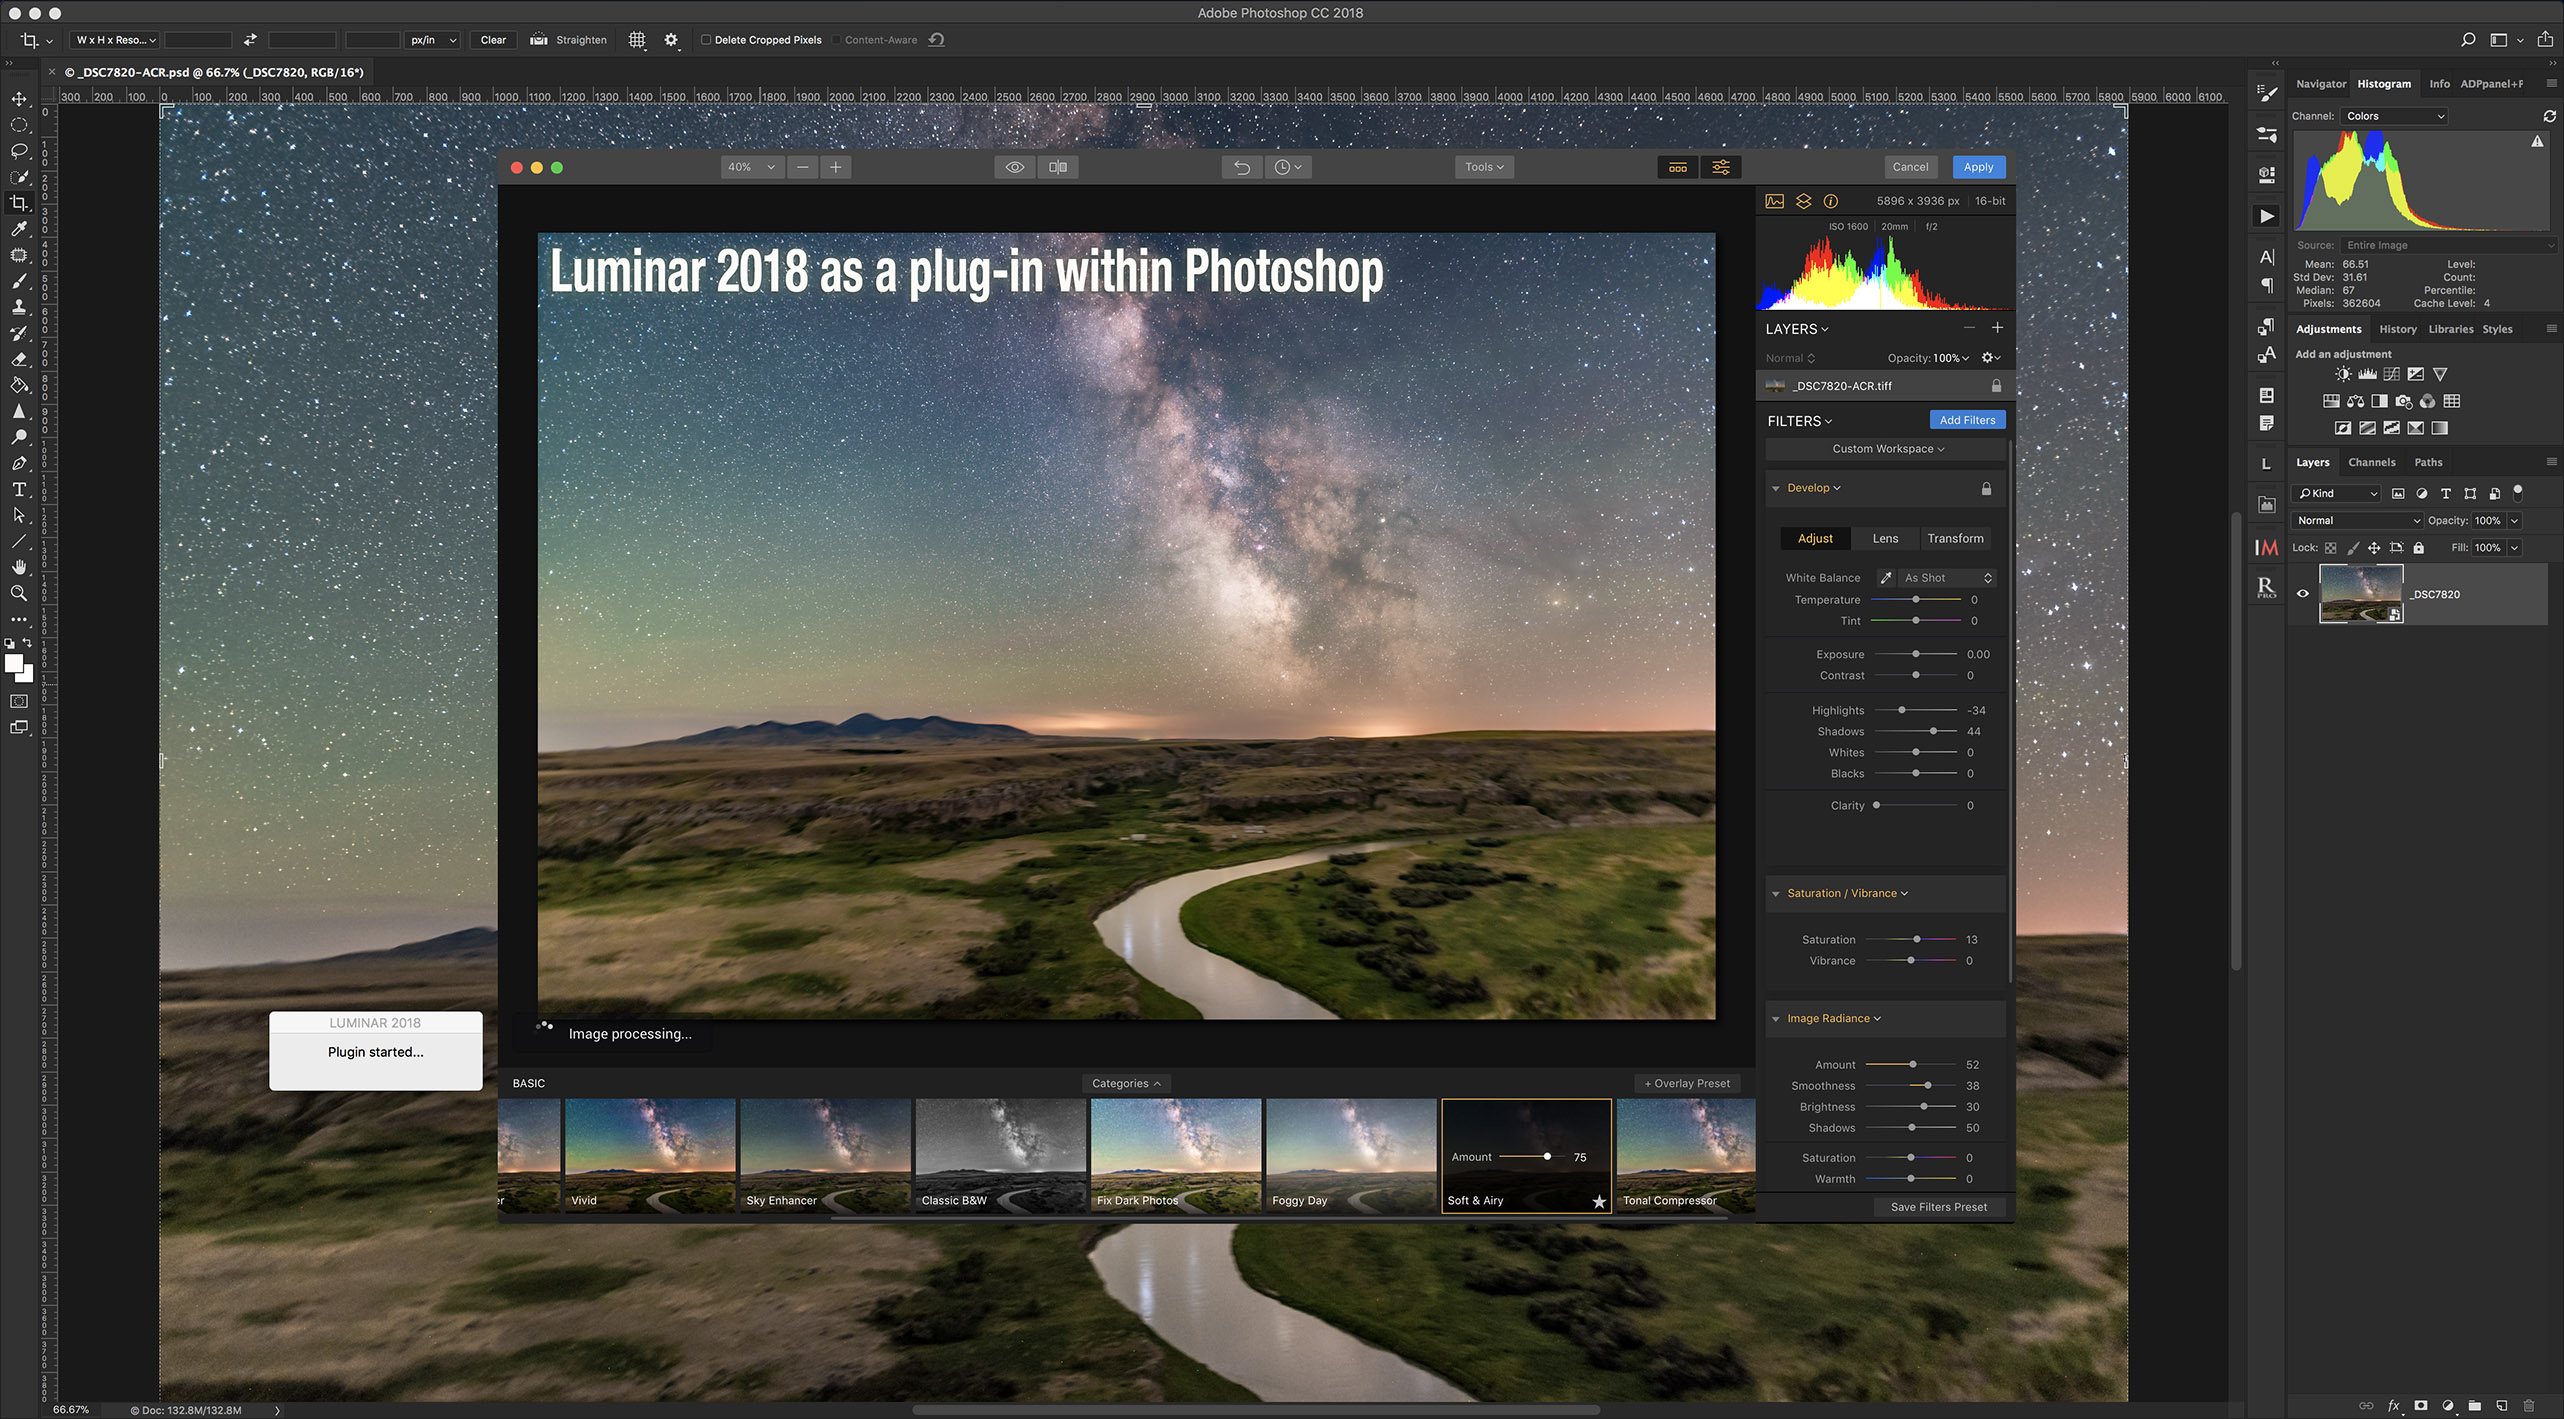
I add finishing touches with some effect plug-ins: Radiant Photo added some pop to the ground, while Luminar Neo added a soft “Orton glow” effect to the sky and slightly to the ground.
All the adjustments, filters, and effects are non-destructive so they can be re-adjusted later, when upon further inspection with fresh eyes I realize something needs work.
Was It Photoshopped?
I hope my look behind the curtains was of interest. While these types of nightscapes taken with a tracker, and especially multi-segment panoramas, do produce dramatic images, they do require a lot of processing at the computer.
Was it “photoshopped?” Yes. Was it faked? No. The sky really was there over the scene you see in the image. However, the long exposures of the camera do reveal more details than the eye alone can see at night — that is the essence of astrophotography.
My one concession to warping reality is in the time-blending — the merging of panoramas taken 30 minutes to an hour apart. I’ll admit that does push my limits for preferring to record real scenes, and not fabricate them (i.e. “photoshop” them in common parlance).
But at this shoot on these marvelous nights, making use of the perfectly timed moonrises was hard to resist!
In a detailed technical blog I compare six AI-based noise reduction programs for the demands of astrophotography. Some can work wonders. Others can ruin your image.
Over the last two years we have seen a spate of specialized programs introduced for removing digital noise from photos. The new generation of programs use artificial intelligence (AI), aka machine learning, trained on thousands of images to better distinguish unwanted noise from desirable image content.
At least that’s the promise – and for noisy but normal daytime images they do work very well.
But in astrophotography our main subjects – stars – can look a lot like specks of pixel-level noise. How well can each program reduce noise without eliminating stars or wanted details, or introducing odd artifacts, making images worse.
To find out, I tested six of the new AI-based programs on real-world – or rather “real-sky” – astrophotos. Does one program stand out from the rest for astrophotography?
NOTE: All the images are full-resolution JPGs you can tap or click on to download for detailed inspection. But that does make the blog page slow to load initially. Patience!
TL;DR SUMMARY
The new AI-trained noise reduction programs can indeed eliminate noise better than older non-AI programs, while leaving fine details untouched or even sharpening them.
Of the group tested, the winner for use on just star-filled images is a specialized program for astrophotography, NoiseXTerminator from RC-Astro.
For nightscapes and other images, Topaz DeNoise AI performed well, better than it did in earlier versions that left lots of patchy artifacts, something AI programs can be prone to.
While ON1’s new NoNoise AI 2023 performed fine, it proved slightly worse in some cases than its earlier 2022 version. Its new sharpening routine needs work.
Other new programs, notably Topaz Photo AI and Luminar’s Noiseless AI, also need improvement before they are ready to be used for the rigours of astrophotography.
For reasons explained below, I would not recommend DxO’s PureRAW2. [See below for comments on the newer DxO PureRaw3, which suffers from the same issues.]
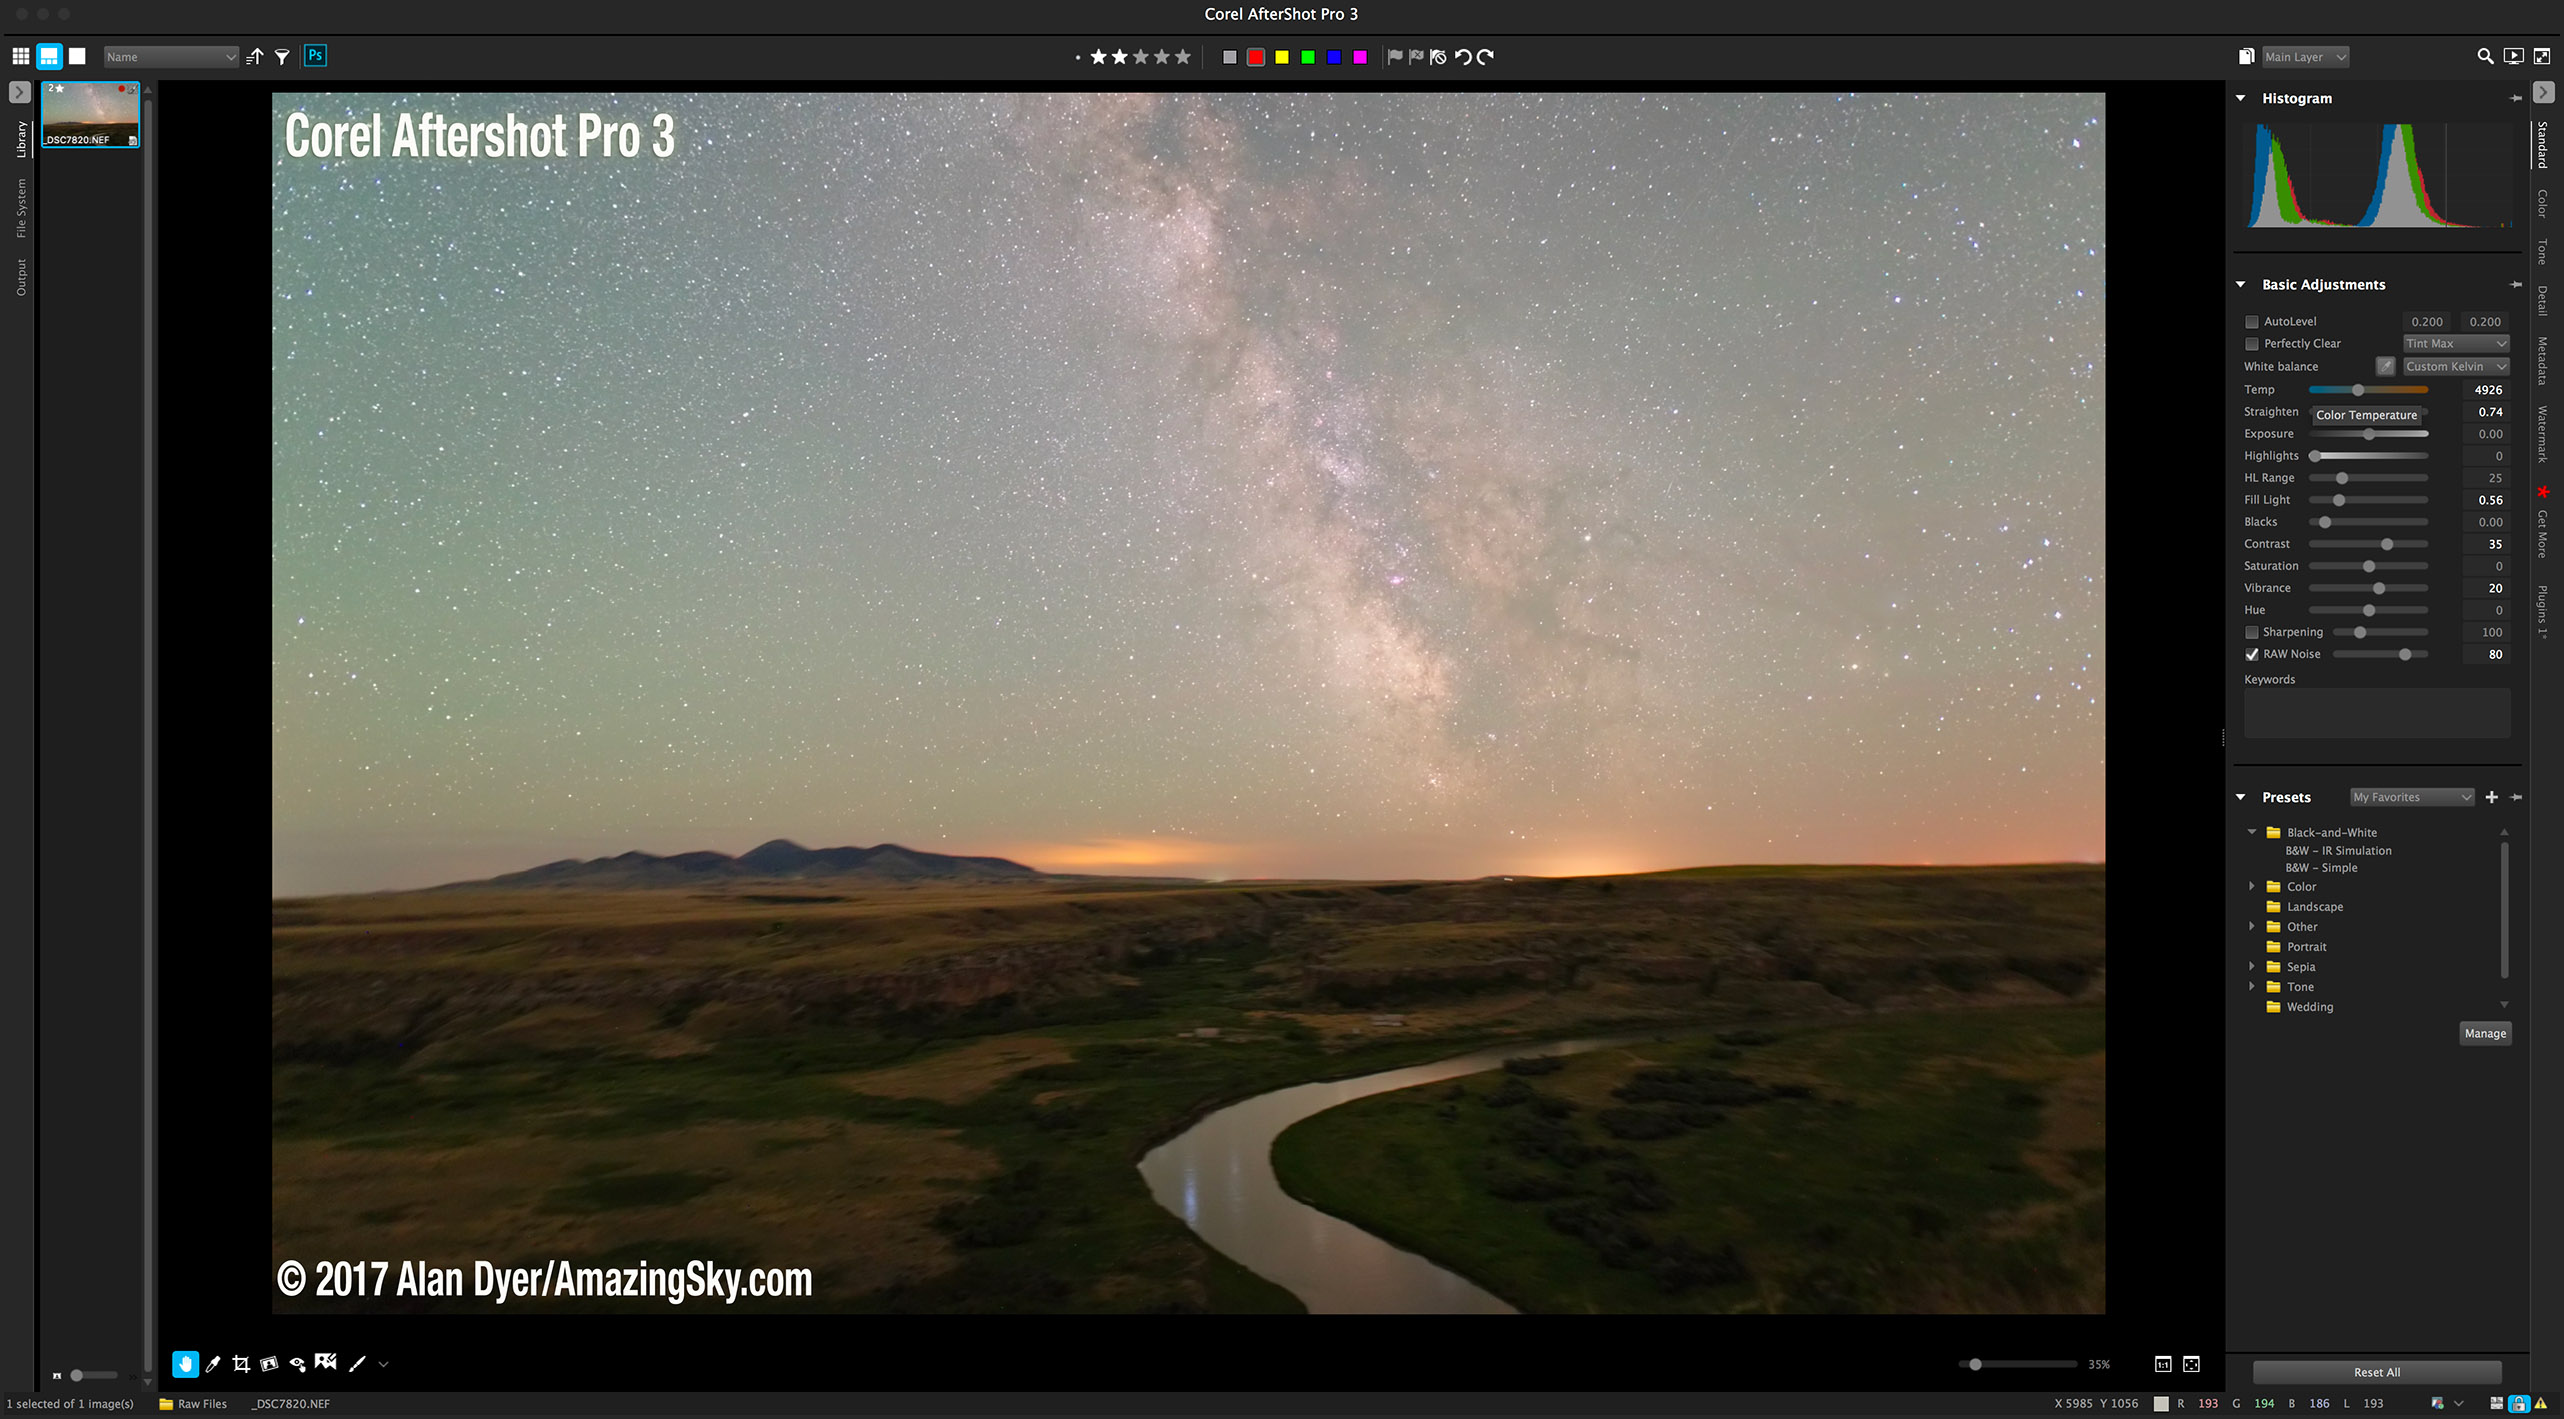
The three test images in Adobe Camera Raw showing the Basic settings applied.
METHODOLOGY
As described below, while some of the programs can be used as stand-alone applications, I tested them all as plug-ins for Photoshop, applying each as a smart filter applied to a developed raw file brought into Photoshop as a Camera Raw smart object.
Most of these programs state that better results might be obtainable by using the stand-alone app on original raw files. But for my personal workflow I prefer to develop the raw files with Adobe Camera Raw, then open those into Photoshop for stacking and layering, applying any further noise reduction or sharpening as non-destructive smart filters.
Many astrophotographers also choose to stack unedited original images with specialized stacking software, then apply further noise reduction and editing later in the workflow. So my workflow and test procedures reflect that.
However, the exception is DxO’s PureRAW2. It can work only on raw files as a stand-alone app, or as a plug-in from Adobe Lightroom. It does not work as a Photoshop plug-in. I tested PureRAW2 by dropping raw Canon .CR3 files onto the app, then exporting the results as raw DNG files, but with the same settings applied as with the other raw files. For the nightscape and wide-field images taken with lenses in DxO’s extensive database, I used PureRAW’s lens corrections, not Adobe’s.
As shown above, I chose three representative images:
A nightscape with star trails and a detailed foreground, at ISO 1600.
A wide-field deep-sky image at ISO 1600 with an 85mm lens, with very tiny stars.
A close-up deep-sky image taken with a telescope and at a high ISO of 3200, showing thermal noise hot pixels.
Each is a single image, not a stack of multiple images.
Before applying the noise reduction, the raw files received just basic color corrections and a contrast boost to emphasize noise all the more.
THE CONTENDERS
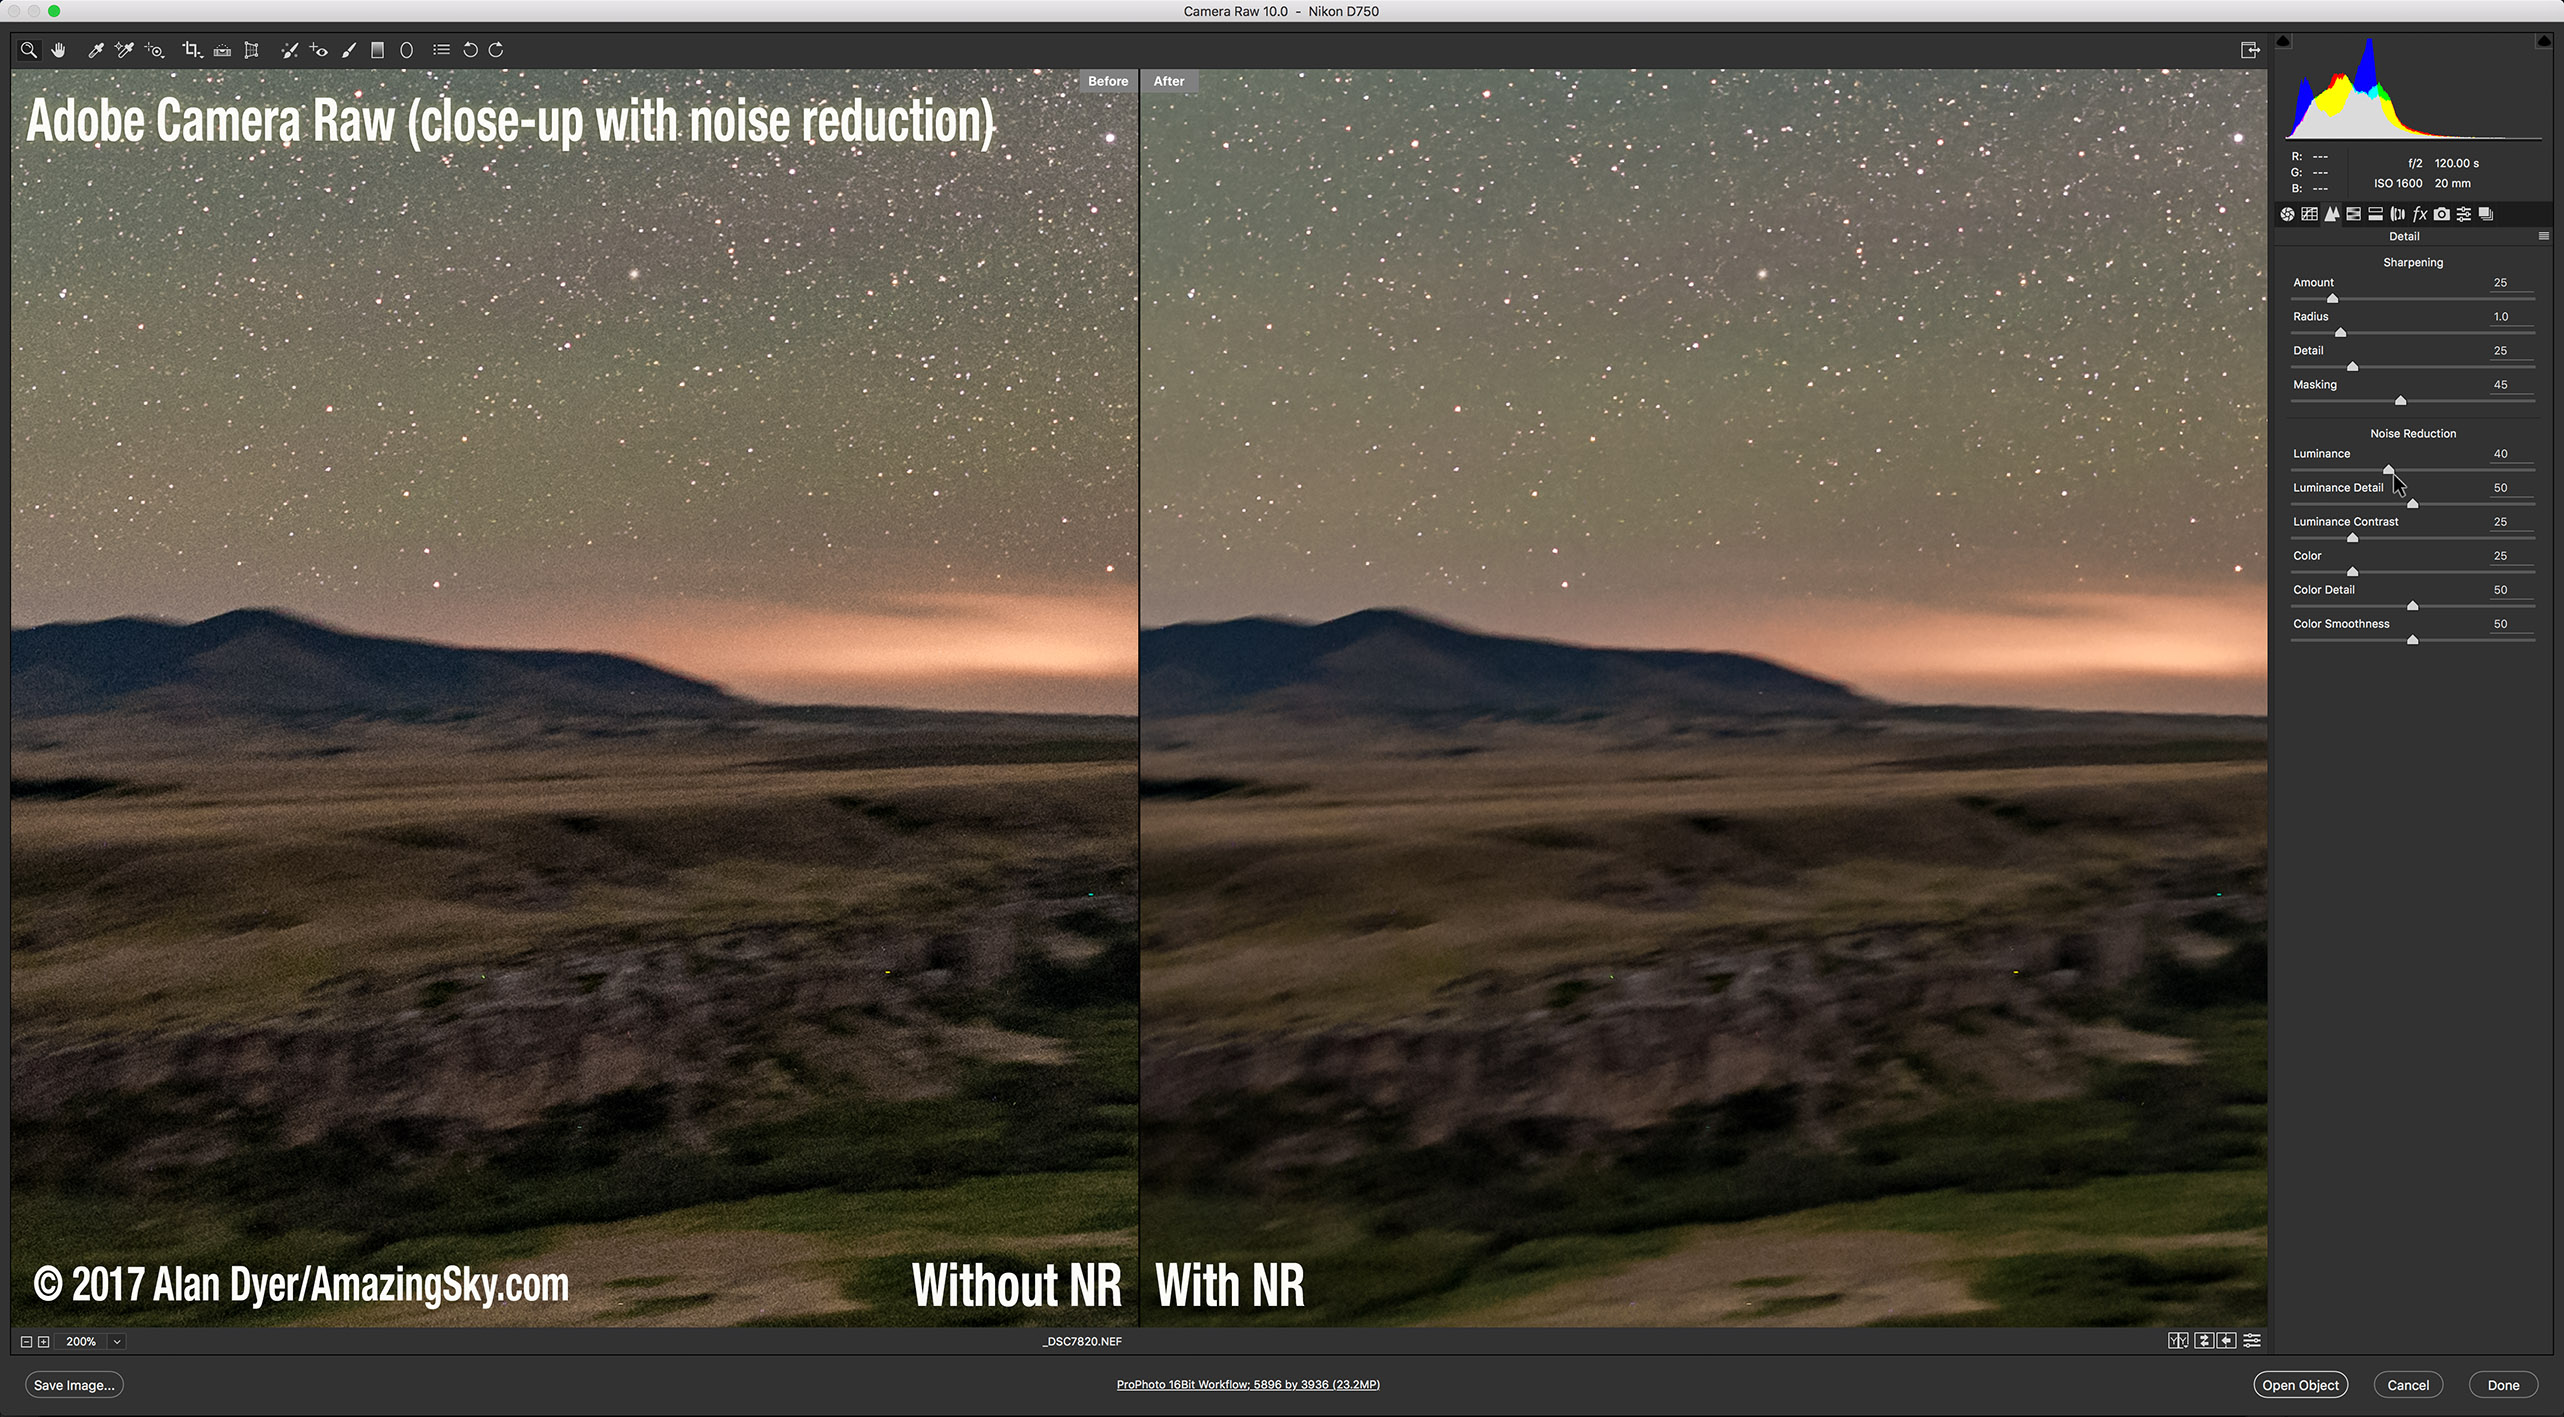
In the test results for the three images, I show the original raw image, plus a version with noise reduction and sharpening applied using Adobe Camera Raw’s own sliders, with luminance noise at 40, color noise at 25, and sharpening at 25.
I use this as a base comparison, as it has been the noise reduction I have long applied to images. However, ACR’s routine (also found in Adobe Lightroom) has not changed in years. It is good, but it is not AI.
[See below for an April 2023 update with a comparison of Adobe’s new AI Denoise with DxO DeepPrimeXD and Topaz PhotoAI.]
The new smart AI programs should improve upon this. But do they?
PLEASENOTE:
I have refrained from providing prices and explaining buying options, as frankly some can be complex!
For those details and for trial copies, go to the software’s website by clicking on the link in the header product names below.
All programs are available for Windows and MacOS. I tested the latter versions.
I have not provided tutorials on how to use the software; I have just reported on their results. For trouble-shooting their use, please consult the software company in question.
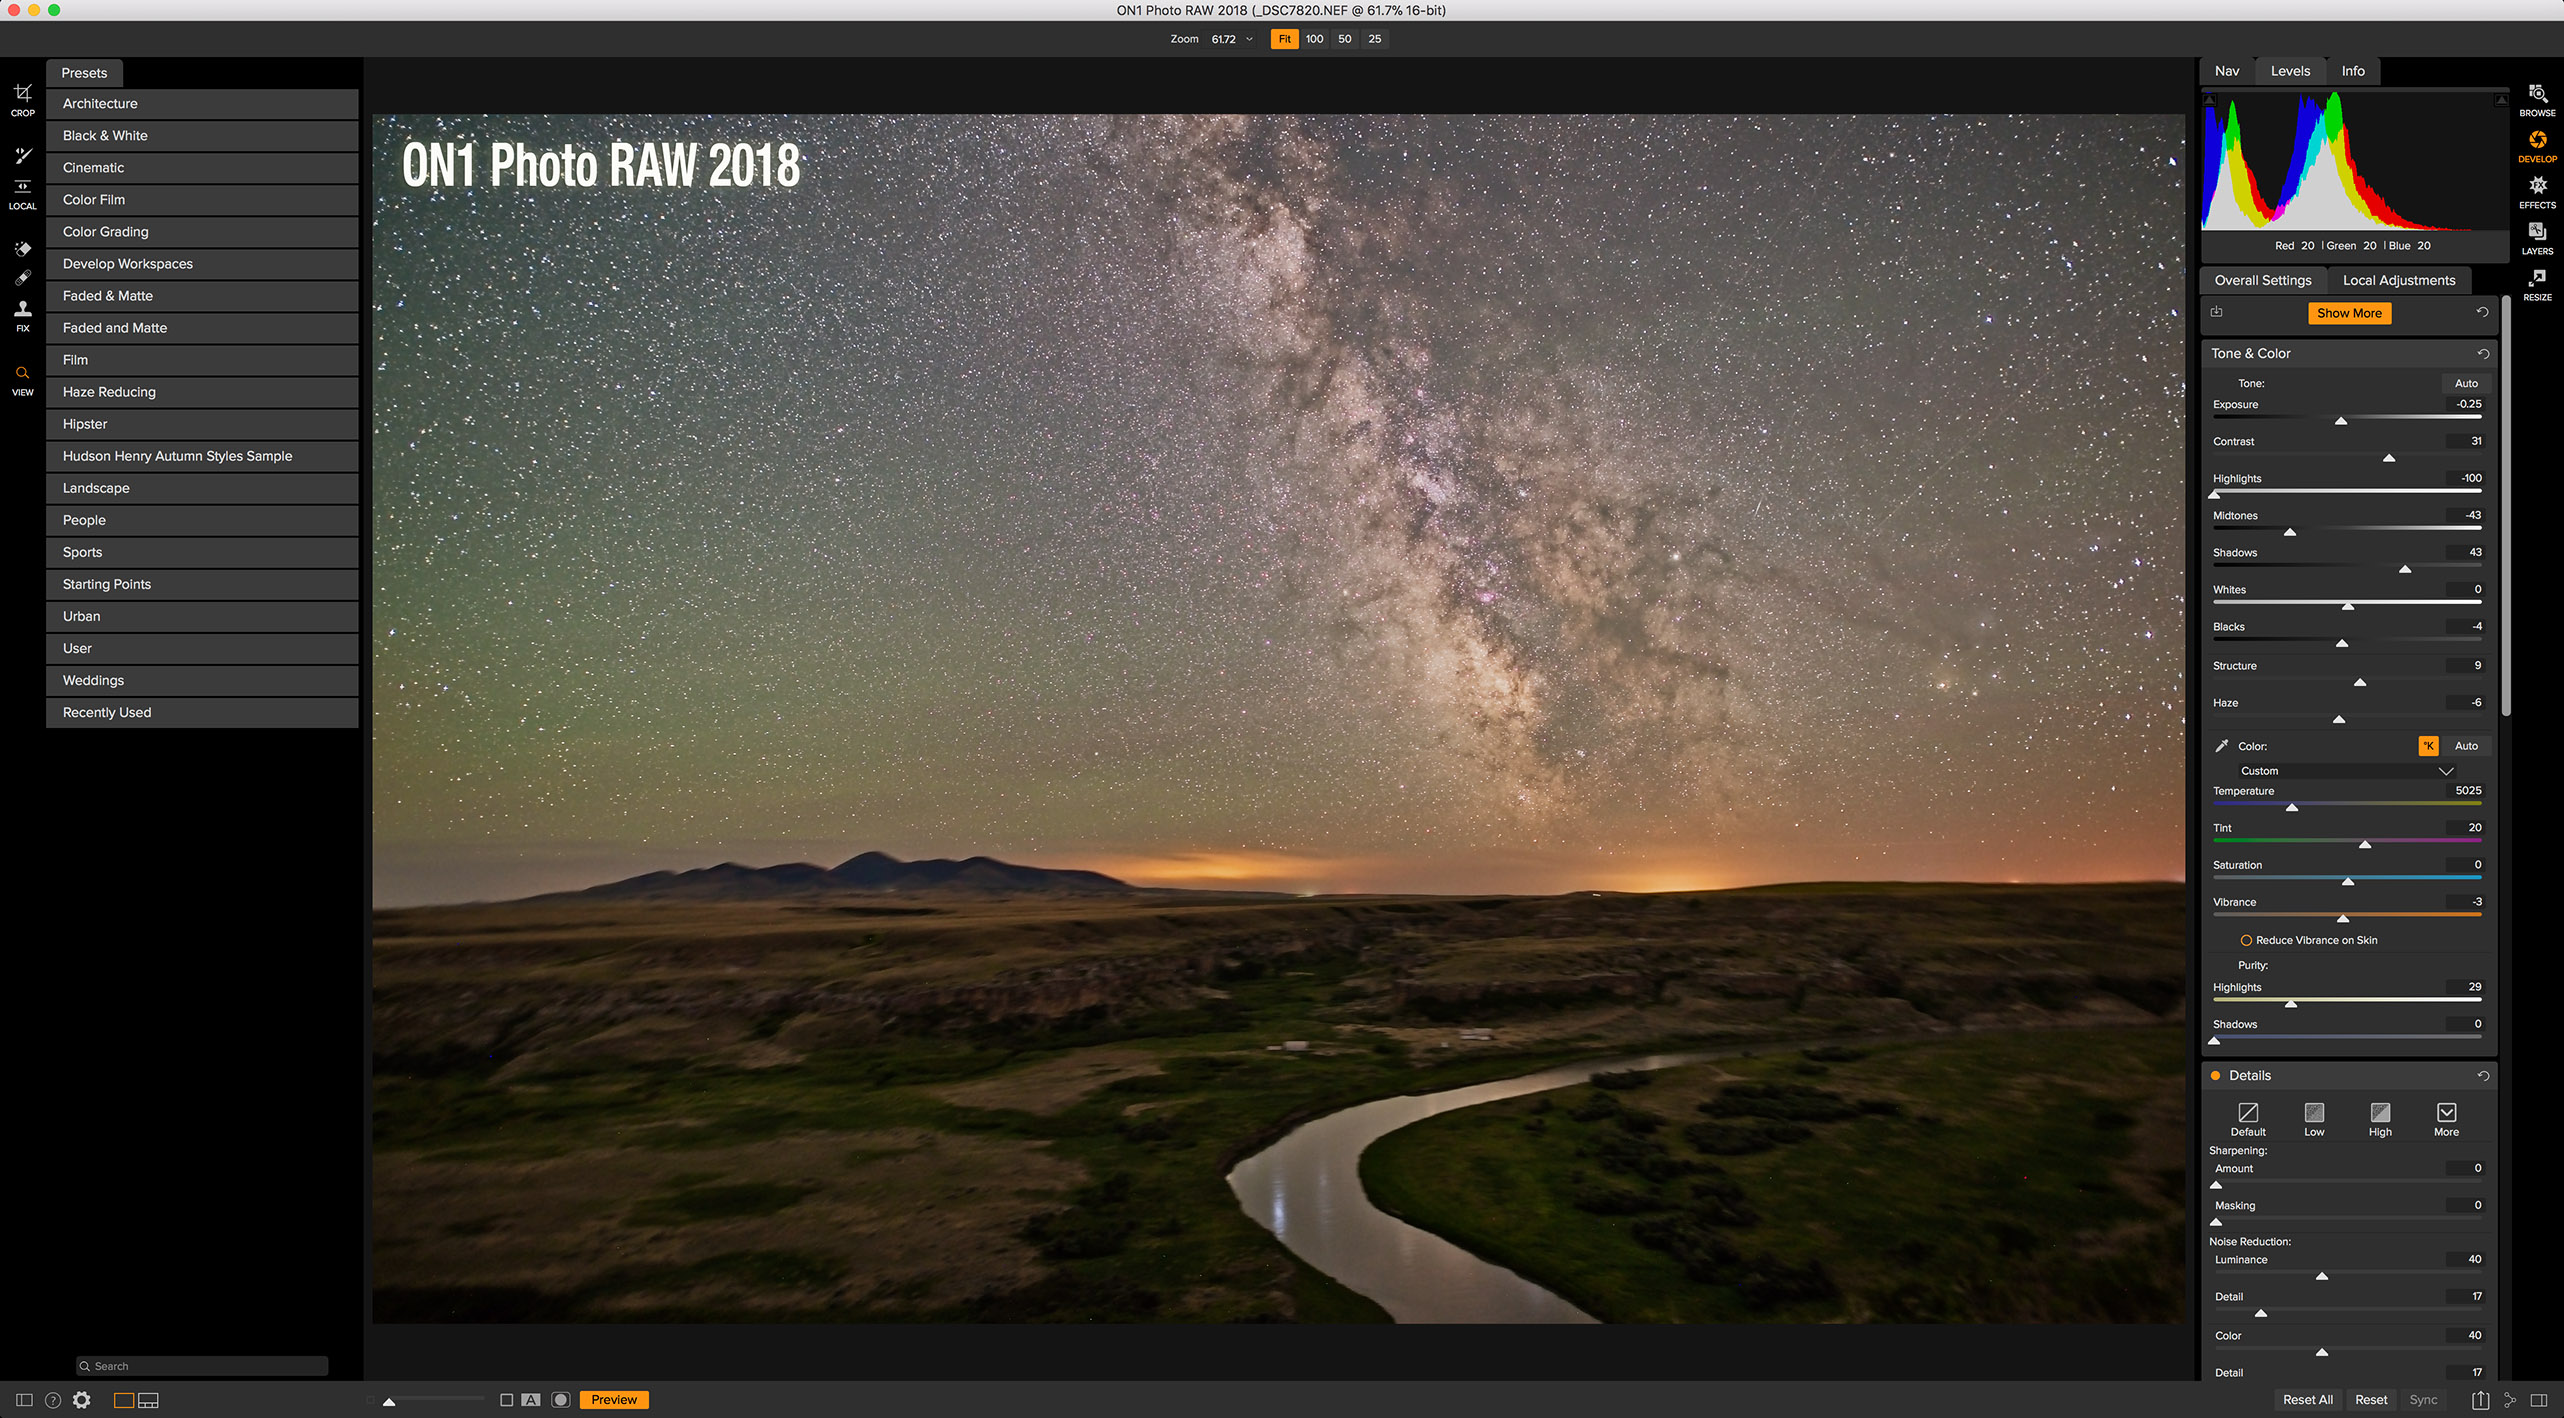
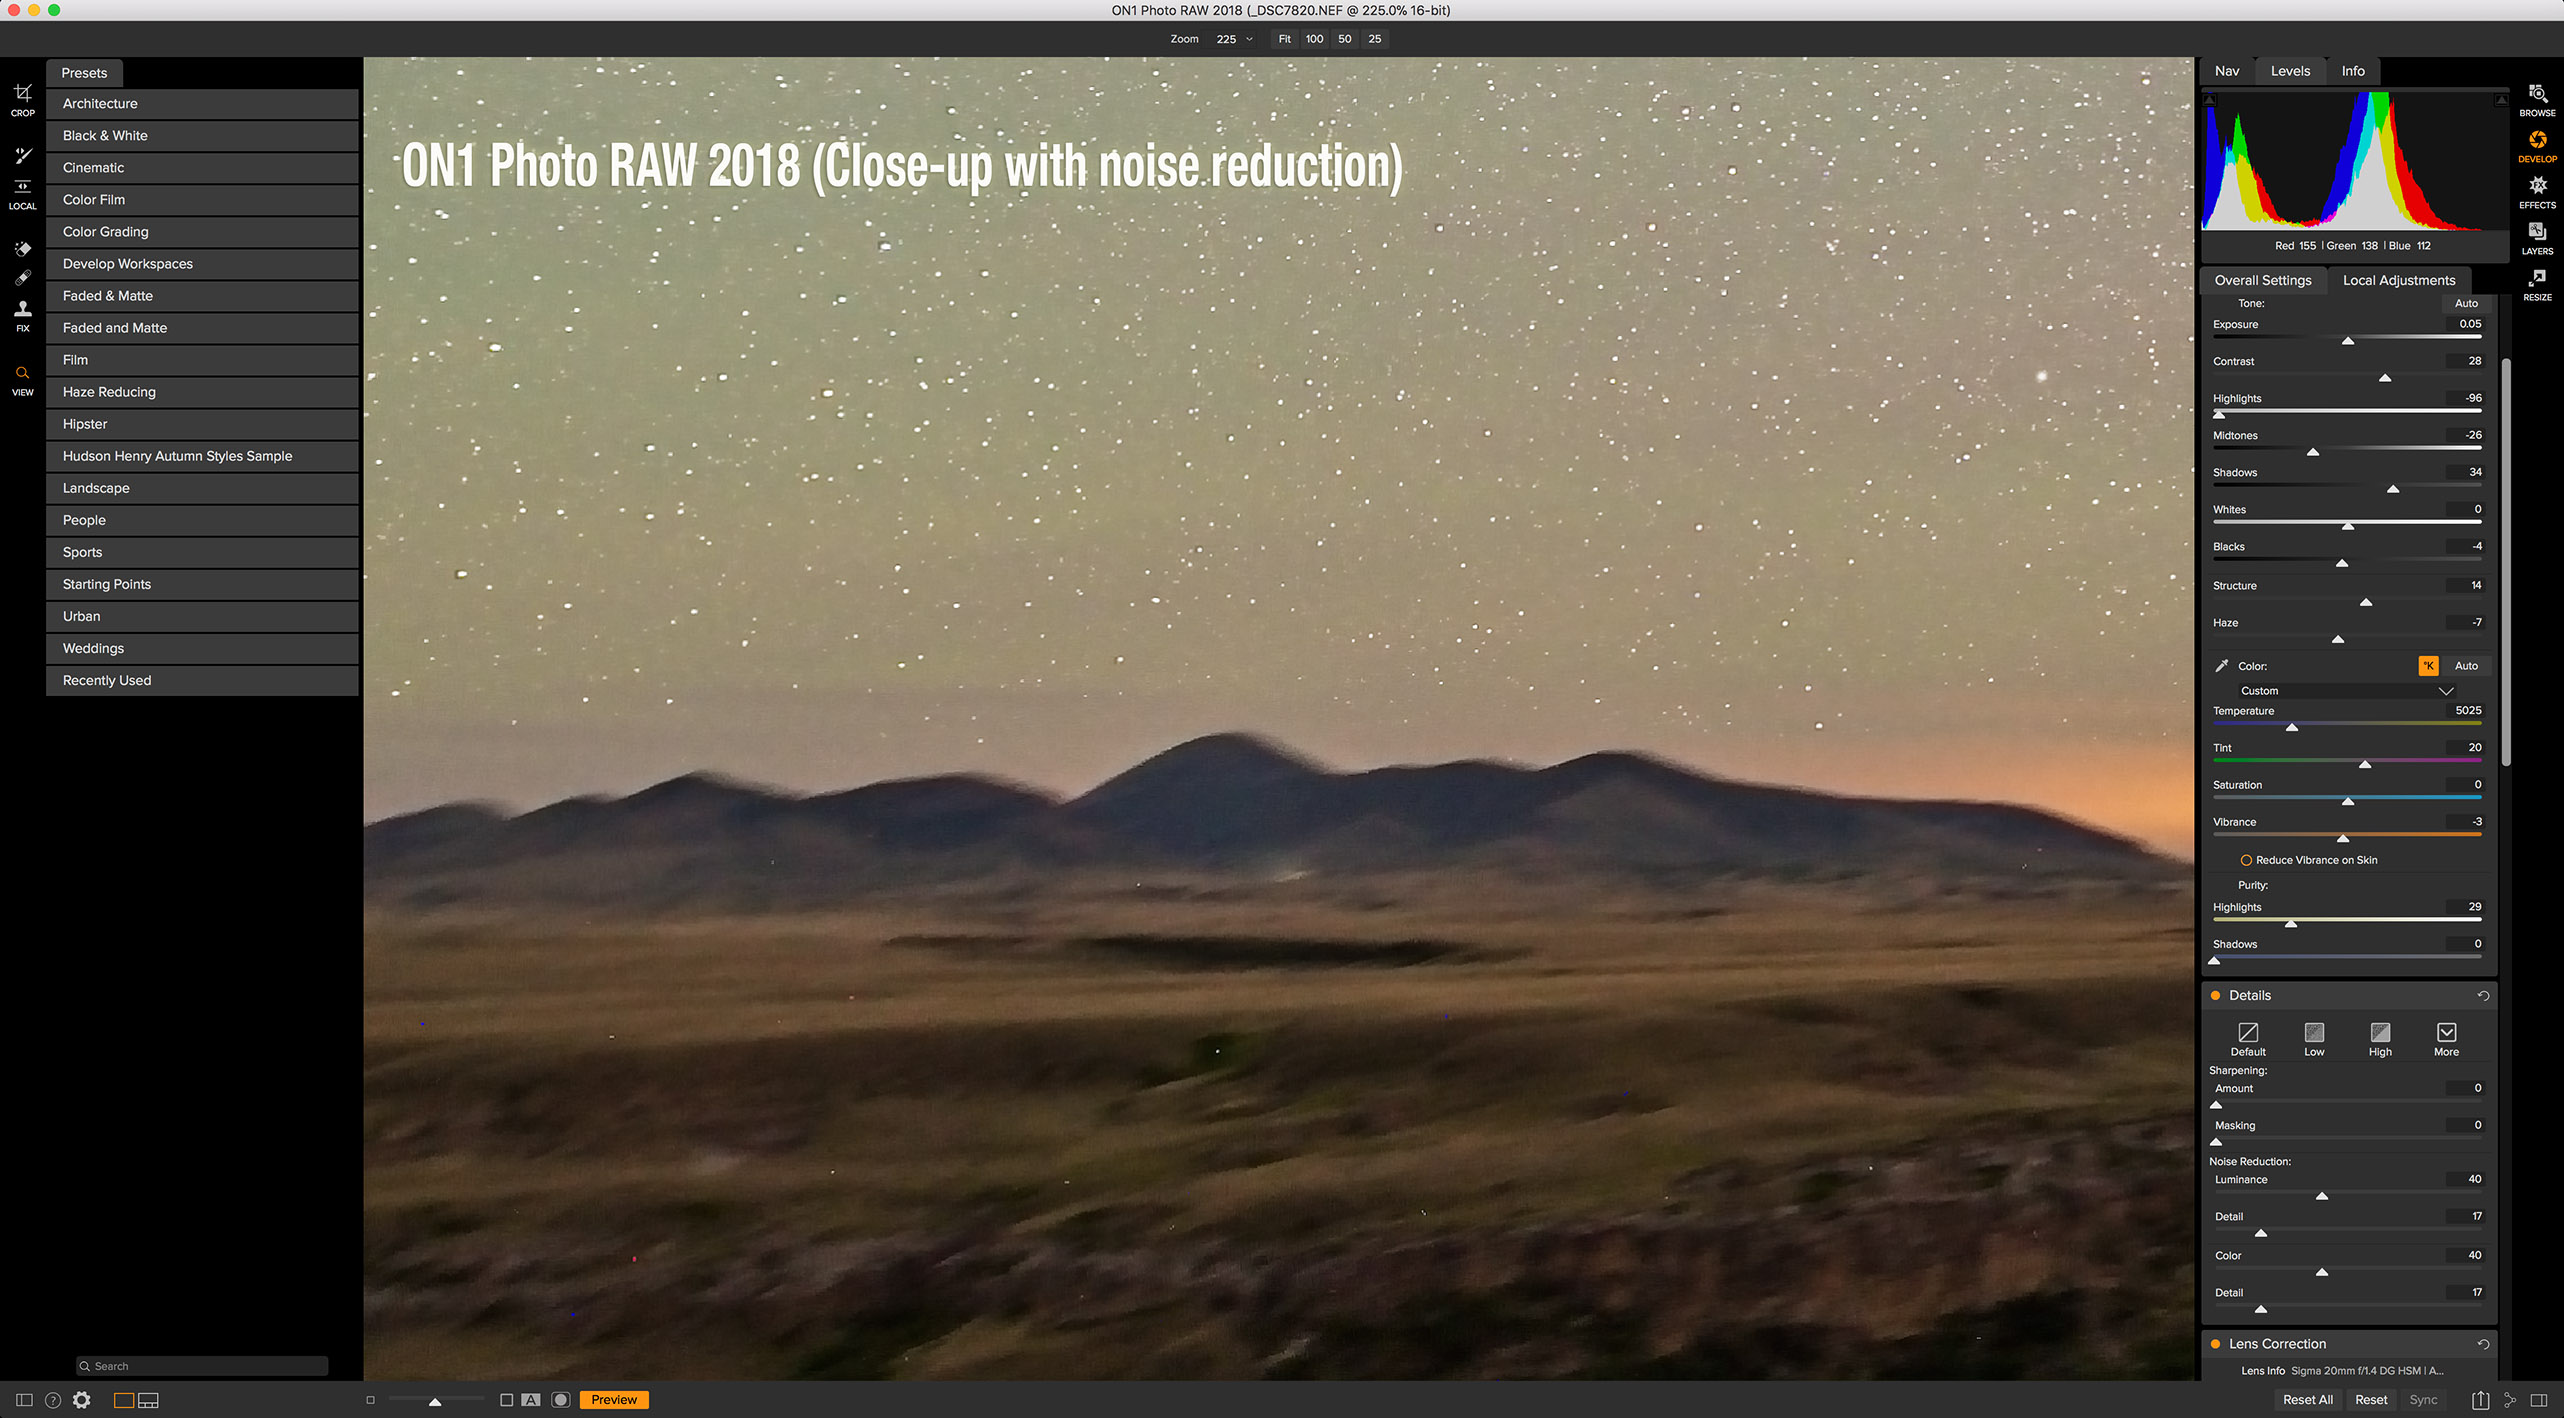
ON1’s main product is the Lightroom/Photoshop alternative program called ON1 Photo RAW, which is updated annually to major new versions. It has full cataloging options like Lightroom and image layering like Photoshop. Its Edit module contains the NoNoise AI routine. But NoNoise AI can be purchased as a stand-alone app that also installs as a plug-in for Lightroom and Photoshop. It’s what I tested here. The latest 2023 version of NoNoise AI added ON1’s new Tack Sharp AI sharpening routine.
Version tested: 17.0.1
Topaz DeNoise AI’s four-pane view to select the best AI model.
This program has proven very popular and has been adopted by many photographers – and astrophotographers – as an essential part of an editing workflow. It performs noise reduction only, offering a choice of five AI models. Auto modes can choose the models and settings for you based on the image content, but you can override those by adjusting the strength, sharpness, and recovery of original detail as desired.
A separate program, Topaz Sharpen AI, is specifically for image sharpening, but I did not test it here. Topaz Gigapixel AI is for image resizing.
Version tested: 3.7.0
Topaz Photo AI’s control interface for its three main functions: noise, sharpening and upscaling.
In 2022 Topaz introduced this new program which incorporates the trio of noise reduction, sharpening and image resizing in one package. Like DeNoise, Sharpen and Gigapixel, Photo AI works as a stand-alone app or as a plug-in for Lightroom and Photoshop. Photo AI’s Autopilot automatically detects and applies what it thinks the image needs. While it is possible to adjust settings, Photo AI offers much less control than DeNoise AI and Topaz’s other single-purpose programs.
As of this writing in November 2022 Photo AI is enjoying almost weekly updates, and seems to be where Topaz is focusing its development and marketing effort. [See below for a test of PhotoAI v1.3.1, current as of April 2023.]
Version tested: 1.0.9
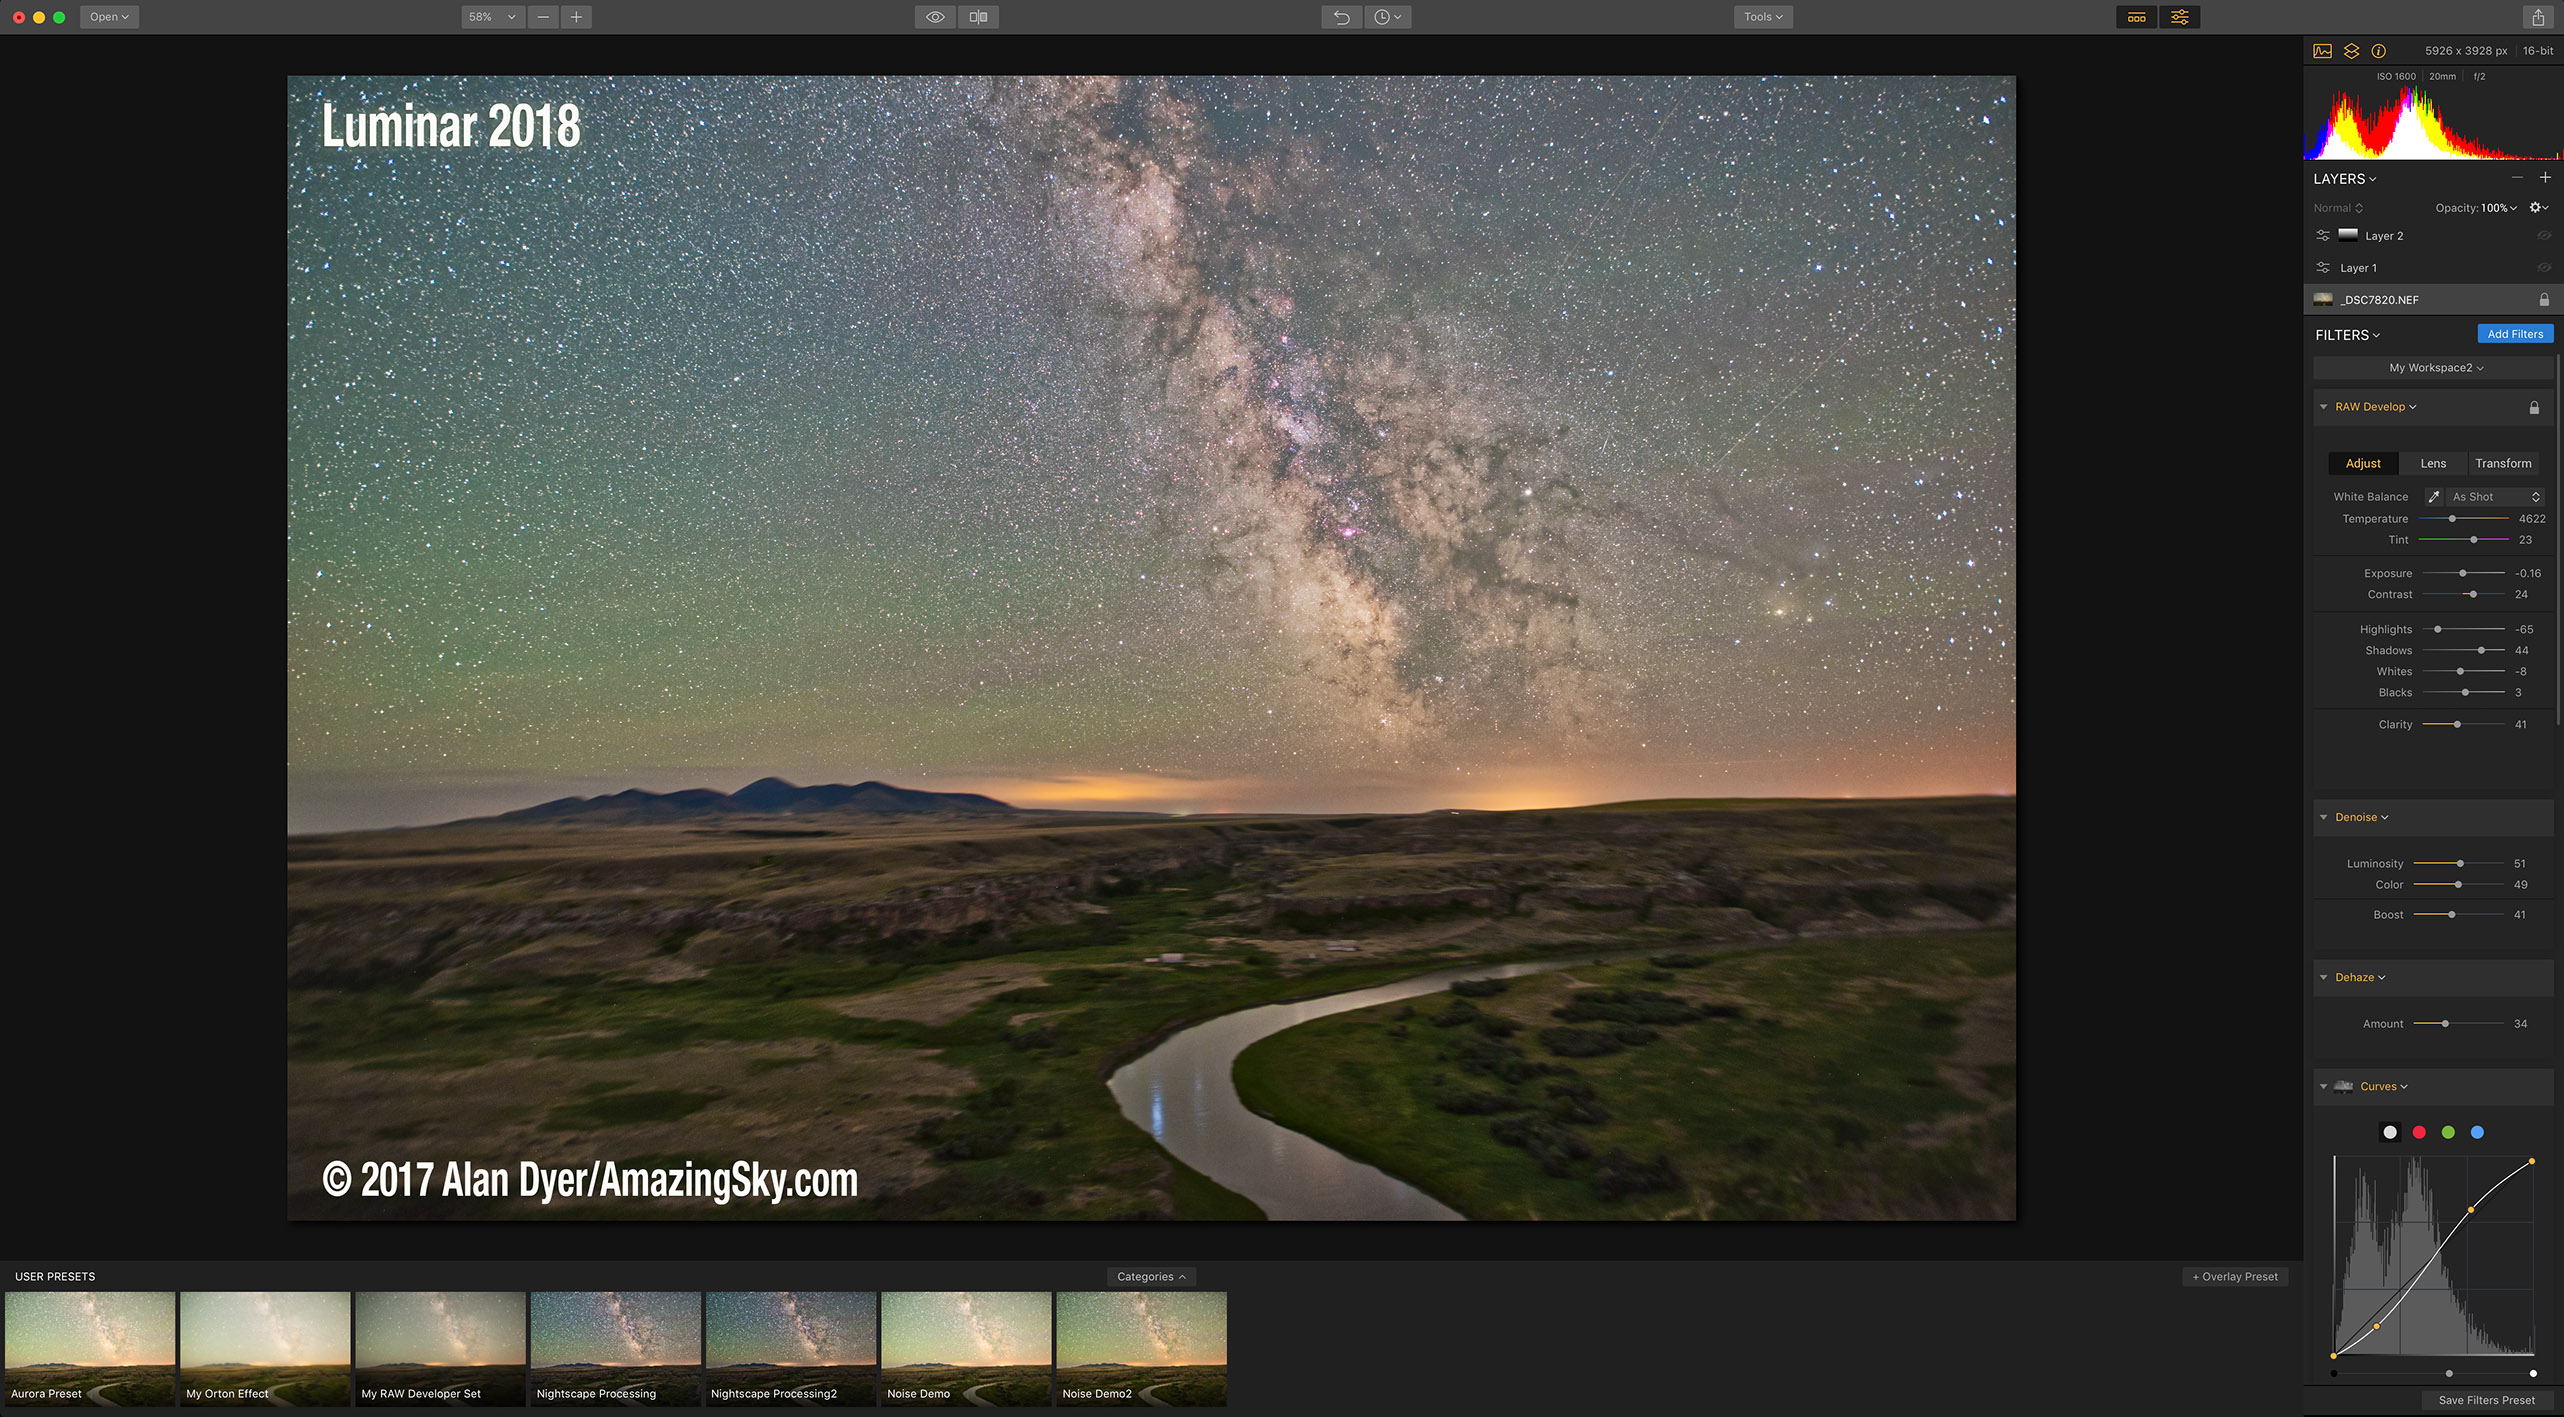
Luminar Neo’s Edit interface with choices of many filters and effects, including Noiseless AI.
Unlike the other noise reduction programs tested here, Luminar Neo from the software company Skylum is a full-featured image editing program, with an emphasis on one-click AI effects. One of those is the new Noiseless AI, available as an extra-cost extension to the main Neo program, either as a one-time purchase or by annual subscription. Noiseless AI cannot be purchased on its own. However, Neo with most of its extensions does work as a plug-in for Lightroom and Photoshop.
Being new, Luminar Neo is also updated frequently, with more extensions coming in the next few months.
Version tested: 1.5.0
DxO PureRAW’s simple interface with few choices for Noise Reduction settings.
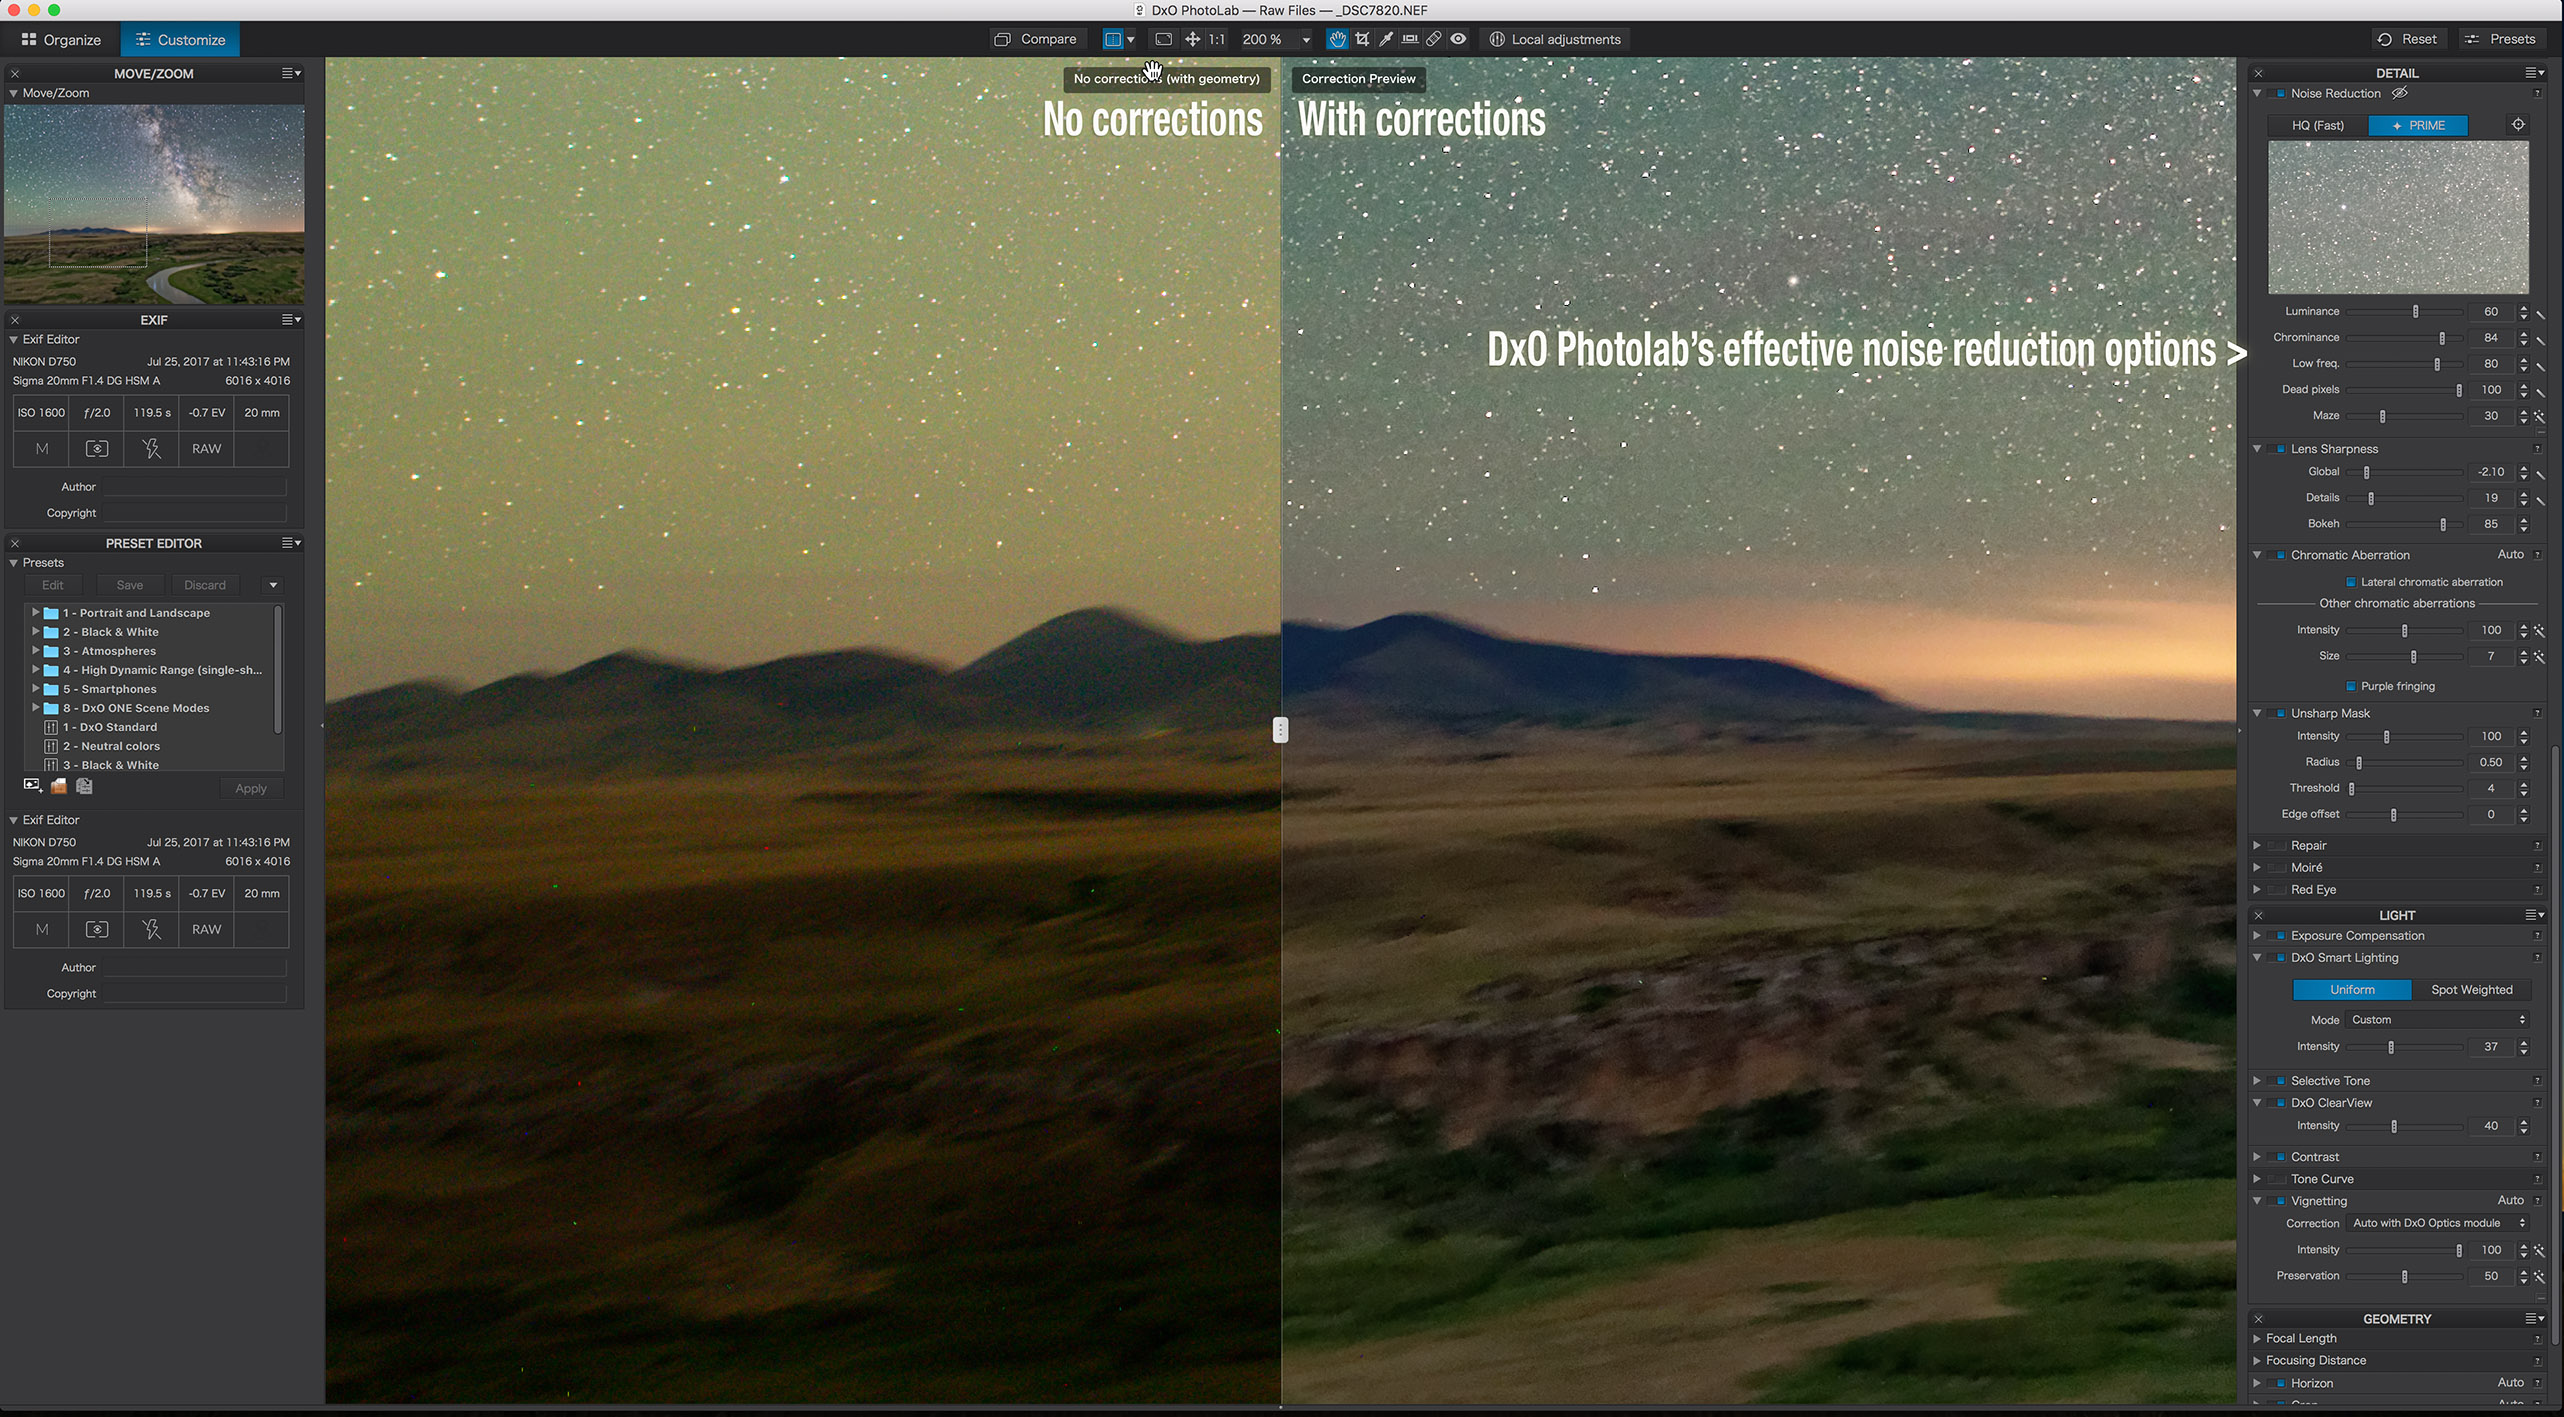
Like ON1, DxO makes a full-featured alternative to Adobe’s Lightroom for cataloging and raw developing called DxO PhotoLab, in version 6 as of late 2022. It contains DxO’s Prime and DeepPrime noise reduction routines. However, as with ON1, DxO has spun off just the noise reduction and lens correction parts of PhotoLab into a separate program, PureRAW2, which runs either as a stand-alone app or as a plug-in for Lightroom – but not Photoshop, as PureRAW works only on original raw files.
Unlike all the other programs, PureRAW2 offers essentially no options to adjust settings, just the option to apply, or not, lens corrections, and to choose the output format. For this testing I applied DeepPrime and exported out to DNG files. [See below for a test of DeepPrimeXD, now offered with PureRaw3.]
Version tested: 2.2
Noise Terminator’s controls allow adjusting strength and detail.
Unlike the other programs tested, NoiseXTerminator from astrophotographer Russell Croman is designed specifically for deep-sky astrophotography. It installs as a plug-in for Photoshop or Affinity Photo, but not Lightroom. It is also available under the same purchased licence as a “process” for PixInsight, an advanced program popular with astrophotographers, as it is designed just for editing deep-sky images.
I tested the Photoshop plug-in version of Noise XTerminator. It receives occasional updates to both the actual plug-in and separate updates to the AI module.
Version tested: 1.1.2, AI model 2
NIGHTSCAPE TEST
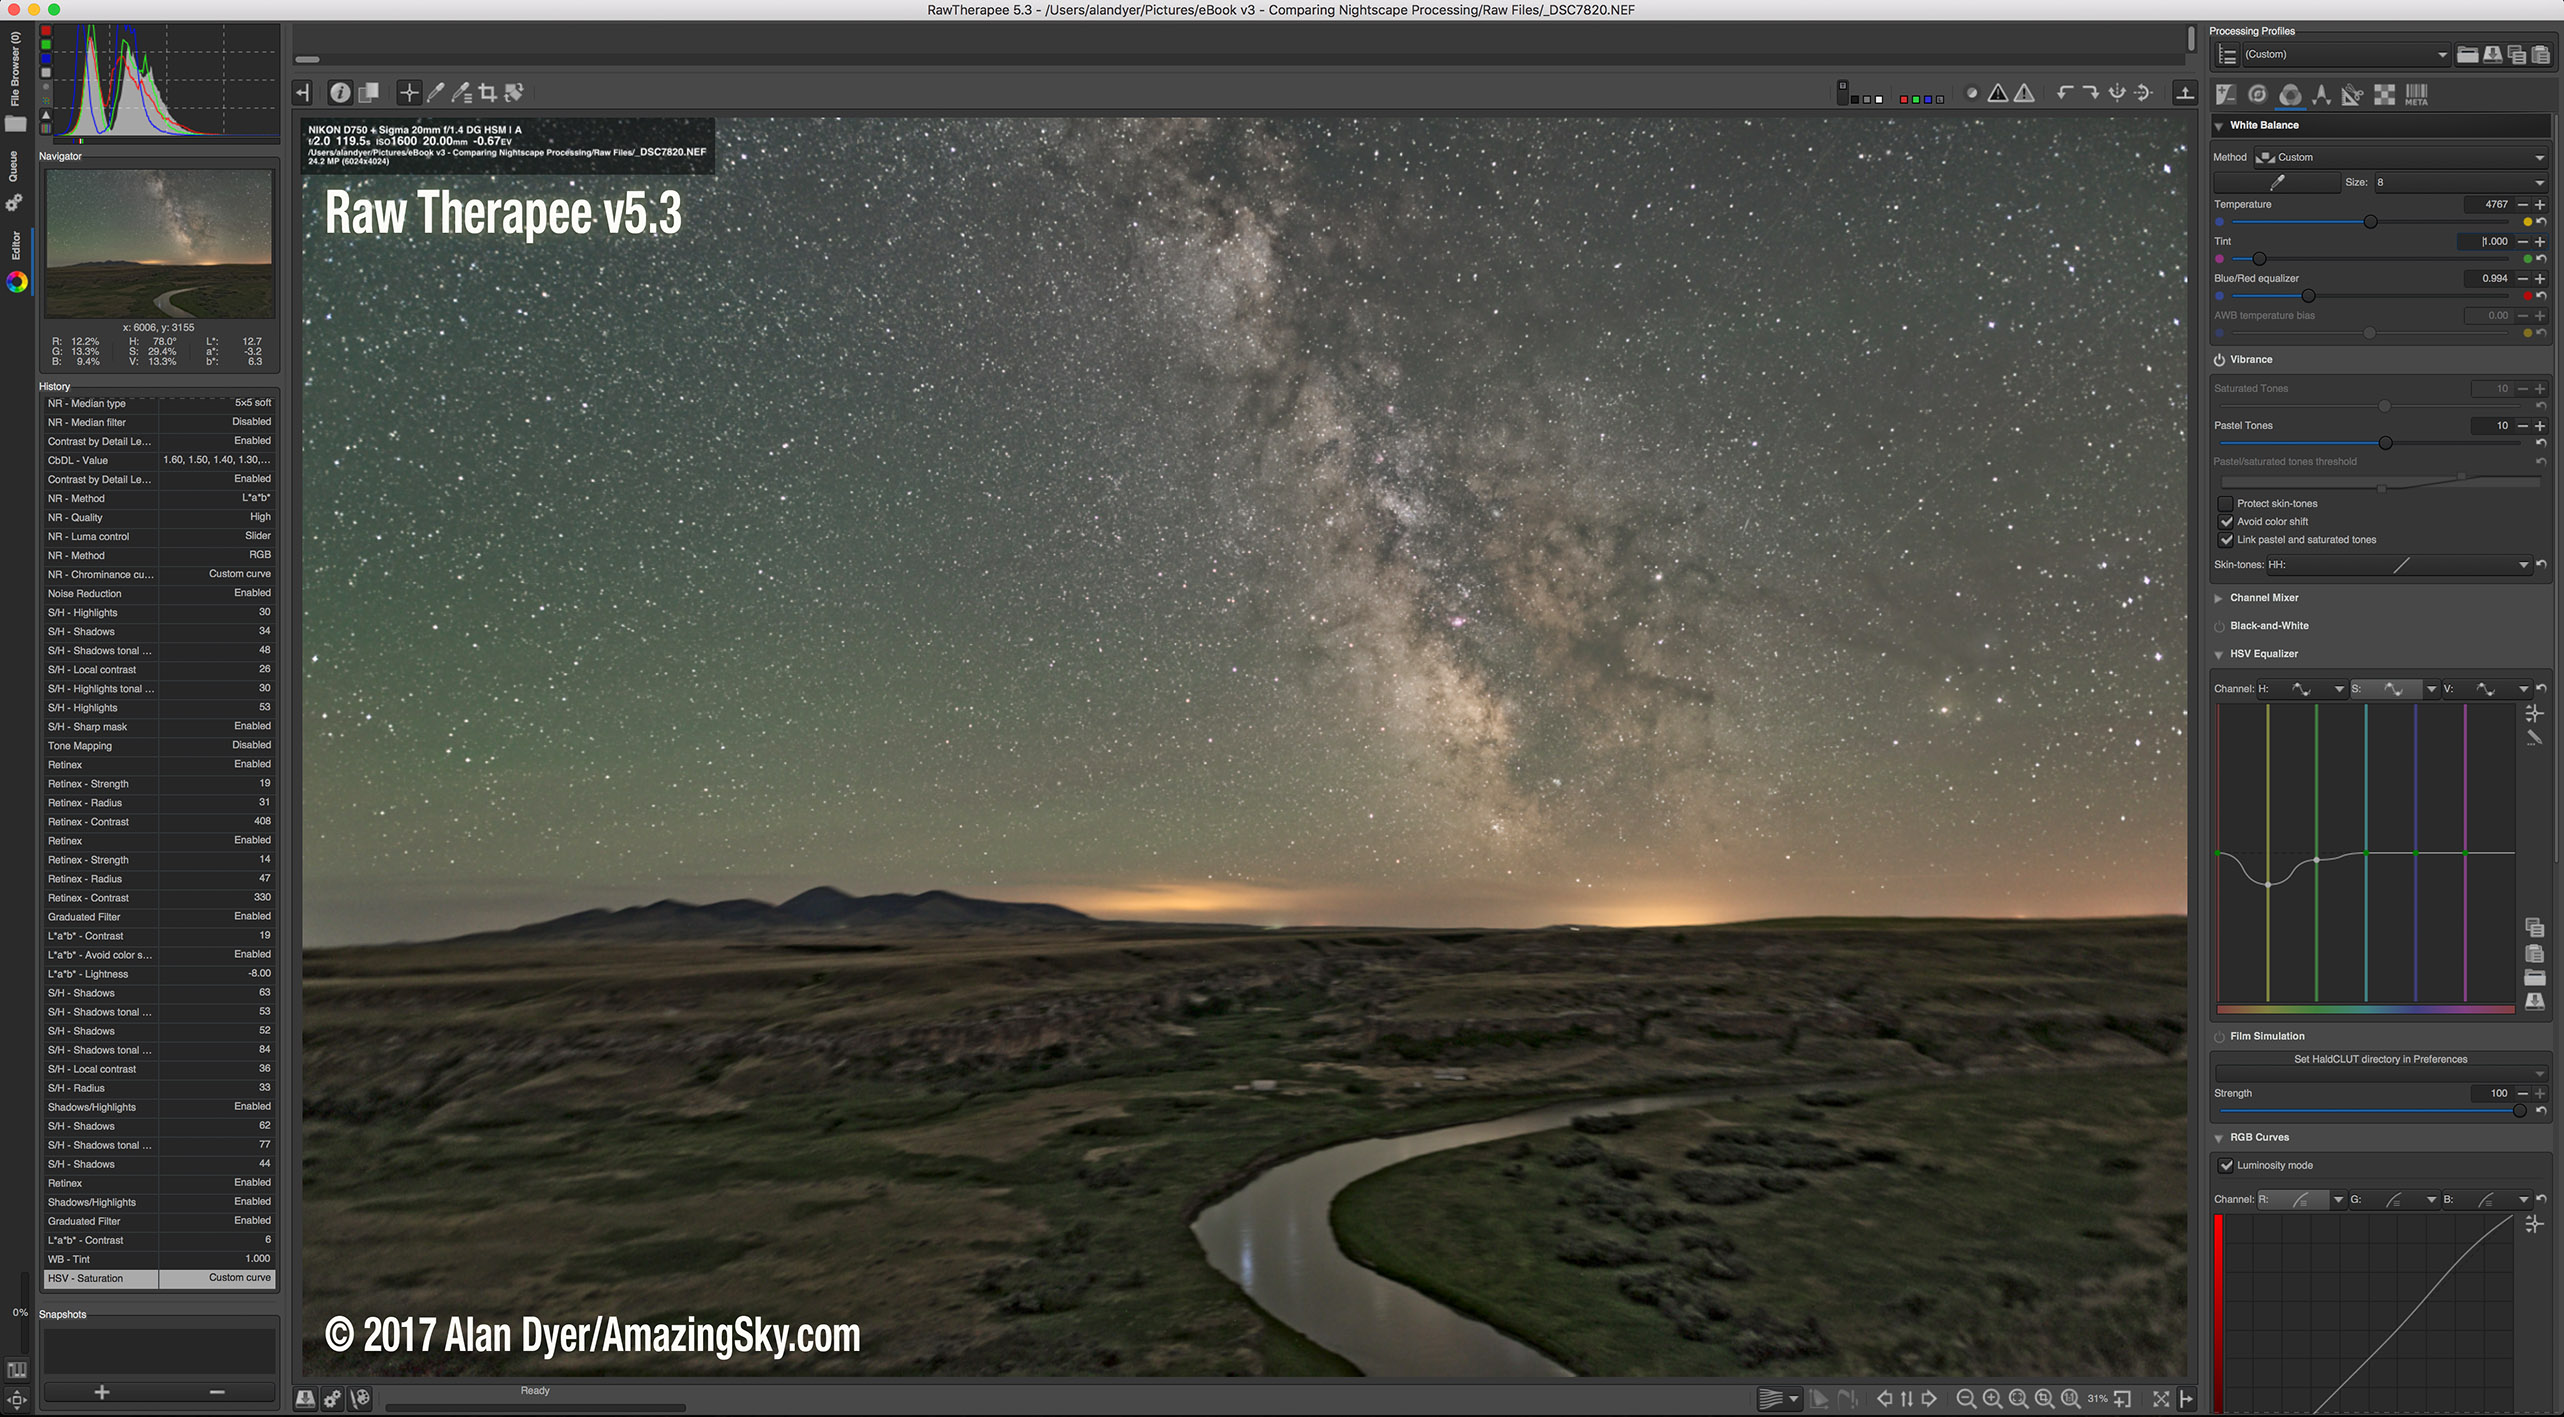
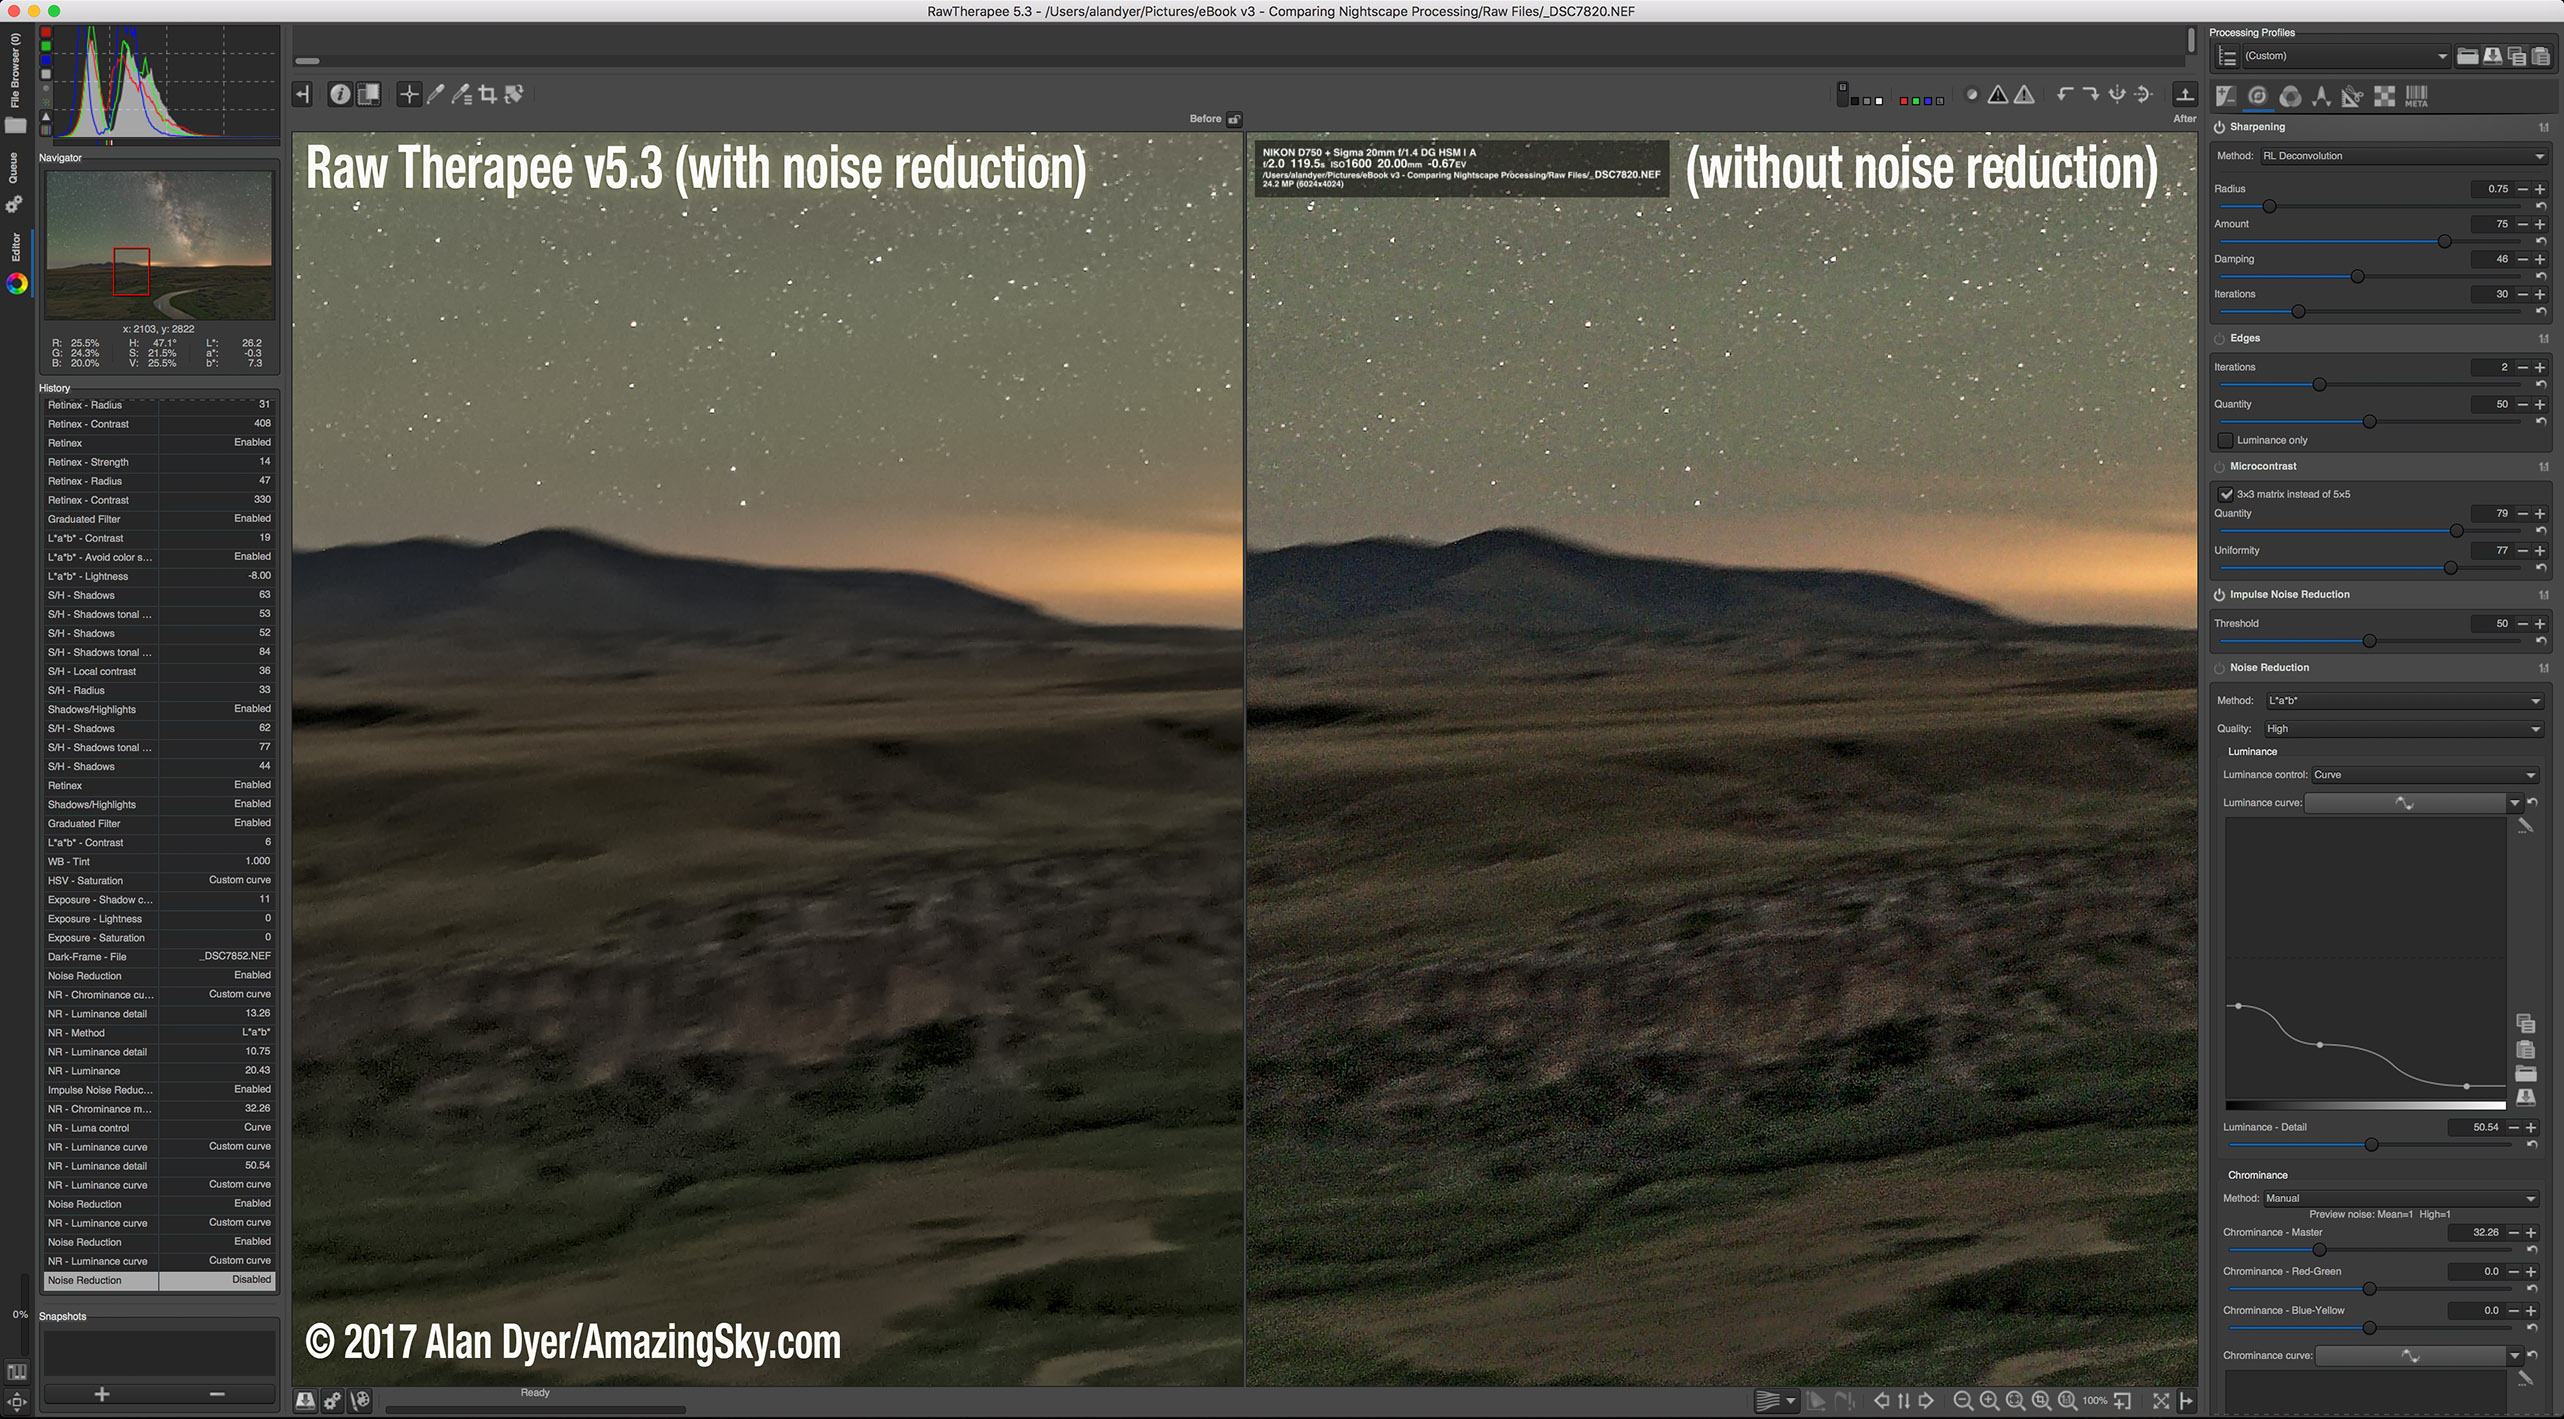
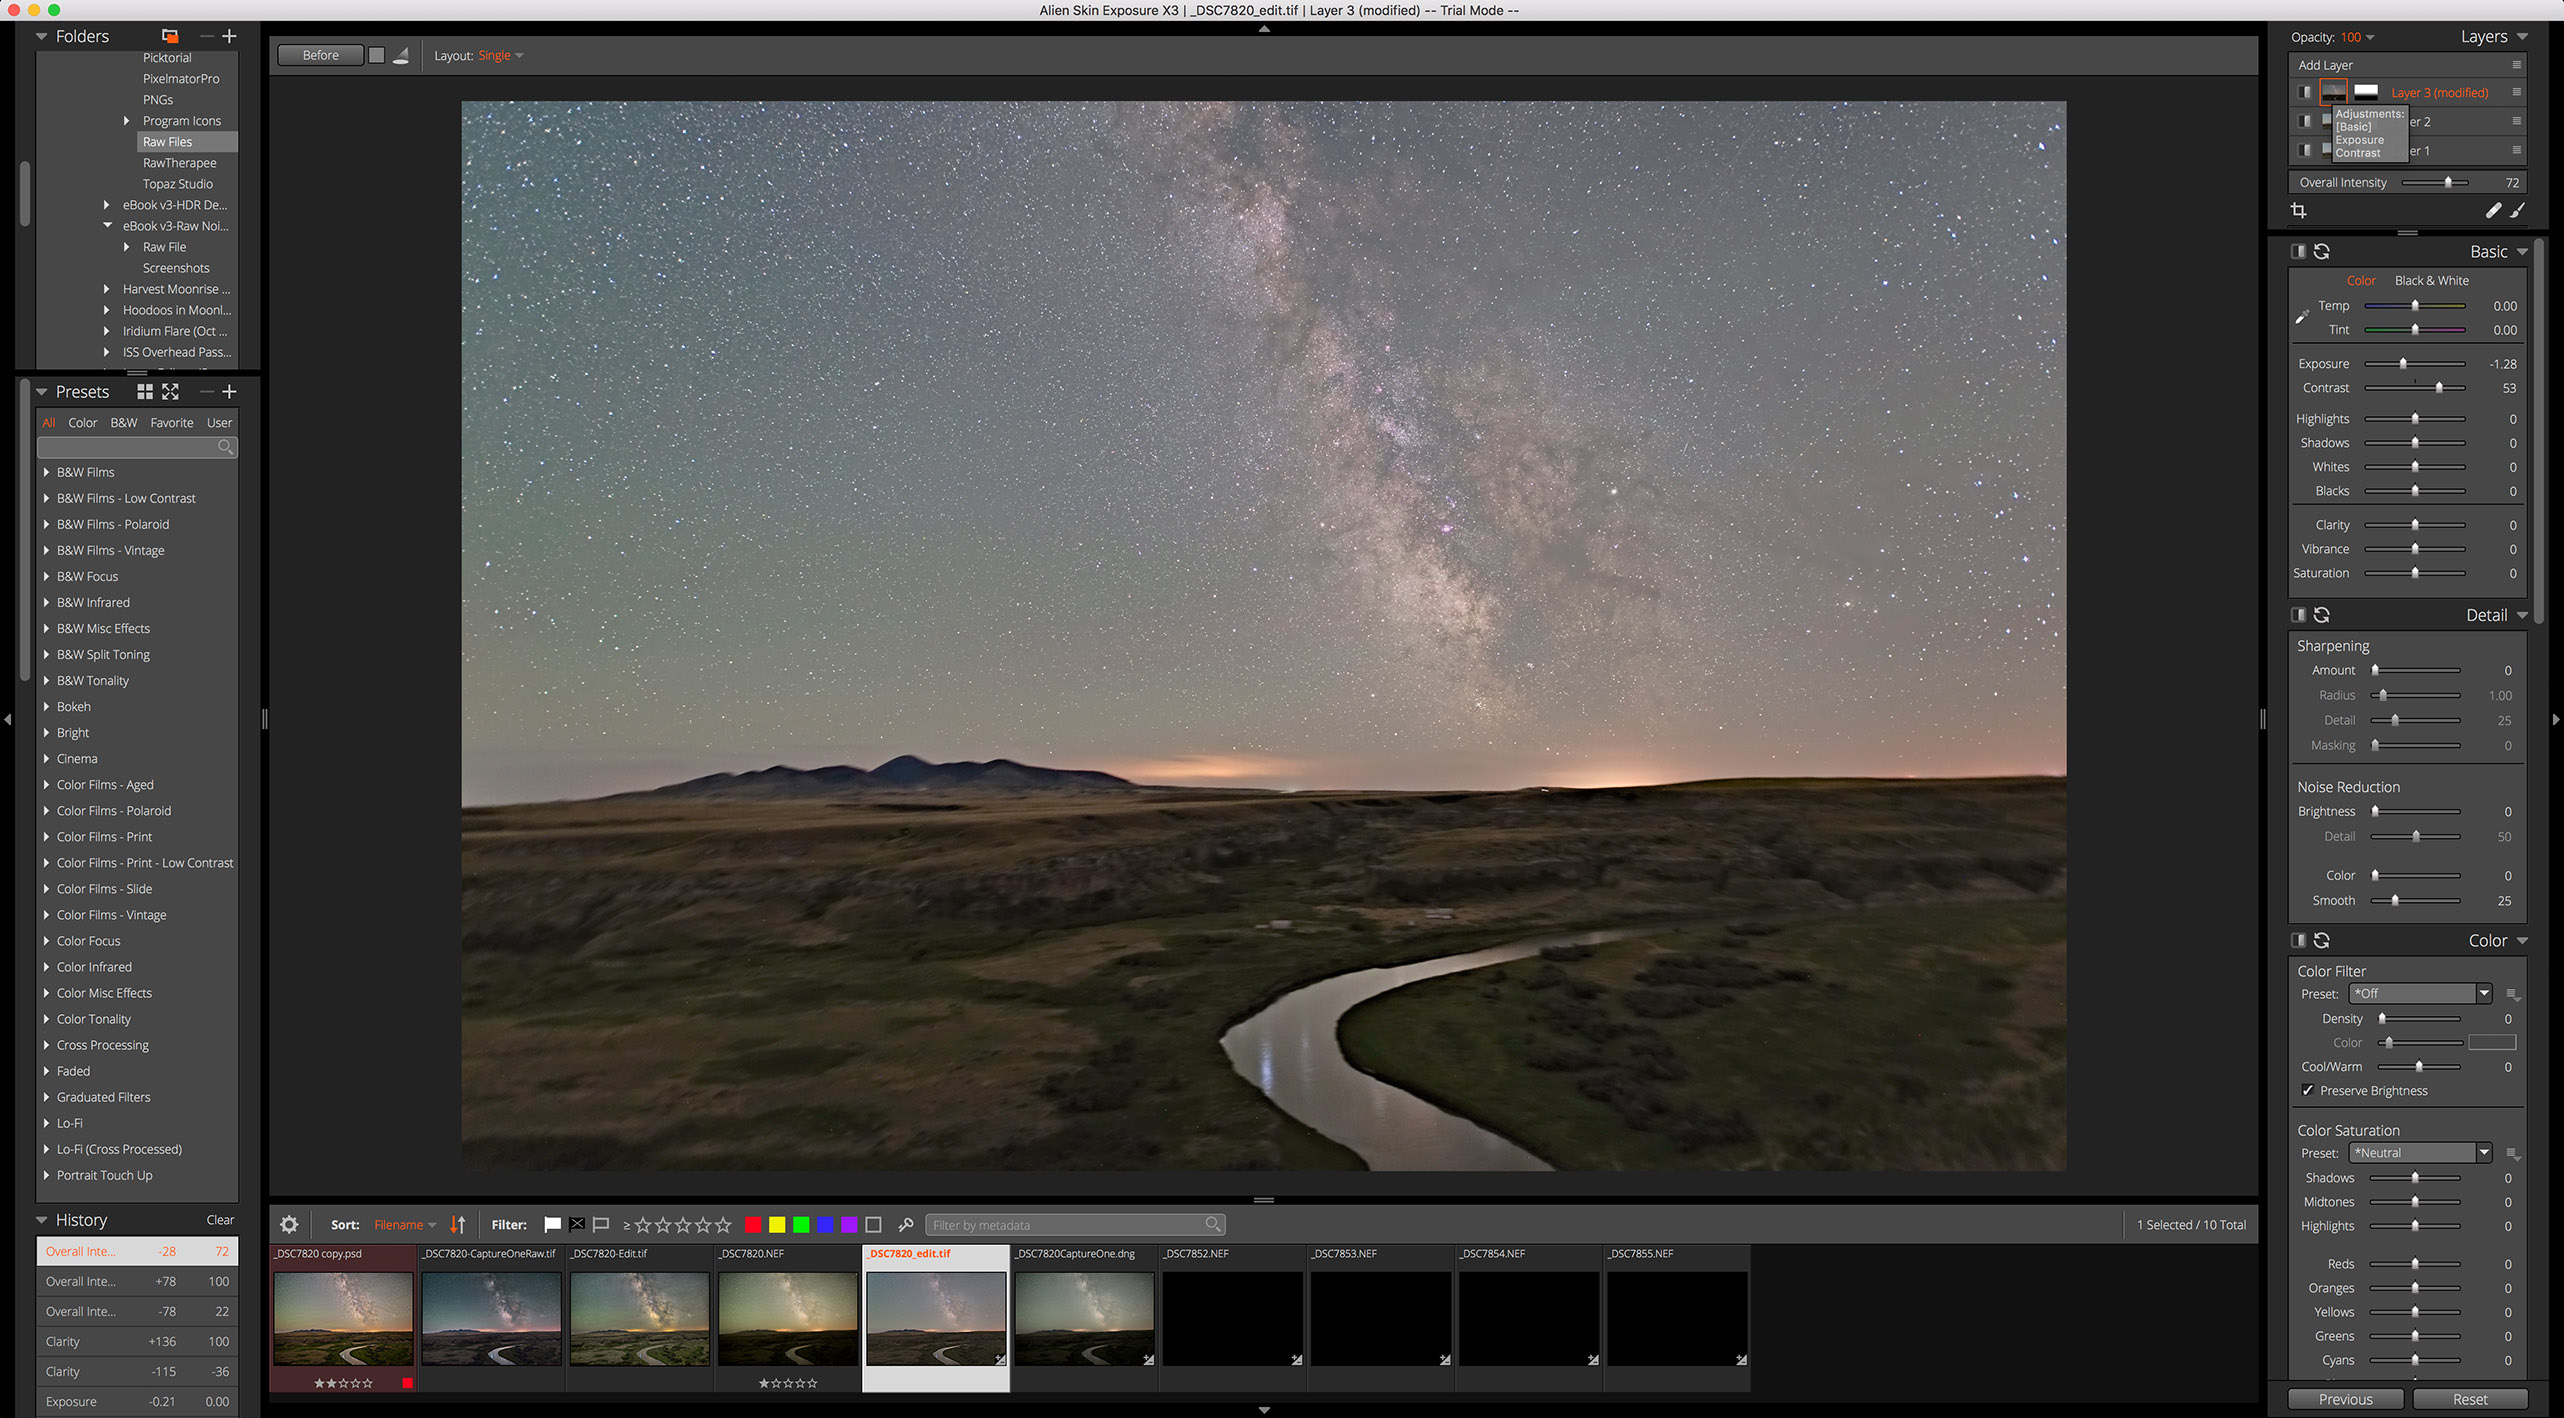
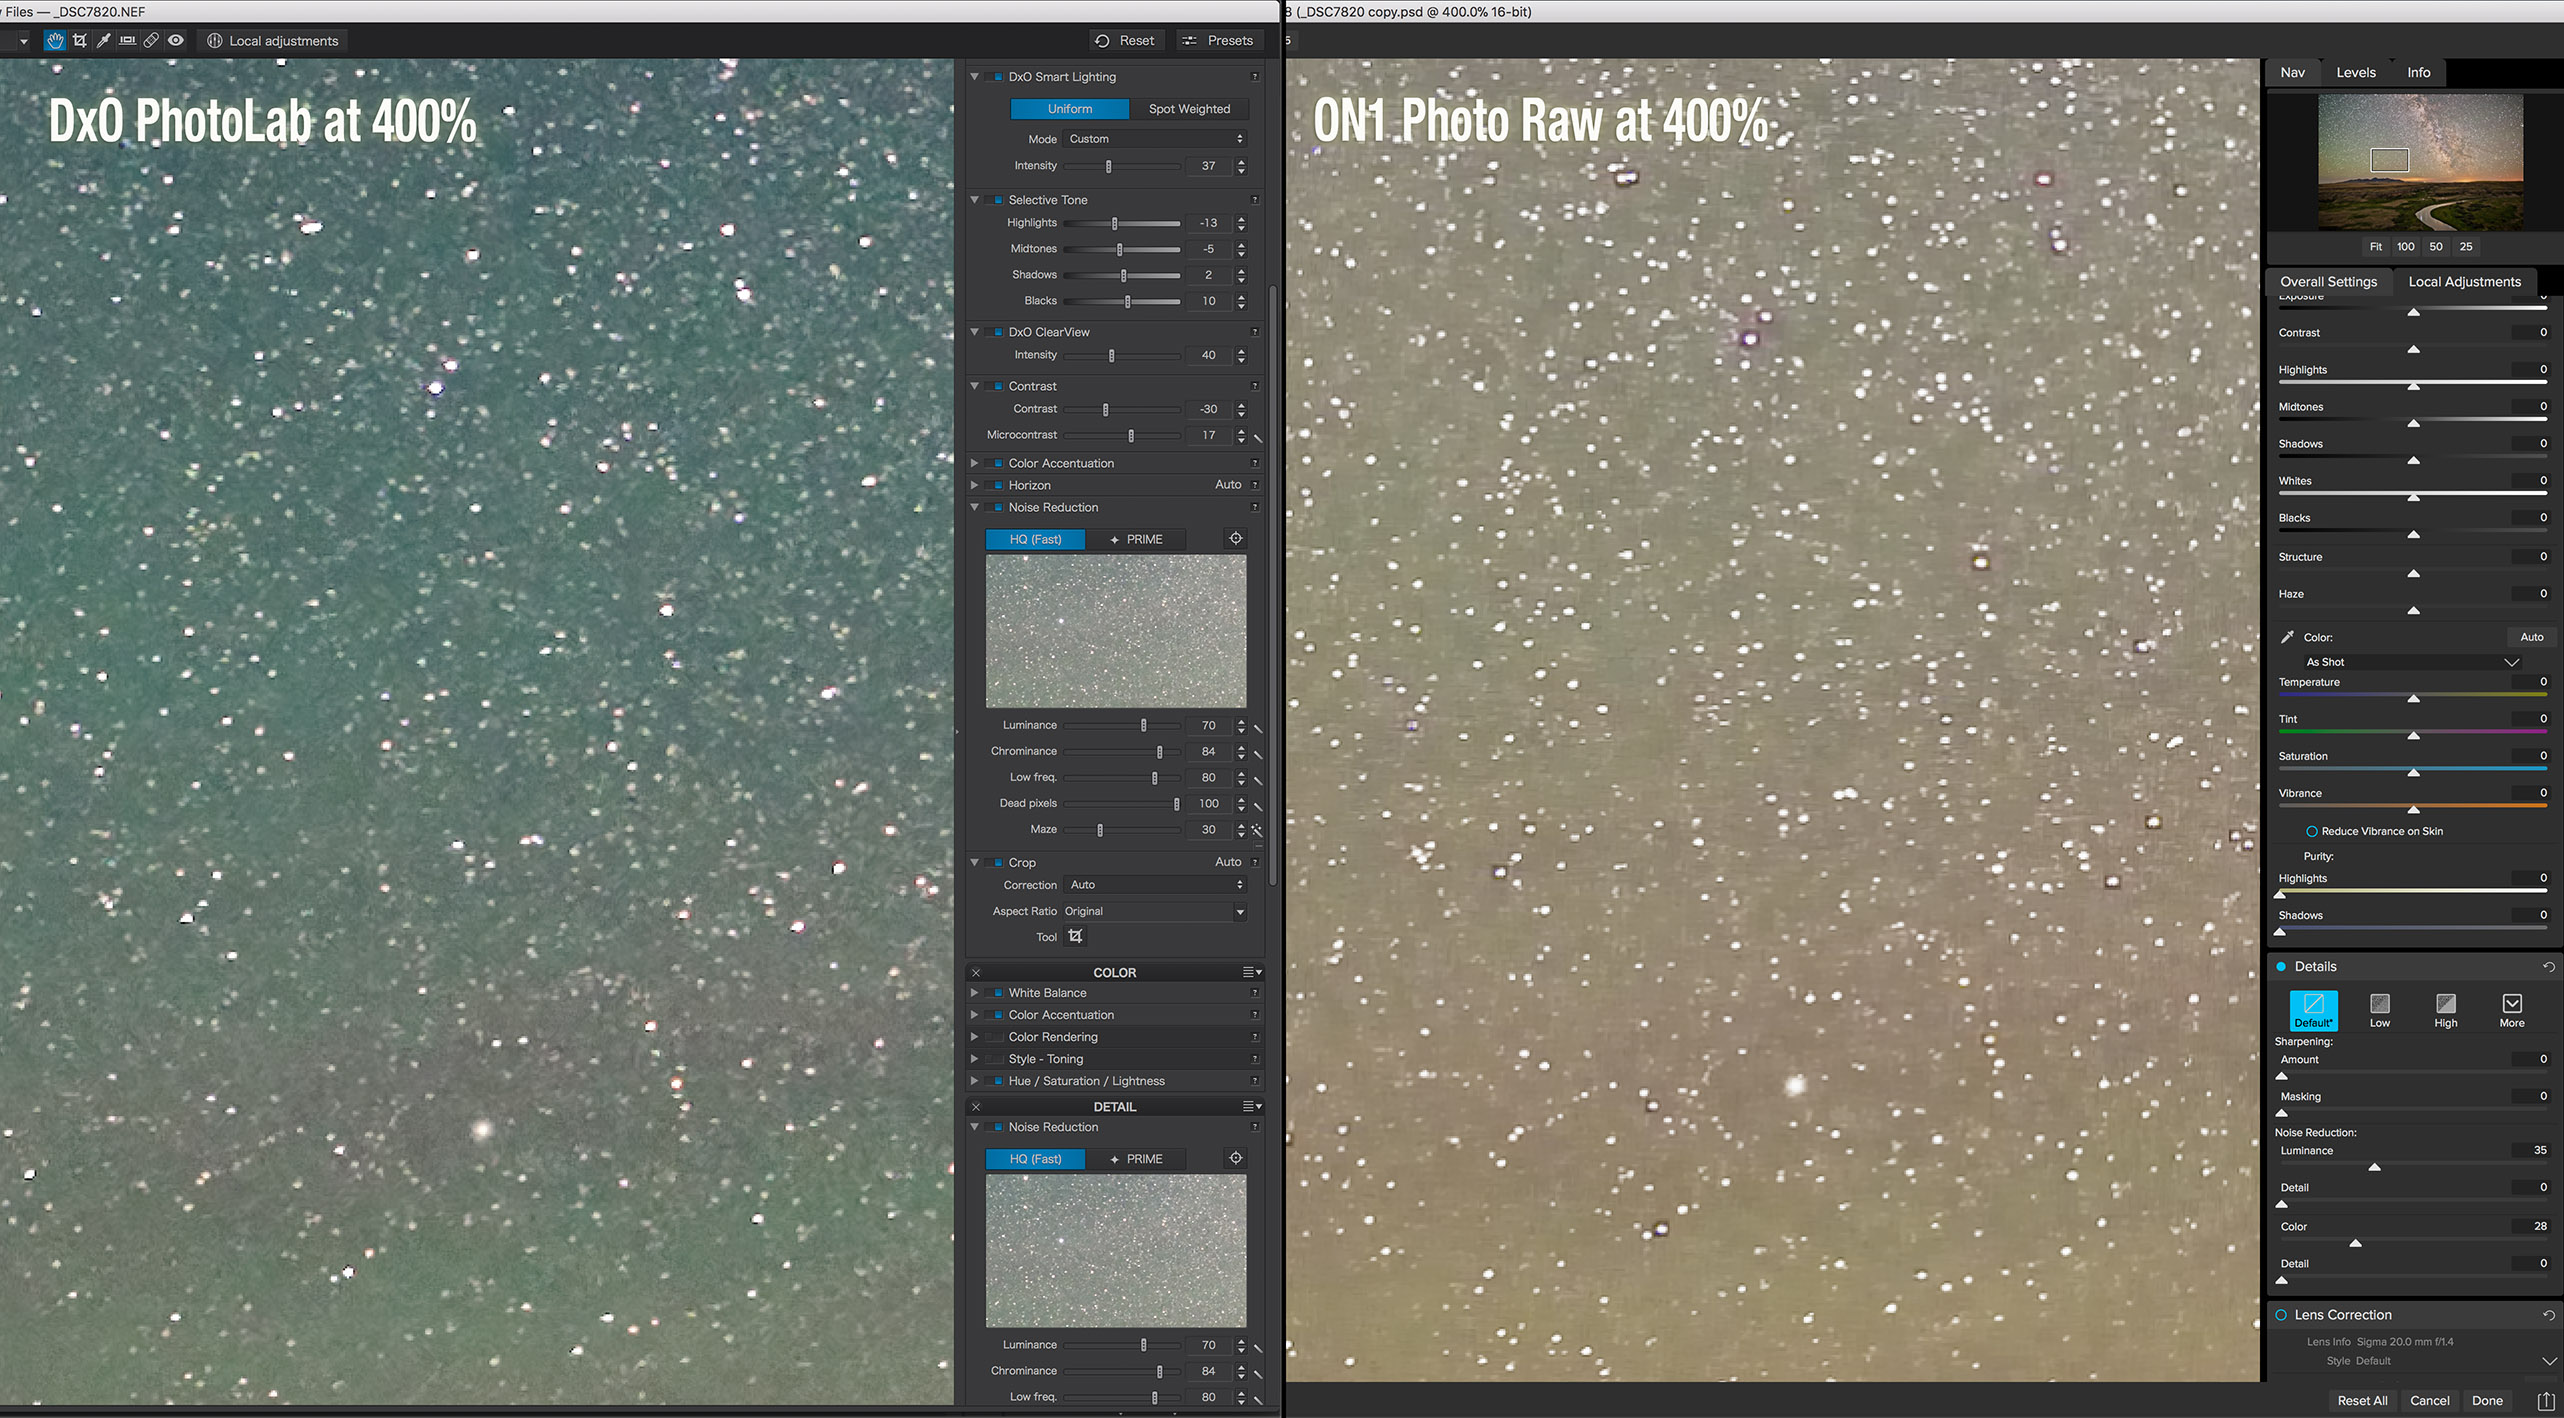
As with the other test images, the panels show a highly magnified section of the image, indicated in the inset. I shot the image of Lake Louise in Banff, Alberta with a Canon RF15-35mm lens on a 45-megapixel Canon R5 camera at ISO 1600.
The test results on a sample nightscape.
Adobe Camera Raw’s basic noise reduction did a good job, but like all general routines it does soften the image as a by-product of smoothing out high-ISO noise.
ON1 NoNoise 2023 retained landscape detail better than ACR but softened the star trails, despite me adding sharpening. It also produced a somewhat patchy noise smoothing in the sky. This was with Luminosity backed off to 75 from the auto setting (which always cranks up the level to 100 regardless of the image), and with the Tack Sharp routine set to 40 with Micro Contrast at 0. It left a uniform pixel-level mosaic effect in the shadow areas. Despite the new Tack Sharp option, the image was softer than with last year’s NoNoise 2022 version (not shown here as it is no longer available) which produced better shadow results.
Topaz DeNoise AI did a better job than NoNoise retaining the sharp ground detail while smoothing noise, always more obvious in the sky in such images. Even so, it also produced some patchiness, with some areas showing more noise than others. This was with the Standard model set to 40 for Noise and Sharpness, and Recover Details at 75. I show the other model variations below.
Topaz Photo AI did a poor job, producing lots of noisy artifacts in the sky and an over-sharpened foreground riddled with colorful speckling. It added noise. This was with the Normal setting and the default Autopilot settings.
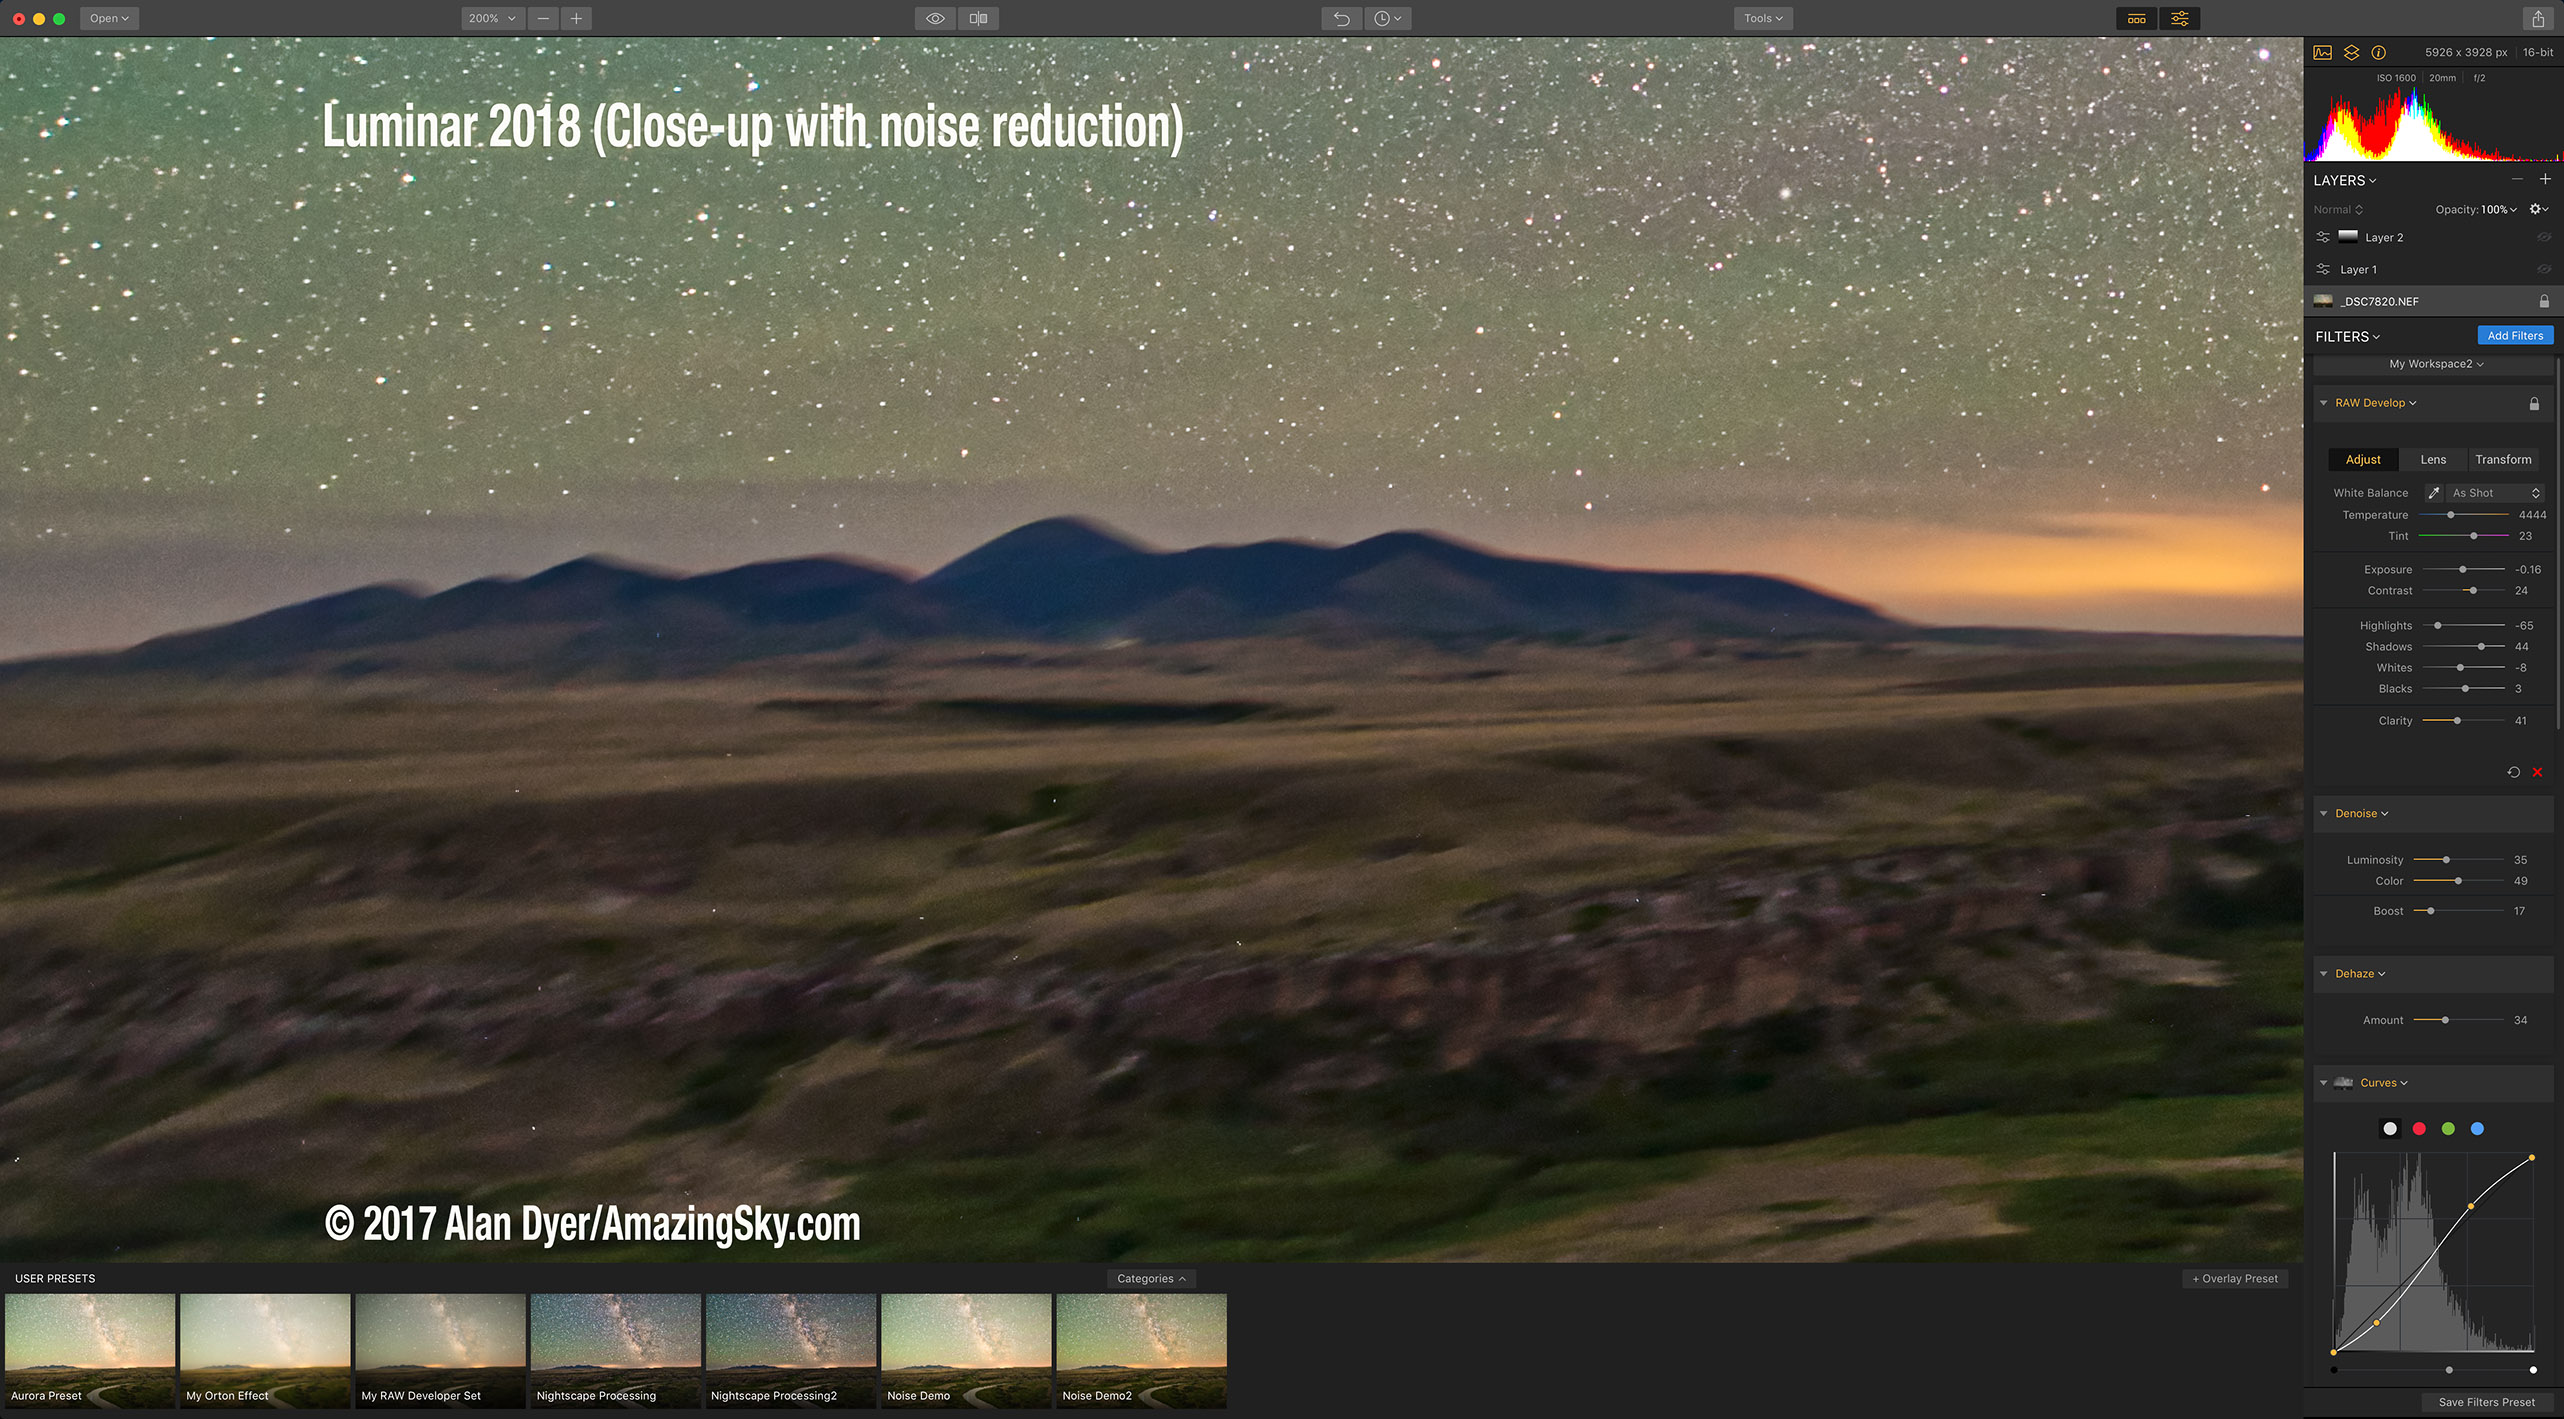
Noiseless AI in Luminar Neo did a decent job smoothing noise while retaining, indeed sharpening ground detail without introducing ringing or colorful edge artifacts. The sky was left with some patchiness and uneven noise smoothing. This was with the suggested Middle setting (vs Low and High) and default levels for Noise, Detail and Sharpness. However, I do like Neo (and Skylum’s earlier Luminar AI) for adding other finishing effects to images such as Orton glows.
DxO PureRAW2 did smooth noise very well while enhancing sharpness quite a lot, almost too much, though it did not introduce obvious edge artifacts. Keep in mind it offers no chance to adjust settings, other than the mode – I used DeepPrime vs the normal Prime. Its main drawback is that in making the conversion back to a raw DNG image it altered the appearance of the image, in this case darkening the image slightly. It also made some faint star trails look wiggly!
Noise XTerminator really smoothed out the sky, and did so very uniformly without doing much harm to the star trails. However, it smoothed out ground detail unacceptably, not surprising given its specialized training on stars, not terrestrial content.
Conclusion: For this image, I’d say Topaz DeNoise AI did the best, though not perfect, job.
This was surprising, as tests I did with earlier versions of DeNoise AI showed it leaving many patchy artifacts and colored edges in places. Frankly, I was put off using it. However, Topaz has improved DeNoise AI a lot.
Why it works so well, when Topaz’s newer program Photo AI works so poorly is hard to understand. Surely they use the same AI code? Apparently not. Photo AI’s noise reduction is not the same as DeNoise AI.
Similarly, ON1’s NoNoise 2023 did a worse job than their older 2022 version. One can assume its performance will improve with updates. The issue seems to be with the new Tack Sharp addition.
NoiseXTerminator might be a good choice for reducing noise in just the sky of nightscape images. It is not suitable for foregrounds, though as of April 2023 its performance on landscapes has improved but is not ideal.
WIDE-FIELD IMAGE TEST
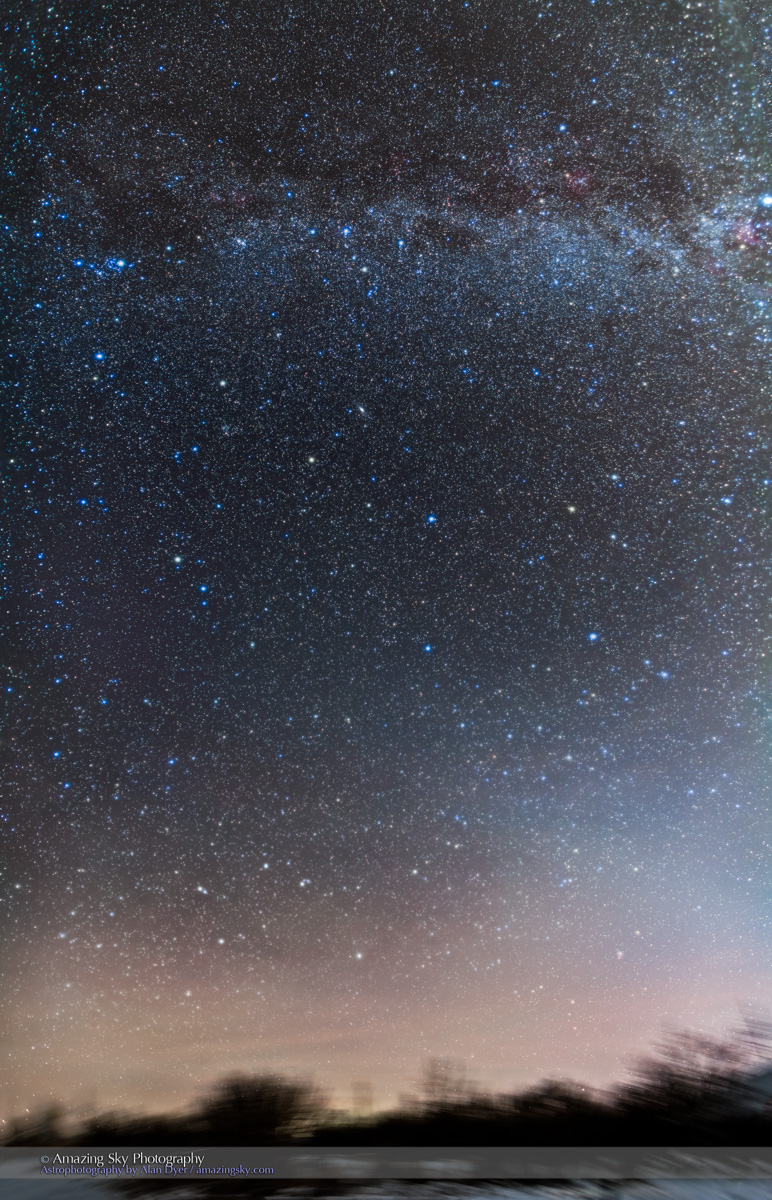
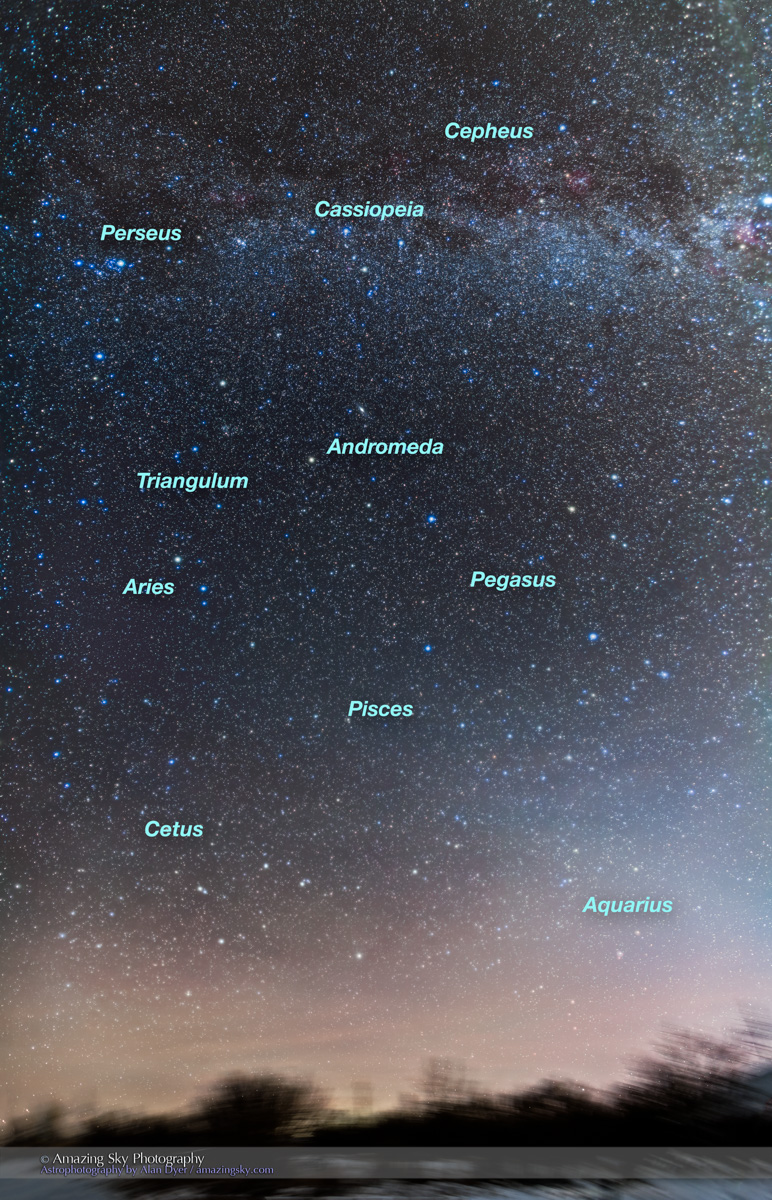
I shot this image of Andromeda and Triangulum with an 85mm Rokinon RF lens on the 45-megapixel Canon R5 on a star tracker. Stars are now points, with small ones easily mistaken for noise. Let’s see how the programs handle such an image, zooming into a tiny section showing the galaxy Messier 33.
The test results on a sample wide-field deep-sky image.
Adobe Camera Raw’s noise and sharpening routines do take care of the worst of the luminance and chrominance noise, but inevitably leave some graininess to the image. This is traditionally dealt with by stacking multiple sub-exposures.
ON1 NoNoise 2023 did a better job than ACR, smoothing the worst of the noise and uniformly, without leaving uneven patchiness. However, it did soften star images, almost like it was applying a 1- or 2-pixel gaussian blur, adding a slight hazy look to the image. And yet the faintest stars that appeared as just perceptible blurs in the original image were sharpened to one- or two-pixel points. This was with only NoNoise AI applied, and no Tack Sharp AI. And, as I show below, NoNoise’s default “High Detail” option introduced with the 2022 version and included in the 2023 edition absolutely destroys star fields. Avoid it.
ON1 NoNoise “High Detail” option ruins star fields, as shown at right. Use “Original” instead.
Topaz DeNoise AI did a better job than Camera Raw, though it wasn’t miles ahead. This was with the Standard setting. Its Low Light and Severe models were not as good, surprising as you might think one of those choices would be the best for such an image. It pays to inspect Topaz’s various models’ results. Standard didn’t erase stars; it actually sharpened the fainter ones, almost a little too much, making them look like specks of noise. Playing with Enhance Sharpness and Recover Detail didn’t make much difference to this behavior.
Topaz Photo AI again performed poorly. Its Normal mode left lots of noise and grainy artifacts. While its Strong mode shown here did smooth background noise better, it softened stars, wiping out the faint ones and leaving colored edges on the brighter ones.
Noiseless AI in Luminar Neo did smooth fine noise somewhat, better than Camera Raw, but still left a grainy background, though with the stars mostly untouched in size and color.
DxO PureRAW2did eliminate noise quite well, while leaving even the faintest stars intact, unlike with the deep-sky image below, which is odd. However, it added some dark halos to bright stars from over-sharpening. And, as with the nightscape example, PureRAW’s output DNG was darker than the raw that went in. I don’t want noise reduction programs altering the basic appearance of an image, even if that can be corrected later in the workflow.
Noise XTerminator performed superbly, as expected – after all, this is the subject matter it is trained to work on. It smoothed out random noise better than any of the other programs, while leaving even the faintest stars untouched, in fact sharpening them slightly. Details in the little galaxy were also unharmed.
Conclusion: The clear winner was NoiseXTerminator.
Topaz DeNoise was a respectable second place, performing better than it had done on such images in earlier versions. Even so, it did alter the appearance of faint stars which might not be desirable.
ON1 NoNoise 2023 also performed quite well, with its softening of brighter stars yet sharpening of fainter ones perhaps acceptable, even desirable for an effect.
TELESCOPIC DEEP-SKY TEST
I shot this image of the NGC 7822 complex of nebulosity with a SharpStar 61mm refractor, using the red-sensitive 30-megapixel Canon Ra and with a narrowband filter to isolate the red and green light of the nebulas.
Again, the test image is a single raw image developed only to re-balance the color and boost the contrast. No dark frames were applied, so the 8-minute exposure at ISO 3200 taken on a warm night shows thermal noise as single “hot pixel” white specks.
The test results on a sample deep-sky close-up.
Adobe Camera Raw did a good job smoothing the worst of the noise, suppressing the hot pixels but only by virtue of it softening all of the image slightly at the pixel level. However, it leaves most stars intact.
ON1 NoNoise 2023 also did a good job smoothing noise while also seeming to boost contrast and structure slightly. But as in the wide-field image, it did smooth out star images a little, though somewhat photogenically, while still emphasizing the faintest stars. This was with no sharpening applied and Luminosity at 60, down from the default 100 NoNoise applies without fail. One wonders if it really is analyzing images to produce optimum settings. With no Tack Sharp sharpening applied, the results on this image with NoNoise 2023 looked identical to NoNoise 2022.
Topaz DeNoise AI did another good job smoothing noise, while leaving most stars unaffected. However, the faintest stars and hot pixels were sharpened to be more visible tiny specks, perhaps too much, even with Sharpening at its lowest level of 1 in Standard mode. Low Light and Severe modes produced worse results, with lots of mottling and unevenness in the background. Unlike NoNoise, at least its Auto settings do vary from image to image, giving you some assurance it really is responding to the image content.
Topaz Photo AI again produced unusable results. Its Normal modes produced lots of mottled texture and haloed stars. Its Strong mode shown here did smooth noise better, but still left lots of uneven artifacts, like DeNoise AI did in its early days. It certainly seems like Photo AI is using old hand-me-down code from DeNoise AI.
Noiseless AI in Luminar Neo did smooth noise but unevenly, leaving lots of textured patches. Stars had grainy halos and the program increased contrast and saturation, adjustments usually best left for specific adjustment layers dedicated to the task.
DxO PureRAW2 did smooth noise very well, including wiping out the faintest specks from hot pixels, but it also wiped out the faintest stars, I think unacceptably and more than other programs like DeNoise AI. For this image it did leave basic brightness alone, likely because it could not apply lens corrections to an image taken with unknown optics. However, it added an odd pixel-level mosaic-like effect on the sky background, again unacceptable.
Noise XTerminator did a great job smoothing random noise without affecting any stars or the nebulosity. The Detail level of 20 I used actually emphasized the faintest stars, but also the hot pixel specks. NoiseXTerminator can’t be counted on to eliminate thermal noise; that demands the application of dark frames and/or using dithering routines to shift each sub-frame image by a few pixels when autoguiding the telescope mount. Even so, Noise XTerminator is so good users might not need to take and stack as many images.
Conclusion: Again, the winner was NoiseXTerminator.
Deep-sky photographers have praised “NoiseX” for its effectiveness, either when applied early on in a PixInsight workflow or, as I do in Photoshop, as a smart filter to the base stacked image underlying other adjustment layers.
Topaz DeNoise is also a good choice as it can work well on many other types of images. But again, play with its various models and settings. Pixel peep!
ON1 NoNoise 2023 did put in a respectable performance here, and it will no doubt improve – it had been out less than a month when I ran these tests.
Based on its odd behavior and results in all three test images I would not recommend DxO’s PureRAW2. Yes, it reduces noise quite well, but it can alter tone and color in the process, and add strange pixel-level mosaic artifacts.
COMPARING DxO and TOPAZ OPTIONS
DxO and Topaz DeNoise AI offer the most choices of AI models and strength of noise reduction. Here I compare:
Topaz DeNoise AI on the nightscape image using three of its models: Standard (which I used in the comparisons above), plus Low Light and Severe. These show how the other models didn’t do as good a job.
The set below also compares DeNoise AI to Topaz’s other program, Photo AI, to show how poor a job it is doing in its early form. Its Strong mode does smooth noise but over-sharpens and leaves edge artifacts. Yes, Photo AI is one-click easy to use, but produces bad results – at least on astrophotos.
Comparing DeNoise’s and Photo AI’s different model settings.
As of this writing DxO’s PureRAW2 offers the Prime and newer DeepPrime AI models – I used DeepPrime for my tests.
However, DxO’s more expensive and complete image processing program, PhotoLab 6, also offers the even newer DeepPrimeXD model, which promises to preserve or recover even more “Xtra Detail” over the DeepPrime model. As of this writing, the XD mode is not offered in PureRAW2. Perhaps that will wait for PureRAW3, no doubt a paid upgrade.
[UPDATE MARCH 2023: DxO has indeed brought out PureRaw3 as a paid upgrade that, as expected, offers the DeepPrimeXD. In testing the new version I found that, while it did not seem to alter an image’s exposure as PureRaw2 did, DeepPrime and DeepPrimeXD still unacceptably ruin starry skies, by either adding a fine-scale mosaic effect (DeepPrime) or weird wormy artifacts (DeepPrimeXD). Try it for yourself to see if you find the same.]
Comparing DxO’s various Prime model settings. DeepPrimeXD is only in PhotoLab 6.
The set above compares the three noise reduction models of DxO’s PhotoLab 6. DeepPrime does do a better job than Prime. DeepPrimeXD does indeed sharpen detail more, but in this example it is too sharp, showing artifacts, especially in the sky where it is adding structures and textures that are not real.
However, when used from within PhotoLab 6, the DeepPrime noise reduction becomes more usable. PhotoLab is then being used to perform all the raw image processing, so PureRAW’s alteration of color and tone is not a concern. Conversely, it can also output raw DNGs with only noise reduction and lens corrections applied, essentially performing the same tasks as PureRAW. If you have PhotoLab, you don’t need PureRAW.
APRIL 2023 UPDATE — TESTING ADOBE’S NEW AI Denoise
In April 2023 Adobe updated Lightroom Classic to v12.3 and the Camera Raw plug-in for Bridge and Photoshop to 15.3. The major new feature was a long-awaited AI noise reduction from Adobe called Denoise. It works only on raw files and generates a new raw DNG file to which all the raw develop settings, including AI masks, can be applied. But the DNG file is some four times larger than the original raw file from the camera.
Here’s a comparison of Camera Raw using the old noise reduction and the new AI option, with DxO’s DeepPrimeXD and Topaz’s PhotoAI, on an aurora image from April 23, 2023:
I used Topaz Photo AI as that’s the program Topaz is now putting all their development effort into, neglecting their other plug-ins such as DeNoise AI. I used DxO PhotoLab 6 with its DeepPrimeXD option to export a DNG with only noise reduction applied, for results identical to what is now offered with DxO’s separate PureRaw3 plug-in.
At 100% above, there’s very little obvious difference. They show up when pixel peeping.
400% blow-ups of the sky – Tap or click to download a full-res JPG
Above are 400% blow-ups of a section of the sky.
Compared to using Adobe’s old noise reduction sliders, their new AI Denoise did a far superior job at smoothing noise, and providing sharpening – almost too much, making even the smallest stars pop out more, perhaps a good thing. But there’s no control of that sharpening.
DxO’s DeepPrimeXD provides a similar, or perhaps more excessive level of AI sharpening. While it smooths noise, it introduces all manner of wormy AI artifacts. It is unacceptable.
Topaz PhotoAI’s noise reduction and sharpening, here both applied with their AutoPilot settings, smoothed noise, but created a patchy appearance. It also softened the stars, despite having sharpening turned on. It was the worst of the set.
400% blow-ups of a section of the ground y – Tap or click to download a full-res JPG
In a similar set of blow-ups of the ground, the old Adobe noise reduction did just that — it smoothed only some noise. The new AI Denoise not only smooths noise, it also applies AI-based sharpening, to the point of almost inventing detail. Here it looks believable, but in other tests I have seen it add content, such as structures in the aurora, that looked fake and out of place. Or just plain wrong!
DxO’s DeepPrimeXD’s main feature over the older DeepPrime is the “eXtra Detail” it finds. Here it produces a result similar to Adobe Denoise, though in some areas of this and other images, I find it is over-sharpening. As with Adobe, there is no option for backing off the sharpening. Other than using DeepPrime or Prime noise reduction.
Topaz PhotoAI didn’t do much to add sharpening. If anything, it made the image softer. While PhotoAI has improved with its weekly updates, it still falls far short of the competition, at least for astrophotos and nightscapes.
The bottom line — Adobe’s new AI Denoise can do a superb job on astrophotos, and will be particularly useful for high-ISO nightscapes, perhaps better than any of the competition. But watch what it does! It can invent details or create results that look artificial. Being able to adjust the sharpening would be helpful. Perhaps that will come in an update.
COMPARING AI TO OLDER NON-AI PROGRAMS
The new generation of AI-based programs have garnered all the attention, leaving older stalwart noise reduction programs looking a little forlorn and forgotten.
Here I compare Camera Raw and two of the best of the AI programs, Topaz DeNoise AI and NoiseXTerminator, with two of the most respected of the “old-school” non-AI programs:
Nik Dfine2’s control interface.
Dfine2, included with the Nik Collection of plug-ins sold by DxO (shown above), and
Reduce Noise v9 sold by Neat Image (shown below).
Neat Image’s Reduce Noise control interface – the simple panel.
I tested both by using them in their automatic modes, where they analyze a section or sections of the image and adjust the noise reduction accordingly, but then apply that setting uniformly across the entire image. However, both allow manual adjustments, with Neat Image’s Reduce Noise offering a bewildering array of technical adjustments.
How do these older programs stack up to the new AI generation? Here are comparisons using the same three test images.
Comparing results with Neat Image and Nik Dfine2 on the nightscape test image.
In the nightscape image, Nik Dfine2 and Neat Image’s Reduce Noise did well, producing uniform noise reduction with no patchiness. But the results weren’t significantly better than with Adobe Camera Raw’s built-in routine. Like ACR, both non-AI programs did smooth detail in the ground, compared to DeNoise AI which sharpened the mountain details.
Comparing results with Neat Image and Nik Dfine2 on the wide-field test image.
In the tracked wide-field image, the differences were harder to distinguish. None performed up to the standard of Noise XTerminator, with both Nik Dfine2 and Neat Image softening stars a little compared to DeNoise AI.
Comparing results with Neat Image and Nik Dfine2 on the deep-sky test image.
In the telescopic deep-sky image, all programs did well, though none matched NoiseXTerminator. None eliminated the hot pixels. But Nik Dfine2 and Neat Image did leave wanted details alone, and did not alter or eliminate desired content. However, they also did not eliminate noise as well as did Topaz DeNoise AI or NoiseXTerminator.
The AI technology does work!
YOUR RESULTS MAY VARY
I should add that the nature of AI means that the results will certainly vary from image to image.
In addition, with many of these programs offering multiple models and settings for strength and sharpening, results even from the same program can be quite different. In this testing I used either the program’s auto defaults or backed off those defaults where I thought the effect was too strong and detrimental to the image.
Software is also a constantly moving target. Updates will alter how these programs perform, we hope for the better. For example, two days after I published this test, ON1 updated NoNoise AI to v17.0.2 with minor fixes and improvements.
And do remember I’m testing on astrophotos, and pixel peeping to the extreme. Rave reviews claiming how well even the poor performers here work on “normal” images might well be valid.
This is all by way of saying, your mileage may vary!
So don’t take my word for it. Most programs (Luminar Neo is an exception) are available as free trial copies to test out on your astro-images and in your preferred workflow. Test for yourself. But do pixel peep. That’s where you’ll see the flaws.
WHAT ABOUT ADOBE?
As noted above, with v15.3 of Camera Raw and v12.3 of Lightroom Classic, Adobe finally introduced their contender into the AI noise reduction contest. And it is a very good entry at that.
But it works only on raw files early in the workflow, and it generates a new raw DNG file, one four times the size of the original. The suggestion is that this technology will expand so that the AI noise reduction can be applied later in the workflow to other file formats.
Indeed, in the last couple of years Adobe has introduced several amazing and powerful “Neural Filters” into Photoshop, which work wonders with one click.
Neural network Noise Reduction is coming to Photoshop. One day!
A neural filter for Noise Reduction is on Adobe’s Wait List for development, so perhaps we will see something in the next few months from Adobe, as a version of the AI noise reduction now offered in Lightroom and Camera Raw.
Until then we have lots of choices for third party programs that all improve with every update. I hope this review has helped you make a choice.
— Alan, November 15, 2022 / Revised April 27, 2023 / AmazingSky.com
I present my top 10 tips for capturing time-lapses of the moving sky.
If you can take one well-exposed image of a nightscape, you can take 300. There’s little extra work required, just your time. But if you have the patience, the result can be an impressive time-lapse movie of the night sky sweeping over a scenic landscape. It’s that simple.
Or is it?
Here are my tips for taking time-lapses, in a series of “Do’s” and “Don’ts” that I’ve found effective for ensuring great results.
But before you attempt a time-lapse, be sure you can first capture well-exposed and sharply focused still shots. Shooting hundreds of frames for a time-lapse will be a disappointing waste of your time if all the images are dark and blurry.
For that reason many of my tips apply equally well to shooting still images. But taking time-lapses does require some specialized gear, techniques, planning, and software. First, the equipment.
NOTE: This article appeared originally in Issue #9 of Dark Sky Travels e-magazine.
SELECTING EQUIPMENT
Essential Gear Time-lapse photography requires just the camera and lens you might already own, but on a solid tripod (a carbon-fibre Manfrotto with an Acratech ball-head is shown here), and with an intervalometer.
TIP 1 — DO: Use a solid tripod
A lightweight travel tripod that might suffice for still images on the road will likely be insufficient for time-lapses. Not only does the camera have to remain rock steady for the length of the exposure, it has to do so for the length of the entire shoot, which could be several hours. Wind can’t move it, nor any camera handling you might need to do mid-shoot, such as swapping out a battery.
The tripod needn’t be massive. For hiking into scenic sites you’ll want a lightweight but sturdy tripod. While a carbon fibre unit is costly, you’ll appreciate its low weight and good strength every night in the field. Similarly, don’t scrimp on the tripod head.
TIP 2 — DO: Use a fast lens
The All-Important Lens A fast lens is especially critical for time-lapses to allow capturing good sky and ground detail in each exposure, as compositing later won’t be feasible. This is the Sigma 20mm f/1.4 Art lens.
As with nightscape stills, the single best purchase you can make to improve your images of dark sky scenes is not buying a new camera (at least not at first), but buying a fast, wide-angle lens.
Ditch the slow kit zoom and go for at least an f/2.8, if not f/2, lens with 10mm to 24mm focal length. This becomes especially critical for time-lapses, as the fast aperture allows using short shutter speeds, which in turn allows capturing more frames in a given period of time. That makes for a smoother, slower time-lapse, and a shoot you can finish sooner if desired.
TIP 3 — DO: Use an intervalometer
Canon intervalometer functions
Nikon intervalometer functions
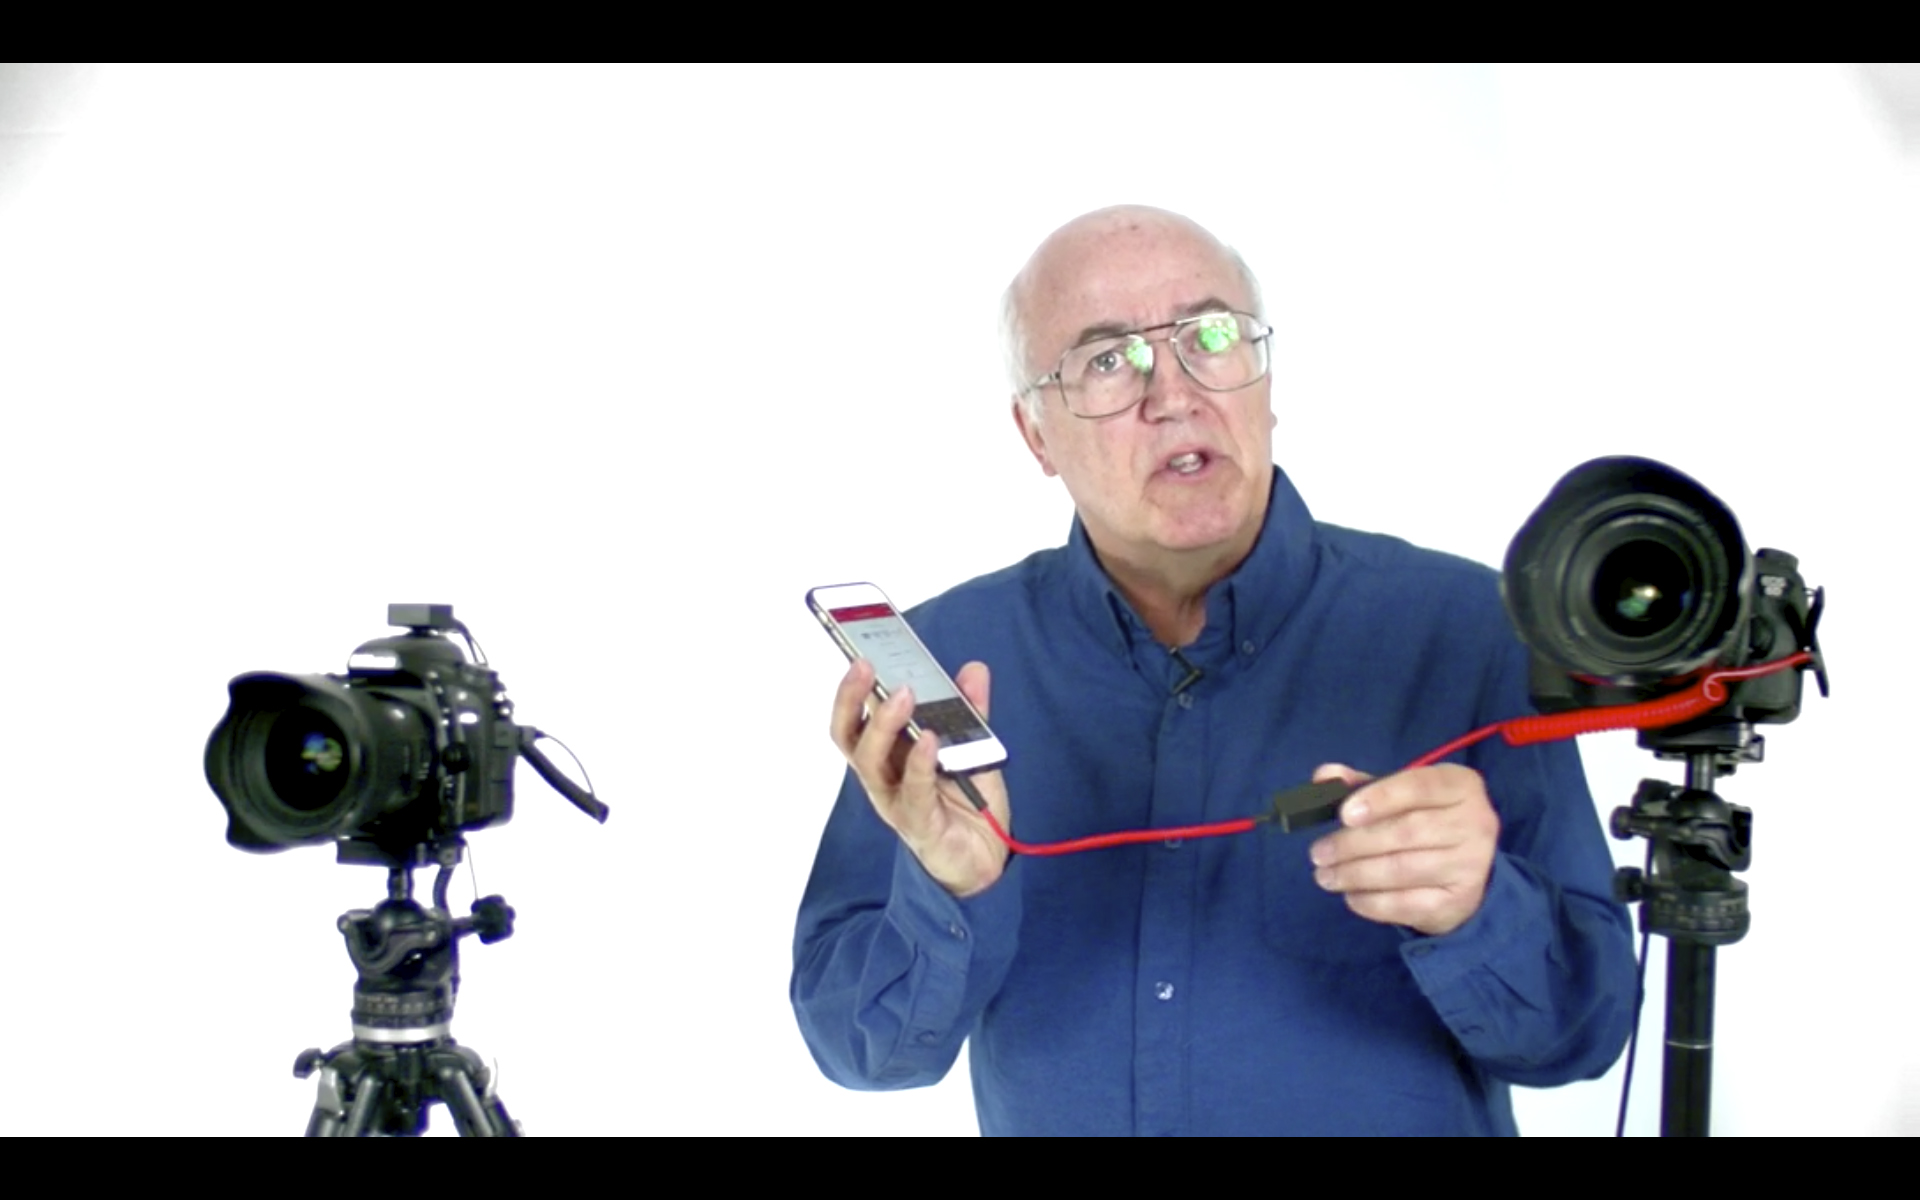
Automating the Camera The intervalometer is also key. For cameras without an internal intervalometer (screens from a Canon and a Nikon are shown above), an outboard unit like one of these, is essential. Be sure to get the model that fits your camera’s remote control jack.
Time-lapses demand the use of an intervalometer to automatically fire the shutter for at least 200 to 300 images for a typical time-lapse. Many cameras have an intervalometer function built into their firmware. The shutter speed is set by using the camera in Manual mode.
Just be aware that a camera’s 15-second exposure really lasts 16 seconds, while a 30-second shot set in Manual is really a 32-second exposure.
So in setting the interval to provide one second between shots, as I advise below, you have to set the camera’s internal intervalometer for an interval of 17 seconds (for a shutter speed of 15 seconds) or 33 seconds (for a shutter speed of 30 seconds). It’s an odd quirk I’ve found true of every brand of camera I use or have tested.
Alternatively, you can set the camera to Bulb and then use an outboard hardware intervalometer (they sell for $60 on up) to control the exposure and fire the shutter. Test your unit. Its interval might need to be set to only one second, or to the exposure time + one second.
How intervalometers define “Interval” varies annoyingly from brand to brand. Setting the interval incorrectly can result in every other frame being missed and a ruined sequence.
SETTING YOUR CAMERA
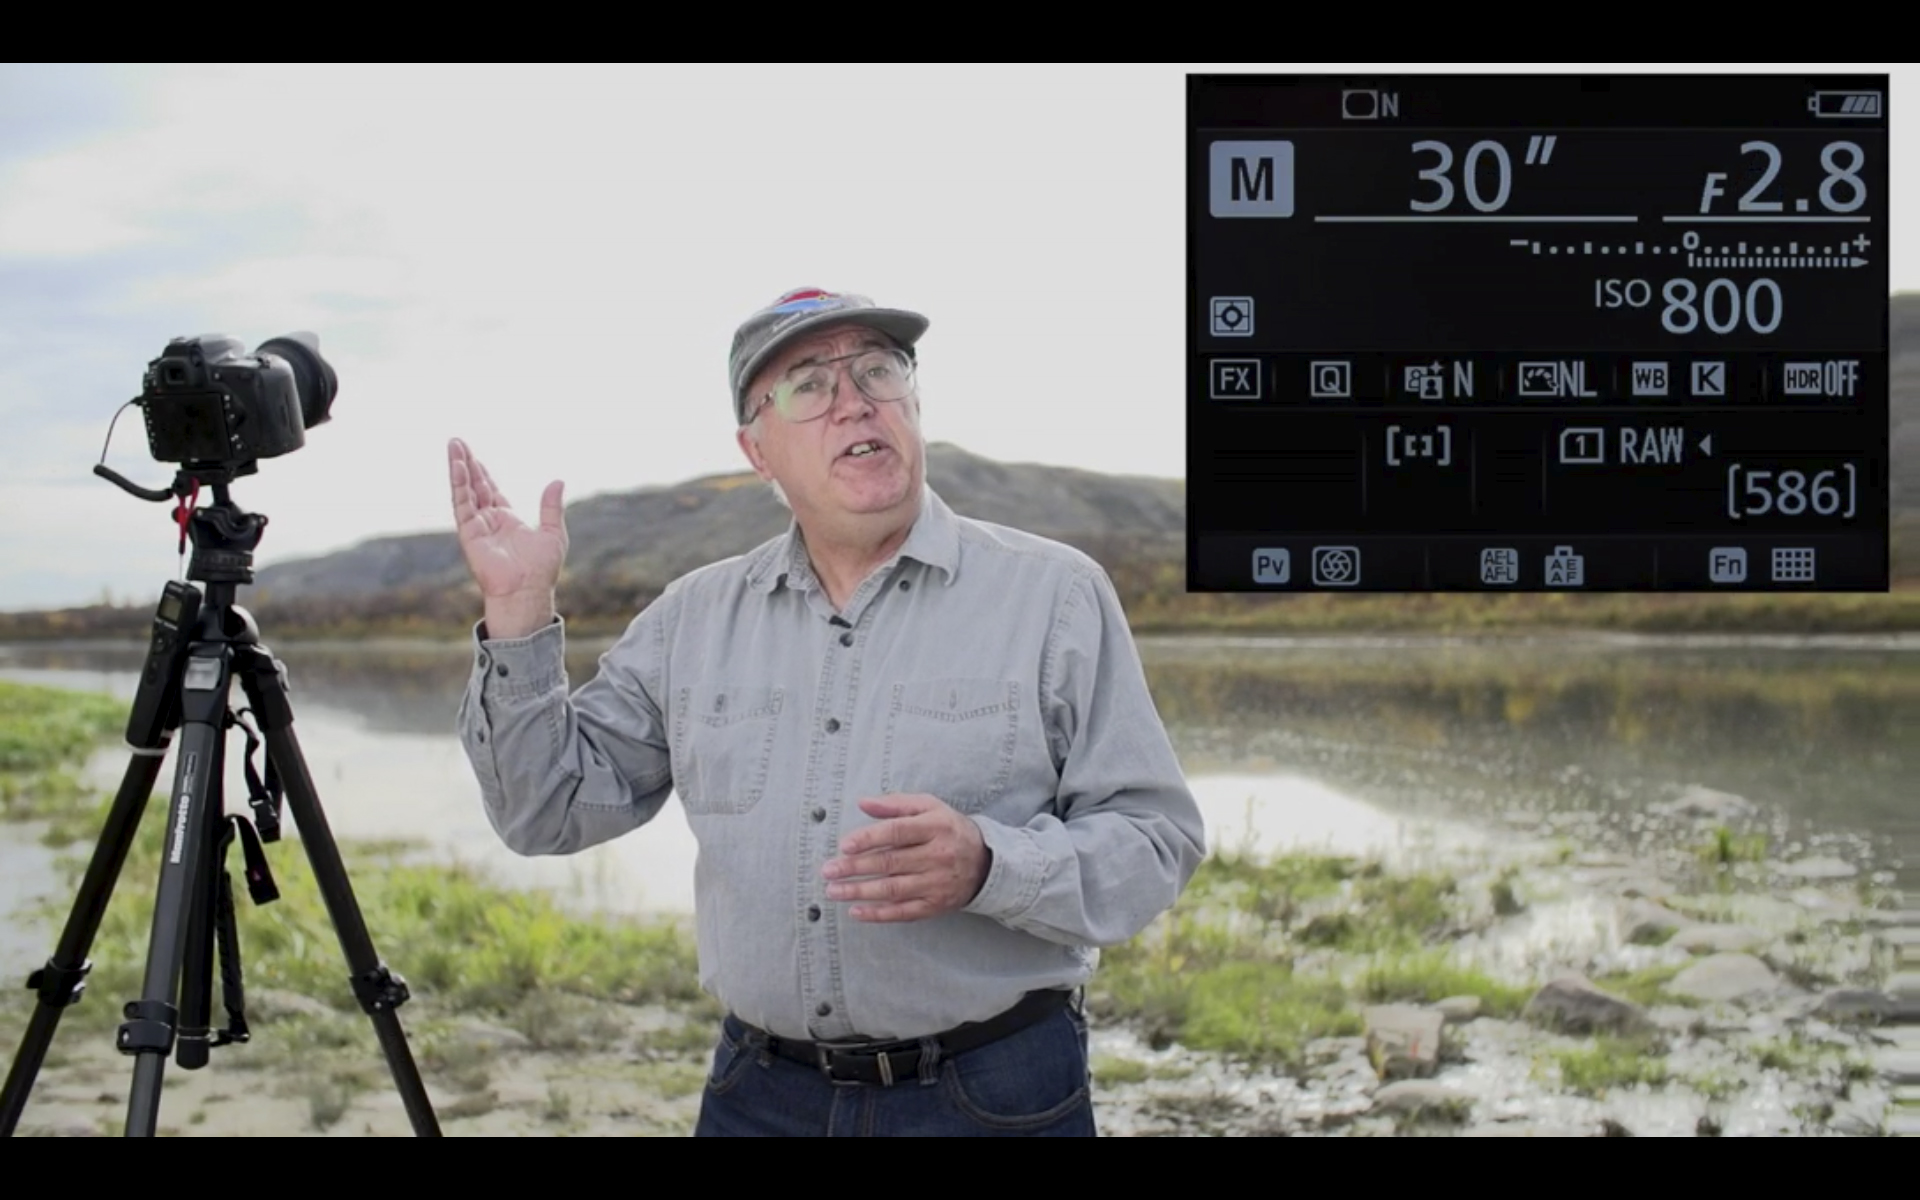
TIP 4 — DON’T: Underexpose
Expose to the Right When shooting, choose settings that will yield a histogram that is not slammed to the left, but is shifted to the right to minimize noise and lift details in the shadows.
As with still images, the best way to beat noise is to give the camera signal. Use a wider aperture, a longer shutter speed, or a higher ISO (or all of the above) to ensure the image is well exposed with a histogram pushed to the right.
If you try to boost the image brightness later in processing you’ll introduce not only the very noise you were trying to avoid, but also odd artifacts in the shadows such as banding and purple discolouration.
With still images we have the option of taking shorter, untrailed images for the sky, and longer exposures for the dark ground to reveal details in the landscape, to composite later. With time-lapses we don’t have that luxury. Each and every frame has to capture the entire scene well.
At dark sky sites, expose for the dark ground as much as you can, even if that makes the sky overly bright. Unless you outright clip the highlights in the Milky Way or in light polluted horizon glows, you’ll be able to recover highlight details later in processing.
After poor focus, underexposure, resulting in overly noisy images, is the single biggest mistake I see beginners make.
TIP 5 — DON’T: Worry about 500 or “NPF” Exposure Rules
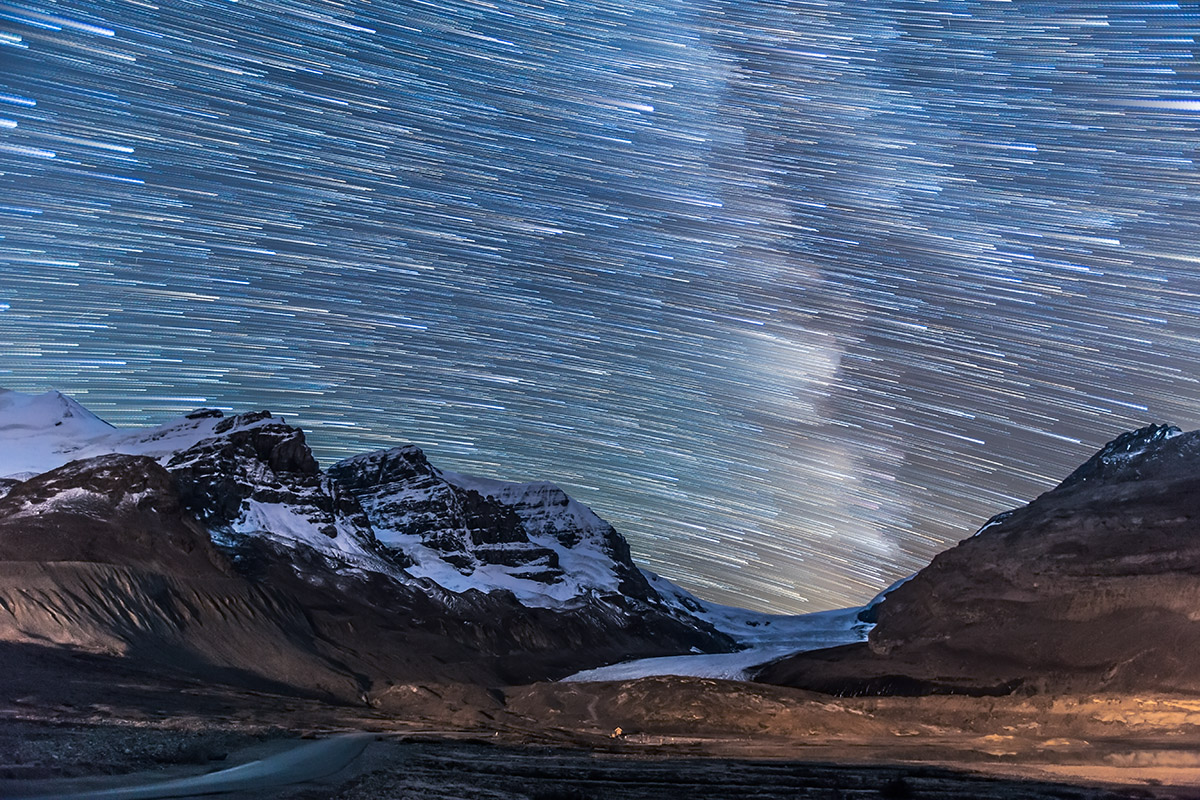
Stills from a Sequence A stack of single frames from a time-lapse sequence can often make a good still image, such as this scene of the Space Station rising over Waterton Lakes National Park. The 30-second exposures were just within the “500 Rule” for the 15mm lens used here, but minor star trailing won’t be that noticeable in a final movie.
While still images might have to adhere to the “500 Rule” or the stricter “NPF Rule” to avoid star trailing, time-lapses are not so critical. Slight trailing of stars in each frame won’t be noticeable in the final movie when the stars are moving anyway.
So go for rule-breaking, longer exposures if needed, for example if the aperture needs to be stopped down for increased depth of field and foreground focus. Again, with time-lapses we can’t shoot separate exposures for focus stacking later.
Just be aware that the longer each exposure is, the longer it will take to shoot 300 of them.
Why 300? I find 300 frames is a good number to aim for. When assembled into a movie at 30 frames per second (a typical frame rate) your 300-frame clip will last 10 seconds, a decent length of time in a final movie.
You can use a slower frame rate (24 fps works fine), but below 24 the movie will look jerky unless you employ advanced frame blending techniques. I do that for auroras.
PhotoPills Calculator Apps such as PhotoPills offer handy calculators for juggling exposure time vs. the number of frames to yield the length of the time-lapse shoot.
Bonus Tip
How long it will take to acquire the needed 300 frames will depend on how long each exposure is and the interval between them. An app such as PhotoPills (via its Time lapse function) is handy in the field for calculating exposure time vs. frame count vs. shoot length, and providing a timer to let you know when the shoot is done.
TIP 6 — DO: Use short intervals
Mind the Gap! At night use intervals as short as possible to avoid gaps in time, simulated here (at top) by stacking several time-lapse frames taken at a one-second interval into one image. Using too long an interval, as demonstrated just above, yields gaps in time and jumps in the star motion, simulated here by stacking only every other frame in a sequence.
At night, the interval between exposures should be no more than one or two seconds. By “interval,” I mean the time between when the shutter closes and when it opens again for the next frame.
Not all intervalometers define “Interval” that way. But it’s what you expect it means. If you use too long an interval then the stars will appear to jump across the sky, ruining the smooth motion you are after.
In practice, intervals of four to five seconds are sometimes needed to accommodate the movement of motorized “motion control” devices that turn or slide the camera between each shot. But I’m not covering the use of those advanced units here. I cover those options and much, much more in 400 pages of tips, techniques and tutorials in my Nightscapes ebook, linked to above.
However, during the day or in twilight, intervals can be, and indeed need to be, much longer than the exposures. It’s at night with stars in the sky that you want the shutter to be closed as little as possible.
TIP 7 — DO: Shoot Raw
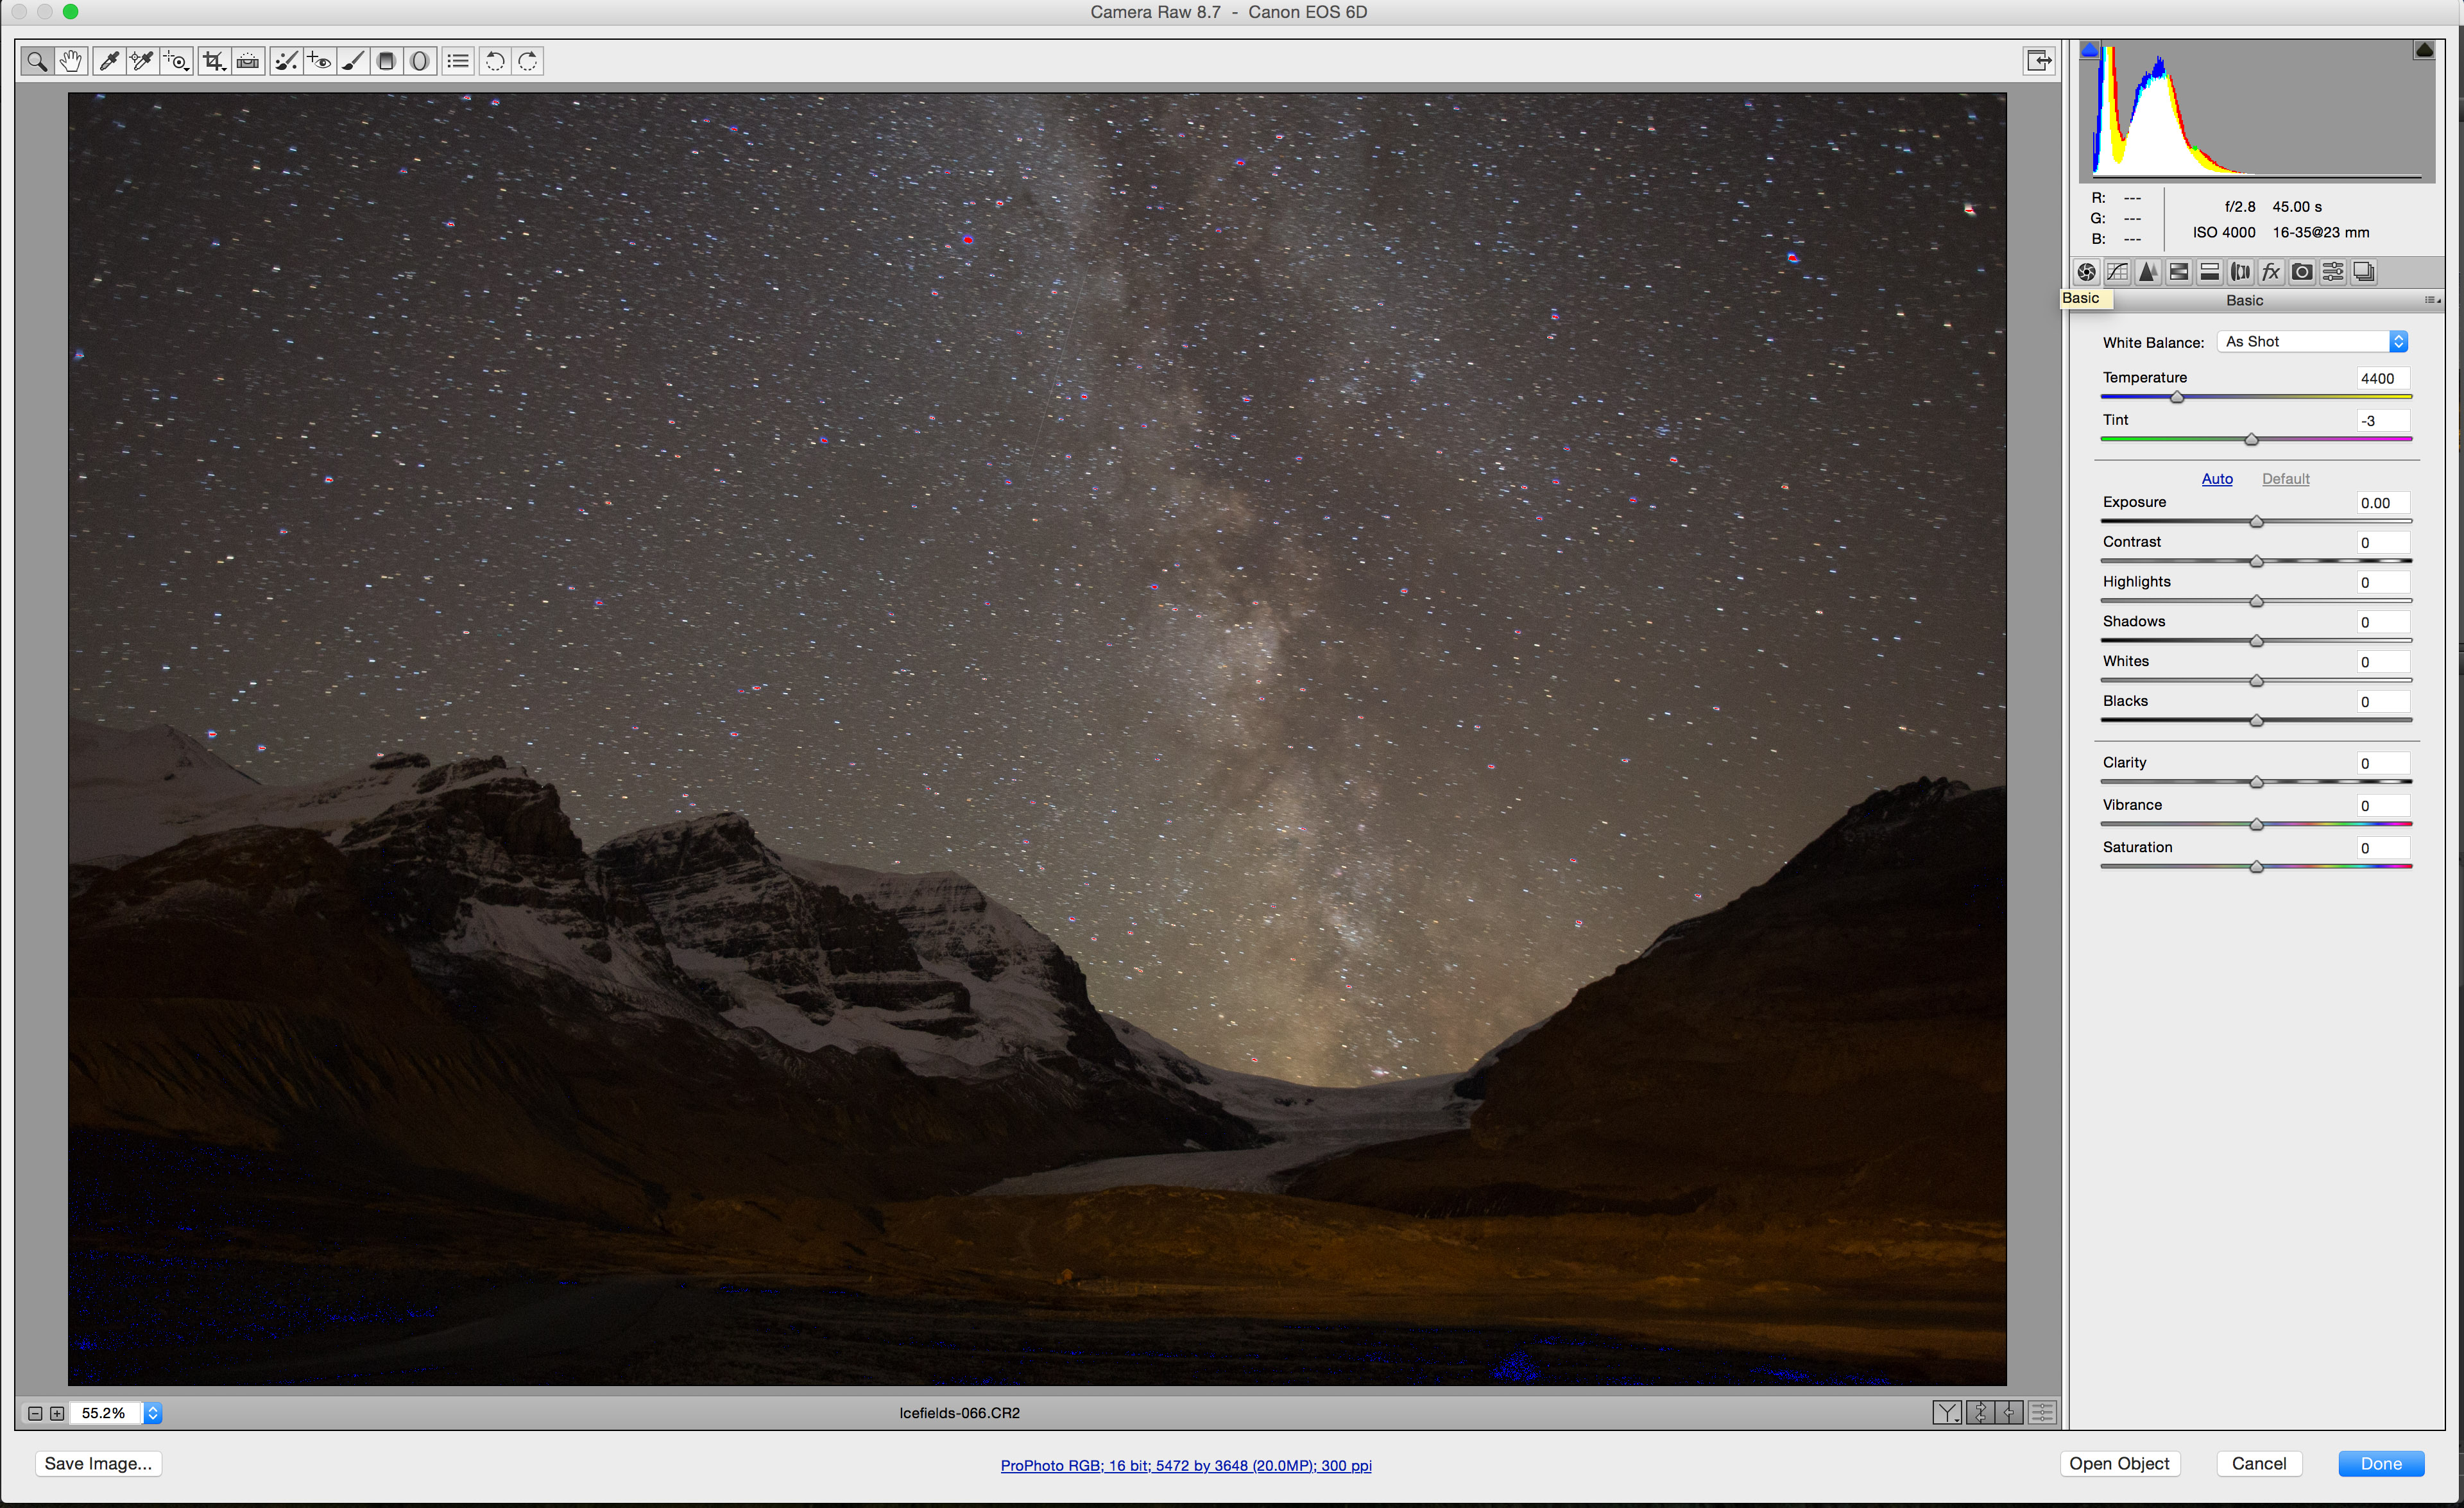
The Power of Raw Shooting raw, even for time-lapse frames that will eventually be turned into JPGs, allows for maximum control of shadows, highlights, colour balance, and noise reduction. “Before” is what came out of the camera; “After” is with the development settings shown applied in Camera Raw.
This advice also applies to still images where shooting raw files is essential for professional results. But you likely knew that.
However, with time-lapses some cameras offer a mode that will shoot time-lapse frames and assemble them into a movie right in the camera. Don’t use it. It gives you a finished, pre-baked movie with no ability to process each frame later, an essential step for good night time-lapses. And raw files provide the most data to work with.
So even with time-lapses, shoot raw not JPGs.
If you are confident the frames will be used only for a time-lapse, you might choose to shoot in a smaller S-Raw or compressed C-Raw mode, for smaller files, in order to fit more frames onto a card.
But I prefer not to shrink or compress the original raw files in the camera, as some of them might make for an excellent stacked and layered still image where I want the best quality originals (such as for the ISS over Waterton Lakes example above).
To get you through a long field shoot away from your computer buy more and larger memory cards. You don’t need costly, superfast cards for most time-lapse work.
PLANNING AND COMPOSITION
TIP 8 — DO: Use planning apps to frame
Planning the Shoot Apps such as The Photographer’s Ephemeris (shown here set for the author’s Waterton Lakes site for moonrise) help in planning where the Sun, Moon and Milky Way will be from your site during the shoot.
Simulating the Shoot The companion app to The Photographer’s Ephemeris, TPE 3D, shown above in the inset, exactly matches the real scene for the mountain skyline, placement of the Milky Way, and lighting from the rising Moon.
All nightscape photography benefits from using one of the excellent apps we now have to assist us in planning a shoot. They are particularly useful for time-lapses.
Apps such as PhotoPills and The Photographer’s Ephemeris are great. I like the latter as it links to its companion TPE 3D app to preview what the sky and lighting will look like over the actual topographic horizon from your site. You can scrub through time to see the motion of the Milky Way over the scenery. The Augmented Reality “AR” modes of these apps are also useful, but only once you are on site during the day.
For planning a time-lapse at home I always turn to a “planetarium” program to simulate the motion of the sky (albeit over a generic landscape), with the ability to add in “field of view” indicators to show the view your lens will capture.
You can step ahead in time to see how the sky will move across your camera frame during the length of the shoot. Indeed, such simulations help you plan how long the shoot needs to last until, for example, the galactic core or Orion sets.
Planetarium software helps ensure you frame the scene properly, not only for the beginning of the shoot (that’s easy — you can see that!), but also for the end of the shoot, which you can only predict.
Planetarium Planning An alternative is to use a planetarium program such as the free Stellarium, shown above, which can display lens fields of view. These scenes show the simulated vs. real images (insets) for the start (top) and end (bottom) of the Waterton Lakes time-lapse with a 35mm lens frame, outlined in red.
If your shoot will last as long as three hours, do plan to check the battery level and swap batteries before three hours is up. Most cameras, even new mirrorless models, will now last for three hours on a full battery, but likely not any longer. If it’s a cold winter night, expect only one or two hours of life from a single battery.
PROCESSING
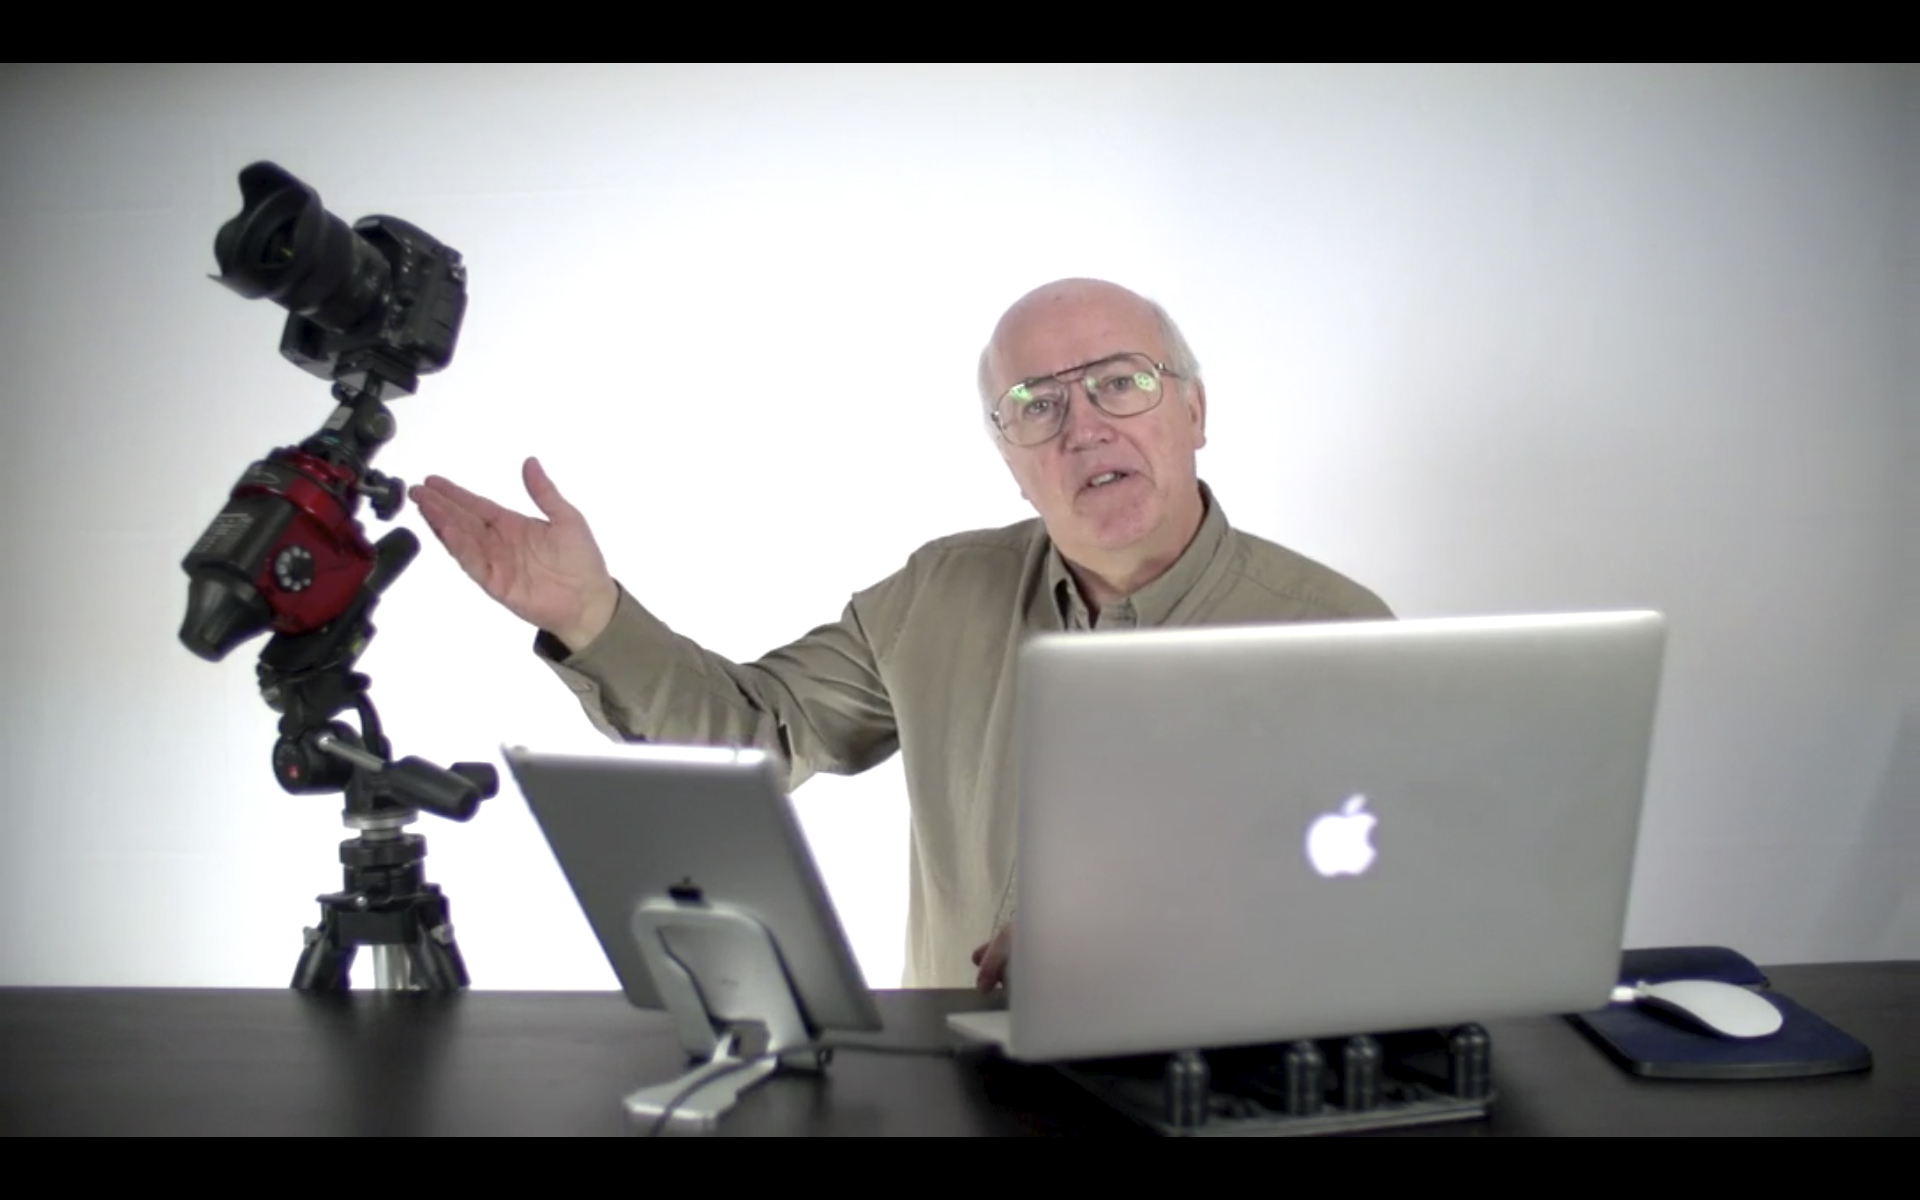
TIP 9 — DO: Develop one raw frame and apply settings to all
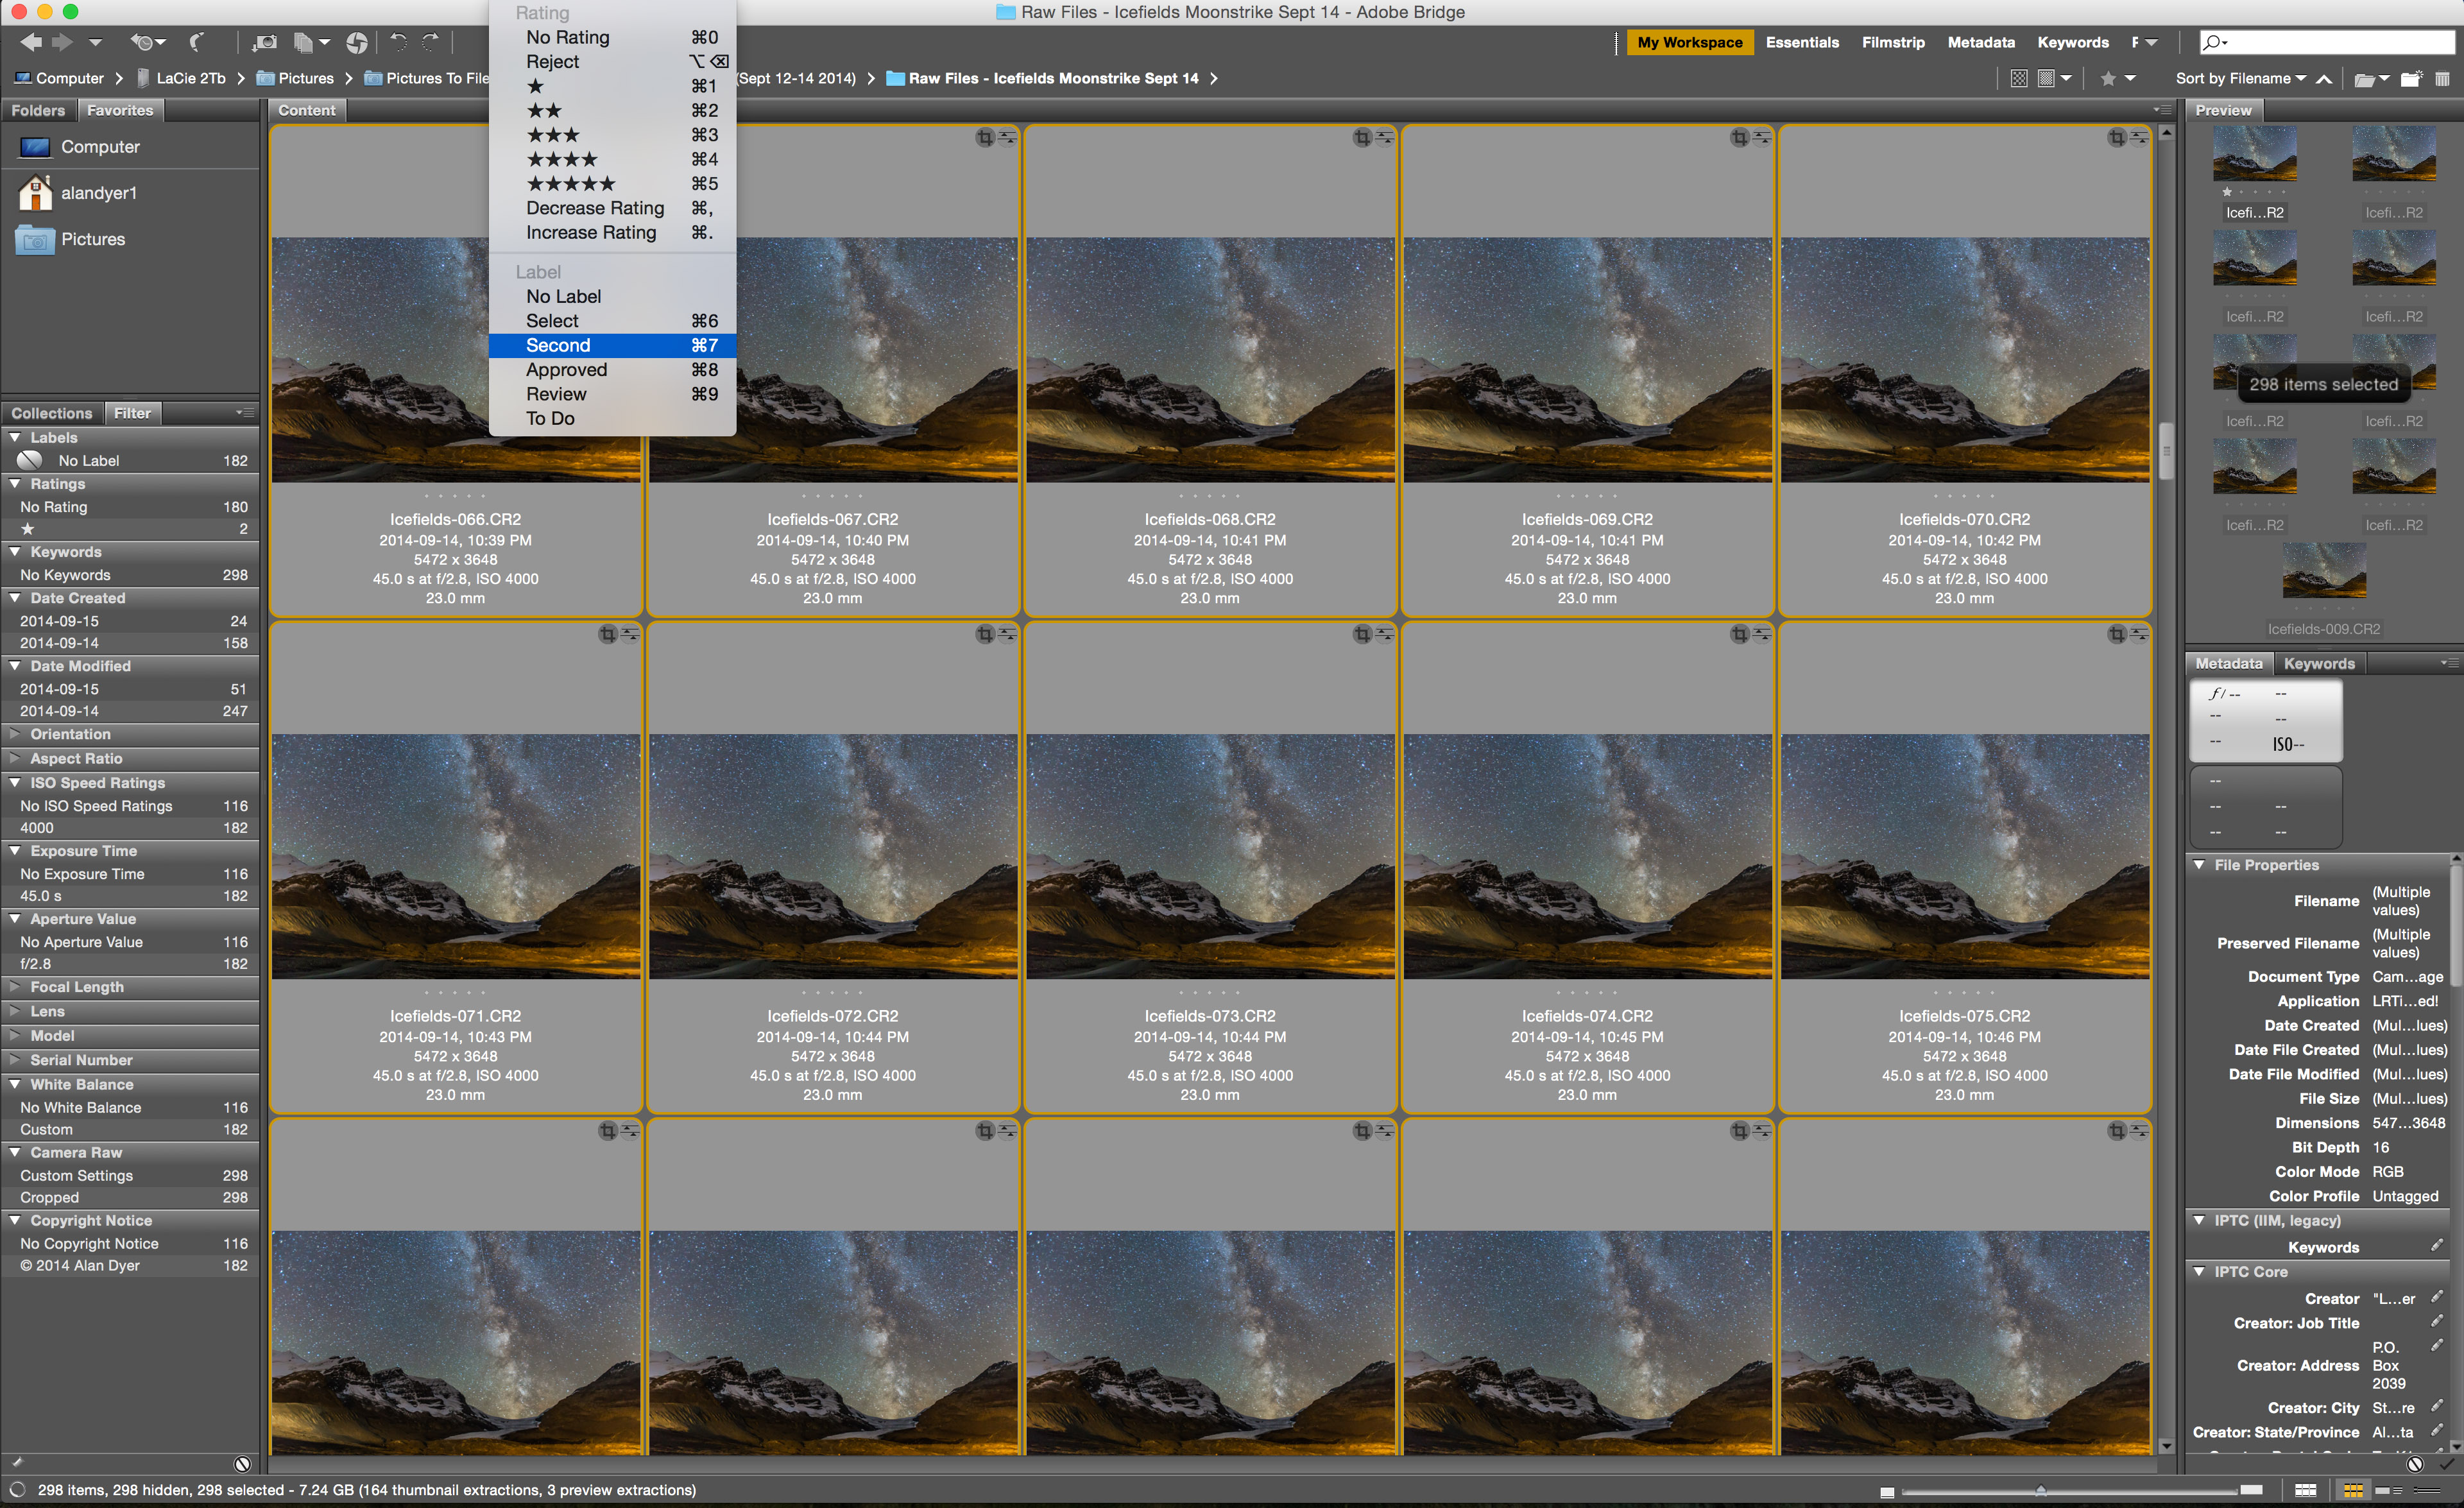
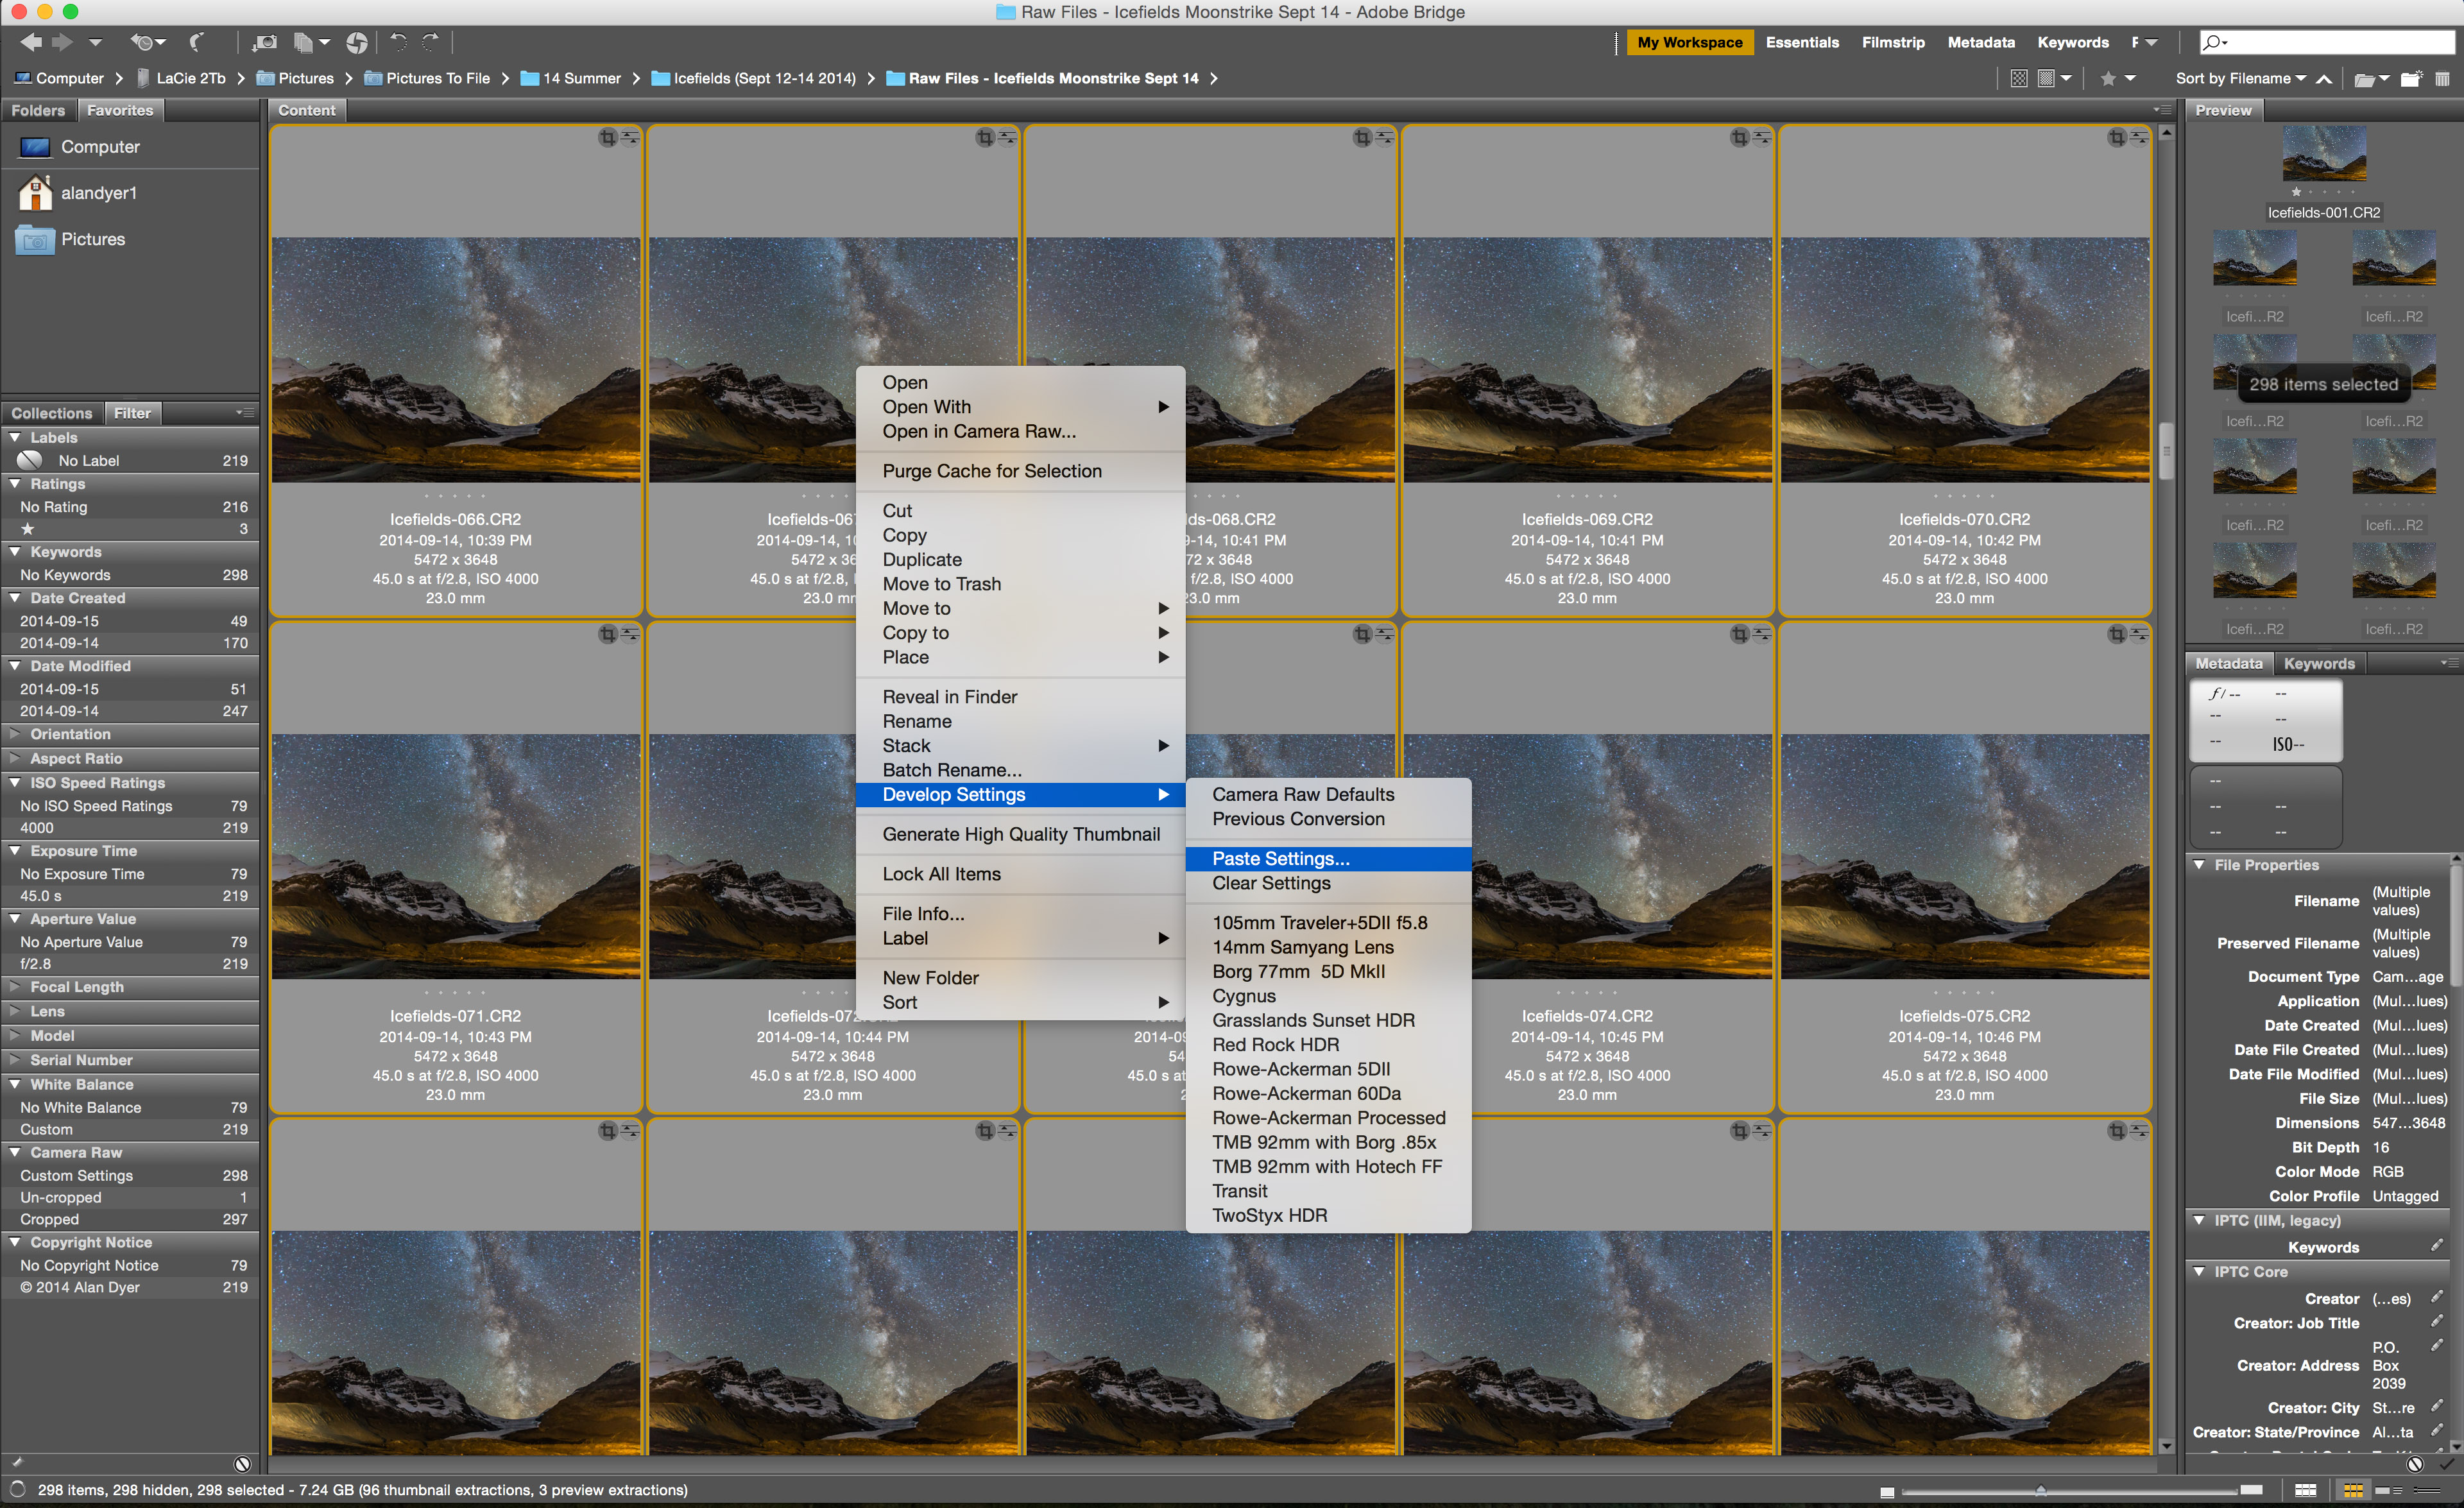
Copy and Paste Settings Most raw developers or photo library programs (Adobe Bridge is shown here) offer the essential ability to copy settings from one image and paste them onto hundreds of others in a folder, developing all the time-lapse frames in a snap.
Processing the raw files takes the same steps and settings as you would use to process still images.
With time-lapses, however, you have to do all the processing required within your favourite raw developer software. You can’t count on bringing multiple exposures into a layer-based processor such as Photoshop to stack and blend images. That works for a single image, but not for 300.
I use Adobe Camera Raw out of Adobe Bridge to do all my time-lapse processing. But many photographers use Lightroom, which offers all the same settings and non-destructive functions as Adobe Camera Raw.
For those who wish to “avoid Adobe” there are other choices, but for time-lapse work an essential feature is the ability to develop one frame, then copy and paste its settings (or “sync” settings) to all the other frames in the set.
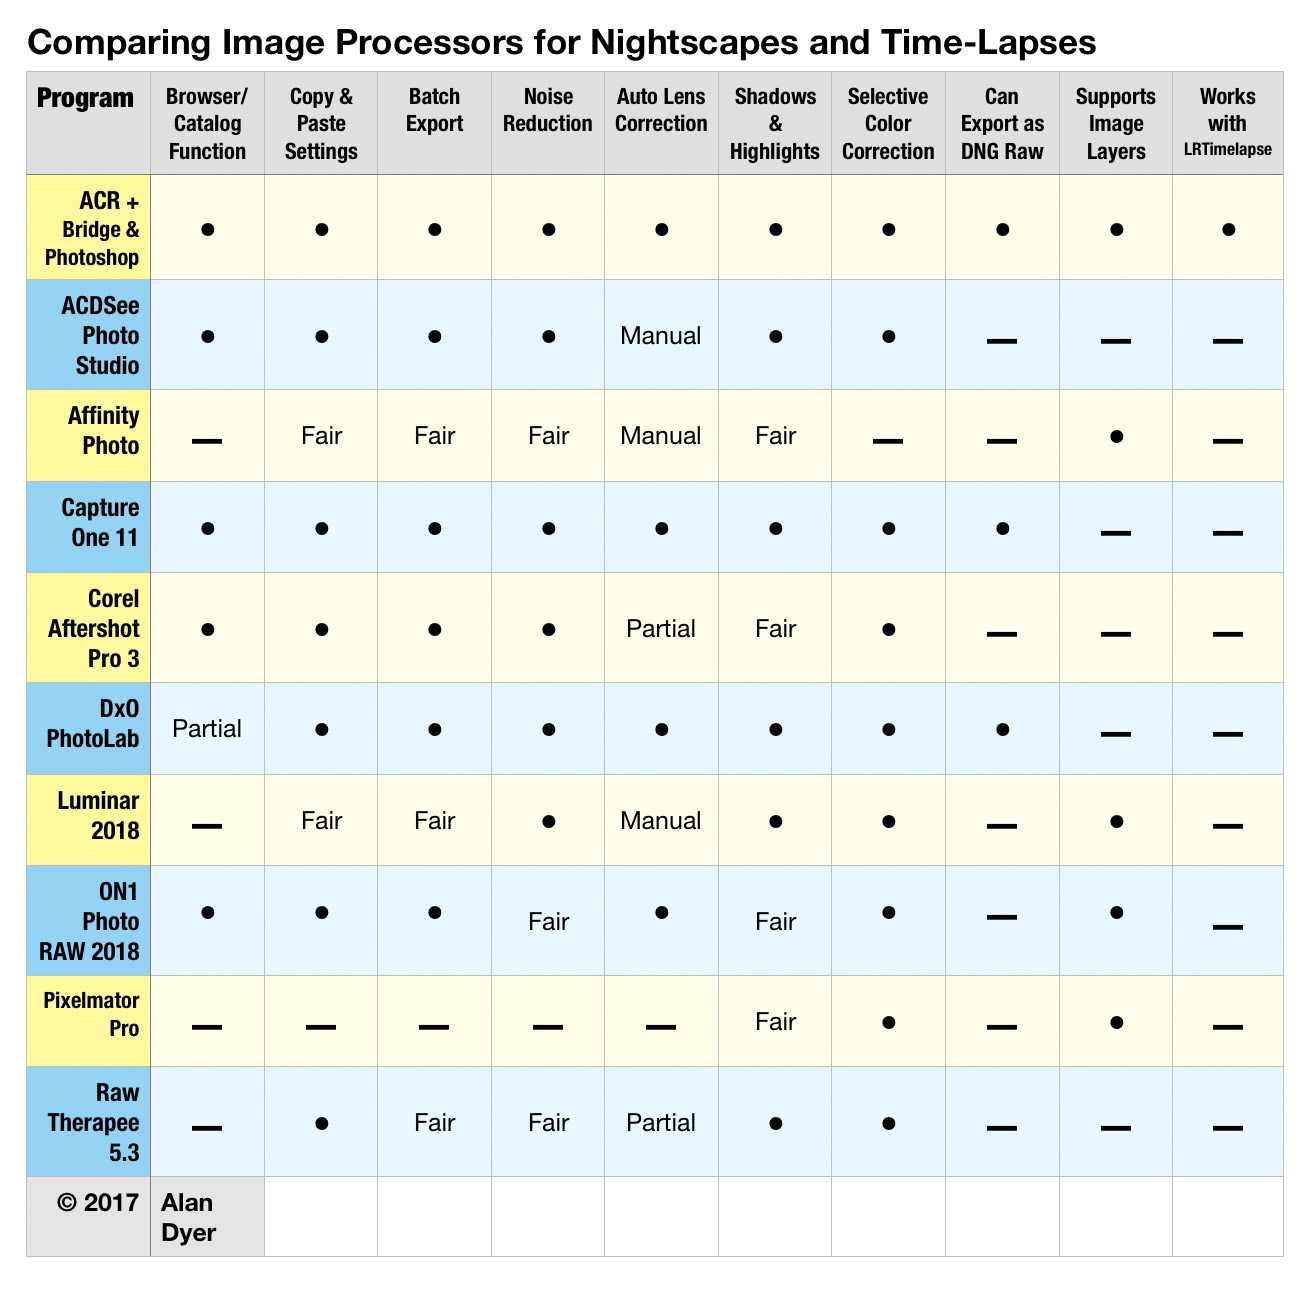
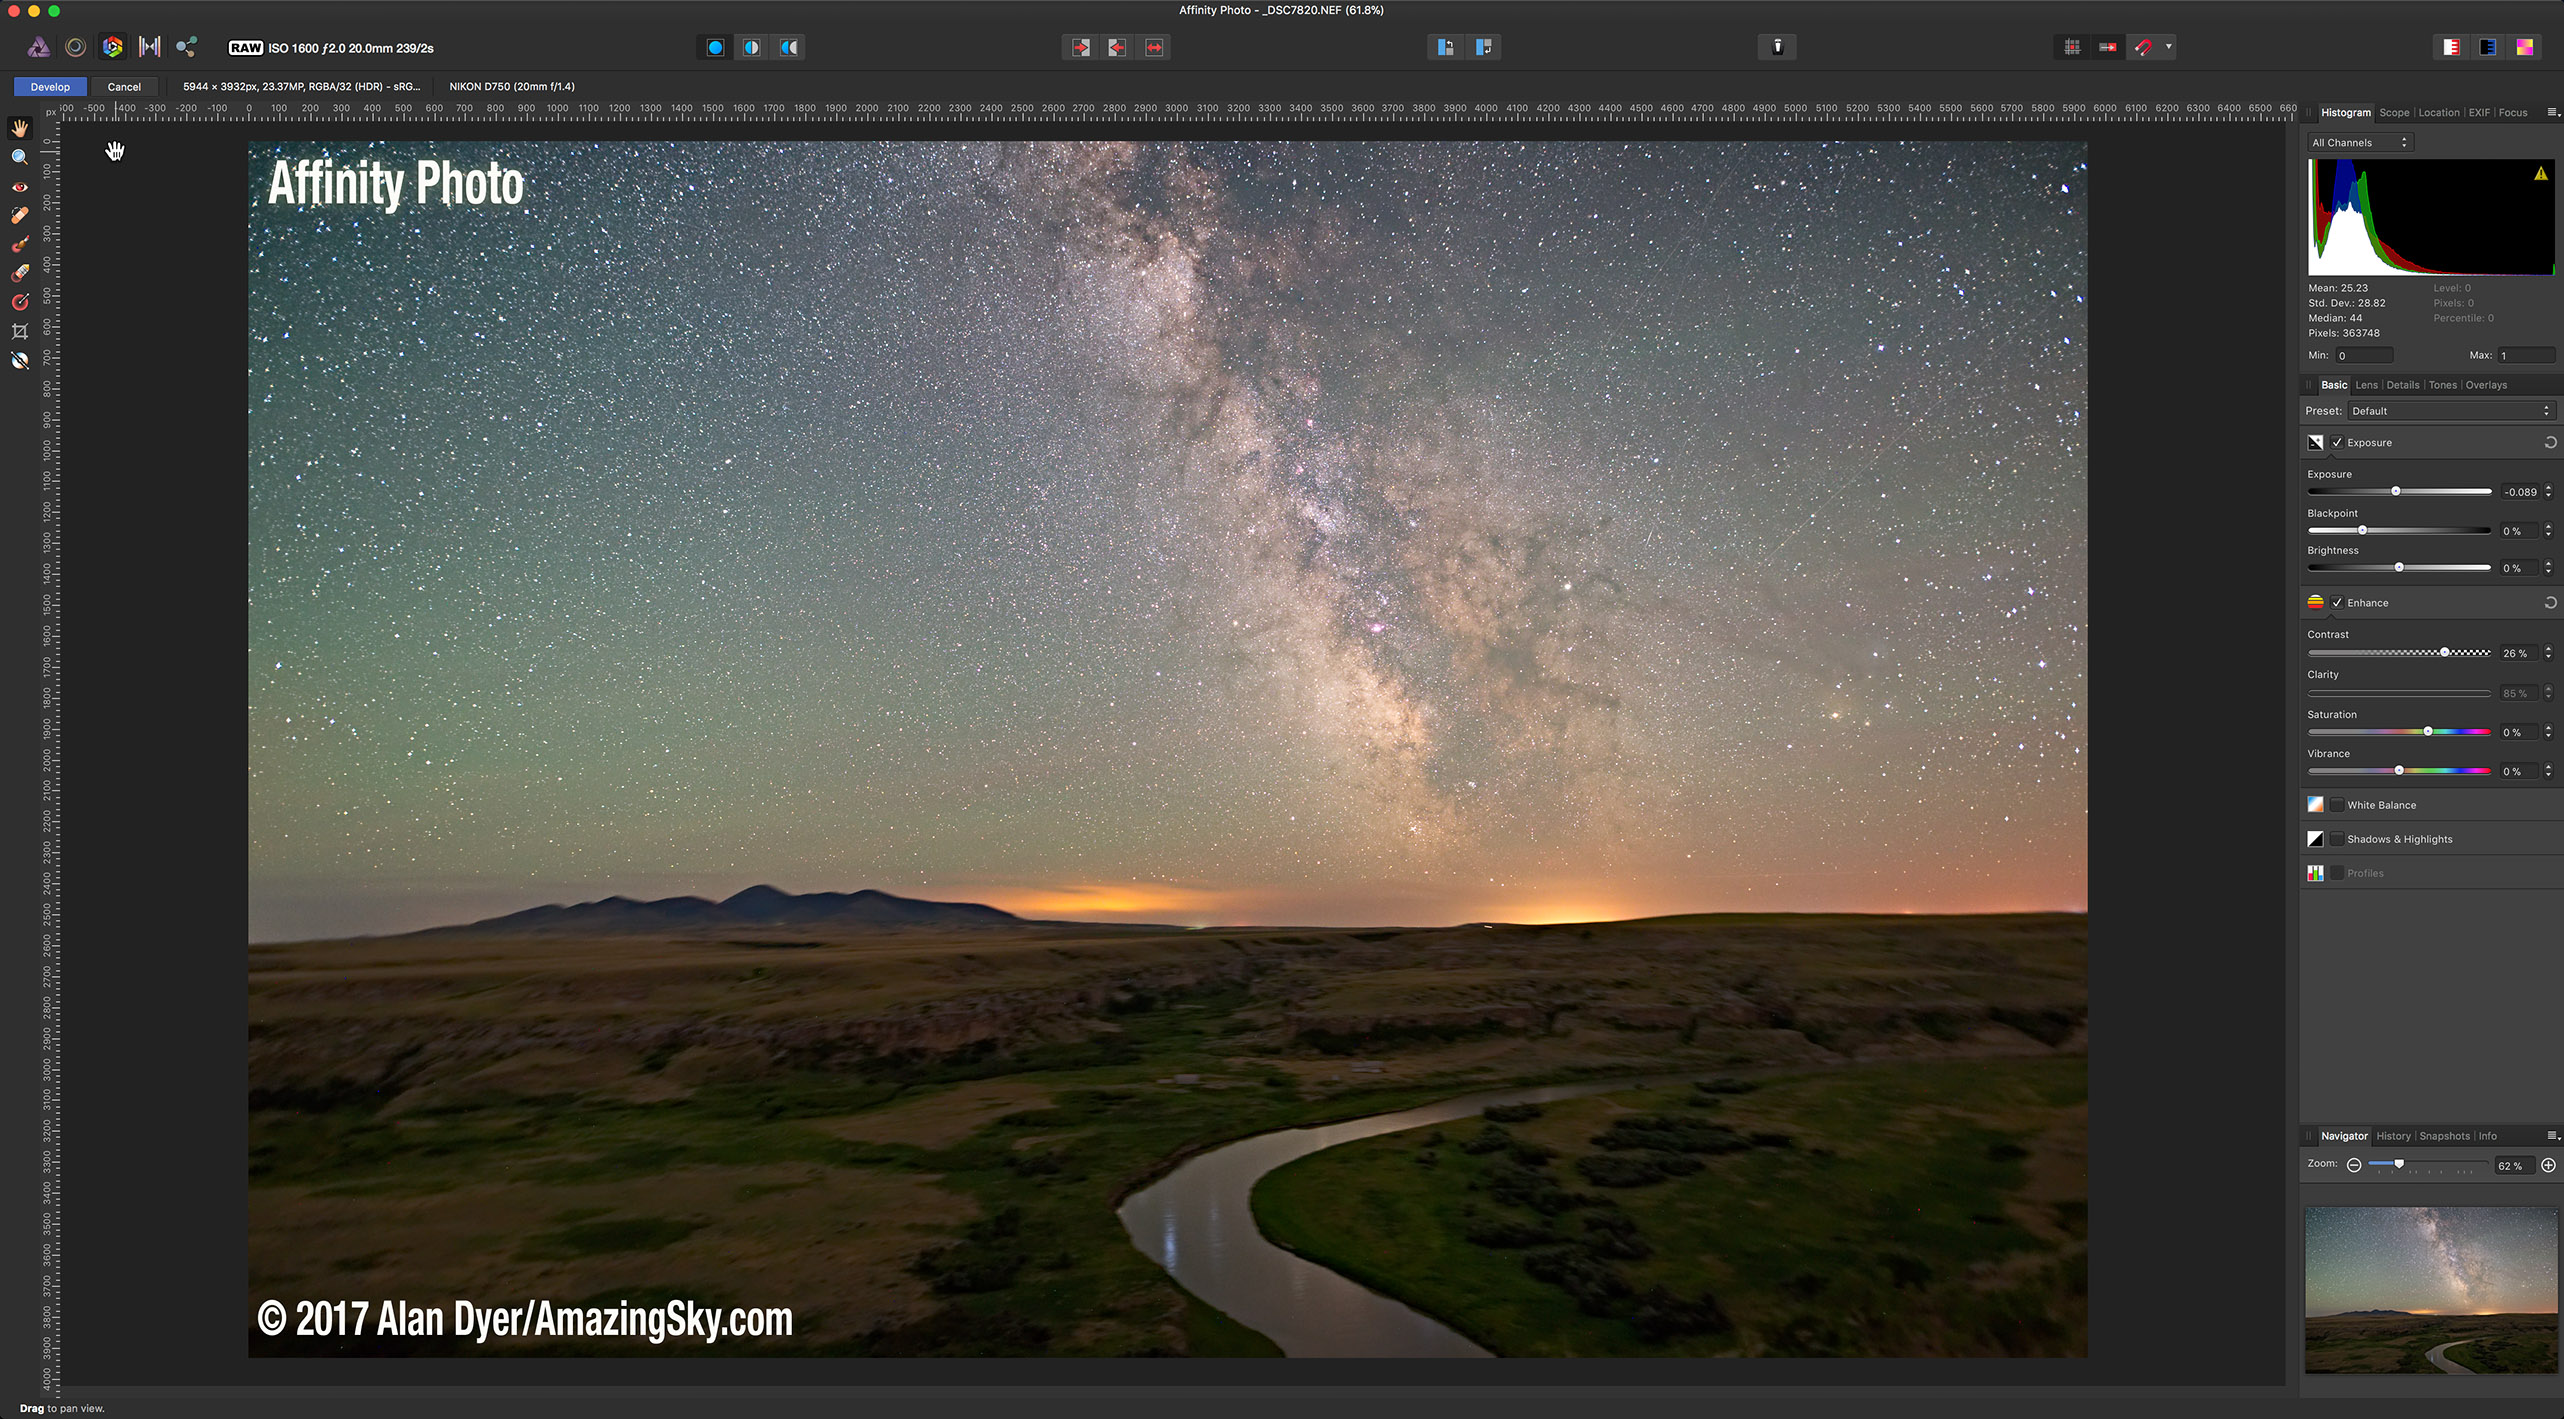
Not all programs allow that. Affinity Photo does not. Luminar doesn’t do it very well. DxO PhotoLab, ON1 Photo RAW, and the free Raw Therapee, among others, all work fine.
HOW TO ASSEMBLE A TIME-LAPSE
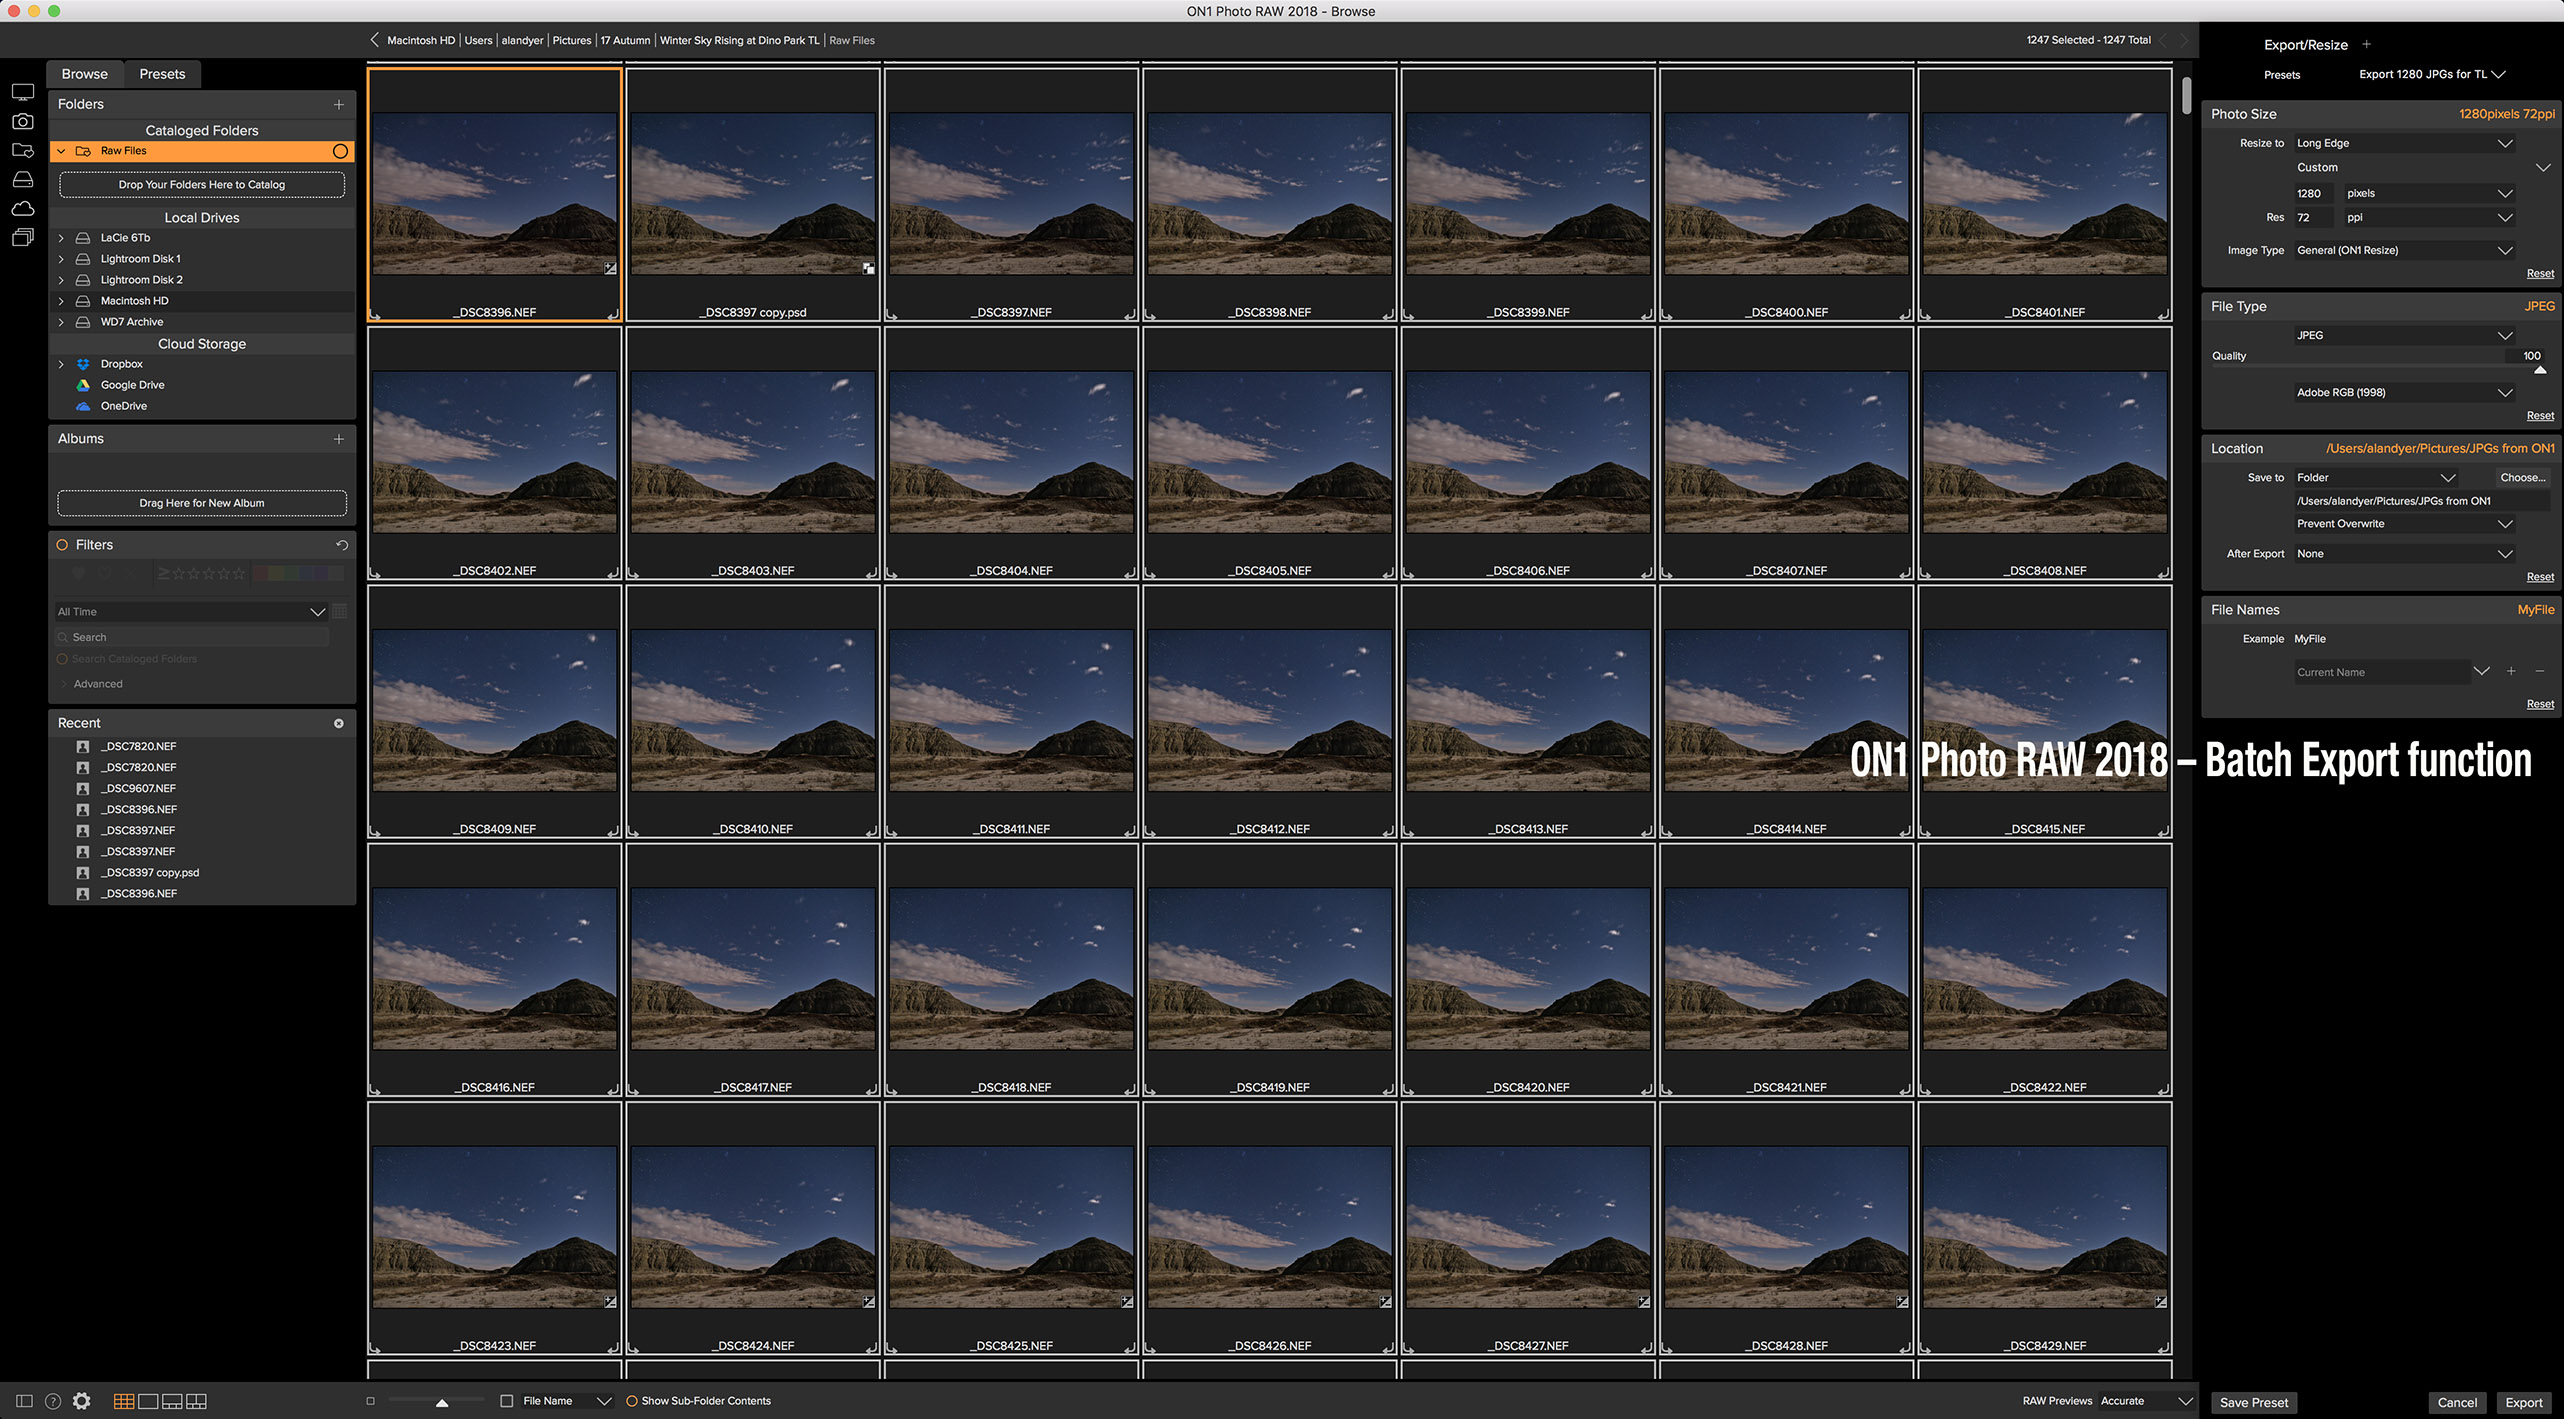
Once you have a set of raws all developed, the usual workflow is to export all those frames out as high-quality JPGs which is what movie assembly programs need. Your raw developing software has to allow batch exporting to JPGs — most do.
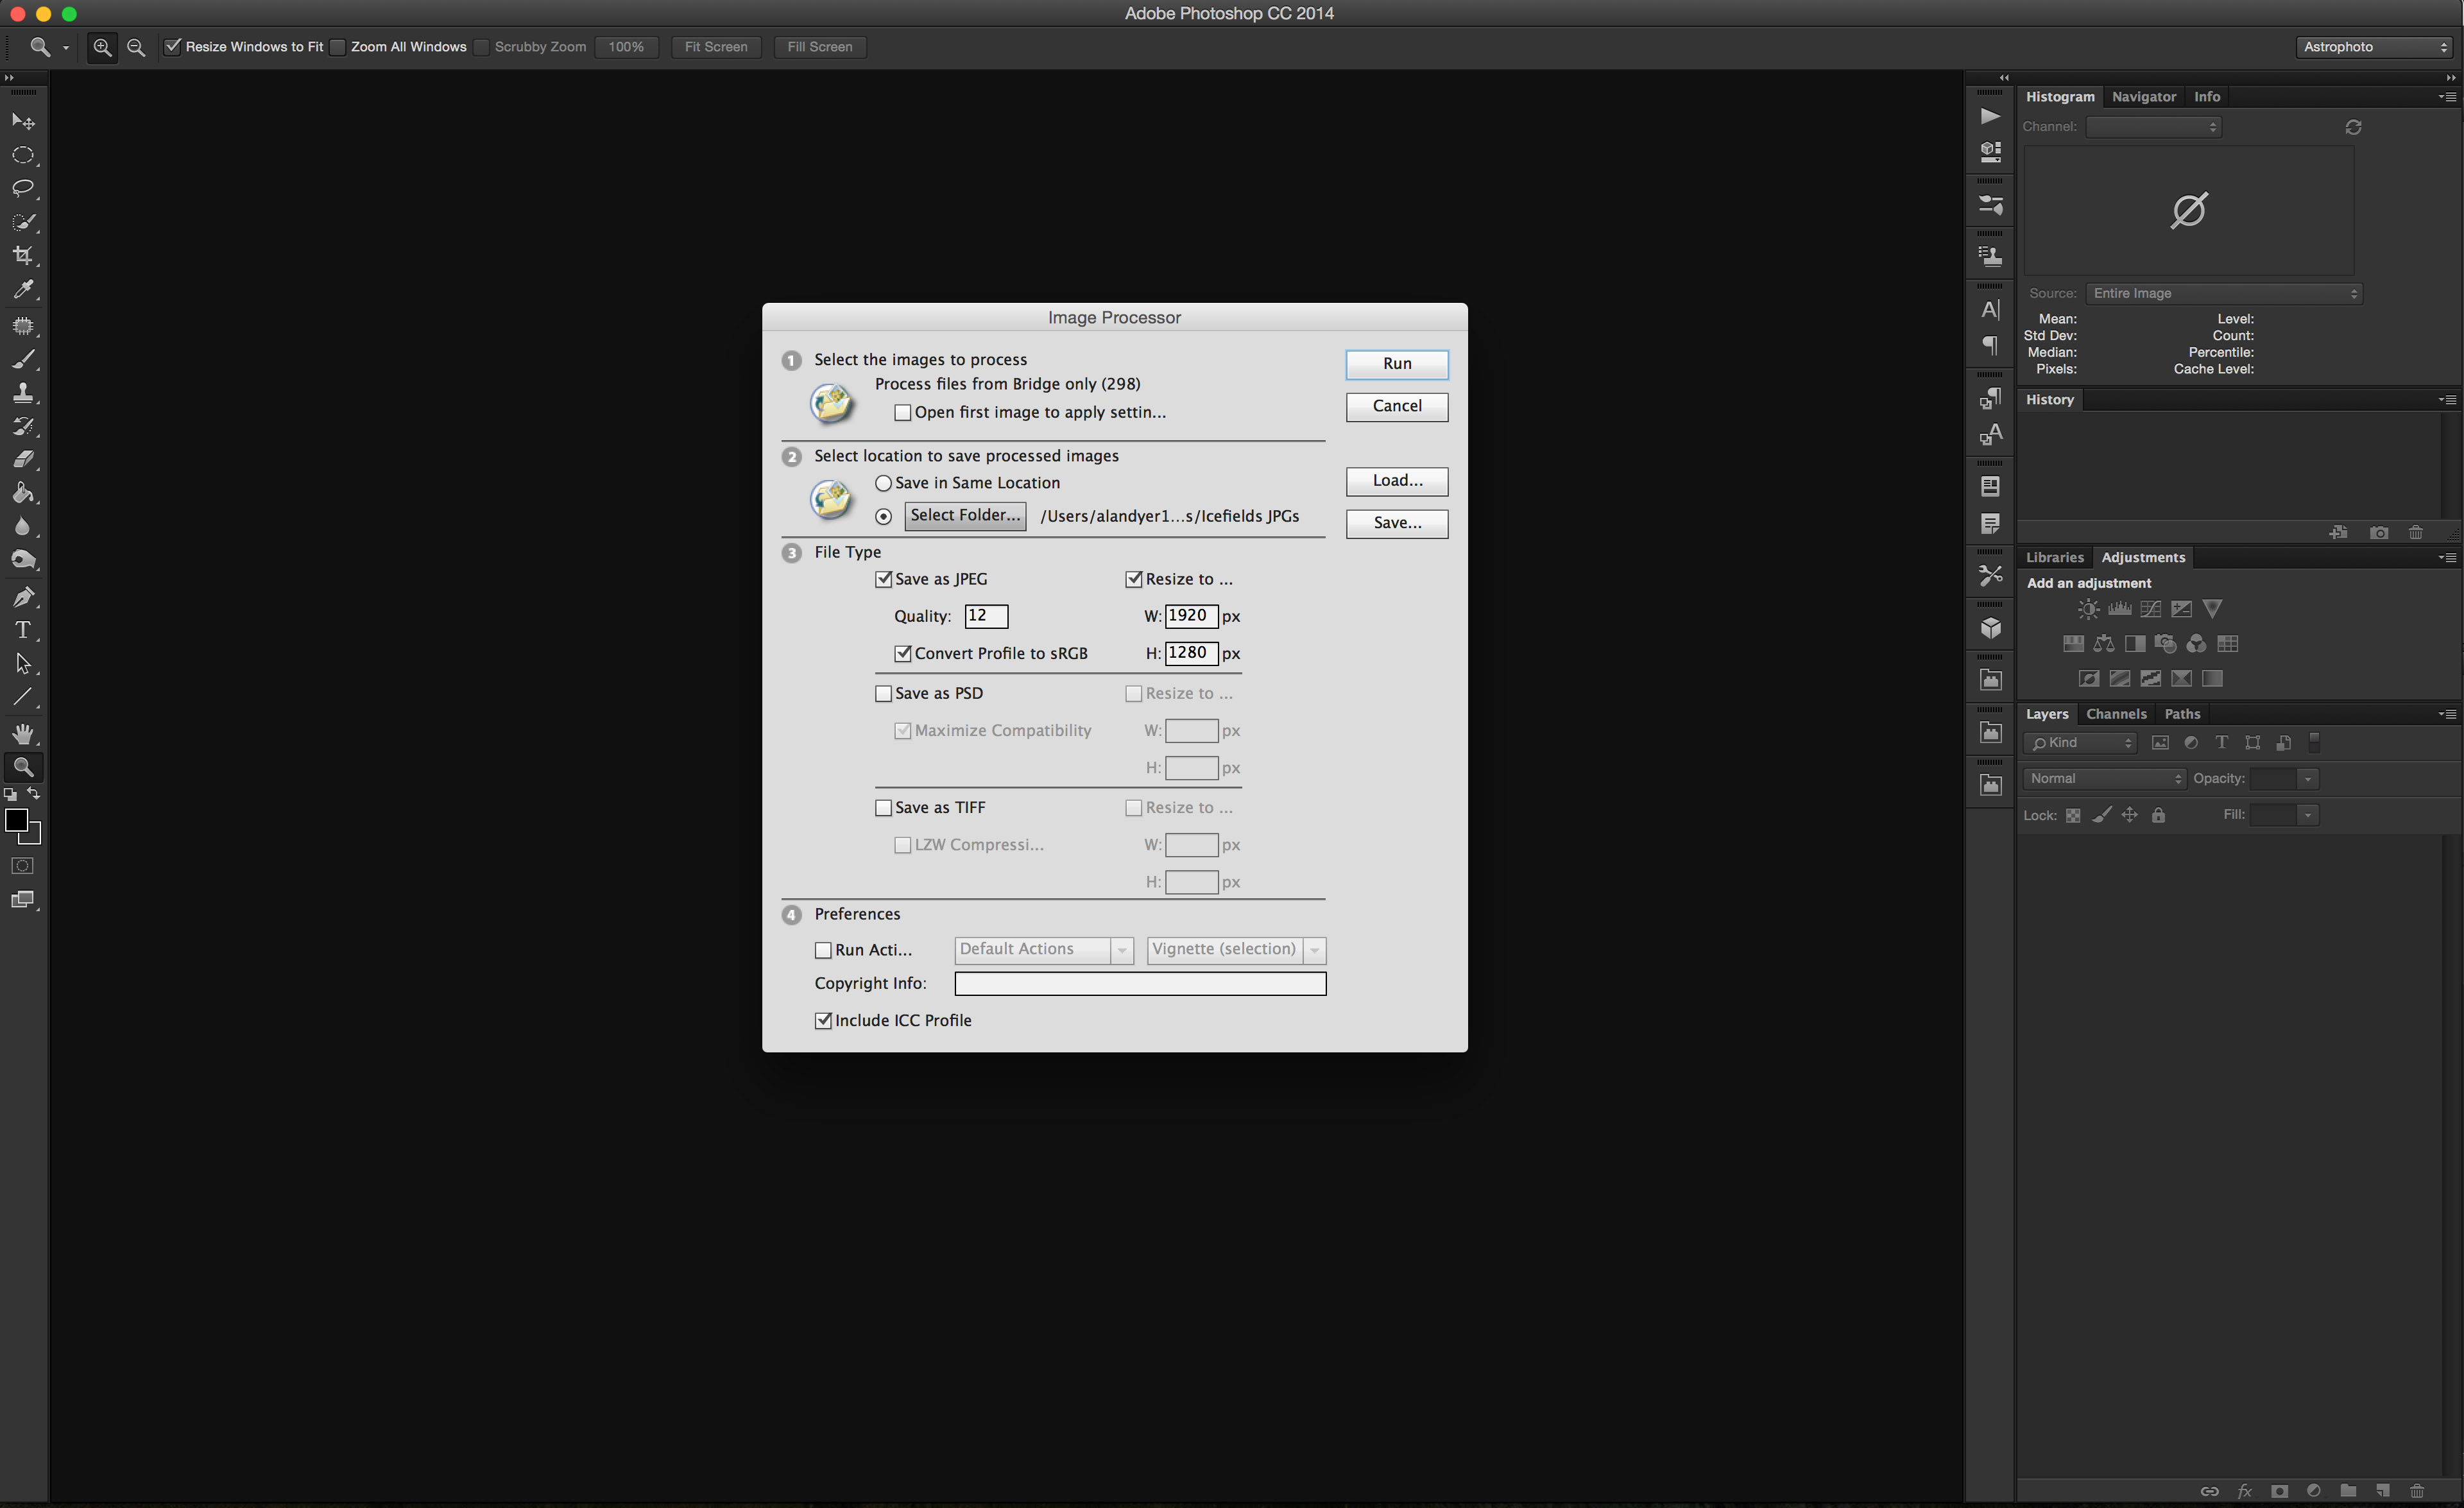
Photoshop Batch Export Raw developers usually have a batch export function. So does Photoshop, via its Image Processor utility, shown here (found under File>Scripts>Image Processor) that can export a folder of raws into JPGs or TIFFs, and re-size them, often needed for final 4K or HD movies.
However, none of the programs above (except Photoshop and Adobe’s After Effects) will create the final movie, whether it be from those JPGs or from the raws.
Assembling JPGs The author’s favourite assembly program is TimeLapse DeFlicker (TLDF). It can turn a folder of JPGs into movies as large as 8K and with ProRes codecs for the highest quality.
So for assembling the intermediate JPGs into a movie, I often use a low-cost program called TLDF (TimeLapse DeFlicker) available for MacOS and Windows (timelapsedeflicker.com). It offers advanced functions such as deflickering (i.e. smoothing slight frame-to-frame brightness fluctuations) and frame blending (useful to smooth aurora motions or to purposely add star trails).
While there are many choices for time-lapse assembly, I suggest using a program dedicated to the task and not, as many do, a movie editing program. For most sequences, the latter makes assembly unnecessarily difficult and harder to set key parameters such as frame rates.
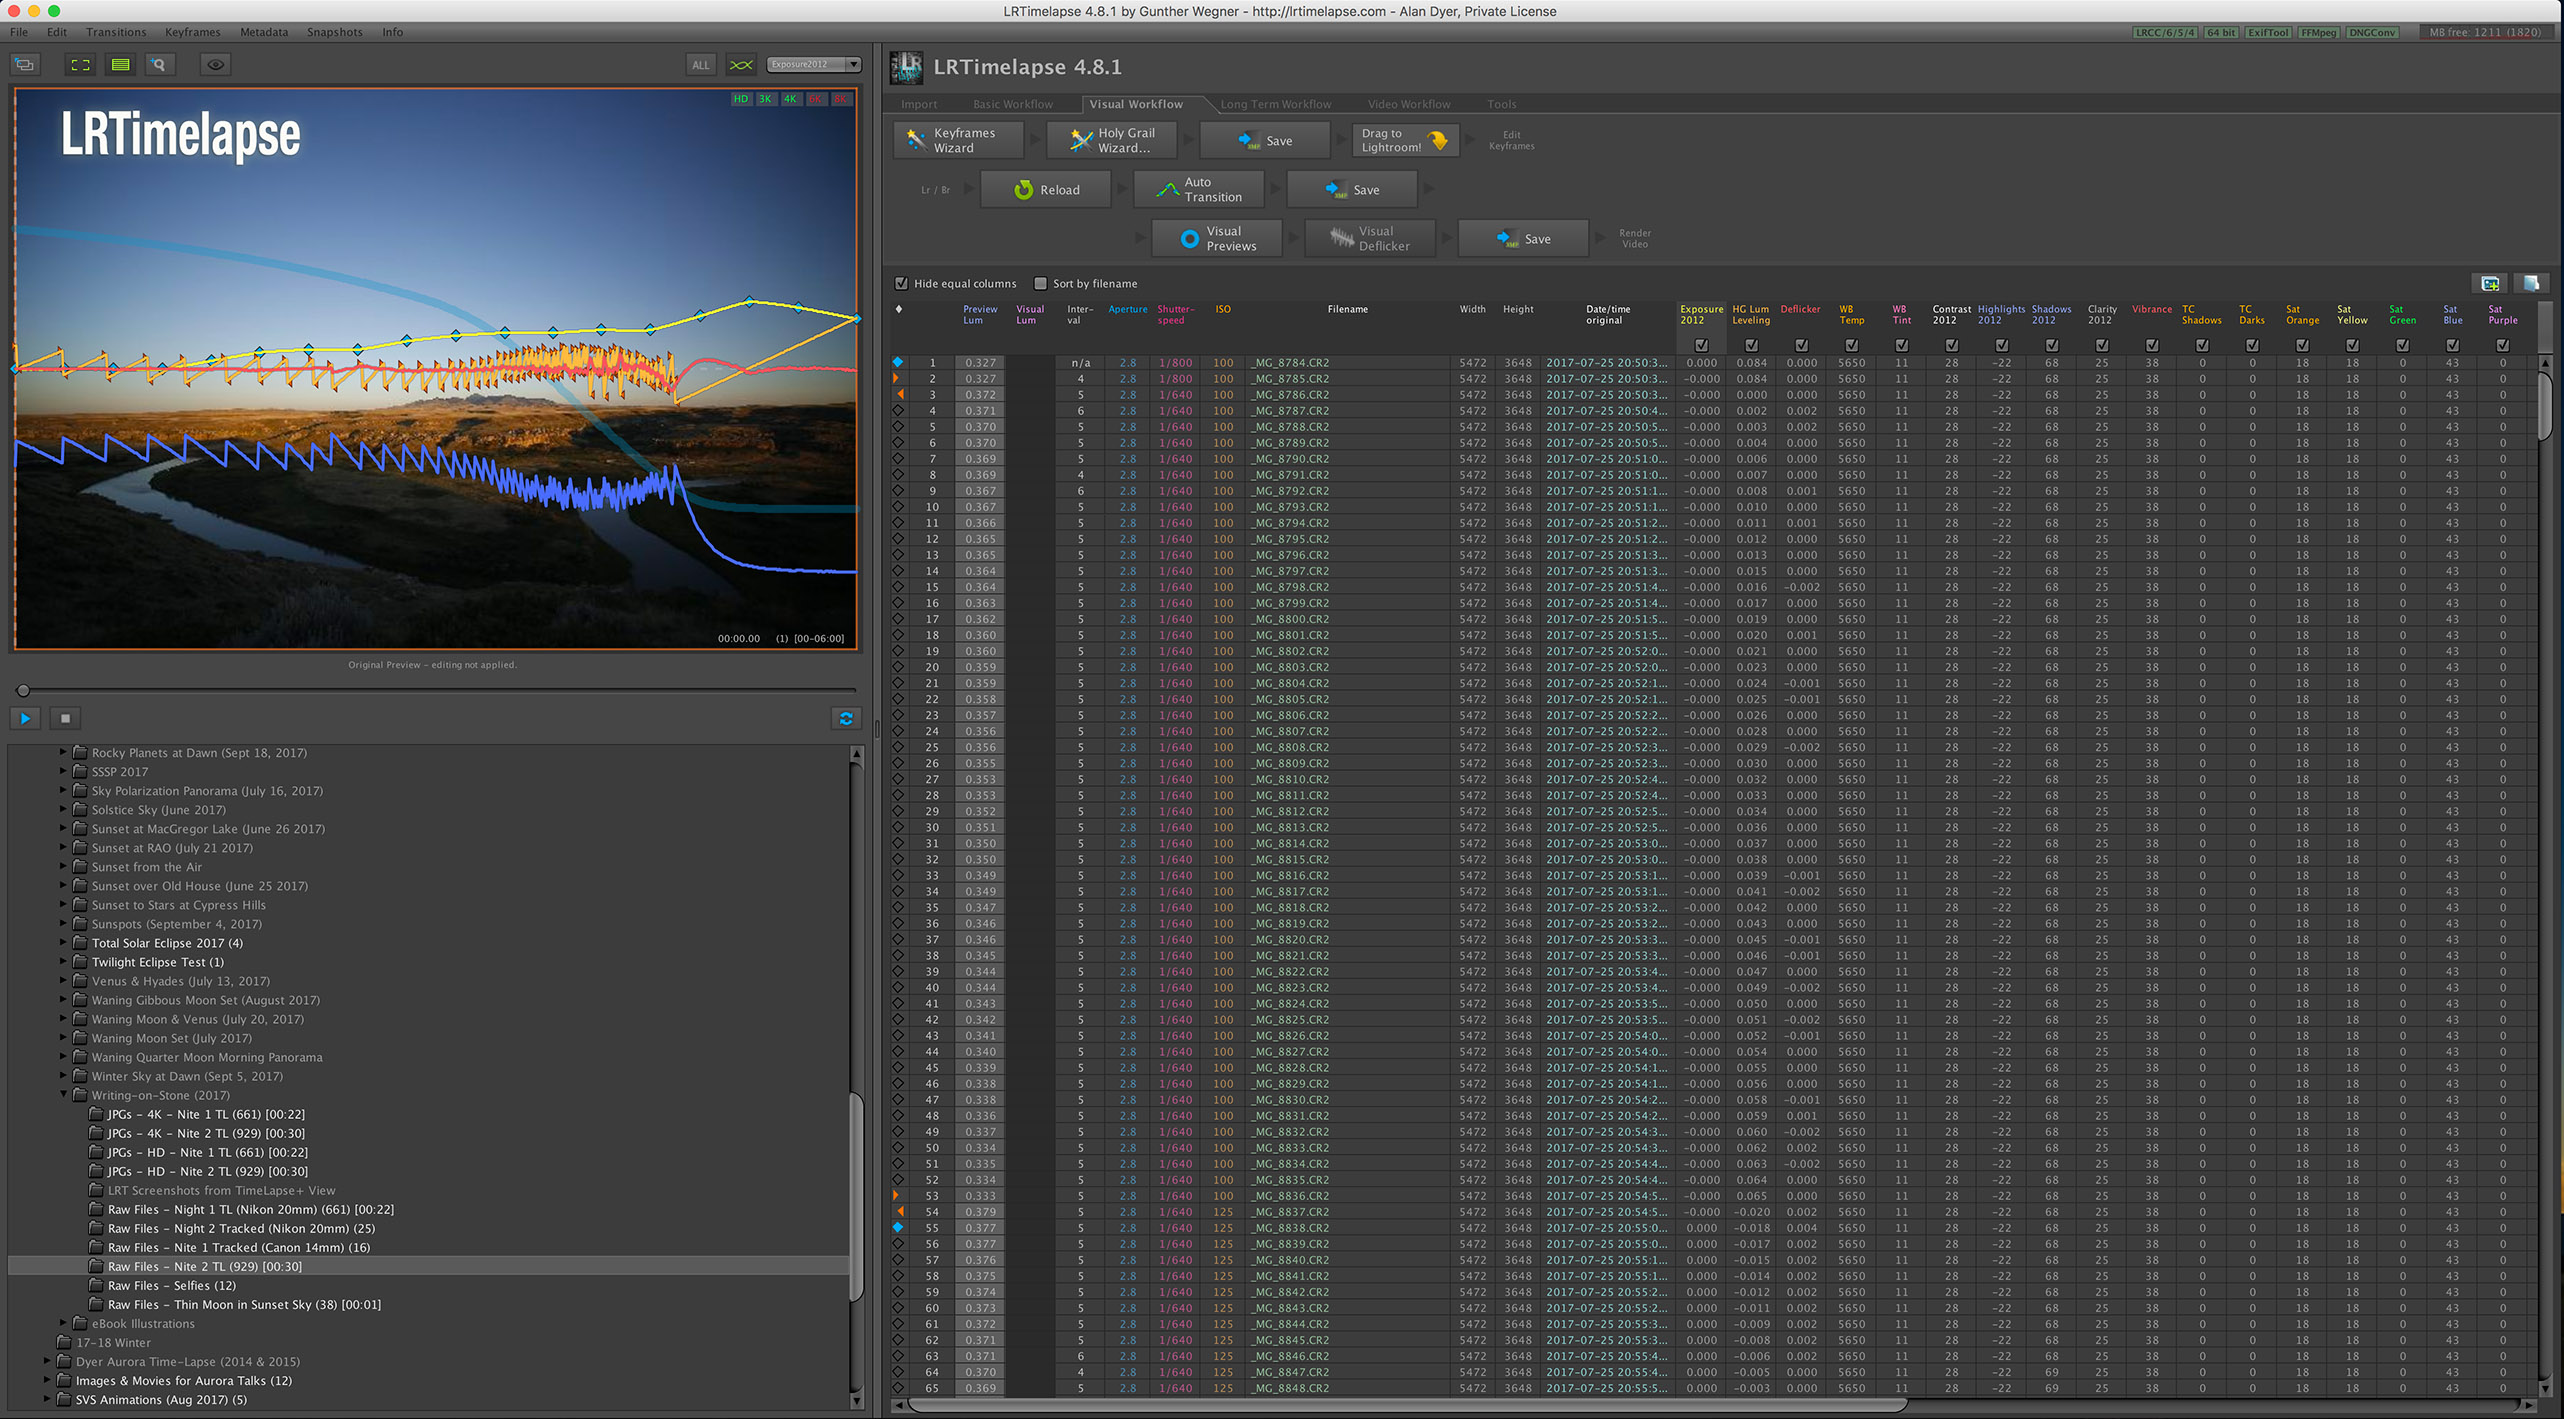
TIP 10 — DO: Try LRTimelapse for more advanced processing
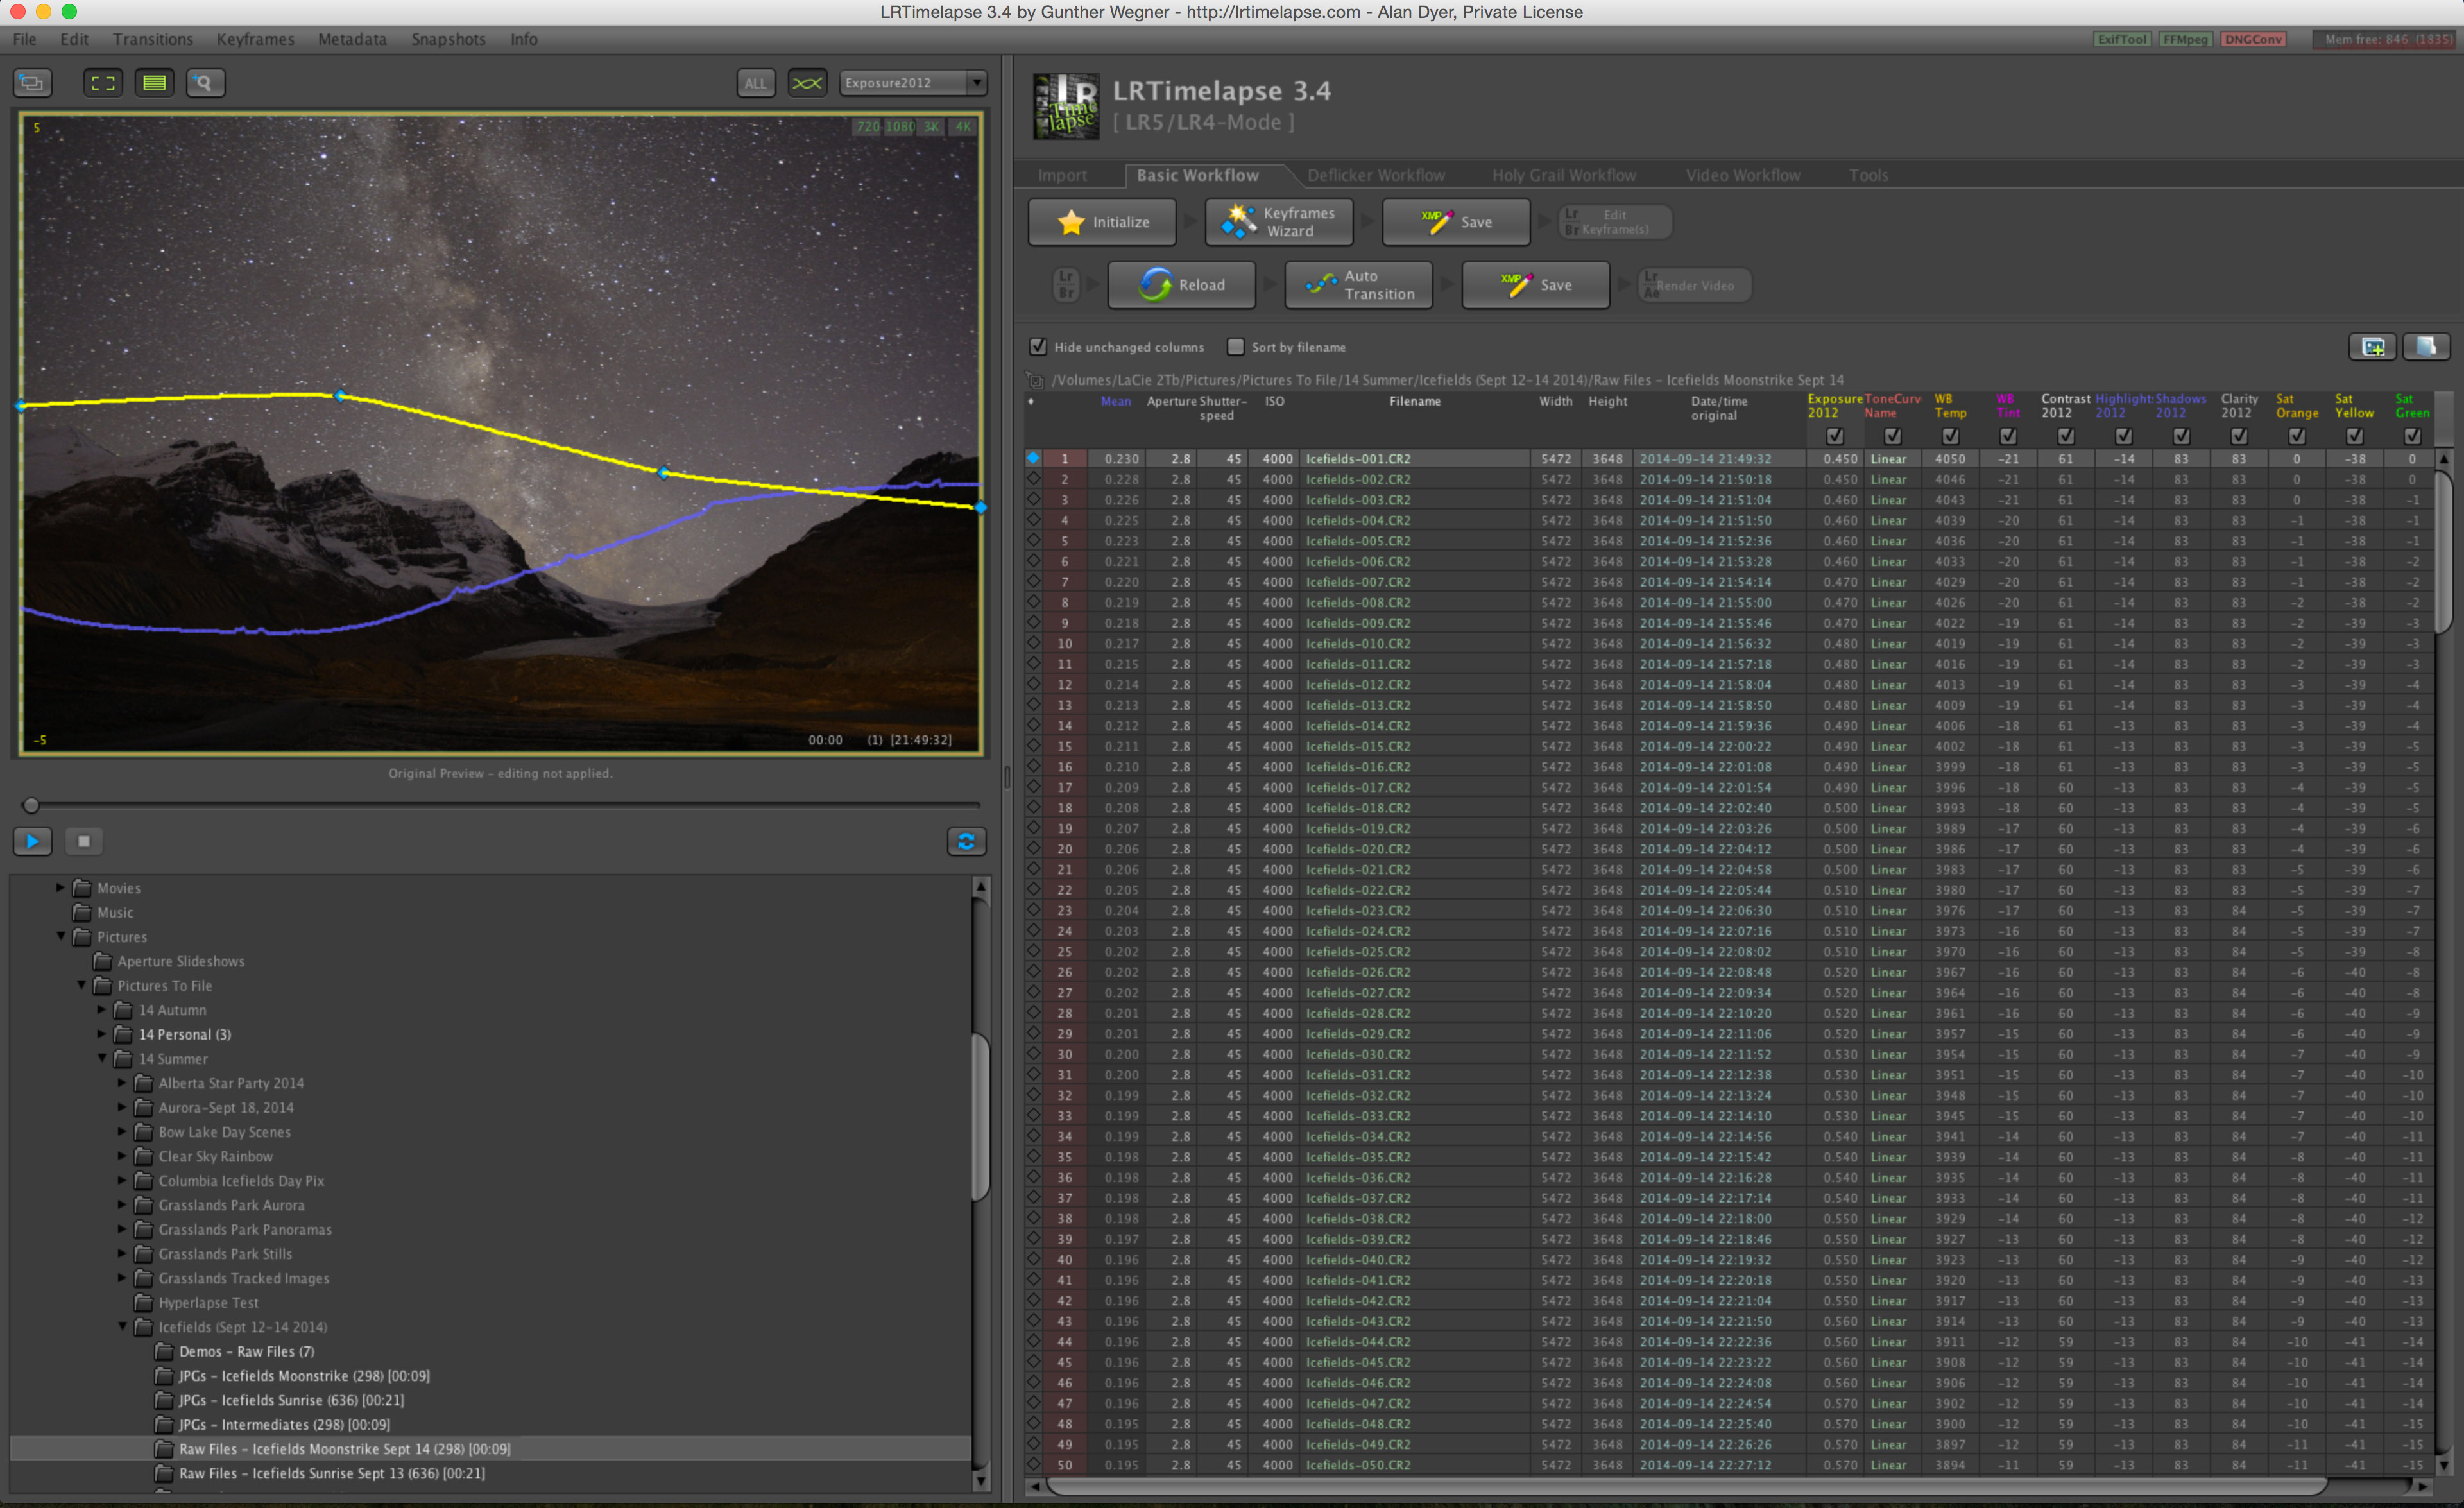
Working on Keyframes The advanced processing program LRTimelapse creates several keyframes through the sequence (seven are shown here in Adobe Bridge) which you develop so each looks its best. During this sequence, the Moon rose changing the lighting toward the end of the shoot (in the last three keyfames).
Get serious about time-lapse shooting and you will want — indeed, you will need — the program LRTimelapse (LRTimelapse.com). A free but limited trial version is available.
This powerful program is for sequences where one setting will not work for all the frames. One size does not fit all.
Instead, LRTimelapse allows you to process a few keyframes throughout a sequence, say at the start, middle, and end. It then interpolates all the settings between those keyframes to automatically process the entire set of images to smooth (or “ramp”) and deflicker the transitions from frame to frame.
LRTimelapse Ramping LRTimelapse reads your developed keyframe data and applies smooth transitions of all settings to each of the raw files between the keyframes. The result is a seamless and smooth final movie. The pink curve shows how the scene brightened at moonrise. The blue diamonds on the yellow line mark the seven keyframes.
This is essential for sequences where the lighting changes during the shoot (say, the Moon rises or sets), and for so-called “holy grails.” Those are advanced sequences that track from daylight or twilight to darkness, or vice versa, over a wide range of camera settings.
However, LRTimelapse works only with Adobe Lightroom or the Adobe Camera Raw/Bridge combination. So for advanced time-lapse work Adobe software is essential.
A Final Bonus Tip
Keep it simple. You might aspire to emulate the advanced sequences you see on the web, where the camera pans and dollies during the movie. I suggest avoiding complex motion control gear at first to concentrate on getting well-exposed time-lapses with just a static camera. That alone is a rewarding achievement.
But before that, first learn to shoot still images successfully. All the settings and skills you need for a great looking still image are needed for a time-lapse. Then move onto capturing the moving sky.
I end with a link to an example music video, shot using the techniques I’ve outlined. Thanks for reading and watching. Clear skies!
The Beauty of the Milky Way from Alan Dyer on Vimeo.
Panoramas featuring the arch of the Milky Way have become the icons of dark sky locations. “Panos” can be easy to shoot, but stitching them together can present challenges. Here are my tips and techniques.
My tutorial complements the much more extensive information I provide in my eBook, at right. Here, I’ll step through techniques for simple to more complex panoramas, dealing first with essential shooting methods, then reviewing the workflows I use for processing and stitching panoramas.
What software works best depends on the number of segments in your panorama, or even on the focal length of the lens you used.
PART 1 — SHOOTING
What Equipment Do You Need?
Nightscape panoramas don’t require any more equipment than what you likely already own for shooting the night sky. For Milky Way scenes you need a fast lens and a solid tripod, but any good DSLR or mirrorless camera will suffice.
Pano Gear A tripod head with a scale marked in degrees is essential. Here it sits on a levelling head with its own bubble level that makes it easy to level the camera. An L-bracket allows the camera to rotate directly above the vertical axis, handy when shooting in portrait mode, as here with a 15mm full-frame fish-eye lens, one option for horizon-to-zenith panoramas. The tripod accessories here are by Acratech.
The tripod head can be either a ball head or a three-axis head, but it should have a horizontal axis marked with a degree scale. This allows you to move the camera at a correct and consistent angle from segment to segment. I think that’s essential.
What you don’t need is a special, and often costly, panorama head. These rotate the camera around the so-called “nodal point” inside the lens, avoiding parallax shifts that can make it difficult to align and stitch adjacent frames. Parallax shift is certainly a concern when shooting interiors or any scenes with prominent content close to the camera. However, in most nightscapes our scene content is far enough away that parallax simply isn’t an issue.
Though not a necessity, I find a levelling base a huge convenience. As I show above, this specialized ball head goes under the usual tripod head and makes it easy to level the main head. It eliminates all the fussing with trial-and-error adjustments of the length of each tripod leg.
On the Level Most cameras now have an electronic level built in that is handy for ensuring the panorama does not end up tilted. This is from a Canon 6D MkII.
Then to level the camera itself, I use the electronic level now in most cameras. Or, if your camera lacks that feature, an accessory bubble level clipped into the camera’s hot shoe will work.
Having the camera level is critical. It can be tipped up, of course, but not tilted left-right. If it isn’t level the whole panorama will be off kilter, requiring excessive straightening and cropping in processing, or the horizon will wave up and down in the final stitch, perhaps causing parts of the scene to go missing.
NOTE: Click or tap on the panorama images to open a high-res version for closer inspection.
Aurora in the Winter Sky To capture this panorama I used a Sigma 14mm lens on a Nikon D750, mounted in portrait orientation with the gear shown above, to shoot eight segments 45° apart, each 13 seconds at f/2 and ISO 3200. Stitching was with Adobe Camera Raw. The aurora lies to the north at left, while Orion and the winter Milky Way are to the south at right.
Shooting Horizon Panoramas
While panoramas spanning the entire sky might be what you are after, I suggest starting simpler, with panos that take in just a portion of the 360° horizon and only a part of the 180° of the sky. These “partial panos” are great for auroras (above) or noctilucent clouds, (below), or for capturing just the core of the Milky Way over a landscape.
The key to all panorama success is overlap. Segments should overlap by 30 to 50 percent, enabling the stitching software to align the segments using the content common to adjacent frames. Contrary to some users, I’ve never found an issue with having too much overlap, where the same content is present on several frames.
Noctilucent Clouds in Summer NLCs are good panorama subjects. I captured this display on June 19, 2019 using a Sony a7III camera at ISO 400, and a Sigma 50mm lens at f/2 for a set of six segments stitched with Adobe Camera Raw
For a practical example, let’s say you shoot with a 24mm lens on a full-frame camera, or a 16mm lens on a cropped-frame camera. Both combinations yield a field of view across the long dimension of the frame of roughly 80°, and across the short dimension of the frame of about 55°.
That means if you shoot with the camera in “landscape” orientation, panning the camera by 40° between segments would provide a generous 50 percent overlap. The left half of each segment will contain the same content as the right half of the previous segment, if you take your panos by turning from left to right.
TIP: My habit is to always shoot from left to right, as that puts the segments in the correct order adjacent to each other when I view them in browser programs such as Lightroom or Adobe Bridge, with images sorted in chronological order (from first to last images in a set) as I typically prefer. But the stitching will work no matter which direction you rotate the camera.
In the example of a 24mm lens and a camera in landscape orientation you could turn at a 45° or 50° spacing and yield enough overlap. However, turning the camera at multiples of 15° is usually the most convenient, as tripod heads are often graduated with markings at 5° increments, and labeled every 15° or 30°.
Some will have coarser and perhaps unlabeled markings. If so, determine what each increment represents, then take care to move the camera consistently by the amount that will provide adequate overlap.
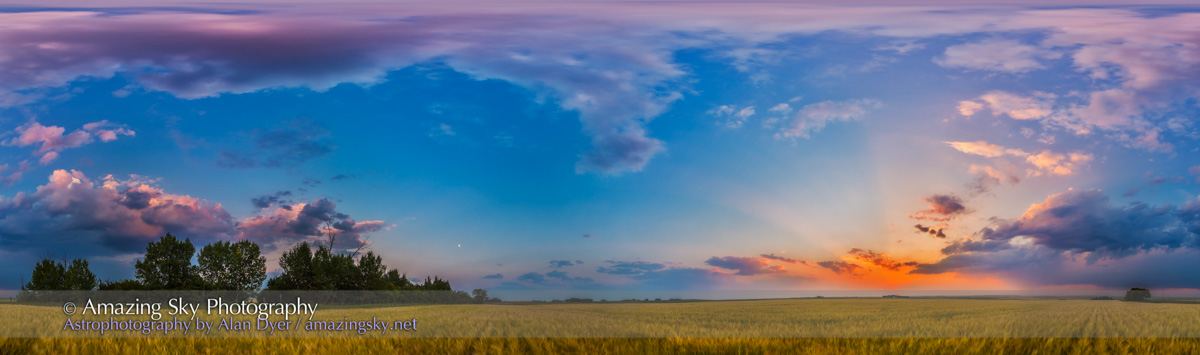
Moonrise over the Red Deer River Not all panoramas have to be of the Milky Way. This captures the sweeping arc of Earth’s blue shadow rising in the eastern sky as the Harvest Moon comes up amid the shadow. This is a 7-section single-tier panorama with the 20mm Sigma lens and Nikon D750 at ISO 100. It stitched fine with Adobe Camera Raw.
To maximize the coverage of the sky while still framing a good amount of foreground, a common practice is to shoot panoramas with the camera in portrait orientation. That provides more vertical but less horizontal coverage for each frame. In that case, for adequate overlap with a 24mm lens and full-frame camera shoot at 30° spacings.
TIP: When shooting a partial panorama, for example just to the south for the Milky Way, or to the north for the aurora borealis, my practice is to always shoot a segment farther to the left and another to the right of the main scene. Shoot more than you need. Those end segments can get distorted when stitching, but if they don’t contain essential content, they can be cropped out with no loss, leaving your main scene clean and undistorted.
Shooting with a longer lens, such as a 50mm (or 35mm on a cropped frame camera), will yield higher resolution in the final panorama, but you will have much less sky coverage, unless you shoot multiple tiers, as I describe below. You would also have to shoot more segments, at 15° to 20° spacings, taking longer to complete the shoot.
Morant’s Curve in the Moonlight Not all panoramas have to be shot under dark skies, or encompass 360°. Moonlight illuminates the famous viewpoint called Morant’s Curve in Banff National Park, with Orion setting over the peaks of the Continental Divide, as a train speeds east through the March night. This is a panorama of 12 segments, each with a 24mm Sigma lens and Nikon D750 in portrait orientation, stitched with PTGui.
As the number of segments goes up shooting fast becomes more important, to minimize how much the sky moves from segment to segment, and during each exposure itself, to aid in stitching. Remember, the sky appears to be turning from east to west, but the ground isn’t. So a prolonged shoot can cause problems later as the stitching software tries to align on either the fixed ground or the moving stars.
Panoramas on moonlit nights, as I show above, are relatively easy because exposures are short.
Milky Way over the Buffalo Jump A moonless night in early May was perfect for a panorama of the Milky Way arching over the Badlands of Dry Island Buffalo Jump in Alberta. This is a multi-tier panorama of 3 tiers of 7 segments each, with exposures of 30 seconds at f/2 with a 20mm Sigma Art lens and Nikon D750 at ISO 6400.
Milky Way panoramas taken on dark, moonless nights are tougher. They require fast apertures (f/2 to f/2.8) and high ISOs (ISO 3200 to 6400), to keep individual exposures no more than 30 to 40 seconds long.
Expose to the Right Minimize noise in the shadows by exposing so the histogram is shifted to the right, and not slammed to the left. Underexposure is the most common cardinal sin of newbie nightscape photographers.
Noise lives in the dark foregrounds, so I find it best to err on the side of overexposure, to ensure adequate exposure for the ground, even if it means the sky is bright and the stars slightly trailed. It’s the “Expose to the Right” philosophy I espouse at length in my eBook.
Advanced users can try shooting in two passes: one at a low ISO and with a long exposure for the fixed ground, and another pass at a higher ISO and a shorter exposure for the moving sky. But assembling such a set will take some deft work in Photoshop to align and mask the two stitched panos. None of the examples here are “double exposures.”
Shooting 360° Panoramas
Milky Way at Waterton Lakes While covering 360° in azimuth, this panorama from July 2018 goes only partway up the sky, to capture the Milky Way core to the south and the solstice twilight glow to the north. This is a 10-segment panorama, with each segment 30 seconds at f/2 with a Sigma 24mm Art lens and Nikon D750 at ISO 6400. Adobe Camera Raw stitched this nicely.
More demanding than partial panoramas are full 360° panoramas, as above. Here I find it is best to start the sequence with the camera aimed toward the celestial pole (to the north in the northern hemisphere, or to the south in the southern hemisphere). That places the area of sky that moves the least over time at the two ends of the panorama, again making it easier for software to align segments, with the two ends taken farthest apart in time meeting up in space.
In our 24mm lens example, to cover the entire 360° scene shooting with a 45° spacing would require at least eight images (8 x 45 = 360). I used 10 above. Using that same lens with the camera in portrait orientation will require at least 12 segments to cover the entire 360° landscape.
Shooting 360° by 180° Panoramas
Capturing STEVE This 360° panorama captures the infamous STEVE auroral arc across the south, with a normal auroral display to the north at right. This was from six segments, each 10 seconds at ISO 2500, with a Sigma 14mm lens at f/1.8 and Nikon D750 in portrait orientation.
More demanding still are 360° panoramas that encompass the entire sky, from the ground below the horizon to the zenith overhead. Above is an example.
To do that with a single row of images requires shooting in portrait orientation with a very wide 14mm rectilinear lens on a full-frame camera. That combination has a field of view of about 100° across the long dimension of the sensor.
That sounds generous, but reaching up to the zenith at an altitude of 90° means only a small portion of the landscape will be included along the bottom of the frame.
To provide an even wider field of view to take in more ground, I use full-frame fish-eye lenses on my full-frame cameras, such as Canon’s old 15mm lens (as shown at top) or Rokinon’s 12mm. Even a circular-format fish-eye will work, such as an 8mm on a full-frame camera or 4.5mm on a cropped-frame camera.
All such fish-eye lenses produce curved horizons, but they take in a wide swath of sky, making it possible to include lots of foreground while reaching well past the zenith. Conventional panorama assembly programs won’t work with such wide and distorted segments, but the specialized programs described below will.
Shooting Multi-Tier Panoramas
Bow Lake by Night The summer Milky Way arches over iconic Bow Lake in Banff on a perfect night in July 2018. This is a stitch, using PTGui, of three tiers of 7 segments each, with a 20mm Sigma lens and Nikon D750, with a Genie Mini automating the horizontal panning and shutter release, as shown above. Each frame was 30 seconds at f/2 and ISO 6400. I used this same set to test the programs described below.
The alternative technique for “all-sky” panos is to shoot multiple tiers of images: first, a lower row covering the ground and partway up the sky, followed by an upper row completing the coverage of just the sky at top.
The trick is to ensure adequate overlap both horizontally and vertically. With the camera in landscape orientation that will require a 20mm lens for full-frame cameras, or a 14mm lens for cropped-frame cameras. Either combination can cover the entire sky plus lots of foreground in two tiers, though I usually shoot three, just to be sure!.
Shooting with longer lenses provides incredible resolution for billboard-sized “gigapan” blow-ups, but will require shooting three, if not more, tiers, each with many segments. That starts to become a chore to do manually. Some motorized assistance really helps when shooting multi-tier panoramas.
Automating the Pan Shooting
The dedicated pano shooter might want to look at a device such as the GigaPan Epic models or the iOptron iPano, (shown below), all about $800 to $1000.
iPano Panorama Machine The iOptron iPano automates all shooting and movement, making even the most complex panoramas easy to shoot. It can also be used for two-axis motion-control time-lapses.
I’ve tested the latter and it works great. You program in the lens, overlap, and angular sweep desired. The iPano works out how many segments and tiers will be required, and automates the shooting, firing the shutter for the duration you program, then moving to the new position, firing again, and so on. I’ve shot four-tier panos effortlessly and with great success.
iPano Control The iPano’s on-board screen provides all the menus and options for setting up a shoot. This screen shows that this multi-tier pano will take 6m37s to complete.
However, these devices are generally bigger and heavier than I care to heft around in the field.
Instead, I use the original Genie Mini from SYRP, (below), a $250 device primarily for shooting motion control time-lapses. But the wireless app that programs the Genie also has a panorama function that automatically slews the camera horizontally between exposures, again based on the lens, overlap, and angular sweep you enter. The just-introduced Genie Mini II is similar, but with even more capabilities for camera control.
The SYRP Genie Mini A lower-cost option for automated shooting, the Genie Mini also provides time-lapse motion control. Here, I show it with a conventional 3-axis head on top, for shifting the camera up in altitude manually for multi-tier panos, while the Mini handles the horizontal motion and exposures.
While combining two Genie Minis allows programming in a vertical motion as well, I’ve been using just a regular tripod head atop the Mini to manually move the camera vertically between each of the horizontal tiers. I don’t feel the one or two moves needed to go from tier to tier too arduous to do manually, and I like to keep my field gear compact and easy to use.
Wireless Control The original Genie App (Apple iOS or Android) connects to the Genie via Bluetooth. This screen shows a 360° panorama programmed for a 20mm lens with 37% percent overlap, requiring eight segments. The shutter will fire after each move for 40 seconds.
The Genie Mini (now replaced by the Mini II) works great and I highly recommend it, even if panoramas are your only interest. But it is also one of the best, yet most affordable, single-axis motion control devices on the market for time-lapse work.
When to Shoot the Milky Way
While the right gear and techniques are important, go out on the wrong night and you won’t be able to capture the Milky Way as the great sweeping arch you might have hoped for.
In the northern hemisphere the Milky Way arches directly overhead from late July to October for most of the night. That’s fine for spherical fish-eye panoramas, but in rectangular images when the Milky Way is overhead it gets stretched and distorted across the top of the final panorama. For example, in the Bow Lake by Night panorama above, I cropped out most of this distorted content.
Capturing the Arch I captured this 360° pano of the summer Milky Way arching over the sandstone formations of Writing-on-Stone Provincial Park in southern Alberta in early June 2018. At that time of year the Milky Way is still confined to the eastern sky. This is a 21-panel panorama, shot in three tiers of seven panels each, with the Nikon D750 and Sigma 20mm Art lens on the Genie Mini, with each segment 30 seconds at f/2 and ISO 6400.
The prime season for Milky Way arches is therefore before the Milky Way climbs overhead, while it is still across the eastern sky, as above. That’s on moonless nights from March to early July, with May and June best for catching it in the evening, and not having to wait up until dawn, as is the case in early spring.
Simulating the Scene I often use Starry Night™ (shown here) to simulate the sky for the place and date I want, to preview where and when the Milky Way will appear and how it will move. The red box shows the field of view of a rectilinear 14mm lens in portrait orientation, showing it covering from the zenith (at top) to just below the horizon.
TIP: The best way to figure out when and where the Milky Way will appear is to use a desktop planetarium program such as Starry Night or Sky Safari or the free Stellarium. All can realistically depict the Milky Way for your location and date. You can then step through time to see how the Milky Way will move through the night, and how it will frame with your camera and lens combination using the “field of view” indicators the programs provide.
The Great Southern Sky A 360° panorama from April 2017 captures the arc of the southern Milky Way over the OzSky star party near Coonabarabran, NSW, Australia. This is 8 segments, each 30 seconds at ISO 6400 and f/2.5 with a Rokinon 14mm lens on a Canon 6D in portrait orientation, and stitched with PTGui.
When shooting in the southern hemisphere I like the April to June period for catching the sweep of the southern Milky Way and the galactic core rising in late evening. By contrast, during mid austral winter in July and August the galactic centre shines directly overhead in the evening, a spectacular sight to be sure, but tough to capture in a panorama except in a spherical or fish-eye scene.
The Other Milky Way This 360° panorama, shot in a single tier with a 14mm Sigma lens and Nikon D750 in portrait orientation, captures the winter Milky Way arching across the western sky on an early spring night at Dinosaur Provincial Park in Alberta. Also in the pano is the sweep of the faint Zodiacal Light. This is a stitch, using PTGui, of 12 segments, each 30 seconds at f/2.8 and ISO 4000.
That said, I always like to put in a good word for the often sadly neglected winter Milky Way (the summer Milky Way for those “down under”). While lacking the spectacle of the galactic core in Sagittarius, the “other” Milky Way has its attractions such as Orion and Taurus. The best months for a panorama with that Milky Way in an arch across a rectangular frame are January to March. The Zodiacal Light can be a bonus at that season, as it was above.
TIP: Always shoot raw files for the widest dynamic range and flexibility in recovering details in the highlights and shadows. Even so, each segment has to be well exposed and focused out in the field.
And unless you are doing a “two-pass” double exposure, always shoot each segment with identical exposure settings. This is especially critical for bright sky scenes such twilights or moonlit scenes. Vary the exposure and you might get unsightly banding at the seams.
There’s nothing worse than getting home only to find one or more segments was missed, or was out of focus or badly exposed, spoiling the set.
PART 2 — STITCHING
Developing Panorama Segments
Once you have your panorama segments, the next step is to develop and assemble them. For my workflow, the process of assembling a panorama from its constituent segments begins with developing each of those segments identically.
NOTE: Click or tap on the software screen shots to open a high-res version for closer inspection.
Developing with Adobe Camera Raw This shows one segment of the multi-tier example before (on the left) and after applying development settings in the Basic panel of Adobe Camera Raw. By selecting all the images, the Sync Settings command (at top left) will apply the settings of one image to the rest of the set.
I like to develop each segment’s raw file as fully as possible at this first stage in the workflow, applying noise reduction, colour correction, contrast adjustments, shadow and highlight recovery, and any special settings such as dehaze and clarity that can make the Milky Way pop.
I also apply lens corrections to each raw image. While some feel doing so produces problems with stitching later on, I’ve never found that. I prefer to have each frame with minimal vignetting and distortion when going into stitching. I use Adobe Camera Raw out of Adobe Bridge, but Lightroom Classic has identical functions.
There are several other raw developers that can work well at this stage. In other tests I’ve conducted, Capture One and DxO PhotoLab stand out as producing good results on nightscapes. See my blog from 2017 for more on software choices.
Developing with DxO Among a host of programs competing with Adobe, DxO PhotoLab does a good job developing raw files, with the ability to copy and paste settings from one image to many. It has excellent noise reduction and shadow detail recovery. However, it cannot layer images.
The key is developing each raw file identically, usually by working on one segment, then copying and pasting its settings to all the others in a set. Not all raw developers have this “Copy Settings” function. For example, Affinity Photo does not. It works very well as a layer-based editor to replace Photoshop, but is crude in its raw developing “Persona” functions.
While panorama stitching software will apply corrections to smooth out image-to-image variations, I find it is best to ensure all the segments look as similar as possible at the raw stage for brightness, contrast, and colour correction.
Do be aware that among social media groups and chat rooms devoted to nightscape imaging a lot of myth and misinformation abounds about how to process and stitch panoramas, and why some don’t work. Someone having a problem with a particular pano will ask why, and get ten different answers from well-meaning helpers, most of them wrong!
Stitching Simple Panoramas
For example, if your segments don’t join well it likely isn’t because you needed to use a panorama head (one oft-heard bit of advice). I never do. The issue is usually a lack of sufficient overlap. Or perhaps the image content moved too much from frame to frame as the photographer took too long to shoot the set.
Or, even when quickly-shot segments do have lots of overlap, stitching software can still get confused if adjoining segments contain featureless content or content that changes, such as segments over rippling water with no identifiable “landmarks” for the software to latch onto.
The primary problems, however, arise from using software that just isn’t up to the task. Programs that work great on simple panoramas (as the next three examples show) will fail when trying to stitch a more demanding set of segments.
Stitching with Adobe Camera Raw The panorama function in all recent versions of Adobe Camera Raw (Lightroom Classic has the same feature) can do a superb job on simple panoramas, such as the moonlit Morant’s Curve pano, with the magical Boundary Warp option allowing you to fill the frame without cropping and losing content.
For example, for partial horizon panos shot with 20mm to 50mm lenses, I’ll use the panorama function now built into Adobe Camera Raw (ACR) and Adobe Lightroom Classic, and also in the mobile-friendly Lightroom app. As I show above, ACR can do a wonderful job, yielding a raw DNG file that can continue to be edited non-destructively. It’s by far the easiest and fastest option, and is my first choice.
Another choice, not shown here, is the Photomerge function from within Photoshop, which yields a layered and masked master file, and provides the option for “content-aware” filling of missing areas. It can sometimes work on panos that ACR balks at.
Stitching with ON1 PhotoRAW The Adobe competitor ON1 PhotoRAW also provides a good panorama stitching feature that can work with both simple and many multi-tier panos. It provides a flattened result, even when exporting as a .PSD Photoshop file.
Two programs popular as Adobe alternatives, ON1 PhotoRAW (above) and the aforementioned Affinity Photo (below), also have very capable panorama stitching functions.
However, in testing both programs with the demanding Bow Lake multi-tier panorama I used below with other programs, ON1 2019.5 did an acceptable job, while Affinity 1.7 failed. It works best on simpler panoramas, like this partial scene with a 24mm lens.
Stitching with Affinity Photo Another program vying to unseat Adobe products is Affinity Photo. It, too, does a fine job on simple panos, but tends to fail on multi-tier panoramas. There is no choice of panorama projections or option to export a layered master.
Even if they succeed when stitching 360° panoramas, such general-purpose editing programs, Adobe’s included, provide no option for choosing how the final scene gets framed. You have no control over where the program puts the ends of the scene.
Or the program just fails, producing a result like this.
When Stitching Goes Awry Throw a multi-tier pano at Adobe Camera Raw and you might end up with this type of unsalvageable result. Here’s where you have to turn to specialized panorama software
Warp Factor Even single-tier panos but shot with 14mm rectilinear (in this case) or fish-eye lenses will create warped results with ACR, only partly correctable with Boundary Warp.
Far worse is that multi-tier panoramas or, as I show above, even single-tier panos shot with very wide lenses, will often completely befuddle your favourite editing software, with it either refusing to perform the stitch or producing bizarre results.
Some photographers attempt to correct such wild distortions with lots of ad hoc adjustments with image-warping filters. But that’s completely unnecessary if you use the right software to begin with.
Stitching Complex Panoramas
When conventional software fails, I turn to the dedicated stitching program PTGui, $150 for MacOS or Windows. The name comes from “Panorama Tools – Graphical User Interface.”
Stitching with PTGui PTGui handles whatever complexity of panorama you can throw at it, either single or multi-tier (in this example), offering an accurate preview, a choice of projection modes (this is “equirectangular”), and the ability to quickly move the pano around to frame it as you like before exporting either a flattened or a layered master.
While PTGui can read raw files from most cameras, it will not read any of the development adjustments you made to those files using Lightroom, Camera Raw, or any other raw developers.
So, my workflow is to develop all the raw segments, export them out as 16-bit TIFFs, then import those into PTGui. It can detect what lens was used to take the images, information PTGui needs to stitch accurately. If you used a manual lens you can enter the lens focal length and type (rectilinear or fish-eye) yourself.
Spherical Scene with PTGui PTGui makes it easy to re-project the same set of images into other map projections, in this case as a circular fish-eye scene which can be rotated as desired.
I include a full tutorial on using PTGui in my eBook linked to above, but suffice to say that the program usually does a superb job first time and very quickly. You can drag the panorama around to frame the scene as you like, and change the projection at will to create rectangular or spherical format images, as above, and even so-called “little planet” projections that appear as if you were looking down at the scene from space.
Occasionally PTGui complains about some frames, requiring you to manually intervene to pick the same stars or horizon features in adjacent frames to provide enough matching alignment points until it is happy. Its interface also leaves something to be desired, with essential floating windows disappearing behind other mostly blank panels.
Adjusting Layers The layered output from PTGui produces a massive image but one that allows fine adjustments to the masks (by using a white paint brush) to correct mismatches like we see see here along the mountain peak.
When exporting the finished panorama I usually choose to export it as a layered 16-bit Photoshop .PSD or, with big panos, as a Photoshop .PSB “big” document.
The reason is that in aligning the moving stars PTGui (indeed, all programs) can produce a few “fault lines” along the horizon, requiring a manual touch up to the masks to clean up mismatched horizon content, as I show above. Having a layered and masked master makes this easy to do non-destructively, though that’s best done in Photoshop.
Opening with Affinity Affinity Photo is one of the few non-Adobe programs that can open large Photoshop .PSB files, and honour the layers, keeping them and the masks that PTGui exports intact.
However, Affinity Photo (above) can also read layered .PSD and .PSB Photoshop files, preserving the layers. By comparison, ON1 PhotoRAW flattens layered Photoshop files when it imports them, one deficiency that prevents this program from being a true Photoshop alternative.
Compressing the Milky Way A common final step is to compress the long dimension of the image to change its aspect ratio to one better suited to publication. But doing so highly distorts the grand sweep of the Milky Way.
Once a 360° panorama is in a program like Photoshop, some photographers like to “squish” the panorama horizontally to make it more square, for ease of printing and publication. I prefer not to do that, as it makes the Milky Way look overly tall, distorted, and in my opinion, ugly. But each to their own style.
You can test out a limited trial version of PTGui for free, but I think it is worth the cost as an essential tool for panorama devotees.
Other Stitching Options
Stitching with Microsoft ICE Image Composite Editor, for Windows only but free from Microsoft Research, also does a superb job on all panoramas (as it did with this test case), with accurate stitching and preview, a choice of projections, cropping, and the option for a layered output.
However, Windows users can also try Image Composite Editor (ICE), free from Microsoft Research. As shown above in my test 3-tier pano, ICE works very well on complex panoramas, has a clean, user-friendly interface, offers a choice of geometric projections, and can export a master file with each segment on its own layer, if desired, for later editing.
Stitching with HugIn The open-source program HugIn is free, but suffers from an inaccurate preview, complex interface and workflow, and technical displays and functions only a programmer will love.
The free, open source program HugIn is based on the same Panorama Tools root software that PTGui uses. However, I find HugIn’s operation clunky and overly technical. Its export process is arcane yet renders out only a flattened image.
HugIn Fail The export of the same multi-tier pano that worked fine with PTGui and ICE failed with HugIn, with missing content and numerous mis-aligned areas of the landscape, tough to fix in the flattened output.
In testing it with the same three-tier 21-segment pano that PTGui and ICE handled perfectly, HugIn failed to properly include one segment. However, it is free for MacOS and Windows, and so the price is right and is well worth a try.
Fish-Eye Milky Way In summer with the Milky Way overhead, a spherical projection is often best for presenting the Milky Way as your eye saw it, as a majestic band of light from horizon to horizon across the sky passing through the zenith.
With the superb tools now at our disposal, it is possible to create detailed panoramas of the night sky that convey the majesty of the Milky Way – and the night sky – as no single image can. Have fun!
To Adobe or not to Adobe. That is the question many photographers are asking with the spate of new image processing programs vying to “kill Photoshop.”
I tested more than ten contenders as alternatives to Adobe’s image processing software, evaluating them ONLY for the specialized task of editing demanding nightscape images taken under the Milky Way, both for single still images and for time-lapses of the moving sky. I did not test these programs for other more “normal” types of images.
Also, please keep in mind, I am a Mac user and tested only programs available for MacOS, though many are also available for Windows. I’ve indicated these.
But I did not test any Windows-only programs. So sorry, fans of Paintshop Pro (though see my note at the end), Photoline, Picture Window Pro, or Xara Photo & Graphic Designer. They’re not here. Even so, I think you will find there’s plenty to pick from!
This review expands upon and updates mini-reviews I included in my Nightscapes and Time-Lapses eBook, shown at right.
If you are hoping there’s a clear winner in the battle against Adobe, one program I can say does it all and for less cost and commitment, I didn’t find one.
However, a number of contenders offer excellent features and might replace at least one member of Adobe’s image processing suite.
For example, only four of these programs can truly serve as a layer-based editing program replacing Photoshop.
The others are better described as Adobe Lightroom competitors – programs that can catalog image libraries and develop raw image files, with some offering adjustment layers for correcting color, contrast, etc. But as with Lightroom, layering of images – to stack, composite, and mask them – is beyond their ability.
For processing time-lapse sequences, however, we don’t need, nor can we use, the ability to layer and mask several images into one composite.
What we need for time-lapses is to:
Develop a single key raw file, then …
Copy its settings to the hundreds of other raw files in the time-lapse set, then …
Export that folder of raw images to “intermediate JPGs” for assembly into a movie.
Even so, not all these contenders are up to the task.
Here are the image processing programs I looked at. Costs are in U.S. dollars. Most have free trial copies available.
The Champion from Adobe
Adobe Camera Raw (ACR), Photoshop, Bridge, and Lightroom, the standards to measure others by
Cost: $10 a month by subscription, includes ACR, Photoshop, Bridge, and Lightroom
Adobe Camera Raw (ACR) is the raw development plug-in that comes with Photoshop and Adobe Bridge, Adobe’s image browsing application that accompanies Photoshop. Camera Raw is equivalent to the Develop module in Lightroom, Adobe’s cataloguing and raw processing software. Camera Raw and Lightroom have identical processing functions and can produce identical results.
Photoshop and Lightroom complement each other and are now available together, but only by monthly subscription through Adobe’s Creative Cloud service, at $10/month. Though $120 for a year is not far off the cost of purchasing many of these other programs and perhaps upgrading them annually, many photographers prefer to purchase their software and not subscribe to it.
Thus the popularity of these alternative programs. Most offered major updates in late 2017.
My question is, how well do they work? Are any serious contenders to replace Photoshop or Lightroom?
Lightroom Contenders: Five Raw Developers
ACDSee Photo Studio (current as of late 2017)
Cost: $60 to $100, depending on version, upgrades $40 to $60.
I tested the single MacOS version. Windows users have a choice of either a Standard or Professional version. Only the Pro version offers the full suite of raw development features, in addition to cataloging functions. The MacOS version resembles the Windows Pro version.
Capture One v11 (late 2017 release)
Cost: $299, and $120 for major upgrades, or by subscription for $180/year
As of version 11 this powerful raw developer and cataloguing program offers “Layers.” But these are only for applying local adjustments to masked areas of an image. You cannot layer different images. So Capture One cannot be used like Photoshop, to stack and composite images. It is a Lightroom replacement only, but a very good one indeed.
Here’s a low cost Lightroom replacement for image management and raw processing abilities. Noise reduction is “Perfectly Clear” from Athentech and works well.
The ELITE version of what DxO now calls “PhotoLab” offers DxO’s superb PRIME noise reduction and excellent ClearView contrast enhancement feature. While it has an image browser, PhotoLab does not create a catalog, so this isn’t a full Lightroom replacement, but it is a superb raw developer. DxO also recently acquired the excellent Nik Collection of image processing plug-ins, so we can expect some interesting additions and features.
This free open source program has been created and is supported by a loyal community of programmers. It offers a bewildering blizzard of panels and controls, among them the ability to apply dark frames and flat field images, features unique among any raw developer and aimed specifically at astrophotographers. Yes, it’s free, but the learning curve is precipitous.
Photoshop Contenders: Four Raw Developers with Layering/Compositing
These programs can not only develop at least single raw images, if not many, but also offer some degree of image layering, compositing, and masking like Photoshop.
However, only ON1 Photo RAW can do that and also catalog/browse images as Lightroom can. Neither Affinity, Luminar, or Pixelmator offer a library catalog like Lightroom, nor even a file browsing function such as Adobe Bridge, serious deficiencies I feel.
This is the lowest cost raw developer and layer-based program on offer here, and has some impressive features, such as stacking images, HDR blending, and panorama stitching. However, it lacks any library or cataloguing function, so this is not a Lightroom replacement, but it could replace Photoshop.
Macphun has changed their name to Skylum and now makes their fine Luminar program for both Mac and Windows. While adding special effects is its forte, Luminar does work well both as a raw developer and layer-based editor. But like Affinity, it has no cataloguing feature. It cannot replace Lightroom.
Of all the contenders tested here, this is the only program that can truly replace both Lightroom and Photoshop, in that ON1 has cataloguing, raw developing, and image layering and masking abilities. In fact, ON1 allows you to migrate your Lightroom catalog into its format. However, ON1’s cost to buy and maintain is similar to Adobe’s Creative Cloud Photo subscription plan. It’s just that ON1’s license is “perpetual.”
NOTE: Windows users might find Corel’s Paintshop Pro 2018 a good “do-it-all” solution – I tested only Corel’s raw developer program Aftershot Pro, which Paintshop Pro uses.
The “Pro” version of Pixelmator was introduced in November 2017. It has an innovative interface and many fine features, and it allows layering and masking of multiple images. However, it lacks some of the key functions (listed below) needed for nightscape and time-lapse work. Touted as a Photoshop replacement, it isn’t there yet.
The Challenge
This is the image I threw at all the programs, a 2-minute exposure of the Milky Way taken at Writing-on-Stone Provincial Park in southern Alberta in late July 2017.
NOTE: Click/tap on any of the screen shots to bring them up full screen so you can inspect and save them.
Original Raw Image Out of the Camera, BEFORE Development
The lens was the Sigma 20mm Art lens at f/2 and the camera the Nikon D750 at ISO 1600.
Thus the ground is blurred. Keep that in mind, as it will always look fuzzy in the comparison images. But it does show up noise well, including hot pixels. This image of the sky is designed to be composited with one taken without the tracker turning, to keep the ground sharp.
Raw Image AFTER Development in Adobe Camera Raw
Above is the image after development in Adobe Camera Raw (ACR), using sliders under its Basic, Tone Curve, Detail, HSL, Lens Corrections, and Effects tabs. Plus I added a “local adjustment” gradient to darken the sky at the top of the frame. I judged programs on how well they could match or beat this result.
Same Image Developed in Adobe Lightroom
Above is the same image developed in Adobe Lightroom, to demonstrate how it can achieve identical results to Camera Raw, because at heart it is Camera Raw.
Feature Focus
I have assumed a workflow that starts with raw image files from the camera, not JPGs, for high-quality results.
And I have assumed the goal of making that raw image look as good as possible at the raw stage, before it goes to Photoshop or some other bit-mapped editor. That’s an essential workflow for time-lapse shooting, if not still-image nightscapes.
However, I made no attempt to evaluate all these programs for a wide range of photo applications. That would be a monumental task!
Nor, in the few programs capable of the task, did I test image layering. My focus was on developing a raw image. As such, I did not test the popular free program GIMP, as it does not open raw files. GIMP users must turn to one of the raw developers here as a first stage.
If you are curious how a program might perform for your purposes and on your photos, then why not test drive a trial copy?
Instead, my focus was on these programs’ abilities to produce great looking results when processing one type of image: my typical Milky Way nightscape, below.
TIFF Exported from DxO PhotoLab … then Imported into Photoshop
Such an image is a challenge because…
The subject is inherently low in contrast, with the sky often much brighter than the ground. The sky needs much more contrast applied, but without blocking up the shadows in the ground.
The sky is often plagued by off-color tints from artificial and natural sky glows.
The ground is dark, perhaps lit only by starlight. Bringing out landscape details requires excellent shadow recovery.
Key to success is superb noise reduction. Images are shot at high ISOs and are rife with noise in the shadows. We need to reduce noise without losing stars or sharpness in the landscape.
I focused on being able to make one image look as good as possible as a raw file, before bringing it into Photoshop or a layer-based editor – though that’s where it will usually end up, for stacking and compositing, as per the final result shown at the end.
I then looked at each program’s ability to transfer that one key image’s settings over to what could be hundreds of other images taken that night, either for stacking into star trails or for assembling into a time-lapse movie.
Summary Conclusions
Results of 8 Programs compared to ACR (at left)
None of the programs I tested ticked all the boxes in providing all the functions and image quality of the Adobe products.
But here’s a summary of my recommendations:
For Advanced Time-Lapse
None of the non-Adobe programs will work with the third-party software LRTimelapse (www.lrtimelapse.com). It is an essential tool for advanced time-lapse processing. LRTimelapse works with Lightroom or ACR/Bridge to gradually shift processing settings over a sequence, and smooth annoying image flickering.
If serious and professional time-lapse shooting is your goal, none of the Adobe contenders will work. Period. Subscribe to Creative Cloud. And buy LRTimelapse.
For Basic Time-Lapse
However, for less-demanding time-lapse shooting, when the same settings can be applied to all the images in a sequence, then I feel the best non-Adobe choices are, in alphabetical order:
ACDSee
Capture One
Corel Aftershot Pro
DxO PhotoLab
ON1 Photo RAW
… With, in my opinion, DxO and Capture One having the edge for image quality and features. But all five have a Library or Browser mode with easy-to-use Copy & Paste and Batch Export functions needed for time-lapse preparation.
Also worth a try is PhotoDirector9 (MacOS and Windows), a good Lightroom replacement. Scroll to the end for more details and a link.
For Still Image Nightscapes
If you are processing just individual still images, perhaps needing only to stack or composite a few exposures, and want to do all the raw development and subsequent layering of images within one non-Adobe program, then look at (again alphabetically):
Affinity Photo
Luminar 2018
ON1 Photo RAW 2018
… With Affinity Photo having the edge in offering a readily-available function off its File menu for stacking images, either for noise smoothing (Mean) or creating star trails (Maximum).
However, I found its raw development module did not produce as good a result as most competitors due to Affinity’s poorer noise reduction and less effective shadow and highlight controls. Using Affinity’s “Develop Persona” module, I could not make my test image look as good as with other programs.
Luminar 2018 has better noise reduction but it demands more manual work to stack and blend images.
While ON1 Photo Raw has some fine features and good masking tools, it exhibits odd de-Bayering artifacts, giving images a cross-hatched appearance at the pixel-peeping level. Sky backgrounds just aren’t smooth, even after noise reduction.
To go into more detail, these are the key factors I used to compare programs.
Noise Reduction
Absolutely essential is effective noise reduction, of luminance noise and chrominance color speckles and splotches.
Ideally, programs should also have a function for suppressing bright “hot” pixels and dark “dead” pixels.
Here’s what I consider to be the “gold standard” for noise reduction, Adobe Camera Raw’s result using the latest processing engine in ACR v10/Photoshop CC 2018.
BEFORE and AFTER Noise Reduction with Adobe Camera Raw (ACR)
I judged other programs on their ability to produce results as good as this, if not better, using their noise reduction sliders. Some programs did better than others in providing smooth, noiseless skies and ground, while retaining detail.
BEFORE and AFTER Noise Reduction and Other Adjustments with DxO PhotoLab
For example, one of the best was DxO PhotoLab, above. It has excellent options for reducing noise without being overwhelming in its choices, the case with a couple of other programs. For example, DxO has a mostly effective dead/hot pixel removal slider.
ACR does apply such a hot pixel removal “under the hood” as a default, but often still leaves many glaring hot specks that must be fixed later in Photoshop.
Comparing Noise Reduction
300% Close-Ups to Compare Noise Reduction
Above are 8 of the contender programs compared to Camera Raw for noise reduction.
Missing from this group is the brand new Pixelmator Pro, for MacOS only. It does not yet have any noise reduction in its v1 release, a serious deficiency in imaging software marketed as “Pro.” For that reason alone, I cannot recommend it. I describe its other deficiencies below.
Lens Corrections
The wide-angle lenses we typically use in nightscape and time-lapse imaging suffer from vignetting and lens distortions. Having software that can automatically detect the lens used and apply bespoke corrections is wonderful.
Lens Corrections in Capture One
Only a few programs, such as Capture One (above), have a library of camera and lens data to draw upon to apply accurate corrections with one click. With others you have to dial in corrections manually by eye, which is crude and inaccurate.
Shadows and Highlights
All programs have exposure and contrast adjustments, but the key to making a Milky Way nightscape look good is being able to boost the shadows (the dark ground) while preventing the sky from becoming overly bright, yet while still applying good contrast to the sky.
Shadows and Highlight and other Enhancements in DxO PhotoLab
Of the contenders, I liked DxO PhotoLab best (shown above), not only for its good shadow and highlight recovery, but also excellent “Smart Lighting” and “ClearView” functions which served as effective clarity and dehaze controls to snap up the otherwise low-contrast sky. With most other programs it was tough to boost the shadows without also flattening the contrast.
On the other hand, Capture One’s excellent layering and local adjustments did make it easier to brush in adjustments just to the sky or ground.
However, any local adjustments like those will be feasible only for still images or time-lapses where the camera does not move. In any motion control sequences the horizon will be shifting from frame to frame, making precise masking impractical over a sequence of hundreds of images.
Therefore, I didn’t place too much weight on the presence of good local adjustments. But they are nice to have. Capture One, DxO PhotoLab, and ON1 win here.
Selective Color Adjustments
All programs allow tweaking the white balance and overall tint.
But it’s beneficial to also adjust individual colors selectively, to enhance red nebulas, enhance or suppress green airglow, bring out green grass, or suppress yellow or orange light pollution.
Some programs have an HSL panel (Hue, Saturation, Lightness) or an equalizer-style control for boosting or dialing back specific colors.
Color Adjustments in Capture One
Capture One (above) has the most control over color correction, with an impressive array of color wheels and sliders that can be set to tweak a broad or narrow range of colors.
And yet, despite this, I was still unable to make my test image look quite the way I wanted for color balance. ACR and DxO PhotoLab still won out for the best looking final result.
Copy and Paste Settings
Even when shooting nightscape stills we often take several images to stack later. It’s desirable to be able to process just one image, then copy and paste its settings to all the others in one fell swoop. And then to be able to inspect those images in thumbnails to be sure they all look good.
Some programs (Affinity Photo, Luminar, Pixelmator Pro) lack any library function for viewing or browsing a folder of thumbnail images. Yes, you can export a bunch of images with your settings applied as a user preset, but that’s not nearly as good as actually seeing those images displayed in a Browser mode.
Copy and Paste Settings in ON1 Photo RAW
What’s ideal is a function such as ON1 Photo RAW displays here, and that some other programs have: the ability to inspect a folder of images, work on one, then copy and paste its settings to all the others in the set.
This is absolutely essential for time-lapse work, and nice to have even when working on a small set to be stacked into a still image.
Batch Export
Once you develop a folder of raw images with “Copy and Paste,” you now have to export them with all those settings “baked into” the exported files.
This step is to create an intermediate set of JPGs to assemble into a movie. Or perhaps to stack into a star trail composite using third party software such as StarStaX, or to work on the images in another layer-based program of your choice.
Batch Export in ON1 Photo RAW
As ON1 Photo RAW shows above, this is best done using a Library or Browser mode to visually select the images, then call up an Export panel or menu to choose the image size, format, quality, and location for the exports.
Click Export and go for coffee – or a leisurely dinner – while the program works through your folder. All programs took an hour or more to export hundreds of images.
Design
Those functions were the key features I looked for when evaluating the programs for nightscape and time-lapse work.
Every program had other attractive features, often ones I wished were in Adobe Camera Raw. But if the program lacked any of the above features, I judged it unsuitable.
Yes, the new contenders to the Photoshop crown have the benefit of starting from a blank slate for interface design.
Luminar 2018’s Clean User Interface
Many, such as Luminar 2018 above, have a clean, attractive design, with less reliance on menus than Photoshop.
Photoshop has grown haphazardly over 25 years, resulting in complex menus. Just finding key functions can take many tutorial courses!
But Adobe dares to “improve” Photoshop’s design and menu structure at its peril, as Photoshop fans would scream if any menus they know and love were to be reorganized!
The new mobile-oriented Lightroom CC is Adobe’s chance to start afresh with a new interface.
Summary Table of Key Features
Click or tap to view and save full screen version.
Fair = Feature is present but doesn’t work as easily or produce as good a result
Partial = Program has lens correction but failed to fully apply settings automatically / DxO has a Browse function but not Cataloging
Manual = Program has only a manually-applied lens correction
– = Program is missing that feature altogether
Program-by-Program Results
I could end the review here, but I feel it’s important to present the evidence, in the form of screen shots of all the programs, showing both the whole image, and a close-up to show the all-important noise reduction.
ACDSee Photo Studio
ACDSee Full Screen
ACDSee Enlargement
PROS: This capable cataloging program has good selective color and highlight/shadow recovery, and pretty smooth noise reduction. It can copy and paste settings and batch export images, for time-lapses. It is certainly affordable, making it a low-cost Lightroom contender.
CONS: It lacks any gradient or local adjustments, or even spot removal brushes. Lens corrections are just manual. There is no dehaze control, which can be useful for snapping up even clear night skies. You cannot layer images to create composites or image stacks. This is not a Photoshop replacement.
Affinity Photo
Affinity Photo Full Screen
Affinity Photo Enlargement
PROS: Affinity supports image layers, masking with precise selection tools, non-destructive “live” filters (like Photoshop’s Smart Filters), and many other Photoshop-like functions. It has a command for image stacking with a choice of stack modes for averaging and adding images.
It’s a very powerful but low cost alternative to Photoshop, but not Lightroom. It works fine when restricted to working on just a handful of images.
CONS: Affinity has no lens correction database, and I found it hard to snap up contrast in the sky and ground without washing them out, or having them block up. Raw noise reduction was acceptable but not up to the best for smoothness. It produced a blocky appearance. There are no selective color adjustments.
Nor is there any library or browse function. You can batch export images, but only through an unfriendly dialog box that lists images only by file name – you cannot see them. Nor can you copy and paste settings visually, but only apply a user-defined “macro” to develop images en masse upon export.
This is not a program for time-lapse work.
Capture One 11
Capture One 11 Full Screen
Capture One 11 Enlargement
PROS: With version 11 Capture One became one of the most powerful raw developers, using multiple layers to allow brushing in local adjustments, a far better method than Adobe Camera Raw’s local adjustment “pins.” It can create a catalog from imported images, or images can be opened directly for quick editing. Its noise reduction was good, with hot pixel removal lacking in Camera Raw.
Its color correction options were many!
It can batch export images. And it can export files in the raw DNG format, though in tests only Adobe Camera Raw was able to read the DNG file with settings more or less intact.
CONS: It’s costly to purchase, and more expensive than Creative Cloud to subscribe to. Despite all its options I could never quite get as good looking an image using Capture One, compared to DxO PhotoLab for example.
It is just a Lightroom replacement; it can’t layer images.
Corel Aftershot Pro 3
Corel Aftershot Pro Full Screen
Corel Aftershot Pro Enlargement
PROS: This low-cost option has good noise reduction using Athentech’s Perfectly Clear process, with good hot pixel or “impulse” noise removal. It has good selective color and offers adjustment layers for brushing in local corrections. And its library mode can be used to copy and paste settings and batch export images.
Again, it’s solely a Lightroom alternative.
CONS: While it has a database of lenses, and identified my lens, it failed to apply any automatic corrections. Its shadow and highlight recovery never produced a satisfactory image with good contrast. Its local adjustment brush is very basic, with no edge detection.
DxO PhotoLab
DxO PhotoLab Full Screen
DxO PhotoLab Enlargement
PROS: I found DxO produced the best looking image, better perhaps than Camera Raw, because of its DxO ClearView and Smart Lighting options. It has downloadable camera and lens modules for automatic lens corrections. Its noise reduction was excellent, with its PRIME option producing by far the best results of all the programs, better perhaps than Camera Raw, plus with hot pixel suppression.
DxO has good selective color adjustments, and its copy and paste and batch export work fine.
CONS: There are no adjustment layers as such. Local adjustments and repairing are done through the unique U-Point interface which works something like ACR’s “pins,” but isn’t as visually intuitive as masks and layers. Plus, DxO is just a raw developer; there is no image layering or compositing. Nor does it create a catalog as such.
So it is not a full replacement for either Lightroom or Photoshop. But it does produce great looking raw files for export (even as raw DNGs) to other programs.
Luminar 2018
Luminar 2018 Full Screen
Luminar 2018 Enlargement
PROS: Luminar has good selective color adjustments, a dehaze control, and good contrast adjustments for highlights, mid-tones, and shadows. Adjustments can be added in layers, making them easier to edit. Noise reduction was smooth and artifact-free, but adjustments were basic. Many filters can be painted on locally with a brush, or with a radial or gradient mask.
CONS: It has no lens correction database; all adjustments are manual. The preview was slow to refresh and display results when adjusting filters. The interface is clean but always requires adding filters to the filter panel to use them when creating new layers. Its batch export is crude, with only a dialog box and no visual browser to inspect or select images.
Settings are applied as a user preset on export, not through a visual copy-and-paste function. I don’t consider that method practical for time-lapses.
ON1 Photo RAW 2018
ON1 Photo RAW Full Screen
ON1 Photo RAW Enlargement
PROS: ON1 is the only program of the bunch that can: catalog images, develop raw files, and then layer and stack images, performing all that Lightroom and Photoshop can do. It is fast to render previews in its “Fast” mode, but in its “Accurate” mode ON1 is no faster than Lightroom. It has good layering and masking functions, both in its Develop mode and in its Photoshop-like Layers mode.
Selective color and contrast adjustments were good, as was noise reduction. Developing, then exporting a time-lapse set worked very well, but still took as long as with Lightroom or Photoshop.
CONS: Despite promising automatic lens detection and correction, ON1 failed to apply any vignetting correction for my 20mm Sigma lens. Stars exhibited dark haloes, even with no sharpening, dehaze, or noise reduction applied. Its de-Bayering algorithm produced a cross-hatched pattern at the pixel level, an effect not seen on other programs.
Noise reduction did not smooth this. Thus, image quality simply wasn’t as good.
Pixelmator Pro
Pixelmator Pro Full Screen
Pixelmator Pro Enlargement
PROS: It is low cost. And it has an attractive interface.
CONS: As of version 1 released in November 2017 Pixelmator Pro lacks: any noise reduction (it’s on their list to add!), any library mode or copy and paste function, nor even the ability to open several images at once displayed together.
It is simply not a contender for “Photoshop killer” for any photo application, despite what click-bait “reviews” promise, ones that only re-write press releases and don’t actually test the product.
Raw Therapee v5.3
Raw Therapee Full Screen
Raw Therapee Enlargement – With and Without Noise Reduction
PROS: It’s free! It offers an immense number of controls and sliders. You can even change the debayering method. It detects and applies lens corrections (though in my case only distortion, not vignetting). It has good selective color with equalizer-style sliders. It has acceptable (sort of!) noise reduction and sharpening with a choice of methods, and with hot and dead pixel removal.
It can load and apply dark frames and flat fields, the only raw developer software that can. This is immensely useful for deep-sky photography.
CONS: It offers an immense number of controls and sliders! Too many! It is open source software by committee, with no one in charge of design or user friendliness. Yes, there is documentation, but it, too, is a lot to wade through to understand, especially with its broken English translations. This is software for digital signal processing geeks.
But worst of all, as shown above, its noise reduction left lots of noisy patches in shadows, no matter what combination of settings I applied. Despite all its hundreds of sliders, results just didn’t look as good.
What About …? (updated December 28)
No matter how many programs I found to test, someone always asks, “What about …?” In some cases such comments pointed me to programs I wasn’t even aware of, but subsequently tried out. So here are even more to pick from…
Billed as having “everything you need in an image editor,” this low-cost ($30) MacOS-only program is anything but. Its raw developer module is crude and lacks any of the sophisticated range of adjustments offered by all the other programs on offer here. It might be useful as a layer-based editor of images developed by another program.
Available for Mac and Windows for $150, this Lightroom competitor offers a good browser function, with the ability to “copy-from-one and paste-to-many” images (unlike some of the programs below), and a good batch export function for time-lapse work. It has good selective color controls and very good noise reduction providing a smooth background without artifacts like blockiness or haloes. Local adjustments, either through brushed-on adjustments or through gradients, are applied via handy and easy to understand (I think!) layers.
While it has auto lens corrections, its database seemed limited — it did not have my Sigma 20mm lens despite it being on the market for 18 months. Manual vignetting correction produced a poor result with just a washed out look.
The main issue was that its shadow, highlight, and clarity adjustments just did not produce the snap and contrast I was looking for, but that other programs could add to raw files. Still, it looks promising, and is worth a try with the trial copy. You might find you like it. I did not. For similar cost, other programs did a better job, notably DxO PhotoLab.
In the same ilk as Raw Therapee, I also tested out another free, open-source raw developer, one simply called “darktable,” with v2.2.5 shown below. While it has some nice functions and produced a decent result, it took a lot of time and work to use.
darktable RAW Developer
The MacOS version I tried (on a brand new 5K iMac) ran so sluggishly, taking so long to re-render screen previews, that I judged it impractical to use. Sliders were slow to move and when I made any adjustments often many seconds would pass before I would see the result. Pretty frustrating, even for free.
A similar crowd-developed raw processing program, Iridient Developer (above), sells for $99 US. I tested a trial copy of v3.2. While it worked OK, I was never able to produce a great looking image with it. It had no redeeming features over the competition that made its price worthwhile.
Paintshop Pro’s included but very basic Raw developer.
Using Parallels running Windows 10 on my Mac, I did try out this popular Windows-only program from Corel. By itself, Paintshop Pro’s raw developer module (shown above) is basic, crude and hardly up to the tax of processing demanding raw files. You are prompted to purchase Corel’s Aftershot Pro for more capable raw development, and I would agree – Aftershot would be an essential addition. However …
As I showed above, I did test the MacOS version of Aftershot Pro on my raw sample image, and found it did the poorest job of making my raw test image look good. Keep in mind that it is the ability of all these programs to develop this typical raw nightscape image that I am primarily testing.
That said, given a well-developed raw file, Paintshop Pro can do much more with it, such as further layering of images and applying non-destructive and masked adjustment layers, as per Photoshop. Indeed, it is sold as a low-cost (~ $60) Photoshop replacement. As such, many Windows users find Paintshop’s features very attractive. However, Paintshop lacks the non-destructive “smart” filters, and the more advanced selection and masking options offered by Photoshop, Affinity Photo, and ON1 Photo Raw. If you have never used these, you likely don’t realize what you are missing.
If it’s an Adobe alternative you are after, I would suggest Windows users would be better served by other options. Why not test drive Affinity and ON1?
PhotoDirector’s very Lightroom-like interface and controls.
This was a surprising find. Little known, certainly to me, this Windows and MacOS program from the Taiwanese company Cyberlink, is best described as a Lightroom substitute, but it’s a good one. Its regular list price is $170. I bought it on sale for $60.
Like Lightroom, working on any images with PhotoDirector requires importing them into a catalog. You cannot just browse to the images. Fine. But one thing some people complain about with Lightroom is the need to always import images.
I was impressed with how good a job PhotoDirector did on my raw test image. PhotoDirector has excellent controls for shadow and highlight recovery, HSL selective color, copying-and-pasting settings, and batch exporting. So it will work well for basic time-lapse processing.
Noise reduction was very good and artifact-free. While it does have automatic lens corrections, its database did not include the 2-year old Sigma 20mm Art lens I used. So it appears its lens data is not updated frequently.
PhotoDirector has good local adjustments and gradients using “pins” rather than layers, similar to Camera Raw and Lightroom.
After performing raw image “Adjustments,” you can take an image into an Edit module (for adding special effects), then into a Layers module for further work. However, doing so destructively “flattens” the image to apply the raw adjustments you made. You cannot go back and tweak the raw settings in the Adjustment module, as you can when opening a raw file as a “smart object” in Adobe Photoshop.
While PhotoDirector does allow you to layer in other images to make basic composites (such as adding type or logos), there is no masking function nor any non-destructive adjustment layers. So this is most assuredly not a Photoshop substitute, despite what the advertising might suggest. But if it’s a Lightroom replacement you are after, do check it out in a trial copy.
MacOS-only Picktorial v3, with its clean interface
This little-known MacOS-only program (only $40 on sale) for developing raw images looks very attractive, with good selective color, lots of local adjustments, and good masking tools, the features promoted on the website. It does have a browse function and can batch export a set of developed files.
However … its noise reduction was poor, introducing glowing haloes around stars when turned up to any useful level. Its shadows, highlights, and contrast adjustments were also poor – it was tough to make the test image look good without flattening contrast or blocking up shadows. Boosting clarity even a little added awful dark haloes to stars, making this a useless function. It has no lens correction, either automatic or manual. Like Topaz Studio, below, it cannot copy and paste settings to a batch of images, only to one image at a time, so it isn’t useful for time-lapse processing.
I cannot recommend this program, no matter how affordable it might be.
Popular among some camera manufacturers as their included raw developer, Silky Pix can be purchased separately ($80 list price for the standard version, $250 list price for the Pro version) with support for many cameras’ image files. It is available for MacOS and Windows. I tried the lower-cost “non-Pro” version 8. It did produce a good-looking end result, with good shadow and highlight recovery, and excellent color controls. Also on the plus side, Silky Pix has very good copy-and-paste functions for development settings, and good batch export functions, so it can be used to work on a folder of time-lapse frames.
On the down side, noise reduction, while acceptable, left an odd mottled pattern, hardly “silky.” The added “Neat” noise reduction option only smoothed out detail and was of little value except perhaps for very noisy images. Noise reduction did nothing to remove hot pixels, leaving lots of colored specks across the image. The program uses unorthodox controls whose purposes are not obvious. Instead of Highlights and Shadows you get Exposure Bias and HDR. Instead of Luminance and Color noise reduction, you get sliders labeled Smoothness and Color Distortion. You really need to read the extensive documentation to learn how to use this program.
I found sliders could be sticky and not easy to adjust precisely. The MacOS version was slow, often presenting long bouts of spinning beachballs while it performed some function. This is a program worth a try, and you might find you like it. But considering what the competition offers, I would not recommend it.
While Topaz Labs previously offered only plug-ins for Photoshop and other programs (their Topaz DeNoise 6 is very good), their Topaz Studio stand-alone program now offers full raw processing abilities.
It is for Mac and Windows. While it did a decent job developing my test Milky Way image (above), with good color and contrast adjustments, it cannot copy and paste settings from one image to a folder of images, only to one other image. Nor can it batch export a folder of images. Both deficiencies make it useless for time-lapse work.
In addition, while the base program is free, adding the “Pro Adjustments” modules I needed to process my test image (Noise Reduction, Dehaze, Precision Contrast, etc.) would cost $160 – each Adjustment is bought separately. Some users might like it, but I wouldn’t recommend it.
And … Adobe Photoshop Elements v18 (late 2017 release)
What about Adobe’s own Photoshop “Lite?” Elements is available for $99 as a boxed or downloadable one-time purchase, but with annual updates costing about $50. While it offers image and adjustment layers, it cannot do much with 16-bit images, and has very limited functions for developing raw files.
And its Lightroom-like Organizer module does not have any copy-and-paste settings or batch export functions, making it unsuitable for time-lapse production.
Photoshop Elements v18 – Showing its Version of Camera Raw Lite
Elements is for processing photos for the snapshot family album. Like Apple’s Photos and other free photo apps, I don’t consider Elements to be a serious option for nightscape and time-lapse work. But it can be pressed into service for raw editing and layering single images, especially by beginners.
However, a Creative Cloud Photo subscription doesn’t cost much more than buying, then upgrading Elements outright, yet gets you far, far more in professional-level software.
And Yet More…!
In addition, for just developing raw files, you likely already have software to do the job – the program that came with your camera.
Canon Digital Photo Professional v4
For Canon it’s Digital Photo Professional (shown above); for Nikon it’s Capture NX; for Pentax it’s Digital Camera Utility, etc.
These are all capable raw developers, but have no layering capabilities. And they read only the files from their camera brand. If theirs is the only software you have, try it. They are great for learning on.
But you’ll find that the programs from other companies offer more features and better image quality.
What Would I Buy?
Except for Capture One, which I tested as a trial copy, I did buy all the software in question, for testing for my Nightscapes eBook.
However, as I’ve described, none of the programs tick all the boxes. Each has strengths, but also weaknesses, if not outright deficiencies. I don’t feel any can fully replace Adobe products for features and image quality.
A possible non-Adobe combination for the best image quality might be DxO PhotoLab for raw developing and basic time-lapse processing, and Affinity Photo for stacking and compositing still images, from finished TIFF files exported out of DxO and opened and layered with Affinity.
But that combo lacks any cataloging option. For that you’d have to add ACDSee or Aftershot for a budget option. It’s hardly a convenient workflow I’d want to use.
ON1 De-Bayer Artifacts (Right) Compared to DxO PhotoLab (Left), at 400%
I’d love to recommend ON1 Photo RAW more highly as a single solution, if only it had better raw processing results, and didn’t suffer from de-Bayering artifacts (shown in a 400% close-up above, compared to DxO PhotoLab). These add the star haloes and a subtle blocky pattern to the sky, most obvious at right.
To Adobe or Not to Adobe
I’m just not anxious, as others are, to “avoid Adobe.”
I’ve been a satisfied Creative Cloud subscriber for several years, and view the monthly fee as the cost of doing business. It’s much cheaper than the annual updates that boxed Photoshop versions used to cost. Nor am I worried about Adobe suddenly jacking up the fees or holding us hostage with demands.
LRTimelapse at Work on a Time-Lapse Sequence
For me, the need to use LRTimelapse (shown above) for about 80 percent of all the time-lapse sequences I shoot means the question is settled. LRTimelapse works only with Adobe software, and the combination works great. Sold.
I feel Camera Raw/Lightroom produces results that others can only just match, if that.
Only DxO PhotoLab beat Adobe for its excellent contrast enhancements and PRIME noise reduction.
Yes, other programs certainly have some fine features I wish Camera Raw or Lightroom had, such as:
Hot and dead pixel removal
Dark frame subtraction and flat field division
Better options for contrast enhancement
And adding local adjustments to raw files via layers, with more precise masking tools
Among others!
But those aren’t “must haves.”
Using ACR or Lightroom makes it easy to export raw files for time-lapse assembly, or to open them into Photoshop for layering and compositing, usually as “smart objects” for non-destructive editing, as shown below.
Final Layered Photoshop Image
Above is the final layered image, consisting of:
A stack of 4 tracked exposures for the sky (the test image is one of those exposures)
And 4 untracked exposures for the ground.
The mean stacking smooths noise even more. The masking reveals just the sky on the tracked set. Every adjustment layer, mask, and “smart filter” is non-destructive and can be adjusted later.
I’ll work on recreating this same image with the three non-Adobe programs capable of doing so – Affinity, Luminar, and ON1 Photo RAW – to see how well they do. But that’s the topic of a future blog.
Making the Switch?
The issue with switching from Adobe to any new program is compatibility.
While making a switch will be fine when working on all new images, reading the terabytes of old images I have processed with Adobe software (and being able to re-adjust their raw settings and layered adjustments) will always require that Adobe software.
If you let your Creative Cloud subscription lapse, as I understand it the only thing that will continue to work is Lightroom’s Library module, allowing you to review images only. You can’t do anything to them.
None of the contender programs will read Adobe’s XMP metadata files to display raw images with Adobe’s settings intact.
Conversely, nor can Adobe read the proprietary files and metadata other programs create.
With final layered Photoshop files, while some programs can read .PSD files, they usually open them just as flattened images, as ON1 warns it will do above. It flattened all of the non-destructive editing elements created in Photoshop. Luminar did the same.
A Layered Photoshop PSB File Opened in Affinity Photo
Only Affinity Photo (above) successfully read a complex and very large Photoshop .PSB file correctly, honouring at least its adjustment and image layers. So, if backwards compatibility with your legacy Photoshop images is important, choose Affinity Photo.
However, Affinity flattened Photoshop’s smart object image layers and their smart filters. Even Adobe’s own Photoshop Elements doesn’t honor smart objects.
Lest you think that’s a “walled garden” created by “evil Adobe,” keep in mind that the same will be true of the image formats and catalogs that all the contender programs produce.
To read the adjustments, layers, and “live filters” you create using any another program, you will need to use that program.
Will Affinity, DxO, Luminar, ON1, etc. be around in ten years?
Yes, you can save out flattened TIFFs that any program can read in the future, but that rules out using those other programs to re-work any of the image’s original settings.
In Conclusion!
U-Point Local Adjustments in DxO PhotoLab
I can see using DxO PhotoLab (above) or Raw Therapee for some specific images that benefit from their unique features.
Or using ACDSee as a handy image browser.
Luminar 2018 as a Plug-In Within Photoshop
And ON1 and Luminar have some lovely effects that can be applied by calling them up as plug-ins from within Photoshop, and applied as smart filters. Above, I show Luminar working as a plug-in, applying its “Soft & Airy” filter.
In the case of Capture One and DxO PhotoLab, their ability to save images back as raw DNG files (the only contender programs of the bunch that can), means that any raw processing program in the future should be able to read the raw image.
DNG Raw File Created by Capture One Opened in ACR
However, only Capture One’s Export to DNG option produced a raw file readable and editable by Adobe Camera Raw with its settings from Capture One (mostly) intact (as shown above).
Even so, I won’t be switching away from Adobe any time soon.
But I hope my survey has given you useful information to judge whether you should make the switch. And if so, to what program.
I’m pleased to announce that after a year in production, our video tutorial series, Nightscapes and Time-Lapses: From Field to Photoshop, is now available.
It’s been quite a project! Over the last few years I’ve presented annual astrophoto workshops in conjunction with our local telescope dealer All-Star Telescope to great success.
However, we always had requests for the workshops on video. Attempts to video the actual workshops never produced satisfactory results. So we spent a year shooting in the field and in the studio to produce a “purpose-built” series of programs.
They are available now as a set of three programs, totalling 4 hours of instruction, for purchase and download at Vimeo at
For those wanting “hard copies” we will also be selling the programs on mailed USB sticks. See All-Star Telescope for info and prices. The downloaded version can also be ordered from there.
This series deals with the basics of capturing, then processing nightscape still images and time-lapse movies of the night sky and landscapes lit by moonlight and starlight.
Here’s the content outline:
Program 1 – Choosing Equipment (1 Hour)
• Tips for Getting Started • Essential Gear • Choosing A Camera • Photo 101 – Exposure Triangle • Setting Exposure • Expose to the Right • Setting a Camera – File Types • Photo 101 – Noise Sources • Setting a Camera – Noise Reduction • Setting a Camera – Focusing • Setting a Camera – Other Menus • Choosing Lenses • Choosing an IntervalometerSummary and Tips
Program 2 – Shooting in the Field (1 hour)
• Climbing the Learning Curve • Twilights • Astronomy 101 – Conjunctions • Shooting Conjunctions • Moonrises • Shooting Auroras • Astronomy 101 – Auroras • Photo 101 – Composing • Moonlit Nightscapes • Astronomy 101 – Where is the Moon? • Choosing a Location • Shooting the Milky Way • Astronomy 101 – Where is the Milky Way? • Astronomy 101 – Daily Sky Motion • Tracking the Sky • Shooting Star Trails • Shooting Time-Lapses • Calculating Time-Lapses • A Pre-Flight Checklist • Summary and Tips
Program 3 – Processing Nightscapes and Time-Lapses (2 hours)
• Workflows • Using Adobe Bridge – Importing and Selecting • Photo 101 – File Formats • Using Adobe Lightroom – Importing and Selecting • Adobe Camera Raw – Essential Settings • Adobe Camera Raw – Developing Raw Images • Adobe Lightroom – Develop Module • Adobe Photoshop – Introduction • Photoshop – Setup • Photoshop – Smart Filters • Photoshop – Adjustment Layers • Photoshop – Masking • Photoshop – Processing Star Trails & Time-Lapses • Stacking Star Trails • Assembling Time-Lapse Movies • Archiving • Summary & Finale
If this first introductory series is successful we may produce follow-up programs on more advanced techniques.
It was a great night for shooting meteors as the annual Perseids put on a show.
For the Perseid meteor shower I went to one of the darkest sites in Canada, Grasslands National Park in southern Saskatchewan, a dark sky preserve and home to several rare species requiring dark nights to flourish – similar to astronomers!
This year a boost in activity was predicted and the predictions seemed to hold true. The lead image records 33 meteors in a series of stacked 30-second exposures taken over an hour.
It shows only one area of sky, looking east toward the radiant point in the constellation Perseus – thus the name of the shower.
Extrapolating the count to the whole sky, I think it’s safe to say there would have been 100 or more meteors an hour zipping about, not bad for my latitude of 49° North.
A lone Perseid meteor streaking down below the radiant point in Perseus, with the sky and landscape lit by the waxing gibbous Moon, August 11, 2016. Perseus is rising in the northeast, Andromeda is at right, with the Andromeda Galaxy right of centre. Cassiopeia is at top. Taken from the 70 Mile Butte trailhead in Grasslands National Park, Saskatchewan.
The early part of the evening was lit by moonlight, which lent itself to some nice nightscapes scenes but fewer meteors.
The 2016 Perseid meteor shower, in a view looking north to the Big Dipper and with the radiant point in Perseus at upper right, the point where the meteors appear to be streaking from. This is a stack of 10 frames, shot over one hour from 1:38 a.m. to 2:37 a.m. CST. The camera was on the Star Adventurer tracker so all the sky frames aligned. The ground is from a stack of four frames, mean combined to smooth noise, and taken with the tracker motor off to minimize ground blurring, and taken at the start of the sequence. All exposures 40 seconds at f/3.2 with the 16-35mm lens and Canon 6D at ISO 6400.
But once the Moon set and the sky darkened the show really began. Competing with the meteors was some dim aurora, but also the brightest display of airglow I have even seen.
It was bright enough to be visible to the eye as grey bands, unusual. Airglow is normally sub-visual.
But the camera revealed the airglow bands as green, red, and yellow, from fluorescing oxygen and sodium atoms. The bands slowly rippled across the sky from south to north.
Airglow is something you can see only from dark sites. It is one of the wonders of the night sky, that can make a dark sky not dark!
TECHNICAL:
The lead image is stack of 31 frames containing meteors (two frames had 2 meteors), shot from 1:13 am to 2:08 a.m. CST, so over 55 minutes. The camera was not tracking the sky but was on a fixed tripod. I choose one frame with the best visibility of the airglow as the base layer. For every other meteor layer, I used Free Transform to rotate each frame around a point far off frame at upper left, close to where the celestial pole would be and then nudged each frame to bring the stars into close alignment with the base layer, especially near the meteor being layered in.
This placed each meteor in its correct position in the sky in relation to the stars, essential for showing the effect of the radiant point accurately.
Each layer above the base sky layer is masked to show just the meteor and is blended with Lighten mode. If I had not manually aligned the sky for each frame, the meteors would have ended up positioned where they appeared in relation to the ground but the radiant point would have been smeared — the meteors would have been in the wrong place.
Unfortunately, it’s what I see in a lot of composited meteor shower shots.
It would have been much easier if I had had this camera on a tracker so all frames would have been aligned coming out of the camera. But the other camera was on the tracker! It took the other composite image, the one looking north.
The ground is a mean combined stack of 4 frames to smooth noise in the ground. Each frame is 30 seconds at f/2 with the wonderful Sigma 20mm Art lens and Nikon D750 at ISO 5000. The waxing Moon had set by the time this sequence started, leaving the sky dark and the airglow much more visible.
I present a horizon-to-zenith panorama of the pantheon of autumn constellations.
Yes, I know it’s winter, but as it gets dark each night now in early January the autumn stars are still front and centre. I took the opportunity during a run of very clear nights at home to shoot a panorama of the autumn sky.
It is a mosaic that sweeps up the sky and frames many related Greek mythological constellations:
• from the watery constellations of Aquarius, Pisces, and Cetus at the bottom near the horizon…
• to Pegasus and Aries in mid-frame…
• on up to Andromeda and Perseus at upper left…
• and finally Cassiopeia and Cepheus at the top of frame embedded in the Milky Way overhead. The Andromeda Galaxy, M31, is just above centre.
Here, I’ve labeled the participating constellations, though only a few, such as the “square” of Pegasus and the “W” of Cassiopeia, have readily identifiable patterns.
Most of these constellations are related in Greek mythology, with Princess Andromeda being the daughter of Queen Cassiopeia and King Cepheus, who was rescued from the jaws of Cetus the Sea Monster by Perseus the Hero, who rode on Pegasus the Winged Horse in some accounts.
Zodiacal Light brightens the sky at bottom right in Aquarius, and angles across the frame to the left.
TECHNICAL:
I shot this from home on a very clear night January 2, 2016 with the Zodiacal Light plainly visible to the naked eye.
This is a mosaic of 5 panels, each a stack of 5 x 2 minute exposures, plus each panel having another stack of 2 x 2 minute exposures blended in, and taken through the Kenko Softon filter to add the fuzzy star glows to make the constellations stand out.
All were shot with the 24mm Canon lens at f/2.8 and Canon 5DMkII at ISO 1600. All tracked on the AP Mach One mount.
All stacking and stitching in Photoshop CC 2015. Final image size is 8500 x 5500 pixels and 3.6 gigabytes for the layered master.
In a sweeping panorama, here is the entire northern hemisphere Milky Way from horizon to horizon.
This is the result of one of the major projects on my recent trek to Arizona and New Mexico – a mosaic of images shot along the Milky Way over several hours.
The goal is a complete 360° panorama of the entire Milky Way, and I’ve got most of the other segments in previous shoots from Alberta, Australia and Chile. But I did not have good shots of the northern autumn segments, until now.
The panorama sweeps from Cygnus (at top, setting in the western sky in the evening), across the sky overhead in Perseus, Auriga and Taurus (in the middle), and down into Orion, Canis Major, and Puppis (at bottom, low in the southern sky at midnight).
The view is looking outward to the near edge of our Milky Way, in the direction opposite the centre of our Galaxy. In this direction the Milky Way becomes dimmer and less defined. Notable are the many red H-alpha emission regions along the Milky Way, as well as the many lanes of dark interstellar dust nearby and obscuring the more distant stars.
However, a diffuse glow in Taurus partly obscures its Taurus Dark Clouds — that’s the Gegenschein, caused by sunlight reflecting off cometary dust particles directly opposite the Sun and marking the anti-solar point this night, by coincidence then close to galactic longitude of 180° opposite the galactic centre.
Here I provide a guided map of the mosaic. Orion is at lower right, while the Pleiades and Andromeda Galaxy lie near the right edge. The Andromeda Galaxy is the only thing in this image that is not part of the Milky Way.
The bright star Canopus is just rising at bottom, in haze. Vega and Altair are just setting at the very top. So the panorama sweeps from Altair to Canopus.
The sky isn’t perfect! Haze and airglow in our atmosphere add discolouration, especially close to the horizon. In my final 360° pan, I’ll use only the central portions of this panorama.
Now let’s put the horizon-to-horizon panorama into cosmic perspective…
In this diagram, based on art from NASA’s Spitzer Space Telescope Institute, I show my Northern Milky Way Panorama in perspective to the “big picture” of our entire Galaxy, using artwork based on our best map of how our Galaxy is thought to look.
We are looking in a “god’s eye” view across our Galaxy from a vantage point on the far side of the Galaxy.
Where we are is marked with the red dot, the location of our average Sun in a minor spiral arm called the Orion Spur.
The diagram places my panorama image in the approximate correct location to show where its features are in our Galaxy. As such it illustrates how my panorama taken from Earth shows our view of the outer portions of our Galaxy, from the bright Cygnus area at right, to Perseus in the middle, directly opposite the centre of the Galaxy, then over to Orion at left.
The panorama sweeps from a “galactic longitude” of roughly 90° at right in Cygnus, to 180° in Perseus, over to 240° in Orion and Canis Major at left.
In the northern autumn and early winter seasons we are looking outward toward the outer Perseus Arm. So the Milky Way we see in our sky is fainter than in mid-summer when we are looking the other way, toward the dense centre of the Galaxy and the rich inner Norma and Sagittarius arms.
Yet, this outer region contains a rich array of star-forming regions, which mostly show up as the red nebulas. But this region of the Milky Way is also laced with dark lanes of interstellar “stardust.”
The panorama is composed of 14 segments, most being stacks 5 x 2.5-minute exposures with the filter-modified Canon 5D MkII at ISO 1600 and 35mm lens at f/2.8.
The end segments near the horizons at top and bottom are stacks of 2 x 2.5-minute exposures.
Each segment also has an additional image shot through a Kenko Softon filter to add the star glows, to make the bright stars show up better.
The camera was oriented with the long dimension of the frame across the Milky Way, not along it, to maximize the amount of sky framed on either side of the Milky Way.
The camera was on the iOptron Sky-Tracker. I shot the segments for this pan from Quailway Cottage, Arizona on December 8/9, 2015, with the end segments taken Dec 10/11, 2015. I decided to add in the horizon segments for completeness, and so shot those two nights later when sky conditions were a little different.
Learn the basics of shooting nightscape and time-lapse images with my three new video tutorials.
In these comprehensive and free tutorials I take you from “field to final,” to illustrate tips and techniques for shooting the sky at night.
At sites in southern Alberta I first explain how to shoot the images. Then back at the computer I step you through how to process non-destructively, using images I shot that night in the field.
Tutorial #1 – The Northern Lights
This 24-minute tutorial takes you from a shoot at a lakeside site in southern Alberta on a night with a fine aurora display, through to the steps to processing a still image and assembling a time-lapse movie.
Tutorial #2 – Moonlit Nightscapes
This 28-minute tutorial takes you from a shoot at Waterton Lakes National Park on a bright moonlit night, to the steps for processing nightscapes using Camera Raw and Photoshop, with smart filters, adjustment layers and masks.
Tutorial #3 – Star Trails
This 35-minute tutorial takes you from a shoot at summer solstice at Dinosaur Provincial Park, then through the steps for stacking star trail stills and assembling star trail time-lapse movies, using specialized programs such as StarStaX and the Advanced Stacker Plus actions for Photoshop.
As always, enlarge to full screen for the HD versions. These are also viewable at my Vimeo channel.
In a “10 Steps” tutorial I review my tips for going from “raw to rave” in processing a nightscape or time-lapse sequence.
NOTE: Click on any of the screen shots below for a full-res version that will be easier to see.
In my preferred “workflow,” Steps 1 through 6 can be performed in either Photoshop (using its ancillary programs Bridge and Adobe Camera Raw) or in Adobe Lightroom. The Develop module of Lightroom is identical to Adobe Camera Raw (ACR for short).
However, my illustrations show Adobe Bridge, Camera Raw and Photoshop CC 2014. Turn to Photoshop to perform advanced filtering, masking and stacking (Steps 7 to 10).
To use Lightroom to assemble a time-lapse movie from processed Raw frames you need the third-party program LRTimelapse, described below. Otherwise, you need to export frames from Lightroom – or from Photoshop – as “intermediate” JPGs (see Step 6), then use other third party programs to assemble them into movies (Step 10B).
–
Step 1 – Bridge or Lightroom – Import & Select
Use Adobe Bridge (shown above) or Lightroom to import the images from your camera’s card.
As you do so you can add “metadata” to each image – your personal information, copyright, keywords, etc. As you import, you can also choose to convert and save images into the open and more universal Adobe DNG format, rather than keep them in the camera’s proprietary Raw format.
Once imported, you can review images, keeping the best and tossing the rest. Mark images with star ratings or colour labels, and group images together (called “stacking” in Bridge), such as frames for a panorama or “high dynamic range” set.
Always save images to both your working drive and to an external drive (which itself should automatically back up to yet another external drive). Never, ever save images to only one location.
–
Step 2 – Adobe Camera Raw or Lightroom – Basics
Open the Raw files you want to process. From Bridge, double click on raw images and they will open in ACR. In Lightroom select the images and switch to its Develop module.
In Adobe Camera Raw be sure to first set the Workflow Preset (the blue link at the bottom of the screen) to 16 bits/channel and ProPhoto RGB colour space, for maximum tonal range. This is a one-time setting. Lightroom defaults to 16-bit and the AdobeRGB colour space.
The Basics panel (the first tab) allows you to fix Exposure and White Balance. For the latter, use the White Balance Tool (the eyedropper, keyboard shortcut I) to click on an area that should be neutral in colour.
You can adjust Contrast, and recover details in the Highlights and Shadows (turn the latter up to show details in starlit landscapes). Clarity and Vibrance improves midrange contrast and colour intensity.
Use Command/Control Z to Undo, or double click on a slider to snap it back to zero. Or under the pull-down menu in the Presets tab go to Camera Raw Defaults to set all back to zero.
–
Step 3 – Adobe Camera Raw or Lightroom – Detail
The Detail panel allows you to set the noise reduction and sharpness as you like it, one of the benefits of shooting Raw.
Generally, settings of Sharpness: Amount 25, Radius 1 work well. Turn up Masking while holding the Option/Alt key to see what areas will be sharpened (they appear in white). There’s no need to sharpen blank, noisy sky, just the edge detail.
Setting Noise Reduction: Luminance to 30 to 50 and Color to 25, with others sliders left to their defaults works well for all but the noisiest of images. Luminance affects the overall graininess of the image. Color, also called chrominance, affects the coloured speckling. Turning the latter up too high wipes out star colours.
Turn up Color Smoothness, however, if the image has lots of large scale colour blotchiness.
Zoom in to at least 100% to see the effect of all noise reduction settings. Adobe Camera Raw and Lightroom have the best noise reduction in the business. Without it your images will be far noisier than they need to be.
–
Step 4 – Adobe Camera Raw or Lightroom – Lens Correction
Wide angle lenses, especially when used at fast apertures, suffer a lot from light falloff at the corners (called vignetting). There’s no need to have photos looking as if they were taken through a dark tunnel.
ACR or Lightroom can automatically detect what lens you used and apply a lens correction to brighten the corners, plus correct for other flaws such as chromatic aberration and lens distortion.
Use the Color tab to “Remove Chromatic Aberration” and dial up the Defringe sliders.
For lenses not in the database (manual lenses like the Rokinons and Samyangs will not be included, nor will any telescopes) use the Manual tab to dial in your own vignetting correction. This can take some trial-and-error to get right, but once you have it, save it as a Preset to apply in future to all photos from that lens or telescope.
I usually apply Lens Corrections as a first step, but sometimes find I have to back it off it as I boost the contrast under Basics.
–
Step 5 – Bridge or Lightroom – Copy & Paste
For a small number of images you could open them all, then Select All in ACR to apply the same settings to all images at the same time.
Or you can adjust one, then Select All and hit Synchronize.
Another method useful for processing dozens or hundreds of frames from a star trail or time-lapse set is to choose one representative image and process it. Then in Bridge choose Edit>Develop Settings>Copy Camera Raw Settings. If you are in Lightroom’s Library module, choose Photo>Develop Settings>Copy Settings.
With either program you can also right-click on an image to get to the same choices. Then select all the other images in the set (Command/Control A) and use the same menus to Paste Settings.
A dialog box comes up for choosing what settings you wish to transfer.
If you cropped the image (a good idea for images destined for an HD movie with a 16:9 aspect ratio), pick that option as well. In moments all your images get processed with identical settings. Nice!
–
Step 6 – Lightroom or Photoshop – Export
You now have a set of developed Raw images. However, the actual Raw files are never altered. They remain raw!
Instead, with Adobe Camera Raw the information on how you processed the images is stored in the “sidecar” XMP text files that live in the same folder as the Raw files.
In Lightroom’s case your settings are stored in its own database, unless you choose Metadata>Save Metadata to File (Command/Control S). In that case, Lightroom also writes the changes to the same XMP sidecar files.
To convert the images into final Photoshop PSDs, TIFFs or JPGs you have a couple of choices. In Lightroom go to the Library module and choose Export. It’s an easy way to export and convert hundreds of images, perhaps into a folder of smaller JPGs needed for assembling a time-lapse movie.
To do that from within Adobe Bridge, select the images, then go to Tools>Photoshop>Image Processor. The dialogue box allows you to choose how and where to export the images. Photoshop then opens, processes, and exports each image.
–
Step 7 – Photoshop – Smart Filters
For a folder of images intended to be stacked into star trails (Step 10A) or time-lapse movies (Step 10B), you’re done processing.
But individual nightscape images can often benefit from more advanced work in Photoshop. The next steps make use of a non-destructive workflow, allowing you to alter settings at any time after the fact. At no time do we actually change pixels.
One secret to doing that is to open an image in Photoshop and then select Layer>Smart Objects>Convert to Smart Object. Or go to Filter>Convert for Smart Filters.
OR … better yet, back in Adobe Camera Raw hold down the Shift key while clicking the Open Image button, so it becomes Open Object. That image will then open in Photoshop already as a Smart Object, which you can re-open and re-edit in ACR at any time later should you wish.
Either way, with the image as a Smart Object, you can now apply useful filters such as Reduce Noise, Smart Sharpen, and Dust & Scratches, plus third-party filters such as Nik Software’s Dfine 2 Noise Reduction, all non-destructively as “smart filters.” They can be re-adjusted or turned off at any time.
–
Step 8 – Photoshop – Adjustment Layers
The other secret to non-destructive processing is to apply adjustment layers.
Go to Layer>New Adjustment Layer, or click on any of the icons in the Adjustments panel. If that panel is not visible at right, then under the Window menu check “Adjustments.”
This panel is where you can alter the colour balance, the brightness and contrast, the vibrancy, and many other choices. I find Selective Color most useful for tweaking colour.
Curves allows you to bring up detail in dark areas. Levels allows setting the black and white points, and overall contrast.
The beauty of adjustment layers is that you can click on the layer’s little icon and bring up the dialog box for changing the setting at any time. You never permanently alter pixels.
The image adjustment “Shadows & Highlights” is also immensely useful, but appears as a smart filter, not as an adjustment layer. It’s one of the prime tools for creating images with great detail in scenes lit only by starlight.
–
Step 9 – Photoshop – Masks
The power of adjustment layers is that you can apply them to just portions of an image. This is useful in nightscapes where the sky and ground often need different processing.
To create a mask first select the region you want to work on. Try the Quick Selection Tool (found near the top of the Tool palette at left). Use it to brush across the sky, or the ground, so that the entire area is outlined by “marching ants.”
Use the Refine Edge option to tweak the selection by brushing across intricate areas such as tree branches.
Once you have an area selected, hit one of the Adjustments to add an adjustment layer with the mask automatically applied. Double click on the mask to tweak it: hit Mask Edge to clean up the edge, or turn up the Feather to blur the edge.
To apply the same mask to another adjustment layer, drag the mask from one layer to another while holding down the Option/Alt key.
Invert the mask (or select it and hit Command/Control I) to apply it to the other half of the image. Paint the mask with black or white brushes if you need manually alter it. Remember – black “conceals,” while white “reveals.”
When done, be sure to always save the image as a layered “master” .PSD file.
Never, ever flatten and save – that will wipe out all your non-destructive filters and adjustment layers.
If you need to save the image as a JPG for social mediia or emailing, then Flatten and Save As … Or use Photoshop’s File>Export>Export As .. function.
–
Stars setting in trails over the Athabasca Glacier and Columbia Icefields, Sept 14, 2014. The Milky Way is trailed at right. This is a stack of 100 exposures, composited with Advanced Stacker Plus actions in Photoshop, with the ground coming from a subset stack of 8 images to reduce noise. Each exposure, taken as part of a time-lapse sequence, was 45 seconds at f/2.8 with the 16-35mm lens at 23mm and Canon 6D at ISO 4000.
Step 10A – Photoshop or 3rd Party Programs – Stack for Star Trails
One popular way to shoot images of stars trailing in arcs across the sky is to shoot dozens or hundreds of well-exposed frames at a fairly high ISO and wide aperture, and at a shutter speed no longer than 30 to 60 seconds. You then “stack” the images to create the equivalent of one frame shot for many minutes, if not an hour or more. The image above is an example.
There are several ways to stack.
From within Photoshop CC (or using an Extended version of the older CS5 or CS6) one method is to go to File>Scripts>Statistics. In the dialog box, drill down to the images you wish to stack (put them all in one folder) and choose Stack Mode: Maximum, and uncheck “Attempt to Automatically Align.” The result is a huge (!) smart object. This method works best on just a few dozen images. In this case, you’ll need to use Layers>Flatten to reduce its size.
Other options for stacking hundreds of images include the free program StarStax (Windows and Mac), which requires a folder of “intermediate” TIFFs or JPGs. See Step 6 above.
The Advanced Stacker Actionsfrom Star Circle Academy are actions you install in Photoshop that work directly from Raw files to create some impressive effects. I use them and recommend them.
–
Step 10B – Photoshop or 3rd Party Programs – Assemble for Movies
The same folder of images taken for star trail stacking can also be turned into a time-lapse movie. Instead of stacking the images on top of one another in space, you string them together one after the other in time.
There are many methods for assembling movies. Free or low cost programs such as Quicktime 7 Pro, Time-Lapse Assembler, Sequence (a Mac program shown above), VirtualDub, or Time-Lapse Tool can do the job, all offering options for the final movie’s format.
Generally, an HD video of 1920×1080 pixels in the H264 format, or “codec,” is best, rendered at 15 to 30 frames per second.
Most movie assembly programs will need to work from a folder of JPGs of the right size, produced using one of the choices listed under Step 6: Export.
But … you can also use Photoshop to assemble a movie.
Choose the Window>Workspace>Motion to bring up a video timeline. Then File>Open to drill to your folder of processed and down-sized JPG files. Select one image, then check “Image Sequence.” Choose the frame rate (15 to 30 fps is best). Then go to File>Export>Render Video to turn the resulting file into a final H264 or Quicktime movie suitable for use in other movie editing programs.
–
Advanced Techniques: Using LRTimelapse
The workflow I’ve outlined works great when you can apply the same development settings to all the images in a folder. For star trail and time-lapse sequences shot once it gets dark and under similar lighting conditions that will be the case.
But if the Moon rises or sets during the shoot, or if you are taking a much more demanding sequence that runs from sunset to night, the same settings won’t work for all frames.
The answer is to turn to the program LRTimelapse (100 Euros for the standard version, and available in a free but limited trial copy). LRTimelapse works with either Lightroom or Bridge/Adobe Camera Raw.
To use it you process just a few selected “keyframes” – at least two, at the start and end of the sequence, and perhaps other frames throughout the sequence, processing them so each frame looks great. You read that processing data into LRTimelapse and, like magic, it interpolates your settings, creating a folder of images with every setting changing incrementally from frame to frame, something you could never do by hand.
It can then work with Lightroom to export the frames out to a video in formats from HD up to 4K in size. For serious time-lapse work, LRTimelapse is an essential tool.
–
Much, much more information and tutorials are included in my multimedia Apple eBook, linked to below.
But I hope this quick tutorial helps in providing you with tips to make your images and movies even better! If you found it useful, please feel free to share a link to this blog page through your social media channels. Thanks!
My multiple-exposure composite shows the complete September 27, 2015 total lunar eclipse to true scale, with the Moon accurately depicted in size and position in the sky.
From my location at Writing-on-Stone Provincial Park in southern Alberta, Canada, the Moon rose in the east at lower left already in partial eclipse.
As it rose it moved into Earth’s shadow and became more red, while the sky darkened from twilight to night, bringing out the stars.
Then, as the Moon continued to rise higher it emerged from Earth’s shadow, at upper right, and returned to a brilliant Full Moon again, here overexposed and now illuminating the landscape with moonlight.
TECHNICAL
The disks of the Moon become overexposed in my composite as the sky darkened because I was setting exposures to show the sky and landscape well, not just the Moon itself. That’s because I shot these frames – and many more! – primarily for use as a time-lapse movie where I wanted the entire scene well exposed in each frame.
Indeed, for this still-image composite of the eclipse from beginning to end, I used just 40 frames taken at 5-minute intervals, selected from 530 I shot, taken at 15- to 30-second intervals for the full time-lapse sequence.
All were taken with a fixed camera, a Canon 6D, with a 35mm lens, to nicely frame the entire path of the Moon, from moonrise at lower left, until it exited the frame at top right, as the partial eclipse was ending.
In the interest of full disclosure, the ground comes from a blend of three frames taken at the beginning, middle, and end of the sequence, and so is partly lit by twilight and moonlight, to reveal the ground detail better than in the single starlit frame from mid-eclipse. Lights at lower left are from the Park’s campground.
The background sky comes from a blend of two exposures: one from the middle of the eclipse when the sky was darkest, and one from the end of the eclipse when the sky was now lit deep blue. The stars come from the mid-eclipse frame, a 30-second exposure.
MY RANT FOR REALITY
So, yes, this is certainly a composite assembled in Photoshop – a contrast to the old days of film where one might attempt such an image just by exposing the same piece of film multiple times, usually with little success.
However … the difference between this image and most you’ve seen on the web of this and other eclipses, is that the size of the Moon and its path across the sky are accurate, because all the images for this composite were taken with the same lens using a camera that did not move during the 3-hour eclipse.
This is how big the Moon actually appeared in the sky in relation to the ground and how it moved across the sky during the eclipse, in what is essentially a straight line, not a giant curving arc as in many viral eclipse images.
And, sorry if the size of the Moon seems disappointingly small, but it is small! This is what a lunar eclipse really looks like to correct scale.
By comparison, many lunar eclipse composites you’ve seen are made of giant moons shot with a telephoto lens that the photographer then pasted into a wide-angle sky scene, often badly, and pasted in locations on the frame that usually bear no resemblance to where the Moon actually was in the sky, but are just placed where the photographer thought would look the nicest.
You would never, ever do that for any other form of landscape photography, at least not without having your reputation tarnished. But with the Moon it seems anything is permitted, even amongst professional landscape photographers.
No, you cannot just place a Moon anywhere you like in your image, eclipse or no eclipse, then pass it off as a real image. Fantasy art perhaps. Fine. But not a photograph of nature.
Sorry for the rant, but I prefer accuracy over fantasy in such lunar eclipse scenes, which means NOT having monster-sized red Moons looming out of proportion and in the wrong place over a landscape. Use Photoshop to inform, not deceive.
It was a good year for Perseid meteors, as they shot across the sky in abundance on dark-of-the-Moon nights.
Last week, August 11 and 12 proved to be superb for weather in southern Alberta, with clear skies and warm temperatures perfect for a night of watching and shooting meteors.
On both nights I had identical camera rigs running, all from my rural backyard. These images are from the peak night, Wednesday, August 12.
The main image at top is with a 15mm ultra wide lens, on a camera that was tracking the sky as it turned. Like many meteor photos these days it is a layered stack of many images, in this case 35, to put as many meteors as possible onto one frame.
While the result does illustrate the effect of meteors streaking away from the radiant point, here in Perseus, it does lend a false impression of what the shower was like. It took me 3.5 hours of shooting to capture all of those meteors.
Note the aurora as well.
With this camera I used a wide 14mm lens, but with the camera on a fixed tripod. I again blended frames, 16 of them, to show the meteors radiating from Perseus.
Because the camera was not tracking the sky, later in Photoshop I rotated each frame relative to a lower “base-level” image, rotating them around Polaris at top as the sky does, in order to line up the stars and have the meteors appear in their correct position relative to the background stars and radiant point.
Note the errant bright “sporadic” meteor not part of the shower.
Camera number 3 was aimed straight up for 3.5 hours, toward Cygnus and the Summer Triangle, in hopes of nabbing that brilliant fireball streaking down the Milky Way. I got a nice “rain of meteors” effect but the bright bolide meteor eluded me.
This was certainly the best year for the Perseids in some time, with it coinciding with New Moon.
Later this year, the Geminids will also put on a good show at nearly New Moon, on the nights of December 13 and 14. So if you liked, or missed, the Perseids, take note of the dates in December.
However, for many of us, a Geminid watch is a very, cold and snowy affair!
The Big Dipper and the Pole Star shine above the moonlit historic Hearst Church.
Tuesday was a productive evening of shooting in the moonlight. One of the best from the night pictures the Hearst Church in the rustic town of Pinos Altos in the Gila Forest of southern New Mexico.
The Big Dipper stars shine at right, with the Pointer stars in the Bowl aiming at Polaris above the Church. Illumination is from a waxing quarter Moon and from some decorative lights in the yard next door across the street.
The Hearst Church was opened in May 1898 and indeed is named for the famous Hearst family. Money to build the church was raised by the local mining families with a major donation from Phoebe Hearst, wife of the mining magnate and senator George Hearst. Phoebe was also mother to newspaper tychoon William Randolph Hearst, the inspiration for Orson Welles’ movie Citizen Kane. Gold that decorates Hearst’s mansion in California came from the family mine near Pinos Altos.
As the mining boom went bust the Methodist church lost its pastor then its congregation. It is now an art gallery and home to the Grant County Art Guild. See their website for details on the historic church.
While I know many of my blog’s followers enjoy the photos for their own sake, lots of folks also like to learn more about the technical aspects of the images.
So with this blog, and selected others in future, I’ll present a bit more of the “how-to” information.
How the Image Was Shot and Processed
Taking the image could not have been simpler. It is a single 45-second exposure at f/2.8 with the 24mm lens and Canon 6D at ISO 800, on a static tripod, about as basic as you get for nightscape shooting. There is no fancy stacking or compositing.
The trick is still in the processing, however. Here is a breakdown of the Photoshop CC 2014 file and its various layers. Every aspect of the processing is non-destructive. No pixels were ever harmed in the process. Every adjustment can be tweaked and modified after the fact.
< Star spikes top layer added with “Astronomy Tools” actions from Noel Carboni.
< Sharpening layer created from stamping the final layers into one layer using the Command-Option-Shift-E command, then a High Pass filter applied, blended with Soft Light and masked to sharpen just the ground.
< Adjustment layers for colour, brightness & contrast, and levels, applied to the sky and ground separately with masks, created using Quick Selection Tool and Refine Edge.
< A Clone & Heal layer for wiping out the power lines & power pole, using the Patch & Spot Healing Tools.
< The base image, opened from the developed Raw file as a Smart Object, with noise reduction and sharpening applied as Smart Filters.
I know this won’t explain all the processing steps but I hope it provides some idea of what goes into a nightscape.
All this and much more will be explained in an upcoming half-day “Photoshop for Astronomy” Workshop I’m presenting Saturday, May 9. If you are in the Calgary, Alberta area, consider joining us. For details and to register, see the All-Star Telescope web page.
Also, my ebook featured below has all the details on shooting and processing images like these.
Here are both the heart and the soul of Cassiopeia the Queen.
Two days ago I posted an image of the Soul Nebula. Now, here is the matching Heart Nebula, in a mosaic of the glorious region of the Milky Way called the Heart and Soul Nebulas located in the constellation of Cassiopeia.
They are otherwise respectively called IC 1805 and IC 1848. Amid the swirls of nebulosity are numerous clusters of stars, such as NGC 1027 just above centre. The separate patch of nebulosity at upper right is NGC 896.
I shot the frames for this 3-segment mosaic over two nights, with one segment taken from the frames that made up the previous post. Plus I shot two others to span the region of the Milky Way that is about seven degrees long, a binocular field.
Each of the 3 segments is a stack of 12 frames, with each frame a 6-minute exposure. I used the filter-modified Canon 5D MkII and shot through the TMB 92mm apo refractor at f/4.4. All processing was in Photoshop, including the mosaic assembly.
In all, it’s the best image I’ve taken of this much-shot area of the sky. It really brings out the diversity in star colours, and sky colours, from the dusty orange-brown region at left, to the inky dark dustless region at far right.
The Soul Nebula glows from within the constellation of Cassiopeia the Queen.
I shot this image last night, capturing an object prosaically known as IC 1848, but more popularly called the Soul Nebula.
It is often depicted framed with a companion nebula just “off camera” here to the right, called the Heart Nebula. Thus they are the Heart and Soul. Both shine on the eastern side of Cassiopeia the Queen.
Here I’m framing just the Soul, taking in some of the faint nebulosity to the left of the main nebula, including a tiny object called IC 289, a star-like planetary nebula at upper left.
I like this image for its variety of subtle colours, not only the reds and magentas in the bright nebula, but also in the dark sky around it from dim dust adding faint yellows, browns and even a touch of green.
The Soul Nebula lies 6,500 light years away in the Perseus Arm, the next spiral arm out from ours in the Milky Way. On northern autumn nights this region of the sky and Milky Way lies high overhead.
For the technically minded:
The image is a stack of 20 six-minute exposures, taken with a filter-modified Canon 5D Mark II at ISO 800. I was shooting through one of my favourite telescopes for deep-sky photography, the TMB (Thomas M. Back-designed) 92mm apo refractor, working at a fast f/4.4 using a Borg 0.85x field flattener and focal reducer.
I used one of Noel Carboni’s “Astronomy Tools” Photoshop actions to add the “diffraction spikes” on the stars. They are artificial (refractors don’t produce spikes on stars) but they add a photogenic touch to a rich starfield.
I shot this from the backyard of my New Mexico winter home.
What a spectacular sunset tonight. The Sun is just going down in a blaze of red, while the waxing Moon shines in the deep blue twilight.
I grabbed the camera fast when I saw this happening out my front window, and raced out to the ripening wheat field across the road.
The top image is a 360° panorama of the sky, with the Sun at right and the Moon left of centre. The zenith is along the top of the image.
I used a 14mm lens in portrait mode to cover the scene from below the horizon to the zenith, taking 7 segments to sweep around the scene.
You can see the darkening of the sky at centre, 90° away from the Sun, due to natural polarization of the skylight.
I shot this sunset image a little earlier, when the Sun was higher but still deep red in the smoky haze that has marked the sky of late. It certainly gives the scene a divine appearance!
This is a 5-exposure high-dynamic-range composite to capture the tonal range from bright sky to darker ground, the wheat field. I increased the contrast to bring out the cloud shadows – crepuscular rays.
I boosted colour vibrancy but didn’t alter the actual colours – it was a superb sky.
I used PTGui v10 to stitch the panorama at top and Photomatix Pro to stack and tone the HDR set. While Photoshop is wonderful it did not work for assembling either of these images.


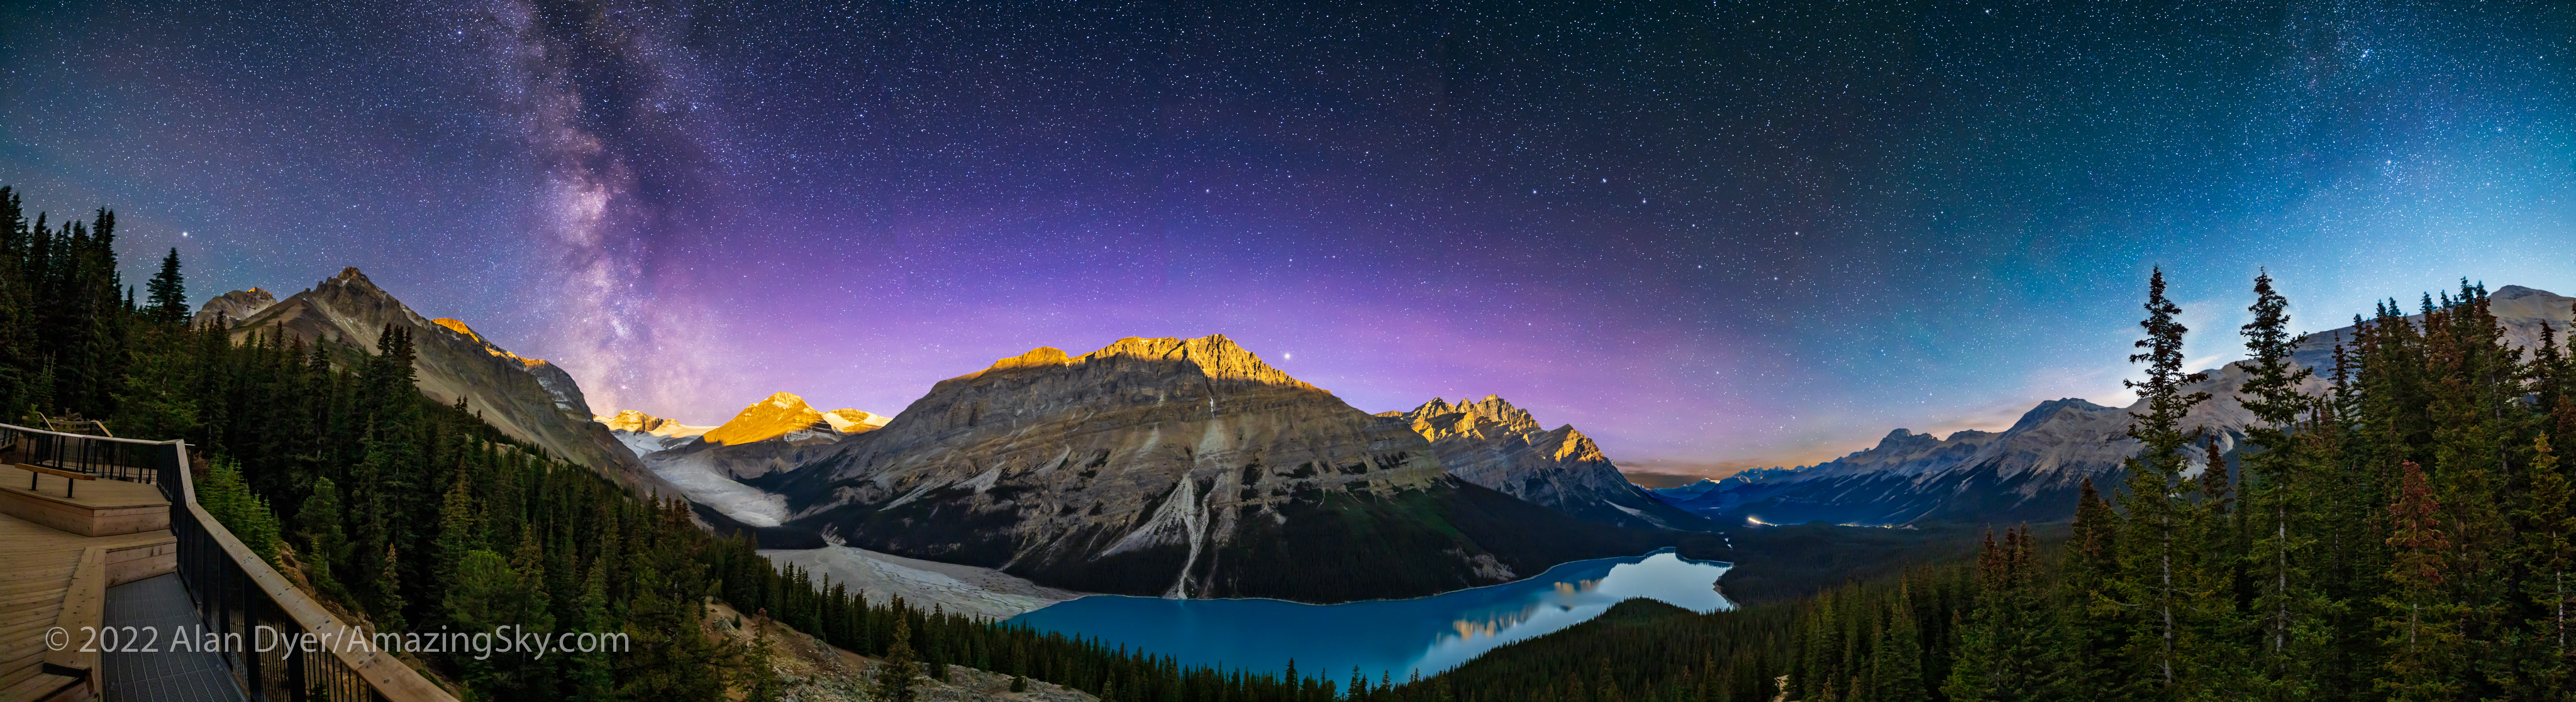
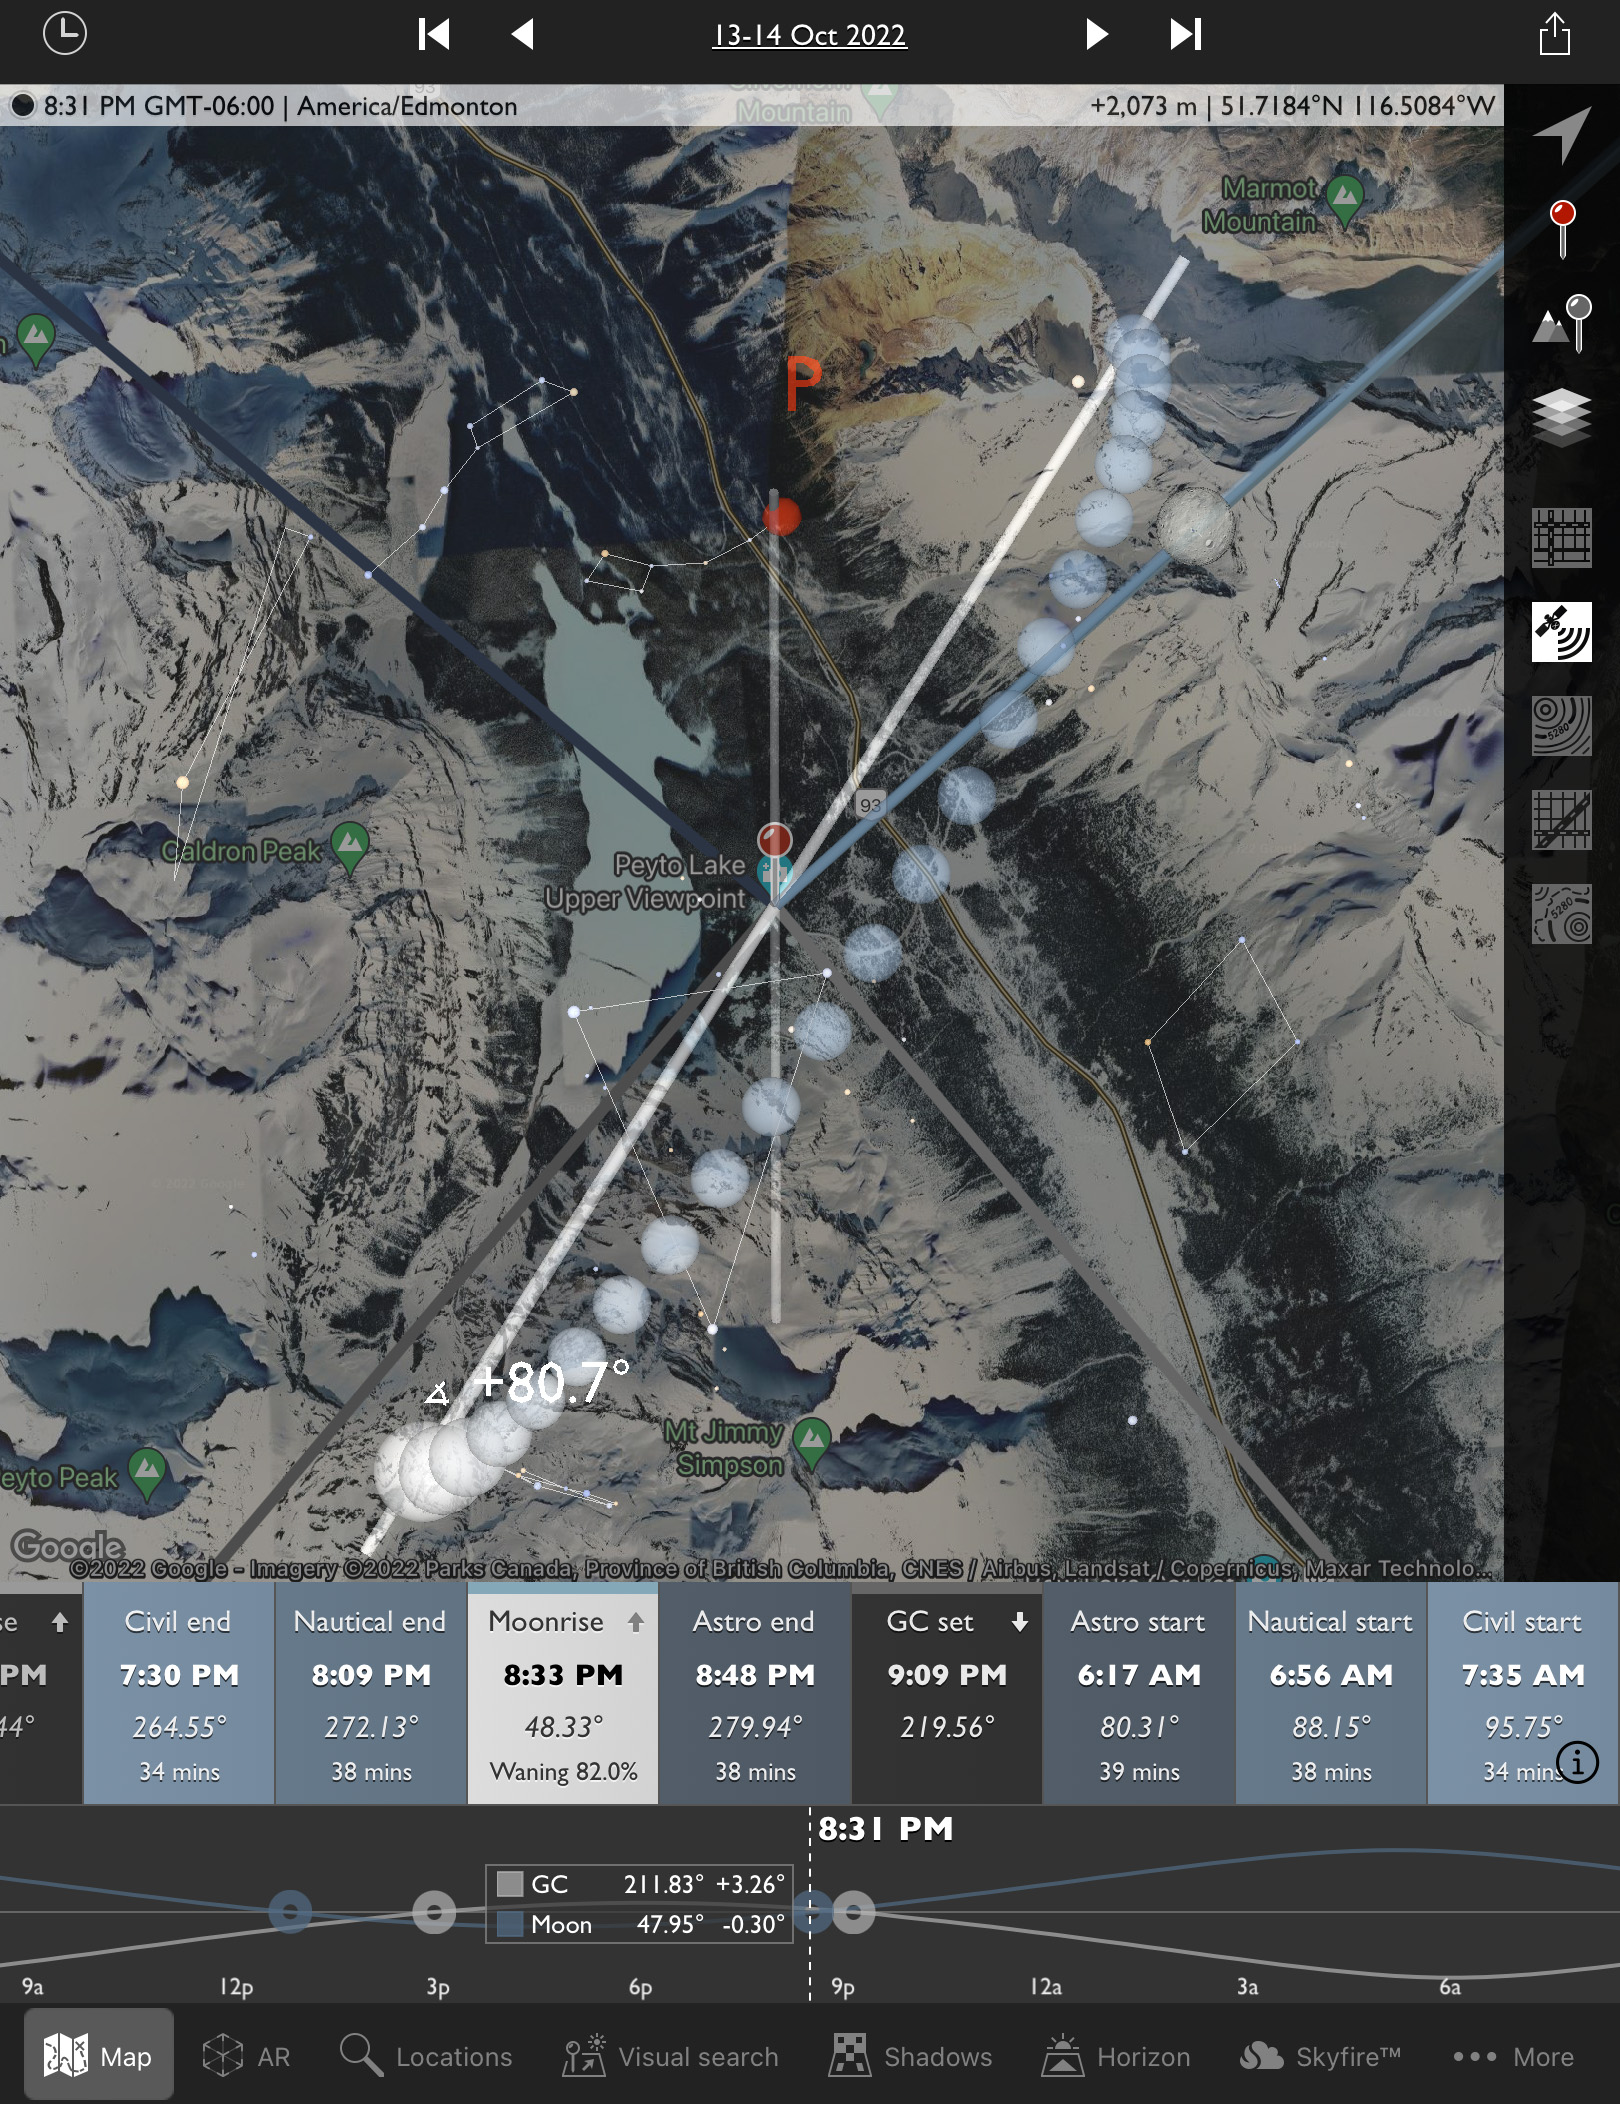

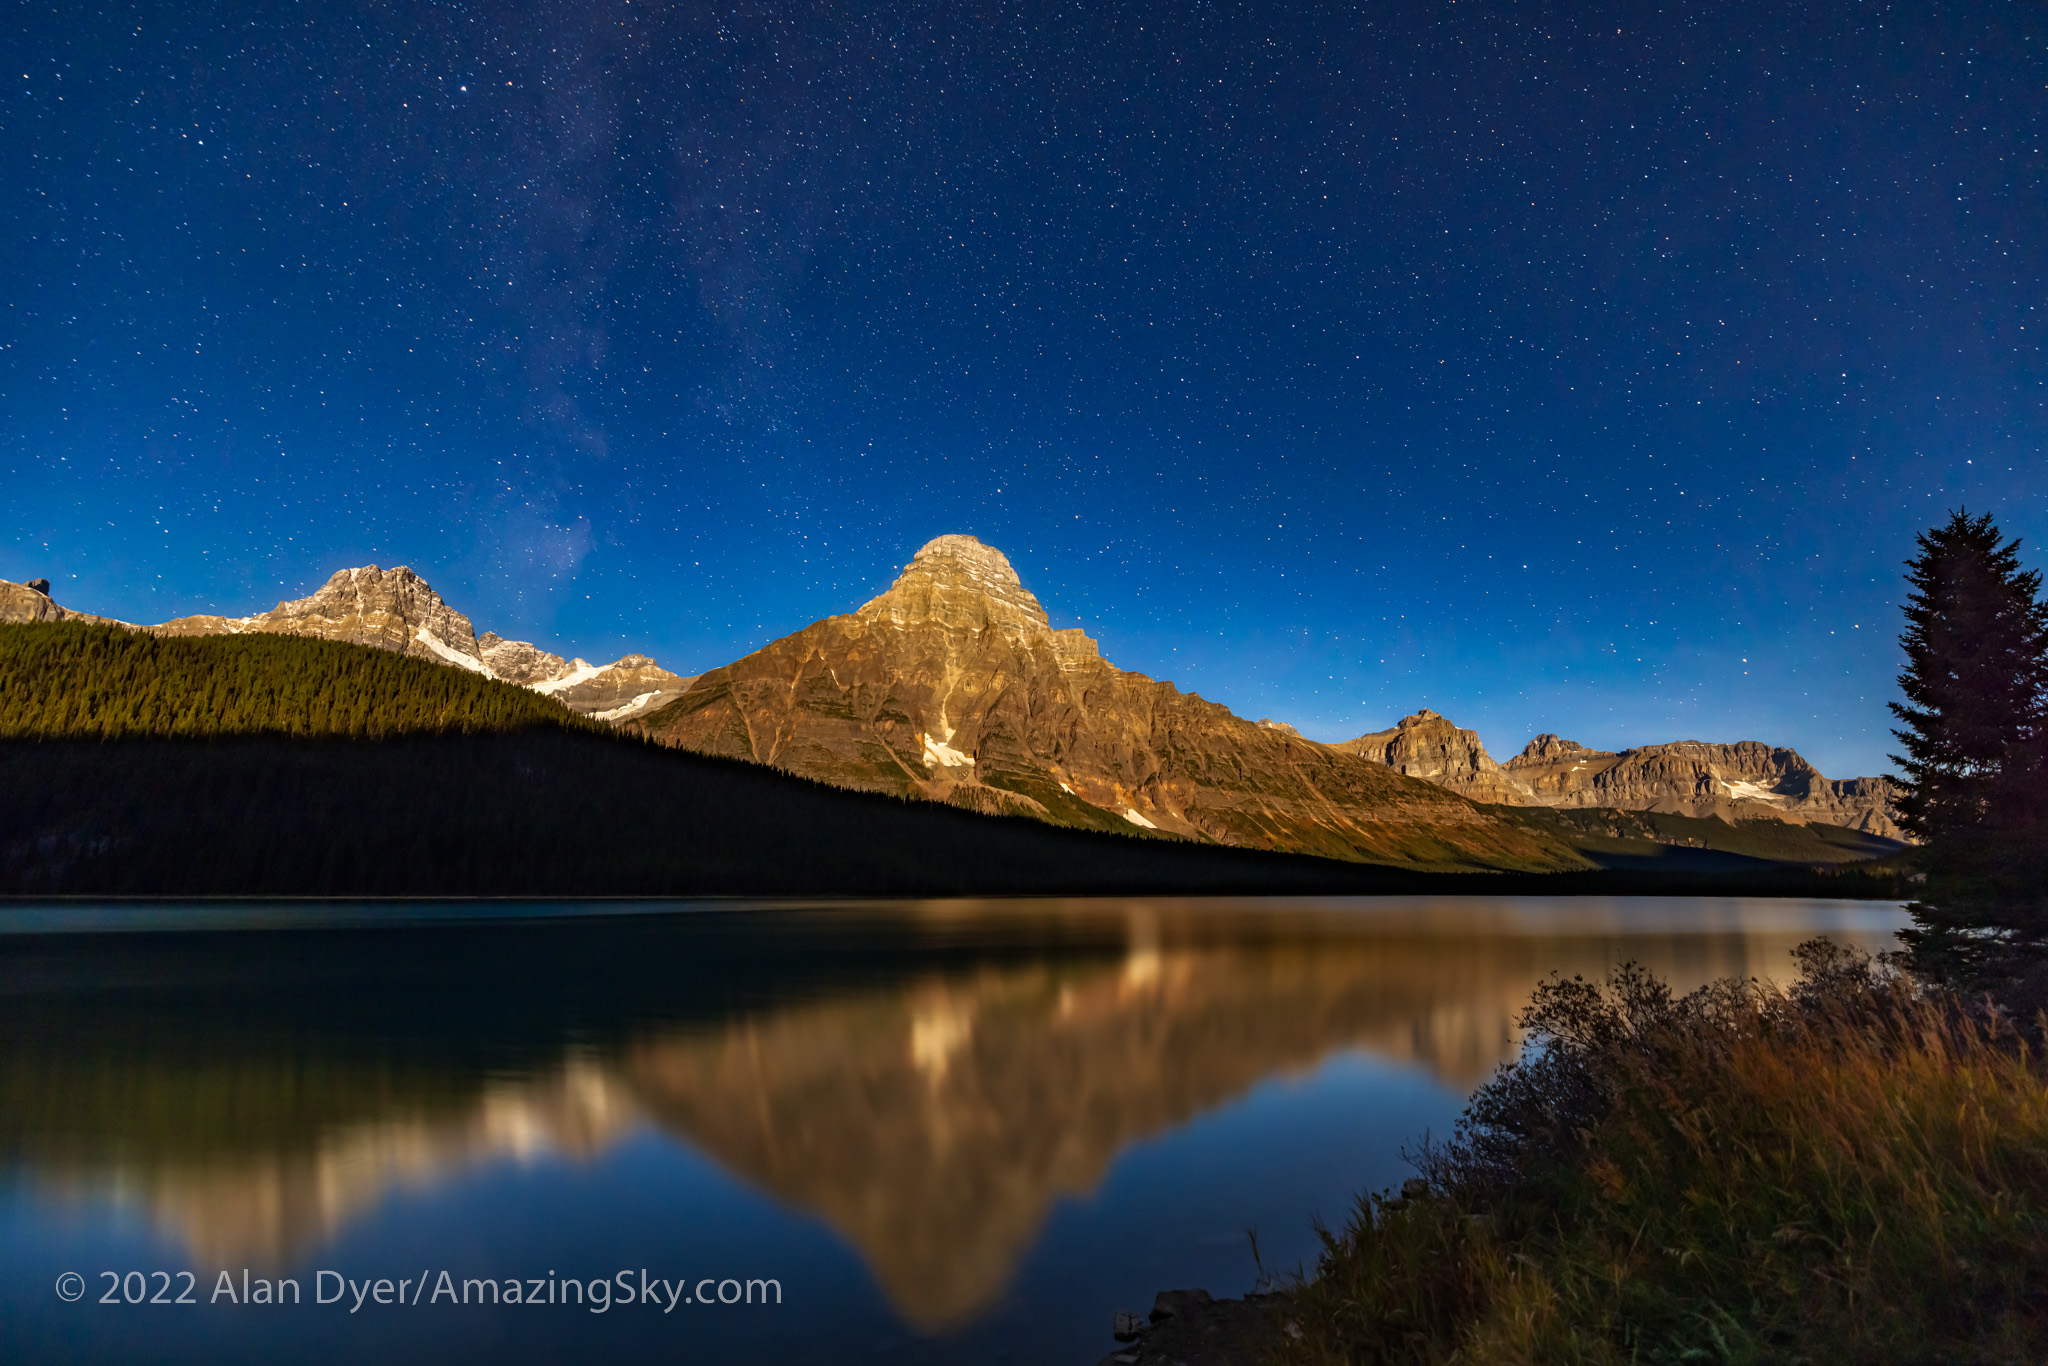
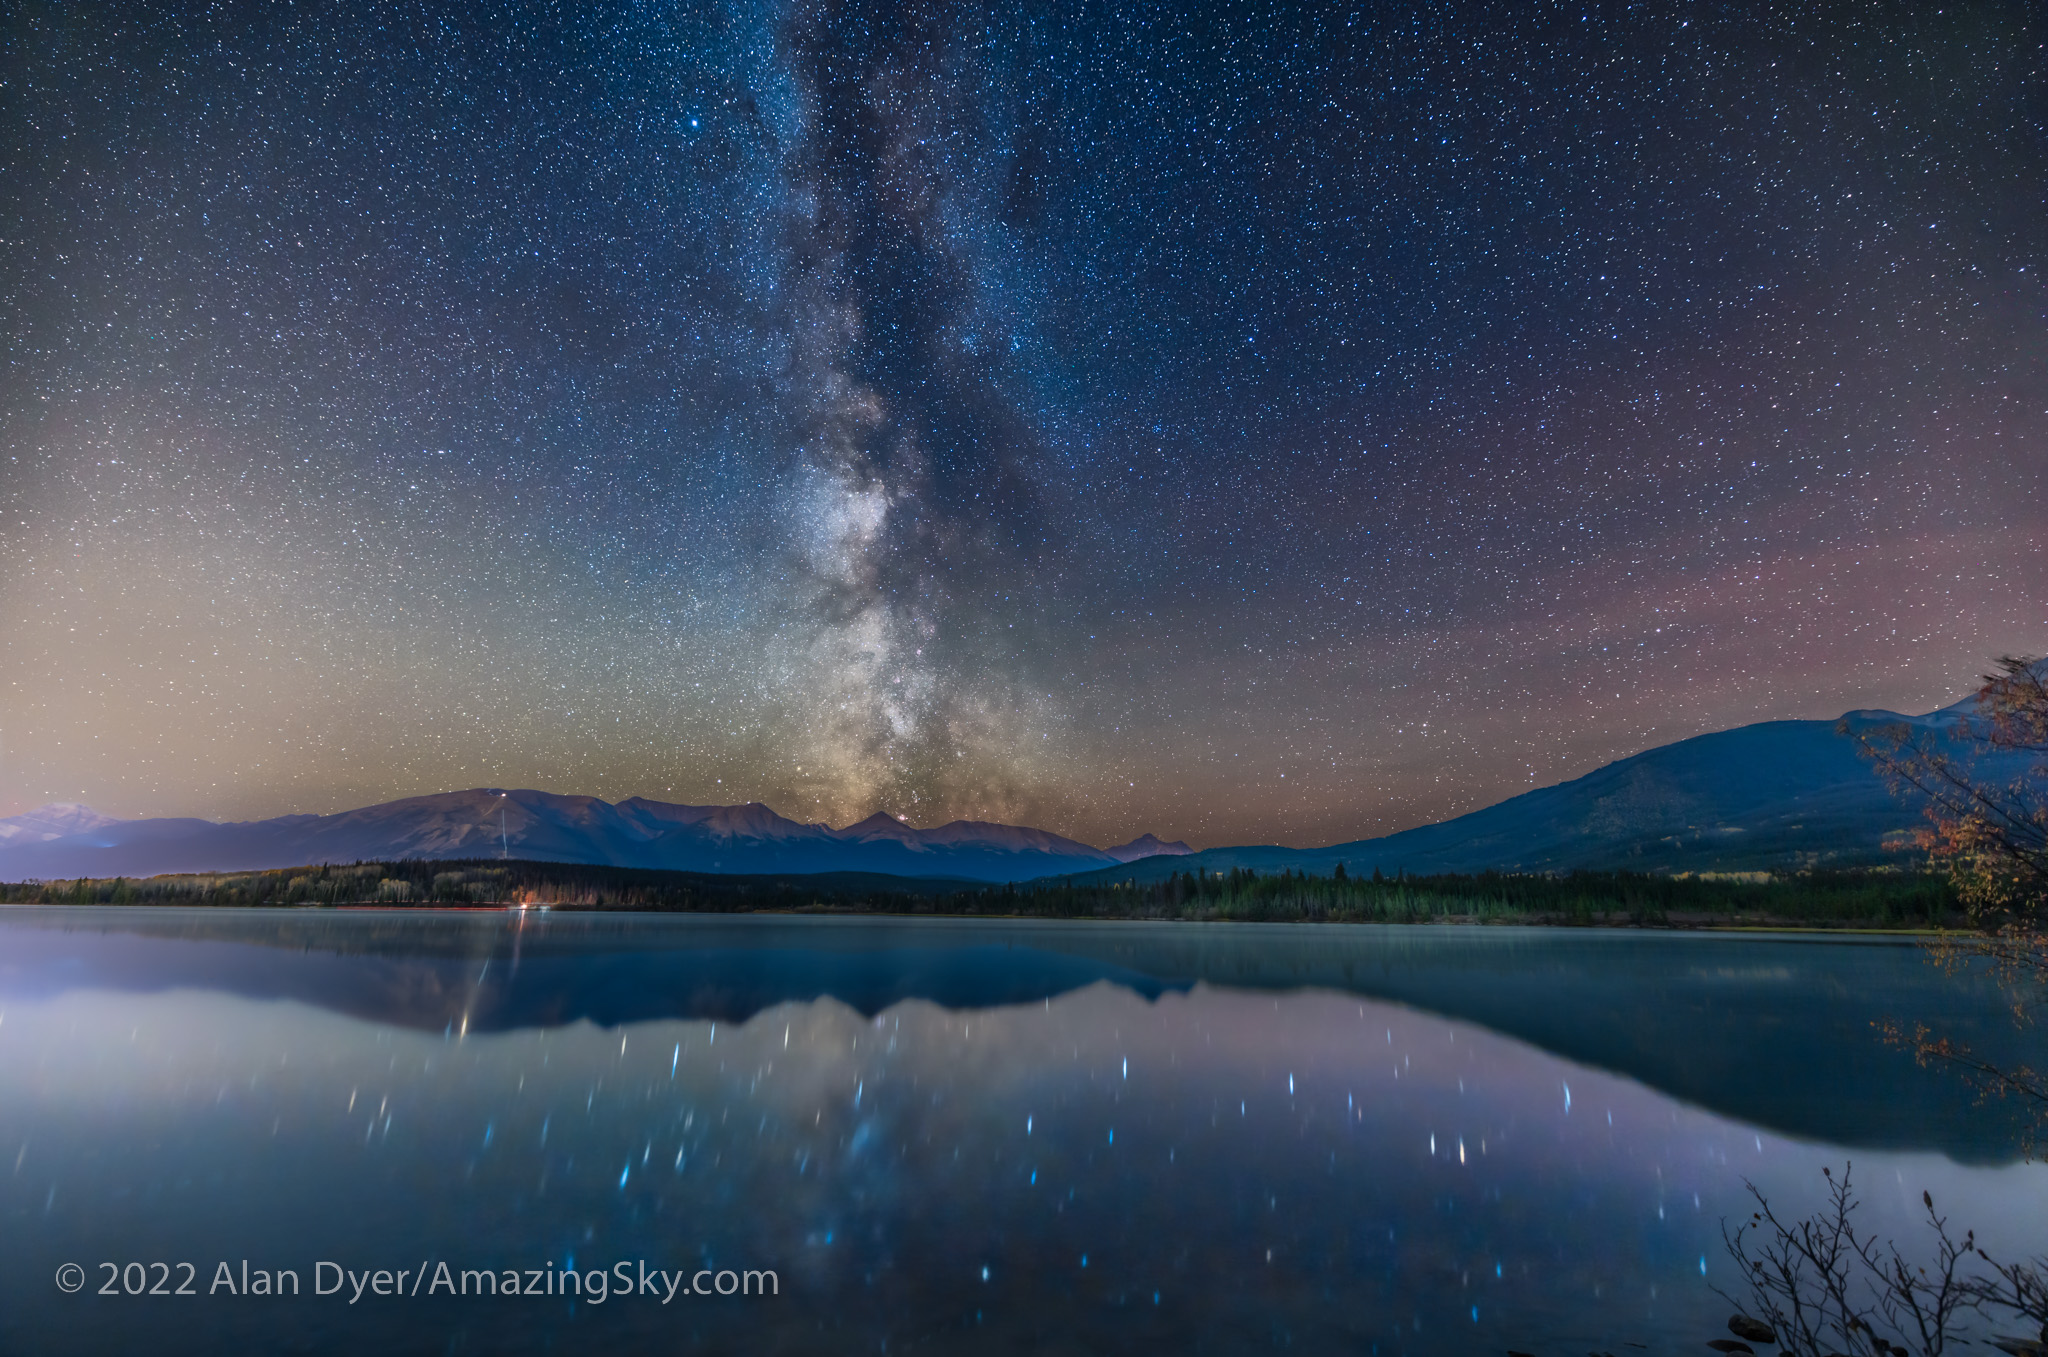
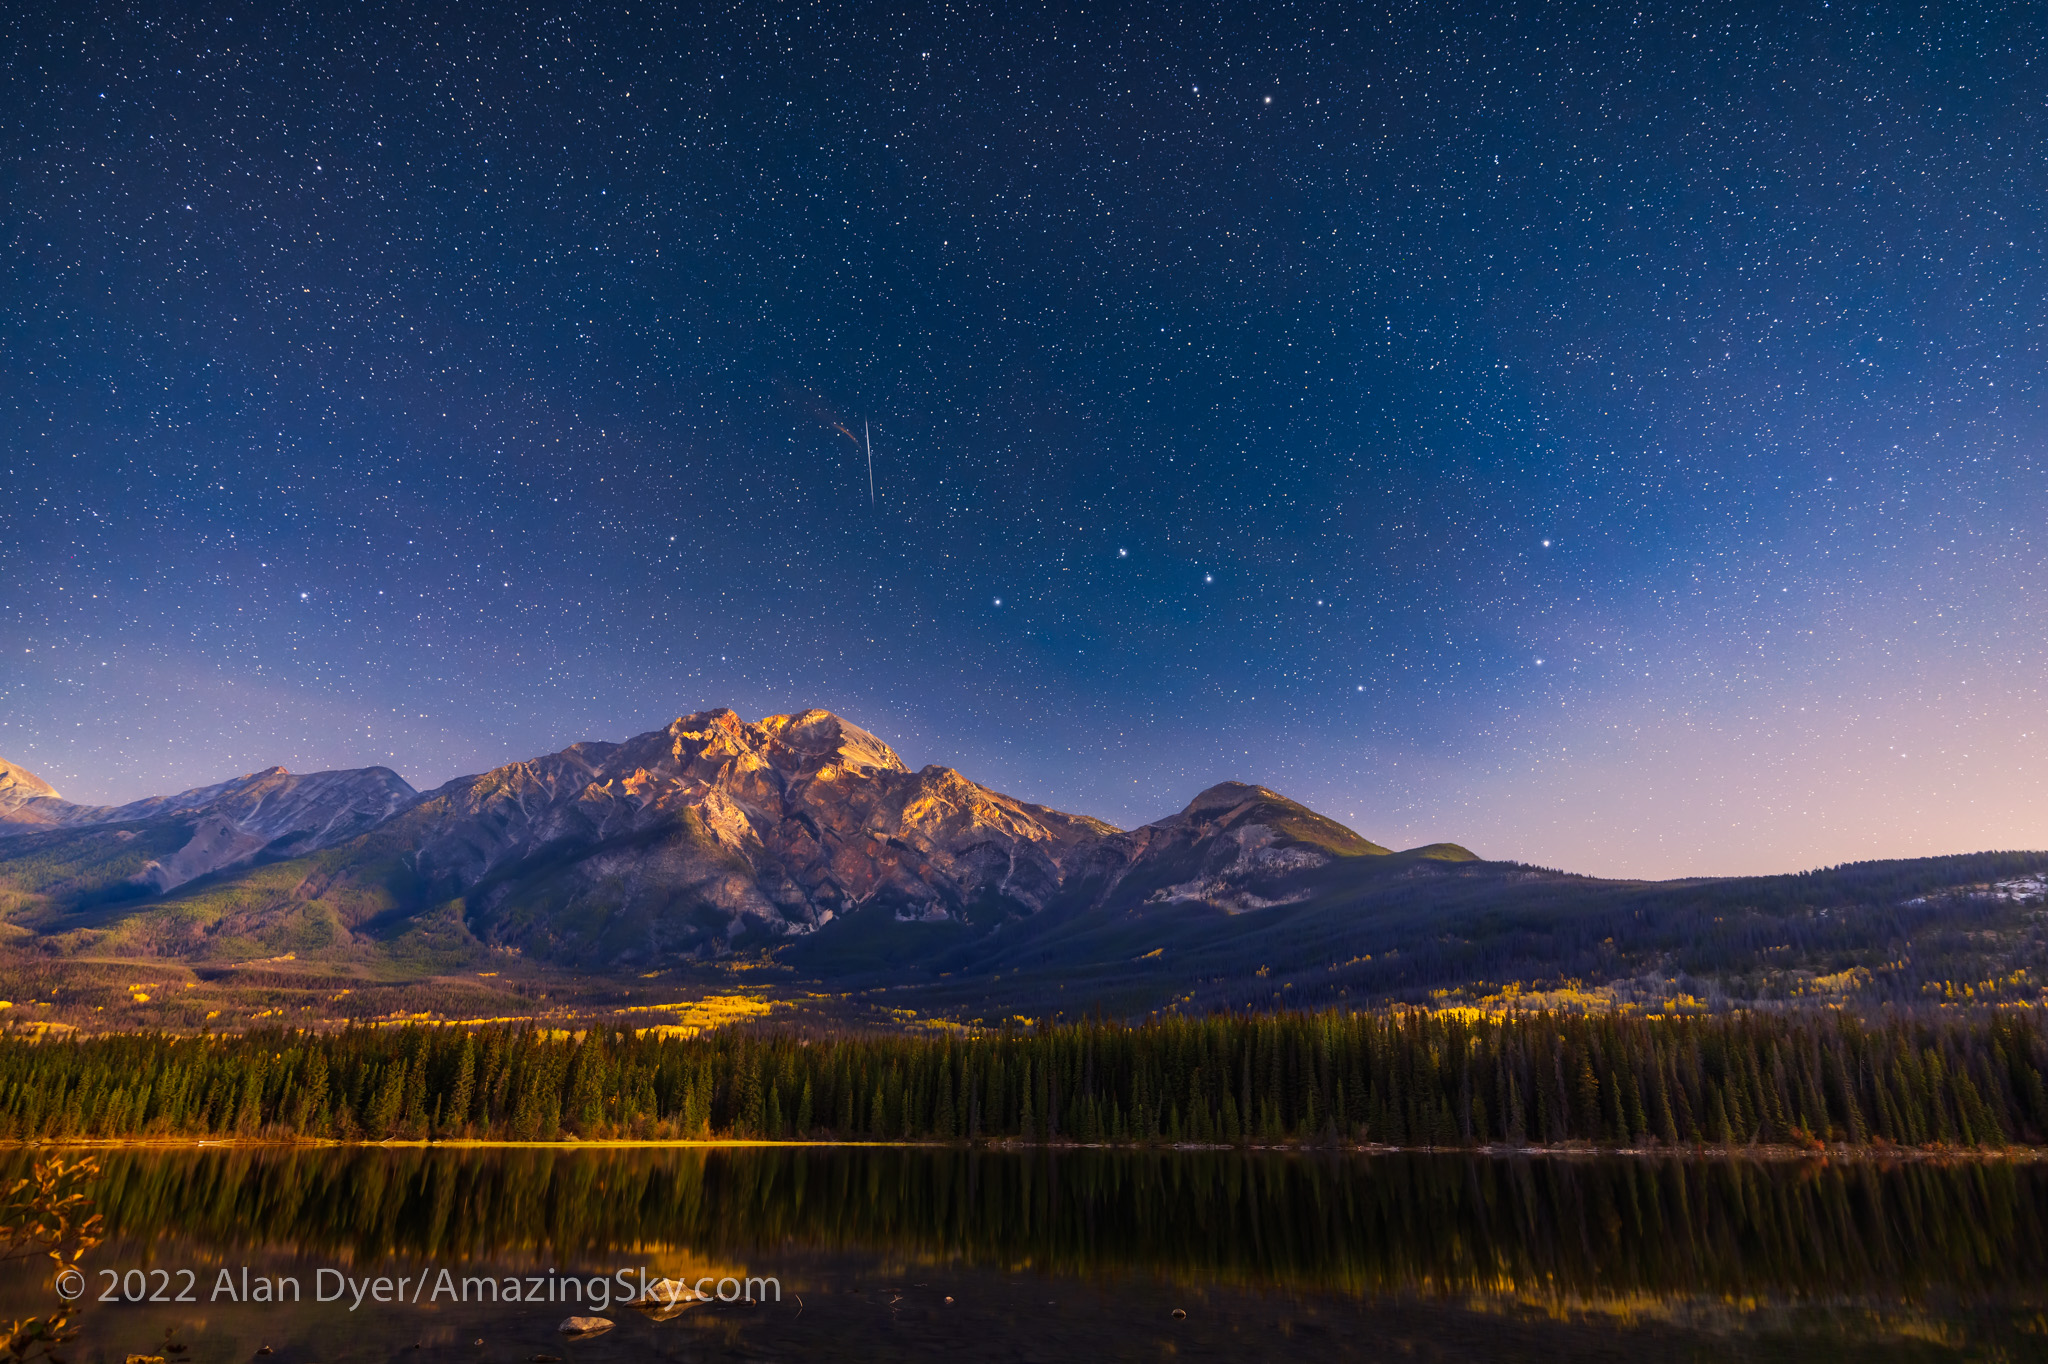
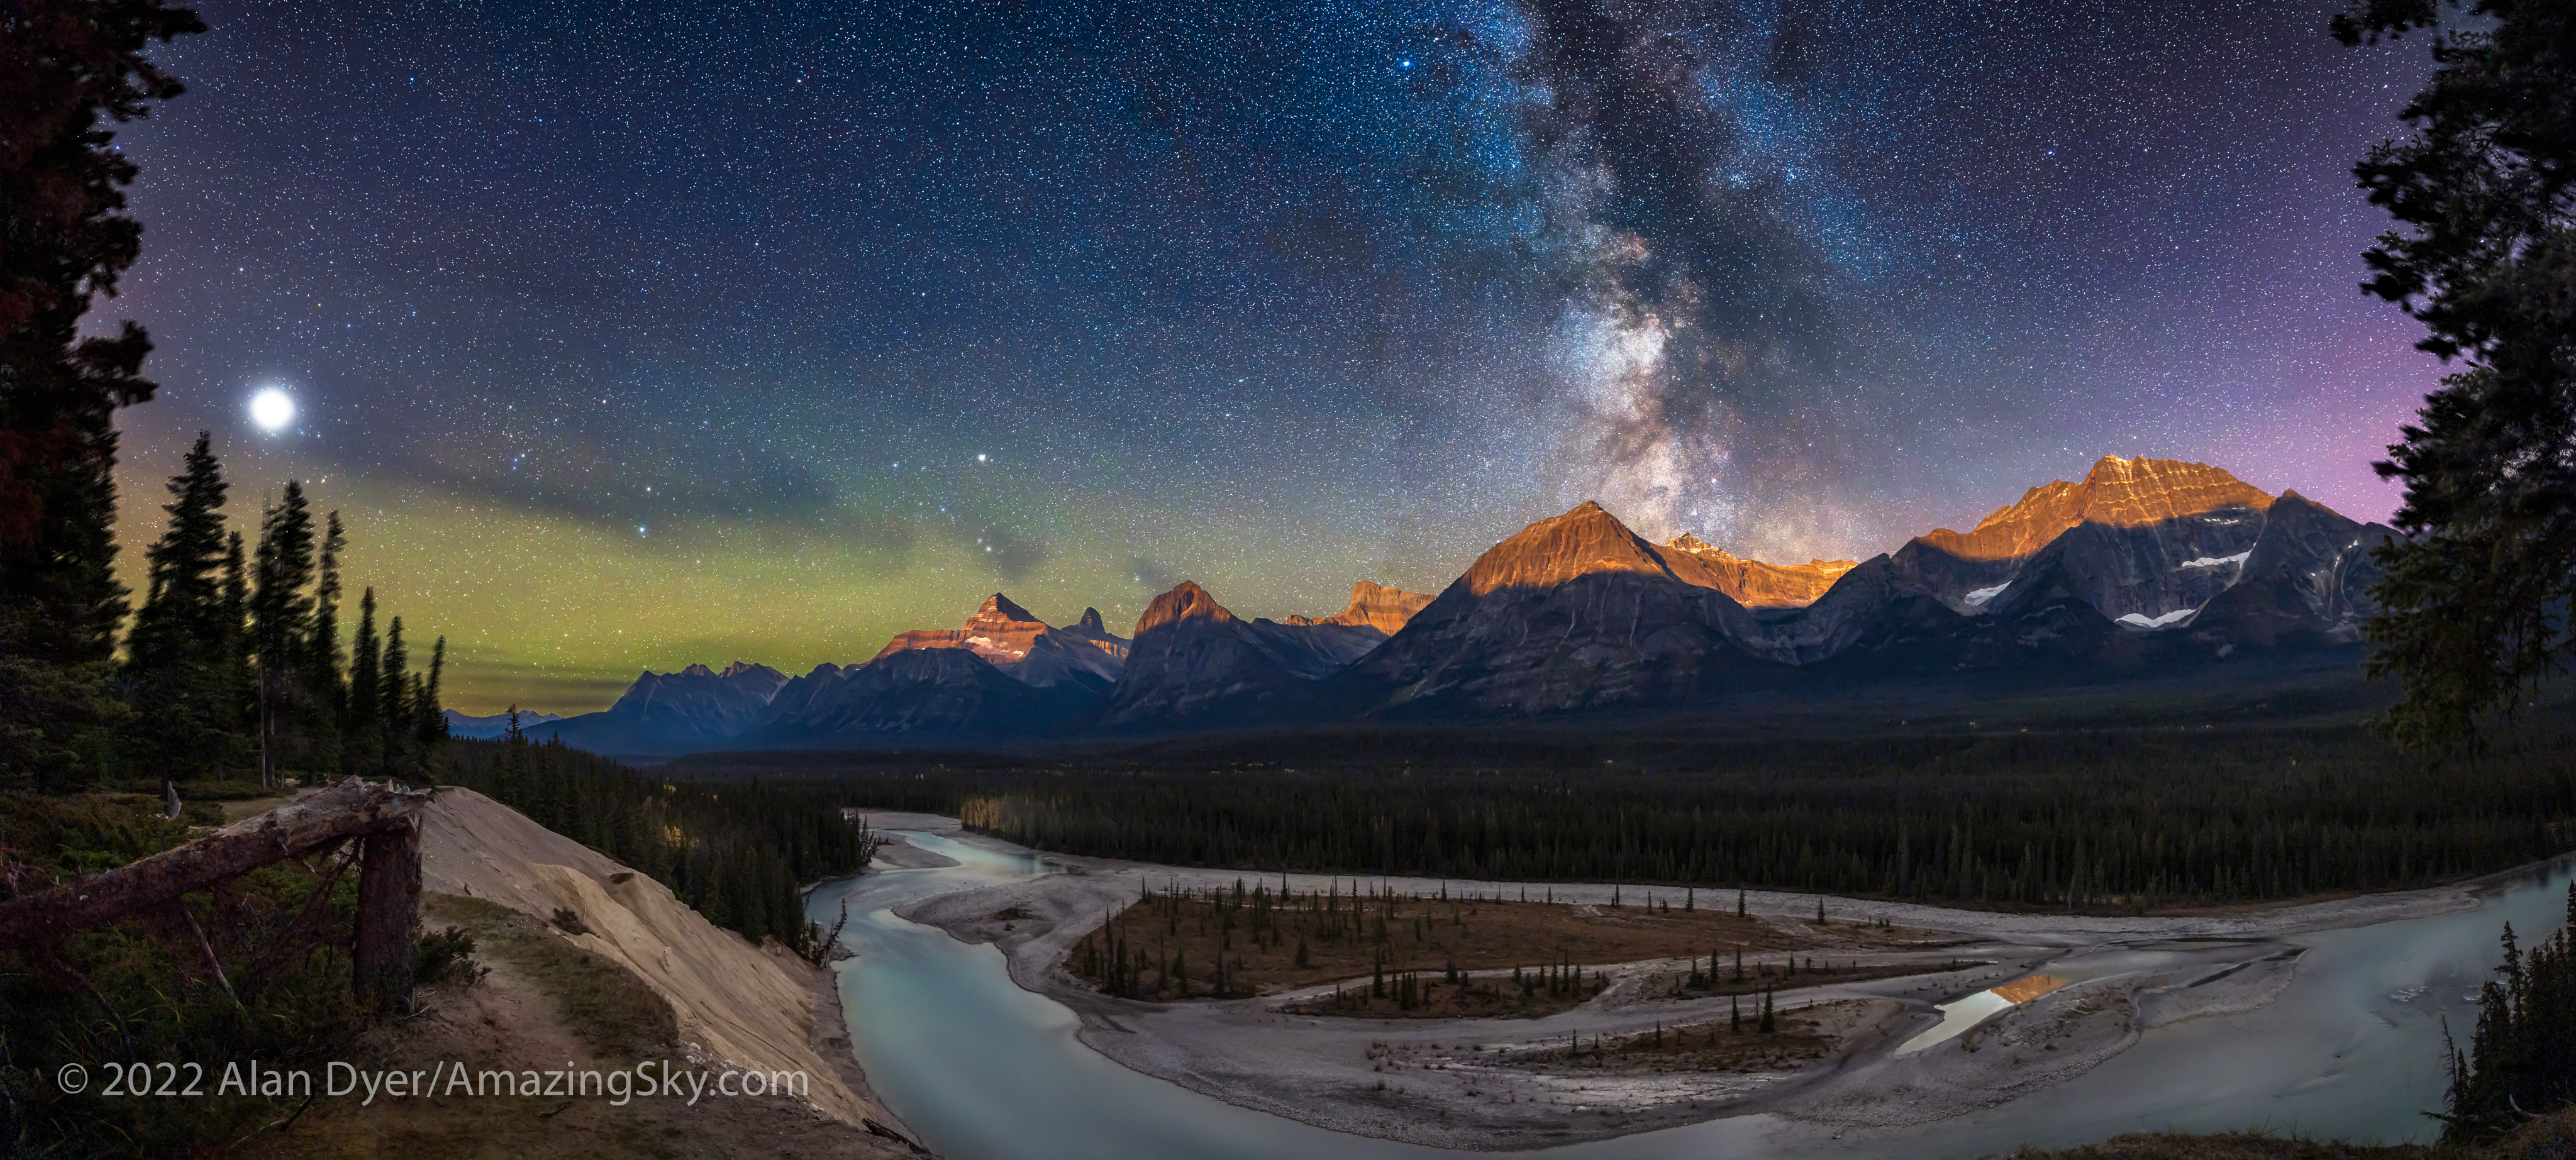
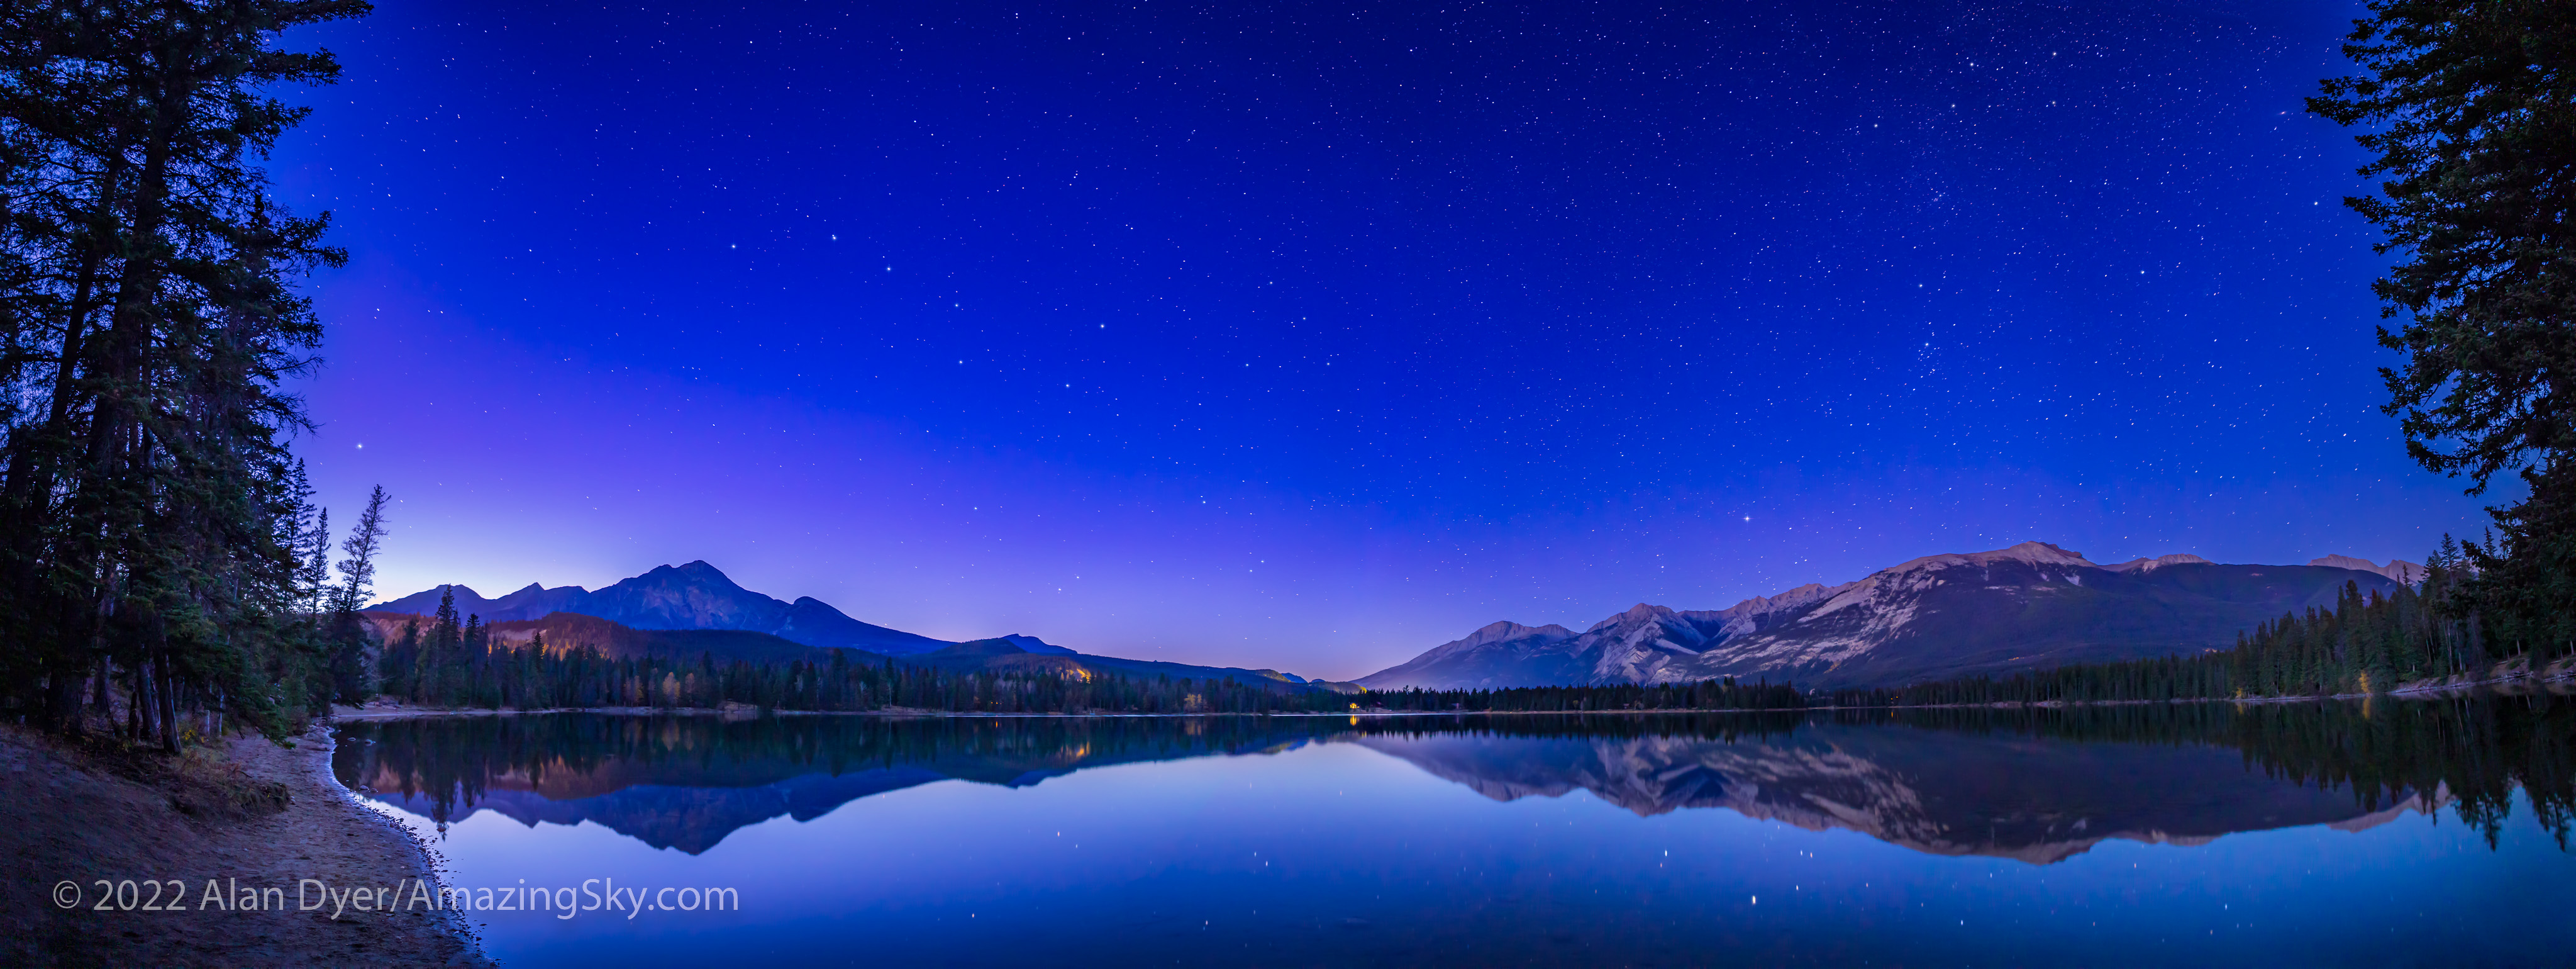
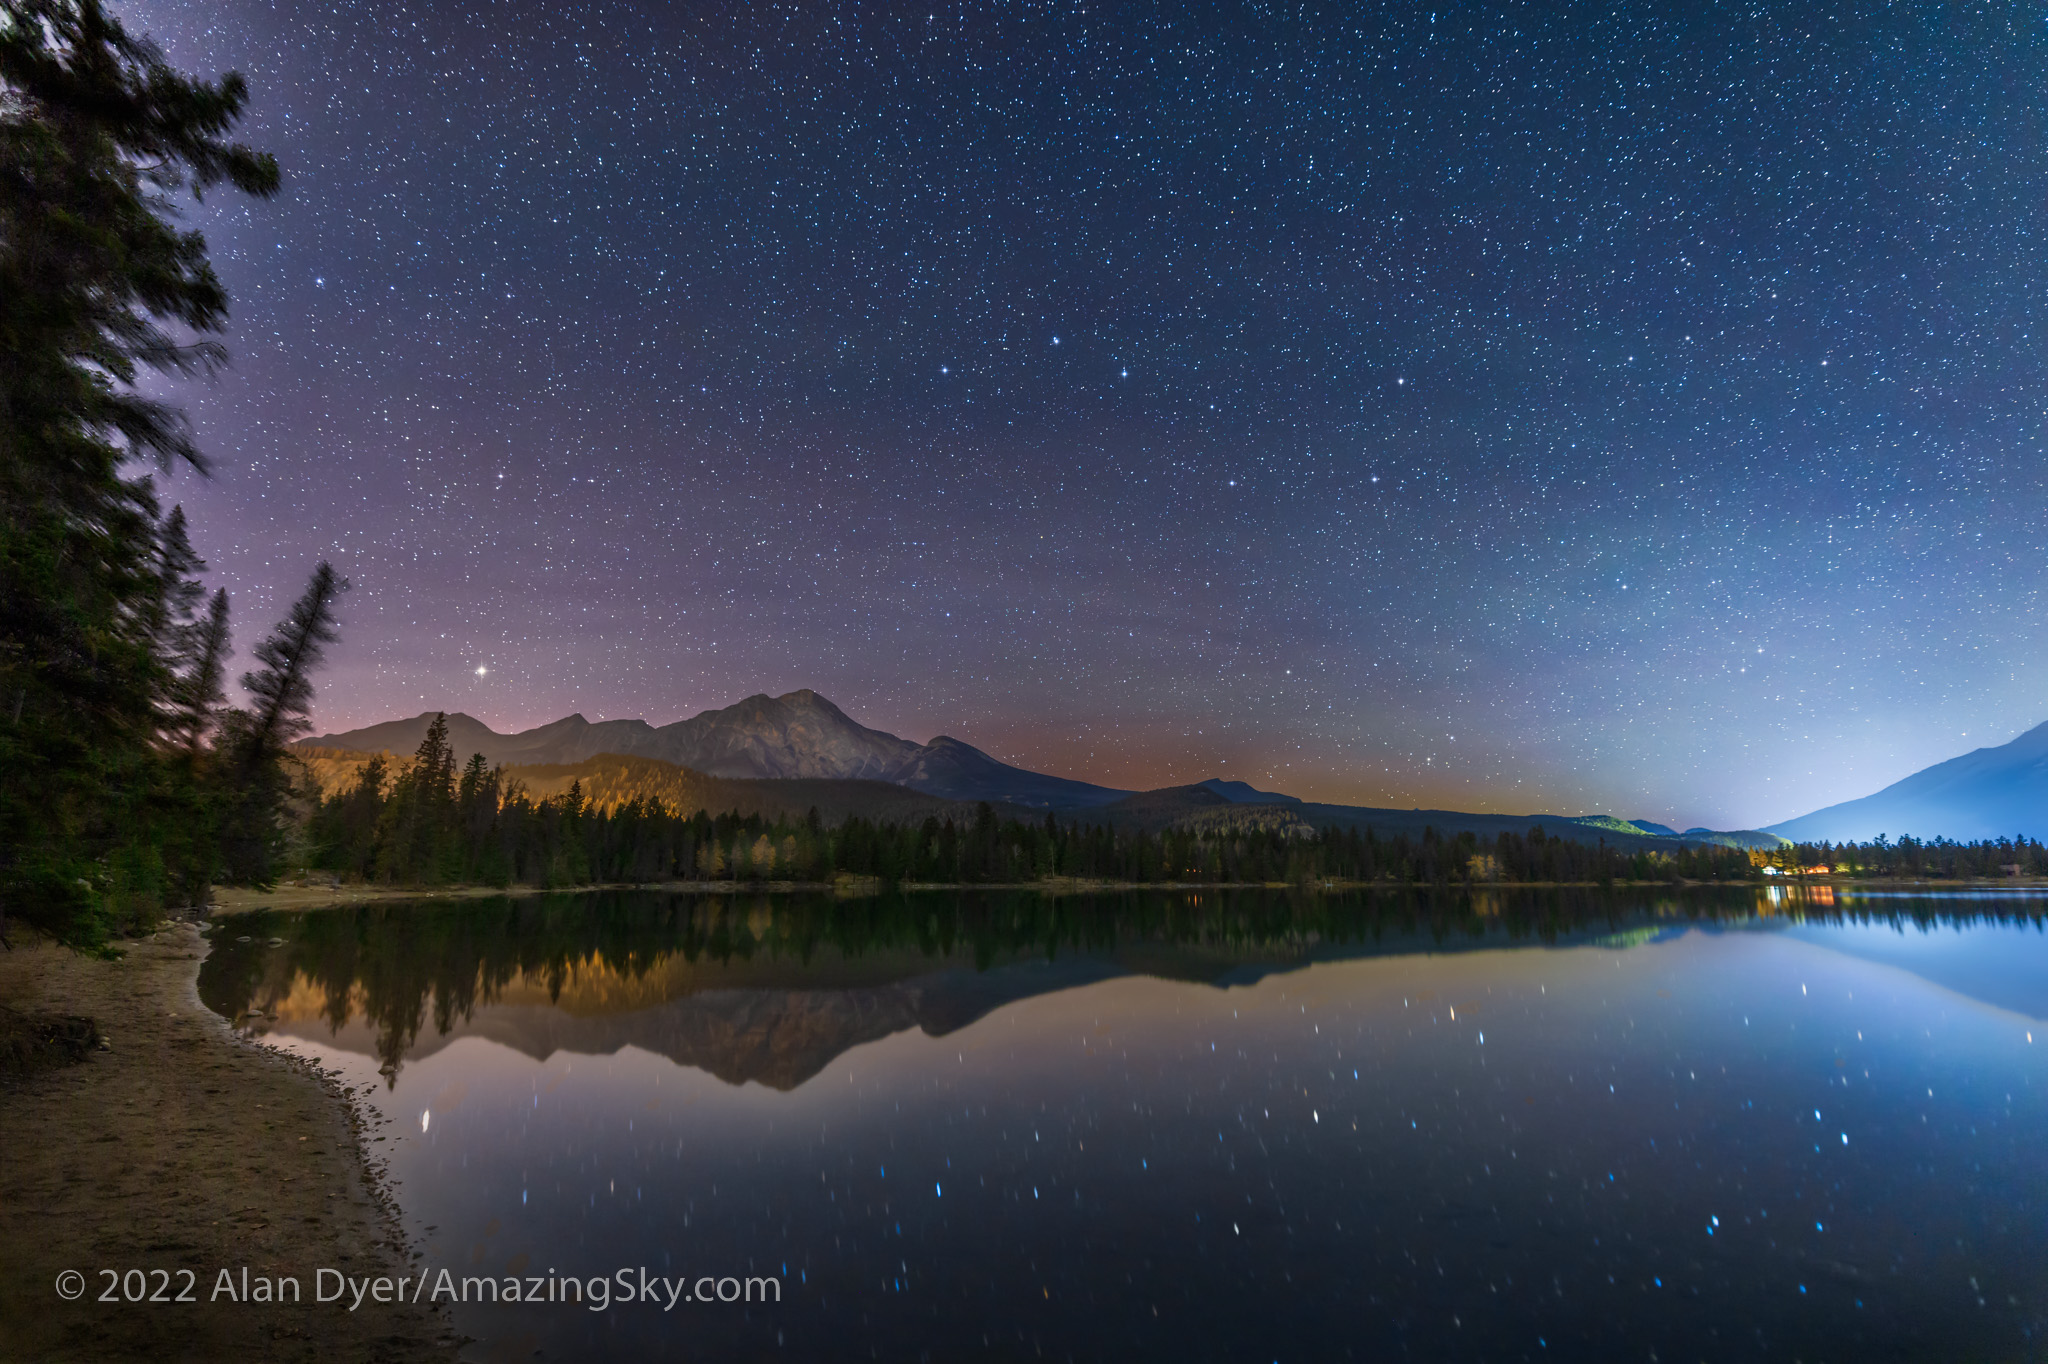

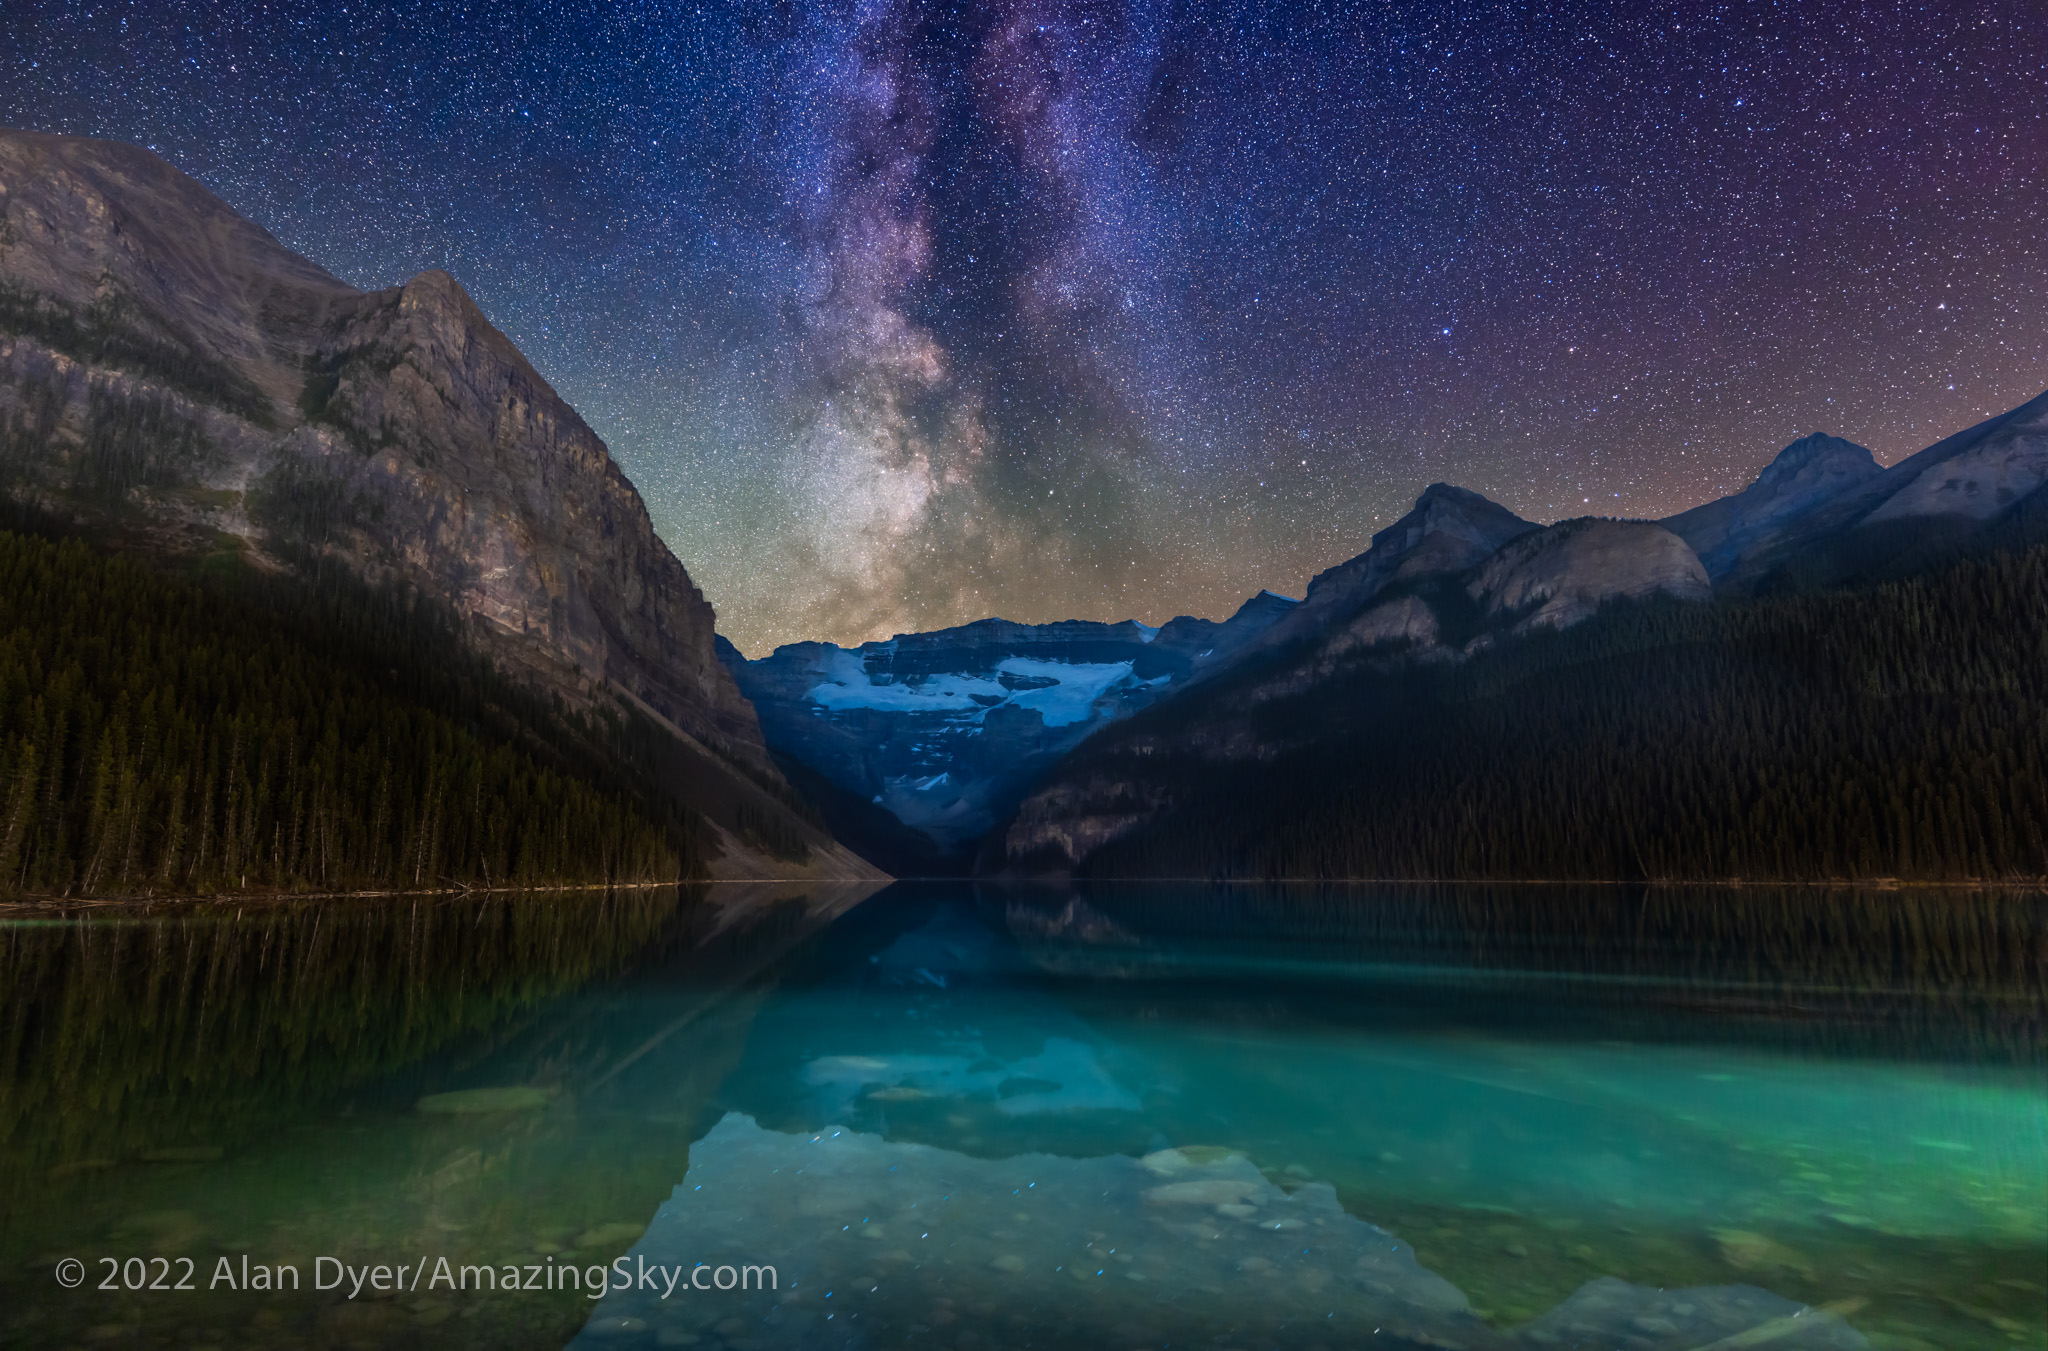
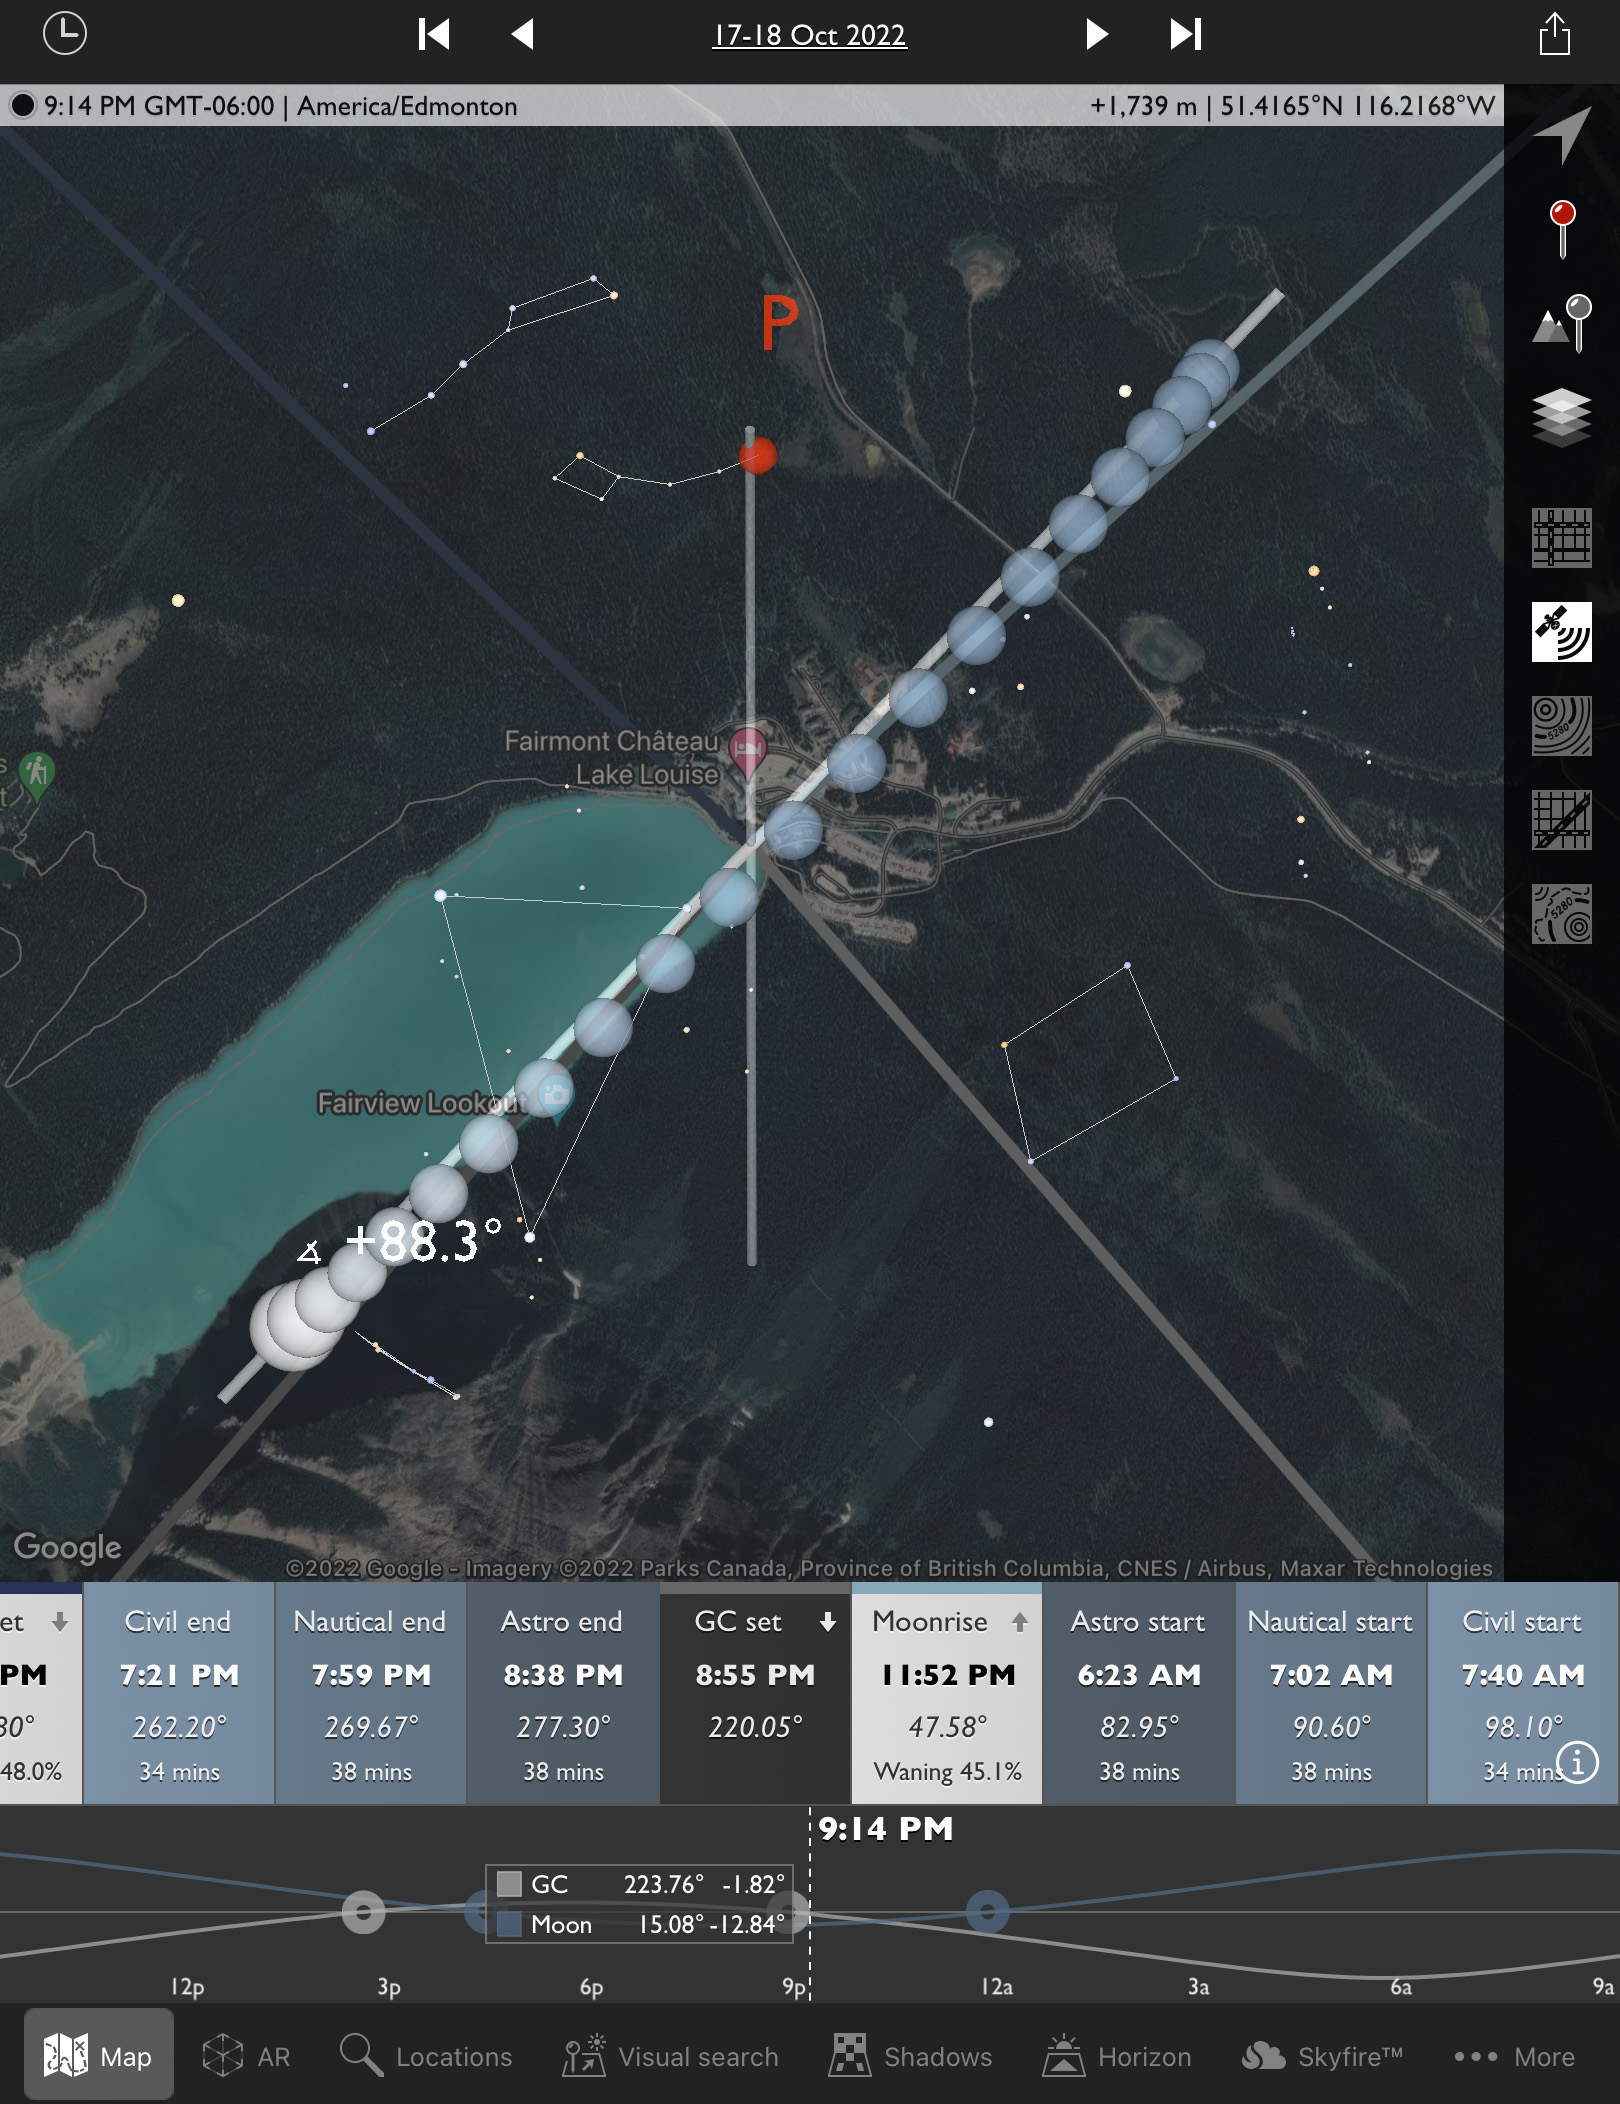
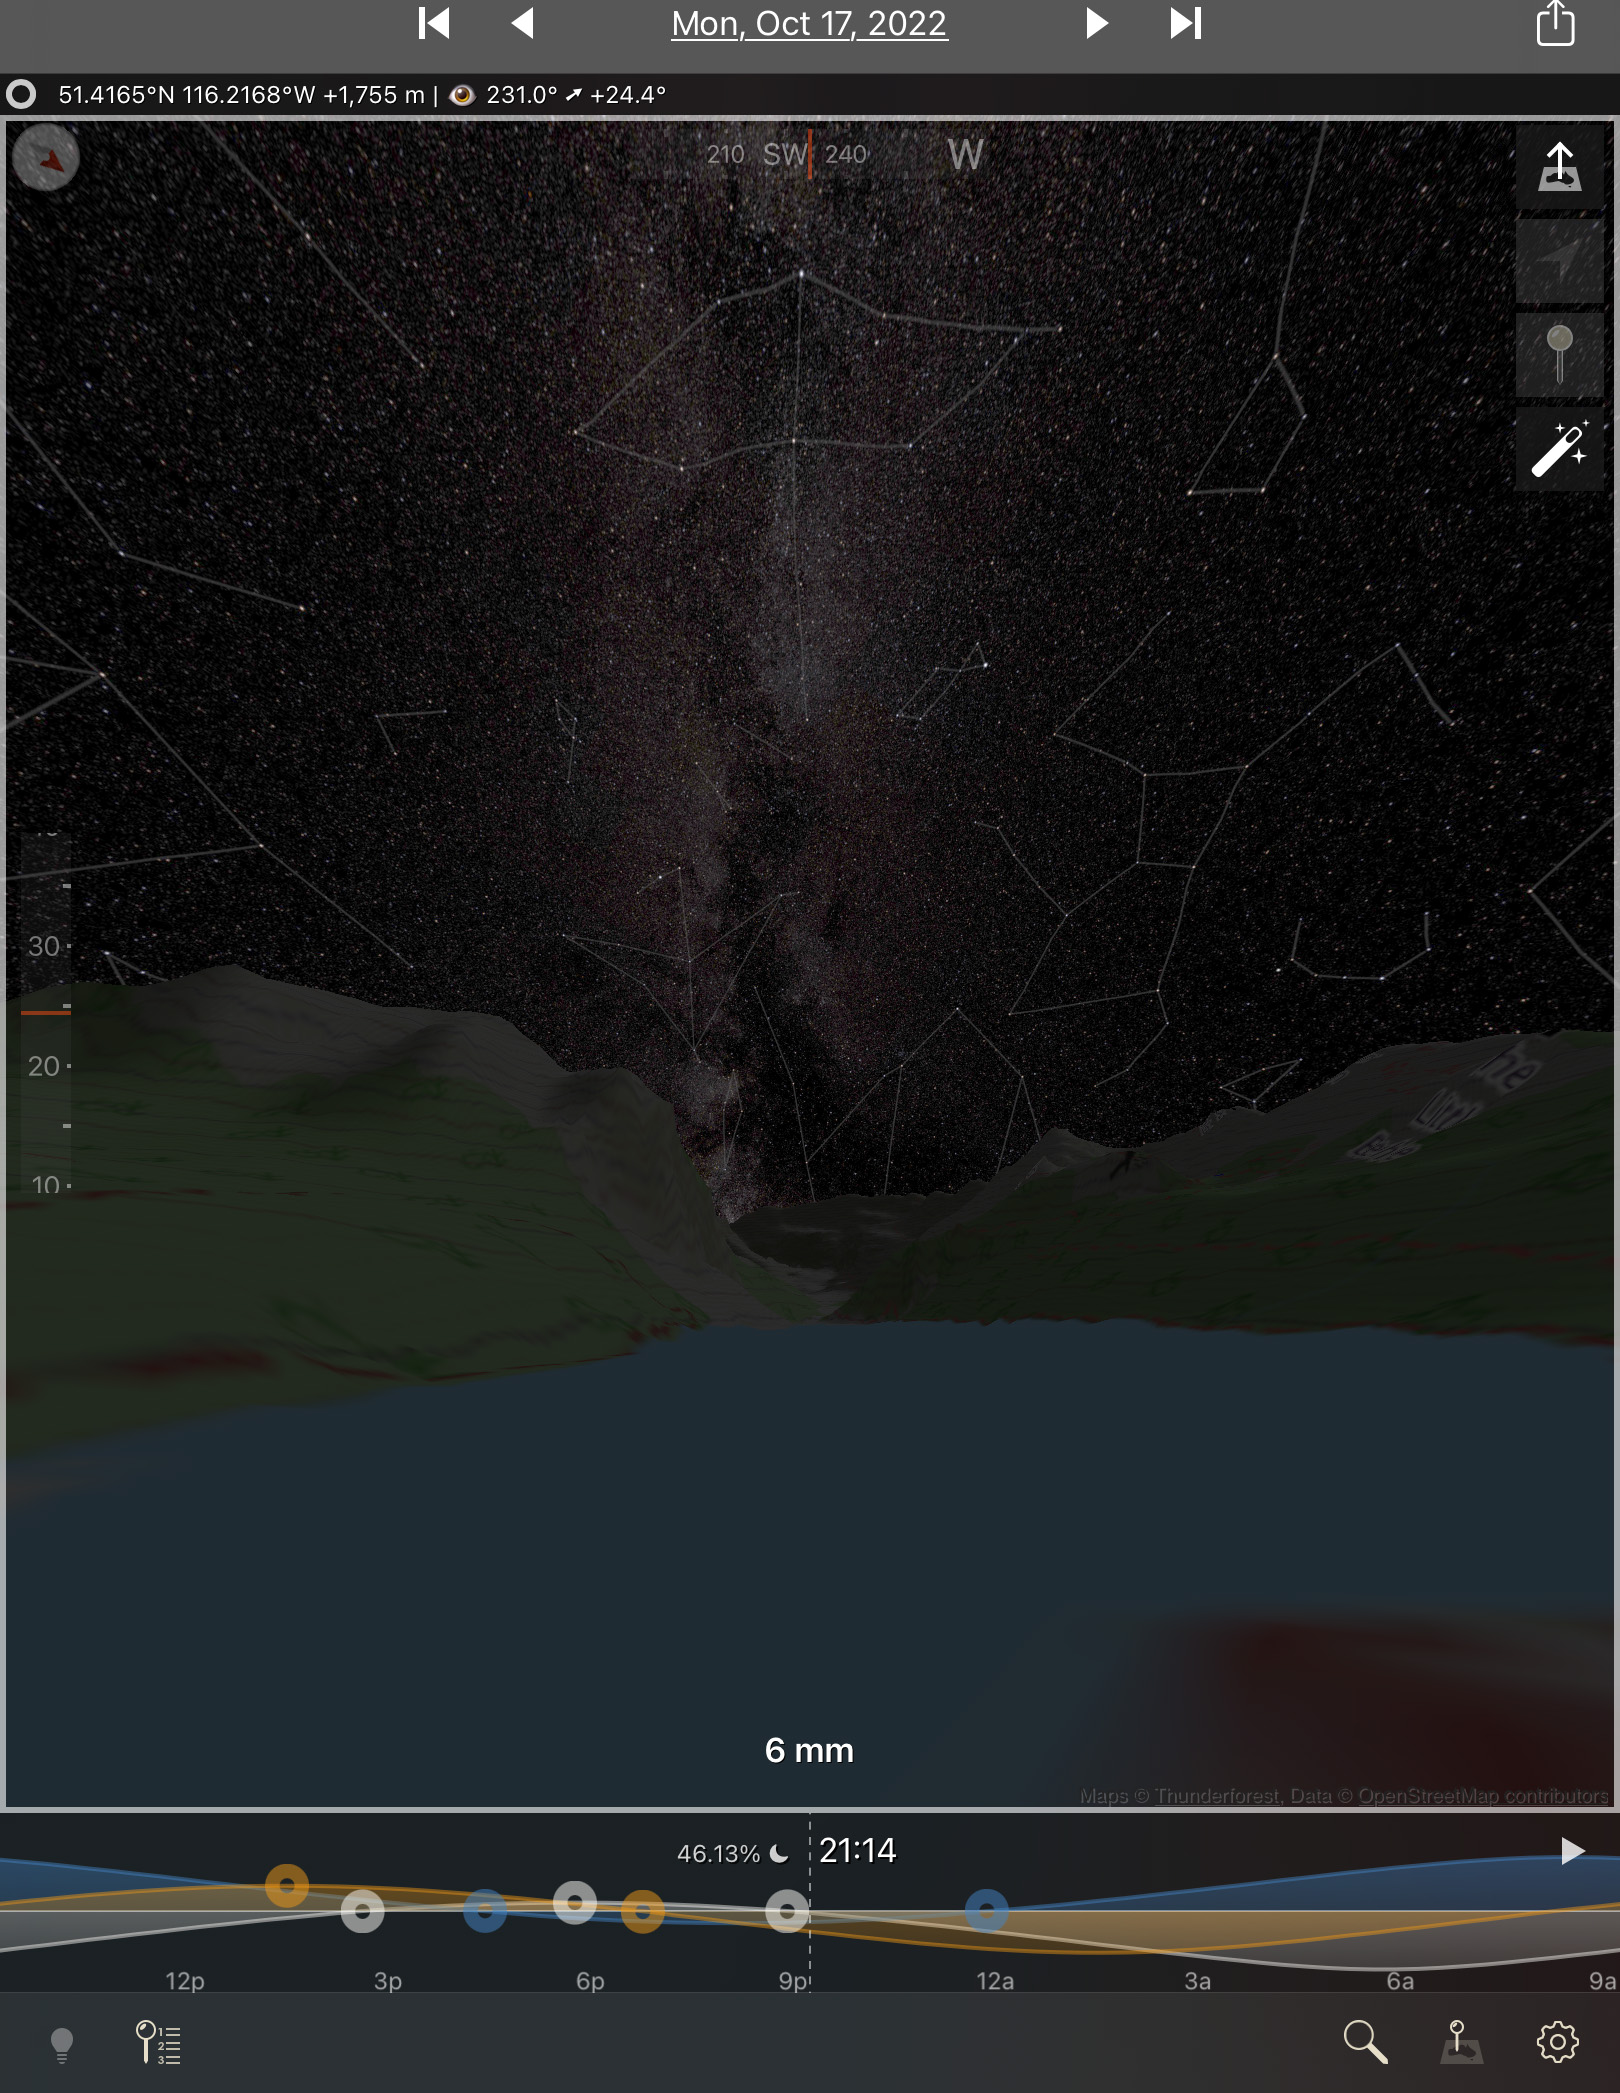

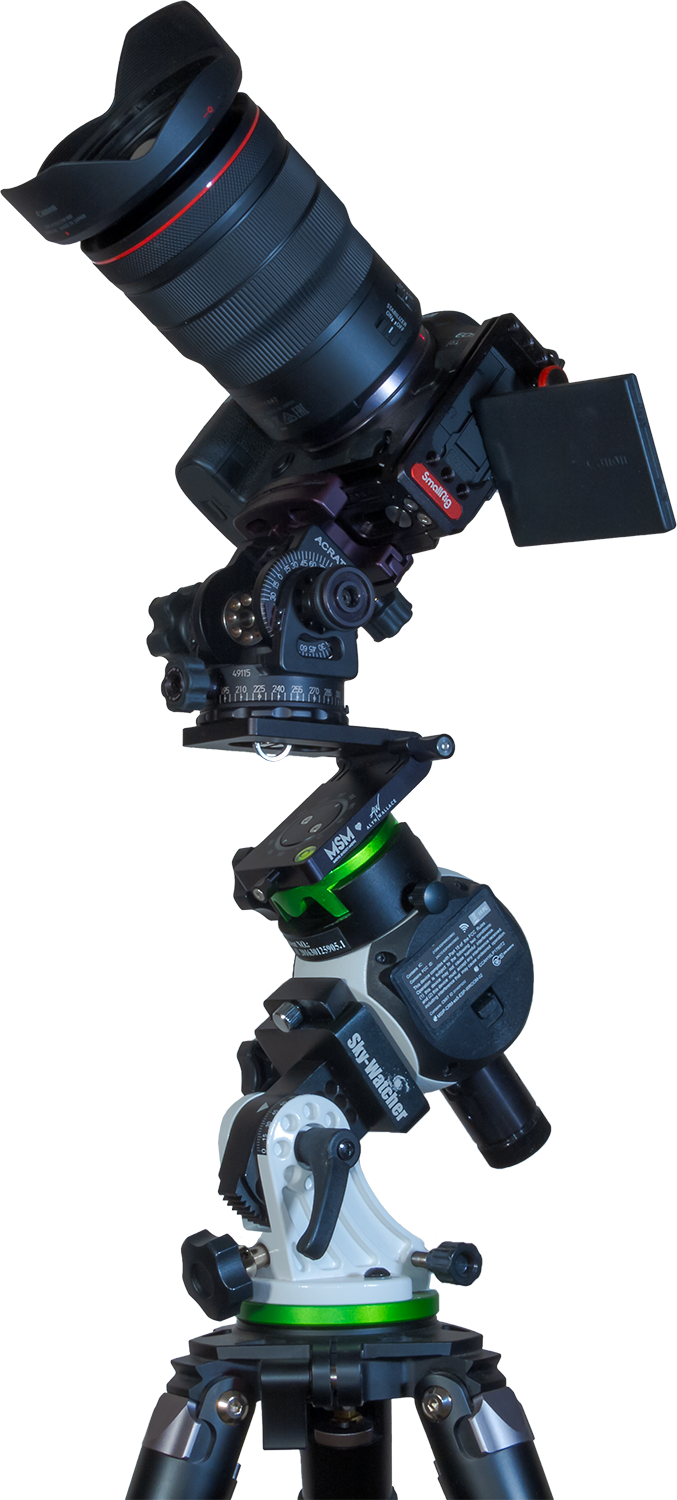
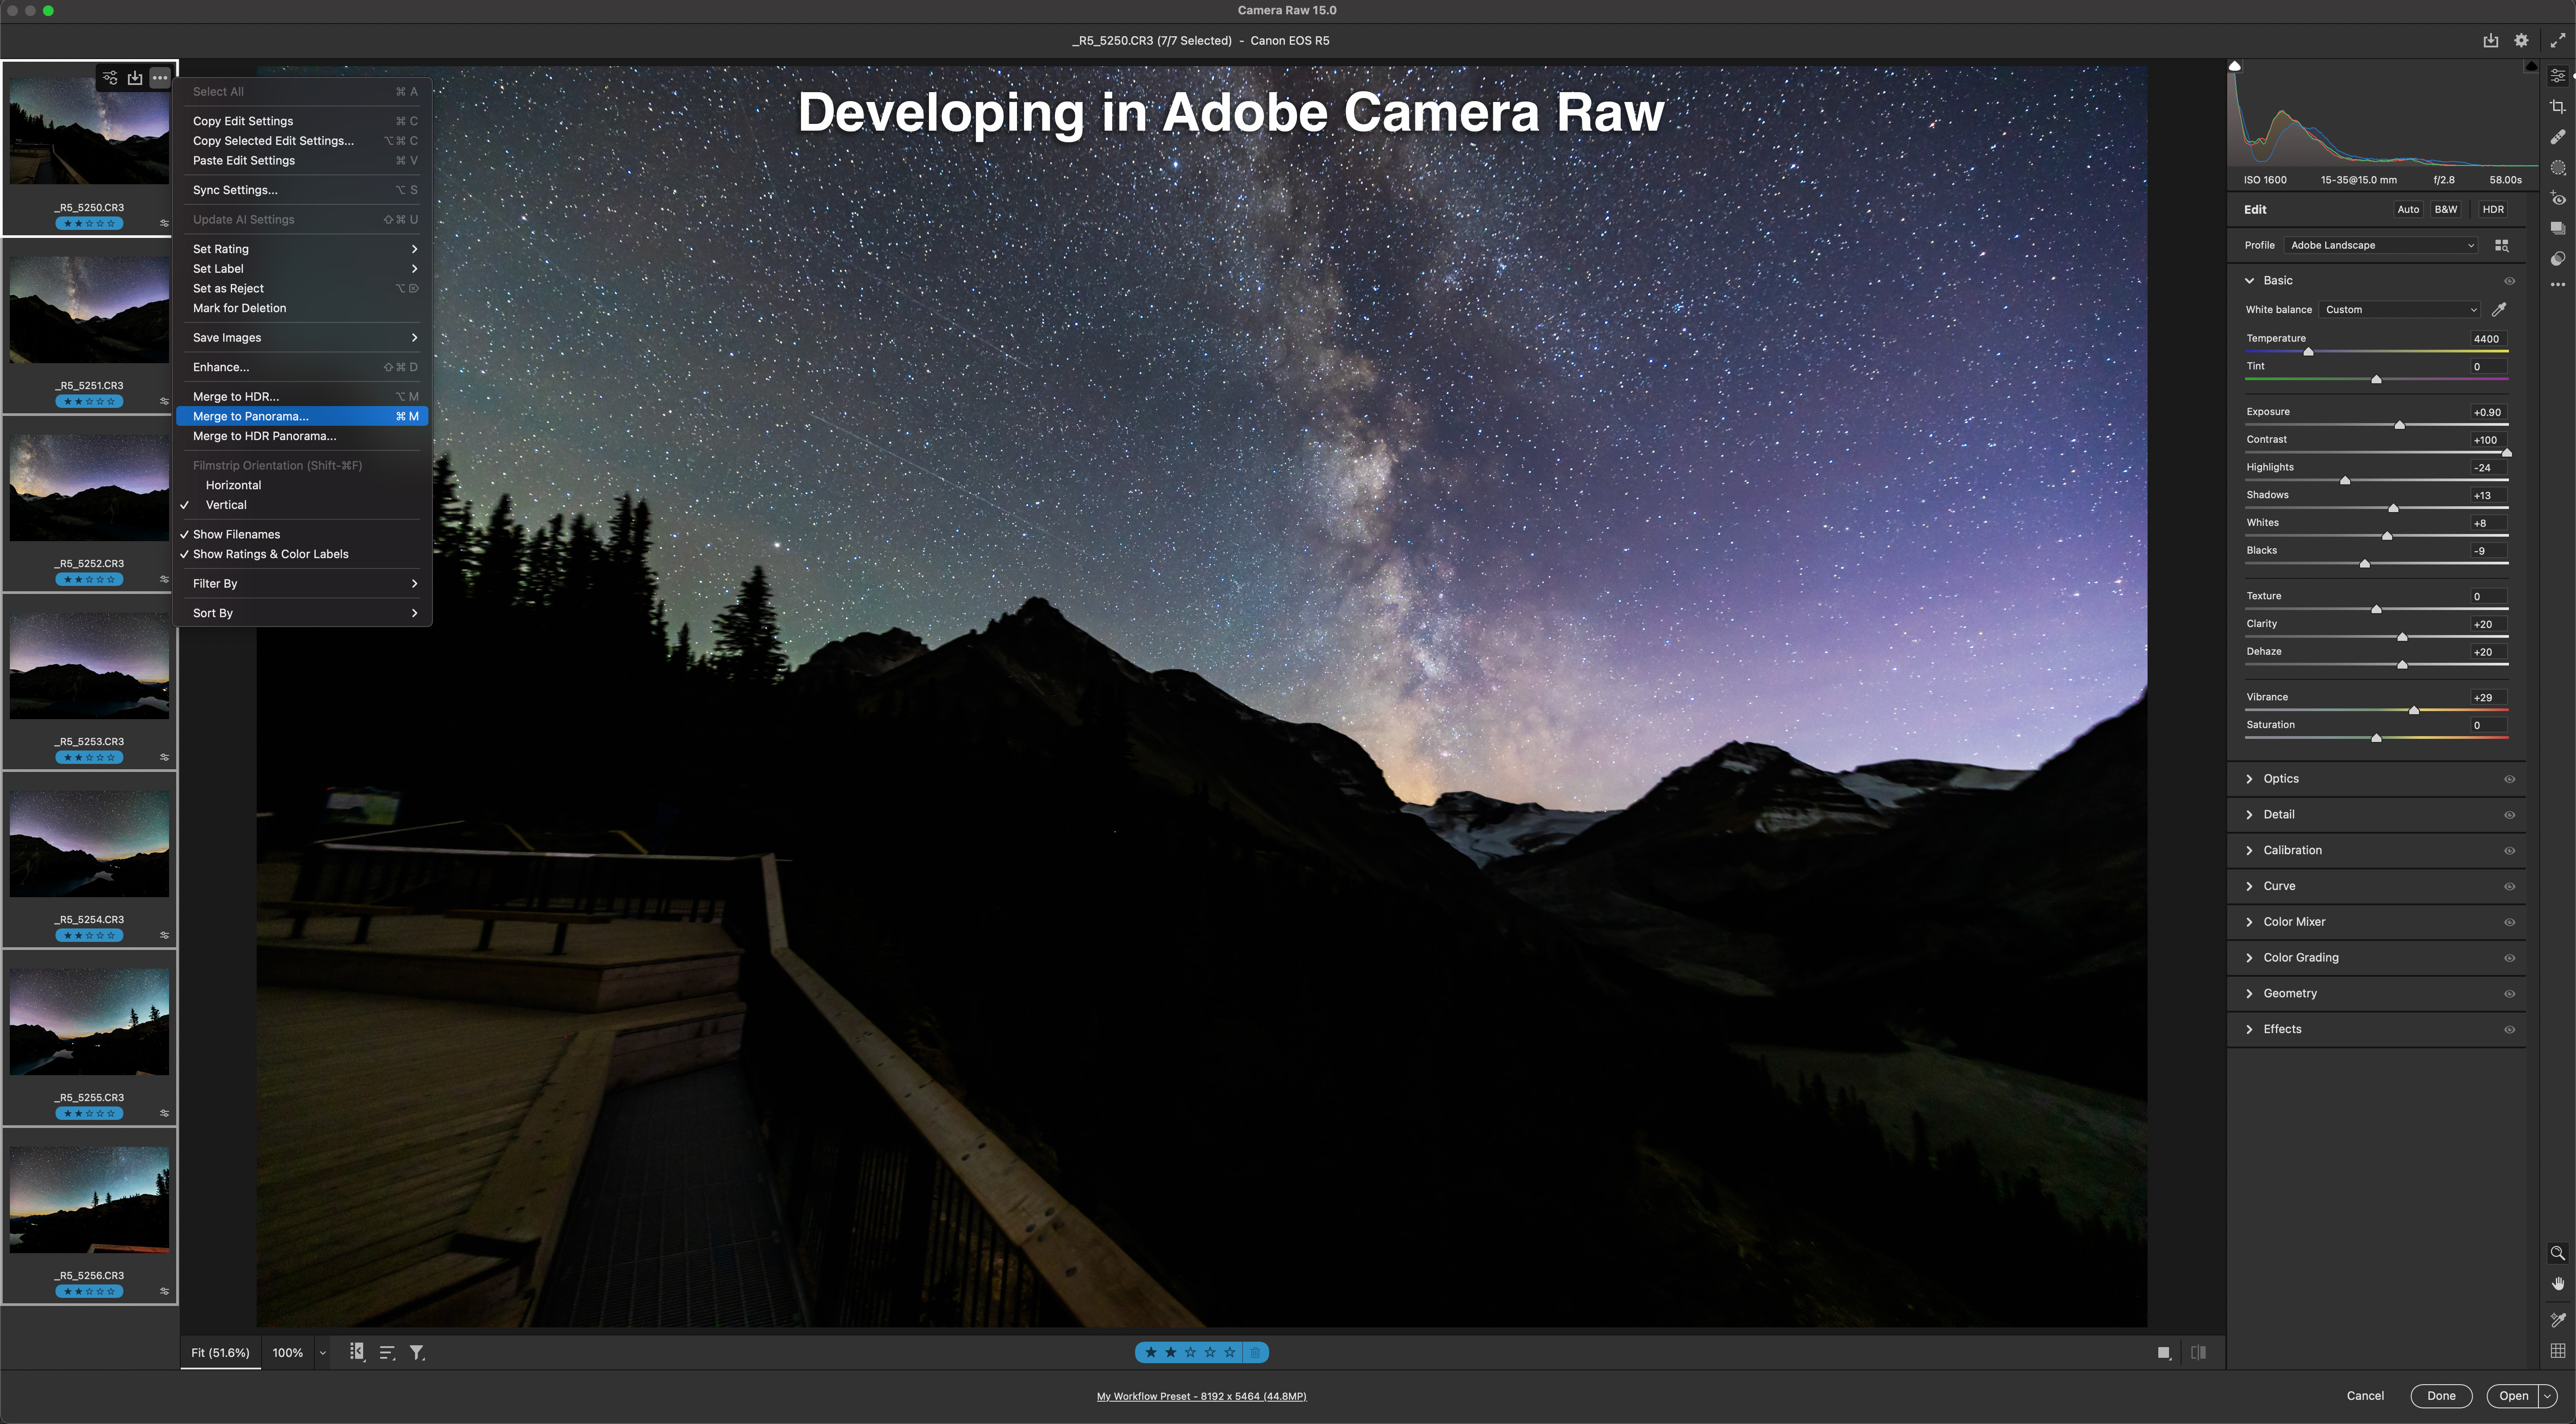

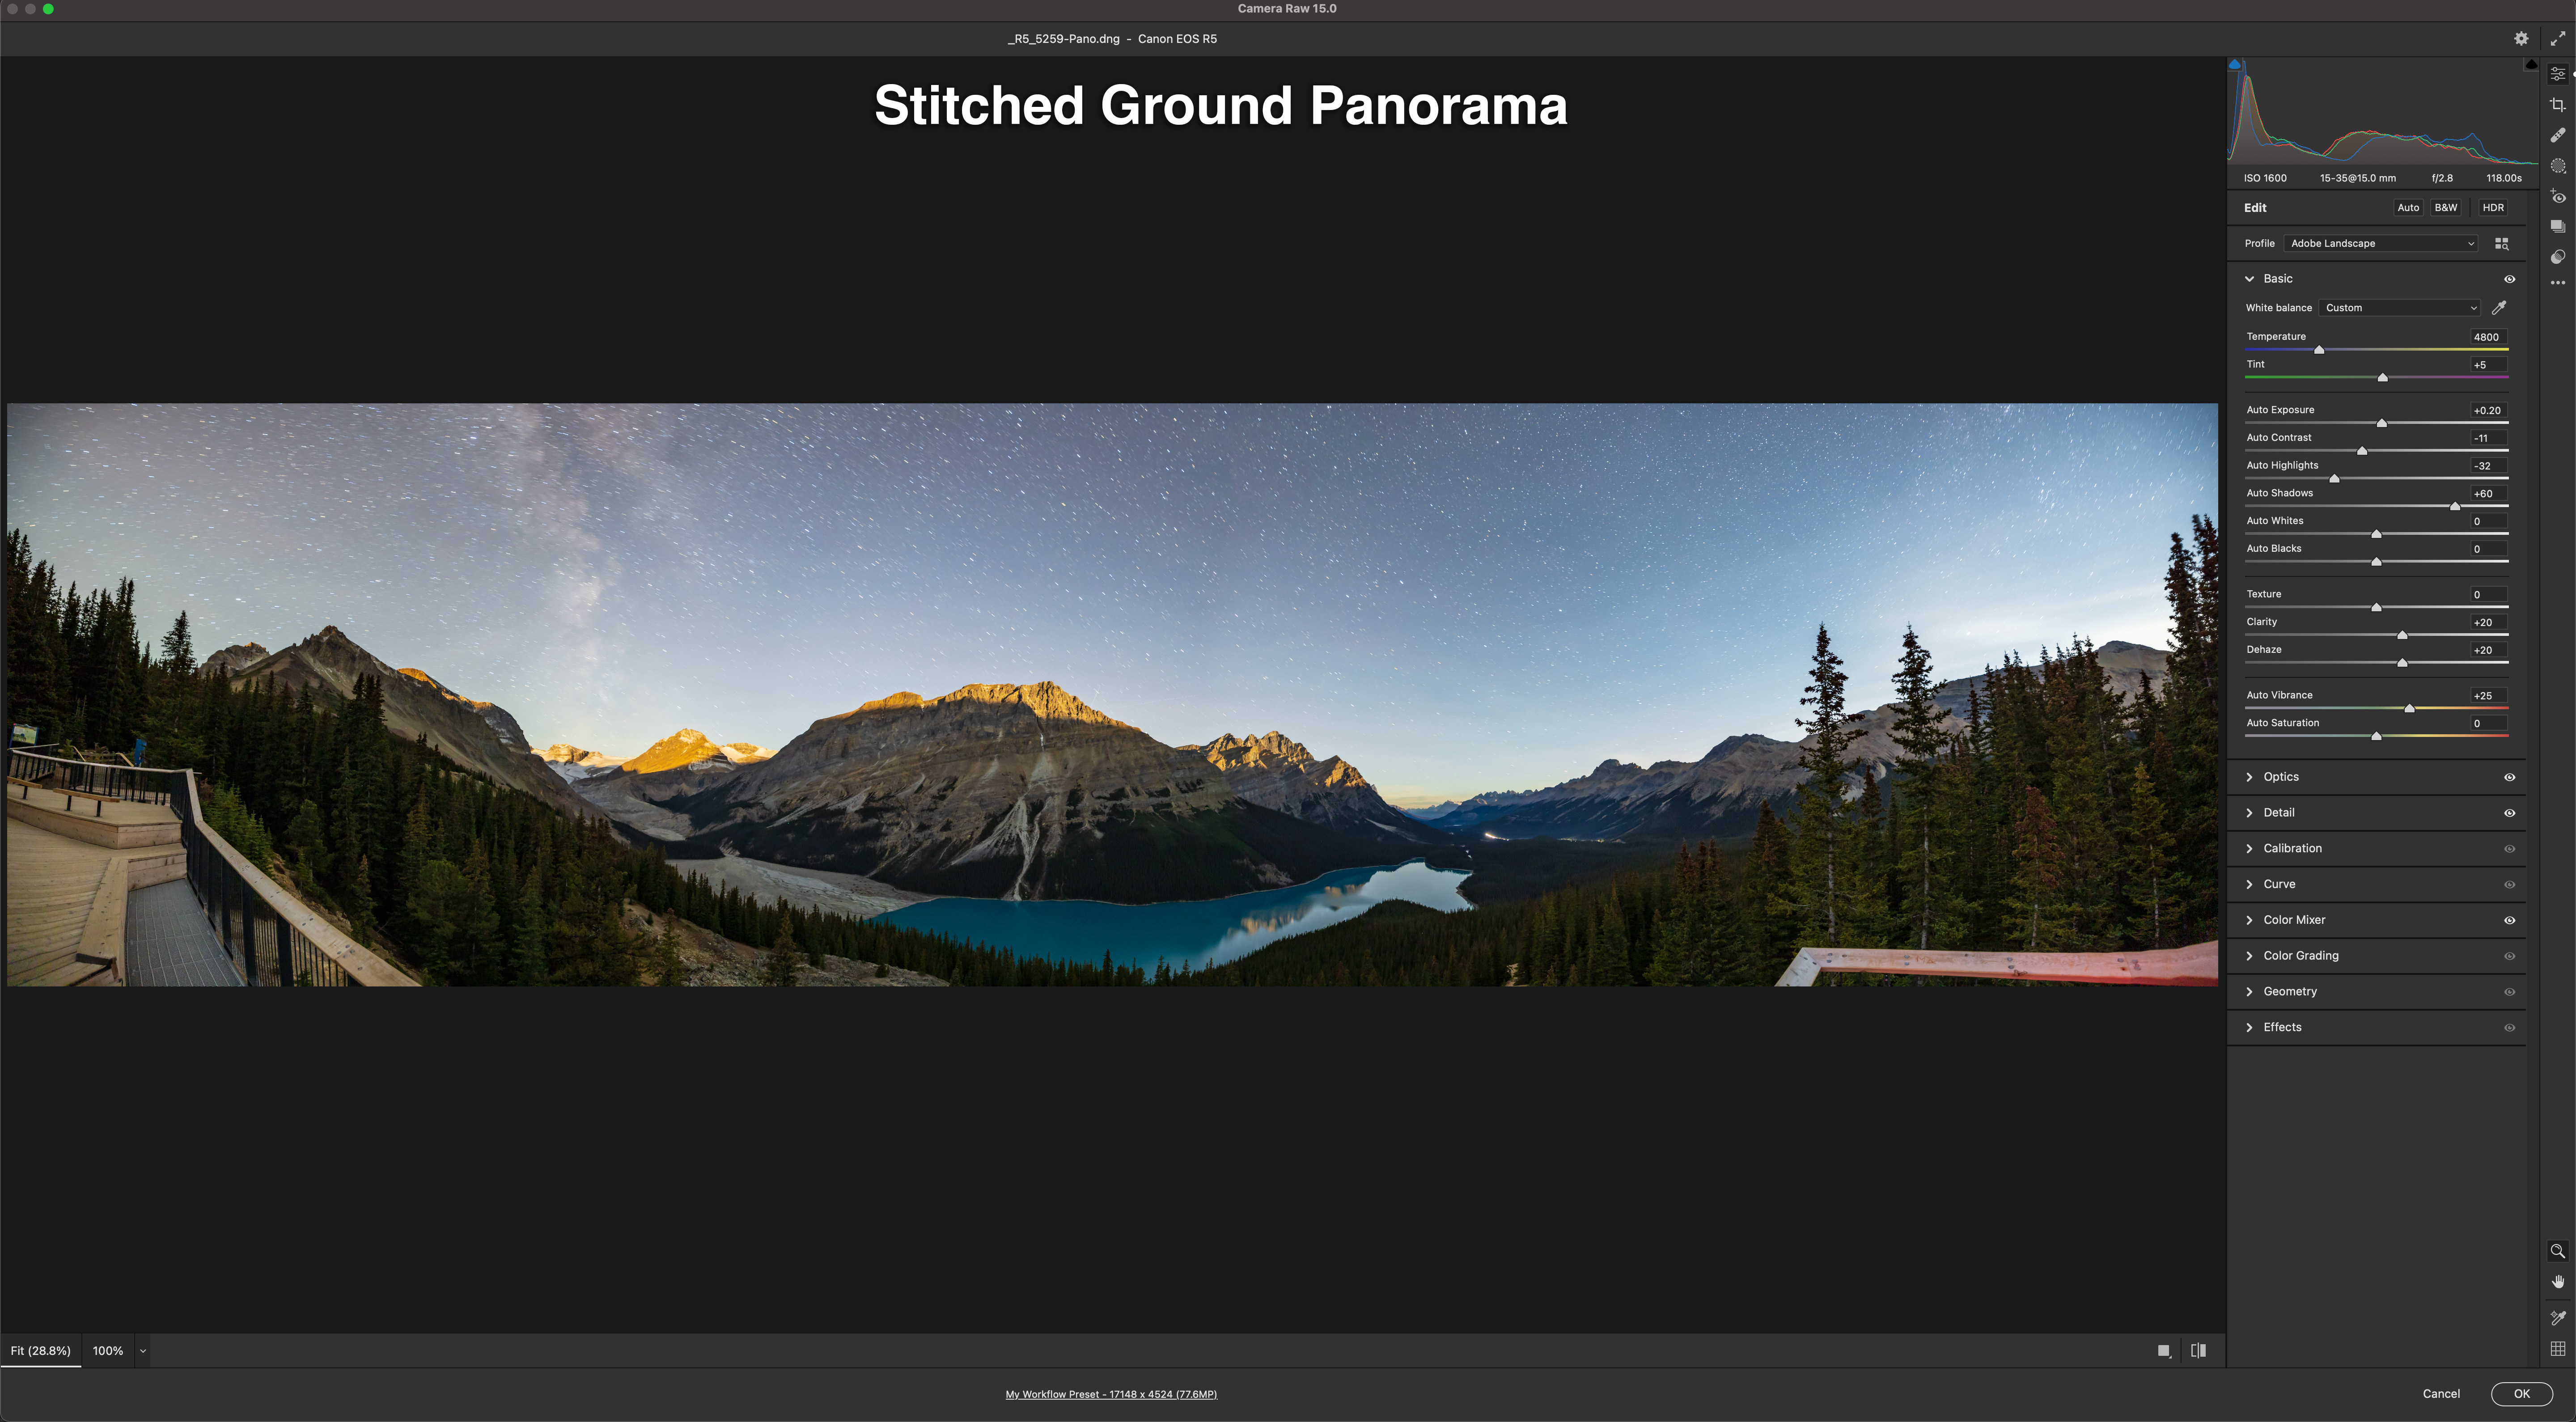

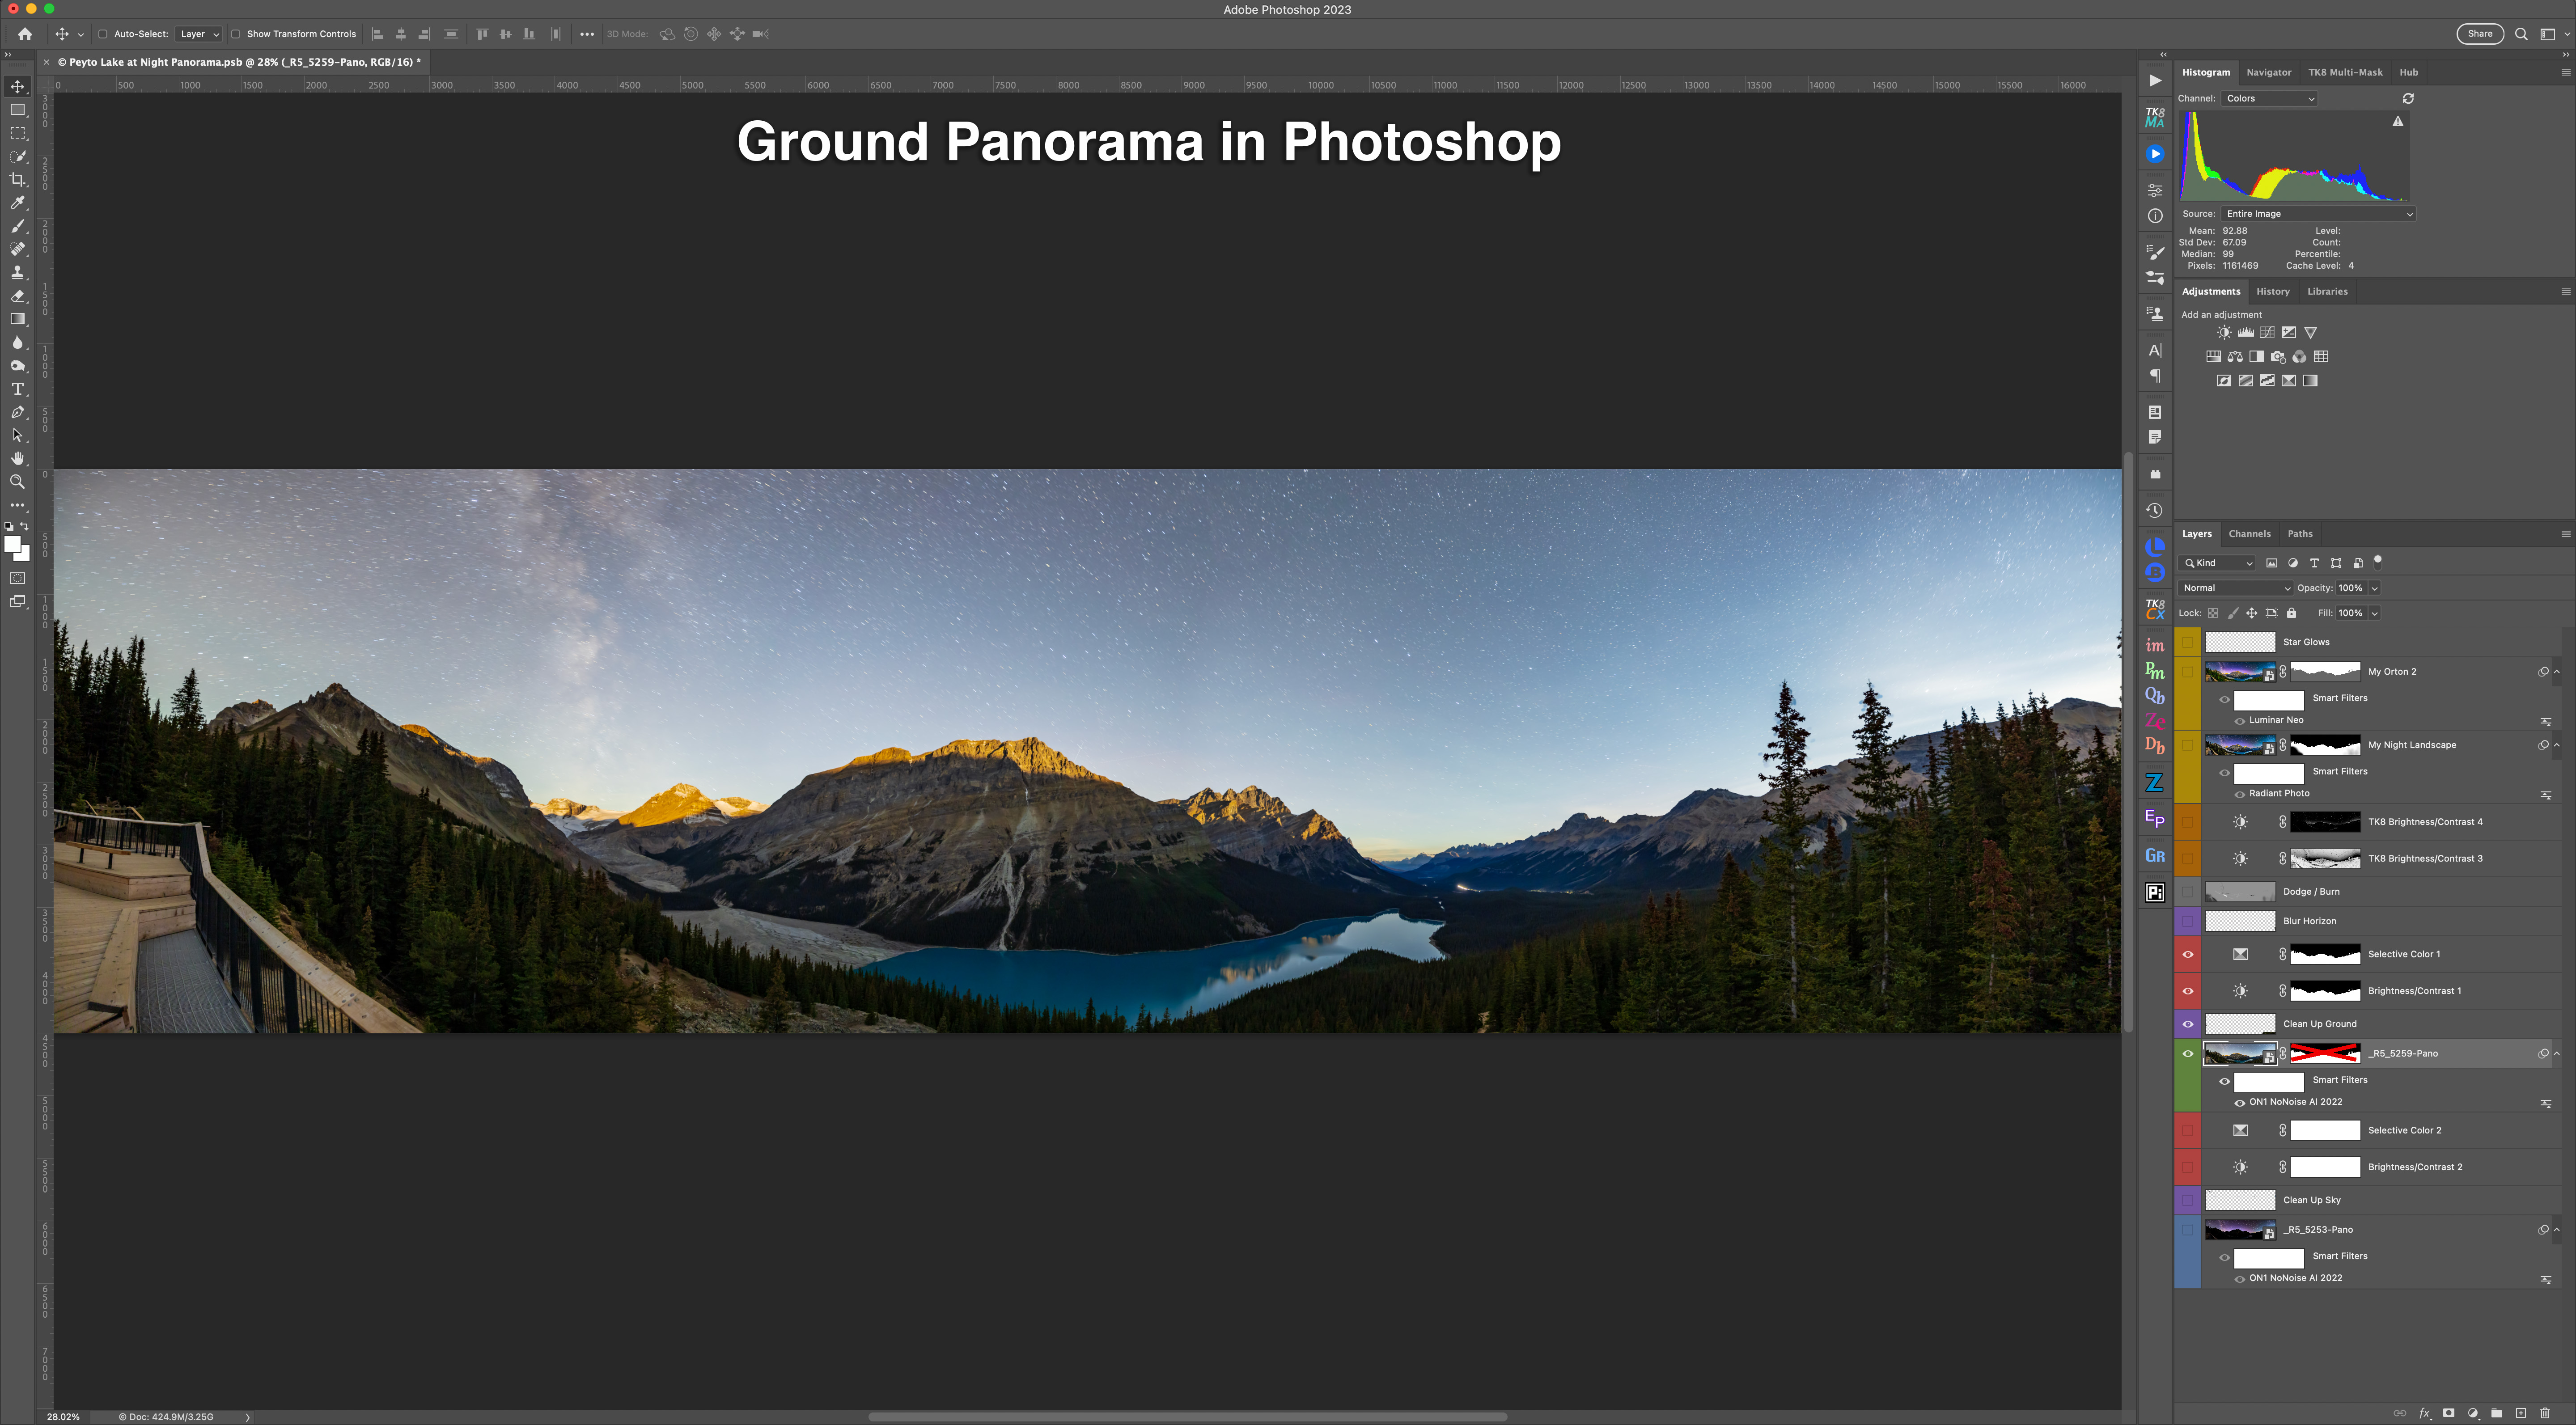

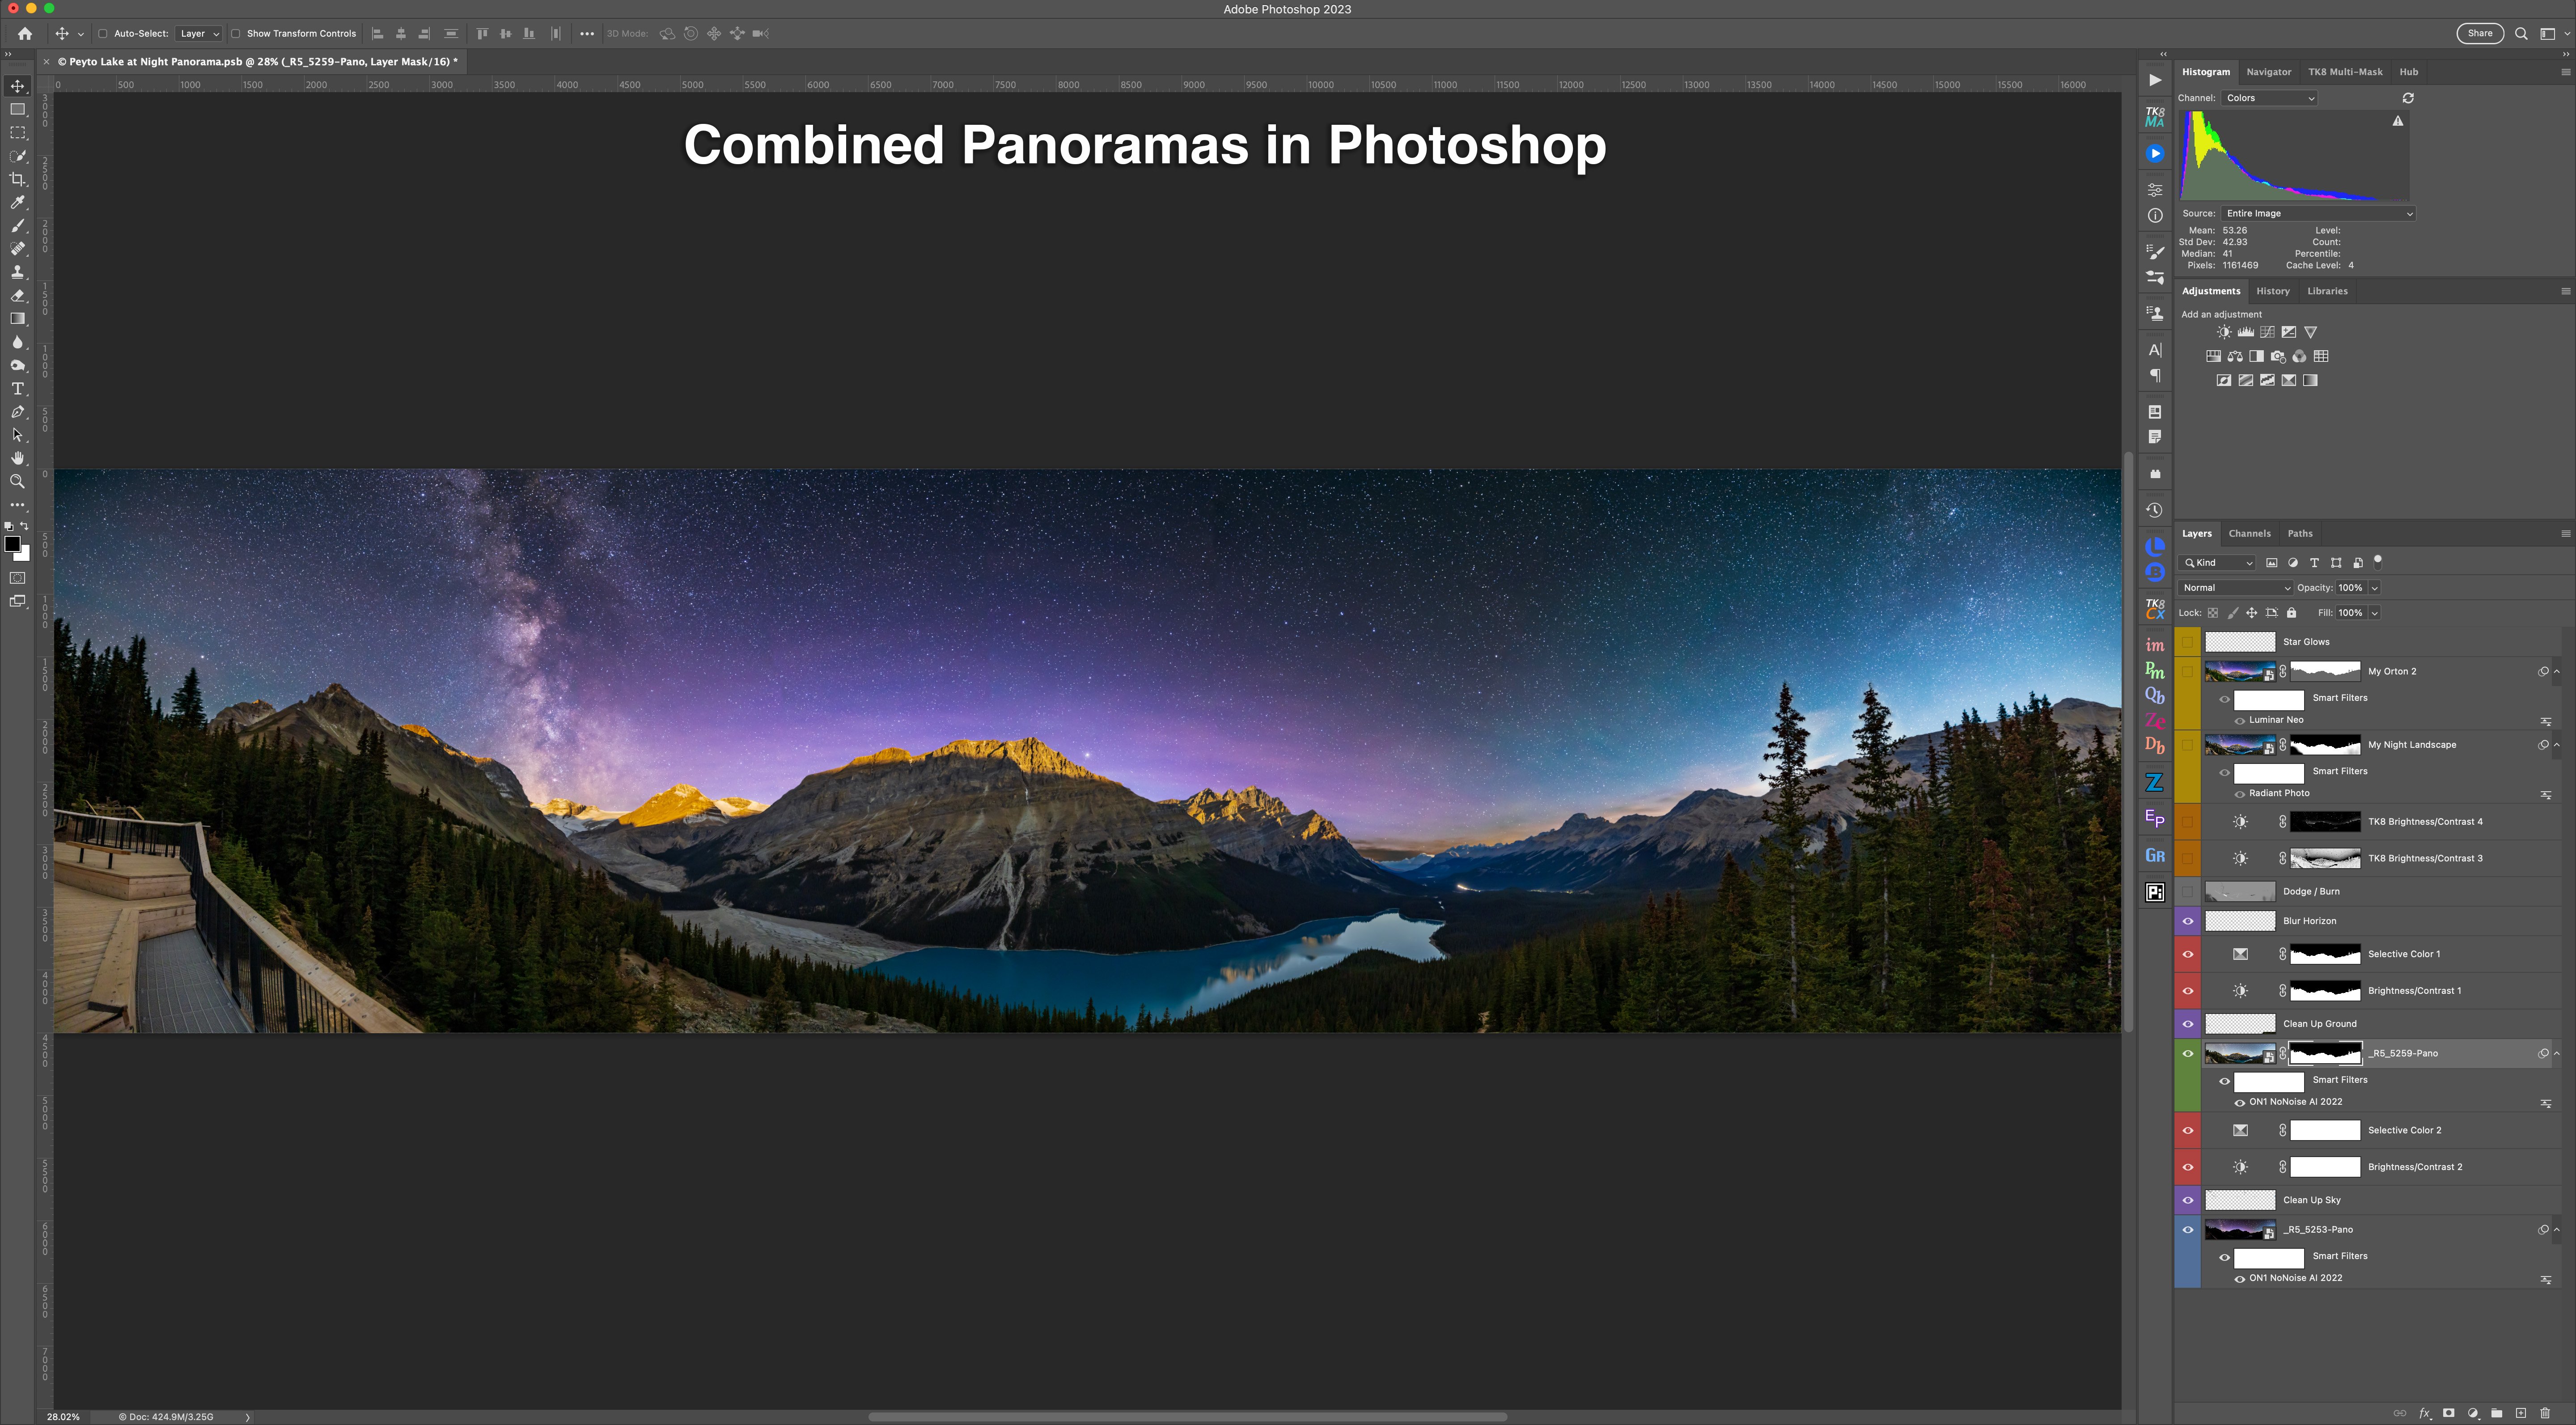


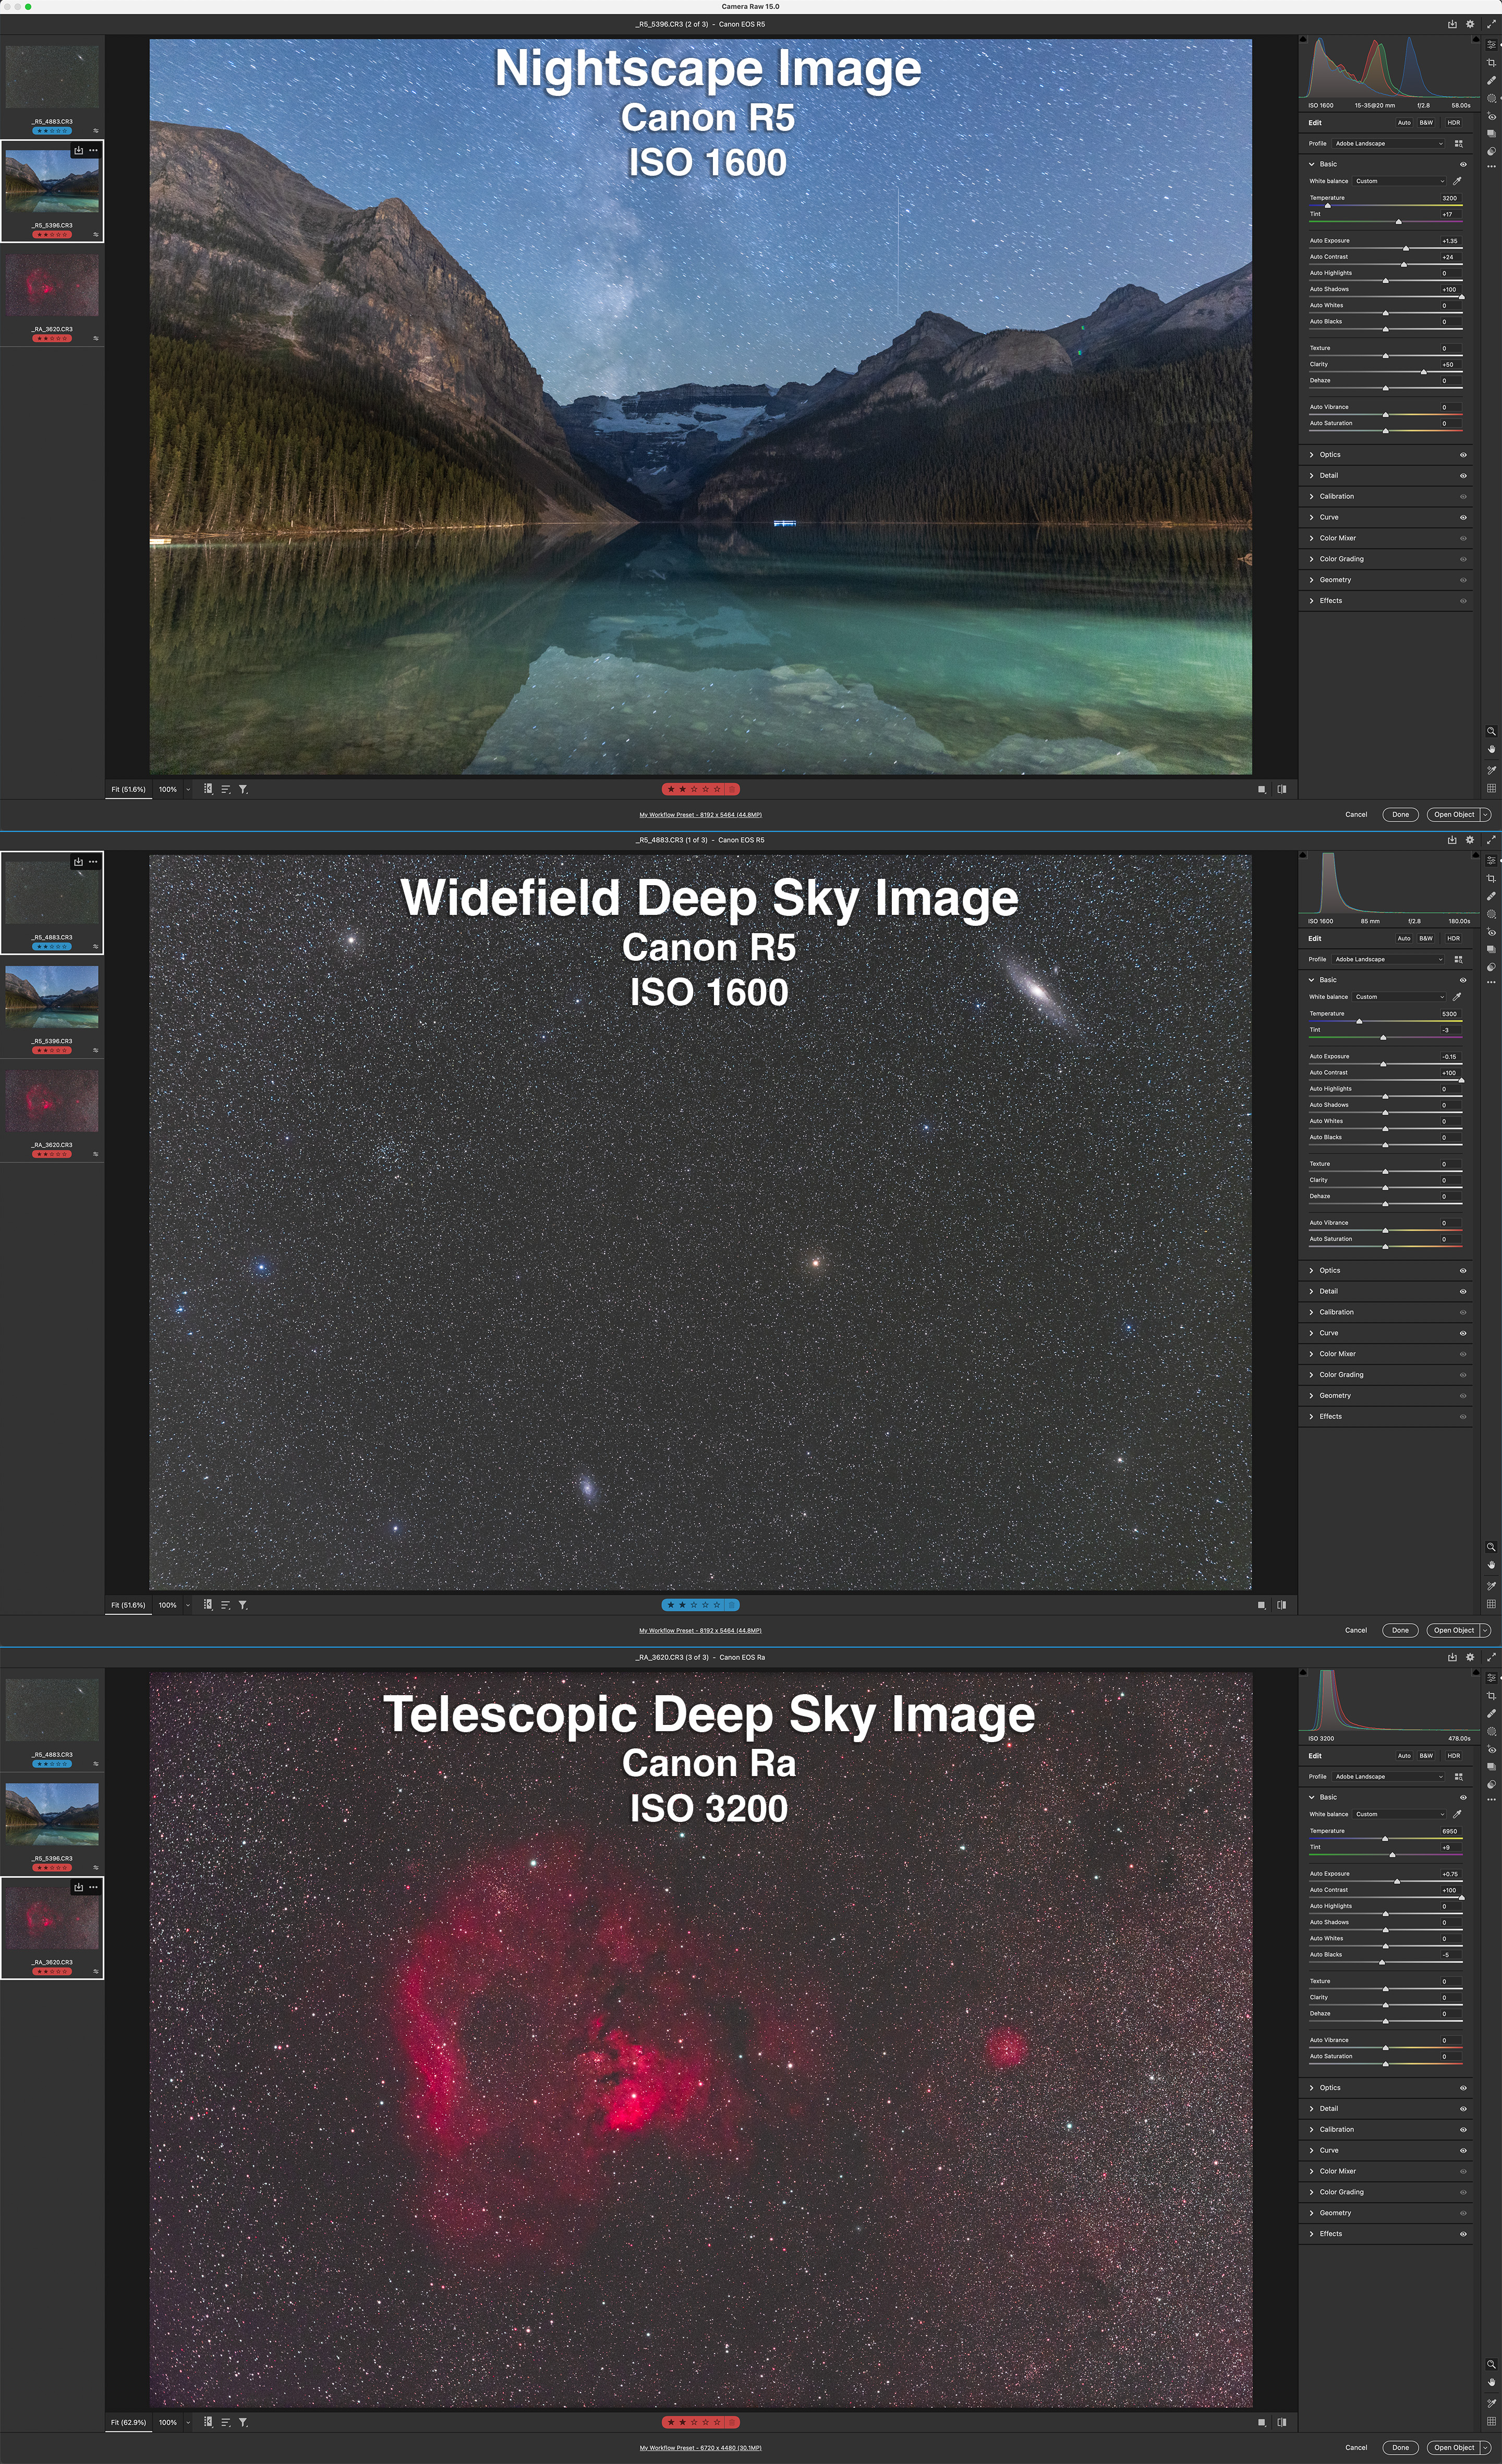

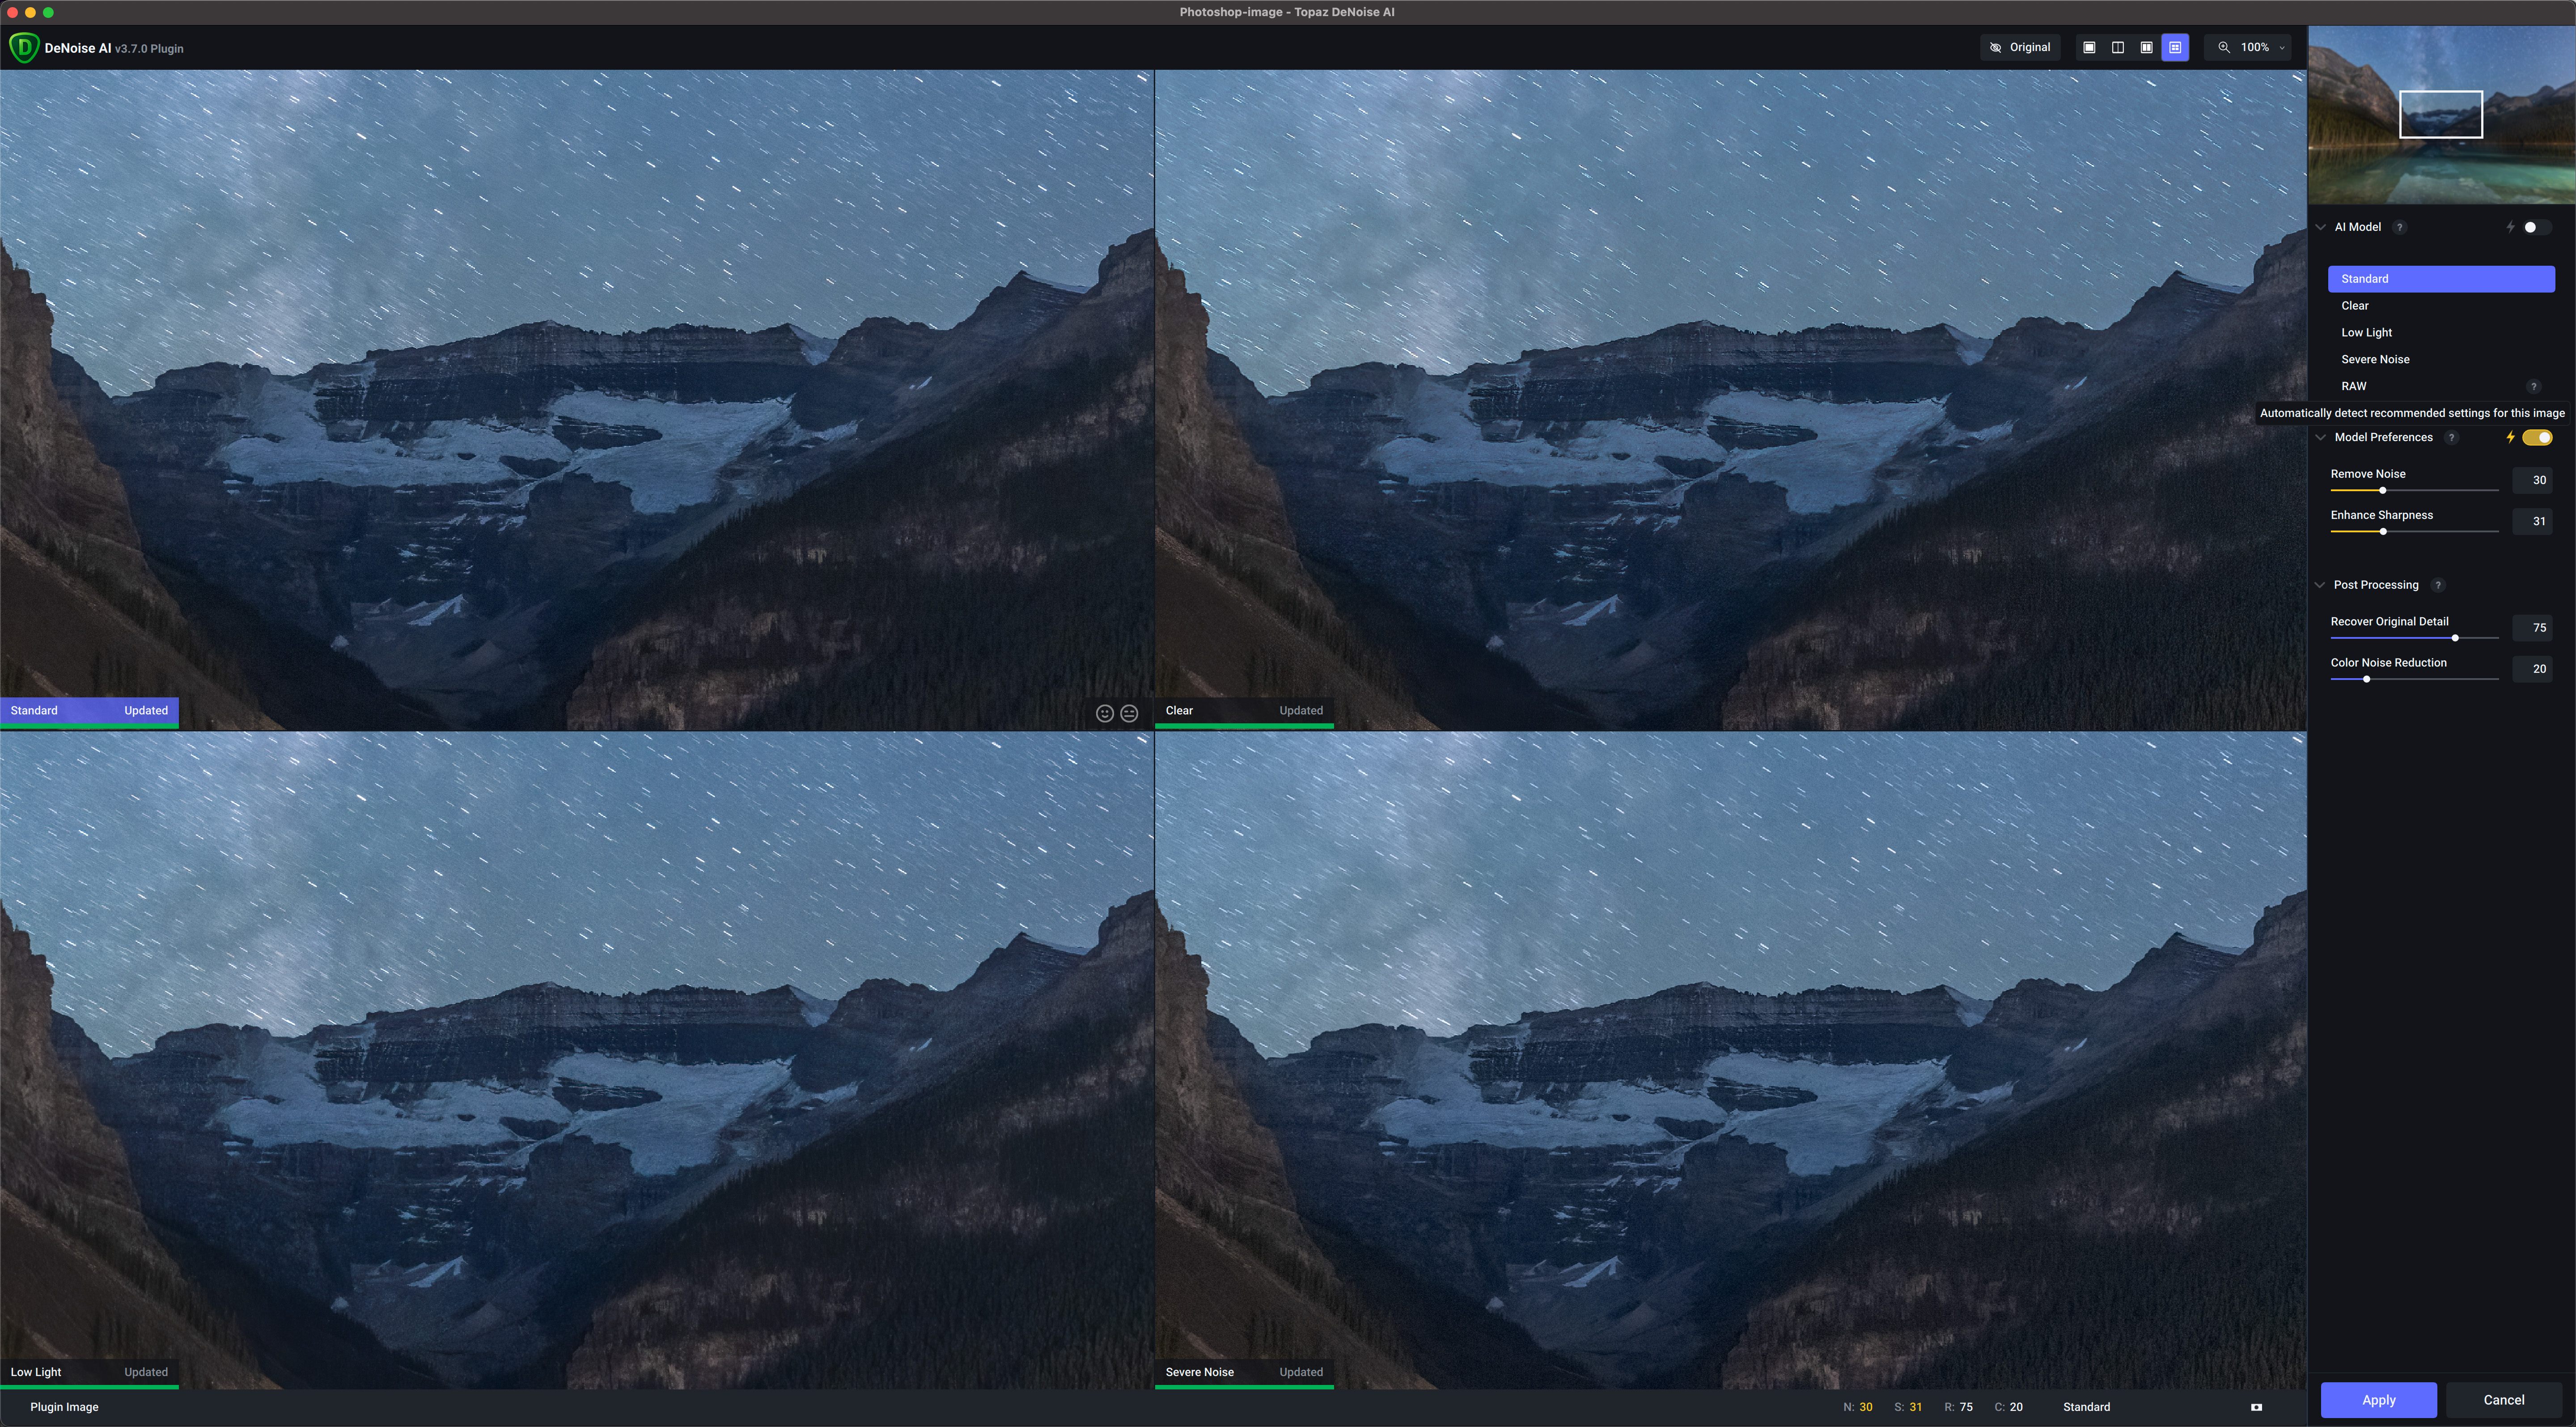
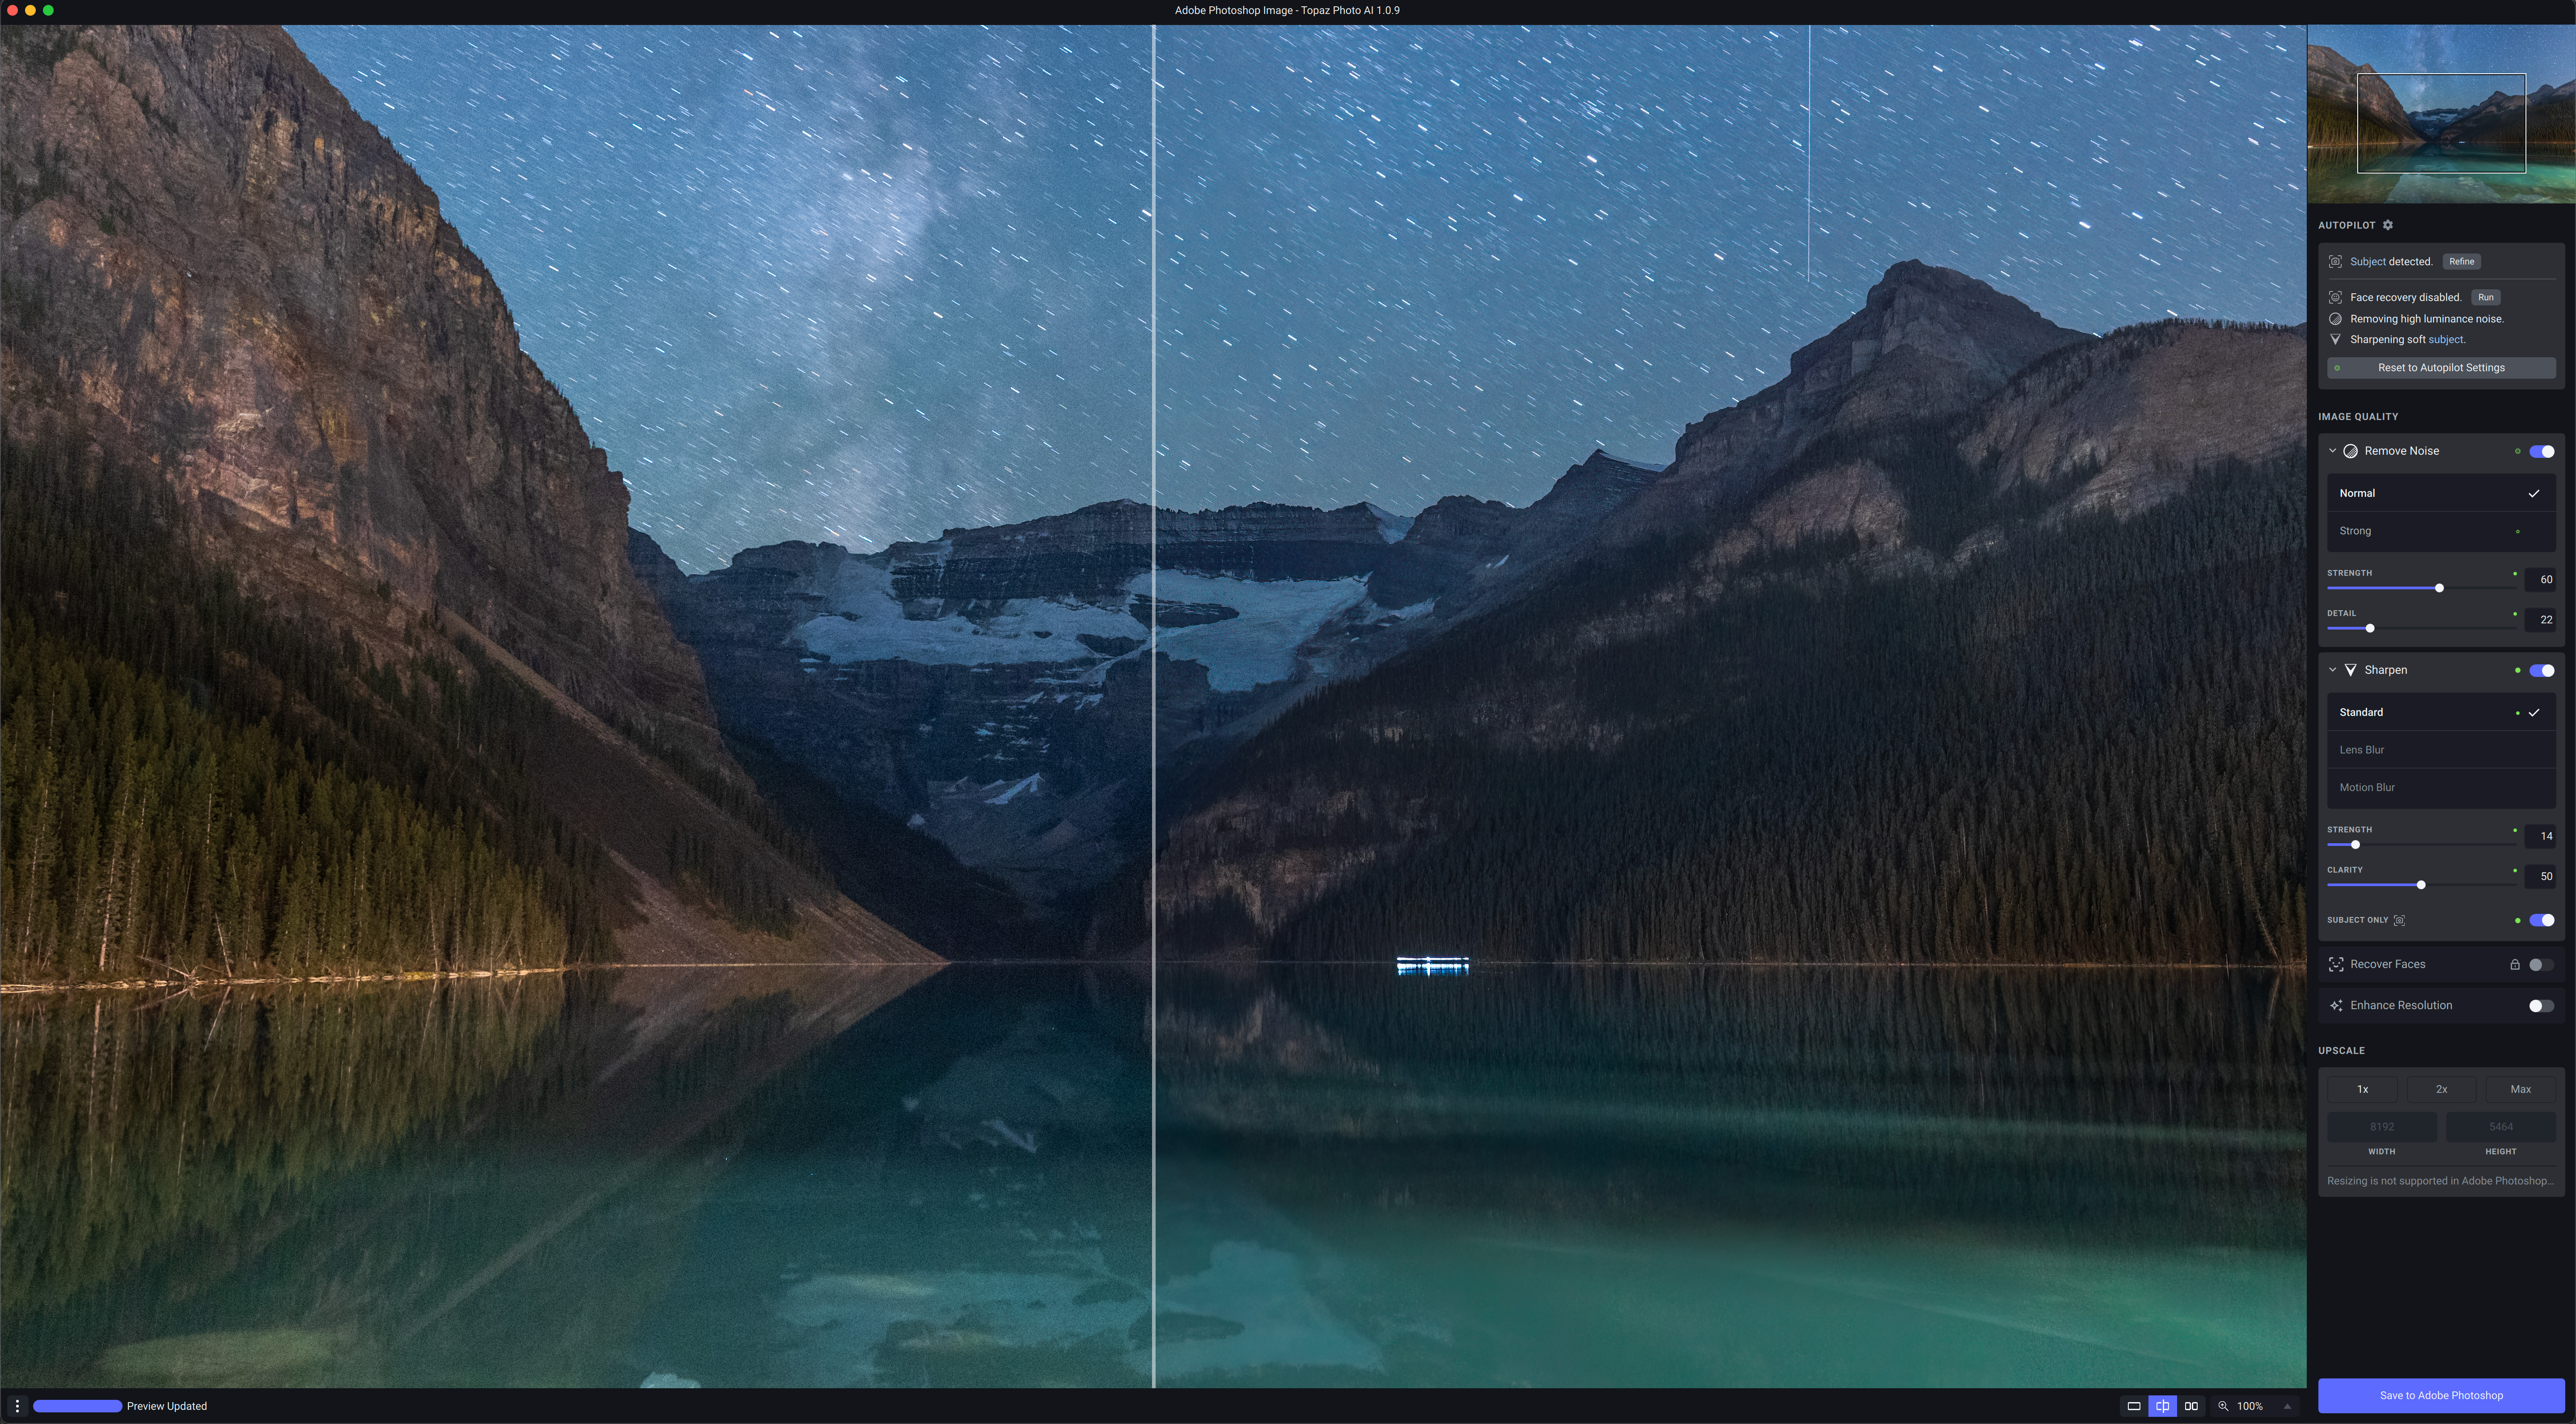
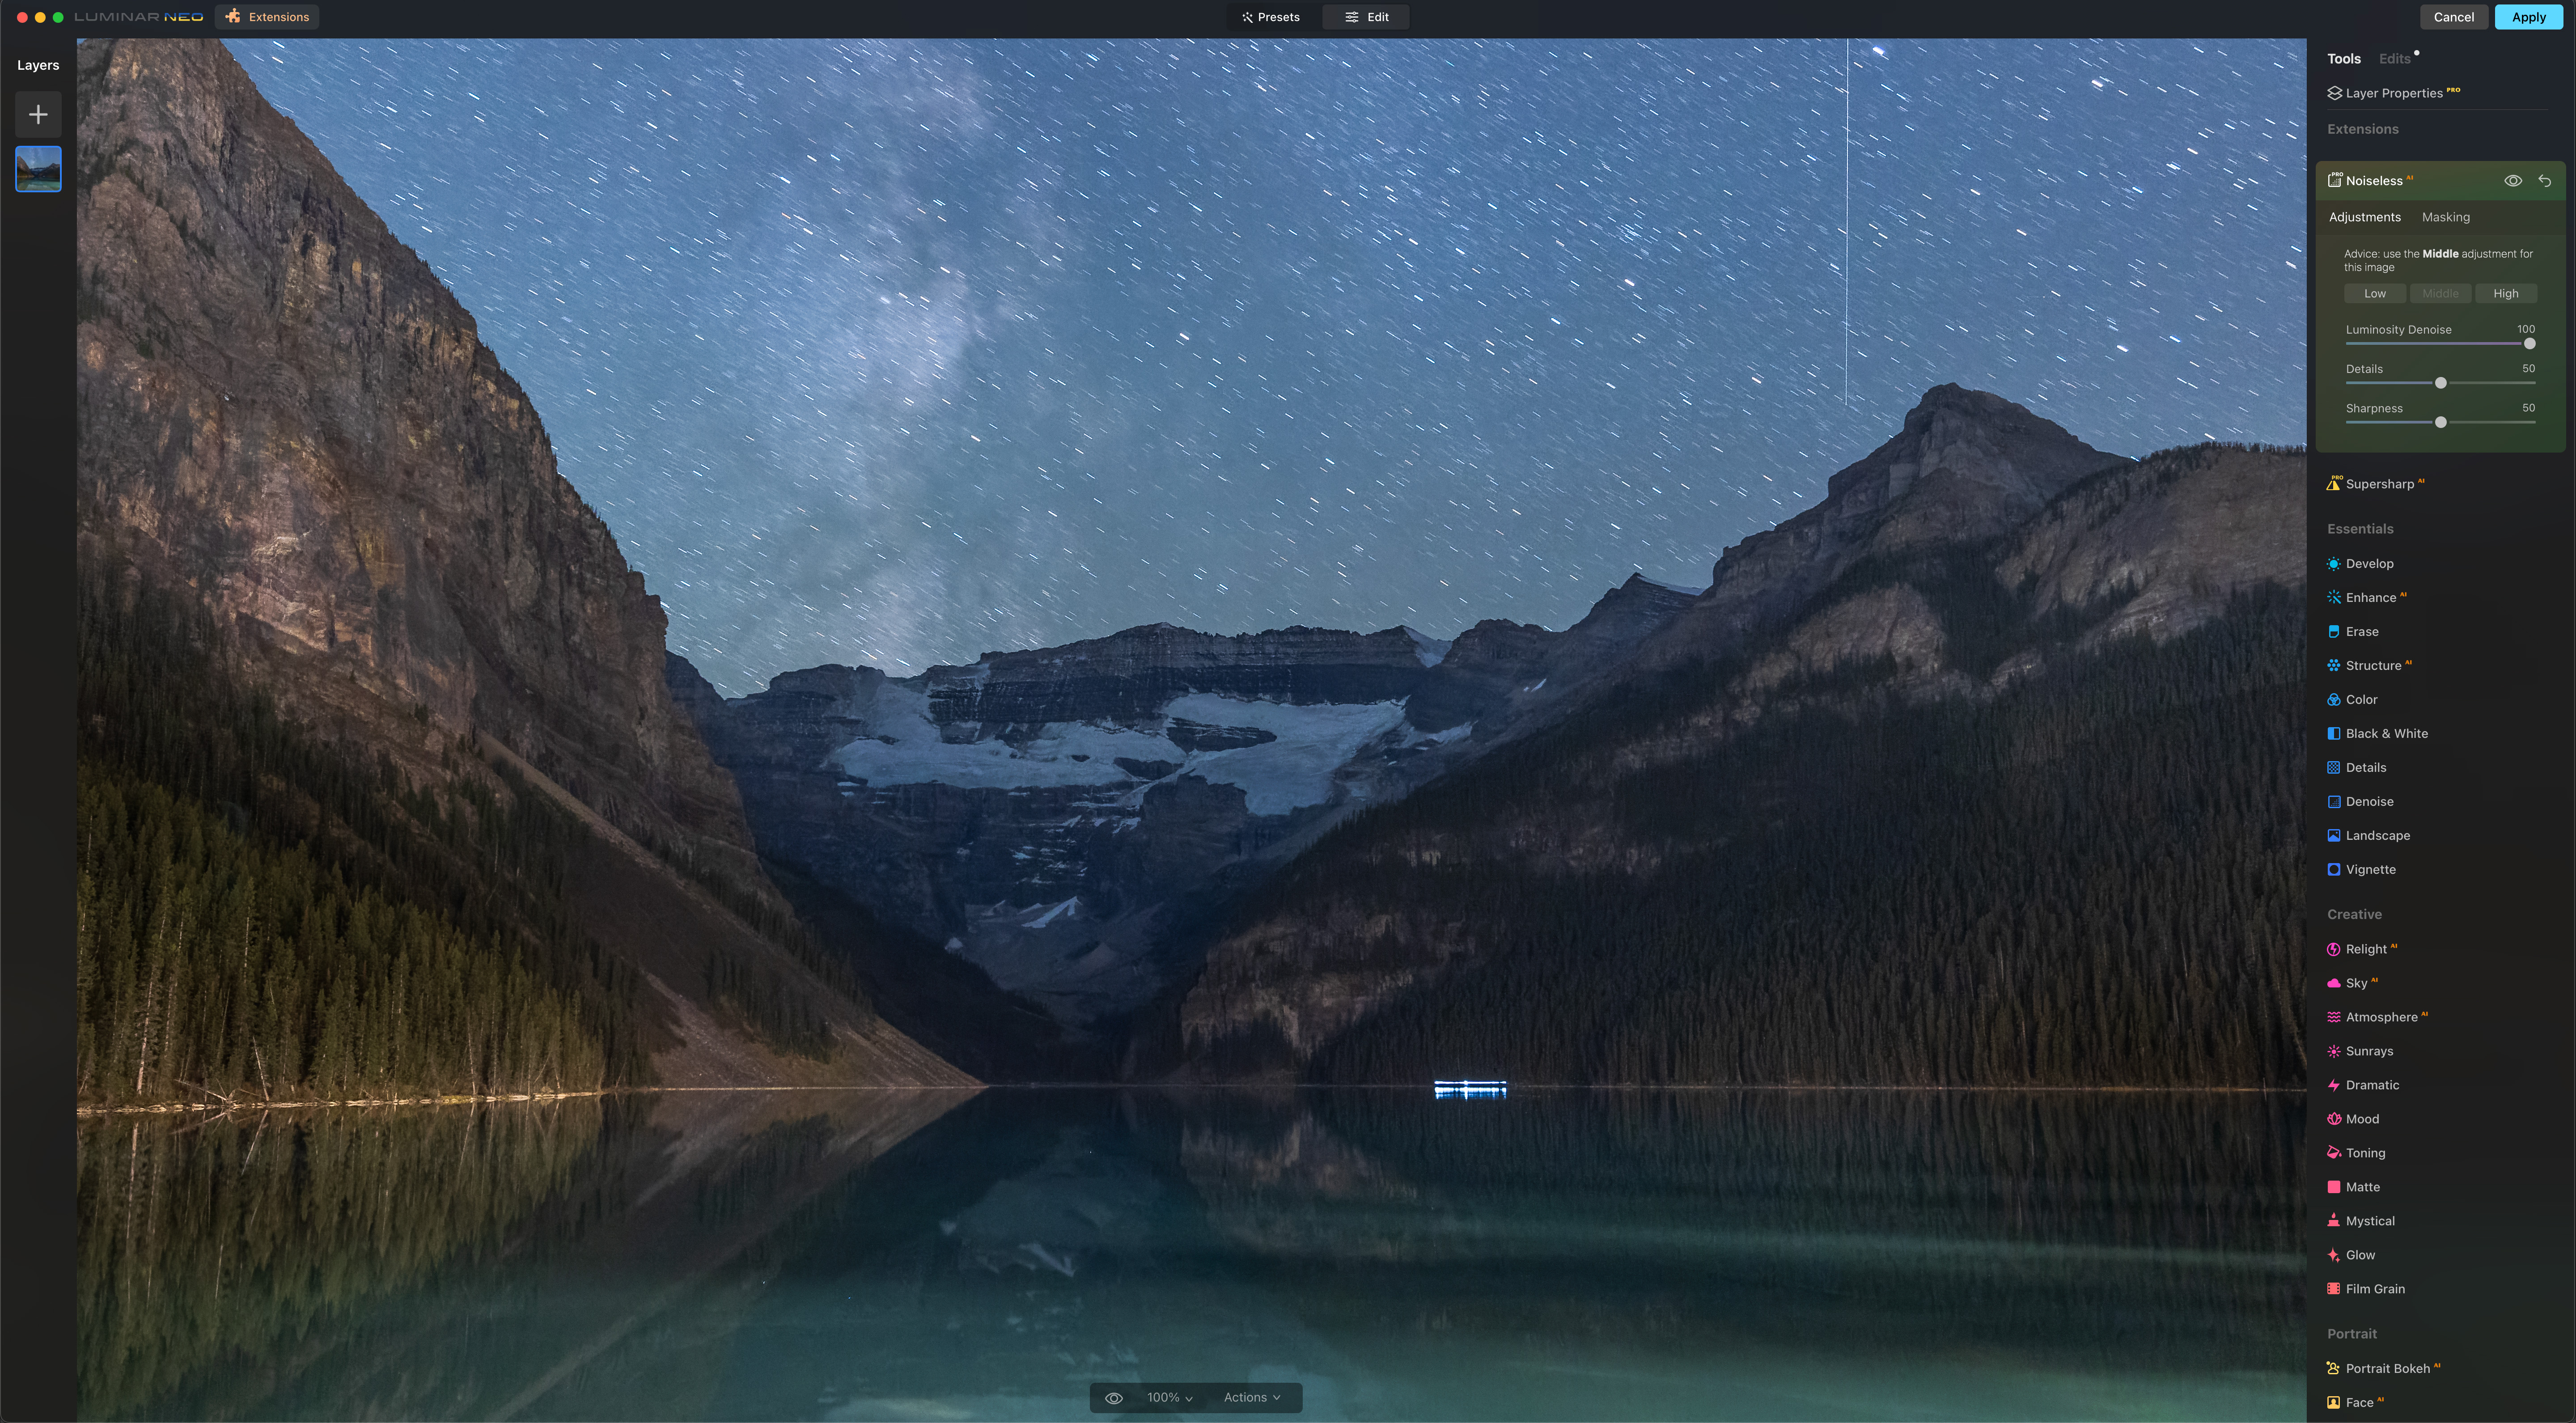
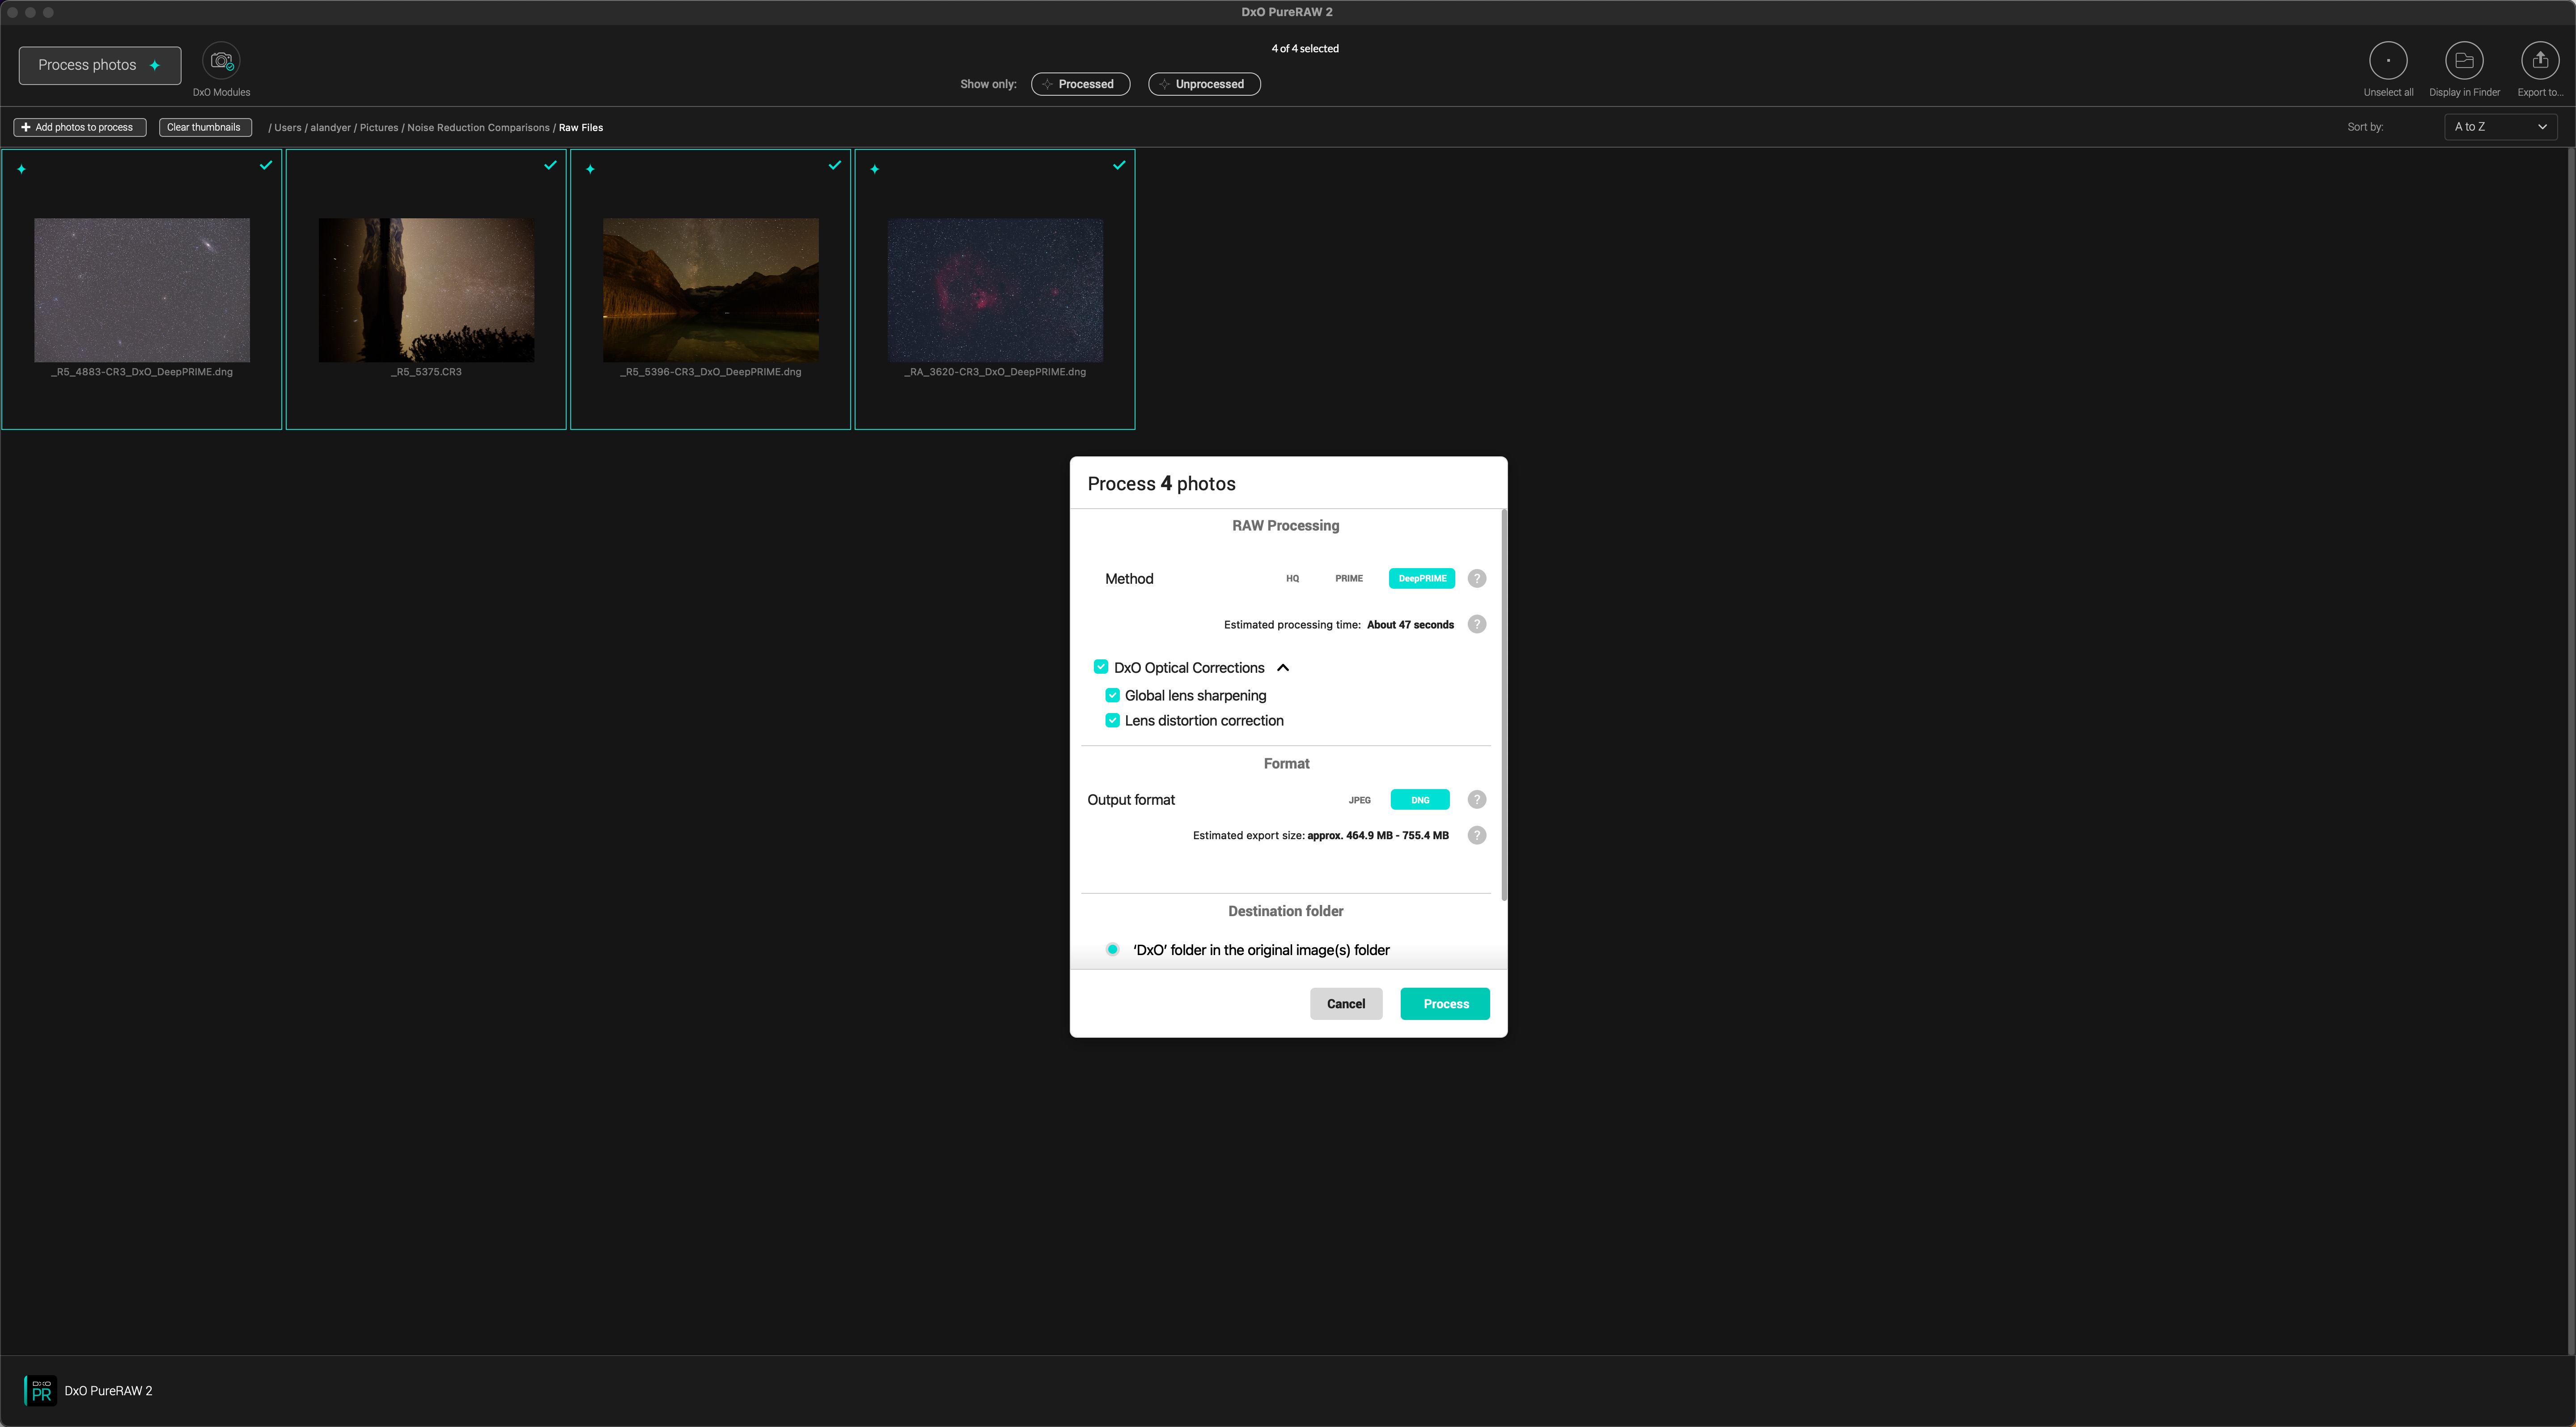
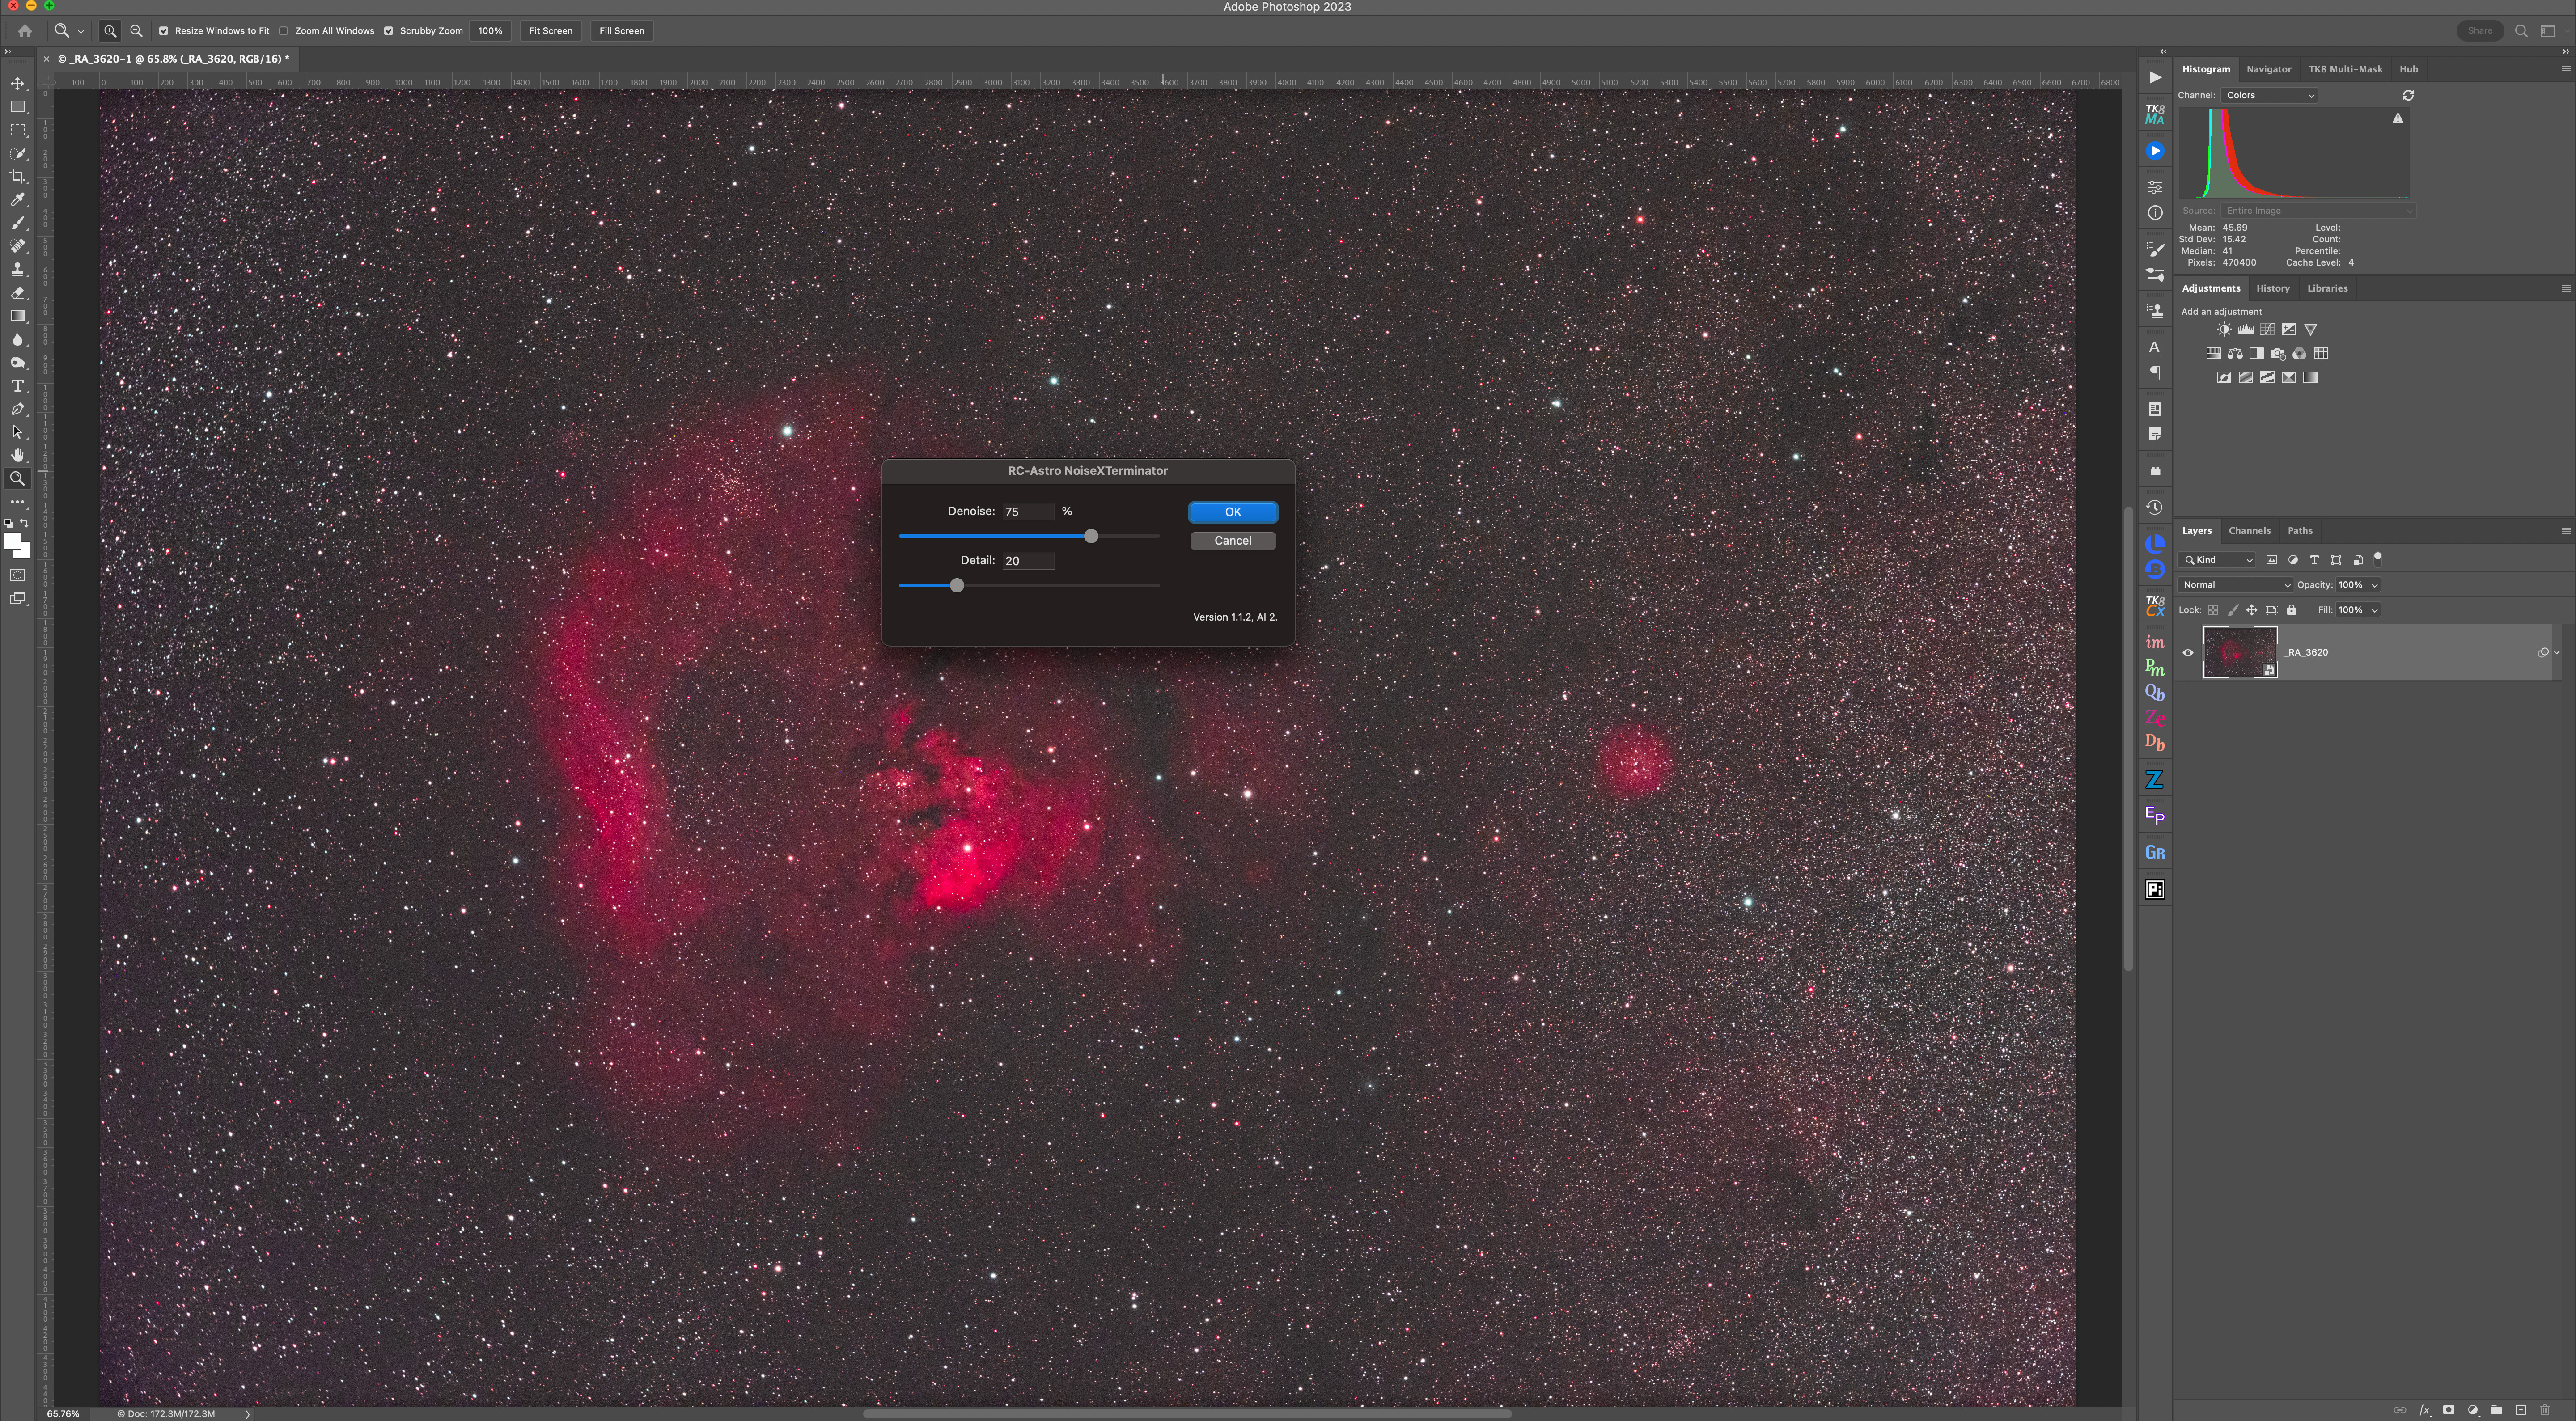


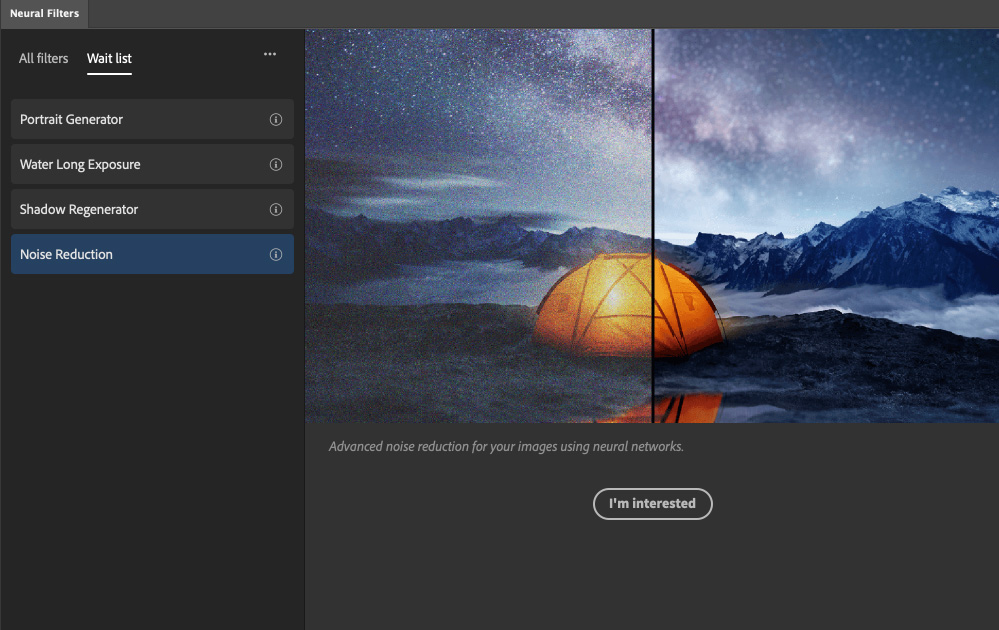
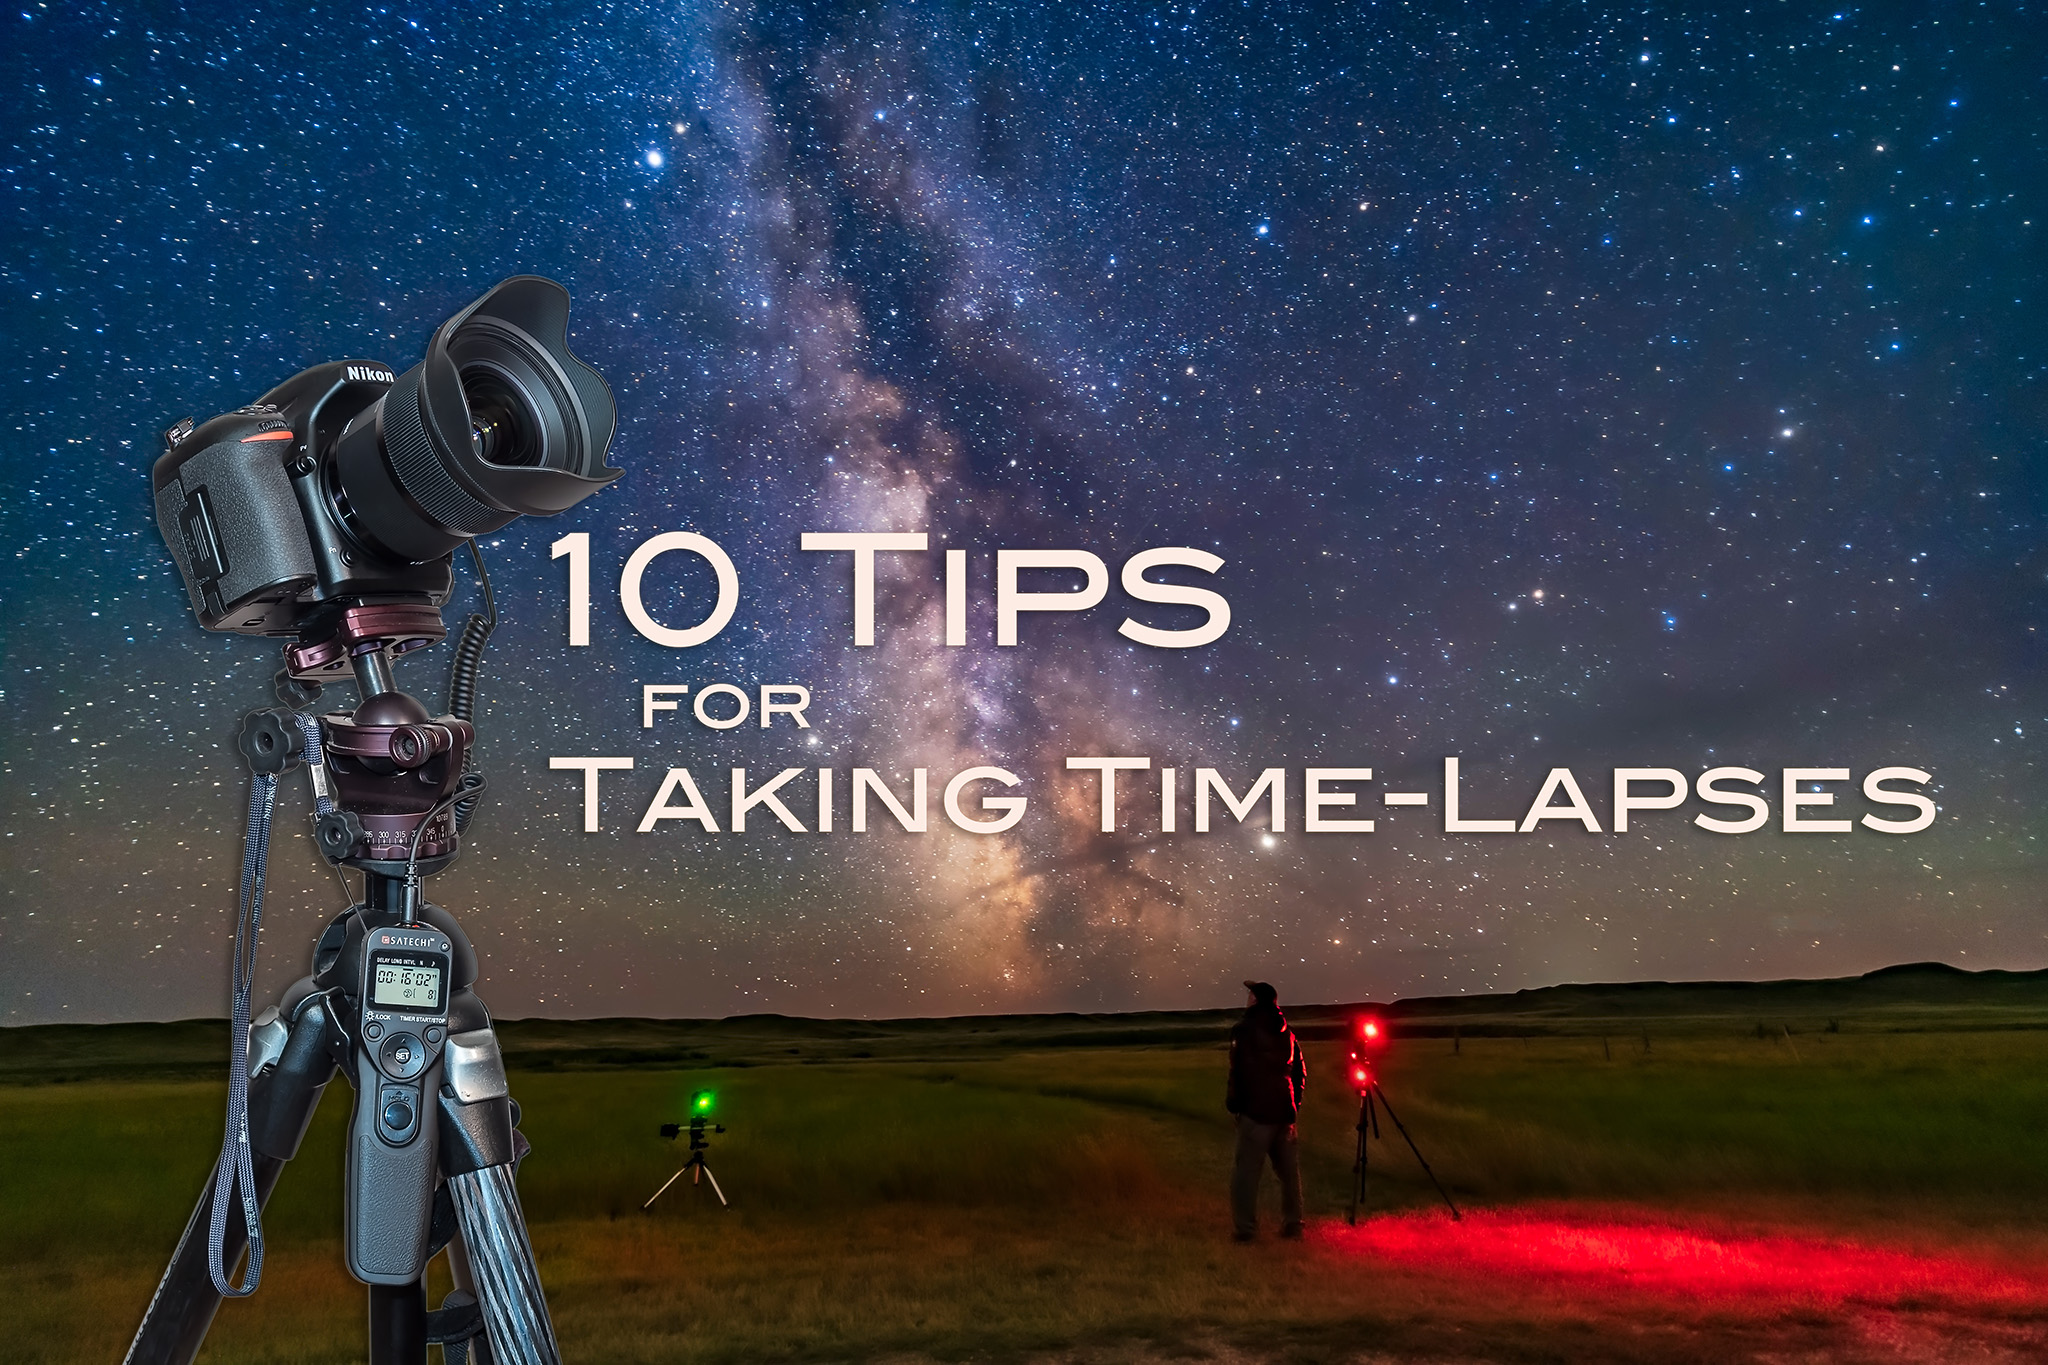
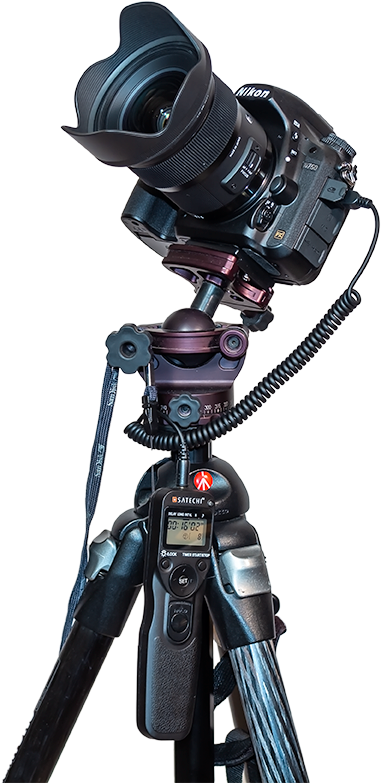
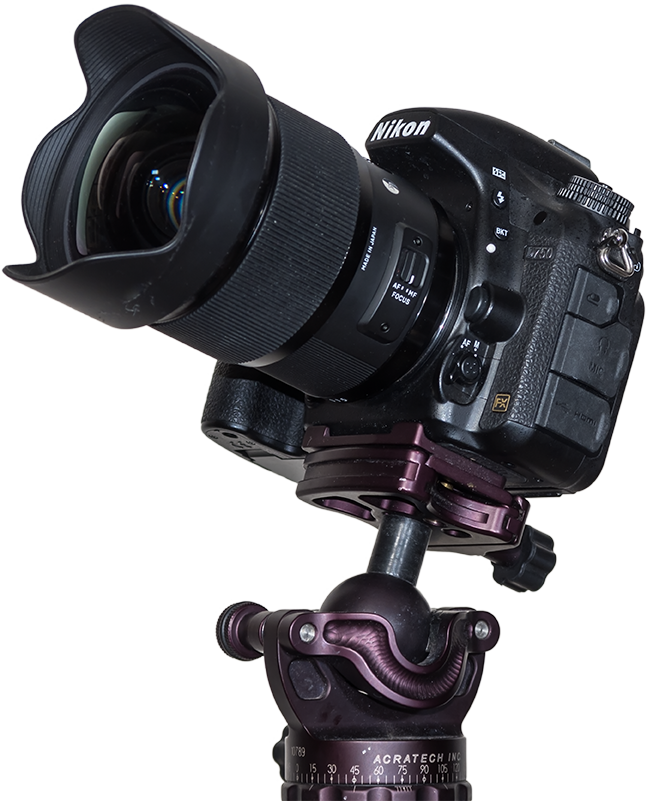
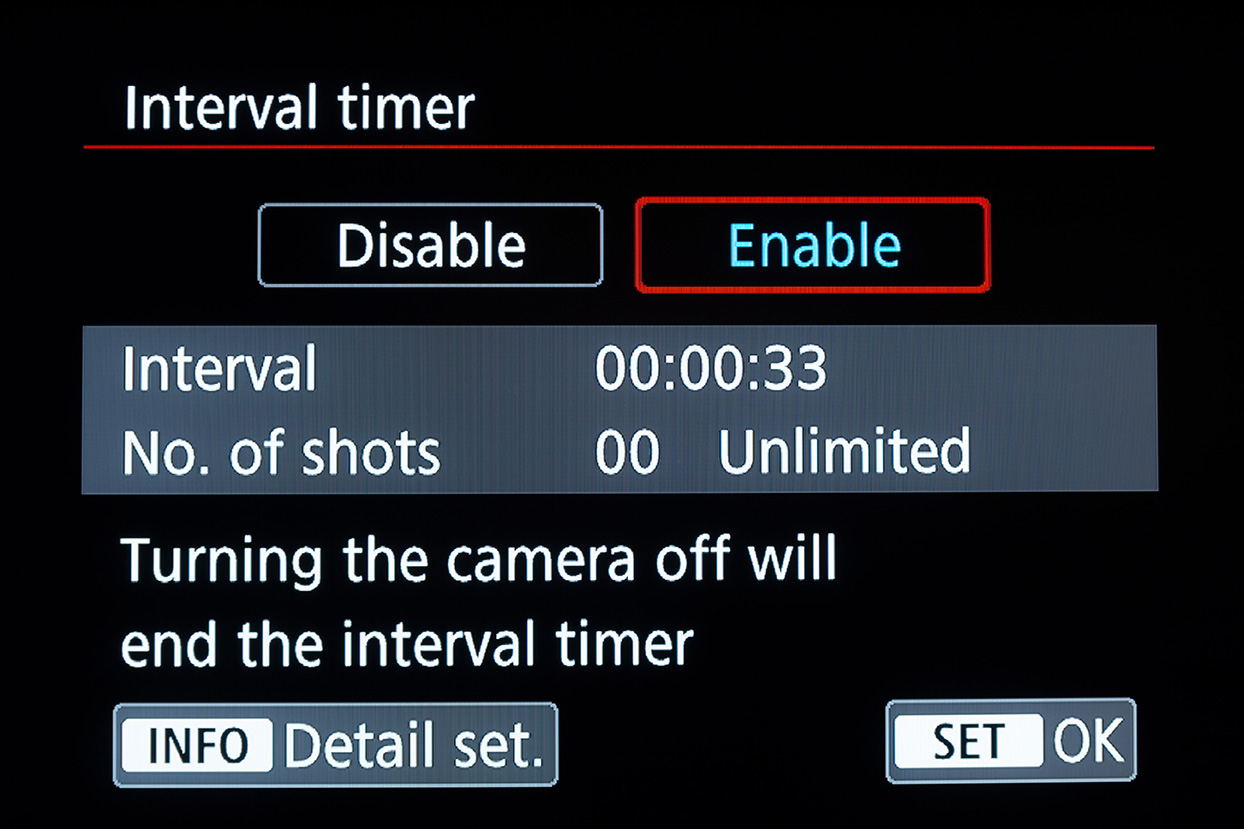
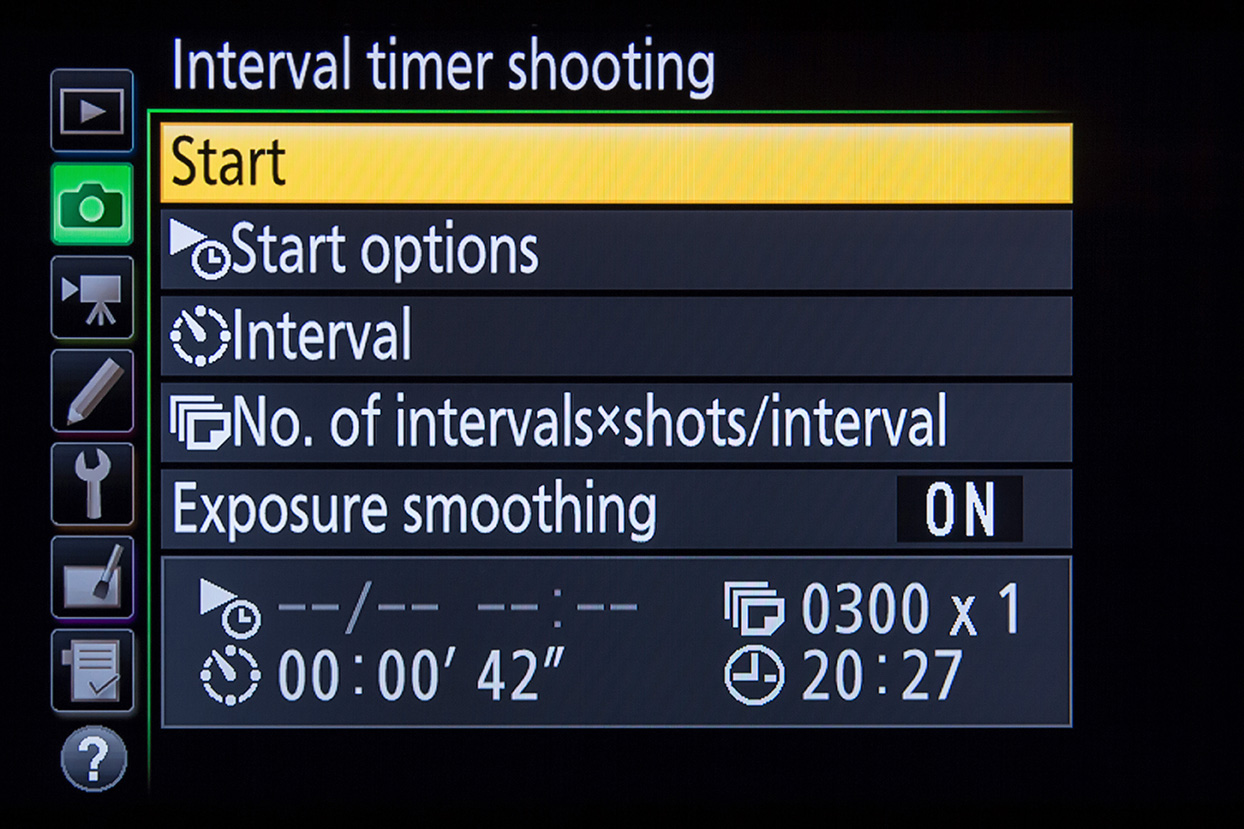
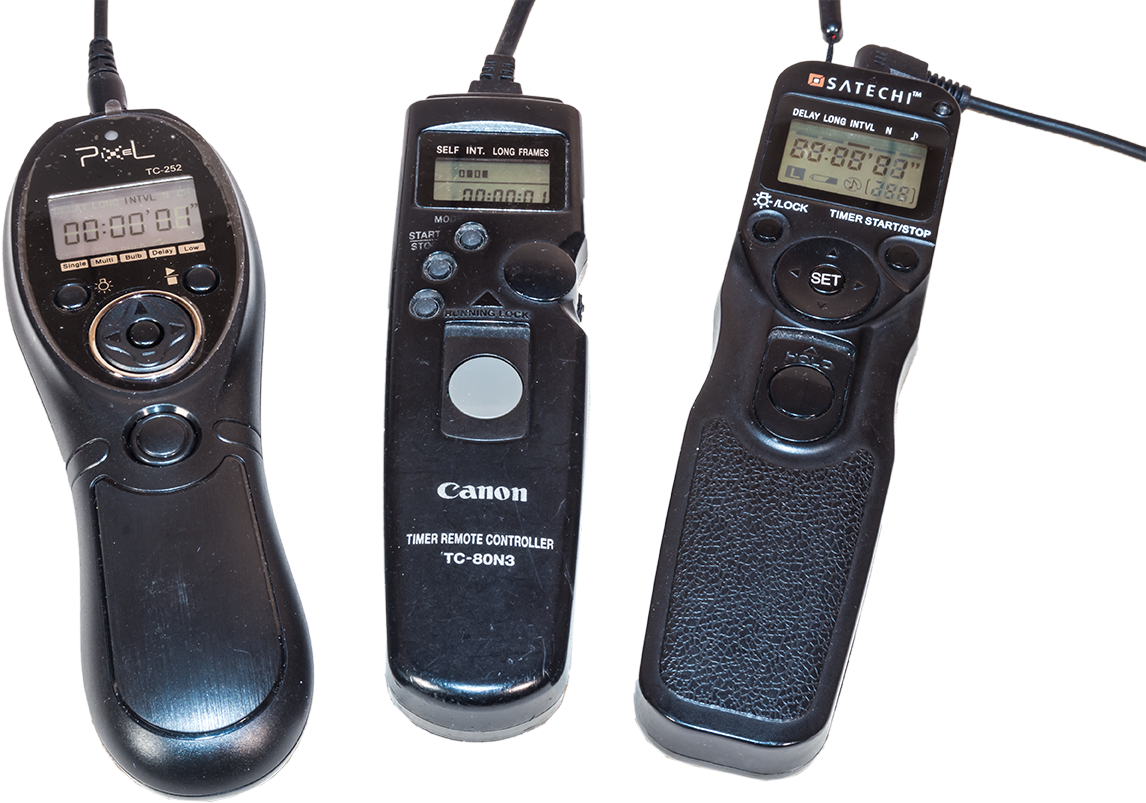
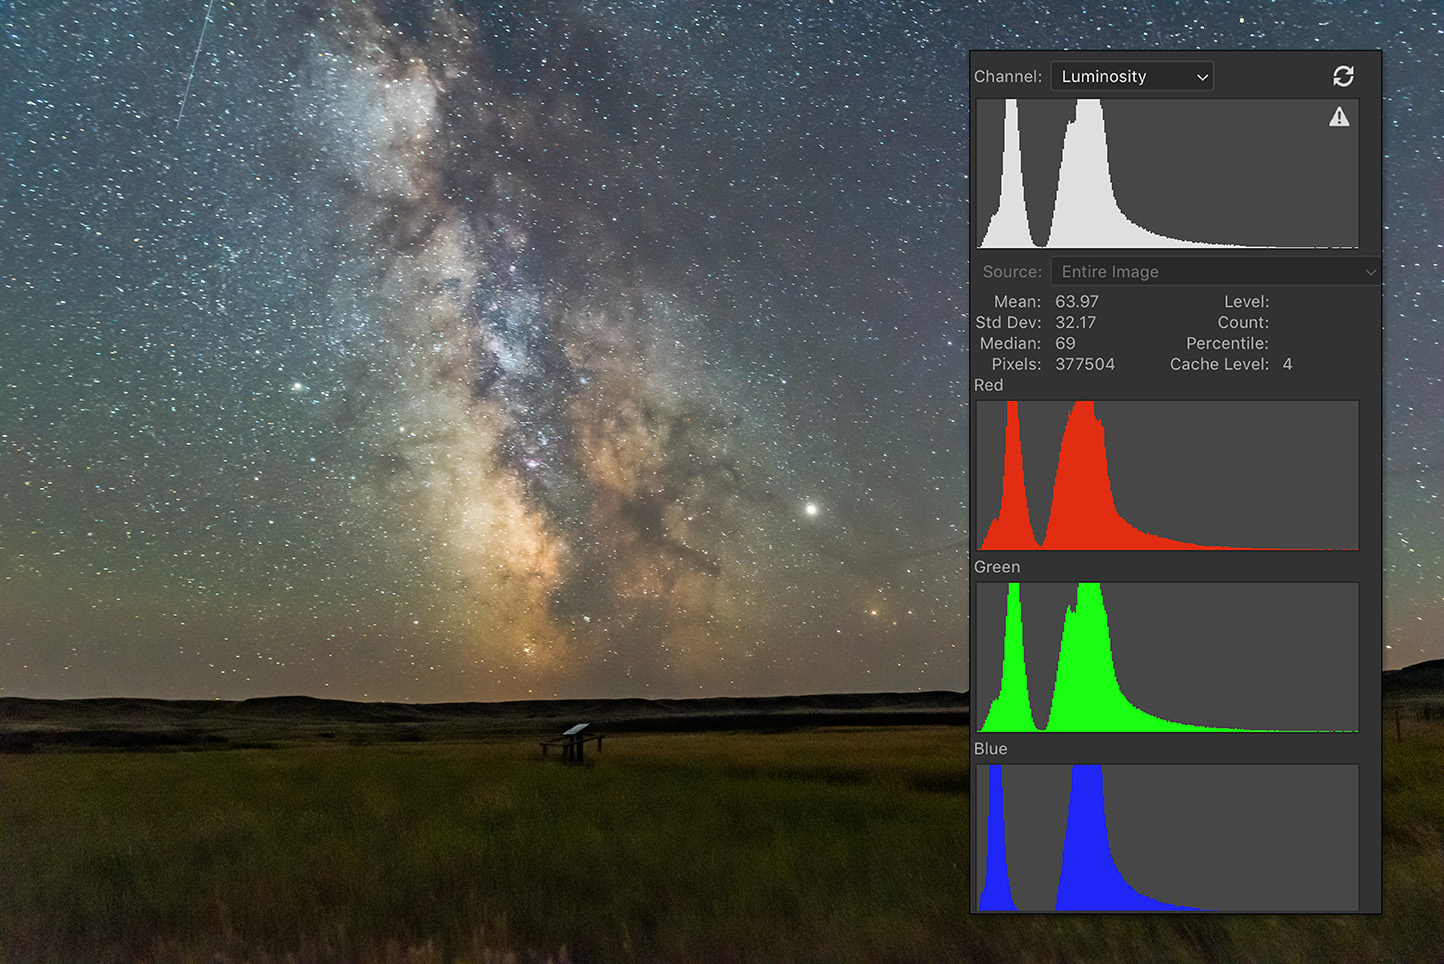
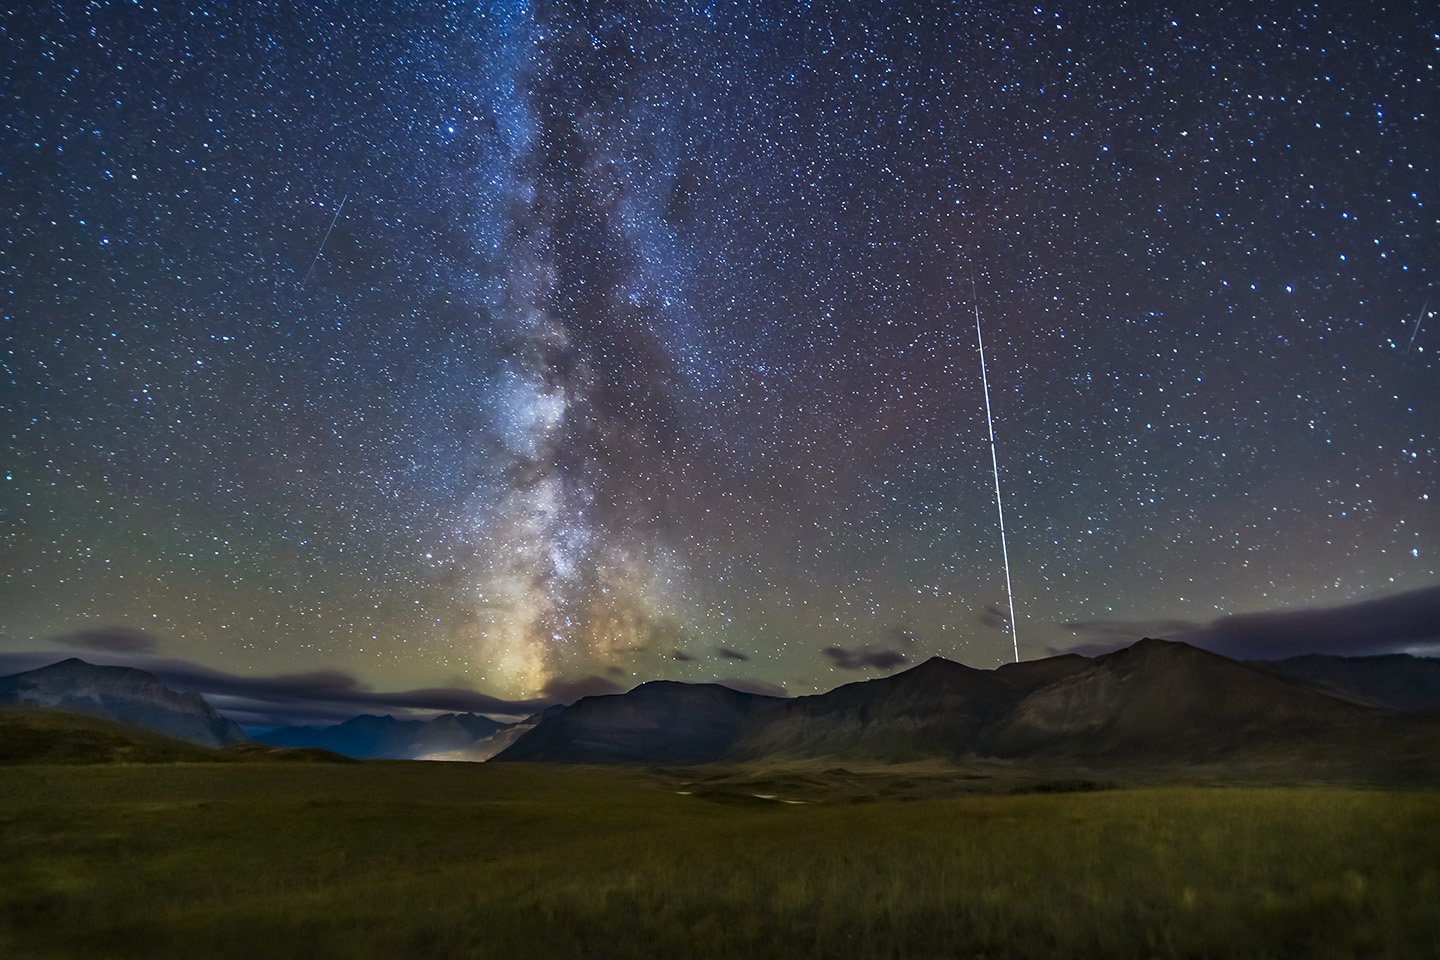
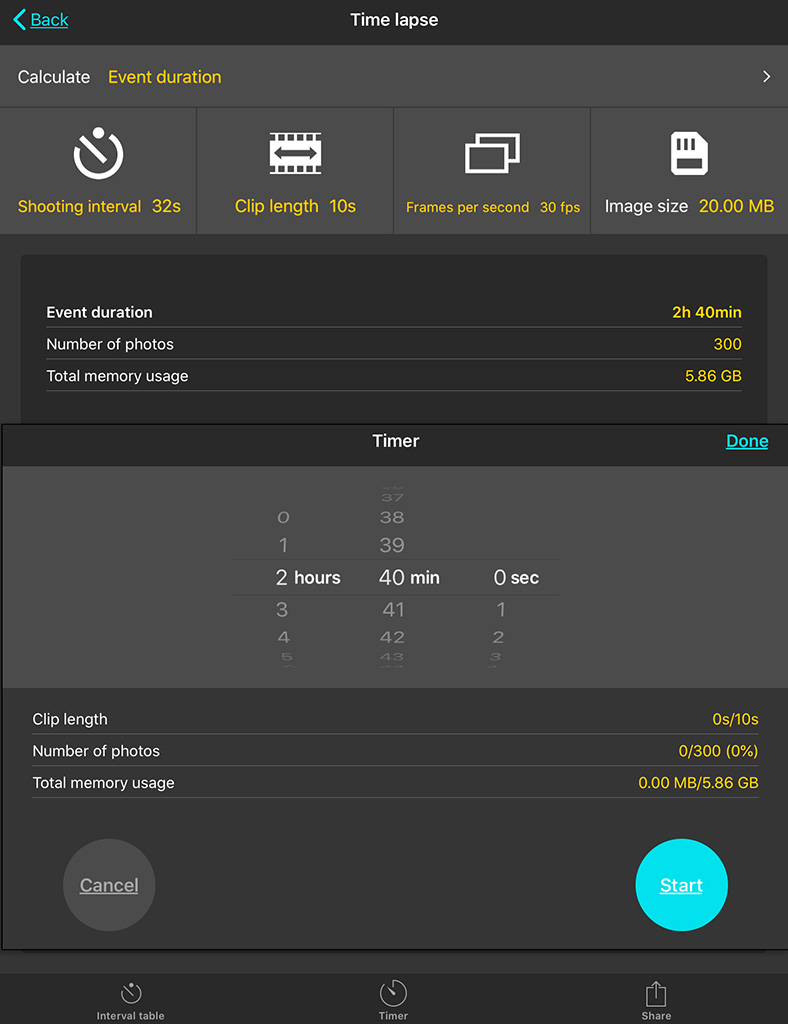
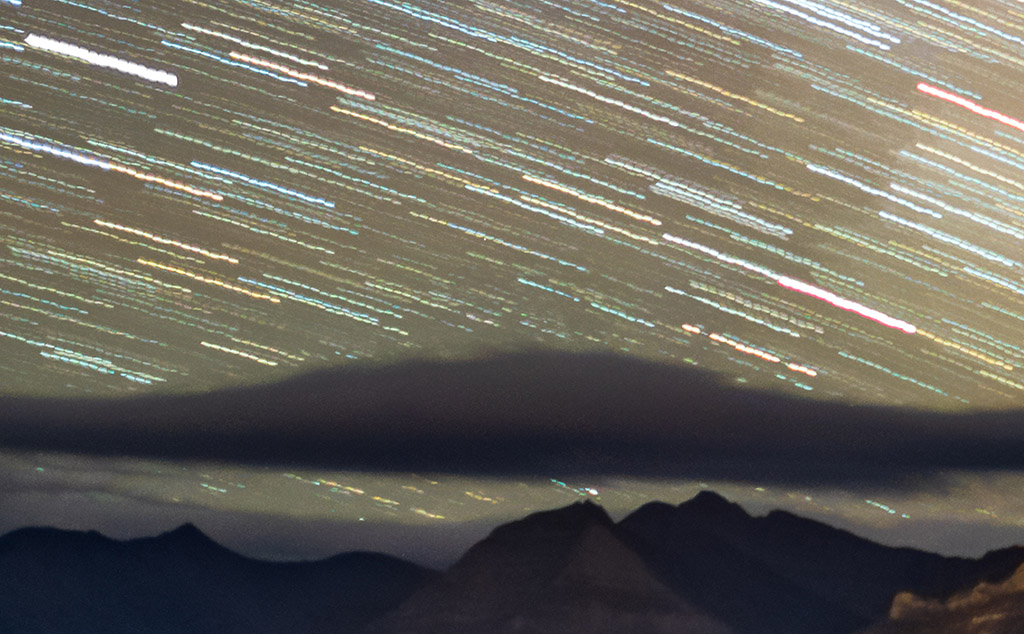
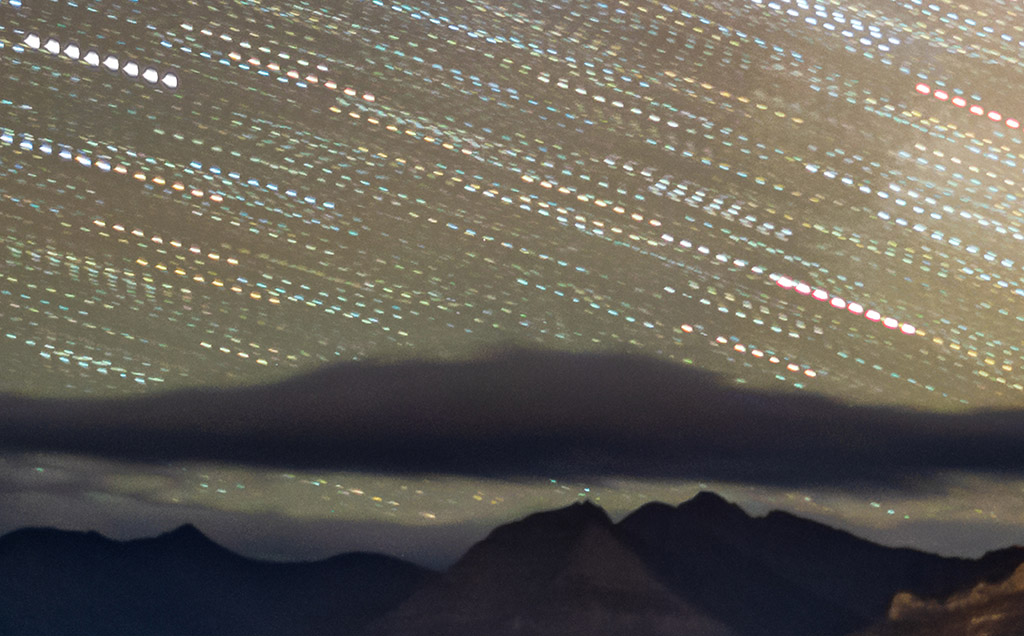
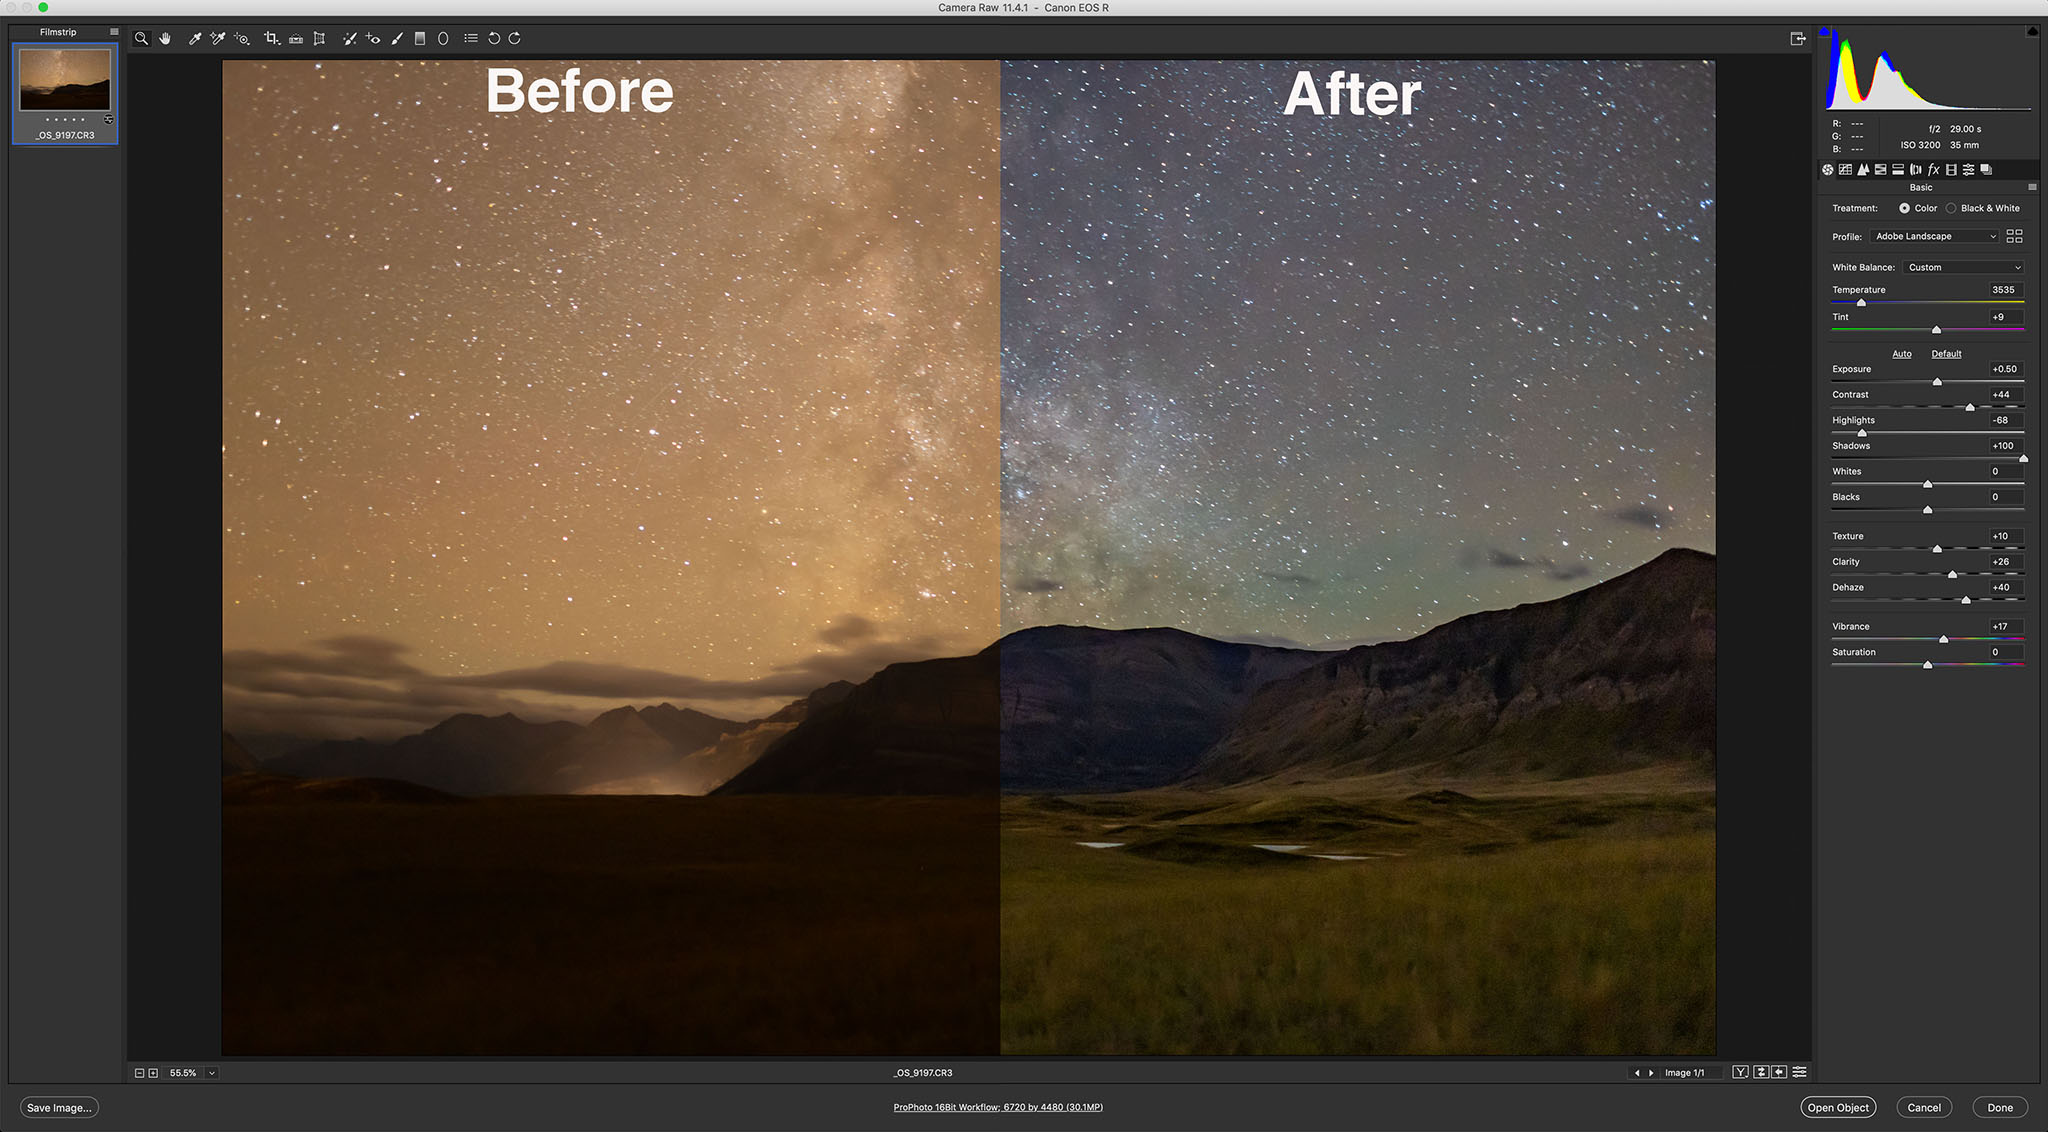

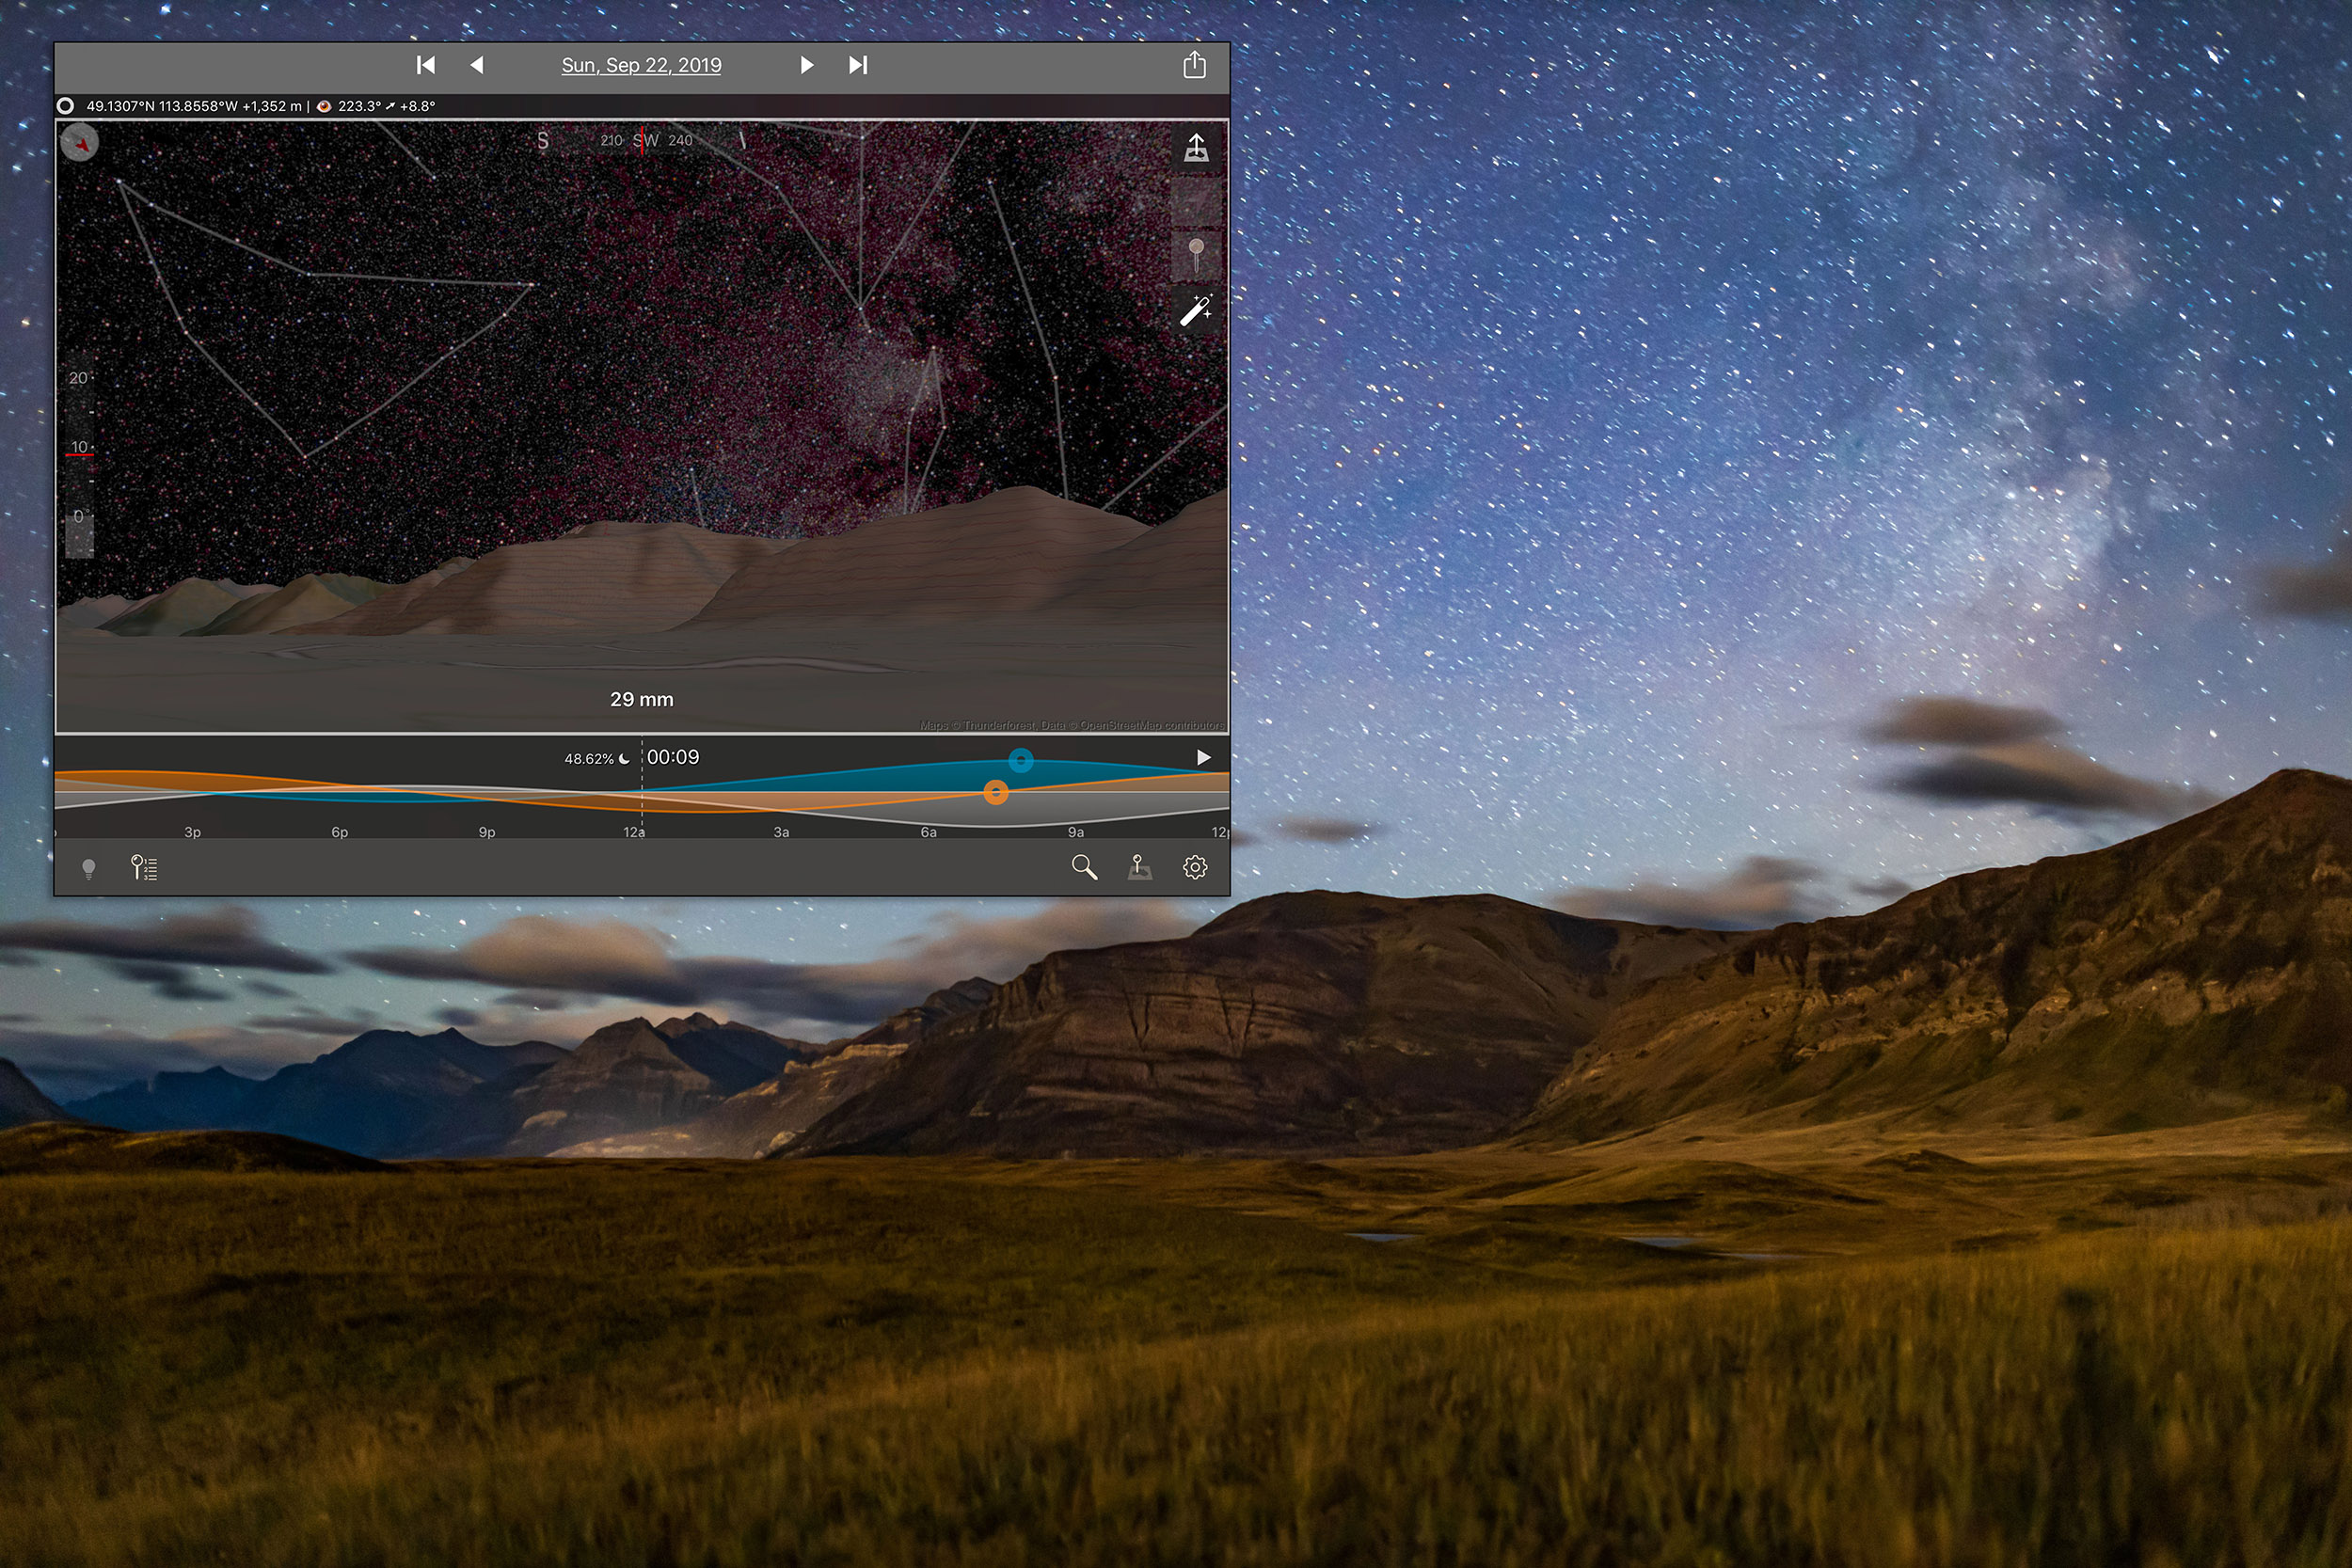
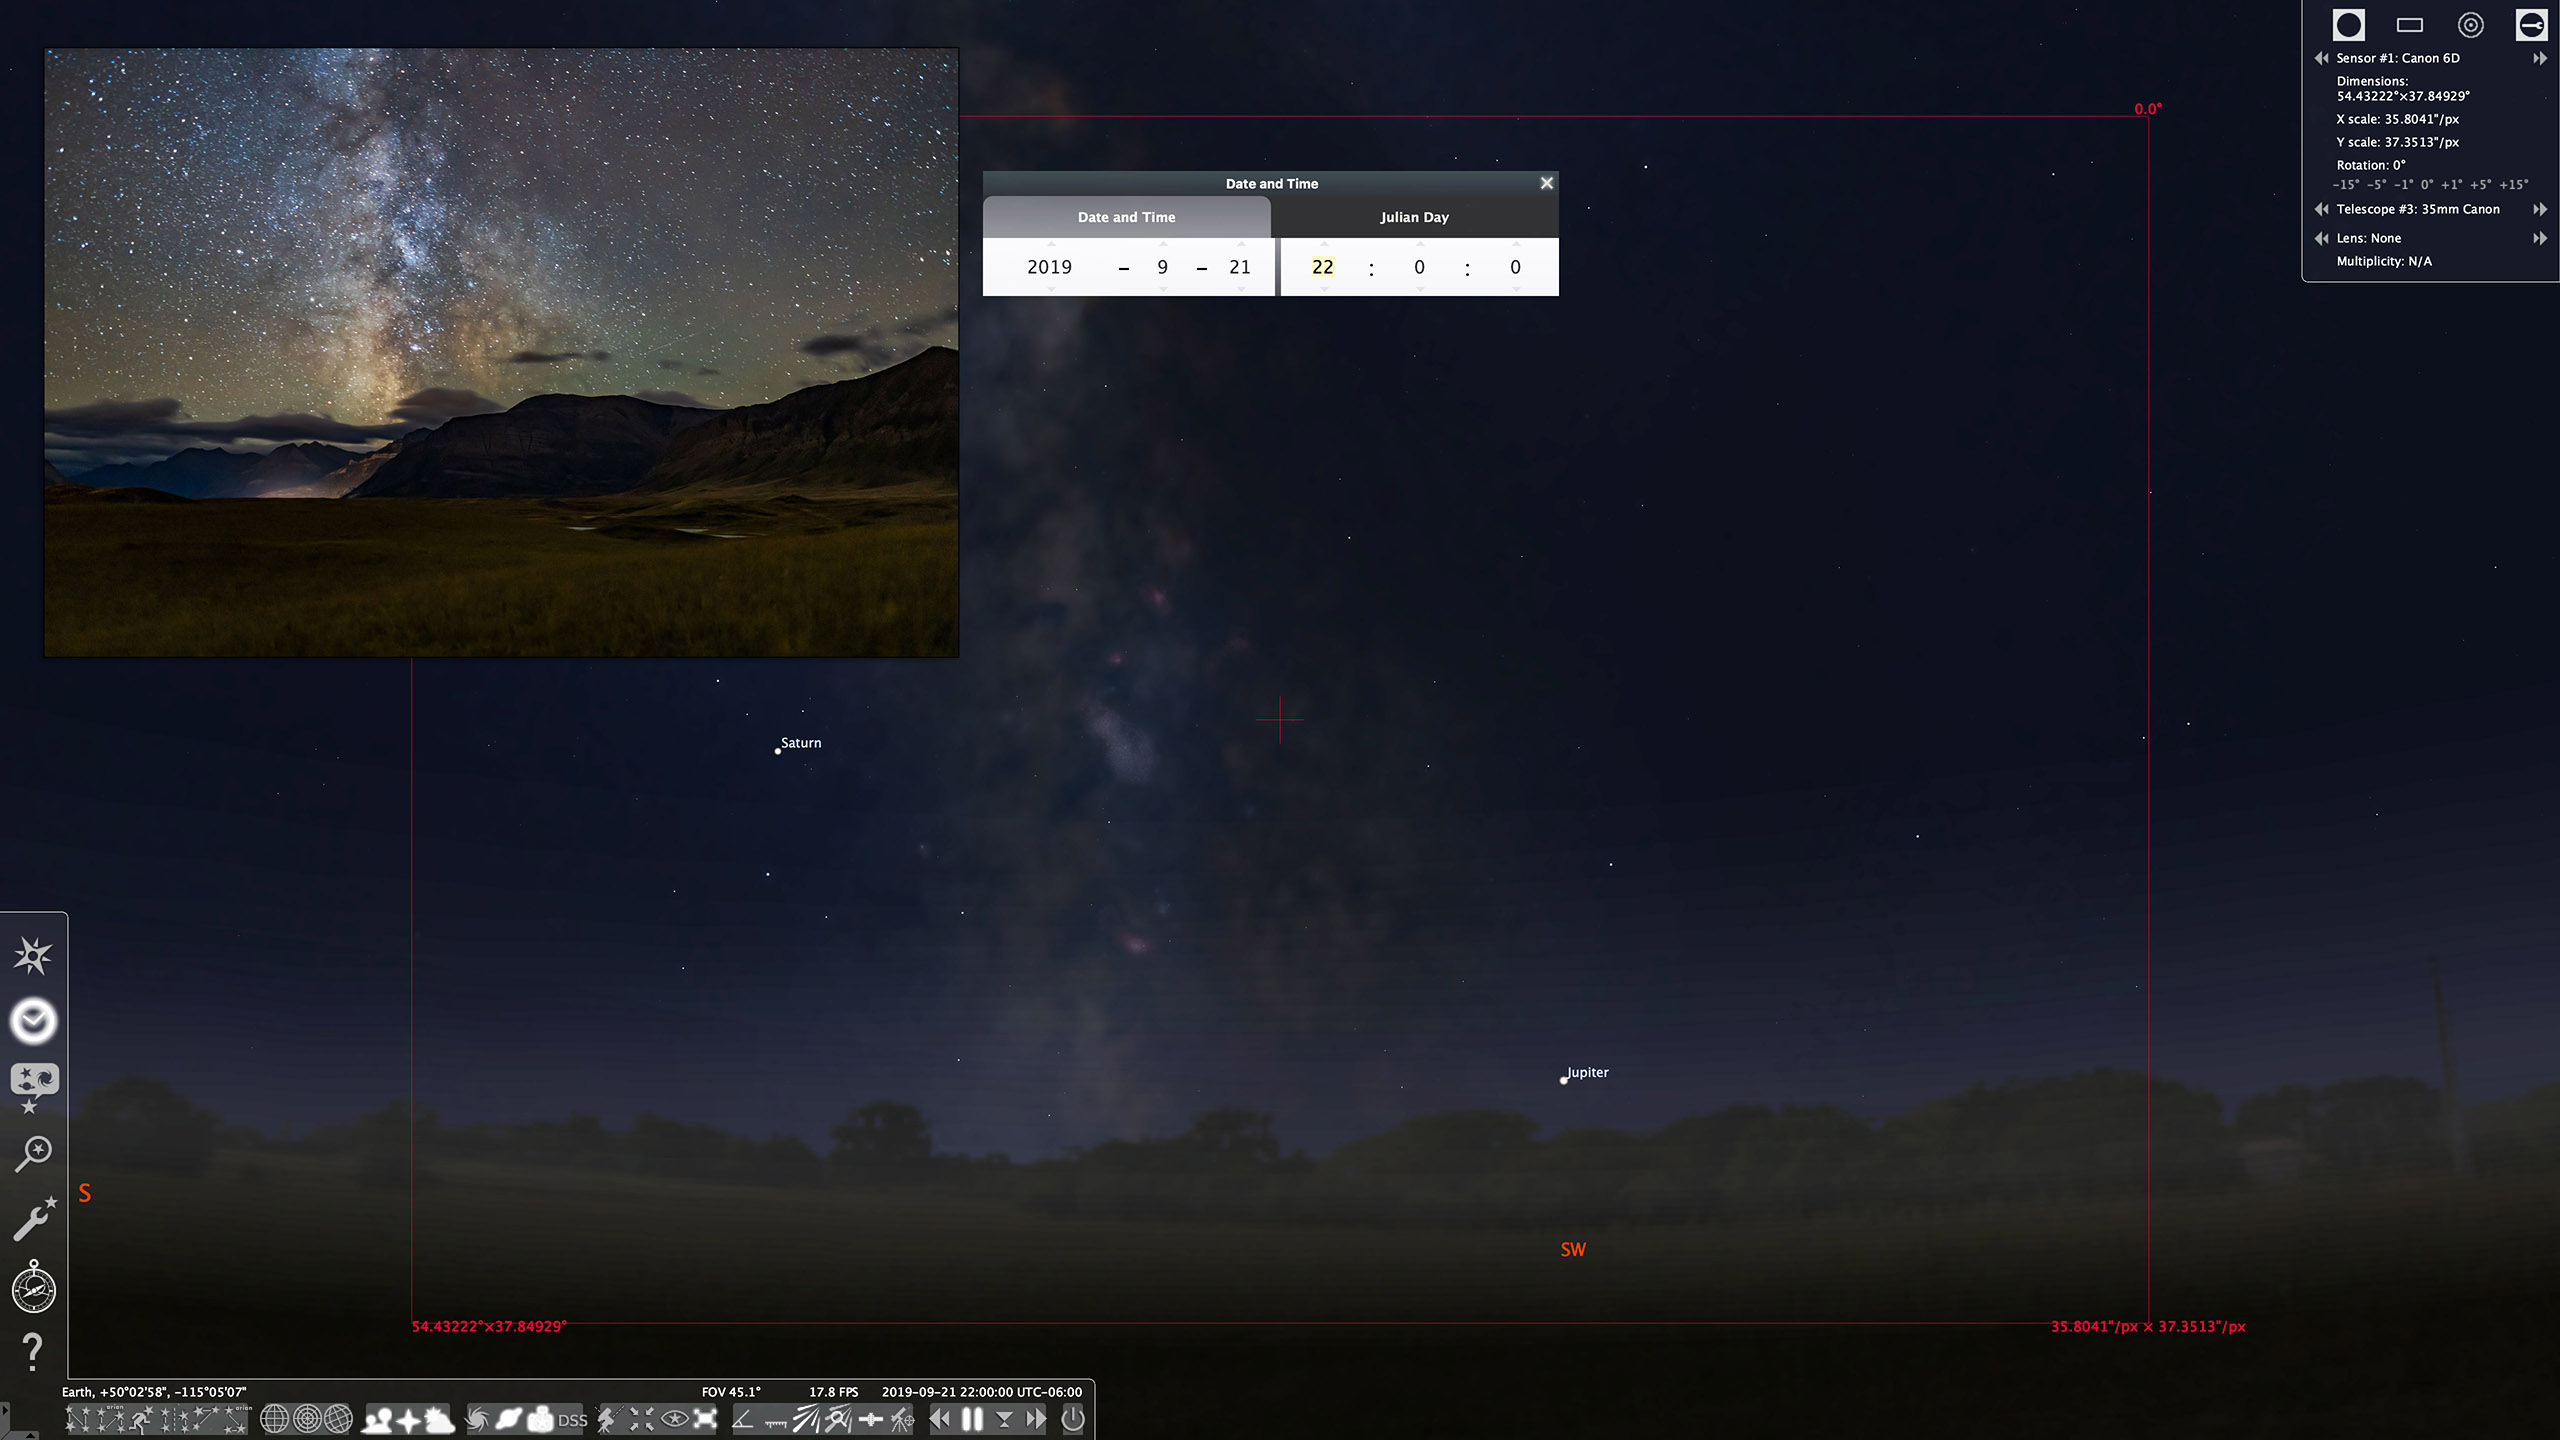
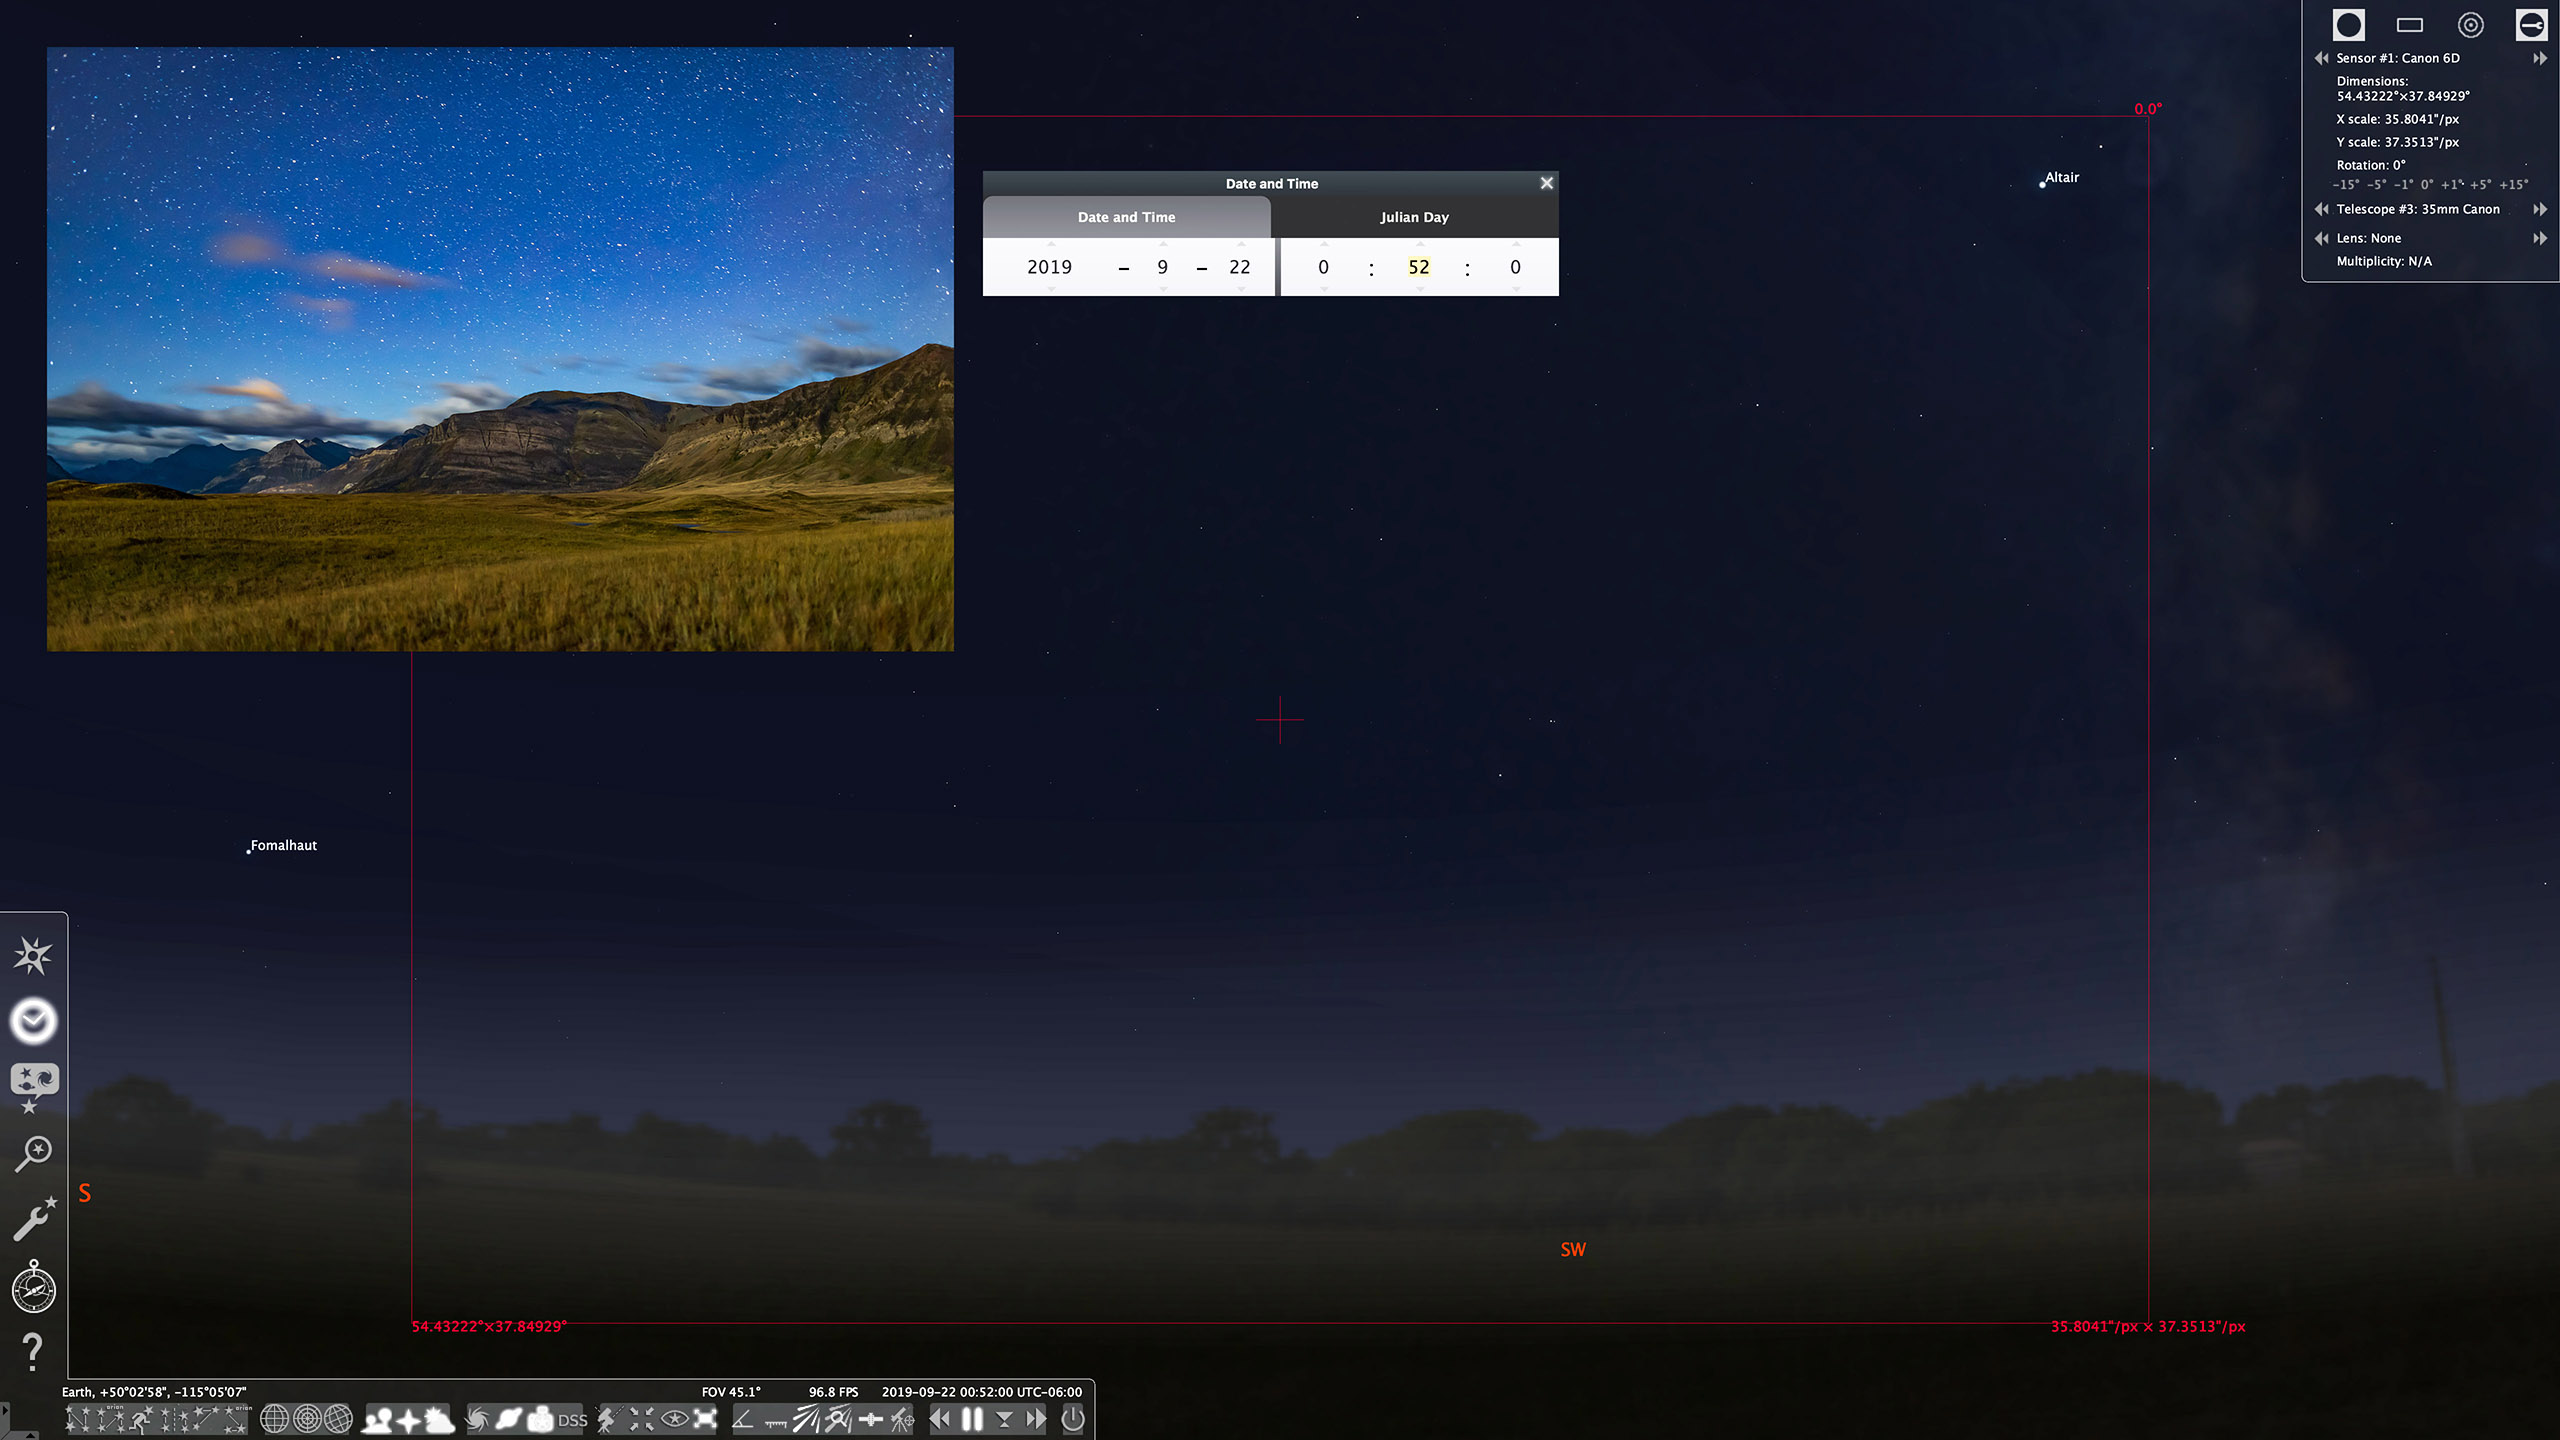
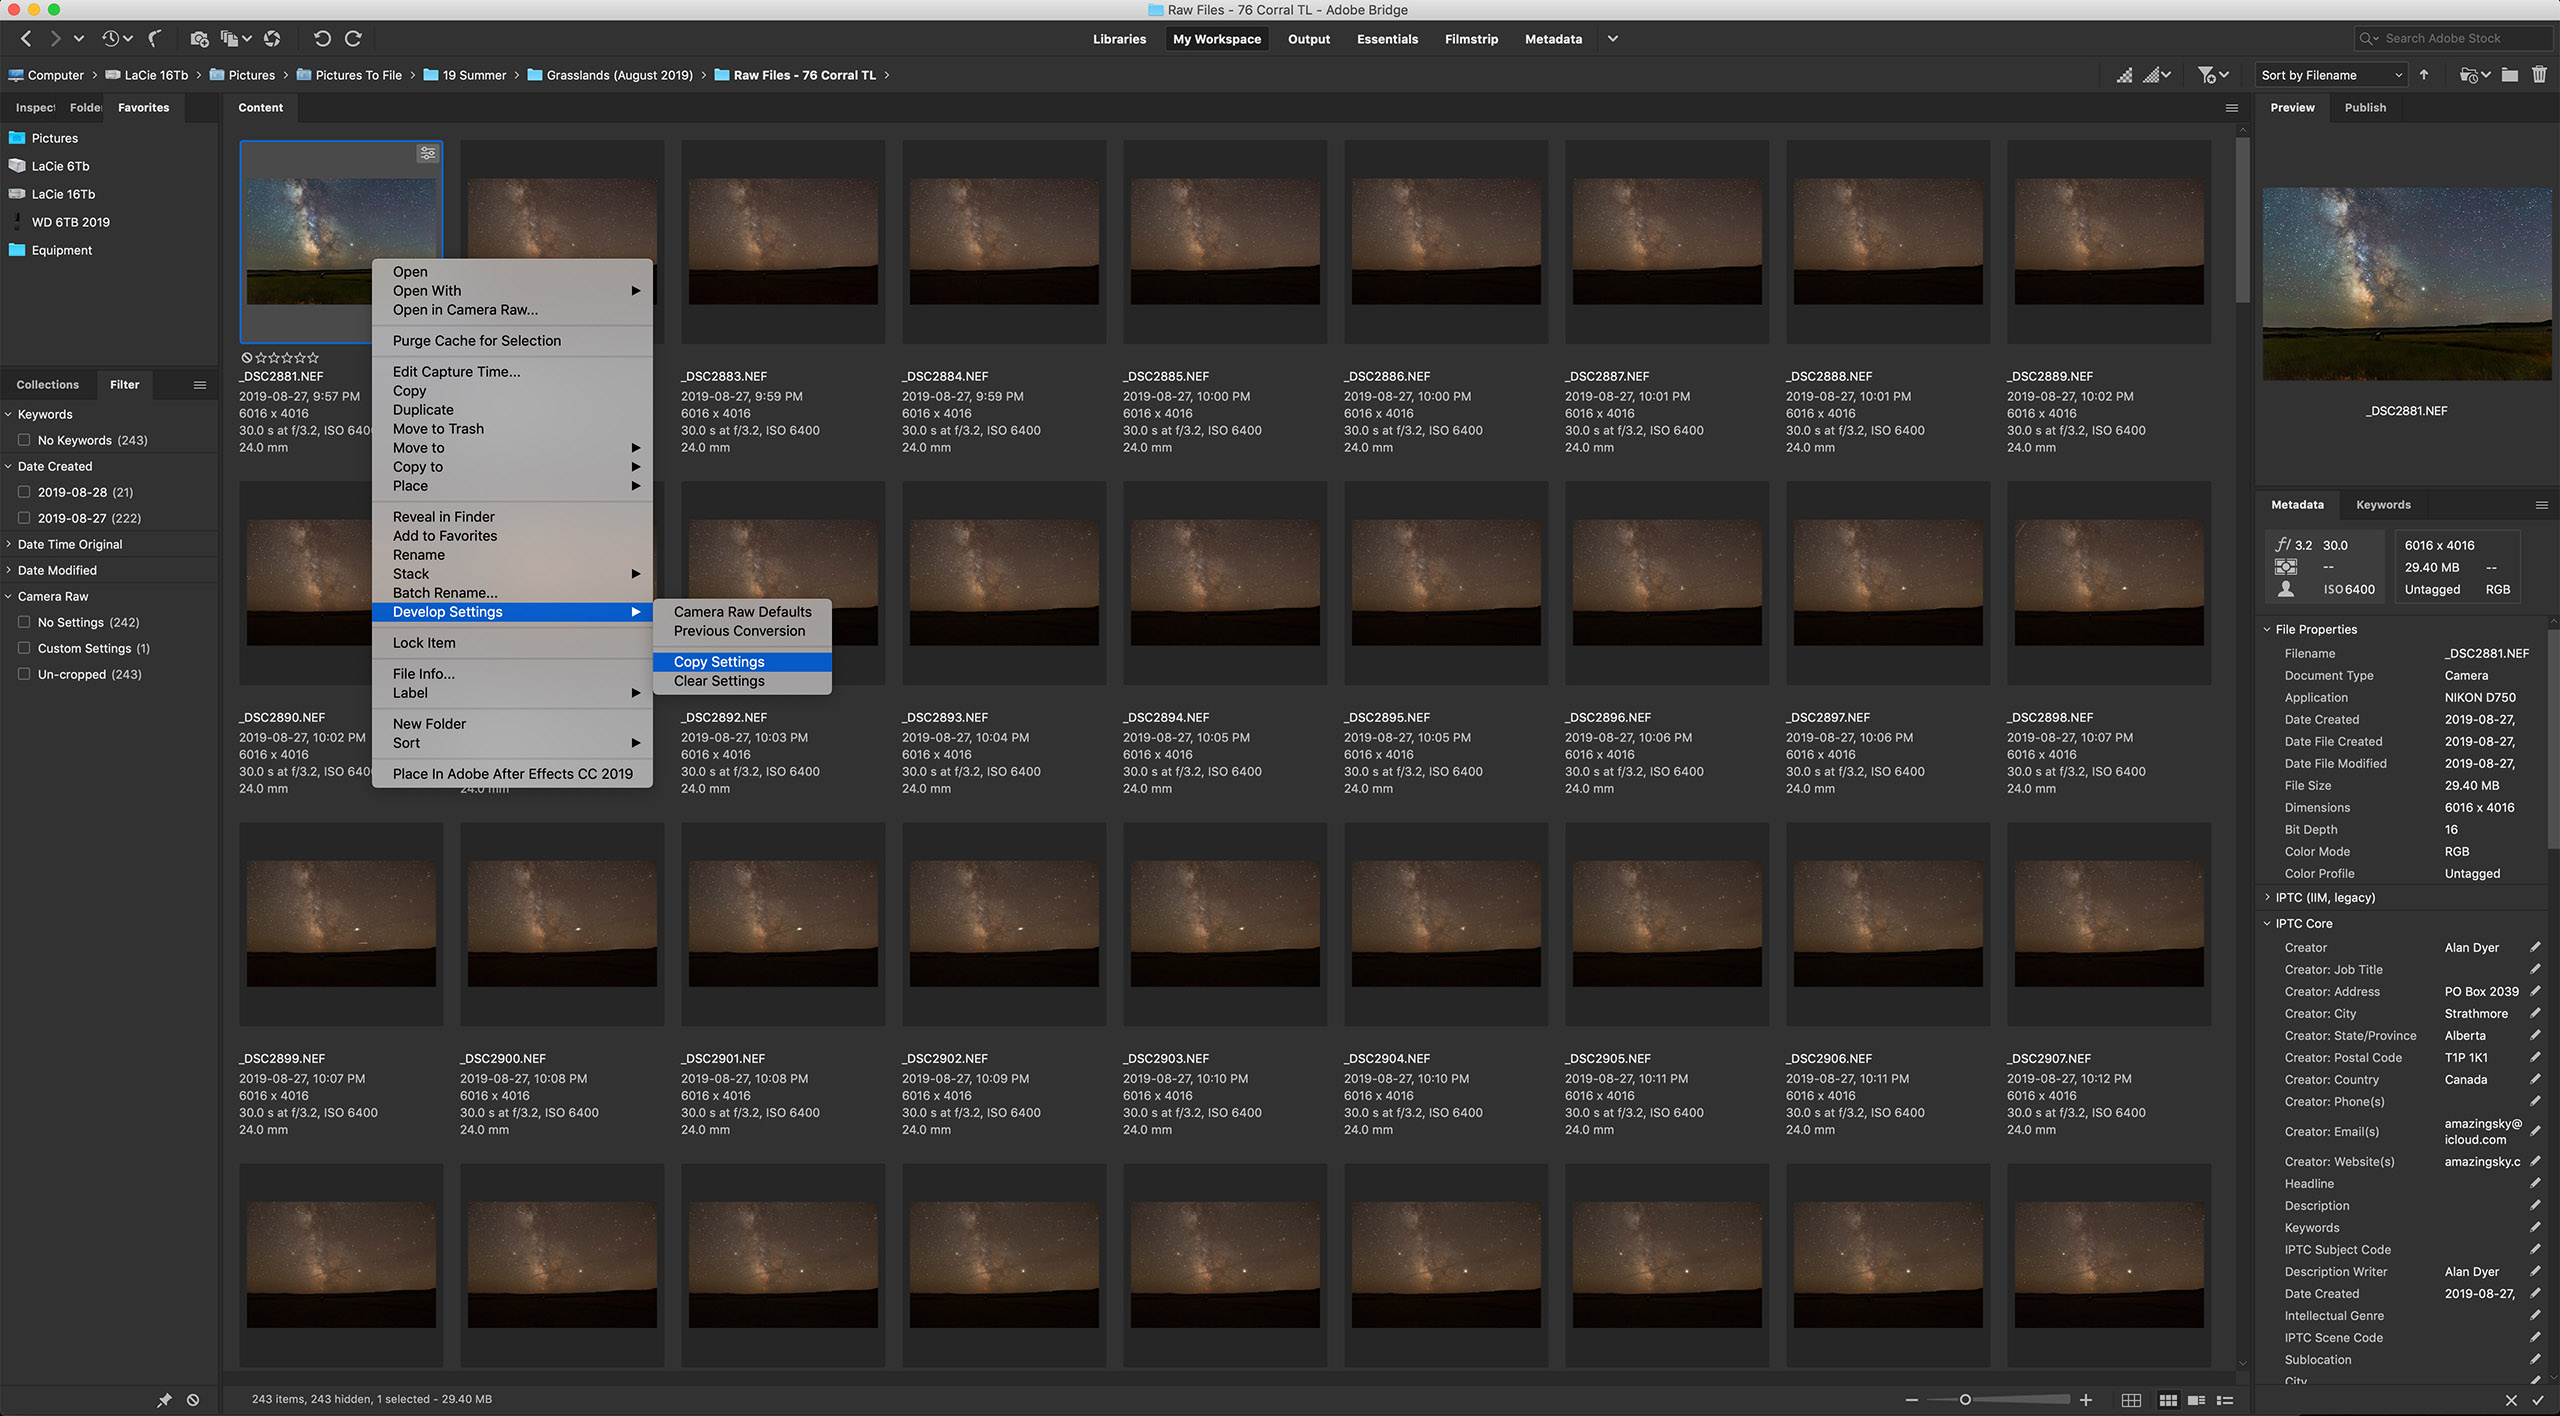
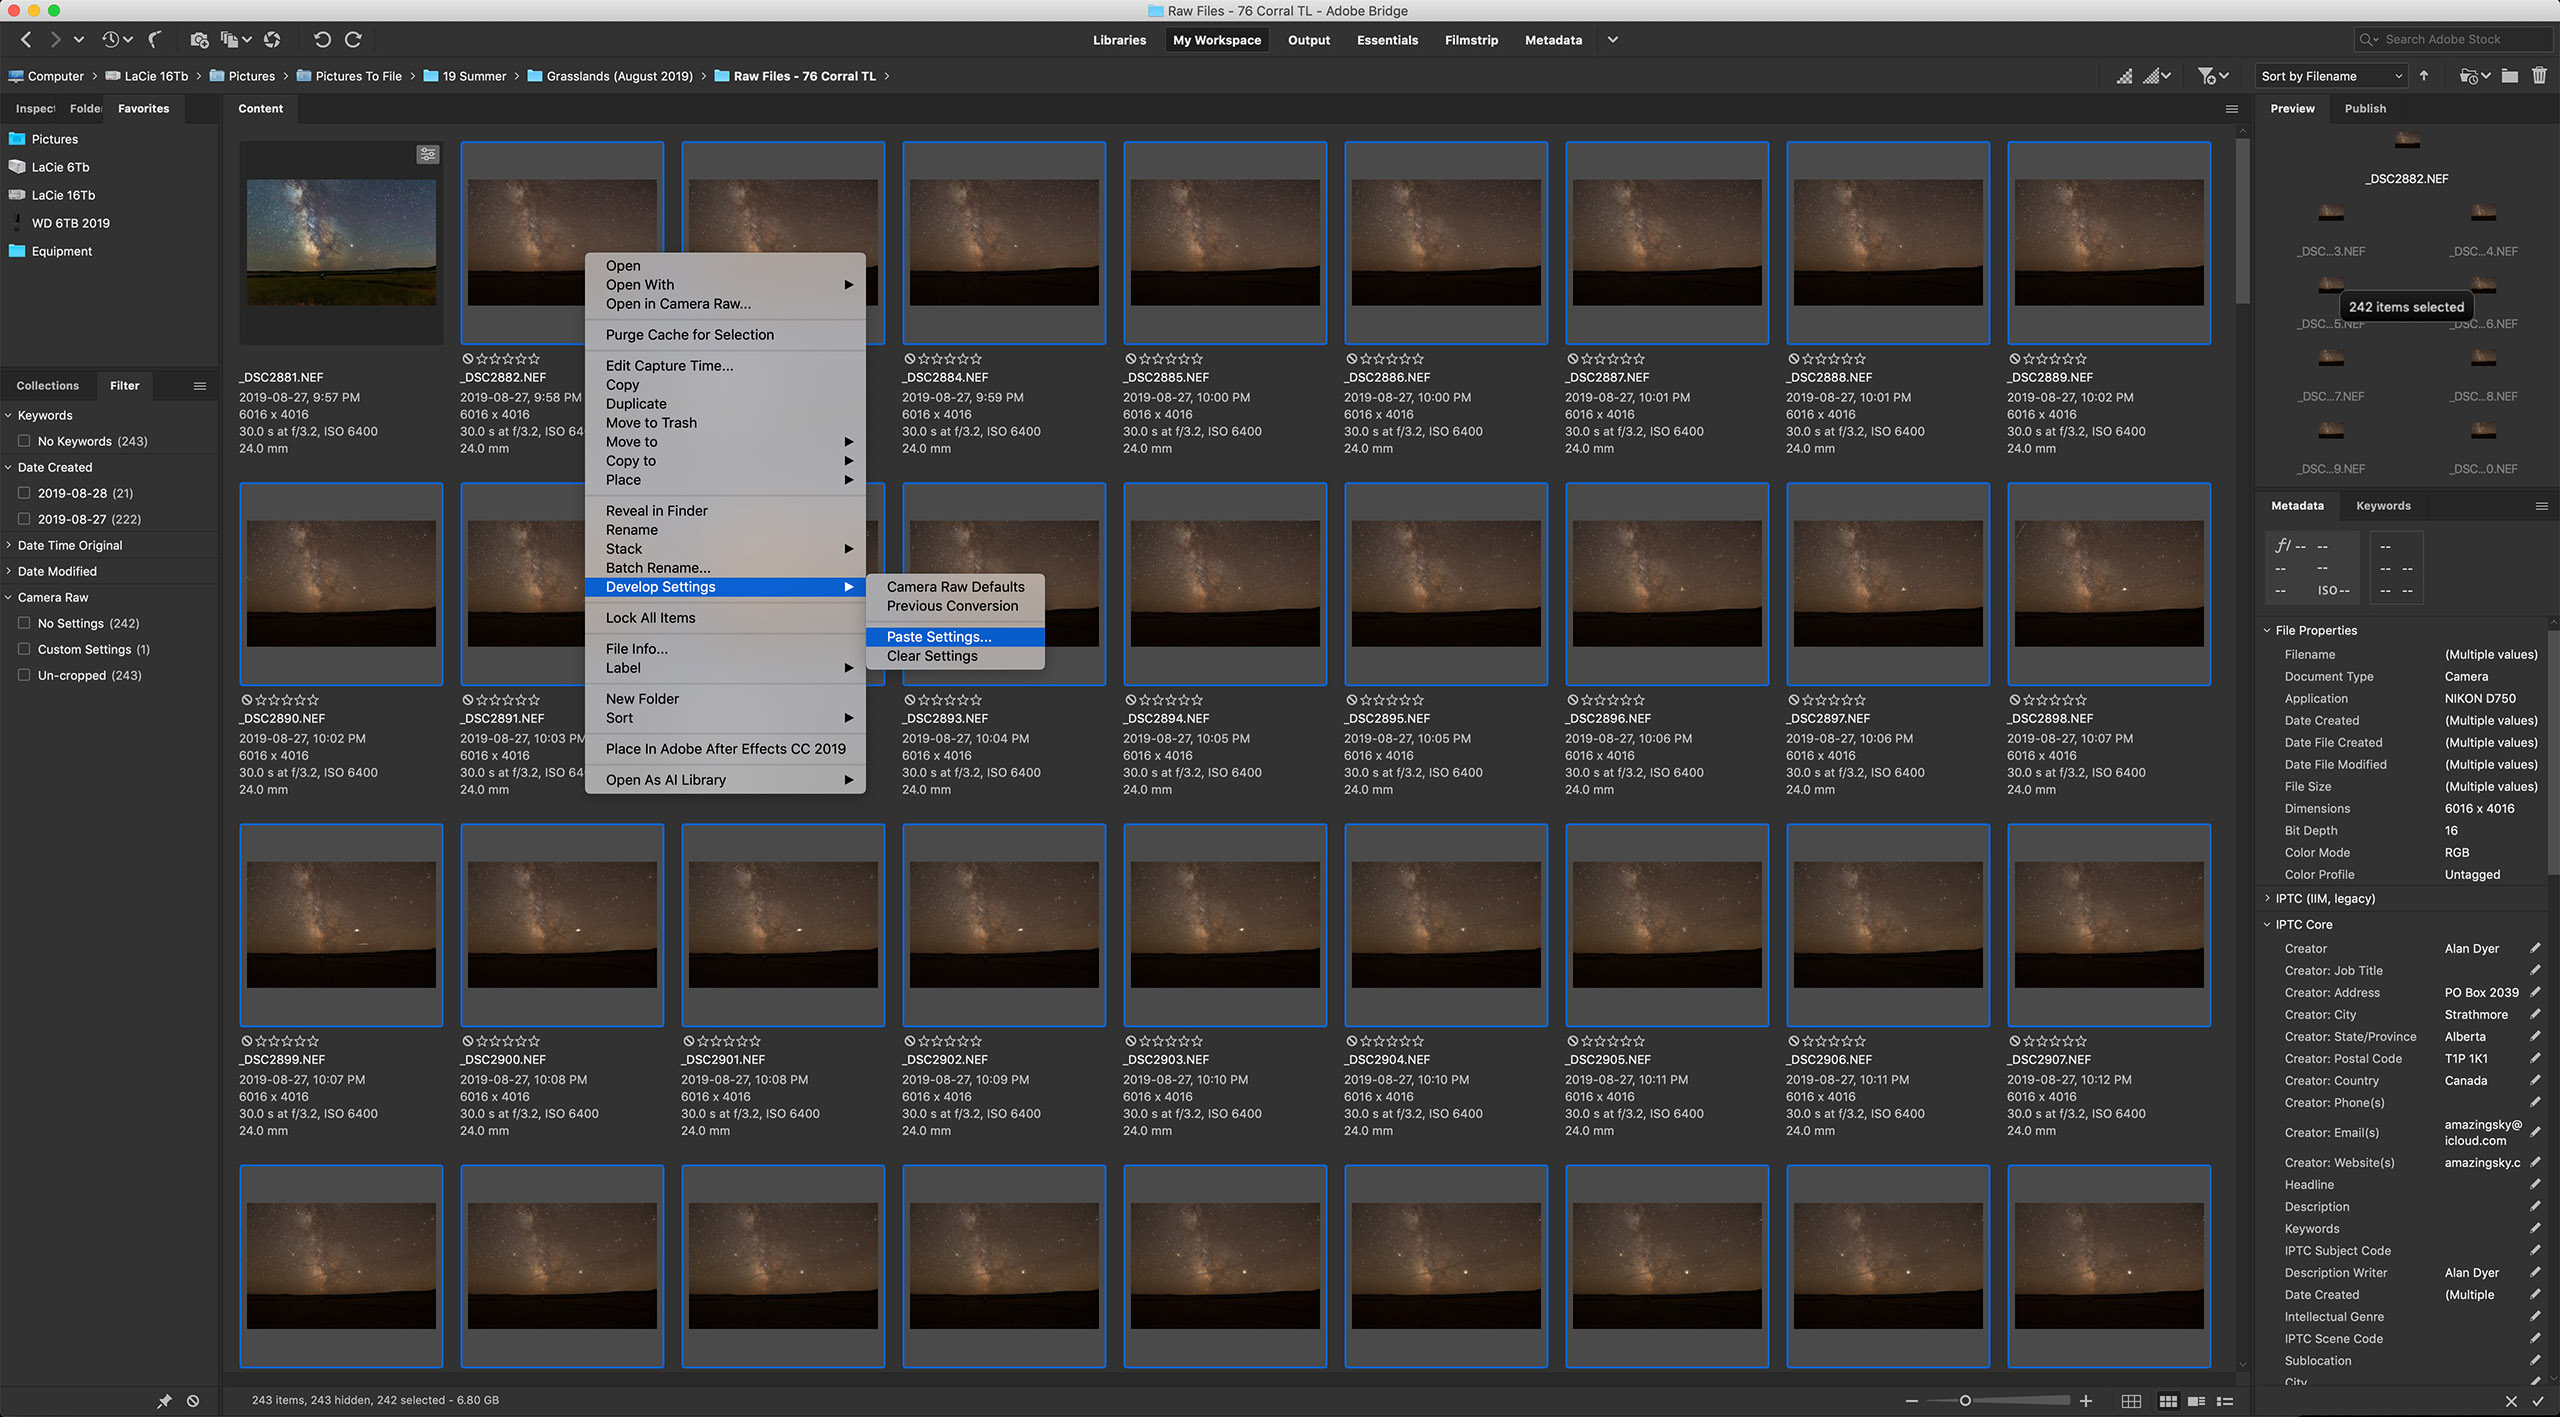
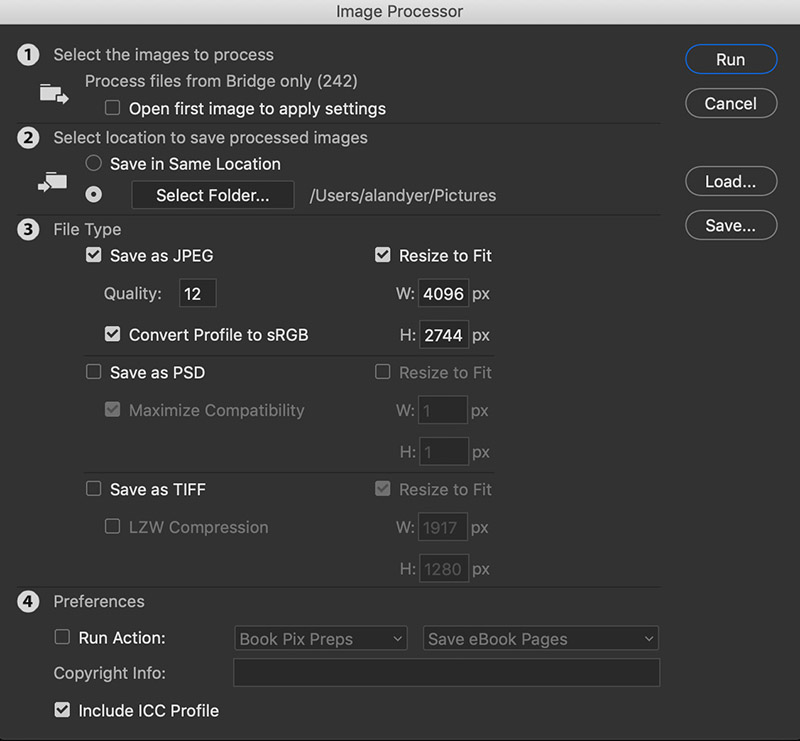
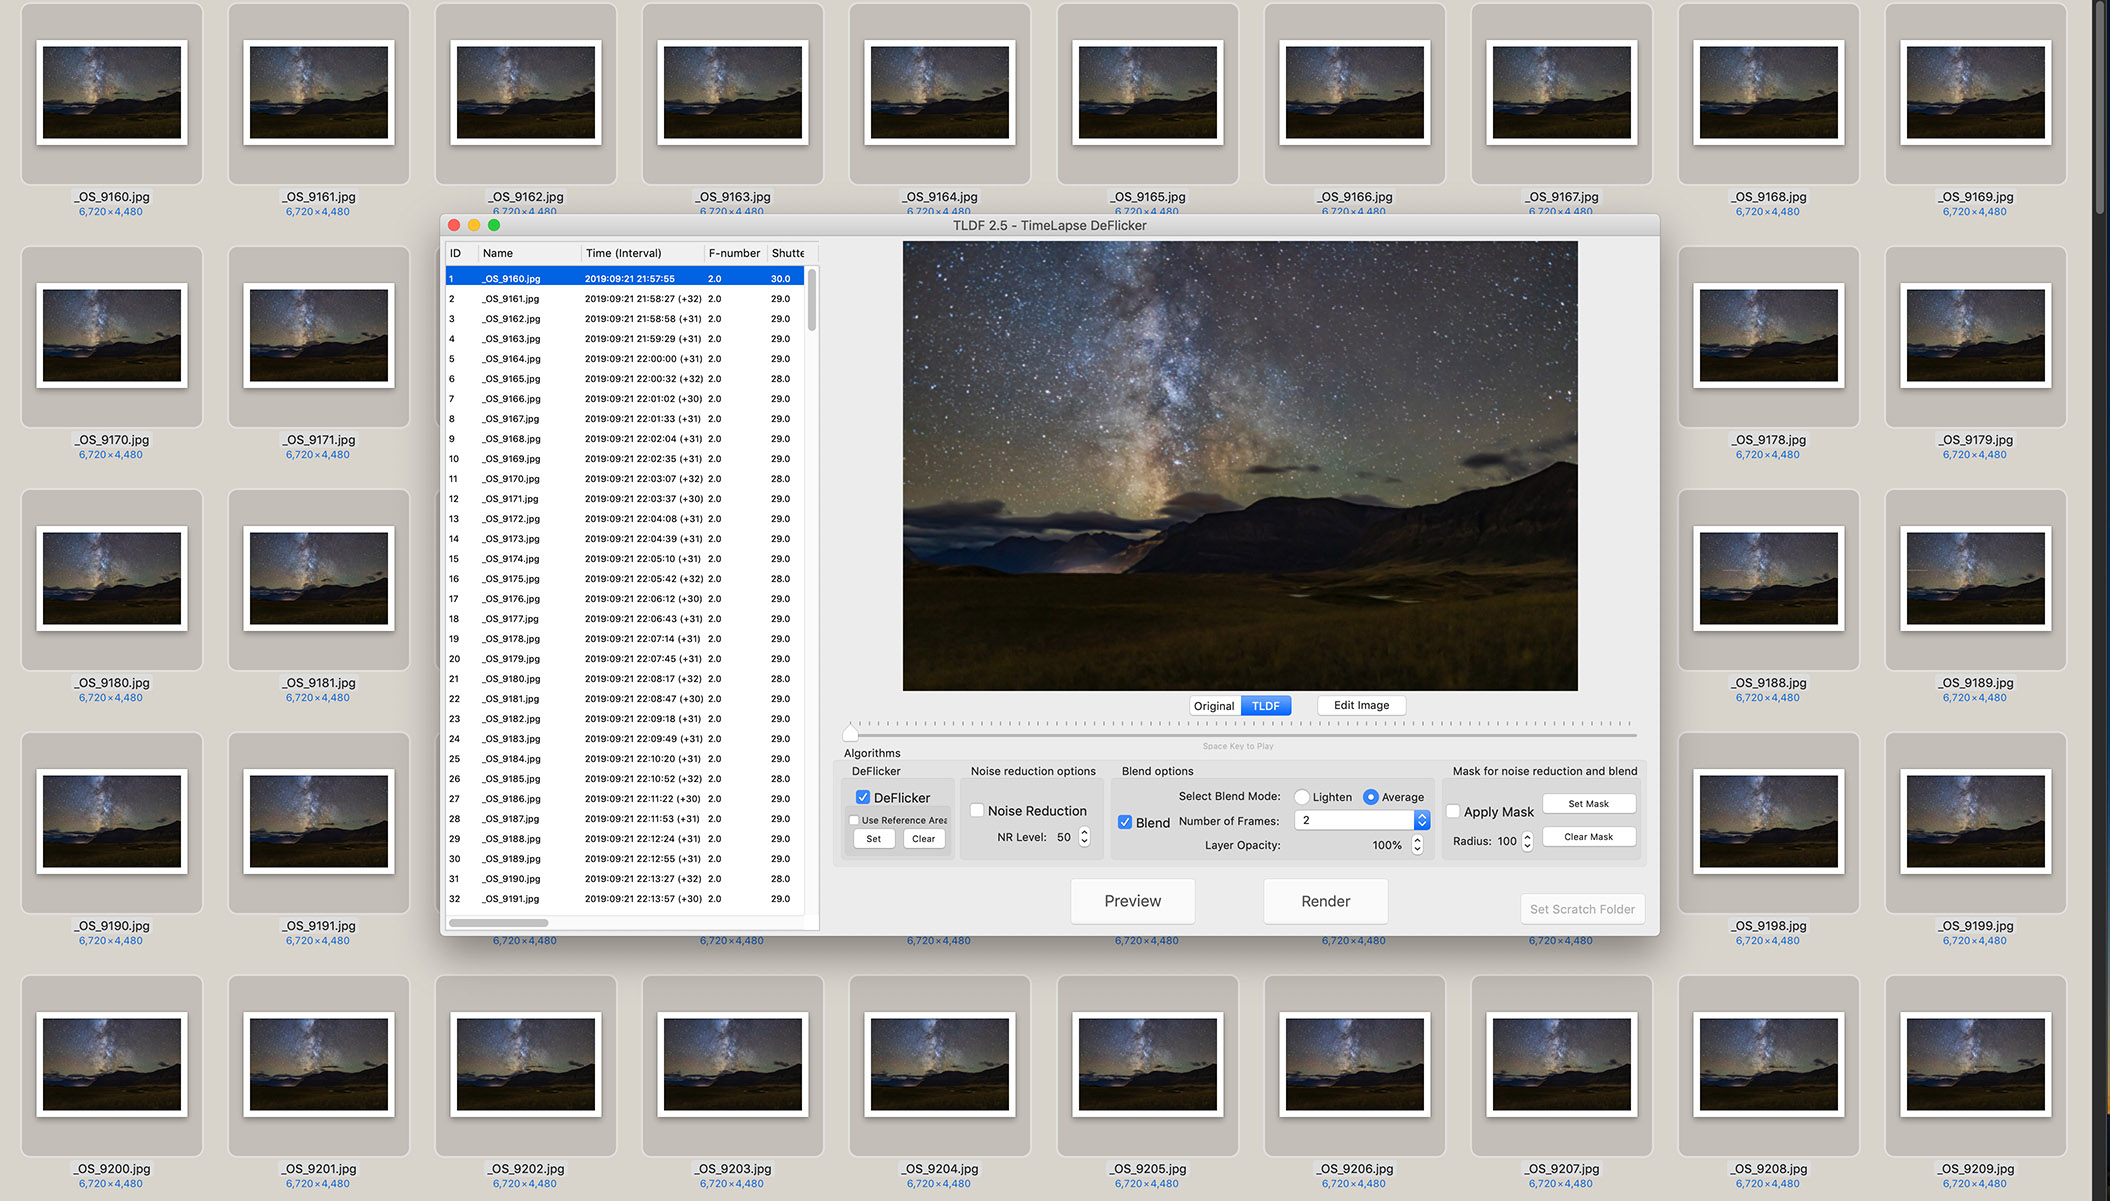
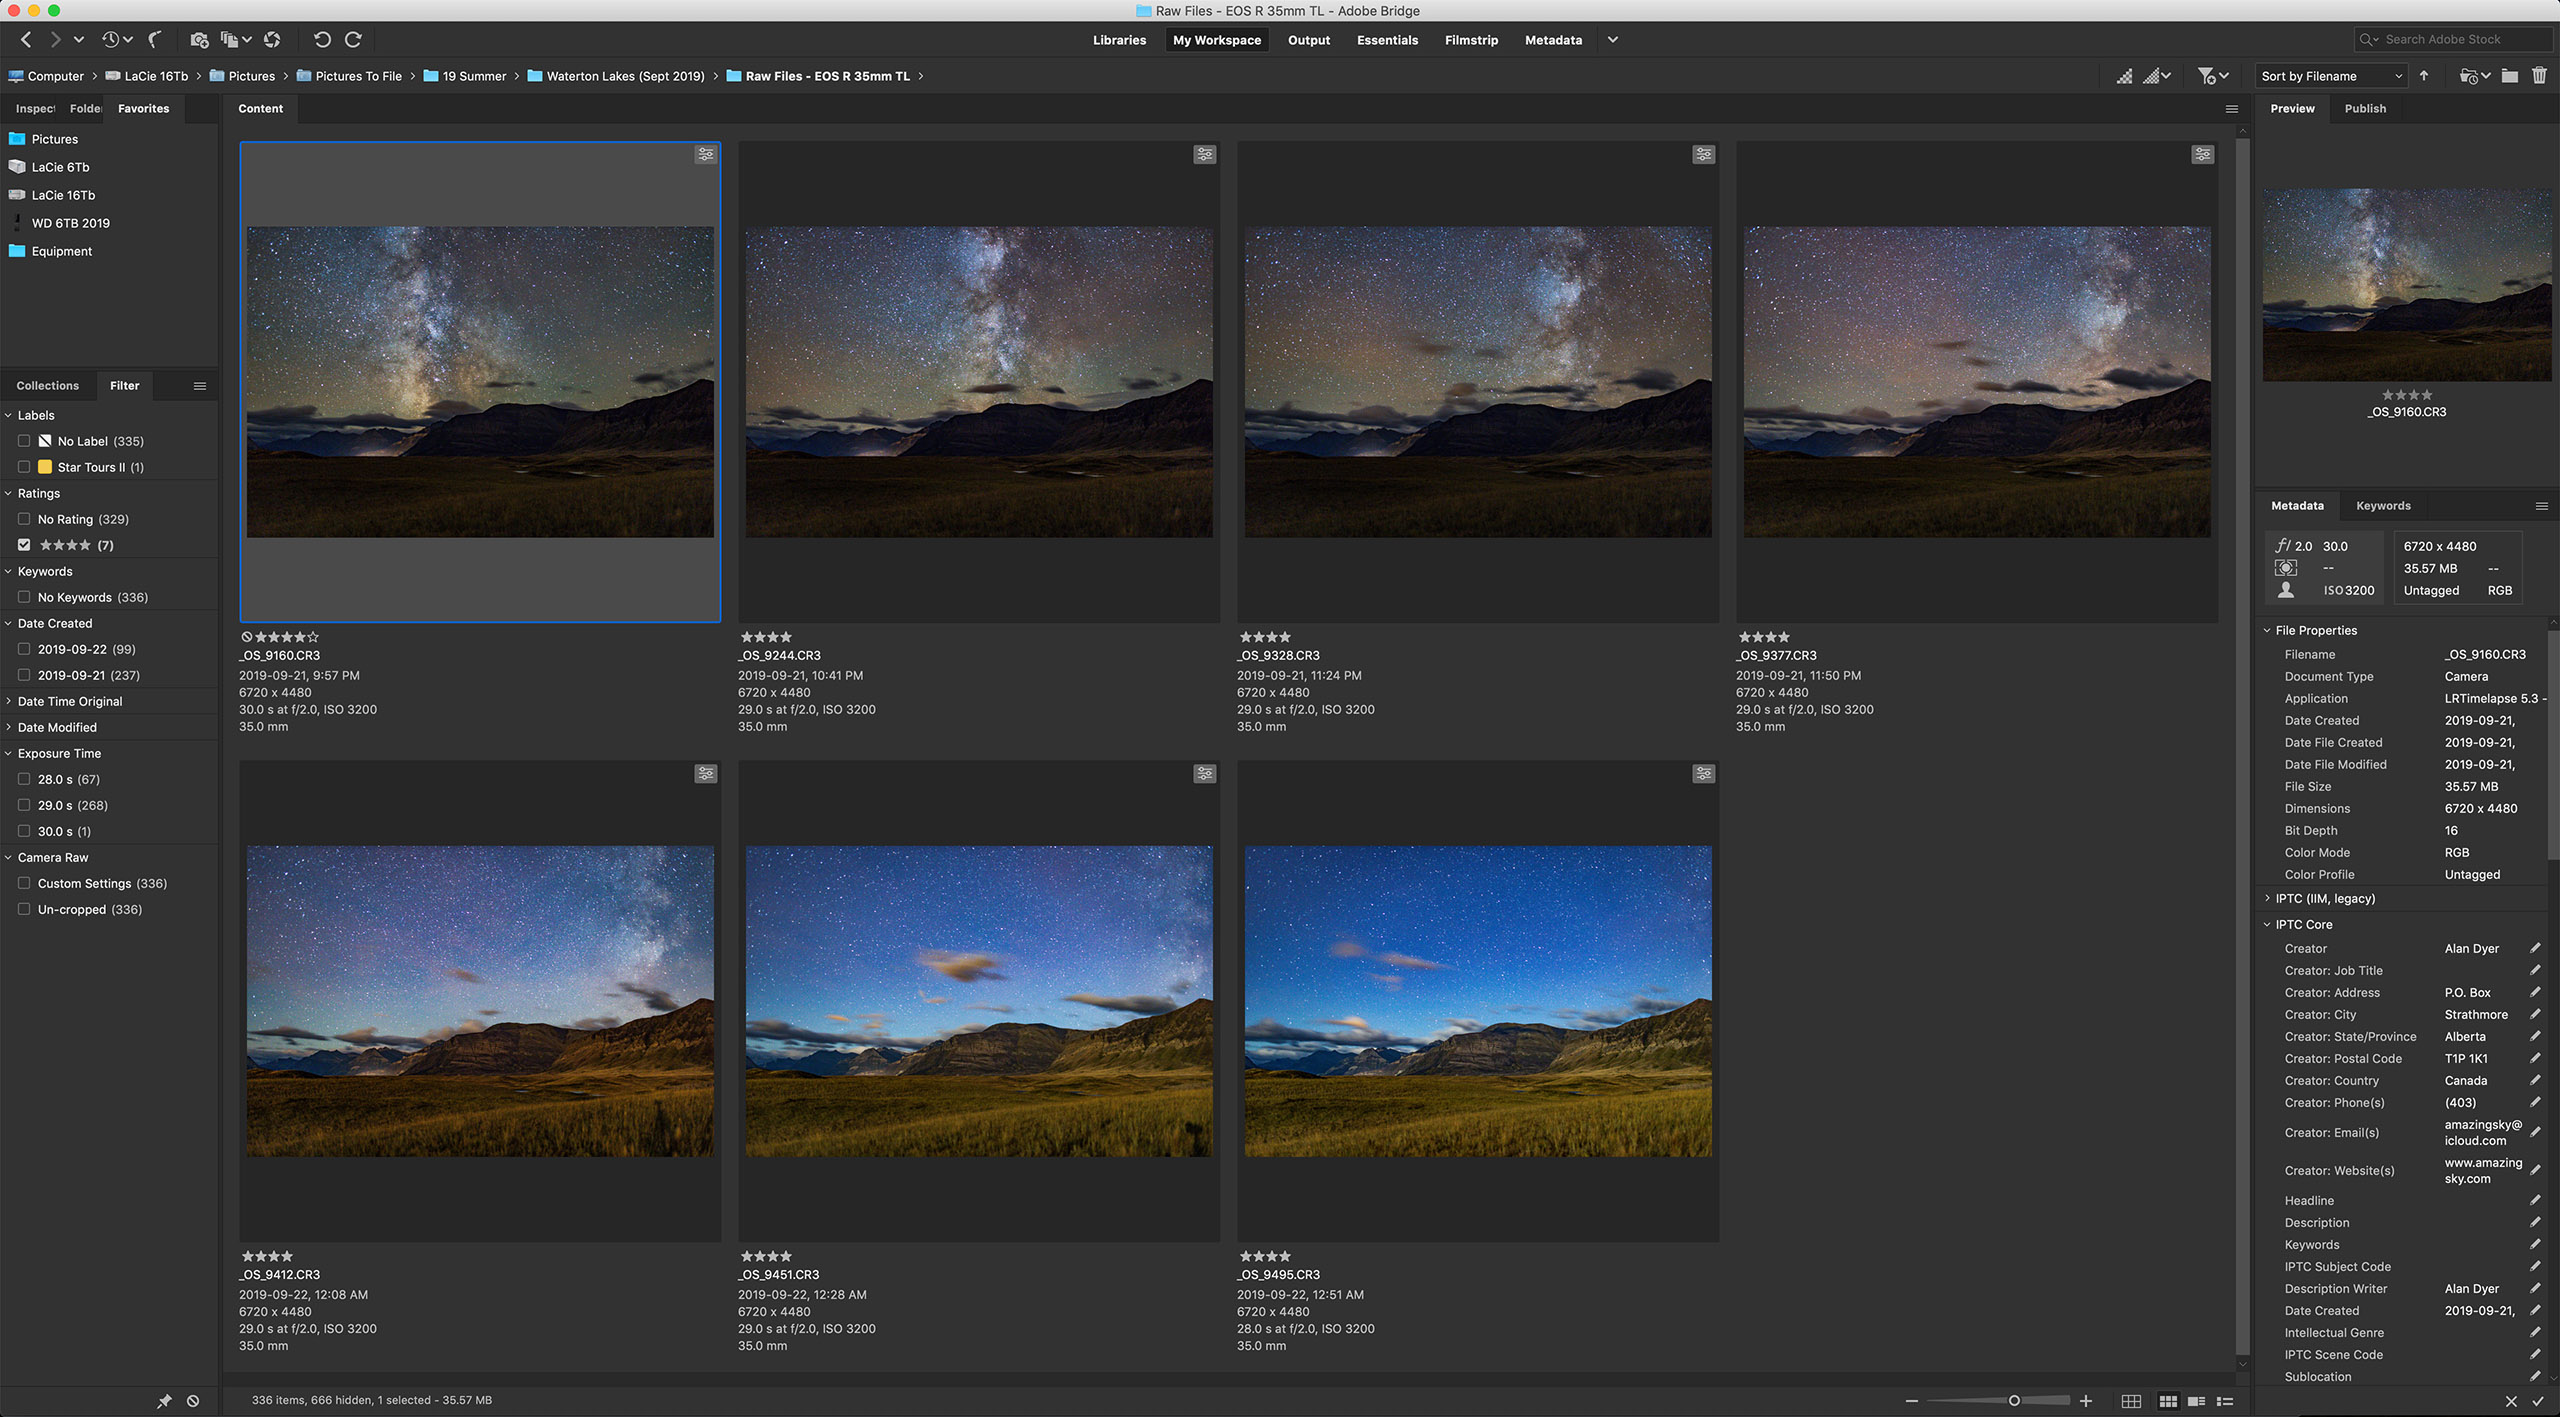
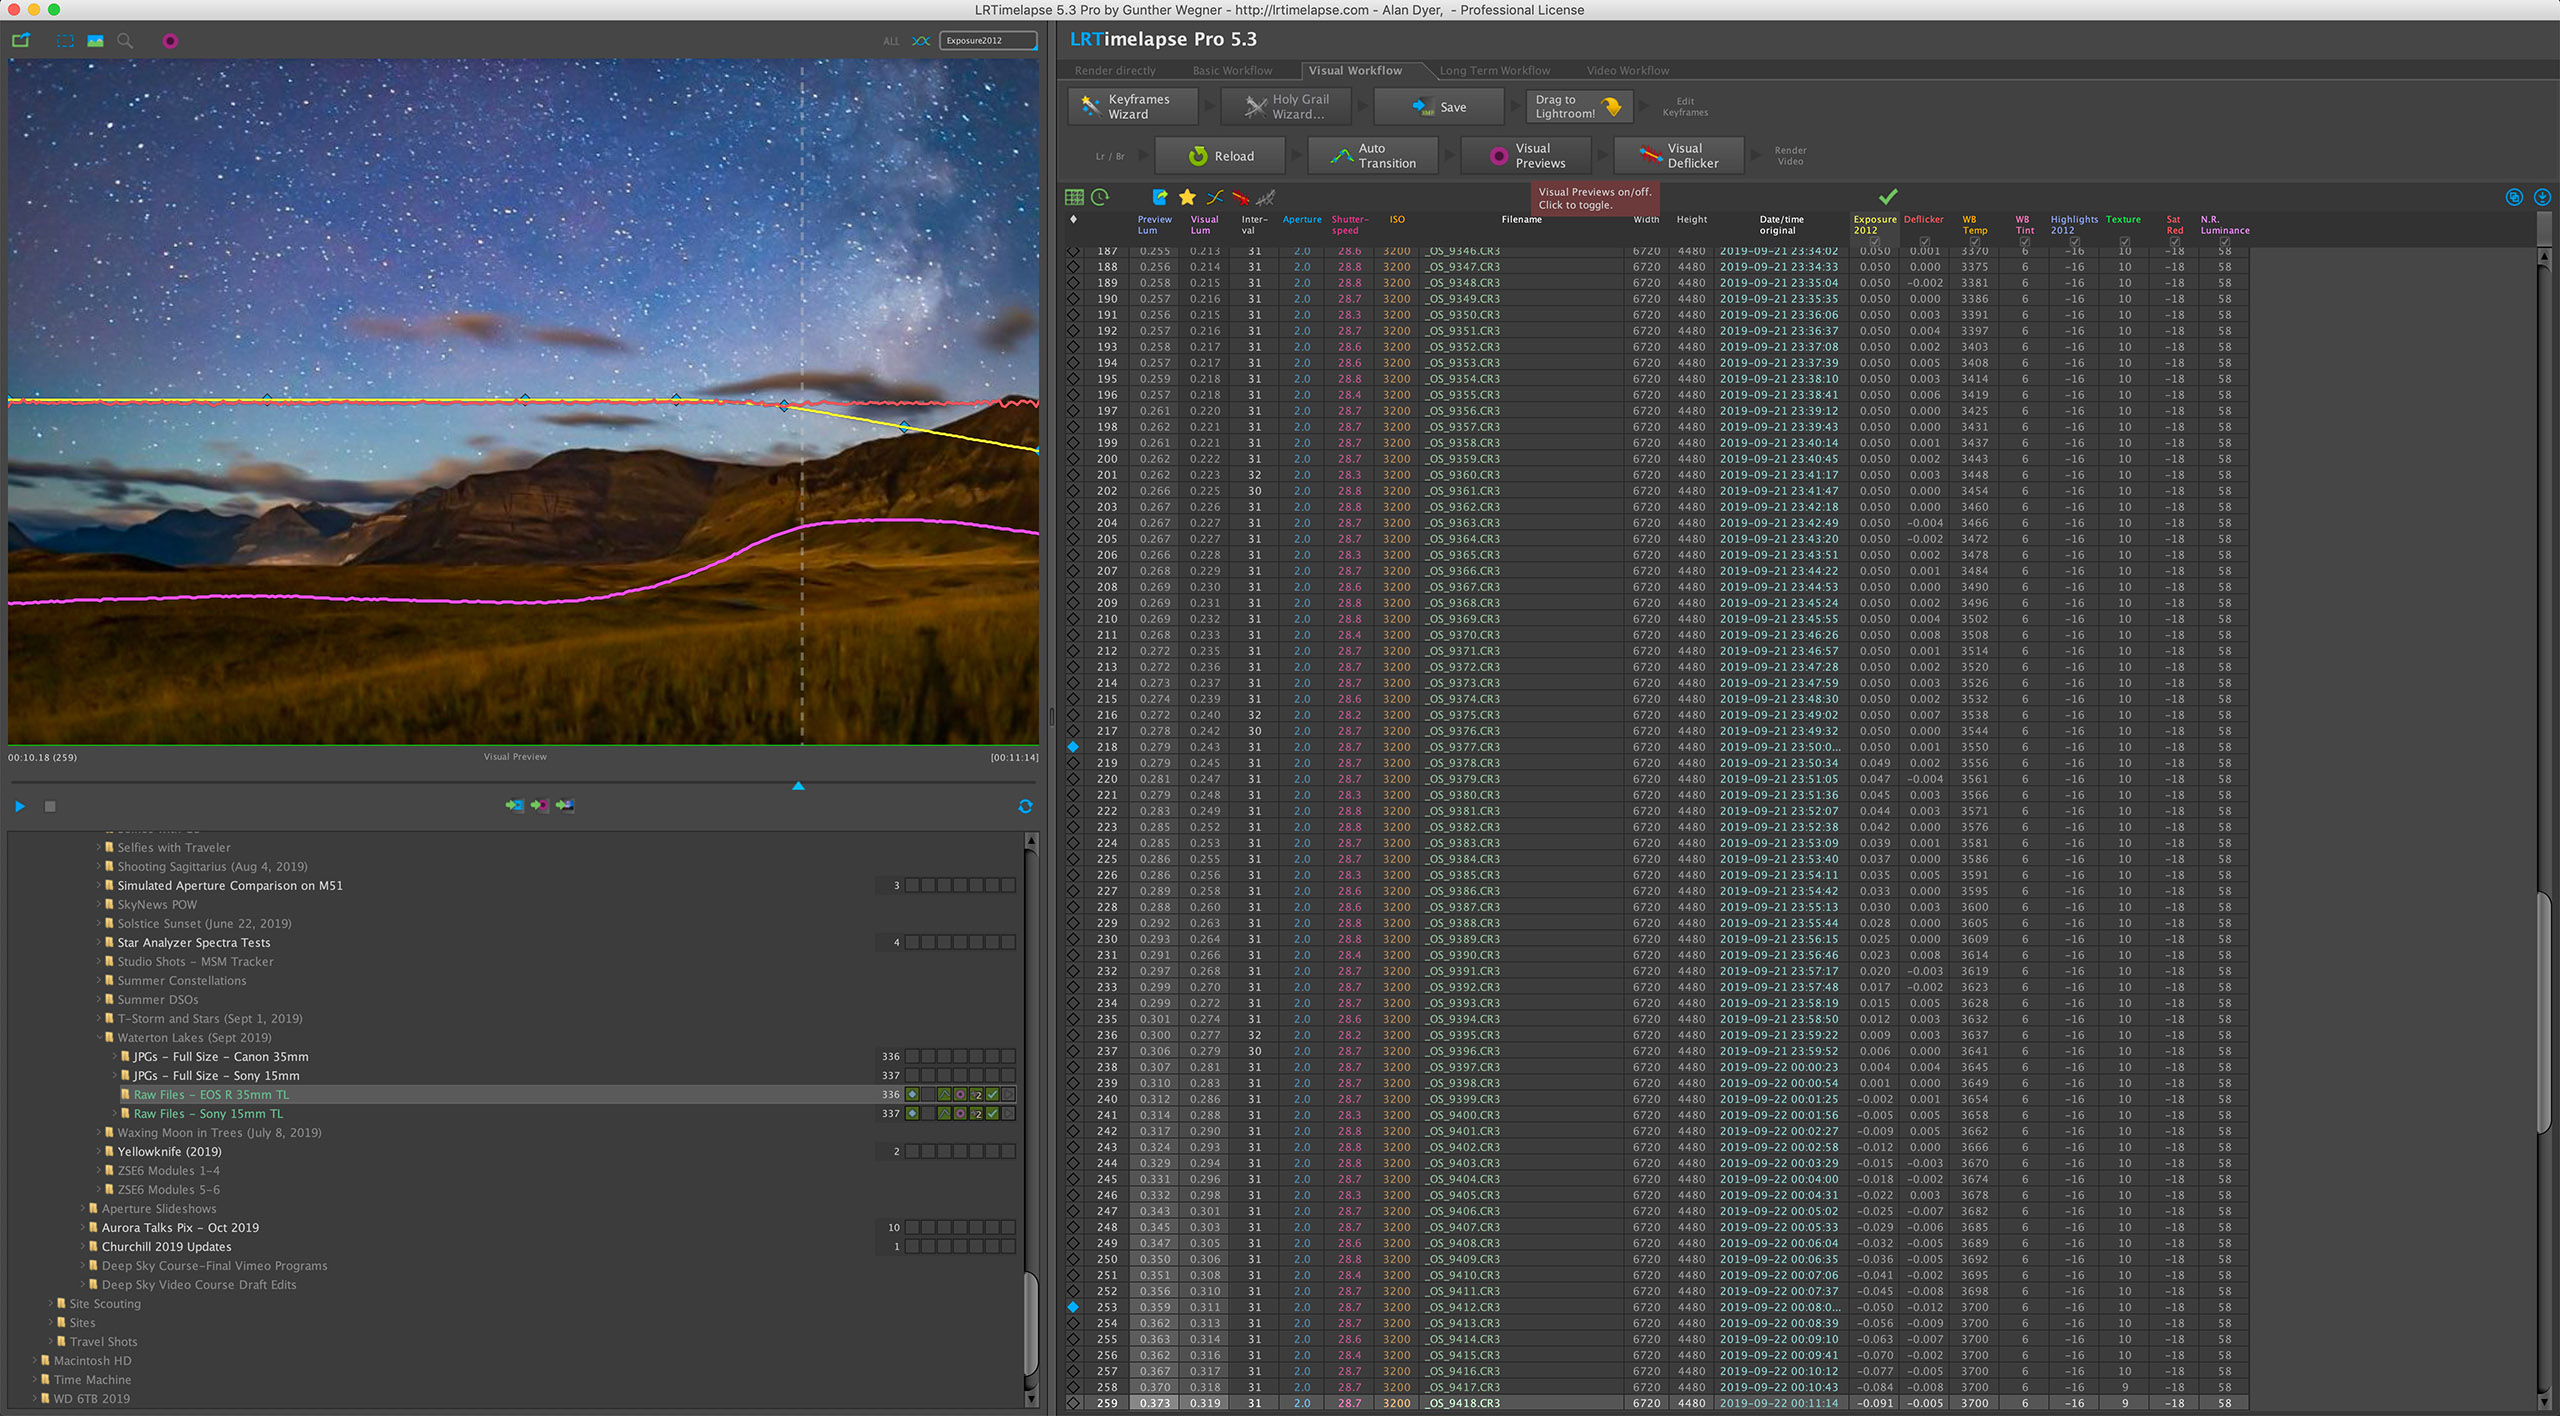
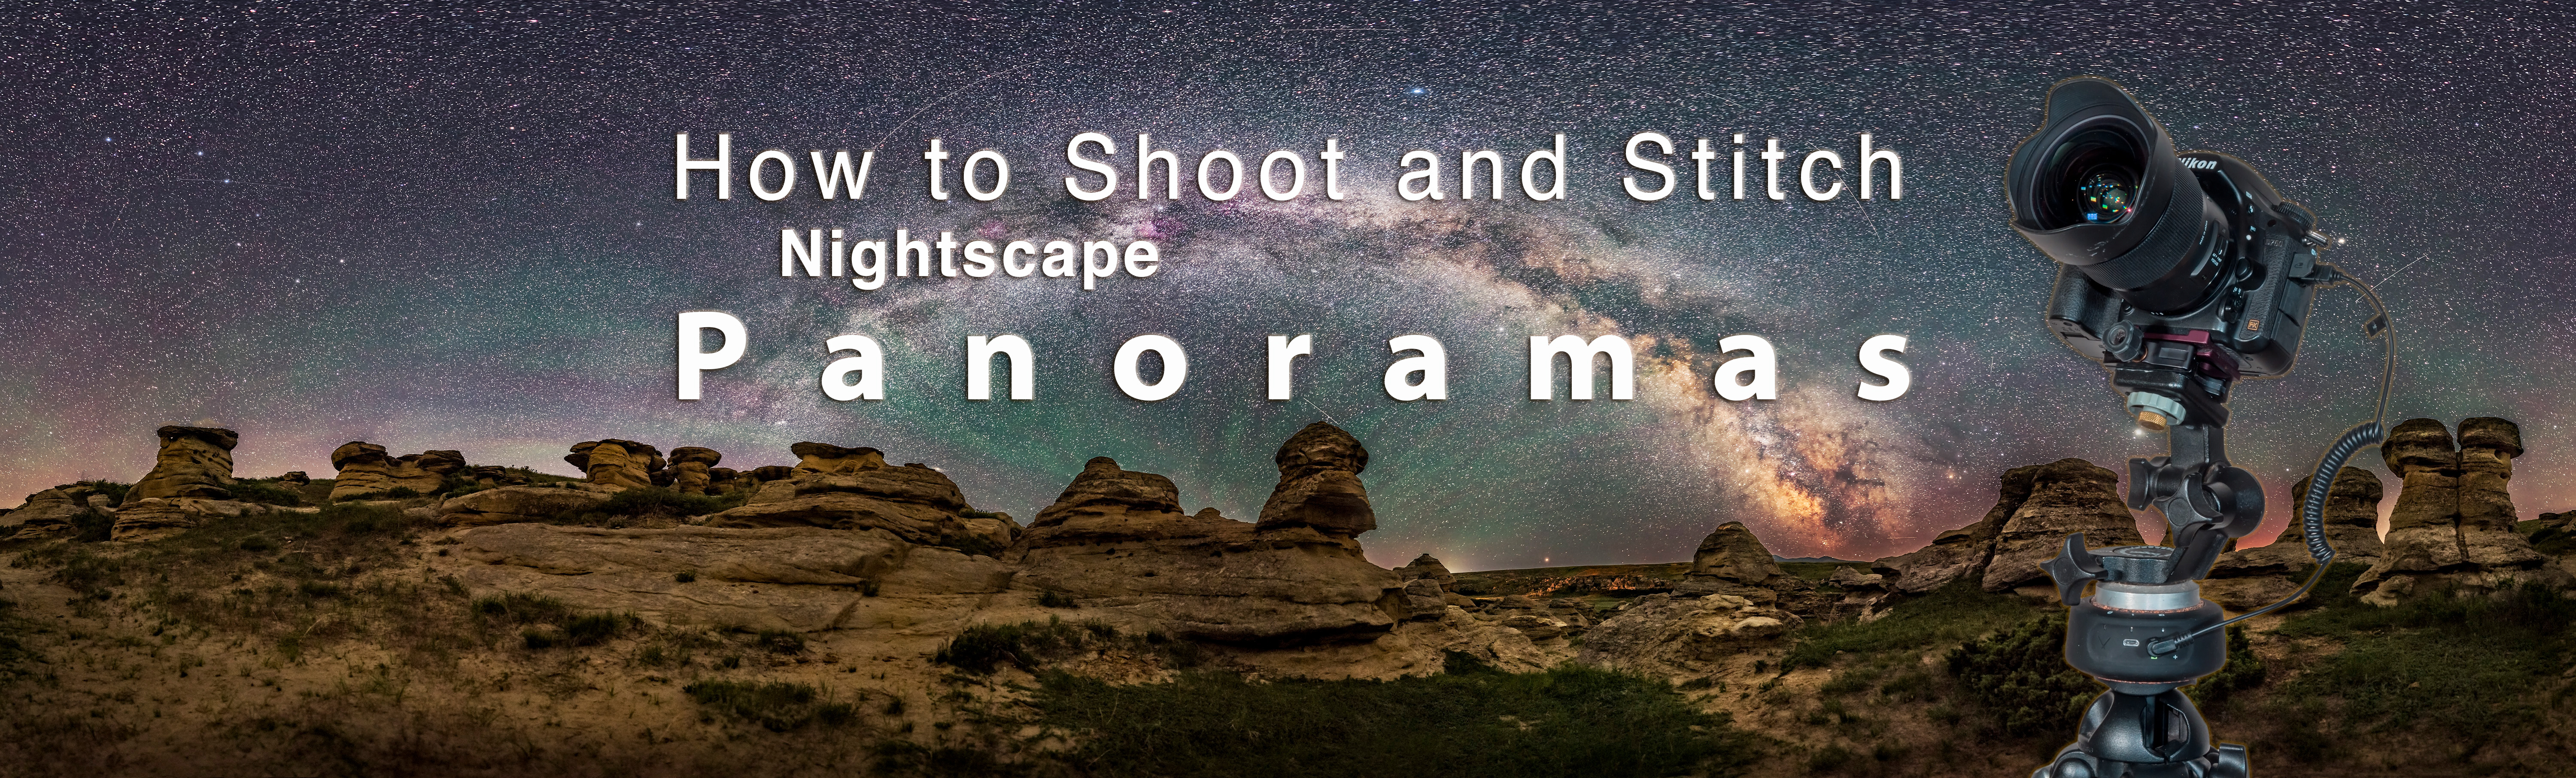
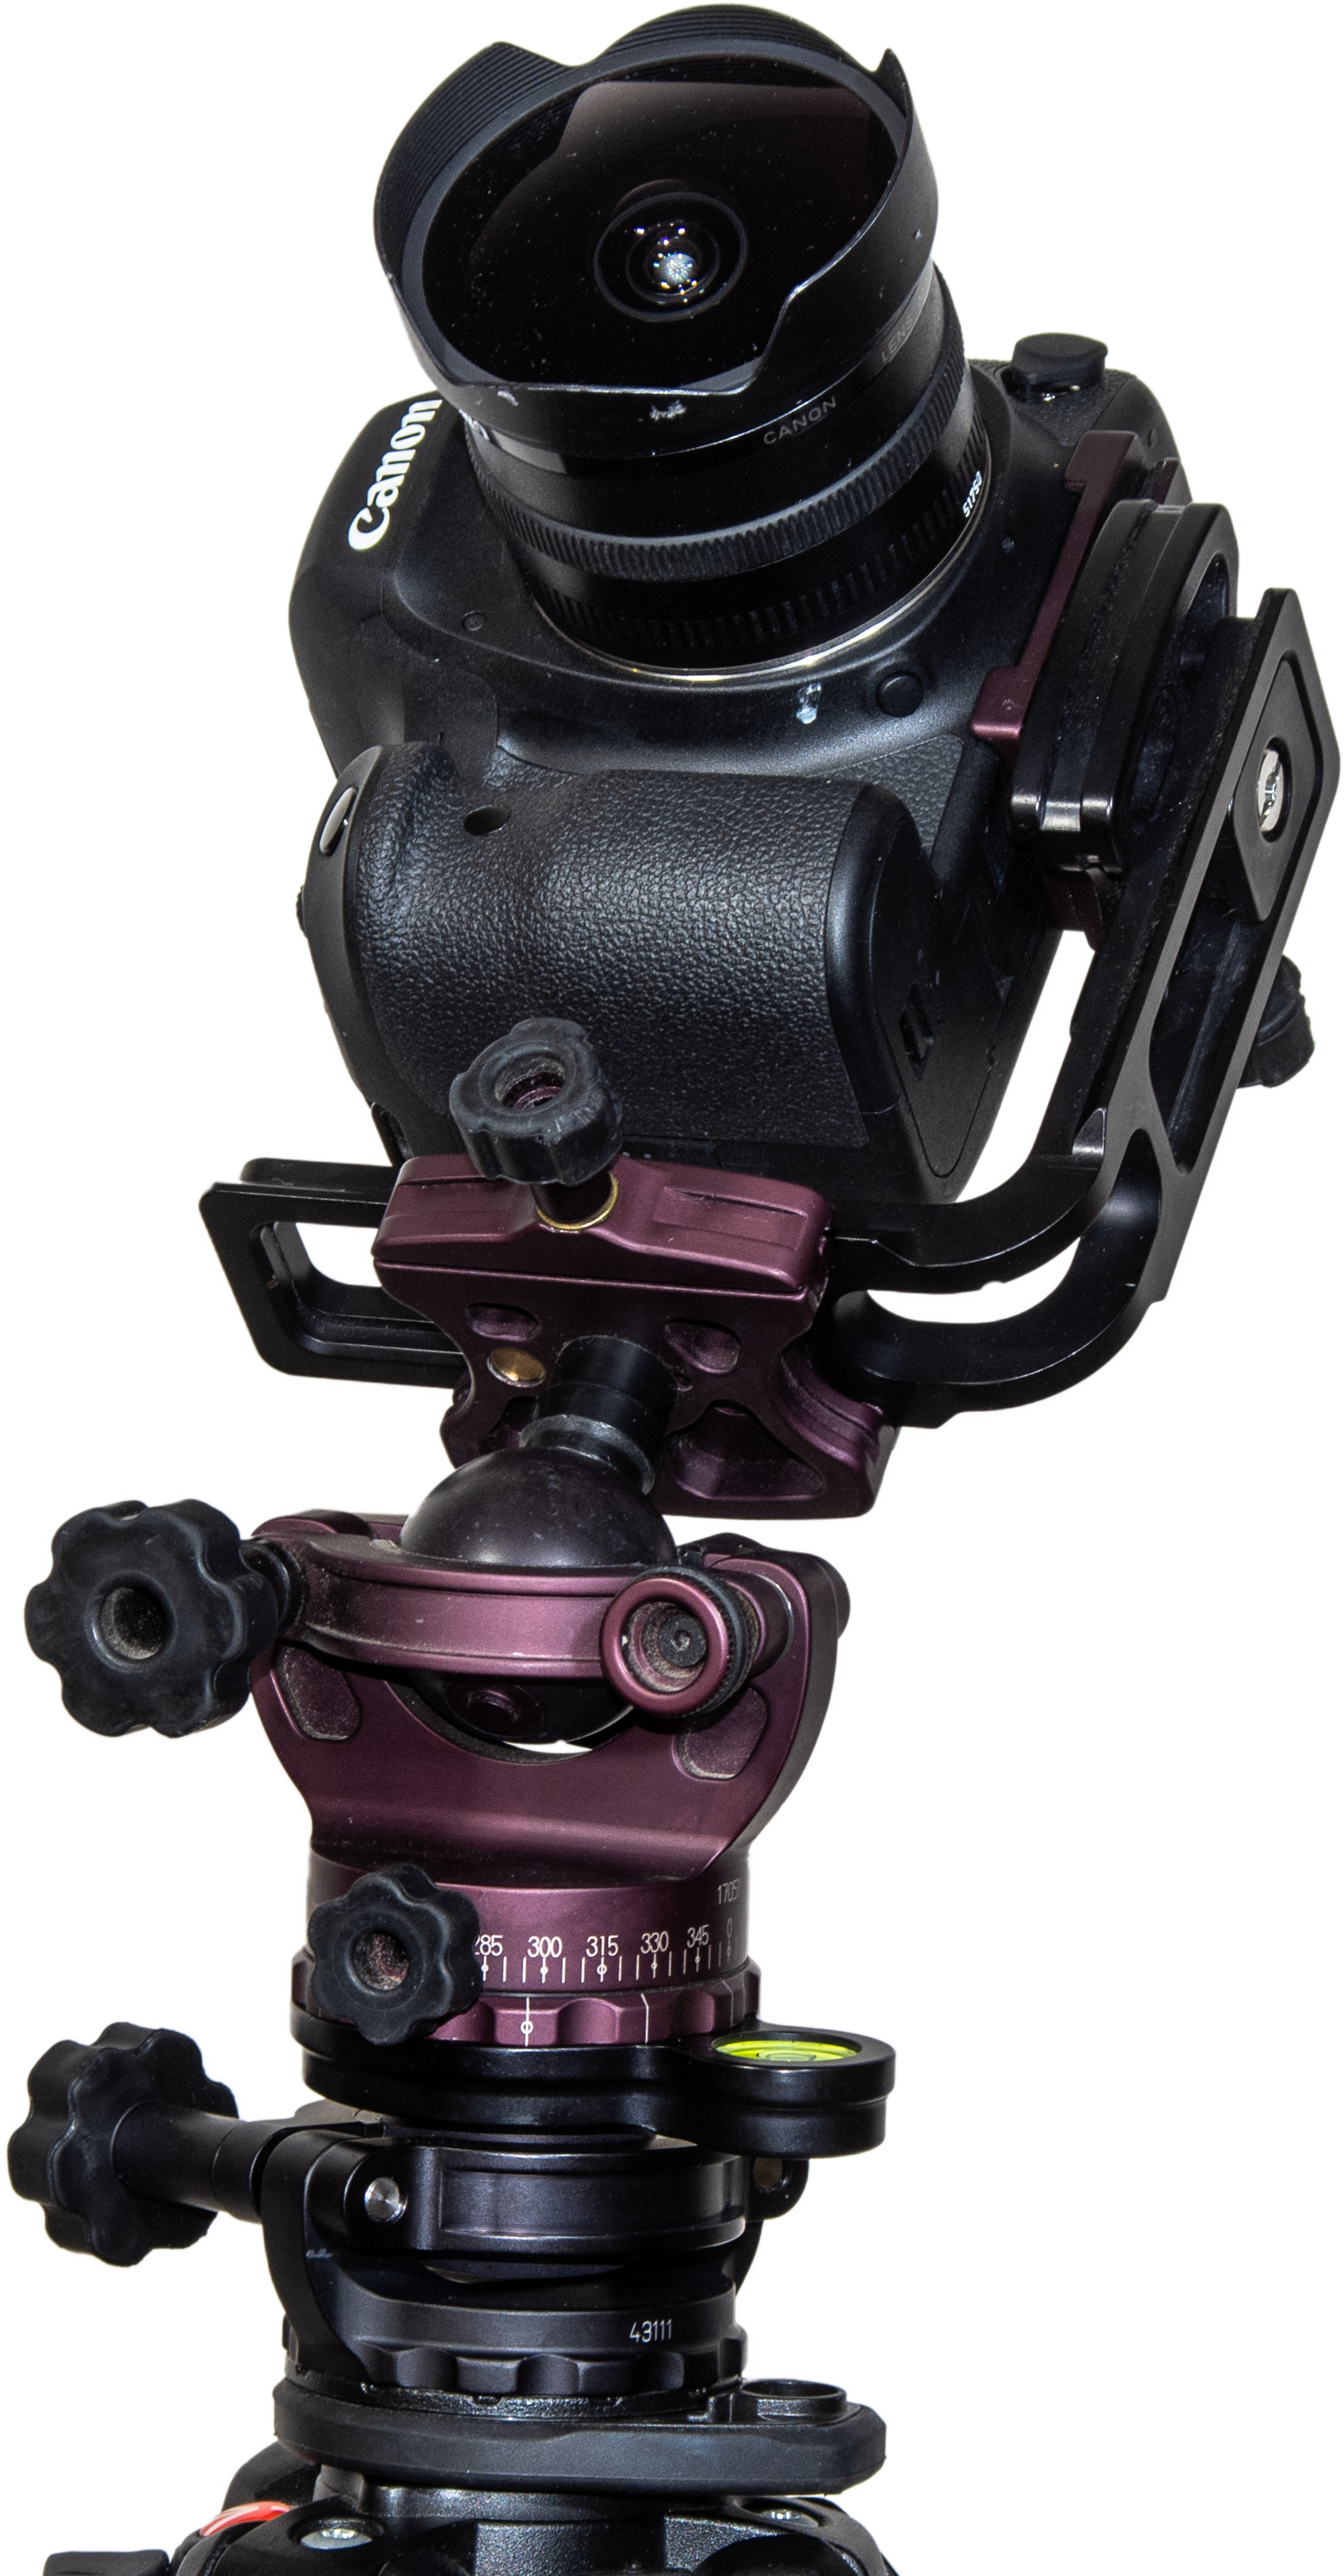
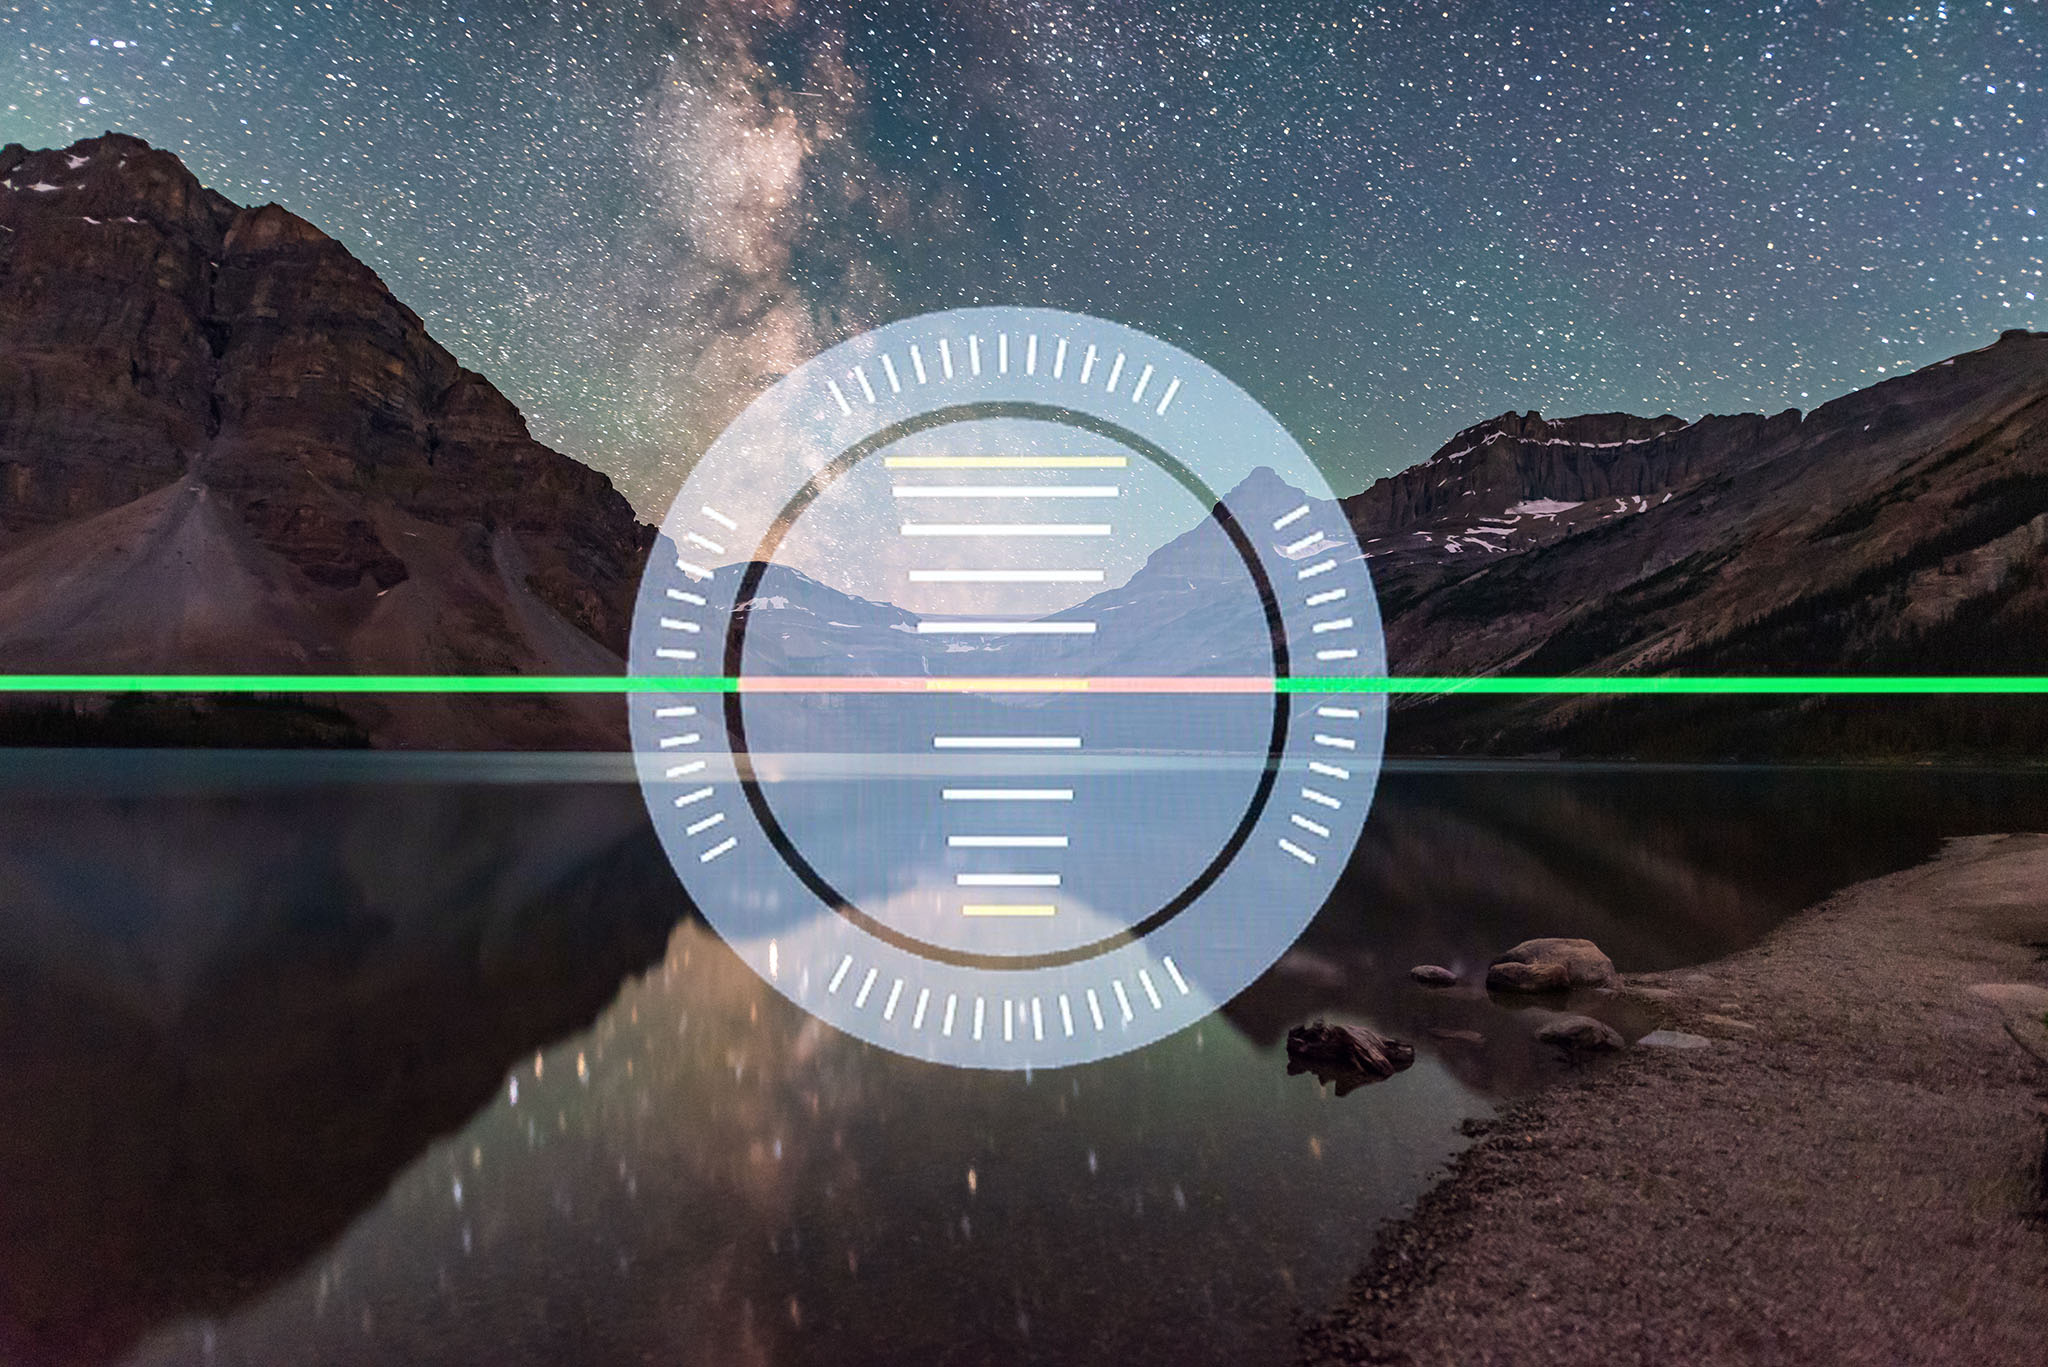


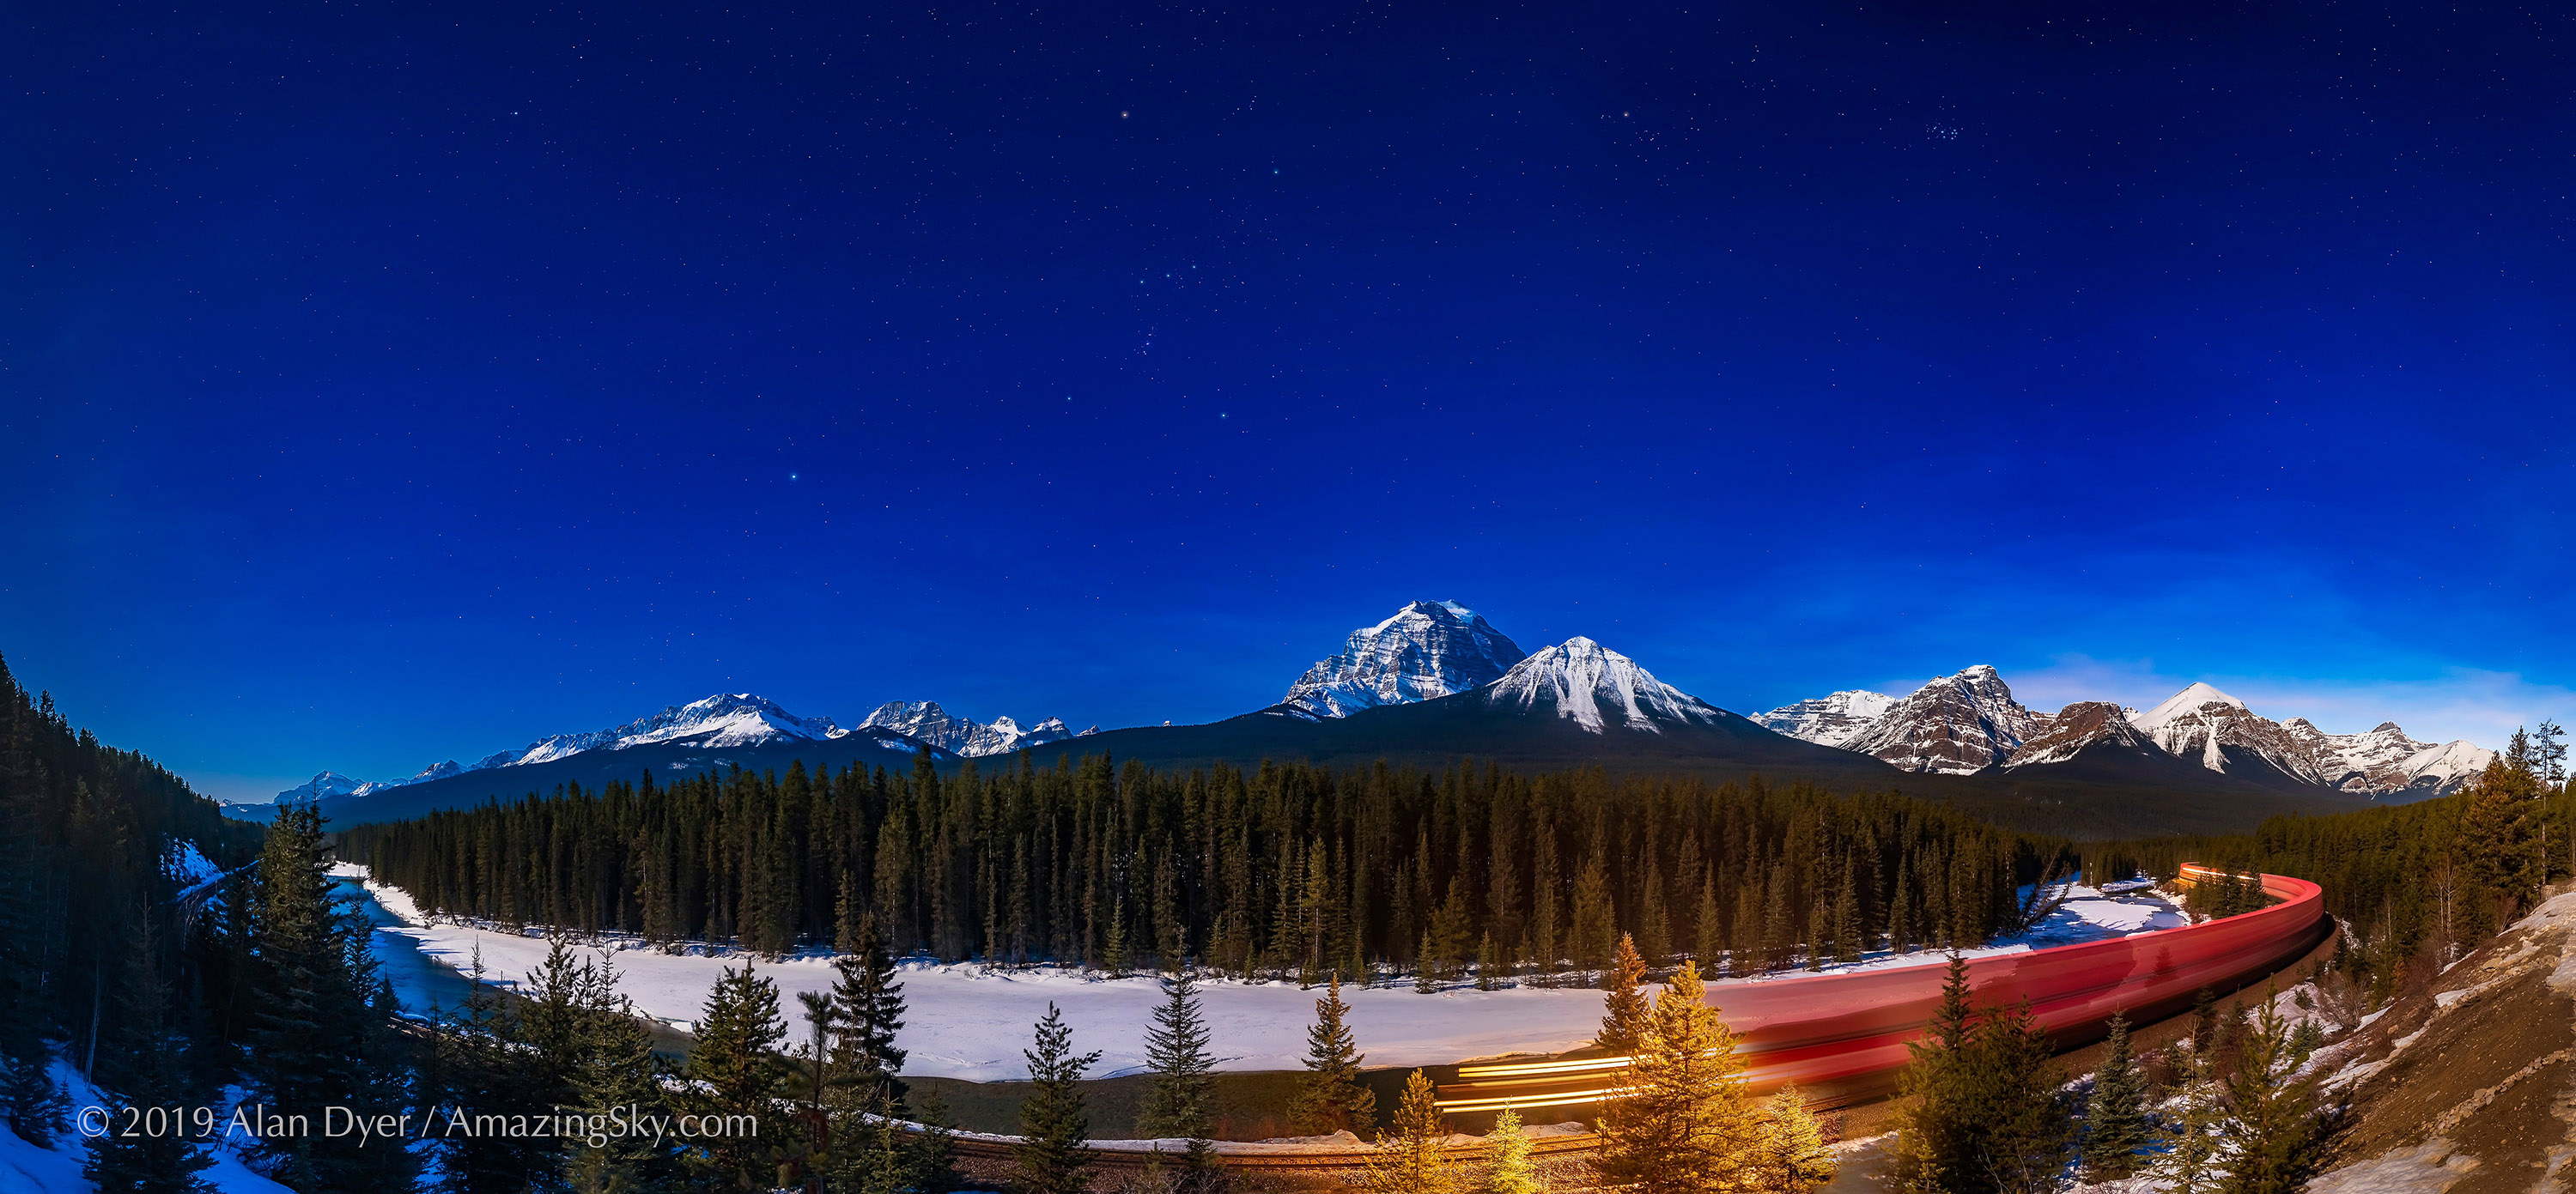

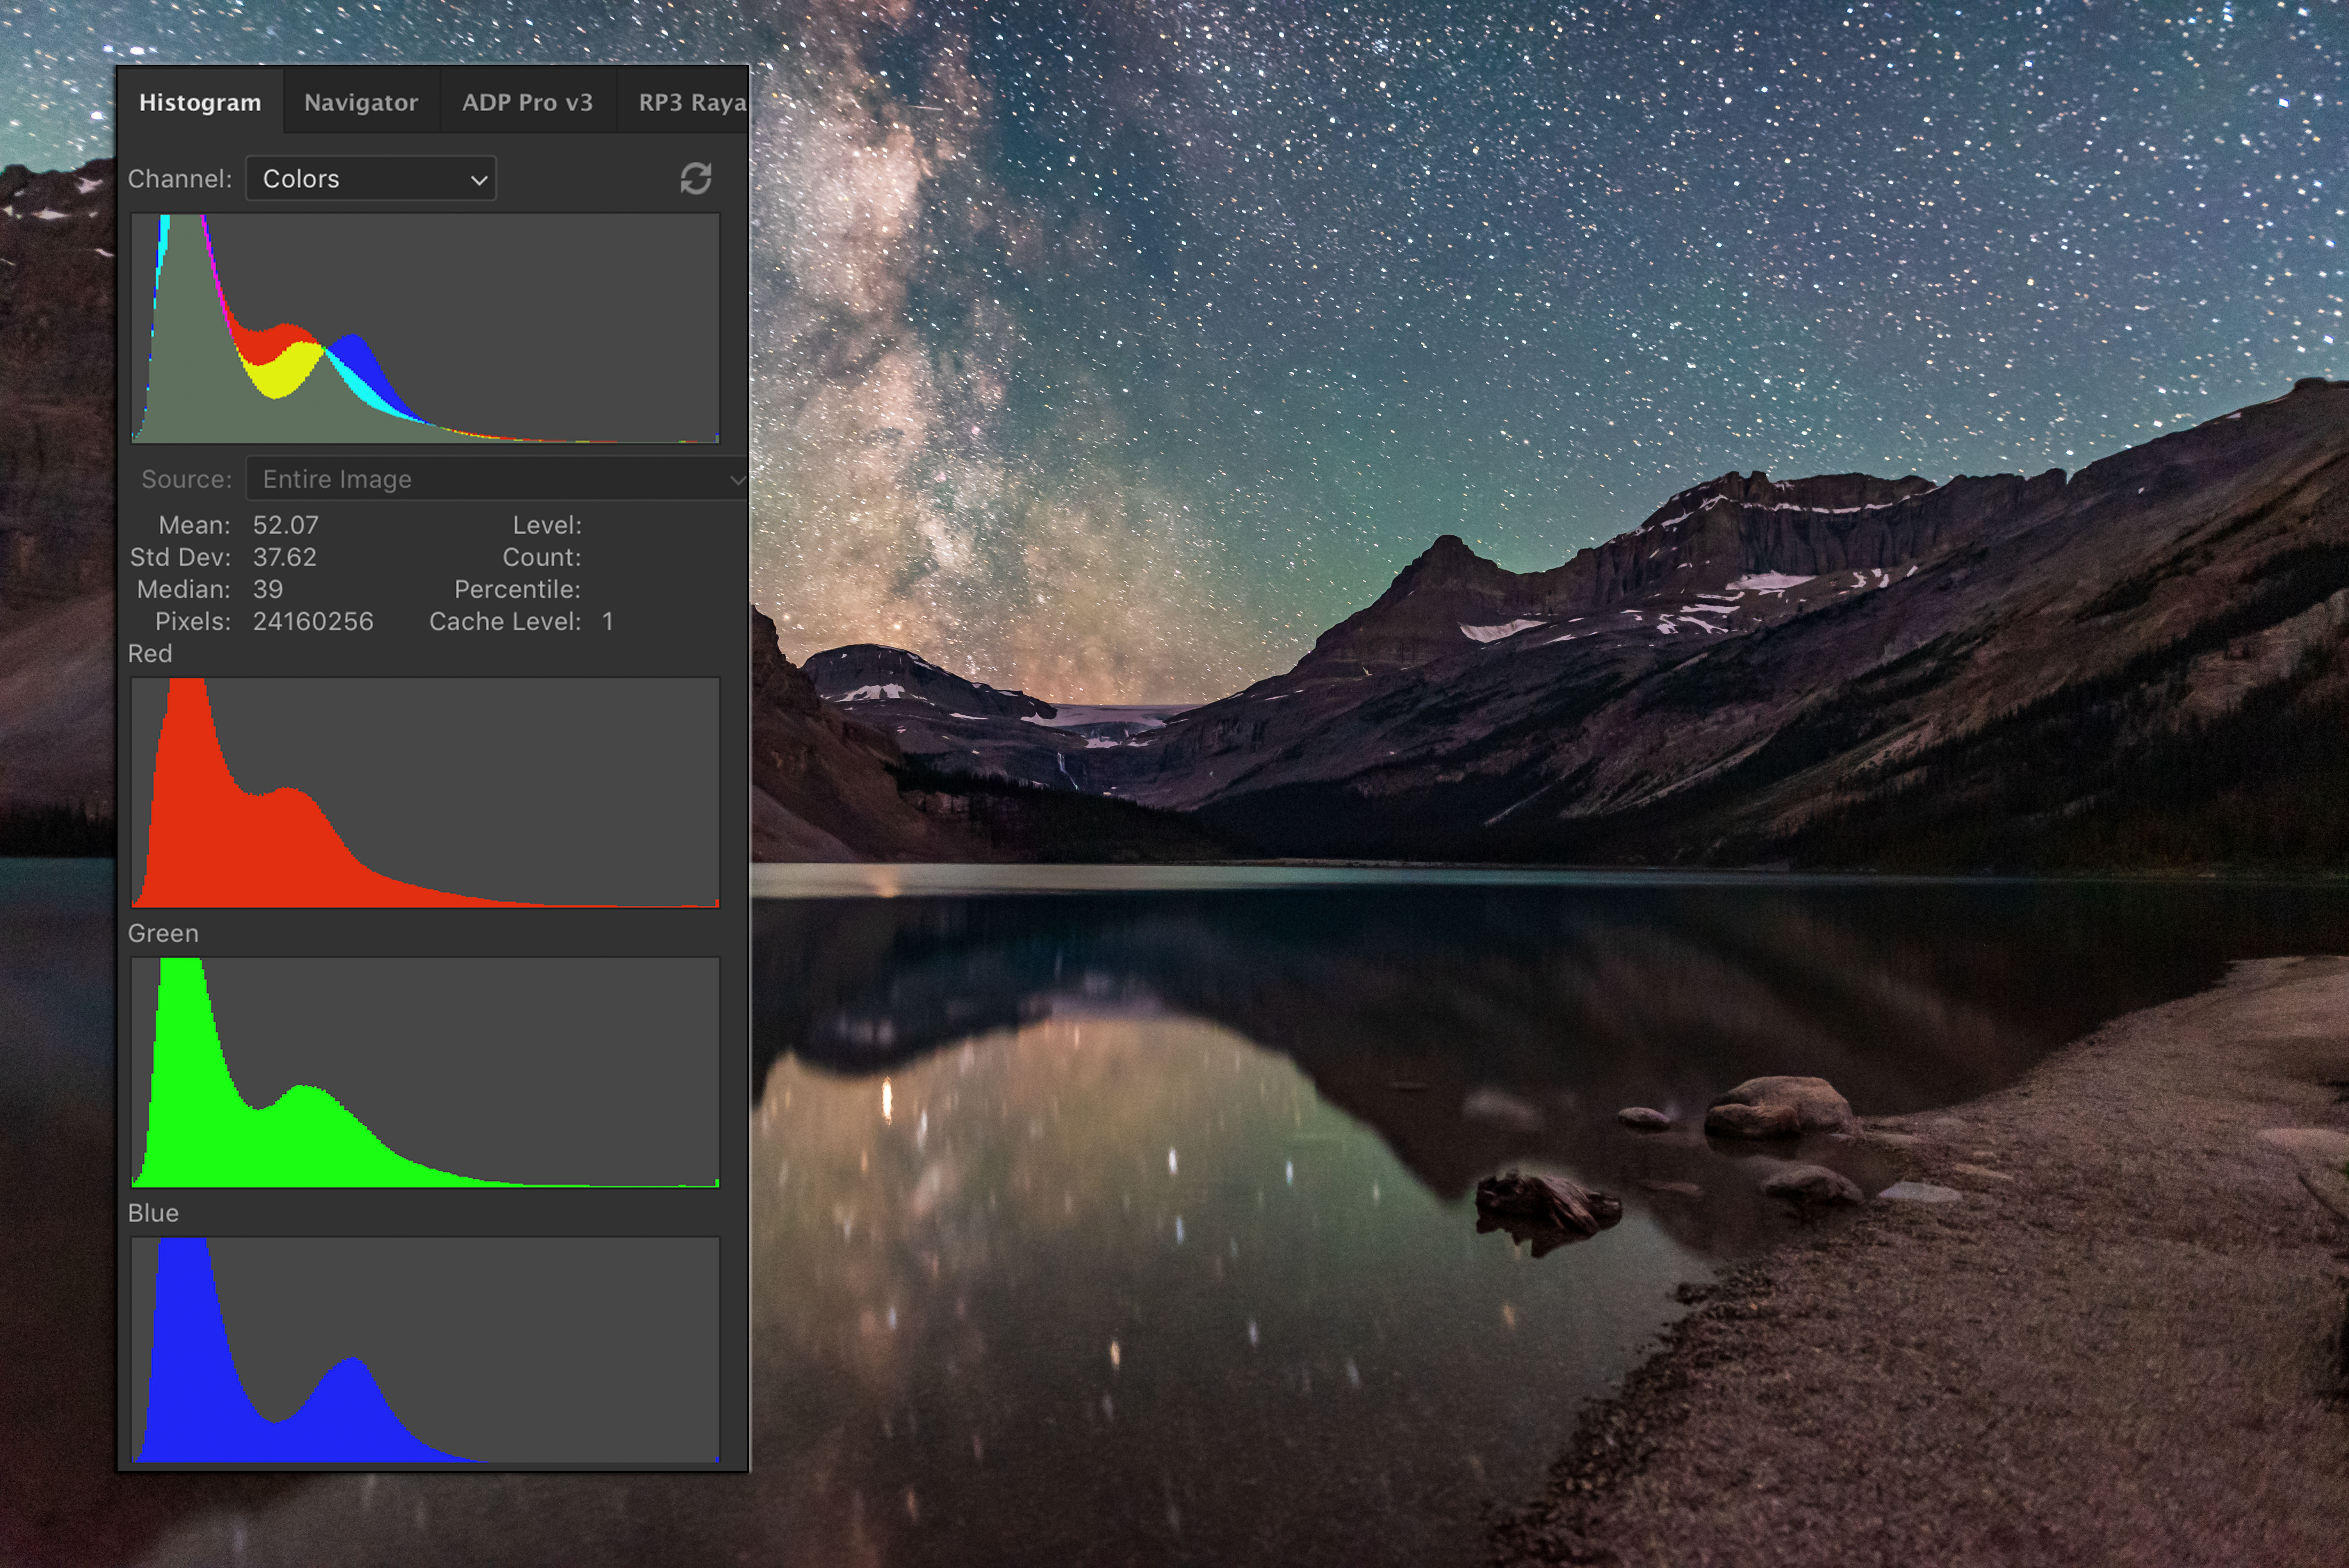


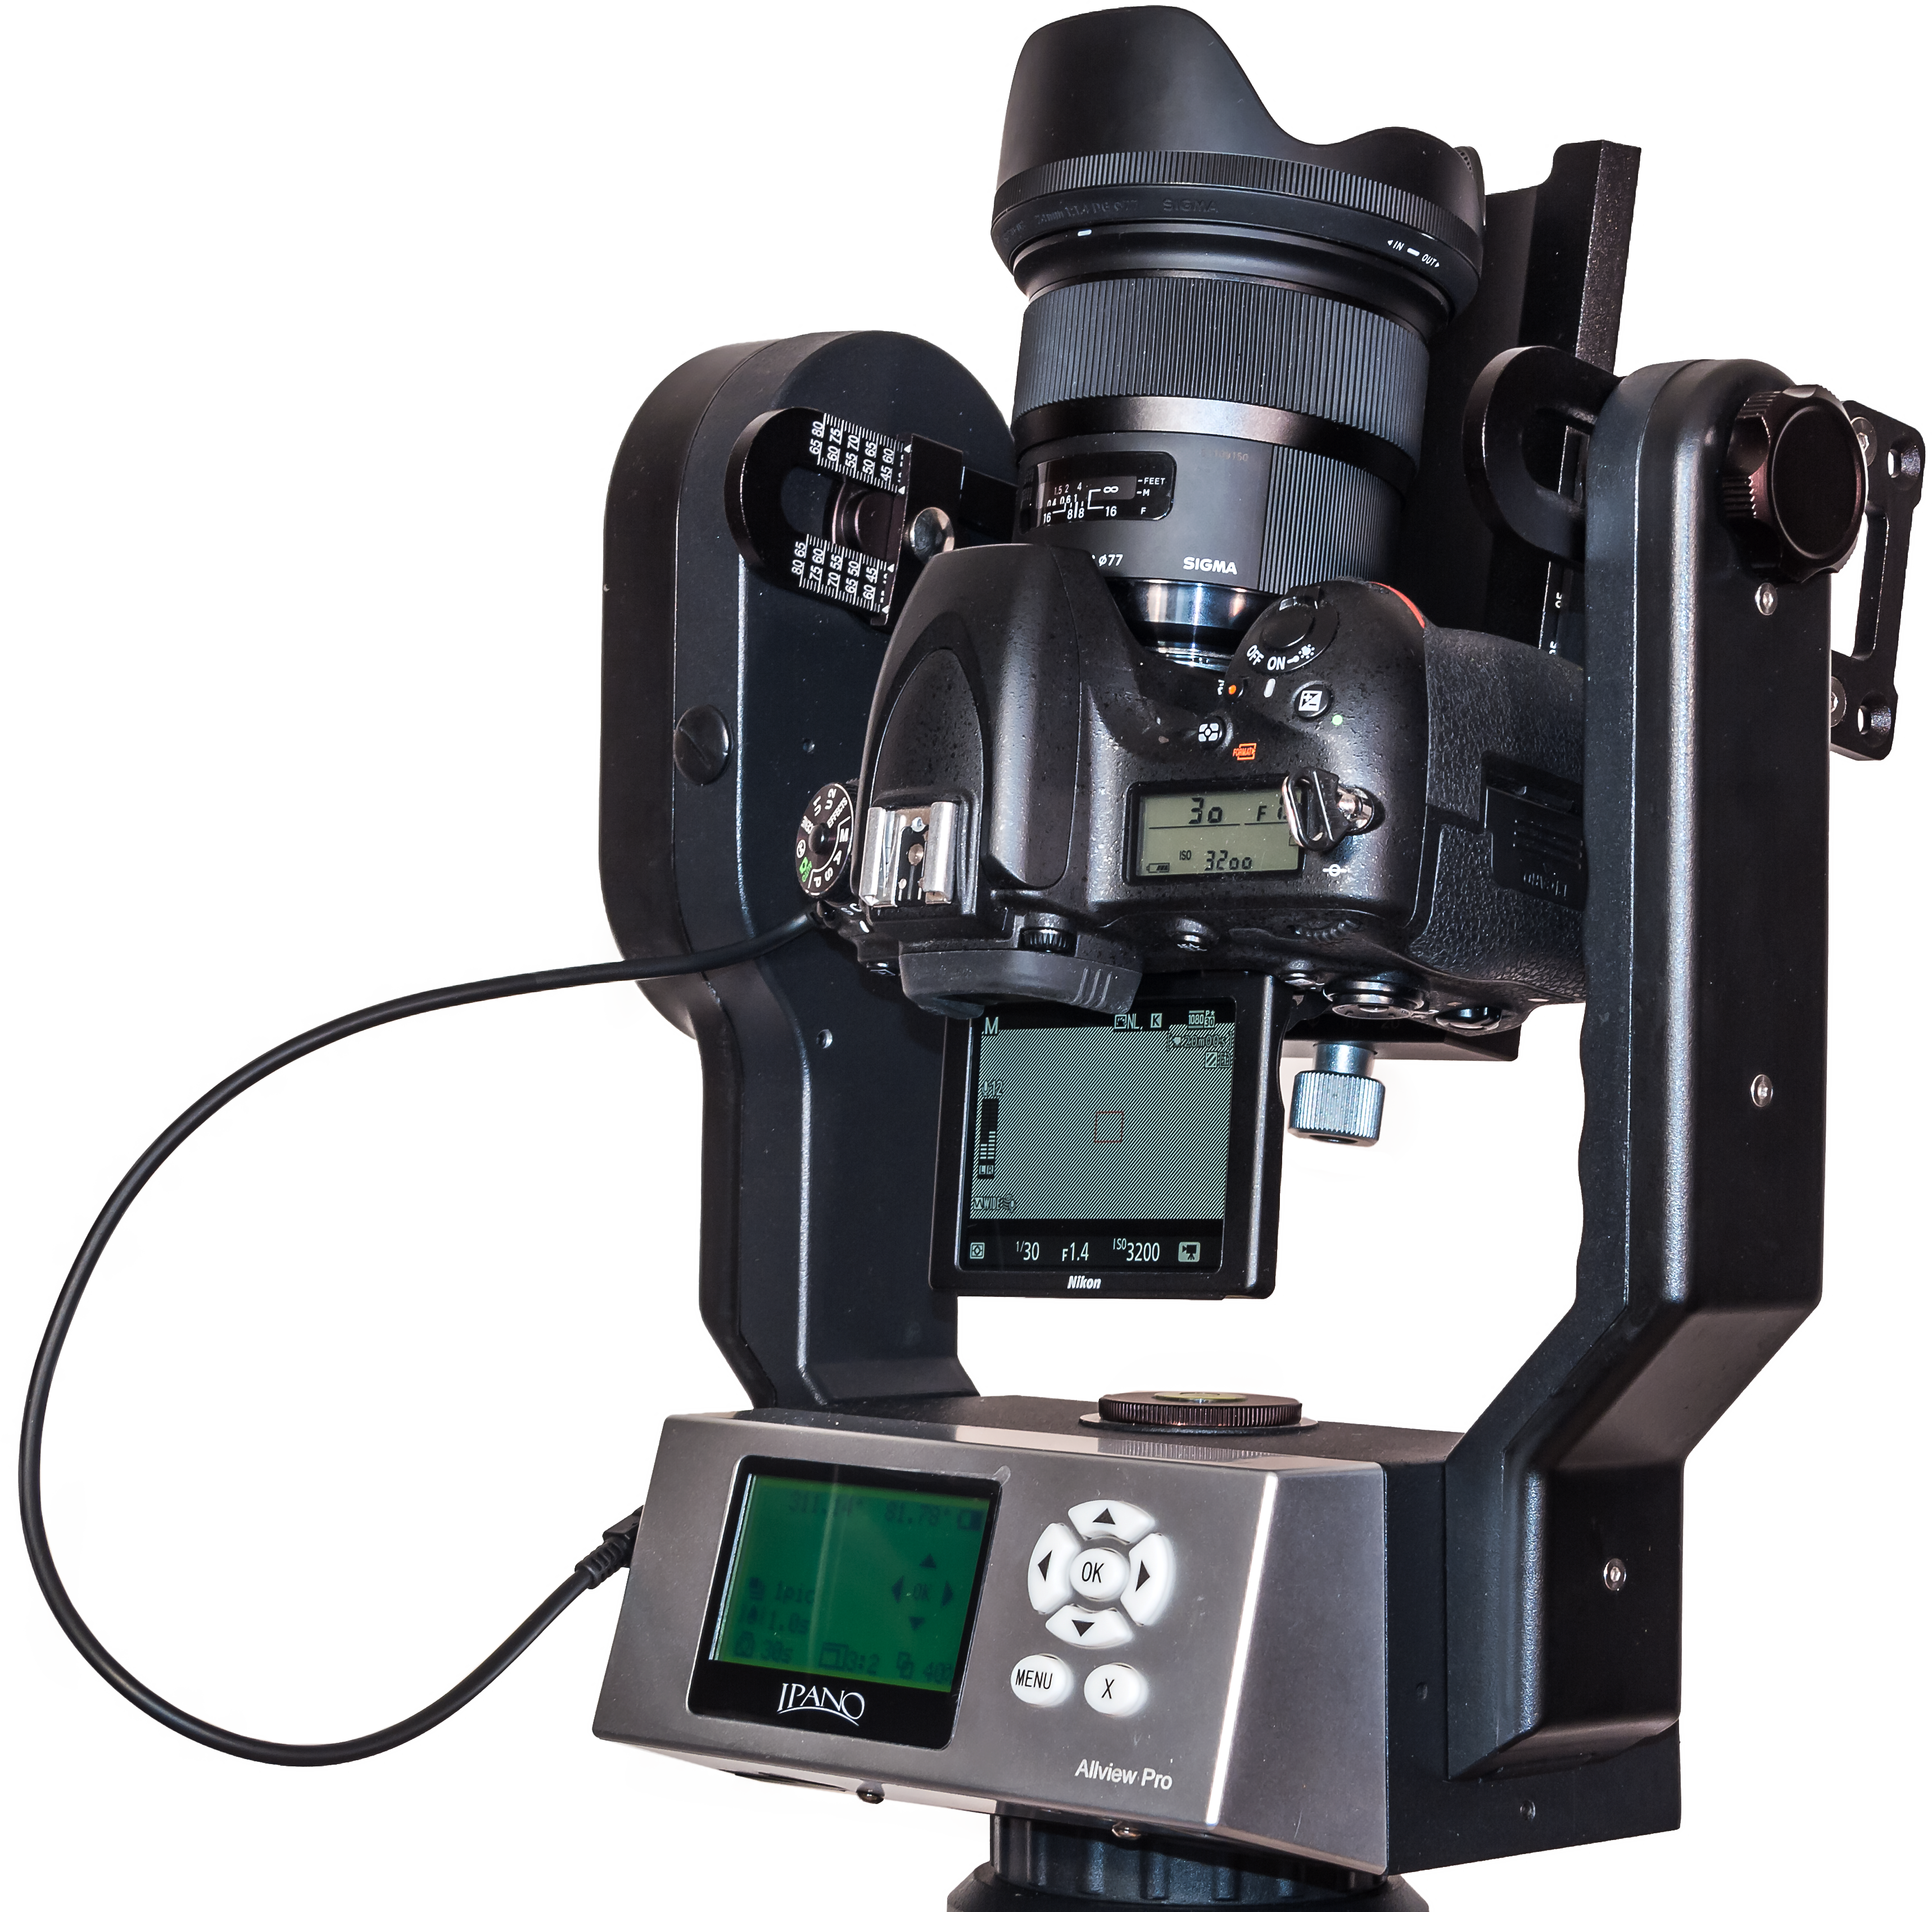
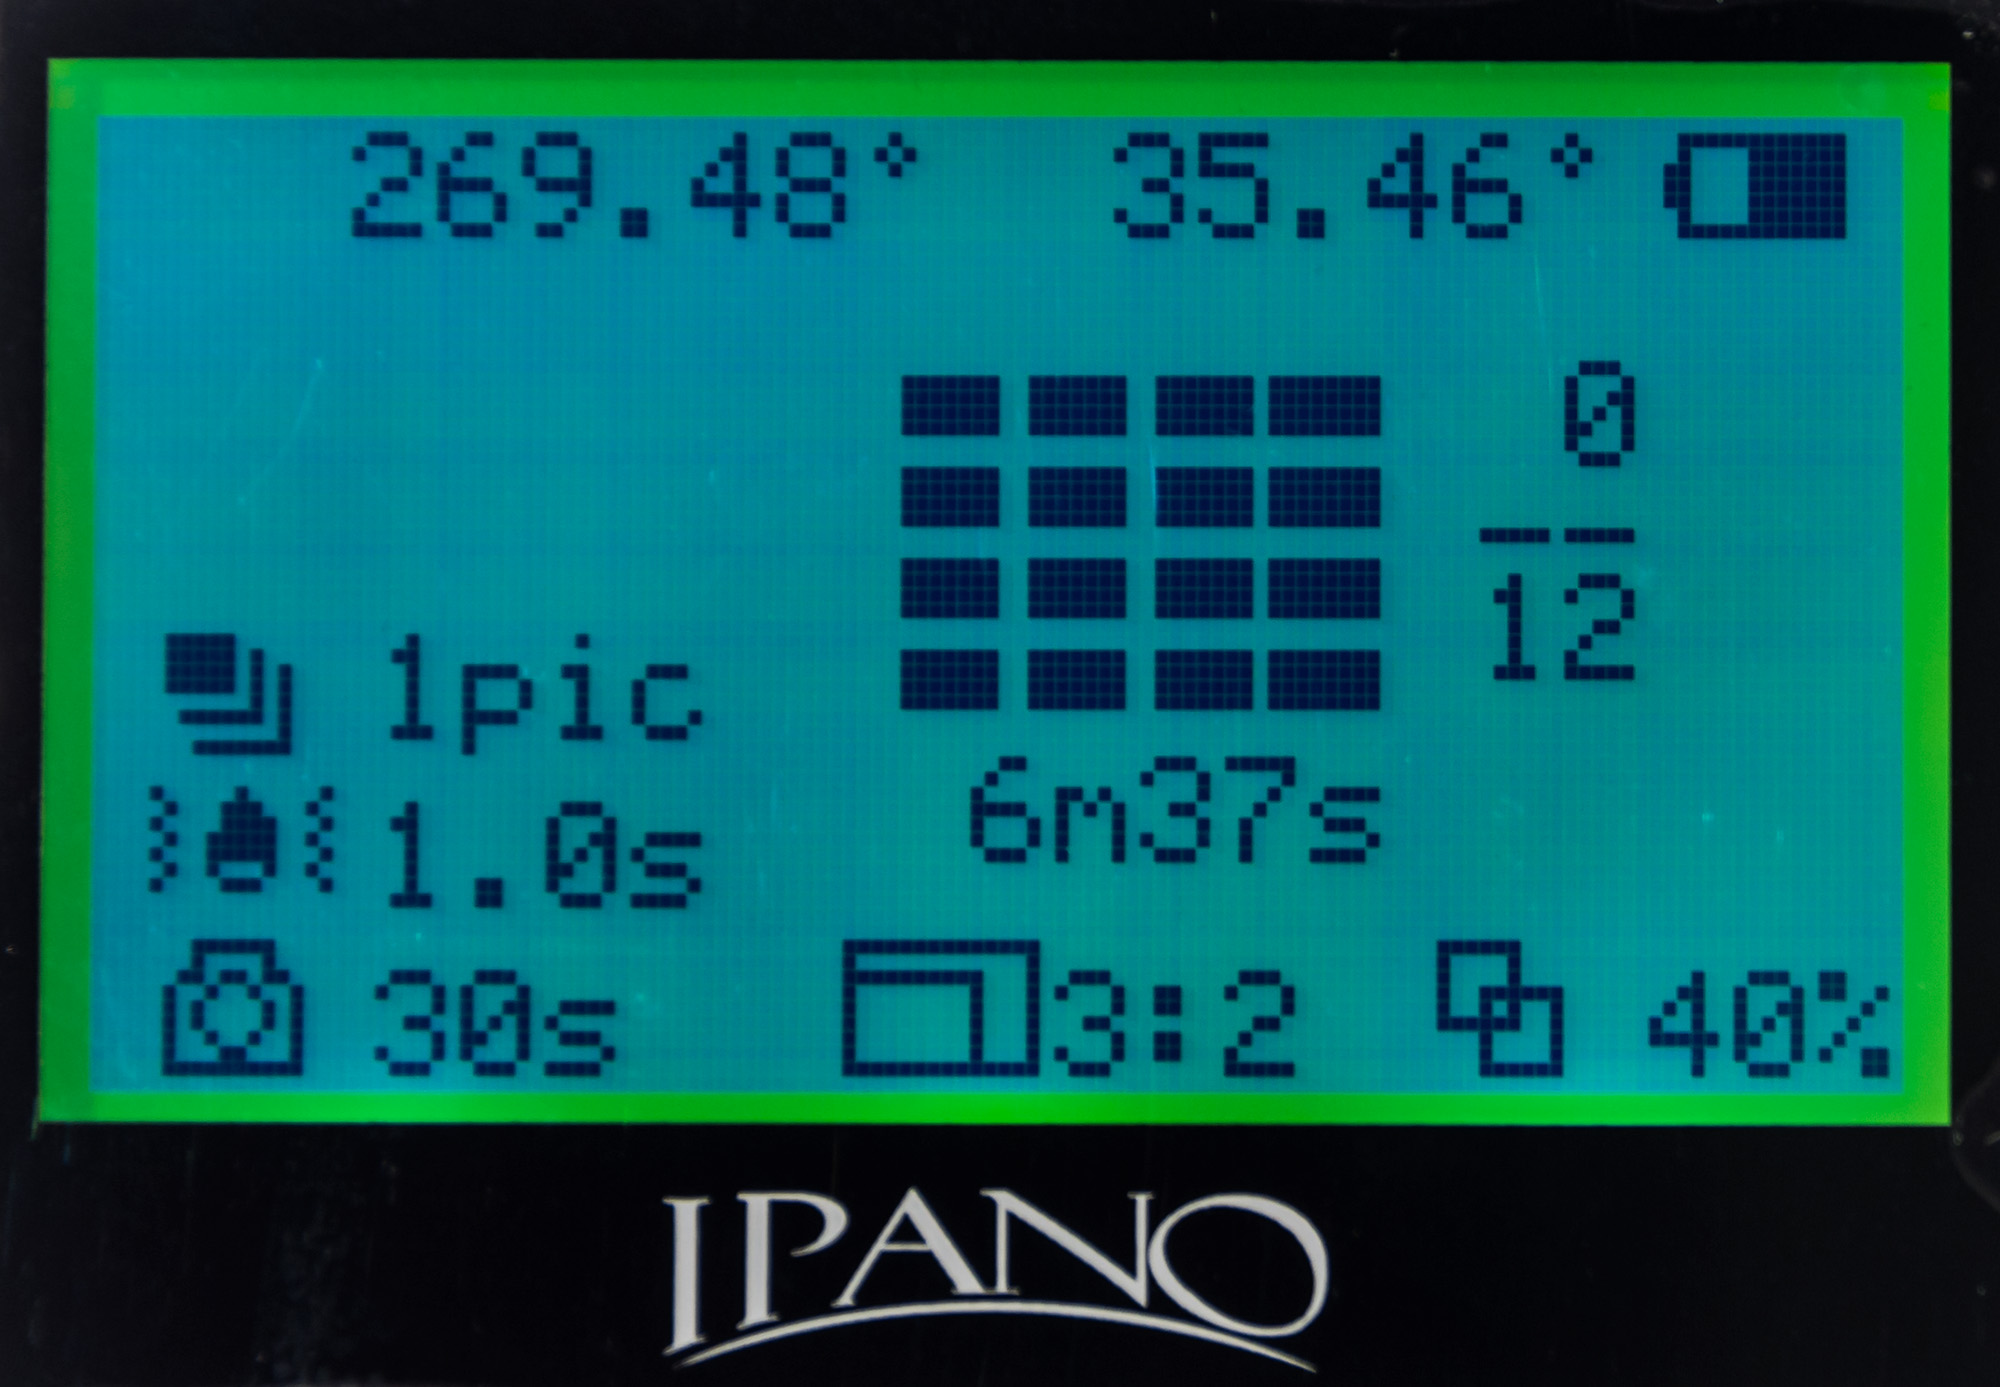
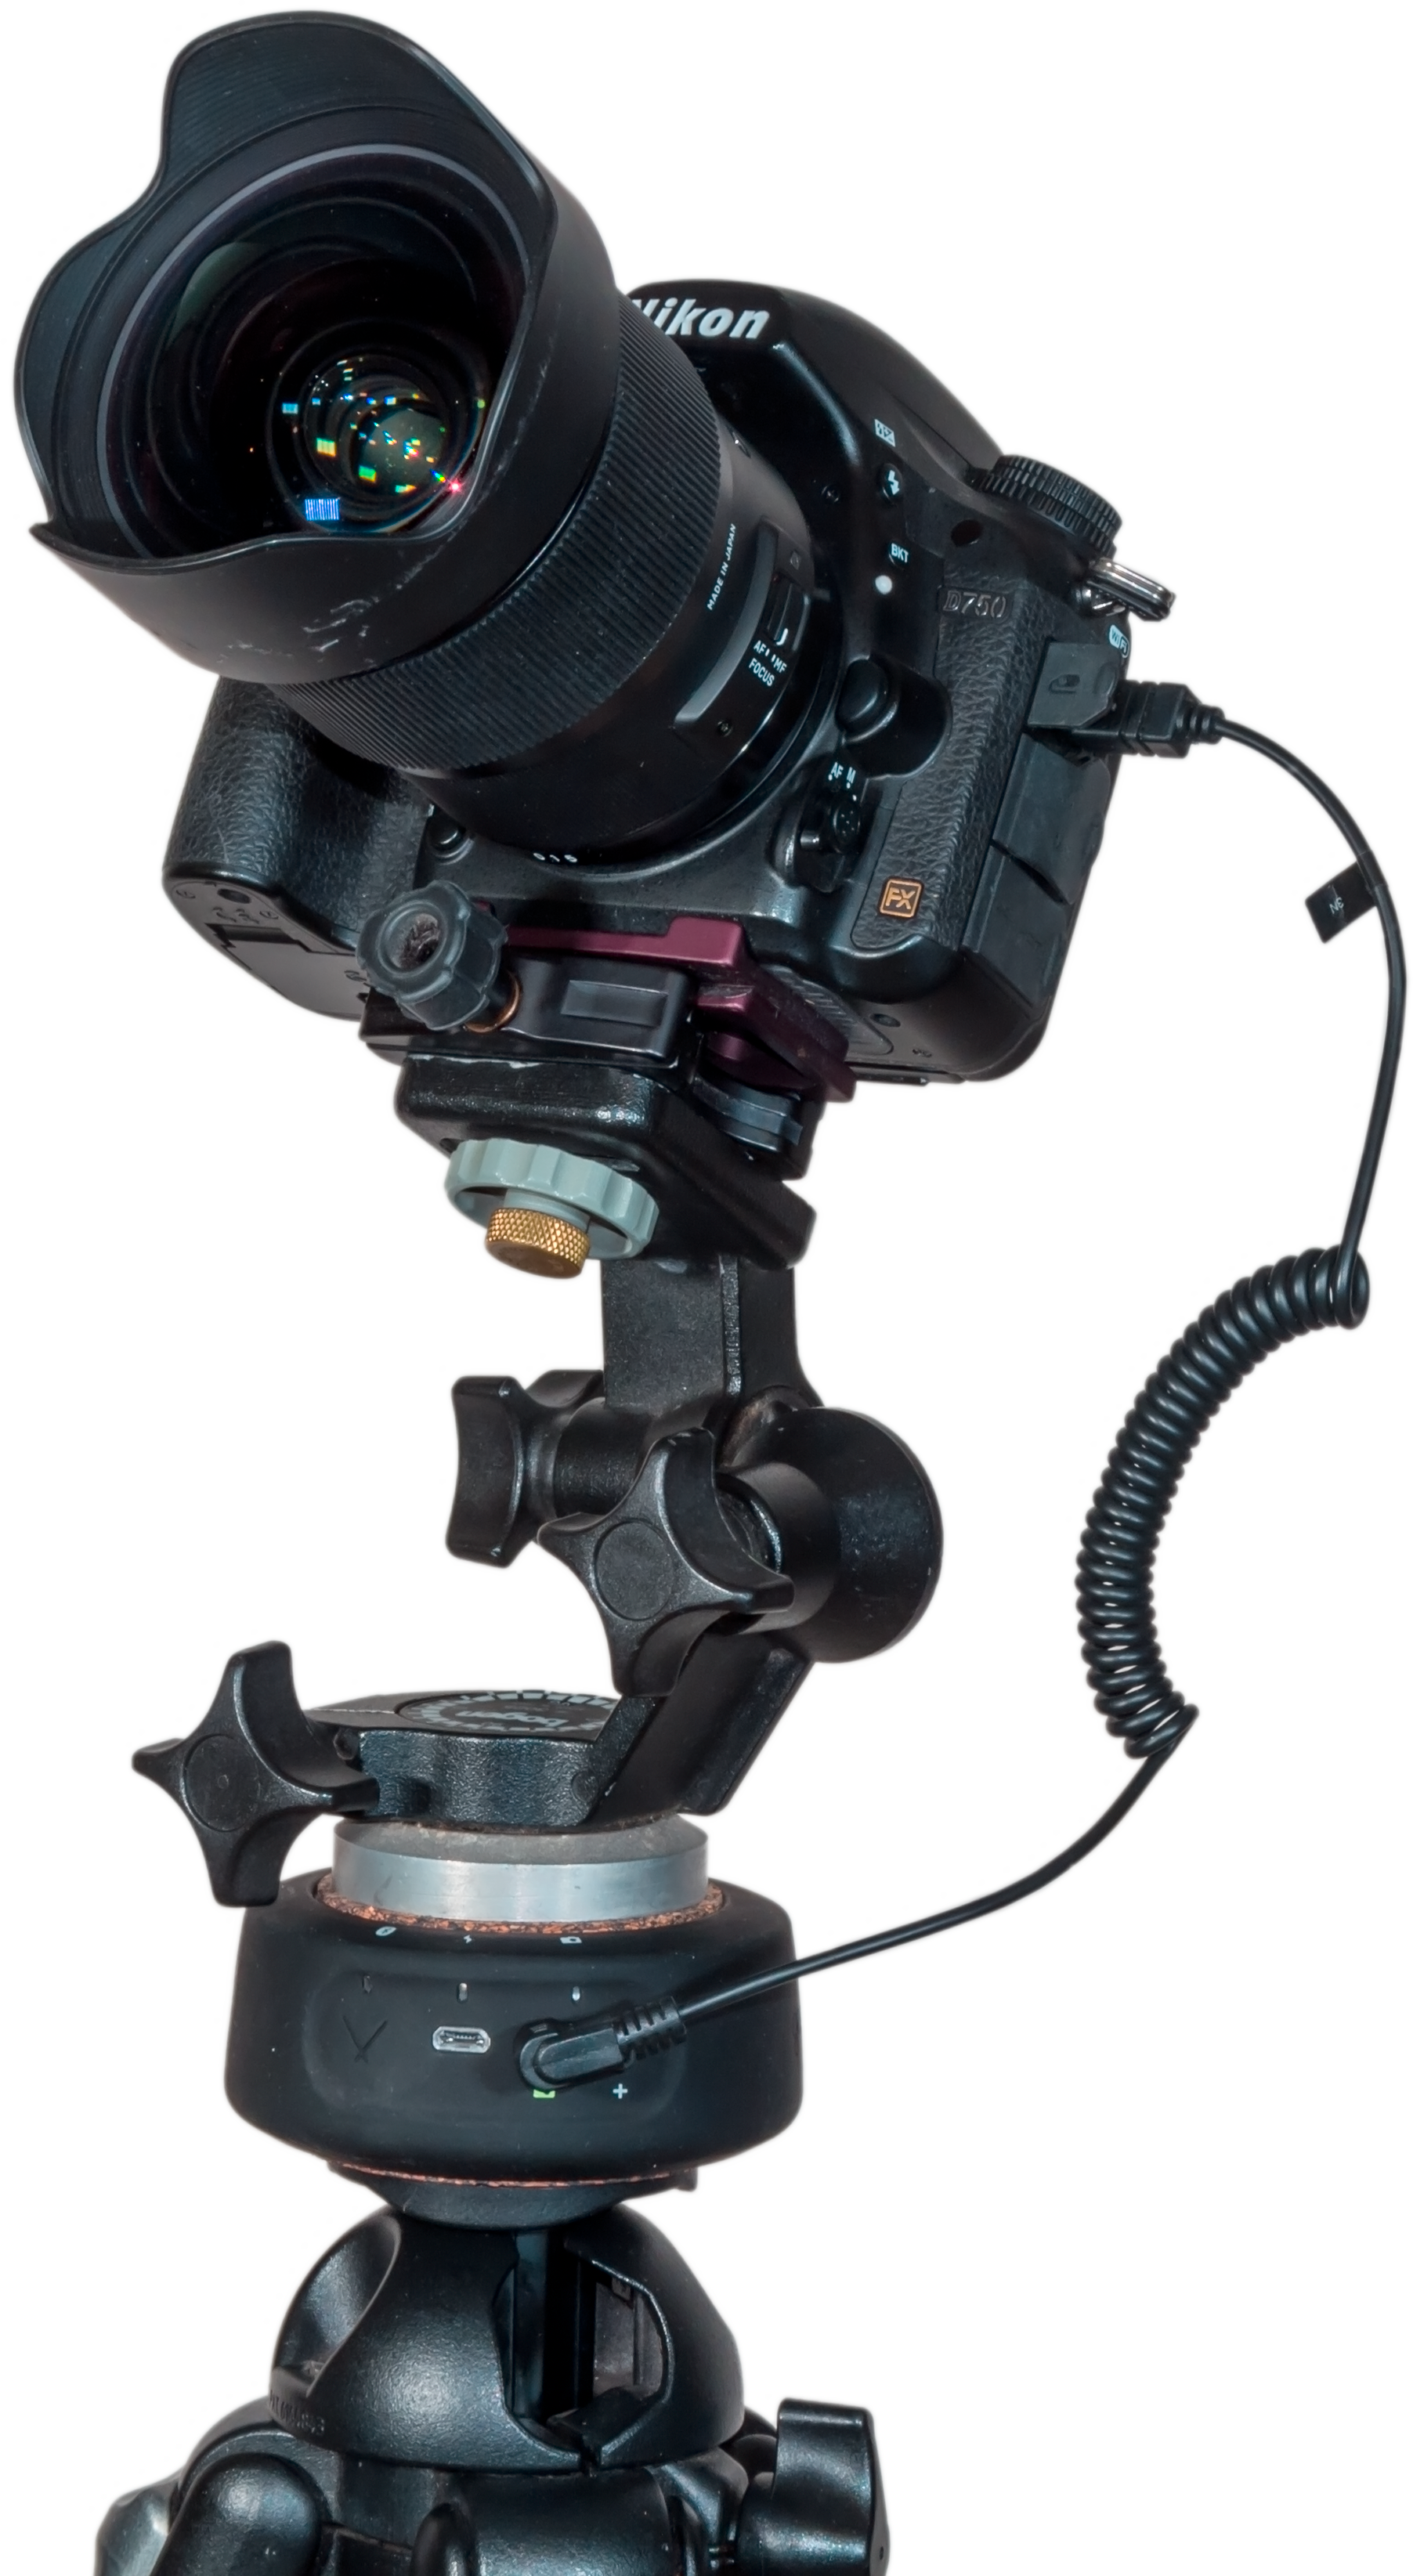
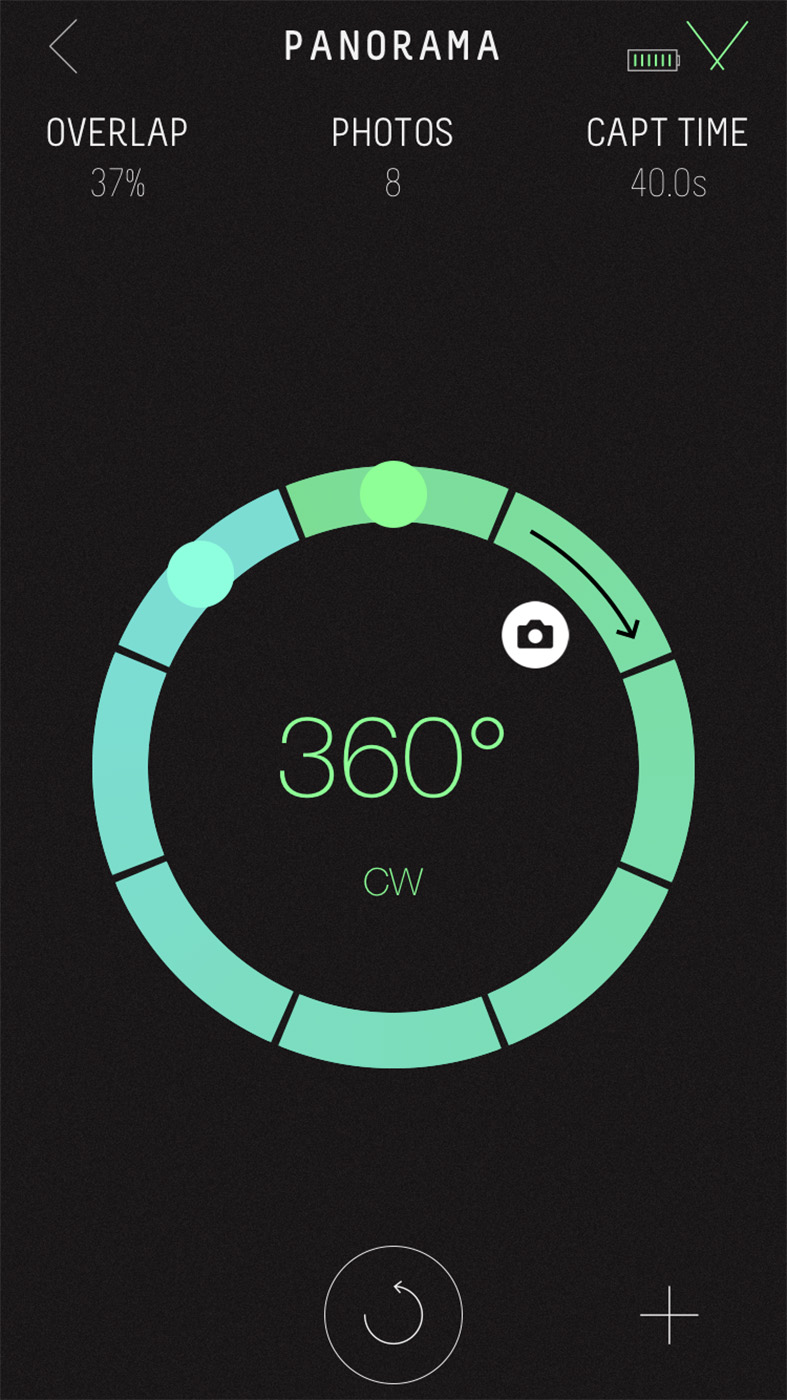
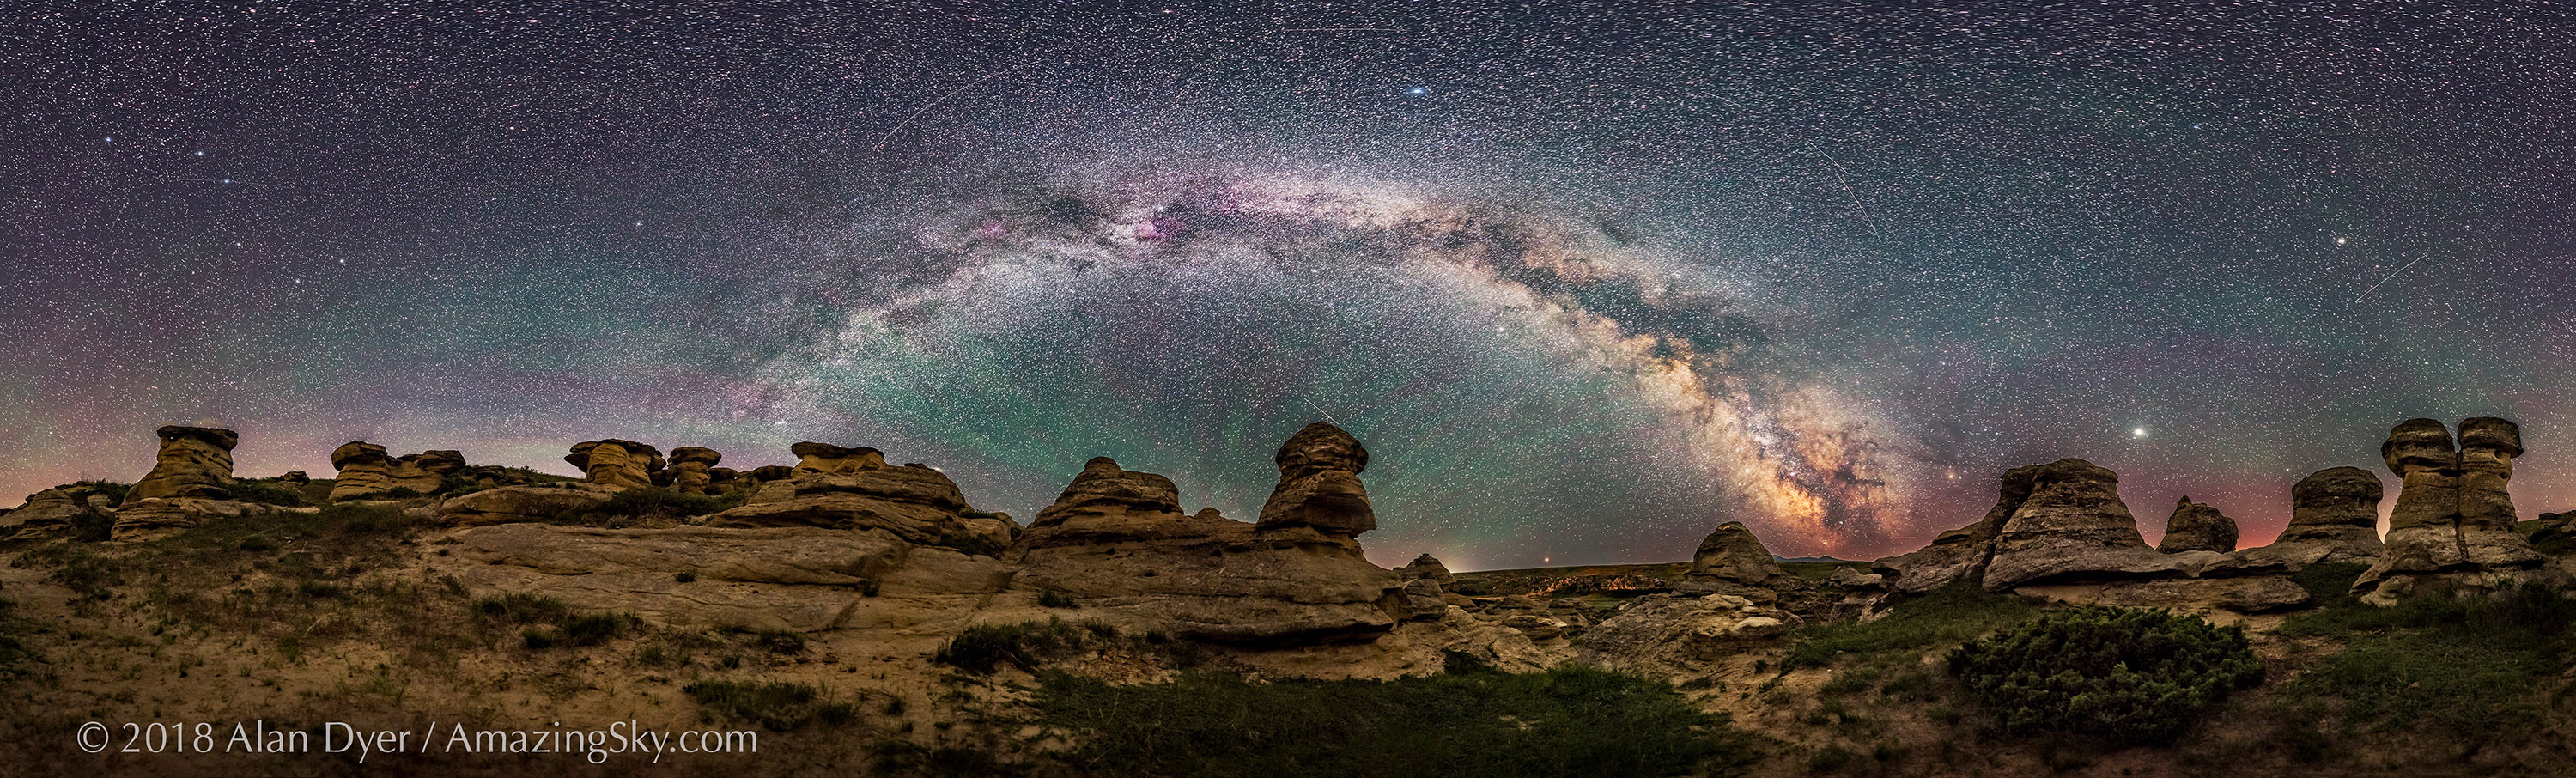


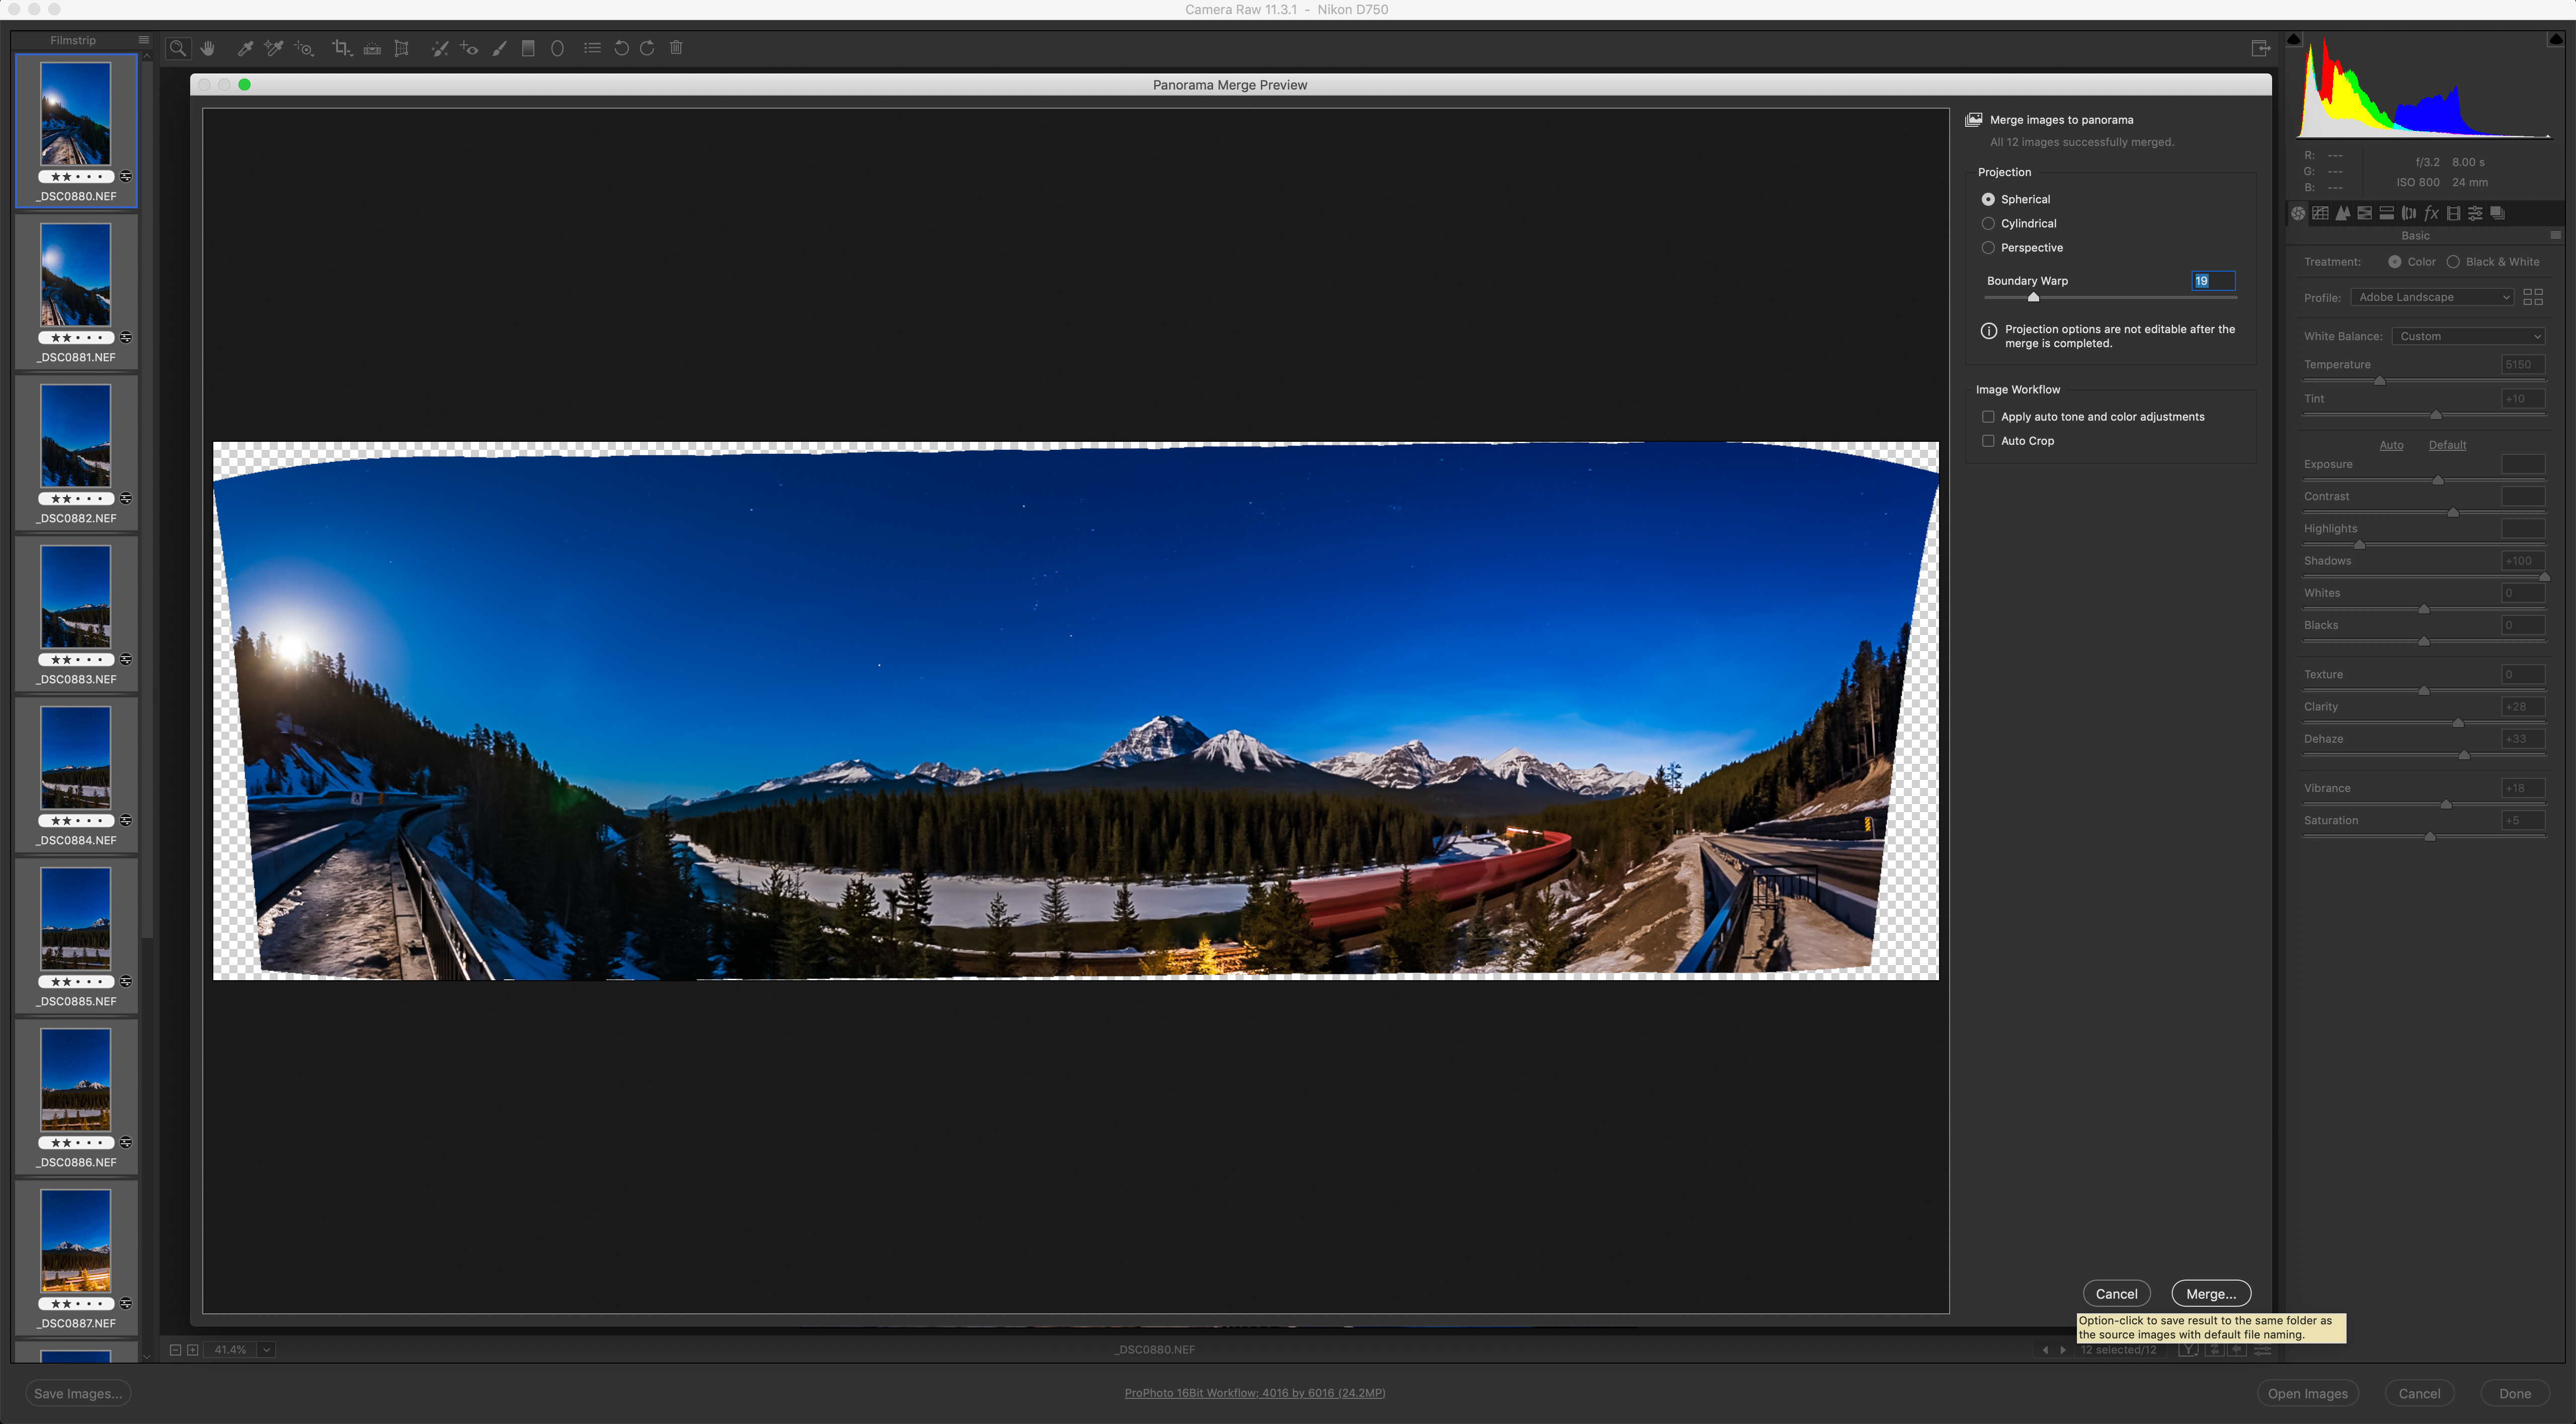
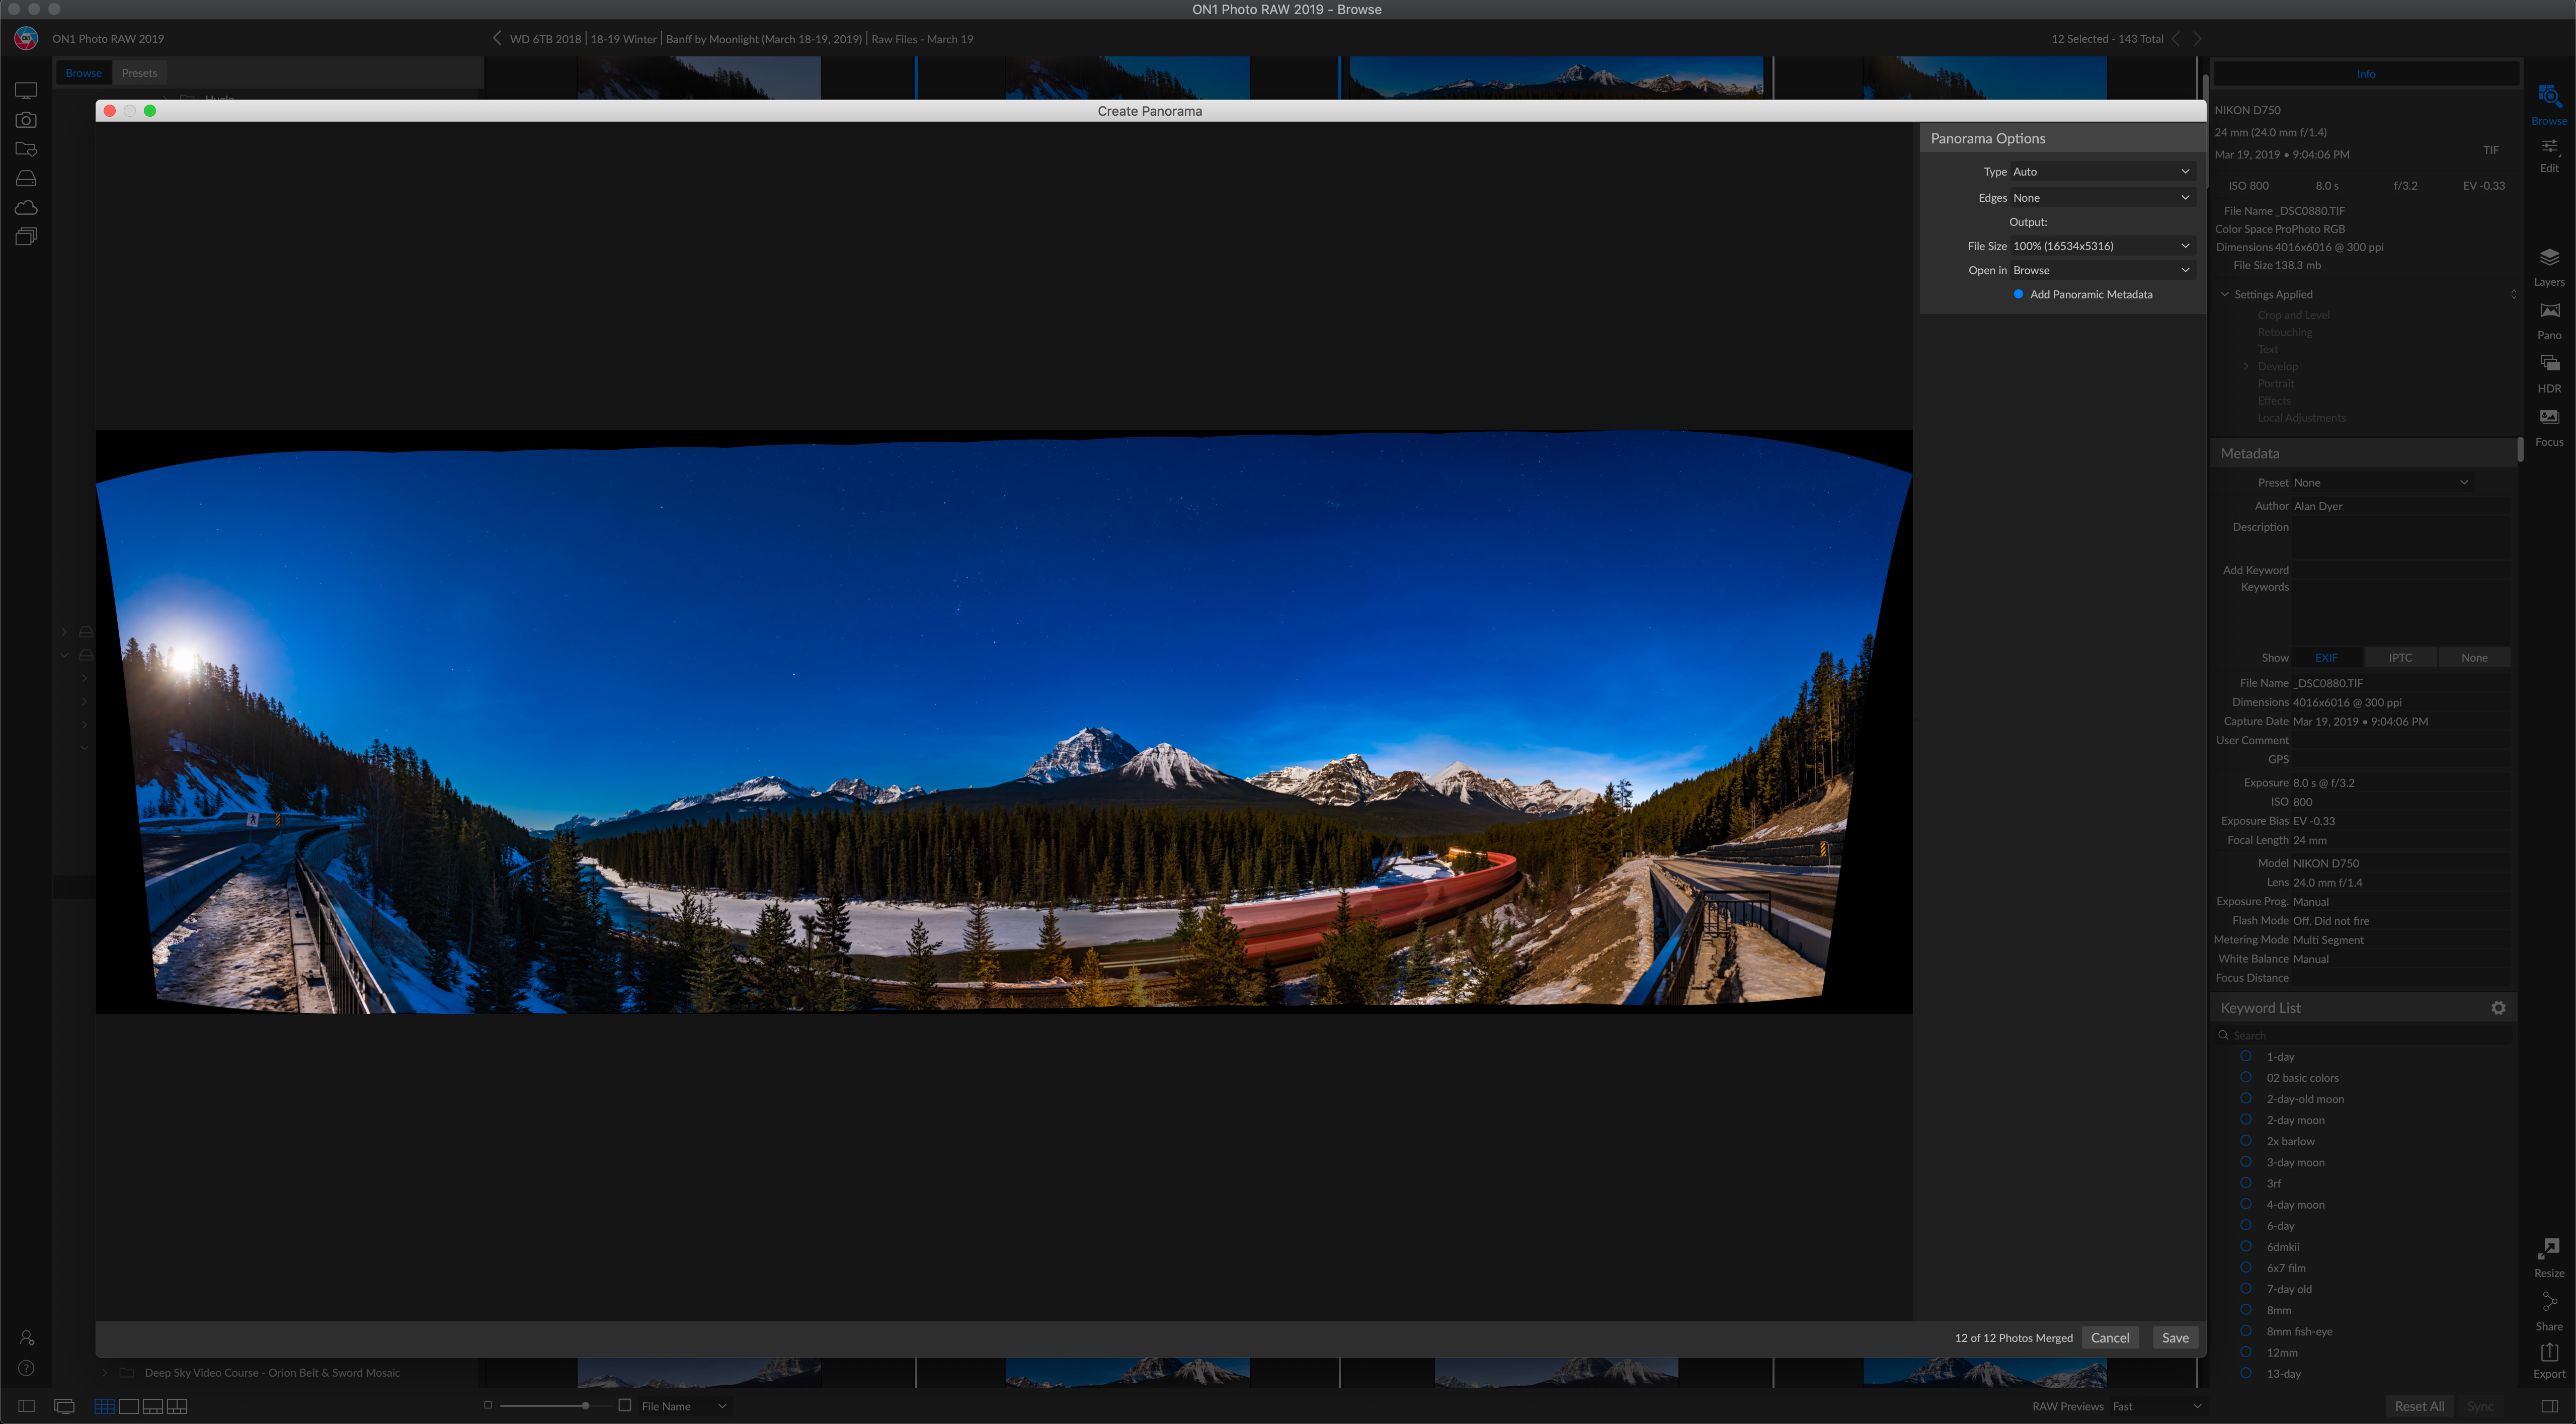

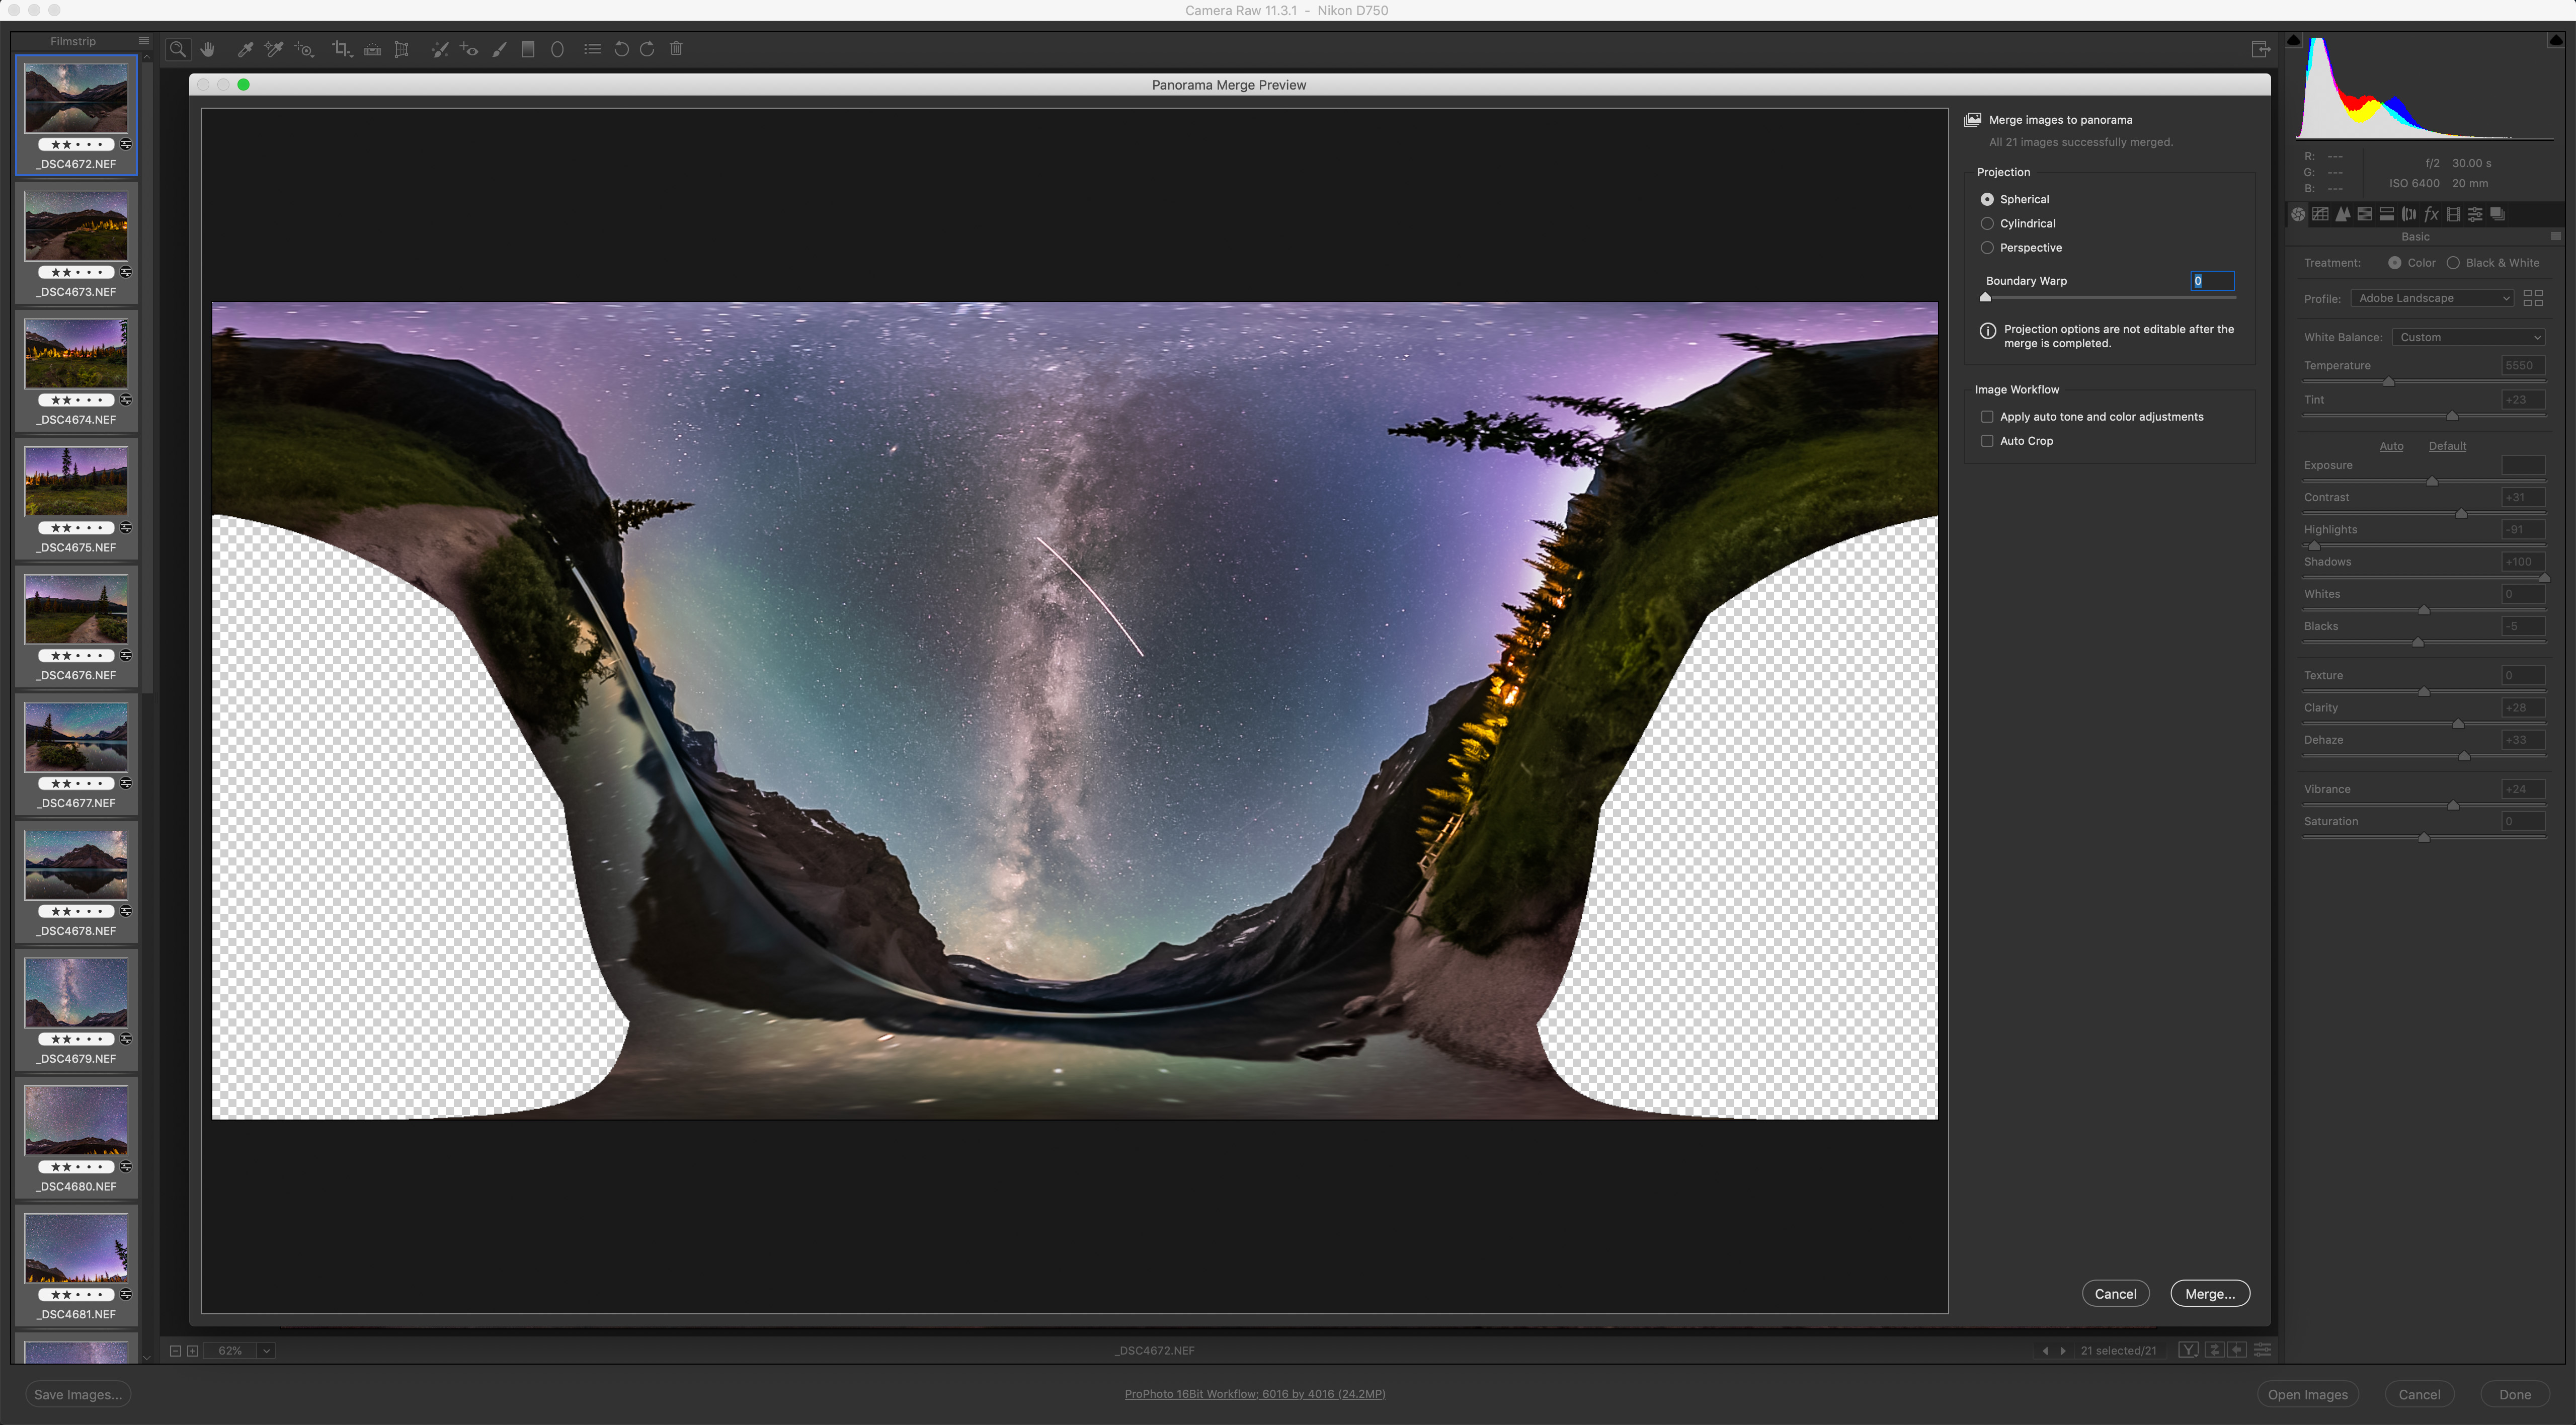
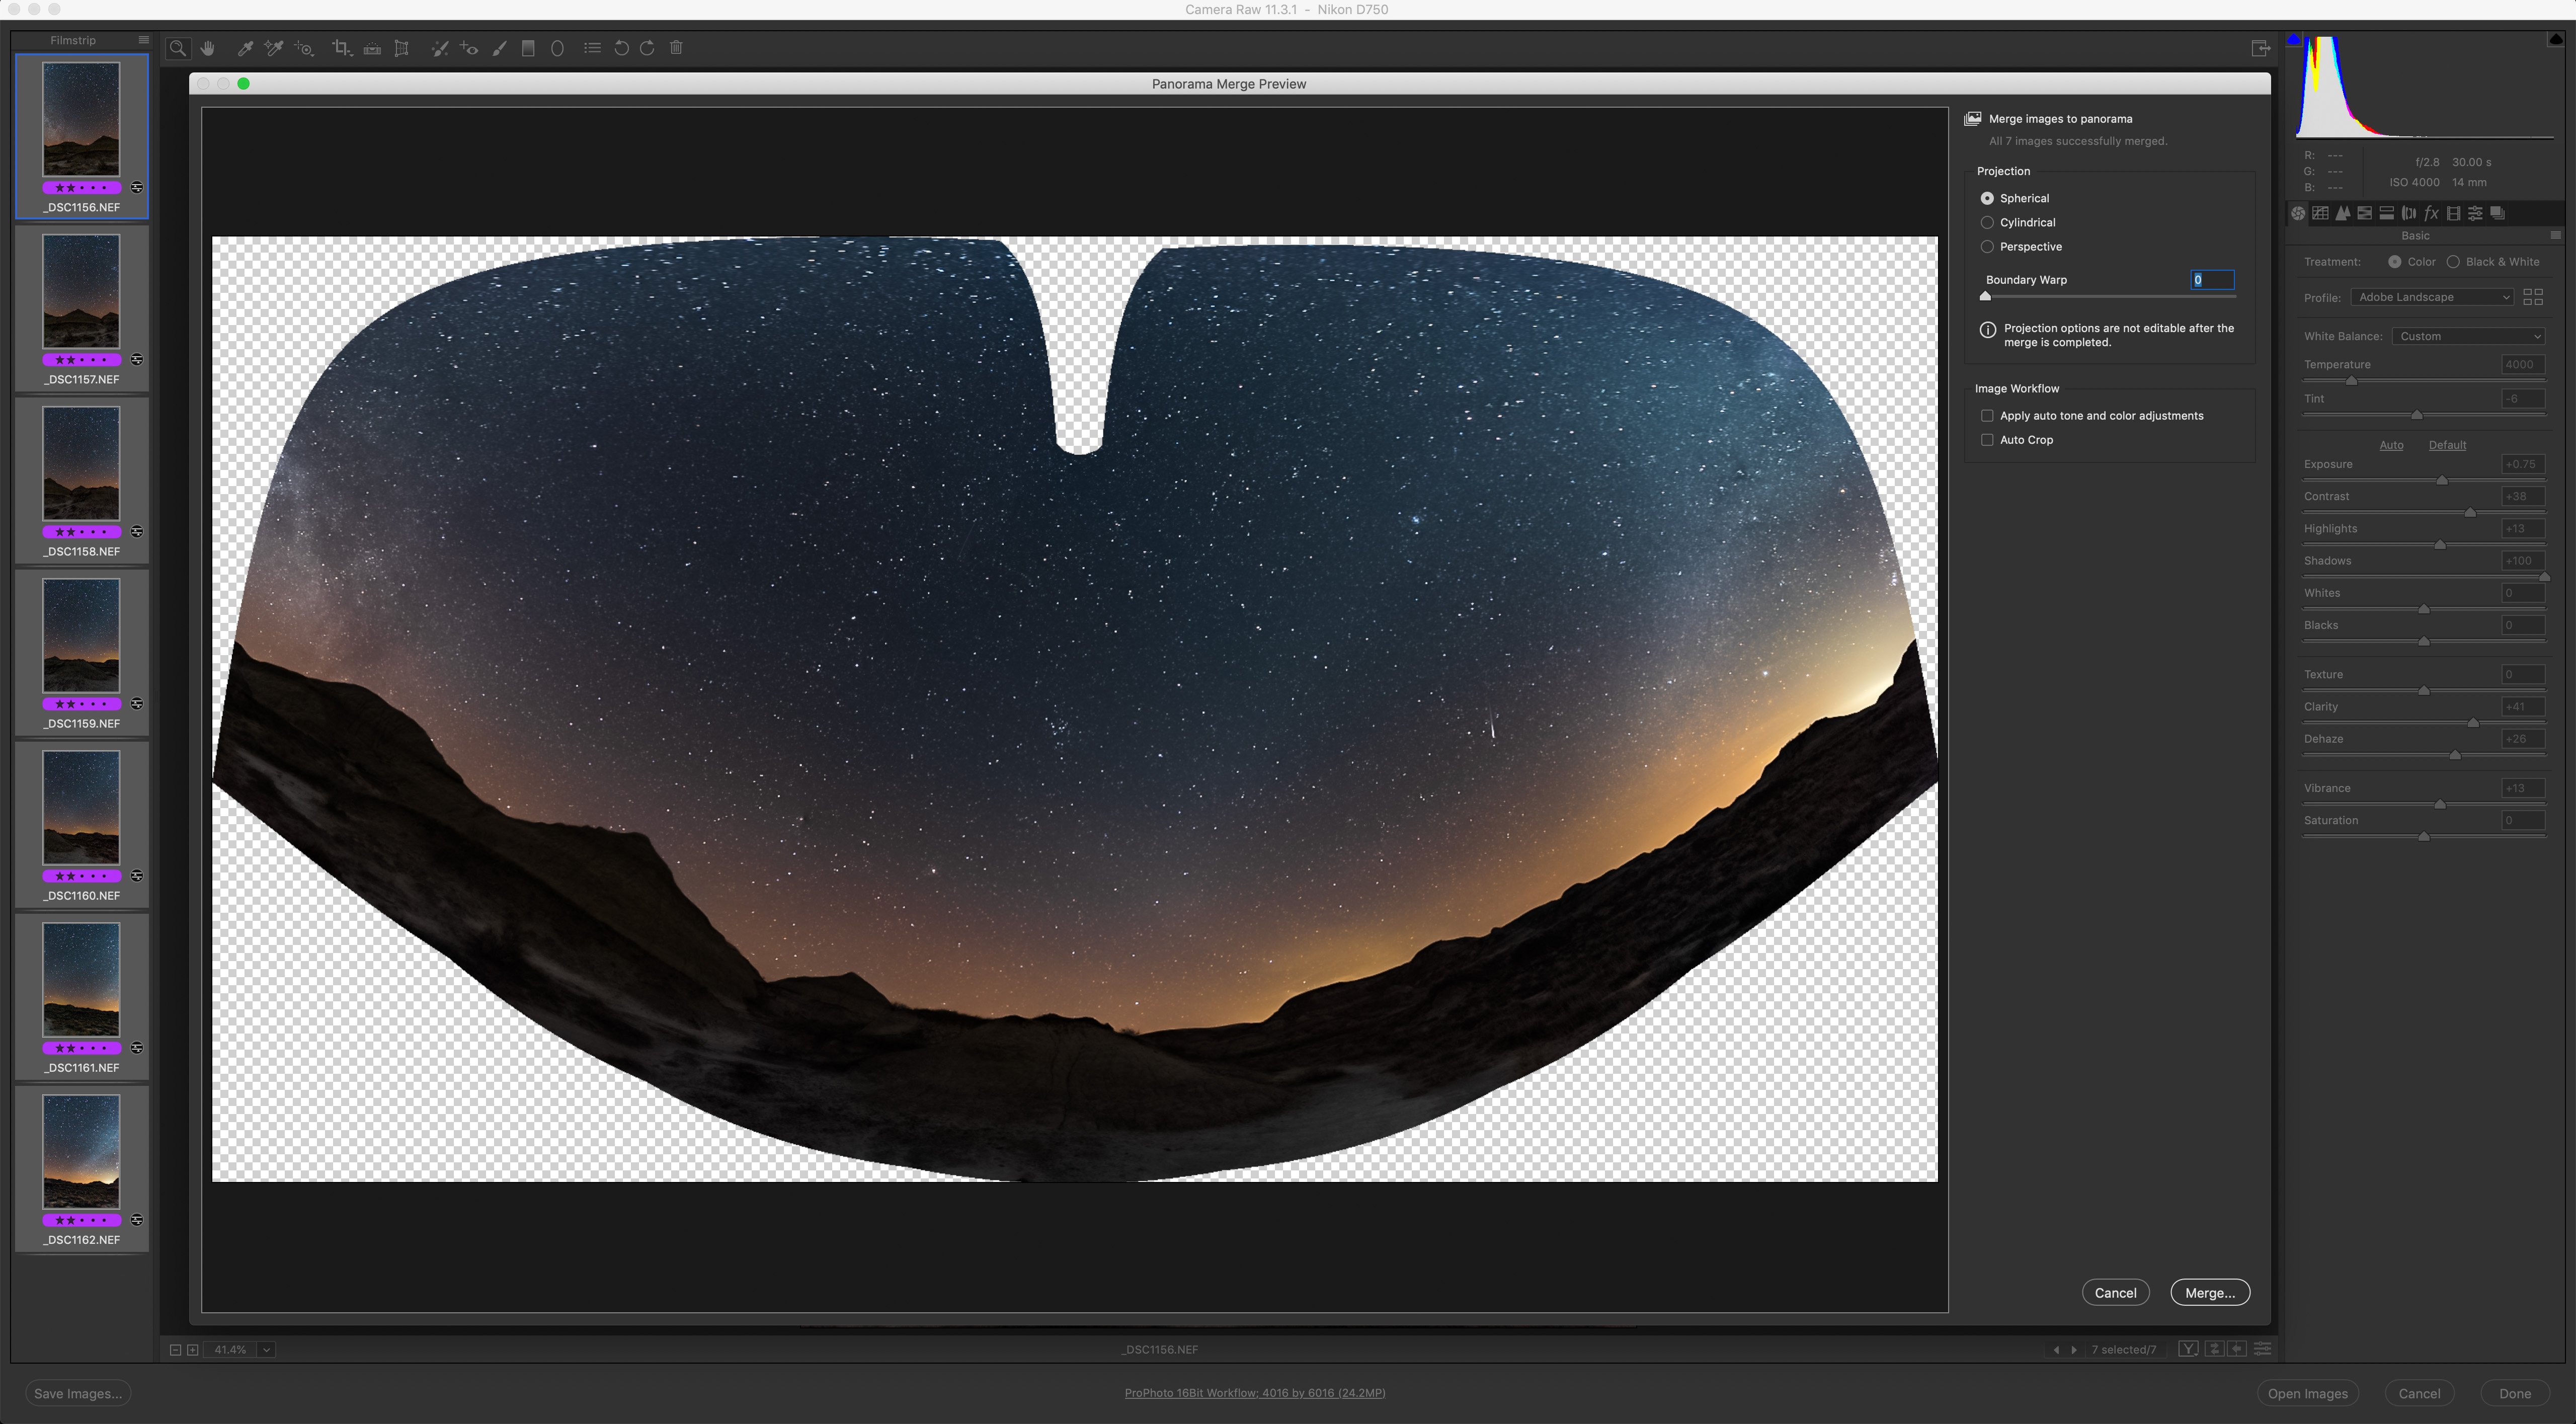

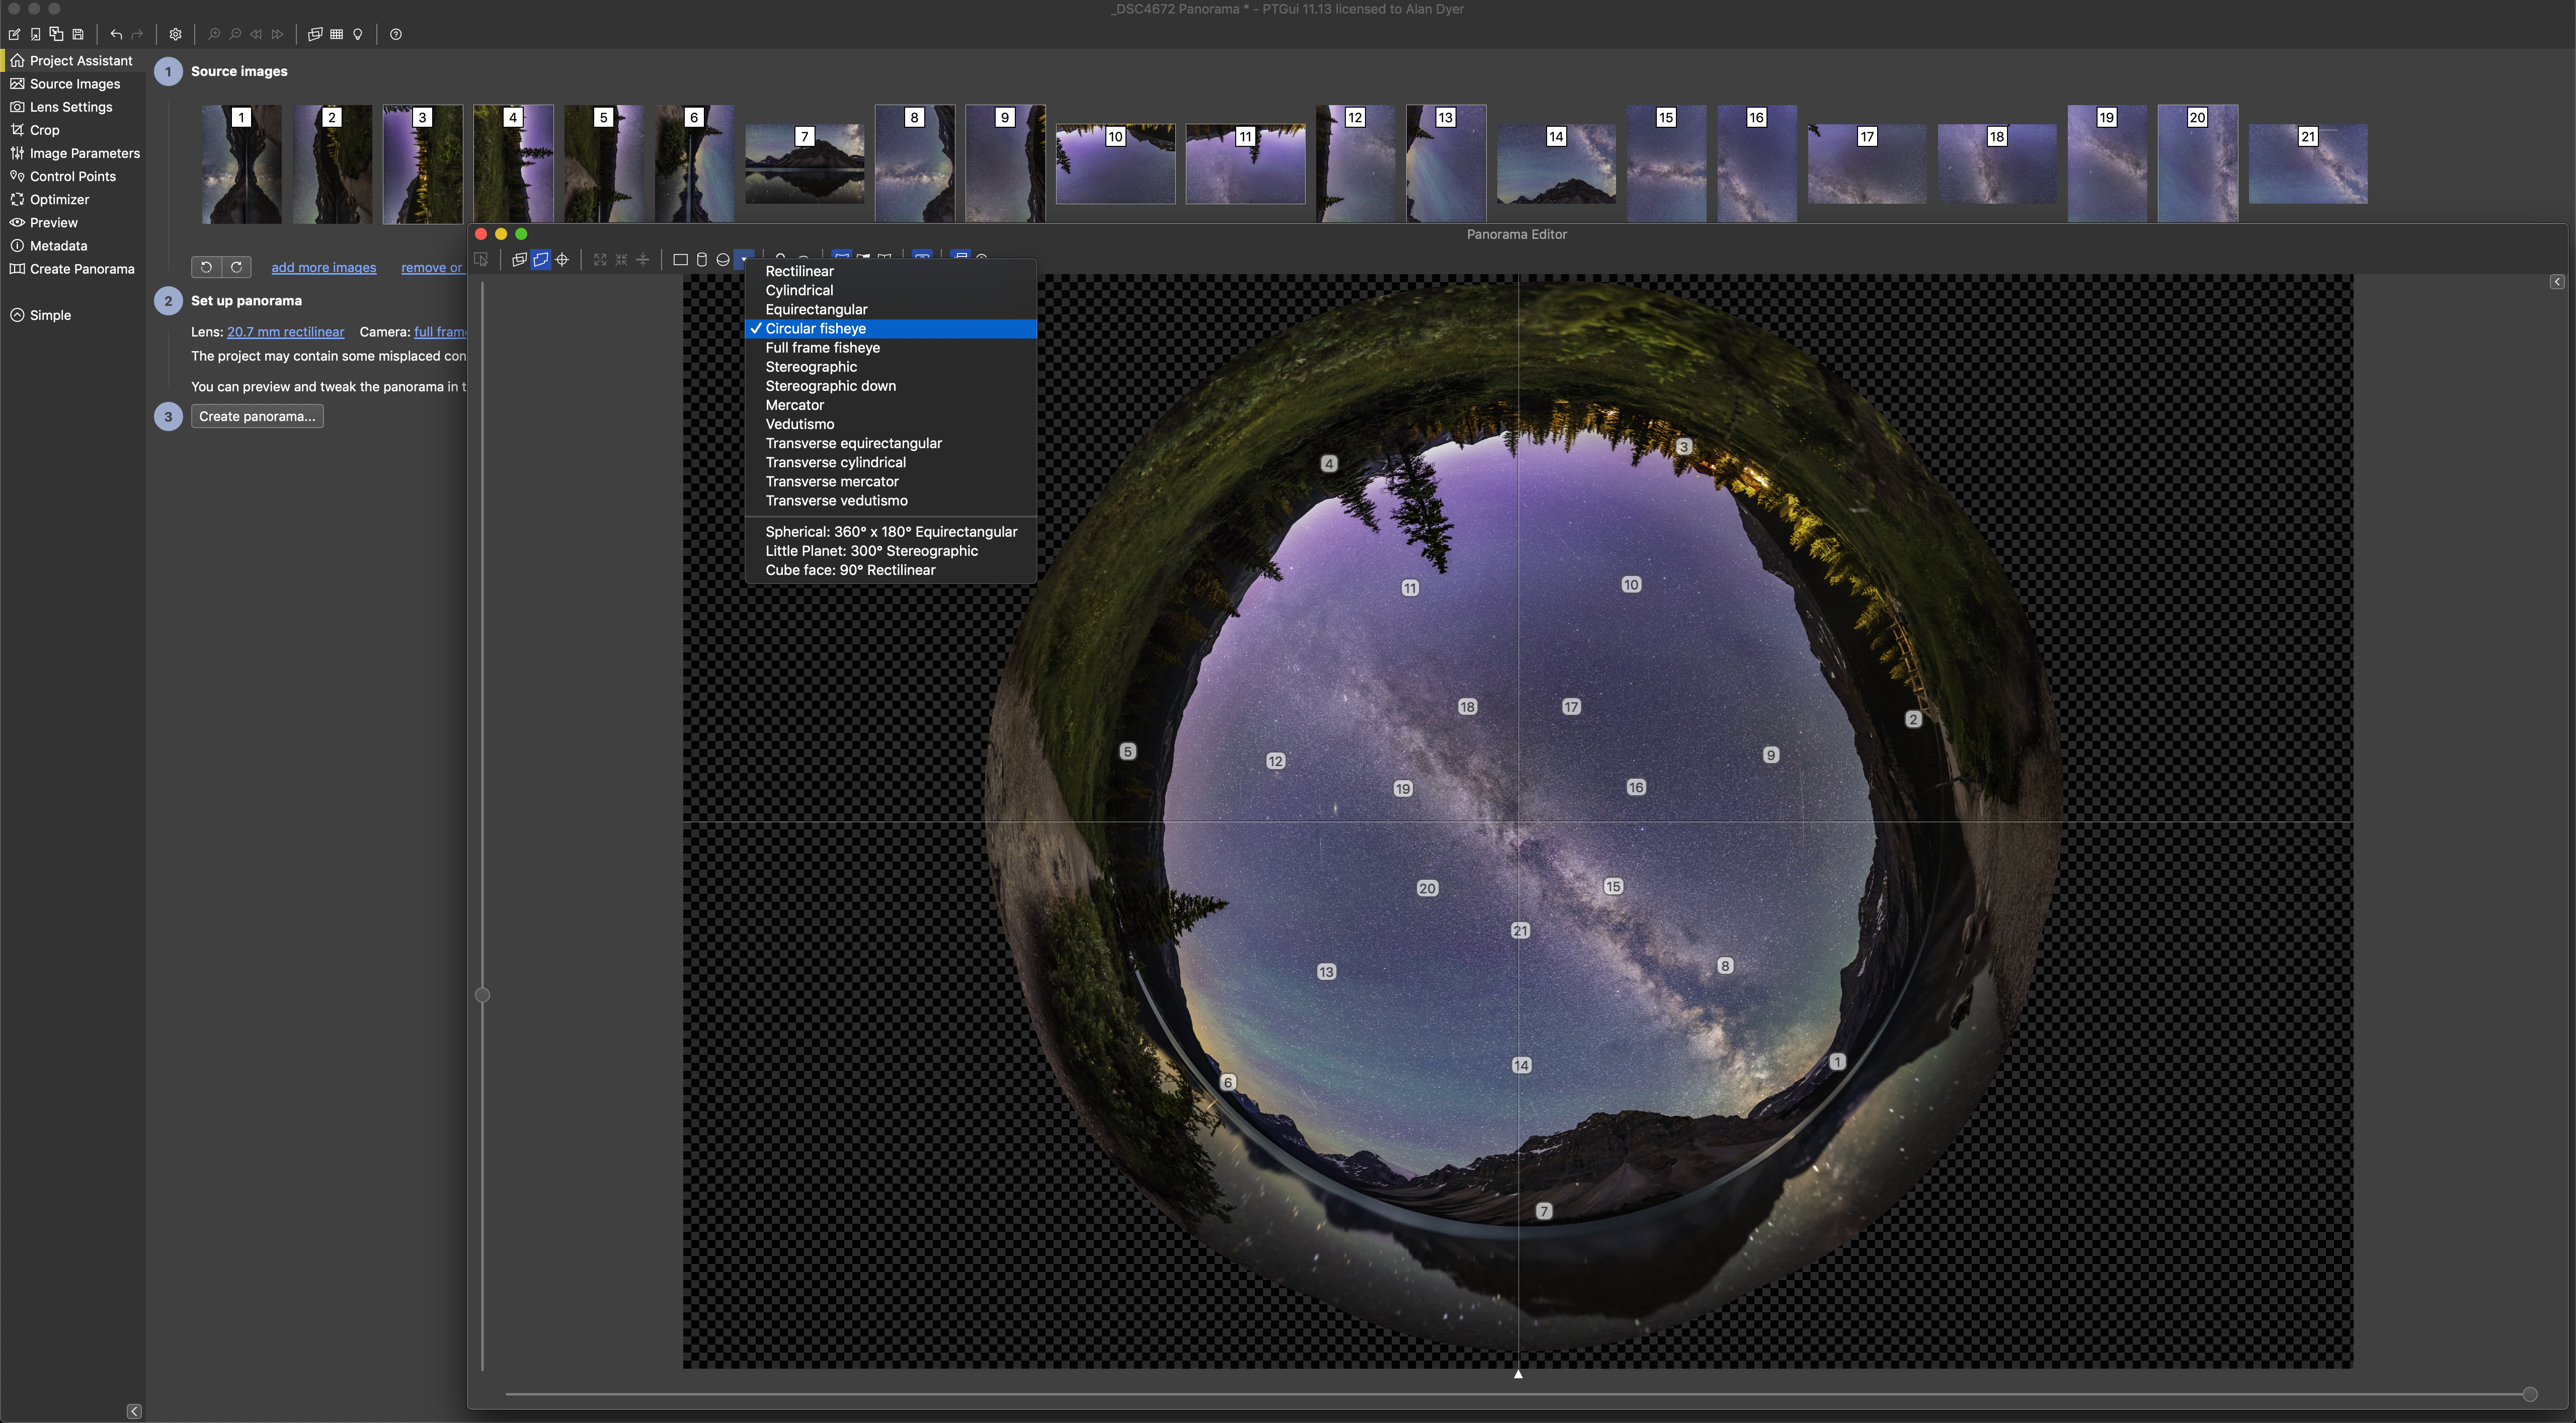
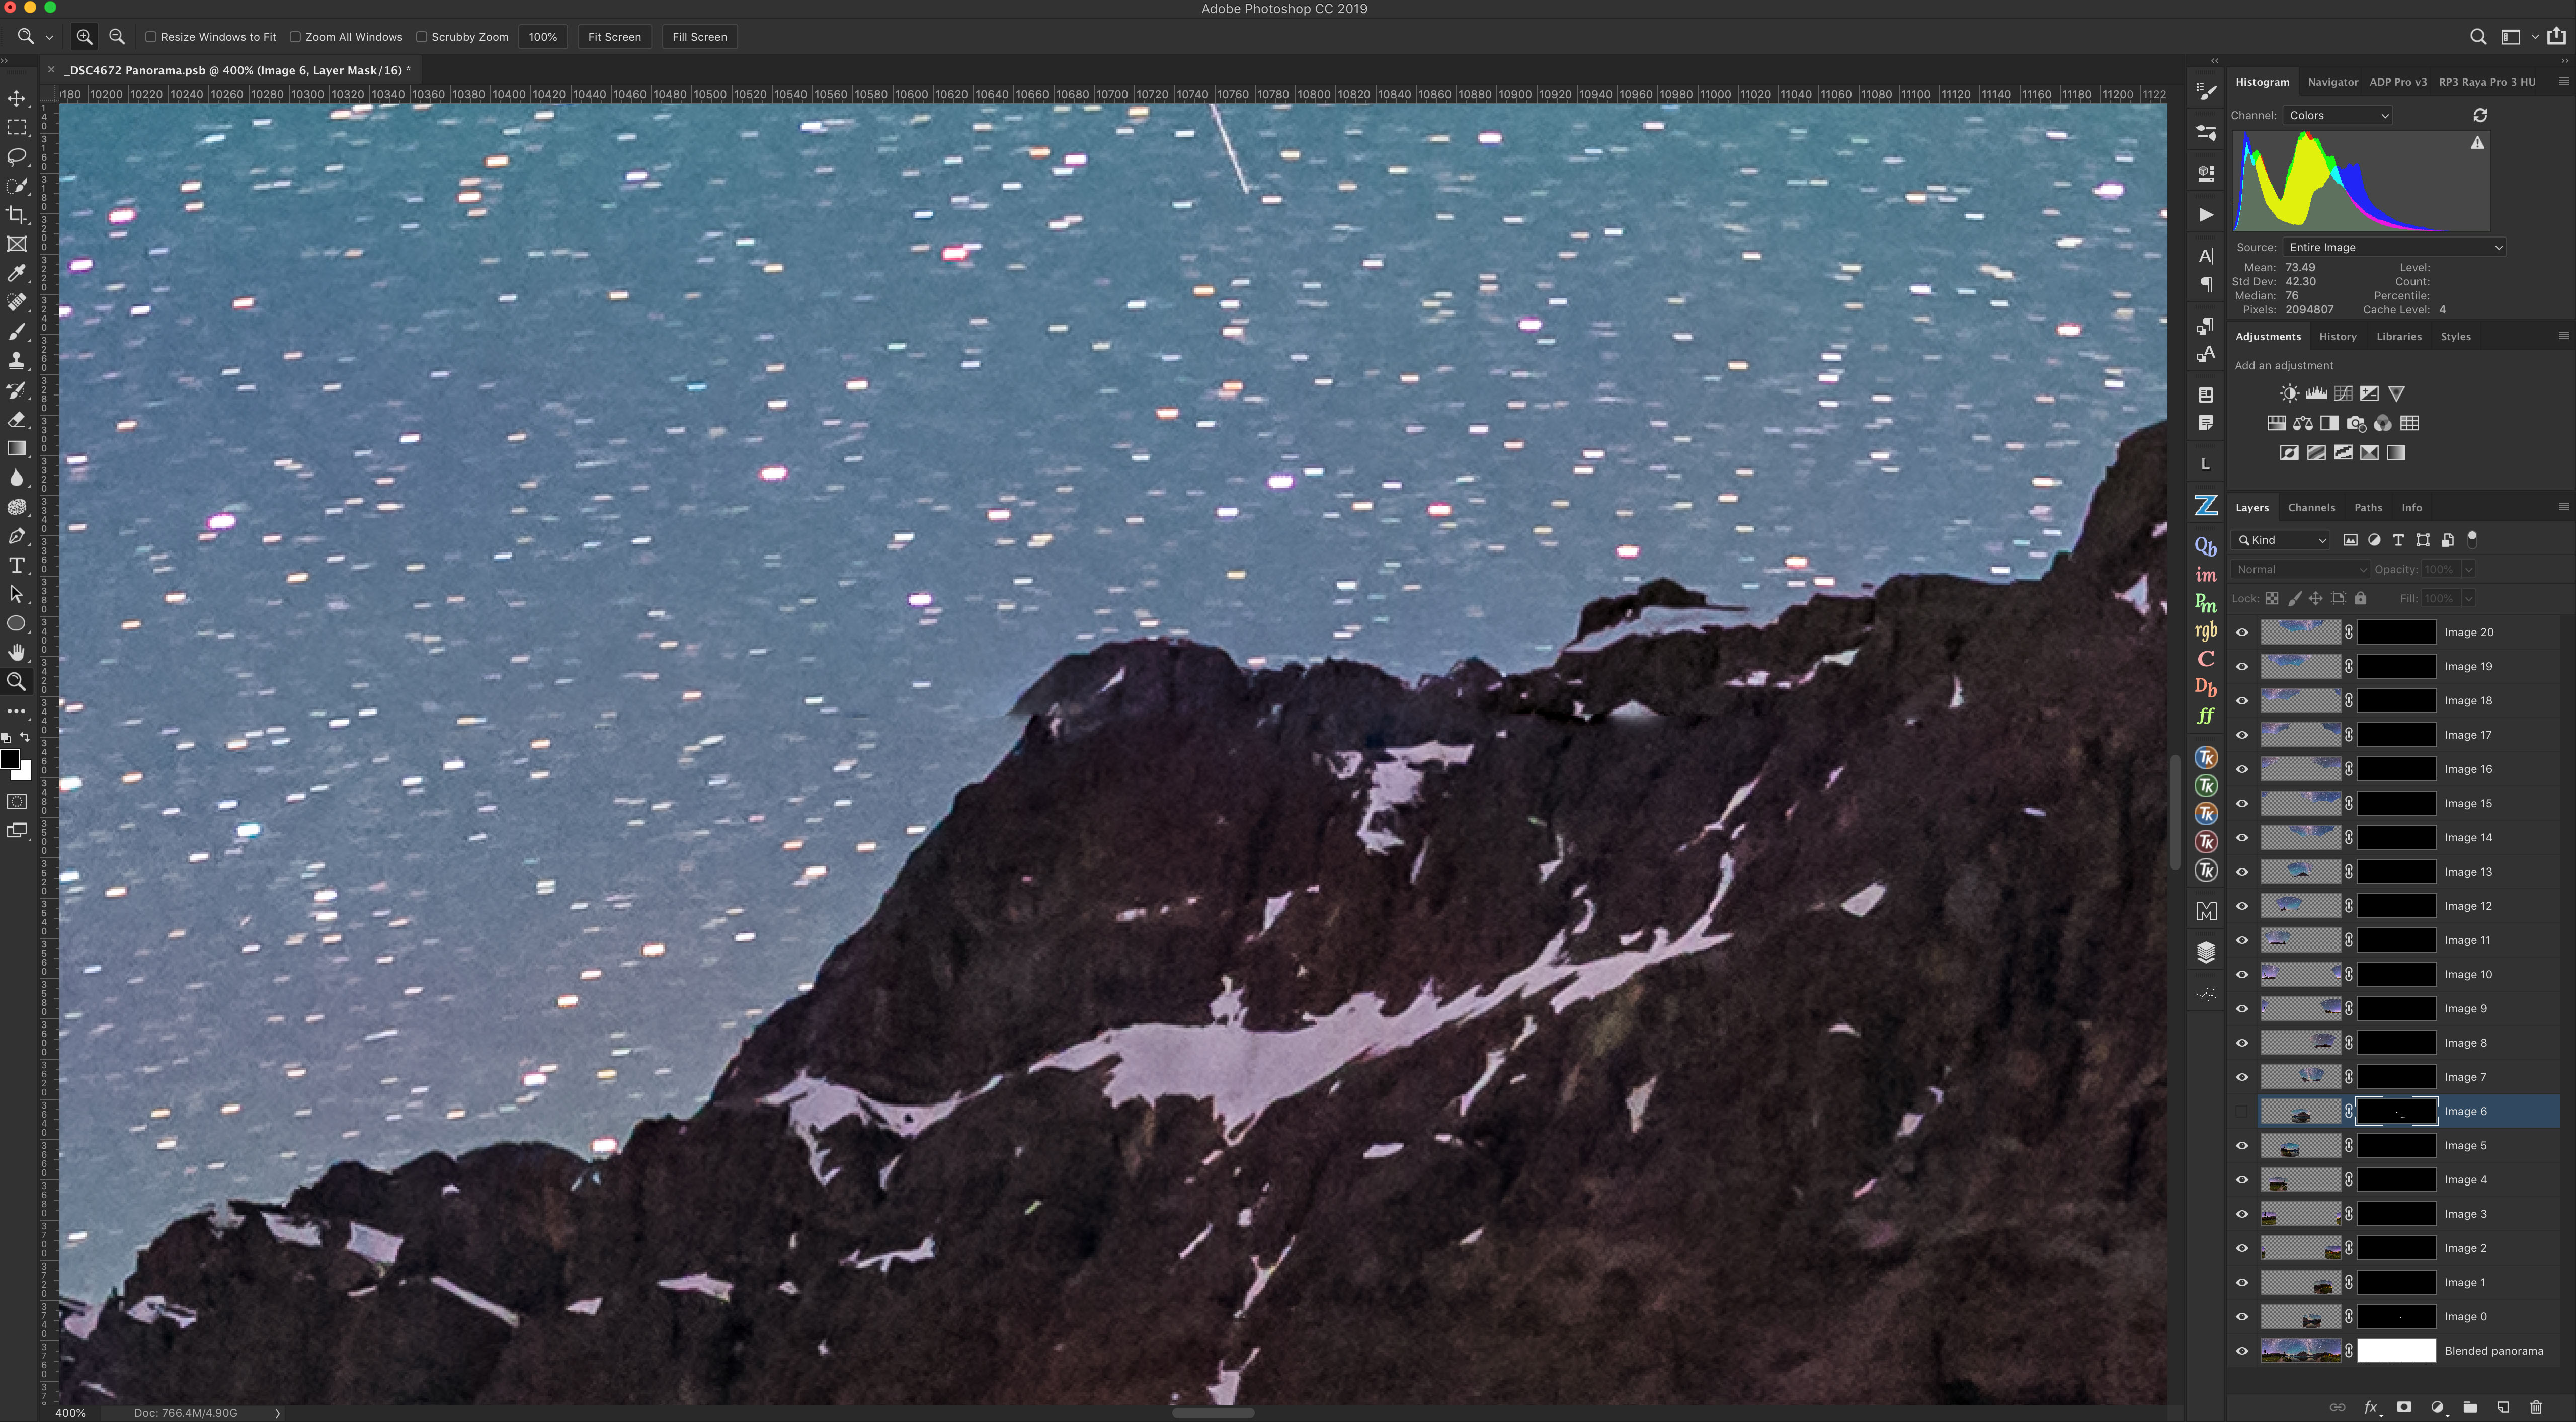


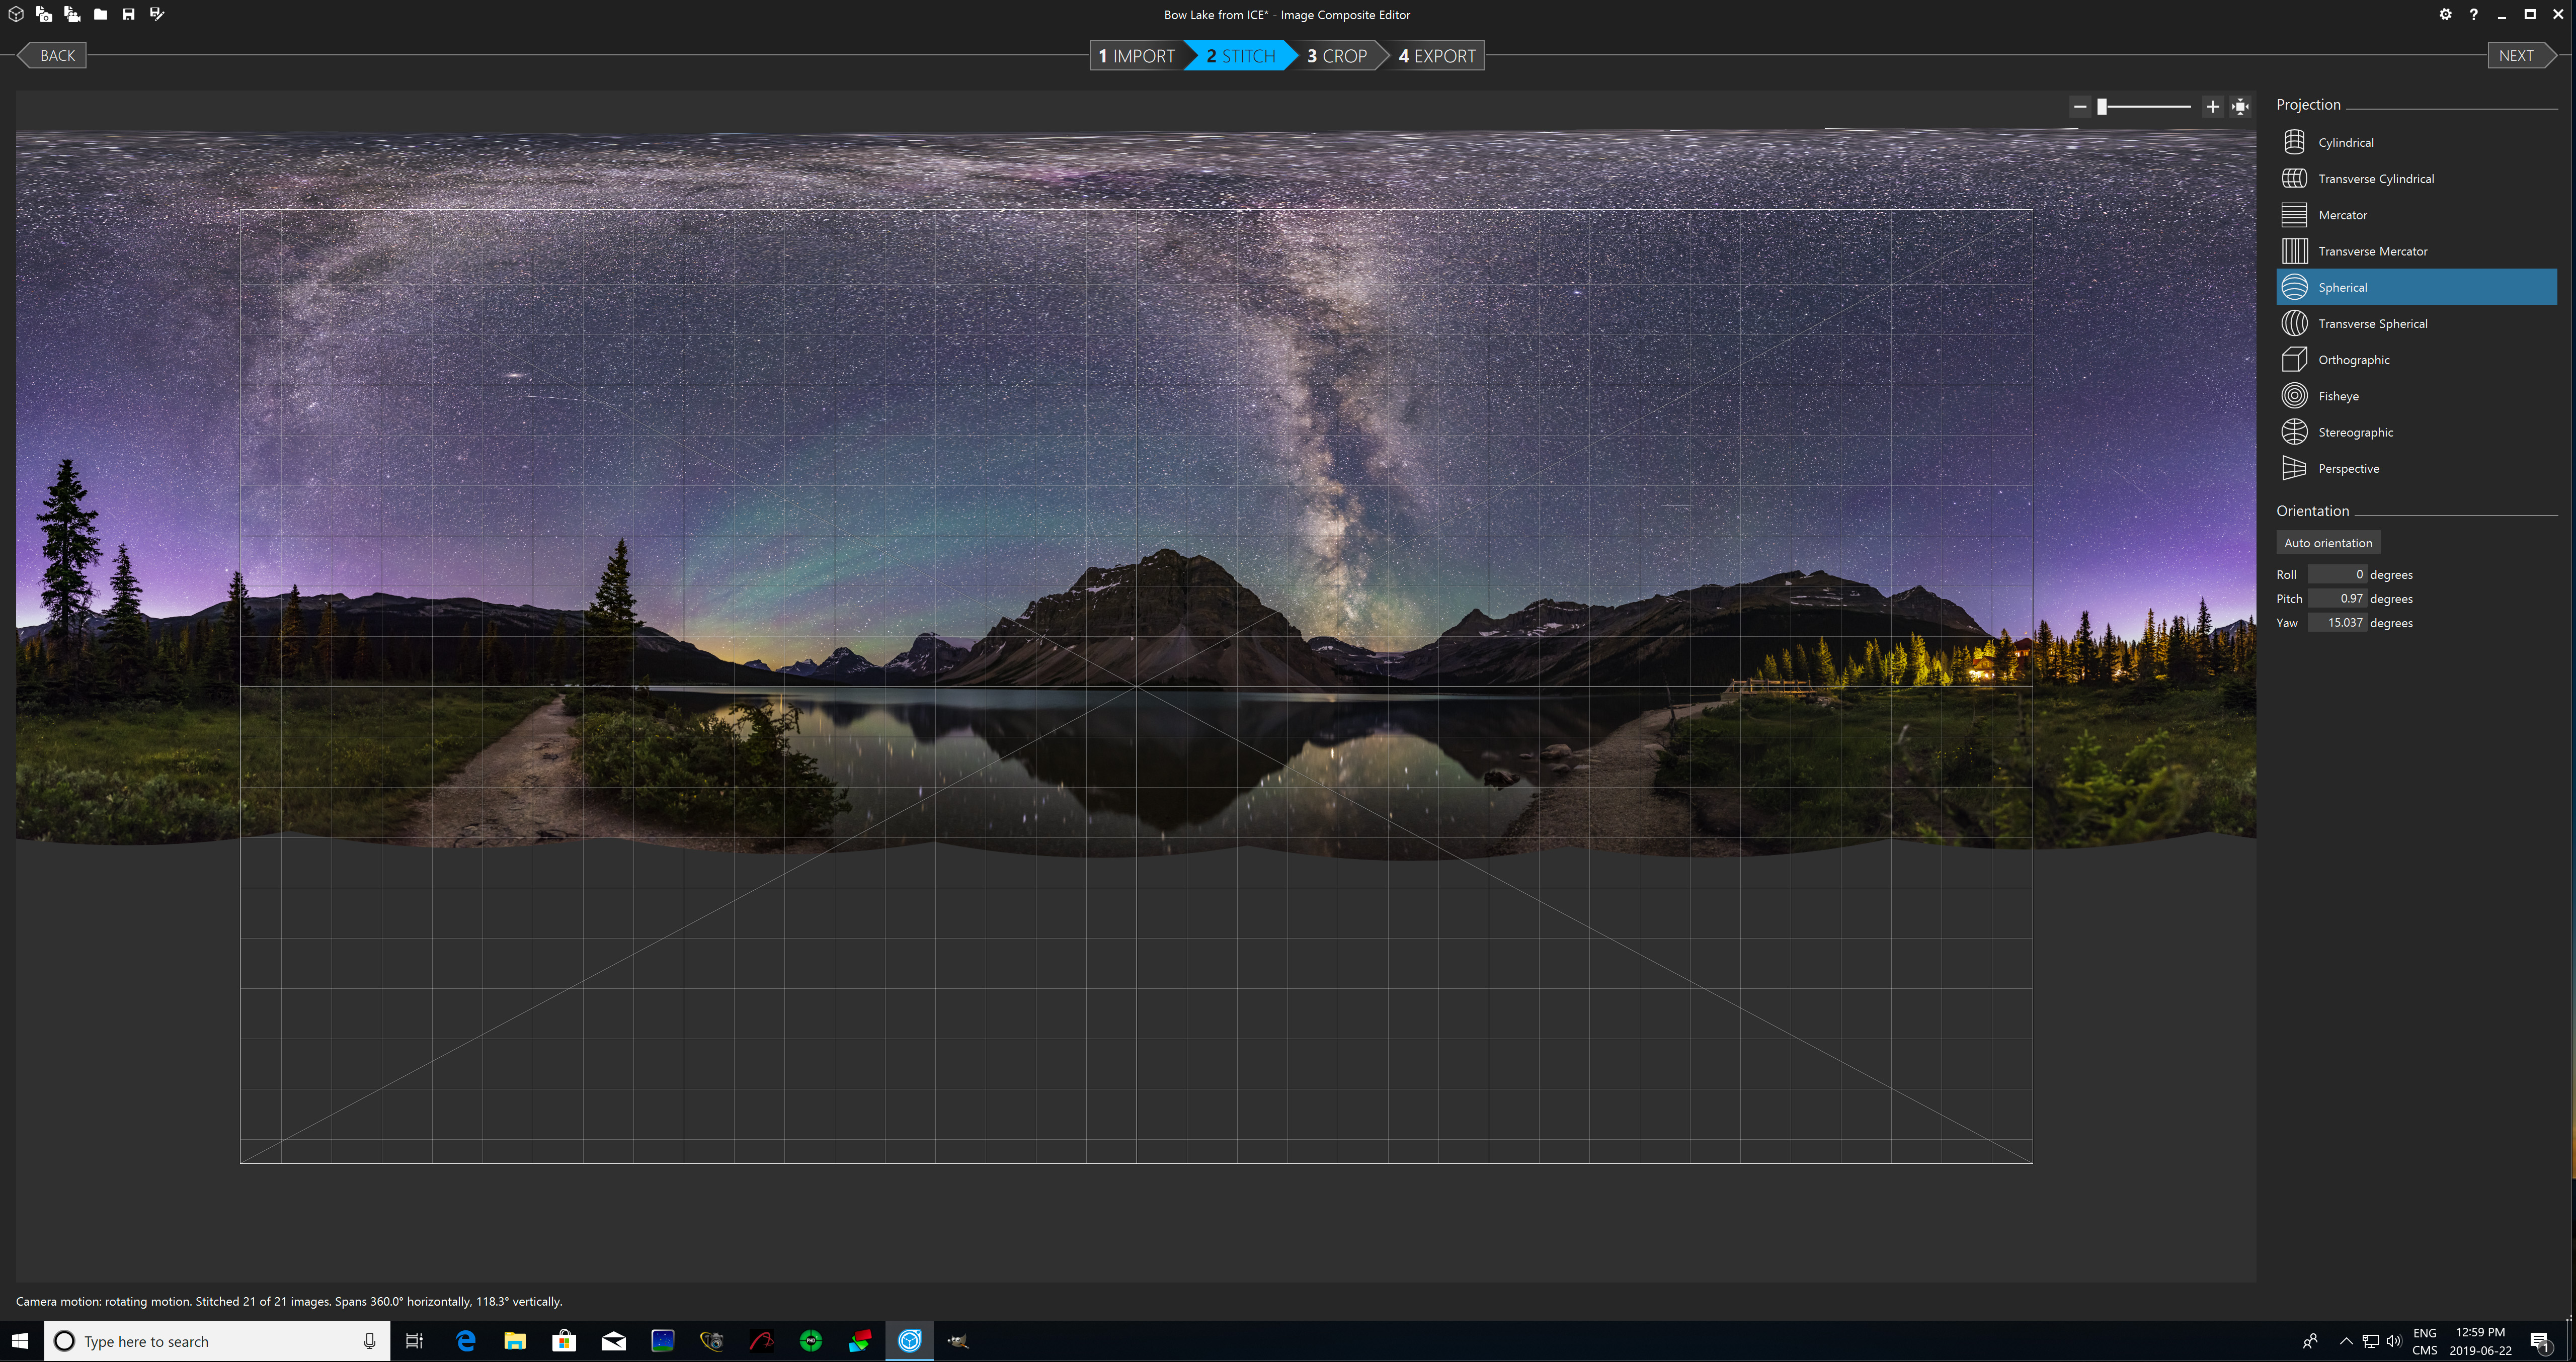
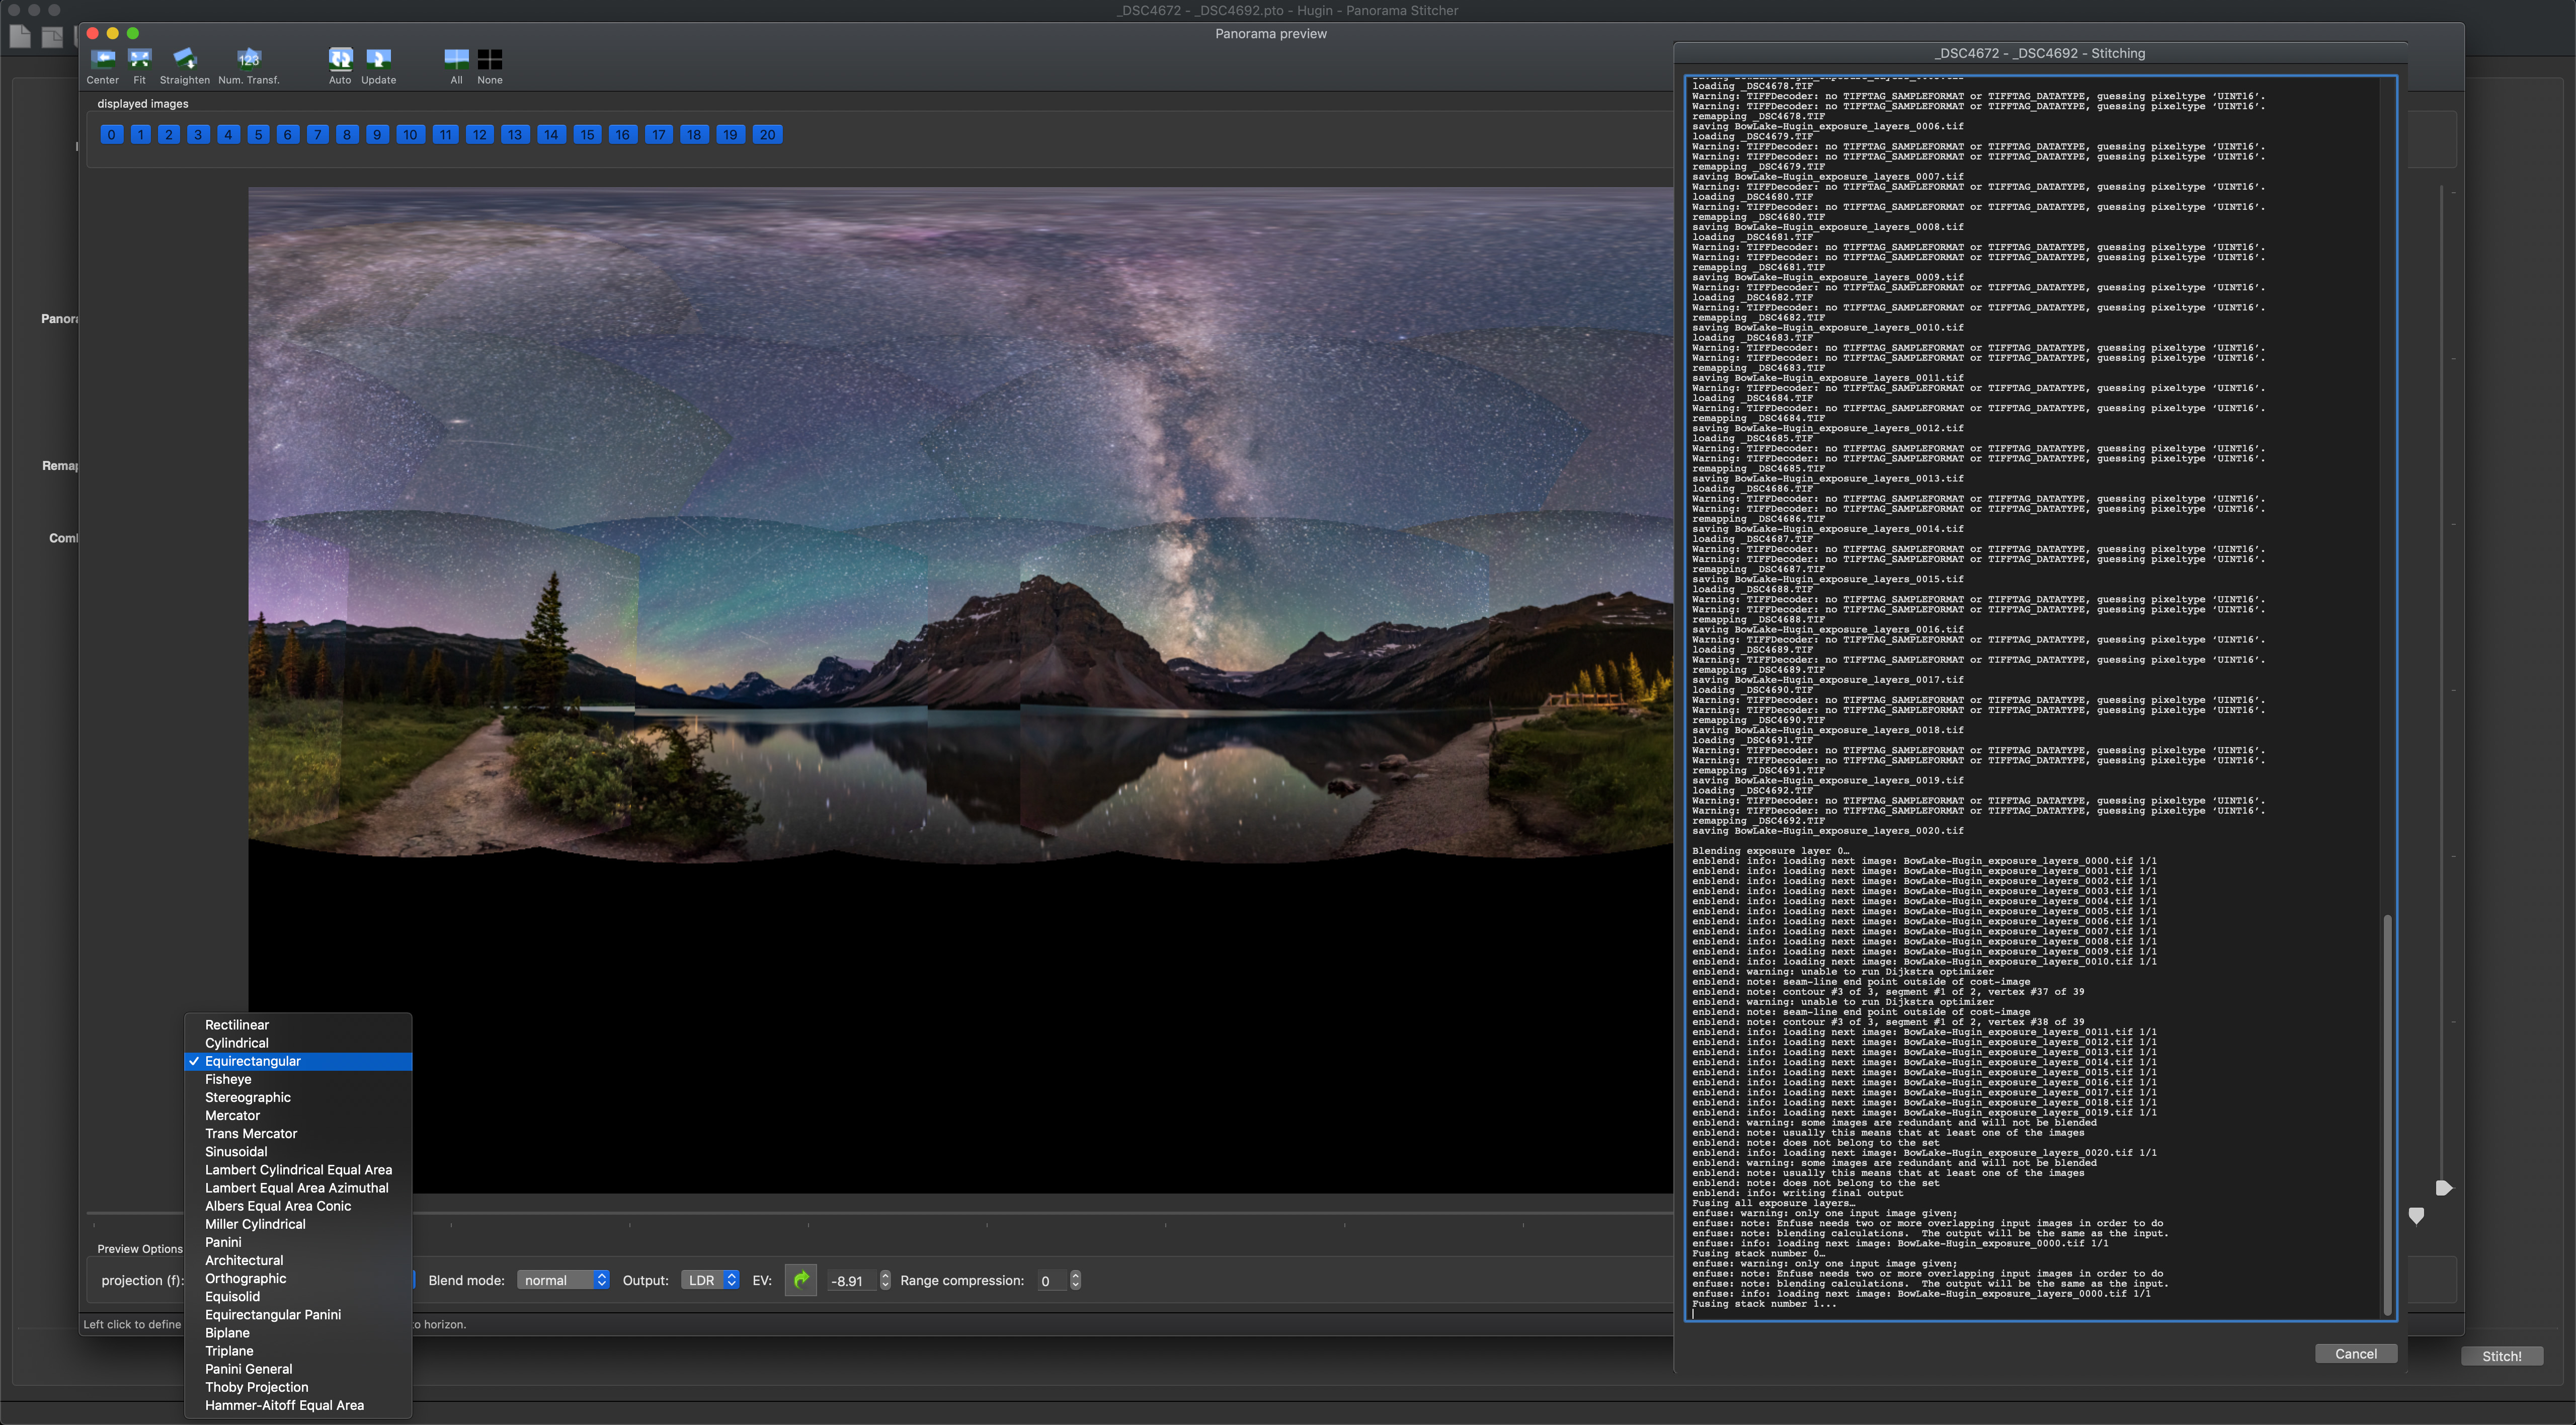

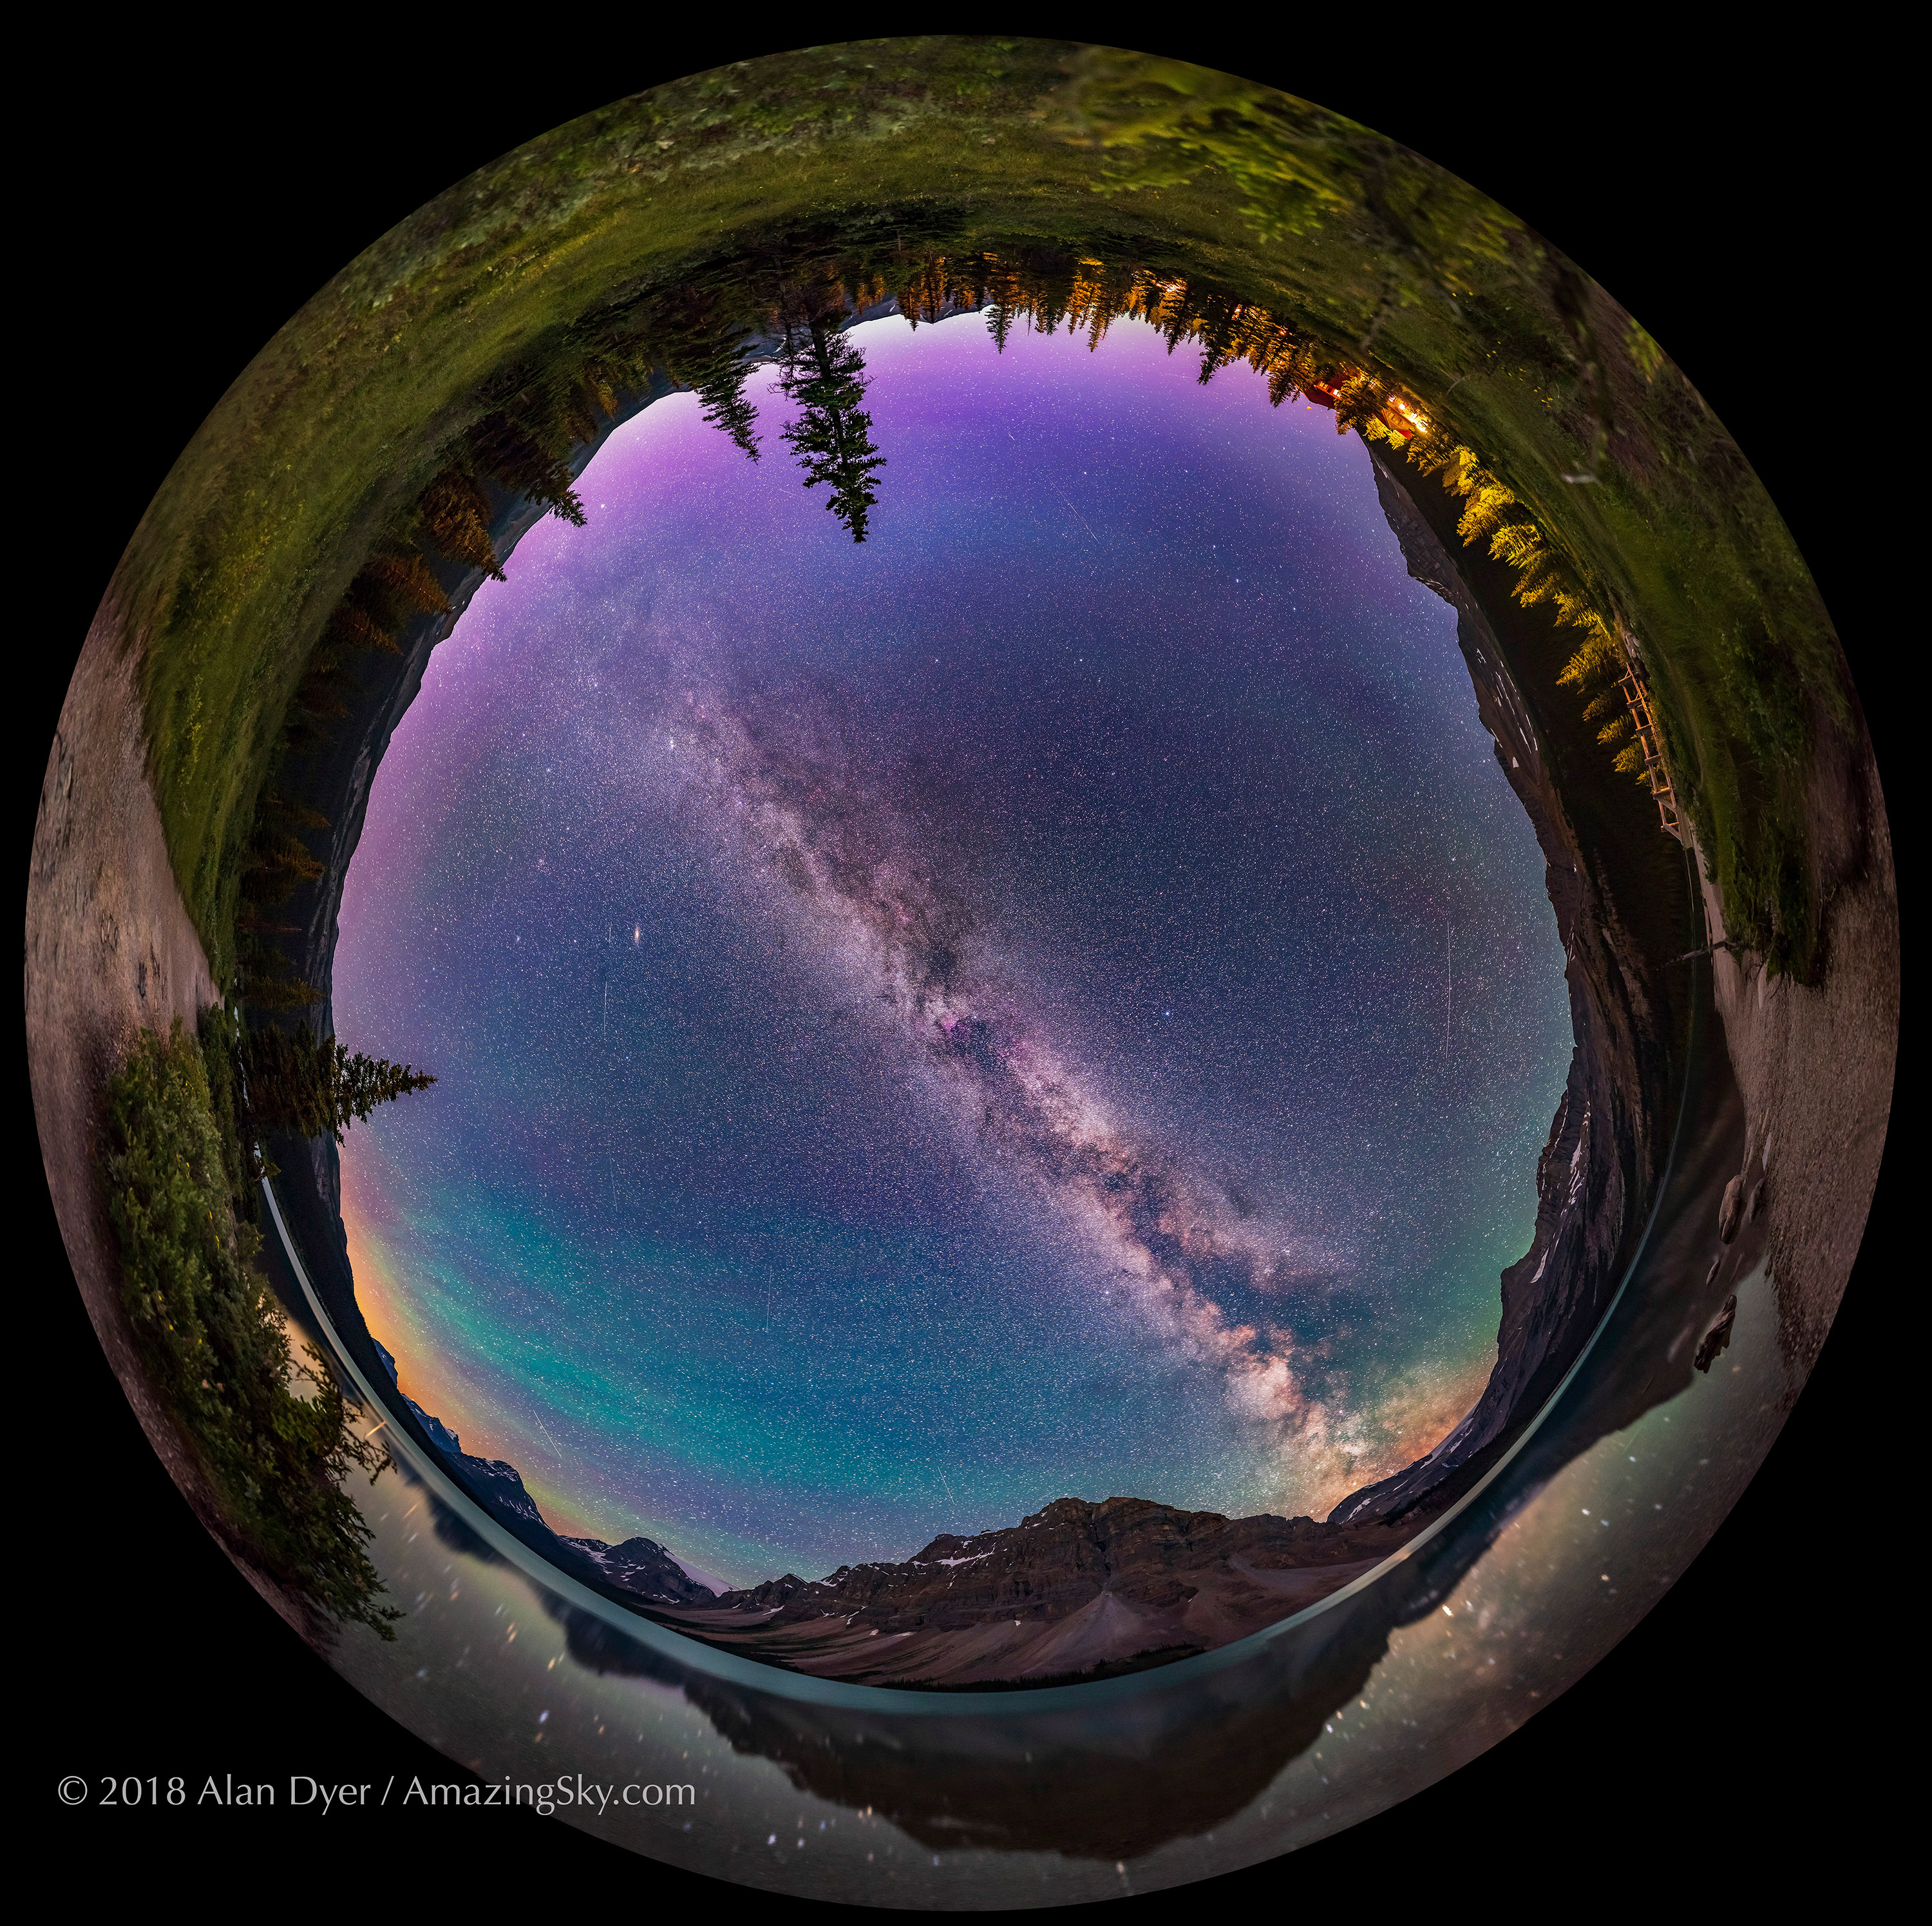
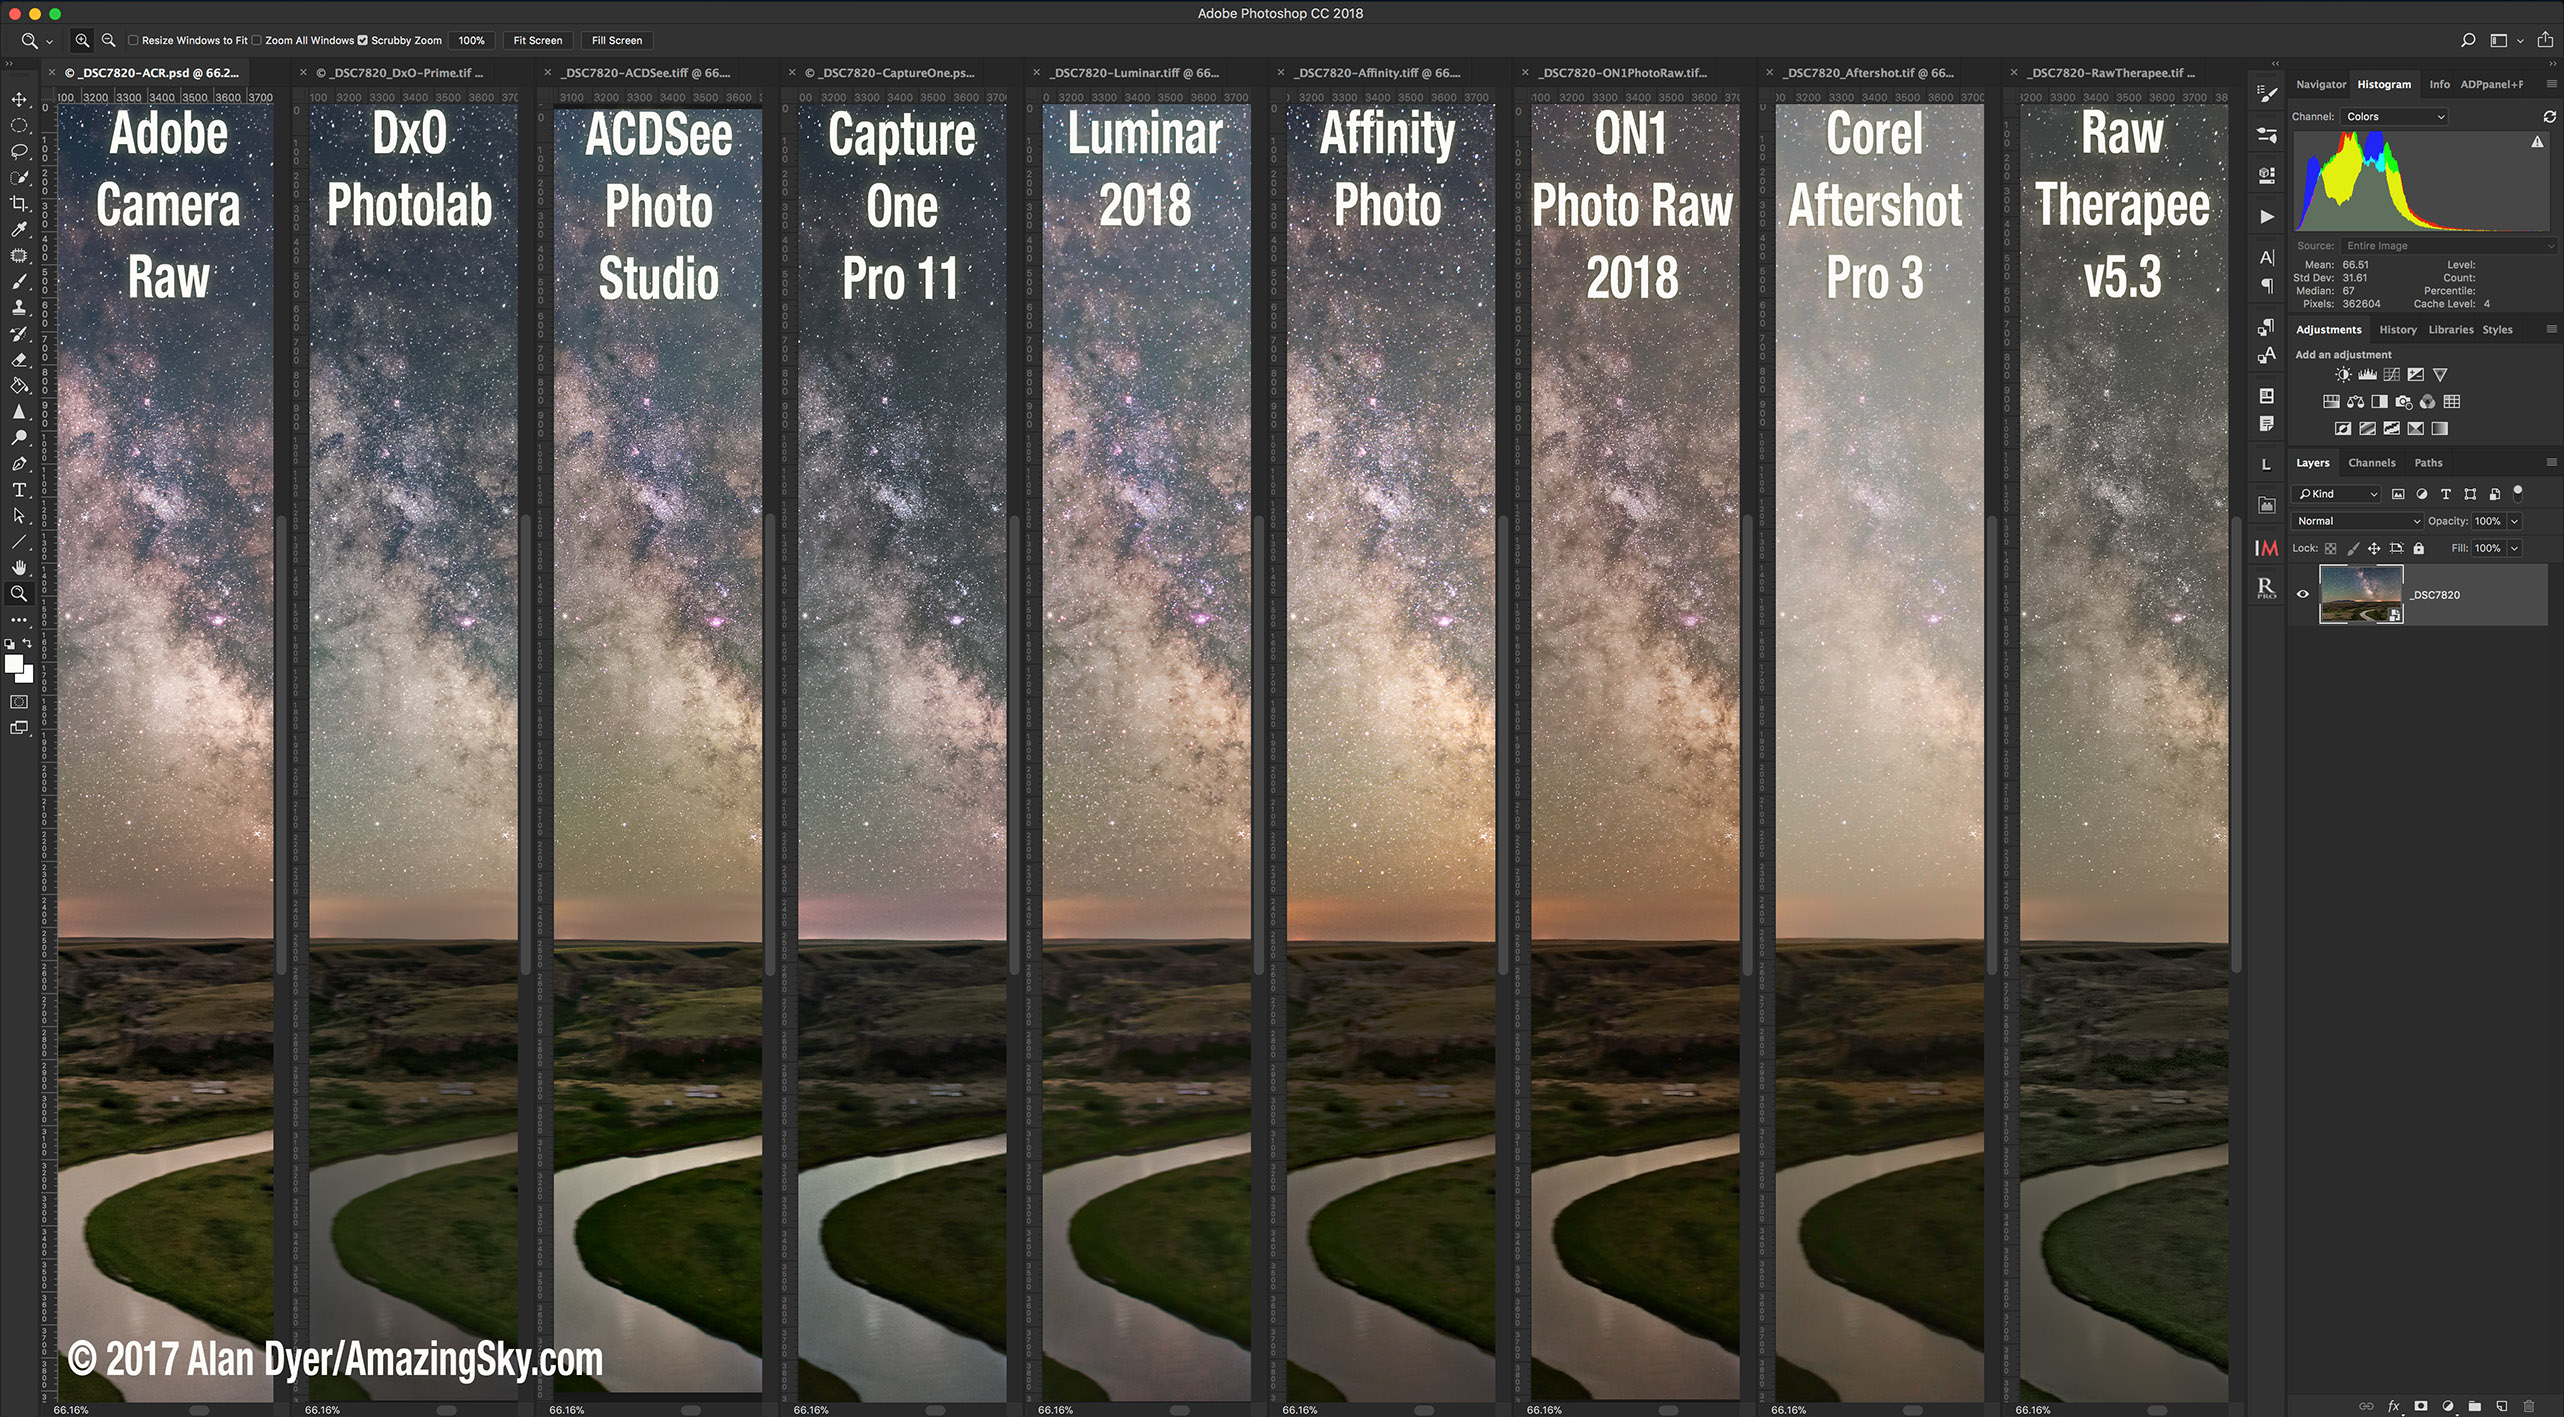


 Lightroom Contenders: Five Raw Developers
 Photoshop Contenders: Four Raw Developers with Layering/Compositing