
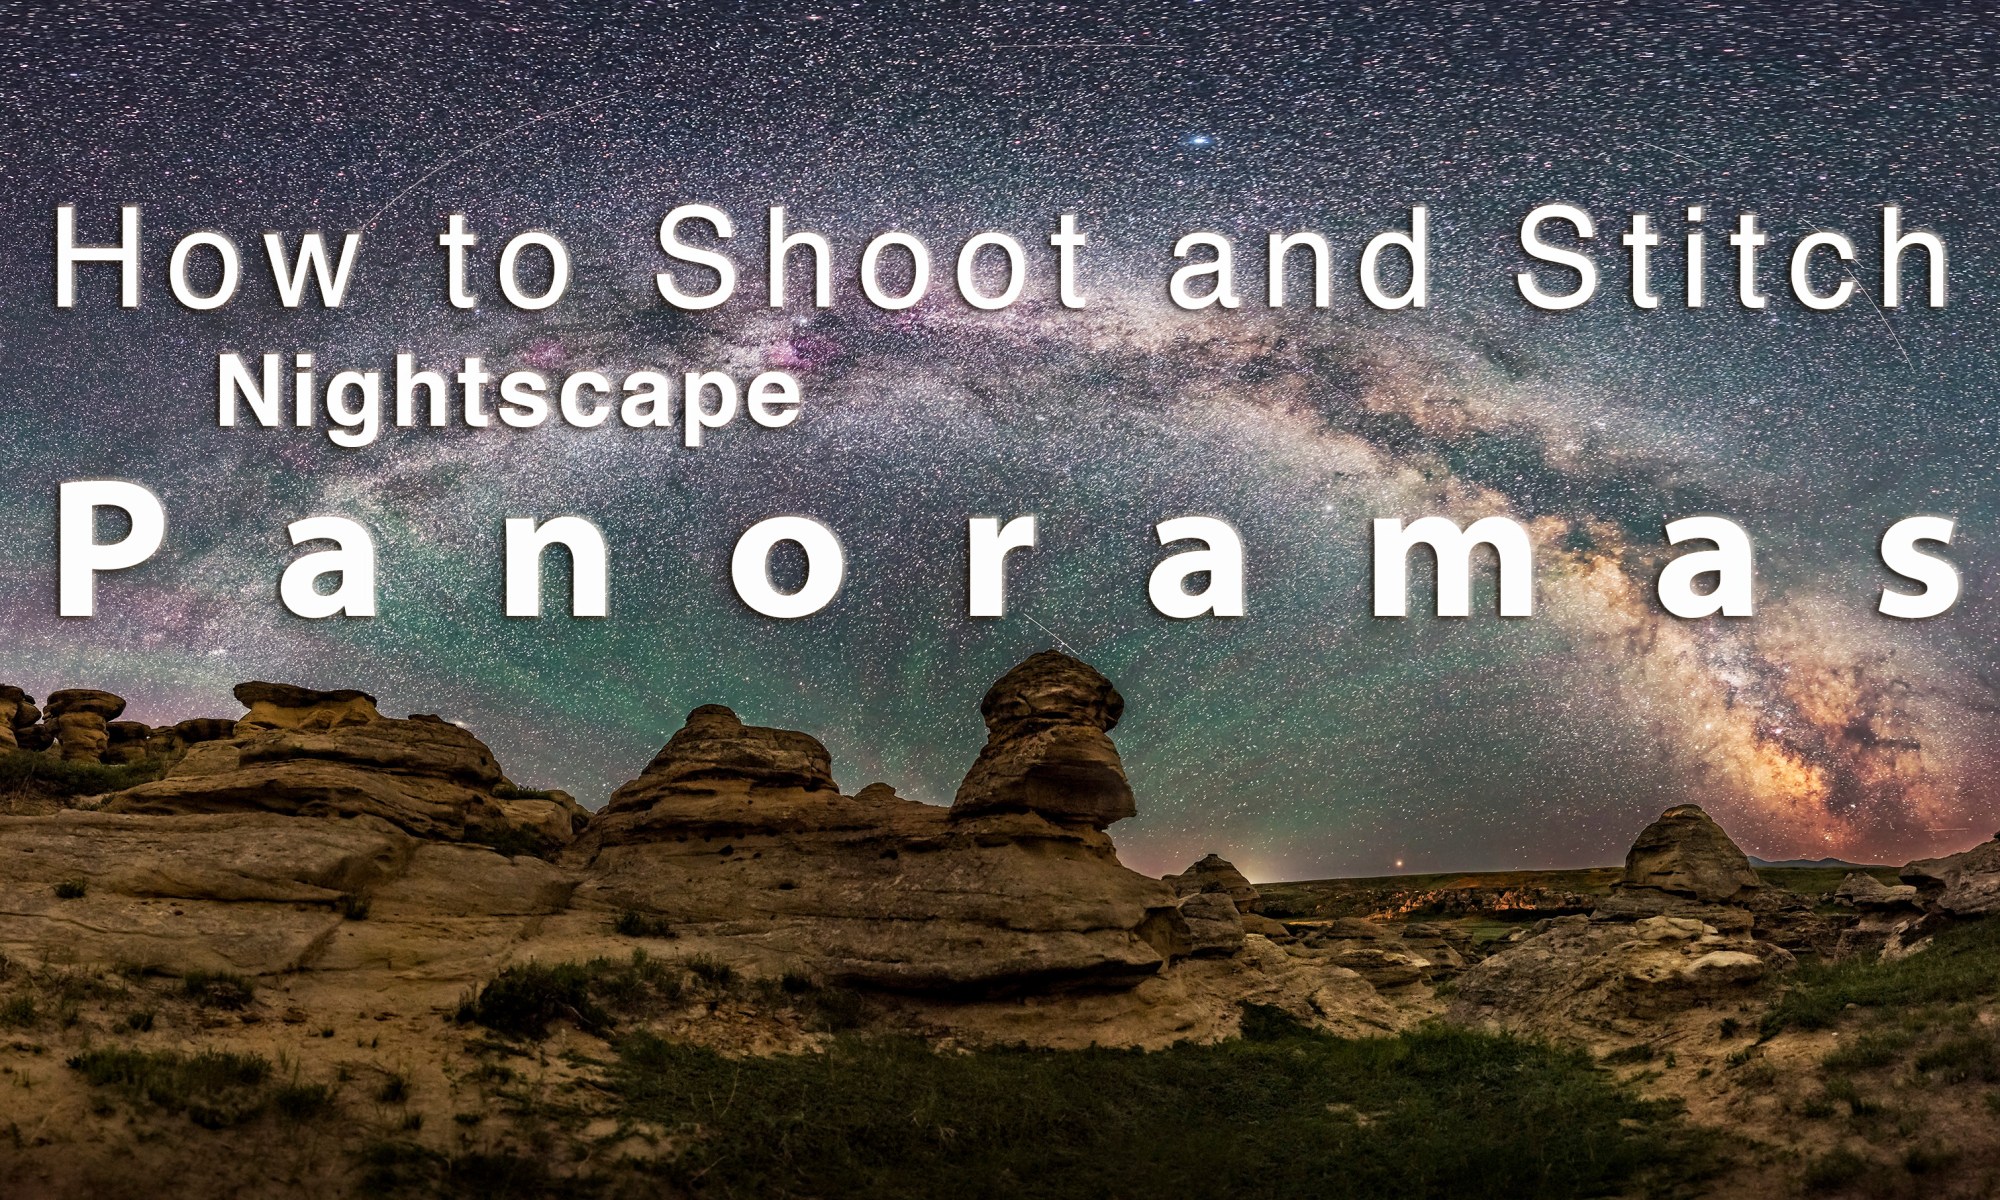

Panoramas featuring the arch of the Milky Way have become the icons of dark sky locations. “Panos” can be easy to shoot, but stitching them together can present challenges. Here are my tips and techniques.
My tutorial complements the much more extensive information I provide in my eBook, at right. Here, I’ll step through techniques for simple to more complex panoramas, dealing first with essential shooting methods, then reviewing the workflows I use for processing and stitching panoramas.
What software works best depends on the number of segments in your panorama, or even on the focal length of the lens you used.
PART 1 — SHOOTING
What Equipment Do You Need?
Nightscape panoramas don’t require any more equipment than what you likely already own for shooting the night sky. For Milky Way scenes you need a fast lens and a solid tripod, but any good DSLR or mirrorless camera will suffice.

A tripod head with a scale marked in degrees is essential. Here it sits on a levelling head with its own bubble level that makes it easy to level the camera. An L-bracket allows the camera to rotate directly above the vertical axis, handy when shooting in portrait mode, as here with a 15mm full-frame fish-eye lens, one option for horizon-to-zenith panoramas. The tripod accessories here are by Acratech.
The tripod head can be either a ball head or a three-axis head, but it should have a horizontal axis marked with a degree scale. This allows you to move the camera at a correct and consistent angle from segment to segment. I think that’s essential.
What you don’t need is a special, and often costly, panorama head. These rotate the camera around the so-called “nodal point” inside the lens, avoiding parallax shifts that can make it difficult to align and stitch adjacent frames. Parallax shift is certainly a concern when shooting interiors or any scenes with prominent content close to the camera. However, in most nightscapes our scene content is far enough away that parallax simply isn’t an issue.
Though not a necessity, I find a levelling base a huge convenience. As I show above, this specialized ball head goes under the usual tripod head and makes it easy to level the main head. It eliminates all the fussing with trial-and-error adjustments of the length of each tripod leg.
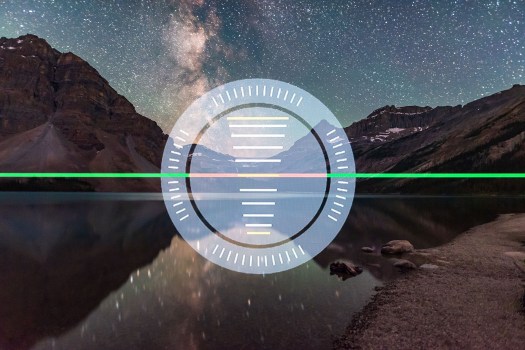
Most cameras now have an electronic level built in that is handy for ensuring the panorama does not end up tilted. This is from a Canon 6D MkII.
Then to level the camera itself, I use the electronic level now in most cameras. Or, if your camera lacks that feature, an accessory bubble level clipped into the camera’s hot shoe will work.
Having the camera level is critical. It can be tipped up, of course, but not tilted left-right. If it isn’t level the whole panorama will be off kilter, requiring excessive straightening and cropping in processing, or the horizon will wave up and down in the final stitch, perhaps causing parts of the scene to go missing.
NOTE: Click or tap on the panorama images to open a high-res version for closer inspection.

To capture this panorama I used a Sigma 14mm lens on a Nikon D750, mounted in portrait orientation with the gear shown above, to shoot eight segments 45° apart, each 13 seconds at f/2 and ISO 3200. Stitching was with Adobe Camera Raw. The aurora lies to the north at left, while Orion and the winter Milky Way are to the south at right.
Shooting Horizon Panoramas
While panoramas spanning the entire sky might be what you are after, I suggest starting simpler, with panos that take in just a portion of the 360° horizon and only a part of the 180° of the sky. These “partial panos” are great for auroras (above) or noctilucent clouds, (below), or for capturing just the core of the Milky Way over a landscape.
The key to all panorama success is overlap. Segments should overlap by 30 to 50 percent, enabling the stitching software to align the segments using the content common to adjacent frames. Contrary to some users, I’ve never found an issue with having too much overlap, where the same content is present on several frames.

NLCs are good panorama subjects. I captured this display on June 19, 2019 using a Sony a7III camera at ISO 400, and a Sigma 50mm lens at f/2 for a set of six segments stitched with Adobe Camera Raw
For a practical example, let’s say you shoot with a 24mm lens on a full-frame camera, or a 16mm lens on a cropped-frame camera. Both combinations yield a field of view across the long dimension of the frame of roughly 80°, and across the short dimension of the frame of about 55°.
That means if you shoot with the camera in “landscape” orientation, panning the camera by 40° between segments would provide a generous 50 percent overlap. The left half of each segment will contain the same content as the right half of the previous segment, if you take your panos by turning from left to right.
TIP: My habit is to always shoot from left to right, as that puts the segments in the correct order adjacent to each other when I view them in browser programs such as Lightroom or Adobe Bridge, with images sorted in chronological order (from first to last images in a set) as I typically prefer. But the stitching will work no matter which direction you rotate the camera.
In the example of a 24mm lens and a camera in landscape orientation you could turn at a 45° or 50° spacing and yield enough overlap. However, turning the camera at multiples of 15° is usually the most convenient, as tripod heads are often graduated with markings at 5° increments, and labeled every 15° or 30°.
Some will have coarser and perhaps unlabeled markings. If so, determine what each increment represents, then take care to move the camera consistently by the amount that will provide adequate overlap.

Not all panoramas have to be of the Milky Way. This captures the sweeping arc of Earth’s blue shadow rising in the eastern sky as the Harvest Moon comes up amid the shadow. This is a 7-section single-tier panorama with the 20mm Sigma lens and Nikon D750 at ISO 100. It stitched fine with Adobe Camera Raw.
To maximize the coverage of the sky while still framing a good amount of foreground, a common practice is to shoot panoramas with the camera in portrait orientation. That provides more vertical but less horizontal coverage for each frame. In that case, for adequate overlap with a 24mm lens and full-frame camera shoot at 30° spacings.
TIP: When shooting a partial panorama, for example just to the south for the Milky Way, or to the north for the aurora borealis, my practice is to always shoot a segment farther to the left and another to the right of the main scene. Shoot more than you need. Those end segments can get distorted when stitching, but if they don’t contain essential content, they can be cropped out with no loss, leaving your main scene clean and undistorted.
Shooting with a longer lens, such as a 50mm (or 35mm on a cropped frame camera), will yield higher resolution in the final panorama, but you will have much less sky coverage, unless you shoot multiple tiers, as I describe below. You would also have to shoot more segments, at 15° to 20° spacings, taking longer to complete the shoot.
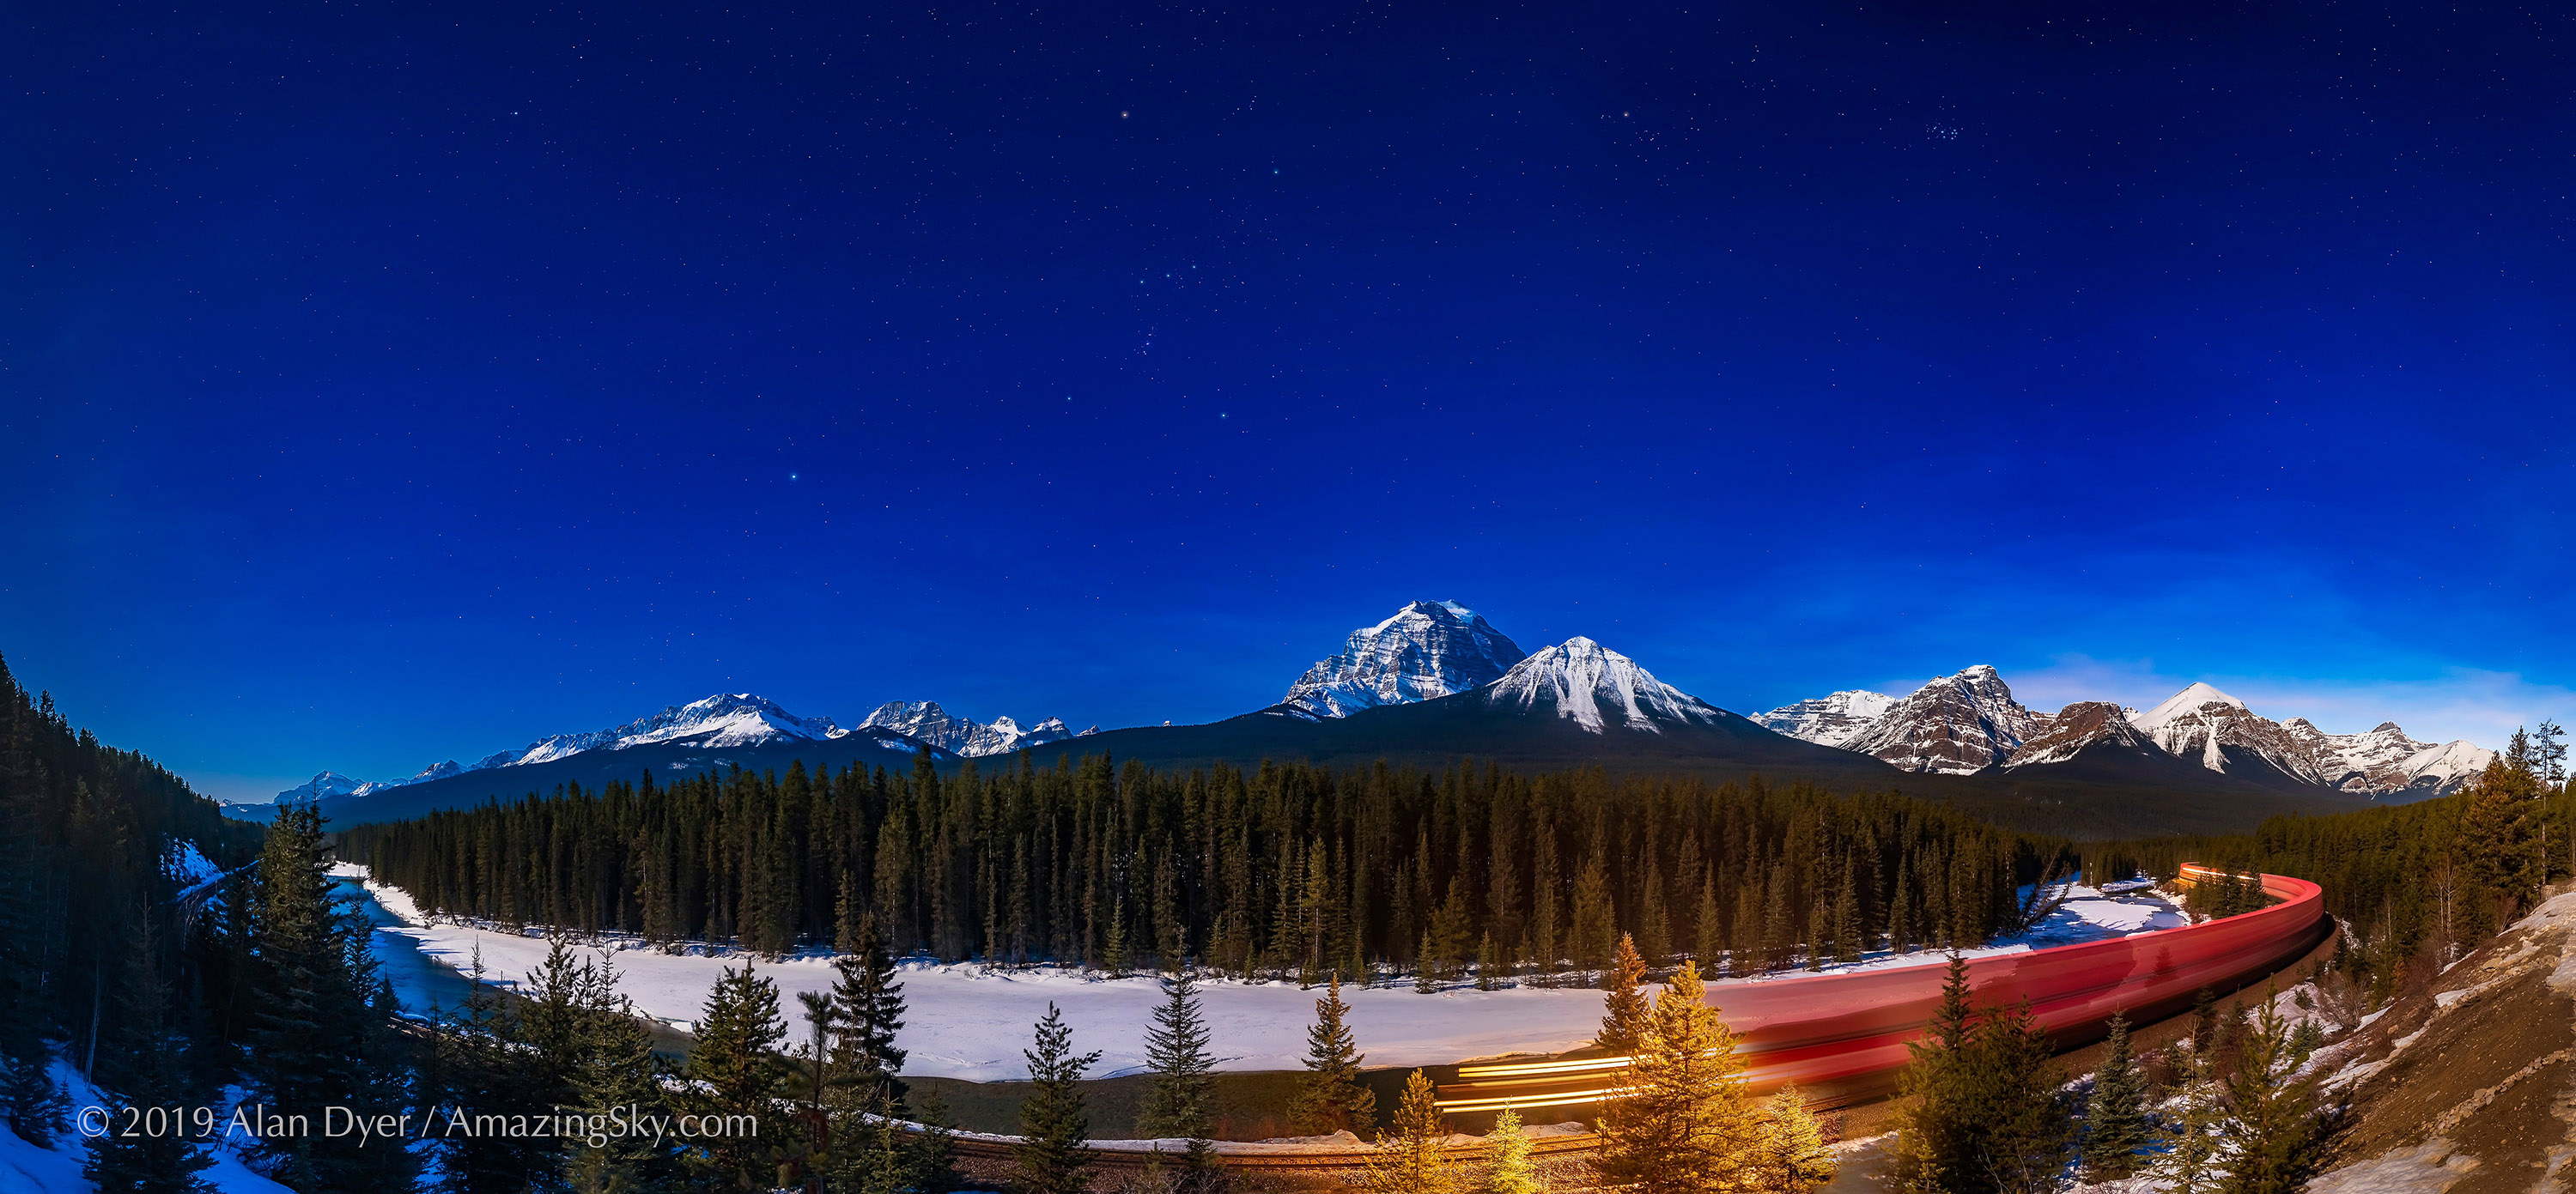
Not all panoramas have to be shot under dark skies, or encompass 360°. Moonlight illuminates the famous viewpoint called Morant’s Curve in Banff National Park, with Orion setting over the peaks of the Continental Divide, as a train speeds east through the March night. This is a panorama of 12 segments, each with a 24mm Sigma lens and Nikon D750 in portrait orientation, stitched with PTGui.
As the number of segments goes up shooting fast becomes more important, to minimize how much the sky moves from segment to segment, and during each exposure itself, to aid in stitching. Remember, the sky appears to be turning from east to west, but the ground isn’t. So a prolonged shoot can cause problems later as the stitching software tries to align on either the fixed ground or the moving stars.
Panoramas on moonlit nights, as I show above, are relatively easy because exposures are short.

A moonless night in early May was perfect for a panorama of the Milky Way arching over the Badlands of Dry Island Buffalo Jump in Alberta. This is a multi-tier panorama of 3 tiers of 7 segments each, with exposures of 30 seconds at f/2 with a 20mm Sigma Art lens and Nikon D750 at ISO 6400.
Milky Way panoramas taken on dark, moonless nights are tougher. They require fast apertures (f/2 to f/2.8) and high ISOs (ISO 3200 to 6400), to keep individual exposures no more than 30 to 40 seconds long.
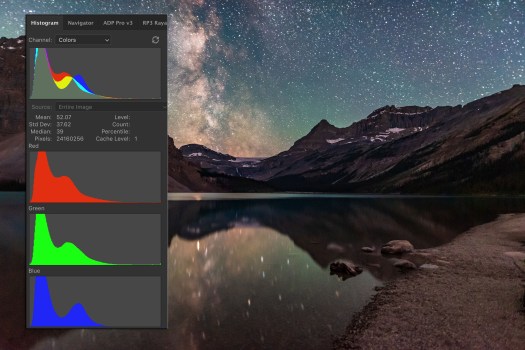
Minimize noise in the shadows by exposing so the histogram is shifted to the right, and not slammed to the left. Underexposure is the most common cardinal sin of newbie nightscape photographers.
Noise lives in the dark foregrounds, so I find it best to err on the side of overexposure, to ensure adequate exposure for the ground, even if it means the sky is bright and the stars slightly trailed. It’s the “Expose to the Right” philosophy I espouse at length in my eBook.
Advanced users can try shooting in two passes: one at a low ISO and with a long exposure for the fixed ground, and another pass at a higher ISO and a shorter exposure for the moving sky. But assembling such a set will take some deft work in Photoshop to align and mask the two stitched panos. None of the examples here are “double exposures.”
Shooting 360° Panoramas

While covering 360° in azimuth, this panorama from July 2018 goes only partway up the sky, to capture the Milky Way core to the south and the solstice twilight glow to the north. This is a 10-segment panorama, with each segment 30 seconds at f/2 with a Sigma 24mm Art lens and Nikon D750 at ISO 6400. Adobe Camera Raw stitched this nicely.
More demanding than partial panoramas are full 360° panoramas, as above. Here I find it is best to start the sequence with the camera aimed toward the celestial pole (to the north in the northern hemisphere, or to the south in the southern hemisphere). That places the area of sky that moves the least over time at the two ends of the panorama, again making it easier for software to align segments, with the two ends taken farthest apart in time meeting up in space.
In our 24mm lens example, to cover the entire 360° scene shooting with a 45° spacing would require at least eight images (8 x 45 = 360). I used 10 above. Using that same lens with the camera in portrait orientation will require at least 12 segments to cover the entire 360° landscape.
Shooting 360° by 180° Panoramas

More demanding still are 360° panoramas that encompass the entire sky, from the ground below the horizon to the zenith overhead. Above is an example.
To do that with a single row of images requires shooting in portrait orientation with a very wide 14mm rectilinear lens on a full-frame camera. That combination has a field of view of about 100° across the long dimension of the sensor.
That sounds generous, but reaching up to the zenith at an altitude of 90° means only a small portion of the landscape will be included along the bottom of the frame.
To provide an even wider field of view to take in more ground, I use full-frame fish-eye lenses on my full-frame cameras, such as Canon’s old 15mm lens (as shown at top) or Rokinon’s 12mm. Even a circular-format fish-eye will work, such as an 8mm on a full-frame camera or 4.5mm on a cropped-frame camera.
All such fish-eye lenses produce curved horizons, but they take in a wide swath of sky, making it possible to include lots of foreground while reaching well past the zenith. Conventional panorama assembly programs won’t work with such wide and distorted segments, but the specialized programs described below will.
Shooting Multi-Tier Panoramas

The summer Milky Way arches over iconic Bow Lake in Banff on a perfect night in July 2018. This is a stitch, using PTGui, of three tiers of 7 segments each, with a 20mm Sigma lens and Nikon D750, with a Genie Mini automating the horizontal panning and shutter release, as shown above. Each frame was 30 seconds at f/2 and ISO 6400. I used this same set to test the programs described below.
The alternative technique for “all-sky” panos is to shoot multiple tiers of images: first, a lower row covering the ground and partway up the sky, followed by an upper row completing the coverage of just the sky at top.
The trick is to ensure adequate overlap both horizontally and vertically. With the camera in landscape orientation that will require a 20mm lens for full-frame cameras, or a 14mm lens for cropped-frame cameras. Either combination can cover the entire sky plus lots of foreground in two tiers, though I usually shoot three, just to be sure!.
Shooting with longer lenses provides incredible resolution for billboard-sized “gigapan” blow-ups, but will require shooting three, if not more, tiers, each with many segments. That starts to become a chore to do manually. Some motorized assistance really helps when shooting multi-tier panoramas.
Automating the Pan Shooting
The dedicated pano shooter might want to look at a device such as the GigaPan Epic models or the iOptron iPano, (shown below), all about $800 to $1000.
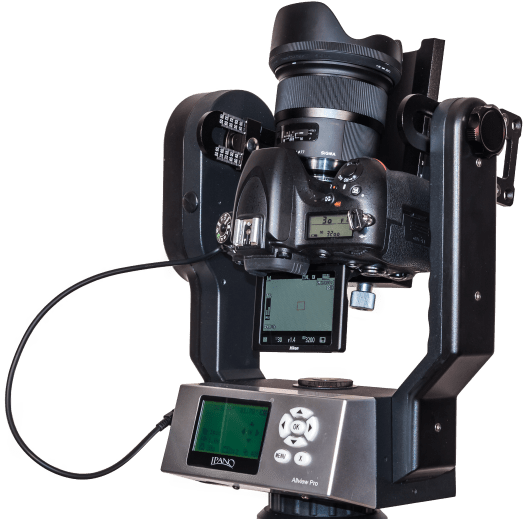
The iOptron iPano automates all shooting and movement, making even the most complex panoramas easy to shoot. It can also be used for two-axis motion-control time-lapses.
I’ve tested the latter and it works great. You program in the lens, overlap, and angular sweep desired. The iPano works out how many segments and tiers will be required, and automates the shooting, firing the shutter for the duration you program, then moving to the new position, firing again, and so on. I’ve shot four-tier panos effortlessly and with great success.

The iPano’s on-board screen provides all the menus and options for setting up a shoot. This screen shows that this multi-tier pano will take 6m37s to complete.
However, these devices are generally bigger and heavier than I care to heft around in the field.
Instead, I use the original Genie Mini from SYRP, (below), a $250 device primarily for shooting motion control time-lapses. But the wireless app that programs the Genie also has a panorama function that automatically slews the camera horizontally between exposures, again based on the lens, overlap, and angular sweep you enter. The just-introduced Genie Mini II is similar, but with even more capabilities for camera control.

A lower-cost option for automated shooting, the Genie Mini also provides time-lapse motion control. Here, I show it with a conventional 3-axis head on top, for shifting the camera up in altitude manually for multi-tier panos, while the Mini handles the horizontal motion and exposures.
While combining two Genie Minis allows programming in a vertical motion as well, I’ve been using just a regular tripod head atop the Mini to manually move the camera vertically between each of the horizontal tiers. I don’t feel the one or two moves needed to go from tier to tier too arduous to do manually, and I like to keep my field gear compact and easy to use.

The original Genie App (Apple iOS or Android) connects to the Genie via Bluetooth. This screen shows a 360° panorama programmed for a 20mm lens with 37% percent overlap, requiring eight segments. The shutter will fire after each move for 40 seconds.
The Genie Mini (now replaced by the Mini II) works great and I highly recommend it, even if panoramas are your only interest. But it is also one of the best, yet most affordable, single-axis motion control devices on the market for time-lapse work.
When to Shoot the Milky Way
While the right gear and techniques are important, go out on the wrong night and you won’t be able to capture the Milky Way as the great sweeping arch you might have hoped for.
In the northern hemisphere the Milky Way arches directly overhead from late July to October for most of the night. That’s fine for spherical fish-eye panoramas, but in rectangular images when the Milky Way is overhead it gets stretched and distorted across the top of the final panorama. For example, in the Bow Lake by Night panorama above, I cropped out most of this distorted content.
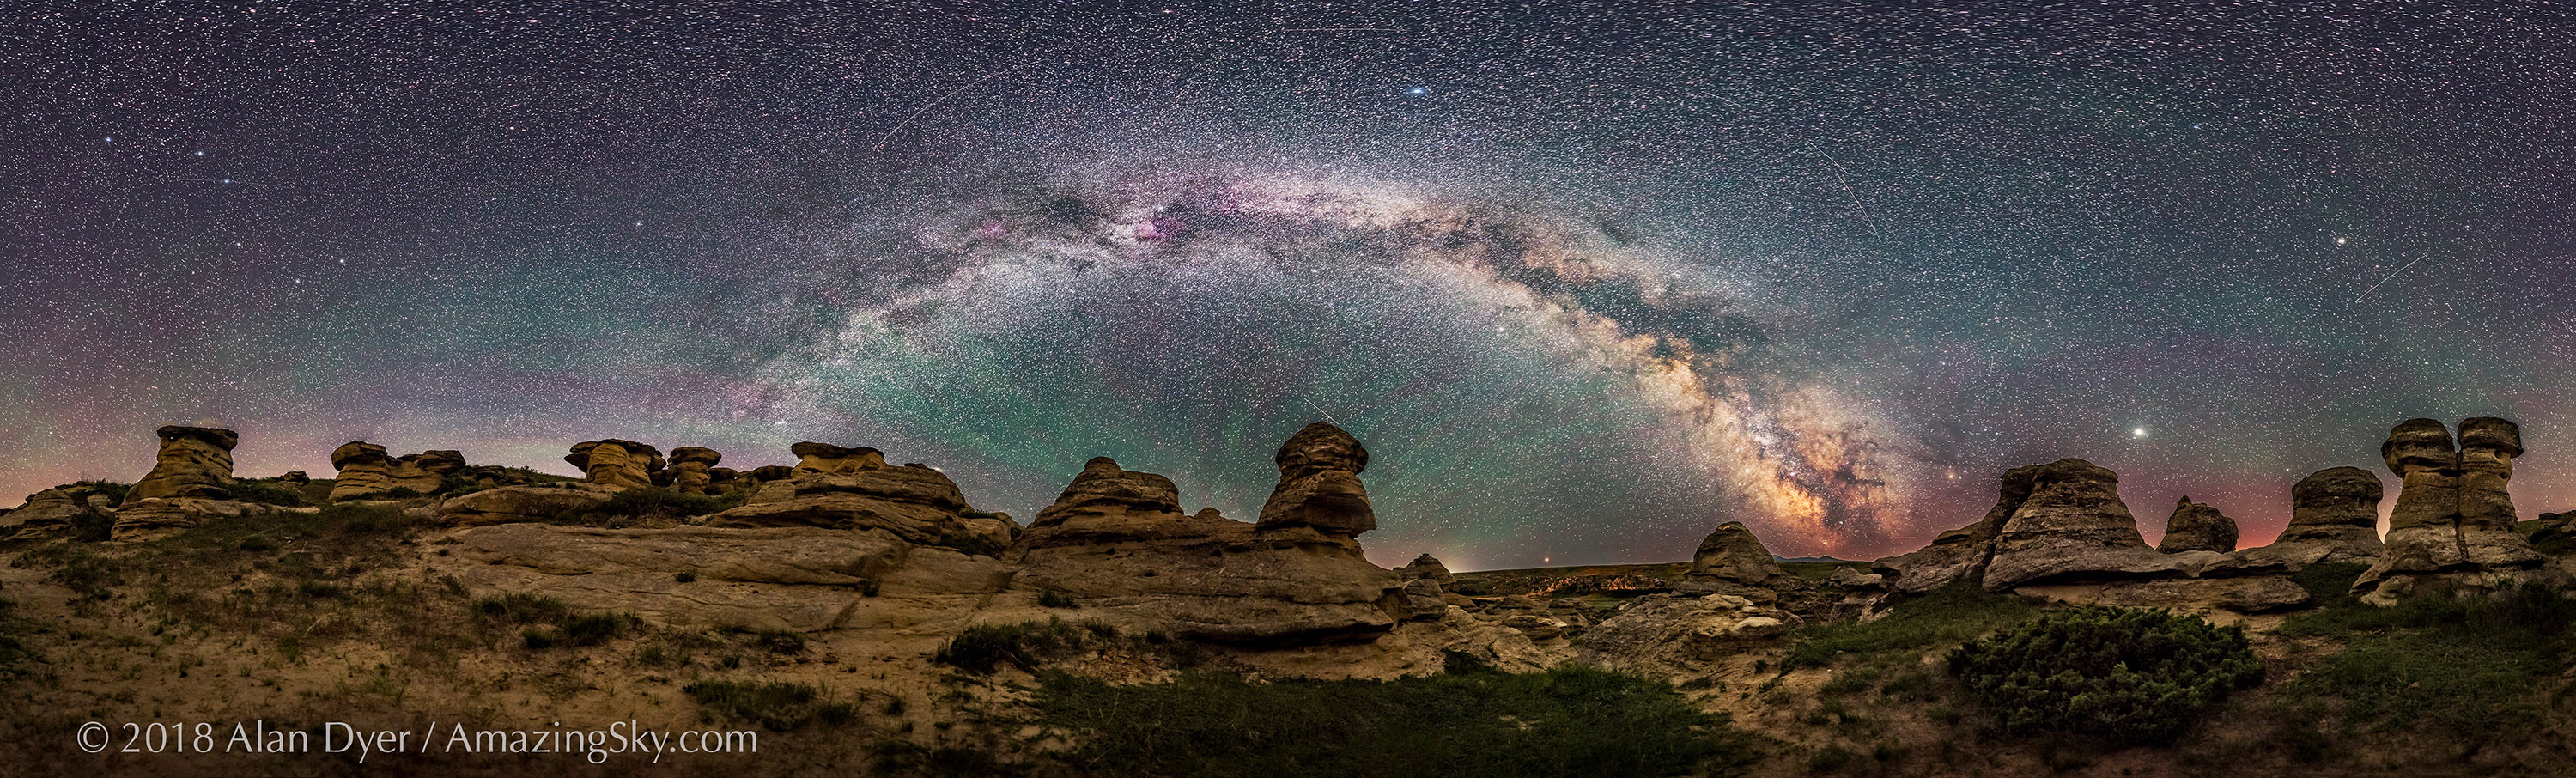
I captured this 360° pano of the summer Milky Way arching over the sandstone formations of Writing-on-Stone Provincial Park in southern Alberta in early June 2018. At that time of year the Milky Way is still confined to the eastern sky. This is a 21-panel panorama, shot in three tiers of seven panels each, with the Nikon D750 and Sigma 20mm Art lens on the Genie Mini, with each segment 30 seconds at f/2 and ISO 6400.
The prime season for Milky Way arches is therefore before the Milky Way climbs overhead, while it is still across the eastern sky, as above. That’s on moonless nights from March to early July, with May and June best for catching it in the evening, and not having to wait up until dawn, as is the case in early spring.

I often use Starry Night™ (shown here) to simulate the sky for the place and date I want, to preview where and when the Milky Way will appear and how it will move. The red box shows the field of view of a rectilinear 14mm lens in portrait orientation, showing it covering from the zenith (at top) to just below the horizon.
TIP: The best way to figure out when and where the Milky Way will appear is to use a desktop planetarium program such as Starry Night or Sky Safari or the free Stellarium. All can realistically depict the Milky Way for your location and date. You can then step through time to see how the Milky Way will move through the night, and how it will frame with your camera and lens combination using the “field of view” indicators the programs provide.

A 360° panorama from April 2017 captures the arc of the southern Milky Way over the OzSky star party near Coonabarabran, NSW, Australia. This is 8 segments, each 30 seconds at ISO 6400 and f/2.5 with a Rokinon 14mm lens on a Canon 6D in portrait orientation, and stitched with PTGui.
When shooting in the southern hemisphere I like the April to June period for catching the sweep of the southern Milky Way and the galactic core rising in late evening. By contrast, during mid austral winter in July and August the galactic centre shines directly overhead in the evening, a spectacular sight to be sure, but tough to capture in a panorama except in a spherical or fish-eye scene.

This 360° panorama, shot in a single tier with a 14mm Sigma lens and Nikon D750 in portrait orientation, captures the winter Milky Way arching across the western sky on an early spring night at Dinosaur Provincial Park in Alberta. Also in the pano is the sweep of the faint Zodiacal Light. This is a stitch, using PTGui, of 12 segments, each 30 seconds at f/2.8 and ISO 4000.
That said, I always like to put in a good word for the often sadly neglected winter Milky Way (the summer Milky Way for those “down under”). While lacking the spectacle of the galactic core in Sagittarius, the “other” Milky Way has its attractions such as Orion and Taurus. The best months for a panorama with that Milky Way in an arch across a rectangular frame are January to March. The Zodiacal Light can be a bonus at that season, as it was above.
TIP: Always shoot raw files for the widest dynamic range and flexibility in recovering details in the highlights and shadows. Even so, each segment has to be well exposed and focused out in the field.
And unless you are doing a “two-pass” double exposure, always shoot each segment with identical exposure settings. This is especially critical for bright sky scenes such twilights or moonlit scenes. Vary the exposure and you might get unsightly banding at the seams.
There’s nothing worse than getting home only to find one or more segments was missed, or was out of focus or badly exposed, spoiling the set.
PART 2 — STITCHING
Developing Panorama Segments
Once you have your panorama segments, the next step is to develop and assemble them. For my workflow, the process of assembling a panorama from its constituent segments begins with developing each of those segments identically.
NOTE: Click or tap on the software screen shots to open a high-res version for closer inspection.

This shows one segment of the multi-tier example before (on the left) and after applying development settings in the Basic panel of Adobe Camera Raw. By selecting all the images, the Sync Settings command (at top left) will apply the settings of one image to the rest of the set.
I like to develop each segment’s raw file as fully as possible at this first stage in the workflow, applying noise reduction, colour correction, contrast adjustments, shadow and highlight recovery, and any special settings such as dehaze and clarity that can make the Milky Way pop.
I also apply lens corrections to each raw image. While some feel doing so produces problems with stitching later on, I’ve never found that. I prefer to have each frame with minimal vignetting and distortion when going into stitching. I use Adobe Camera Raw out of Adobe Bridge, but Lightroom Classic has identical functions.
There are several other raw developers that can work well at this stage. In other tests I’ve conducted, Capture One and DxO PhotoLab stand out as producing good results on nightscapes. See my blog from 2017 for more on software choices.

Among a host of programs competing with Adobe, DxO PhotoLab does a good job developing raw files, with the ability to copy and paste settings from one image to many. It has excellent noise reduction and shadow detail recovery. However, it cannot layer images.
The key is developing each raw file identically, usually by working on one segment, then copying and pasting its settings to all the others in a set. Not all raw developers have this “Copy Settings” function. For example, Affinity Photo does not. It works very well as a layer-based editor to replace Photoshop, but is crude in its raw developing “Persona” functions.
While panorama stitching software will apply corrections to smooth out image-to-image variations, I find it is best to ensure all the segments look as similar as possible at the raw stage for brightness, contrast, and colour correction.
Do be aware that among social media groups and chat rooms devoted to nightscape imaging a lot of myth and misinformation abounds about how to process and stitch panoramas, and why some don’t work. Someone having a problem with a particular pano will ask why, and get ten different answers from well-meaning helpers, most of them wrong!
Stitching Simple Panoramas
For example, if your segments don’t join well it likely isn’t because you needed to use a panorama head (one oft-heard bit of advice). I never do. The issue is usually a lack of sufficient overlap. Or perhaps the image content moved too much from frame to frame as the photographer took too long to shoot the set.
Or, even when quickly-shot segments do have lots of overlap, stitching software can still get confused if adjoining segments contain featureless content or content that changes, such as segments over rippling water with no identifiable “landmarks” for the software to latch onto.
The primary problems, however, arise from using software that just isn’t up to the task. Programs that work great on simple panoramas (as the next three examples show) will fail when trying to stitch a more demanding set of segments.
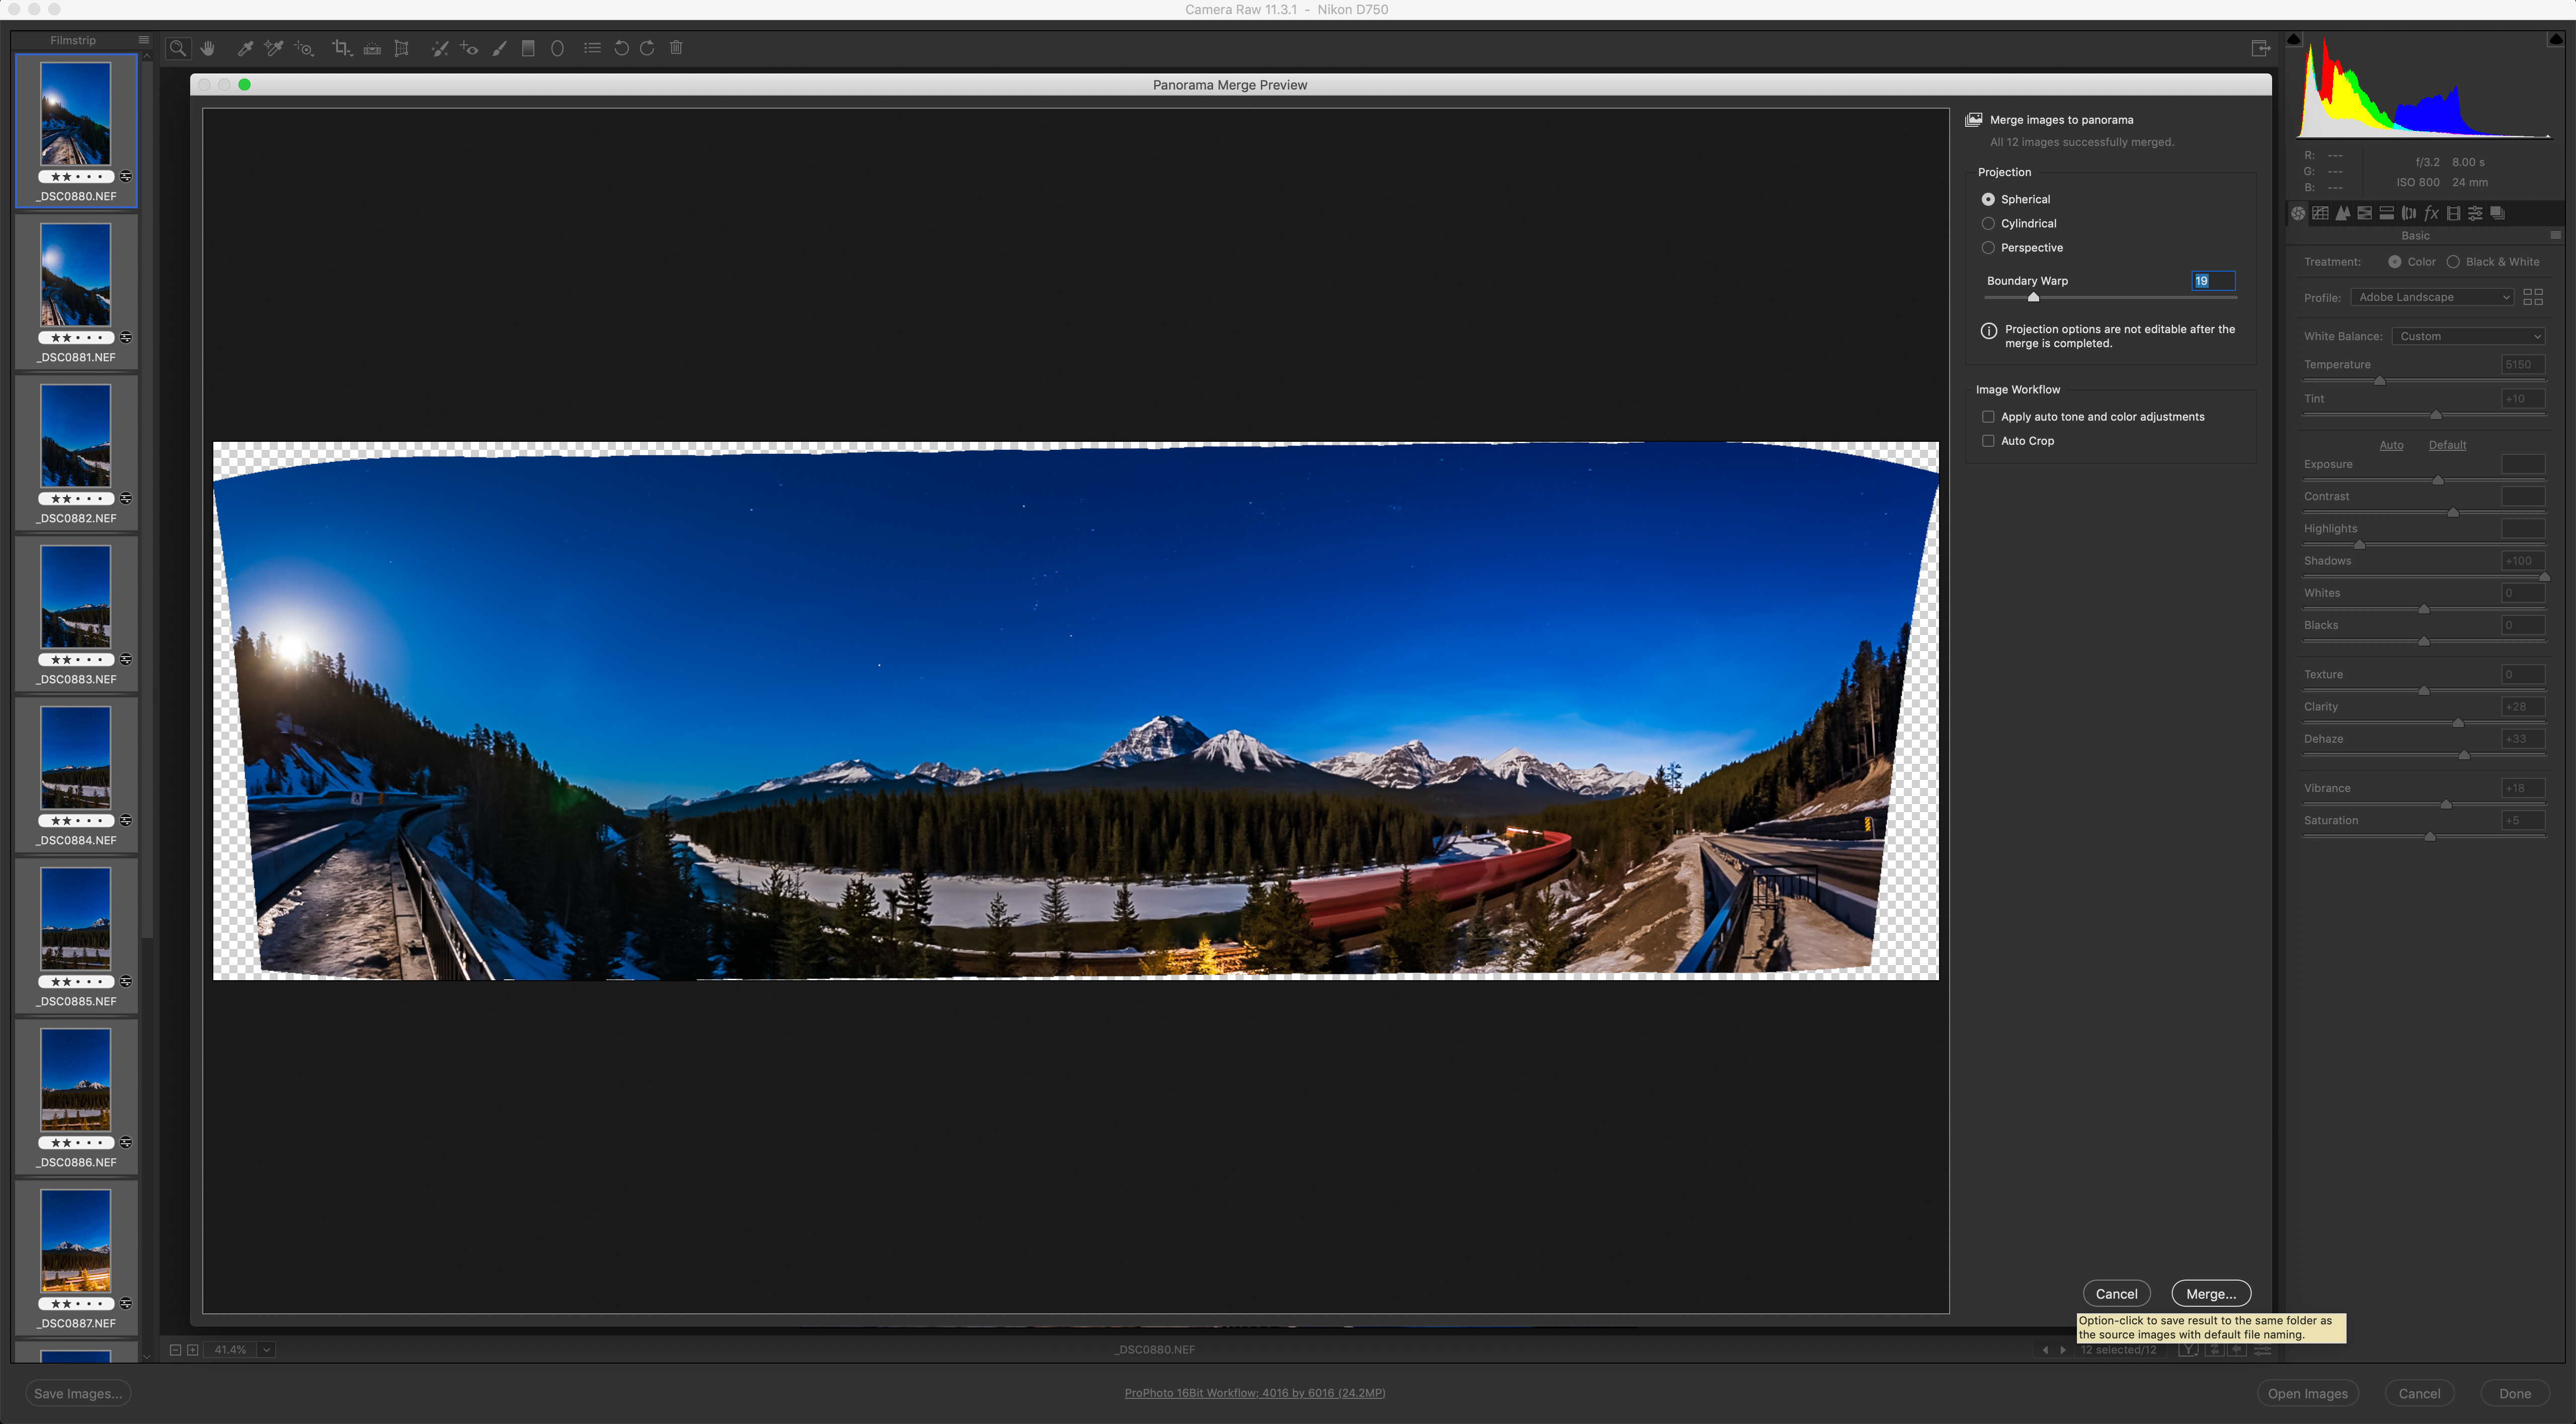
The panorama function in all recent versions of Adobe Camera Raw (Lightroom Classic has the same feature) can do a superb job on simple panoramas, such as the moonlit Morant’s Curve pano, with the magical Boundary Warp option allowing you to fill the frame without cropping and losing content.
For example, for partial horizon panos shot with 20mm to 50mm lenses, I’ll use the panorama function now built into Adobe Camera Raw (ACR) and Adobe Lightroom Classic, and also in the mobile-friendly Lightroom app. As I show above, ACR can do a wonderful job, yielding a raw DNG file that can continue to be edited non-destructively. It’s by far the easiest and fastest option, and is my first choice.
Another choice, not shown here, is the Photomerge function from within Photoshop, which yields a layered and masked master file, and provides the option for “content-aware” filling of missing areas. It can sometimes work on panos that ACR balks at.
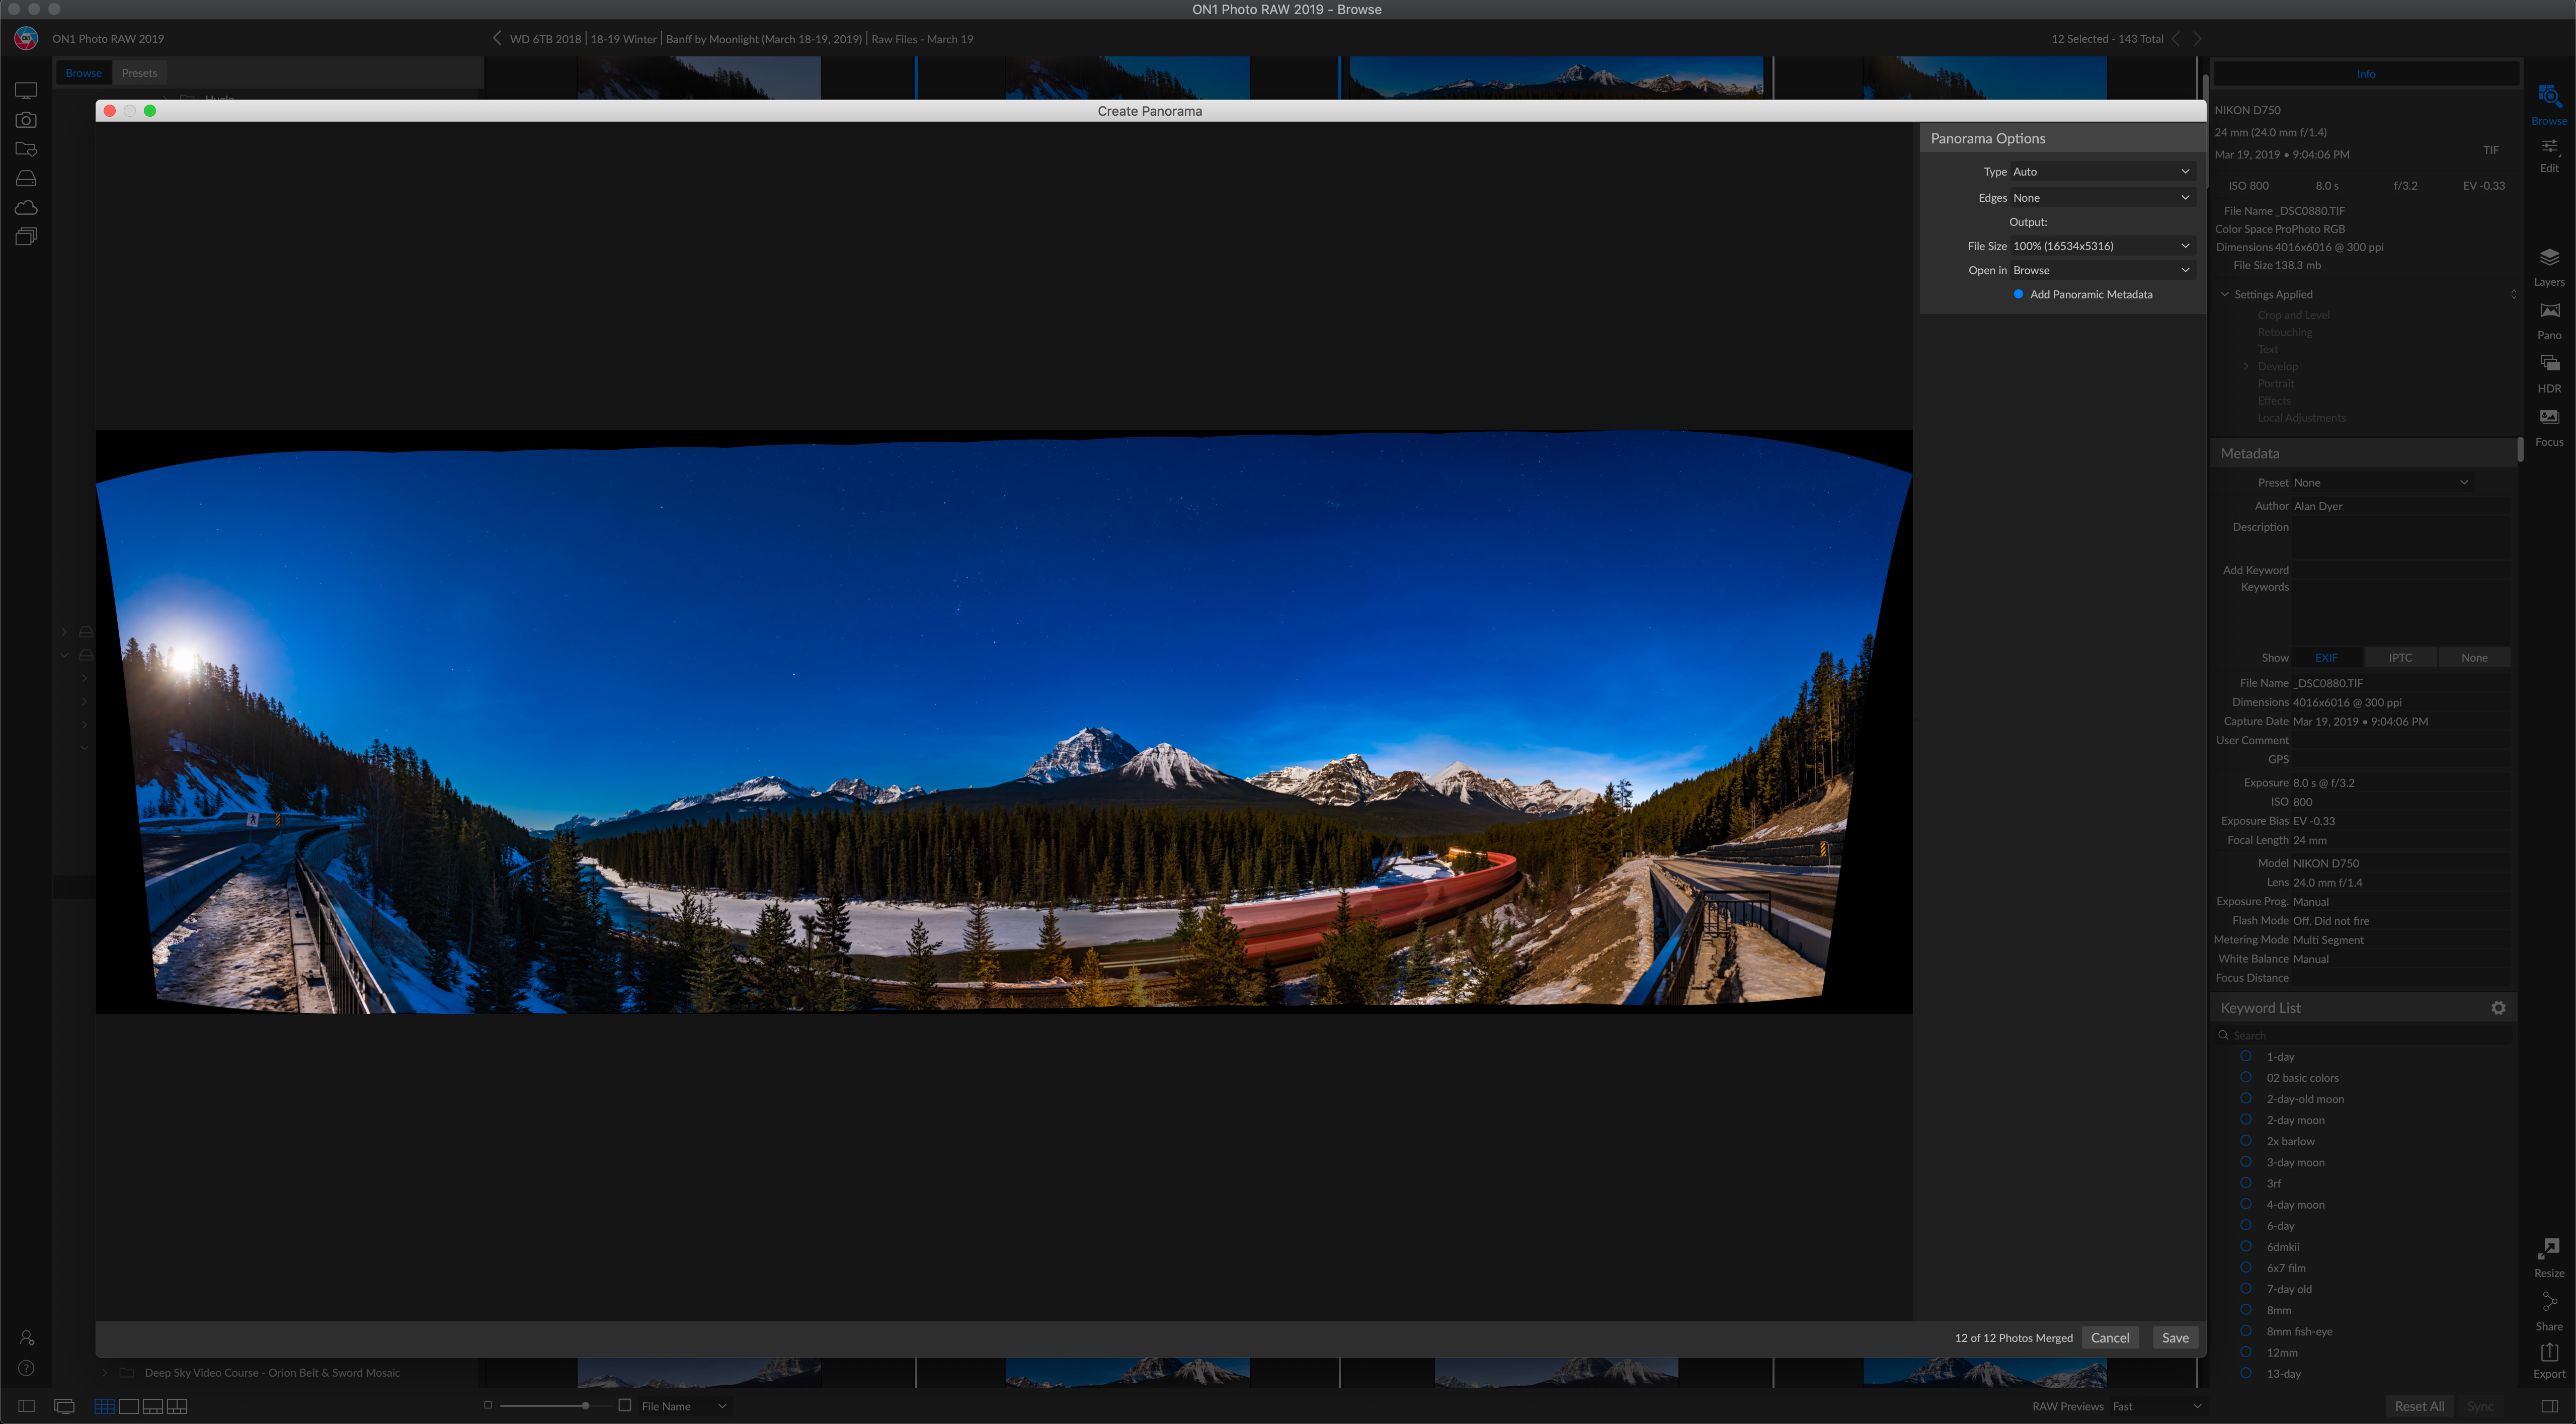
The Adobe competitor ON1 PhotoRAW also provides a good panorama stitching feature that can work with both simple and many multi-tier panos. It provides a flattened result, even when exporting as a .PSD Photoshop file.
Two programs popular as Adobe alternatives, ON1 PhotoRAW (above) and the aforementioned Affinity Photo (below), also have very capable panorama stitching functions.
However, in testing both programs with the demanding Bow Lake multi-tier panorama I used below with other programs, ON1 2019.5 did an acceptable job, while Affinity 1.7 failed. It works best on simpler panoramas, like this partial scene with a 24mm lens.

Another program vying to unseat Adobe products is Affinity Photo. It, too, does a fine job on simple panos, but tends to fail on multi-tier panoramas. There is no choice of panorama projections or option to export a layered master.
Even if they succeed when stitching 360° panoramas, such general-purpose editing programs, Adobe’s included, provide no option for choosing how the final scene gets framed. You have no control over where the program puts the ends of the scene.
Or the program just fails, producing a result like this.
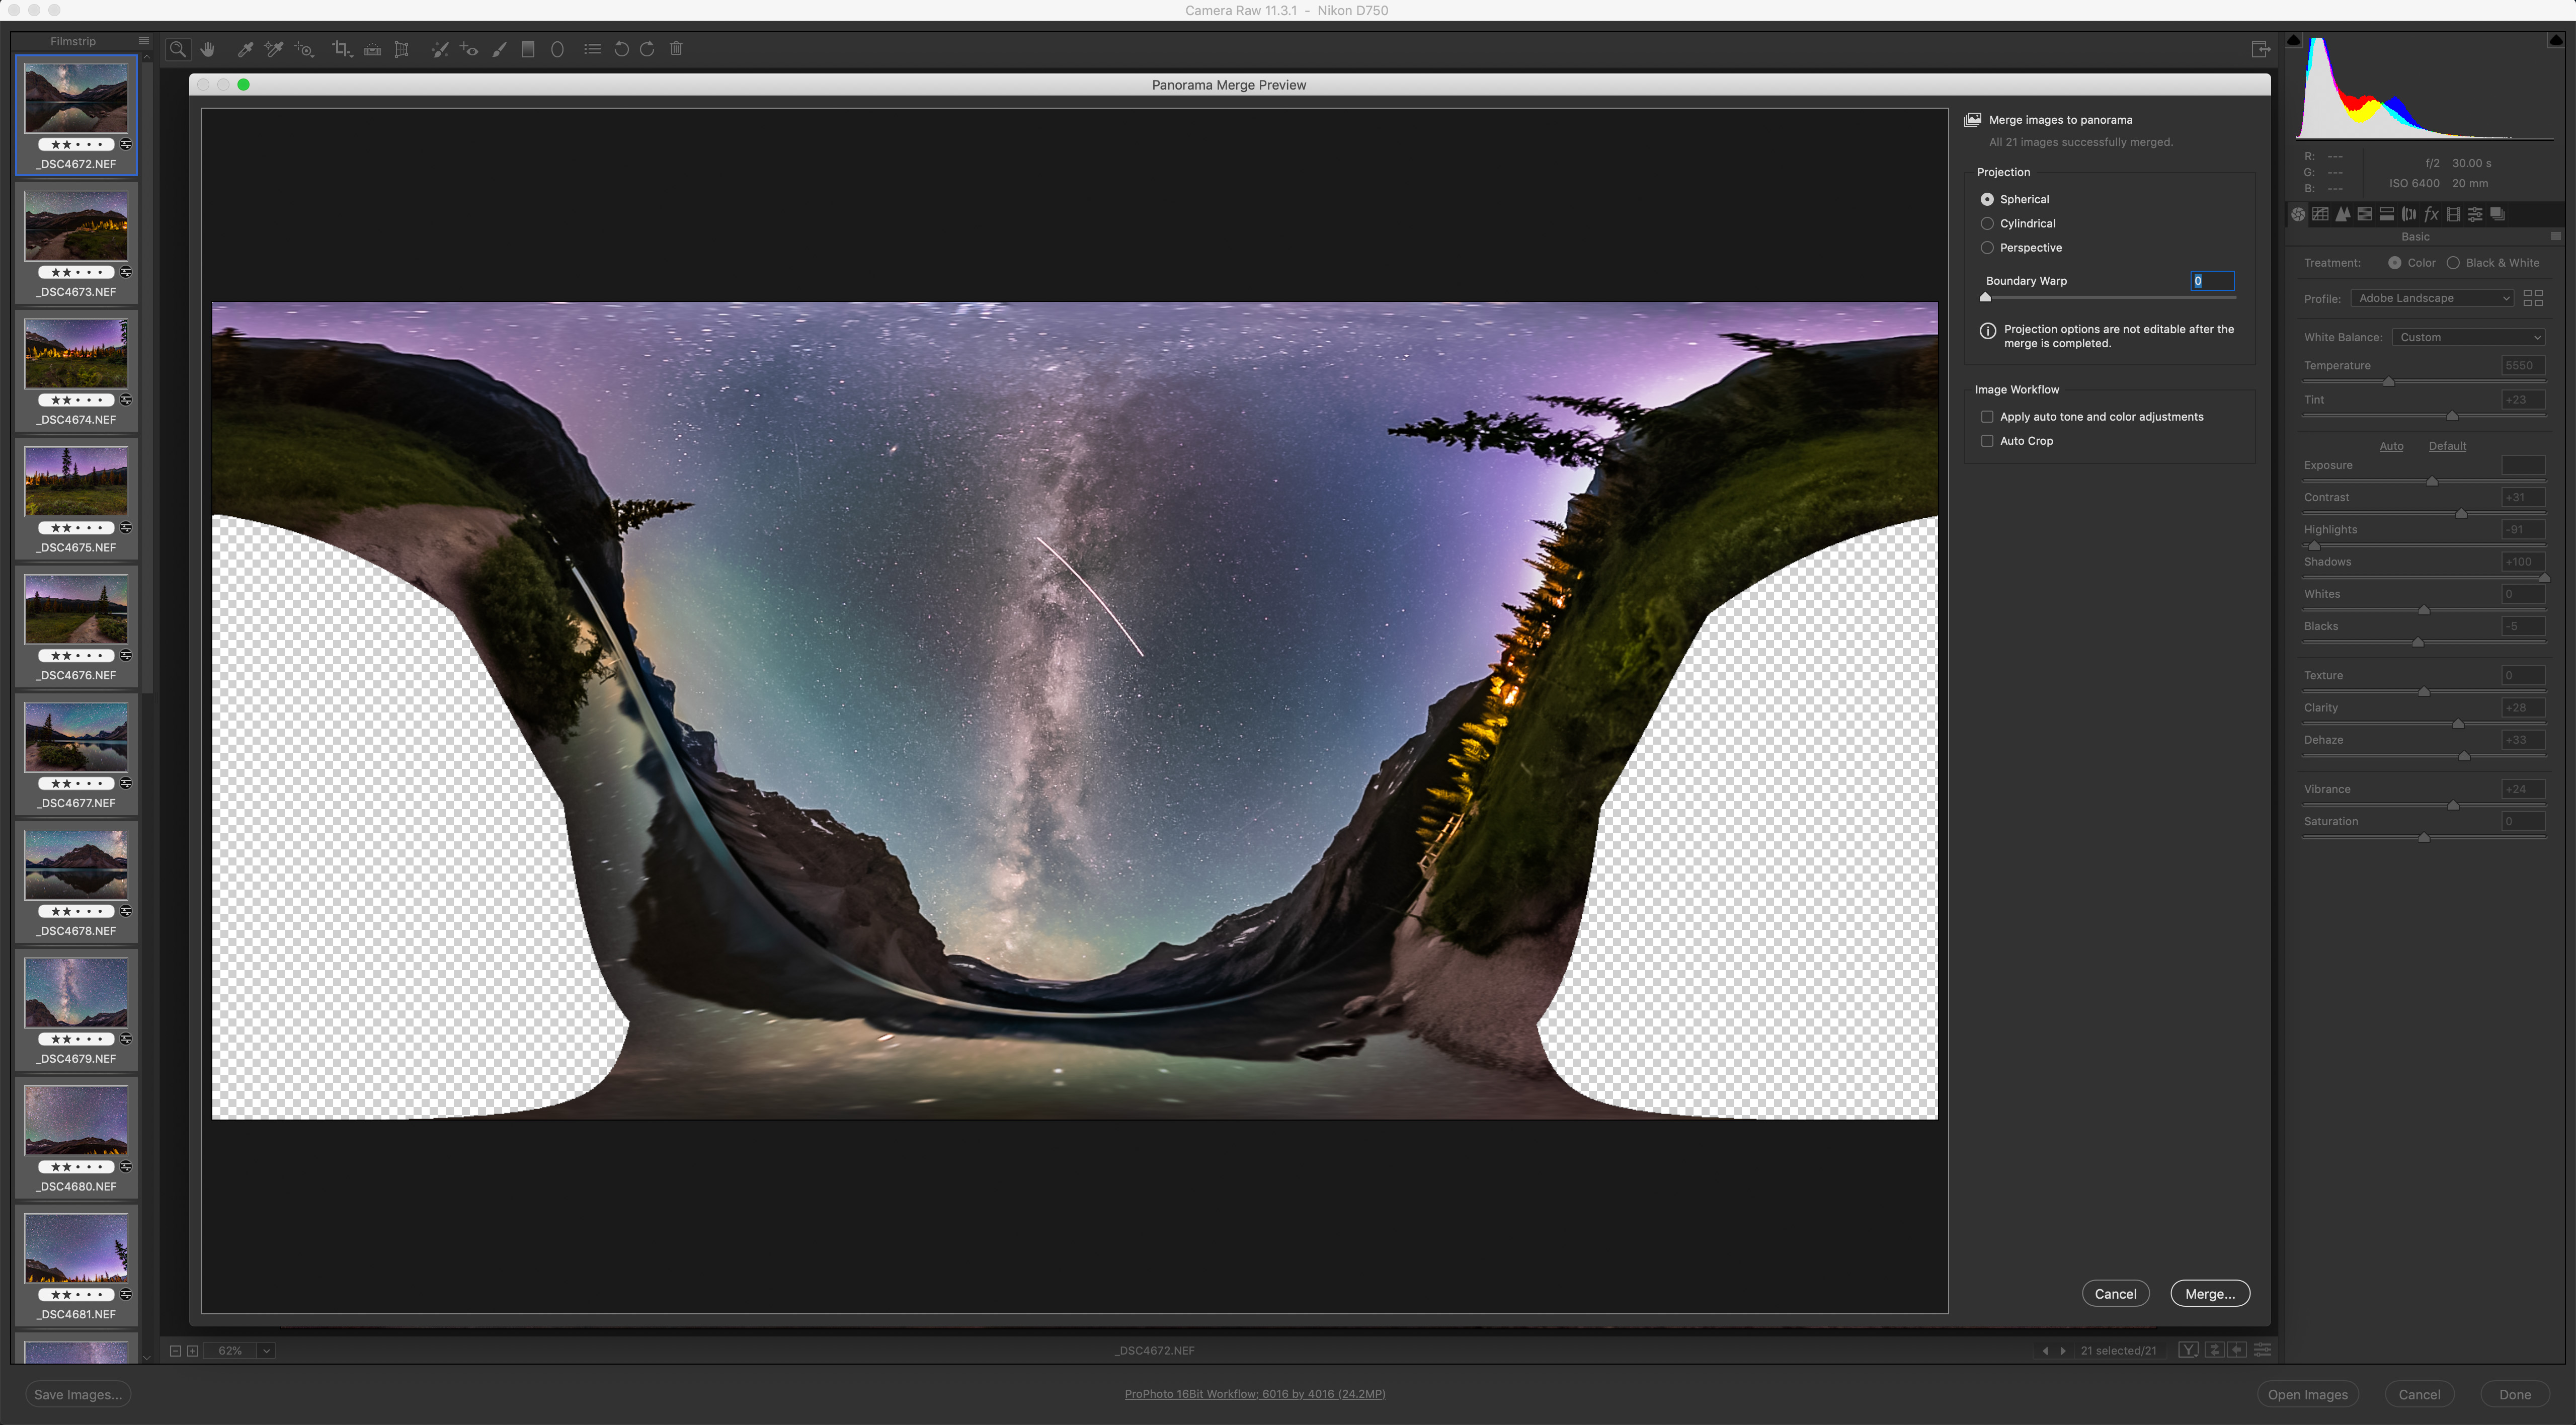
Throw a multi-tier pano at Adobe Camera Raw and you might end up with this type of unsalvageable result. Here’s where you have to turn to specialized panorama software
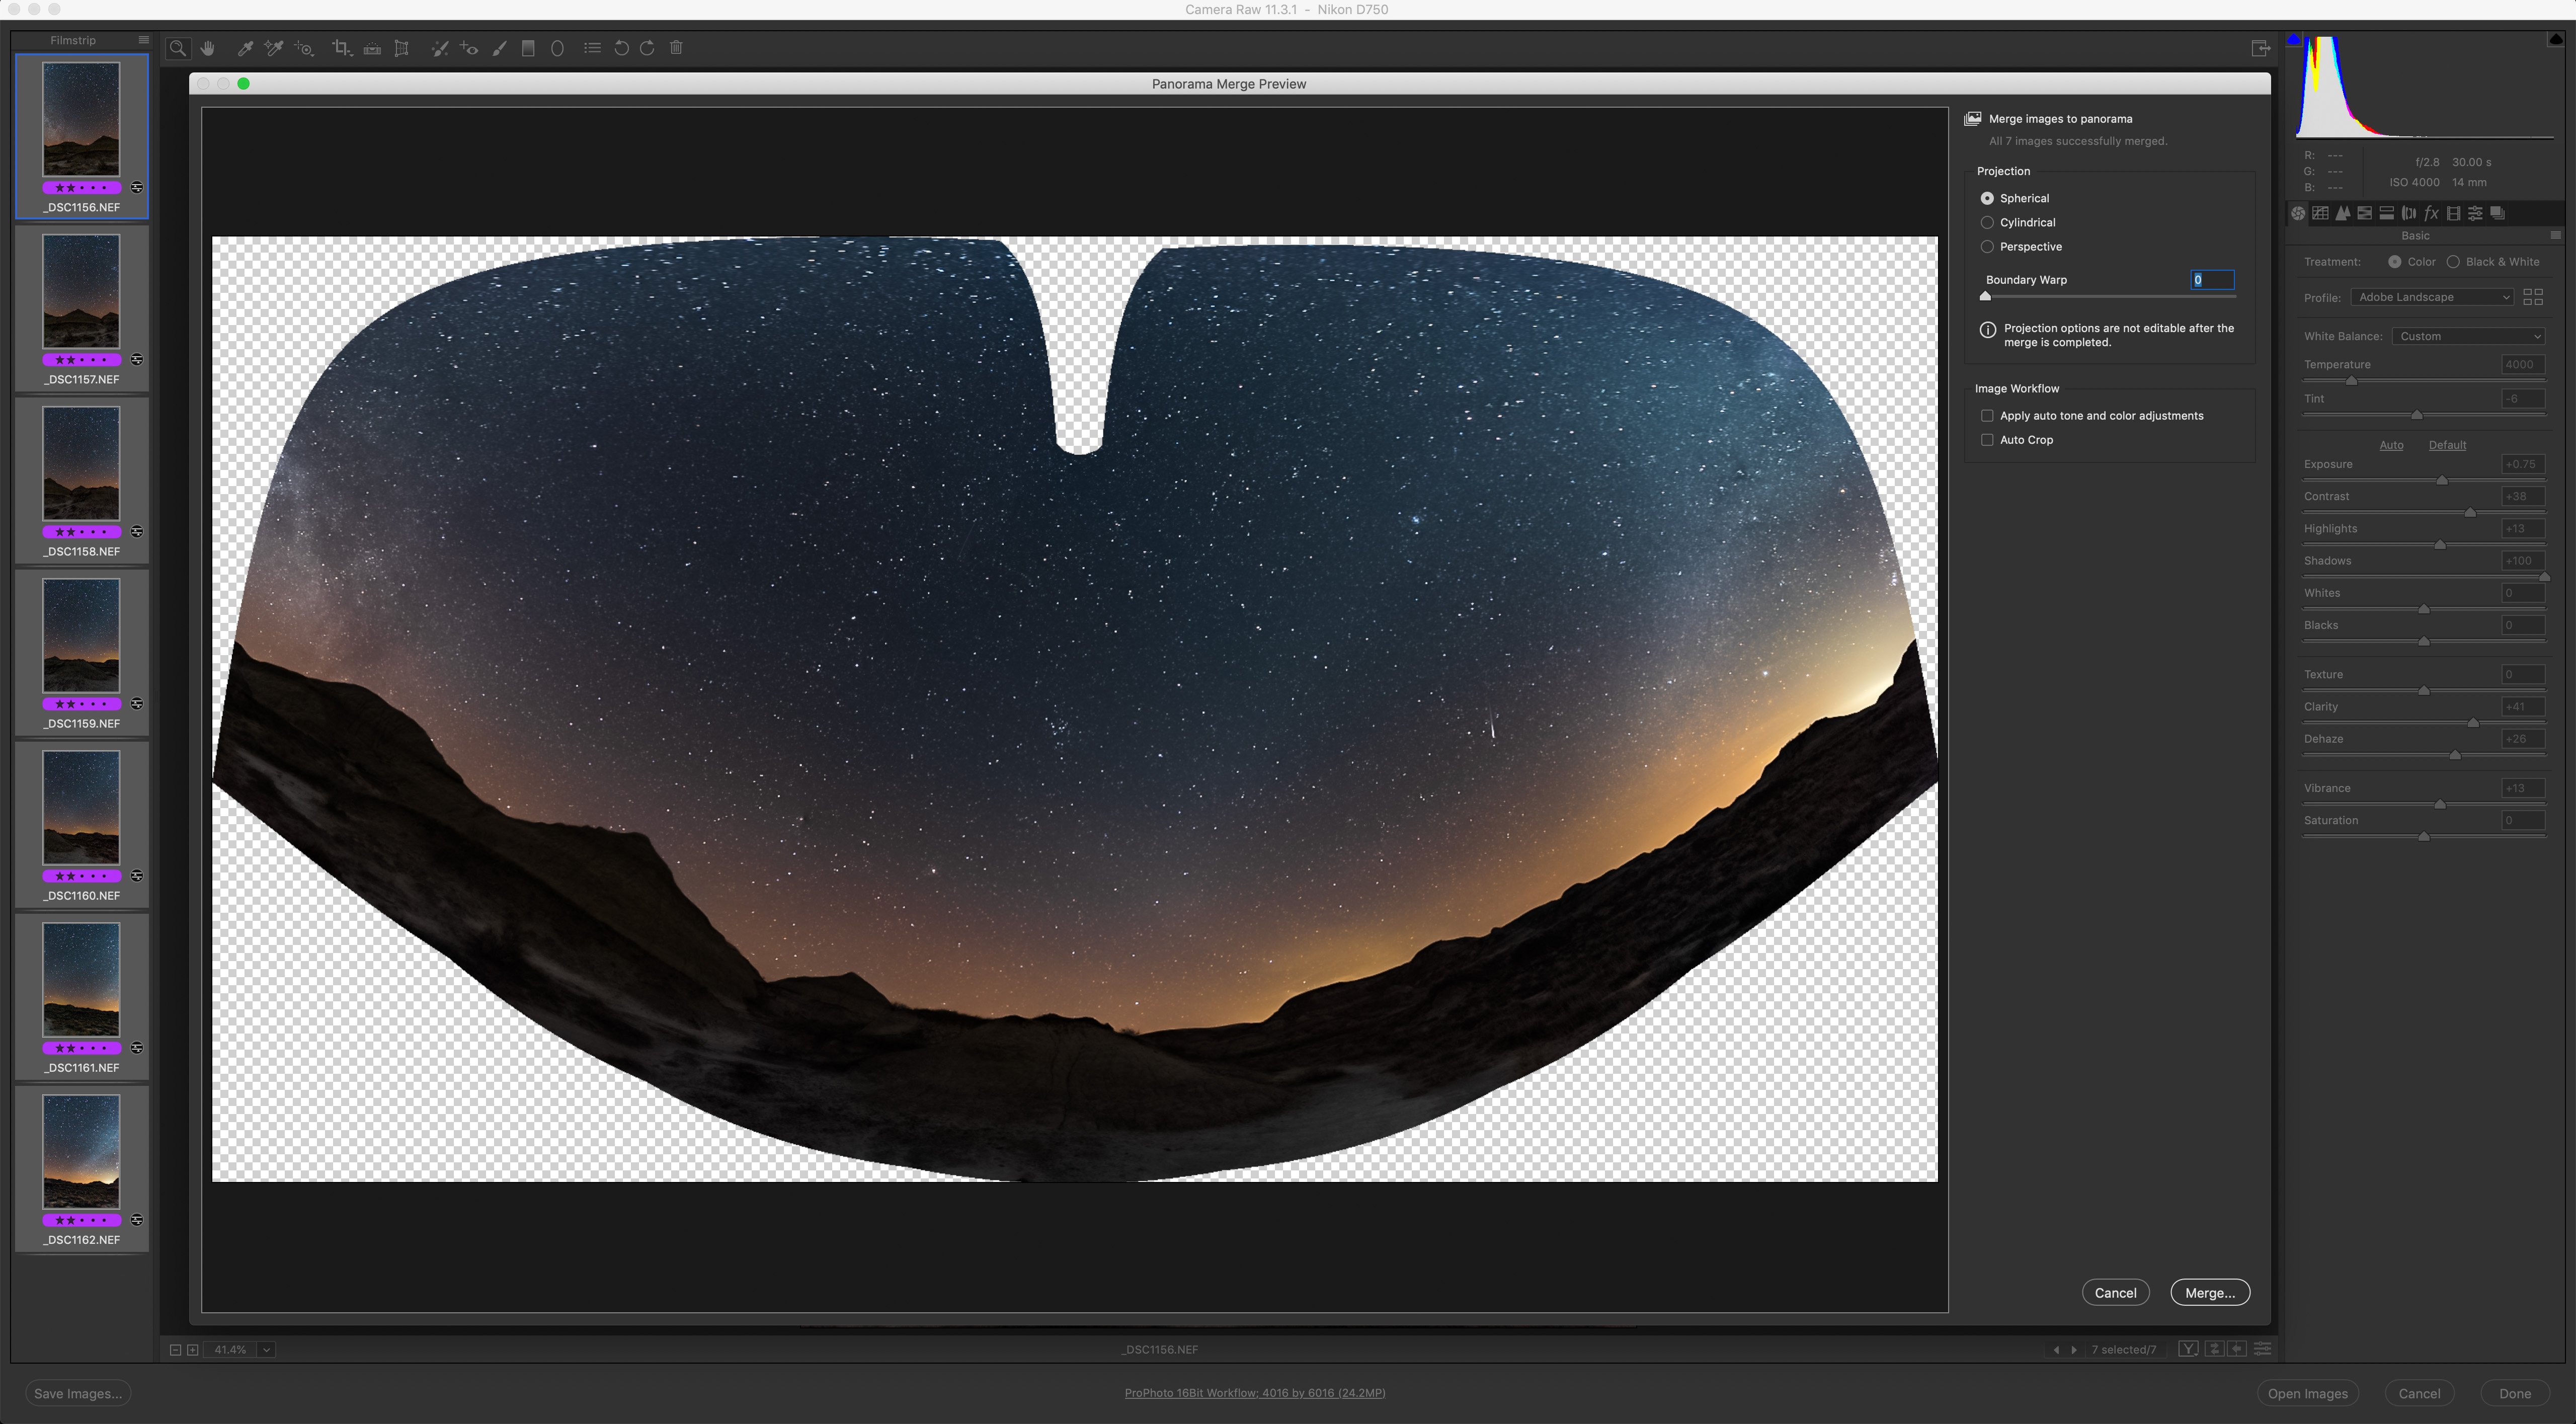
Even single-tier panos but shot with 14mm rectilinear (in this case) or fish-eye lenses will create warped results with ACR, only partly correctable with Boundary Warp.
Far worse is that multi-tier panoramas or, as I show above, even single-tier panos shot with very wide lenses, will often completely befuddle your favourite editing software, with it either refusing to perform the stitch or producing bizarre results.
Some photographers attempt to correct such wild distortions with lots of ad hoc adjustments with image-warping filters. But that’s completely unnecessary if you use the right software to begin with.
Stitching Complex Panoramas
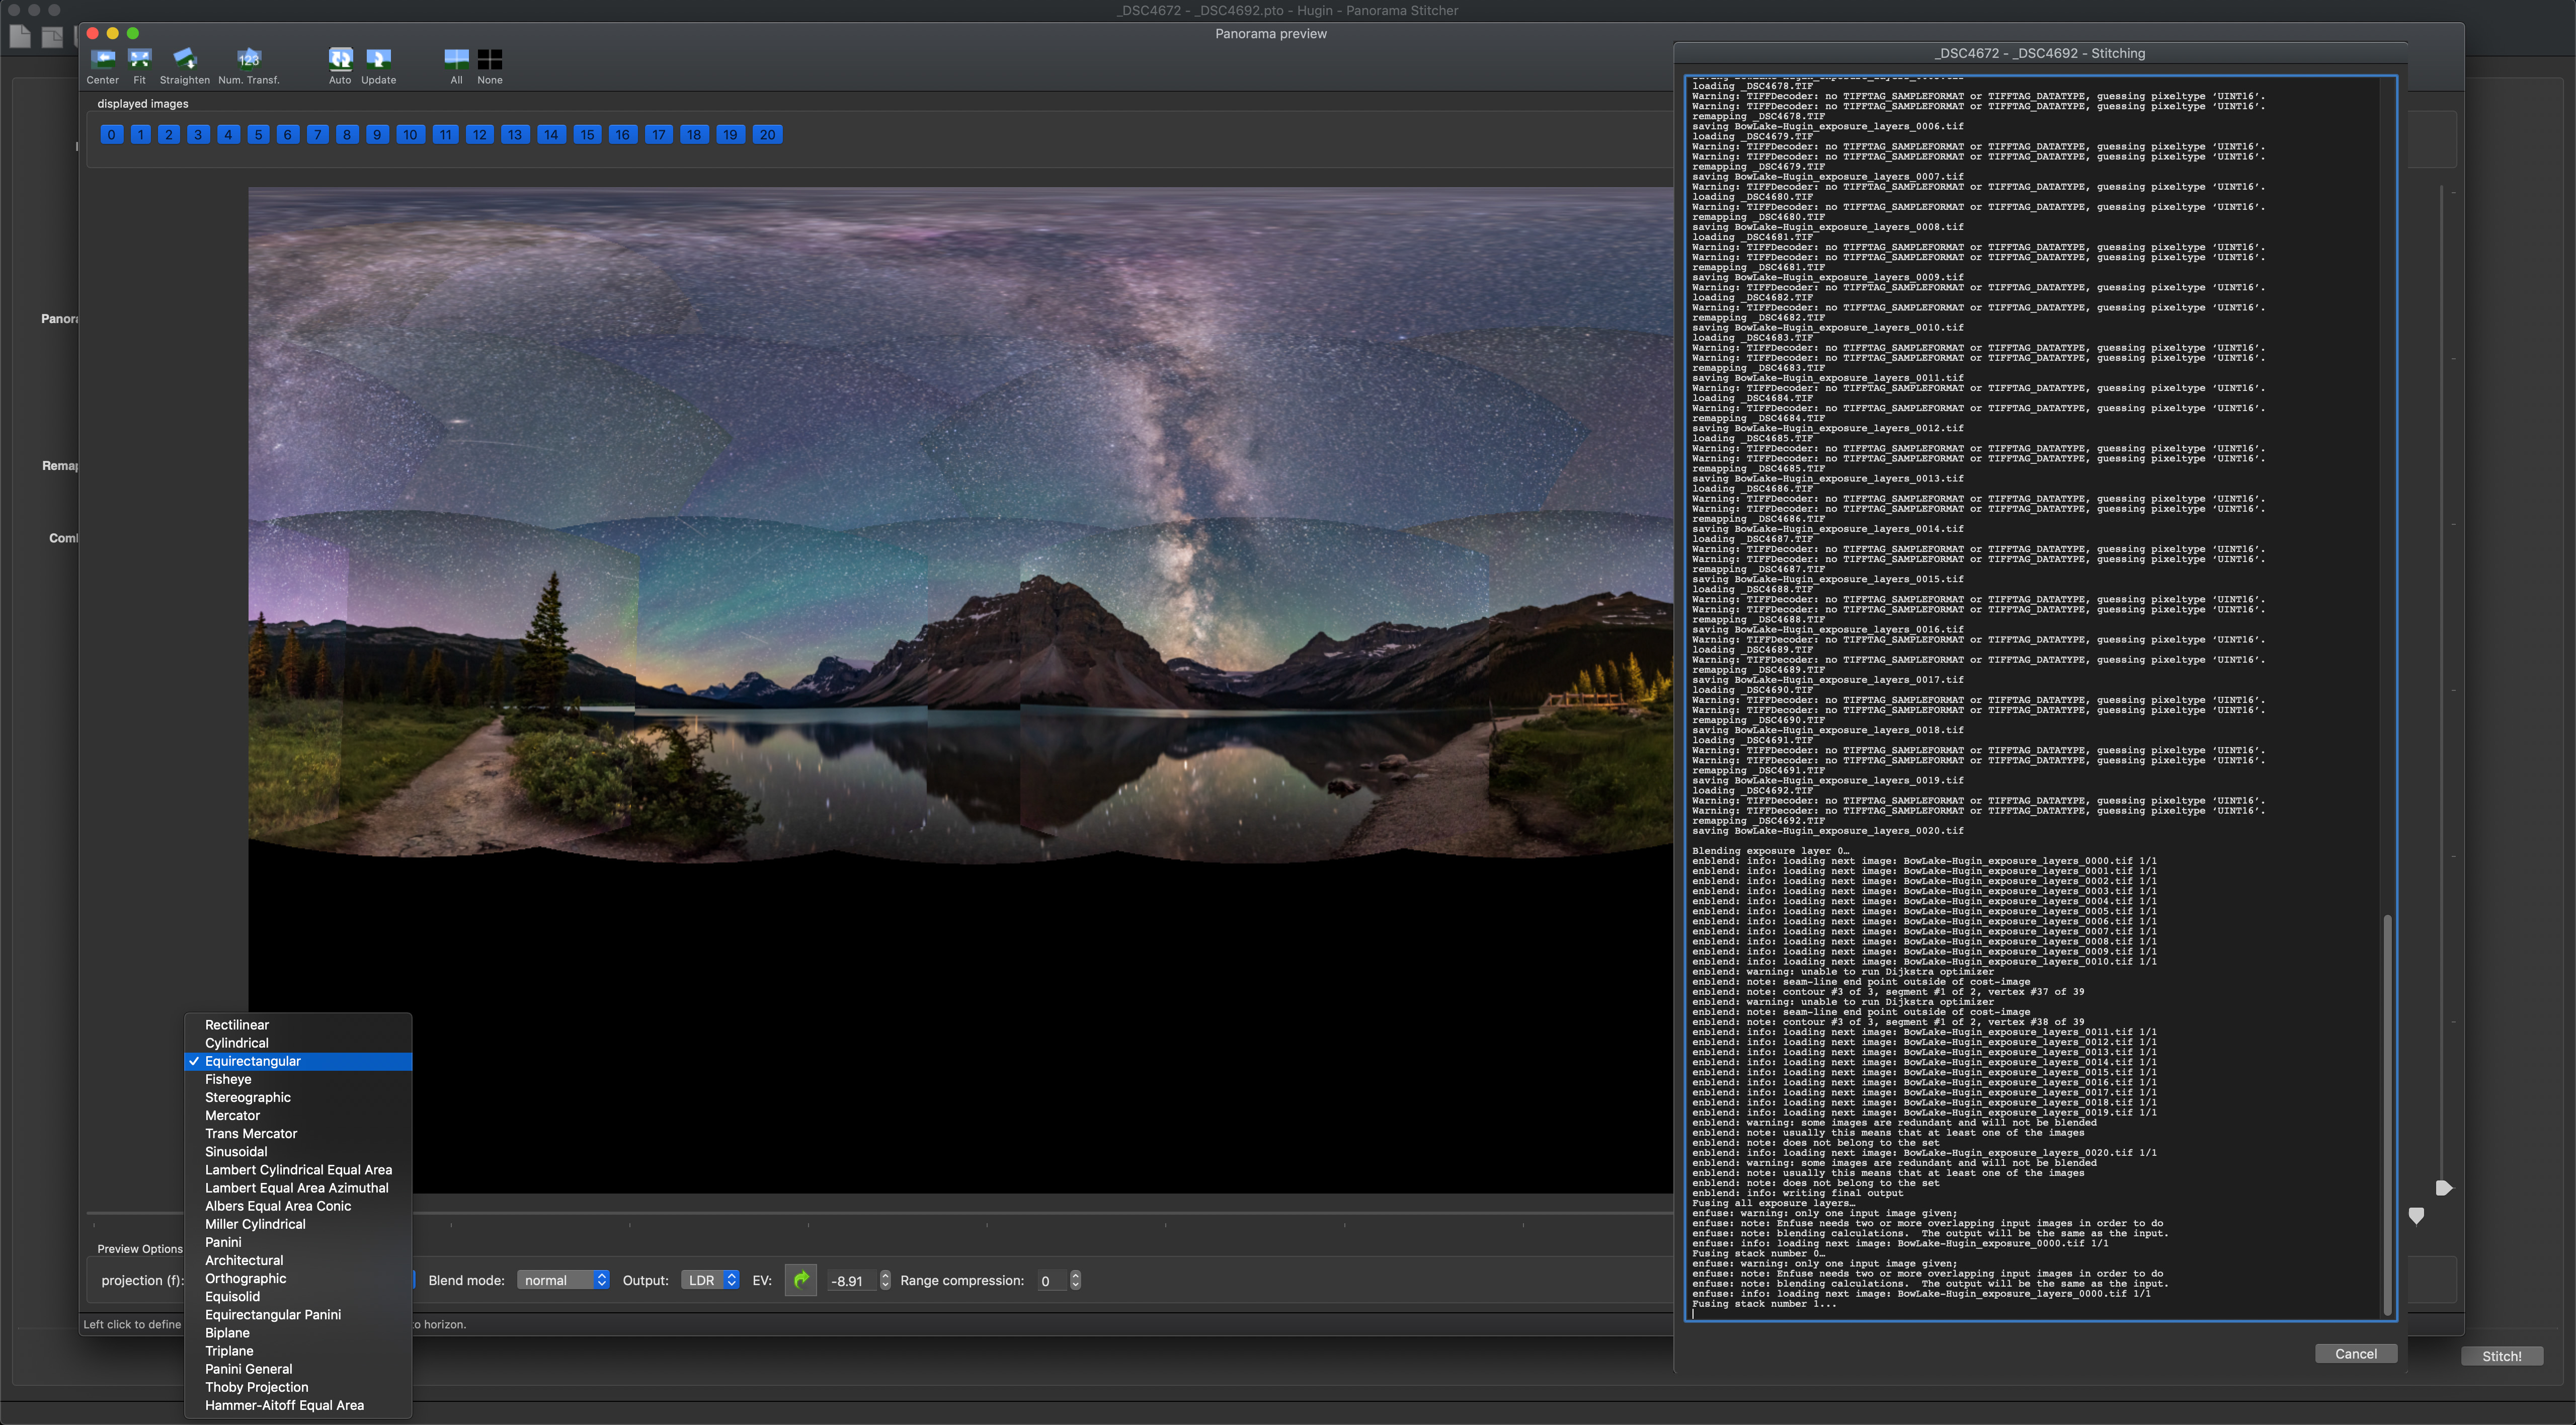
When conventional software fails, I turn to the dedicated stitching program PTGui, $150 for MacOS or Windows. The name comes from “Panorama Tools – Graphical User Interface.”

PTGui handles whatever complexity of panorama you can throw at it, either single or multi-tier (in this example), offering an accurate preview, a choice of projection modes (this is “equirectangular”), and the ability to quickly move the pano around to frame it as you like before exporting either a flattened or a layered master.
While PTGui can read raw files from most cameras, it will not read any of the development adjustments you made to those files using Lightroom, Camera Raw, or any other raw developers.
So, my workflow is to develop all the raw segments, export them out as 16-bit TIFFs, then import those into PTGui. It can detect what lens was used to take the images, information PTGui needs to stitch accurately. If you used a manual lens you can enter the lens focal length and type (rectilinear or fish-eye) yourself.
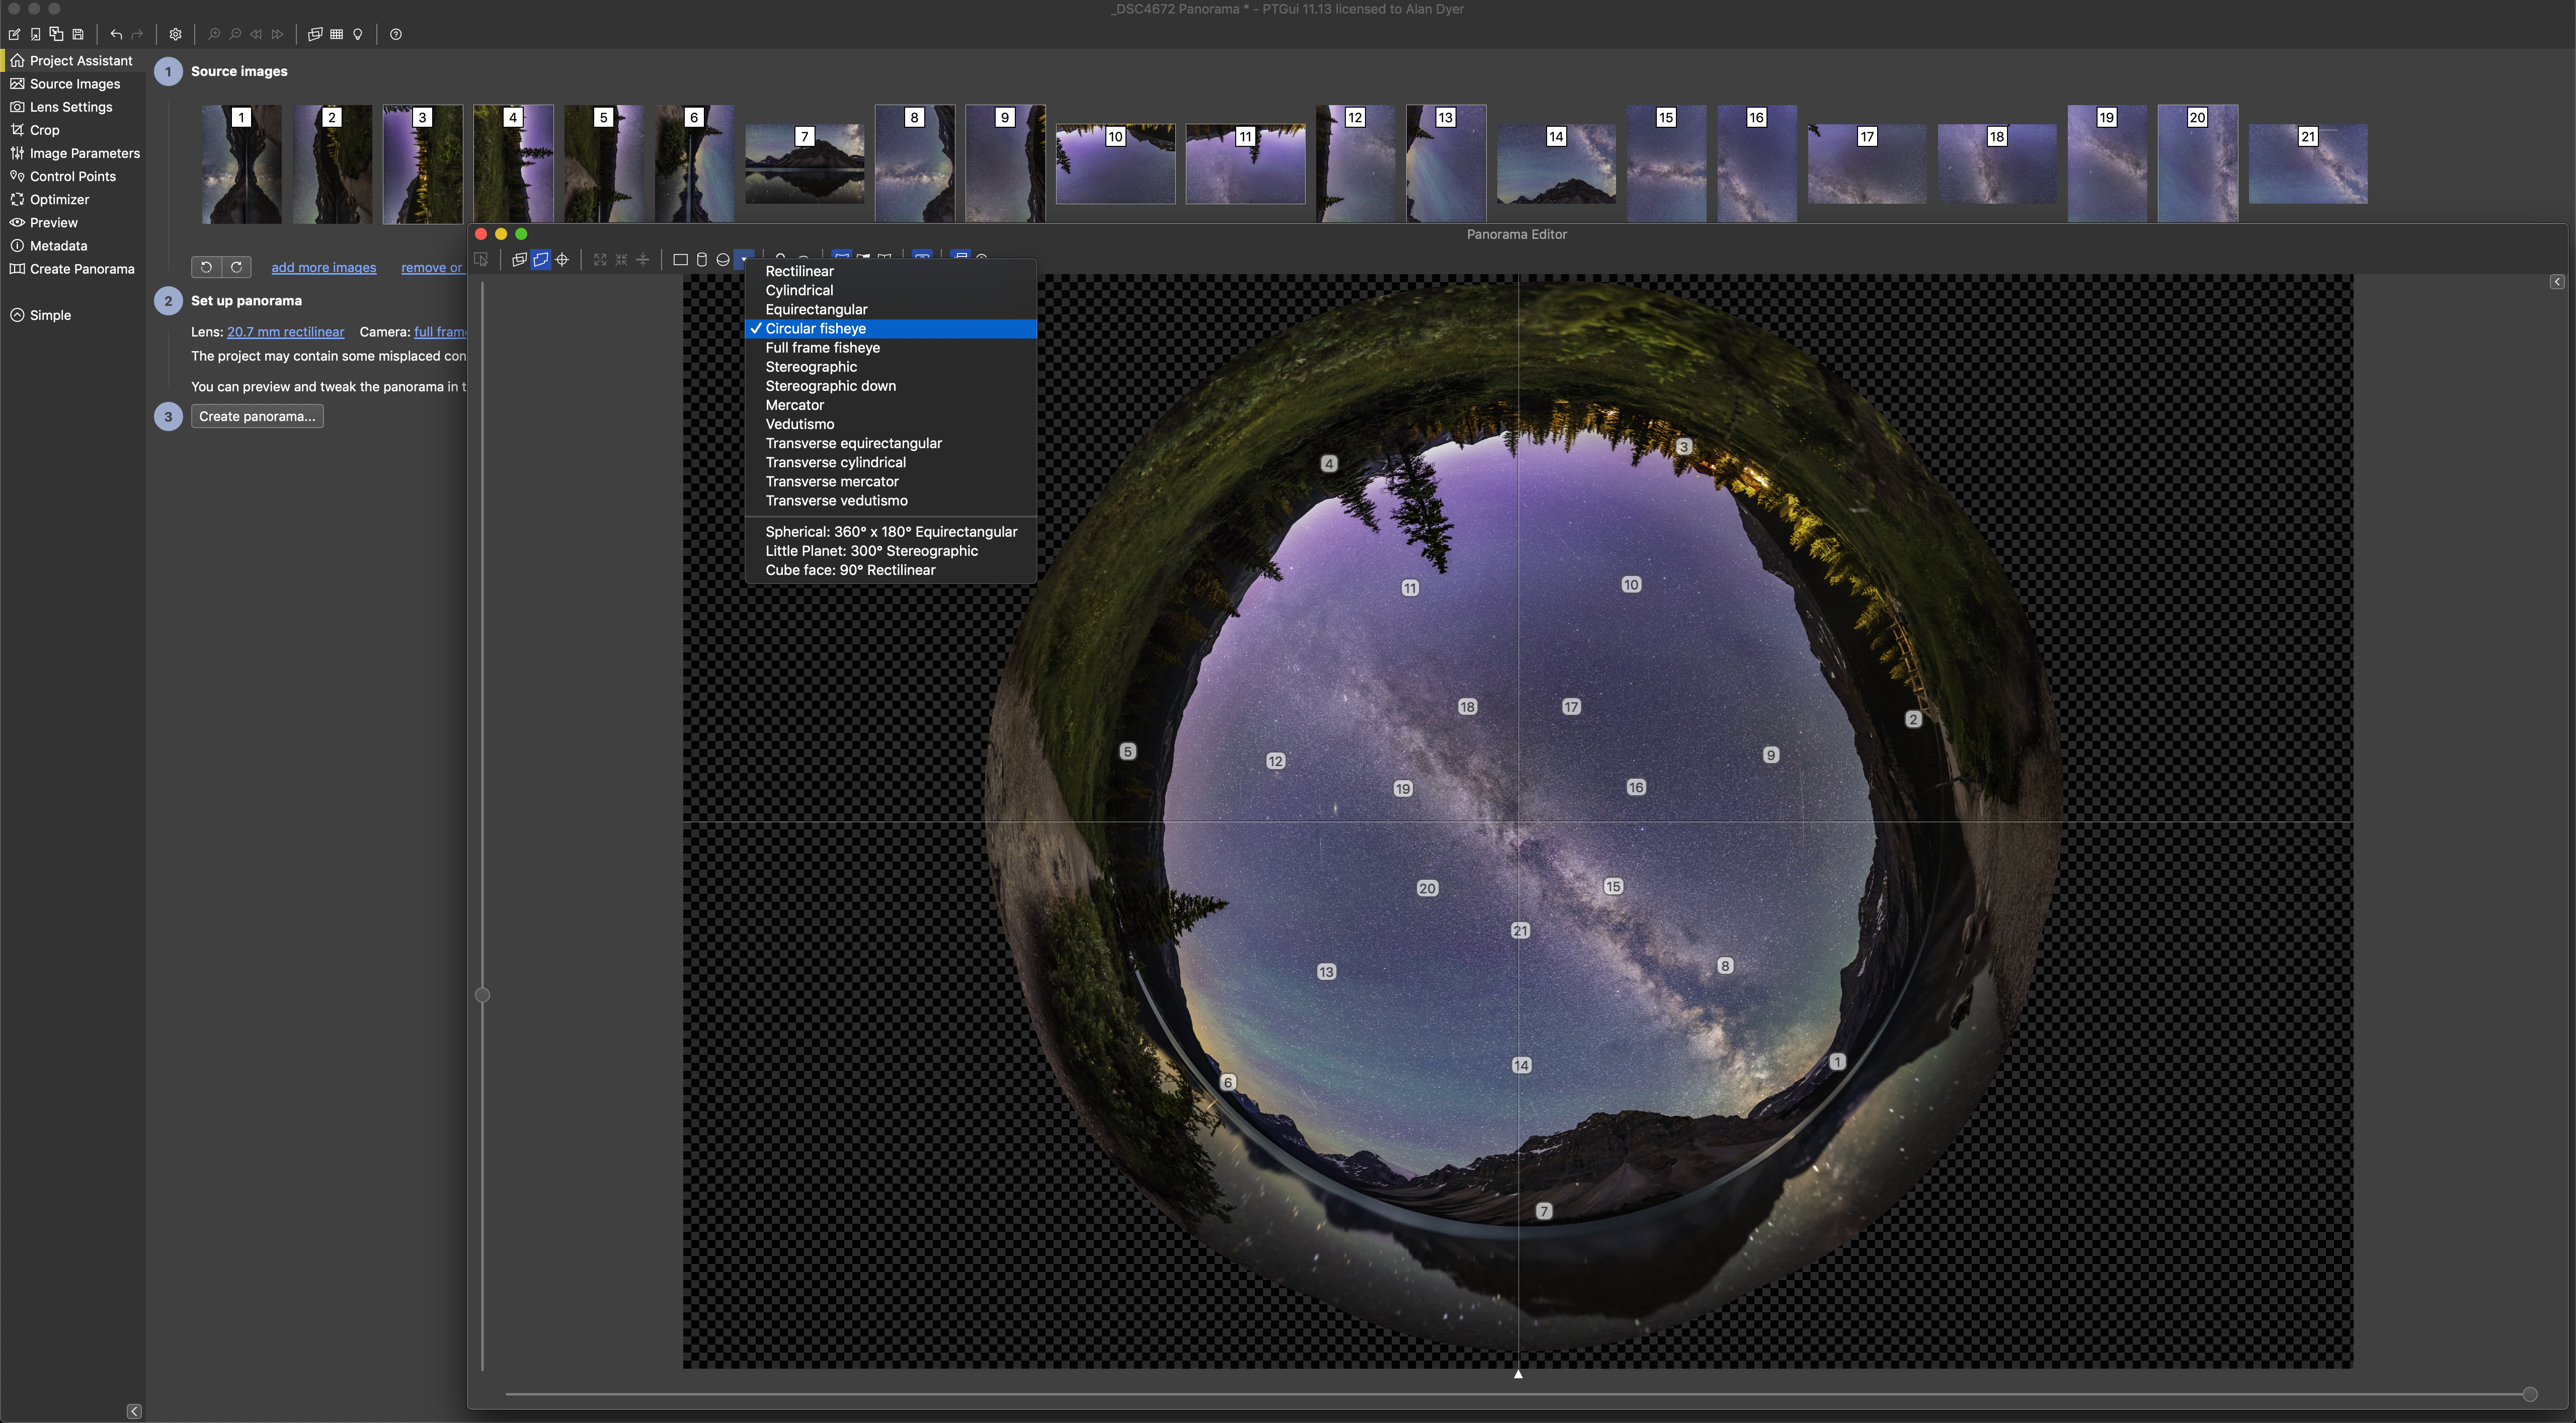
PTGui makes it easy to re-project the same set of images into other map projections, in this case as a circular fish-eye scene which can be rotated as desired.
I include a full tutorial on using PTGui in my eBook linked to above, but suffice to say that the program usually does a superb job first time and very quickly. You can drag the panorama around to frame the scene as you like, and change the projection at will to create rectangular or spherical format images, as above, and even so-called “little planet” projections that appear as if you were looking down at the scene from space.
Occasionally PTGui complains about some frames, requiring you to manually intervene to pick the same stars or horizon features in adjacent frames to provide enough matching alignment points until it is happy. Its interface also leaves something to be desired, with essential floating windows disappearing behind other mostly blank panels.
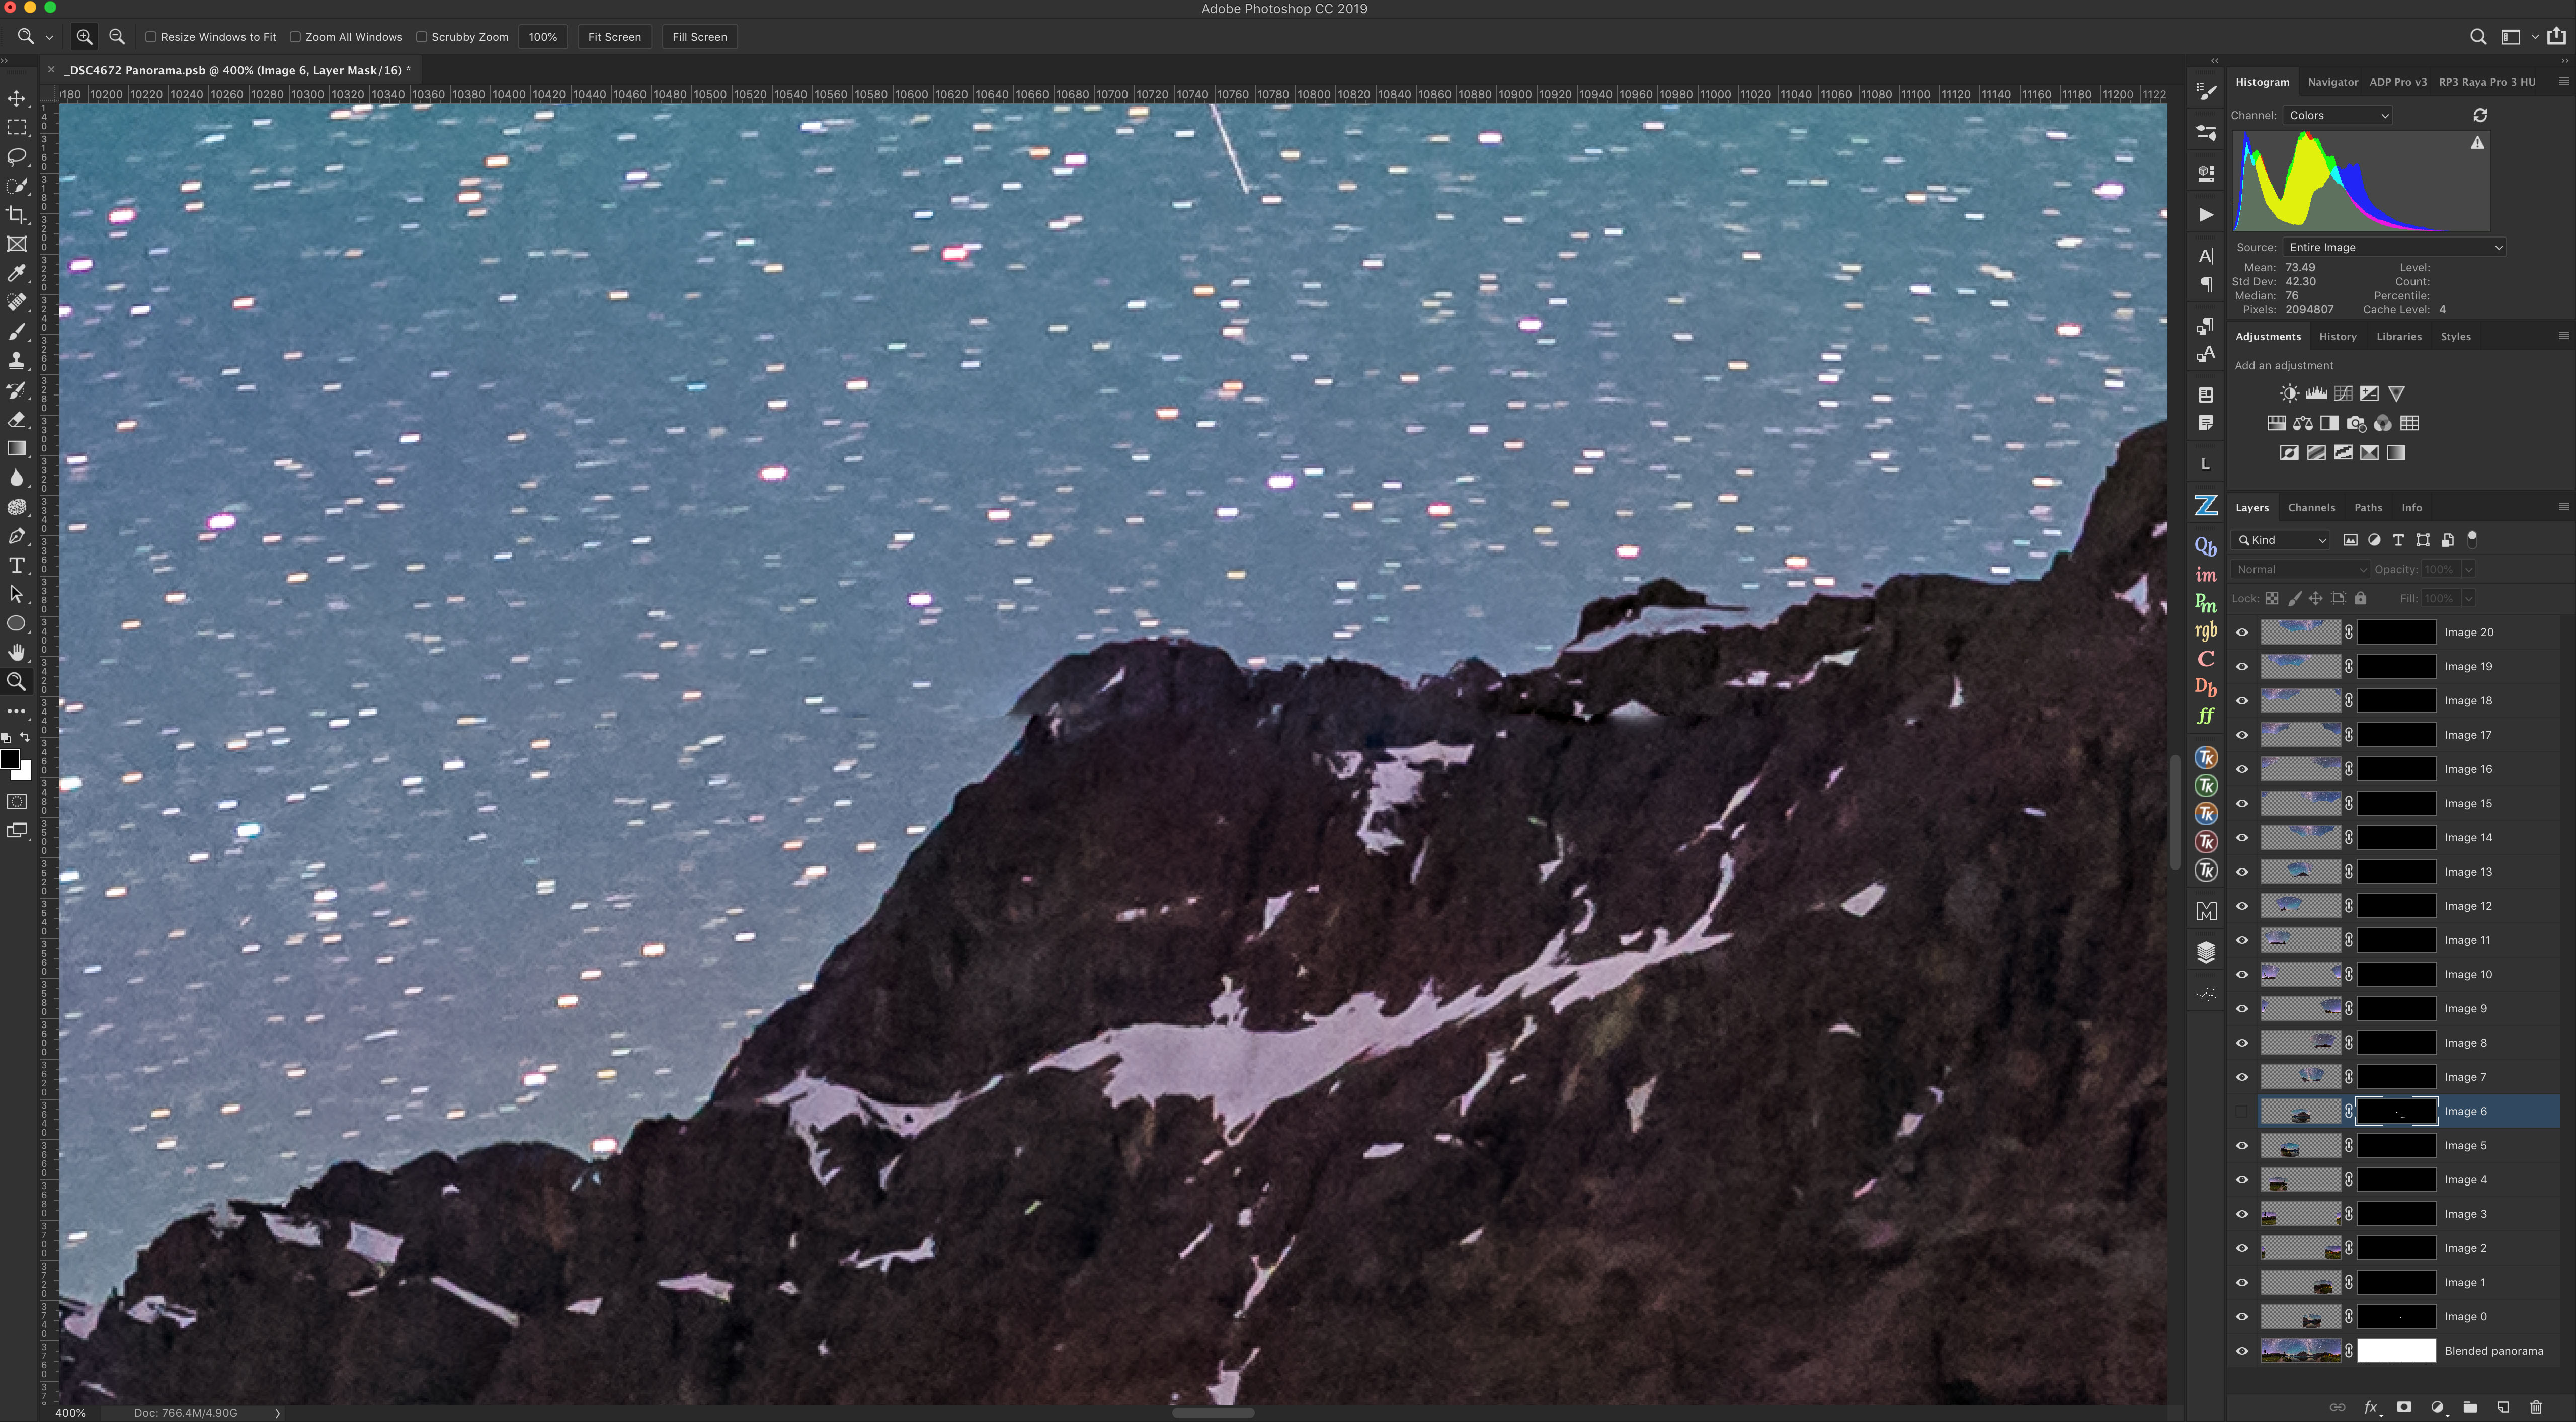
The layered output from PTGui produces a massive image but one that allows fine adjustments to the masks (by using a white paint brush) to correct mismatches like we see see here along the mountain peak.
When exporting the finished panorama I usually choose to export it as a layered 16-bit Photoshop .PSD or, with big panos, as a Photoshop .PSB “big” document.
The reason is that in aligning the moving stars PTGui (indeed, all programs) can produce a few “fault lines” along the horizon, requiring a manual touch up to the masks to clean up mismatched horizon content, as I show above. Having a layered and masked master makes this easy to do non-destructively, though that’s best done in Photoshop.

Affinity Photo is one of the few non-Adobe programs that can open large Photoshop .PSB files, and honour the layers, keeping them and the masks that PTGui exports intact.
However, Affinity Photo (above) can also read layered .PSD and .PSB Photoshop files, preserving the layers. By comparison, ON1 PhotoRAW flattens layered Photoshop files when it imports them, one deficiency that prevents this program from being a true Photoshop alternative.

A common final step is to compress the long dimension of the image to change its aspect ratio to one better suited to publication. But doing so highly distorts the grand sweep of the Milky Way.
Once a 360° panorama is in a program like Photoshop, some photographers like to “squish” the panorama horizontally to make it more square, for ease of printing and publication. I prefer not to do that, as it makes the Milky Way look overly tall, distorted, and in my opinion, ugly. But each to their own style.
You can test out a limited trial version of PTGui for free, but I think it is worth the cost as an essential tool for panorama devotees.
Other Stitching Options
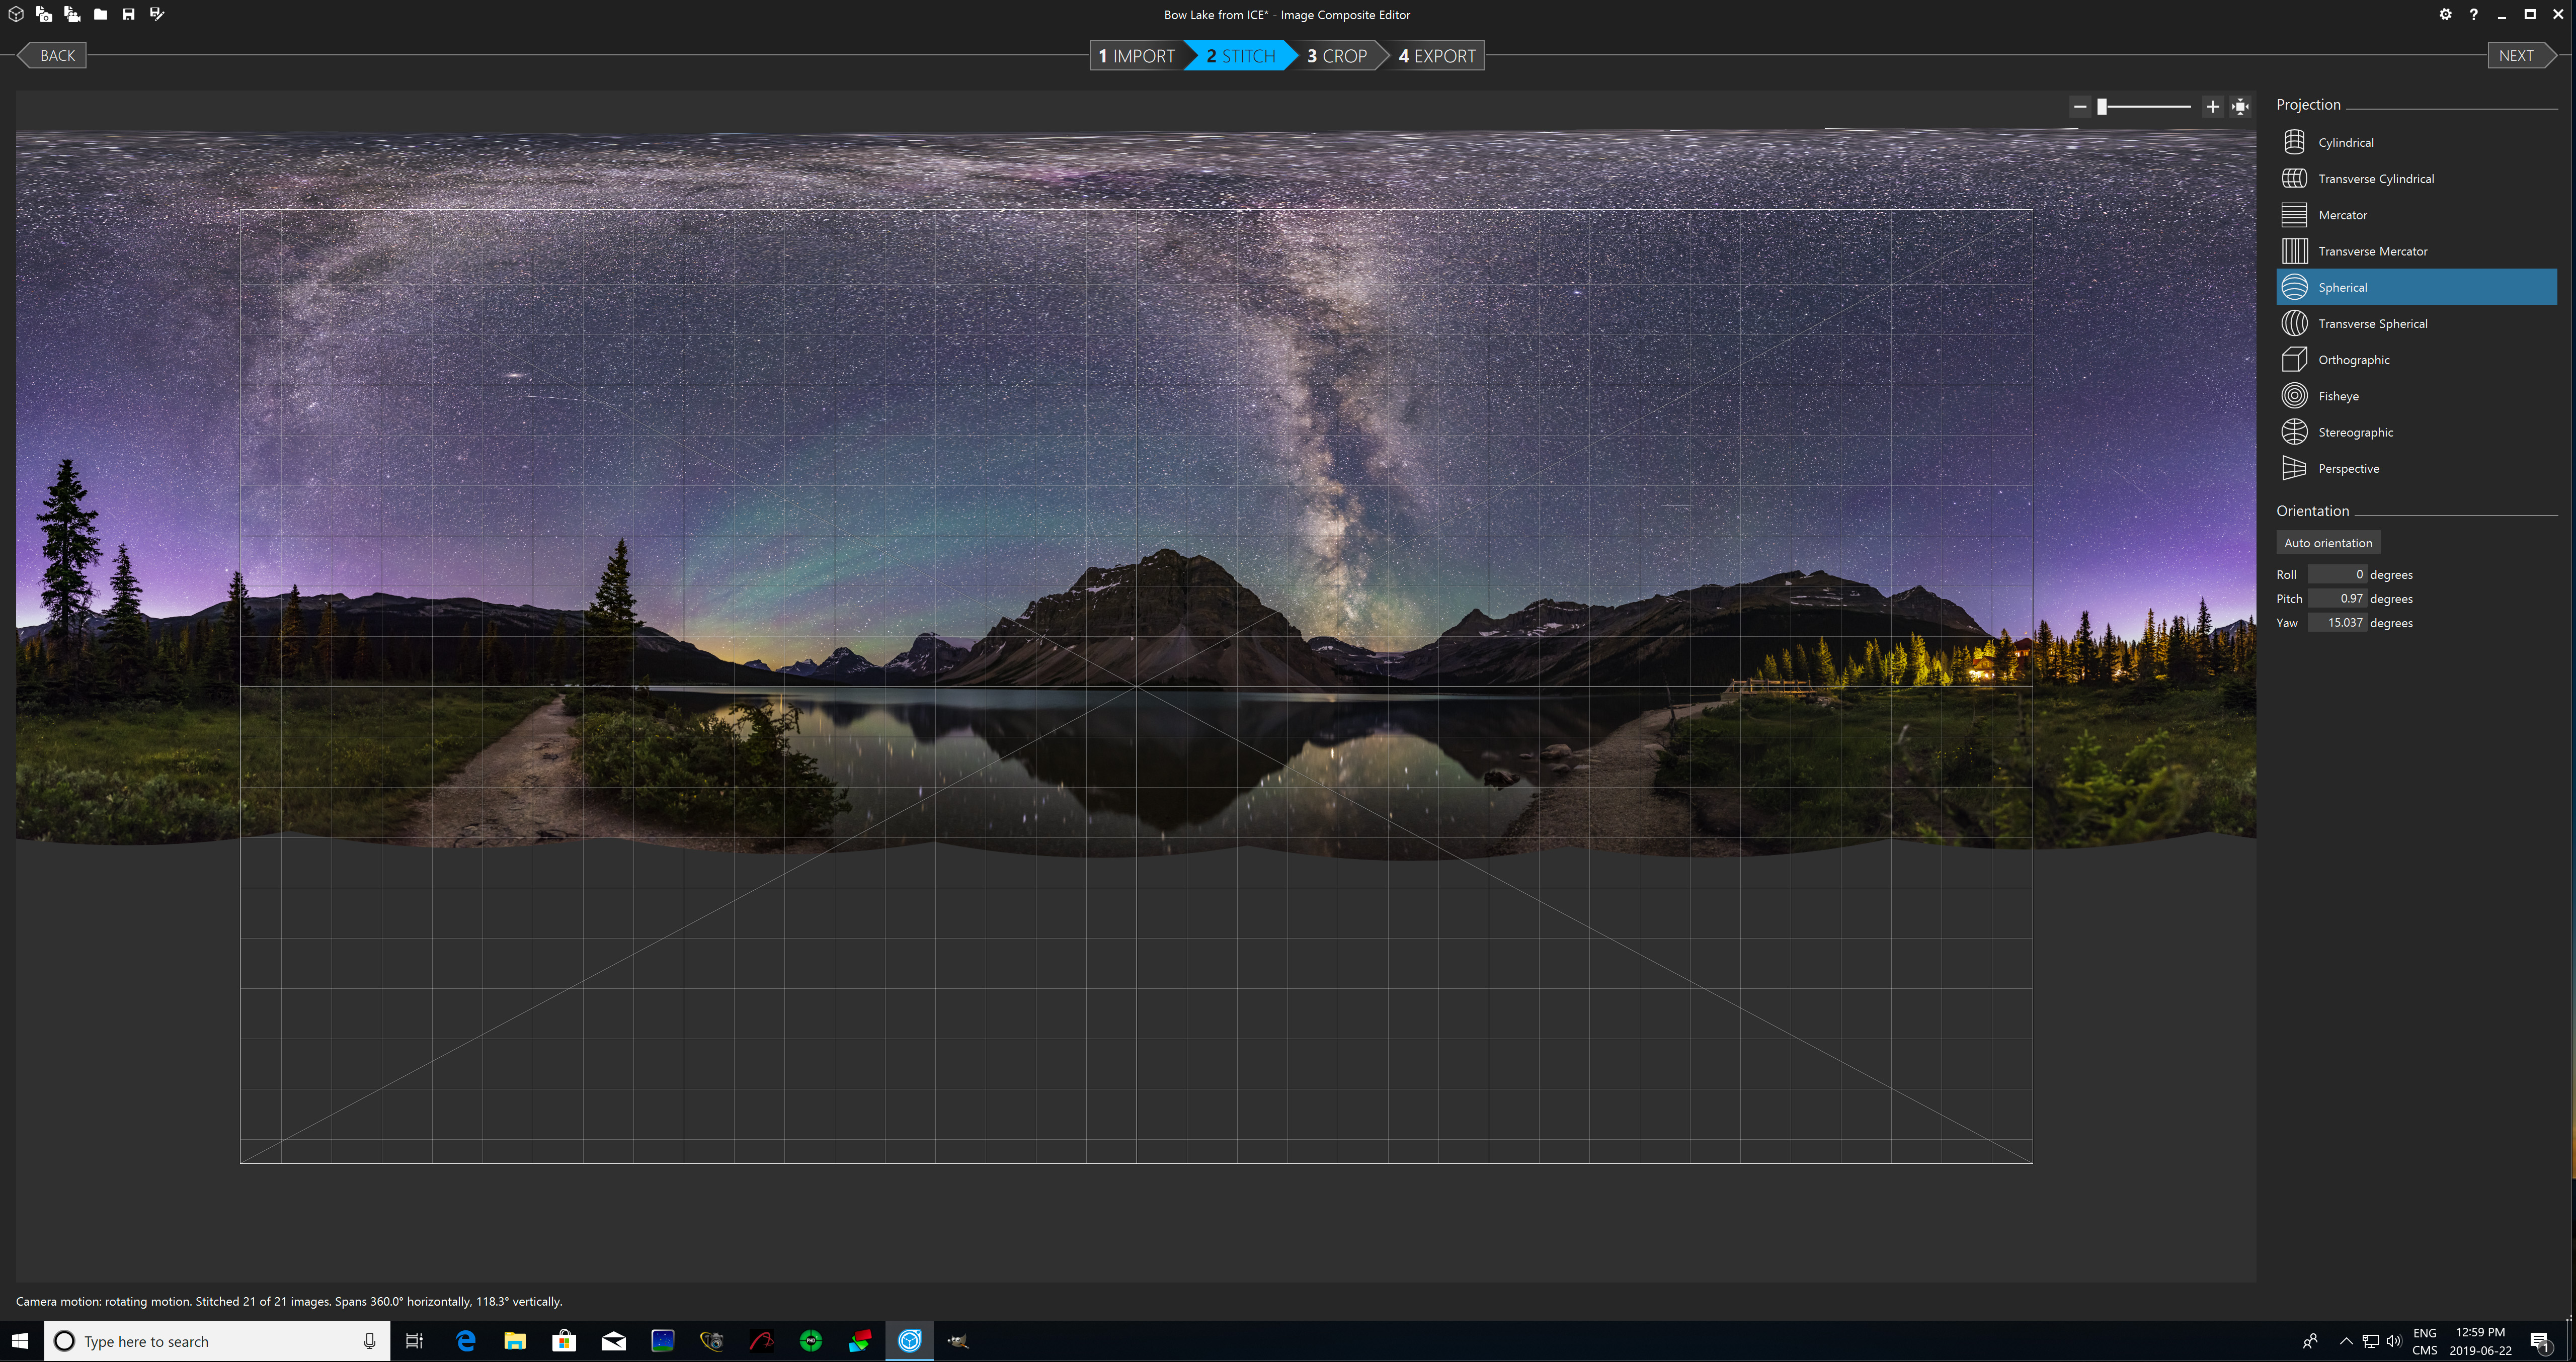
Image Composite Editor, for Windows only but free from Microsoft Research, also does a superb job on all panoramas (as it did with this test case), with accurate stitching and preview, a choice of projections, cropping, and the option for a layered output.
However, Windows users can also try Image Composite Editor (ICE), free from Microsoft Research. As shown above in my test 3-tier pano, ICE works very well on complex panoramas, has a clean, user-friendly interface, offers a choice of geometric projections, and can export a master file with each segment on its own layer, if desired, for later editing.
The open-source program HugIn is free, but suffers from an inaccurate preview, complex interface and workflow, and technical displays and functions only a programmer will love.
The free, open source program HugIn is based on the same Panorama Tools root software that PTGui uses. However, I find HugIn’s operation clunky and overly technical. Its export process is arcane yet renders out only a flattened image.

The export of the same multi-tier pano that worked fine with PTGui and ICE failed with HugIn, with missing content and numerous mis-aligned areas of the landscape, tough to fix in the flattened output.
In testing it with the same three-tier 21-segment pano that PTGui and ICE handled perfectly, HugIn failed to properly include one segment. However, it is free for MacOS and Windows, and so the price is right and is well worth a try.
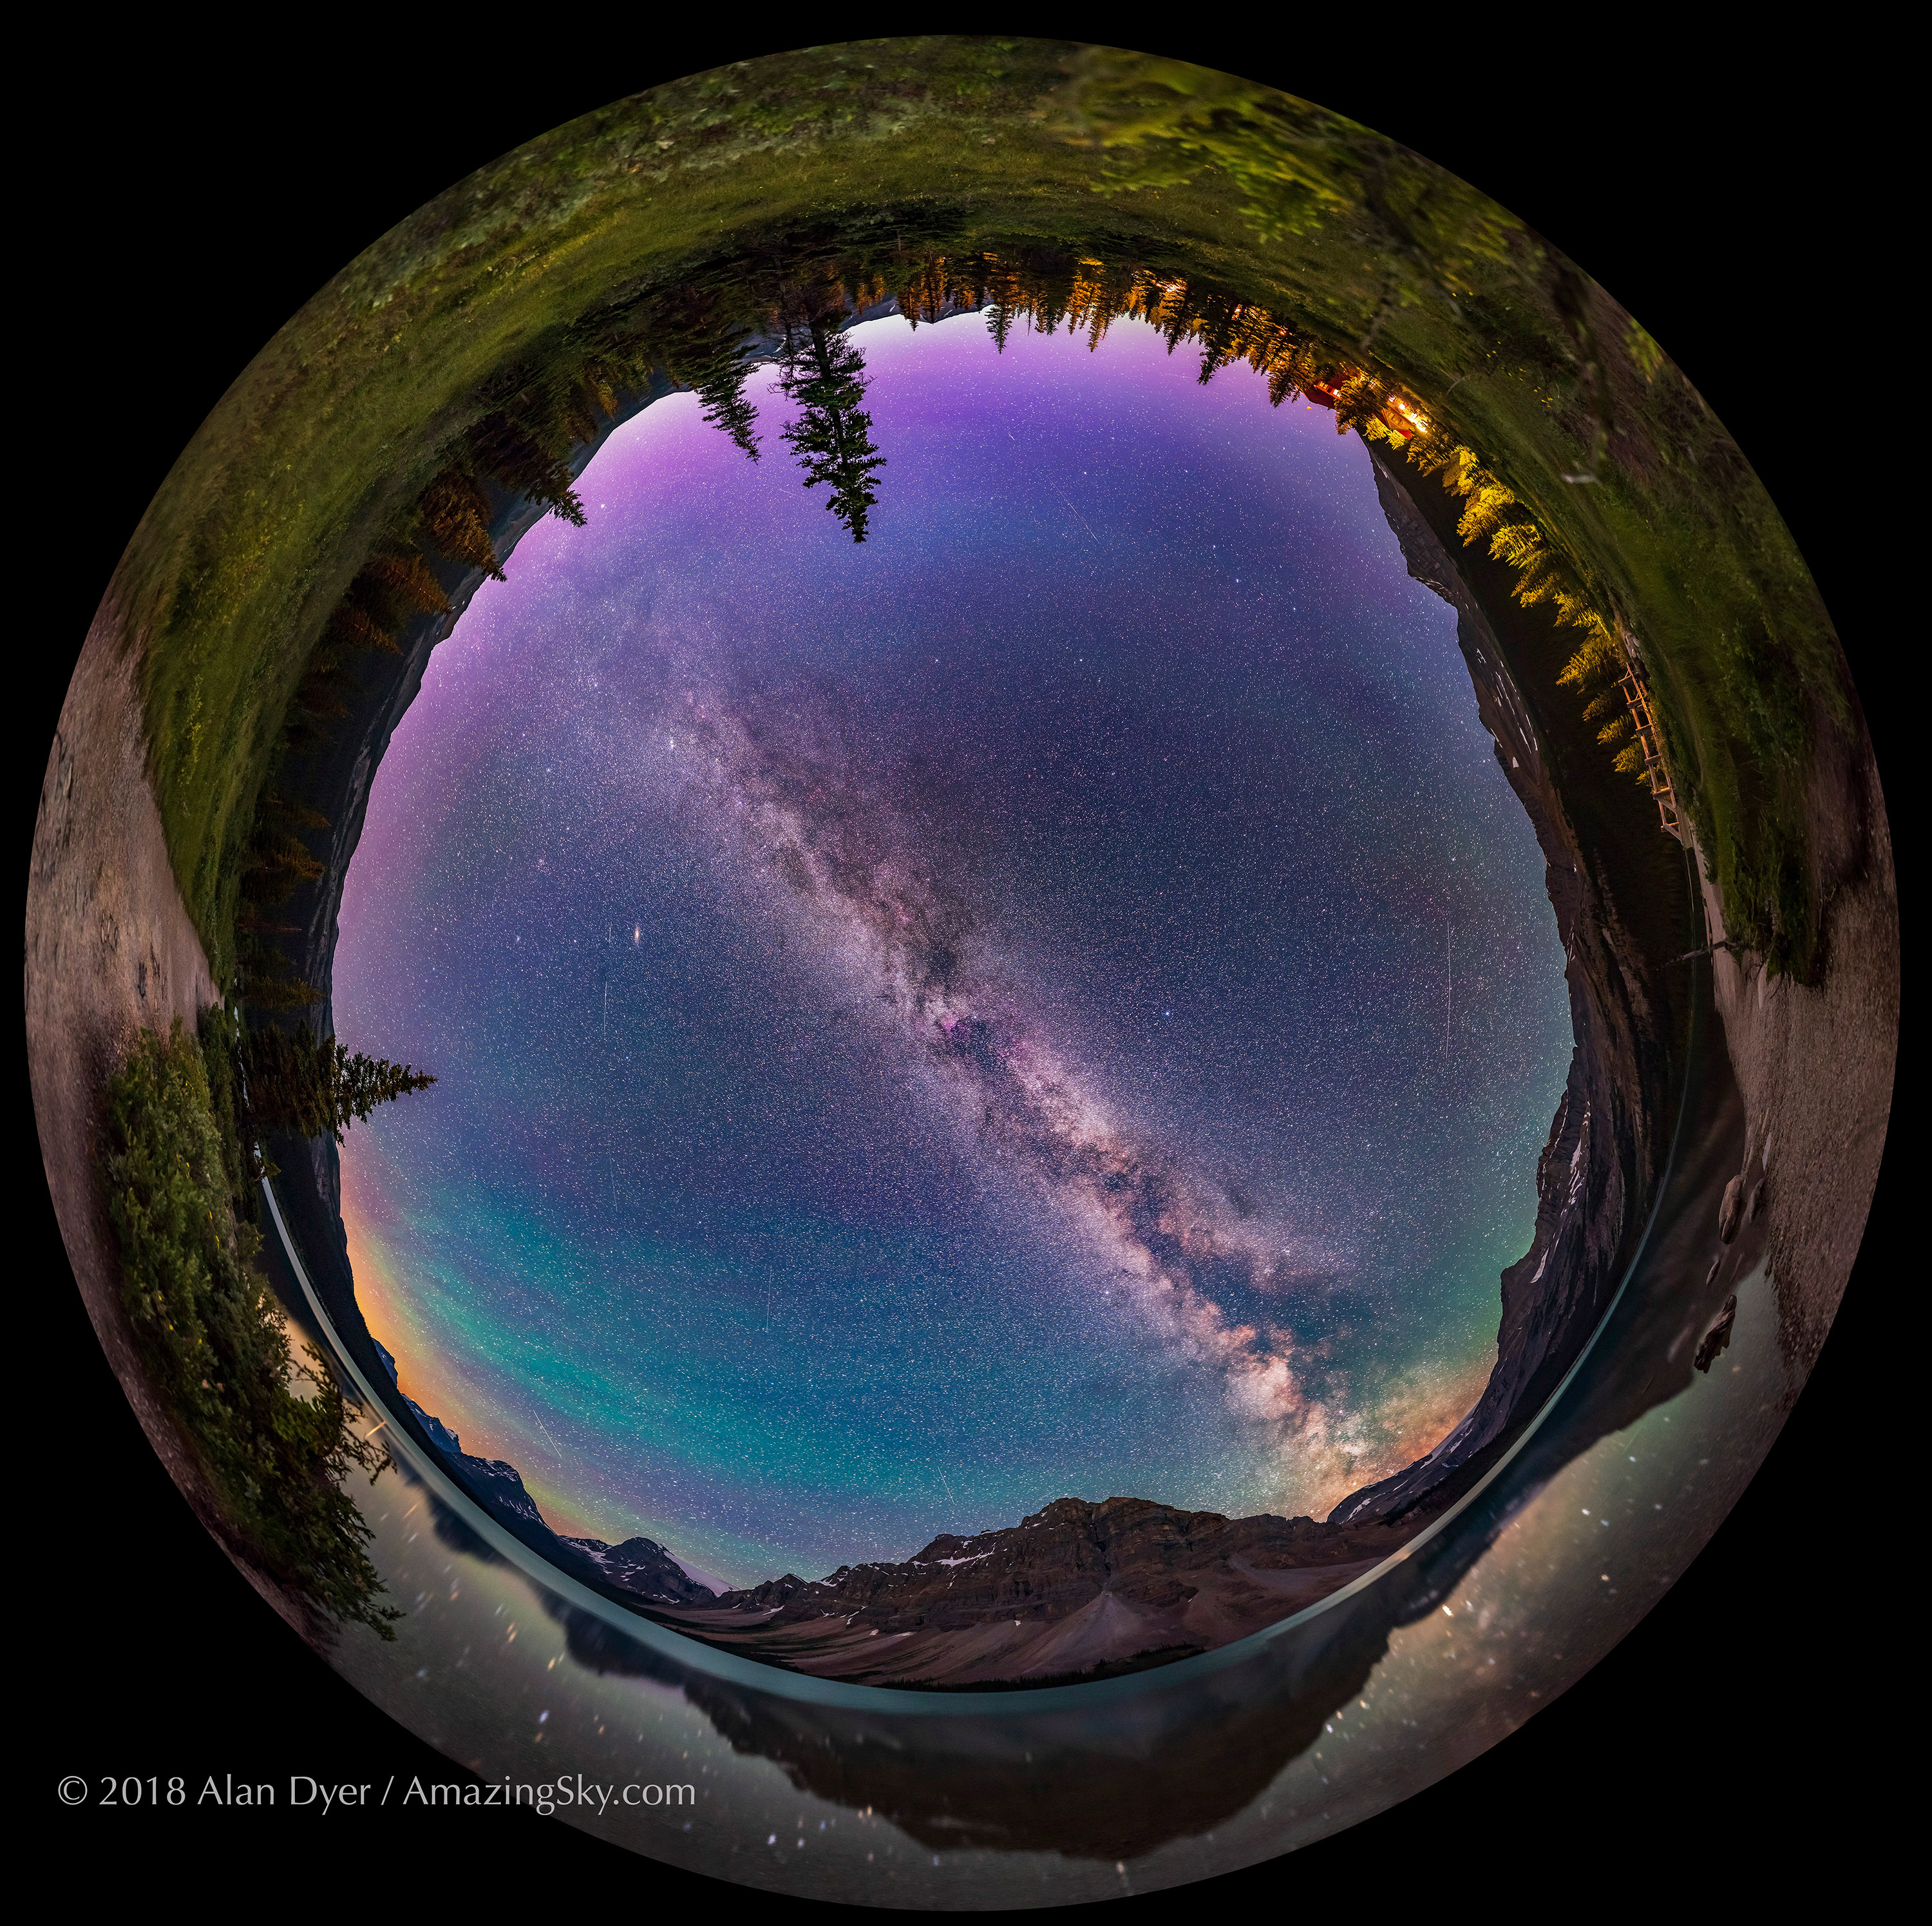
In summer with the Milky Way overhead, a spherical projection is often best for presenting the Milky Way as your eye saw it, as a majestic band of light from horizon to horizon across the sky passing through the zenith.
With the superb tools now at our disposal, it is possible to create detailed panoramas of the night sky that convey the majesty of the Milky Way – and the night sky – as no single image can. Have fun!
— Alan, June 25, 2019 / © 2019 Alan Dyer / AmazingSky.com

Rather informative and thorough…thanks.
Very informative. Thanks for taking the time to include the step by step instructions. I recently purchased the Nodal Ninja 6 to make it easy to do the panos. I’m especially interested in capturing the 180 degrees of the Milky Way, and your tutorial reinforced a lot of information I got from different sources.
Nice and thoughtful article. Did you ever use Starry Landscape tracker for stacking milky way photos. If so, what is your experience? Kind regards, Hans G. Smit
Yes, I’ve used SLS and Sequator and they work OK but I don’t like to use them as they are destructive and have crude masking, resulting in edge defects along the horizon especially with complex ground to sky boundaries, defects that are then hard to remove as they are burned into the single flattened layer – crude. This is documented in my ebook. YouTube reviews of these apps never show these defects.
Thanks very much for your answer. Good to hear from a professional what are the advantages and disadvantages of SLS. Kind regards, Hans G. Smit
Nice work, thanks
Very informative…. Thank you
Especially loved the moonrise over Red Deer! Inspirational e-mails! Thanks!
>
You are a maestro at what you do . It has taken you years the slow long hard route Now to explain that to get the results that you do ,is like a heart surgeon giving you a 30 minute lesson before your first heart op Keep on doing ,you stuff is excellent