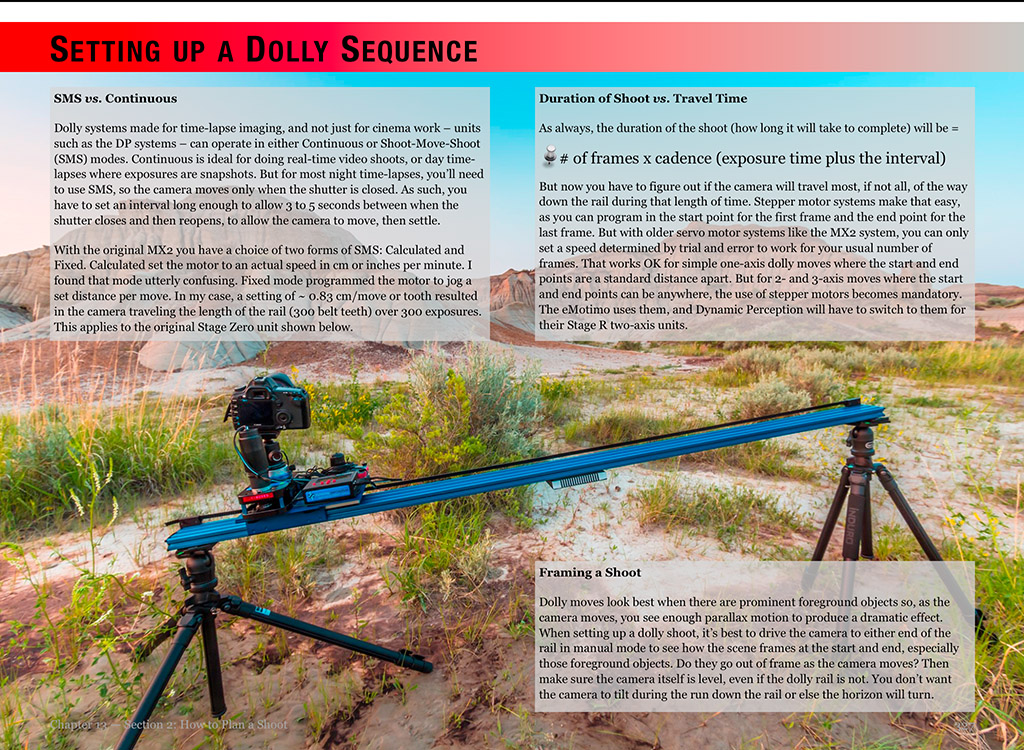
As eclipse day approaches here are some tips and video tutorials from me about how best to capture the total eclipse of April 8, 2024.
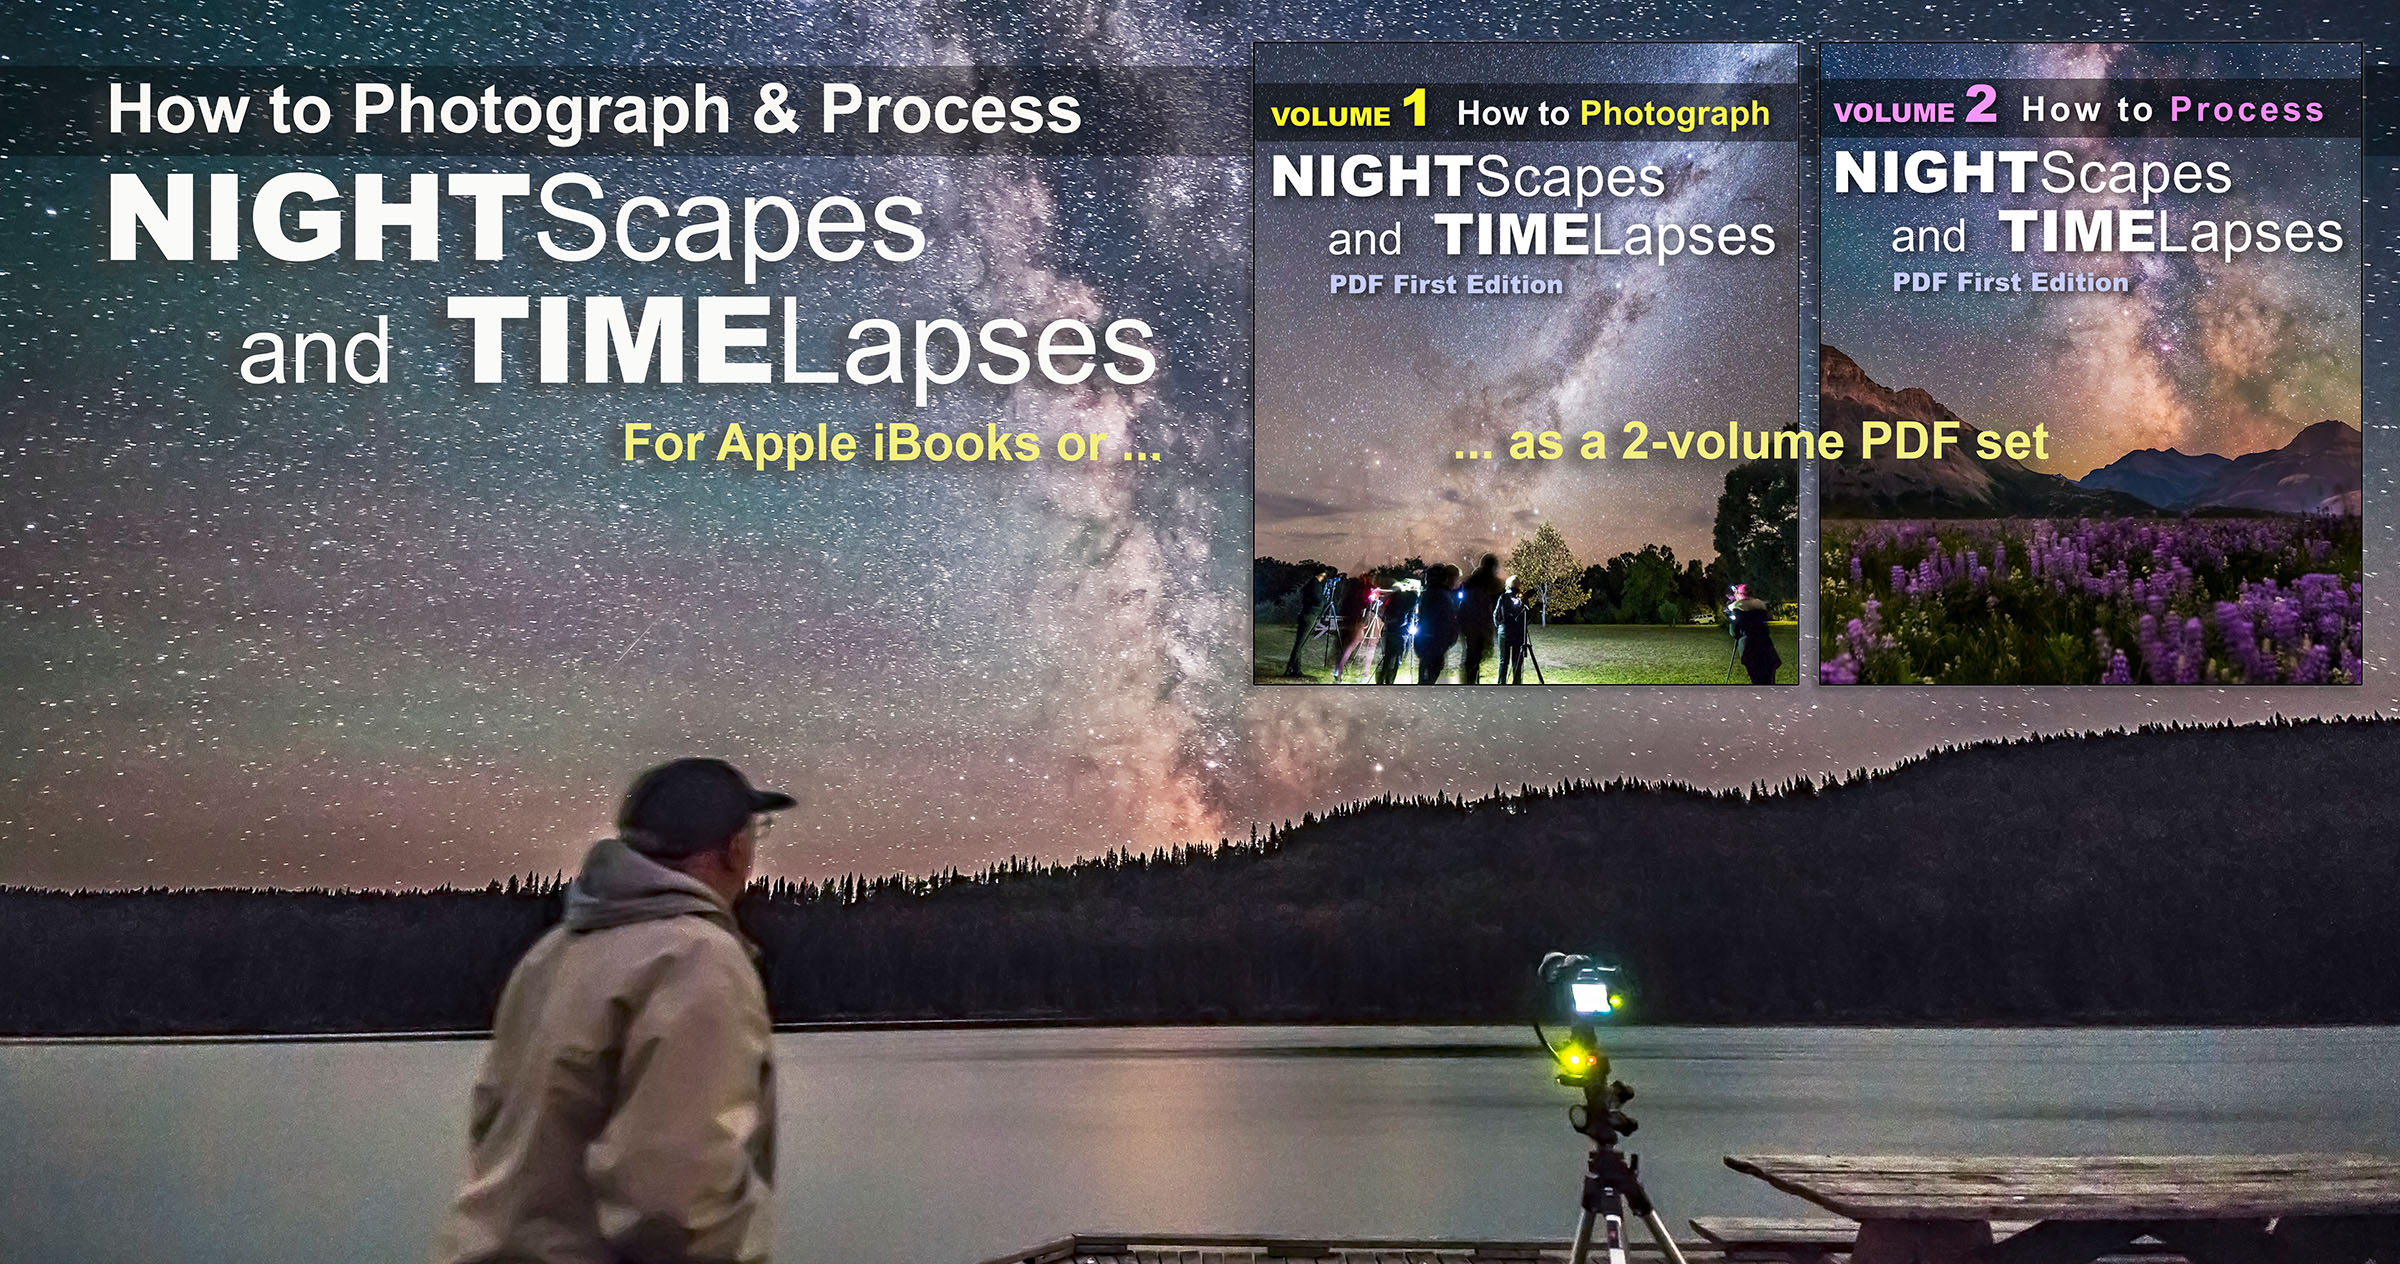
There are many ways to capture great images and movies of a total eclipse of the Sun. I outline them all in great detail in my 380-page ebook How to Capture the Solar Eclipses, linked to at right.
Originally published in June 2023, I revised the ebook following the October 14, 2023 annular eclipse of the Sun to include “lessons learned at the eclipse,” and some processing tutorials on assembling annular eclipse composites. I’ve also added new content on using software to control cameras and updated information about solar filters.
Brief Tips and Techniques
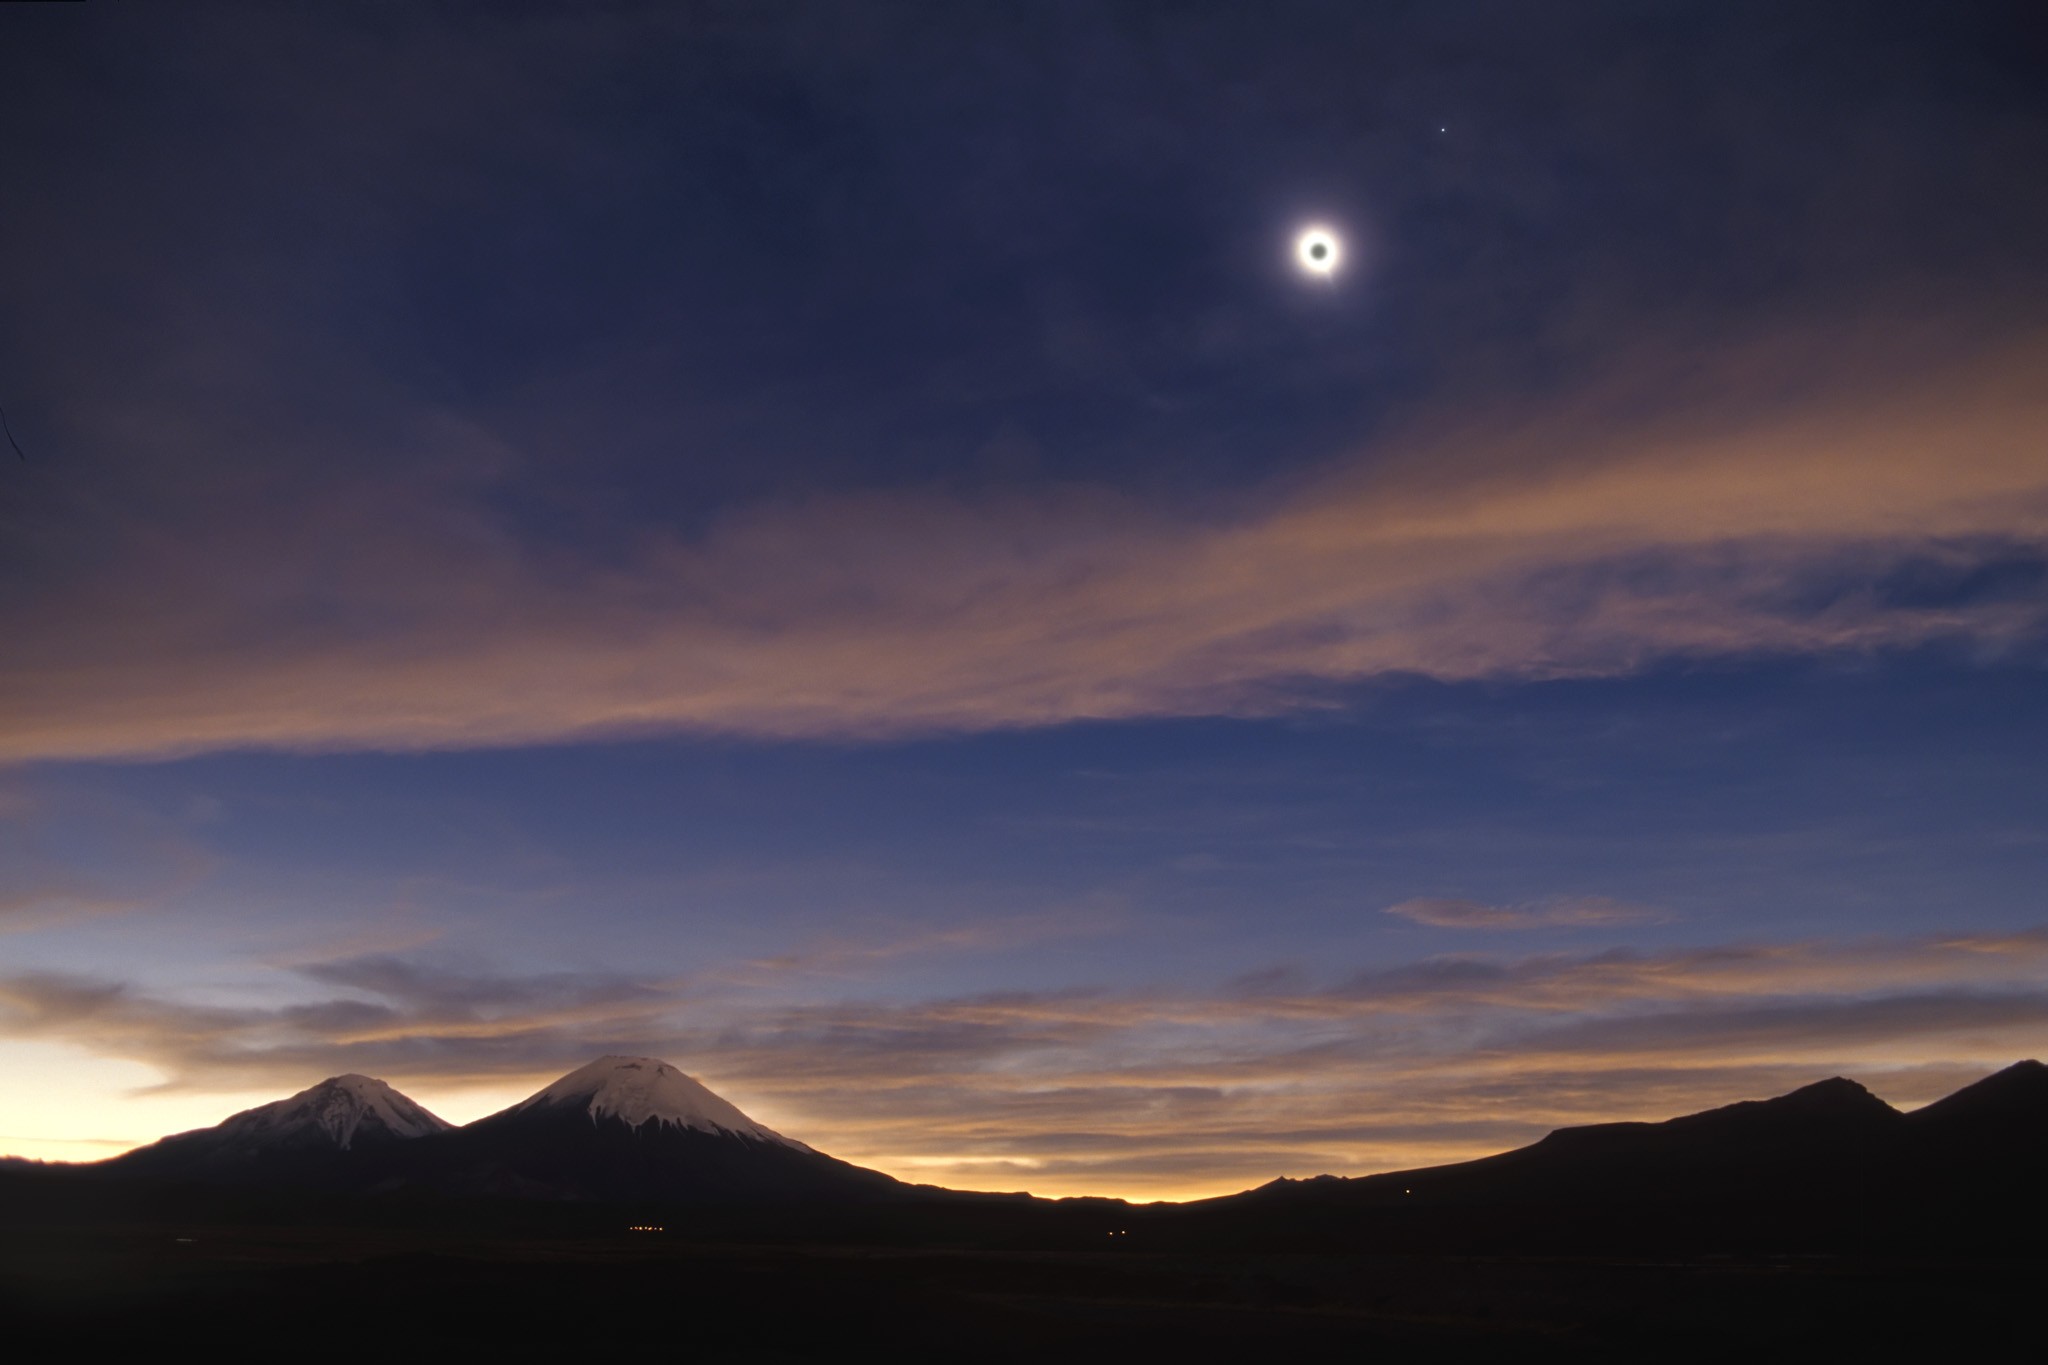
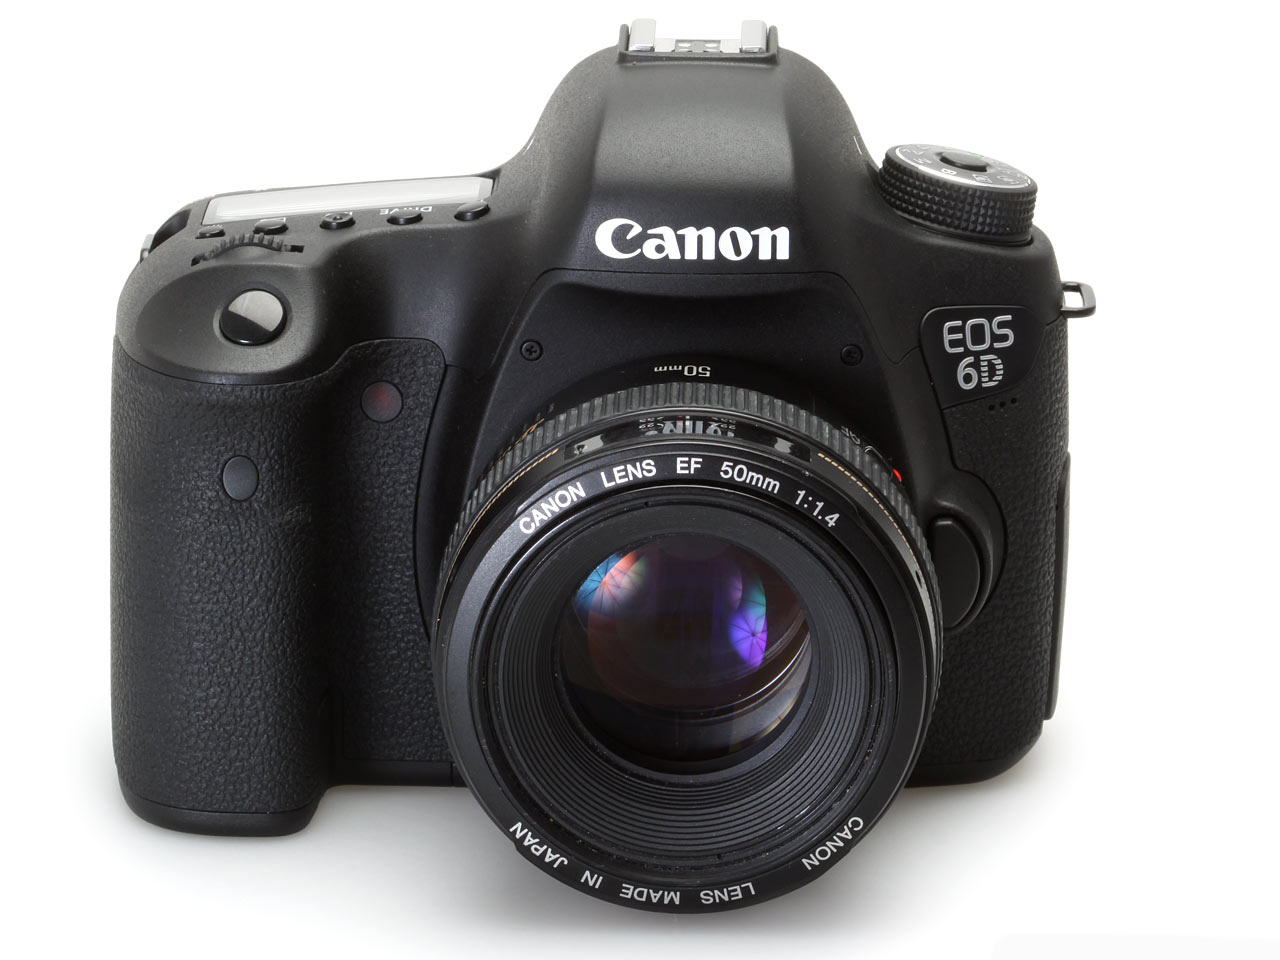
The August 21, 2017 total solar eclipse over the Grand Tetons as seen from the Teton Valley in Idaho, near Driggs. With the Canon 6D and 14mm SP Rokinon lens at f/2.5 for 1/10 second at ISO 100.
My breakdown of recommend methods, in order from simplest to most complex, and with increasing demands on your time, is generally this:
Use a Phone Camera for a Movie. While they can be used for a quick handheld grab shot during totality, a better method is to place a phone on a tripod using a clamp of some kind. Then a few minutes before totality aim and frame the scene, with no filter over the camera lens. Start it in movie mode to record video of the eclipse and sky changes, and the excited sounds of your group! Just remember to stop the video shortly after the end of totality and aim the phone away from the Sun. Never leave any unfiltered camera aimed at the Sun for a long time.
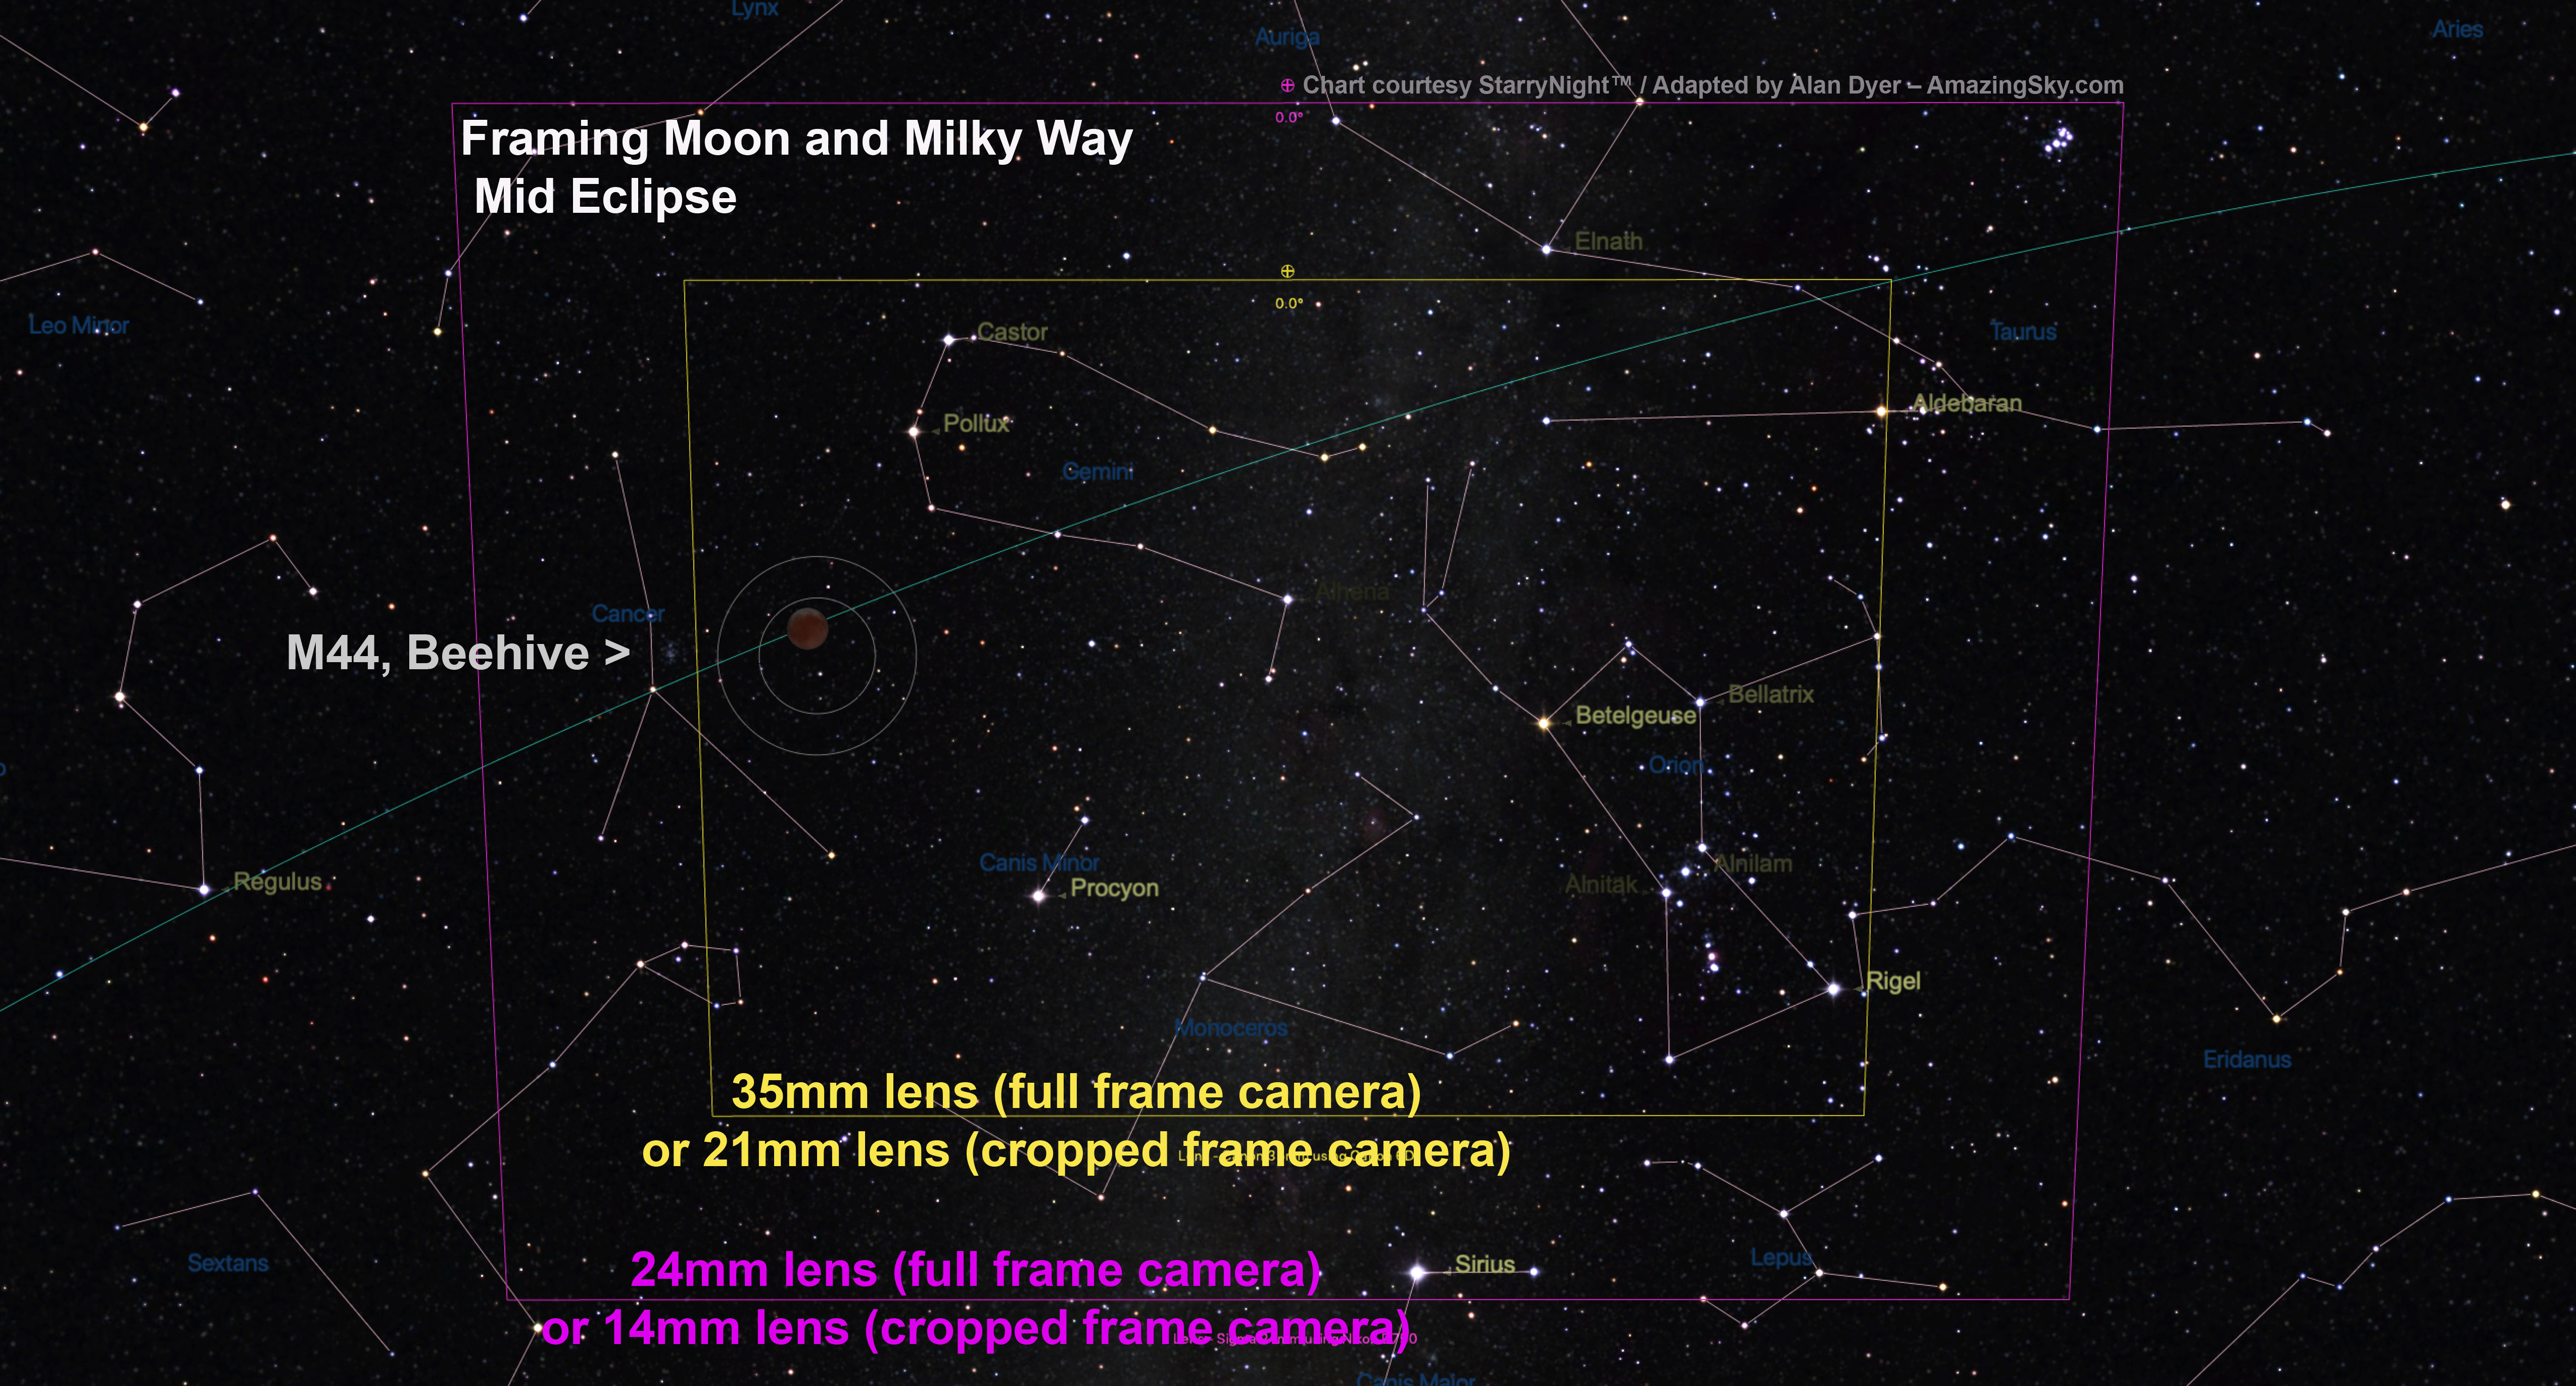
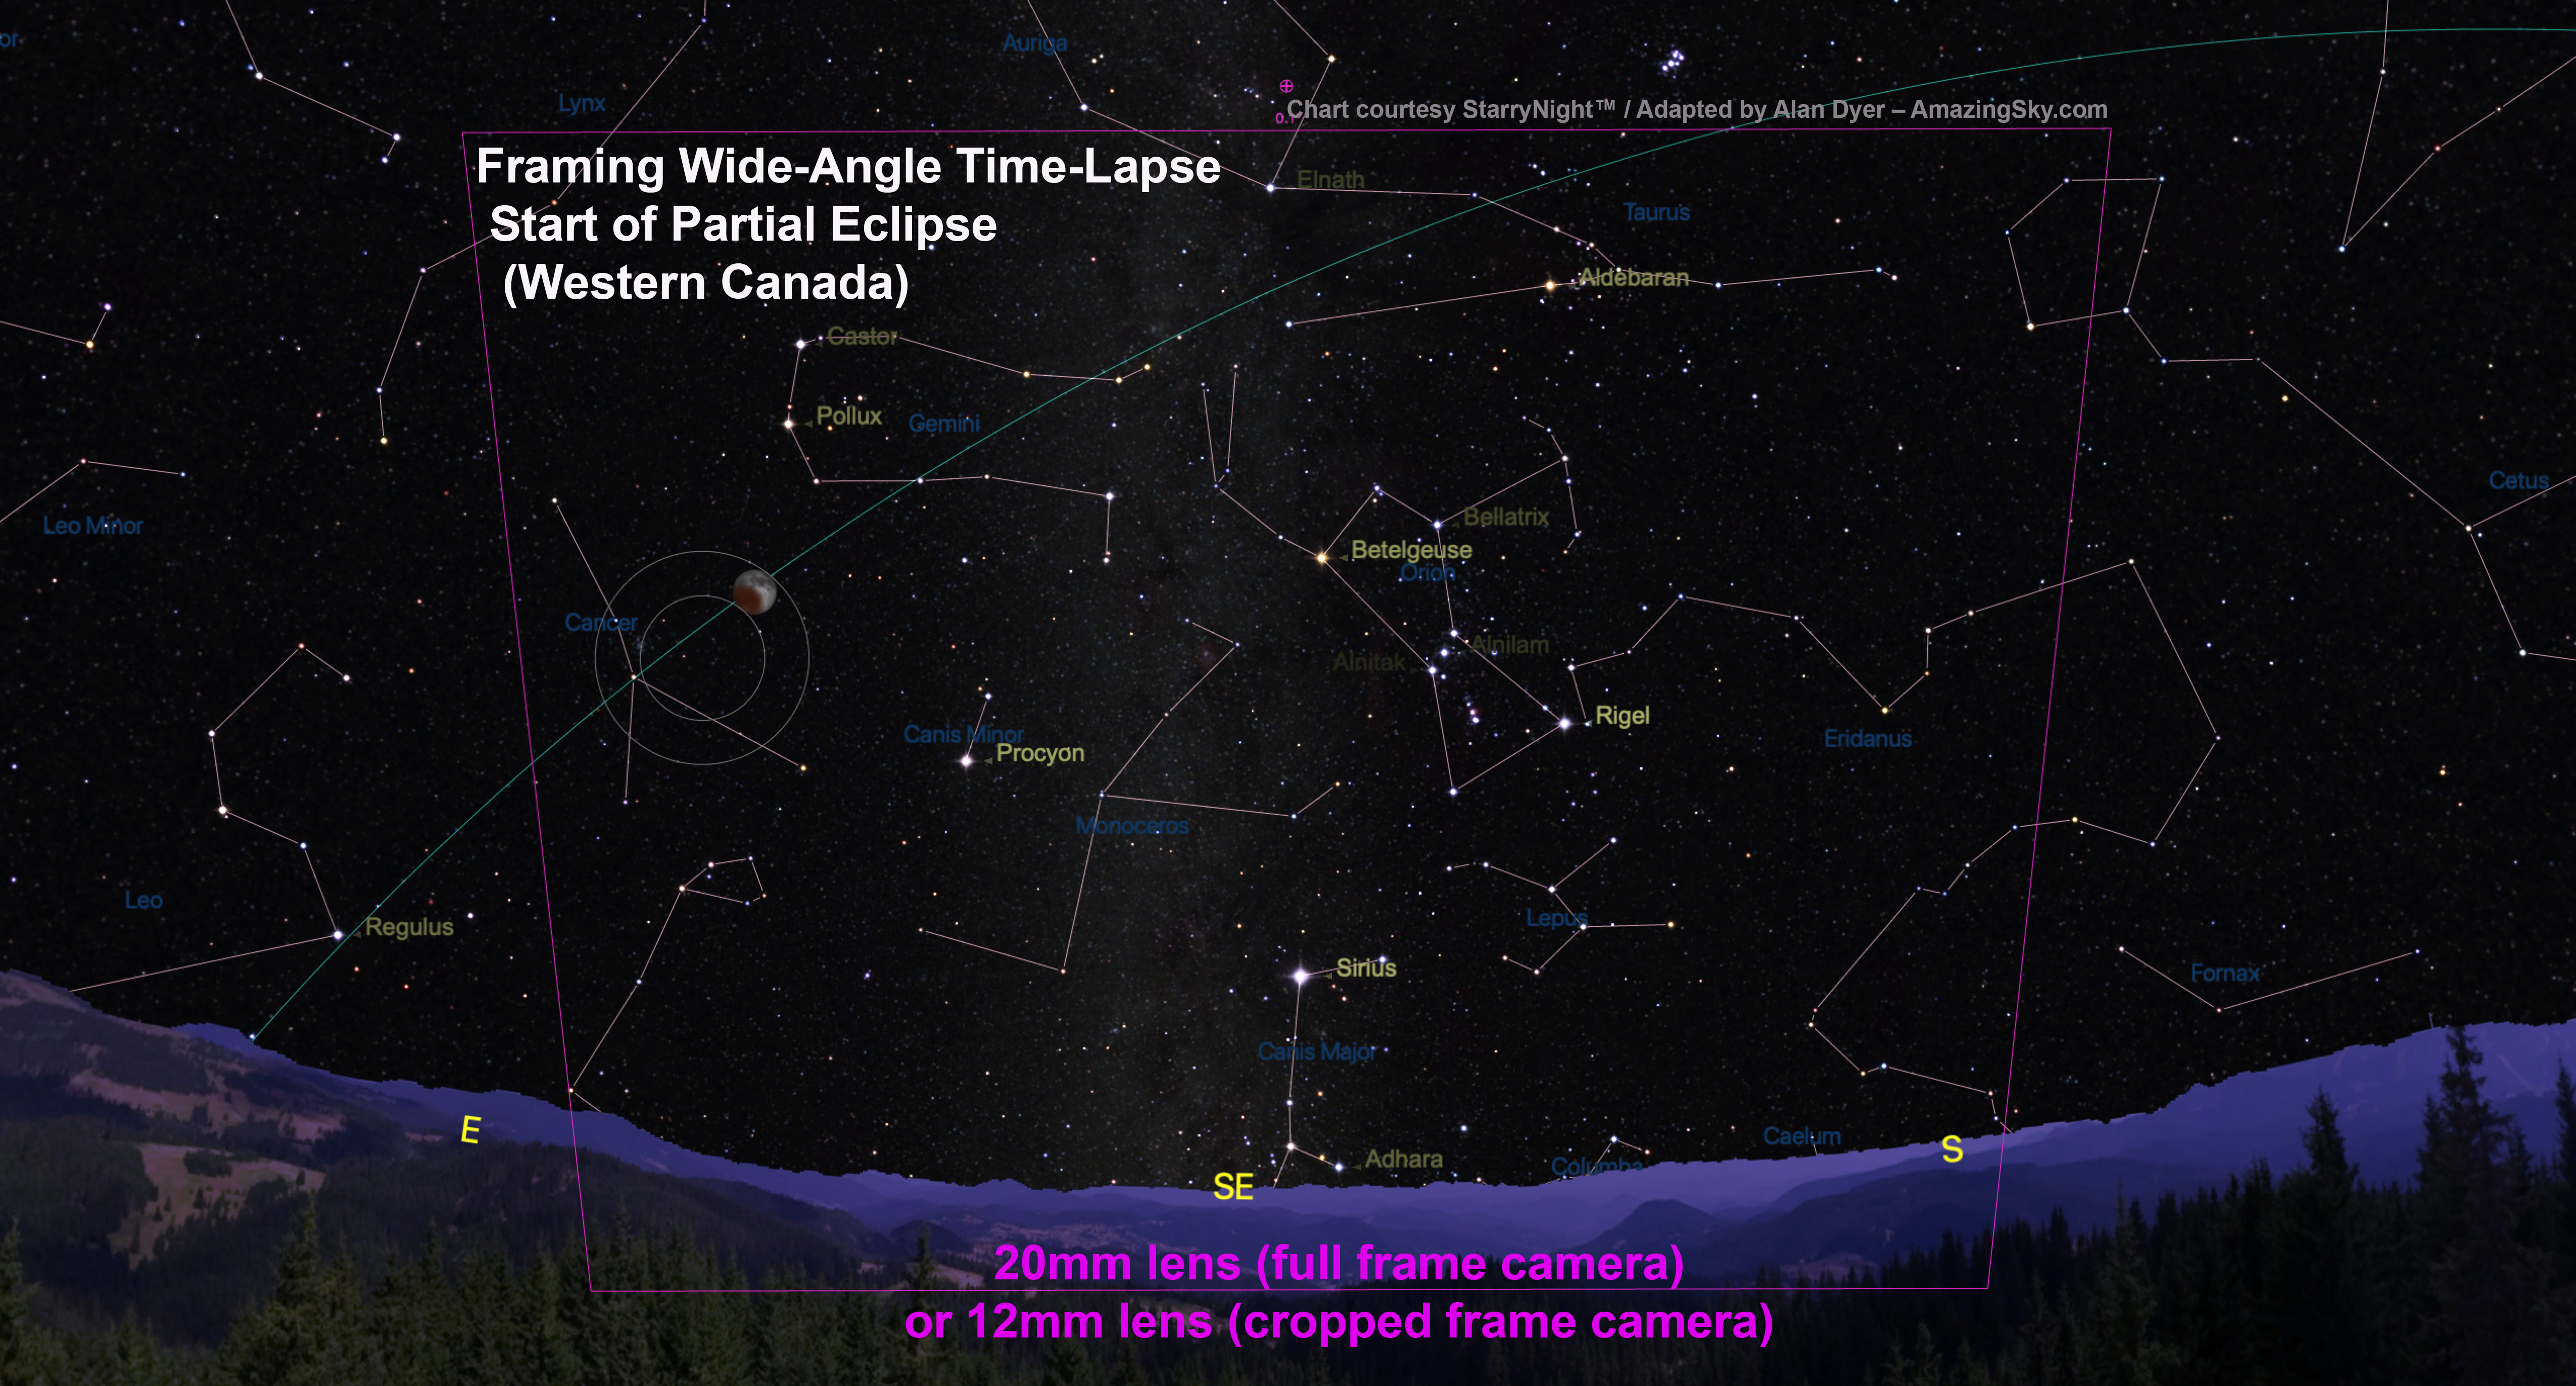
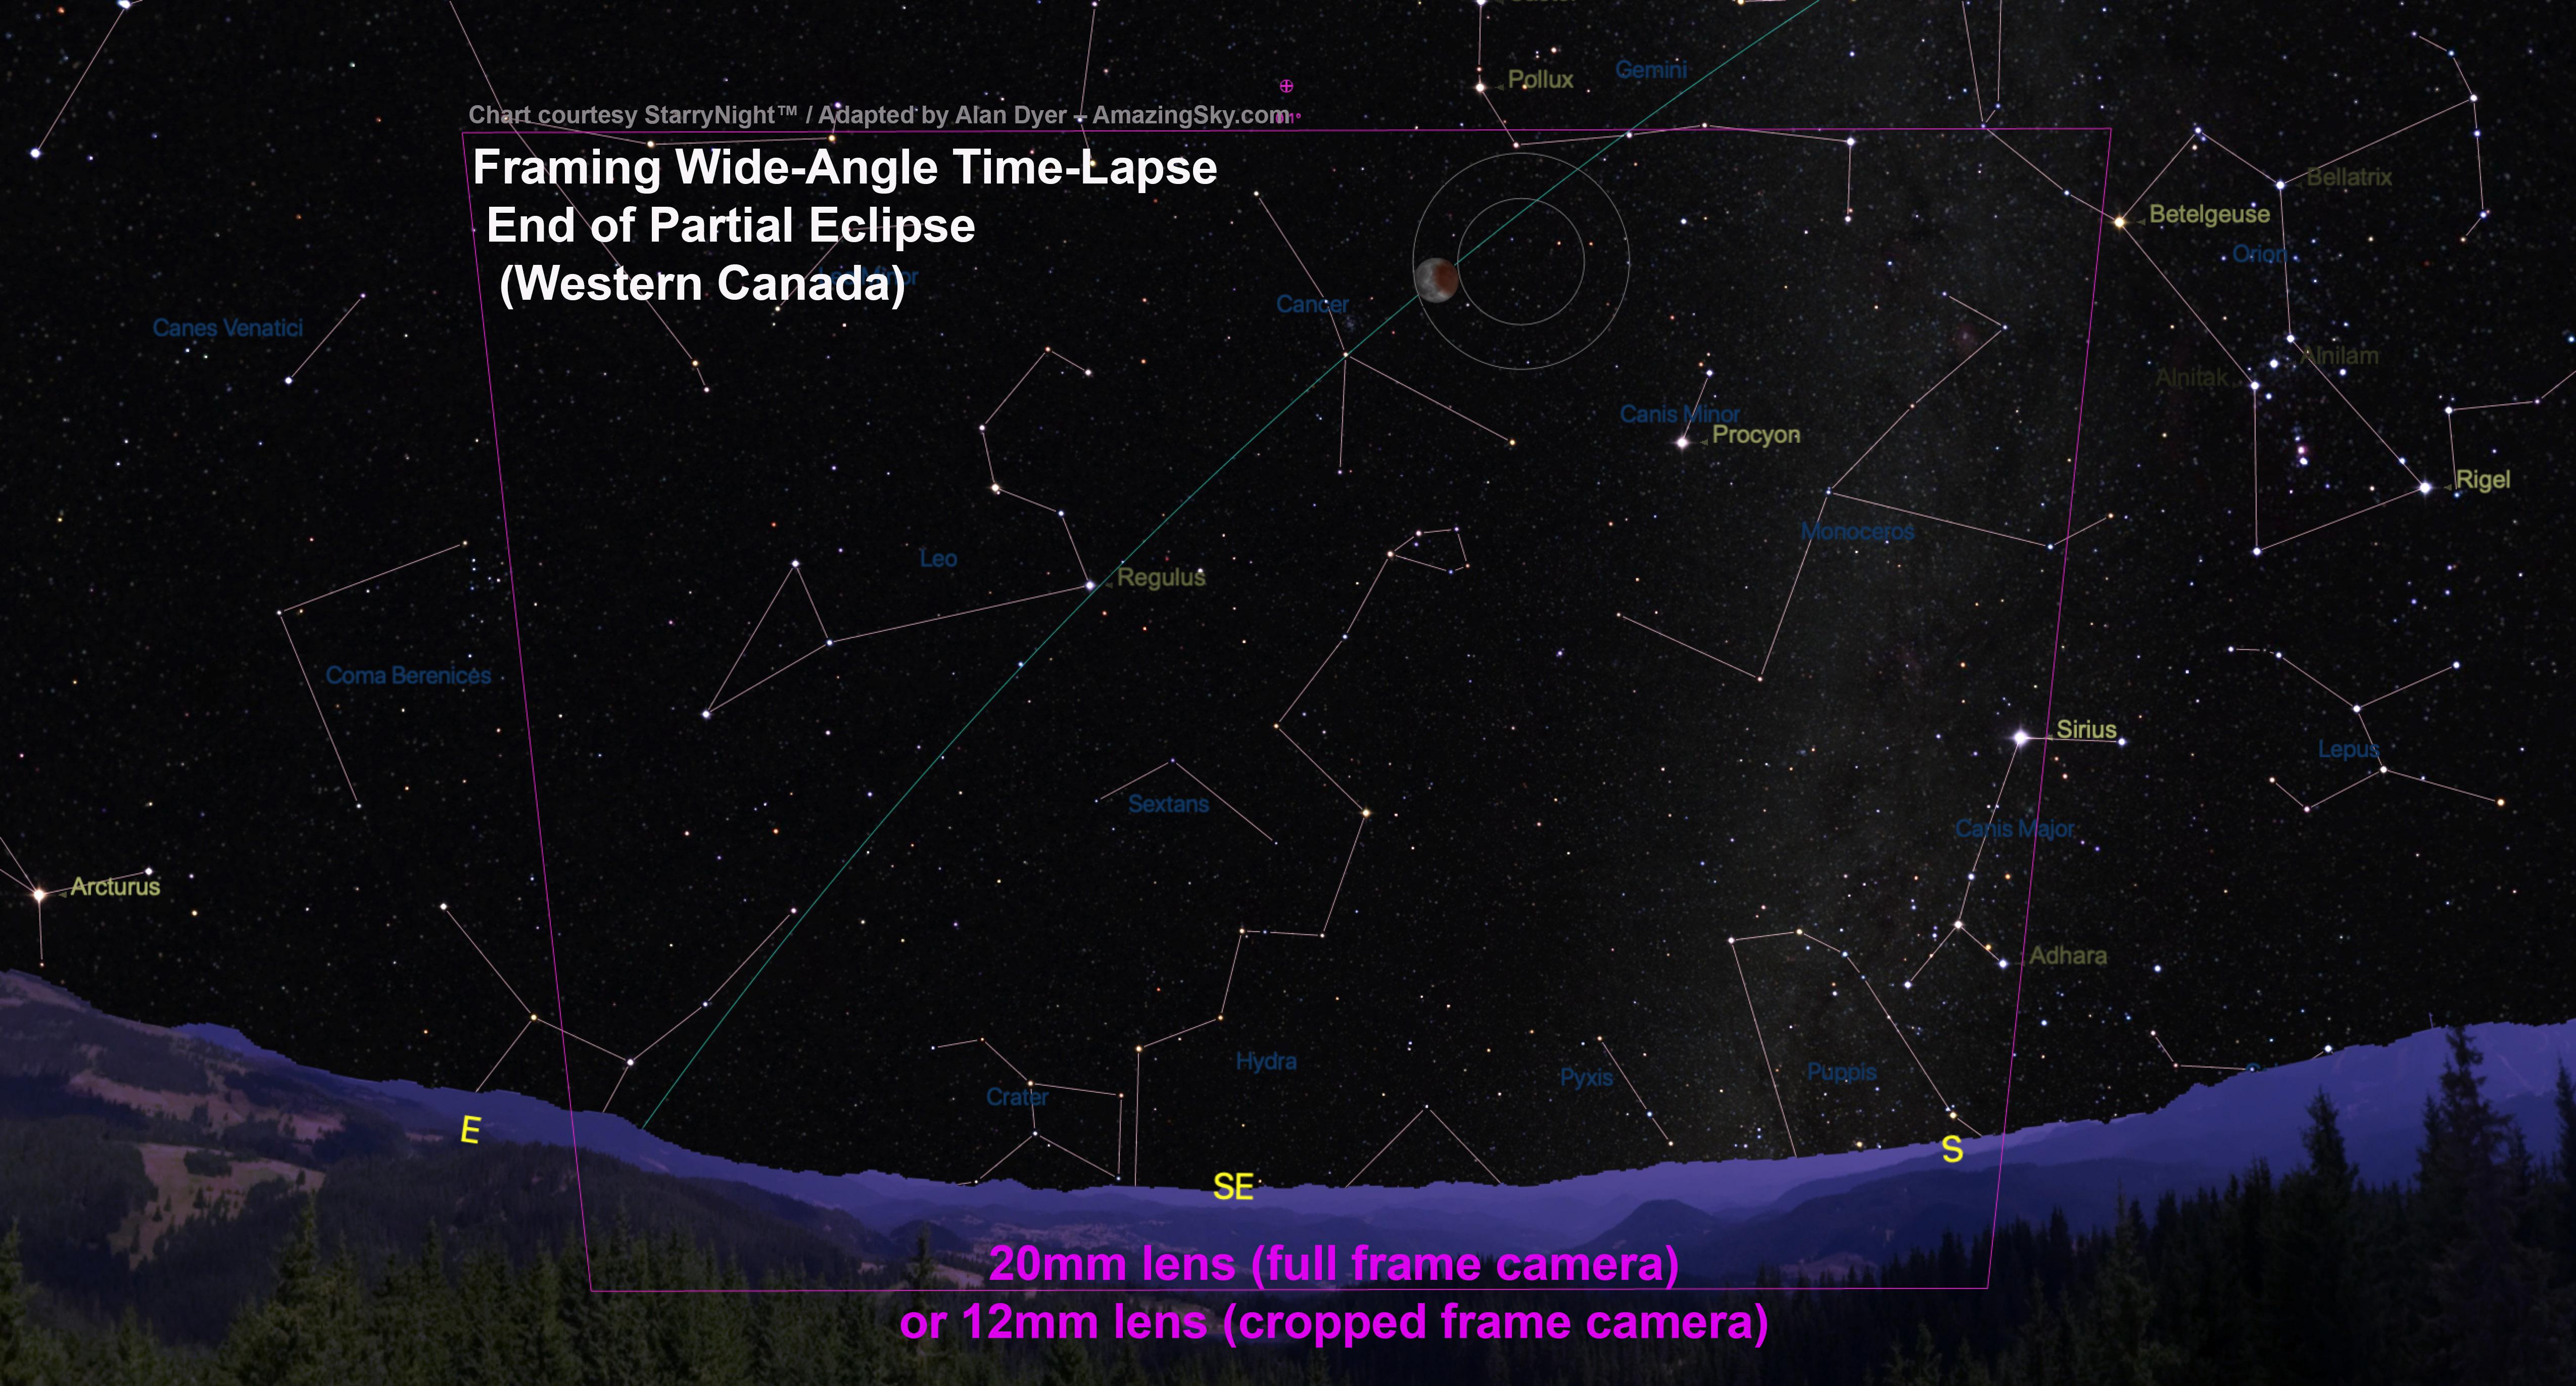
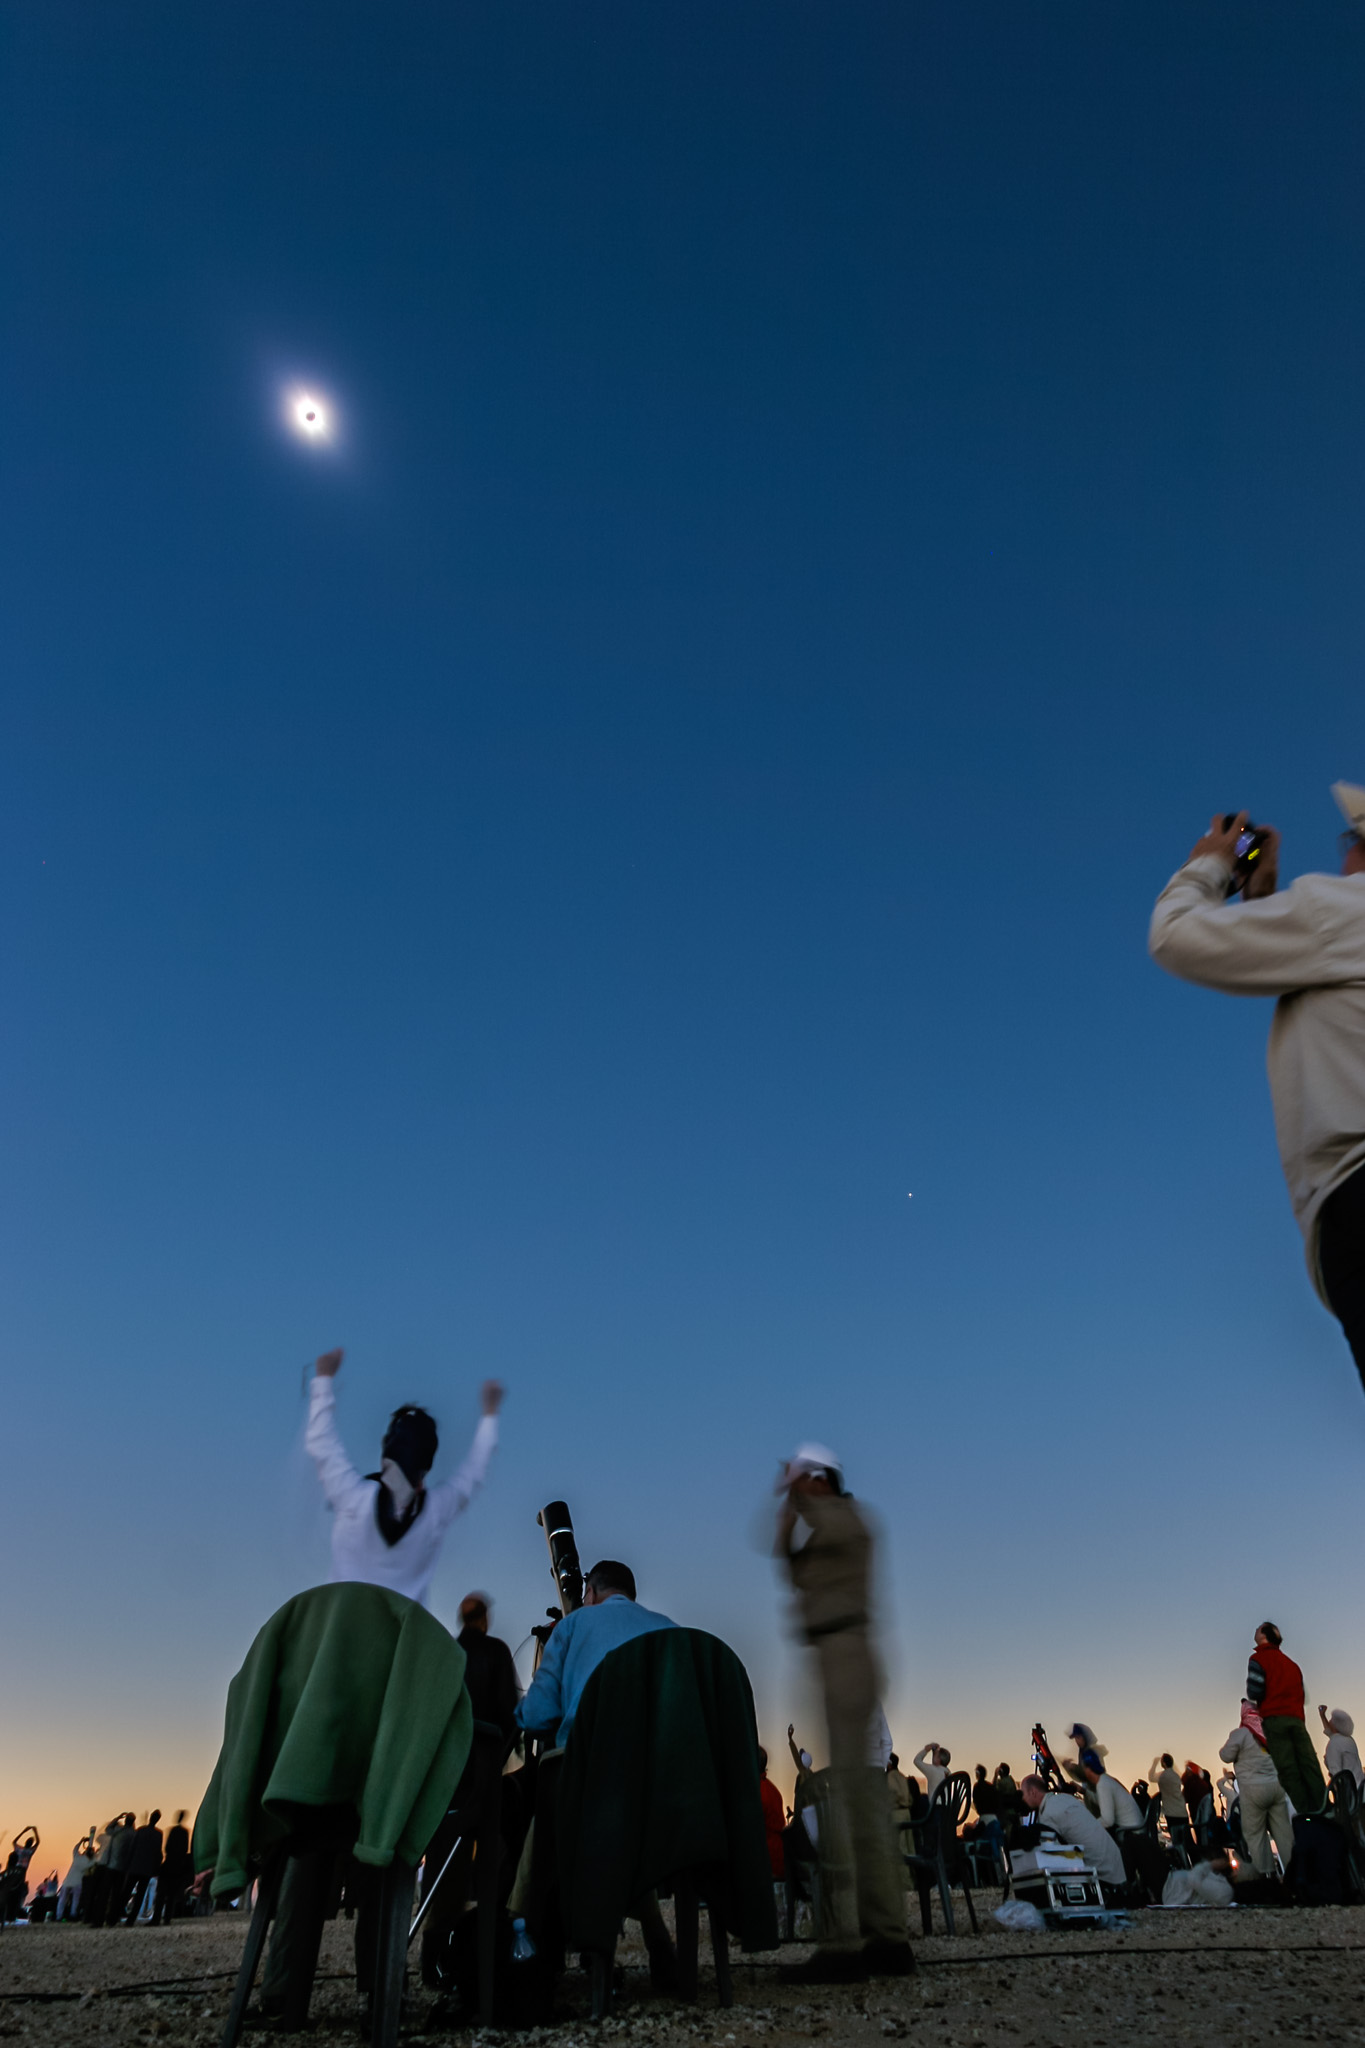
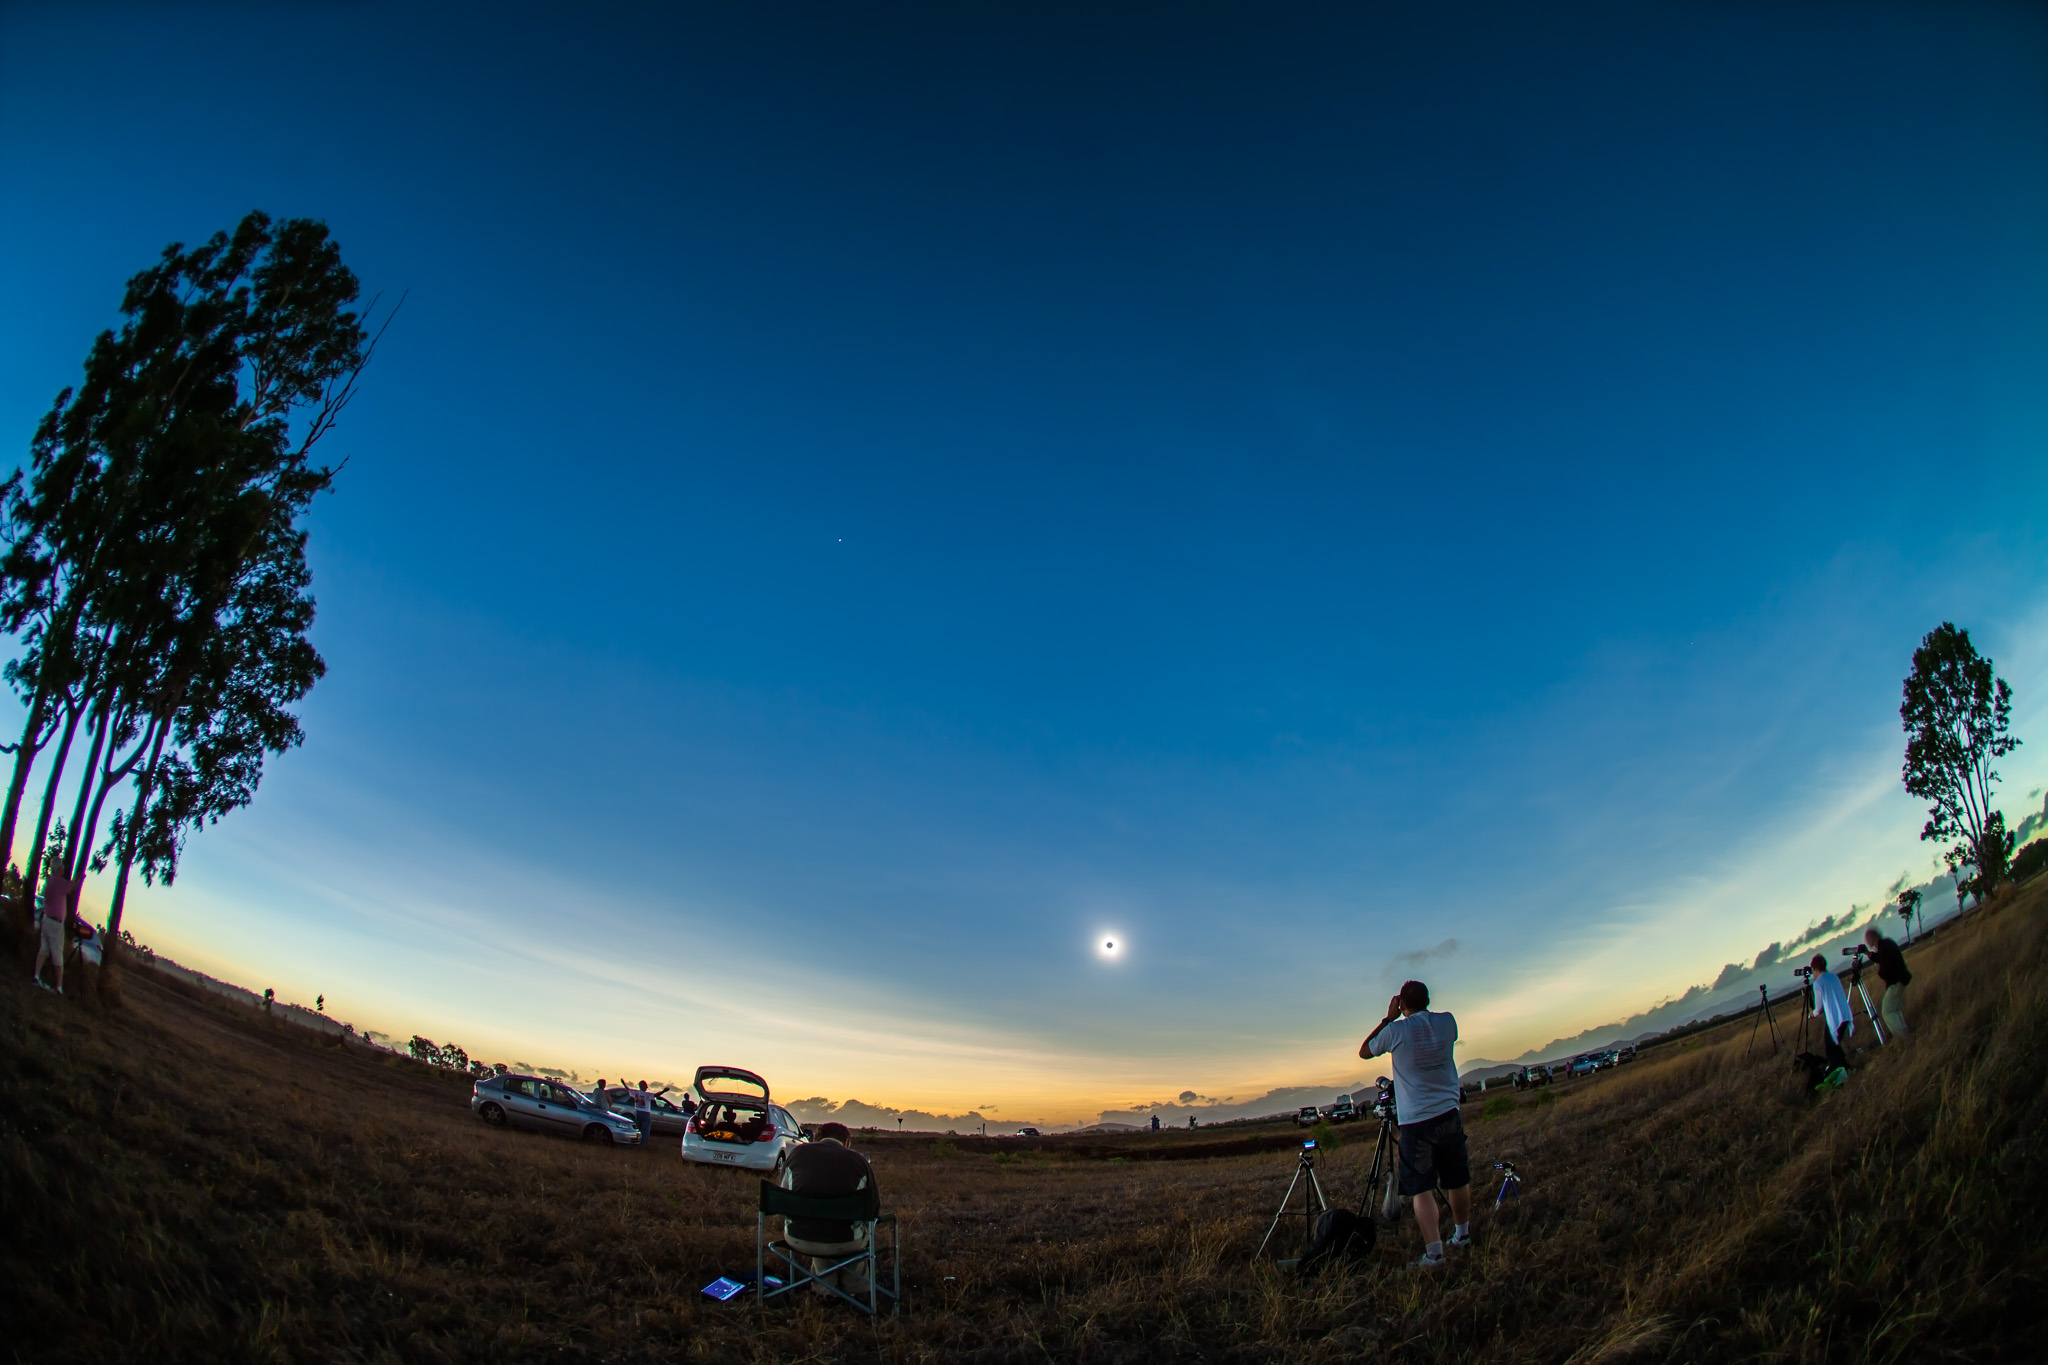
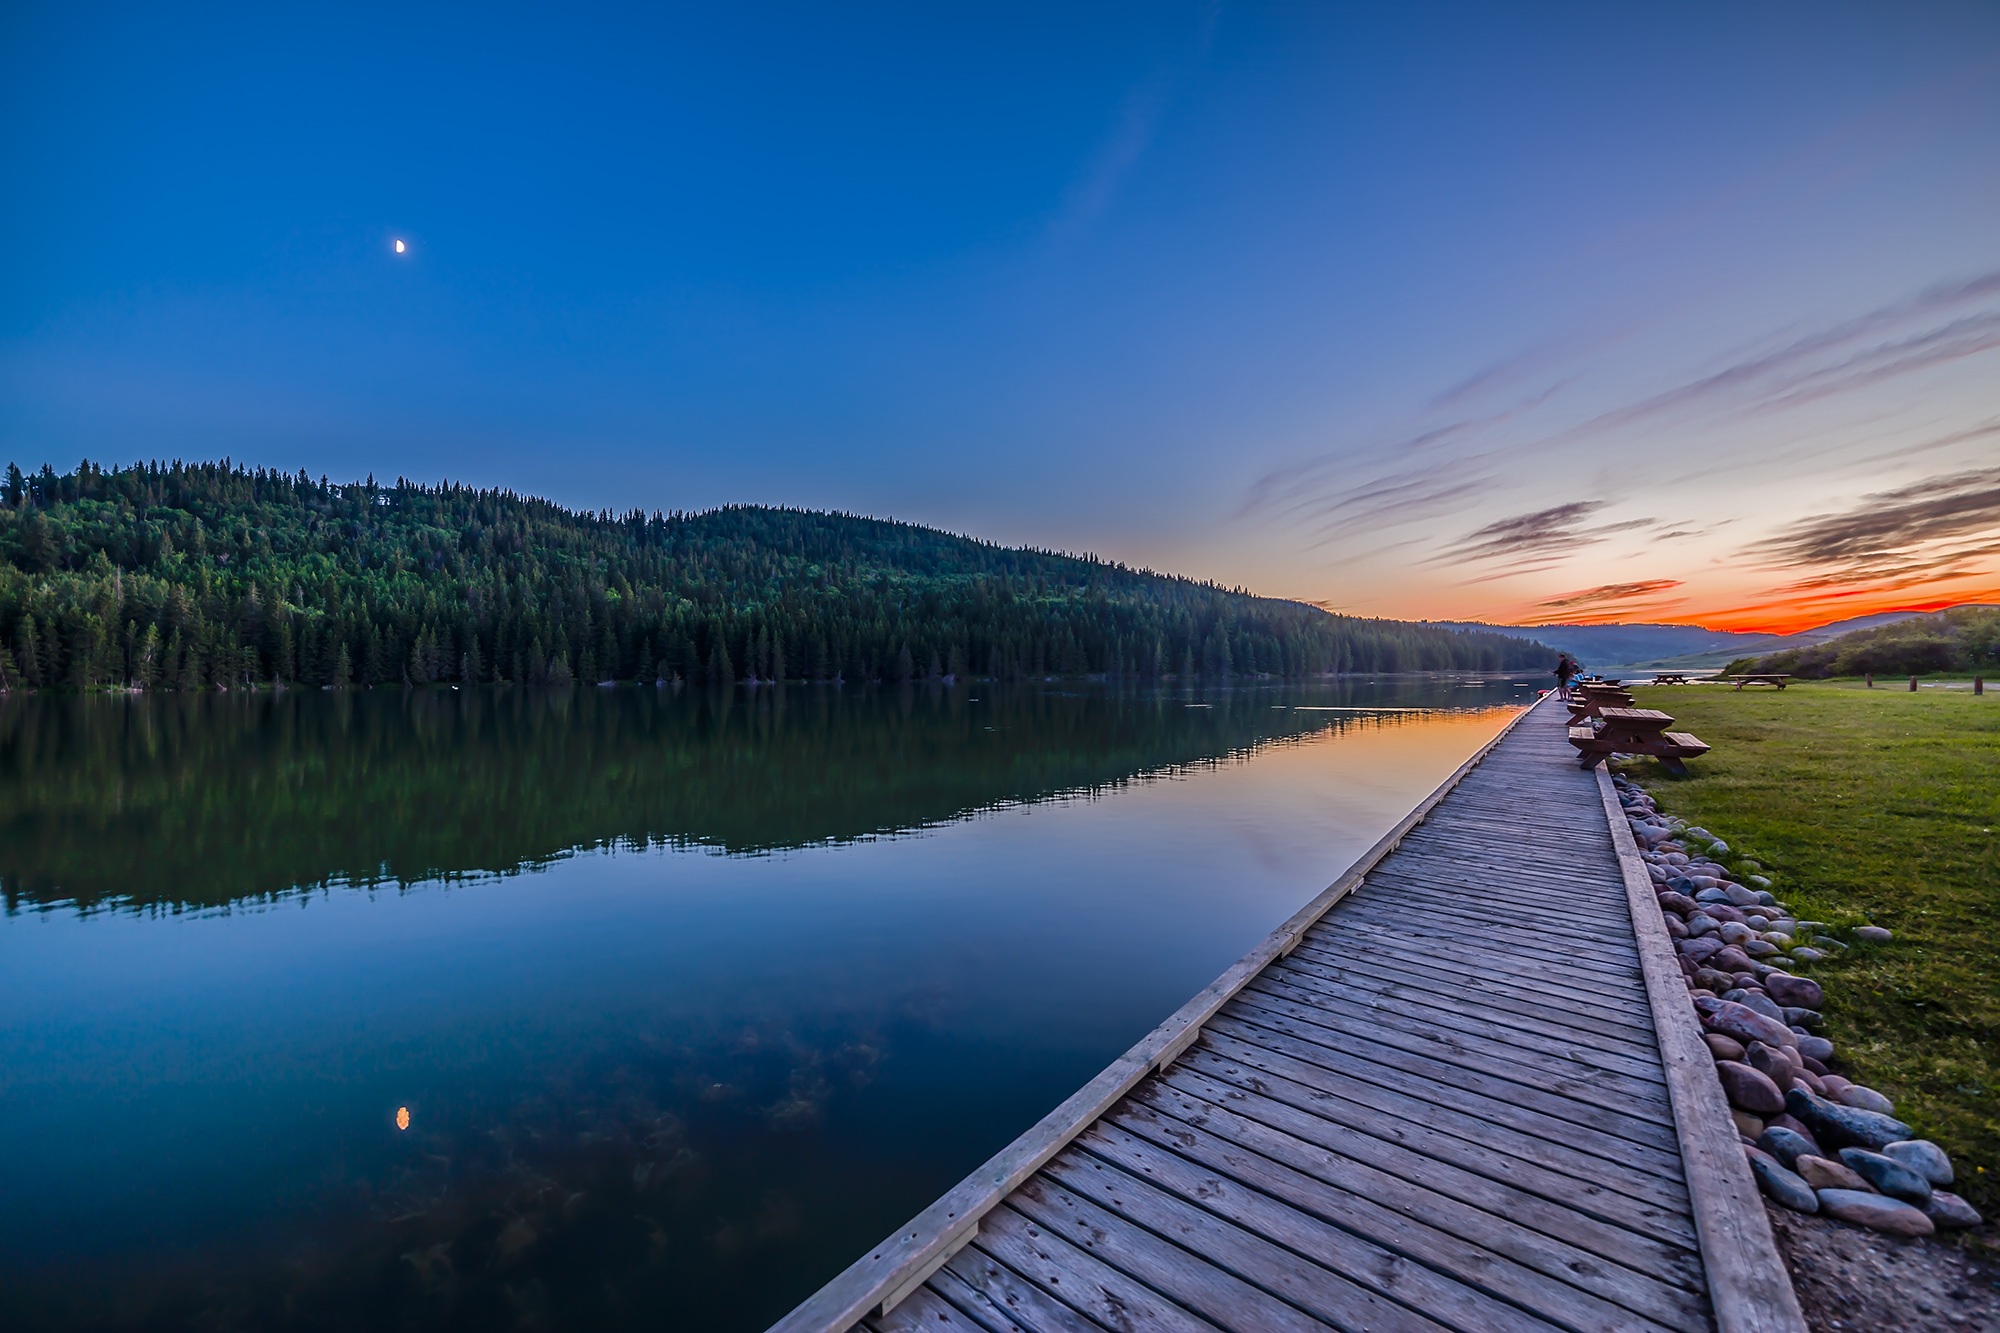
Shoot a Wide-Angle Time-Lapse. Using a DSLR or mirrorless camera and a wide-angle lens (it might need to be as wide as a 14mm at sites in Mexico and the southern U.S.) aim and frame the camera to include the Sun and landscape below. Focus the lens! And leave it on manual focus. But put the camera into Auto-Exposure Aperture Priority (Av) with wide-area metering and with it set to underexpose by -1 EV Exposure Compensation. With the camera at ISO 100 or 200, use either its internal intervalometer (if it has one) or an external intervalometer to take frames once per second. Start the sequence with no filter on the lens a few minutes before totality. Let it run on its own until a few minutes after totality. The result is hundreds of frames you can turn into a time-lapse movie of the lunar shadow approaching and receding, and of the changes in sky colours. Or you can extract single frames at key points to process individually, as I did for the image above from August 2017. The advantage, as with the phone camera movie method, is that the camera, once going, requires no further attention. You can enjoy the eclipse!
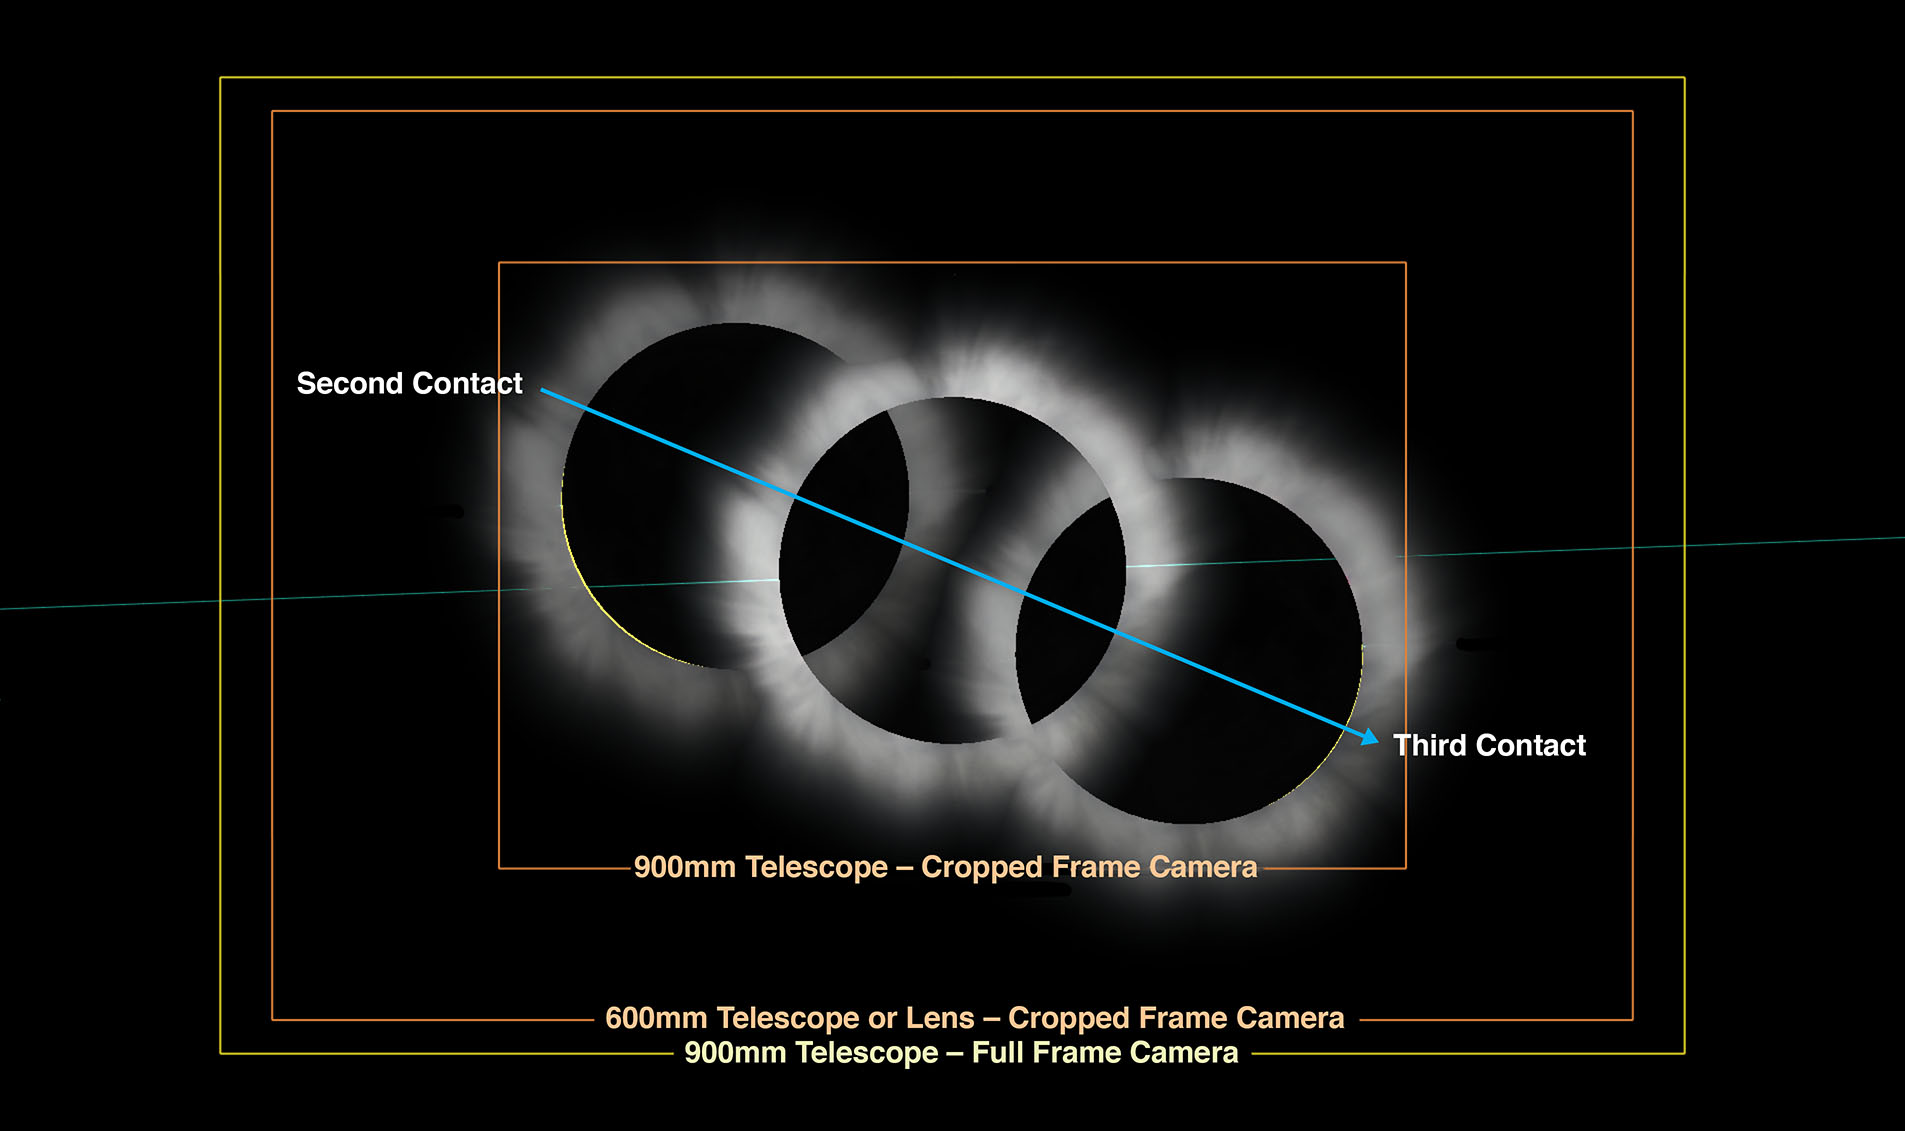
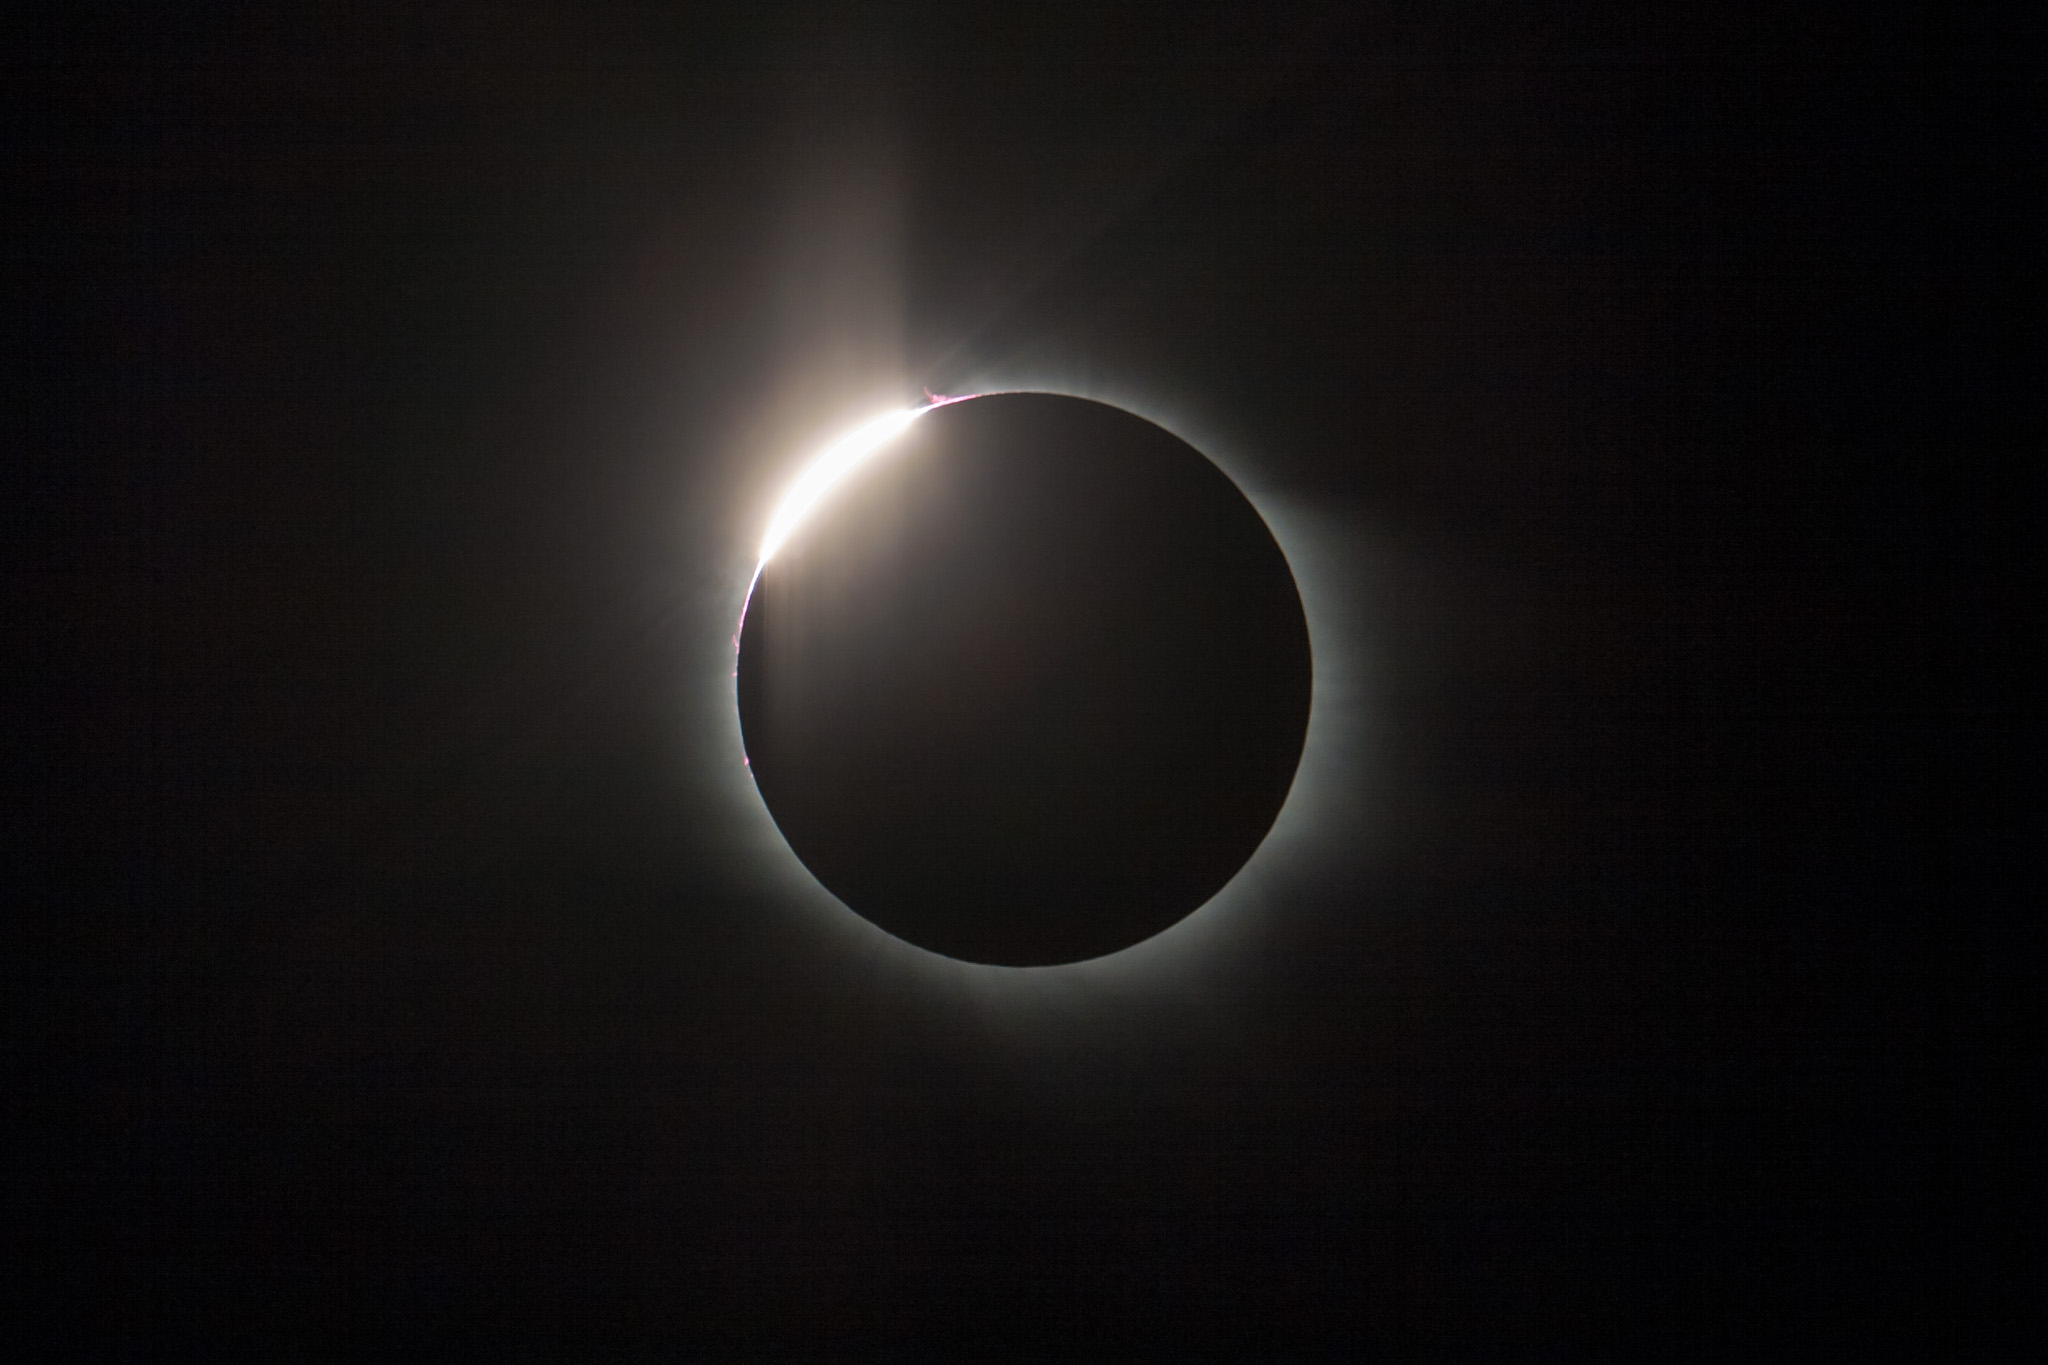
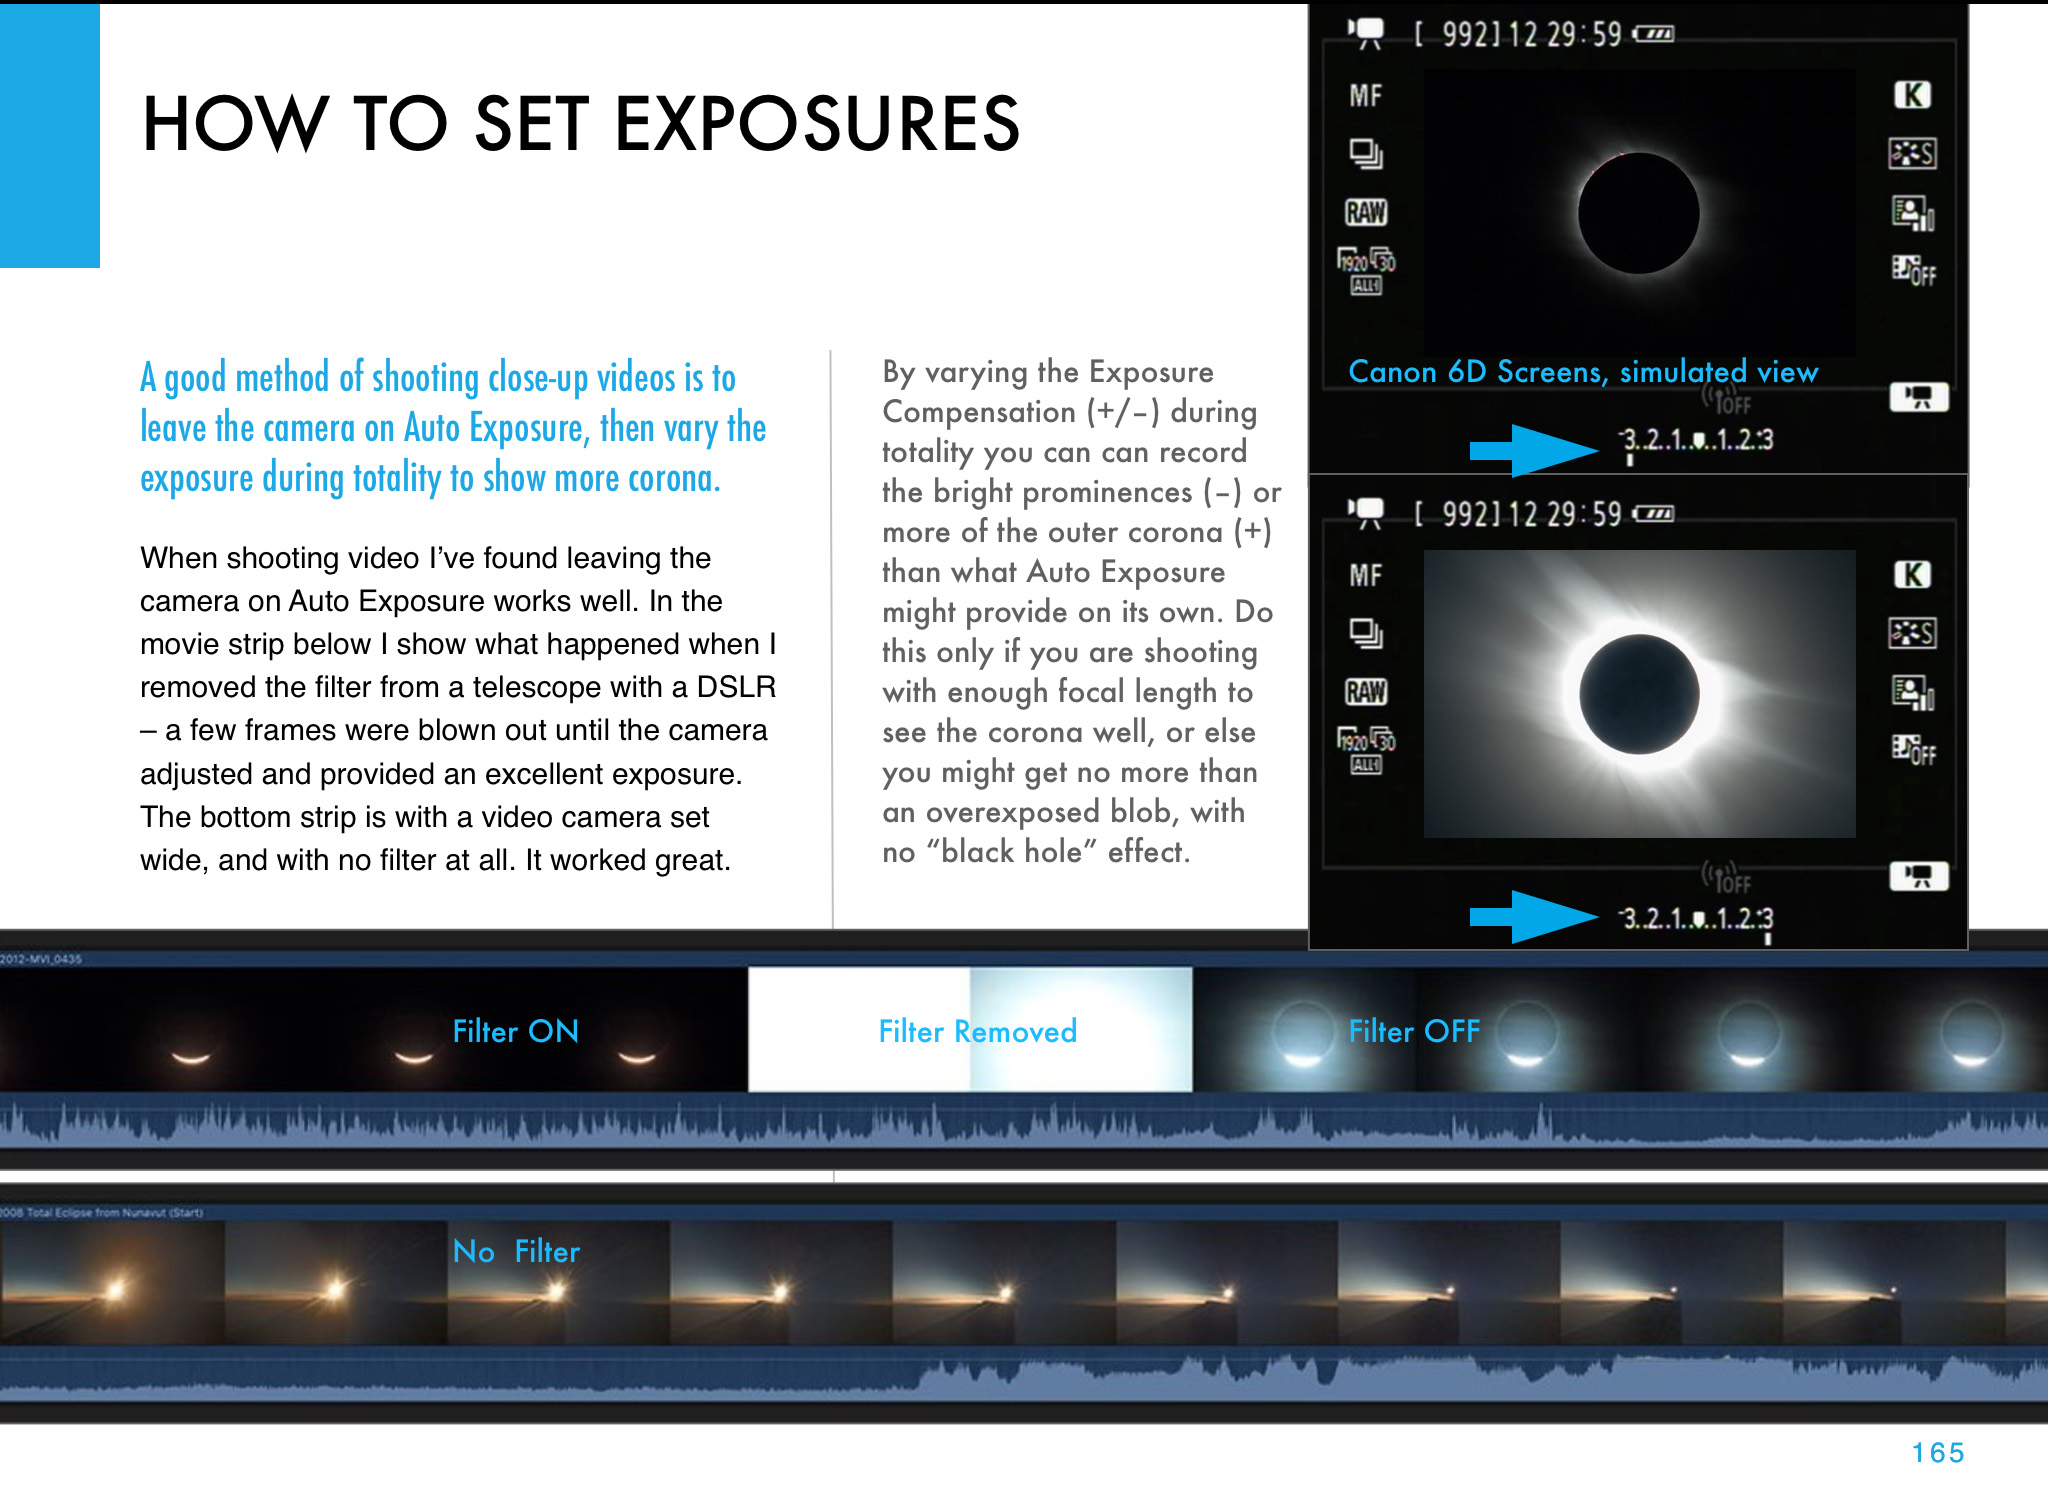
Shoot a Telephoto Video. Use a 300mm to 500mm lens on a DSLR or mirrorless camera to shoot a real-time close-up video of the eclipse. Start the video a minute or two before totality with the Sun positioned to the left of frame centre and with a solar filter over the lens. Use a slow ISO, the lens wide open (typically f/4 to f/5.6) and the camera on Auto-Exposure Aperture Priority (Av). Just be careful to focus precisely on the filtered Sun before starting the video. Poor focus is what spoils most eclipse images, not poor exposure. Just before totality (about 30 seconds prior to Second Contact) remove the filter. The auto-exposure will compensate and provide a proper exposure for the rest of totality. Just let the camera run and the Sun drift across the frame from left to right. Just remember to replace the filter, or cap the lens, and stop the video shortly (~30 seconds) after totality and Third Contact. The video will capture the diamond rings and a well-exposed corona. Vary the exposure compensation during totality if you wish, but that involves more work at the camera. Otherwise, you can just let the camera run. But, as I illustrate in my ebook, it’s important to plan and place the Sun correctly to begin with (using a planetarium app to plan the sequence), so it does not drift off the frame or close to the edge.
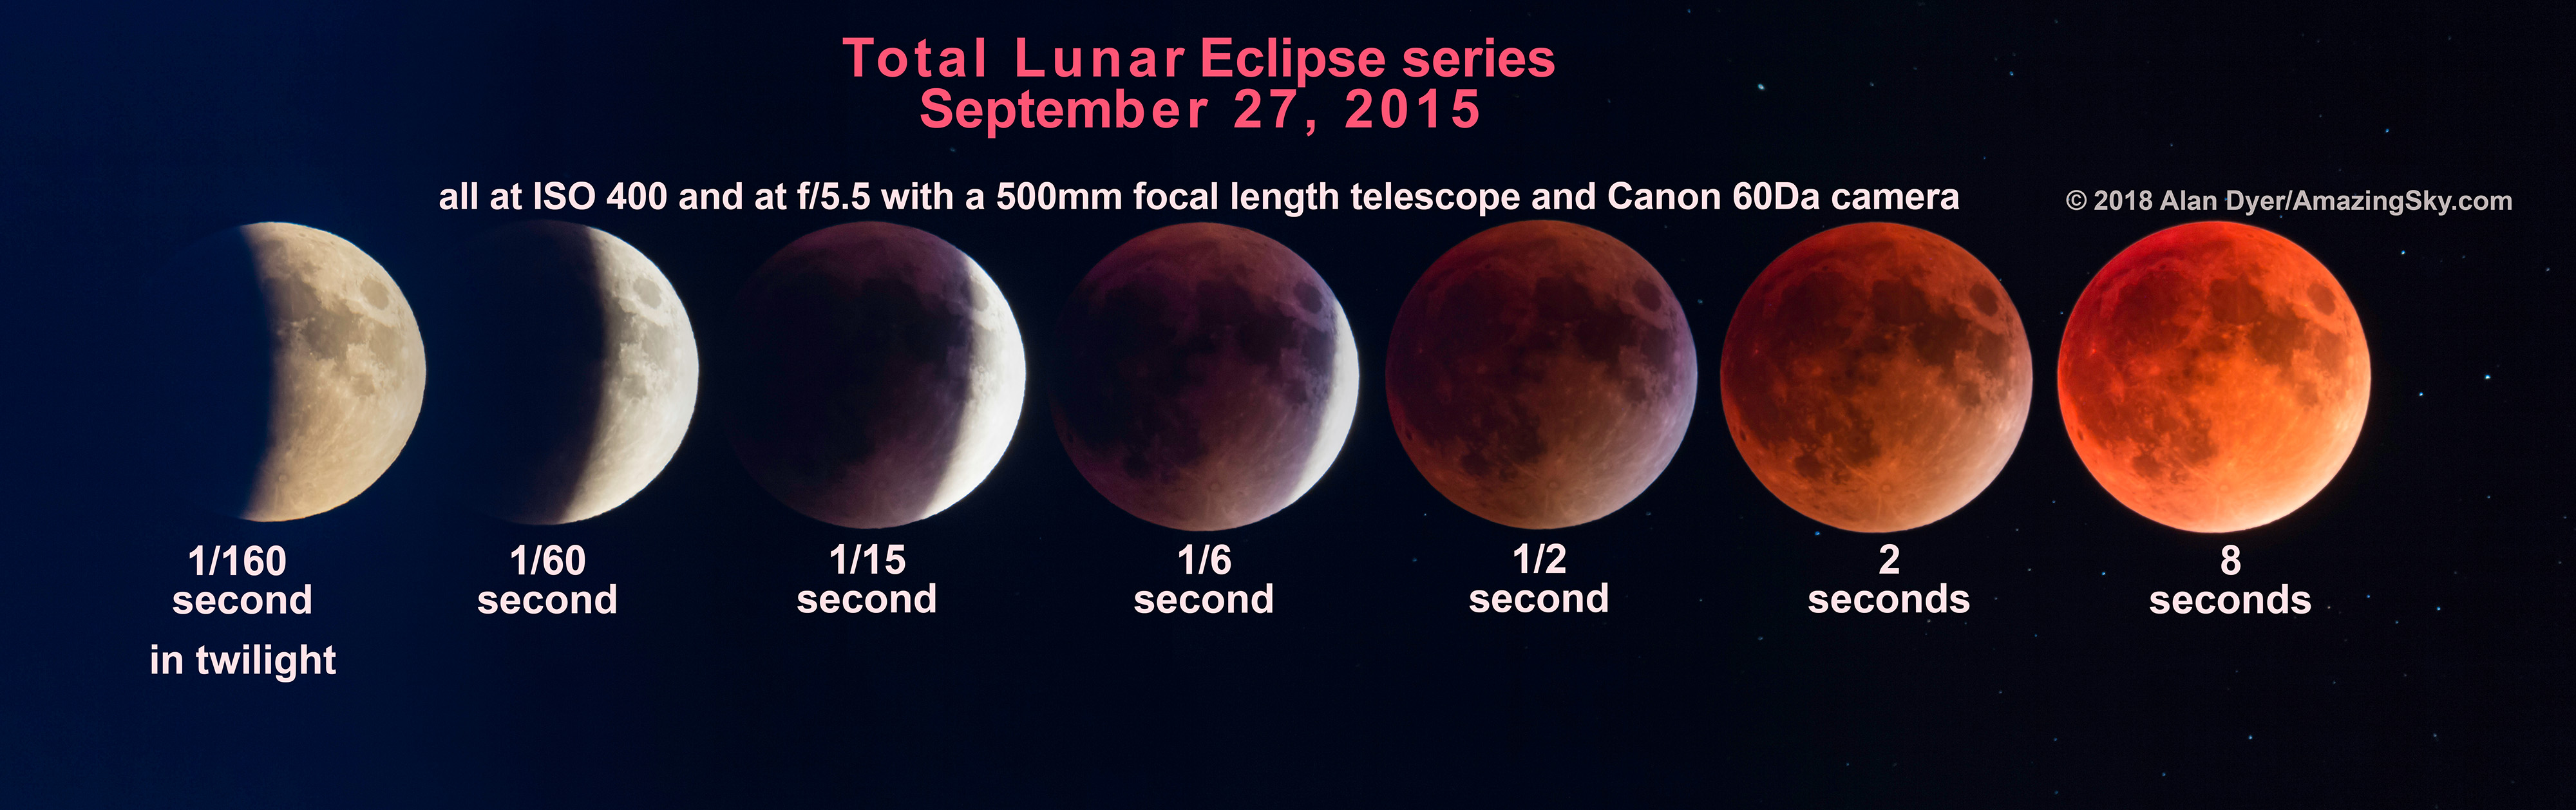
Shoot Telephoto Close-Up Stills. Use the same type of gear to shoot still images. While you could shoot stills on Auto-Exposure, it’s better to shoot still images over a range of exposures, from very short (~1/1000 second) for the diamond rings and prominences, to long (~1 second) for the outer corona. No one exposure can capture all that the eye can see during totality. This takes more work at the camera, and with the camera on a static tripod you might have to re-centre the Sun during totality, another thing to fuss with and where things can go wrong. Using the camera’s Auto-Bracketing mode can help automate the shooting, allowing the camera to automatically shoot a set of 7 to 9 exposures at say, one-stop increments in quick succession with just one press of the shutter button (by using the self-timer set to 2 seconds).
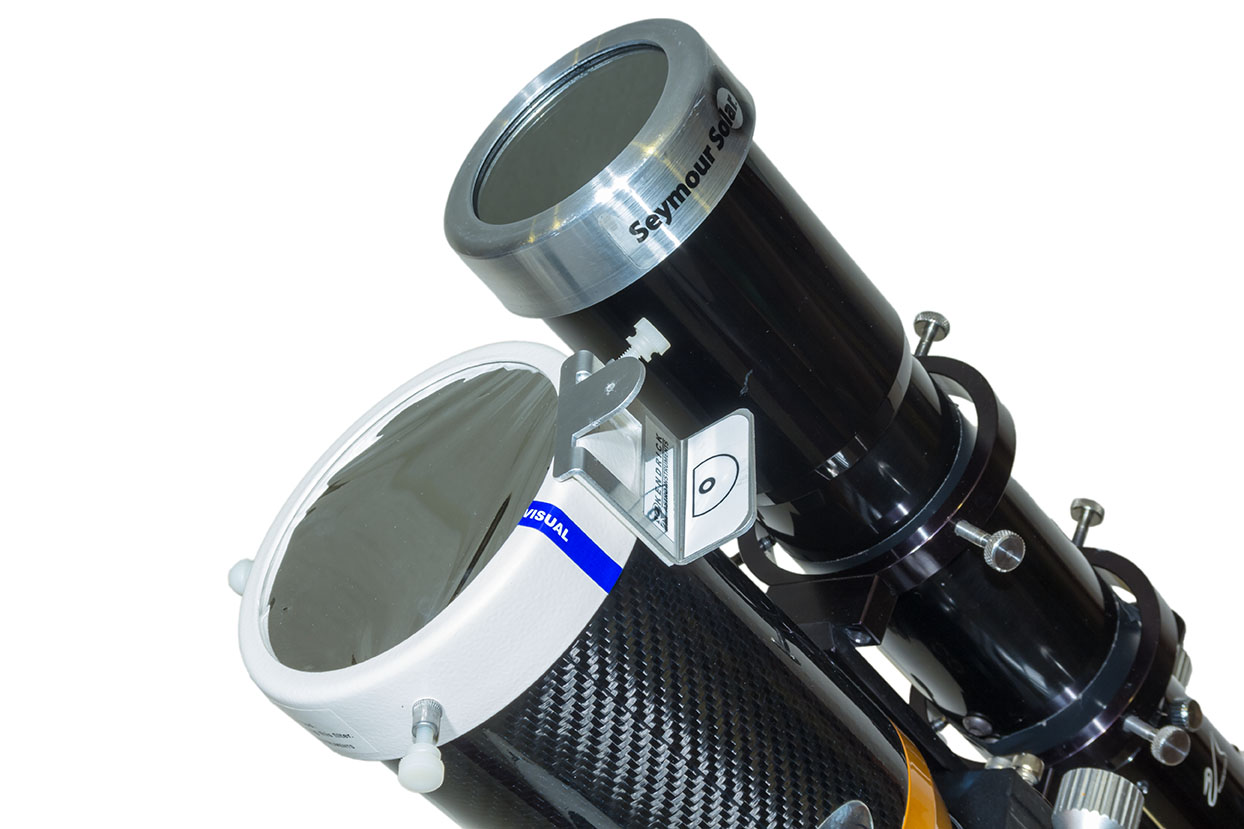
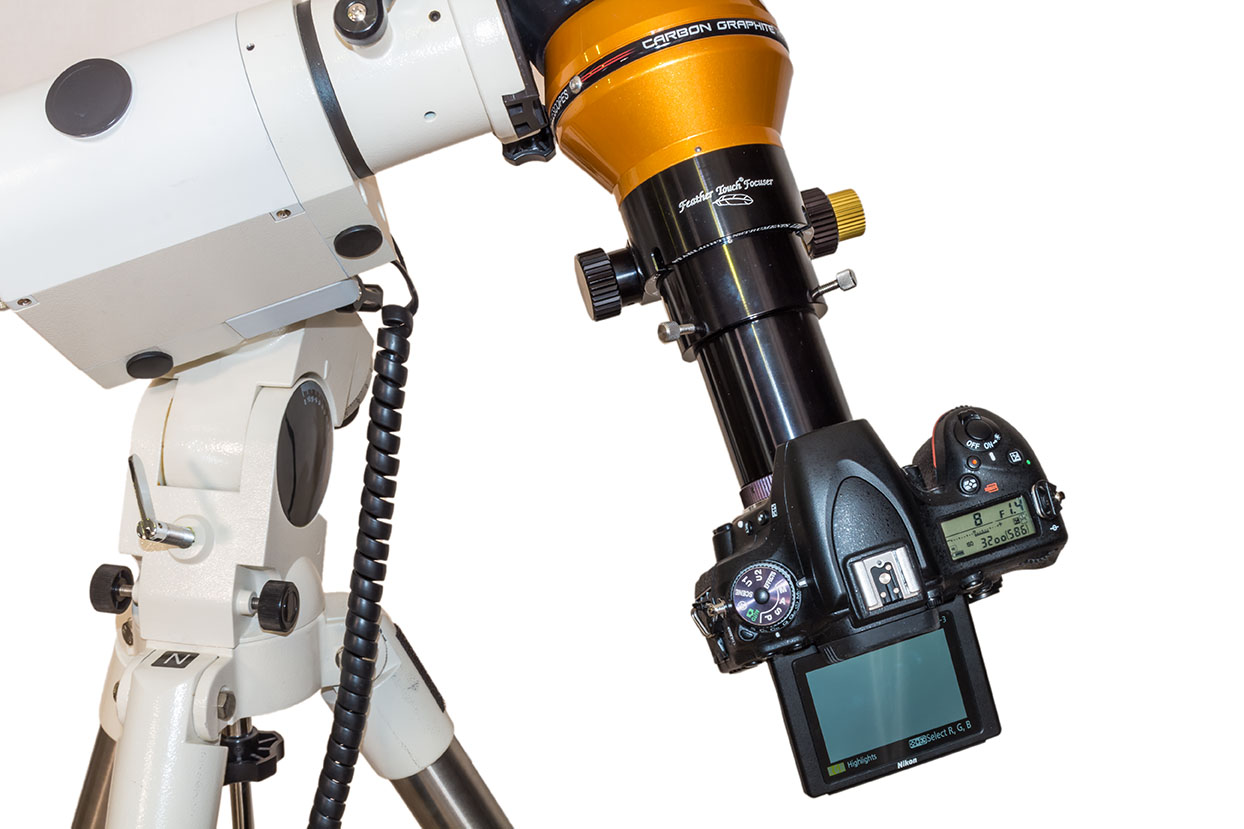
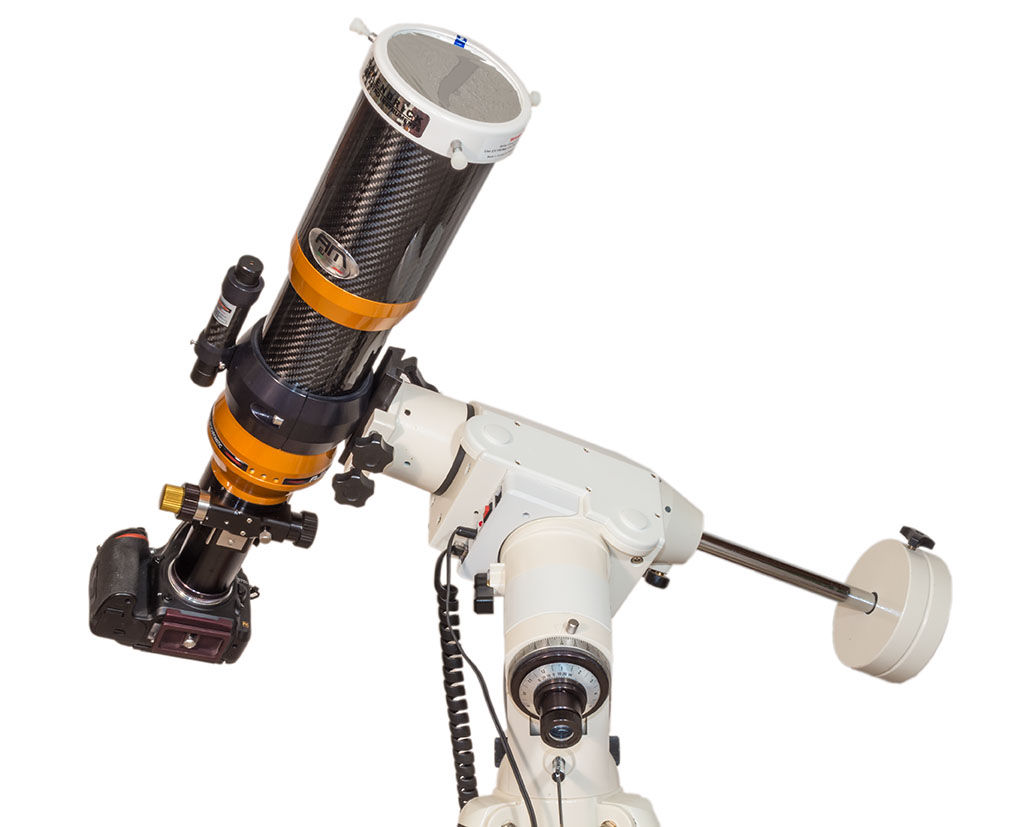
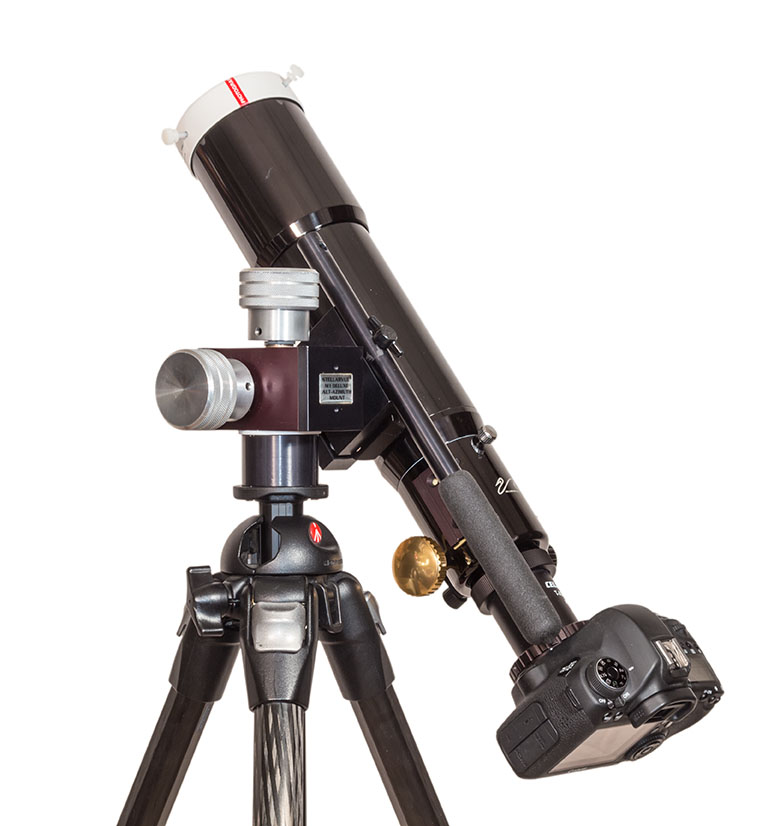
Shoot with a Telescope on a Tracking Mount. Telescopes (I like 60mm- to 100mm-aperture apochromatic refractors) allow longer focal lengths, though I would advise against shooting with any optics longer than 600mm to 800mm, so the image frames the corona well. Use similar settings as above, but with the telescope (or a telephoto lens) on a tracking mount to turn from east to west at the same rate as the sky moves. That will ensure the Sun stays centred on its own, provided you have at least roughly polar aligned the mount. (Set it to your site’s latitude and aim the polar axis as due north as you can determine from compass apps.)
Those are brief summaries of the methods I recommend, as they are ones I’ve used with success in the past and plan to use on April 8. My ebook contains much more information, and answers to most of the “But what about using ….?” questions. And I provide lots of information on what can go wrong! Some learned the hard way over 16 previous total solar eclipses.
Video Tutorials
For a video tutorial, check out the webinar I conducted as part of the Kalamazoo Astronomical Society’s excellent Eclipse Series here on YouTube. It is about a 1-hour presentation, plus with lots of Q&A at the end.
KAS Eclipse Series — Part 1: Shooting
Of course, once you have all your images, you need to process them. My ebook’s biggest chapter (at 80 pages) is the one on processing still images and time-lapses.
So, a month after I presented the above webinar on Shooting, I was back on-line again for a follow-up webinar on Processing. You can view that KAS Eclipse Series tutorial here on YouTube.
KAS Eclipse Series — Part 2: Processing
I cover processing single wide-angle images, a wide-angle time-lapse series, single-image close-ups, and blending multiple exposure composites.
A month later, I presented a further webinar to the Astronomical League as part of their AL Live series, again on shooting the eclipse, but now with an emphasis on techniques amateur astronomers and astrophotographers with typical telescope gear might use.
You can view the AL Live webinar here. My presentation begins at the 44-minute mark.
AL Live Webinar — Scrub ahead to 44 minutes
I emphasized that the kinds of gear astrophotographers use these days with great success on deep-sky objects might not work well for the eclipse. The specialized cameras, and software used to control them, are just not designed for the demands of a total eclipse, where exposures have to range over a wide array of settings and change very quickly. Images have to be taken and recorded in rapid succession.
I suspect a lot of ambitious and overly-confident astrophotographers will come away from the 2024 eclipse disappointed — and what’s worse, without having seen the eclipse because they were too wrapped up looking at laptop screens trying to get their high-tech gear working.
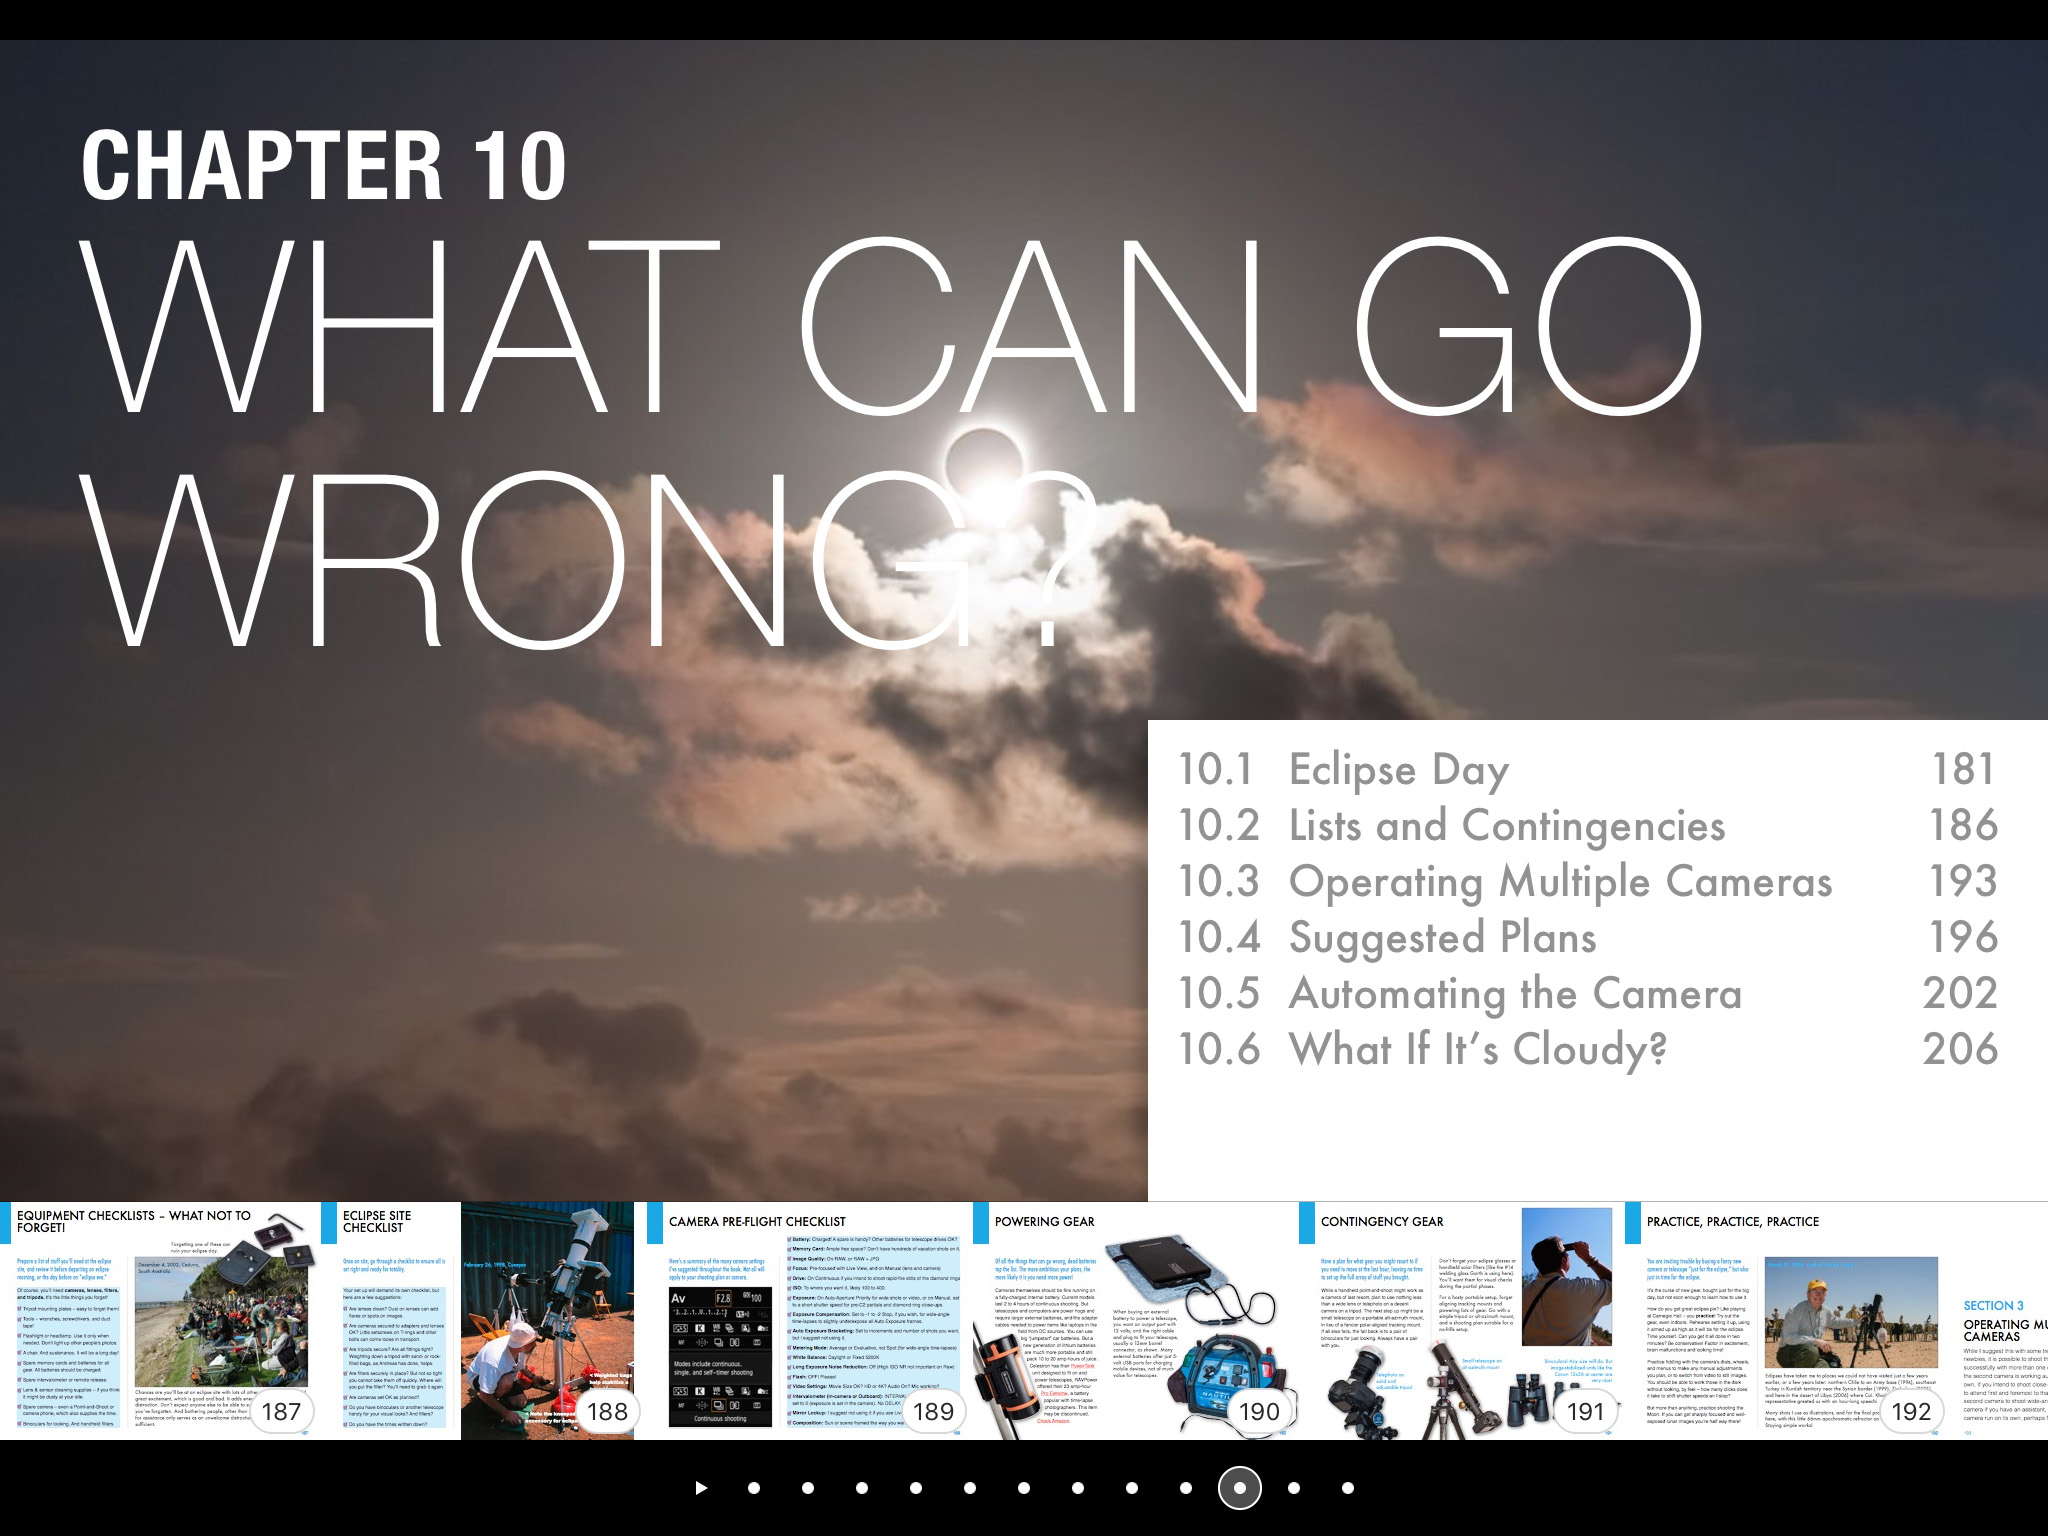
The Checklist page from my eBook
Practice, Practice, Practice
In these webinars and in my ebook, my common theme is the importance of practicing.
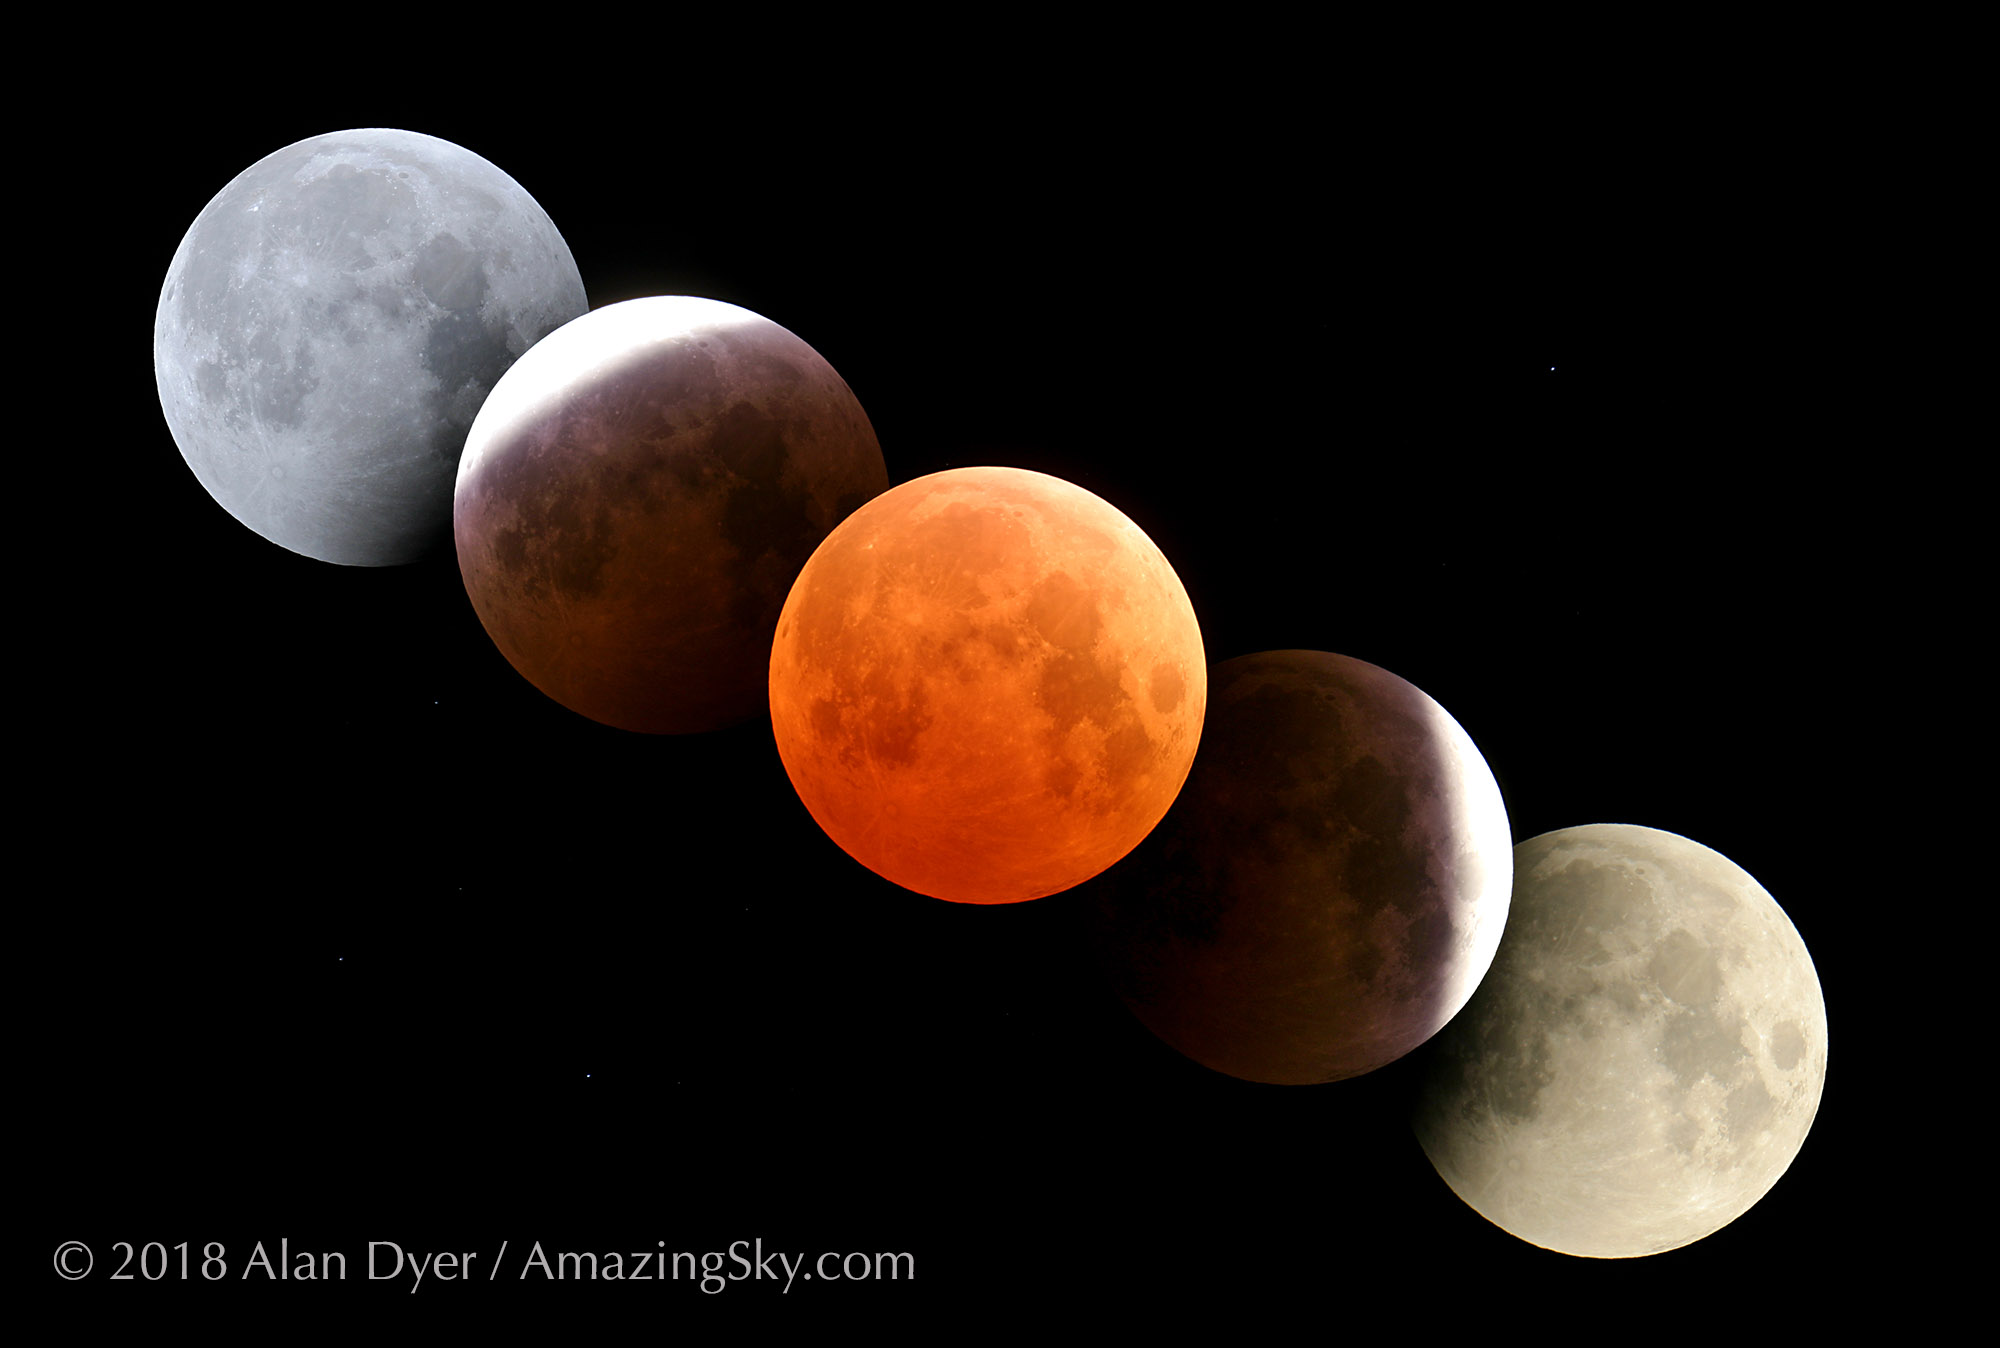
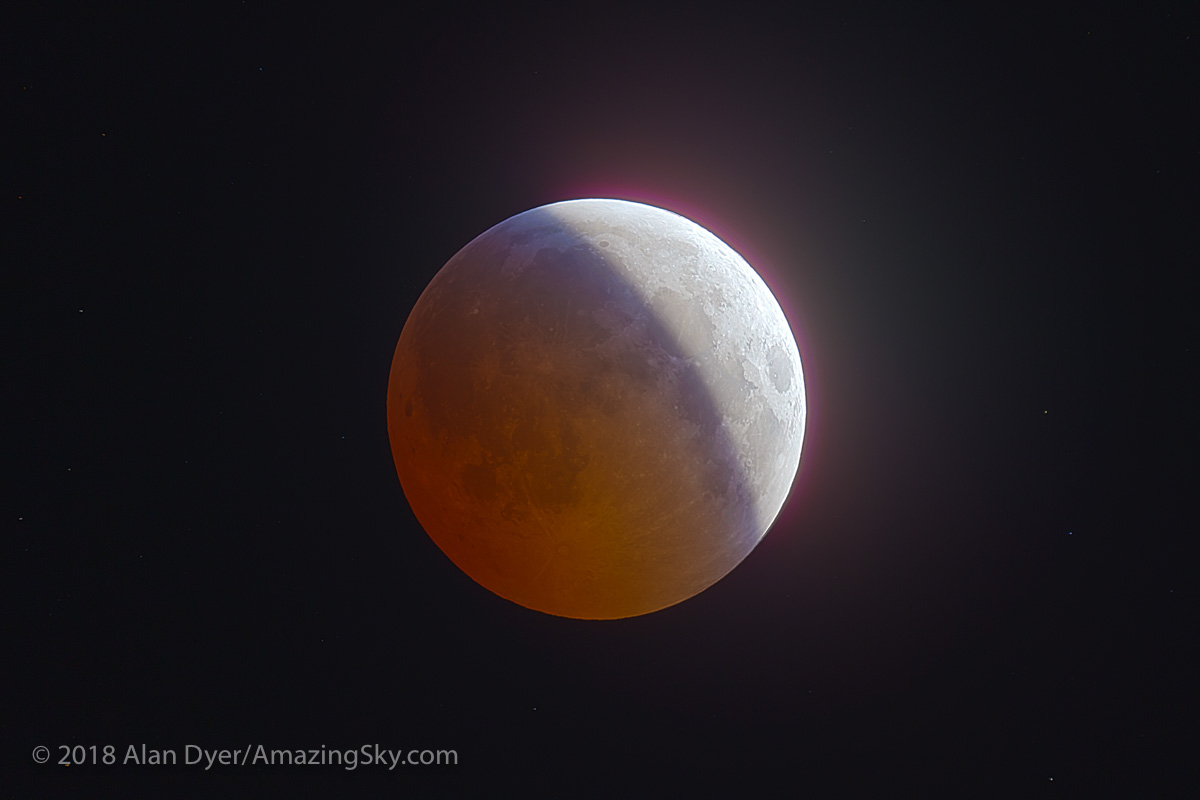
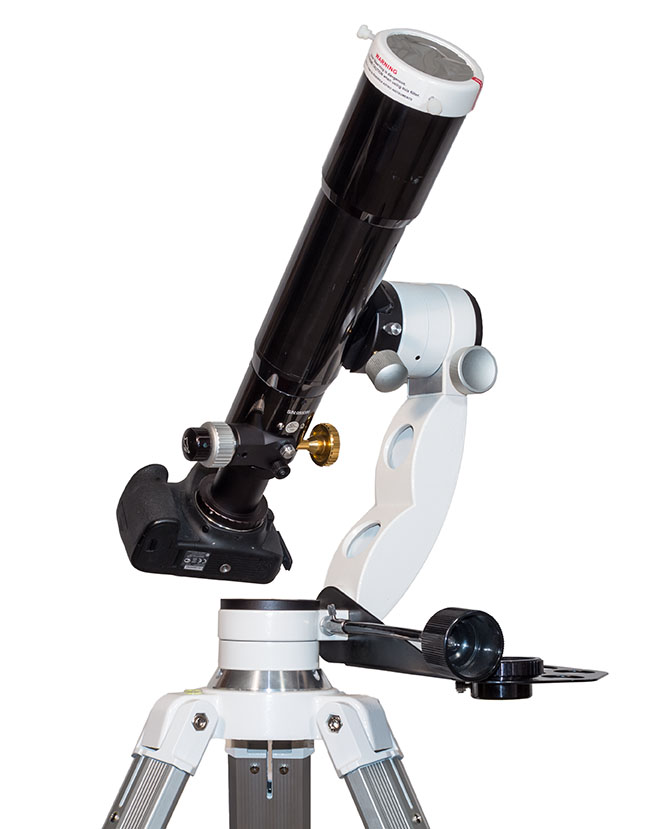
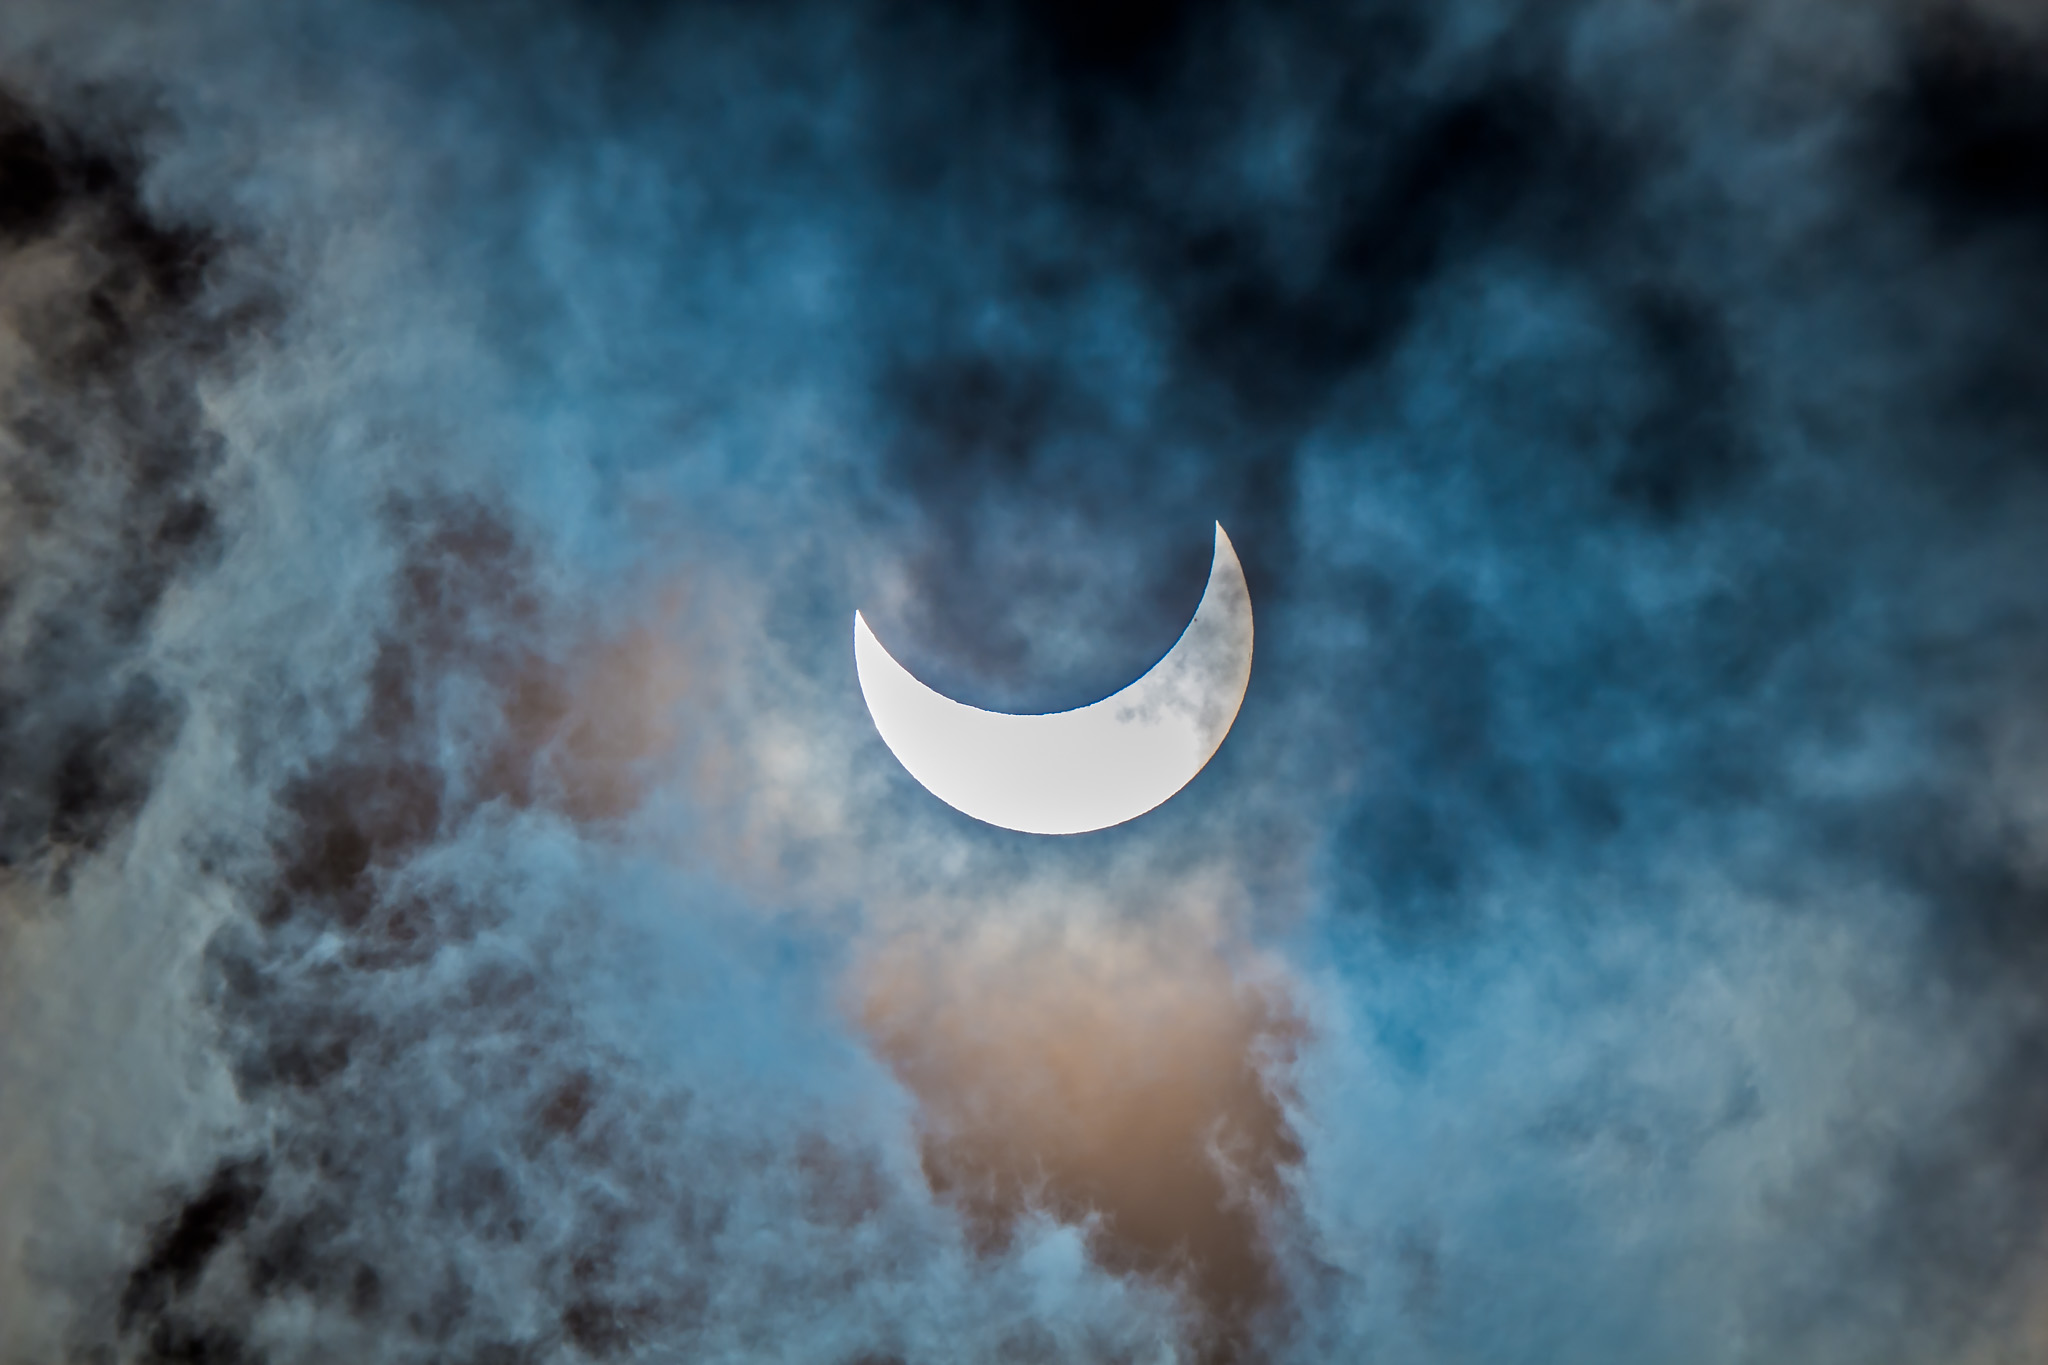
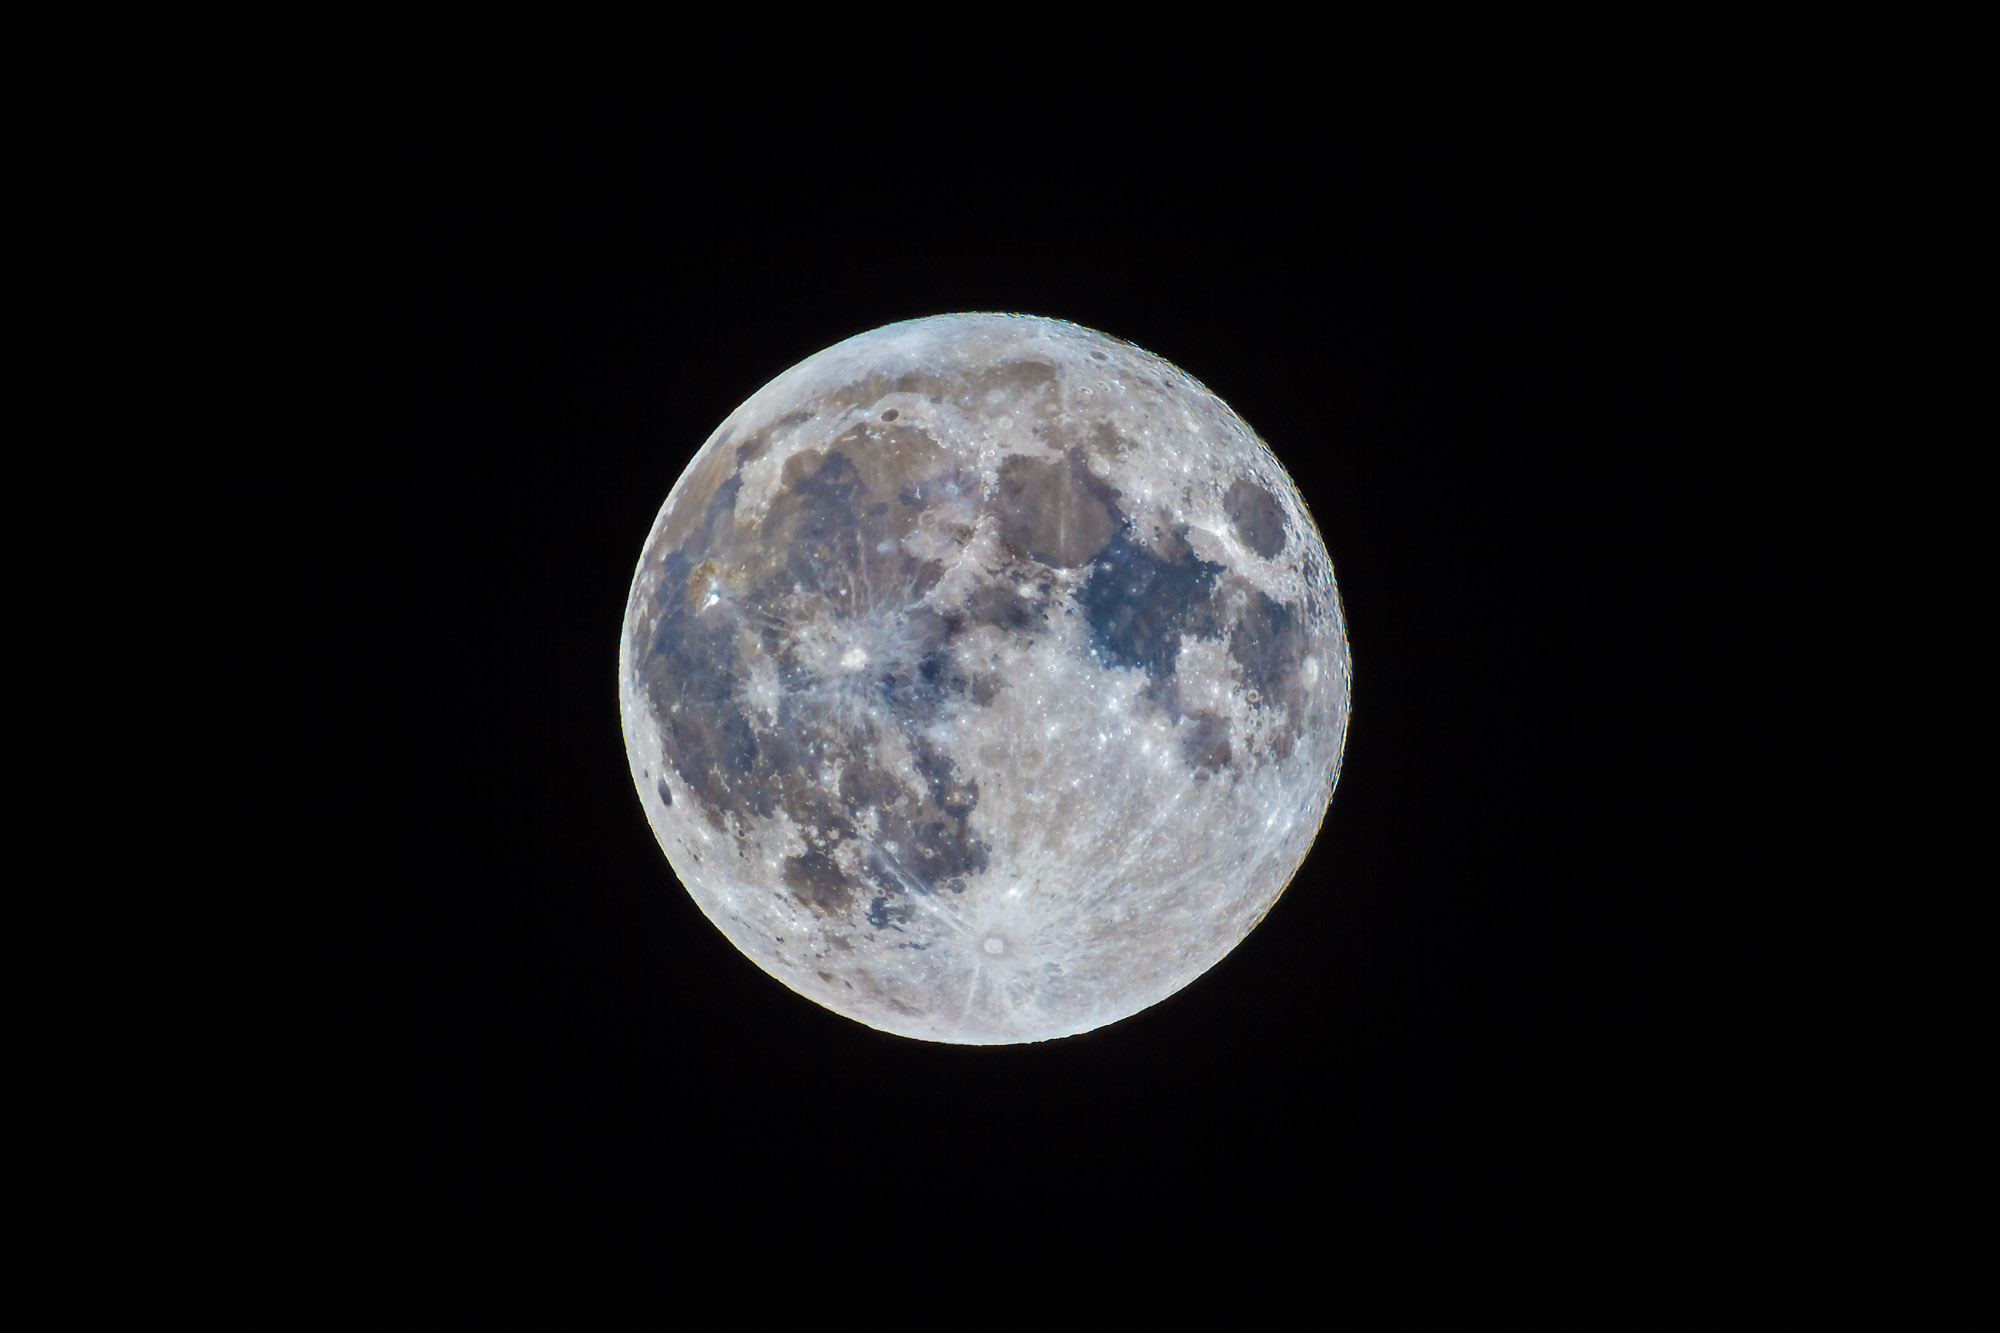
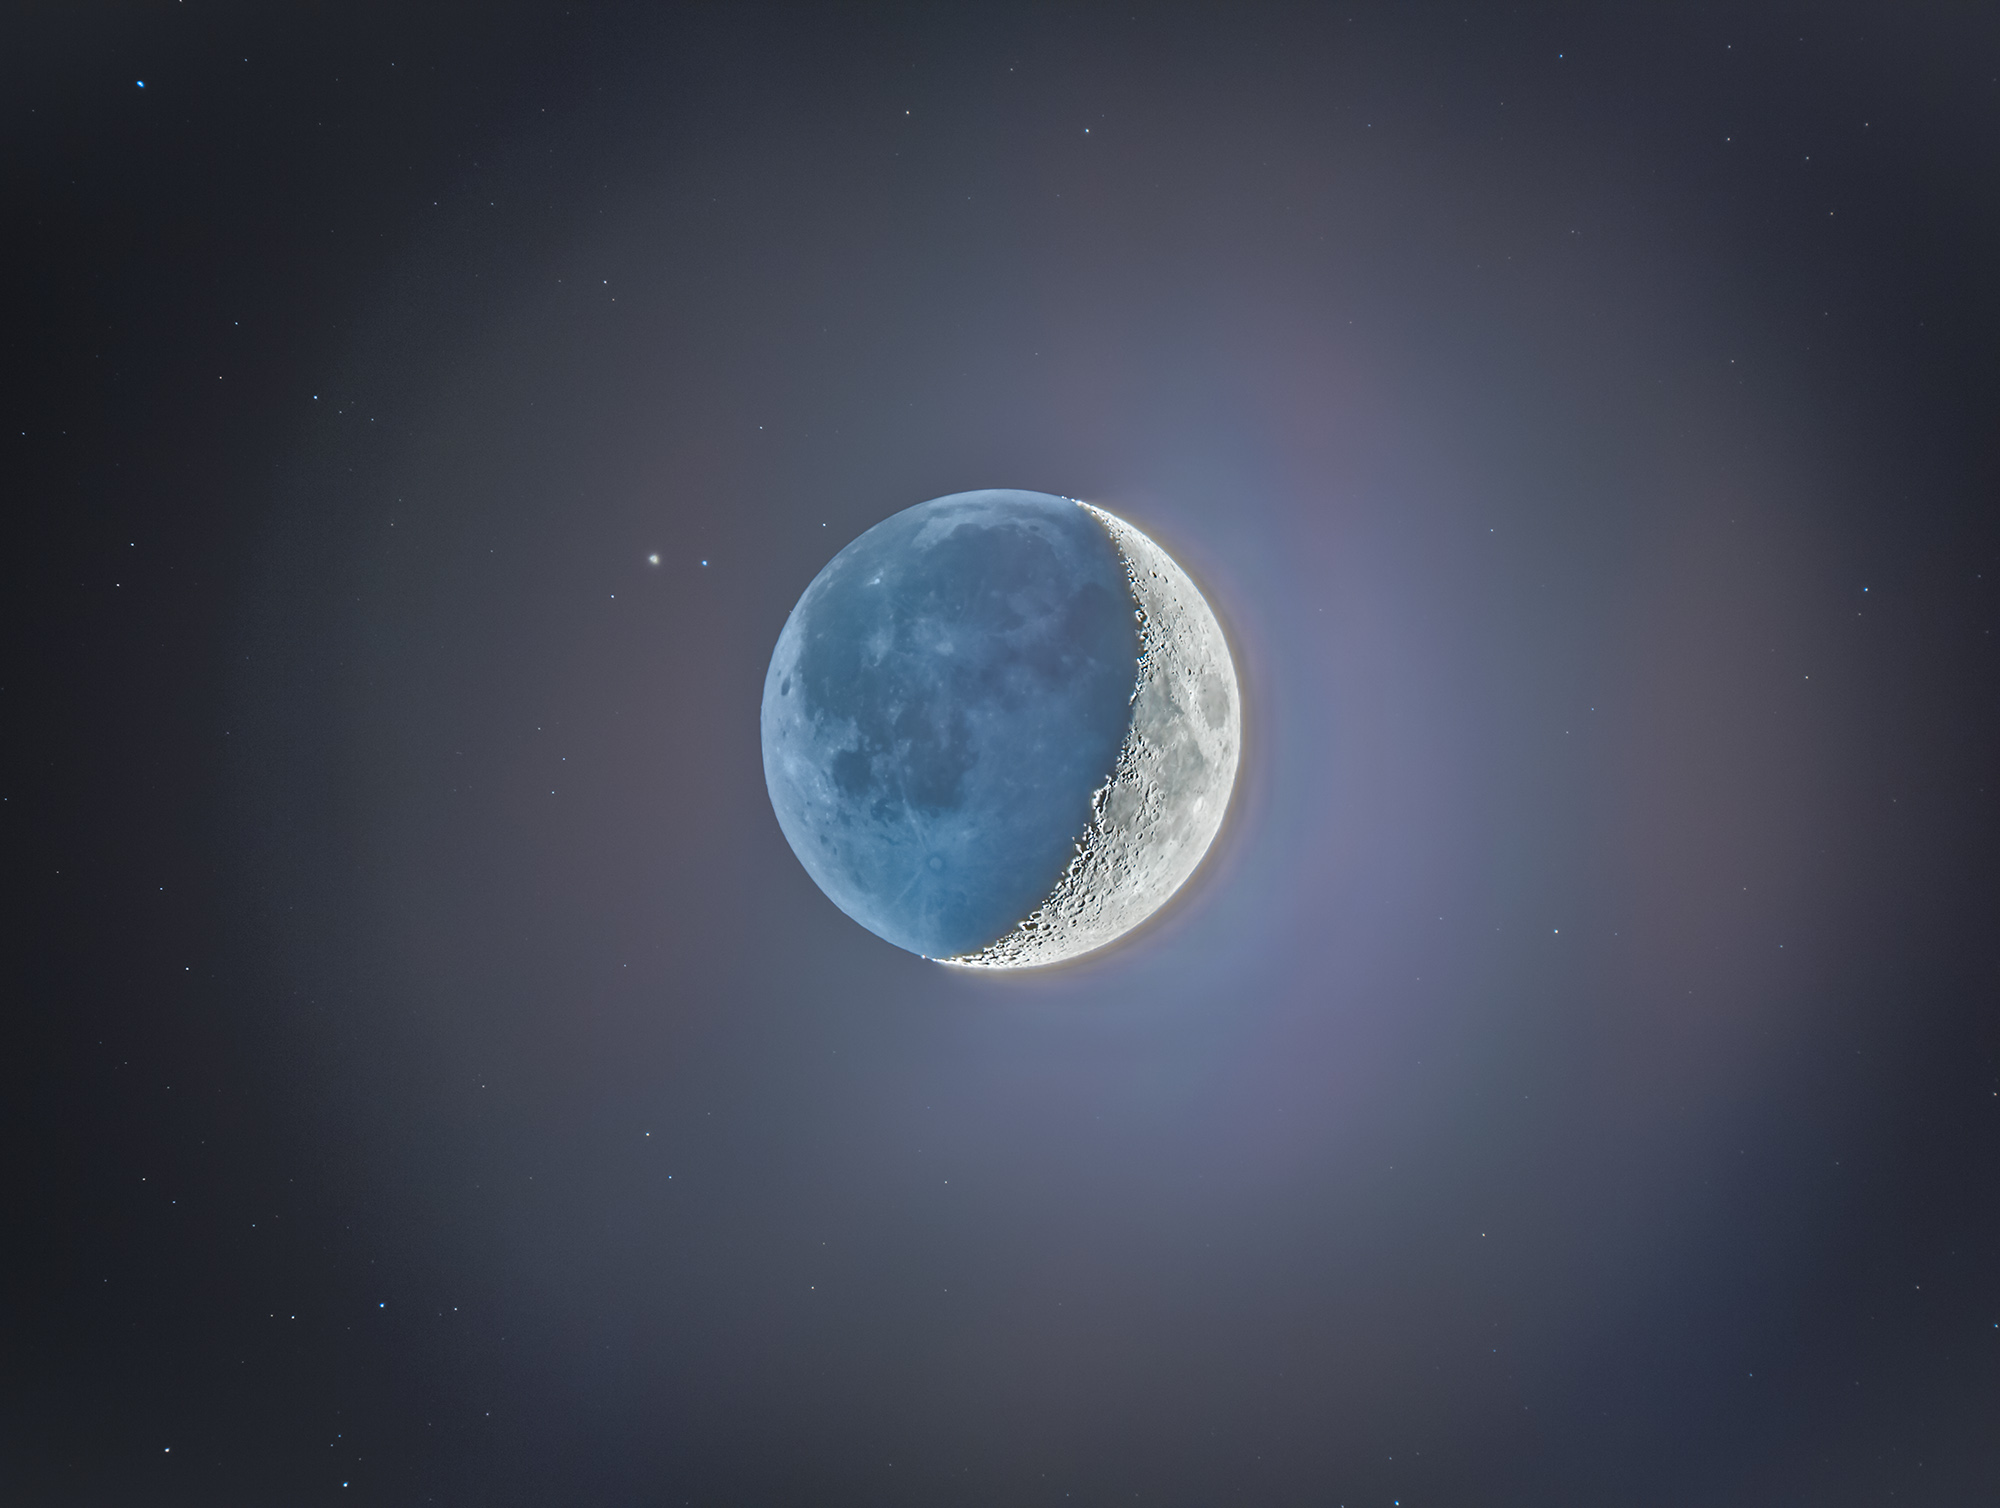
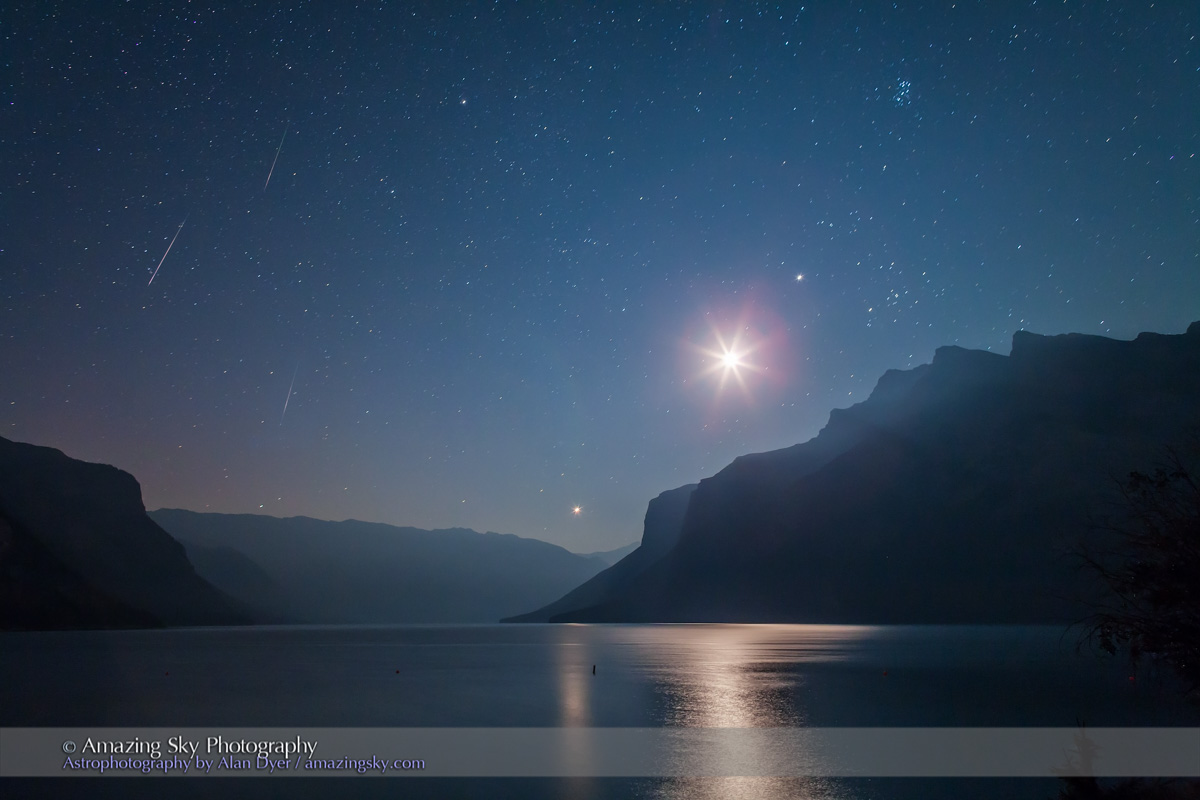
Don’t assume something will work. Practice with the gear you intend to use, on the Sun now (with proper filters) and on the Moon. The crescent Moon, with dim Earthshine lighting the lunar night side, is a great practice target because of its wide range of brightness. And it moves like the Sun will, to check maximum exposure times vs. image blurring from motion.
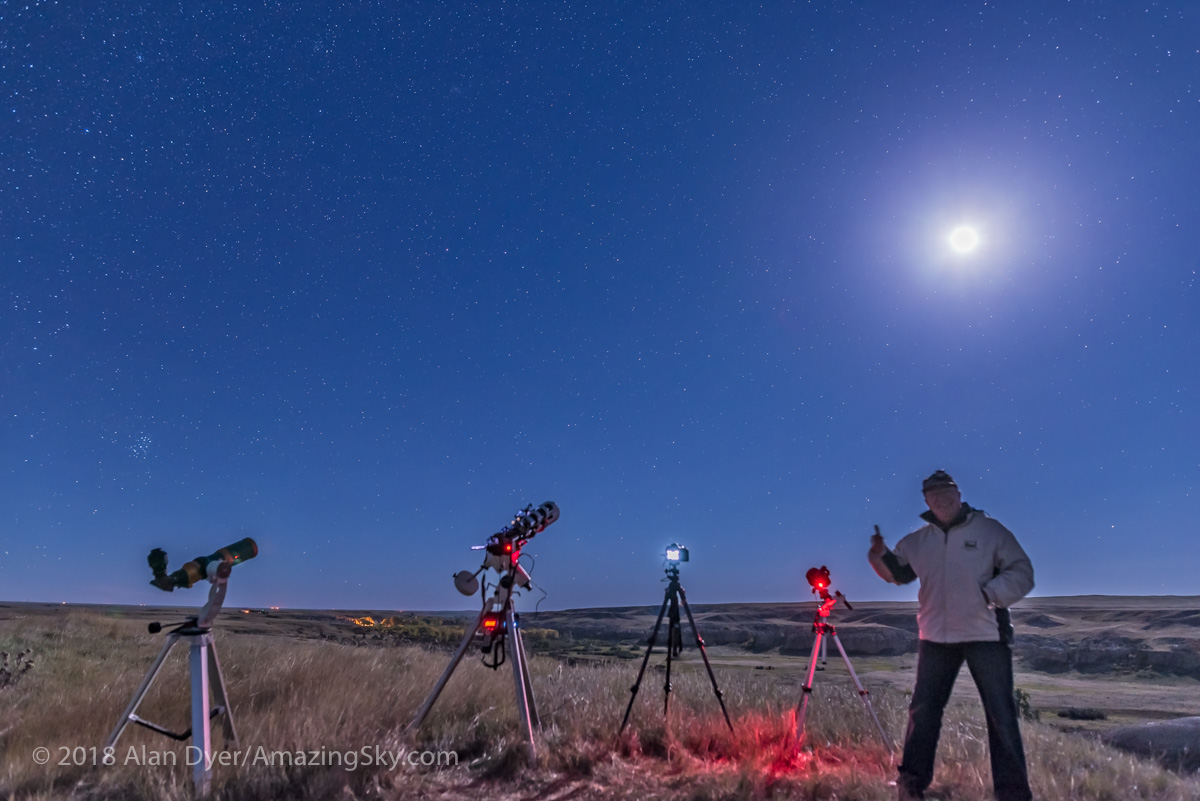
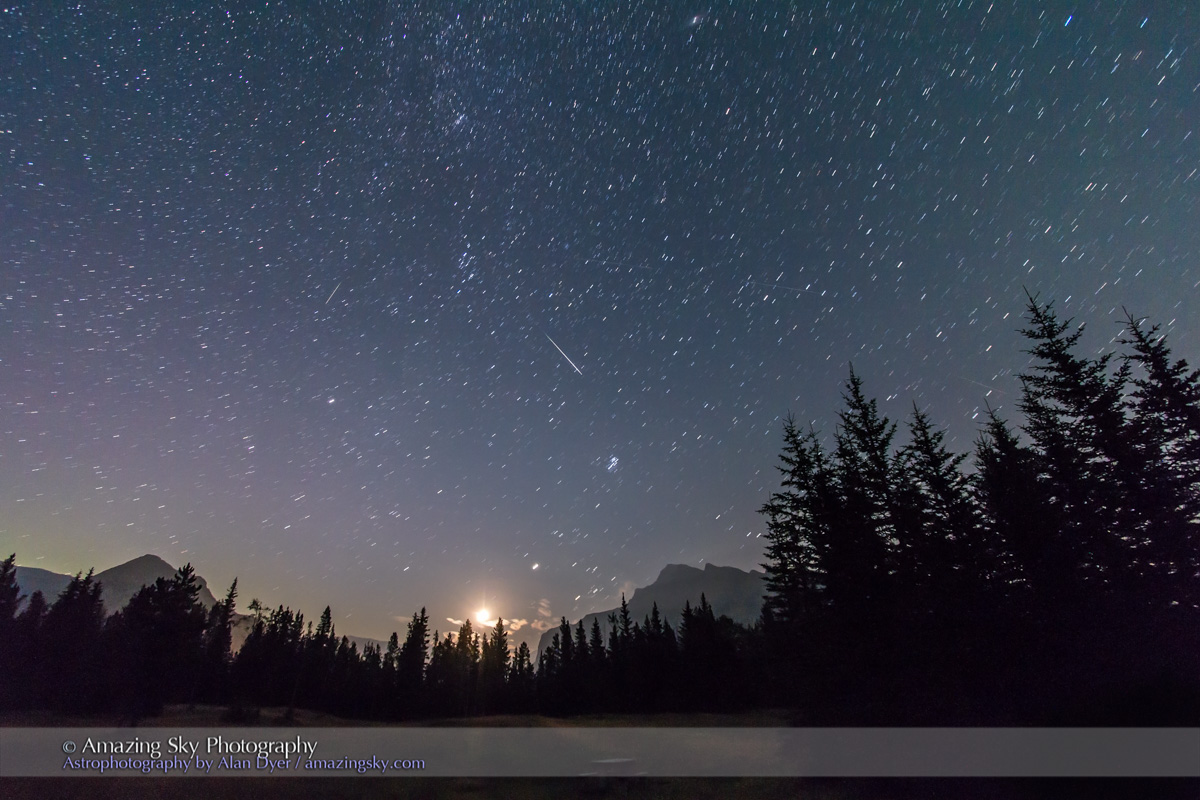
Practice with your tripod or mount aimed to the altitude and location in the sky where the Sun will be from the site you have chosen. Set a tracking mount to the latitude you will be at to be sure it will aim at and track the Sun without issues. Some telescope mounts stop tracking when they reach due south, exactly where the Sun will be at totality from southern sites. That’s a nasty surprise you do not want to encounter on eclipse day.
All this and much more is covered in my ebook, available for Apple Books and as a PDF for all platforms here from my website at https://www.amazingsky.com/EclipseBook
A bright comet is a once-a-decade opportunity to capture some unique nightscapes. Here are my suggested tips and FAQs for getting your souvenir shot.
My guide to capturing Comet NEOWISE assumes you’ve done little, if any, nightscape photography up to now. Even for those who have some experience shooting landscape scenes by night, the comet does pose new challenges — for one, it moves from night to night and requires good planning to get it over a scenic landmark.
So here are my tips and techniques, in answers to the most frequently asked questions I get and that I see on social media posts.
Comet NEOWISE (C/2020 F3) over the eroded hoodoo formations at Dinosaur Provincial Park, Alberta, July 14-15, 2020. A faint aurora is at right. The foreground is lit by starlight only; there was no light painting employed here. This is a stack of 12 exposures for the ground to smooth noise, blended with a single untracked exposure of the sky, all at 20 seconds at f/2.8 and ISO 1600, all with the 35mm Canon lens and Canon 6D MkII camera.
How Long Will the Comet be Visible?
The comet is not going to suddenly whoosh away or disappear. It is in our northern hemisphere sky and fairly well placed for shooting and watching all summer.
But … it is now getting fainter each night so the best time to shoot it is now! Or as soon as clouds allow on your next clear night.
As of this writing on July 18 it is still bright enough to be easily visible to the unaided eye from a dark site. How long this will be the case is unknown.
But after July 23 and its closest approach to Earth the comet will be receding from us and that alone will cause it to dim. Later this summer it will require binoculars to see, but might still be a good photogenic target, but smaller and dimmer than it was in mid-July.
This chart shows the position of Comet NEOWISE at nightly intervals through the rest of the summer. However, the rest of July are the prime nights left for catching the comet at its best. Click or tap on the image to download a full-res copy.
When is the Best Time to Shoot?
The comet has moved far enough west that it is now primarily an evening object. So look as soon as it gets dark each night.
Until later in July it is still far enough north to be “circumpolar” for northern latitudes (above 50° N) and so visible all night and into the dawn.
But eventually the comet will be setting into the northwest even as seen from northern latitudes and only visible in the evening sky. Indeed, by the end of July the comet will have moved far enough south that observers in the southern hemisphere anxious to see the comet will get their first looks.
Comet NEOWISE (C/2020 F3) over the Red Deer River from Orkney Viewpoint north of Drumheller, Alberta, on the morning of July 11, 2020. The sky is brightening with dawn twilight and a small display of noctilucent clouds is on the horizon at right. This is a two-segment vertical panorama with the 35mm Canon lens at f/2.8 and Canon 6D MkII at ISO 200 for 13 seconds each. Stitched with Adobe Camera Raw.
Where Do I Look?
In July look northwest below the Big Dipper. By August the comet is low in the west below the bright star Arcturus. By then it will be moving much less from night to night. The chart above shows the comet at nightly intervals; you can see how its nightly motion slows as it recedes from us and from the Sun.
A selfie observing Comet NEOWISE (C/2020 F3) with binoculars on the dark moonless night of July 14/15, 2020 from Dinosaur Provincial Park, Alberta. A faint aurora colours the sky green and magenta. The faint blue ion tail of the comet is visible in addition to its brighter dust tail. The ground is illuminated by starlight and aurora light only. This is a blend of 6 exposures stacked for the ground (except me) to smooth noise, and one exposure for the sky and me, all 13 seconds at f/2.5 with the 35mm lens and Canon 6D MkII at ISO 6400. Topaz DeNoise AI applied.
What Exposures Do I Use?
There is no single best setting. It depends on …
— How bright the sky is from your location (urban vs a rural site).
— Whether the Moon is up — it will be after July 23 or so when the Moon returns to the western sky as a waxing crescent.
— The phase of the Moon — in late July it will be waxing to Full on August 3 when the sky will be very bright and the comet faint enough it might lost in the bright sky.
However, here are guidelines:
— ISO 400 to 1600
— Aperture f/2 to f/4
— Shutter speed of 4 to 30 seconds
Unless you are shooting in a very bright sky, your automatic exposure settings are likely not going to work.
As with almost all nightscape photography you will need to set your camera on Manual (M) and dial in those settings for ISO, Aperture and Shutter Speed manually. Just how is something you need to consult your camera’s instruction manual for, as some point-and-shoot snapshot cameras are simply not designed to be used manually.
A once-in-a-lifetime scene — A panorama of the dawn sky at 4 am on July 14, 2020 from Waterton Lakes National Park, Alberta, Canada with Comet NEOWISE (C/2020 F3) over the iconic Prince of Wales Hotel. Noctilucent clouds glow below the comet in the dawn twilight. Venus is rising right of centre paired with Aldebaran and the Hyades star cluster, while the Pleiades cluster shine above. The waning quarter Moon shines above the Vimy Peak at far right. The Big Dipper is partly visible above the mountain at far left. Capella and the stars of Auriga are at centre. This is an 8-segment panorama with the 35mm Canon lens at f/2.5 for 15 seconds each at ISO 100 with the Canon 6D MkII and stitched with Adobe Camera Raw.
Exposure Considerations
As a rule you want to …
— Keep the ISO as low as possible for the lowest noise. The higher the ISO the worse the noise. But … do raise the ISO high enough to get a well-exposed image. Better to shoot at ISO 3200 and expose well, than at ISO 800 and end up with a dark, underexposed image.
— Shoot at a wide aperture, such as f/2 or f/2.8. The wider the aperture (smaller the f-number) the shorter the exposure can be and/or lower the ISO can be. But … lens aberrations might spoil the sharpness of the image.
— Keep exposures short enough that the stars won’t trail too much during the exposure due to Earth’s rotation. The “500 Rule” of thumb says exposures should be no longer than 500 / Focal length of your lens.
So for a 50mm lens exposures should be no longer than 500/50 = 10s seconds. You’ll still see some trailing but not enough to spoil the image. And going a bit longer in exposure time can make it possible to use a slower and less noisy ISO speed or simply having a better exposed shot.
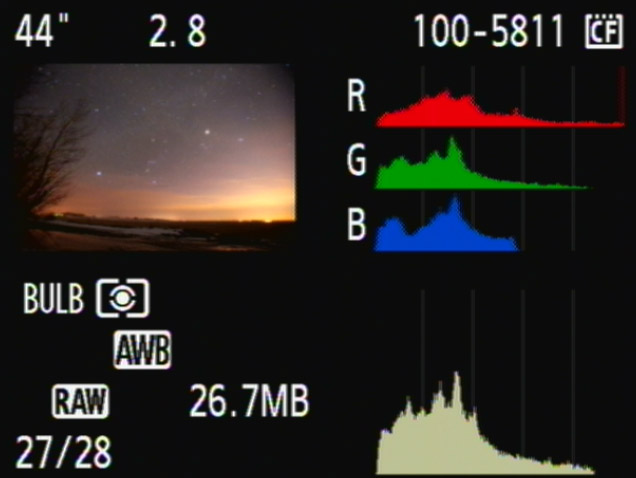
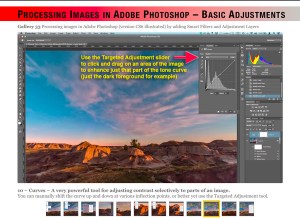
The histogram as shown in Adobe Camera Raw. Cameras also display the image’s histogram in the Live View preview and in playback of recorded images. Keep the histogram from slamming to the left.
— Avoid underexposing. If you can, call up the “histogram”— the graph of exposure values — on the resulting image in playback on your camera. The histogram should look fairly well distributed from left to right and not all bunched up at the left.
This is Comet NEOWISE (C/2020 F3) over the badlands and formations of Dinosaur Provincial Park, Alberta, on the night of July 14-15, 202. This is a blend of 6 exposures for the ground stacked to smooth noise, with a single exposure for the sky, with the 35mm Canon lens and Canon 6D MkII. The ground exposures are 1- and 2-minutes at ISO 1600 and f/2.8, while the single untracked sky exposure was 20 seconds at ISO 3200 and f/2.5.
When and where you are will also affect your exposure combination.
If you are at a site with lots of lights such as overlooking a city skyline, exposures will need to be shorter than at a dark site.
And nights with a bright Moon will require shorter exposures than moonless nights.
Take test shots and see what looks good! Inspect the histogram. This isn’t like shooting with film when we had no idea if we got the shot until it was too late!
What Lens Do I Use?
With a 35mm lens. Comet NEOWISE (C/2020 F3) over a ripening canola field near home in southern Alberta, on the night of July 15-16, 2020. This is a blend of a stack of six 2-minute exposures at ISO 3200 and f/5.6 to smooth noise, provide depth of field, and bring out the colours of the canola, blended with a single short 15-second exposure of the sky at f/2.8 and ISO 1600, all with the 35mm lens and Canon 6D MkII camera.
With a 50mm lens. Comet NEOWISE (C/2020 F3) over a ripening canola field near home in southern Alberta, on the night of July 15-16, 2020. This is a blend of a stack of three 2-minute exposures at ISO 1600 and f/5 to smooth noise, provide depth of field, and bring out the colours of the canola, blended with a single short 15-second exposure of the sky at f/2.8 and ISO 3200, all with the 50mm Sigma lens and Canon 6D MkII camera.
Any lens can produce a fine shot. Choose the lens to frame the scene well.
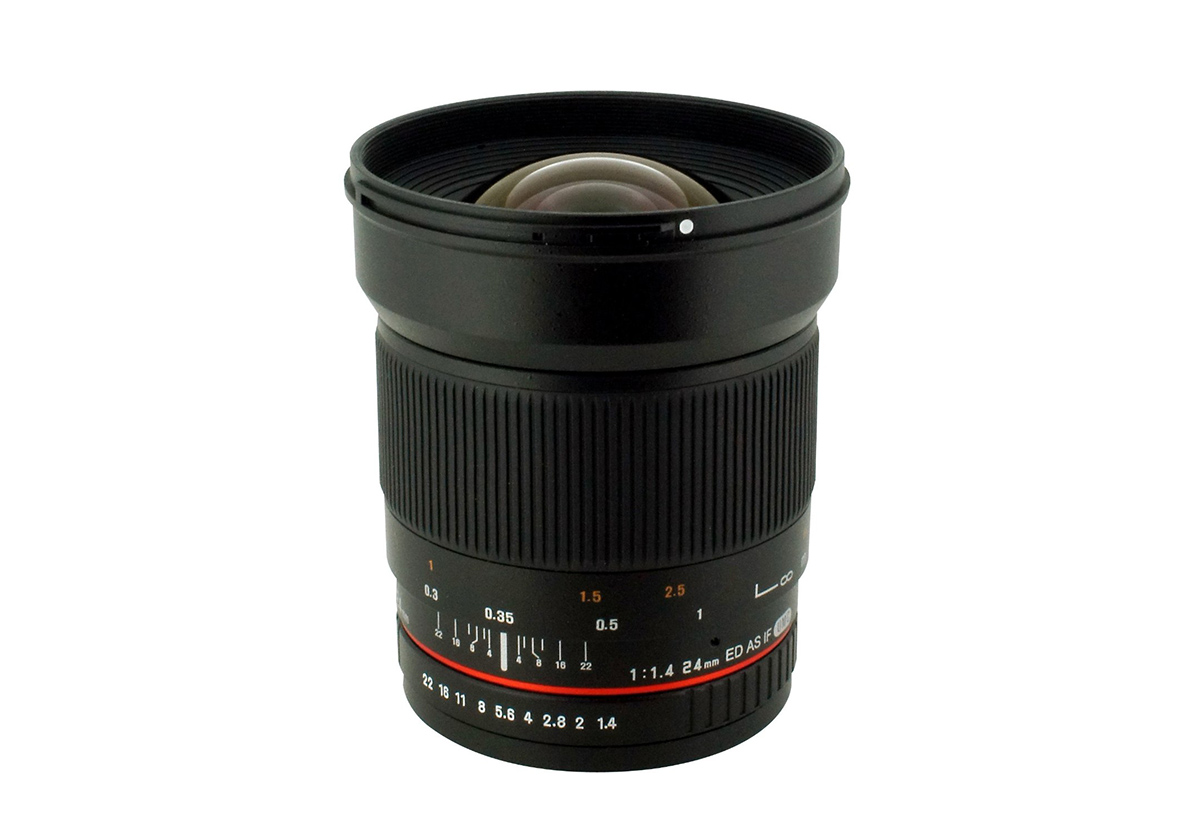
Using a longer lens (105mm to 200mm) does make the comet larger, but … might make it more difficult to also frame it above a landscape. A good choice is likely a 24mm to 85mm lens.
A fast lens is best, to keep exposure times below the 500 Rule threshold and ISO speeds lower. Slow f/5.6 kit zooms can be used but do pose challenges for getting well exposed and untrailed shots.
Shooting with shorter focal lengths can help keep the aperture wider and faster. Long focal lengths aren’t needed, especially for images of the comet over a landscape. Avoid the temptation to use that monster 400mm or 600mm telephoto wildlife lens. Unless it is on a tracker (see below) it will produce a trailed mess. It is best to shoot with no more than a 135mm telephoto, the faster the better, IF you want a close-up.
Planetarium programs that I recommend below offer “field of view” indicators so you can preview how much of the horizon and sky your camera and lens combination will show.
StarryNight™ and other programs offer “Field of View” indicator frames that can show how the scene will frame with (in this example) lenses from 24mm to 135mm.
Can I Use My [insert camera here] Camera?
Yes. Whatever you have, try it.
However, the best cameras for any nightscape photography are DSLRs and Mirrorless cameras, either full-frame or cropped frame. They have the lowest noise and are easiest to set manually.
In my experience in teaching workshops I find that the insidious menus of automatic “point-and-shoot” pocket cameras make it very difficult to find the manual settings. And some have such noisy sensors they do not allow longer exposures and/or higher ISO speeds. But try their Night or Fireworks scene modes.
It doesn’t hurt to try, but if you don’t get the shot, don’t fuss. Just enjoy the view with your eyes and binoculars.
But … if you have an iPhone11 or recent Android phone (I have neither!) their “Night scene” modes are superb and use clever in-camera image stacking and processing routines to yield surprisingly good images. Give them a try — keep the camera steady and shoot.
This is Comet NEOWISE (C/2020 F3) over Deadhorse Lake near Hussar in southern Alberta, taken just after midnight on July 10-11, 2020 during its evening appearance. The comet shines just above low noctilucent clouds. This is a blend of nine exposures for the ground stacked to smooth noise and the water, with a single exposure for the sky, all 4 seconds with the 135mm Canon lens at f/2 and Canon 6D MkII at ISO 1600.
What No One Asks: How Do I Focus?
Everyone fusses about “the best” exposure.
What no one thinks of is how they will focus at night. What ruins images is often not bad exposure (a lot of exposure sins can be fixed in processing) but poor focus (which cannot be fixed later).
On bright scenes it is possible your camera’s Autofocus system will “see” enough in the scene to work and focus the lens. Great.
On dark scenes it will not. You must manually focus. Do that using your camera’s “Live View” function (all DSLRs and Mirrorless cameras have it — but check your user manual as on DSLRs it might need to be activated in the menus if you have never used it).
The Live View screen of a Canon DSLR. Look in your manual for tips on how to boost the Live screen image brightness with the Exposure Simulation option.
Magnify the image 5x, 10x or more with the Zoom box centred on a star to focus the star to a pinpoint.
Aim at a bright star or distant light and magnify the image 5x or 10x (with the + button) to inspect the star or light. Put the lens on MF (not AF) and focus the lens manually to make the star as pinpoint as possible. Do not touch the lens afterwards.
Practice on a cloudy night on distant lights.
All shooting must be done with a camera on a good tripod. As such, turn OFF any image stabilization (IS), whether it be on the lens or in the camera. IS can ruin shots taken on a tripod.
What Few Ask: How Do I Plan a Shoot?
Good photos rarely happen by accident. They require planning. That’s part of the challenge and satisfaction of getting the once-in-a-lifetime shot.
To get the shot of the comet over some striking scene below, you have to figure out:
— First, where the comet will be in the sky,
— Then, where you need to be to look toward that location.
— And of course, you need to be where the sky will be clear!
The free web version of Stellarium shows the comet, as do the paid mobile apps.
Planning Where the Comet Will Be
Popular planning software such as PhotoPills and The Photographer’s Ephemeris can help immensely, but won’t have the comet itself included in their displays, just the position of the Sun, Moon and Milky Way.
For previewing the comet’s position in the sky, I use the planetarium programs Starry Night (desktop) or SkySafari (mobile app). Both include comet positions.
The program Stellarium (stellarium.org) is free for desktop while the mobile Stellarium Plus apps (iOS and Android) have a small fee. There is also a free web-based version at https://stellarium-web.orgBe sure to allow it to access your location.
Set the programs to the night in question to see where the comet will be in relation to the stars and patterns such as the Big Dipper. Note the comet’s altitude in degrees and azimuth (how far along the horizon it will be). For example, an azimuth of 320° puts it in the northwest (270° is due west; 0° or 360° is due north, 315° is directly northwest).
Comet NEOWISE (C/2020 F3) with a small display of noctilucent clouds over Emerald Bay and the iconic Prince of Wales Hotel at Waterton Lakes National Park, Alberta, at dawn on July 14, 2020. This is a blend of a stack of four exposures for the ground and water to smooth noise, blended with a single short exposure for the sky, all 20 seconds at f/2.5 and ISO 400. All with the 35mm Canon lens and Canon 6D MkII camera.
With either you can dial in the time and date and see lines pointing toward where the Sun would be, but below the horizon. Scrub through time to move that line to the same azimuth angle as where the comet will be and then see if the comet is sitting in the right direction.
The screen from The Photographer’s Ephemeris app showing the planning map for the image above, with the faint yellow line indicating the line toward the comet’s azimuth.
Move your location to place the line toward the comet over what you want to include in the scene.
The simulation of the real scene above, of the comet over the Prince of Wales Hotel, using TPE 3D app. The simulation matches the real scene very well!
I like The Photographer’s Ephemeris as it links to the companion app TPE3D that can show the stars over the actual topographic landscape. It won’t show the comet, but if you know where it is in the sky you can see if if will clear mountains, for example.
The Astrospheric app prediction of skies for me for the night I prepared this blog. Not great! But clear skies could be found to to east with a fresh hours drive.
Planning for the Weather
All is for nought if the sky is cloudy.
For planning astro shoots I like the app Astrospheric (https://www.astrospheric.com). It is free for mobile and there is a web-based version. It uses Environment Canada predictions of cloud cover for North America. Use it to plan where to be for clear skies first, then figure out the best scenic site that will be under those clear skies.
Be happy to get a well-composed and exposed single shot.
But … if you wish to try some more advanced techniques for later processing, here are suggestions.
A panorama of the sky just before midnight on July 13, 2020 from Waterton Lakes National Park, Alberta, Canada with Comet NEOWISE (C/2020 F3) over the front range of the Rocky Mountains and an arc of aurora across the north. This is a 6-segment panorama with the 35mm Canon lens at f/2.2 for 25 seconds each at ISO 800 with the Canon 6D MkII and stitched with Adobe Camera Raw.
1. Panoramas
On several nights I’ve found a panorama captures the scene better, including the comet in context with the wide horizon, sweep of the twilight arch or, as we’ve had in western Canada, some Northern Lights.
Take several identical exposures, moving the camera 10 to 15 degrees between images. Editing programs such as Lightroom, Adobe Camera Raw, ON1 Photo RAW and Affinity Photo have panorama stitching routines built in.
My Nightscapes and Time-Lapses ebook shown above provides tutorials for shooting and processing nightscape panoramas.
What a magical scene this was! This is Comet NEOWISE (C/2020 F3) over the sweep of the Red Deer River and Badlands from Orkney Viewpoint north of Drumheller, Alberta, on the morning of July 11, 2020. Light from the waning gibbous Moon provides the illumination, plus twilight. This nicely shows the arch of the twilight colours. This is a 6-segment panorama with the 50mm Sigma lens at f/2.8 and Canon 6D MkII at ISO 400 for 13 seconds each. Stitched with Adobe Camera Raw. Topaz DeNoise AI and Sharpen AI applied.
2. Exposure Blending
If you have a situation where the sky is bright but the ground is dark, or vice versa, and one exposure cannot record both well, then shoot two exposures, each best suited to recording the sky and ground individually.
For example, on moonless nights I’ve been shooting 2- to 5-minute long exposures for the ground and with the lens stopped down to f/5.6 or f/8 for better depth of field to be sure the foreground was in focus.
This is Comet NEOWISE (C/2020 F3) over the Horseshoe Canyon formation near Drumheller, Alberta on the night of July 10-11, 2020, taken about 2 a.m. MDT with the comet just past lower culmination with it circumpolar at this time. Warm light from the rising waning gibbous Moon provides the illumination. This is a blend of six 1- and 2-minute exposures for the ground at ISO 800 and 400 stacked to smooth noise, with a single 30-second exposure at ISO 1600 for the sky, all with the 35mm Canon lens at f/2.8 and Canon 6D MkII.
3. Exposure Stacking
To reduce noise, it is also possible to shoot multiple exposures to stack later in processing to smooth noise. This is most useful in scenes with dark foregrounds where noise is most obvious, and where I will stack 4 to 8 images.
Just how to do this is beyond the scope of this blog. I also give step-by-step tutorials for the process in my Nightscapes and Time-Lapses ebook shown above. It be done in Photoshop, or in specialized programs such as StarryLandscapeStacker (for MacOS) or Sequator (Windows).
But shoot the images now, and learn later how to use them.
A close-up of Comet NEOWISE (C/2020 F3) on the night of July 14/15, 2020 with a 135mm telephoto lens. This is a stack of nine 1-minute exposures with the 135mm Canon lens wide-open at f/2 and Canon EOS Ra camera at ISO 800. The camera was on the iOptron SkyGuider Pro tracker tracking the stars not the comet. Stacked and aligned in Photoshop.
4. Tracking the Sky
If it is close-ups of the comet you want, then you will need to use a 135mm to 300mm telephoto lens (especially later in the summer when the comet is farther away and smaller).
But with such lenses any exposure over a few seconds will result in lots of trailing.
The iOptron SkyGuider Pro and 135mm lens used to take the close-up shot of the comet above.
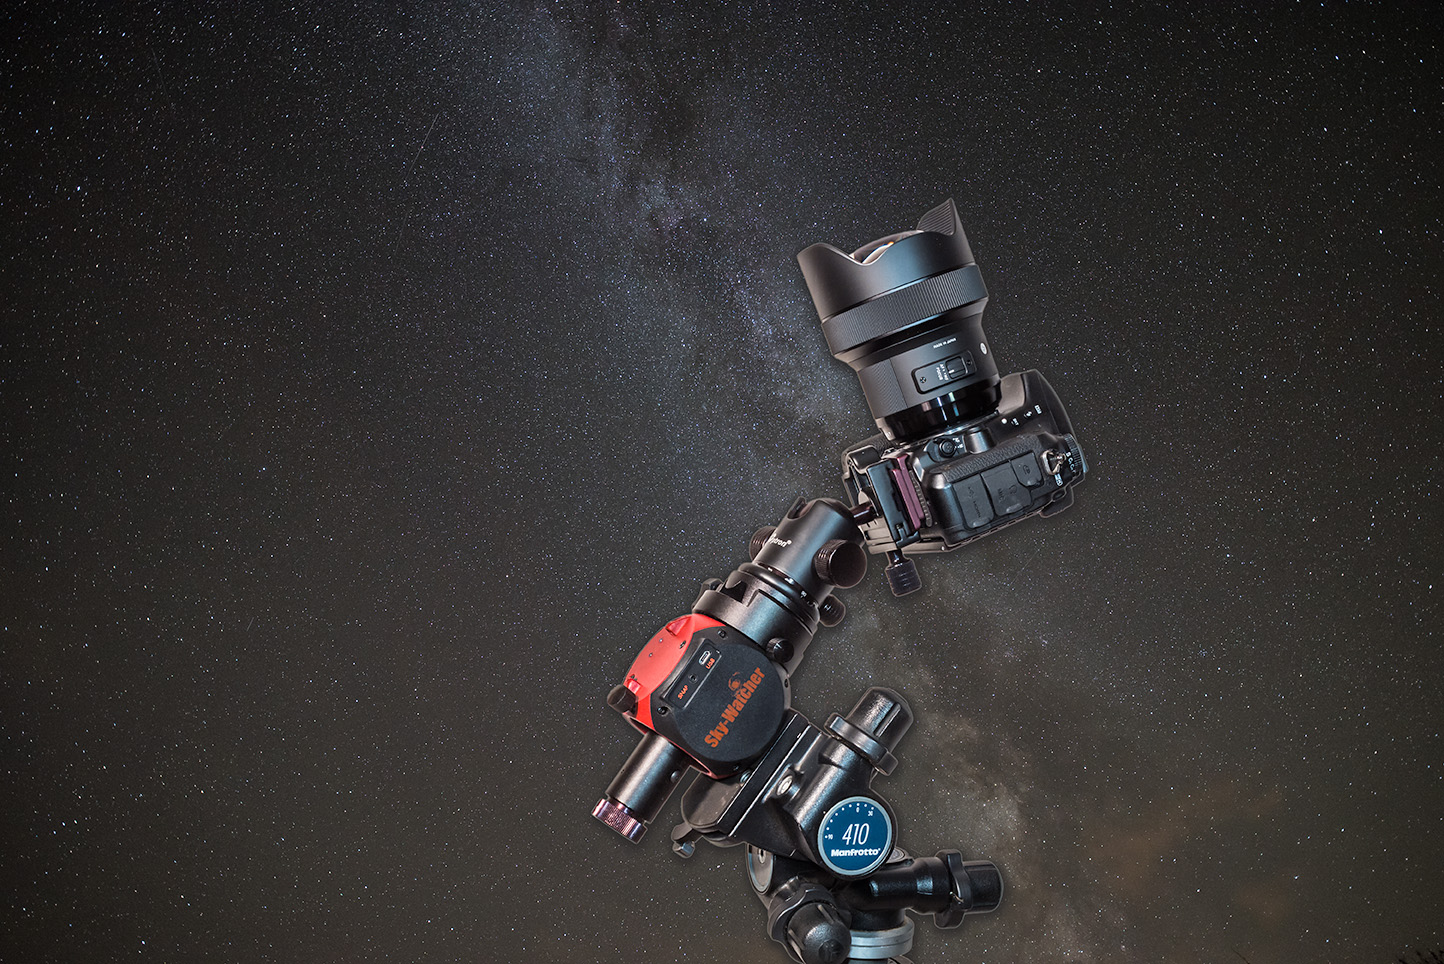
The solution is a tracking device such as the Sky-Watcher Star Adventurer or iOptron SkyGuider. These need to be set up so their rotation axis aims at the North Celestial Pole near Polaris. The camera can then follow the stars for the required exposures of up to a minute or more needed to record the comet and its tails well.
This is the Sky-Watcher Star Adventurer. All trackers have a polar axis that needs to be aligned to the Celestial Pole, near Polaris.
Just how to use a tracker is again beyond the scope of this blog. But if you have one, it will work very well for comet shots with telephoto lenses. However, trackers are not essential for wide-angle shots, especially once the Moon begins to light the sky.
But later in the summer when the comet is fainter and smaller, a tracked and stacked set of telephoto lens images will likely be the best way to capture the comet.
I present my top 10 tips for capturing time-lapses of the moving sky.
If you can take one well-exposed image of a nightscape, you can take 300. There’s little extra work required, just your time. But if you have the patience, the result can be an impressive time-lapse movie of the night sky sweeping over a scenic landscape. It’s that simple.
Or is it?
Here are my tips for taking time-lapses, in a series of “Do’s” and “Don’ts” that I’ve found effective for ensuring great results.
But before you attempt a time-lapse, be sure you can first capture well-exposed and sharply focused still shots. Shooting hundreds of frames for a time-lapse will be a disappointing waste of your time if all the images are dark and blurry.
For that reason many of my tips apply equally well to shooting still images. But taking time-lapses does require some specialized gear, techniques, planning, and software. First, the equipment.
NOTE: This article appeared originally in Issue #9 of Dark Sky Travels e-magazine.
SELECTING EQUIPMENT
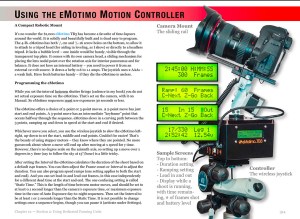
Essential Gear Time-lapse photography requires just the camera and lens you might already own, but on a solid tripod (a carbon-fibre Manfrotto with an Acratech ball-head is shown here), and with an intervalometer.
TIP 1 — DO: Use a solid tripod
A lightweight travel tripod that might suffice for still images on the road will likely be insufficient for time-lapses. Not only does the camera have to remain rock steady for the length of the exposure, it has to do so for the length of the entire shoot, which could be several hours. Wind can’t move it, nor any camera handling you might need to do mid-shoot, such as swapping out a battery.
The tripod needn’t be massive. For hiking into scenic sites you’ll want a lightweight but sturdy tripod. While a carbon fibre unit is costly, you’ll appreciate its low weight and good strength every night in the field. Similarly, don’t scrimp on the tripod head.
TIP 2 — DO: Use a fast lens
The All-Important Lens A fast lens is especially critical for time-lapses to allow capturing good sky and ground detail in each exposure, as compositing later won’t be feasible. This is the Sigma 20mm f/1.4 Art lens.
As with nightscape stills, the single best purchase you can make to improve your images of dark sky scenes is not buying a new camera (at least not at first), but buying a fast, wide-angle lens.
Ditch the slow kit zoom and go for at least an f/2.8, if not f/2, lens with 10mm to 24mm focal length. This becomes especially critical for time-lapses, as the fast aperture allows using short shutter speeds, which in turn allows capturing more frames in a given period of time. That makes for a smoother, slower time-lapse, and a shoot you can finish sooner if desired.
TIP 3 — DO: Use an intervalometer
Canon intervalometer functions
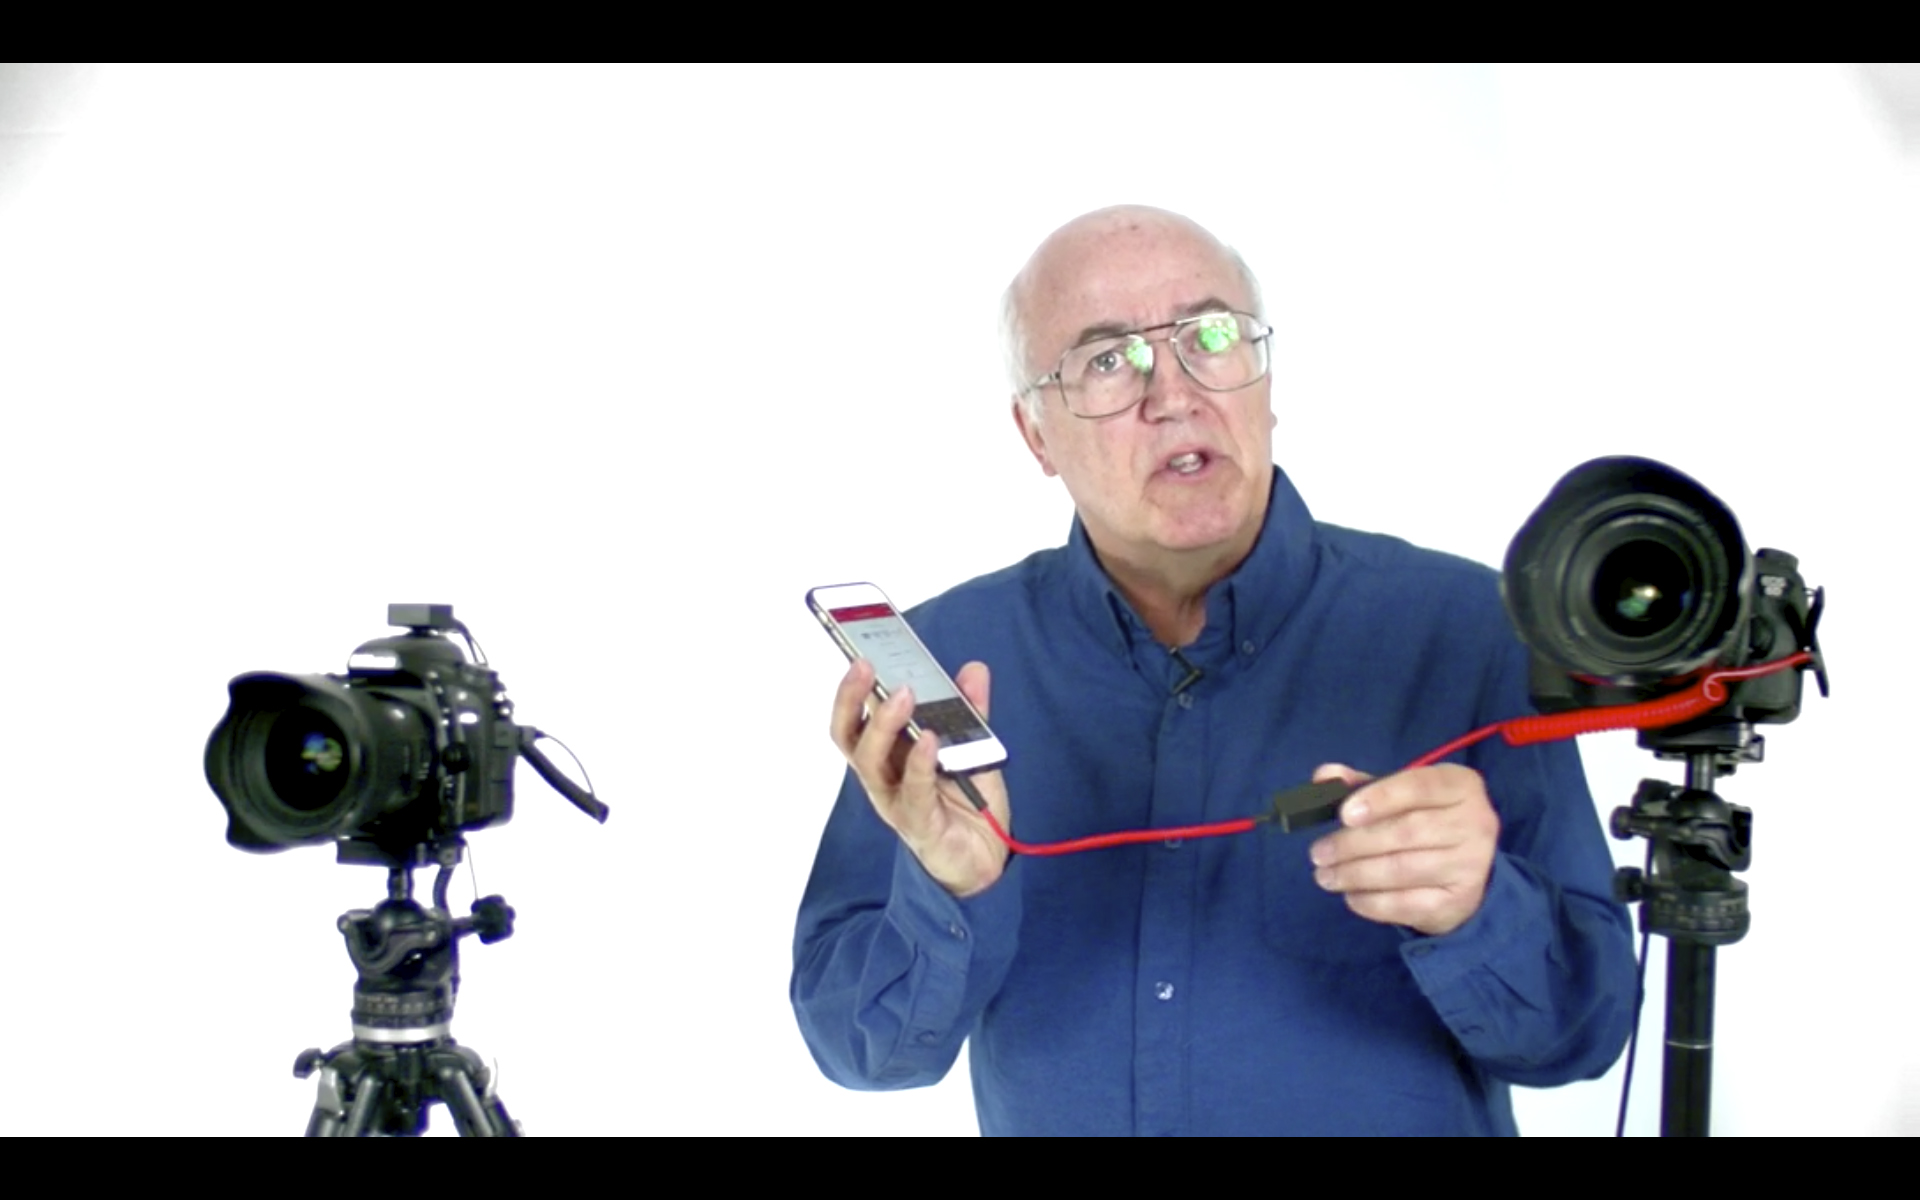
Nikon intervalometer functions
Automating the Camera The intervalometer is also key. For cameras without an internal intervalometer (screens from a Canon and a Nikon are shown above), an outboard unit like one of these, is essential. Be sure to get the model that fits your camera’s remote control jack.
Time-lapses demand the use of an intervalometer to automatically fire the shutter for at least 200 to 300 images for a typical time-lapse. Many cameras have an intervalometer function built into their firmware. The shutter speed is set by using the camera in Manual mode.
Just be aware that a camera’s 15-second exposure really lasts 16 seconds, while a 30-second shot set in Manual is really a 32-second exposure.
So in setting the interval to provide one second between shots, as I advise below, you have to set the camera’s internal intervalometer for an interval of 17 seconds (for a shutter speed of 15 seconds) or 33 seconds (for a shutter speed of 30 seconds). It’s an odd quirk I’ve found true of every brand of camera I use or have tested.
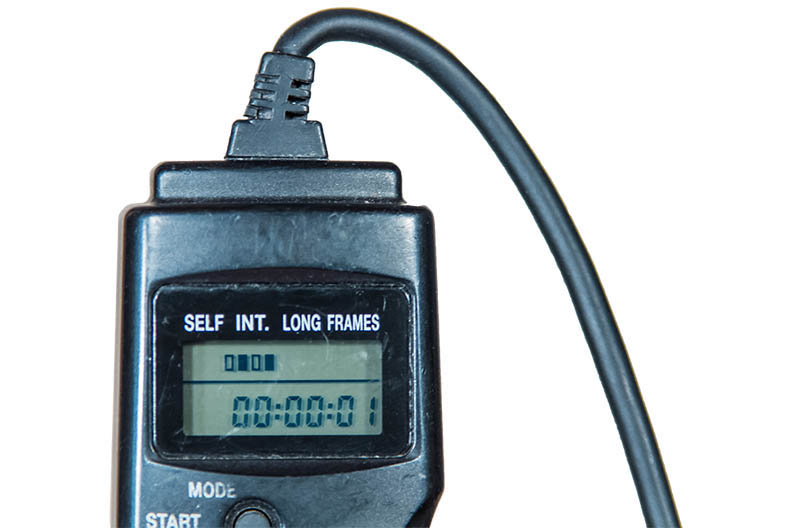
Alternatively, you can set the camera to Bulb and then use an outboard hardware intervalometer (they sell for $60 on up) to control the exposure and fire the shutter. Test your unit. Its interval might need to be set to only one second, or to the exposure time + one second.
How intervalometers define “Interval” varies annoyingly from brand to brand. Setting the interval incorrectly can result in every other frame being missed and a ruined sequence.
SETTING YOUR CAMERA
TIP 4 — DON’T: Underexpose
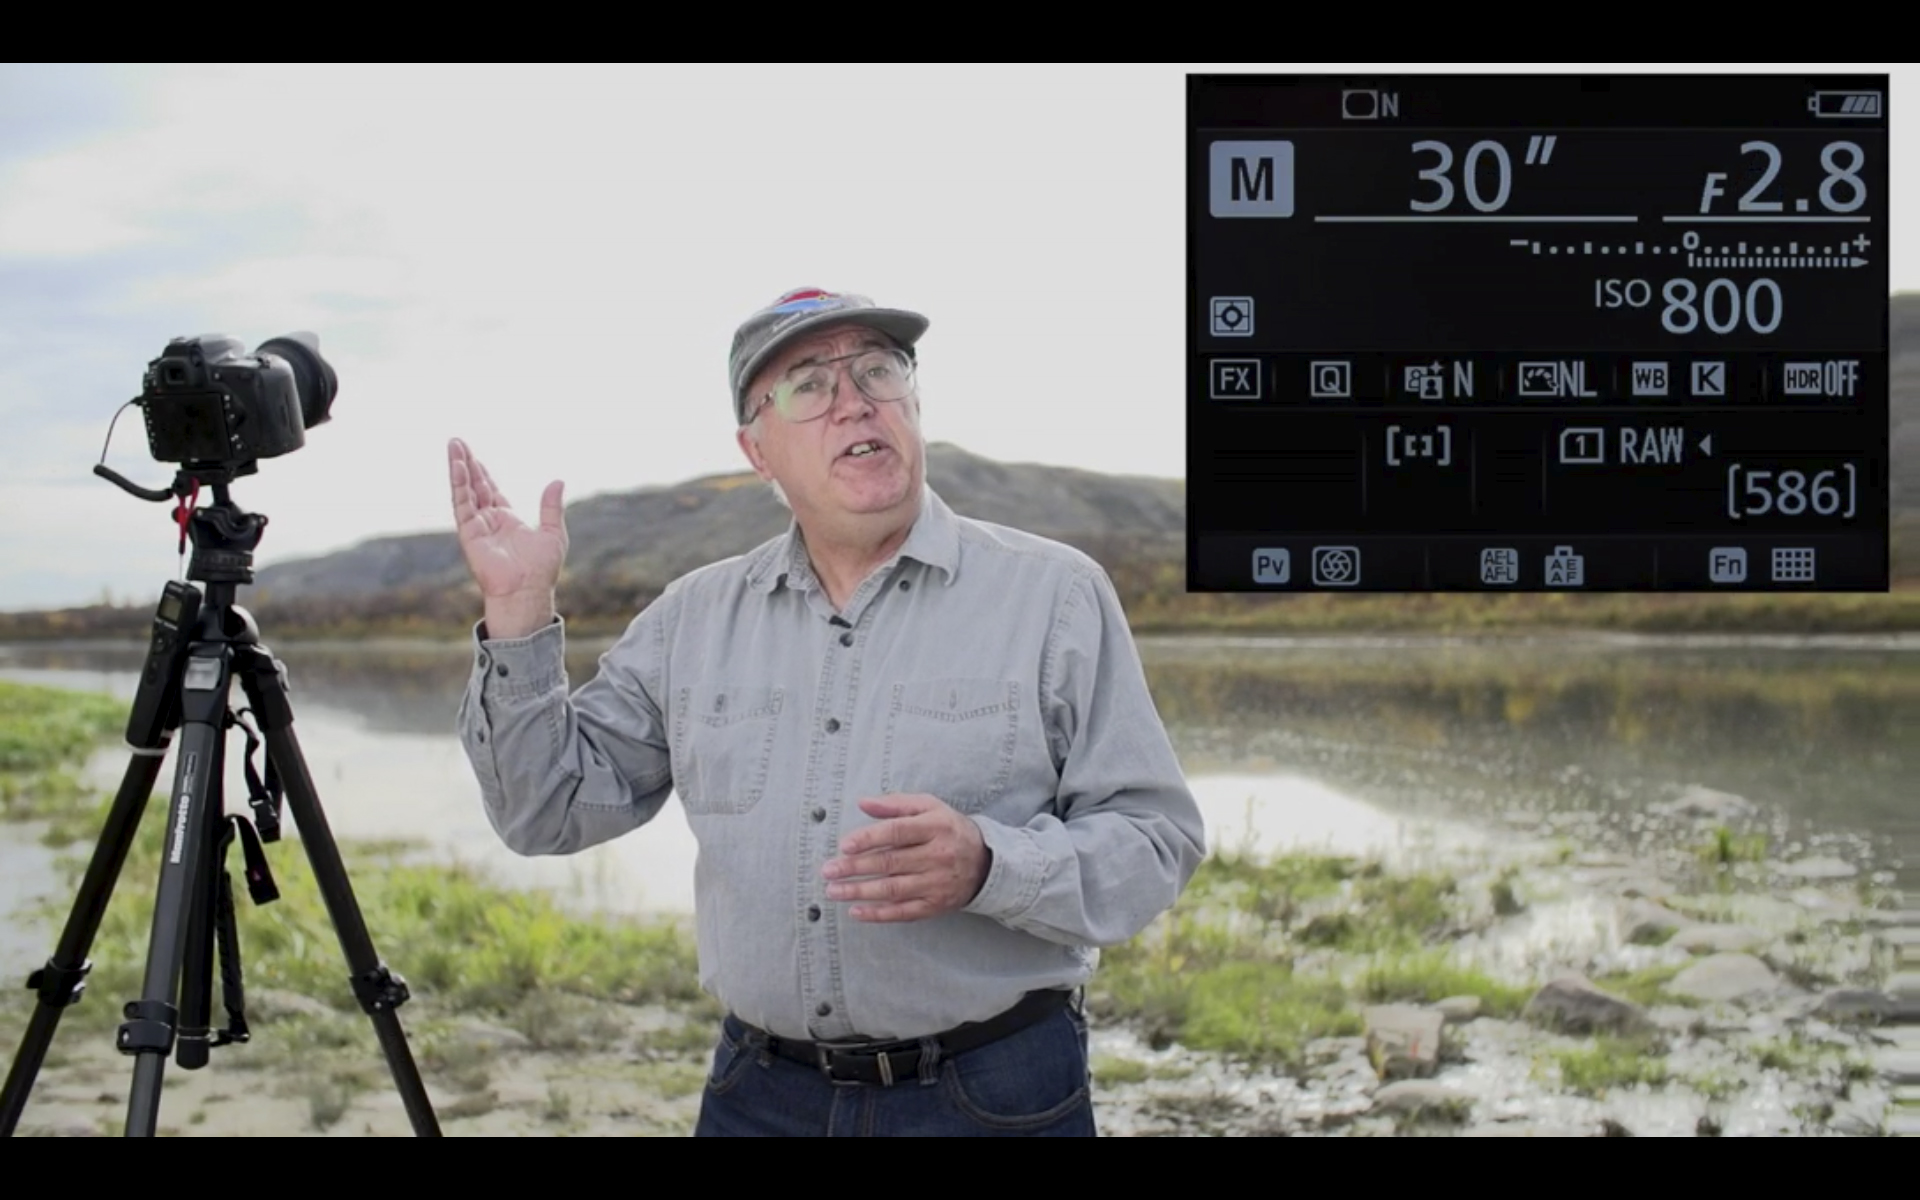
Expose to the Right When shooting, choose settings that will yield a histogram that is not slammed to the left, but is shifted to the right to minimize noise and lift details in the shadows.
As with still images, the best way to beat noise is to give the camera signal. Use a wider aperture, a longer shutter speed, or a higher ISO (or all of the above) to ensure the image is well exposed with a histogram pushed to the right.
If you try to boost the image brightness later in processing you’ll introduce not only the very noise you were trying to avoid, but also odd artifacts in the shadows such as banding and purple discolouration.
With still images we have the option of taking shorter, untrailed images for the sky, and longer exposures for the dark ground to reveal details in the landscape, to composite later. With time-lapses we don’t have that luxury. Each and every frame has to capture the entire scene well.
At dark sky sites, expose for the dark ground as much as you can, even if that makes the sky overly bright. Unless you outright clip the highlights in the Milky Way or in light polluted horizon glows, you’ll be able to recover highlight details later in processing.
After poor focus, underexposure, resulting in overly noisy images, is the single biggest mistake I see beginners make.
TIP 5 — DON’T: Worry about 500 or “NPF” Exposure Rules
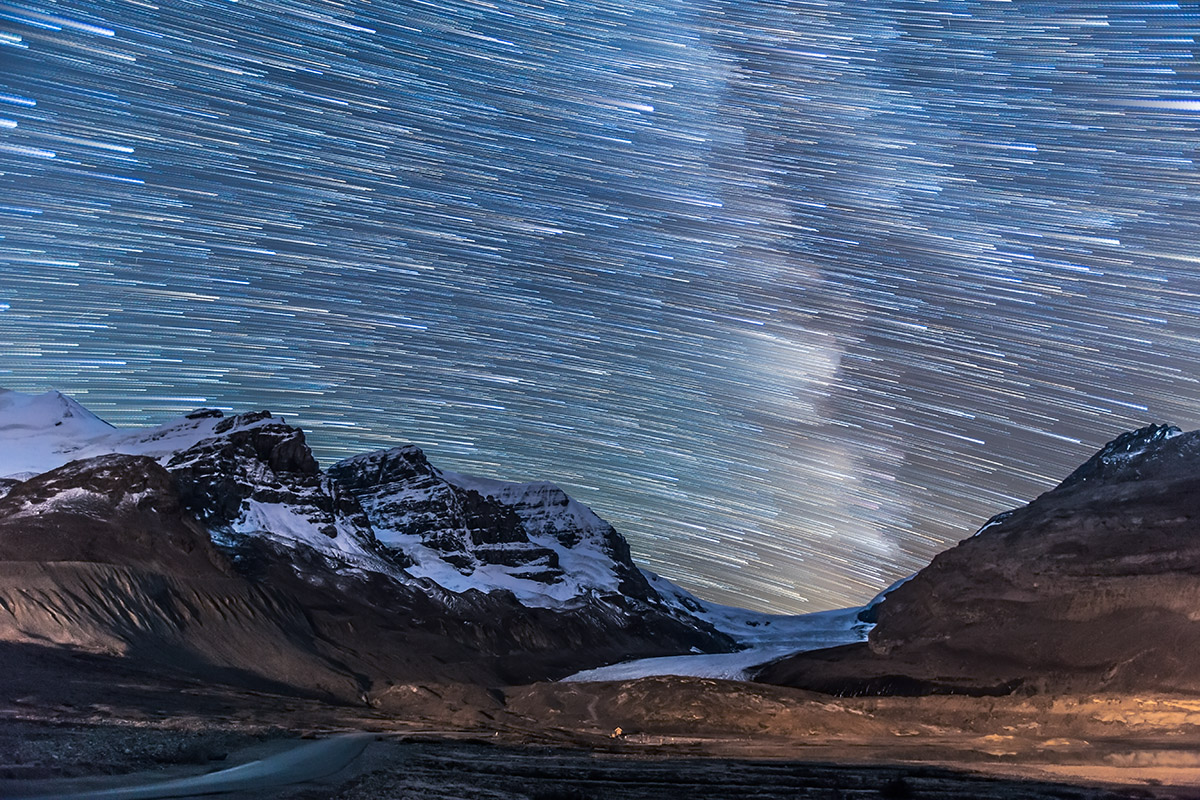
Stills from a Sequence A stack of single frames from a time-lapse sequence can often make a good still image, such as this scene of the Space Station rising over Waterton Lakes National Park. The 30-second exposures were just within the “500 Rule” for the 15mm lens used here, but minor star trailing won’t be that noticeable in a final movie.
While still images might have to adhere to the “500 Rule” or the stricter “NPF Rule” to avoid star trailing, time-lapses are not so critical. Slight trailing of stars in each frame won’t be noticeable in the final movie when the stars are moving anyway.
So go for rule-breaking, longer exposures if needed, for example if the aperture needs to be stopped down for increased depth of field and foreground focus. Again, with time-lapses we can’t shoot separate exposures for focus stacking later.
Just be aware that the longer each exposure is, the longer it will take to shoot 300 of them.
Why 300? I find 300 frames is a good number to aim for. When assembled into a movie at 30 frames per second (a typical frame rate) your 300-frame clip will last 10 seconds, a decent length of time in a final movie.
You can use a slower frame rate (24 fps works fine), but below 24 the movie will look jerky unless you employ advanced frame blending techniques. I do that for auroras.
PhotoPills Calculator Apps such as PhotoPills offer handy calculators for juggling exposure time vs. the number of frames to yield the length of the time-lapse shoot.
Bonus Tip
How long it will take to acquire the needed 300 frames will depend on how long each exposure is and the interval between them. An app such as PhotoPills (via its Time lapse function) is handy in the field for calculating exposure time vs. frame count vs. shoot length, and providing a timer to let you know when the shoot is done.
TIP 6 — DO: Use short intervals
Mind the Gap! At night use intervals as short as possible to avoid gaps in time, simulated here (at top) by stacking several time-lapse frames taken at a one-second interval into one image. Using too long an interval, as demonstrated just above, yields gaps in time and jumps in the star motion, simulated here by stacking only every other frame in a sequence.
At night, the interval between exposures should be no more than one or two seconds. By “interval,” I mean the time between when the shutter closes and when it opens again for the next frame.
Not all intervalometers define “Interval” that way. But it’s what you expect it means. If you use too long an interval then the stars will appear to jump across the sky, ruining the smooth motion you are after.
In practice, intervals of four to five seconds are sometimes needed to accommodate the movement of motorized “motion control” devices that turn or slide the camera between each shot. But I’m not covering the use of those advanced units here. I cover those options and much, much more in 400 pages of tips, techniques and tutorials in my Nightscapes ebook, linked to above.
However, during the day or in twilight, intervals can be, and indeed need to be, much longer than the exposures. It’s at night with stars in the sky that you want the shutter to be closed as little as possible.
TIP 7 — DO: Shoot Raw
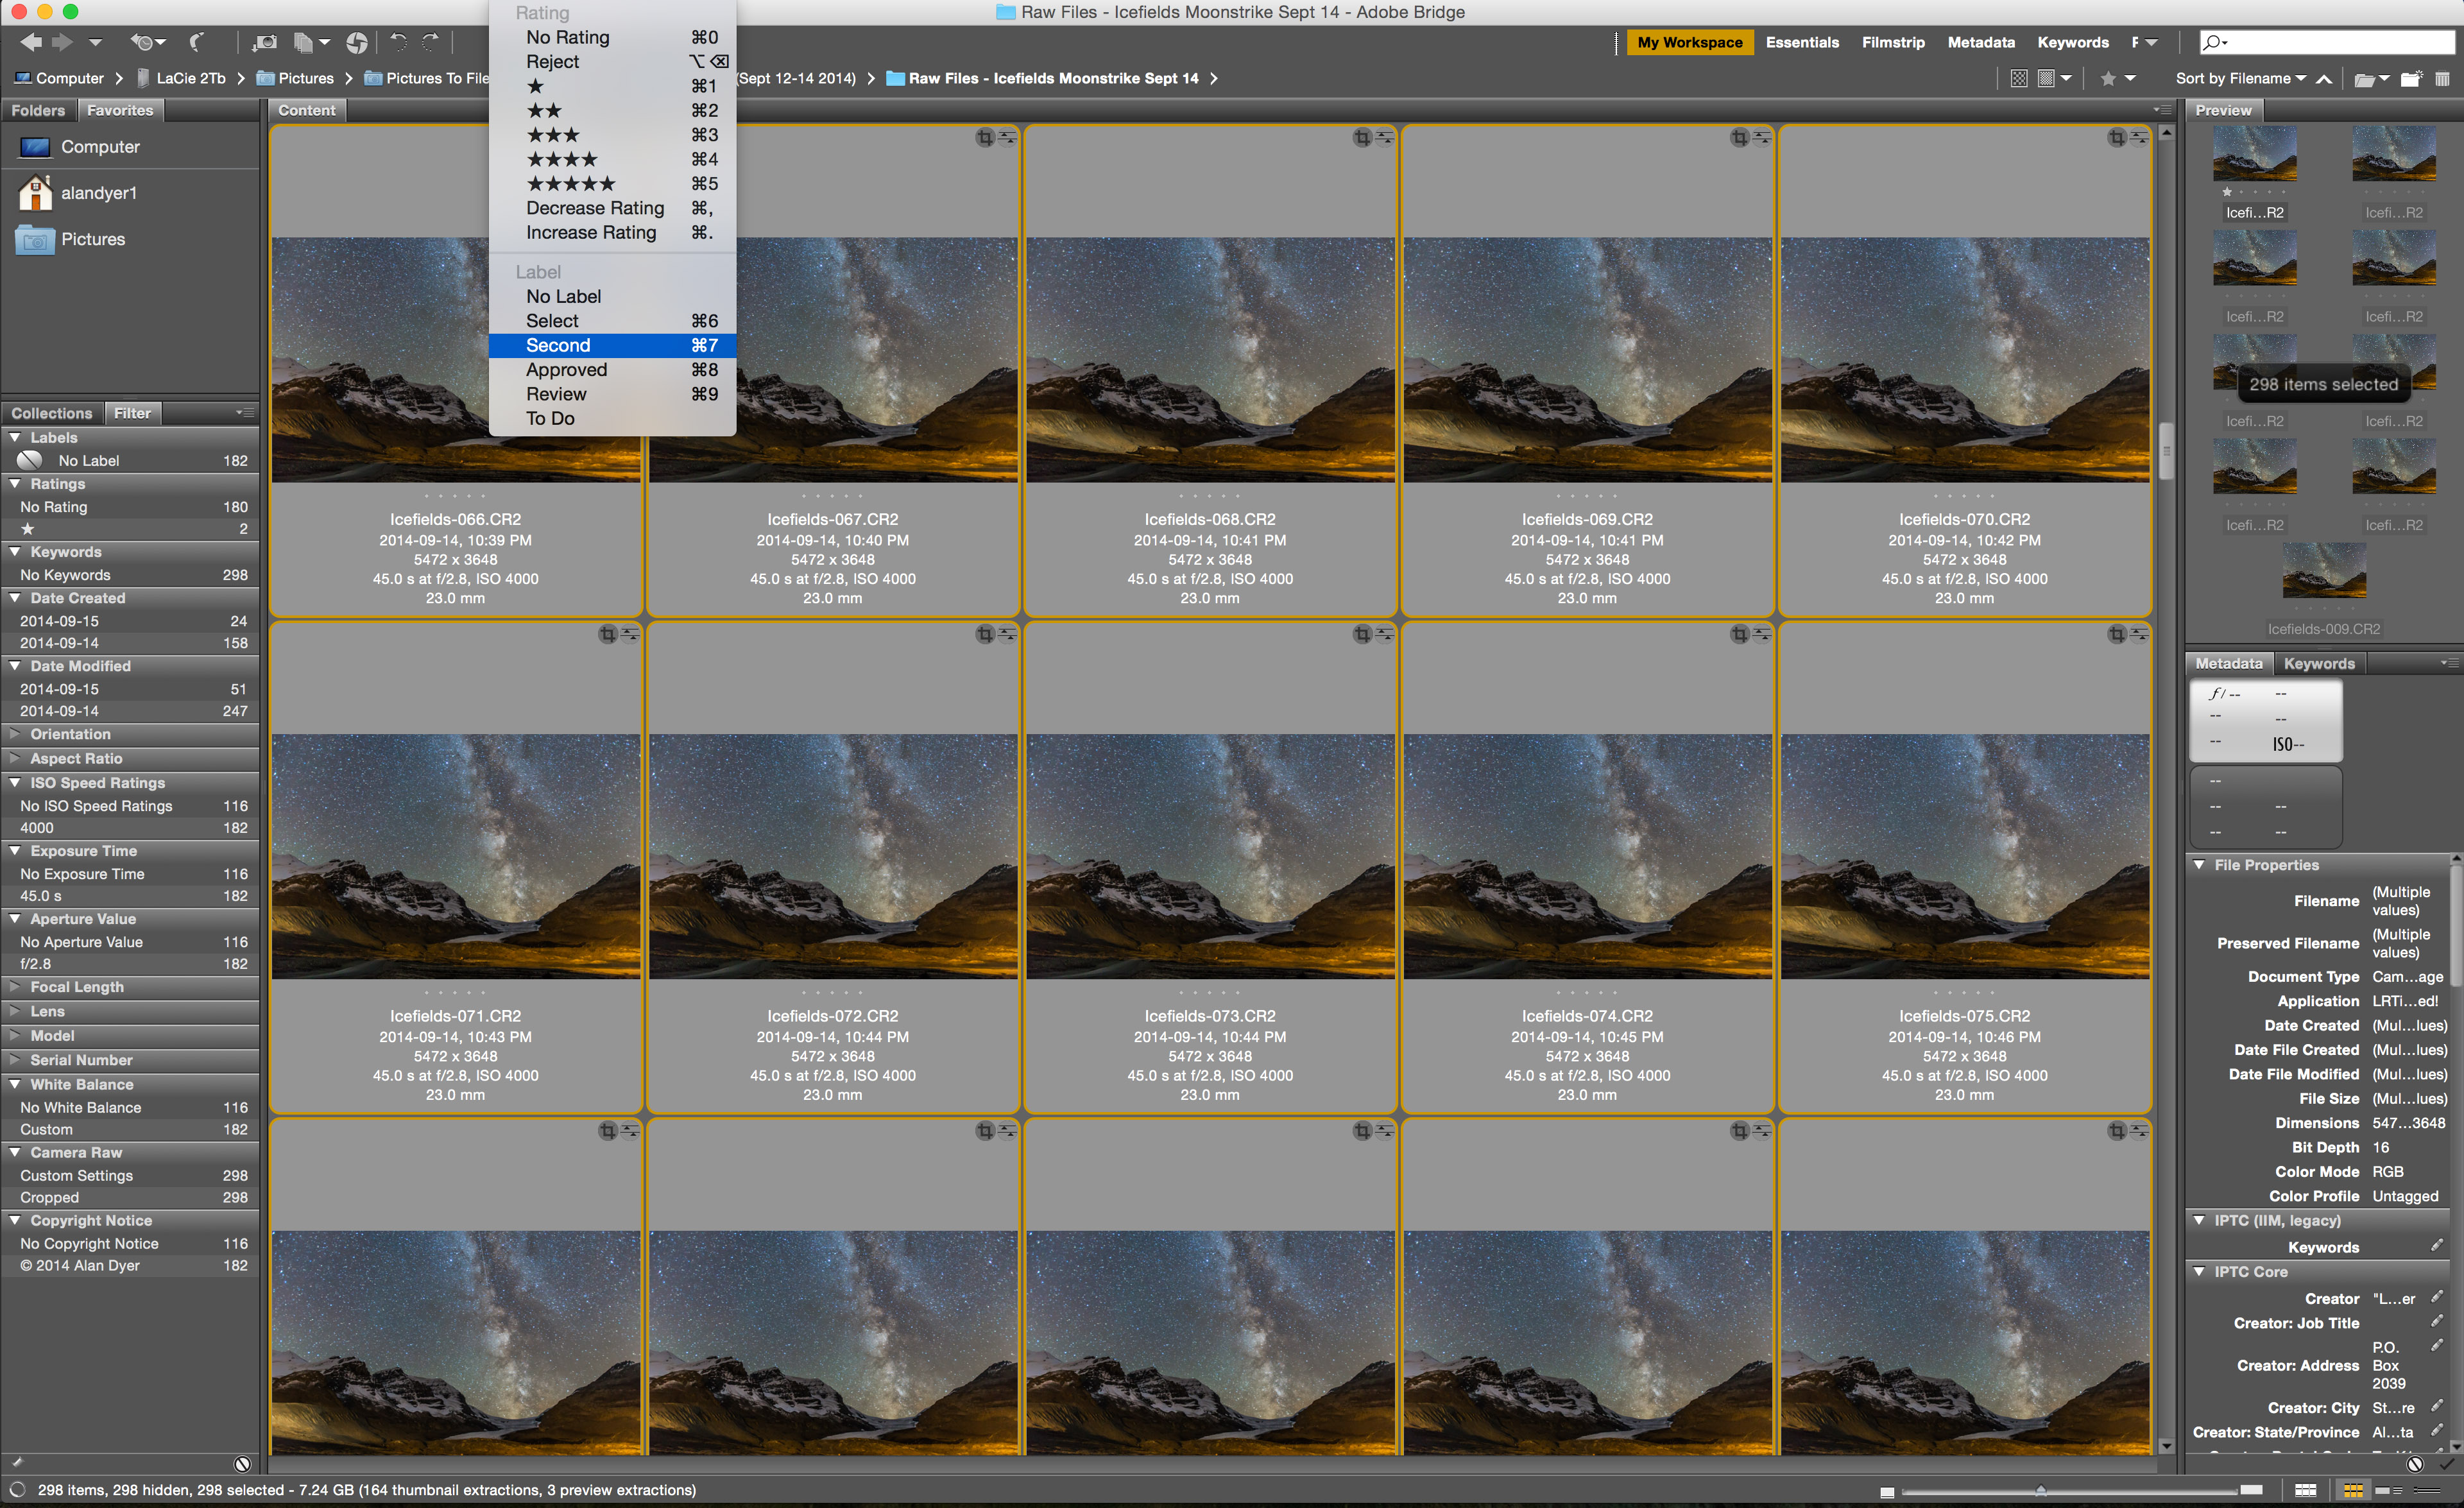
The Power of Raw Shooting raw, even for time-lapse frames that will eventually be turned into JPGs, allows for maximum control of shadows, highlights, colour balance, and noise reduction. “Before” is what came out of the camera; “After” is with the development settings shown applied in Camera Raw.
This advice also applies to still images where shooting raw files is essential for professional results. But you likely knew that.
However, with time-lapses some cameras offer a mode that will shoot time-lapse frames and assemble them into a movie right in the camera. Don’t use it. It gives you a finished, pre-baked movie with no ability to process each frame later, an essential step for good night time-lapses. And raw files provide the most data to work with.
So even with time-lapses, shoot raw not JPGs.
If you are confident the frames will be used only for a time-lapse, you might choose to shoot in a smaller S-Raw or compressed C-Raw mode, for smaller files, in order to fit more frames onto a card.
But I prefer not to shrink or compress the original raw files in the camera, as some of them might make for an excellent stacked and layered still image where I want the best quality originals (such as for the ISS over Waterton Lakes example above).
To get you through a long field shoot away from your computer buy more and larger memory cards. You don’t need costly, superfast cards for most time-lapse work.
PLANNING AND COMPOSITION
TIP 8 — DO: Use planning apps to frame
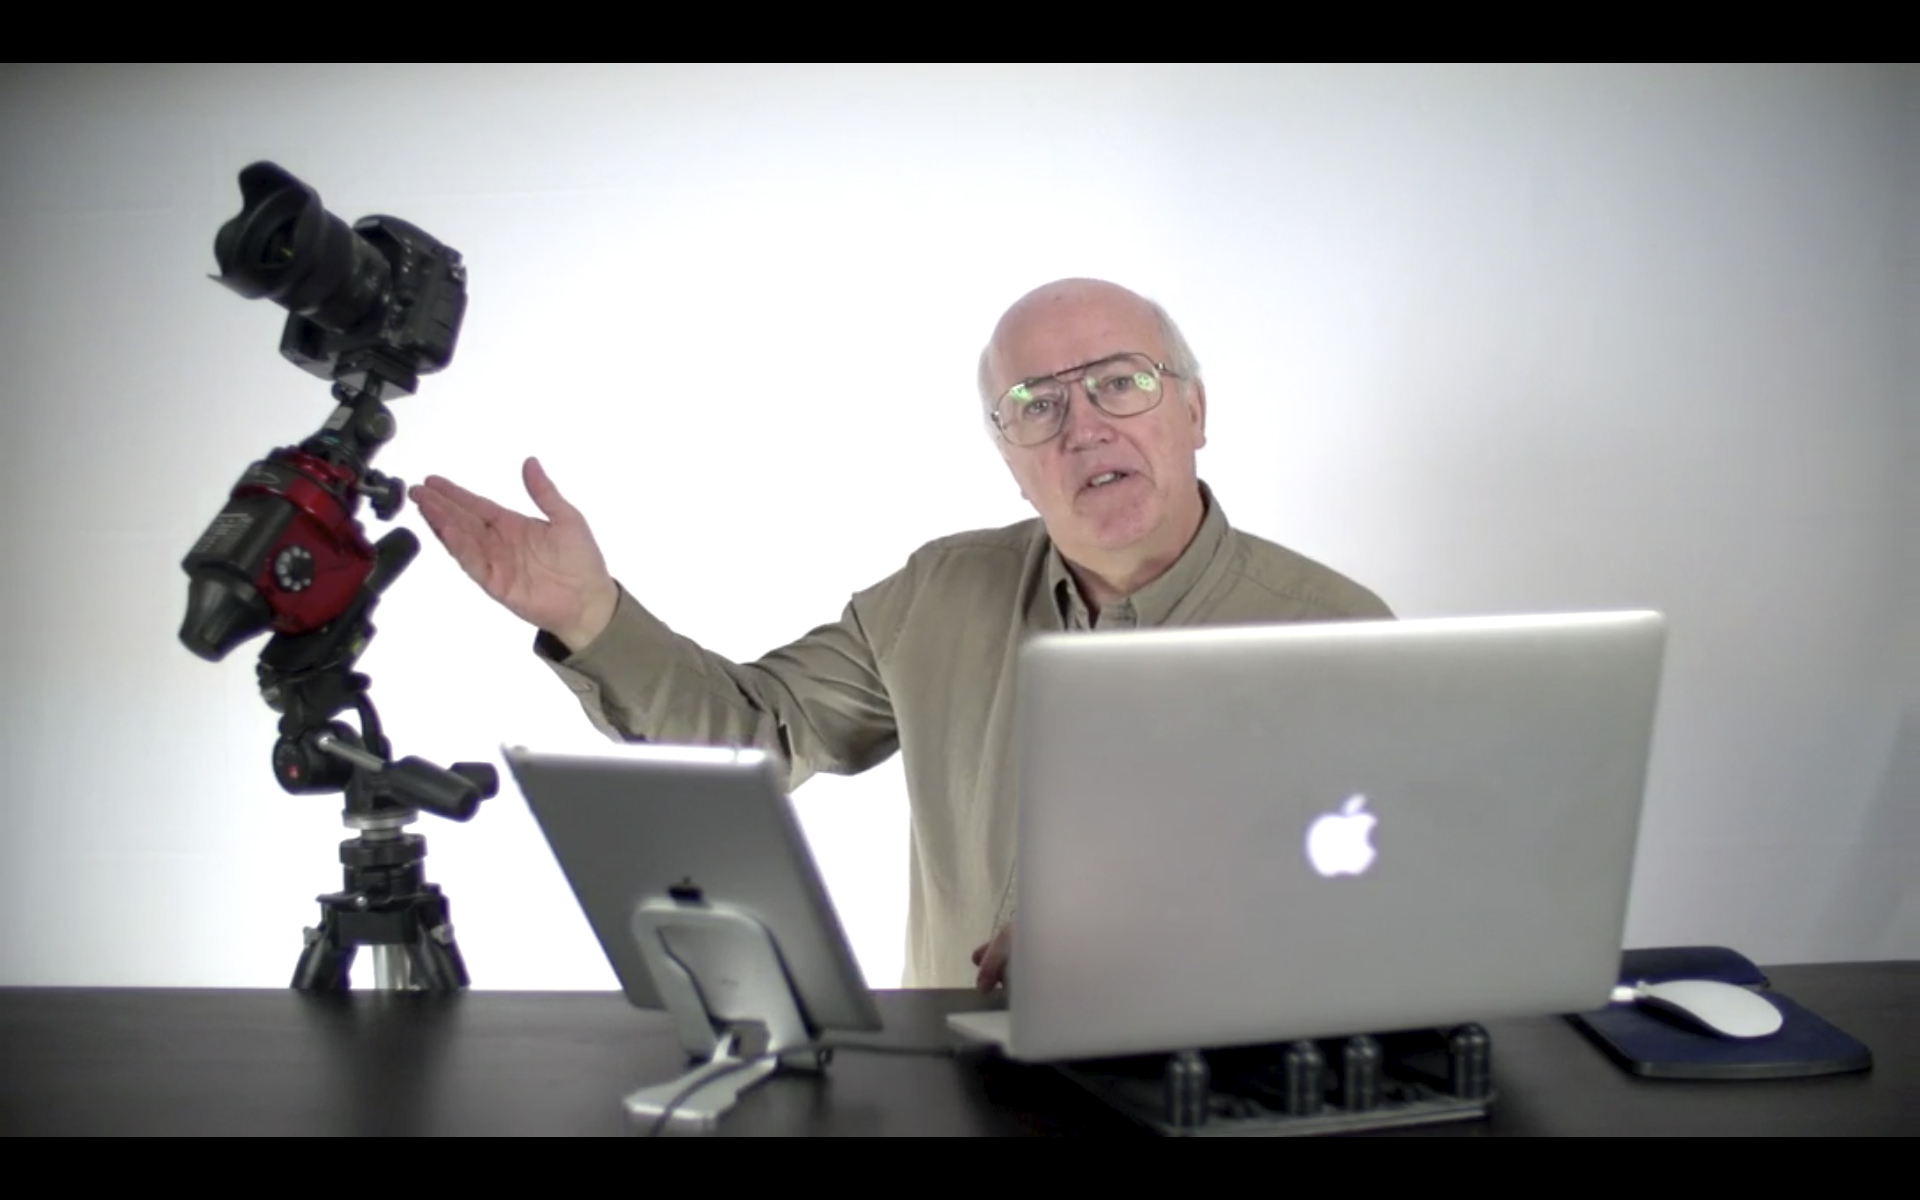
Planning the Shoot Apps such as The Photographer’s Ephemeris (shown here set for the author’s Waterton Lakes site for moonrise) help in planning where the Sun, Moon and Milky Way will be from your site during the shoot.
Simulating the Shoot The companion app to The Photographer’s Ephemeris, TPE 3D, shown above in the inset, exactly matches the real scene for the mountain skyline, placement of the Milky Way, and lighting from the rising Moon.
All nightscape photography benefits from using one of the excellent apps we now have to assist us in planning a shoot. They are particularly useful for time-lapses.
Apps such as PhotoPills and The Photographer’s Ephemeris are great. I like the latter as it links to its companion TPE 3D app to preview what the sky and lighting will look like over the actual topographic horizon from your site. You can scrub through time to see the motion of the Milky Way over the scenery. The Augmented Reality “AR” modes of these apps are also useful, but only once you are on site during the day.
For planning a time-lapse at home I always turn to a “planetarium” program to simulate the motion of the sky (albeit over a generic landscape), with the ability to add in “field of view” indicators to show the view your lens will capture.
You can step ahead in time to see how the sky will move across your camera frame during the length of the shoot. Indeed, such simulations help you plan how long the shoot needs to last until, for example, the galactic core or Orion sets.
Planetarium software helps ensure you frame the scene properly, not only for the beginning of the shoot (that’s easy — you can see that!), but also for the end of the shoot, which you can only predict.
Planetarium Planning An alternative is to use a planetarium program such as the free Stellarium, shown above, which can display lens fields of view. These scenes show the simulated vs. real images (insets) for the start (top) and end (bottom) of the Waterton Lakes time-lapse with a 35mm lens frame, outlined in red.
If your shoot will last as long as three hours, do plan to check the battery level and swap batteries before three hours is up. Most cameras, even new mirrorless models, will now last for three hours on a full battery, but likely not any longer. If it’s a cold winter night, expect only one or two hours of life from a single battery.
PROCESSING
TIP 9 — DO: Develop one raw frame and apply settings to all
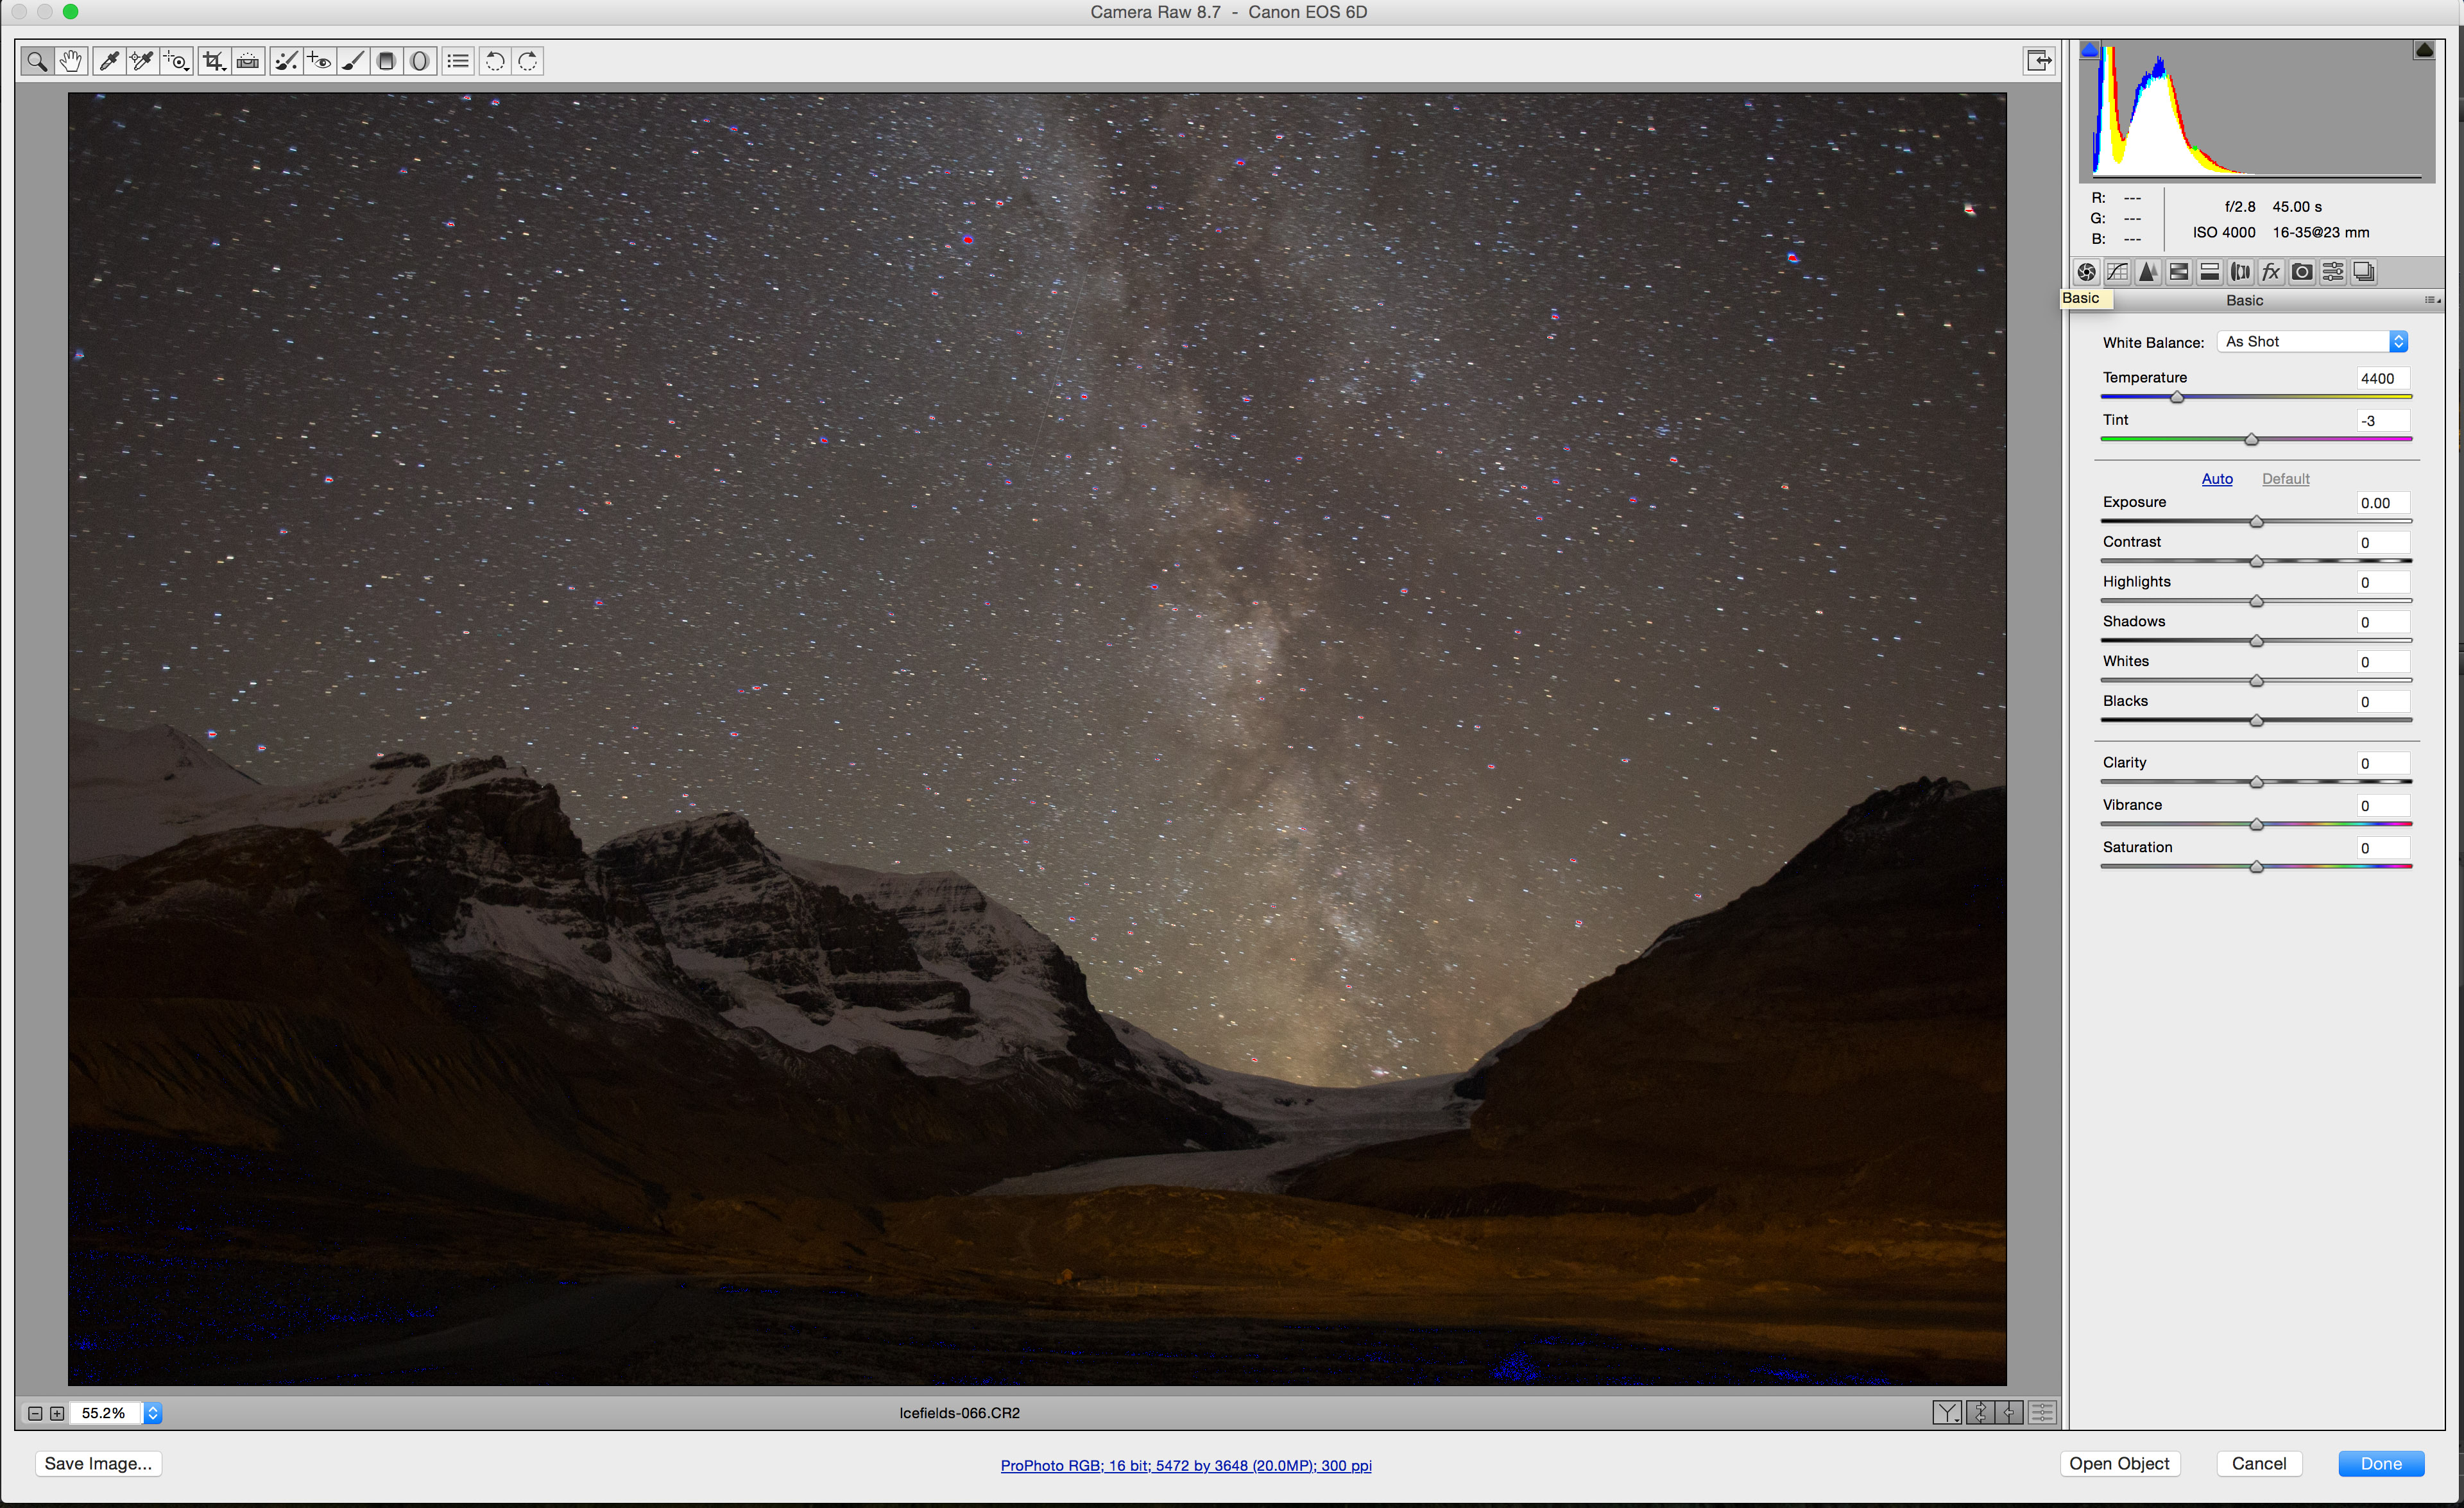
Copy and Paste Settings Most raw developers or photo library programs (Adobe Bridge is shown here) offer the essential ability to copy settings from one image and paste them onto hundreds of others in a folder, developing all the time-lapse frames in a snap.
Processing the raw files takes the same steps and settings as you would use to process still images.
With time-lapses, however, you have to do all the processing required within your favourite raw developer software. You can’t count on bringing multiple exposures into a layer-based processor such as Photoshop to stack and blend images. That works for a single image, but not for 300.
I use Adobe Camera Raw out of Adobe Bridge to do all my time-lapse processing. But many photographers use Lightroom, which offers all the same settings and non-destructive functions as Adobe Camera Raw.
For those who wish to “avoid Adobe” there are other choices, but for time-lapse work an essential feature is the ability to develop one frame, then copy and paste its settings (or “sync” settings) to all the other frames in the set.
Not all programs allow that. Affinity Photo does not. Luminar doesn’t do it very well. DxO PhotoLab, ON1 Photo RAW, and the free Raw Therapee, among others, all work fine.
HOW TO ASSEMBLE A TIME-LAPSE
Once you have a set of raws all developed, the usual workflow is to export all those frames out as high-quality JPGs which is what movie assembly programs need. Your raw developing software has to allow batch exporting to JPGs — most do.
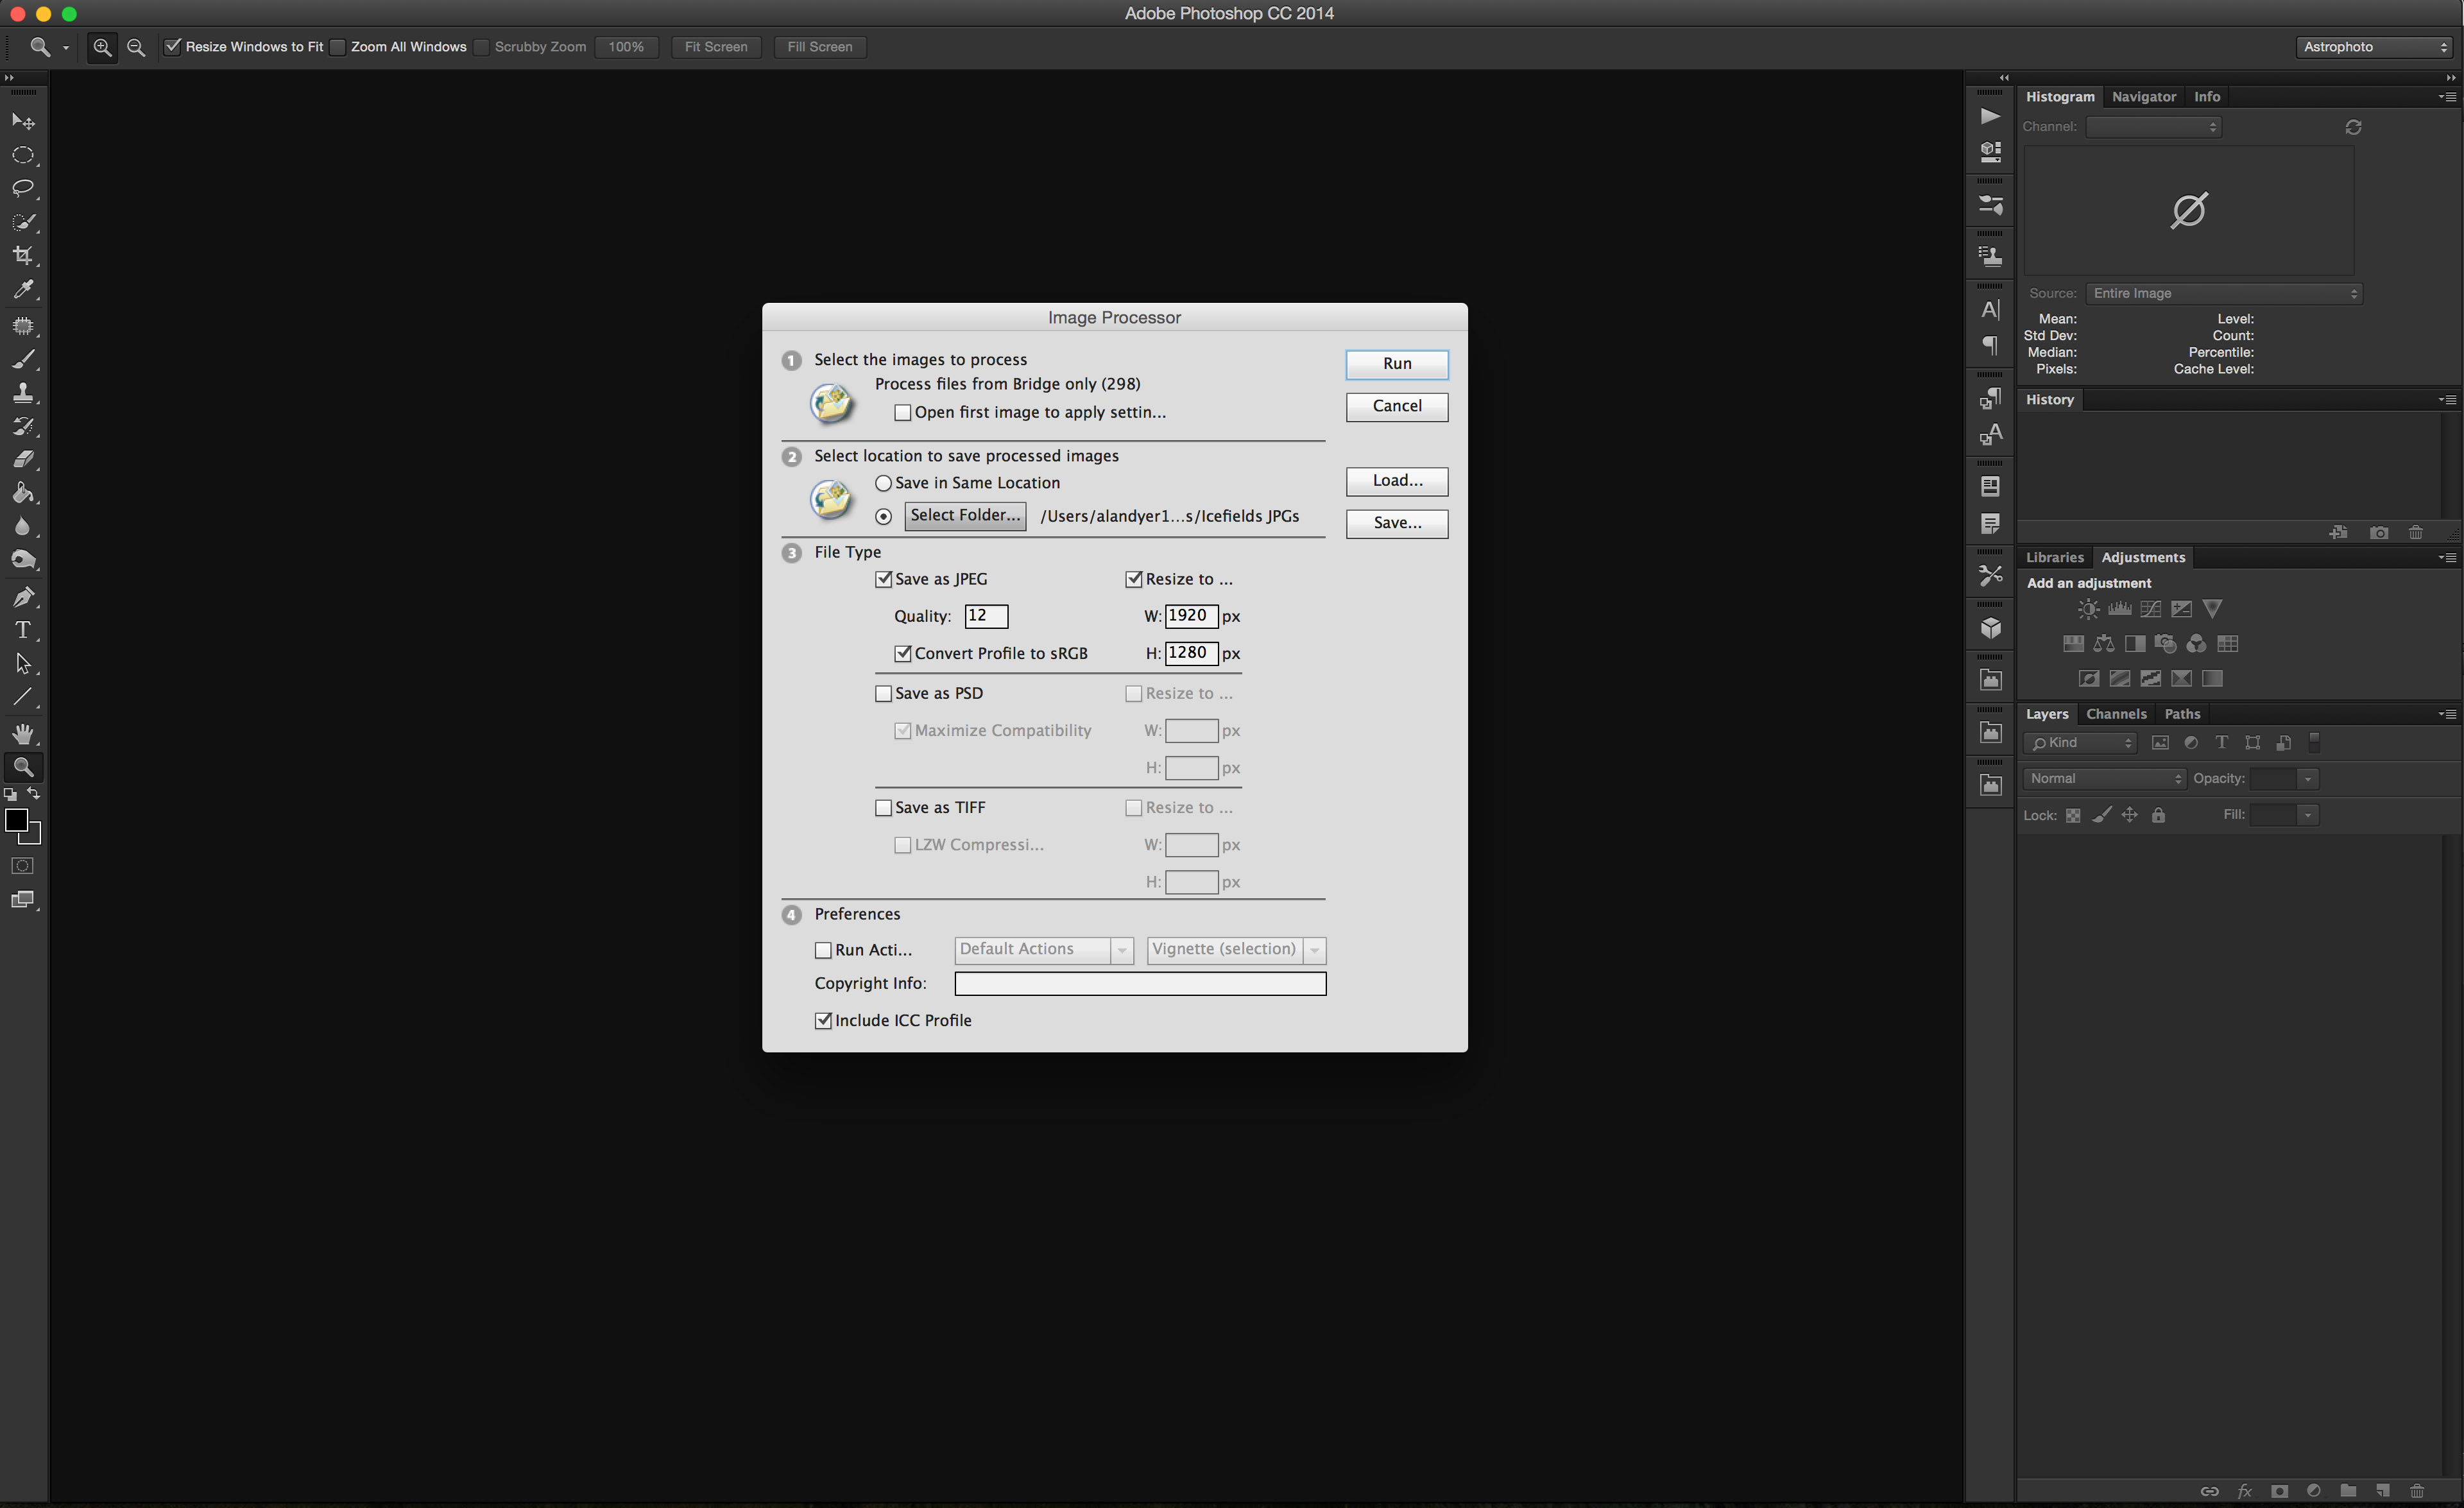
Photoshop Batch Export Raw developers usually have a batch export function. So does Photoshop, via its Image Processor utility, shown here (found under File>Scripts>Image Processor) that can export a folder of raws into JPGs or TIFFs, and re-size them, often needed for final 4K or HD movies.
However, none of the programs above (except Photoshop and Adobe’s After Effects) will create the final movie, whether it be from those JPGs or from the raws.
Assembling JPGs The author’s favourite assembly program is TimeLapse DeFlicker (TLDF). It can turn a folder of JPGs into movies as large as 8K and with ProRes codecs for the highest quality.
So for assembling the intermediate JPGs into a movie, I often use a low-cost program called TLDF (TimeLapse DeFlicker) available for MacOS and Windows (timelapsedeflicker.com). It offers advanced functions such as deflickering (i.e. smoothing slight frame-to-frame brightness fluctuations) and frame blending (useful to smooth aurora motions or to purposely add star trails).
While there are many choices for time-lapse assembly, I suggest using a program dedicated to the task and not, as many do, a movie editing program. For most sequences, the latter makes assembly unnecessarily difficult and harder to set key parameters such as frame rates.
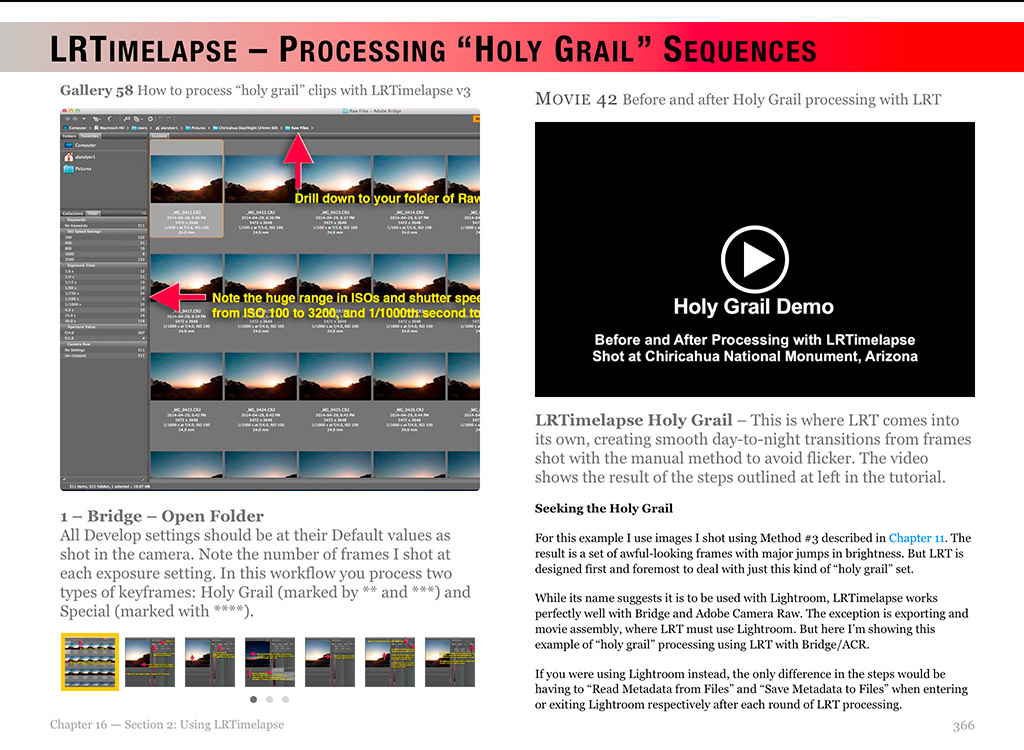
TIP 10 — DO: Try LRTimelapse for more advanced processing
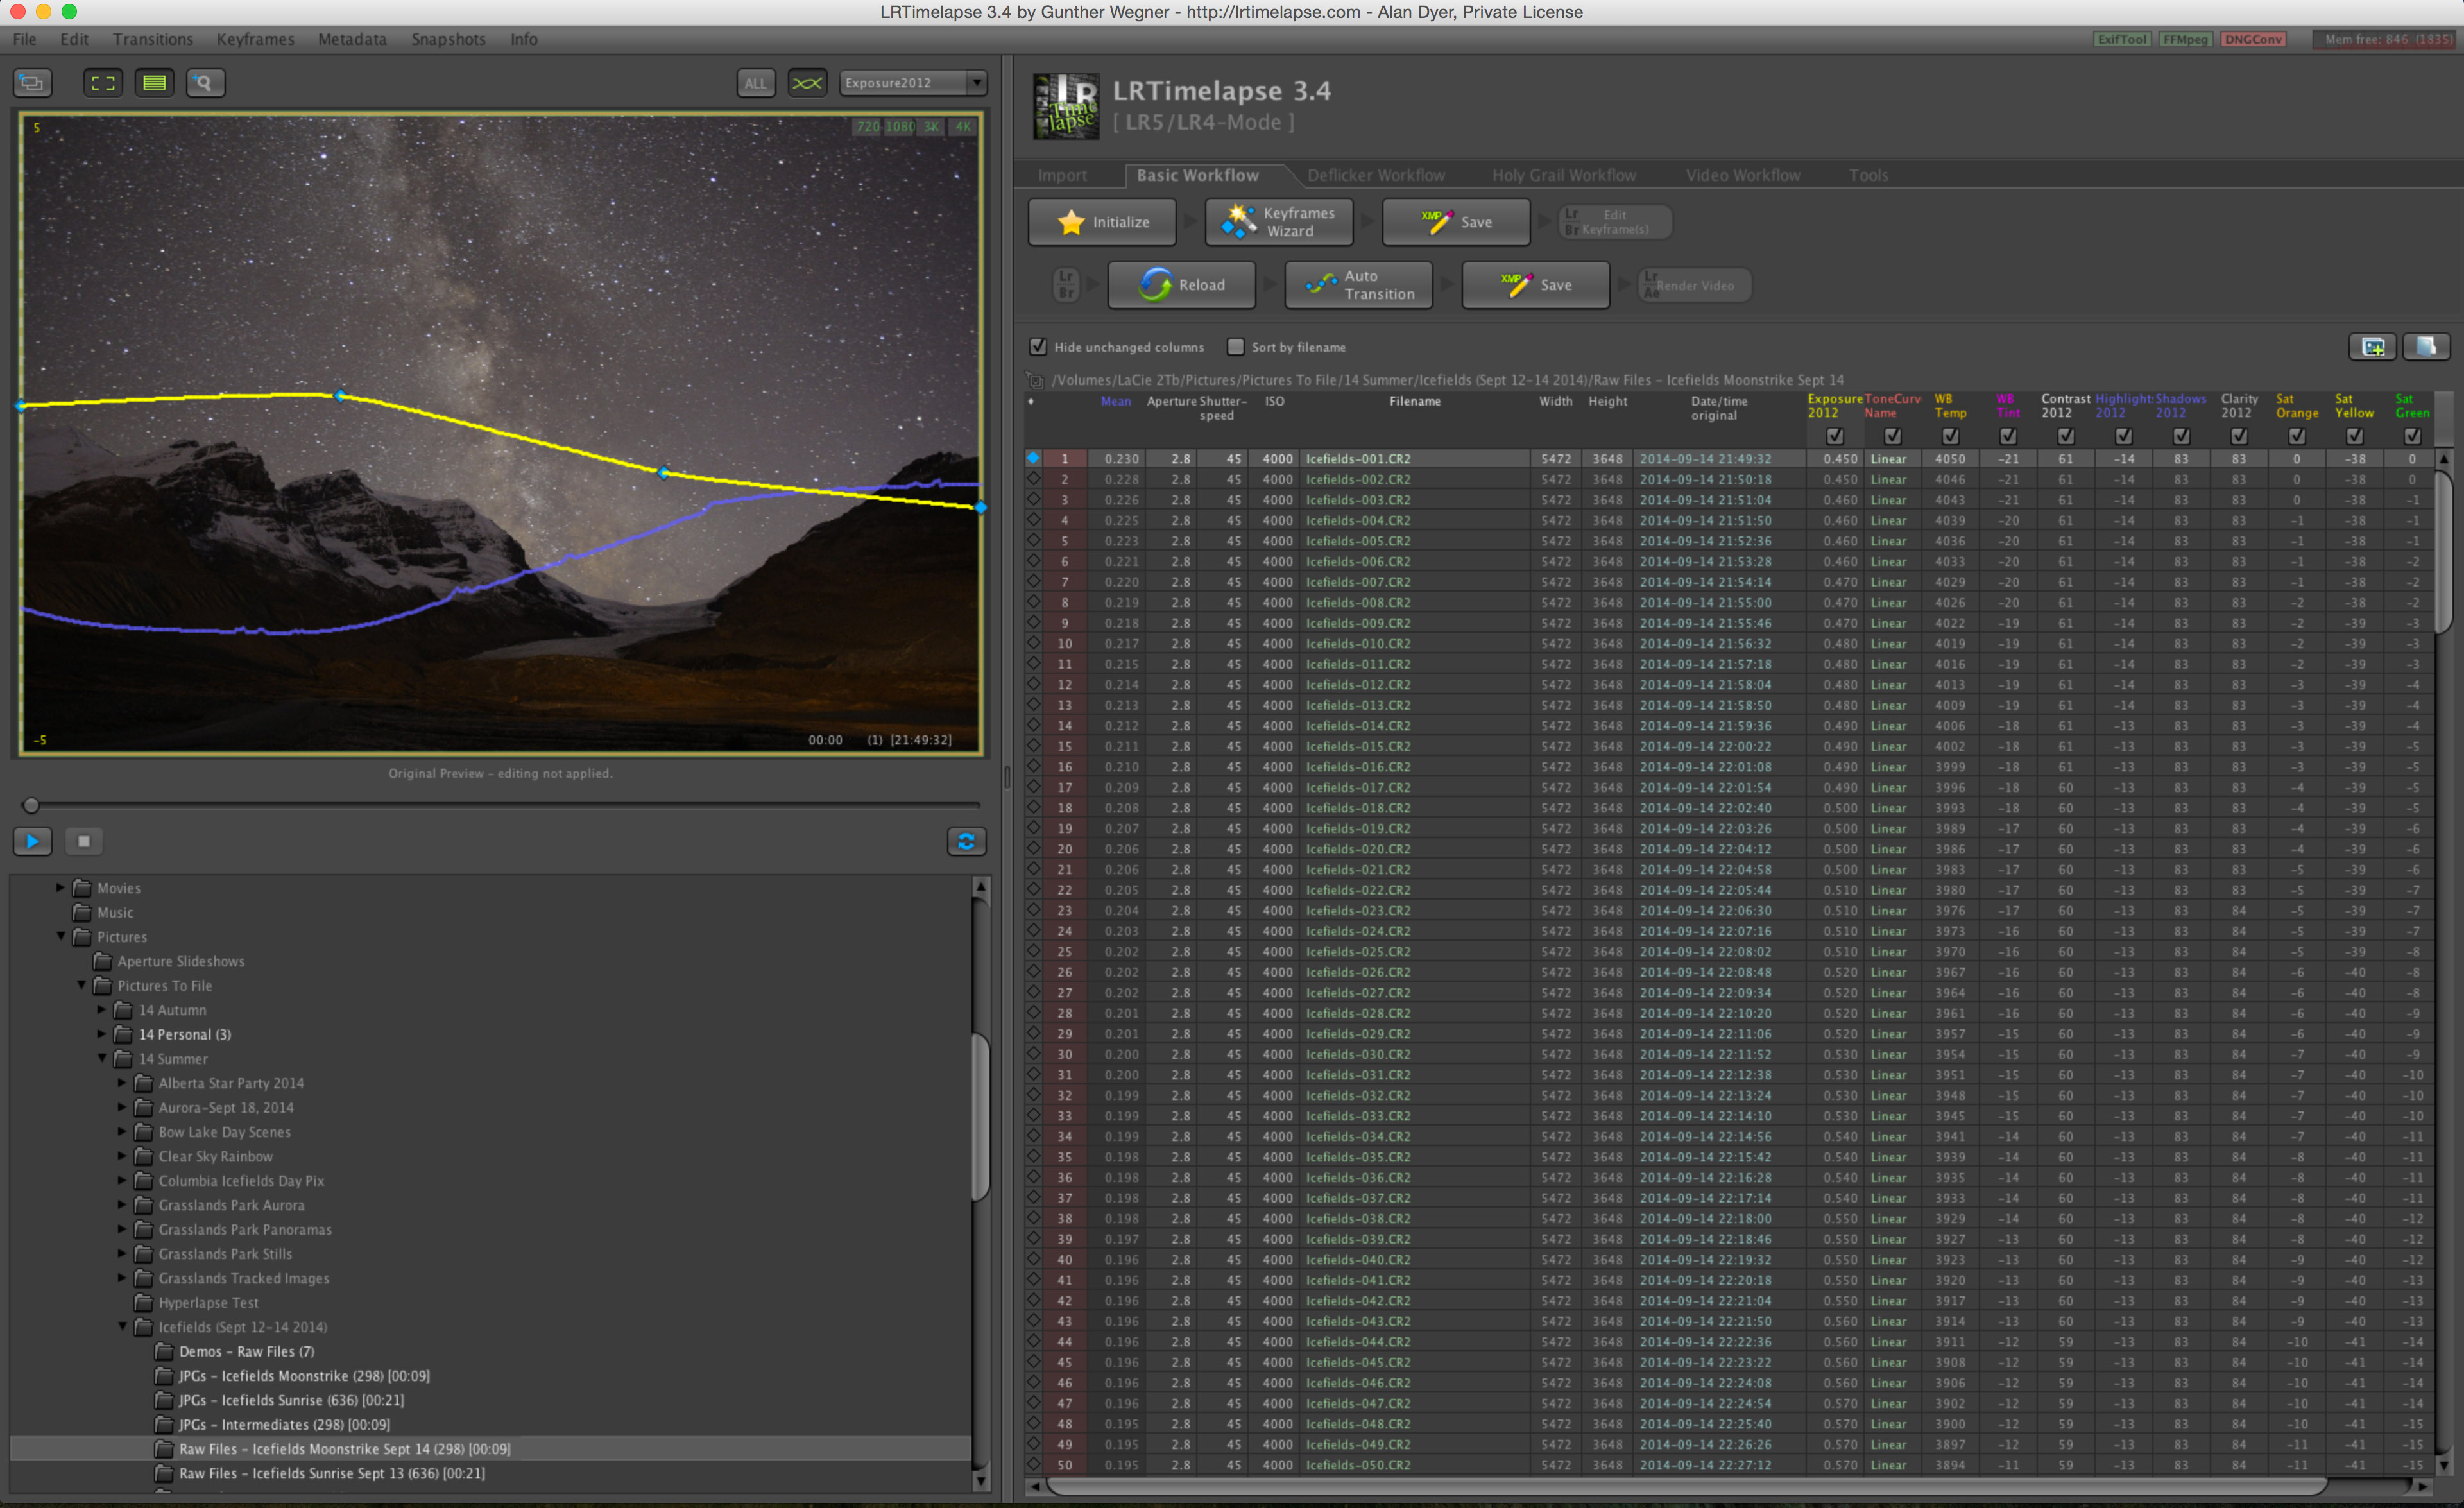
Working on Keyframes The advanced processing program LRTimelapse creates several keyframes through the sequence (seven are shown here in Adobe Bridge) which you develop so each looks its best. During this sequence, the Moon rose changing the lighting toward the end of the shoot (in the last three keyfames).
Get serious about time-lapse shooting and you will want — indeed, you will need — the program LRTimelapse (LRTimelapse.com). A free but limited trial version is available.
This powerful program is for sequences where one setting will not work for all the frames. One size does not fit all.
Instead, LRTimelapse allows you to process a few keyframes throughout a sequence, say at the start, middle, and end. It then interpolates all the settings between those keyframes to automatically process the entire set of images to smooth (or “ramp”) and deflicker the transitions from frame to frame.
LRTimelapse Ramping LRTimelapse reads your developed keyframe data and applies smooth transitions of all settings to each of the raw files between the keyframes. The result is a seamless and smooth final movie. The pink curve shows how the scene brightened at moonrise. The blue diamonds on the yellow line mark the seven keyframes.
This is essential for sequences where the lighting changes during the shoot (say, the Moon rises or sets), and for so-called “holy grails.” Those are advanced sequences that track from daylight or twilight to darkness, or vice versa, over a wide range of camera settings.
However, LRTimelapse works only with Adobe Lightroom or the Adobe Camera Raw/Bridge combination. So for advanced time-lapse work Adobe software is essential.
A Final Bonus Tip
Keep it simple. You might aspire to emulate the advanced sequences you see on the web, where the camera pans and dollies during the movie. I suggest avoiding complex motion control gear at first to concentrate on getting well-exposed time-lapses with just a static camera. That alone is a rewarding achievement.
But before that, first learn to shoot still images successfully. All the settings and skills you need for a great looking still image are needed for a time-lapse. Then move onto capturing the moving sky.
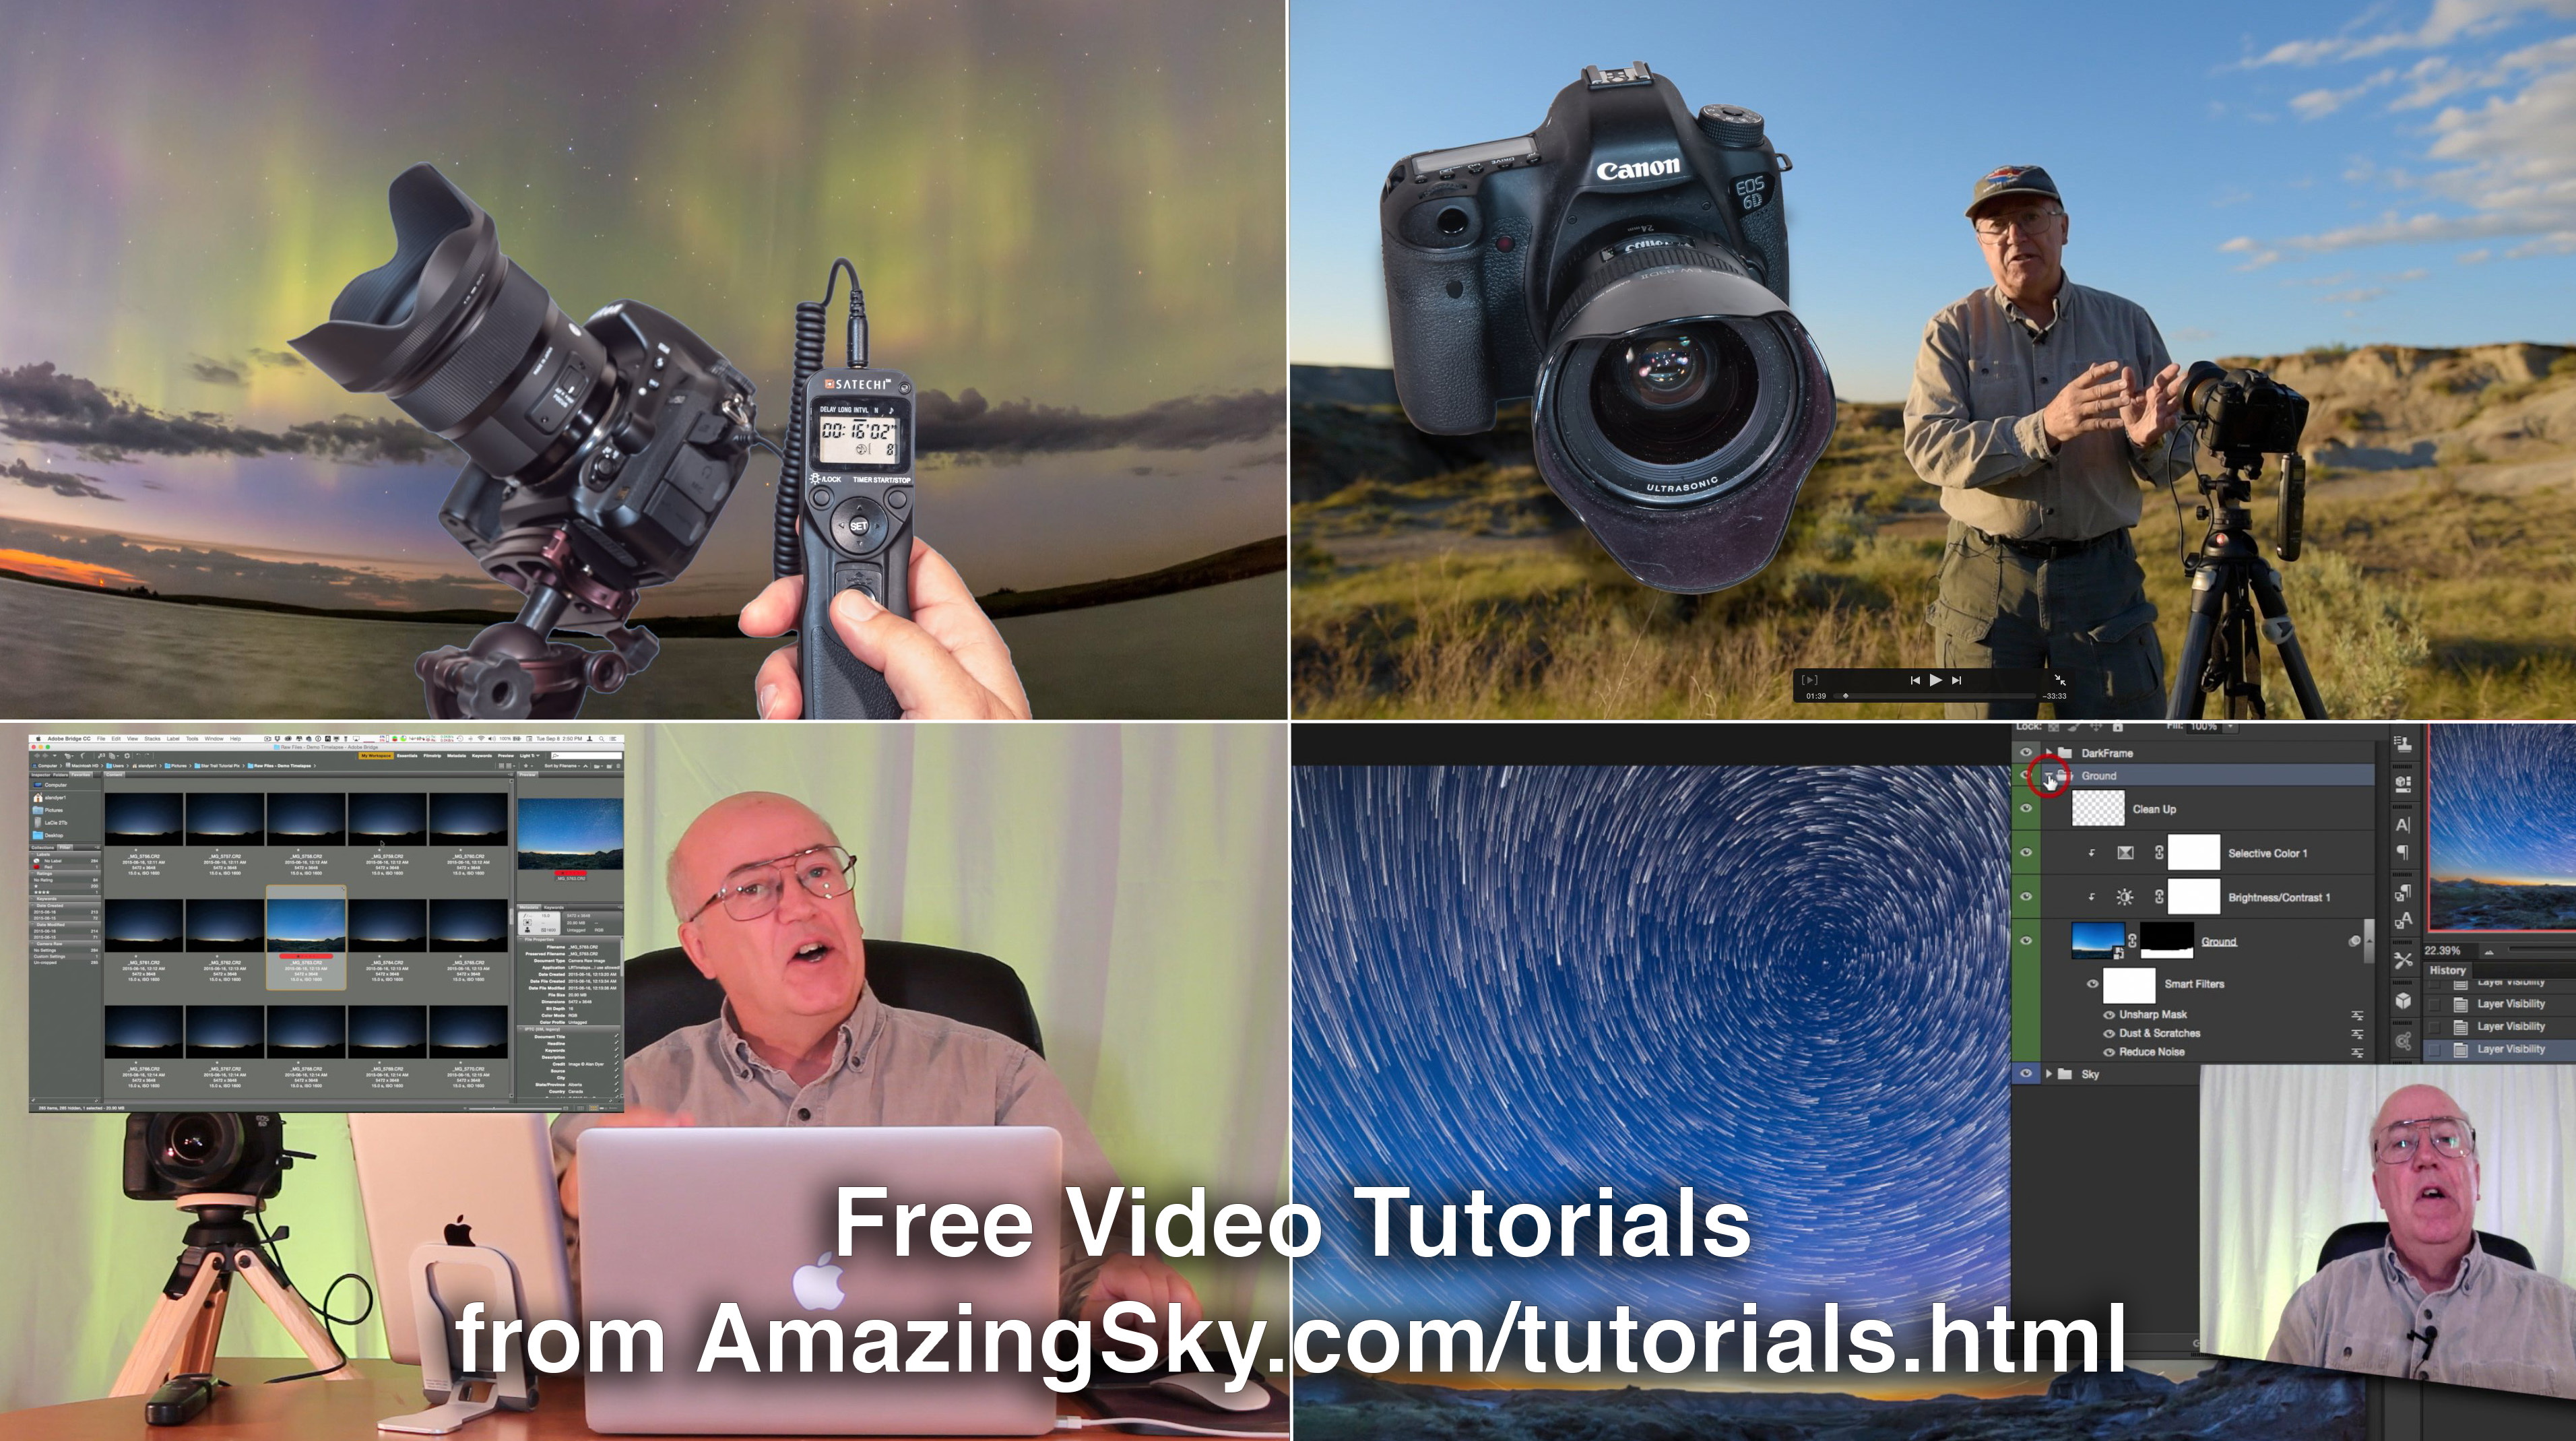
I end with a link to an example music video, shot using the techniques I’ve outlined. Thanks for reading and watching. Clear skies!
The Beauty of the Milky Way from Alan Dyer on Vimeo.
Panoramas featuring the arch of the Milky Way have become the icons of dark sky locations. “Panos” can be easy to shoot, but stitching them together can present challenges. Here are my tips and techniques.
My tutorial complements the much more extensive information I provide in my eBook, at right. Here, I’ll step through techniques for simple to more complex panoramas, dealing first with essential shooting methods, then reviewing the workflows I use for processing and stitching panoramas.
What software works best depends on the number of segments in your panorama, or even on the focal length of the lens you used.
PART 1 — SHOOTING
What Equipment Do You Need?
Nightscape panoramas don’t require any more equipment than what you likely already own for shooting the night sky. For Milky Way scenes you need a fast lens and a solid tripod, but any good DSLR or mirrorless camera will suffice.
Pano Gear A tripod head with a scale marked in degrees is essential. Here it sits on a levelling head with its own bubble level that makes it easy to level the camera. An L-bracket allows the camera to rotate directly above the vertical axis, handy when shooting in portrait mode, as here with a 15mm full-frame fish-eye lens, one option for horizon-to-zenith panoramas. The tripod accessories here are by Acratech.
The tripod head can be either a ball head or a three-axis head, but it should have a horizontal axis marked with a degree scale. This allows you to move the camera at a correct and consistent angle from segment to segment. I think that’s essential.
What you don’t need is a special, and often costly, panorama head. These rotate the camera around the so-called “nodal point” inside the lens, avoiding parallax shifts that can make it difficult to align and stitch adjacent frames. Parallax shift is certainly a concern when shooting interiors or any scenes with prominent content close to the camera. However, in most nightscapes our scene content is far enough away that parallax simply isn’t an issue.
Though not a necessity, I find a levelling base a huge convenience. As I show above, this specialized ball head goes under the usual tripod head and makes it easy to level the main head. It eliminates all the fussing with trial-and-error adjustments of the length of each tripod leg.
On the Level Most cameras now have an electronic level built in that is handy for ensuring the panorama does not end up tilted. This is from a Canon 6D MkII.
Then to level the camera itself, I use the electronic level now in most cameras. Or, if your camera lacks that feature, an accessory bubble level clipped into the camera’s hot shoe will work.
Having the camera level is critical. It can be tipped up, of course, but not tilted left-right. If it isn’t level the whole panorama will be off kilter, requiring excessive straightening and cropping in processing, or the horizon will wave up and down in the final stitch, perhaps causing parts of the scene to go missing.
NOTE: Click or tap on the panorama images to open a high-res version for closer inspection.
Aurora in the Winter Sky To capture this panorama I used a Sigma 14mm lens on a Nikon D750, mounted in portrait orientation with the gear shown above, to shoot eight segments 45° apart, each 13 seconds at f/2 and ISO 3200. Stitching was with Adobe Camera Raw. The aurora lies to the north at left, while Orion and the winter Milky Way are to the south at right.
Shooting Horizon Panoramas
While panoramas spanning the entire sky might be what you are after, I suggest starting simpler, with panos that take in just a portion of the 360° horizon and only a part of the 180° of the sky. These “partial panos” are great for auroras (above) or noctilucent clouds, (below), or for capturing just the core of the Milky Way over a landscape.
The key to all panorama success is overlap. Segments should overlap by 30 to 50 percent, enabling the stitching software to align the segments using the content common to adjacent frames. Contrary to some users, I’ve never found an issue with having too much overlap, where the same content is present on several frames.
Noctilucent Clouds in Summer NLCs are good panorama subjects. I captured this display on June 19, 2019 using a Sony a7III camera at ISO 400, and a Sigma 50mm lens at f/2 for a set of six segments stitched with Adobe Camera Raw
For a practical example, let’s say you shoot with a 24mm lens on a full-frame camera, or a 16mm lens on a cropped-frame camera. Both combinations yield a field of view across the long dimension of the frame of roughly 80°, and across the short dimension of the frame of about 55°.
That means if you shoot with the camera in “landscape” orientation, panning the camera by 40° between segments would provide a generous 50 percent overlap. The left half of each segment will contain the same content as the right half of the previous segment, if you take your panos by turning from left to right.
TIP: My habit is to always shoot from left to right, as that puts the segments in the correct order adjacent to each other when I view them in browser programs such as Lightroom or Adobe Bridge, with images sorted in chronological order (from first to last images in a set) as I typically prefer. But the stitching will work no matter which direction you rotate the camera.
In the example of a 24mm lens and a camera in landscape orientation you could turn at a 45° or 50° spacing and yield enough overlap. However, turning the camera at multiples of 15° is usually the most convenient, as tripod heads are often graduated with markings at 5° increments, and labeled every 15° or 30°.
Some will have coarser and perhaps unlabeled markings. If so, determine what each increment represents, then take care to move the camera consistently by the amount that will provide adequate overlap.
Moonrise over the Red Deer River Not all panoramas have to be of the Milky Way. This captures the sweeping arc of Earth’s blue shadow rising in the eastern sky as the Harvest Moon comes up amid the shadow. This is a 7-section single-tier panorama with the 20mm Sigma lens and Nikon D750 at ISO 100. It stitched fine with Adobe Camera Raw.
To maximize the coverage of the sky while still framing a good amount of foreground, a common practice is to shoot panoramas with the camera in portrait orientation. That provides more vertical but less horizontal coverage for each frame. In that case, for adequate overlap with a 24mm lens and full-frame camera shoot at 30° spacings.
TIP: When shooting a partial panorama, for example just to the south for the Milky Way, or to the north for the aurora borealis, my practice is to always shoot a segment farther to the left and another to the right of the main scene. Shoot more than you need. Those end segments can get distorted when stitching, but if they don’t contain essential content, they can be cropped out with no loss, leaving your main scene clean and undistorted.
Shooting with a longer lens, such as a 50mm (or 35mm on a cropped frame camera), will yield higher resolution in the final panorama, but you will have much less sky coverage, unless you shoot multiple tiers, as I describe below. You would also have to shoot more segments, at 15° to 20° spacings, taking longer to complete the shoot.
Morant’s Curve in the Moonlight Not all panoramas have to be shot under dark skies, or encompass 360°. Moonlight illuminates the famous viewpoint called Morant’s Curve in Banff National Park, with Orion setting over the peaks of the Continental Divide, as a train speeds east through the March night. This is a panorama of 12 segments, each with a 24mm Sigma lens and Nikon D750 in portrait orientation, stitched with PTGui.
As the number of segments goes up shooting fast becomes more important, to minimize how much the sky moves from segment to segment, and during each exposure itself, to aid in stitching. Remember, the sky appears to be turning from east to west, but the ground isn’t. So a prolonged shoot can cause problems later as the stitching software tries to align on either the fixed ground or the moving stars.
Panoramas on moonlit nights, as I show above, are relatively easy because exposures are short.
Milky Way over the Buffalo Jump A moonless night in early May was perfect for a panorama of the Milky Way arching over the Badlands of Dry Island Buffalo Jump in Alberta. This is a multi-tier panorama of 3 tiers of 7 segments each, with exposures of 30 seconds at f/2 with a 20mm Sigma Art lens and Nikon D750 at ISO 6400.
Milky Way panoramas taken on dark, moonless nights are tougher. They require fast apertures (f/2 to f/2.8) and high ISOs (ISO 3200 to 6400), to keep individual exposures no more than 30 to 40 seconds long.
Expose to the Right Minimize noise in the shadows by exposing so the histogram is shifted to the right, and not slammed to the left. Underexposure is the most common cardinal sin of newbie nightscape photographers.
Noise lives in the dark foregrounds, so I find it best to err on the side of overexposure, to ensure adequate exposure for the ground, even if it means the sky is bright and the stars slightly trailed. It’s the “Expose to the Right” philosophy I espouse at length in my eBook.
Advanced users can try shooting in two passes: one at a low ISO and with a long exposure for the fixed ground, and another pass at a higher ISO and a shorter exposure for the moving sky. But assembling such a set will take some deft work in Photoshop to align and mask the two stitched panos. None of the examples here are “double exposures.”
Shooting 360° Panoramas
Milky Way at Waterton Lakes While covering 360° in azimuth, this panorama from July 2018 goes only partway up the sky, to capture the Milky Way core to the south and the solstice twilight glow to the north. This is a 10-segment panorama, with each segment 30 seconds at f/2 with a Sigma 24mm Art lens and Nikon D750 at ISO 6400. Adobe Camera Raw stitched this nicely.
More demanding than partial panoramas are full 360° panoramas, as above. Here I find it is best to start the sequence with the camera aimed toward the celestial pole (to the north in the northern hemisphere, or to the south in the southern hemisphere). That places the area of sky that moves the least over time at the two ends of the panorama, again making it easier for software to align segments, with the two ends taken farthest apart in time meeting up in space.
In our 24mm lens example, to cover the entire 360° scene shooting with a 45° spacing would require at least eight images (8 x 45 = 360). I used 10 above. Using that same lens with the camera in portrait orientation will require at least 12 segments to cover the entire 360° landscape.
Shooting 360° by 180° Panoramas
Capturing STEVE This 360° panorama captures the infamous STEVE auroral arc across the south, with a normal auroral display to the north at right. This was from six segments, each 10 seconds at ISO 2500, with a Sigma 14mm lens at f/1.8 and Nikon D750 in portrait orientation.
More demanding still are 360° panoramas that encompass the entire sky, from the ground below the horizon to the zenith overhead. Above is an example.
To do that with a single row of images requires shooting in portrait orientation with a very wide 14mm rectilinear lens on a full-frame camera. That combination has a field of view of about 100° across the long dimension of the sensor.
That sounds generous, but reaching up to the zenith at an altitude of 90° means only a small portion of the landscape will be included along the bottom of the frame.
To provide an even wider field of view to take in more ground, I use full-frame fish-eye lenses on my full-frame cameras, such as Canon’s old 15mm lens (as shown at top) or Rokinon’s 12mm. Even a circular-format fish-eye will work, such as an 8mm on a full-frame camera or 4.5mm on a cropped-frame camera.
All such fish-eye lenses produce curved horizons, but they take in a wide swath of sky, making it possible to include lots of foreground while reaching well past the zenith. Conventional panorama assembly programs won’t work with such wide and distorted segments, but the specialized programs described below will.
Shooting Multi-Tier Panoramas
Bow Lake by Night The summer Milky Way arches over iconic Bow Lake in Banff on a perfect night in July 2018. This is a stitch, using PTGui, of three tiers of 7 segments each, with a 20mm Sigma lens and Nikon D750, with a Genie Mini automating the horizontal panning and shutter release, as shown above. Each frame was 30 seconds at f/2 and ISO 6400. I used this same set to test the programs described below.
The alternative technique for “all-sky” panos is to shoot multiple tiers of images: first, a lower row covering the ground and partway up the sky, followed by an upper row completing the coverage of just the sky at top.
The trick is to ensure adequate overlap both horizontally and vertically. With the camera in landscape orientation that will require a 20mm lens for full-frame cameras, or a 14mm lens for cropped-frame cameras. Either combination can cover the entire sky plus lots of foreground in two tiers, though I usually shoot three, just to be sure!.
Shooting with longer lenses provides incredible resolution for billboard-sized “gigapan” blow-ups, but will require shooting three, if not more, tiers, each with many segments. That starts to become a chore to do manually. Some motorized assistance really helps when shooting multi-tier panoramas.
Automating the Pan Shooting
The dedicated pano shooter might want to look at a device such as the GigaPan Epic models or the iOptron iPano, (shown below), all about $800 to $1000.
iPano Panorama Machine The iOptron iPano automates all shooting and movement, making even the most complex panoramas easy to shoot. It can also be used for two-axis motion-control time-lapses.
I’ve tested the latter and it works great. You program in the lens, overlap, and angular sweep desired. The iPano works out how many segments and tiers will be required, and automates the shooting, firing the shutter for the duration you program, then moving to the new position, firing again, and so on. I’ve shot four-tier panos effortlessly and with great success.
iPano Control The iPano’s on-board screen provides all the menus and options for setting up a shoot. This screen shows that this multi-tier pano will take 6m37s to complete.
However, these devices are generally bigger and heavier than I care to heft around in the field.
Instead, I use the original Genie Mini from SYRP, (below), a $250 device primarily for shooting motion control time-lapses. But the wireless app that programs the Genie also has a panorama function that automatically slews the camera horizontally between exposures, again based on the lens, overlap, and angular sweep you enter. The just-introduced Genie Mini II is similar, but with even more capabilities for camera control.
The SYRP Genie Mini A lower-cost option for automated shooting, the Genie Mini also provides time-lapse motion control. Here, I show it with a conventional 3-axis head on top, for shifting the camera up in altitude manually for multi-tier panos, while the Mini handles the horizontal motion and exposures.
While combining two Genie Minis allows programming in a vertical motion as well, I’ve been using just a regular tripod head atop the Mini to manually move the camera vertically between each of the horizontal tiers. I don’t feel the one or two moves needed to go from tier to tier too arduous to do manually, and I like to keep my field gear compact and easy to use.
Wireless Control The original Genie App (Apple iOS or Android) connects to the Genie via Bluetooth. This screen shows a 360° panorama programmed for a 20mm lens with 37% percent overlap, requiring eight segments. The shutter will fire after each move for 40 seconds.
The Genie Mini (now replaced by the Mini II) works great and I highly recommend it, even if panoramas are your only interest. But it is also one of the best, yet most affordable, single-axis motion control devices on the market for time-lapse work.
When to Shoot the Milky Way
While the right gear and techniques are important, go out on the wrong night and you won’t be able to capture the Milky Way as the great sweeping arch you might have hoped for.
In the northern hemisphere the Milky Way arches directly overhead from late July to October for most of the night. That’s fine for spherical fish-eye panoramas, but in rectangular images when the Milky Way is overhead it gets stretched and distorted across the top of the final panorama. For example, in the Bow Lake by Night panorama above, I cropped out most of this distorted content.
Capturing the Arch I captured this 360° pano of the summer Milky Way arching over the sandstone formations of Writing-on-Stone Provincial Park in southern Alberta in early June 2018. At that time of year the Milky Way is still confined to the eastern sky. This is a 21-panel panorama, shot in three tiers of seven panels each, with the Nikon D750 and Sigma 20mm Art lens on the Genie Mini, with each segment 30 seconds at f/2 and ISO 6400.
The prime season for Milky Way arches is therefore before the Milky Way climbs overhead, while it is still across the eastern sky, as above. That’s on moonless nights from March to early July, with May and June best for catching it in the evening, and not having to wait up until dawn, as is the case in early spring.
Simulating the Scene I often use Starry Night™ (shown here) to simulate the sky for the place and date I want, to preview where and when the Milky Way will appear and how it will move. The red box shows the field of view of a rectilinear 14mm lens in portrait orientation, showing it covering from the zenith (at top) to just below the horizon.
TIP: The best way to figure out when and where the Milky Way will appear is to use a desktop planetarium program such as Starry Night or Sky Safari or the free Stellarium. All can realistically depict the Milky Way for your location and date. You can then step through time to see how the Milky Way will move through the night, and how it will frame with your camera and lens combination using the “field of view” indicators the programs provide.
The Great Southern Sky A 360° panorama from April 2017 captures the arc of the southern Milky Way over the OzSky star party near Coonabarabran, NSW, Australia. This is 8 segments, each 30 seconds at ISO 6400 and f/2.5 with a Rokinon 14mm lens on a Canon 6D in portrait orientation, and stitched with PTGui.
When shooting in the southern hemisphere I like the April to June period for catching the sweep of the southern Milky Way and the galactic core rising in late evening. By contrast, during mid austral winter in July and August the galactic centre shines directly overhead in the evening, a spectacular sight to be sure, but tough to capture in a panorama except in a spherical or fish-eye scene.
The Other Milky Way This 360° panorama, shot in a single tier with a 14mm Sigma lens and Nikon D750 in portrait orientation, captures the winter Milky Way arching across the western sky on an early spring night at Dinosaur Provincial Park in Alberta. Also in the pano is the sweep of the faint Zodiacal Light. This is a stitch, using PTGui, of 12 segments, each 30 seconds at f/2.8 and ISO 4000.
That said, I always like to put in a good word for the often sadly neglected winter Milky Way (the summer Milky Way for those “down under”). While lacking the spectacle of the galactic core in Sagittarius, the “other” Milky Way has its attractions such as Orion and Taurus. The best months for a panorama with that Milky Way in an arch across a rectangular frame are January to March. The Zodiacal Light can be a bonus at that season, as it was above.
TIP: Always shoot raw files for the widest dynamic range and flexibility in recovering details in the highlights and shadows. Even so, each segment has to be well exposed and focused out in the field.
And unless you are doing a “two-pass” double exposure, always shoot each segment with identical exposure settings. This is especially critical for bright sky scenes such twilights or moonlit scenes. Vary the exposure and you might get unsightly banding at the seams.
There’s nothing worse than getting home only to find one or more segments was missed, or was out of focus or badly exposed, spoiling the set.
PART 2 — STITCHING
Developing Panorama Segments
Once you have your panorama segments, the next step is to develop and assemble them. For my workflow, the process of assembling a panorama from its constituent segments begins with developing each of those segments identically.
NOTE: Click or tap on the software screen shots to open a high-res version for closer inspection.
Developing with Adobe Camera Raw This shows one segment of the multi-tier example before (on the left) and after applying development settings in the Basic panel of Adobe Camera Raw. By selecting all the images, the Sync Settings command (at top left) will apply the settings of one image to the rest of the set.
I like to develop each segment’s raw file as fully as possible at this first stage in the workflow, applying noise reduction, colour correction, contrast adjustments, shadow and highlight recovery, and any special settings such as dehaze and clarity that can make the Milky Way pop.
I also apply lens corrections to each raw image. While some feel doing so produces problems with stitching later on, I’ve never found that. I prefer to have each frame with minimal vignetting and distortion when going into stitching. I use Adobe Camera Raw out of Adobe Bridge, but Lightroom Classic has identical functions.
There are several other raw developers that can work well at this stage. In other tests I’ve conducted, Capture One and DxO PhotoLab stand out as producing good results on nightscapes. See my blog from 2017 for more on software choices.
Developing with DxO Among a host of programs competing with Adobe, DxO PhotoLab does a good job developing raw files, with the ability to copy and paste settings from one image to many. It has excellent noise reduction and shadow detail recovery. However, it cannot layer images.
The key is developing each raw file identically, usually by working on one segment, then copying and pasting its settings to all the others in a set. Not all raw developers have this “Copy Settings” function. For example, Affinity Photo does not. It works very well as a layer-based editor to replace Photoshop, but is crude in its raw developing “Persona” functions.
While panorama stitching software will apply corrections to smooth out image-to-image variations, I find it is best to ensure all the segments look as similar as possible at the raw stage for brightness, contrast, and colour correction.
Do be aware that among social media groups and chat rooms devoted to nightscape imaging a lot of myth and misinformation abounds about how to process and stitch panoramas, and why some don’t work. Someone having a problem with a particular pano will ask why, and get ten different answers from well-meaning helpers, most of them wrong!
Stitching Simple Panoramas
For example, if your segments don’t join well it likely isn’t because you needed to use a panorama head (one oft-heard bit of advice). I never do. The issue is usually a lack of sufficient overlap. Or perhaps the image content moved too much from frame to frame as the photographer took too long to shoot the set.
Or, even when quickly-shot segments do have lots of overlap, stitching software can still get confused if adjoining segments contain featureless content or content that changes, such as segments over rippling water with no identifiable “landmarks” for the software to latch onto.
The primary problems, however, arise from using software that just isn’t up to the task. Programs that work great on simple panoramas (as the next three examples show) will fail when trying to stitch a more demanding set of segments.
Stitching with Adobe Camera Raw The panorama function in all recent versions of Adobe Camera Raw (Lightroom Classic has the same feature) can do a superb job on simple panoramas, such as the moonlit Morant’s Curve pano, with the magical Boundary Warp option allowing you to fill the frame without cropping and losing content.
For example, for partial horizon panos shot with 20mm to 50mm lenses, I’ll use the panorama function now built into Adobe Camera Raw (ACR) and Adobe Lightroom Classic, and also in the mobile-friendly Lightroom app. As I show above, ACR can do a wonderful job, yielding a raw DNG file that can continue to be edited non-destructively. It’s by far the easiest and fastest option, and is my first choice.
Another choice, not shown here, is the Photomerge function from within Photoshop, which yields a layered and masked master file, and provides the option for “content-aware” filling of missing areas. It can sometimes work on panos that ACR balks at.
Stitching with ON1 PhotoRAW The Adobe competitor ON1 PhotoRAW also provides a good panorama stitching feature that can work with both simple and many multi-tier panos. It provides a flattened result, even when exporting as a .PSD Photoshop file.
Two programs popular as Adobe alternatives, ON1 PhotoRAW (above) and the aforementioned Affinity Photo (below), also have very capable panorama stitching functions.
However, in testing both programs with the demanding Bow Lake multi-tier panorama I used below with other programs, ON1 2019.5 did an acceptable job, while Affinity 1.7 failed. It works best on simpler panoramas, like this partial scene with a 24mm lens.
Stitching with Affinity Photo Another program vying to unseat Adobe products is Affinity Photo. It, too, does a fine job on simple panos, but tends to fail on multi-tier panoramas. There is no choice of panorama projections or option to export a layered master.
Even if they succeed when stitching 360° panoramas, such general-purpose editing programs, Adobe’s included, provide no option for choosing how the final scene gets framed. You have no control over where the program puts the ends of the scene.
Or the program just fails, producing a result like this.
When Stitching Goes Awry Throw a multi-tier pano at Adobe Camera Raw and you might end up with this type of unsalvageable result. Here’s where you have to turn to specialized panorama software
Warp Factor Even single-tier panos but shot with 14mm rectilinear (in this case) or fish-eye lenses will create warped results with ACR, only partly correctable with Boundary Warp.
Far worse is that multi-tier panoramas or, as I show above, even single-tier panos shot with very wide lenses, will often completely befuddle your favourite editing software, with it either refusing to perform the stitch or producing bizarre results.
Some photographers attempt to correct such wild distortions with lots of ad hoc adjustments with image-warping filters. But that’s completely unnecessary if you use the right software to begin with.
Stitching Complex Panoramas
When conventional software fails, I turn to the dedicated stitching program PTGui, $150 for MacOS or Windows. The name comes from “Panorama Tools – Graphical User Interface.”
Stitching with PTGui PTGui handles whatever complexity of panorama you can throw at it, either single or multi-tier (in this example), offering an accurate preview, a choice of projection modes (this is “equirectangular”), and the ability to quickly move the pano around to frame it as you like before exporting either a flattened or a layered master.
While PTGui can read raw files from most cameras, it will not read any of the development adjustments you made to those files using Lightroom, Camera Raw, or any other raw developers.
So, my workflow is to develop all the raw segments, export them out as 16-bit TIFFs, then import those into PTGui. It can detect what lens was used to take the images, information PTGui needs to stitch accurately. If you used a manual lens you can enter the lens focal length and type (rectilinear or fish-eye) yourself.
Spherical Scene with PTGui PTGui makes it easy to re-project the same set of images into other map projections, in this case as a circular fish-eye scene which can be rotated as desired.
I include a full tutorial on using PTGui in my eBook linked to above, but suffice to say that the program usually does a superb job first time and very quickly. You can drag the panorama around to frame the scene as you like, and change the projection at will to create rectangular or spherical format images, as above, and even so-called “little planet” projections that appear as if you were looking down at the scene from space.
Occasionally PTGui complains about some frames, requiring you to manually intervene to pick the same stars or horizon features in adjacent frames to provide enough matching alignment points until it is happy. Its interface also leaves something to be desired, with essential floating windows disappearing behind other mostly blank panels.
Adjusting Layers The layered output from PTGui produces a massive image but one that allows fine adjustments to the masks (by using a white paint brush) to correct mismatches like we see see here along the mountain peak.
When exporting the finished panorama I usually choose to export it as a layered 16-bit Photoshop .PSD or, with big panos, as a Photoshop .PSB “big” document.
The reason is that in aligning the moving stars PTGui (indeed, all programs) can produce a few “fault lines” along the horizon, requiring a manual touch up to the masks to clean up mismatched horizon content, as I show above. Having a layered and masked master makes this easy to do non-destructively, though that’s best done in Photoshop.
Opening with Affinity Affinity Photo is one of the few non-Adobe programs that can open large Photoshop .PSB files, and honour the layers, keeping them and the masks that PTGui exports intact.
However, Affinity Photo (above) can also read layered .PSD and .PSB Photoshop files, preserving the layers. By comparison, ON1 PhotoRAW flattens layered Photoshop files when it imports them, one deficiency that prevents this program from being a true Photoshop alternative.
Compressing the Milky Way A common final step is to compress the long dimension of the image to change its aspect ratio to one better suited to publication. But doing so highly distorts the grand sweep of the Milky Way.
Once a 360° panorama is in a program like Photoshop, some photographers like to “squish” the panorama horizontally to make it more square, for ease of printing and publication. I prefer not to do that, as it makes the Milky Way look overly tall, distorted, and in my opinion, ugly. But each to their own style.
You can test out a limited trial version of PTGui for free, but I think it is worth the cost as an essential tool for panorama devotees.
Other Stitching Options
Stitching with Microsoft ICE Image Composite Editor, for Windows only but free from Microsoft Research, also does a superb job on all panoramas (as it did with this test case), with accurate stitching and preview, a choice of projections, cropping, and the option for a layered output.
However, Windows users can also try Image Composite Editor (ICE), free from Microsoft Research. As shown above in my test 3-tier pano, ICE works very well on complex panoramas, has a clean, user-friendly interface, offers a choice of geometric projections, and can export a master file with each segment on its own layer, if desired, for later editing.
Stitching with HugIn The open-source program HugIn is free, but suffers from an inaccurate preview, complex interface and workflow, and technical displays and functions only a programmer will love.
The free, open source program HugIn is based on the same Panorama Tools root software that PTGui uses. However, I find HugIn’s operation clunky and overly technical. Its export process is arcane yet renders out only a flattened image.
HugIn Fail The export of the same multi-tier pano that worked fine with PTGui and ICE failed with HugIn, with missing content and numerous mis-aligned areas of the landscape, tough to fix in the flattened output.
In testing it with the same three-tier 21-segment pano that PTGui and ICE handled perfectly, HugIn failed to properly include one segment. However, it is free for MacOS and Windows, and so the price is right and is well worth a try.
Fish-Eye Milky Way In summer with the Milky Way overhead, a spherical projection is often best for presenting the Milky Way as your eye saw it, as a majestic band of light from horizon to horizon across the sky passing through the zenith.
With the superb tools now at our disposal, it is possible to create detailed panoramas of the night sky that convey the majesty of the Milky Way – and the night sky – as no single image can. Have fun!
We’ve embarked upon a new project to produce a comprehensive tutorial on deep-sky imaging with DSLR cameras.
This past week we launched a new KickStarter campaign to fund the production of a new multi-hour video course on how to capture deep-sky objects using entry-level telescope gear and DSLR cameras.
The emphasis in the course will be on techniques for taking and processing publication-quality images as simply and easily as possible.
The final video course will consist of several programs, including a video of one of our annual “Deep-Sky with Your DSLR” workshops presented locally here in Alberta. We’ve often had requests for a video version of those workshops, for those who cannot attend in person.
This is it! Here’s a short preview of some of the content.
We include the Workshop video, but we supplement it with much more: with video segments shot in the field by day and by night, showing how to setup and use gear, and shot in the studio showing how to process images.
While much of the content has been shot and edited, there’s more to do yet. Thus our KickStarter campaign to complete the funding and production. Backers of the project through KickStarter will get the final videos at a substantial discount off the final retail price.
All the details are on the project’s KickStarter page. Click through for the listing of course content, and options for funding levels. An FAQ page answers many of the common questions.
A week into the campaign and we’re just over 50% funded, but we have a way to go yet!
We hope you’ll consider backing our project, which we think will be unique on the market.
On the evening of January 20 for North America, the Full Moon passes through the umbral shadow of the Earth, creating a total eclipse of the Moon.
No, this isn’t a “blood,” “super,” nor “wolf” Moon. All those terms are internet fabrications designed to bait clicks.
It is a totallunareclipse — an event that doesn’t need sensational adjectives to hype, because they are always wonderful sights! And yes, the Full Moon does turn red.
As such, on January 20 the evening and midnight event provides many opportunities for great photos of a reddened Moon in the winter sky.
Here’s my survey of tips and techniques for capturing the eclipsed Moon.
First … What is a Lunar Eclipse?
As the animation below shows (courtesy NASA/Goddard Space Flight Center), an eclipse of the Moon occurs when the Full Moon (and they can happen only when the Moon is exactly full) travels through the shadow of the Earth.
The Moon does so at least two times each year, though often not as a total eclipse, one where the entire disk of the Moon enters the central umbral shadow. Many lunar eclipses are of the imperceptible penumbral variety, or are only partial eclipses.
Total eclipses of the Moon can often be years apart. The last two were just last year, on January 31 and July 27, 2018. However, the next is not until May 26, 2021.
At any lunar eclipse we see an obvious darkening of the lunar disk only when the Moon begins to enter the umbra. That’s when the partial eclipse begins, and we see a dark bite appear on the left edge of the Moon.
While it looks as if Earth’s shadow sweeps across the Moon, it is really the Moon moving into, then out of, our planet’s umbra that causes the eclipse. We are seeing the Moon’s revolution in its orbit around Earth.
At this eclipse the partial phases last 67 minutes before and after totality.
This shows the length of the eclipse phases relative to the start of the partial eclipse as the Moon begins to enter the umbra at right. The Moon’s orbital motion takes it through the umbra from right to left (west to east) relative to the background stars. The visible eclipse ends 196 minutes (3 hours and 16 minutes) after it began. Click or tap on the charts to download a high-res version.
Once the Moon is completely immersed in the umbra, totality begins and lasts 62 minutes at this eclipse, a generous length.
The Moon will appear darkest and reddest at mid-eclipse. During totality the lunar disk is illuminated only by red sunlight filtering through Earth’s atmosphere. It is the light of all the sunsets and sunrises going on around our planet.
And yes, it is perfectly safe to look at the eclipsed Moon with whatever optics you wish. Binoculars often provide the best view. Do have a pair handy!
Total eclipse of the Moon, December 20/21, 2010, taken from home with 130mm AP apo refractor at f/6 and Canon 7D at ISO 400 for 4 seconds, single exposure, shortly after totality began.
At this eclipse because the Moon passes across the north half of the umbra, the top edge of the Moon will always remain bright, as it did above in 2010, looking like a polar cap on the reddened Moon.
Near the bright edge of the umbra look for subtle green and blue tints the eye can see and that the camera can capture.
Where is the Eclipse?
As the chart below shows, all of the Americas can see the entire eclipse, with the Moon high in the evening or late-night sky. For the record, the Moon will be overhead at mid-eclipse at local midnight from Cuba!
All of the Americas can see this eclipse. The eclipse gets underway as the Moon sets at dawn over Europe. Diagram courtesy EclipseWise.com
I live in Alberta, Canada, at a latitude of 50 degrees North. And so, the sky charts I provide here are for my area, where the Moon enters the umbral shadow at 8:35 p.m. MST with the Moon high in the east. By the end of totality at 10:44 p.m. MST the Moon shines high in the southeast. This sample chart is for mid-eclipse at my site.
The sky at mid-eclipse from my Alberta site. Created with the planetarium software Starry Night, from Simulation Curriculum.
I offer them as examples of the kinds of planning you can do to ensure great photos. I can’t provide charts good for all the continent because exactly where the Moon will be during totality, and the path it will take across your sky will vary with your location.
In general, the farther east and south you live in North America the higher the Moon will appear. But from all sites in North America the Moon will always appear high and generally to the south.
To plan your local shoot, I suggest using planetarium software such as the free Stellarium or Starry Night (the software I used to prepare the sky charts in this post), and photo planning apps such as The Photographer’s Ephemeris or PhotoPills.
The latter two apps present the sightlines toward the Moon overlaid on a map of your location, to help you plan where to be to shoot the eclipsed Moon above a suitable foreground, if that’s your photographic goal.
When is the Eclipse?
While where the Moon is in your sky depends on your site, the various eclipse events happen at the same time for everyone, with differences in hour due only to the time zone you are in.
While all of North America can see the entirety of the partial and total phases of this eclipse (lasting 3 hours and 16 minutes from start to finish), the farther east you live the later the eclipse occurs, making for a long, late night for viewers on the east coast.
Those in western North America can enjoy all of totality and be in bed at or before midnight.
Here are the times for the start and end of the partial and total phases. Because the penumbral phases produce an almost imperceptible darkening, I don’t list the times below for the start and end of the penumbral eclipse.
PM times are on the evening of January 20.
AM times are after midnight on January 21.
Note that while some sources list this eclipse as occurring on January 21, that is true for Universal Time (Greenwich Time) and for sites in Europe where the eclipse occurs at dawn near moonset.
For North America, if you go out on the evening of January 21 expecting to see the eclipse you’ll be a day late and disappointed!
Picking a Photo Technique
Lunar eclipses lend themselves to a wide range of techniques, from a simple camera on a tripod, to a telescope on a tracking mount following the sky.
If this is your first lunar eclipse I suggest keeping it simple! Select just one technique, to focus your attention on only one camera on a cold and late winter night.
The total eclipse of the Moon of September 27, 2015, through a telescope, at mid-totality with the Moon at its darkest and deepest into the umbral shadow, in a long exposure to bring out the stars surrounding the dark red moon. This is a single exposure taken through a 92mm refractor at f/5.5 for 500mm focal length using the Canon 60Da at ISO 400 for 8 seconds. The telescope was on a SkyWatcher HEQ5 equatorial mount tracking at the lunar rate.
Then during the hour of totality take the time to enjoy the view through binoculars and with the unaided eye. No photo quite captures the glowing quality of an eclipsed Moon. But here’s how to try it.
Option 1: Simple — Camera-on-Tripod
The easiest method is to take single shots using a very wide-angle lens (assuming you also want to include the landscape below) with the camera on a fixed tripod. No fancy sky trackers are needed here.
During totality, with the Moon now dimmed and in a dark sky, use a good DSLR or mirrorless camera in Manual (M) mode (not an automatic exposure mode) for settings of 2 to 20 seconds at f/2.8 to f/4 at ISO 400 to 1600.
That’s a wide range, to be sure, but it will vary a lot depending on how bright the sky is at your site. Shoot at lots of different settings, as blending multiple exposures later in processing is often the best way to reproduce the scene as your eyes saw it.
Shoot at a high ISO if you must to prevent blurring from sky motion. However, lower ISOs, if you can use them by choosing a slower shutter speed or wider lens aperture, will yield less digital noise.
Focus carefully on a bright star, as per the advice below for telephoto lenses. Don’t just set the lens focus to infinity, as that might not produce the sharpest stars.
Total eclipse of the Moon, December 20/21, 2010, with 15mm lens at f/3.2 and Canon 5D MkII at ISO 1600 for a 1-minute tracked exposure. Without a tracker, use shorter exposures (less than 20 seconds) and higher ISOs or wider apertures to avoid trailing,
One scene to go for at this eclipse is similar to the above photo, with the reddened Moon above a winter landscape and shining east of Orion and the winter Milky Way. But that will require shooting from a dark site away from urban lights. But when the Moon is totally eclipsed, the sky will be dark enough for the Milky Way to appear.
Click or tap on any of the charts to download a high-resolution copy.
The high altitude of the Moon at mid-eclipse from North America (with it 40 to 70 degrees above the horizon) will also demand a lens as wide as 10mm to 24mm, depending whether you use portrait or landscape orientation, and if your camera uses a cropped frame or full frame sensor. The latter have the advantage in this category of wide-angle nightscape.
Alternatively, using a longer 14mm to 35mm lens allows you to frame the Moon beside Orion and the winter Milky Way, as above, but without the landscape. Again, this will require a dark rural site.
If you take this type of image with a camera on a fixed tripod, use high ISOs to keep exposures below 10 to 20 seconds to avoid star trailing. You have an hour of totality to shoot lots of exposures to make sure some will work best.
Total eclipse of the Moon, December 20/21, 2010, with Canon 5D MKII and 24mm lens at f2.8 for stack of four 2-minute exposures at ISO 800. Taken during totality using a motorized sky tracker. The eclipsed Moon is the red object above Orion, and the stars appear bloated due to high haze and fog rolling in.
If you have a sky tracker to follow the stars, as I did above, exposures can be much longer — perhaps a minute to pick up the Milky Way really well — and ISOs can be lower to avoid noise.
Option 1 Variation — Urban Eclipses
Unfortunately, point-and-shoot cameras and so-called “bridge” cameras, ones with non-interchangeable lenses, likely won’t have lenses wide enough to capture the whole scene, landscape and all. Plus their sensors will be noisy when used at high ISOs. Those cameras might be best used to capture moderate telephoto closeups at bright urban sites.
With any camera, at urban sites look for scenic opportunities to capture the eclipsed Moon above a skyline or behind a notable landmark. By looking up from below you might be able to frame the Moon beside a church spire, iconic building, or a famous statue using a normal or short telephoto lens, making this a good project for those without ultra-wide lenses.
Lunar eclipse, Feb 20, 2008 with a 135mm telephoto and Canon 20Da camera showing the Moon’s size with such a lens and cropped-frame camera. This is a blend of 8-second and 3-second exposures to bring out stars and retain the Moon. Both at ISO200 and f/2.8. Saturn is at lower left and Regulus at upper right.
Whatever your lens or subject, at urban sites expose as best you can for the foreground, trying to avoid any bright and bare lights in the frame that will flood the image with lens flares in long exposures.
Capturing such a scene during the deep partial phases might produce a brighter Moon that stands out better in an urban sky than will a photo taken at mid-totality when the Moon is darkest.
TIP: Practice, Practice, Practice!
With any camera, especially beginner point-and-shoots, ensure success on eclipse night by practicing shooting the Moon before the eclipse, during the two weeks of the waxing Moon leading up to Full Moon night and the eclipse.
The crescent Moon with Earthshine on the dark side of the Moon is a good stand-in for the eclipsed Moon. Set aside the nights of January 8 to 11 to shoot the crescent Moon. Check for exposure and focus. Can you record the faint Earthshine? It’s similar in brightness to the shadowed side of the eclipsed Full Moon.
The next week, on the nights of January 18 and 19, the waxing gibbous Moon will be closer to its position for eclipse night and almost as bright as the uneclipsed Full Moon, allowing some rehearsals for shooting it near a landmark.
Option 2: Advanced — Multiple Exposures
An advanced method is to compose the scene so the lens frames the entire path of the Moon for the 3 hours and 16 minutes from the start to the end of the partial eclipse.
This set of 3 charts shows the position of the Moon at the start, middle, and end of the eclipse, for planning lens choice and framing of the complete eclipse path. The location is Alberta, Canada.
As shown above, including the landscape will require at least a 20mm lens on a full frame camera, or 12mm lens on a cropped frame camera. However, these charts are for my site in western Canada. From sites to the east and south where the Moon is higher an even wider lens might be needed, making this a tough sequence to take.
With wide lenses, the Moon will appear quite small. The high altitude of the Moon and midnight timing won’t lend itself to this type of multiple image composite as well as it does for eclipses that happen near moonrise or moonset, as per the example below.
This is a multiple-exposure composite of the total lunar eclipse of Sunday, September 27, 2015, as shot from Writing-on-Stone Provincial Park, Alberta, Canada. For this still image composite of the eclipse from beginning to end, I selected just 40 frames taken at 5-minute intervals, out of 530 I shot in total, taken at 15- to 30-second intervals for the full time-lapse sequence included below.
A still-image composite with the lunar disks well separated will need shots only every 5 minutes, as I did above for the September 27, 2015 eclipse.
Exposures for any lunar eclipse are tricky, whether you are shooting close-ups or wide-angles, because the Moon and sky change so much in brightness.
As I did for the image below, for a still-image composite, you can expose just for the bright lunar disk and let the sky go dark.
Exposures for just the Moon will range from very short (about 1/500th second at f/8 and ISO 100) for the partials, to 1/2 to 2 seconds at f/2.8 to f/4 and ISO 400 for the totals, then shorter again (back to 1/500 at ISO 100) for the end shots when the Full Moon has returned to its normal brilliance.
That’ll take constant monitoring and adjusting throughout the shoot, stepping the shutter speed gradually longer thorough the initial partial phase, then shorter again during the post-totality partial phase.
You’d then composite and layer (using a Lighten blend mode) the well-exposed disks (surrounded by mostly black sky) into another background image exposed longer for 10 to 30 seconds at ISO 800 to 1600 for the sky and stars, shot at mid-totality.
To maintain the correct relative locations of the lunar disks and foreground, the camera cannot move.
The total lunar eclipse of April 4, 2015 taken from near Tear Drop Arch, in western Monument Valley, Utah. I shot the totality images during the short 4 minutes of totality. The mid-totality image is a composite of 2 exposures: 30 seconds at f/2.8 and ISO 1600 for the sky and landscape, with the sky brightening blue from dawn twilight, and 1.5 seconds at f/5.6 and ISO 400 for the disk of the Moon itself. Also, layered in are 26 short exposures for the partial phases, most being 1/125th sec at f/8 and ISO 400, with ones closer to totality being longer, of varying durations.
That technique works best if it’s just a still image you are after, such as above. This image is such a composite, of the April 4, 2015 total lunar eclipse from Monument Valley, Utah.
This type of composite takes good planning and proper exposures to pull off, but will be true to the scene, with the lunar disk and its motion shown to the correct scale and position as it was in the sky. It might be a composite, but it will be accurate.
My Rant!
That’s in stark contrast to the flurry of ugly “faked” composites that will appear on the web by the end of the day on January 21, ones with huge telephoto Moons pasted willy-nilly onto a wide-angle sky.
Rather than look artistic, most such attempts look comically cut-and-pasted. They are amateurish. Don’t do it!
Option 3: Advanced — Wide-Angle Time-Lapses
If it’s a time-lapse movie you want (see the video below), take exposures every 10 to 30 seconds, to ensure a final movie with smooth motion.
Unlike shooting for a still-image composite, for a time lapse each frame will have to be exposed well enough to show the Moon, sky, and landscape.
That will require exposures long enough to show the sky and foreground during the partial phases — likely about 1 to 4 seconds at f/2.8 and ISO 400. In this case, the disk of the partially-eclipsed Moon will greatly overexpose, as it does toward the end of the above time-lapse from September 27, 2015..
But the Moon will darken and become better exposed during the late stages of the partial eclipse and during totality when a long exposure — perhaps now 10 to 20 seconds at f/2.8 and ISO 800 to 1600 — will record the bright red Moon amid the stars and winter Milky Way.
Maintaining a steady cadence during the entire sequence requires using an interval long enough throughout to accommodate the expected length of the longest exposure at mid-totality, with similar camera settings to what you’ve used for other Milky Way nightscapes. If you’ve never taken those before, then don’t attempt this complex sequence.
After totality, as the Moon and sky re-brighten, exposures will have to shorten again, andsymmetrically in reverse fashion for the final partial phases.
Such a time-lapse requires consistently and incrementally adjusting the camera over the three or more hours of the eclipse on a cold winter night. The high altitude of the Moon and its small size on the required wide angle lenses will make any final time lapse less impressive than at eclipses that occur when the Moon is rising or setting.
But … the darkening of the sky and “turning on” of the Milky Way during totality will make for an interesting time-lapse effect. The sky and scene will be going from a bright fully moonlit night to effectively a dark moonless night, then back to moonlit. It’s a form of “holy grail” time lapse, requiring advanced processing with LRTimelapse software.
Again, do not move the camera. Choose your lens and frame your camera to include the entire path of the Moon for as long as you plan to shoot.
Even if the final movie looks flawed, individual frames should still produce good still images, or a composite built from a subset of the frames.
Option 4: Simple — Telephoto Close-Ups
The first thought of many photographers is to shoot the eclipse with as long a telephoto lens as possible. That can work, but …
The harsh reality is that the Moon is surprisingly small (only 1/2-degree across) and needs a lot of focal length to do it justice, if you want a lunar close-up.
You’ll need a 300mm to 800mm lens. Unfortunately, the Moon and sky are moving and any exposures over 1/4 to 2 seconds (required during totality) will blur the Moon badly if its disk is large on the frame and all you are using is a fixed tripod.
If you don’t have a tracking mount, one solution is to keep the Moon’s disk small (using no more than a fast f/2 or f/2.8 135mm to 200mm lens) and exposures short by using a high ISO speed of 1600 to 3200. Frame the Moon beside the Beehive star cluster as I show below.
Take a range of exposures. But … be sure to focus!
TIP: Focus! And Focus Again!
Take care to focus precisely on a bright star using Live View. That’s true of any lens but especially telephotos and telescopes.
Focus not just at the start of the night, but also more than once again later at night. Falling temperatures on a winter night will cause long lenses and telescopes to shift focus. What was sharp at the start of the eclipse won’t be by mid totality.
The catch is that if you are shooting for a time-lapse or composite you likely won’t be able to re-point the optics to re-focus on a star in mid-eclipse. In that case, be sure to set up the gear well before you want to start shooing to let it cool to ambient air temperature. Now focus on a star, then frame the scene. Then hope the lens doesn’t shift off focus. You might be able to focus on the bright limb of the Moon but it’s risky.
Fuzzy images, not bad exposures, are the ruin of most attempts to capture a lunar eclipse, especially with a telephoto lens. And the Moon itself, especially during totality, is not a good target to focus on. Use a bright star. The winter sky has lots!
Option 5: Advanced — Tracked Telescopic Close-Ups
If you have a mount that can be polar aligned to track the sky, then many more options are open to you.
You can use a telescope mount or one of the compact and portable trackers, such as the Sky-Watcher Star Adventurer (I show the Mini model above) or iOptron Sky Tracker units. While these latter units work great, you are best to keep the payload weight down and your lens size well under 300mm.
That’s just fine for this eclipse, as you really don’t need a frame-filling Moon. The reason is that the Moon will appear about 6 degrees west of the bright star cluster called the Beehive, or Messier 44, in Cancer.
As shown above, a 135mm to 200mm lens will frame this unique pairing well. For me, that will be the signature photo of this eclipse. The pairing can happen only at lunar eclipses that occur in late January, and there won’t be any more of those until 2037!
That’s the characteristic that makes this eclipse rare and unique, not that it’s a “super-duper, bloody, wolf Moon!” But it doesn’t make for a catchy headline.
A High Dynamic Range composite of 7 exposures of the Dec 20/21, 2010 total lunar eclipse, from 1/2 second to 30 seconds, to show the more normally exposed eclipsed Moon with the star cluster M35, at left, in Gemini, to show the scene as it appeared in binoculars. Each tracked photo taken with a 77mm Borg apo refractor at f/4.2 (300mm focal length) and Canon 5D MkII at ISO 1600.
Exposures to show the star cluster properly might have to be long enough (30 to 120 seconds) that the Moon overexposes, even at mid-totality. If so, take different exposures for the Moon and stars, then composite them later, as I did above for the December 20, 2010 eclipse near the Messier 35 star cluster in Gemini.
If really you want to shoot with even more focal length for framing just the Moon, a monster telephoto lens will work, but a small telescope such as an 80mm aperture f/6 to f/7 refractor will provide enough focal length and image size at much lower cost and lighter weight, and be easier to attach to a telescope mount.
But even with a 500mm to 800mm focal length telescope the Moon fills only a small portion of the frame, though cropped frame cameras have the advantage here. Use one if it’s a big Moon you’re after!
No matter the camera, the lens or telescope should be mounted on a solid equatorial telescope mount that you must polar align earlier in the night to track the sky.
Alternatively, a motorized Go To telescope on an alt-azimuth mount will work, but only for single shots. The rotation of the field with alt-az mounts will make a mess of any attempts to shoot multiple-exposure composites or time-lapses, described below.
Whatever the mount, for the sharpest lunar disks during totality, use the Lunar tracking rate for the motor.
This series shows the need to constantly shift exposure by lengthening the shutter speed as the eclipse progresses. Do the same to shorten the exposure after totality. The exposures shown here are typical.
Assuming an f-ratio of f/6 to f/8, exposures will vary from as short as 1/250th second at ISO 100 to 200 for the barely eclipsed Moon, to 4 to 20 seconds at ISO 400 to 1600 for the Moon at mid-totality.
It’s difficult to provide a precise exposure recommendation for totality because the brightness of the Moon within the umbra can vary by several stops from eclipse to eclipse, depending on how much red sunlight manages to make it through Earth’s atmospheric filter to light the Moon.
TIP: Shoot for HDR
Total eclipse of the Moon, December 20/21, 2010, with 5-inch refractor at f/6 (780mm focal length) and Canon 7D (cropped frame camera) at ISO 400. This is an HDR blend of 9 images from 1/125 second to 2 seconds, composited in Photoshop. Note the blue tint along the shadow edge.
As I did above, during the deep partial phases an option is to shoot both long, multi-second exposures for the red umbra and short, split-second exposures for the bright part of the Moon not yet in the umbra.
Take 5 to 7 shots in rapid succession, covering the range needed, perhaps at 1-stop increments. Merge those later with High Dynamic Range (HDR) techniques and software, or with luminosity masks.
Even if you’re not sure how to do HDR processing now, shoot all the required exposures anyway so you’ll have them when your processing skills improve.
Option 6: Advanced — Close-Up Composites and Time-Lapses
With a tracking telescope on an equatorial mount you could fire shots every 10 to 30 seconds, and then assemble them into a time-lapse movie, as below.
But as with wide-angle time-lapses, that will demand constant attention to gradually and smoothly shift exposures, ideally by 1/3rd-stop increments every few shots during the partial and total phases. Make lots of small adjustments, rather than fewer large ones.
If you track at the lunar rate, as I did above, the Moon should stay more or less centred while it drifts though the stars, assuming your mount is accurately polar aligned, an absolutely essential prerequisite here.
Composite image digitally created in Photoshop of images taken during October 27, 2004 total lunar eclipse, from Alberta Canada. Images taken through 5-inch apo refractor at f/6 with Canon Digital Rebel 300D camera at ISO 200.
Conversely, track at the sidereal rate and the stars will stay more or less fixed while the Moon drifts through the frame from right to left (west to east) as I show above in a composite of the October 27, 2004 eclipse.
But such a sequence takes even more careful planning to position the Moon correctly at the start of the sequence so it remains “in frame” for the duration of the eclipse, and ends up where you want at the end.
In the chart below, north toward Polaris is at the top of the frame. Position the Moon at the start of the eclipse so it ends up just above the centre of the frame at mid-eclipse. Tricky!
Repeated from earlier, this chart shows the path of the Moon through the north half of the umbra, a path that will be the same for any site, as will be the timing. North is up here.
As I show above, for this type of “Moon-thru-shadow” sequence a focal length of about 400mm is ideal on a full frame camera, or 300mm on a cropped frame camera.
From such a time-lapse set you could also use several frames selected from key stages of the eclipse, as I did in 2004, to make up a multiple-image composite showing the Moon moving through the Earth’s shadow.
Again, planetarium software such as Starry Night I used above, which can be set to display the field of view of the camera and lens of your choice, is essential to plan the shoot. Don’t attempt it without the right software to plan the framing.
I would consider the telescopic time-lapse method the most challenging of techniques. Considering the hour of the night and the likely cold temperatures, your best plan might be to keep it simple.
It’s what I plan to do.
I’ll be happy to get a tracked telephoto close-up of the Moon and Beehive cluster as my prime goal, with a wide-angle scene of the eclipsed Moon beside Orion and the Milky Way as a bonus. A few telescope close-ups will be even more of a bonus.
The Astrospheric website, with astronomy-oriented weather predictions. It’s also available as a great mobile app.
However, just finding clear skies might be the biggest challenge!
Try the Astrospheric app for astronomy-oriented weather predictions. The Environment Canada data it uses has led me to clear skies for several recent eclipses that other observers in my area missed.
It’ll be worth the effort to chase!
The next total eclipse of the Moon anywhere on Earth doesn’t occur until May 26, 2021 in an event visible at dawn from Western North America. The next total lunar eclipse visible from all of North America comes a lunar year later, on May 15, 2022.
Total Lunar Eclipse from Alan Dyer on Vimeo.
I leave you with a music video of the lunar eclipse of September 27, 2015 that incorporates still and time-lapse sequences shot using all of the above methods.
I’m pleased to announce that my “Nightscapes and Time-Lapses” eBook is now available for all devices as a “universal” PDF!
First published in 2014, and revised several times since then, my How to Photograph and Process Nightscapes and Time-Lapses eBook had been available only for Apple devices through the Apple iBooks Store. Not any more!
Over the years, many people have inquired about an edition for other devices, notably Android and Windows tablets. The only format that I can be sure the wide array of other devices can read and display as I intend it is PDF.
To convert the interactive Apple iBook into a PDF required splitting the content into two volumes:
Volume 1 deals just with Photography in 425 pages.
Volume 2 deals just with Processing, also in 425 pages.
Volume 2 includes all the same step-by-step tutorials as the Apple edition, but spread over many more pages. That’s because the Apple Edition allows “stacking” many processing steps into a one-page interactive gallery.
In the PDF version, however, those same steps are shown over several pages. And there are about 50 processing tutorials, including for selected non-Adobe programs such as Affinity Photo, ON1 Photo RAW, and DxO PhotoLab.
The other main difference is that, unlike the Apple version, I cannot embed videos. So all the videos are provided by links to Vimeo feeds, many “private” so only my ebook owners have access to those videos.
Otherwise, the combined content of the two PDFs is the same as the Apple iBooks edition.
I’ve also updated the Apple iBooks version (to v3.1) to revise the content, and add a few new pages: on Luminosity Mask panel extensions, southern hemisphere Milky Way and Moon charts, and even the new Nikon Z6 camera. It is now 580 pages.
Owners of the previous Apple iBooks edition can get the updated version for free. In iBooks, check under Purchased>Updates.
Both Apple and PDF editions are now in sync and identical in content. I think you’ll find them the most comprehensive works on the subject in print and in digital.
Revised and expanded, the new Third Edition of my Nightscapes and Time-Lapses eBook provides one of the most comprehensive guides to the subject you’ll find!
The 2018 Third Edition of my ebook How to Photograph and Process Nightscapes and Time-Lapses is now available at the Apple iBooks Store.
Here’s a short promo video, one that also opens the ebook as one of the embedded videos.
I originally published this ebook in 2014, then revised it in late 2016. Here’s what’s new in this 2018 Third Edition:
Updated equipment (cameras, lenses, filters, time-lapse gear) to reflect what’s current as of mid-2018. For example I added: the Revolve Camera slider; functions from the Canon 6D MkII; and information about the Sony a7III Mirrorless.
Updated the processing tutorials with current software: Photoshop CC2018, Lightroom Classic CC, Starry Landscape Stacker, TLDF, Timelapse Workflow, and LRTimelapse version 5.
Added tutorials on selected non-Adobe programs: DxO PhotoLab, ON1 Photo RAW, Affinity Photo, and the extensions Raya Pro 3 and Dr. Brown’s Services.
Added some 50 new topic pages, such as on memory cards and exposure blending.
In addition I’ve performed “housekeeping chores” such as:
Removing some embedded movies to reduce the file size and
Converting interactive diagrams into labeled images and
Flattening some of the interactive image galleries, all for facilitating conversion to PDFs for non-Apple platforms.
Improving the resolution of most tutorial screenshot images.
Improving many diagrams and updating many images.
Merging the chapter on Intervalometers into Chapter 1.
Plus I’ve added a section on lunar eclipses back in. Yay!
Here are screen shots of sample chapter content pages, to provide an idea of what the ebook contains and looks like.
All current owners of the older editions get the Third Edition update for free through the iBooks app (Mac or iPad, and also iPhone).
I hope you enjoy the new edition. Tell your friends! And do leave a rating or review at the iBooks sales page. Thanks!
And yes, for non-Apple people, a non-interactive PDF version for all other platforms (Windows and Android) is in production for later this year.
The first total lunar eclipse in 2.5 years provides lots of opportunities for some great photos.
On the morning of January 31, before sunrise for North America, the Full Moon passes through the umbral shadow of the Earth, creating the first total eclipse of the Moon since September 27, 2015.
The pre-dawn event provides many photo opportunities. Here’s my summary of tips and techniques for capturing the eclipsed Moon.
But First … What is a Lunar Eclipse?
As the animation (courtesy NASA/Goddard Space Flight Center) shows, an eclipse of the Moon occurs when the Full Moon (and they can happen only when the Moon is exactly full) travels through the shadow of the Earth.
The Moon does so at least two times a year, though often not as a total eclipse, one where the entire disk of the Moon is engulfed by the umbra.
When the Moon is within only the outer penumbral shadow we see very little effect, with a barely perceptible darkening of the Moon, if that. I don’t even list the times below for the start and end of the penumbral phases.
An HDR stack of images to encompass the range of brightness from the bright portion of the lunar disk (at right here) still just in the penumbral shadow, to the dark portion of the disk at left deep in the umbral shadow. I shot this at the October 8, 2014 total lunar eclipse, from Writing-on-Stone Park in southern Alberta. Taken 7 to 5 minutes before totality began.
It’s only when the Moon begins to enter the central umbral shadow that we see an obvious effect. That’s when the partial eclipse begins, and we see a dark bite appear on the left edge of the Moon. The shadow appears to creep across the Moon to darken more of its disk. While it looks like the shadow is moving across the Moon, it is really the Moon moving into, then out of, the umbral shadow that causes the eclipse.
At this eclipse the partial phases last about an hour before and after totality.
Once the Moon is completely immersed in the umbra, totality begins, and lasts 77 minutes at this eclipse, a generous length. However, in North America, only sites in the western half of the continent get to see all or most of totality.
Where is the Eclipse?
Courtesy Fred Espenak and Royal Astronomical Society of Canada (Observer’s Handbook)
As the chart above shows, the Pacific area including Hawaii, Australia, and eastern Asia can see the entire eclipse with the Moon high in the evening or midnight sky.
Most of North America (my tips are aimed at North American photographers) can see at least some part of this eclipse.
From the eastern half of the continent the Moon sets at sunrise during either totality (from the central areas of North America), or during the first partial phases (from eastern North America). Those in the east can take advantage of interesting photo opportunities by capturing the partially eclipsed Moon setting in the west in the dawn twilight.
The total eclipse of the Moon on December 10, 2011, taken from the the Rothney Astrophysical Observatory, near Priddis, Alberta, and looking west to the Rockies. This is a 2 second exposure at ISO 800 with the Canon 5DMkII and Canon 200mm lens at f/4. This was taken toward the end of totality at 7:48 a.m. local time.
However, the most dramatic images of a deep red Moon in the western sky, such as above, will be possible only from the west. And even then, the further north and west you live, the better your view.
Even from the southwestern United States the Moon sets just after the end of totality, requiring a site with a low and clear horizon to the west in order to see the whole event.
I live in Alberta, Canada, and the diagrams I provide here are for my area, where the Moon sets during the final partial phase. I offer them as examples of the kinds of planning you can do to ensure great photos. But exactly where the Moon will be during totality, and where and when it will set on your horizon, will depend on your location.
The latter two apps present the sightlines toward the Moon overlaid on a map of your location, to help you plan where to be to shoot the eclipsed Moon setting behind a suitable foreground.
When is the Eclipse?
While where the Moon is in your sky depends on your site, the various eclipse events happen at the same time for everyone, with differences in hour due only to the time zone you are in.
Here are the times for the start and end of the partial and total phases.
Note that all times are A.M., in the early morning, before sunrise, on January 31. Go out at 6 P.M. on the evening of January 31 and you’ll be 12 hours too late. You missed it!
All times are A.M. on January 31. “—“ means the event is not visible; the Moon has set.
The time of moonset at your site will vary with your location. Use planning apps to calculate your local moonset time.
Picking a Site
No matter where you are in North America you want a site with a good view to the west and northwest, preferably with a clear view of a relatively unobstructed but photogenic horizon.
While having an eclipse occur at dawn (or at dusk) does limit the amount of eclipse we can see, it has the benefit of providing many more photo opportunities of the eclipsed Moon above a scenic landscape or foreground element.
The Full Moon rises in partial eclipse over the sandstone formations of Writing-on-Stone Provincial Park in southern Alberta, on the evening of September 27, 2015. Shot with the 200mm lens and 1.4x extender, on the Canon 5DMkII.
From eastern North America you will have to be content with images of the partially eclipsed Moon setting, similar to the image above of a rising partially-eclipsed Moon.
From the centre of the continent, where the Moon sets during totality, the dim, reddened Moon is likely to disappear into the brightening sky. Remember, when the Moon is full it sets just as the Sun rises. So shots of a red Moon right on the horizon aren’t likely to be possible. The Moon will be too dim and the sky too bright.
From sites in the west, the Moon will set either just at the end of totality or shortly afterwards, making the Moon brighter and more obvious in the sunrise sky, as the foreground in the west lights up with red light from the Sun rising in the east.
It is that same red sunlight filtered by our atmosphere that continues on into our planet’s shadow and lights the Moon red during totality.
Picking a Technique
Lunar eclipses lend themselves to a wide range of techniques, from a simple camera on a tripod, to a telescope on a tracking mount following the sky.
What you use depends not only on the gear you have on hand, but also on your site. It might not be practical to set up loads of gear at a scenic site you have to trek into — especially when you have to set up in the wee hours of a cold winter morning.
You could set up earlier that night on January 30, but only if your site is safe enough to leave the gear unattended while you sleep.
Keep it simple!
Option 1: Simple Camera-on-Tripod
The Moon in totality in the deep twilight on September 27, 2015, with a 35mm lens on a full-frame camera. This is one frame from a time-lapse sequence. A 5-second exposure at f/2.8 and at ISO 800.
The easiest method is to take single shots with a moderate wide-angle or normal lens with the camera on a fixed tripod. No fancy trackers are needed here.
If the sky is bright with twilight, you might be able to meter the scene and use Auto exposure.
Composing a single shot during mid-totality from southern Alberta, framed to include Castor and Pollux in Gemini.
But earlier in the night, with the Moon in a darker sky, as I show above, use Manual exposure and try settings of 1 to 10 seconds at f/2.8 to f/4 at ISO 400 to 1600. That’s a wide range, to be sure, but it will vary a lot depending on when you shoot and where you are, factors that will affect how bright the sky is at your site. Just shoot, check, and adjust.
Option 2: Advanced Camera-on-Tripod
A more advanced method is to compose the scene so the lens frames the entire path of the Moon from the start of the partial eclipse until moonset.
Framing a time-lapse sequence for southern Alberta. (Courtesy Starry Night™/Simulation Curriculum)
As shown above, that will take at least a 35mm lens on a full frame camera, or 20mm lens on a cropped frame camera.
Take exposures every 15 to 30 seconds if you want to turn the set into a time-lapse movie. But a still-image composite with the lunar disks well separated will need shots only every 5 to 10 minutes.
Such a composite takes good planning and proper exposures to pull off, but will be true to the scene, with the lunar disk and its motion shown to the correct scale as it was in the sky. That’s in stark contrast to the flurry of ugly “faked” composites that will appear on the web by the end of February 1, ones with huge telephoto Moons pasted willy-nilly onto a wide-angle sky. Don’t do it!
Exposures for any lunar eclipse are tricky, whether you are shooting closeups or wide-angles, because the Moon and sky change so much in brightness.
For wide-angle composites, you can expose just for the bright lunar disk and let the sky go dark. Exposures for just the Moon will range from very short (about 1/500th second at ISO 100) for the partials, to 1 to 2 seconds at ISO 400 for the totals, then shorter again (1/15 to 1/2 second at ISO 400) for the end shots in twilight when the Moon and sky may be similar in brightness. That’ll take constant monitoring and adjusting throughout the shoot.
As I did below, you’d then composite and layer the well-exposed disks into another background image exposed longer for the sky, likely shot in twilight. To maintain the correct relative locations of the lunar disks and foreground, the camera cannot move.
That technique works best if it’s just a still image you are after, such as below.
The total lunar eclipse of April 4, 2015 taken from near Tear Drop Arch, in Monument Valley, Utah. I shot the totality images at 6:01 a.m. MDT, during mid-totality during the very short 4 minutes of totality. The mid-totality image is a composite of 2 exposures: 30 seconds at f/2.8 and ISO 1600 for the sky and landscape, with the sky brightening blue from dawn twilight, and 1.5 seconds at f/5.6 and ISO 400 for the disk of the Moon itself. Also, layered in are 26 short exposures for the partial phases, most being 1/125th sec at f/8 and ISO 400, with ones closer to totality being longer, of varying durations. All are with a 24mm lens and Canon 6D on a static tripod, with the camera not moved through the entire sequence. The short duration of totality at this eclipse lent itself to a sequence with one total phase image flanked by partial phases.
The above image is a composite of the April 4, 2015 total lunar eclipse from Monument Valley, Utah. That eclipse occurred under similar circumstances as this month’s eclipse, with the eclipse underway as the Moon set in the west at sunrise.
A multiple-exposure composite of the total lunar eclipse of Sunday, September 27, 2015, as shot from Writing-on-Stone Provincial Park, Alberta, Canada. NOTE: The size of the Moon and its path across the sky are accurate here, because all the images for this composite were taken with the same lens using a camera that did not move during the shoot.
By comparison, the composite here is made of a few selected frames out of hundreds I took at 15-second intervals, and with each frame exposed for the sky, for use in a time-lapse movie. In this case, the Moon became overexposed at the end as it emerged from the umbra.
Indeed, if it’s a time-lapse movie you want (see the video linked to below), then each frame will have to be exposed well enough to show the sky and landscape.
While this method will overexpose the partially-eclipsed Moon, the Moon will darken and become better exposed throughout totality when the same long exposure for the reddened Moon might also work for the sky, to pick up stars. Exposures will have to shorten again as the sky brightens with twilight.
Again, constant baby-sitting and adjusting the camera will be needed. So if it’s cold where you are prepare for a frigid multi-hour shoot. I doubt you’ll be able to leave the camera on Auto exposure to run on its own, not until at least bright twilight begins.
Option 3: Telephoto Close-Ups
Size of the Moon with a 600mm telephoto on a full-frame and cropped-frame camera. (Courtesy Starry Night™/Simulation Curriculum)
The Moon is surprisingly small (only 1/2-degree across) and needs a lot of focal length to do it justice.
For an “in-your-face” close-up of the eclipse you’ll need a 300mm to 800mm (!) lens. Unfortunately, the Moon and sky are moving and any exposures over 1 to 2 seconds (required during totality) will blur the Moon badly if its disk is large on the frame.
If you don’t have a tracking mount, one solution is to keep the Moon’s disk small (using no more than a fast f/2.8 200mm lens) and exposures short by using a high ISO speed.
The eclipse of December 10, 2011, with the Moon setting in deep partial eclipse at sunrise.
Or plan to shoot with a telephoto only when the Moon is low in the sky, as I did above, when you can include the horizon which you would want to be sharp anyway. Framing the Moon and horizon won’t need a super telephoto.
The sky will then also be brighter and require short exposures that don’t need to be tracked. However, how bright and obvious the Moon will be will again depend on your location. This may or may not be a practical option, certainly not if the Moon is setting during mid-totality where you are.
Option 4: Tracked Telescopic Close-Ups
Framing the eclipsed Moon and the Beehive star cluster (Messier 44). (Courtesy Starry Night™/Simulation Curriculum)
If you have a mount that can be polar aligned to track the sky, then more options are open to you.
You can use a telescope mount or one of the compact and portable trackers, such as the Sky-Watcher Star Adventurer or iOptron Sky Tracker units. While these latter units work great, you are best to keep the payload weight down and your lens size under 300mm.
That’s just fine for this eclipse, as you really don’t need a frame-filling Moon. The reason is that the Moon will appear about 4 degrees away from the bright star cluster called the Beehive, or Messier 44, in Cancer. As shown above, a 200mm to 300mm lens will frame this unique pairing well.
Even so, exposures to show the cluster properly might have to be long enough that the Moon overexposes, even at mid-totality. If so, take different exposures for the Moon and stars and composite them later, as I did below.
A High Dynamic Range composite of 7 exposures of the Dec 20/21, 2010 total lunar eclipse, from 1/2 second to 30 seconds, to show the more normally exposed eclipsed Moon with the star cluster M35 at left in Gemini, to show the scene more like it appeared in binoculars. Each photo taken with a 77mm aperture Borg apo refractor at f/4.2 (300mm focal length) and Canon 5D MkII camera at ISO 1600.
If you do want to shoot with more focal length, a monster telephoto lens will work, but a small telescope such as an 80mm aperture f/6 to f/7 refractor will provide enough focal length and image size at much lower cost. But either way, the lens or telescope should be mounted on a solid equatorial telescope mount, and polar aligned to track the sky.
For the sharpest lunar disks, use the Lunar tracking rate.
Exposures will vary from as short as 1/500th second at ISO 100 to 200 for the barely eclipsed Moon, to 4 to 16 seconds at f/6 to f/8 and at ISO 400 to 1600 for the Moon at mid-totality.
Total eclipse of the Moon, December 20/21, 2010, taken with a 130mm AP apo refractor at f/6 and Canon 7D at ISO 400. An HDR composite of 9 images from 1/125 second to 2 seconds, composited in Photoshop.Taken at about 12:21 a.m. MST on Dec 21, about 20 minutes before totality began, during the partial phase.
As I did above, during the deep partial phases shoot both long exposures for the red umbra and short exposures for the bright part of the Moon not yet in the umbra. Merge those later with High Dynamic Range (HDR) techniques and software, or with luminosity masks.
Even if you’re not sure how to do this now, shoot all the required exposures anyway so you’ll have them when your processing skills improve.
Option 5: Time-Lapse Close-Ups
Total eclipse of the Moon, December 20/21, 2010, taken from home with 130mm AP apo refractor at f/6 and Canon 7D at ISO 400 for 4 seconds, single exposure, shortly after totality began.
With a tracking telescope you could fire shots every 30 seconds or so, and then assemble them into a time-lapse movie.
But as with wide-angle time-lapses, that will take constant attention to gradually and smoothly shift exposures, ideally by 1/3rd-stop increments every few shots during the partial and total phases.
If you track at the lunar rate, as I did in the still image below and in the music video linked to at bottom, the Moon will stay centred while it drifts though the stars.
Taken with 90mm Stowaway AP Refractor, with Borg .85x compressor/flattener for f/5.6. With Canon 20Da camera at ISO 400 for a 13 second exposure, on a Skywatcher HEQ5 mount tracking at Lunar rate. Exposure was long to bring out star background.
Track at the sidereal rate and the stars will stay more or less fixed while the Moon drifts through the frame from right to left (west to east). But that takes even more careful planning to position the Moon correctly at the start of the sequence so it remains “in frame” for the duration of the eclipse and ends up where you want at the end, which will occur with the Moon low in a bright sky.
Again, planetarium software such as Starry Night, which can be set to display a camera frame, is essential to plan the shoot.
Either way, do take care to accurately polar align your mount, or you’ll be confronted with the monumental task of having to manually align hundreds of images later. Trust me, I know!
Me enjoying the September 27, 2015 total lunar eclipse while various cameras snapped away, but still requiring constant attention and adjustments.
I would consider the telescopic time-lapse method the most challenging of techniques.
Considering the hour of the night and the likely cold temperatures, your best plan might be to keep it simple. It’s what I plan to do. I’ll be happy to get a few good wide-angle still images, and perhaps a tracked telephoto close-up of the Moon and Beehive as a bonus.
While there is another total lunar eclipse (TLE) in six months on July 27/28, it is not visible at all from North America.
Our next TLE occurs 12 Full Moons, or one lunar year from now, on the night of January 20/21, 2019, when all of North America gets to watch totality at a more reasonable hour, though perhaps not at a more reasonable temperature.
I leave you with a music video of the last TLE, on September 27, 2015 that incorporates still and time-lapse sequences shot using all of the above methods.
I present suggestions for how to ensure everything under your control will go well on eclipse day. The secret is: Practice, Practice, Practice!
The techniques I suggest practicing are outlined in my previous blog, Ten Tips for the Solar Eclipse. It’s prerequisite reading.
However, while you can read all about how to shoot the eclipse, nothing beats actually shooting to ensure success. But how do you do that, when there’s only one eclipse?
Here are my “Top 10” suggestions:
Total eclipse of the Sun, November 3, 2013 as seen from the middle of the Atlantic Ocean, from the Star Flyer sailing ship. I took this with a Canon 5D MkII and 16-35mm lens at 19mm for 1/40s at f/2.8 and ISO 800 on a heavily rolling ship.
Wide-Angle Shots – Shoot a Twilight Scene
The simplest way to shoot the eclipse is to employ a camera with a wide lens running on auto exposure to capture the changing sky colors and scene brightness.
Auto Exposure Check in Twilight
If you intend to shoot wide-angle shots of the eclipse sky and scene below, with anything from a mobile phone to a DSLR, practice shooting a time-lapse sequence or a movie under twilight lighting. Does your camera expose properly when set to Auto Exposure? If you are using a phone camera, does it have any issues focusing on the sky? How big a file does a movie create?
With Telephotos and Telescopes – Shoot the Filtered Sun
The toughest techniques involve using long lenses and telescopes to frame the eclipsed Sun up close. They need lots of practice.
Framing and Focusing
You’ll need to have your safe and approved solar filter purchased (don’t wait!) that you intend to use over your lens or telescope. With the filter in place, simply practice aiming your lens or telescope at the Sun at midday. It’s not as easy as you think! Then practice using Live View to manually focus on the edge of the Sun or on a sunspot. Can you get consistently sharp images?
The partial eclipse of the Sun, October 23, 2014, shot through thin cloud, but that makes for a more interesting photo than one in a clear sky. Despite the cloud, this was still shot through a Mylar filter, on the front of telescope with 450mm focal length, using the Canon 60Da for 1/25 sec exposure at ISO 100.
Exposure Times
Exposures of the filtered Sun will be the same as during the partial phases, barring cloud or haze, as above, that can lengthen exposure times. Otherwise, only during the thin crescent phases will shutter speeds need to be 2 to 3 stops (or EV steps) longer than for a normal Sun.
Solar filters that clamp around the front of lenses are easier to remove than ones that screw onto lenses. They will bind and get stuck!
Filter Removal
With the camera aimed away from the Sun (very important!), perhaps at a distant landscape feature, practice removing the filter quickly. Can you do it without jarring the camera and bumping it off target? Perhaps try this on the Moon at night as well, as it’s important to also test this with the camera and tripod aimed up high.
Articulated LCD screens are a great aid for framing and viewing the eclipse in Live View when the camera is aimed up high, as it will be!
Ease of Use
With the Sun up high at midday (as it will be during the eclipse from most sites), check that you can still look through, focus, and operate the camera easily. Can you read screens in the bright daylight? What about once it gets darker, as in twilight, which is how dark it will get during totality.
The east-to-west motion of the sky will carry the Sun its own diameter across the frame during totality, making consistent framing an issue with very long lenses and telescopes.
Sun Motion
If you are using an untracked tripod, check how much the Sun moves across your camera frame during several minutes. For videos you might make use of that motion. For still shots, you’ll want to ensure the Sun doesn’t move too far off center.
An equatorial mount like this is great but needs to be at least roughly polar aligned to be useful.
Aligning Tracking Mounts
If you plan to use a motorized equatorial mount capable of tracking the sky, “Plan A” might be to set it up the night before so it can be precisely polar aligned. But the reality is that you might need to move on eclipse morning. To prepare for that prospect, practice roughly polar aligning your mount during the day to see how accurate its tracking is over several minutes. Do that by leveling the mount, setting it to your site’s latitude, and aiming the polar axis as close as you can to due and true north. You don’t need precise polar alignment to gain the benefits of a tracking mount – it keeps the Sun centered – for the few minutes of totality.
The Full Moon is the same brightness as the Sun’s inner corona.
Telephotos and Telescopes – Shoot Full Moon Closeups
Exposure Check
Shoot the Full Moon around July 8 or August 7. If you intend to use Auto Exposure during totality, check how well it works on the Full Moon. It’s the same brightness as the inner corona of the Sun, though the Moon occupies a larger portion of the frame and covers more metering sensor points. This is another chance to check your focusing skill.
The crescent Moon has a huge range in brightness and serves as a good test object. Remember, the Moon is the same size as the Sun. That’s why we get eclipses!
Telescopes and Telescopes – Shoot Crescent Moon Closeups
Exposure Check
Shoot the waxing crescent moon in the evening sky during the last week of June and again in the last week of July. Again, test Auto Exposure with your camera in still or movie mode (if you intend to shoot video) to see how well the camera behaves on a subject with a large range in brightness. Or step through a range of exposures manually, from short for the bright sunlit crescent, to long for the dark portion of the Moon lit by Earthshine. It’s important to run through your range of settings quickly, just as you would during the two minutes of totality. But not too quickly, as you might introduce vibration. So …
Good focus matters for recording the fine prominences and sharp edge of the Moon.
Sharpness Check
In the resulting images, check for blurring from vibration (from you handling the camera), from wind, and from the sky’s east-to-west motion moving the Moon across the frame, during typical exposures of 1 second or less.
By practicing, you’ll be much better prepared for the surprises that eclipse day inevitably bring. Always have a less ambitious “Plan B” for shooting the eclipse simply and quickly should a last-minute move be needed.
However, may I recommend …
My 295-page ebook on photographing the August 21 total eclipse of the Sun is now available. See http://www.amazingsky.com/eclipsebook.html It covers all techniques, for both stills, time-lapses, and video, from basic to advanced, plus a chapter on image processing. And a chapter on What Can Go Wrong?! The web page has all the details on content, and links to order the book from Apple iBooks Store (for the best image quality and navigation) or as a PDF for all other devices and platforms.
For much more detailed advice on shooting options and techniques, and for step-by-step tutorials on processing eclipse images, see my 295-page eBook on the subject, available as an iBook for Apple devices and as a PDF for all computers and tablets.
I present my Top 10 Tips for photographing the August 21 total eclipse of the Sun.
If the August total eclipse will be your first, then you could heed the advice of many and simply follow “Tip #0:” Just don’t photograph it! Look up and around to take in the spectacle. Even then, you will not see it all.
However, you might see less if you are operating a camera.
But I know you want pictures! To help you be successful, here are my tips for taking great photos without sacrificing seeing the eclipse.
An iPhone in a tripod bracket and on a small tabletop tripod.
TIP #1: Keep It Simple
During the brief minutes of totality, the easiest way to record the scene is to simply hold your phone camera up to the sky and shoot. Zoom in if you wish, but a wide shot may capture more of the twilight effects and sky colors, which are as much a part of the experience as seeing the Sun’s gossamer corona around the dark disk of the Moon.
Better yet, use an adapter to clamp your phone to a tripod. Frame the scene as best you can (you might not be able to include both the ground and Sun) and shoot a time-lapse, or better yet, a video.
Start it 2 or 3 minutes before totality (if you can remember in the excitement!) and let the camera’s auto exposure take care of the rest. It’ll work fine.
That way you’ll also record the audio of your excited voices. The audio may serve as a better souvenir than the photos. Lots of people will have photos, but nobody else will record your reactions!
Just make sure your phone has enough free storage space to save several minutes of HD video or, if your camera has that feature, 4K video.
A wide shot of the 2006 eclipse in Libya with a high altitude Sun. 10mm lens on a cropped-frame Canon 20Da camera.
TIP #2: Shoot Wide With a DSLR
For better image quality, step up to this hands-off technique.
Use a tripod-mounted camera that accepts interchangeable lenses (a digital single lens reflex or a mirrorless camera) and use a lens wide enough to take in the ground below and Sun above.
Depending on where you are and the sensor size in your camera, that’ll likely mean a 10mm to 24mm lens.
By going wide you won’t record details in the corona of the Sun or its fiery red prominences. But you can record the changing sky colors and perhaps the dark shadow of the Moon sweeping from right to left (west to east) across the sky. You can also include you and your eclipse group silhouetted in the foreground. Remember, no one else will record you at the eclipse.
A sequence of shots of the 2012 eclipse from Australia, with a wide 15mm lens and camera on Auto Exposure showing the change of sky color.
The total eclipse of the Sun, November 14, 2012, from a site near Lakeland Downs, Queensland, Australia. Shot with the Canon 5D Mark II and 15mm lens for a wide-angle view showing the Moon’s conical shadow darkening the sky and the twilight glow on the horizon. Taken near mid-eclipse.
TIP #3: Shoot on Auto Exposure
For wide shots, there’s no need to attend to the camera during the eclipse. Set the camera on Auto Exposure – Aperture Priority (Av), the camera ISO between 100 to 400, and your lens aperture to f/2.8 (fast) to f/5.6 (slow).
Use a higher ISO if you are using a slower lens such as a kit zoom. But shoot at ISO 100 and at f/2.8 if you have a wide lens that fast.
In Av mode the camera will decide what shutter speed to use as the lighting changes. I’ve used this technique at many eclipses and it works great.
An accessory intervalometer set for an interval of 1 second.
TIP #4: Let the Camera Do the Shooting
To make this wide-angle technique truly hands-off use an intervalometer (either built into your camera or a separate hardware unit) to fire the shutter automatically.
Once again, start the sequence going 3 to 5 minutes before totality, with the intervalometer set to fire the shutter once every second. Don’t shoot at longer intervals, or you’ll miss too much. Shutter speeds won’t likely exceed one second.
Again, be sure your camera’s memory card has enough free space for several hundred images. And don’t worry about a solar filter on your lens. It’ll be fine for the several minutes you’ll have it aimed up.
Out of the many images you’ll get, pick the best ones, or turn the entire set into a time-lapse movie.
A Nikon DSLR and lens set to Manual Focus.
TIP #5: Shoot on Manual Focus
Use Auto Exposure and an intervalometer. But … don’t use Auto Focus.
Switch your lens to Manual Focus (MF) and focus on a distant scene element using Live View.
Or use Auto Focus to first focus on something in the distance, then switch to Manual and don’t touch focus after that. If you leave your lens on Auto Focus the shutter might not fire if the camera decides it can’t focus on the blank sky.
A comparison of a Raw image as it came from the camera (left) and after developing in Lightroom (right).
TIP #6: Shoot Raw
For demanding subjects like a solar eclipse always shoot your images in the Raw file format. Look in your camera’s menus under Image Quality.
Shoot JPGs, too, if you like, but only Raw files record the widest range of colors and brightness levels the camera sensor is capable of detecting.
Later in processing you can extract amazing details from Raw files, both in the dark shadows of the foreground, and in the bright highlights of the distant twilight glows and corona around the Sun. Software to do so came with your camera. Put it to use.
A 200mm telephoto and 1.4x Extender, with the camera on a sturdy and finely adjustable tripod head.
TIP #7: OK, Use a Telephoto Lens! But …
If you really want to shoot close-ups, great! But don’t go crazy with focal length. Yes, using a mere 135mm or 200mm lens will yield a rather small image of the eclipsed Sun. But you don’t need a monster 600mm lens or a telescope, which typically have focal lengths starting at 600mm. With long focal lengths come headaches like:
•Keeping the Sun centered. The Earth is turning! During the eclipse that motion will carry the Sun (and Moon) its own diameter across your frame from east to west during the roughly two minutes of totality. While a motorized tracking mount can compensate for this motion, they take more work to set up properly, and must be powered. And, if you are flying to the eclipse, they will be much more challenging to pack. I’m trying to keep things simple!
•Blurring from vibration. This can be an issue with any lens, but the longer your lens, the more your chances of getting fuzzy images because of camera shake, especially if you are touching the camera to alter settings.
An ideal focal length is 300mm to 500mm. But …
When using any telephoto lens, always use a sturdy tripod with a head that is easy to adjust for precise aiming, and that can aim up high without any mechanical issues. The Sun will be halfway, or more, up the sky, not a position some tripod heads can reach.
A re-processed version of a still frame of the total solar eclipse of November 14, 2012 taken from our site at Lakeland Downs, Queensland, Australia. This is a still frame shot during the shooting of an HD video of the eclipse, using the cropped-frame Canon 60Da and Astro-Physics Traveler 4-inch apo refractor telescope at f/5.8 (580mm focal length). The image is 1/60th second at ISO 100. This is a full-sized still not a frame grab taken from the movie.
A sequence from a movie showing the camera adjusting the exposure automatically when going from a filtered view (left) to an unfiltered view of the diamond ring (right).
TIP #8: Use Auto Exposure, or … Shoot a Movie
During totality with your telephoto, you could manually step through a rehearsed set of exposures, from very short shutter speeds (as short as 1/4000 second) for the diamond rings at either end of totality, to as long as one or two seconds at mid-totality for the greatest extent of the corona’s outermost streamers.
But that takes a lot of time and attention away from looking. Yes, there are software programs for automating a camera, or techniques for auto bracketing. But if this is your first eclipse an easier option is to simply use Auto Exposure/Aperture Priority and let the camera set the shutter speed. Again, you could use an intervalometer to fire the shutter so you can just watch.
Don’t use high ISO speeds. A low ISO of 100 to 400 is all you need and will produce less noise. The eclipsed Sun is still bright. You don’t need ISO 800 to 3200.
Even on Auto Exposure, you’ll get good shots, just not of the whole range of phenomena an eclipsed Sun displays.
Or, once again and better yet – put your camera into video mode and shoot an HD or 4K movie. Auto Exposure will work just fine, allowing you to start the camera then forget it.
Place the Sun a solar diameter or two to the left of the frame and let the sky’s motion drift it across the frame for added effect. Start the sequence running a minute or two before totality with your solar filter on. Then just let the camera run … except …
A small refractor telescope with a solar filter over the front aperture. That filter has to be removed for totality.
TIP #9: Remember to Remove the Filter!
You will need a safe solar filter over your lens or telescope to shoot the partial phases of the eclipse, and to frame and focus the Sun. This cannot be a photo neutral density or polarizing filter. It must be a filter designed for observing and shooting the Sun, made of metal-coated glass or Mylar plastic. Anything else is not safe and likely far too bright.
But you do NOT need the filter for totality.
Remove it … when?
The answer: a minute or so before totality if you want to capture the first diamond ring just before totality officially starts. Set a timer to remind you, as visually it is very difficult to judge the right moment with your unaided eye. The eclipse will start sooner than you expect.
If you have your camera on Auto Exposure, it will compensate just fine for the change in brightness, from the filtered to the unfiltered view.
But don’t leave your unfiltered camera aimed at the Sun. Replace the filter no more than a minute or so after totality and the second diamond ring ends.
The partial eclipse of the Sun, October 23, 2014, shot through a mylar filter, on the front of the 66mm f/7 apo refractor shown above (450mm focal length), using a cropped-frame Canon 60Da camera for 1/8000 second exposure at ISO 100. Focus on the sharp tips of the crescent Sun or a sunspot if one is present.
TIP #10: Focus!
Everyone worries about getting the “best exposure.” Don’t! You’ll get great looking telephoto eclipse close-ups with any of a wide range of exposures.
What ruins most eclipse shots, other than filter forgetfulness, is fuzzy images, from either shaky tripods or poor focus.
Focus manually using Live View on the filtered partially eclipsed Sun. Zoom up on the edge of the Sun or sharp tip of the crescent. Re-focus a few minutes before totality, as the changing temperature can shift the focus of long lenses and telescopes.
But you needn’t worry about re-focusing after you remove the filter. The focus will not change with the filter off.
Me in Libya in 2006 with my eclipse setup: a small telescope on an alt-azimuth mount.
TIP #1 AGAIN: Keep It Simple!
I’ll remind you to keep things simple for a reason other than giving you time to enjoy the view, and that’s mobility.
You might have to move at the last minute to escape clouds. Complex photo gear can be just too much to take down and set up, often with minutes to spare, as many an eclipse chaser can attest is often necessary. Keep your gear light, easy to use, and mobile. Committing to an overly ambitious and inflexible photo plan and rig could be your undoing.
By following both my “Ten Tips” advice blogs you should be able to get great eclipse images to wow your friends and fans, all without missing the experience of actually seeing … and feeling … the eclipse.
However … may I recommend …
My 295-page ebook on photographing the August 21 total eclipse of the Sun is now available. See http://www.amazingsky.com/eclipsebook.html It covers all techniques, for both stills, time-lapses, and video, from basic to advanced, plus a chapter on image processing. And a chapter on What Can Go Wrong?! The web page has all the details on content, and links to order the book from Apple iBooks Store (for the best image quality and navigation) or as a PDF for all other devices and platforms. Thanks! Clear skies on eclipse day, August 21, 2017.
For much more detailed advice on shooting options and techniques, and for step-by-step tutorials on processing eclipse images, see my 295-page eBook on the subject, available as an iBook for Apple devices and as a PDF for all computers and tablets.
The most spectacular sight the universe has to offer is coming to a sky near you this summer.
On August 21 the Moon will eclipse the Sun, totally!, along a path that crosses the continental USA from coast to coast. All the details of where to go are at the excellent website GreatAmericanEclipse.com.
If this will be your first total solar eclipse, you might want to just watch it. But many will want to photograph or video it. It can be easy to do, or it can be very complex, for those who are after ambitious composites and time-lapses.
To tell you how to shoot the eclipse, with all types of cameras, from cell phones to DSLRs, with all types of techniques, from simple to advanced, I’ve prepared a comprehensive ebook, How to Photograph the Solar Eclipse.
It is 295 pages of sage advice, gathered over 38 years of shooting 15 total solar eclipses around the world.
The book is filled with illustrations designed specifically for the 2017 eclipse – where the Sun will be, how to frame the scene, what will be in the sky, how the shadow will move, where the diamond rings will be, what lenses to use, etc.
Here are a few sample pages:
I cover shooting with everything from wide-angle cameras for the entire scene, to close-ups with long telephotos and telescopes, both on tripods and on tracking mounts.
I cover all the details on exposures and camera settings, and on focusing and ensuring the sharpest images. Most bad eclipse pix are ruined not by poor exposure but poor focus and blurry images – the Sun is moving!
A big chapter covers processing of eclipse images, again, from simple images to complex stacks and composites.
For example, I show how to produce a shot like this, from 2012, combining a short diamond ring image with a long-exposure image of the corona.
A final chapter covers “what can go wrong!” and how to avoid the common mistakes.
The ebook is available on the Apple iBooks Store for Mac and iOS devices. This version has the best interactivity (zoomable images), higher quality images (less compression), and easiest content navigation.
However, for non-Apple people and devices, the ebook can also be purchased directly from my website as a downloadable PDF, which has embedded hyperlinks to external sites.
I think you’ll find the ebook to be the most comprehensive guide to shooting solar eclipses you’ll find. It is up to date (as of last week!) and covers all the techniques for the digital age.
Many thanks, and clear skies on August 21, wherever you may be in the shadow of the Moon!
I’m pleased to announce that after a year in production, our video tutorial series, Nightscapes and Time-Lapses: From Field to Photoshop, is now available.
It’s been quite a project! Over the last few years I’ve presented annual astrophoto workshops in conjunction with our local telescope dealer All-Star Telescope to great success.
However, we always had requests for the workshops on video. Attempts to video the actual workshops never produced satisfactory results. So we spent a year shooting in the field and in the studio to produce a “purpose-built” series of programs.
They are available now as a set of three programs, totalling 4 hours of instruction, for purchase and download at Vimeo at
For those wanting “hard copies” we will also be selling the programs on mailed USB sticks. See All-Star Telescope for info and prices. The downloaded version can also be ordered from there.
This series deals with the basics of capturing, then processing nightscape still images and time-lapse movies of the night sky and landscapes lit by moonlight and starlight.
Here’s the content outline:
Program 1 – Choosing Equipment (1 Hour)
• Tips for Getting Started • Essential Gear • Choosing A Camera • Photo 101 – Exposure Triangle • Setting Exposure • Expose to the Right • Setting a Camera – File Types • Photo 101 – Noise Sources • Setting a Camera – Noise Reduction • Setting a Camera – Focusing • Setting a Camera – Other Menus • Choosing Lenses • Choosing an IntervalometerSummary and Tips
Program 2 – Shooting in the Field (1 hour)
• Climbing the Learning Curve • Twilights • Astronomy 101 – Conjunctions • Shooting Conjunctions • Moonrises • Shooting Auroras • Astronomy 101 – Auroras • Photo 101 – Composing • Moonlit Nightscapes • Astronomy 101 – Where is the Moon? • Choosing a Location • Shooting the Milky Way • Astronomy 101 – Where is the Milky Way? • Astronomy 101 – Daily Sky Motion • Tracking the Sky • Shooting Star Trails • Shooting Time-Lapses • Calculating Time-Lapses • A Pre-Flight Checklist • Summary and Tips
Program 3 – Processing Nightscapes and Time-Lapses (2 hours)
• Workflows • Using Adobe Bridge – Importing and Selecting • Photo 101 – File Formats • Using Adobe Lightroom – Importing and Selecting • Adobe Camera Raw – Essential Settings • Adobe Camera Raw – Developing Raw Images • Adobe Lightroom – Develop Module • Adobe Photoshop – Introduction • Photoshop – Setup • Photoshop – Smart Filters • Photoshop – Adjustment Layers • Photoshop – Masking • Photoshop – Processing Star Trails & Time-Lapses • Stacking Star Trails • Assembling Time-Lapse Movies • Archiving • Summary & Finale
If this first introductory series is successful we may produce follow-up programs on more advanced techniques.
Learn the basics of shooting nightscape and time-lapse images with my three new video tutorials.
In these comprehensive and free tutorials I take you from “field to final,” to illustrate tips and techniques for shooting the sky at night.
At sites in southern Alberta I first explain how to shoot the images. Then back at the computer I step you through how to process non-destructively, using images I shot that night in the field.
Tutorial #1 – The Northern Lights
This 24-minute tutorial takes you from a shoot at a lakeside site in southern Alberta on a night with a fine aurora display, through to the steps to processing a still image and assembling a time-lapse movie.
Tutorial #2 – Moonlit Nightscapes
This 28-minute tutorial takes you from a shoot at Waterton Lakes National Park on a bright moonlit night, to the steps for processing nightscapes using Camera Raw and Photoshop, with smart filters, adjustment layers and masks.
Tutorial #3 – Star Trails
This 35-minute tutorial takes you from a shoot at summer solstice at Dinosaur Provincial Park, then through the steps for stacking star trail stills and assembling star trail time-lapse movies, using specialized programs such as StarStaX and the Advanced Stacker Plus actions for Photoshop.
As always, enlarge to full screen for the HD versions. These are also viewable at my Vimeo channel.
In a “10 Steps” tutorial I review my tips for going from “raw to rave” in processing a nightscape or time-lapse sequence.
NOTE: Click on any of the screen shots below for a full-res version that will be easier to see.
In my preferred “workflow,” Steps 1 through 6 can be performed in either Photoshop (using its ancillary programs Bridge and Adobe Camera Raw) or in Adobe Lightroom. The Develop module of Lightroom is identical to Adobe Camera Raw (ACR for short).
However, my illustrations show Adobe Bridge, Camera Raw and Photoshop CC 2014. Turn to Photoshop to perform advanced filtering, masking and stacking (Steps 7 to 10).
To use Lightroom to assemble a time-lapse movie from processed Raw frames you need the third-party program LRTimelapse, described below. Otherwise, you need to export frames from Lightroom – or from Photoshop – as “intermediate” JPGs (see Step 6), then use other third party programs to assemble them into movies (Step 10B).
–
Step 1 – Bridge or Lightroom – Import & Select
Use Adobe Bridge (shown above) or Lightroom to import the images from your camera’s card.
As you do so you can add “metadata” to each image – your personal information, copyright, keywords, etc. As you import, you can also choose to convert and save images into the open and more universal Adobe DNG format, rather than keep them in the camera’s proprietary Raw format.
Once imported, you can review images, keeping the best and tossing the rest. Mark images with star ratings or colour labels, and group images together (called “stacking” in Bridge), such as frames for a panorama or “high dynamic range” set.
Always save images to both your working drive and to an external drive (which itself should automatically back up to yet another external drive). Never, ever save images to only one location.
–
Step 2 – Adobe Camera Raw or Lightroom – Basics
Open the Raw files you want to process. From Bridge, double click on raw images and they will open in ACR. In Lightroom select the images and switch to its Develop module.
In Adobe Camera Raw be sure to first set the Workflow Preset (the blue link at the bottom of the screen) to 16 bits/channel and ProPhoto RGB colour space, for maximum tonal range. This is a one-time setting. Lightroom defaults to 16-bit and the AdobeRGB colour space.
The Basics panel (the first tab) allows you to fix Exposure and White Balance. For the latter, use the White Balance Tool (the eyedropper, keyboard shortcut I) to click on an area that should be neutral in colour.
You can adjust Contrast, and recover details in the Highlights and Shadows (turn the latter up to show details in starlit landscapes). Clarity and Vibrance improves midrange contrast and colour intensity.
Use Command/Control Z to Undo, or double click on a slider to snap it back to zero. Or under the pull-down menu in the Presets tab go to Camera Raw Defaults to set all back to zero.
–
Step 3 – Adobe Camera Raw or Lightroom – Detail
The Detail panel allows you to set the noise reduction and sharpness as you like it, one of the benefits of shooting Raw.
Generally, settings of Sharpness: Amount 25, Radius 1 work well. Turn up Masking while holding the Option/Alt key to see what areas will be sharpened (they appear in white). There’s no need to sharpen blank, noisy sky, just the edge detail.
Setting Noise Reduction: Luminance to 30 to 50 and Color to 25, with others sliders left to their defaults works well for all but the noisiest of images. Luminance affects the overall graininess of the image. Color, also called chrominance, affects the coloured speckling. Turning the latter up too high wipes out star colours.
Turn up Color Smoothness, however, if the image has lots of large scale colour blotchiness.
Zoom in to at least 100% to see the effect of all noise reduction settings. Adobe Camera Raw and Lightroom have the best noise reduction in the business. Without it your images will be far noisier than they need to be.
–
Step 4 – Adobe Camera Raw or Lightroom – Lens Correction
Wide angle lenses, especially when used at fast apertures, suffer a lot from light falloff at the corners (called vignetting). There’s no need to have photos looking as if they were taken through a dark tunnel.
ACR or Lightroom can automatically detect what lens you used and apply a lens correction to brighten the corners, plus correct for other flaws such as chromatic aberration and lens distortion.
Use the Color tab to “Remove Chromatic Aberration” and dial up the Defringe sliders.
For lenses not in the database (manual lenses like the Rokinons and Samyangs will not be included, nor will any telescopes) use the Manual tab to dial in your own vignetting correction. This can take some trial-and-error to get right, but once you have it, save it as a Preset to apply in future to all photos from that lens or telescope.
I usually apply Lens Corrections as a first step, but sometimes find I have to back it off it as I boost the contrast under Basics.
–
Step 5 – Bridge or Lightroom – Copy & Paste
For a small number of images you could open them all, then Select All in ACR to apply the same settings to all images at the same time.
Or you can adjust one, then Select All and hit Synchronize.
Another method useful for processing dozens or hundreds of frames from a star trail or time-lapse set is to choose one representative image and process it. Then in Bridge choose Edit>Develop Settings>Copy Camera Raw Settings. If you are in Lightroom’s Library module, choose Photo>Develop Settings>Copy Settings.
With either program you can also right-click on an image to get to the same choices. Then select all the other images in the set (Command/Control A) and use the same menus to Paste Settings.
A dialog box comes up for choosing what settings you wish to transfer.
If you cropped the image (a good idea for images destined for an HD movie with a 16:9 aspect ratio), pick that option as well. In moments all your images get processed with identical settings. Nice!
–
Step 6 – Lightroom or Photoshop – Export
You now have a set of developed Raw images. However, the actual Raw files are never altered. They remain raw!
Instead, with Adobe Camera Raw the information on how you processed the images is stored in the “sidecar” XMP text files that live in the same folder as the Raw files.
In Lightroom’s case your settings are stored in its own database, unless you choose Metadata>Save Metadata to File (Command/Control S). In that case, Lightroom also writes the changes to the same XMP sidecar files.
To convert the images into final Photoshop PSDs, TIFFs or JPGs you have a couple of choices. In Lightroom go to the Library module and choose Export. It’s an easy way to export and convert hundreds of images, perhaps into a folder of smaller JPGs needed for assembling a time-lapse movie.
To do that from within Adobe Bridge, select the images, then go to Tools>Photoshop>Image Processor. The dialogue box allows you to choose how and where to export the images. Photoshop then opens, processes, and exports each image.
–
Step 7 – Photoshop – Smart Filters
For a folder of images intended to be stacked into star trails (Step 10A) or time-lapse movies (Step 10B), you’re done processing.
But individual nightscape images can often benefit from more advanced work in Photoshop. The next steps make use of a non-destructive workflow, allowing you to alter settings at any time after the fact. At no time do we actually change pixels.
One secret to doing that is to open an image in Photoshop and then select Layer>Smart Objects>Convert to Smart Object. Or go to Filter>Convert for Smart Filters.
OR … better yet, back in Adobe Camera Raw hold down the Shift key while clicking the Open Image button, so it becomes Open Object. That image will then open in Photoshop already as a Smart Object, which you can re-open and re-edit in ACR at any time later should you wish.
Either way, with the image as a Smart Object, you can now apply useful filters such as Reduce Noise, Smart Sharpen, and Dust & Scratches, plus third-party filters such as Nik Software’s Dfine 2 Noise Reduction, all non-destructively as “smart filters.” They can be re-adjusted or turned off at any time.
–
Step 8 – Photoshop – Adjustment Layers
The other secret to non-destructive processing is to apply adjustment layers.
Go to Layer>New Adjustment Layer, or click on any of the icons in the Adjustments panel. If that panel is not visible at right, then under the Window menu check “Adjustments.”
This panel is where you can alter the colour balance, the brightness and contrast, the vibrancy, and many other choices. I find Selective Color most useful for tweaking colour.
Curves allows you to bring up detail in dark areas. Levels allows setting the black and white points, and overall contrast.
The beauty of adjustment layers is that you can click on the layer’s little icon and bring up the dialog box for changing the setting at any time. You never permanently alter pixels.
The image adjustment “Shadows & Highlights” is also immensely useful, but appears as a smart filter, not as an adjustment layer. It’s one of the prime tools for creating images with great detail in scenes lit only by starlight.
–
Step 9 – Photoshop – Masks
The power of adjustment layers is that you can apply them to just portions of an image. This is useful in nightscapes where the sky and ground often need different processing.
To create a mask first select the region you want to work on. Try the Quick Selection Tool (found near the top of the Tool palette at left). Use it to brush across the sky, or the ground, so that the entire area is outlined by “marching ants.”
Use the Refine Edge option to tweak the selection by brushing across intricate areas such as tree branches.
Once you have an area selected, hit one of the Adjustments to add an adjustment layer with the mask automatically applied. Double click on the mask to tweak it: hit Mask Edge to clean up the edge, or turn up the Feather to blur the edge.
To apply the same mask to another adjustment layer, drag the mask from one layer to another while holding down the Option/Alt key.
Invert the mask (or select it and hit Command/Control I) to apply it to the other half of the image. Paint the mask with black or white brushes if you need manually alter it. Remember – black “conceals,” while white “reveals.”
When done, be sure to always save the image as a layered “master” .PSD file.
Never, ever flatten and save – that will wipe out all your non-destructive filters and adjustment layers.
If you need to save the image as a JPG for social mediia or emailing, then Flatten and Save As … Or use Photoshop’s File>Export>Export As .. function.
–
Stars setting in trails over the Athabasca Glacier and Columbia Icefields, Sept 14, 2014. The Milky Way is trailed at right. This is a stack of 100 exposures, composited with Advanced Stacker Plus actions in Photoshop, with the ground coming from a subset stack of 8 images to reduce noise. Each exposure, taken as part of a time-lapse sequence, was 45 seconds at f/2.8 with the 16-35mm lens at 23mm and Canon 6D at ISO 4000.
Step 10A – Photoshop or 3rd Party Programs – Stack for Star Trails
One popular way to shoot images of stars trailing in arcs across the sky is to shoot dozens or hundreds of well-exposed frames at a fairly high ISO and wide aperture, and at a shutter speed no longer than 30 to 60 seconds. You then “stack” the images to create the equivalent of one frame shot for many minutes, if not an hour or more. The image above is an example.
There are several ways to stack.
From within Photoshop CC (or using an Extended version of the older CS5 or CS6) one method is to go to File>Scripts>Statistics. In the dialog box, drill down to the images you wish to stack (put them all in one folder) and choose Stack Mode: Maximum, and uncheck “Attempt to Automatically Align.” The result is a huge (!) smart object. This method works best on just a few dozen images. In this case, you’ll need to use Layers>Flatten to reduce its size.
Other options for stacking hundreds of images include the free program StarStax (Windows and Mac), which requires a folder of “intermediate” TIFFs or JPGs. See Step 6 above.
The Advanced Stacker Actionsfrom Star Circle Academy are actions you install in Photoshop that work directly from Raw files to create some impressive effects. I use them and recommend them.
–
Step 10B – Photoshop or 3rd Party Programs – Assemble for Movies
The same folder of images taken for star trail stacking can also be turned into a time-lapse movie. Instead of stacking the images on top of one another in space, you string them together one after the other in time.
There are many methods for assembling movies. Free or low cost programs such as Quicktime 7 Pro, Time-Lapse Assembler, Sequence (a Mac program shown above), VirtualDub, or Time-Lapse Tool can do the job, all offering options for the final movie’s format.
Generally, an HD video of 1920×1080 pixels in the H264 format, or “codec,” is best, rendered at 15 to 30 frames per second.
Most movie assembly programs will need to work from a folder of JPGs of the right size, produced using one of the choices listed under Step 6: Export.
But … you can also use Photoshop to assemble a movie.
Choose the Window>Workspace>Motion to bring up a video timeline. Then File>Open to drill to your folder of processed and down-sized JPG files. Select one image, then check “Image Sequence.” Choose the frame rate (15 to 30 fps is best). Then go to File>Export>Render Video to turn the resulting file into a final H264 or Quicktime movie suitable for use in other movie editing programs.
–
Advanced Techniques: Using LRTimelapse
The workflow I’ve outlined works great when you can apply the same development settings to all the images in a folder. For star trail and time-lapse sequences shot once it gets dark and under similar lighting conditions that will be the case.
But if the Moon rises or sets during the shoot, or if you are taking a much more demanding sequence that runs from sunset to night, the same settings won’t work for all frames.
The answer is to turn to the program LRTimelapse (100 Euros for the standard version, and available in a free but limited trial copy). LRTimelapse works with either Lightroom or Bridge/Adobe Camera Raw.
To use it you process just a few selected “keyframes” – at least two, at the start and end of the sequence, and perhaps other frames throughout the sequence, processing them so each frame looks great. You read that processing data into LRTimelapse and, like magic, it interpolates your settings, creating a folder of images with every setting changing incrementally from frame to frame, something you could never do by hand.
It can then work with Lightroom to export the frames out to a video in formats from HD up to 4K in size. For serious time-lapse work, LRTimelapse is an essential tool.
–
Much, much more information and tutorials are included in my multimedia Apple eBook, linked to below.
But I hope this quick tutorial helps in providing you with tips to make your images and movies even better! If you found it useful, please feel free to share a link to this blog page through your social media channels. Thanks!
On Sunday, September 27 the Moon undergoes a total eclipse, the last we’ll see until January 2018.
This is a sky event you don’t want to miss. Whether you photograph it or just enjoy the view, it will be a night to remember, as the Full Moon turns deep red during a total eclipse.
Note — For this article I’m giving times and sky directions for North America. For Europe the eclipse occurs early in the morning of September 28, as the Moon sets into the west. But for here in North America the timing could not be better. Totality occurs in the evening of Sunday, September 27 as the Moon rises into the east.
Courtesy Wikimedia Commons
ECLIPSE BASICS
A total lunar eclipse occurs when the Moon — and it can only be Full — passes through the shadow cast into space by Earth. The Sun, Earth and Moon are in near-perfect alignment.
All total eclipses of the Moon consist of 3 main parts:
• The initial partial eclipse occurs as the Moon slowly enters the dark central portion of our planet’s shadow, the umbra. This lasts about an hour.
• Totality begins as the entire disk of the Moon is within the umbra. For this eclipse, totality lasts a generous 72 minutes.
• Totality ends as the Moon emerges from the umbra to begin the final partial eclipse lasting another hour.
Courtesy Fred Espenak/EclipseWise.com – All times are Eastern Daylight. Subtract 1 hour for Central Daylight, 2 hours for Mountain Daylight, 3 hours for Pacific Daylight Time. Times apply for anywhere in that time zone.
WHERE TO SEE IT
All of North America, indeed most of the western hemisphere, can see this eclipse. In North America, the farther east you live on the continent the later in your evening the eclipse occurs and the higher the Moon appears in the southeast.
For example, in the Eastern time zone, totality begins at 10:11 p.m. EDT and ends at 11:23 p.m. EDT, with mid-totality is at 10:47 p.m. EDT with the Moon about 35 degrees up, placing it high in the southeast sky for southern Ontario, for example.
For me in the Mountain time zone, the total eclipse begins at 8:11 p.m. MDT and ends at 9:23 p.m. MDT, with mid-totality is at 8:47 p.m. MDT, with the Moon just 13 degrees up in the east from here in southern Alberta. From my time zone, and from most location in the Rocky Mountain regions, the Moon rises with the initial partial phases in progress.
This is the total eclipse of the Moon, December 10, 2011, taken from the grounds of the Rothney Astrophysical Observatory, near Priddis Alberta, and looking west to the Rockies. This is a 2 second exposure at ISO 800 with the Canon 5DMkII and Canon 200mm lens at f/4.
For locations on the west coast viewers miss most of the partial eclipse phase before totality. Instead, the Moon rises as totality begins, making for a more challenging observation. Viewers on the coast will need clear skies and a low horizon to the east, but the reward could be a beautiful sight and images of a red Moon rising.
Total eclipse of the Moon, December 20/21, 2010, taken from home with 130mm AP apo refractor at f/6 and Canon 7D at ISO 400. An HDR composite of 9 images from 1/125 second to 2 seconds, composited in Photoshop CS5. Taken at about 12:21 am MST on Dec 21, about 20 minutes before totality began, during the partial phase.
“SUPERMOON” ECLIPSE
This eclipse of the Moon is the last in a series of four total lunar eclipses that occurred at six-month intervals over the last two years. We won’t enjoy another such “tetrad” of total lunar eclipses until 2032-33.
But this eclipse is unique in that it also coincides with the annual Harvest Moon, the Full Moon closest to the autumnal equinox. Harvest Moons are known for their orange tint as they rise into what is sometimes a dusty autumn evening.
But what is making internet headlines is that this Full Moon is also the year’s “supermoon,” the Full Moon of 2015 that comes closest to Earth. In recent years these “perigee” Full Moons have been dubbed “supermoons.”
Call it what you will, it does make this Full Moon a little larger than usual, though the difference is virtually impossible to detect by eye. And it makes little difference to the circumstances or appearance of the eclipse itself.
Partial eclipse of the Moon at moonset, morning of June 26, 2010, at about 5:00 am. Shot with 200mm telephoto and 1.4x teleconvertor, for 1/15th sec at f/5 and ISO 100, using Canon 7D. From western North America the Moon will rise in partial eclipse like this on September 27.
HOW TO SEE IT
Just look up! You can enjoy the eclipse with the unaided eye, and even from within city limits.
Unlike eclipses of the Sun, the eclipsed Moon is perfectly safe to look at with whatever you wish to use to enhance the view. The best views are with binoculars or a telescope at low power.
Look for subtle variations in the red colouring across the disk of the Moon, and even tints of green or blue along the dark edge of the Earth’s advancing or retreating shadow during the partial phases.
If you can, travel to a dark site to enjoy the view of the stars and Milky Way brightening into view as the Full Moon reddens and the night turns dark.
HOW TO SHOOT IT
The total eclipse of the Moon, April 15, 2014 local time just after sunset from Australia. This is an 8-second exposure at f/2.8 with the 50mm lens on the Canon 60Da at ISO 800.
1. On A Tripod
The easiest method is to use a camera on a tripod, with a remote release to fire the shutter and prevent vibration from blurring the image. What lens you use will depend on how you wish to frame the scene and how high the Moon is in your sky.
Lens Choice
From eastern North America you’ll need a wide-angle lens (14mm to 24mm) to frame the eclipsed Moon and the ground below. The Moon will appear as a small red dot.
While you can shoot the Moon with longer focal lengths it takes quite a long lens (>300mm) to really make it worthwhile shooting just the Moon itself isolated in empty sky. Better to include a landscape to put the Moon in context, even if the Moon is small.
From western North America the lower altitude of the Moon allows it to be framed above a scenic landscape with a longer 35mm to 50mm lens, yielding a larger lunar disk.
From the west coast you could use a telephoto lens (135mm to 200mm) to frame the horizon and the eclipsed Moon as it rises for a dramatic photo.
Focusing
Use Live View (and zoom in at 10x magnification) to manually focus on the horizon, distant lights, or bright stars. The Moon itself my be tough to focus on.
Exposure Times
Exposures will depend on how bright your sky is. Use ISO 400 to 800 and try metering the scene as a starting point if your sky is still lit by twilight. Use wide lens apertures (f/4 to f/2) if you can, to keep exposures times as a short as possible.
The apparent motion of the Moon as the sky turns from east to west will blur the image of the Moon in exposures lasting more than a few seconds, especially ones taken with telephoto lenses.
The maximum exposure you can use before trailing sets in is roughly 500 / lens focal length.
Total eclipse of the Moon, December 20/21, 2010, taken with Canon 5D MKII and 24mm lens at f2.8 for stack of 4 x 2 minutes at ISO 800. Taken during totality using a camera tracker.
2. On a Tracker or Equatorial Mount
If you can track the sky using a motorized tracker or telescope mount, you can take exposures up to a minute or more, to record the red Moon amid a starry sky.
For this type of shot, you’ll need to be at a dark site away from urban light pollution. But during totality the sky will be dark enough that the Milky Way will appear overhead. Use a wide-angle lens to capture the red Moon to the east of the summer Milky Way.
The total eclipse of the Moon, October 8, 2014, the Hunter’s Moon, as seen and shot from Writing-on-Stone Provincial Park, Alberta. I shot this just after mid-totality in a single 15-second exposure at ISO 400 with the Canon 60Da, and with the 80mm apo refractor at f/6. It was mounted on the Sky-Watcher HEQ5 mount tracking at the lunar rate.
3. Through a Telescope
The most dramatic closeups of the eclipsed red Moon require attaching your camera body (with its lens removed) to a telescope. The telescope becomes the lens, providing a focal length of 600mm or more, far longer than any telephoto lens most of us own.
You’ll need the appropriate “prime focus” camera adapter and, to be blunt, if you don’t have one now, and have never shot the Moon though your telescope then plan on shooting with another method.
But even if you have experience shooting the Moon through your telescope, capturing sharp images of the dim red Moon demand special attention.
The telescope must be on a motorized mount tracking the sky, preferably at the “lunar,” not sidereal, drive rate. Focus on the Moon during the partial phases when it is easier to focus on the bright edge of the Moon.
Exposures during totality typically need to be 5 to 30 seconds at ISO 800 to 3200, depending on the focal ratio of your telescope. Take lots of exposures at various shutter speeds. You have over an hour to get it right!
The total lunar eclipse of April 4, 2015 taken from near Tear Drop Arch, in western Monument Valley, Utah. The mid-totality image is a composite of 2 exposures: 30 seconds at f/2.8 and ISO 1600 for the sky and landscape, with the sky brightening blue from dawn twilight, and 1.5 seconds at f/5.6 and ISO 400 for the disk of the Moon itself. Also, layered in are 26 short exposures for the partial phases, most being 1/125th sec at f/8 and ISO 400, with ones closer to totality being longer, of varying durations. All are with the 24mm lens and Canon 6D on a static tripod.
4. Time-Lapses
I’d suggest attempting time-lapses only if you have lots of experience with lunar eclipses.
Exposures can vary tremendously over the partial phases and then into totality. Any time-lapse taken through a telescope, or even with a wide-angle lens, will require a lot of manual attention to ensure each frame is well-exposed as the sky and Moon darken.
However, even if you do not get a complete set of frames suitable for a smooth, continuous time-lapse, selected frames taken every 5 to 10 minutes may work well in creating a multiple-exposure composite (as above), by layering exposures later in Photoshop.
Whatever method – or methods — you use, don’t get so wrapped up in fussing with cameras you forget to simply enjoy the eclipse for the beautiful sight it is.
This is the last total eclipse of the Moon anyone on Earth will see until January 31, 2018. So enjoy the view of the deep red Moon in the autumn sky.
Here are my top tips for shooting terrific still-image nightscapes … and time-lapse movies of the night sky.
1. Go for pixel size, not pixel count
When choosing a camera for night sky scenes, the most important characteristic is not number of megapixels. Just the opposite.
The best cameras are usually models with more modest megapixel counts. Each of their individual pixels is larger and so collects more photons in a given exposure time, yielding higher a signal-to-noise ratio – or lower noise, critical for night shooting.
Cameras with pixels (the “pixel pitch”) 6 to 8 microns across are best. Many high-megapixel cameras have tiny 4-micron pixels.
Large-pixel cameras are often the full-frame models, such as the Canon 5D MkIII and 6D, the Nikon D610, D750, and Df, and the Sony a7s and a7S II.
Many “cropped-frame” cameras are now 18- to 24-megapixel models with smaller, noise-prone pixels. They can certainly be used, but will require more care in exposing well at lower ISOs, and in processing to smooth out noise without blurring detail.
2. Learn to fly on manual
While DSLRs and Compact System Cameras have amazing automatic functions we use none of them at night.
Instead, we use the camera on Manual or Bulb, dialling in shutter speed, aperture and ISO speed manually. We also have to focus manually, using Live View mode to focus on a bright star or distant light.
Learn the tradeoffs involved: Increasing ISO sensitivity of the sensor keeps exposure times down but increases noise. Opening up the lens aperture to f/2 or f/1.4 also keeps exposures short but introduces image-blurring aberrations, especially at the frame corners.
To prevent stars from trailing due to the sky’s motion adhere to the “500 Rule:” the maximum exposure time is roughly 500 divided by the focal length of your lens.
3. Expose to the right
At night, always give the sensor plenty of signal.
Use whatever combination of shutter speed, aperture and ISO will provide a well-exposed image. The image “histogram,” the graph of number of pixels at each brightness level shown above, should never be slammed to the left.
It should be a well-distributed “mountain range” of pixels, extending well to the right. If the 500 Rule restricts your shutter speed, and your desire for sharp images across the frame demands you shoot at f/2.8 or even slower, then don’t be afraid to bump up the ISO speed to whatever it takes to produce a good histogram and a well-exposed image.
Noise will look far worse if you underexpose, then try to boost the image brightness later in processing. Expose to the right!
4. Shoot Raw!
Shoot Raw. Period.
When comparing Raw and compressed JPG versions of the same image, you can be fooled into thinking the JPGs look better (i.e. smoother) because of the noise reduction the camera has applied to the JPG that is beyond your control. However, that smoothing has also wiped out fine detail, like stars.
By shooting Raw you get to control whatever level of noise reduction and sharpening the image needs later in processing.
JPGs are also 8-bit images with a limited tonal range – or palette – in which to record the subtle gradations of brightness and colour present in our images.
Imported Raw files are 16-bit, with a much wider tonal scale and colour palette. That’s critical for all astrophotos when, even with a well-exposed image, many tonal values are down in the dark end of the range. Processing Raw images makes it possible to extract detail in the shadows and highlights.
Even when shooting a time-lapse sequence, shoot Raw.
5. Take dark frames (sometimes!)
LENR reduces noise.
It’s a topic of some debate, but in my experience it is always better to turn on the camera’s Long Exposure Noise Reduction (LENR) function when shooting individual nightscape images. Doing so forces the camera to take a “dark frame,” an exposure of equal length but with the shutter closed.
It records just the noise, which the camera then subtracts from the image. Yes, it takes twice as long to acquire an image, but the image is cleaner, with fewer noisy pixels.
This is especially true when shooting on hot summer nights (the warmer the sensor the higher the noise). That said, you cannot use LENR when shooting frames for star trail composites or time-lapse movies.
For those, the interval between images should be no more than 1 to 5 seconds. Using LENR would introduce unsightly gaps in the trails or jumps in the star motion in time-lapses.
As an alternative, it is possible to take separate dark frames at the end of the night by simply covering the lens and taking exposures of the same duration and at the same ISO as your “light frames.”
Some stacking software, such as StarStax and the Advanced Stacker Actions have places to put these dark frames, to subtract them from the stack later in processing.
6. Use fast lenses
A fast lens is your best accessory.
While the “kit zoom” lenses that come with many DSLRs are great for shooting bright twilight or Full Moon scenes, they will prove too slow for dark starlit scenes with the Milky Way.
In addition to exposing to the right and shooting Raw, the secret to great nightscapes is to shoot with fast lenses, usually “prime” lenses with fixed focal lengths. They are usually faster and have better image quality than zooms.
Your most-used lens for nightscape and time-lapse shooting is likely to be a 14mm to 24mm f/2 to f/2.8 lens.
Fortunately, because we don’t need (and indeed can’t use) autofocus we can live happily with low-cost manual lenses, such as the models made in Korea and sold under brands such as Rokinon, Samyang and Bower. They work very well.
7. Get to know the Moon & Milky Way
For many nightscape and time-lapse shoots, the Moon is your light source for illuminating the landscape.
When the Moon is absent, the Milky Way is often your main sky subject.
Knowing where the Moon will be in the sky at its various phases, and when it will rise (in its waning phases after Full Moon) or set (in its waxing phases before Full) helps you a plan a shoot, so you’ll know whether a landscape will be well lit.
Astronomy apps for desktop computers and mobile devices are essential planning aids. A good one specifically for photographers is The Photographer’s Ephemeris.
Knowing in what season and time of night the Milky Way will be visible is essential if you want to capture it. Don’t try for Milky Way shots in spring – it isn’t up!
8. Keep it simple to start
Don’t be seduced by the fancy gear.
Time-lapse imaging has blossomed into a field replete with incredible gear for moving a camera incrementally during a shoot, and for automating a shoot as day turns to night.
I explain how to use all the fancy gear in my ebook, linked to below, however … Great time-lapses, and certainly still-frame nightscapes, can be taken with no more than a DSLR camera with a good fast lens and mounted on a sturdy tripod. Invest in the lens and don’t scrimp on the tripod.
Another essential for shooting multi-frame star trails and time-lapses is a hardware intervalometer ($50 to $150).
9. Learn the intricacies of intervals
For time-lapses, an intervalometer is essential.
Mastering exposure and focus in still images is essential for great time-lapse movies because they are simply made of hundreds of well-exposed still frames.
But move to time-lapses and you have additional factors to consider: how many frames to shoot and how often to shoot them. A good rule of thumb is to shoot 200 to 300 frames per sequence, shot with an interval of no more than 1 to 5 seconds between exposures, at least for starry night sequences.
However, most intervalometers (the Canon TC-80N3 is an exception) define their “Interval” setting to mean the time from when the shutter opens to when it opens again. In that case, you set the Interval to be a value 1 to 5 seconds longer than the exposure time you are using. That’s also true of the intervalometer function Nikon builds into their internal camera firmware.
Test first!
10. Go to beautiful places
While the gear can be simple, great shots demand an investment in time.
By all means practice at home and at nearby sites that are quick to get to. Try out gear and techniques at Full Moon when exposures are short (the Full Moon is bright!) and you can see what you are doing.
But beautiful images of landscapes lit by moonlight or starlight require you to travel to beautiful locations.
When you are on site, take the time to frame the scene well, just as you would during the day. Darkness is no excuse for poor composition!
While shooting nightscapes and time-lapses can be done with a minimal investment in hardware and software, it does require an investment in time – time to travel and spend nights shooting at wonderful places under the stars.
Enjoy the night!
I cover all these topics, and much more, in detail in my ebook How to Photograph & Process Nightscapes and Time-Lapses. Click the link below to learn more.
It’s Perseid meteor shower time. Here are tips for seeing and shooting the meteors.
What are the Perseids?
They are an annual meteor shower, perhaps the most widely observed of the year, that peak every year about August 12. They are caused by Earth passing through a dust stream left by Comet Swift-Tuttle, last seen near Earth in 1992.
Each “shooting star” is really a bit of comet dust burning up in our atmosphere as it ploughs into us at 200,000 kilometres an hour. They don’t stand a chance of surviving – and none do.
All Perseid particles burn up. None reach Earth.
Perseid meteor caught night of August 12-13 2009 from Cypress Hills Prov Park in Saskatchewan at the annual Saskatchewan Summer Star Party. One frame of 250 shot as part of a time-lapse movie. Taken with Canon 5D MkII and 24mm lens at f/2.5 for 30s at ISO1600.
When are the Perseids?
The peak night of the Perseids this year is the night of Wednesday, August 12 into the early morning hours of August 13, with the peak hour occurring about midnight Mountain Daylight Time or 2 a.m. on the 13th for Eastern Daylight Time.
For North America, this is ideal timing for a good show this year. However, a good number of meteors will be visible the night before and night after peak night.
Even better, the Moon is near New and so won’t interfere with the viewing by lighting up the sky.
In all, except for the mid-week timing, conditions this year in 2015 couldn’t be better!
Perseid meteor caught night of August 12-13 2009 from Cypress Hills Prov Park in Saskatchewan at the annual Saskatchewan Summer Star Party. One frame of 260 shot as part of a time-lapse movie. Taken with Canon 20Da and 15mm lens at f/2.8 for 45s at ISO1600.
What do they look like?
Any meteor looks like a brief streak of light shooting across the sky. The brightest will outshine the brightest stars and are sure to evoke a “wow!” reaction.
However, the spectacular Perseids are the least frequent. From a dark site, expect to see about 40 to 80 meteors in an hour of patient and observant watching, but of those, only a handful – perhaps only 1 or 2 – will be “wow!” meteors.
A pair of Perseid meteors shoot at left in the late night sky at the Upper Bankhead parking lot in Banff National Park. The waning crescent Moon is just rising above the trees. Taken the night of Saturday, August 11 into the wee hours of Sunday, August 12, 2012 with the Canon 7D and 10-22mm Canon lens. This is a stack of two exposures, one for each meteor, each for 60 seconds at ISO 1250 and f/4.
Where do I look?
All the meteors will appear to radiate from a point in the constellation of Perseus in the northeastern sky in the early hours of the night, climbing to high overhead by dawn.
So you can face that direction if you wish, but Perseids can appear anywhere in the sky, with the longest meteor trails often opposite the radiant point, over in the southwest.
Shows unusual Perseid meteor varying in brightness? Or is this a satellite that mimics Perseid for position (it comes right out of the radiant point). Taken at Saskatchewan Star Party, August 14, 2010, using Canon 5D MkII and 15mm lens.
How do I look?
Simple – just lie back on a comfy lawn chair or patch of grass and look up!
But … you need to be at a dark location away from city lights to see the most meteors. You’ll see very little in a city or light-polluted suburbs.
Head to a site as far from city lights as you can, to wherever you’ll be safe and comfortable.
How do I take pictures?
To stand any chance of capturing these brief meteors you’ll need a good low-noise camera (a DSLR or Compact System Camera) with a fast (f/2.8 or faster) wide-angle lens (10mm to 24mm).
Sorry, keep your point-and-shoot camera and phone camera tucked away in your pocket – they won’t work.
Set up you camera on a tripod, open the lens to f/2.8 (wide open perhaps) and the ISO to 800 to 3200) and take a test exposure of 20 to 40 seconds. You want a well-exposed image but not over-exposed so the sky is washed out.
Set your exposure time accordingly – most cameras allow a maximum exposure of 30 seconds. Exposures longer than 30 seconds require a separate intervalometer to set the exposure, with the camera set on Bulb (B).
Take lots of pictures!
To up your chances of catching a meteor, you need to set the camera to shoot lots of frames in rapid succession.
Use an intervalometer to take shots one after the other with as little time between as possible – because that’s when a meteor will appear!
Barring an intervalometer, if you have standard switch remote control, set the camera on High Speed Continuous, and the shutter speed to 30 seconds, then lock the remote’s switch to ON to keep the camera firing. As soon as one exposure ends it’ll fire another.
Twin Perseids in this photo? Or are these satellites? Taken at SSSP, August 14, 2010, using Canon 5D MkII and 15mm lens.
What else do I need to know?
• Focus the lens carefully so the stars are sharp – the Live Focus mode helps for this. Focus on a bright star or distant light.
• Aim the camera to take in a wide swath of the sky but include a well-composed foreground for the most attractive shot.
• Aim northeast to capture meteors streaking away from the radiant. But you can aim the camera to any direction that lends itself to a good composition and still capture a meteor.
• To increase your chances, shoot with two or more cameras aimed to different areas of the sky. Meteors always appear where your camera isn’t aimed!
• Be patient! Despite shooting hundreds of frames only a handful will record a meteor, as only the brightest will show up.
Can I track the sky?
If you have a motorized equatorial mount or a dedicated sky tracking device (the iOptron Sky Tracker and Sky-Watcher Star Adventurer, each about $400, are popular), you can follow the stars while taking lots of shots. This avoids the stars trailing and allows you to use longer exposures.
The video above shows a Star Adventurer tracking the sky as it turns about its polar axis which is aimed up to a point near Polaris. Click the Enlarge and HD buttons to view the video properly.
Polar align the tracker, but then perhaps aim the camera to frame the summer Milky Way overhead. Take lots of 1- to 3-minute exposures, again at f/2.8 and ISO 800 to 1600. Some exposures will pick up meteors – with luck!
Tracking then stacking
Later, in processing, because the sky has remained fixed on the frame, it’s then possible to stack the images (using a “Lighten” blend mode on each image layer) so that the final composite frame contains more meteors, for an image with lots of meteors captured over an hour or more of shooting.
While it is possible to stack shots taken on a static tripod to produce such a meteor composite, doing so requires a lot of manual cutting, pasting and aligning of meteor images by hand. The result is a bit of a fake, though I’ve done it myself – the image at top is an example, though with only a trio of meteors.
50 embedded HD videos (no internet connection required) demonstrating time-lapse techniques.
60 multi-page tutorials with step-by-step instructions of how to use software: Adobe Bridge, Adobe Camera Raw, Photoshop, Lightroom, LRTimelapse, Advanced Stacker Actions, StarStaX, Panolapse, Sequence, GBTimelapse, and more.
Numerous Photo 101 sections explaining the basic concepts of photography and video production (f-stops, ISOs, file types, aspect ratios, frame rates, compression, etc.).
Numerous Astronomy 101 sections explaining the basics of how the sky works (how the sky moves, where the Moon can be found, when the Milky Way can be seen, when and where to see auroras).
Reviews of gear – I don’t just mention that specialized gear exists, I illustrate in detail how to use popular units such as the Time-Lapse+, Michron, and TriggerTrap intervalometers, and the All-View mount, Radian, Mindarin Astro, eMotimo, and Dynamic Perception motion-control units, with comments on what’s good – and not so good – to use.
You’ll learn —
• What are the best cameras and lenses to buy (cropped vs. full-frame, Canon vs. Nikon, manual vs. automatic lenses, zooms vs. primes).
• How to set your cameras and lenses for maximum detail and minimum noise (following the mantra of “exposing to the right” and using dark frames).
• How to shoot auroras, conjunctions, satellites, comets, and meteor showers.
• How to shoot nightscapes lit only by moonlit, and how to determine where the Moon will be to plan a shoot.
• How to shoot & stitch panoramas of the night sky and Milky Way, using Photoshop and PTGui software.
• How to shoot tracked long exposures of the Milky Way using camera trackers such as the iOptron Star Tracker and Sky-Watcher Star Adventurer.
• How to develop Raw files, the essential first step to great images and movies.
• How to process nightscape stills using techniques such as compositing multiple exposures, masking ground and sky, and using non-destructive adjustment layers and smart filters.
• How to shoot and stack star trail images made of hundreds of frames.
• How to assemble time-lapse movies from those same hundreds of frames.
• How to plan a time-lapse shoot and calculate the best balance of exposure time vs. frame count vs. length of shoot, and recommended apps to use.
• How to process hundreds of frames using Adobe Camera Raw, Bridge, Photoshop, and Lightroom.
• How to shoot and process advanced “Holy Grail” time-lapse transitions from day to night.
• How to shoot motion-control sequences using specialized dolly and pan/tilt devices.
• How to use time-lapse processing tools such as LRTimelapse, Panolapse, Sequence, and Advanced Stacker Actions.
• What can go wrong and how best to avoid problems in the field.
It’s a large, multi-media book available only for MacOS and iPads through the Apple iBookstore.
For technical and economic reasons, the book’s size and media content prevent it from being offered via other platforms such as Kindles and Android devices. It is not available as a static PDF or traditional print book. It’s subject makes use of an ebook’s ability to contain interactive and video content.
See http://tiny.cc/urdoqx for more about the book at iTunes. Available worldwide. It’s $24.95 in the U.S.


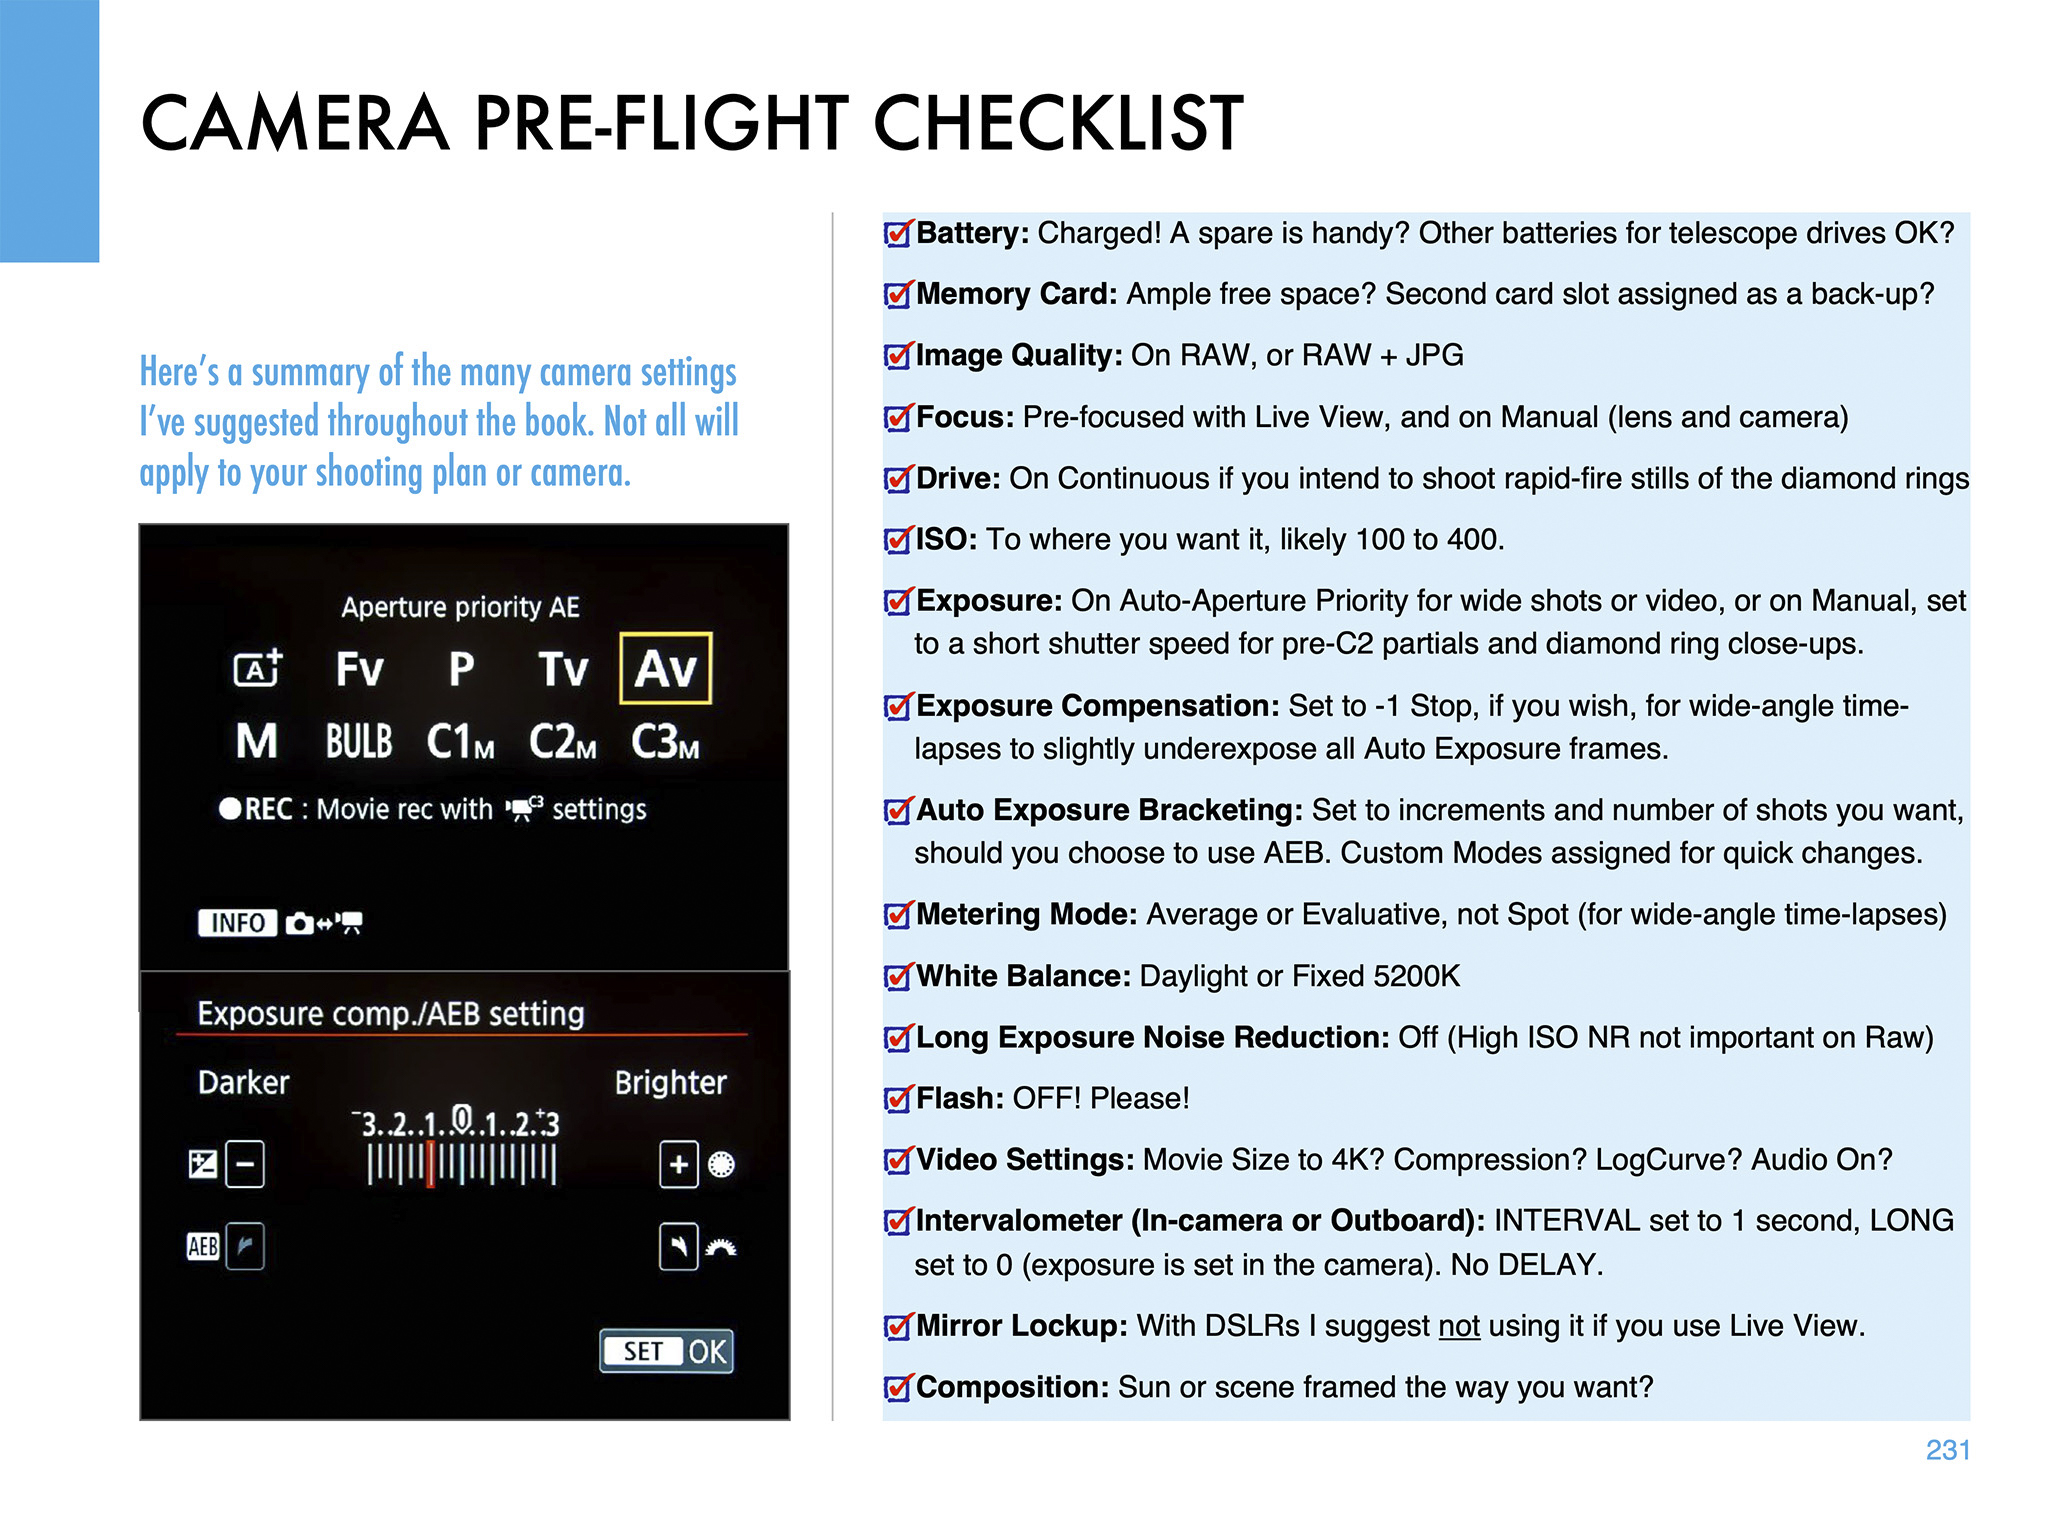

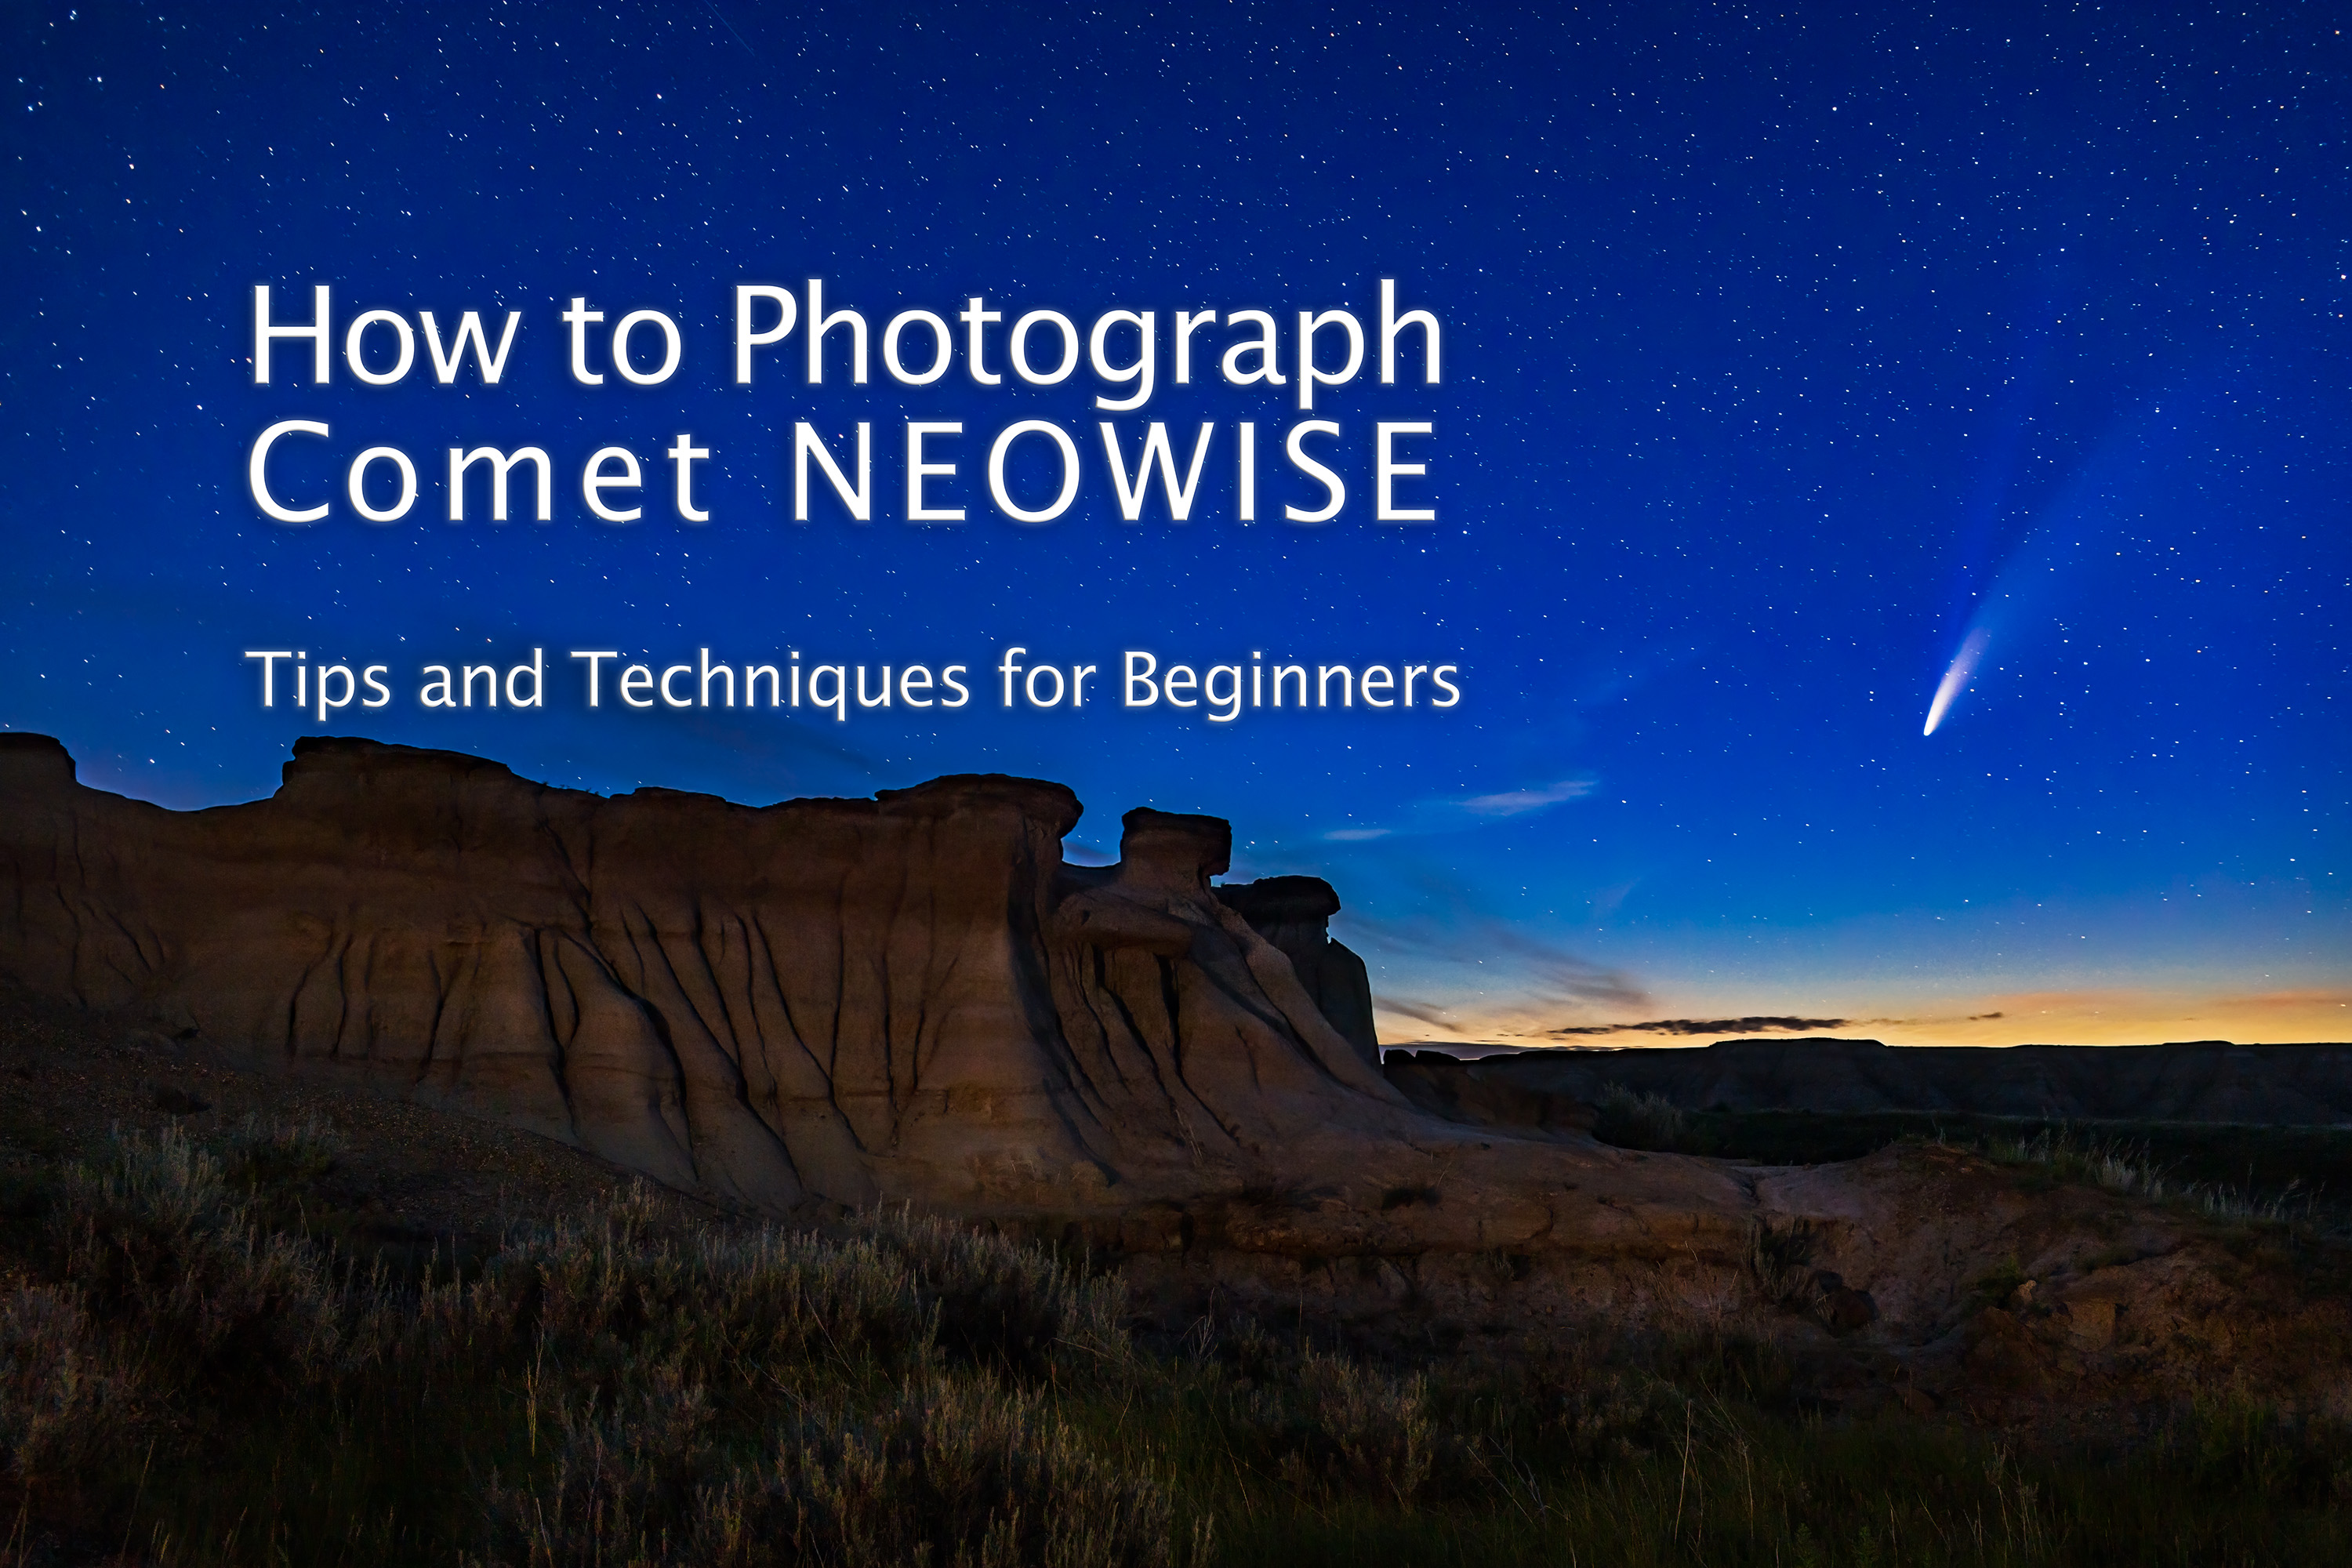 A bright comet is a once-a-decade opportunity to capture some unique nightscapes. Here are my suggested tips and FAQs for getting your souvenir shot.
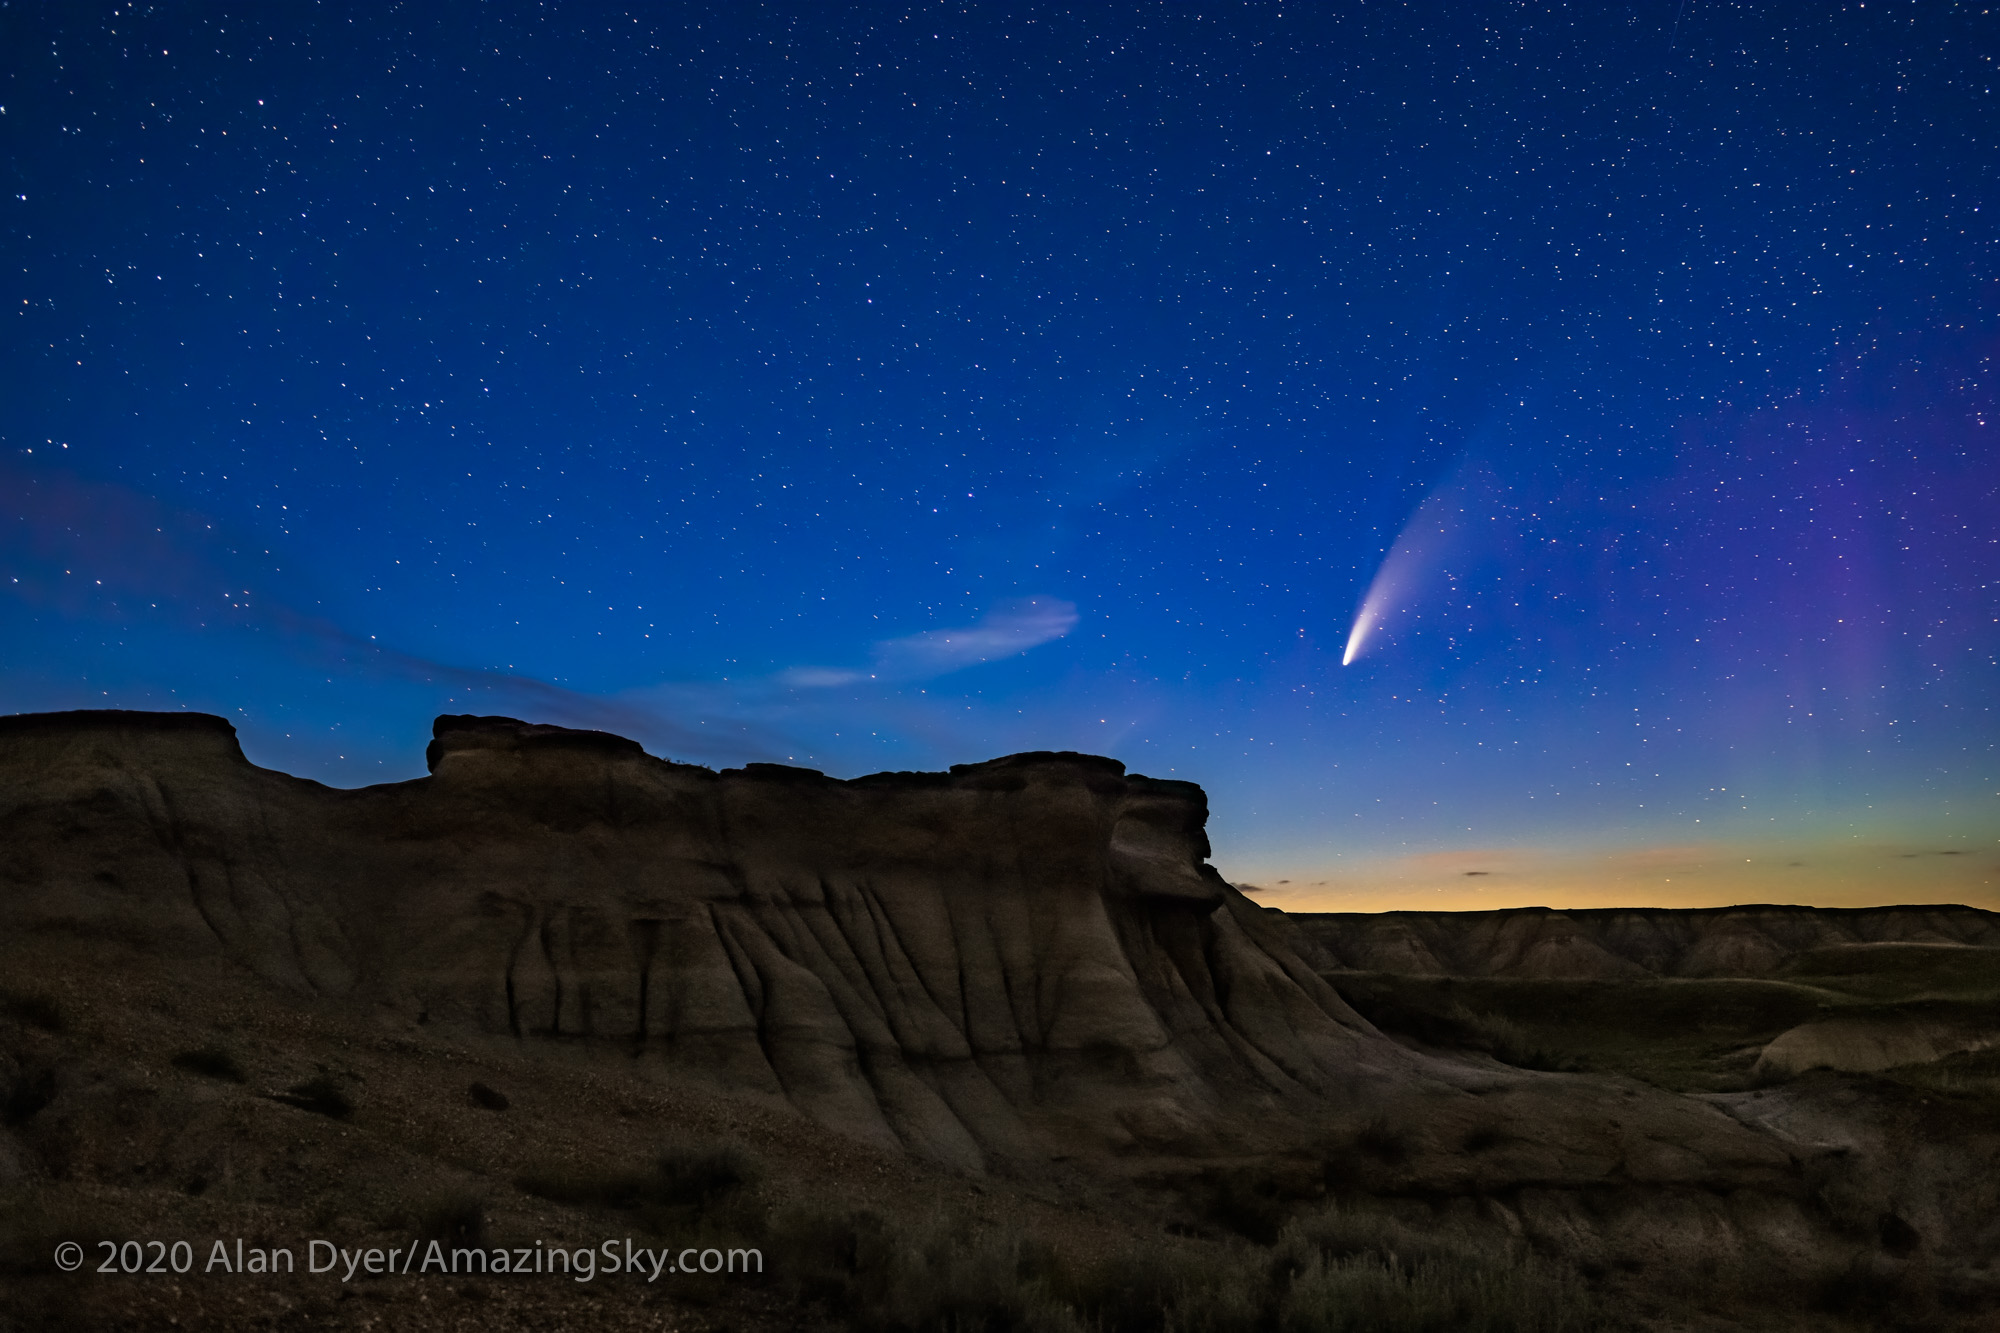


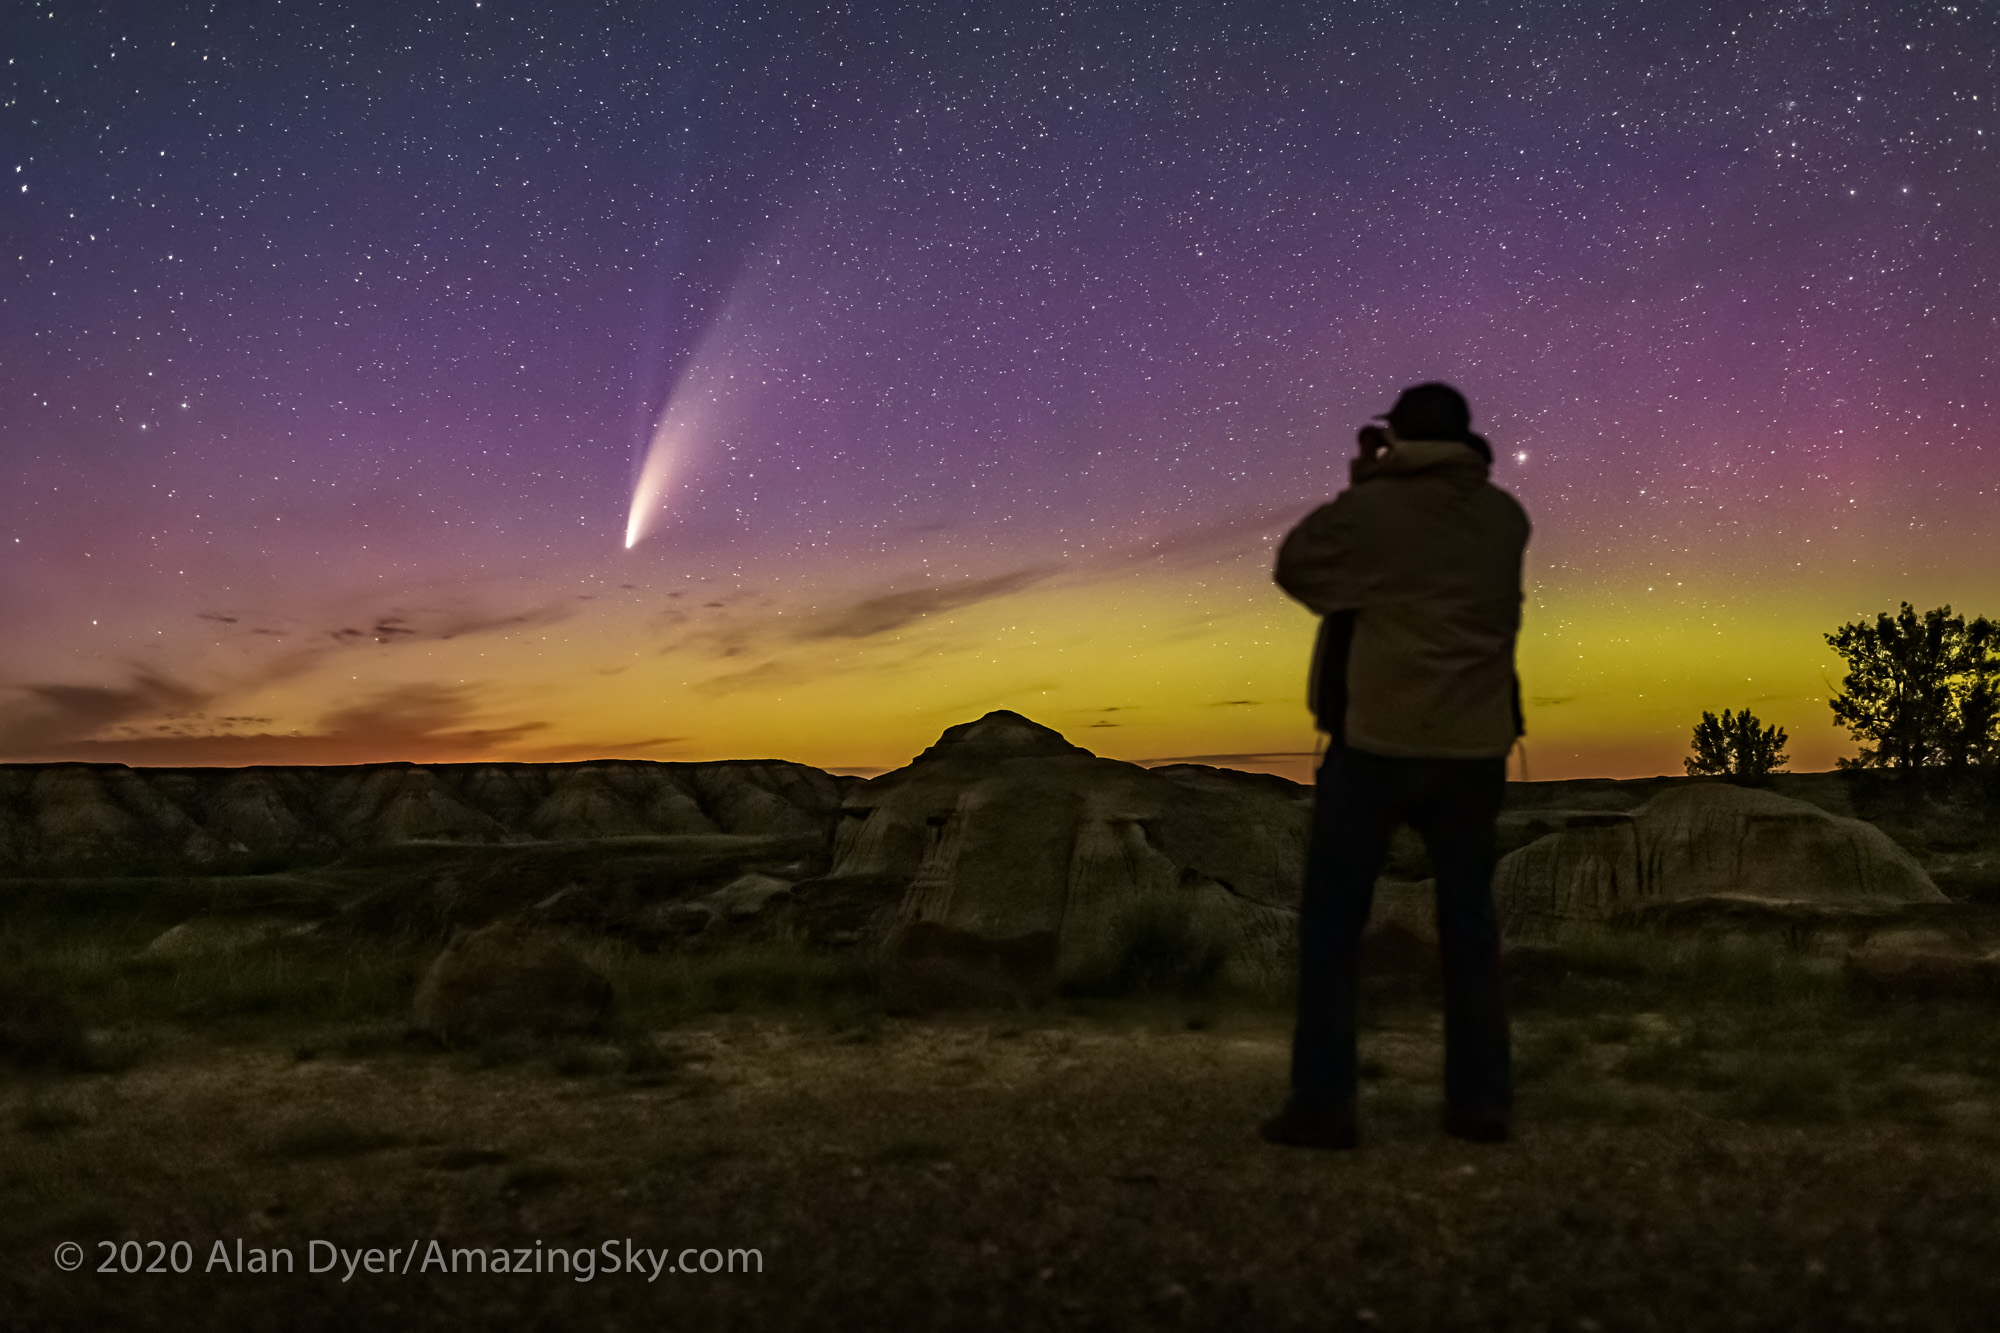
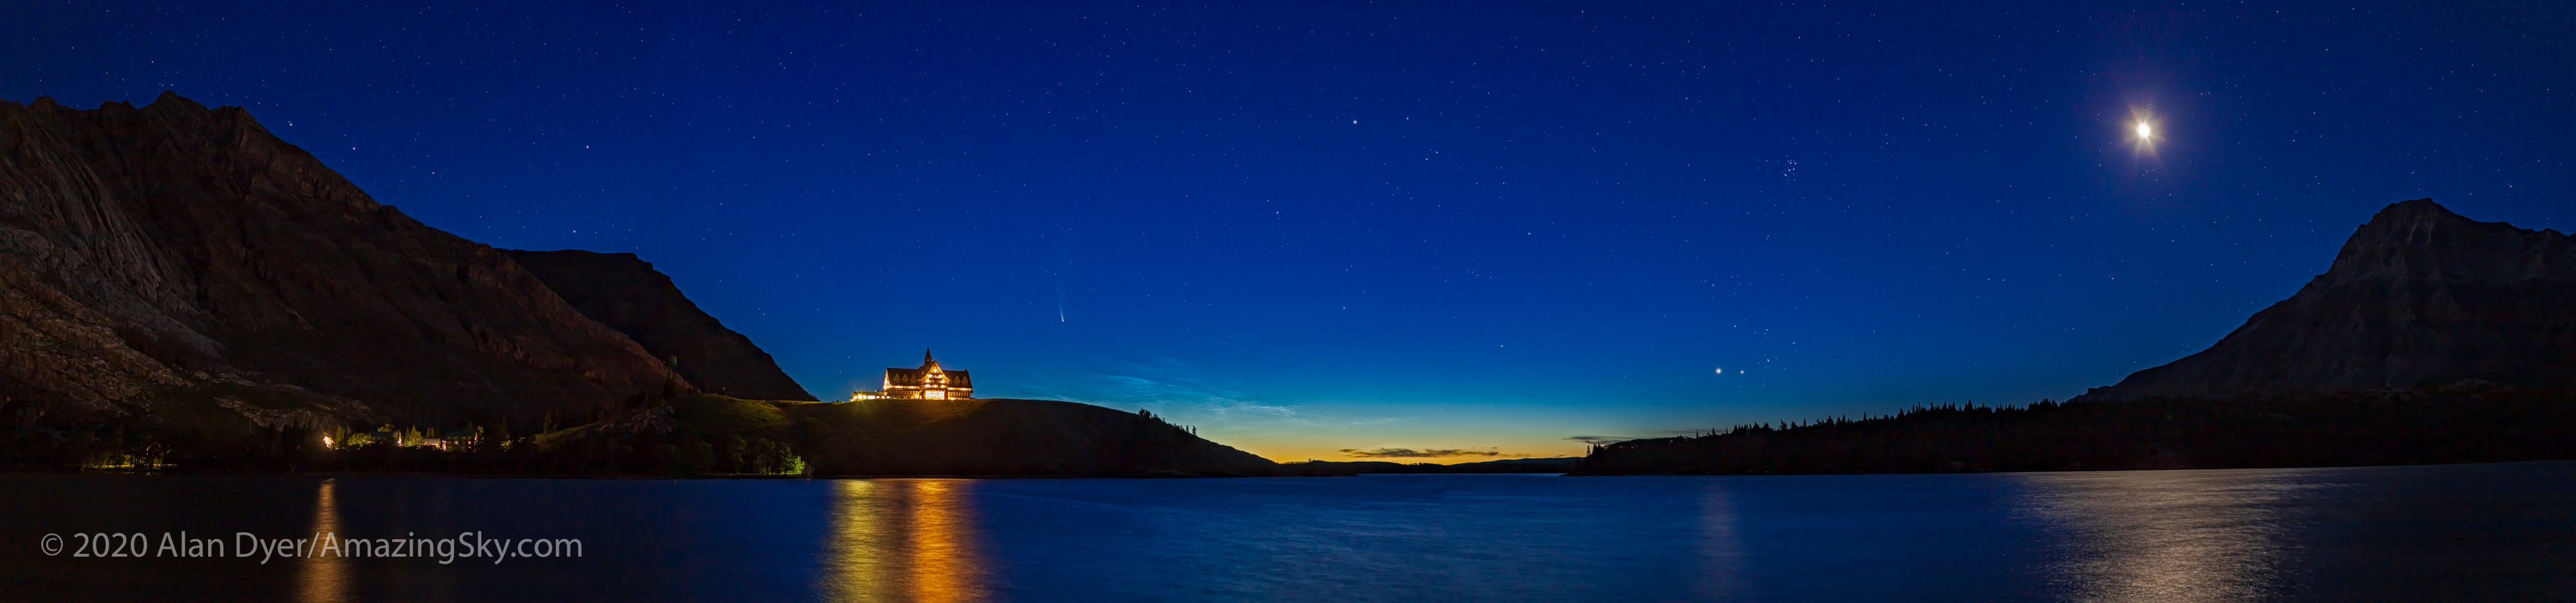
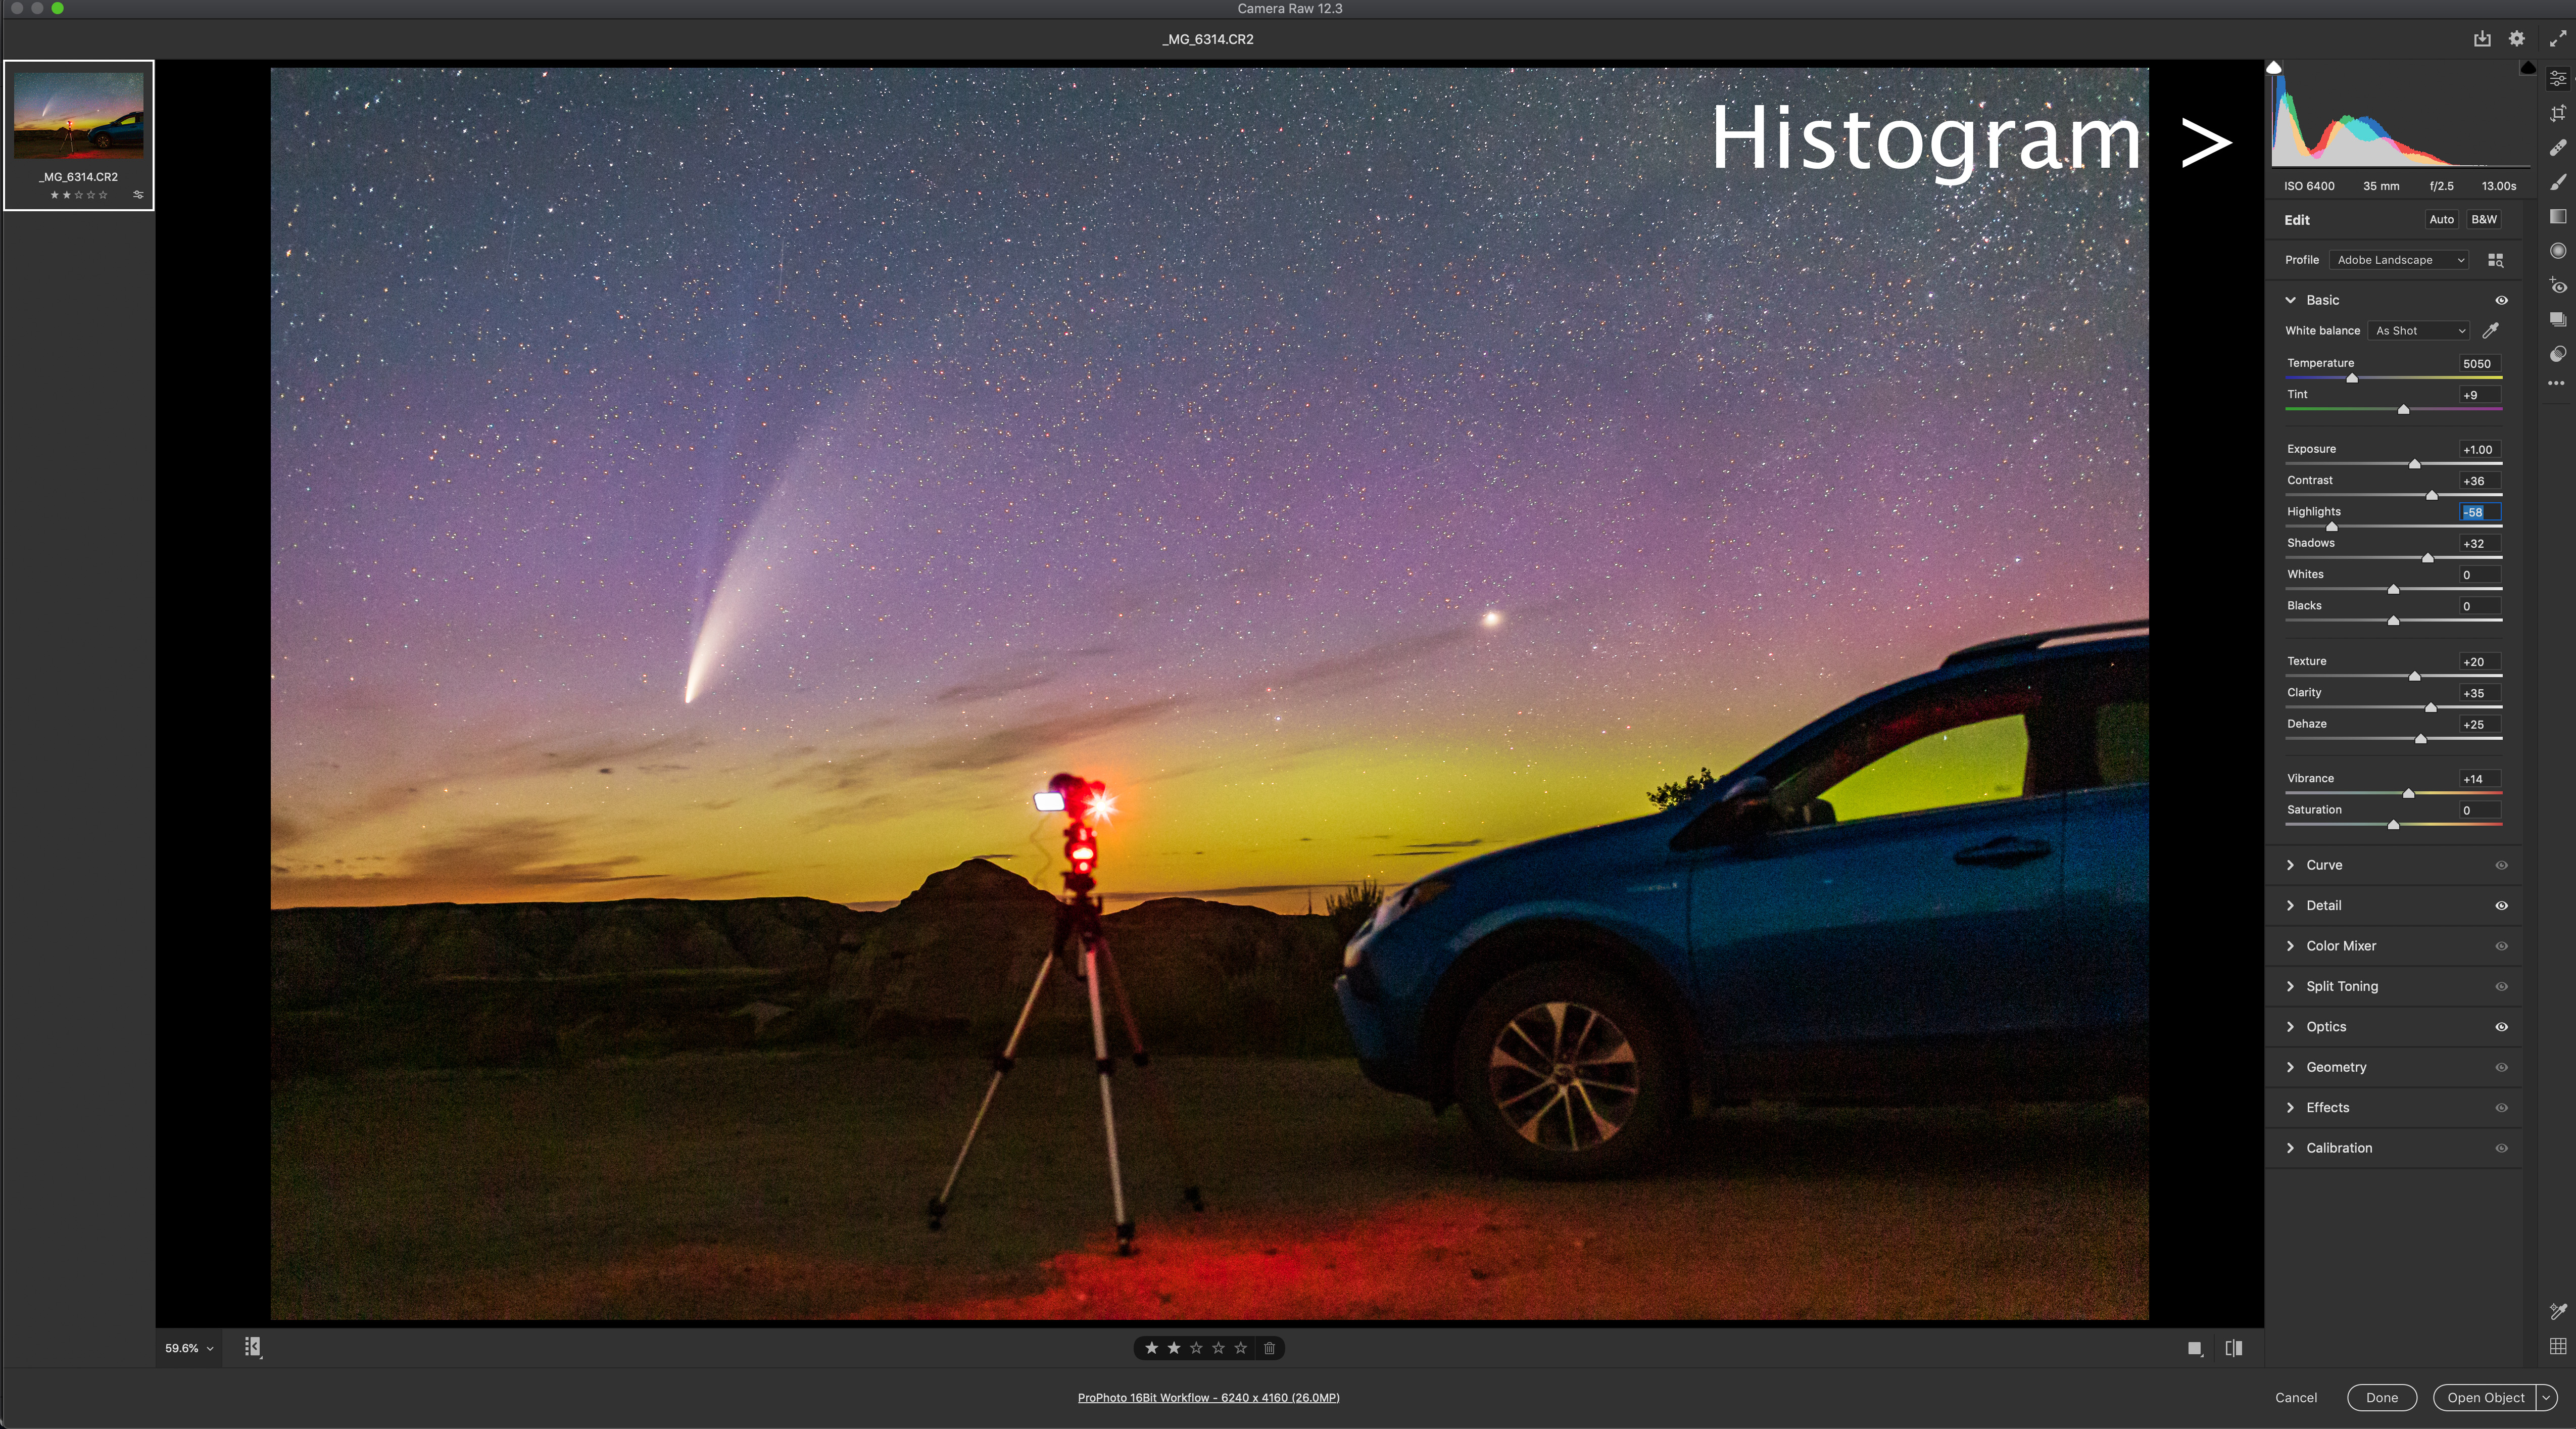
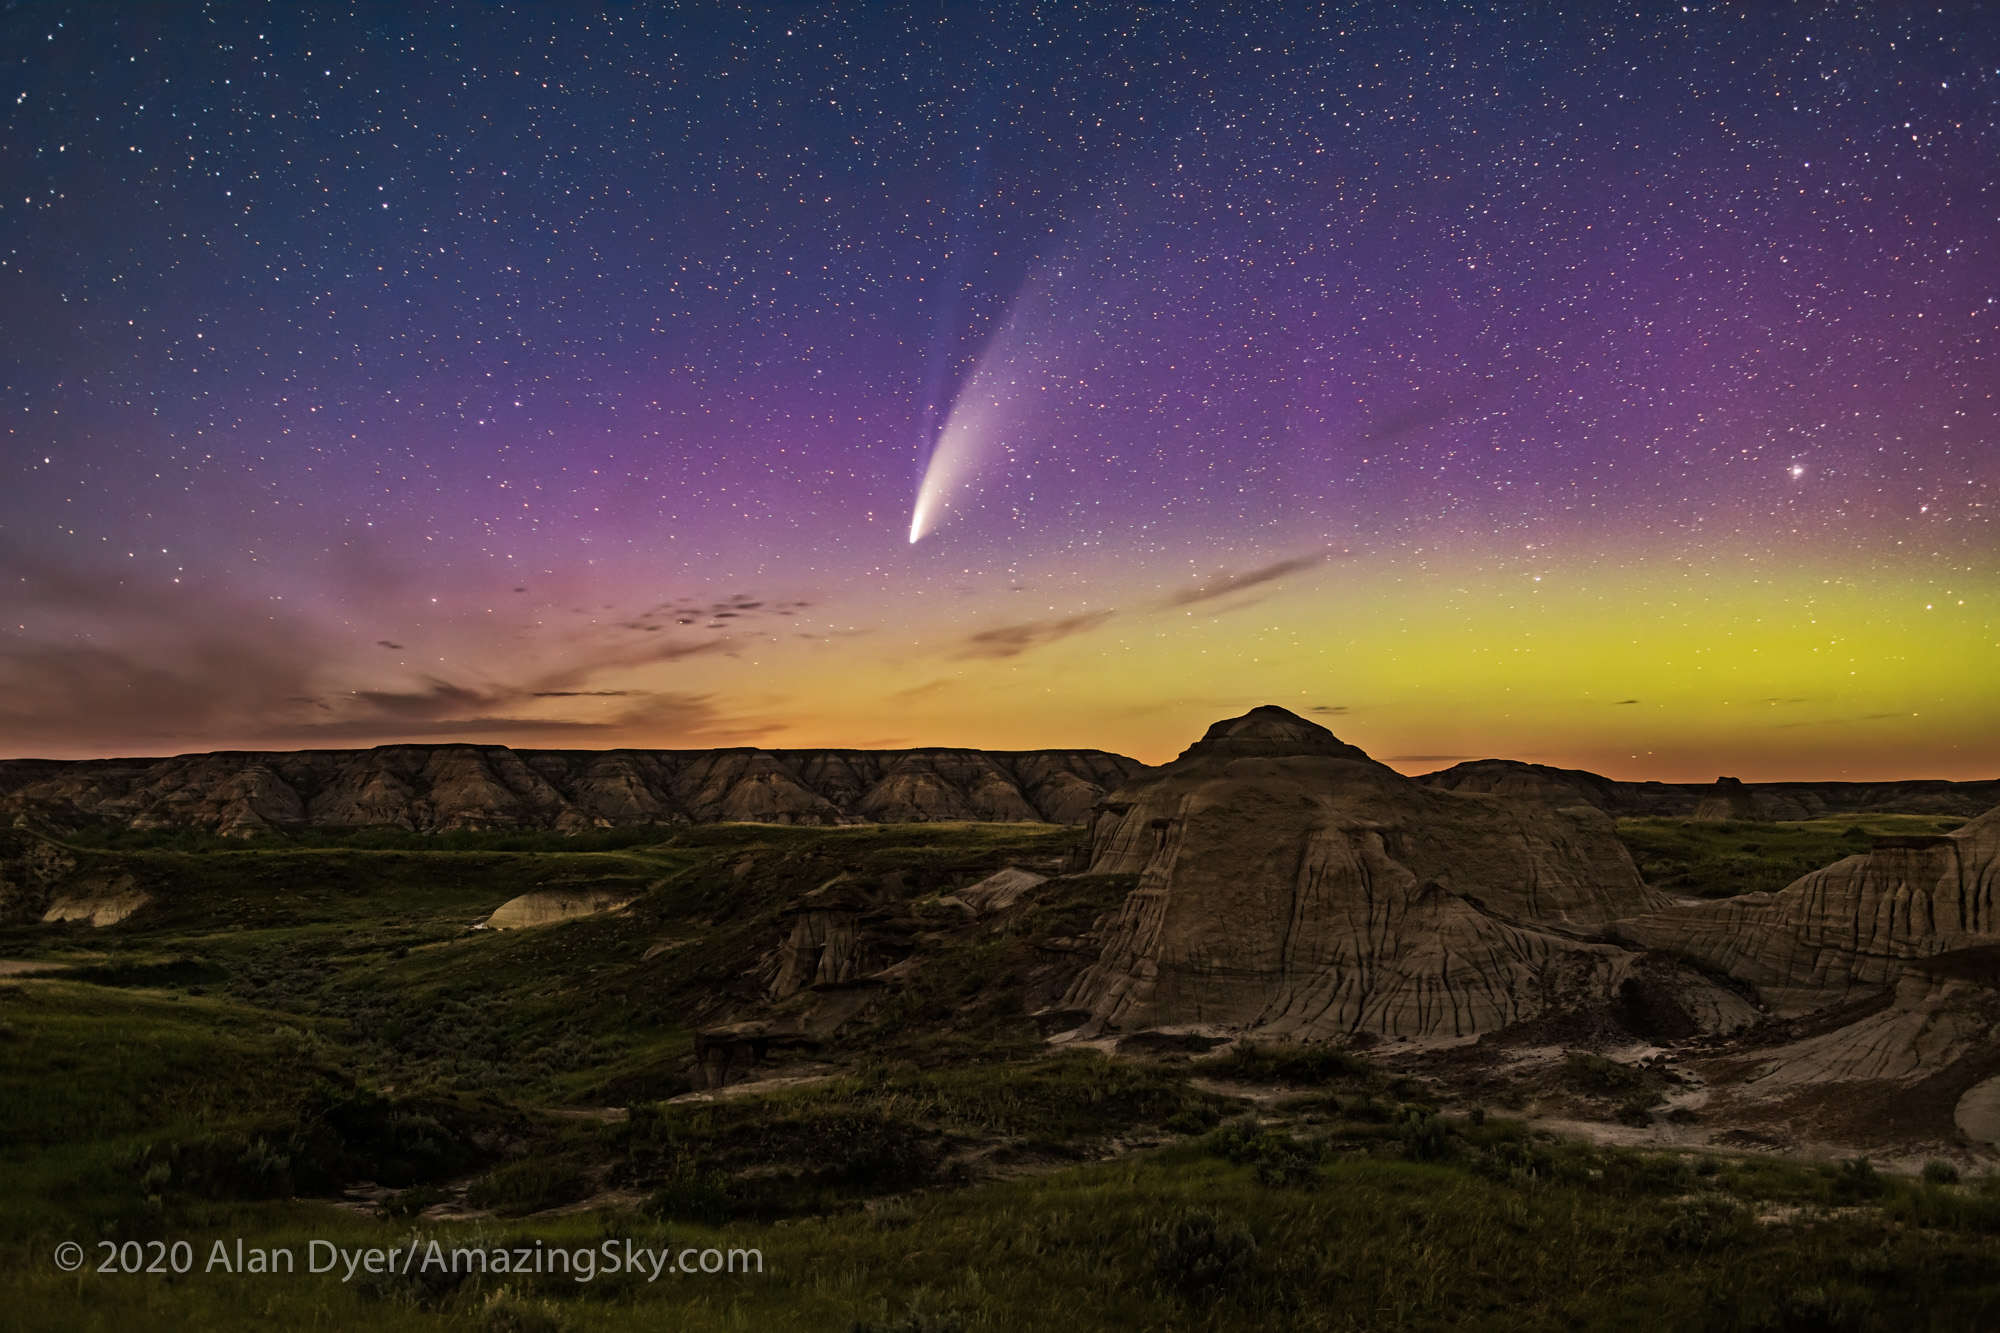
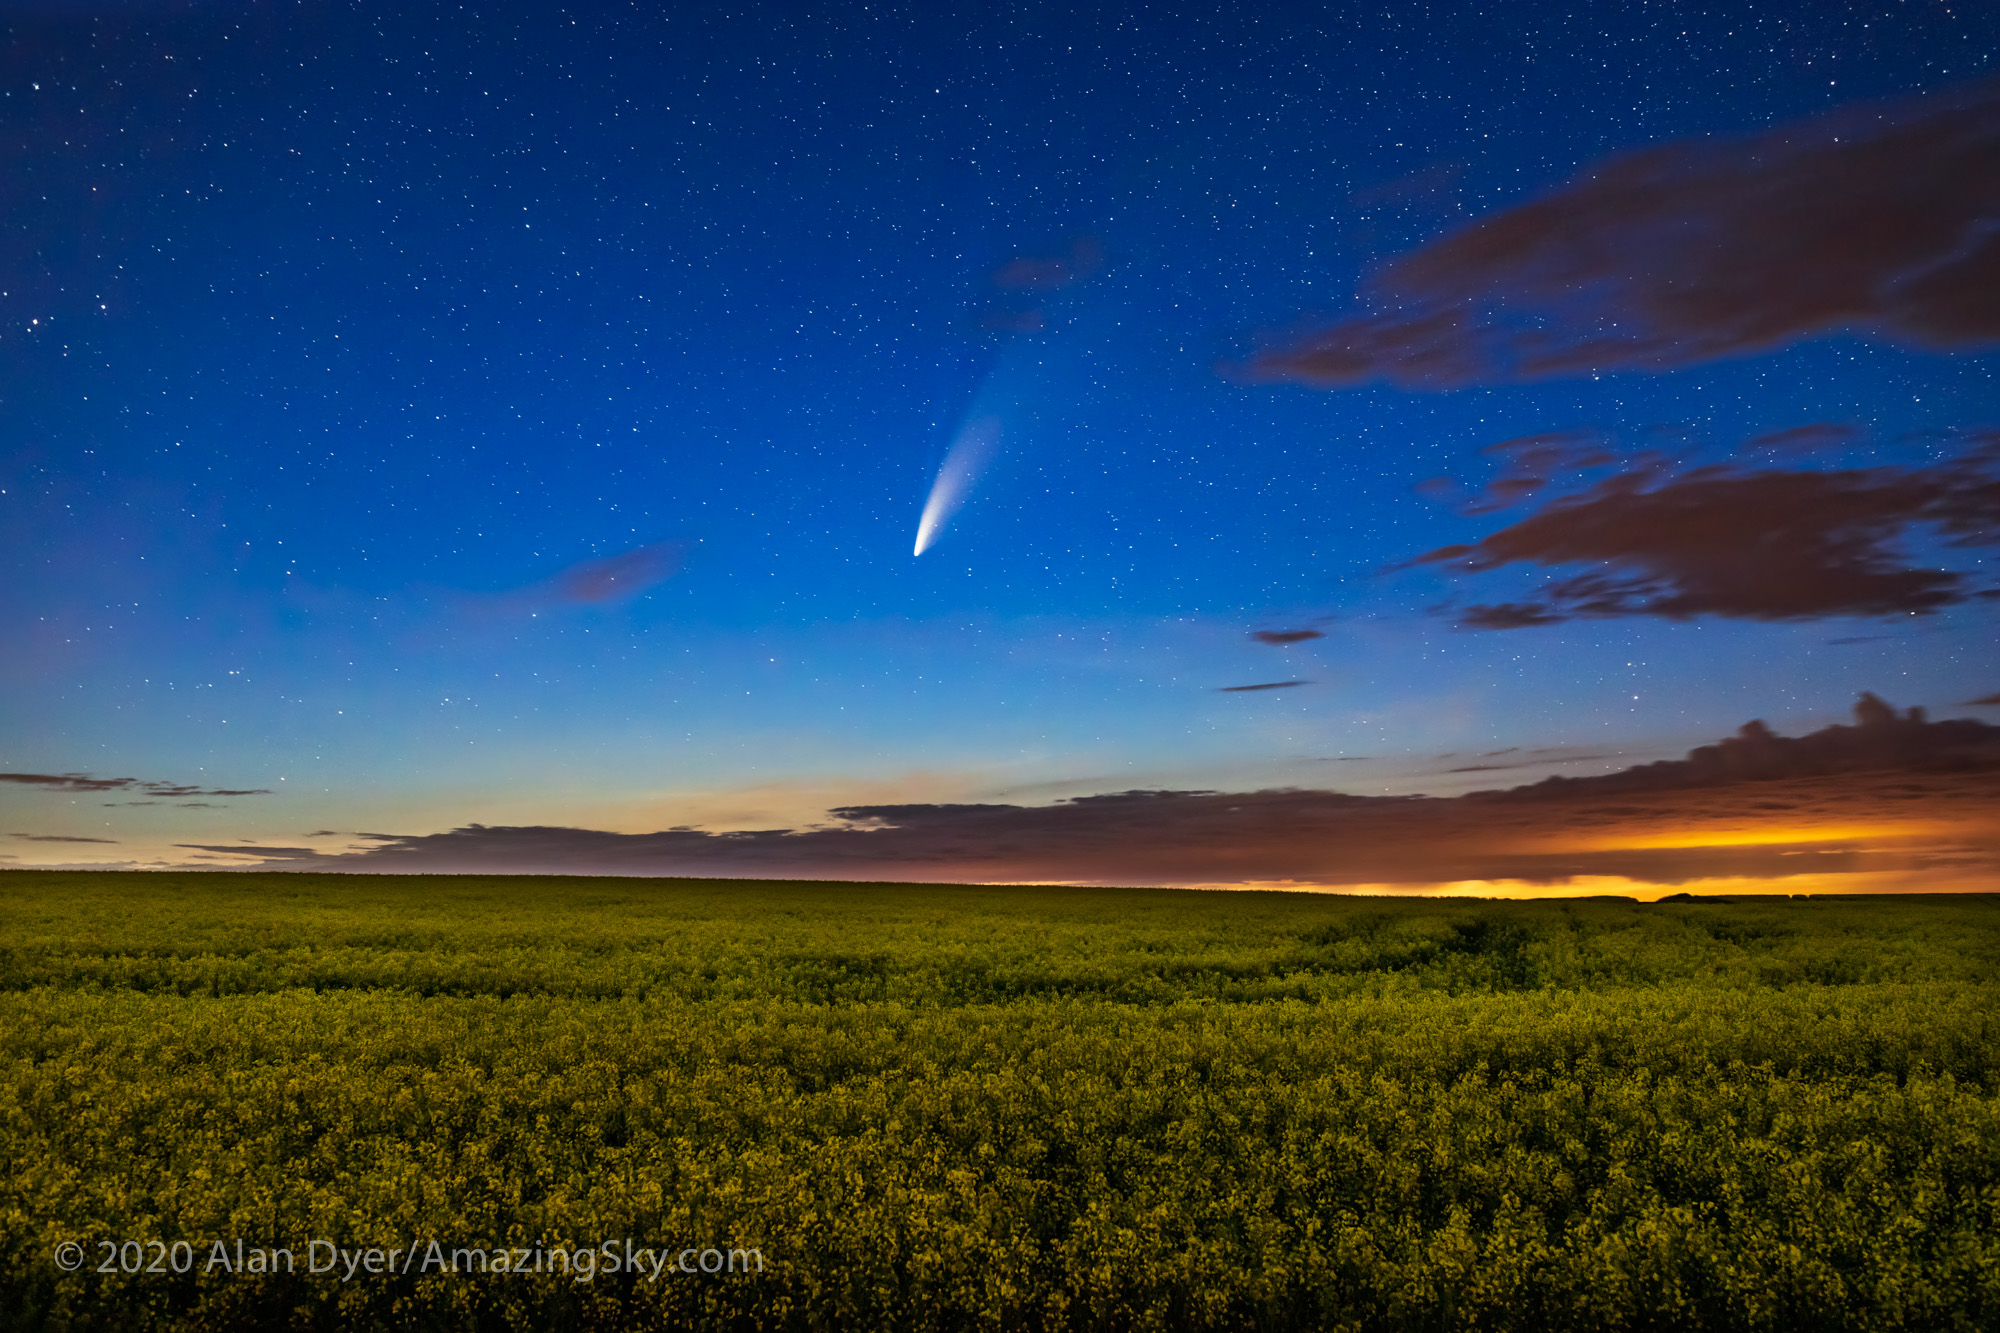

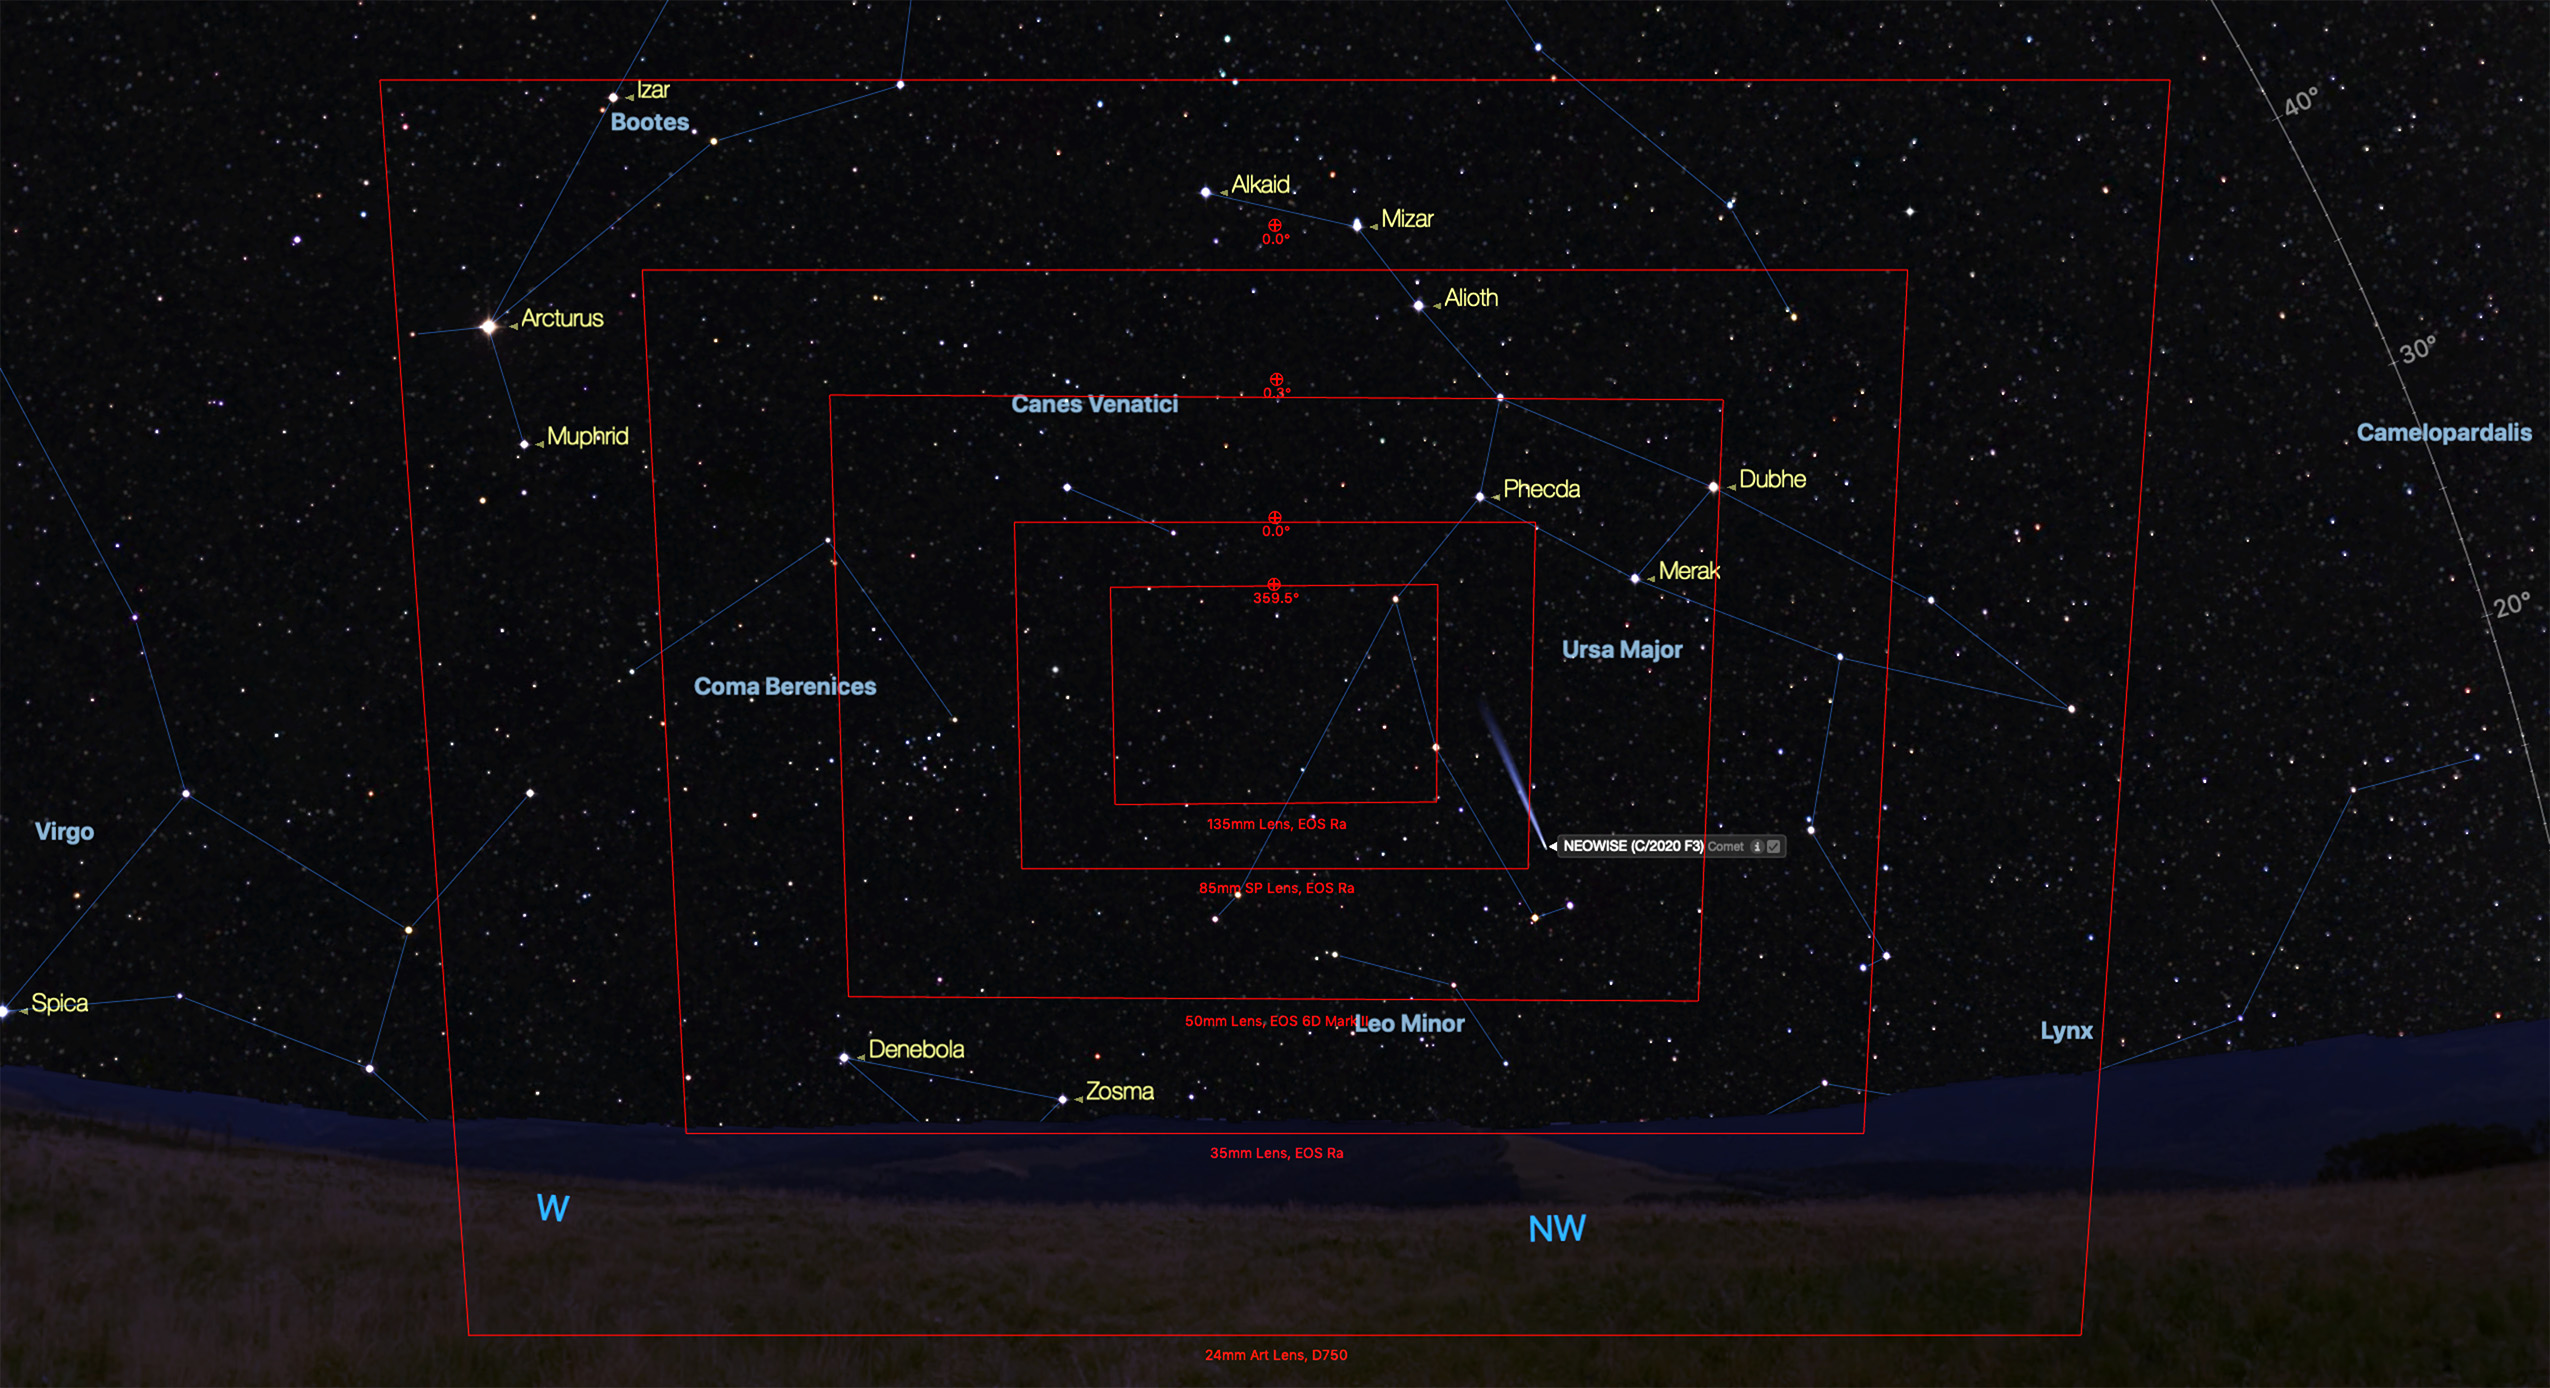
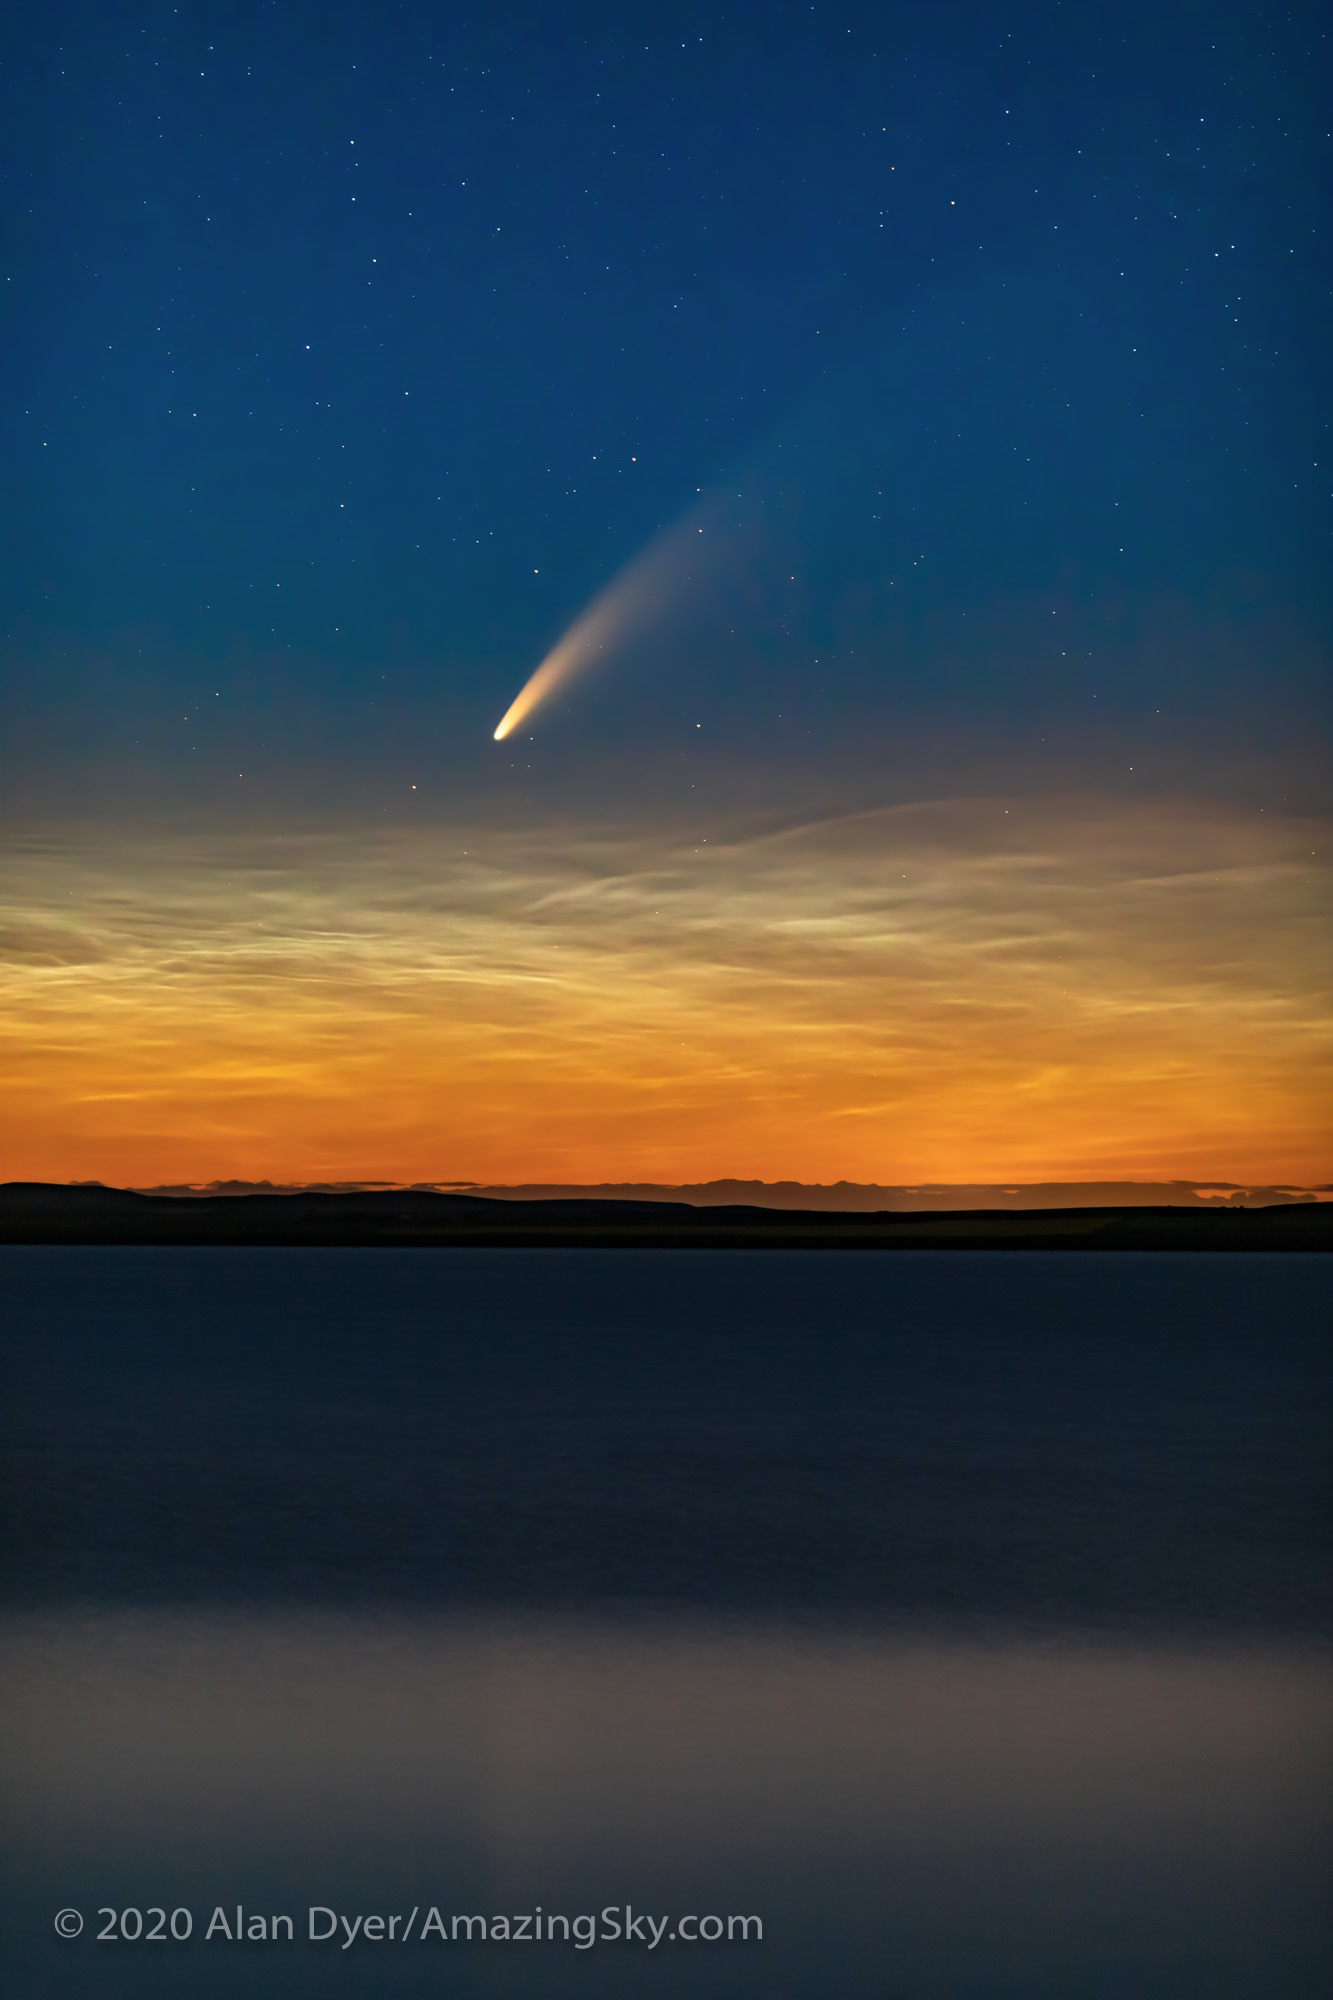
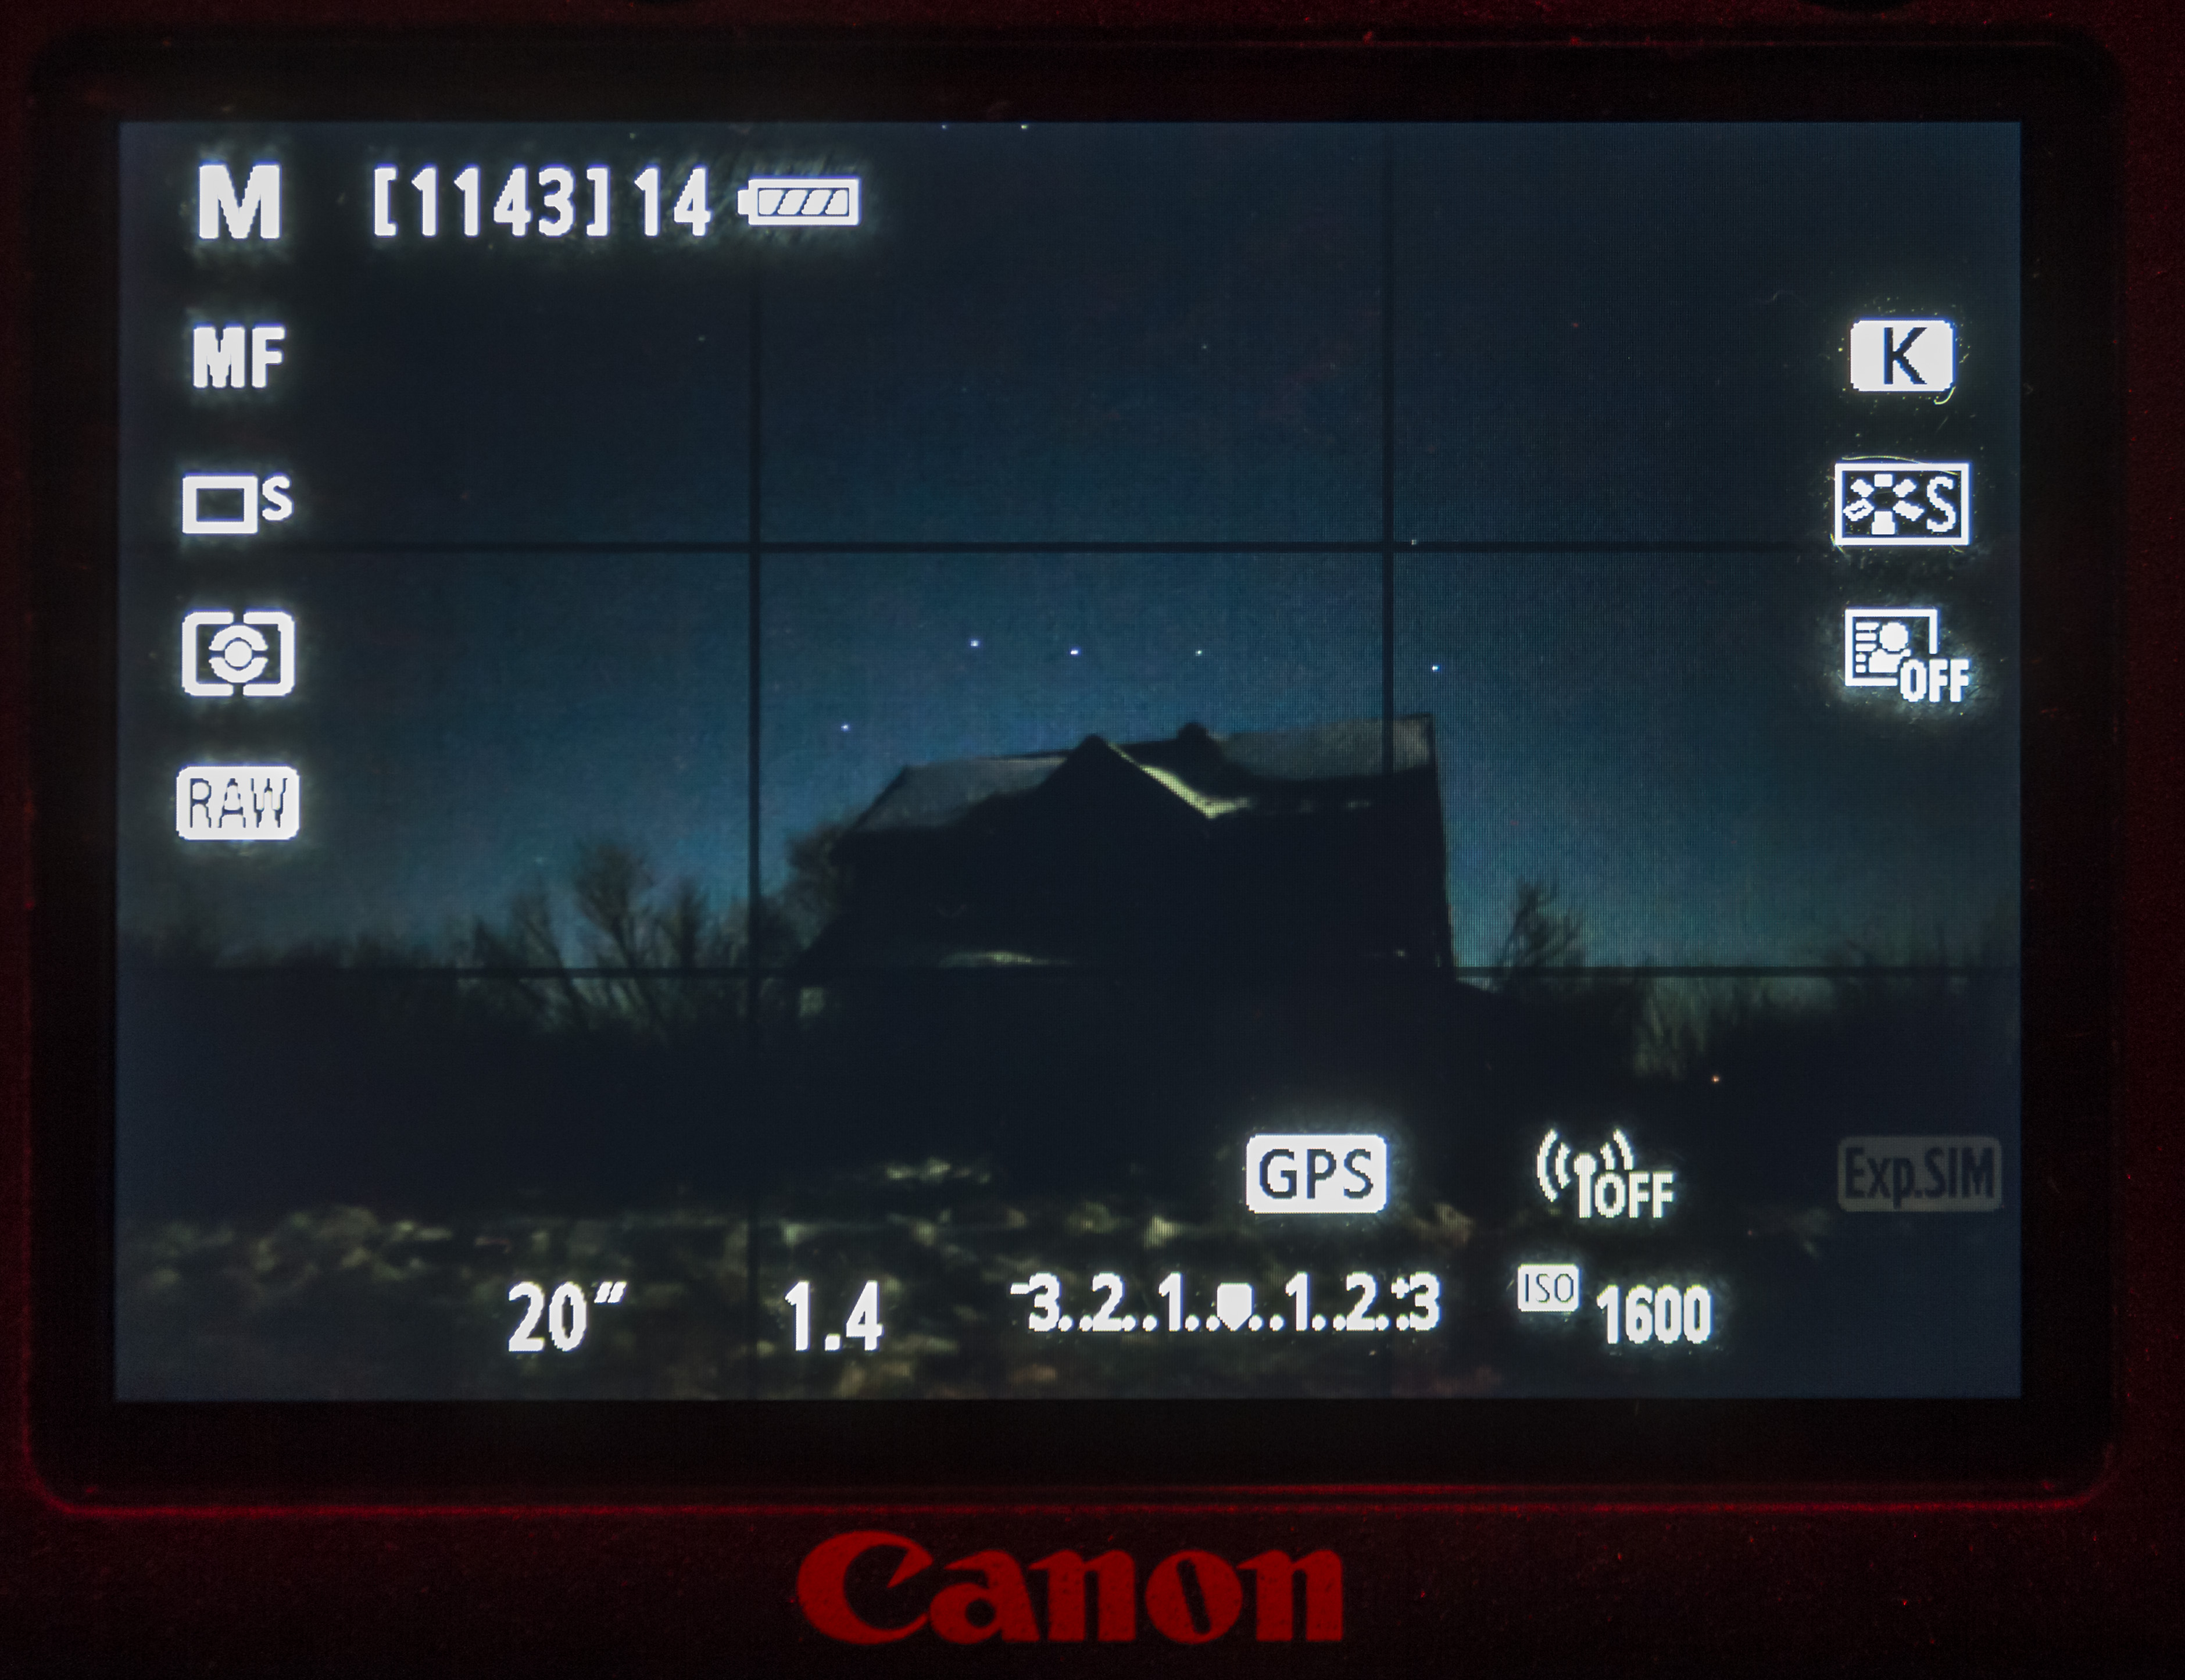
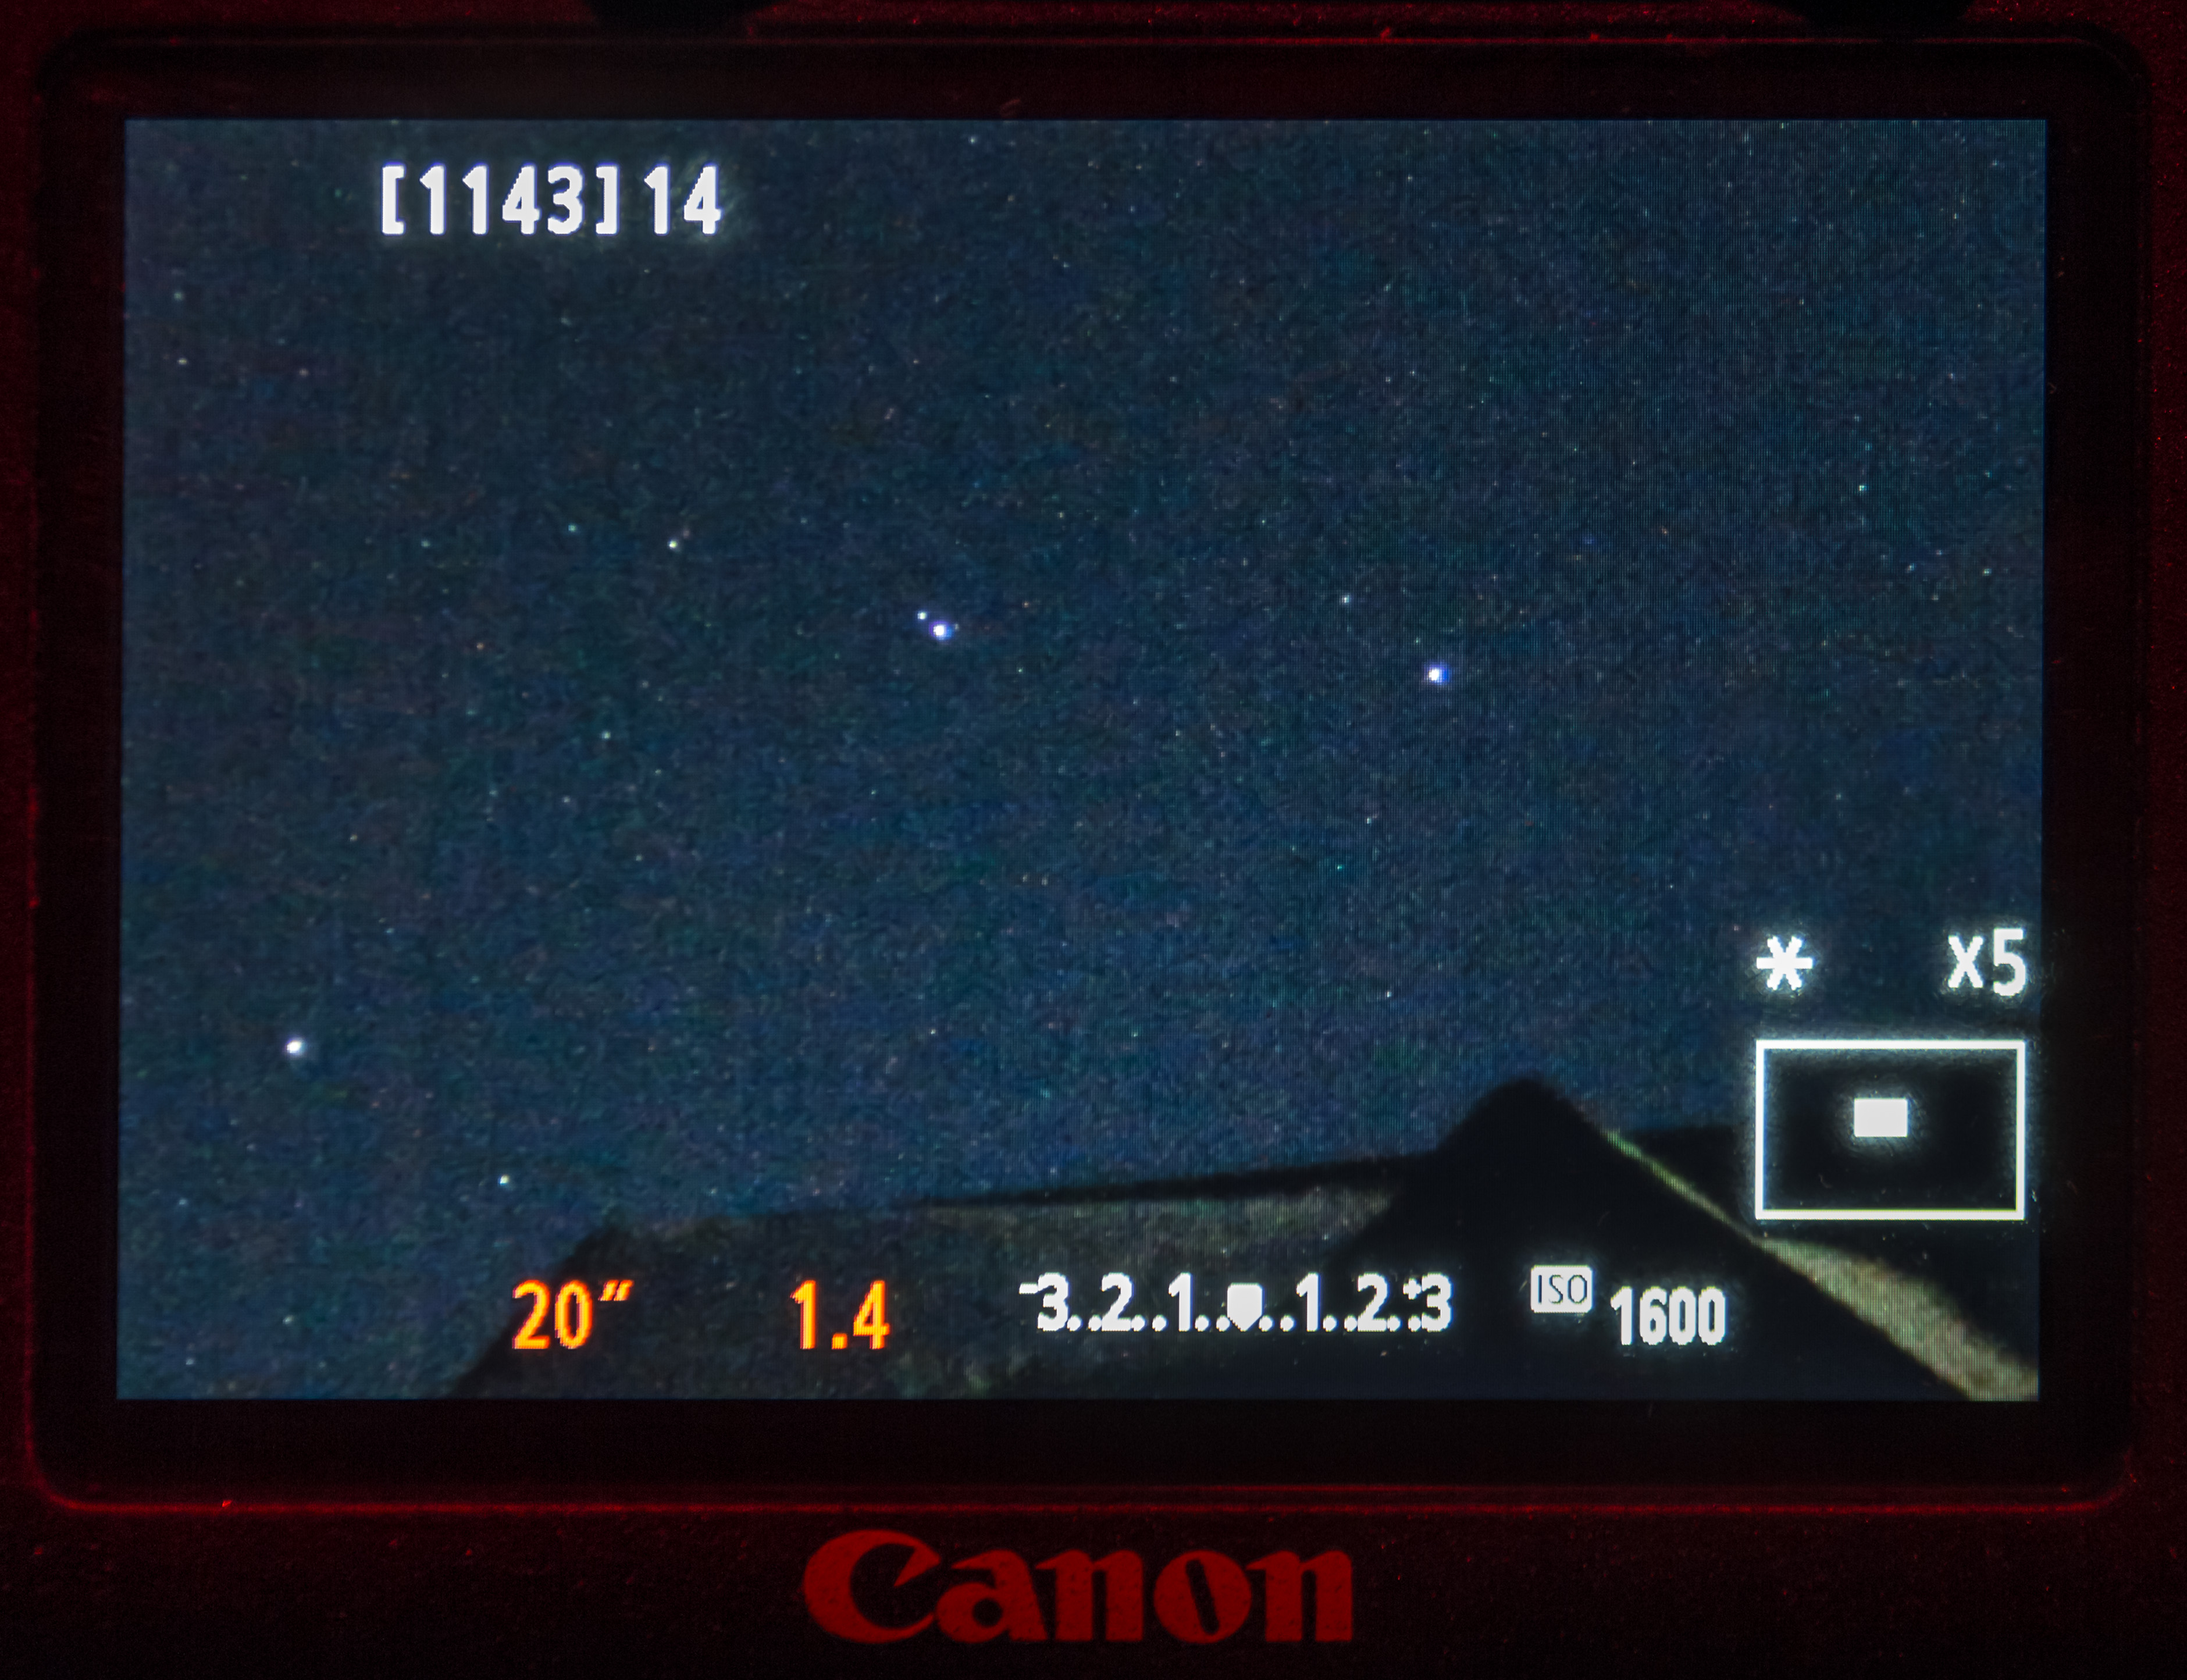

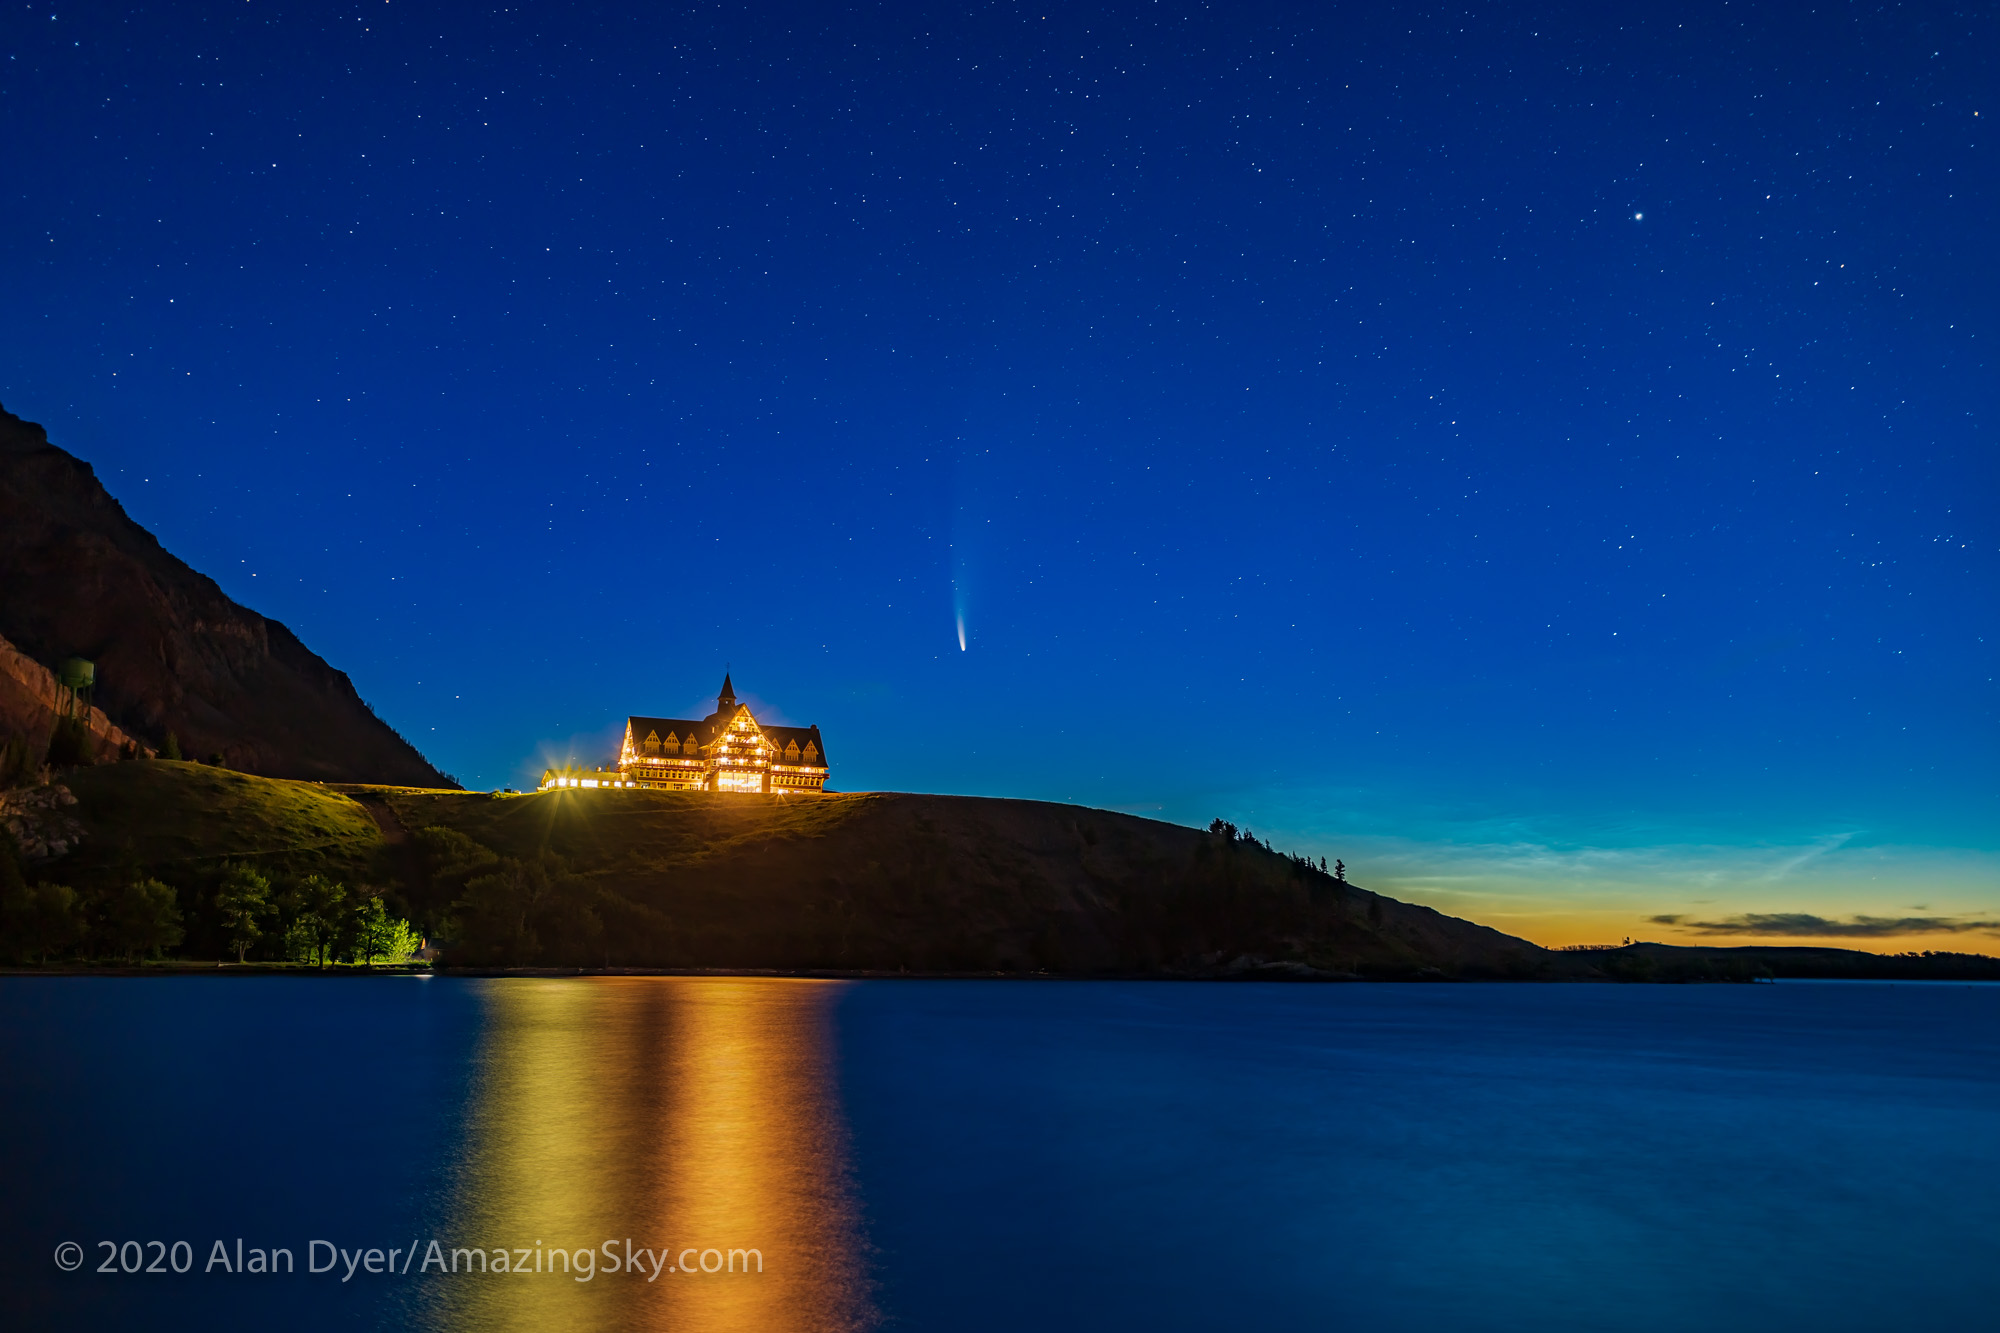
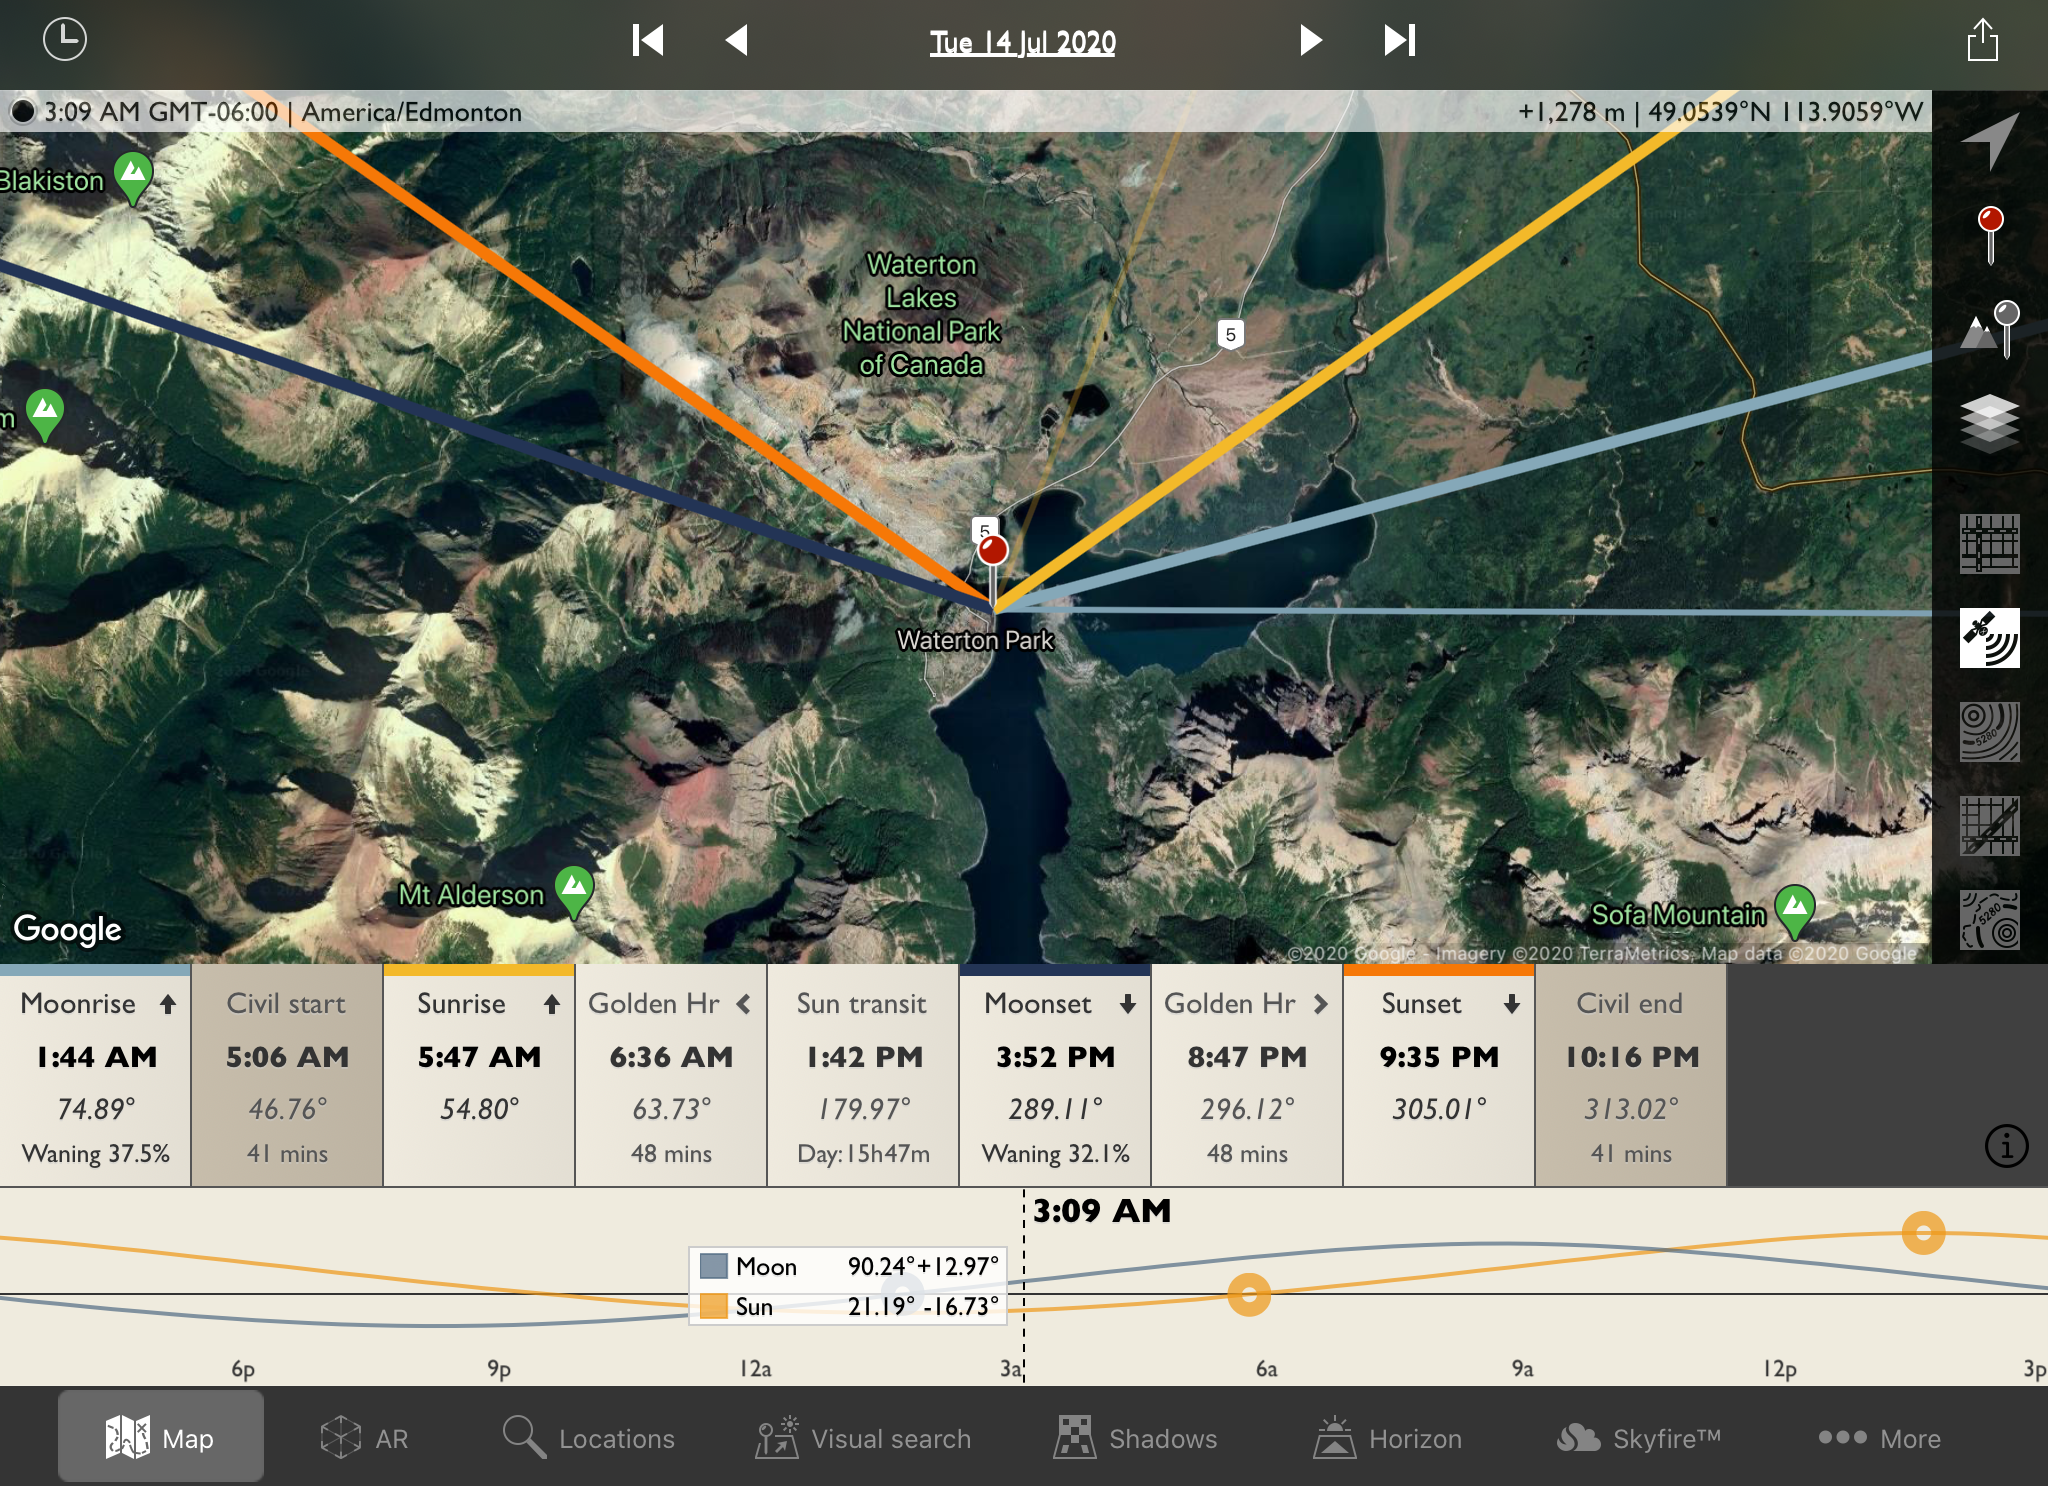
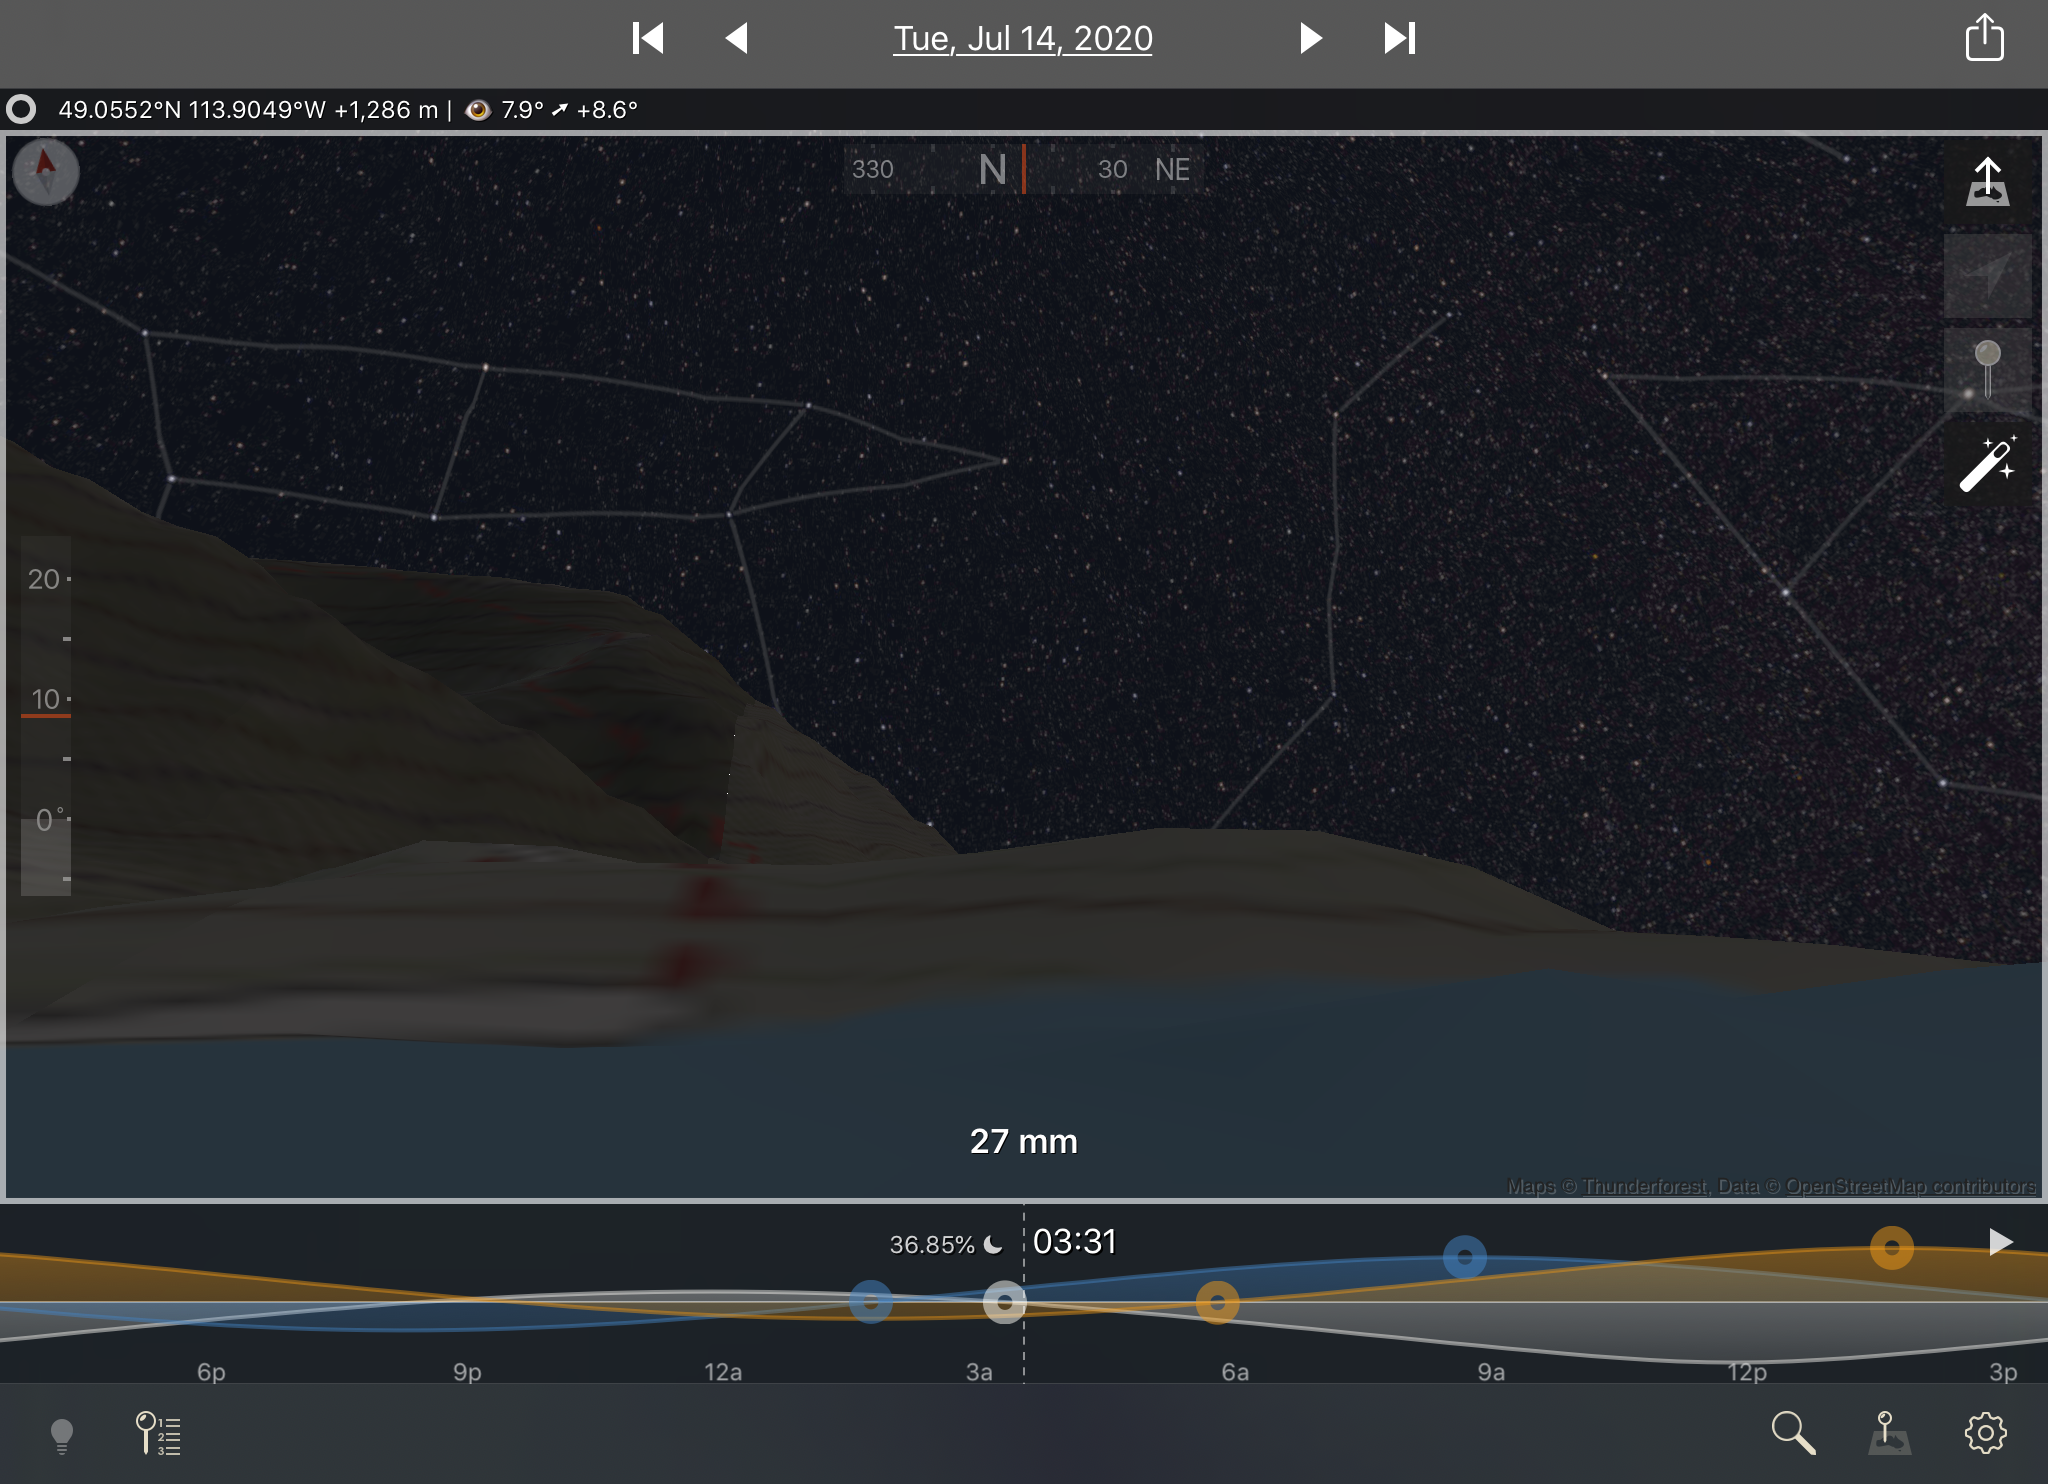
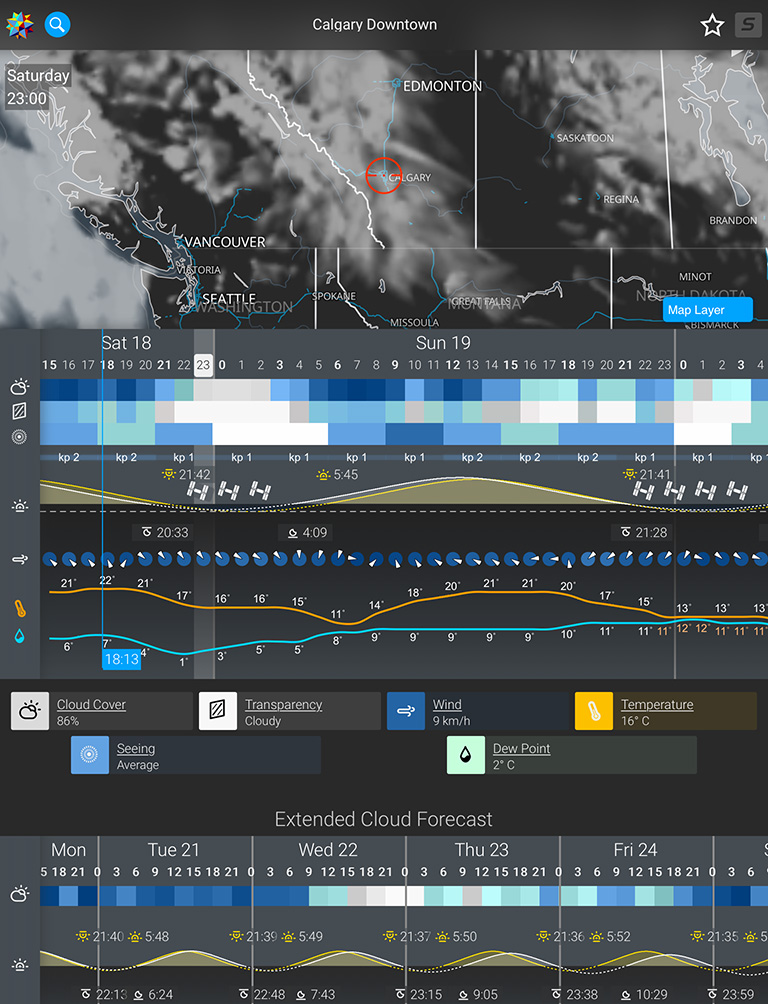
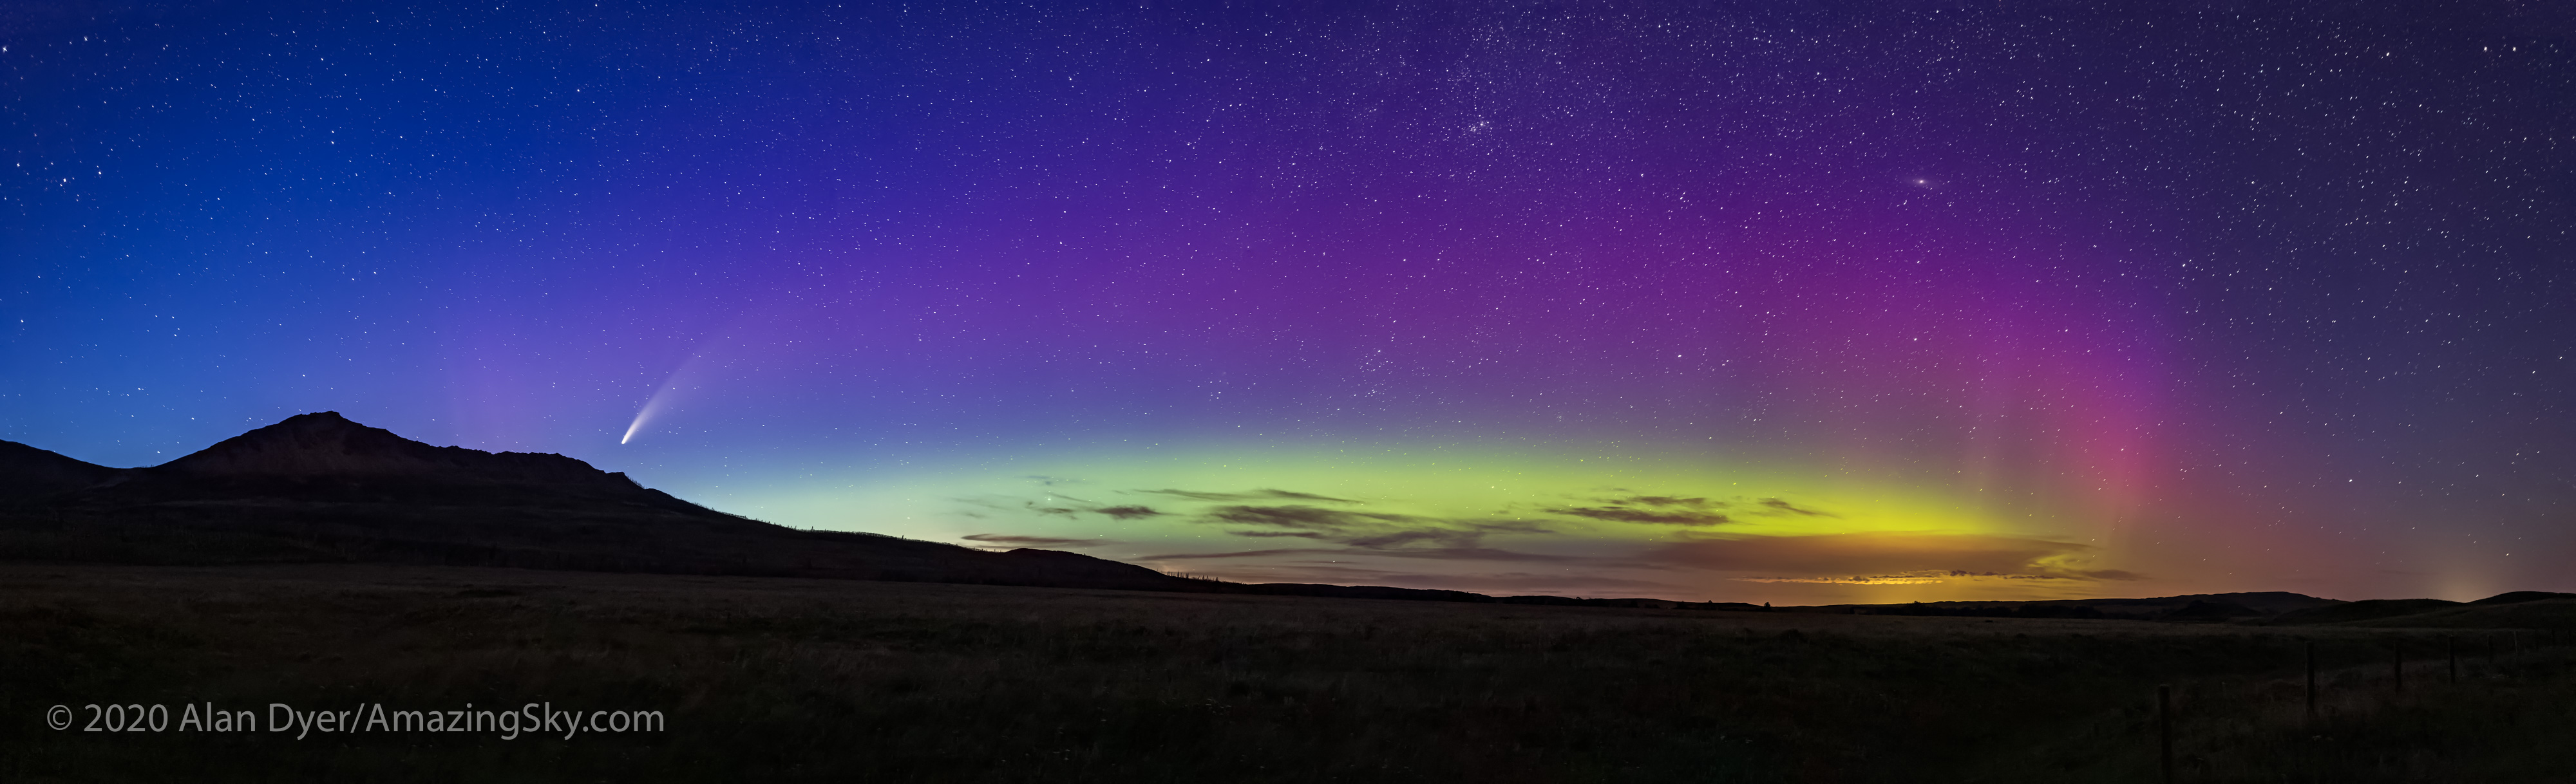
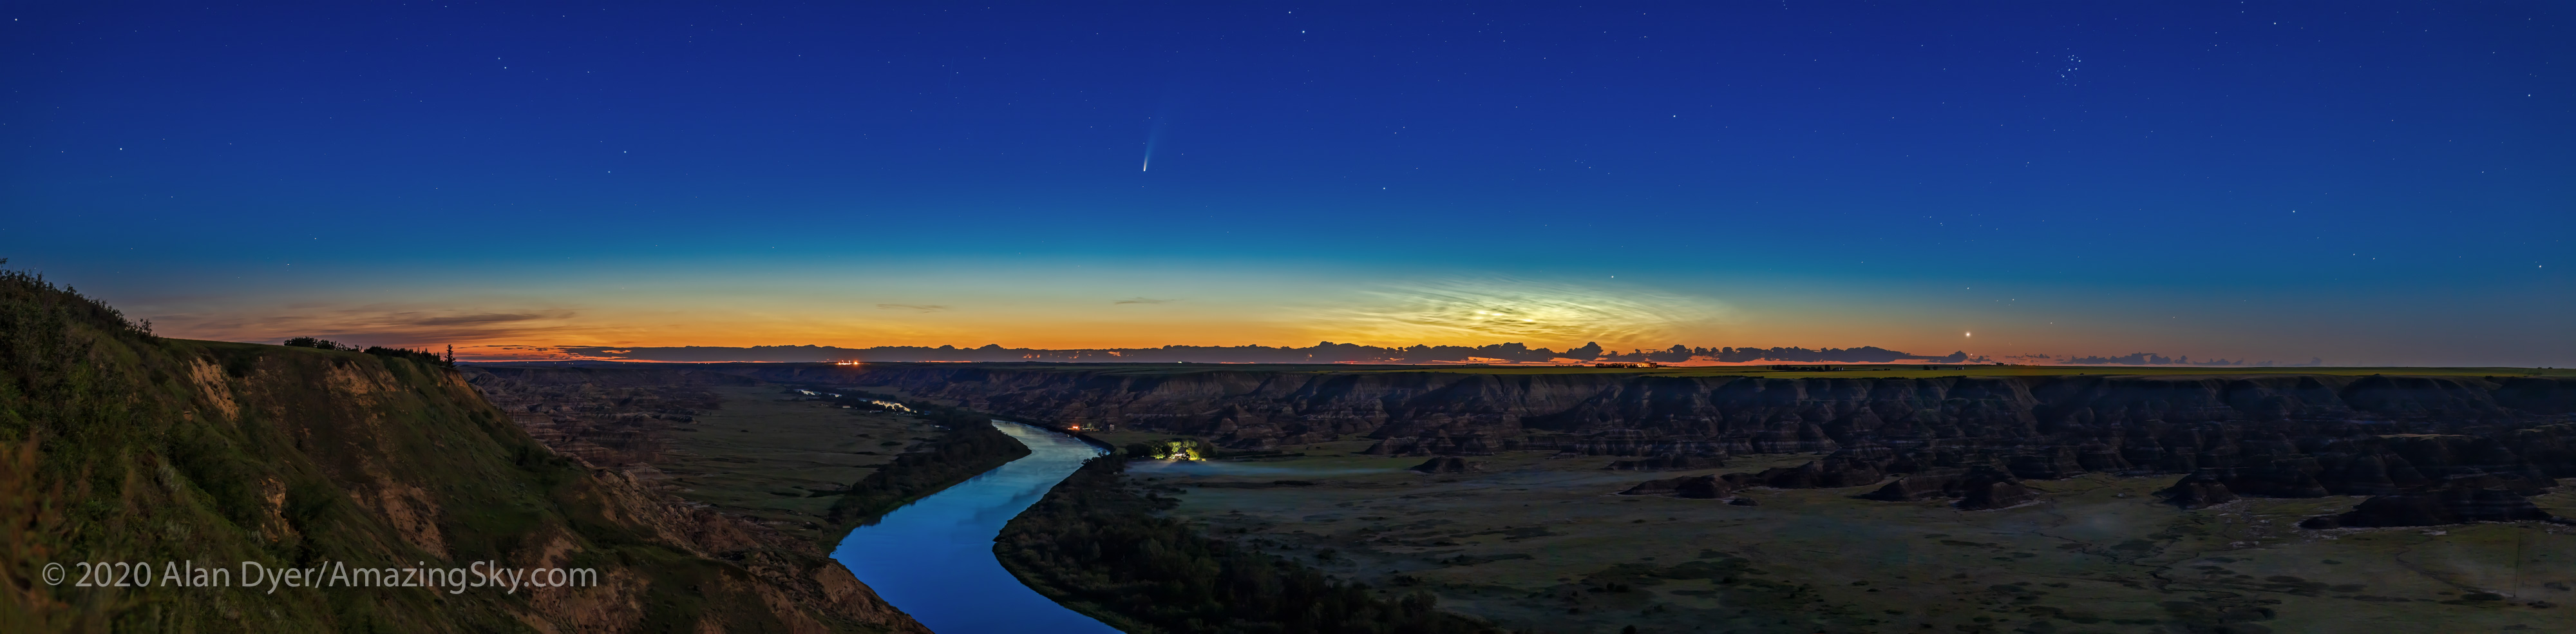
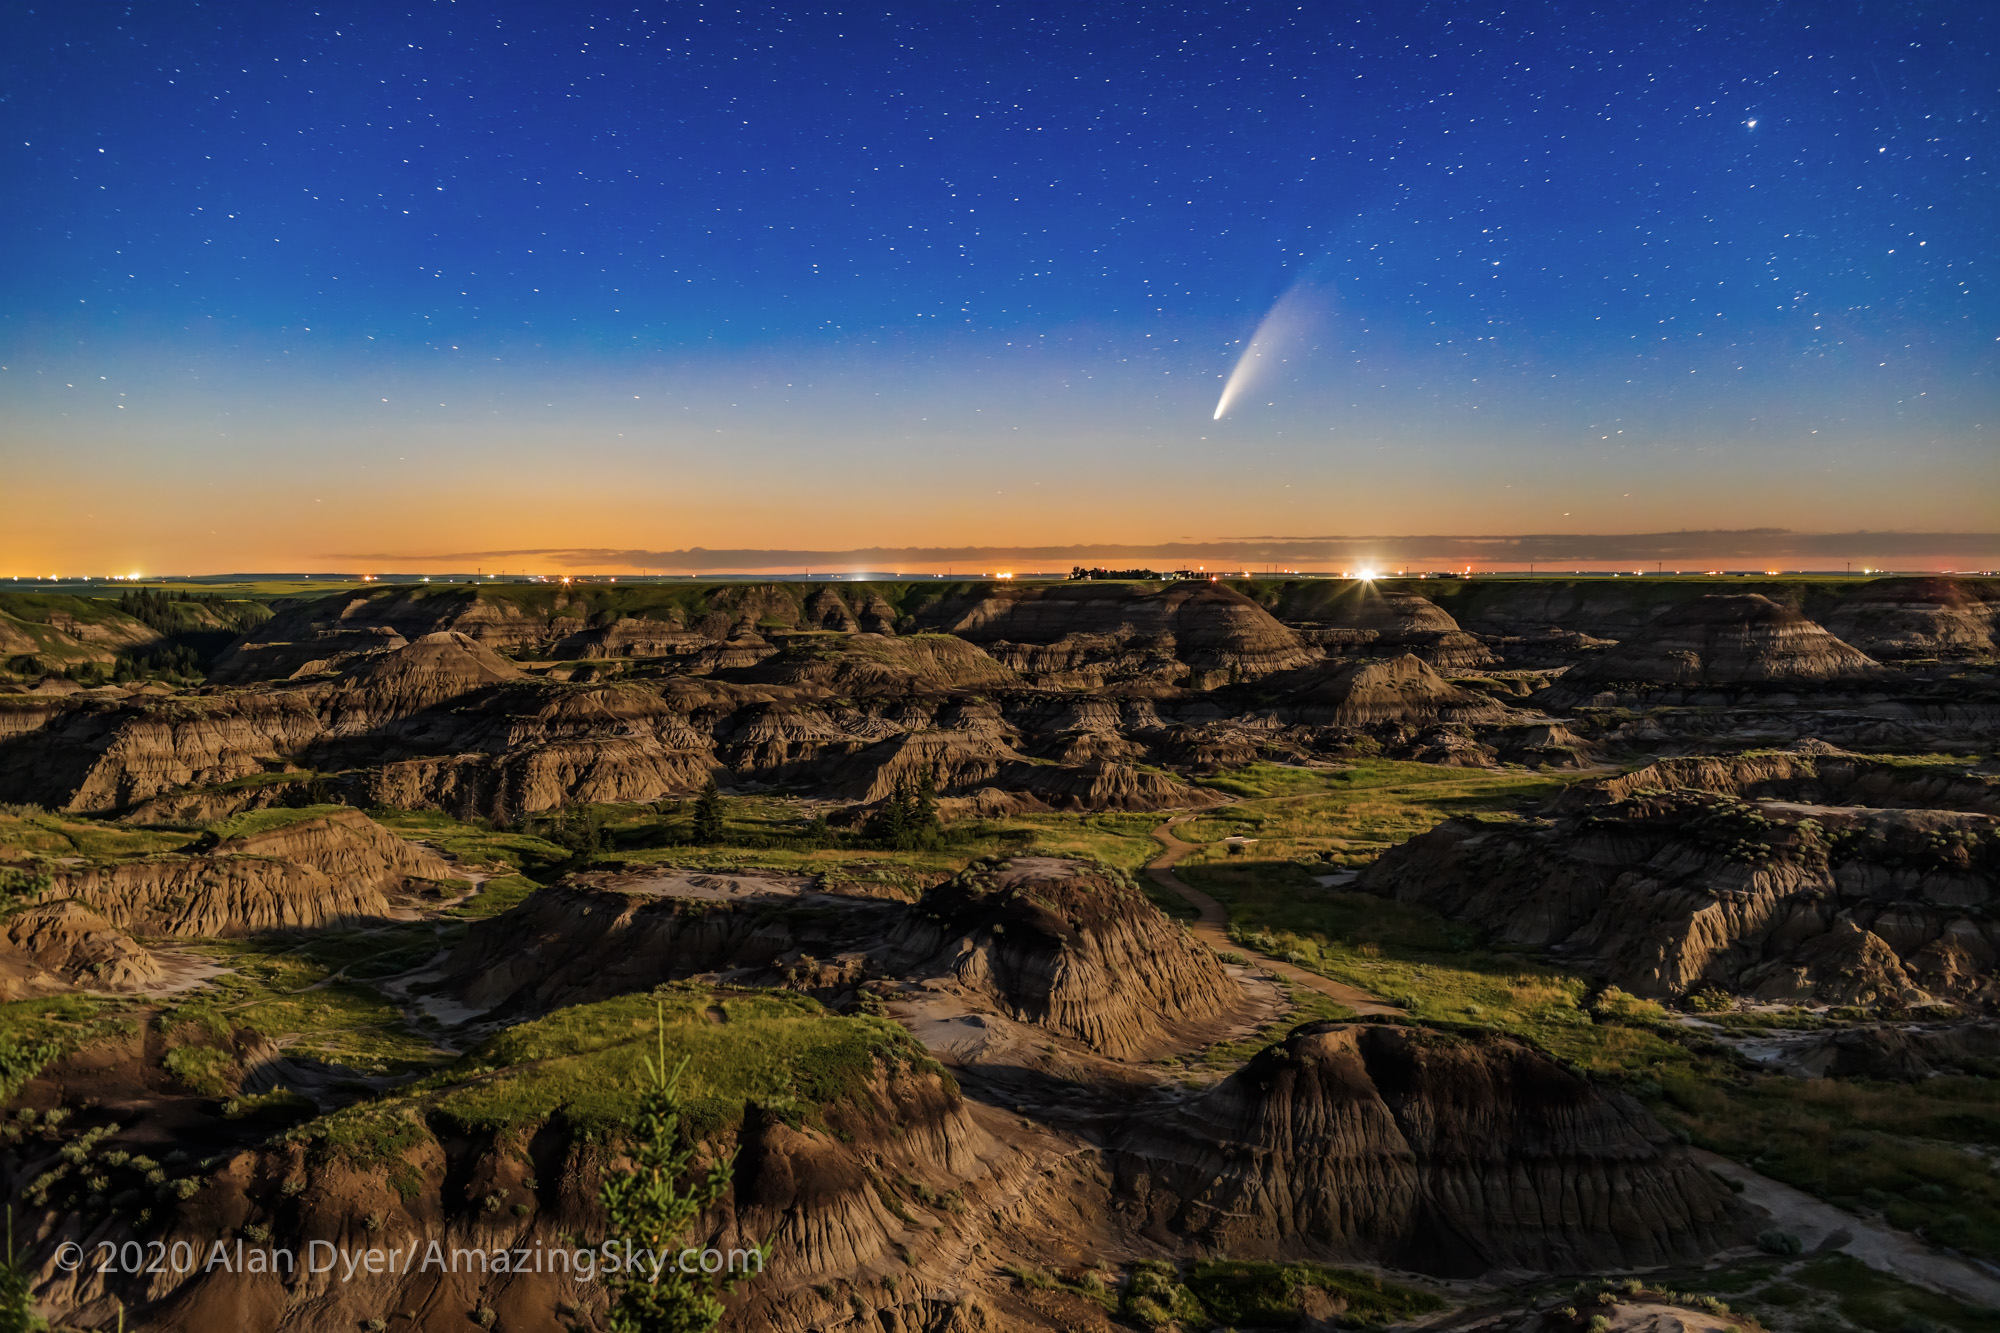
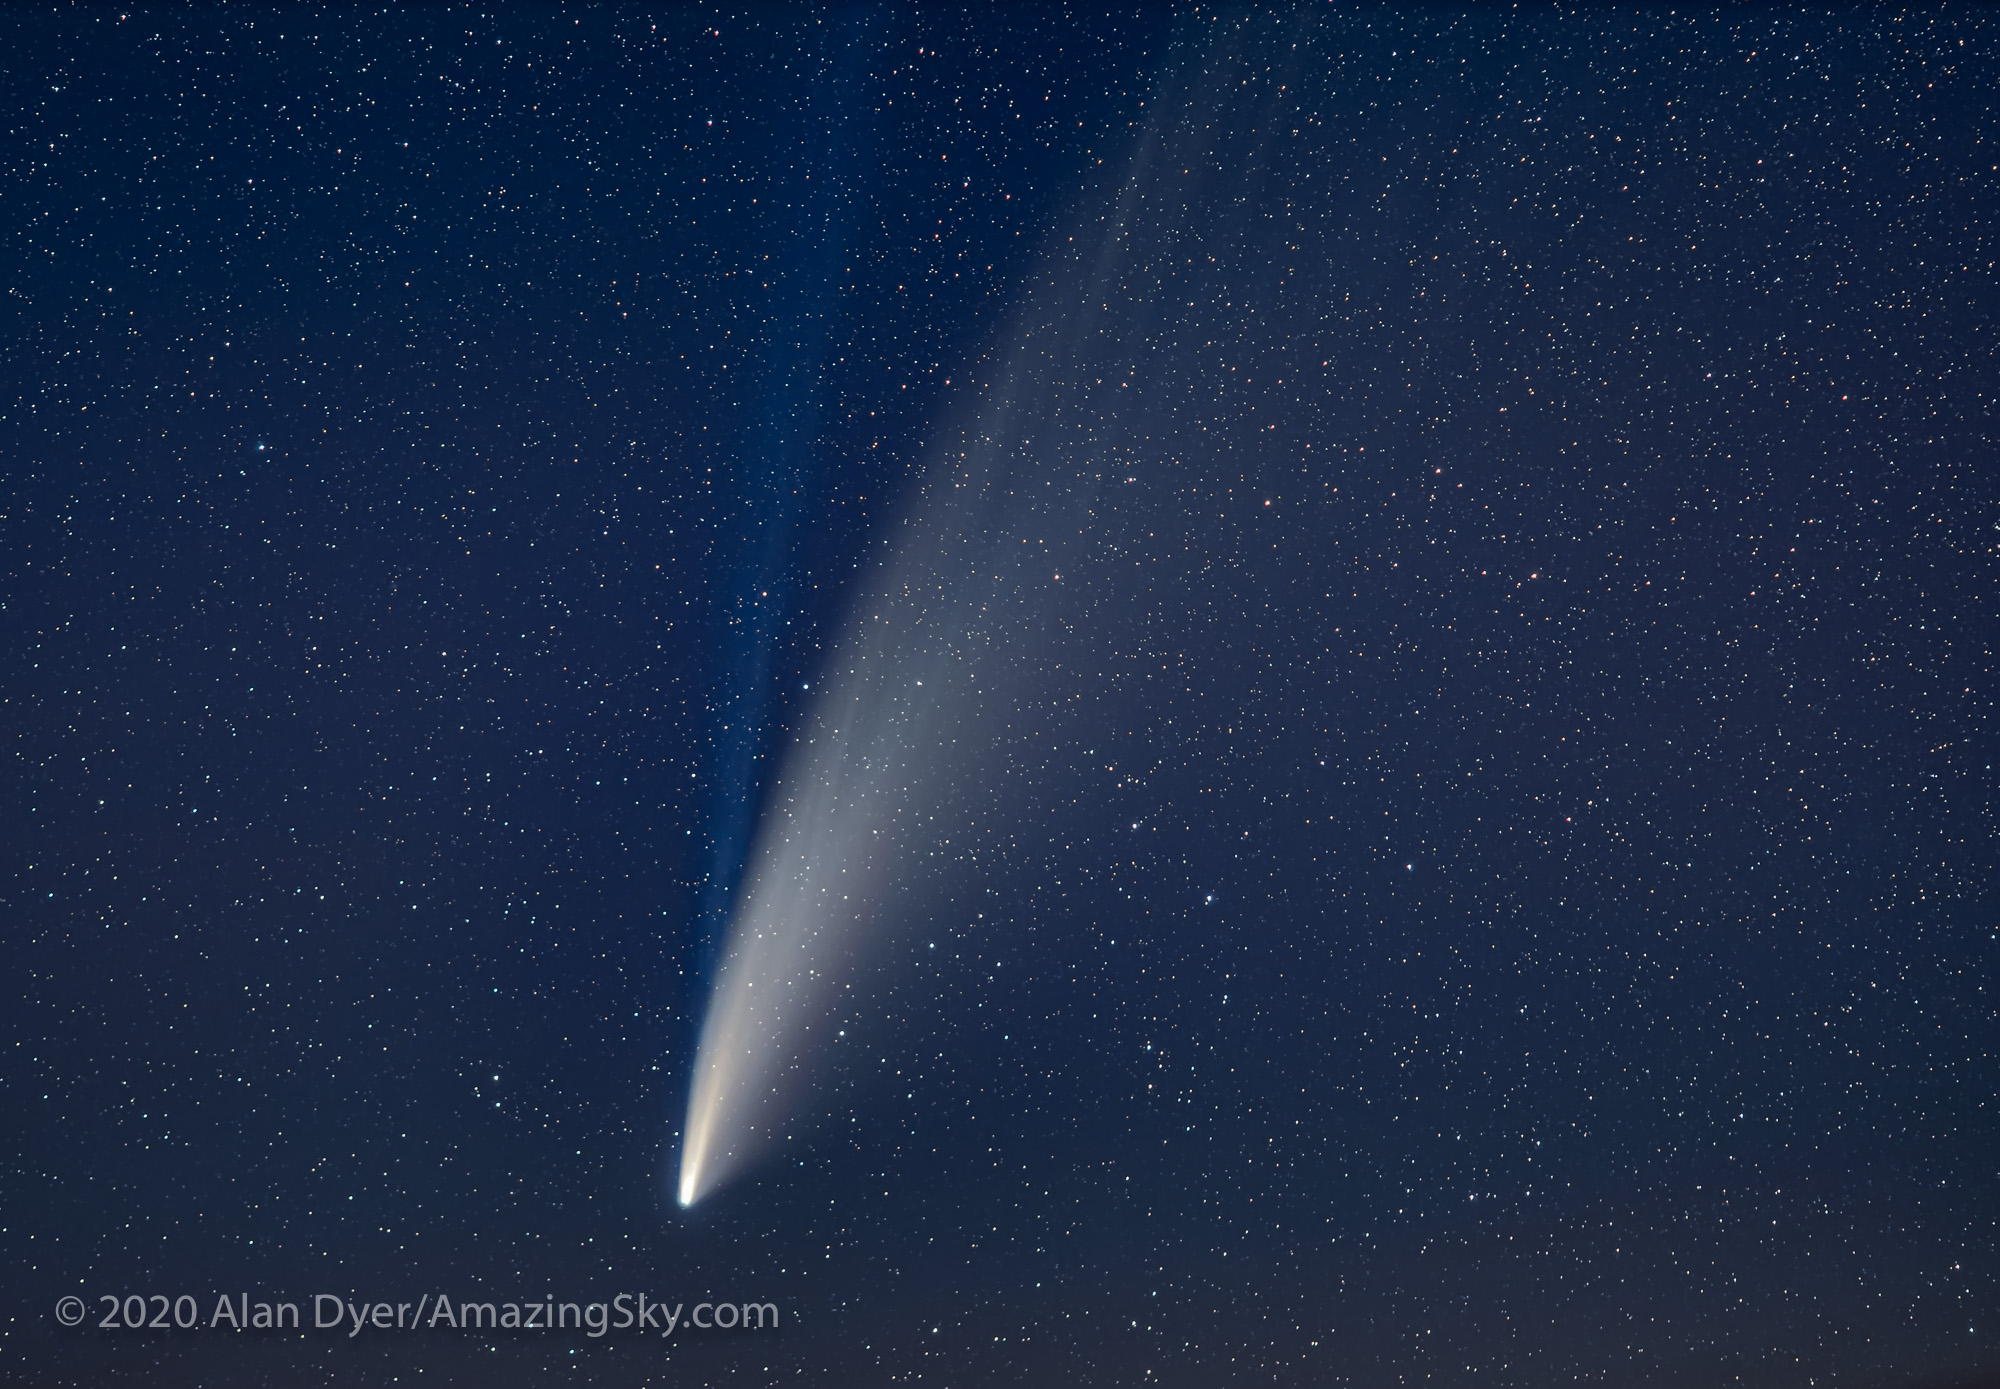
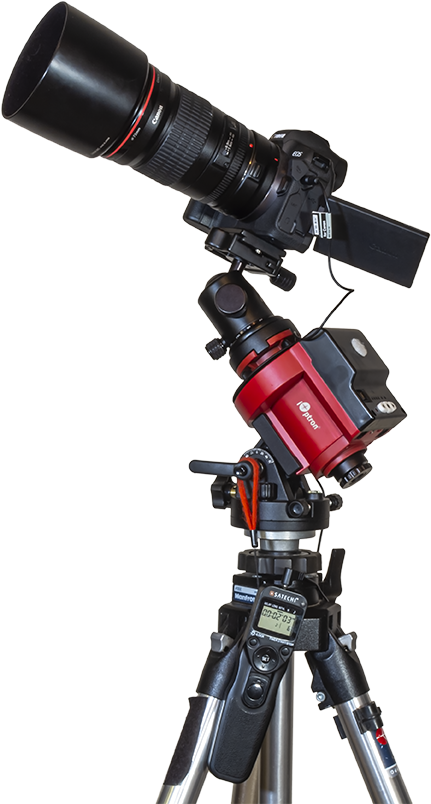
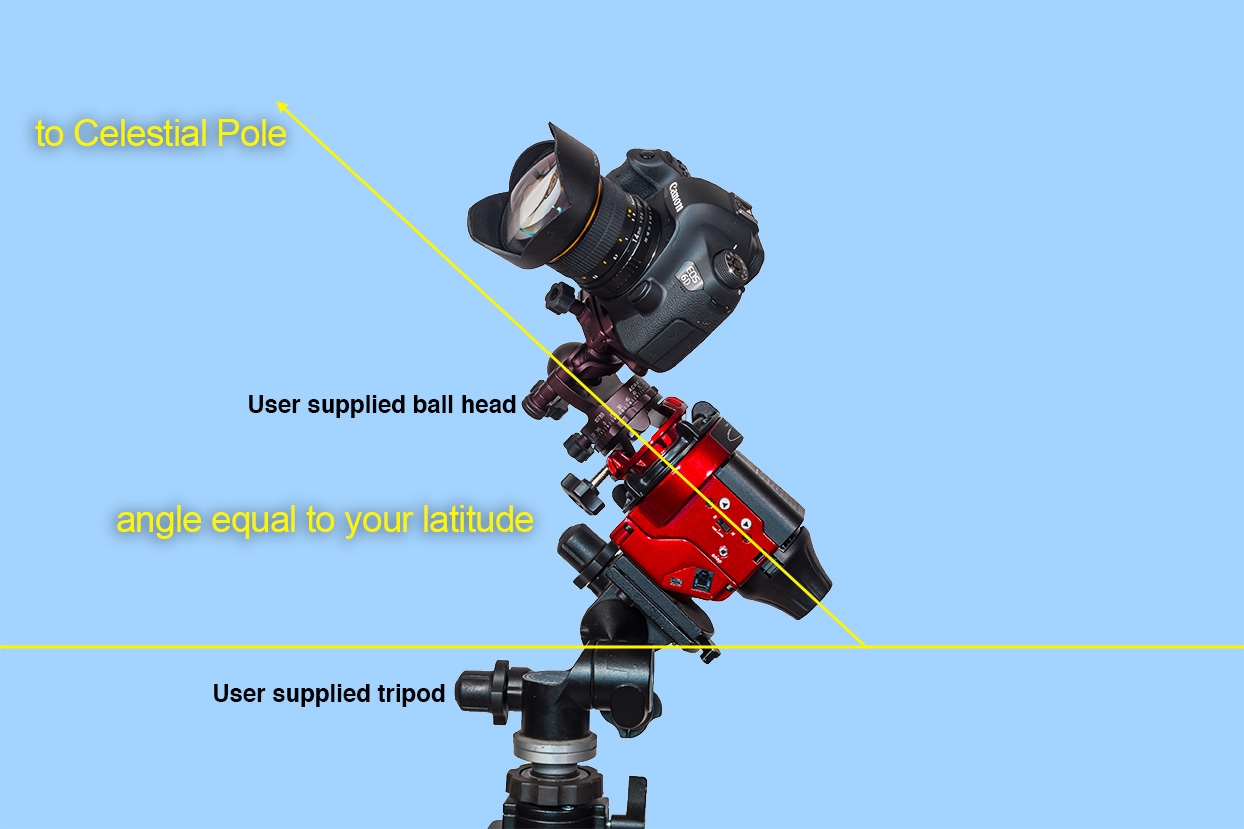
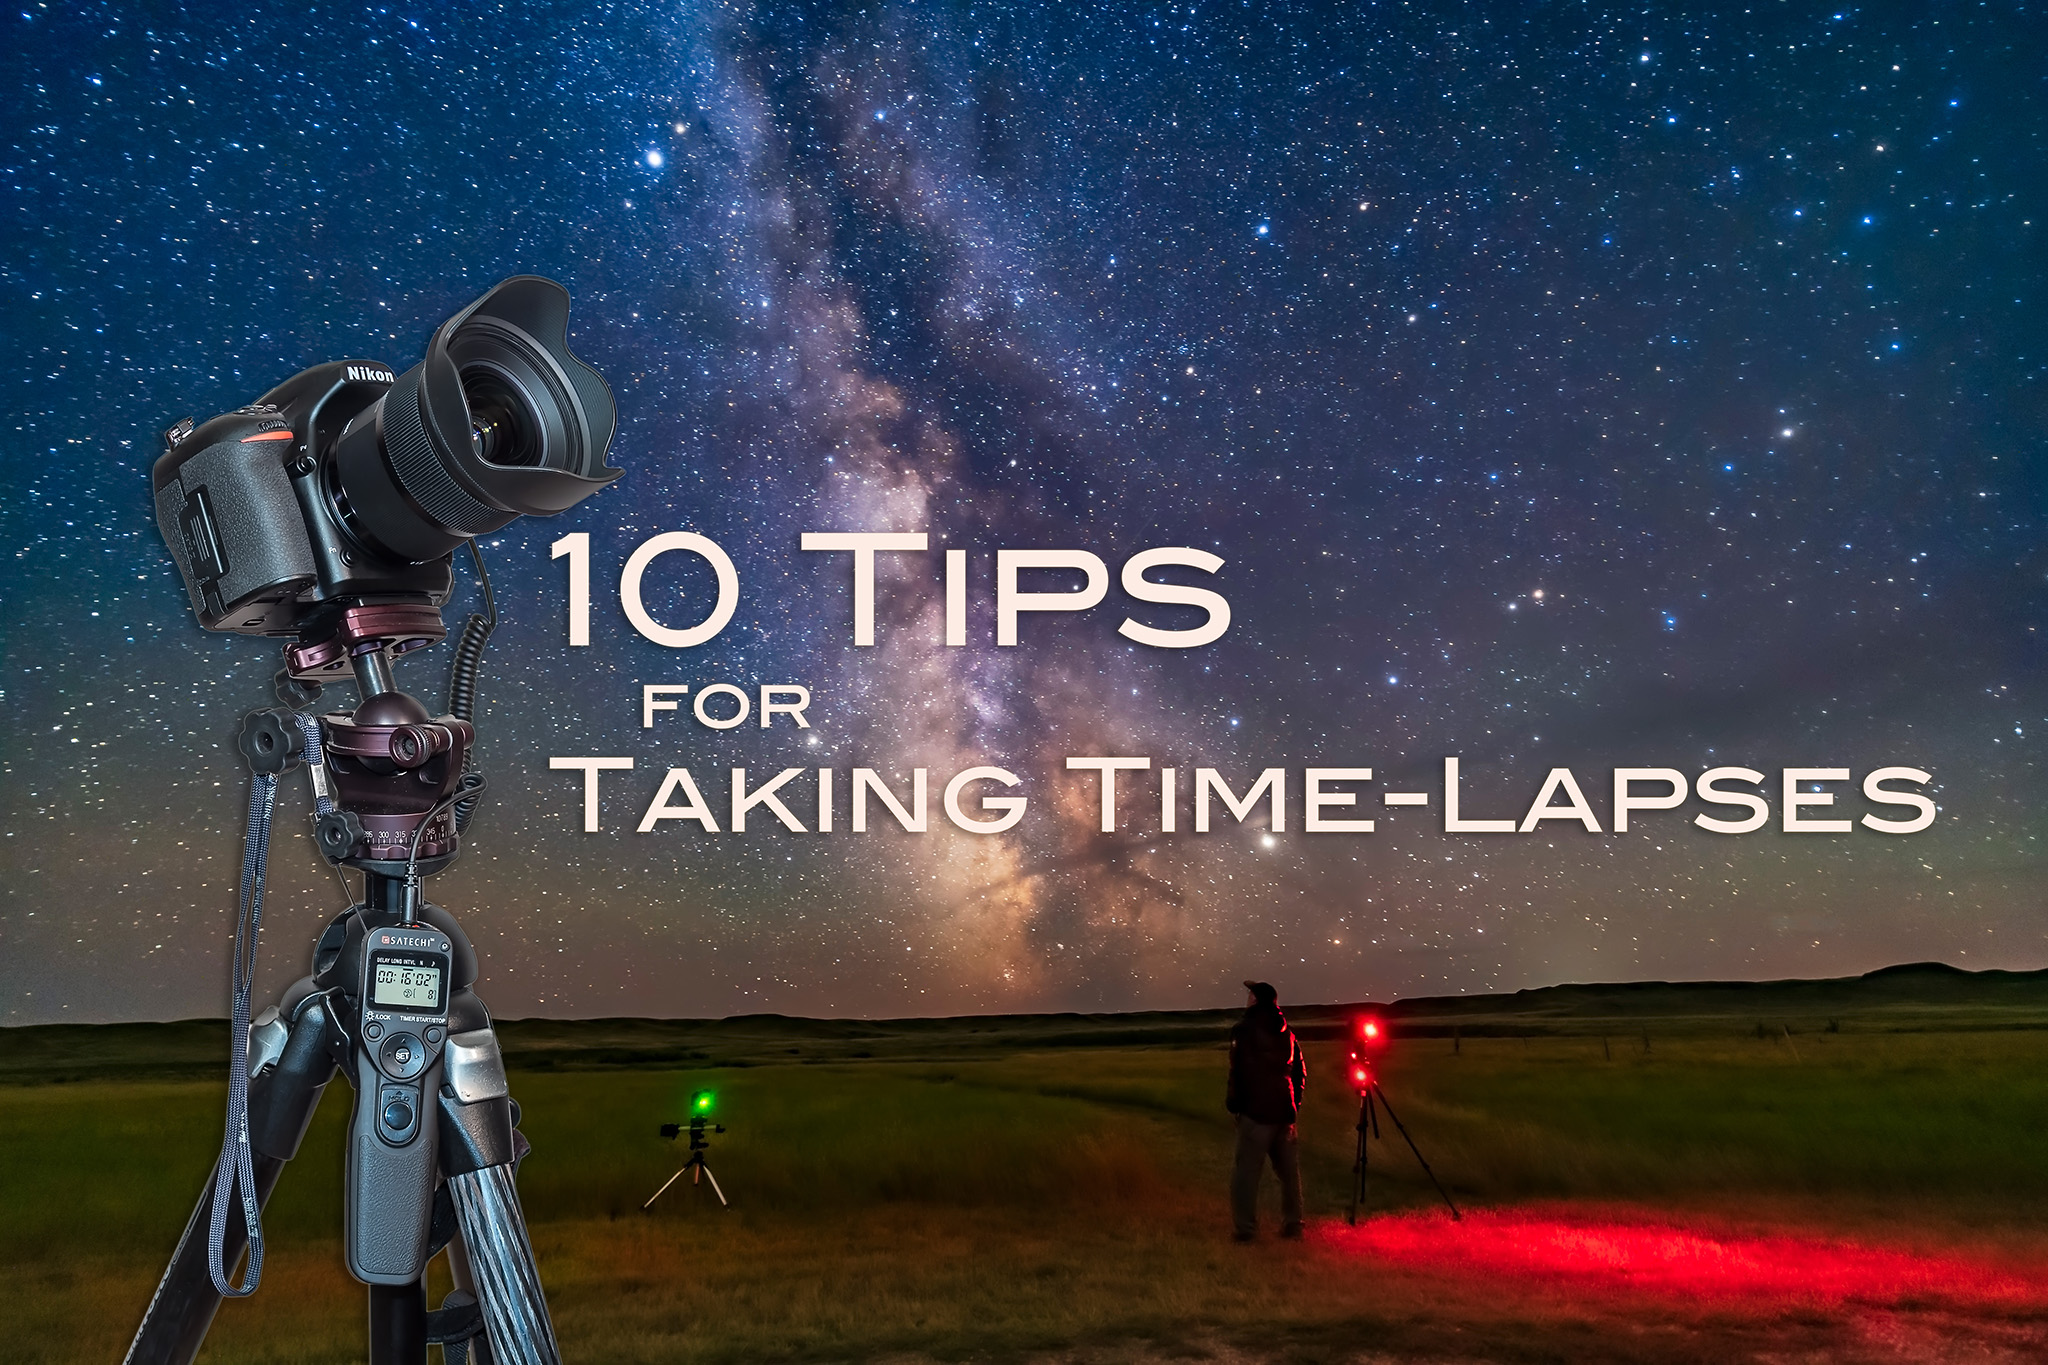
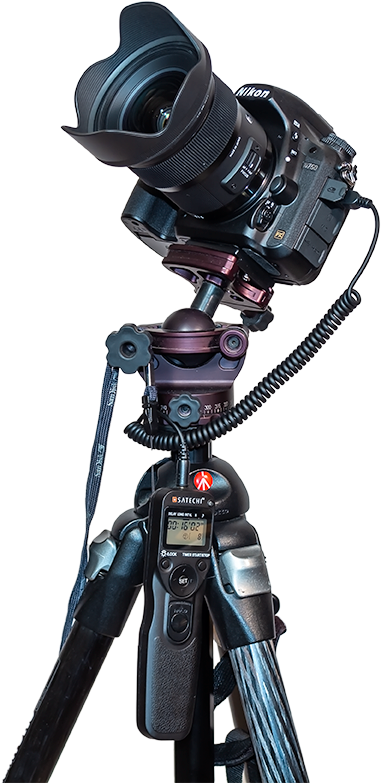
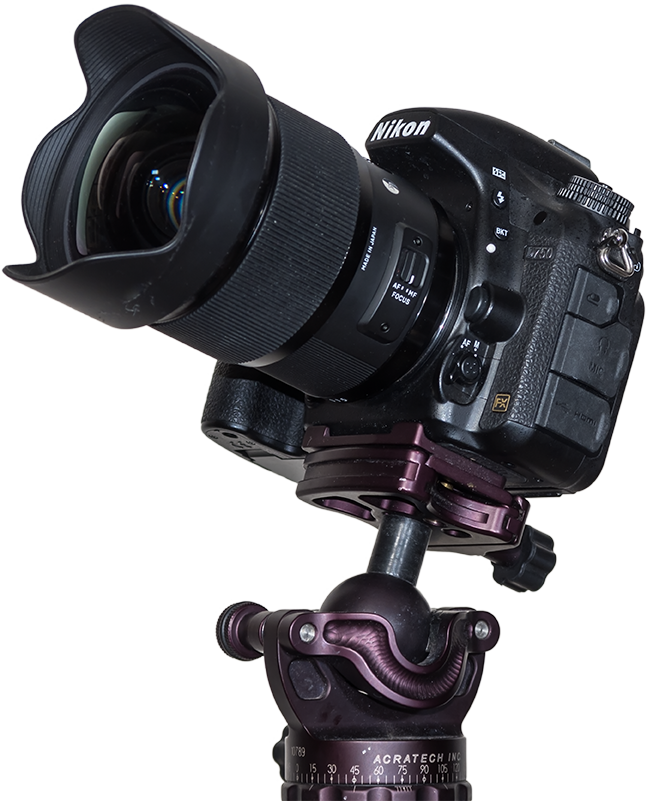
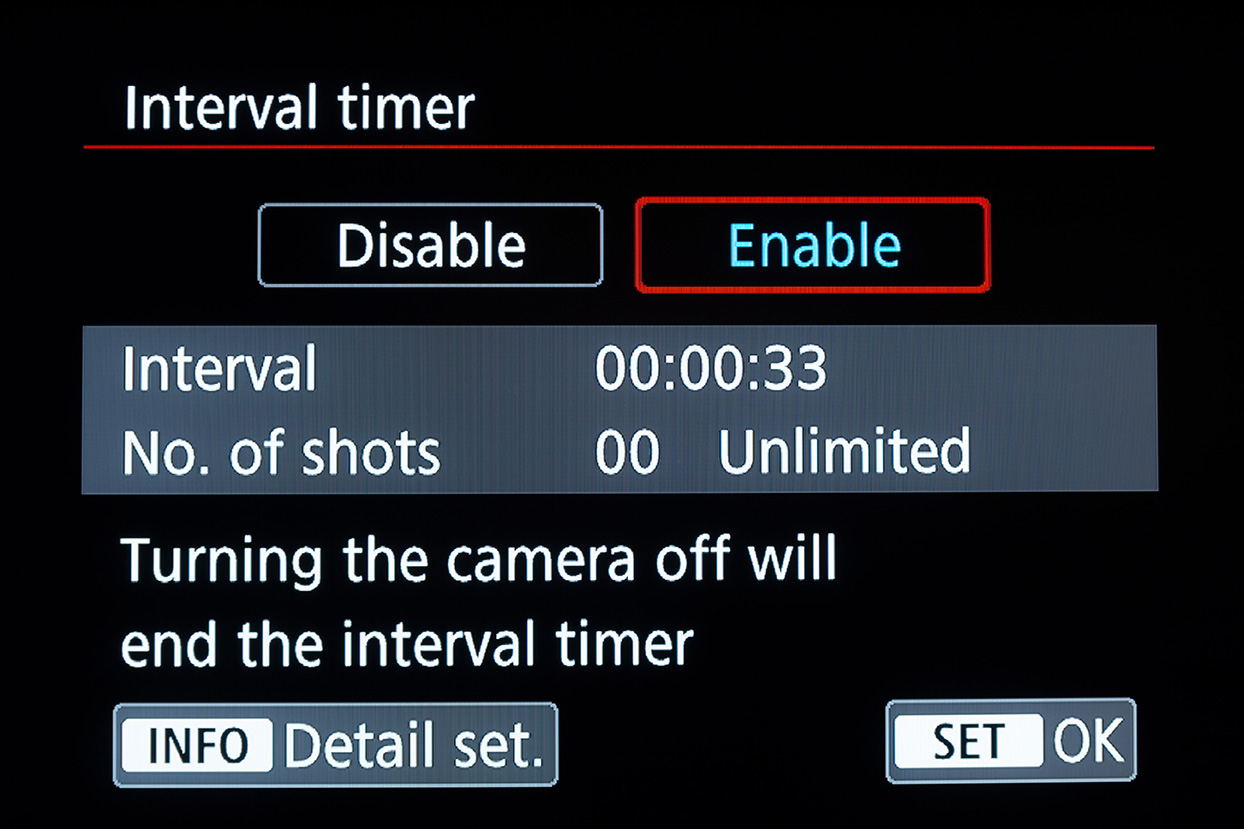
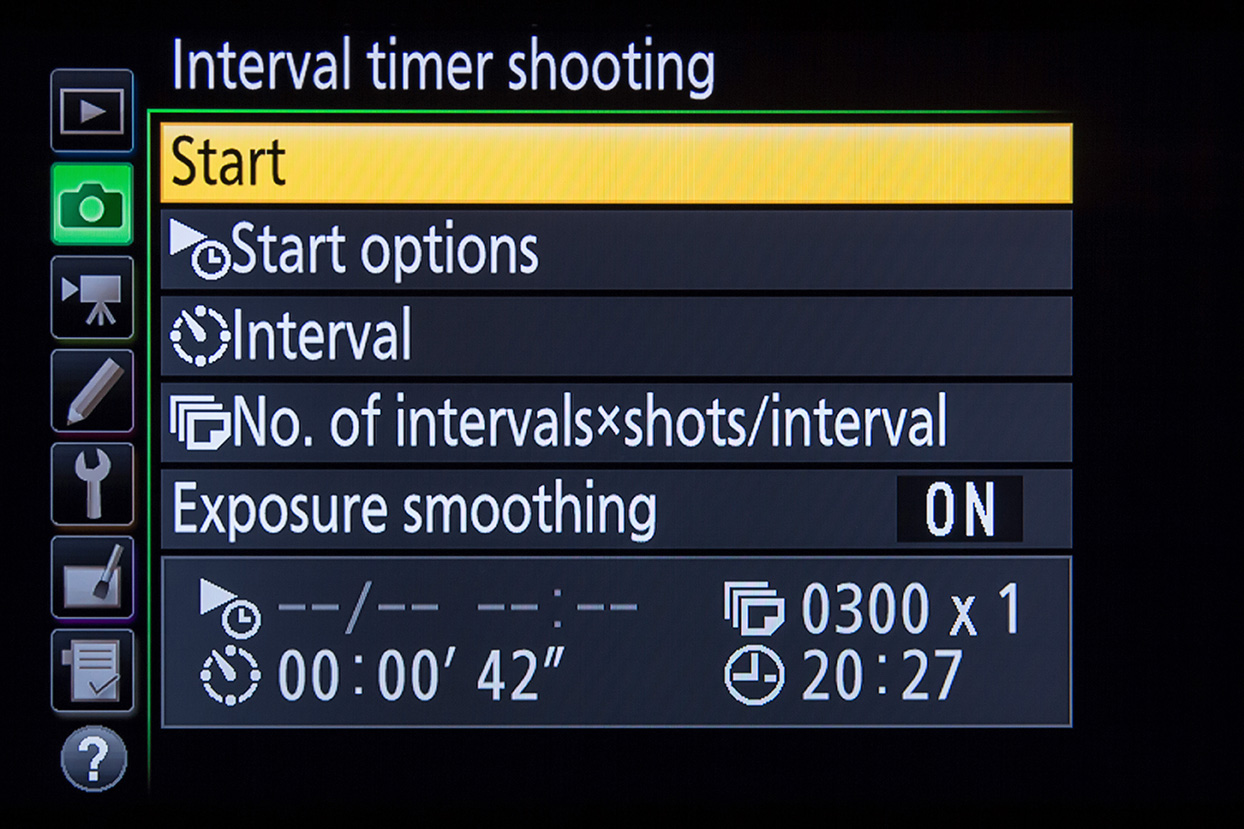
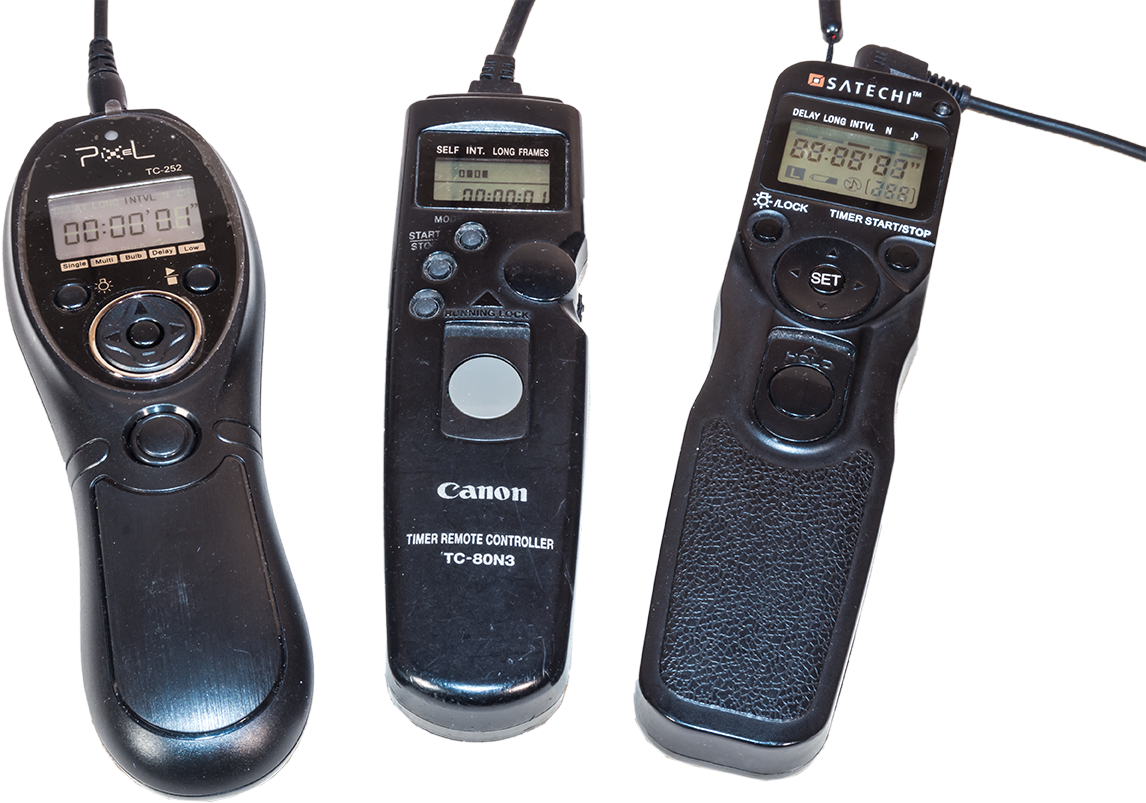
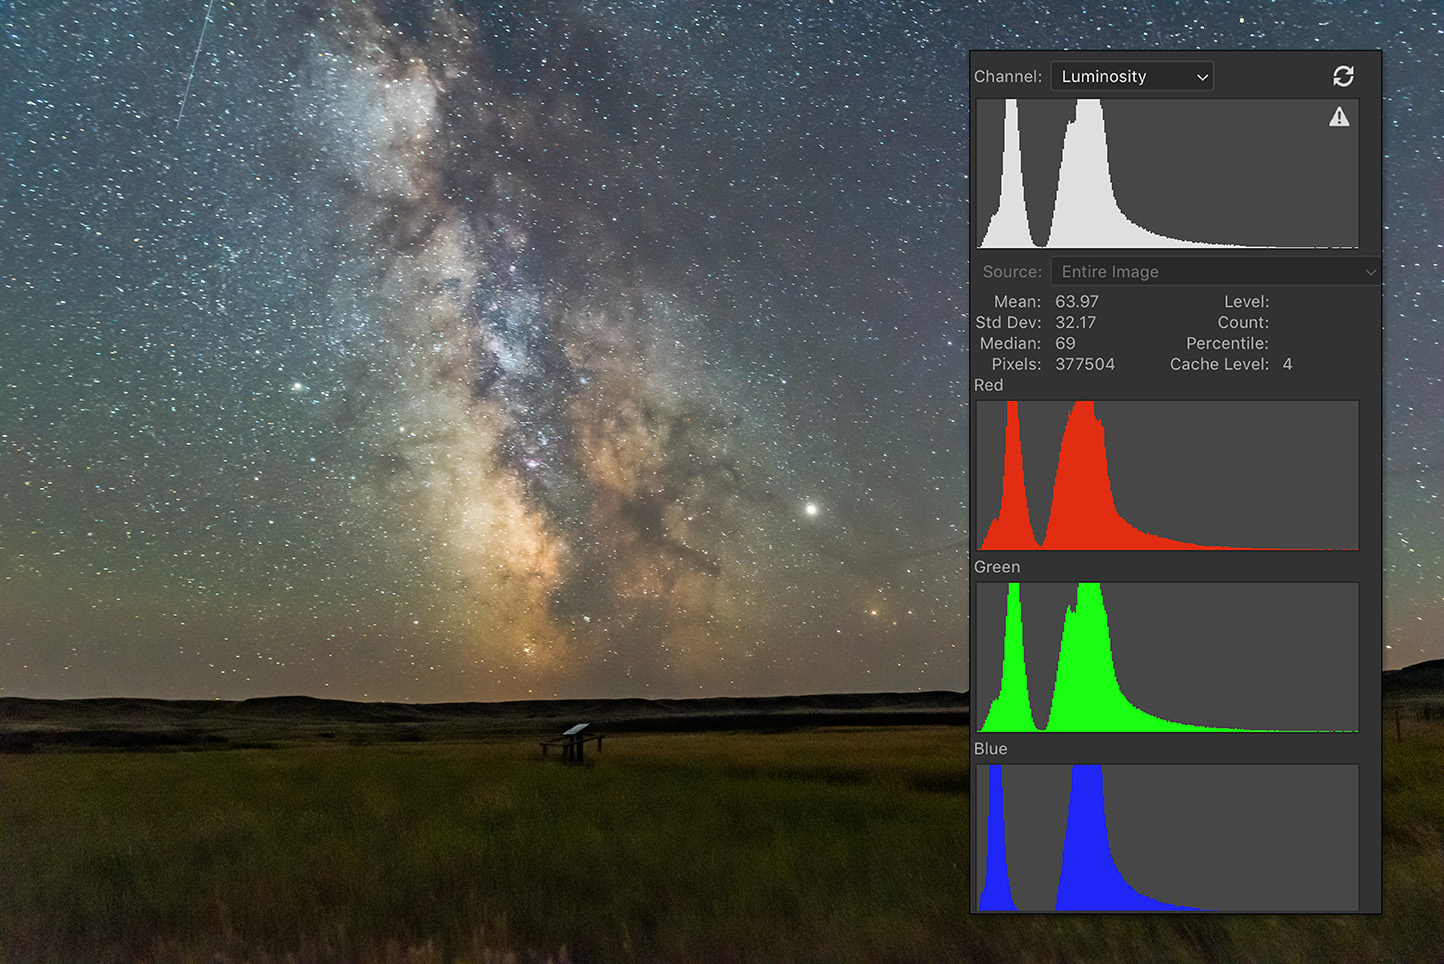
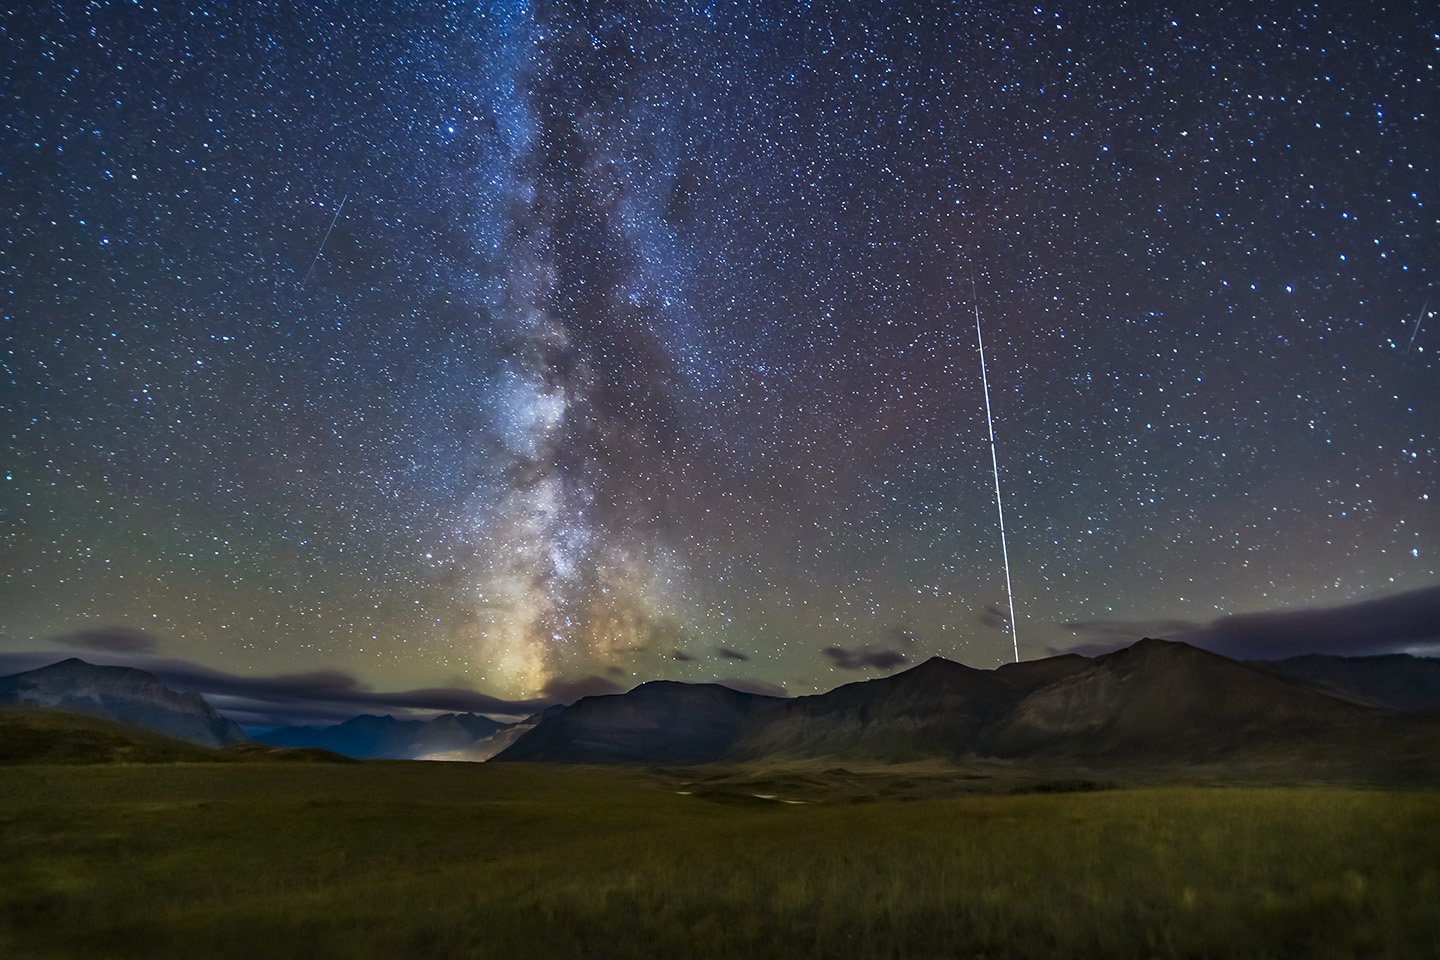
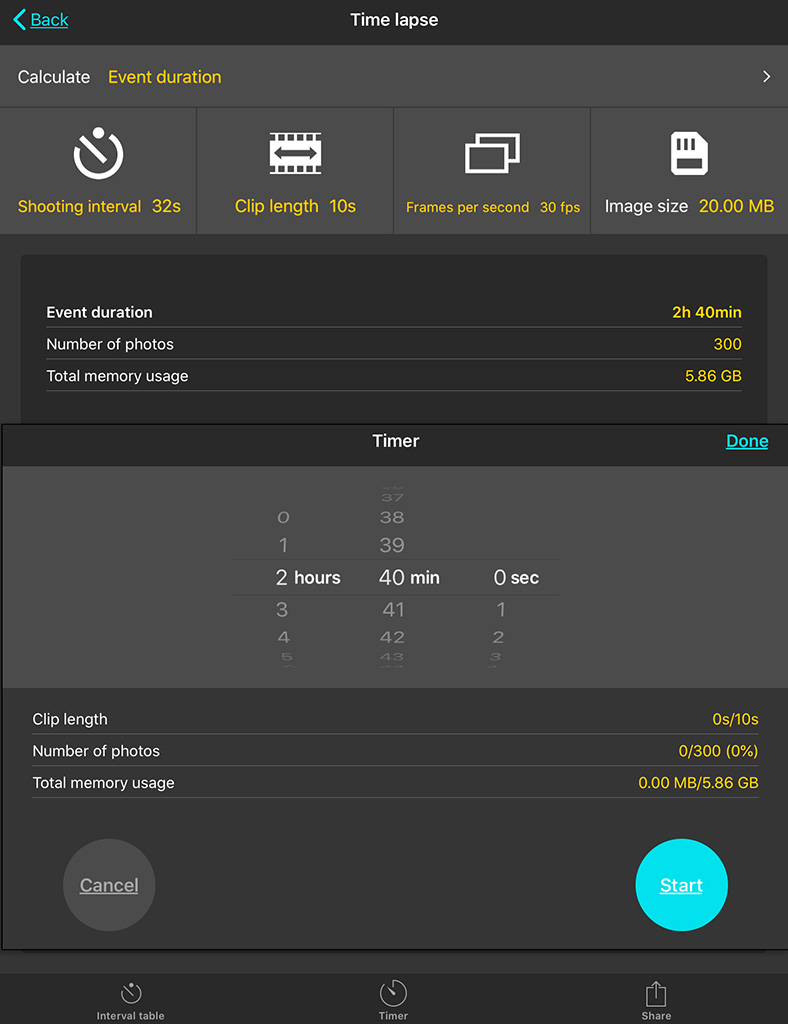
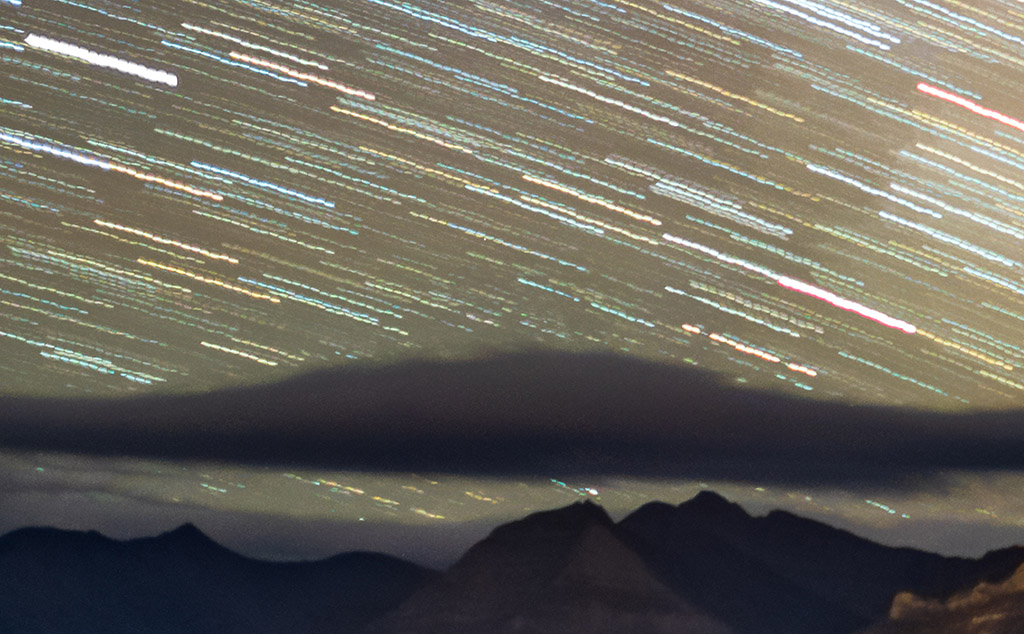
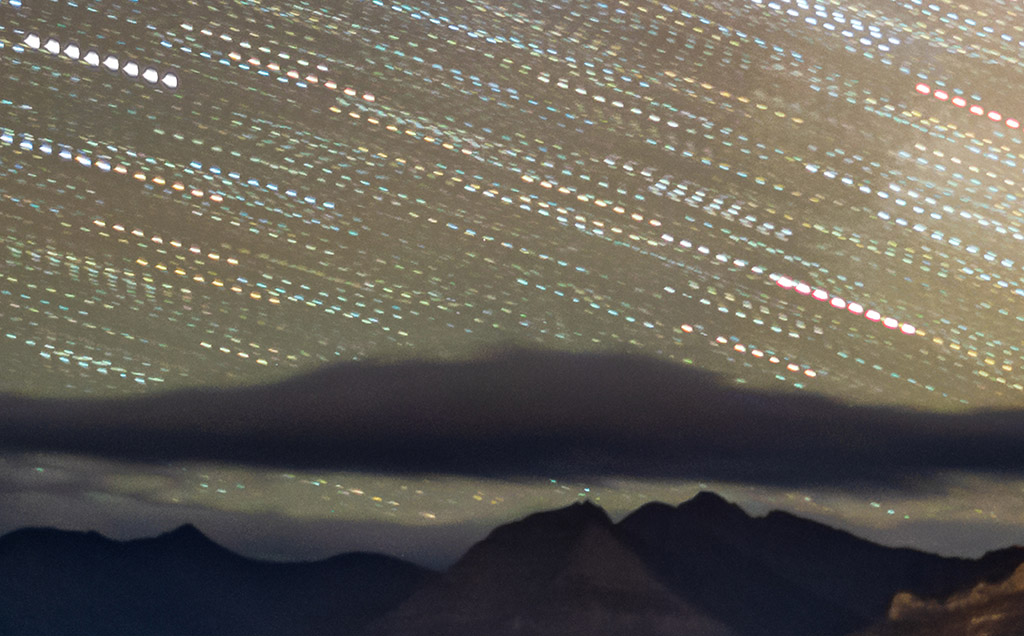
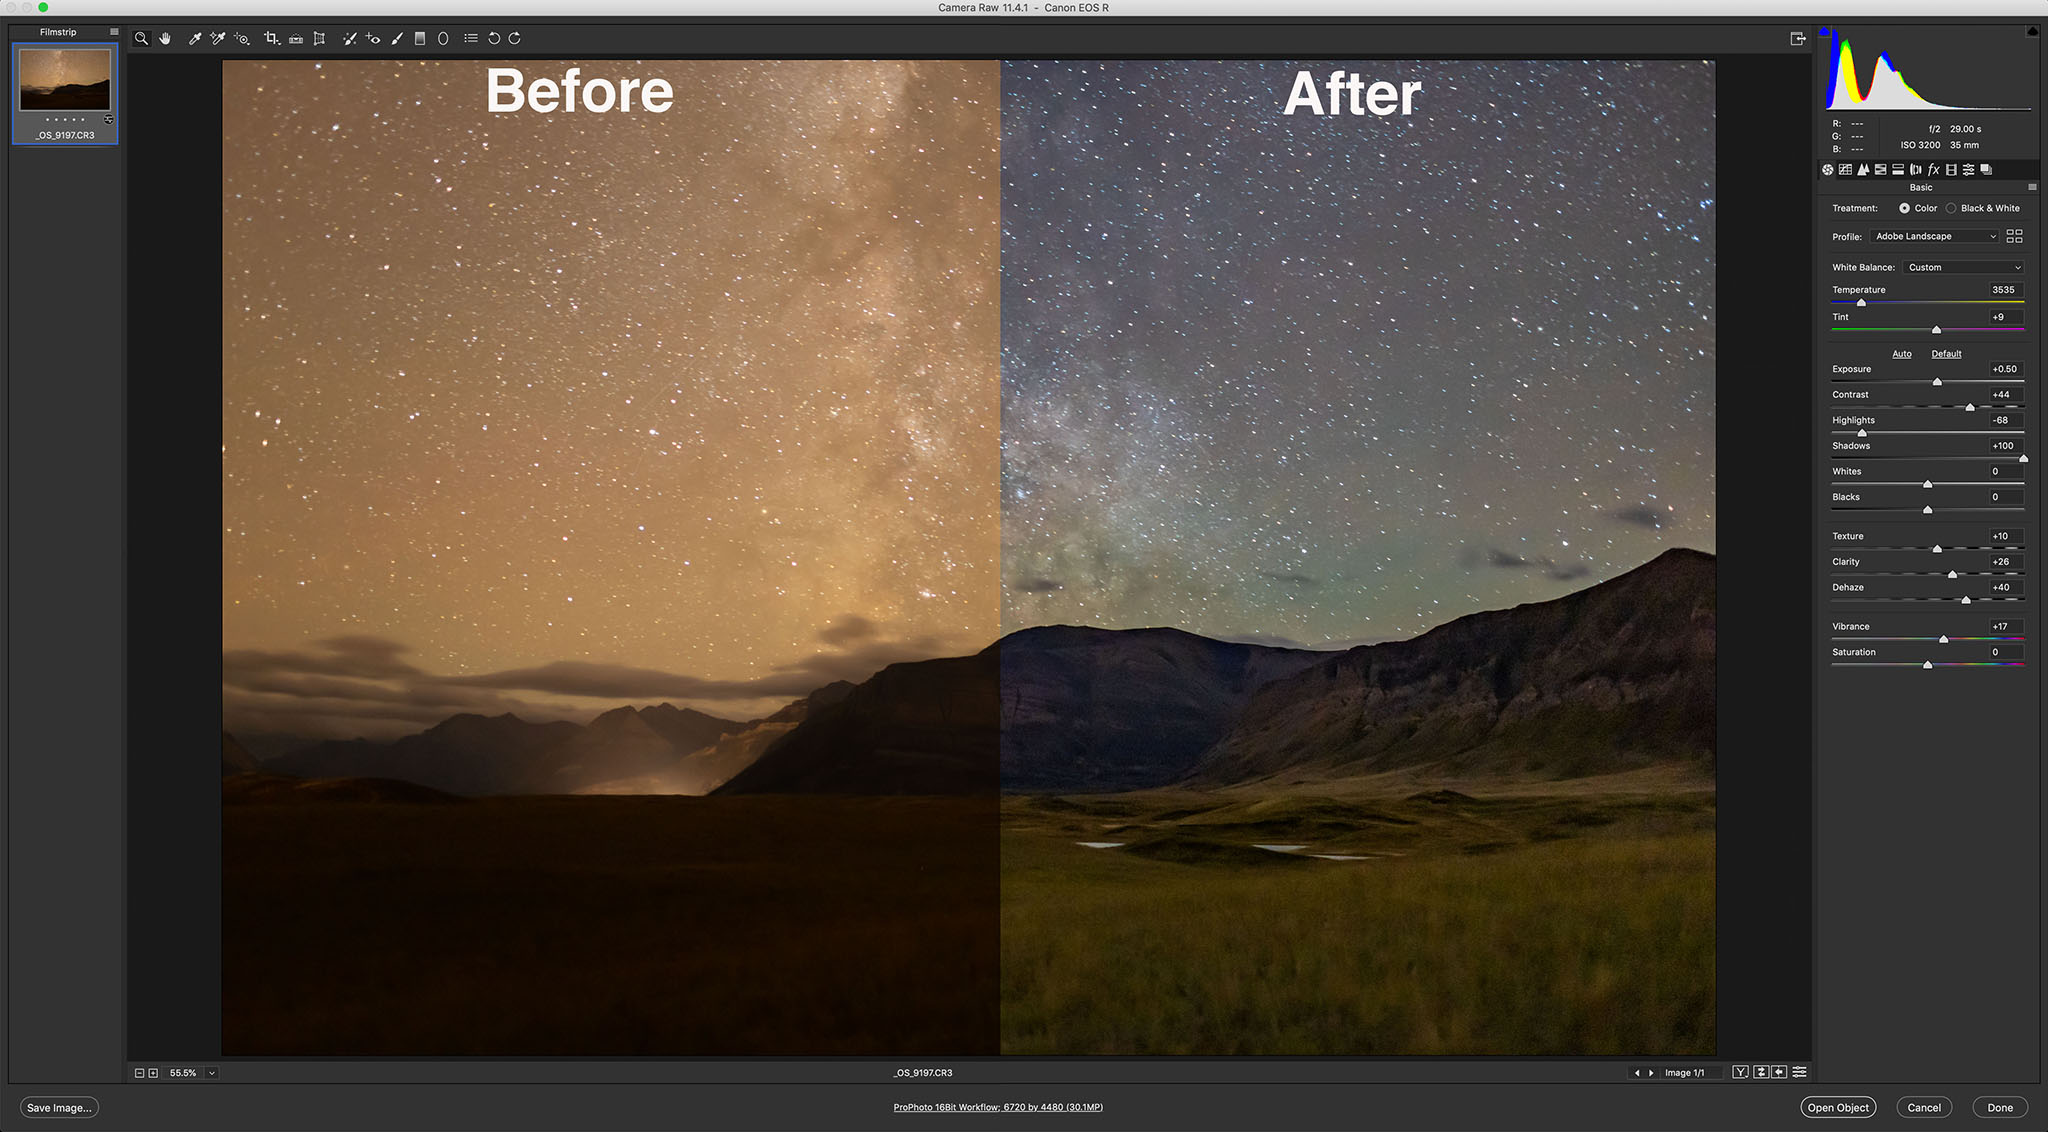

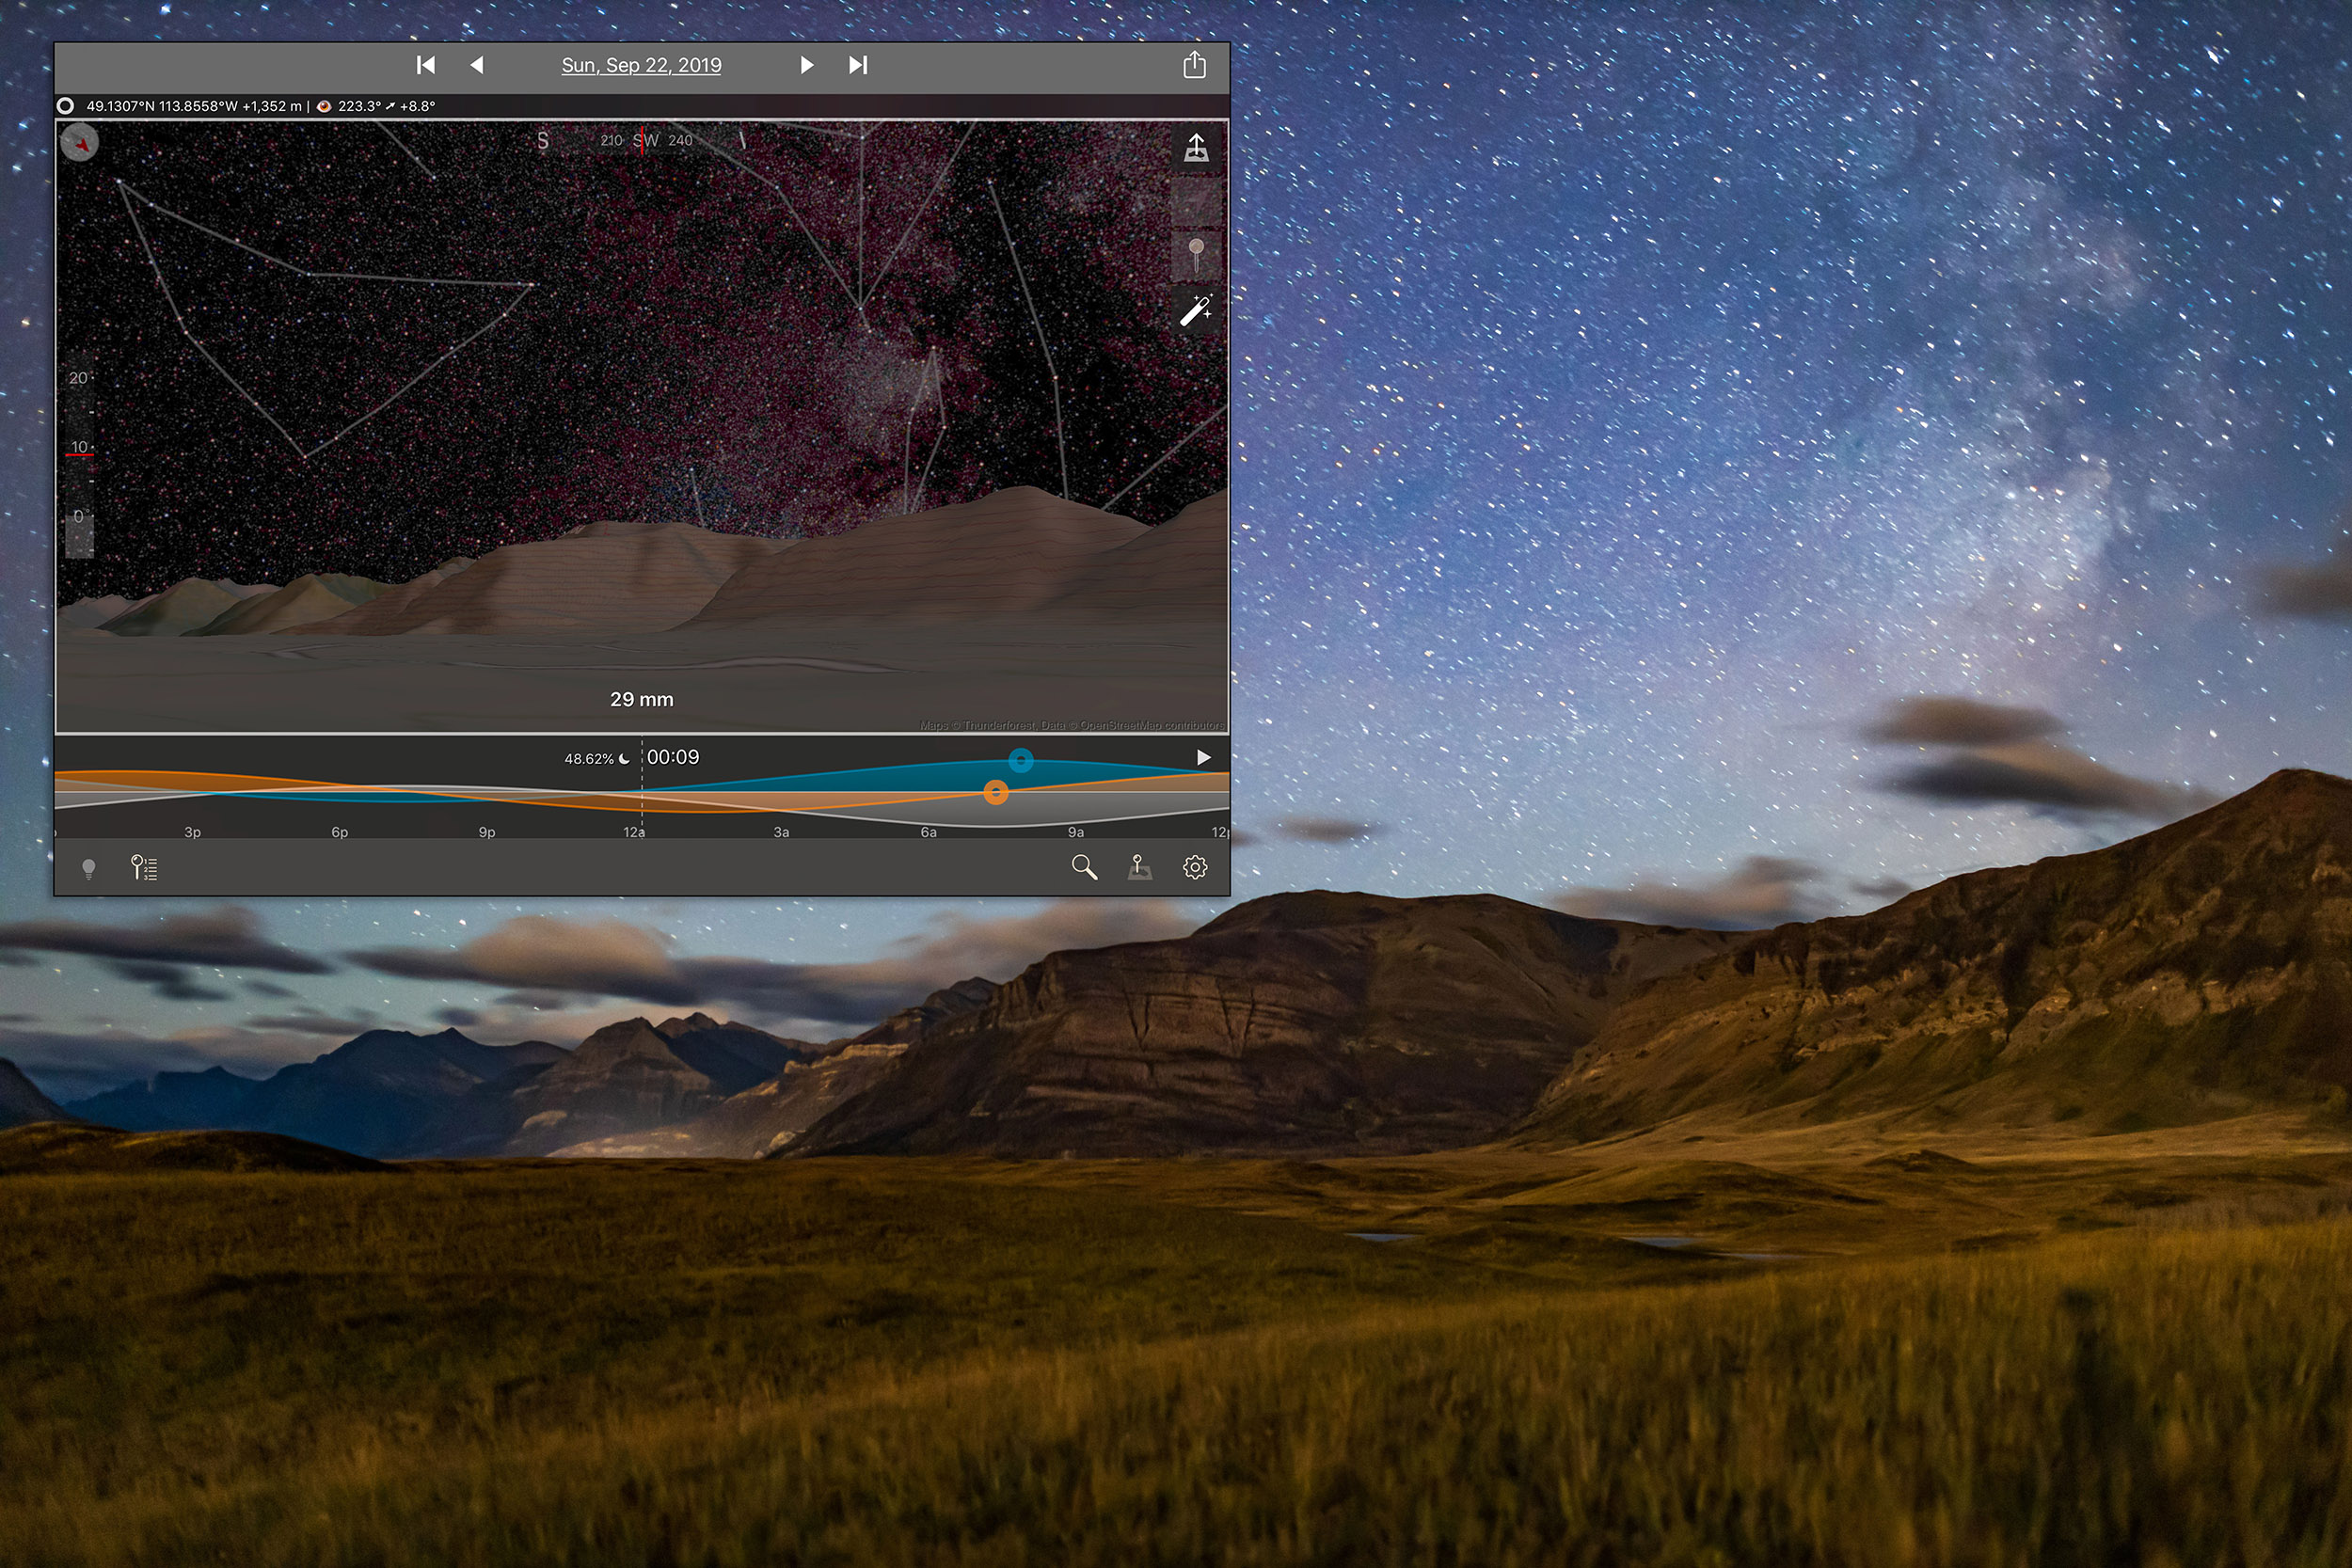
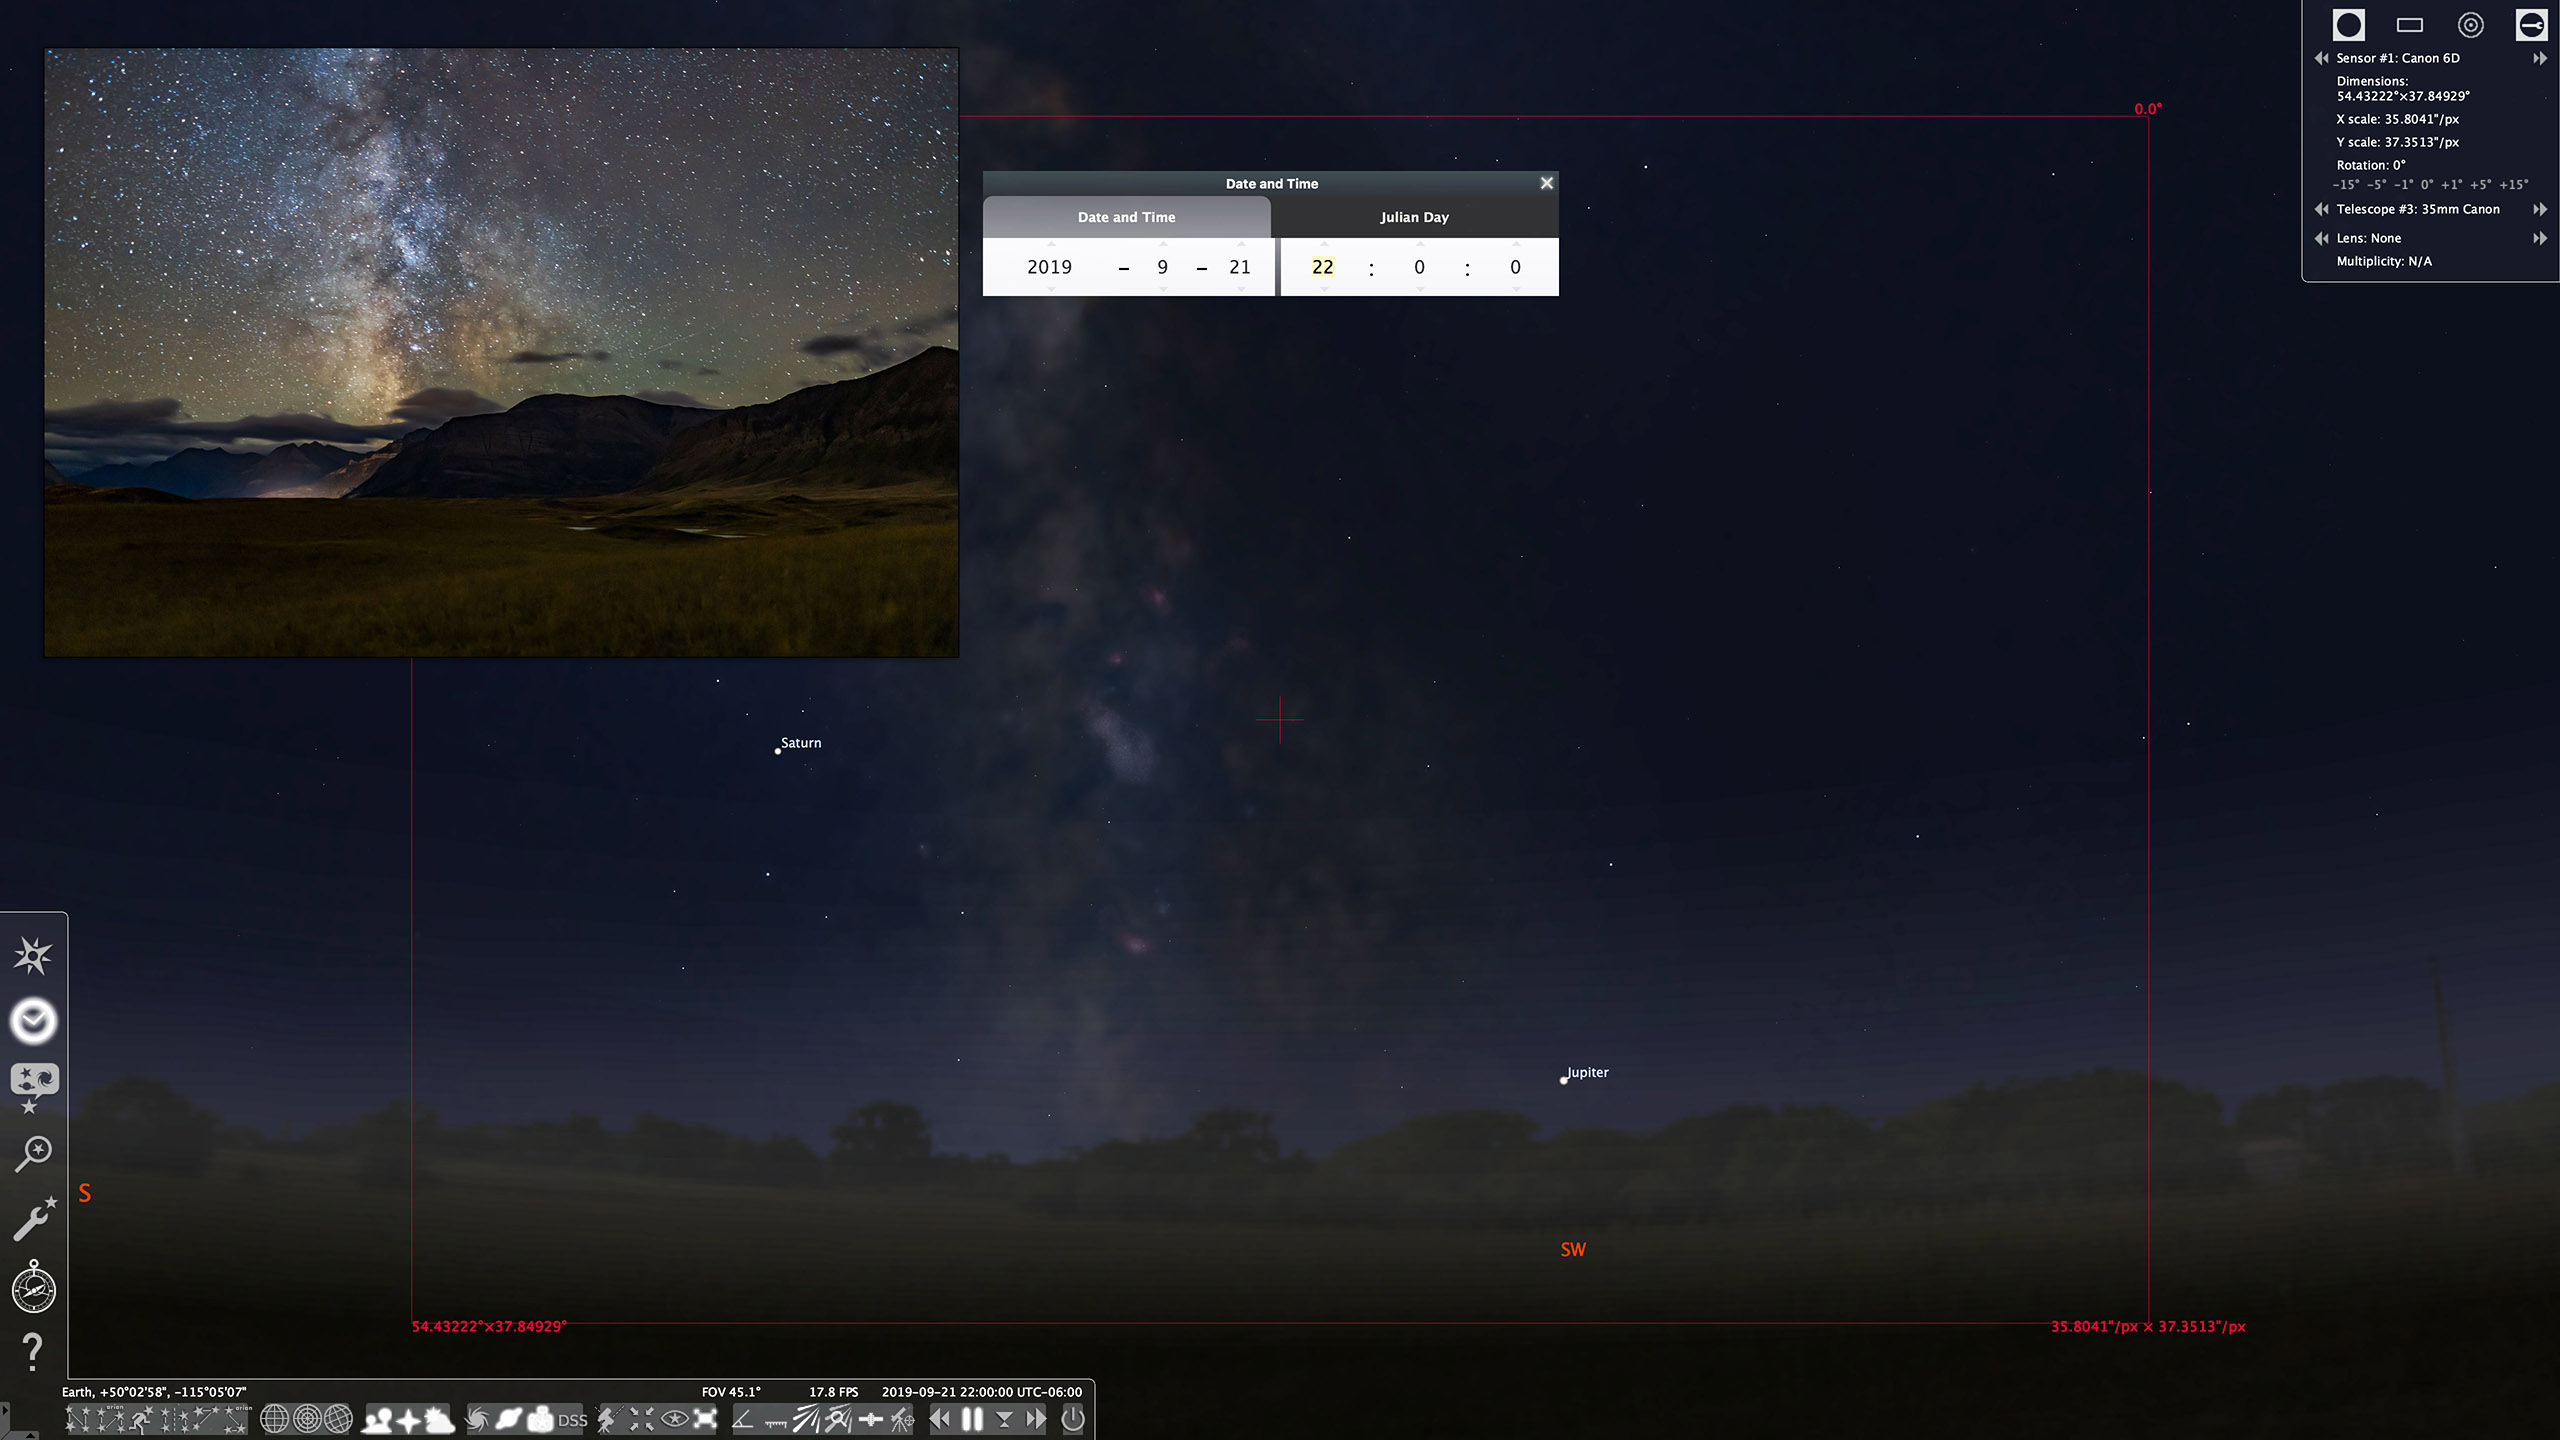
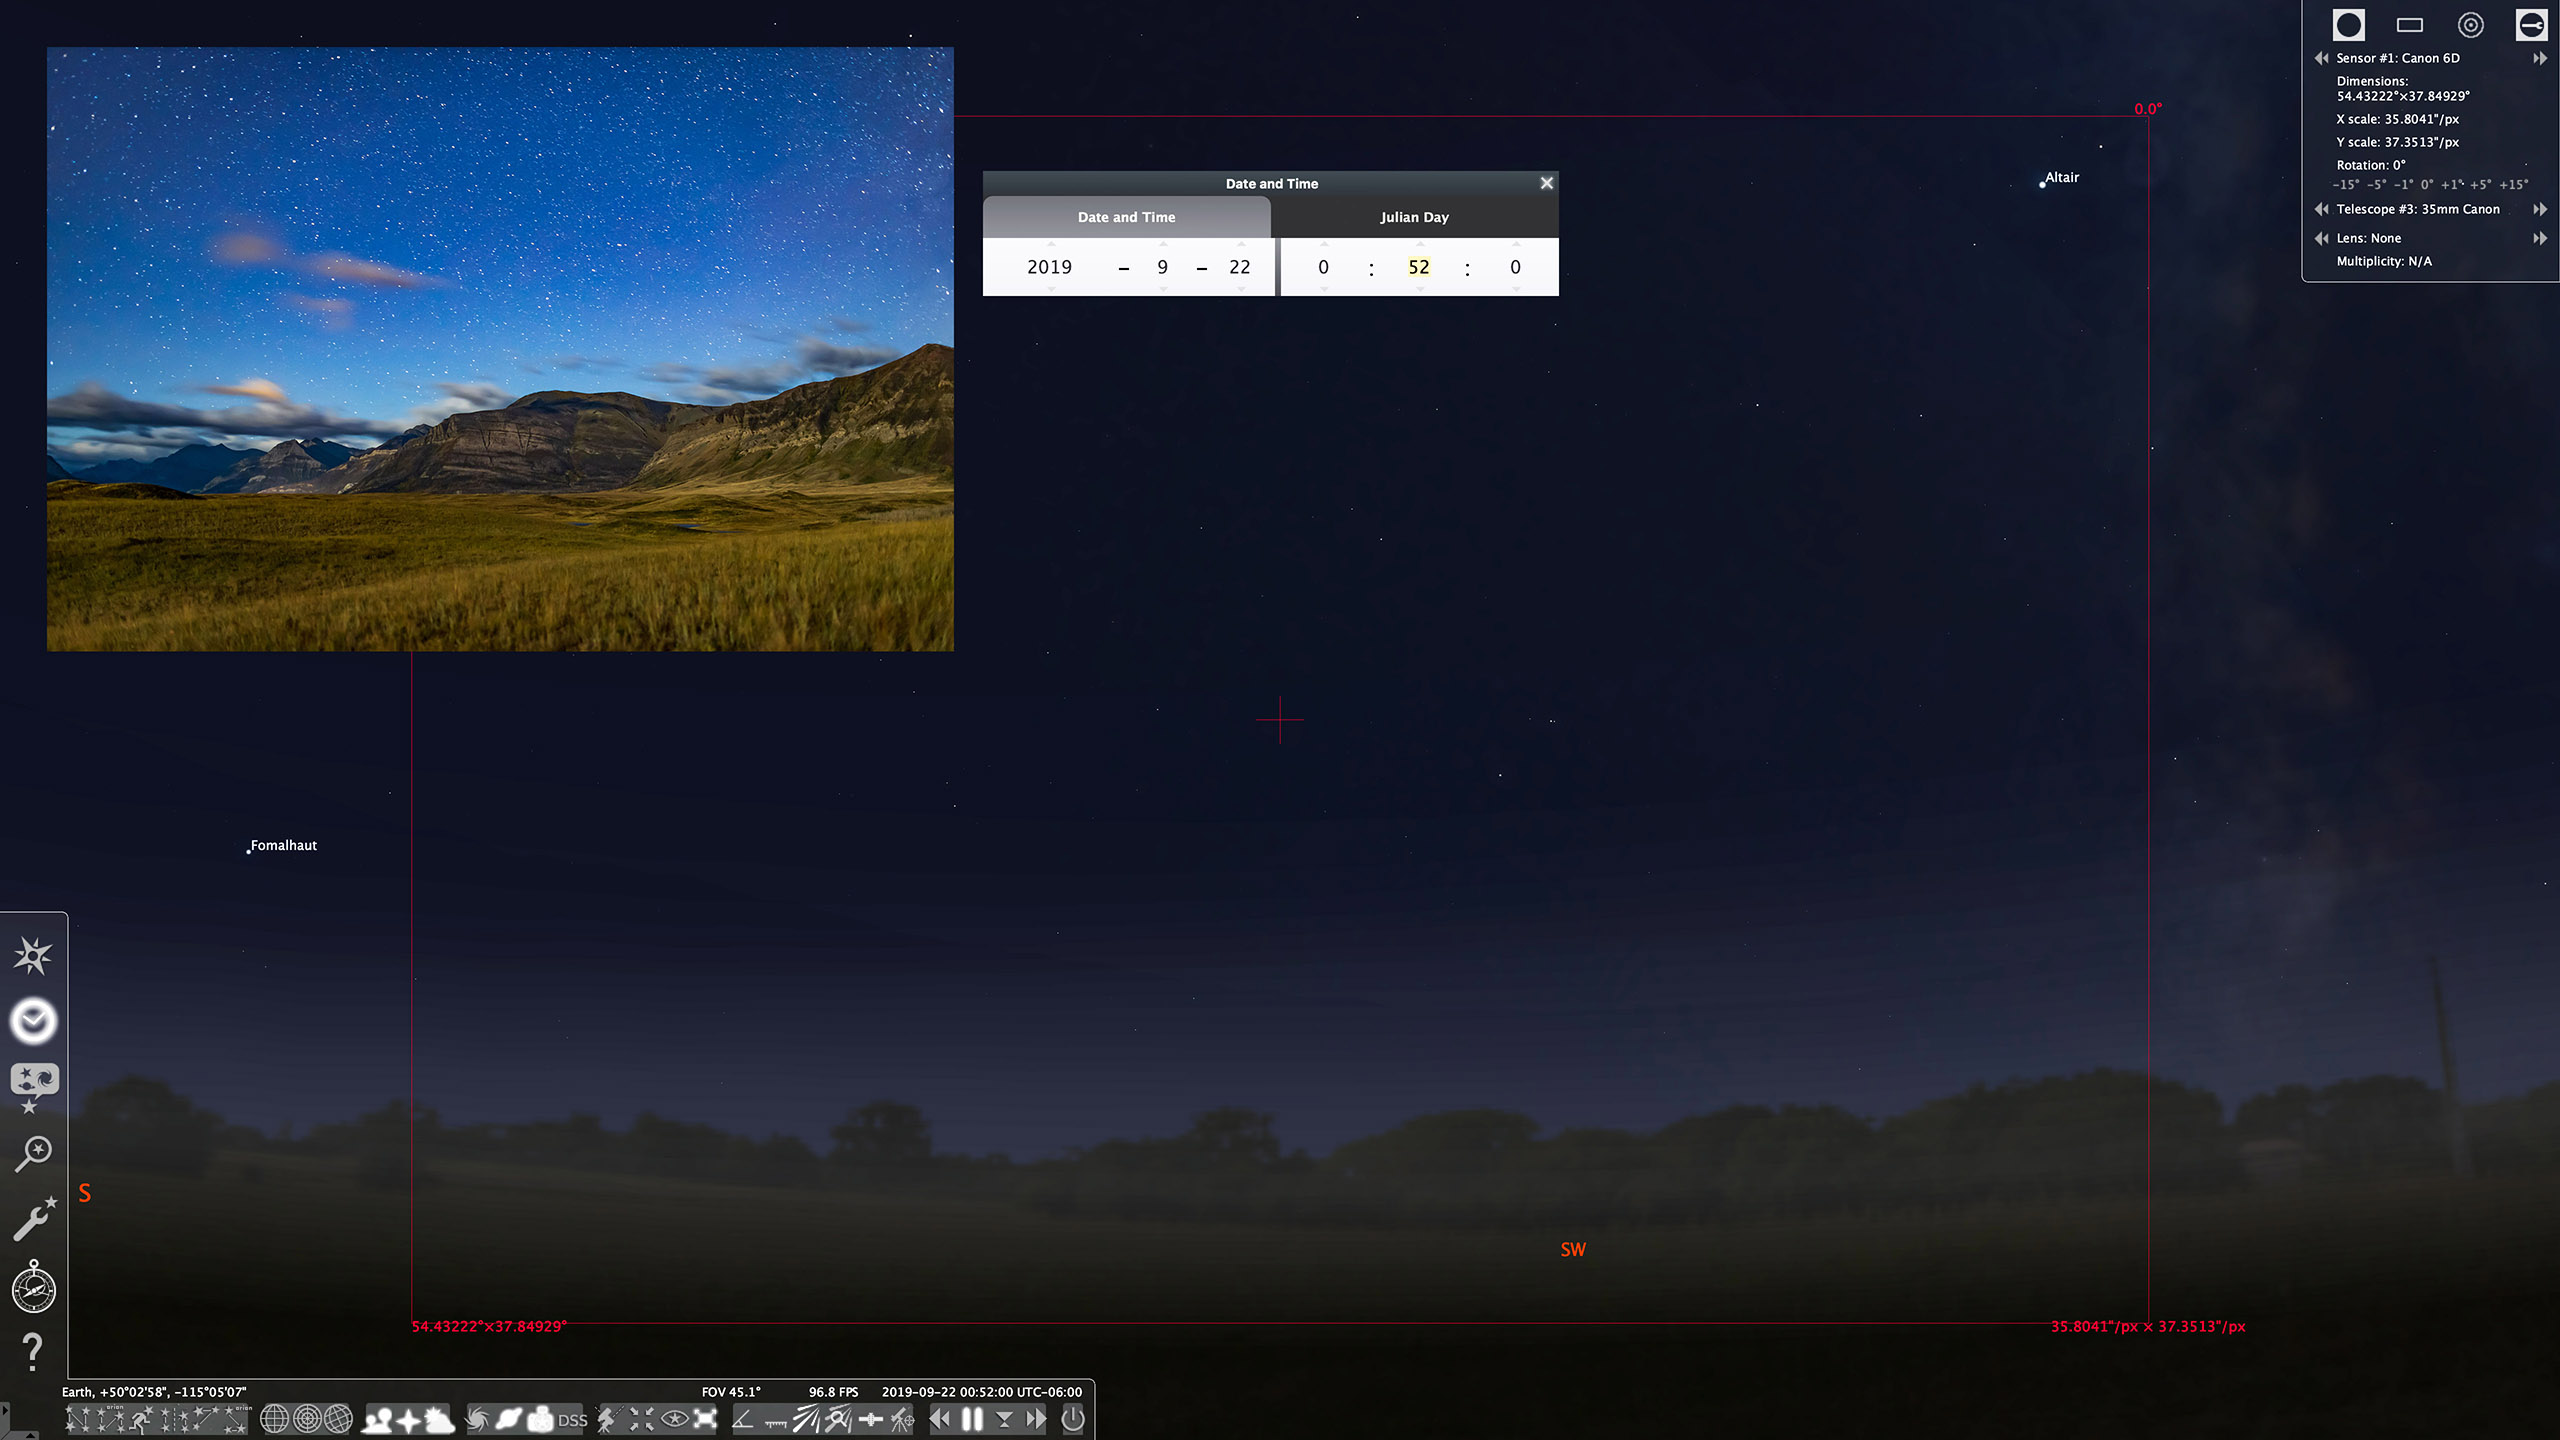
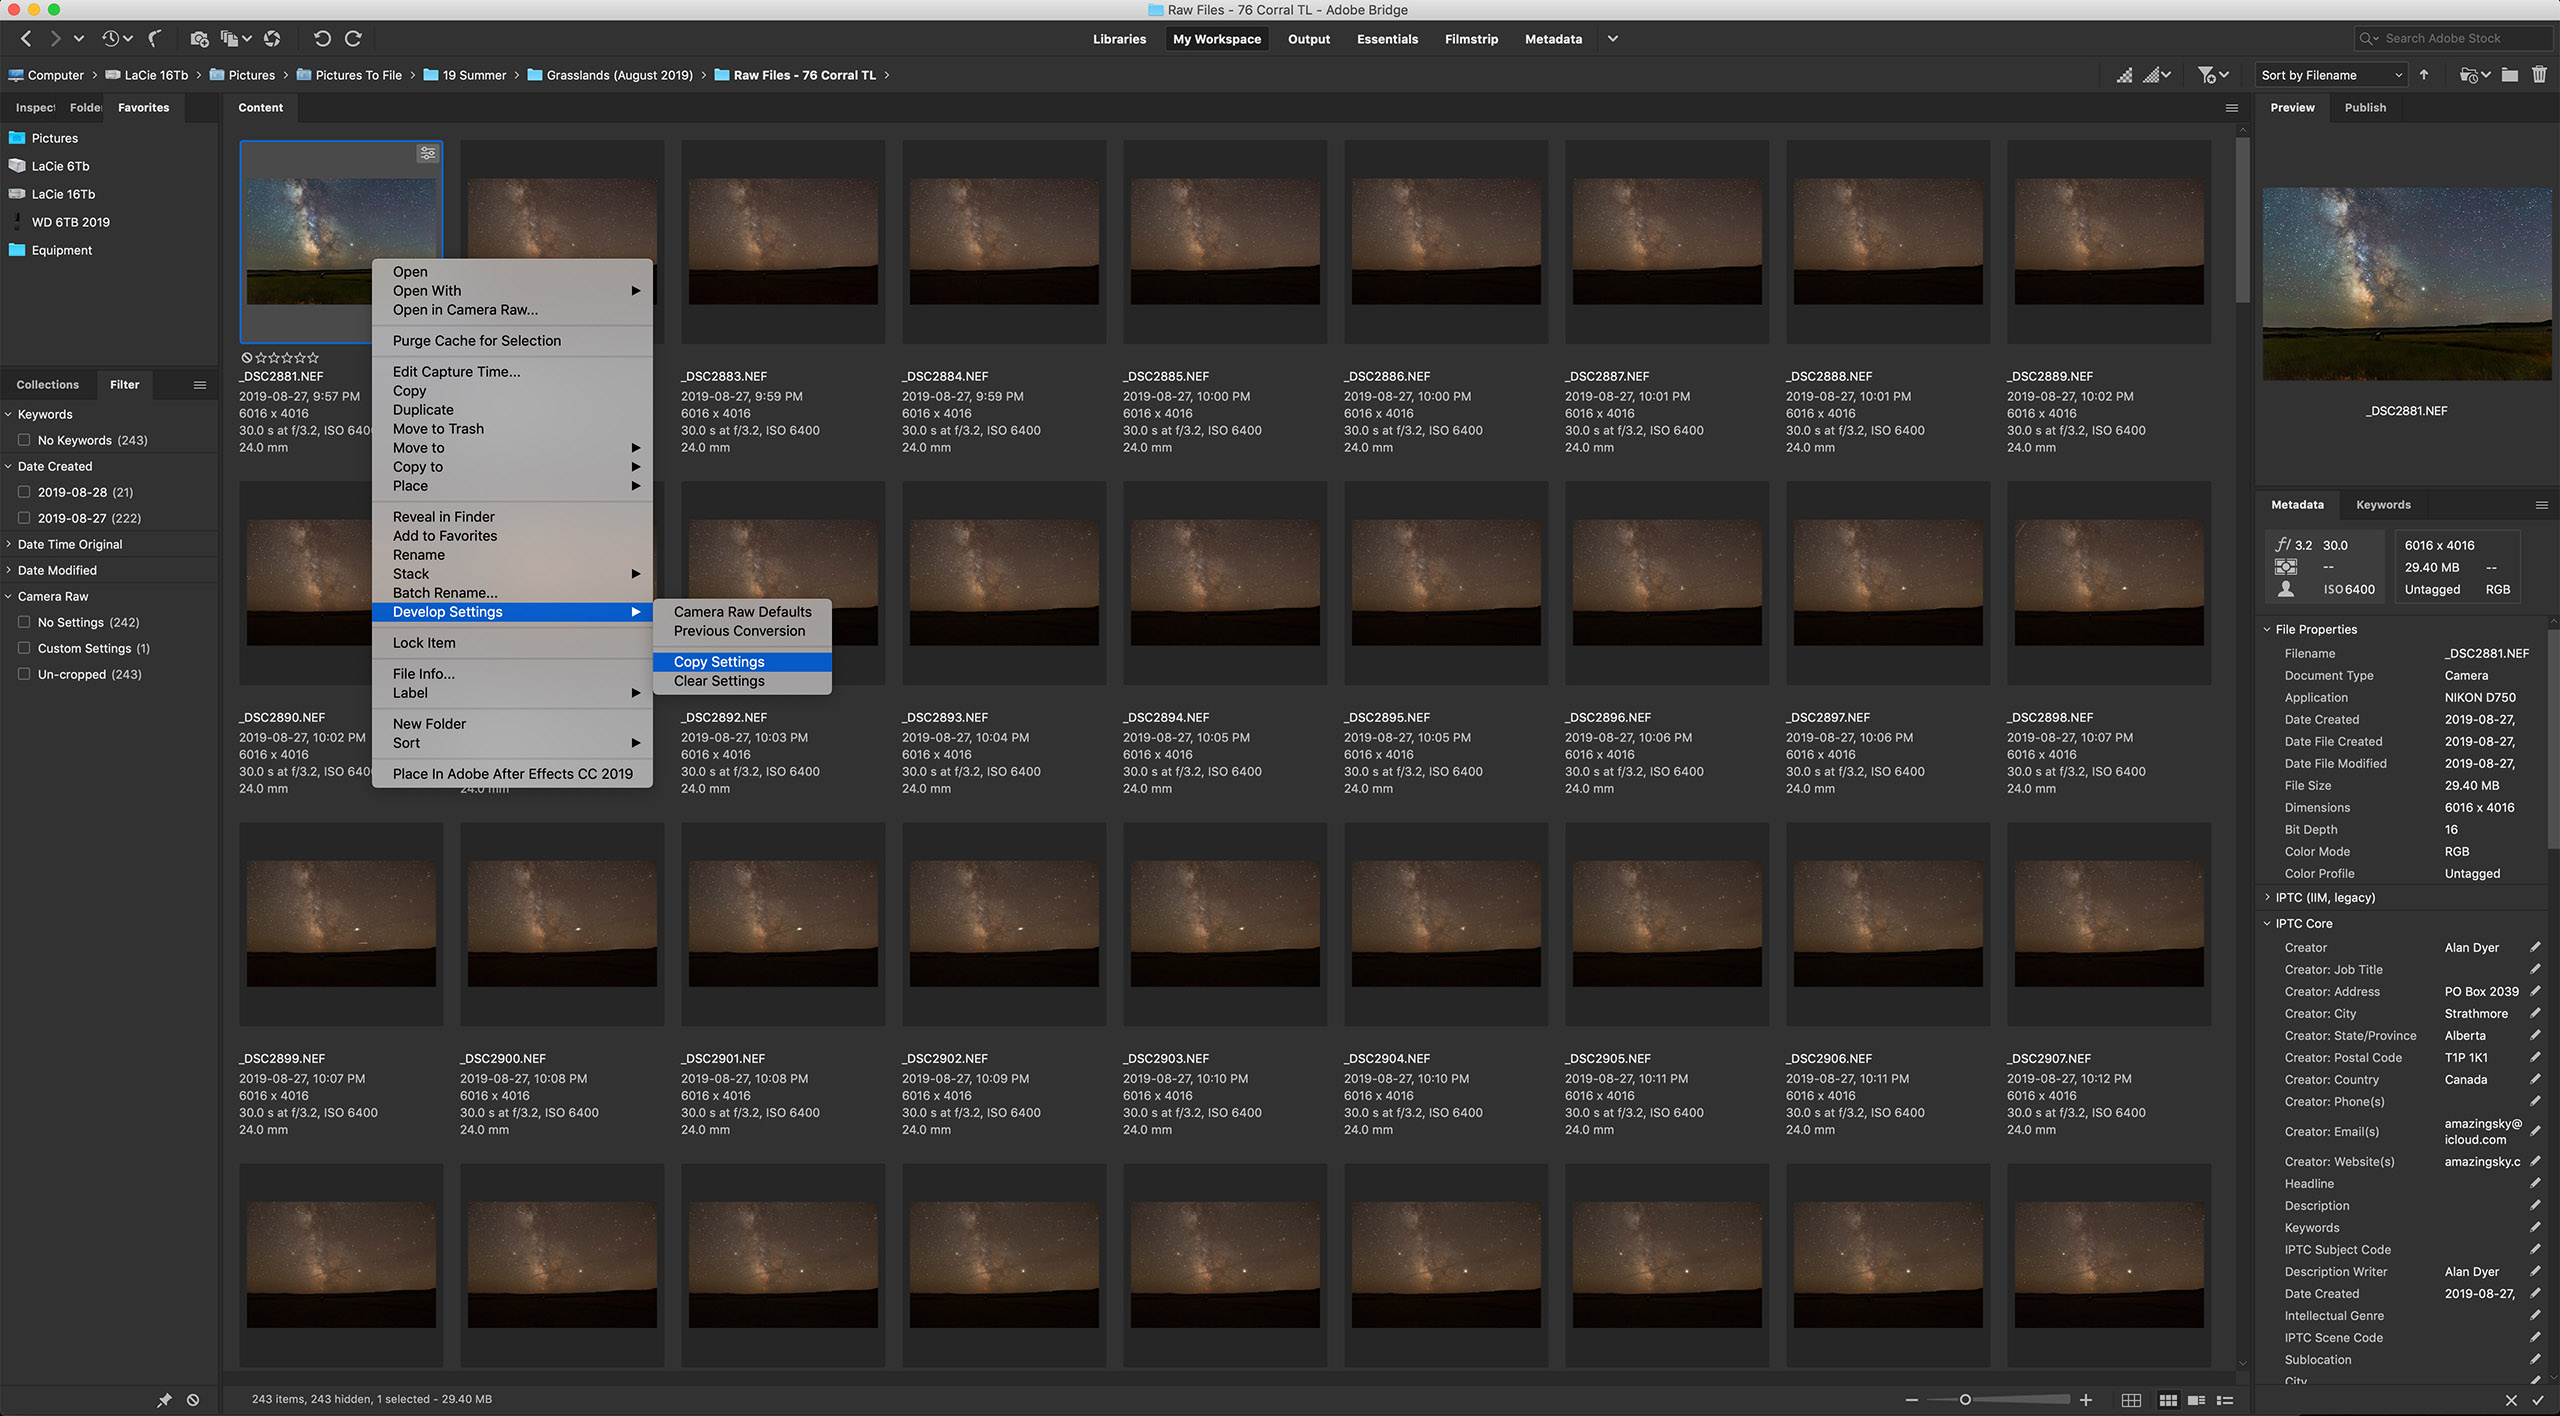
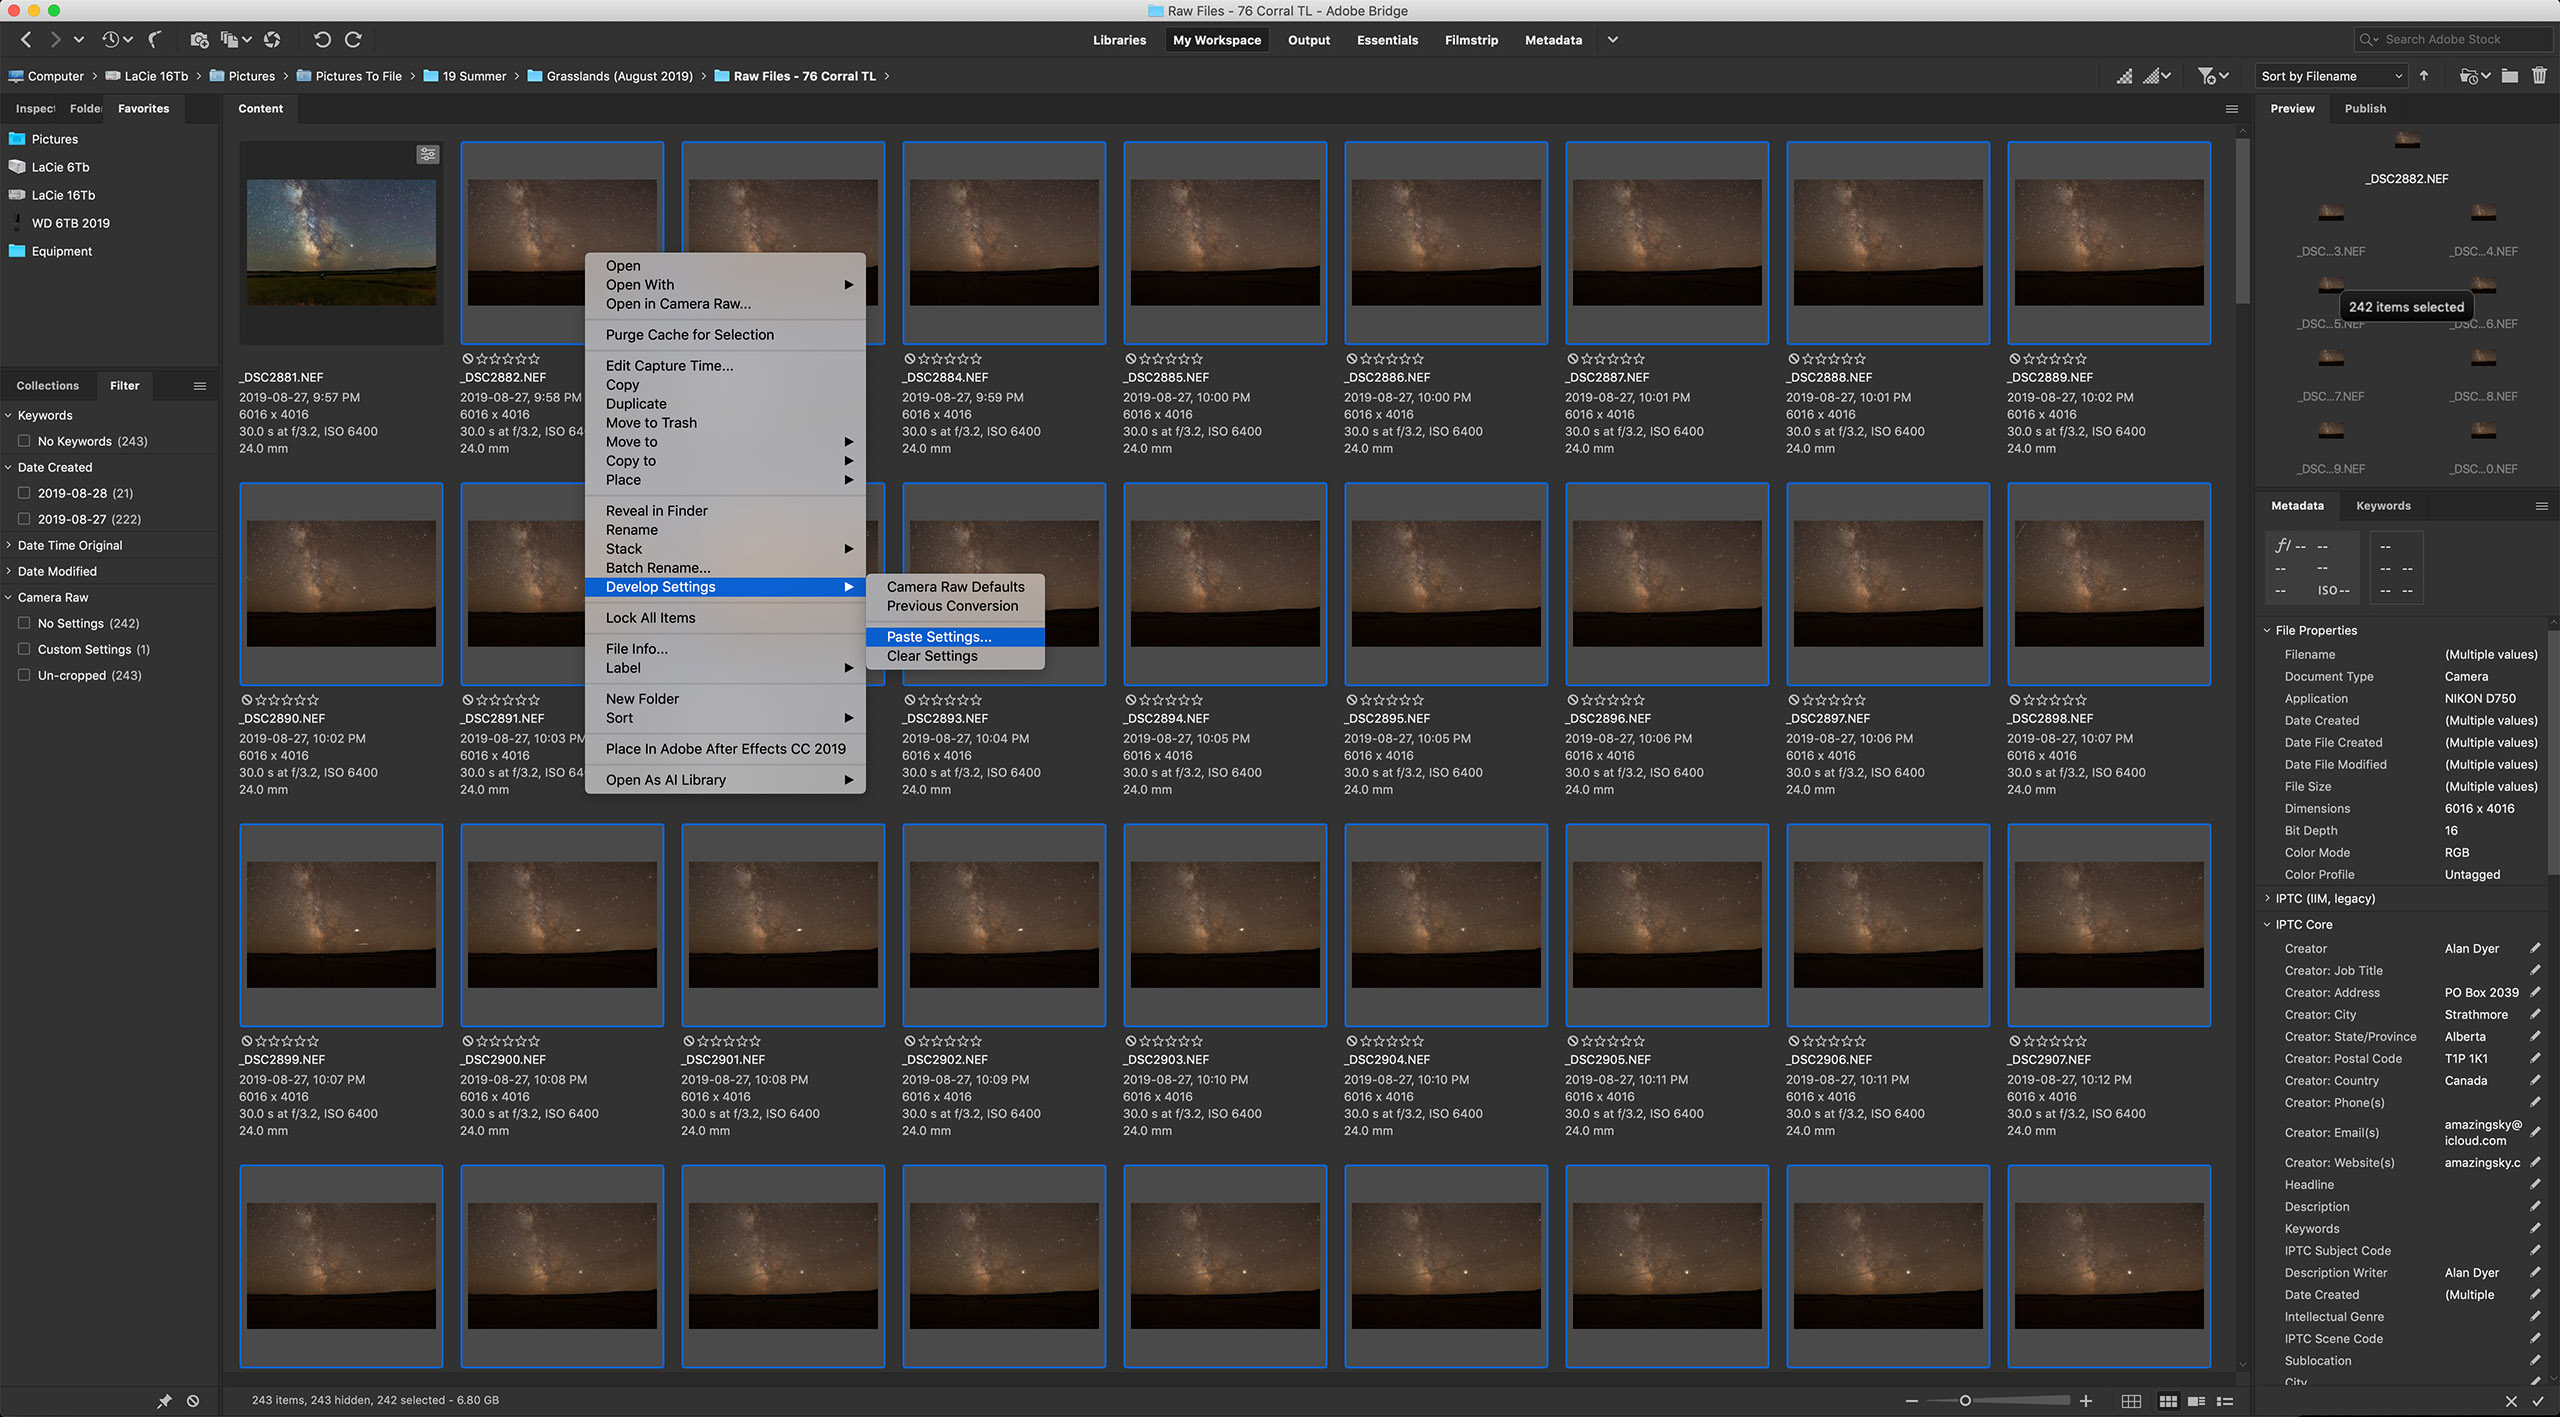
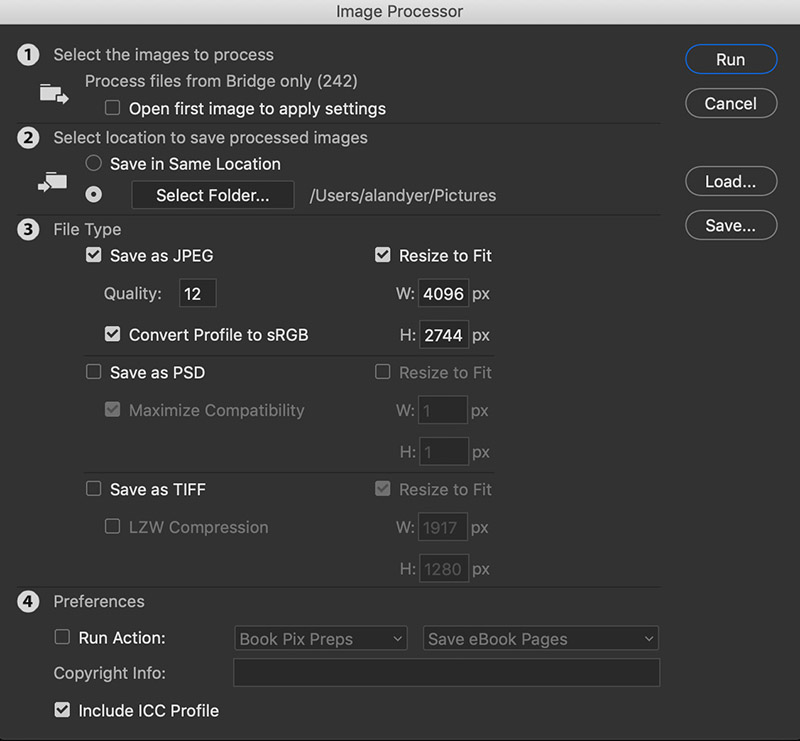
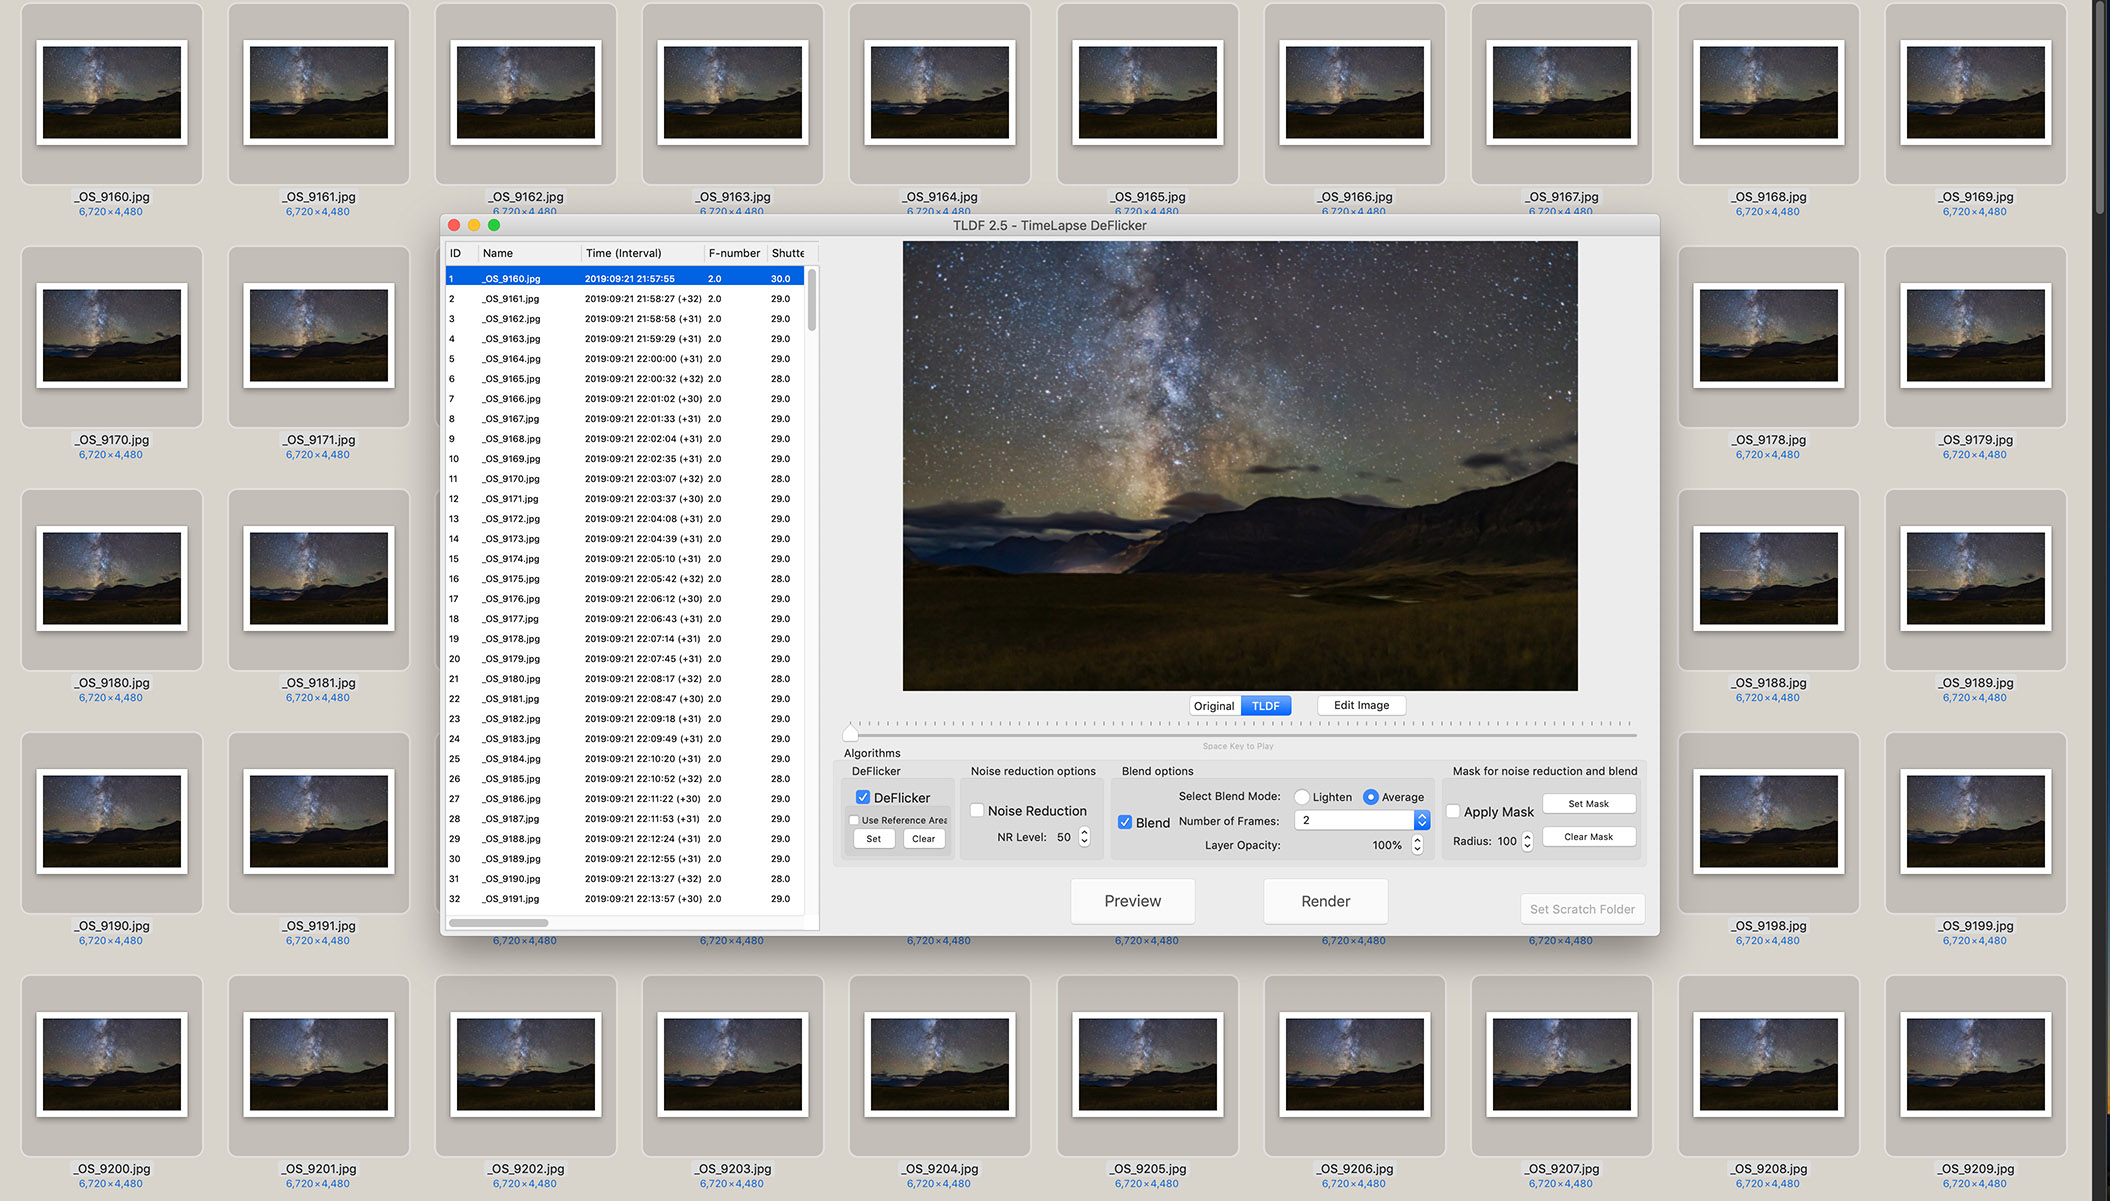
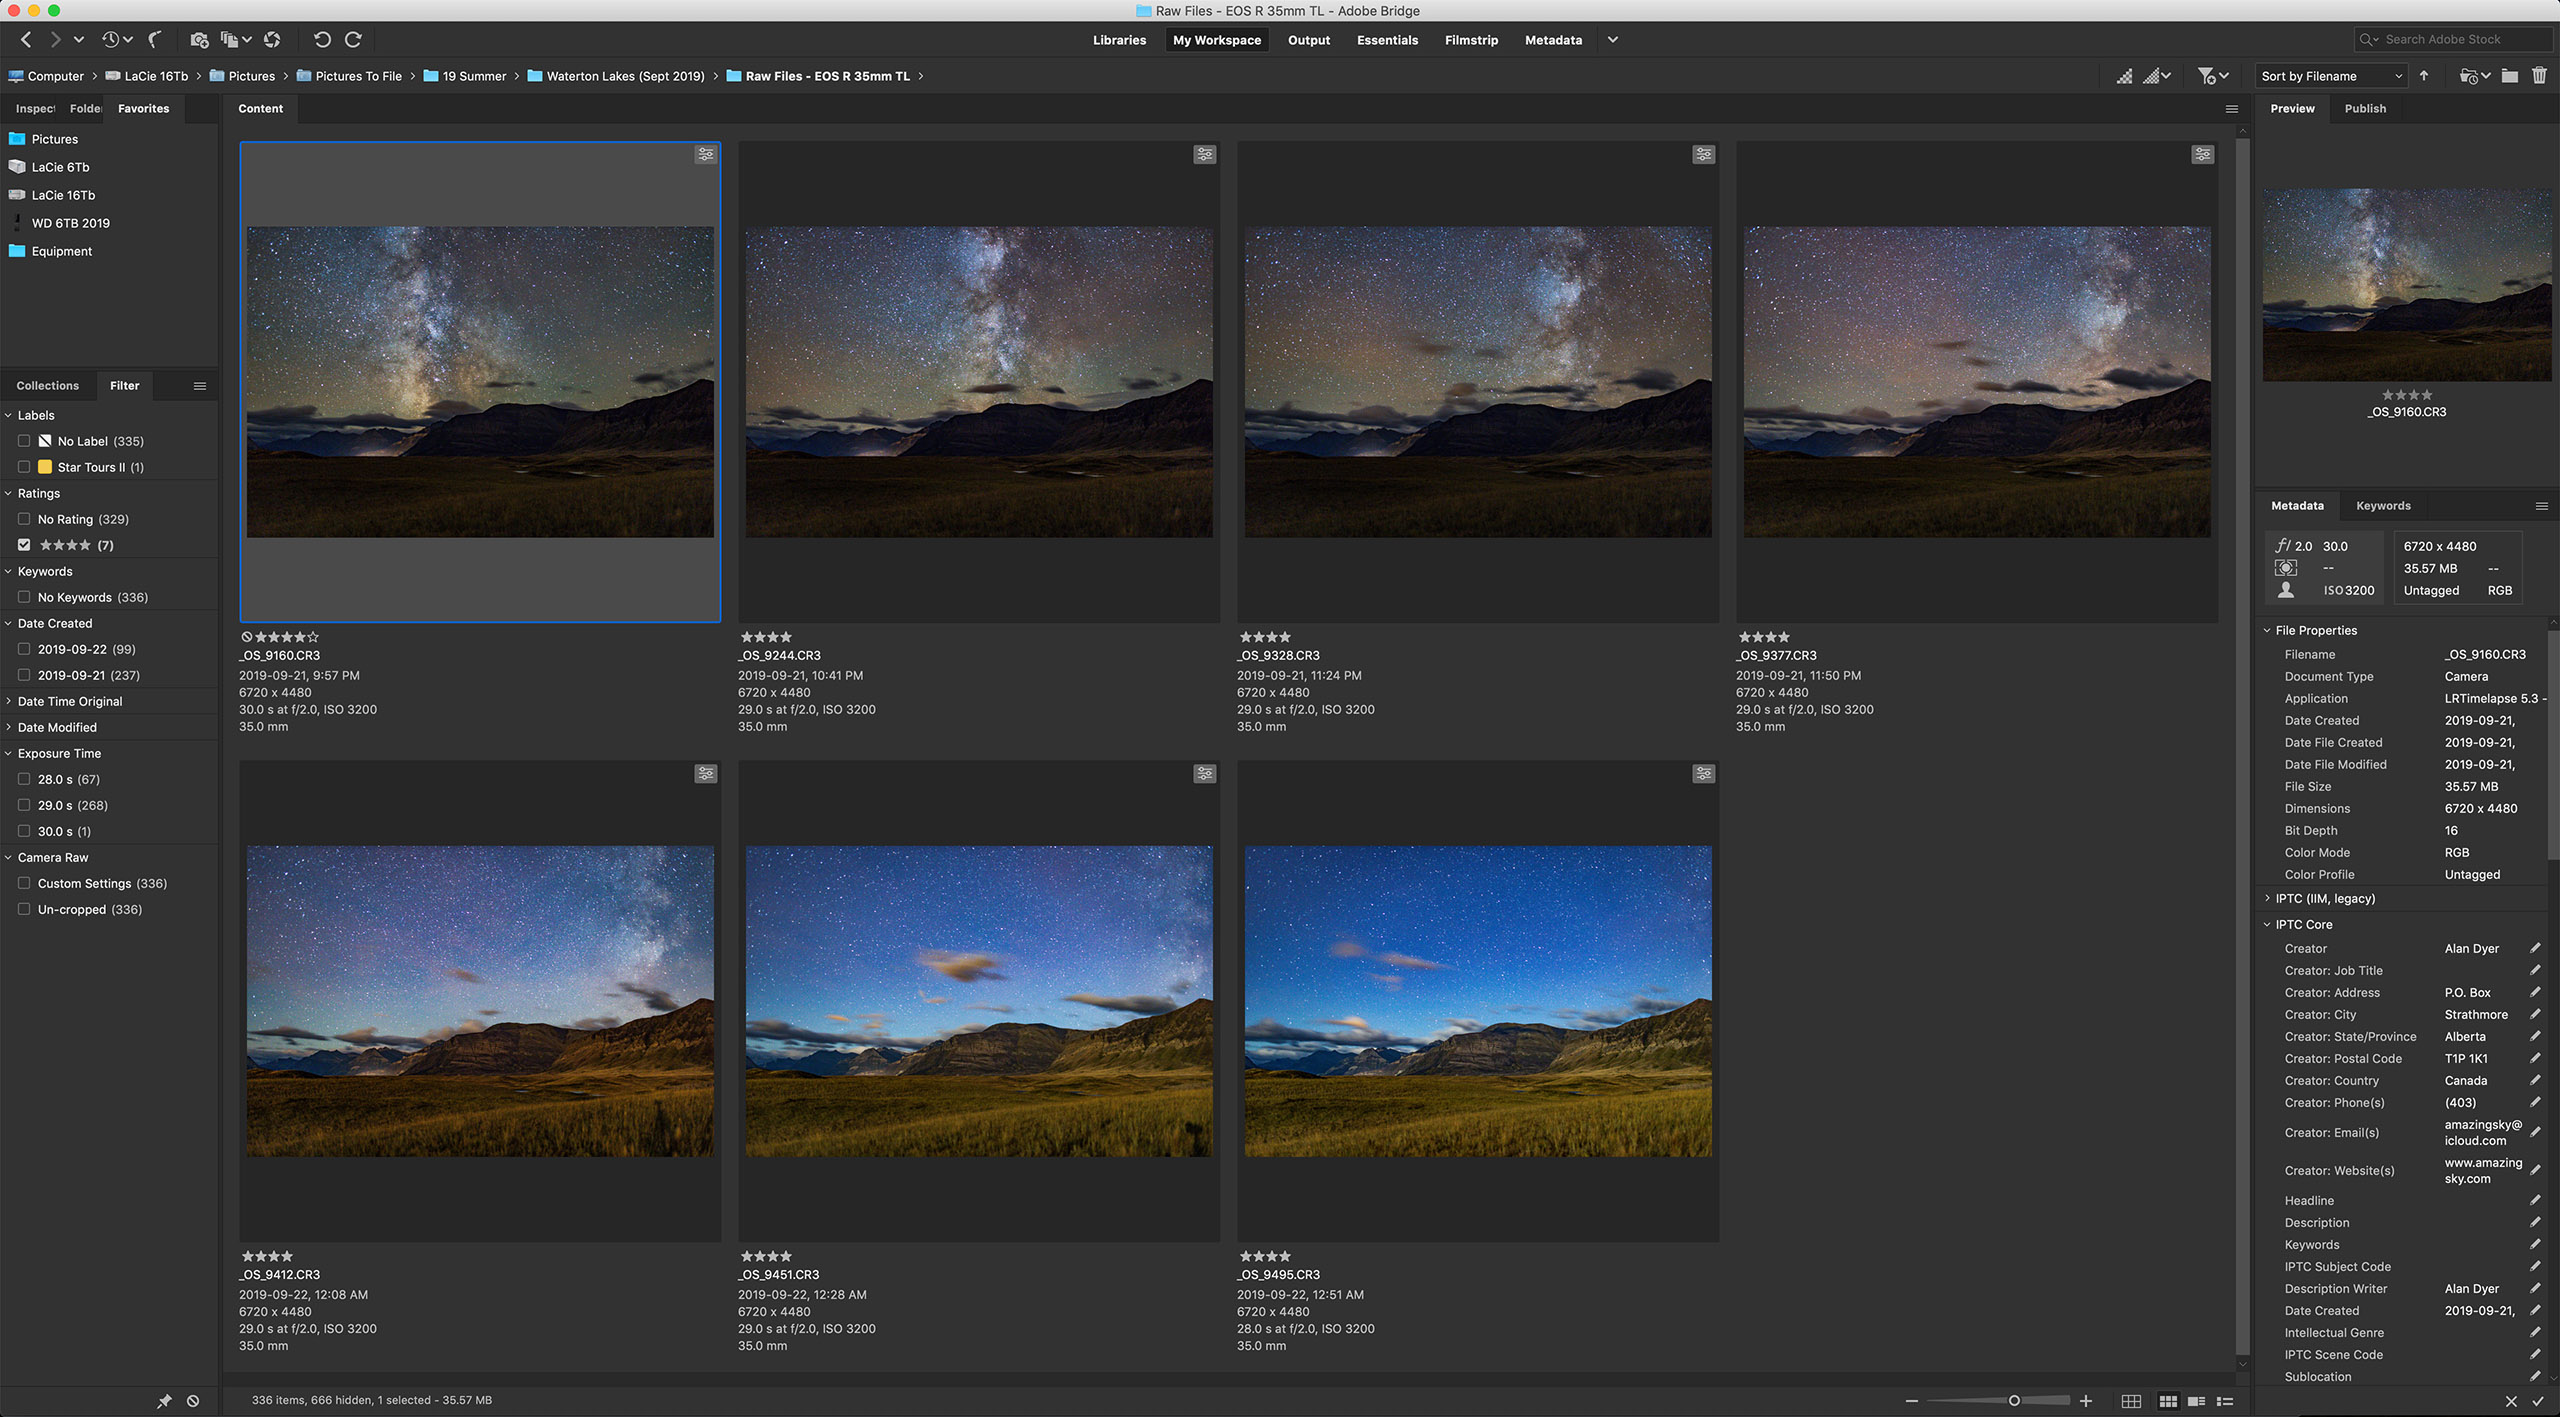
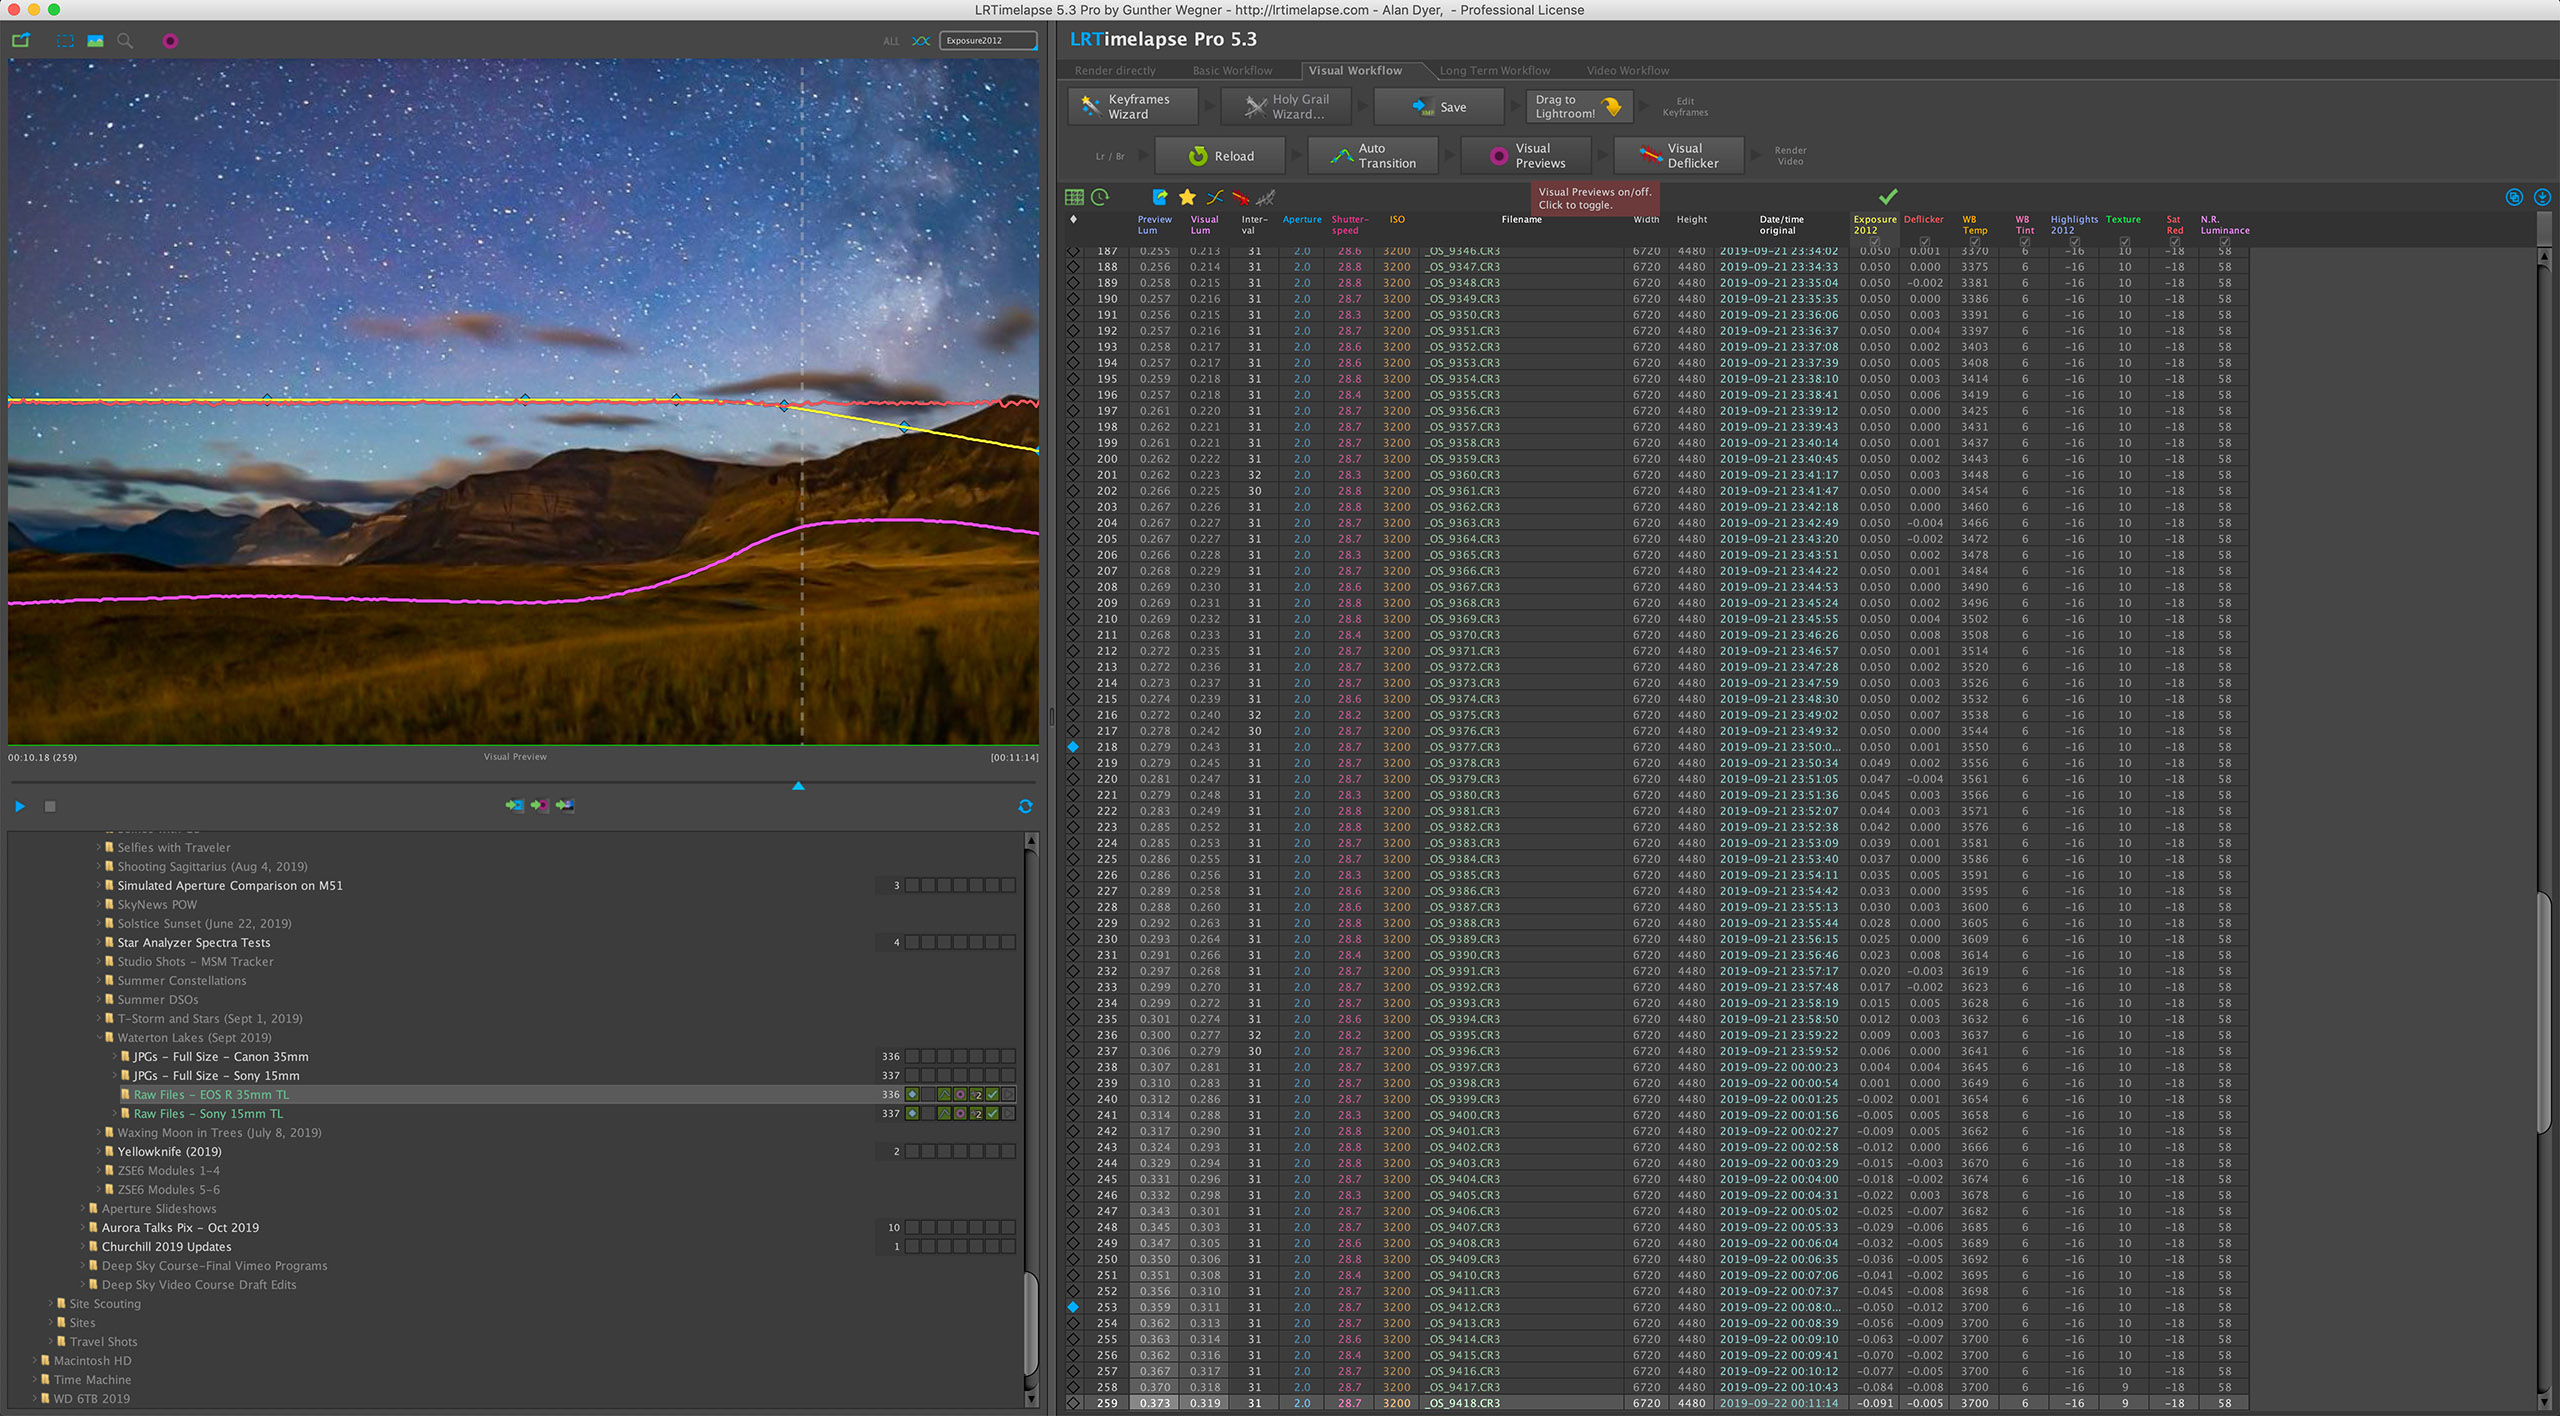
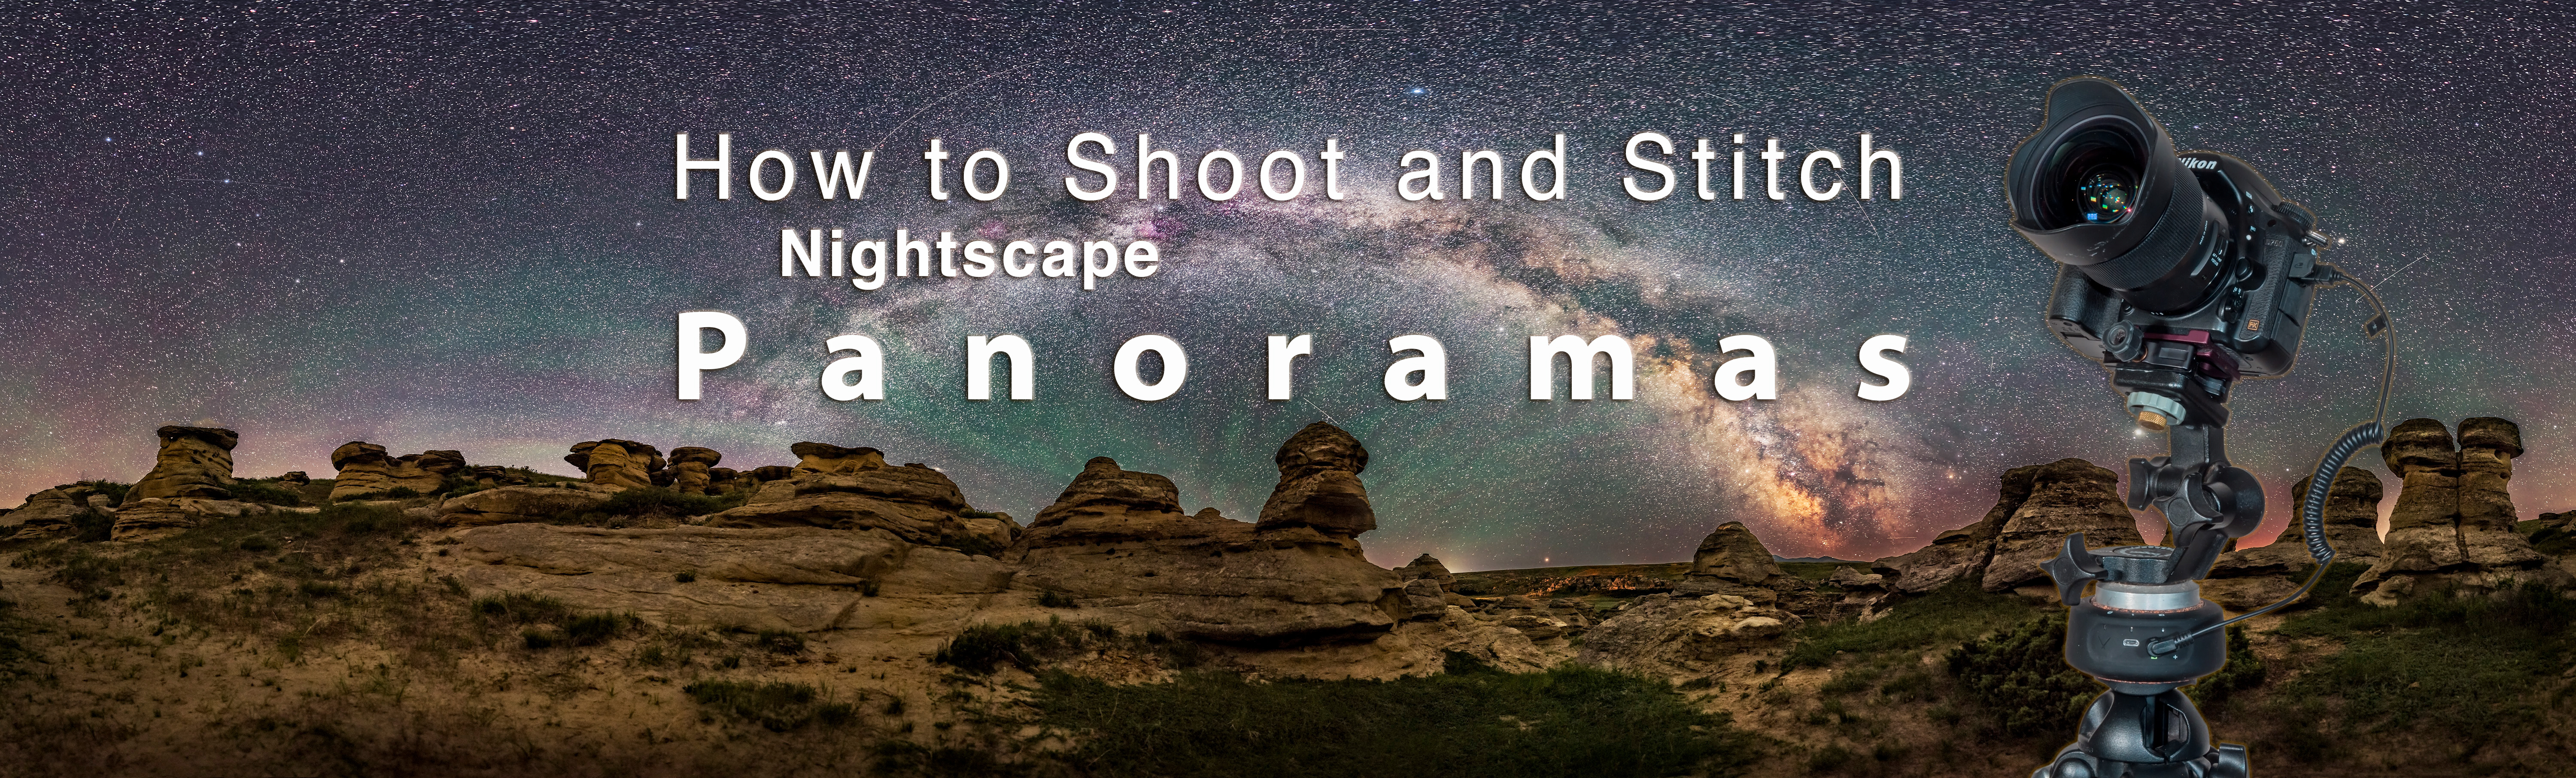
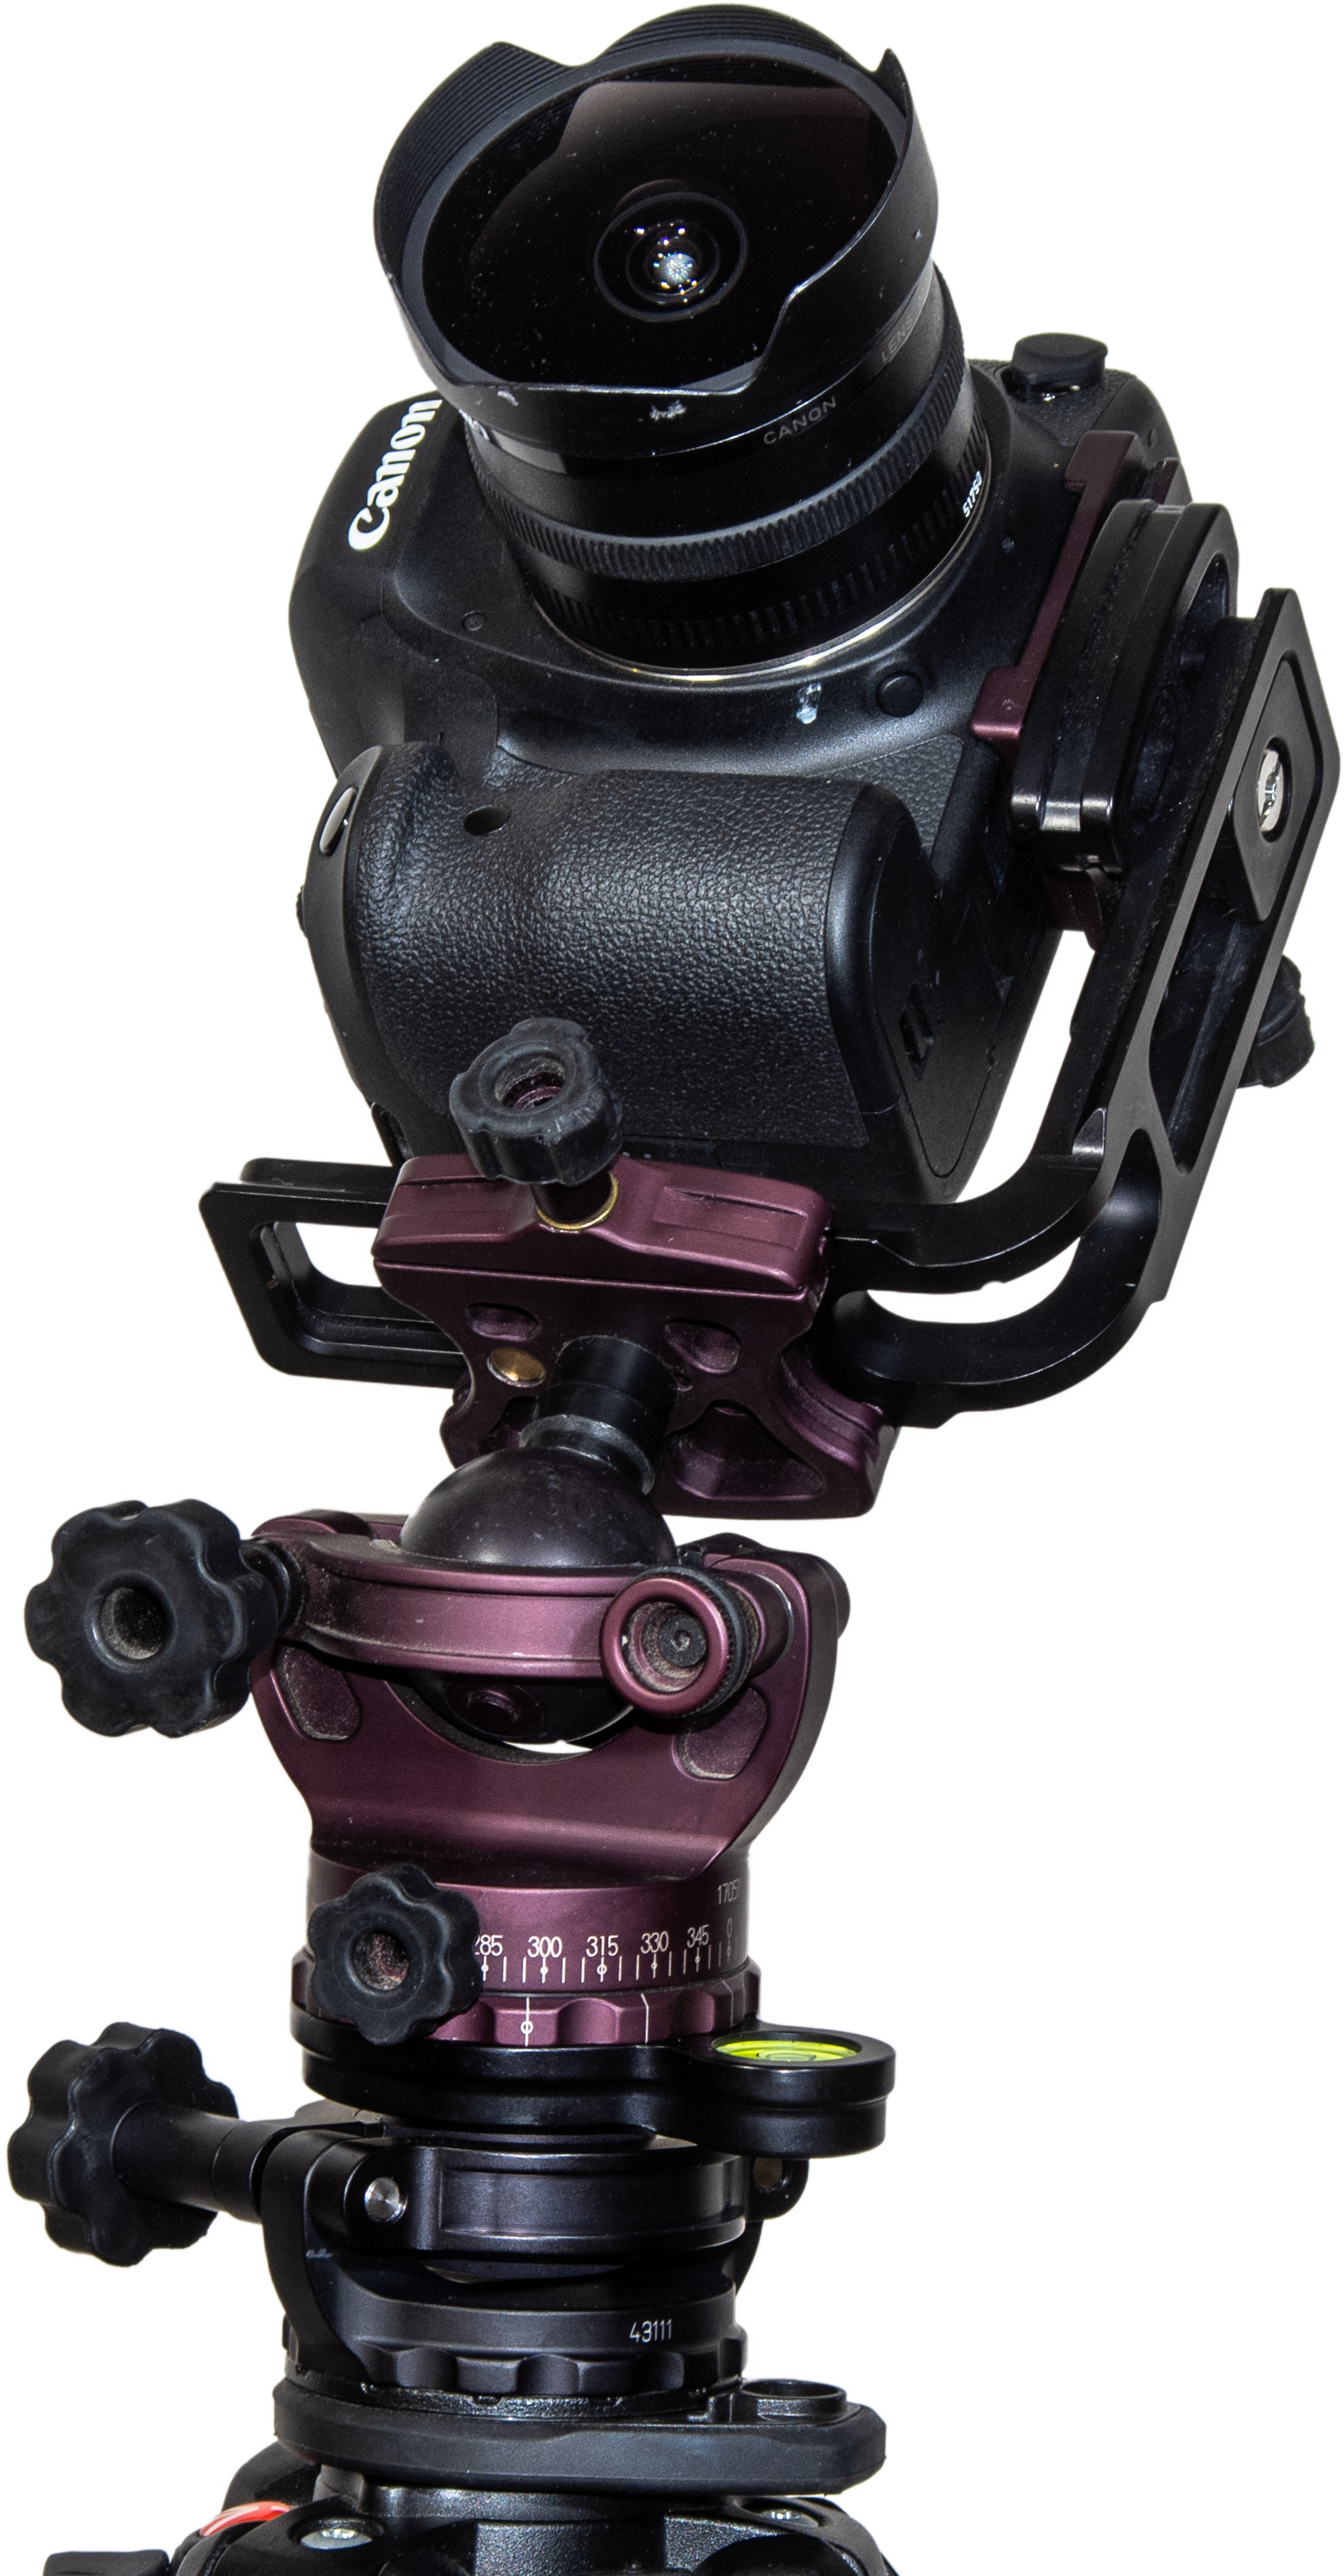
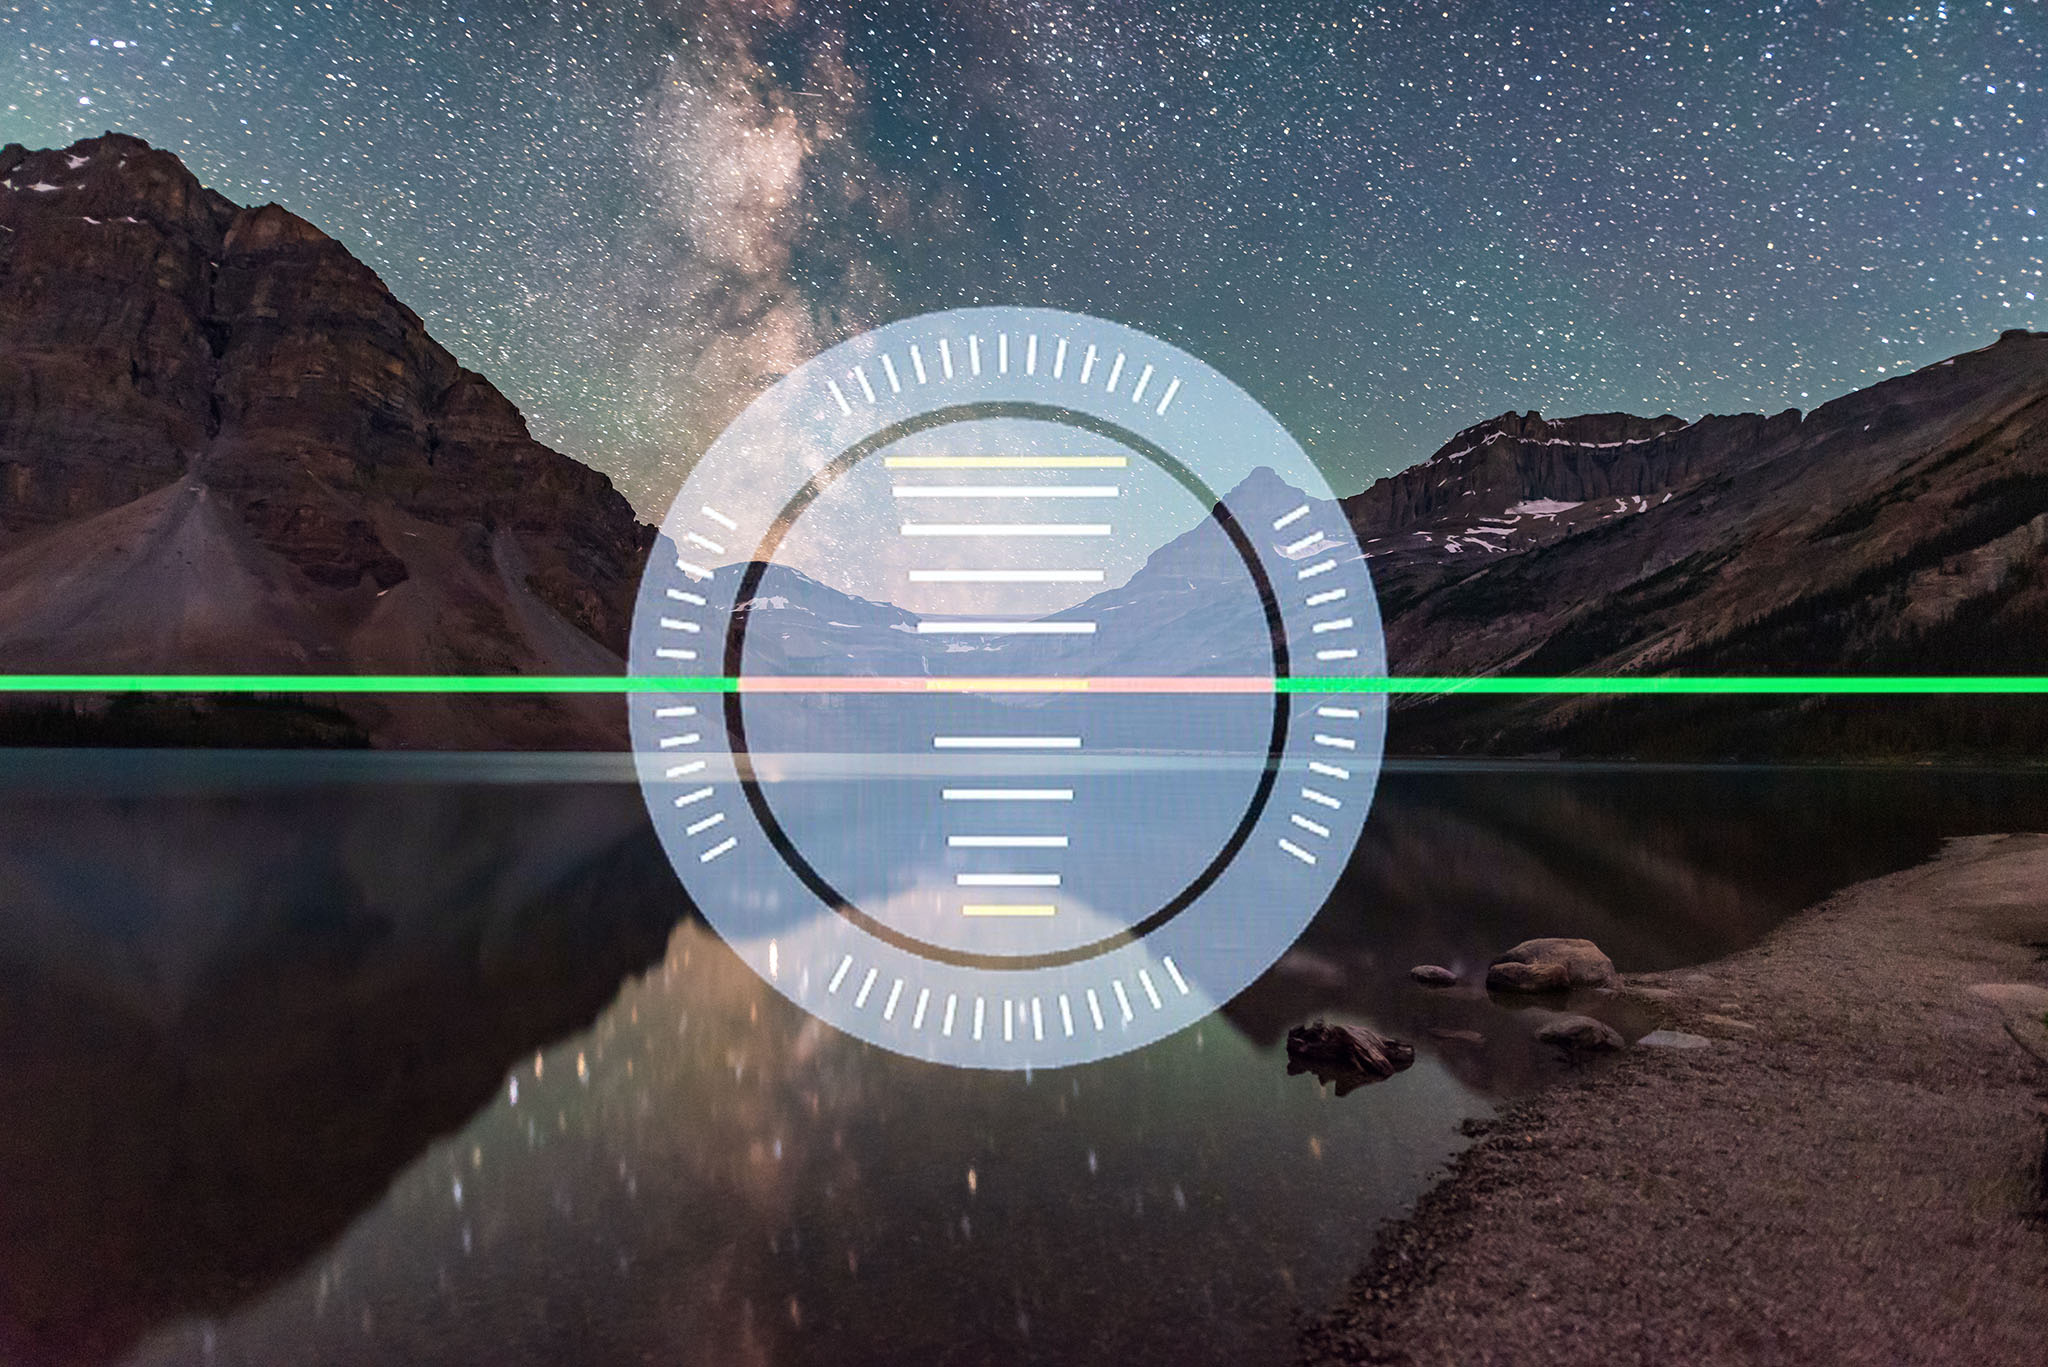


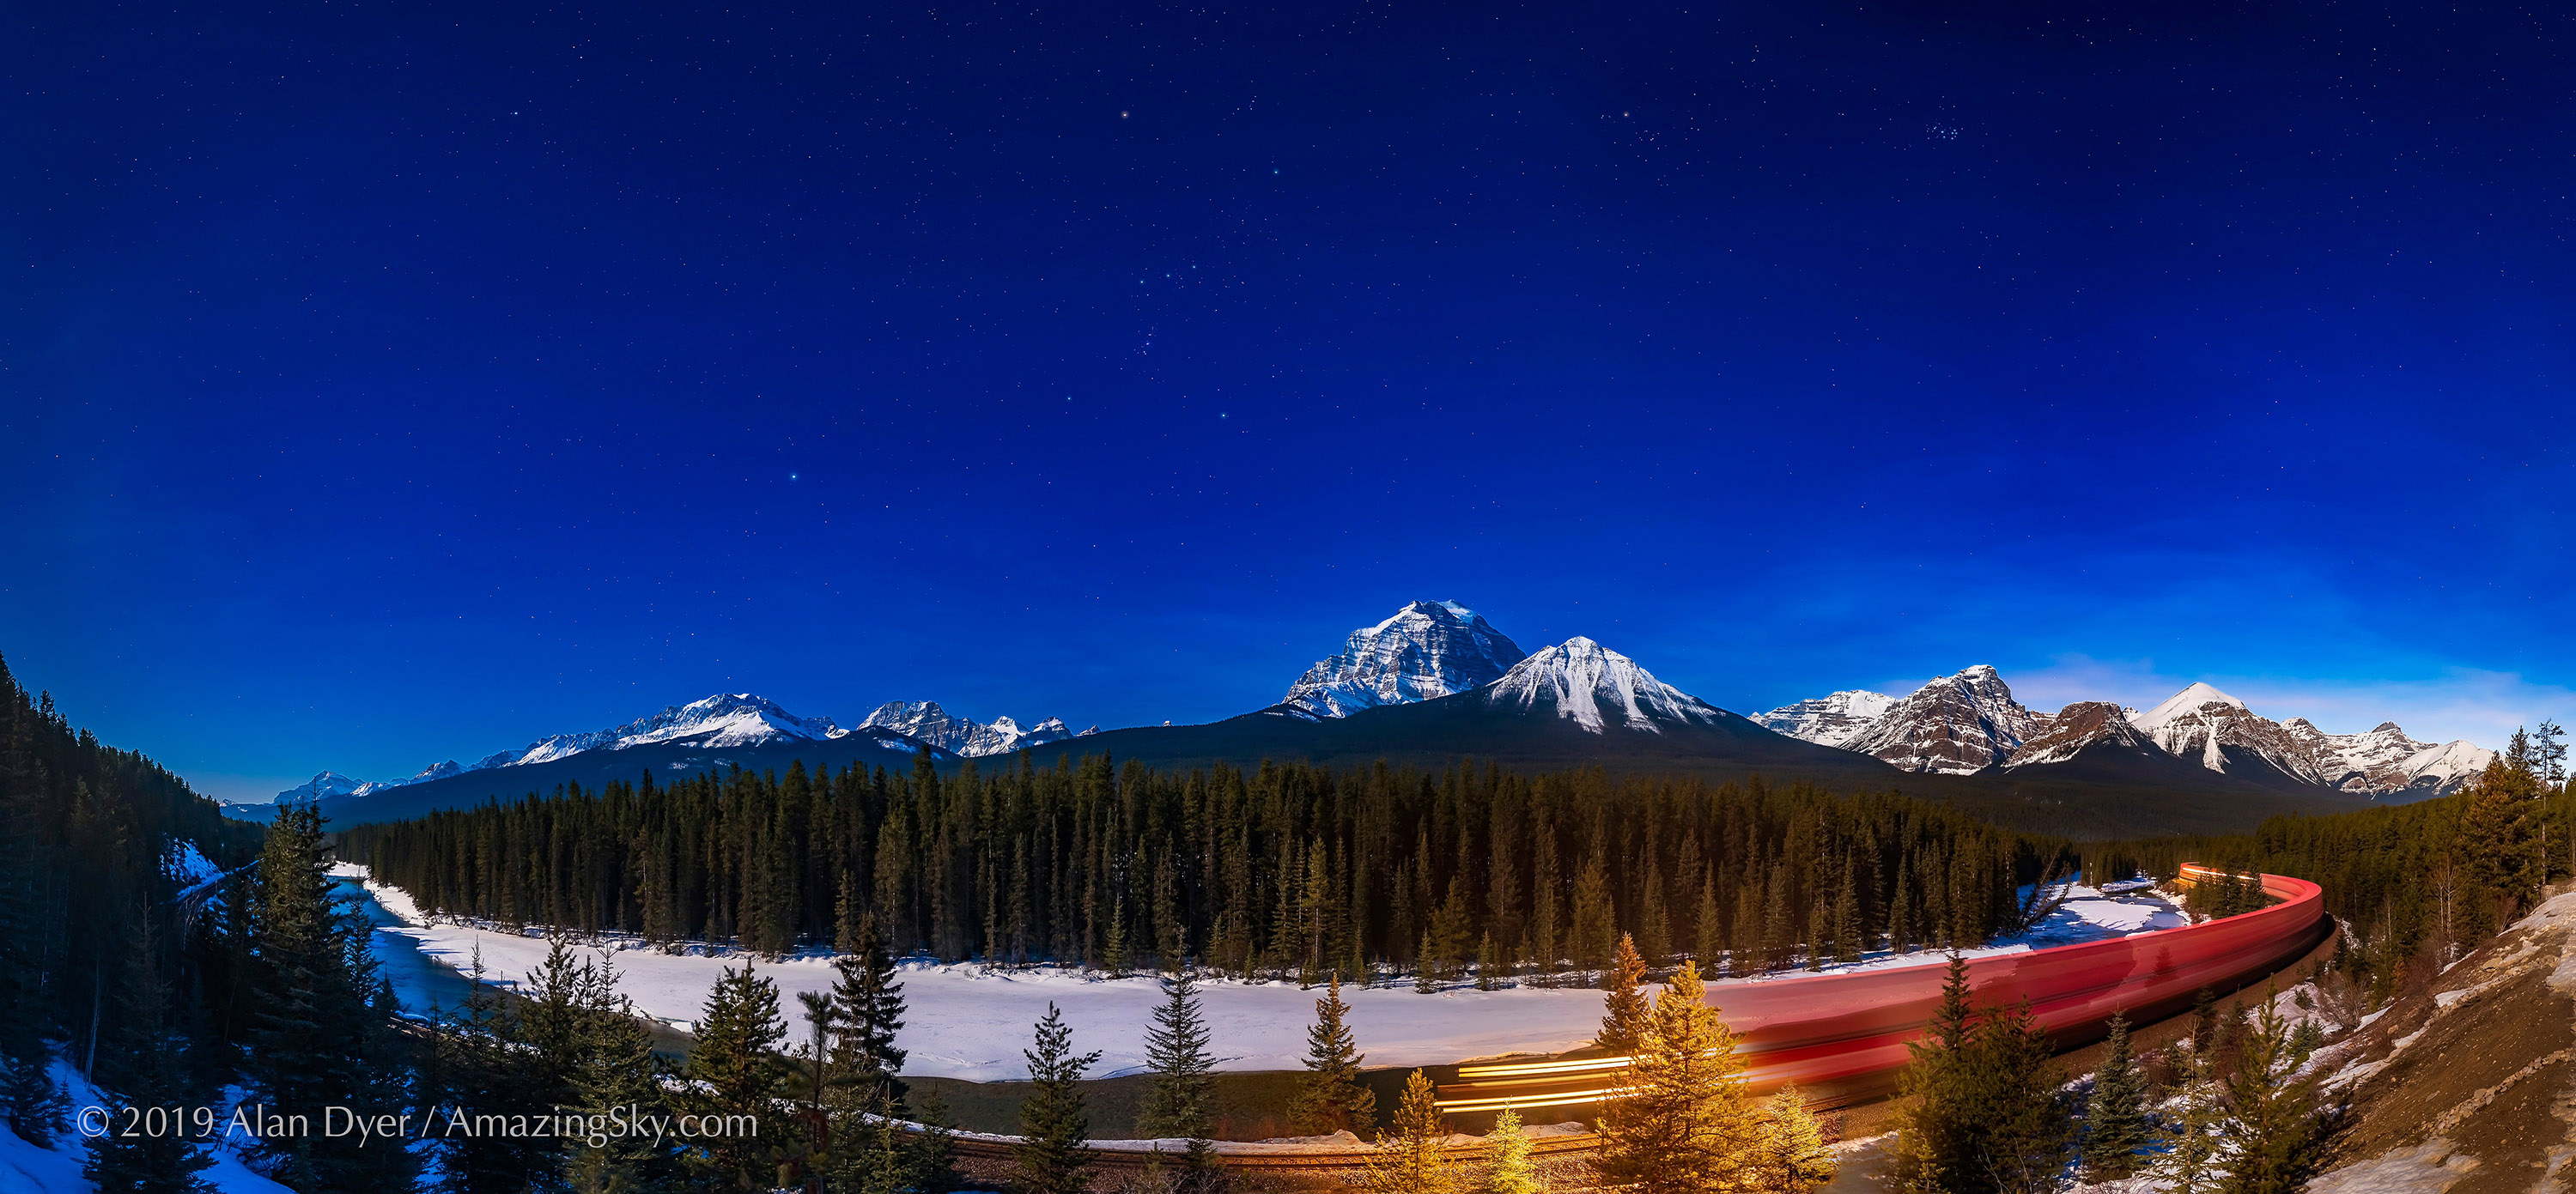

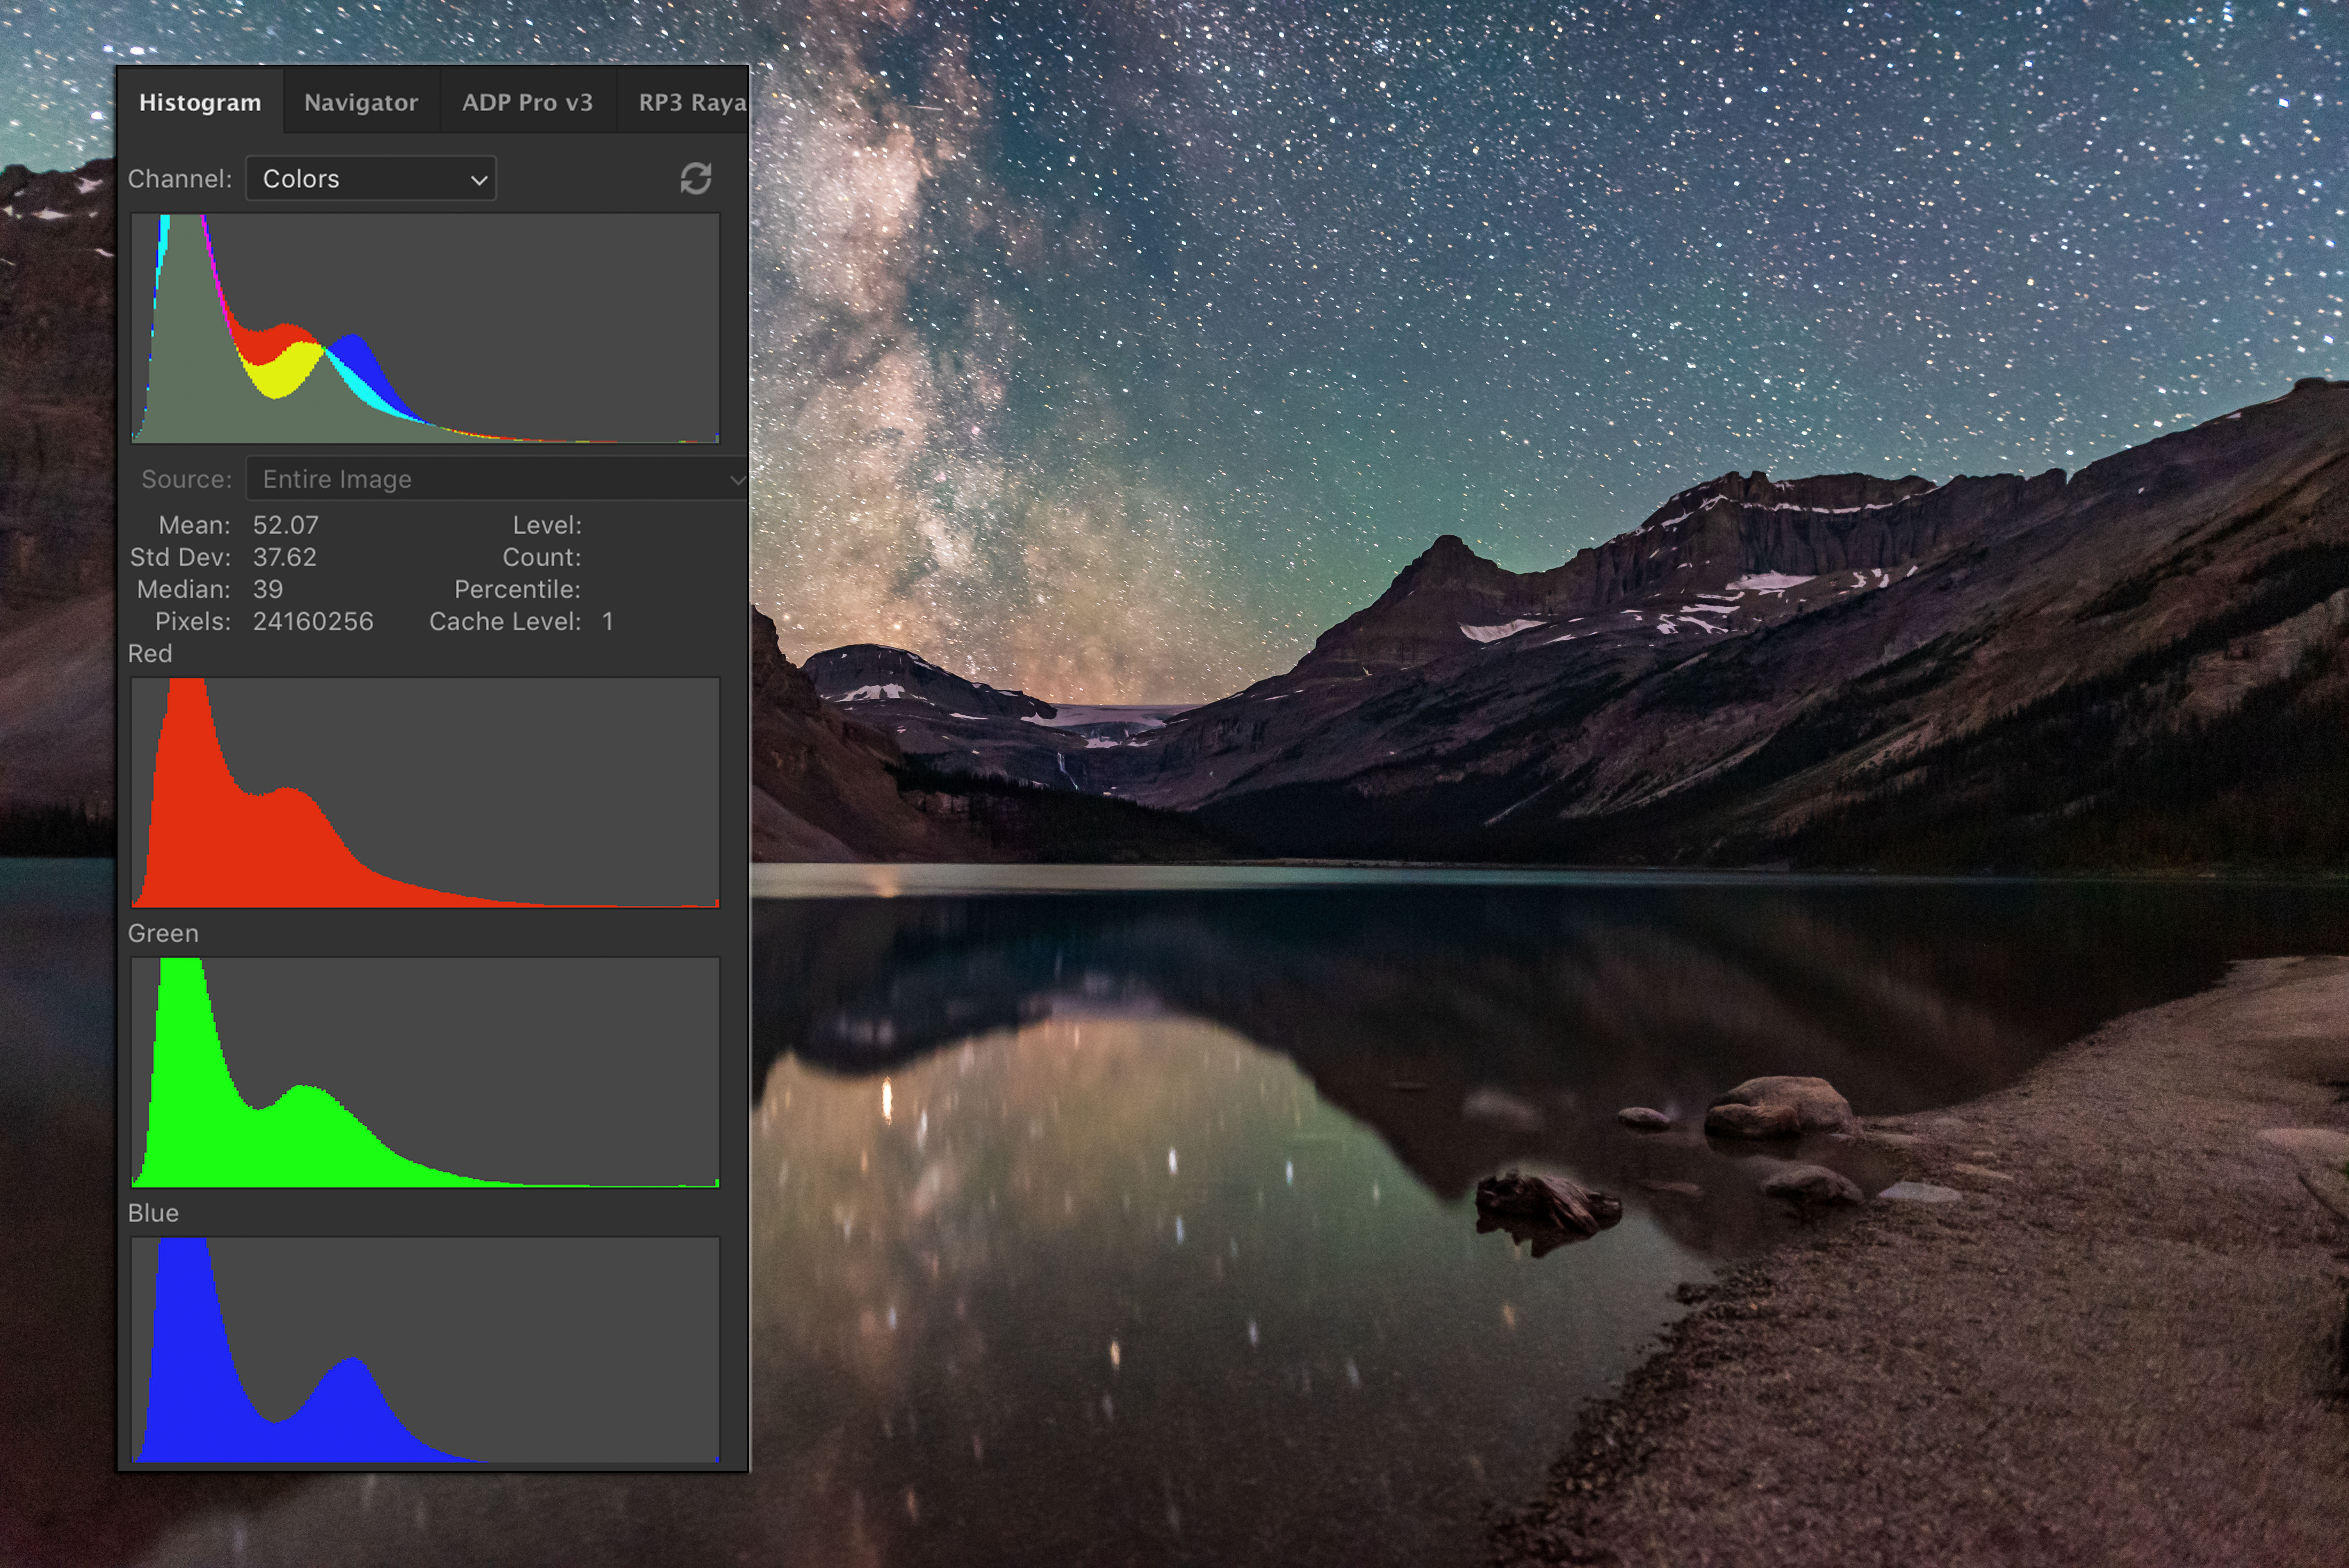


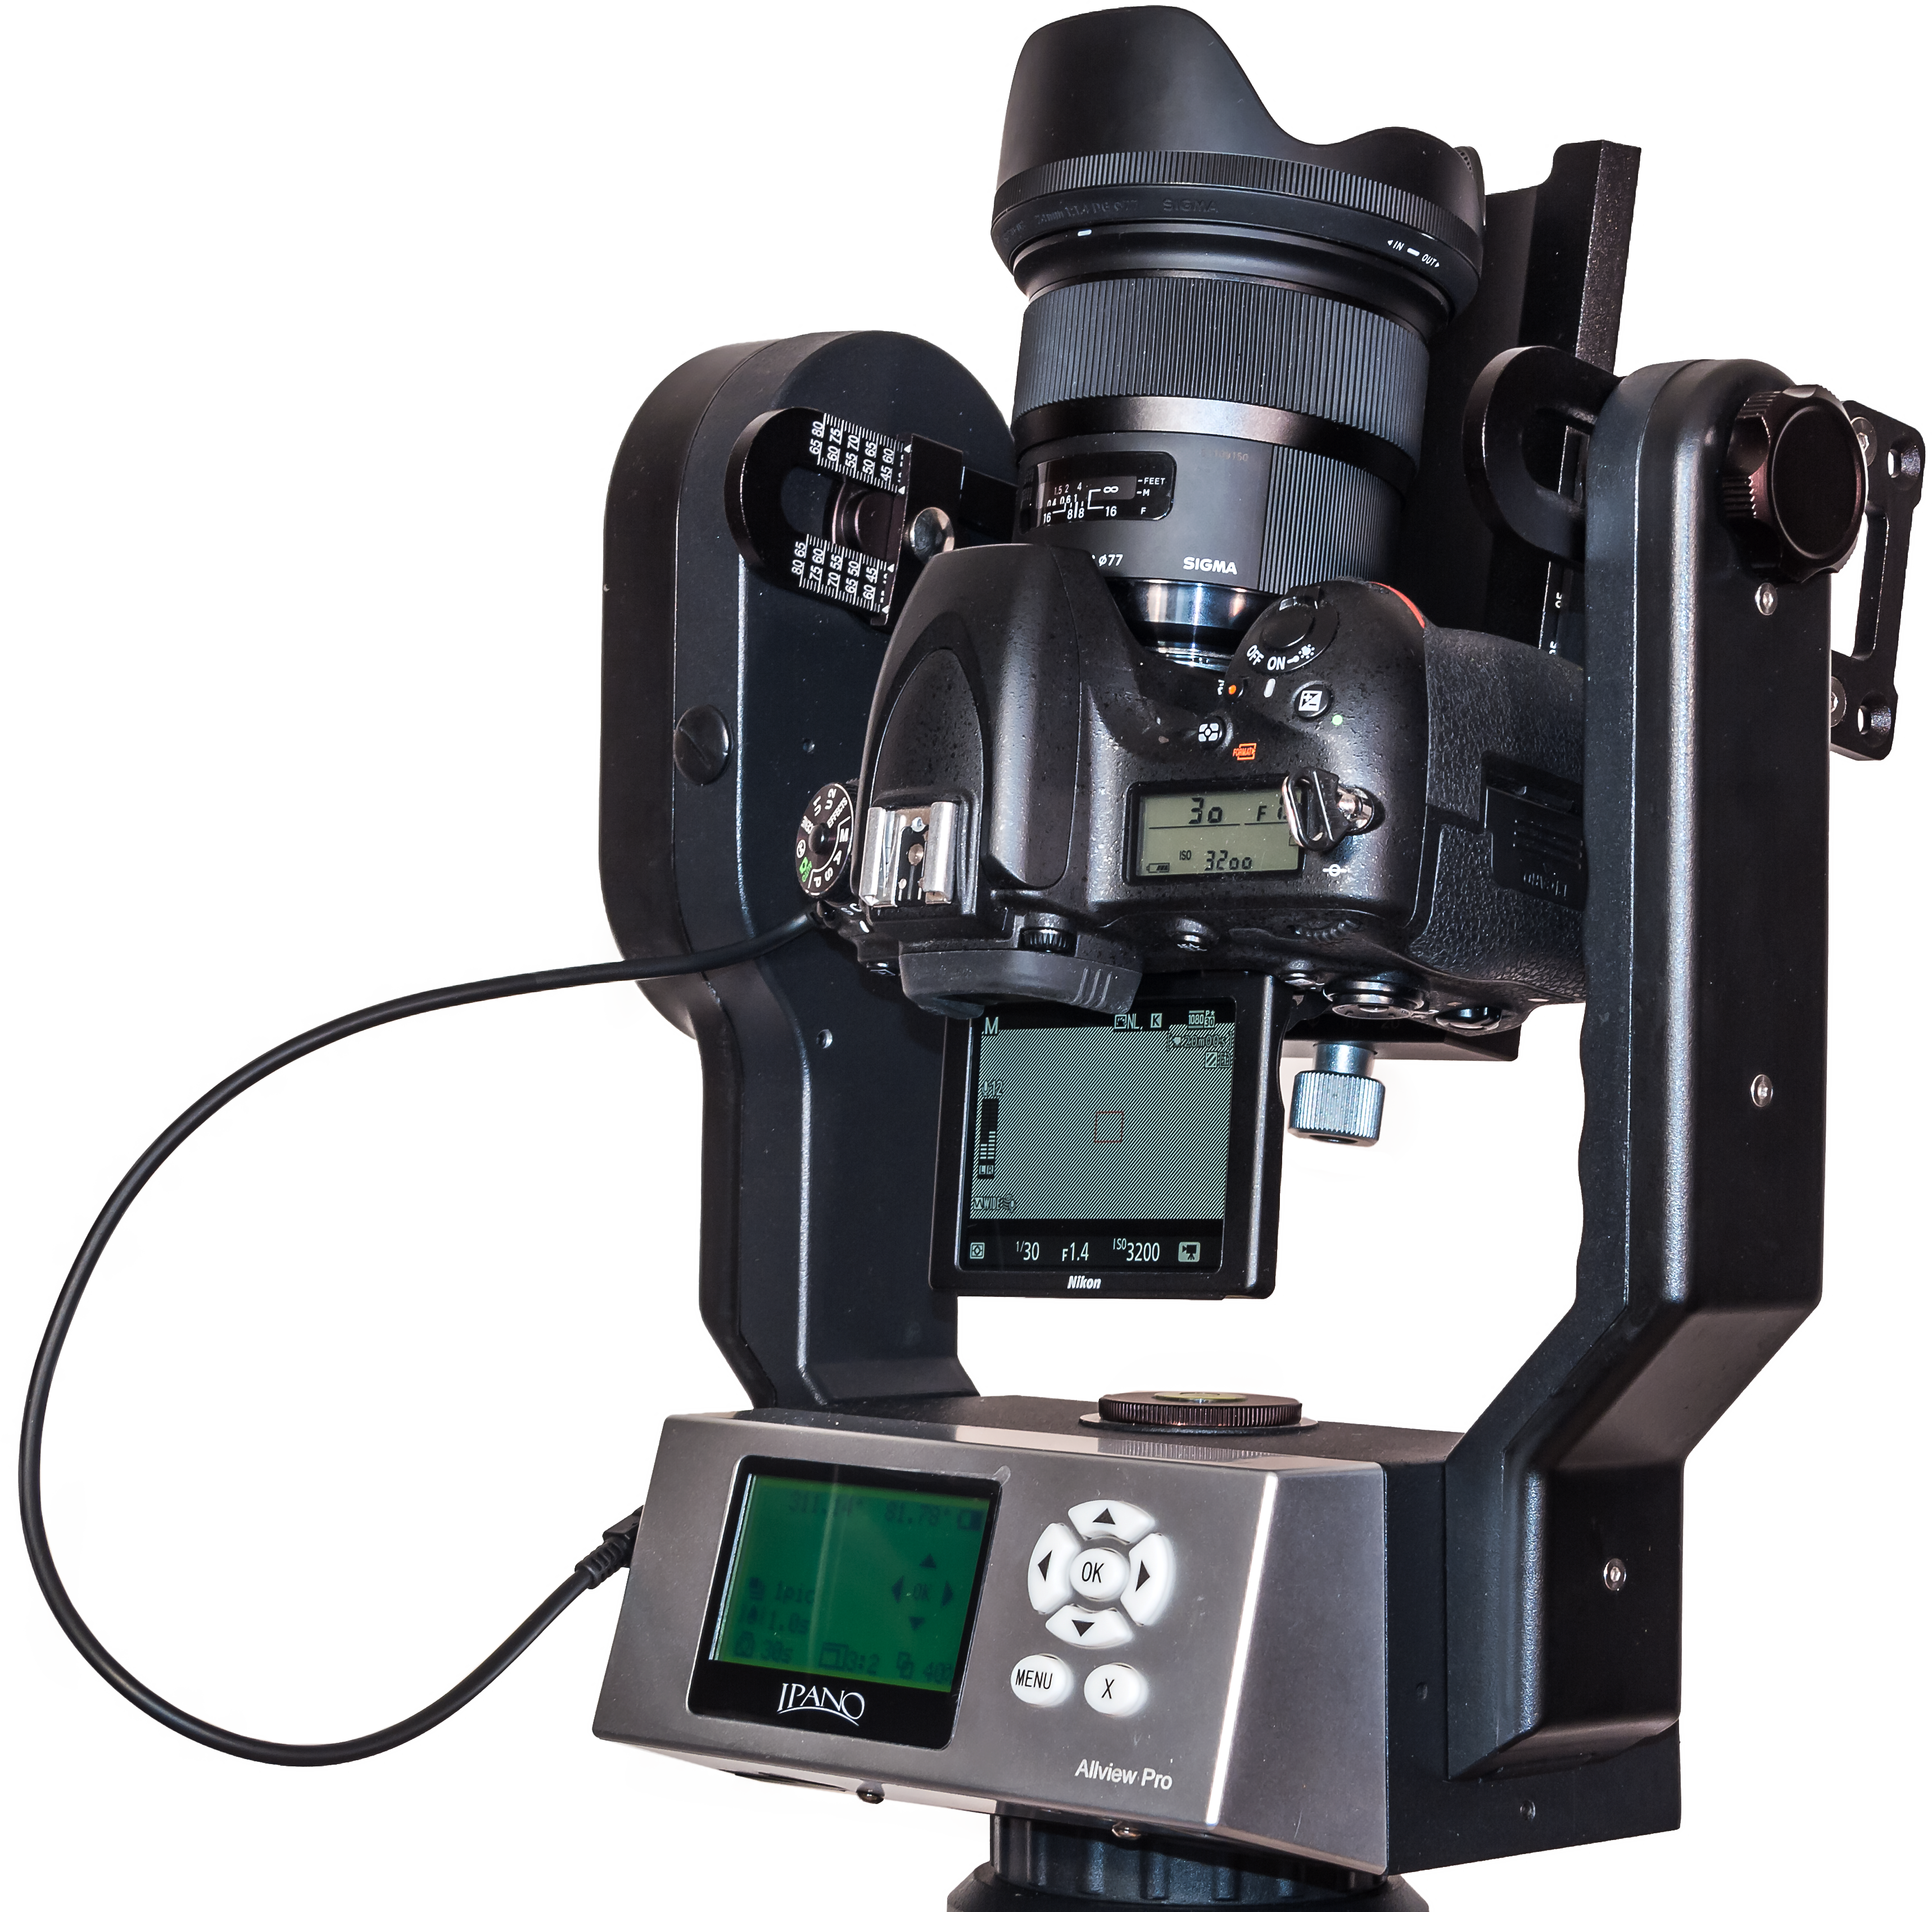
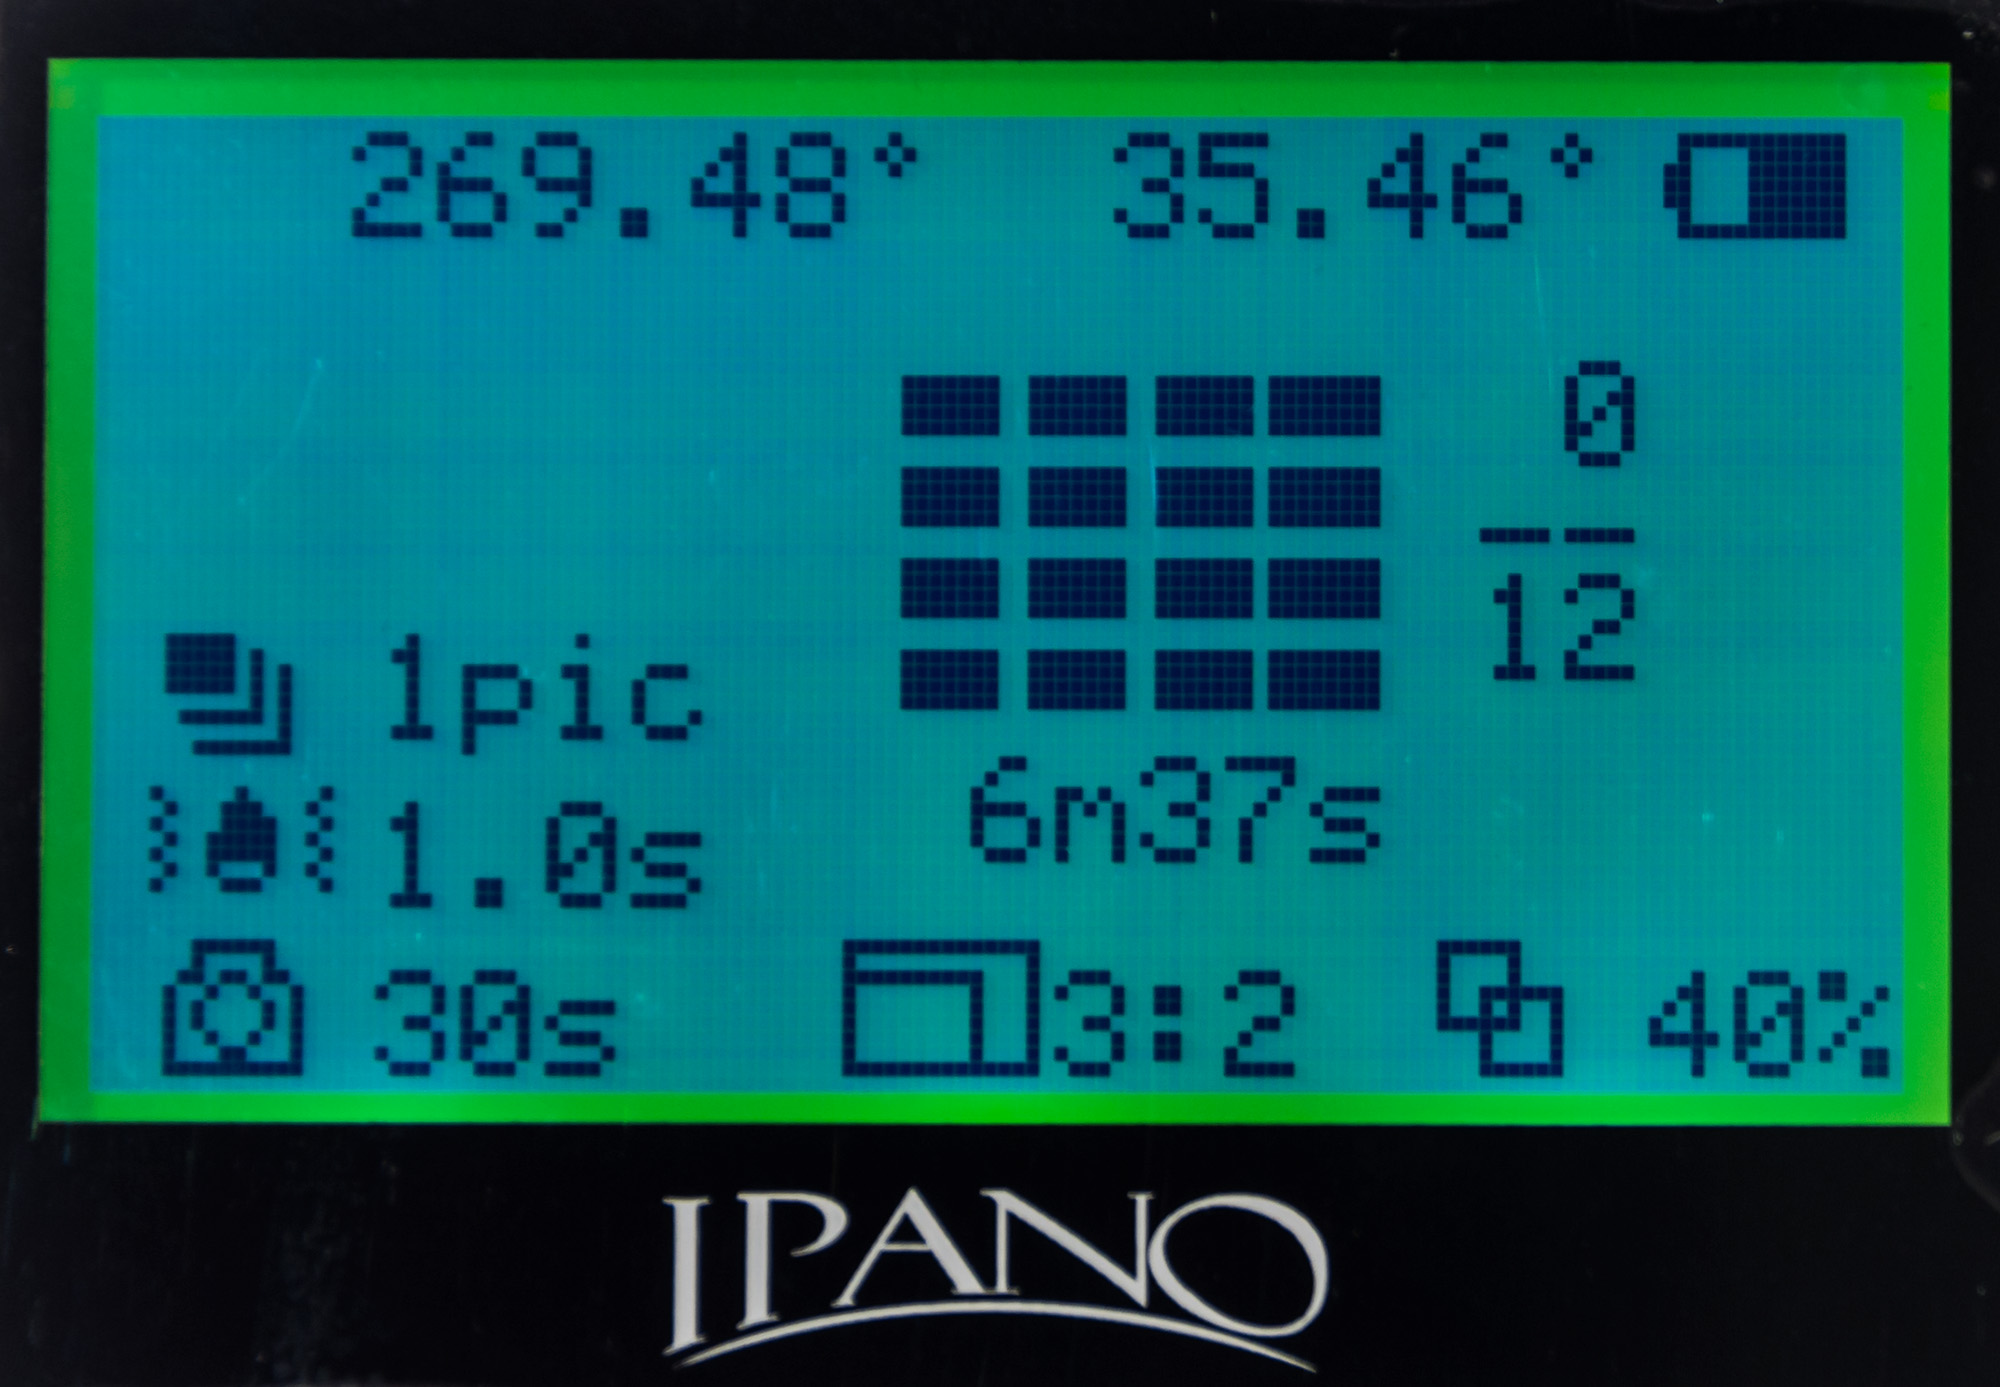
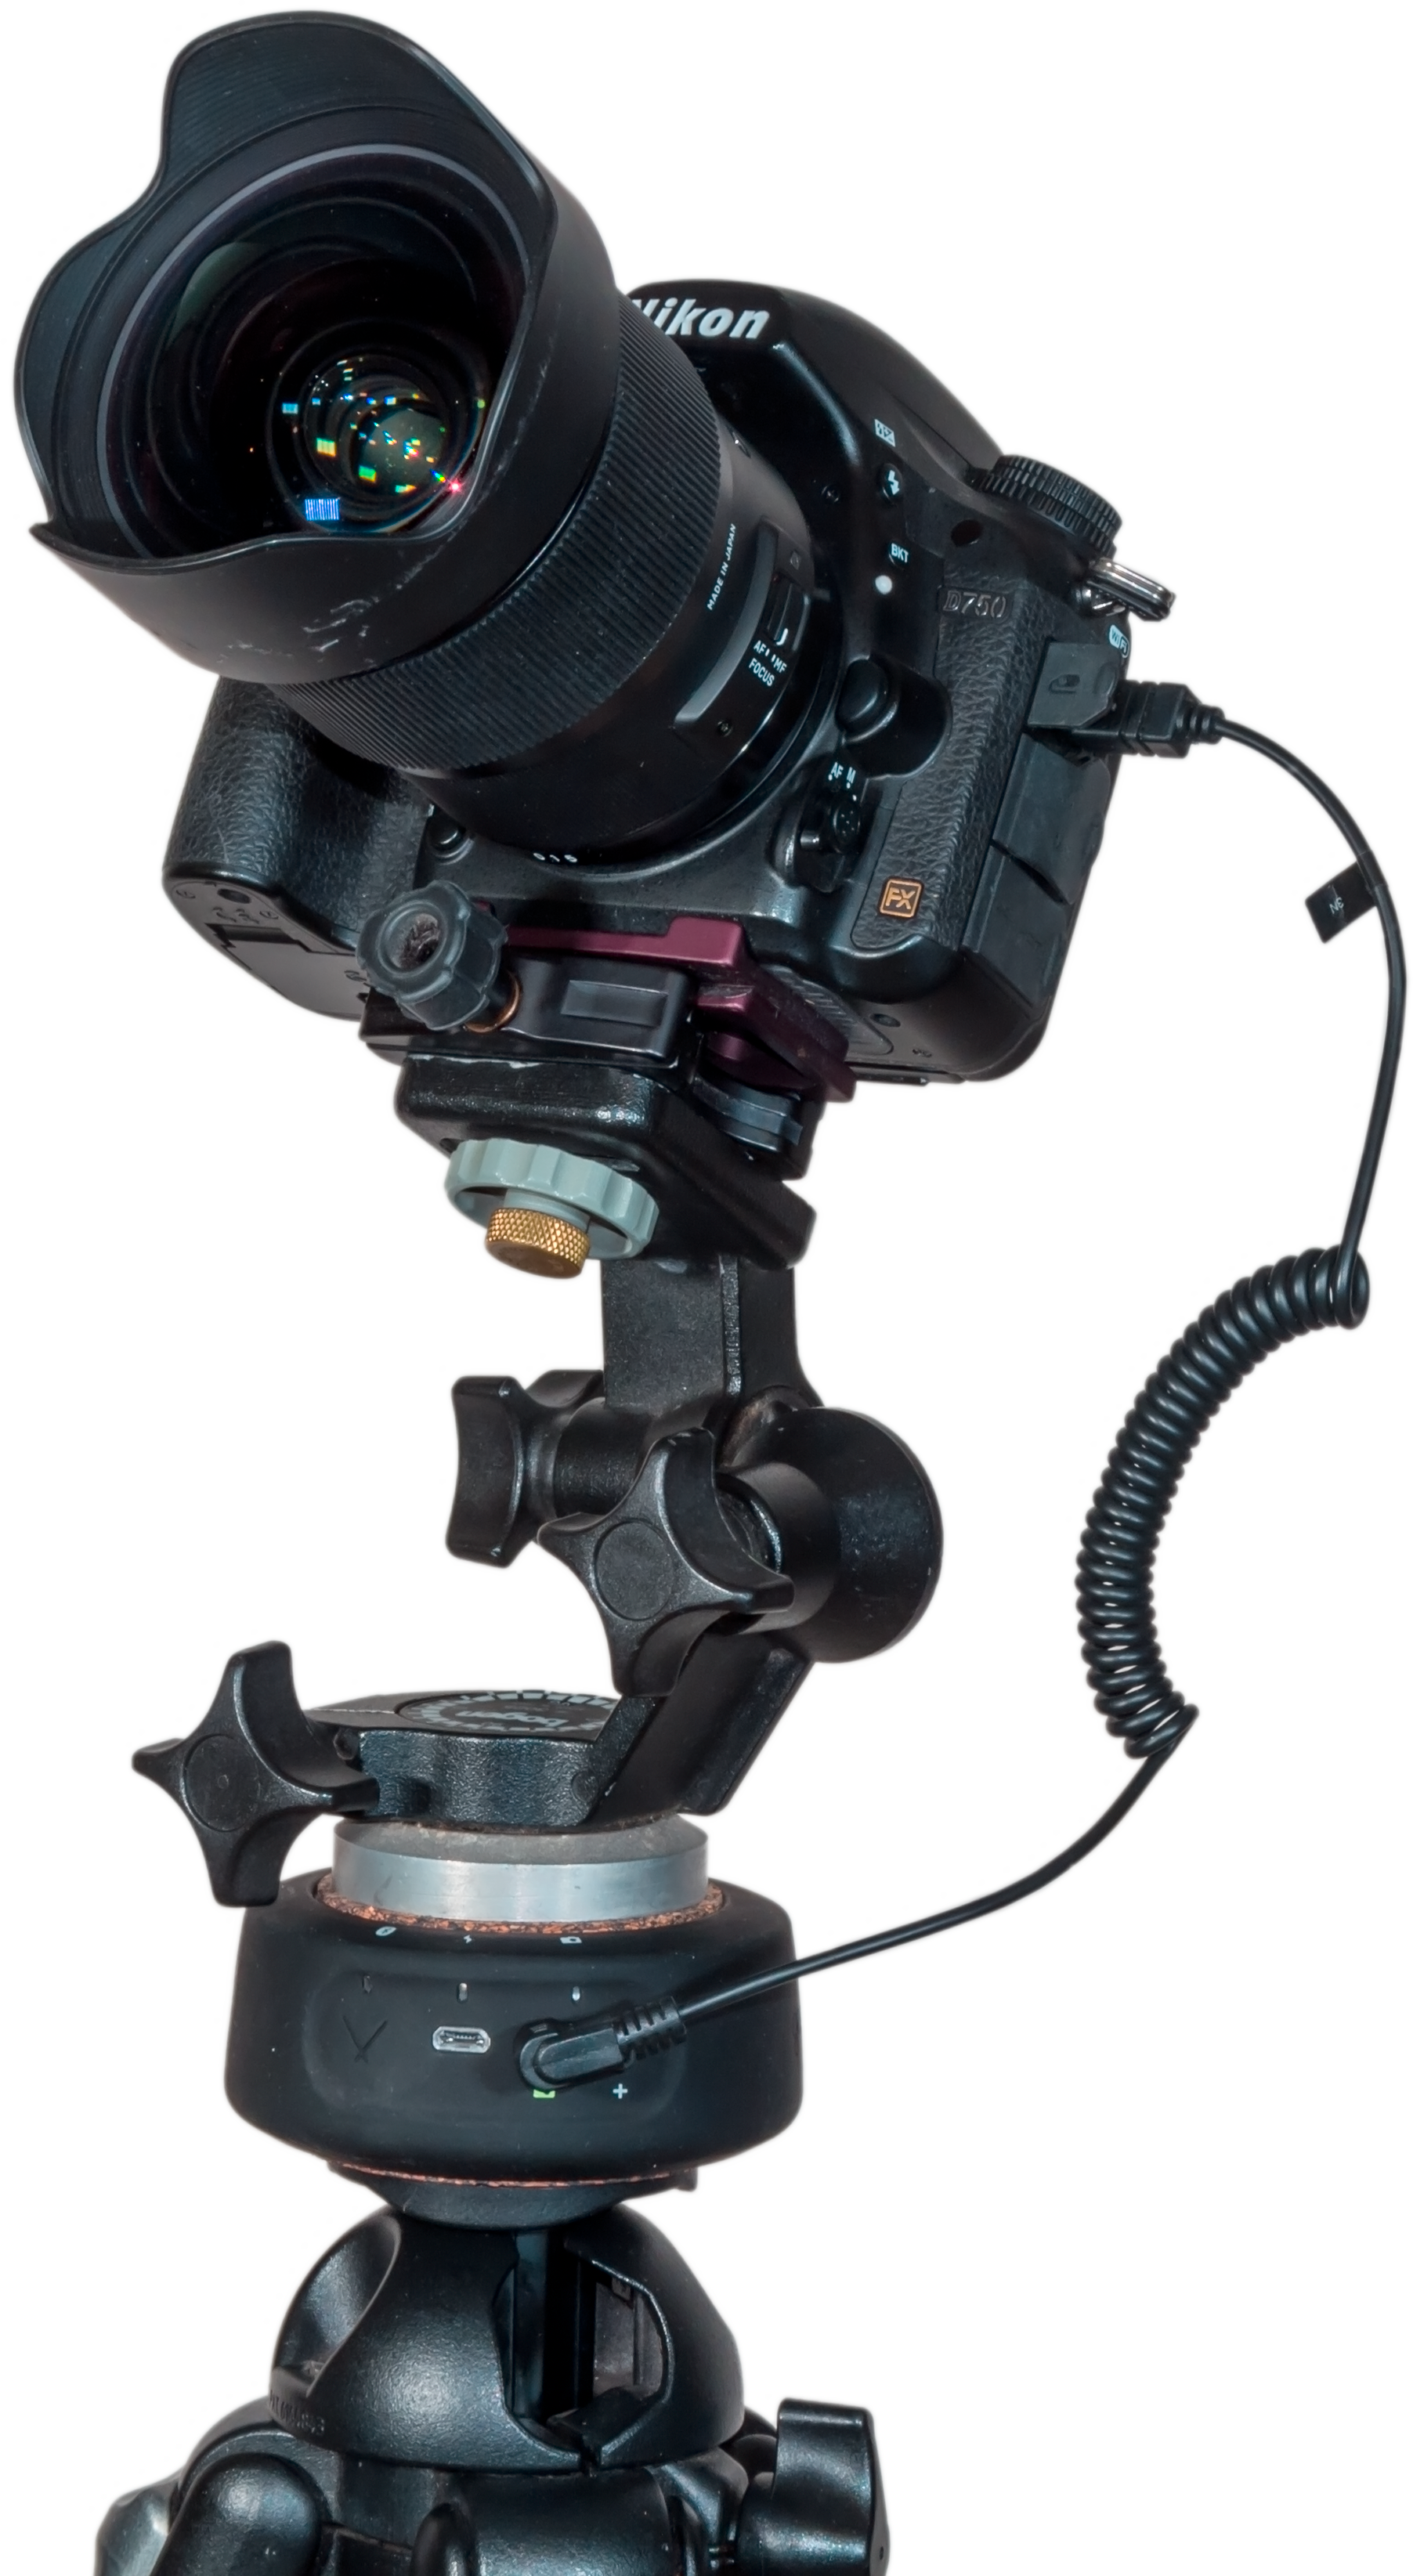
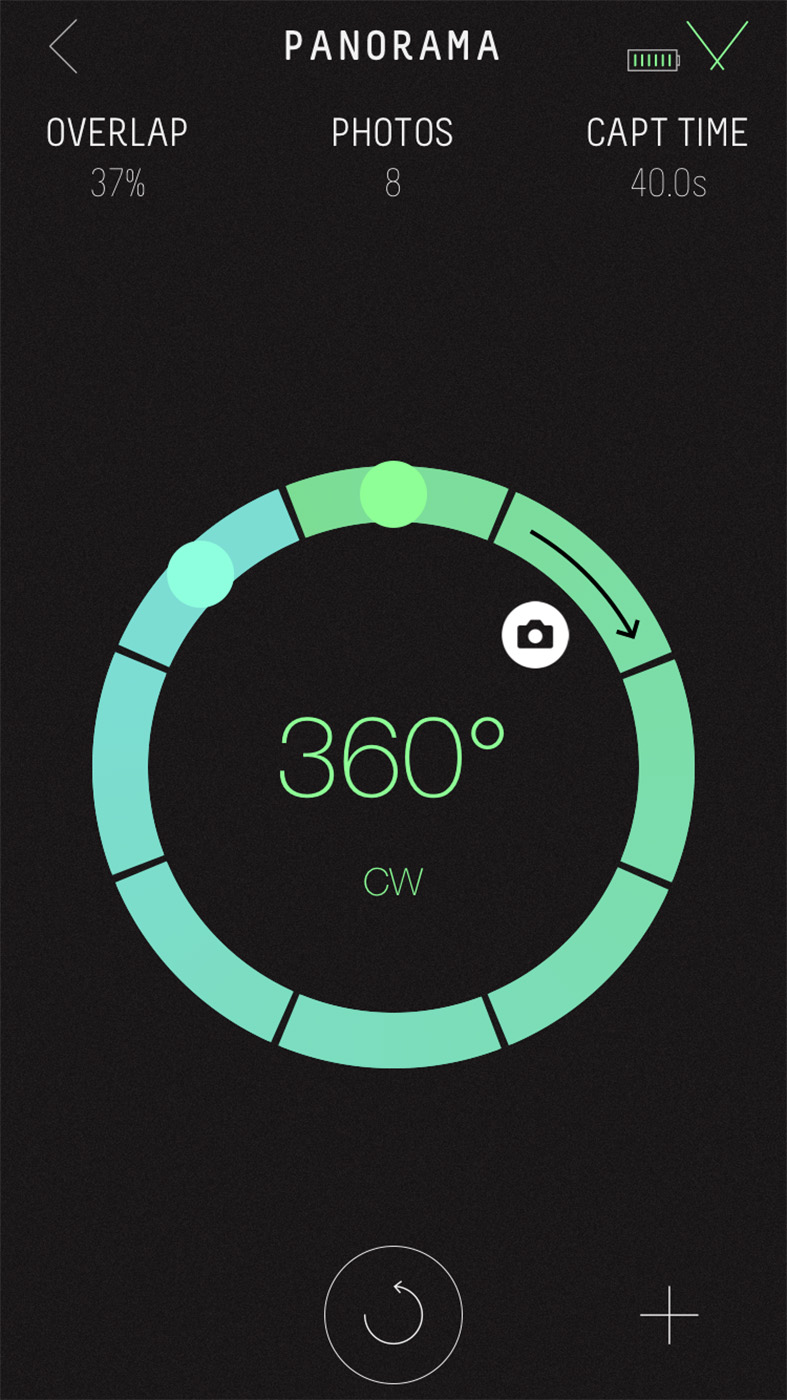
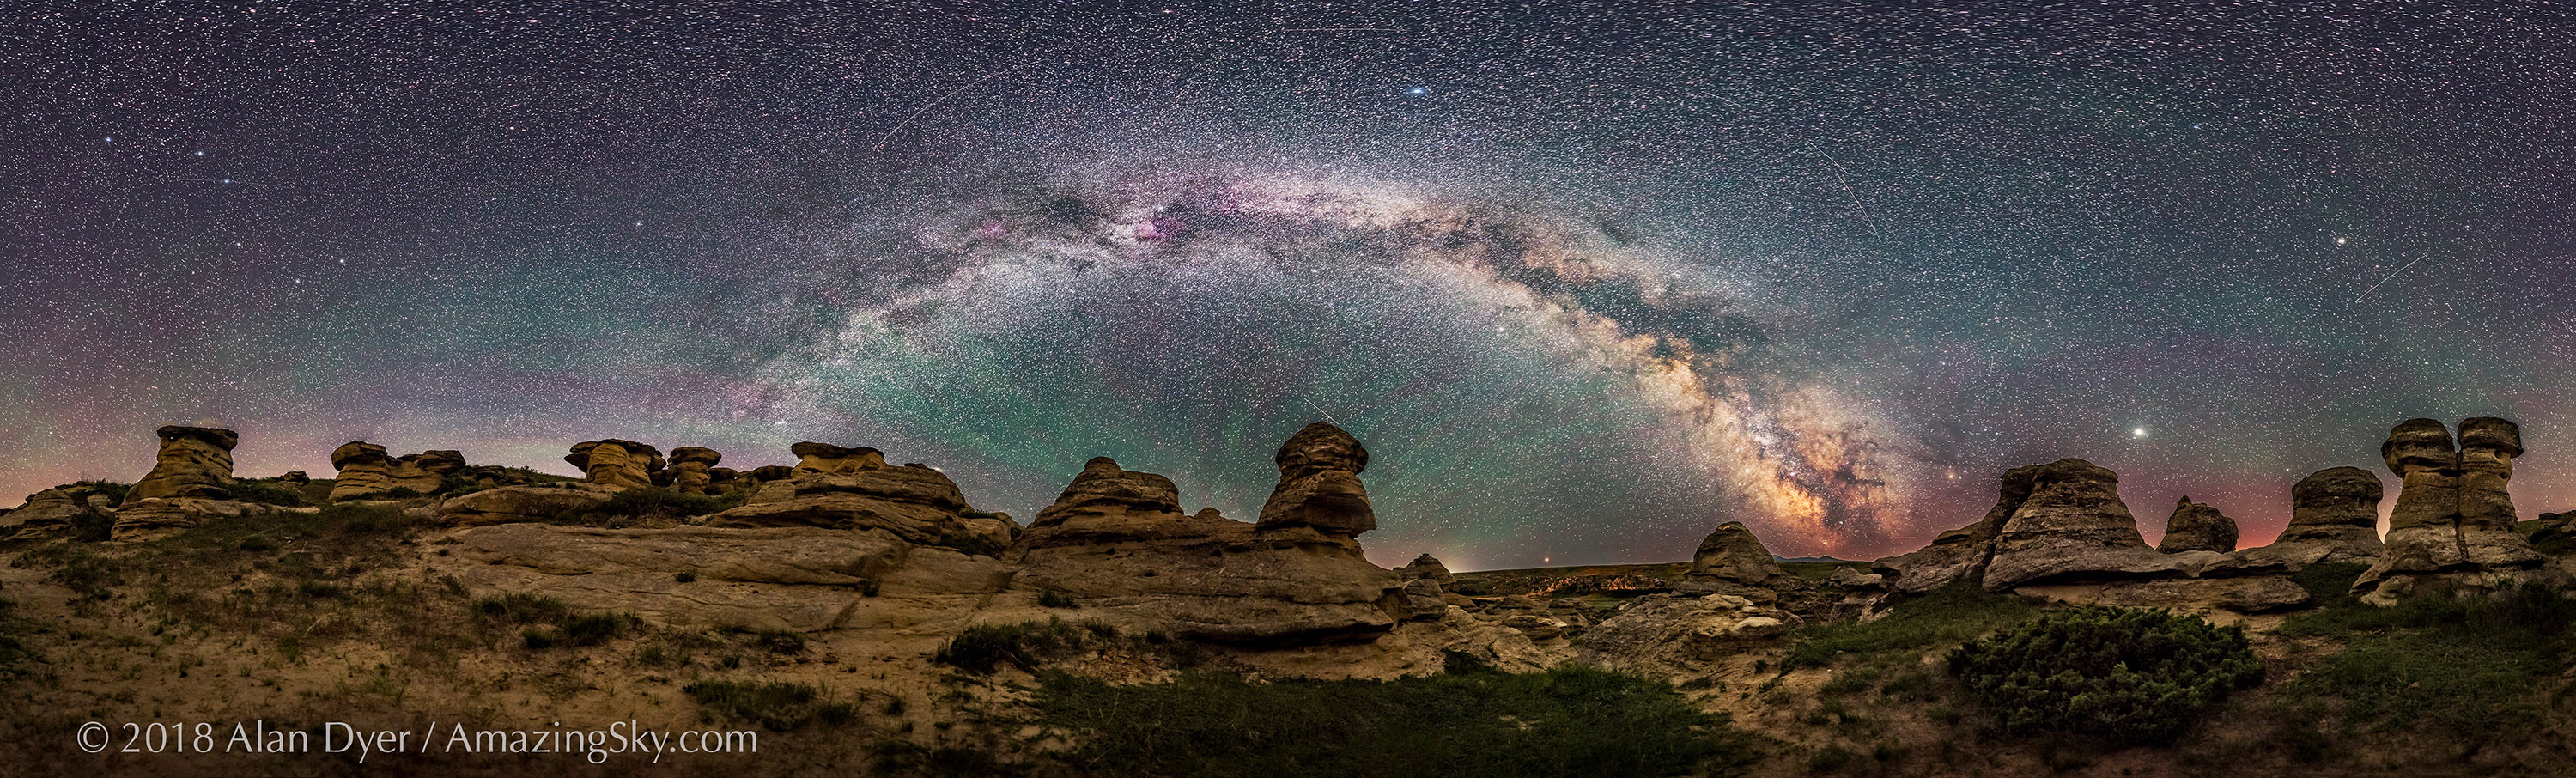


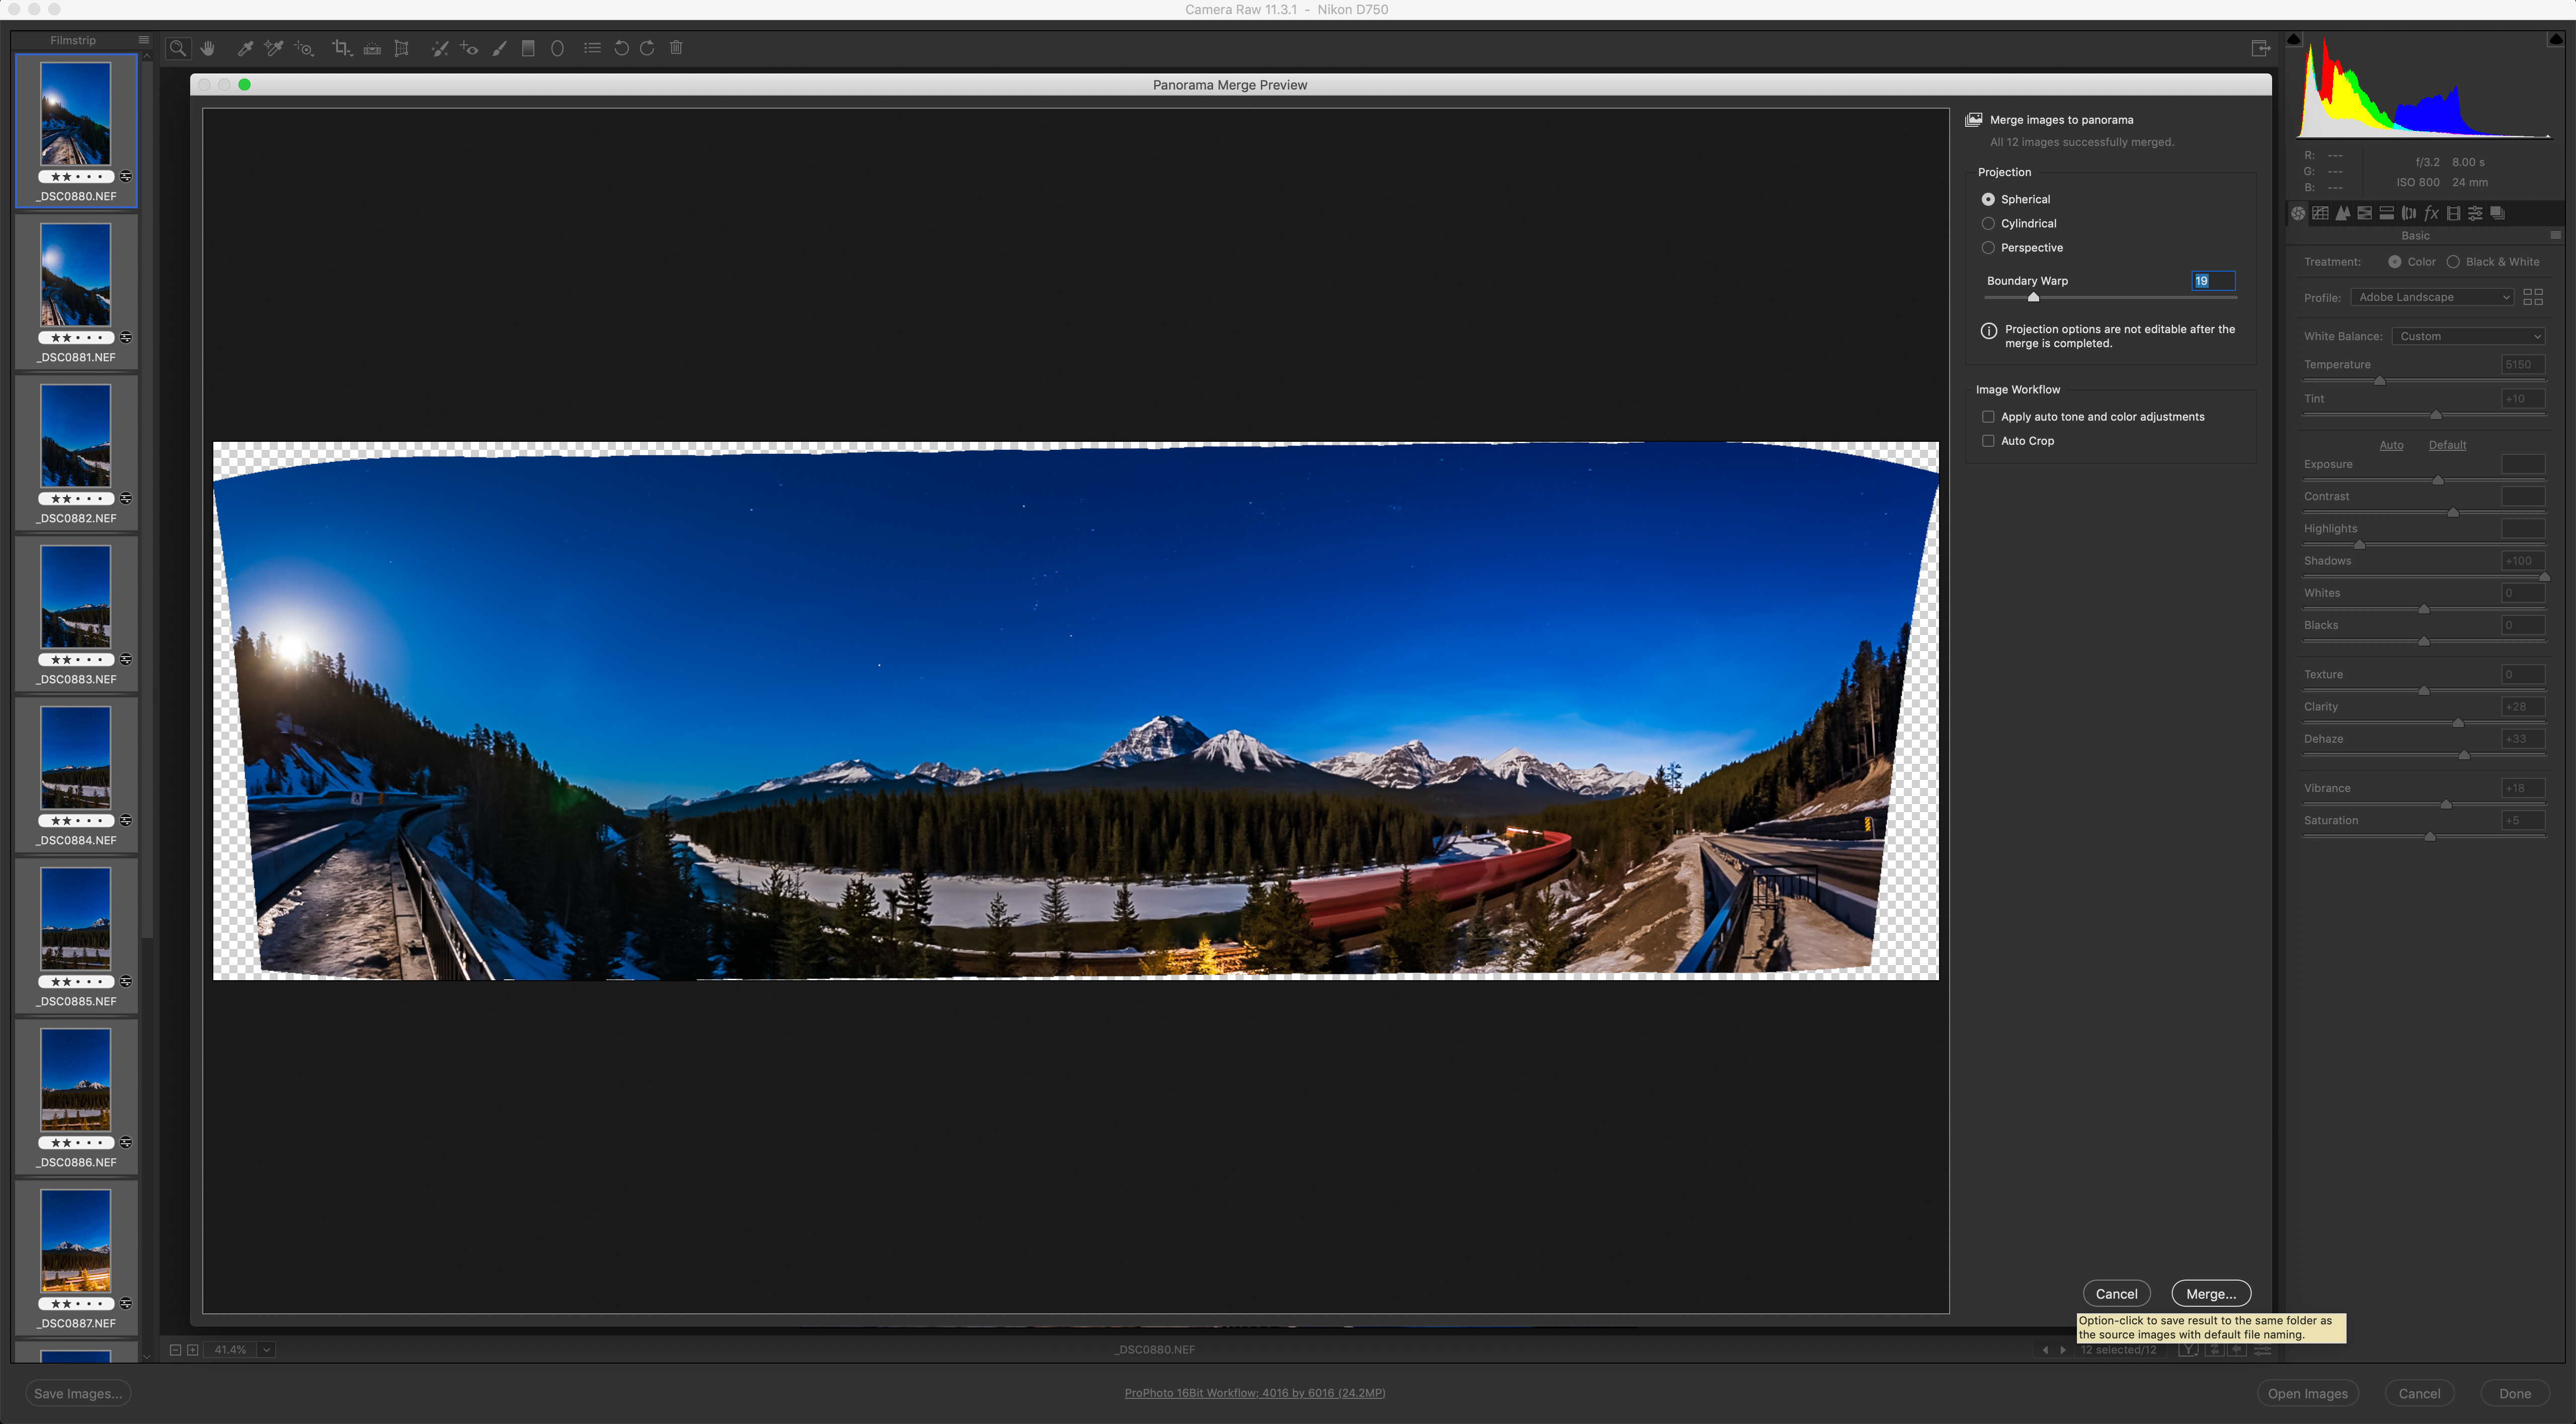
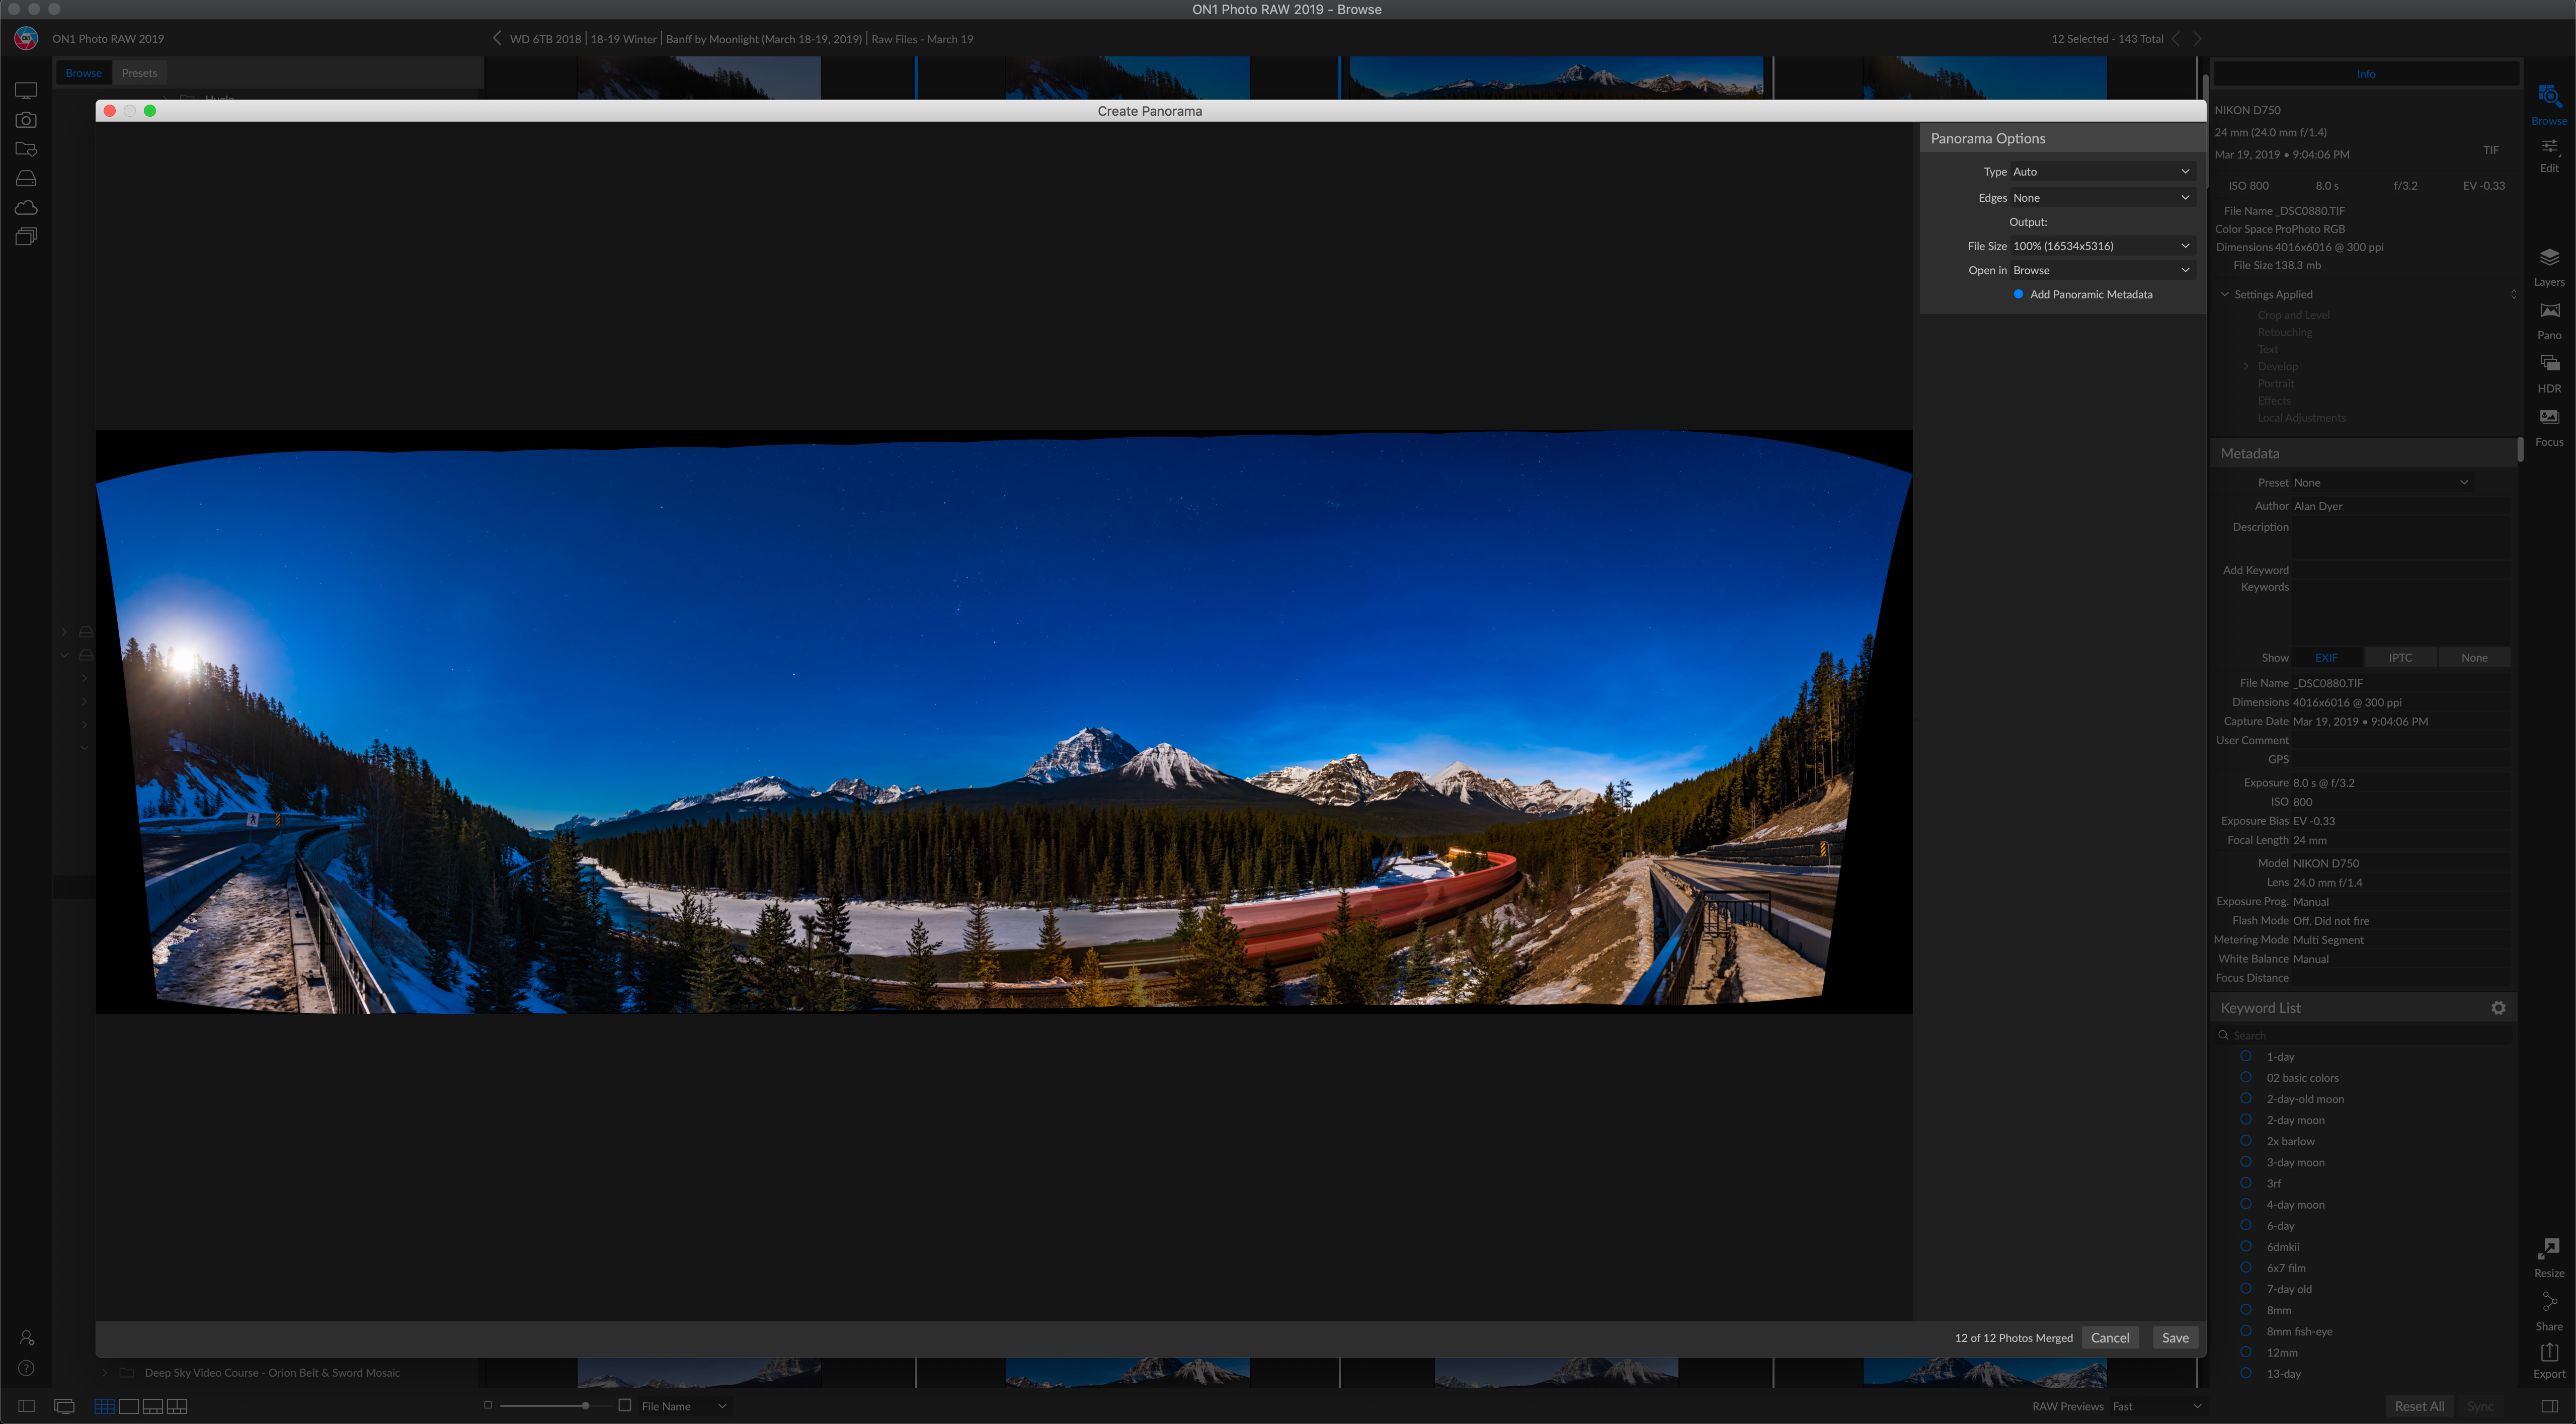

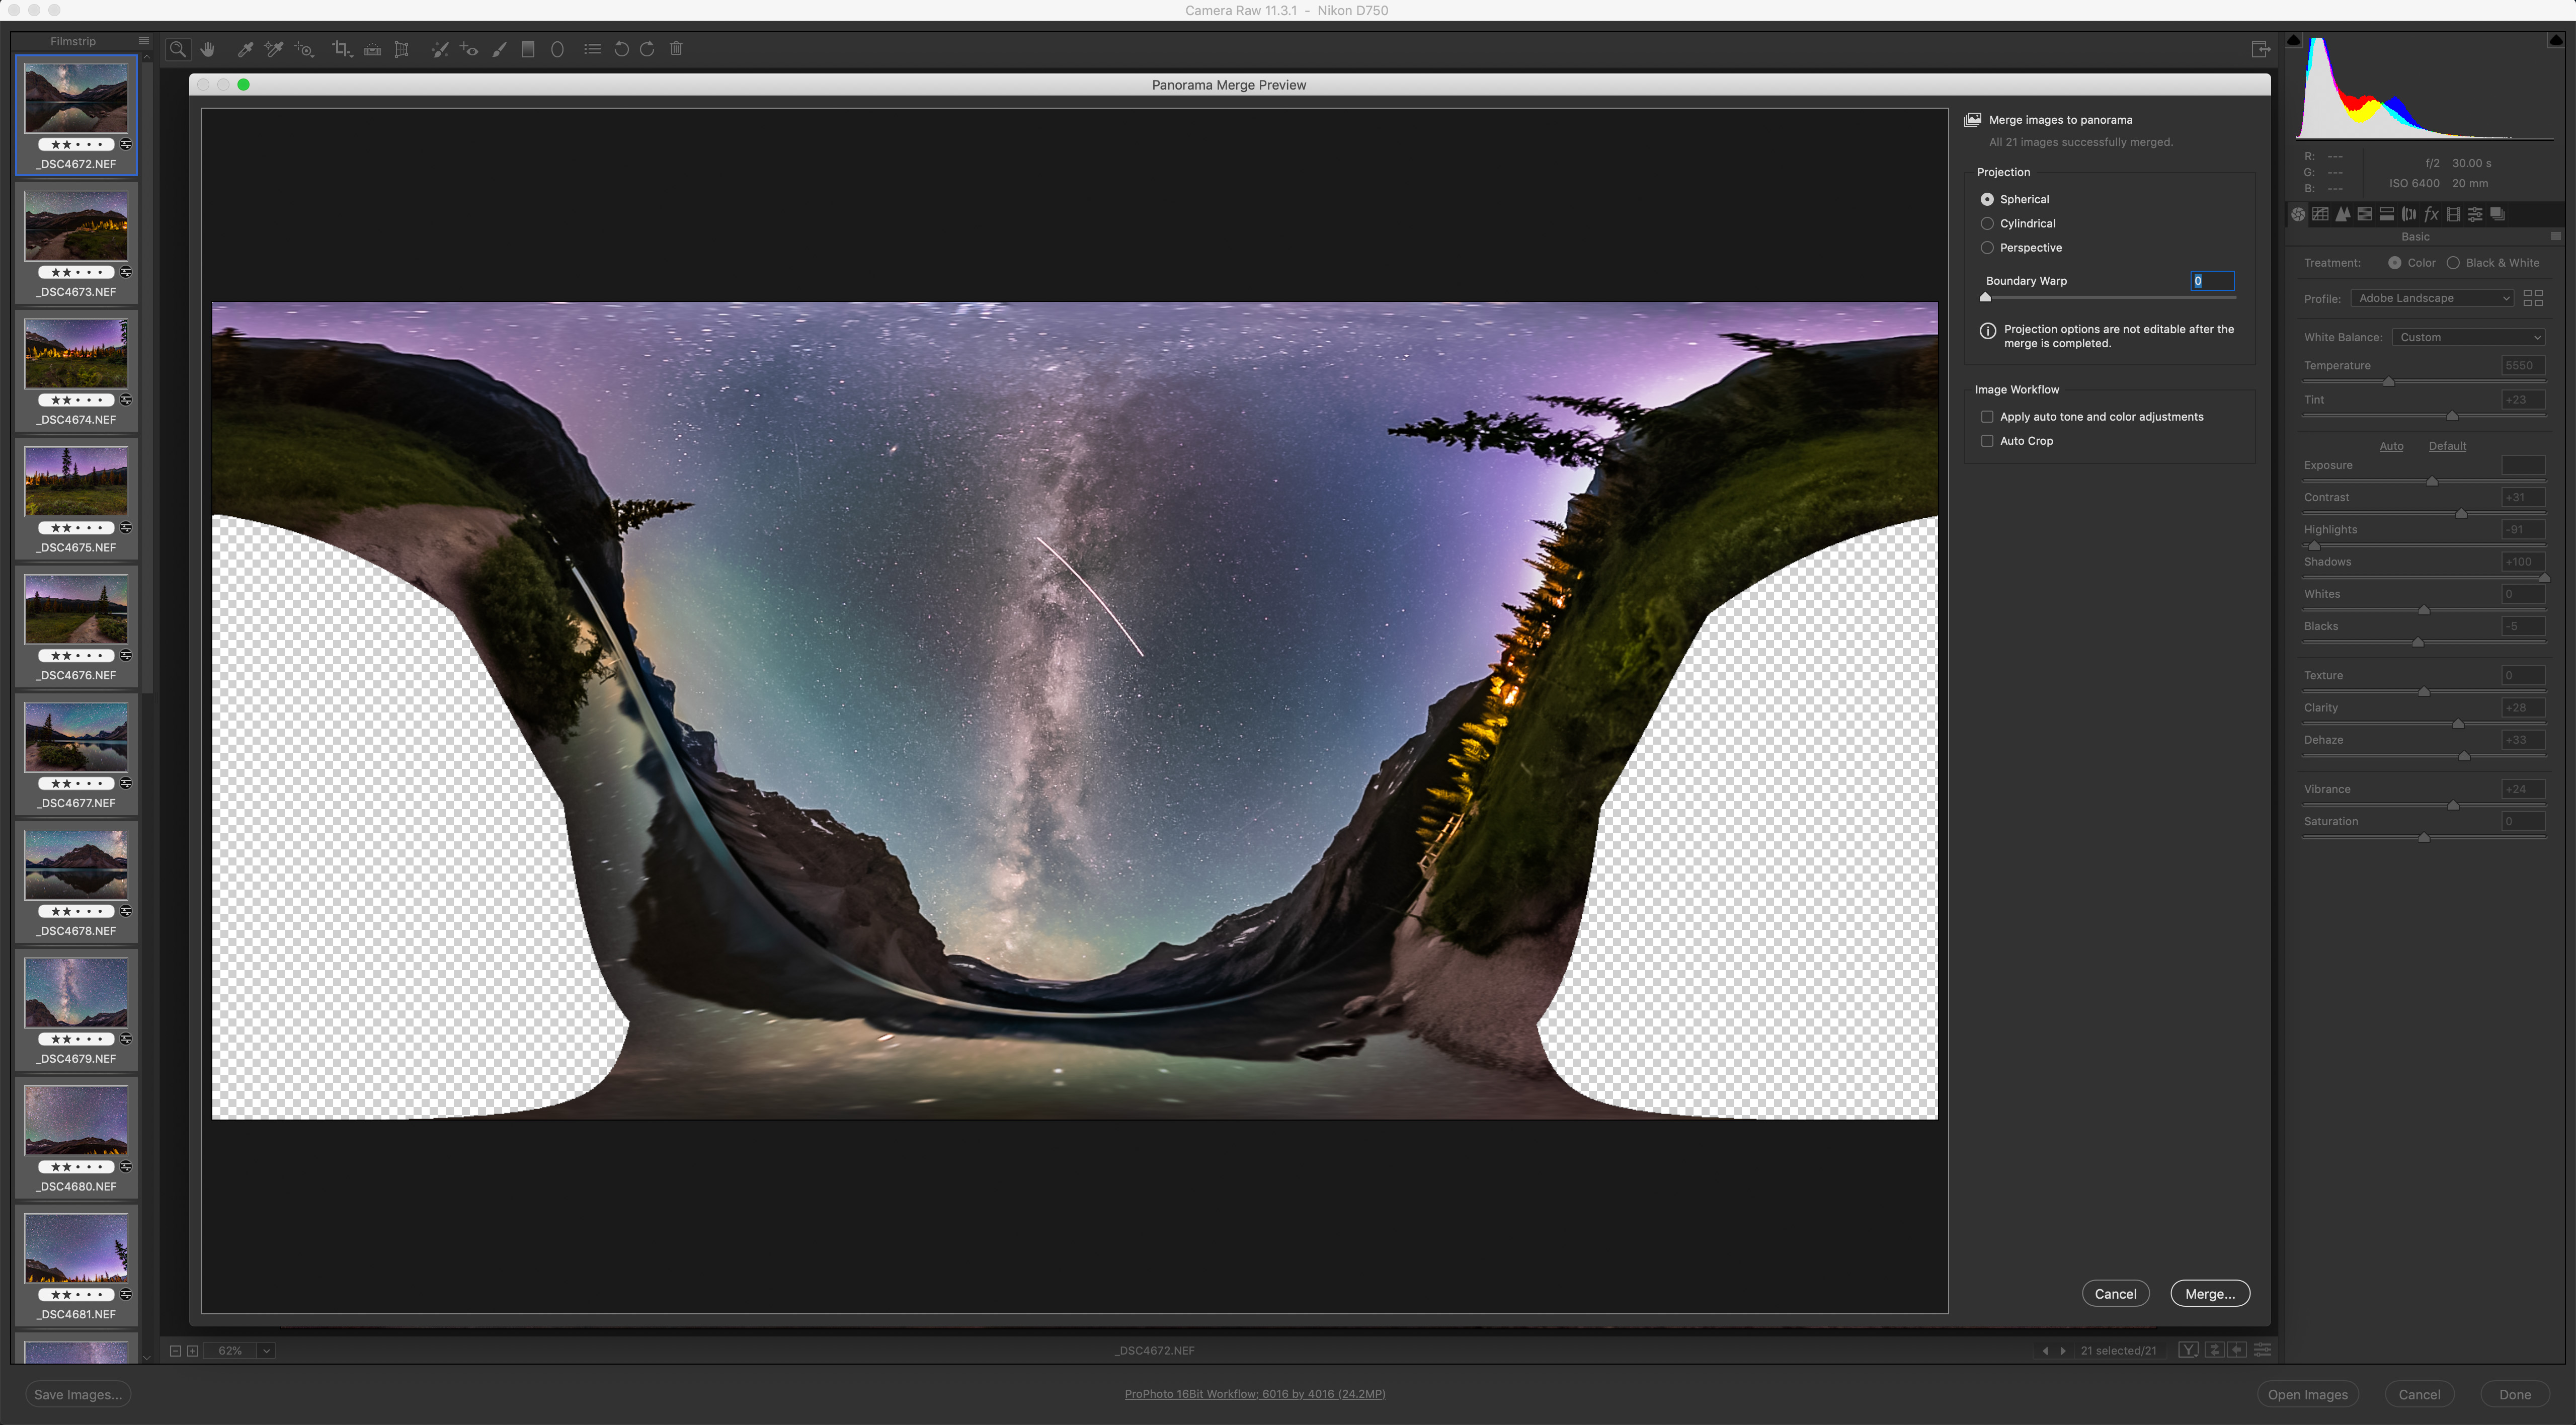
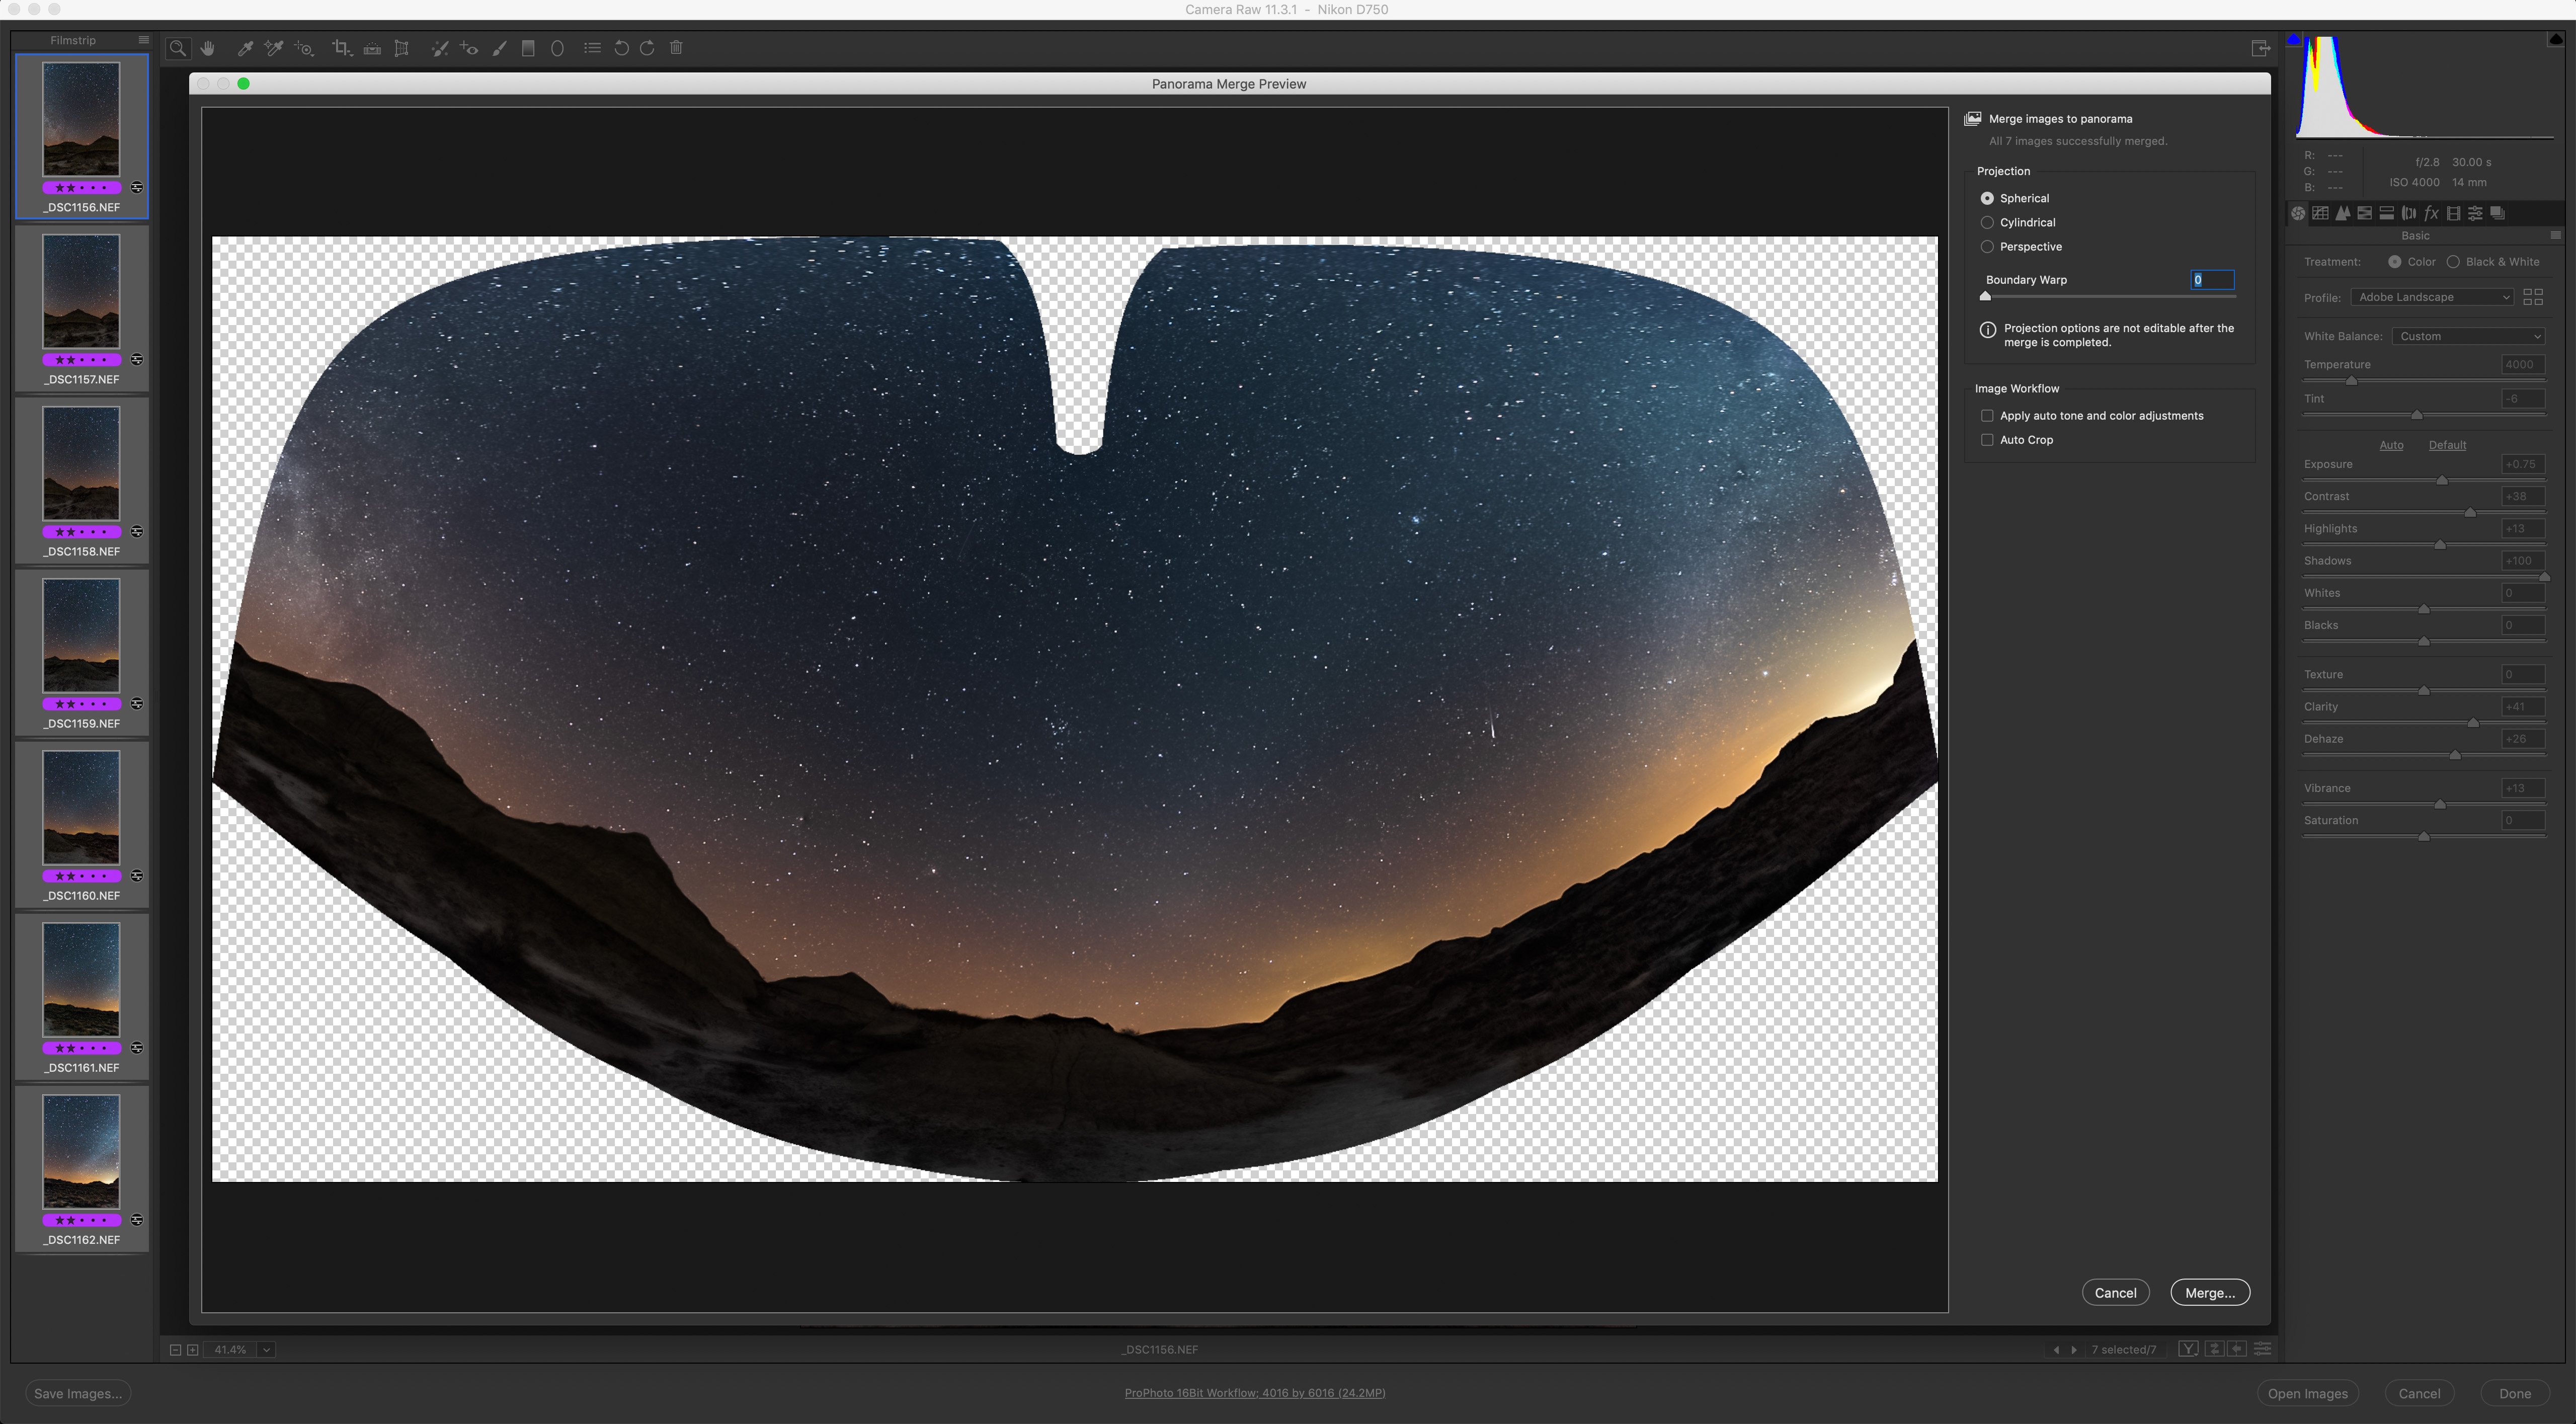

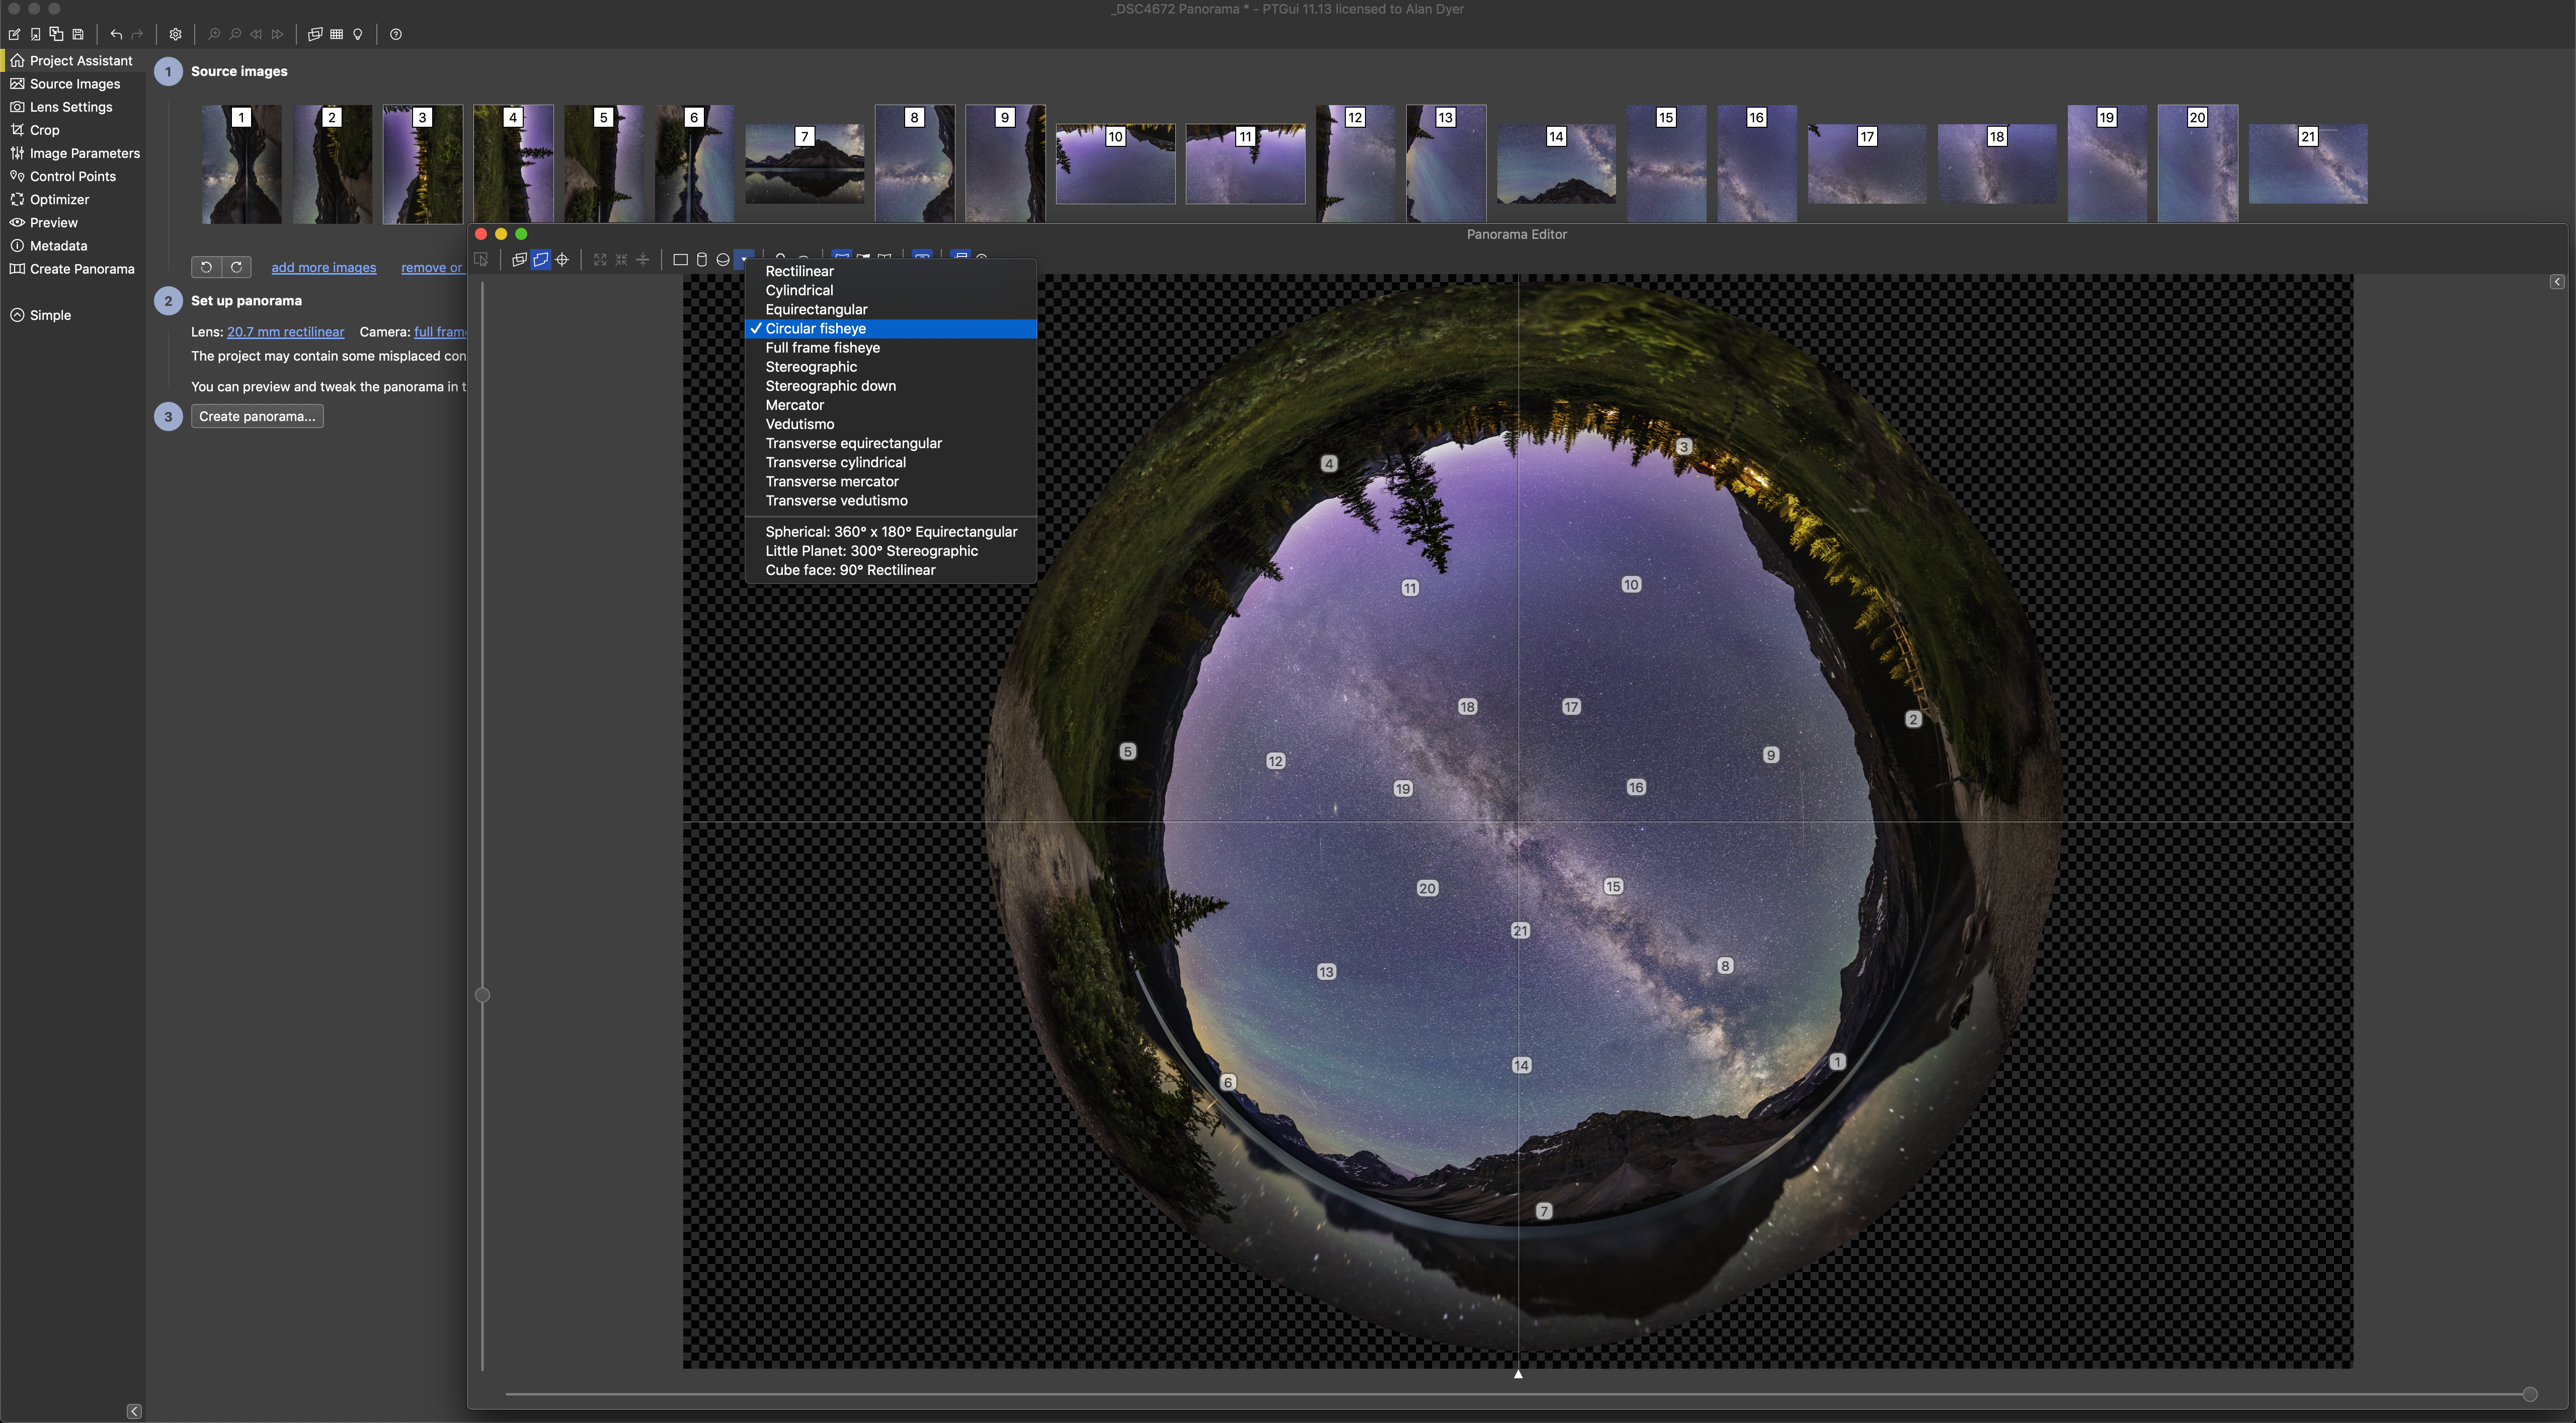
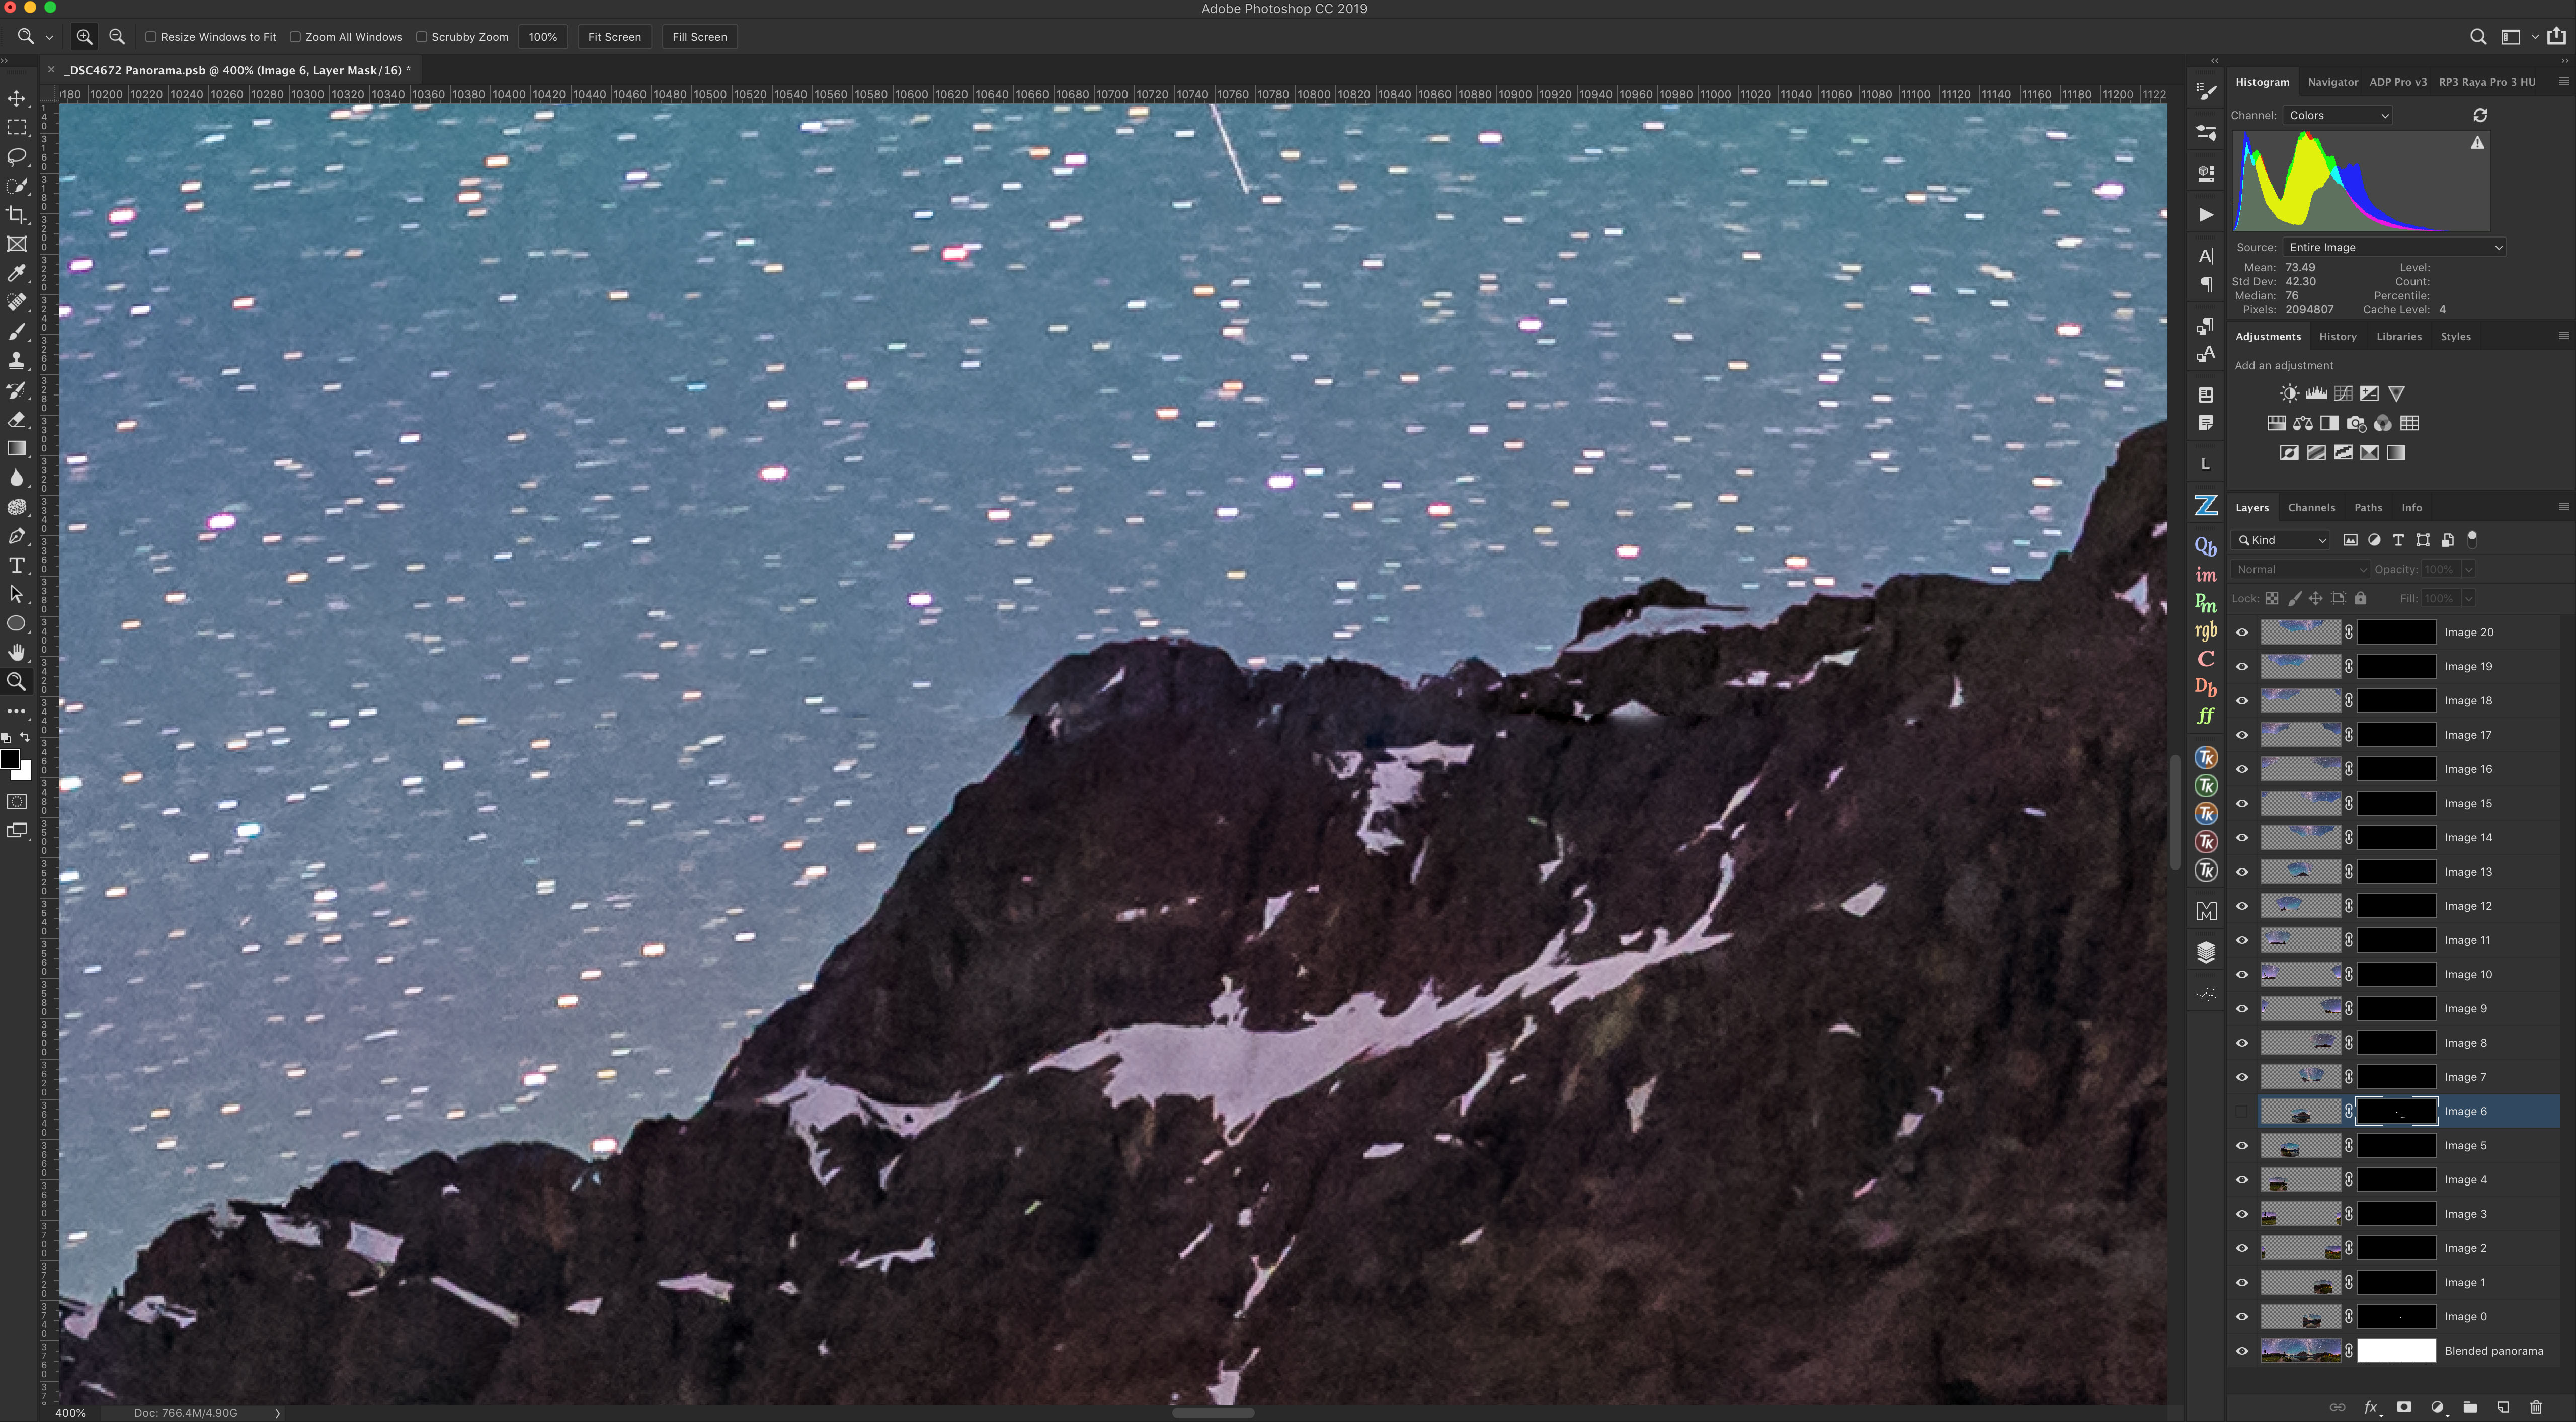


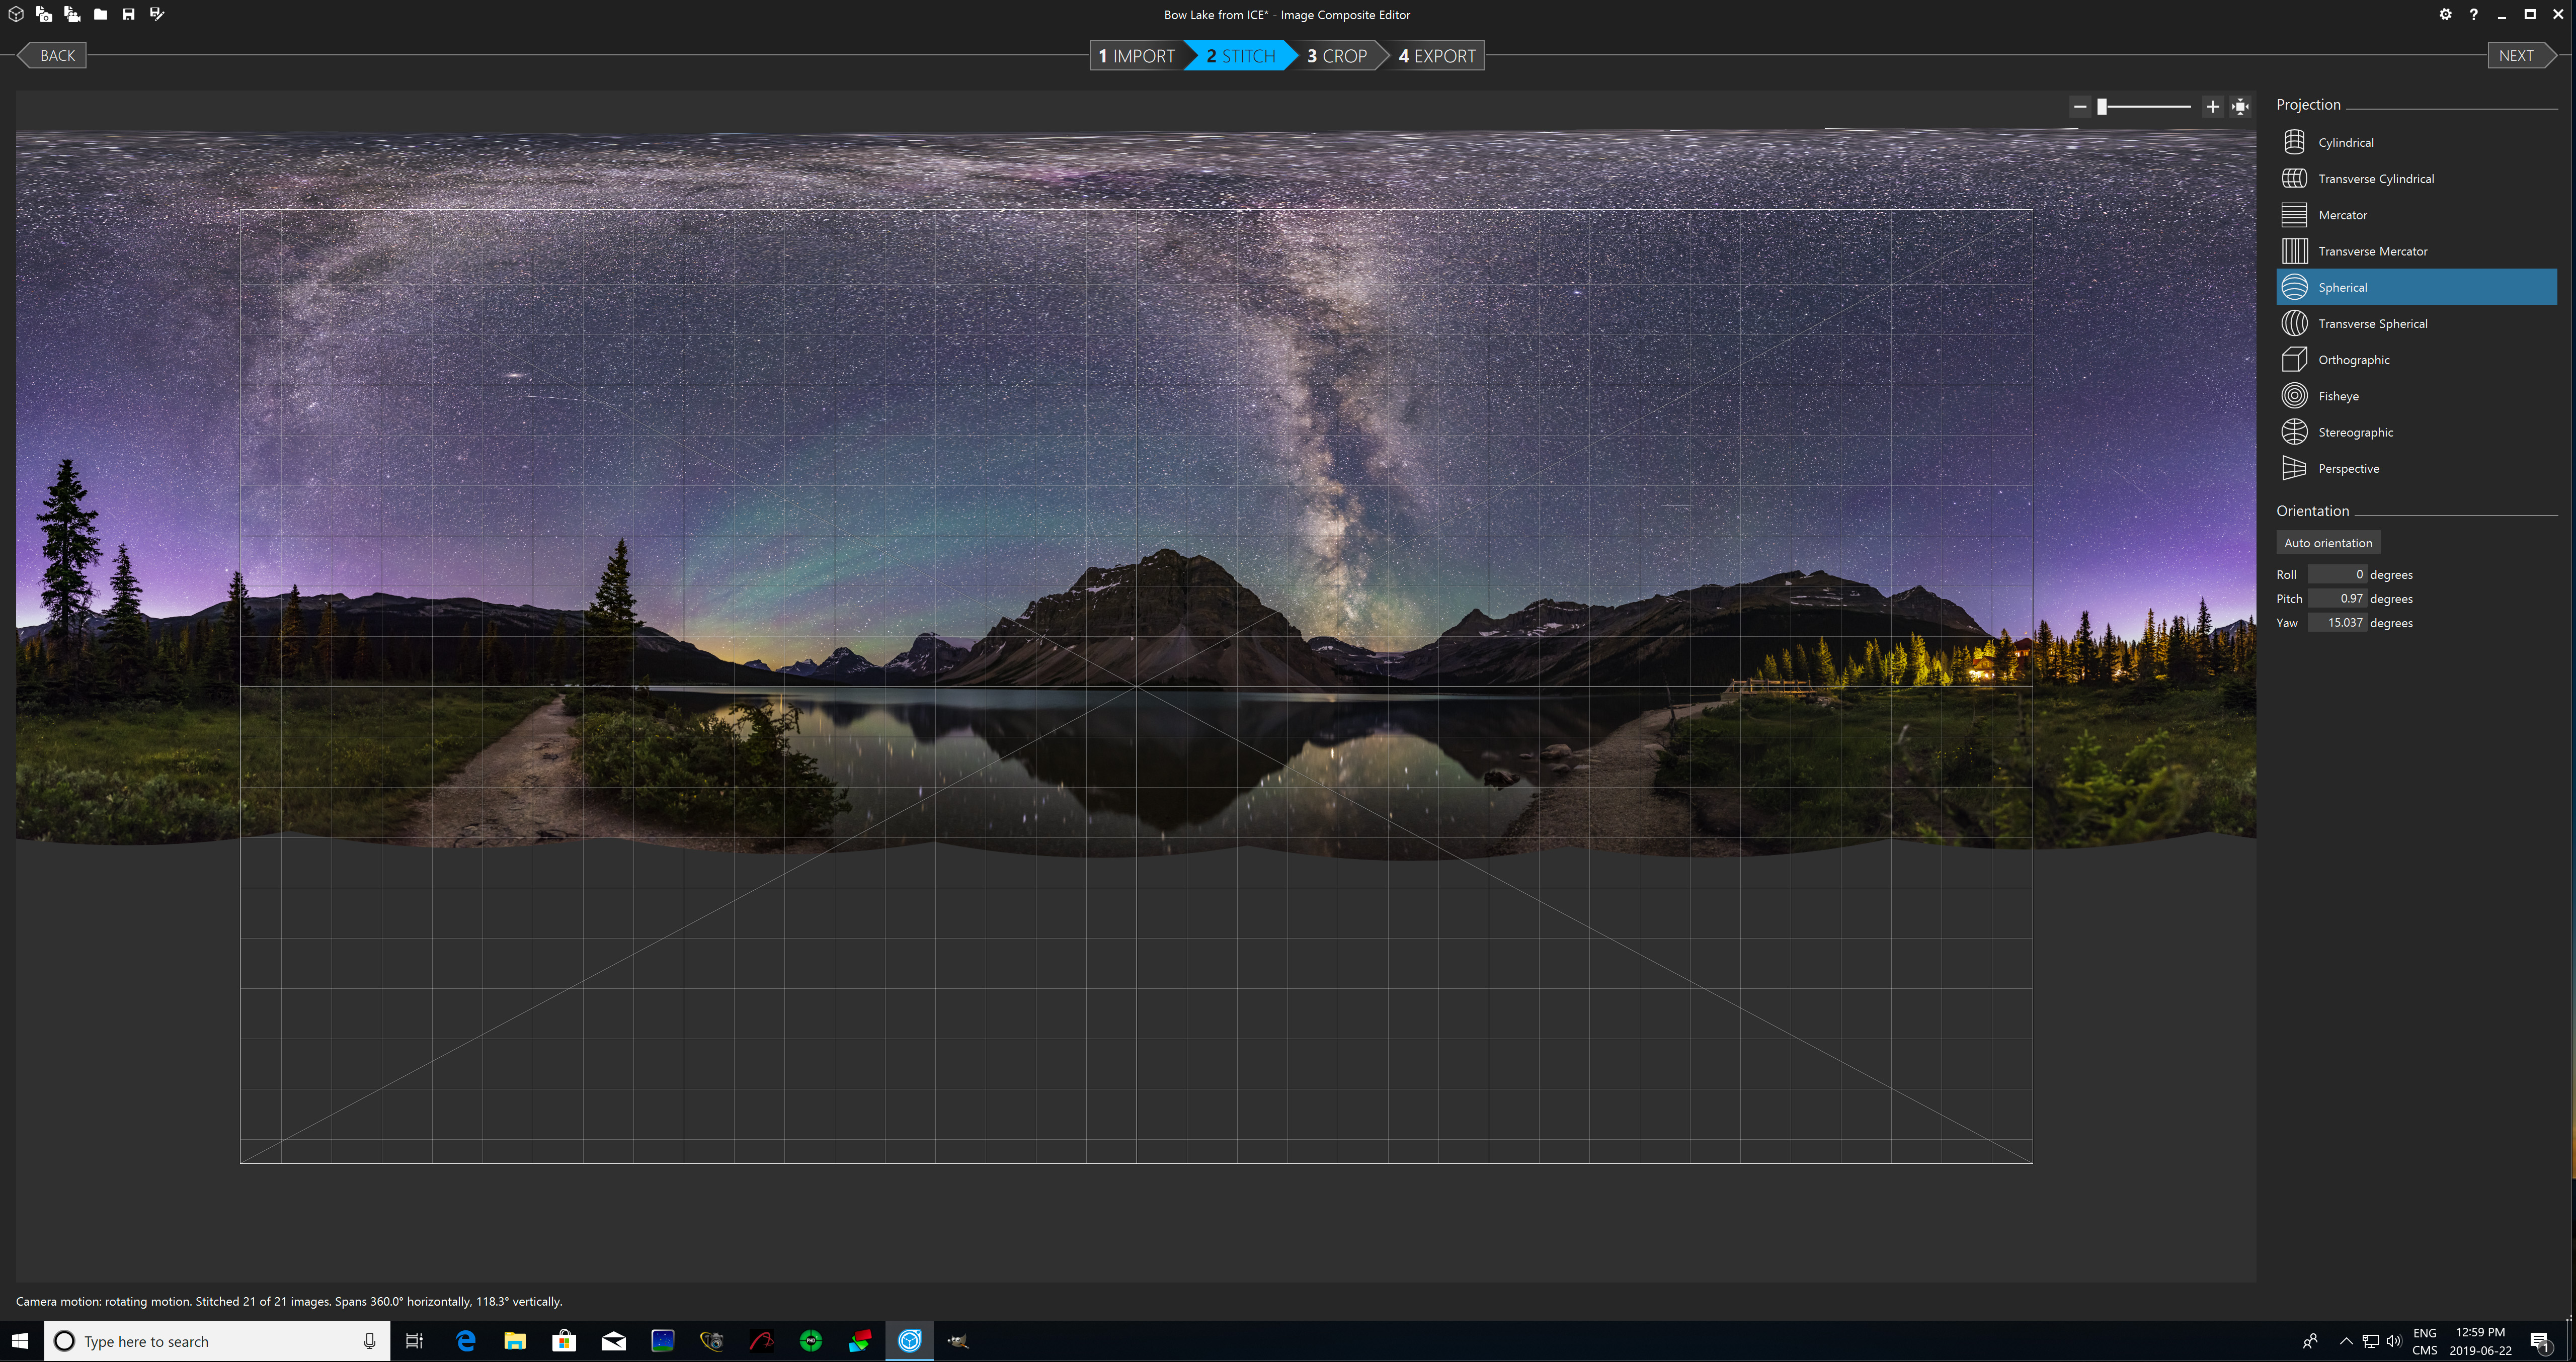
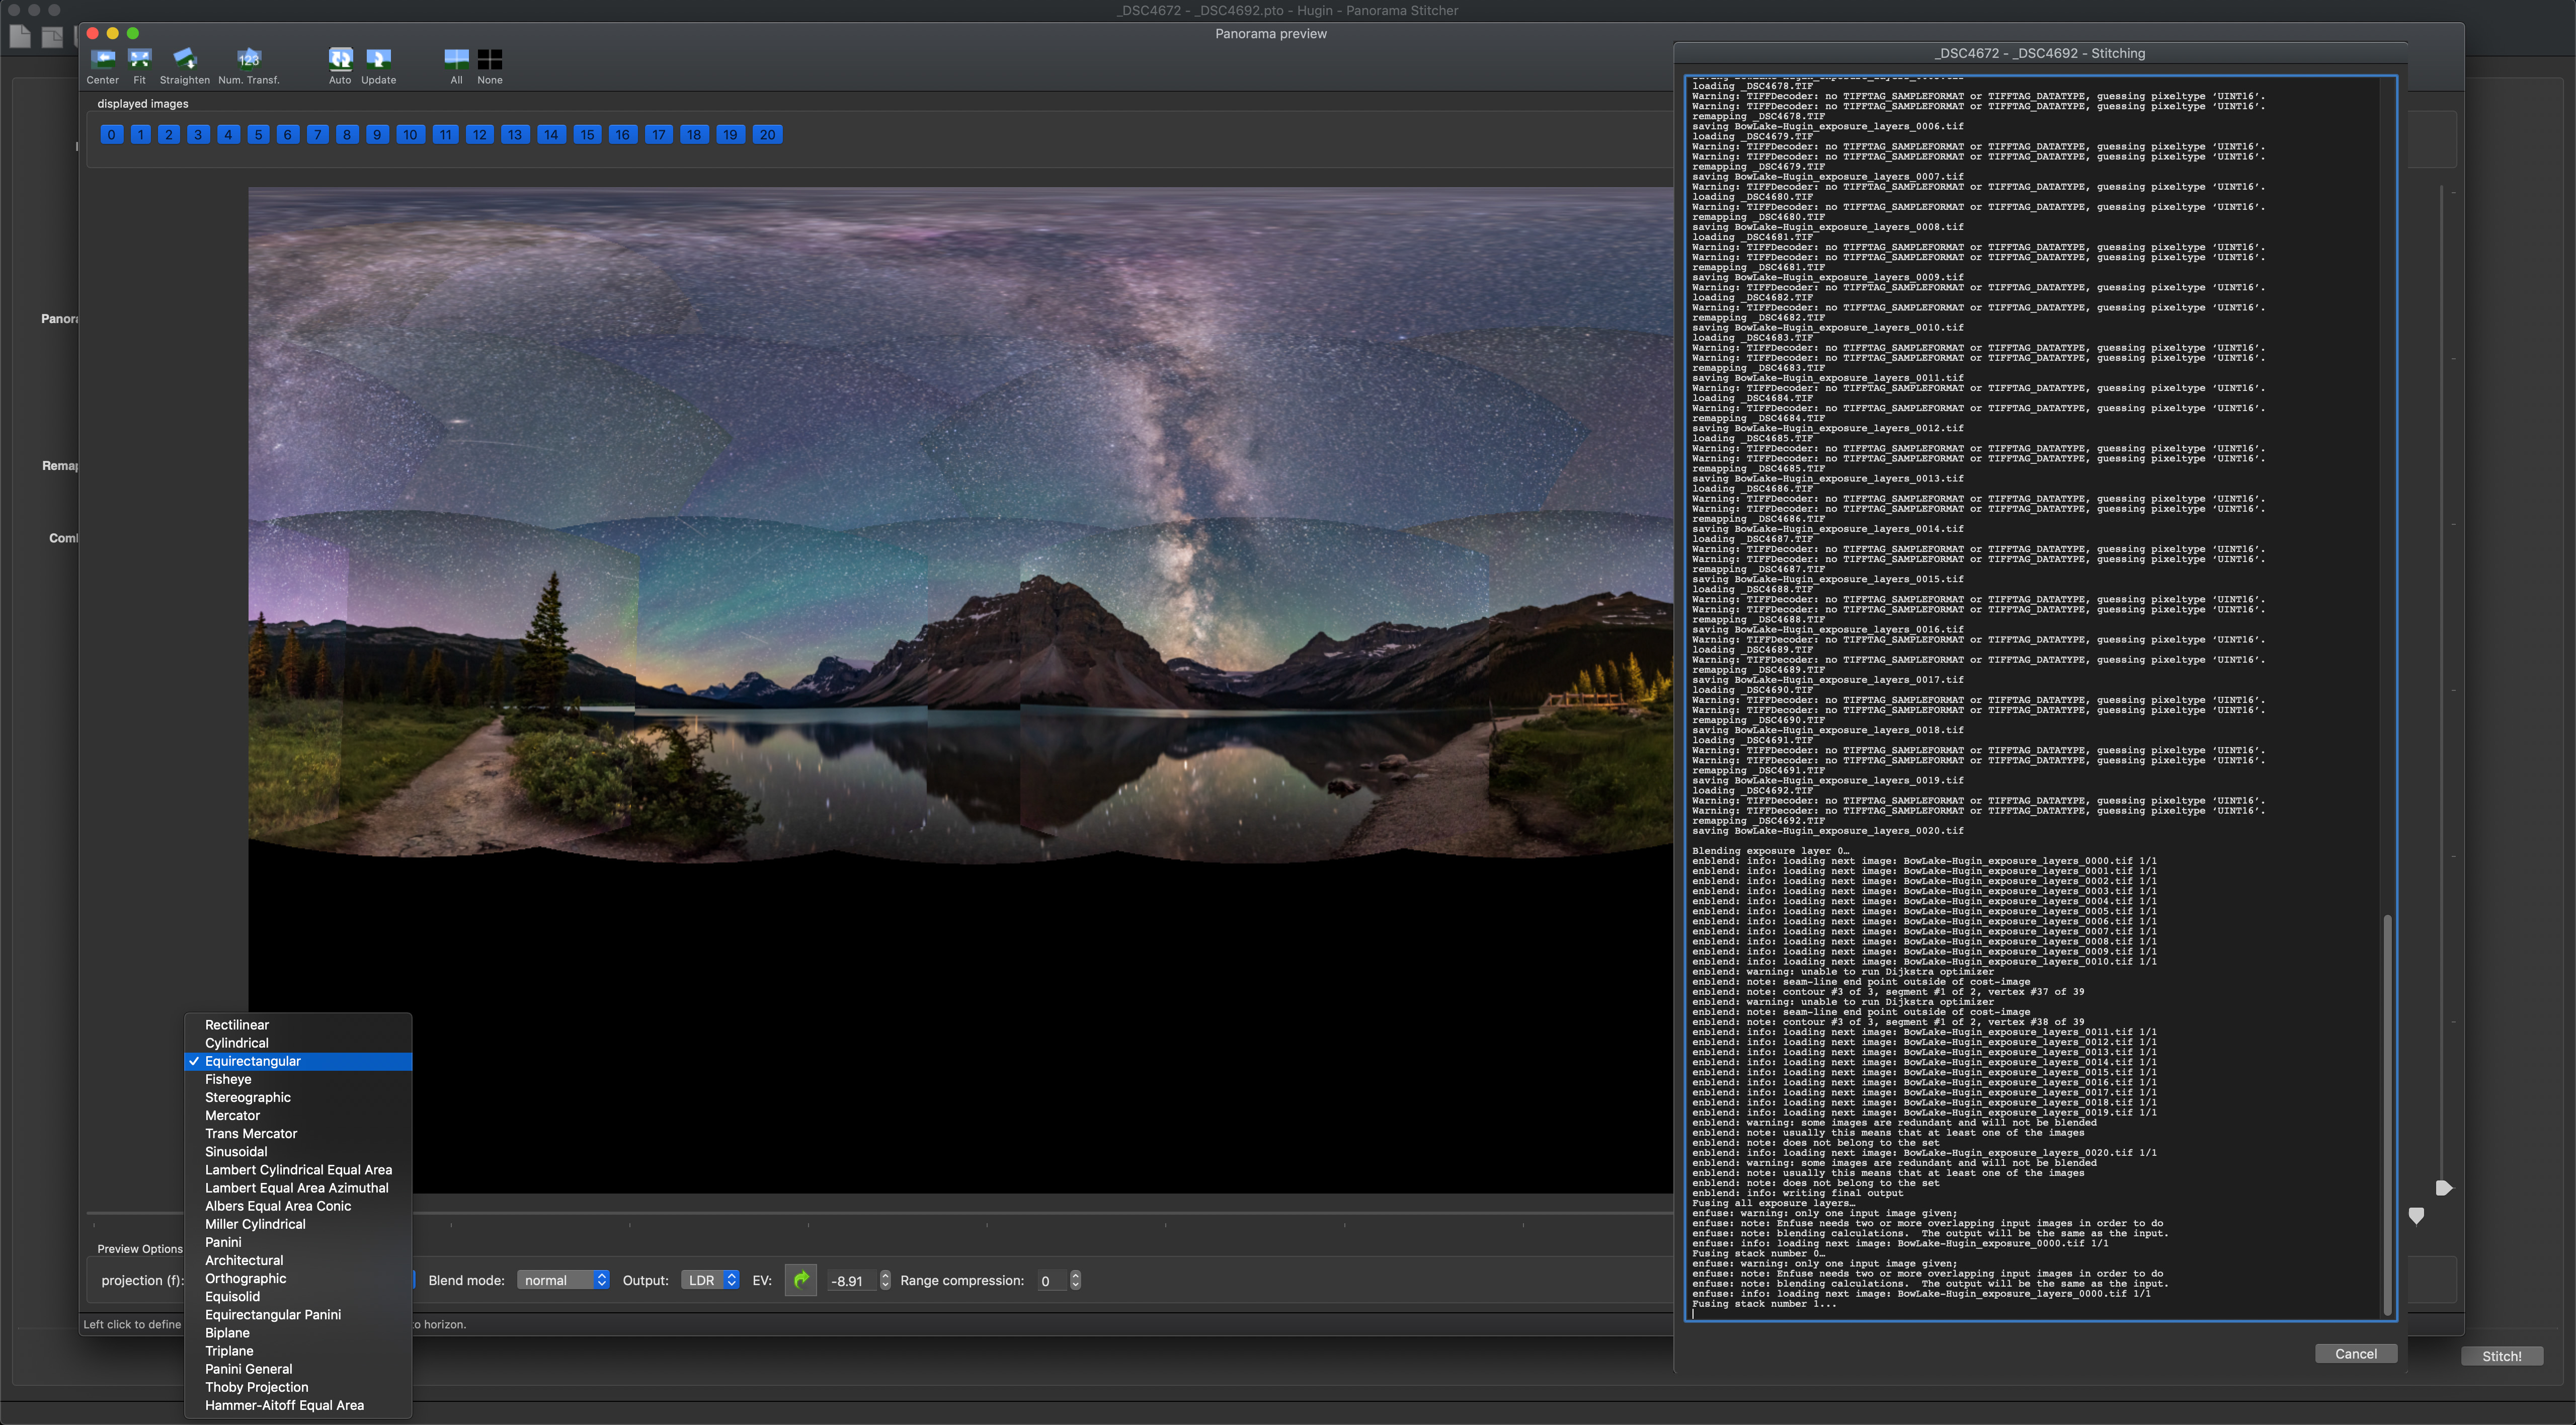

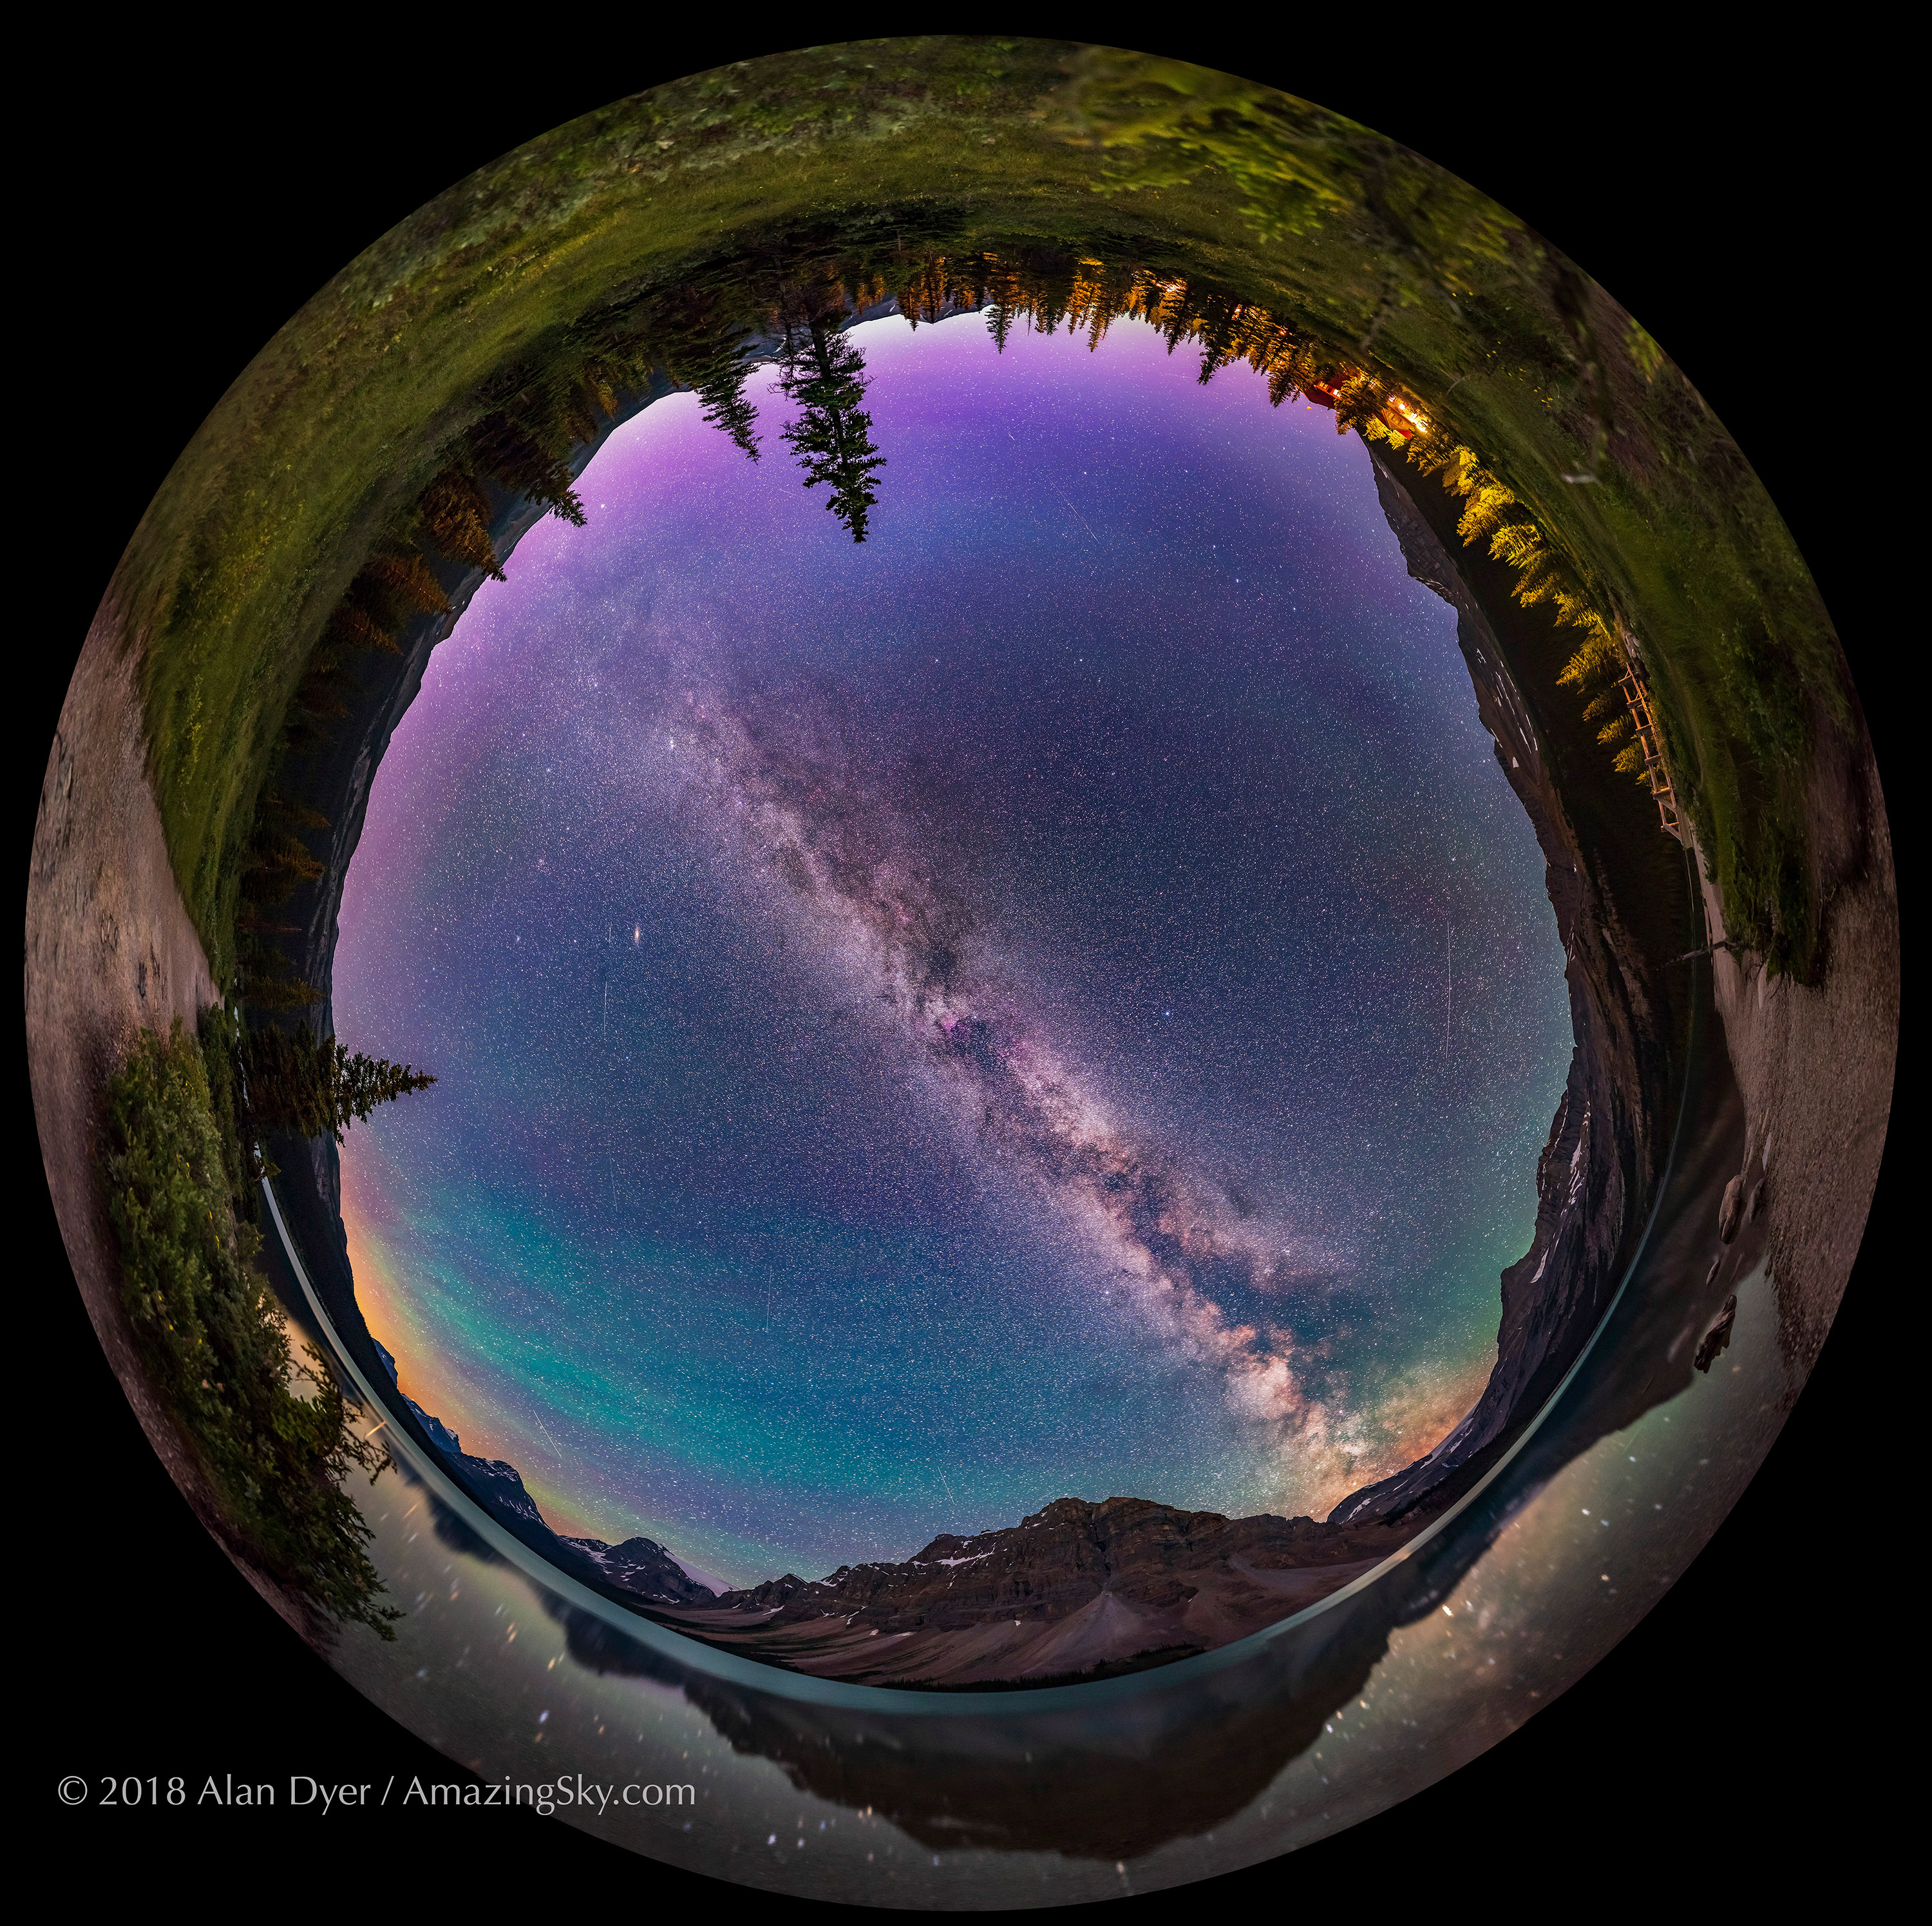
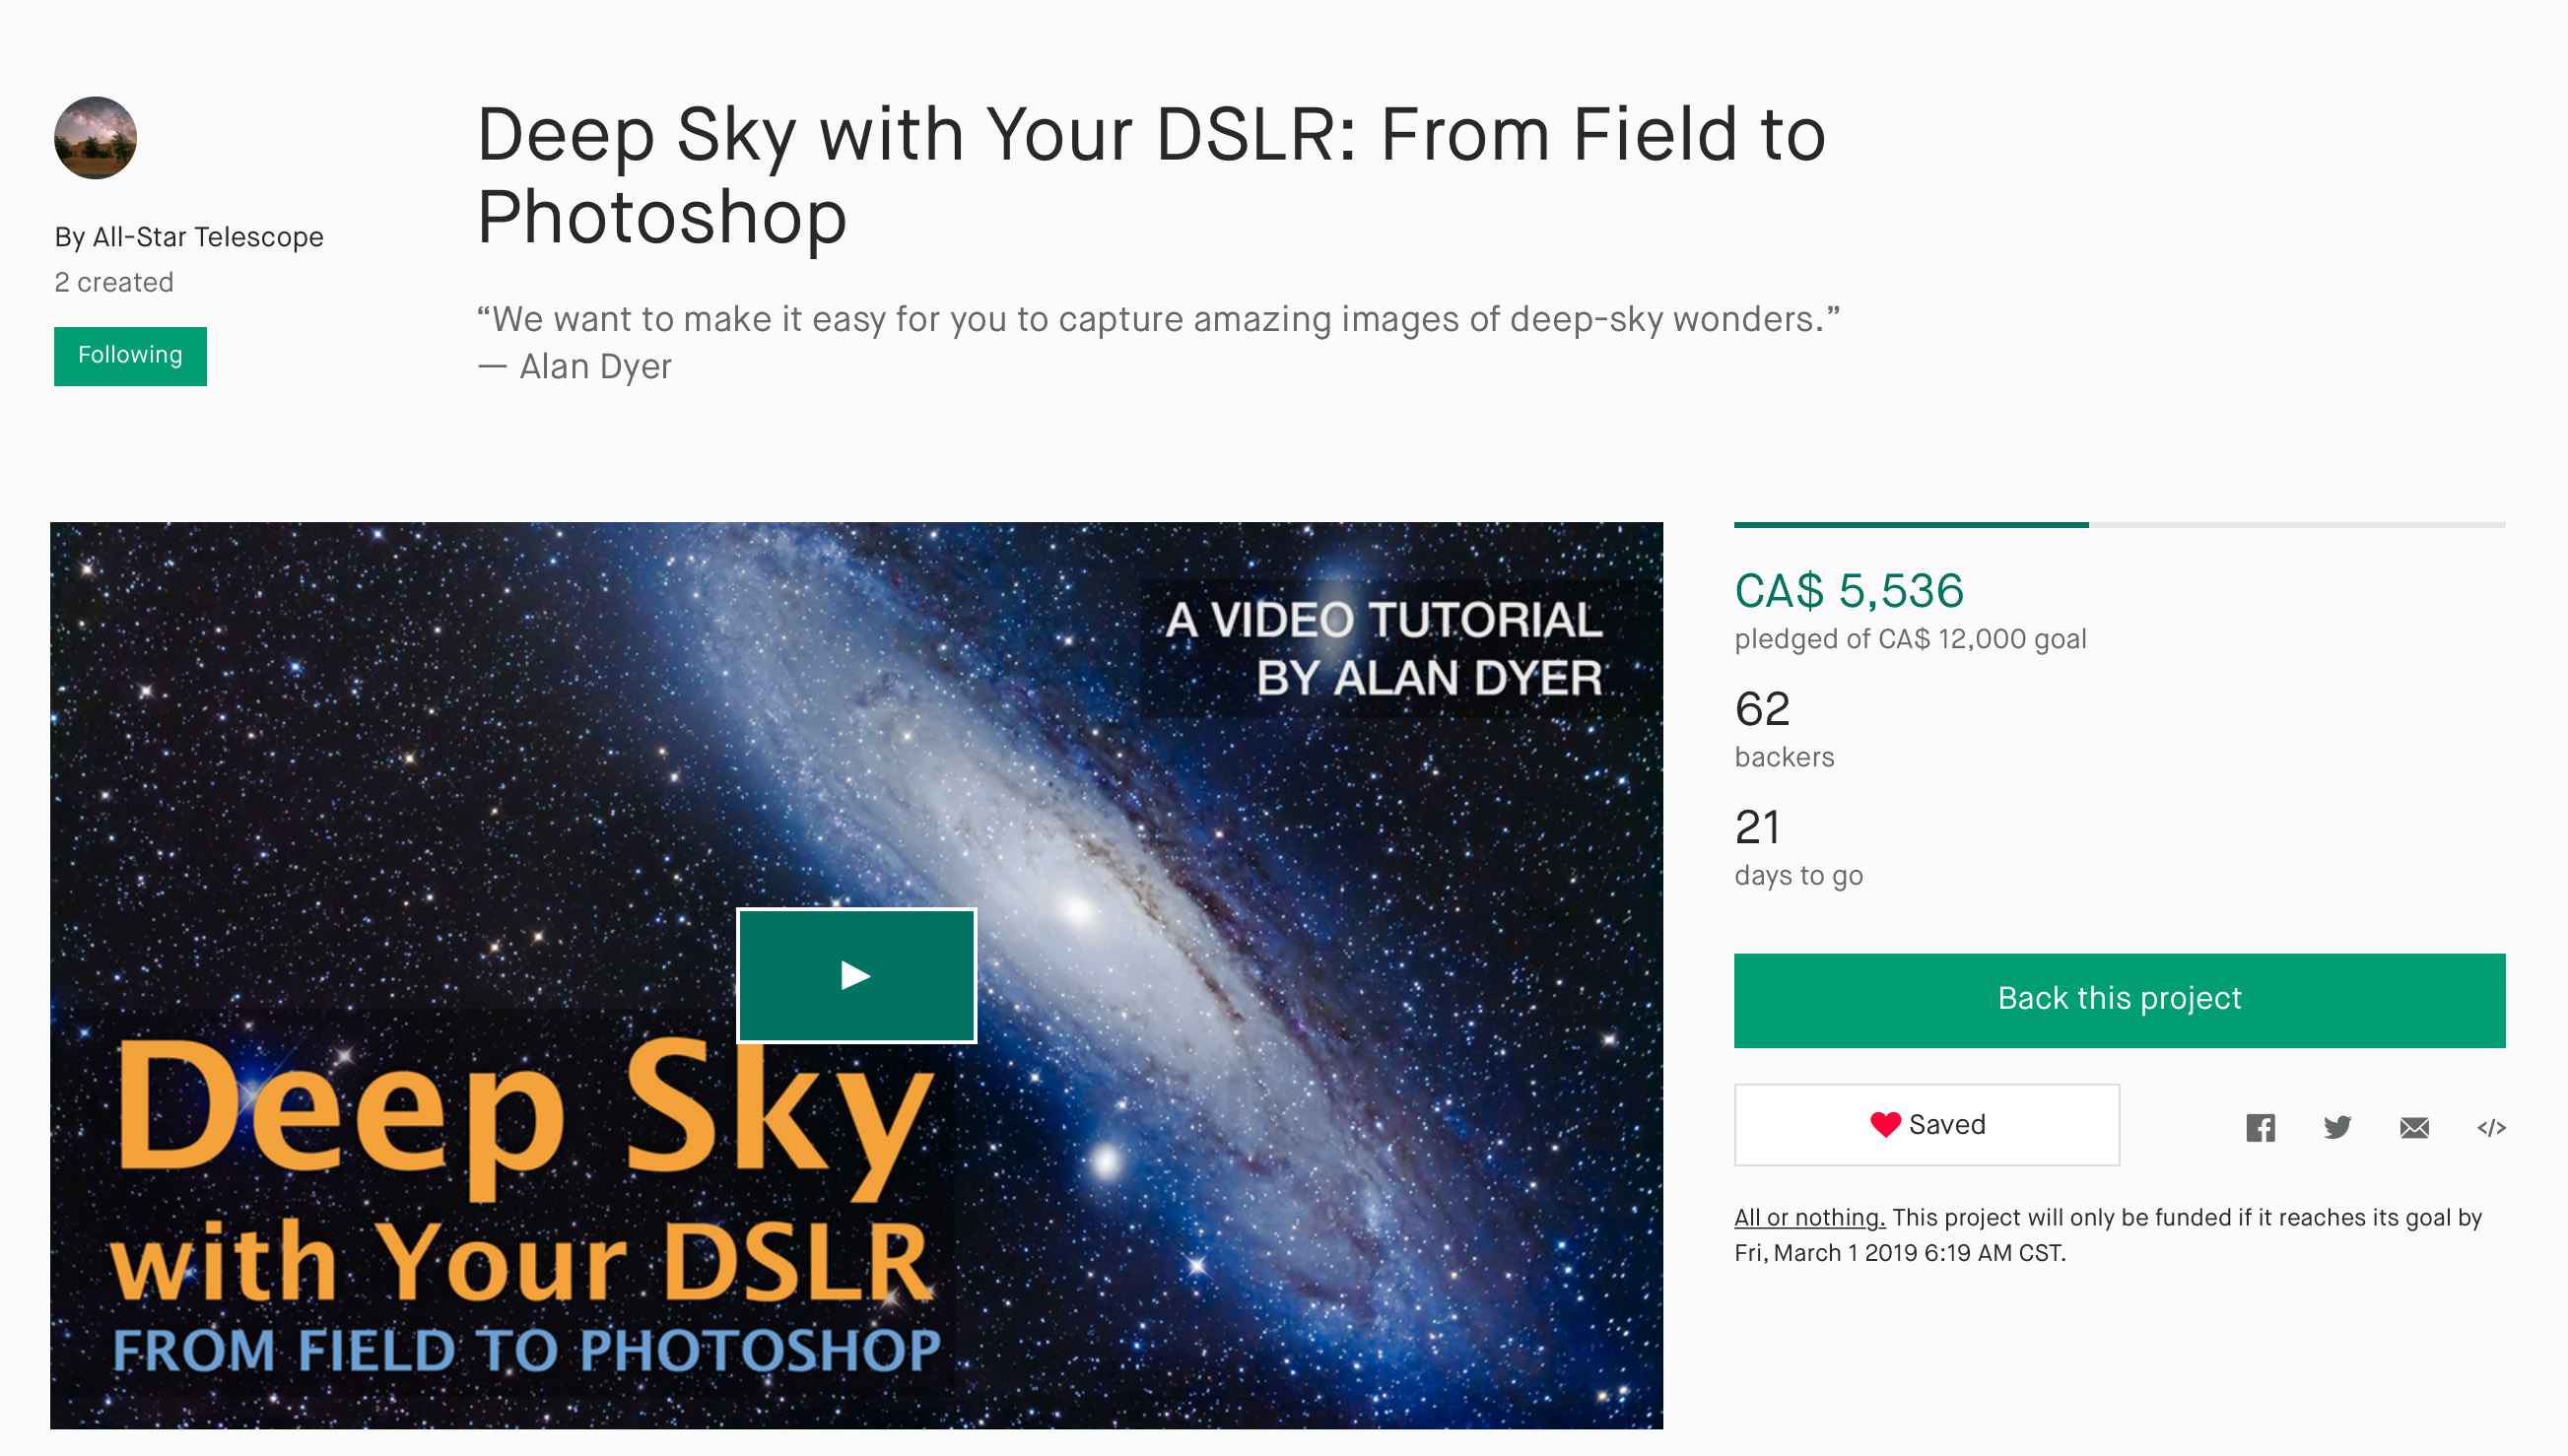 We’ve embarked upon a new project to produce a comprehensive tutorial on deep-sky imaging with DSLR cameras.
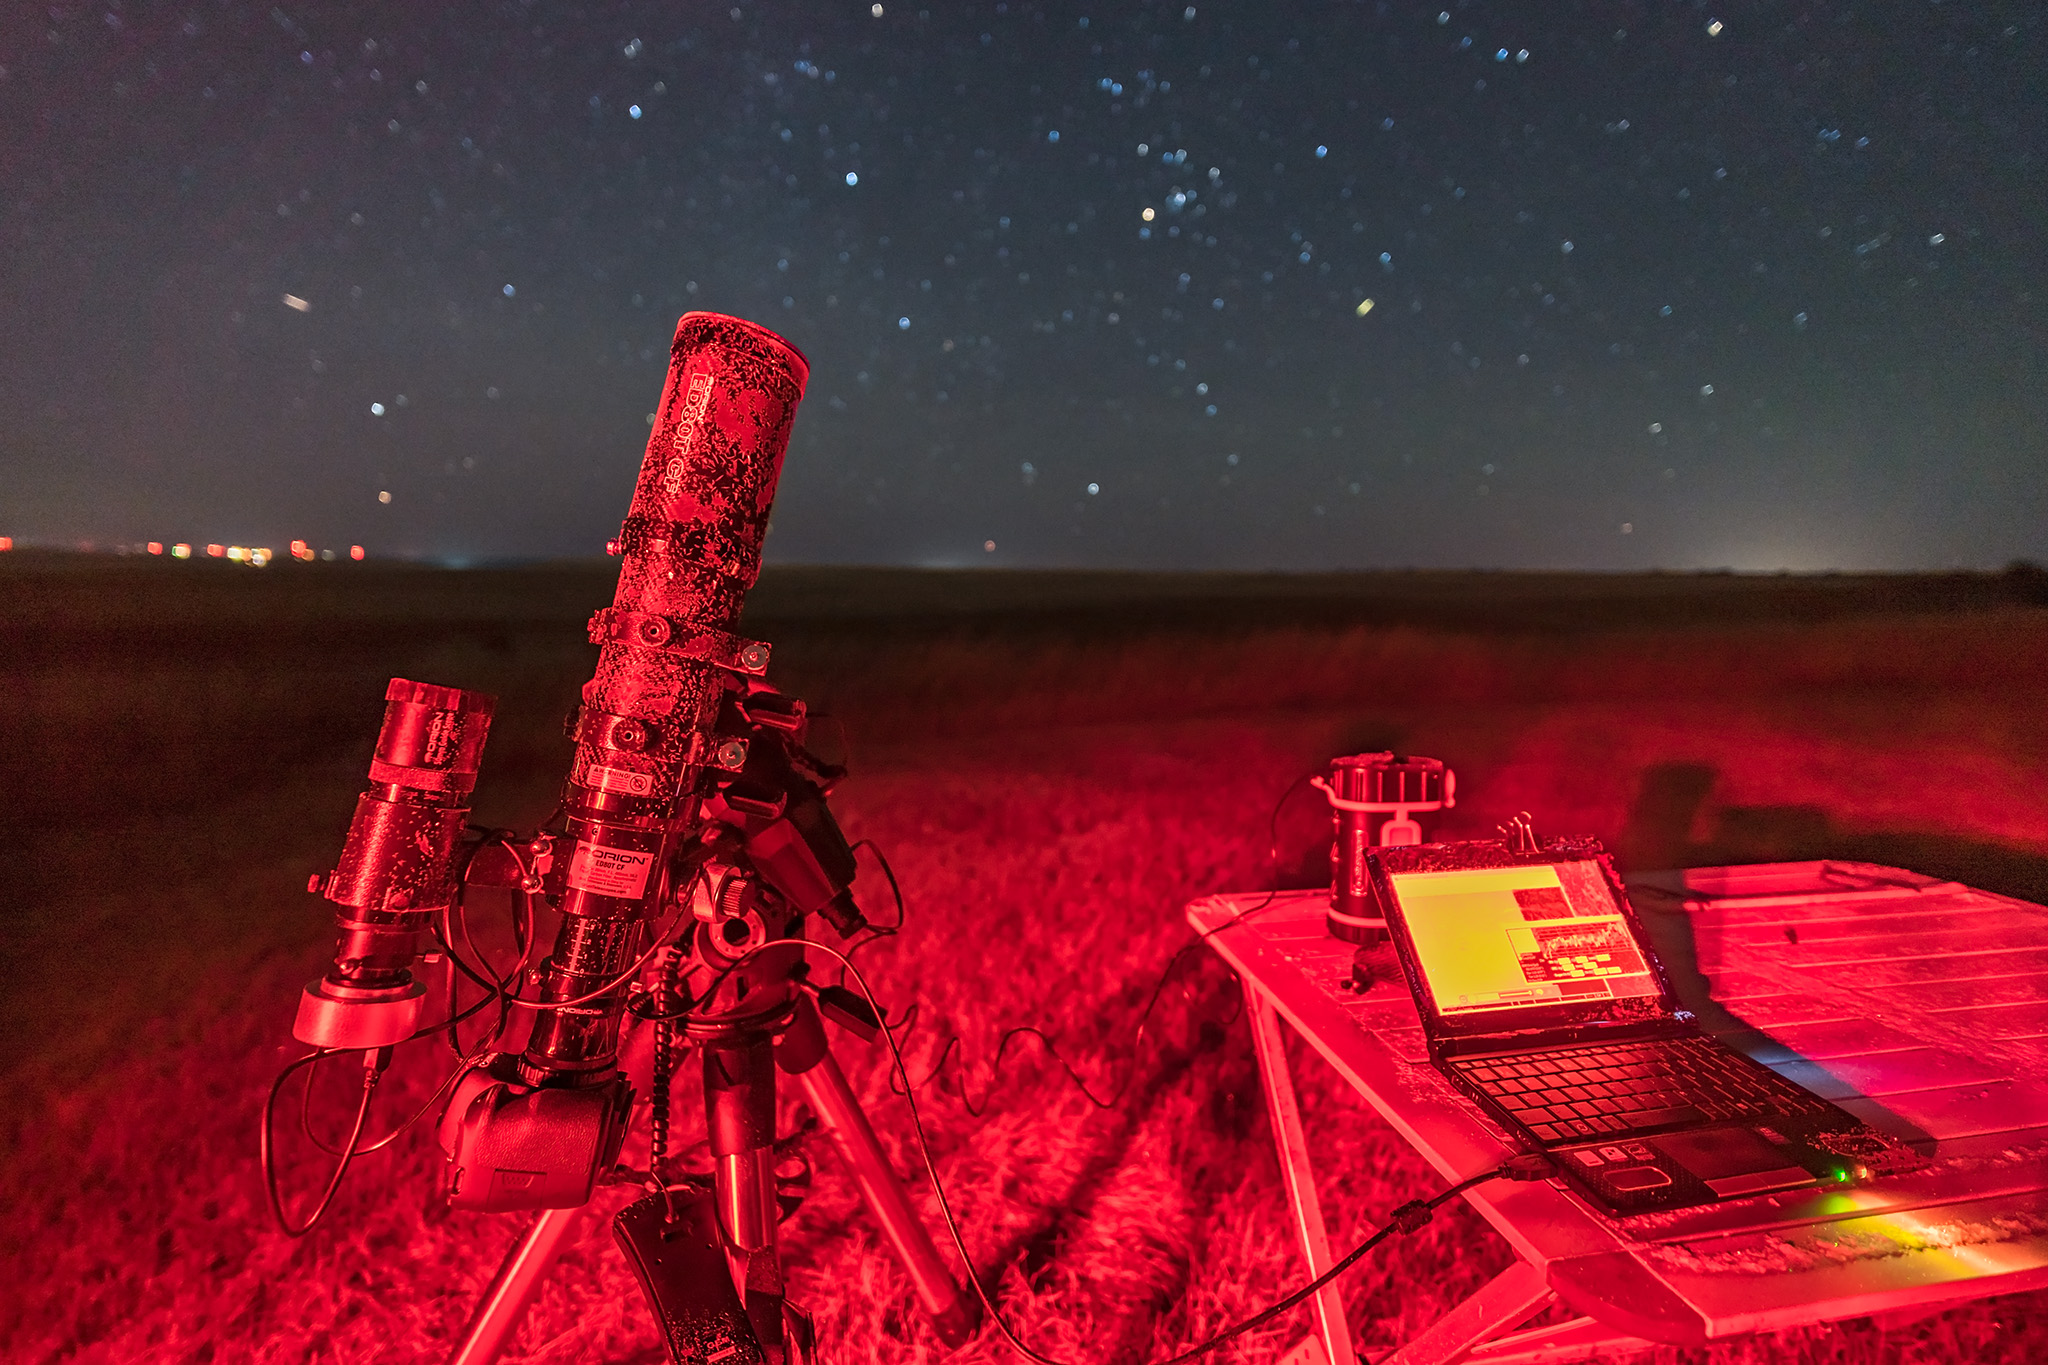
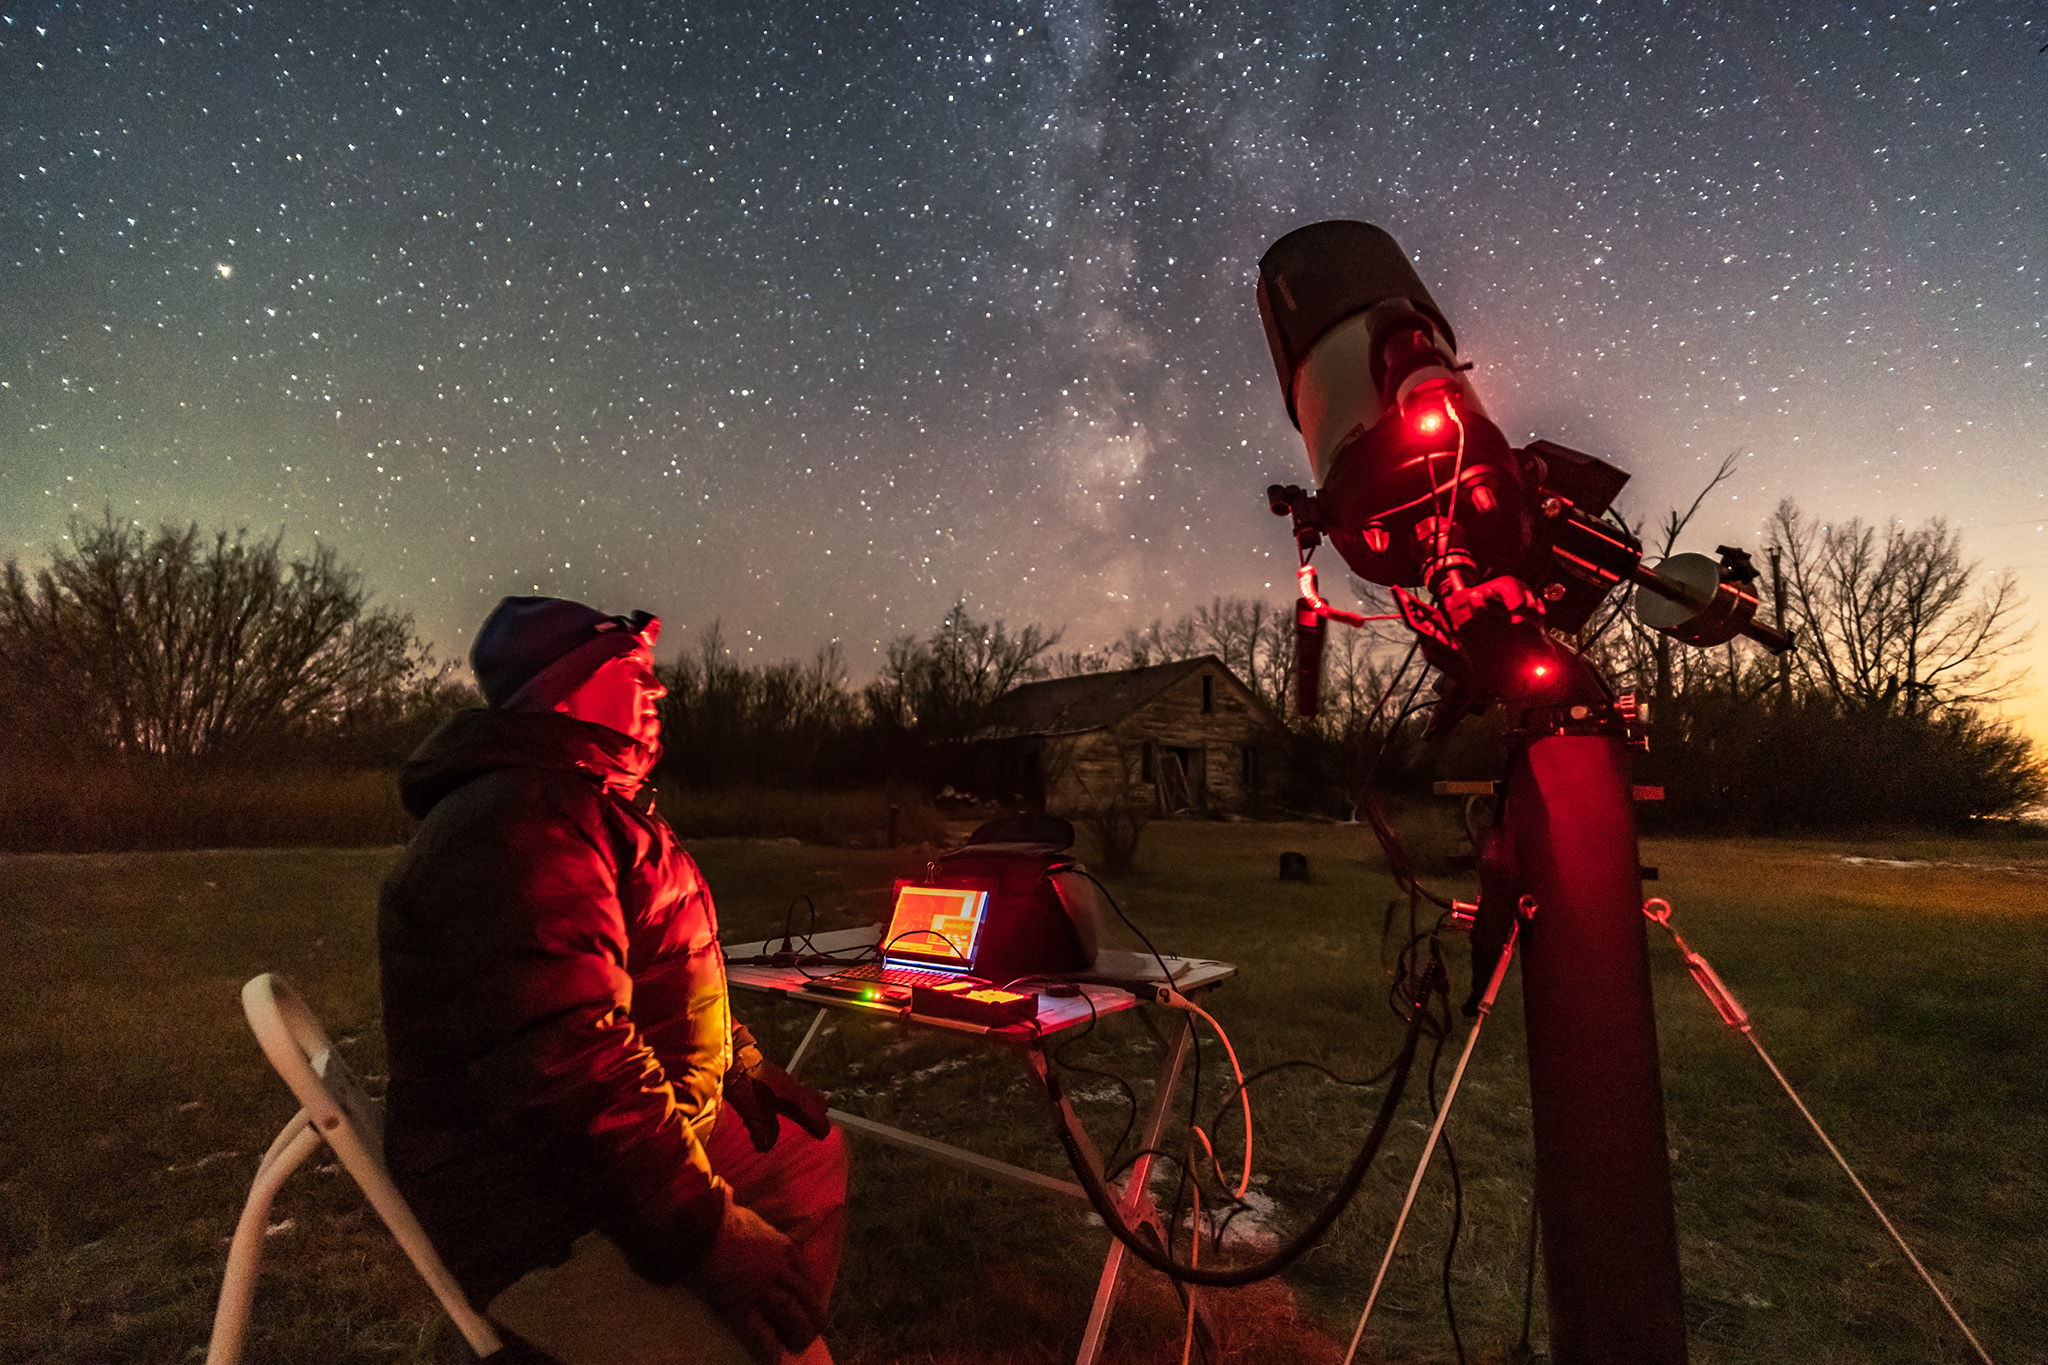
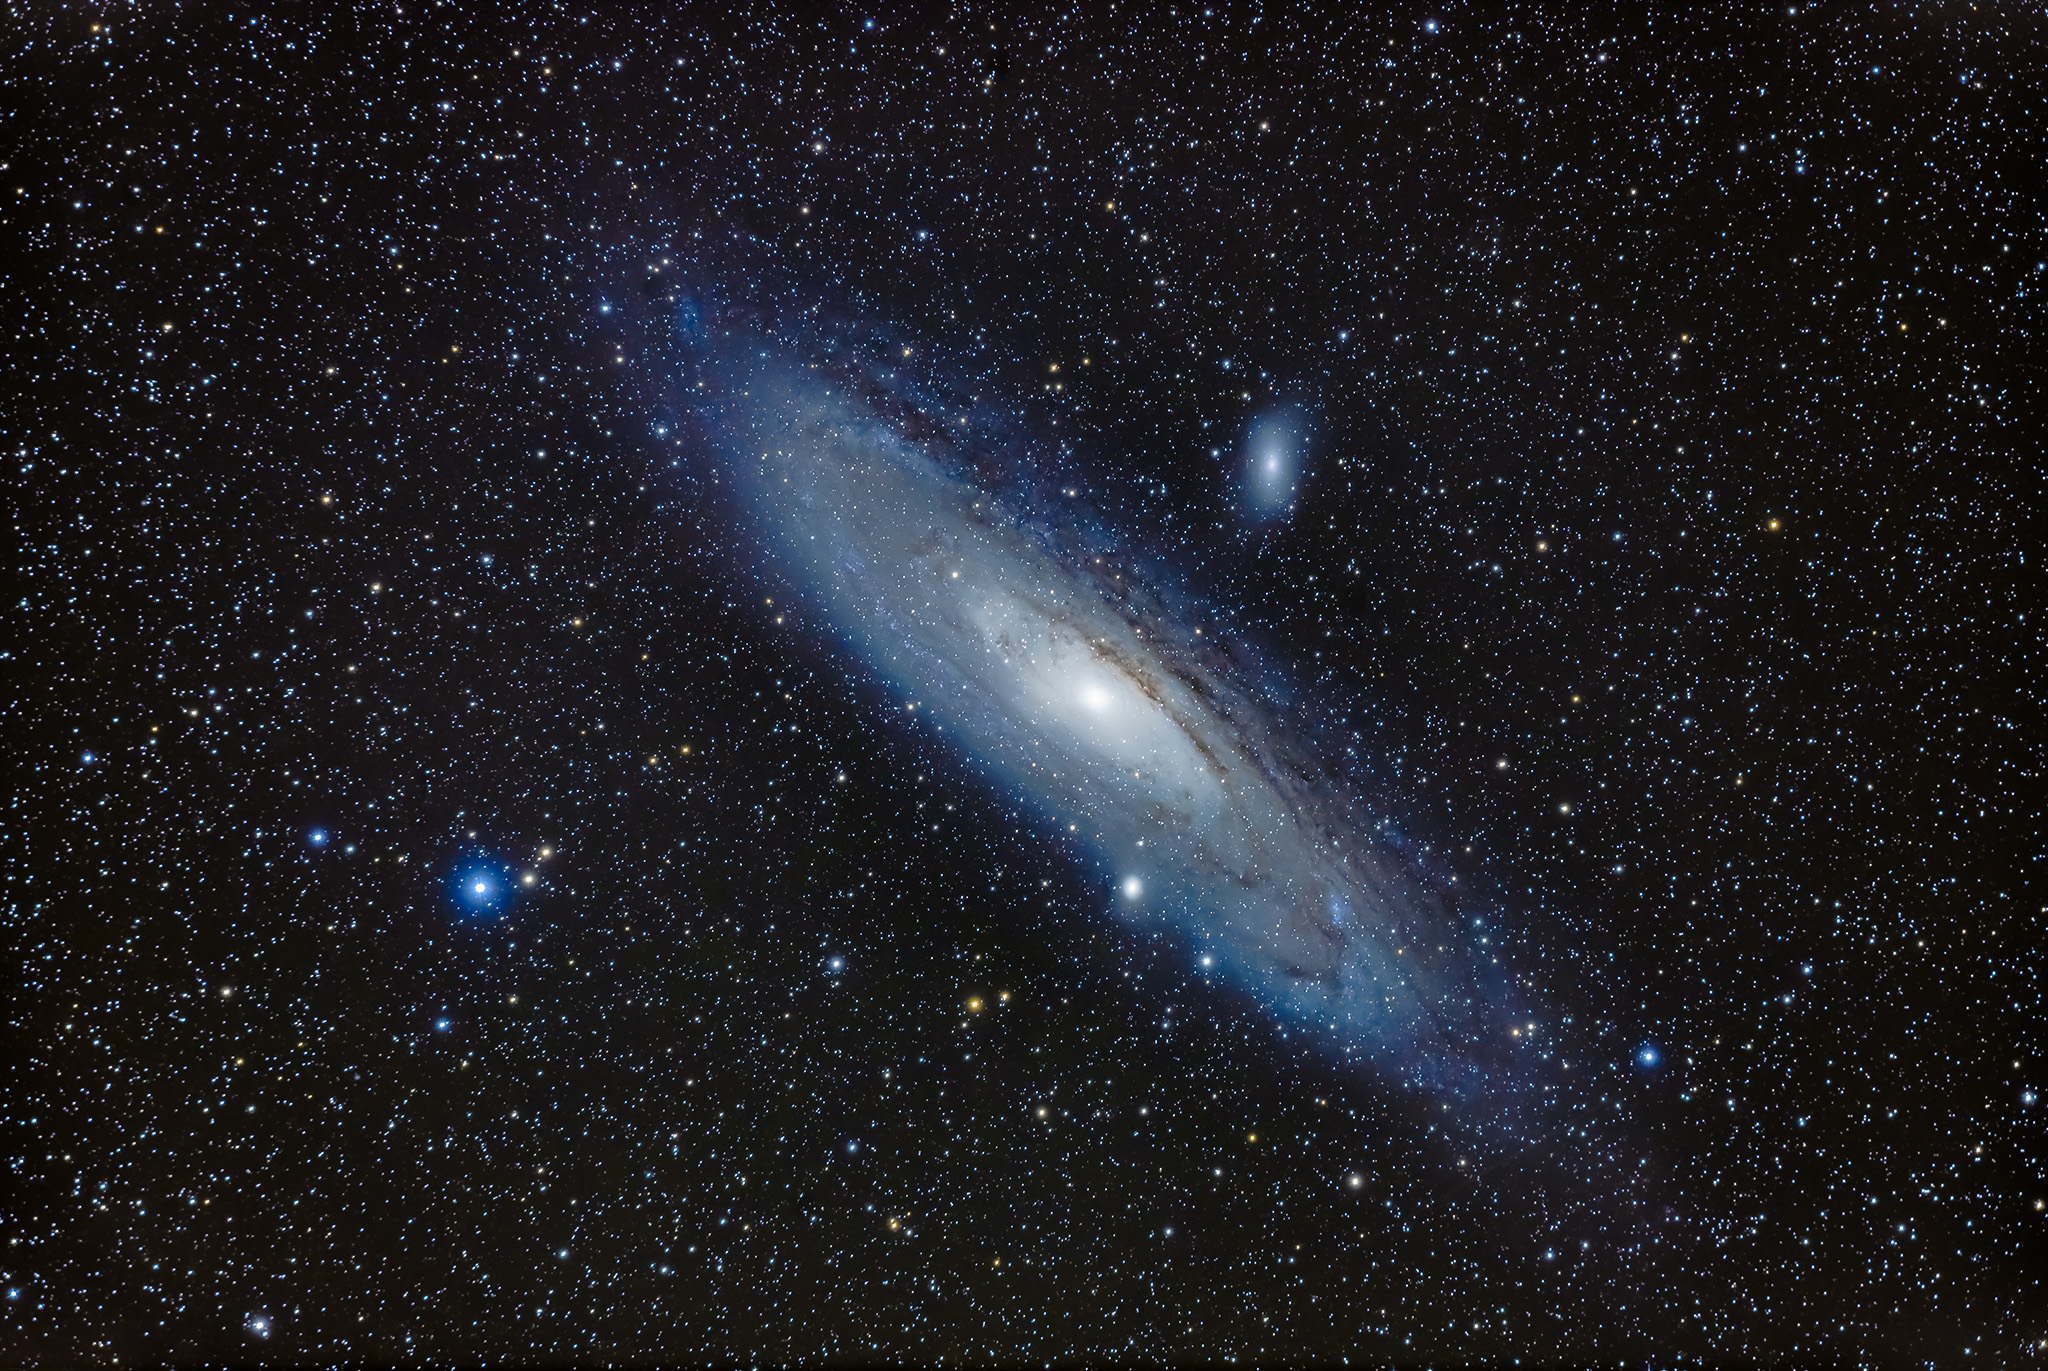
 On the evening of January 20 for North America, the Full Moon passes through the umbral shadow of the Earth, creating a total eclipse of the Moon.