

 On the evening of January 20 for North America, the Full Moon passes through the umbral shadow of the Earth, creating a total eclipse of the Moon.
No, this isn’t a “blood,” “super,” nor “wolf” Moon. All those terms are internet fabrications designed to bait clicks.
It is a total lunar eclipse — an event that doesn’t need sensational adjectives to hype, because they are always wonderful sights! And yes, the Full Moon does turn red.
As such, on January 20 the evening and midnight event provides many opportunities for great photos of a reddened Moon in the winter sky.
Here’s my survey of tips and techniques for capturing the eclipsed Moon.
First … What is a Lunar Eclipse?
As the animation below shows (courtesy NASA/Goddard Space Flight Center), an eclipse of the Moon occurs when the Full Moon (and they can happen only when the Moon is exactly full) travels through the shadow of the Earth.
The Moon does so at least two times each year, though often not as a total eclipse, one where the entire disk of the Moon enters the central umbral shadow. Many lunar eclipses are of the imperceptible penumbral variety, or are only partial eclipses.
Total eclipses of the Moon can often be years apart. The last two were just last year, on January 31 and July 27, 2018. However, the next is not until May 26, 2021.
For a short explanation of the geometry of lunar eclipses see the NASA/Goddard video at https://svs.gsfc.nasa.gov/11516
At any lunar eclipse we see an obvious darkening of the lunar disk only when the Moon begins to enter the umbra. That’s when the partial eclipse begins, and we see a dark bite appear on the left edge of the Moon.
While it looks as if Earth’s shadow sweeps across the Moon, it is really the Moon moving into, then out of, our planet’s umbra that causes the eclipse. We are seeing the Moon’s revolution in its orbit around Earth.
At this eclipse the partial phases last 67 minutes before and after totality.
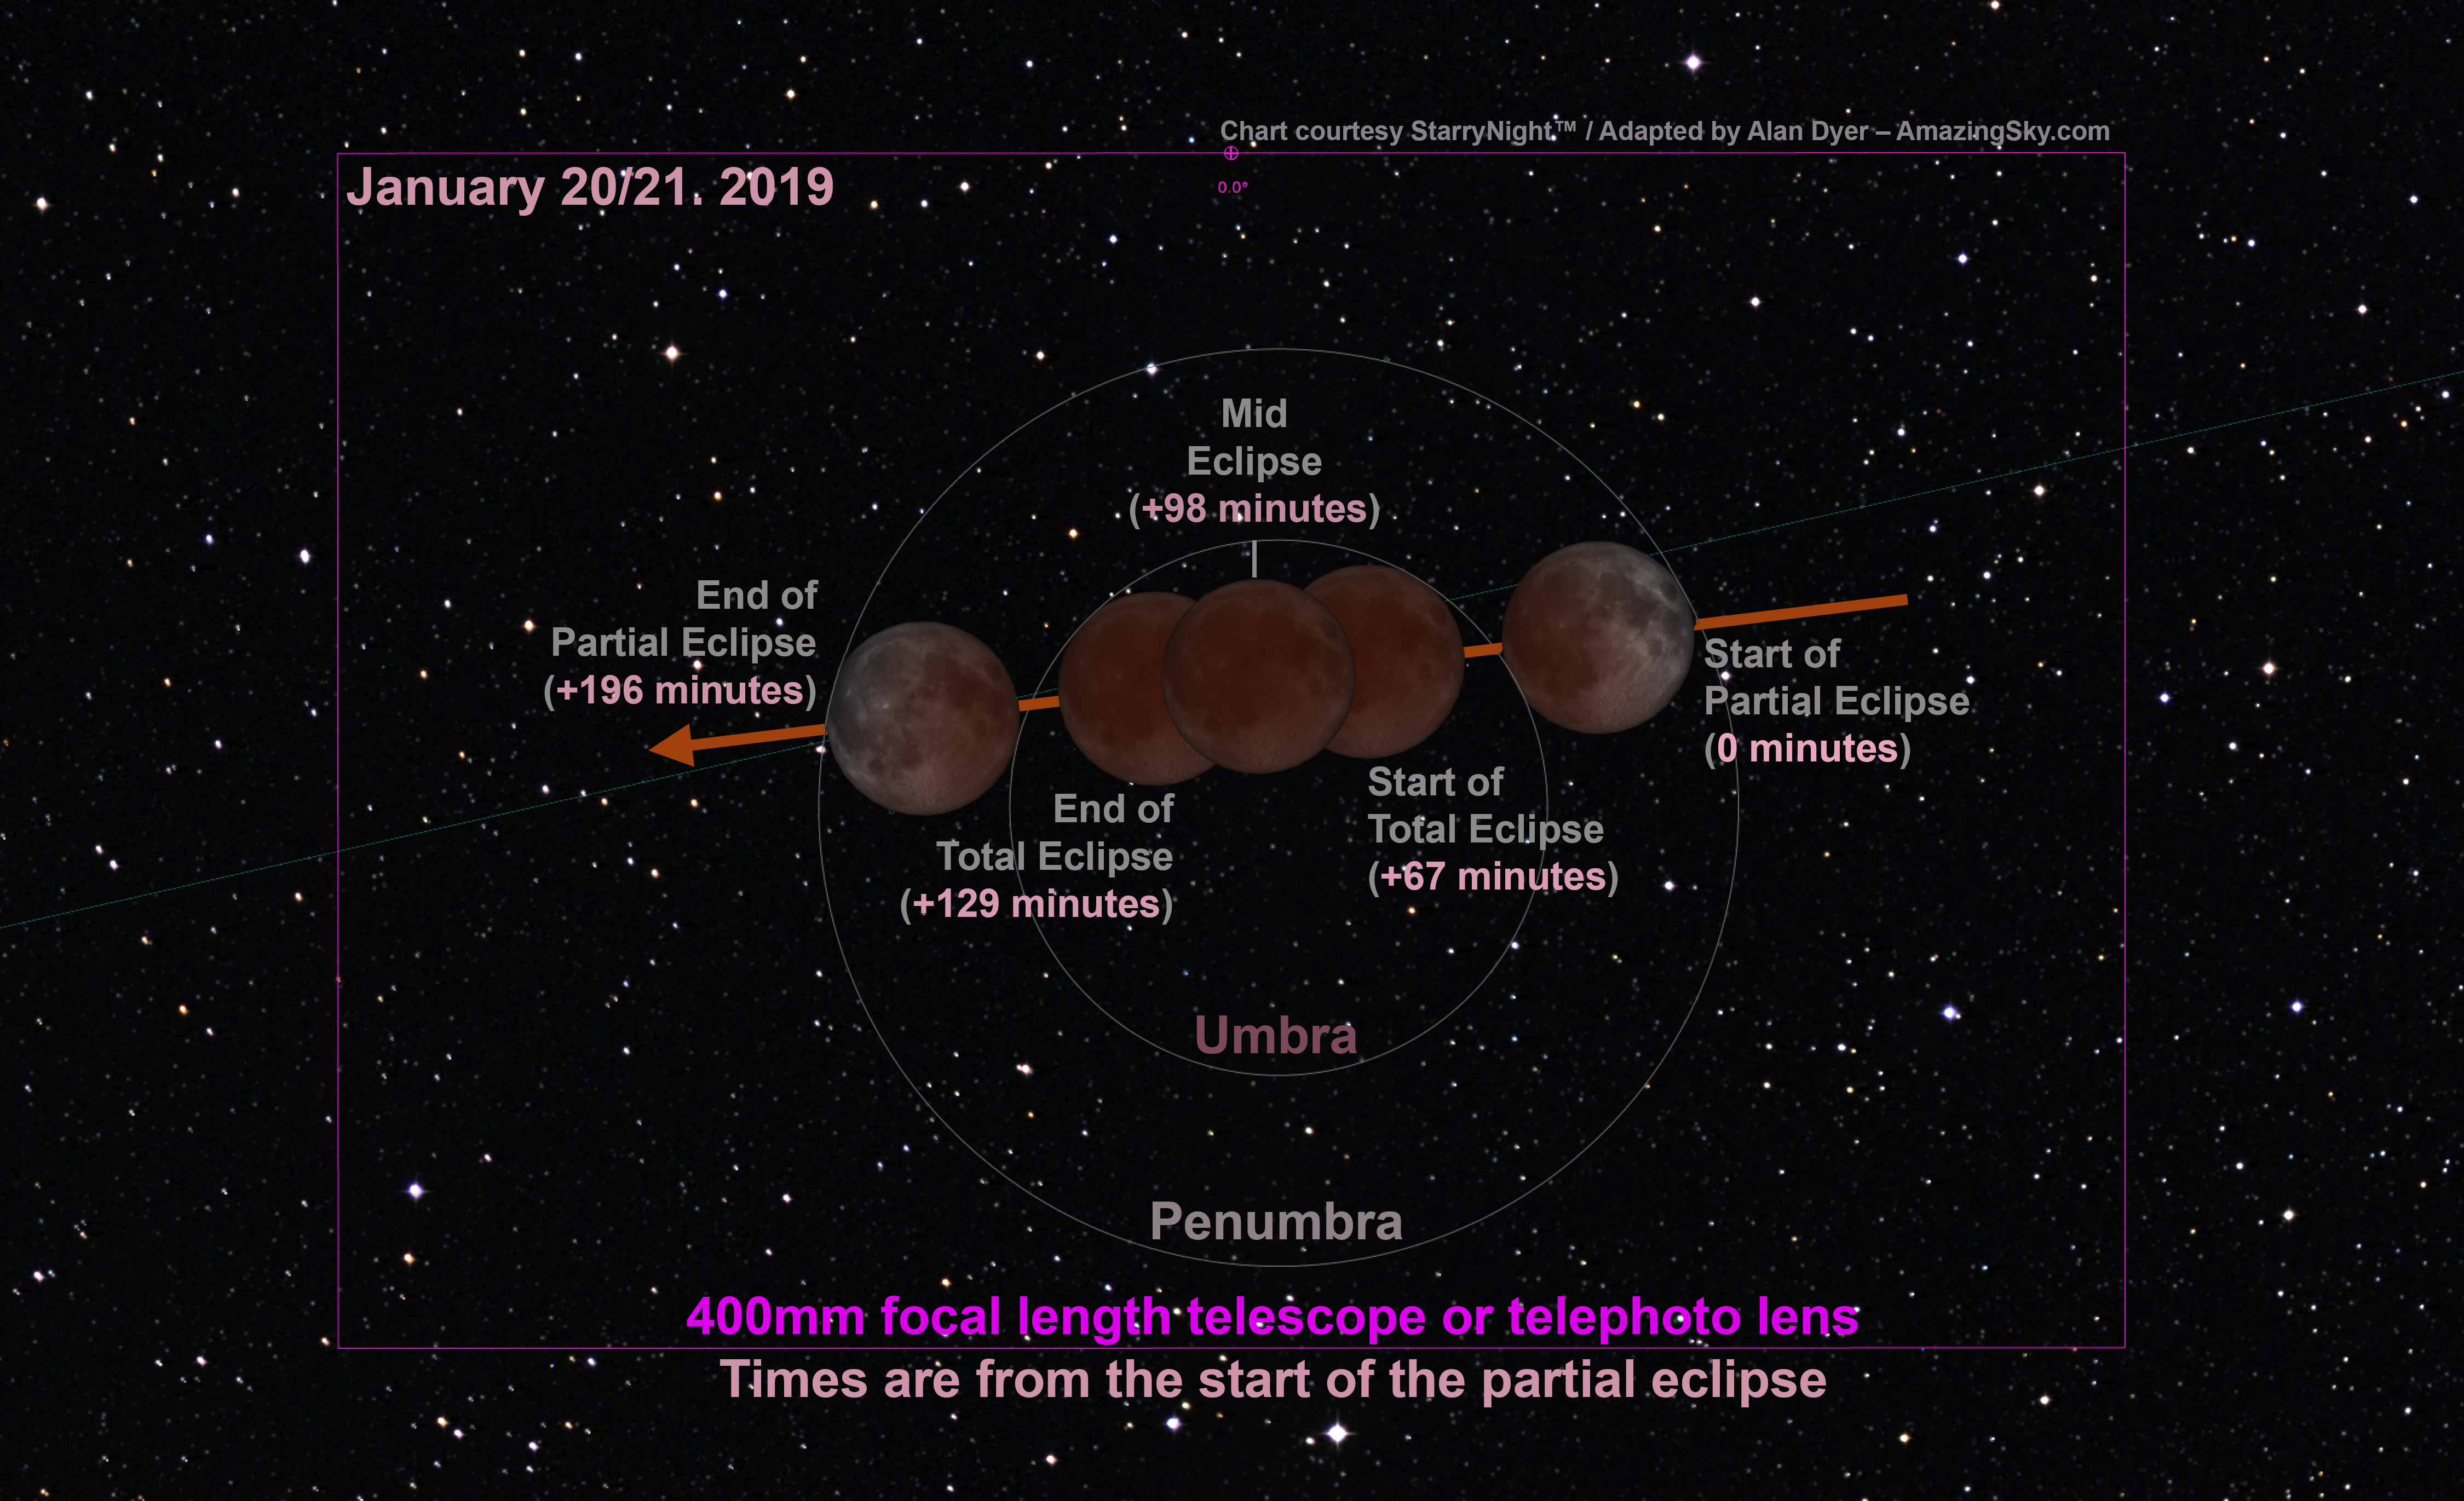
Once the Moon is completely immersed in the umbra, totality begins and lasts 62 minutes at this eclipse, a generous length.
The Moon will appear darkest and reddest at mid-eclipse. During totality the lunar disk is illuminated only by red sunlight filtering through Earth’s atmosphere. It is the light of all the sunsets and sunrises going on around our planet.
And yes, it is perfectly safe to look at the eclipsed Moon with whatever optics you wish. Binoculars often provide the best view. Do have a pair handy!

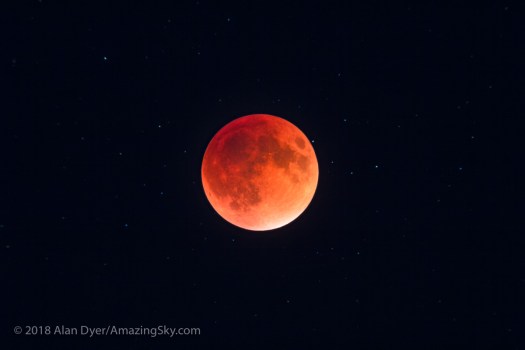
At this eclipse because the Moon passes across the north half of the umbra, the top edge of the Moon will always remain bright, as it did above in 2010, looking like a polar cap on the reddened Moon.
Near the bright edge of the umbra look for subtle green and blue tints the eye can see and that the camera can capture.
Where is the Eclipse?
As the chart below shows, all of the Americas can see the entire eclipse, with the Moon high in the evening or late-night sky. For the record, the Moon will be overhead at mid-eclipse at local midnight from Cuba!
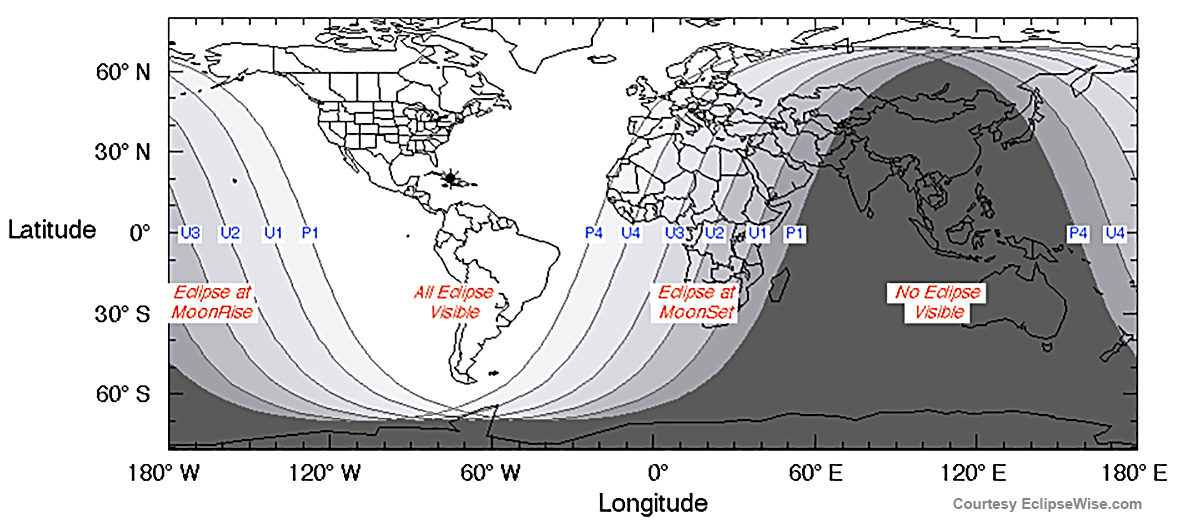
For more details on times see www.EclipseWise.com and the event page at http://www.eclipsewise.com/lunar/LEprime/2001-2100/LE2019Jan21Tprime.html
I live in Alberta, Canada, at a latitude of 50 degrees North. And so, the sky charts I provide here are for my area, where the Moon enters the umbral shadow at 8:35 p.m. MST with the Moon high in the east. By the end of totality at 10:44 p.m. MST the Moon shines high in the southeast. This sample chart is for mid-eclipse at my site.

I offer them as examples of the kinds of planning you can do to ensure great photos. I can’t provide charts good for all the continent because exactly where the Moon will be during totality, and the path it will take across your sky will vary with your location.
In general, the farther east and south you live in North America the higher the Moon will appear. But from all sites in North America the Moon will always appear high and generally to the south.
To plan your local shoot, I suggest using planetarium software such as the free Stellarium or Starry Night (the software I used to prepare the sky charts in this post), and photo planning apps such as The Photographer’s Ephemeris or PhotoPills.
The latter two apps present the sightlines toward the Moon overlaid on a map of your location, to help you plan where to be to shoot the eclipsed Moon above a suitable foreground, if that’s your photographic goal.
When is the Eclipse?
While where the Moon is in your sky depends on your site, the various eclipse events happen at the same time for everyone, with differences in hour due only to the time zone you are in.
While all of North America can see the entirety of the partial and total phases of this eclipse (lasting 3 hours and 16 minutes from start to finish), the farther east you live the later the eclipse occurs, making for a long, late night for viewers on the east coast.
Those in western North America can enjoy all of totality and be in bed at or before midnight.
Here are the times for the start and end of the partial and total phases. Because the penumbral phases produce an almost imperceptible darkening, I don’t list the times below for the start and end of the penumbral eclipse.
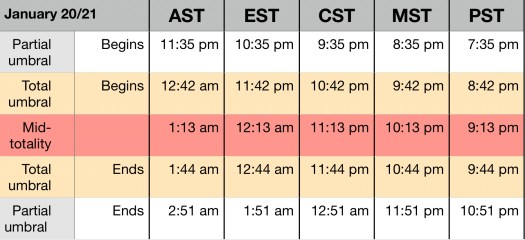
PM times are on the evening of January 20.
AM times are after midnight on January 21.
Note that while some sources list this eclipse as occurring on January 21, that is true for Universal Time (Greenwich Time) and for sites in Europe where the eclipse occurs at dawn near moonset.
For North America, if you go out on the evening of January 21 expecting to see the eclipse you’ll be a day late and disappointed!
Picking a Photo Technique
Lunar eclipses lend themselves to a wide range of techniques, from a simple camera on a tripod, to a telescope on a tracking mount following the sky.
If this is your first lunar eclipse I suggest keeping it simple! Select just one technique, to focus your attention on only one camera on a cold and late winter night.
Then during the hour of totality take the time to enjoy the view through binoculars and with the unaided eye. No photo quite captures the glowing quality of an eclipsed Moon. But here’s how to try it.
Option 1: Simple — Camera-on-Tripod
The easiest method is to take single shots using a very wide-angle lens (assuming you also want to include the landscape below) with the camera on a fixed tripod. No fancy sky trackers are needed here.
During totality, with the Moon now dimmed and in a dark sky, use a good DSLR or mirrorless camera in Manual (M) mode (not an automatic exposure mode) for settings of 2 to 20 seconds at f/2.8 to f/4 at ISO 400 to 1600.
That’s a wide range, to be sure, but it will vary a lot depending on how bright the sky is at your site. Shoot at lots of different settings, as blending multiple exposures later in processing is often the best way to reproduce the scene as your eyes saw it.
Shoot at a high ISO if you must to prevent blurring from sky motion. However, lower ISOs, if you can use them by choosing a slower shutter speed or wider lens aperture, will yield less digital noise.
Focus carefully on a bright star, as per the advice below for telephoto lenses. Don’t just set the lens focus to infinity, as that might not produce the sharpest stars.

One scene to go for at this eclipse is similar to the above photo, with the reddened Moon above a winter landscape and shining east of Orion and the winter Milky Way. But that will require shooting from a dark site away from urban lights. But when the Moon is totally eclipsed, the sky will be dark enough for the Milky Way to appear.
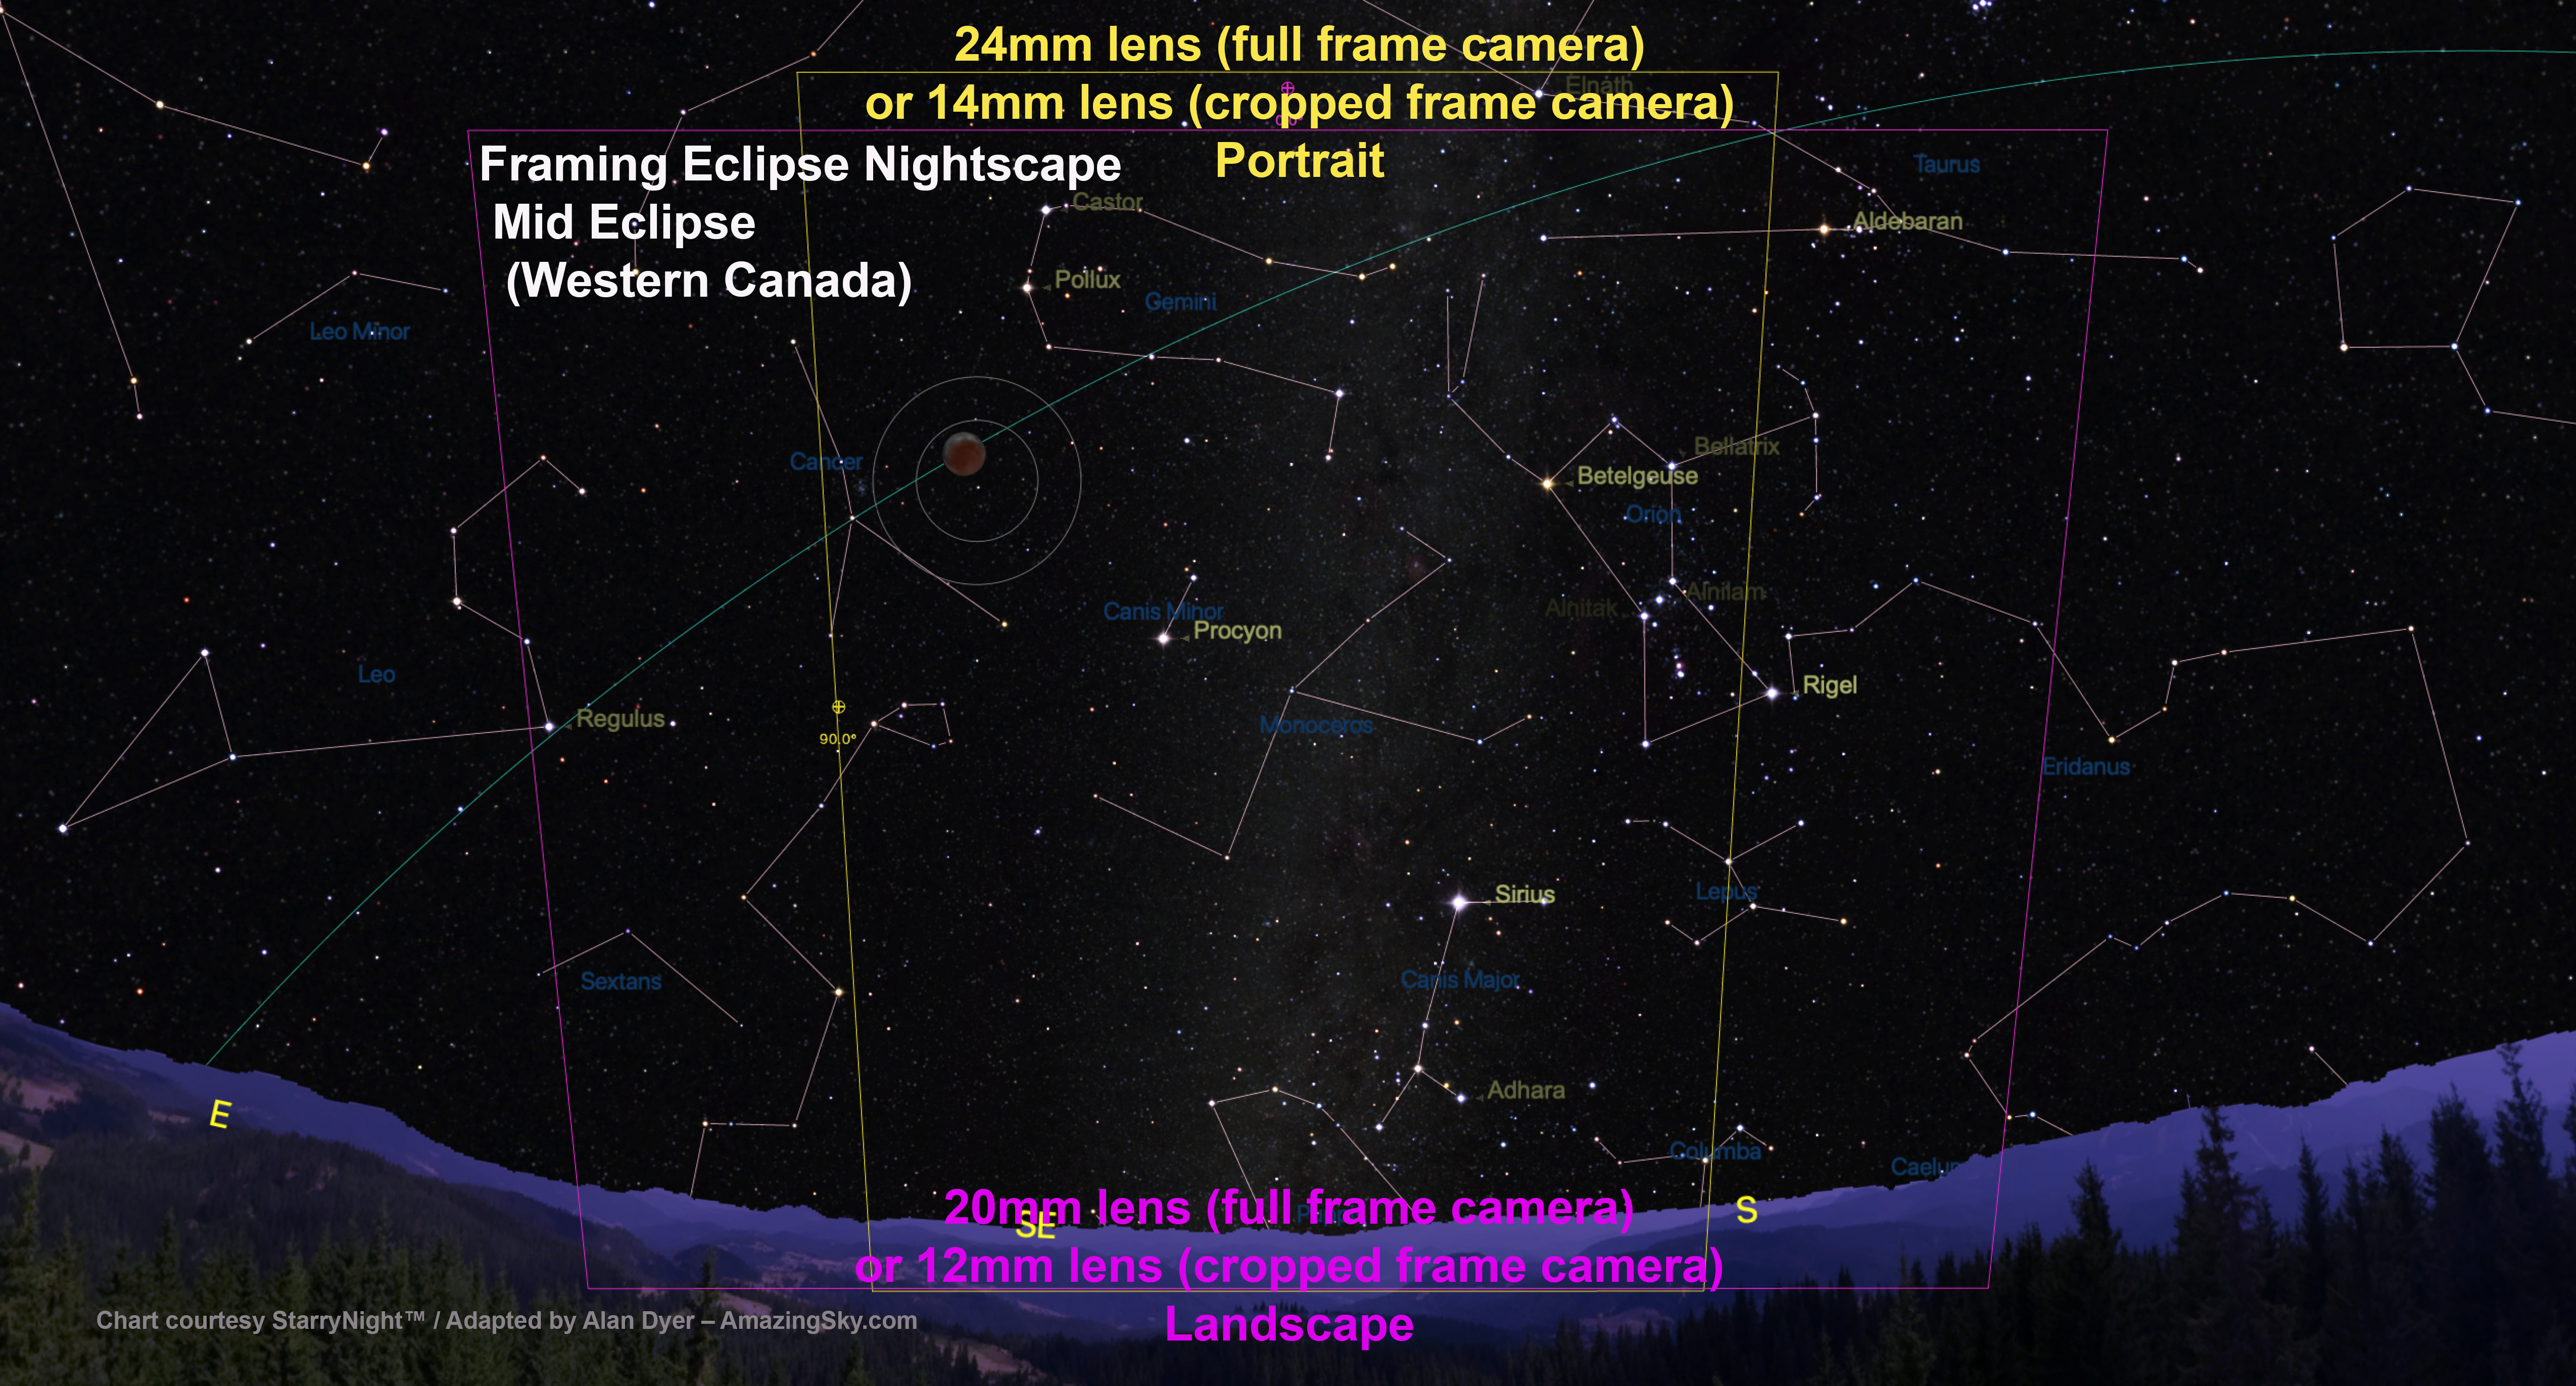
The high altitude of the Moon at mid-eclipse from North America (with it 40 to 70 degrees above the horizon) will also demand a lens as wide as 10mm to 24mm, depending whether you use portrait or landscape orientation, and if your camera uses a cropped frame or full frame sensor. The latter have the advantage in this category of wide-angle nightscape.
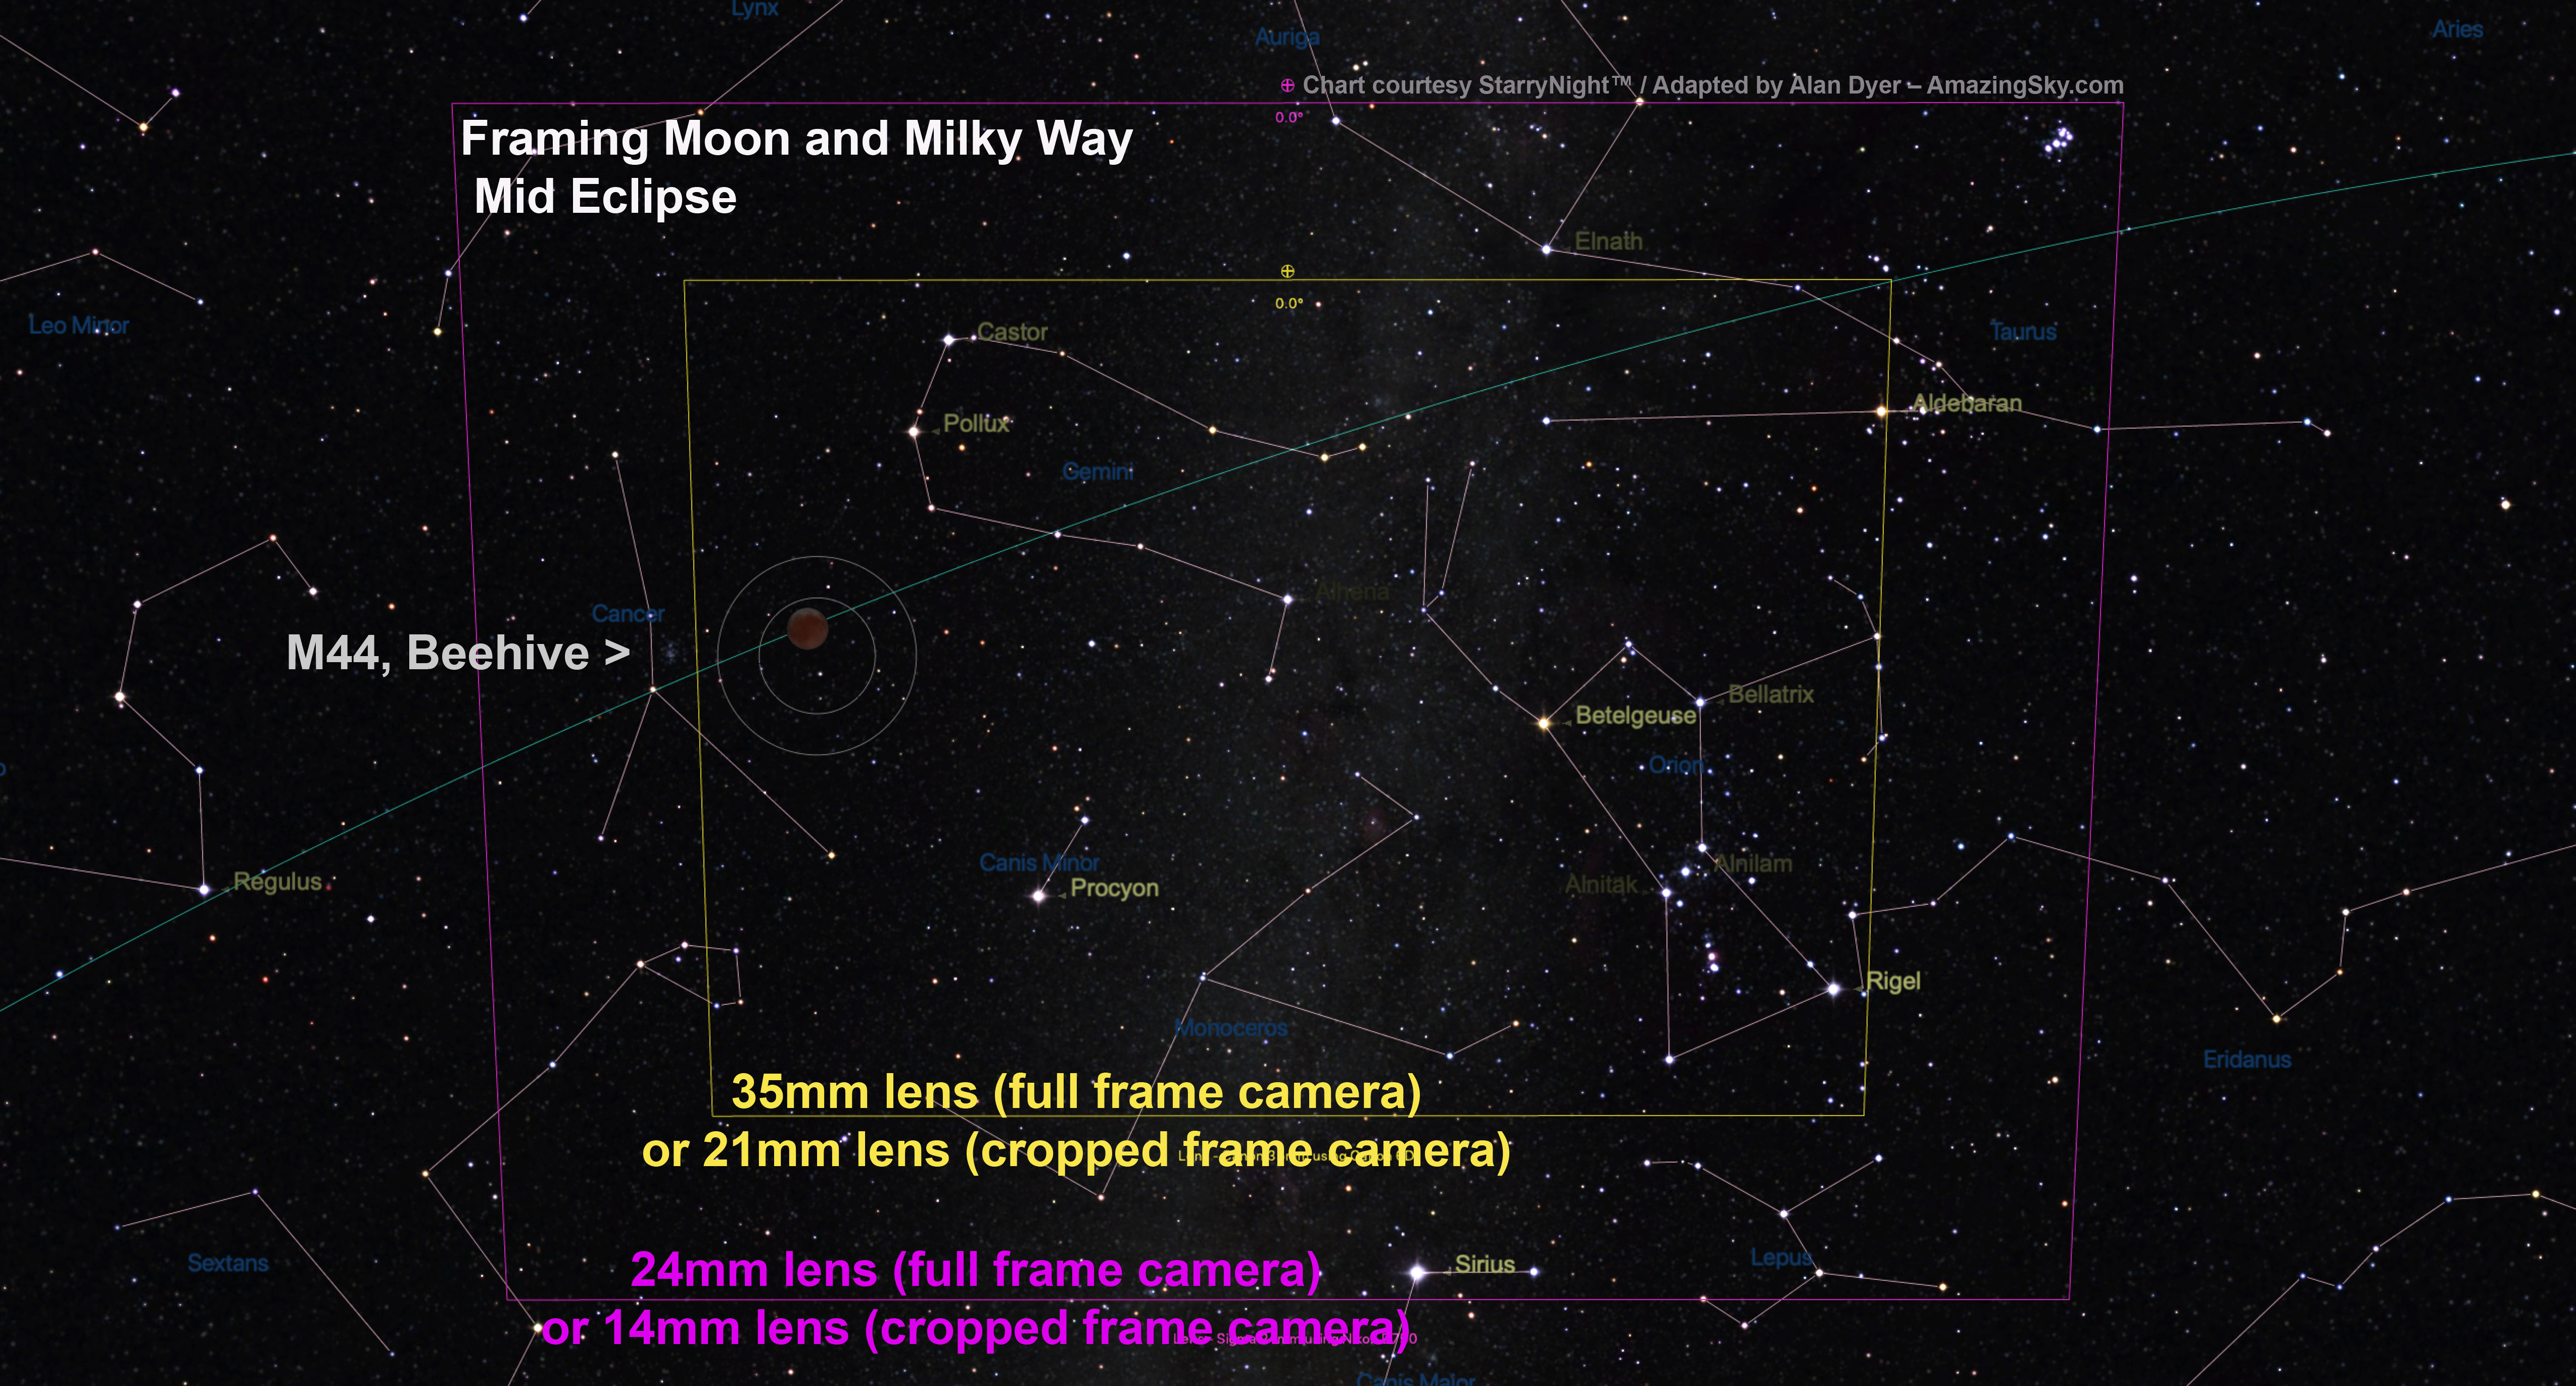
Alternatively, using a longer 14mm to 35mm lens allows you to frame the Moon beside Orion and the winter Milky Way, as above, but without the landscape. Again, this will require a dark rural site.
If you take this type of image with a camera on a fixed tripod, use high ISOs to keep exposures below 10 to 20 seconds to avoid star trailing. You have an hour of totality to shoot lots of exposures to make sure some will work best.

If you have a sky tracker to follow the stars, as I did above, exposures can be much longer — perhaps a minute to pick up the Milky Way really well — and ISOs can be lower to avoid noise.
Option 1 Variation — Urban Eclipses
Unfortunately, point-and-shoot cameras and so-called “bridge” cameras, ones with non-interchangeable lenses, likely won’t have lenses wide enough to capture the whole scene, landscape and all. Plus their sensors will be noisy when used at high ISOs. Those cameras might be best used to capture moderate telephoto closeups at bright urban sites.
With any camera, at urban sites look for scenic opportunities to capture the eclipsed Moon above a skyline or behind a notable landmark. By looking up from below you might be able to frame the Moon beside a church spire, iconic building, or a famous statue using a normal or short telephoto lens, making this a good project for those without ultra-wide lenses.
Whatever your lens or subject, at urban sites expose as best you can for the foreground, trying to avoid any bright and bare lights in the frame that will flood the image with lens flares in long exposures.
Capturing such a scene during the deep partial phases might produce a brighter Moon that stands out better in an urban sky than will a photo taken at mid-totality when the Moon is darkest.
TIP: Practice, Practice, Practice!
With any camera, especially beginner point-and-shoots, ensure success on eclipse night by practicing shooting the Moon before the eclipse, during the two weeks of the waxing Moon leading up to Full Moon night and the eclipse.
The crescent Moon with Earthshine on the dark side of the Moon is a good stand-in for the eclipsed Moon. Set aside the nights of January 8 to 11 to shoot the crescent Moon. Check for exposure and focus. Can you record the faint Earthshine? It’s similar in brightness to the shadowed side of the eclipsed Full Moon.
The next week, on the nights of January 18 and 19, the waxing gibbous Moon will be closer to its position for eclipse night and almost as bright as the uneclipsed Full Moon, allowing some rehearsals for shooting it near a landmark.
Option 2: Advanced — Multiple Exposures
An advanced method is to compose the scene so the lens frames the entire path of the Moon for the 3 hours and 16 minutes from the start to the end of the partial eclipse.
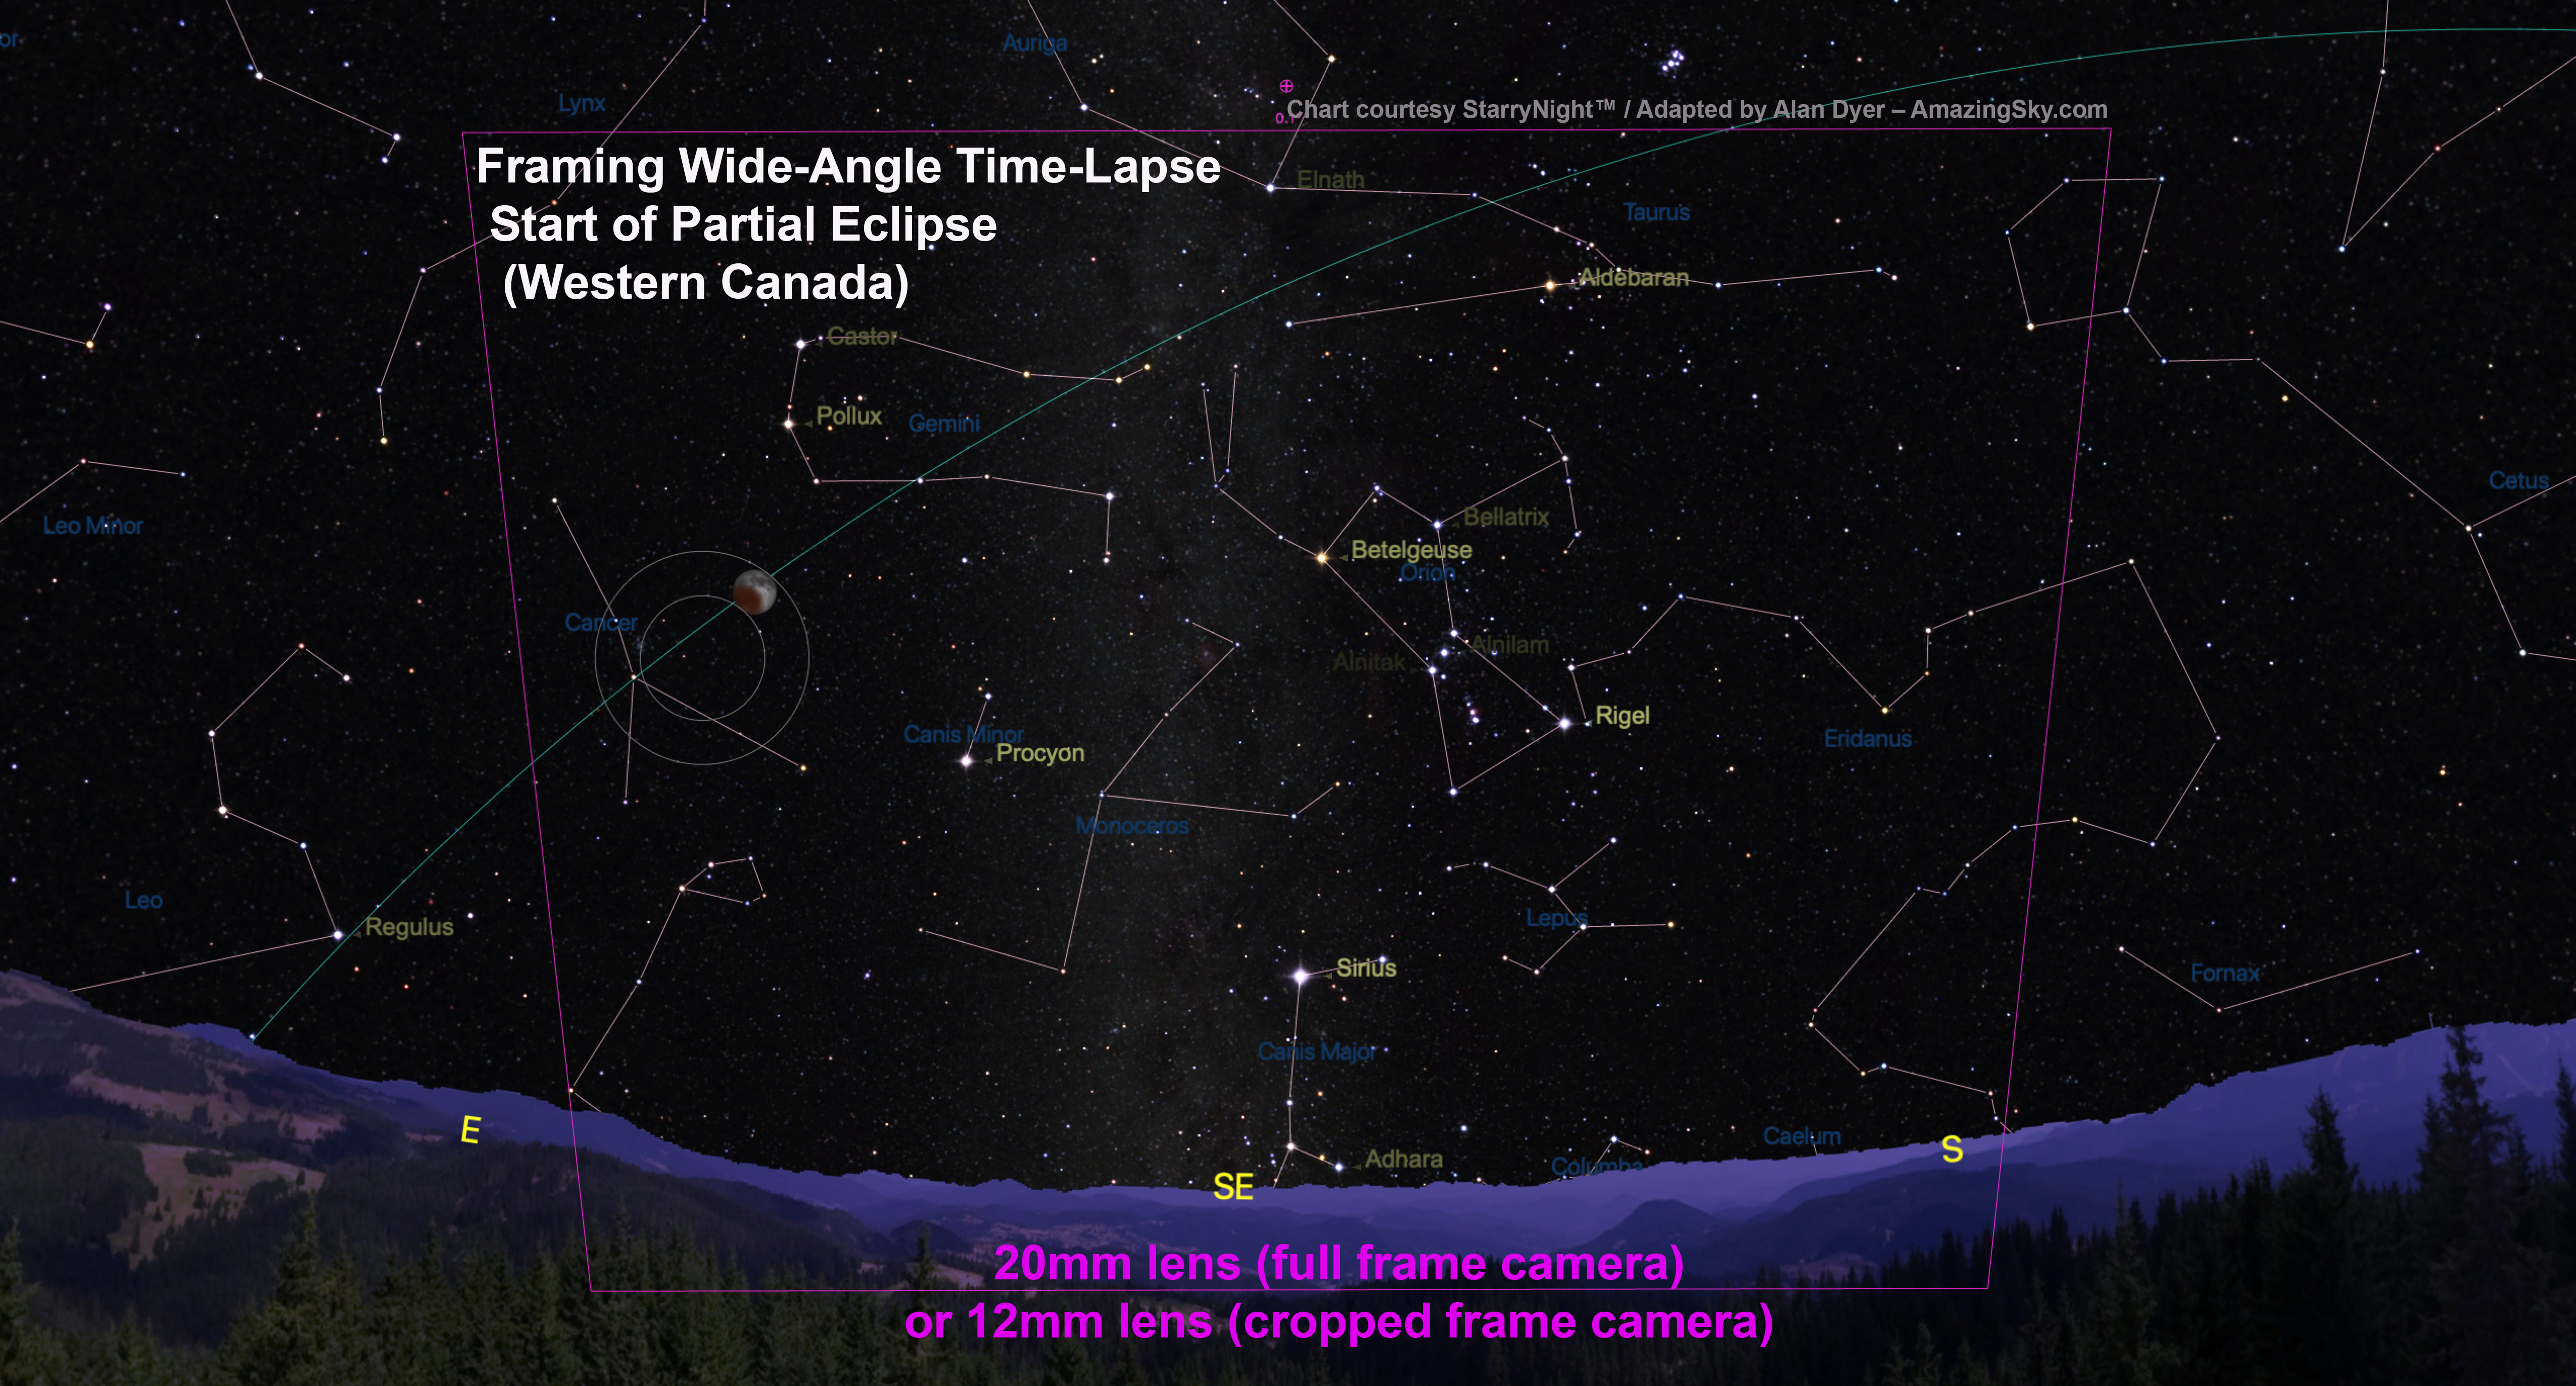
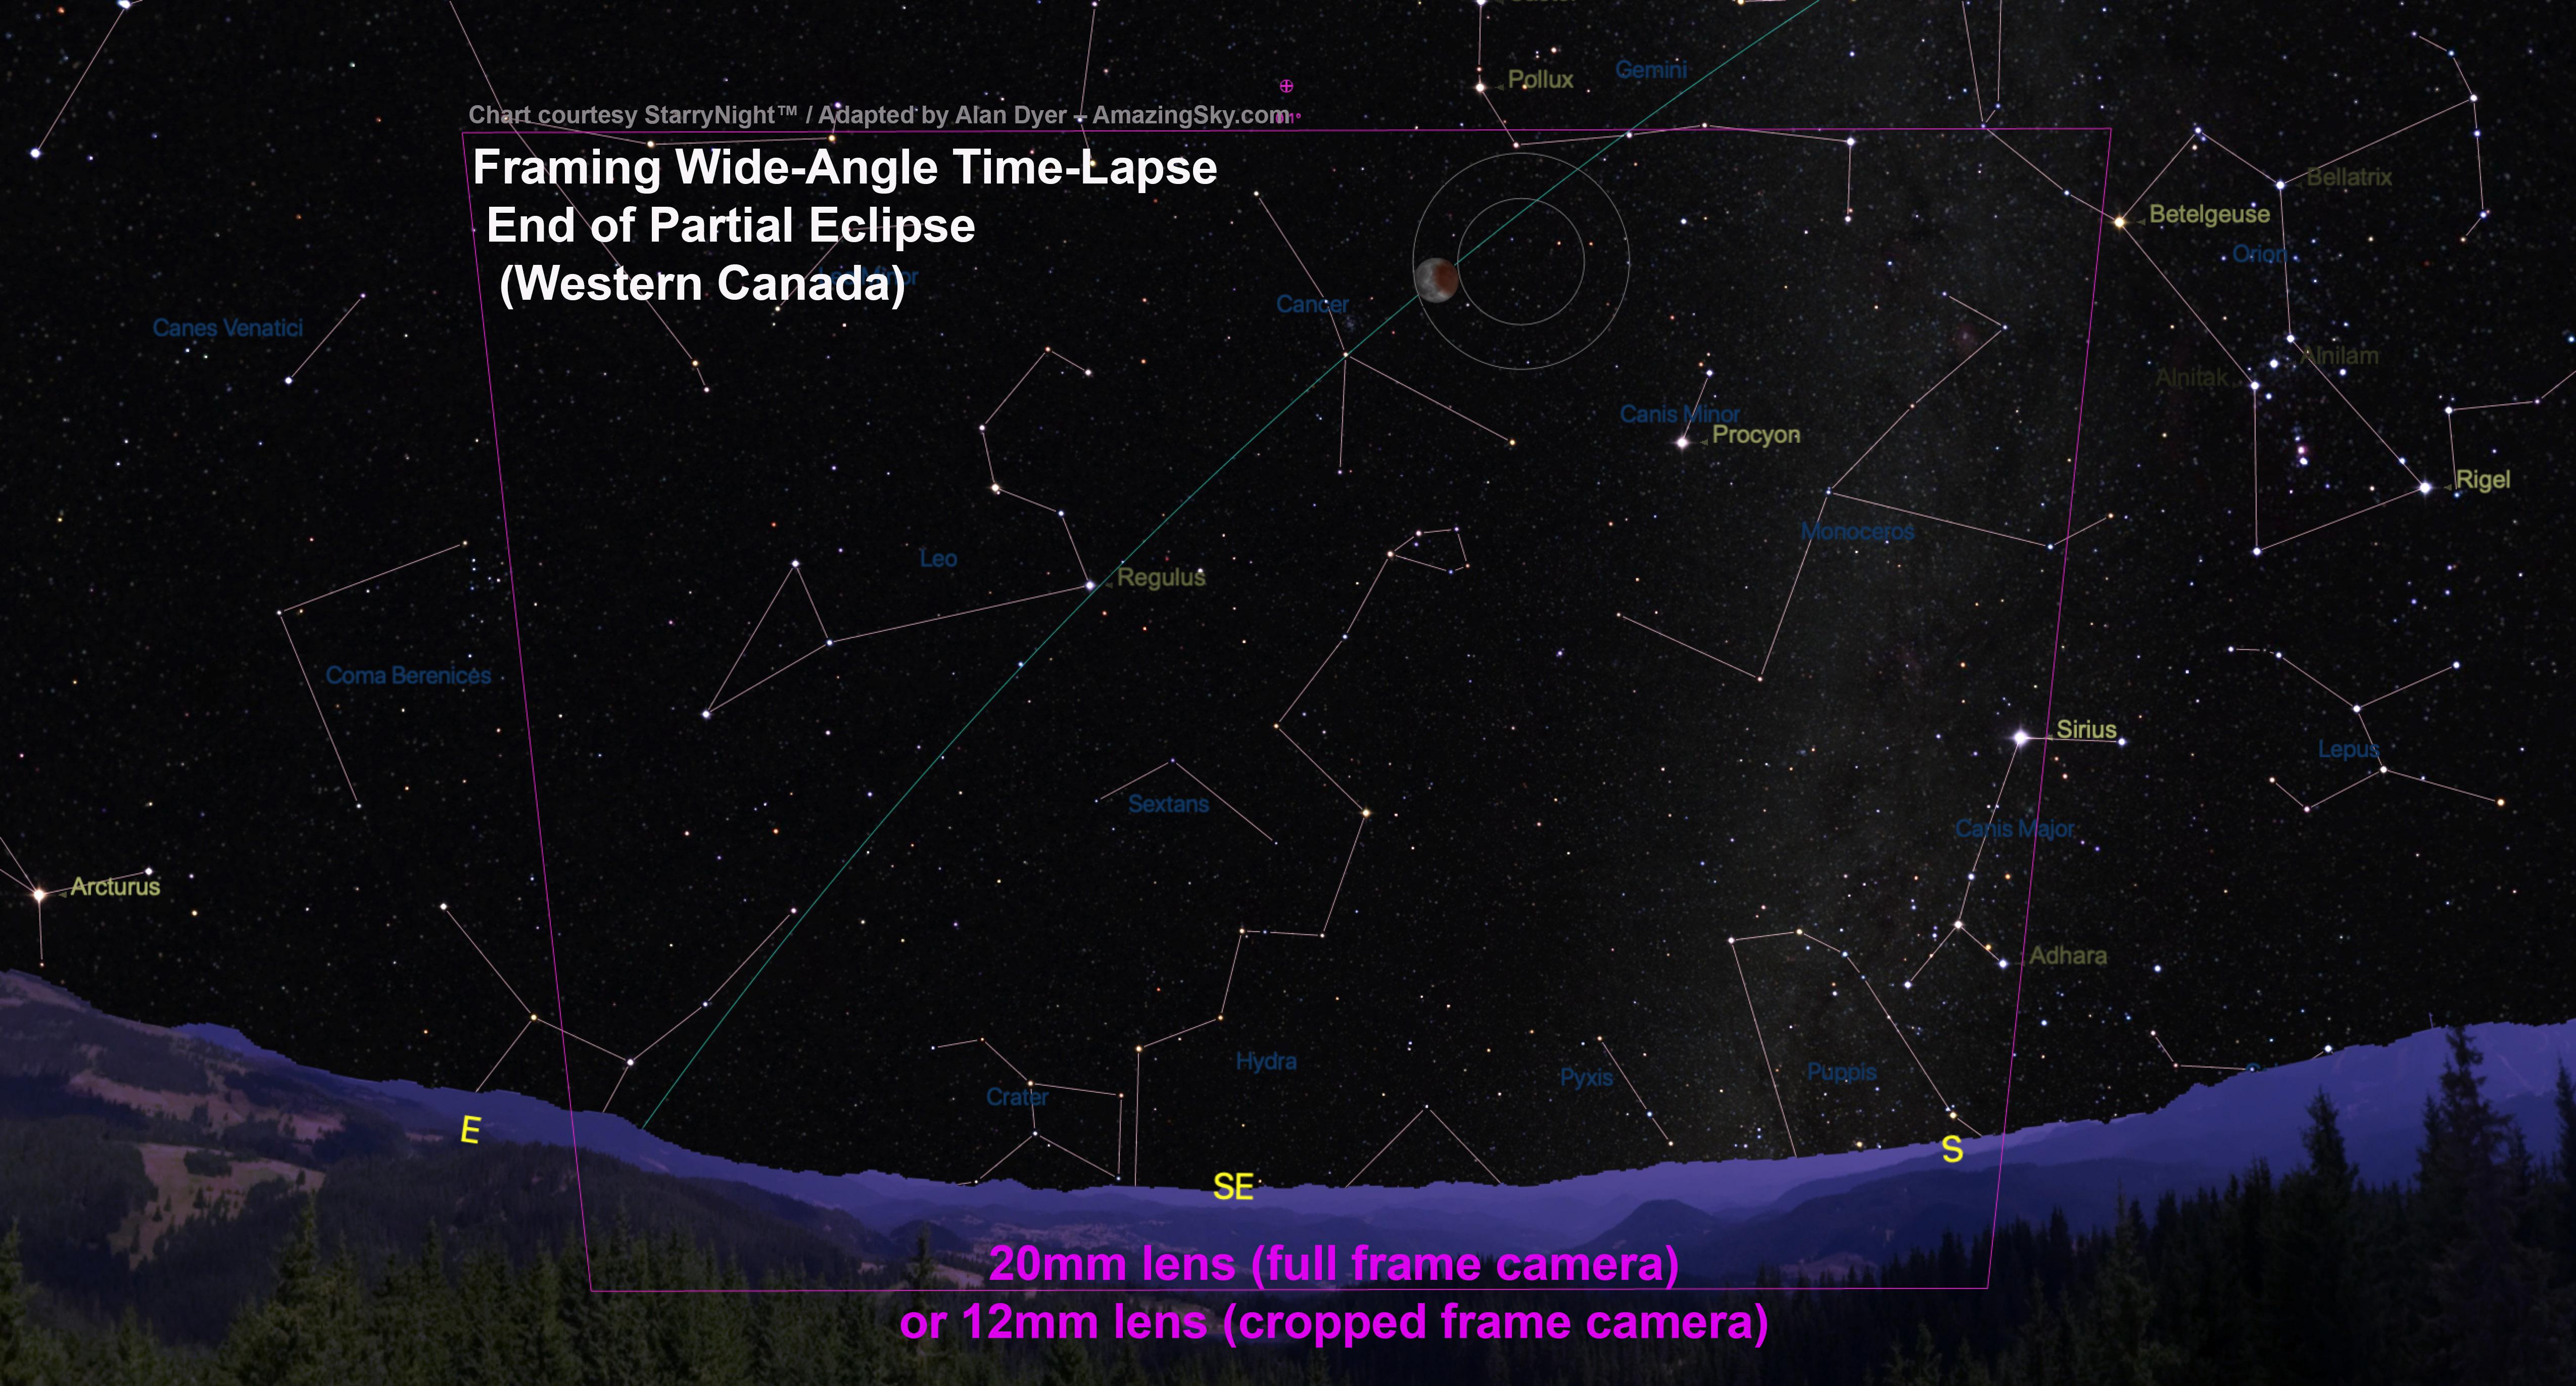
As shown above, including the landscape will require at least a 20mm lens on a full frame camera, or 12mm lens on a cropped frame camera. However, these charts are for my site in western Canada. From sites to the east and south where the Moon is higher an even wider lens might be needed, making this a tough sequence to take.
With wide lenses, the Moon will appear quite small. The high altitude of the Moon and midnight timing won’t lend itself to this type of multiple image composite as well as it does for eclipses that happen near moonrise or moonset, as per the example below.

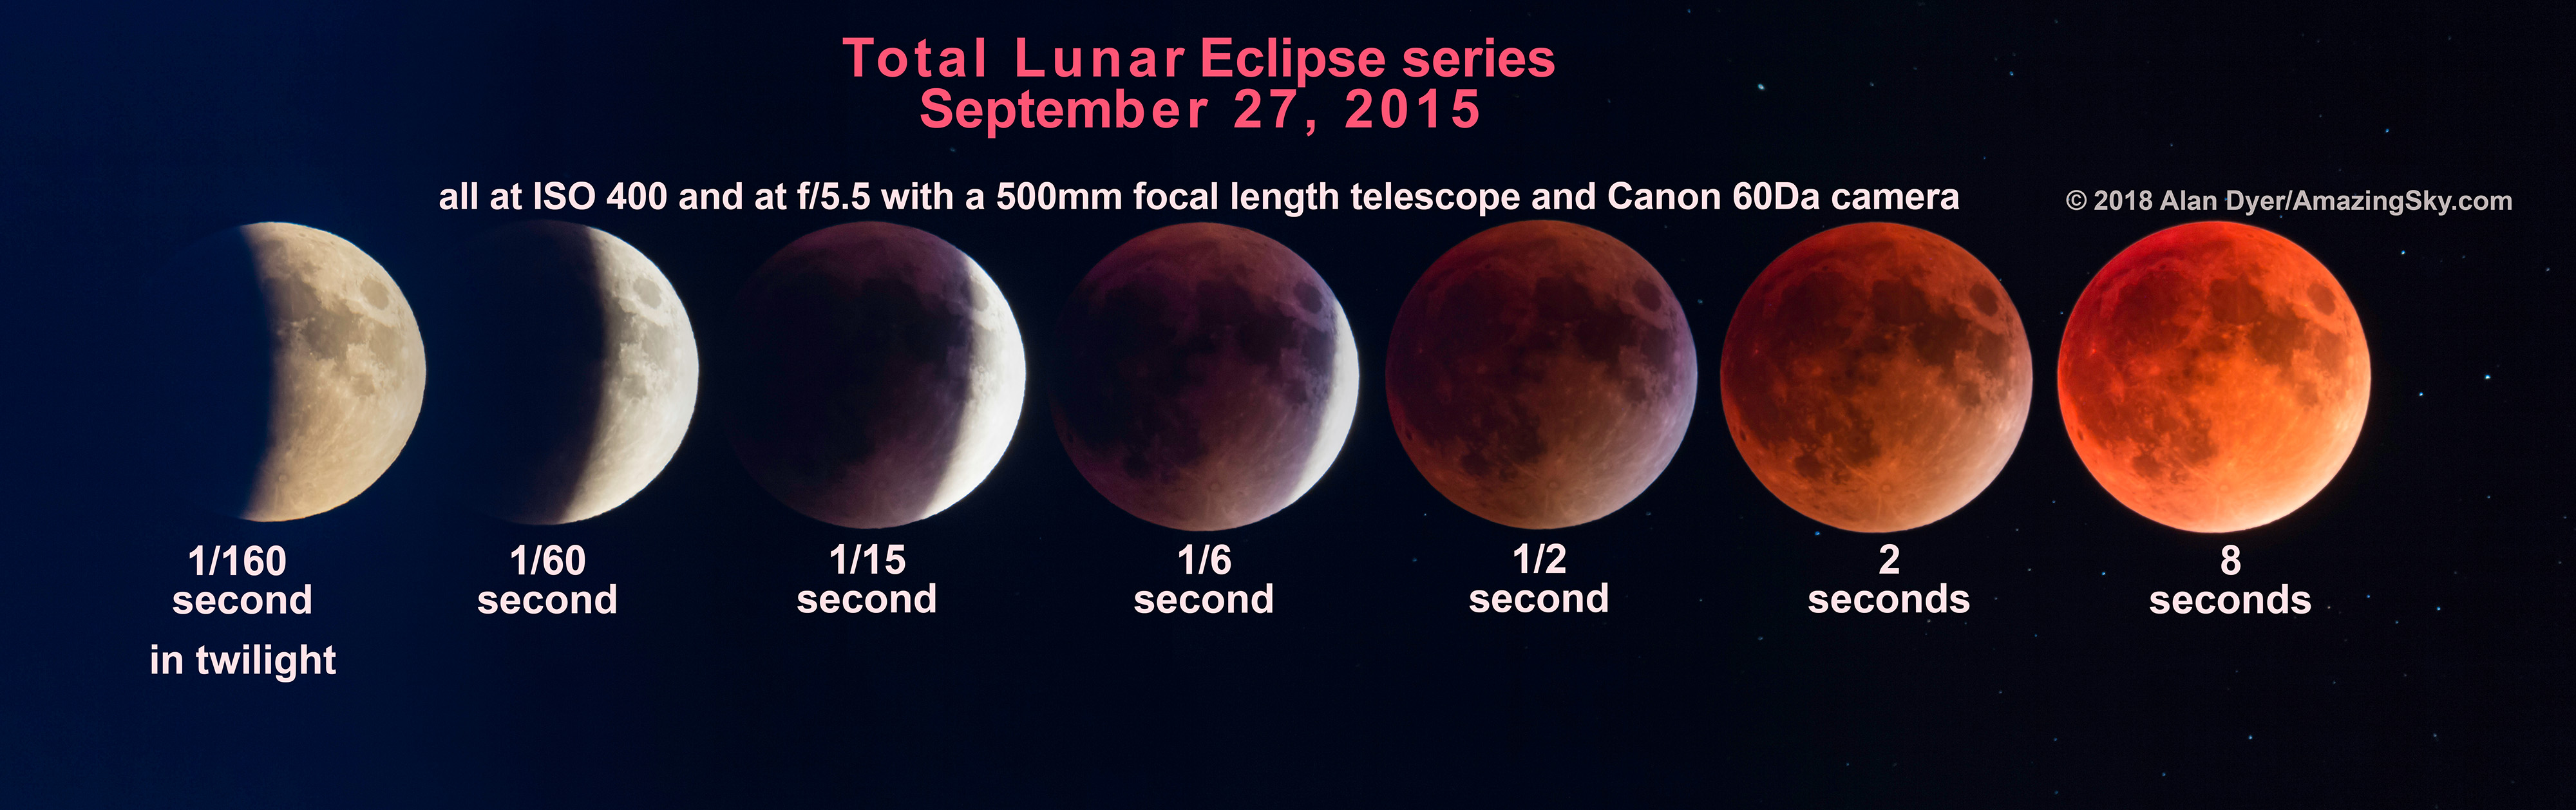
A still-image composite with the lunar disks well separated will need shots only every 5 minutes, as I did above for the September 27, 2015 eclipse.
Exposures for any lunar eclipse are tricky, whether you are shooting close-ups or wide-angles, because the Moon and sky change so much in brightness.
As I did for the image below, for a still-image composite, you can expose just for the bright lunar disk and let the sky go dark.
Exposures for just the Moon will range from very short (about 1/500th second at f/8 and ISO 100) for the partials, to 1/2 to 2 seconds at f/2.8 to f/4 and ISO 400 for the totals, then shorter again (back to 1/500 at ISO 100) for the end shots when the Full Moon has returned to its normal brilliance.
That’ll take constant monitoring and adjusting throughout the shoot, stepping the shutter speed gradually longer thorough the initial partial phase, then shorter again during the post-totality partial phase.
You’d then composite and layer (using a Lighten blend mode) the well-exposed disks (surrounded by mostly black sky) into another background image exposed longer for 10 to 30 seconds at ISO 800 to 1600 for the sky and stars, shot at mid-totality.
To maintain the correct relative locations of the lunar disks and foreground, the camera cannot move.
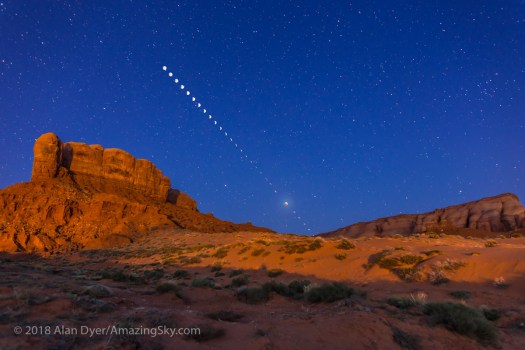
That technique works best if it’s just a still image you are after, such as above. This image is such a composite, of the April 4, 2015 total lunar eclipse from Monument Valley, Utah.
This type of composite takes good planning and proper exposures to pull off, but will be true to the scene, with the lunar disk and its motion shown to the correct scale and position as it was in the sky. It might be a composite, but it will be accurate.
My Rant!
That’s in stark contrast to the flurry of ugly “faked” composites that will appear on the web by the end of the day on January 21, ones with huge telephoto Moons pasted willy-nilly onto a wide-angle sky.
Rather than look artistic, most such attempts look comically cut-and-pasted. They are amateurish. Don’t do it!
Option 3: Advanced — Wide-Angle Time-Lapses
If it’s a time-lapse movie you want (see the video below), take exposures every 10 to 30 seconds, to ensure a final movie with smooth motion.
Unlike shooting for a still-image composite, for a time lapse each frame will have to be exposed well enough to show the Moon, sky, and landscape.
That will require exposures long enough to show the sky and foreground during the partial phases — likely about 1 to 4 seconds at f/2.8 and ISO 400. In this case, the disk of the partially-eclipsed Moon will greatly overexpose, as it does toward the end of the above time-lapse from September 27, 2015..
But the Moon will darken and become better exposed during the late stages of the partial eclipse and during totality when a long exposure — perhaps now 10 to 20 seconds at f/2.8 and ISO 800 to 1600 — will record the bright red Moon amid the stars and winter Milky Way.
Maintaining a steady cadence during the entire sequence requires using an interval long enough throughout to accommodate the expected length of the longest exposure at mid-totality, with similar camera settings to what you’ve used for other Milky Way nightscapes. If you’ve never taken those before, then don’t attempt this complex sequence.
After totality, as the Moon and sky re-brighten, exposures will have to shorten again, and symmetrically in reverse fashion for the final partial phases.
Such a time-lapse requires consistently and incrementally adjusting the camera over the three or more hours of the eclipse on a cold winter night. The high altitude of the Moon and its small size on the required wide angle lenses will make any final time lapse less impressive than at eclipses that occur when the Moon is rising or setting.
But … the darkening of the sky and “turning on” of the Milky Way during totality will make for an interesting time-lapse effect. The sky and scene will be going from a bright fully moonlit night to effectively a dark moonless night, then back to moonlit. It’s a form of “holy grail” time lapse, requiring advanced processing with LRTimelapse software.
Again, do not move the camera. Choose your lens and frame your camera to include the entire path of the Moon for as long as you plan to shoot.
Even if the final movie looks flawed, individual frames should still produce good still images, or a composite built from a subset of the frames.
Option 4: Simple — Telephoto Close-Ups
The first thought of many photographers is to shoot the eclipse with as long a telephoto lens as possible. That can work, but …
The harsh reality is that the Moon is surprisingly small (only 1/2-degree across) and needs a lot of focal length to do it justice, if you want a lunar close-up.

You’ll need a 300mm to 800mm lens. Unfortunately, the Moon and sky are moving and any exposures over 1/4 to 2 seconds (required during totality) will blur the Moon badly if its disk is large on the frame and all you are using is a fixed tripod.
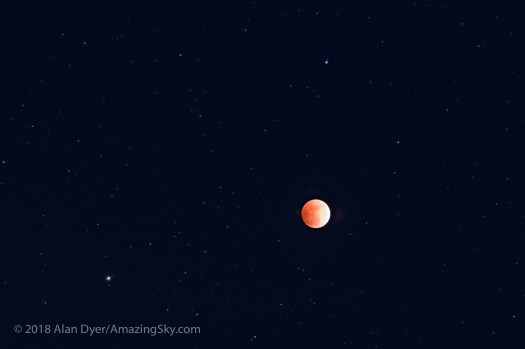
If you don’t have a tracking mount, one solution is to keep the Moon’s disk small (using no more than a fast f/2 or f/2.8 135mm to 200mm lens) and exposures short by using a high ISO speed of 1600 to 3200. Frame the Moon beside the Beehive star cluster as I show below.
Take a range of exposures. But … be sure to focus!
TIP: Focus! And Focus Again!
Take care to focus precisely on a bright star using Live View. That’s true of any lens but especially telephotos and telescopes.
Focus not just at the start of the night, but also more than once again later at night. Falling temperatures on a winter night will cause long lenses and telescopes to shift focus. What was sharp at the start of the eclipse won’t be by mid totality.
The catch is that if you are shooting for a time-lapse or composite you likely won’t be able to re-point the optics to re-focus on a star in mid-eclipse. In that case, be sure to set up the gear well before you want to start shooing to let it cool to ambient air temperature. Now focus on a star, then frame the scene. Then hope the lens doesn’t shift off focus. You might be able to focus on the bright limb of the Moon but it’s risky.
Fuzzy images, not bad exposures, are the ruin of most attempts to capture a lunar eclipse, especially with a telephoto lens. And the Moon itself, especially during totality, is not a good target to focus on. Use a bright star. The winter sky has lots!
Option 5: Advanced — Tracked Telescopic Close-Ups
If you have a mount that can be polar aligned to track the sky, then many more options are open to you.
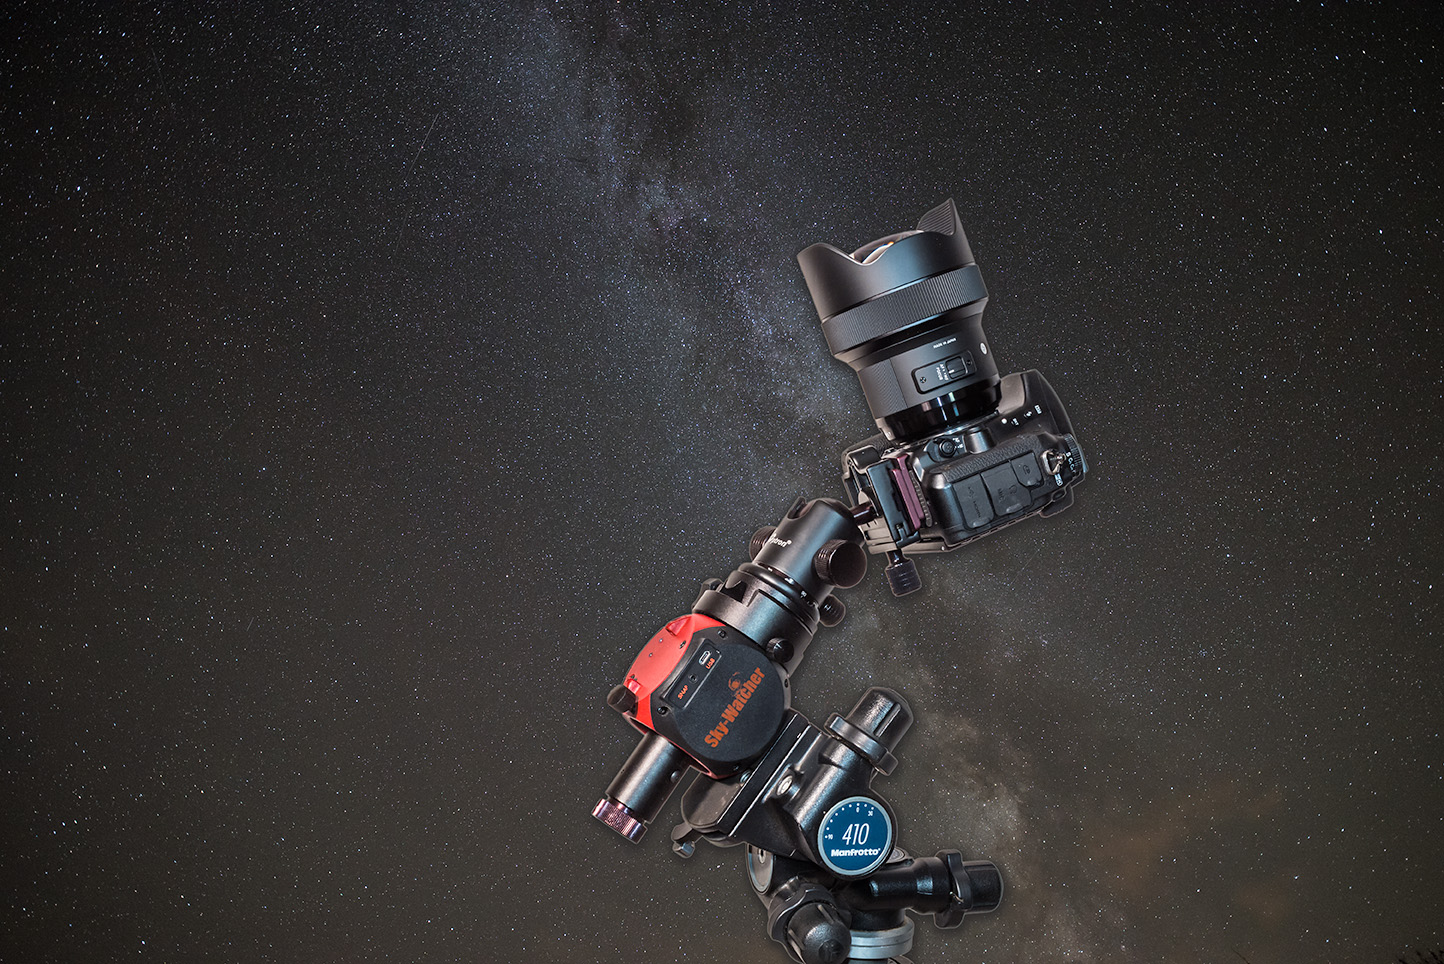
You can use a telescope mount or one of the compact and portable trackers, such as the Sky-Watcher Star Adventurer (I show the Mini model above) or iOptron Sky Tracker units. While these latter units work great, you are best to keep the payload weight down and your lens size well under 300mm.

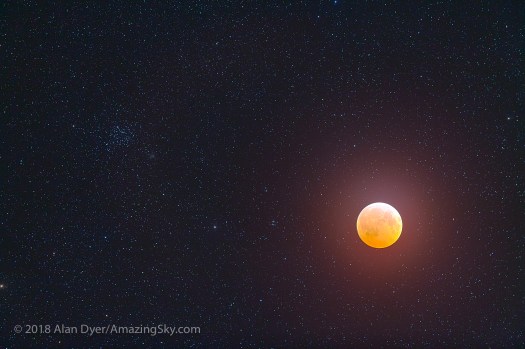
That’s just fine for this eclipse, as you really don’t need a frame-filling Moon. The reason is that the Moon will appear about 6 degrees west of the bright star cluster called the Beehive, or Messier 44, in Cancer.
As shown above, a 135mm to 200mm lens will frame this unique pairing well. For me, that will be the signature photo of this eclipse. The pairing can happen only at lunar eclipses that occur in late January, and there won’t be any more of those until 2037!
That’s the characteristic that makes this eclipse rare and unique, not that it’s a “super-duper, bloody, wolf Moon!” But it doesn’t make for a catchy headline.
Exposures to show the star cluster properly might have to be long enough (30 to 120 seconds) that the Moon overexposes, even at mid-totality. If so, take different exposures for the Moon and stars, then composite them later, as I did above for the December 20, 2010 eclipse near the Messier 35 star cluster in Gemini.
If really you want to shoot with even more focal length for framing just the Moon, a monster telephoto lens will work, but a small telescope such as an 80mm aperture f/6 to f/7 refractor will provide enough focal length and image size at much lower cost and lighter weight, and be easier to attach to a telescope mount.
But even with a 500mm to 800mm focal length telescope the Moon fills only a small portion of the frame, though cropped frame cameras have the advantage here. Use one if it’s a big Moon you’re after!
No matter the camera, the lens or telescope should be mounted on a solid equatorial telescope mount that you must polar align earlier in the night to track the sky.
Alternatively, a motorized Go To telescope on an alt-azimuth mount will work, but only for single shots. The rotation of the field with alt-az mounts will make a mess of any attempts to shoot multiple-exposure composites or time-lapses, described below.
Whatever the mount, for the sharpest lunar disks during totality, use the Lunar tracking rate for the motor.
Assuming an f-ratio of f/6 to f/8, exposures will vary from as short as 1/250th second at ISO 100 to 200 for the barely eclipsed Moon, to 4 to 20 seconds at ISO 400 to 1600 for the Moon at mid-totality.
It’s difficult to provide a precise exposure recommendation for totality because the brightness of the Moon within the umbra can vary by several stops from eclipse to eclipse, depending on how much red sunlight manages to make it through Earth’s atmospheric filter to light the Moon.
TIP: Shoot for HDR

As I did above, during the deep partial phases an option is to shoot both long, multi-second exposures for the red umbra and short, split-second exposures for the bright part of the Moon not yet in the umbra.
Take 5 to 7 shots in rapid succession, covering the range needed, perhaps at 1-stop increments. Merge those later with High Dynamic Range (HDR) techniques and software, or with luminosity masks.
Even if you’re not sure how to do HDR processing now, shoot all the required exposures anyway so you’ll have them when your processing skills improve.
Option 6: Advanced — Close-Up Composites and Time-Lapses
With a tracking telescope on an equatorial mount you could fire shots every 10 to 30 seconds, and then assemble them into a time-lapse movie, as below.
But as with wide-angle time-lapses, that will demand constant attention to gradually and smoothly shift exposures, ideally by 1/3rd-stop increments every few shots during the partial and total phases. Make lots of small adjustments, rather than fewer large ones.
If you track at the lunar rate, as I did above, the Moon should stay more or less centred while it drifts though the stars, assuming your mount is accurately polar aligned, an absolutely essential prerequisite here.
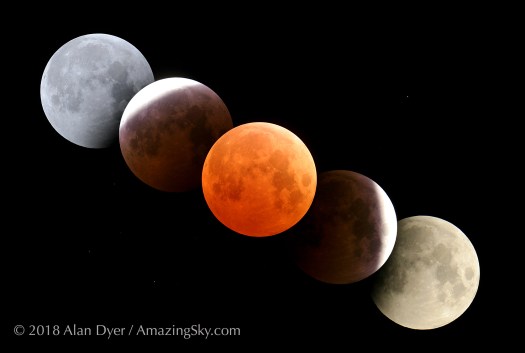
Conversely, track at the sidereal rate and the stars will stay more or less fixed while the Moon drifts through the frame from right to left (west to east) as I show above in a composite of the October 27, 2004 eclipse.
But such a sequence takes even more careful planning to position the Moon correctly at the start of the sequence so it remains “in frame” for the duration of the eclipse, and ends up where you want at the end.
In the chart below, north toward Polaris is at the top of the frame. Position the Moon at the start of the eclipse so it ends up just above the centre of the frame at mid-eclipse. Tricky!
As I show above, for this type of “Moon-thru-shadow” sequence a focal length of about 400mm is ideal on a full frame camera, or 300mm on a cropped frame camera.
From such a time-lapse set you could also use several frames selected from key stages of the eclipse, as I did in 2004, to make up a multiple-image composite showing the Moon moving through the Earth’s shadow.
Again, planetarium software such as Starry Night I used above, which can be set to display the field of view of the camera and lens of your choice, is essential to plan the shoot. Don’t attempt it without the right software to plan the framing.
I would consider the telescopic time-lapse method the most challenging of techniques. Considering the hour of the night and the likely cold temperatures, your best plan might be to keep it simple.
It’s what I plan to do.
I’ll be happy to get a tracked telephoto close-up of the Moon and Beehive cluster as my prime goal, with a wide-angle scene of the eclipsed Moon beside Orion and the Milky Way as a bonus. A few telescope close-ups will be even more of a bonus.
However, just finding clear skies might be the biggest challenge!
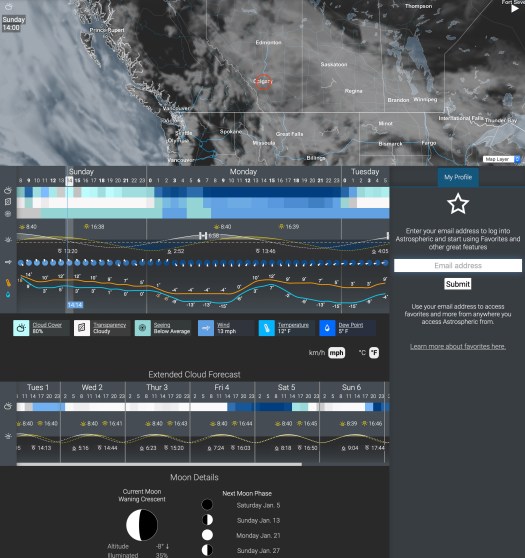
Try the Astrospheric app for astronomy-oriented weather predictions. The Environment Canada data it uses has led me to clear skies for several recent eclipses that other observers in my area missed.
It’ll be worth the effort to chase!
The next total eclipse of the Moon anywhere on Earth doesn’t occur until May 26, 2021 in an event visible at dawn from Western North America. The next total lunar eclipse visible from all of North America comes a lunar year later, on May 15, 2022.
Total Lunar Eclipse from Alan Dyer on Vimeo.I leave you with a music video of the lunar eclipse of September 27, 2015 that incorporates still and time-lapse sequences shot using all of the above methods.
Good luck and clear skies on eclipse night!
— Alan, January 1, 2019 / © 2019 Alan Dyer / amazingsky.com

Hi Alan,
I have the same sentiment regarding these gigantic Moon over the horizon images posted by so many amateur photographers? I often catch them out and actually point out their stupidity? I caught one guy trying to sell framed posters of a image sequence for high prices, which he apparently took of the lunar eclipse in 2018. However I also had 3 cams set up for this event, and because I did it myself, I immediately noticed he Photoshopped his image?
>> Not only is it dishonest, but it is a crime nowadays to spread “fake” information and it leaves the public thinking that it is actually scientifically true?? ..people are quick to believe this BS as the movie industry has enlarged the Moon in dramatic scenes for many years, brainwashing people’s understanding that the Moon can become so large, under mystical and special conditions.
So now I have caught out another guy, and he has every answer u can dream up, of why his Moon picture is oversized.
Please see the link below, maybe if u don’t mind to comment on this post, and maybe if u have knowledgable friends to do the same? Hundreds of idiots are liking it, believing this nonsense? The more people I get to confirm his dishonesty, the better for humans future knowledge and it may enlighten their current ignorance?
His name is Andrew Cleland..
– https://www.facebook.com/groups/345337876456847/permalink/540909026899730/
Regards,
ERiC KiRSTEN
erickirsten.sa@gmail.com
+27 84 374-7444 W/App
https://www.facebook.com/ERiC.KiRSTEN.sa
I’m afraid you are wrong and the photo in question is legitimate. The lunar disk size is exactly what you get with a 600mm lens and the orientation of the Moon is just as it would have appeared at moonrise from South Africa. There are indeed many fake moon shots but this isn’t one of them.
Hi Alan,
I calculated and used feedback from those with knowledge beyond my own. Most agree that his images are indeed from the correct angle facing West, from Sunnyridge side for a Moon setting in Johannesburg and seems fairly realistic. In fact even I agreed to that aspect of it all along. See the map I used to check what he mentioned, about the POV of the images?
Others said they doubt its accurate as the Moon just looks too “big” or too “oval”, and that is what I am disputing? Nasa even pointed out that all Super Moons size illusion can only account for 7-12% enlargement over a horizon.
I asked him to send me the originals from his camera with EXIF data, and I may be able to establish a more accurate answer? EXIF will show the exact times, settings and specs used to capture these images.
If he does oblige, I can check the stats and things will be clear to all.
If he does not oblige, it points to some irregularities in these images.
Thank u very much for your time!
Regards,
ÎRiC KiRSTÎN
084 374-7444
eric@digi-image.co.za
(>iÎ)
Really enjoyed reading this, its in real English, something anyone can digest. Thanks for that. I photographed the eclipse from the top parking lot at the Rothney Astrophysical Observatory this year. As it as my first with my new Nikkor 200-500 lens, i’m pleased to say that my settings very much followed what you wrote here. I hope you have a moment to take a peak at the pictures i posted in Canada’s Night Sky Photography and send me any critiques, i’m learning quickly and plan to have some of these techniques down by the time my family convinces me to retire so i can chase my photo passions.
I’m just wondering if you have any articles on the Aurora’s as we are travelling back to NWT this March.
Thanks! Glad the tips worked out. I have many posts on the aurora but not necessarily photo tips. For those see my tutorials at http://www.amazingsky.com/tablet/free-tutorials.html and my eBook. It covers everything on nightscapes.
Thanks for the fabulous information and clear guidance! Looking forward to seeing your new images 🙂
This is awesome and explained very well! Thank you for taking the time to put this together.
Alan, what a great education publication for photographers seeking to plan the wild adventures of the night sky. Very unselfish contribution to astrophotography! Thanks!
Fantastic overview! Thanks.
Great article! I’m planning on using Xavier Jubier’s Lunar Eclipse Maestro to control my cameras.
(http://xjubier.free.fr/en/site_pages/lunar_eclipses/Lunar_Eclipse_Maestro_Photography_Software.html)
Good luck! Remember it might be cold and laptops can die in the cold. Have a Plan B!
Thanks much!!!!
Thank you sooooo much Alan!!! Happy new year!