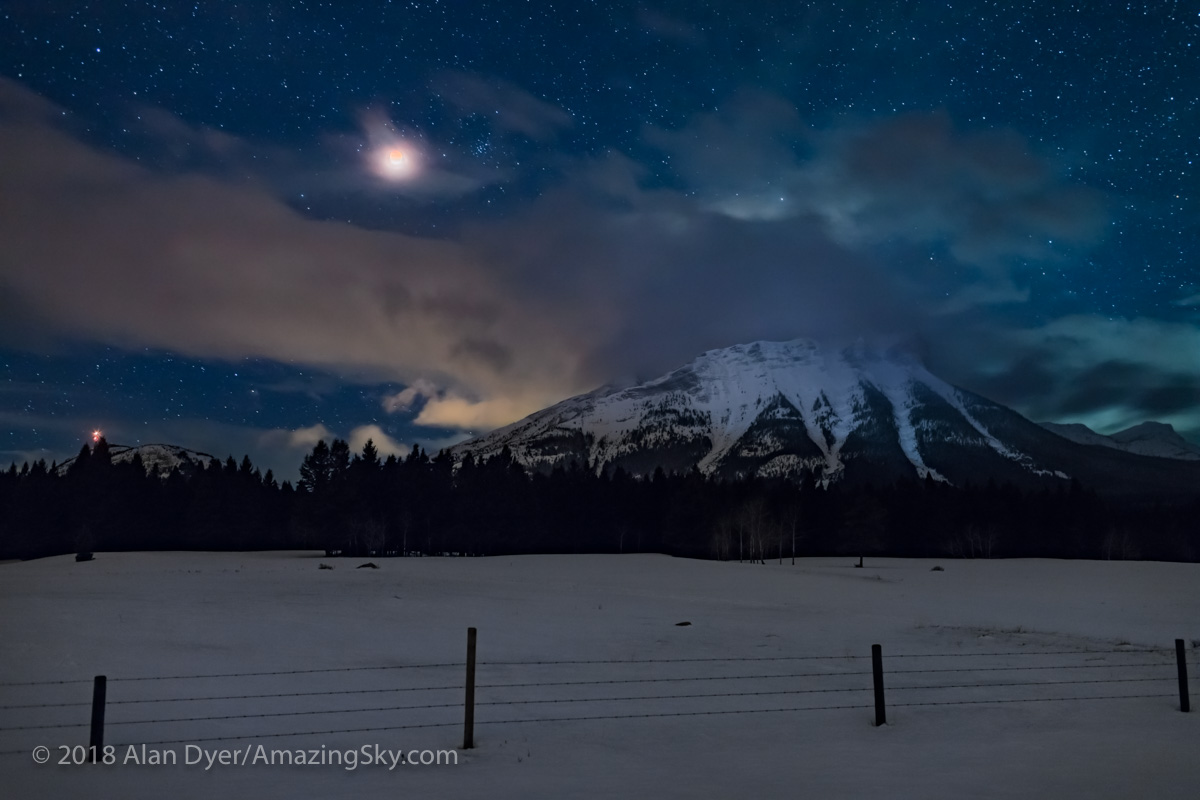
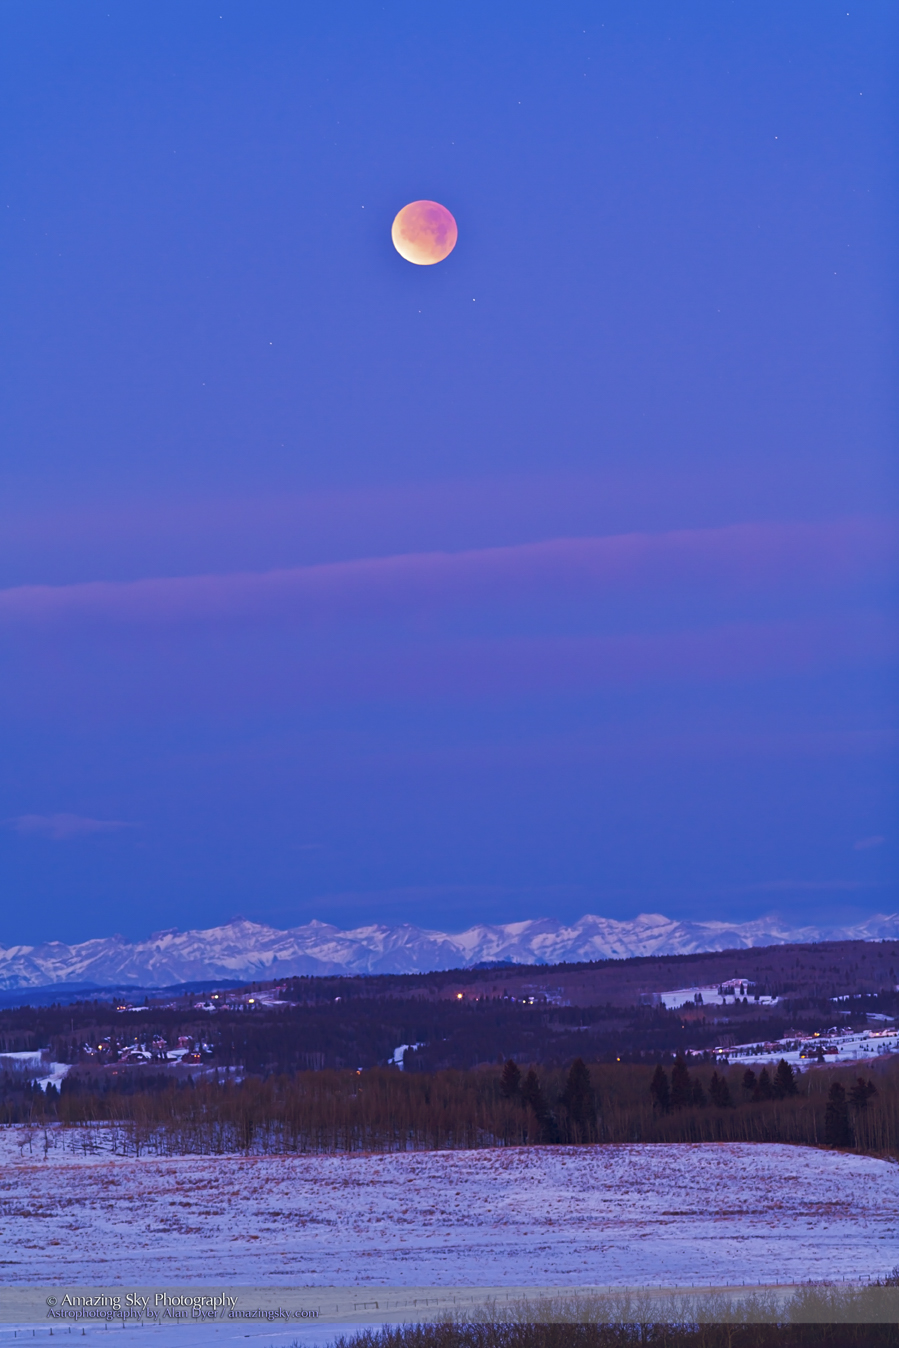
It took a last-minute chase, but I managed to capture the total eclipse of the Moon on March 14, 2025.
It would not be an eclipse without a chase. Solar eclipses of the total kind almost always involve travel, often to exotic locales around the world. But total lunar eclipses come to you, as they can be seen from an entire hemisphere of the planet.
Except there’s one problem — clouds! Over the last decade since 2014, of the eight total lunar eclipses (TLEs) I was home in Alberta for, I had to chase into clear skies for all but one. A recounting of one such chase from January 2019 is here.
Only for the TLE before this most recent (on November 8, 2022) was I able to stay home to watch it. Though in that case a snowstorm the day before made the roads and travel poor, so I had to stay home. I recounted that eclipse story here. You’ll find links to my other lunar eclipse stories below.
Once again, for the March 13/14, 2025 TLE, weather prospects looked poor. Not just in my area but in many regions of the continent. But there was hope!
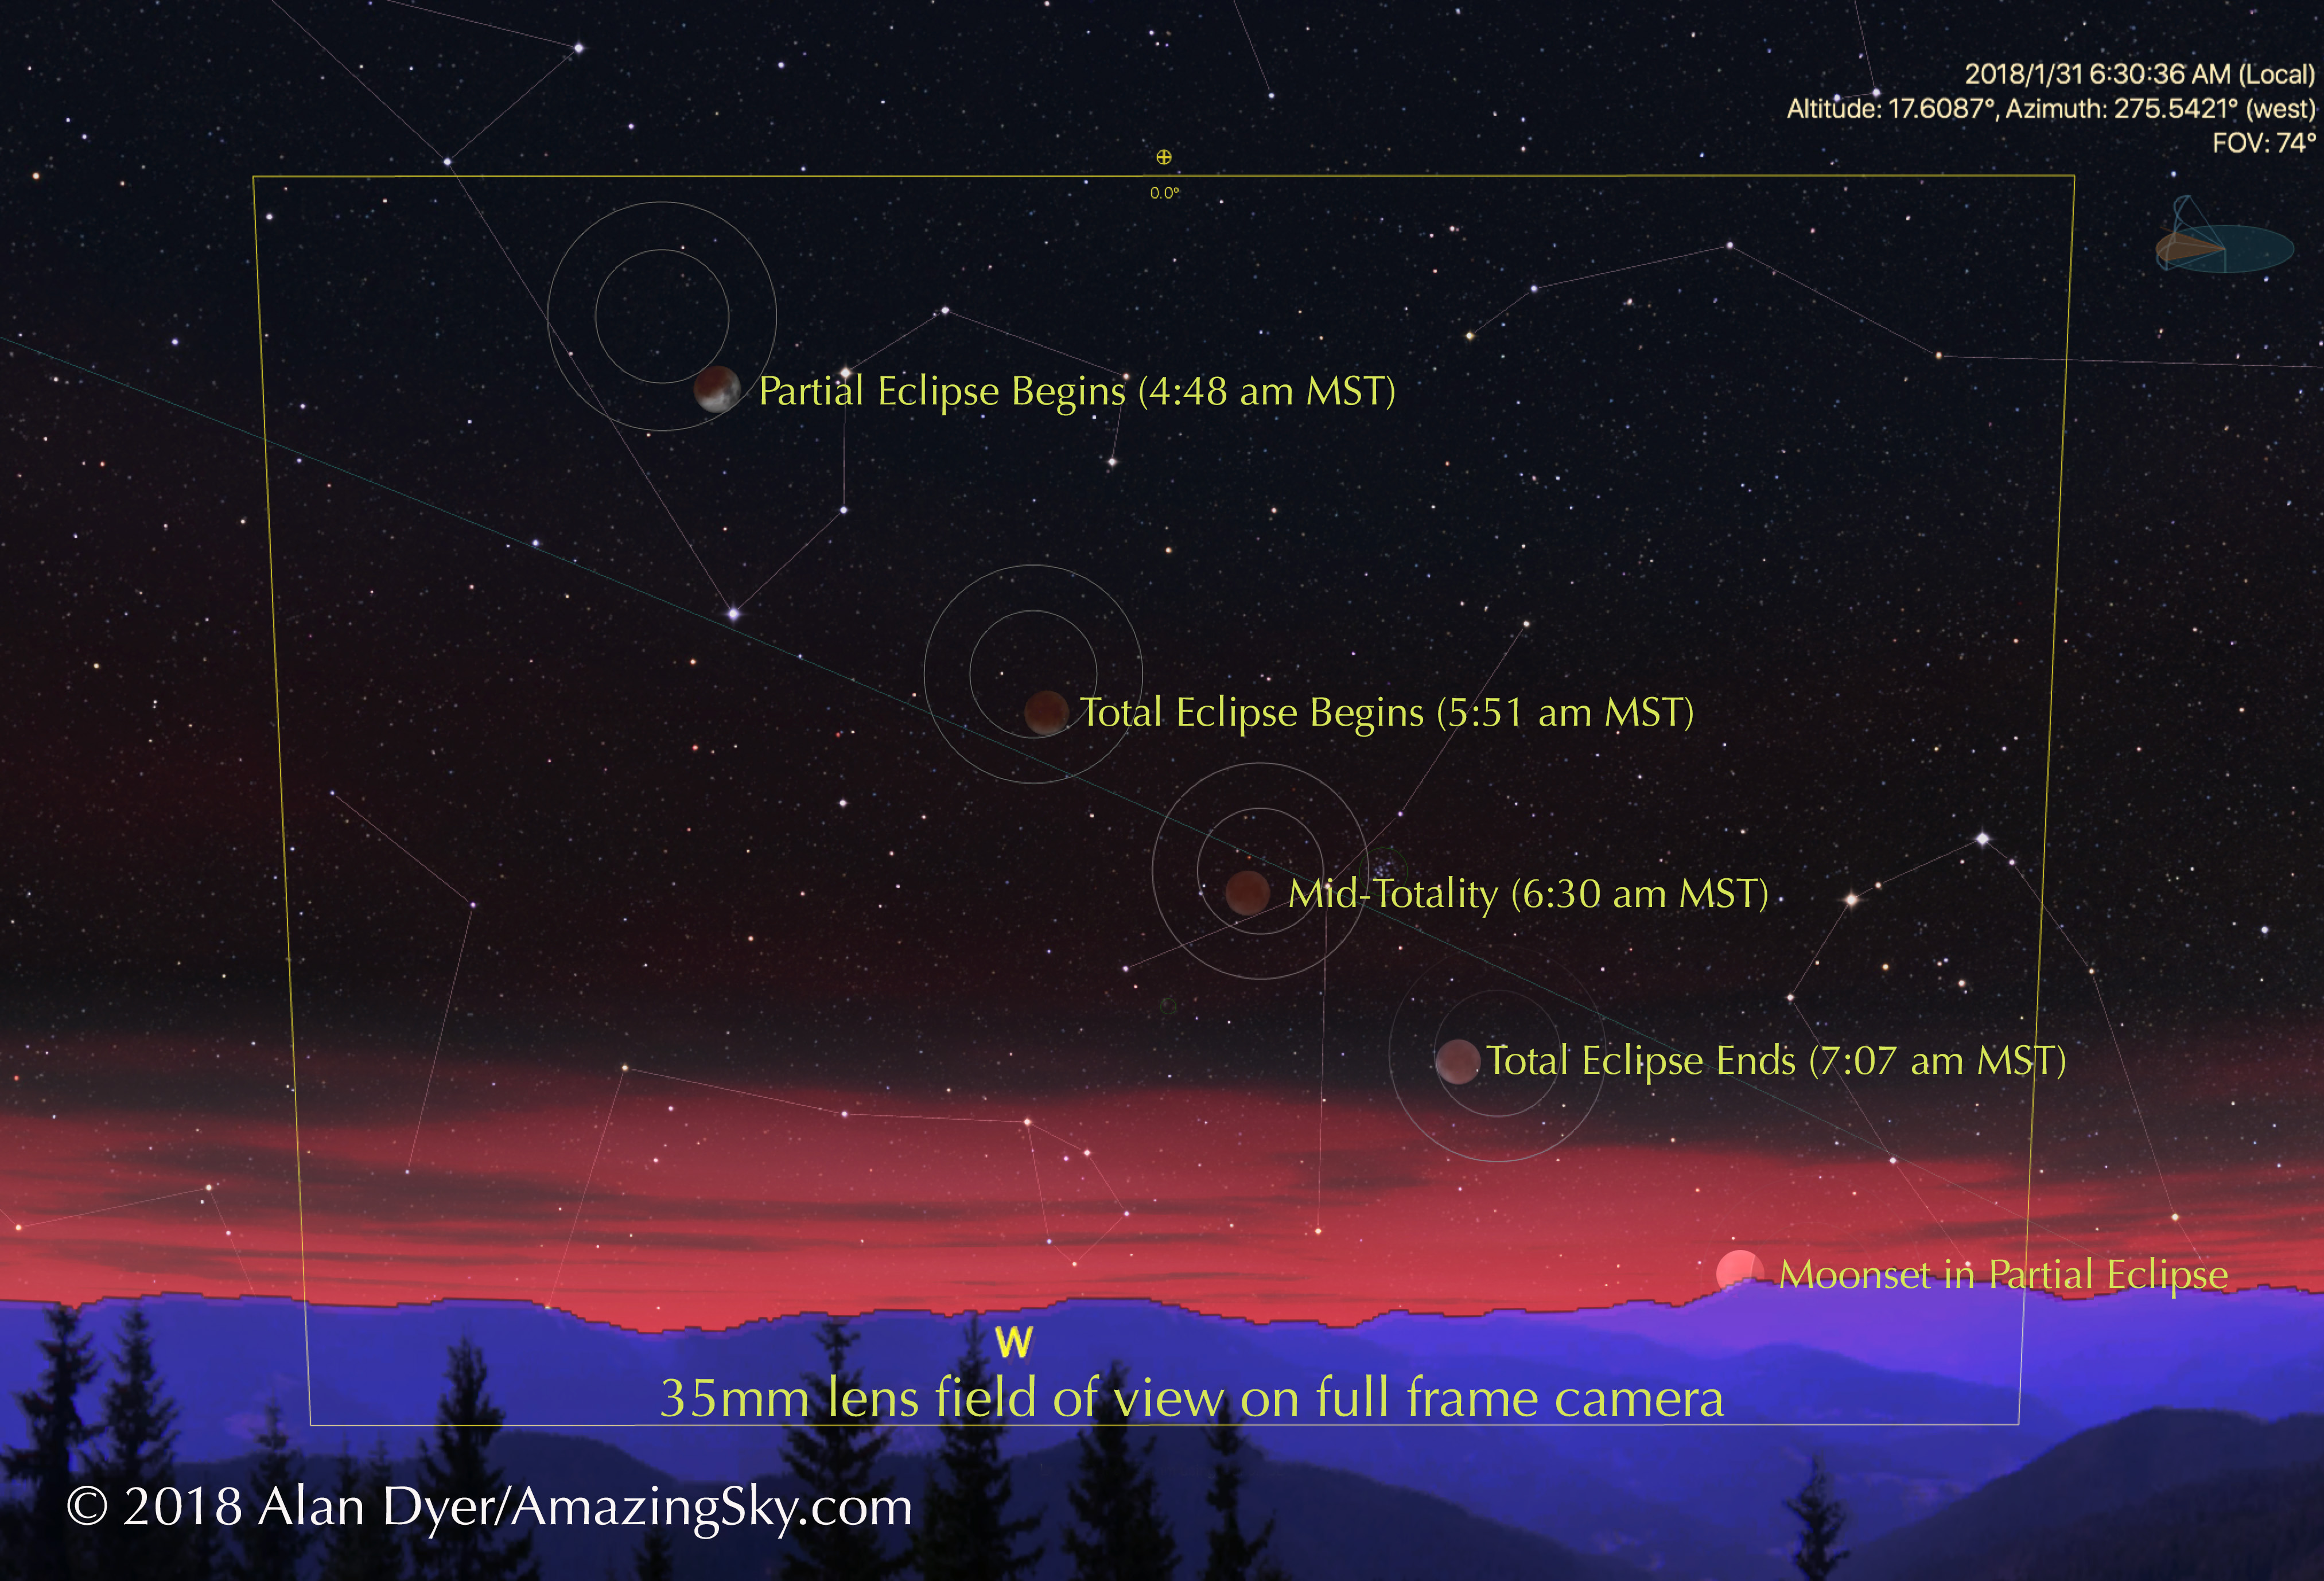
Astrospheric and Environment Canada cloud forecast + Moon information
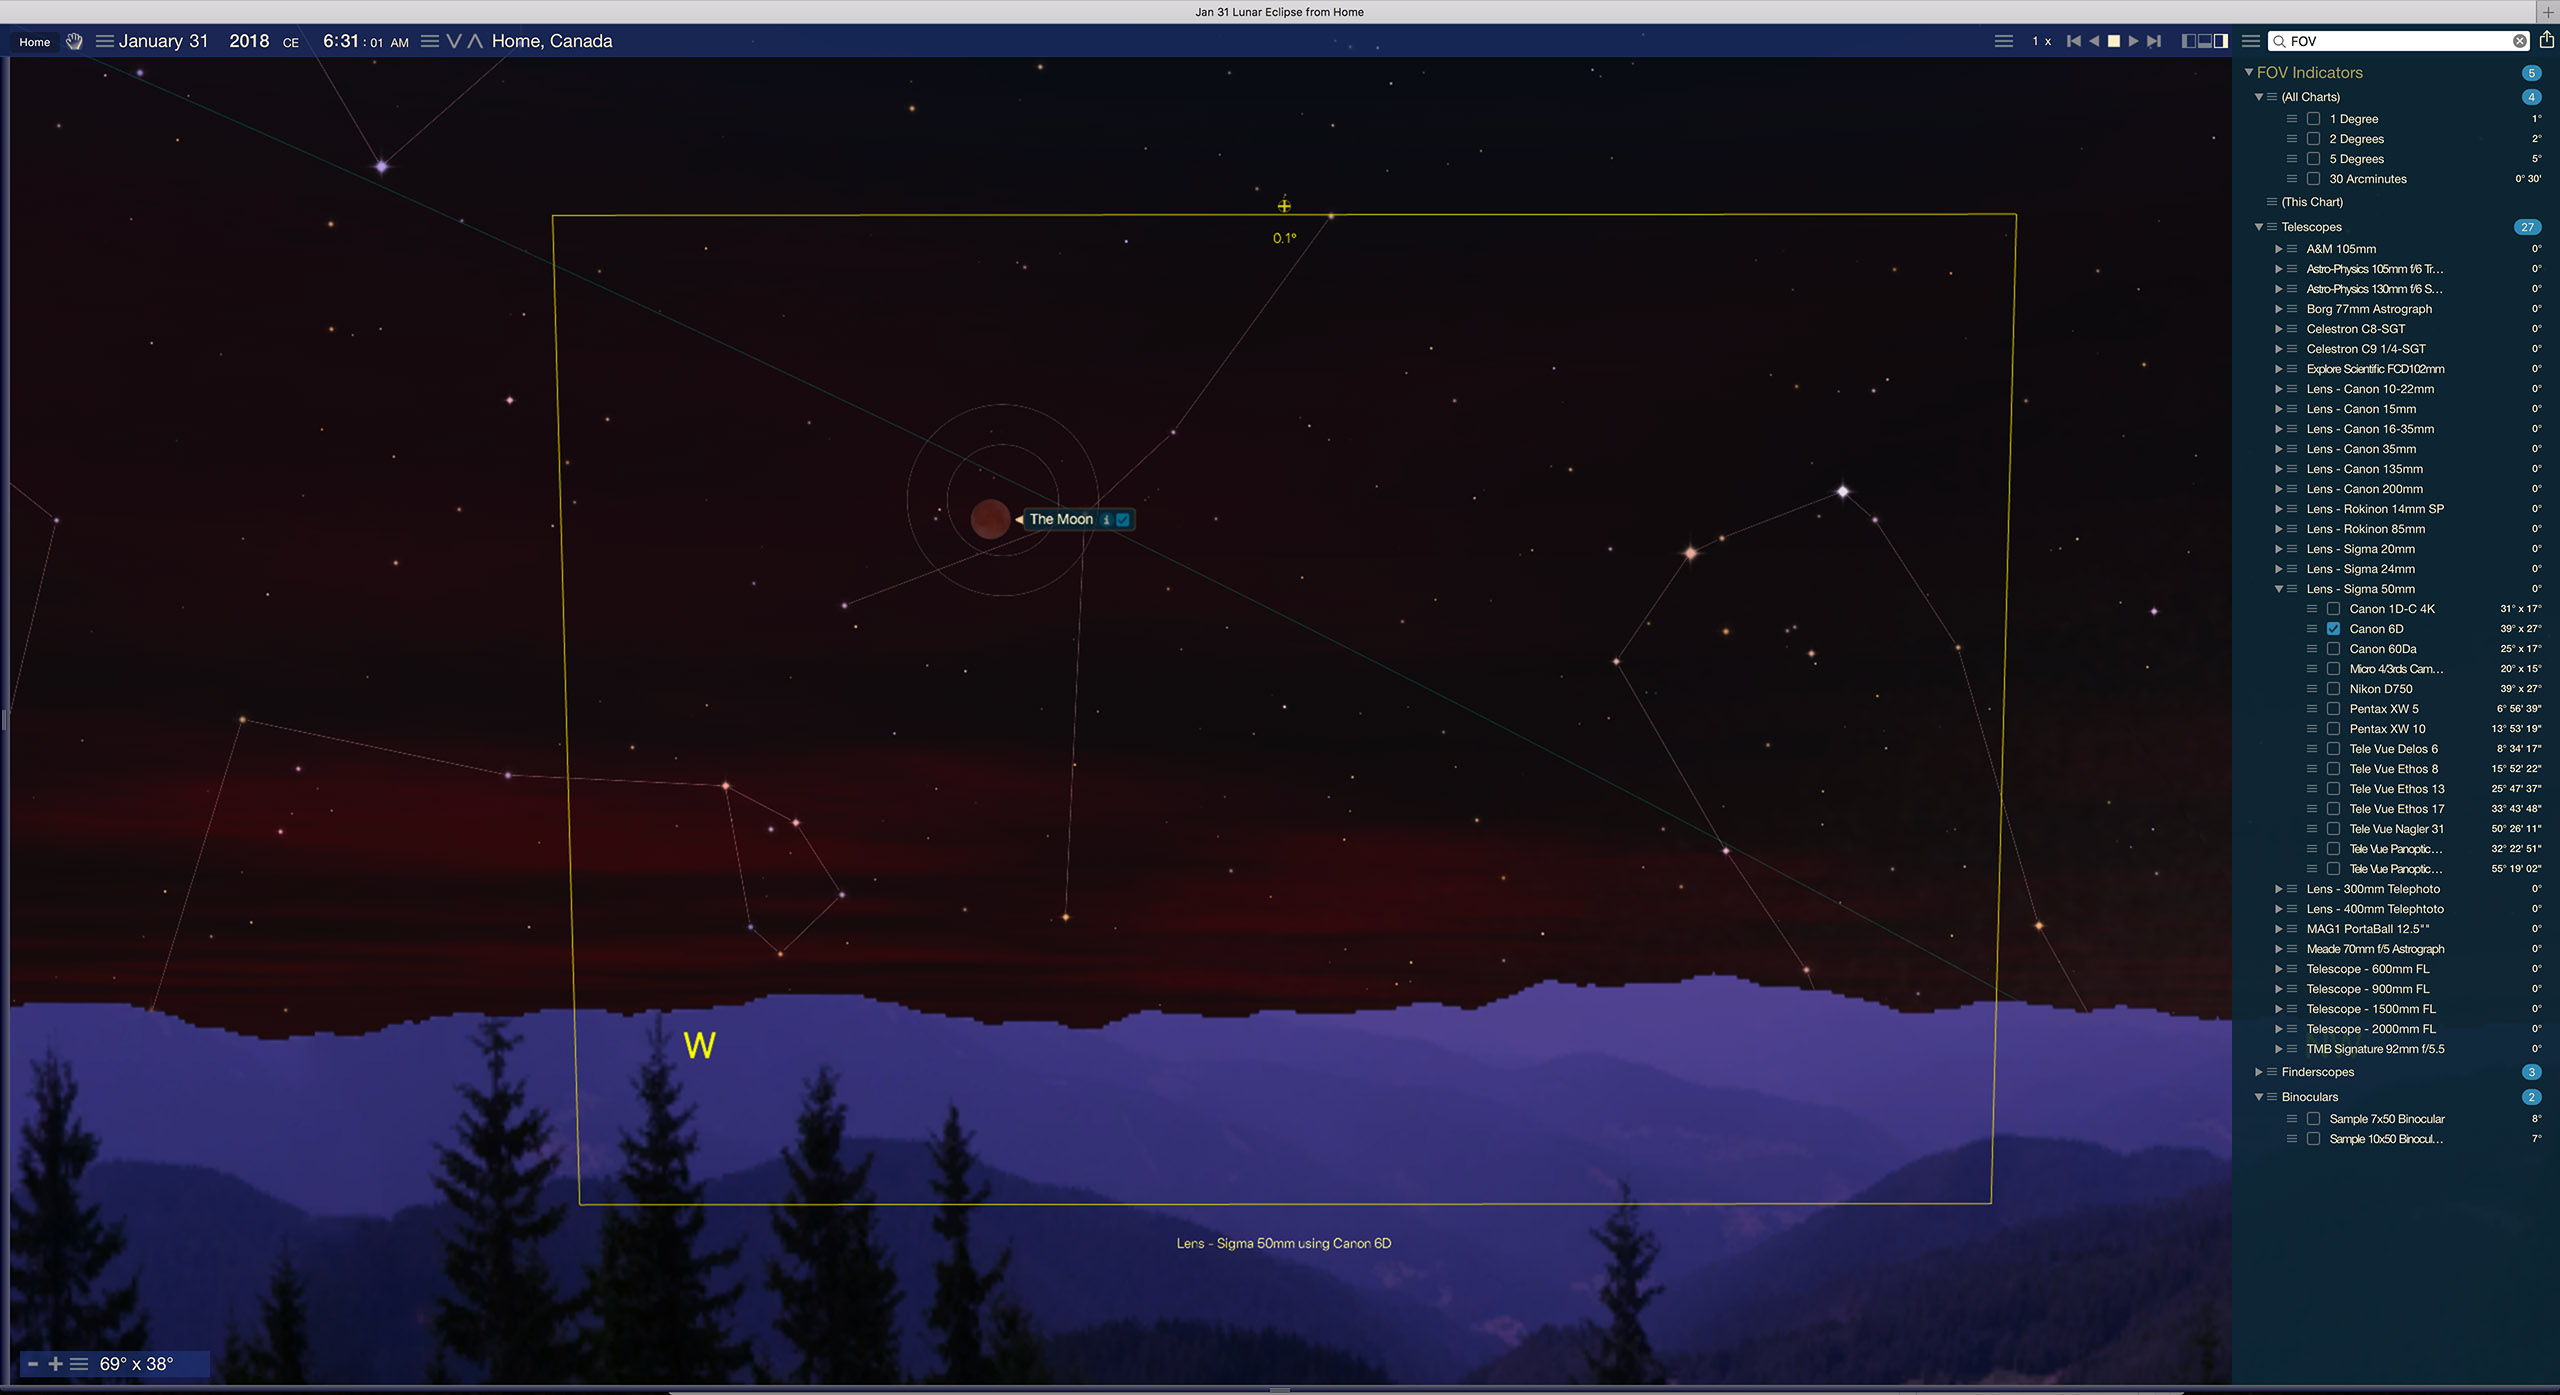
The forecast cloud cover showed home to be hopeless. But a clear area was supposed to be open in southwestern Alberta, marked by the red circle above. That’s Waterton Lakes National Park, just on the US border. It’s a favourite place of mine for nightscape photography anyway (see my blog from this past summer here).
The chart above from the app Astrospheric shows the clear hole, and the dark blue on the time-line indicates the period with no clouds. Note how it coincides with the wavy line below which shows Moon altitude, with the orange and red regions indicating when the eclipse would take place. Looks good! So I made my plan to chase.
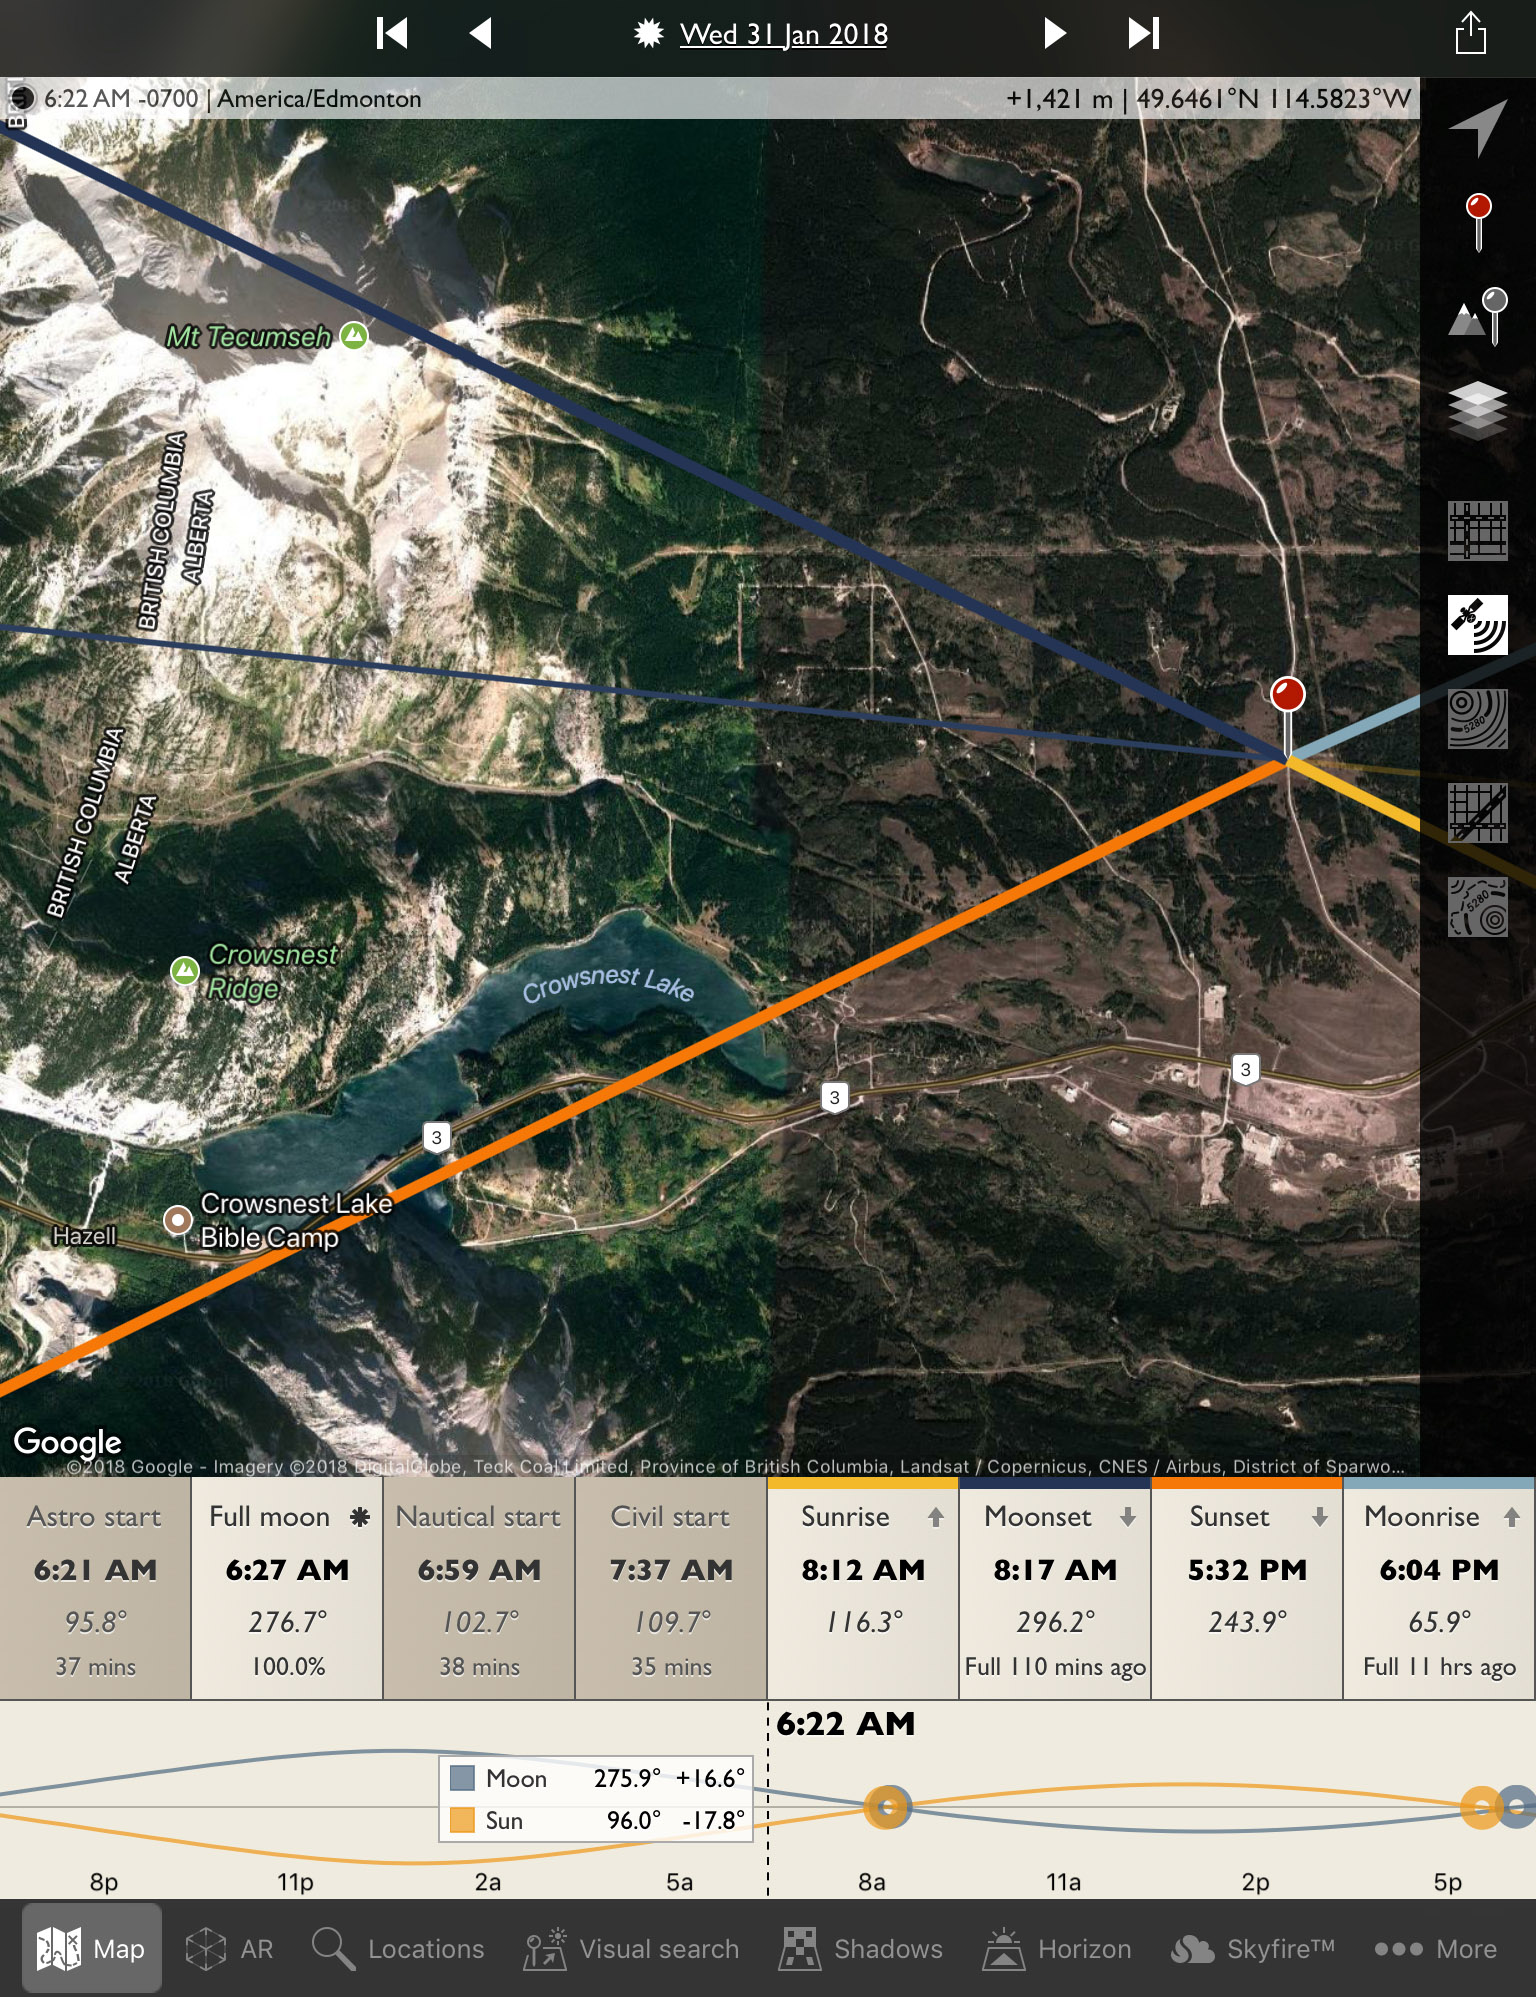
I knew the area well enough to know the site would be a good one for the eclipse, and the Moon’s location to the south. But it pays to check. I use The Photographer’s Ephemeris as my main photo planning app.
TPE Plot of Sightlines
It showed the sightline toward the Moon during the eclipse as straight down Upper Waterton Lake. My chosen spot was on the lakeside Waterton Avenue, where I could set up both the wide-angle camera and a telescope without having to heft gear any distance. Winter road closures also limited my site choices. Indeed, in winter the Park is quiet, with only a few hotels and restaurants open, and many businesses boarded up.
TPE 3D Simulation
Switching to the companion app TPE 3D (above) showed a preview of the landscape and the Moon’s position in the sky relative to the scene below.
Compare the simulation to the real thing below! Pretty accurate, except for the scattered clouds that drifted through.
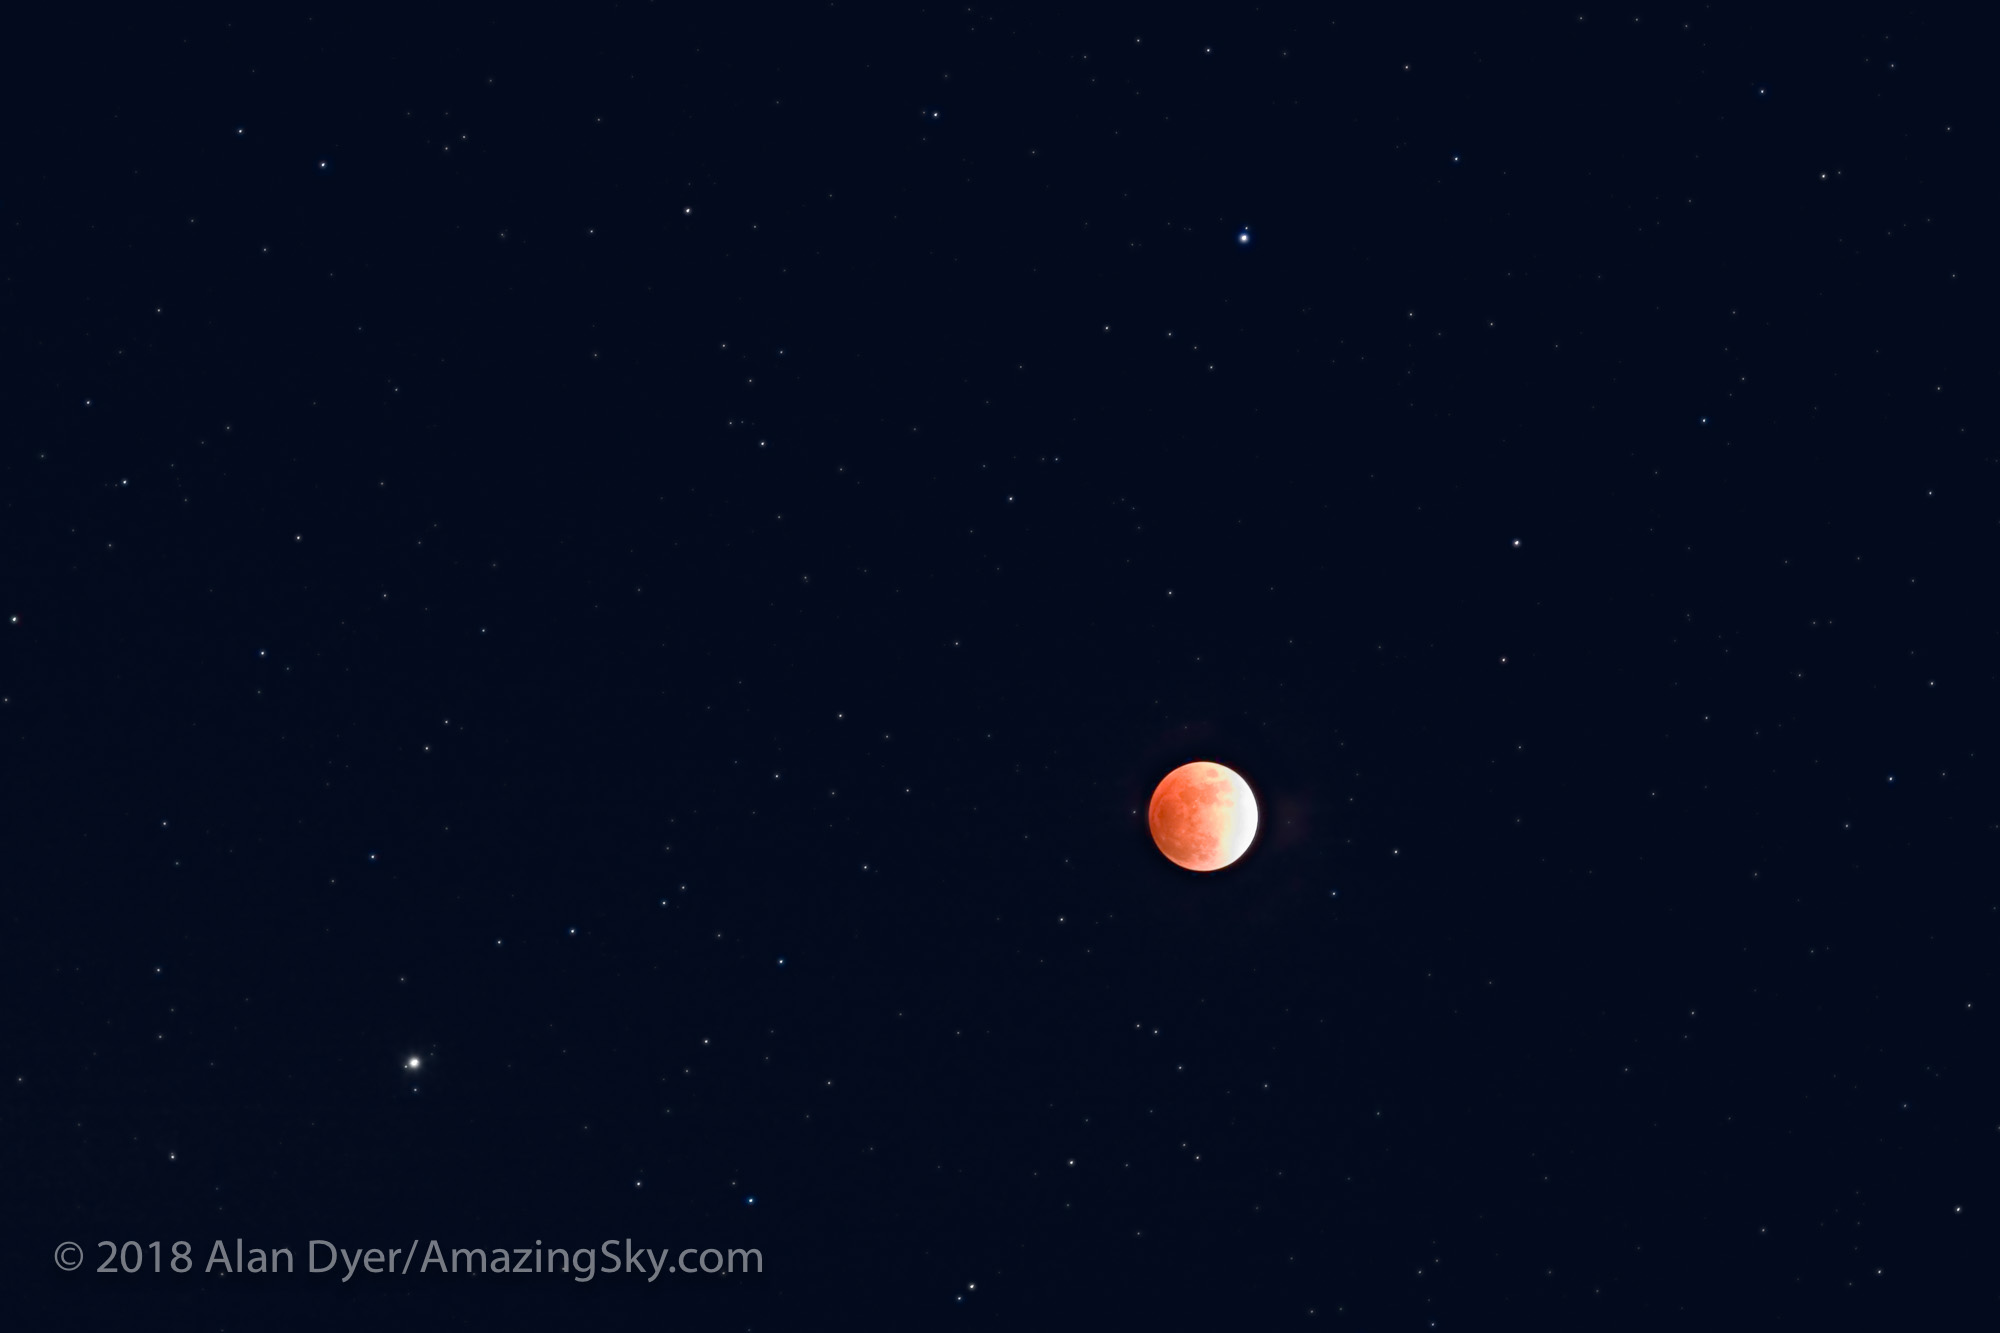
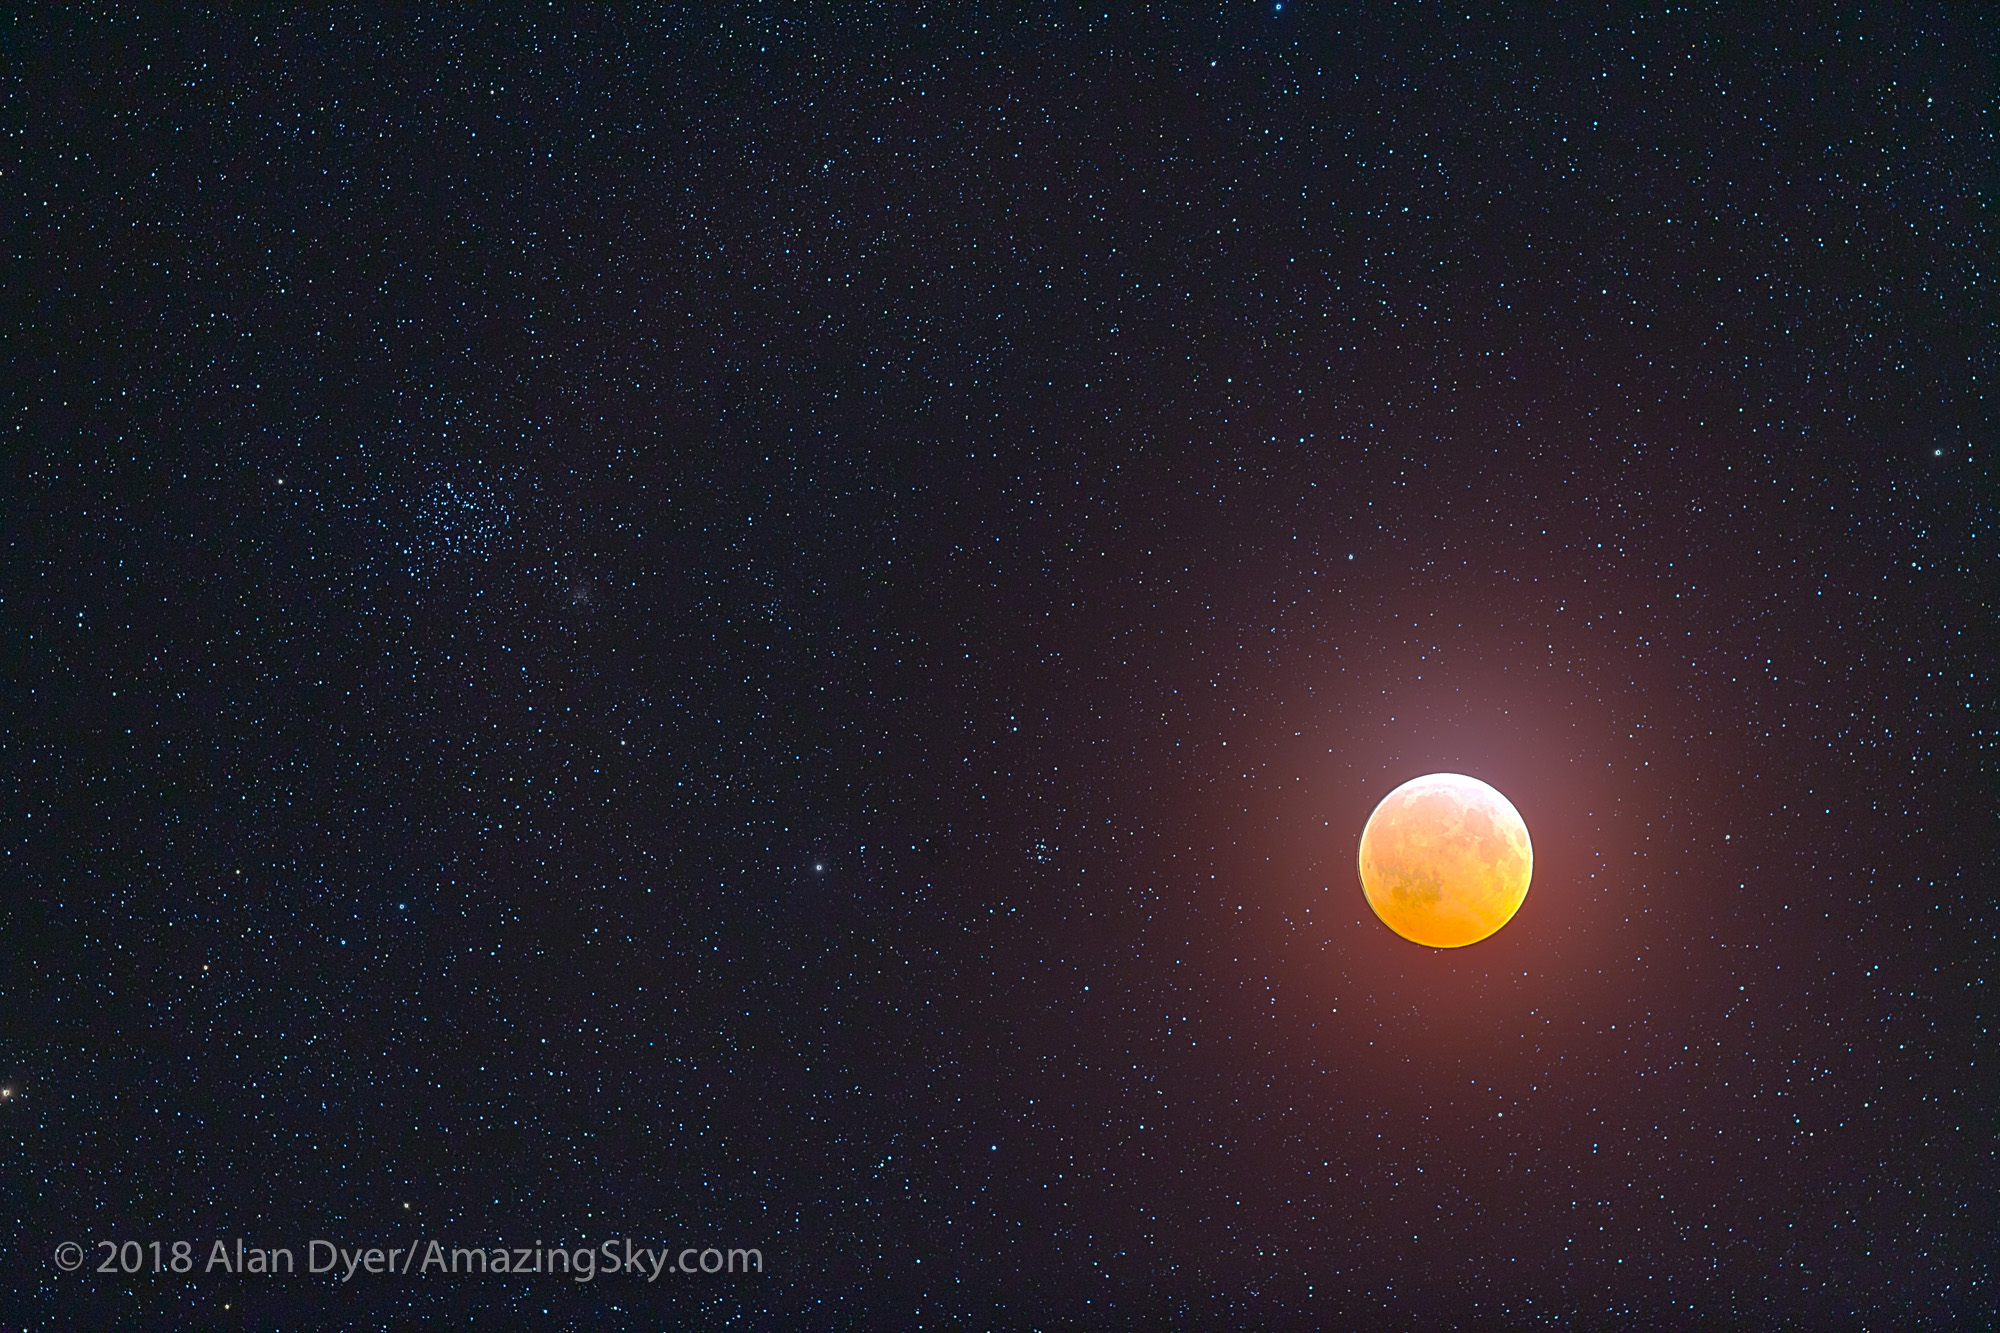
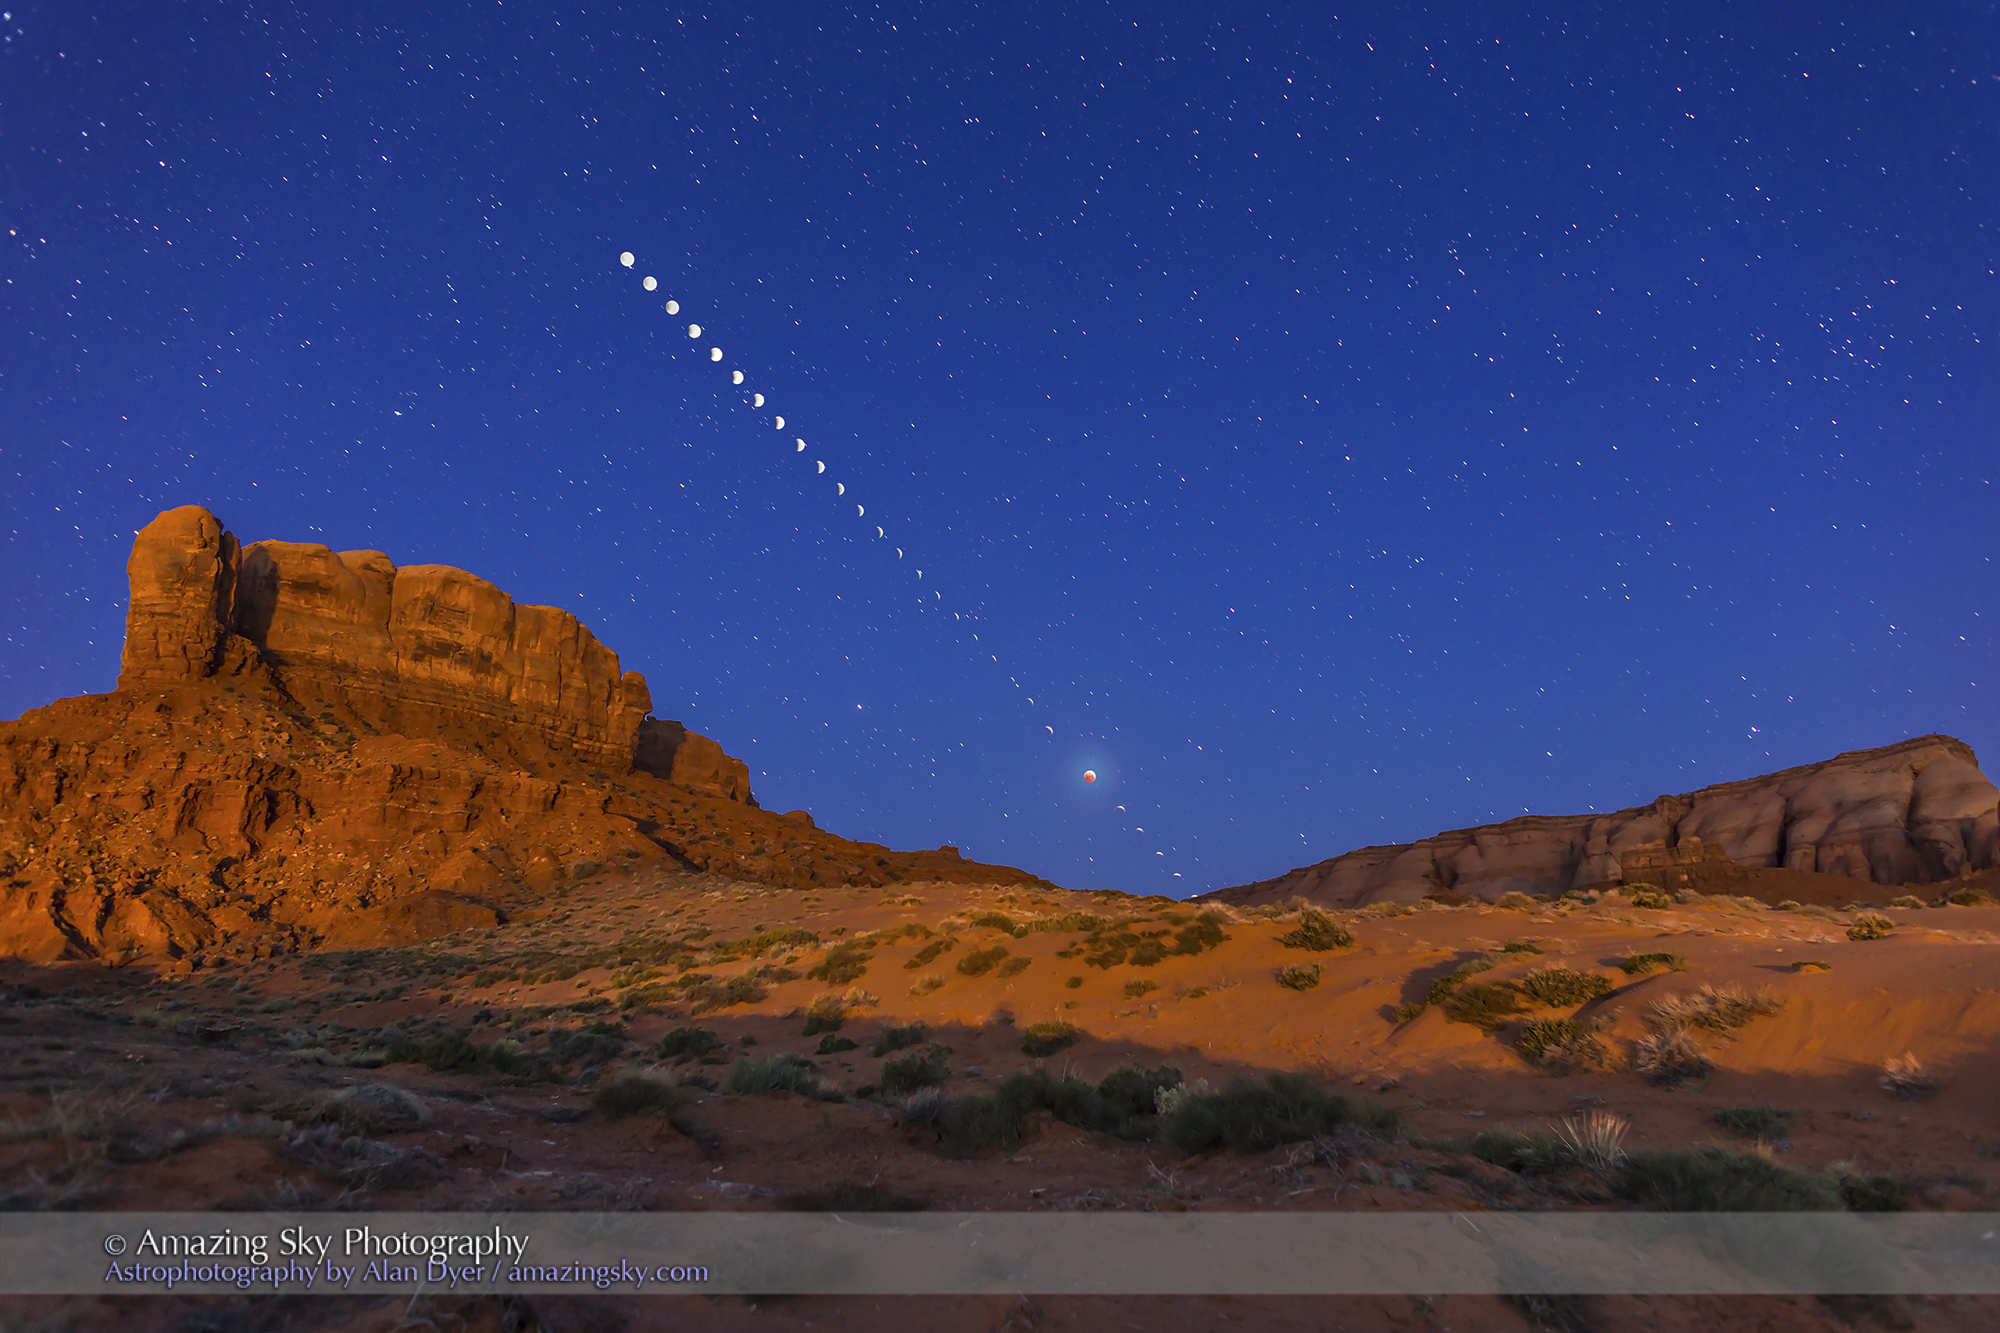
This is a blend of separate images for the sky and ground: a stack of two untracked images for 60 seconds each for the ground, then a third exposure for the sky and untrailed stars, taken immediately afterwards with the tracker motor on, for 30 seconds, all with the Canon RF15-35mm lens wide-open at f/2.8 and at 20mm, on the Canon R5 at ISO 1600. Separate shorter tracked exposures of 15, 8 and 4 seconds blended in kept the lunar disk from overexposing, showing it more as the eye saw it.
The above image is a blend of tracked exposures for the Moon and sky, with untracked exposures for the ground. I shot them just before mid-totality at 1 am MDT. That image was second in priority. First, was a panorama. That result is below.
This is a panorama of four segments at 30º spacing, taken in two passes: first untracked for 30 seconds each, then a second pass immediately afterwards with the tracker motor on, also for 30 seconds each, all with the Canon RF15-35mm lens wide-open at f/2.8 and at 20mm, on the Canon R5 at ISO 1600, with the camera in landscape orientation. Separate shorter exposures of 15s, 10s, 5s and 2.5s at ISO 400 were blended in to preserve the lunar disk more as the eye saw it.
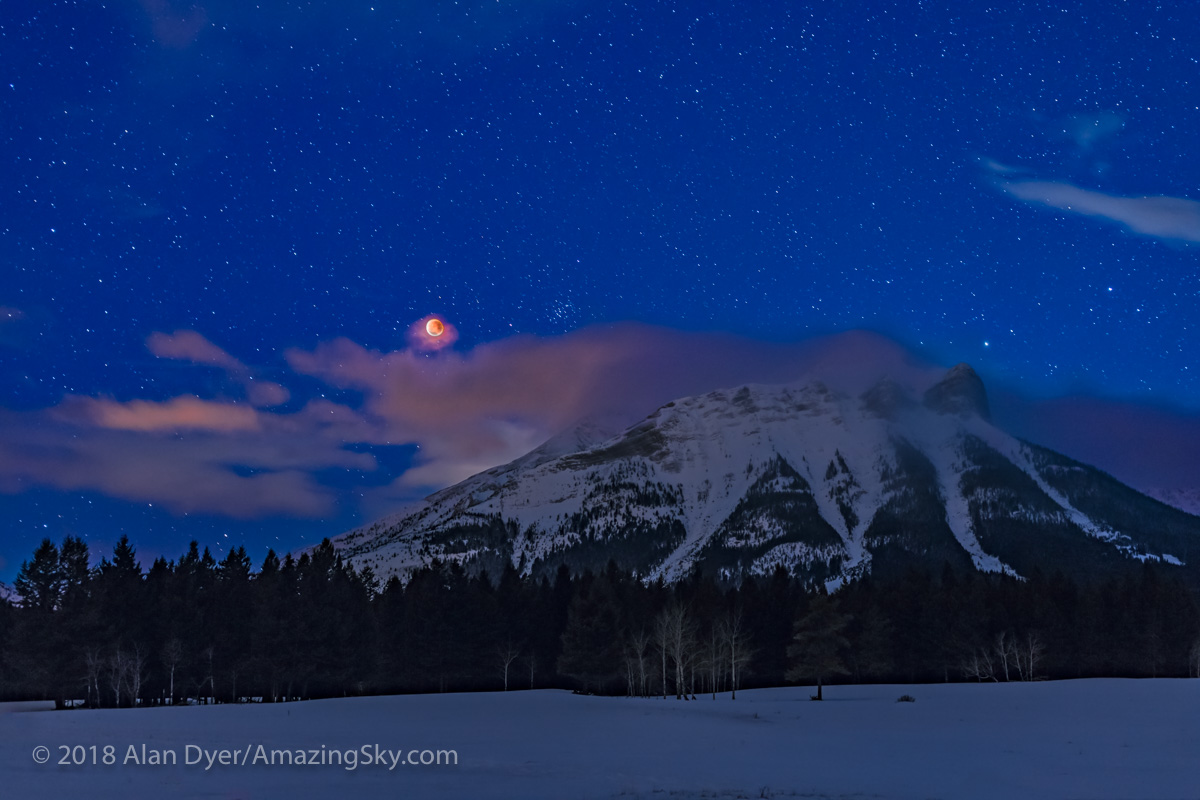
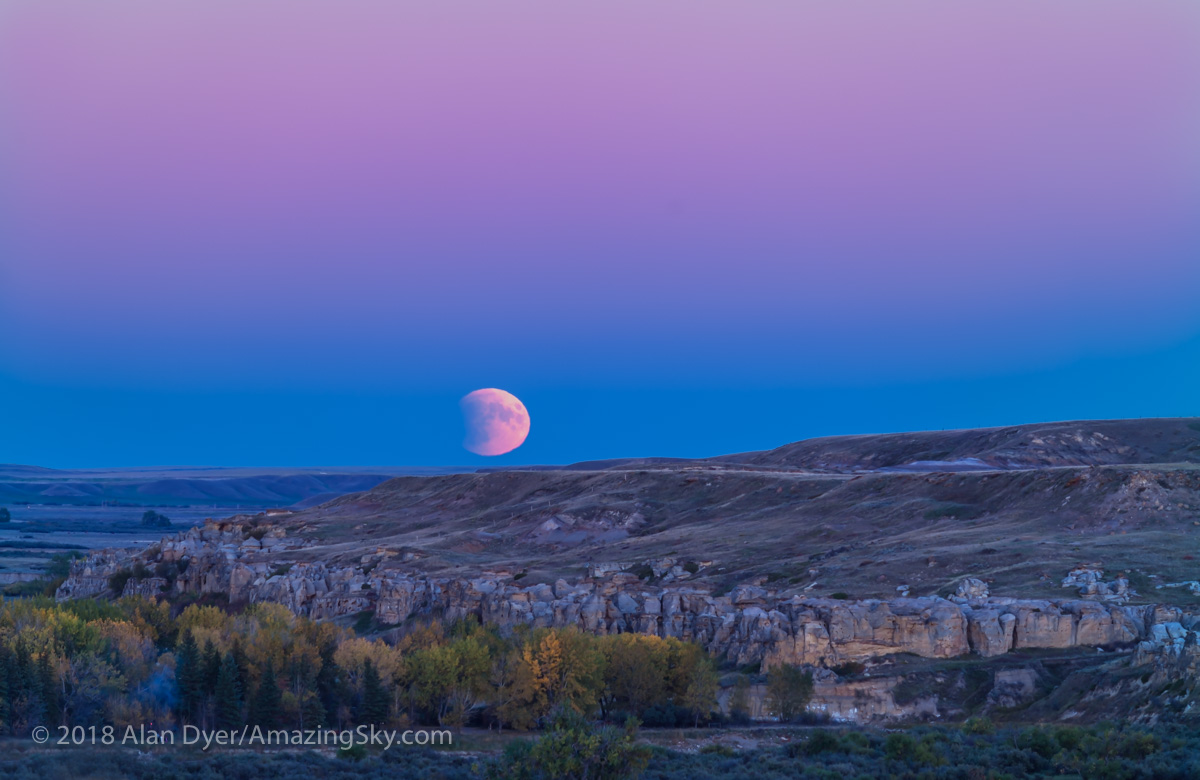
I shot this scene just as totality began, to ensure I got it. While the Moon was in clear sky before totality during the partial phase, sure enough as the Moon became fully eclipsed, the clouds wafting over the mountains threatened to move in and obscure the view.
Luckily, while they did hide the Moon now and then, they opened up enough for good views and images for a few minutes at a time throughout the eclipse.
For the panorama I processed the image for a more monochromatic look, to resemble the naked-eye view, but with the Moon appearing as a red globe in the sky, the only colour in the scene. (I shot the tracked shots with the MSM Nomad tracker I reviewed here.)
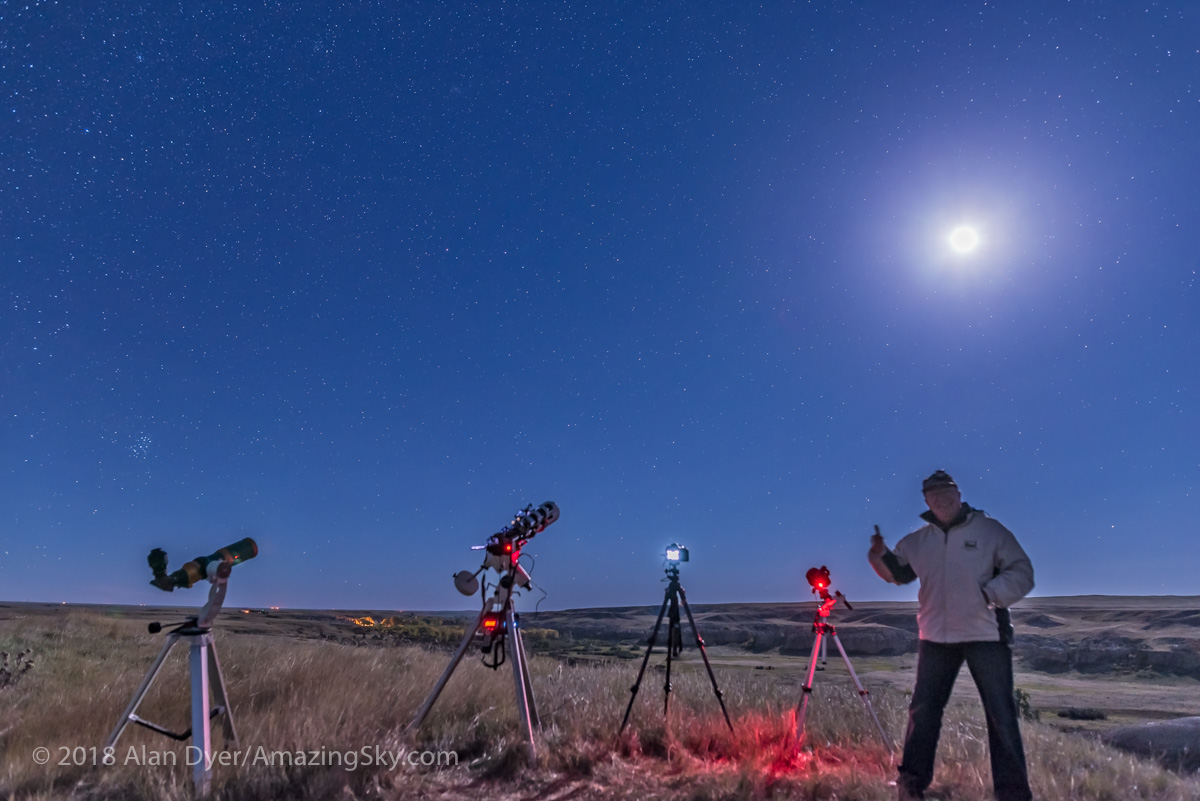
The site proved excellent, but it was a cold night! While the temperature was only just below freezing, the brisk Waterton wind off the lake made it a chilly experience watching the eclipse for two hours. I was actually being hit by ice pellets blowing off the lake.
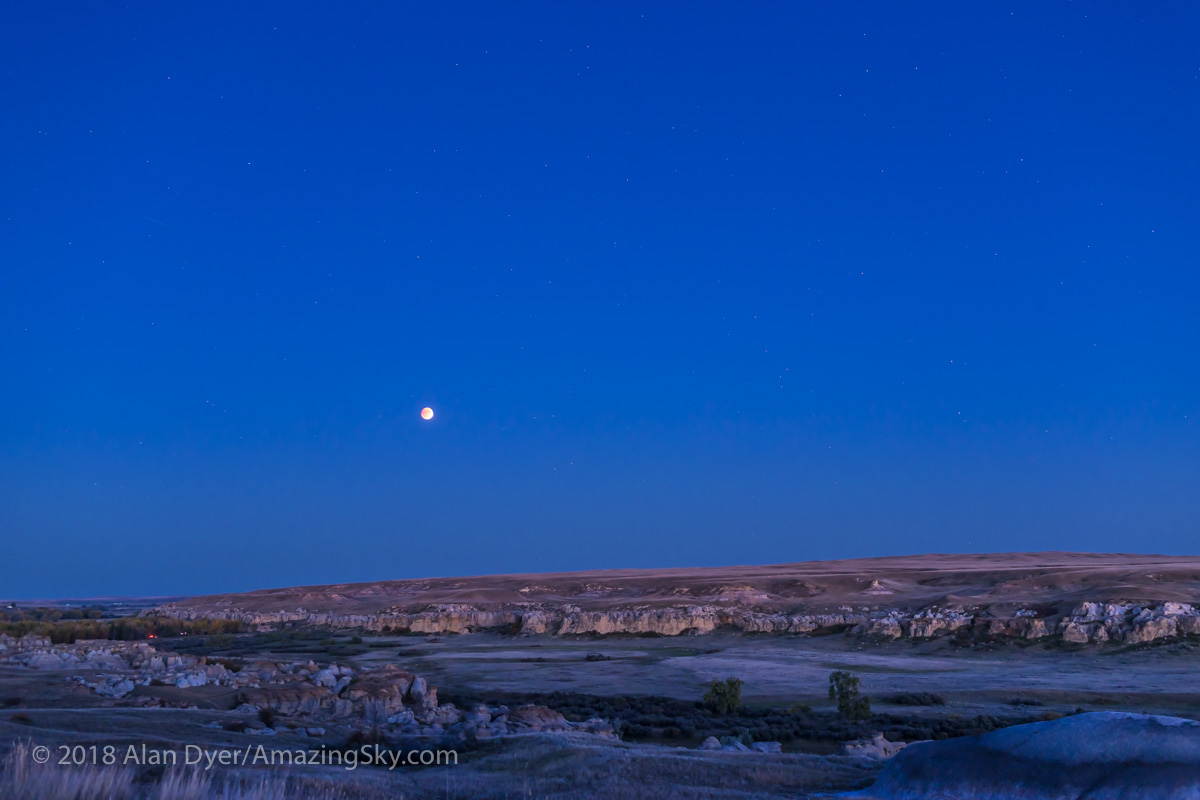
I decided not to set up the telescope for close-ups; the wide-angle images were the priority anyway from such a scenic spot.
A single untracked 15-second exposure with the RF15-35mm lens at f/2.8 and 17mm on the Canon R5 at ISO 3200.
But I am not complaining. I got the eclipse, once again by chasing to where the weather predictions said it would be clear. The above is my requisite trophy shot.
Had I stayed home I would have been clouded out. Had predictions called for clear skies at home, I would not have made the trip to Waterton to enjoy the eclipse over its wonderful scenery.
The next total lunar eclipse is September 7, 2025, six months after this eclipse. But it is visible from the opposite hemisphere to this one, with no part of that eclipse visible from North America. I will not chase that far for a TLE!
The March 3, 2026 TLE from Alberta
After that, and after a passage of one lunar year (355 days or 12 lunar cycles) since the March 14, 2025 TLE, I have a chance for another total lunar eclipse from home, with western North America favoured. As I preview above, it’ll be an early morning event on March 3, 2026, with the eclipsed Moon setting in the west in the pre-dawn hours.
Sounds like another chase to a mountain site with the red Moon over the Rockies. That’ll be the plan!
Once again, catching the eclipsed Moon required a chase to clear skies.
As with every previous eclipse of the Moon visible from my area in the last decade, I didn’t have the luxury of watching it from home, but had to chase to find clear skies.
However, the reward was the sight of the reddened Moon from one of my favourite locations in Alberta, Reesor Lake, in Cypress Hills Interprovincial Park.
The eclipse in question was the total lunar eclipse of May 15/16, 2022. As with any eclipse, planning starts with a look at the weather forecasts, or more specifically cloud forecasts.
A few days prior, conditions didn’t look good from my home, to the west of the red marker.
Cloud forecast two days prior.
But as the chart from the app Astrospheric shows, very clear skies were forecast for southeast Alberta, in the Cypress Hills area, where I have shot many times before.
Except as eclipse evening drew closer, the forecast got worse. Now, the clouds were going to extend to my chosen site, with a particularly annoying tongue of cloud right over my spot. Clouds were going to move in just as the total eclipse began. Of course!
Cloud forecast the morning of the eclipse.
I decided to go for it anyway, as the Moon would be to the east, in the direction of the clear skies. It didn’t need to be clear overhead. Nor did I want to drive any farther than I really needed, especially to another location with an unknown foreground.
The spot I chose was one I knew well, on the west shore of scenic Reesor Lake, near the Alberta/Saskatchewan border, but on the Alberta side of Cypress Hills Interprovincial Park.
Handily, TPE provides moonrise times and angles for the chosen location, as well as eclipse times for that time zone.
The companion app, TPE 3D, provides a preview of the scene in 3D relief, with the hills depicted, as a check on Moon altitude and azimuth with respect to the horizon below.
TPE 3D’s simulation
As you can see the simulation matched reality quite well, though the image below was from an earlier time than the simulation, which was for well after mid-totality.
The eclipse over Reesor Lake, in the last stages of the partial eclipse.
However, true to the predictions, clouds were moving in from the west all during the eclipse, to eventually obscure the Moon just as it entered totality and became very dim. Between the clouds and the dark, red Moon, I lost sight of it at totality. As expected!
Below is my last sighting, just before totality began.
The eclipsed Full Moon rising over Reesor Lake in Cypress Hills Interprovincial Park, Alberta, on May 15, 2022.
However, I was content at having captured the eclipse from a photogenic site. More images of a complete eclipse would have been nice, but alas! I still consider the chase a success.
A panorama of the eclipsed Full Moon rising over Reesor Lake in Cypress Hills Interprovincial Park, Alberta, on May 15, 2022.
Just for fun, I shot a quick panorama of three segments, and it turned out to be my favourite image from the eclipse, capturing the scene very well. Pelicans and geese were plying the calm waters of the lake. And owls were hooting in the woods. It was a fabulous evening!
Me at Reesor Lake after shooting the lunar eclipse of May 15, 2022, with the Moon now in clouds behind me.
Before departing, I took my customary “trophy” shot, of the eclipse hunter having bagged his game.
Interestingly, this eclipse was a close repeat of one 19 years earlier to the day, because of the so-called Metonic Cycle where eclipses of the Sun and Moon repeat at 19-year intervals on the same calendar day, at least for 2 or 3 cycles.
The trophy shot from May 15, 2003.
On May 15, 2003, we also had a total lunar eclipse in the early evening, with the eclipsed Moon rising into a spring twilight sky. I also chased clear skies for that one, but in the opposite direction from home, to the southwest, to the foothills. At that time it was all film, and medium format at that.
Total eclipse of the Moon seen May 15, 2003 from southern Alberta (from a site west of Nanton). The Moon rose as totality started so was deep into totality by the time it was high enough to see and sky dark enough to make it stand out. Pentax 67 camera with 165mm lens at f/2.8 with Fujichrome 100F slide film.
So it was another (partially!) successful eclipse chase.
The next opportunity is on the night of November 7/8, 2022, a time of year not known for clear skies!
Just once I would like to see one from home, to make it easier to shoot with various telescopes and trackers, as the reddened Moon will be west of the photogenic winter Milky Way, and very close to the planet Uranus. Plus for me in Alberta the November eclipse occurs in the middle of the night, making a home eclipse much more convenient. After that, the next chance is March 13/14, 2025.
But no matter the eclipse, I suspect another chase will be in order! It just wouldn’t be a lunar eclipse without one.
On the night of November 18/19 eclipse fans across North America can enjoy the sight of the Moon turning deep red. Here’s how to capture the scene.
Seeing and shooting this eclipse will demand staying up late or getting up very early. That’s the price to pay for an eclipse everyone on the continent can see.
Also, this is not a total eclipse of the Moon. But it’s the next best thing, a 97% partial eclipse – almost total! So the main attraction — a red Moon — will still be front and centre.
CLICK ON AN IMAGE to bring it up full screen for closer inspection.
NOT QUITE TOTAL
At mid-eclipse 97% of the disk of the Full Moon will be within Earth’s dark umbral shadow, and should appear a bright red colour to the eye and even more so to the camera. A sliver of the southern edge of the Moon will remain outside the umbra and will appear bright white, like a southern polar cap on the Moon.
While some references will say the eclipse begins at 1:01 am EST, that’s when the Moon first enters the outer lighter penumbral shadow. Nothing unusual can be seen at that point, as the darkening of the Moon’s disk by the penumbra is so slight, you won’t notice any difference over the normally bright Full Moon.
The extent of the umbra and penumbra at the October 2004 total lunar eclipse.
It isn’t until the Moon begins to enter the umbra that you can see a dark bite being taken out of the edge of the Moon.
WHAT TO SEE
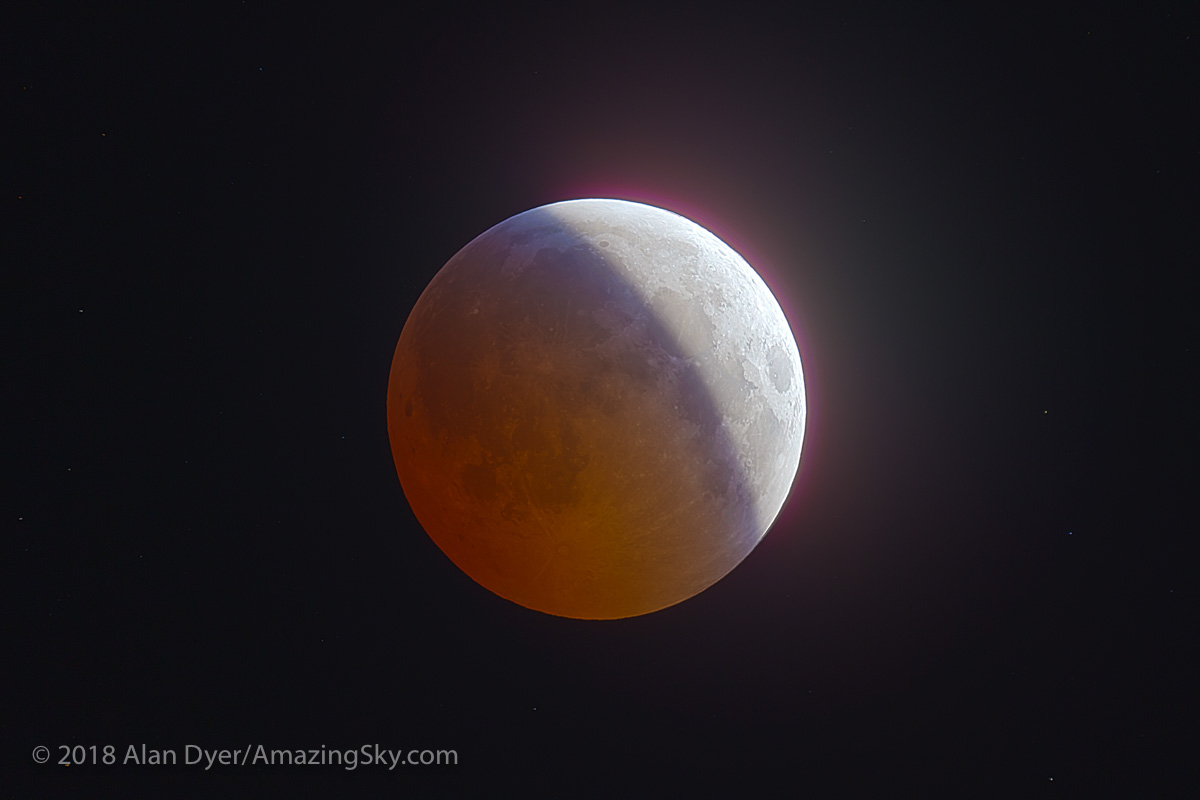
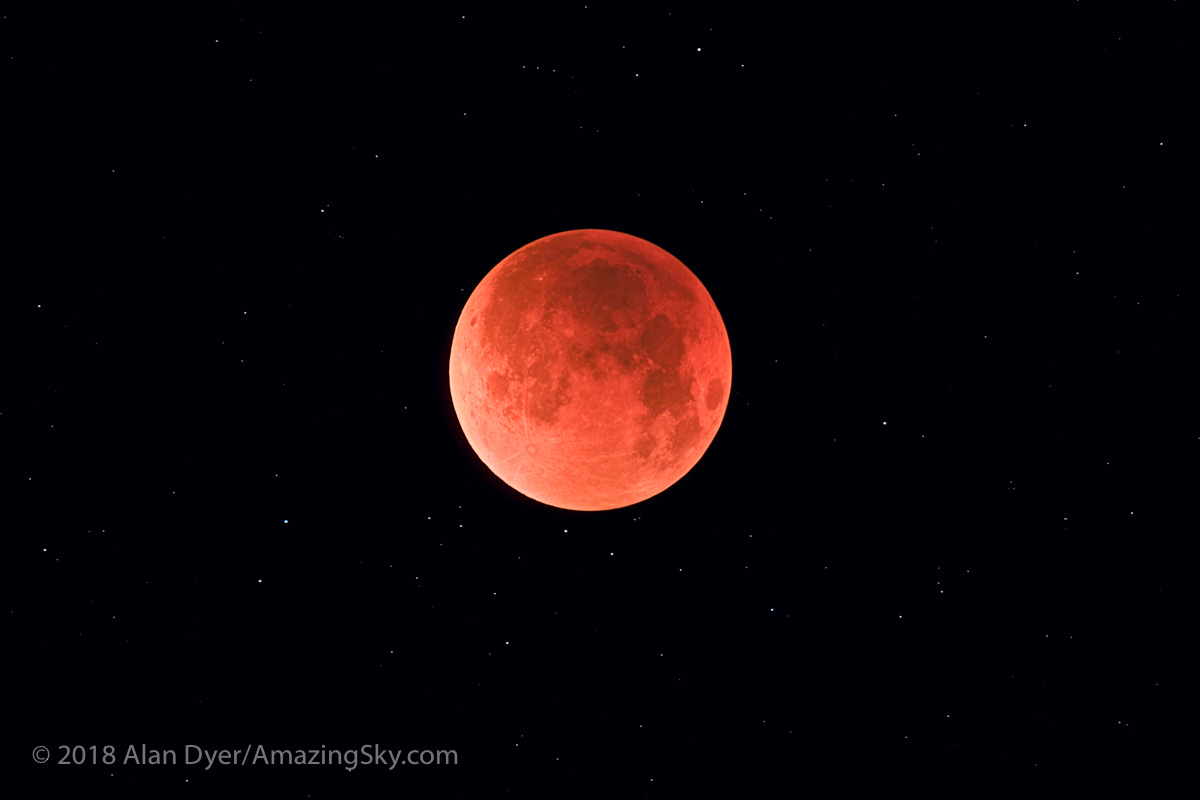
At mid-eclipse the Full Moon will look deep red or perhaps bright orange — the colours can vary from eclipse to eclipse, depending on the clarity of the Earth’s atmosphere through which the sunlight is passing to light the Moon. The red is the colour of all the sunsets and sunrises going on around the Earth during the eclipse.
The total lunar eclipse of August 2007. At the November 18 eclipse the bottom edge of the Moon, as it did here, will be bright, but brighter than it appears here.
The unique aspect of this eclipse is that for the 15 to 30 minutes around mid-eclipse we might see some unusual colour gradations at the edge of the umbral shadow, from sunlight passing through Earth’s upper atmosphere and ozone layer. This can tint the shadow edge blue or even green.
The last lunar eclipse six months ago on the morning of May 26, 2021 (see my blog here) was visible during its total phase only from western North America, and then only just. However, this eclipse can be seen from coast to coast.
Only from the very easternmost points in North America does the Moon set with the eclipse in progress, but during the inconsequential penumbral phase. All of the umbral phase is visible from the Eastern Seaboard, though the last stages will be in progress with the Moon low in the west in the pre-dawn hours. But that positioning can make for photogenic sight.
The start, middle and end times of the umbral eclipse for Eastern and Pacific time zones. The background image is a simulation of the path of the November 18/19, 2021 eclipse when the Moon travels through the southern part of the umbra.
WHEN IS THE ECLIPSE?
The show really begins when the Moon begins to enter the umbra at 2:18 am EST (1:18 am CST, 12:18 am MST, 11:18 pm PST).
But note,these times are for the night of November 18/19. If you go out on the evening of November 19 expecting to see the eclipse, you’ll be sadly disappointed as you will have missed it. It’s the night before!
The eclipse effectively ends at 5:47 am EST (4:47 am CST, 3:47 am MST, 2:47 am PST) when the Moon leaves the umbra. That makes the eclipse 3 1/2 hours long, though the most photogenic part will be for the 15 to 30 minutes centred on mid-eclipse at 4:03 am EST (3:03 am CST, 2:03 am MST, 1:03 am PST).
The sky at mid-eclipse from my home on Alberta, Canada (51° N)
WHERE WILL THE MOON BE?
The post-midnight timing places the Moon at mid-eclipse high in the south to southwest for most of North America, just west (right) of the winter Milky Way and below the distinctive Pleiades star cluster.
The view from the West Coast.
The high altitude of the Moon (some 60º to 70º above the horizon) puts it well above haze and murk low in the sky, but makes it a challenge to capture in a frame that includes the landscape below for an eclipse nightscape.
ASTRONOMY 101: The high altitude of the Moon is a function of both the eclipse timing in the middle of the night and its place on the ecliptic. The Full Moon is always 180° away from the Sun. So it sits where the Sun was six months earlier, in this case back in May, when the high Sun was bringing us warmer and longer days. Winter lunar eclipses are always high; summer lunar eclipses are always low, the opposite of what the Sun does.
The view from the East Coast.
From eastern North America the Moon appears lower in the west at mid-eclipse, making it easier to frame above a landscape. For example from Boston the Moon is 30º up, lending itself to nightscape scenes.
However, the sky will still be dark. To make use of the darkness to capture scenes which include the Milky Way, I suggest making the effort to travel away from urban light pollution to a dark sky site. That applies to all locations. Yes, that means a very long night!
PHOTO OPTIONS 1 — CAMERA ON A FIXED TRIPOD
With just a camera on a tripod, if you are on the East Coast (I show Boston here) it will be possible to frame the eclipsed Moon above a landscape with a 24mm lens (assuming a full frame camera; a cropped frame camera will require a 16mm lens).
Framing the scene from the East Coast.
What exposure will be best will depend on the level of local light pollution at your site. But from a dark site, 30 seconds at ISO 1600 and f/2.8 should work well. But without tracking, you will see some star trailing at 30 seconds. Also try shorter exposures at a higher ISO.
There’s lots of time, so take lots of shots. Include some short shots of just the Moon to blend in later, as the exposures best for picking up the Milky Way will still overexpose the Moon, even when it is darkest at mid-eclipse.
Framing the scene from the West.
From western North America, including the landscape below will require wide lenses and a vertical format, with the Moon appearing quite small. But from a photogenic site, it might be worth the effort.
Total eclipse of the Moon, December 20/21, 2010, taken from home with 15mm lens at f/3.2 and Canon 5D MkII at ISO 1600 for 1 minute single exposure, toward the end of totality.
Total eclipse of the Moon, December 20/21, 2010, taken from home with Canon 5D MKII and 24mm lens at f2.8 for stack of 4 x 2 minutes at ISO 800. Taken during totality..
However, as my images above from the December 2010 eclipse show, if there’s any haze, the Moon could turn into a reddish blob.
You might be tempted to shoot with a long telephoto lens, but unless the camera is on a tracker, as below, the result will likely be a blurry mess. The sky moves enough during the long (over 1 second) exposures needed to pick up the reddened portion of the Moon that the image will smear when shot with long focal lengths. The solution is to use a sky tracker.
PHOTO OPTIONS 2 — CAMERA ON A TRACKER
Placing the camera on a motorized tracker that has been polar aligned to follow the motion of the stars opens up many more possibilities.
Camera on a Star Adventurer tracker showing the field of a 24mm lens.
From a dark site, make use of the Moon’s position near the Milky Way to frame it and Orion and his fellow winter constellations. A 24mm lens will do the job nicely, in exposures up to 2 to 4 minutes long. But take short ones for just the Moon to layer in later.
Showing the field of a 50mm lens.
A 50mm lens (again assuming a full frame camera) frames the Moon with the Pleiades and Hyades star clusters in Taurus.
Showing the field of an 85mm lens,
Switching to an 85mm lens frames the clusters more tightly and makes the Moon’s disk a little larger. For me, this is the best shot to go for at this eclipse, as it tells the story of the eclipse and its unique position near the two star clusters.
Showing the field of 200mm and 250mm lenses.
But going with a longer lens allows framing the red eclipsed Moon below the blue Pleiades cluster, a fine colour contrast. A 200mm lens will do the job nicely (or a 135mm on a cropped frame camera).
Or, as I show here, the popular William Optics RedCat with its 250mm focal length will also work well. But such a lens must be on a polar-aligned tracker to get sharp shots. Use the Sidereal rate drive speed to ensure the sharpest stars over the 1 to 4 minutes needed to record lots of stars.
Typical settings for tracker images, with an image of the January 2019 eclipse.
Take lots of exposures over a range of settings — long to bring out the deep sky detail and shorter to preserve detail in the reddened lunar disk. These can be layered and blended later in Photoshop, or in the layer-based image editing program of your choice, such as Affinity Photo or ON1 Photo RAW.
PHOTO OPTIONS 3 — THROUGH A TELESCOPE
While I think the tracked wide-field options are some of the best for this eclipse, many photographers will want frame-filling close-ups of the red Moon. While a telescope will do the job, unless it has motors to track the sky, your options are limited.
Phone on a simple Dobsonian reflector.
A phone clamped to the eyepiece of a telescope can capture the shrinking bright part of the eclipsed Moon as the Moon enters more deeply into the umbra. Exposures for the bright part of the Moon are short enough a motor drive on the telescope is not essential.
But if you haven’t shot the Moon with this gear before, eclipse night is not the time to learn. Practice on the Moon before the eclipse.
DSLR on a beginner refractor telescope showing the adapter.
For shooting with a DSLR camera through a telescope you’ll need a special camera adapter nosepiece and T-ring for your camera. Again, if you don’t have the gear and the experience doing this, I would suggest not making the attempt at two in the morning on eclipse night!
DSLR on a beginner reflector with an often necessary Barlow lens.
For example, owners of typical beginner reflectors are often surprised to find their cameras won’t even reach focus on their telescope. Many are simply not designed for photography. Adding a Barlow lens is required for the camera to reach focus, though without a drive, exposures will be limited to short (under 1/15s) shots of the bright part of the Moon.
An exposure composite of short and long exposures.
The challenge with this and all lunar eclipses is that the Moon presents a huge range of brightness. Short snapshots can capture the bright part of the Moon not in the umbra, but the dark umbral-shaded portion requires much longer exposures, usually over one second.
Your eye can see the whole scene (as depicted above) but the camera cannot, not in one exposure. This example is a “high dynamic range” blend of several exposures.
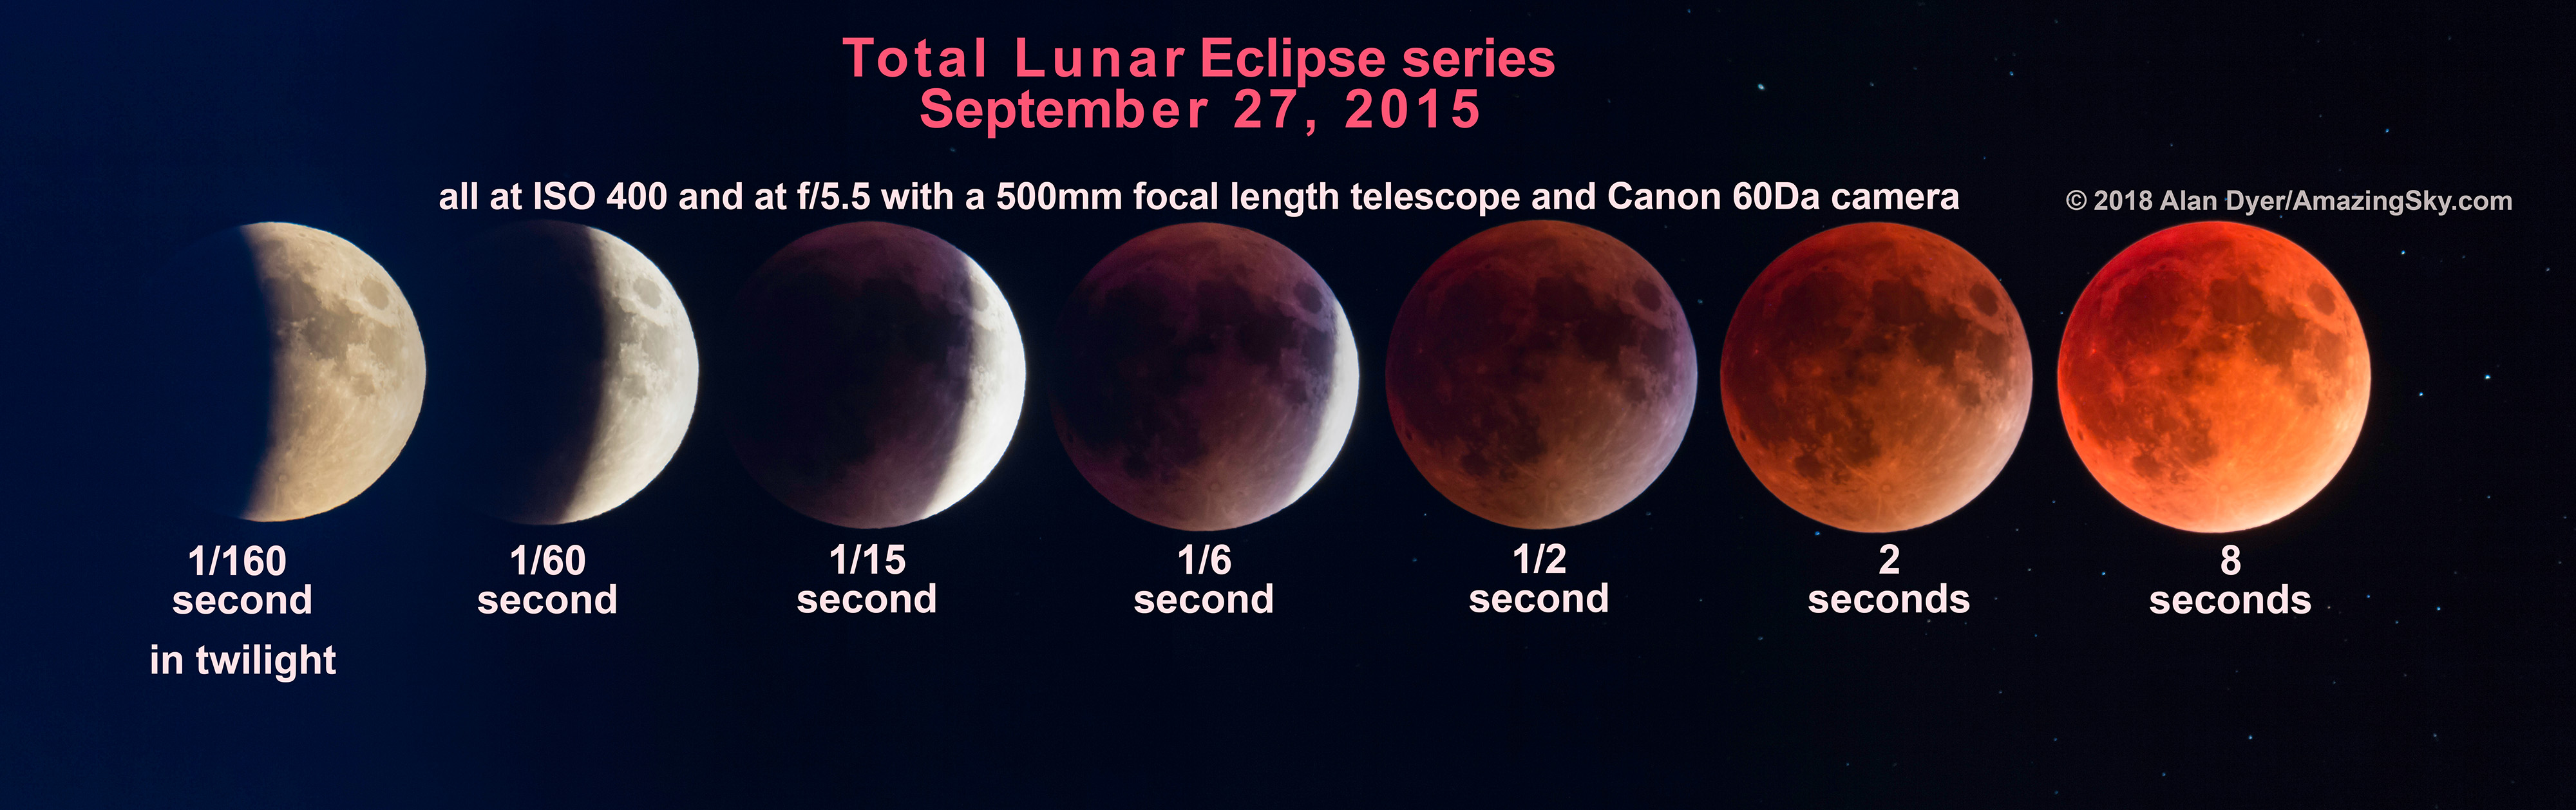
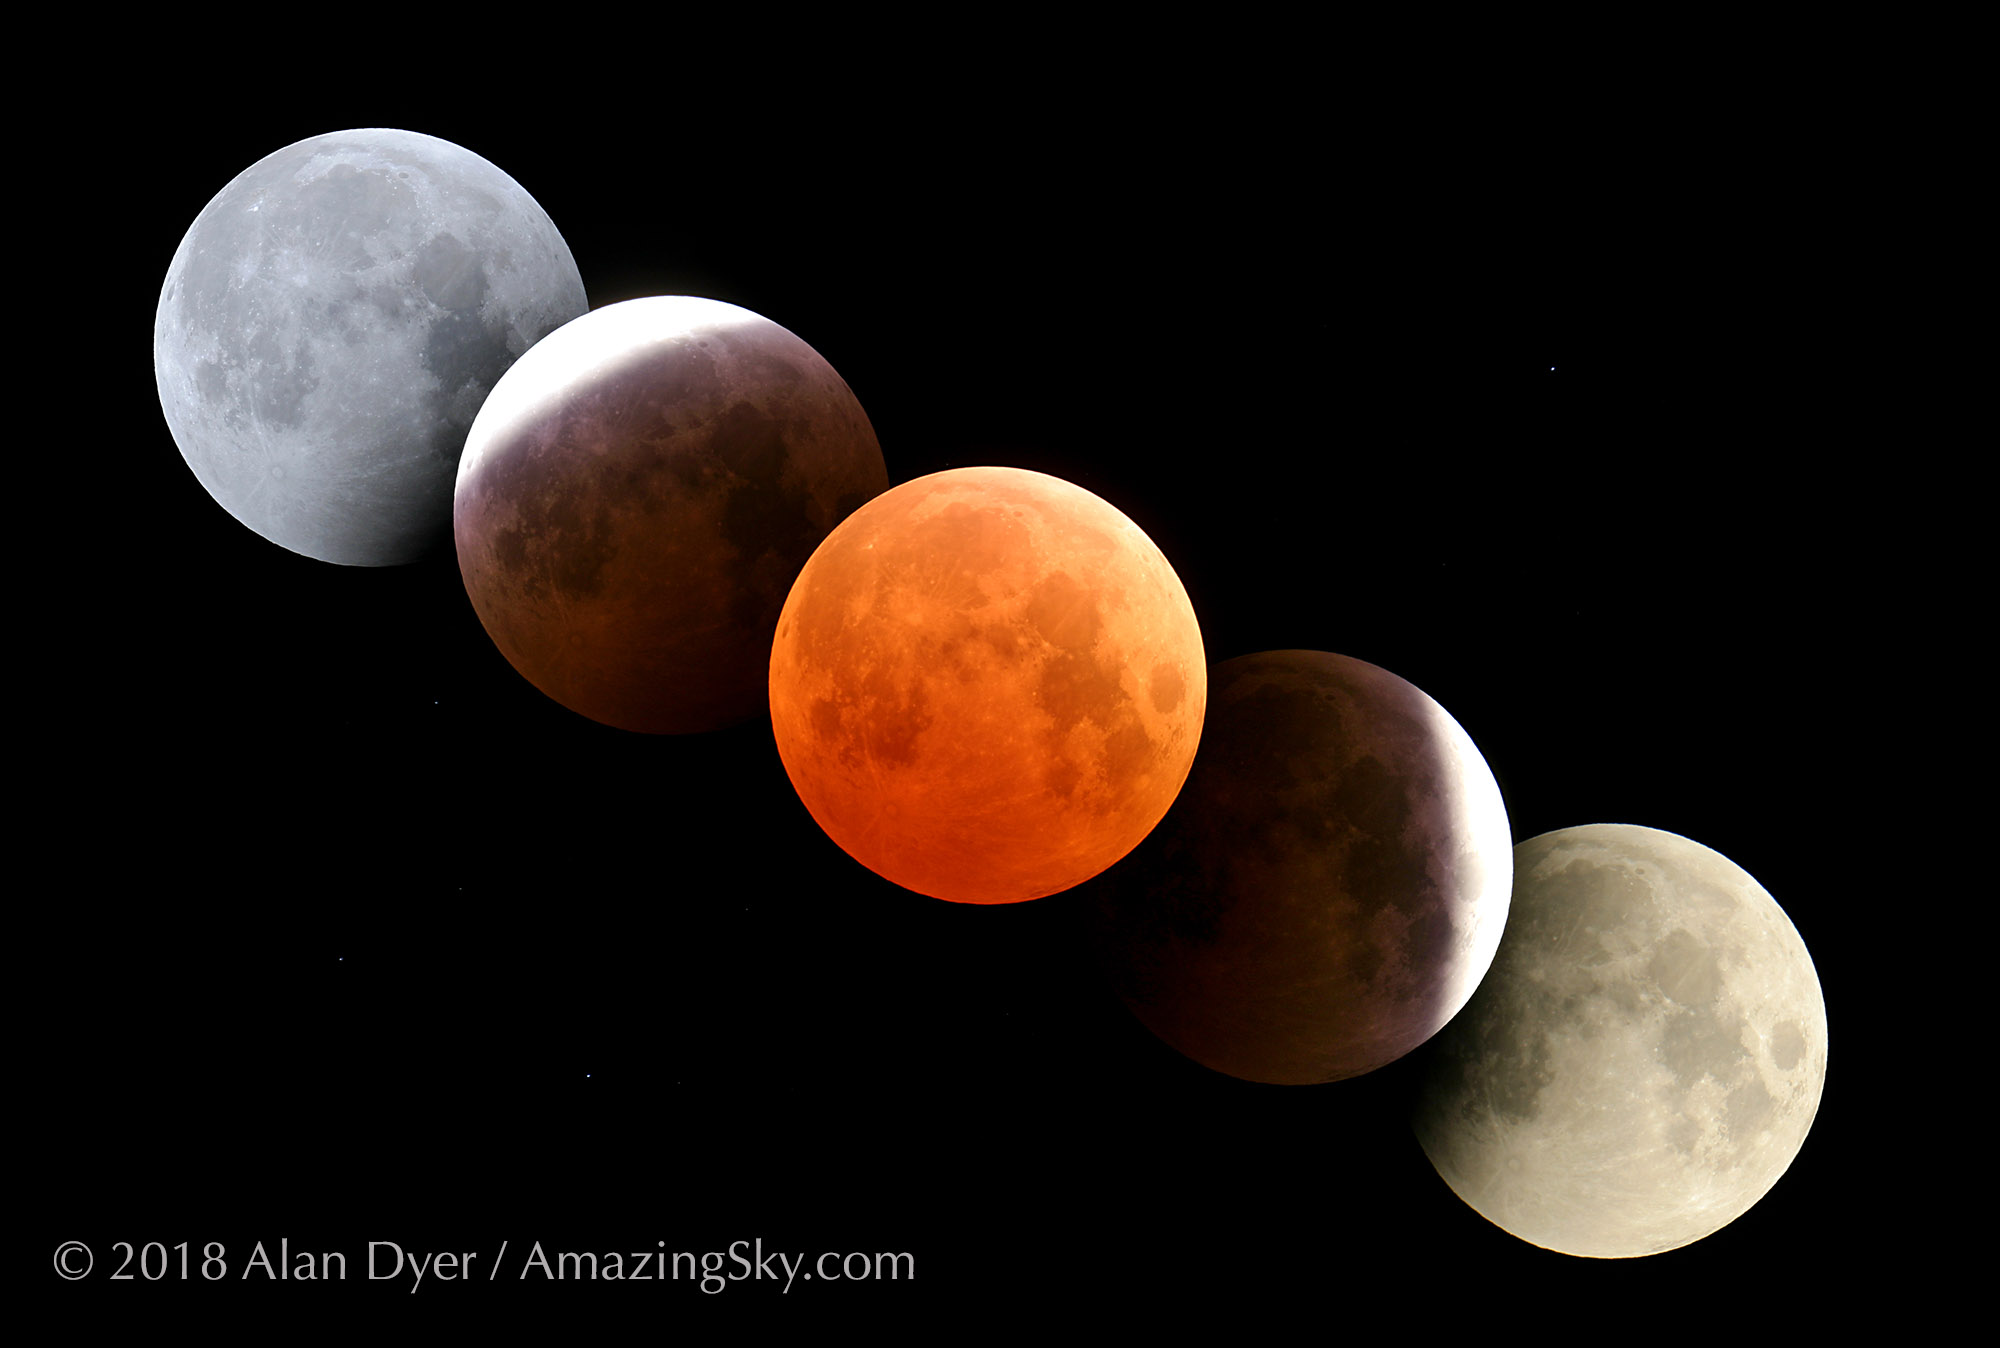
A series of the September 27, 2015 total lunar eclipse to demonstrate an exposure sequence from partial to total phase.
Plus as the eclipse progresses, longer and longer exposures are needed to capture the sequence as the Moon is engulfed by more of the umbra.
After mid-eclipse, the exposures must get progressively shorter again in reverse order. So attempting to capture an entire sequence requires a lot of exposure adjustments.
TIP: Bracket a lot! Take lots of frames at each burst of images shot every minute, or however often you wish to capture the progress of the eclipse for a final set. Unlike total solar eclipses, lunar eclipses provide lots of time to take lots of images.
PHOTO OPTIONS 4 — THROUGH A TRACKING TELESCOPE
If you want close-ups of the eclipsed red Moon, you will need to use a mount equipped with a tracking motor, such as an equatorial mount shown here. But for use with telephoto lenses and short telescopes, a polar-aligned sky tracker, as above, will work.
A small apo refractor on an equatorial mount with typical settings for mid-eclipse.
Exposures can now be several seconds long, and at a lower ISO speed for less noise, allowing the Moon to be captured in sharp detail and with great colour. Long exposures will even pick up stars near the Moon.
However, when shooting close-ups, use the Lunar drive rate (if your mount offers that choice) to follow the Moon itself, as it has a motion of its own against the background stars. It’s that orbital motion that takes it from west to east (right to left) through the Earth’s shadow.
The fields of view and size of the Moon’s disk with typical telescope focal lengths.
Filling the camera frame with the Moon requires a surprising amount of focal length. The Moon appears big to our eyes, but is only 1/2º across.
Even with 800mm of focal length, the Moon fills only a third of a full frame camera field. Using a cropped frame camera has the advantage of tightening the field of view, but it still takes 1200mm to 1500mm of focal length to fill the frame.
But I wouldn’t worry about doing so, as longer focal lengths typically also come with slower f-ratios, requiring longer exposure times or higher ISOs, both of which can blur detail.
A camera on an alt-azimuth GoTo Schmidt-Cassegrain.
For close-ups, a polar-aligned equatorial mount is best. But if your telescope is a GoTo telescope on an alt-azimuth mount (such as a Schmidt-Cassegrain shown here), you should be able to get good shots.
The field of view will slowly rotate during the eclipse, making it more difficult to later accurately assemble a series of shots documenting the entire sequence.
But any one shot should be fine, though it might be best to keep exposures shorter by using a higher ISO speed. As always, take lots of shots at different settings.
You won’t be able to tell which is sharpest until you inspect them later at the computer.
TIP: People worry about exposures, but the flaw that ruins many eclipse shots is poor focus. Use Live View to focus carefully on the sharp edge of the bright part of the Moon. Or better yet, focus on a bright star nearby. Zoom up to 10x to make it easier to see when the star is in sharpest focus. It can be a good idea to refocus through the night as the changing temperature can shift the focus point of long lenses and telescopes. That might take moving the scope over to a bright star, which won’t be possible if you need to preserve the framing for a composite.
PHOTO OPTIONS 5 — HDR COMPOSITES
Using an equatorial mount tracking at the lunar rate keeps the Moon stationary. This opens up the possibility of taking a series of shots over the wide range of exposures needed to capture the Moon from bright to dark, to assemble later in processing. Take 5 to 7 shots in quick succession.
An HDR composite from the December 2010 eclipse.
High dynamic range software can blend the images, or use luminosity masks created by extension panels for Photoshop such as Lumenzia, TK8 or Raya Pro. Either technique can create a final image that looks like what your eye saw. The key is making sure all the images are aligned. HDR software likely won’t align them for you very well.
The January 2019 eclipse layered and blended in Photoshop.
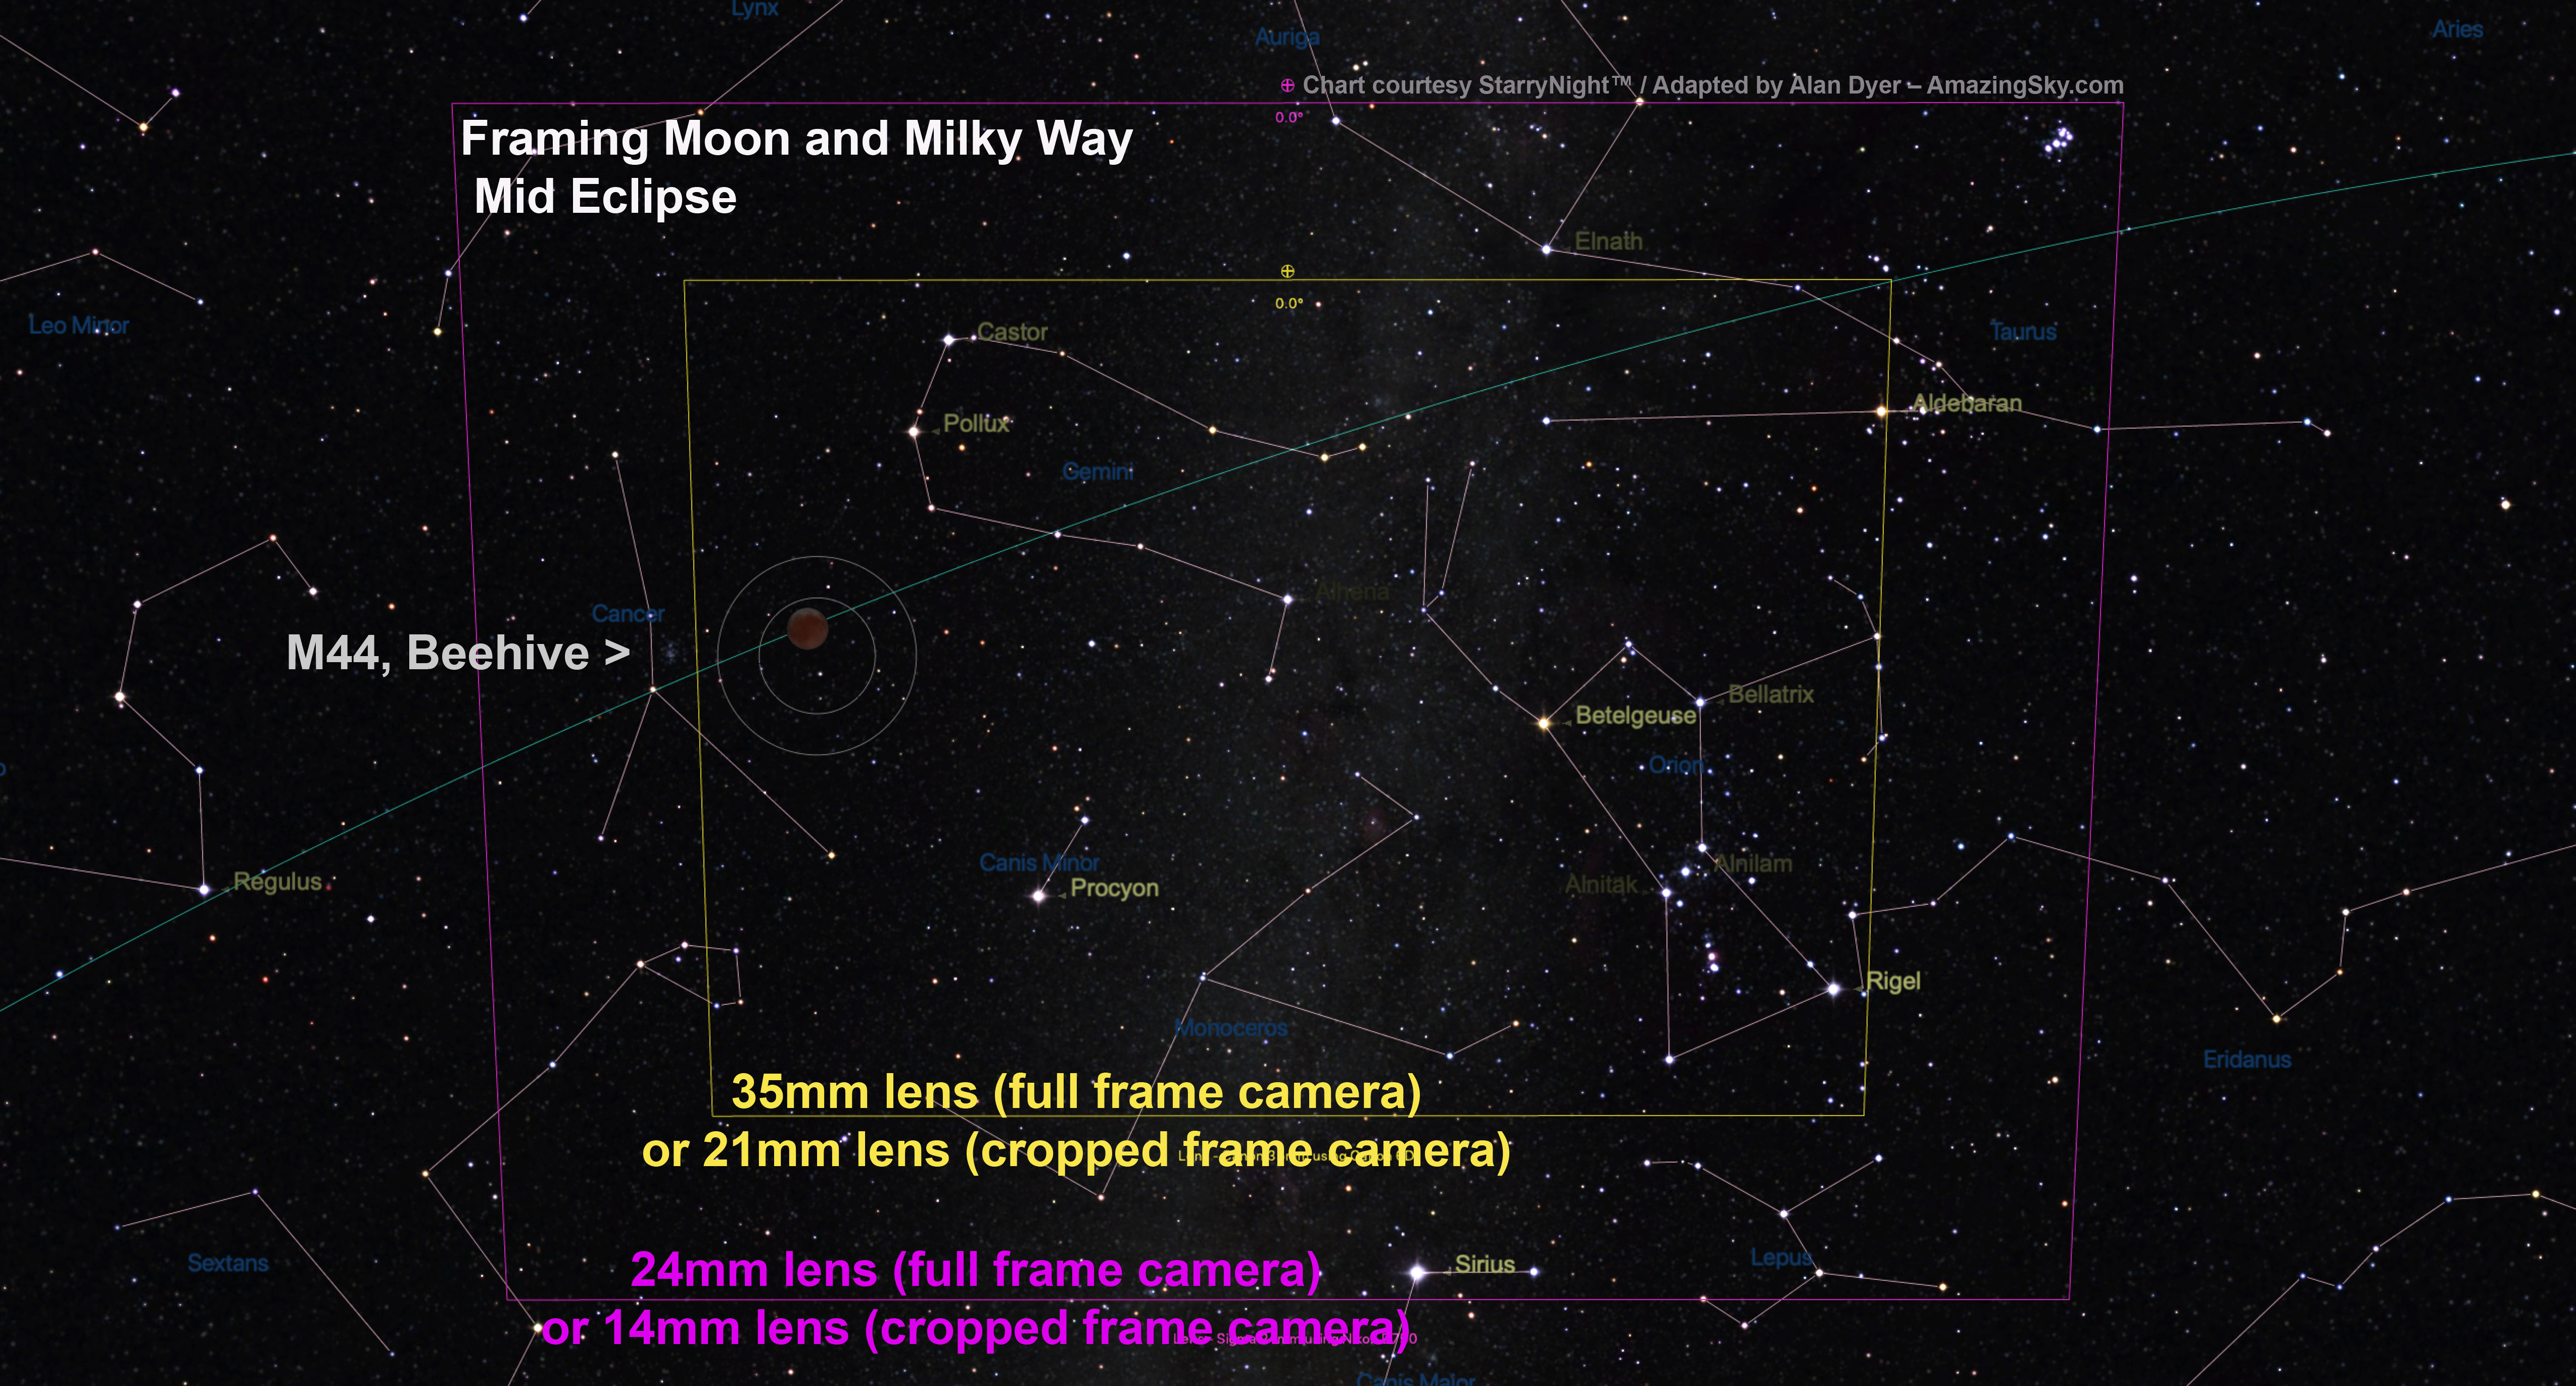
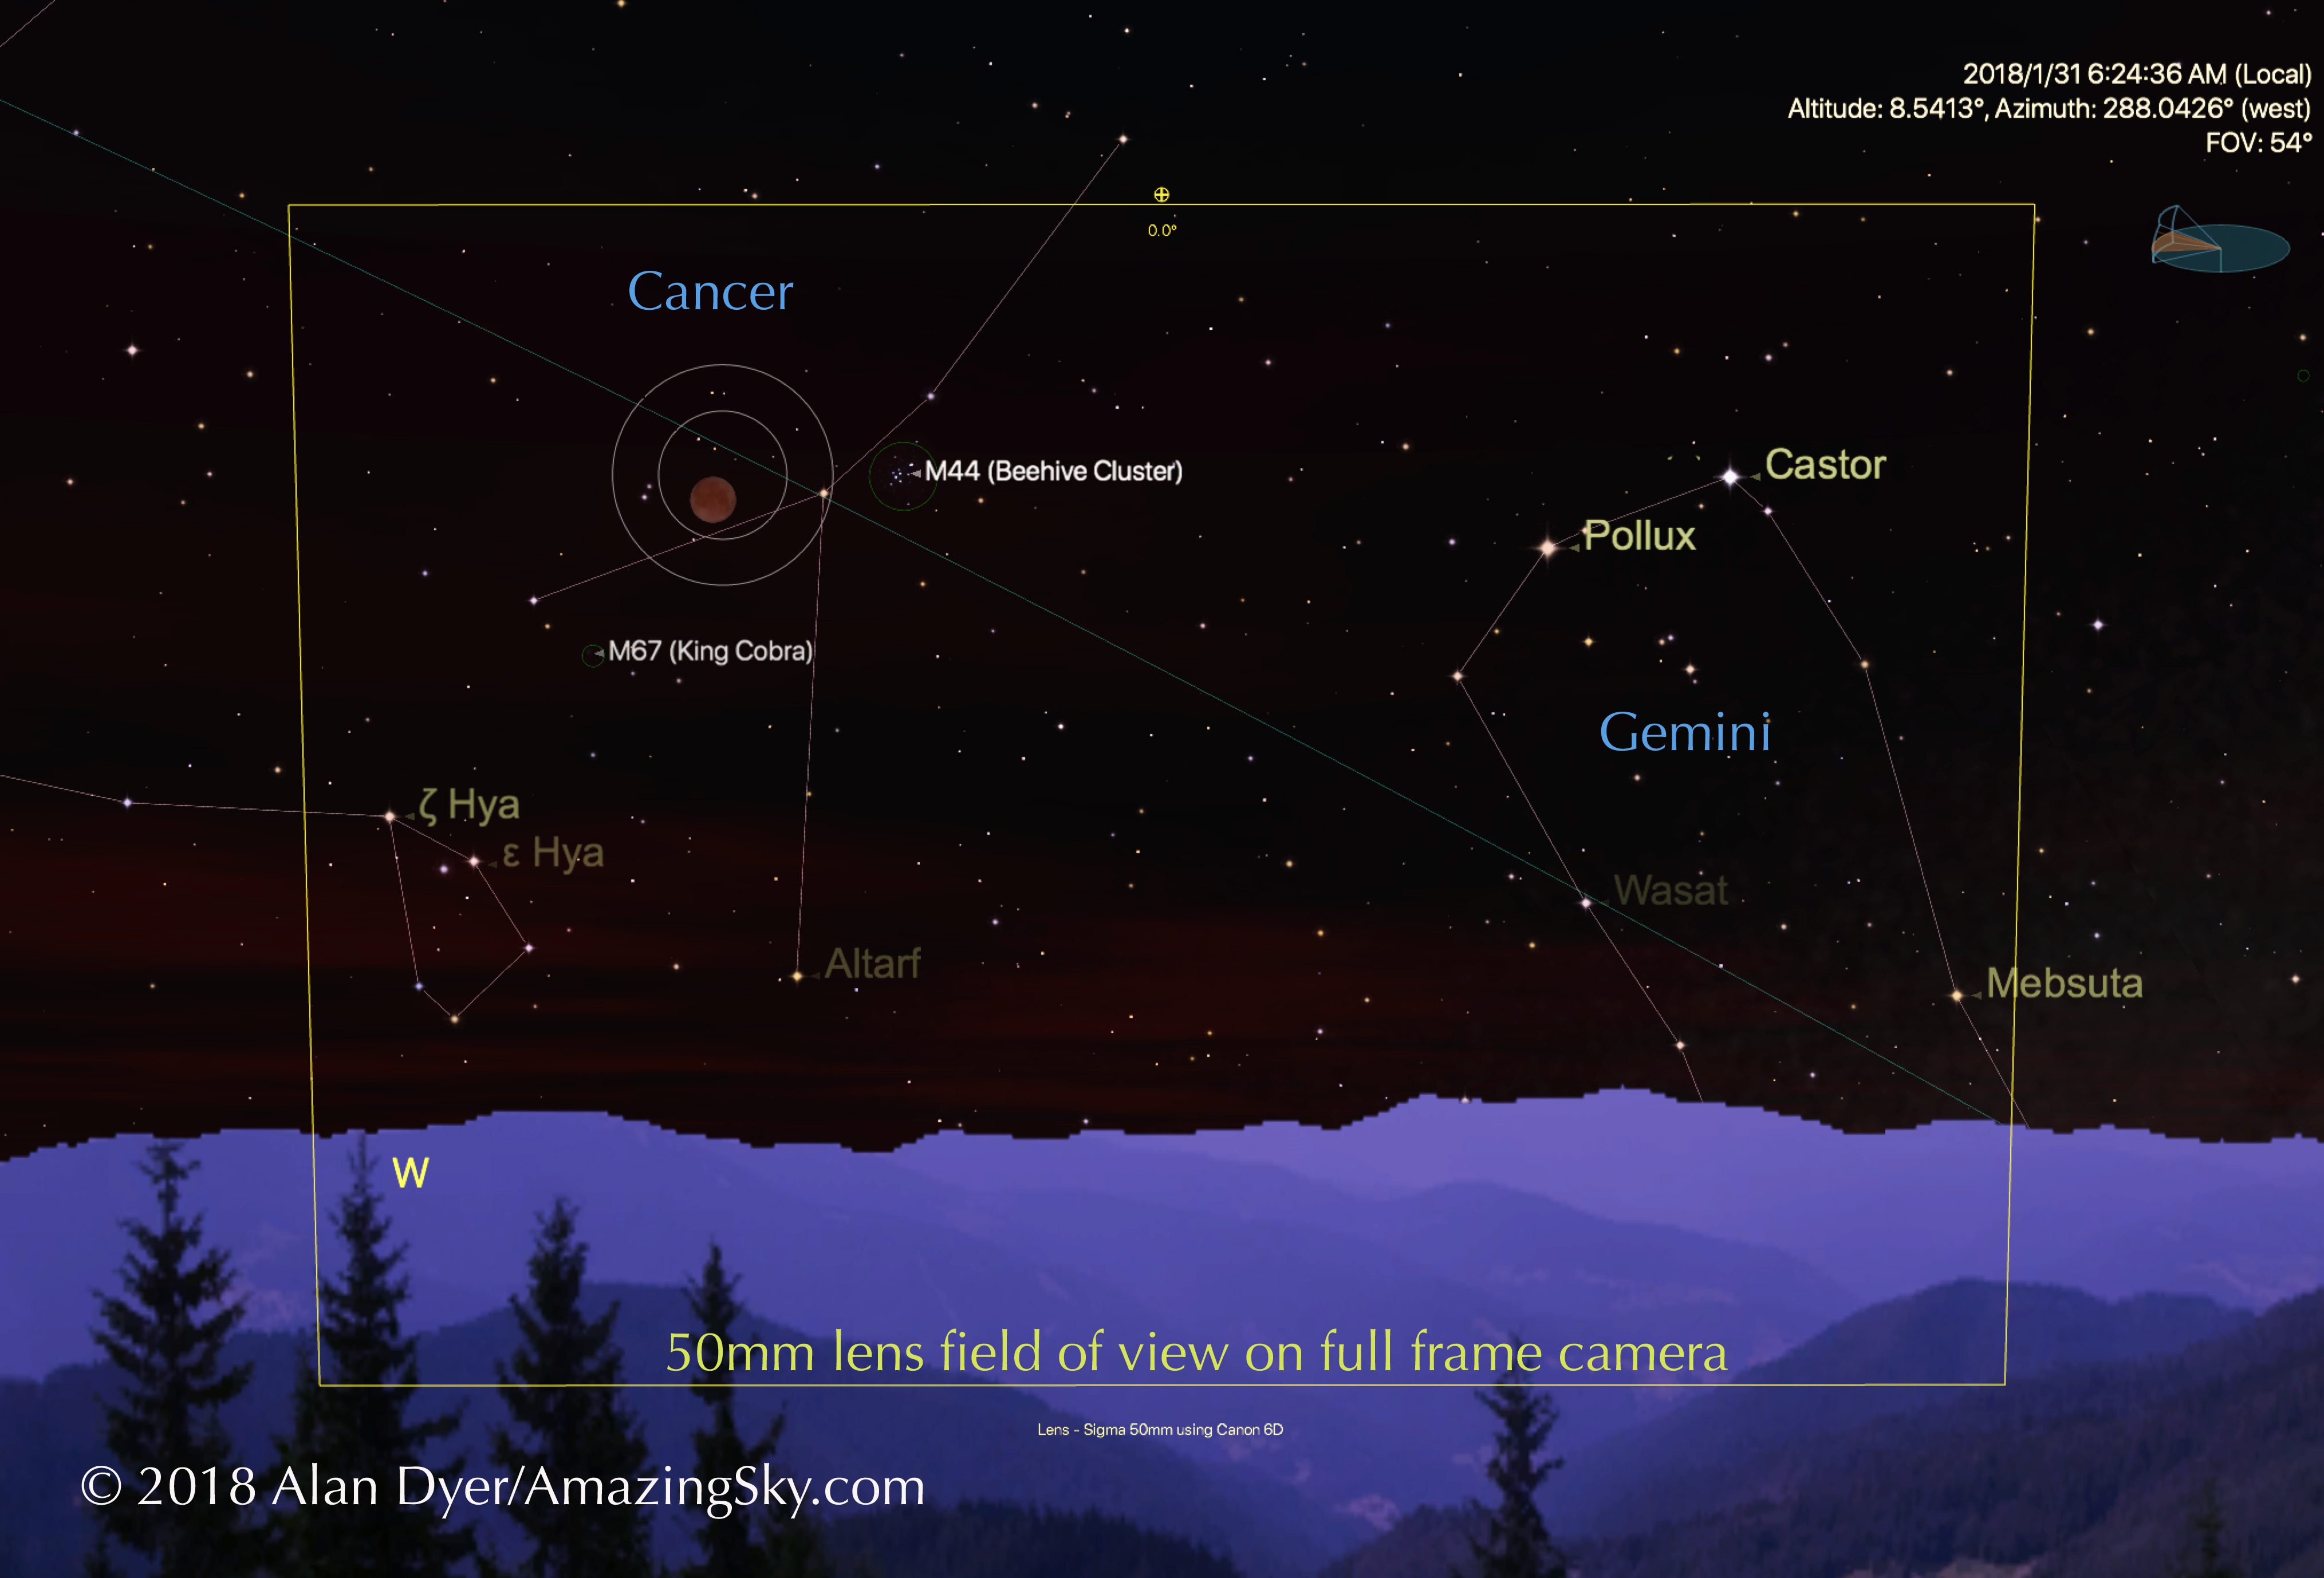
Blending multiple exposures will also be needed to properly capture the eclipsed Moon below the Pleiades, similar to what I show here (and below) from the January 2019 eclipse when the Moon appeared near the Beehive star cluster.
PHOTO OPTIONS 6 — ECLIPSE TRACK COMPOSITES
Another popular form of eclipse image (though also one rife for laughably inaccurate fakes) is capturing the entire path of the Moon across the sky over the duration of the eclipse from start to end.
The track of the September 2015 eclipse, accurately assembled to correct scale.
It can be done with a fixed camera on a tripod but requires a wide (14mm to 20mm) and properly framed lens, to capture the sequence as it actually appeared to proper scale, and not created by just pasting over-sized moons onto a sky to “simulate” the scene, usually badly. By the end of the day on November 19 the internet will be filled with such ugly fakes.
You could set the camera at one exposure setting (one best for when the Moon and sky are darkest at mid-eclipse) and let the camera run, shooting frames every 5 seconds or so. The result might work well as a time-lapse sequence, showing the bright sky darkening, then brightening again.
But chances are the frames taken at the start and end when the sky is lit by full moonlight will be blown out. It will still take some manual camera adjustments through the eclipse.
For a still-image composite, you should instead expose properly for the Moon’s disk at all times, a setting that will change every few minutes, then take a long exposure at mid-eclipse to pick up the stars and Milky Way. The short Moon shots are then blended into the base-layer sky image later in processing.
Framing the eclipse path for the start of the sequence. Framing the path so the Moon ends up at a desired location on the frame.
If the camera has been well-framed and was not moved over the 3.5 hours of the eclipse, the result is an accurate and authentic record of the Moon’s path and passage into the shadow, and not a faked atrocity!
But creating a real image requires a lot of work at the camera, and at the computer.
TIP: Shooting for composites is not work I would recommend attempting while also running other cameras. Focus on one type of image and get it right, rather than trying to do too many and doing them all poorly.
PHOTO OPTION 7 — ECLIPSE SHADOW COMPOSITE
One of the most striking types of lunar eclipse images is a close-up composite showing the Moon passing through the Earth’s umbral shadow, with the arc of the shadow edge on the Moon defining the extent of the shadow, which is about three times larger than the Moon.
Such a composite can be re-created later by placing individual exposures accurately on a wider canvas, using screen shots from planetarium software as a template guide.
A composite of the Moon moving through the umbra.
But to create an image that is more accurate, it is possible to do it “in camera.” Unlike in the film days, we don’t have to do it with multiple exposures onto one piece of film.
We take lots of separate frames with a telescope or lens wide enough to contain the entire path of the Moon through the umbra. A polar-aligned equatorial mount tracking at the sidereal rate is essential. That way the scope follows the stars, not the Moon, and so the Moon travels across the frame from right to left.
Framing for a shadow composite.
Start such a sequence with the Moon at lower right if you are framing just the path through the shadow. Use planetarium software (I used Starry Night™ to create the star charts for this blog) to plan the framing for your camera, lens and site, so the Moon ends up in the middle of the frame at mid-eclipse. This is not a technique for the faint of heart!
A shadow-defining composite from January 2019, with the Moon near the Beehive cluster.
An interesting variation would be using a 200mm to 250mm lens to frame the Moon’s shadow passage below the Pleiades, to create an image as above. That will be unique. Again, an accurately aligned tracker turning at the sidereal rate will be essential.
Acquiring the frames for any composite takes constantly adjusting the exposure during the length of eclipse, which can try your patience and gear during the wee hours of the morning.
I’ll be happy just to get a good set of images at mid-eclipse to make a single composite of the red Moon below the Pleiades.
TIP: It could be cold and lenses can frost over. A battery-powered heater coil on the optics might be essential. And spare warm batteries.
The 4-day-old waxing crescent Moon on April 8, 2019 in a blend of 7 exposures from 1/30 second to 2 seconds, blended with luminosity masks in Photoshop.
PRACTICE!
To test your equipment and your skills at focusing, you can use the waning crescent Moon in the dawn hours on the mornings of October 29 to November 2 or, after New Moon on November 4, the waxing crescent Moon on the evenings of November 6 to 10. While the crescent Moon isn’t as bright as the Full Moon, it will be a good stand in for the bright part of the eclipsed Moon when it is deep in the umbra.
Even better, the dark part of the crescent Moon lit by Earthshine is a good stand-in for the part of the Moon in the umbra. Like the eclipsed Moon, the crescent Moon’s bright and dark parts can’t be captured in one exposure. So it’s a good test for the range of exposures you’ll need for the eclipse, for practising changing settings on your camera, and for checking your tracking system.
The crescent Moon is also useful to test your manual focusing, though the sharp detail along the terminator (the line dividing the bright crescent from the earthlit dark part of the Moon) is much easier to focus on than the flat, low contrast Full Moon.
A selfie of me looking up at the total eclipse of the Moon on January 20, 2019, using binoculars to enjoy the view.
DON’T FORGET TO LOOK!
Amid all the effort needed to shoot this or any eclipse, lunar or solar, don’t forget to just look at it. No photo can ever quite capture the glowing nature of the eclipsed Moon set against the stars.
A selfie of the successful eclipse chaser bagging his trophy, the total lunar eclipse of January 20, 2019.
I wish you clear skies and good luck with your lunar eclipse photography. If you miss it, we have two more visible from North America next year, both total eclipses, on May 15/16 and November 8, 2022.
Two major eclipses of the Moon and a partial eclipse of the Sun over eastern North America highlight the astronomical year of 2021.
I provide my selection of three dozen of the best sky sights for 2021. I focus on events you can actually see, and from North America. I also emphasize events with the potential for good “photo ops.”
What I Don’t Include
Thus, I’m excluding minor meteor showers and ones that peak at Full Moon, and events that happen with the objects too close to the Sun.
I also don’t include events seen only from the eastern hemisphere, such as the April 17 occultation of Mars by the Moon — it isn’t even a close conjunction for us in North America. The August 15 rare triple transit of three Galilean moons at once on the disk of Jupiter occurs during daylight hours for western North America, rendering it very challenging to see. An outburst on August 31 of the normally quiet Aurigid meteor shower is predicted to happen over Asia, not North America.
I also don’t list the growing profusion of special or “supermoons” that get click-bait PR every year, choosing instead to limit my list to just the Harvest Moon of September as a notably photogenic Moon.
Good Year for Lunar Eclipses
But two Full Moons — in May and in November — do undergo eclipses that will be wonderful sights for the eye and camera. As a bonus, the Full Moon of May is the closest Full Moon of 2021, making it, yes, a “supermoon.”
The New Moon eclipses the Sun on June 10, bringing an annular eclipse to remote regions of northern Canada and the Arctic (including the North Pole!). Eastern North America and all of Europe can witness a partial solar eclipse this day.
Recommended Guides
For an authoritative annual guide to the sky and detailed reference work, see the Observer’s Handbook published each year in Canadian and U.S. editions by The Royal Astronomical Society of Canada. I used it to compile this list.
The RASC has also partnered with Firefly Books to publish a more popular-level guide to the coming year’s sky for North America, in the 2021 Night Sky Almanac, authored by Canadian science writer Nicole Mortillaro. It provides excellent monthly star charts.
However, feel free to print out my blog or save it as a PDF for your personal reference. To share my listing with others, please send them the link to this blog page. Thanks!
January
The year begins with a chance to see three planets together at dusk.
January 10 — Mercury, Jupiter and Saturn within 2 degrees (°)
Even three weeks after their much publicized Great Conjunction, Jupiter and Saturn are still close and visible low in the evening twilight. On January 10 Mercury joins them to form a neat triangle of worlds, but very low in the southwest. Clear skies and binoculars are a must!
NOTE: The red circle on this and most charts represents the 6.5° field of view of a typical 10×50 binocular. So you can see here how binoculars will frame the trio perfectly. All charts are courtesy the desktop app Starry Night™ bySimulation Curriculum.
January 14 — Thin waxing crescent Moon above line of Mercury, Jupiter and Saturn
Saturn disappears behind the Sun on January 23, followed by Jupiter on January 28, so early January is our last chance to see the evening trio of planets, tonight with the crescent Moon.
January 20 — Mars and Uranus 1.6° apart
Uranus will be easy to spot in binoculars as a magnitude 5.8 green star below red Mars, so this is your chance to find the seventh planet. The quarter Moon shines below the planet pair.
January 23 — Mercury at a favourable evening elongation
This and its appearance in May are the best opportunities for northern hemisphere observers to catch the innermost planet in the evening sky in 2021. Look for a bright magnitude -0.8 “star” in the dusk twilight.
February
This is a quiet month with Mars the main evening planet, but now quite small in the telescope.
February 18 — Waxing Moon 4° below Mars
The pairing appears near the Pleiades and Hyades star clusters high in the evening sky.
March
Mars shines high in evening sky in Taurus, while the three planets that were in the evening sky in January begin to emerge into the dawn sky.
A 200+ degree panorama of the arch of the winter Milky Way, from south (left) to northwest (ar right) with the Zodiacal Light to the west at centre. This was from Dinosaur Provincial Park in southern Alberta on February 28, 2017.
March 1 — Zodiacal light “season” begins in the evening
From sites away from light pollution look for a faint glow of light rising out of the southwest sky on any clear evening for the next two weeks with no Moon.
March 3 — Mars 2.5° below the Pleiades
This will be a nice sight in binoculars tonight and tomorrow high in the evening sky, and a good target for tracked telephoto lens shots.
March 4 — Mercury and Jupiter just 1/2° apart
Close to be sure! But this pairing will be so low in the dawn sky it will be difficult to spot. They will appear equally close on March 5 should clouds intervene on March 4.
March 9 — Line of Mercury, Jupiter, Saturn and waning crescent Moon
Three planets and the waxing crescent Moon form a line across the dawn sky but again, very low in the southeast. The even thinner Moon will be below Jupiter on March 10. Observers at low latitudes (south of 35° N) will have the best view on these mornings.
March 20 — Equinox at 5:37 a.m. EDT
Spring officially begins for the northern hemisphere, autumn for the southern, as the Sun crosses the celestial equator heading north. Today, the Sun rises due east and sets due west for photo ops.
March 30 — Zodiacal light season again!
With the Moon out of the way, the faint zodiacal light can again be seen and photographed in the west over the next two weeks, but only from a site without significant light pollution on the western horizon.
April
The inner planets appear in the evening sky, while Mars meets M35.
The arch of the Milky Way over the Red Deer River valley and badlands at Dry Island Buffalo Jump Provincial Park, Alberta, on May 19/20, 2018 just after moonset of the waxing crescent Moon.
April 6 — Milky Way arch season begins
With the waning Moon just getting out of view, this morning and for the next two weeks are good nights to shoot panoramas of the bright summer Milky Way as an arch across the sky, with the galactic core in view to the south. The moonless first two weeks of May, June and July will also work this year, but by August the Milky Way is reaching high overhead and so is difficult to capture in a horizontal landscape panorama.
April 24 — Mercury and Venus 1° apart
The two inner planets will be very low in the western evening sky tonight and tomorrow, but with clear skies this is a chance to catch both at once. Use a telephoto lens for the best image.
April 26 — Mars passes 1/2° north of M35 star cluster
This will be a fine scene for binoculars or a photo op for a tracked telephoto lens or telescope in a long enough exposure to reveal the rich star cluster Messier 35 in Gemini.
May
On May 26 a totally eclipsed Moon shines red in the west before sunrise for western North America.
May 12 — Venus and Moon 1.5° apart
Look low in the western evening sky this night for the pairing of the thin crescent Moon and Venus, and the next night, May 13, for the crescent Moon higher and 4° away from Mercury. These are good nights to capture both inner planets using a short telephoto lens.
May 16 — Mercury at a favourable evening elongation
With Mercury angled up high in the northwest this is the best week of the year to catch it in the evening sky from northern latitudes.
The total lunar eclipse of April 4, 2015 taken from near Tear Drop Arch, in western Monument Valley, Utah. This is a single 5-second exposure at f/2.8 and ISO 400 with the Canon 24mm lens and Canon 6D, untracked. The sky is brightening with blue from dawn twilight.
May 26 — Total Eclipse of the Moon
The first total lunar eclipse since January 20, 2019, this “TLE” can be seen as a total eclipse only from western North America, Hawaii, and from Australia and New Zealand. Totality lasts a brief 15 minutes, with the Moon in Scorpius not far from red Antares. The red Moon in a twilight sky will be beautiful, as it was for the April 4, 2015 eclipse at dawn over Monument Valley, Utah shown above.
Those in western North America will see the totally eclipsed Moon setting into the southwest in the dawn hour before sunrise, as depicted here. Over a suitable landscape this will be a photogenic scene, as even at mid-eclipse the Moon will be bright red because it passes so far from the centre of Earth’s umbral shadow.
Unfortunately, those in eastern North America will have to be content with a view of a partially eclipsed Moon setting in the morning twilight.
A bonus is that this is also the closest and largest Full Moon of 2021, with a close perigee of 357,311 kilometres occurring just 9 hours earlier. So the Full Moon that rises on the evening of May 25 will be the year’s “supermoon.”
See Fred Espenak’s EclipseWise.com page for details on timing and viewing regions. The dark region on this map does not see any of this eclipse.
May 26 — Comet 7/P Pons-Winnecke at perihelion
The brightest comet predicted to be visible in 2021 (as of this writing) is the short-period Comet Pons-Winnecke (aka Comet 7/P). It reaches its closest point to the Sun — perihelion — the night of the lunar eclipse and is well placed in Aquarius high in the southeastern dawn sky above Jupiter and Saturn.
But … it is expected to be only 8th magnitude, making it a binocular object at best, looking like a fuzzball, not the spectacular object depicted here in this exaggerated view of its brightness and tail length.
May 28 — Mercury and Venus less than 1/2° apart
Look low in the northwest evening sky for a very close conjunction of the two inner worlds. A telescope will frame them well, with Mercury a tiny crescent and Venus an almost fully illuminated disk.
June
While eastern North America misses the total lunar eclipse, two weeks later observers in the east do get to see a partial solar eclipse.
May 10, 1994 Annular Eclipse taken from a site east of Douglas Arizona Showing “reverse” Bailey’s Beads — lunar mountains just touching Sun’s limb 4-inch f/6 apo refractor at f/15 with Barlow lens, and with Ektachrome 100 slide film !
June 10 — Annular eclipse of the Sun
Should you manage to get yourself to the path of the Moon’s anti-umbral shadow you will see the dark disk of the Moon contained within the bright disk of the Sun but not large enough to cover the Sun completely. You see a ring of light, as above from a 1994 annular eclipse.
The Moon is near apogee, so its disk is about as small as it gets, in contrast to the perigee Moon two weeks earlier. During the maximum of 3 minutes 51 seconds of annularity the sky will get unusually dark, but none of the dramatic effects of a total eclipse will appear. The annulus of sunlight that remains is still so bright special solar filters must be used at all times, covering the eyes and lenses.
The region with the best accessibility to the path is northwestern Ontario north and east of Thunder Bay. However, the annular phase of the eclipse there occurs at or just after sunrise, so clouds are likely to obscure the view, as are trees!
The eastern seaboard of the U.S. and much of eastern Canada can see a partial eclipse of the Sun, as can most of Europe. For details of times and amount of eclipse see Fred Espenak’s EclipseWise website.
Summer officially begins for the northern hemisphere, winter for the southern, as the Sun reaches its most northerly position above the celestial equator. The Sun rises farthest to the northeast and sets farthest to the northwest, and the length of daylight is at its maximum.
June 22 — Mars passes through the Beehive star cluster
Mars, now at a modest magnitude +1.8, appears amid the Beehive star cluster, aka M44, tonight and tomorrow evening, but low in the northwest in the twilight sky. Use binoculars or a telescope for the best view.
July
Venus and Mars put on a show low in the western twilight.
July 2 — Venus passes through the Beehive star cluster
Venus (at a brilliant magnitude -3.9) follows Mars through the Beehive cluster this evening, but with the pairing even lower in the sky, making it tough to pick out the star cluster.
July 4 — Mercury at a good morning elongation
Though not at its best for a morning appearance from northern latitudes, Mercury should still be easy to spot and photograph in the pre-dawn sky in Taurus, outshining bright Aldebaran.
July 11 — Grouping of Venus, Mars and waxing crescent Moon
Look low in the evening sky for the line of the thin crescent Moon, bright Venus and dim Mars all in the same binocular field. Venus passes 1/2° above Mars on the next two nights, July 12 and 13.
July 21 — Grouping of Venus, Mars and Regulus
The two planets appear with bright Regulus in Leo, all within a binocular field, but again, low in the northwest twilight. The colour contrast of red Mars with white Venus and blue-white Regulus should be apparent in binoculars.
August
The popular Perseid meteors peak, and we can see (maybe!) the extremely close conjunction of Mercury and Mars.
The core of the Milky Way in Sagittarius low in the south over the Frenchman River valley at Grasslands National Park, Saskatchewan.
August 1 — Milky Way core season opens
For southerly latitudes, the first two weeks of May and June are also good, but from the northern U.S. and much of Canada, the nights don’t get dark enough to see and shoot the bright galactic centre until August. The rich star clouds of Sagittarius now shine due south as it gets dark each night over the next two weeks.
August 2 — Saturn at opposition
Saturn is at its closest and brightest for 2021 tonight, rising at sunset and shining due south in Capricornus in the middle of the night.
A composite of the Perseid meteors over Dinosaur Provincial Park on the night of August 12/13, 2017.
August 12 — Perseid meteor shower peaks
The annual Perseid meteor shower peaks tonight with a waxing crescent Moon that sets early, to leave most of the night dark and ideal for watching meteors. Look for the crescent Moon 5° above Venus on August 10.
August 18 — Mars and Mercury only 0.06° apart!
Now this is a very close conjunction, with Mercury passing only 4 arc minutes from Mars (compared to the 6 arc minute separation of the Great Conjunction of Jupiter and Saturn on December 21, 2020). But the planets will be very low in the west at dusk and tough to sight. This will be a conjunction for skilled observers blessed with clear skies and a low horizon.
August 20 — Jupiter at opposition
Jupiter, now in Aquarius, reaches its closest and brightest for 2021 tonight, also rising at sunset and shining due south in the middle of the night. On the night of August 21/22, the Full Moon, also at opposition — as all Full Moons are — appears 4° below Jupiter, as shown above.
September
It’s Harvest Moon time, with this annual special Full Moon occurring close to the equinox this year for an ideal geometry, making the Moon rise due east.
Zodiacal Light at dawn on September 24, 2009. Taken from home in Alberta, with a Canon 5D MkII and 15mm lens at f/4 and ISO 800 for 6 minutes, tracking the sky so the ground is blurred.
September 5 — Zodiacal light “season” begins in the morning
With no Moon for the next two weeks, from sites away from light pollution look to the pre-dawn sky for a faint glow of light rising out of the east before twilight brightens the morning sky.
September 20 — Full “Harvest” Moon
Occurring two days before the equinox, this Full Moon will rise nearly due east (a little to the south of east) at sunset and set nearly due west at sunrise at dawn on September 21, for some fine photo ops.
September 22 — Equinox at 3:21 p.m. EDT
Autumn officially begins for the northern hemisphere, spring for the southern, as the Sun crosses the celestial equator heading south. Today, the Sun rises due east and sets due west for photo ops.
October
Mercury adorns the dawn while Venus shines bright but low at dusk.
October 4 — Zodiacal light “season” begins in the morning
With the Moon out of the way for the next two weeks, the zodiacal light will again be visible in the east in the pre-dawn hours.
October 9 — The Moon 2.5° from Venus
The crescent Moon passes close to Venus this evening, with the pair not far from the star Antares. The low altitude of the worlds lends itself to some fine photo ops. Look for a similar close conjunction on the evening of November 7.
October 25 — Mercury at its most favourable morning elongation
The high angle of the ecliptic — the path of the planets — on autumn dawns swings Mercury up as high as it can get in the morning sky, making this week the best for sighting Mercury as a “morning star” in 2021 from northern latitudes.
October 29 — Venus at its greatest angle away from the Sun
While now farthest from the Sun in our sky, its low altitude at this time of year makes this an unfavourable evening appearance of Venus.
November
The second lunar eclipse brings a mostly red Moon to the skies over North America.
November 3 — Moon and Mercury 2° apart, then a daylight occultation
Before dawn, with Mercury still well-placed in the morning sky, the waning crescent Moon shines 2° above the planet, with Mars below and the star Spica nearby. Later in the day, about noon to early afternoon (the time varies with your location), the Moon will occult (pass in front of) Mercury. This will be a challenging observation even with a telescope, with the pale and thin Moon only 14° east of the Sun. A very clear sky will be essential!
Total lunar eclipse November 8, 2003. Taken through Astro-Physics 5″ Apo refractor at f/6 with MaxView 40mm eyepiece projection into a Sony DSC-V1 5 megapixel digital camera, mounted afocally.
November 19 — 97% Partial Eclipse of the Moon
Though not a total eclipse, this is the next best thing: a 97% partial! And unlike the May 26 eclipse, all of North America gets to see this one.
Mid-eclipse, when the Moon is most deeply embedded in Earth’s umbral shadow, occurs at 4:04 a.m. EST (1:04 a.m. PST) on November 19. While not convenient timing, it ensures that all of the continent can see the entire 3.5-hour long eclipse. The partial umbral phase begins at 3:18 a.m EST (12:18 a.m. PST).
At mid-eclipse, the Moon will resemble Mars — a red world with a bright south “polar cap” caused by the small 3% of the southern edge of the Moon outside the umbra. Its position near the Pleiades and Hyades clusters will make for a great wide-field image.
Remember — this occurs on the night of November 18/19! So don’t miss it thinking the eclipse starts on the evening of November 19. You’ll be a day late!
The year ends with a chance to see four planets together at dusk.
Nov. 23, 2003 total solar eclipse over Antarctica on Qantas/Croydon Travel charter flight out of Melbourne, Australia. Sony DSC-V1 camera. 1/3 sec, f/2.8, 7mm lens, max wide-angle.
December 4 — Total Eclipse of the Sun
I include this for completeness, but this total solar eclipse (TSE) could not be more remote, as the path of totality lies over Antarctica. Only the most intrepid will be there, in expedition ships and in aircraft. (I took this image over Antarctica at the November 23, 2003 total eclipse one 18-year Saros cycle before this year’s TSE.) Even the partial phases are visible only from southernmost Australia and Africa.
December 6 — Moon 2.5° below Venus
With Venus just past its official December 3 date of “greatest brilliancy” (at magnitude -4.7), the waxing crescent Moon appears close below it, with Saturn and Jupiter further along the line of the ecliptic in the southwest. The Moon appears below Saturn on December 7 and below Jupiter on December 8.
A single bright meteor from the Geminid meteor shower of December 2017, dropping toward the horizon in Ursa Major.
December 13 — Geminid meteor shower peaks
The most prolific meteor shower of the year peaks with a waxing 10-day-old gibbous Moon lighting the sky, so not great conditions. But with luck it will still be possible to see and capture bright fireballs.
December 21 — Solstice at 10:59 a.m. EST
Winter officially begins for the northern hemisphere, summer for the southern, as the Sun reaches its most southerly position below the celestial equator. The Sun rises farthest to the southeast and sets farthest to the southwest, and the length of daylight is at its minimum.
December 31 — Four planets in view
As the year ends the same three planets that adorned the evening sky in early January are back, with the addition of Venus. So on New Year’s Eve we can see four of the naked eye planets (only Mars is missing) at once in the evening sky.
It took a chase but it was worth it to catch the January 20, 2019 total eclipse of the Moon in the winter sky.
While the internet and popular press fawned over the bogus moniker of “Super Blood Wolf” Moon, to me this was the “Cold Moon” eclipse. And I suspect that was true for many other observers and eclipse chasers last Sunday.
Total solar eclipses almost always involve a chase, usually to far flung places around the world to stand in the narrow shadow path. But total lunar eclipses (TLEs) come to you, with more than half the planet able to view the Moon pass through the Earth’s shadow and turn red for several minutes to over an hour.
The glitch is clouds. For several of the last TLEs I have had to chase, to find clear skies in my local area, creating pre-eclipse stress … and post-eclipse relief!
A screen shot from Astrospheric
That was the case for the January 20, 2019 total lunar, as the weather predictions above, based on Environment Canada data, were showing east-central Alberta along the Saskatchewan border as the only clear hole within range and accessible.
The above is a screen shot from the wonderful app Astrospheric, a recommended and great aid to astronomers. In 2014, 2015, and 2018 the Environment Canada predictions led me to clear skies, allowing me to see an eclipse that others in my area missed.
So trusting the predictions, the day before the eclipse I drove the 5 hours and 500 km north and east to Lloydminster, a town where the provincial border runs right down the main street, Highway 17.
A screen shot from Theodolite
The morning of the evening eclipse, I drove up and down that highway looking for a suitable site to setup. Scenery was not in abundance! It’s farm land and oil wells. I settled for a site shown above, an access road to a set of wells and tanks where I would likely not be disturbed, that had no lights, and had a clear view of the sky.
The image above is from the iOS app Theodolite, another fine app for planning and scouting sites, as it overlays where the camera was looking.
Scenery was not a priority as I was mostly after a telephoto view of the eclipsed Moon near the Beehive star cluster. Wide views would be a bonus if I could get them, for use in further ebook projects, as is the plan for the image below.
This is a single untracked exposure of 25 seconds at f/2.8 and ISO 1600 with the Nikon D750 and Sigma 20mm Art lens, but with a shorter exposure of 1 second blended in for the Moon itself so it retains its color and appearance to the naked eye. Your eye can see the eclipsed Moon and Milky Way well but the camera cannot in a single exposure. The scene, taken just after the start of totality, just fit into the field of the 20mm lens. A little later in the night it did not.
The site, which was east of the border in Saskatchewan, served me well, and the skies behaved just as I had hoped, with not a cloud nor haze to interfere with the view. It was a long and cold 5-hour night on the Prairies, with the temperature around -15° C.
It could have been worse, with -25° not uncommon at this time of year. And fortunately, the wind was negligible, with none of the problems with frost that can happen on still nights.
Nevertheless, I kept my photo ambitions in check, as in the cold much can go wrong and running two cameras was enough!
The Moon in mid-total eclipse, on January 20, 2019, with it shining beside the Beehive star cluster, Messier 44, in Cancer. This view tries to emulate the visual scene through binoculars, though the camera picks up more stars and makes the Moon more vivid than it appears to the eye. However, creating a view that looks even close to what the eye can see in this case takes a blend of exposures: a 1-minute exposure at ISO 800 and f/2.8 for the stars, which inevitably overexposes the Moon. So I’ve blended in three shorter exposures for the Moon, taken immediately after the long “star” exposure. These were 8, 4 and 2 seconds at ISO 400 and f/4, and all with the Canon 200mm telephoto on a Fornax Lightrack II tracking mount to follow the stars.
Above was the main image I was after, capturing the red Moon shining next to the Beehive star cluster, a sight we will not see again for another 18-year-long eclipse “saros,” in January 2037.
But I shot images every 10 minutes, to capture the progression of the Moon through the shadow of the Earth, for assembly into a composite. I’d pick the suitable images later and stack them to produce a view of the Moon and umbral shadow outline set amid the stars.
The Moon in total eclipse, on January 20, 2019, in a multiple exposure composite showing the Moon moving from right to left (west to east) through the Earth’s umbral shadow. The middle image is from just after mid-totality at about 10:21 pm MST, while the partial eclipse shadow ingress image set is from 9:15 pm and the partial eclipse shadow egress image set is from 11:15 pm. I added in two images at either end taken at the very start and end of the umbral eclipse to add a more complete sequence of the lunar motion. The central image of totality includes a 1-minute exposure at ISO 800 and f/2.8 for the stars, which inevitably overexposes the Moon. So I’ve blended in three shorter exposures for the Moon, taken immediately after the long “star” exposure. These were 8, 4 and 2 seconds at ISO 400 and f/4, and all with the Canon 200mm telephoto. The two partial eclipse phases are stacks of 7 exposures each, from very short for the bright portion of the lunar disk, to long for the shadowed portion. They are blended with luminosity masks created with ADP Pro v3 panel for Photoshop, but modified with feathering to blend the images smoothly.
Above is the final result, showing the outline of the circular umbral shadow of the Earth defined by the shadow edge on the partially eclipsed Moons. The umbra is about three times the size of the Moon. And at this eclipse the Moon moved across the northern half of the shadow.
So mission accomplished!
This is an untracked single exposure of 15 seconds at ISO 3200 and f/2.8 with the Sigma 20mm Art lens and Nikon D750. However, I blended in a shorter 1-second exposure for the red eclipsed Moon itself to prevent its disk from overexposing as it would in any exposure long enough to record the Milky Way.
I usually try to take a “trophy” shot of the successful eclipse chaser having bagged his game. This is it, from mid-eclipse during totality, with the red Moon shining in the winter sky beside the Beehive.
With this eclipse I can now say I have seen every total lunar eclipse visible from my area of the world since May 2003. I’m not counting those TLEs that were visible from only the eastern hemisphere — I’m not so avid as to chase those. And there were a couple of TLEs in that time that were visible from North America, but not from Alberta. So I’m not counting those.
And a couple of TLEs that were visible from here I did not see from here in Alberta — I saw April 15, 2014 from Australia and April 4, 2015 from Utah.
With that tally I’ve seen all the locally visible TLEs over a full saros cycle, 18 years. The last local TLE I missed was January 20, 2000, exactly 19 years — a Metonic cycle — ago. It must have been cloudy!
The next total eclipse of the Moon is May 26, 2021, visible from Alberta as the Moon sets at dawn. I’d like to be in Australia for that one (depicted above in a screen shot from StarryNight™), to see the eclipsed Moon beside the galactic centre as both rise in the east, a sight to remember. Being late austral autumn, that will be a “cool Moon.”
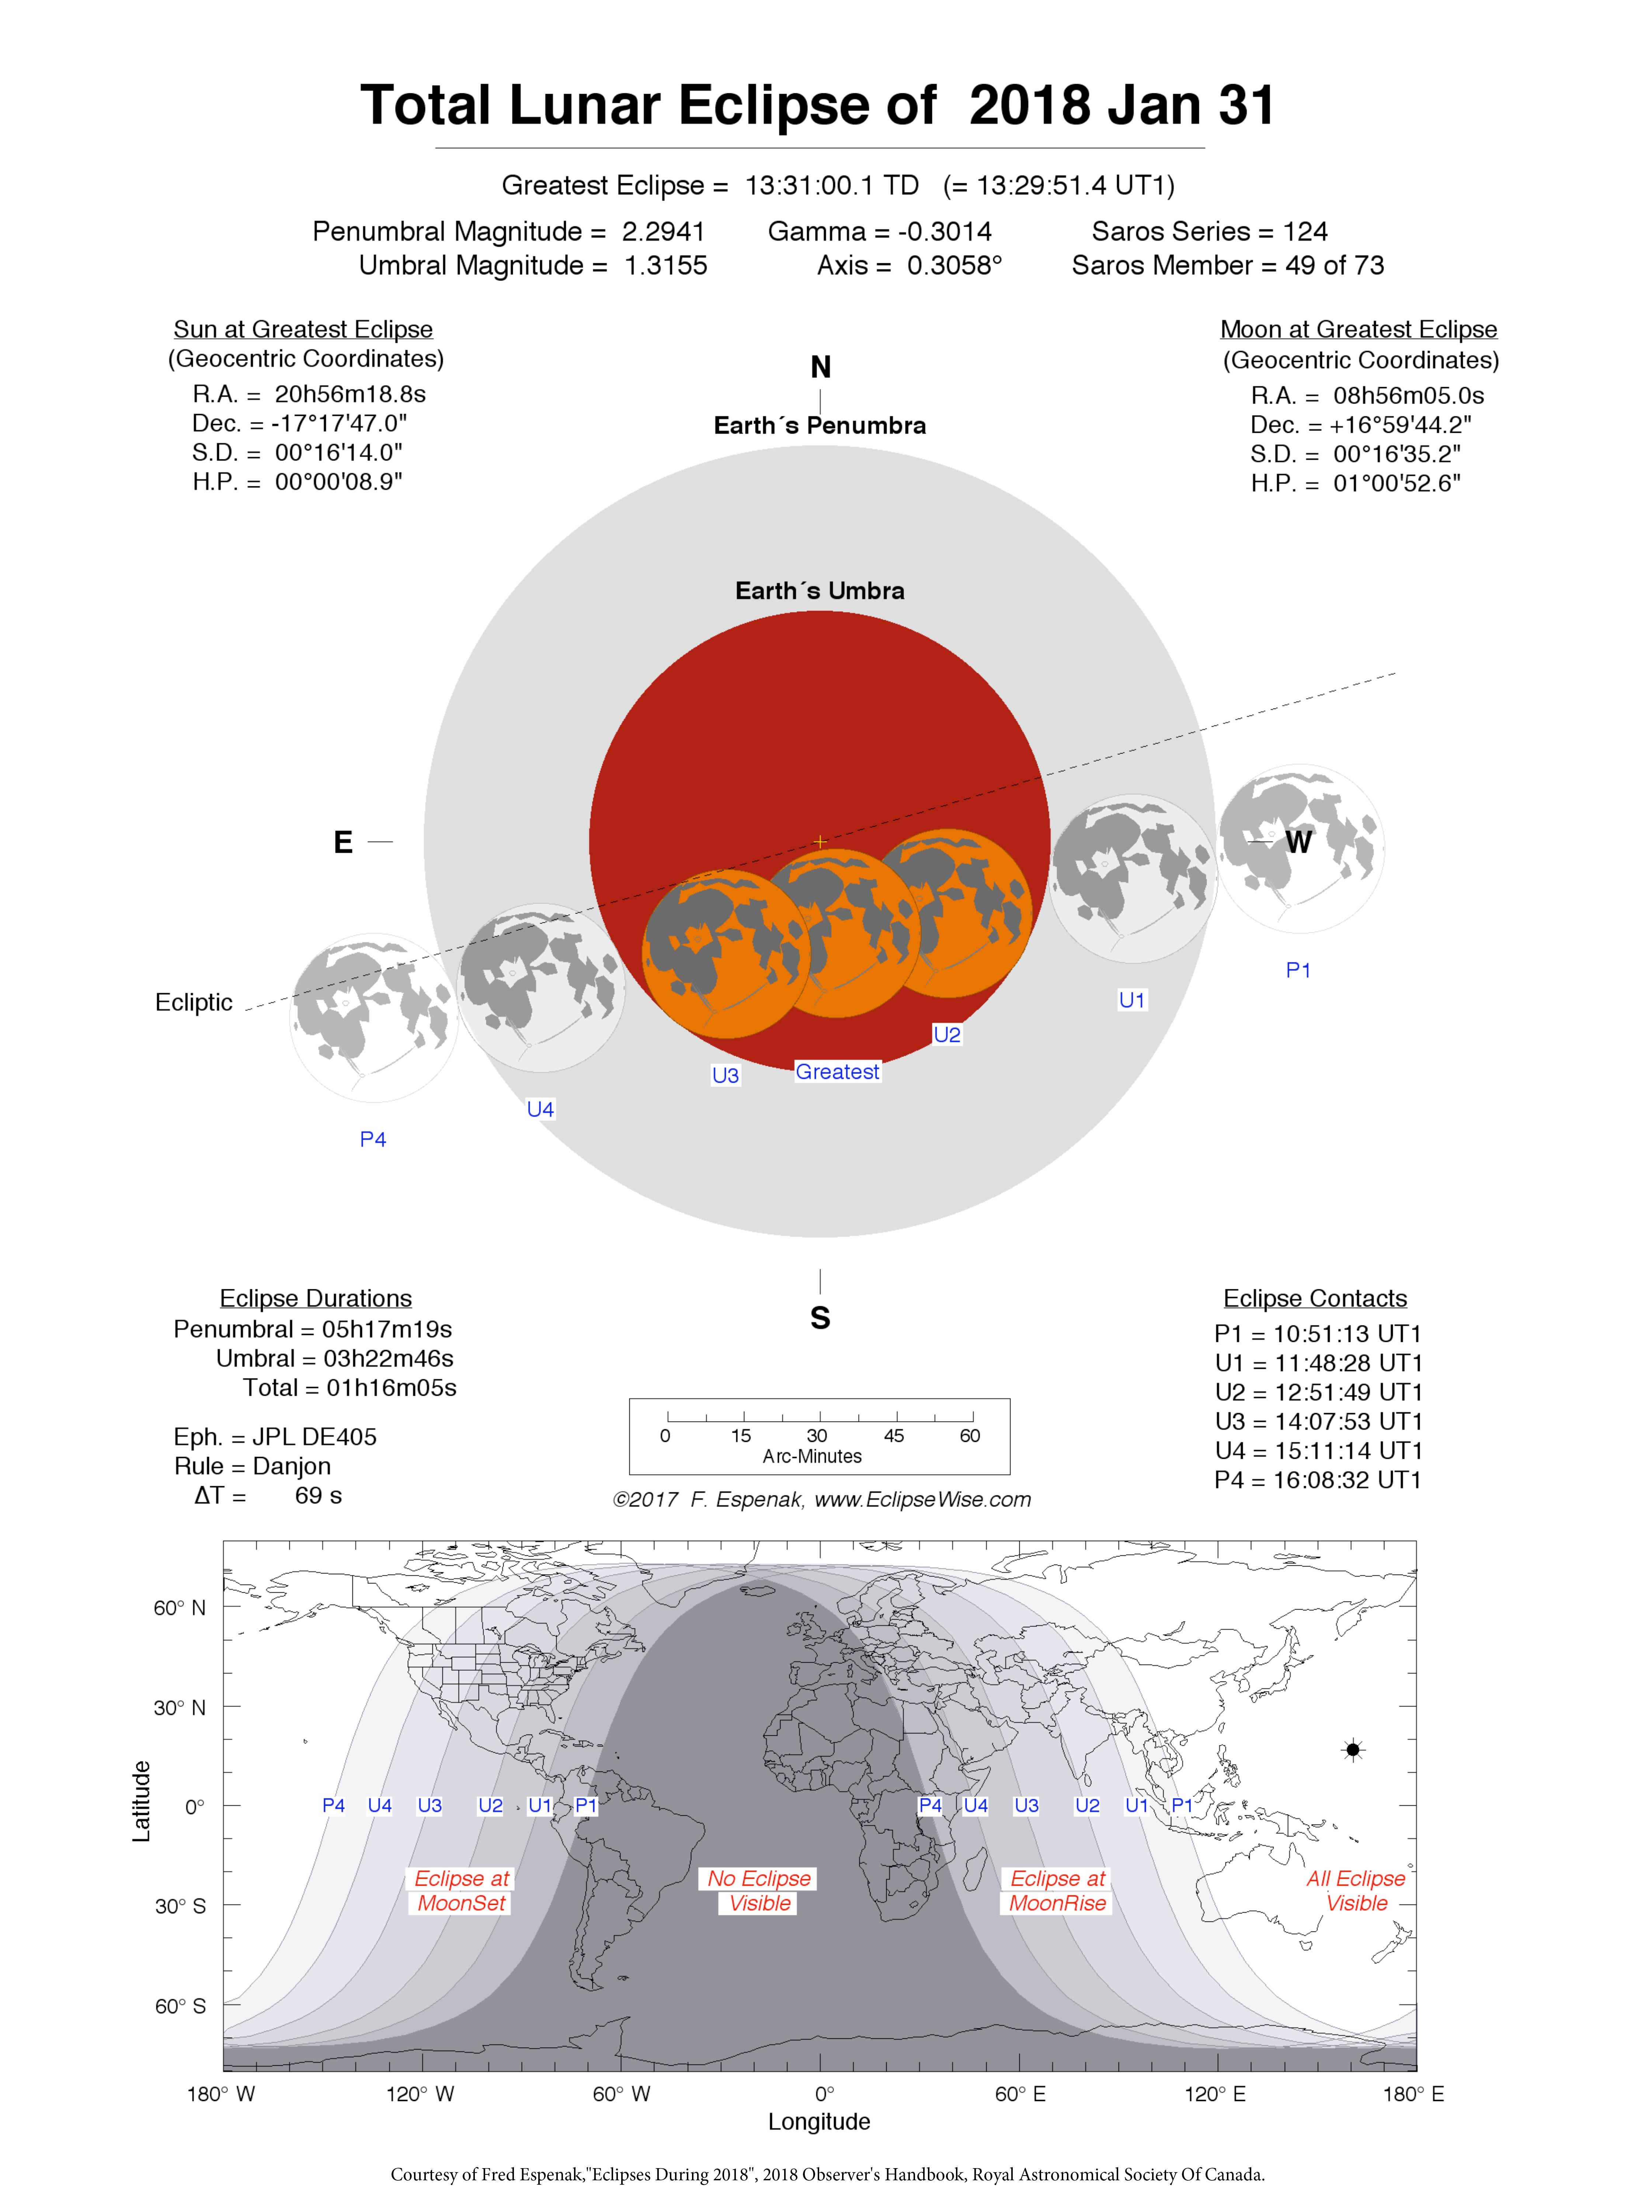
On the evening of January 20 for North America, the Full Moon passes through the umbral shadow of the Earth, creating a total eclipse of the Moon.
No, this isn’t a “blood,” “super,” nor “wolf” Moon. All those terms are internet fabrications designed to bait clicks.
It is a totallunareclipse — an event that doesn’t need sensational adjectives to hype, because they are always wonderful sights! And yes, the Full Moon does turn red.
As such, on January 20 the evening and midnight event provides many opportunities for great photos of a reddened Moon in the winter sky.
Here’s my survey of tips and techniques for capturing the eclipsed Moon.
First … What is a Lunar Eclipse?
As the animation below shows (courtesy NASA/Goddard Space Flight Center), an eclipse of the Moon occurs when the Full Moon (and they can happen only when the Moon is exactly full) travels through the shadow of the Earth.
The Moon does so at least two times each year, though often not as a total eclipse, one where the entire disk of the Moon enters the central umbral shadow. Many lunar eclipses are of the imperceptible penumbral variety, or are only partial eclipses.
Total eclipses of the Moon can often be years apart. The last two were just last year, on January 31 and July 27, 2018. However, the next is not until May 26, 2021.
At any lunar eclipse we see an obvious darkening of the lunar disk only when the Moon begins to enter the umbra. That’s when the partial eclipse begins, and we see a dark bite appear on the left edge of the Moon.
While it looks as if Earth’s shadow sweeps across the Moon, it is really the Moon moving into, then out of, our planet’s umbra that causes the eclipse. We are seeing the Moon’s revolution in its orbit around Earth.
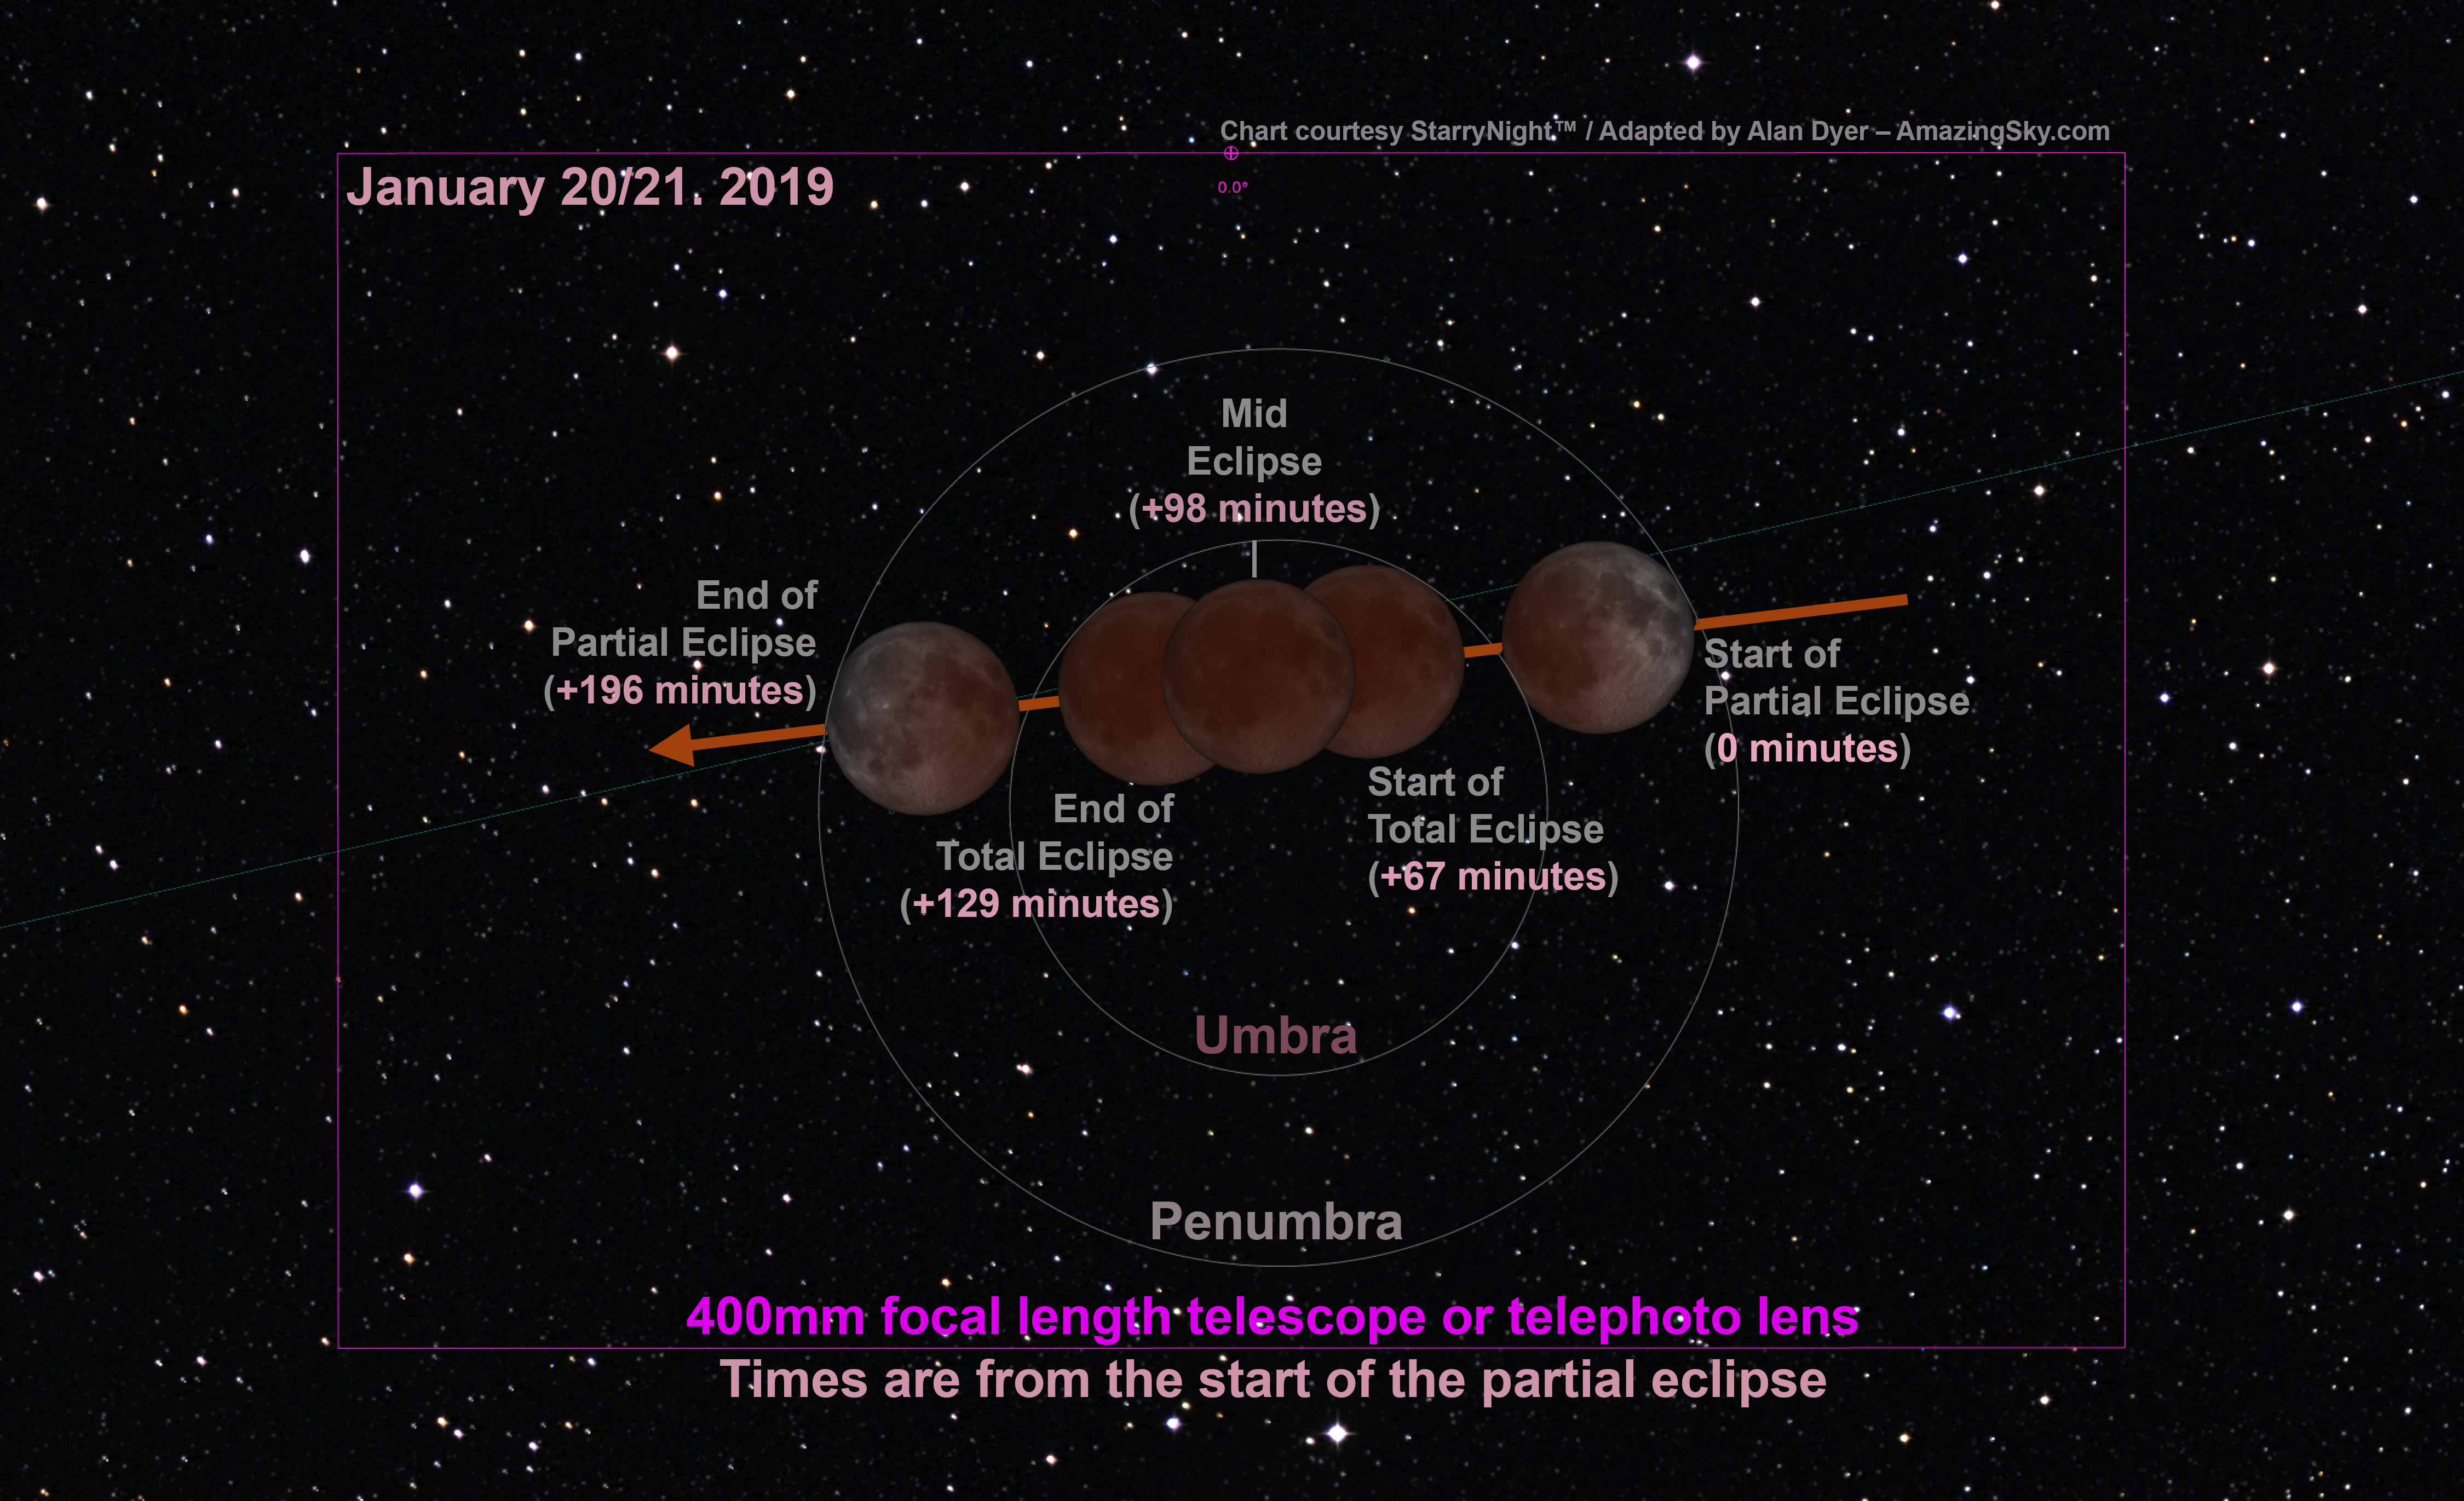
At this eclipse the partial phases last 67 minutes before and after totality.
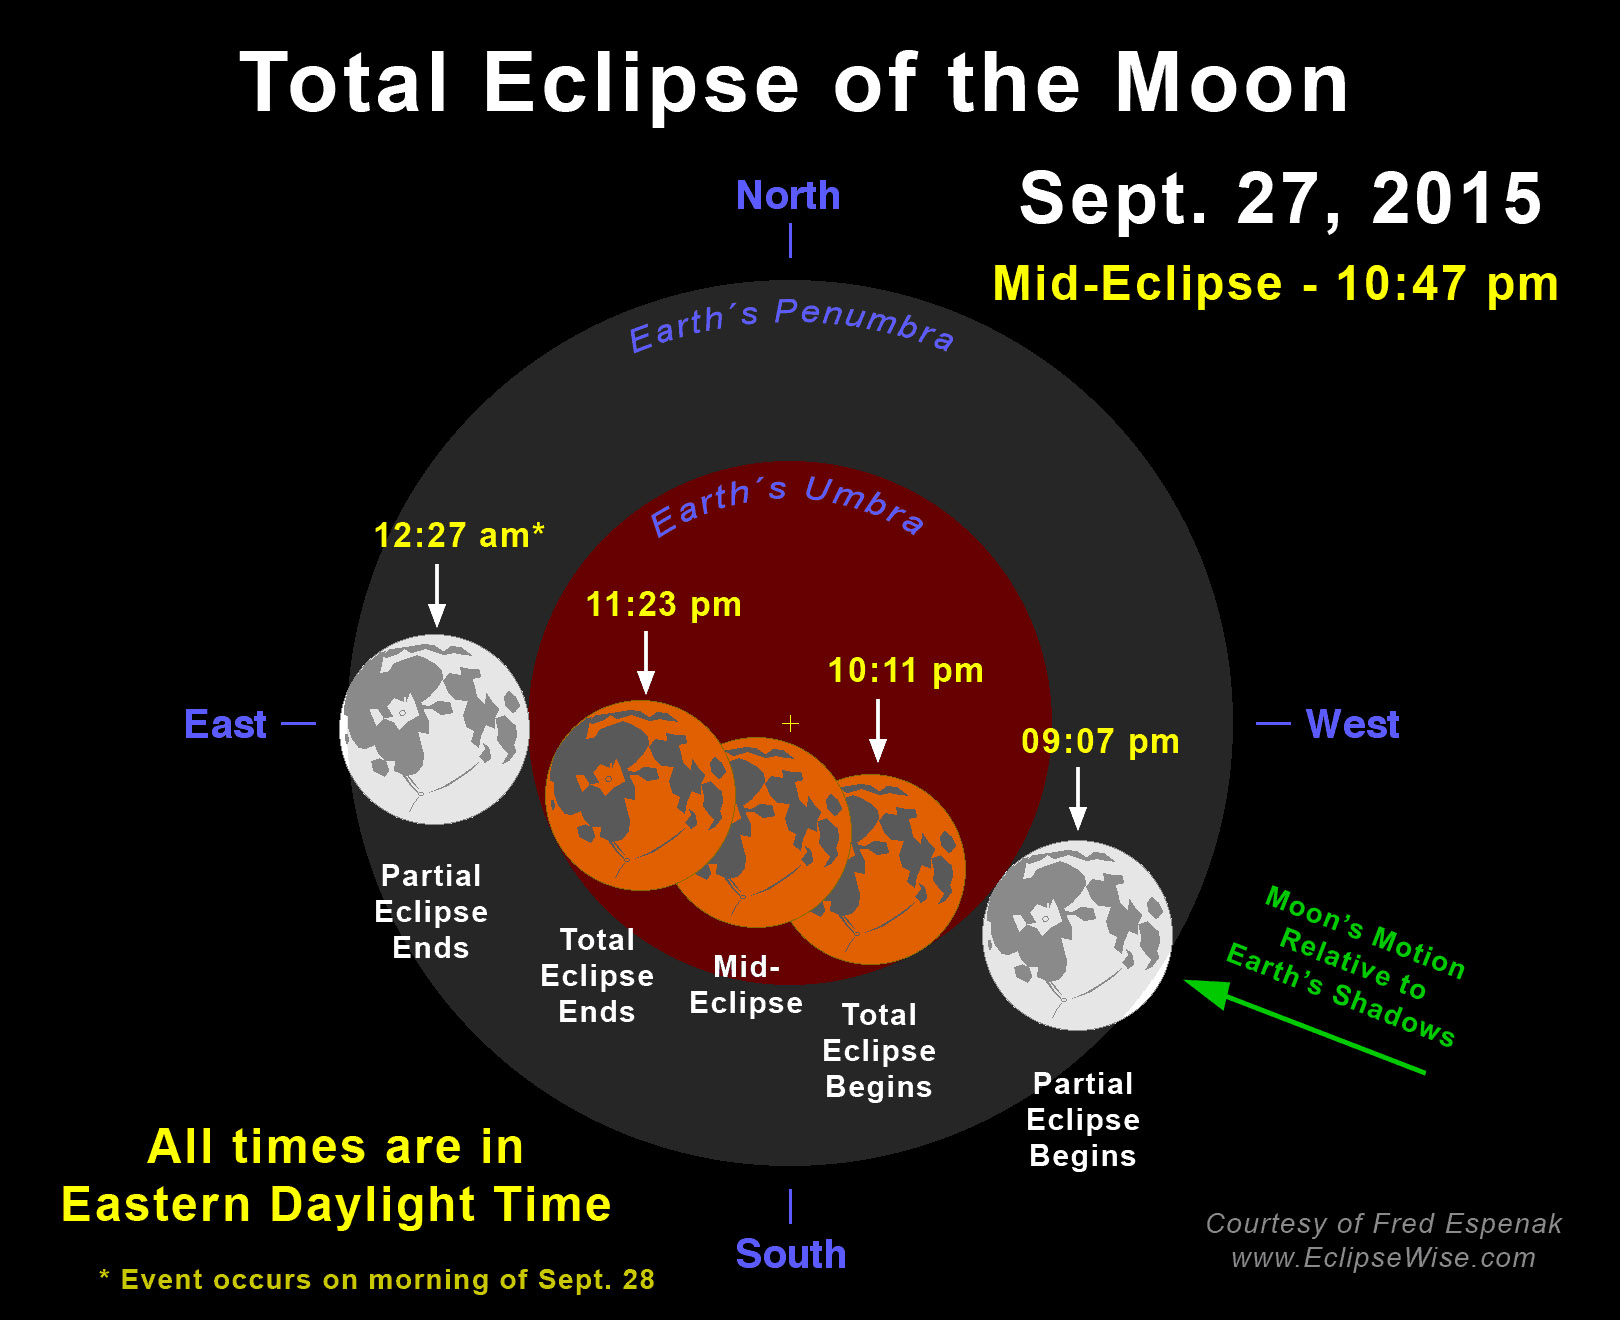
This shows the length of the eclipse phases relative to the start of the partial eclipse as the Moon begins to enter the umbra at right. The Moon’s orbital motion takes it through the umbra from right to left (west to east) relative to the background stars. The visible eclipse ends 196 minutes (3 hours and 16 minutes) after it began. Click or tap on the charts to download a high-res version.
Once the Moon is completely immersed in the umbra, totality begins and lasts 62 minutes at this eclipse, a generous length.
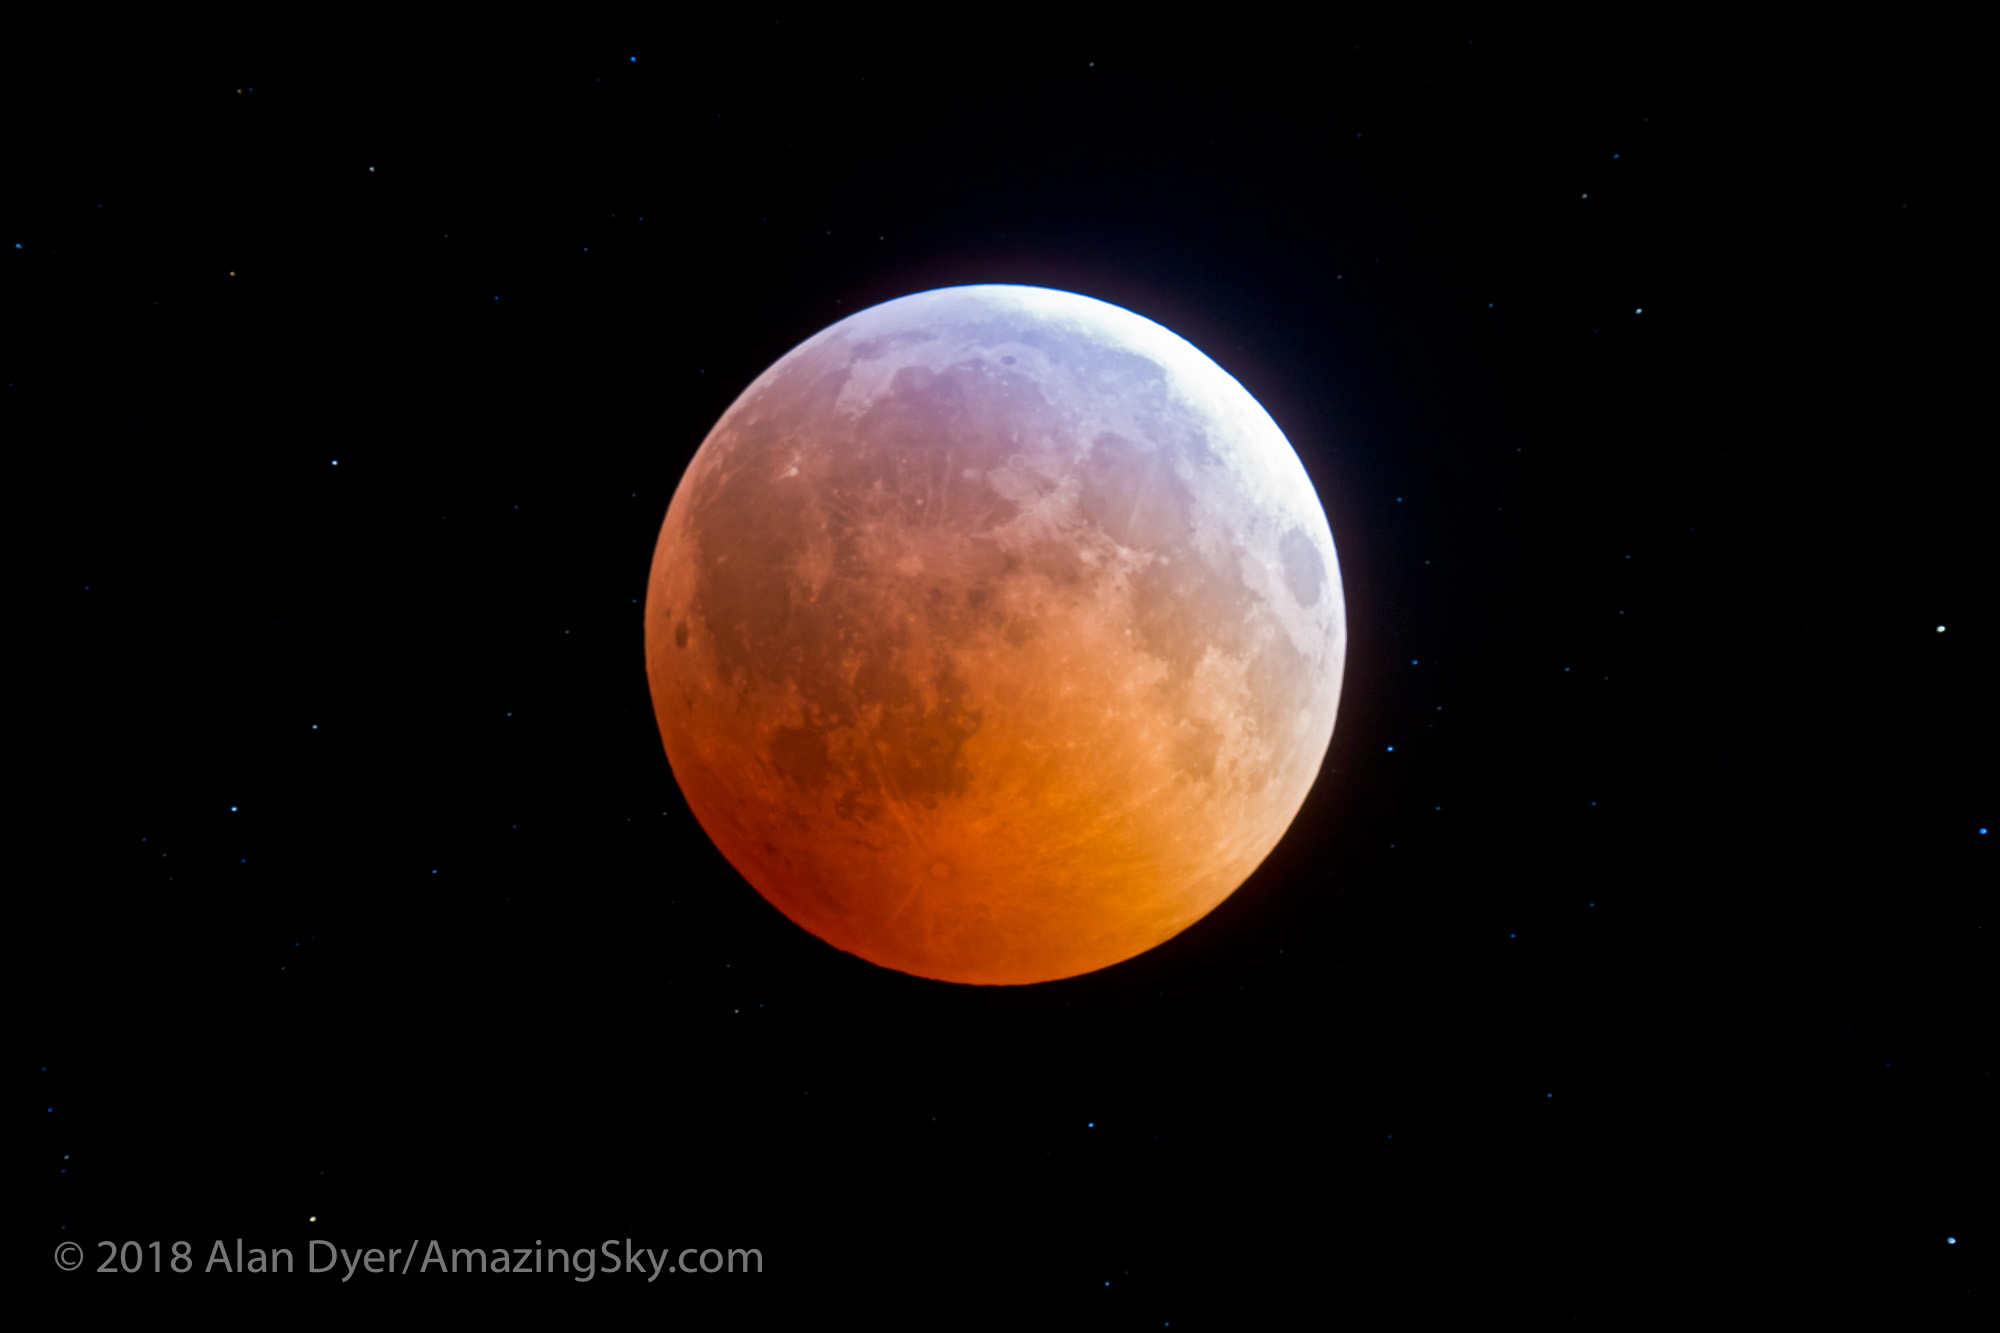
The Moon will appear darkest and reddest at mid-eclipse. During totality the lunar disk is illuminated only by red sunlight filtering through Earth’s atmosphere. It is the light of all the sunsets and sunrises going on around our planet.
And yes, it is perfectly safe to look at the eclipsed Moon with whatever optics you wish. Binoculars often provide the best view. Do have a pair handy!
Total eclipse of the Moon, December 20/21, 2010, taken from home with 130mm AP apo refractor at f/6 and Canon 7D at ISO 400 for 4 seconds, single exposure, shortly after totality began.
At this eclipse because the Moon passes across the north half of the umbra, the top edge of the Moon will always remain bright, as it did above in 2010, looking like a polar cap on the reddened Moon.
Near the bright edge of the umbra look for subtle green and blue tints the eye can see and that the camera can capture.
Where is the Eclipse?
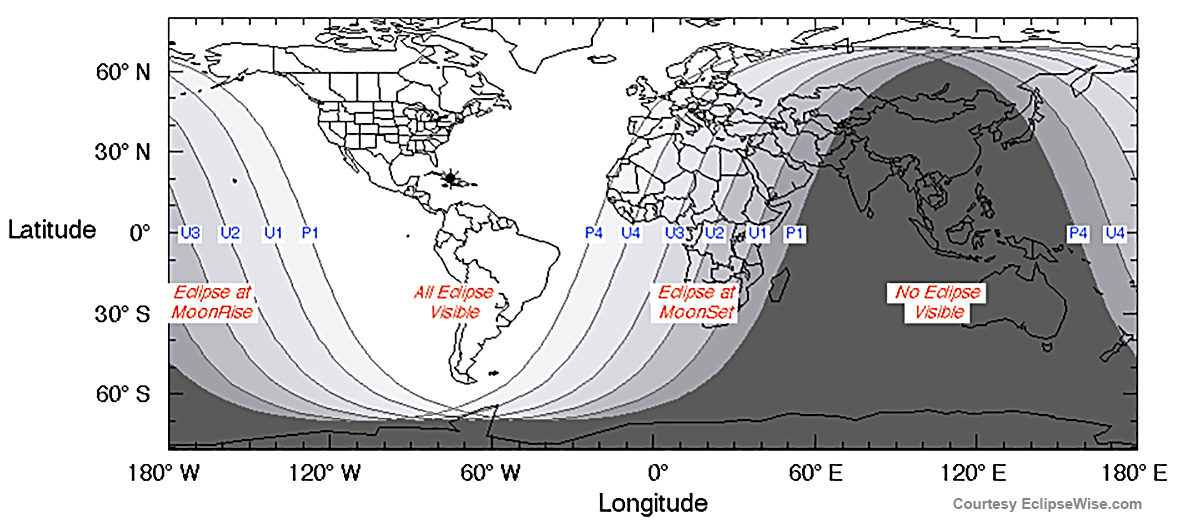
As the chart below shows, all of the Americas can see the entire eclipse, with the Moon high in the evening or late-night sky. For the record, the Moon will be overhead at mid-eclipse at local midnight from Cuba!
All of the Americas can see this eclipse. The eclipse gets underway as the Moon sets at dawn over Europe. Diagram courtesy EclipseWise.com
I live in Alberta, Canada, at a latitude of 50 degrees North. And so, the sky charts I provide here are for my area, where the Moon enters the umbral shadow at 8:35 p.m. MST with the Moon high in the east. By the end of totality at 10:44 p.m. MST the Moon shines high in the southeast. This sample chart is for mid-eclipse at my site.
The sky at mid-eclipse from my Alberta site. Created with the planetarium software Starry Night, from Simulation Curriculum.
I offer them as examples of the kinds of planning you can do to ensure great photos. I can’t provide charts good for all the continent because exactly where the Moon will be during totality, and the path it will take across your sky will vary with your location.
In general, the farther east and south you live in North America the higher the Moon will appear. But from all sites in North America the Moon will always appear high and generally to the south.
To plan your local shoot, I suggest using planetarium software such as the free Stellarium or Starry Night (the software I used to prepare the sky charts in this post), and photo planning apps such as The Photographer’s Ephemeris or PhotoPills.
The latter two apps present the sightlines toward the Moon overlaid on a map of your location, to help you plan where to be to shoot the eclipsed Moon above a suitable foreground, if that’s your photographic goal.
When is the Eclipse?
While where the Moon is in your sky depends on your site, the various eclipse events happen at the same time for everyone, with differences in hour due only to the time zone you are in.
While all of North America can see the entirety of the partial and total phases of this eclipse (lasting 3 hours and 16 minutes from start to finish), the farther east you live the later the eclipse occurs, making for a long, late night for viewers on the east coast.
Those in western North America can enjoy all of totality and be in bed at or before midnight.
Here are the times for the start and end of the partial and total phases. Because the penumbral phases produce an almost imperceptible darkening, I don’t list the times below for the start and end of the penumbral eclipse.
PM times are on the evening of January 20.
AM times are after midnight on January 21.
Note that while some sources list this eclipse as occurring on January 21, that is true for Universal Time (Greenwich Time) and for sites in Europe where the eclipse occurs at dawn near moonset.
For North America, if you go out on the evening of January 21 expecting to see the eclipse you’ll be a day late and disappointed!
Picking a Photo Technique
Lunar eclipses lend themselves to a wide range of techniques, from a simple camera on a tripod, to a telescope on a tracking mount following the sky.
If this is your first lunar eclipse I suggest keeping it simple! Select just one technique, to focus your attention on only one camera on a cold and late winter night.
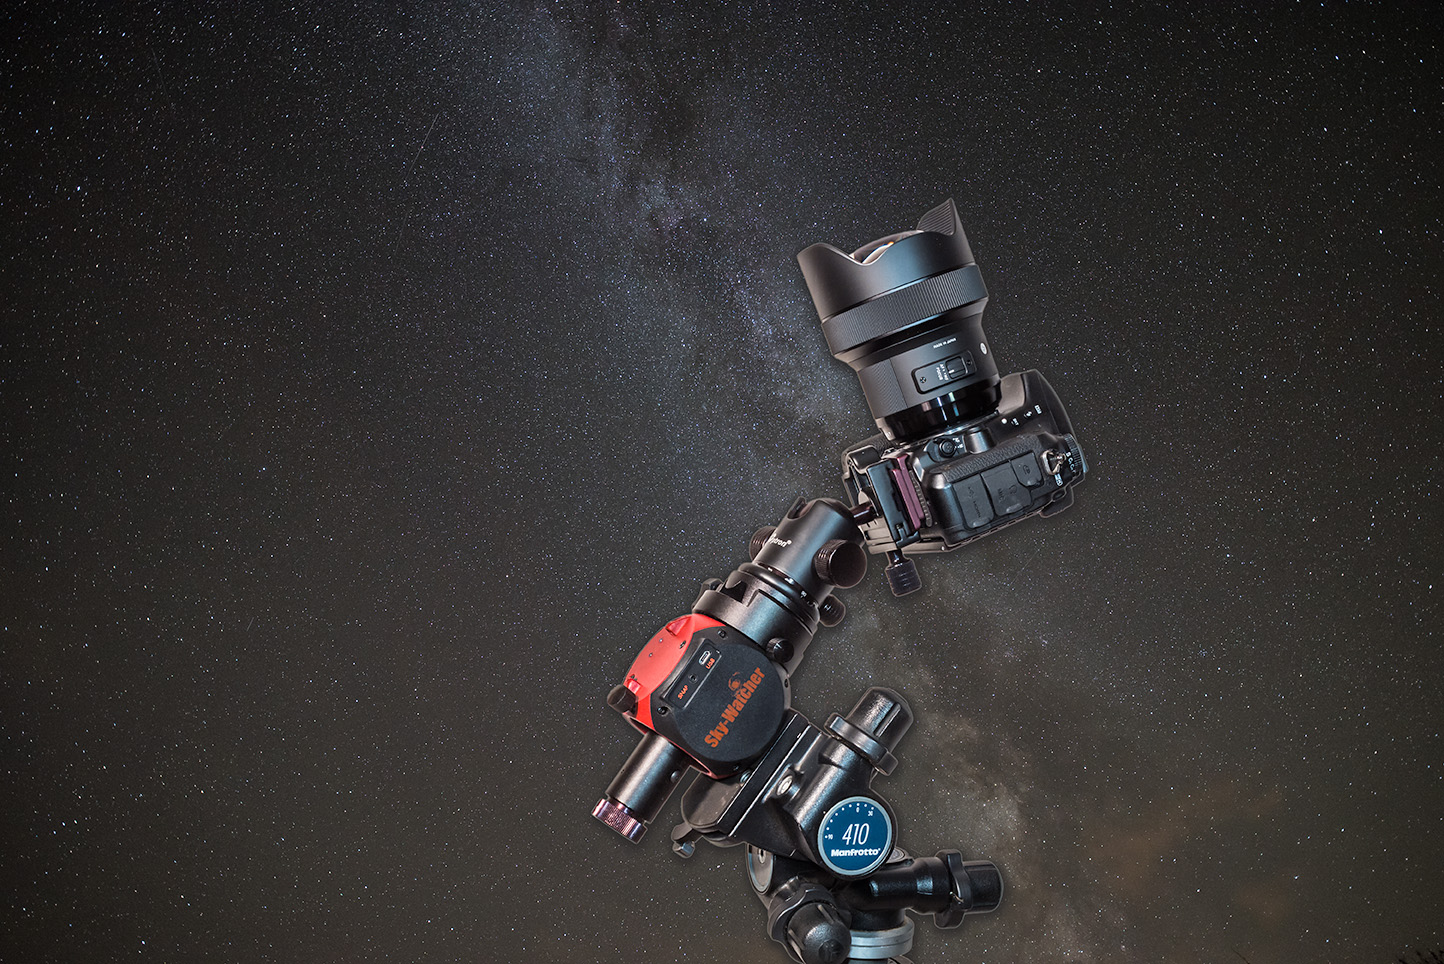
The total eclipse of the Moon of September 27, 2015, through a telescope, at mid-totality with the Moon at its darkest and deepest into the umbral shadow, in a long exposure to bring out the stars surrounding the dark red moon. This is a single exposure taken through a 92mm refractor at f/5.5 for 500mm focal length using the Canon 60Da at ISO 400 for 8 seconds. The telescope was on a SkyWatcher HEQ5 equatorial mount tracking at the lunar rate.
Then during the hour of totality take the time to enjoy the view through binoculars and with the unaided eye. No photo quite captures the glowing quality of an eclipsed Moon. But here’s how to try it.
Option 1: Simple — Camera-on-Tripod
The easiest method is to take single shots using a very wide-angle lens (assuming you also want to include the landscape below) with the camera on a fixed tripod. No fancy sky trackers are needed here.
During totality, with the Moon now dimmed and in a dark sky, use a good DSLR or mirrorless camera in Manual (M) mode (not an automatic exposure mode) for settings of 2 to 20 seconds at f/2.8 to f/4 at ISO 400 to 1600.
That’s a wide range, to be sure, but it will vary a lot depending on how bright the sky is at your site. Shoot at lots of different settings, as blending multiple exposures later in processing is often the best way to reproduce the scene as your eyes saw it.
Shoot at a high ISO if you must to prevent blurring from sky motion. However, lower ISOs, if you can use them by choosing a slower shutter speed or wider lens aperture, will yield less digital noise.
Focus carefully on a bright star, as per the advice below for telephoto lenses. Don’t just set the lens focus to infinity, as that might not produce the sharpest stars.
Total eclipse of the Moon, December 20/21, 2010, with 15mm lens at f/3.2 and Canon 5D MkII at ISO 1600 for a 1-minute tracked exposure. Without a tracker, use shorter exposures (less than 20 seconds) and higher ISOs or wider apertures to avoid trailing,
One scene to go for at this eclipse is similar to the above photo, with the reddened Moon above a winter landscape and shining east of Orion and the winter Milky Way. But that will require shooting from a dark site away from urban lights. But when the Moon is totally eclipsed, the sky will be dark enough for the Milky Way to appear.
Click or tap on any of the charts to download a high-resolution copy.
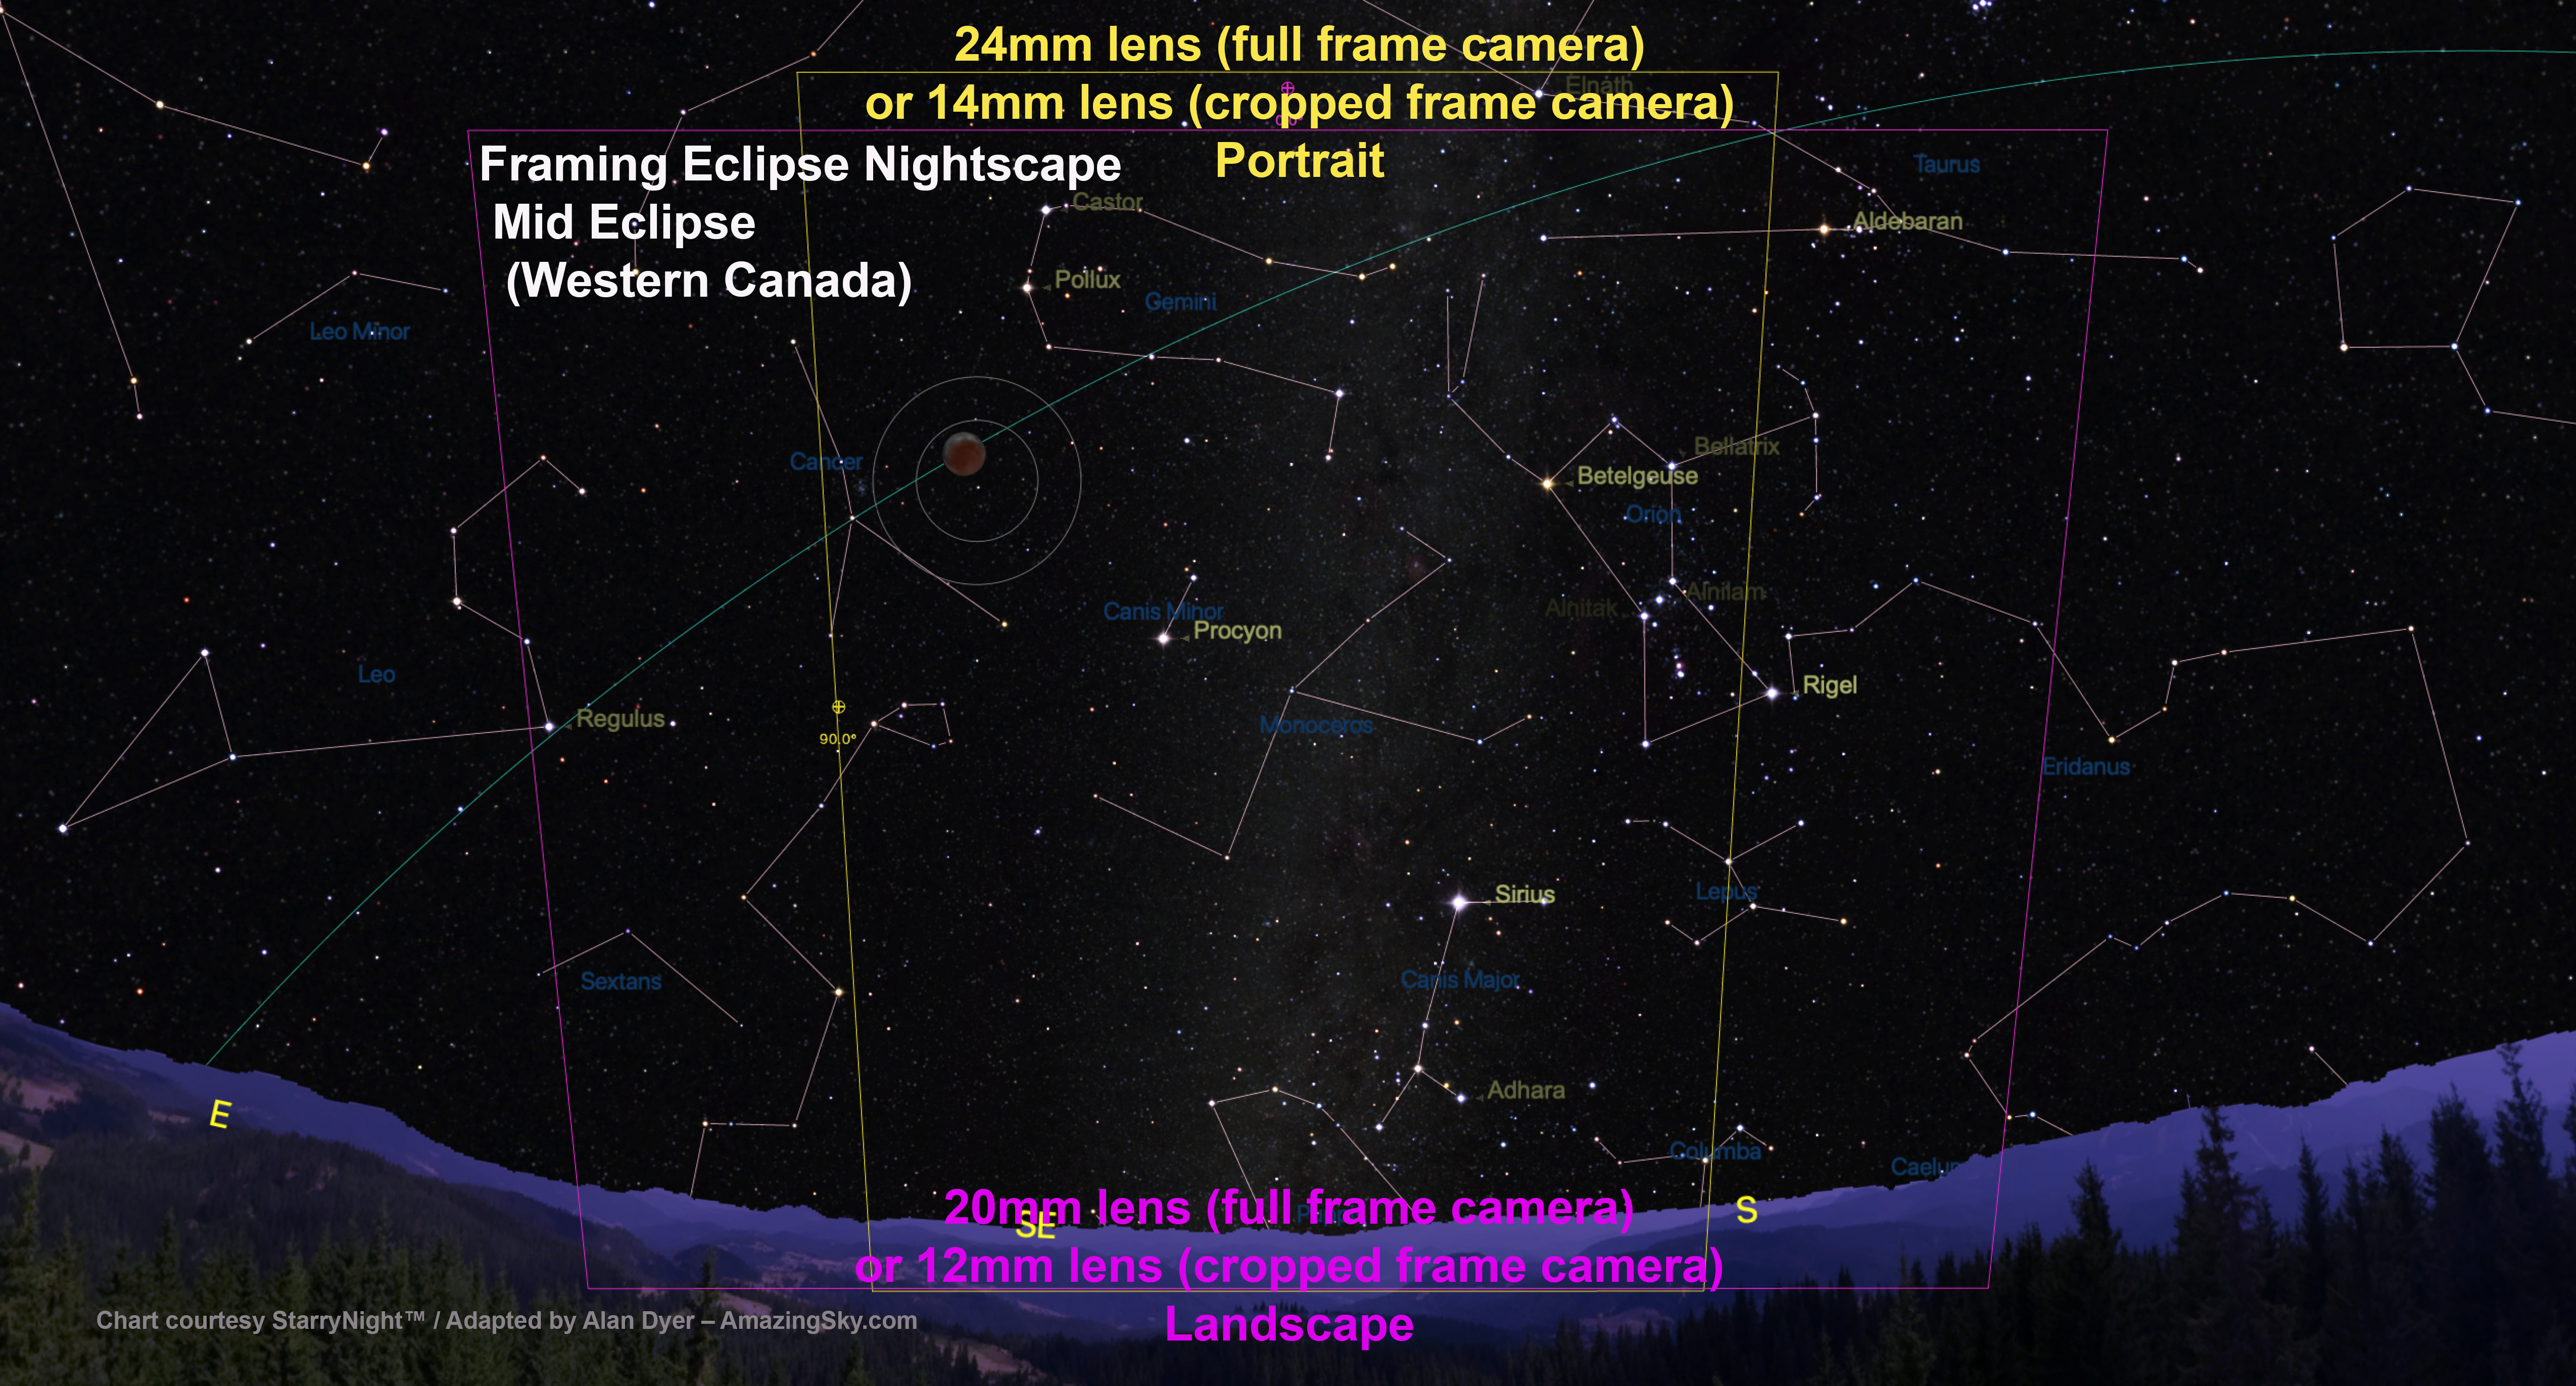
The high altitude of the Moon at mid-eclipse from North America (with it 40 to 70 degrees above the horizon) will also demand a lens as wide as 10mm to 24mm, depending whether you use portrait or landscape orientation, and if your camera uses a cropped frame or full frame sensor. The latter have the advantage in this category of wide-angle nightscape.
Alternatively, using a longer 14mm to 35mm lens allows you to frame the Moon beside Orion and the winter Milky Way, as above, but without the landscape. Again, this will require a dark rural site.
If you take this type of image with a camera on a fixed tripod, use high ISOs to keep exposures below 10 to 20 seconds to avoid star trailing. You have an hour of totality to shoot lots of exposures to make sure some will work best.
Total eclipse of the Moon, December 20/21, 2010, with Canon 5D MKII and 24mm lens at f2.8 for stack of four 2-minute exposures at ISO 800. Taken during totality using a motorized sky tracker. The eclipsed Moon is the red object above Orion, and the stars appear bloated due to high haze and fog rolling in.
If you have a sky tracker to follow the stars, as I did above, exposures can be much longer — perhaps a minute to pick up the Milky Way really well — and ISOs can be lower to avoid noise.
Option 1 Variation — Urban Eclipses
Unfortunately, point-and-shoot cameras and so-called “bridge” cameras, ones with non-interchangeable lenses, likely won’t have lenses wide enough to capture the whole scene, landscape and all. Plus their sensors will be noisy when used at high ISOs. Those cameras might be best used to capture moderate telephoto closeups at bright urban sites.
With any camera, at urban sites look for scenic opportunities to capture the eclipsed Moon above a skyline or behind a notable landmark. By looking up from below you might be able to frame the Moon beside a church spire, iconic building, or a famous statue using a normal or short telephoto lens, making this a good project for those without ultra-wide lenses.
Lunar eclipse, Feb 20, 2008 with a 135mm telephoto and Canon 20Da camera showing the Moon’s size with such a lens and cropped-frame camera. This is a blend of 8-second and 3-second exposures to bring out stars and retain the Moon. Both at ISO200 and f/2.8. Saturn is at lower left and Regulus at upper right.
Whatever your lens or subject, at urban sites expose as best you can for the foreground, trying to avoid any bright and bare lights in the frame that will flood the image with lens flares in long exposures.
Capturing such a scene during the deep partial phases might produce a brighter Moon that stands out better in an urban sky than will a photo taken at mid-totality when the Moon is darkest.
TIP: Practice, Practice, Practice!
With any camera, especially beginner point-and-shoots, ensure success on eclipse night by practicing shooting the Moon before the eclipse, during the two weeks of the waxing Moon leading up to Full Moon night and the eclipse.
The crescent Moon with Earthshine on the dark side of the Moon is a good stand-in for the eclipsed Moon. Set aside the nights of January 8 to 11 to shoot the crescent Moon. Check for exposure and focus. Can you record the faint Earthshine? It’s similar in brightness to the shadowed side of the eclipsed Full Moon.
The next week, on the nights of January 18 and 19, the waxing gibbous Moon will be closer to its position for eclipse night and almost as bright as the uneclipsed Full Moon, allowing some rehearsals for shooting it near a landmark.
Option 2: Advanced — Multiple Exposures
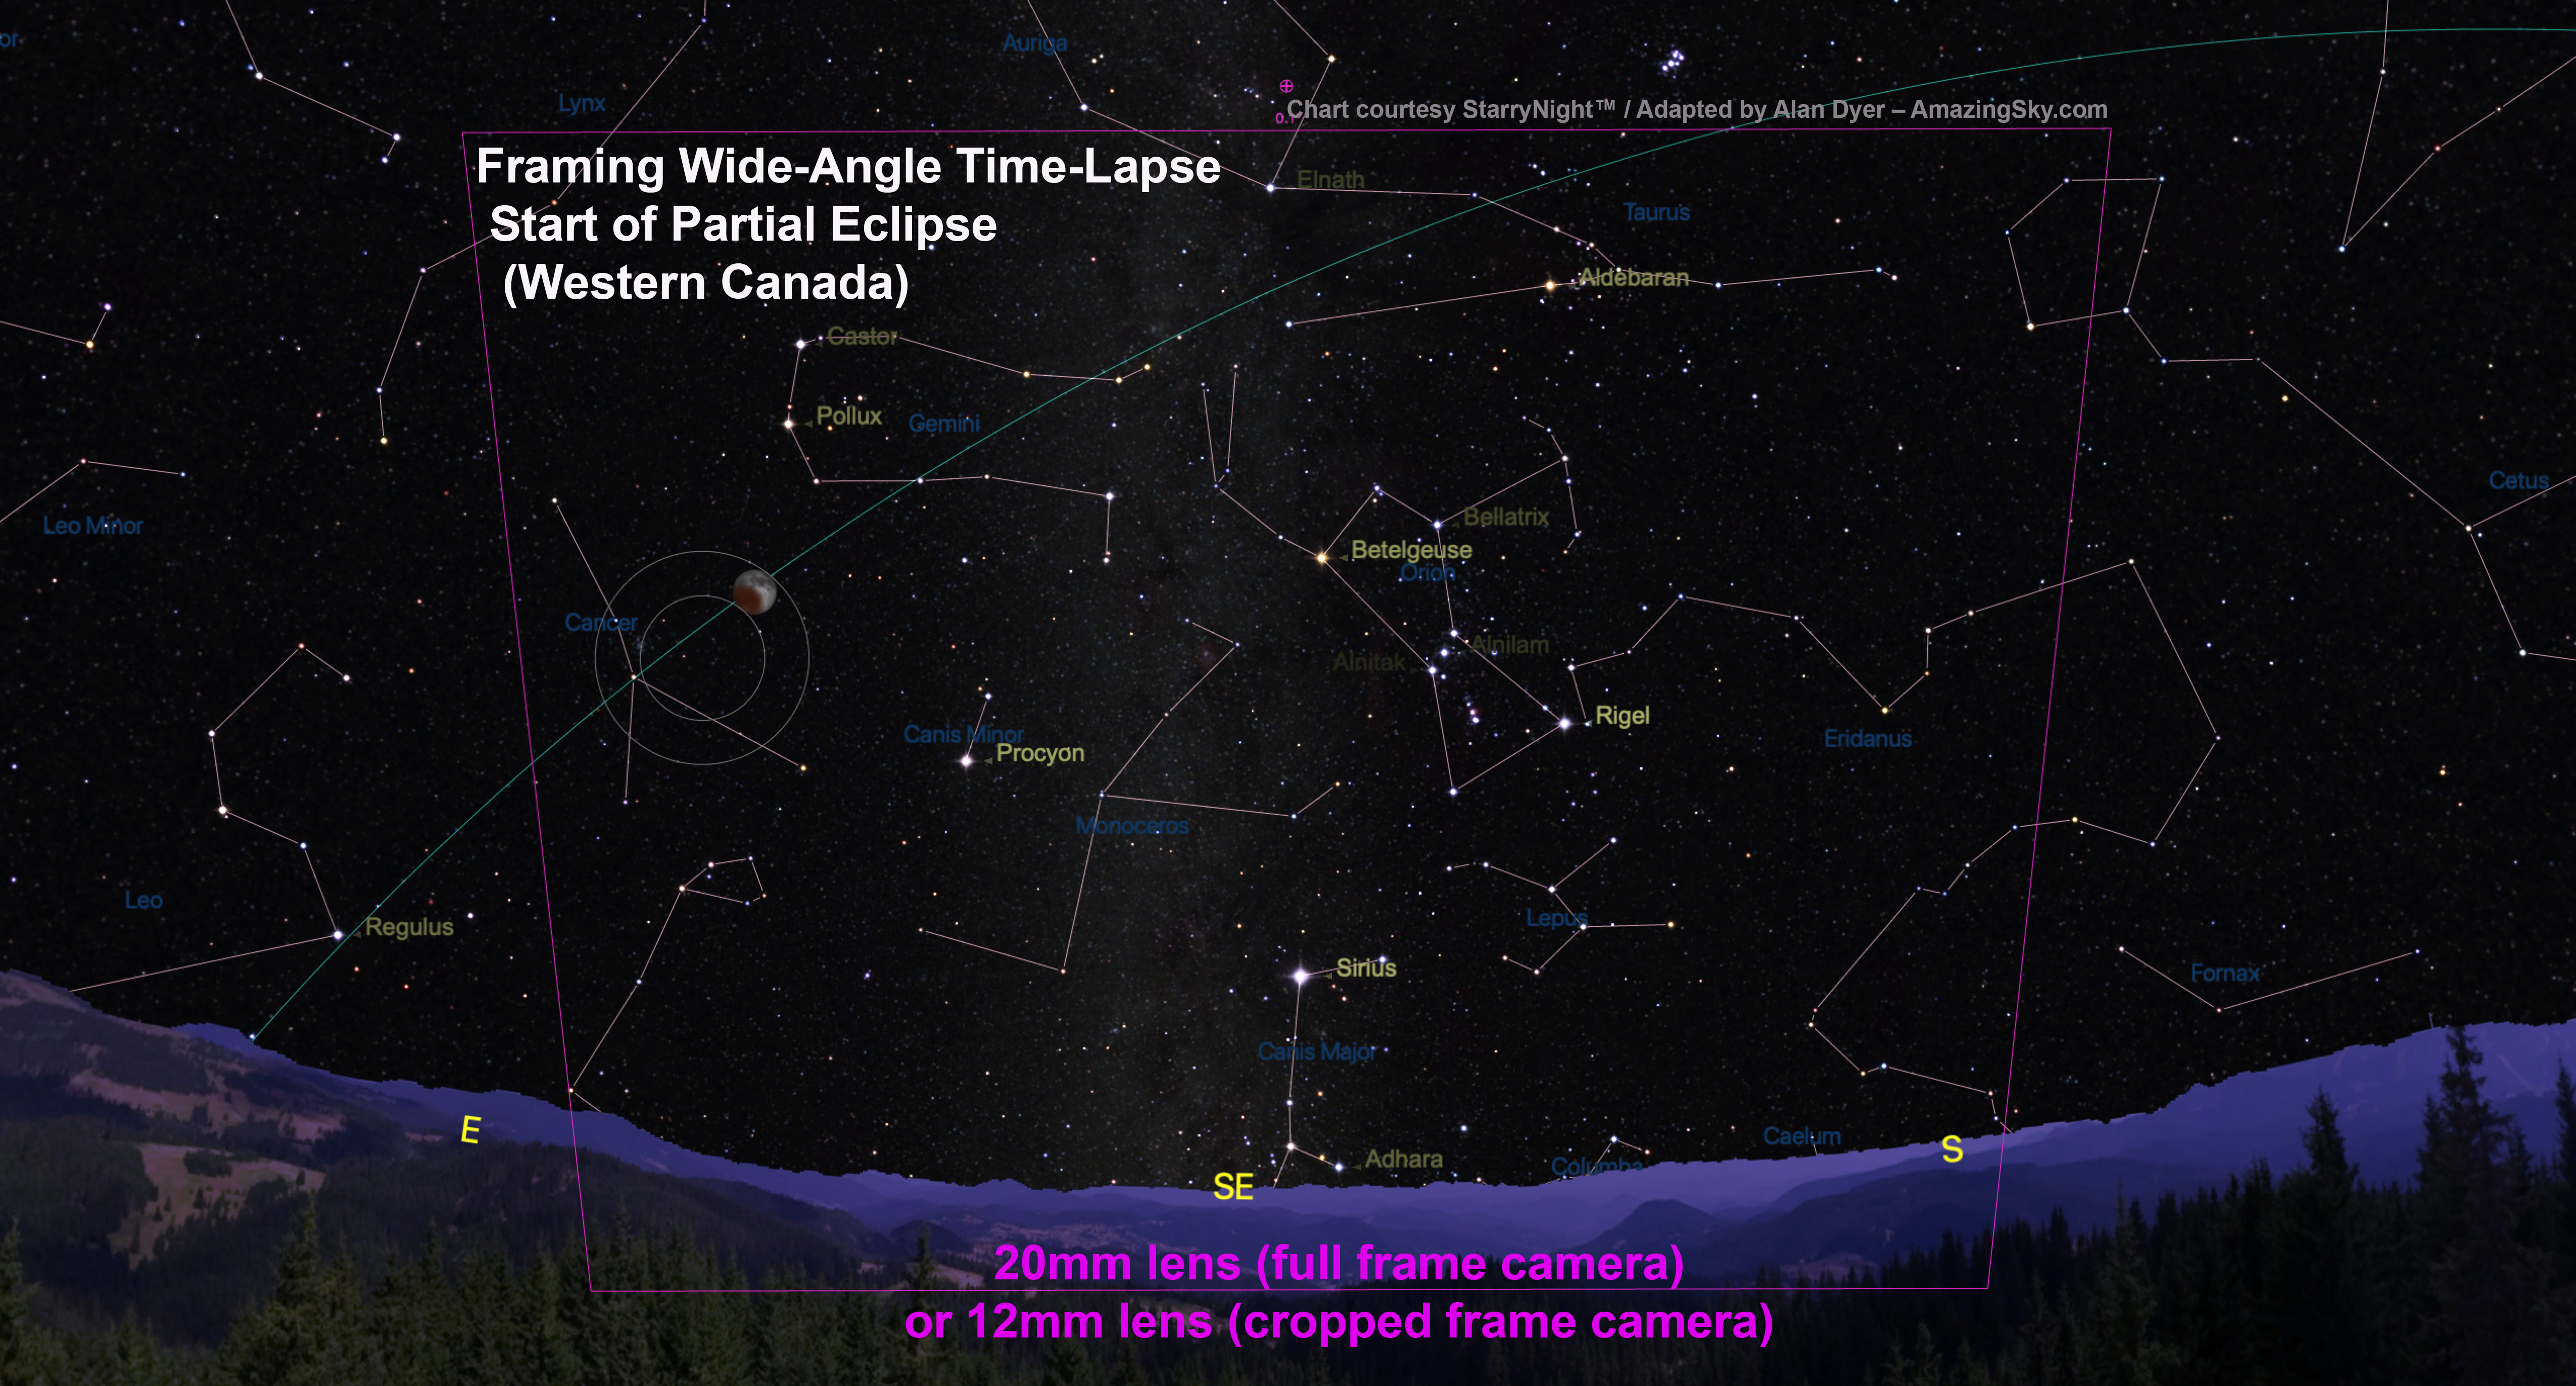
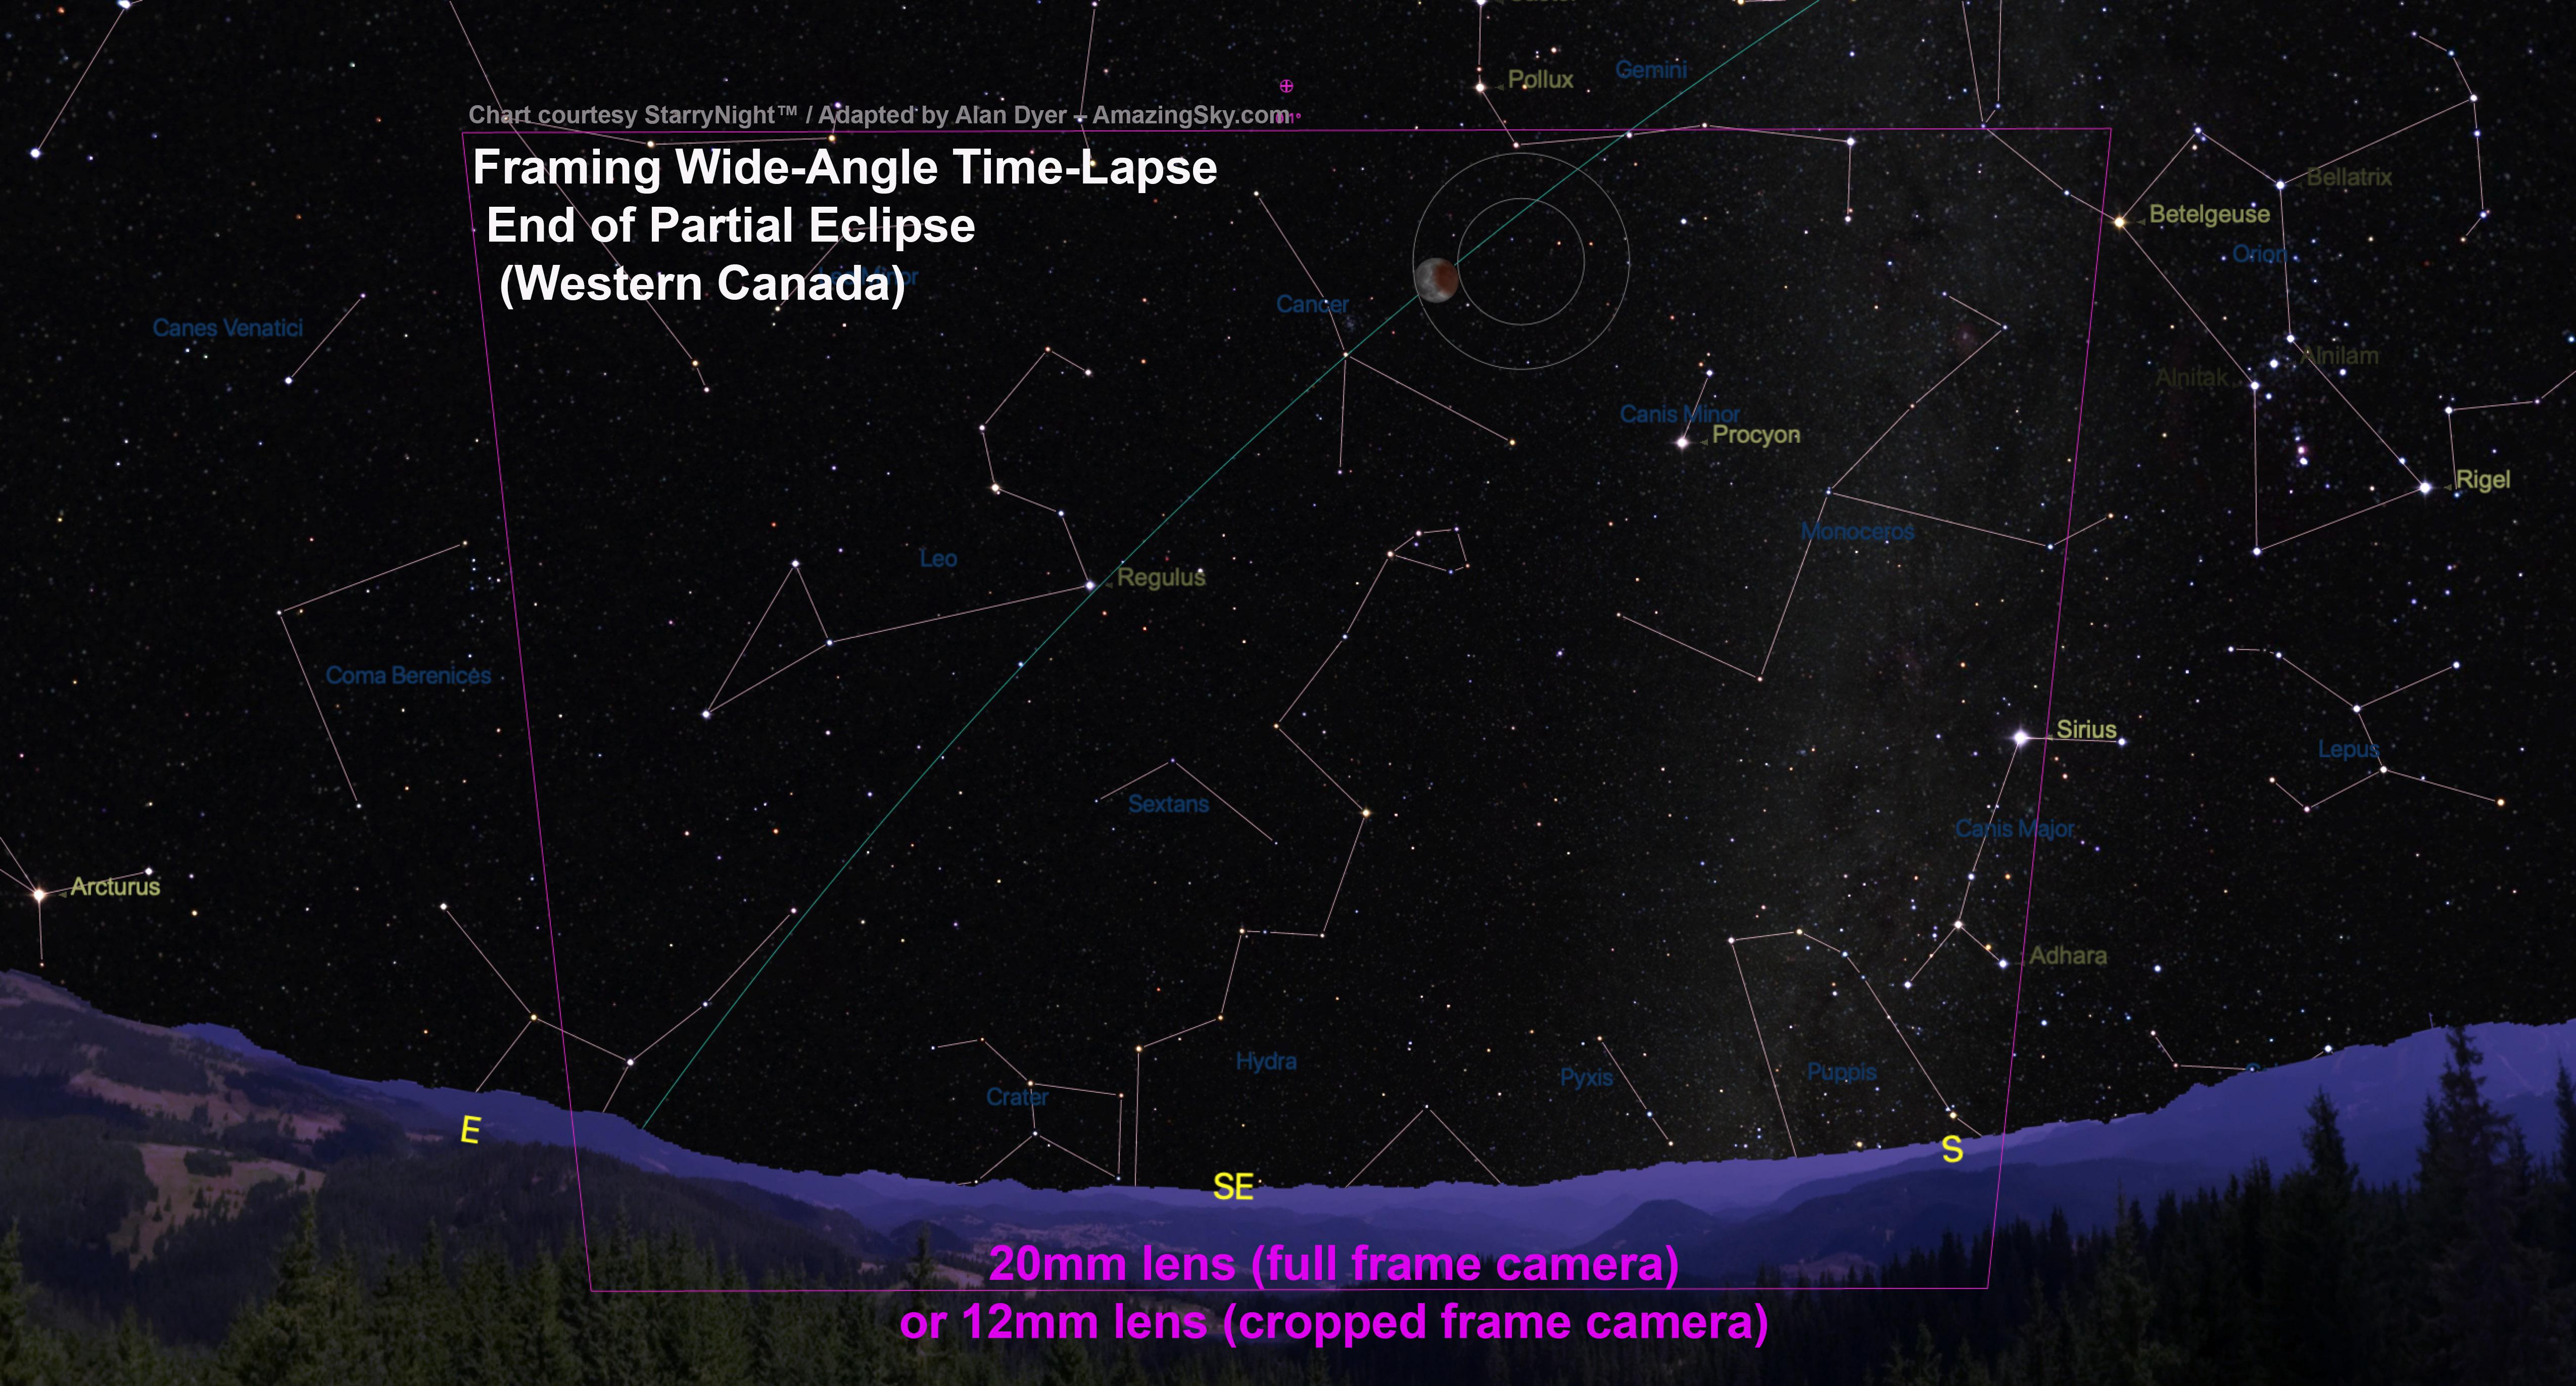
An advanced method is to compose the scene so the lens frames the entire path of the Moon for the 3 hours and 16 minutes from the start to the end of the partial eclipse.
This set of 3 charts shows the position of the Moon at the start, middle, and end of the eclipse, for planning lens choice and framing of the complete eclipse path. The location is Alberta, Canada.
As shown above, including the landscape will require at least a 20mm lens on a full frame camera, or 12mm lens on a cropped frame camera. However, these charts are for my site in western Canada. From sites to the east and south where the Moon is higher an even wider lens might be needed, making this a tough sequence to take.
With wide lenses, the Moon will appear quite small. The high altitude of the Moon and midnight timing won’t lend itself to this type of multiple image composite as well as it does for eclipses that happen near moonrise or moonset, as per the example below.
This is a multiple-exposure composite of the total lunar eclipse of Sunday, September 27, 2015, as shot from Writing-on-Stone Provincial Park, Alberta, Canada. For this still image composite of the eclipse from beginning to end, I selected just 40 frames taken at 5-minute intervals, out of 530 I shot in total, taken at 15- to 30-second intervals for the full time-lapse sequence included below.
A still-image composite with the lunar disks well separated will need shots only every 5 minutes, as I did above for the September 27, 2015 eclipse.
Exposures for any lunar eclipse are tricky, whether you are shooting close-ups or wide-angles, because the Moon and sky change so much in brightness.
As I did for the image below, for a still-image composite, you can expose just for the bright lunar disk and let the sky go dark.
Exposures for just the Moon will range from very short (about 1/500th second at f/8 and ISO 100) for the partials, to 1/2 to 2 seconds at f/2.8 to f/4 and ISO 400 for the totals, then shorter again (back to 1/500 at ISO 100) for the end shots when the Full Moon has returned to its normal brilliance.
That’ll take constant monitoring and adjusting throughout the shoot, stepping the shutter speed gradually longer thorough the initial partial phase, then shorter again during the post-totality partial phase.
You’d then composite and layer (using a Lighten blend mode) the well-exposed disks (surrounded by mostly black sky) into another background image exposed longer for 10 to 30 seconds at ISO 800 to 1600 for the sky and stars, shot at mid-totality.
To maintain the correct relative locations of the lunar disks and foreground, the camera cannot move.
The total lunar eclipse of April 4, 2015 taken from near Tear Drop Arch, in western Monument Valley, Utah. I shot the totality images during the short 4 minutes of totality. The mid-totality image is a composite of 2 exposures: 30 seconds at f/2.8 and ISO 1600 for the sky and landscape, with the sky brightening blue from dawn twilight, and 1.5 seconds at f/5.6 and ISO 400 for the disk of the Moon itself. Also, layered in are 26 short exposures for the partial phases, most being 1/125th sec at f/8 and ISO 400, with ones closer to totality being longer, of varying durations.
That technique works best if it’s just a still image you are after, such as above. This image is such a composite, of the April 4, 2015 total lunar eclipse from Monument Valley, Utah.
This type of composite takes good planning and proper exposures to pull off, but will be true to the scene, with the lunar disk and its motion shown to the correct scale and position as it was in the sky. It might be a composite, but it will be accurate.
My Rant!
That’s in stark contrast to the flurry of ugly “faked” composites that will appear on the web by the end of the day on January 21, ones with huge telephoto Moons pasted willy-nilly onto a wide-angle sky.
Rather than look artistic, most such attempts look comically cut-and-pasted. They are amateurish. Don’t do it!
Option 3: Advanced — Wide-Angle Time-Lapses
If it’s a time-lapse movie you want (see the video below), take exposures every 10 to 30 seconds, to ensure a final movie with smooth motion.
Unlike shooting for a still-image composite, for a time lapse each frame will have to be exposed well enough to show the Moon, sky, and landscape.
That will require exposures long enough to show the sky and foreground during the partial phases — likely about 1 to 4 seconds at f/2.8 and ISO 400. In this case, the disk of the partially-eclipsed Moon will greatly overexpose, as it does toward the end of the above time-lapse from September 27, 2015..
But the Moon will darken and become better exposed during the late stages of the partial eclipse and during totality when a long exposure — perhaps now 10 to 20 seconds at f/2.8 and ISO 800 to 1600 — will record the bright red Moon amid the stars and winter Milky Way.
Maintaining a steady cadence during the entire sequence requires using an interval long enough throughout to accommodate the expected length of the longest exposure at mid-totality, with similar camera settings to what you’ve used for other Milky Way nightscapes. If you’ve never taken those before, then don’t attempt this complex sequence.
After totality, as the Moon and sky re-brighten, exposures will have to shorten again, andsymmetrically in reverse fashion for the final partial phases.
Such a time-lapse requires consistently and incrementally adjusting the camera over the three or more hours of the eclipse on a cold winter night. The high altitude of the Moon and its small size on the required wide angle lenses will make any final time lapse less impressive than at eclipses that occur when the Moon is rising or setting.
But … the darkening of the sky and “turning on” of the Milky Way during totality will make for an interesting time-lapse effect. The sky and scene will be going from a bright fully moonlit night to effectively a dark moonless night, then back to moonlit. It’s a form of “holy grail” time lapse, requiring advanced processing with LRTimelapse software.
Again, do not move the camera. Choose your lens and frame your camera to include the entire path of the Moon for as long as you plan to shoot.
Even if the final movie looks flawed, individual frames should still produce good still images, or a composite built from a subset of the frames.
Option 4: Simple — Telephoto Close-Ups
The first thought of many photographers is to shoot the eclipse with as long a telephoto lens as possible. That can work, but …
The harsh reality is that the Moon is surprisingly small (only 1/2-degree across) and needs a lot of focal length to do it justice, if you want a lunar close-up.
You’ll need a 300mm to 800mm lens. Unfortunately, the Moon and sky are moving and any exposures over 1/4 to 2 seconds (required during totality) will blur the Moon badly if its disk is large on the frame and all you are using is a fixed tripod.
If you don’t have a tracking mount, one solution is to keep the Moon’s disk small (using no more than a fast f/2 or f/2.8 135mm to 200mm lens) and exposures short by using a high ISO speed of 1600 to 3200. Frame the Moon beside the Beehive star cluster as I show below.
Take a range of exposures. But … be sure to focus!
TIP: Focus! And Focus Again!
Take care to focus precisely on a bright star using Live View. That’s true of any lens but especially telephotos and telescopes.
Focus not just at the start of the night, but also more than once again later at night. Falling temperatures on a winter night will cause long lenses and telescopes to shift focus. What was sharp at the start of the eclipse won’t be by mid totality.
The catch is that if you are shooting for a time-lapse or composite you likely won’t be able to re-point the optics to re-focus on a star in mid-eclipse. In that case, be sure to set up the gear well before you want to start shooing to let it cool to ambient air temperature. Now focus on a star, then frame the scene. Then hope the lens doesn’t shift off focus. You might be able to focus on the bright limb of the Moon but it’s risky.
Fuzzy images, not bad exposures, are the ruin of most attempts to capture a lunar eclipse, especially with a telephoto lens. And the Moon itself, especially during totality, is not a good target to focus on. Use a bright star. The winter sky has lots!
Option 5: Advanced — Tracked Telescopic Close-Ups
If you have a mount that can be polar aligned to track the sky, then many more options are open to you.
You can use a telescope mount or one of the compact and portable trackers, such as the Sky-Watcher Star Adventurer (I show the Mini model above) or iOptron Sky Tracker units. While these latter units work great, you are best to keep the payload weight down and your lens size well under 300mm.
That’s just fine for this eclipse, as you really don’t need a frame-filling Moon. The reason is that the Moon will appear about 6 degrees west of the bright star cluster called the Beehive, or Messier 44, in Cancer.
As shown above, a 135mm to 200mm lens will frame this unique pairing well. For me, that will be the signature photo of this eclipse. The pairing can happen only at lunar eclipses that occur in late January, and there won’t be any more of those until 2037!
That’s the characteristic that makes this eclipse rare and unique, not that it’s a “super-duper, bloody, wolf Moon!” But it doesn’t make for a catchy headline.
A High Dynamic Range composite of 7 exposures of the Dec 20/21, 2010 total lunar eclipse, from 1/2 second to 30 seconds, to show the more normally exposed eclipsed Moon with the star cluster M35, at left, in Gemini, to show the scene as it appeared in binoculars. Each tracked photo taken with a 77mm Borg apo refractor at f/4.2 (300mm focal length) and Canon 5D MkII at ISO 1600.
Exposures to show the star cluster properly might have to be long enough (30 to 120 seconds) that the Moon overexposes, even at mid-totality. If so, take different exposures for the Moon and stars, then composite them later, as I did above for the December 20, 2010 eclipse near the Messier 35 star cluster in Gemini.
If really you want to shoot with even more focal length for framing just the Moon, a monster telephoto lens will work, but a small telescope such as an 80mm aperture f/6 to f/7 refractor will provide enough focal length and image size at much lower cost and lighter weight, and be easier to attach to a telescope mount.
But even with a 500mm to 800mm focal length telescope the Moon fills only a small portion of the frame, though cropped frame cameras have the advantage here. Use one if it’s a big Moon you’re after!
No matter the camera, the lens or telescope should be mounted on a solid equatorial telescope mount that you must polar align earlier in the night to track the sky.
Alternatively, a motorized Go To telescope on an alt-azimuth mount will work, but only for single shots. The rotation of the field with alt-az mounts will make a mess of any attempts to shoot multiple-exposure composites or time-lapses, described below.
Whatever the mount, for the sharpest lunar disks during totality, use the Lunar tracking rate for the motor.
This series shows the need to constantly shift exposure by lengthening the shutter speed as the eclipse progresses. Do the same to shorten the exposure after totality. The exposures shown here are typical.
Assuming an f-ratio of f/6 to f/8, exposures will vary from as short as 1/250th second at ISO 100 to 200 for the barely eclipsed Moon, to 4 to 20 seconds at ISO 400 to 1600 for the Moon at mid-totality.
It’s difficult to provide a precise exposure recommendation for totality because the brightness of the Moon within the umbra can vary by several stops from eclipse to eclipse, depending on how much red sunlight manages to make it through Earth’s atmospheric filter to light the Moon.
TIP: Shoot for HDR
Total eclipse of the Moon, December 20/21, 2010, with 5-inch refractor at f/6 (780mm focal length) and Canon 7D (cropped frame camera) at ISO 400. This is an HDR blend of 9 images from 1/125 second to 2 seconds, composited in Photoshop. Note the blue tint along the shadow edge.
As I did above, during the deep partial phases an option is to shoot both long, multi-second exposures for the red umbra and short, split-second exposures for the bright part of the Moon not yet in the umbra.
Take 5 to 7 shots in rapid succession, covering the range needed, perhaps at 1-stop increments. Merge those later with High Dynamic Range (HDR) techniques and software, or with luminosity masks.
Even if you’re not sure how to do HDR processing now, shoot all the required exposures anyway so you’ll have them when your processing skills improve.
Option 6: Advanced — Close-Up Composites and Time-Lapses
With a tracking telescope on an equatorial mount you could fire shots every 10 to 30 seconds, and then assemble them into a time-lapse movie, as below.
But as with wide-angle time-lapses, that will demand constant attention to gradually and smoothly shift exposures, ideally by 1/3rd-stop increments every few shots during the partial and total phases. Make lots of small adjustments, rather than fewer large ones.
If you track at the lunar rate, as I did above, the Moon should stay more or less centred while it drifts though the stars, assuming your mount is accurately polar aligned, an absolutely essential prerequisite here.
Composite image digitally created in Photoshop of images taken during October 27, 2004 total lunar eclipse, from Alberta Canada. Images taken through 5-inch apo refractor at f/6 with Canon Digital Rebel 300D camera at ISO 200.
Conversely, track at the sidereal rate and the stars will stay more or less fixed while the Moon drifts through the frame from right to left (west to east) as I show above in a composite of the October 27, 2004 eclipse.
But such a sequence takes even more careful planning to position the Moon correctly at the start of the sequence so it remains “in frame” for the duration of the eclipse, and ends up where you want at the end.
In the chart below, north toward Polaris is at the top of the frame. Position the Moon at the start of the eclipse so it ends up just above the centre of the frame at mid-eclipse. Tricky!
Repeated from earlier, this chart shows the path of the Moon through the north half of the umbra, a path that will be the same for any site, as will be the timing. North is up here.
As I show above, for this type of “Moon-thru-shadow” sequence a focal length of about 400mm is ideal on a full frame camera, or 300mm on a cropped frame camera.
From such a time-lapse set you could also use several frames selected from key stages of the eclipse, as I did in 2004, to make up a multiple-image composite showing the Moon moving through the Earth’s shadow.
Again, planetarium software such as Starry Night I used above, which can be set to display the field of view of the camera and lens of your choice, is essential to plan the shoot. Don’t attempt it without the right software to plan the framing.
I would consider the telescopic time-lapse method the most challenging of techniques. Considering the hour of the night and the likely cold temperatures, your best plan might be to keep it simple.
It’s what I plan to do.
I’ll be happy to get a tracked telephoto close-up of the Moon and Beehive cluster as my prime goal, with a wide-angle scene of the eclipsed Moon beside Orion and the Milky Way as a bonus. A few telescope close-ups will be even more of a bonus.
The Astrospheric website, with astronomy-oriented weather predictions. It’s also available as a great mobile app.
However, just finding clear skies might be the biggest challenge!
Try the Astrospheric app for astronomy-oriented weather predictions. The Environment Canada data it uses has led me to clear skies for several recent eclipses that other observers in my area missed.
It’ll be worth the effort to chase!
The next total eclipse of the Moon anywhere on Earth doesn’t occur until May 26, 2021 in an event visible at dawn from Western North America. The next total lunar eclipse visible from all of North America comes a lunar year later, on May 15, 2022.
Total Lunar Eclipse from Alan Dyer on Vimeo.
I leave you with a music video of the lunar eclipse of September 27, 2015 that incorporates still and time-lapse sequences shot using all of the above methods.
Prospects looked bleak for seeing the January 31 total eclipse of the Moon. A little planning, a chase, and a lot of luck made it possible.
A mid-winter eclipse doesn’t bode well. Especially one in the cold dawn hours. Skies could be cloudy. Or, if they are clear, temperatures could be -25° C.
I managed to pull this one off, not just seeing the eclipse of the Moon, but getting a few photos.
The secret was in planning, using some helpful apps …
Starry Night™ / Simulation Curriculum
Because this eclipse was occurring before dawn for western North America the eclipsed Moon was going to be in the west, setting.
To plan any shoot the first app I turn to is the desktop planetarium program Starry Night™.
Shown above, the program simulates the eclipse with the correct timing, accurate appearance, and location in the sky at your site. You can set up indicators for the fields of various lenses, to help you pick a lens. The yellow box shows the field of view of a 50mm lens on my full-frame camera, essential information for framing the scene.
With that information in mind, the plan was to shoot the Moon over the Rocky Mountains, which lie along the western border of Alberta.
The original plan was a site in Banff on the Bow Valley Parkway looking west toward the peaks of the Divide.
But then the next critical information was the weather.
For that I turned to the website ClearDarkSky.com. It uses information from Environment Canada’s Astronomy forecasts and weather maps to predict the likelihood of clouds at your site. The day before the eclipse this is what it showed.
ClearSkyChart
Not good! Home on the prairies was not an option. While Banff looked OK, the best prospects were from farther south in the Crowsnest Pass area of Alberta, as marked. So a chase was in order, involving a half-day drive south.
But what actual site was going to be useful? Where could I set up for the shot I wanted?
I needed a spot off a main highway but drivable to, and with no trees in the way. I did not know the area, but Allison Road looked like a possibility.
The TPE app shows the direction to the Sun and Moon to help plan images by day. And in its night mode it can show where the Milky Way is. Here, the thin blue line is showing the direction to the Moon during totality, showing it to the south of Mt. Tecumseh. I wanted the Moon over the mountains, but not behind a mountain!
With a possible site picked out, it was time to take a virtual drive with Google Earth.
Google Earth Street View
The background map TPE uses is from Google Earth. But the actual Google Earth app also offers the option of a Street View for many locations.
Above is its view from along Allison Road, on the nice summer day when the Google camera car made the drive. But at least this confirms there are no obstructions or ugly elements to spoil the scene, or trees to block the view.
But there’s nothing like being there to be sure. It looks a little different in winter!
Theodolite App
After driving down to the Crowsnest Pass the morning before, the first order of the day upon arrival was to go to the site before it got dark, to see if it was usable.
I used the mobile app Theodolite to take images (above) that superimpose the altitude and azimuth (direction) where the camera was aimed. It confirms the direction where the Moon will be is in open sky to the left of Tecumseh peak. And the on-site inspection shows I can park there!
All set?
There is one more new and very powerful app that provides another level of planning. From The Photographer’s Ephemeris, you can hand off your position to a companion mobile app (for iOS only) called TPE 3D …
TPE 3D with 50mm lens field
It provides elevation maps and places you on site, with the actual skyline around you drawn in. And with the Moon and stars in the sky at their correct positions.
While it doesn’t simulate the actual eclipse, it sure shows an accurate sky … and what you’ll frame with your lens with the actual skyline in place.
Compare the simulation, above, to the real thing, below:
This is a blend of a 15-second exposure for the sky and foreground, and a shorter 1-second exposure for the Moon to prevent its disk from being overexposed, despite it being dim and deep red in totality. Both were at f/2.8 with the 50mm Sigma lens on the Canon 6D MkII at ISO 1600.
Pretty amazing!
Zooming out with TPE 3D provides this preview of a panorama I hoped to take.
TPE 3D zoomed out for 11mm lens simulation
It shows Cassiopeia (the W of stars at right) over the iconic Crowsnest Mountain, and the stars of Gemini setting to the right of Tecumseh.
Here’s the real thing, in an even wider 180° view sweeping from south to north. Again, just as predicted!
The panorama is from 8 segments, each with the 35mm lens at f/2.8 for 15 seconds at ISO 1600 with the Canon 6D MkII. Stitching was with Adobe Camera Raw. The Moon itself is blend of 4 exposures: 15 seconds, 4 seconds, 1 second, and 1/4 second to retain the red disk of the eclipsed Moon while bringing out the stars in the twilight sky.
Between the weather predictions – which proved spot on – and the geographical and astronomical planning apps – which were deadly accurate – we now have incredible tools to make it easier to plan the shot.
If only we could control the clouds! As it was, the Moon was in and out of clouds throughout the 70 minutes of totality. But I was happy to just get a look, let alone a photo.
The next total lunar eclipse is in six months, on July 27, 2018, but in an event visible only from the eastern hemisphere.
The next TLE for North America is a more convenient evening event on January 20, 2019. That will be another winter eclipse requiring careful planning!
The first total lunar eclipse in 2.5 years provides lots of opportunities for some great photos.
On the morning of January 31, before sunrise for North America, the Full Moon passes through the umbral shadow of the Earth, creating the first total eclipse of the Moon since September 27, 2015.
The pre-dawn event provides many photo opportunities. Here’s my summary of tips and techniques for capturing the eclipsed Moon.
But First … What is a Lunar Eclipse?
As the animation (courtesy NASA/Goddard Space Flight Center) shows, an eclipse of the Moon occurs when the Full Moon (and they can happen only when the Moon is exactly full) travels through the shadow of the Earth.
The Moon does so at least two times a year, though often not as a total eclipse, one where the entire disk of the Moon is engulfed by the umbra.
When the Moon is within only the outer penumbral shadow we see very little effect, with a barely perceptible darkening of the Moon, if that. I don’t even list the times below for the start and end of the penumbral phases.
An HDR stack of images to encompass the range of brightness from the bright portion of the lunar disk (at right here) still just in the penumbral shadow, to the dark portion of the disk at left deep in the umbral shadow. I shot this at the October 8, 2014 total lunar eclipse, from Writing-on-Stone Park in southern Alberta. Taken 7 to 5 minutes before totality began.
It’s only when the Moon begins to enter the central umbral shadow that we see an obvious effect. That’s when the partial eclipse begins, and we see a dark bite appear on the left edge of the Moon. The shadow appears to creep across the Moon to darken more of its disk. While it looks like the shadow is moving across the Moon, it is really the Moon moving into, then out of, the umbral shadow that causes the eclipse.
At this eclipse the partial phases last about an hour before and after totality.
Once the Moon is completely immersed in the umbra, totality begins, and lasts 77 minutes at this eclipse, a generous length. However, in North America, only sites in the western half of the continent get to see all or most of totality.
Where is the Eclipse?
Courtesy Fred Espenak and Royal Astronomical Society of Canada (Observer’s Handbook)
As the chart above shows, the Pacific area including Hawaii, Australia, and eastern Asia can see the entire eclipse with the Moon high in the evening or midnight sky.
Most of North America (my tips are aimed at North American photographers) can see at least some part of this eclipse.
From the eastern half of the continent the Moon sets at sunrise during either totality (from the central areas of North America), or during the first partial phases (from eastern North America). Those in the east can take advantage of interesting photo opportunities by capturing the partially eclipsed Moon setting in the west in the dawn twilight.
The total eclipse of the Moon on December 10, 2011, taken from the the Rothney Astrophysical Observatory, near Priddis, Alberta, and looking west to the Rockies. This is a 2 second exposure at ISO 800 with the Canon 5DMkII and Canon 200mm lens at f/4. This was taken toward the end of totality at 7:48 a.m. local time.
However, the most dramatic images of a deep red Moon in the western sky, such as above, will be possible only from the west. And even then, the further north and west you live, the better your view.
Even from the southwestern United States the Moon sets just after the end of totality, requiring a site with a low and clear horizon to the west in order to see the whole event.
I live in Alberta, Canada, and the diagrams I provide here are for my area, where the Moon sets during the final partial phase. I offer them as examples of the kinds of planning you can do to ensure great photos. But exactly where the Moon will be during totality, and where and when it will set on your horizon, will depend on your location.
The latter two apps present the sightlines toward the Moon overlaid on a map of your location, to help you plan where to be to shoot the eclipsed Moon setting behind a suitable foreground.
When is the Eclipse?
While where the Moon is in your sky depends on your site, the various eclipse events happen at the same time for everyone, with differences in hour due only to the time zone you are in.
Here are the times for the start and end of the partial and total phases.
Note that all times are A.M., in the early morning, before sunrise, on January 31. Go out at 6 P.M. on the evening of January 31 and you’ll be 12 hours too late. You missed it!
All times are A.M. on January 31. “—“ means the event is not visible; the Moon has set.
The time of moonset at your site will vary with your location. Use planning apps to calculate your local moonset time.
Picking a Site
No matter where you are in North America you want a site with a good view to the west and northwest, preferably with a clear view of a relatively unobstructed but photogenic horizon.
While having an eclipse occur at dawn (or at dusk) does limit the amount of eclipse we can see, it has the benefit of providing many more photo opportunities of the eclipsed Moon above a scenic landscape or foreground element.
The Full Moon rises in partial eclipse over the sandstone formations of Writing-on-Stone Provincial Park in southern Alberta, on the evening of September 27, 2015. Shot with the 200mm lens and 1.4x extender, on the Canon 5DMkII.
From eastern North America you will have to be content with images of the partially eclipsed Moon setting, similar to the image above of a rising partially-eclipsed Moon.
From the centre of the continent, where the Moon sets during totality, the dim, reddened Moon is likely to disappear into the brightening sky. Remember, when the Moon is full it sets just as the Sun rises. So shots of a red Moon right on the horizon aren’t likely to be possible. The Moon will be too dim and the sky too bright.
From sites in the west, the Moon will set either just at the end of totality or shortly afterwards, making the Moon brighter and more obvious in the sunrise sky, as the foreground in the west lights up with red light from the Sun rising in the east.
It is that same red sunlight filtered by our atmosphere that continues on into our planet’s shadow and lights the Moon red during totality.
Picking a Technique
Lunar eclipses lend themselves to a wide range of techniques, from a simple camera on a tripod, to a telescope on a tracking mount following the sky.
What you use depends not only on the gear you have on hand, but also on your site. It might not be practical to set up loads of gear at a scenic site you have to trek into — especially when you have to set up in the wee hours of a cold winter morning.
You could set up earlier that night on January 30, but only if your site is safe enough to leave the gear unattended while you sleep.
Keep it simple!
Option 1: Simple Camera-on-Tripod
The Moon in totality in the deep twilight on September 27, 2015, with a 35mm lens on a full-frame camera. This is one frame from a time-lapse sequence. A 5-second exposure at f/2.8 and at ISO 800.
The easiest method is to take single shots with a moderate wide-angle or normal lens with the camera on a fixed tripod. No fancy trackers are needed here.
If the sky is bright with twilight, you might be able to meter the scene and use Auto exposure.
Composing a single shot during mid-totality from southern Alberta, framed to include Castor and Pollux in Gemini.
But earlier in the night, with the Moon in a darker sky, as I show above, use Manual exposure and try settings of 1 to 10 seconds at f/2.8 to f/4 at ISO 400 to 1600. That’s a wide range, to be sure, but it will vary a lot depending on when you shoot and where you are, factors that will affect how bright the sky is at your site. Just shoot, check, and adjust.
Option 2: Advanced Camera-on-Tripod
A more advanced method is to compose the scene so the lens frames the entire path of the Moon from the start of the partial eclipse until moonset.
Framing a time-lapse sequence for southern Alberta. (Courtesy Starry Night™/Simulation Curriculum)
As shown above, that will take at least a 35mm lens on a full frame camera, or 20mm lens on a cropped frame camera.
Take exposures every 15 to 30 seconds if you want to turn the set into a time-lapse movie. But a still-image composite with the lunar disks well separated will need shots only every 5 to 10 minutes.
Such a composite takes good planning and proper exposures to pull off, but will be true to the scene, with the lunar disk and its motion shown to the correct scale as it was in the sky. That’s in stark contrast to the flurry of ugly “faked” composites that will appear on the web by the end of February 1, ones with huge telephoto Moons pasted willy-nilly onto a wide-angle sky. Don’t do it!
Exposures for any lunar eclipse are tricky, whether you are shooting closeups or wide-angles, because the Moon and sky change so much in brightness.
For wide-angle composites, you can expose just for the bright lunar disk and let the sky go dark. Exposures for just the Moon will range from very short (about 1/500th second at ISO 100) for the partials, to 1 to 2 seconds at ISO 400 for the totals, then shorter again (1/15 to 1/2 second at ISO 400) for the end shots in twilight when the Moon and sky may be similar in brightness. That’ll take constant monitoring and adjusting throughout the shoot.
As I did below, you’d then composite and layer the well-exposed disks into another background image exposed longer for the sky, likely shot in twilight. To maintain the correct relative locations of the lunar disks and foreground, the camera cannot move.
That technique works best if it’s just a still image you are after, such as below.
The total lunar eclipse of April 4, 2015 taken from near Tear Drop Arch, in Monument Valley, Utah. I shot the totality images at 6:01 a.m. MDT, during mid-totality during the very short 4 minutes of totality. The mid-totality image is a composite of 2 exposures: 30 seconds at f/2.8 and ISO 1600 for the sky and landscape, with the sky brightening blue from dawn twilight, and 1.5 seconds at f/5.6 and ISO 400 for the disk of the Moon itself. Also, layered in are 26 short exposures for the partial phases, most being 1/125th sec at f/8 and ISO 400, with ones closer to totality being longer, of varying durations. All are with a 24mm lens and Canon 6D on a static tripod, with the camera not moved through the entire sequence. The short duration of totality at this eclipse lent itself to a sequence with one total phase image flanked by partial phases.
The above image is a composite of the April 4, 2015 total lunar eclipse from Monument Valley, Utah. That eclipse occurred under similar circumstances as this month’s eclipse, with the eclipse underway as the Moon set in the west at sunrise.
A multiple-exposure composite of the total lunar eclipse of Sunday, September 27, 2015, as shot from Writing-on-Stone Provincial Park, Alberta, Canada. NOTE: The size of the Moon and its path across the sky are accurate here, because all the images for this composite were taken with the same lens using a camera that did not move during the shoot.
By comparison, the composite here is made of a few selected frames out of hundreds I took at 15-second intervals, and with each frame exposed for the sky, for use in a time-lapse movie. In this case, the Moon became overexposed at the end as it emerged from the umbra.
Indeed, if it’s a time-lapse movie you want (see the video linked to below), then each frame will have to be exposed well enough to show the sky and landscape.
While this method will overexpose the partially-eclipsed Moon, the Moon will darken and become better exposed throughout totality when the same long exposure for the reddened Moon might also work for the sky, to pick up stars. Exposures will have to shorten again as the sky brightens with twilight.
Again, constant baby-sitting and adjusting the camera will be needed. So if it’s cold where you are prepare for a frigid multi-hour shoot. I doubt you’ll be able to leave the camera on Auto exposure to run on its own, not until at least bright twilight begins.
Option 3: Telephoto Close-Ups
Size of the Moon with a 600mm telephoto on a full-frame and cropped-frame camera. (Courtesy Starry Night™/Simulation Curriculum)
The Moon is surprisingly small (only 1/2-degree across) and needs a lot of focal length to do it justice.
For an “in-your-face” close-up of the eclipse you’ll need a 300mm to 800mm (!) lens. Unfortunately, the Moon and sky are moving and any exposures over 1 to 2 seconds (required during totality) will blur the Moon badly if its disk is large on the frame.
If you don’t have a tracking mount, one solution is to keep the Moon’s disk small (using no more than a fast f/2.8 200mm lens) and exposures short by using a high ISO speed.
The eclipse of December 10, 2011, with the Moon setting in deep partial eclipse at sunrise.
Or plan to shoot with a telephoto only when the Moon is low in the sky, as I did above, when you can include the horizon which you would want to be sharp anyway. Framing the Moon and horizon won’t need a super telephoto.
The sky will then also be brighter and require short exposures that don’t need to be tracked. However, how bright and obvious the Moon will be will again depend on your location. This may or may not be a practical option, certainly not if the Moon is setting during mid-totality where you are.
Option 4: Tracked Telescopic Close-Ups
Framing the eclipsed Moon and the Beehive star cluster (Messier 44). (Courtesy Starry Night™/Simulation Curriculum)
If you have a mount that can be polar aligned to track the sky, then more options are open to you.
You can use a telescope mount or one of the compact and portable trackers, such as the Sky-Watcher Star Adventurer or iOptron Sky Tracker units. While these latter units work great, you are best to keep the payload weight down and your lens size under 300mm.
That’s just fine for this eclipse, as you really don’t need a frame-filling Moon. The reason is that the Moon will appear about 4 degrees away from the bright star cluster called the Beehive, or Messier 44, in Cancer. As shown above, a 200mm to 300mm lens will frame this unique pairing well.
Even so, exposures to show the cluster properly might have to be long enough that the Moon overexposes, even at mid-totality. If so, take different exposures for the Moon and stars and composite them later, as I did below.
A High Dynamic Range composite of 7 exposures of the Dec 20/21, 2010 total lunar eclipse, from 1/2 second to 30 seconds, to show the more normally exposed eclipsed Moon with the star cluster M35 at left in Gemini, to show the scene more like it appeared in binoculars. Each photo taken with a 77mm aperture Borg apo refractor at f/4.2 (300mm focal length) and Canon 5D MkII camera at ISO 1600.
If you do want to shoot with more focal length, a monster telephoto lens will work, but a small telescope such as an 80mm aperture f/6 to f/7 refractor will provide enough focal length and image size at much lower cost. But either way, the lens or telescope should be mounted on a solid equatorial telescope mount, and polar aligned to track the sky.
For the sharpest lunar disks, use the Lunar tracking rate.
Exposures will vary from as short as 1/500th second at ISO 100 to 200 for the barely eclipsed Moon, to 4 to 16 seconds at f/6 to f/8 and at ISO 400 to 1600 for the Moon at mid-totality.
Total eclipse of the Moon, December 20/21, 2010, taken with a 130mm AP apo refractor at f/6 and Canon 7D at ISO 400. An HDR composite of 9 images from 1/125 second to 2 seconds, composited in Photoshop.Taken at about 12:21 a.m. MST on Dec 21, about 20 minutes before totality began, during the partial phase.
As I did above, during the deep partial phases shoot both long exposures for the red umbra and short exposures for the bright part of the Moon not yet in the umbra. Merge those later with High Dynamic Range (HDR) techniques and software, or with luminosity masks.
Even if you’re not sure how to do this now, shoot all the required exposures anyway so you’ll have them when your processing skills improve.
Option 5: Time-Lapse Close-Ups
Total eclipse of the Moon, December 20/21, 2010, taken from home with 130mm AP apo refractor at f/6 and Canon 7D at ISO 400 for 4 seconds, single exposure, shortly after totality began.
With a tracking telescope you could fire shots every 30 seconds or so, and then assemble them into a time-lapse movie.
But as with wide-angle time-lapses, that will take constant attention to gradually and smoothly shift exposures, ideally by 1/3rd-stop increments every few shots during the partial and total phases.
If you track at the lunar rate, as I did in the still image below and in the music video linked to at bottom, the Moon will stay centred while it drifts though the stars.
Taken with 90mm Stowaway AP Refractor, with Borg .85x compressor/flattener for f/5.6. With Canon 20Da camera at ISO 400 for a 13 second exposure, on a Skywatcher HEQ5 mount tracking at Lunar rate. Exposure was long to bring out star background.
Track at the sidereal rate and the stars will stay more or less fixed while the Moon drifts through the frame from right to left (west to east). But that takes even more careful planning to position the Moon correctly at the start of the sequence so it remains “in frame” for the duration of the eclipse and ends up where you want at the end, which will occur with the Moon low in a bright sky.
Again, planetarium software such as Starry Night, which can be set to display a camera frame, is essential to plan the shoot.
Either way, do take care to accurately polar align your mount, or you’ll be confronted with the monumental task of having to manually align hundreds of images later. Trust me, I know!
Me enjoying the September 27, 2015 total lunar eclipse while various cameras snapped away, but still requiring constant attention and adjustments.
I would consider the telescopic time-lapse method the most challenging of techniques.
Considering the hour of the night and the likely cold temperatures, your best plan might be to keep it simple. It’s what I plan to do. I’ll be happy to get a few good wide-angle still images, and perhaps a tracked telephoto close-up of the Moon and Beehive as a bonus.
While there is another total lunar eclipse (TLE) in six months on July 27/28, it is not visible at all from North America.
Our next TLE occurs 12 Full Moons, or one lunar year from now, on the night of January 20/21, 2019, when all of North America gets to watch totality at a more reasonable hour, though perhaps not at a more reasonable temperature.
I leave you with a music video of the last TLE, on September 27, 2015 that incorporates still and time-lapse sequences shot using all of the above methods.
On Sunday, September 27 the Moon undergoes a total eclipse, the last we’ll see until January 2018.
This is a sky event you don’t want to miss. Whether you photograph it or just enjoy the view, it will be a night to remember, as the Full Moon turns deep red during a total eclipse.
Note — For this article I’m giving times and sky directions for North America. For Europe the eclipse occurs early in the morning of September 28, as the Moon sets into the west. But for here in North America the timing could not be better. Totality occurs in the evening of Sunday, September 27 as the Moon rises into the east.
Courtesy Wikimedia Commons
ECLIPSE BASICS
A total lunar eclipse occurs when the Moon — and it can only be Full — passes through the shadow cast into space by Earth. The Sun, Earth and Moon are in near-perfect alignment.
All total eclipses of the Moon consist of 3 main parts:
• The initial partial eclipse occurs as the Moon slowly enters the dark central portion of our planet’s shadow, the umbra. This lasts about an hour.
• Totality begins as the entire disk of the Moon is within the umbra. For this eclipse, totality lasts a generous 72 minutes.
• Totality ends as the Moon emerges from the umbra to begin the final partial eclipse lasting another hour.
Courtesy Fred Espenak/EclipseWise.com – All times are Eastern Daylight. Subtract 1 hour for Central Daylight, 2 hours for Mountain Daylight, 3 hours for Pacific Daylight Time. Times apply for anywhere in that time zone.
WHERE TO SEE IT
All of North America, indeed most of the western hemisphere, can see this eclipse. In North America, the farther east you live on the continent the later in your evening the eclipse occurs and the higher the Moon appears in the southeast.
For example, in the Eastern time zone, totality begins at 10:11 p.m. EDT and ends at 11:23 p.m. EDT, with mid-totality is at 10:47 p.m. EDT with the Moon about 35 degrees up, placing it high in the southeast sky for southern Ontario, for example.
For me in the Mountain time zone, the total eclipse begins at 8:11 p.m. MDT and ends at 9:23 p.m. MDT, with mid-totality is at 8:47 p.m. MDT, with the Moon just 13 degrees up in the east from here in southern Alberta. From my time zone, and from most location in the Rocky Mountain regions, the Moon rises with the initial partial phases in progress.
This is the total eclipse of the Moon, December 10, 2011, taken from the grounds of the Rothney Astrophysical Observatory, near Priddis Alberta, and looking west to the Rockies. This is a 2 second exposure at ISO 800 with the Canon 5DMkII and Canon 200mm lens at f/4.
For locations on the west coast viewers miss most of the partial eclipse phase before totality. Instead, the Moon rises as totality begins, making for a more challenging observation. Viewers on the coast will need clear skies and a low horizon to the east, but the reward could be a beautiful sight and images of a red Moon rising.
Total eclipse of the Moon, December 20/21, 2010, taken from home with 130mm AP apo refractor at f/6 and Canon 7D at ISO 400. An HDR composite of 9 images from 1/125 second to 2 seconds, composited in Photoshop CS5. Taken at about 12:21 am MST on Dec 21, about 20 minutes before totality began, during the partial phase.
“SUPERMOON” ECLIPSE
This eclipse of the Moon is the last in a series of four total lunar eclipses that occurred at six-month intervals over the last two years. We won’t enjoy another such “tetrad” of total lunar eclipses until 2032-33.
But this eclipse is unique in that it also coincides with the annual Harvest Moon, the Full Moon closest to the autumnal equinox. Harvest Moons are known for their orange tint as they rise into what is sometimes a dusty autumn evening.
But what is making internet headlines is that this Full Moon is also the year’s “supermoon,” the Full Moon of 2015 that comes closest to Earth. In recent years these “perigee” Full Moons have been dubbed “supermoons.”
Call it what you will, it does make this Full Moon a little larger than usual, though the difference is virtually impossible to detect by eye. And it makes little difference to the circumstances or appearance of the eclipse itself.
Partial eclipse of the Moon at moonset, morning of June 26, 2010, at about 5:00 am. Shot with 200mm telephoto and 1.4x teleconvertor, for 1/15th sec at f/5 and ISO 100, using Canon 7D. From western North America the Moon will rise in partial eclipse like this on September 27.
HOW TO SEE IT
Just look up! You can enjoy the eclipse with the unaided eye, and even from within city limits.
Unlike eclipses of the Sun, the eclipsed Moon is perfectly safe to look at with whatever you wish to use to enhance the view. The best views are with binoculars or a telescope at low power.
Look for subtle variations in the red colouring across the disk of the Moon, and even tints of green or blue along the dark edge of the Earth’s advancing or retreating shadow during the partial phases.
If you can, travel to a dark site to enjoy the view of the stars and Milky Way brightening into view as the Full Moon reddens and the night turns dark.
HOW TO SHOOT IT
The total eclipse of the Moon, April 15, 2014 local time just after sunset from Australia. This is an 8-second exposure at f/2.8 with the 50mm lens on the Canon 60Da at ISO 800.
1. On A Tripod
The easiest method is to use a camera on a tripod, with a remote release to fire the shutter and prevent vibration from blurring the image. What lens you use will depend on how you wish to frame the scene and how high the Moon is in your sky.
Lens Choice
From eastern North America you’ll need a wide-angle lens (14mm to 24mm) to frame the eclipsed Moon and the ground below. The Moon will appear as a small red dot.
While you can shoot the Moon with longer focal lengths it takes quite a long lens (>300mm) to really make it worthwhile shooting just the Moon itself isolated in empty sky. Better to include a landscape to put the Moon in context, even if the Moon is small.
From western North America the lower altitude of the Moon allows it to be framed above a scenic landscape with a longer 35mm to 50mm lens, yielding a larger lunar disk.
From the west coast you could use a telephoto lens (135mm to 200mm) to frame the horizon and the eclipsed Moon as it rises for a dramatic photo.
Focusing
Use Live View (and zoom in at 10x magnification) to manually focus on the horizon, distant lights, or bright stars. The Moon itself my be tough to focus on.
Exposure Times
Exposures will depend on how bright your sky is. Use ISO 400 to 800 and try metering the scene as a starting point if your sky is still lit by twilight. Use wide lens apertures (f/4 to f/2) if you can, to keep exposures times as a short as possible.
The apparent motion of the Moon as the sky turns from east to west will blur the image of the Moon in exposures lasting more than a few seconds, especially ones taken with telephoto lenses.
The maximum exposure you can use before trailing sets in is roughly 500 / lens focal length.
Total eclipse of the Moon, December 20/21, 2010, taken with Canon 5D MKII and 24mm lens at f2.8 for stack of 4 x 2 minutes at ISO 800. Taken during totality using a camera tracker.
2. On a Tracker or Equatorial Mount
If you can track the sky using a motorized tracker or telescope mount, you can take exposures up to a minute or more, to record the red Moon amid a starry sky.
For this type of shot, you’ll need to be at a dark site away from urban light pollution. But during totality the sky will be dark enough that the Milky Way will appear overhead. Use a wide-angle lens to capture the red Moon to the east of the summer Milky Way.
The total eclipse of the Moon, October 8, 2014, the Hunter’s Moon, as seen and shot from Writing-on-Stone Provincial Park, Alberta. I shot this just after mid-totality in a single 15-second exposure at ISO 400 with the Canon 60Da, and with the 80mm apo refractor at f/6. It was mounted on the Sky-Watcher HEQ5 mount tracking at the lunar rate.
3. Through a Telescope
The most dramatic closeups of the eclipsed red Moon require attaching your camera body (with its lens removed) to a telescope. The telescope becomes the lens, providing a focal length of 600mm or more, far longer than any telephoto lens most of us own.
You’ll need the appropriate “prime focus” camera adapter and, to be blunt, if you don’t have one now, and have never shot the Moon though your telescope then plan on shooting with another method.
But even if you have experience shooting the Moon through your telescope, capturing sharp images of the dim red Moon demand special attention.
The telescope must be on a motorized mount tracking the sky, preferably at the “lunar,” not sidereal, drive rate. Focus on the Moon during the partial phases when it is easier to focus on the bright edge of the Moon.
Exposures during totality typically need to be 5 to 30 seconds at ISO 800 to 3200, depending on the focal ratio of your telescope. Take lots of exposures at various shutter speeds. You have over an hour to get it right!
The total lunar eclipse of April 4, 2015 taken from near Tear Drop Arch, in western Monument Valley, Utah. The mid-totality image is a composite of 2 exposures: 30 seconds at f/2.8 and ISO 1600 for the sky and landscape, with the sky brightening blue from dawn twilight, and 1.5 seconds at f/5.6 and ISO 400 for the disk of the Moon itself. Also, layered in are 26 short exposures for the partial phases, most being 1/125th sec at f/8 and ISO 400, with ones closer to totality being longer, of varying durations. All are with the 24mm lens and Canon 6D on a static tripod.
4. Time-Lapses
I’d suggest attempting time-lapses only if you have lots of experience with lunar eclipses.
Exposures can vary tremendously over the partial phases and then into totality. Any time-lapse taken through a telescope, or even with a wide-angle lens, will require a lot of manual attention to ensure each frame is well-exposed as the sky and Moon darken.
However, even if you do not get a complete set of frames suitable for a smooth, continuous time-lapse, selected frames taken every 5 to 10 minutes may work well in creating a multiple-exposure composite (as above), by layering exposures later in Photoshop.
Whatever method – or methods — you use, don’t get so wrapped up in fussing with cameras you forget to simply enjoy the eclipse for the beautiful sight it is.
This is the last total eclipse of the Moon anyone on Earth will see until January 31, 2018. So enjoy the view of the deep red Moon in the autumn sky.
The Hunter’s Moon of 2014 turned deep red during a total lunar eclipse.
It wouldn’t be an eclipse without a chase!
To see and shoot this total eclipse of the Hunter’s Moon I had to chase clear skies, seeking out the only clear area for hundreds of miles around, requiring a 3-hour drive to the south of me in Alberta, to near the Canada-US border, at Writing-on-Stone Provincial Park.
It was worth the midnight trek, though I arrived on site and got set up with just 10 minutes to go before the start of totality.
But I was very pleased to see the sky remain mostly clear for all of totality, with only some light haze adding the glow around the eclipsed Moon. Remarkably, the clouds closed in and hid the Moon just after totality ended.
This is a single 15-second exposure at ISO 400 with a Canon 60Da, shooting through an 80mm apo refractor at f/6 and on an equatorial mount tracking the sky at the lunar rate. I shot this shortly after mid-totality. It shows how the Moon’s northern limb, closest to the edge of the umbral shadow, remained bright throughout totality.
It shows lots of stars, with the brightest being greenish Uranus at the 8 o’clock position left of the Moon, itself shining in opposition and at a remarkably close conjunction with the Moon at eclipse time.
More images are to come! But this is the result of fast processing after a dawn drive back home and an all-nighter chasing and shooting an eclipse.

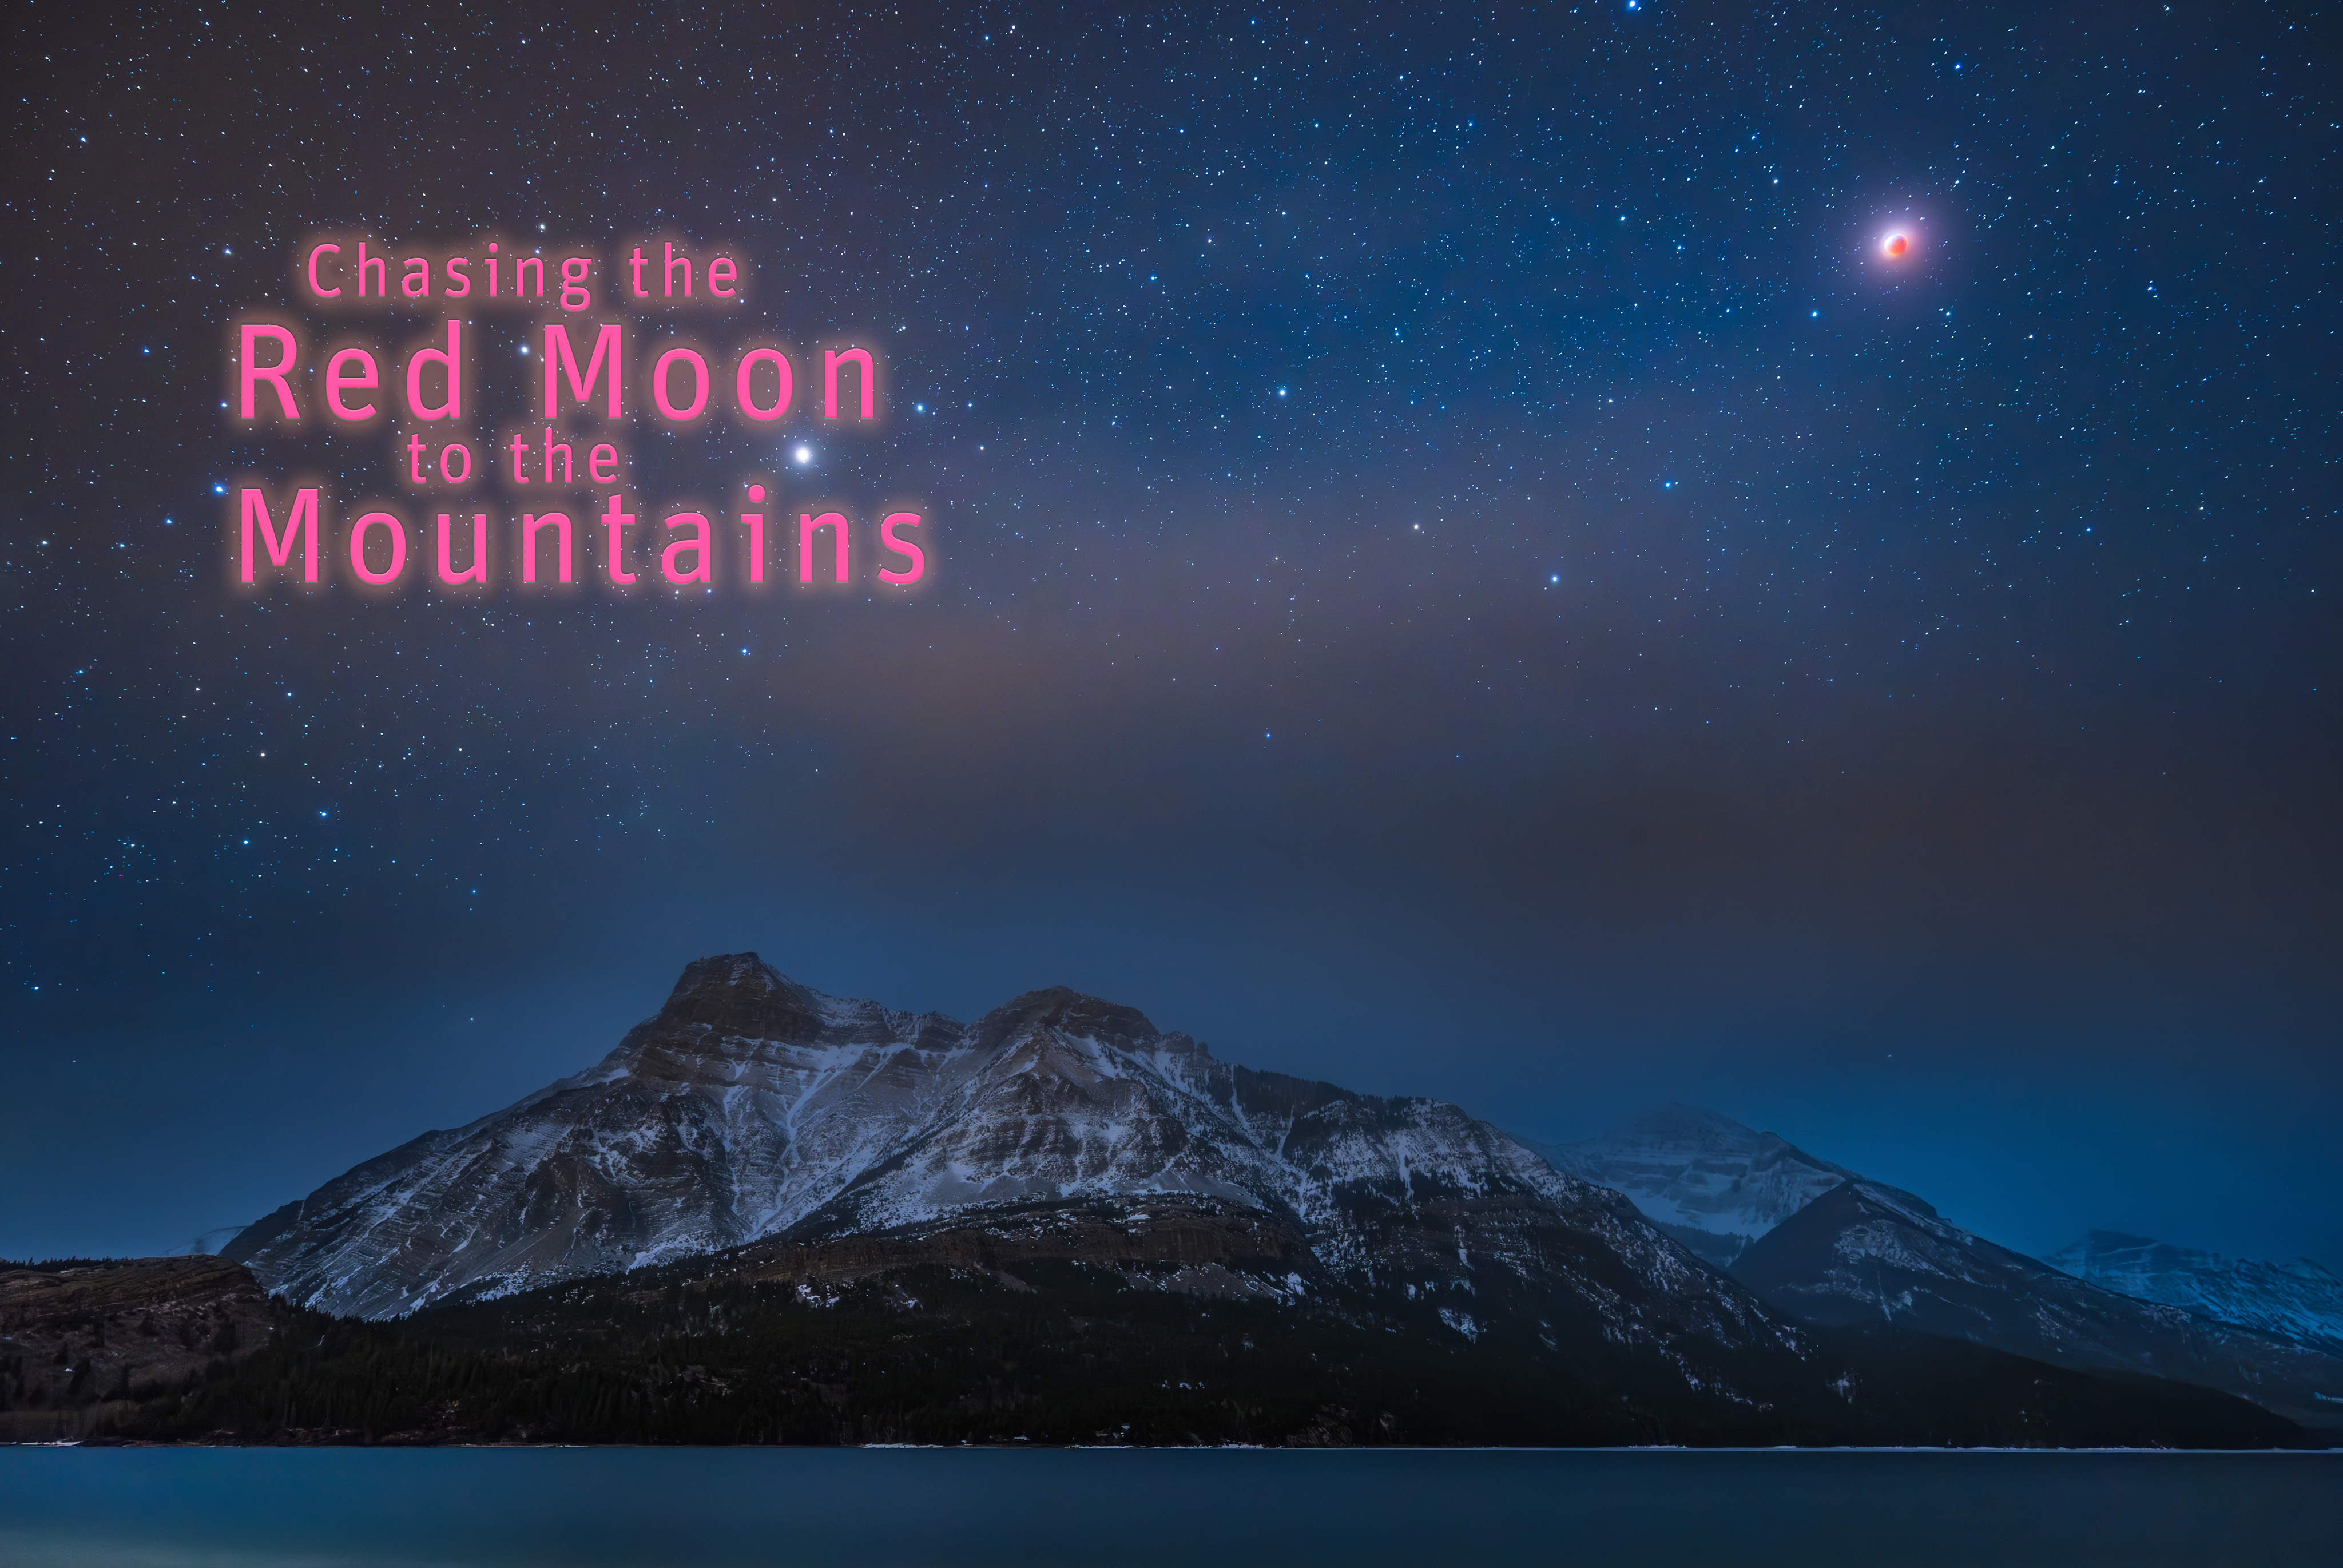
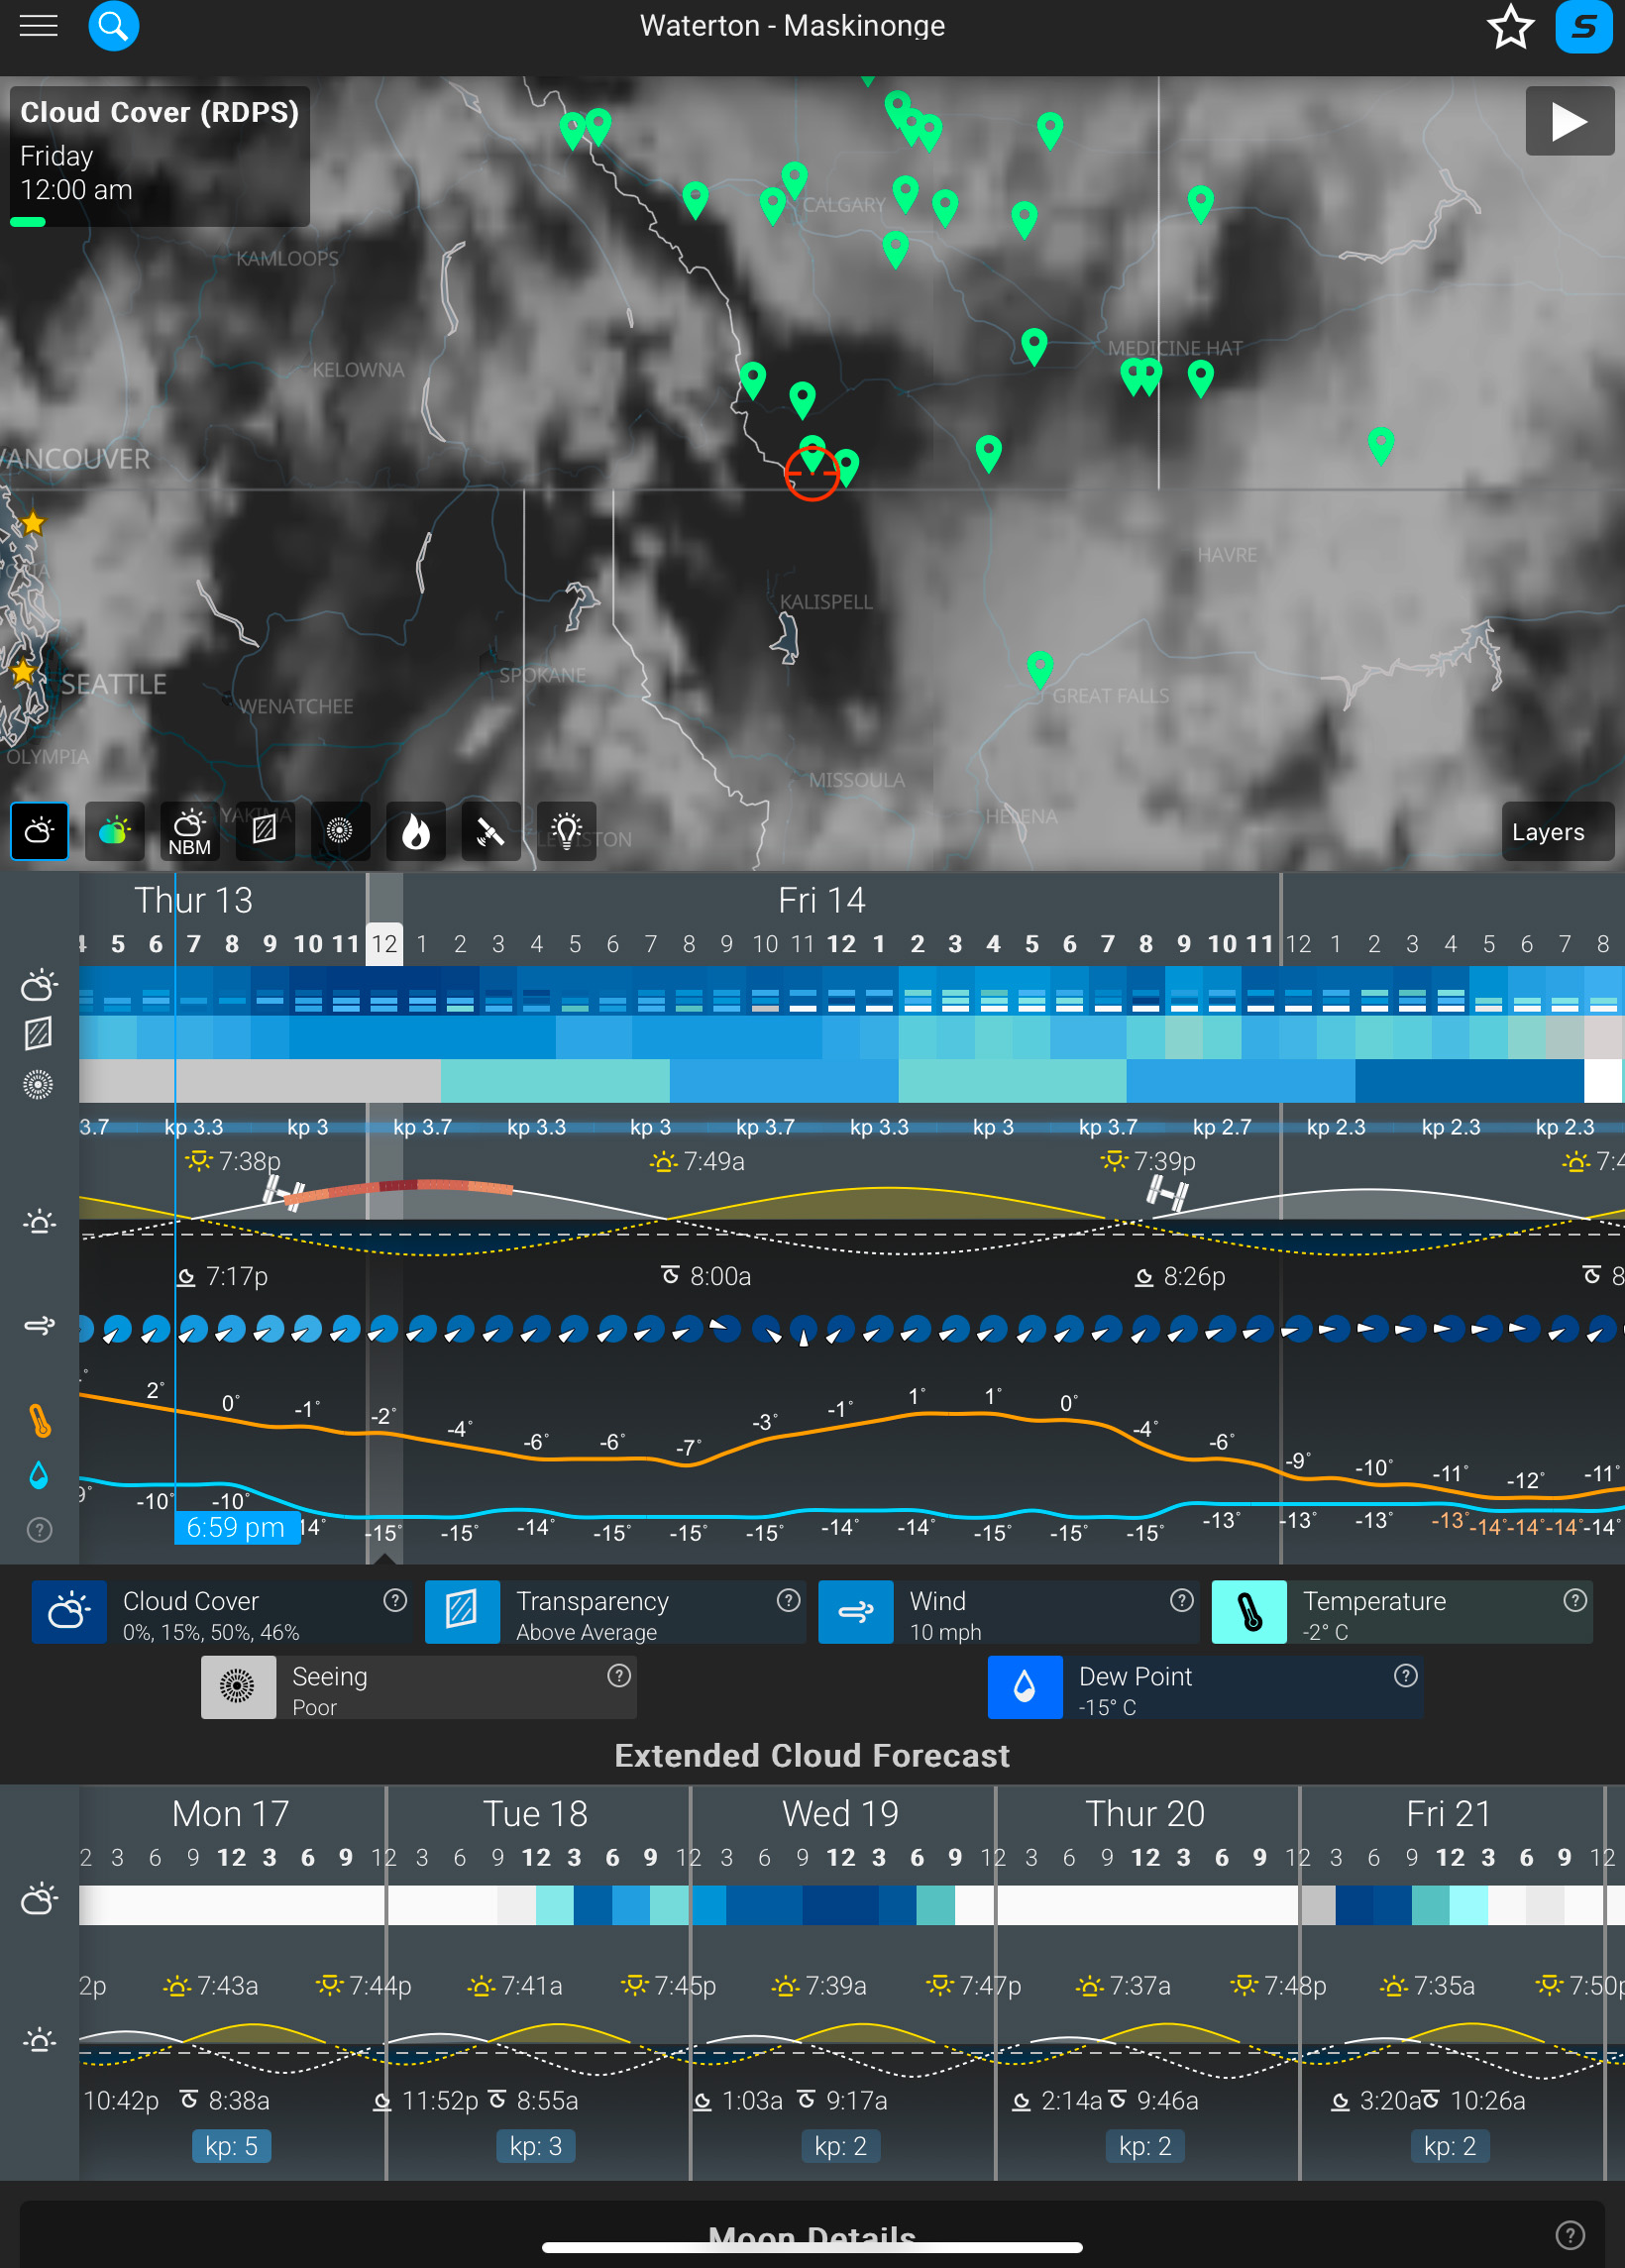
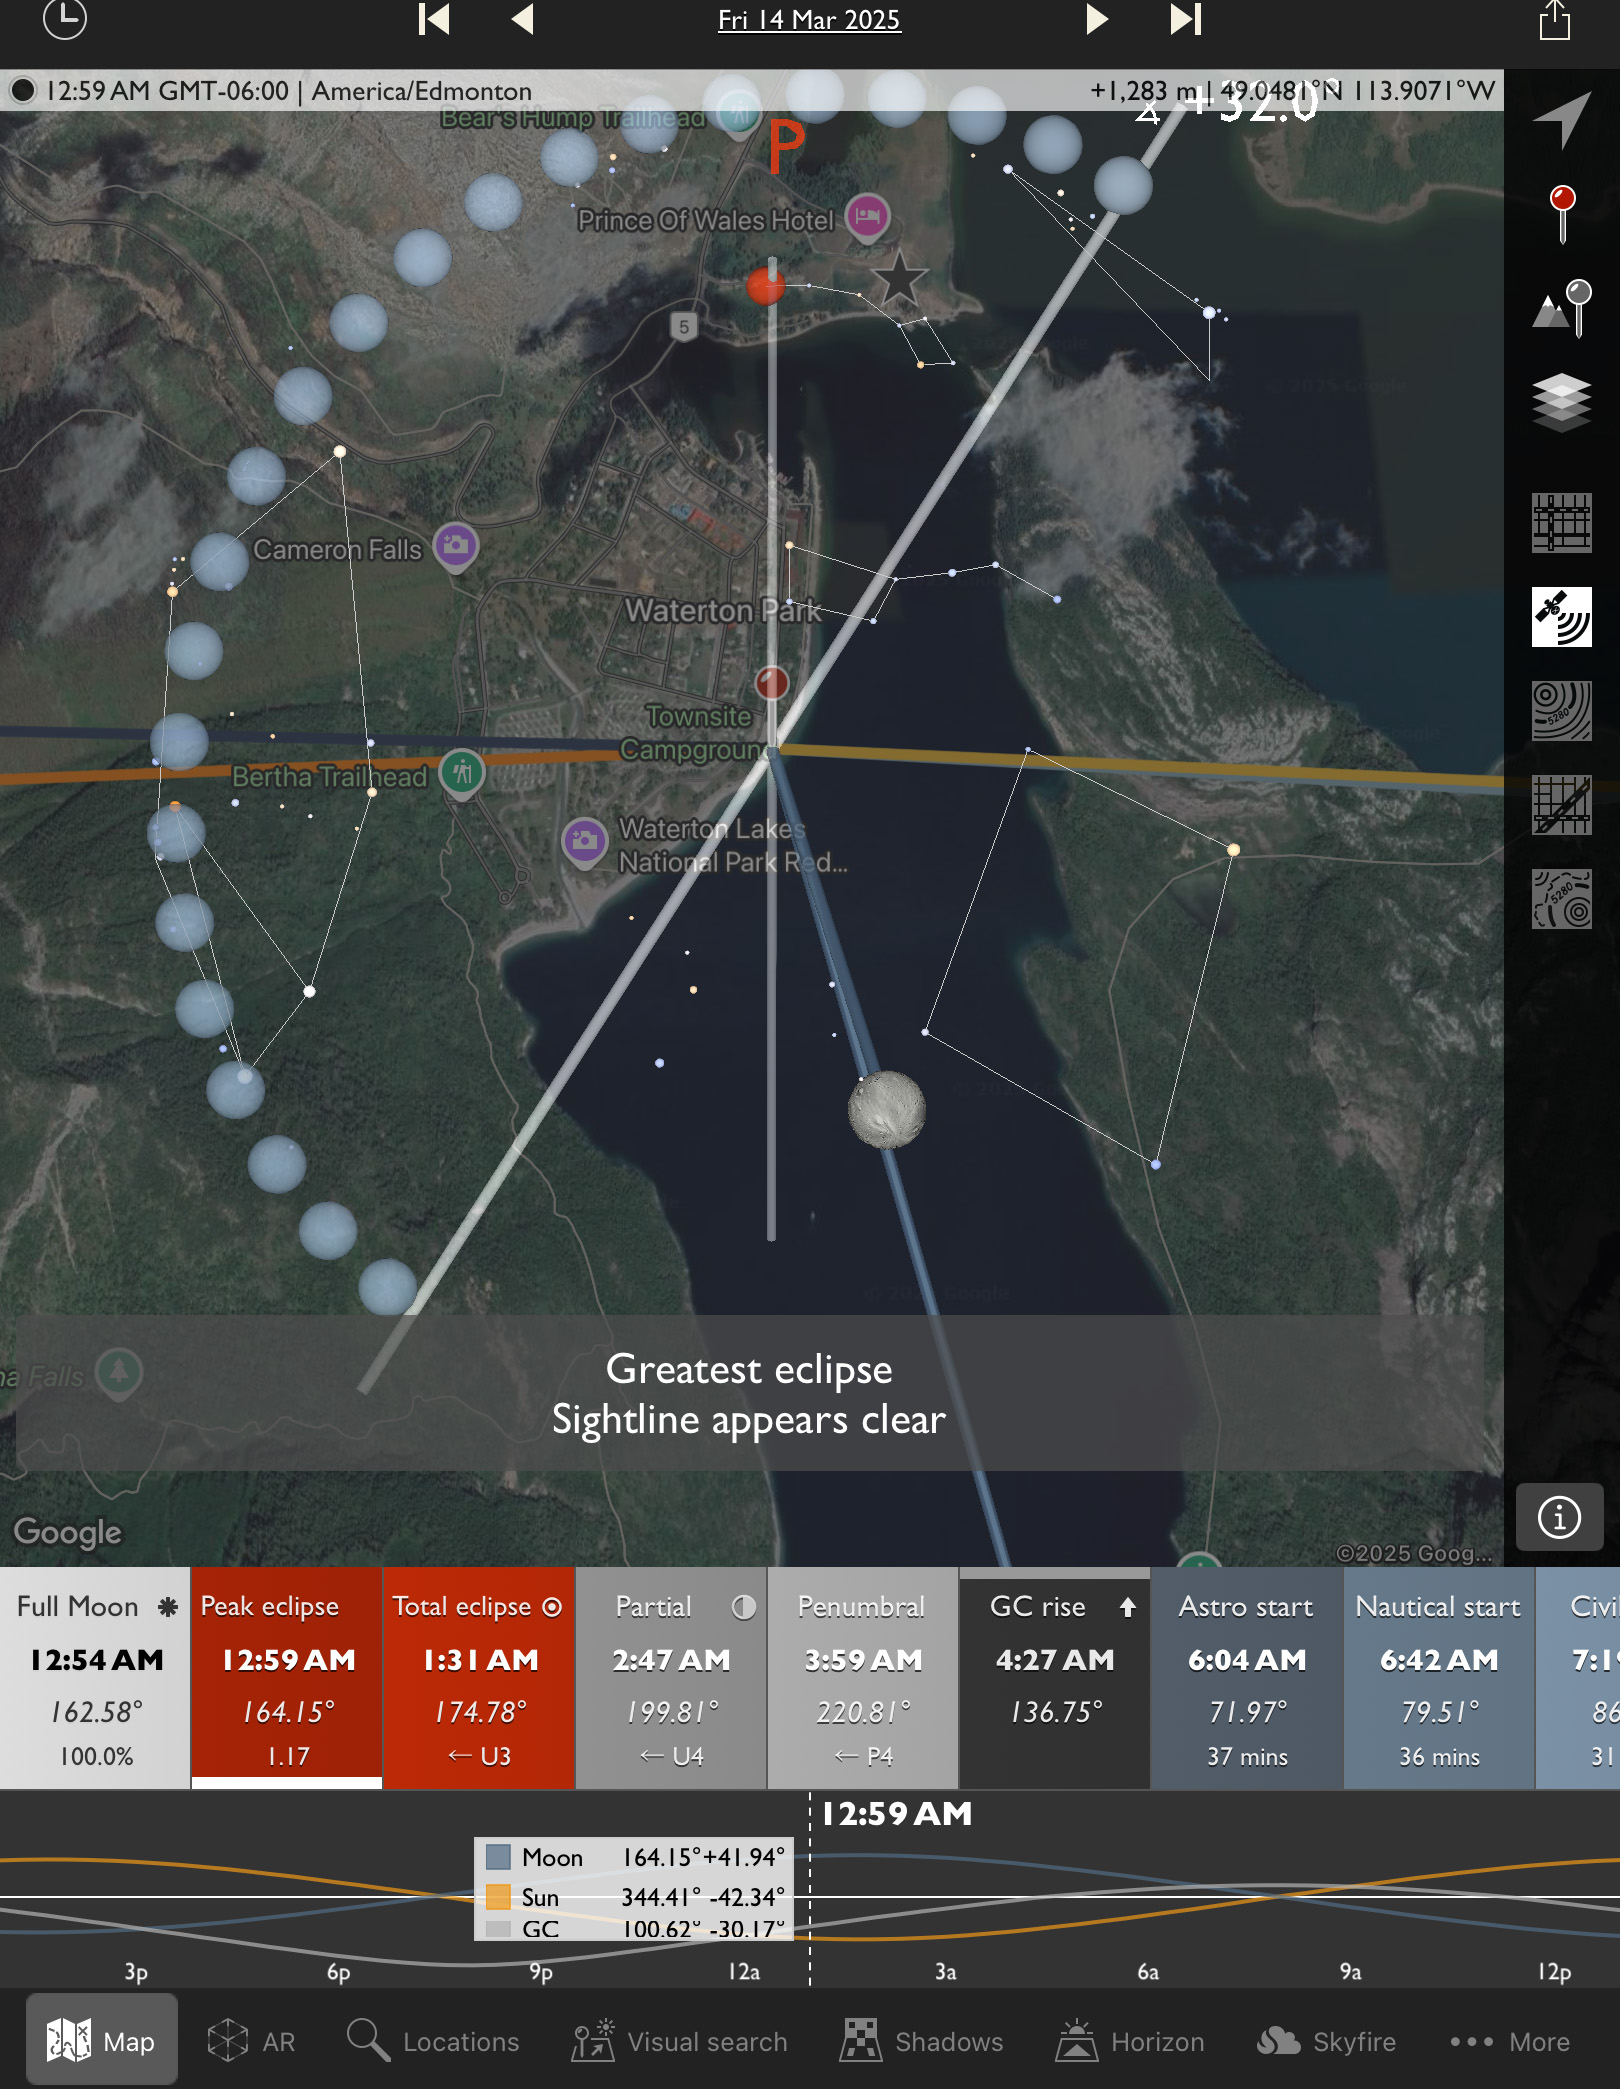
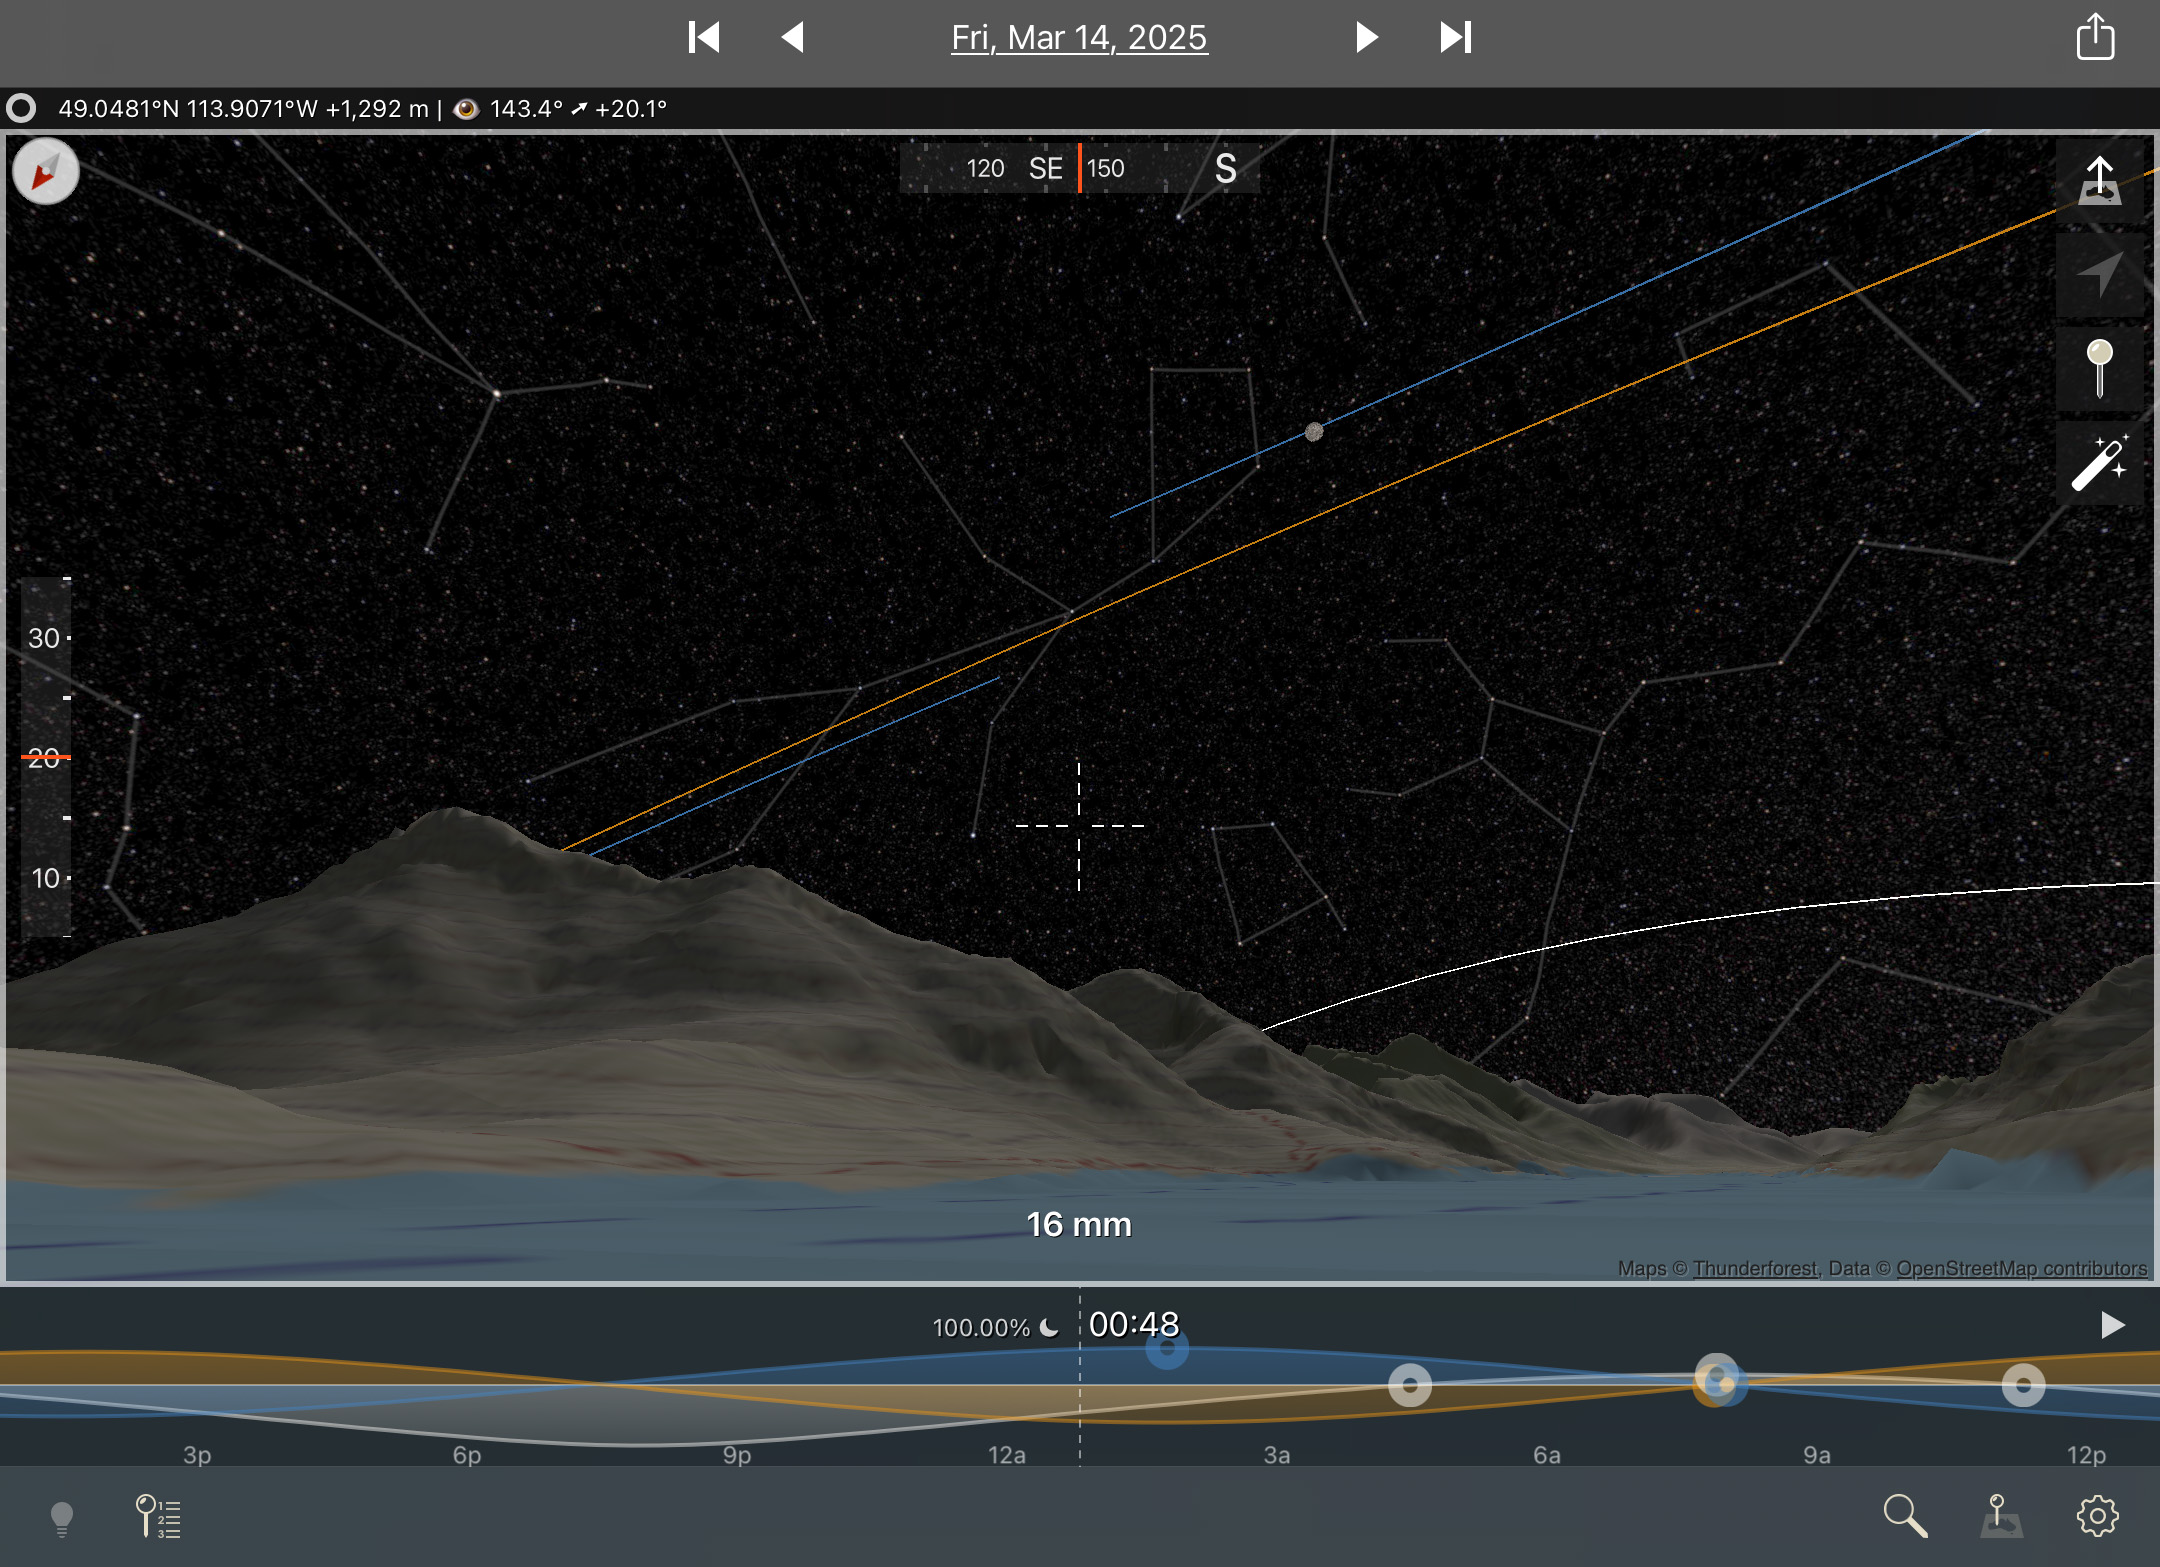
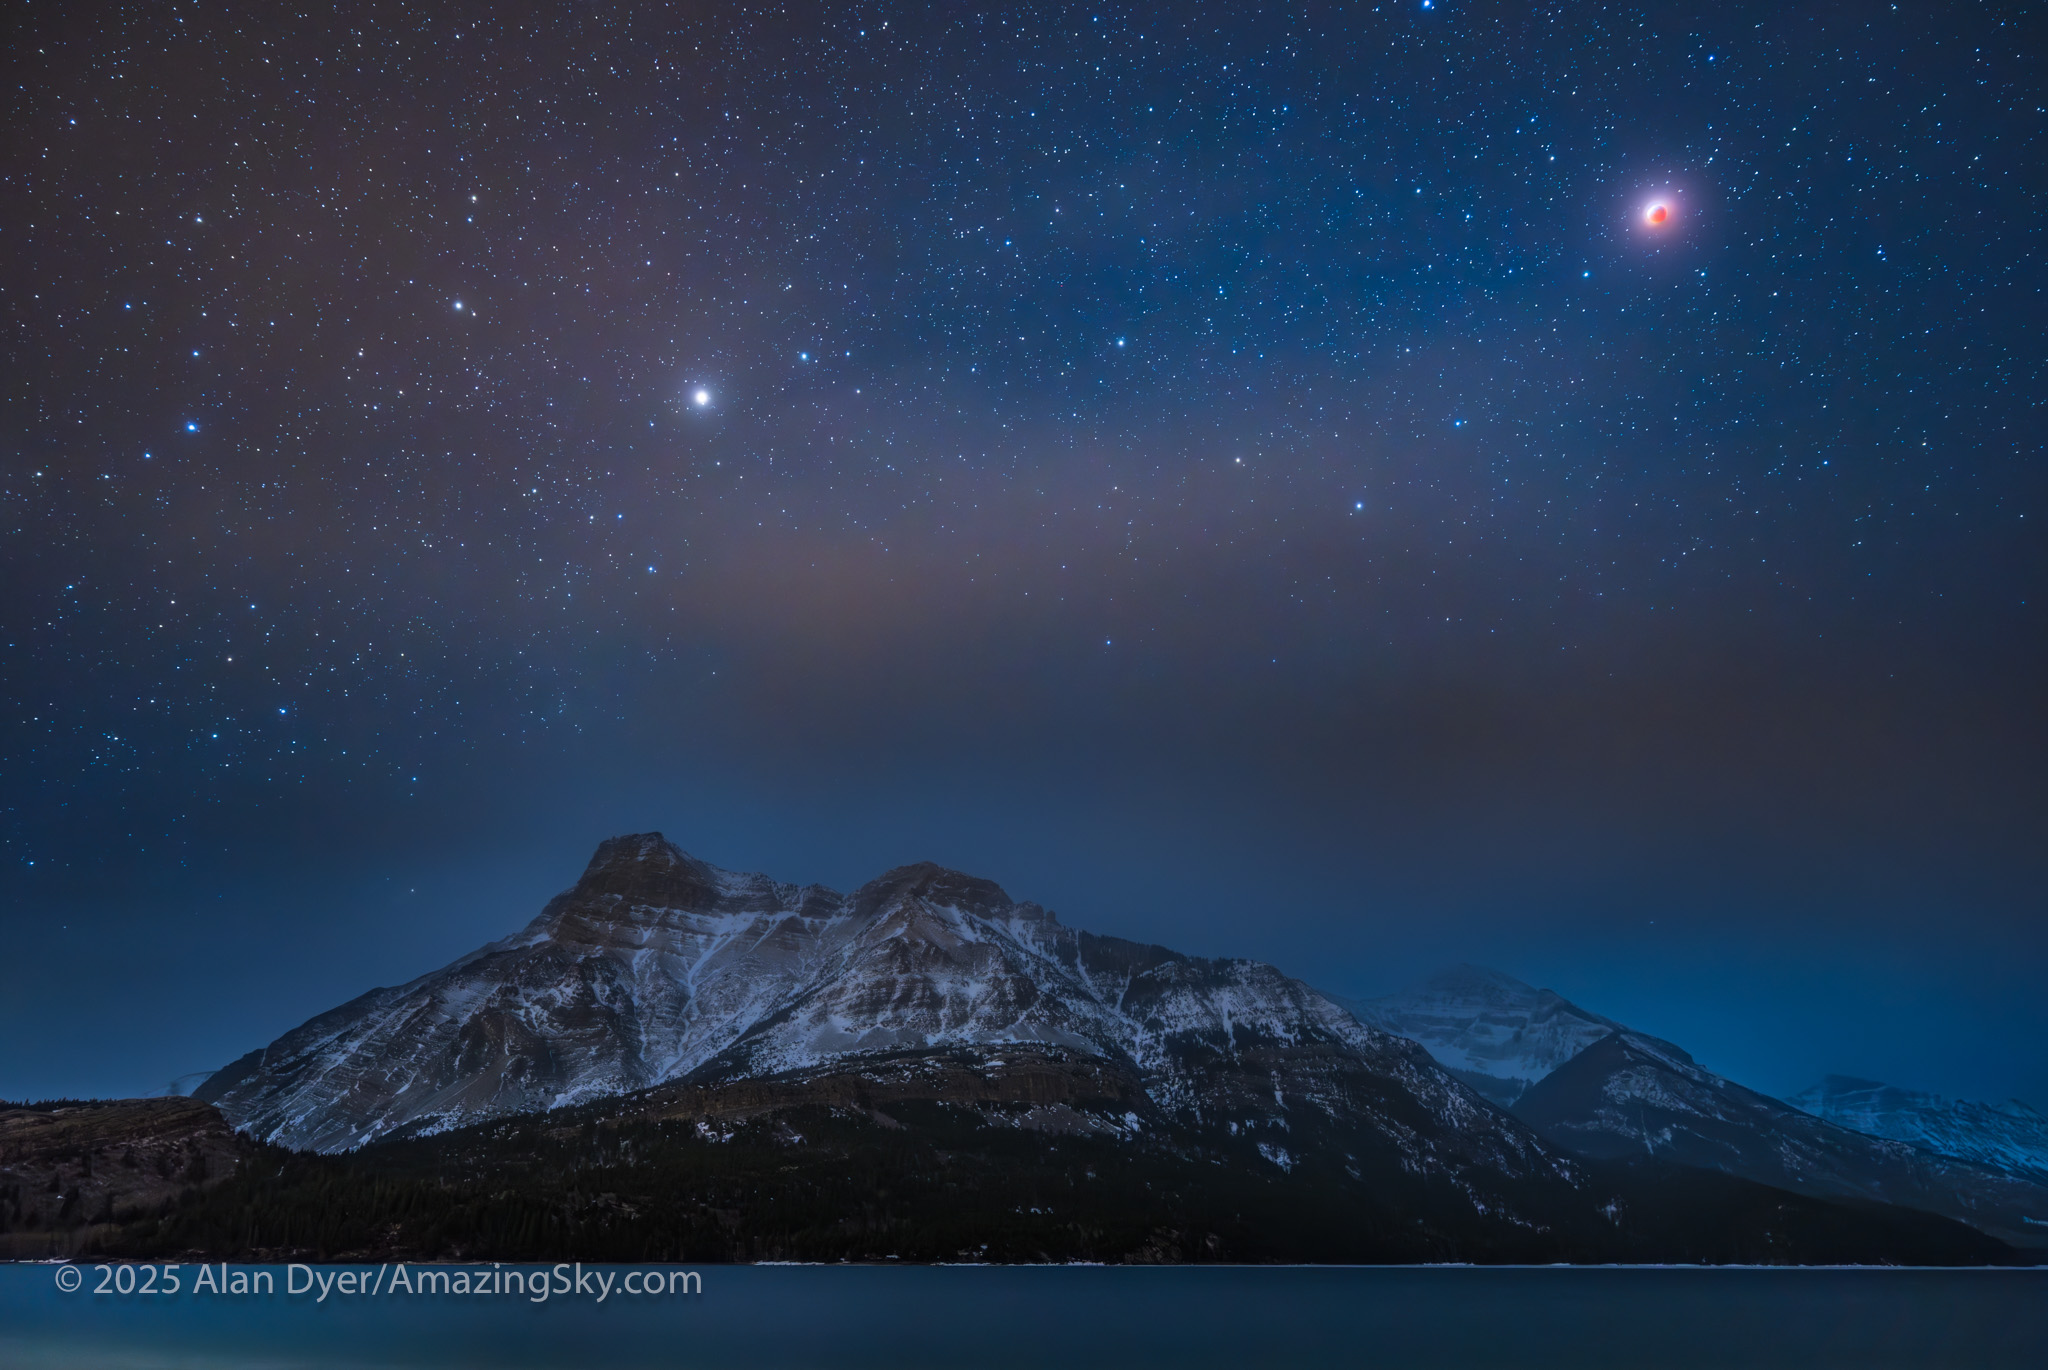
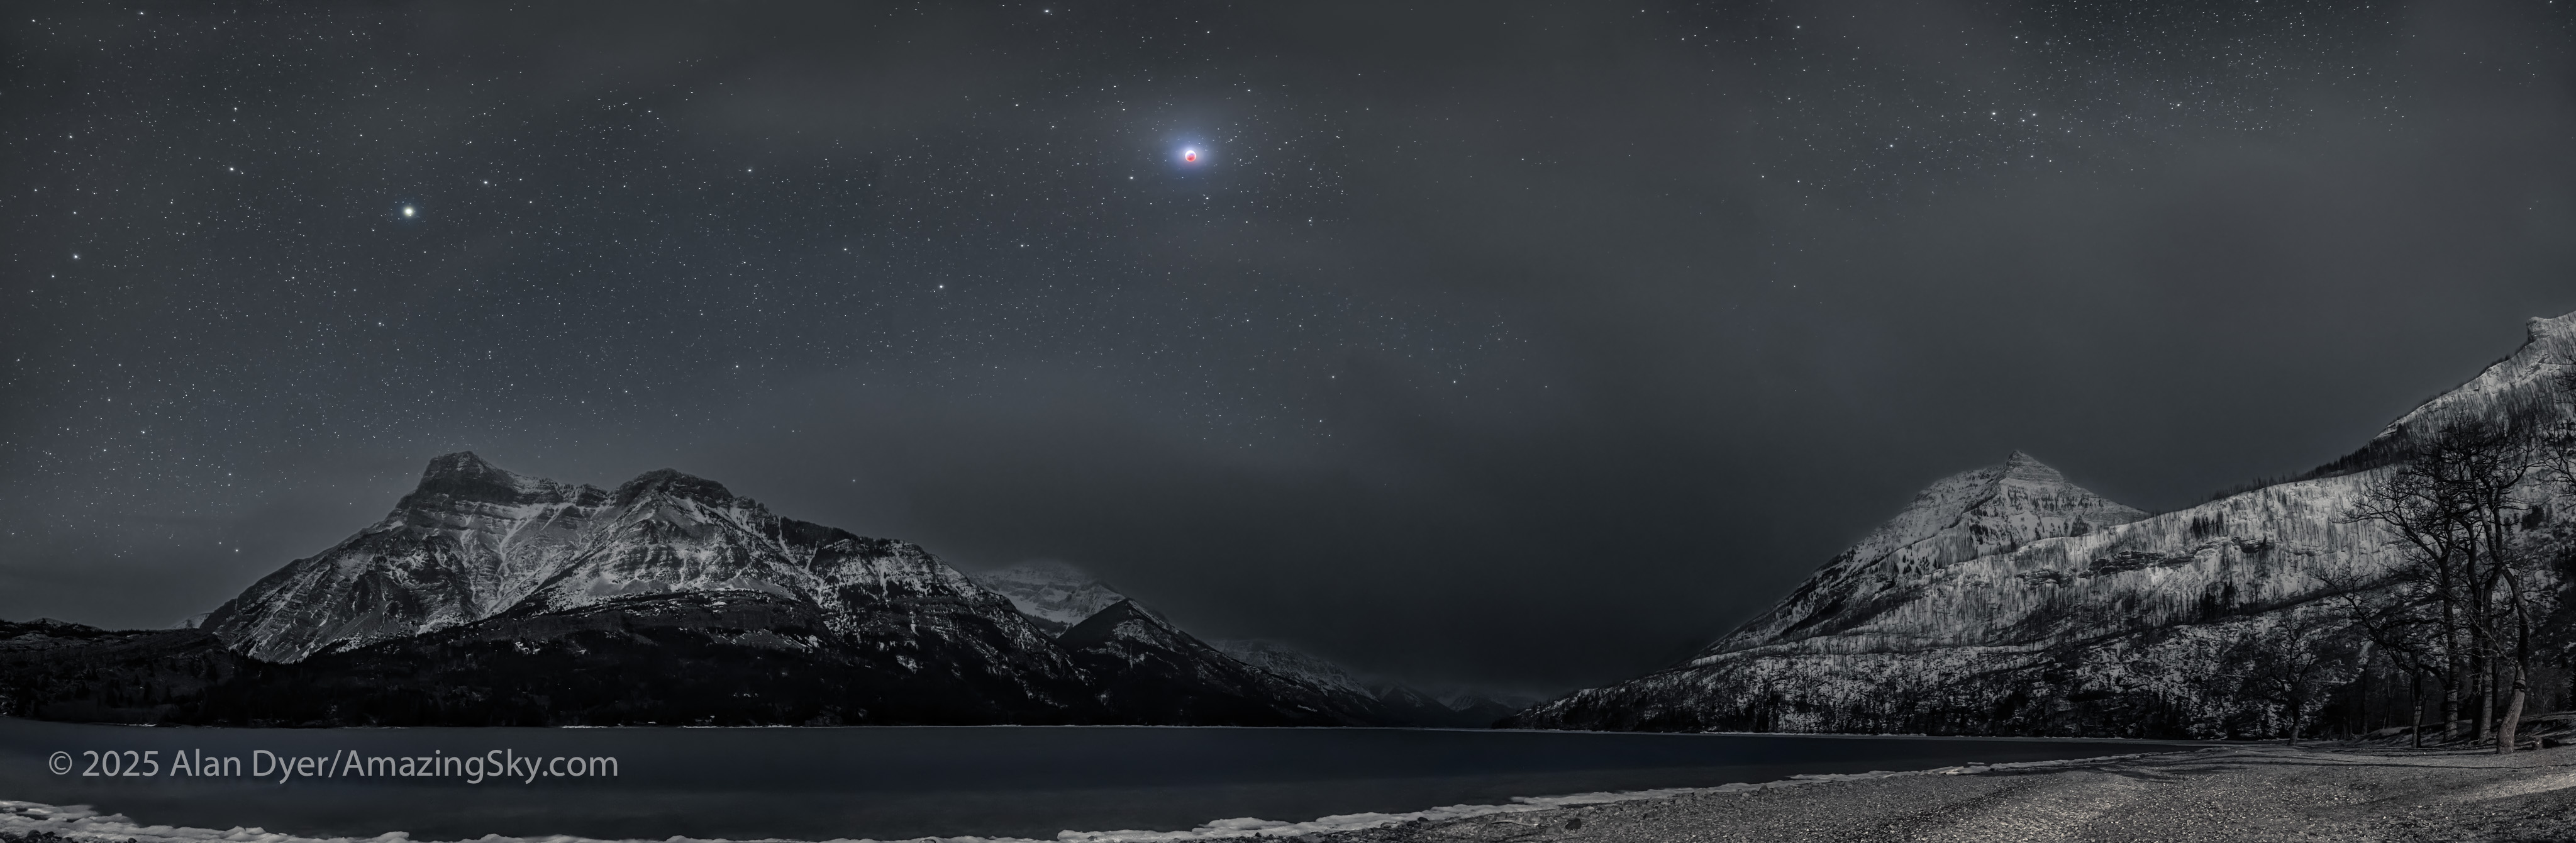
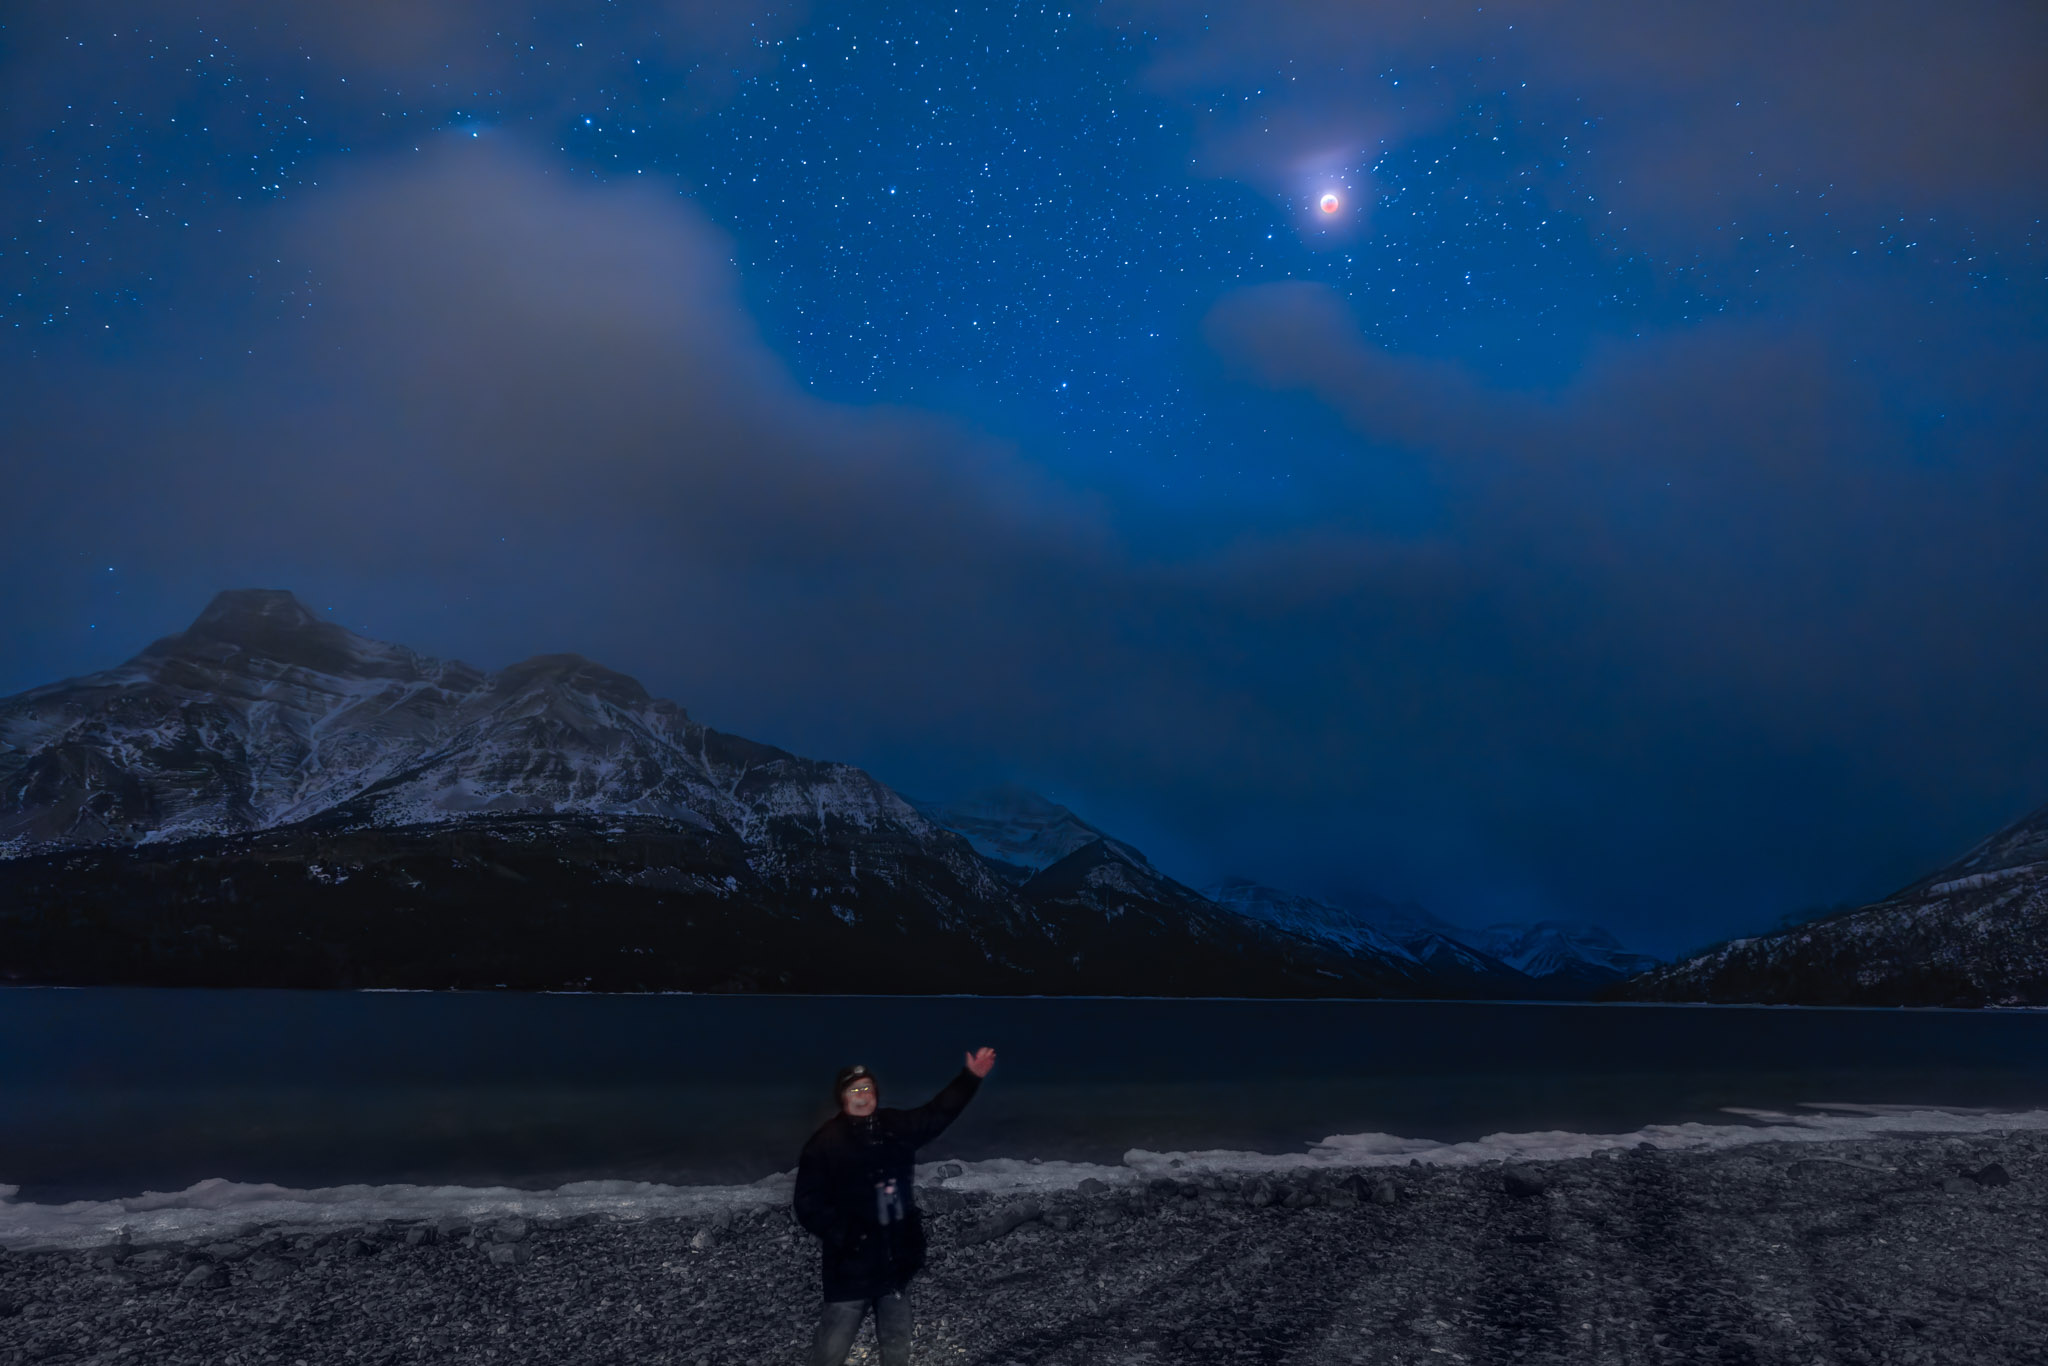
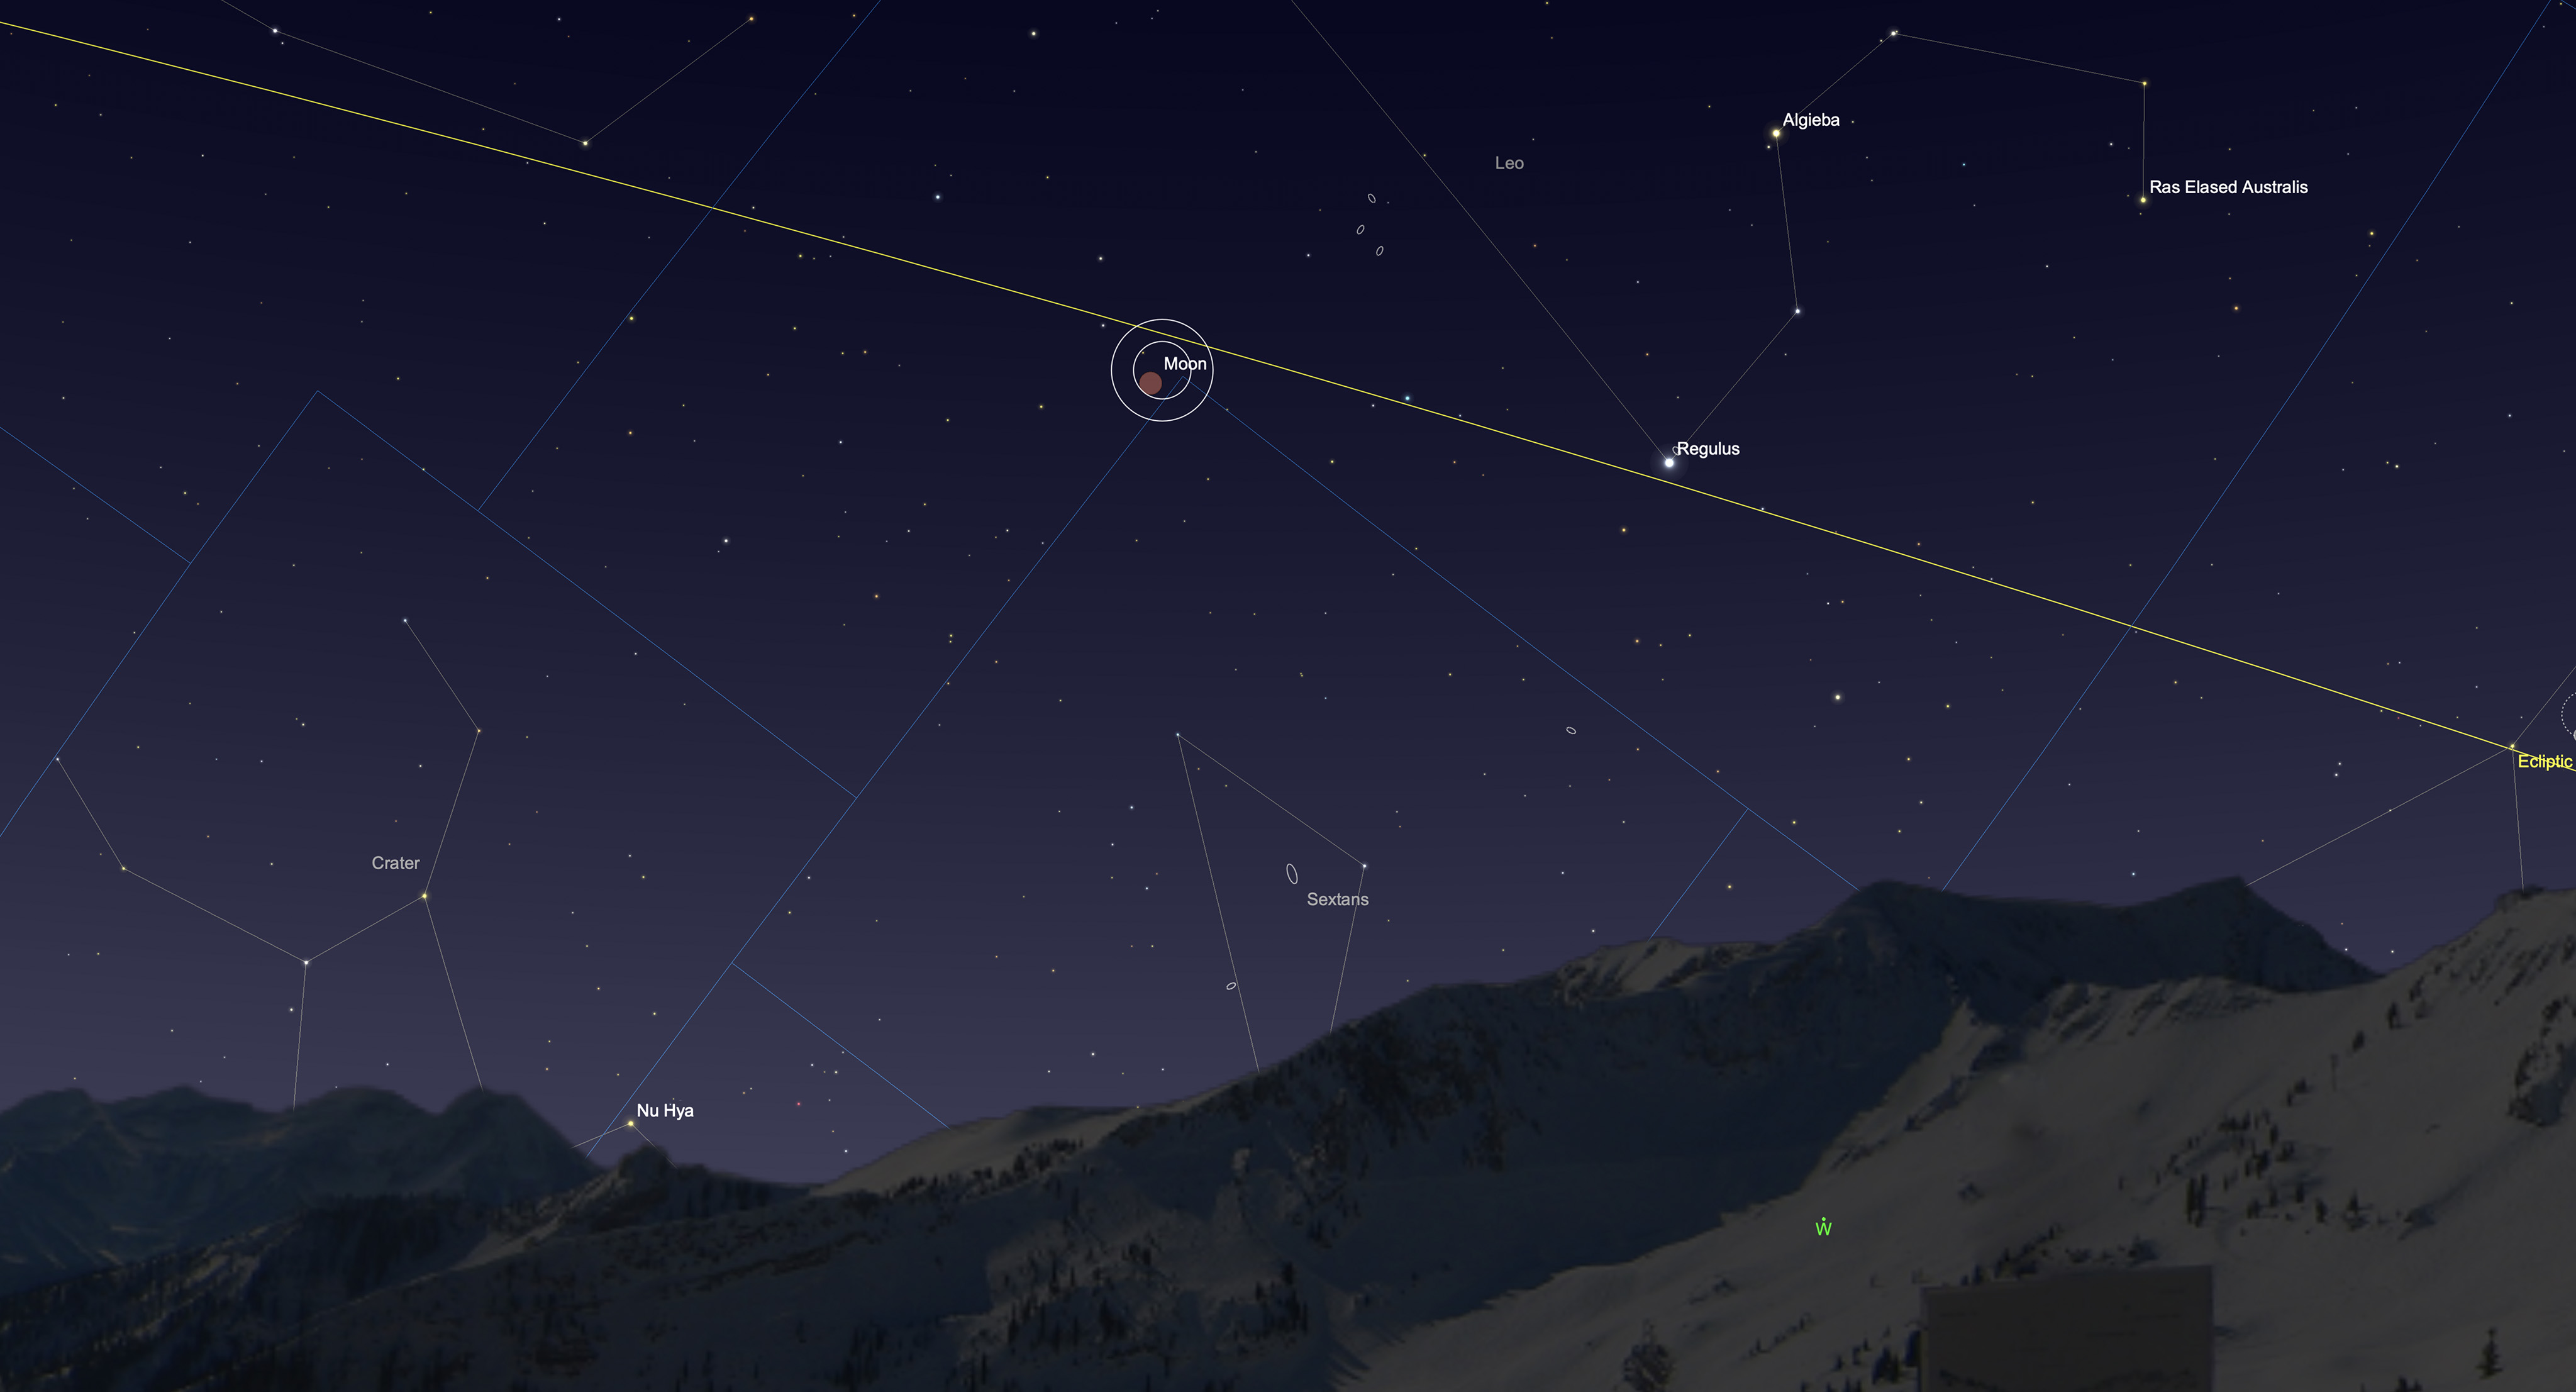
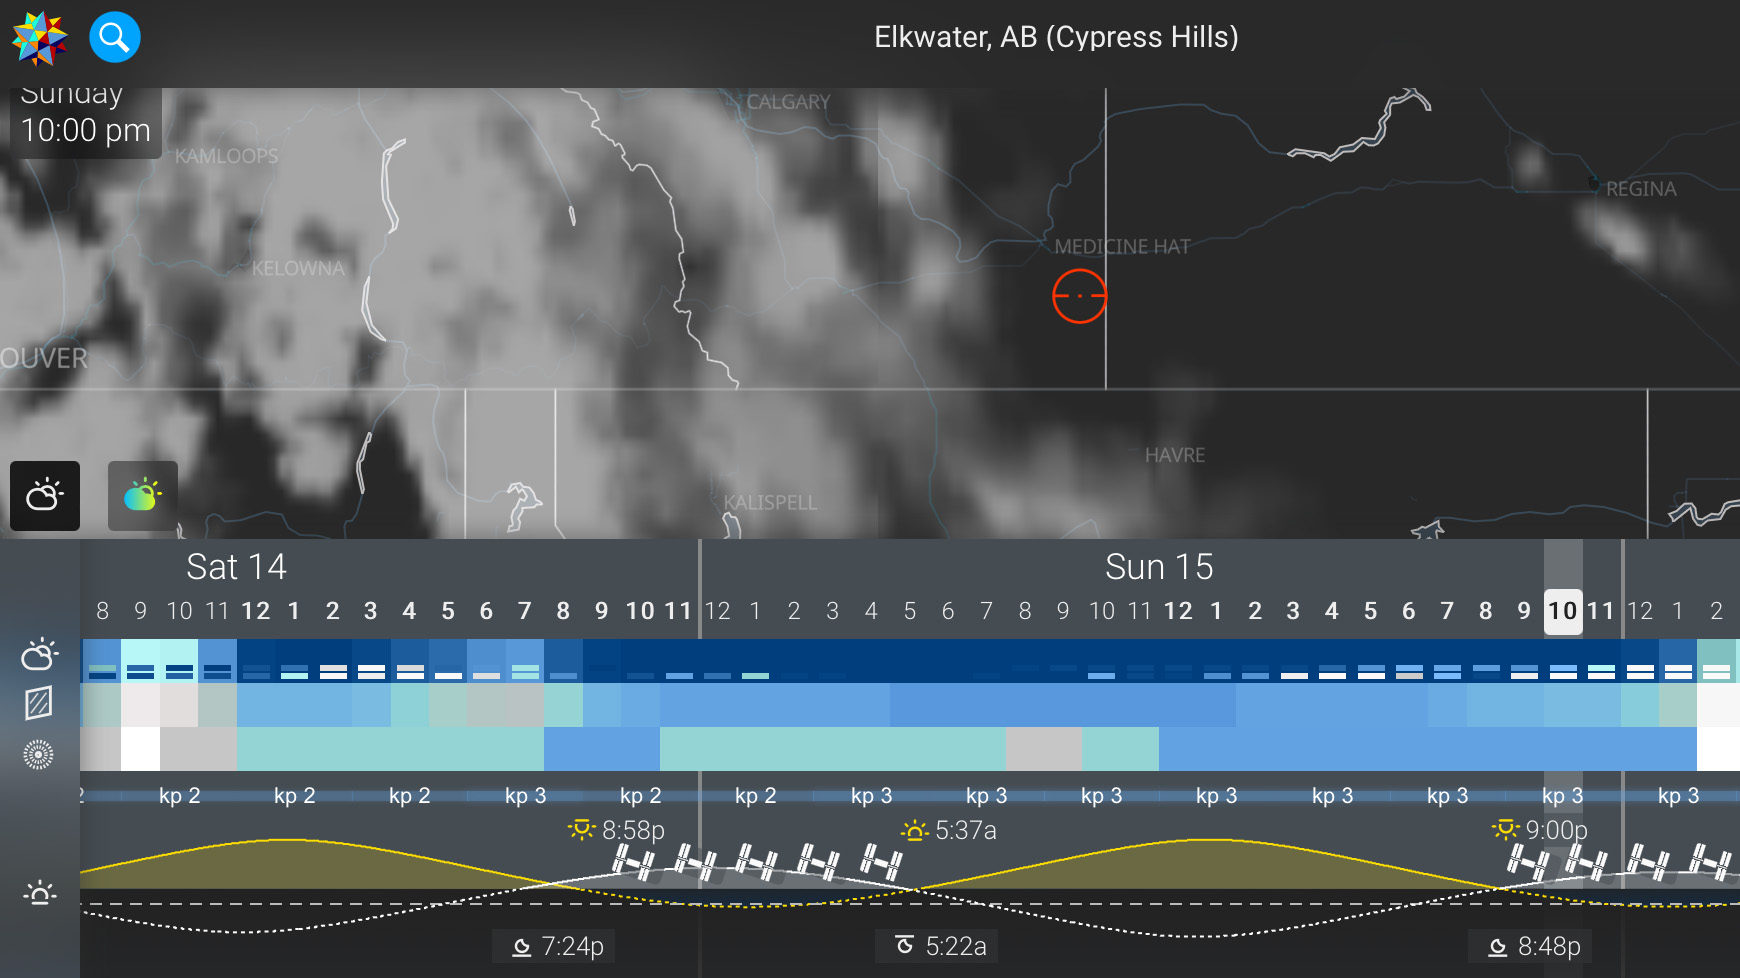
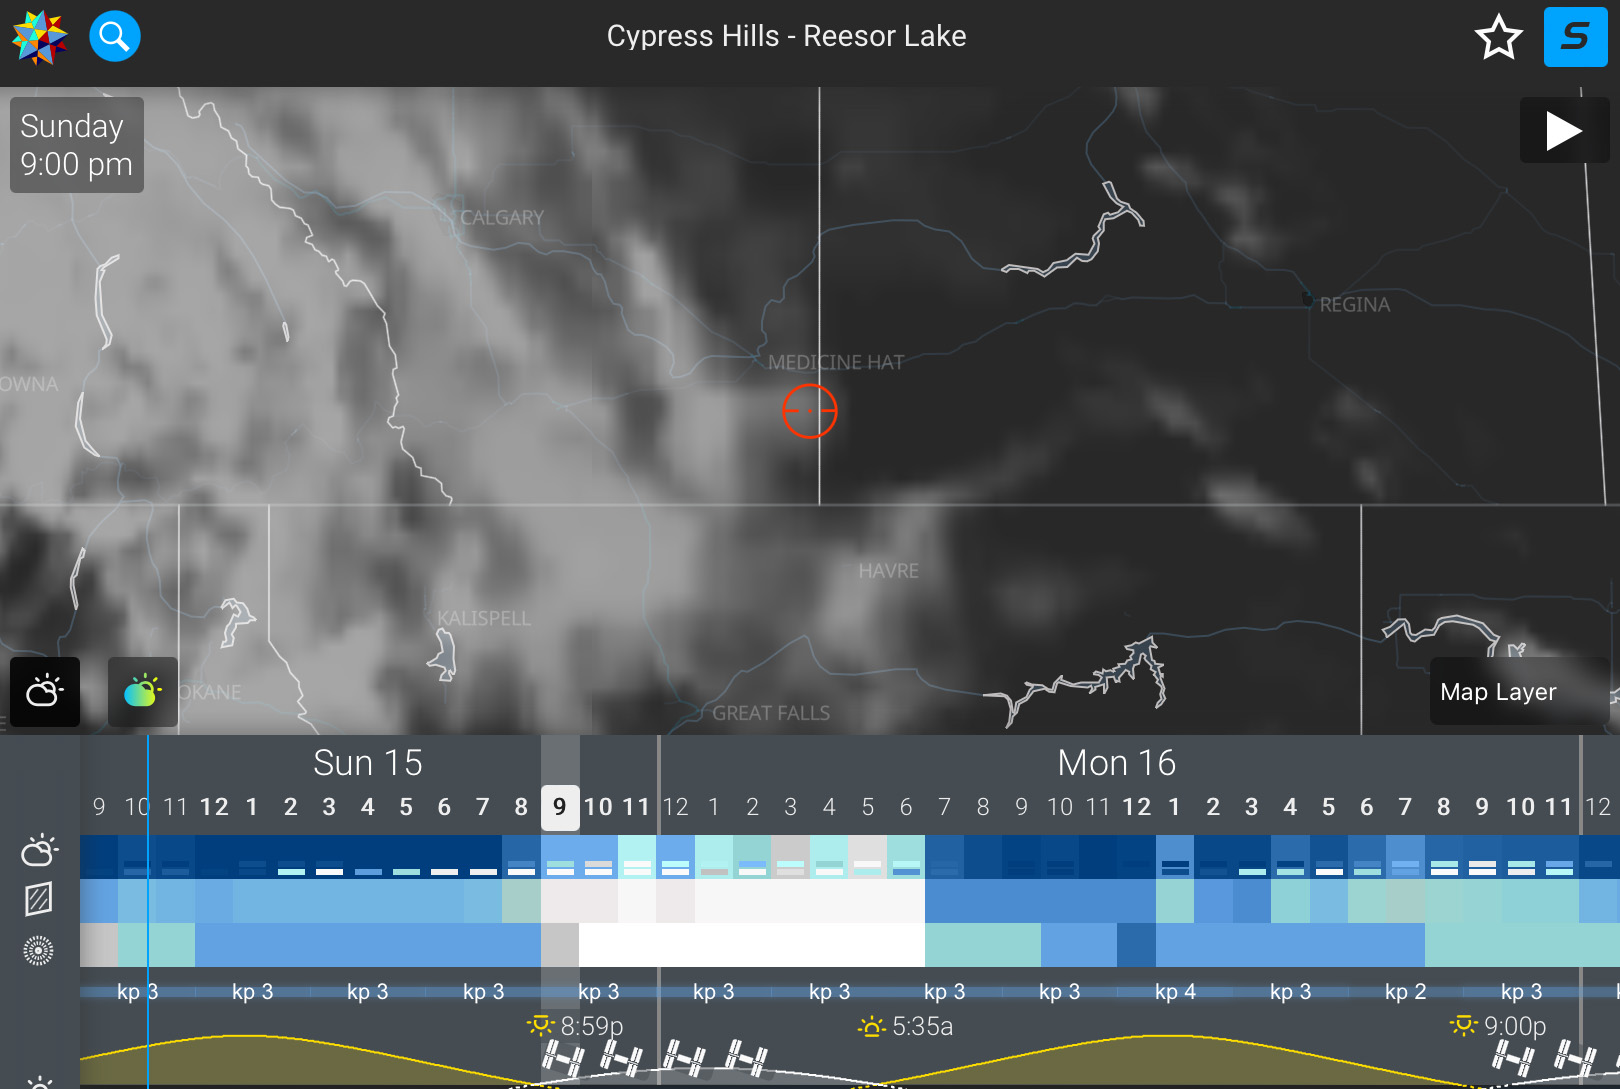


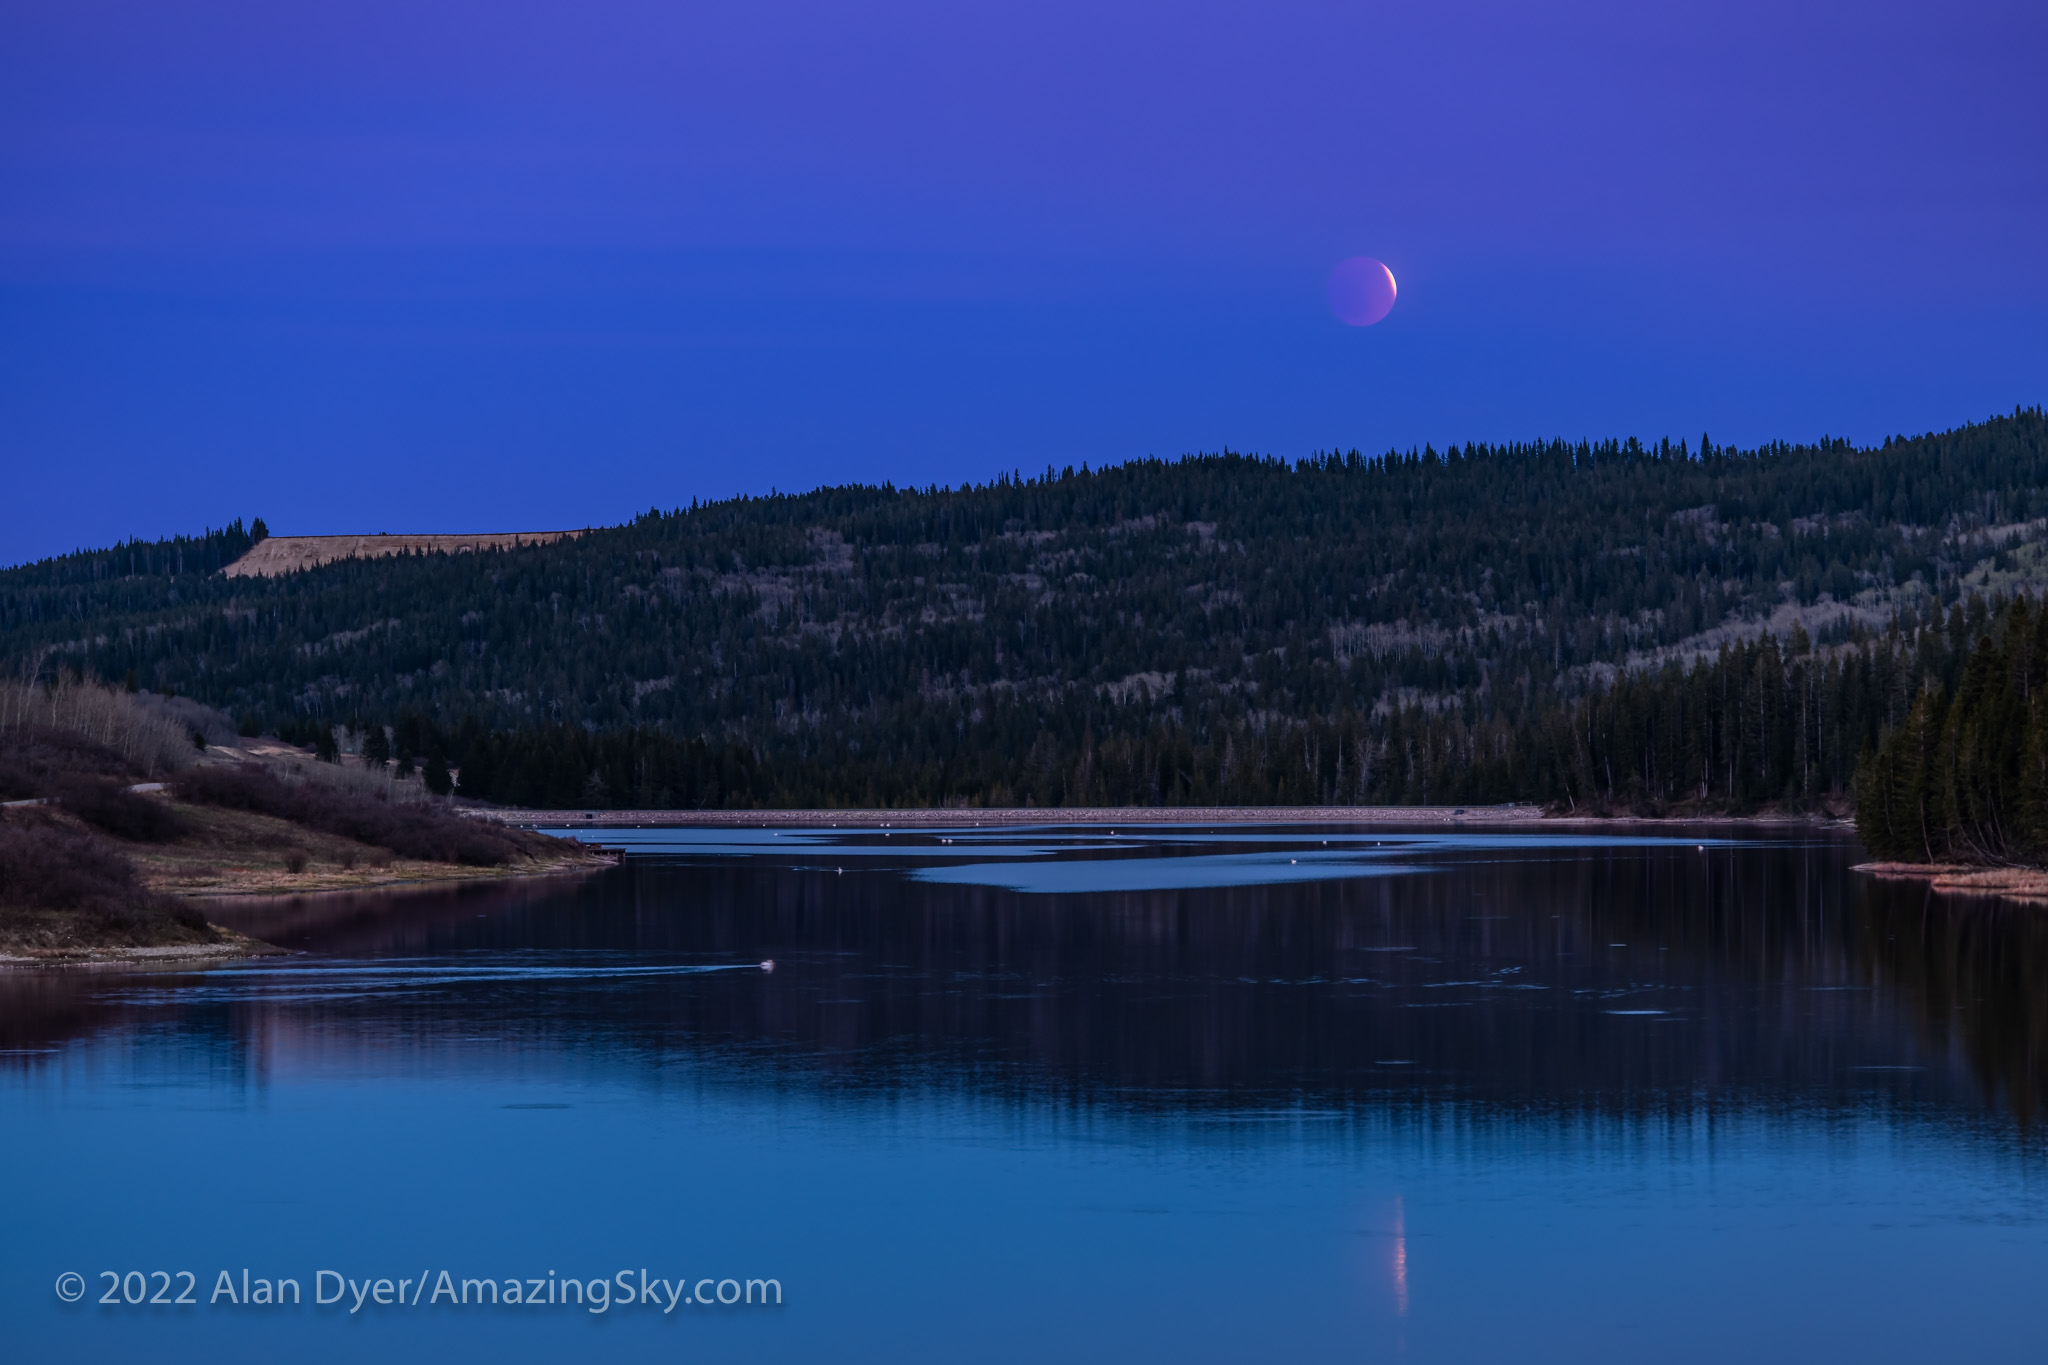
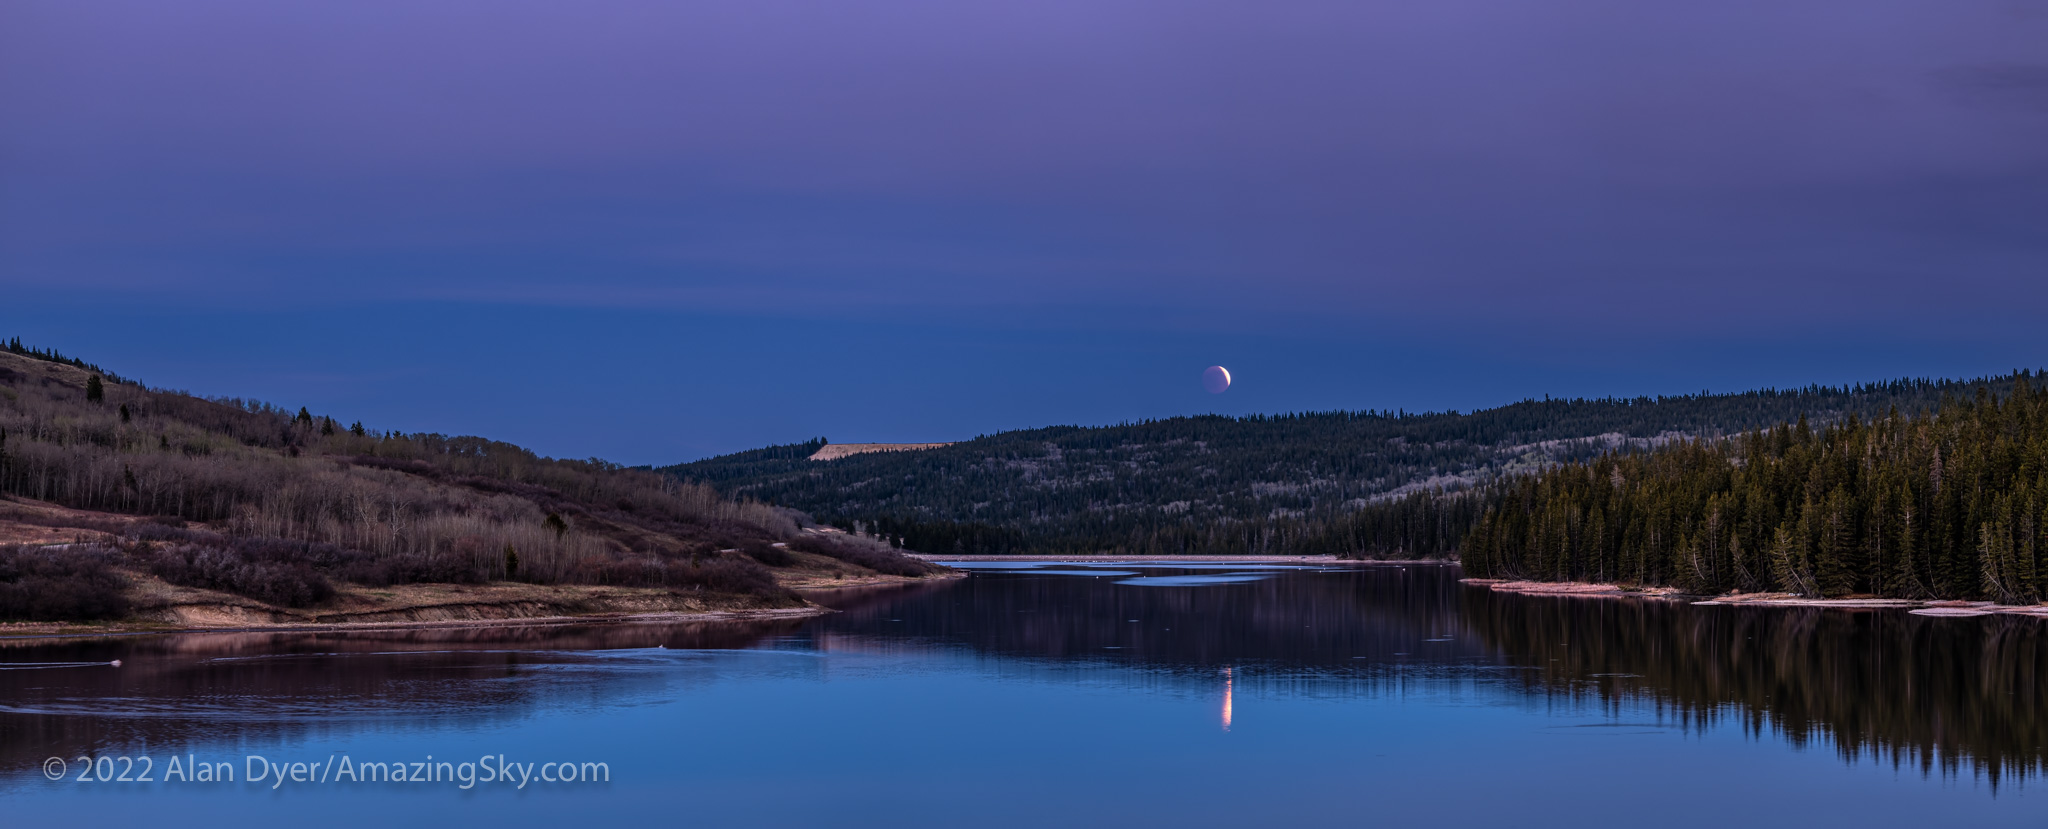
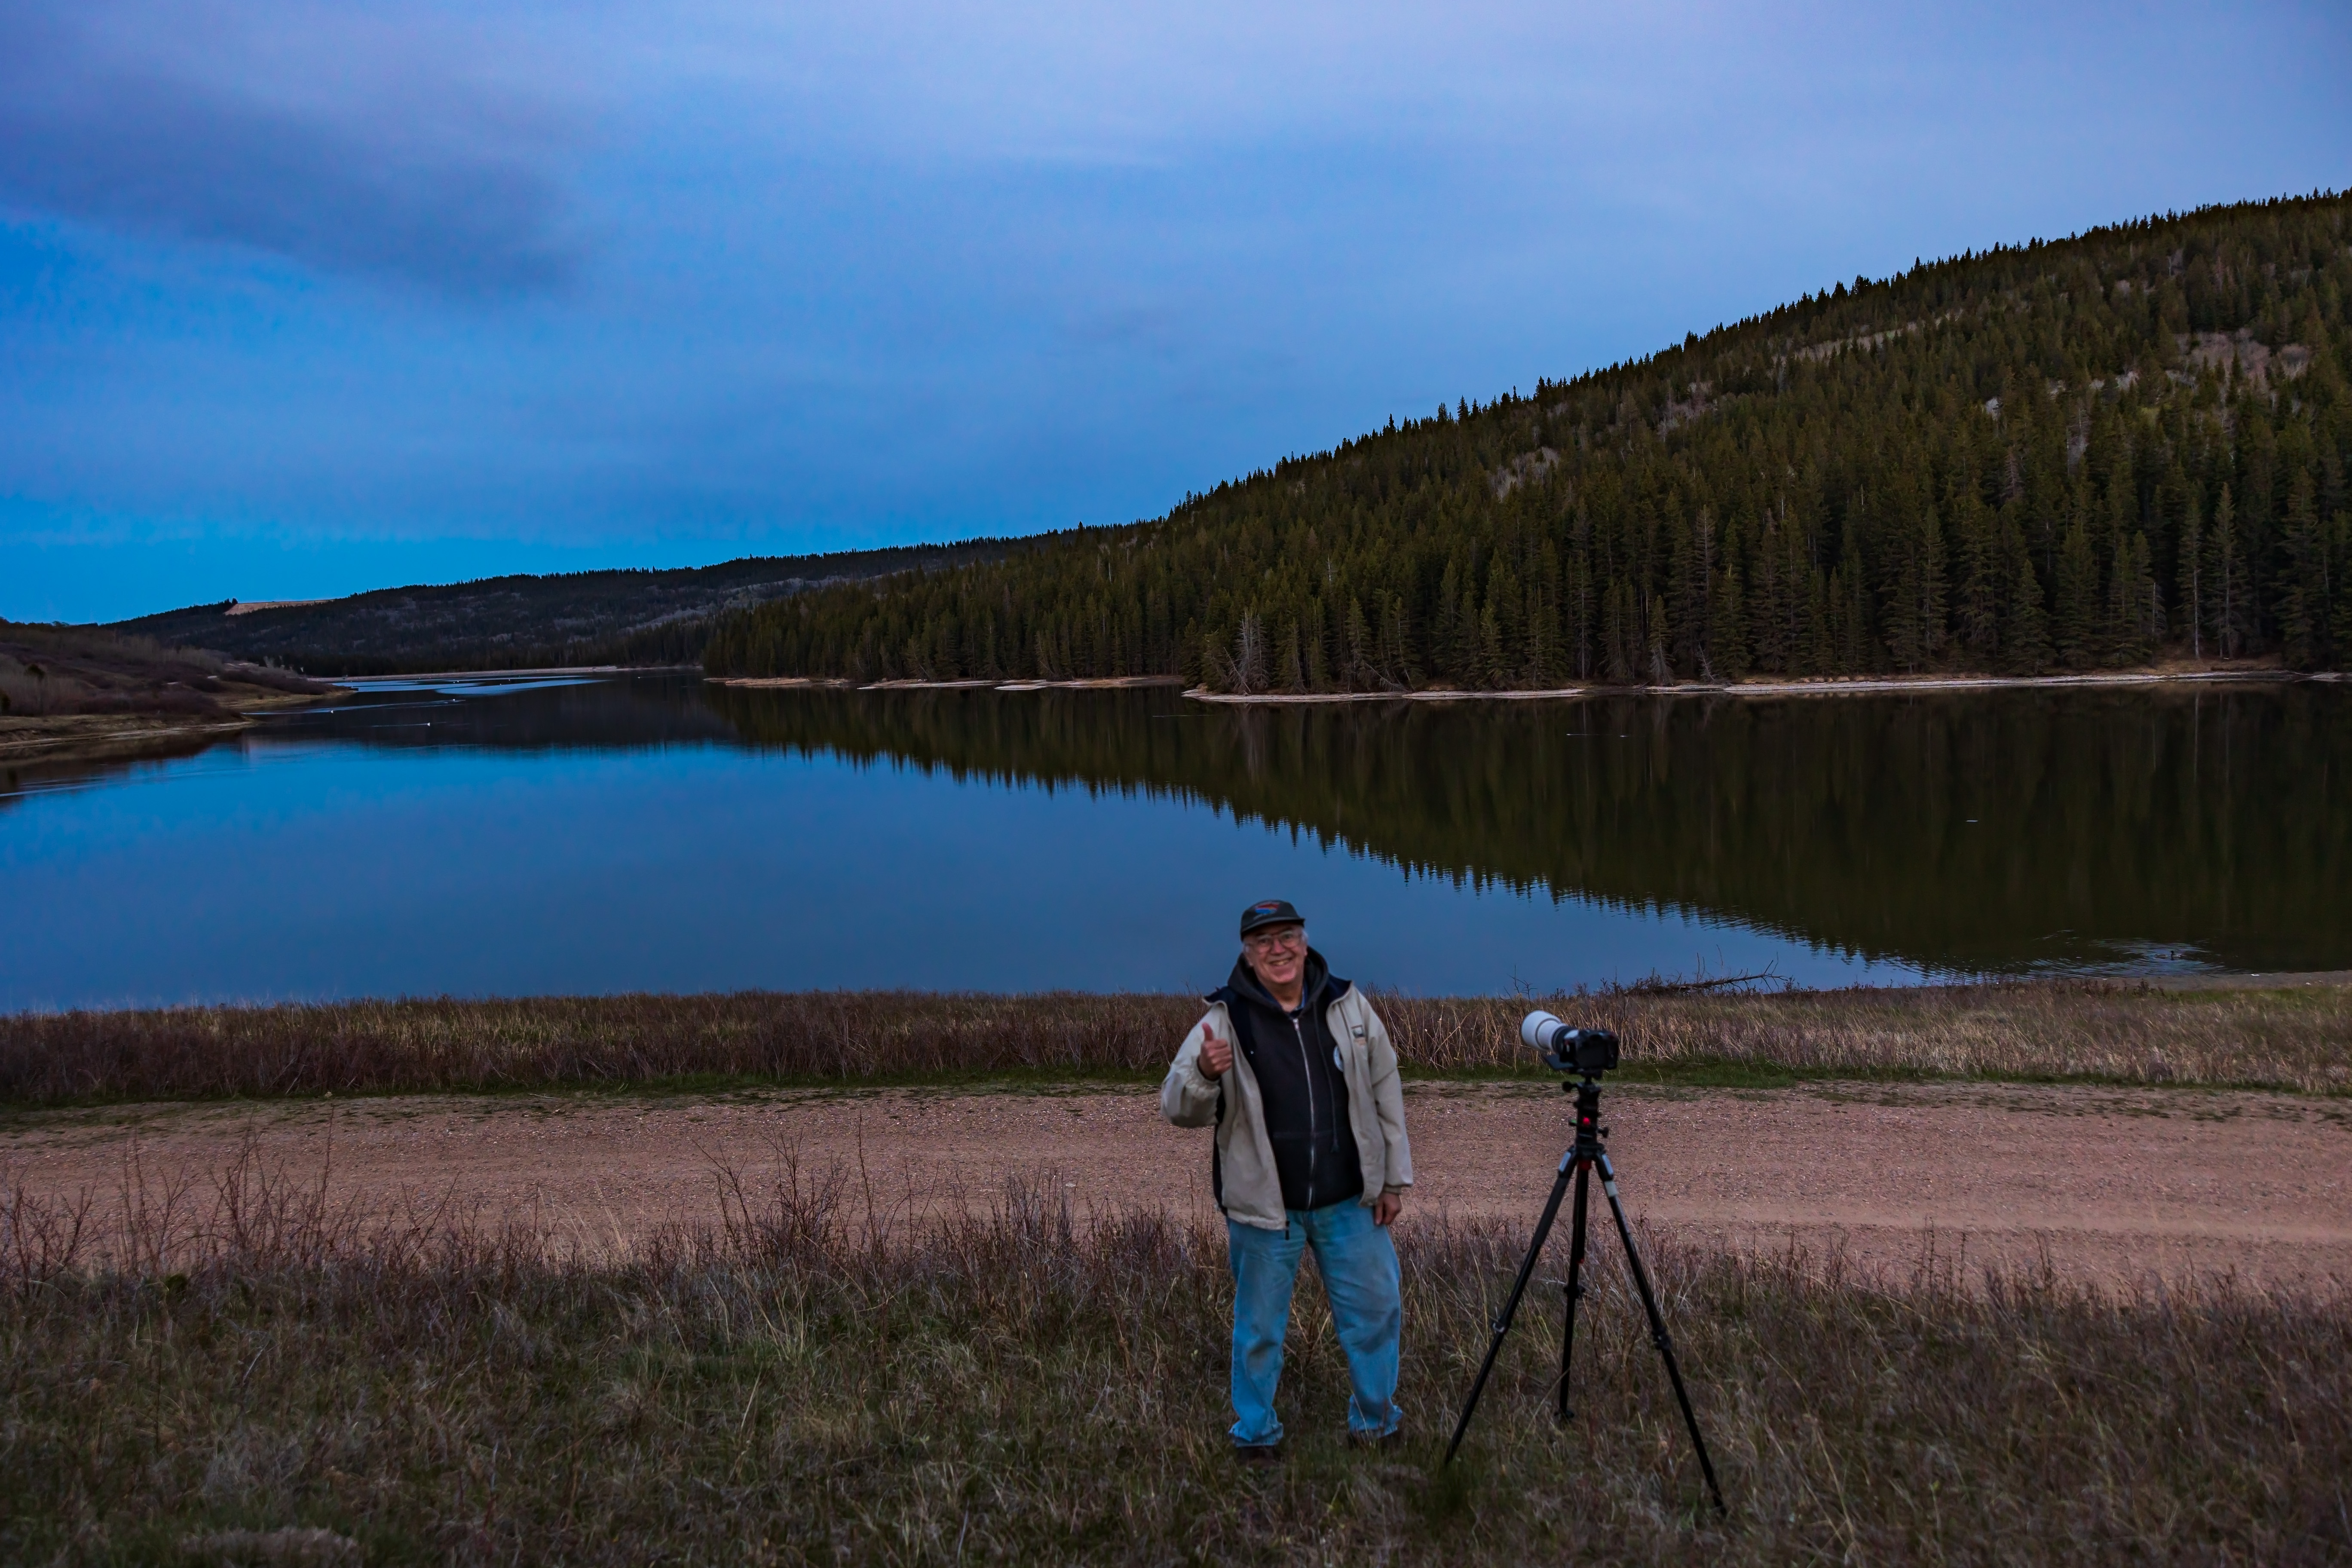
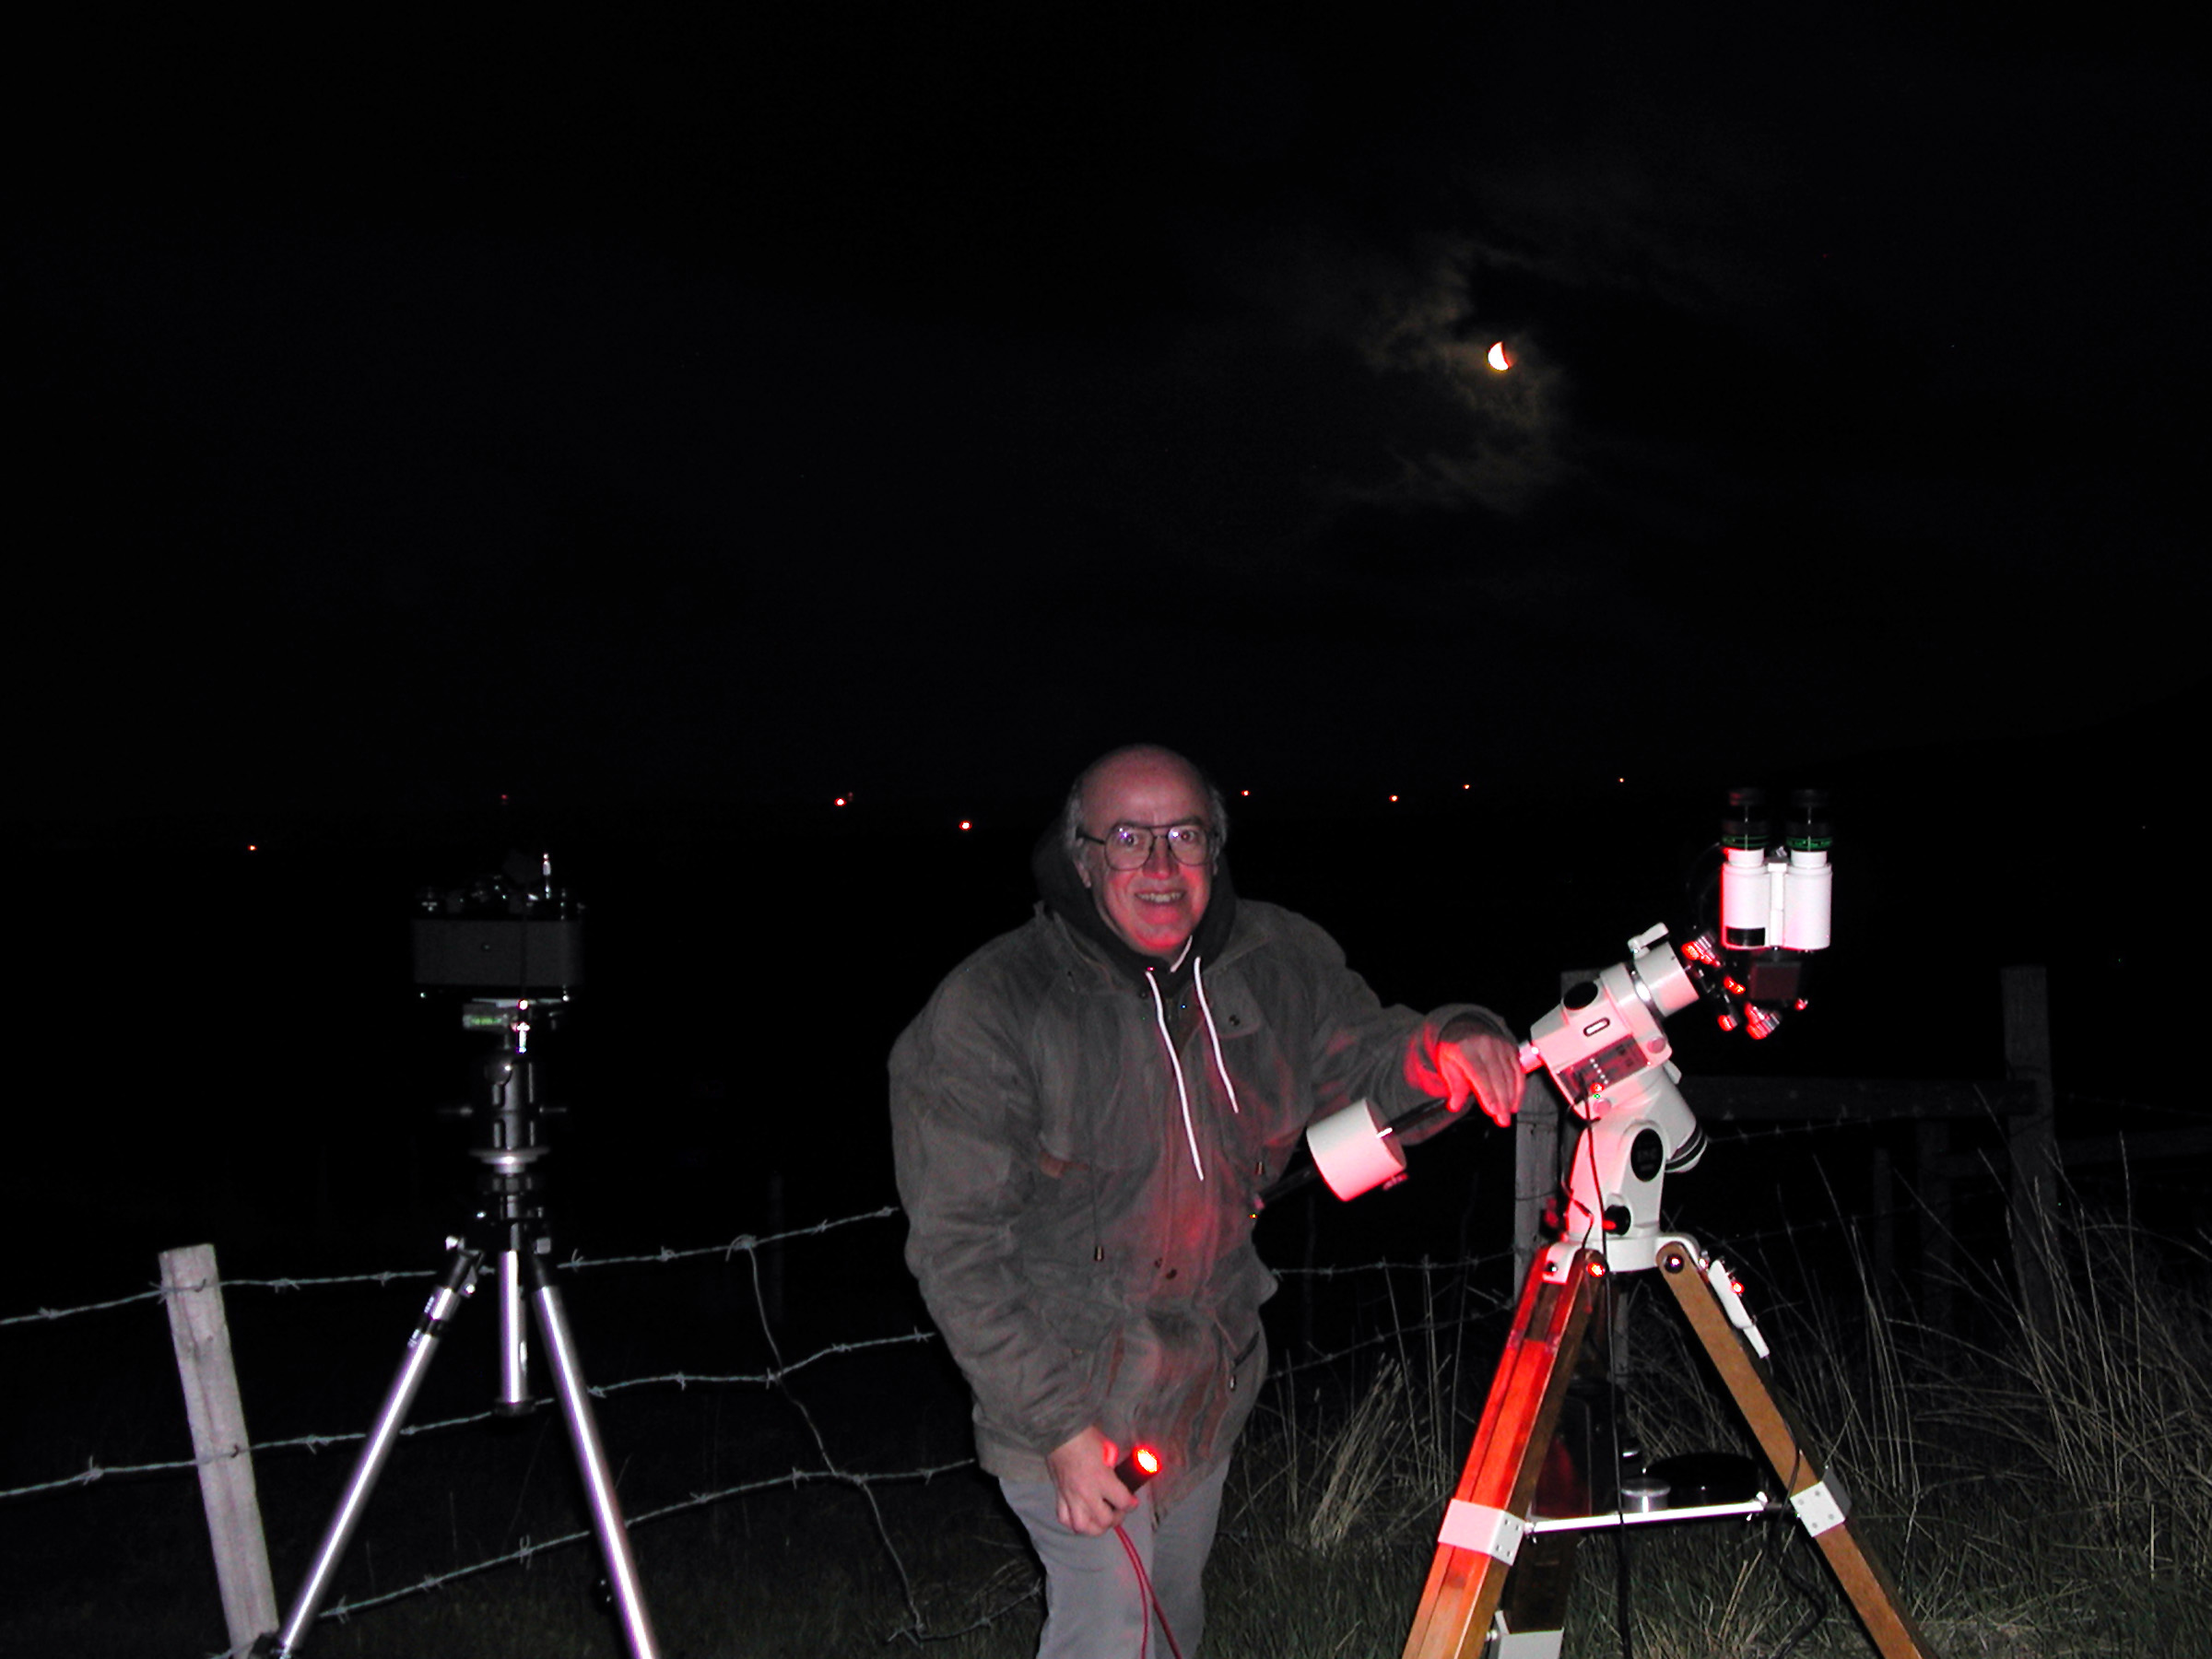
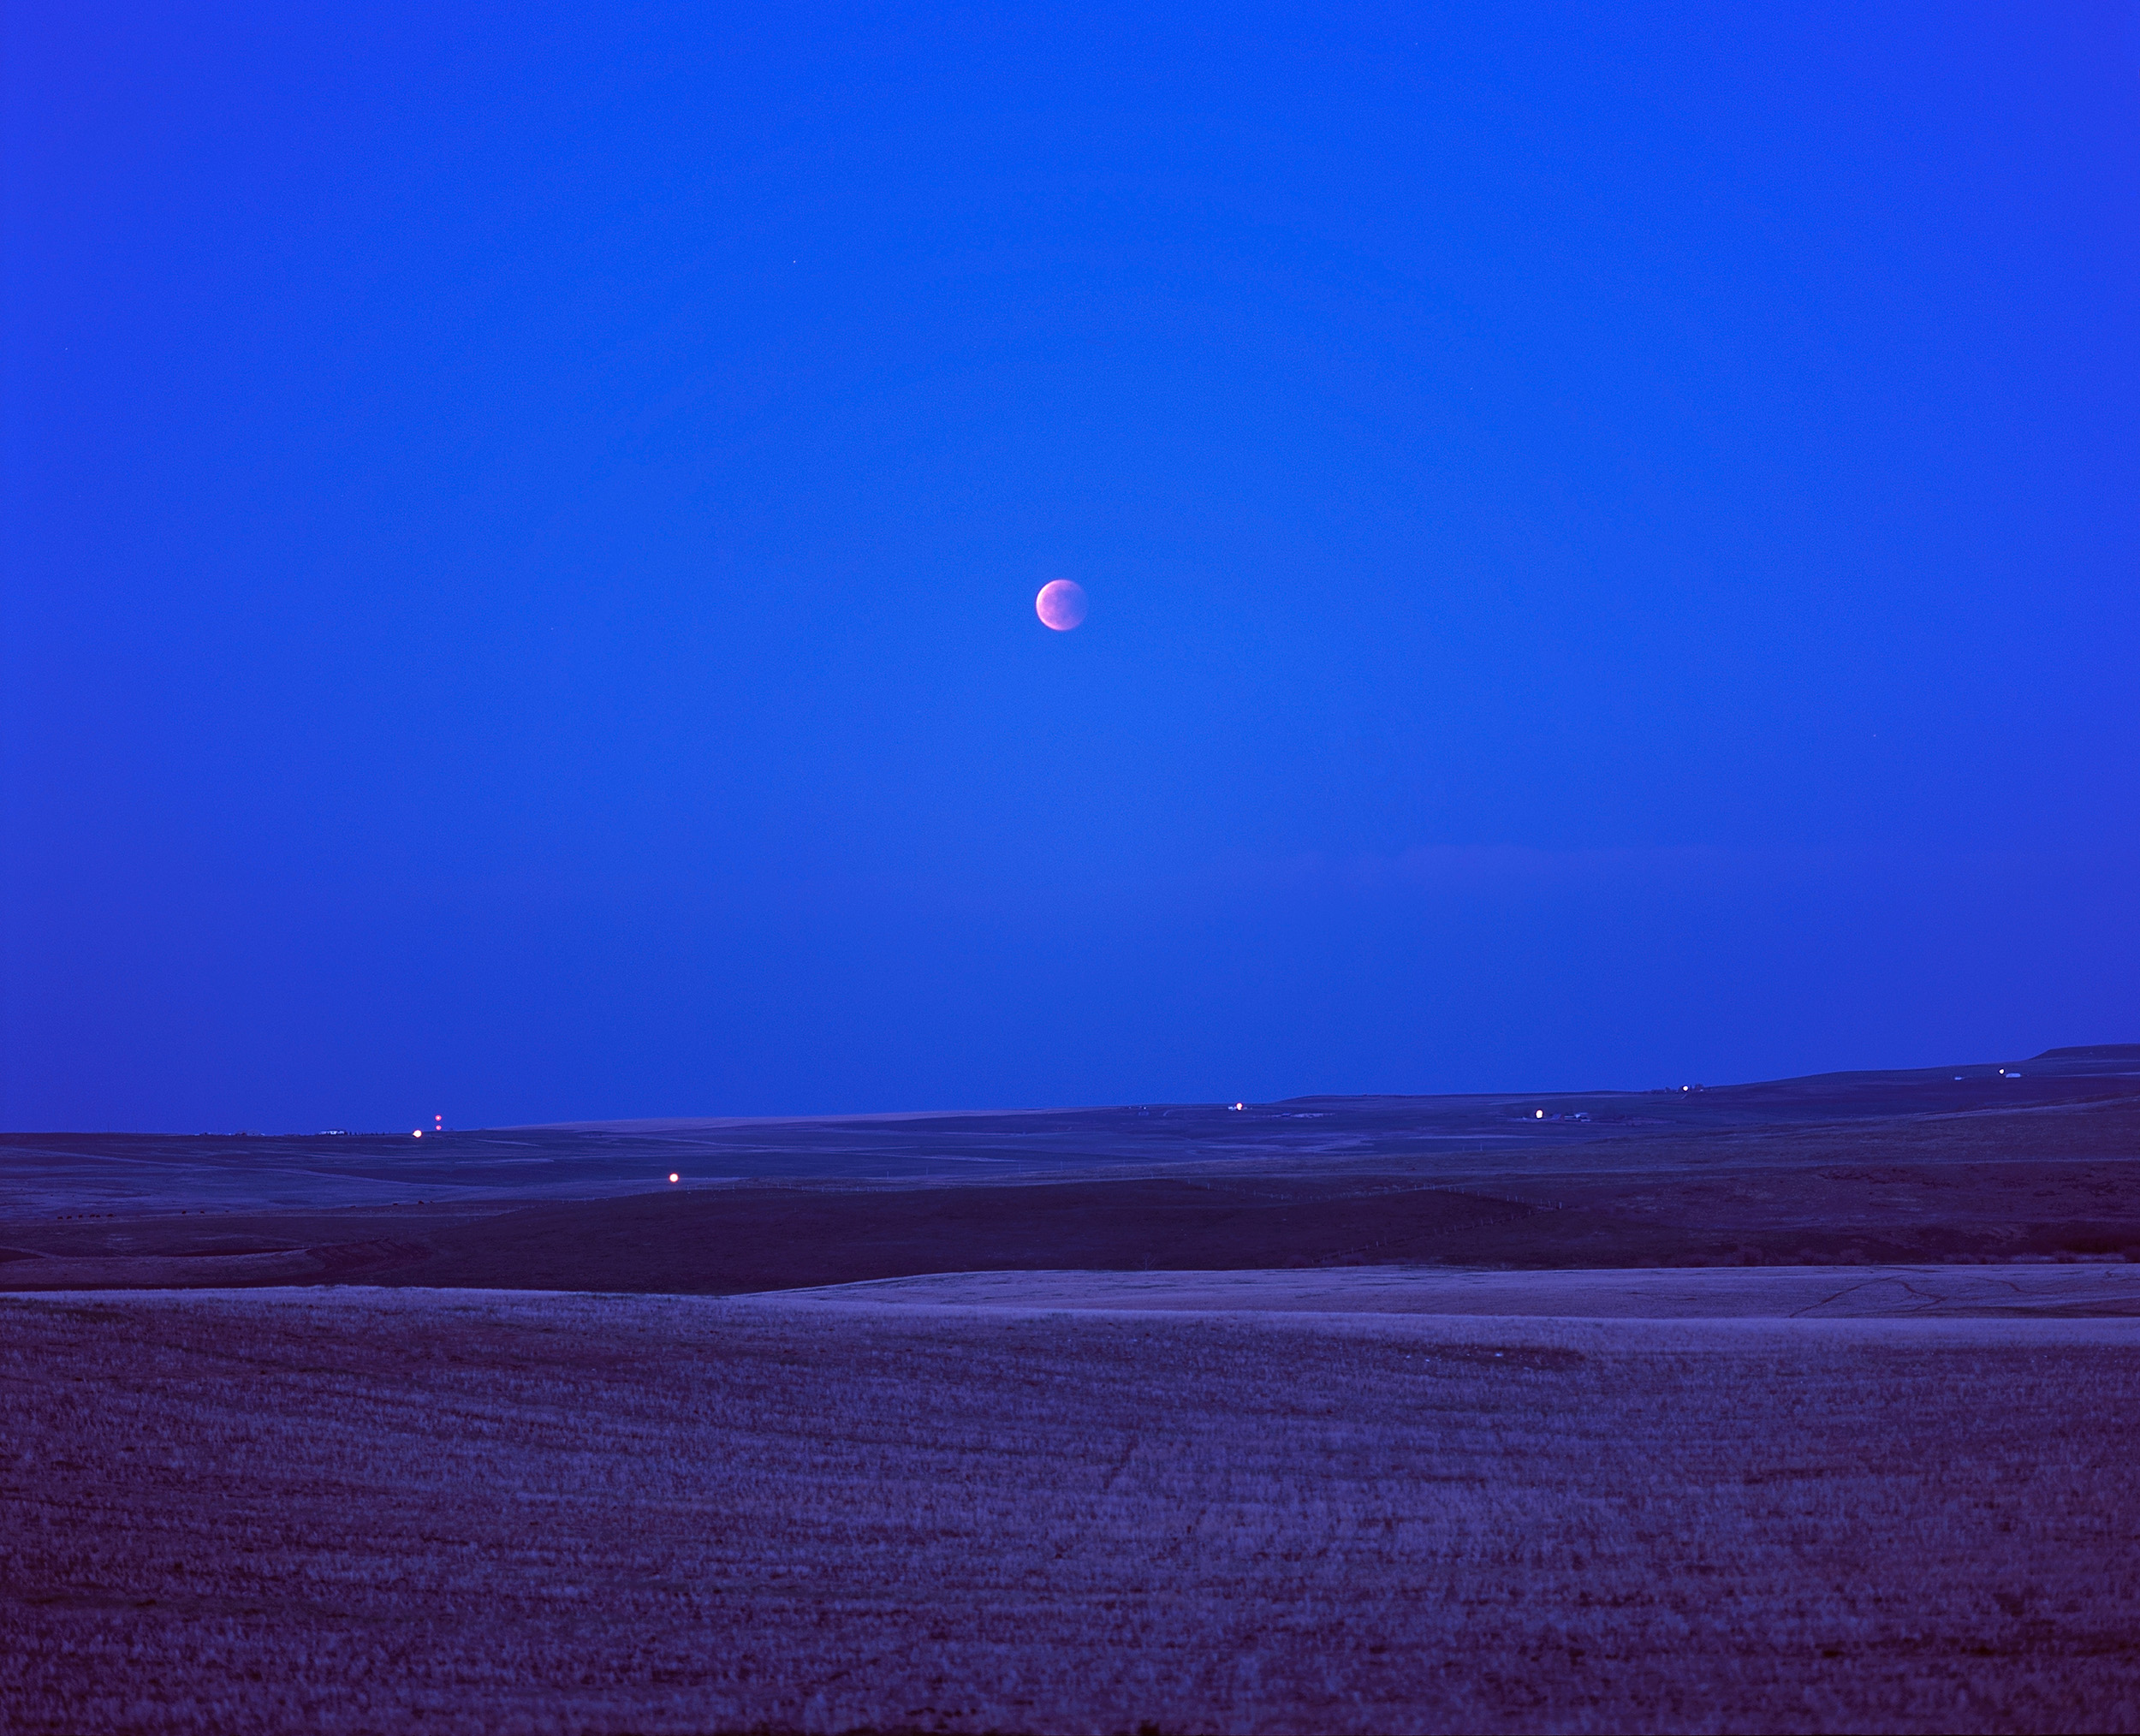
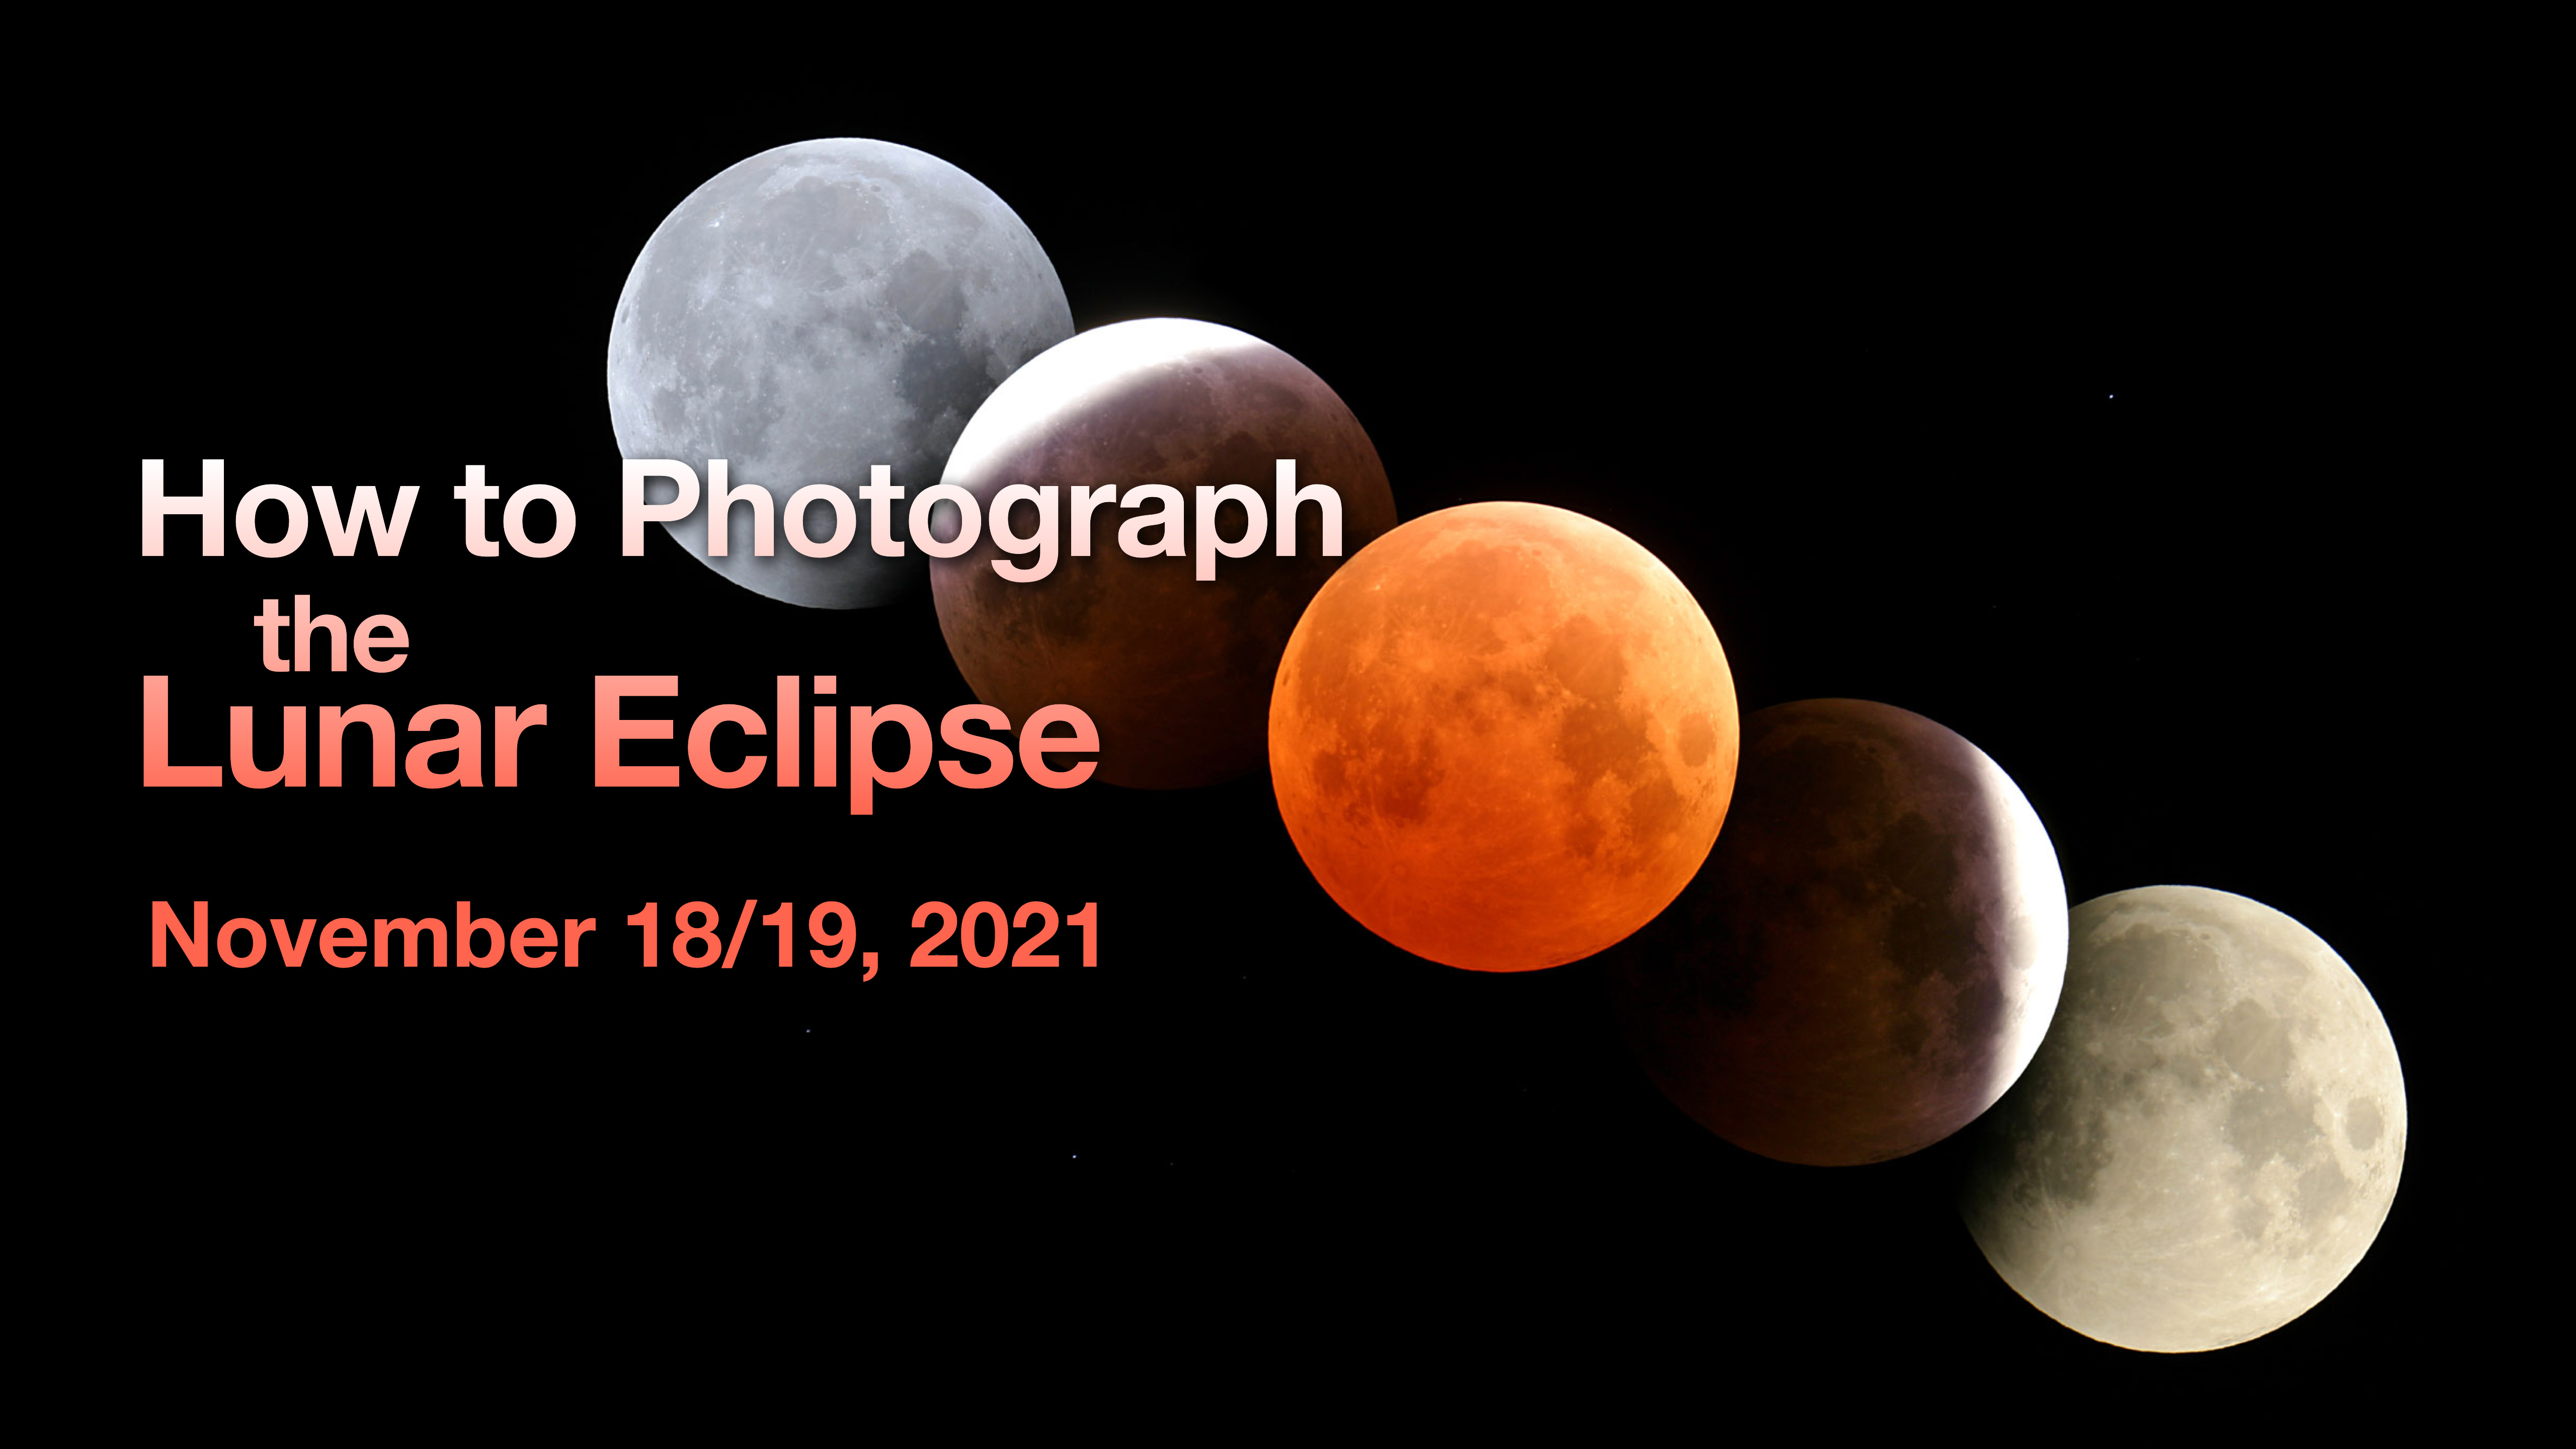


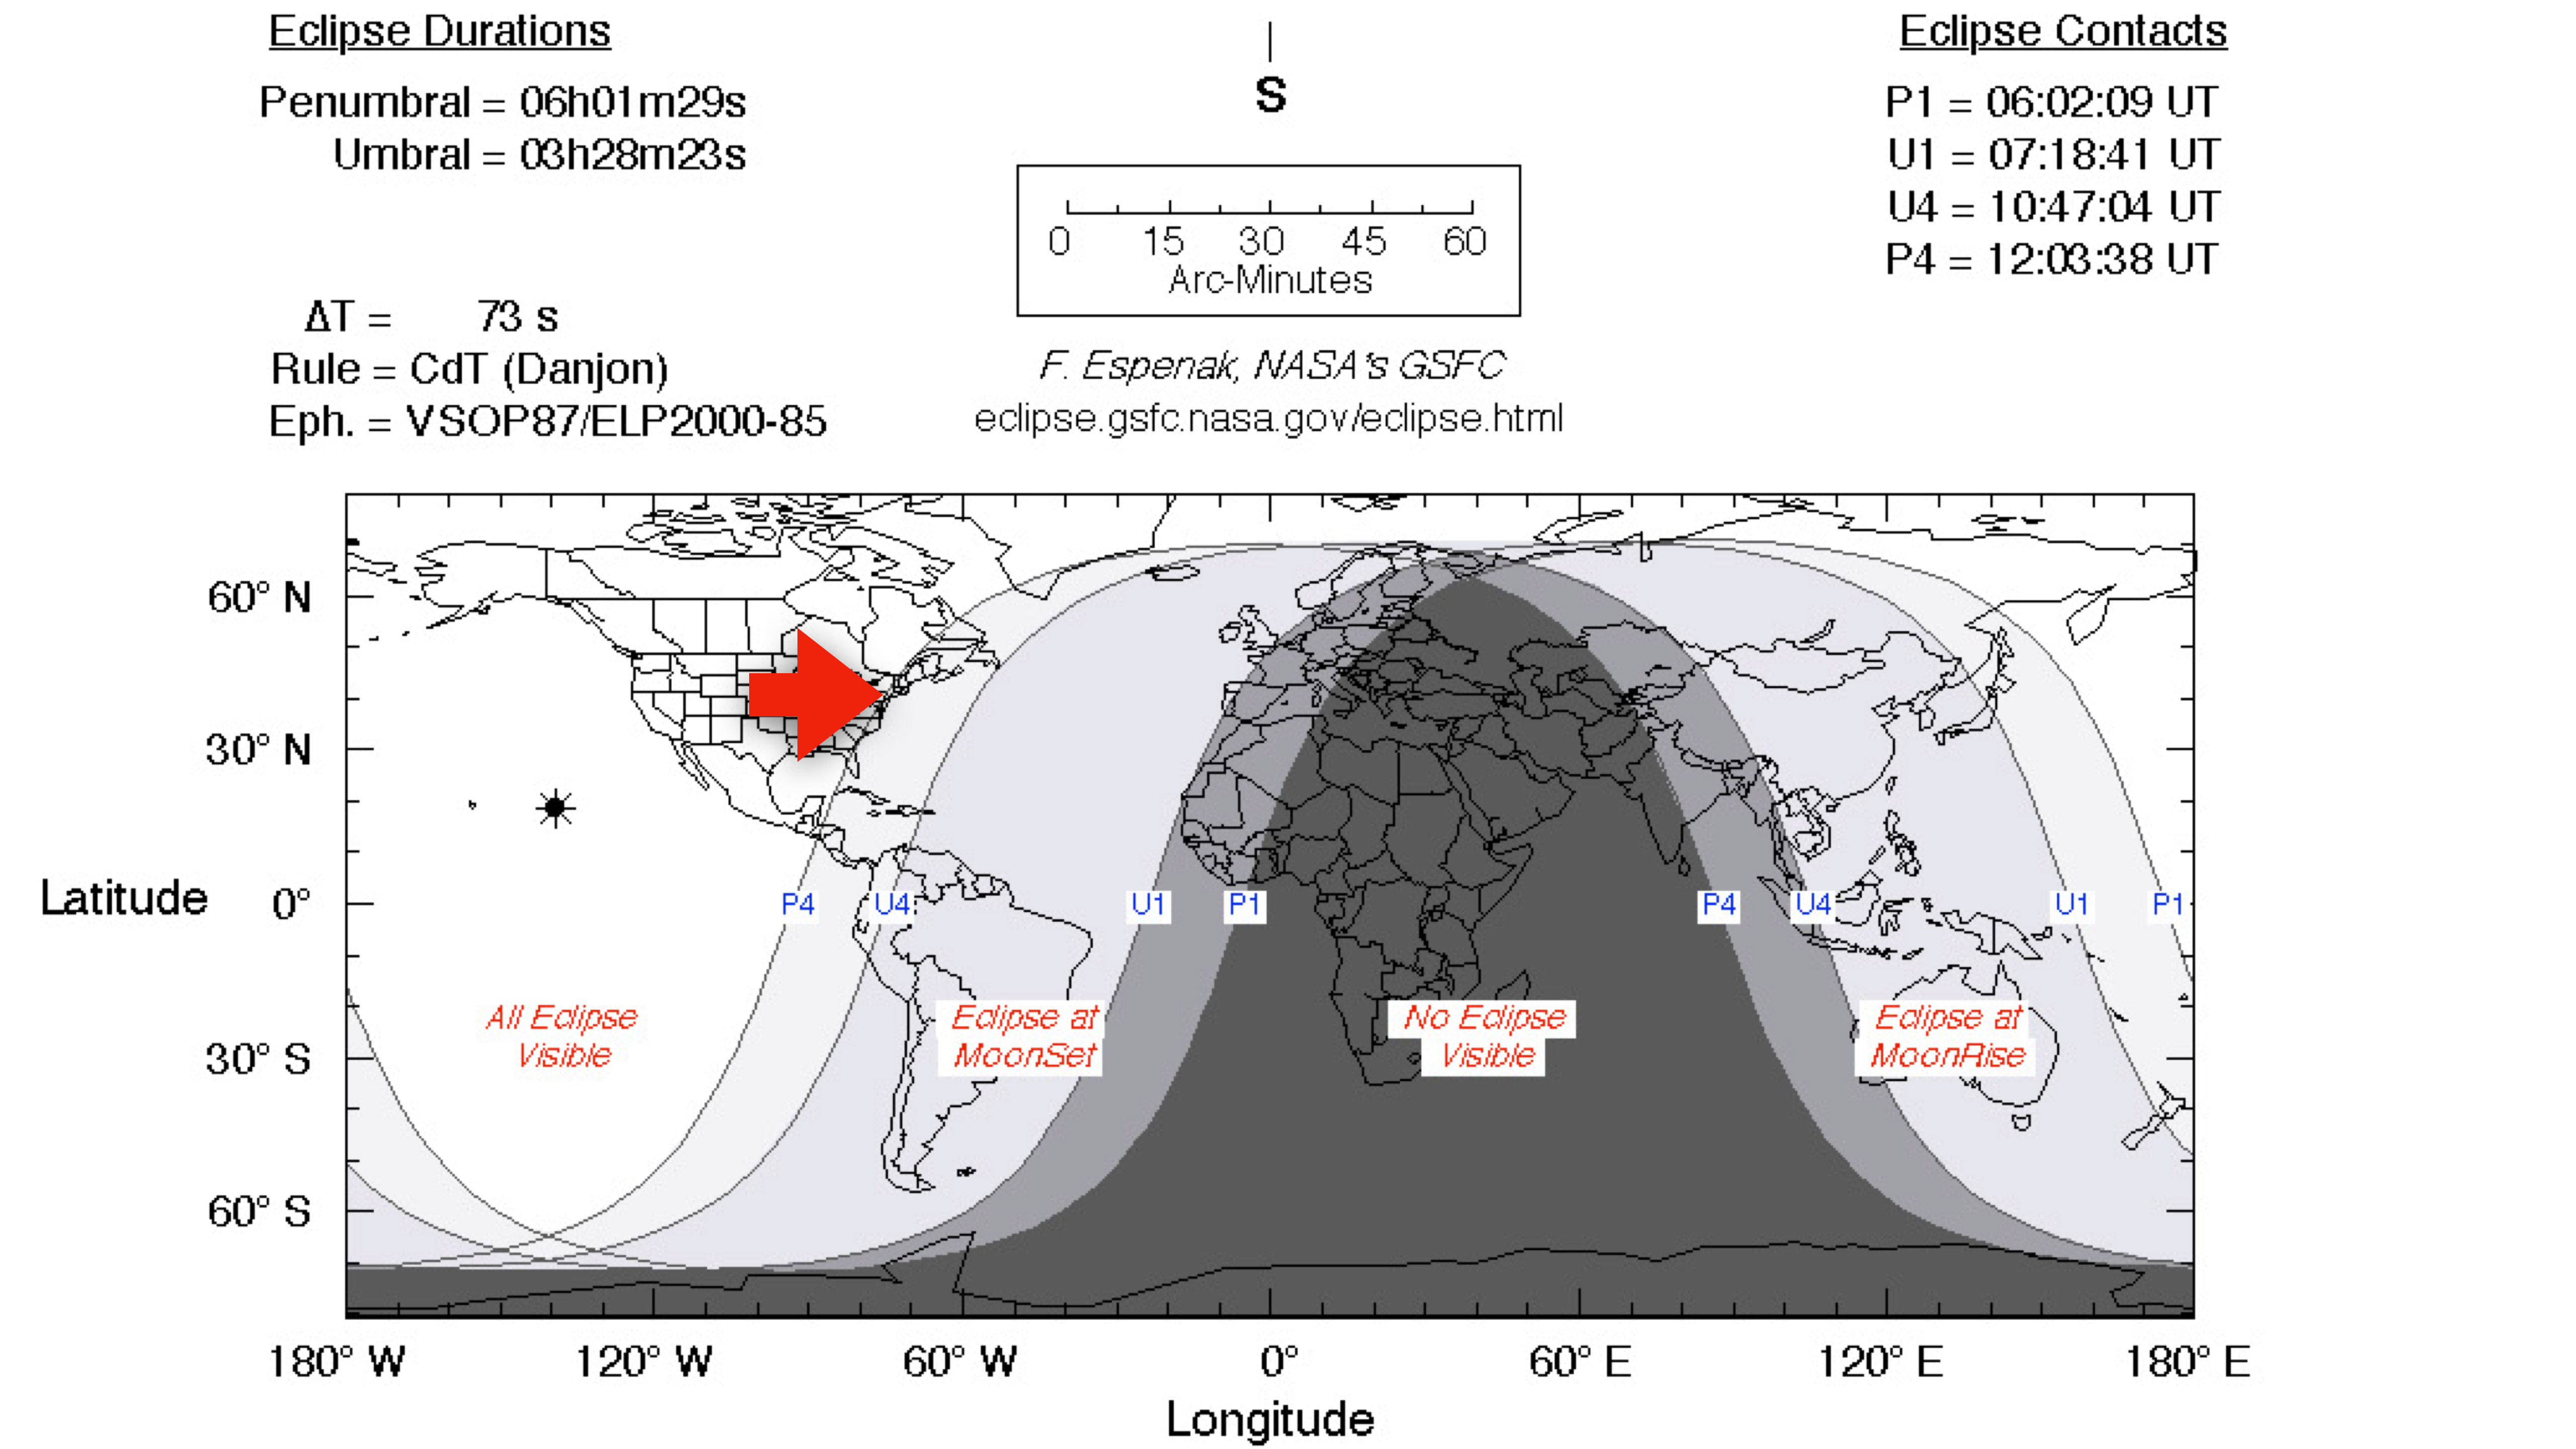
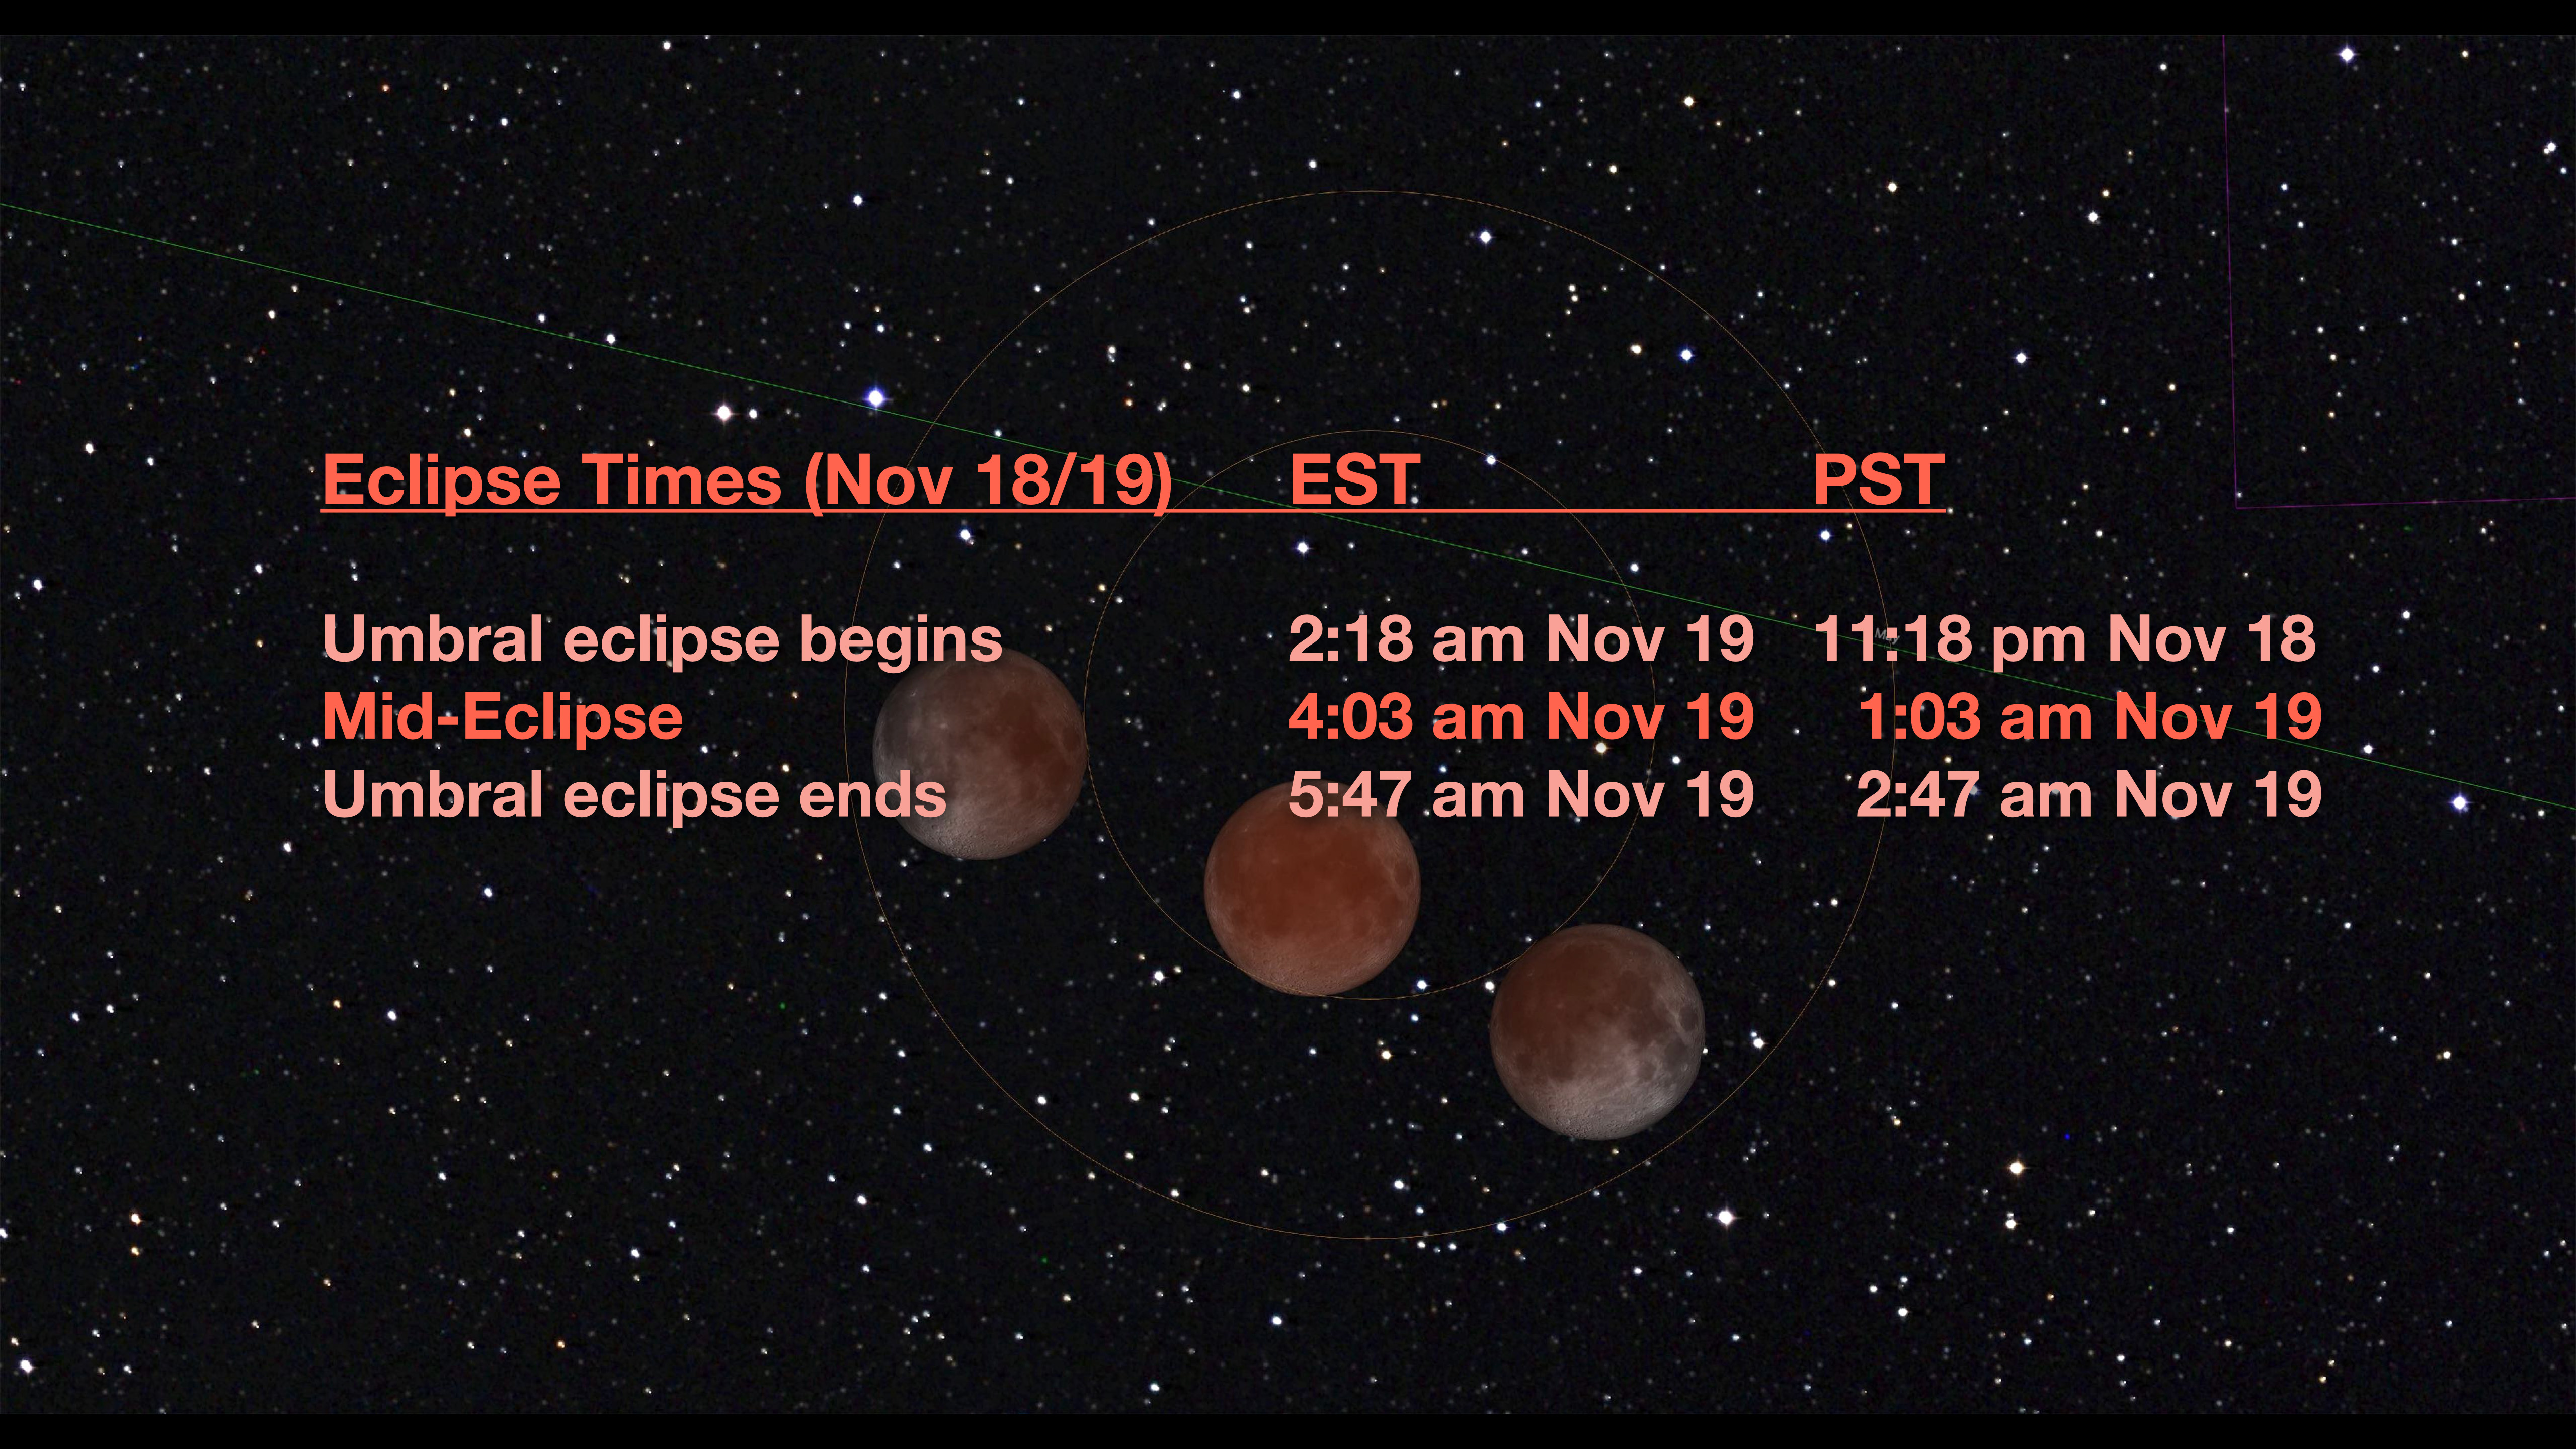

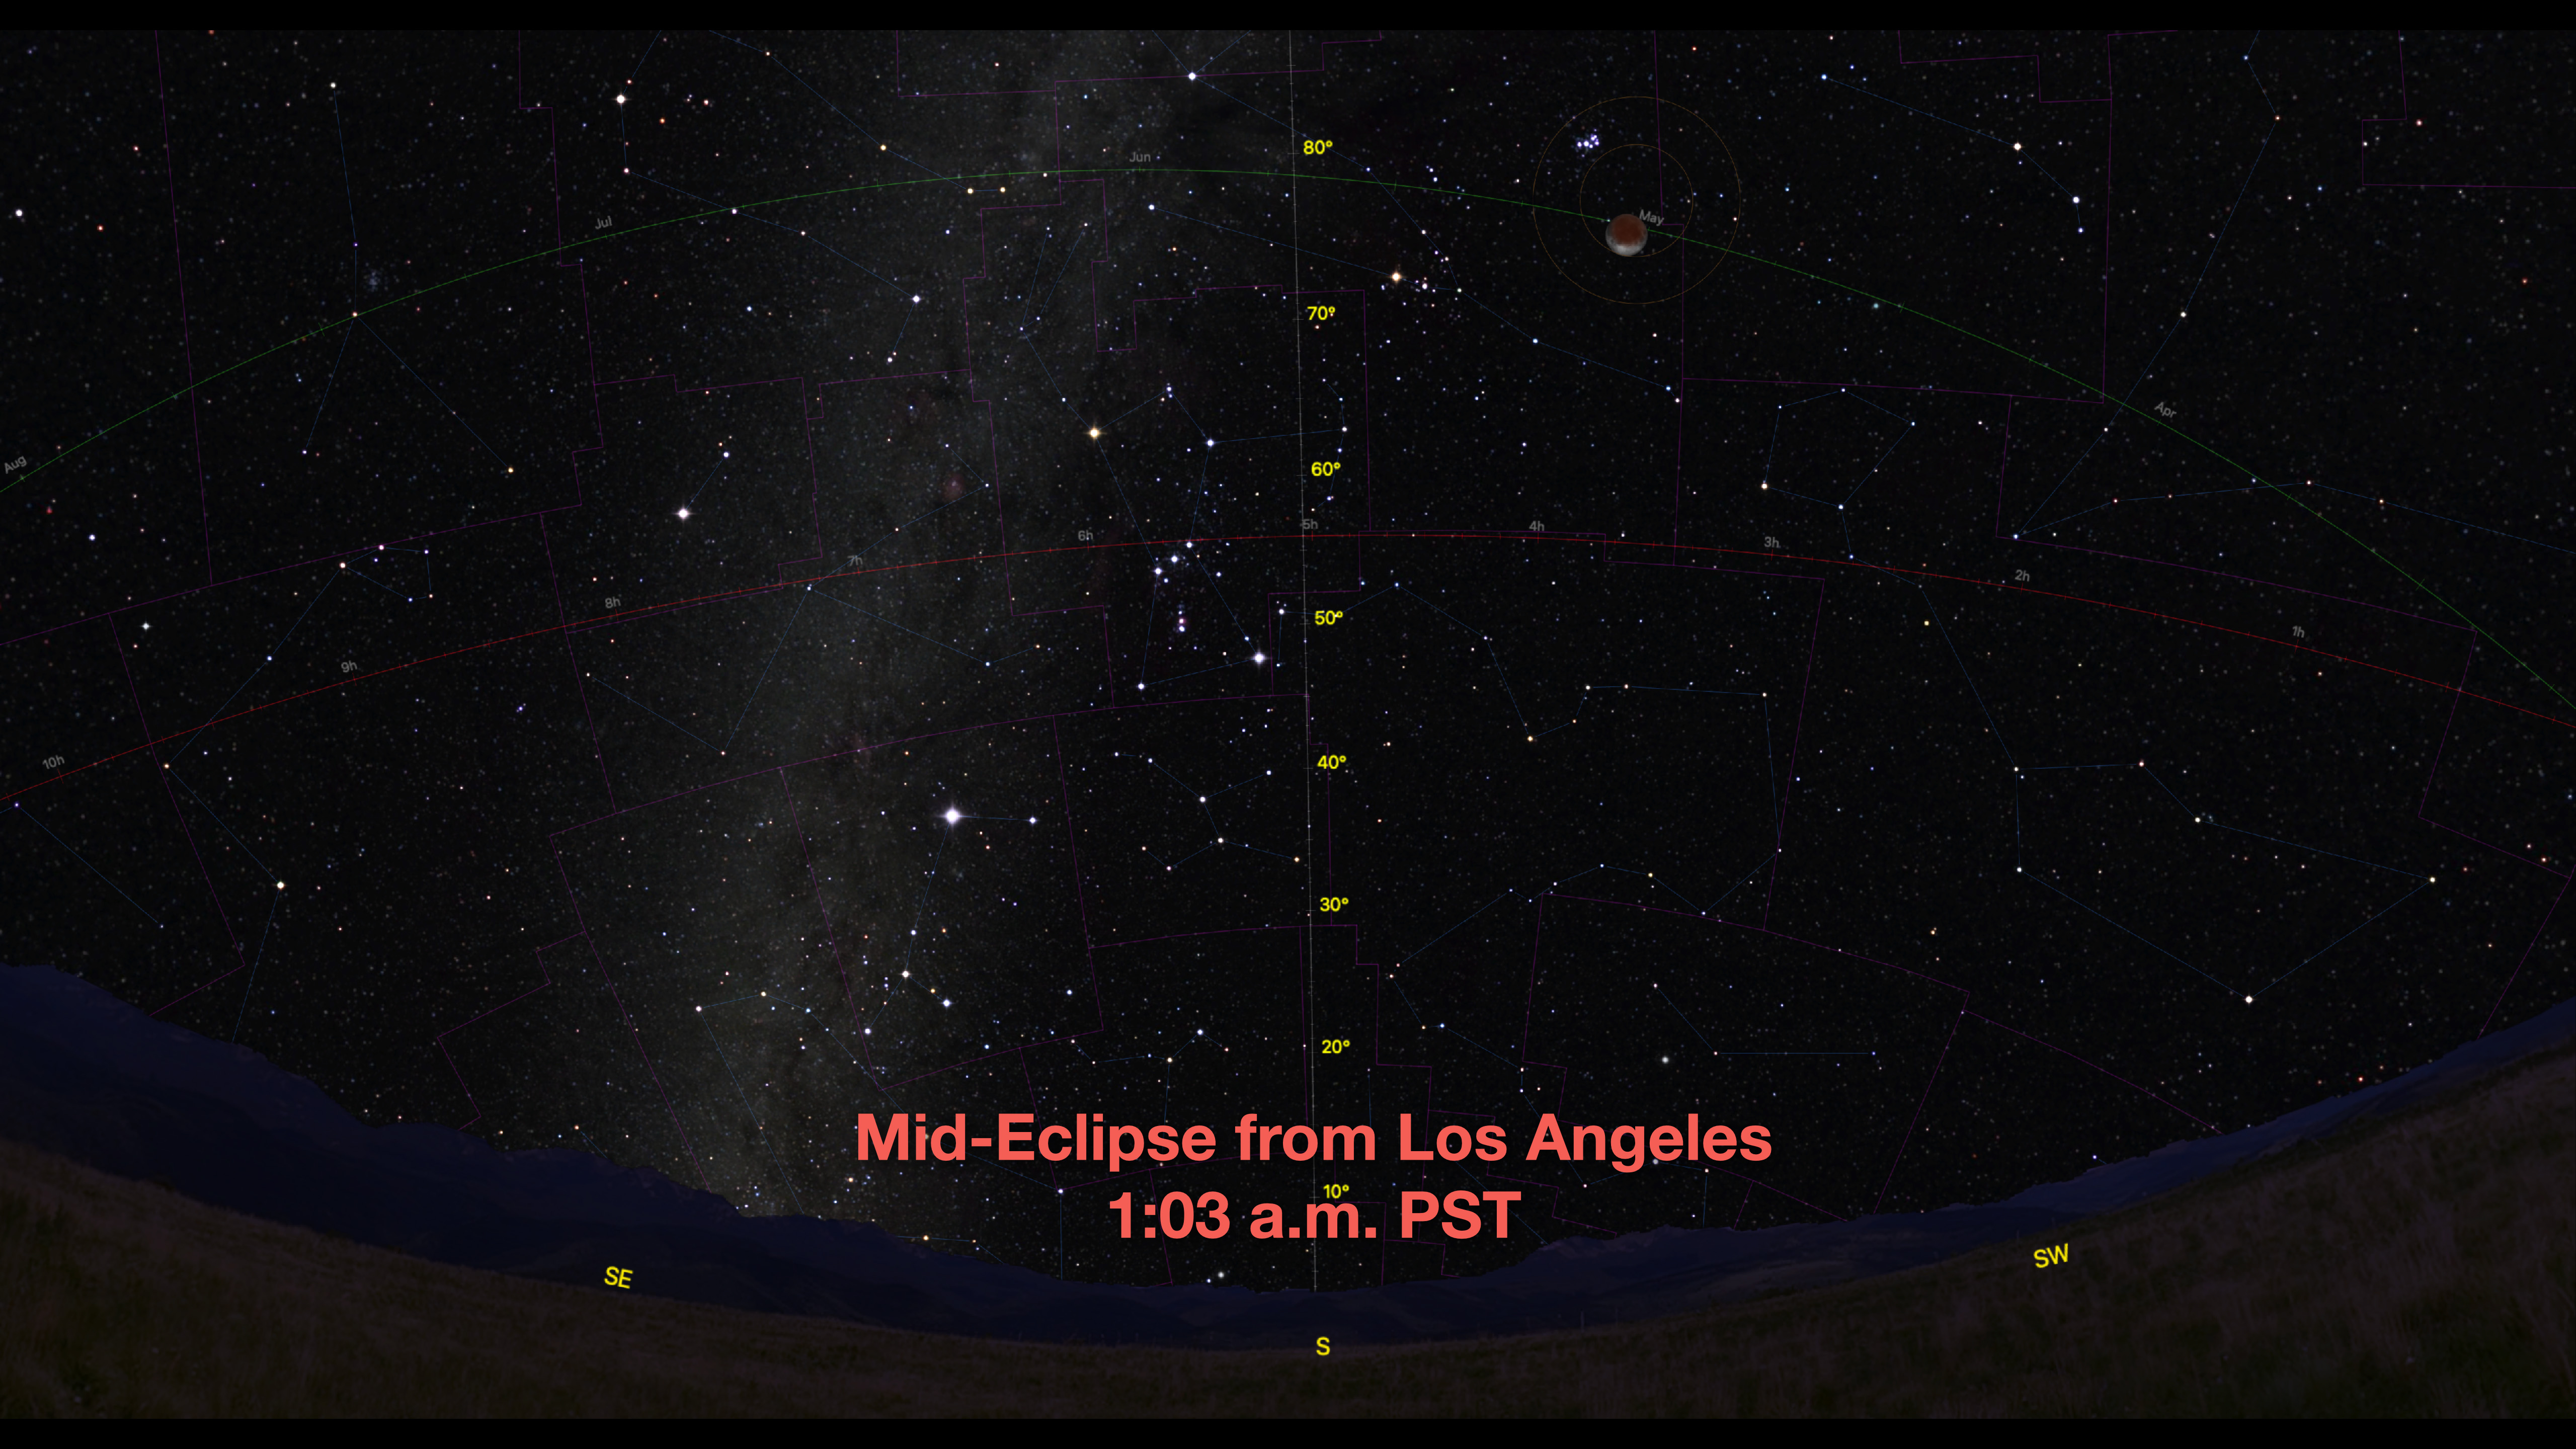
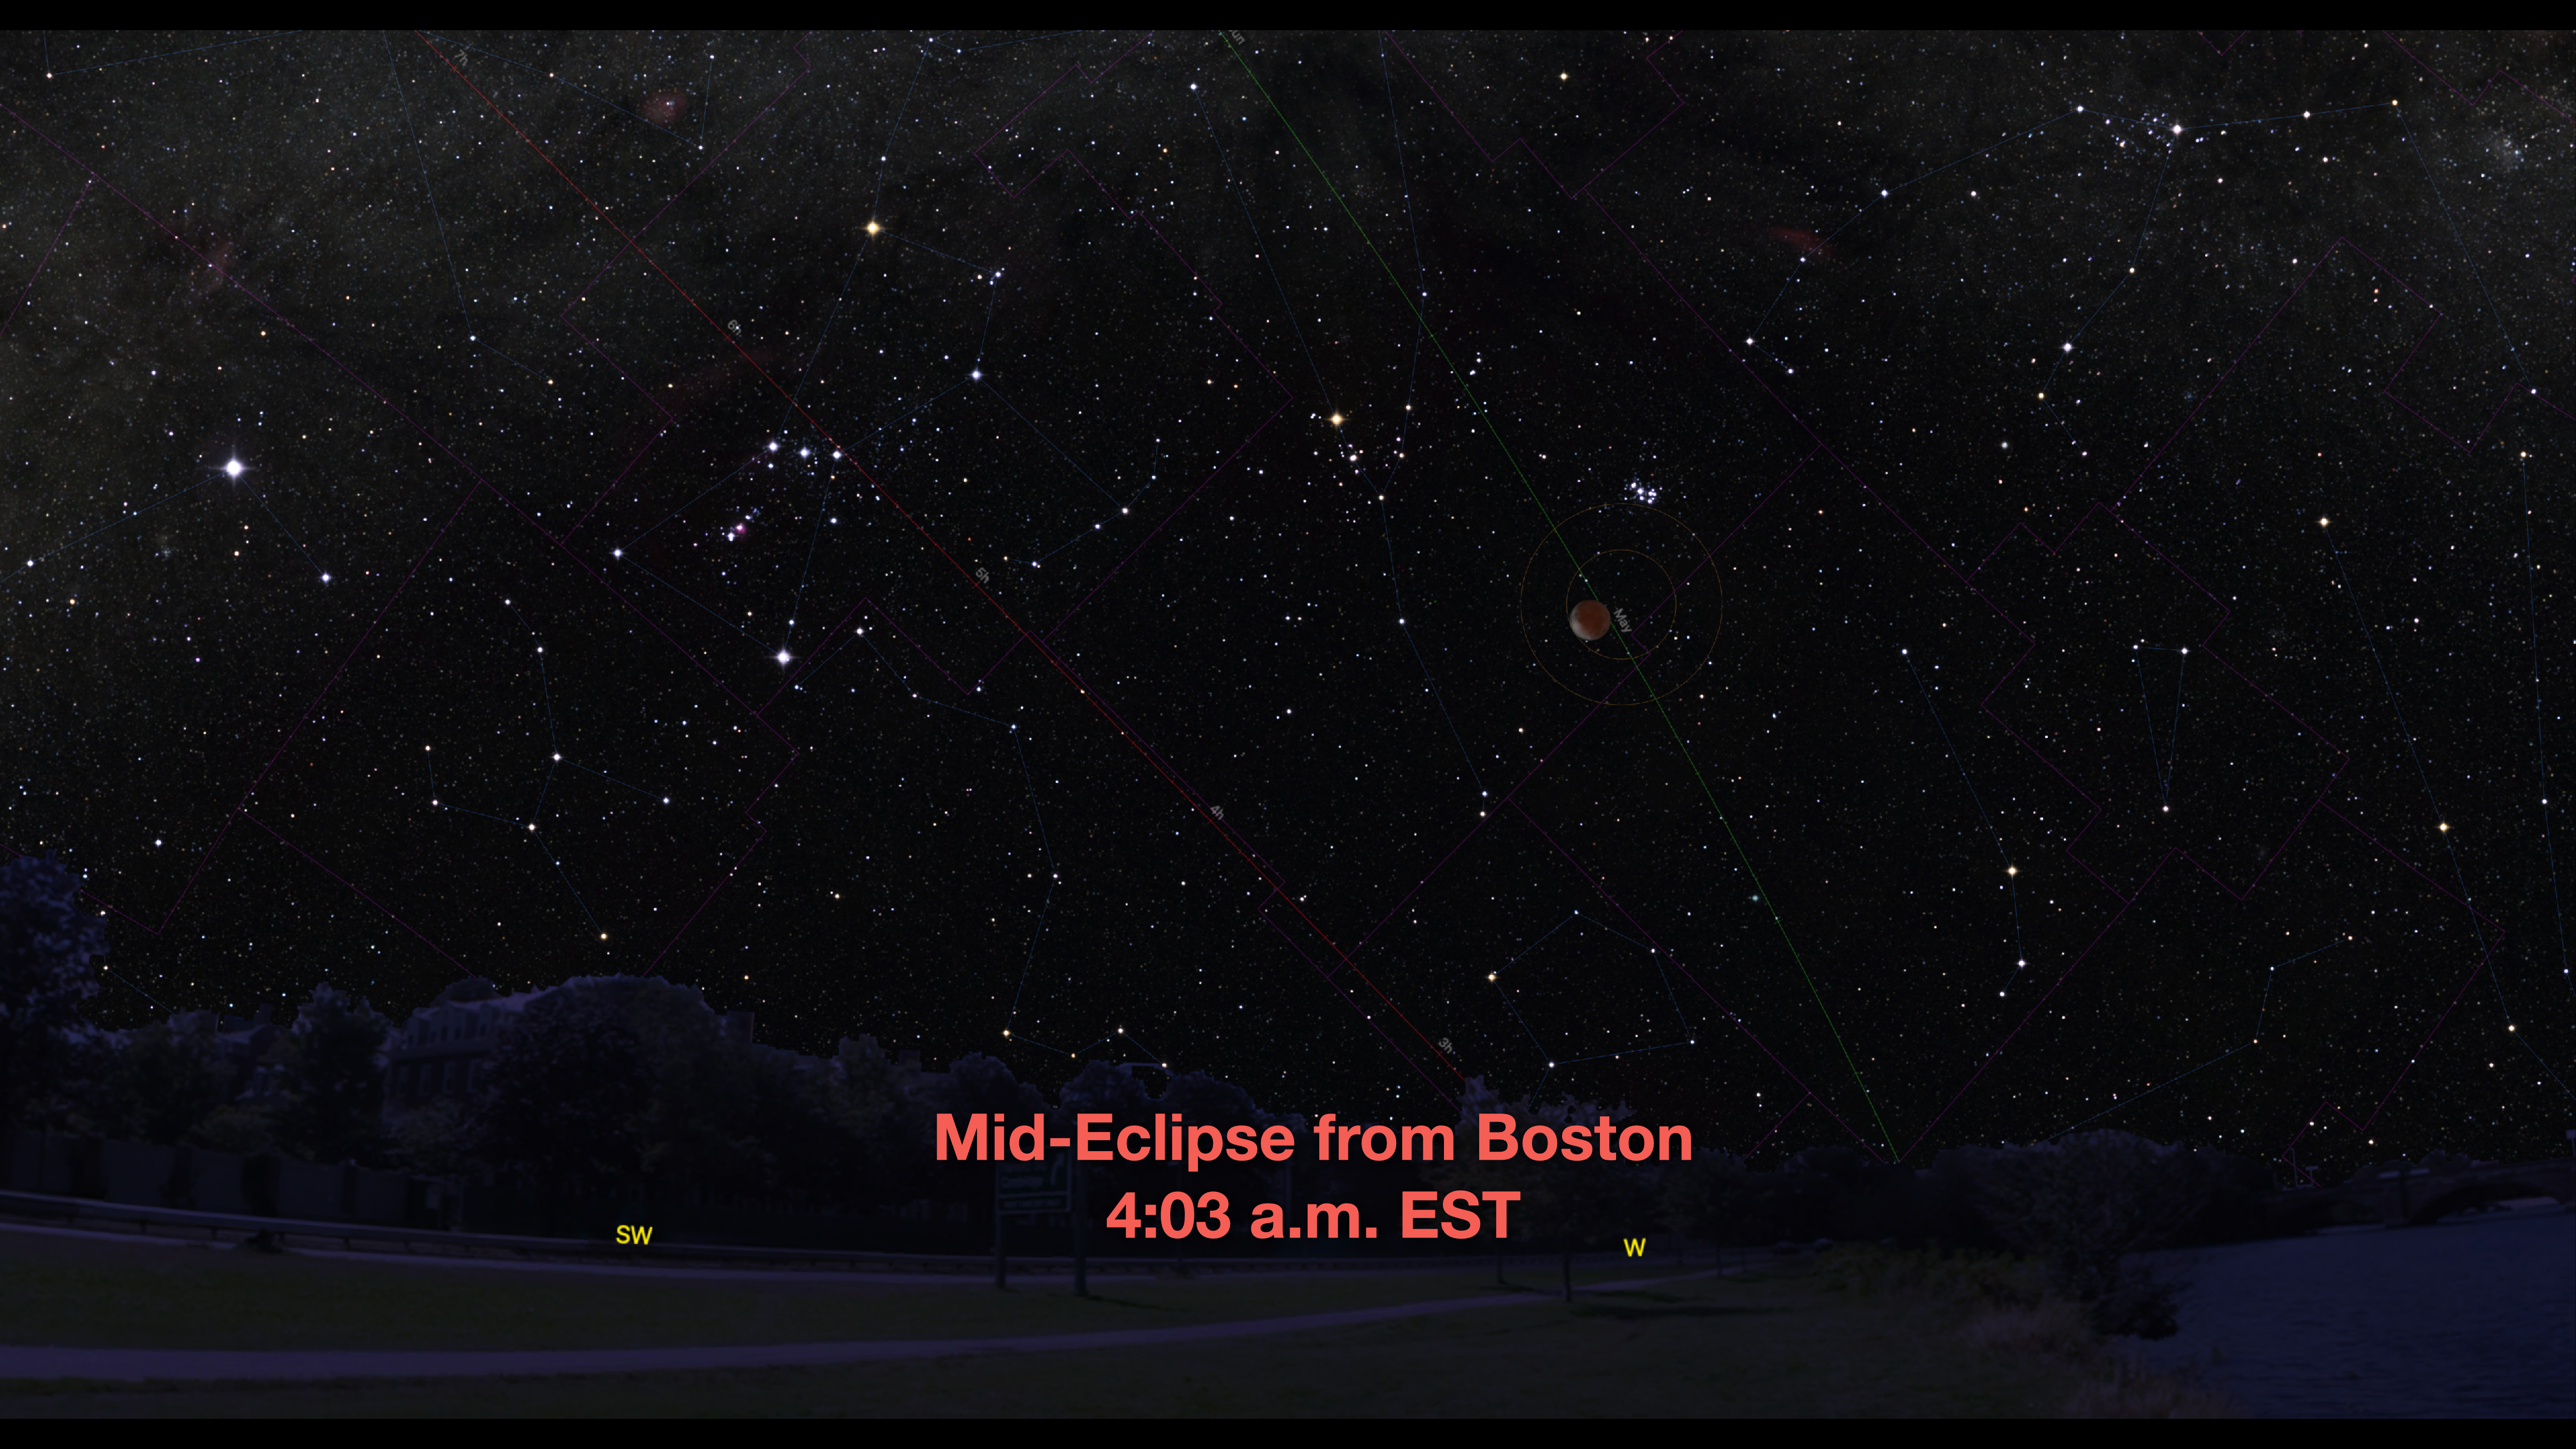
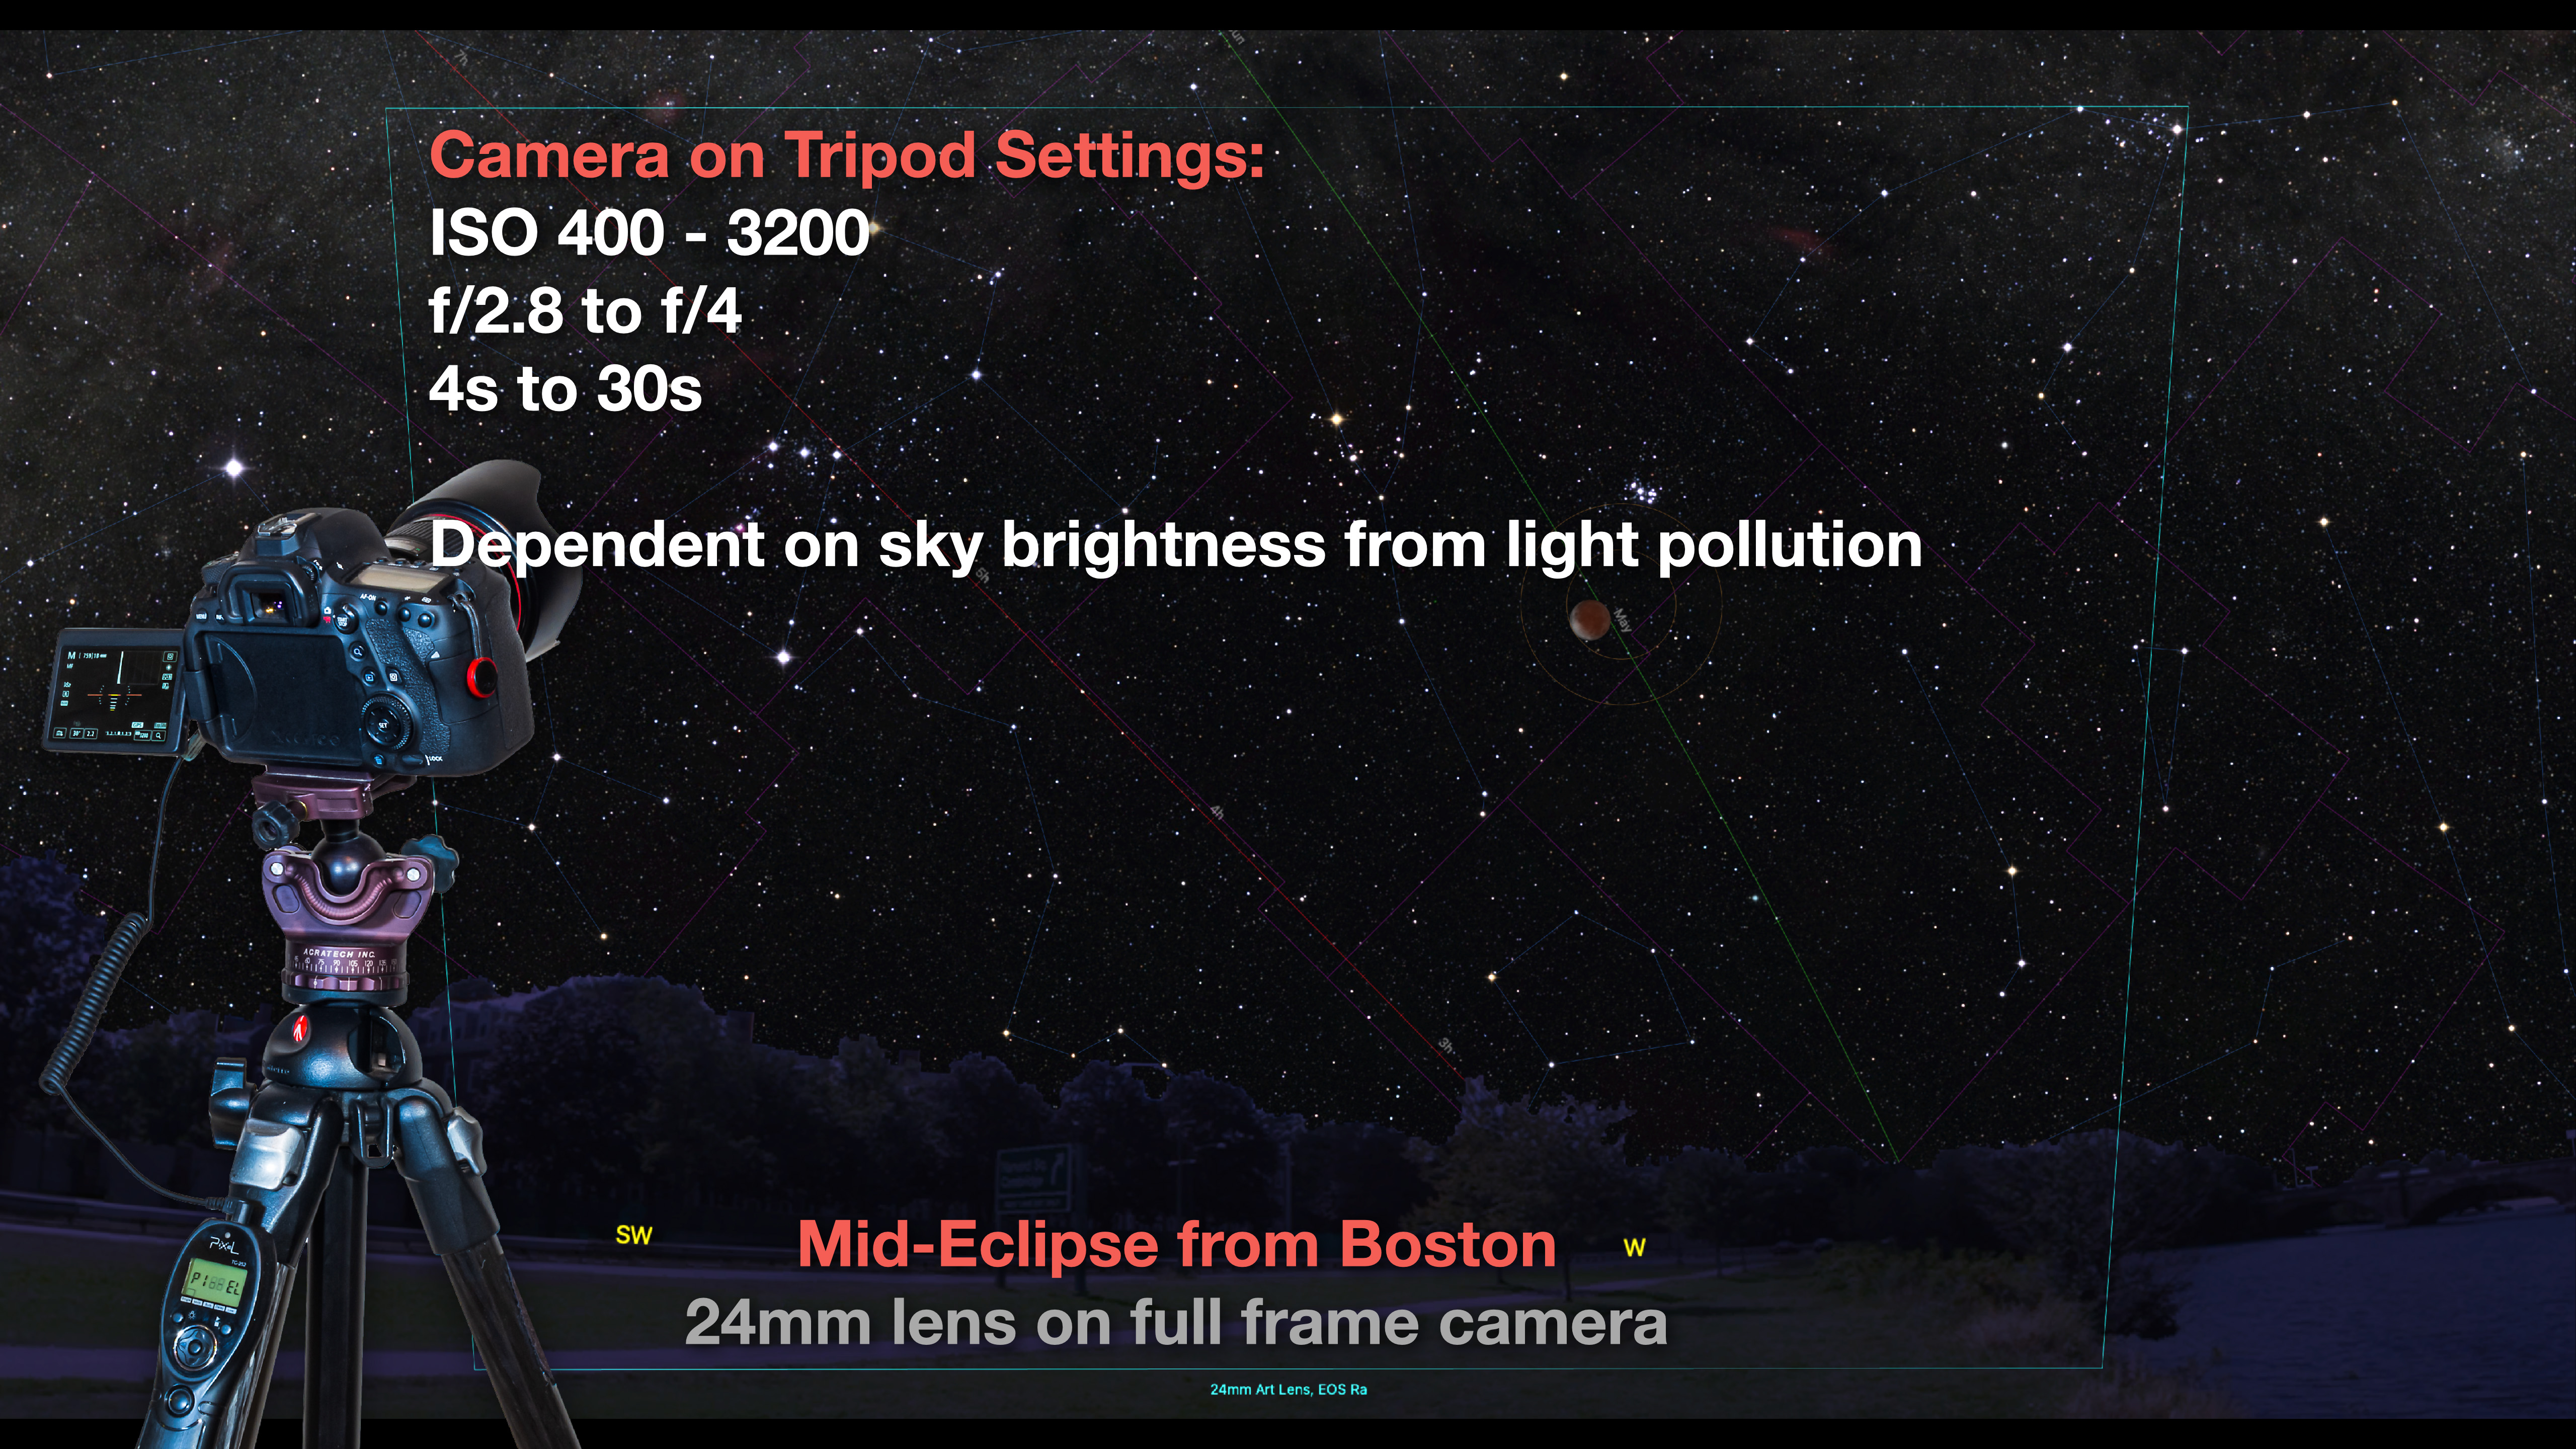
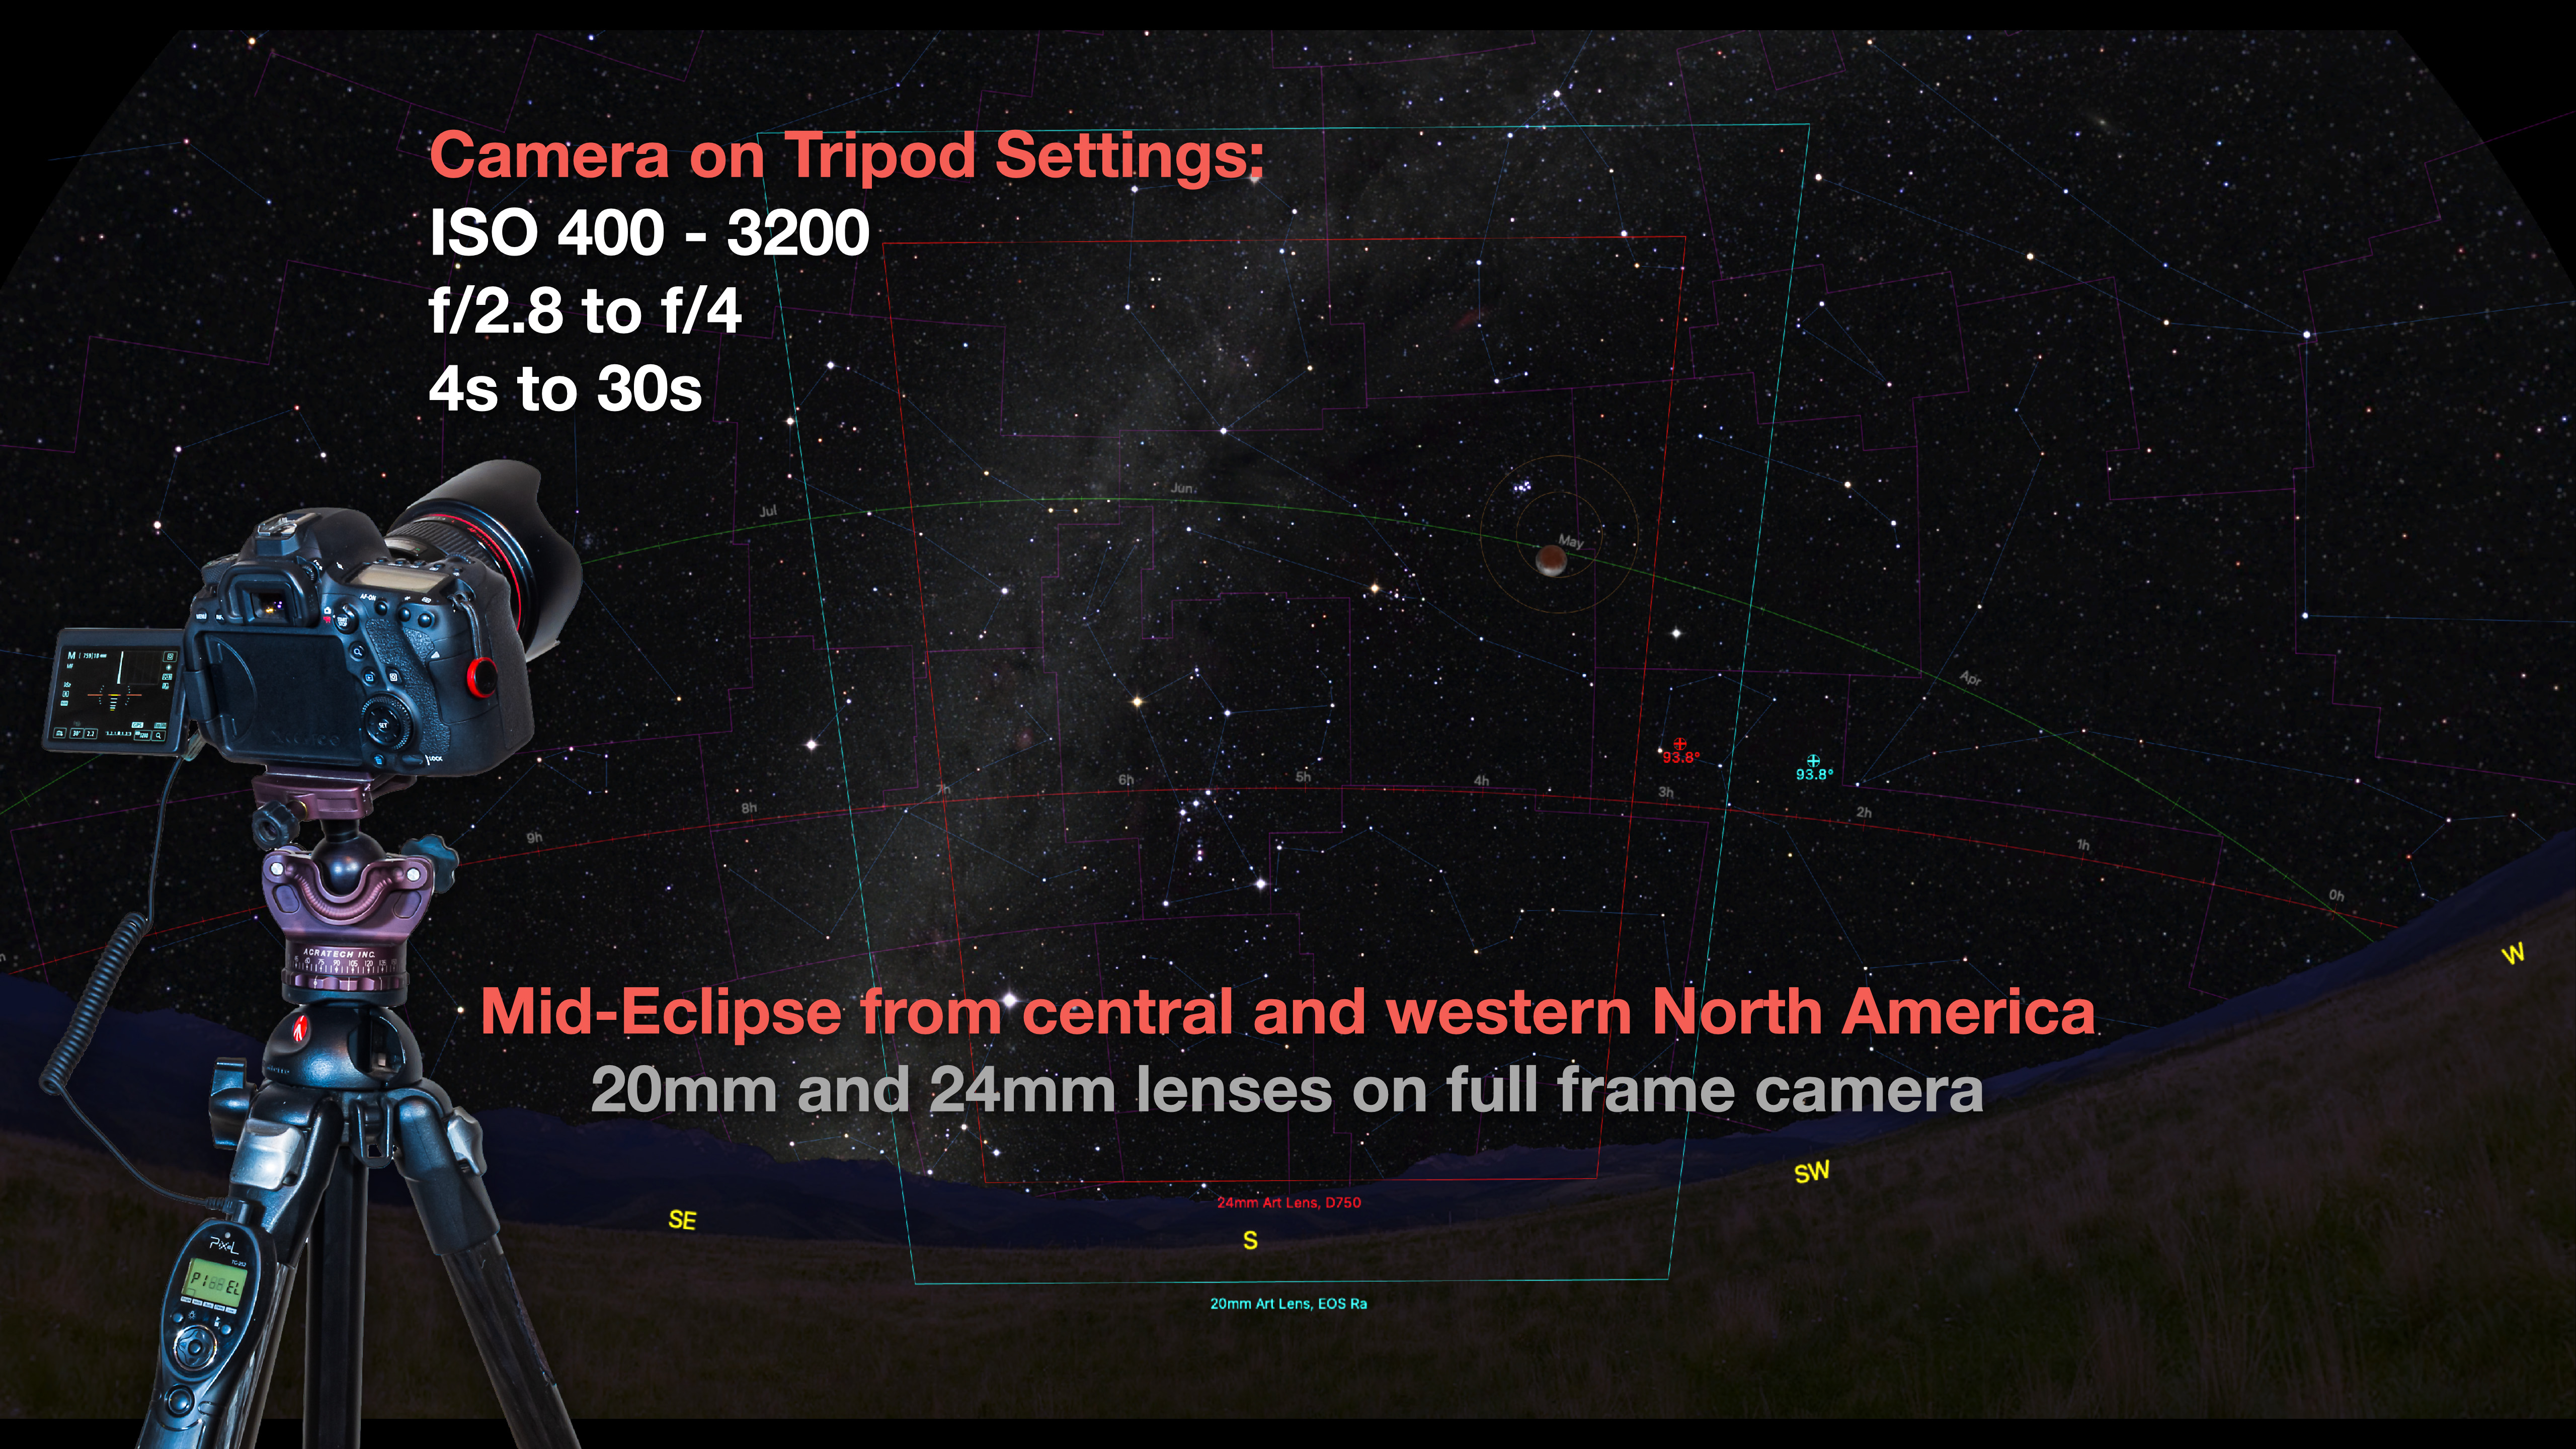

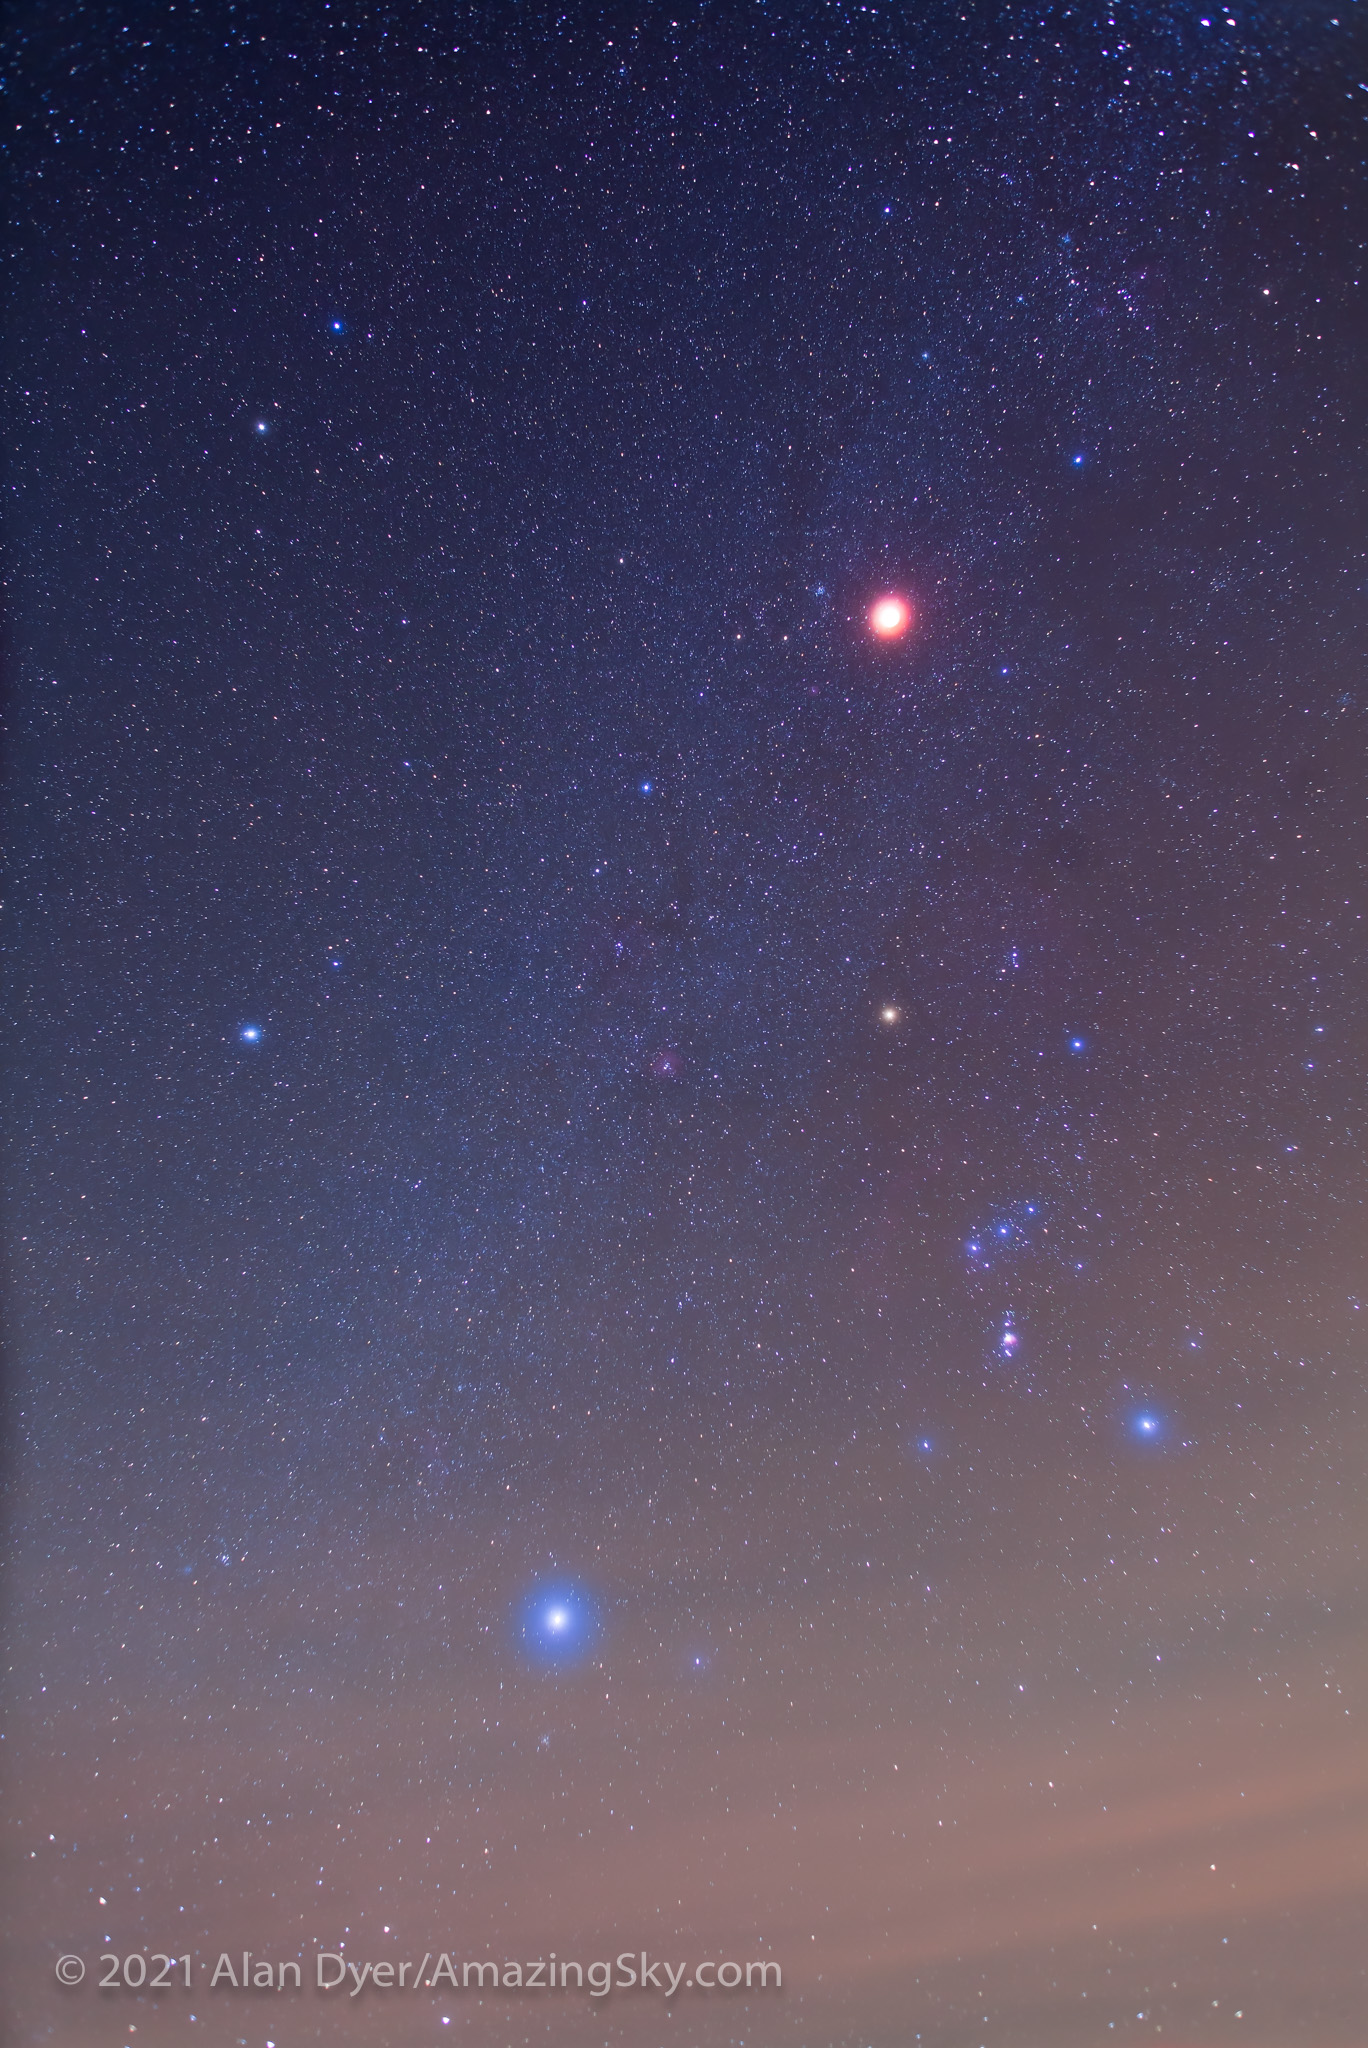
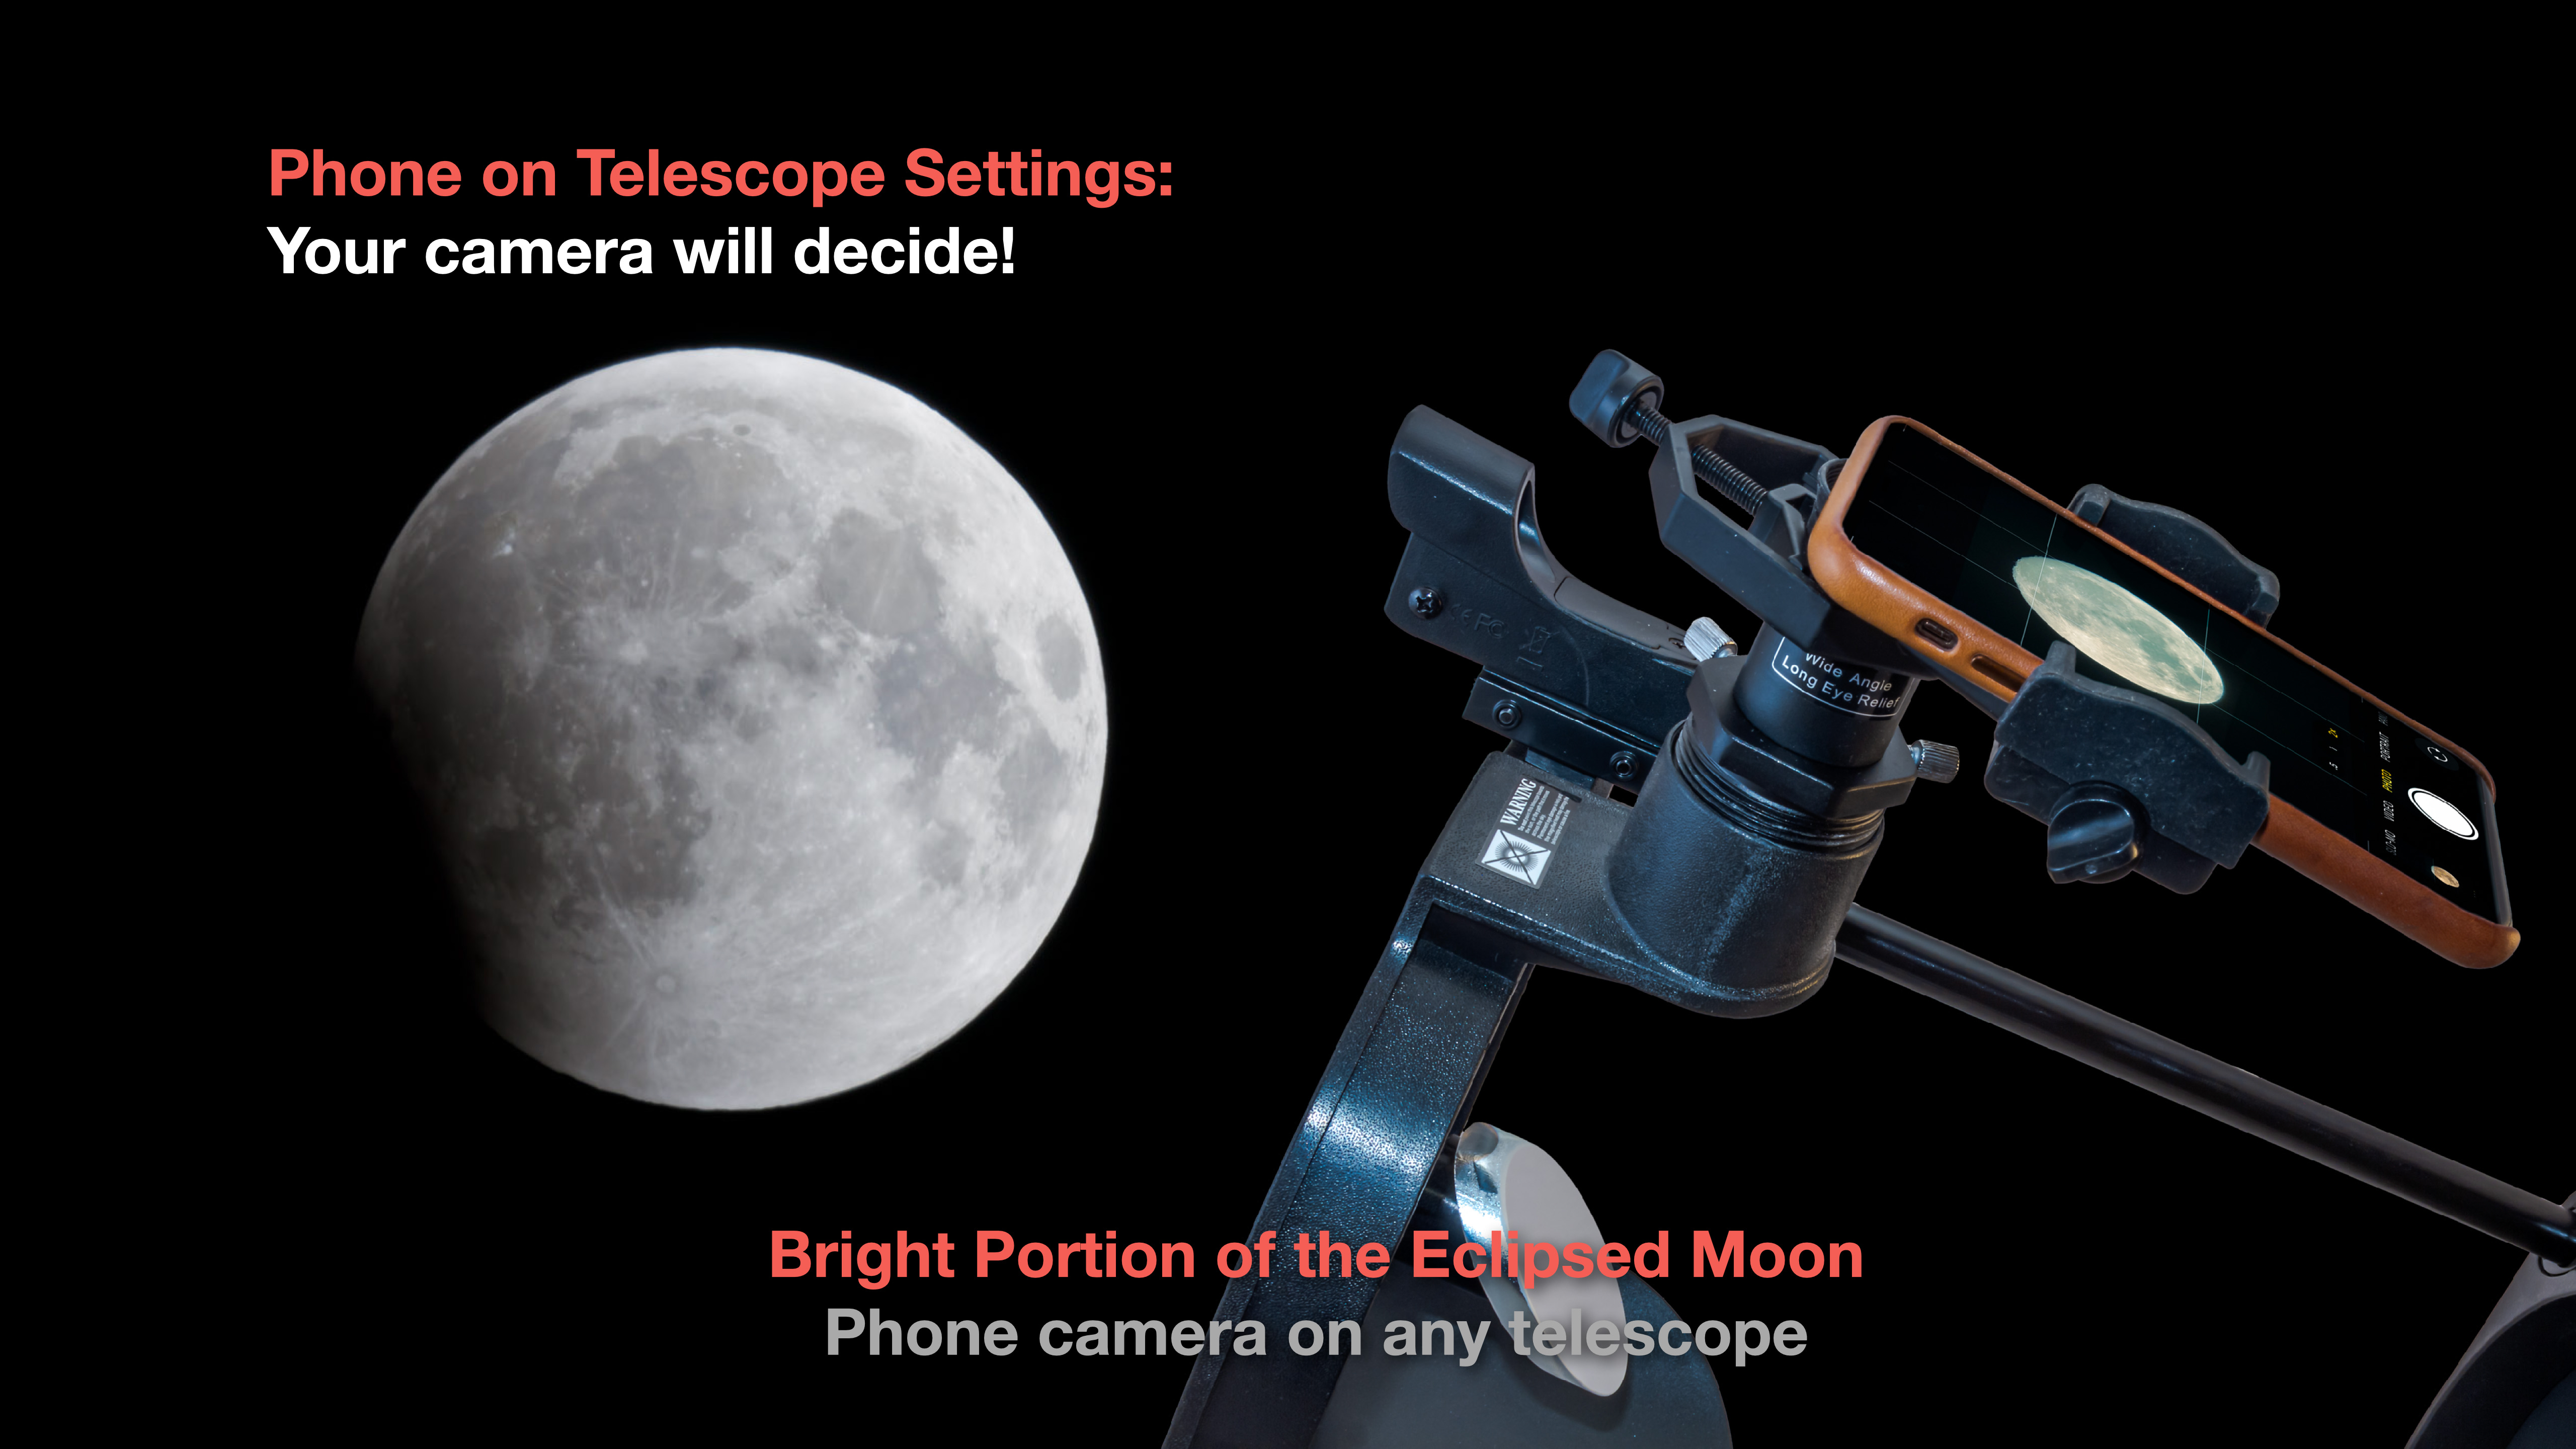

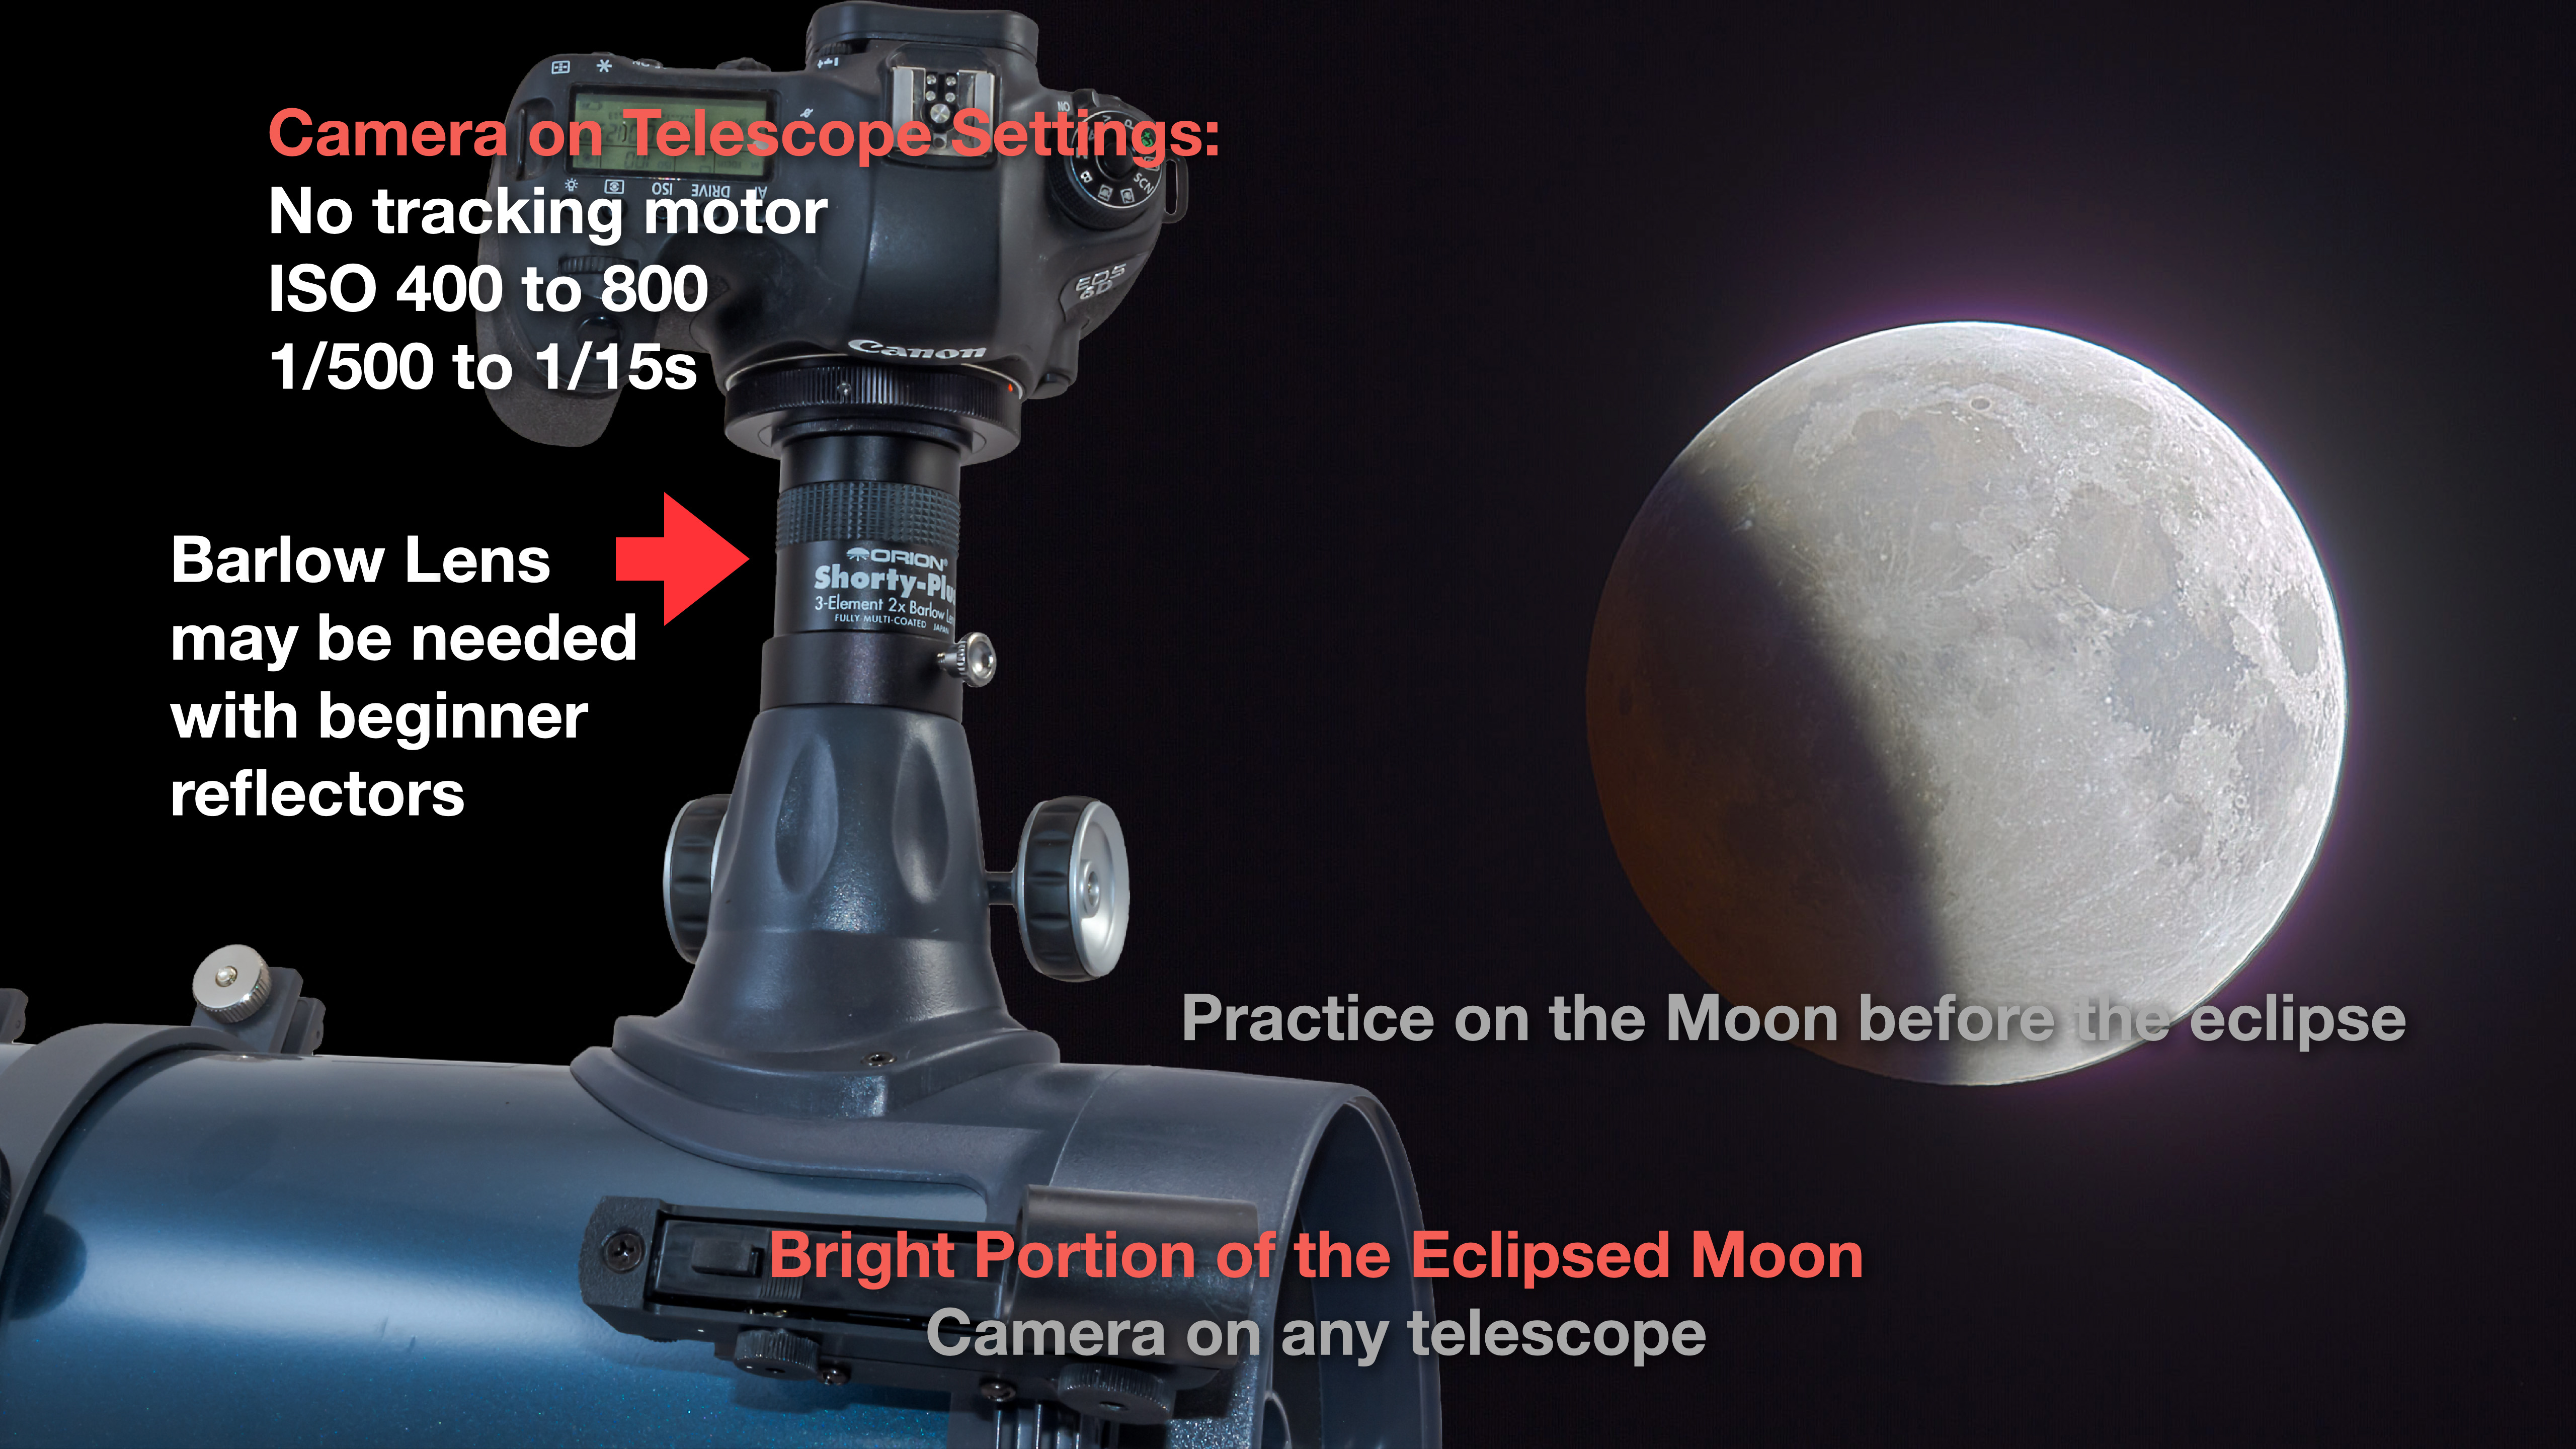
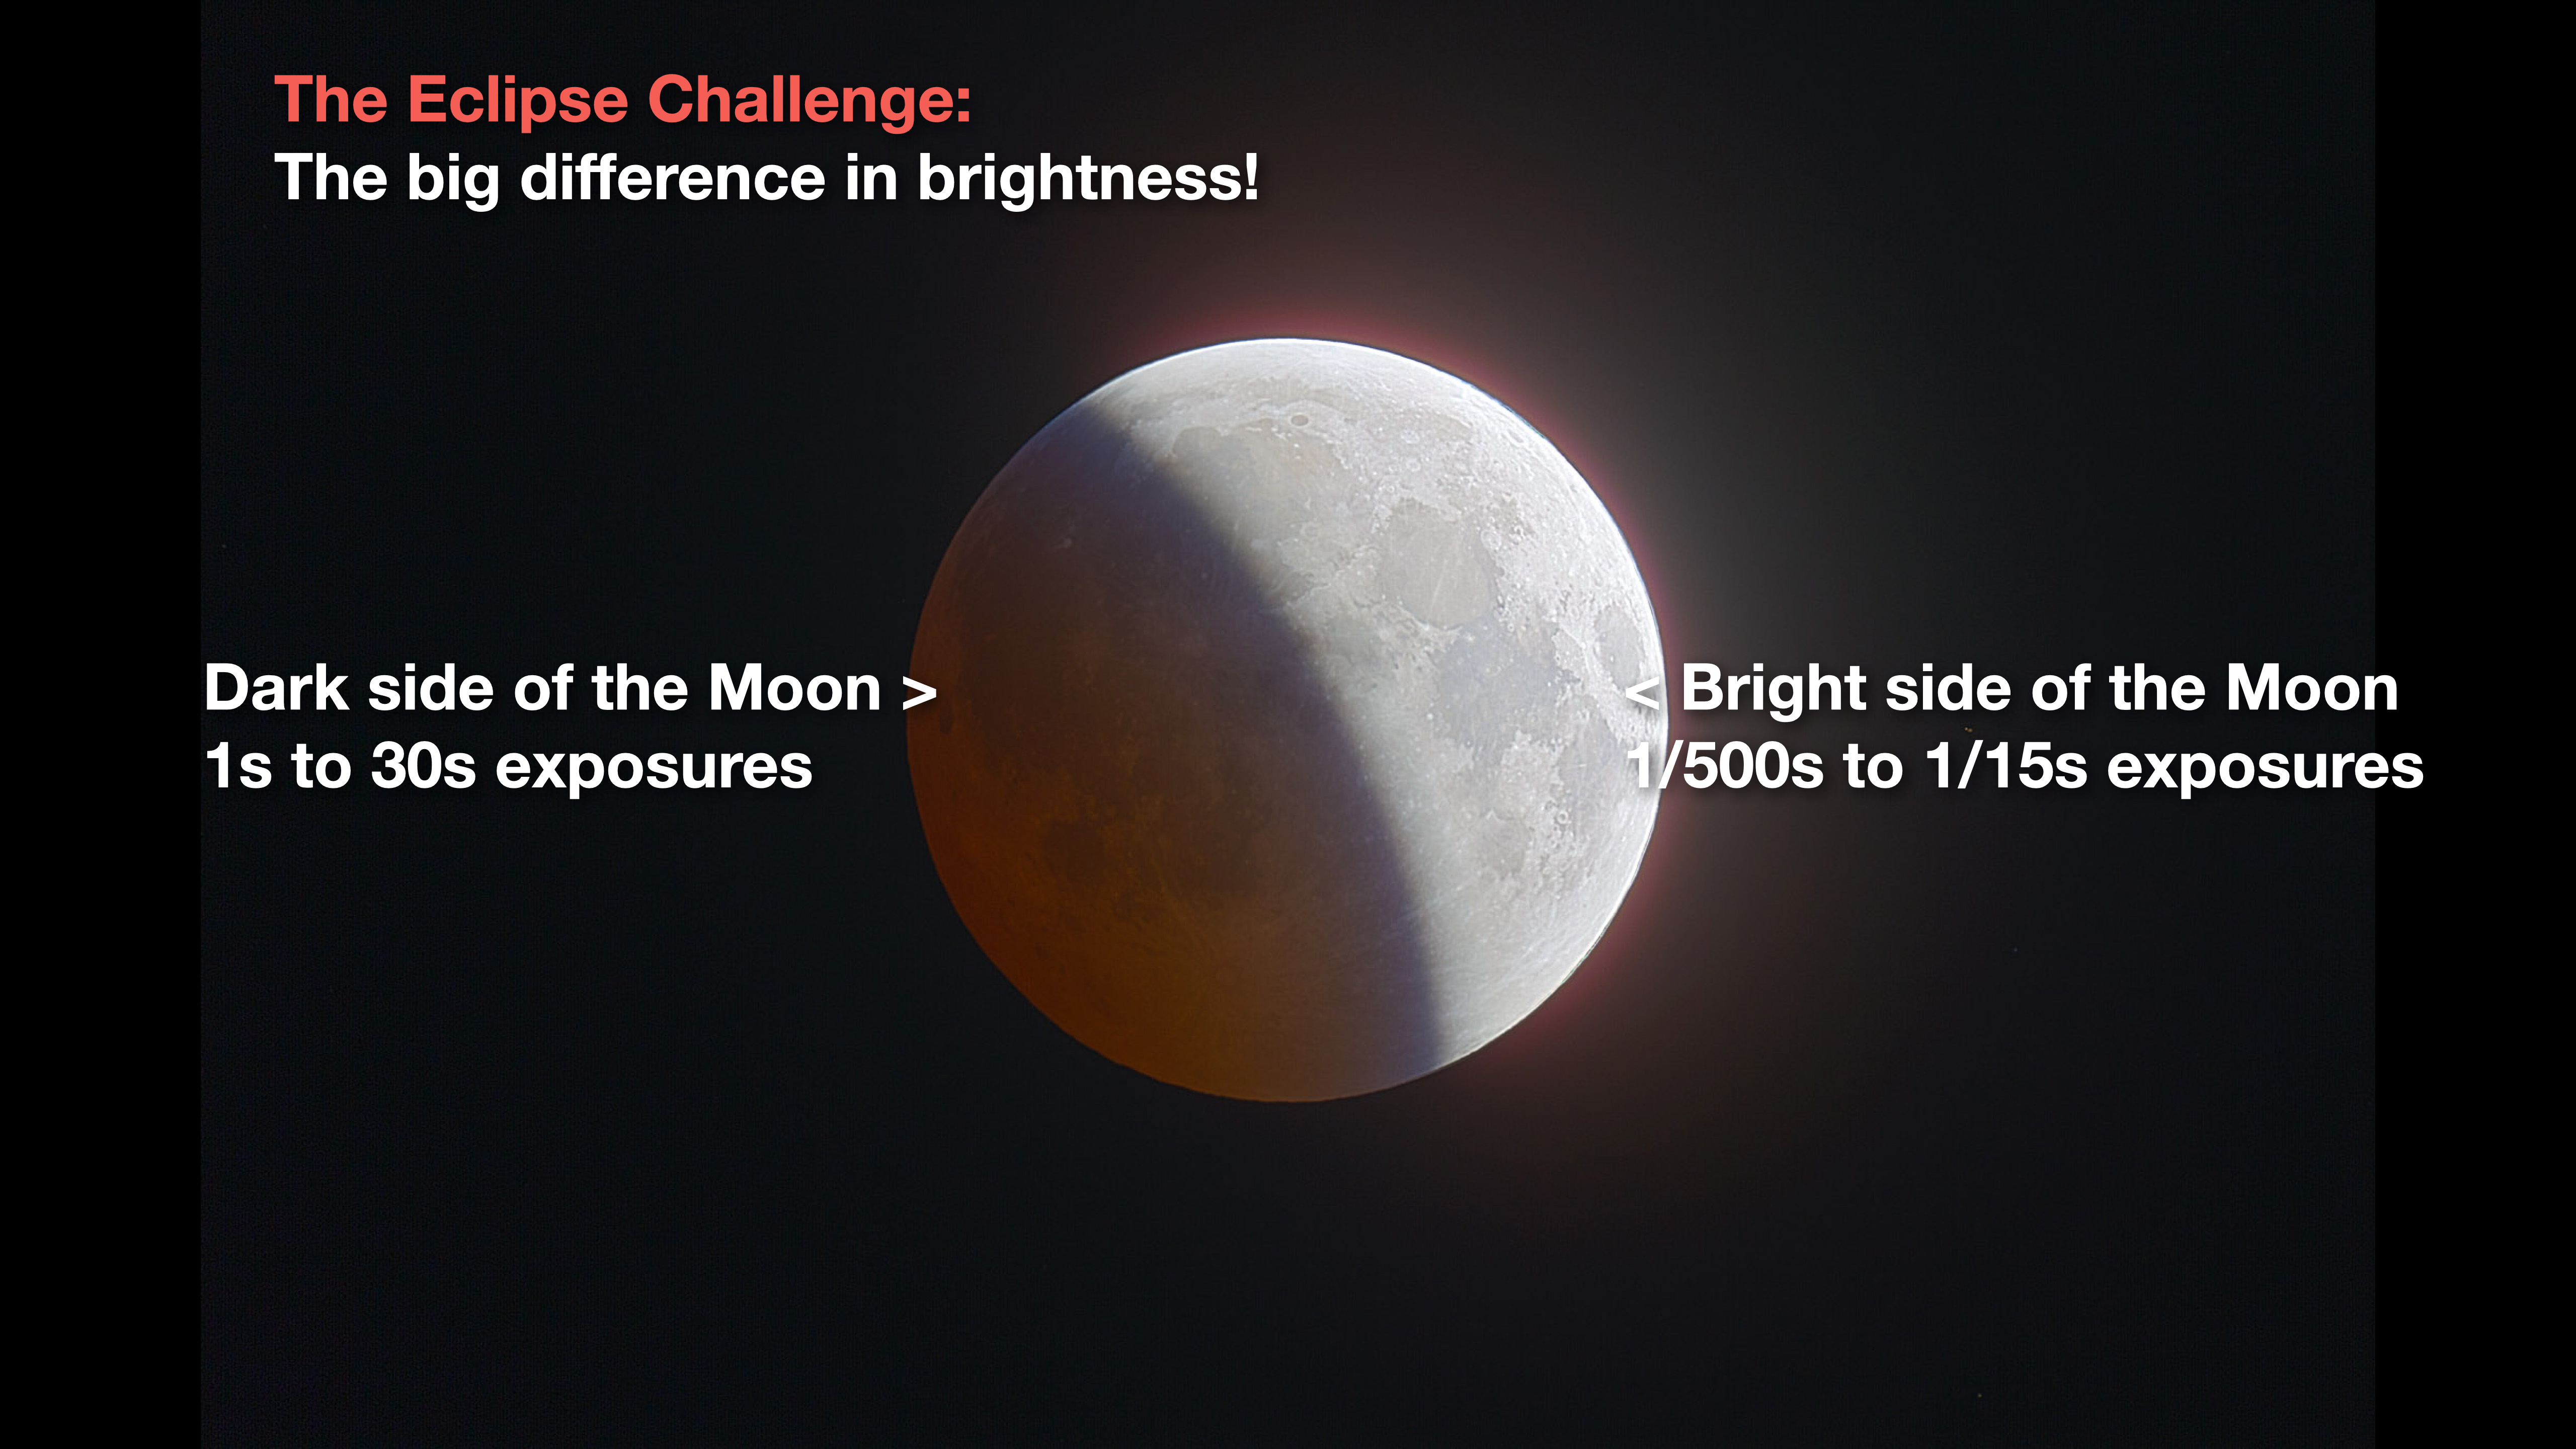
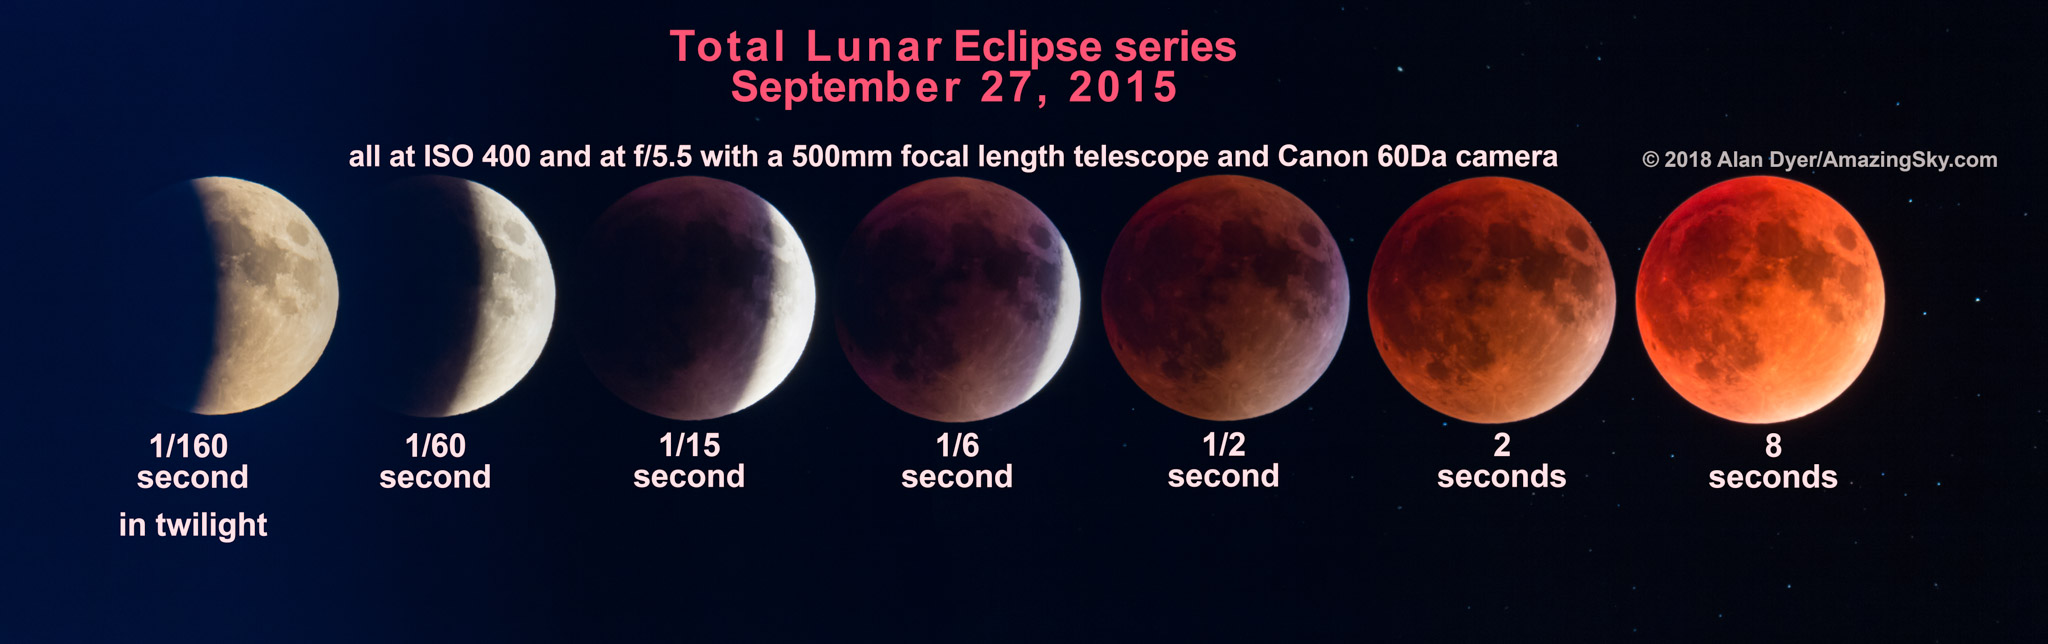
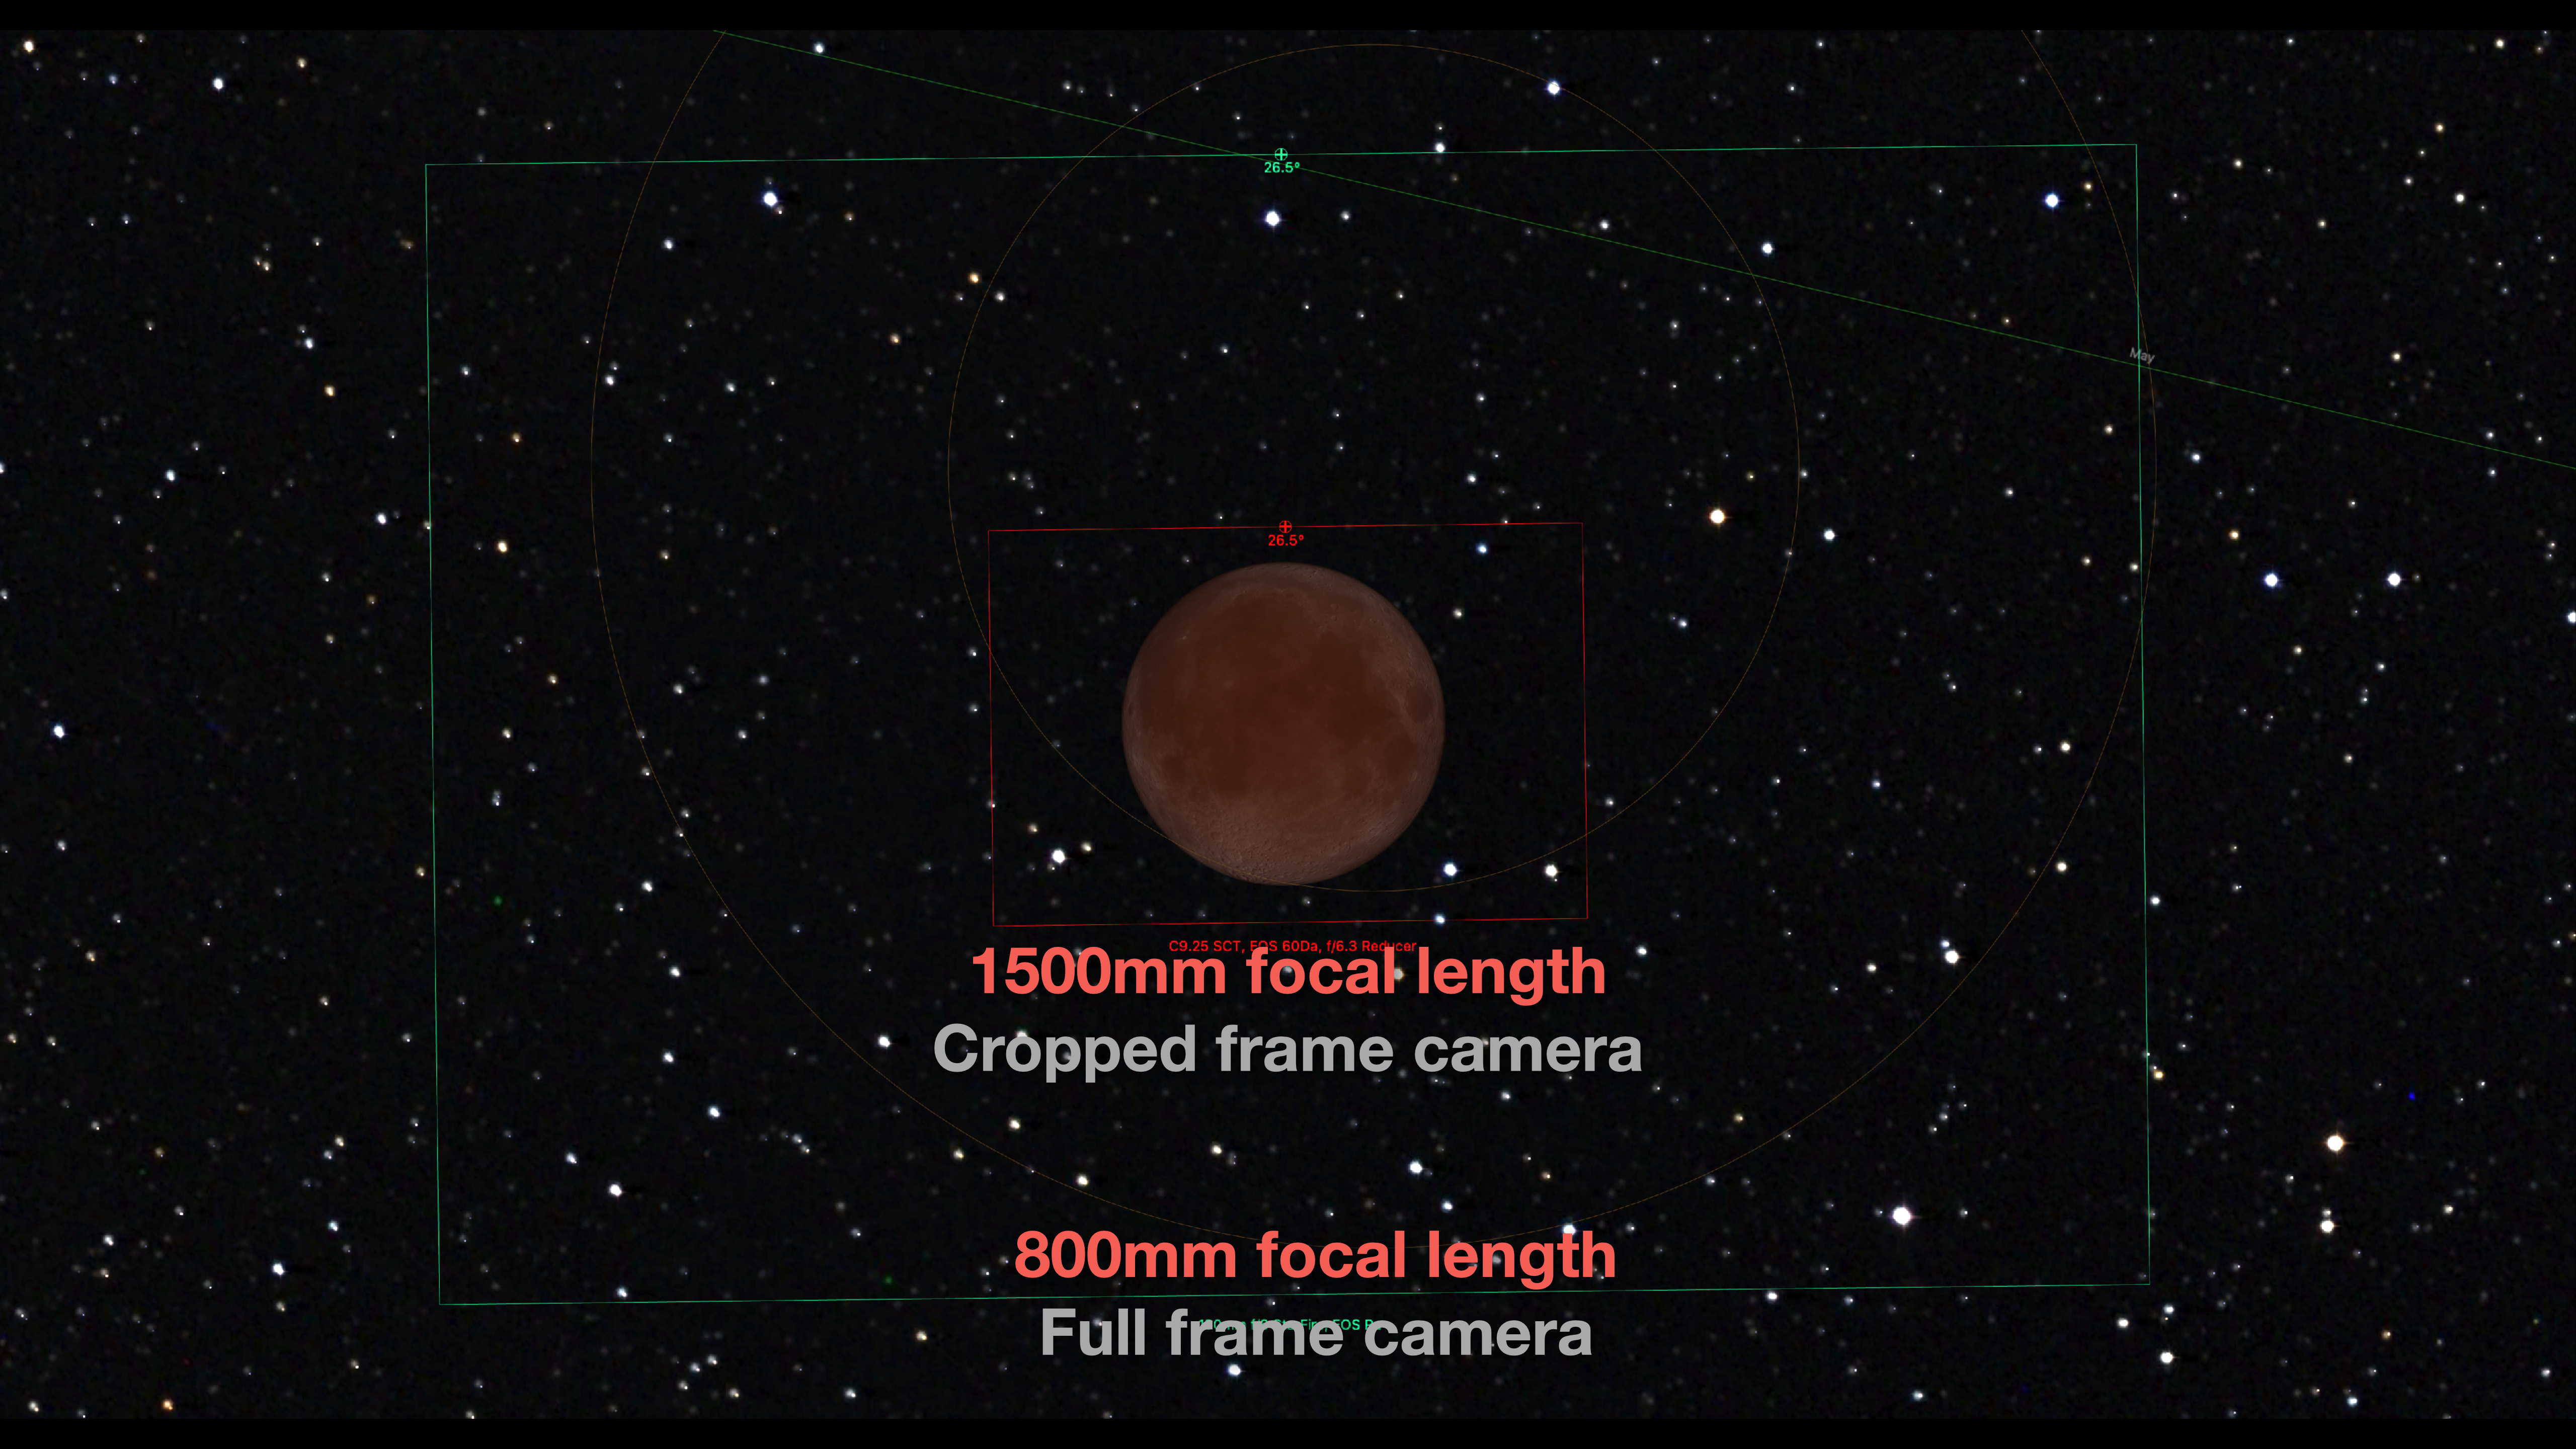
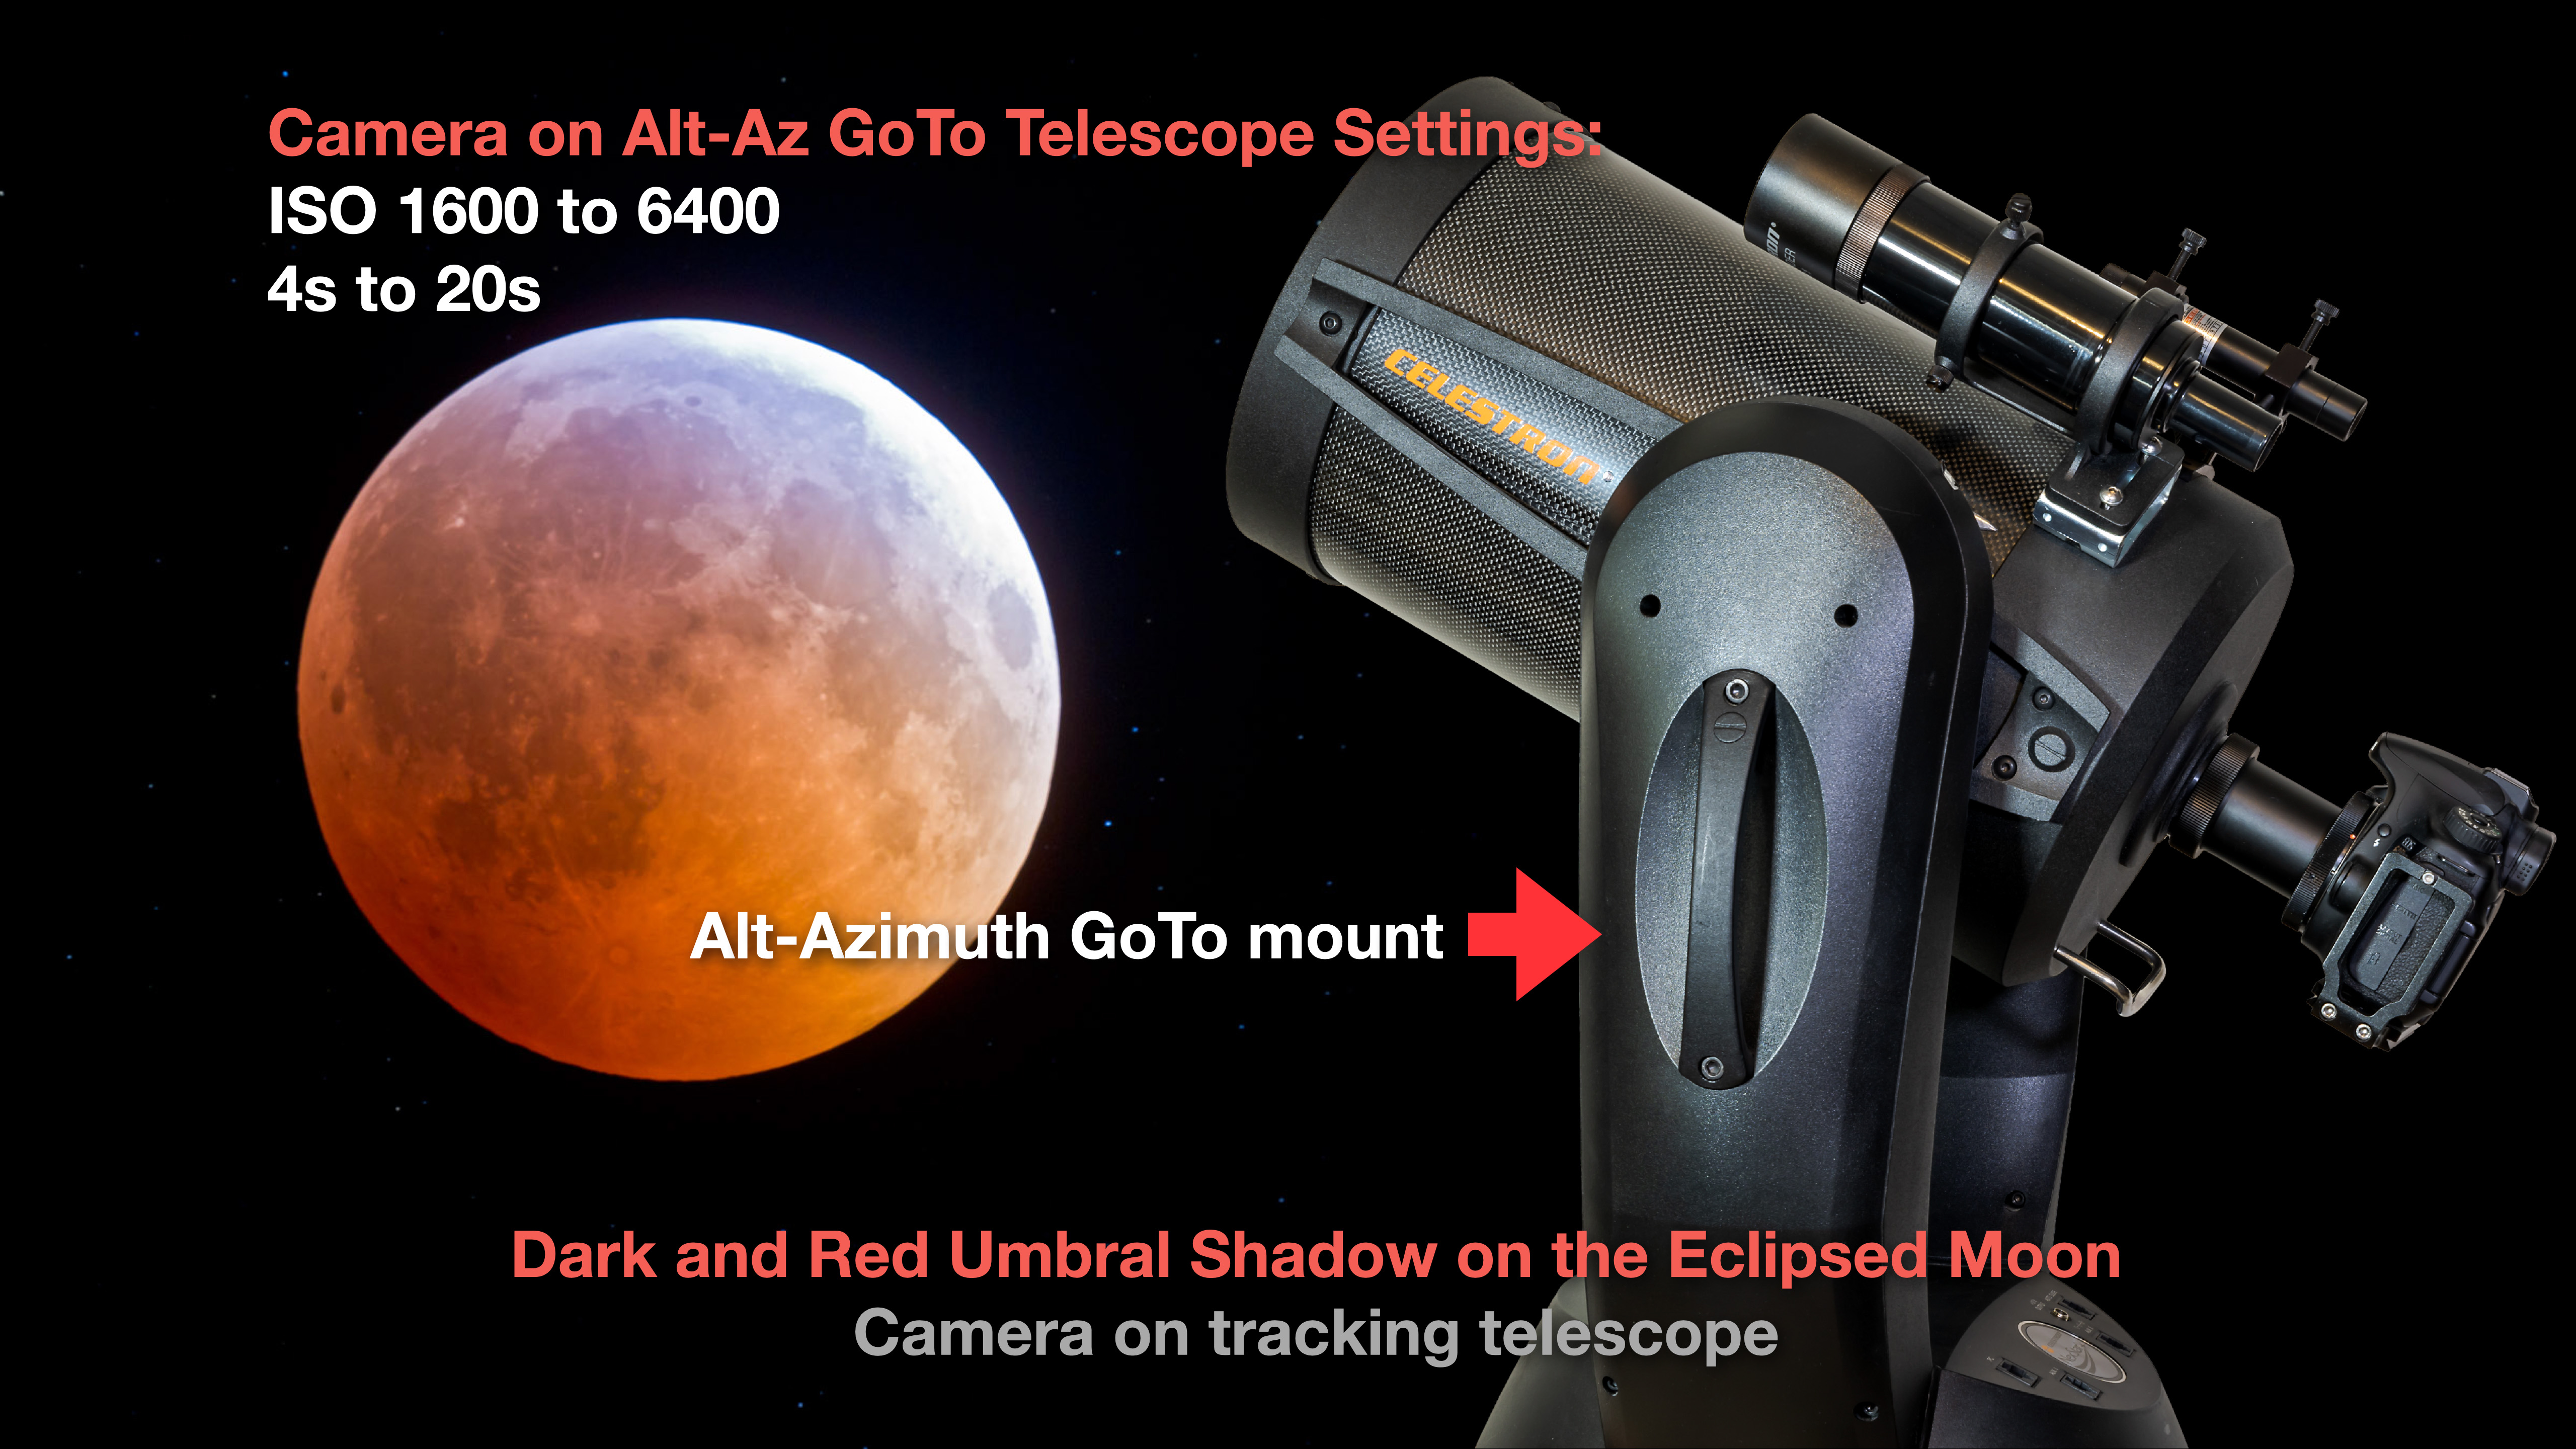
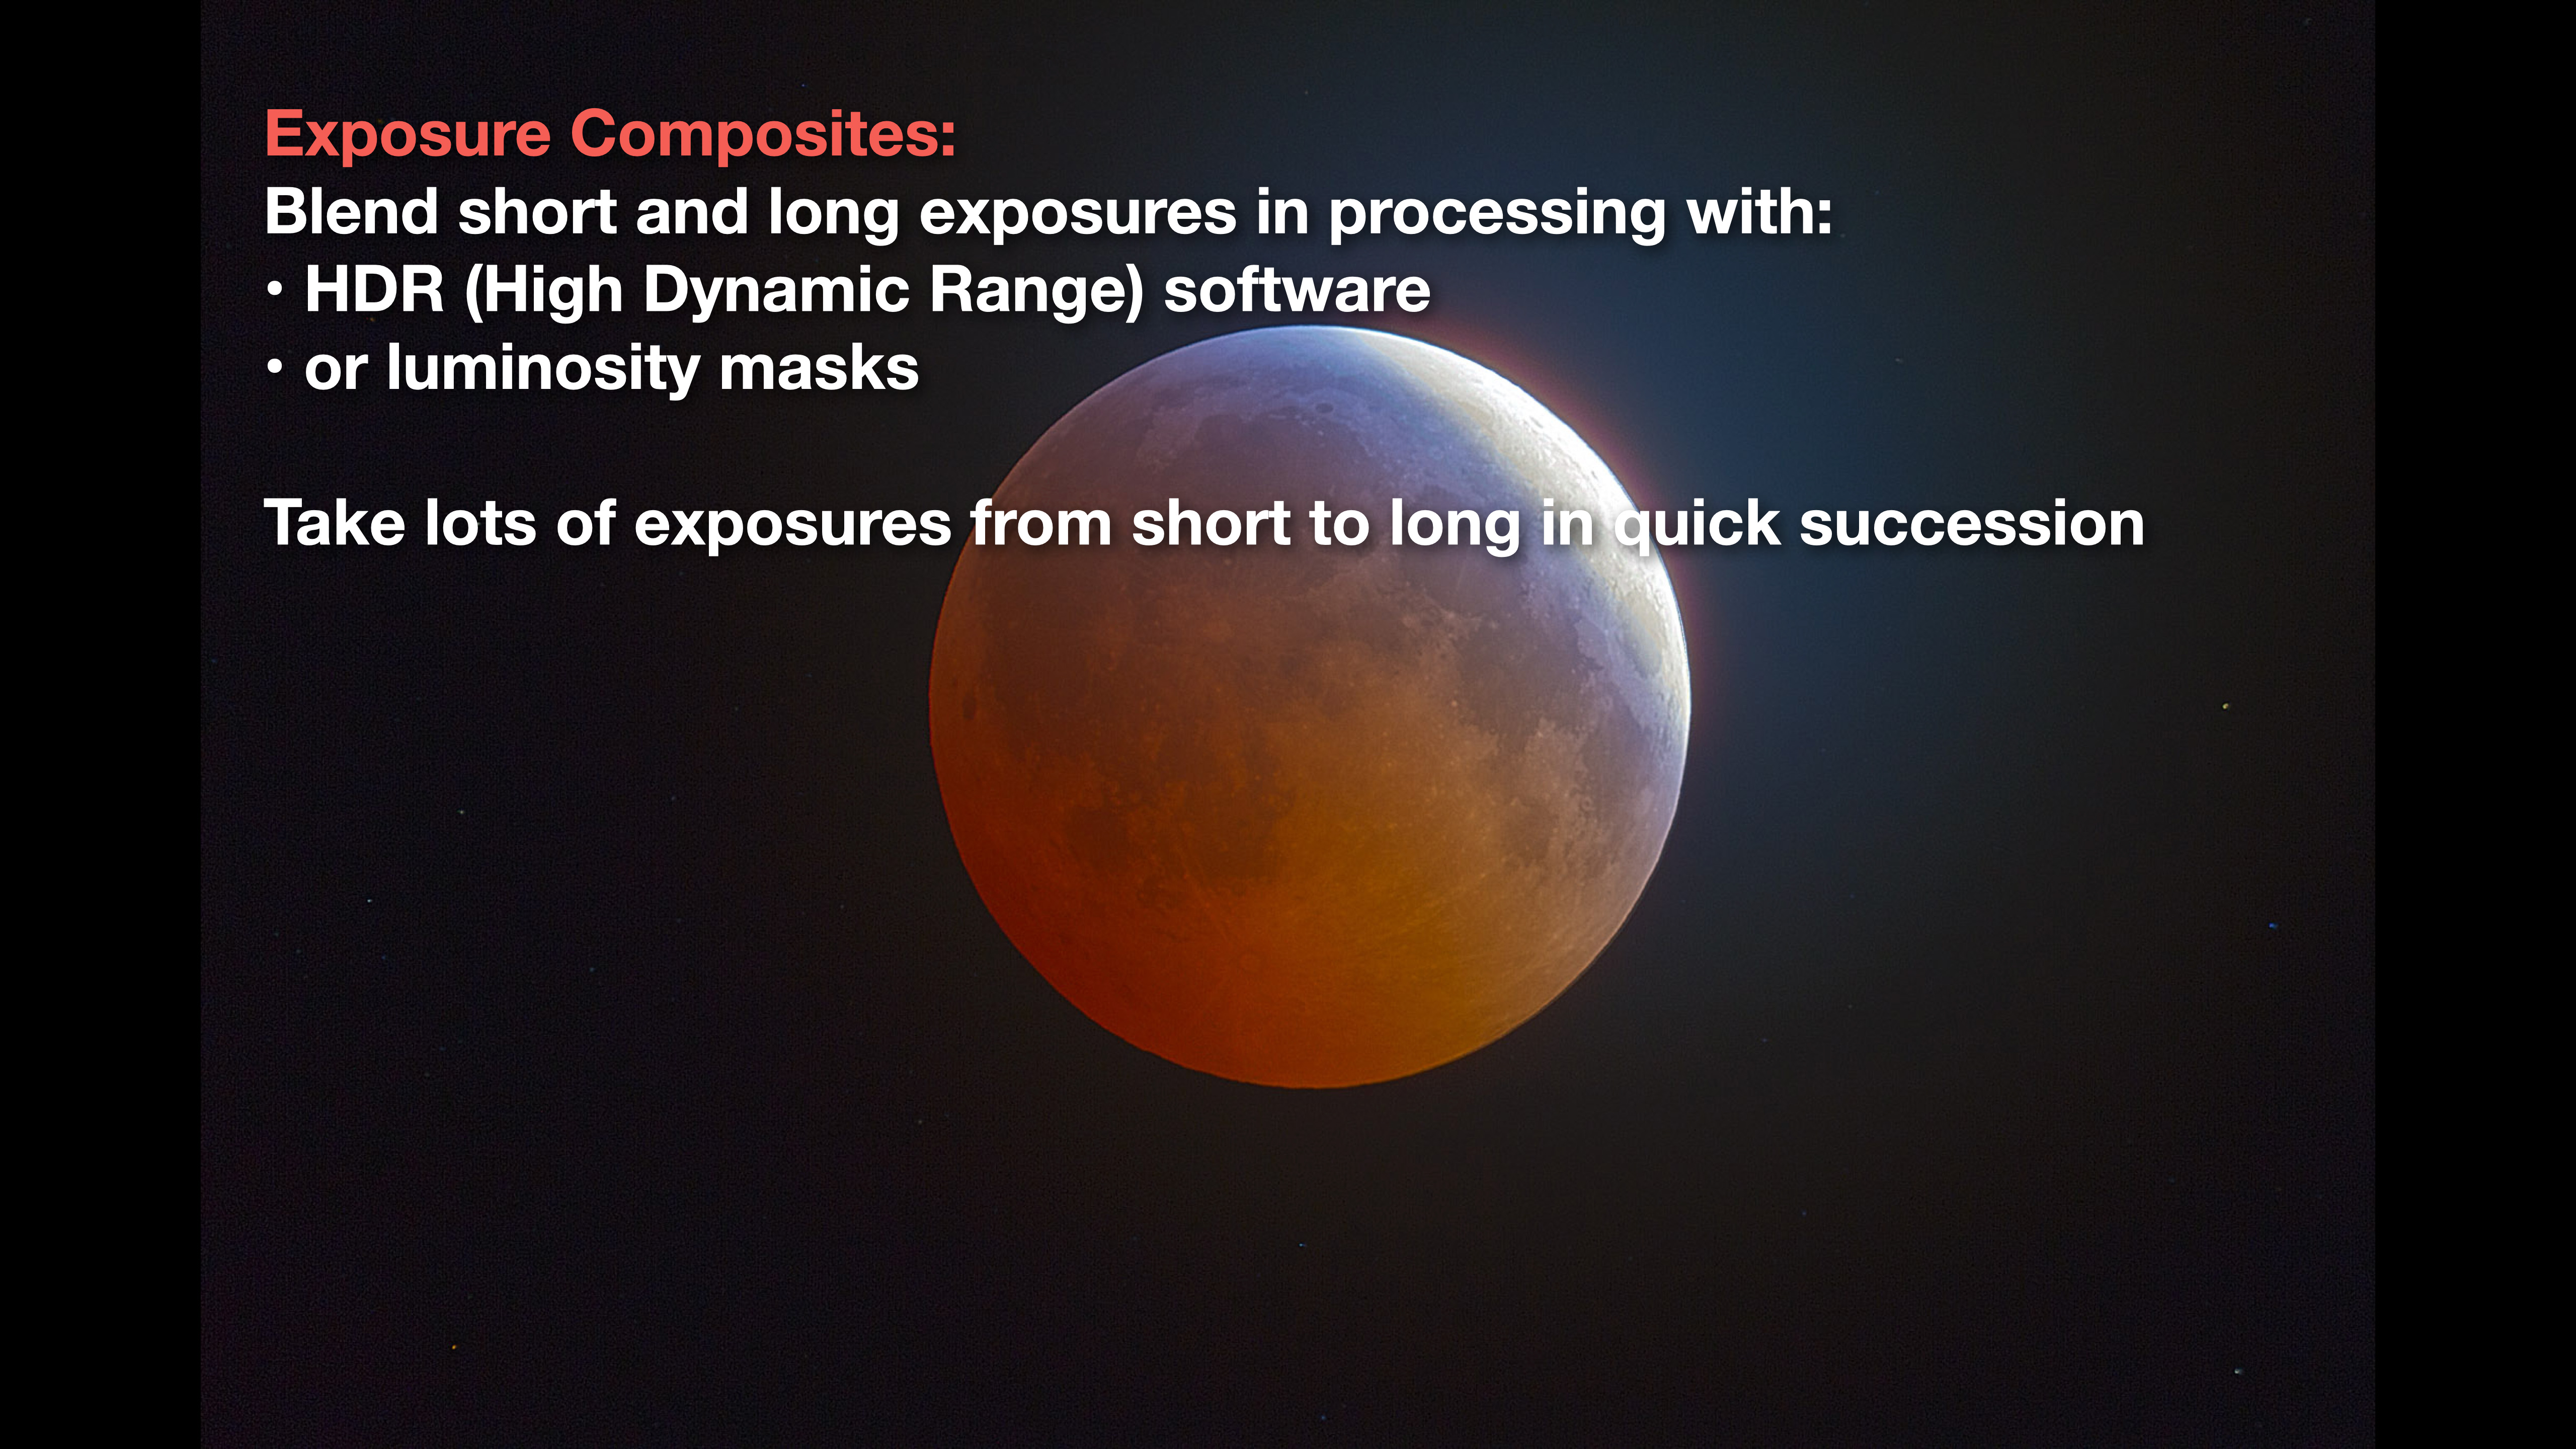
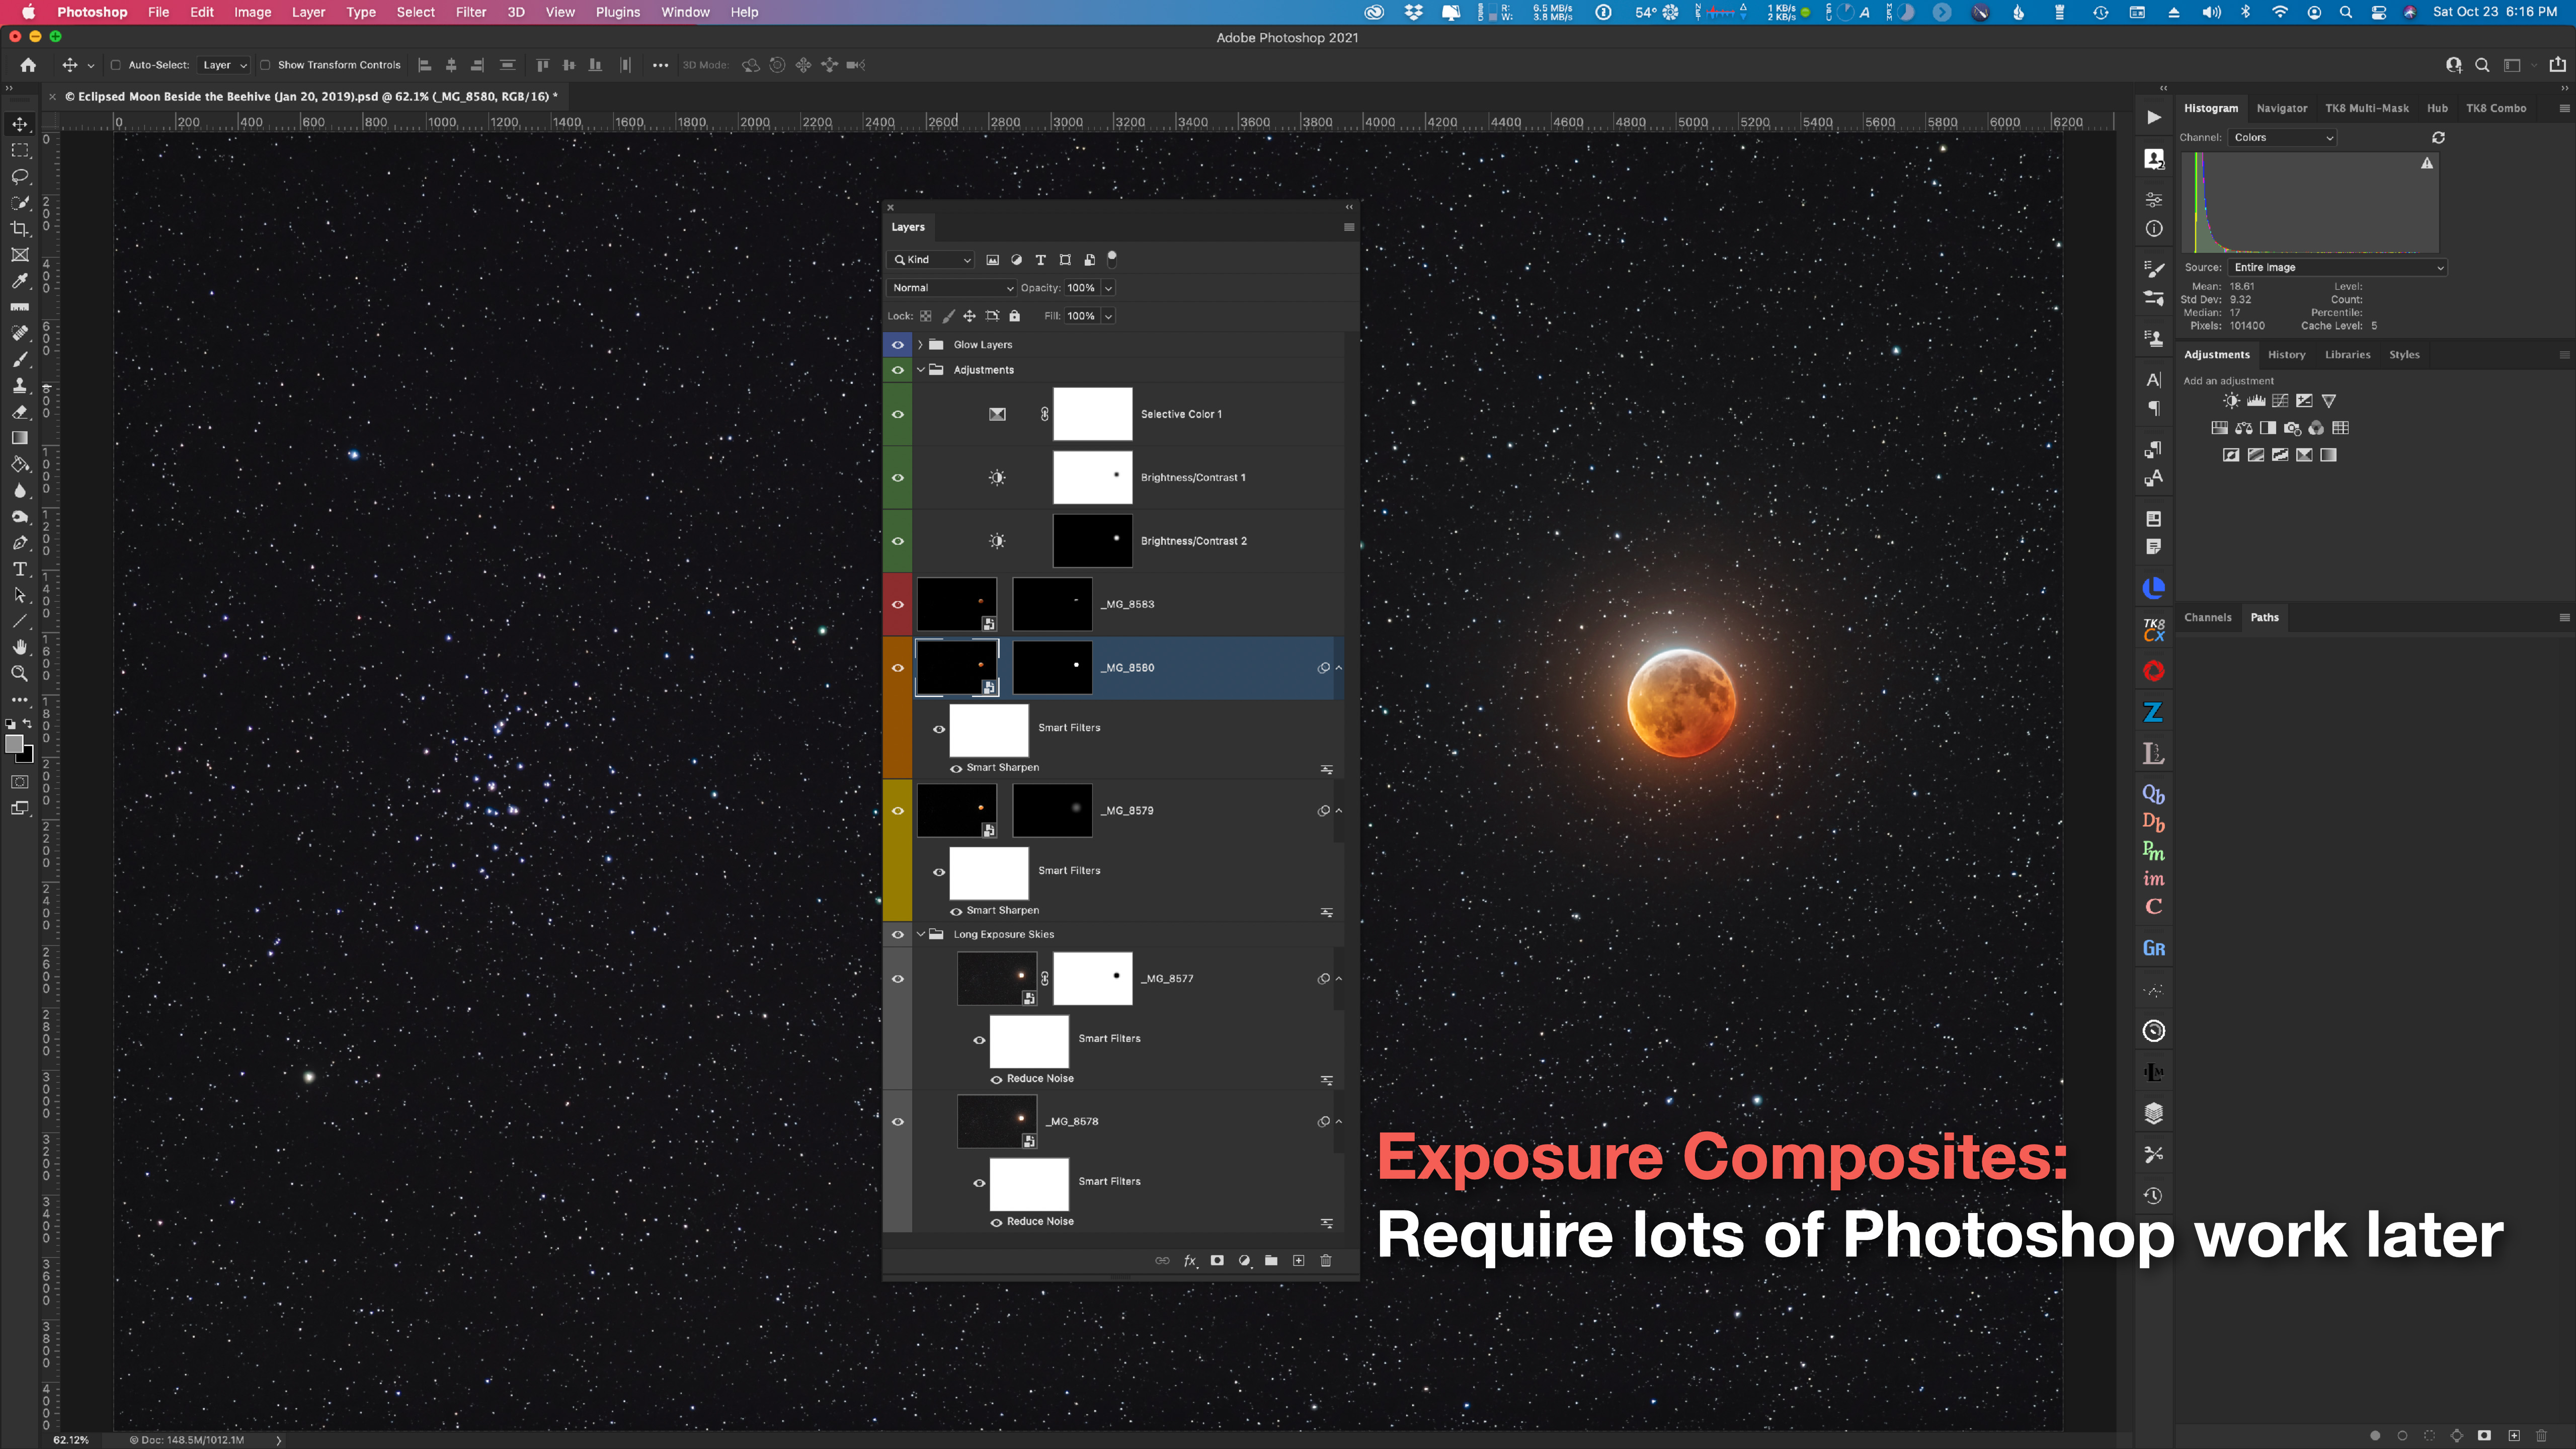
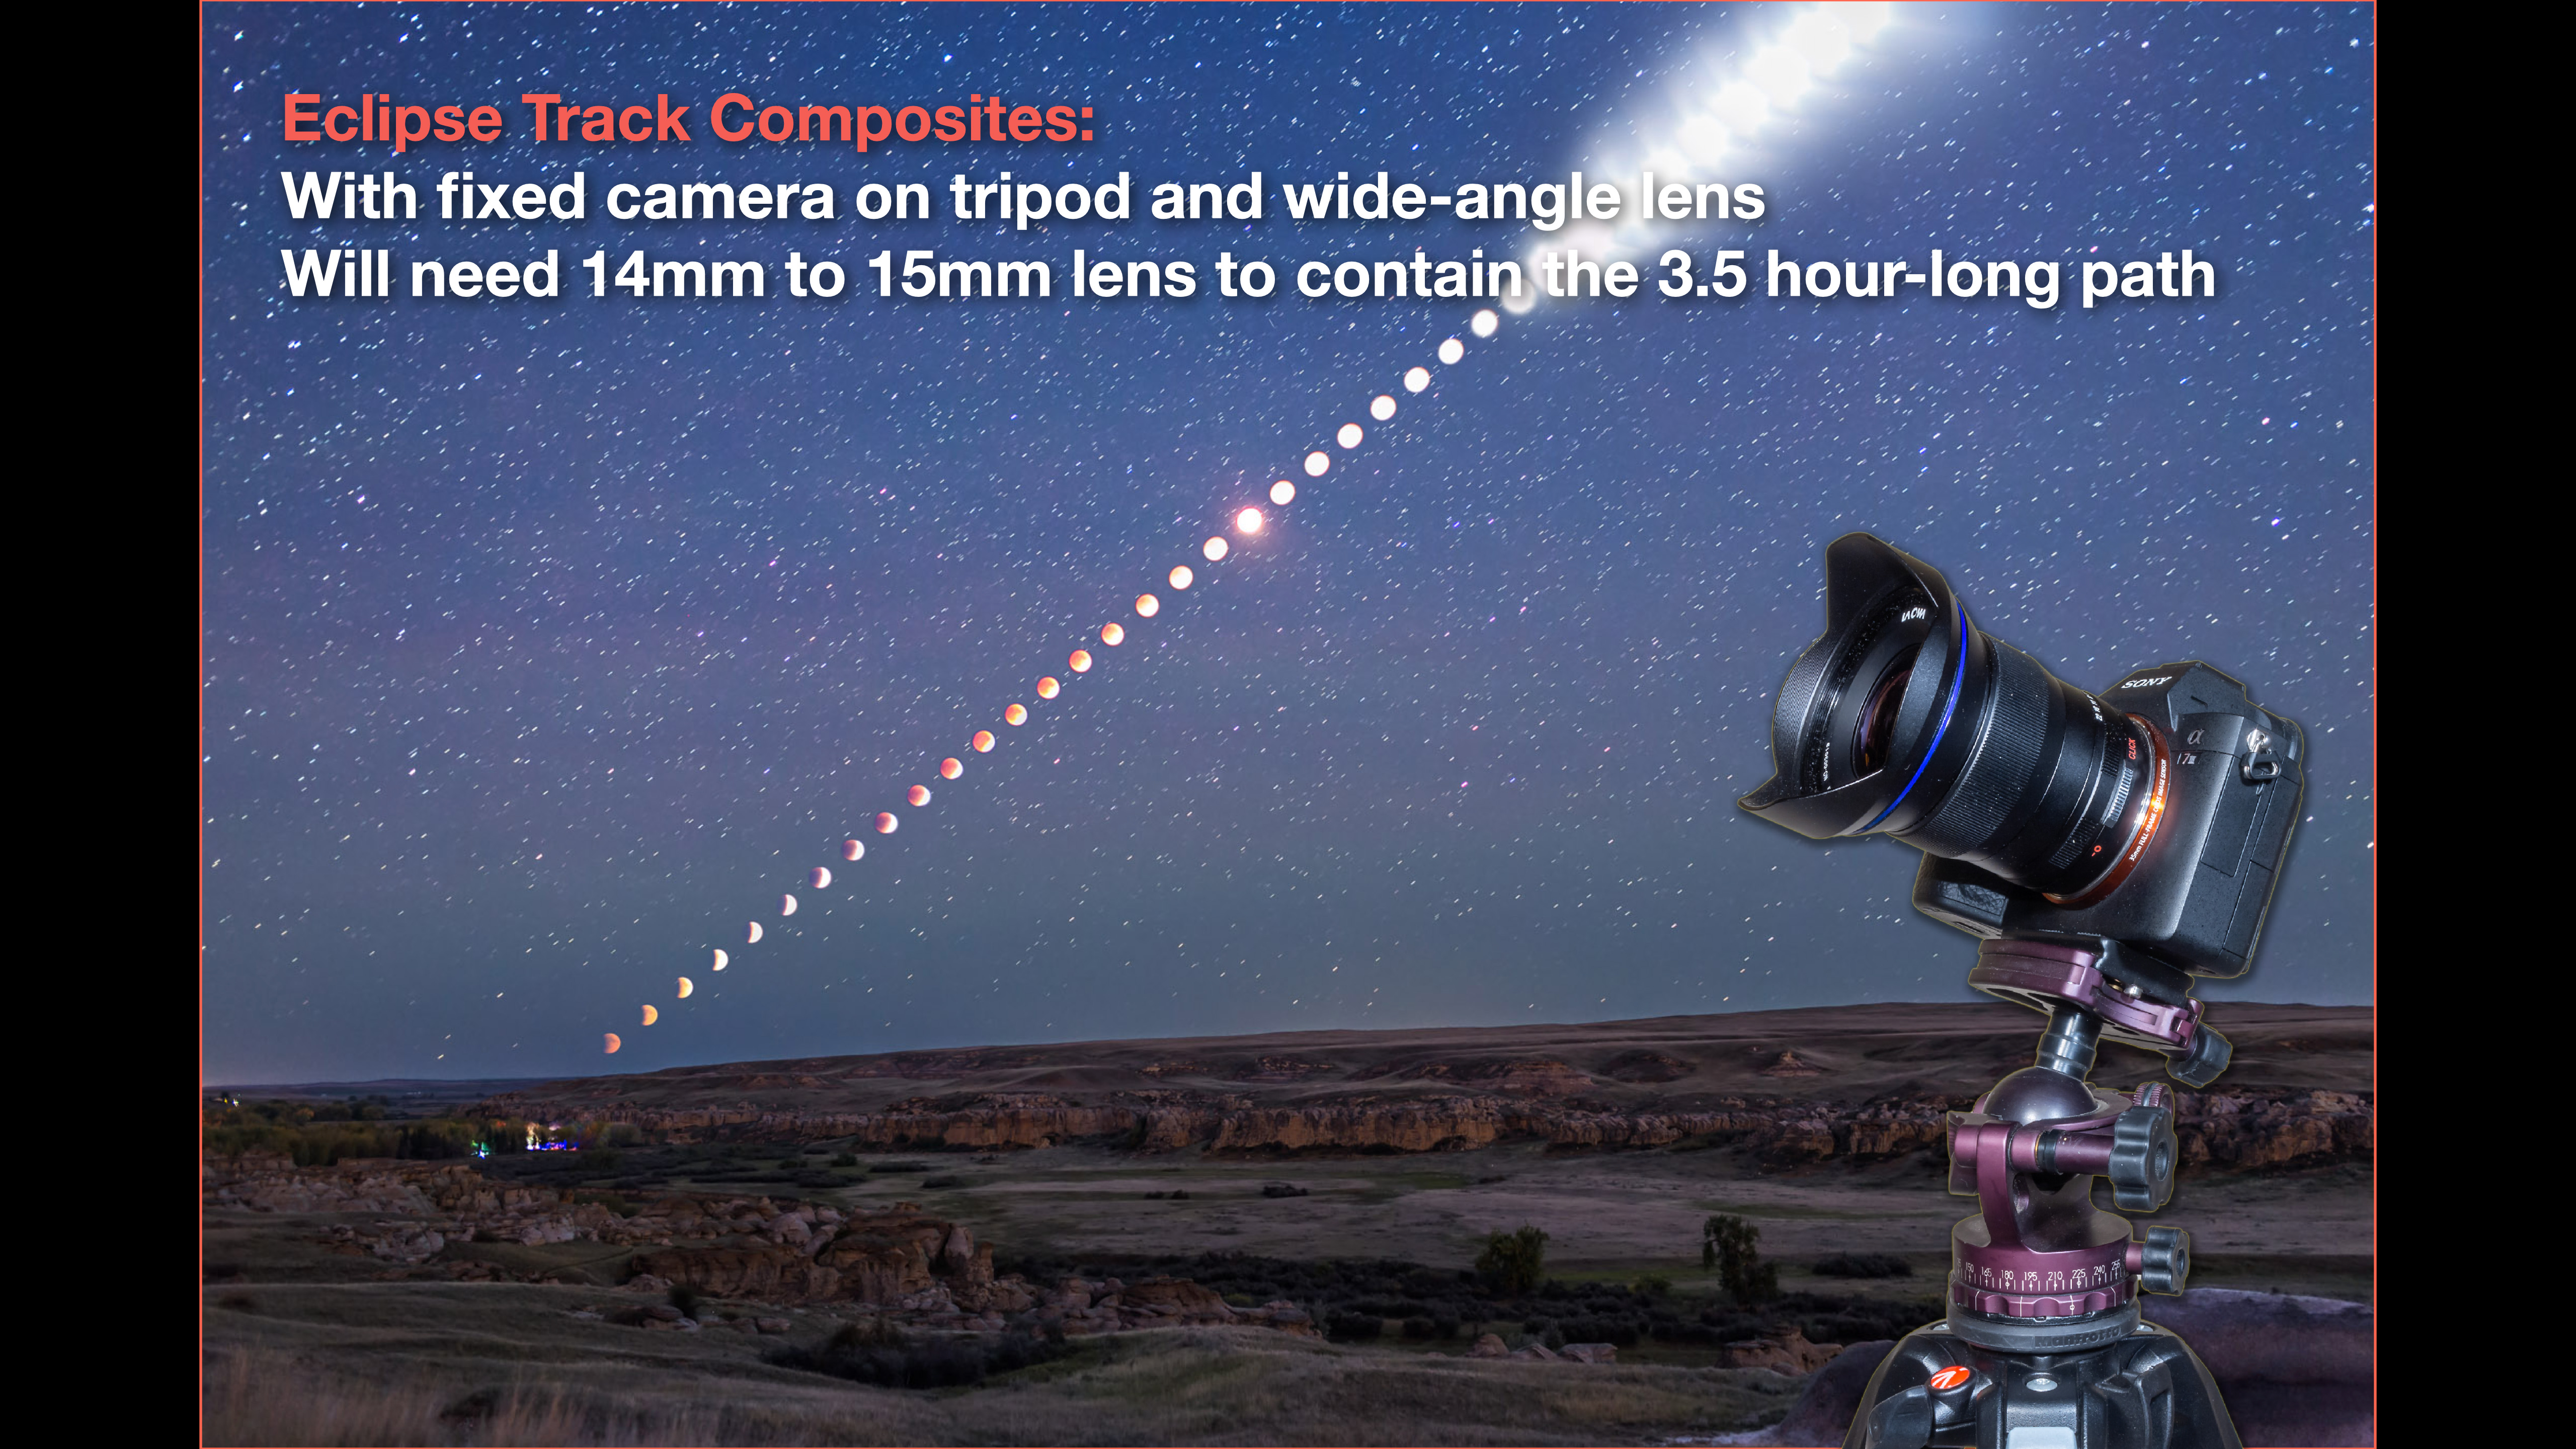
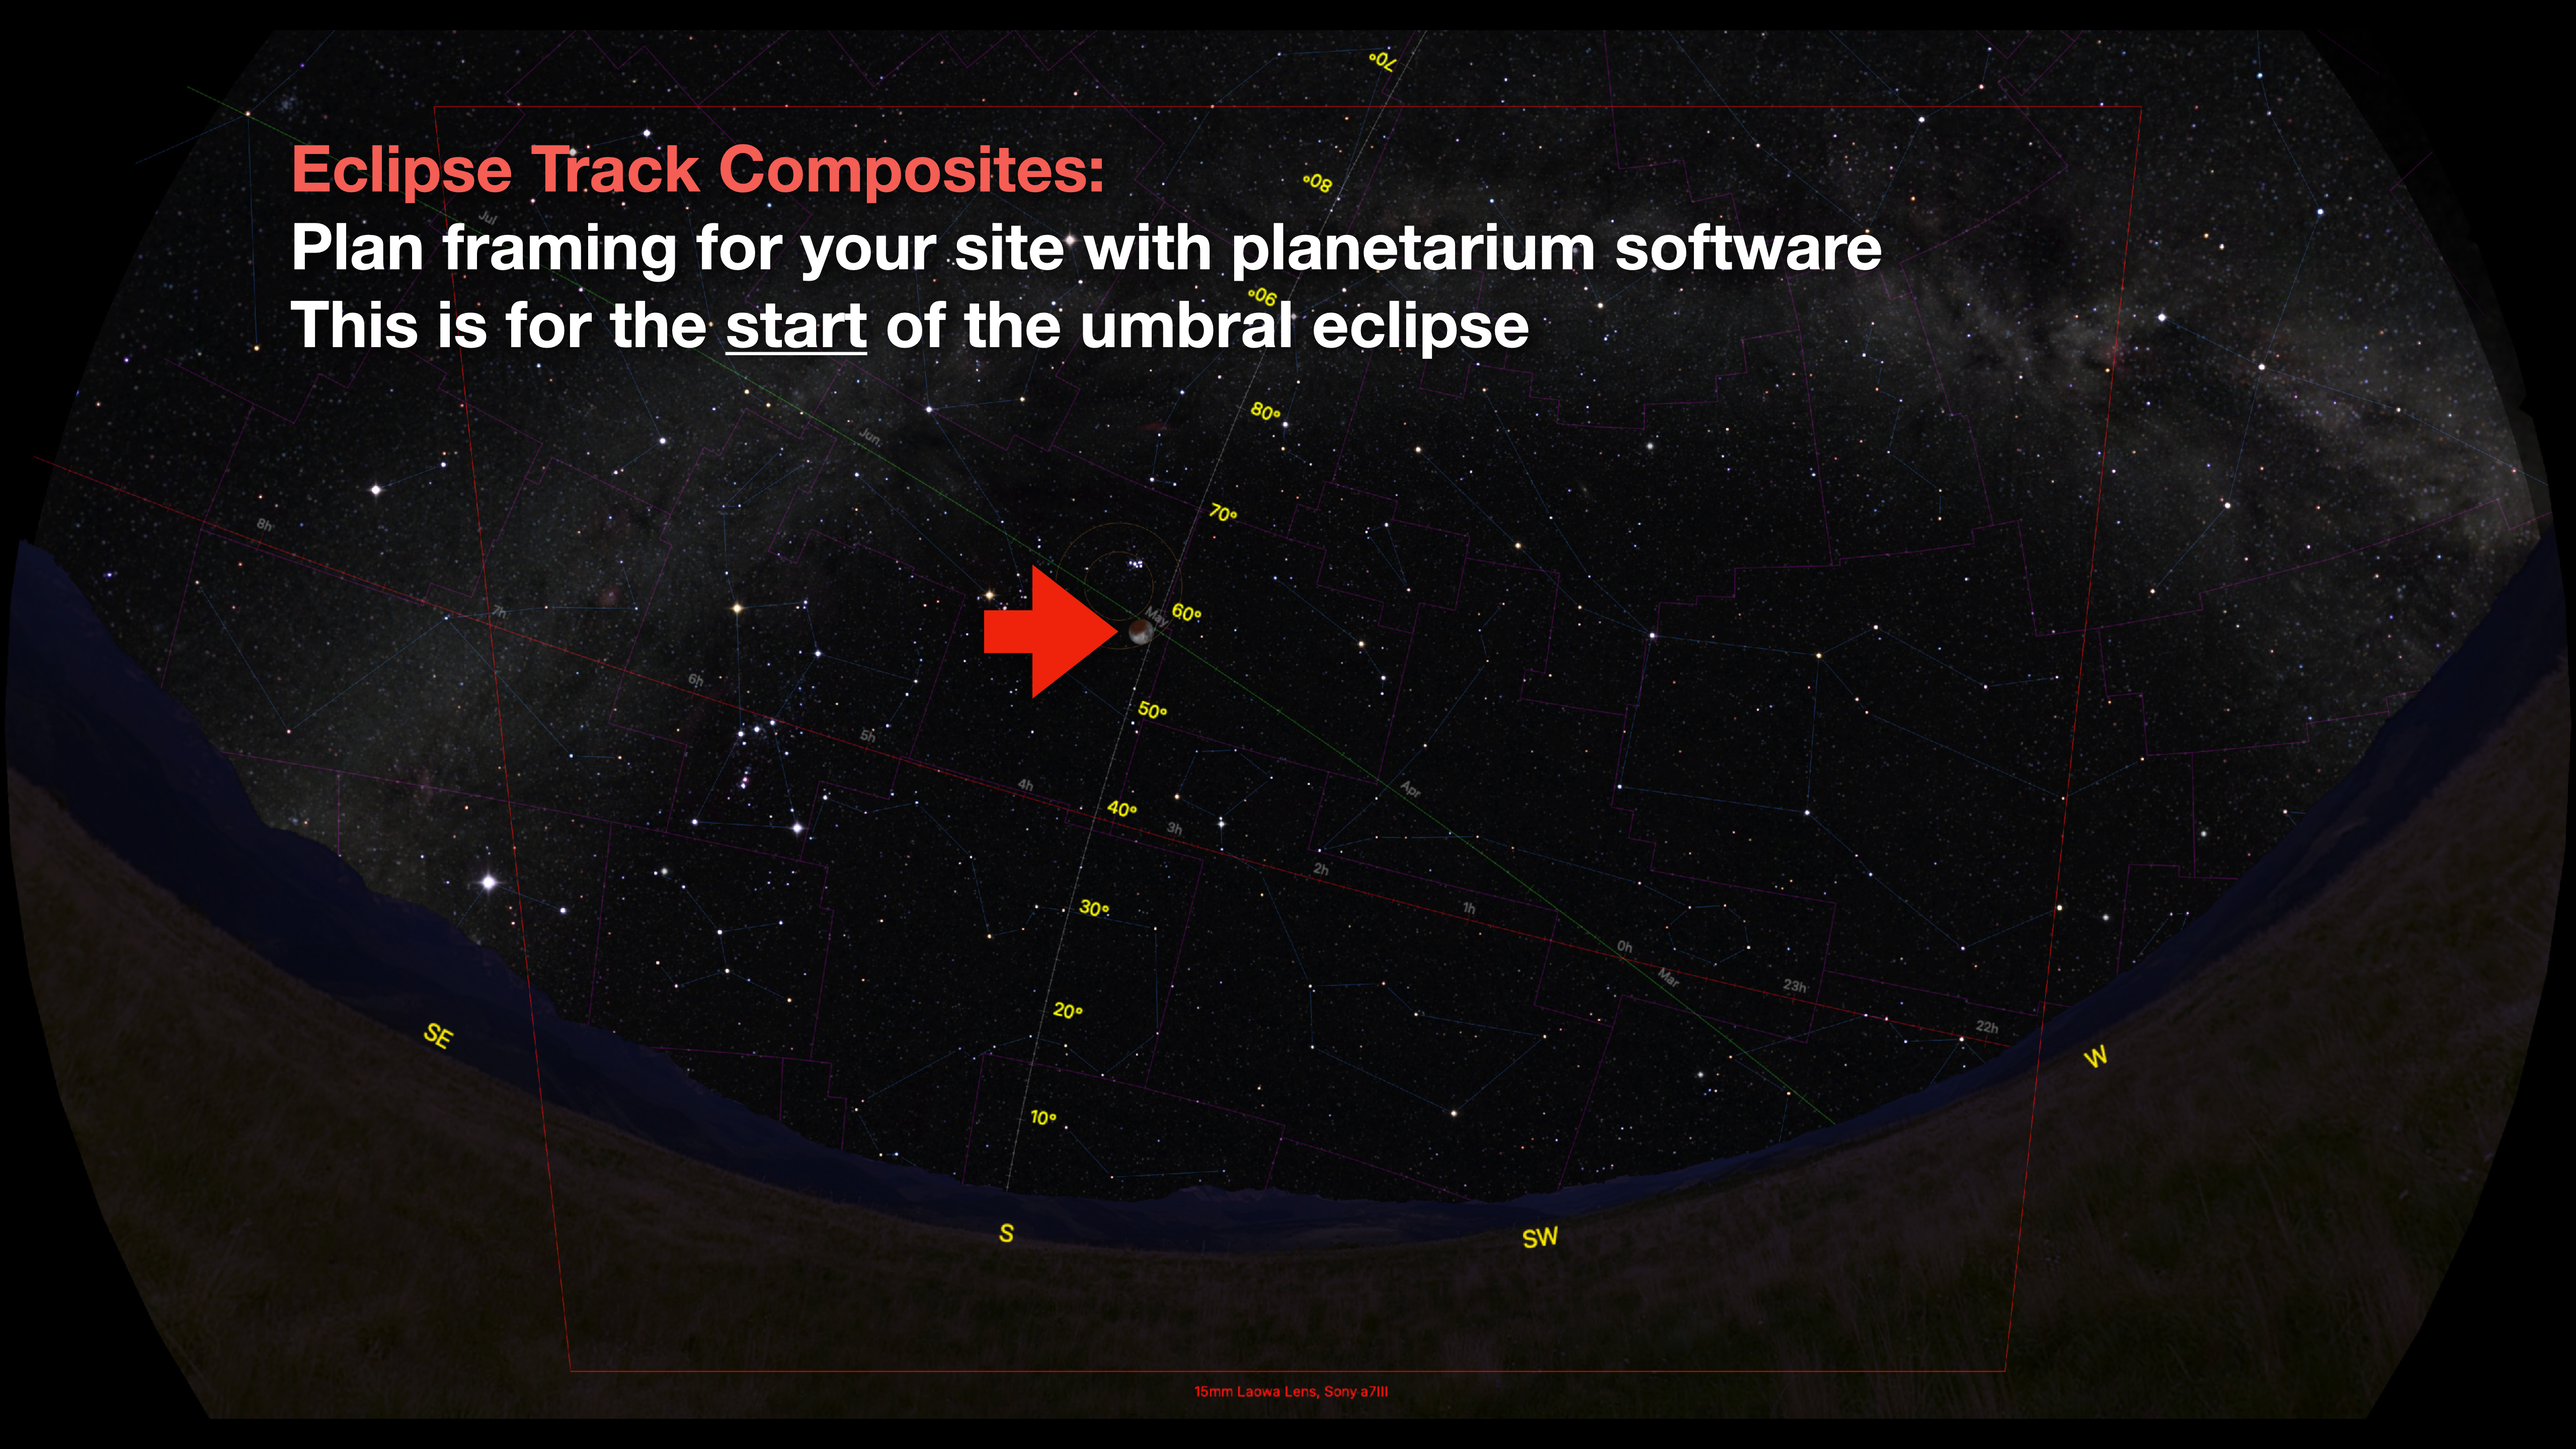

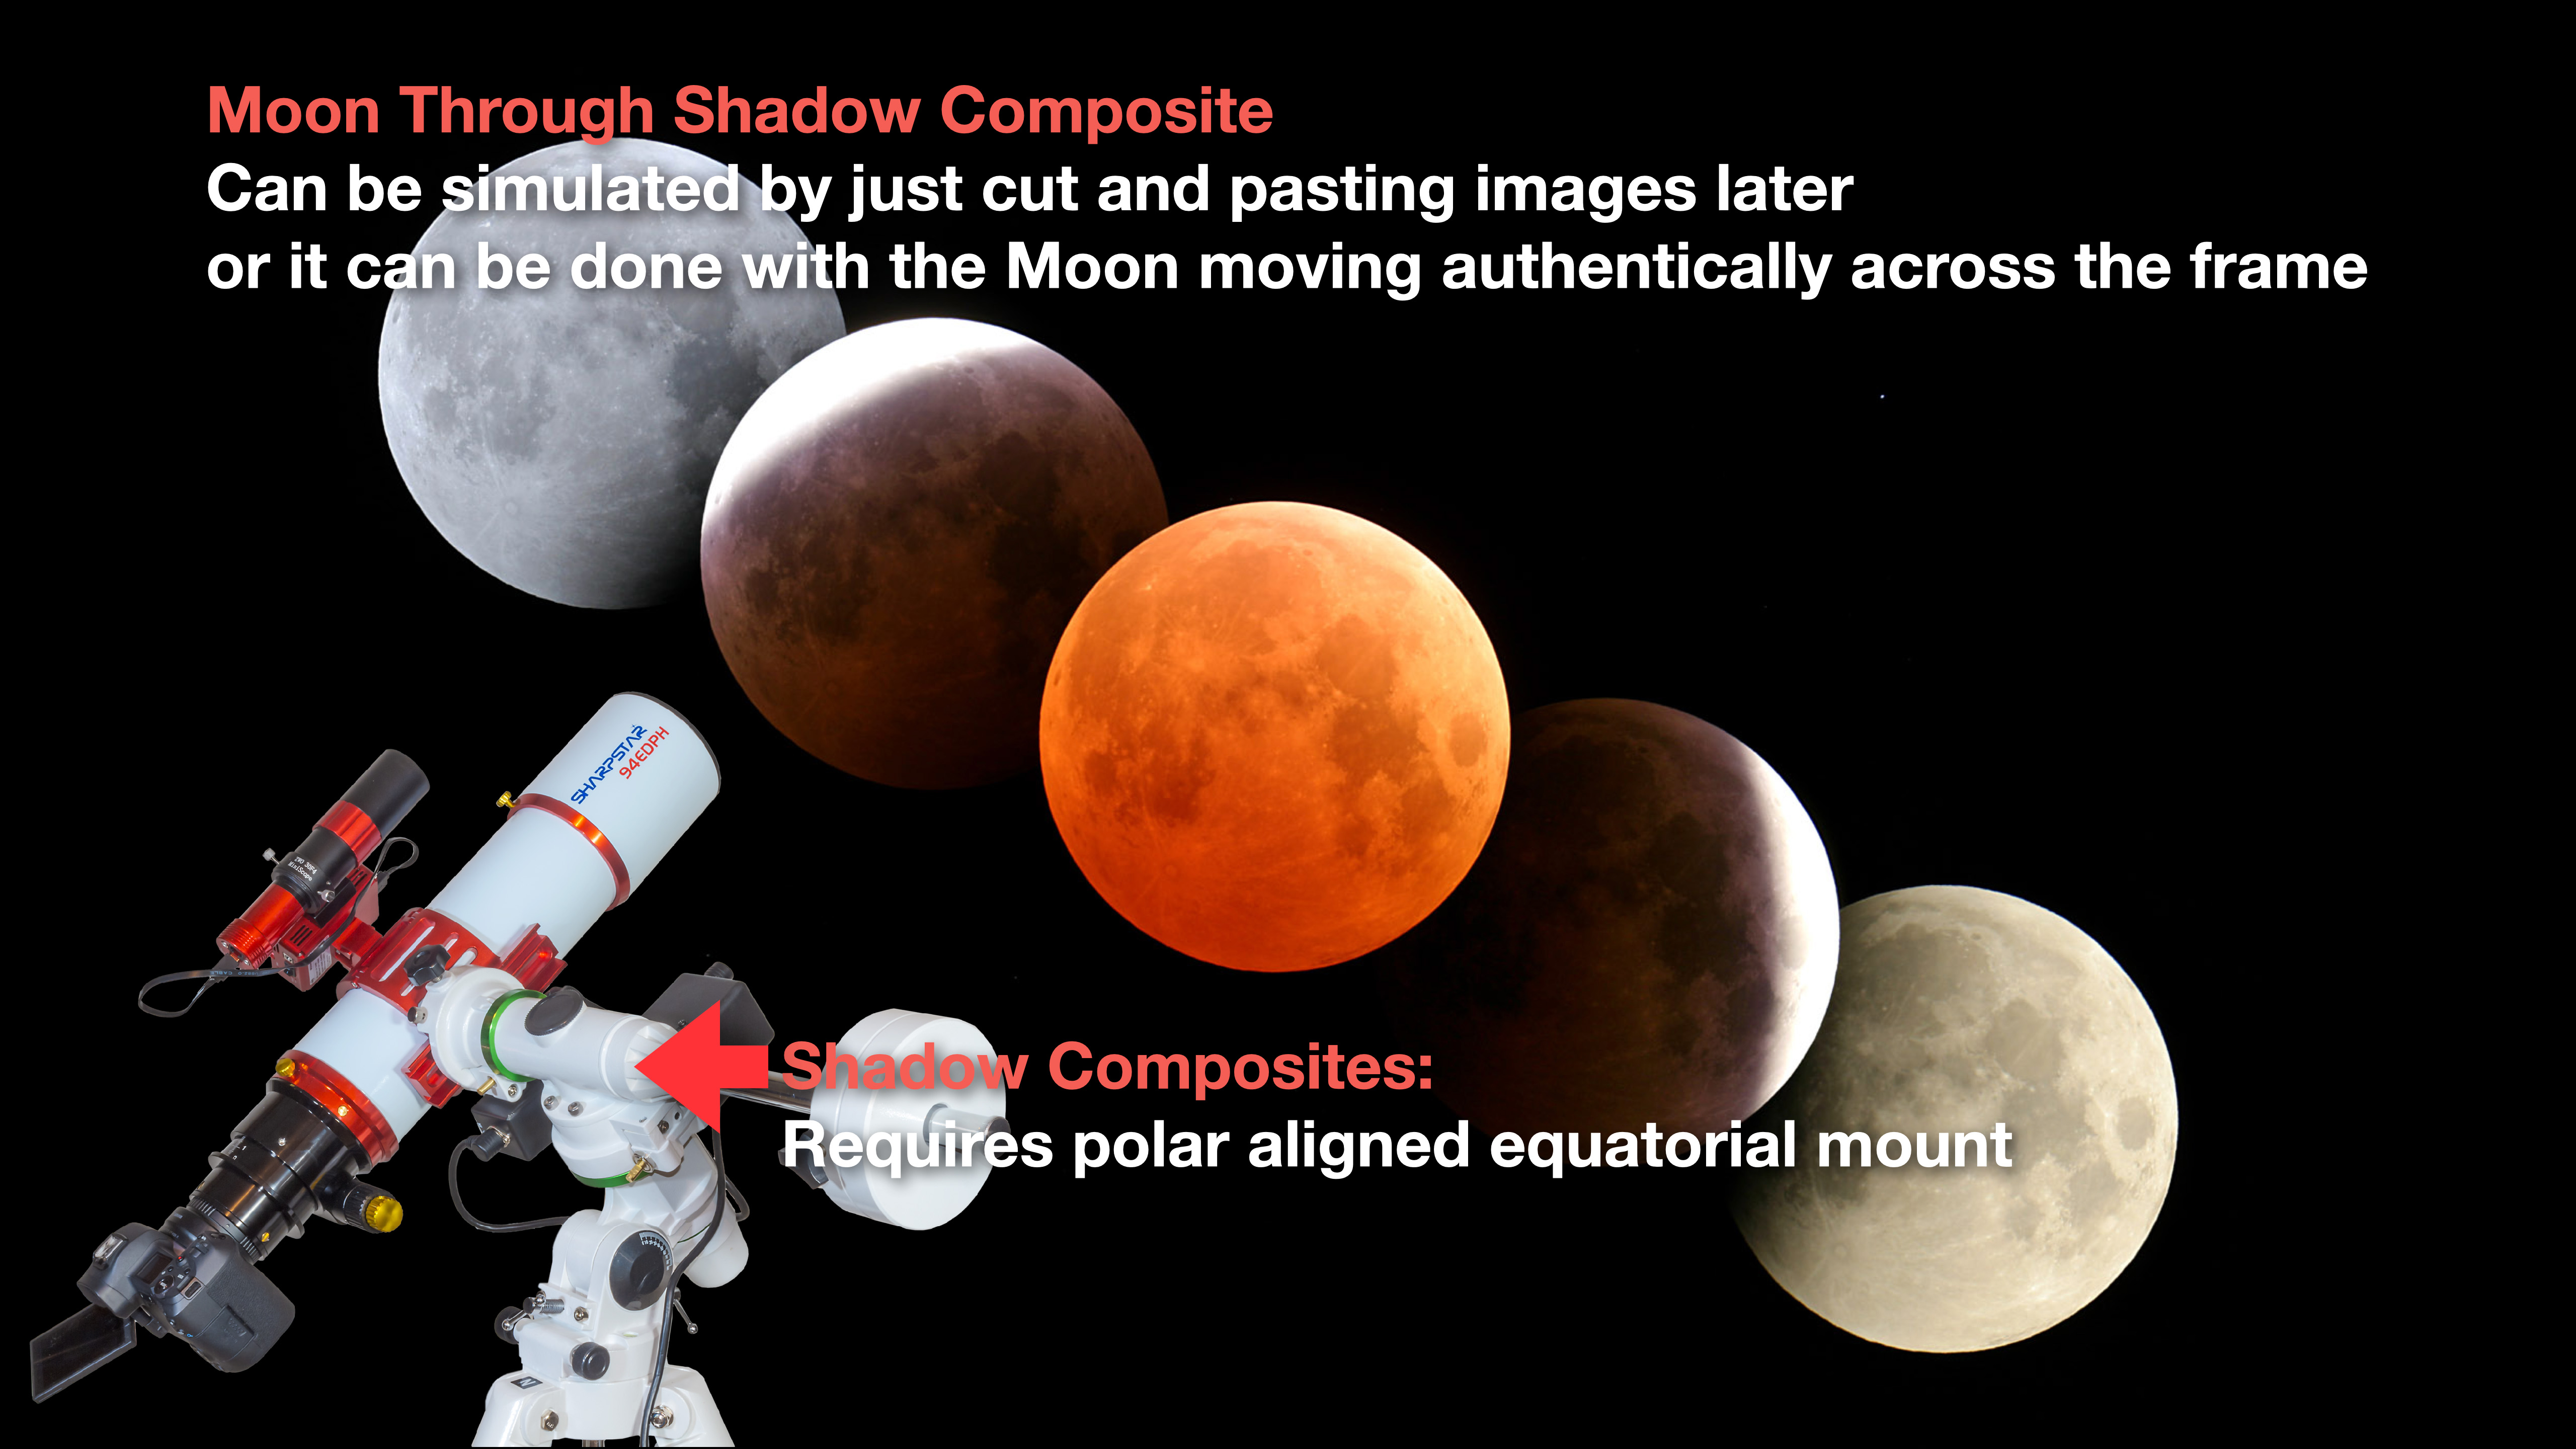
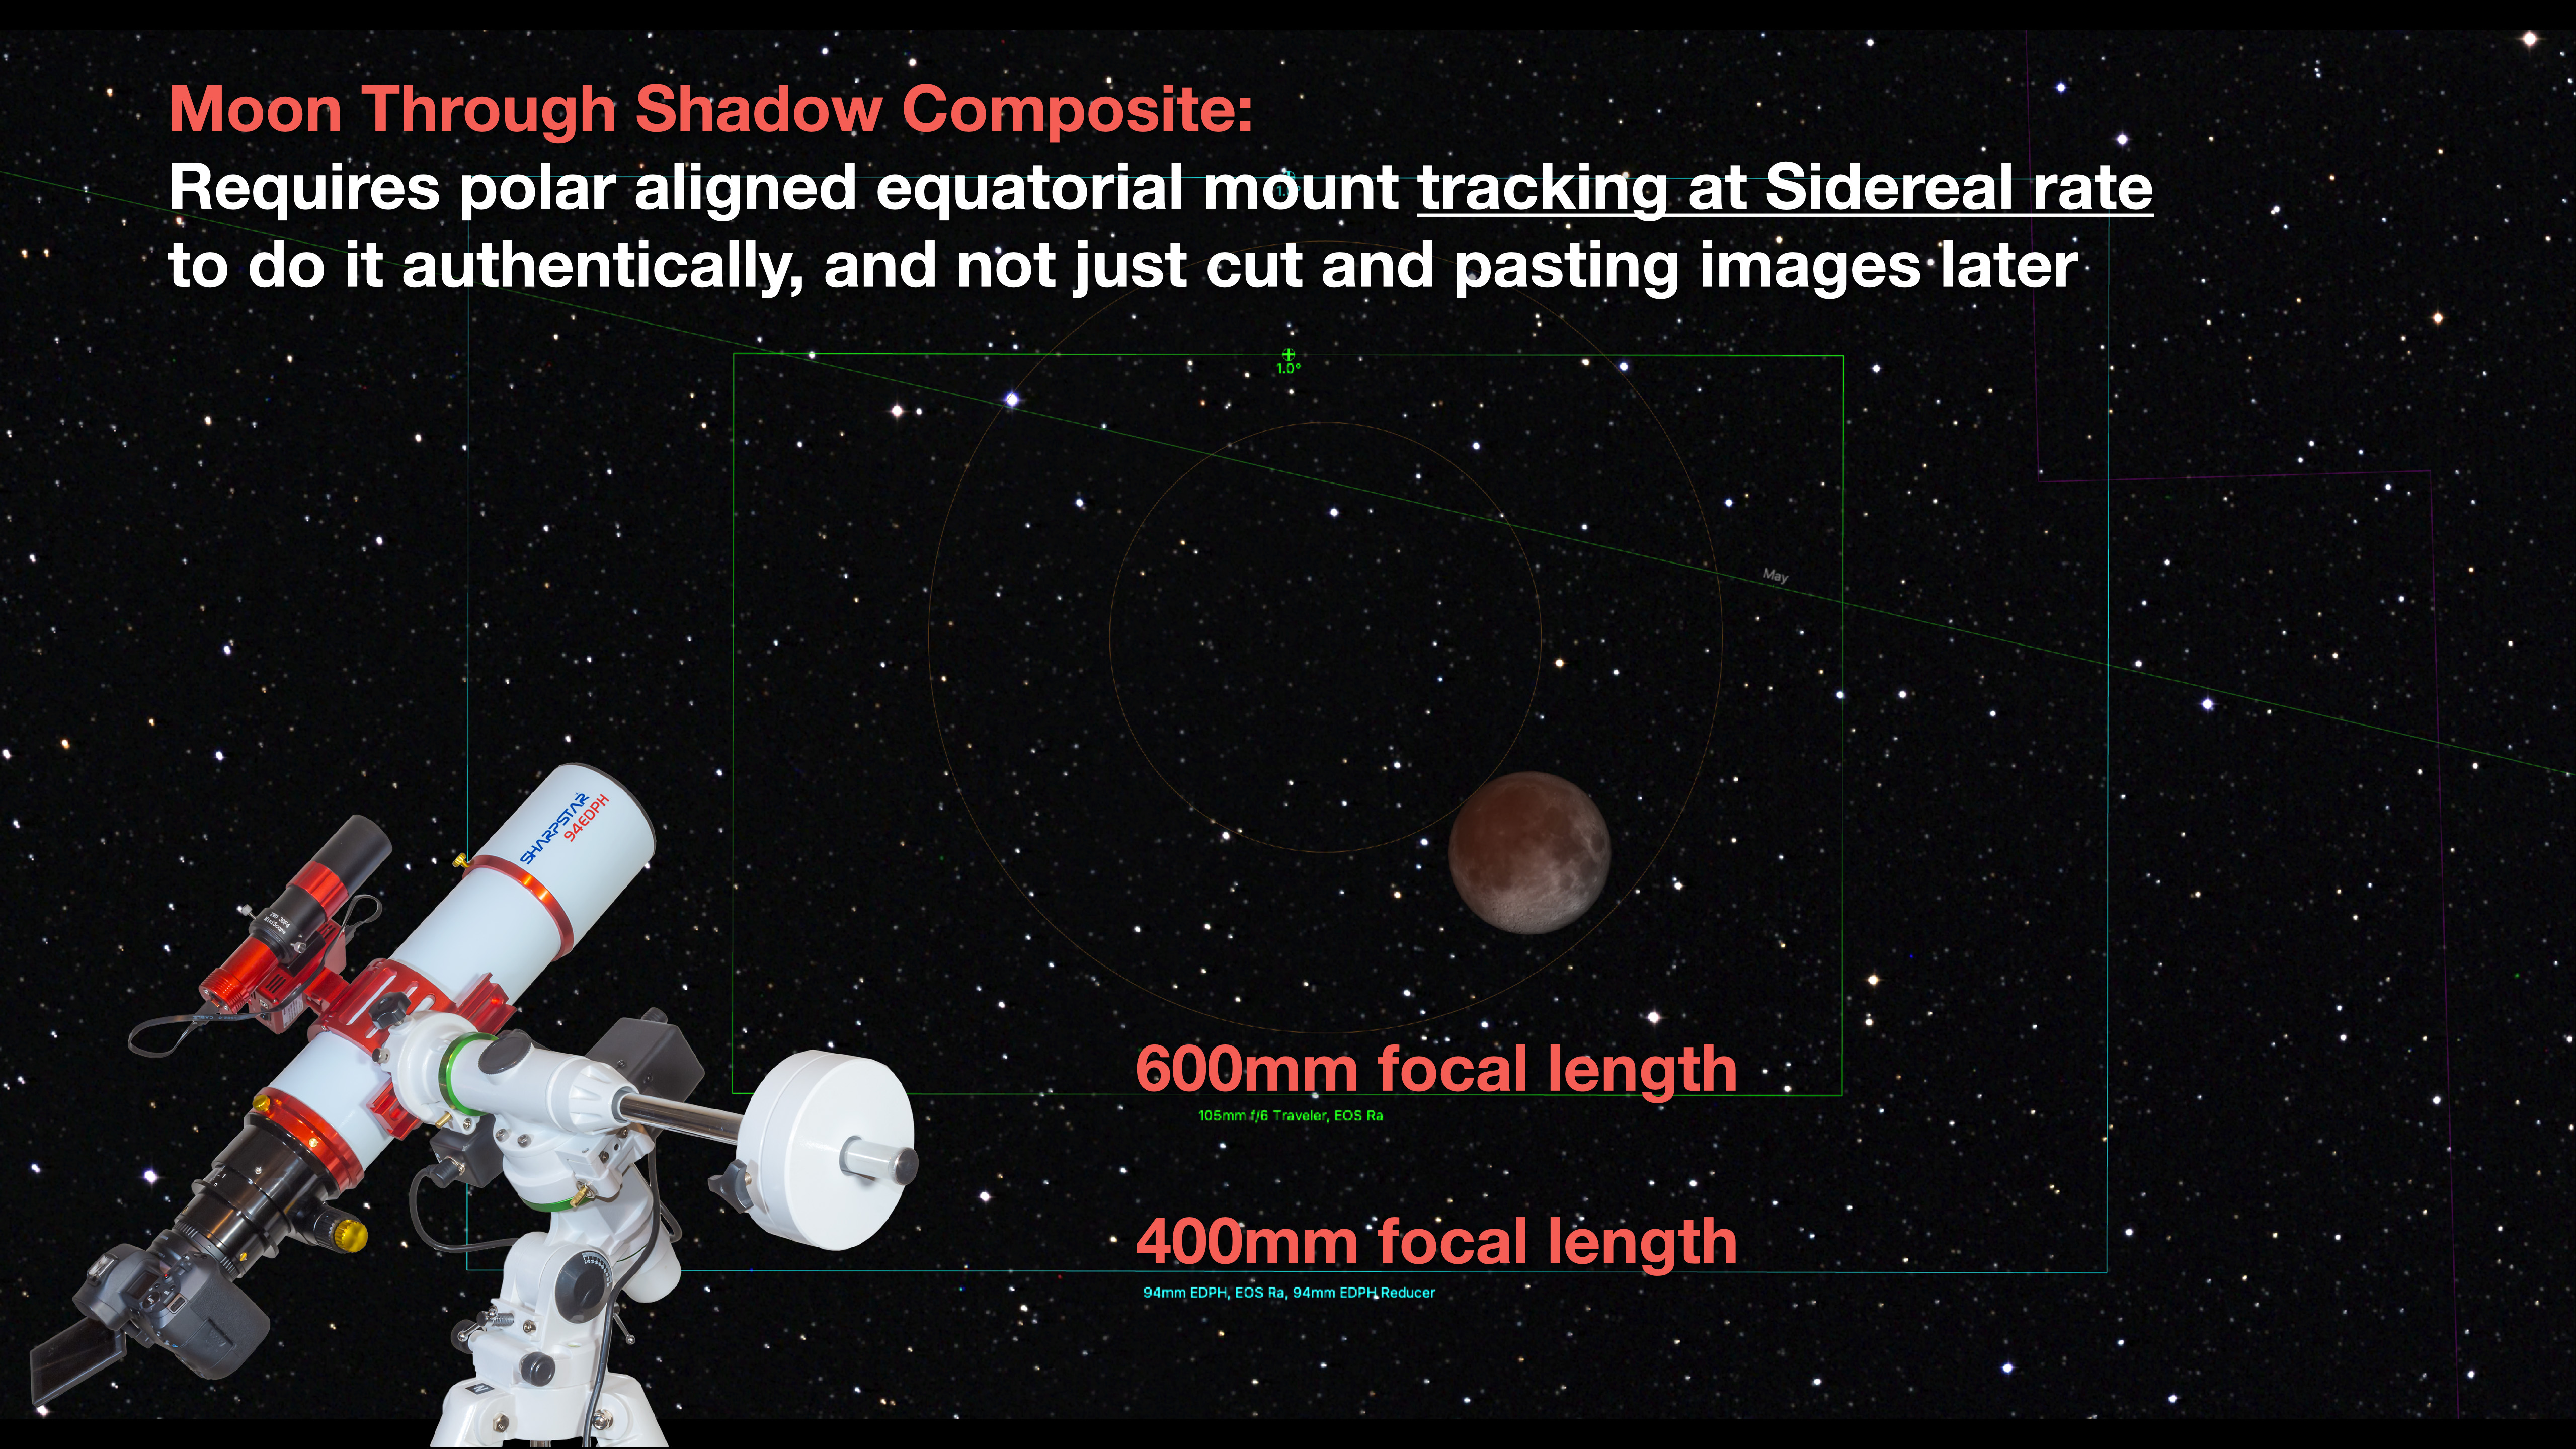
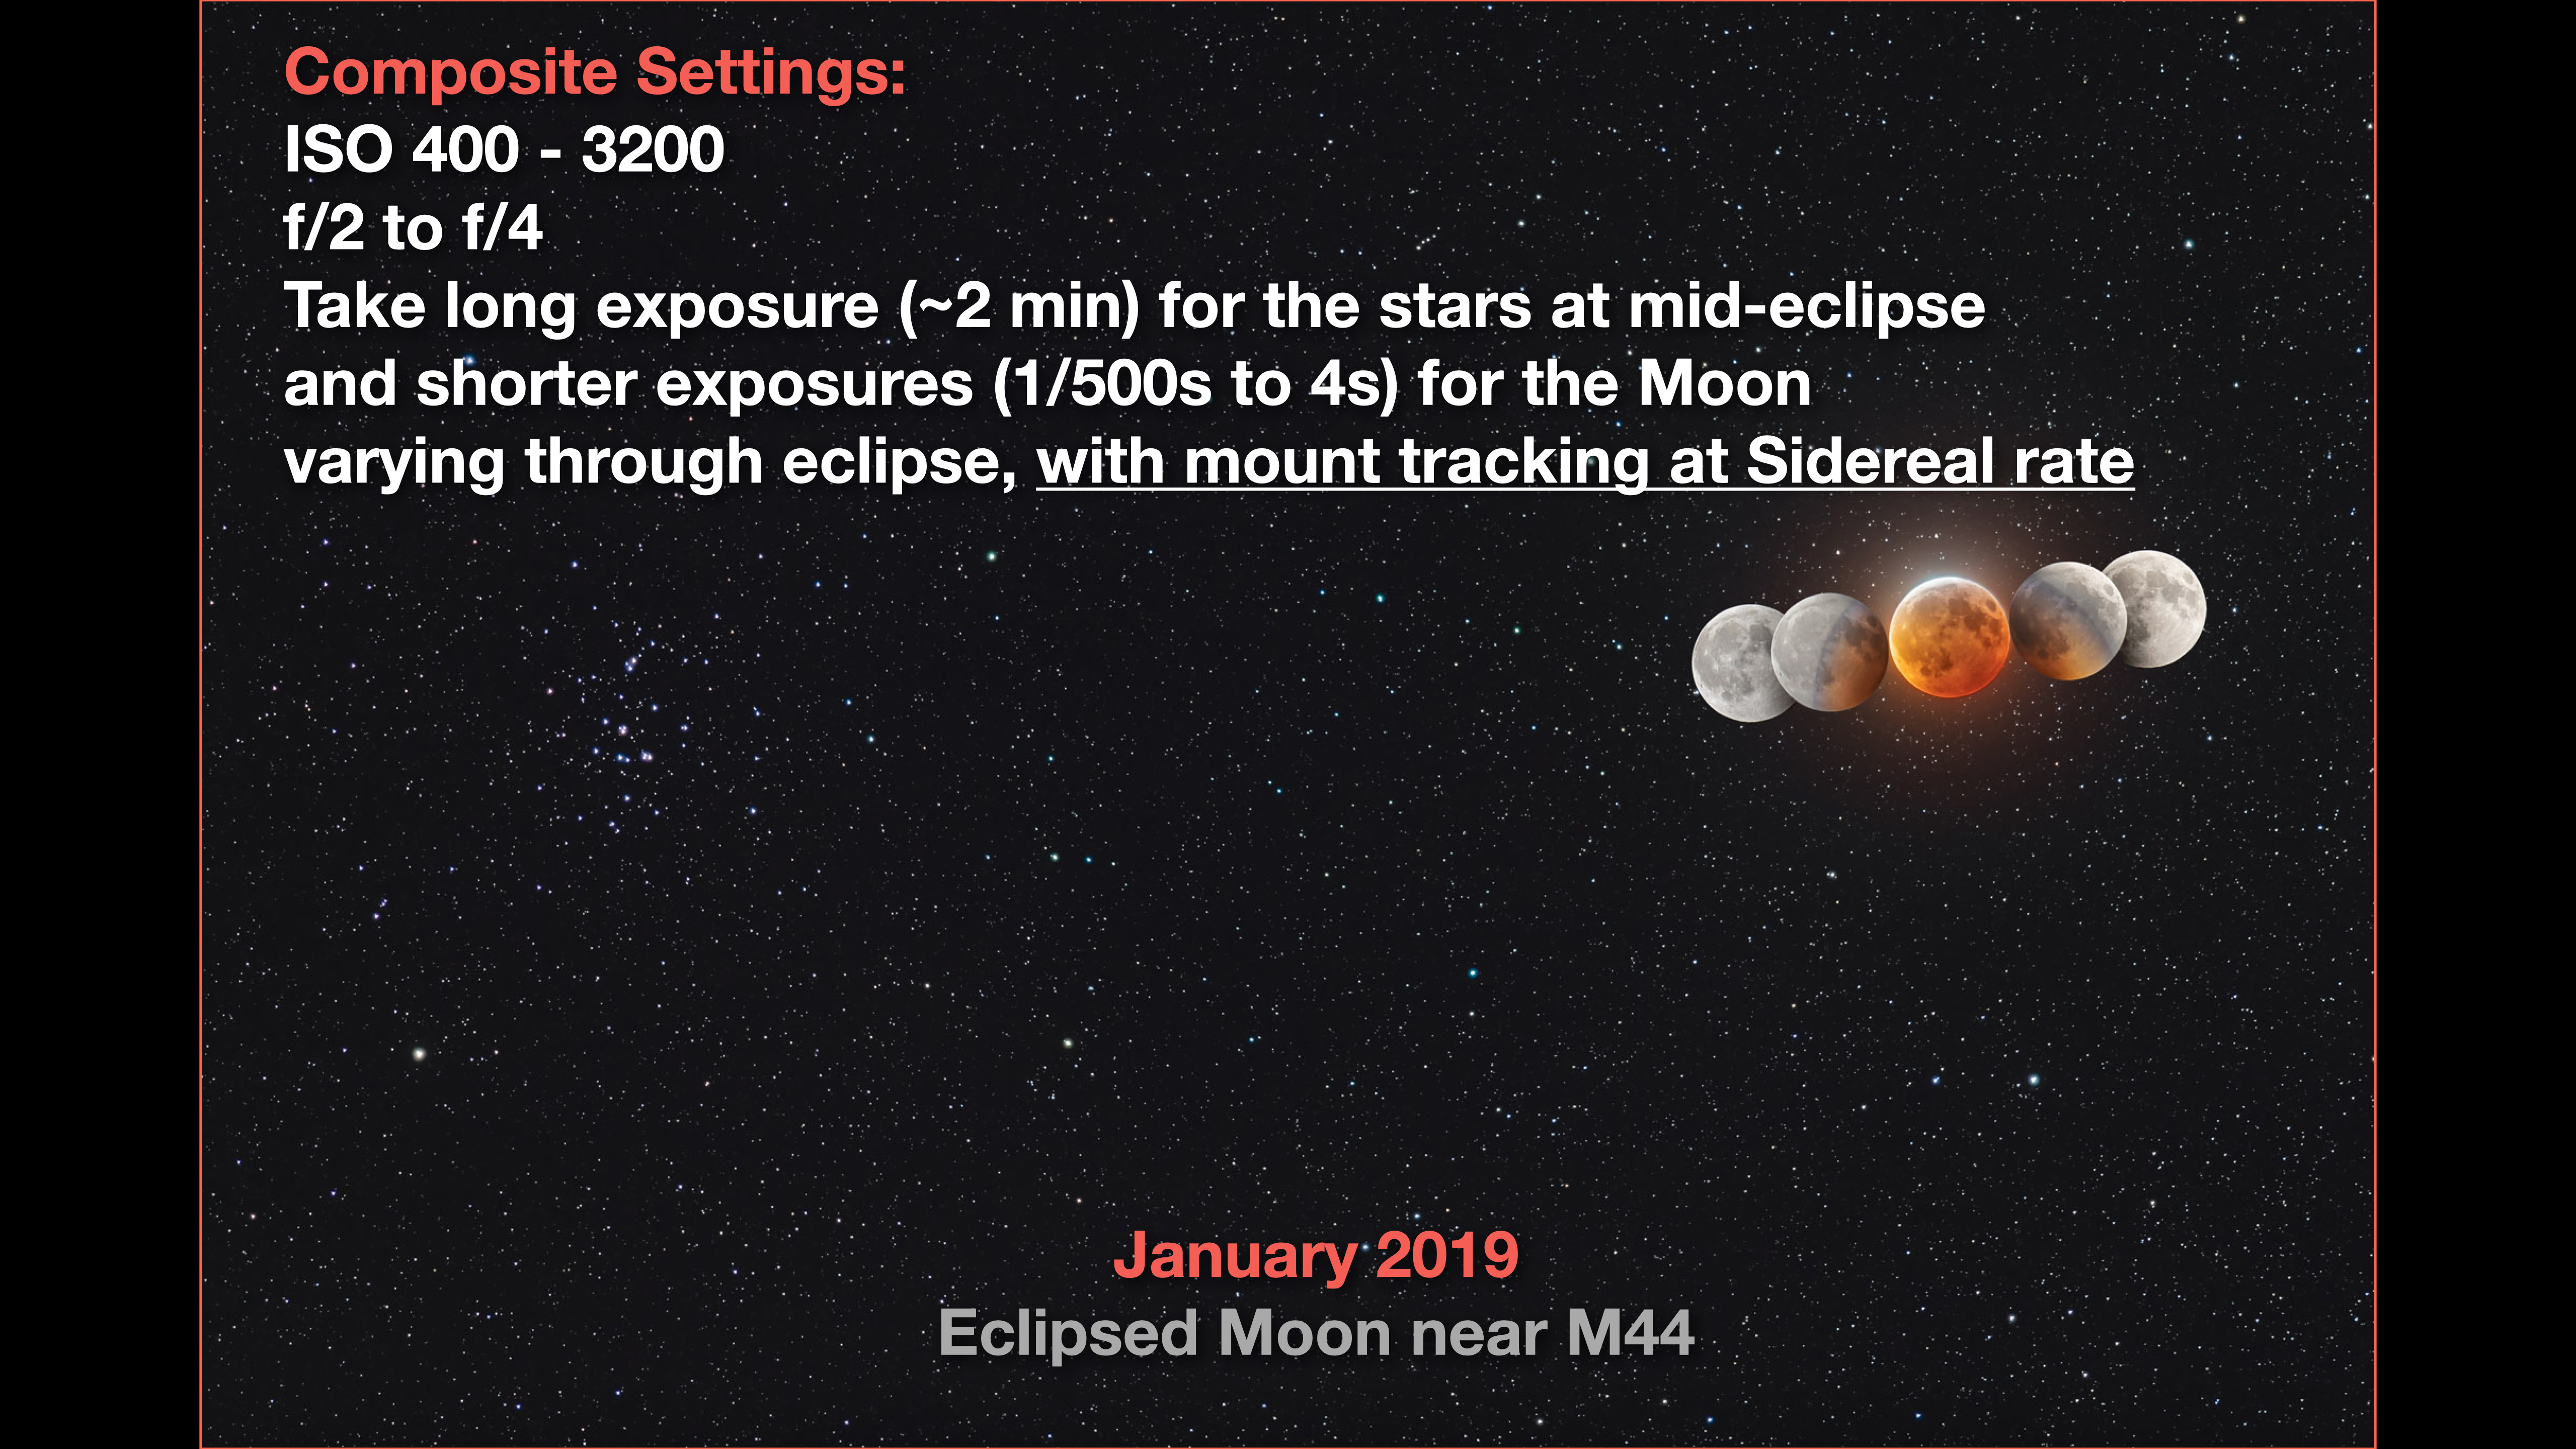
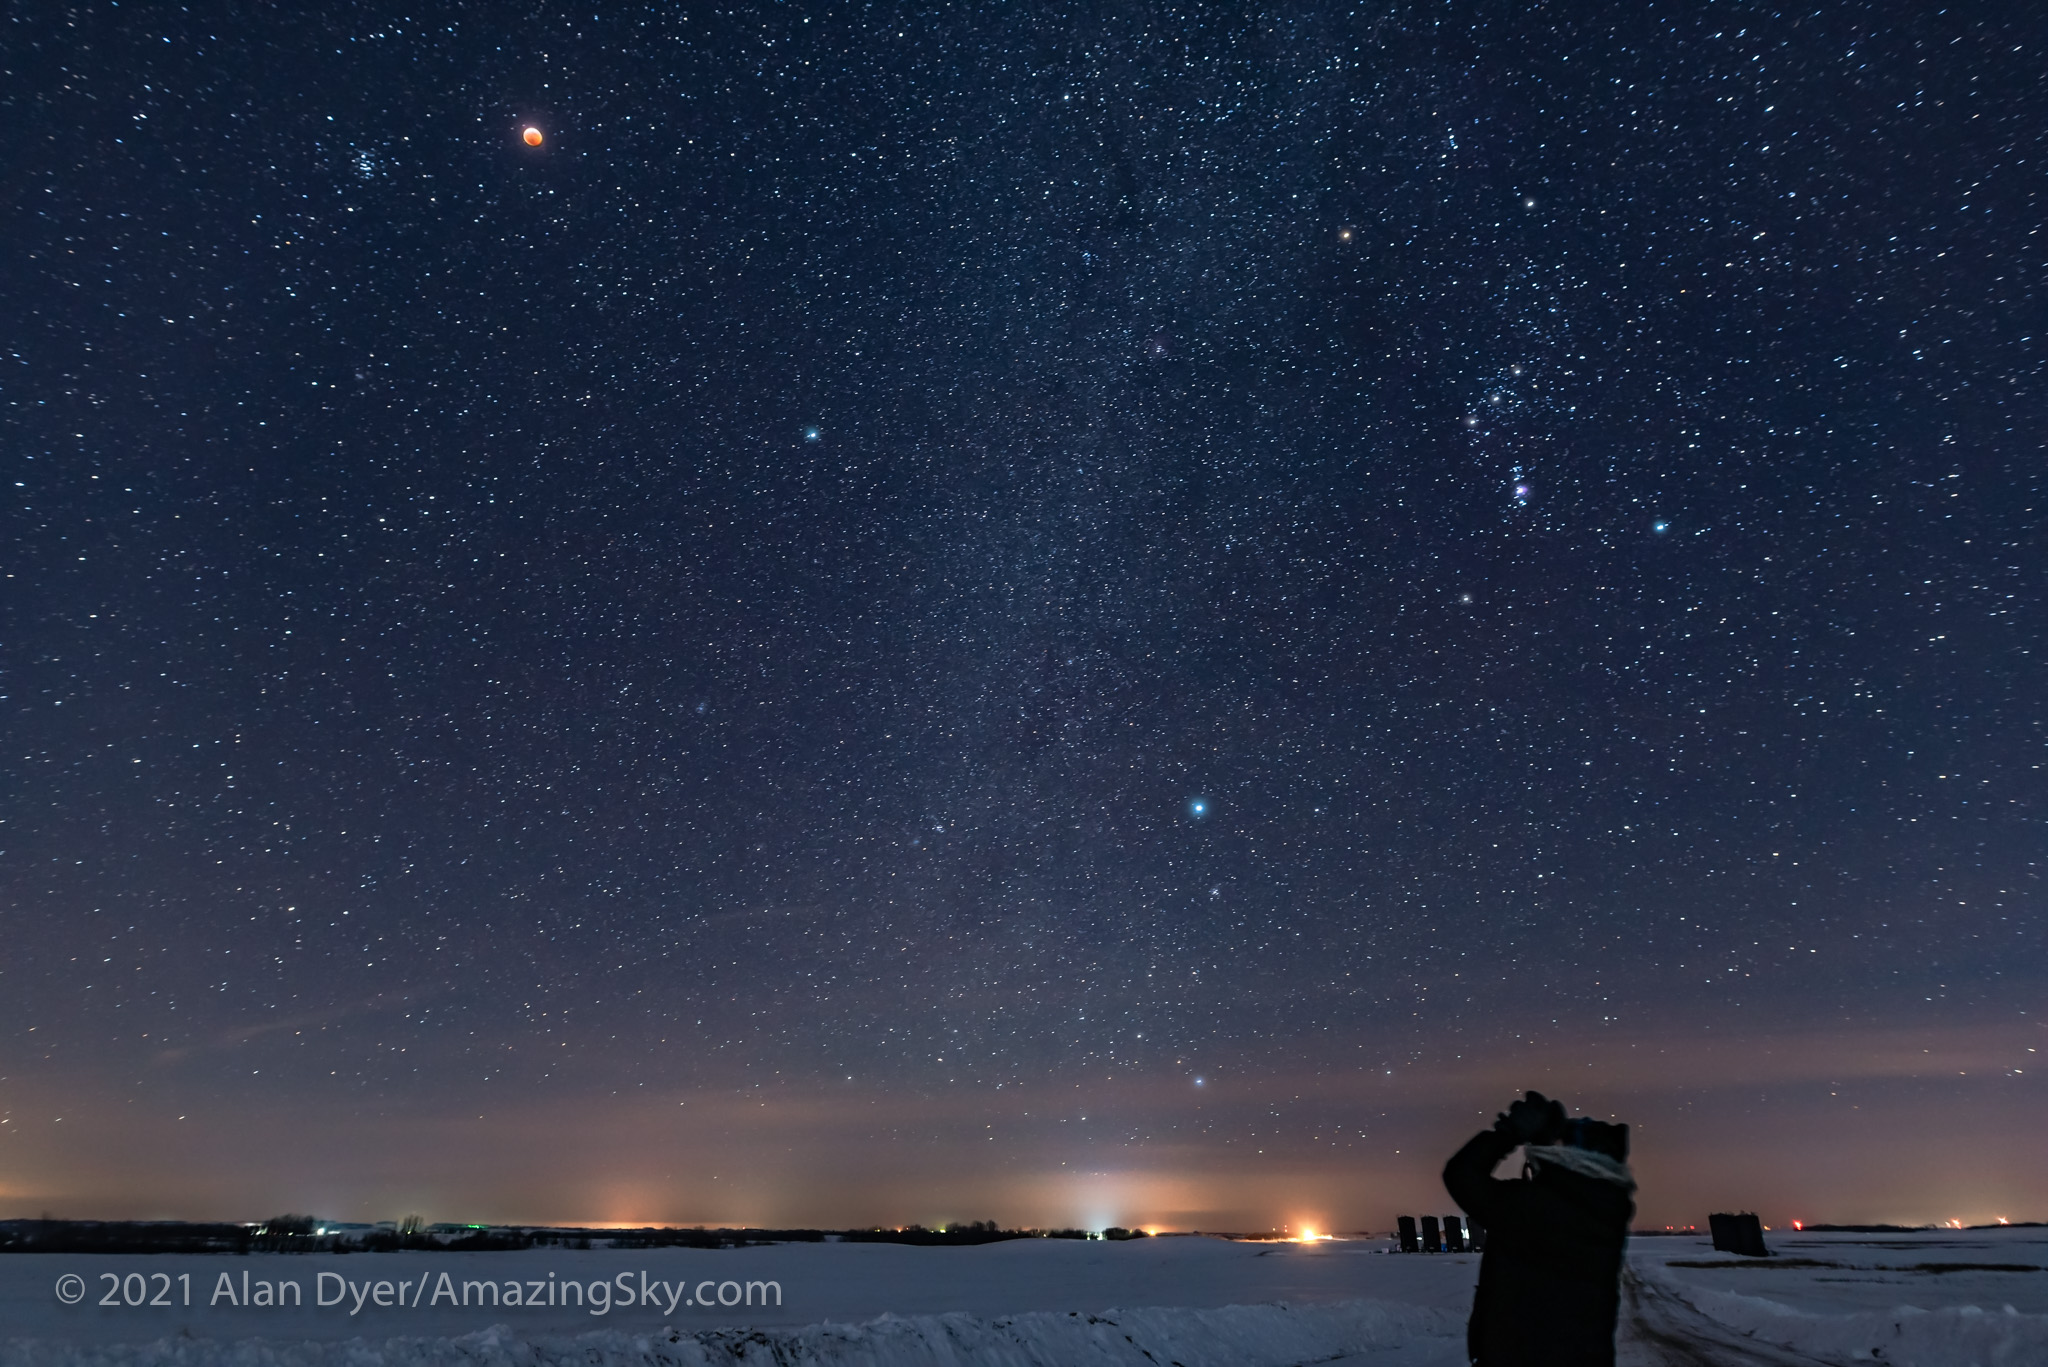
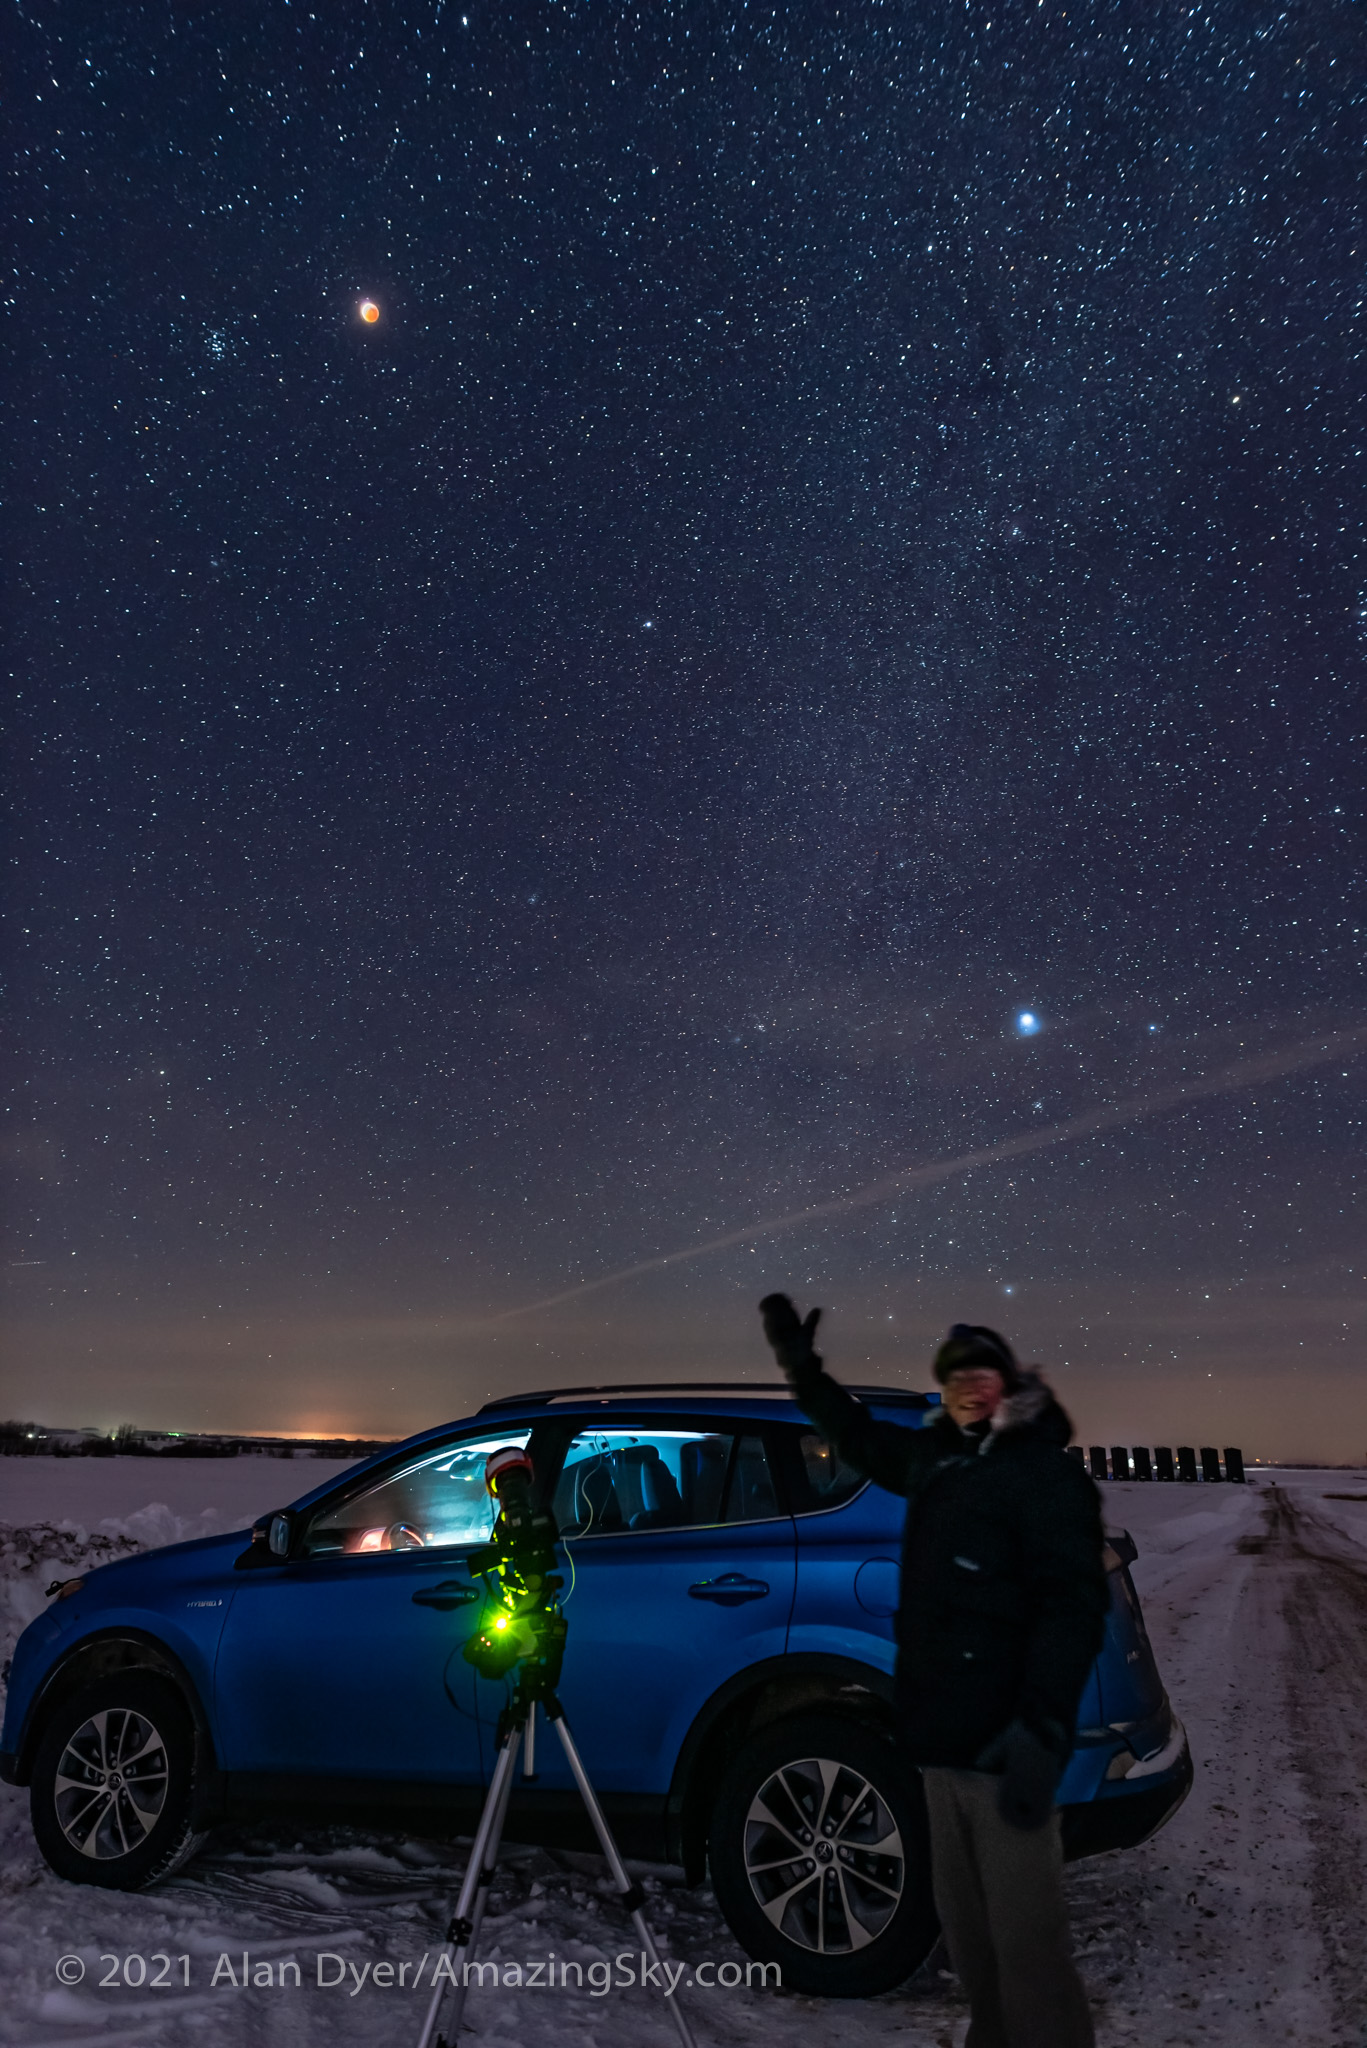
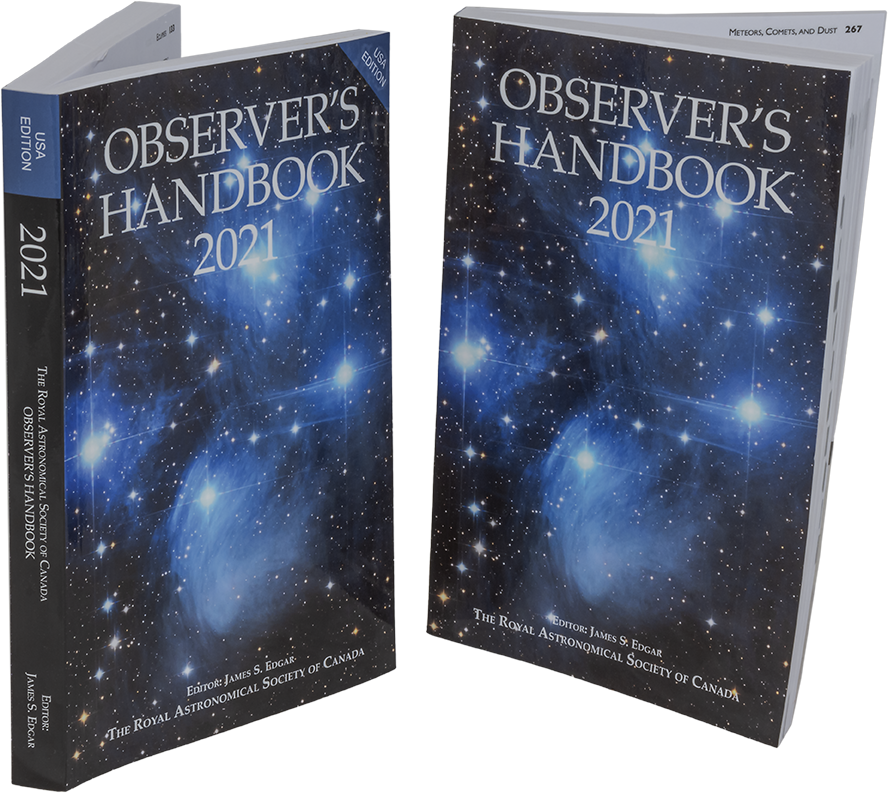
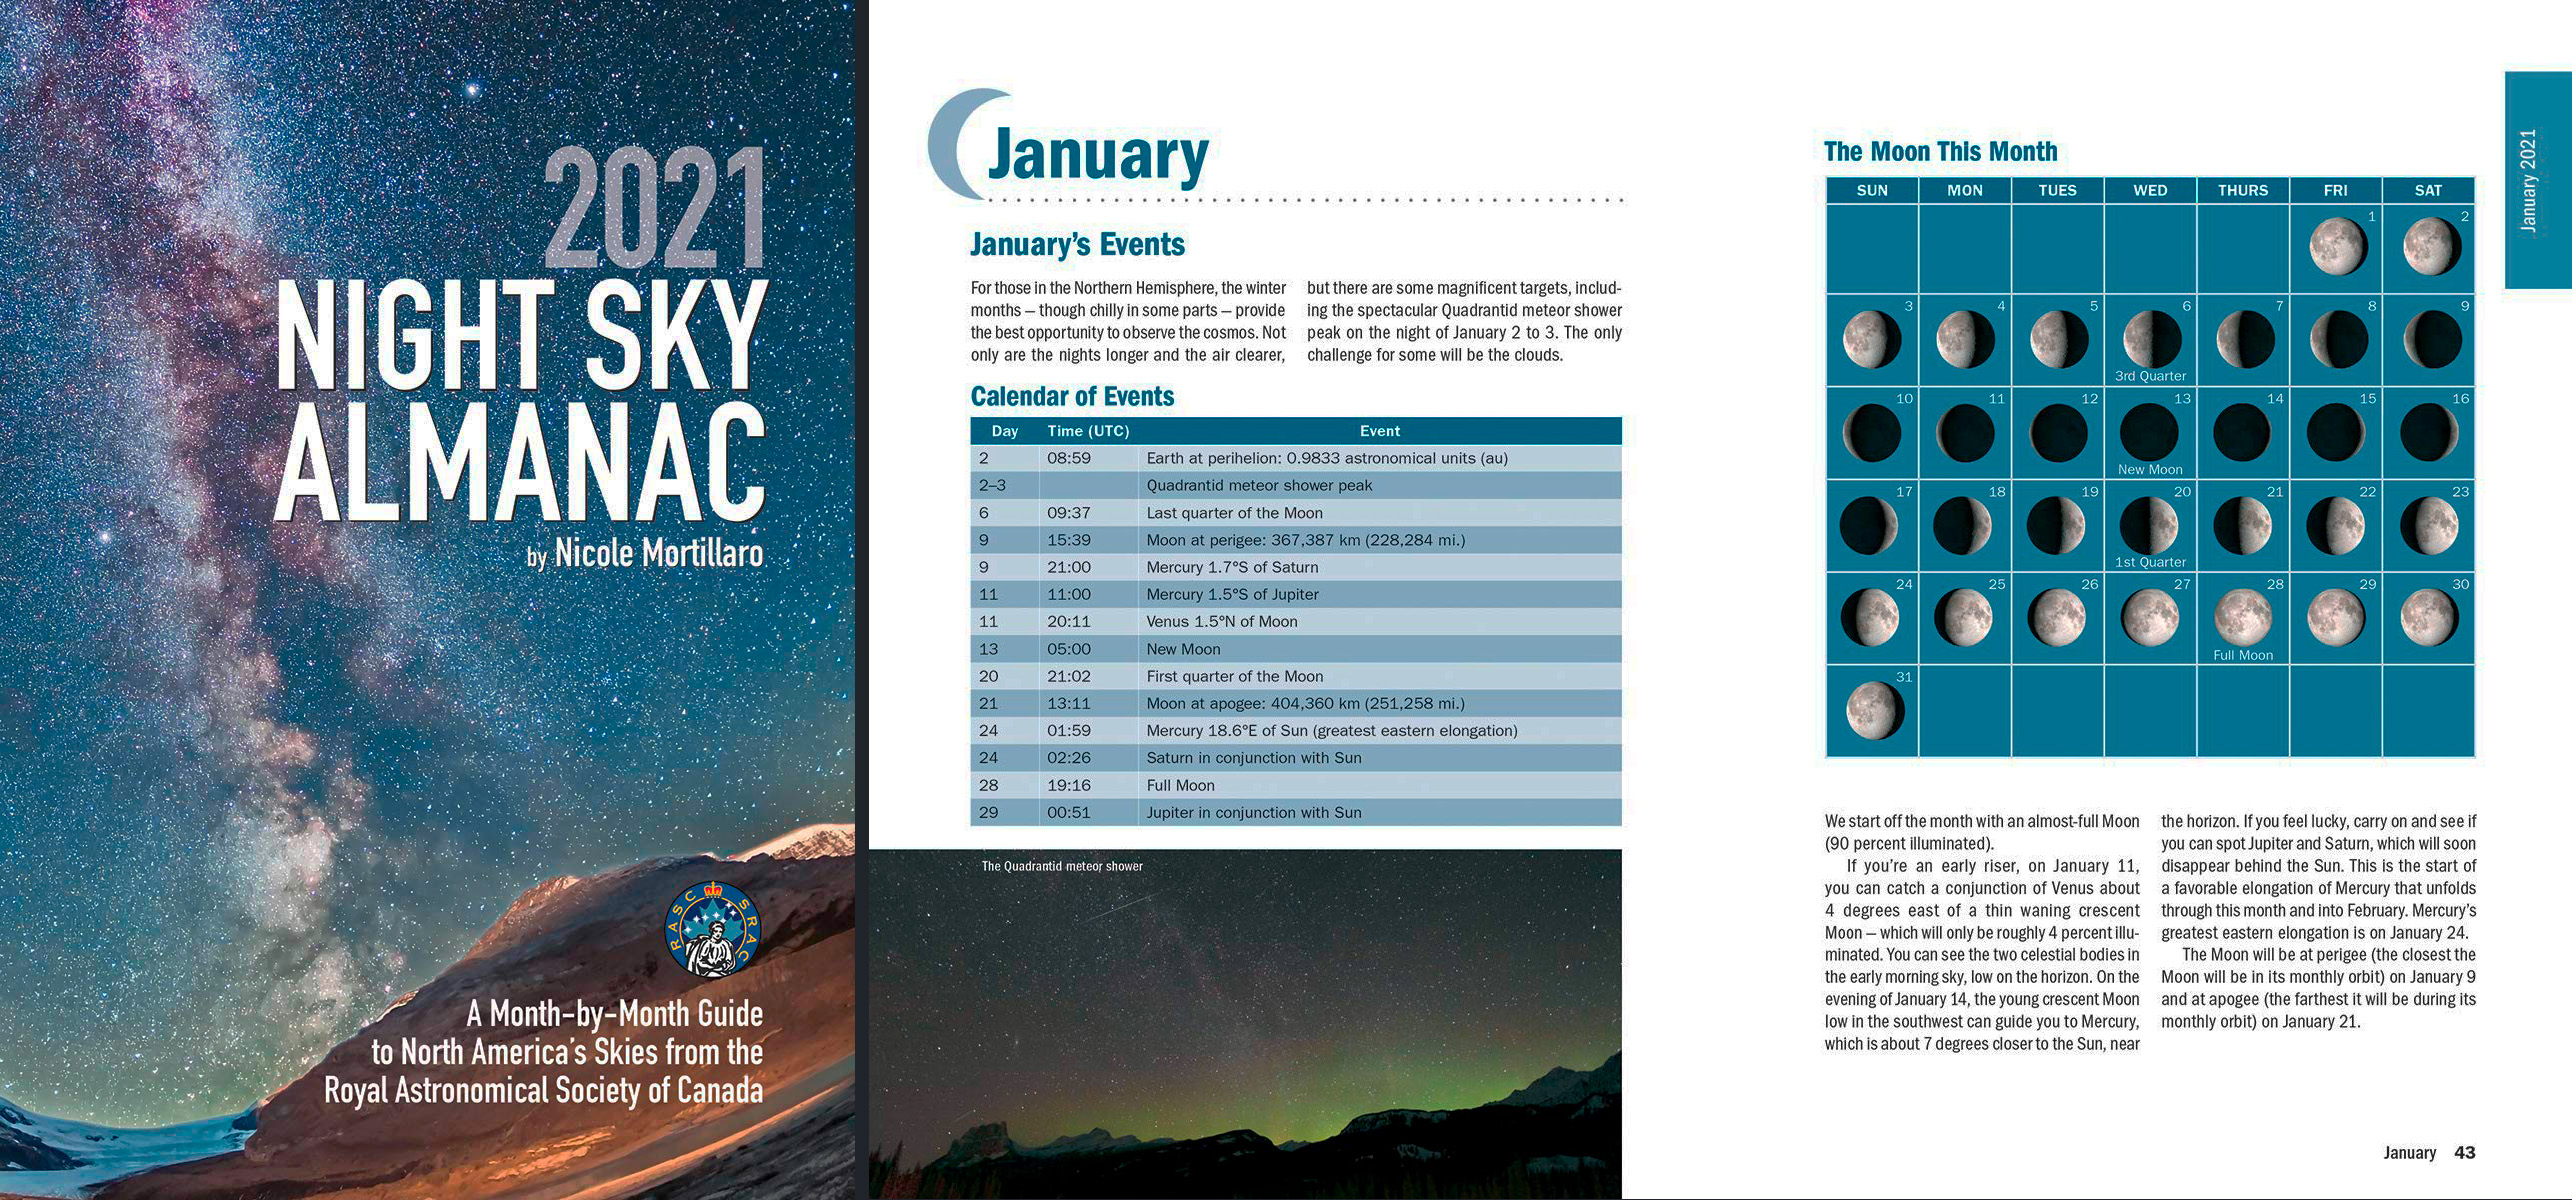
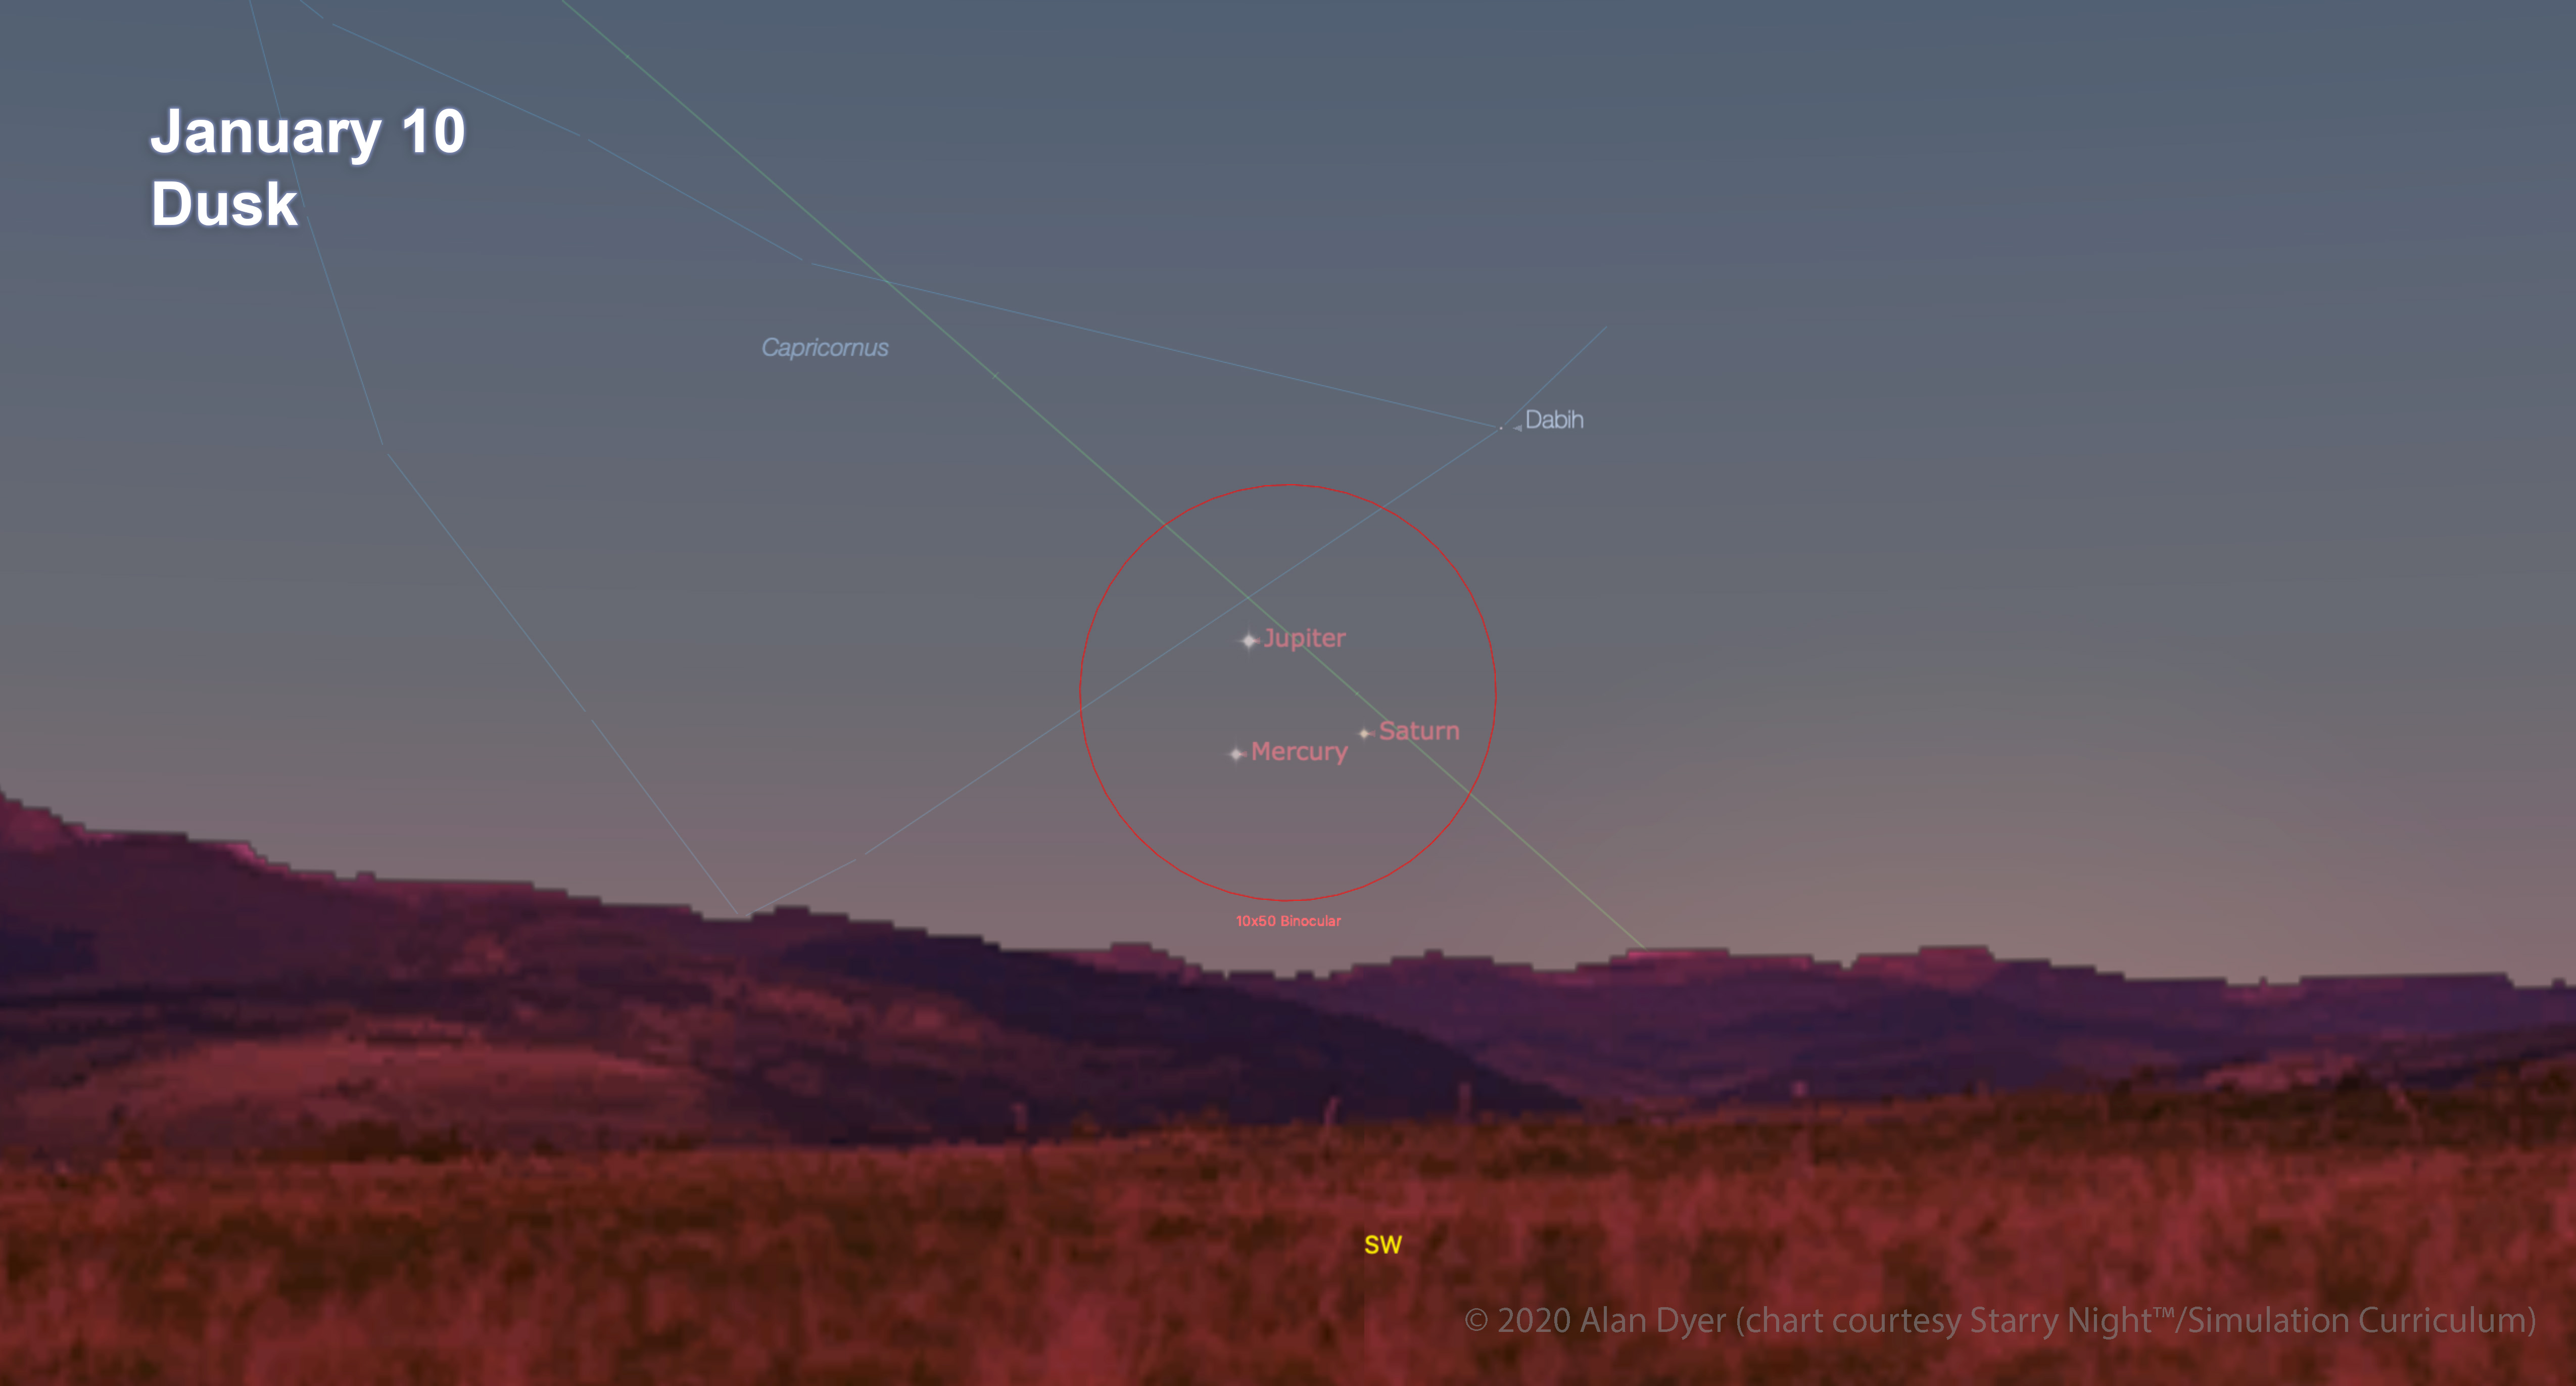
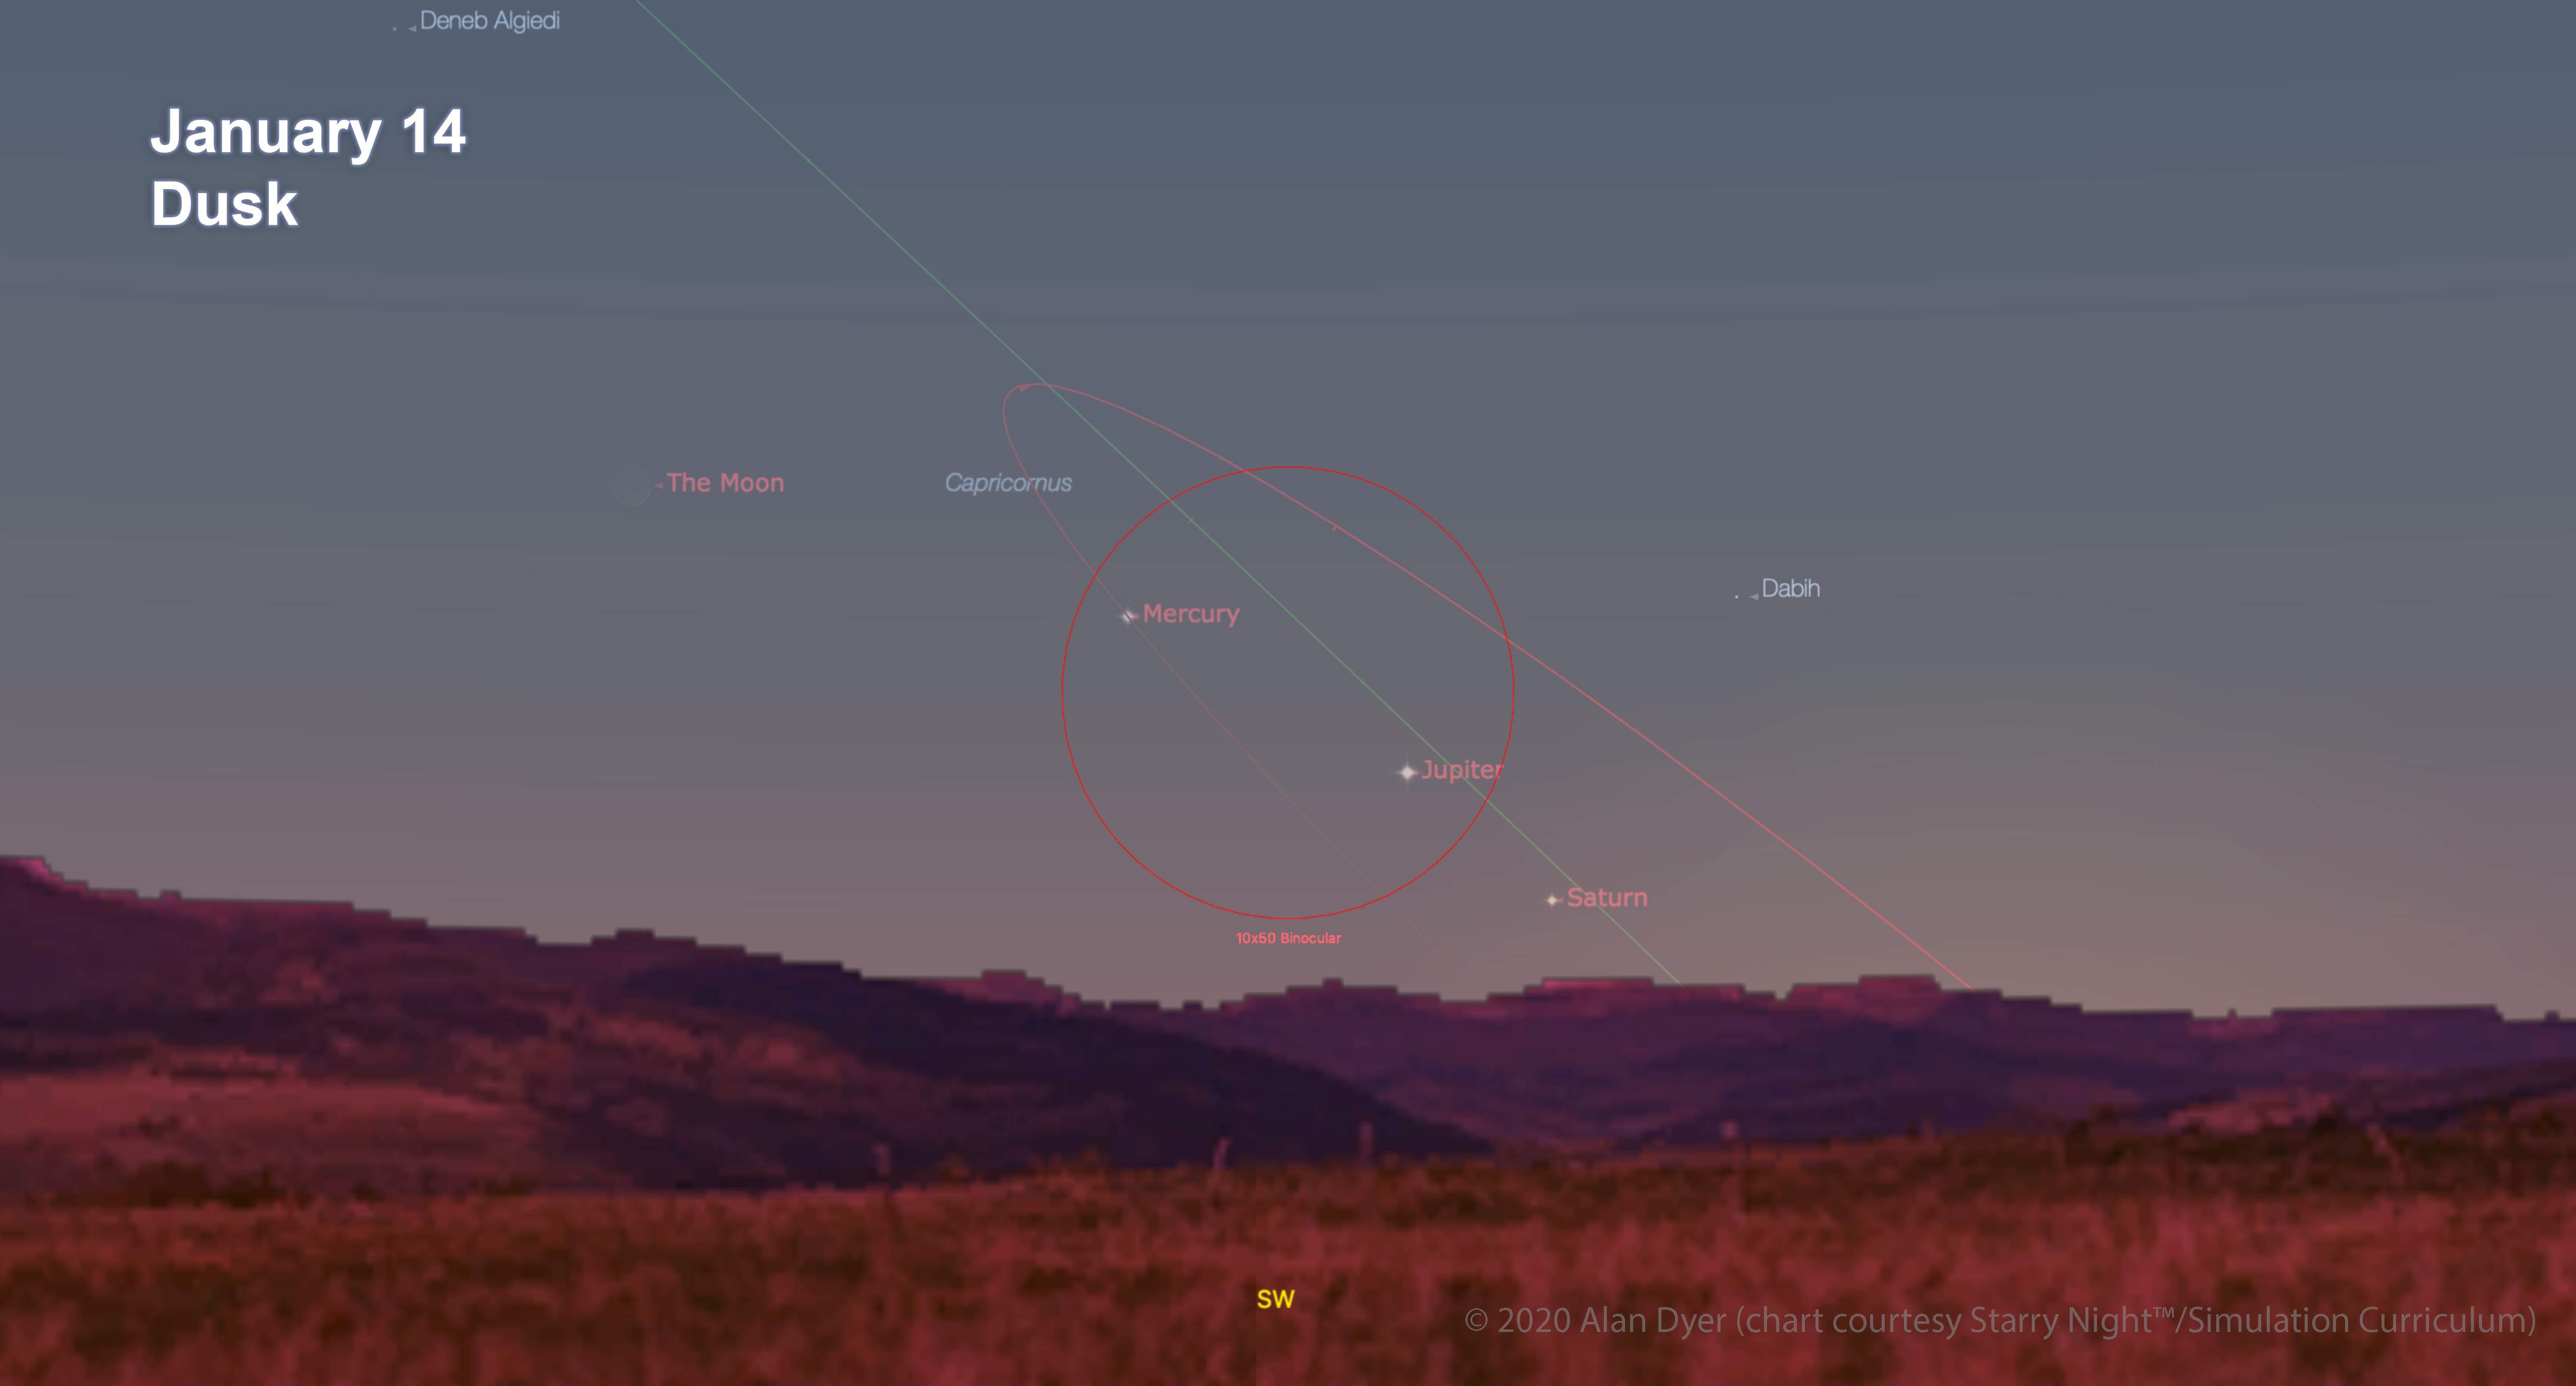
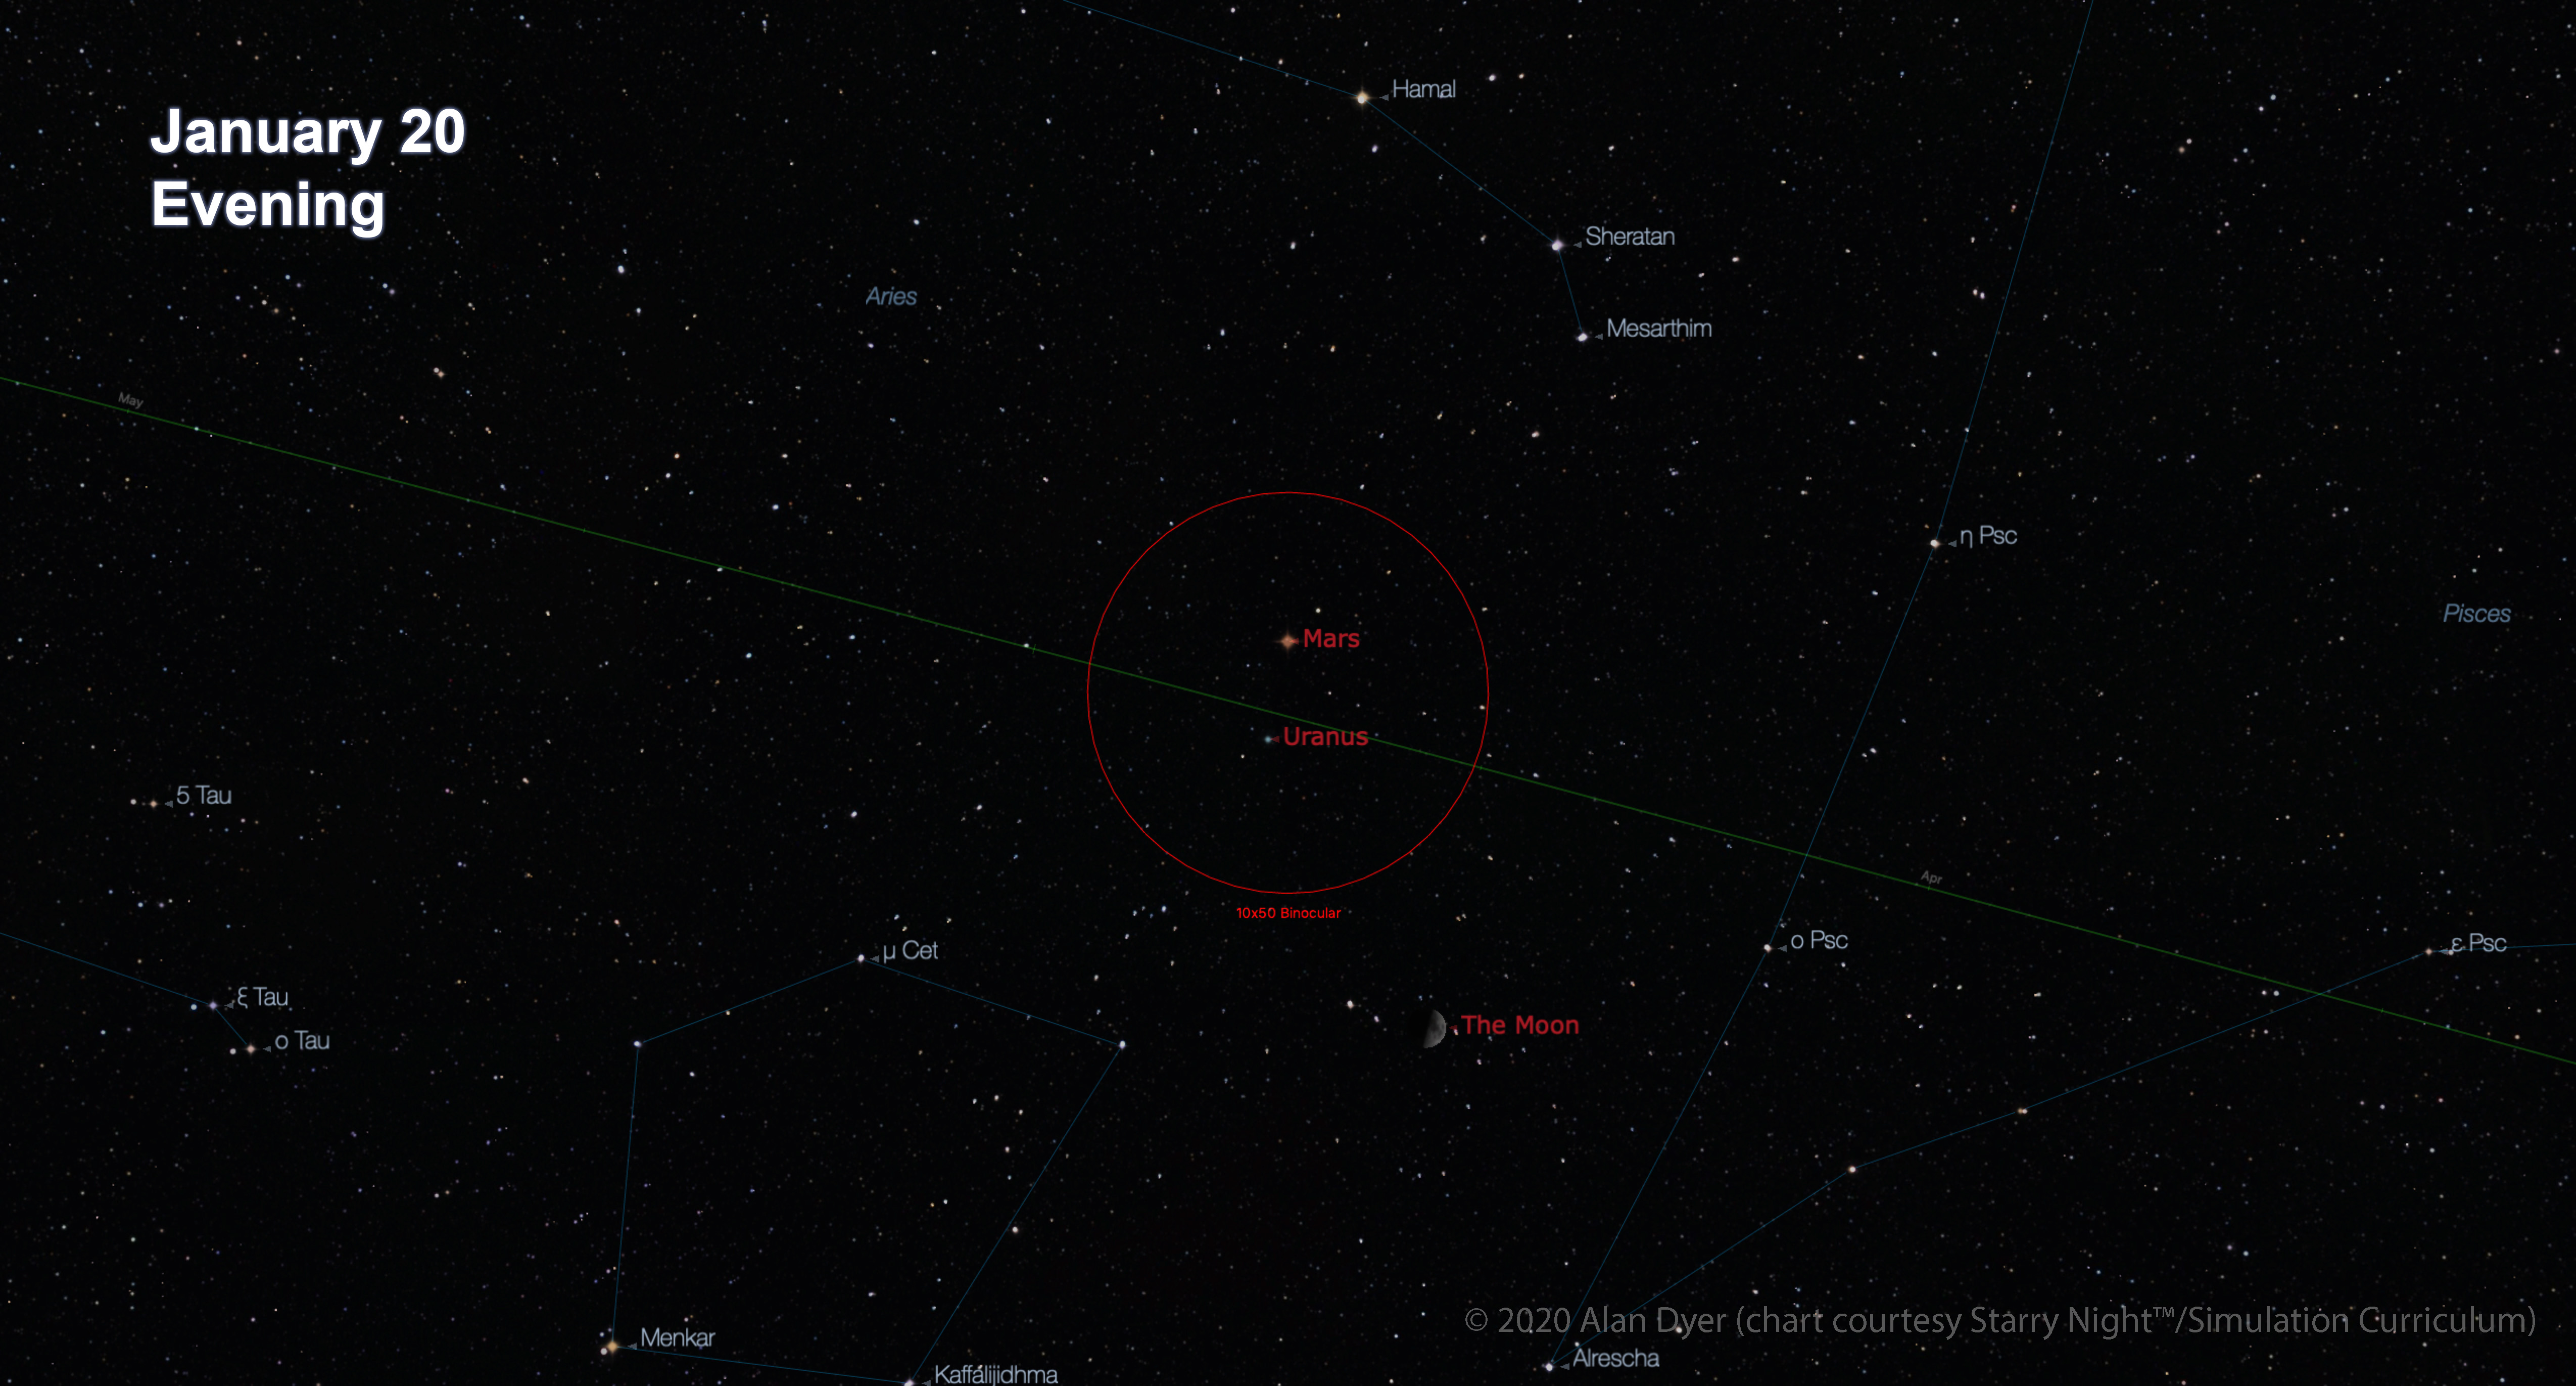
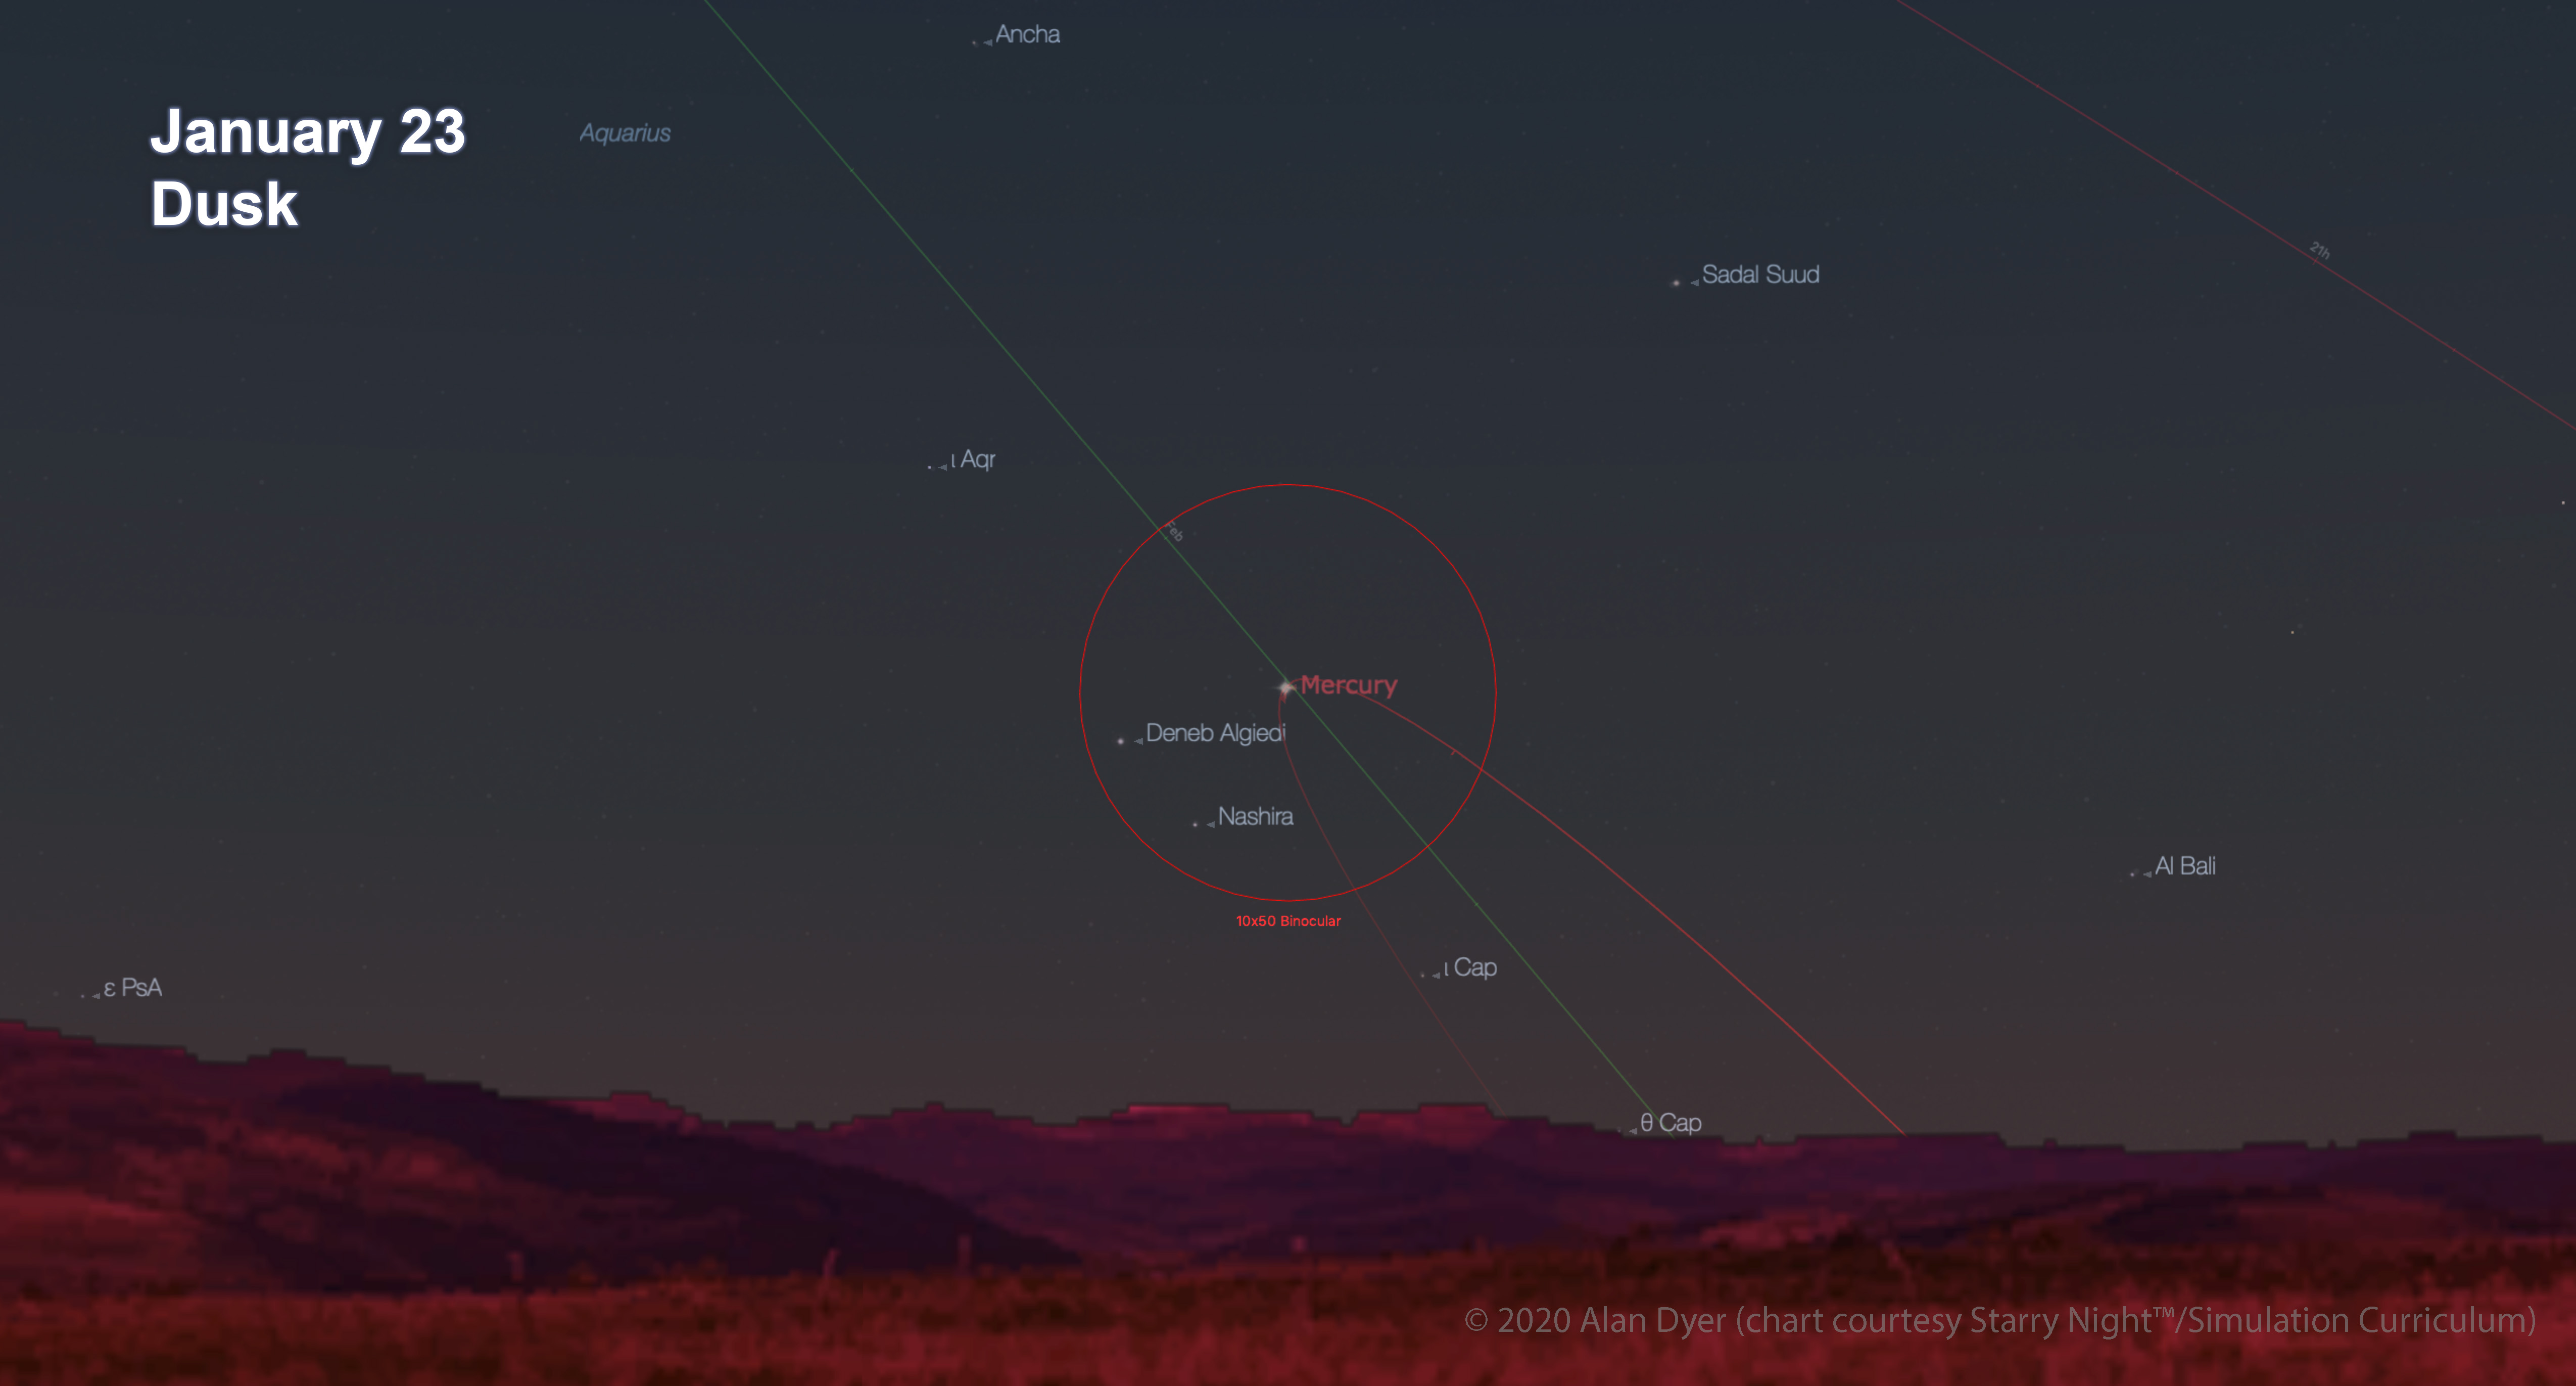
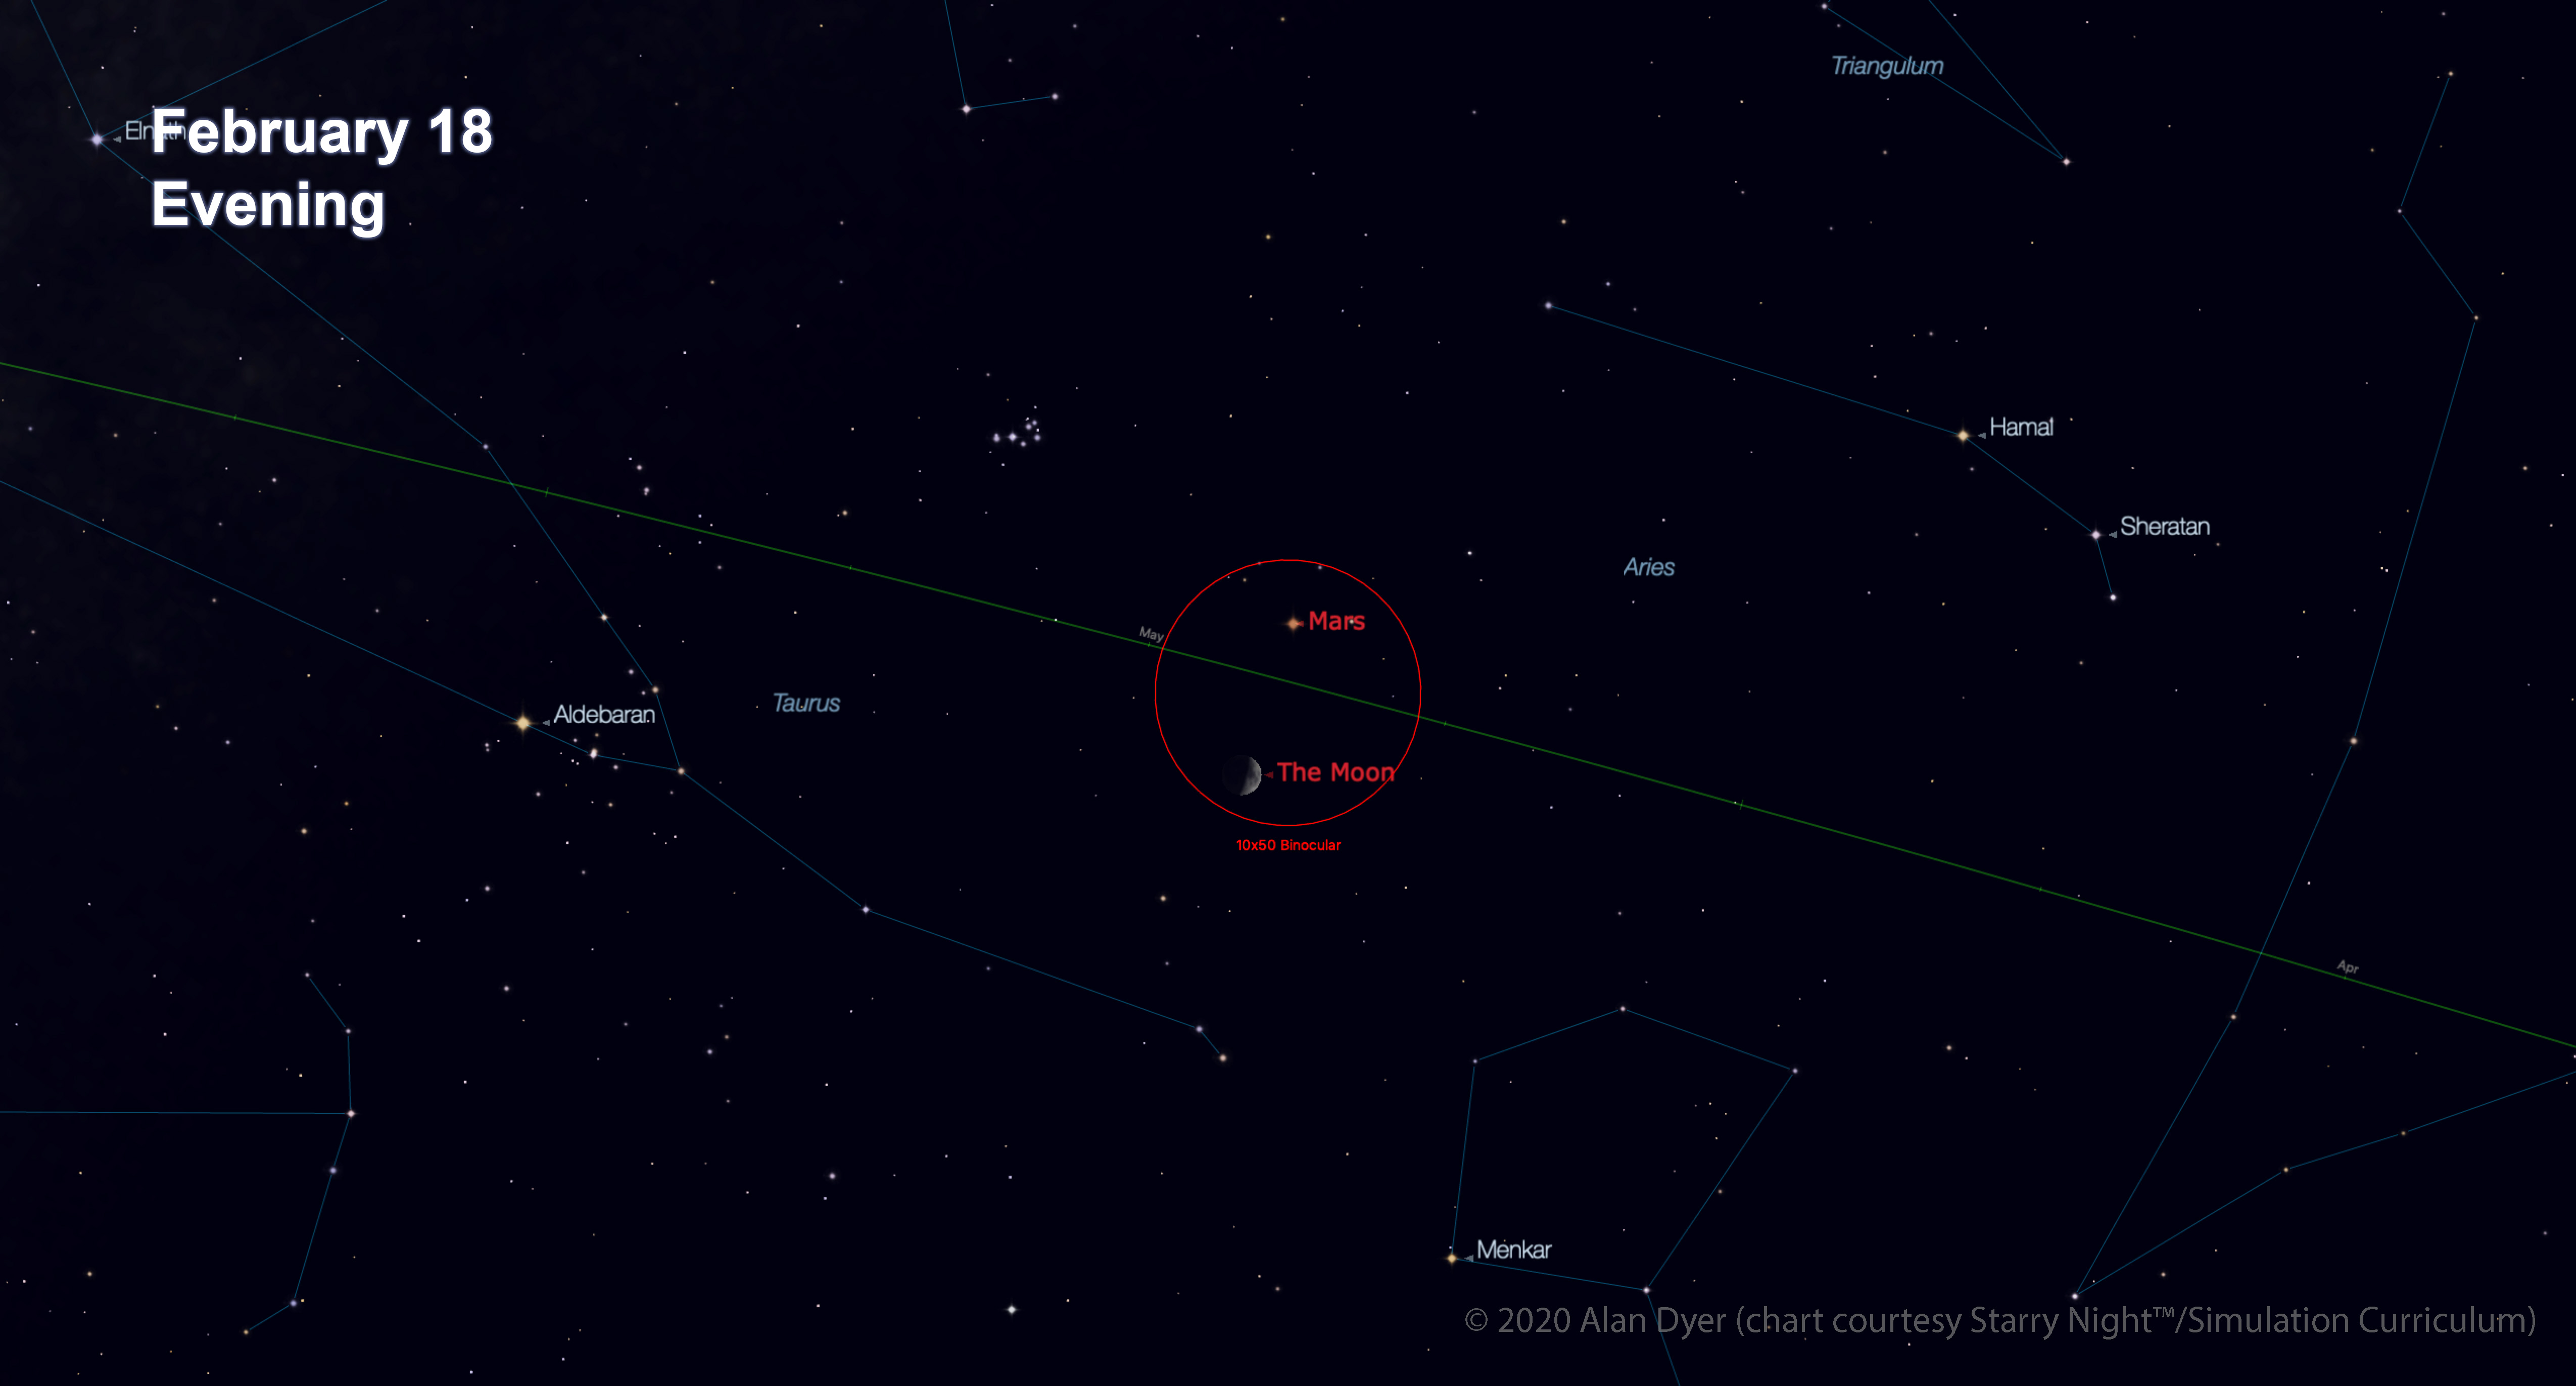
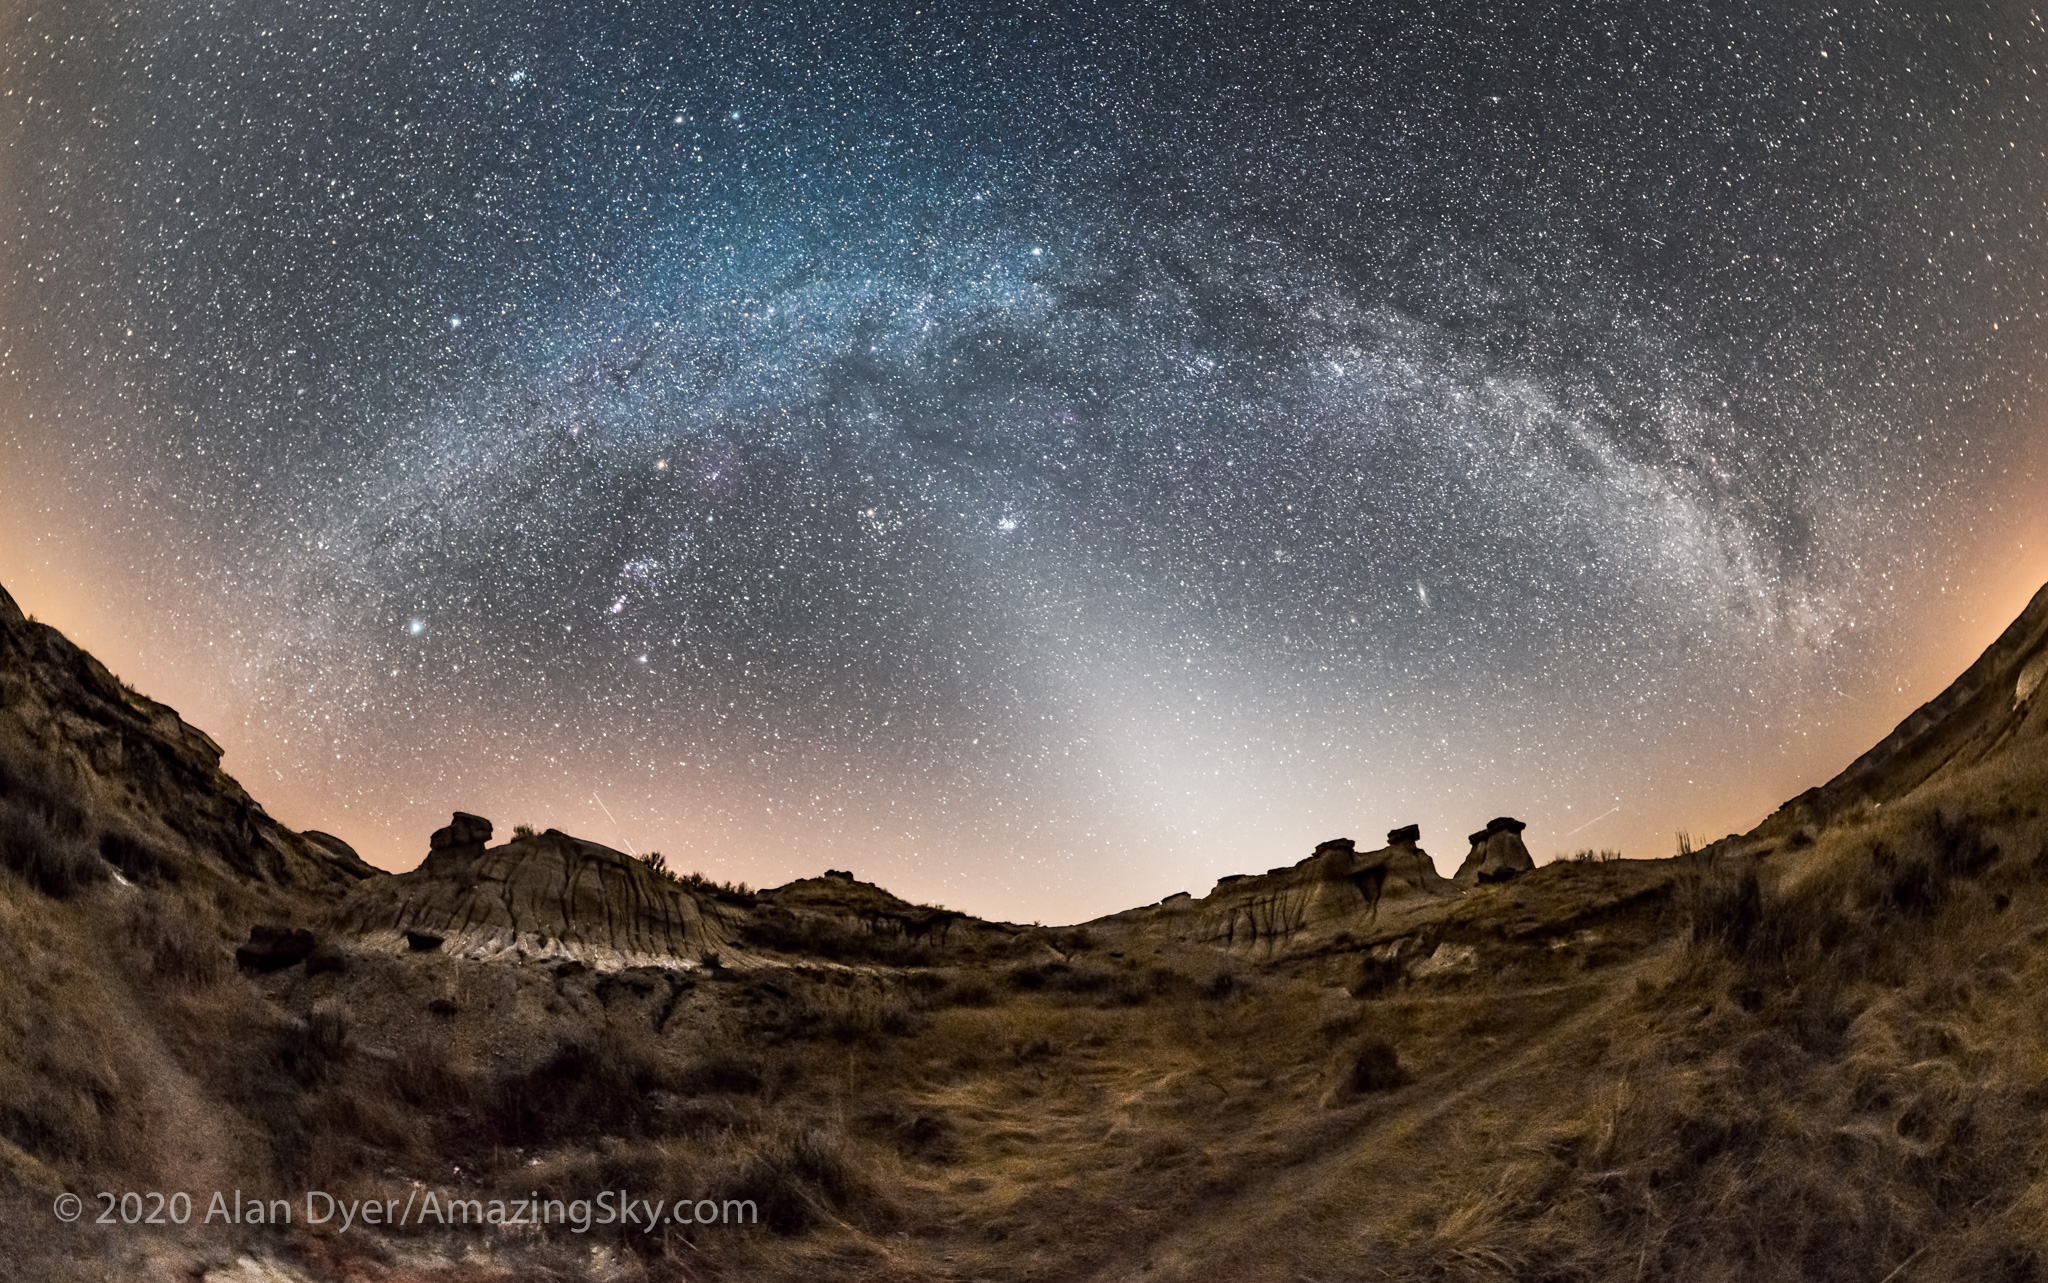
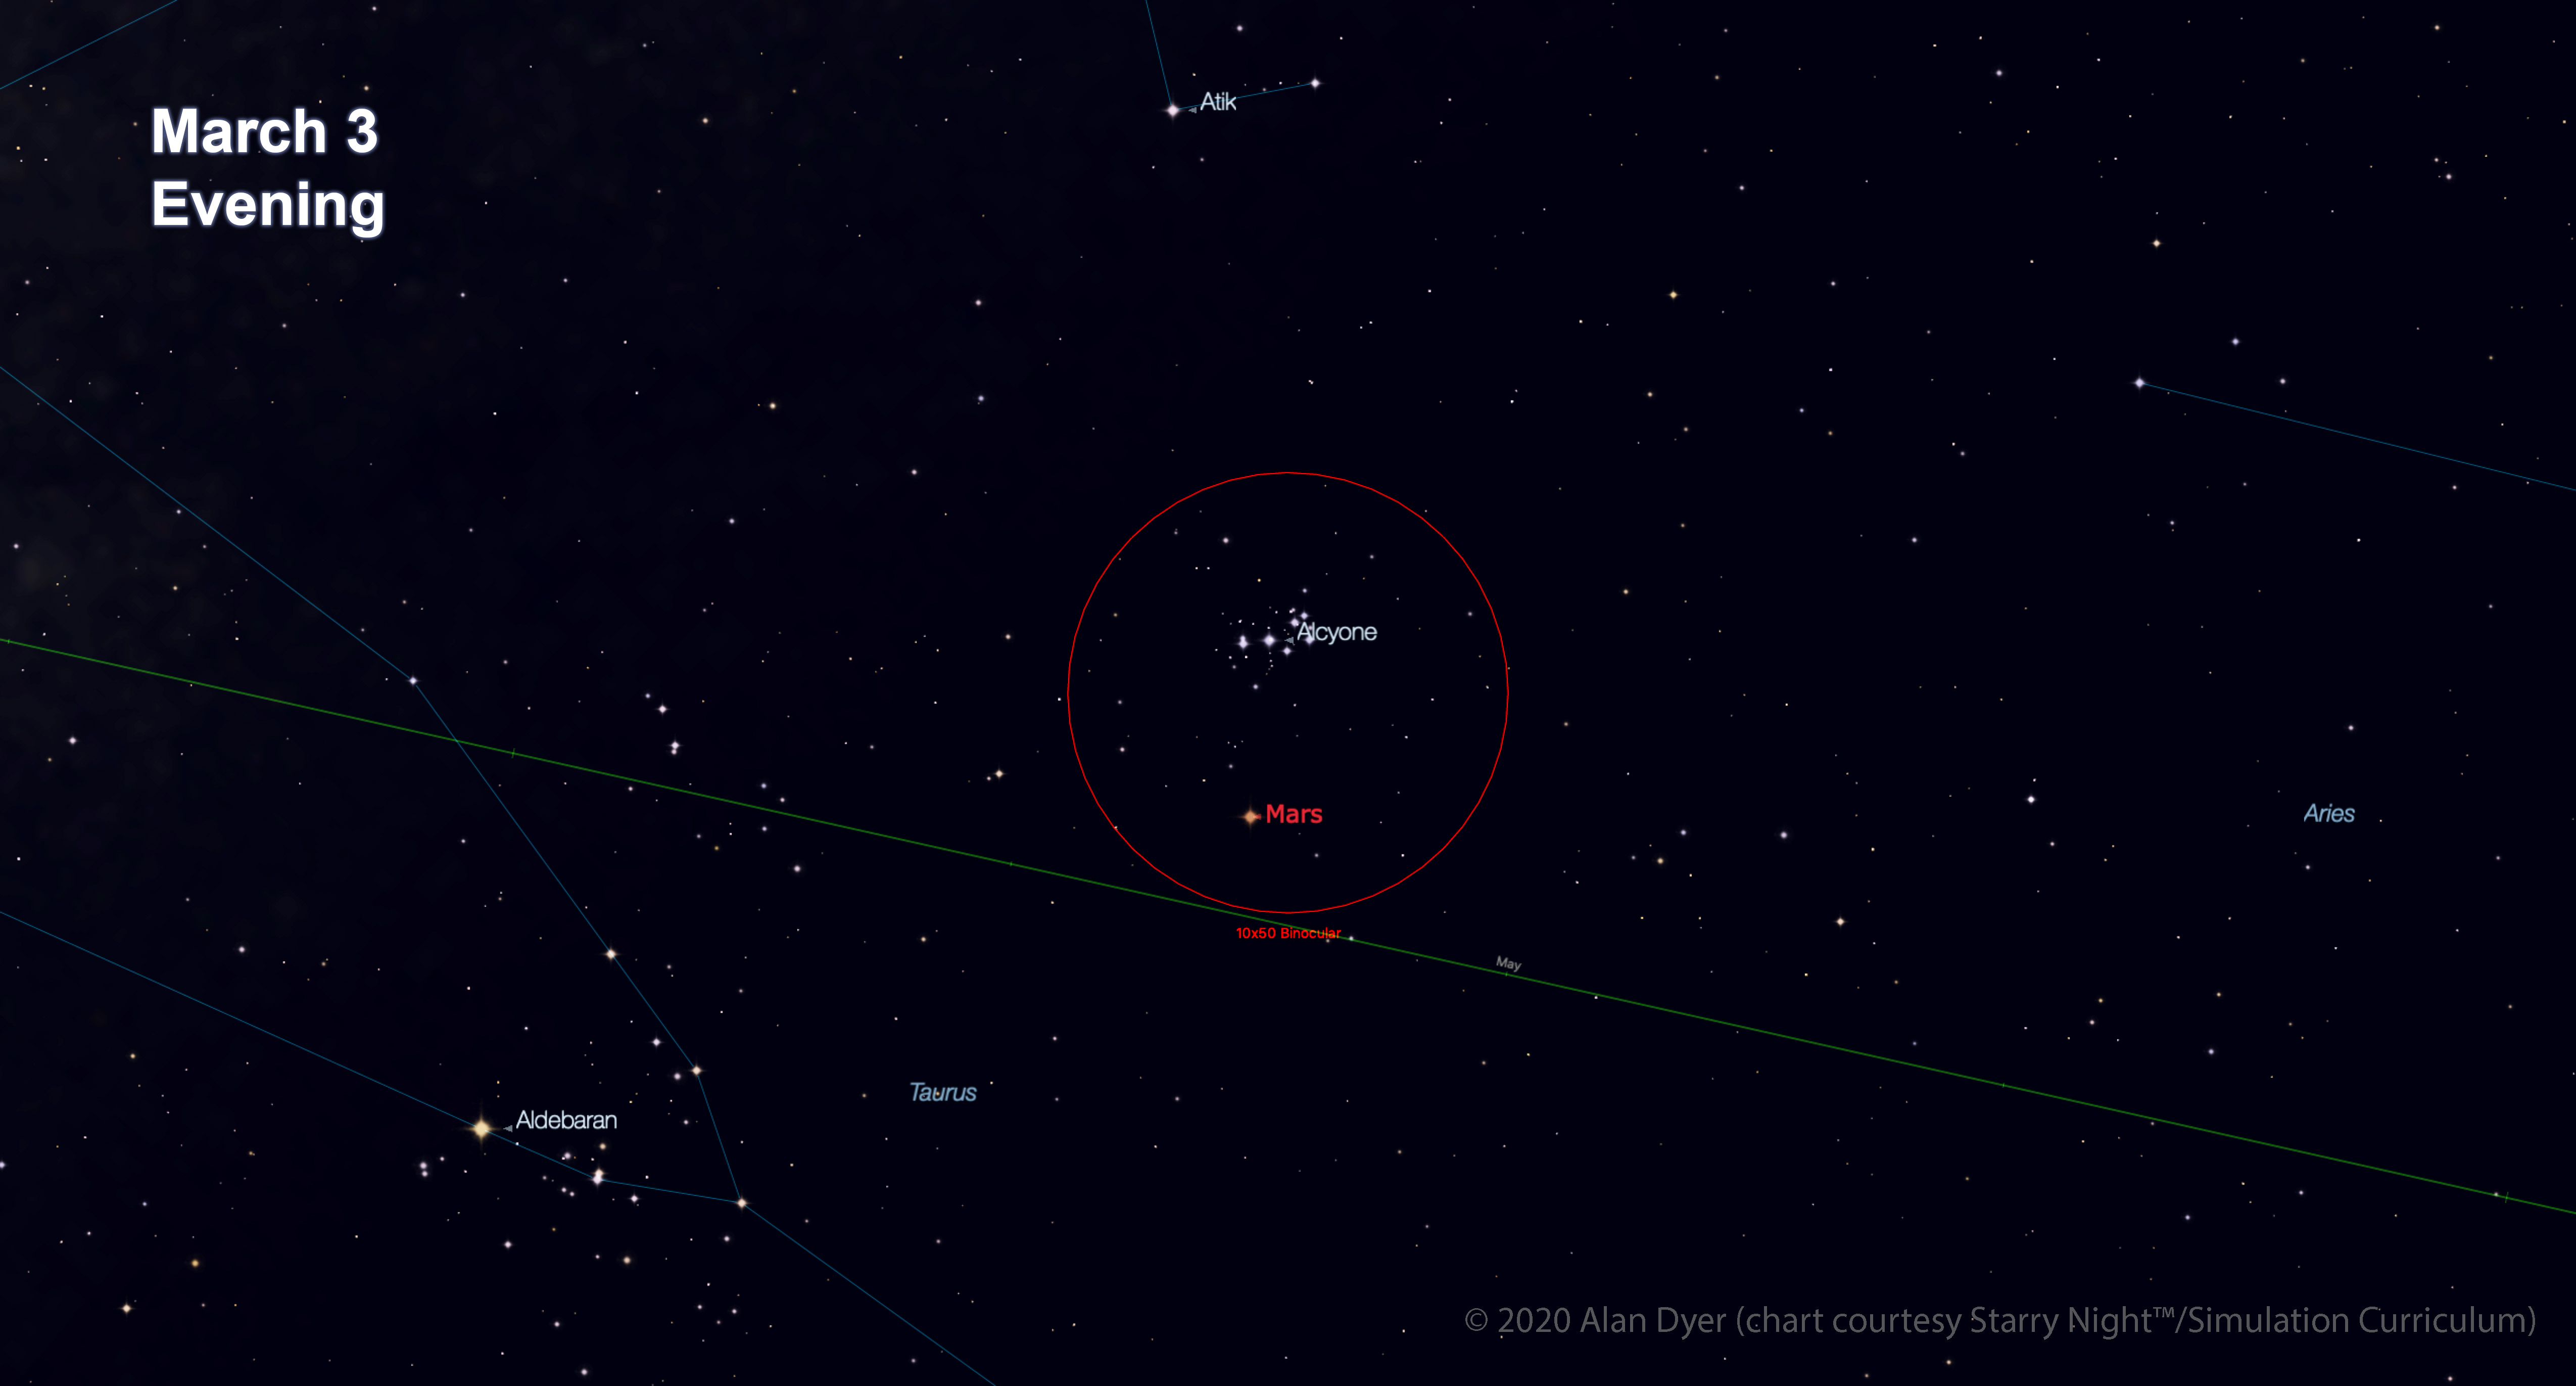
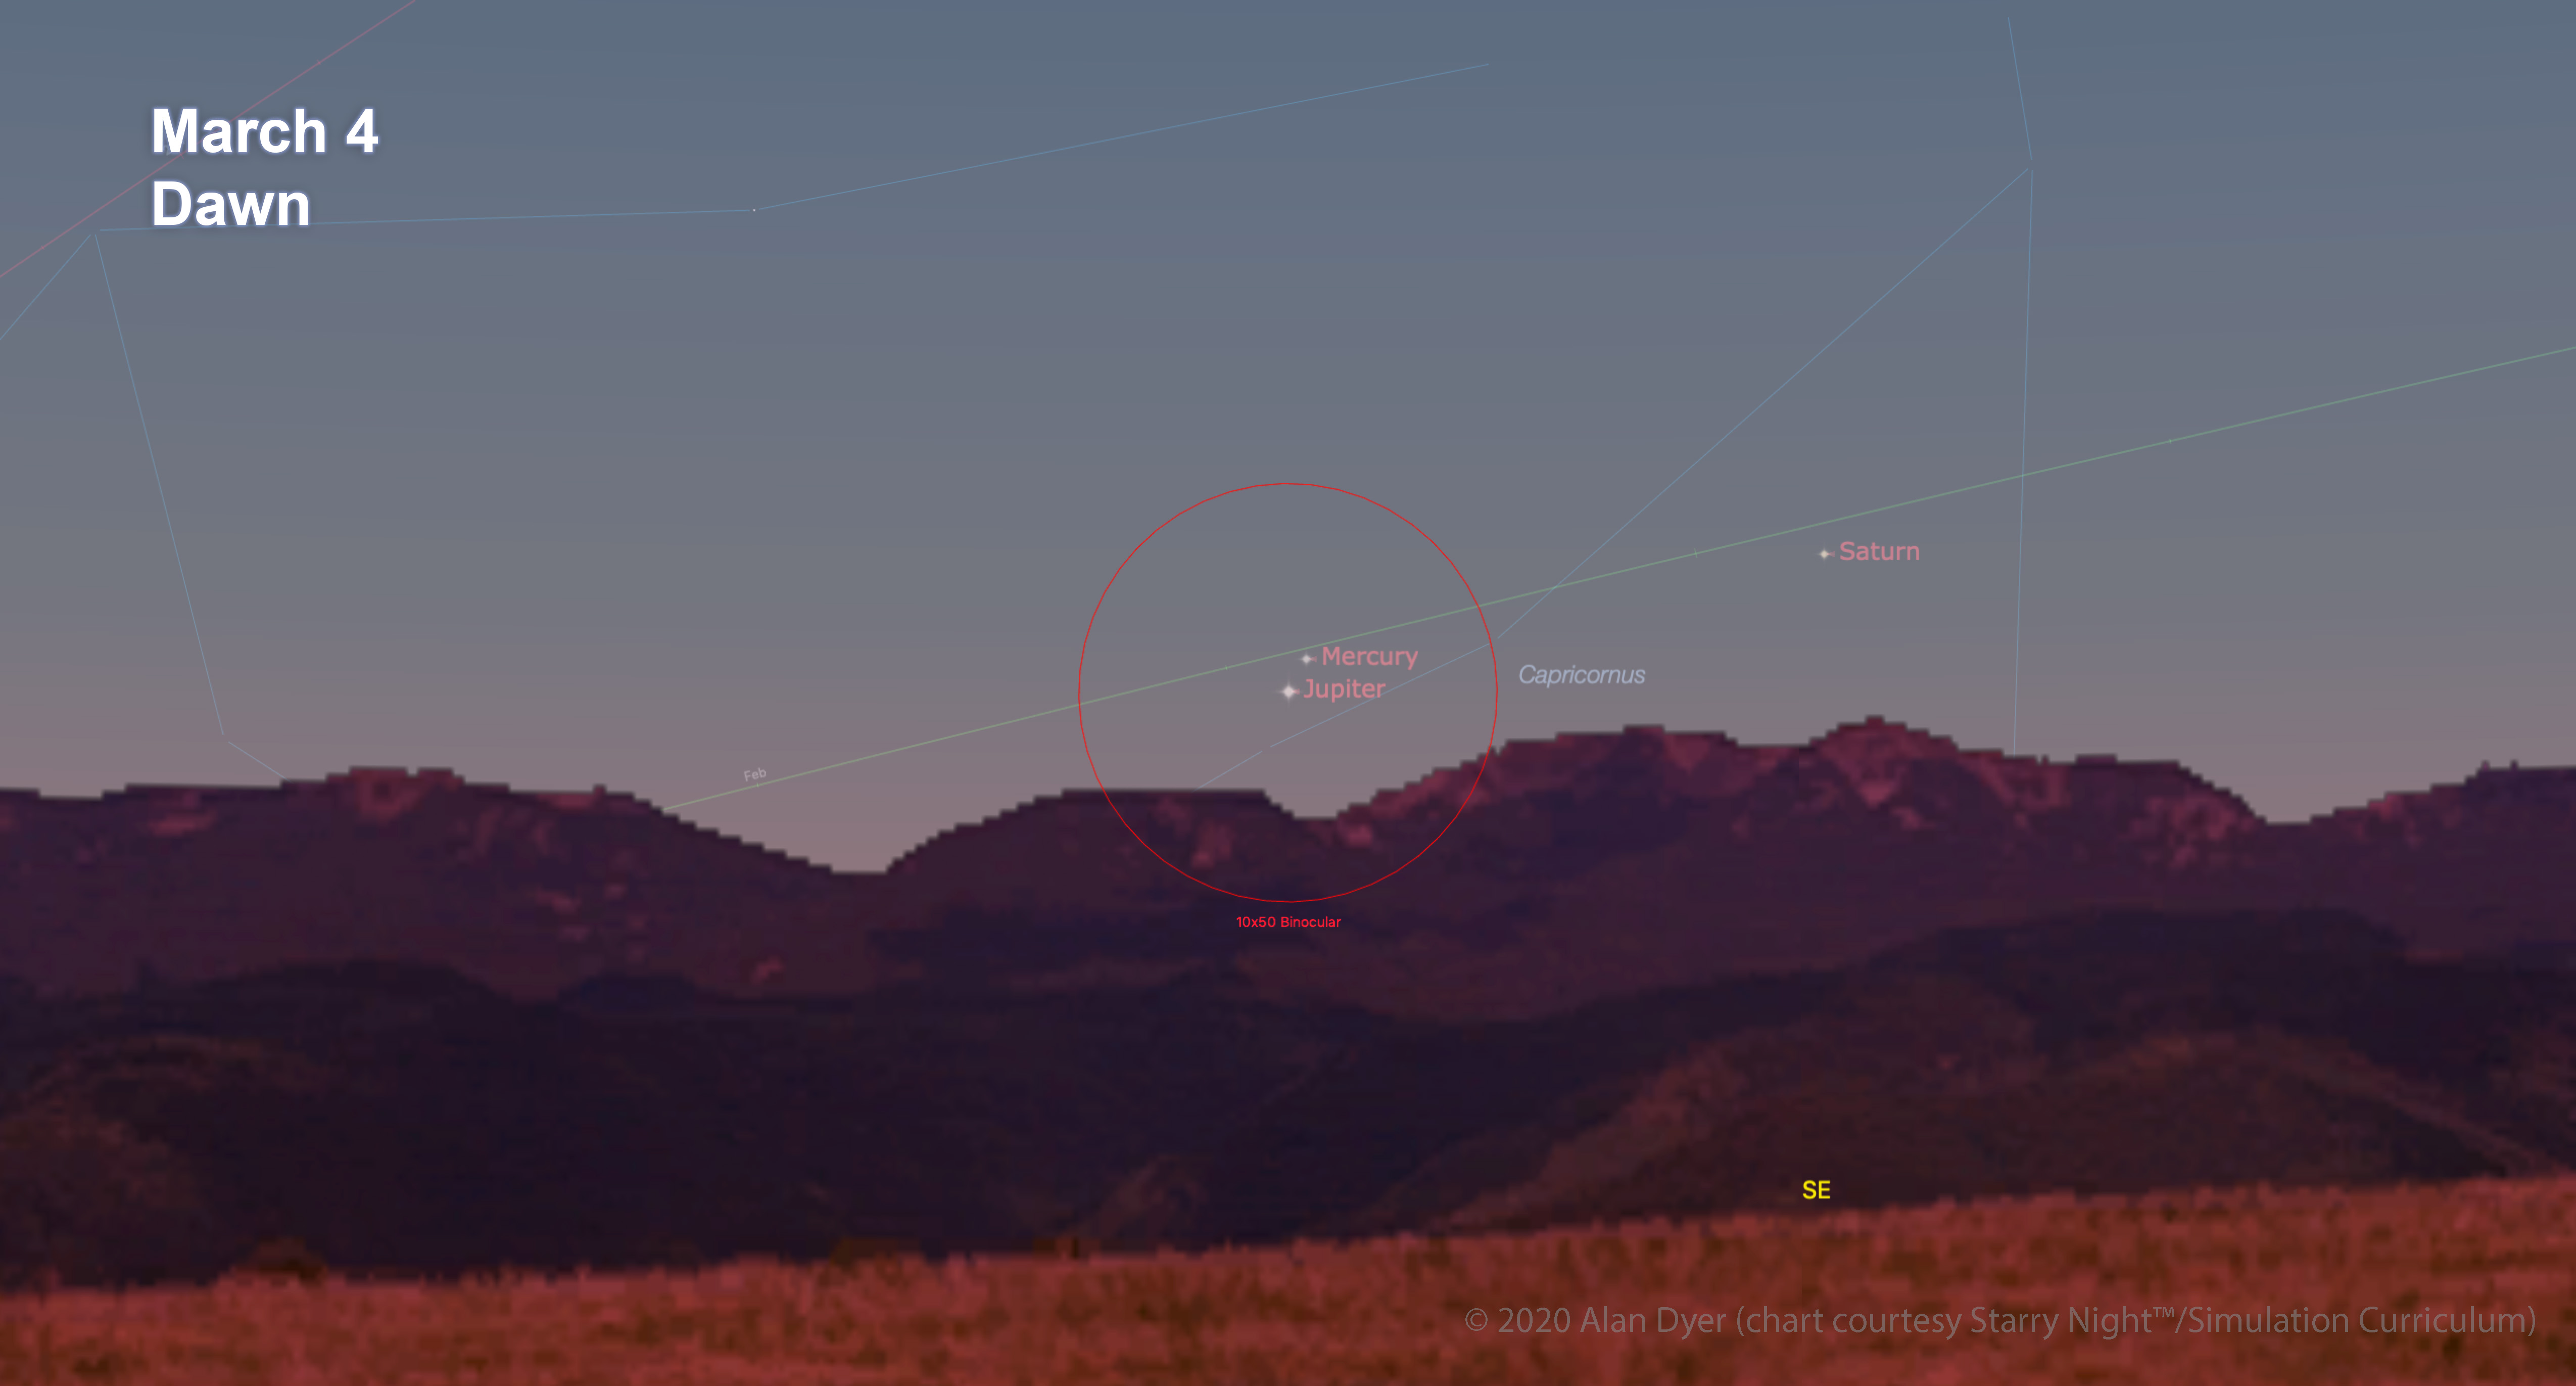
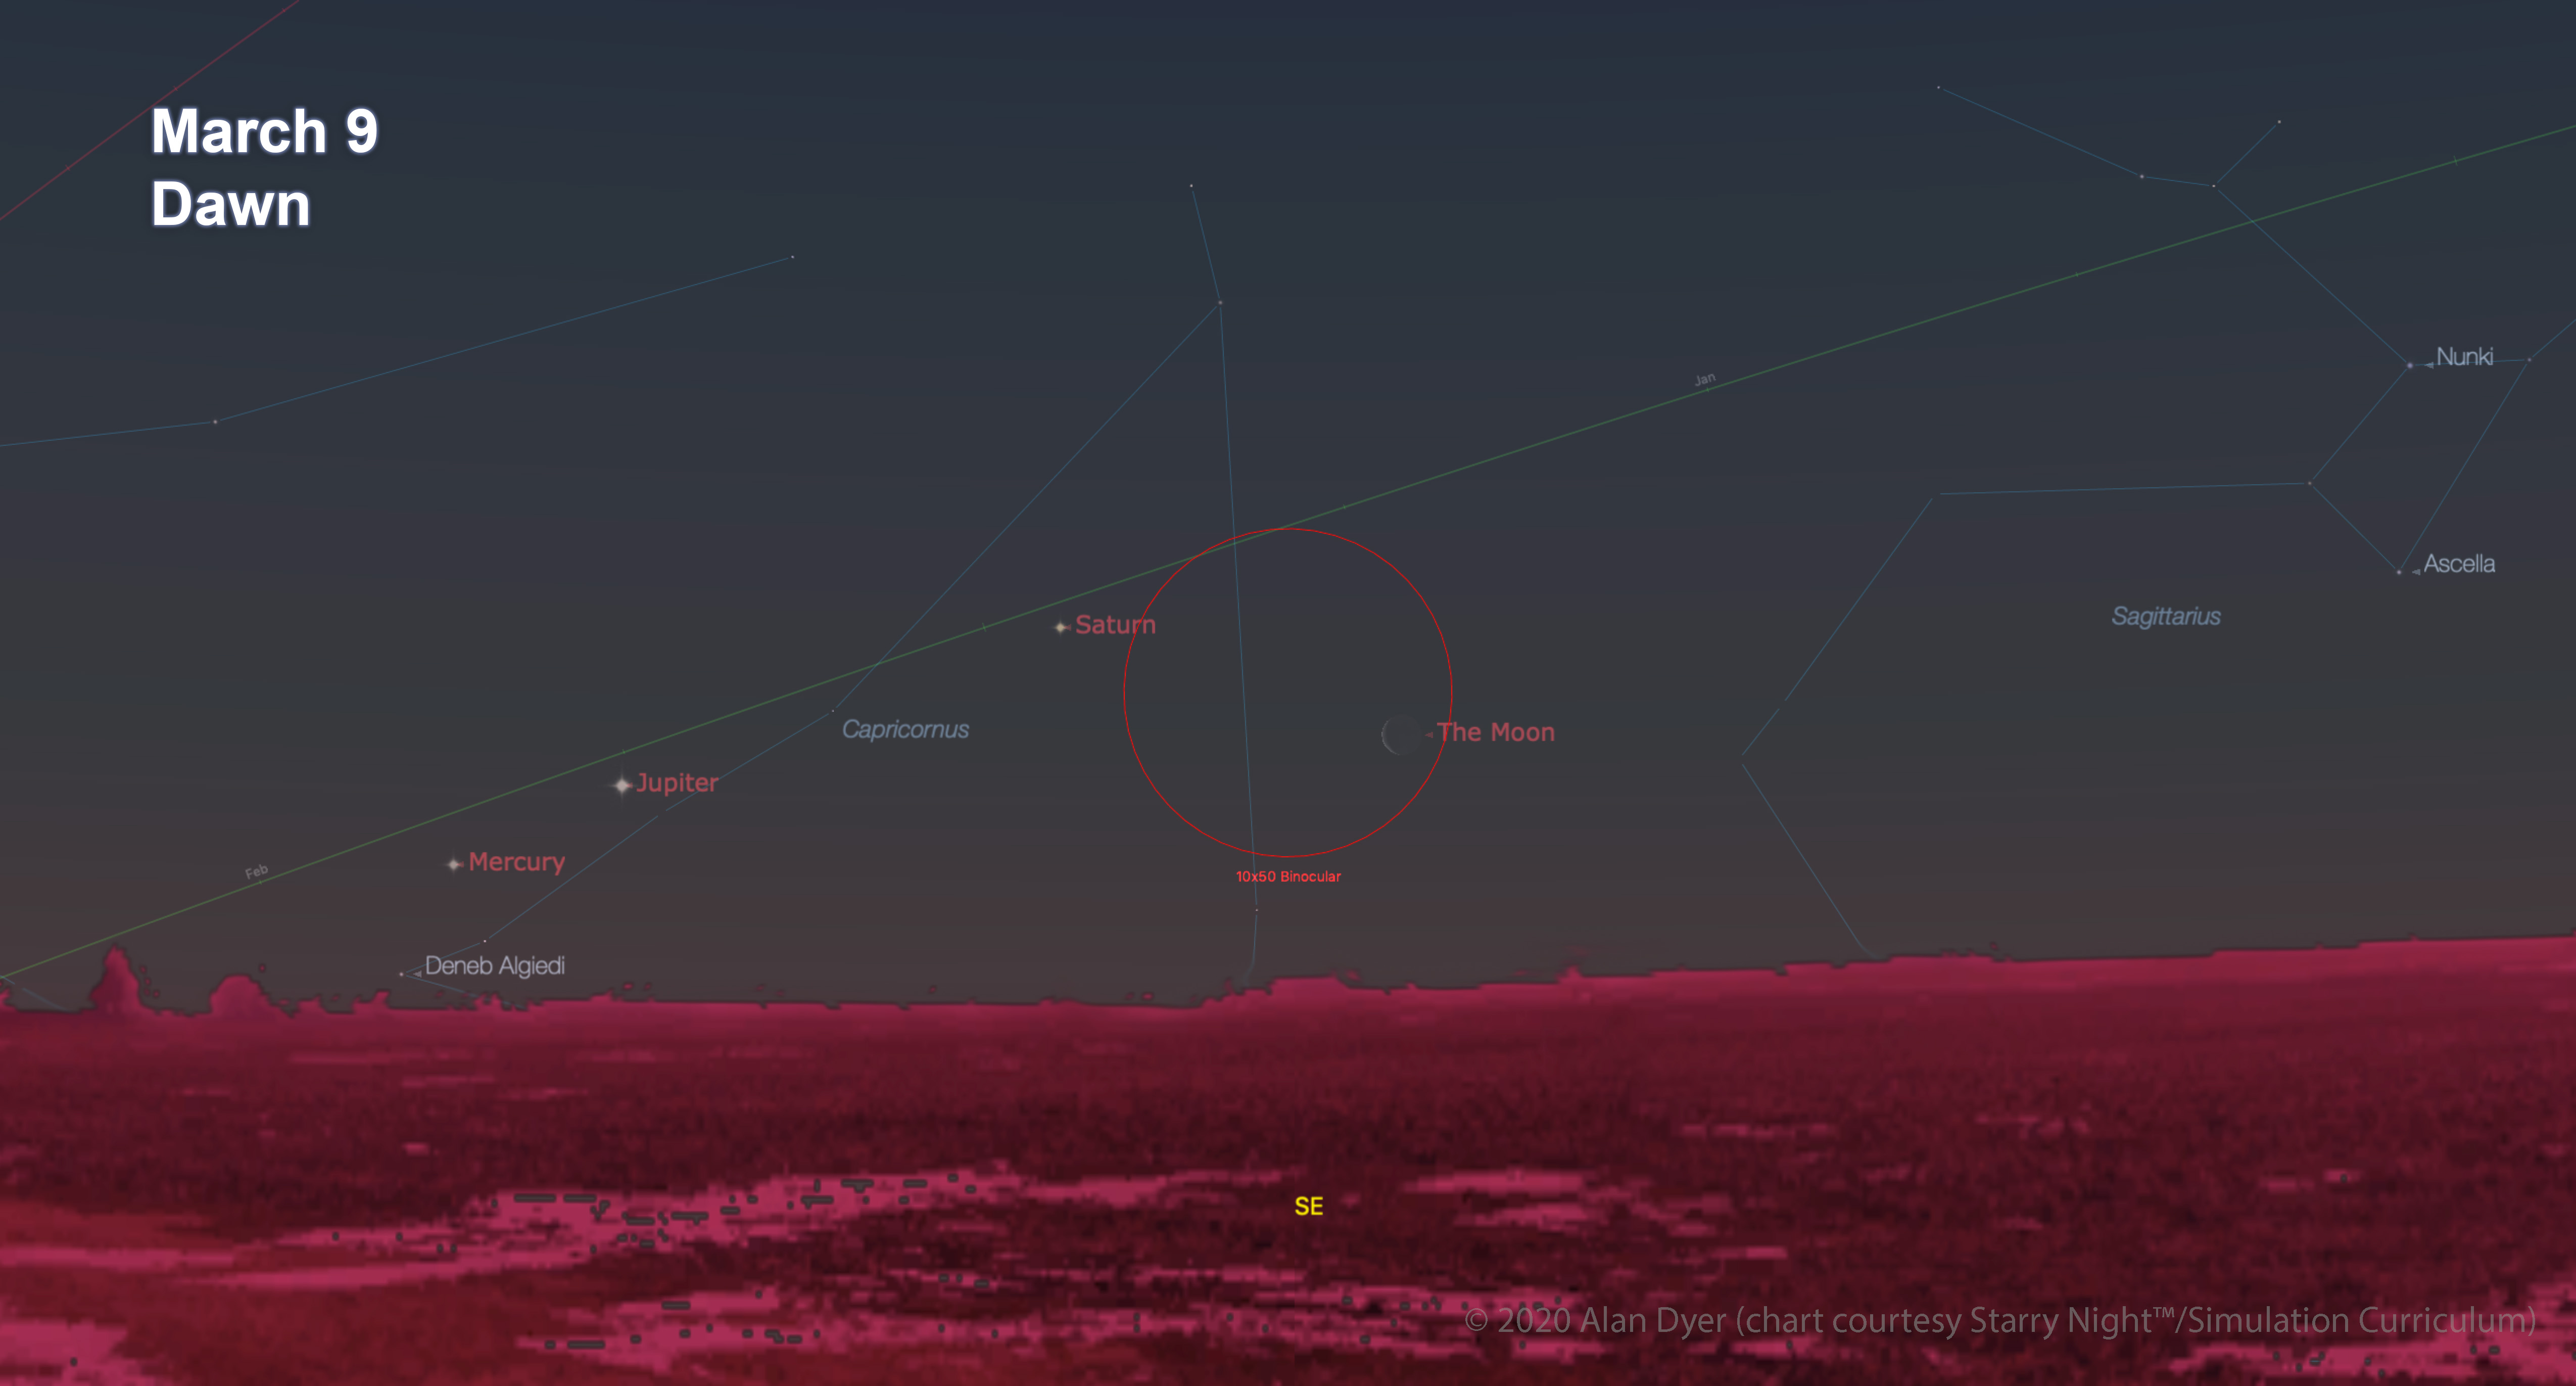
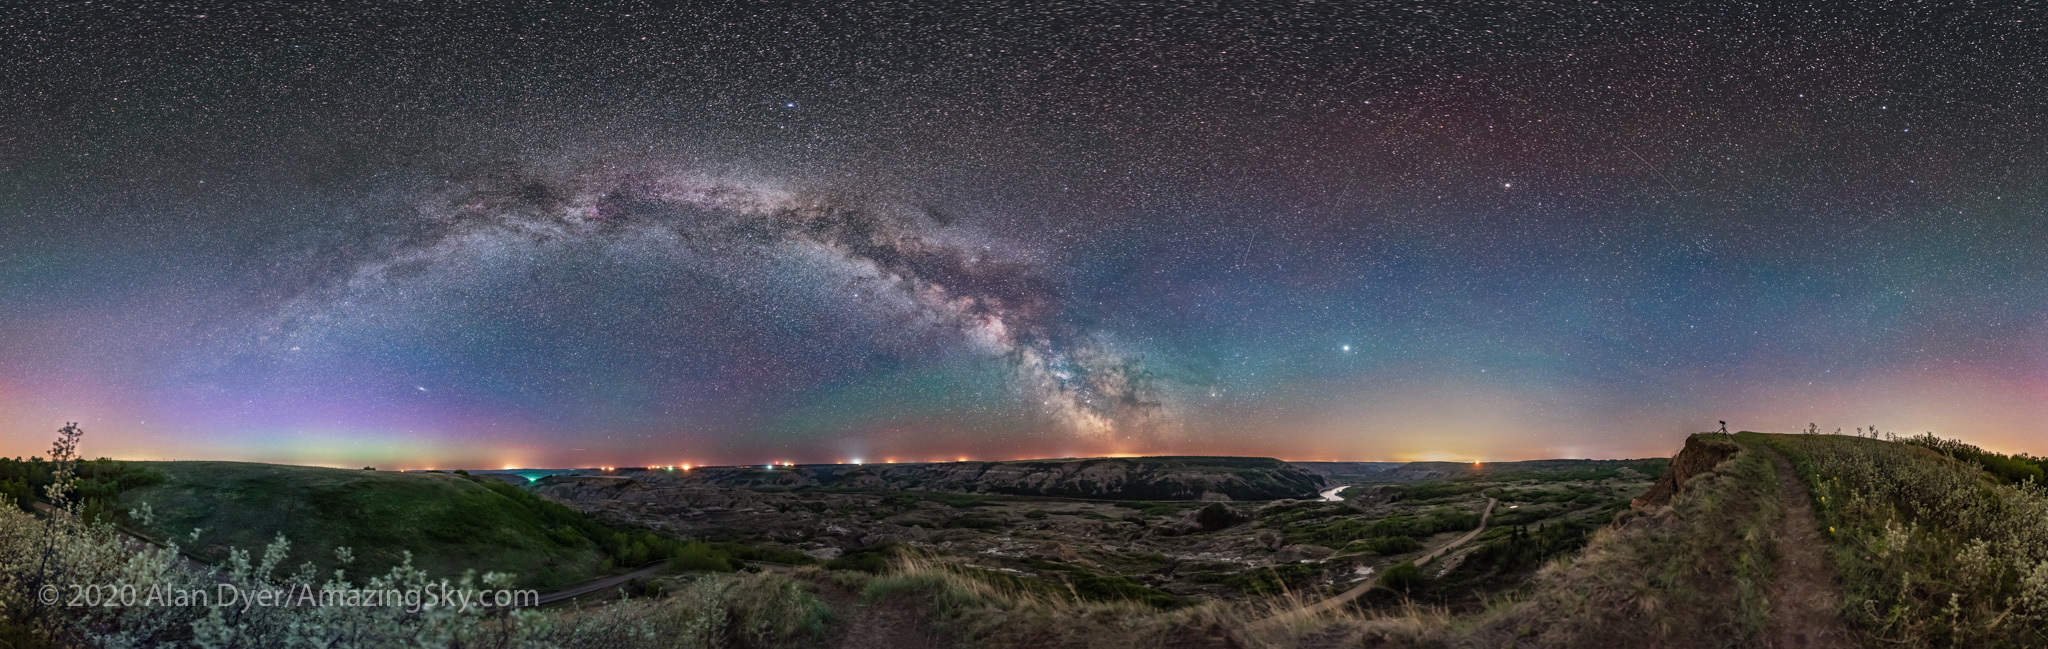
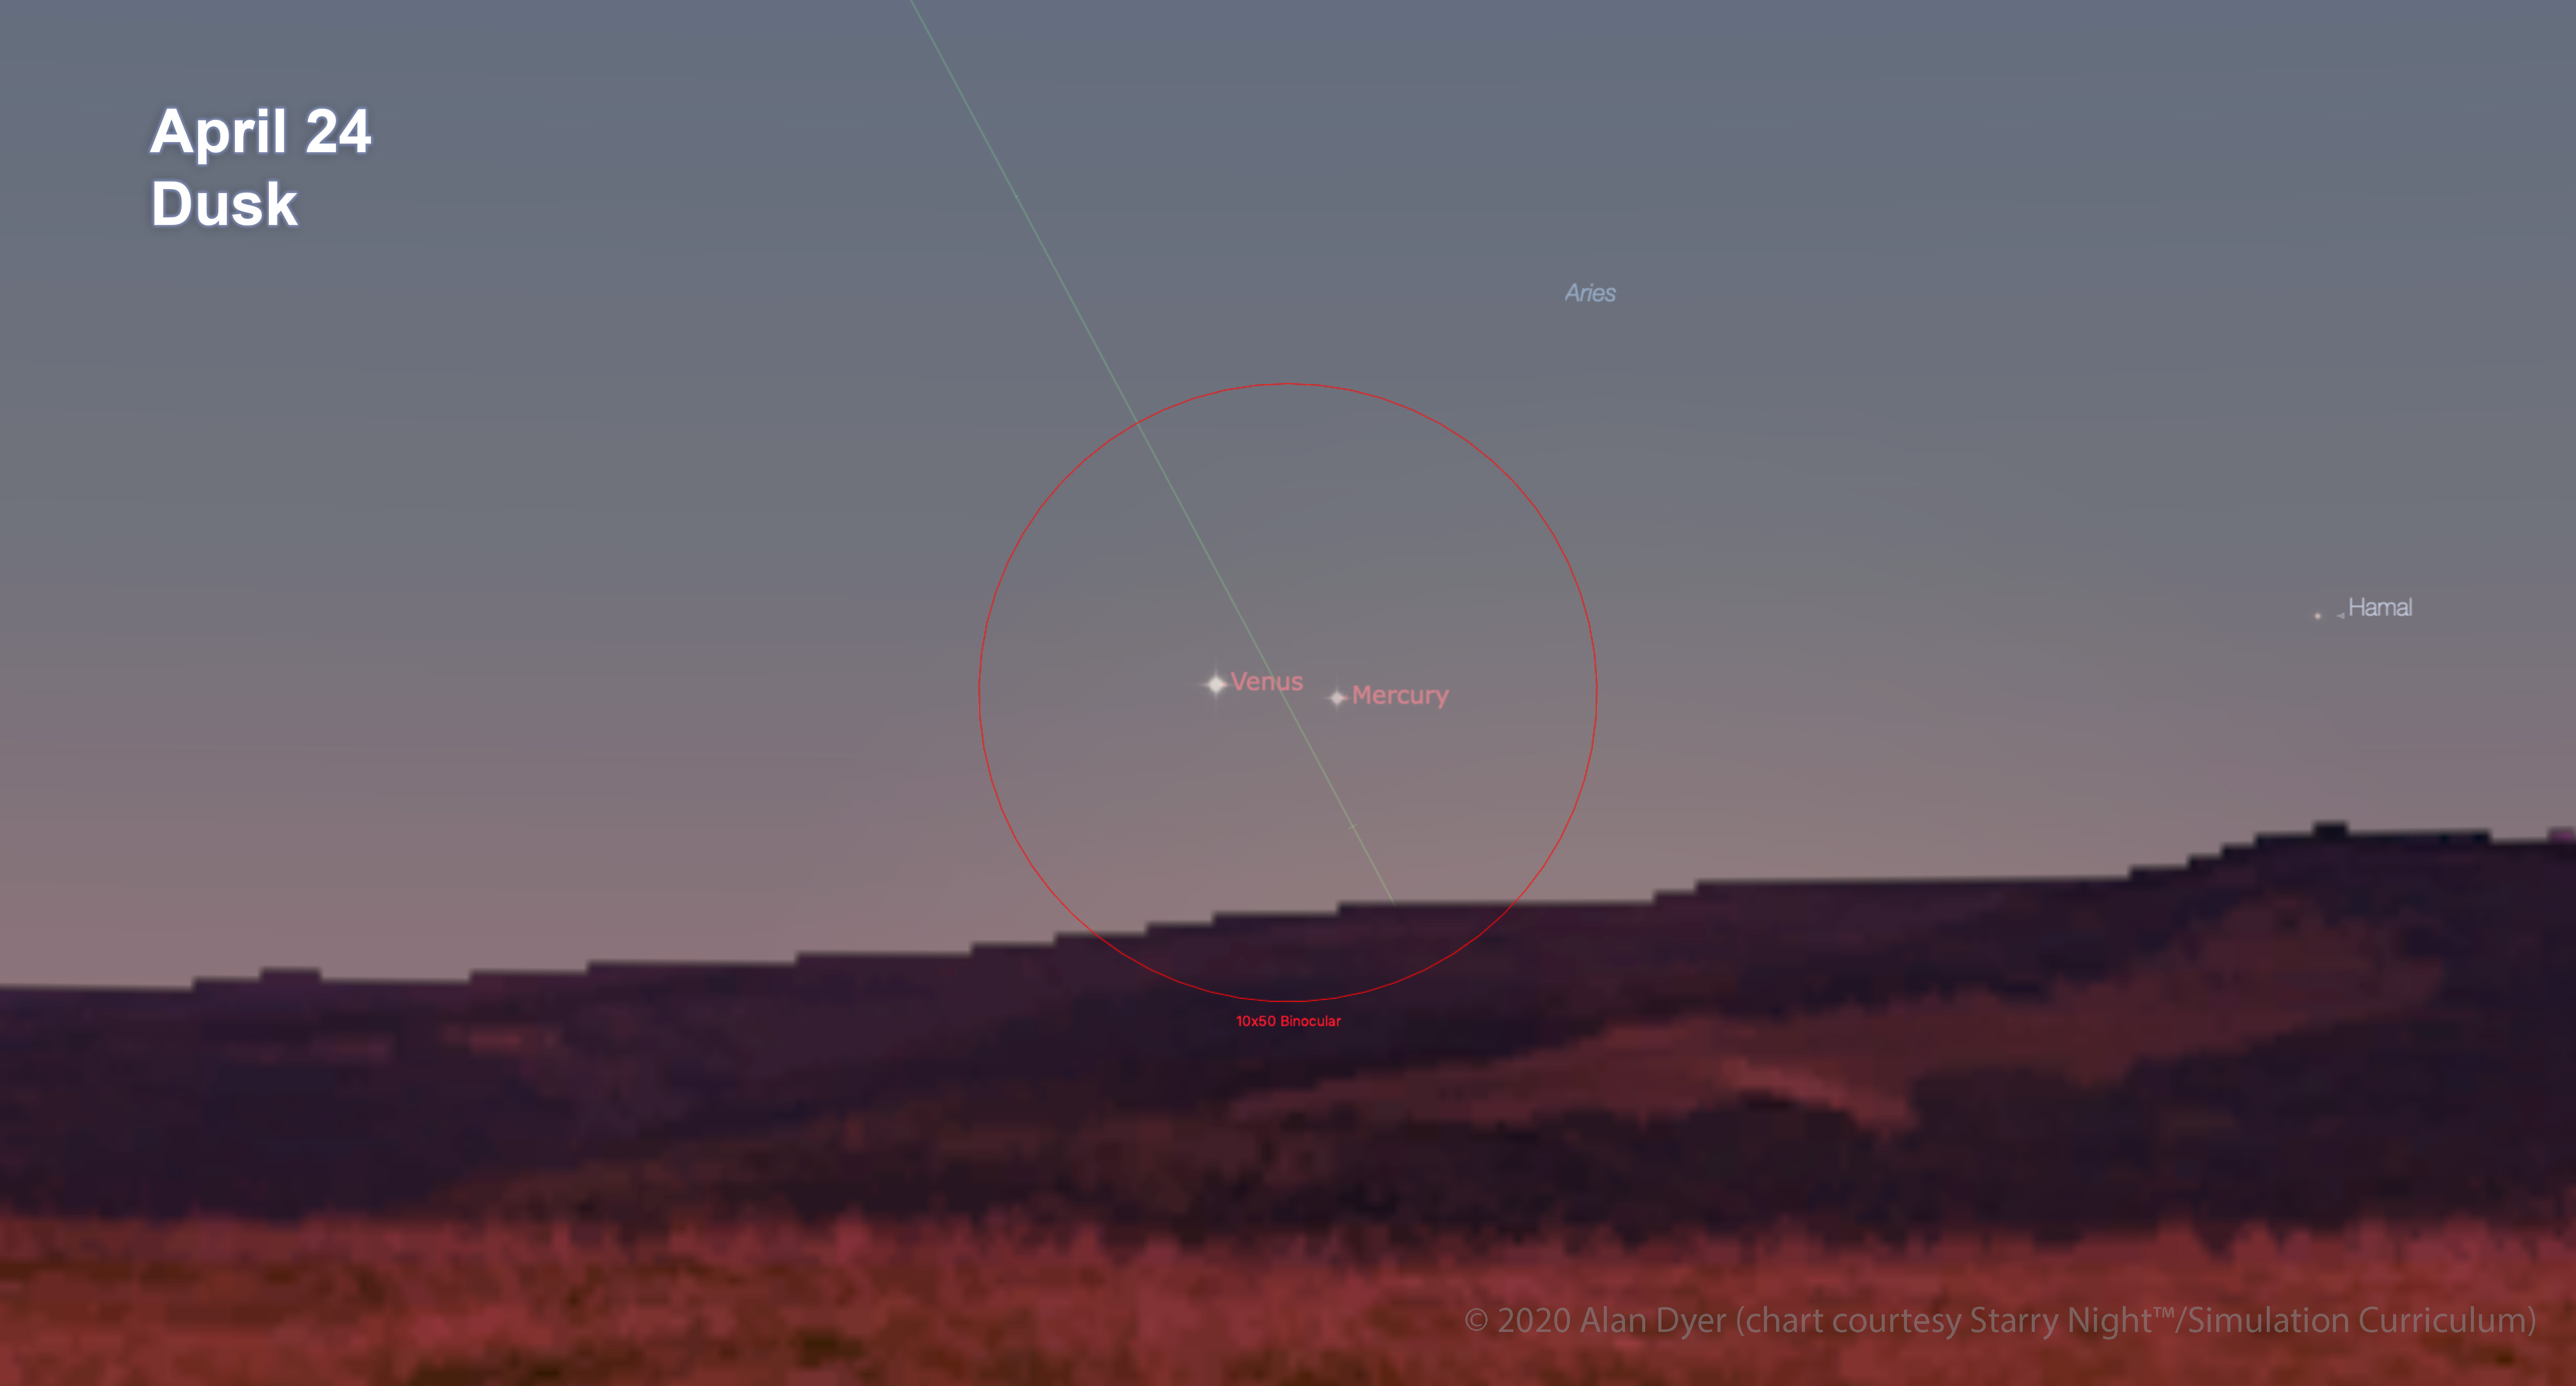
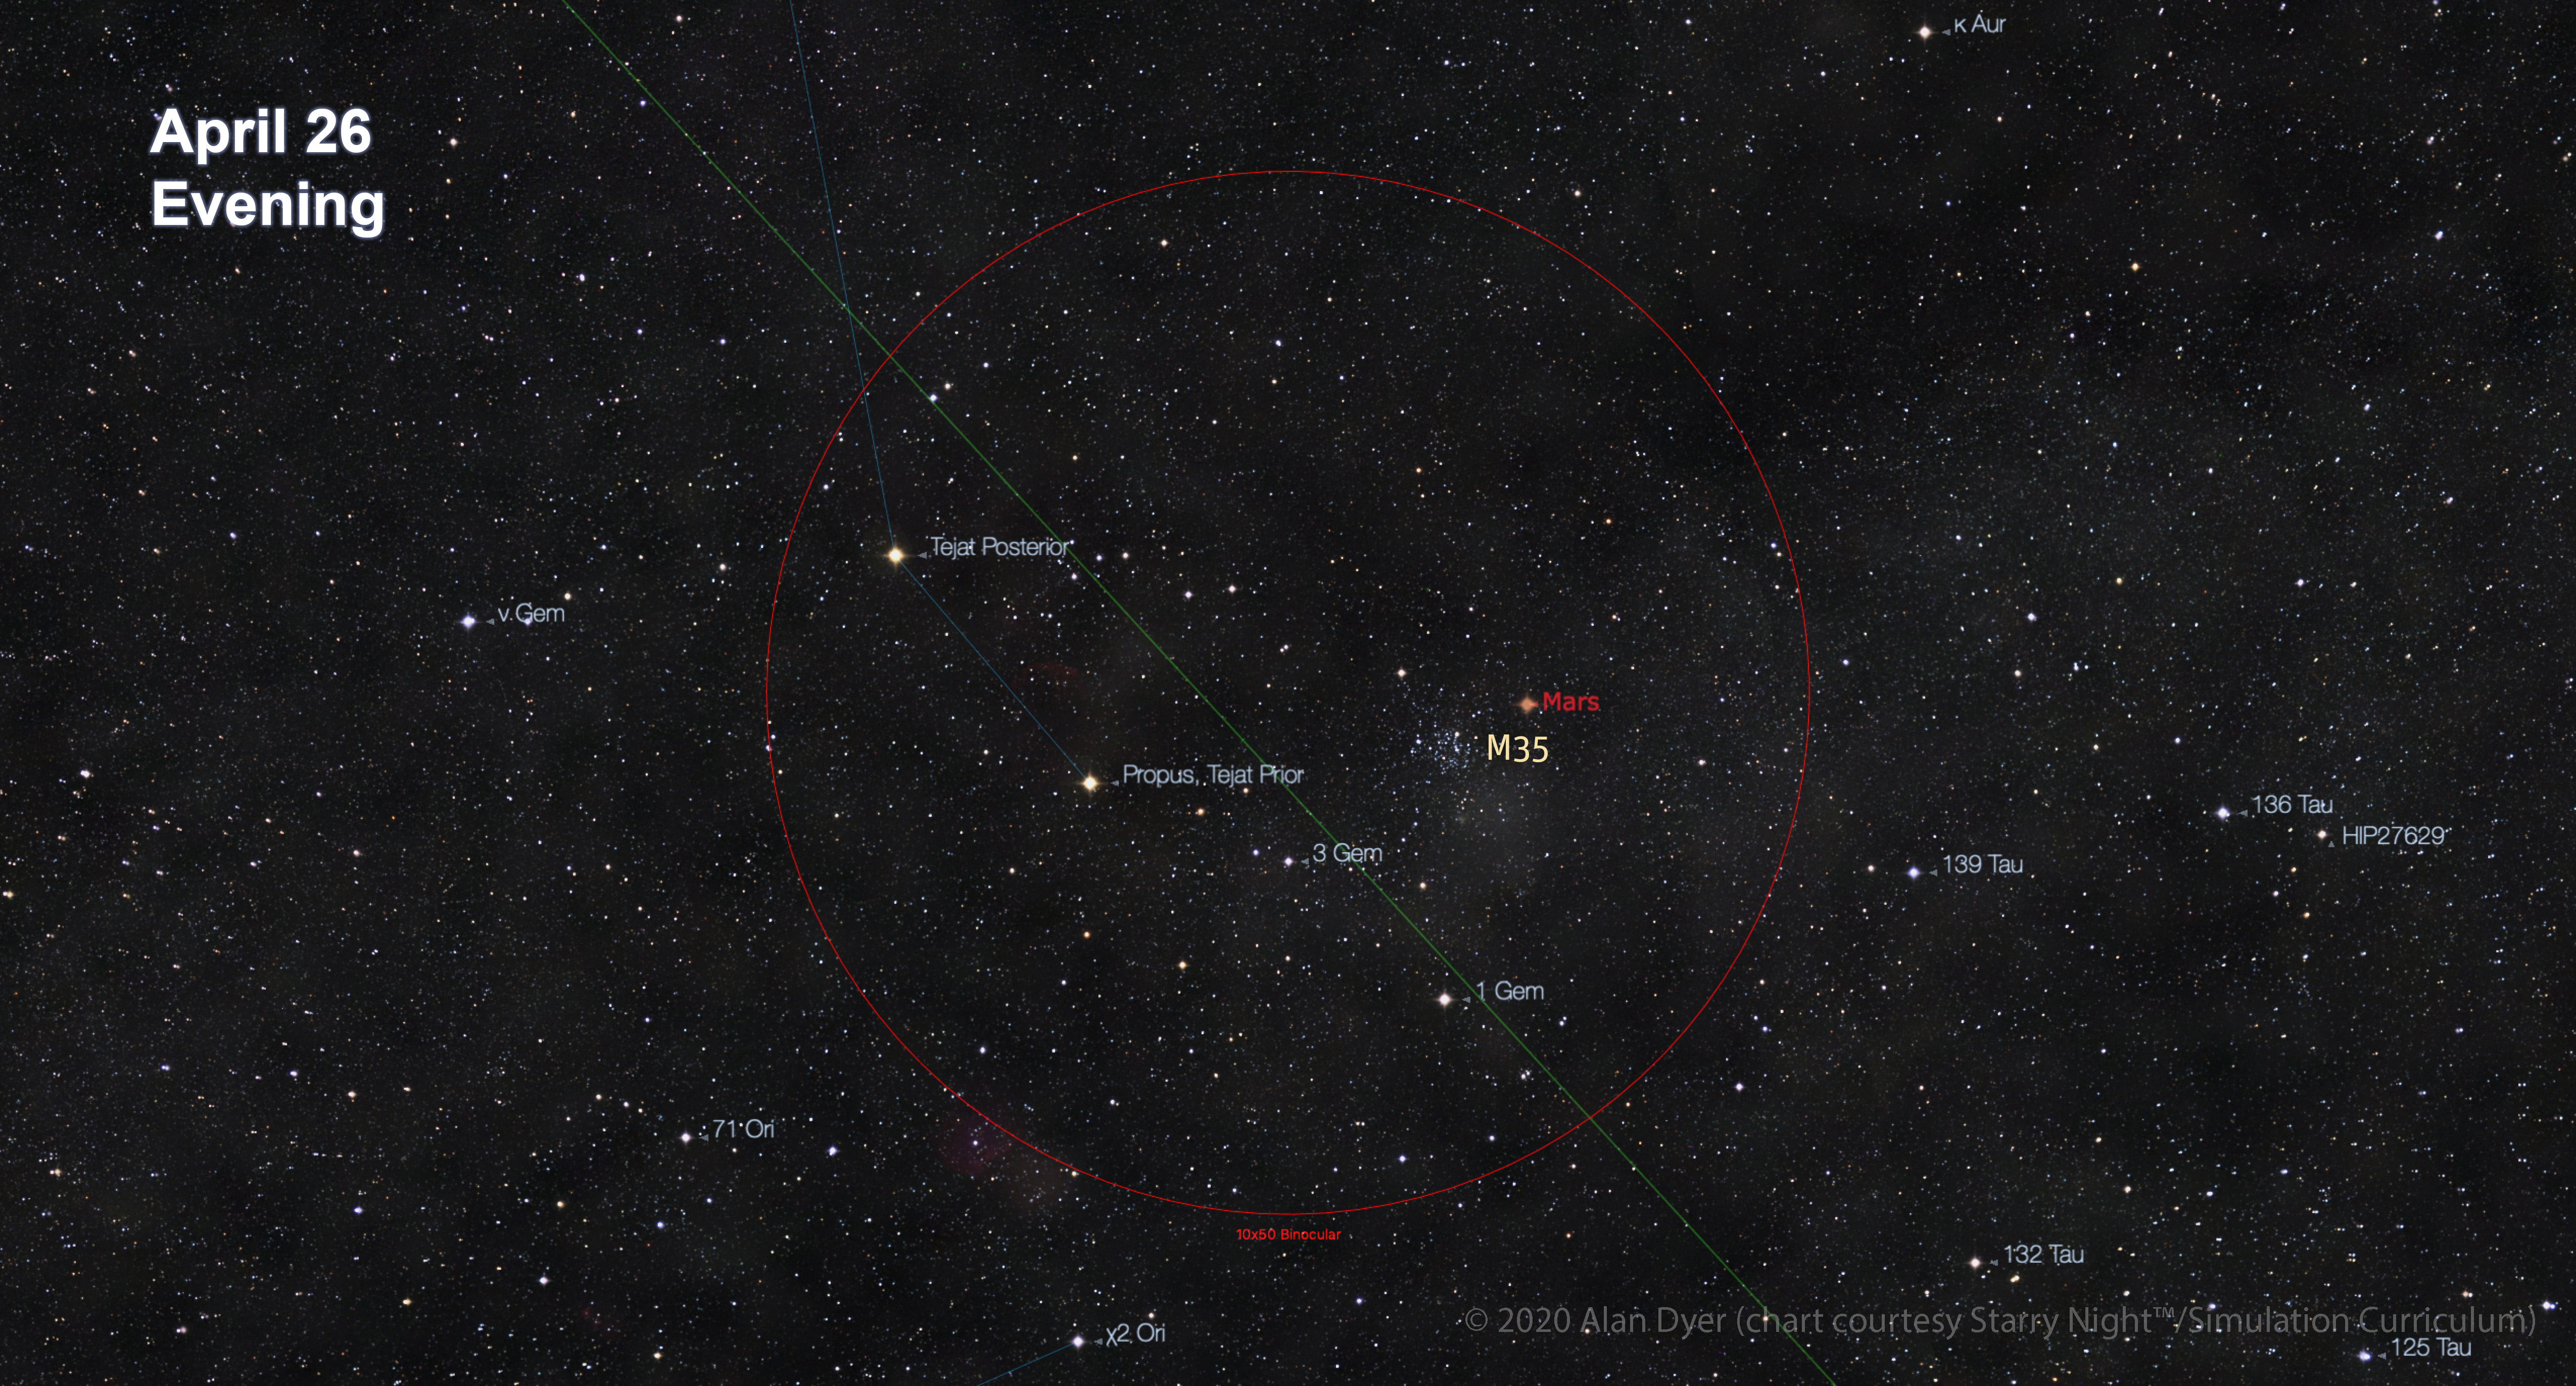
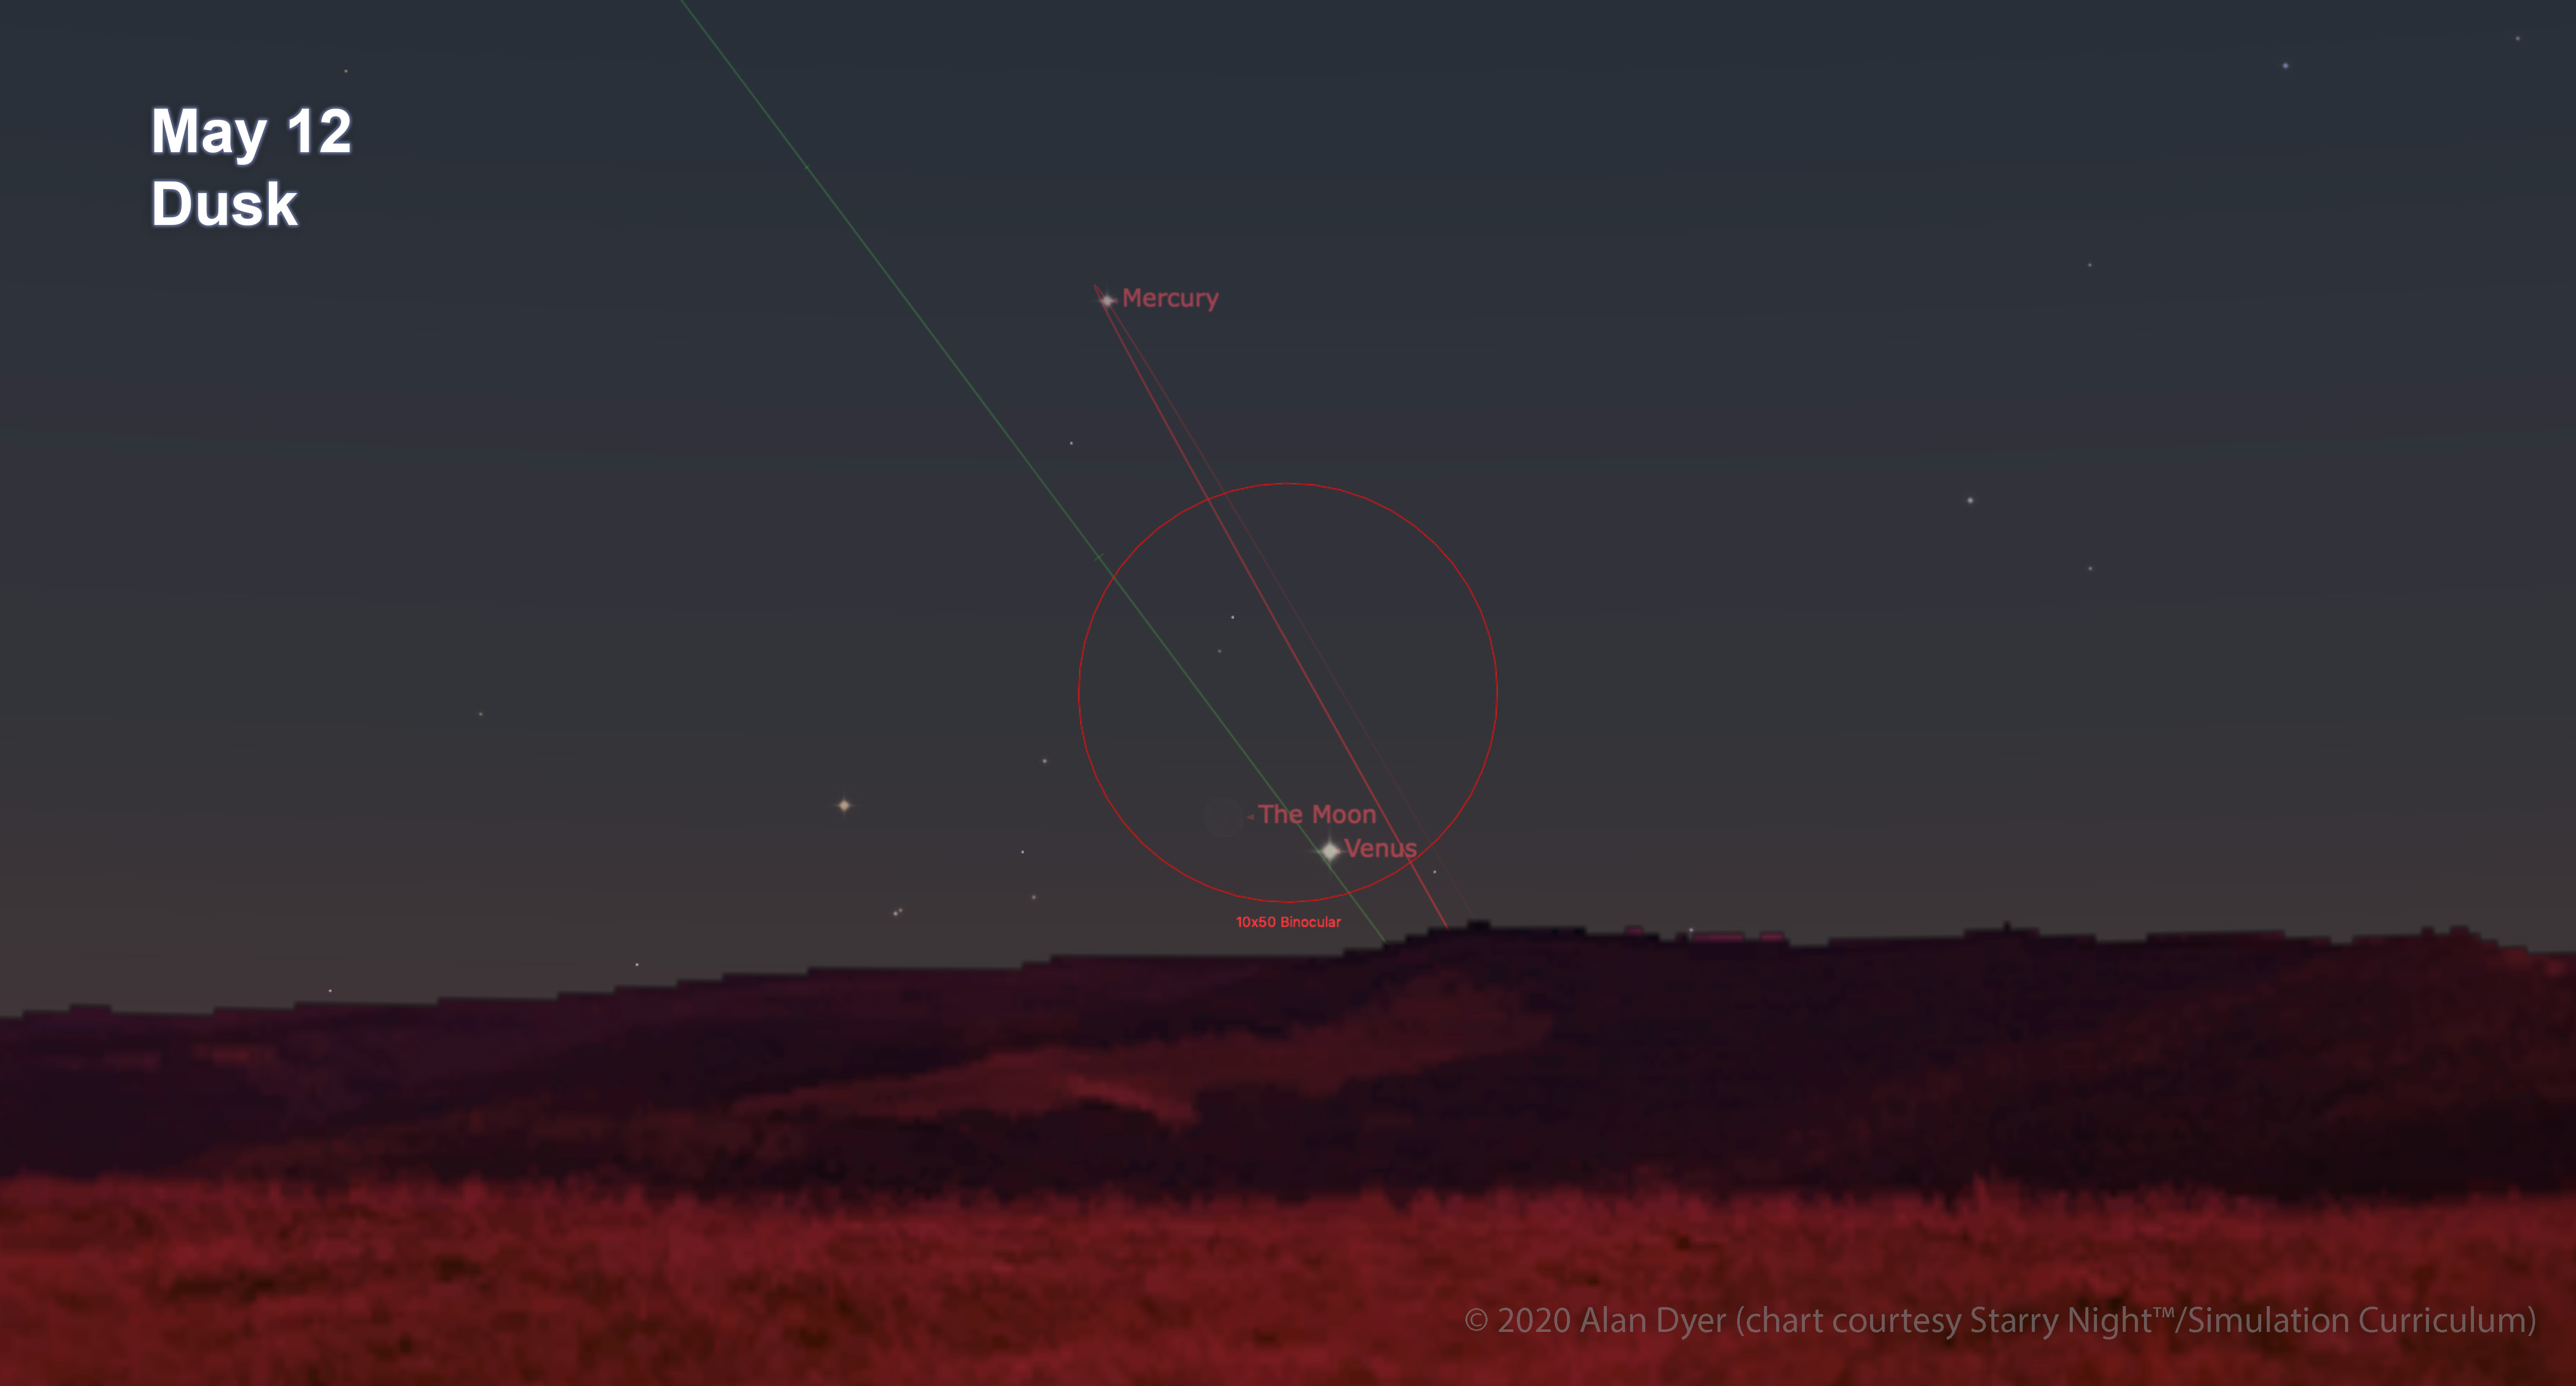
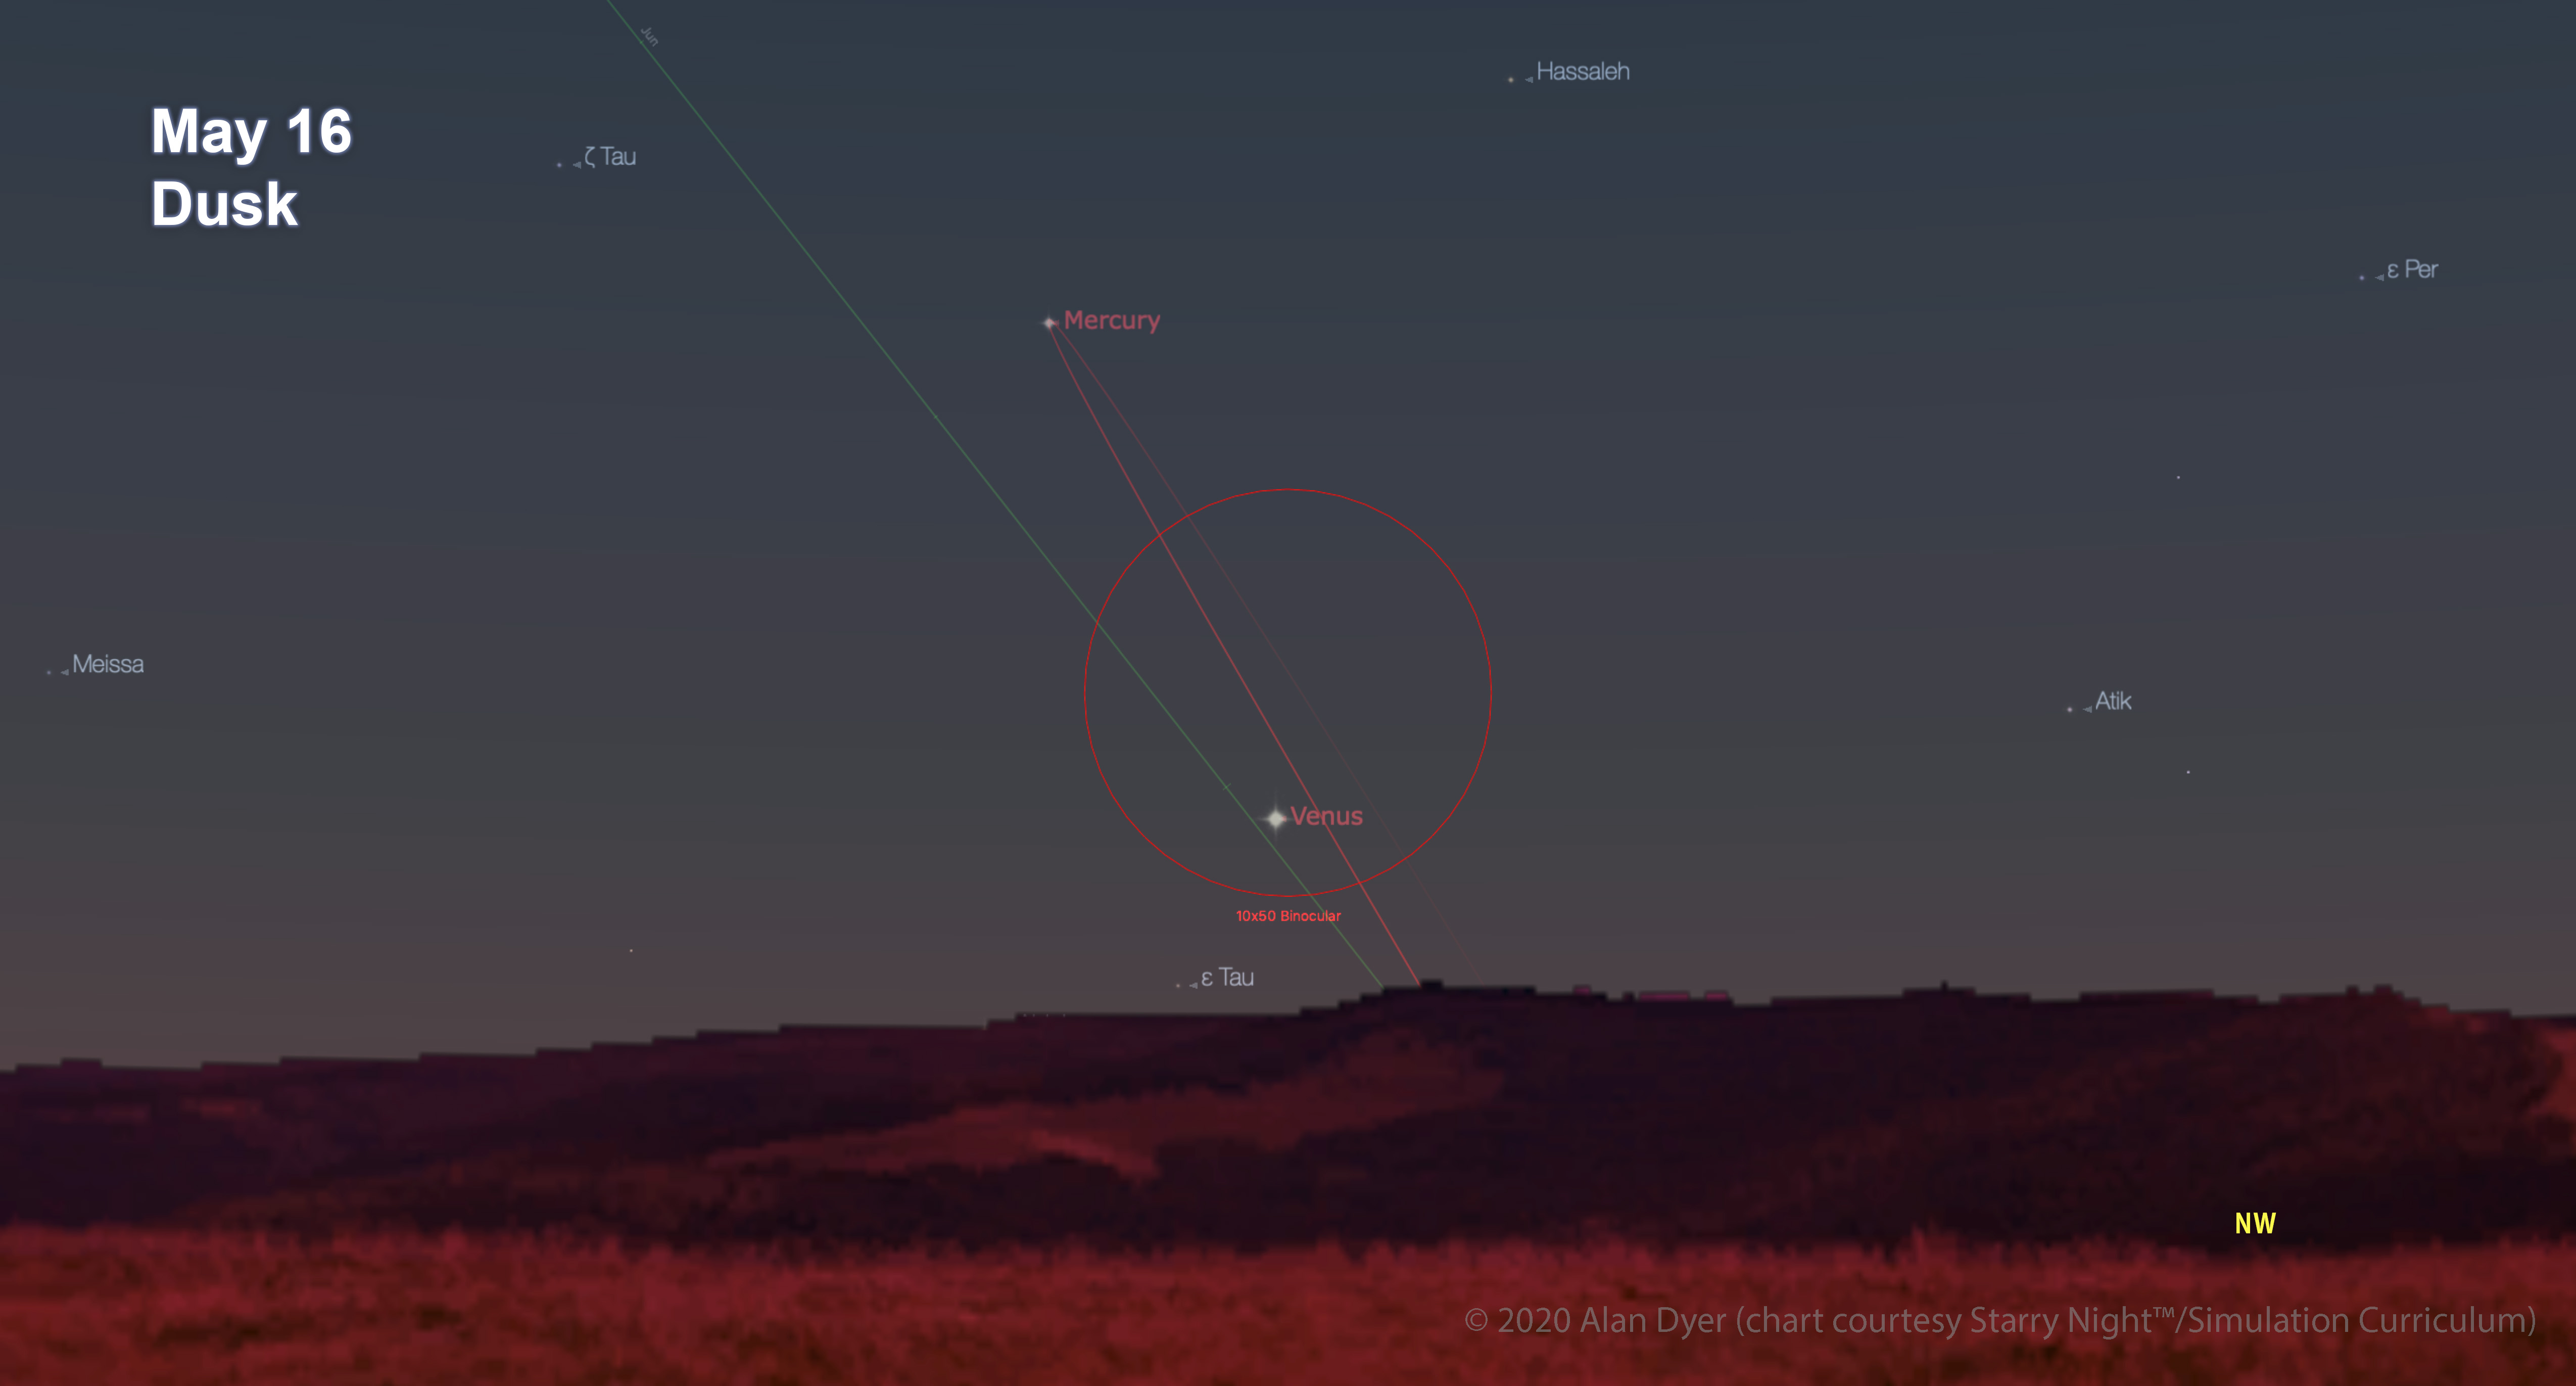
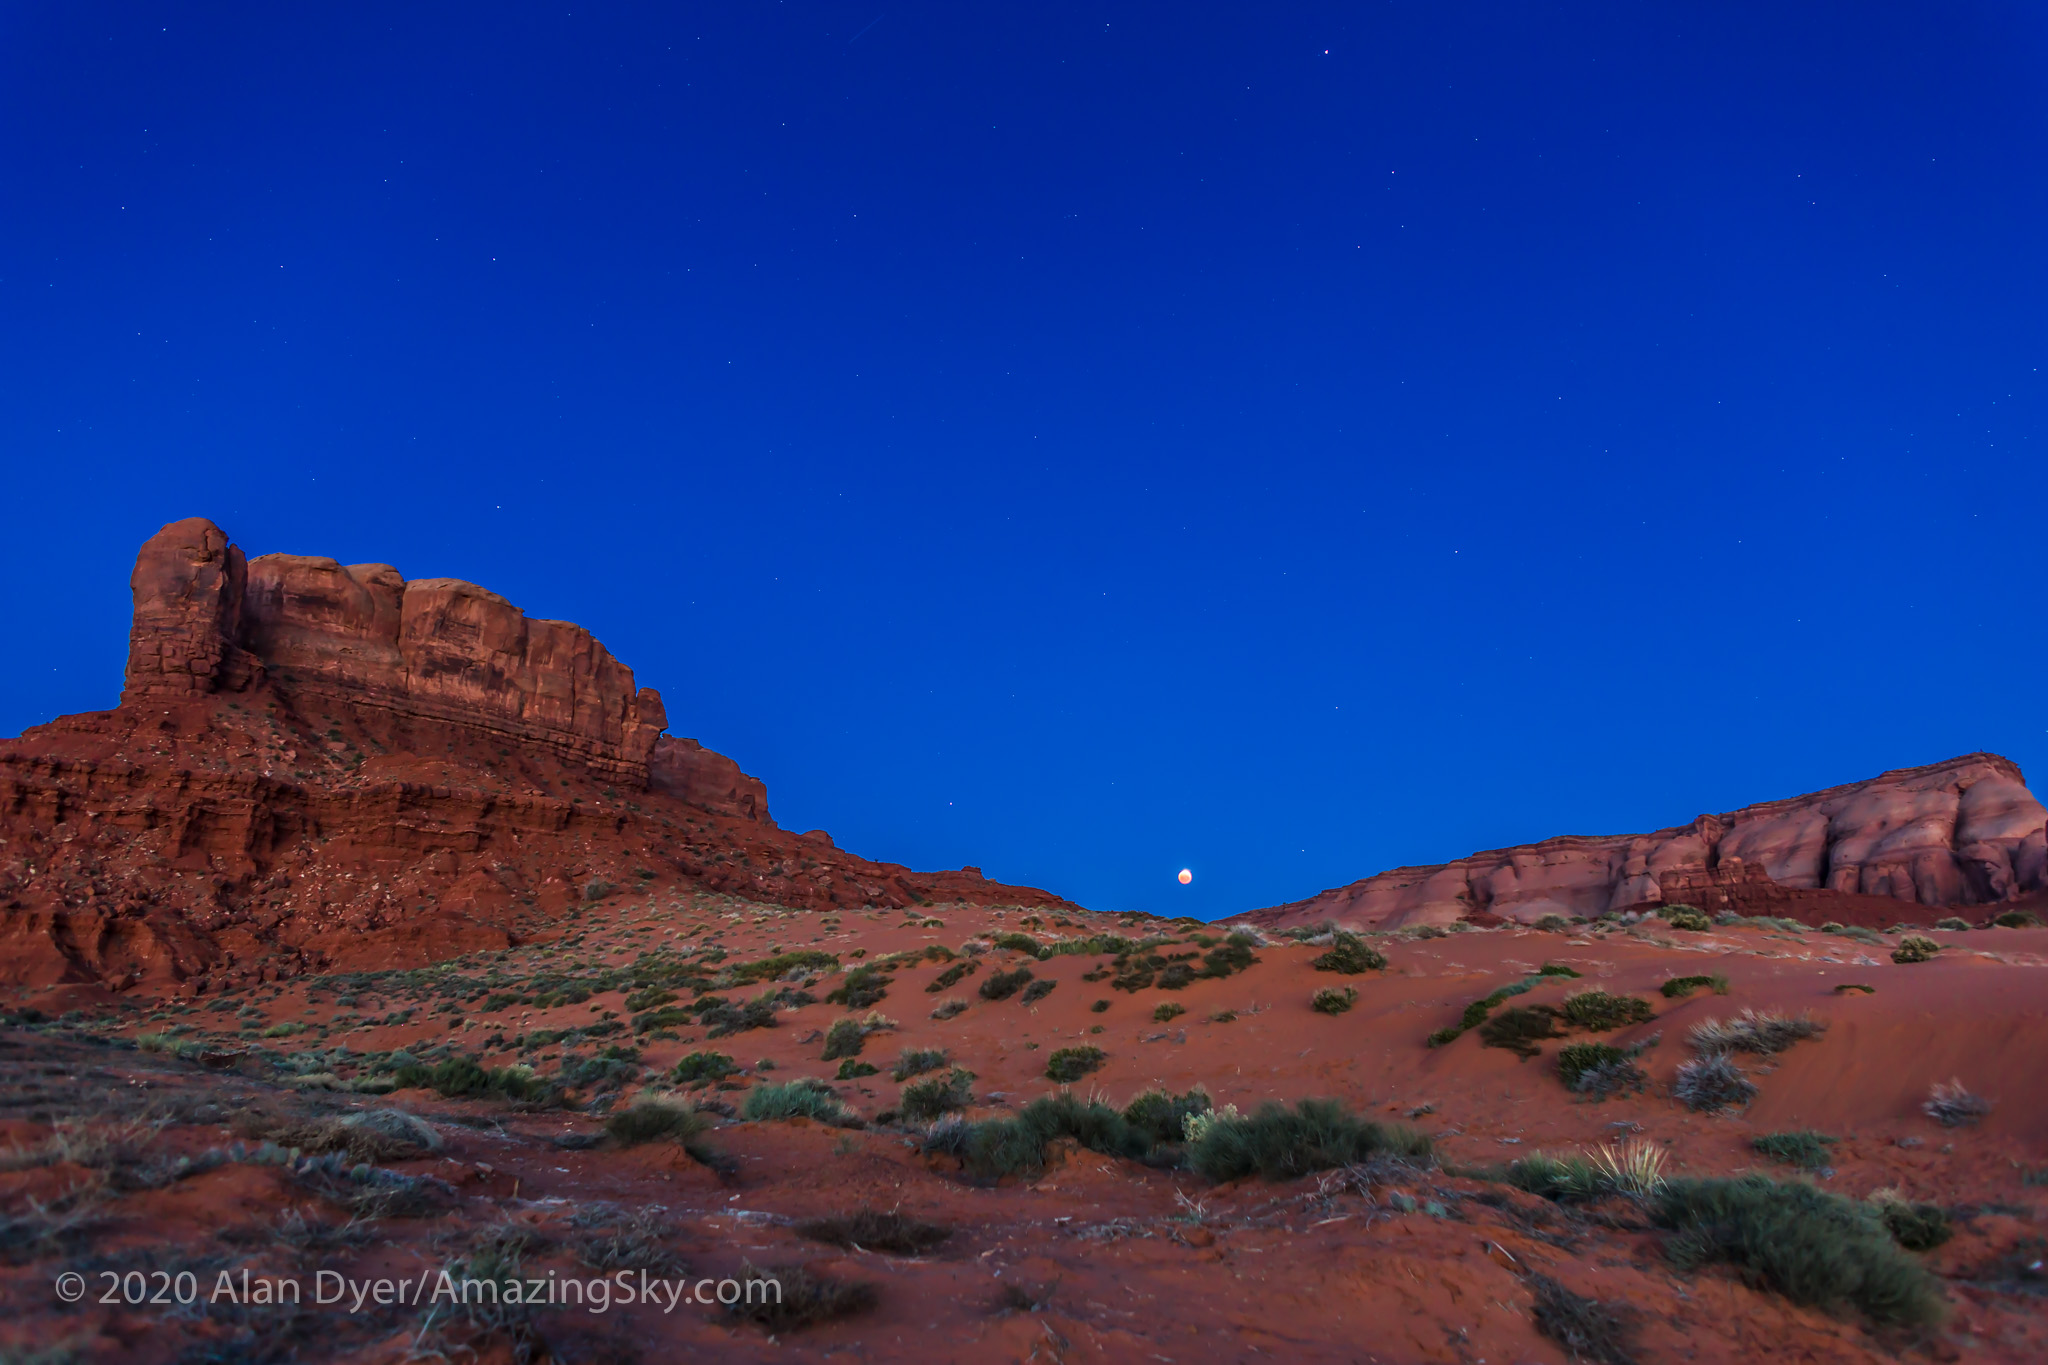
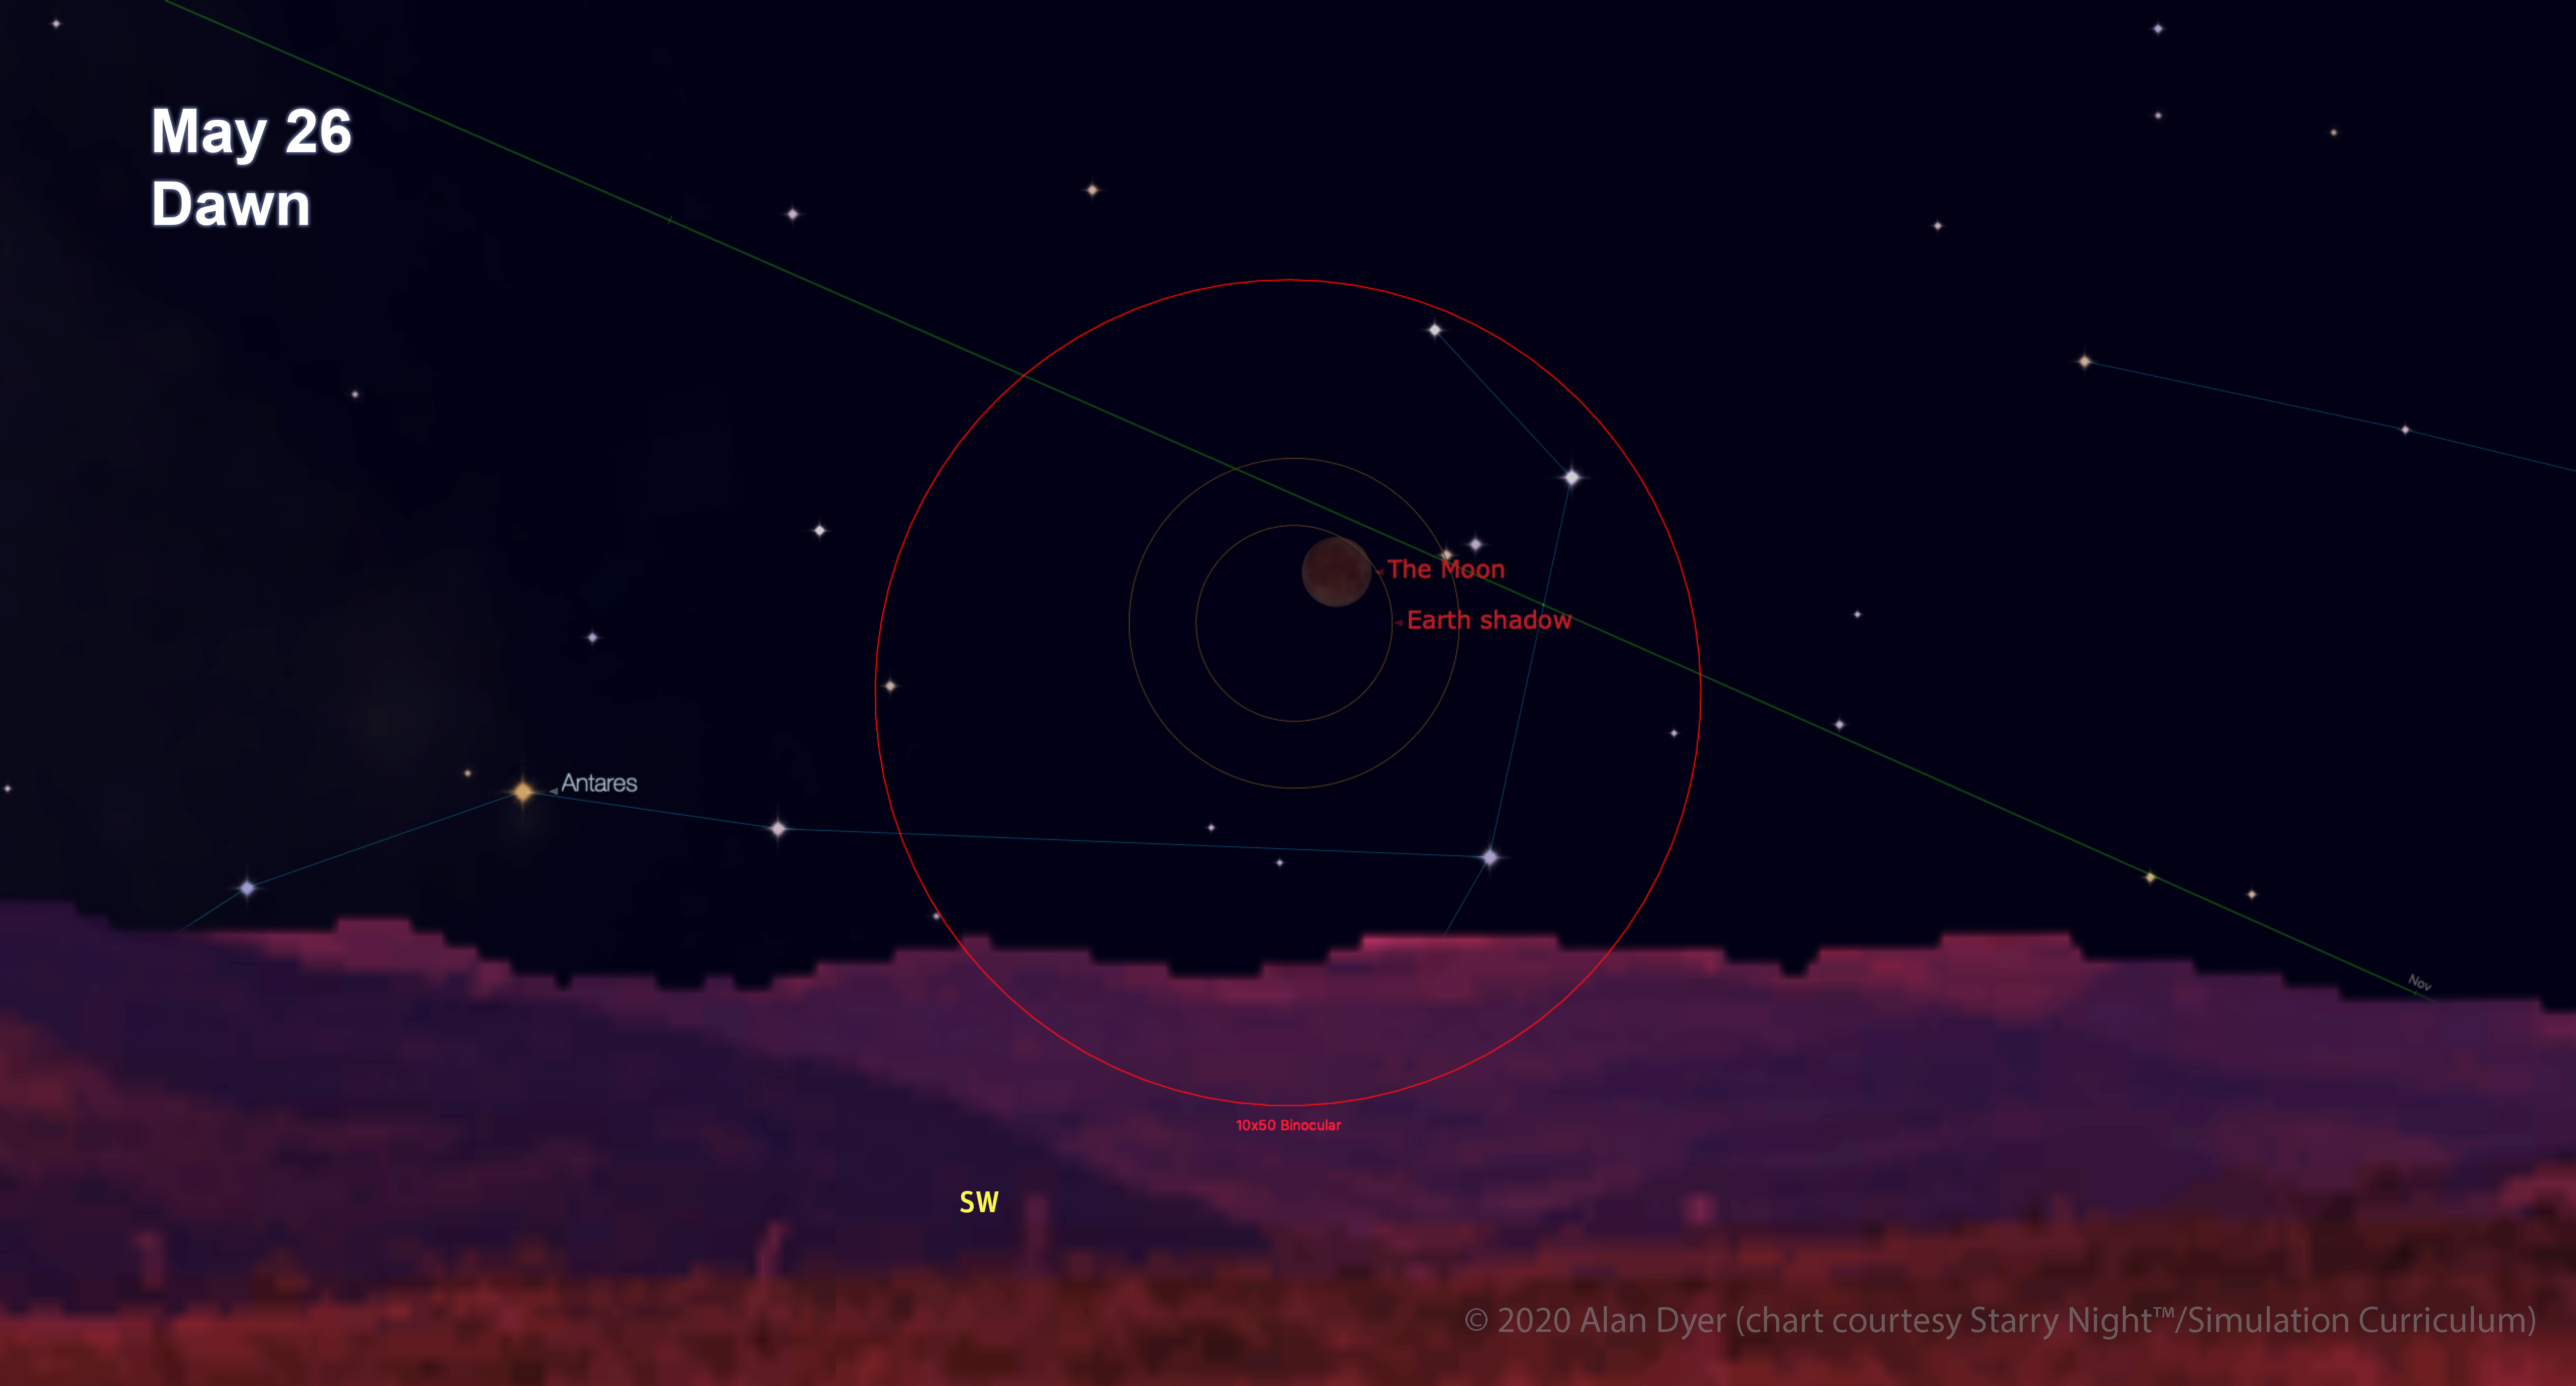


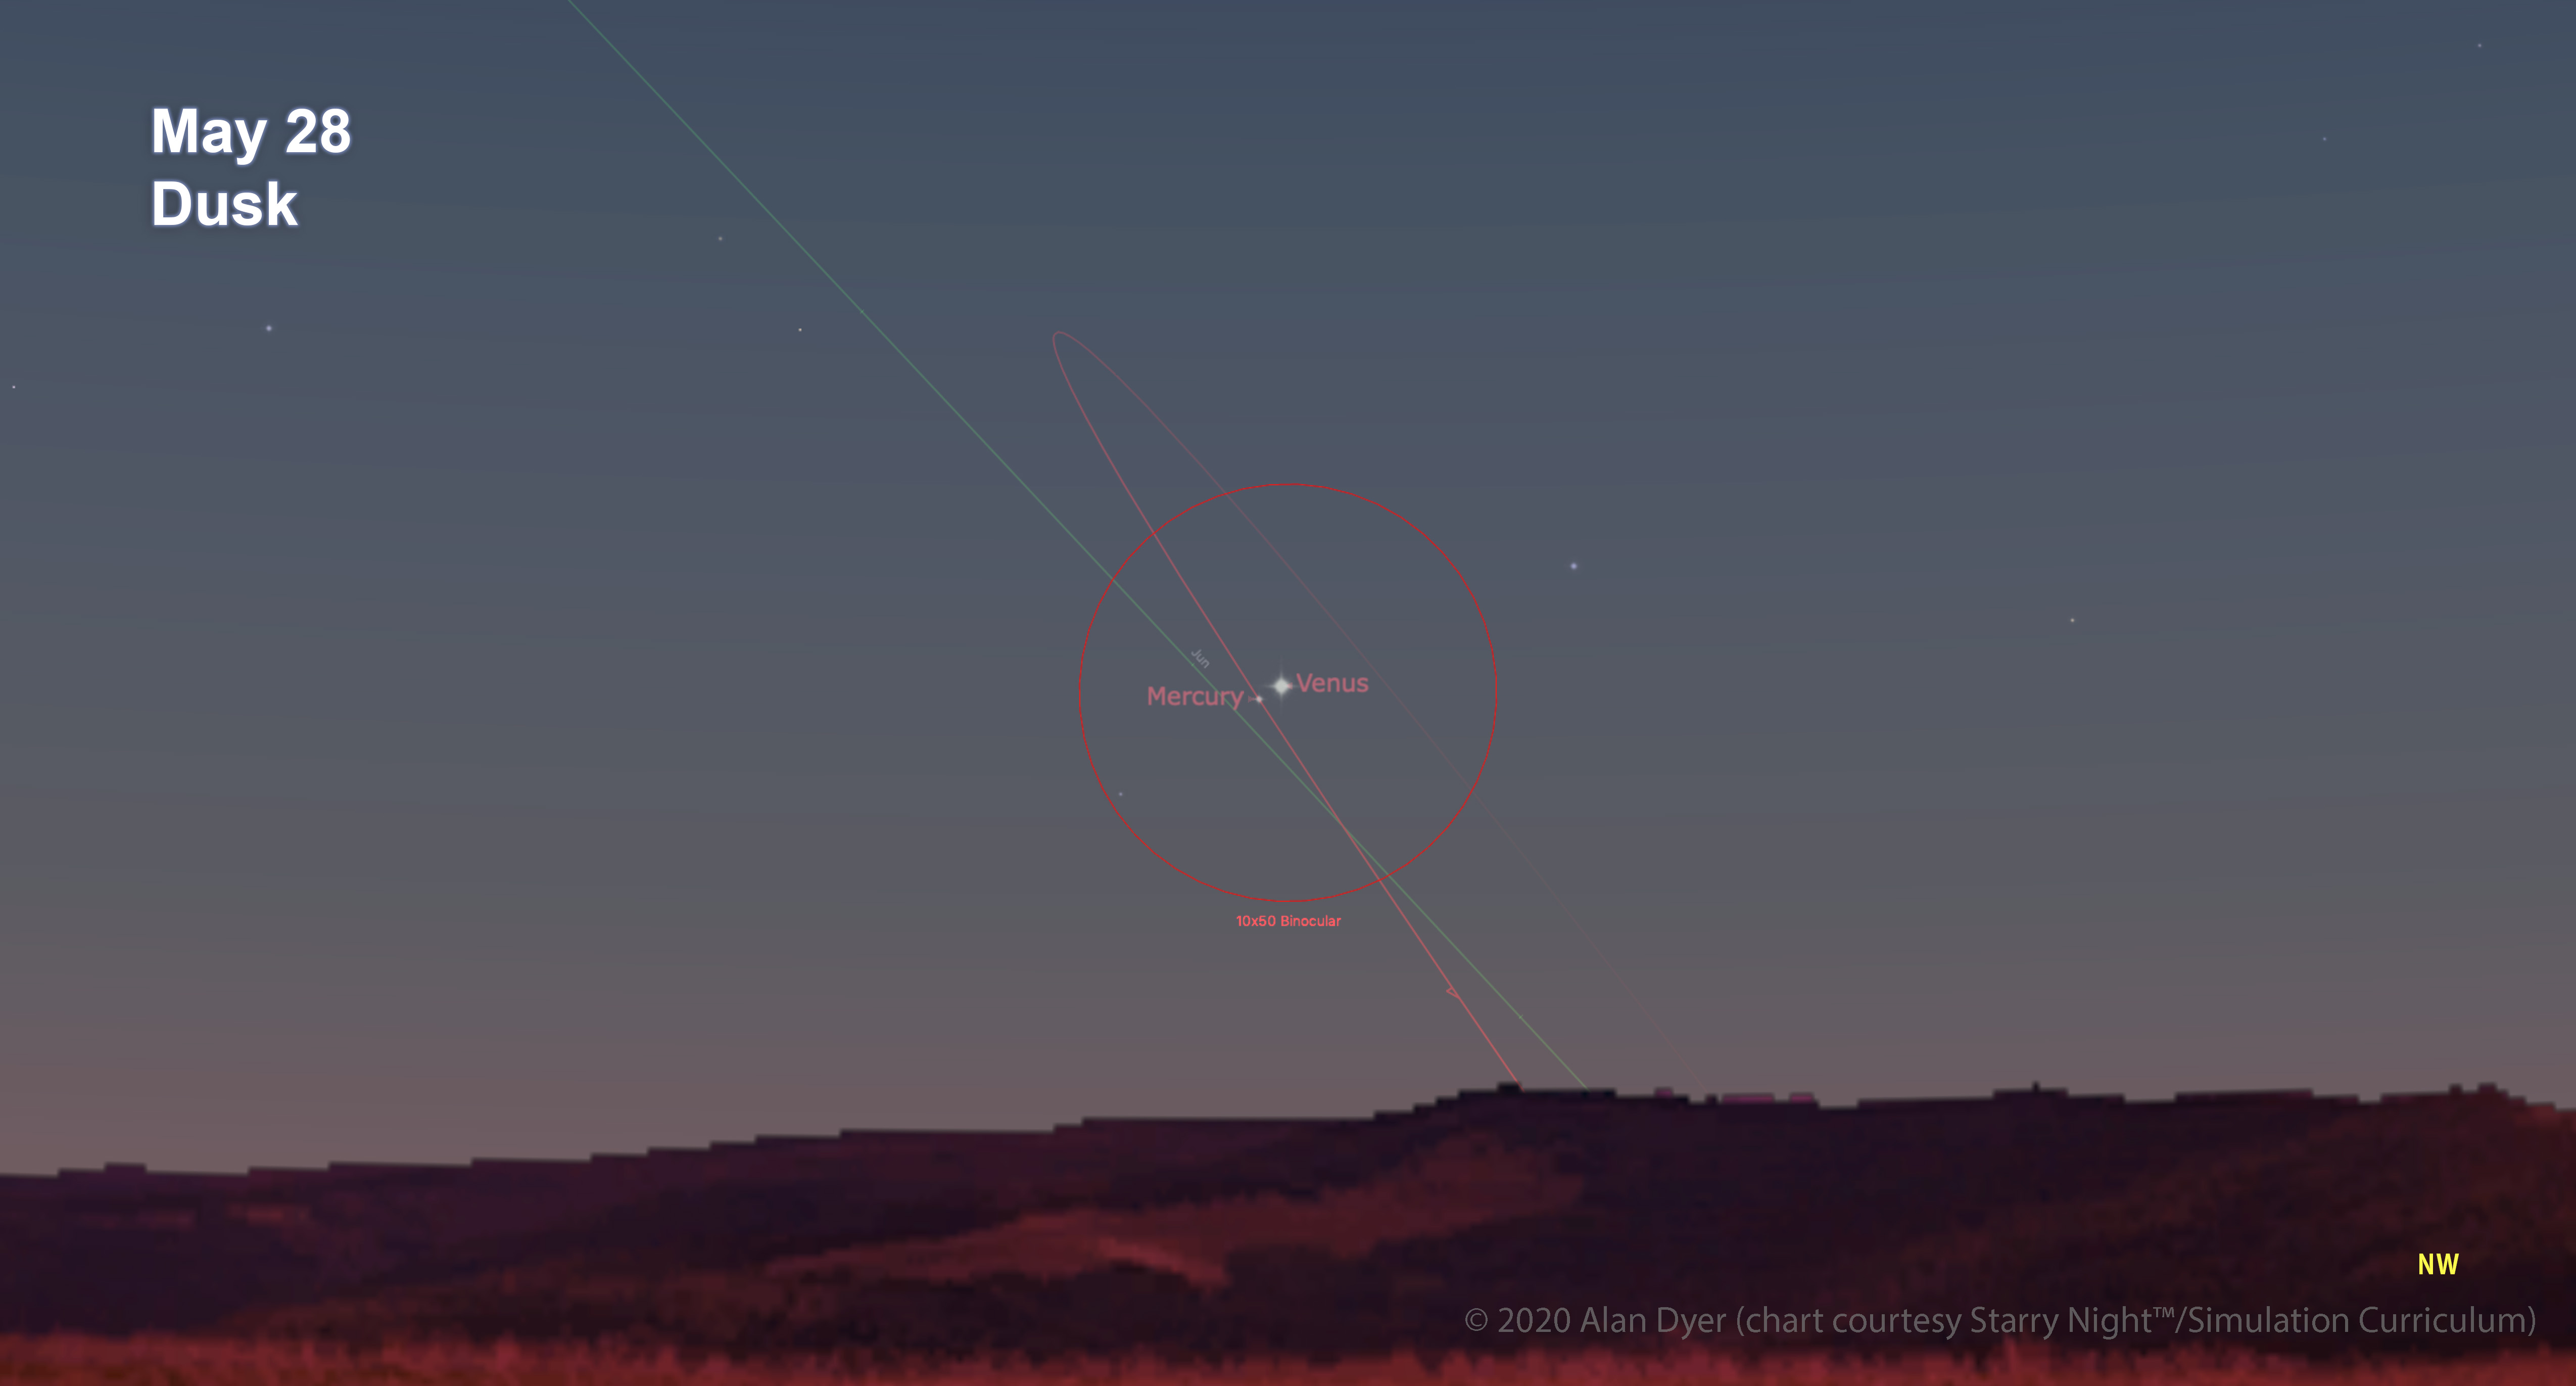
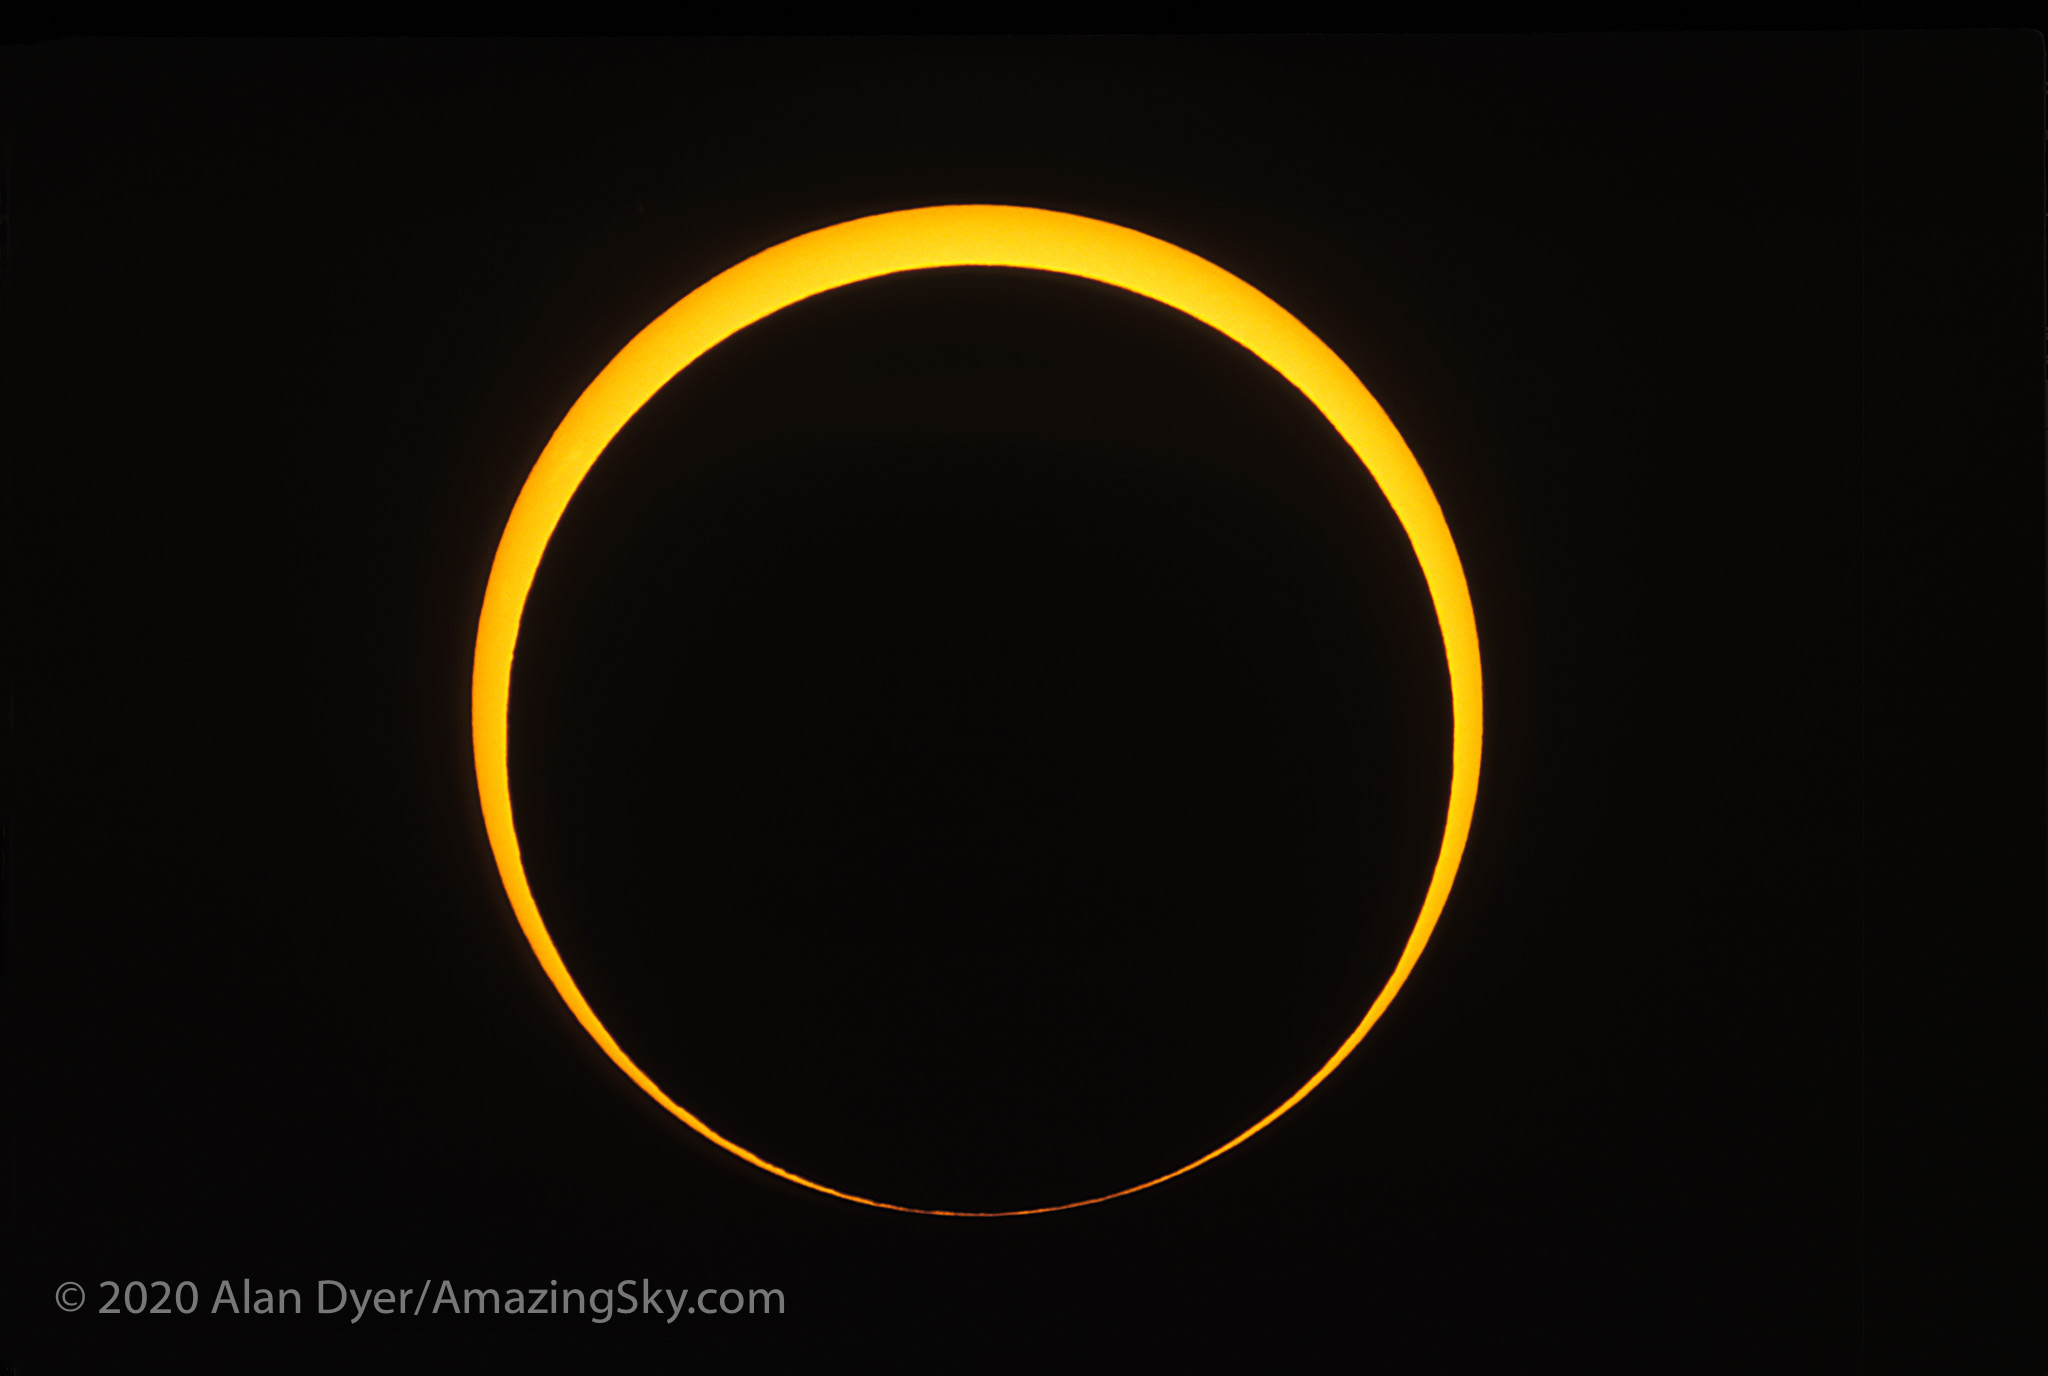
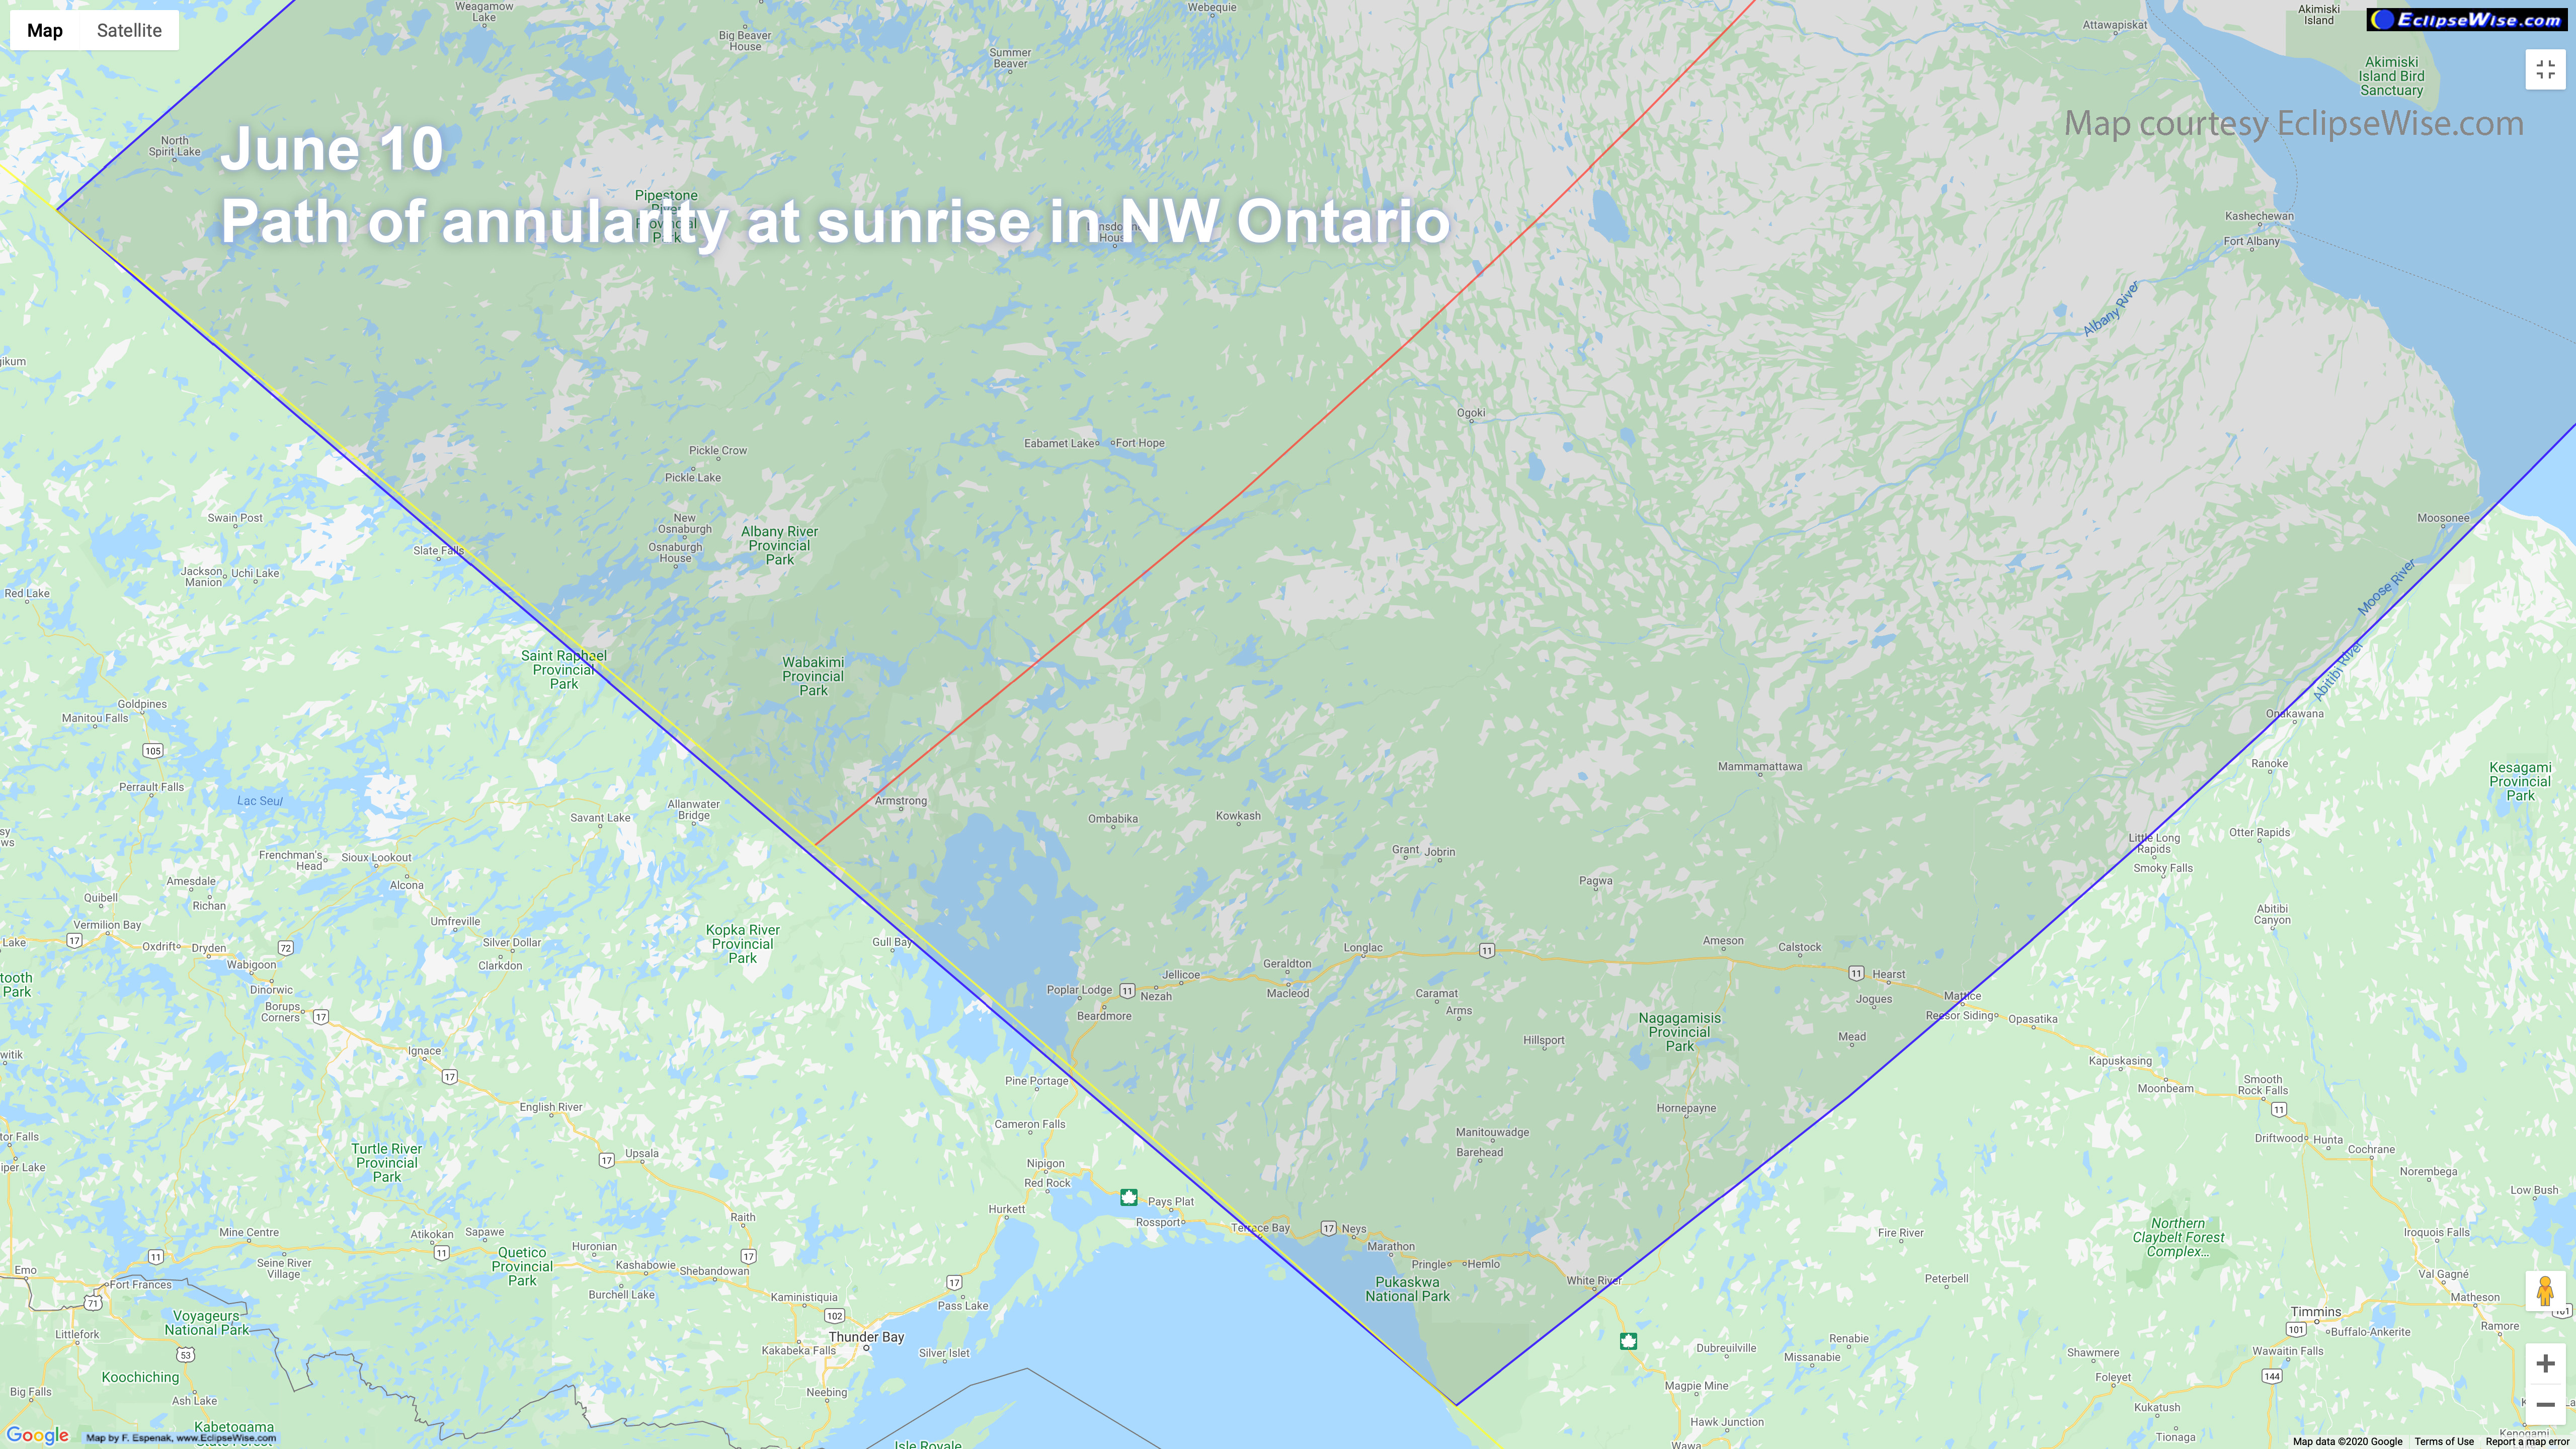
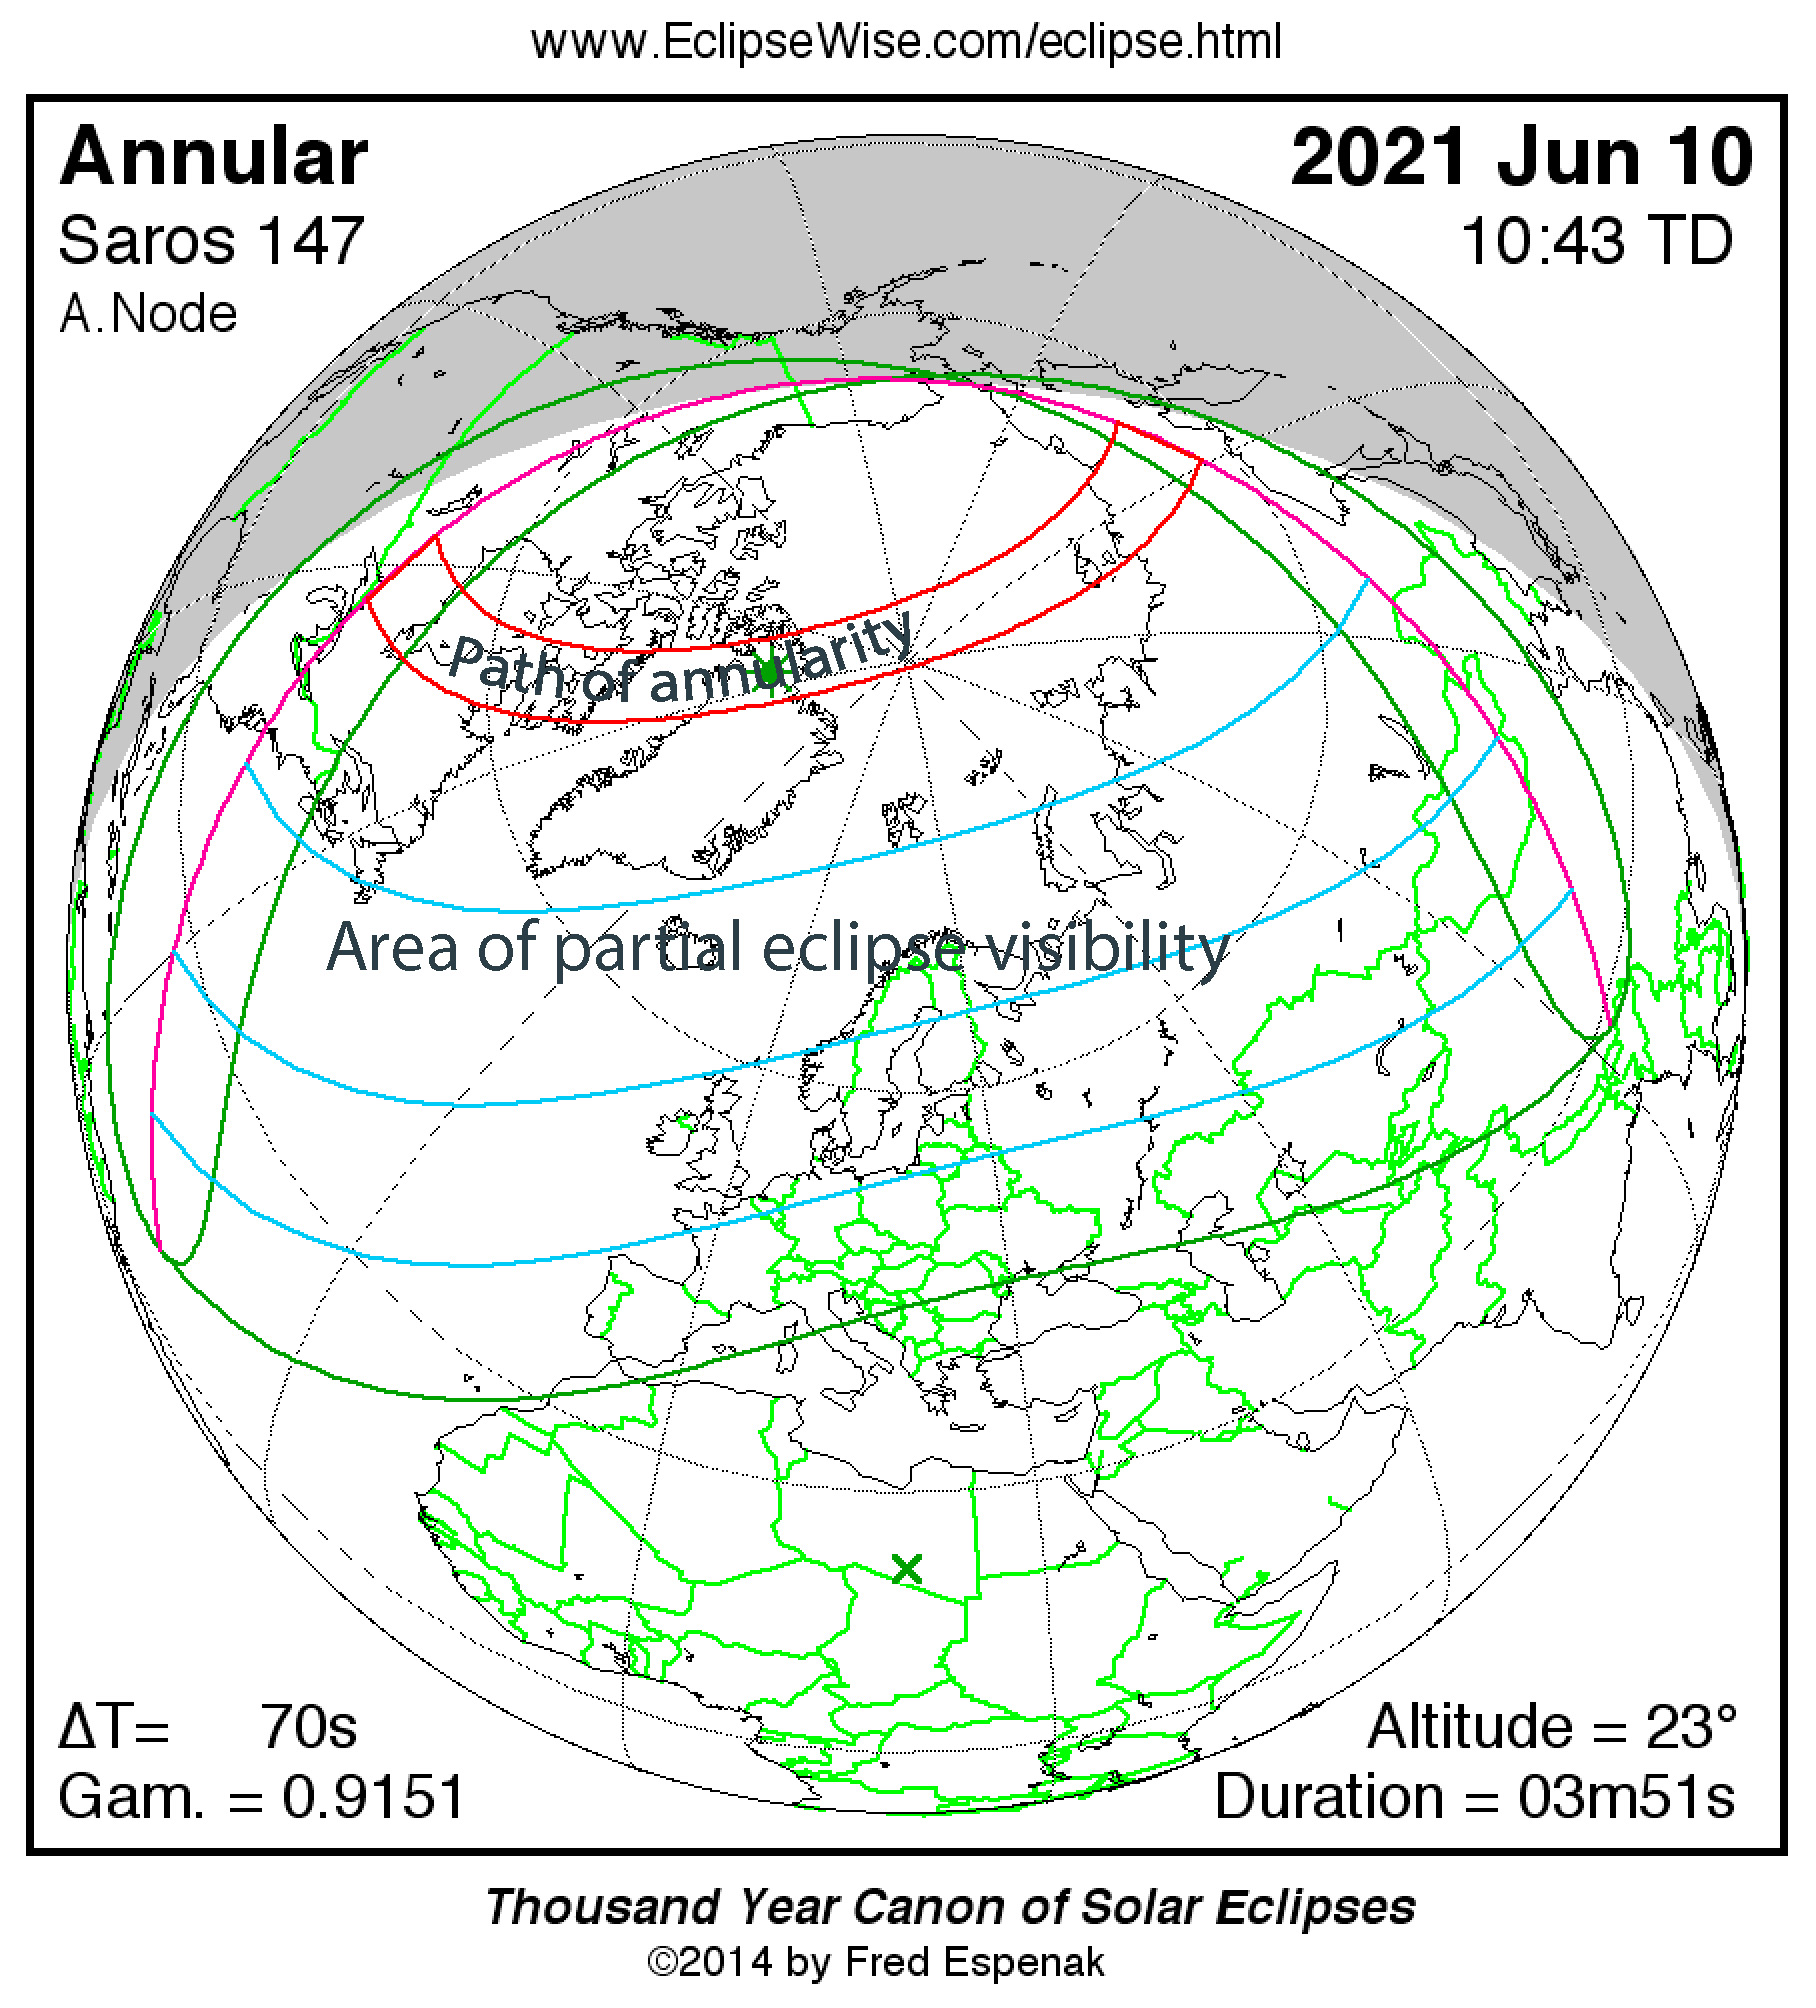

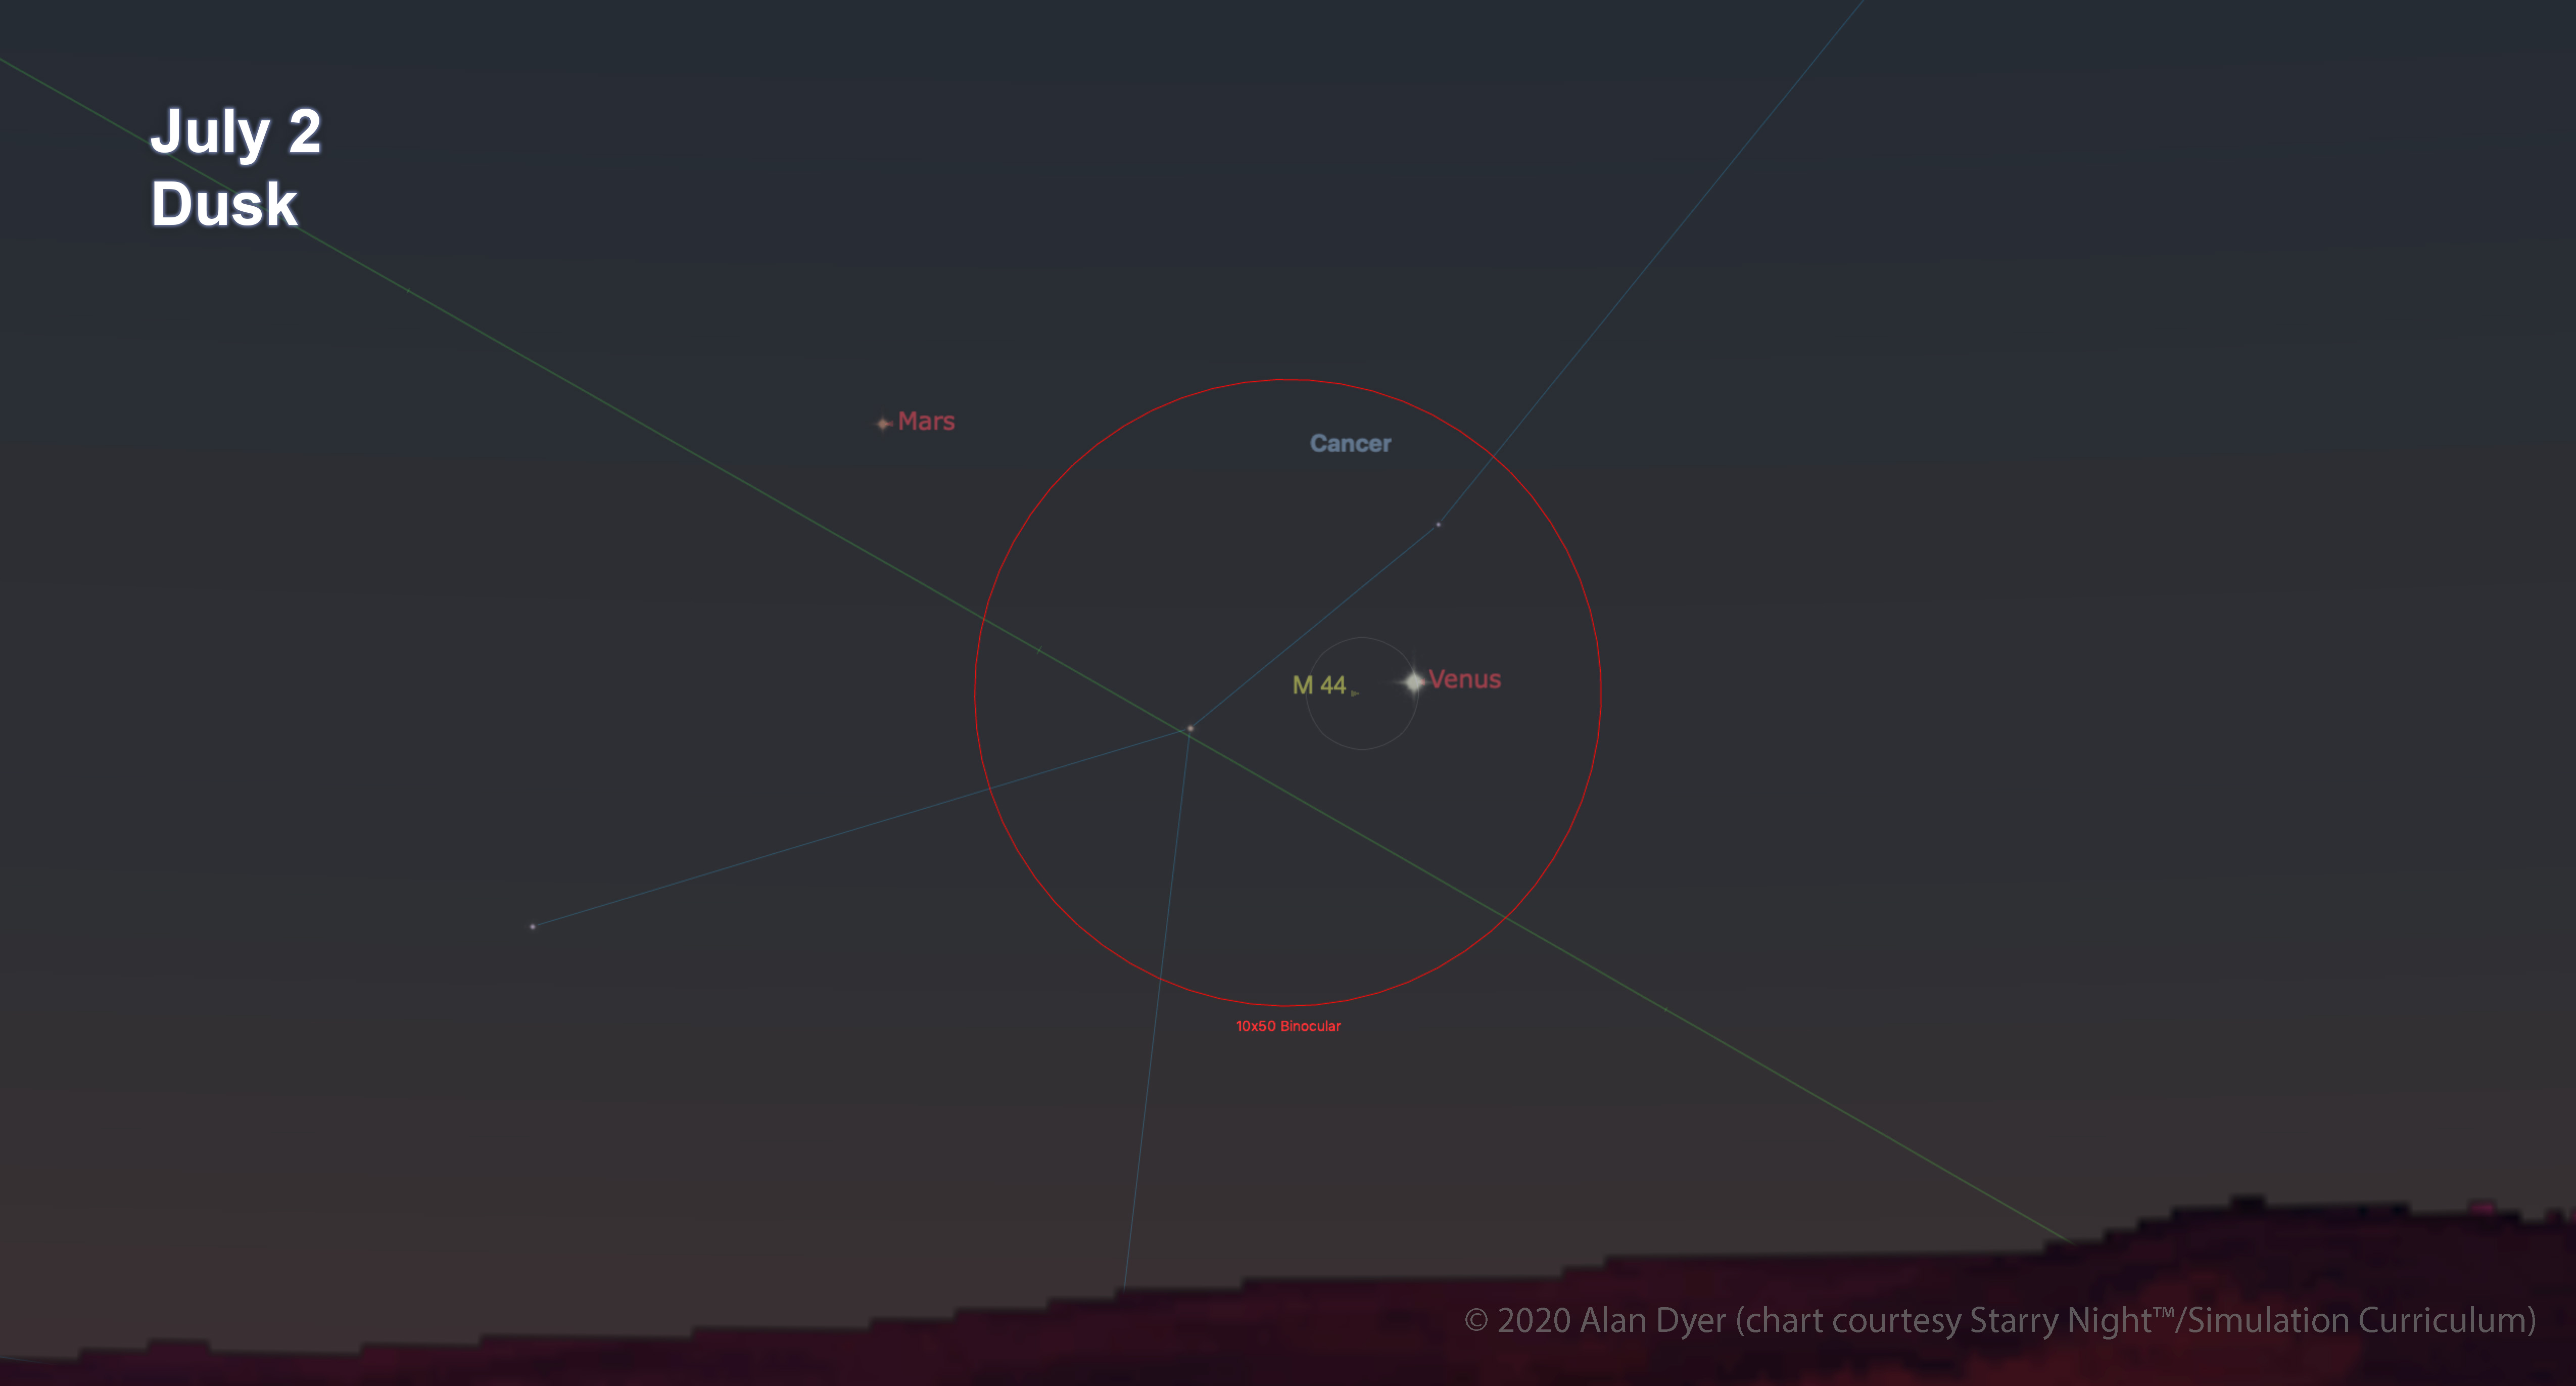

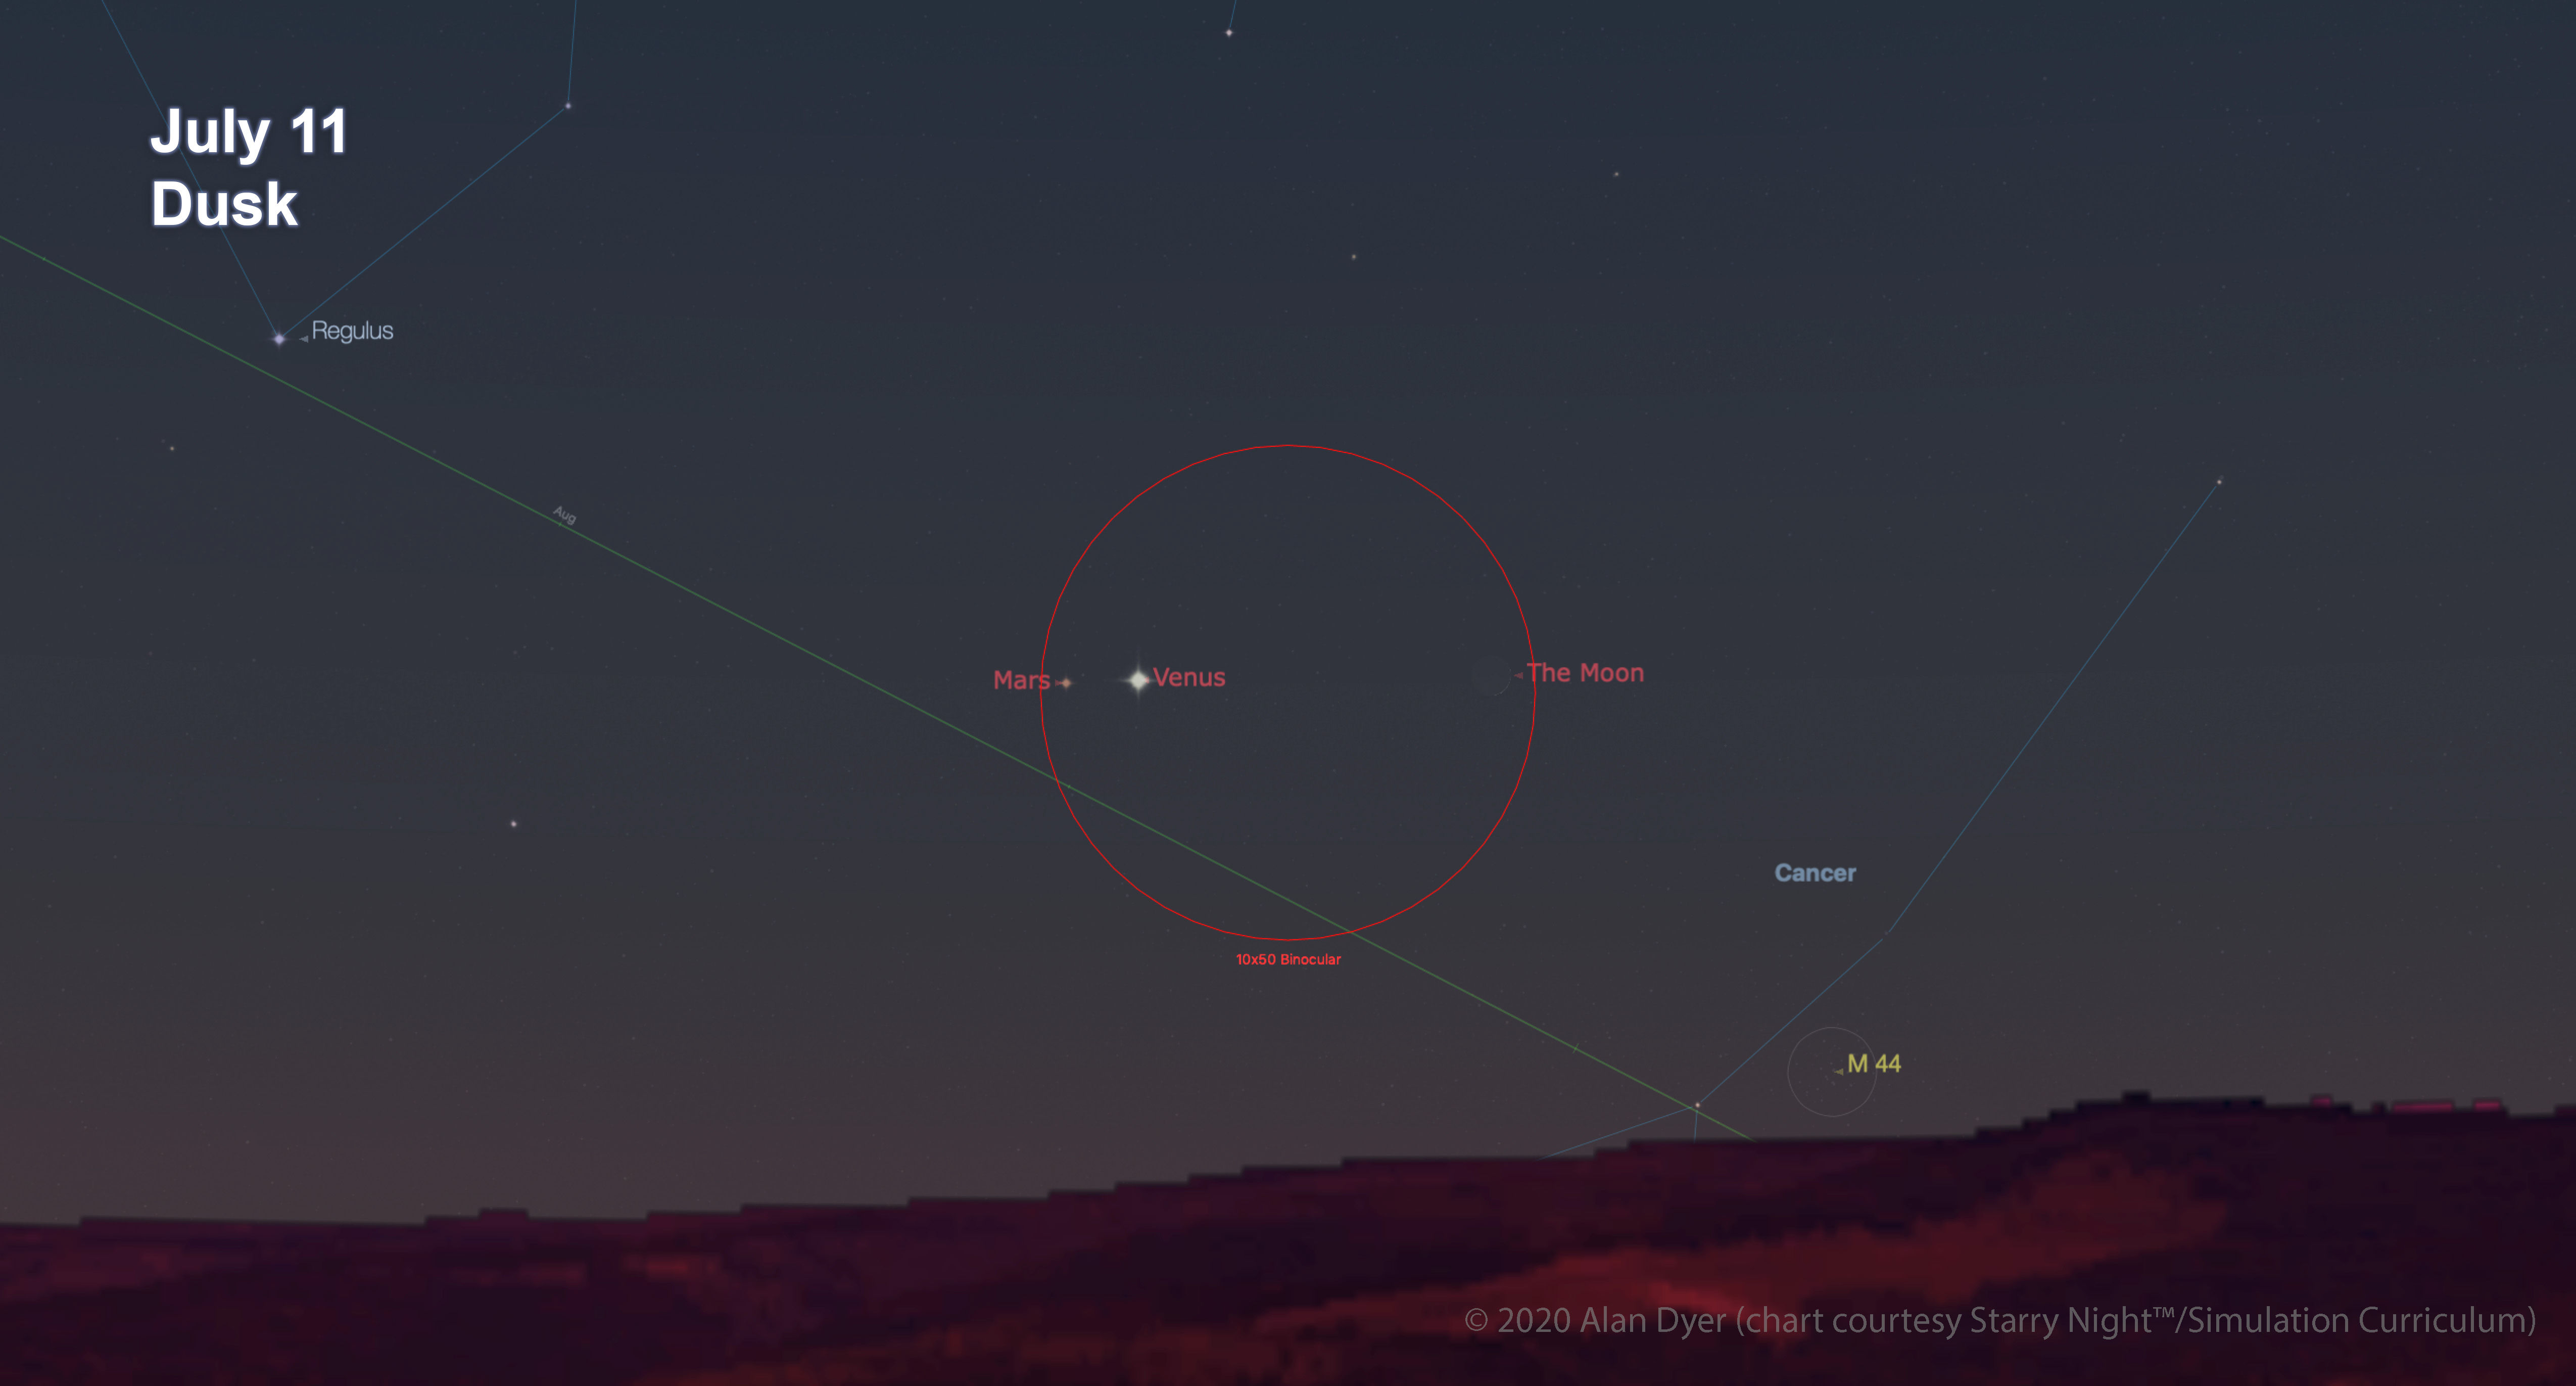
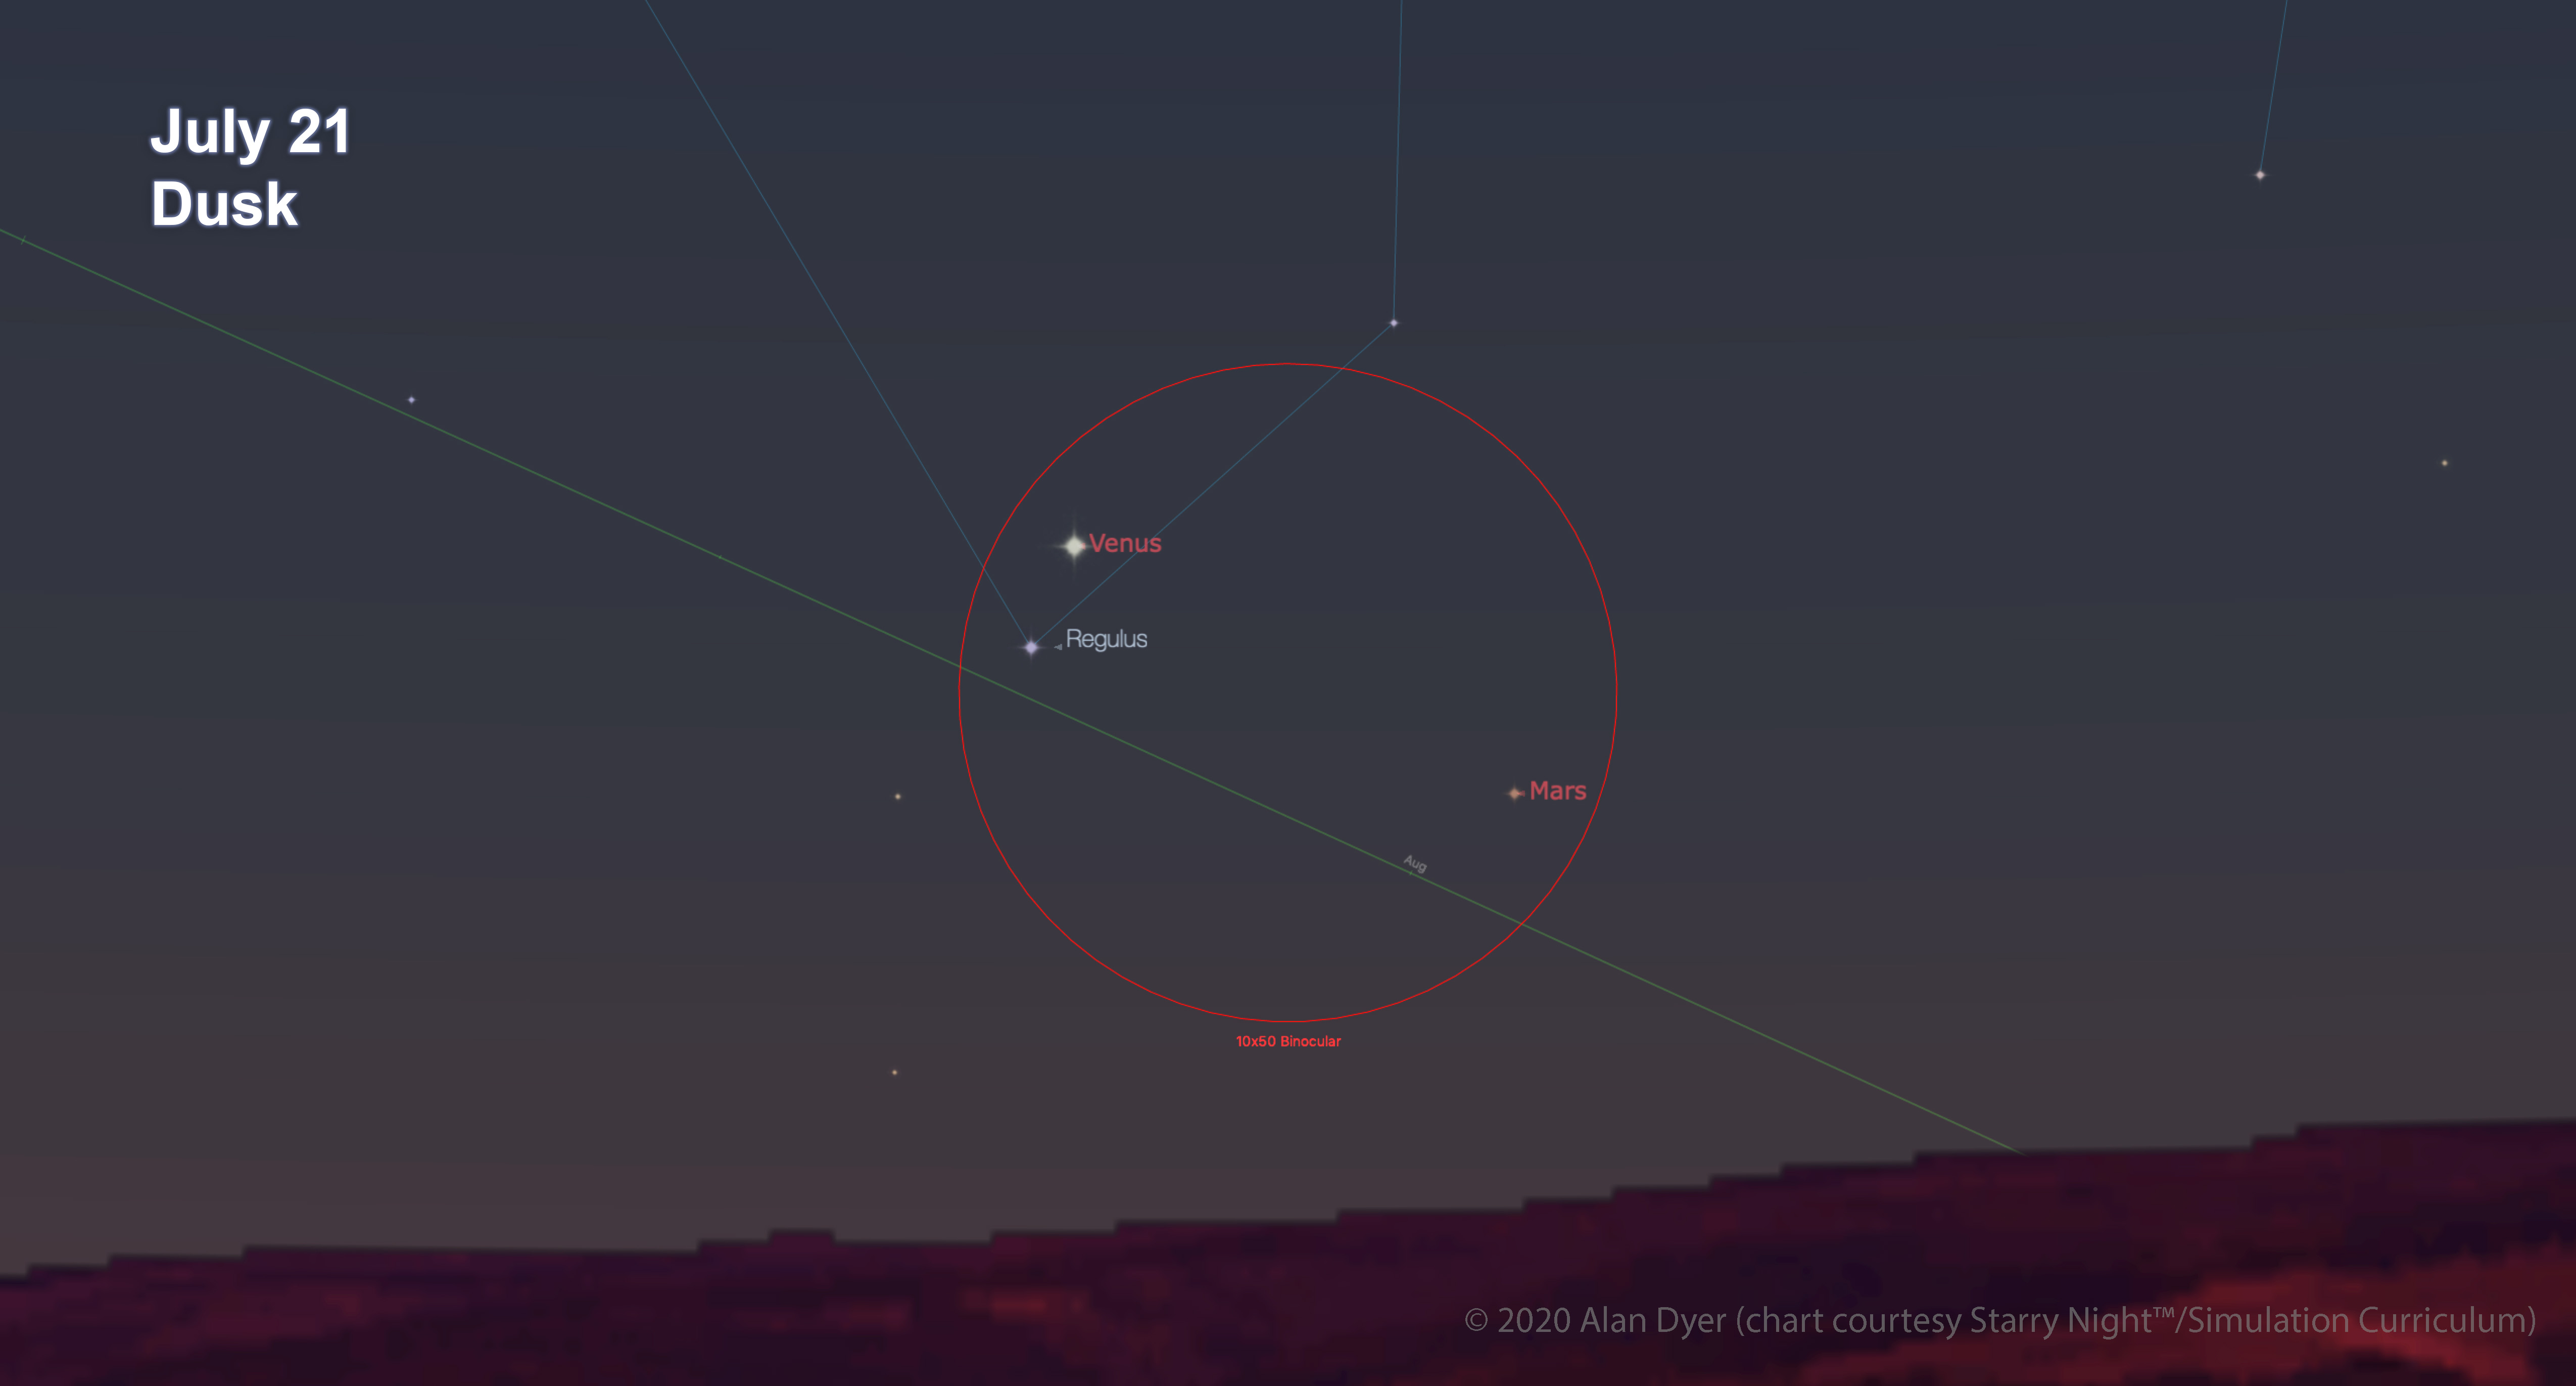
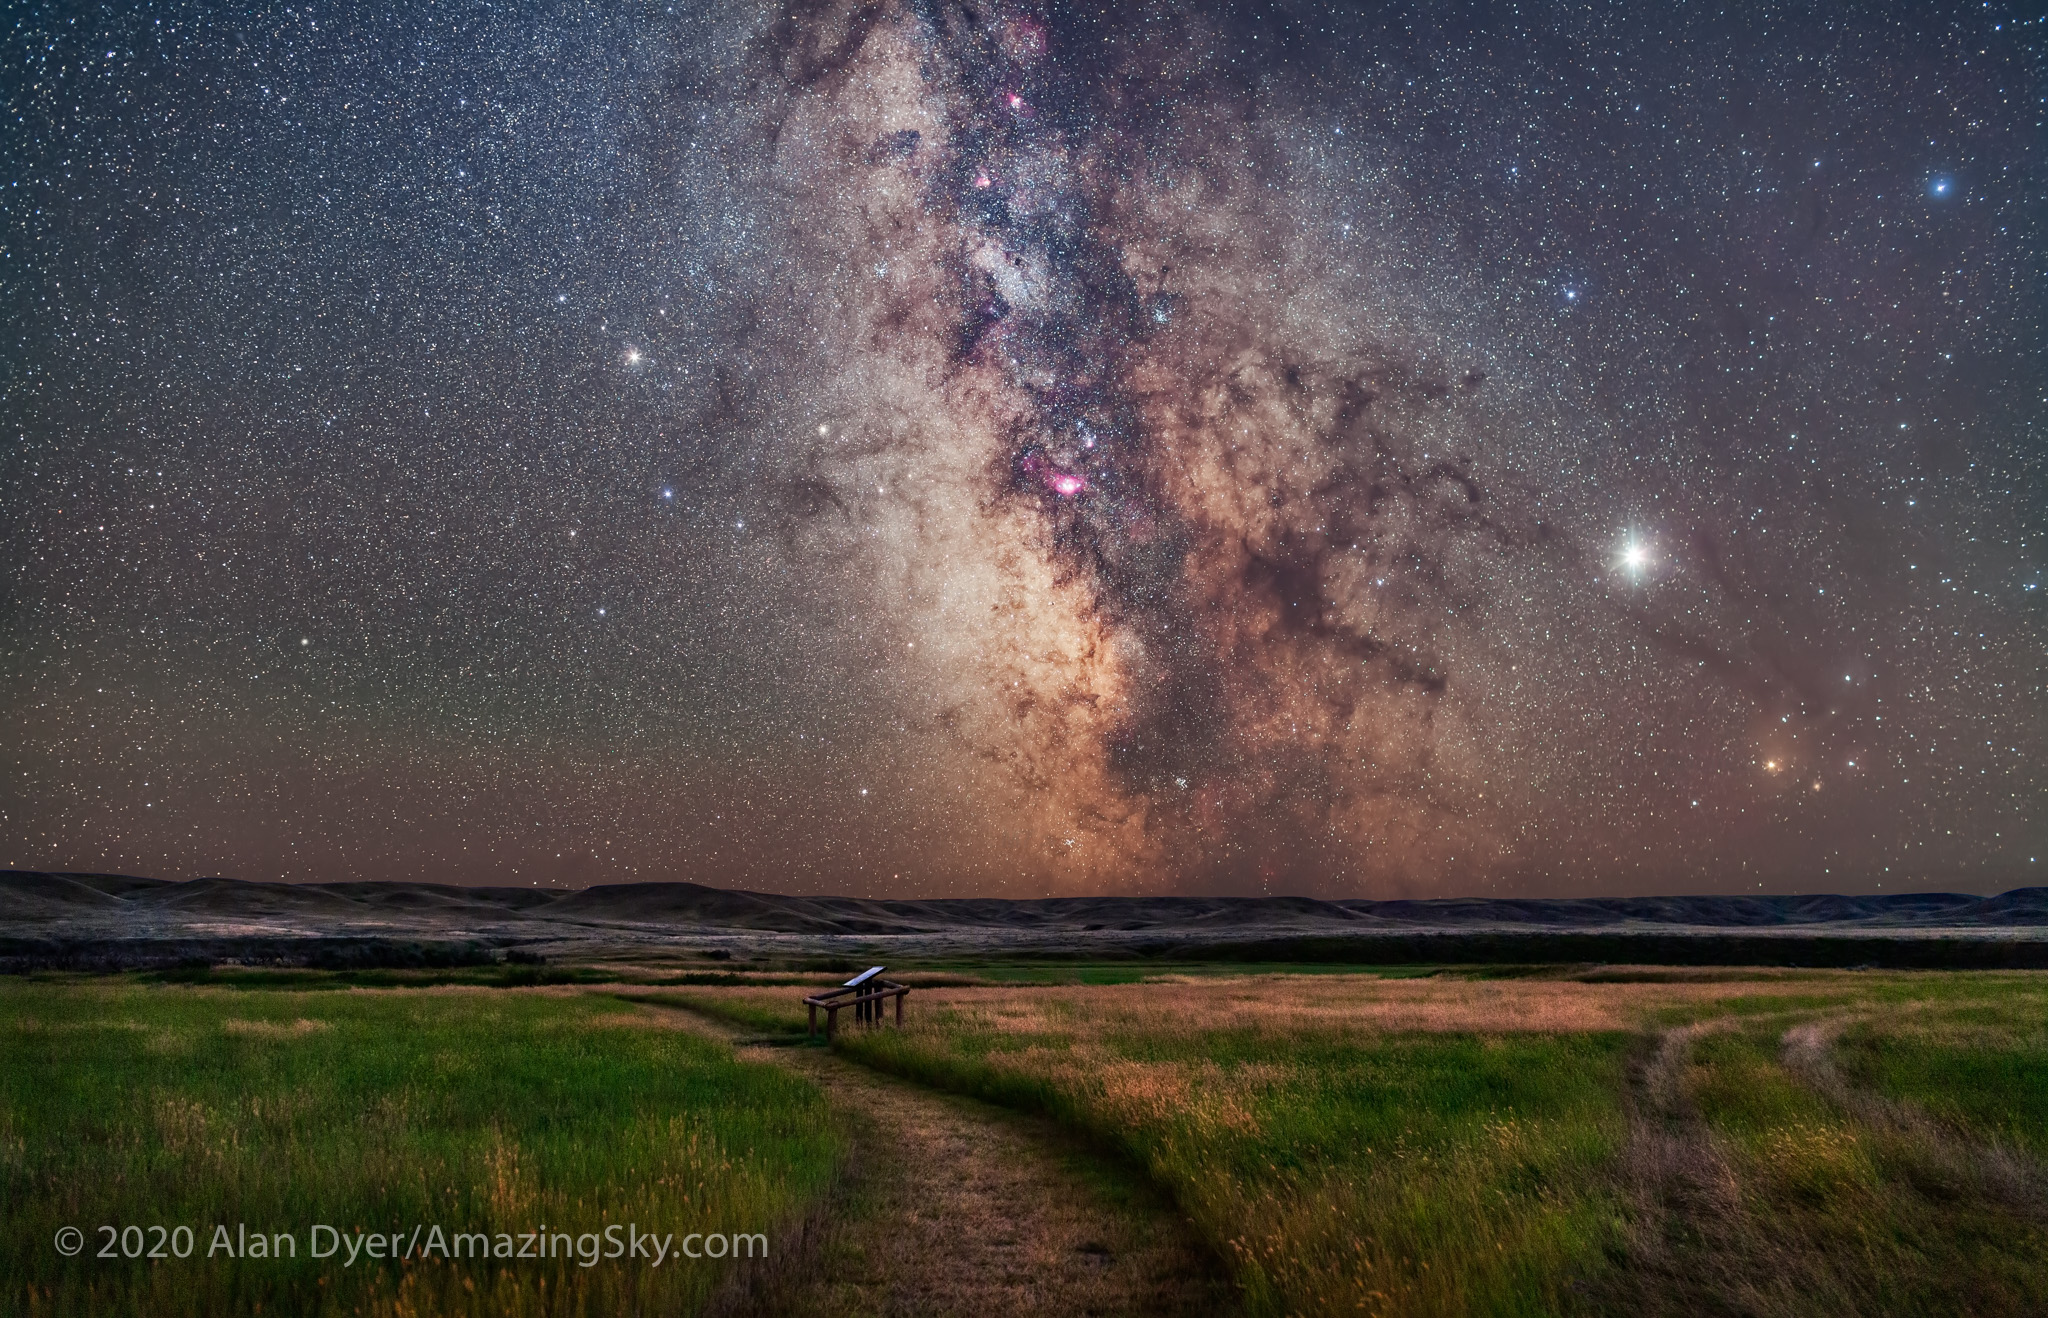
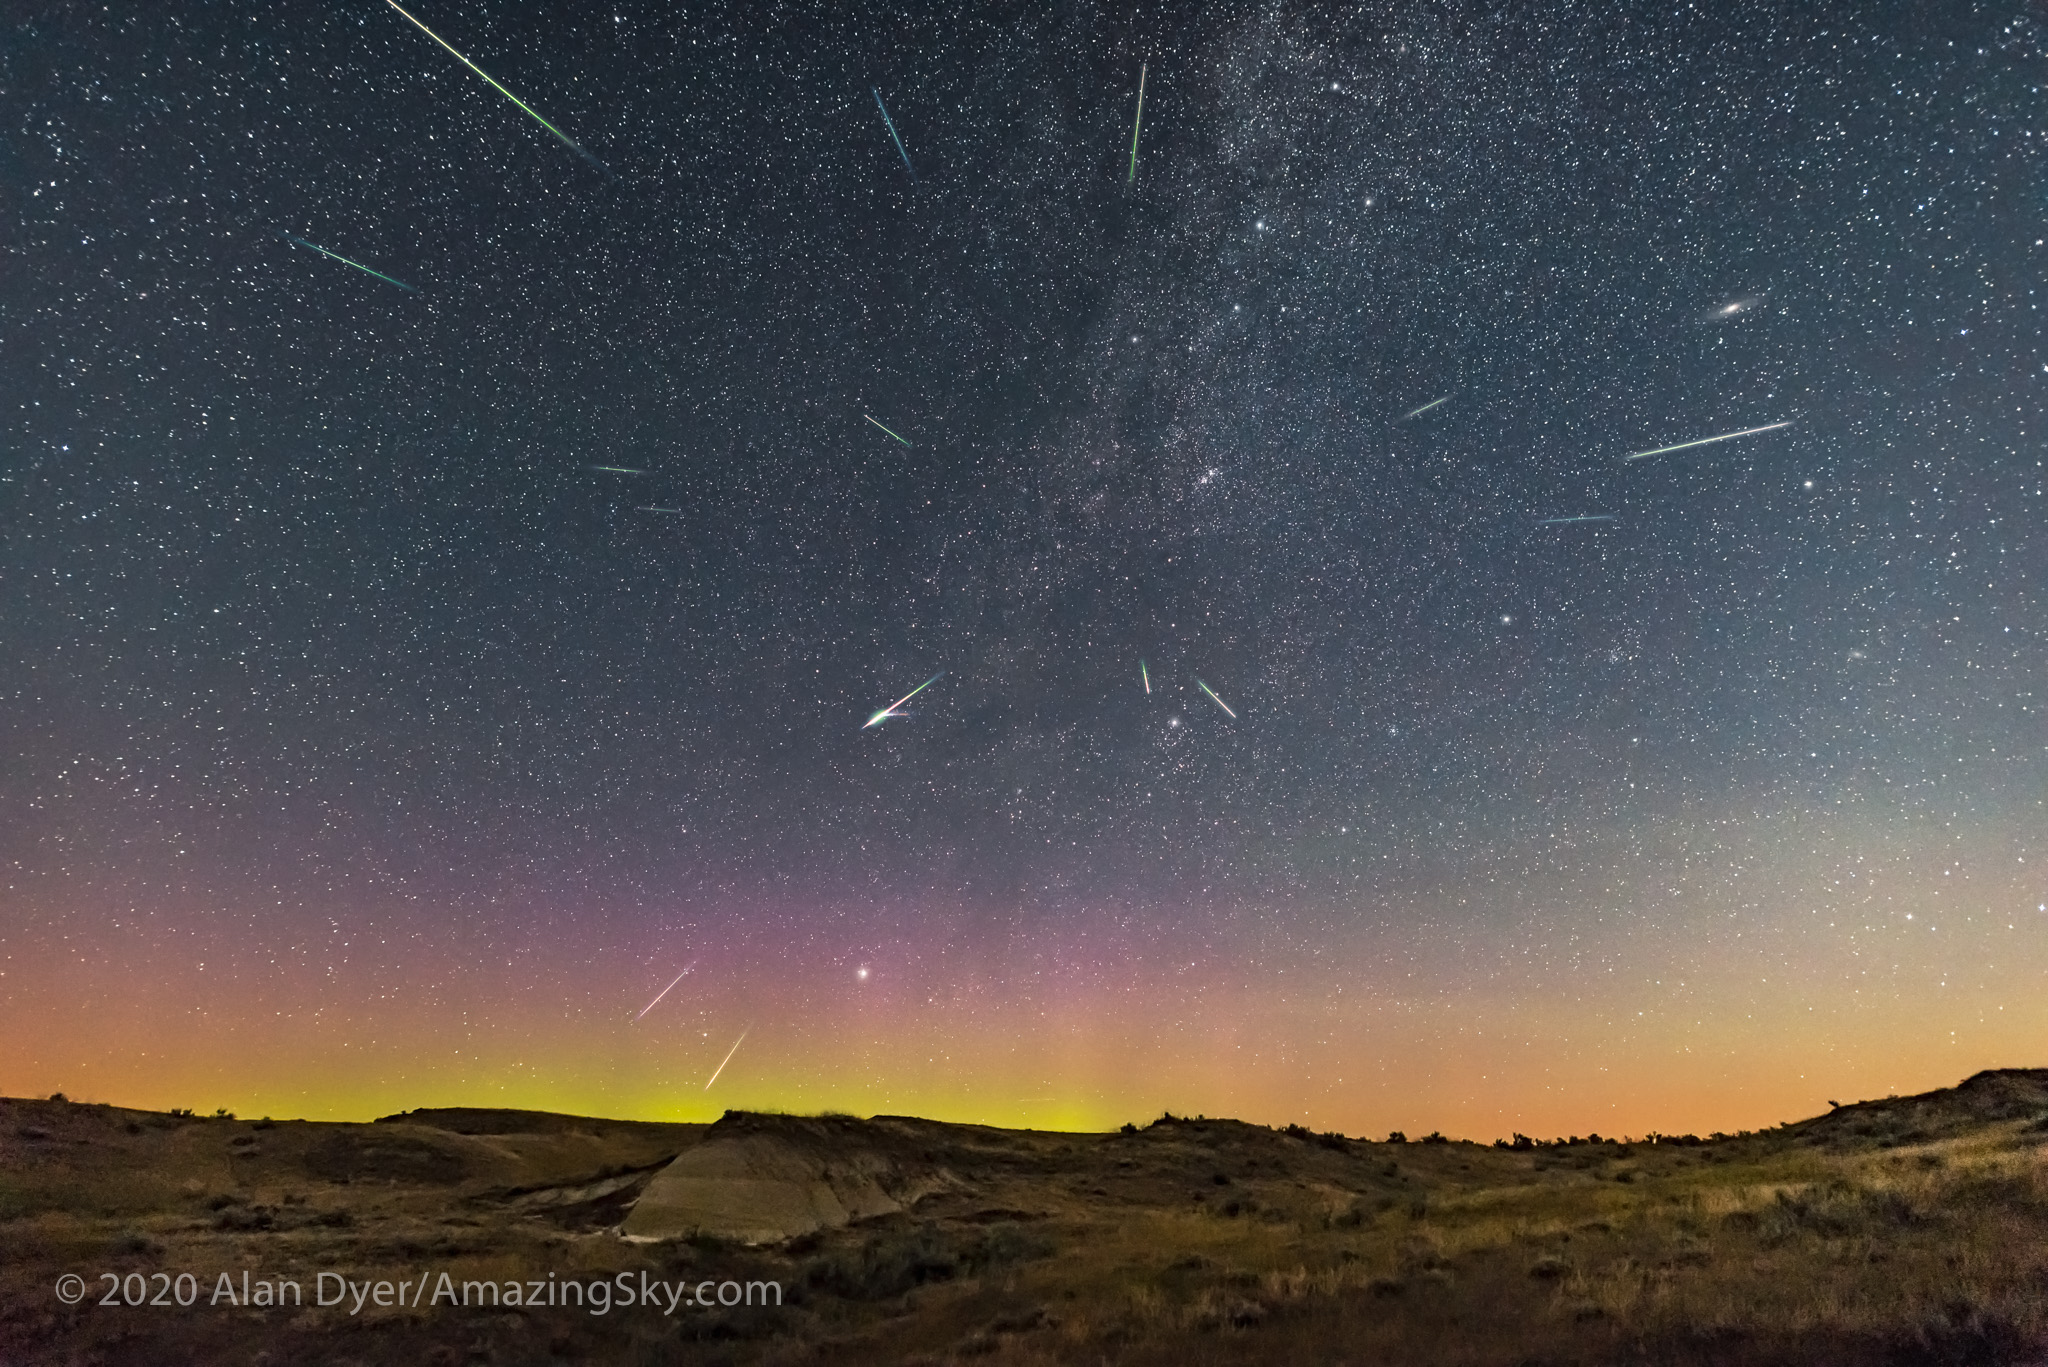
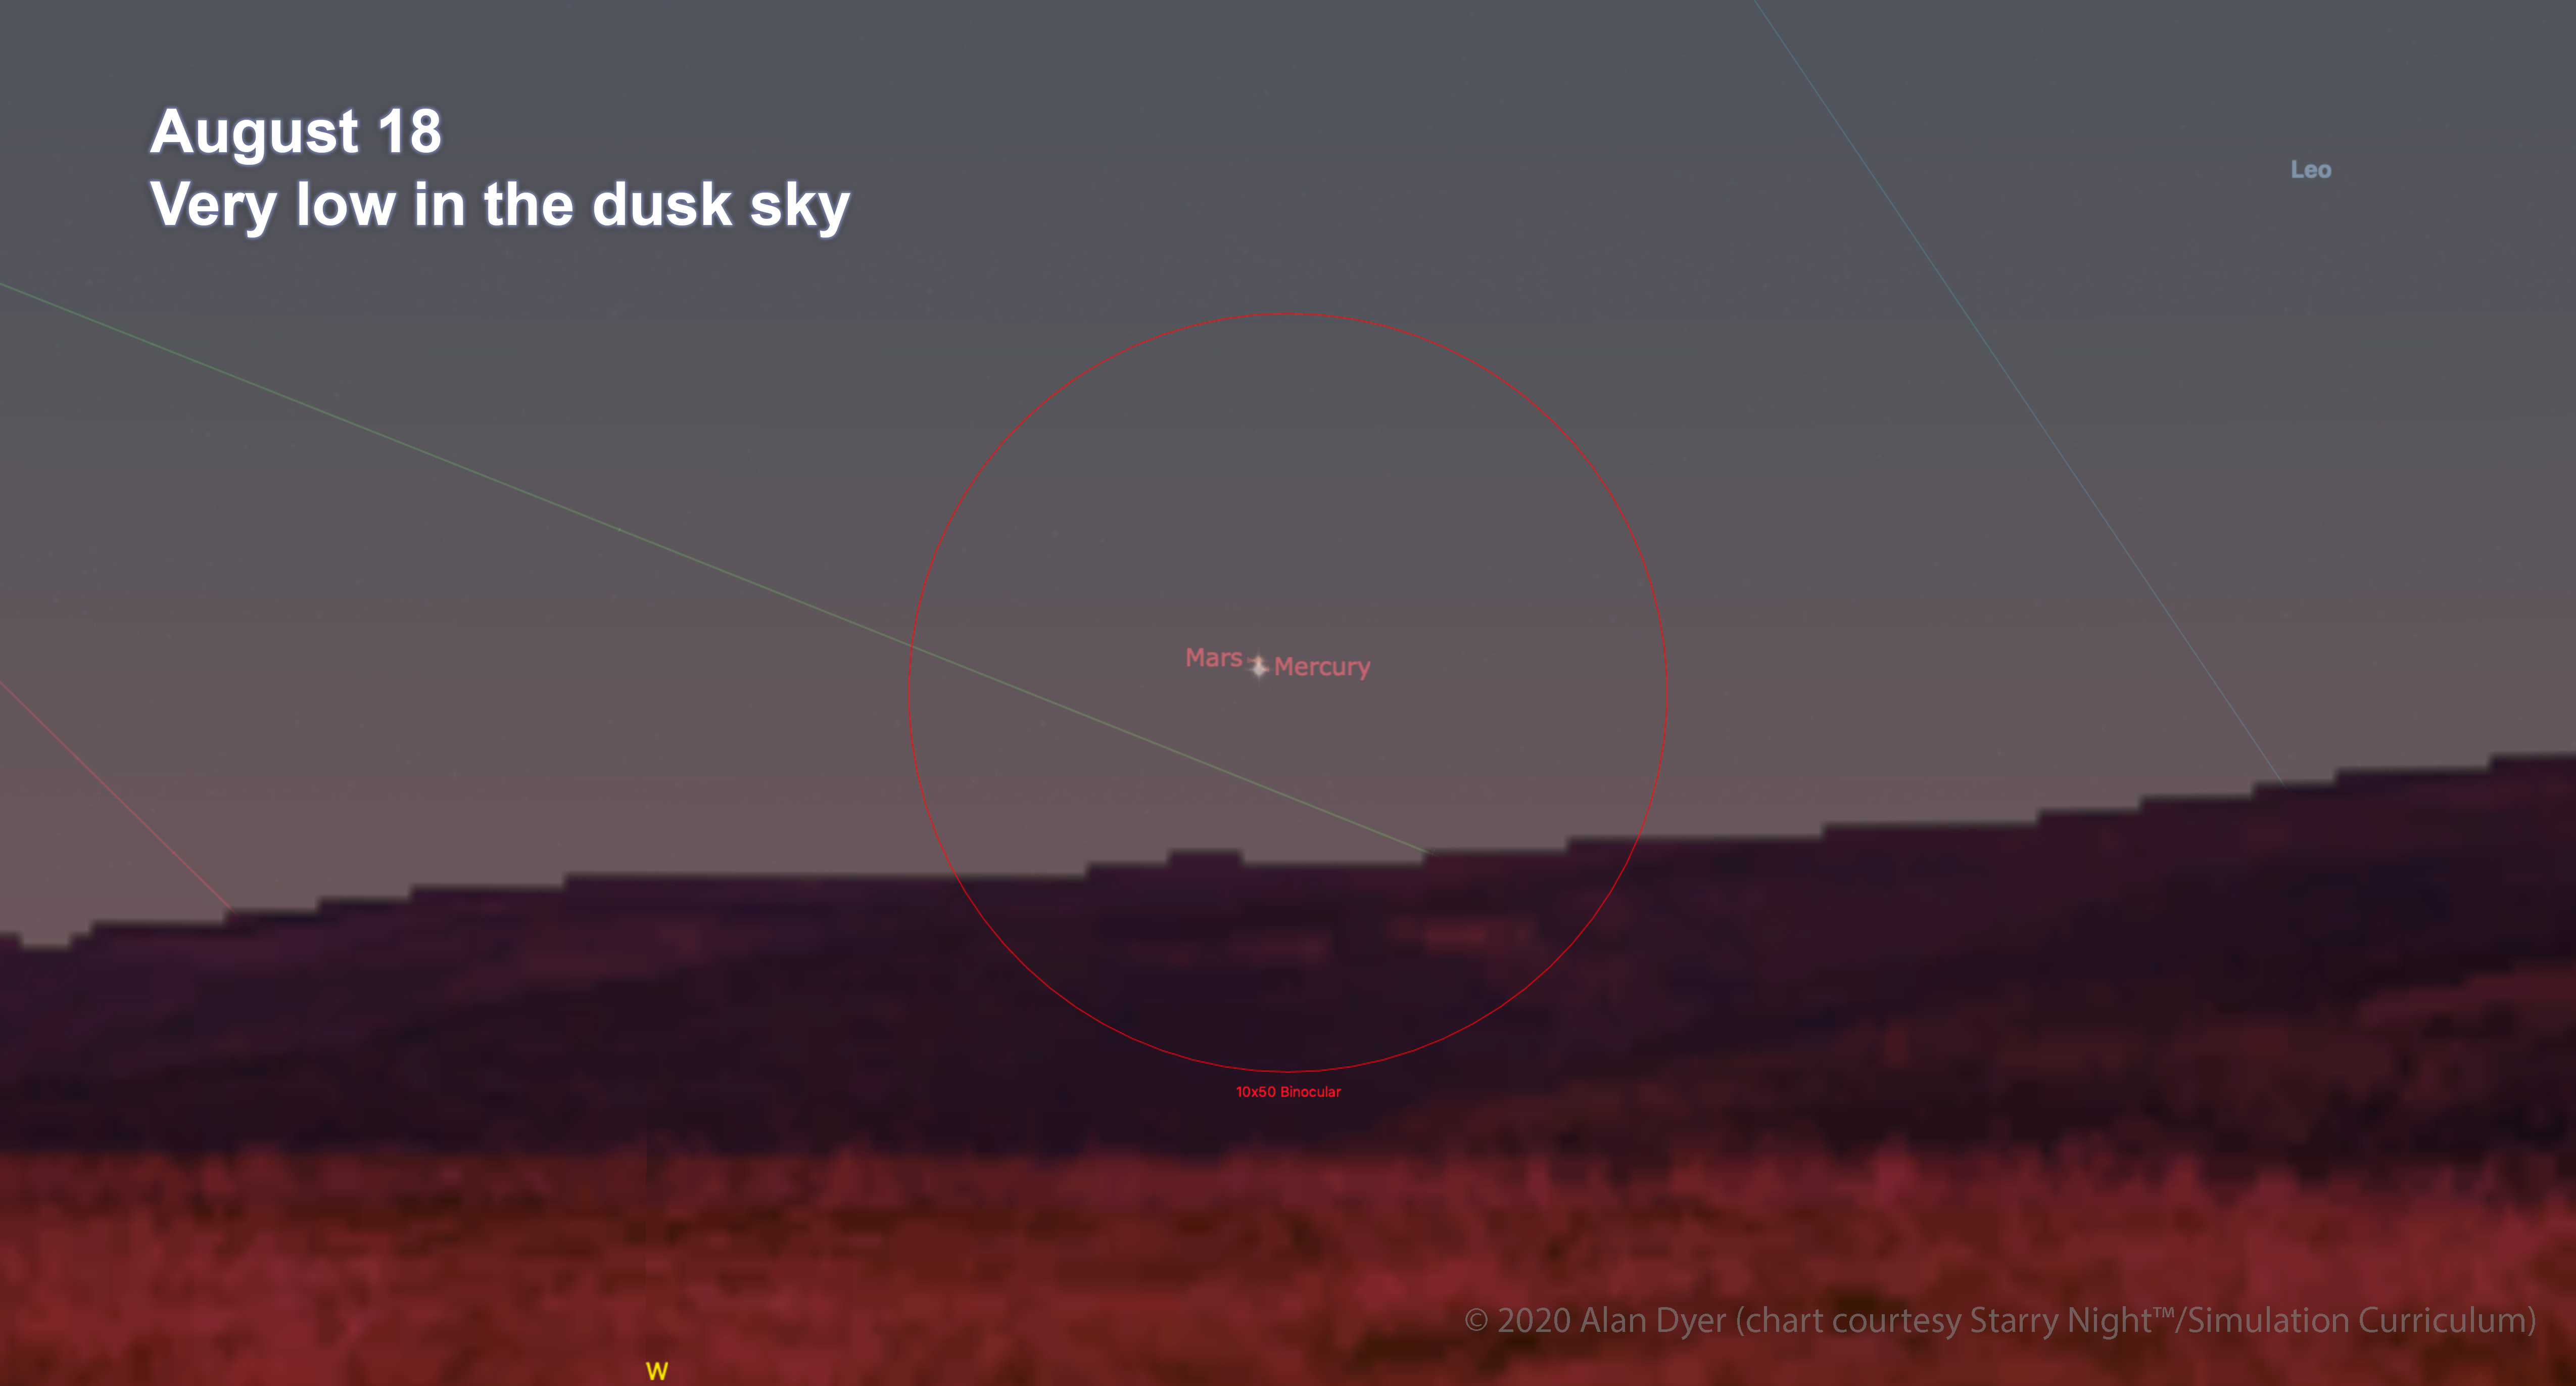
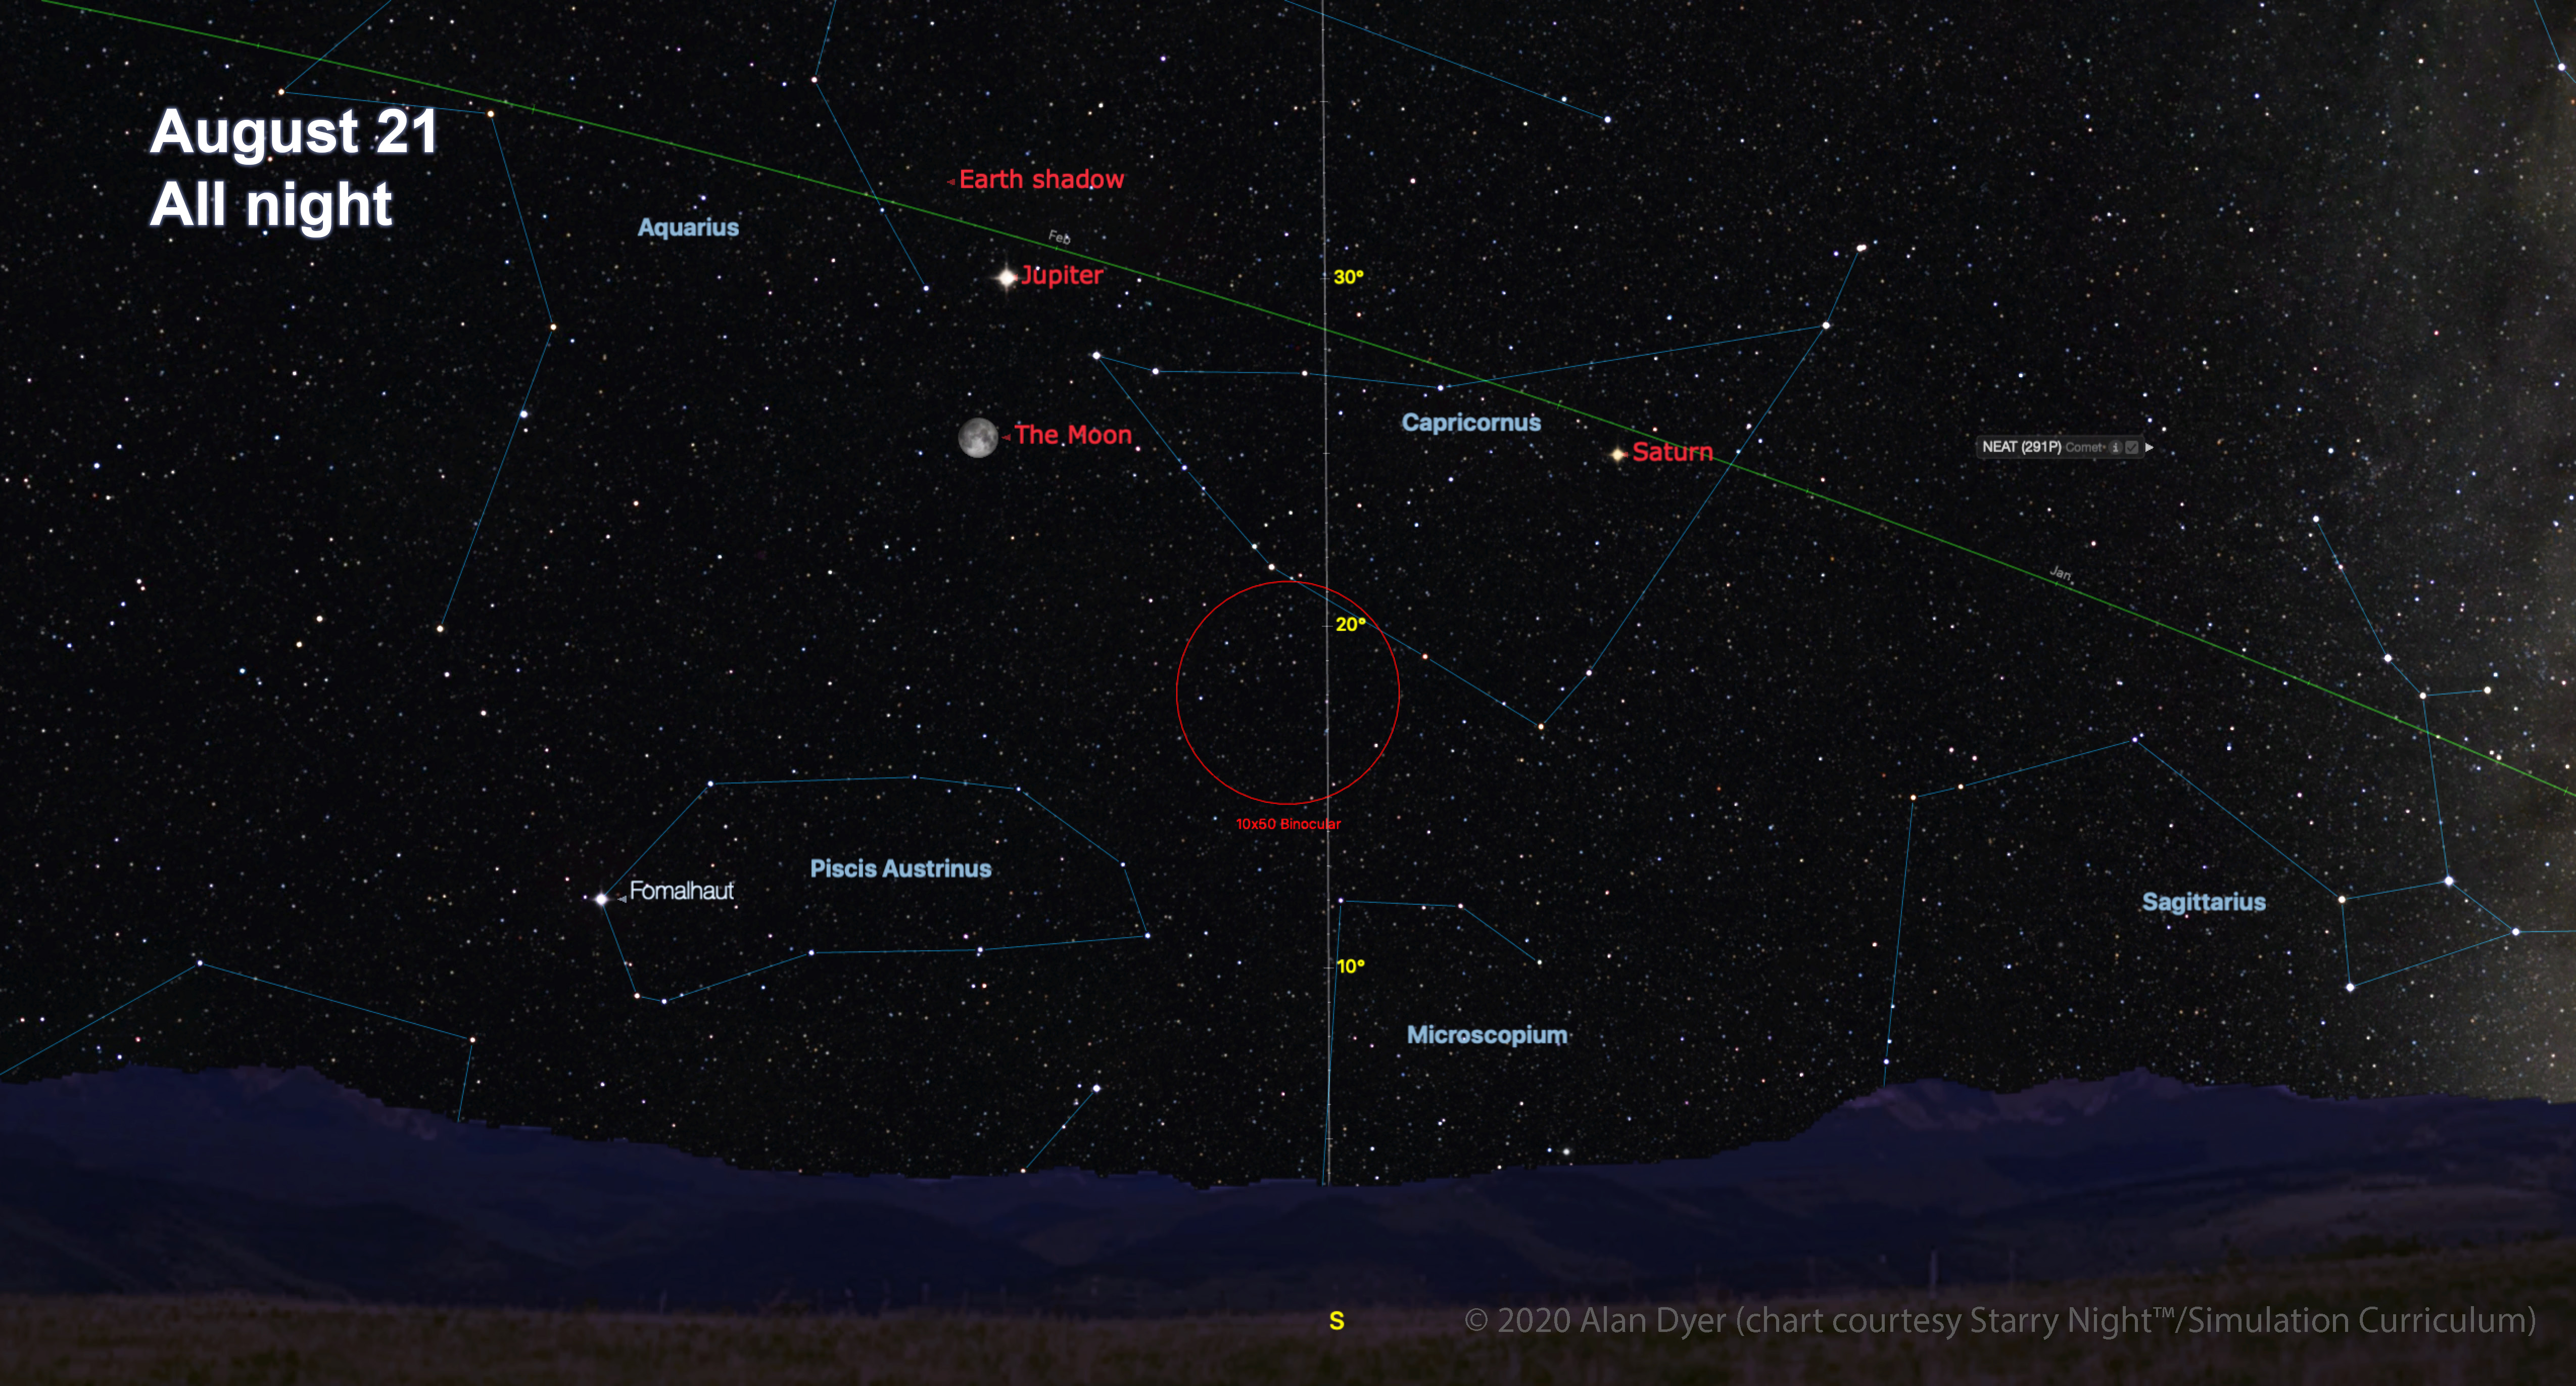
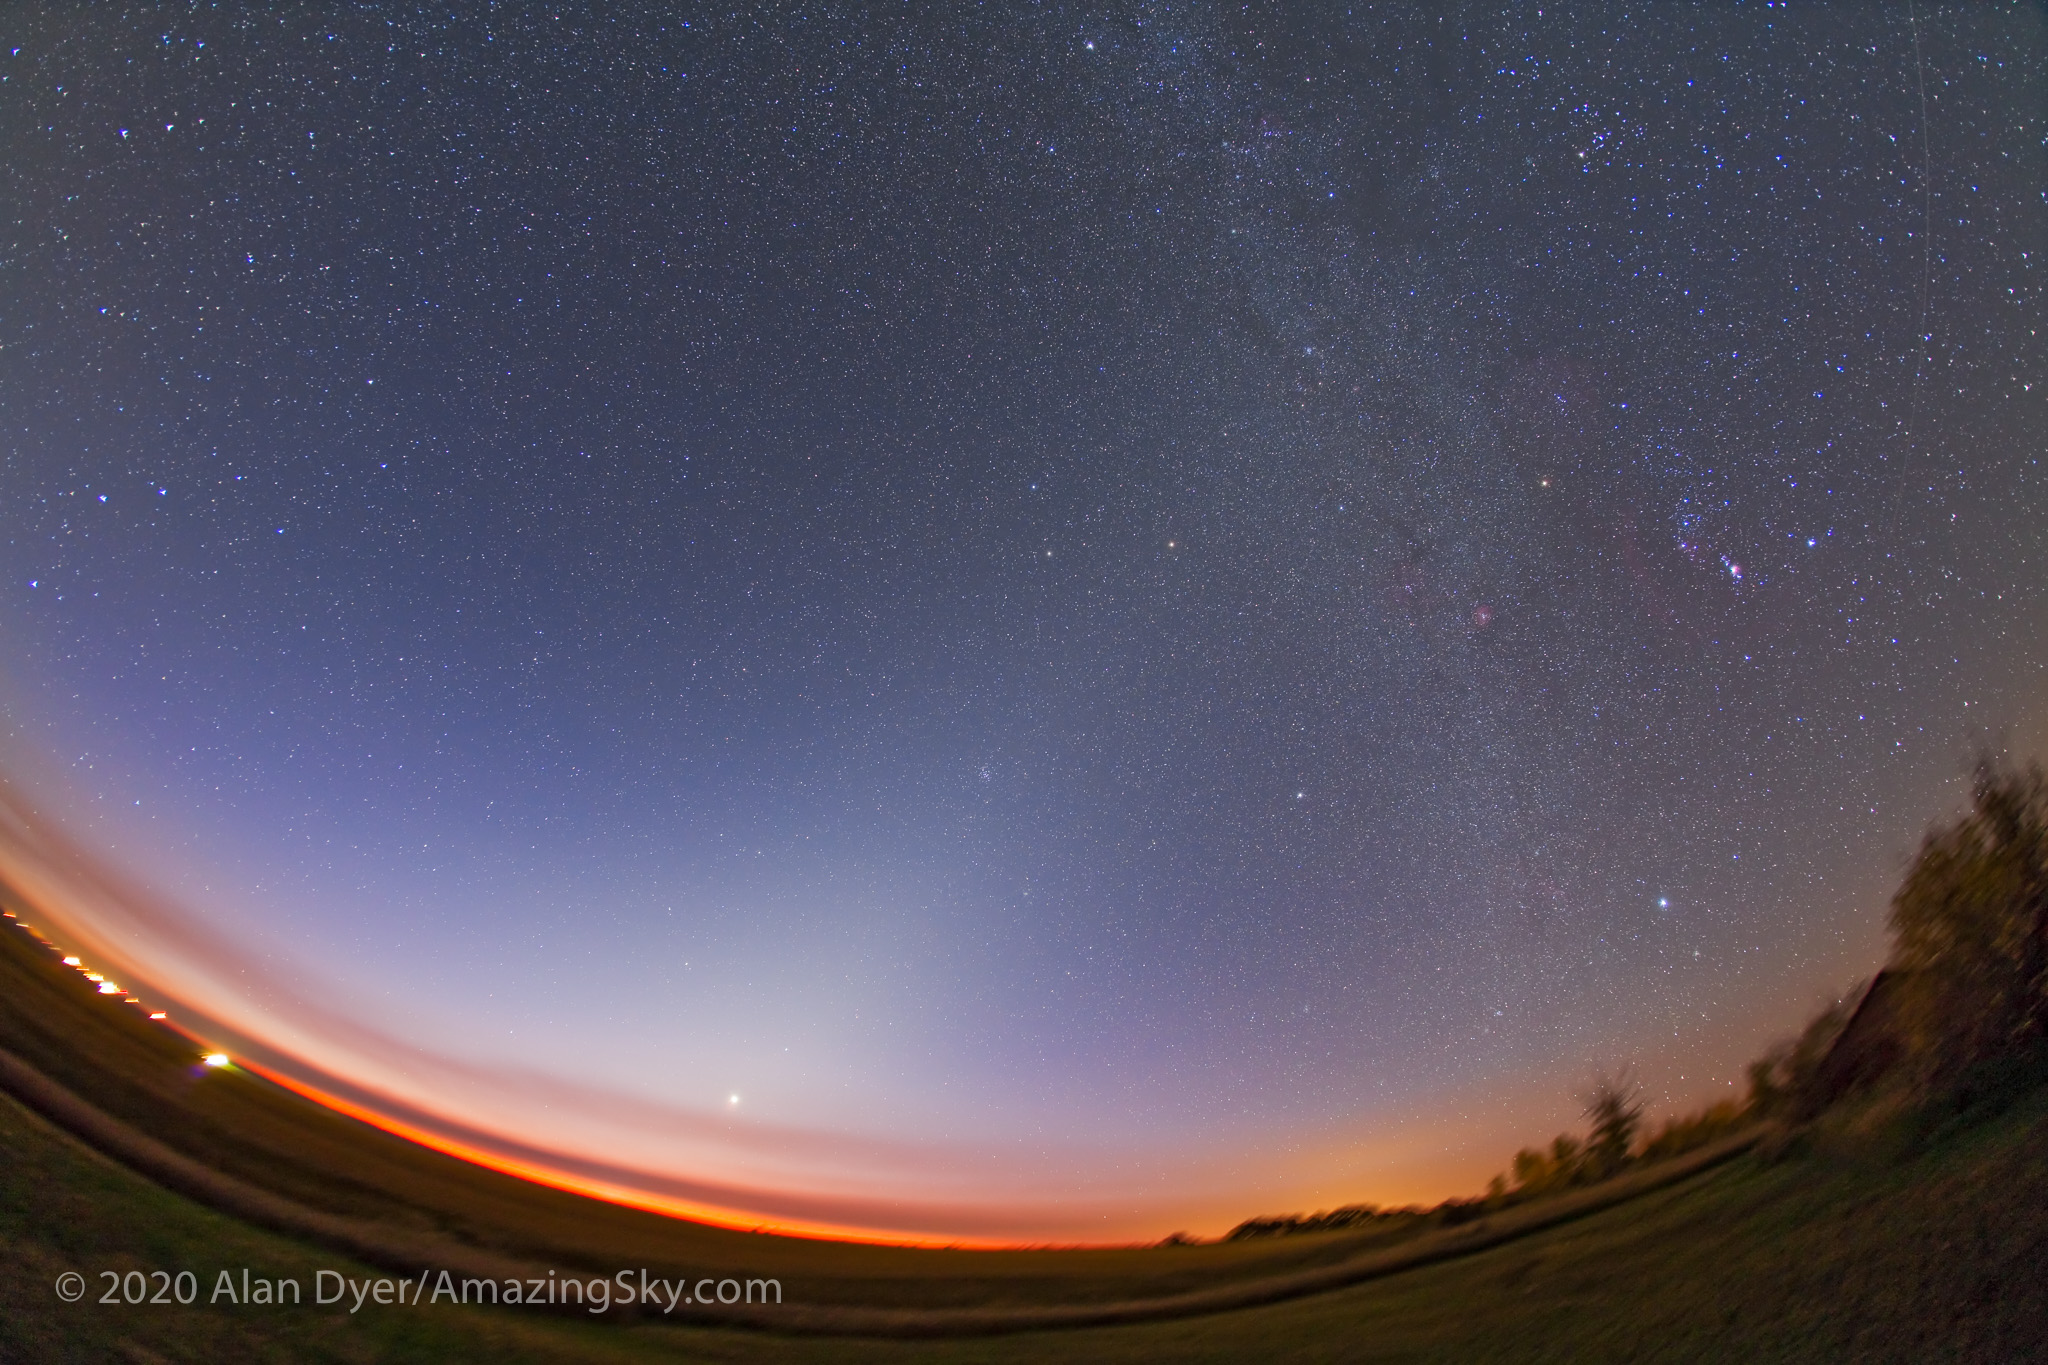
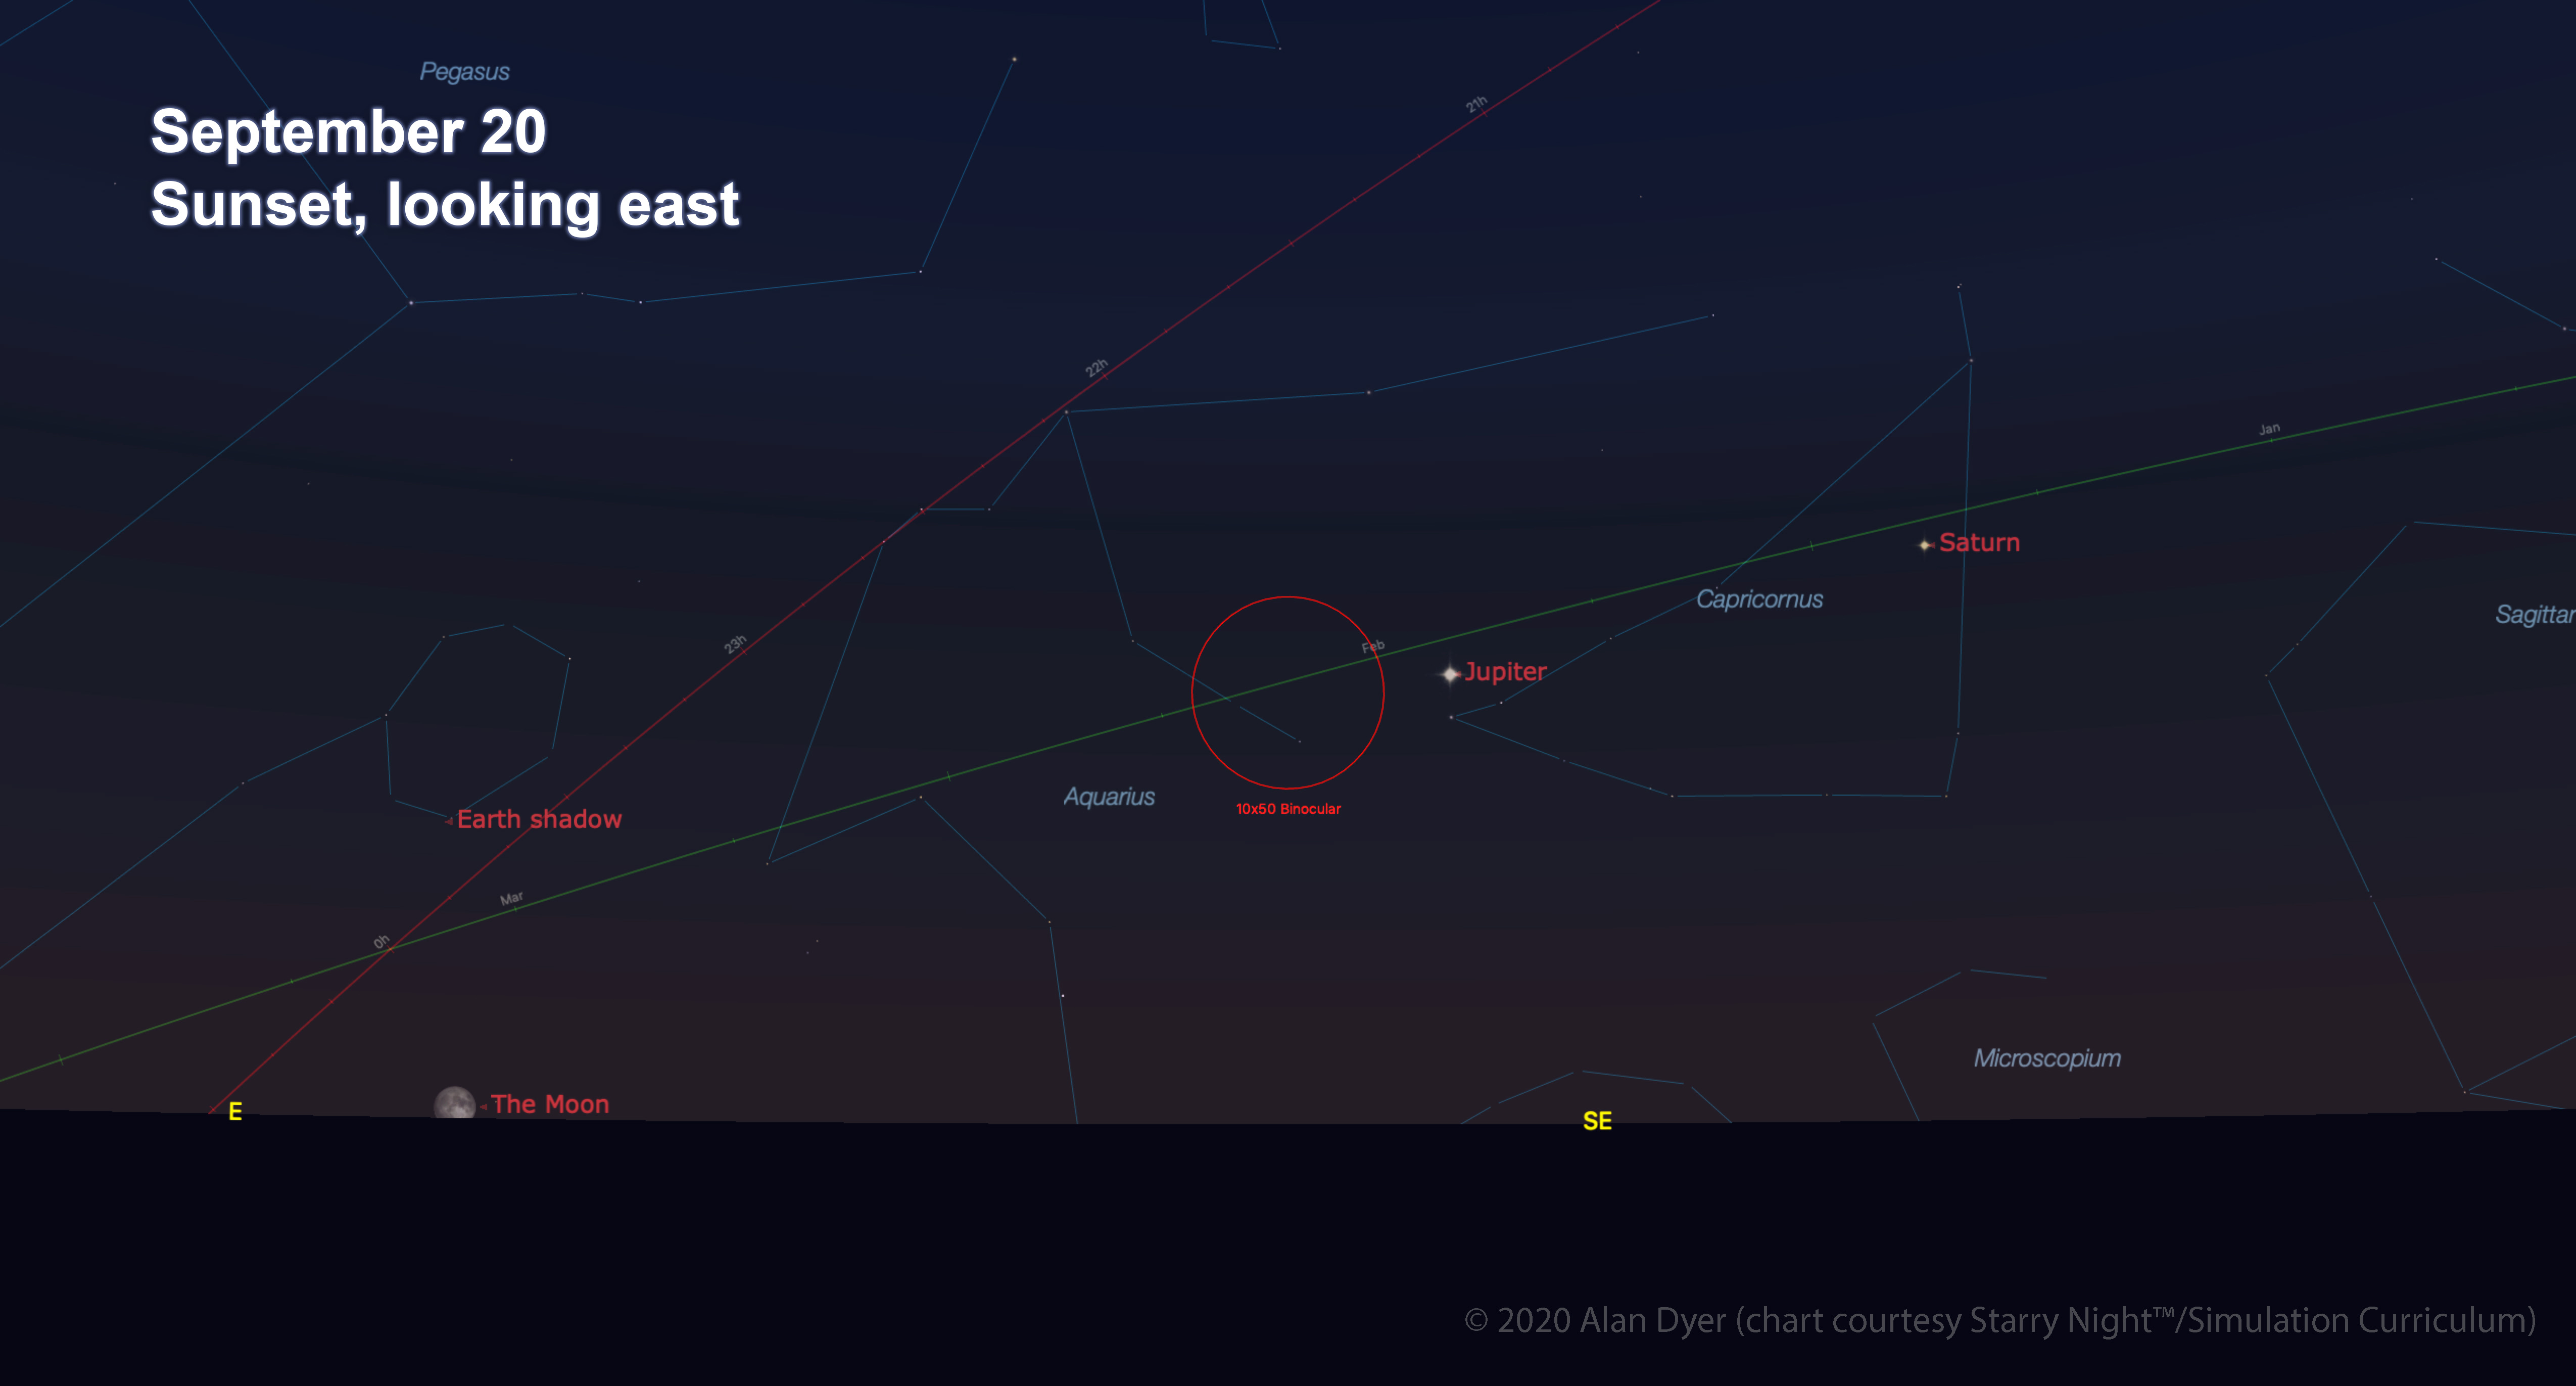
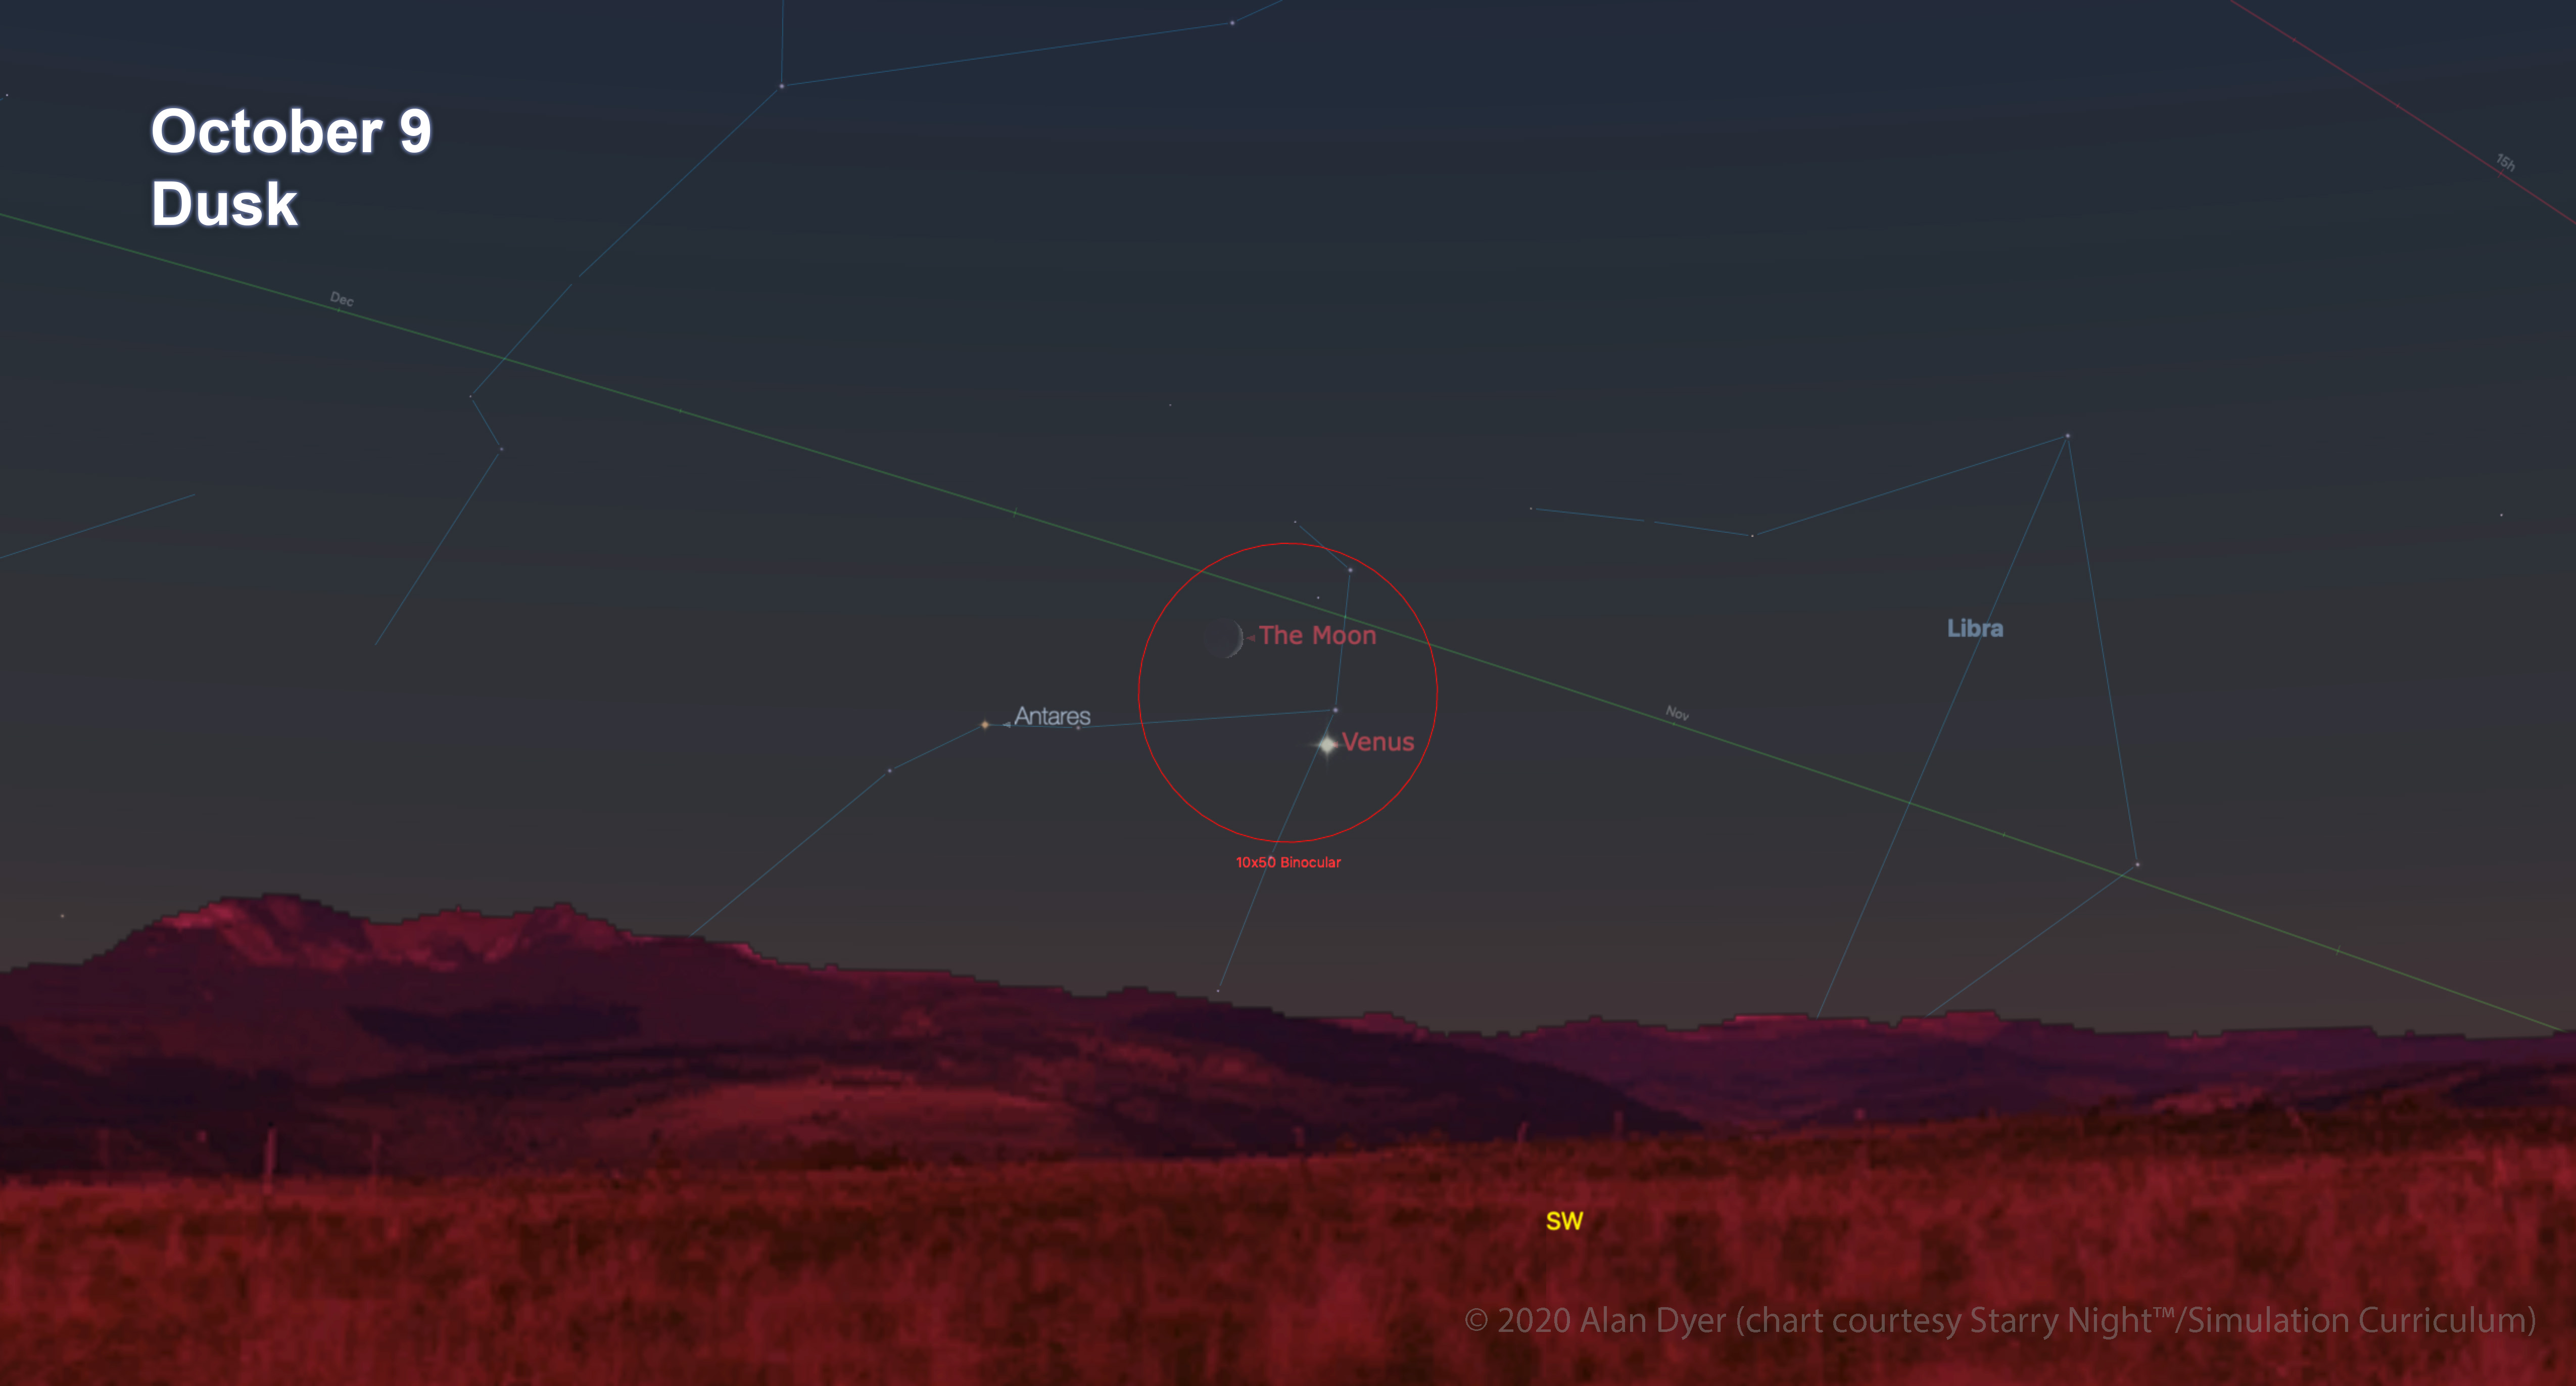
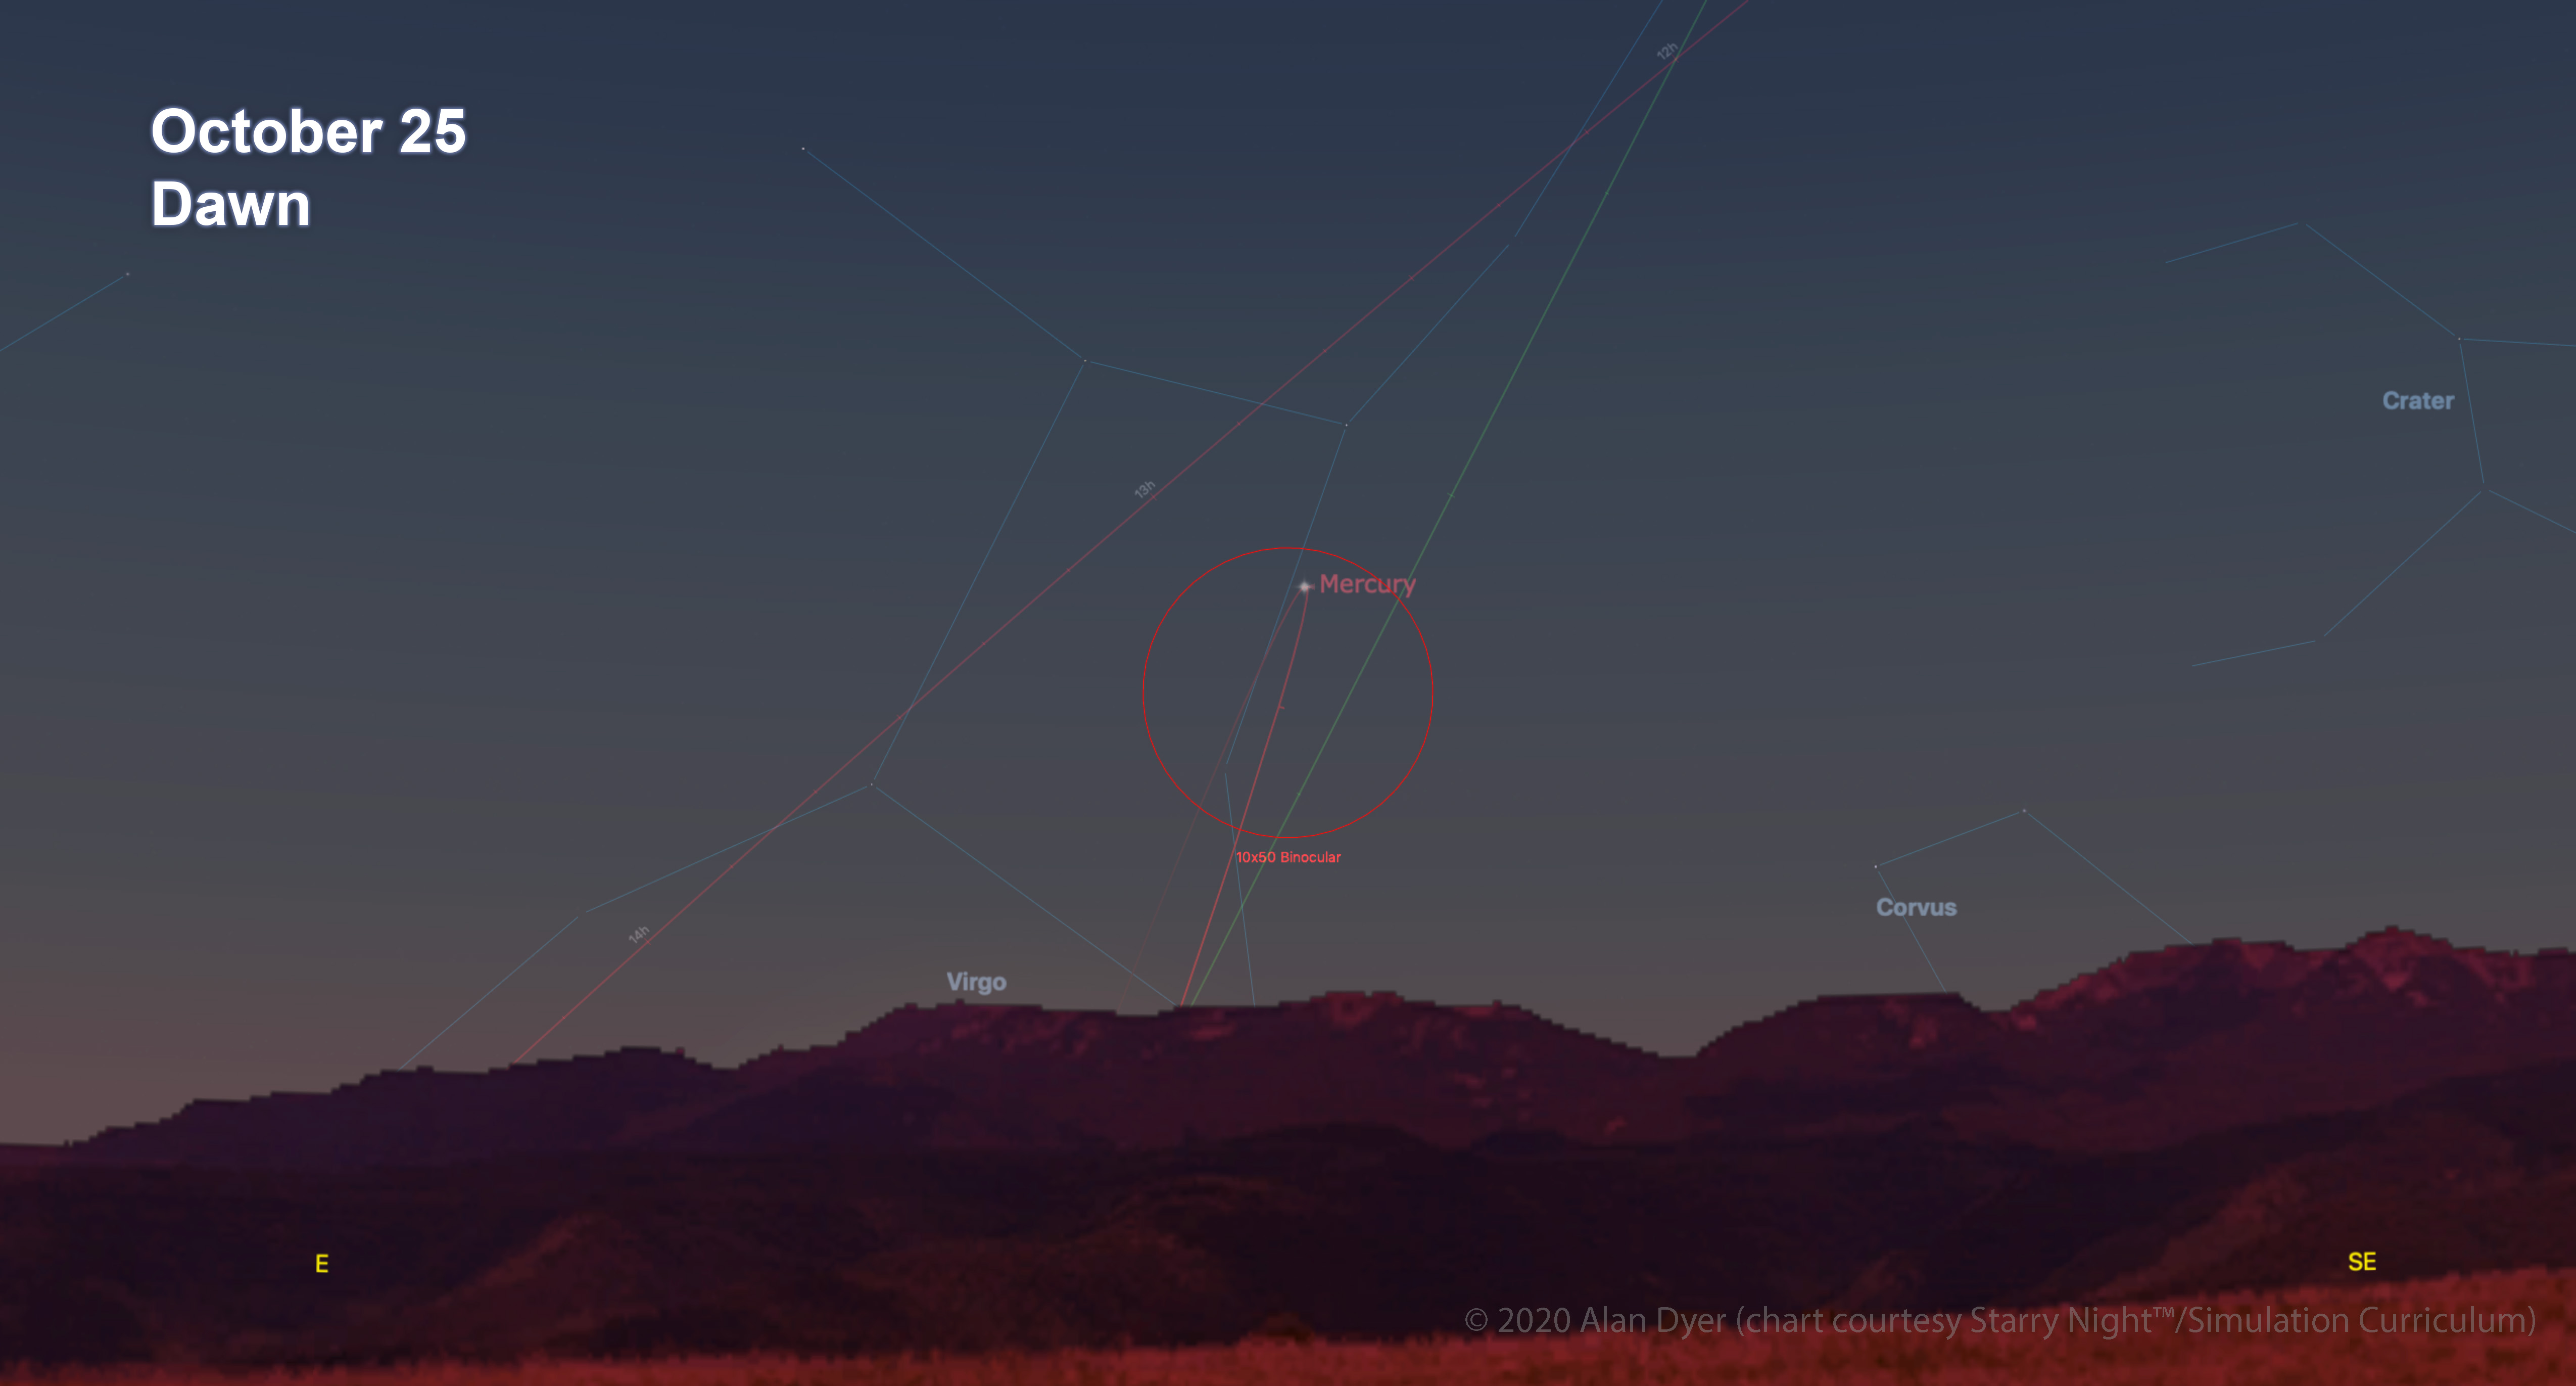
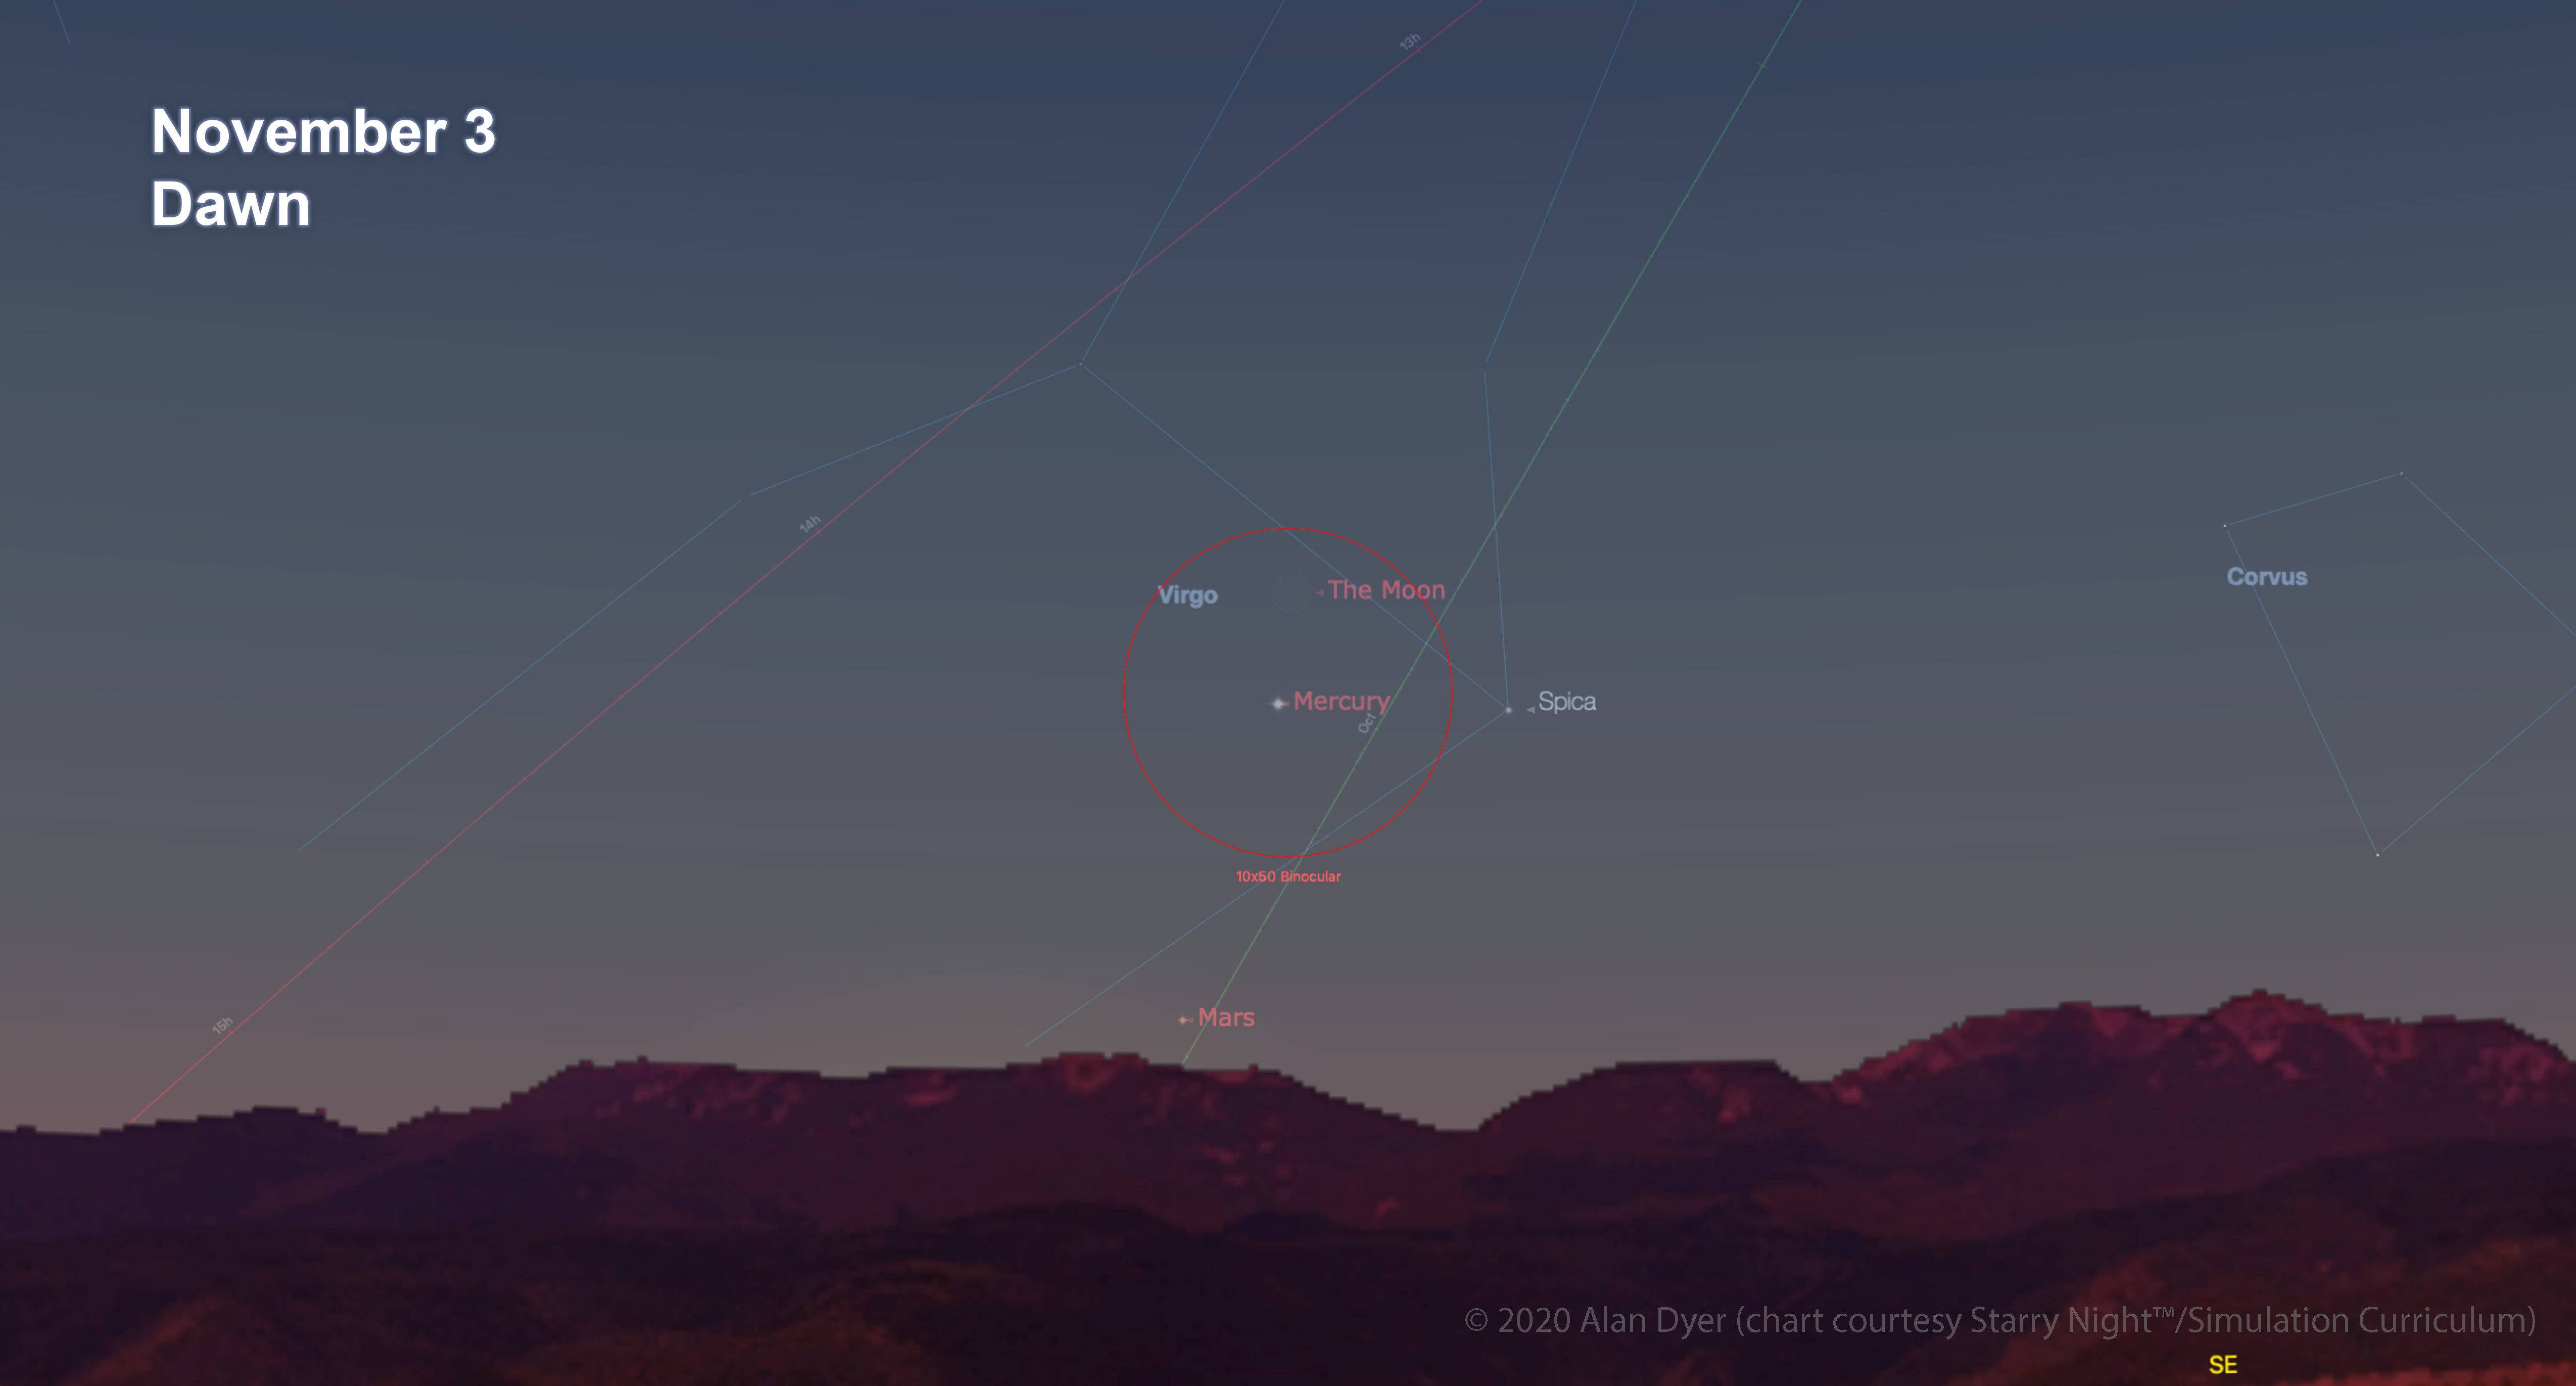
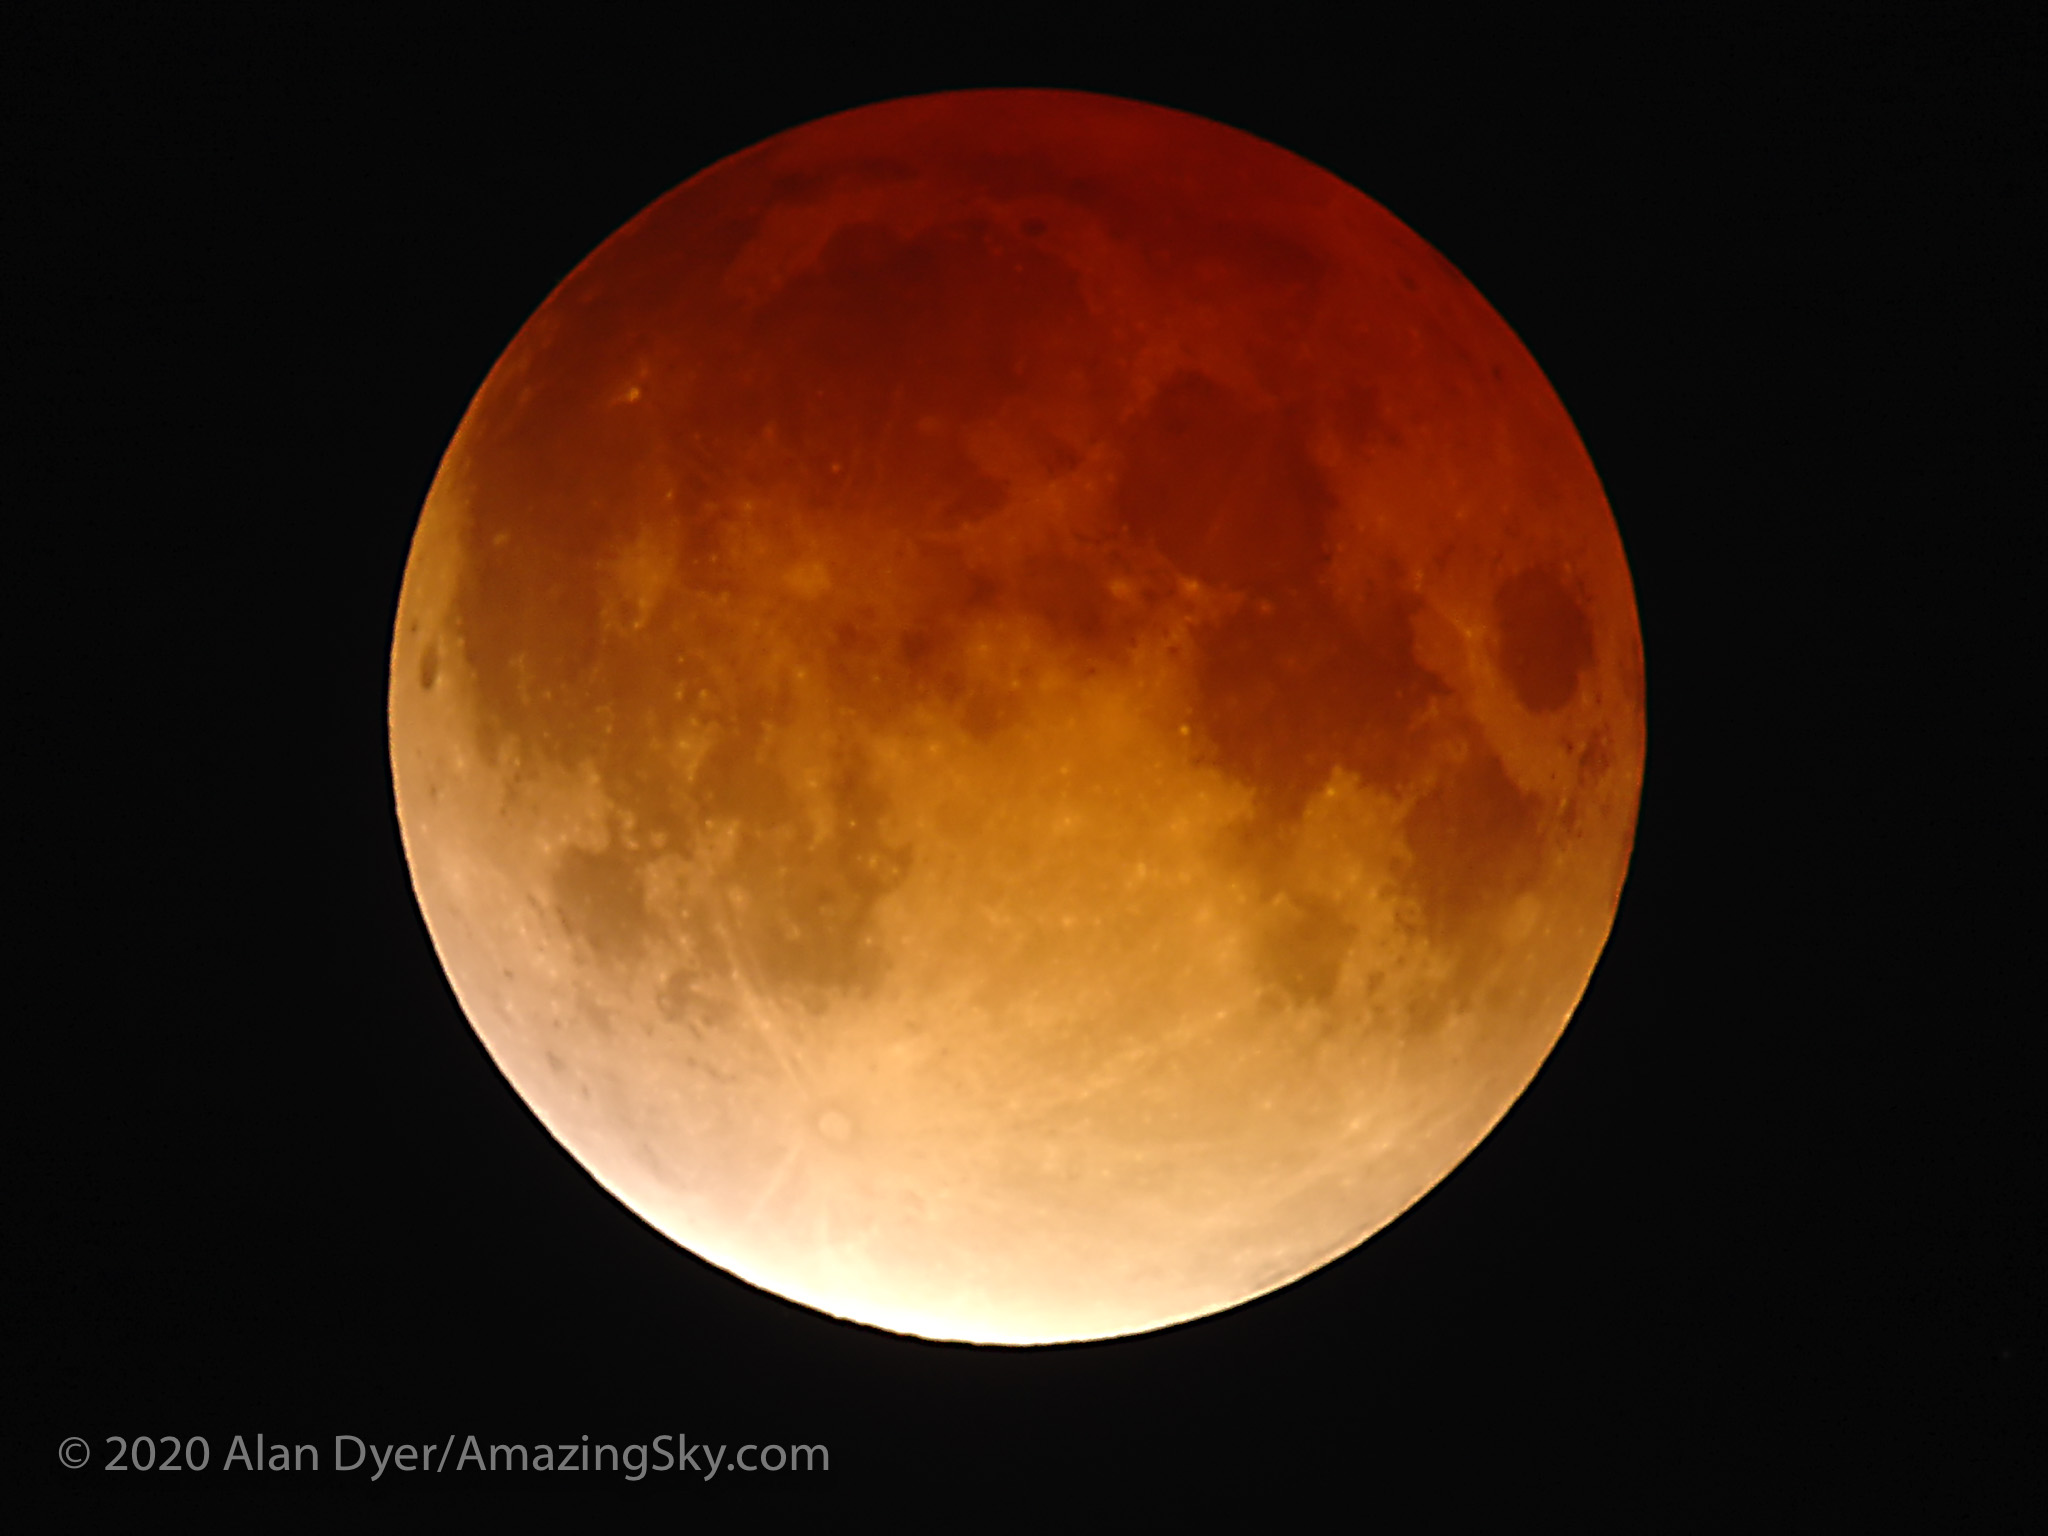
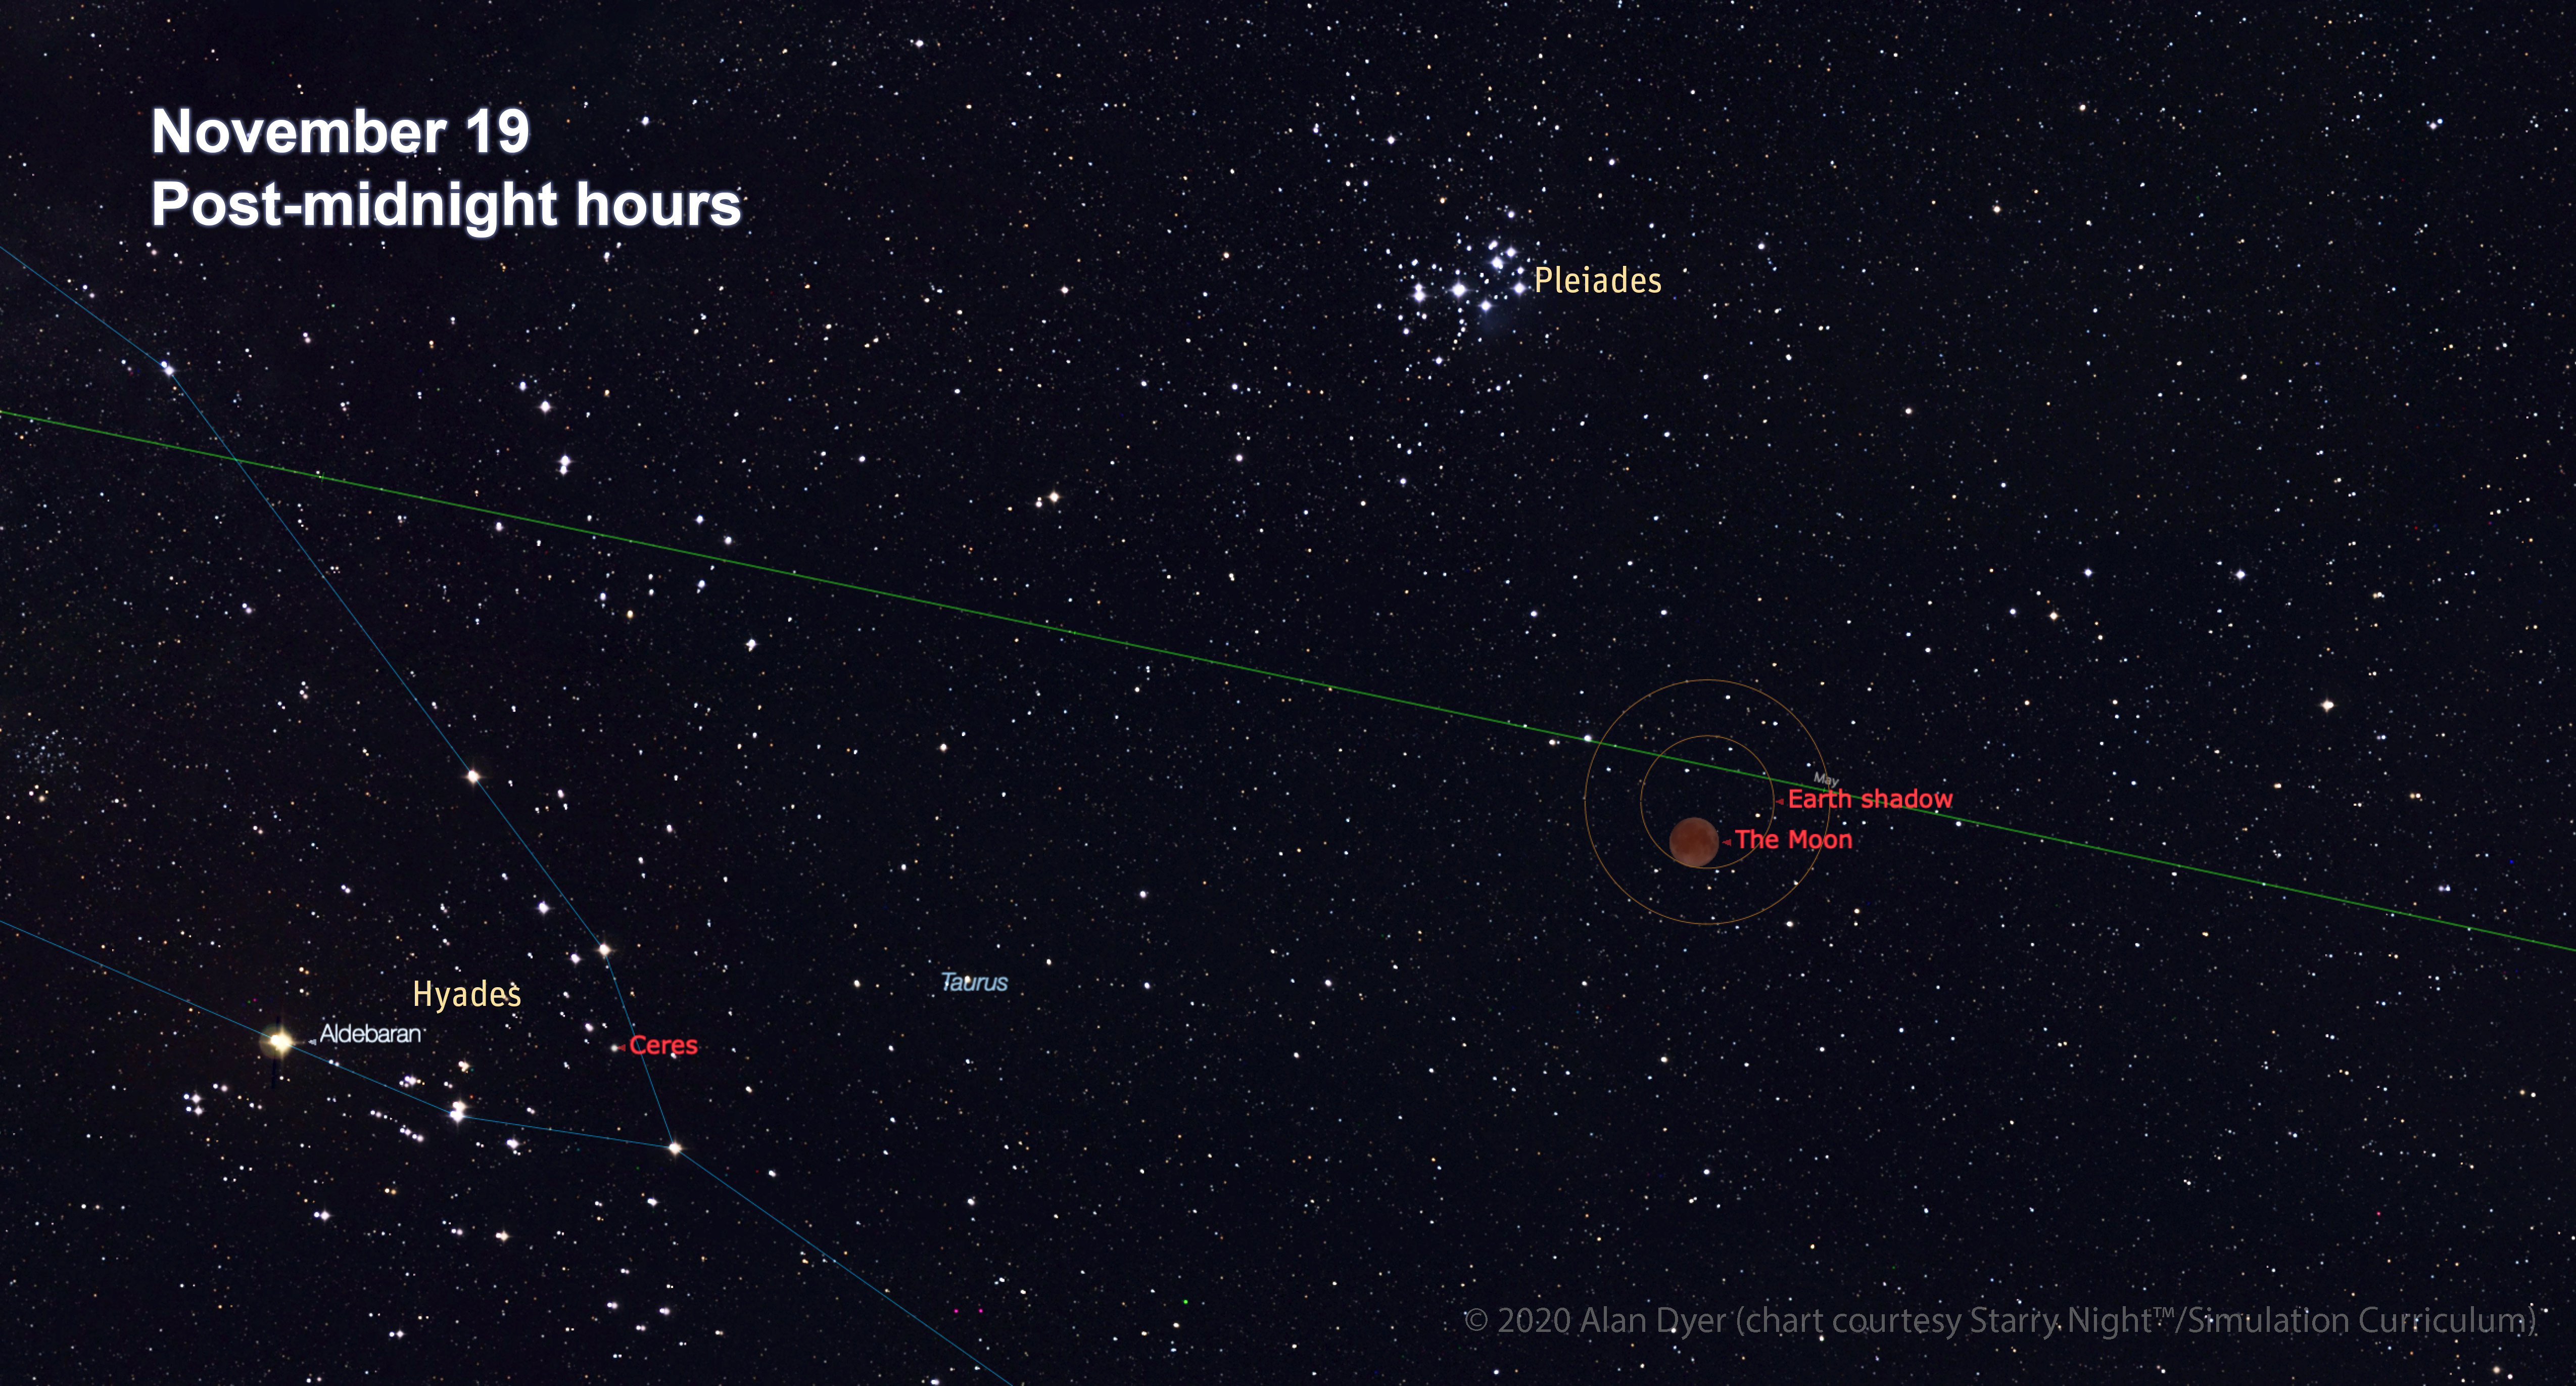
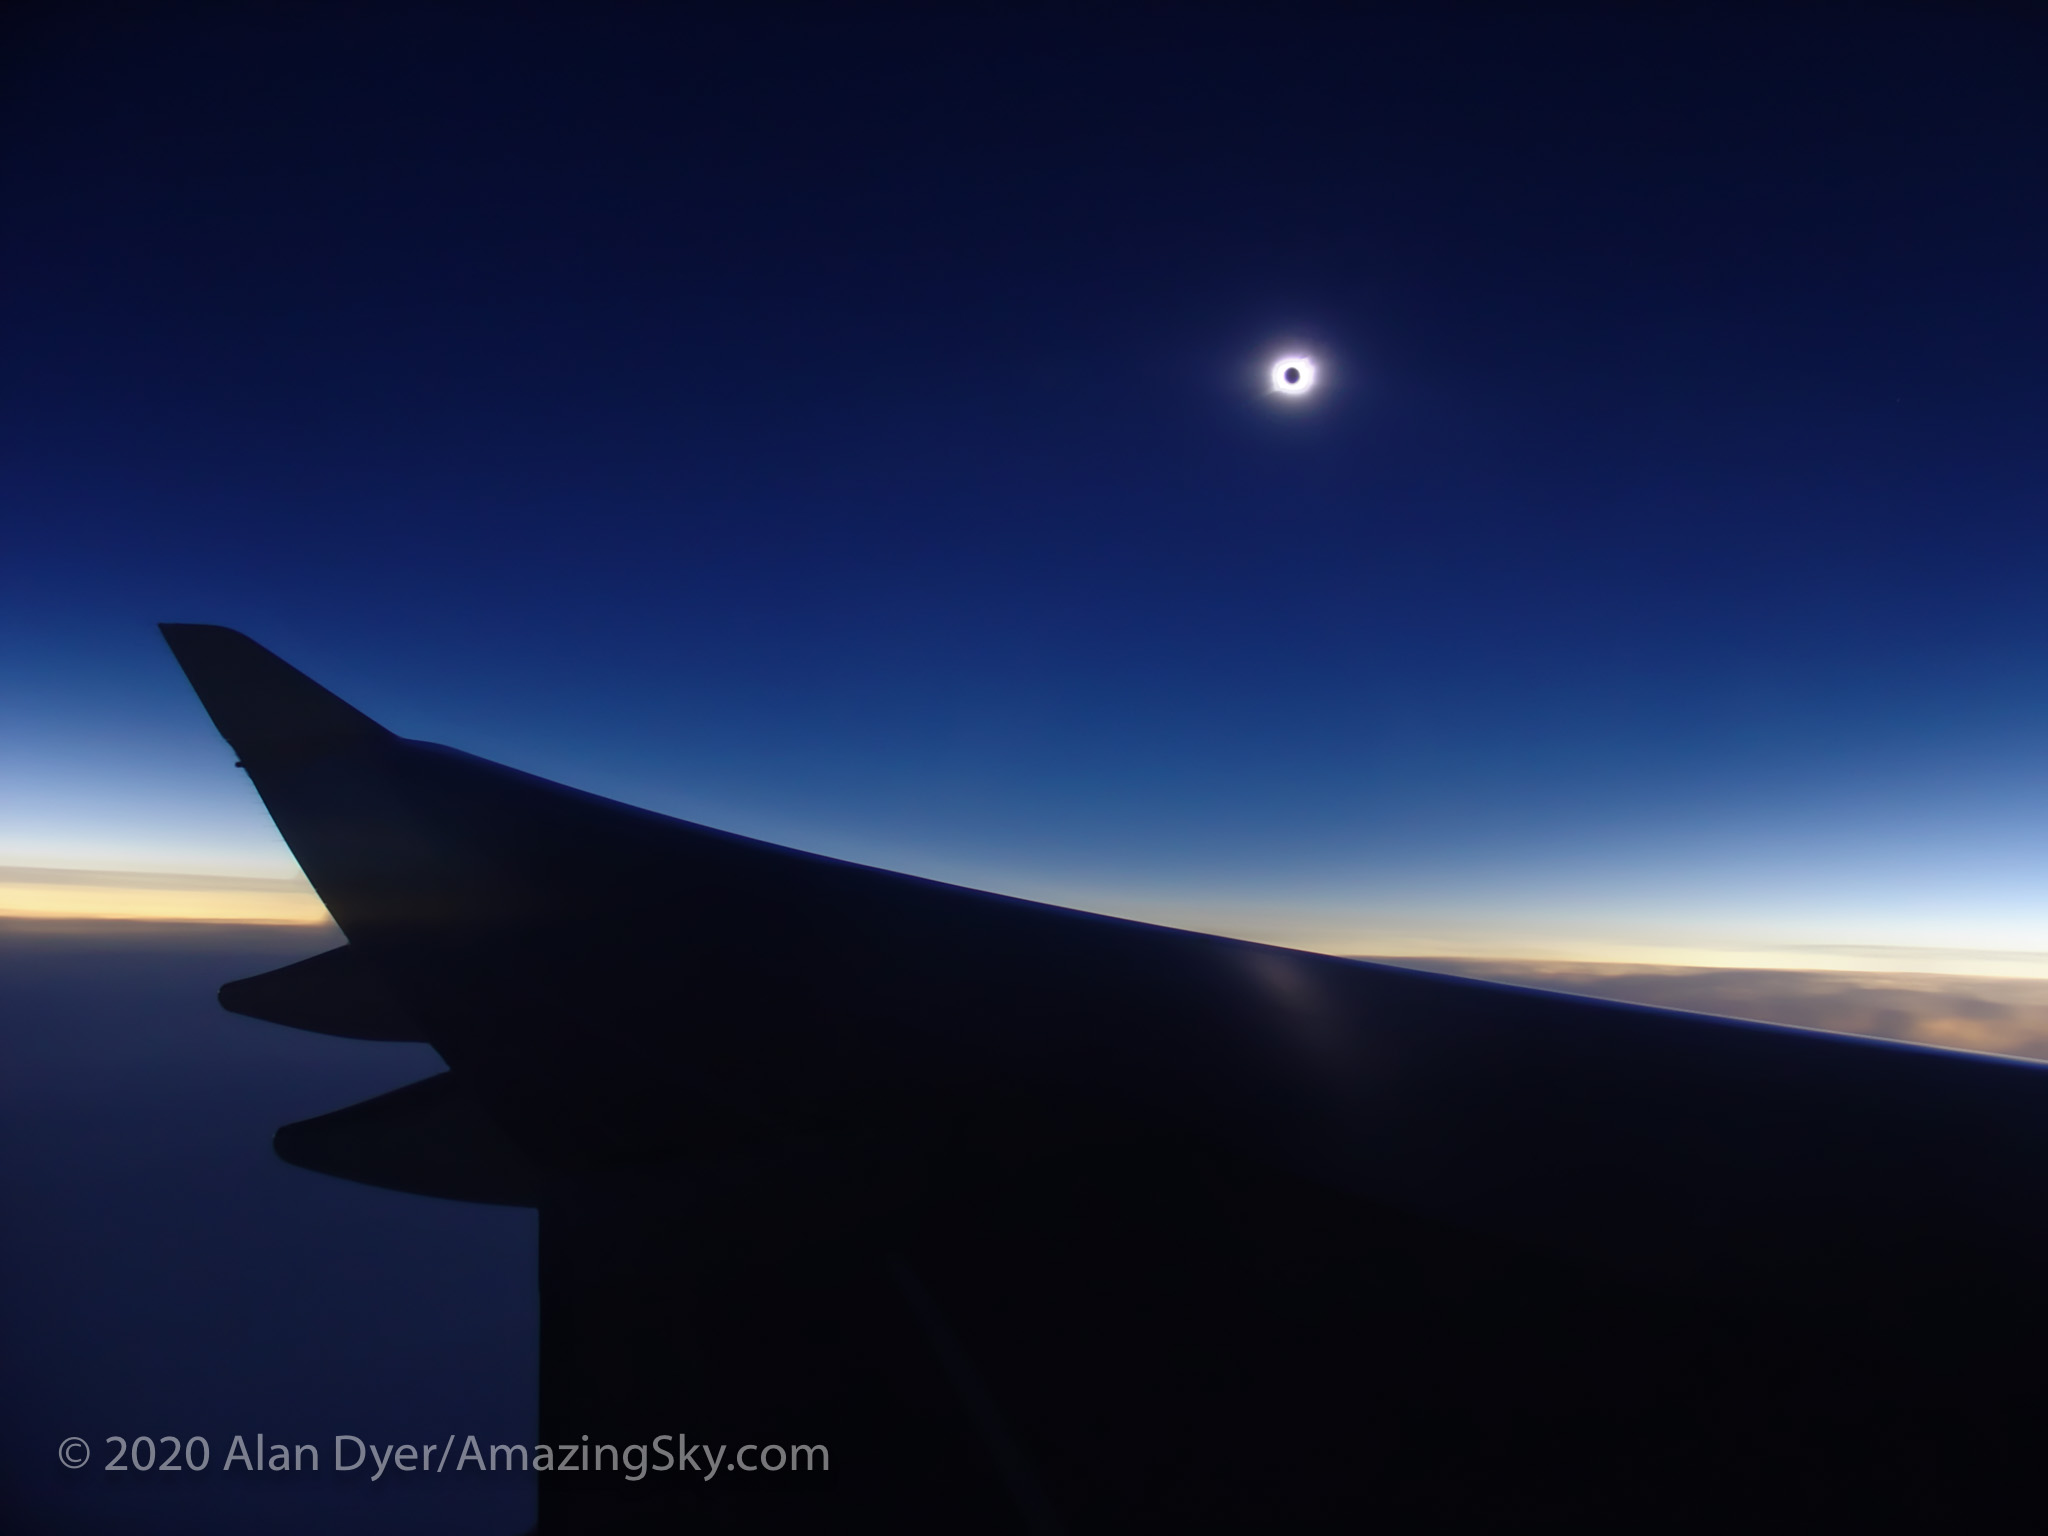
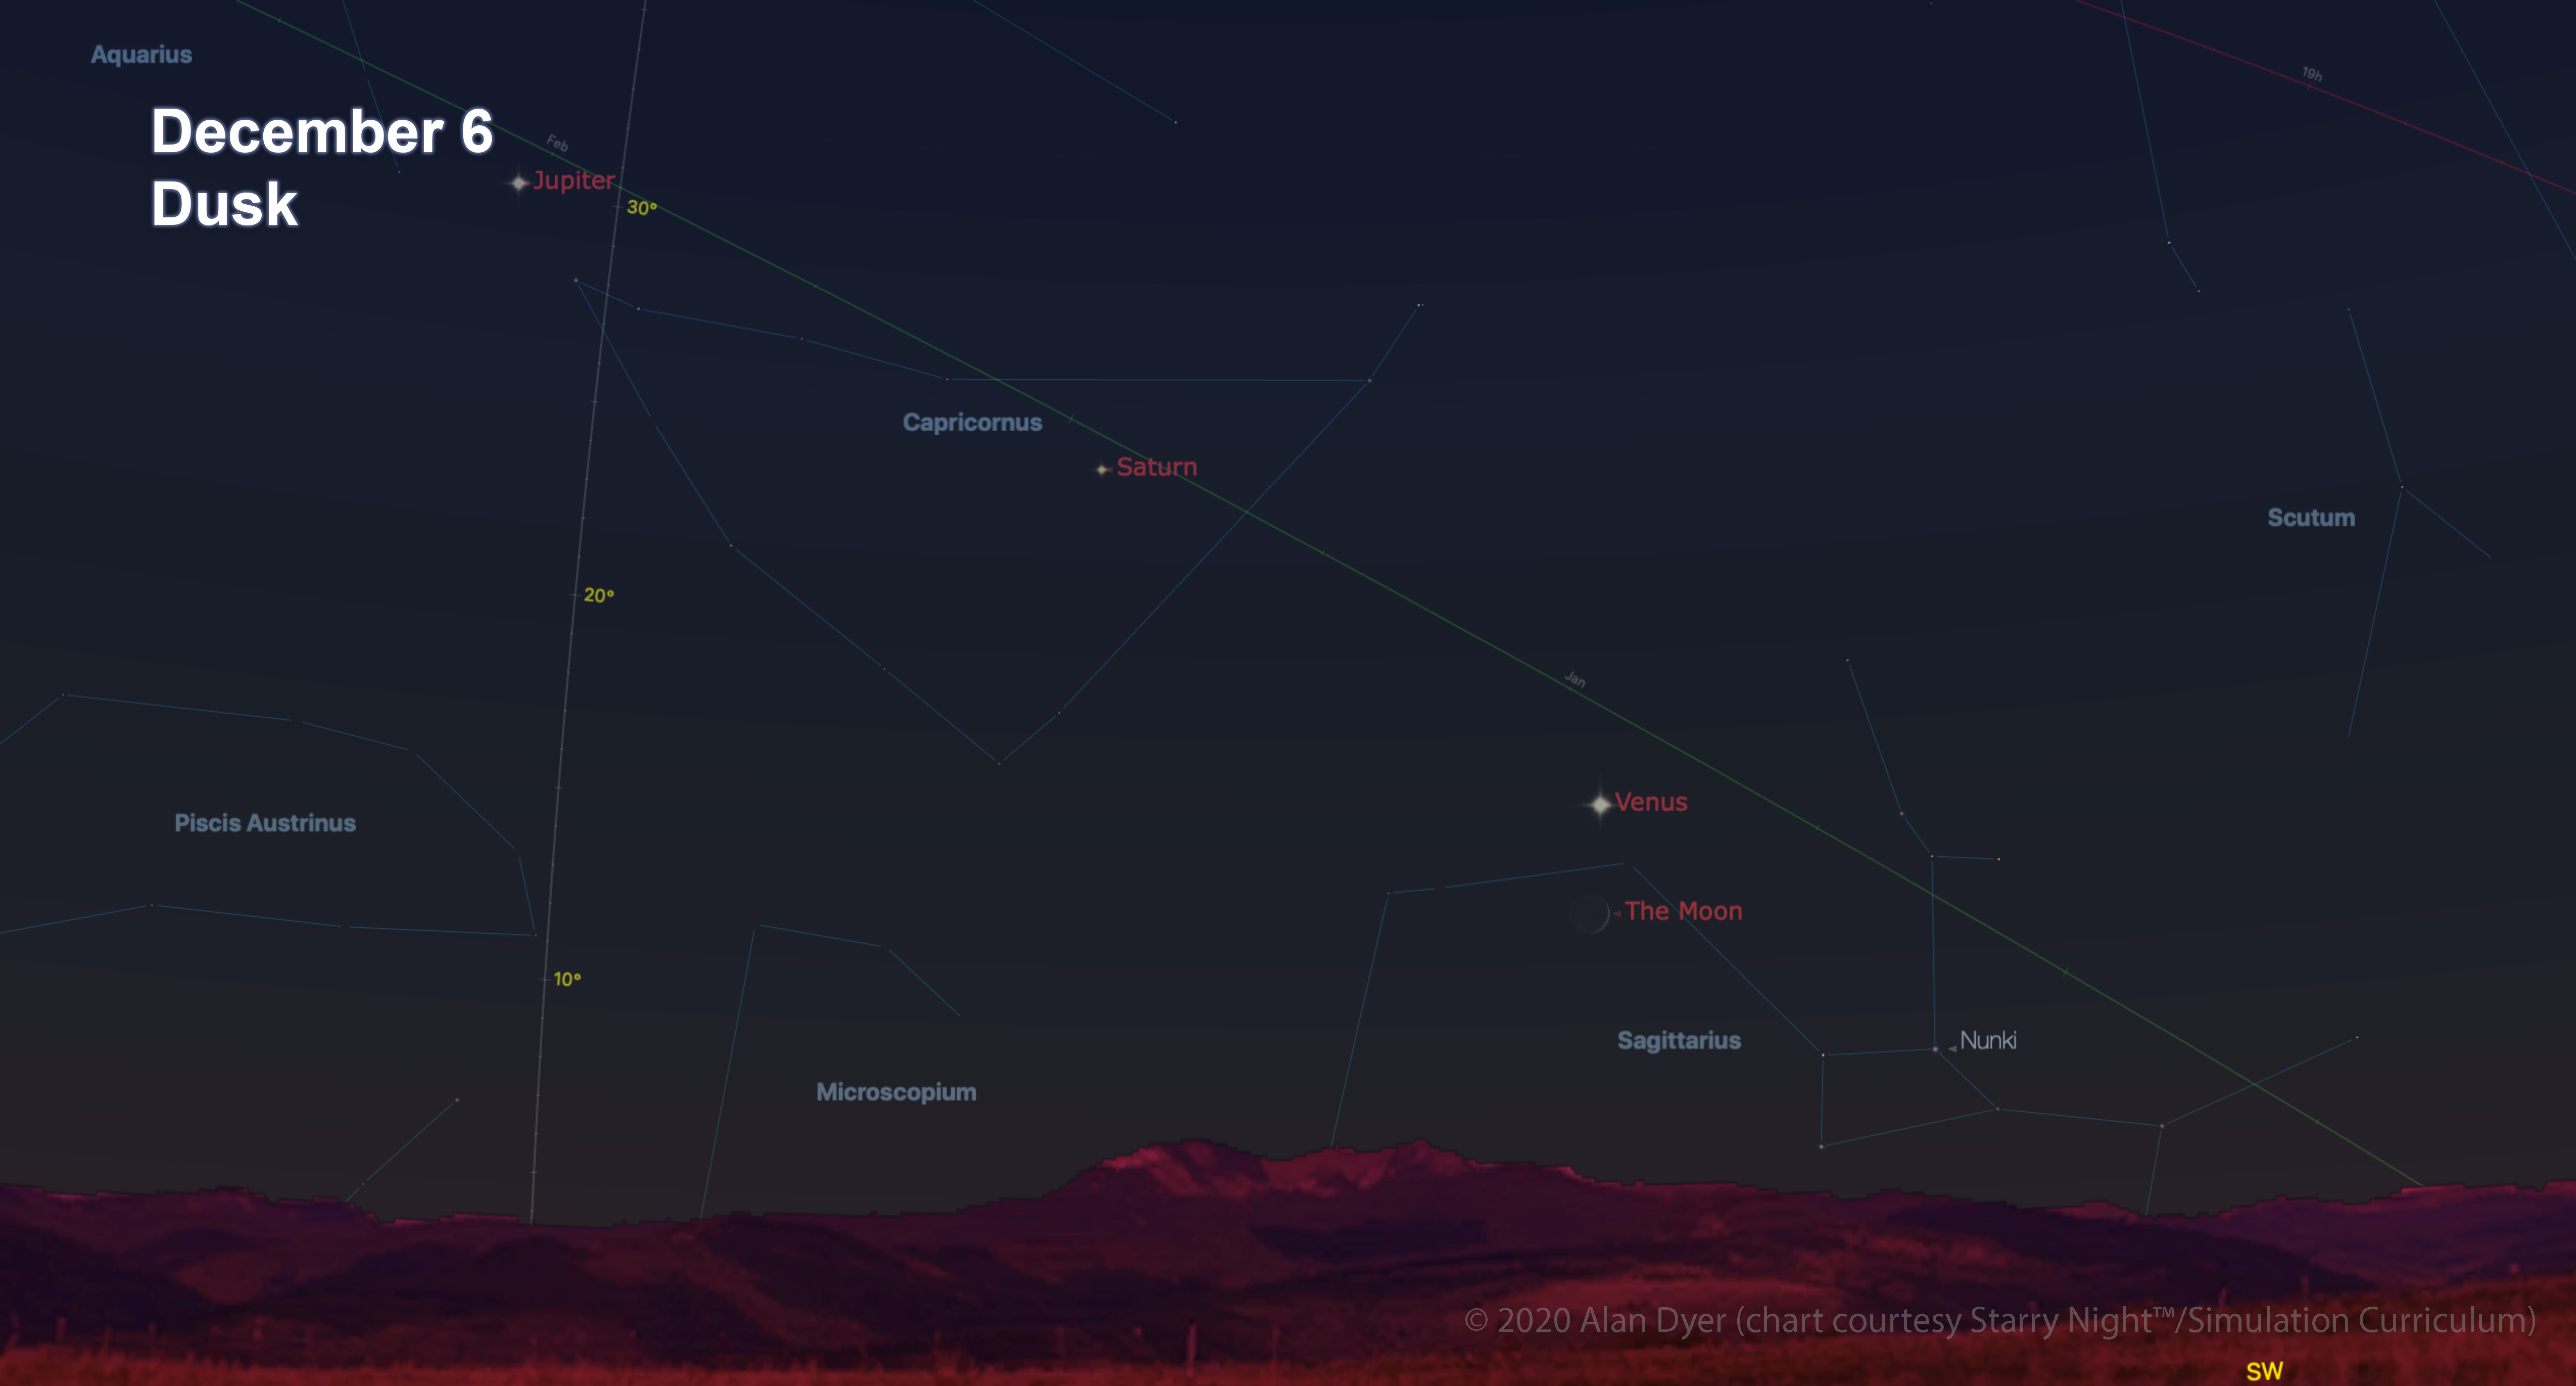

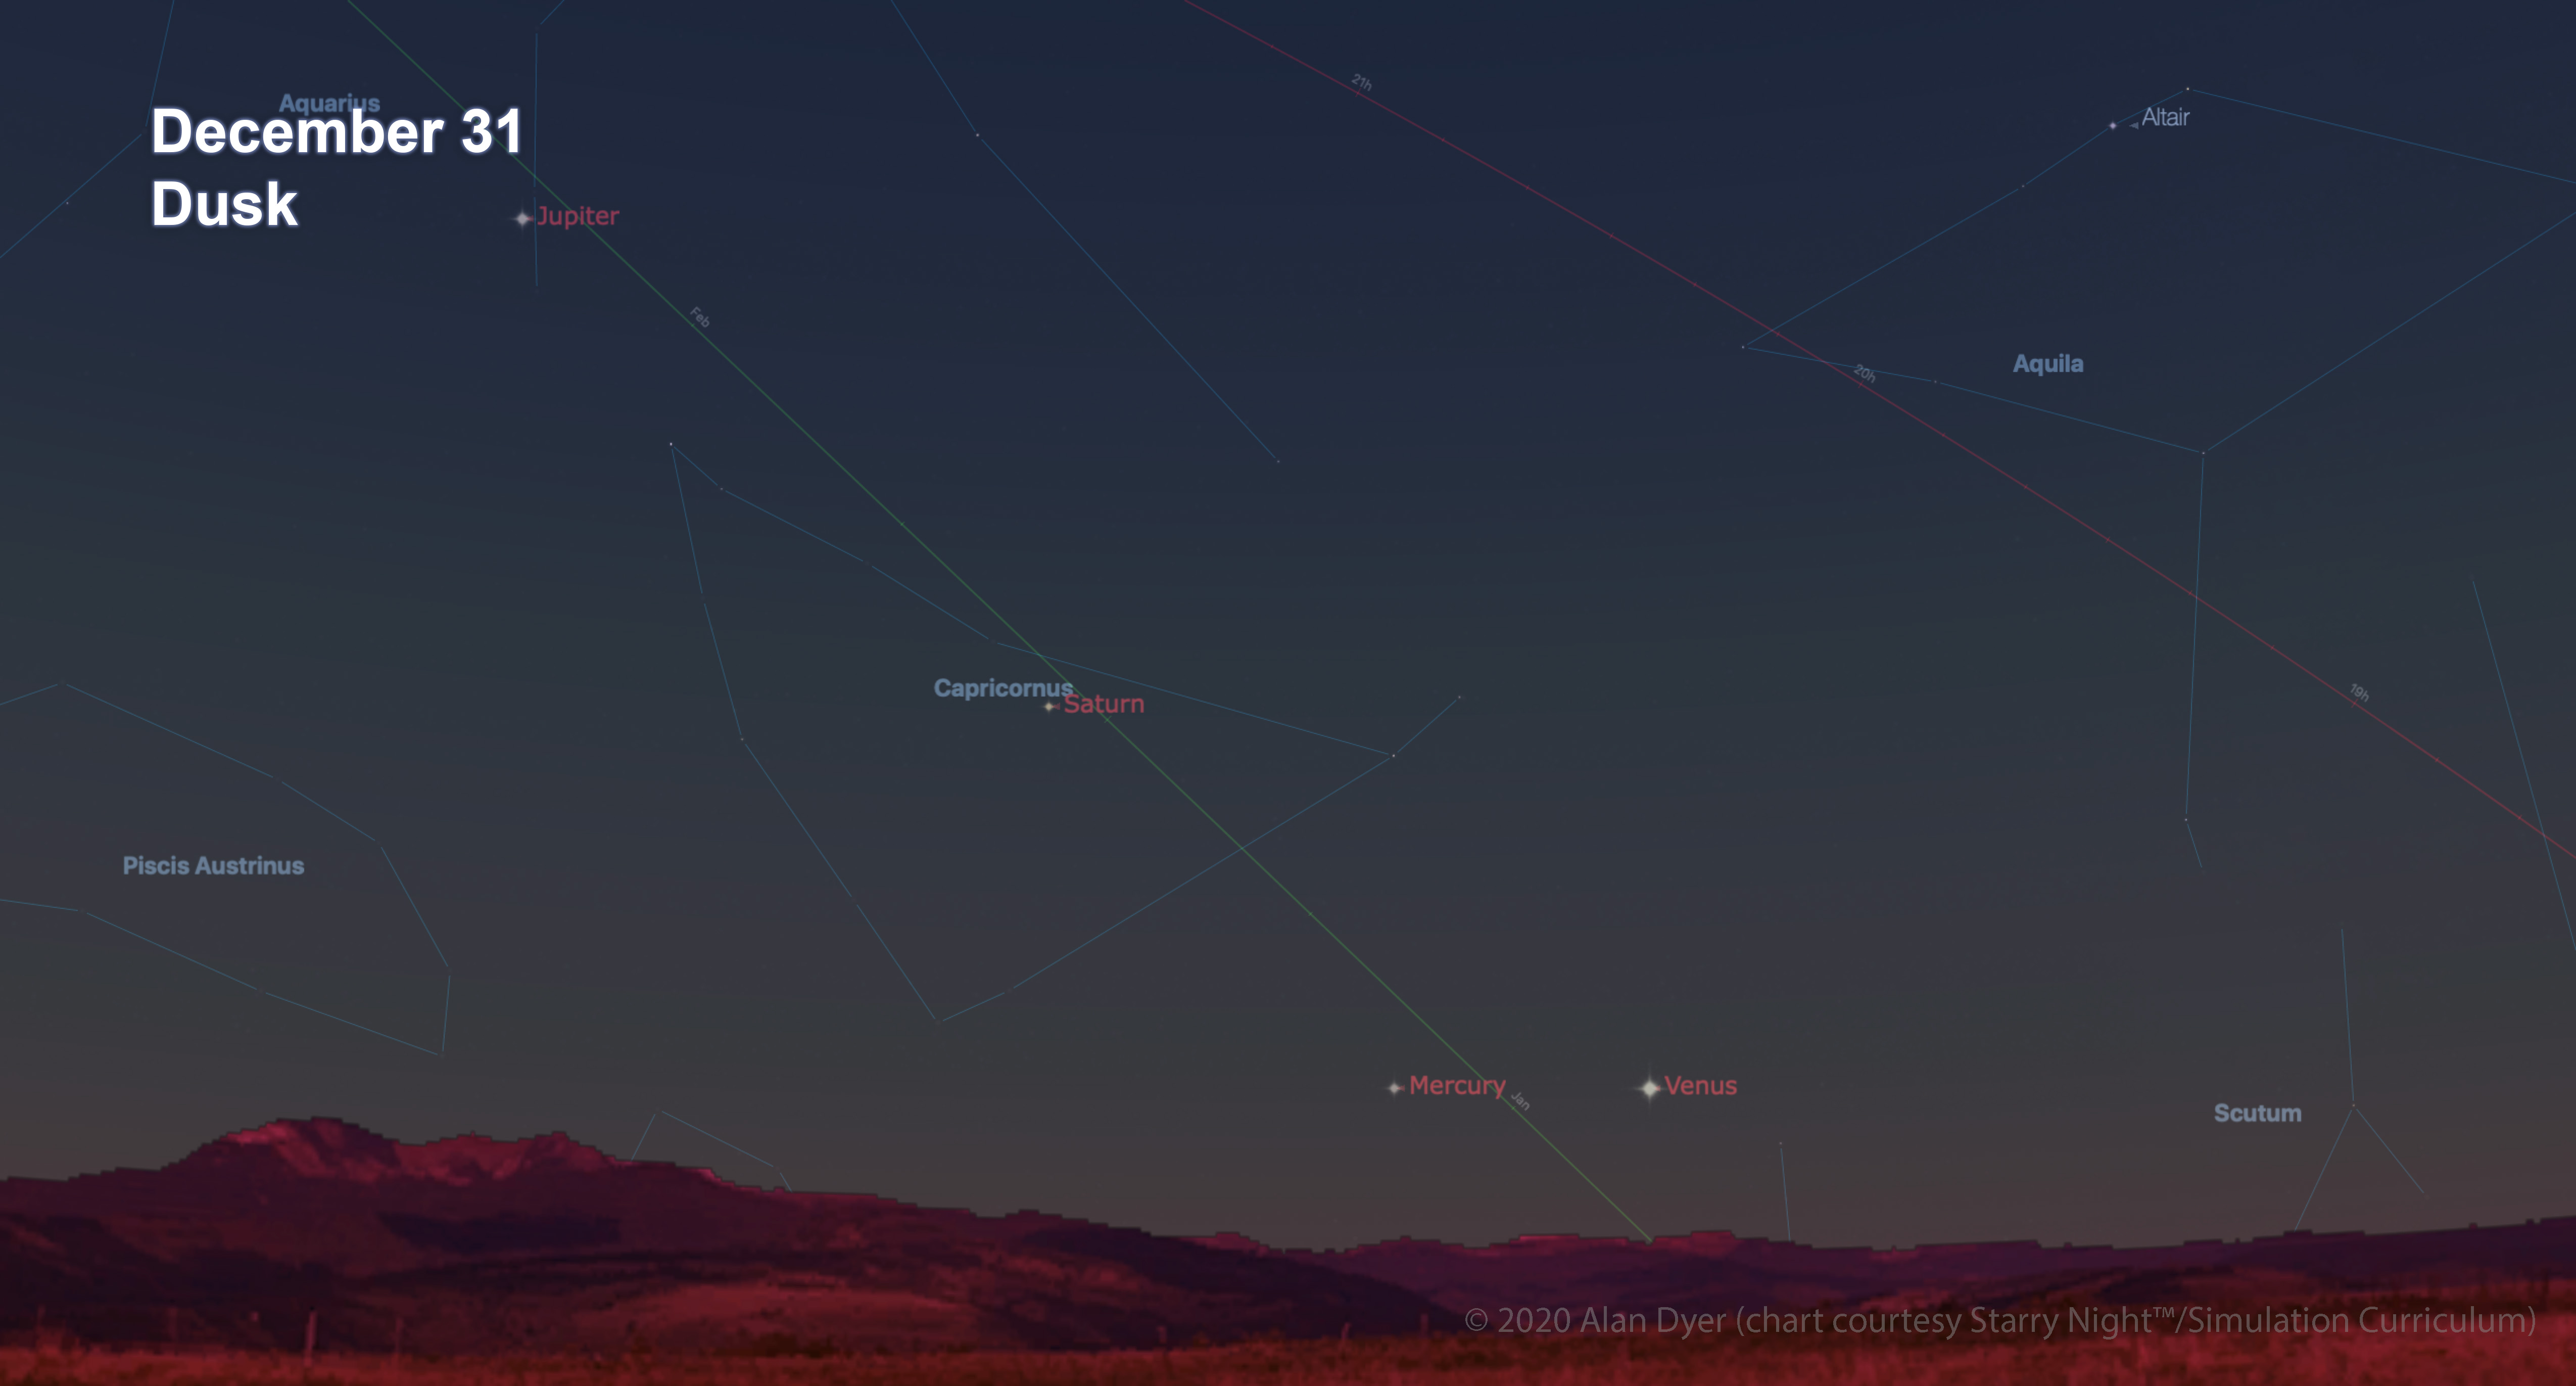
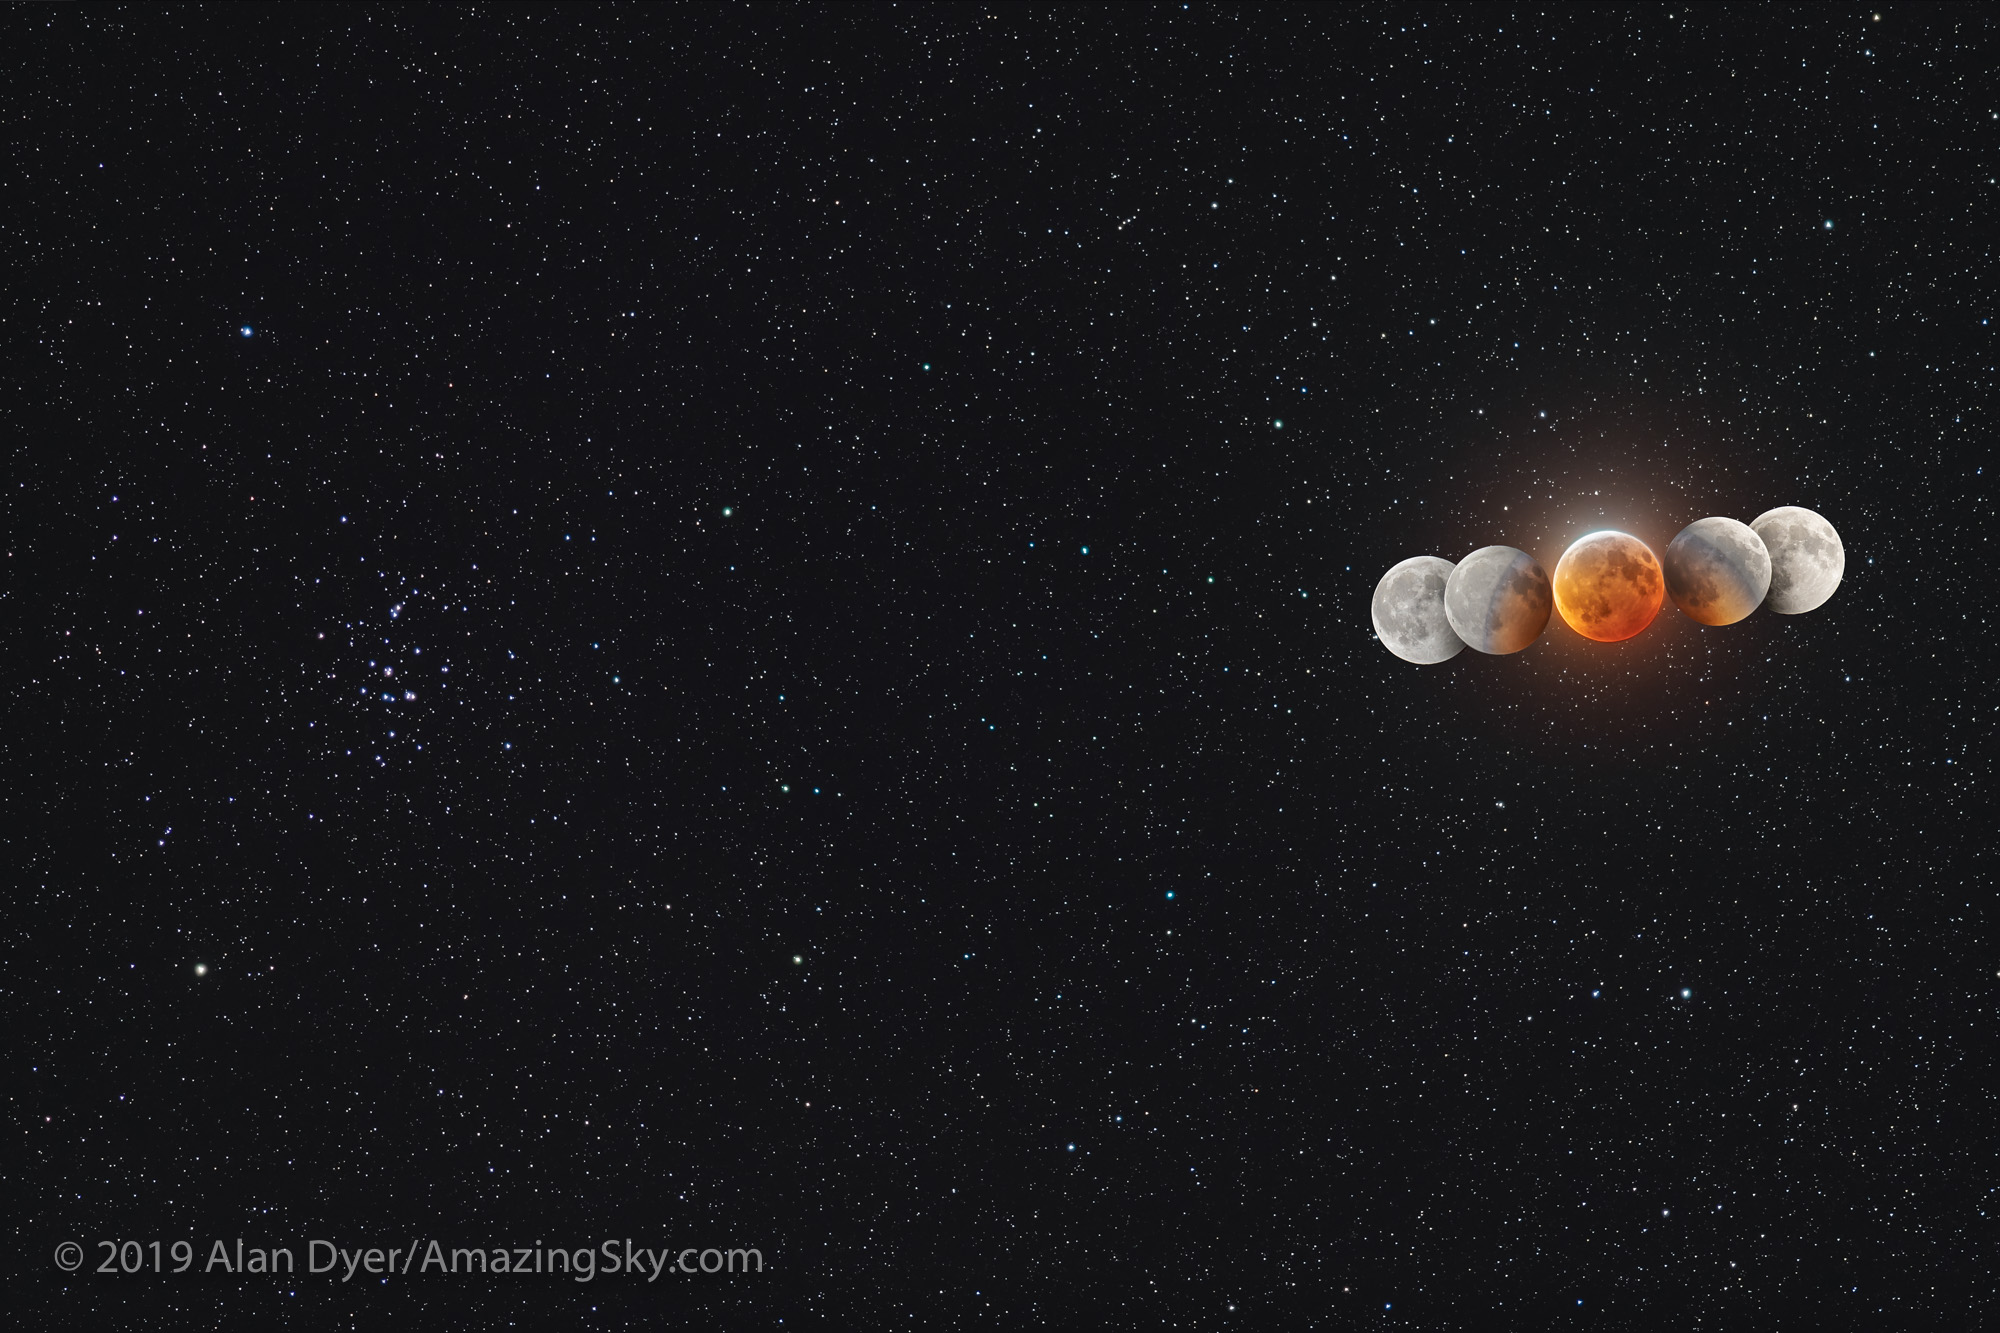
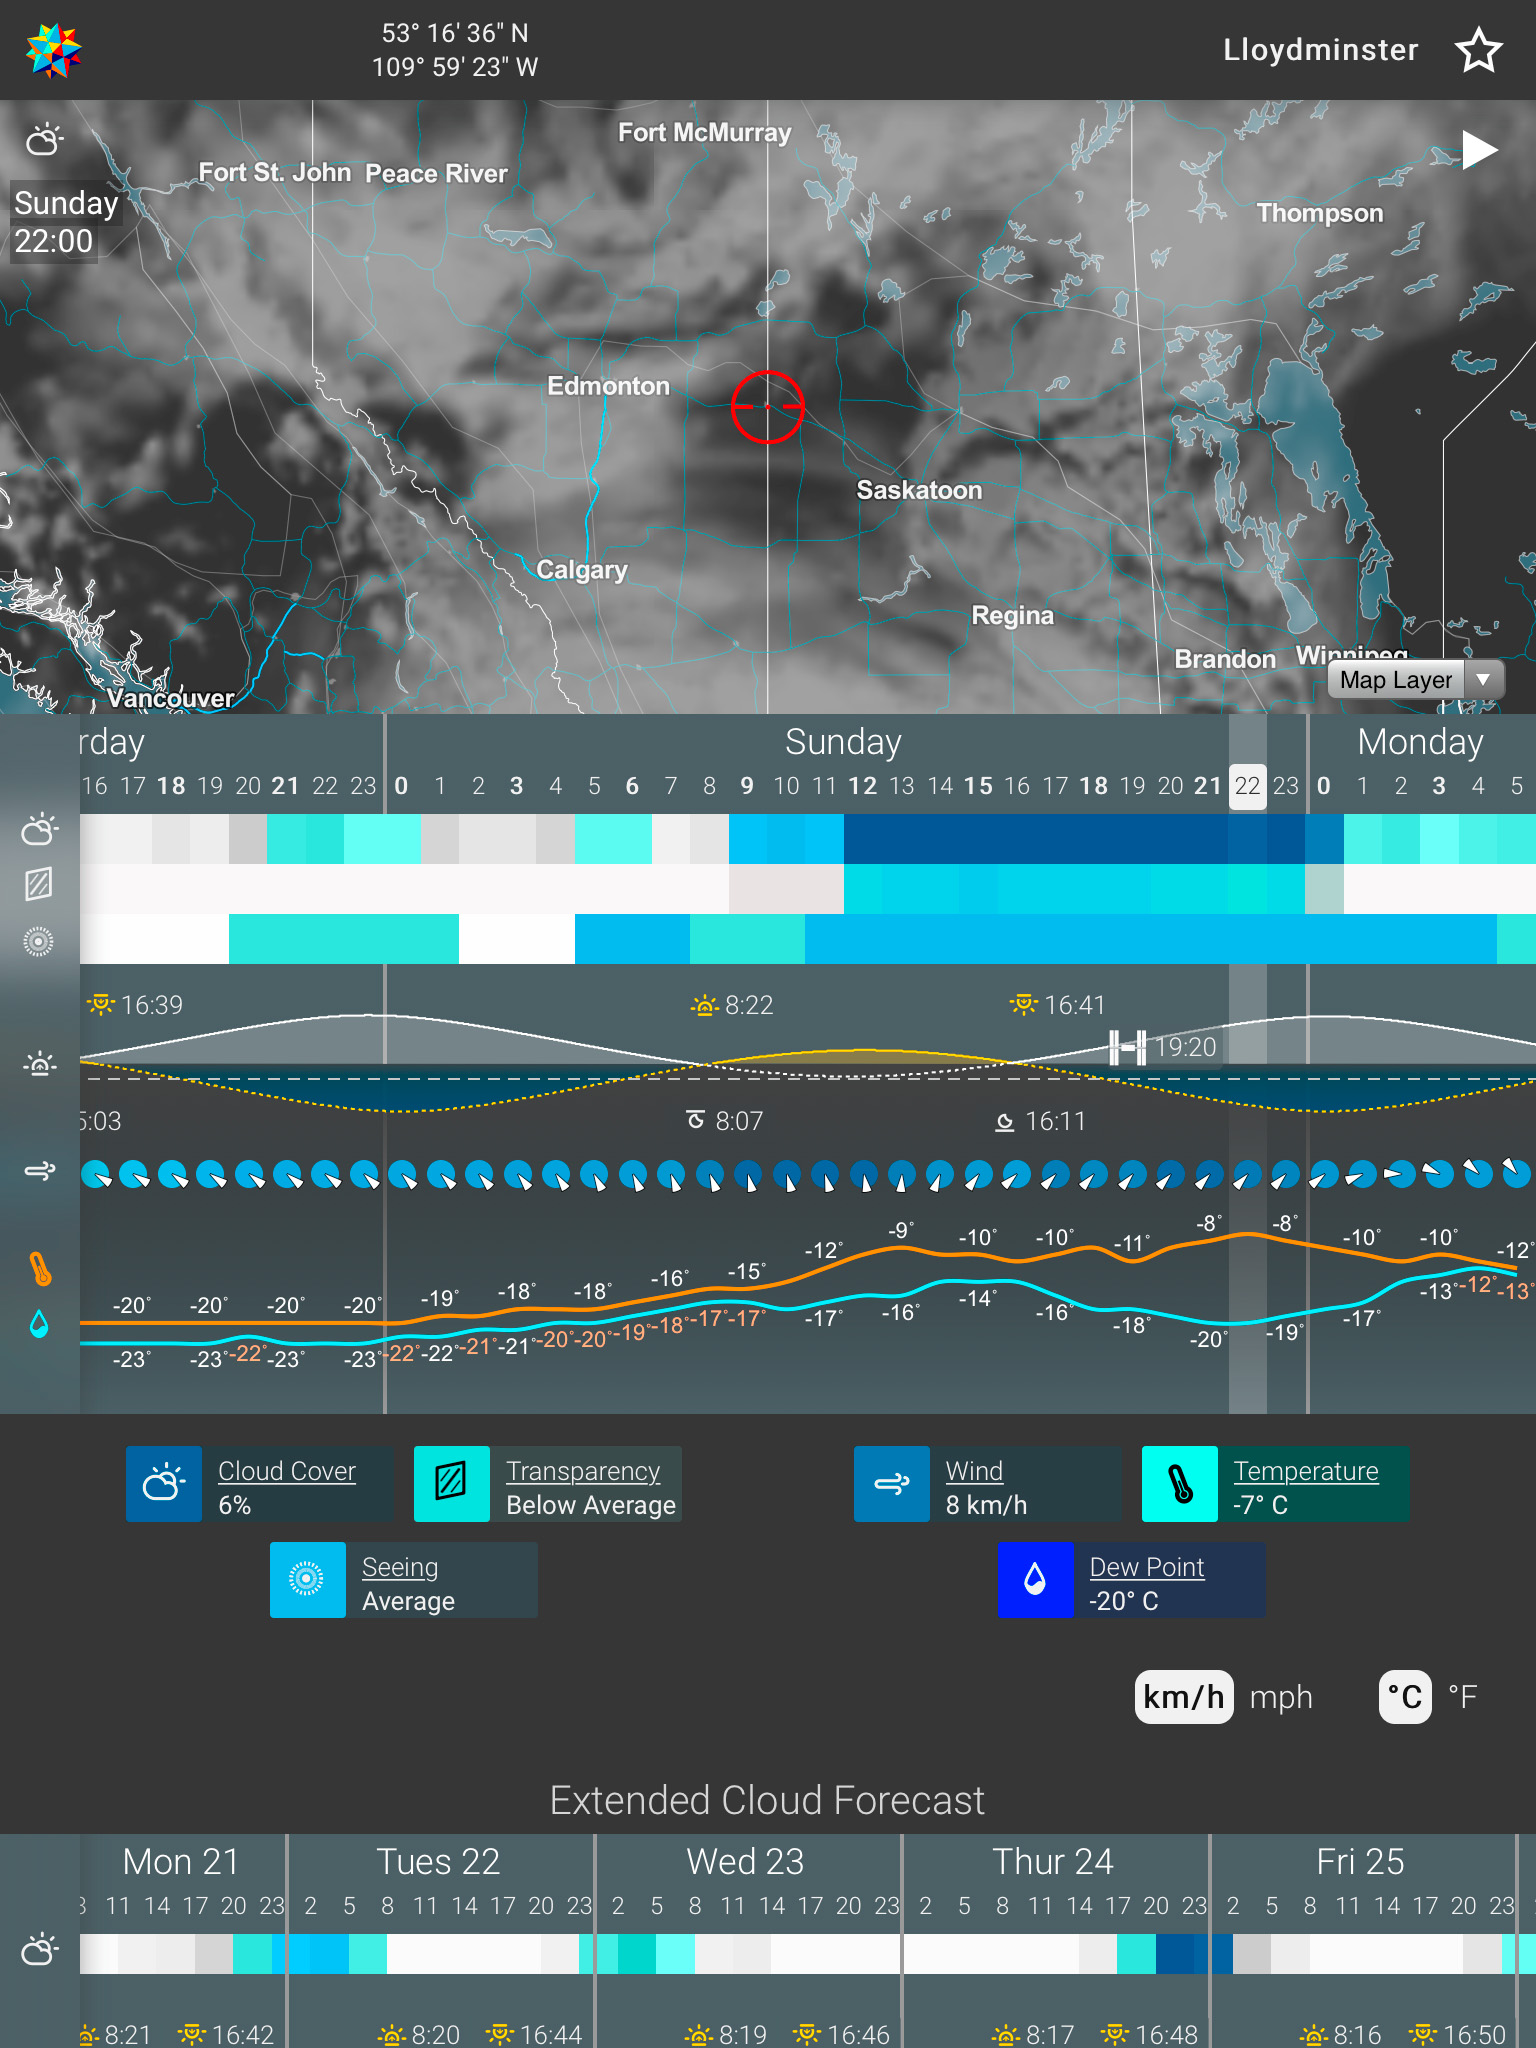
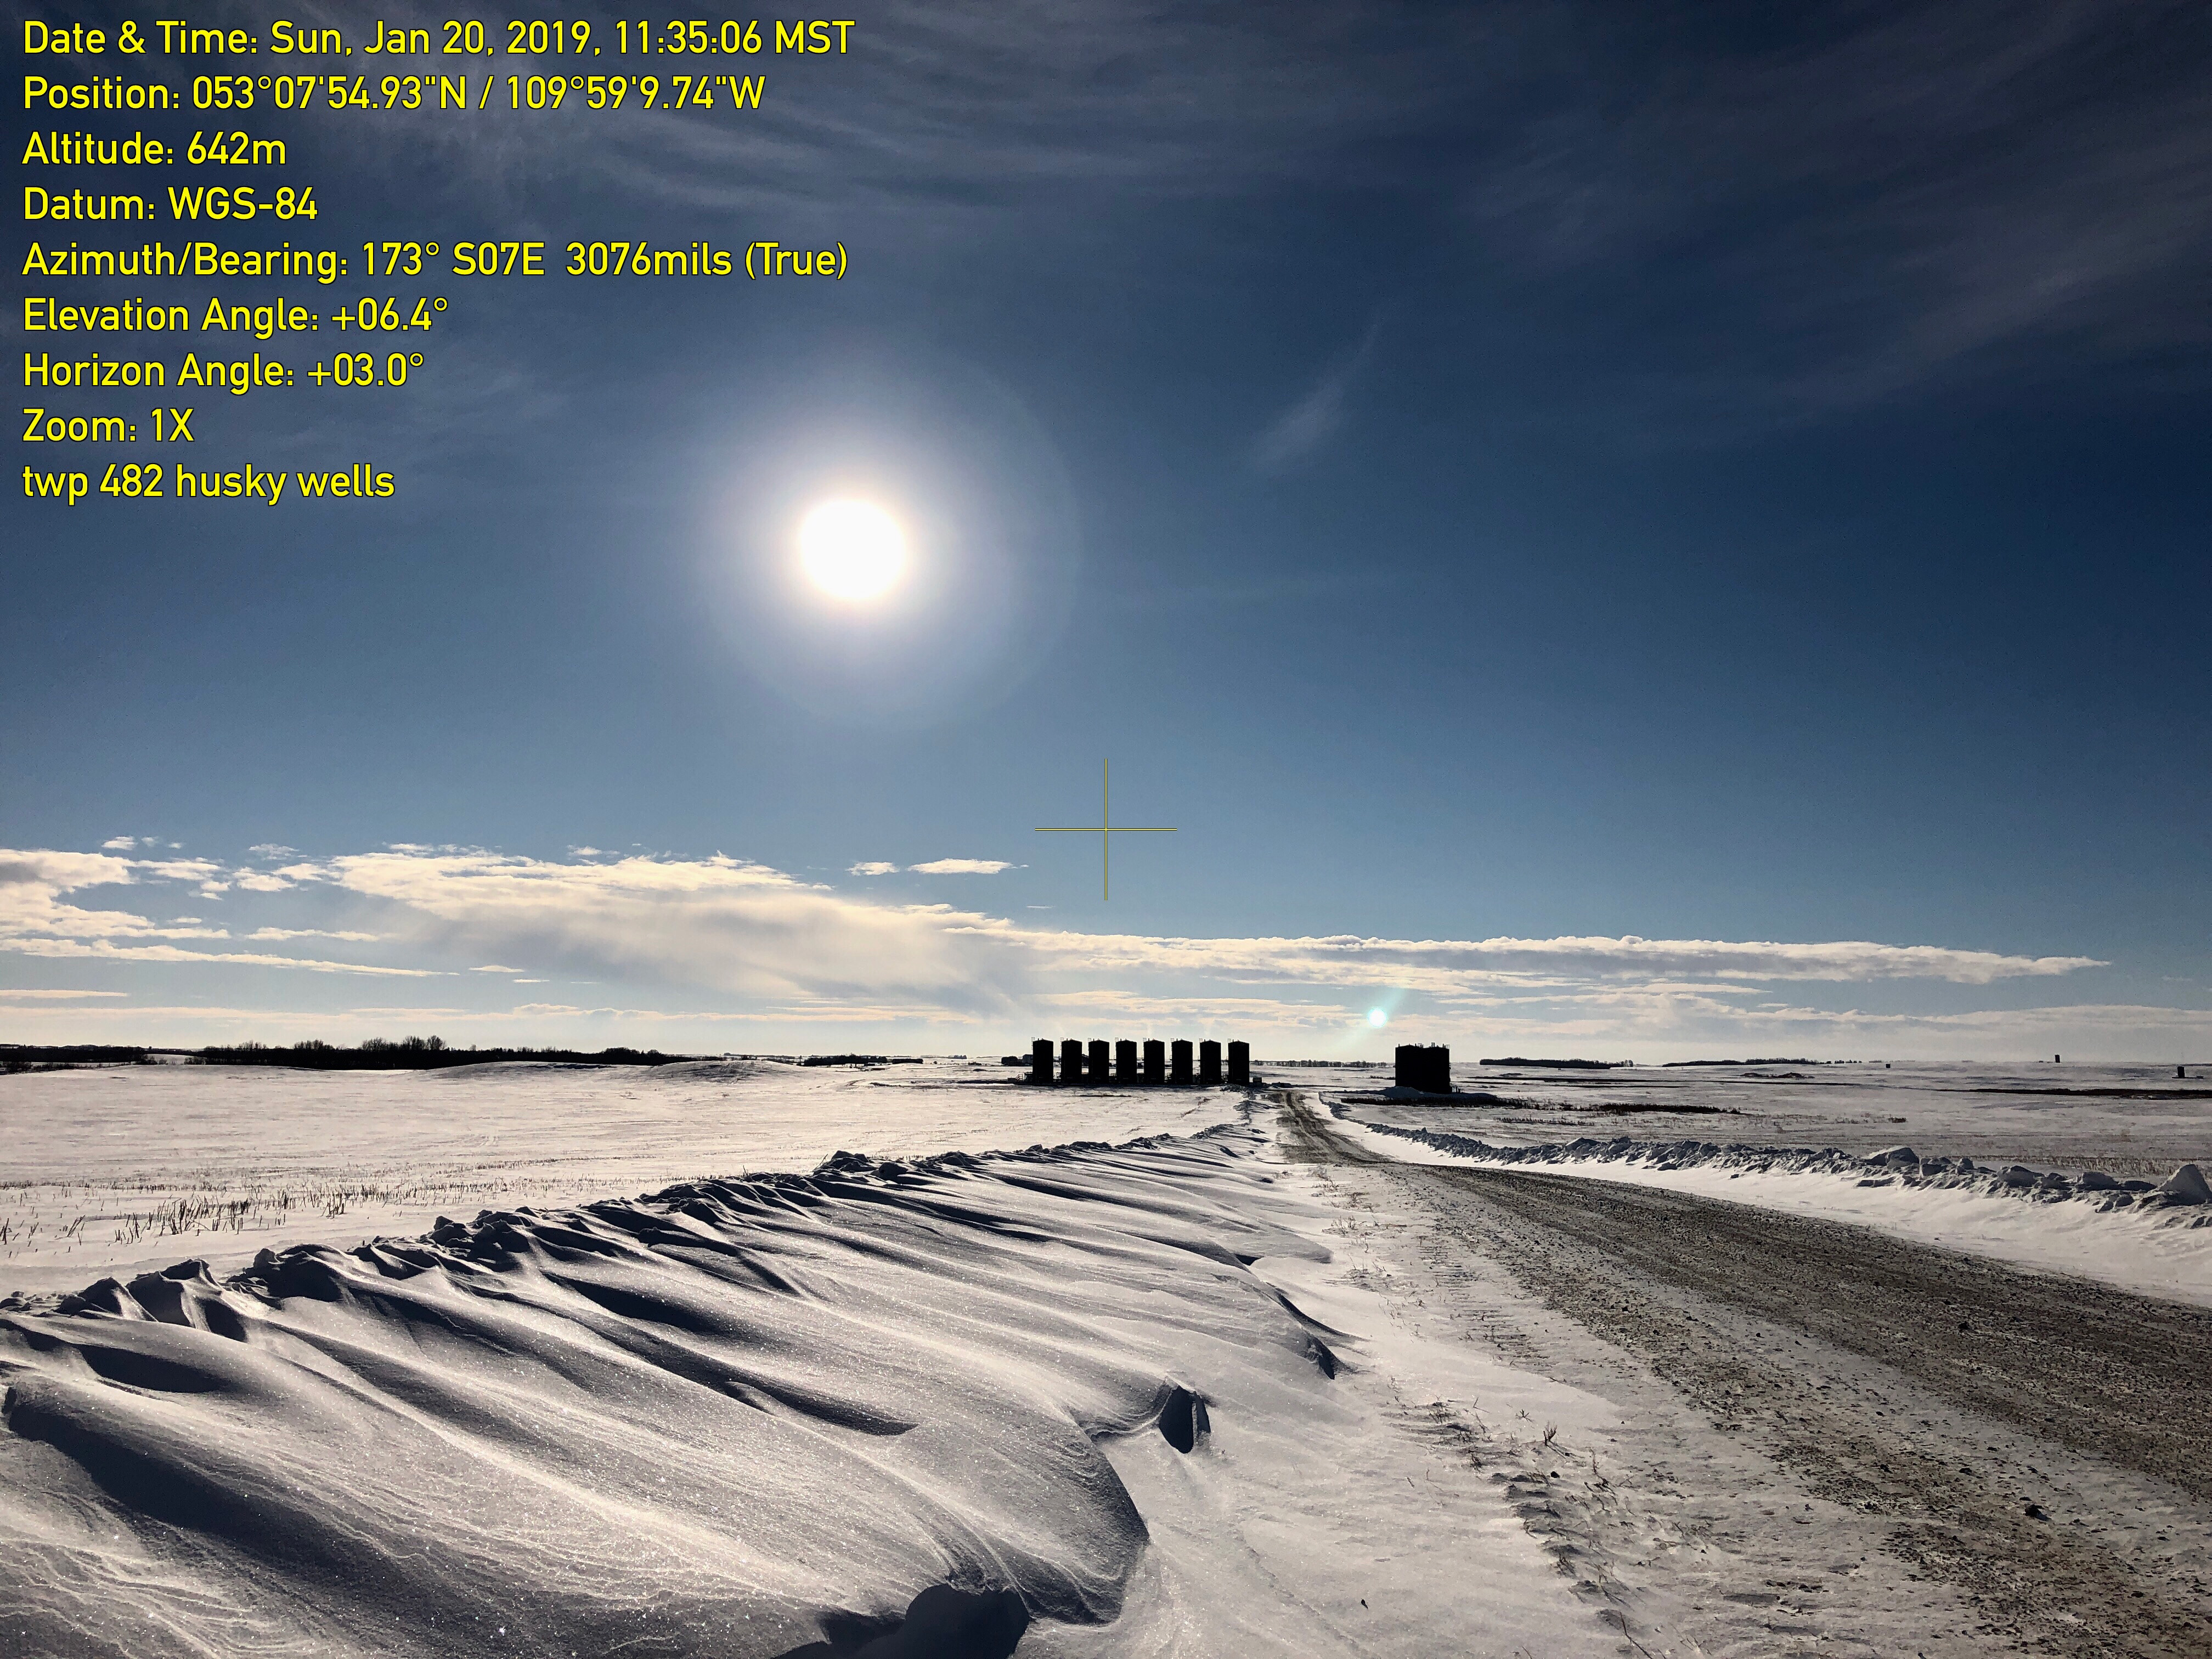


 On the evening of January 20 for North America, the Full Moon passes through the umbral shadow of the Earth, creating a total eclipse of the Moon.