

The first total lunar eclipse in 2.5 years provides lots of opportunities for some great photos.
On the morning of January 31, before sunrise for North America, the Full Moon passes through the umbral shadow of the Earth, creating the first total eclipse of the Moon since September 27, 2015.
The pre-dawn event provides many photo opportunities. Here’s my summary of tips and techniques for capturing the eclipsed Moon.
But First … What is a Lunar Eclipse?
As the animation (courtesy NASA/Goddard Space Flight Center) shows, an eclipse of the Moon occurs when the Full Moon (and they can happen only when the Moon is exactly full) travels through the shadow of the Earth.
The Moon does so at least two times a year, though often not as a total eclipse, one where the entire disk of the Moon is engulfed by the umbra.
When the Moon is within only the outer penumbral shadow we see very little effect, with a barely perceptible darkening of the Moon, if that. I don’t even list the times below for the start and end of the penumbral phases.

It’s only when the Moon begins to enter the central umbral shadow that we see an obvious effect. That’s when the partial eclipse begins, and we see a dark bite appear on the left edge of the Moon. The shadow appears to creep across the Moon to darken more of its disk. While it looks like the shadow is moving across the Moon, it is really the Moon moving into, then out of, the umbral shadow that causes the eclipse.
At this eclipse the partial phases last about an hour before and after totality.
Once the Moon is completely immersed in the umbra, totality begins, and lasts 77 minutes at this eclipse, a generous length. However, in North America, only sites in the western half of the continent get to see all or most of totality.
Where is the Eclipse?
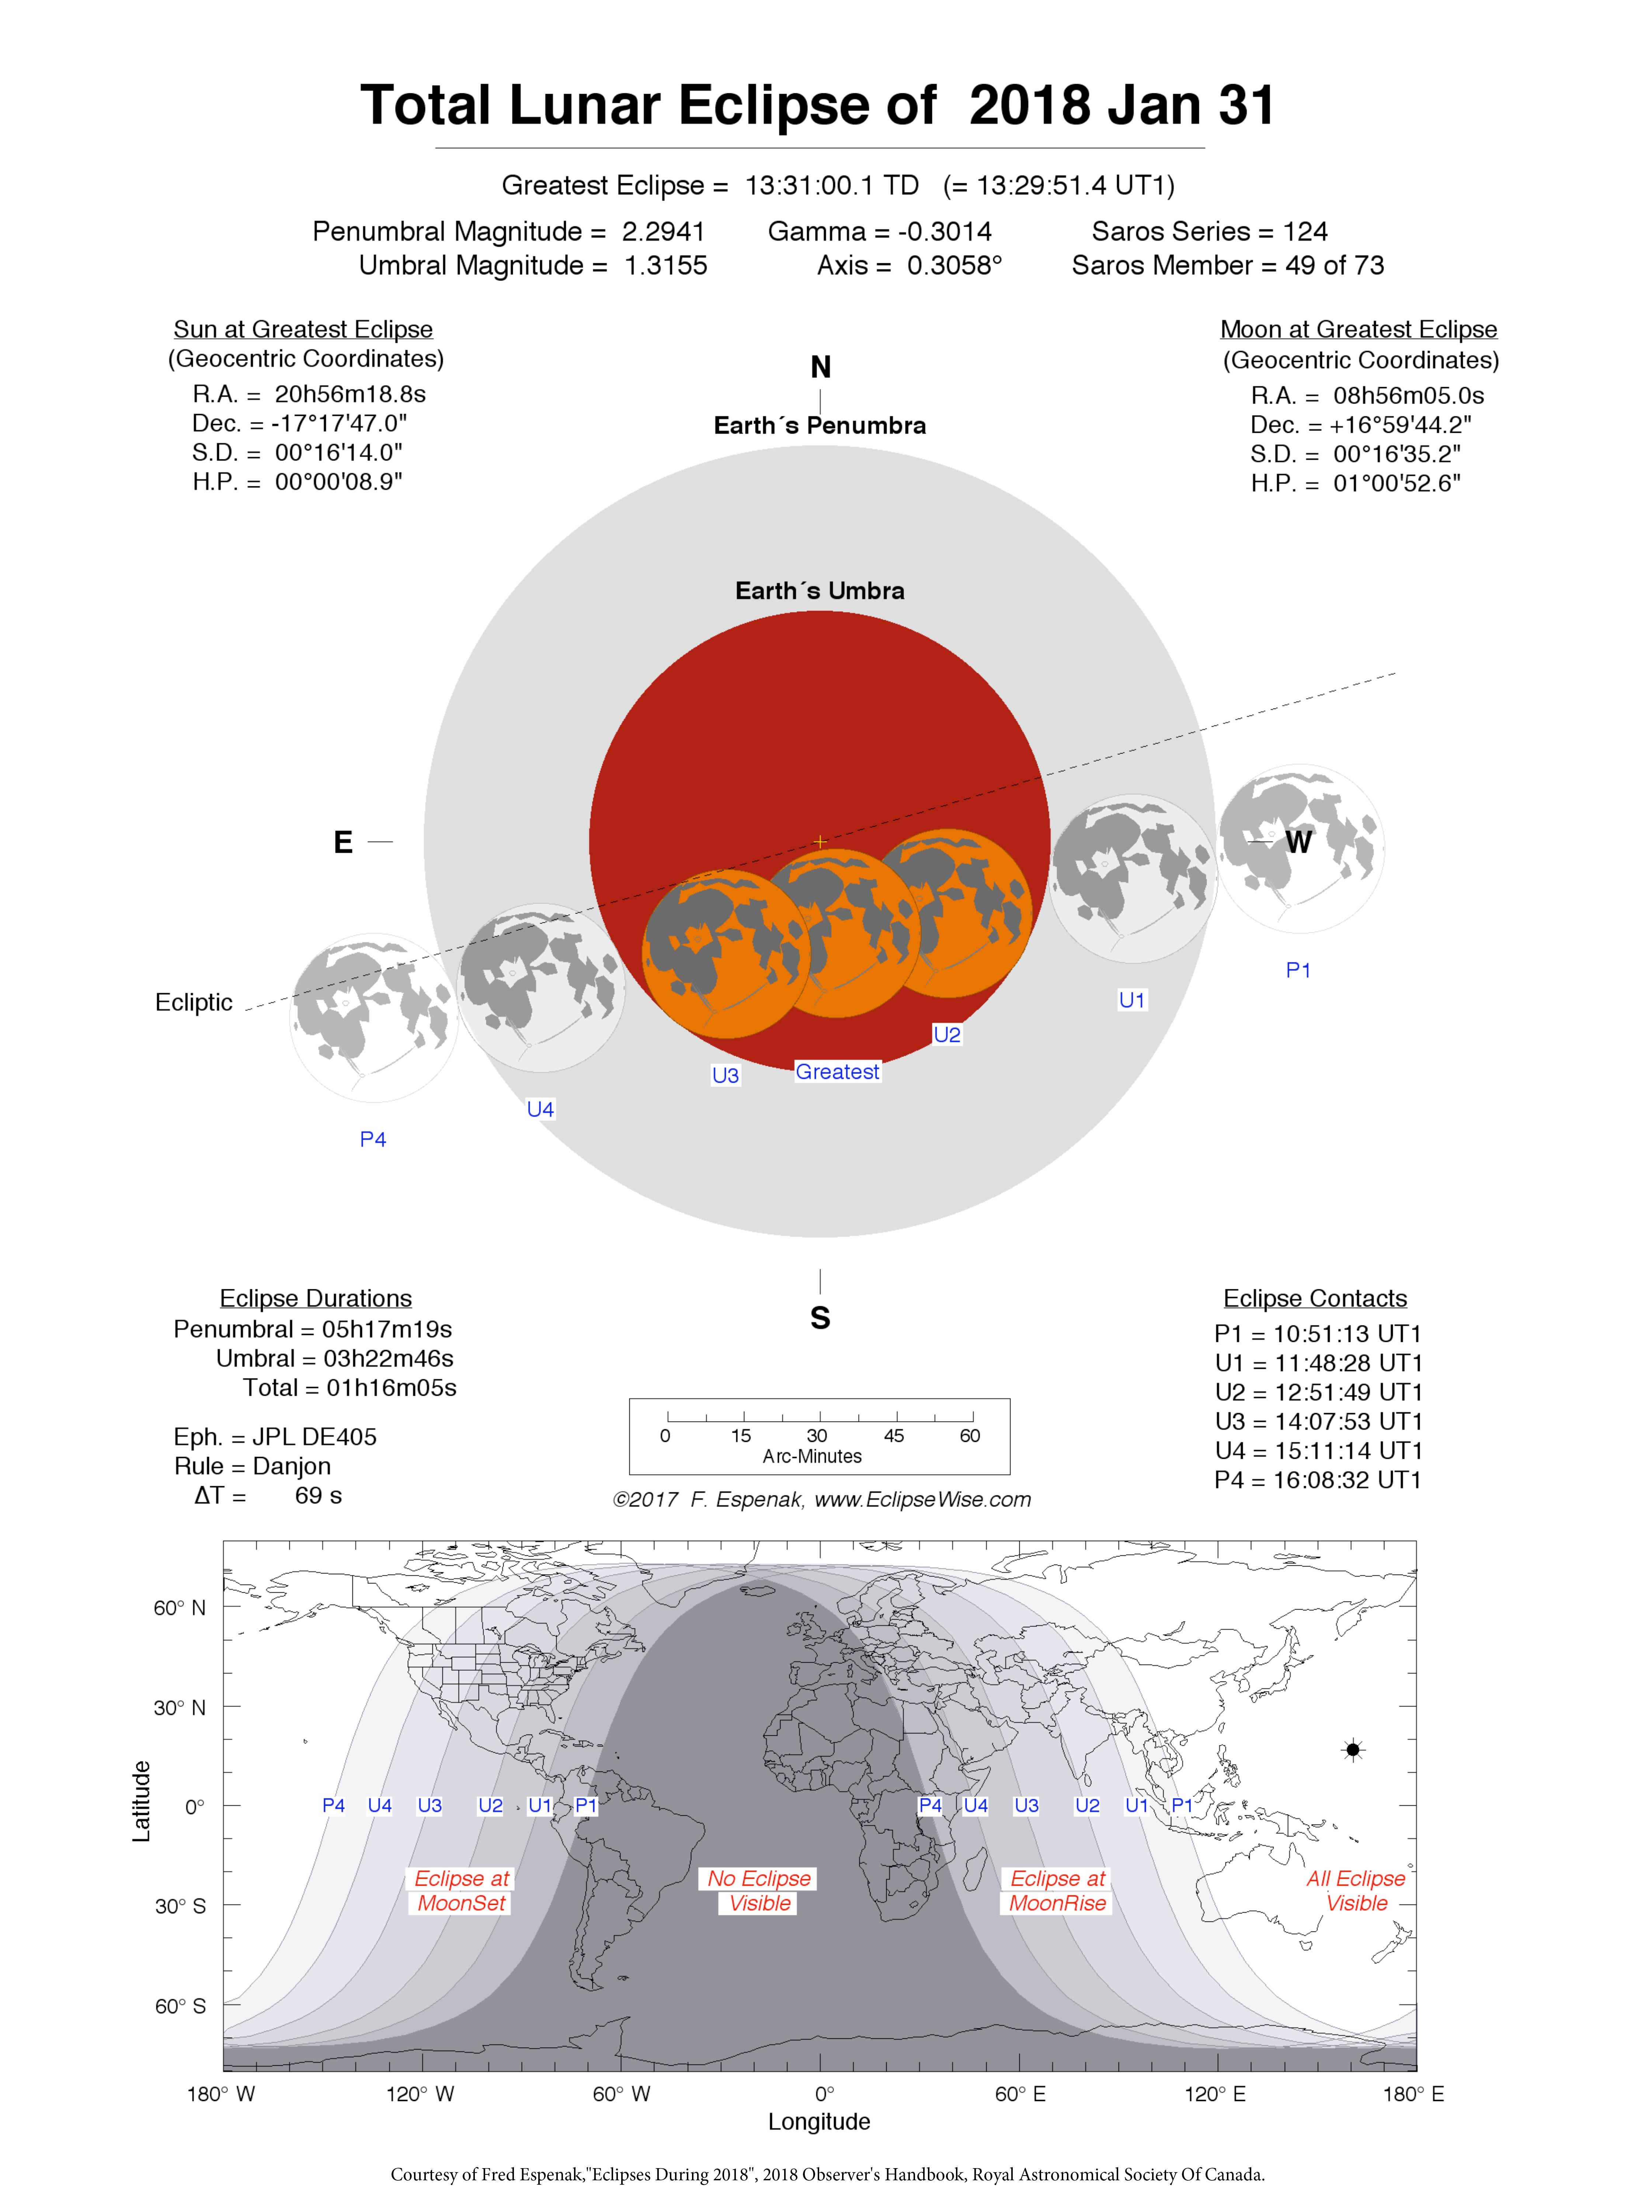
As the chart above shows, the Pacific area including Hawaii, Australia, and eastern Asia can see the entire eclipse with the Moon high in the evening or midnight sky.
Most of North America (my tips are aimed at North American photographers) can see at least some part of this eclipse.
From the eastern half of the continent the Moon sets at sunrise during either totality (from the central areas of North America), or during the first partial phases (from eastern North America). Those in the east can take advantage of interesting photo opportunities by capturing the partially eclipsed Moon setting in the west in the dawn twilight.

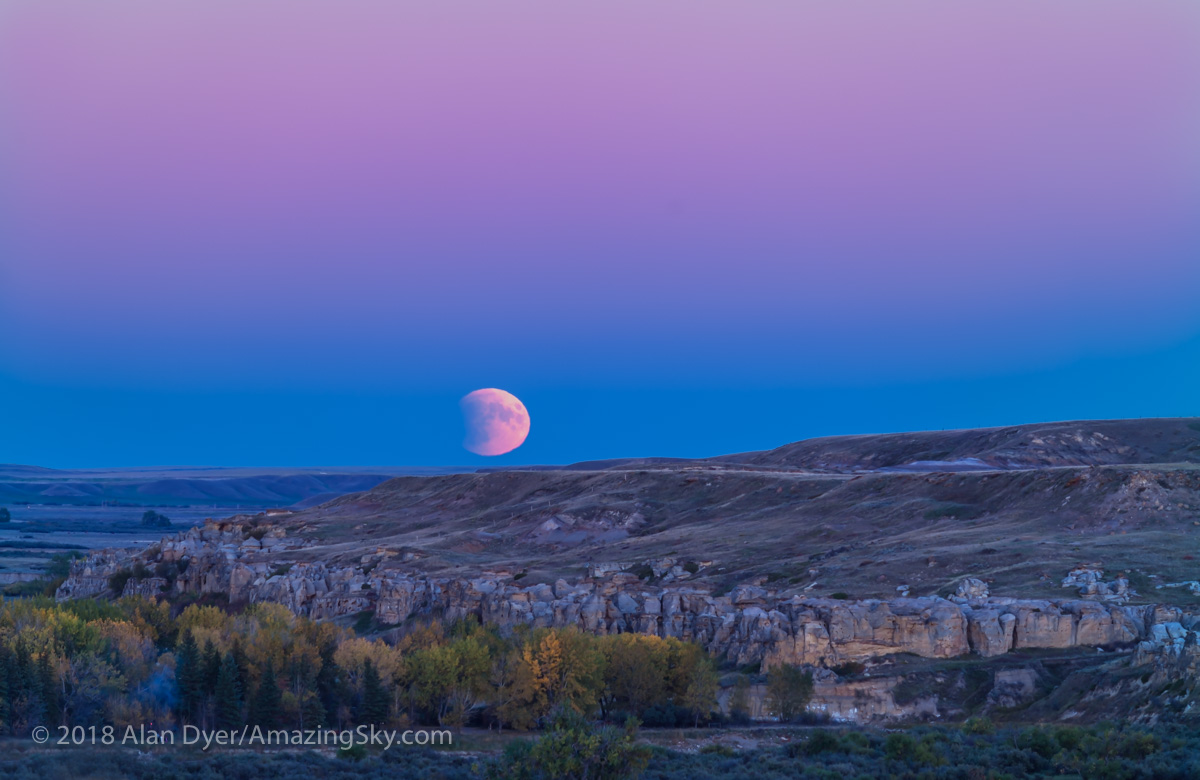
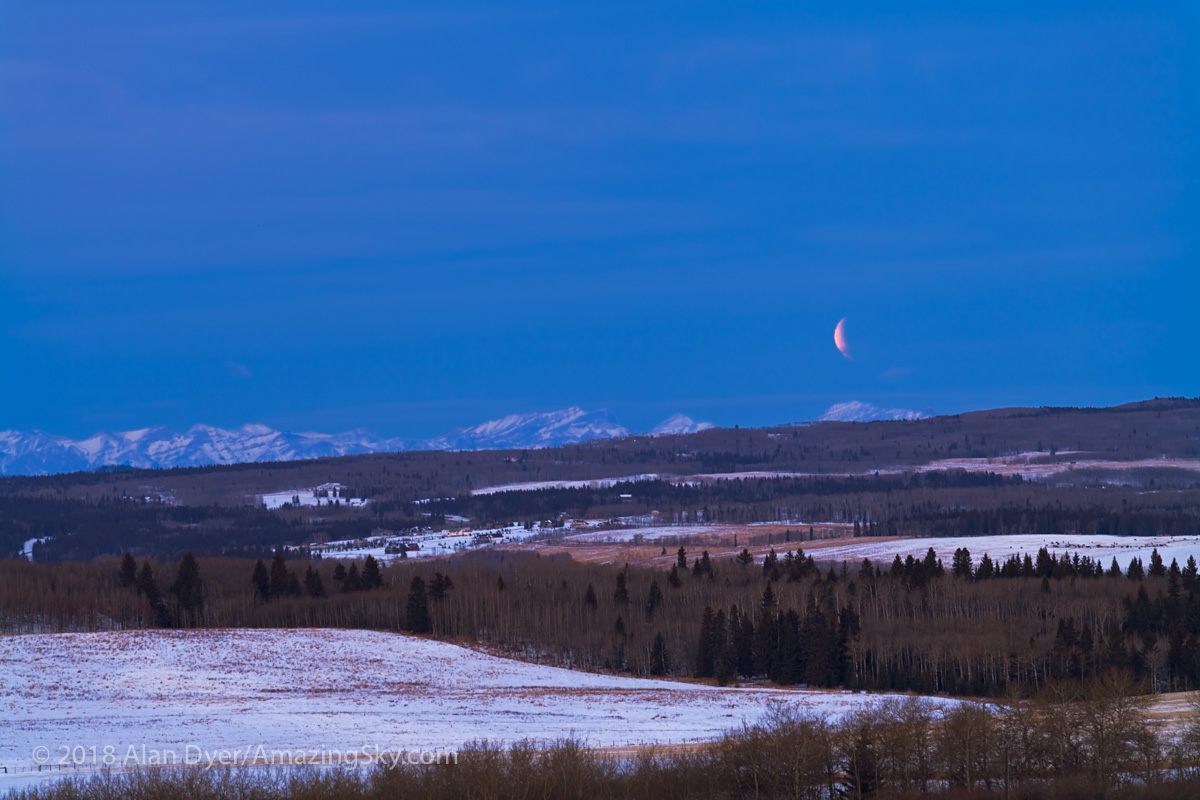
However, the most dramatic images of a deep red Moon in the western sky, such as above, will be possible only from the west. And even then, the further north and west you live, the better your view.
Even from the southwestern United States the Moon sets just after the end of totality, requiring a site with a low and clear horizon to the west in order to see the whole event.
I live in Alberta, Canada, and the diagrams I provide here are for my area, where the Moon sets during the final partial phase. I offer them as examples of the kinds of planning you can do to ensure great photos. But exactly where the Moon will be during totality, and where and when it will set on your horizon, will depend on your location.
To plan your local shoot, I suggest using planetarium software such as Stellarium or Starry Night (the software I used to prepare the charts below), and photo planning apps such as The Photographer’s Ephemeris or PhotoPills.
The latter two apps present the sightlines toward the Moon overlaid on a map of your location, to help you plan where to be to shoot the eclipsed Moon setting behind a suitable foreground.
When is the Eclipse?
While where the Moon is in your sky depends on your site, the various eclipse events happen at the same time for everyone, with differences in hour due only to the time zone you are in.
Here are the times for the start and end of the partial and total phases.
Note that all times are A.M., in the early morning, before sunrise, on January 31. Go out at 6 P.M. on the evening of January 31 and you’ll be 12 hours too late. You missed it!

All times are A.M. on January 31. “—“ means the event is not visible; the Moon has set.
The time of moonset at your site will vary with your location. Use planning apps to calculate your local moonset time.
Picking a Site
No matter where you are in North America you want a site with a good view to the west and northwest, preferably with a clear view of a relatively unobstructed but photogenic horizon.
While having an eclipse occur at dawn (or at dusk) does limit the amount of eclipse we can see, it has the benefit of providing many more photo opportunities of the eclipsed Moon above a scenic landscape or foreground element.
From eastern North America you will have to be content with images of the partially eclipsed Moon setting, similar to the image above of a rising partially-eclipsed Moon.
From the centre of the continent, where the Moon sets during totality, the dim, reddened Moon is likely to disappear into the brightening sky. Remember, when the Moon is full it sets just as the Sun rises. So shots of a red Moon right on the horizon aren’t likely to be possible. The Moon will be too dim and the sky too bright.
From sites in the west, the Moon will set either just at the end of totality or shortly afterwards, making the Moon brighter and more obvious in the sunrise sky, as the foreground in the west lights up with red light from the Sun rising in the east.
It is that same red sunlight filtered by our atmosphere that continues on into our planet’s shadow and lights the Moon red during totality.
Picking a Technique
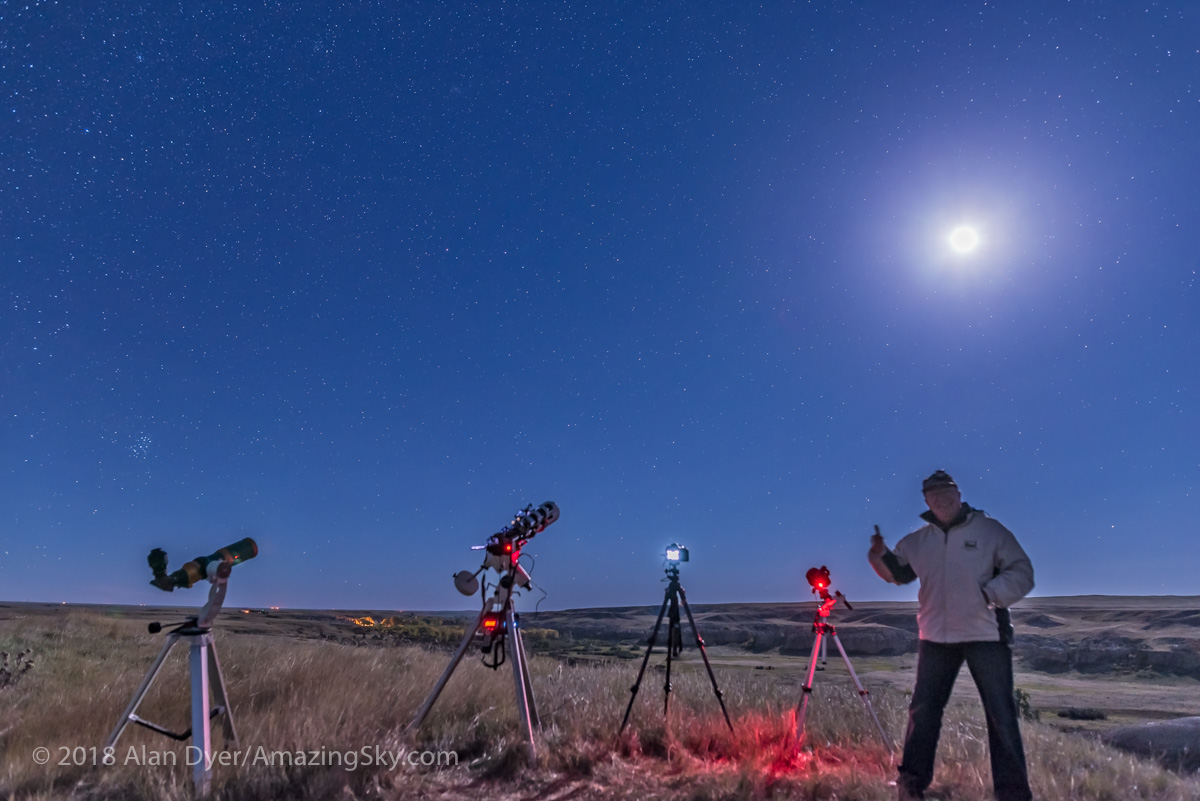
Lunar eclipses lend themselves to a wide range of techniques, from a simple camera on a tripod, to a telescope on a tracking mount following the sky.
What you use depends not only on the gear you have on hand, but also on your site. It might not be practical to set up loads of gear at a scenic site you have to trek into — especially when you have to set up in the wee hours of a cold winter morning.
You could set up earlier that night on January 30, but only if your site is safe enough to leave the gear unattended while you sleep.
Keep it simple!
Option 1: Simple Camera-on-Tripod
The easiest method is to take single shots with a moderate wide-angle or normal lens with the camera on a fixed tripod. No fancy trackers are needed here.
If the sky is bright with twilight, you might be able to meter the scene and use Auto exposure.
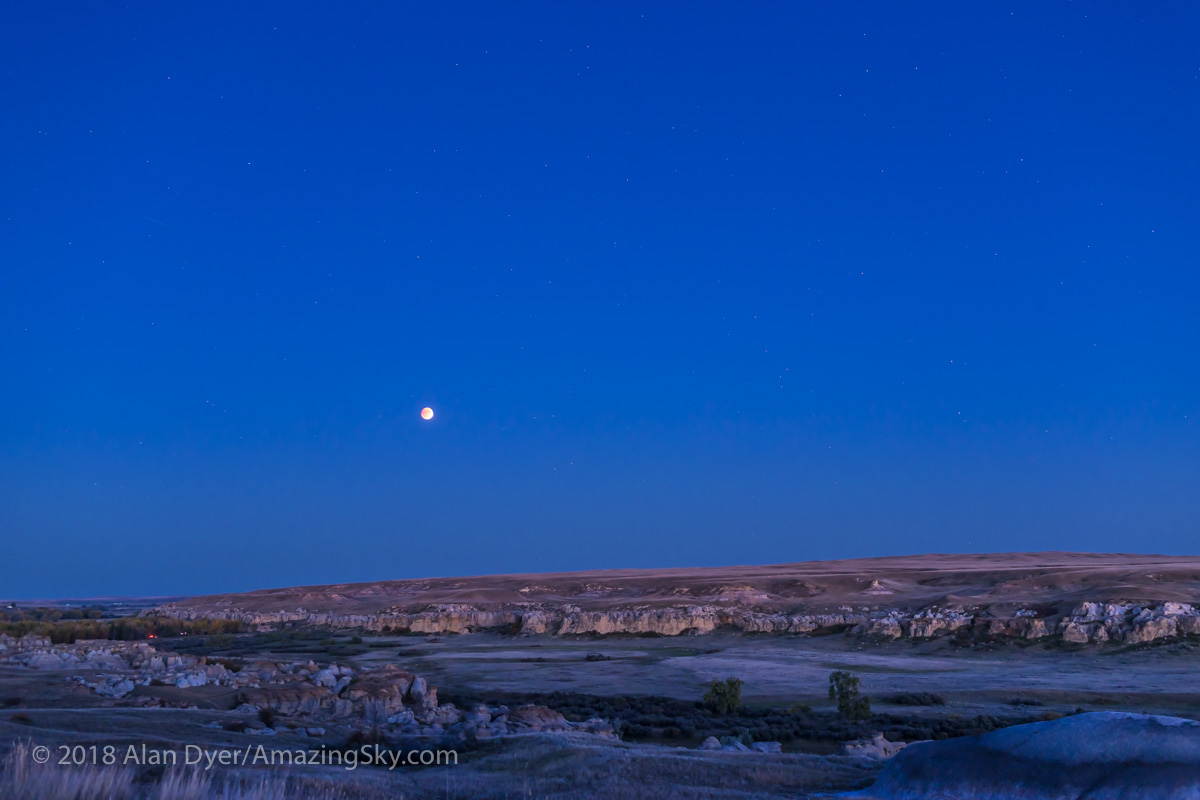
But earlier in the night, with the Moon in a darker sky, as I show above, use Manual exposure and try settings of 1 to 10 seconds at f/2.8 to f/4 at ISO 400 to 1600. That’s a wide range, to be sure, but it will vary a lot depending on when you shoot and where you are, factors that will affect how bright the sky is at your site. Just shoot, check, and adjust.
Option 2: Advanced Camera-on-Tripod
A more advanced method is to compose the scene so the lens frames the entire path of the Moon from the start of the partial eclipse until moonset.
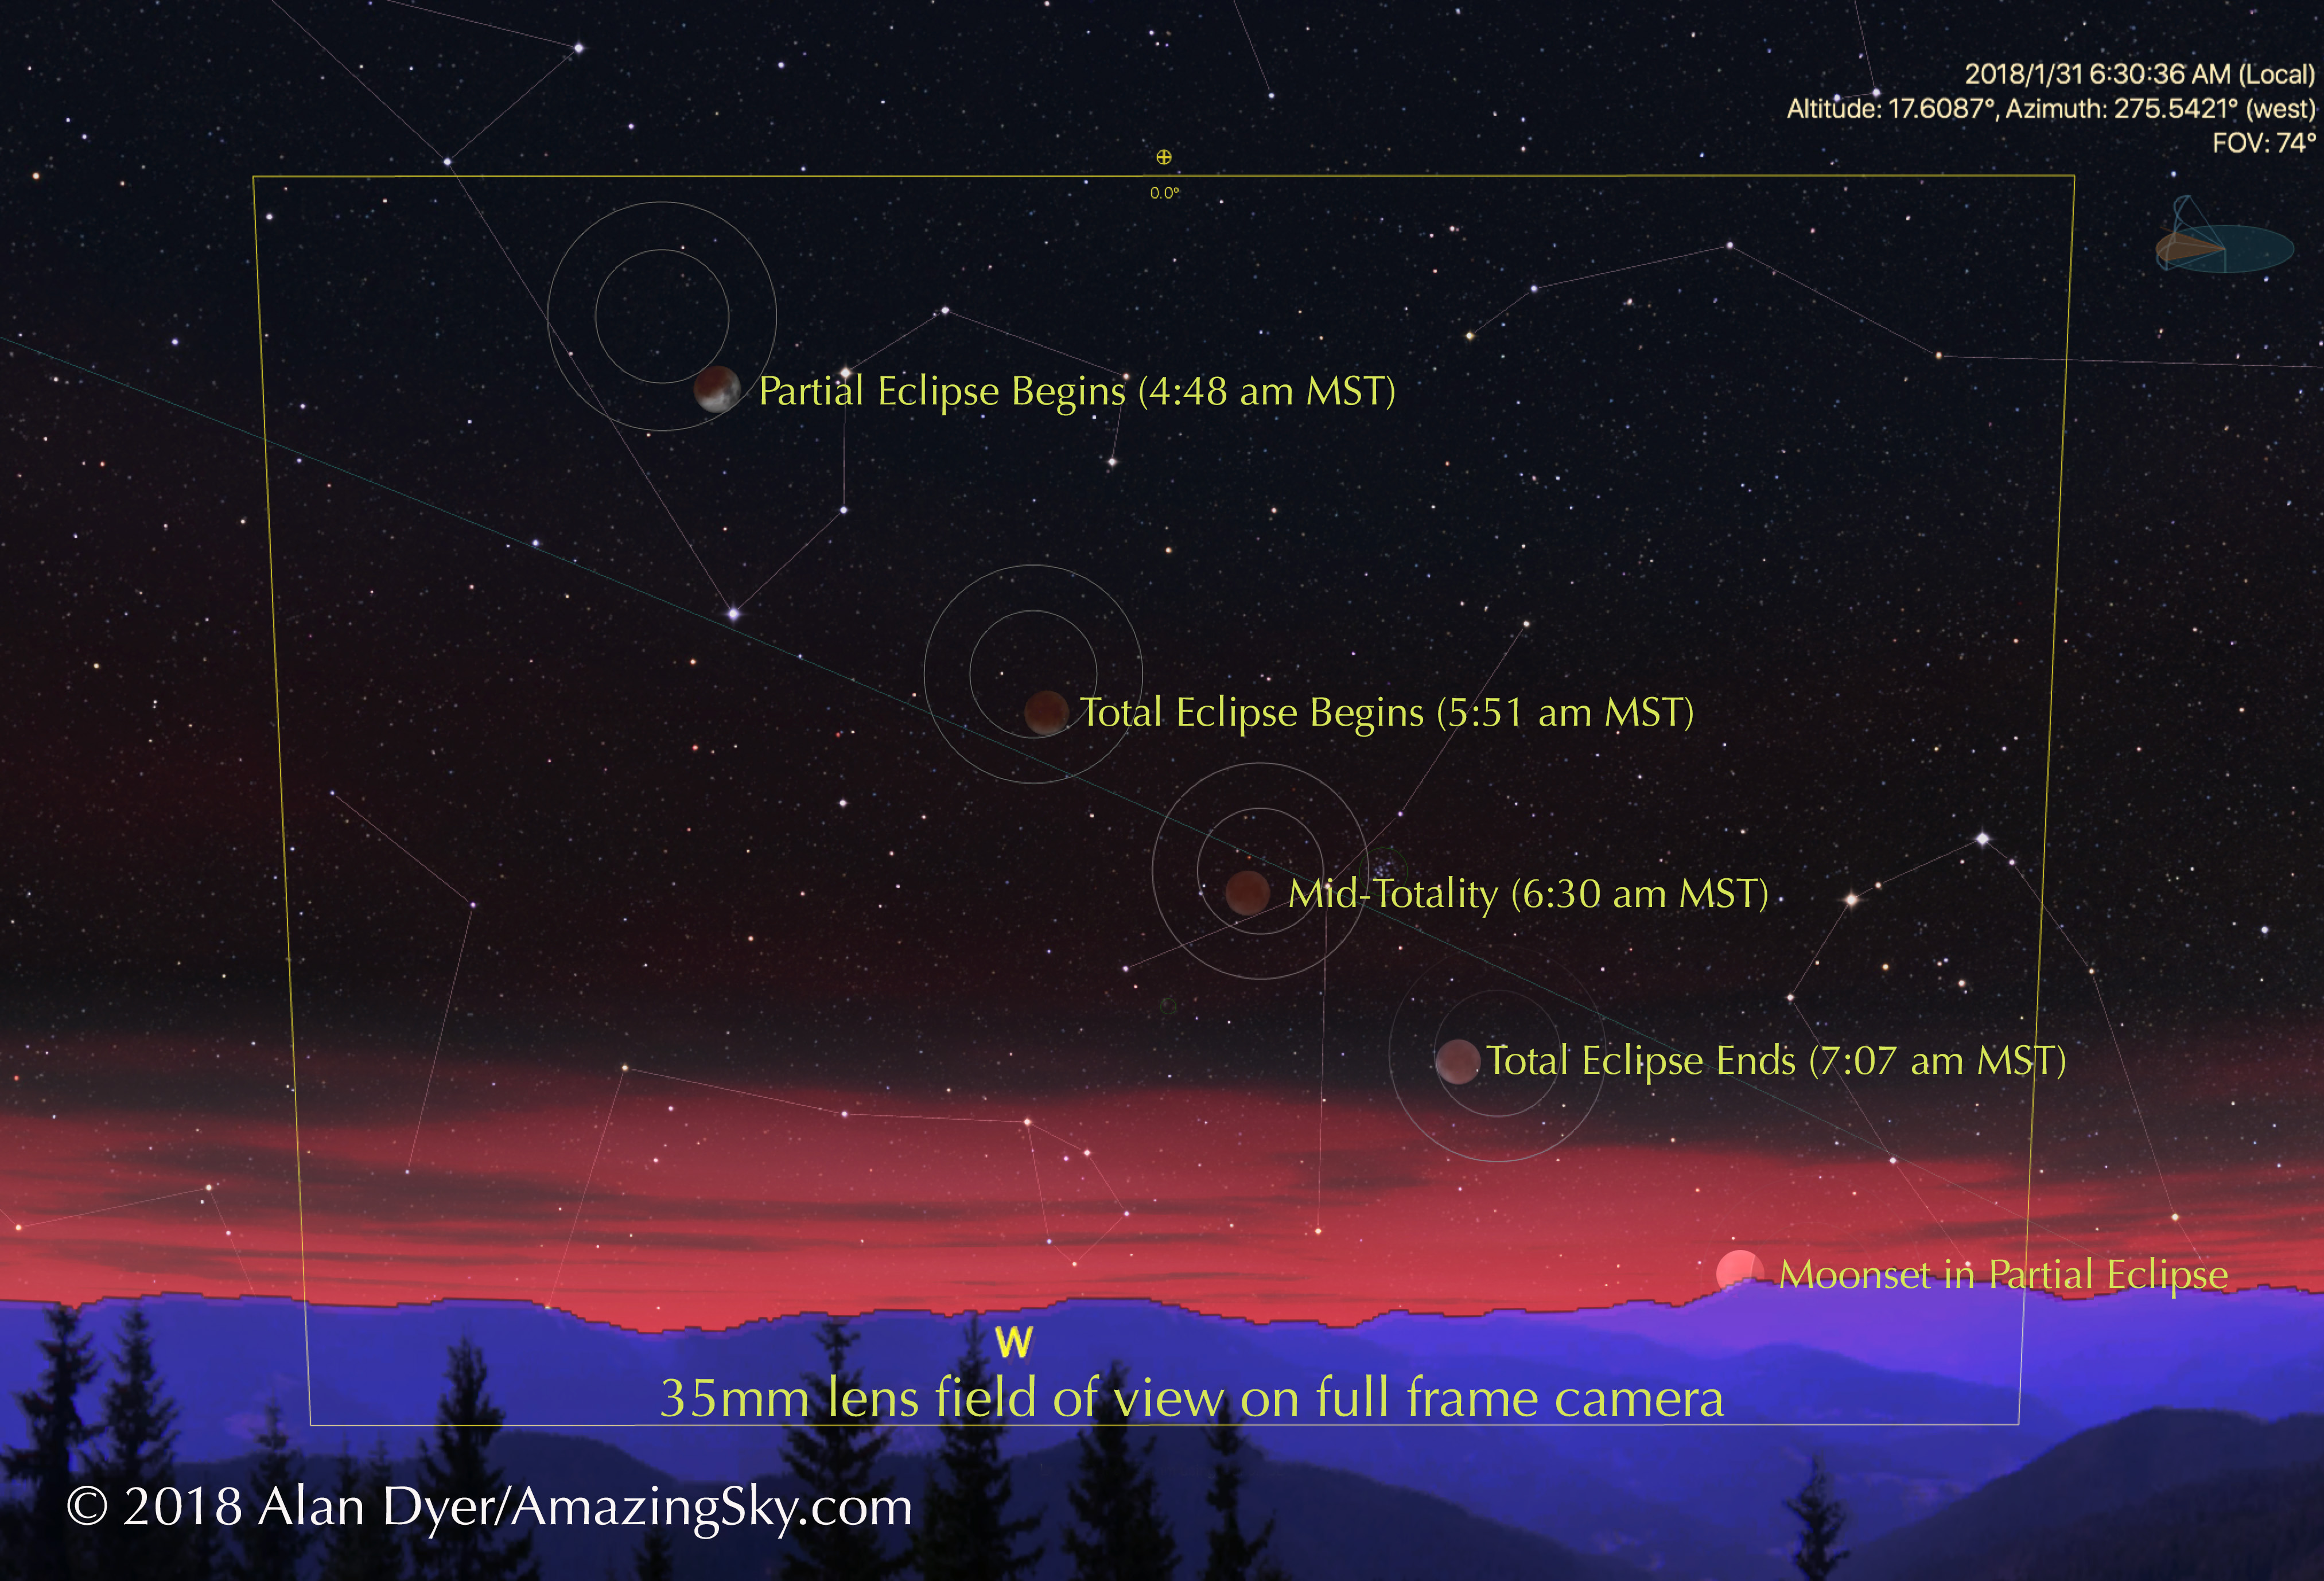
As shown above, that will take at least a 35mm lens on a full frame camera, or 20mm lens on a cropped frame camera.
Take exposures every 15 to 30 seconds if you want to turn the set into a time-lapse movie. But a still-image composite with the lunar disks well separated will need shots only every 5 to 10 minutes.
Such a composite takes good planning and proper exposures to pull off, but will be true to the scene, with the lunar disk and its motion shown to the correct scale as it was in the sky. That’s in stark contrast to the flurry of ugly “faked” composites that will appear on the web by the end of February 1, ones with huge telephoto Moons pasted willy-nilly onto a wide-angle sky. Don’t do it!
Exposures for any lunar eclipse are tricky, whether you are shooting closeups or wide-angles, because the Moon and sky change so much in brightness.
For wide-angle composites, you can expose just for the bright lunar disk and let the sky go dark. Exposures for just the Moon will range from very short (about 1/500th second at ISO 100) for the partials, to 1 to 2 seconds at ISO 400 for the totals, then shorter again (1/15 to 1/2 second at ISO 400) for the end shots in twilight when the Moon and sky may be similar in brightness. That’ll take constant monitoring and adjusting throughout the shoot.
As I did below, you’d then composite and layer the well-exposed disks into another background image exposed longer for the sky, likely shot in twilight. To maintain the correct relative locations of the lunar disks and foreground, the camera cannot move.
That technique works best if it’s just a still image you are after, such as below.

The above image is a composite of the April 4, 2015 total lunar eclipse from Monument Valley, Utah. That eclipse occurred under similar circumstances as this month’s eclipse, with the eclipse underway as the Moon set in the west at sunrise.

By comparison, the composite here is made of a few selected frames out of hundreds I took at 15-second intervals, and with each frame exposed for the sky, for use in a time-lapse movie. In this case, the Moon became overexposed at the end as it emerged from the umbra.
Indeed, if it’s a time-lapse movie you want (see the video linked to below), then each frame will have to be exposed well enough to show the sky and landscape.
While this method will overexpose the partially-eclipsed Moon, the Moon will darken and become better exposed throughout totality when the same long exposure for the reddened Moon might also work for the sky, to pick up stars. Exposures will have to shorten again as the sky brightens with twilight.
Again, constant baby-sitting and adjusting the camera will be needed. So if it’s cold where you are prepare for a frigid multi-hour shoot. I doubt you’ll be able to leave the camera on Auto exposure to run on its own, not until at least bright twilight begins.
Option 3: Telephoto Close-Ups
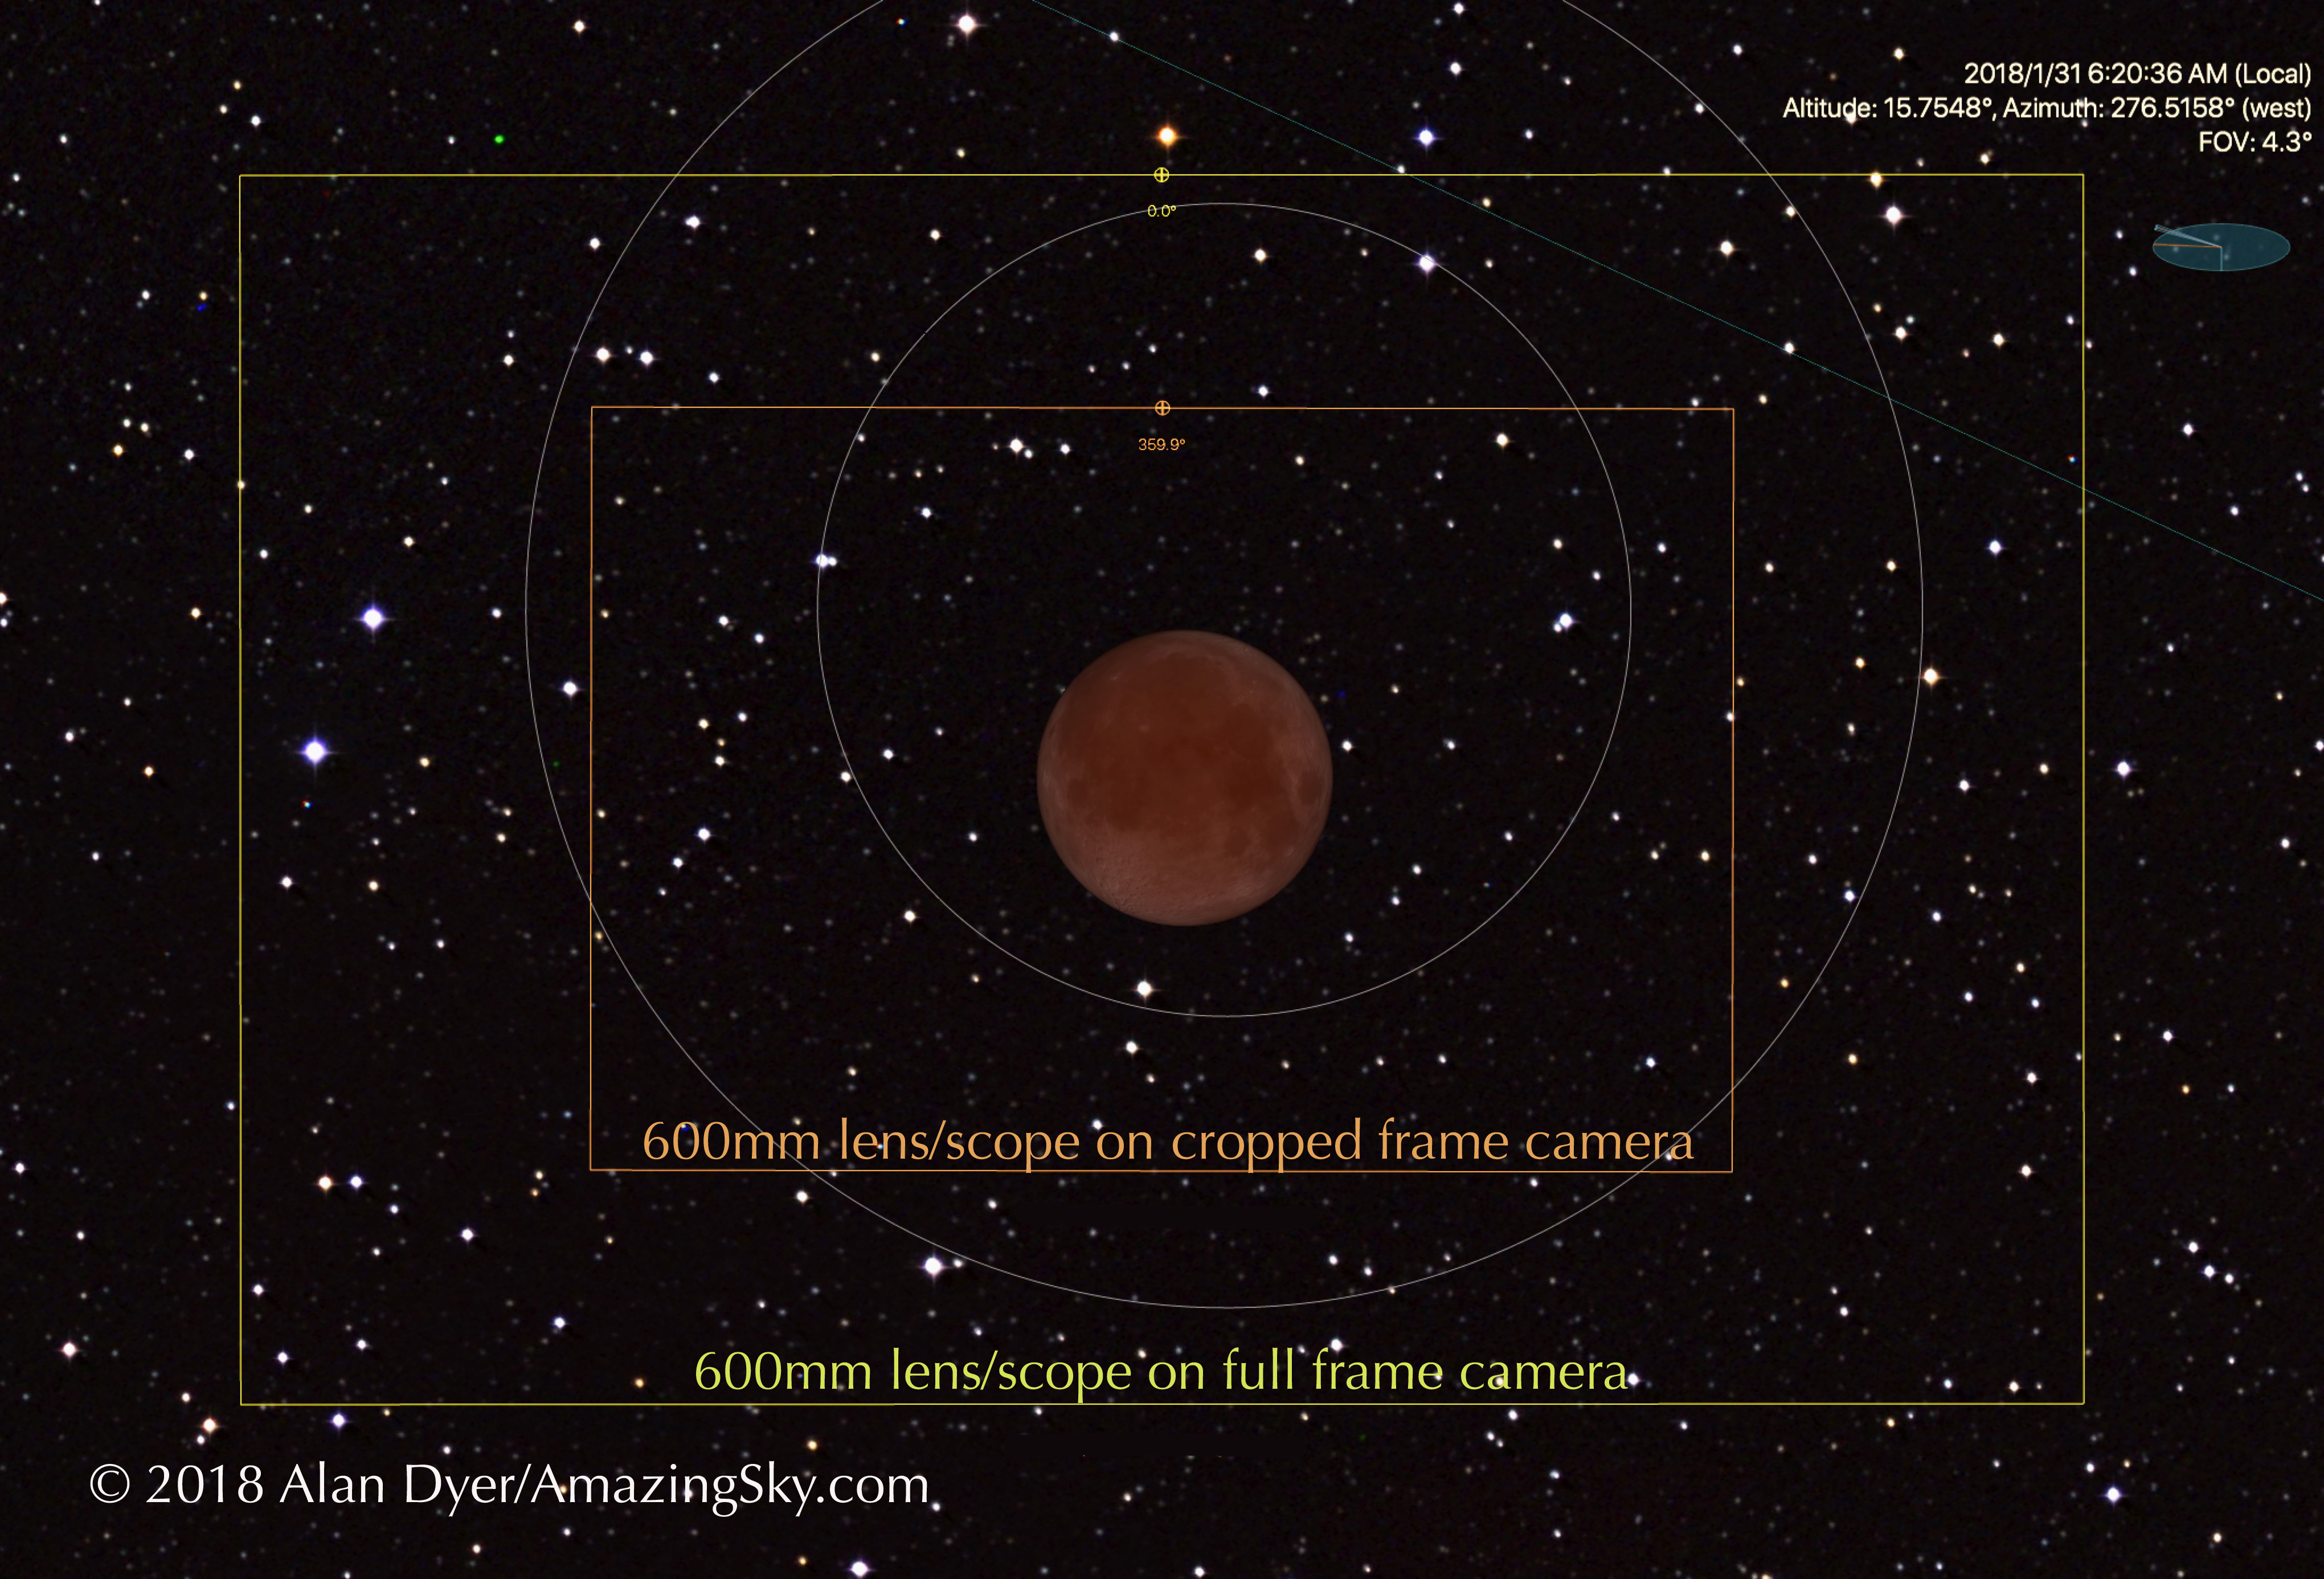
The Moon is surprisingly small (only 1/2-degree across) and needs a lot of focal length to do it justice.
For an “in-your-face” close-up of the eclipse you’ll need a 300mm to 800mm (!) lens. Unfortunately, the Moon and sky are moving and any exposures over 1 to 2 seconds (required during totality) will blur the Moon badly if its disk is large on the frame.
If you don’t have a tracking mount, one solution is to keep the Moon’s disk small (using no more than a fast f/2.8 200mm lens) and exposures short by using a high ISO speed.
Or plan to shoot with a telephoto only when the Moon is low in the sky, as I did above, when you can include the horizon which you would want to be sharp anyway. Framing the Moon and horizon won’t need a super telephoto.
The sky will then also be brighter and require short exposures that don’t need to be tracked. However, how bright and obvious the Moon will be will again depend on your location. This may or may not be a practical option, certainly not if the Moon is setting during mid-totality where you are.
Option 4: Tracked Telescopic Close-Ups
If you have a mount that can be polar aligned to track the sky, then more options are open to you.
You can use a telescope mount or one of the compact and portable trackers, such as the Sky-Watcher Star Adventurer or iOptron Sky Tracker units. While these latter units work great, you are best to keep the payload weight down and your lens size under 300mm.
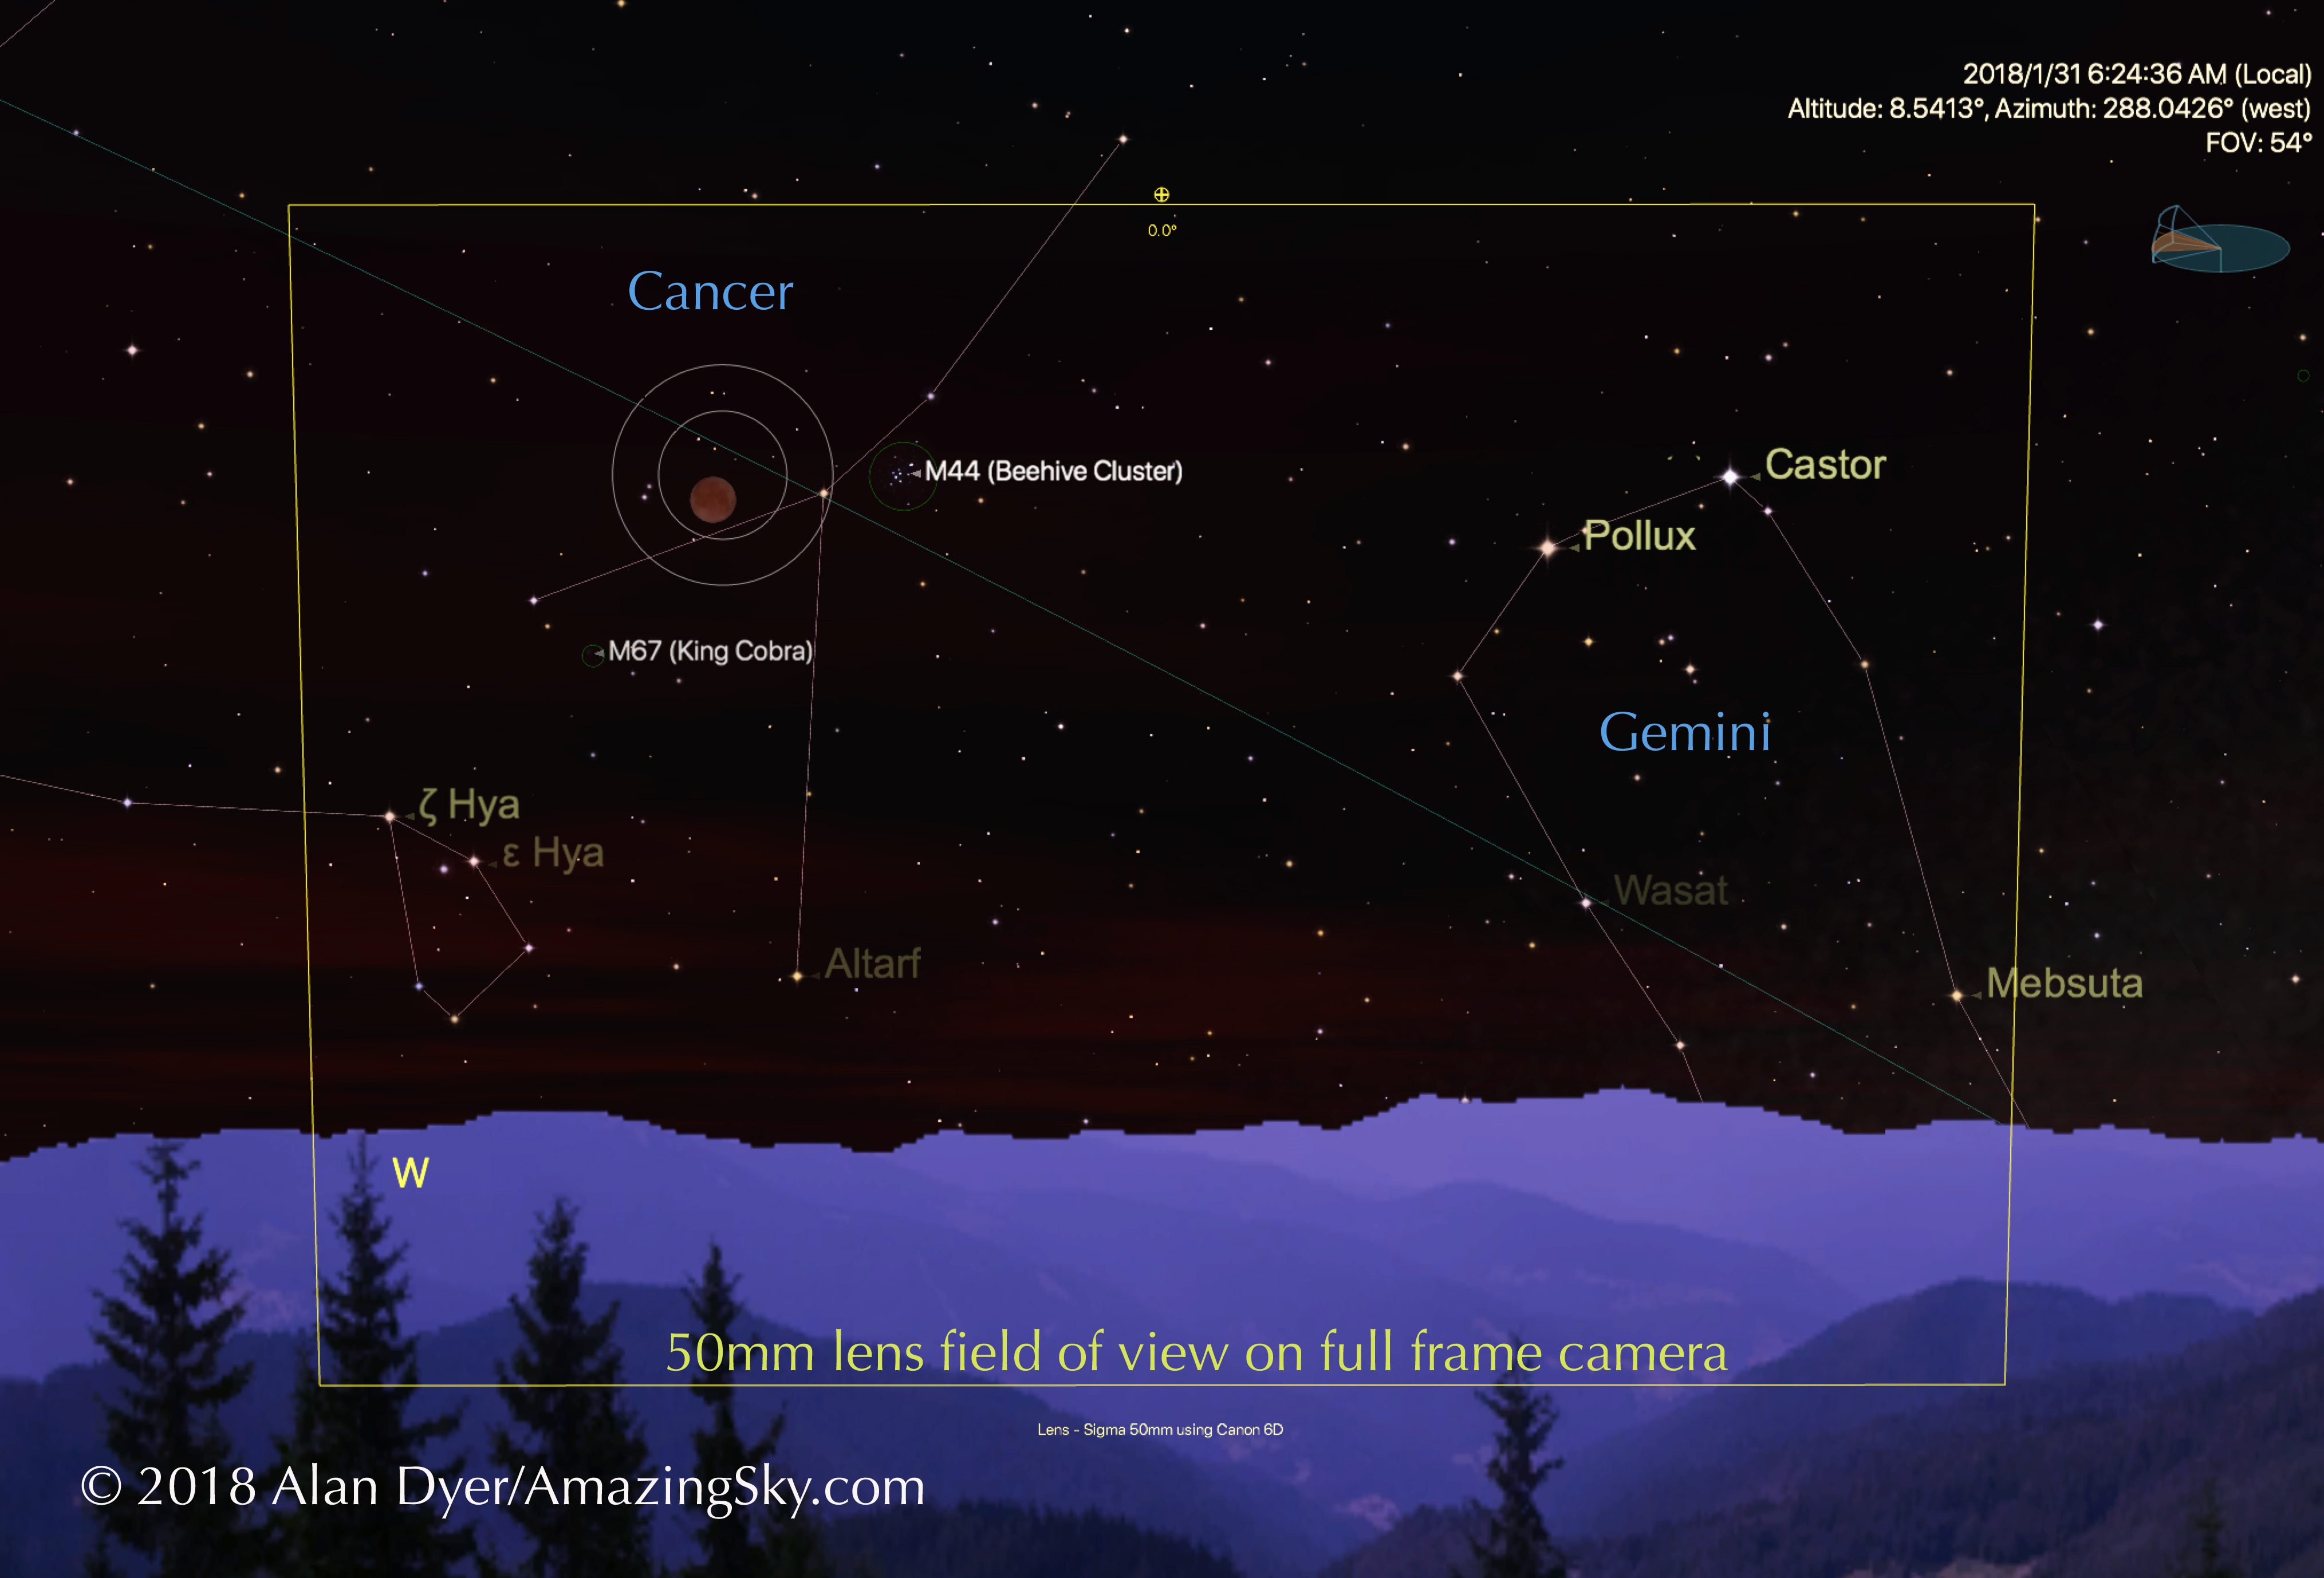
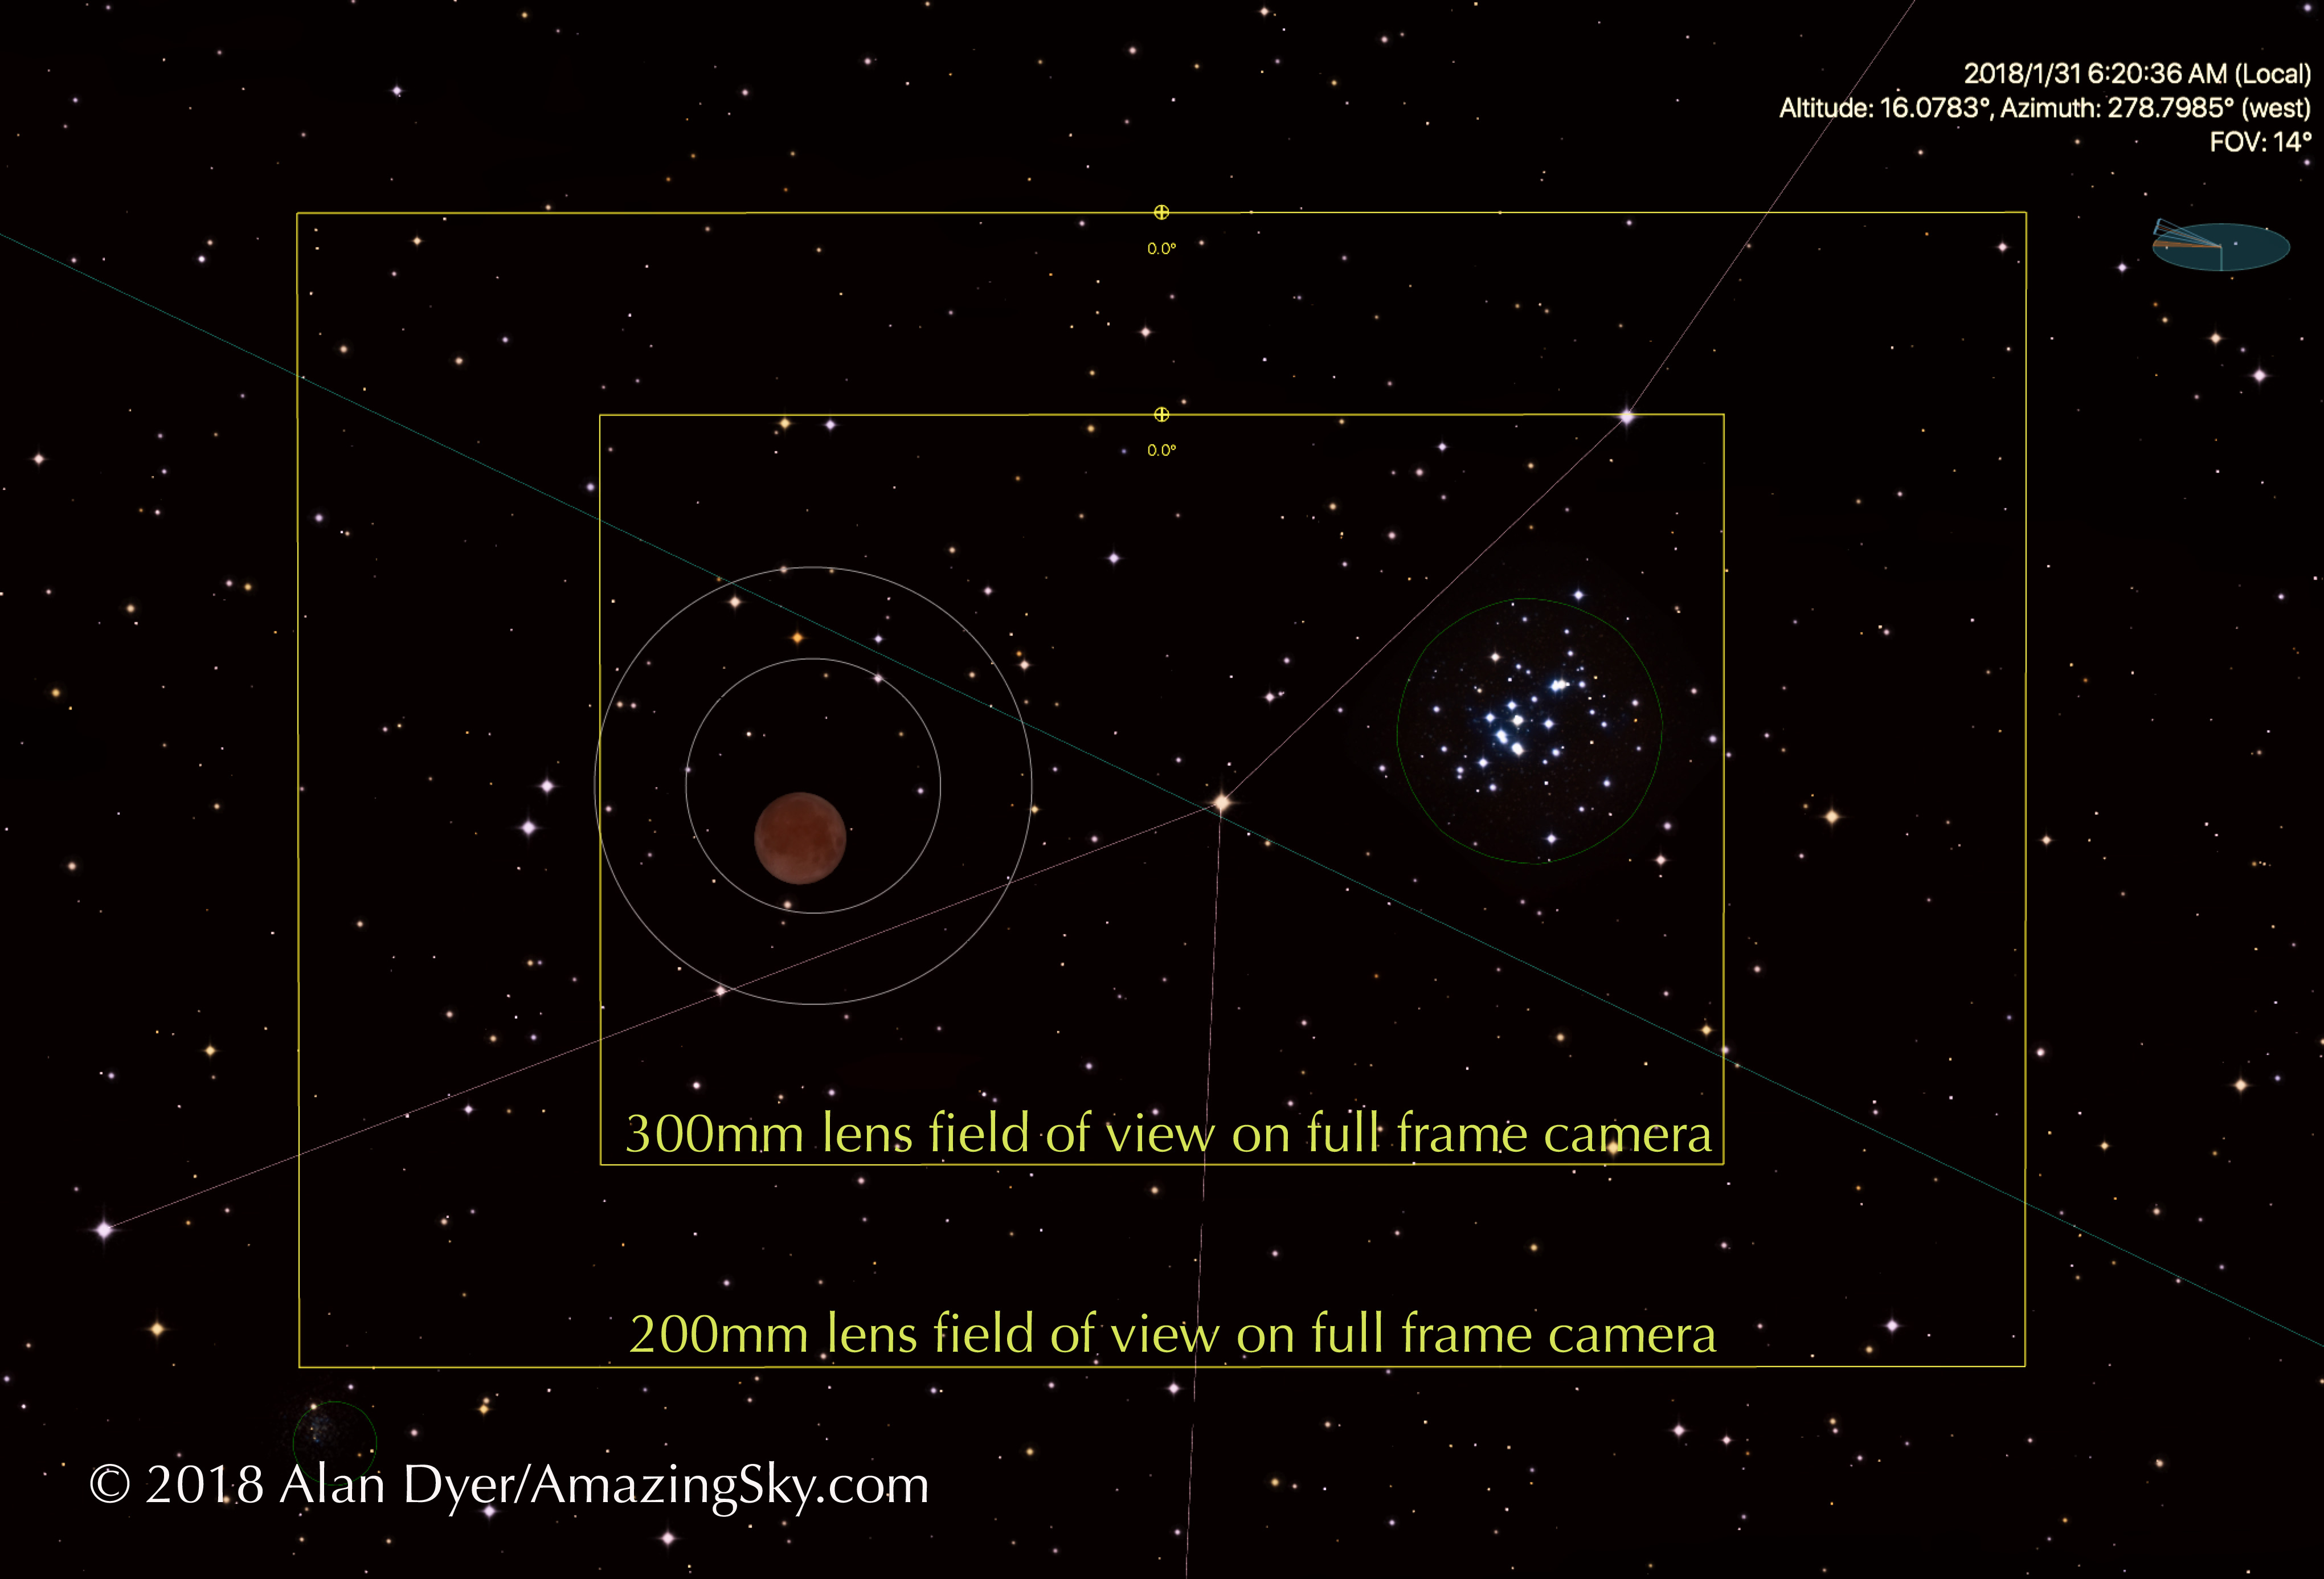
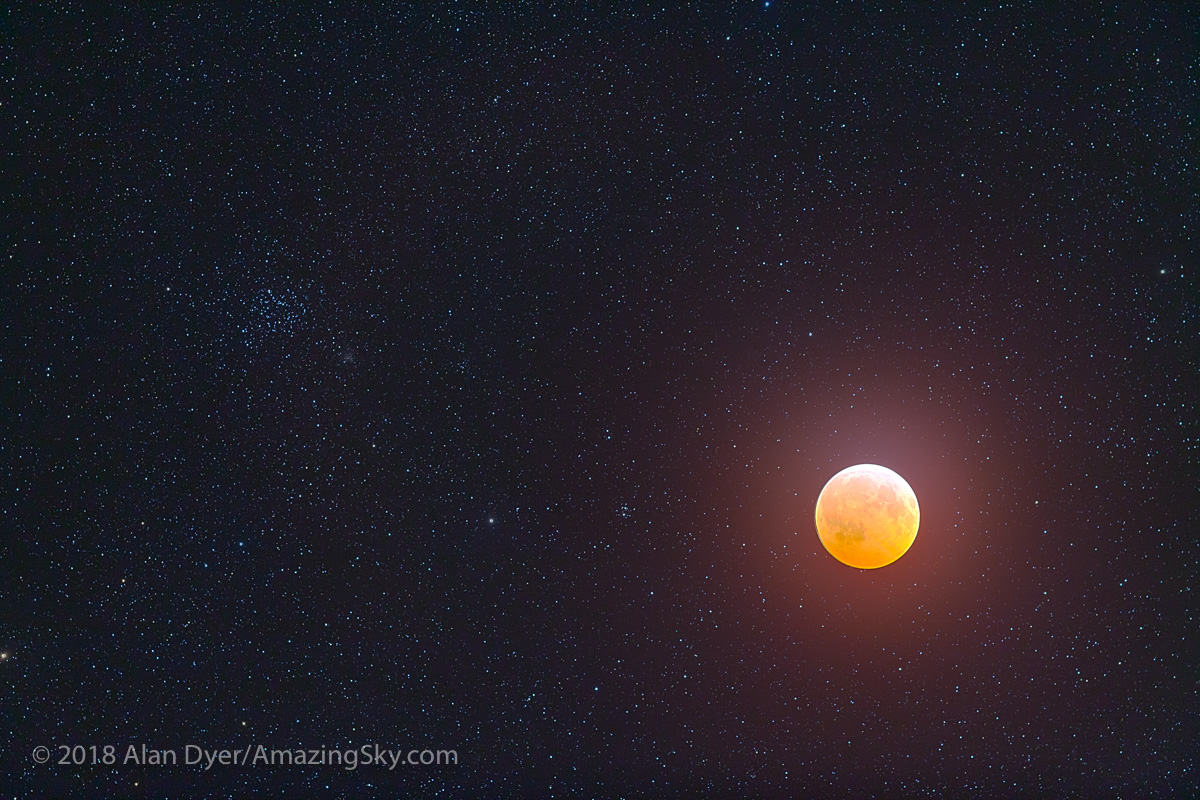
That’s just fine for this eclipse, as you really don’t need a frame-filling Moon. The reason is that the Moon will appear about 4 degrees away from the bright star cluster called the Beehive, or Messier 44, in Cancer. As shown above, a 200mm to 300mm lens will frame this unique pairing well.
Even so, exposures to show the cluster properly might have to be long enough that the Moon overexposes, even at mid-totality. If so, take different exposures for the Moon and stars and composite them later, as I did below.
If you do want to shoot with more focal length, a monster telephoto lens will work, but a small telescope such as an 80mm aperture f/6 to f/7 refractor will provide enough focal length and image size at much lower cost. But either way, the lens or telescope should be mounted on a solid equatorial telescope mount, and polar aligned to track the sky.
For the sharpest lunar disks, use the Lunar tracking rate.
Exposures will vary from as short as 1/500th second at ISO 100 to 200 for the barely eclipsed Moon, to 4 to 16 seconds at f/6 to f/8 and at ISO 400 to 1600 for the Moon at mid-totality.
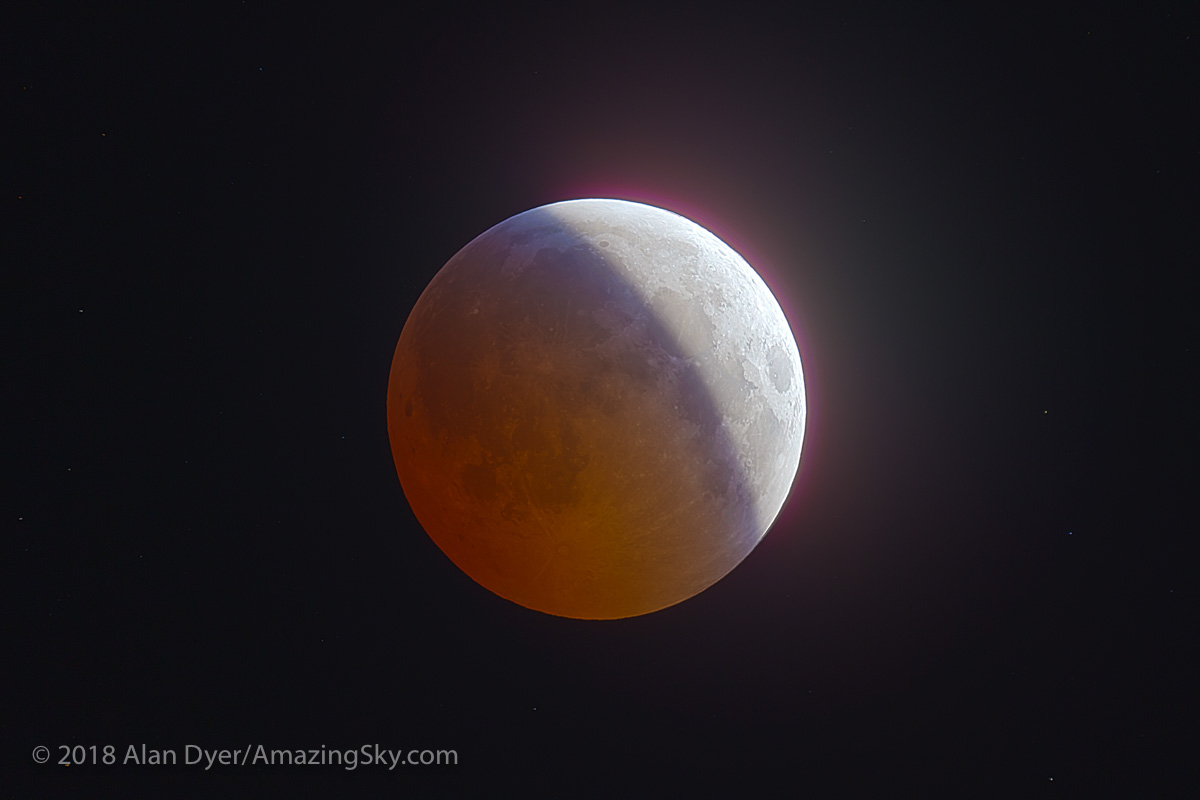
As I did above, during the deep partial phases shoot both long exposures for the red umbra and short exposures for the bright part of the Moon not yet in the umbra. Merge those later with High Dynamic Range (HDR) techniques and software, or with luminosity masks.
Even if you’re not sure how to do this now, shoot all the required exposures anyway so you’ll have them when your processing skills improve.
Option 5: Time-Lapse Close-Ups

With a tracking telescope you could fire shots every 30 seconds or so, and then assemble them into a time-lapse movie.
But as with wide-angle time-lapses, that will take constant attention to gradually and smoothly shift exposures, ideally by 1/3rd-stop increments every few shots during the partial and total phases.
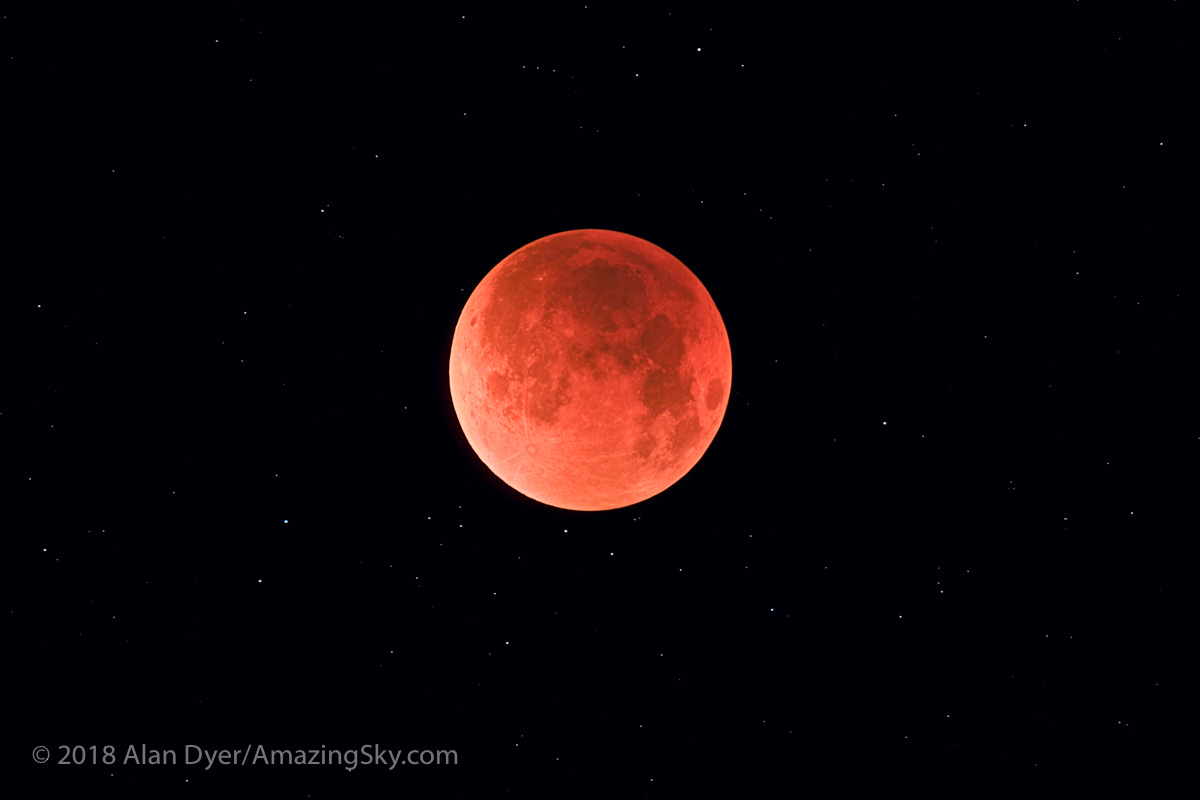
If you track at the lunar rate, as I did in the still image below and in the music video linked to at bottom, the Moon will stay centred while it drifts though the stars.
Track at the sidereal rate and the stars will stay more or less fixed while the Moon drifts through the frame from right to left (west to east). But that takes even more careful planning to position the Moon correctly at the start of the sequence so it remains “in frame” for the duration of the eclipse and ends up where you want at the end, which will occur with the Moon low in a bright sky.
Again, planetarium software such as Starry Night, which can be set to display a camera frame, is essential to plan the shoot.
Either way, do take care to accurately polar align your mount, or you’ll be confronted with the monumental task of having to manually align hundreds of images later. Trust me, I know!

I would consider the telescopic time-lapse method the most challenging of techniques.
Considering the hour of the night and the likely cold temperatures, your best plan might be to keep it simple. It’s what I plan to do. I’ll be happy to get a few good wide-angle still images, and perhaps a tracked telephoto close-up of the Moon and Beehive as a bonus.
While there is another total lunar eclipse (TLE) in six months on July 27/28, it is not visible at all from North America.
Our next TLE occurs 12 Full Moons, or one lunar year from now, on the night of January 20/21, 2019, when all of North America gets to watch totality at a more reasonable hour, though perhaps not at a more reasonable temperature.
I leave you with a music video of the last TLE, on September 27, 2015 that incorporates still and time-lapse sequences shot using all of the above methods.
Enjoy!
Good luck and clear skies on eclipse morning!
— Alan, January 6, 2018 / © 2018 Alan Dyer / amazingsky.com

This is so cool. These tips will come in handy🙂
What an excellent post; I’ll be sure and promote it!
Alan, can you do something to ensure great weather and especially given the time of the year?! 😛
I’ve ordered the clear skies from Amazon. We will see if they deliver!
Eclipsed moon moving against star background was a very powerful image, esp with choice of music. Great production, Alan, thank you.
You’re welcome!
Amazing insights. I hope I am able to follow your instructions and do good justice to the opportunity. Thank you.
Great post, definitely looking forward to it. Hopefully we get some great clear skies.