

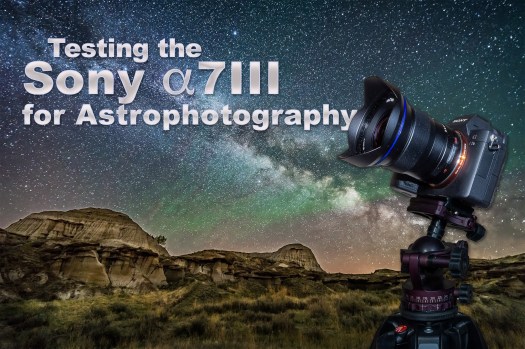
I put the new Sony a7III mirrorless camera through its paces for the features and functions we need to shoot the night sky.
Sony’s a7III camera has enjoyed rave reviews since its introduction earlier in 2018. Most tests focus on its superb auto exposure and auto focus capabilities that rival much more costly cameras, including Sony’s own a7rIII and a9.
For astrophotography, none of those auto functions are of any value. We shoot everything on manual. Indeed, the ease of manually focusing in Live View is a key function.
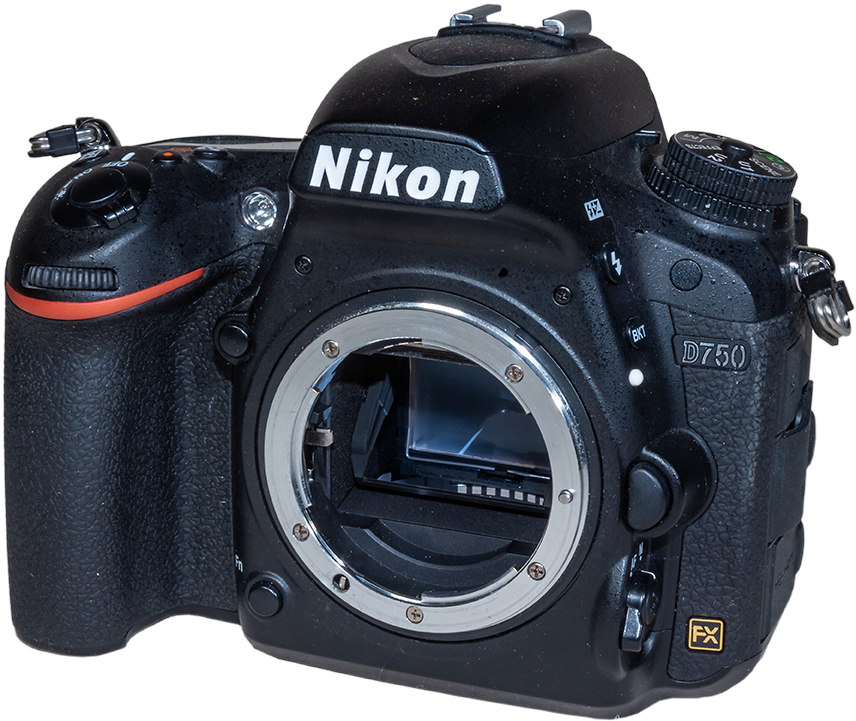
In my testing I compared the Sony a7III to two competitive DSLRs, the Canon 6D MkII and Nikon D750.
All three are “entry-level” full-frame cameras, with 24 to 26 megapixels and in a similar price league of $1,500 (Nikon) to 2,000 (Sony).
I tested a Sony a7III purchased locally. It was not supplied to me by Sony in return for an “influential” blog post.
I did this testing in preparation for the new third edition of my Nightscapes and Time-Lapse eBook, which includes information on Sony mirrorless cameras, as well as many, many other updates and additions!
NOTE: Click or Tap on most images to bring them up full-frame for inspection.

Mirrorless vs. DSLR

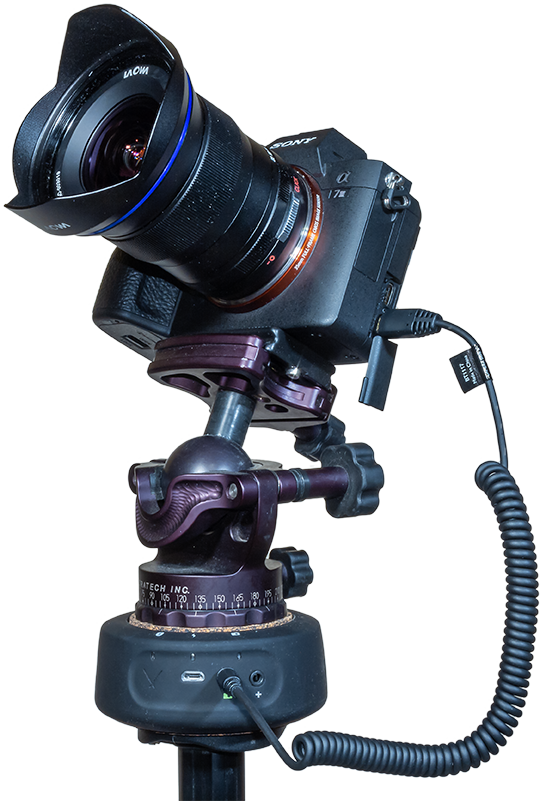
The Sony a7III with the compact but fast Laowa Venus Optics 15mm f/2 lens.
As with Sony’s other popular Alpha 7 and 9 series cameras, the new Alpha 7III is a full-frame mirrorless camera, a class of camera Canon and Nikon have yet to offer, though models are rumoured or promised.
In the meantime, Sony commands the full-frame mirrorless market.
As its name implies, a mirrorless camera lacks the reflex mirror of a digital single lens reflex camera that, in a DSLR, provides the light path for framing the scene though the optical viewfinder.
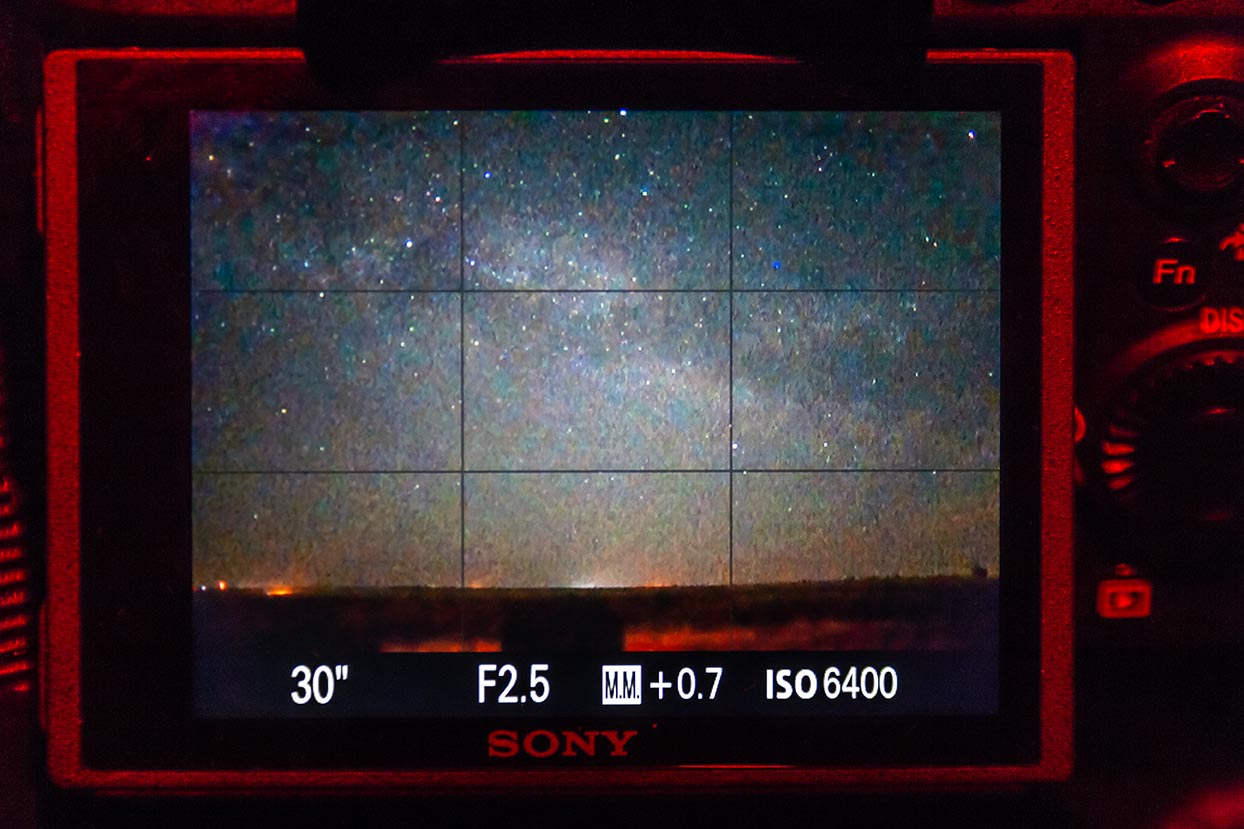
The Sony a7III’s excellent Live View screen display. You can see the Milky Way!
In a mirrorless, the camera remains in “live view” all the time, with the sensor always feeding a live image to either or both the rear LCD screen and electronic viewfinder (EVF). While you can look through and frame using the EVF as you would with a DSLR, you are looking at an electronic image from the sensor, not an optical image from the lens.
The advantage of purely electronic viewing is that the image you are previewing matches the image you’ll capture, at least for short exposures. The disadvantage is that full-time live view draws more power, with mirrorless cameras notorious for being battery hungry.
Other mirrorless advantages include:
- Compact size and lighter weight, yet offering all the image quality of a full-frame DSLR.
- The thinner body allows the use of lenses from any manufacturer, albeit requiring the right adapter, an additional expense.
- Lenses developed natively for mirrorless models can be smaller and lighter. An example is the Laowa 15mm f/2 I used for some of the testing.
- The design lends itself to video shooting, with many mirrorless cameras offering 4K as standard, while often in DSLRs only high-end models do.
- More rapid-fire burst modes and quieter shutters are a plus for action and wedding photographers, though they are of limited value for astrophotography.
Points of Comparison
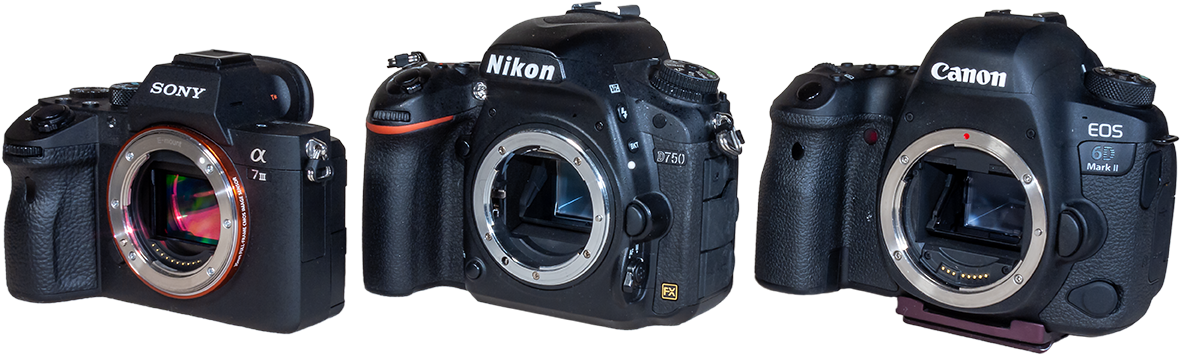
The Sony a7III, Nikon D750, and Canon 6D Mark II. Note the size difference.
In testing the Sony a7III I ignored all the auto functions. Instead, I concentrated on those points I felt of most concern to astrophotographers, such as:
- Noise levels
- Effectiveness of Long Exposure Noise Reduction (LENR)
- Quality of Raw files, such as sharpness of stars
- Brightness of Live View for framing and focusing
- Uniformity of sensor illumination
- Compatibility for time-lapse imaging
- Battery life
TL;DR Conclusions
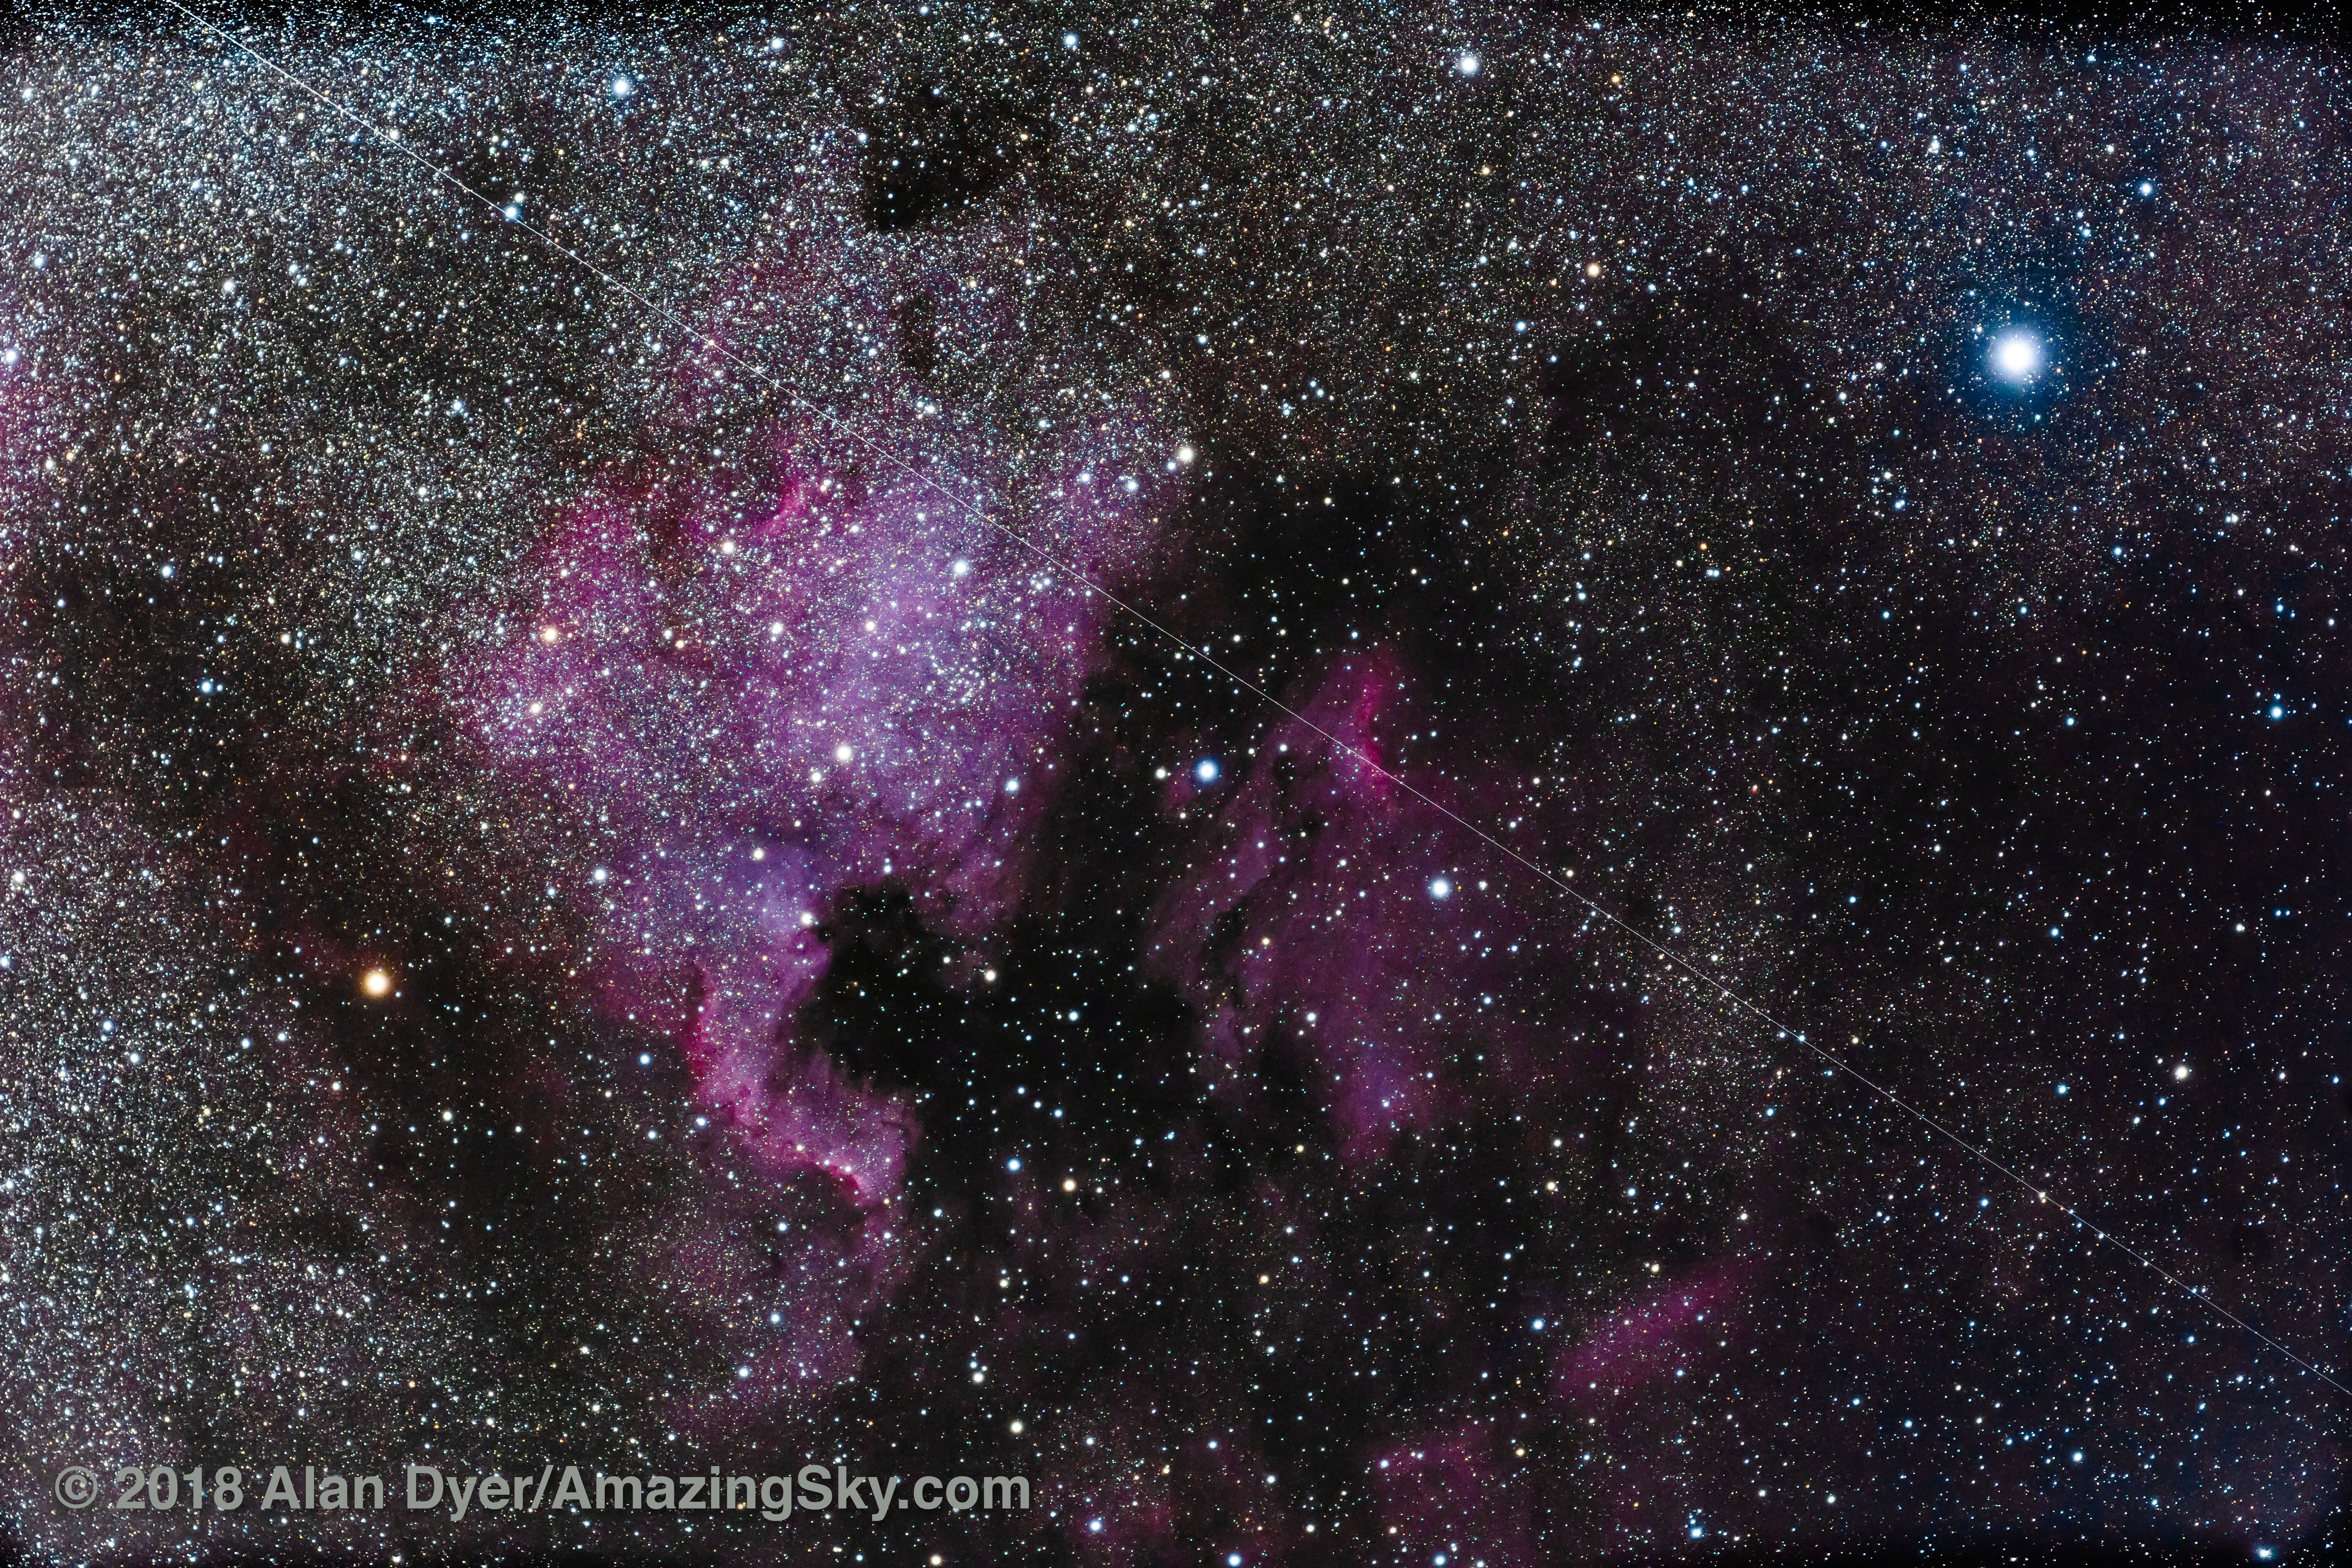
The North America Nebula with the Sony a7III and a Meade 70mm f/5 astrographic refractor, for a single 4-minute exposure at ISO 1600. The reds have been boosted in processing.
Noise
Levels of luminance and chrominance noise were excellent and similar to – but surprisingly not better than – the Nikon D750.
Star Eater
The Star Eater is effectively gone. Stars are not smoothed out in long exposures.
ISO Invariance
The Sony exhibited good – though not great – “ISO invariant” performance.
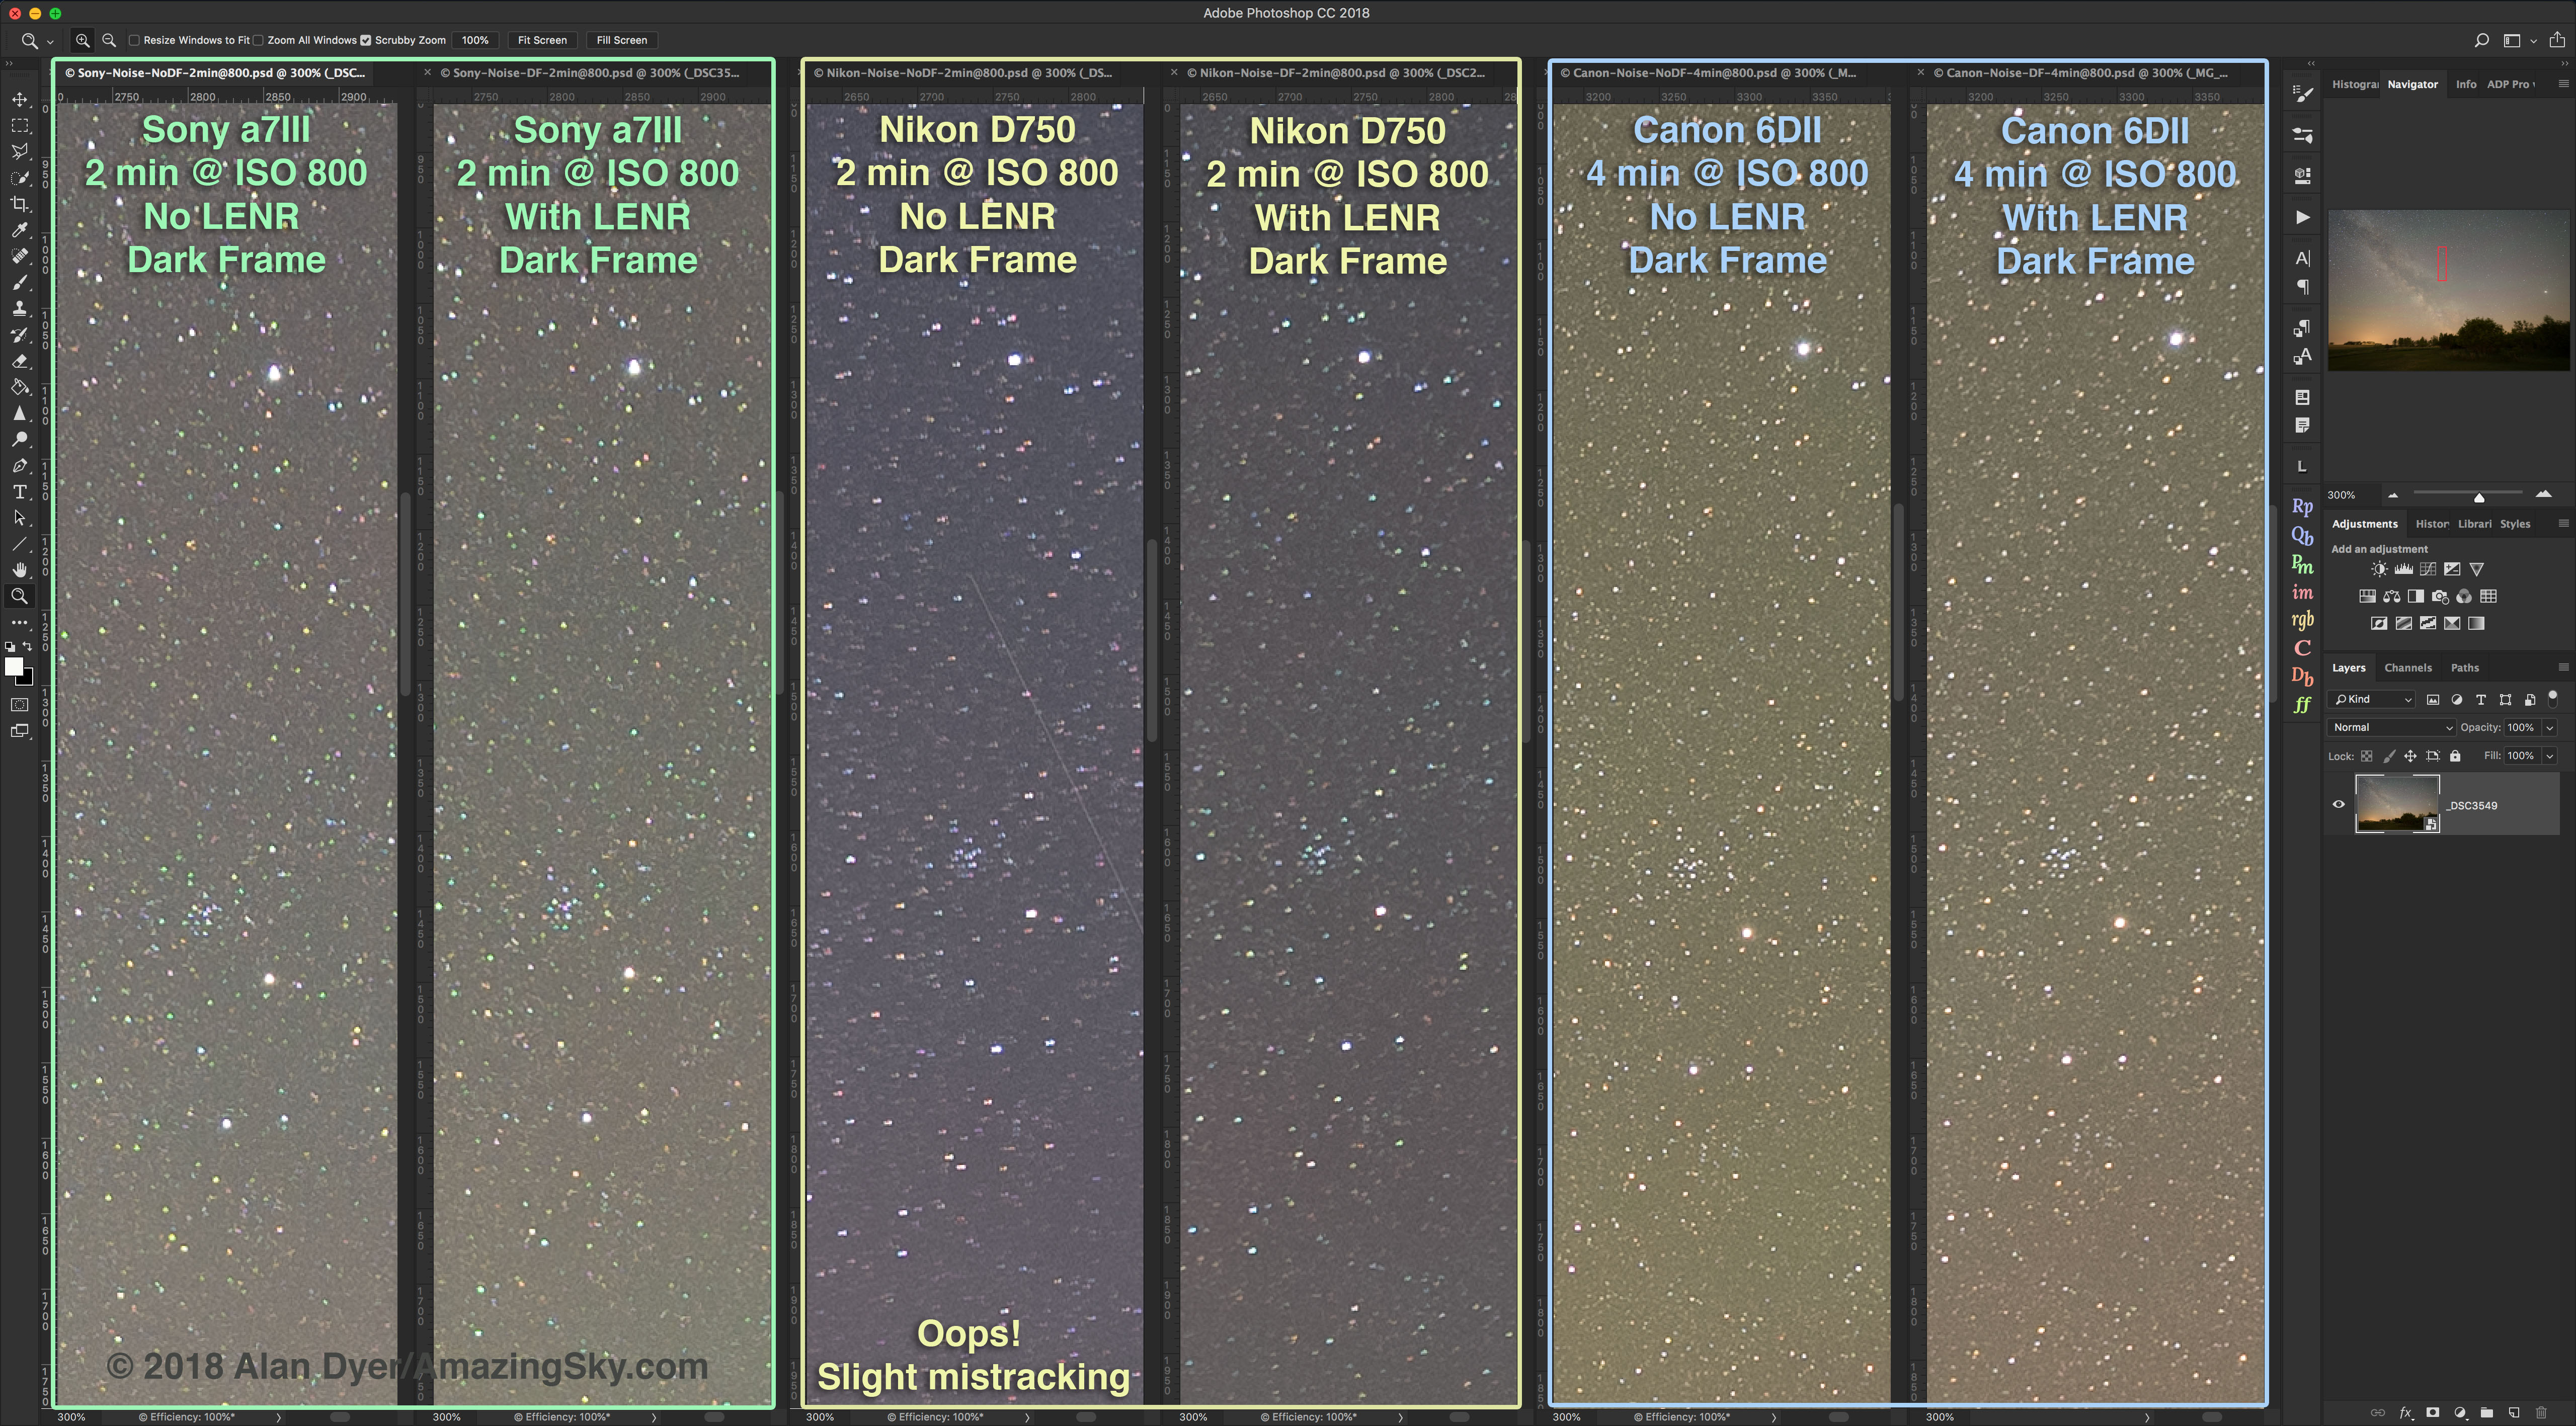
Dark Frames
Dark frame subtraction using Long Exposure Noise Reduction removed most – but not all – hot pixels from thermal noise.
Live View Focusing and Framing
Live View was absolutely superb, though the outstanding Bright Monitoring function is as well-hidden as Sony could possibly make it.
Sensor Illumination Uniformity
The Sony showed some slight edge-of-frame shadowing from the mask in front of the sensor, as well as a weak purple amp glow.
Features
• The a7III lacks any internal intervalometer or ability to add one via an app. But it is compatible with many external intervalometers and controllers.
• The a7III’s red sensitivity for recording H-Alpha-emitting nebulas was poor.
• It lacks the “light-frame” buffer offered by full-frame Canons that allows shooting several frames in quick succession even with LENR turned on.
Video Capability
The a7III offers 4K video and, at 24 frames-per-second, is full-frame. Shutter speeds can be as slow as 1/4-second, allowing real-time aurora shooting at reasonable ISO speeds.
Battery Life
Shooting typical 400-frame time-lapses used about 40% of the battery capacity, similar to the other DSLRs.
Overall Recommendations
The Sony a7III is a superb camera for still and time-lapse nightscape shooting, and excellent for real-time aurora videos. It is good, though not great, for long-exposure deep-sky imaging.
Noise
The Sony a7III uses a sensor that is “Backside Illuminated,” a feature that promises to improve low-light performance and reduce noise.
I saw no great benefit from the BSI sensor. Noise at typical astrophoto ISO speeds – 800 to 6400 – were about equal to the four-year-old Nikon D750.
That was a bit surprising. I expected the new BSI-equipped Sony to better the Nikon by about a stop. It did not. This emphasizes just how good the Nikon D750 is.
Nevertheless, noise performance of the Sony a7III was still excellent, with both the Sony and Nikon handily outperforming the Canon 6D MkII, with its slightly smaller pixels, by about a stop in noise levels.
NOTE: I performed all Raw developing with Adobe Camera Raw v10.3. It is possible some of the artifacts I saw are due to ACR not handling the a7III’s .ARW files as well as it should. But to develop all the images from Sony, Nikon, and Canon equally for comparisons, ACR is the best choice.

The Sony a7III exhibited noise levels similar to the Nikon D750 at high ISOs, with the Sony and Nikon each about a stop better for noise than the Canon 6D MkII.
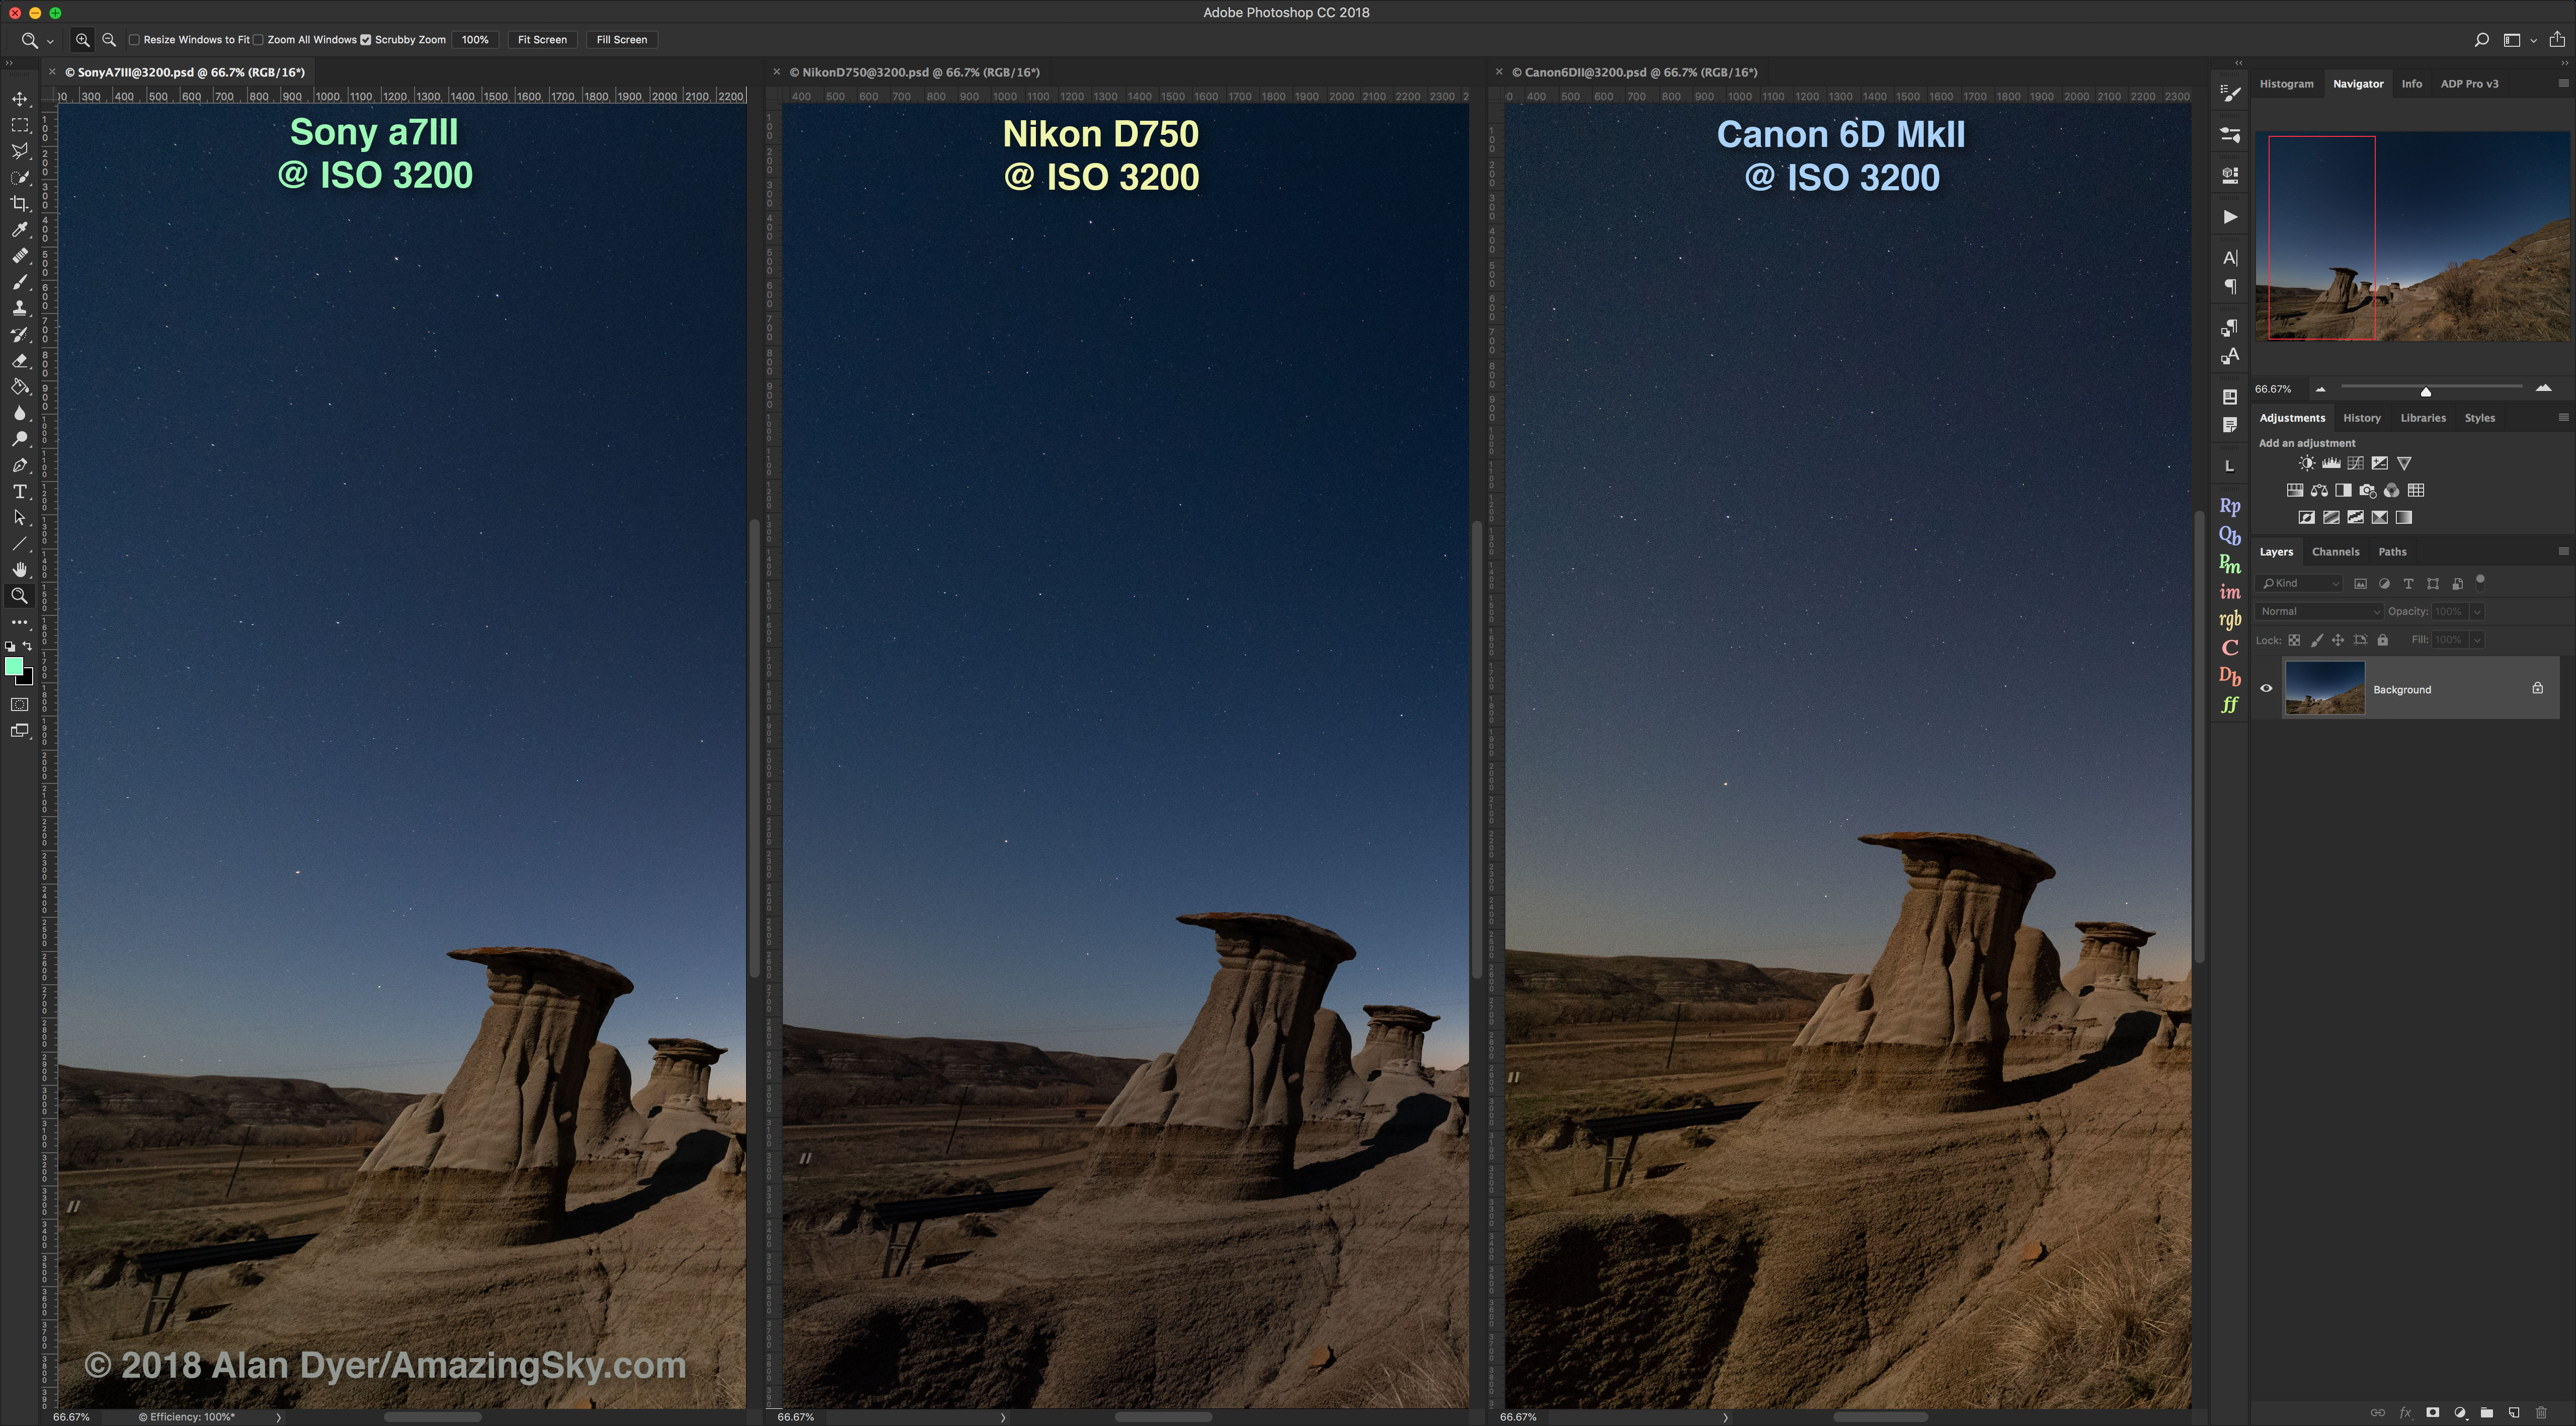
At ISO 3200, a common nightscape ISO speed, all three cameras performed well in this moonlit scene. The Canon shows a darker sky as its images were taken a few minutes later. The Nikon had the Sigma 14mm Art lens; the Canon and Sony used the same Rokinon 14mm SP lens.

At ISO 6400, the Canon begins to show excessive noise, about a stop worse than the Nikon and Sony. No luminance noise reduction was applied to these images. All cameras show an equal number of stars recorded.
ISO Invariance
Both the Sony and Nikon use sensor and signal path designs that are “ISO invariant.” As a result, images shot underexposed at slower ISOs, then boosted in exposure later in processing look identical to properly exposed high-ISO images. Well, almost.
The Sony still showed some discoloration artifacts and added noise when boosting images by +4 EV that the Nikon did not. Even with uncompressed Raws, the Sony was not quite as ISO invariant as the Nikon, though the difference shows up only under extreme push-processing of badly underexposed frames.
Plus, the Sony was far better than the Canon 6D MkII’s “ISO variant” sensor. Canon really needs to improve their sensors to keep in the game.
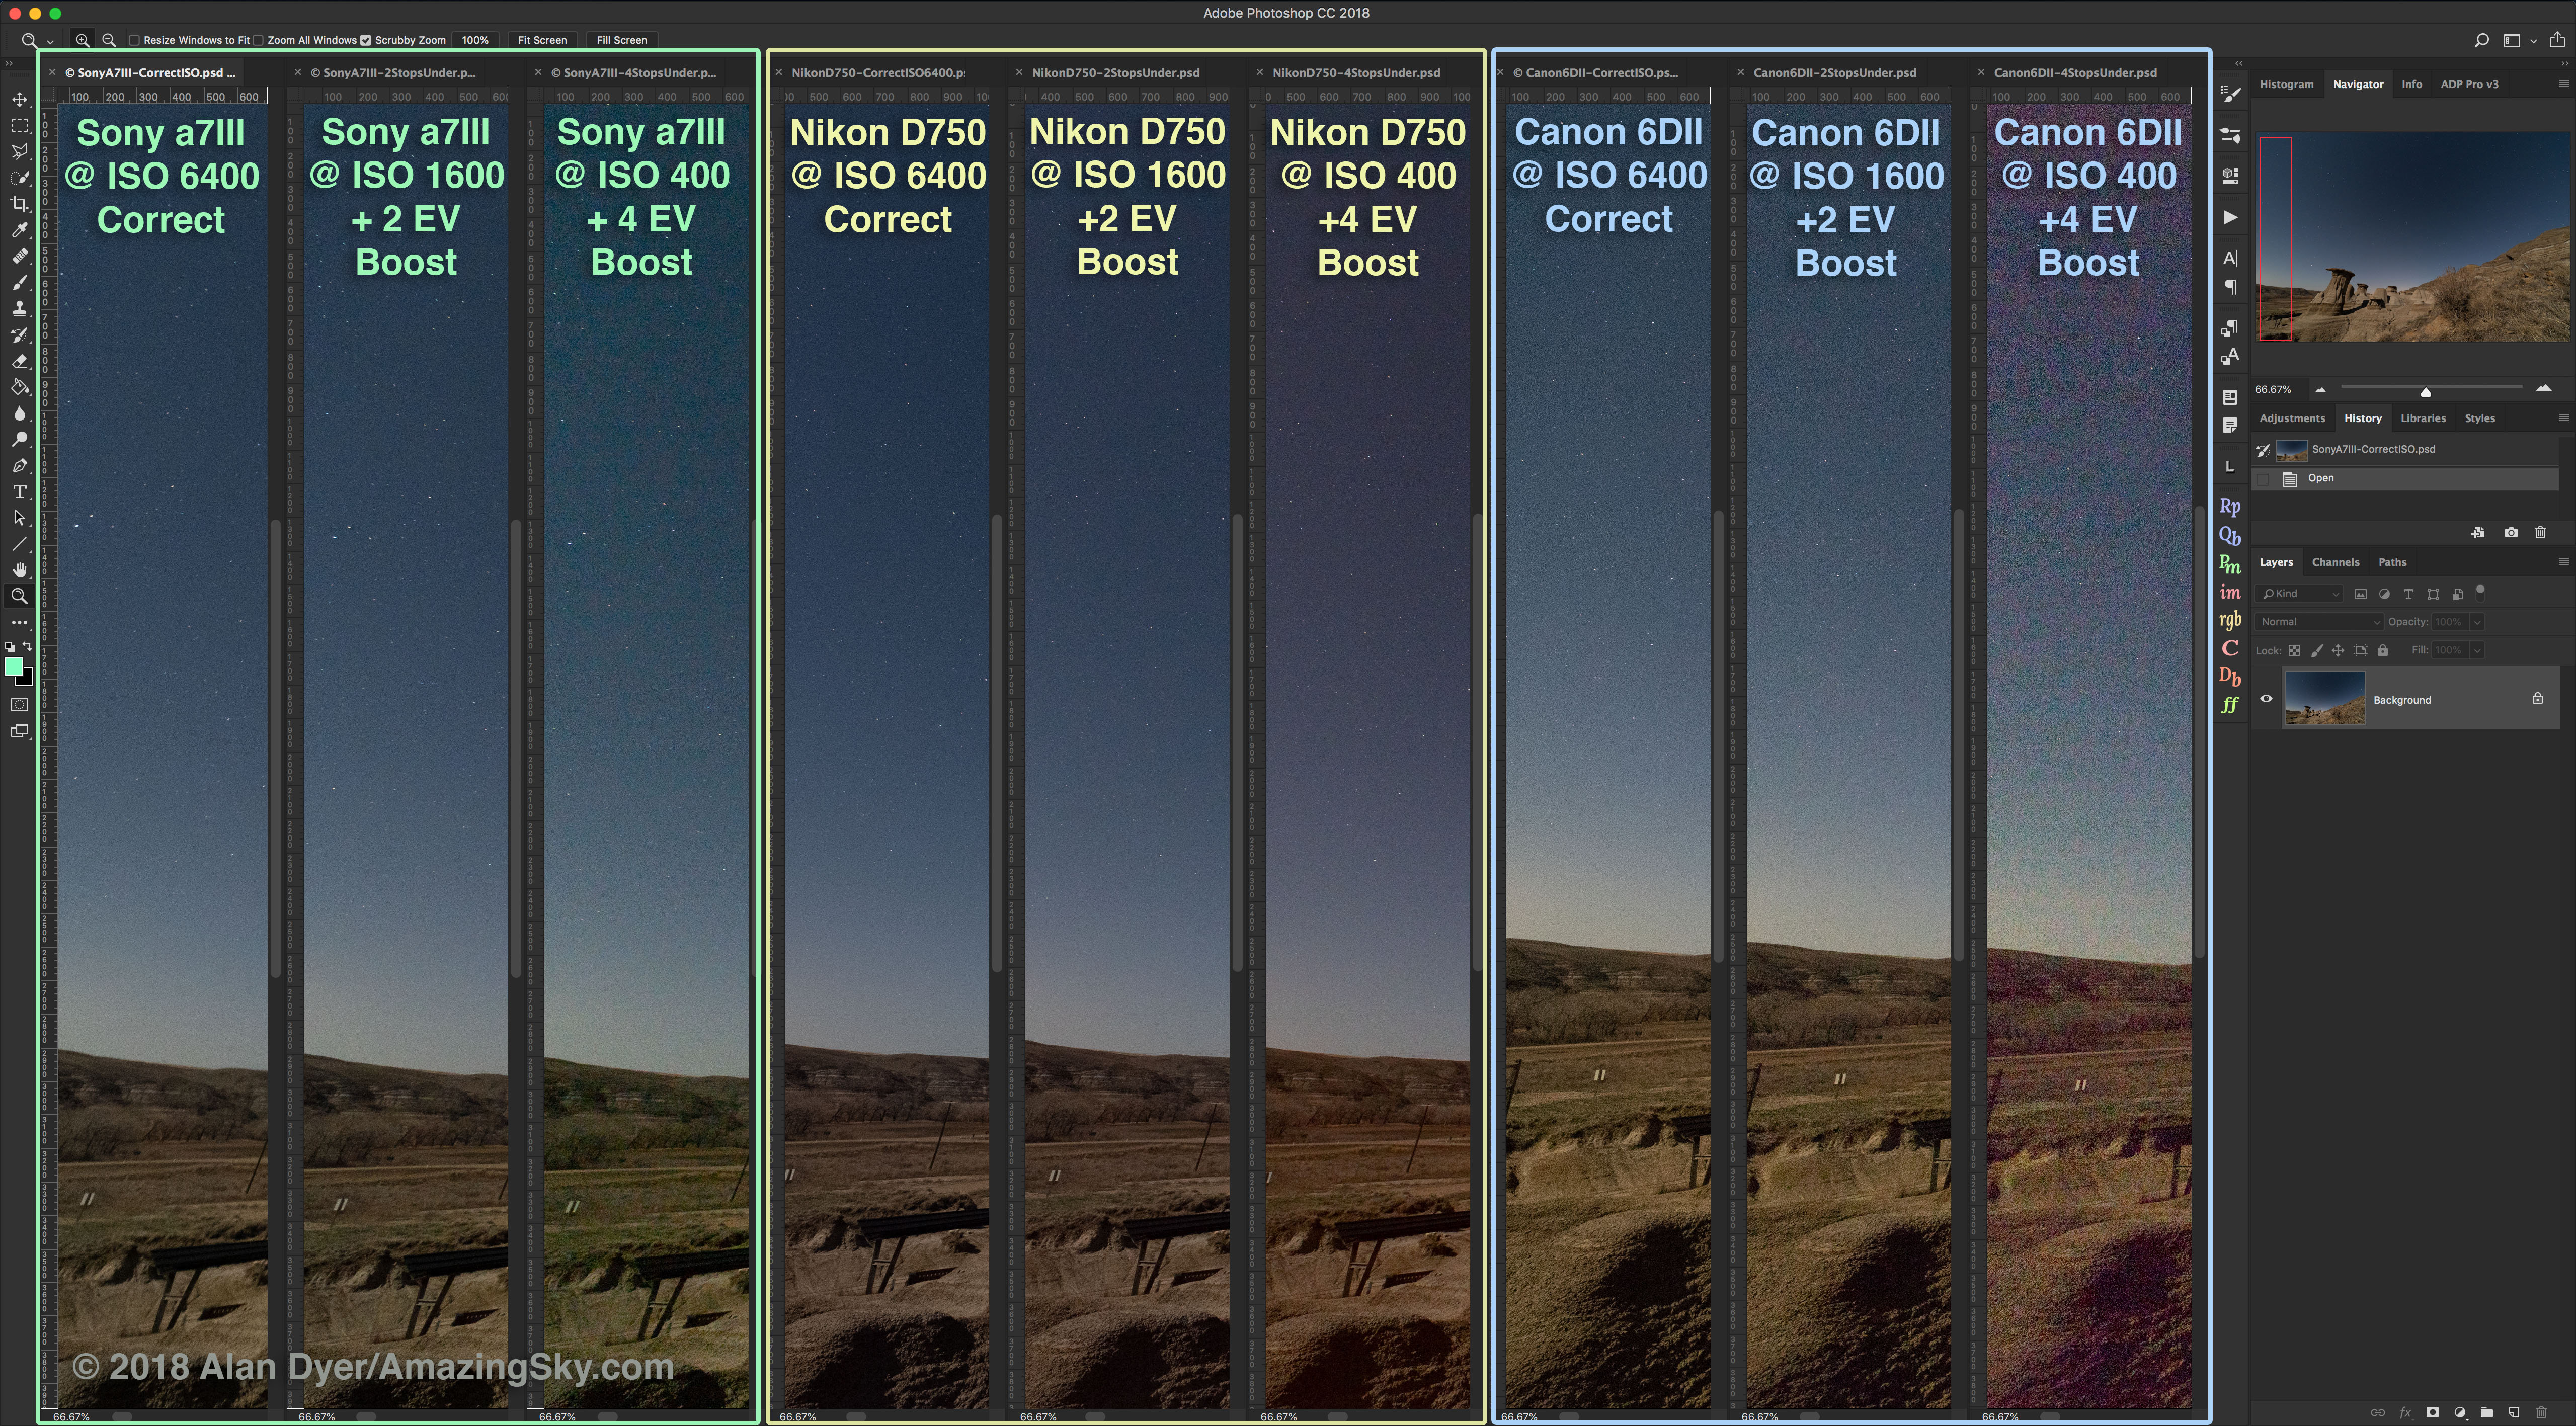
Here I shot all three cameras at ISO 6400 for a correct exposure for the scene, and also at ISO 1600 and ISO 400, for images 2 and 4 stops underexposed respectively. These were then boosted in Adobe Camera Raw by 2 and 4 stops in Exposure Value (EV) to compensate. With ISO invariant sensors the boosted images should look similar to the well-exposed image.

A closeup of the scene shows the ISO variant Canon exhibited more noise and magenta discoloration in the +4 EV boosted image. The Nikon looks very clean, but the Sony also shows discoloration, green here, and an increase in noise. These are all uncompressed 14-bit Raw files.
Comparing just the two ISO-invariant cameras, the Sony and the Nikon, on another night, shows a similar performance difference when boosting underexposed slow-ISO images later in Camera Raw. The Sony begins to show more noise and now a magenta discoloration in the +3 and +4 EV images, similar to, but not as badly as does the ISO-variant Canon 6D MkII.
Compressed vs. Uncompressed
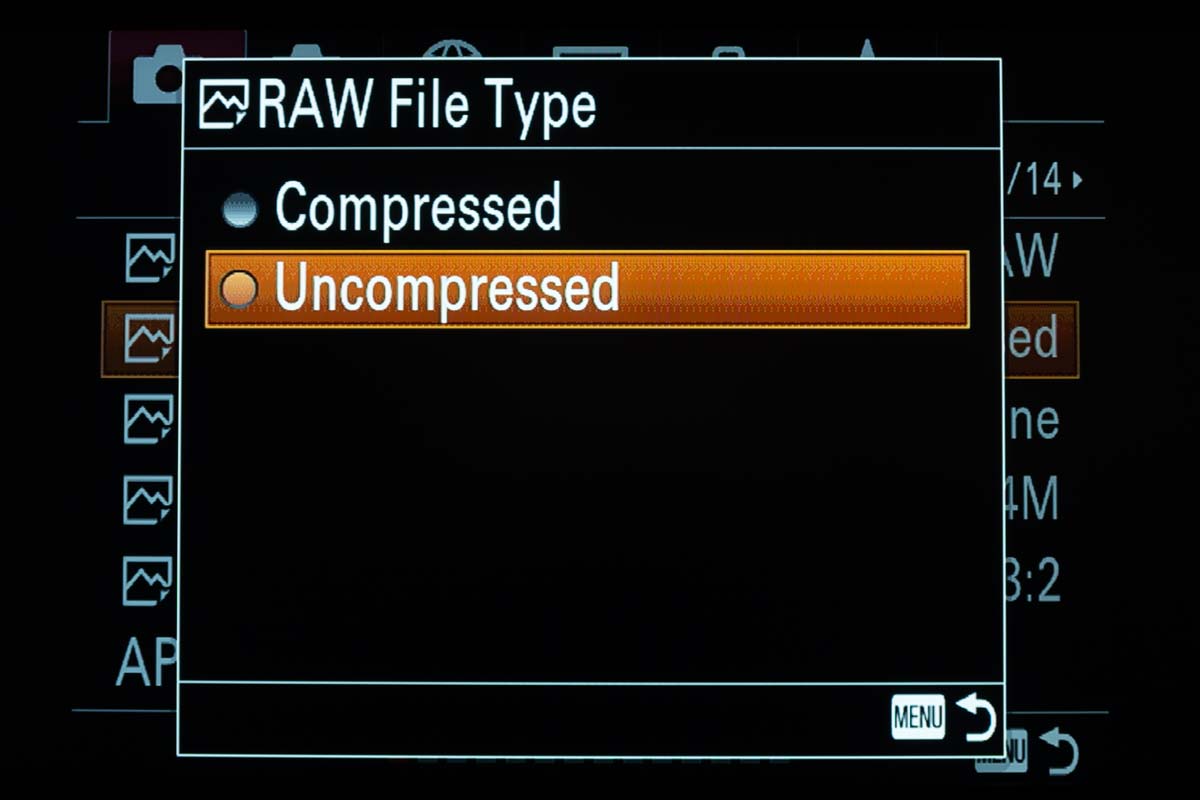 The Sony a7III offers a choice of shooting Uncompressed or Compressed Raw files. Uncompressed Raws are 47 Mb in size; Compressed Raws are 24 Mb.
In well-exposed images, I saw little difference in image quality.
But the dark shadows in underexposed nightscapes withstood shadow recovery better in the uncompressed files. Compressed files showed more noise and magenta discoloration in the shadows.
It is not clear if Sony’s compressed Raws are 12-bit vs. 14-bit for uncompressed files.
Nevertheless, for the demands of nightscape and deep-sky shooting and processing, I suggest shooting Uncompressed Raws. Use Compressed only if you plan to take lots of time-lapse frames and need to conserve memory card space on extended shoots.
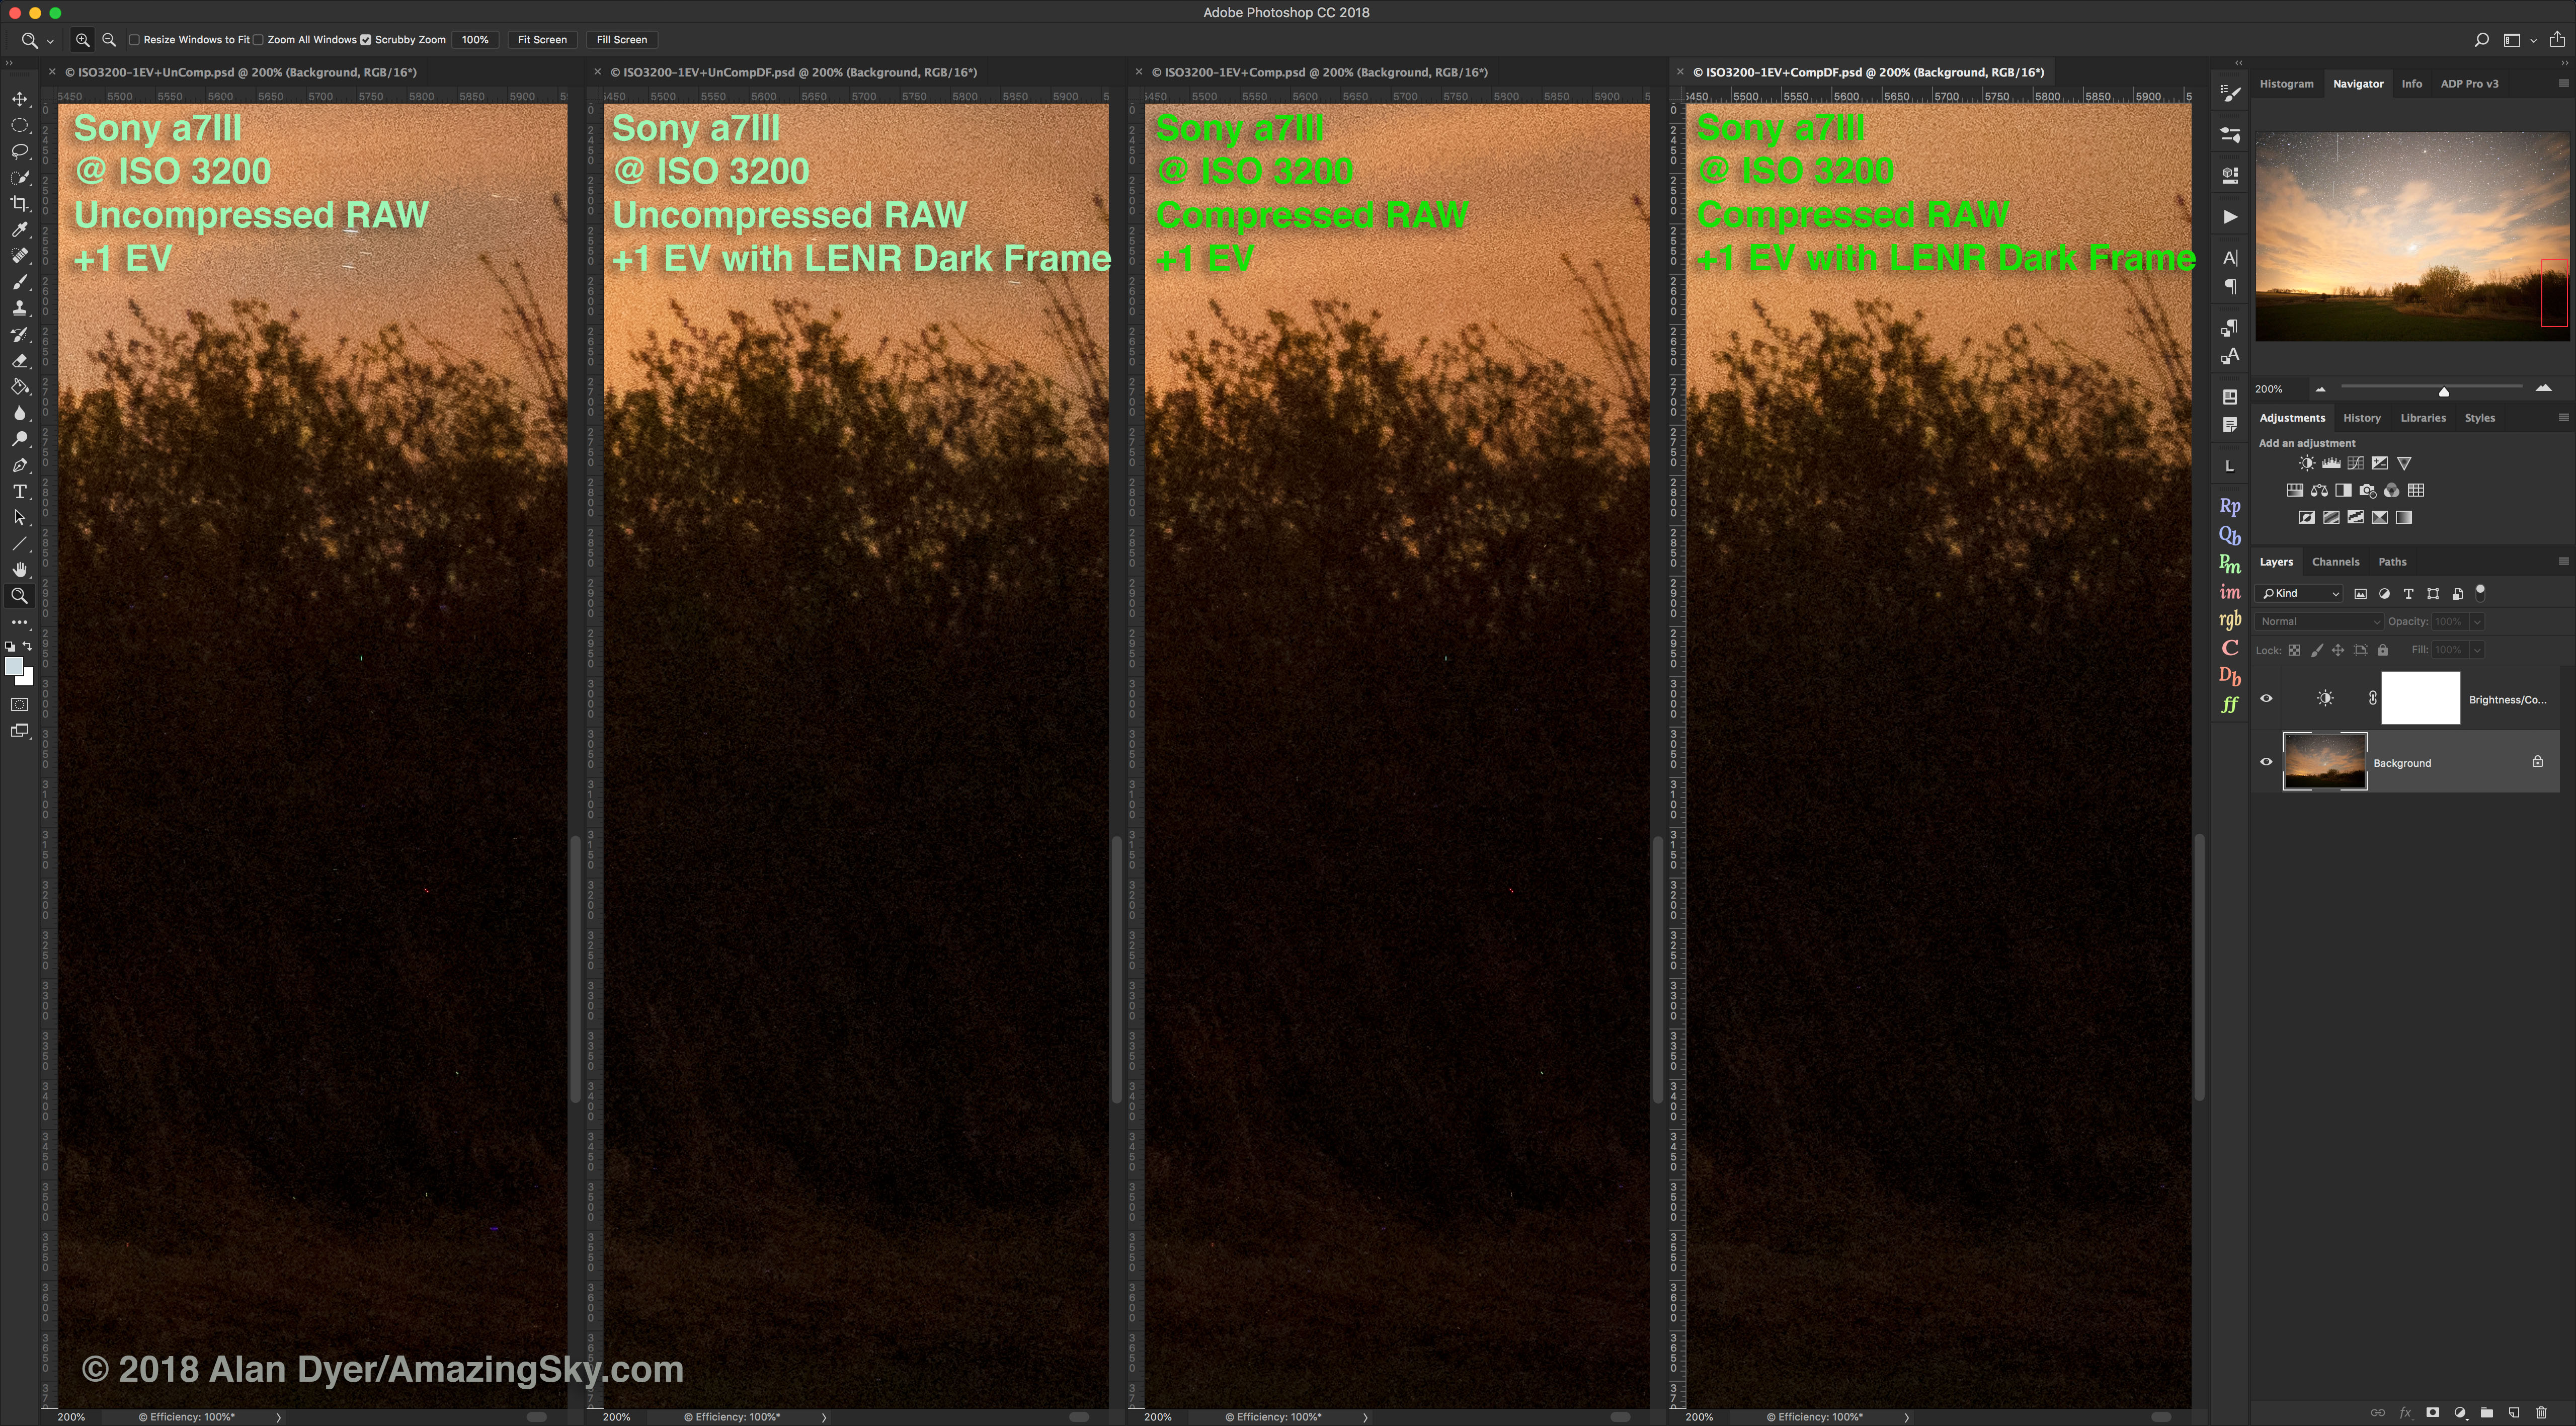
Here I compare any image degradation from using compressed vs. uncompressed Raws, and from employing Long Exposure Noise Reduction. Images are only slightly underexposed and boosted by +1 EV in Camera Raw. Shadow noise is similar in all images, with the ones taken with LENR on showing elimination of colored hot pixels, as they should.
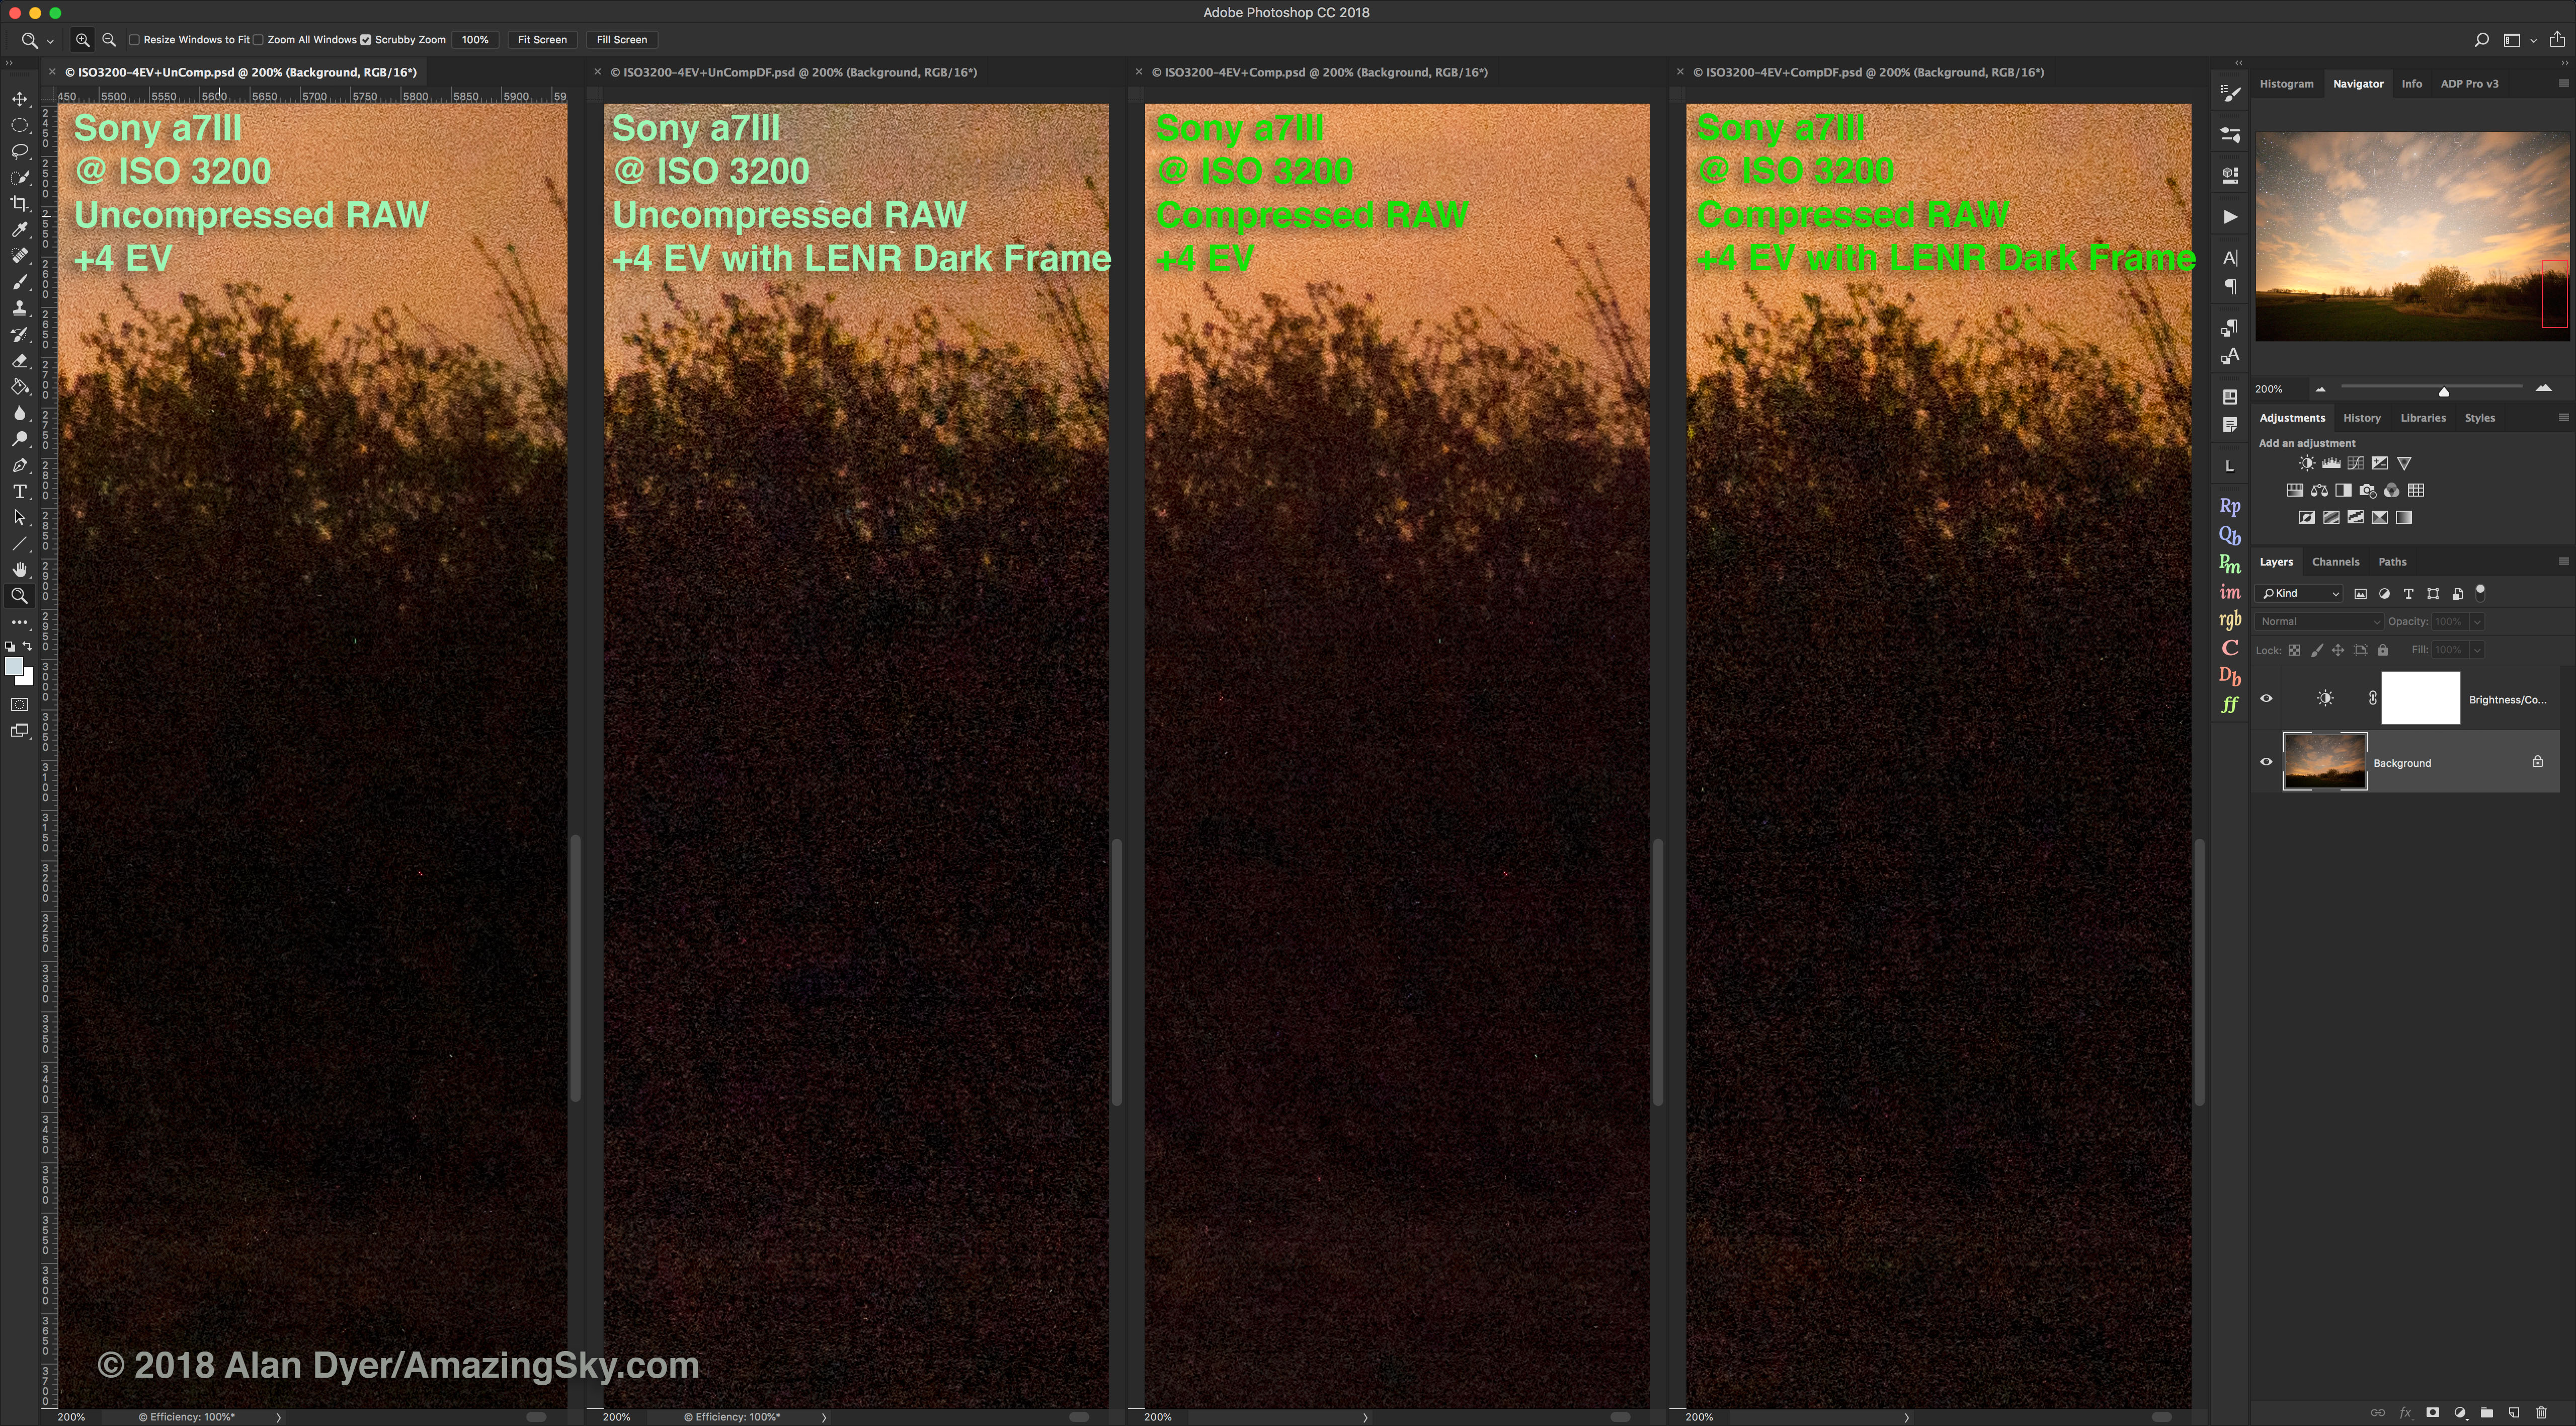
The same scene but now underexposed by 4 stops and boosted by +4 EV later shows greater differences. The compressed image shows more noise and discoloration, and the images taken with LENR on, while eliminating hot pixels, show more random luminance noise. Keep in mind, these are vastly underexposed images.
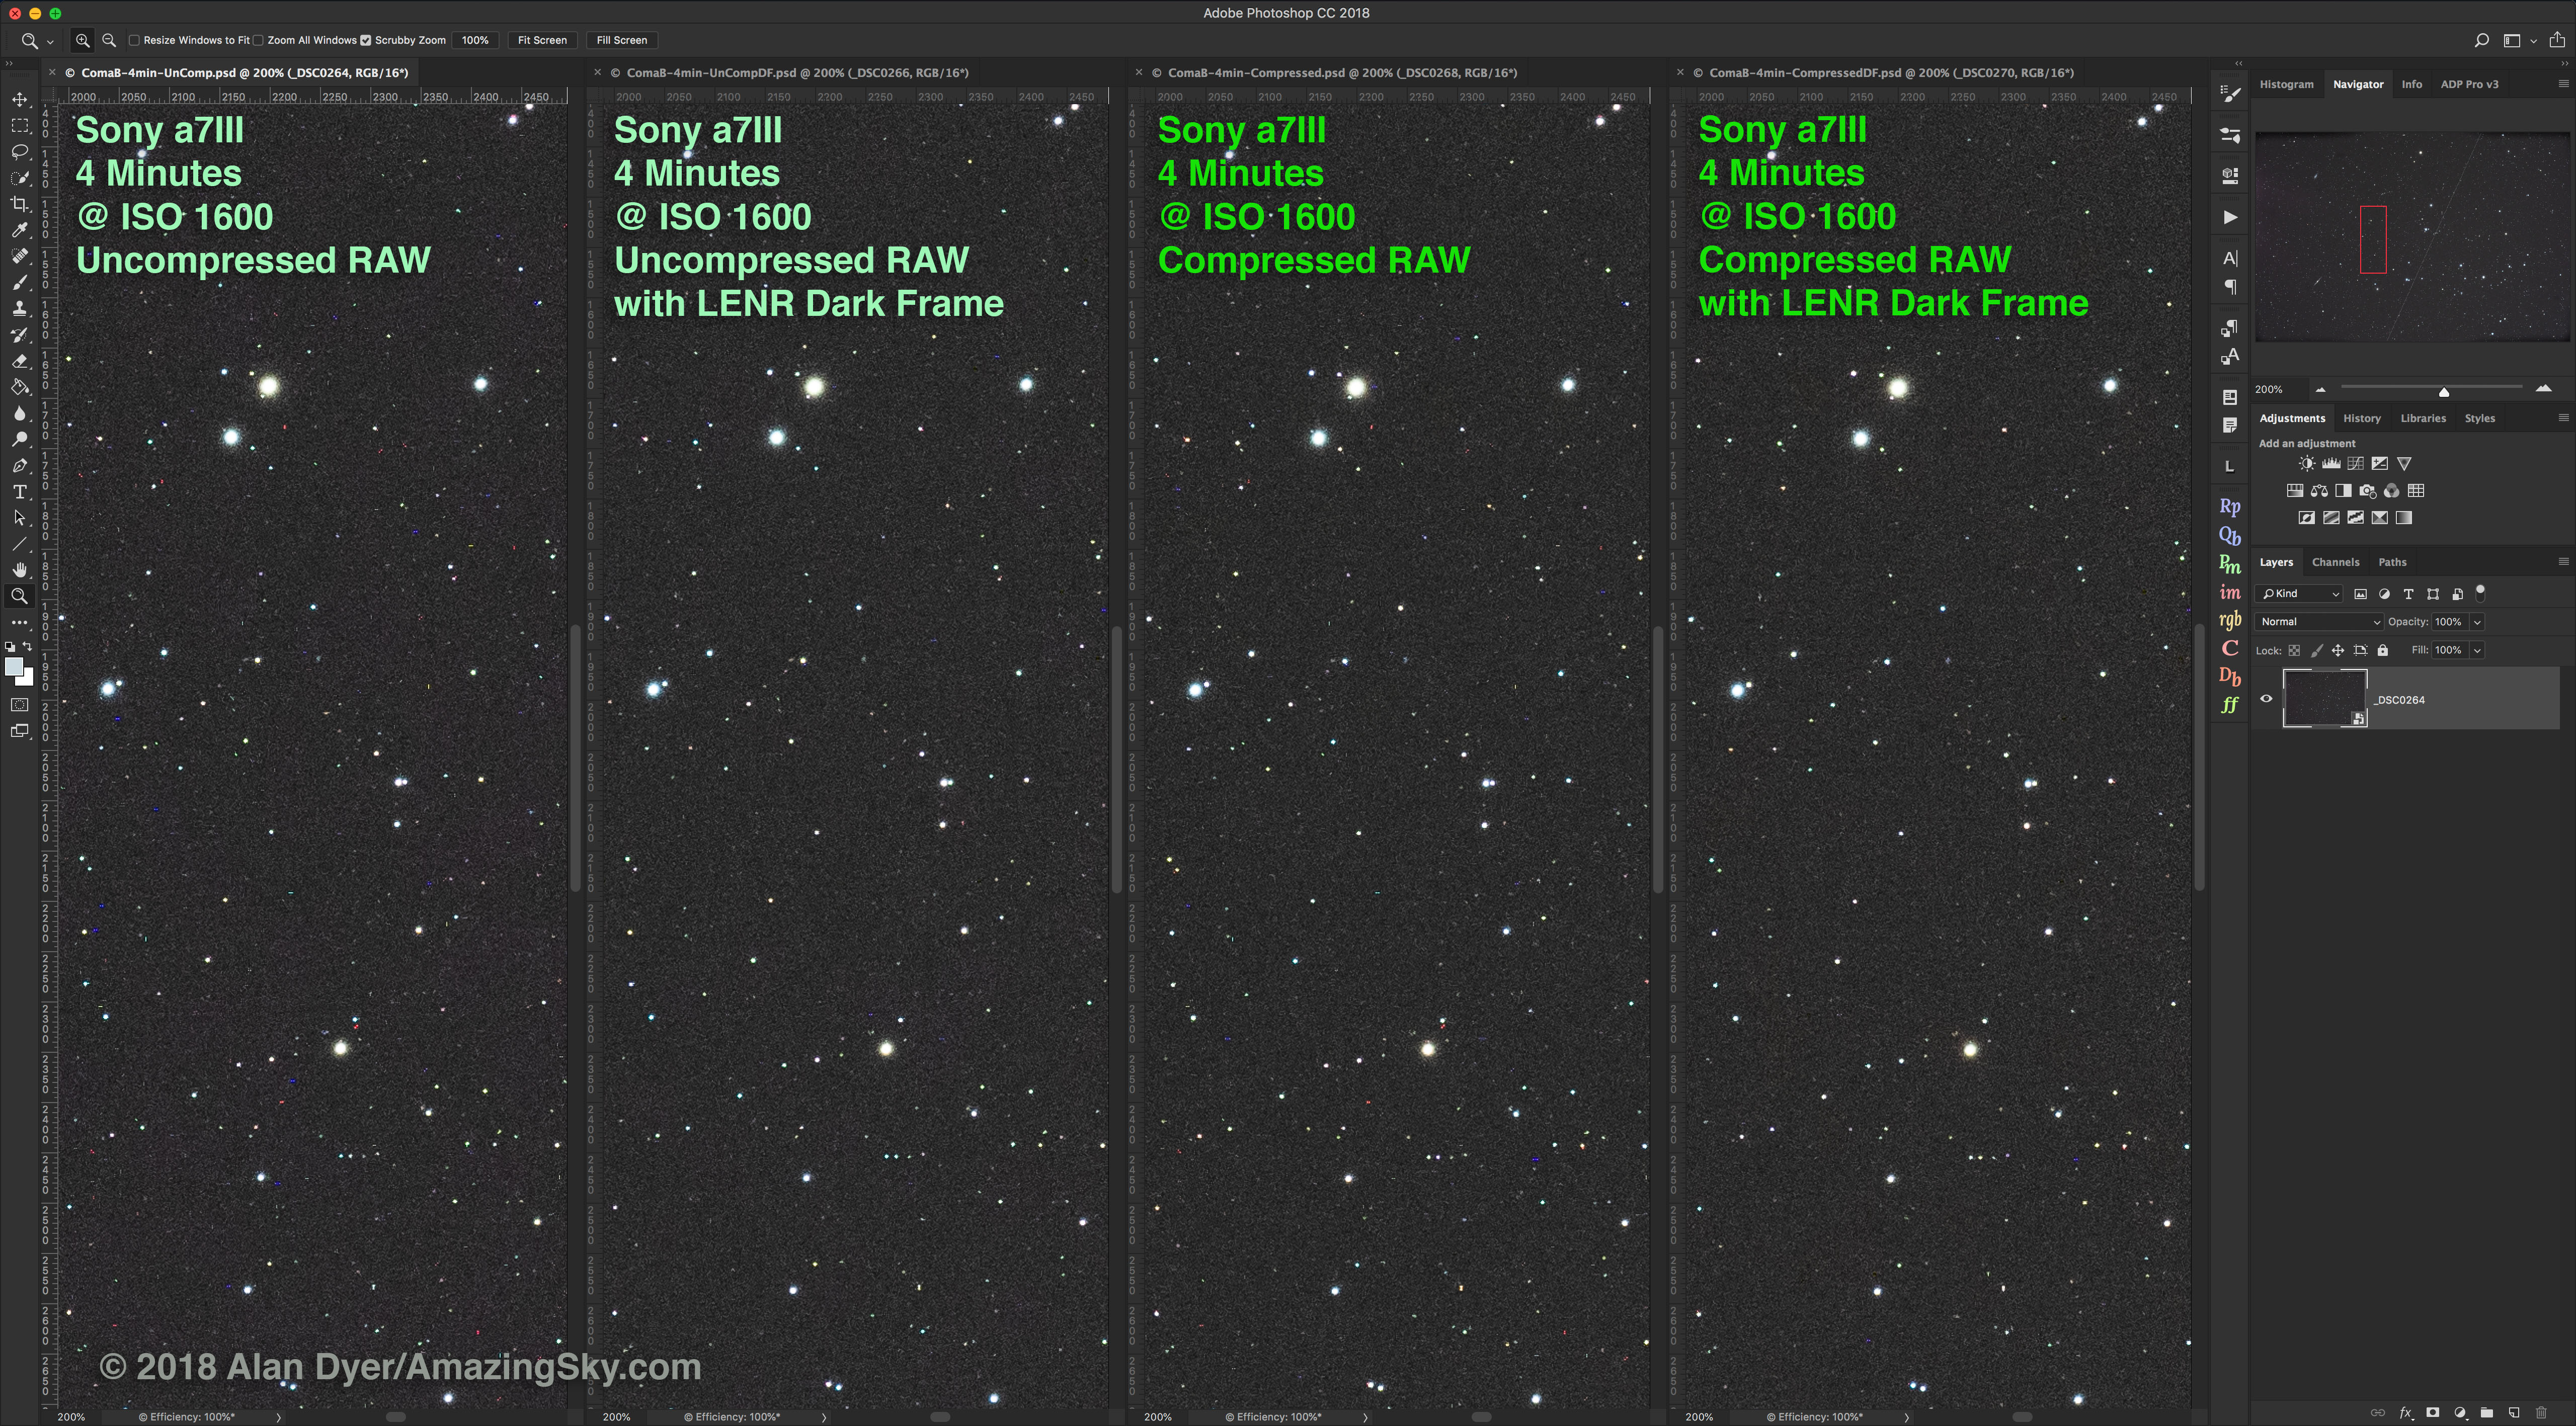
A real-world deep-sky example shows the same comparison. All images are well-exposed, for tracked and guided 4-minute exposures. The ones taken with LENR on show fewer hot pixels. The compressed images appear identical to the uncompressed files for noise and star content.
Star Eater (Updated March 27, 2021)
Over the last year or so, firmware updates from Sony introduced a much-publicized penchant for Sony Alphas to “eat” stars even in Raw files, apparently due to an internal noise reduction or anti-aliasing routine users could not turn off. Stars were smoothed away along with the noise in exposures longer than 3.2 seconds in some Sony cameras (longer than 30 seconds in others).
I feel that in the a7III the Star Eater has been largely vanquished.
While others beg to differ and claim this camera still eats stars, they offer no evidence of it other than graphs and charts, not A-B photos of actual tracked starfields taken with the Sony vs. another camera thought not to eat stars.
As the images below show, there is a very slight one-pixel-level softening that kicks in at 4 seconds and longer but it did not eat or wipe out stars. Stars are visible to the same limiting magnitude and close double stars are just as well resolved across all exposures. Indeed, at slower ISOs and longer exposures, more stars are visible.
I saw none of the extreme effects reported by others with other Sonys, where masses of faint stars disappeared or turned into multi-colored blotches. It is possible the effect is still present in other Sony Alpha models. I have not tested those.
But in the a7III, I did not see any significant “star eating” in any long exposures even up to the 4 minutes I used for some deep-sky shots. In images taken at the same time with other cameras not accused of star eating, the Sony showed just as many faint stars as the competitors. Stars were visible to just as faint a limiting magnitude, and that’s what counts, NOT graphs and charts, especially when such results are not shown for other cameras.
In short, long exposures showed just as many stars as did short exposures.
This was true whether I was shooting compressed or uncompressed Raws, with or without Long Exposure Noise Reduction. Neither compression nor LENR invoked “star eating.”
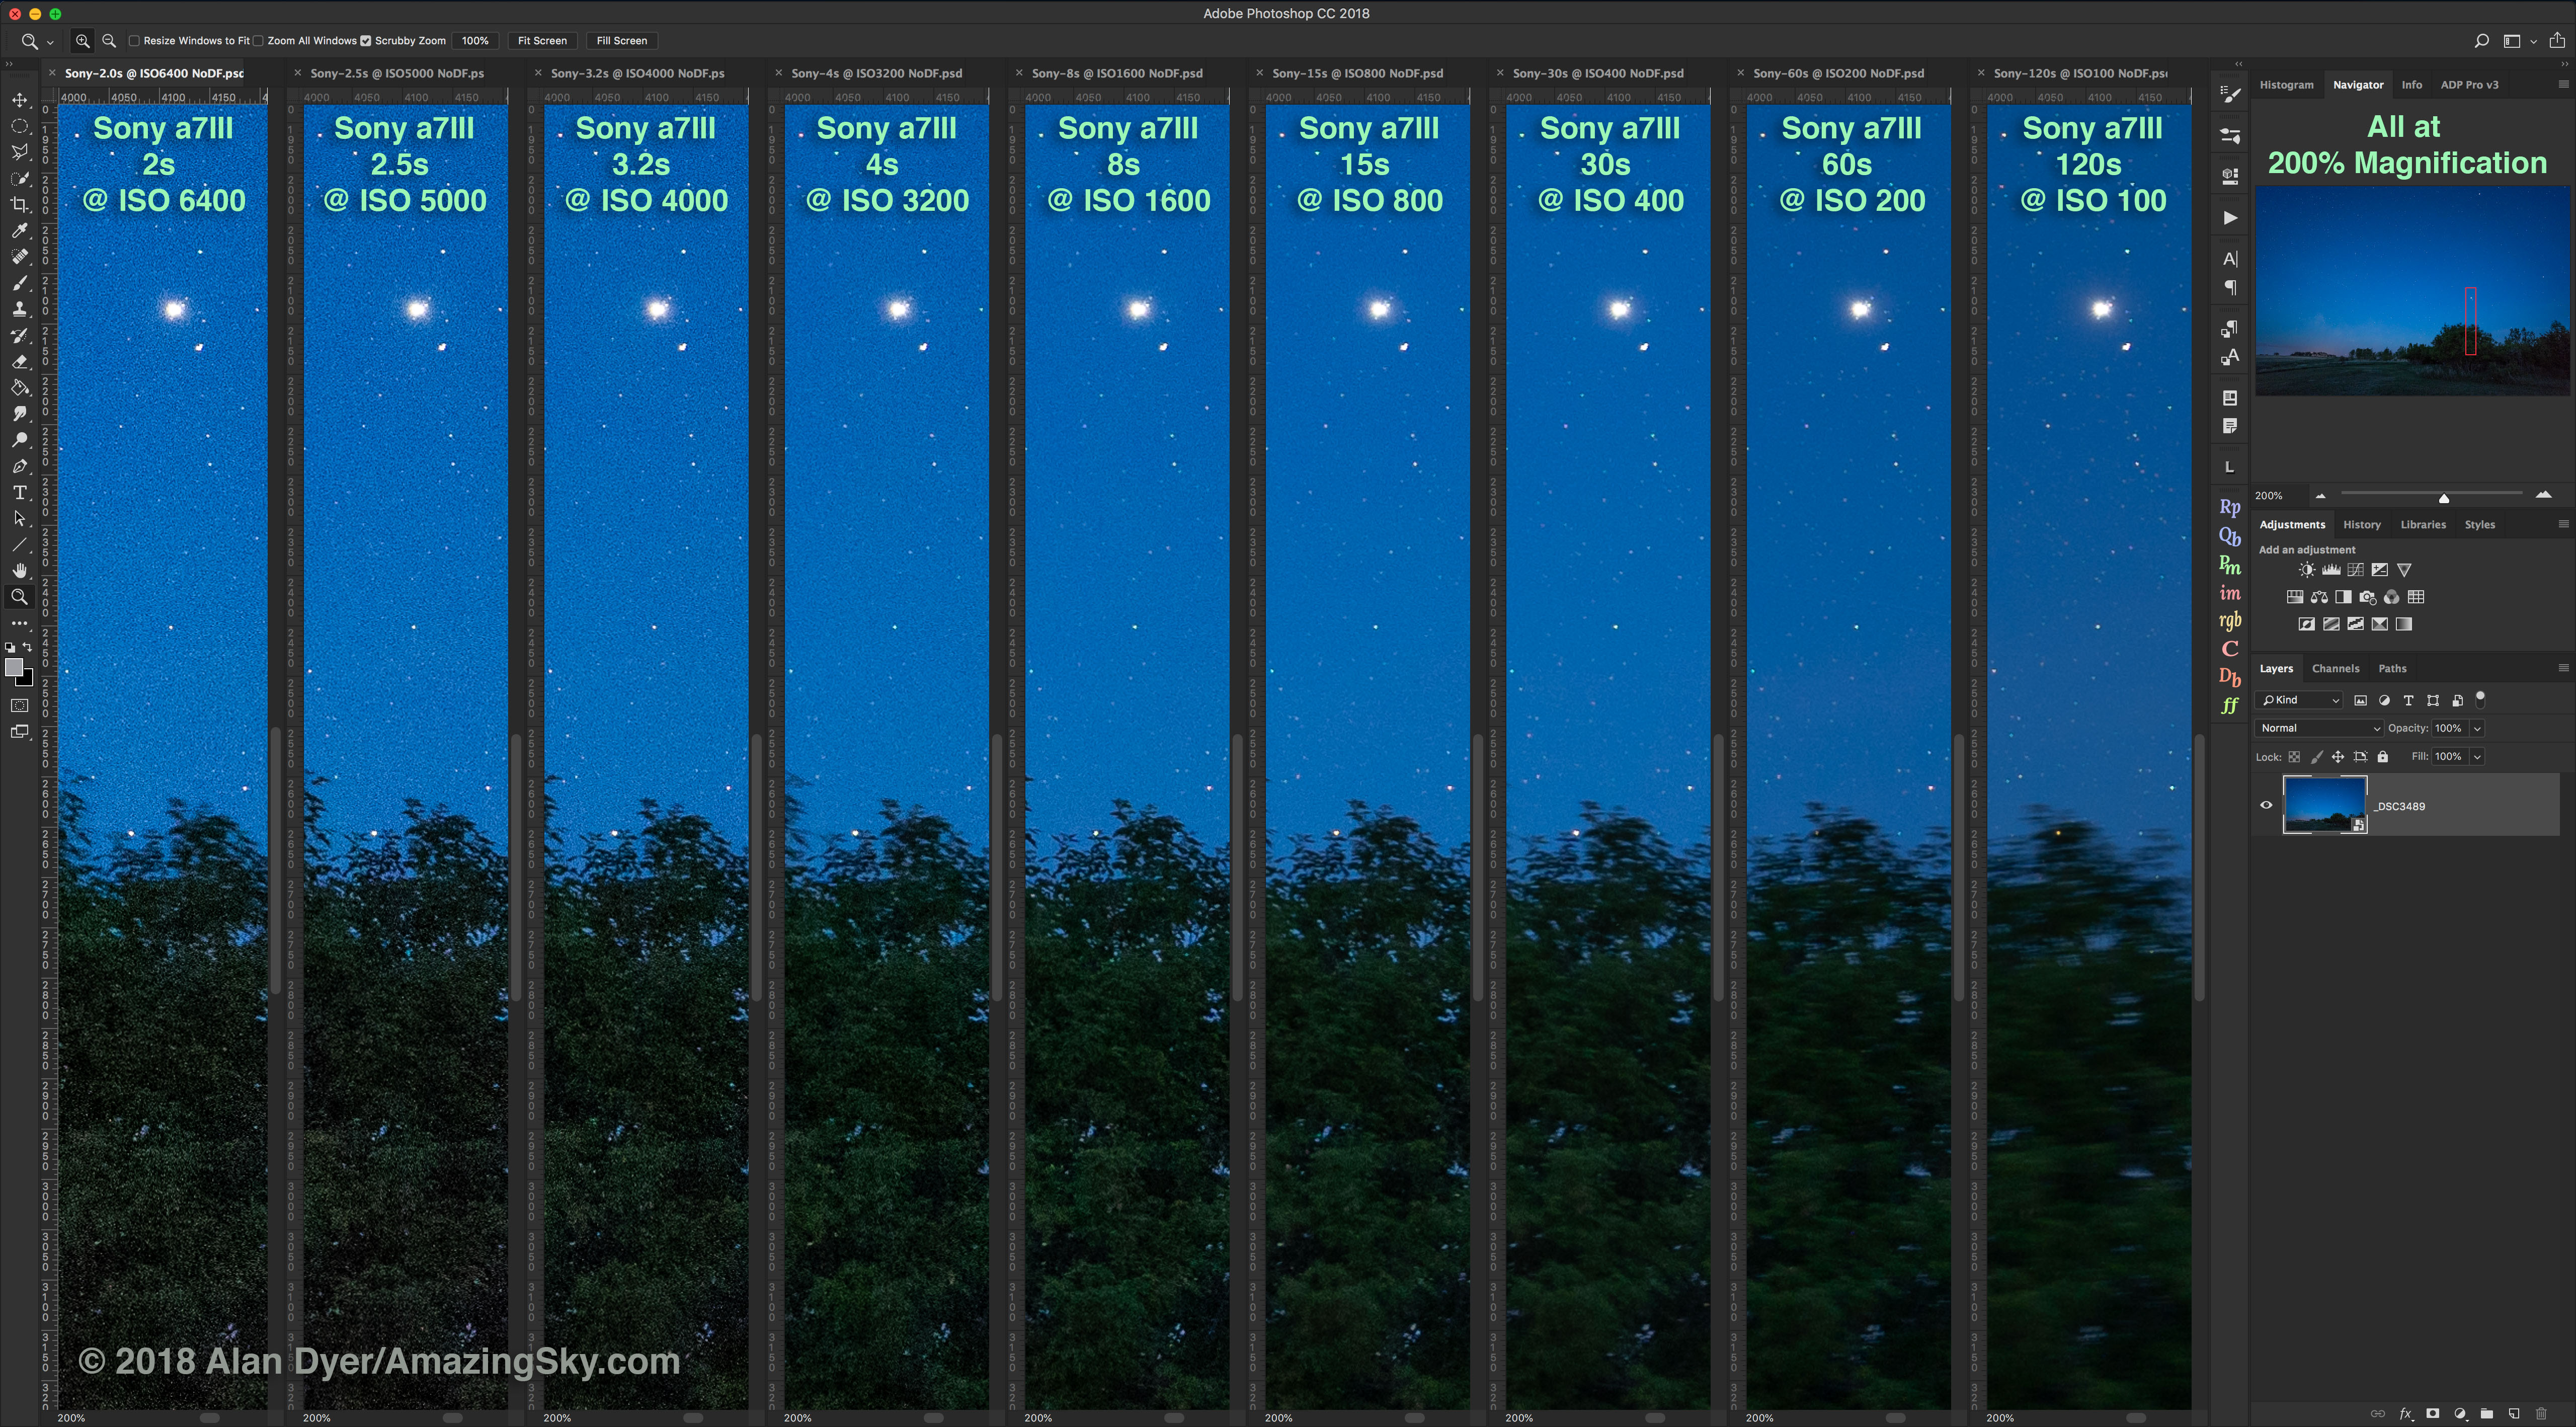
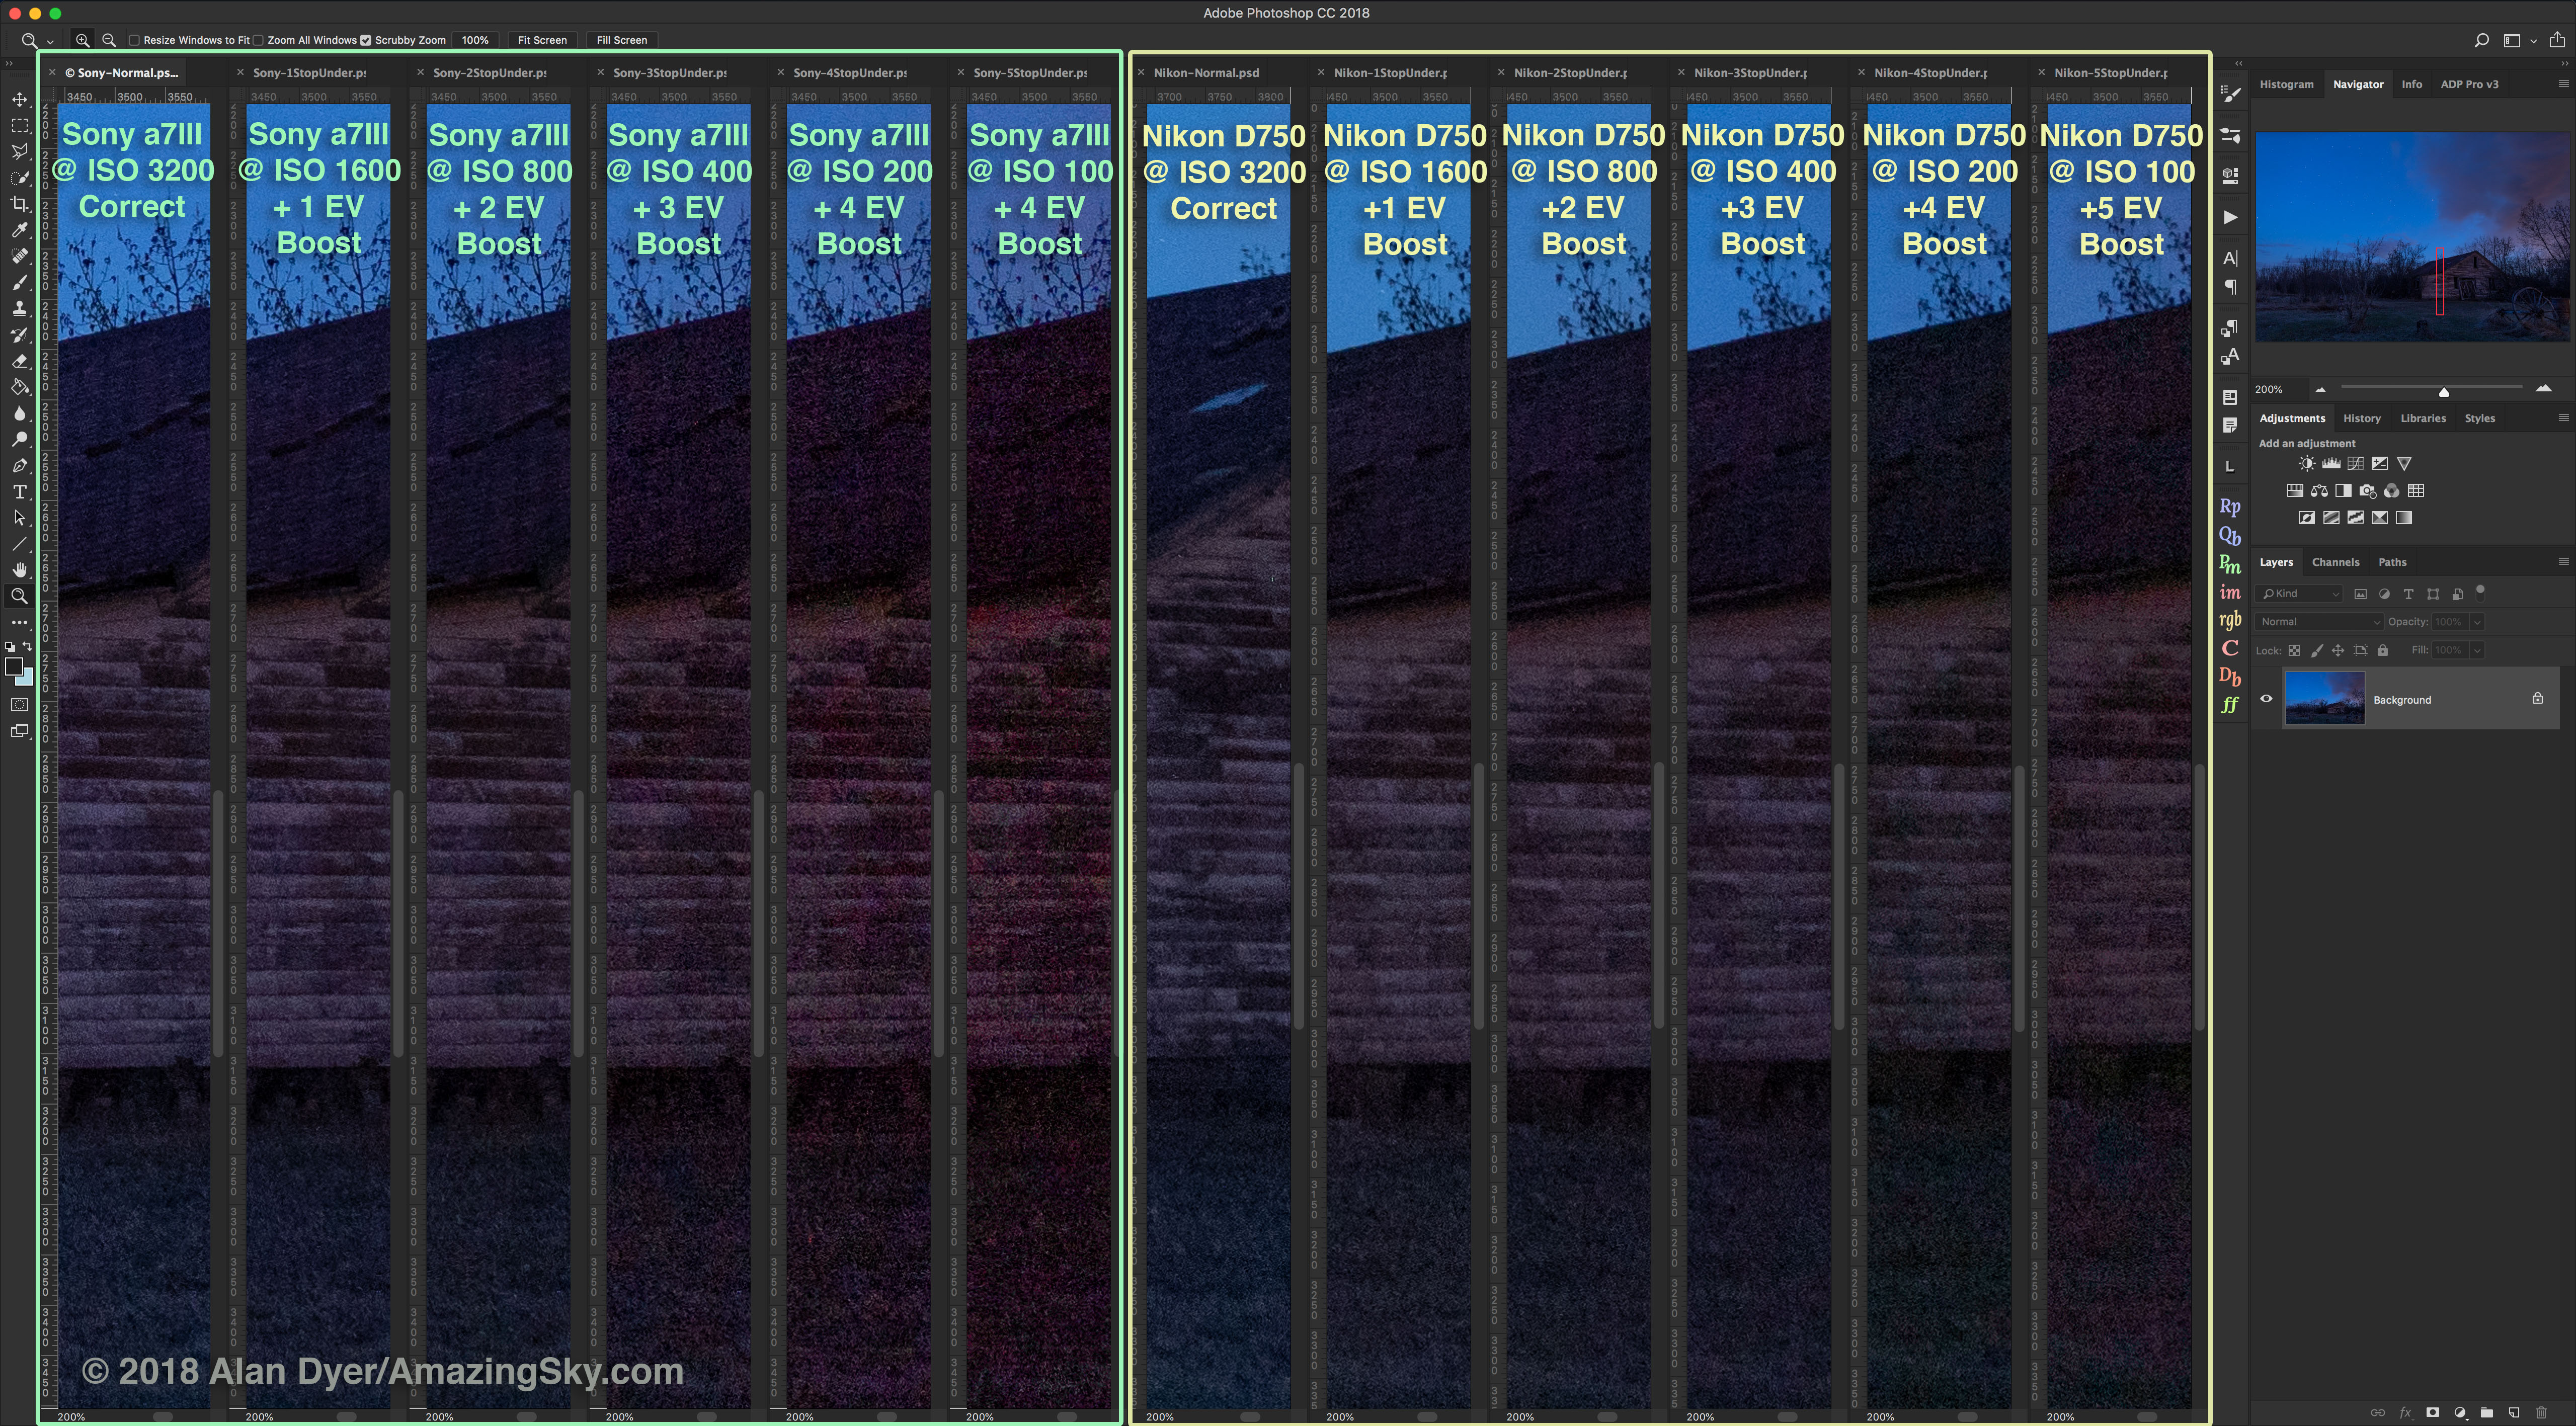
This series of tracked images (shown here blown up 200%) goes from 2 seconds to 2 minutes, with decreasing ISO speed to equalize the exposure value across the series. Between 3.2s and 4s a very slight one-pixel-level softening does kick in, reducing noise and very slightly blurring stars. Yet, just as many stars are recorded and are resolved, and at the lower ISOs/longer exposures more stars are visible because faint stars are not lost in the noise.

This is the same series as above but now blown up 400% to better reveal the very subtle change in pixel-level sharpness as exposure lengthened from 3.2 to 4 seconds. Noise (most noticeable in the trees) is reduced and stars are very slightly softened. But none are “eaten” or wiped out. And star colors are not affected, though very small stars are sometimes green, an effect seen in other cameras due to de-Bayering artifacts.
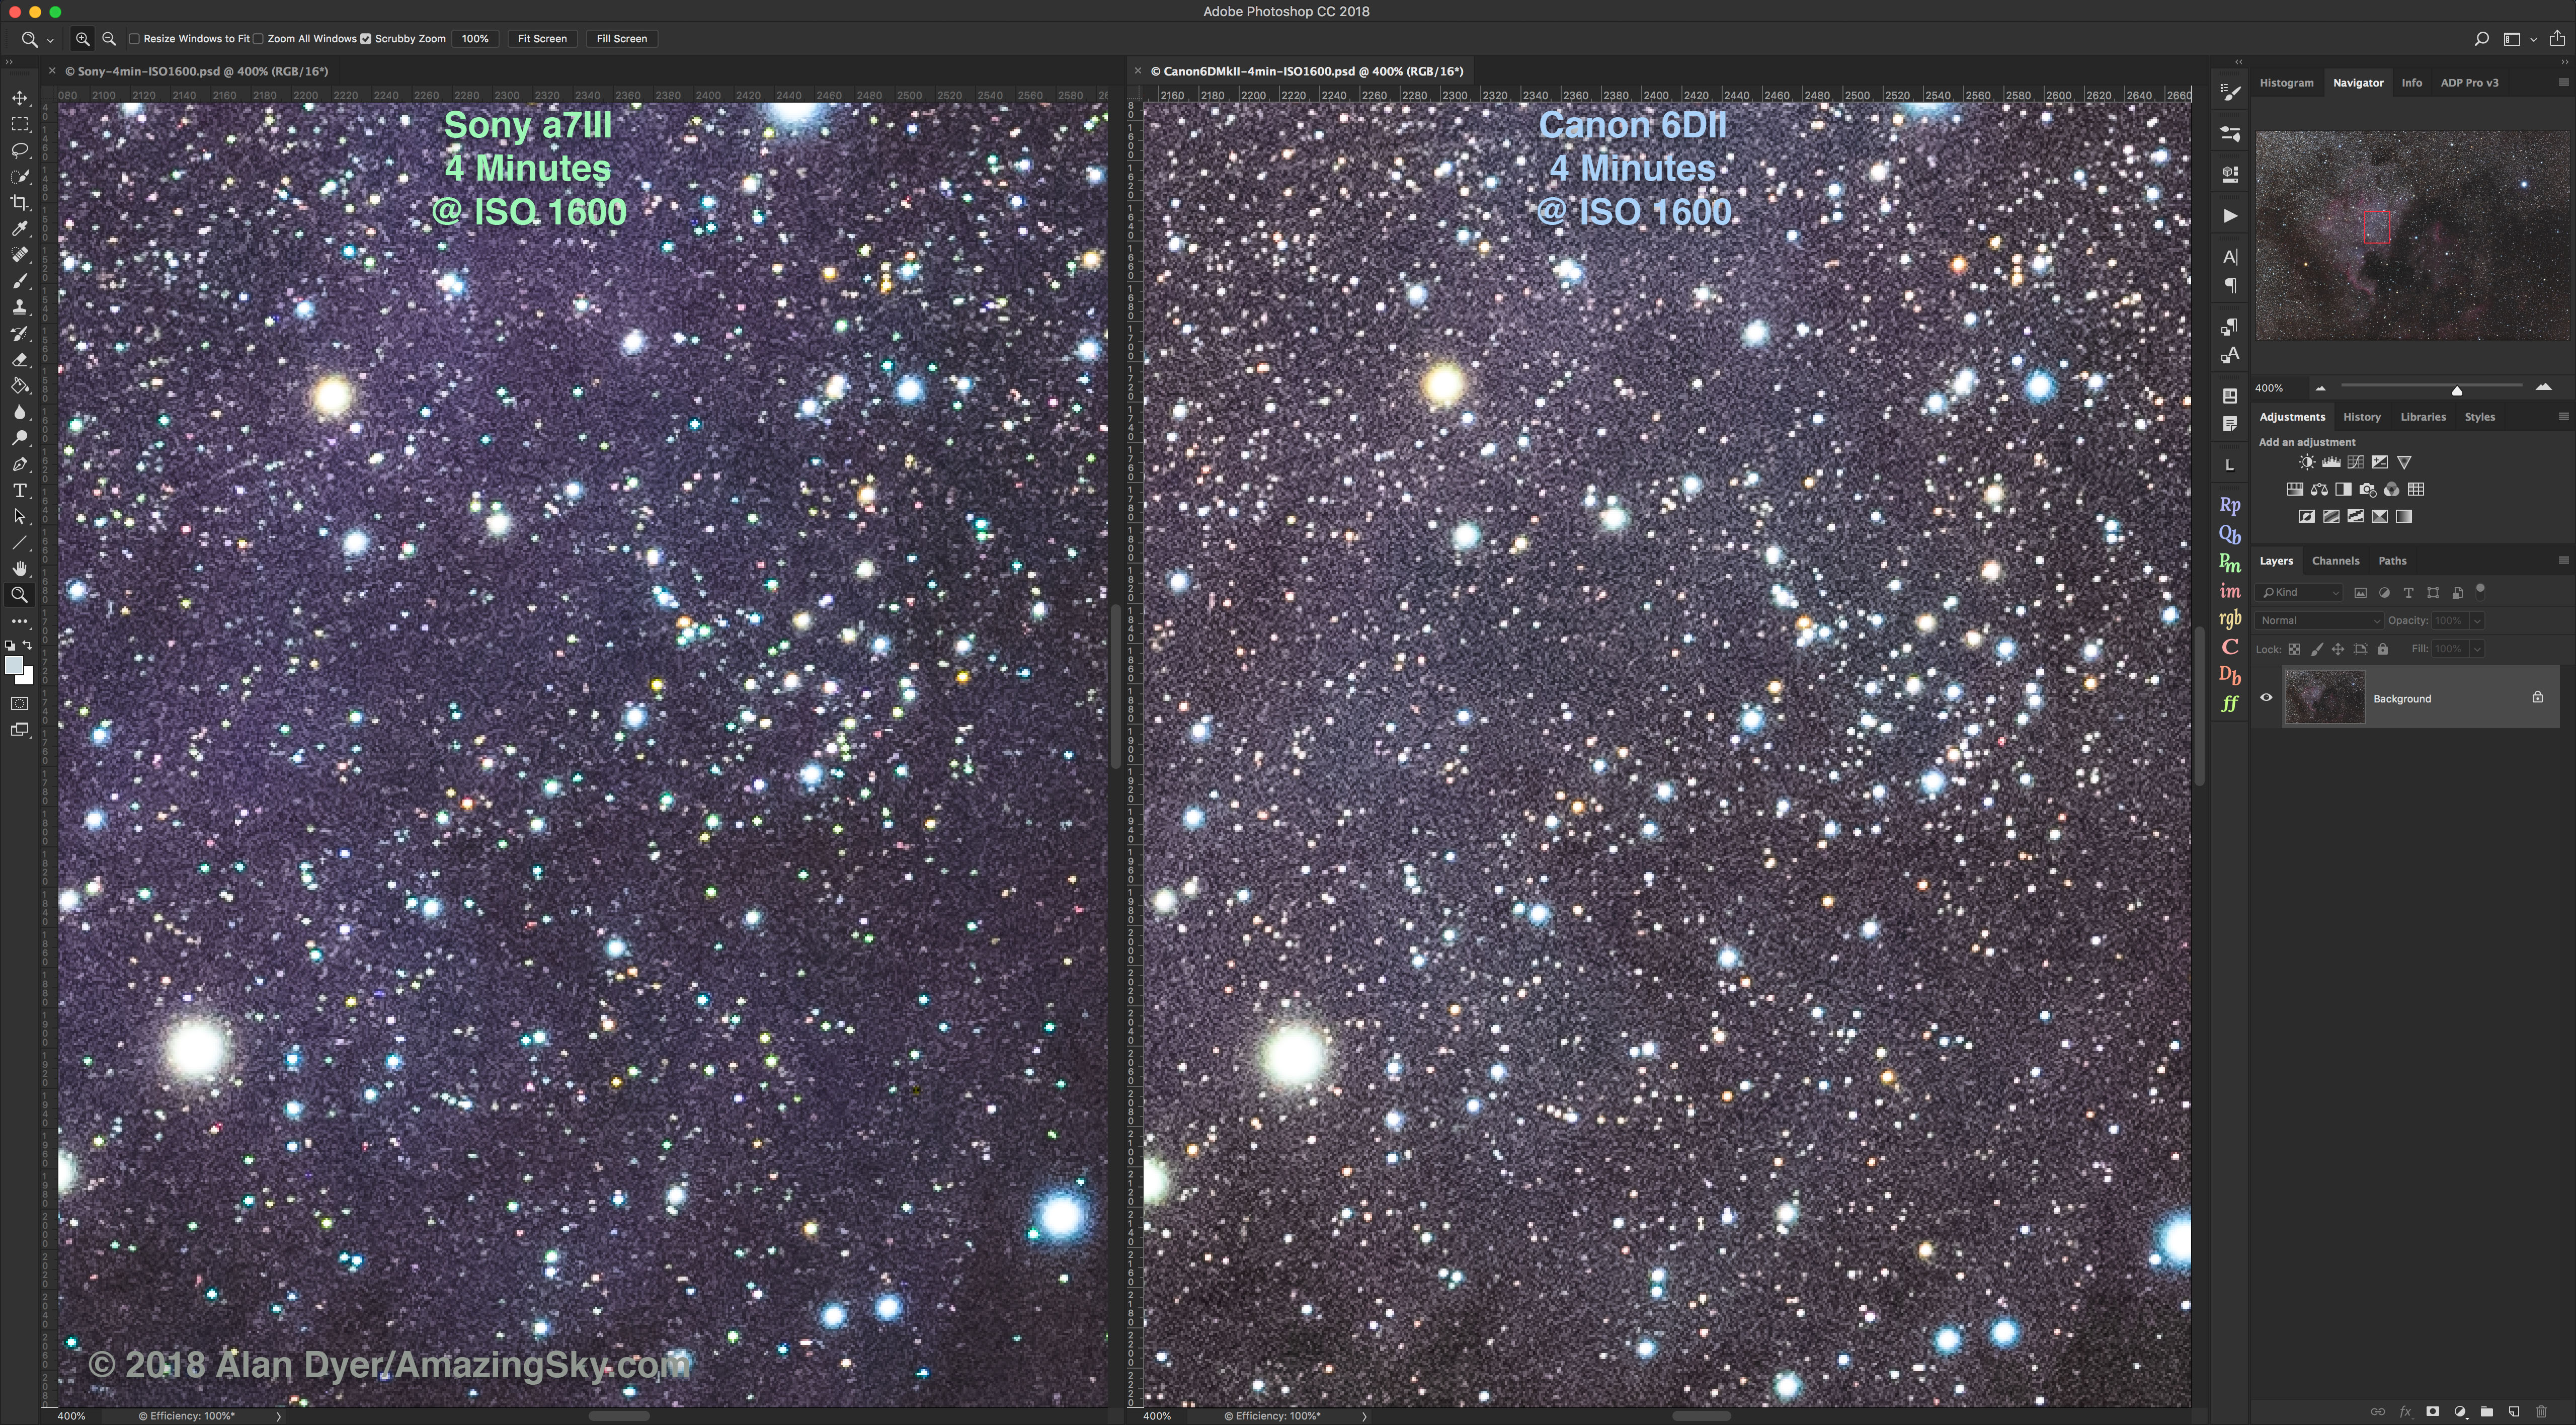
Tracked deep-sky images through a telescope using 4-minute exposures show the Sony a7III recording an equal number of faint stars as the Canon 6D MkII. No luminance noise reduction was applied to these images in processing.
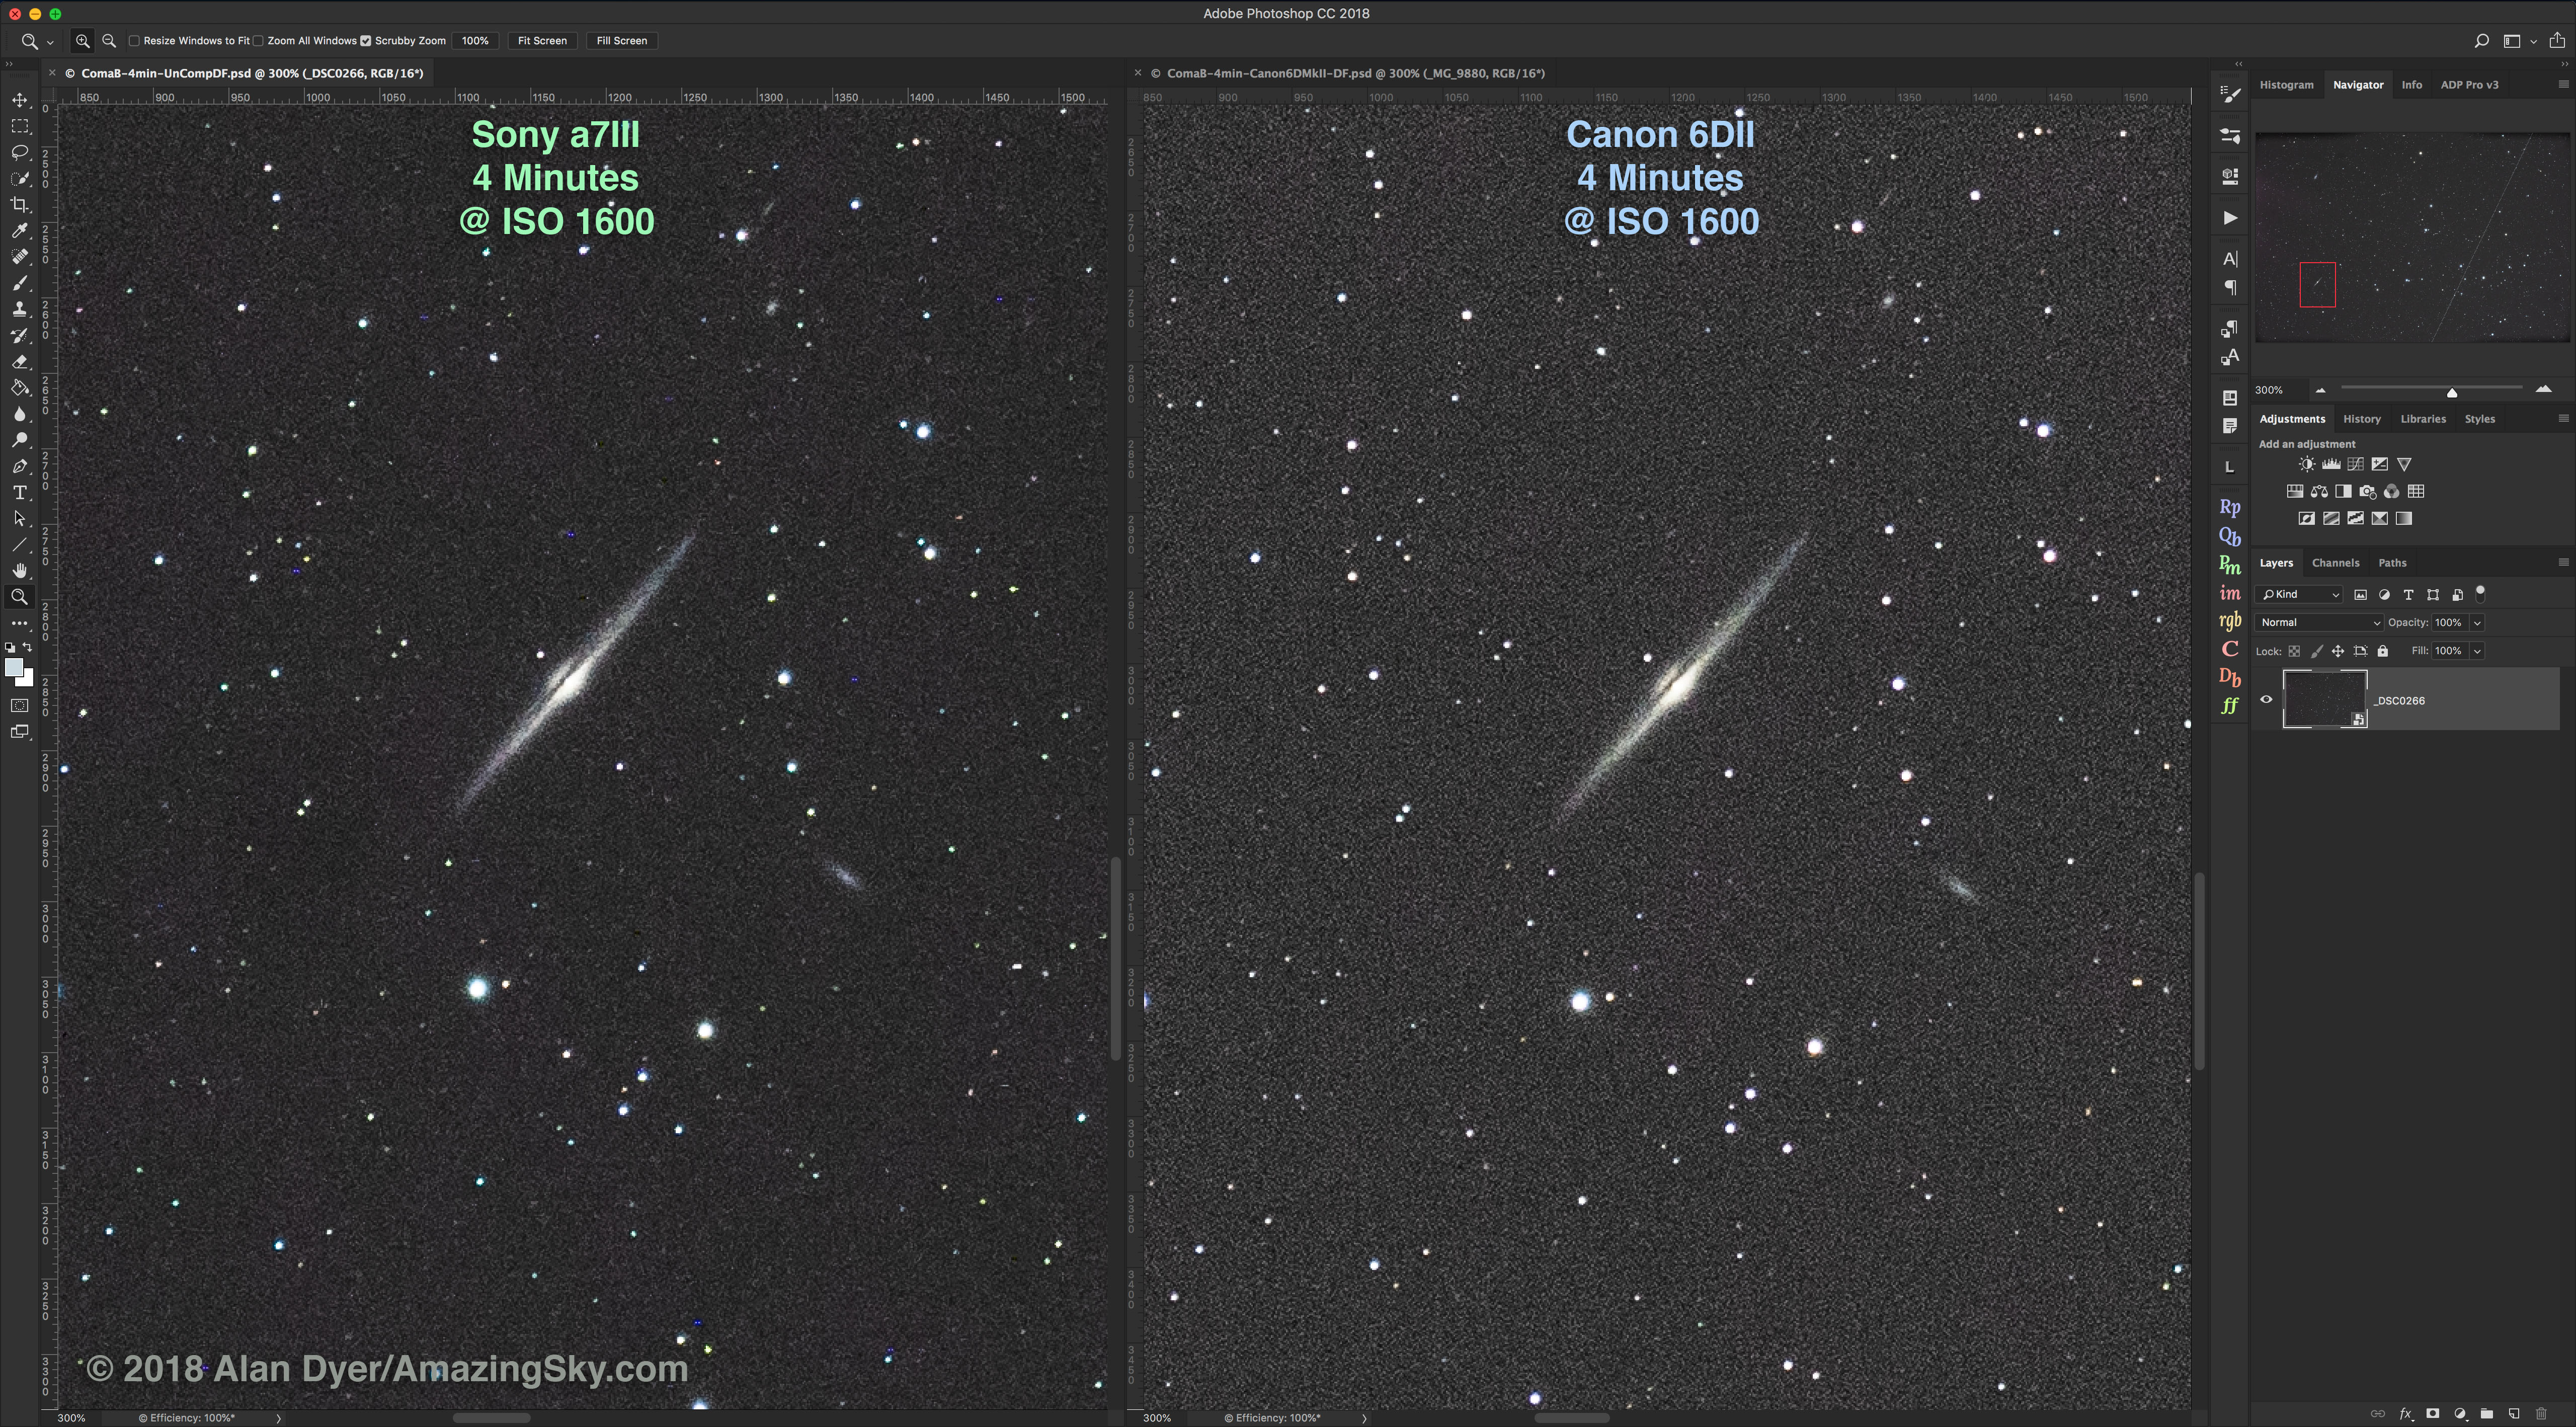
Another example with 4-minute exposures again demonstrates no problems recording faint stars. The Canon does show more noise than the Sony. No noise reduction was applied in processing.
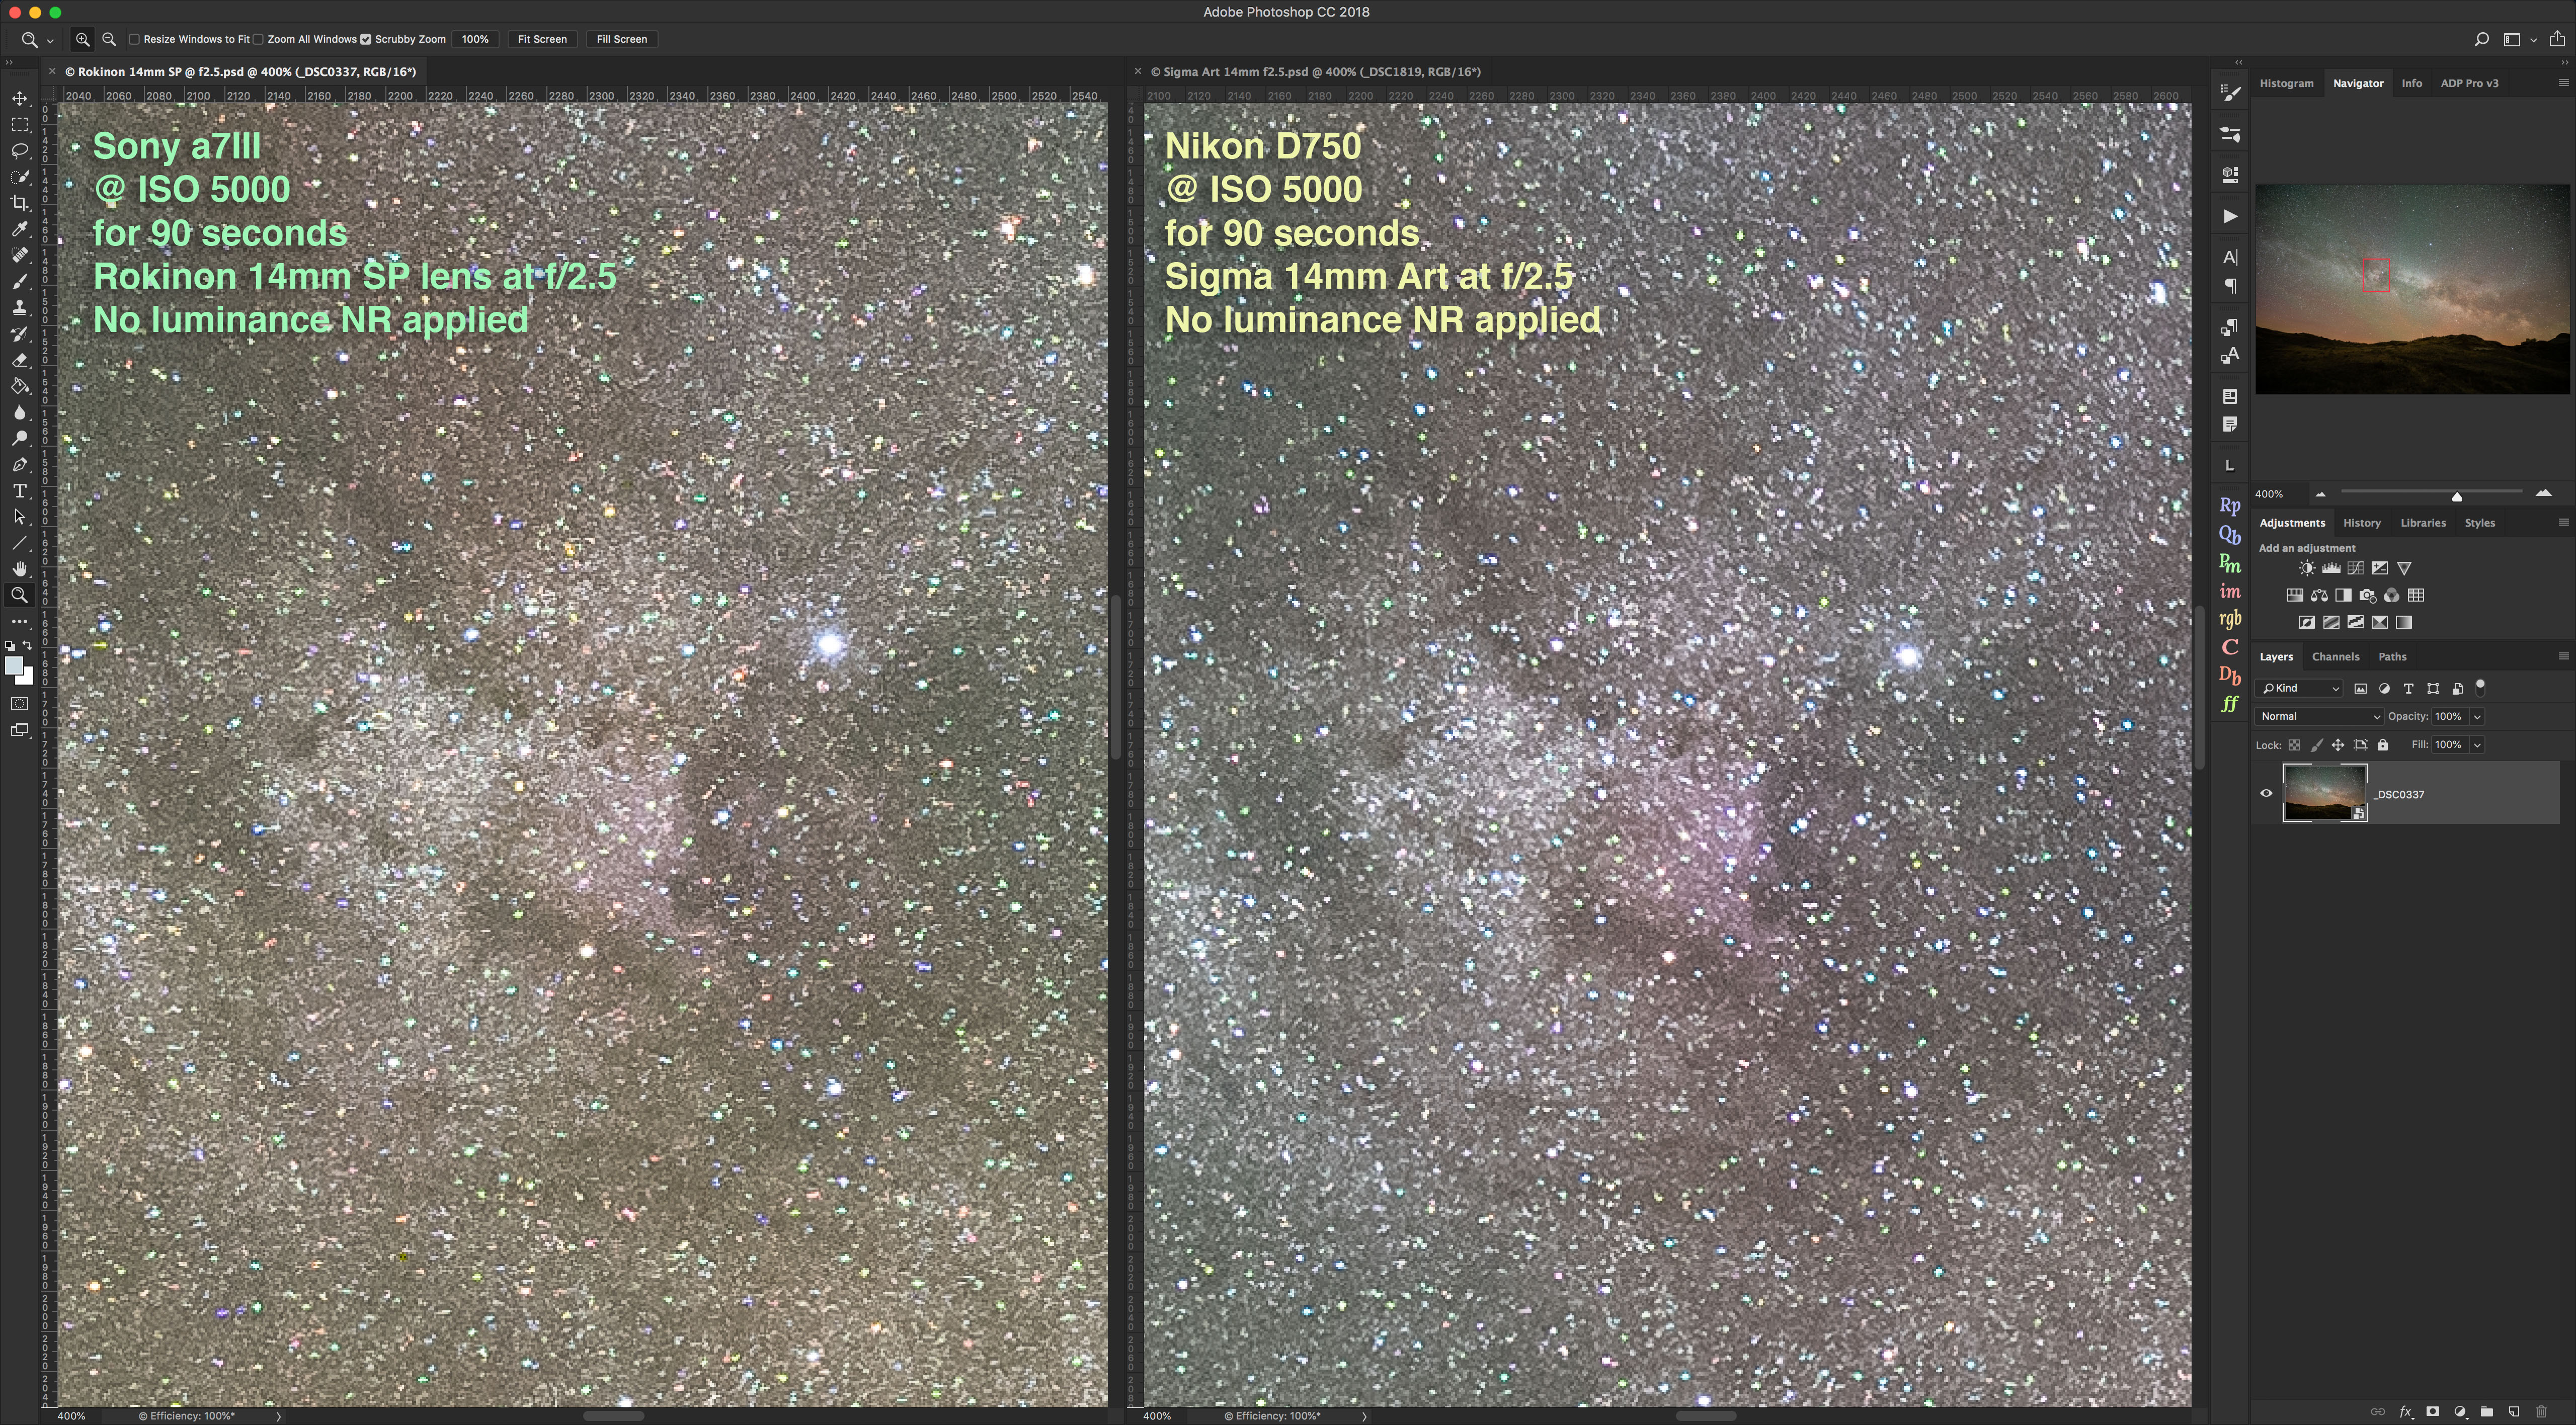
For yet more evidence, this is a comparison of the Sony a7III vs. the Nikon D750 in tracked 90-second exposures with 14mm lenses. Again, the Sony records just as many stars as the Nikon.
LENR Dark frames
 For elimination of hot pixels from thermal noise I prefer to use Long Exposure Noise Reduction when possible for nightscape and deep-sky images, especially on warm summer nights.
Exceptions are images taken for star trail stacking and for time-lapses, images that must be taken in quick succession, with minimal time gap between frames.
Turning on LENR did eliminate most hot pixels in long exposures, but not all. A few remained. Also, when boosting the exposure a lot in processing, the images taken with LENR on showed more shot and read noise than non-LENR frames.
The dark frame the camera was taking and subtracting was actually adding some noise, perhaps due to a temperature difference. The cause is not clear.
Sony advises that when using LENR Raw images are recorded with only 12-bit depth, not 14-bit. This might be a contributing factor. Yet frames taken with LENR on were the same 47 Mb size as normal uncompressed frames.
For those who think this is normal for LENR use, the Nikon D750 shows nothing like this – frames taken with LENR on are free of all hot pixels and do not show more shot or read noise, nor deterioration of shadow detail from lower bit depths.
However, I emphasize that the noise increase from using LENR with the Sony was visible only when severely boosting underexposed images in processing.
In most shooting situations, I found using LENR provided the overriding positive benefit of reducing hot pixels. It just needs to be better, Sony!
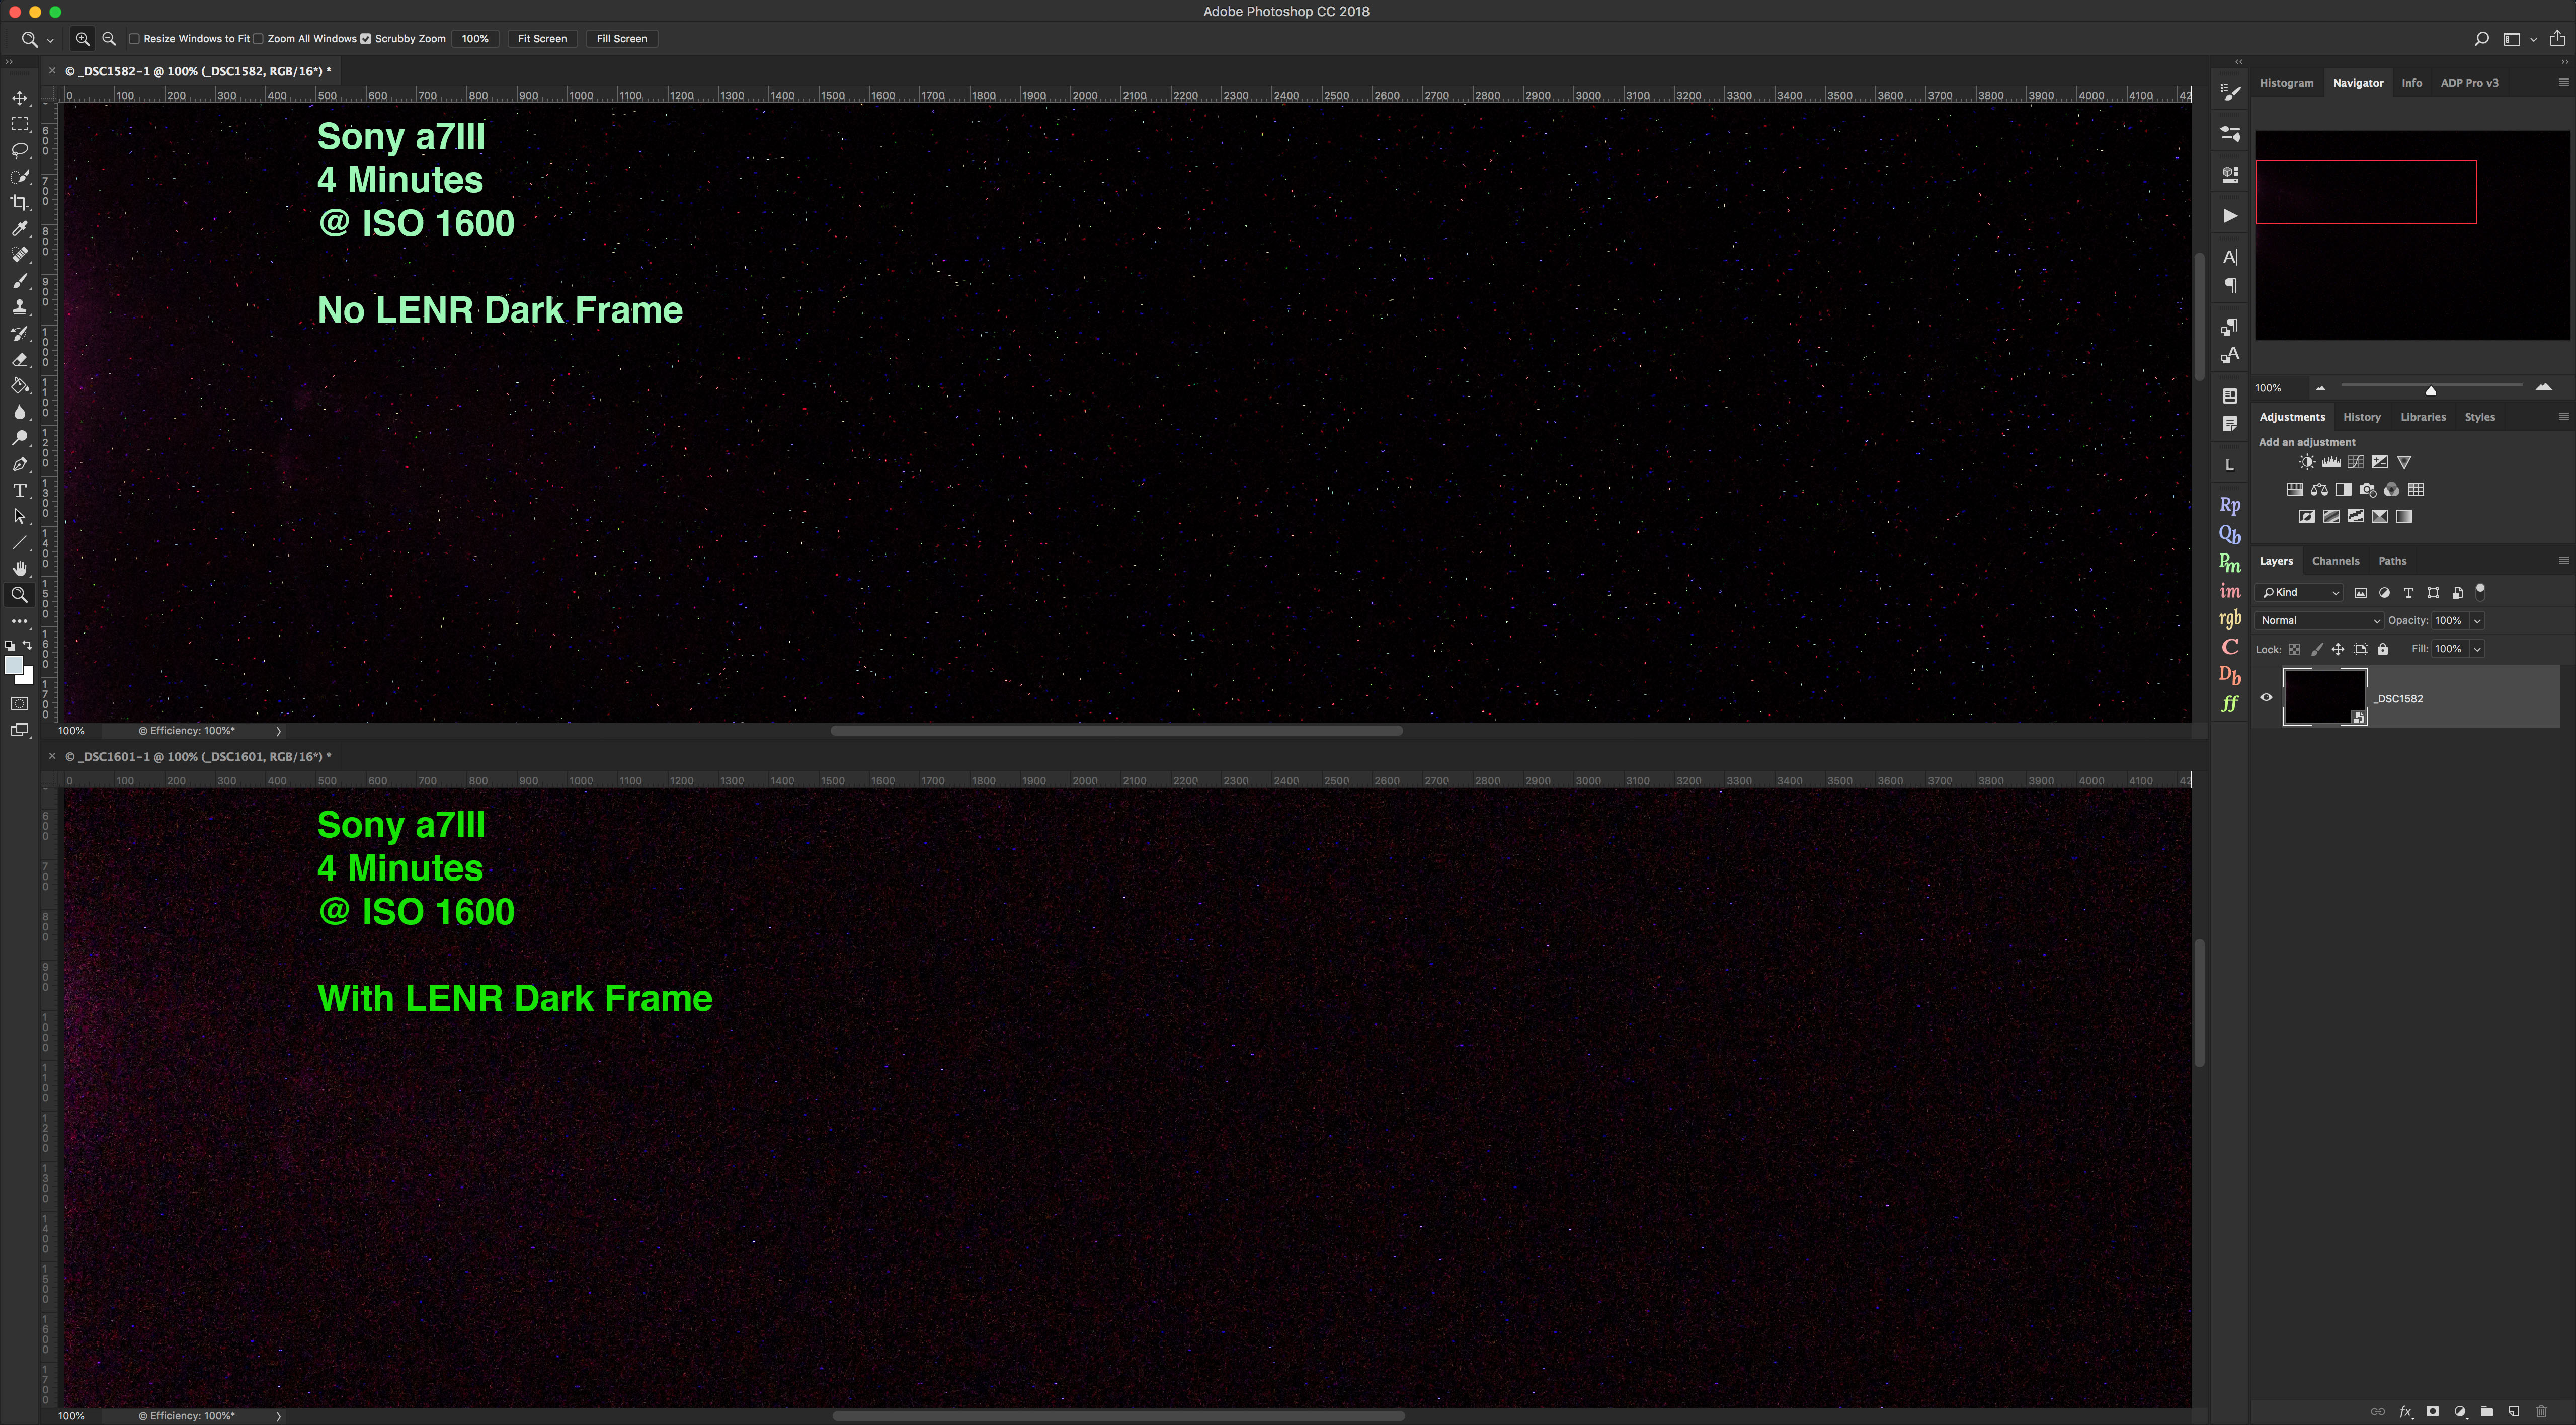
These are 4-minute exposures of dark frames (i.e. the lens cap on!) taken at room temperature with and without Long Exposure Noise Reduction. In the Sony, LENR did not eliminate all hot pixels nor the magenta amp glow at the left edge. LENR also added a background level of fine noise. These have had exposure and contrast increased to exaggerate the differences.
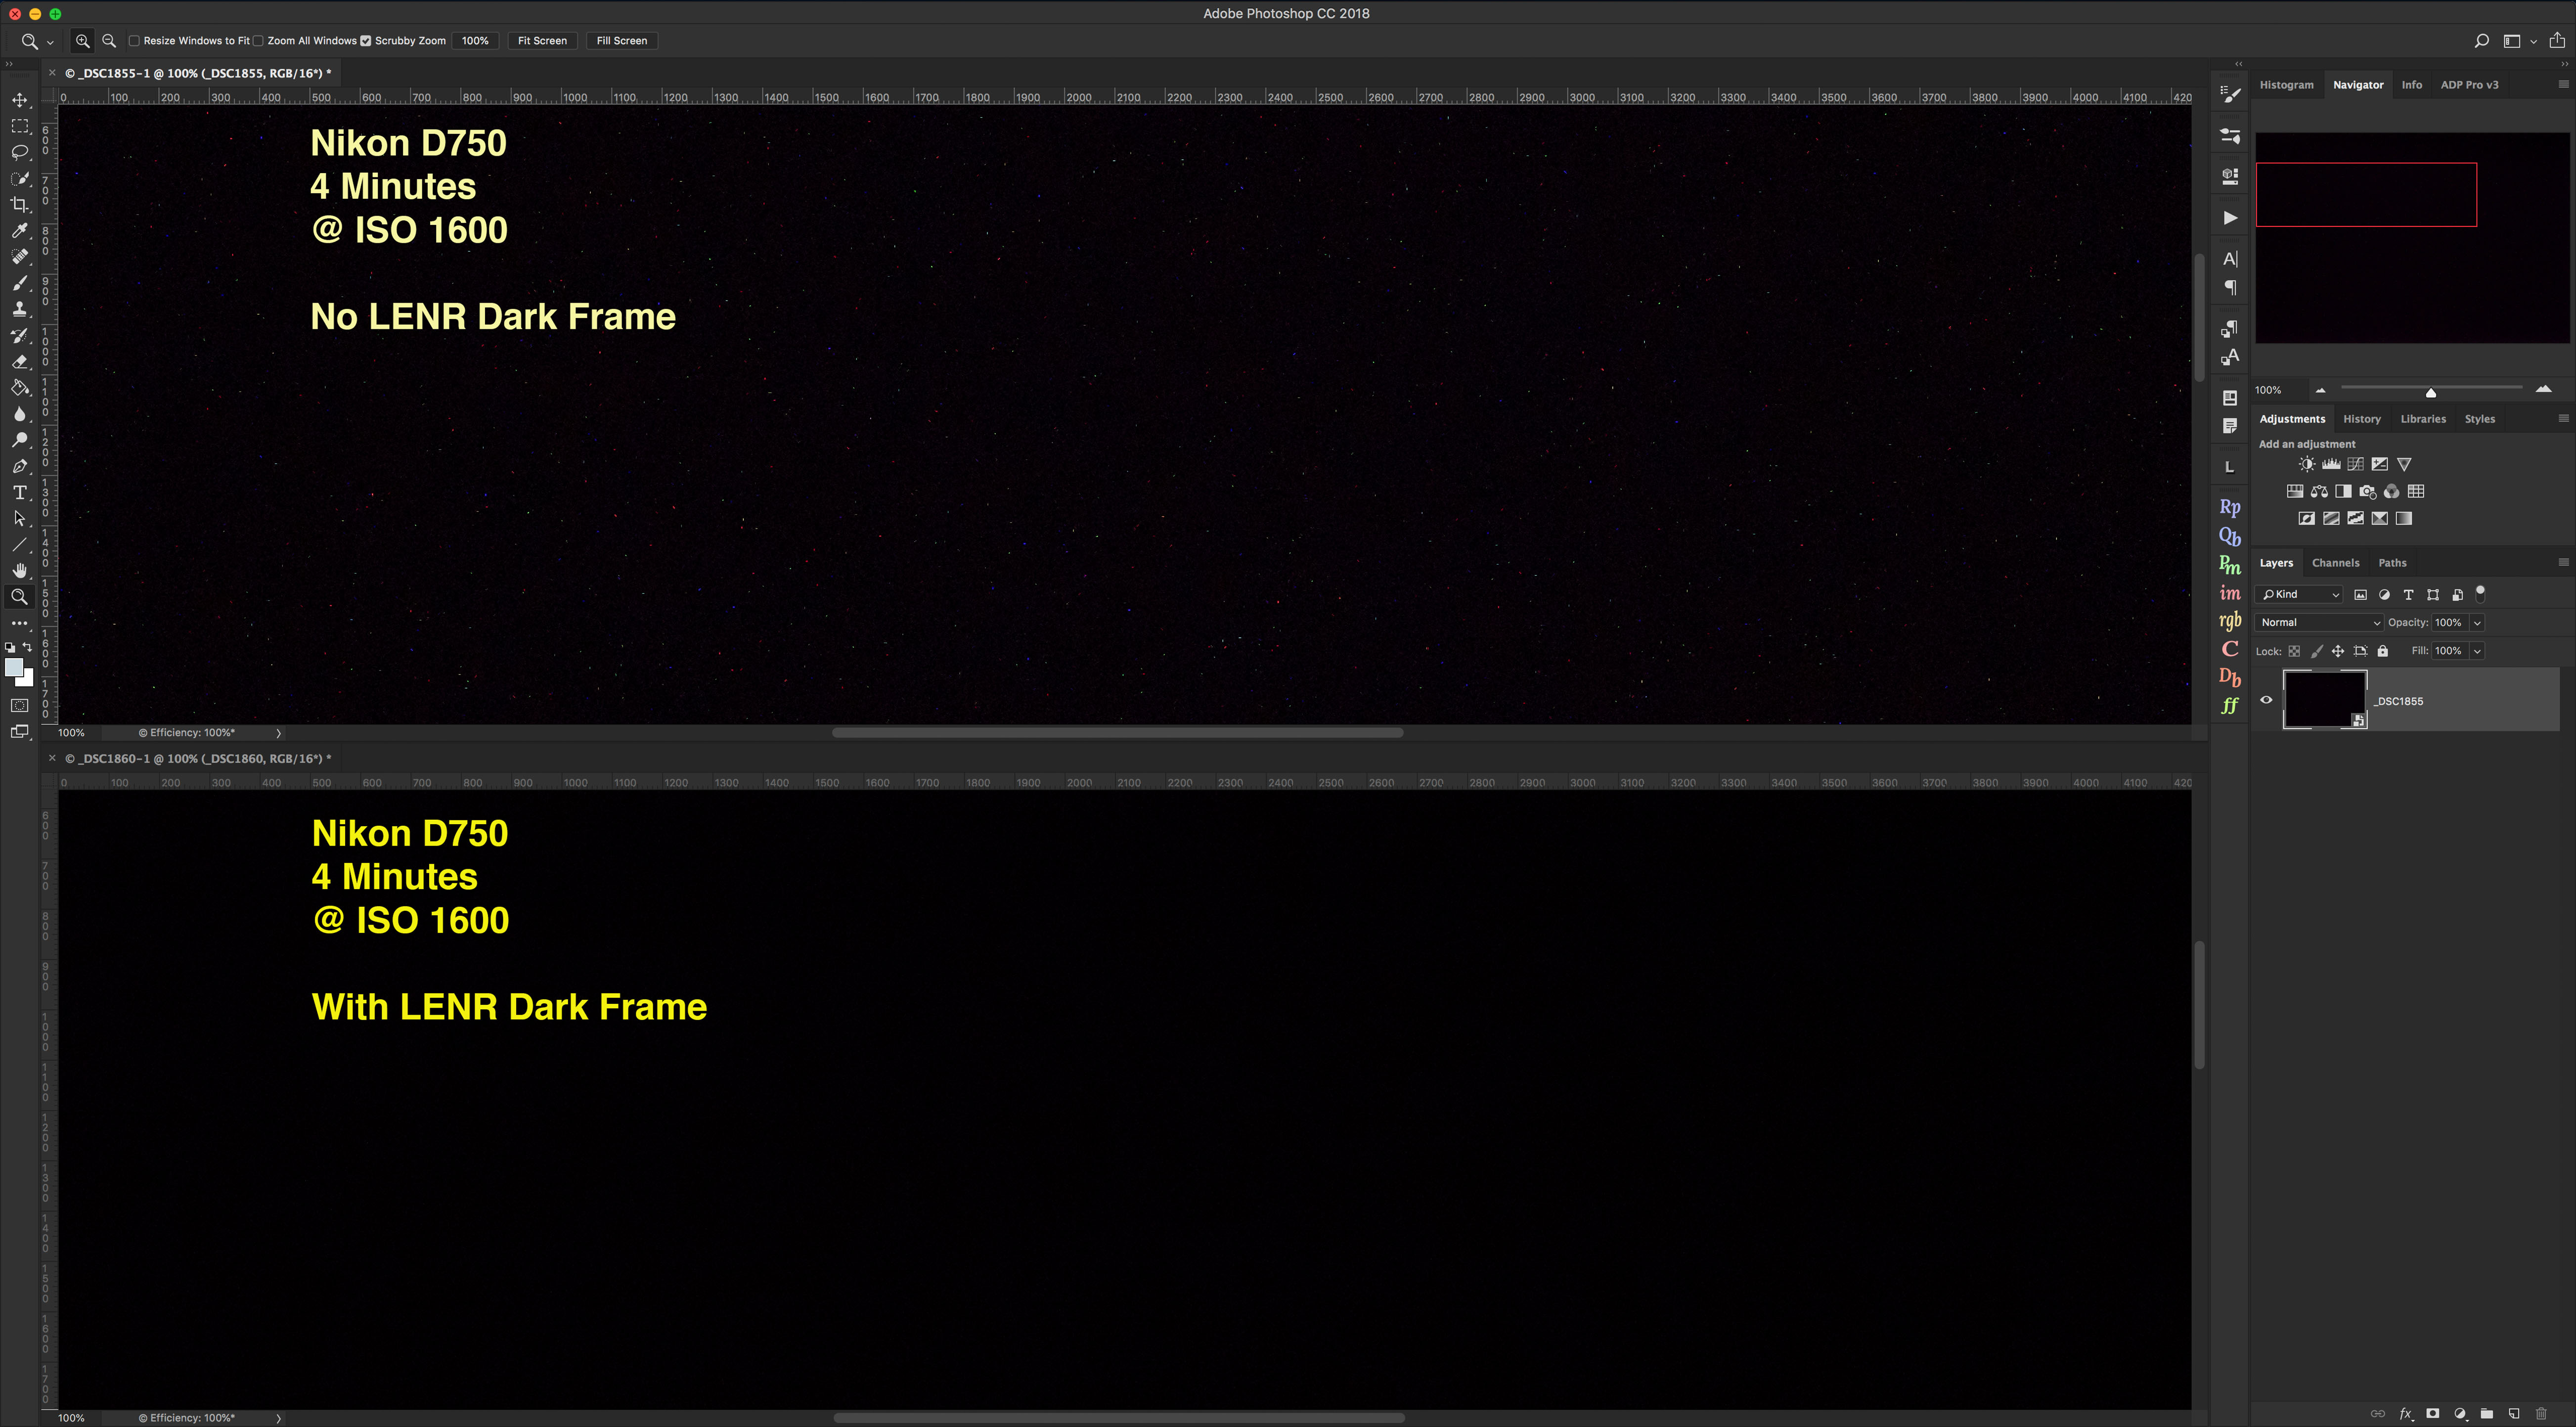
Dark frames taken with the Nikon D750 under the same circumstances and processed the same show none of the residual hot pixels and added background noise when LENR is employed. Nor is there any amp glow anywhere along the frame edges.

A real-world example with the Sony, with a properly exposed nightscape, shows that the ill effects of using LENR don’t show up under normal processing. You do get the benefit of reduced hot pixels in shadows, especially on a warm night like this was. This is a blow-up of the lower corner of the frame, as indicated.
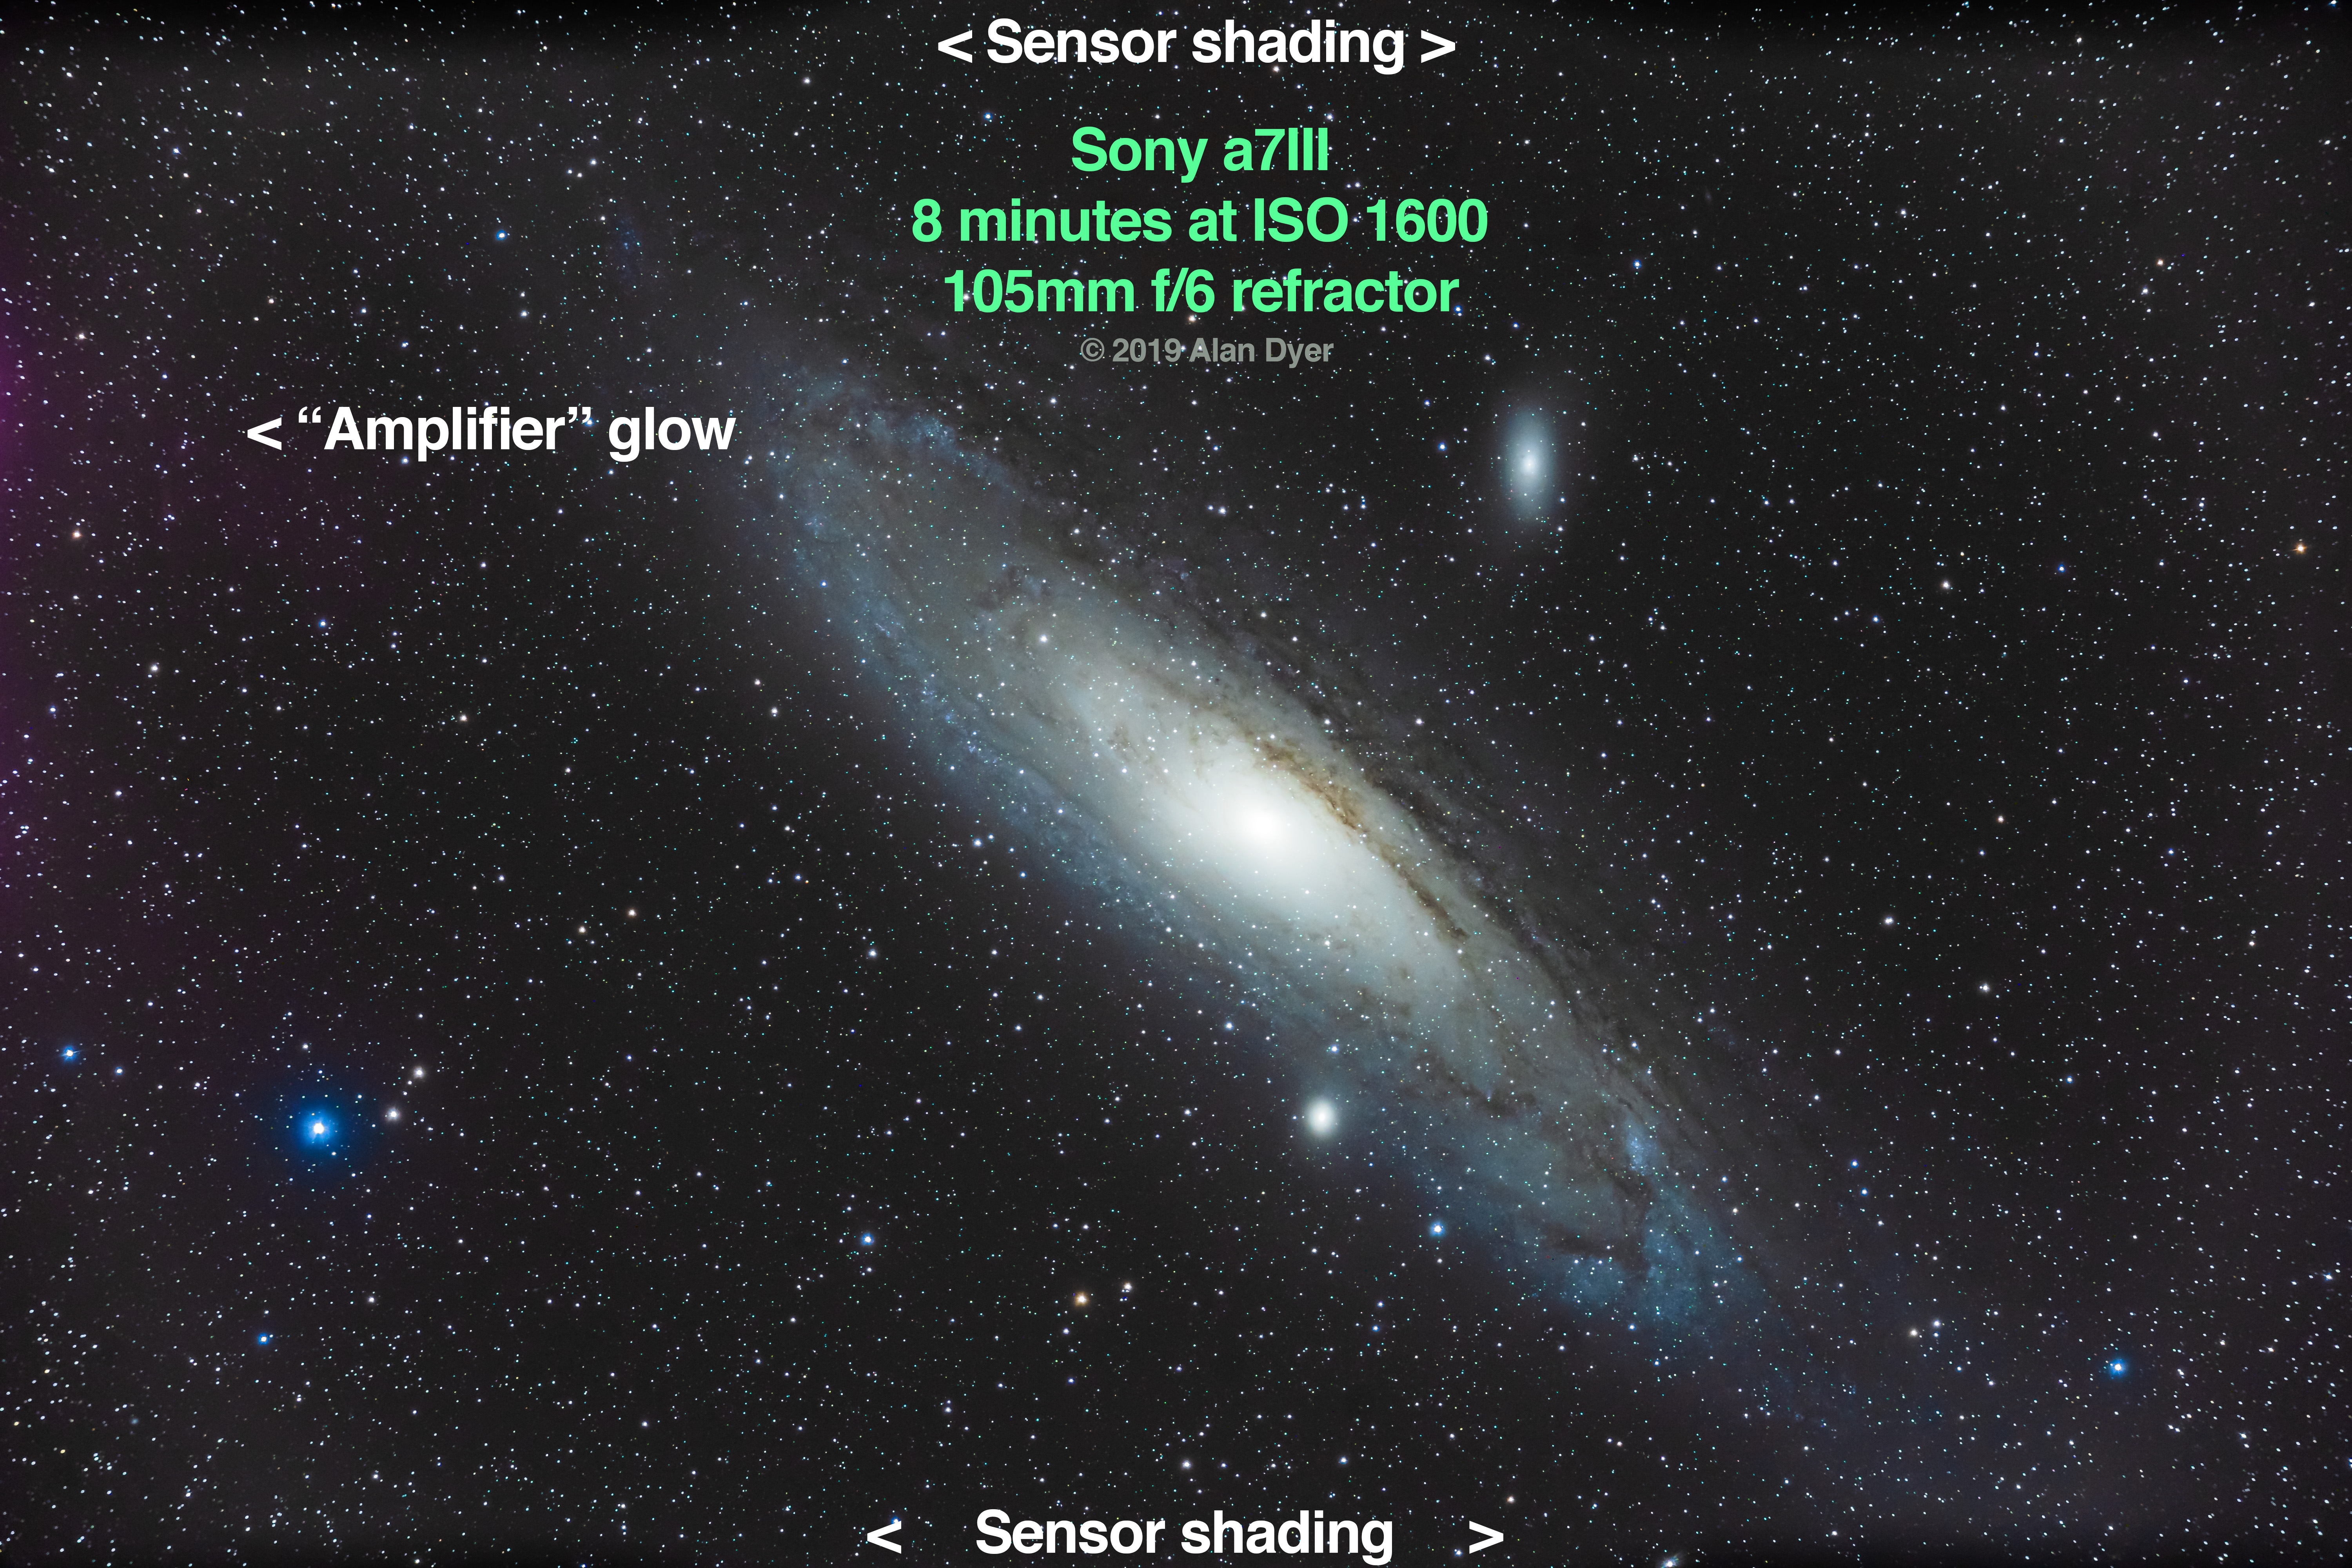
Sensor Illumination
How evenly an image is illuminated is a common factor when testing lenses.
But astrophotography, which often requires extreme contrast boosts, reveals non-uniform illumination of the sensor itself, regardless of the optics, originating from hardware elements in front of the sensor casting shadows onto the sensor.
This is most noticeable – indeed usually only noticeable – when shooting deep-sky targets though telescopes.
With DSLRs it is the raised mirror which often casts a shadow, produced a dark vignetted band along the bottom of the frame. Its extent varies from camera model to model.
With a mirrorless camera the sensor is not set far back in a mirror box, as it is in a DSLR. As such, I would have expected a more uniformly illuminated sensor.

Instead, I saw a slight shadowing at the top and bottom edges but just at the corners. This is from a thin metal mask in front of the sensor. It intrudes into the light path ever so slightly. It shouldn’t.
This is an annoying flaw, though applying “flat fields” or ad hoc local adjustments should eliminate this. But that’s a nuisance to do, and should not be necessary with a mirrorless camera.
Worse is that long deep-sky exposures at high ISOs also exhibited a faint purple glow at the left edge, perhaps from heat from nearby electronics, a so-called “amp glow.” Or I’ve read where this is from an internal infrared source near the sensor.
Taking a dark frame with LENR did not eliminate this, and it should, demonstrating again that for whatever reason in the a7III LENR is not as effective as it should be.
I have not seen such “amp” glows in cameras (at least in the DSLRs I’ve used) for a number of years, so seeing it in the new Sony a7III was another surprise.
This would be much tougher to eliminate in deep-sky images where the extreme contrast boosts we typically apply to images of nebulas and galaxies will accentuate any odd glows.
UPDATE: March 27, 2021 — Subsequent firmware updates seem to have eliminated this amp glow. One supplier of filter-modified cameras, Spencer’s Camera, who had refused to modify Sonys because of this glow, now lists many Sony Alphas as suitable for modification. However, the sensor masks and “green stars” (described below) still make the Sony a7III less desirable for deep-sky imaging than other mirrorless cameras I’ve tested.

The full field of a deep-sky image taken through an f/5 70mm astrographic refractor shows the minor level of edge darkening at the corners from shadowing of the sensor in the Sony.
Red Sensitivity
When shooting deep-sky objects, particularly red nebulas, we like a camera to have a less aggressive infrared cutoff filter, to pick up as much of the deep red Hydrogen-Alpha emission line as possible.
The Sony showed poor deep-red sensitivity, though not unlike other cameras. It was a little worse than the stock Canon 6D MkII.
This isn’t a huge detriment, as anyone who really wants to go after deep nebulosity must use a “filter-modified” camera anyway.
Canon and Nikon both offered factory modified cameras at one time, notably the Canon 60Da and Nikon D810a. Sony doesn’t have an “a” model mirrorless.
To get the most out of the Sony for deep-sky imaging you would have to have it modified by a third-party, though the amp glow described above makes it a poor choice for modification.

Three deep-sky exposures compare cameras for red sensitivity: a filter-modified Canon 5D MkII, a stock Canon 6D MkII, and the stock Sony a7III. As expected the filter-modified camera picks up much more red nebulosity. The Sony doesn’t do quite as well as the Canon 6D MkII.
Live View Focusing and Framing
Up to now my report on the Sony a7III hasn’t shown as glowing a performance as all the YouTube reviews would have you believe.
But Live Focus is where the a7III really stands out. I love it!
In Live View it is possible to make the image so bright you can actually see the Milky Way live on screen! Wow! This makes it so easy to frame nightscapes and deep-sky fields.
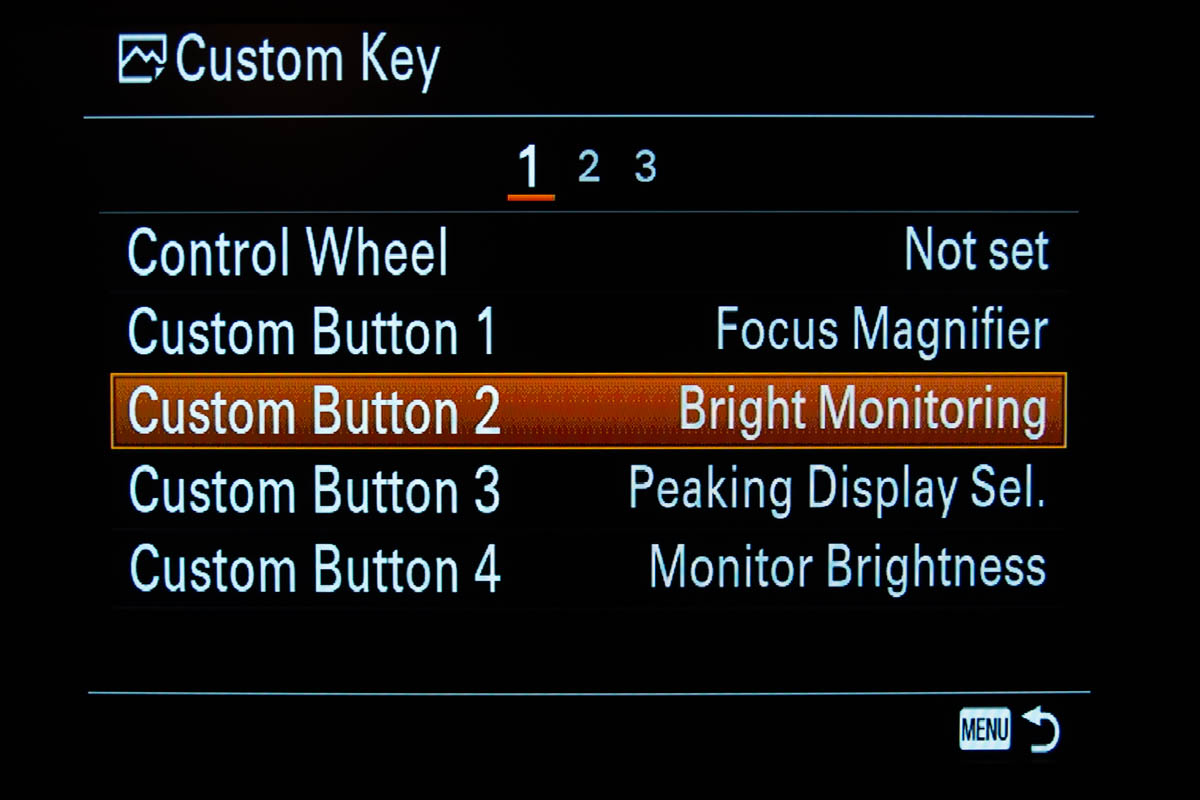
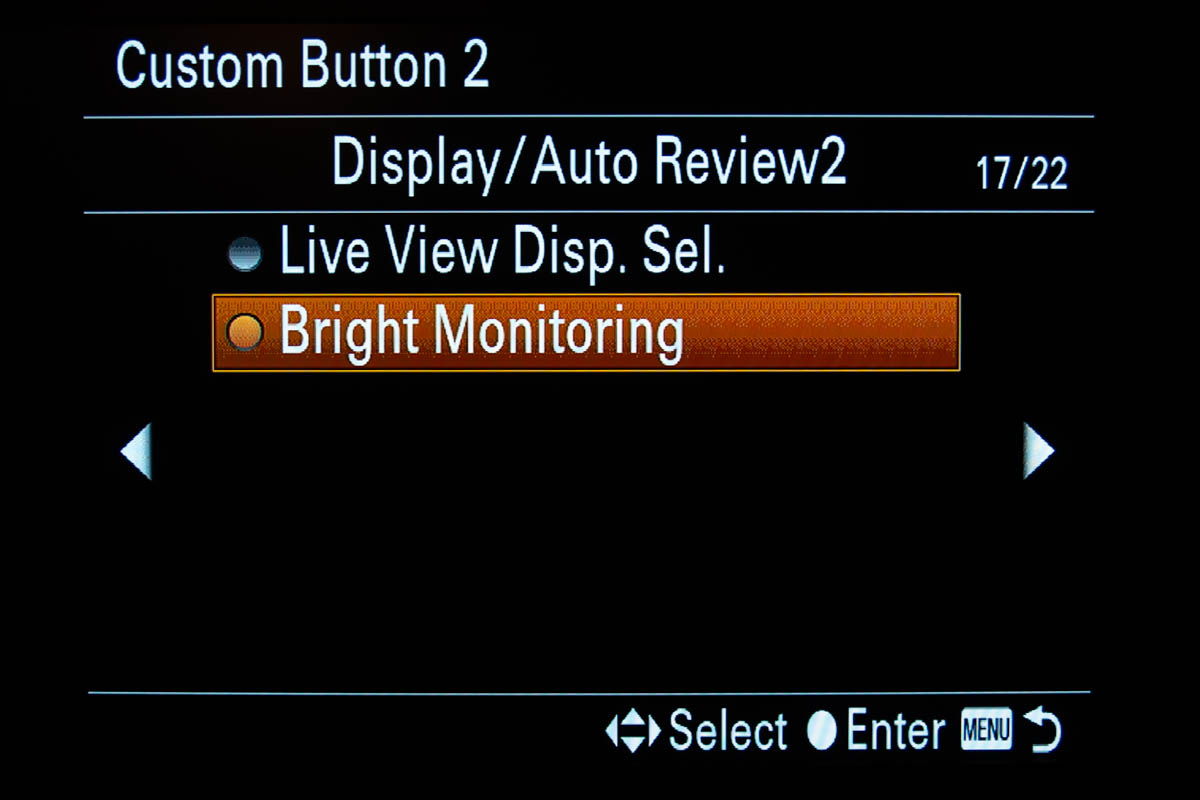
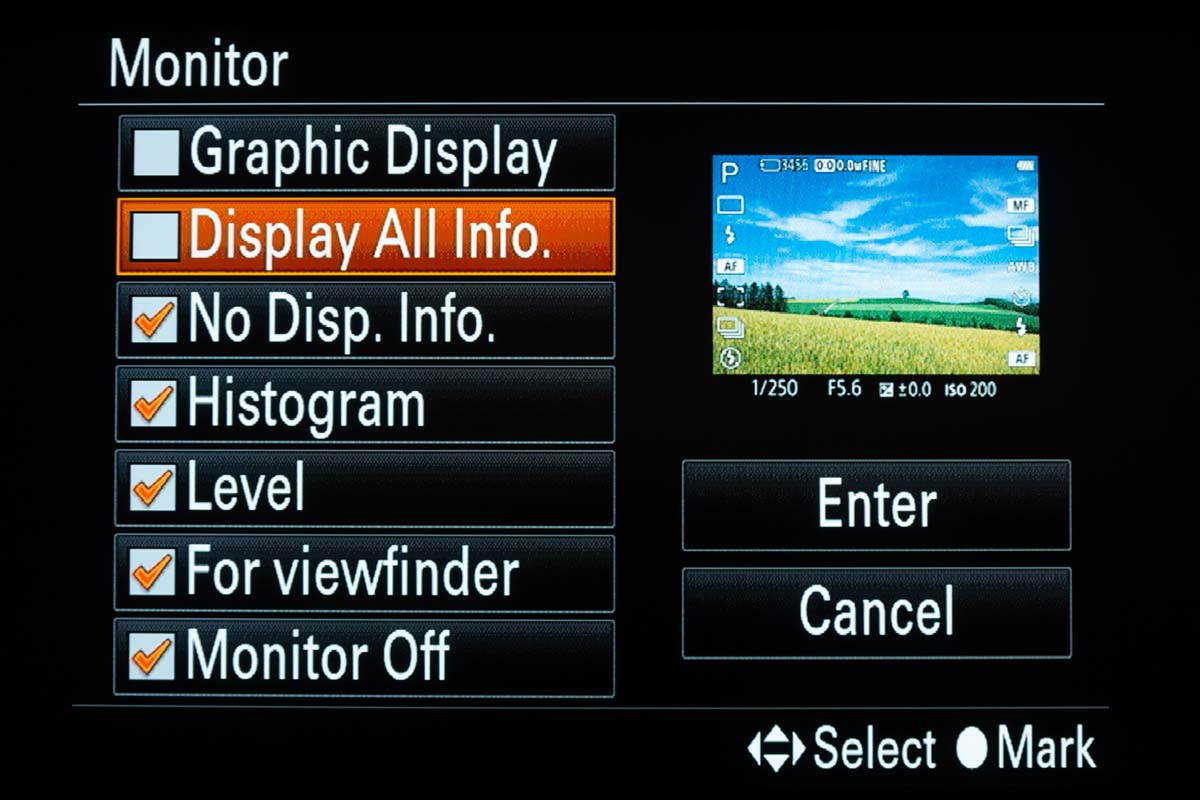
The excellent Bright Monitoring function is accessible only off the Custom Key menu where it appears as a choice on the Display/Auto Review2 page (below) that can be assigned to a C button.
But this special “Bright Monitoring” mode is as well hidden as Sony could make it. Unless you actually read the full-length 642-page PDF manual (you have to download it), you won’t know about it. Bright Monitoring does not appear in any of the in-camera menus you can scroll through, so you won’t stumble across it.
Instead, you have to go to the Camera Settings 2 page, then select Still Image–Custom Key. In the menu options that appear you can now scroll to one called Bright Monitoring. Surprise! Assign it to one of the hardware Custom C buttons. I put it on C2, making it easy to call up when needed.
The other Live View function that works well, but also needs assigning to a C button is the Camera Settings 1 > Focus Magnifier. I put this on C1. It magnifies the Live View by 5.9x or 11.7x, allowing for precise manual focusing on a star.

Two other functions are useful for Live View:
- Camera Settings 2 > Live View Display > Setting Effect ON. This allows the Live View image to reflect the camera settings in use, better simulating the actual exposure, even without Bright Monitoring on.
- Camera Settings 1 > Peaking Setting. Turning this ON superimposes a shimmering effect on parts of an image judged in focus. This might be an aid, or an annoyance. Try it.
In all, the Sony provides superb, if well-hidden, Live View options that make accurately framing and focusing a nightscape or time-lapse scene a joy.
Great Features for Astrophotography
Here are some other Sony a7III features I found of value for astrophotography, and for operating the camera at night.
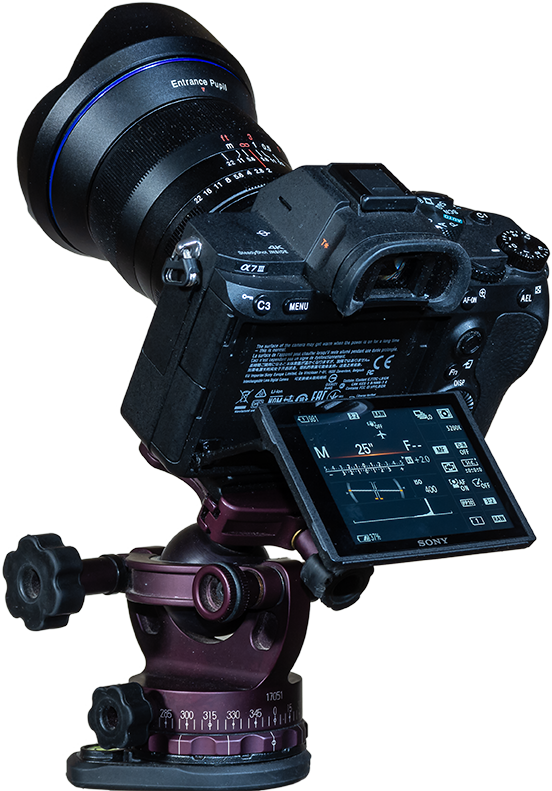
Tilting LCD Screen
Like the Nikon D750, the Sony’s screen tilts vertically up and down, great for use when on a telescope, or on any tripod when aimed up at the sky. As photographers age, this becomes a more essential feature!

Custom Buttons
The four C buttons can be programmed for oft-used functions, making them easy to access at night. Standard functions such as ISO and Drive Mode are easy to get at on the thumb wheel, unlike the Nikon D750 where I am forever hunting for the ISO or Focus Zoom buttons, or the Canon 6D MkII which successfully hides the Focus Zoom and Playback buttons at night.
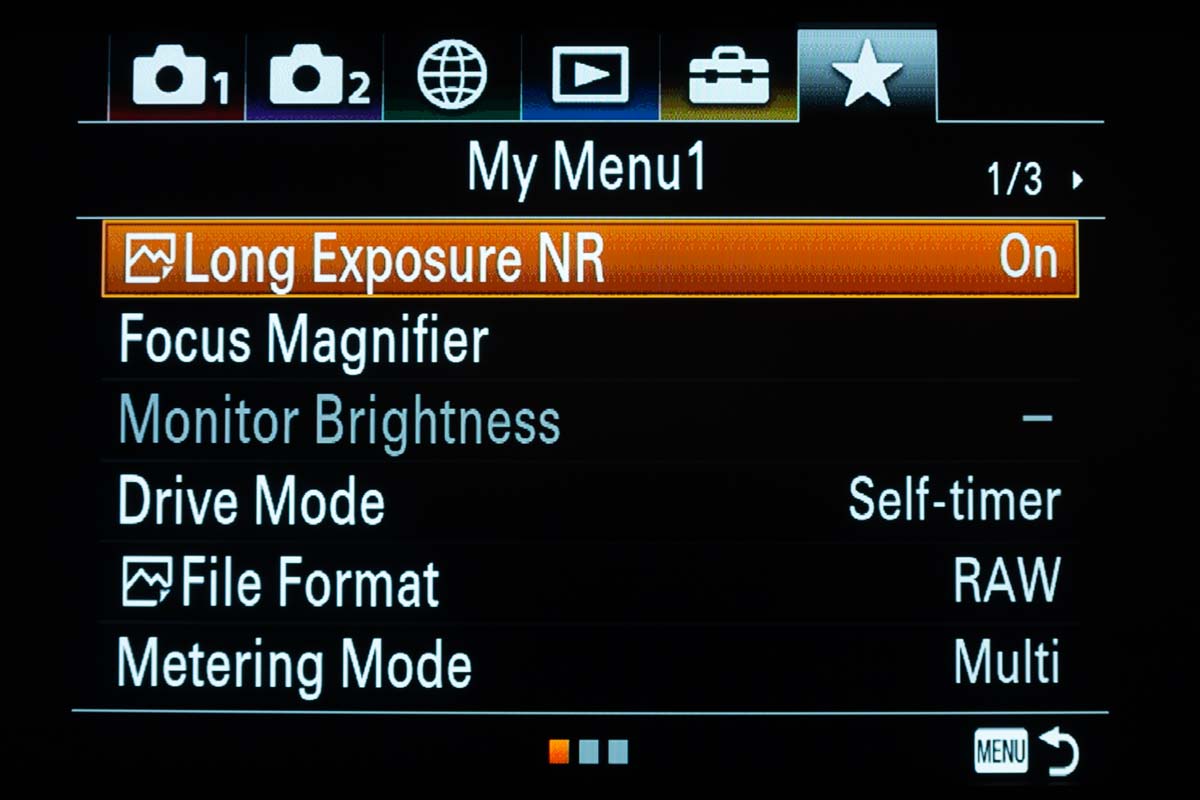
My Menu
In new models, Sony now offers the option of a final “My Menu” page which you can populate with often-used functions from the other 35 pages of menu commands!
Adaptability to Many Lenses
Using the right lens adapter (I use one from Metabones), it is possible to use lenses with mounts made for Canon, Nikon, Sigma and others. Plus there are an increasing number of lenses from third parties offered with native Sony E-mounts. This is good news, as astrophotography requires fast, high-quality lenses, and the Sony allows more choices.
Lighter Weight / Smaller Size
The compact a7III body weighs a measured 750 grams, vs. 900 grams each for the Nikon D750 and Canon 6D MkII. The lower weight can be helpful for use on lightweight telescopes, on small motion control devices, and for simply keeping weight and bulk down when traveling.

Dual Card Slots
Not essential, but having two card slots is very helpful, for backup, for handling overflows from very long time-lapse shoots, or assigning them for stills vs. movies, or Raws vs. JPGs. Only Slot 1 will work with the fastest UHS II cards that are needed for recording the highest quality 4K video.
USB Power
It is possible to power the camera though the USB port (indeed that’s how you charge the battery, as no separate battery charger is supplied as standard, a deficiency). This might be useful for long shoots, though likely as not that same USB port will be needed for an intervalometer or motion control device. But if the Sony had a built-in intervalometer…!
Display Options
To reduce battery drain it is possible to turn off the EVF completely – I find I never use it at night – and to turn off the LCD display when shooting, though the latter is an option you have to activate to add to the Display button’s various modes.
The downside is that when shooting is underway you get no reassuring indication anything is happening, except for a brief LED flash when an image is written to a card.
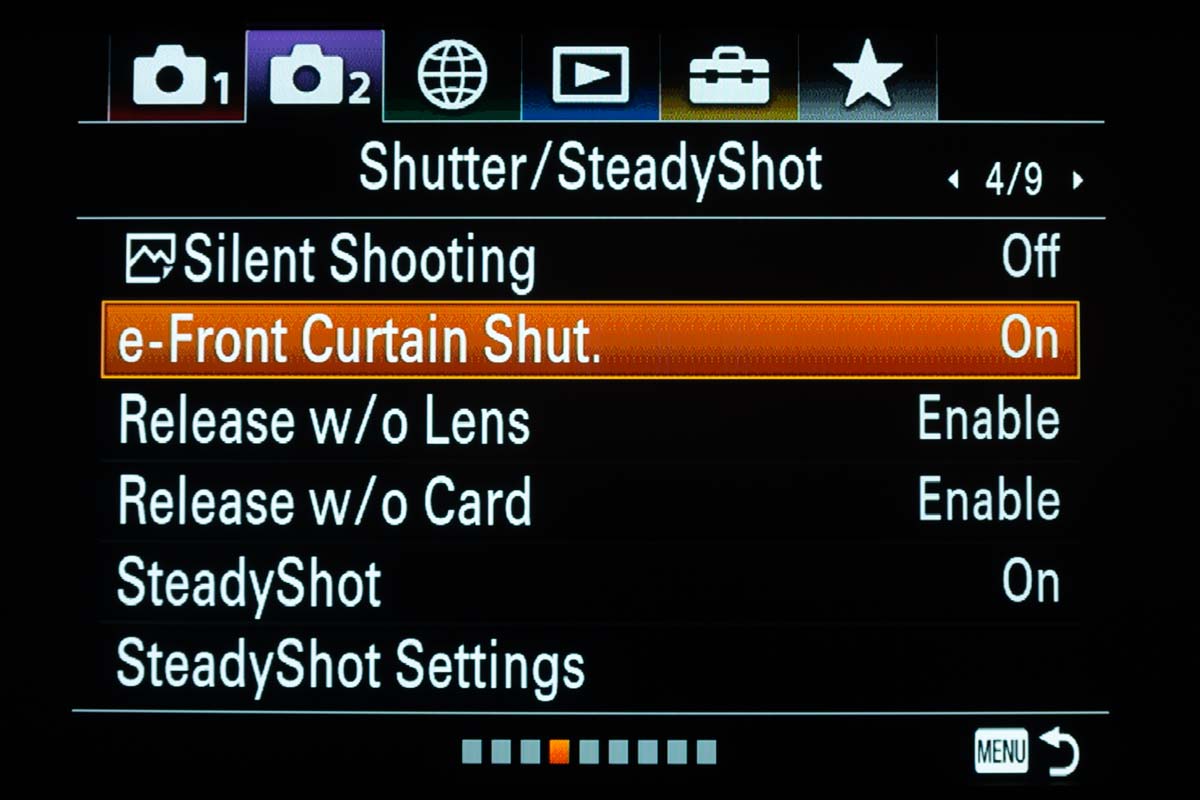
Electronic Front Curtain Shutter
Most DSLRs do not offer this, but the Sony’s option of an electronic front curtain shutter and the additional Silent Shooting mode completely eliminates vibration, useful for some high-magnification shooting through telephotos and telescopes.
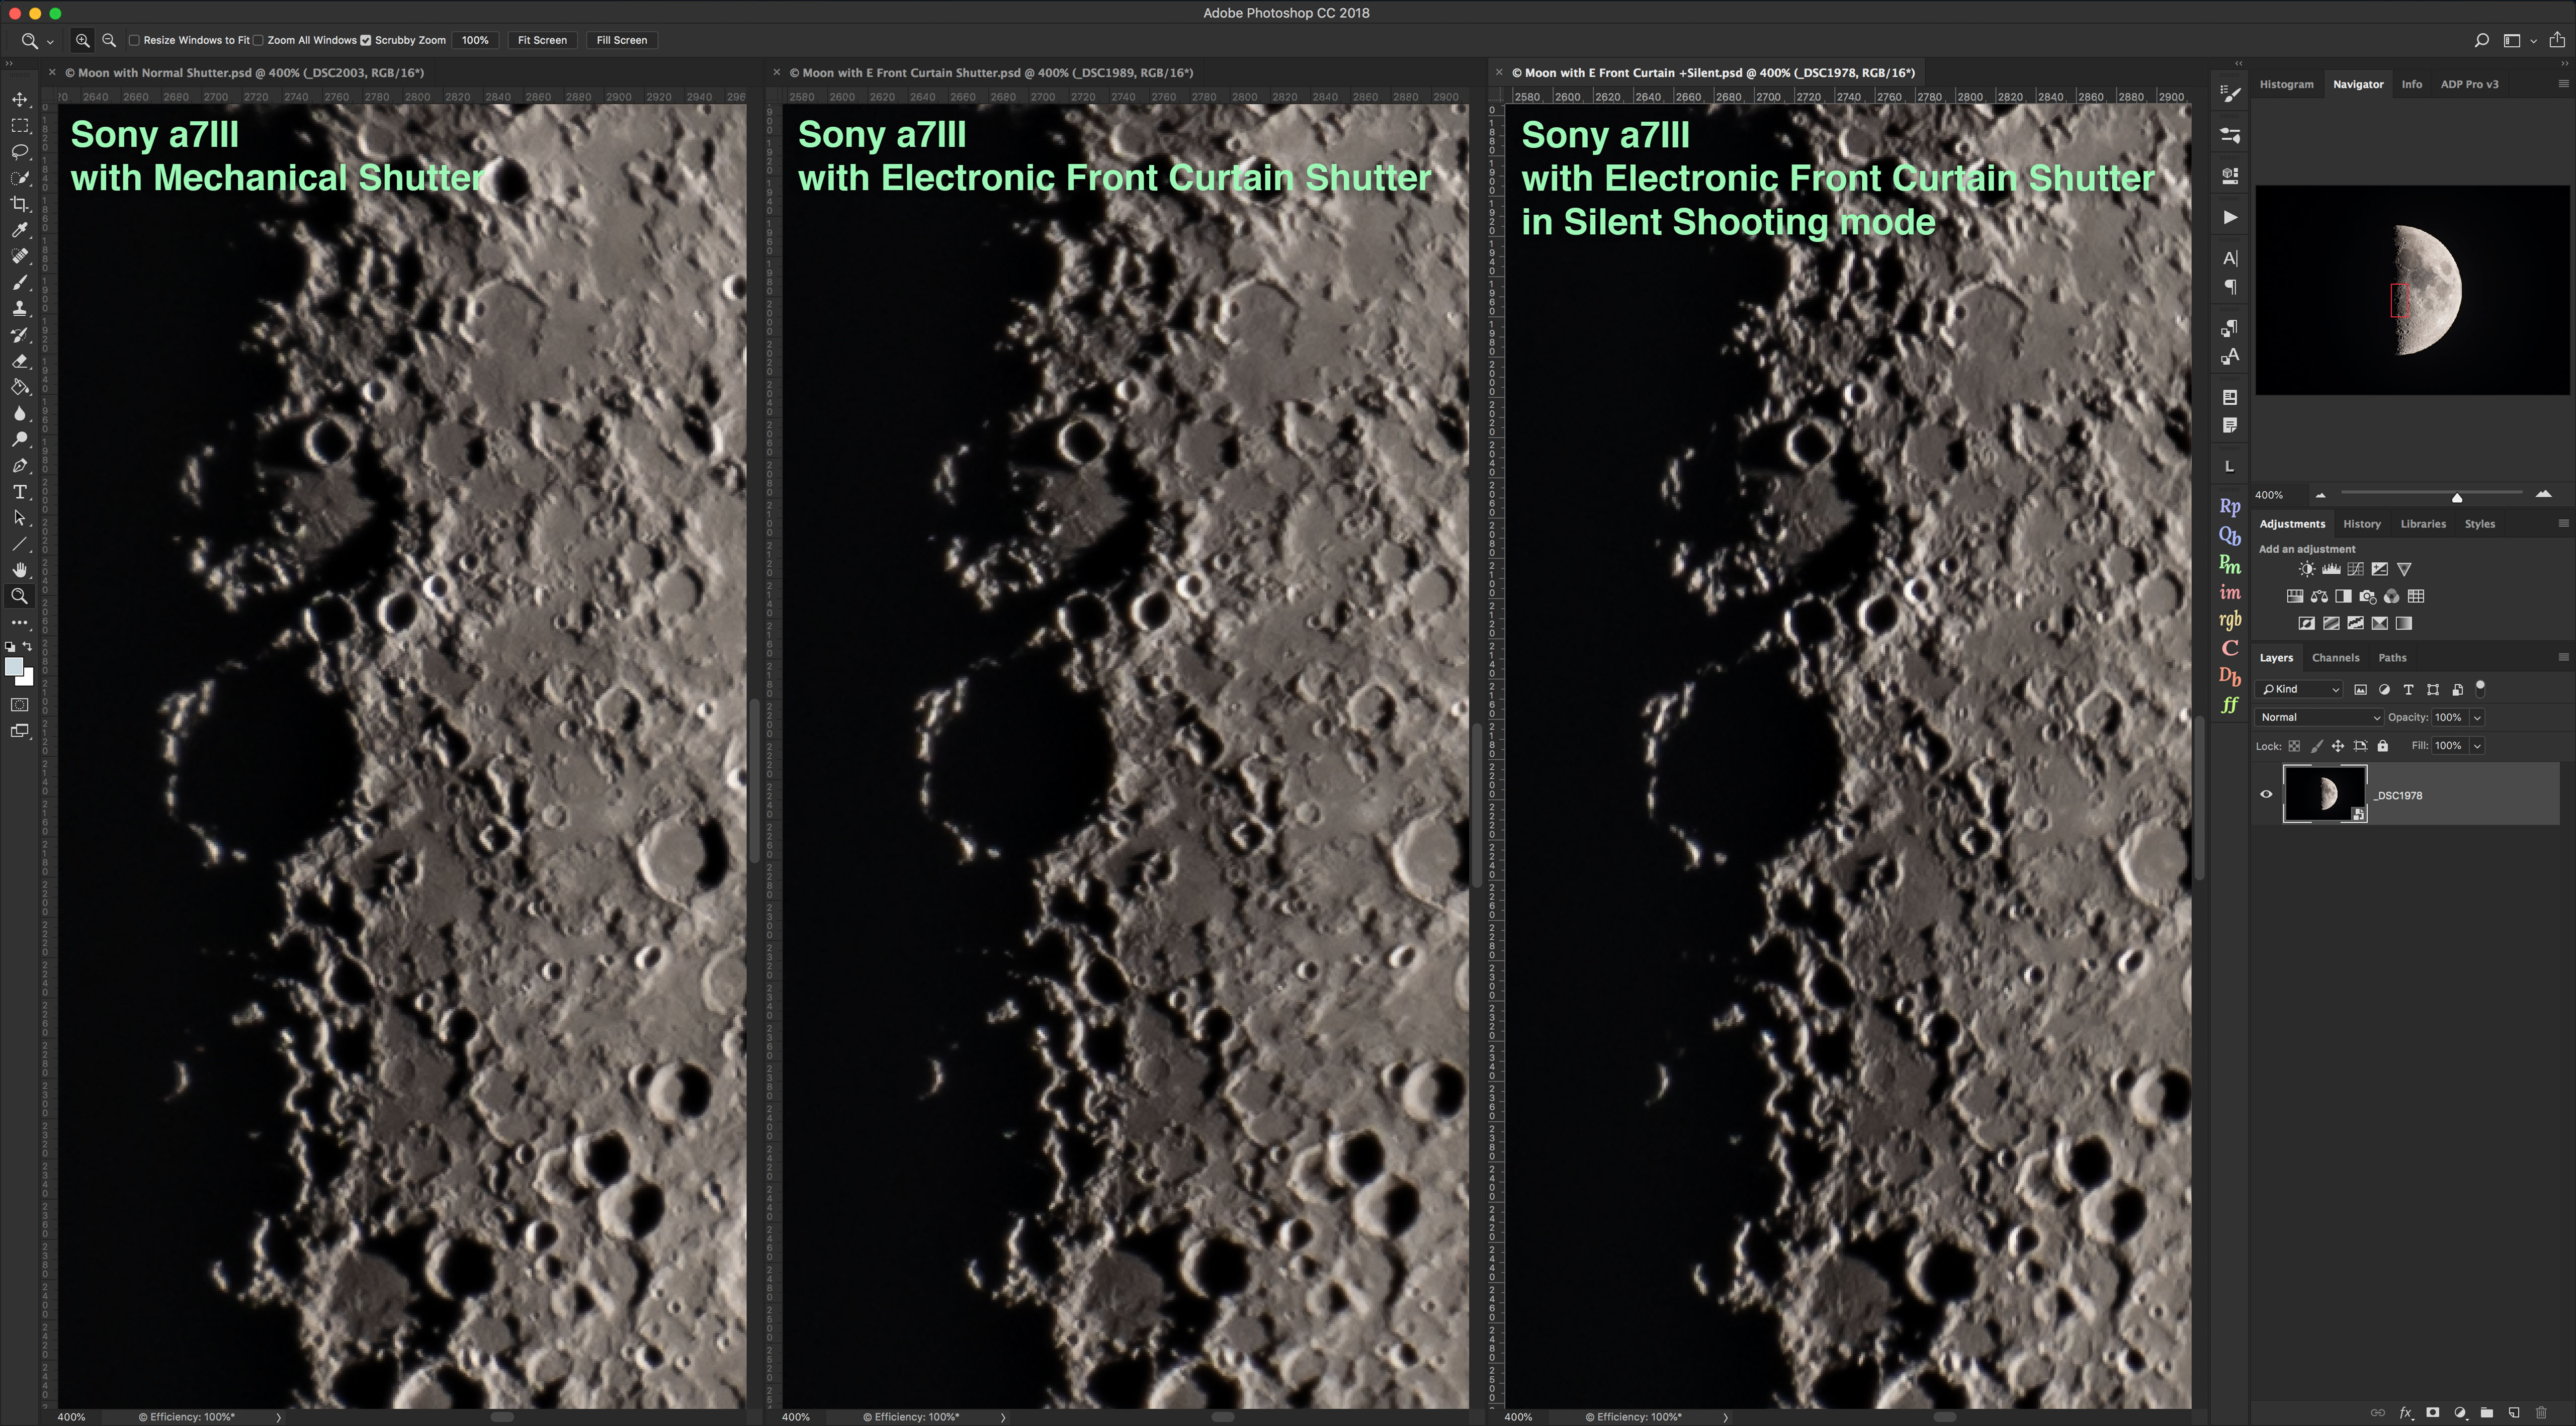
This trio compares closeups of the Moon taken with and without electronic front curtain shutter. All were taken through a 130mm refractor telescope at f/12 using a Barlow lens. The image with e-shutter and in Silent Mode is a tad sharper, but that could be just as much from variations in seeing conditions as from the lower vibration from using the electronic shutter.
What’s Missing for Astrophotography
Intervalometer — NOW INCLUDED!
UPDATE: In April 2019 Sony issued a v3 Firmware update for the a7III which added an internal intervalometer. I’ve used this new function and it works very well.
I had originally remarked that this useful function was missing. But no more! Thank you Sony!
While a built-in intervalometer is not essential, I find I often do use the Canon and Nikon in-camera intervalometers for simple shoots. So it is great to have one available on the Sony. However, like other brands’ internal intervalometers Sony’s is good only for exposures up to 30 seconds long.
Bulb Timer or Long Exposures
However, while the Sony has a Bulb setting there is no Bulb Timer as there is with the Canon. The Bulb Timer would allow setting long Bulb exposures of any length in the camera.
Instead, for any exposures over 30 seconds long (or time-lapses with >30-second-long frames) the Sony must be used with an external Intervalometer. I use a $50 Vello unit, and it works very well. It controls the Sony through the camera’s Multi USB port.
In-Camera Image Stacking
Also missing, and present on most new Canons, are Multiple Exposure modes for in-camera stacking of exposures in a Brighten mode (for star trails) or Averaging mode (for noise smoothing).
Yes, this can all be done later in processing, but having the camera do the stacking can often be convenient, and great for beginners, as long as they understand what those functions do, or even that they exist!
Time-Lapse Smoothing
When using its internal intervalometer, the Nikon D750 has an excellent Exposure Smoothing option. This does a fine job smoothing frame-to-frame flickering in time-lapses, something the Canon cannot do. Nor the Sony, as it has no intervalometer at all.
Light Frame Buffer in LENR
This feature is little known and utilized, and only Canon full-frame cameras offer it. Turn on LENR and it is possible to shoot three (with the 6D MkII) or four (with the 6D) Raw images in quick succession even with LENR turned on. The Canon 5D series also has this.
The dark frame kicks in and locks up the camera only after the series of “light frames” are taken. This is wonderful for taking a set of noise-reduced deep-sky images for later stacking. Nikons don’t have this, not even the D810a, and not Sonys.
Illuminated Buttons
The Sony’s buttons are not illuminated. While these might add glows to long exposure images, if they could be designed not to do that (i.e. they turn off during exposures), lit buttons would be very handy at night.
Limited Touch Screen Functions
An alternative would be an LCD screen that was touch sensitive. The Sony a7III’s screen is, but only to select an area for auto focus or zooming up an image in playback. The Canon 6D MkII has a fully functional touch screen which can be, quite literally, handy at night.
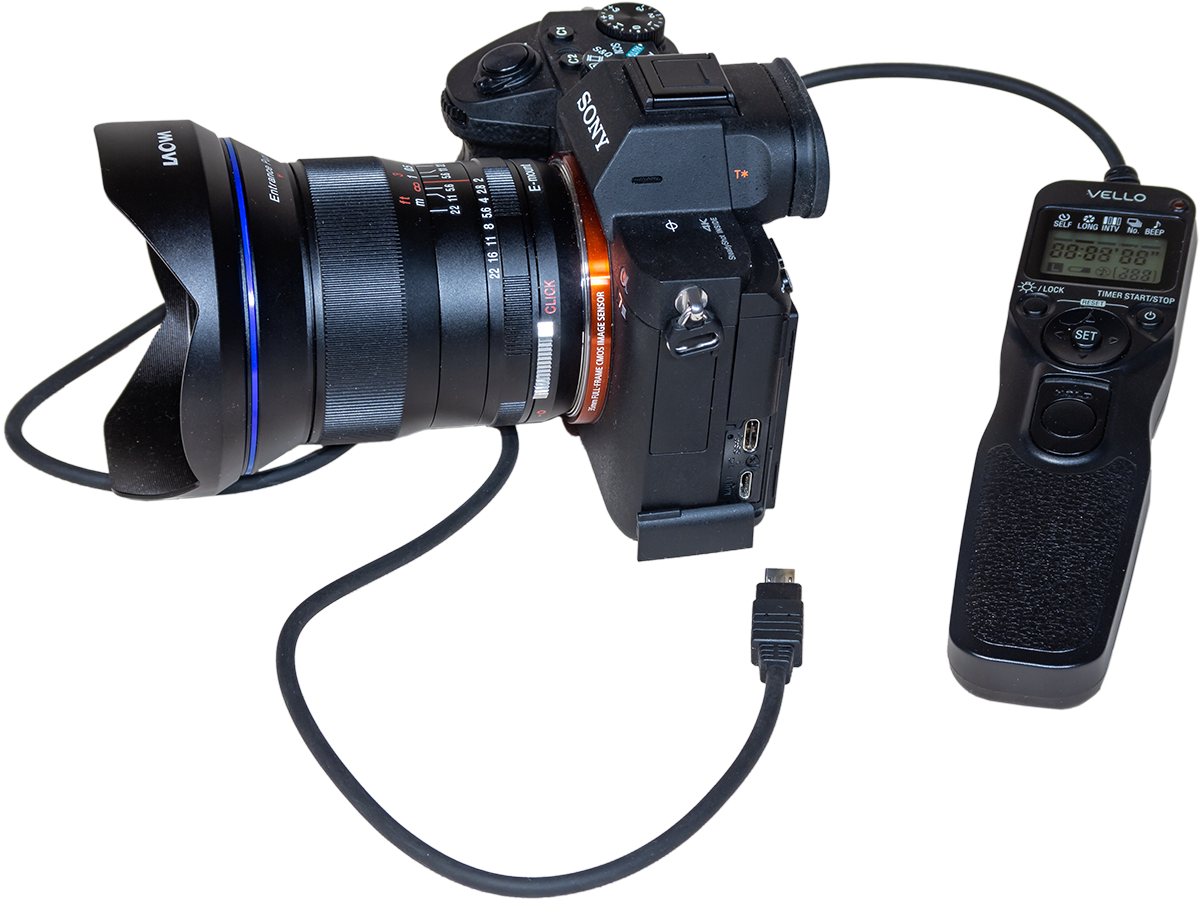
For time-lapses, the Sony must be used with an external intervalometer like this Vello unit.
Video Capability
Here’s another area where the new Sony a7III really shines.
It offers 4K (or more precisely UltraHD) video recording for videos of 3840 x 2160 pixels. (True 4K is actually 4096 x 2160 pixels.)
With a fast enough UHS-II Class card it can record 4K video up to 30 frames per second and at a bit rate of either 60 or 100 Mbps.
At 24 fps videos are full-frame with no cropping. Hurray! You can take full advantage of wide-angle lenses, great for auroras. At 30 fps, 4K videos are cropped with a 1.2x crop factor.
In Movie Mode ISO speeds go up to ISO 102,400, but are pretty noisy, if unusable at such speeds.
But when shooting aurora videos I found, to my surprise, I could “drag” the shutter speeds as slow as 1/4-second, fully 4 stops better than the Nikon’s slowest shutter speed of 1/60 second in Full HD, and 3 stops better than the Canon’s slowest movie shutter of 1/30 second.
Coupled with a fast f/1.4 to f/2 lens, the slow shutter speed allows real-time aurora shooting at “only” ISO 6400 to 12,800, for quite acceptable levels of noise. I am very impressed!
Real-time video of auroras is not possible with anything like this quality with the Nikon (I’ve used it often), and absolutely not with the Canon. And neither are 4K.
Is the a7III as good for low-light video as the Sony a7s models, with their larger 8.5-micron pixels?
I would assume not, but not having an a7s (either Mark I or II) to test I can’t say for sure. But the a7III should do the job for bright auroras, the ones with rapid motion worth recording with video, plus offer 24 megapixels for high-quality stills of all sky subjects.
I think it’s a great camera for both astrophoto stills and video.

This is a frame grab from a real-time 4K video of a “Steve” aurora.
An example is in a 4K video I shot on May 6, 2018 of an usual aurora known as “STEVE.”
Steve Aurora – May 6, 2018 (4K) from Alan Dyer on Vimeo.For another example of using the Sony a7III for recording real-time video of the night sky see this video of the aurora shot from Norway in March 2019.
The Northern Lights At Sea from Alan Dyer on Vimeo.
Battery Life
I found the a7III would use up about about 40% of the battery capacity in a typical 400-frame time-lapse on mild spring nights, with 30-second exposures. This is with the EVF and rear LCD Display OFF, and the camera in Airplane mode to turn off wireless functions to further conserve battery power. I was using the wired Vello intervalometer.
This is excellent performance on par with the DSLRs I use. At last, we have a mirrorless camera that not only doesn’t eat stars, it also does not eat batteries!
One battery can get you through a night of shooting, though performance will inevitably decline in winter, as with all cameras.

Lens and Telescope Compatibility
As versatile as a mirrorless camera is for lens choice, making use of that versatility requires buying the right lens adapter(s). They can cost anywhere from $100 to $400. The lowest cost units just adapt the lens mechanically; the more costly units also transfer lens data and allow auto focusing with varying degrees of compatibility.

The MetaBones Canon EF-to-Sony E mount adapter transfers lens data and allows auto focus to function.
For use on telescopes, the simple adapters will be sufficient, and necessary as many telescope-to-camera adapters and field flatteners are optimized for the longer lens flange-to-sensor distance of a DSLR. Even if you could get a mirrorless camera to focus without a lens adapter to add the extra spacing, the image quality across the field might be compromised on many telescopes.
I used the Metabones Canon-to-Sony adapter when attaching the Sony to my telescopes using my existing Canon telescope adapters. Image quality was just fine.
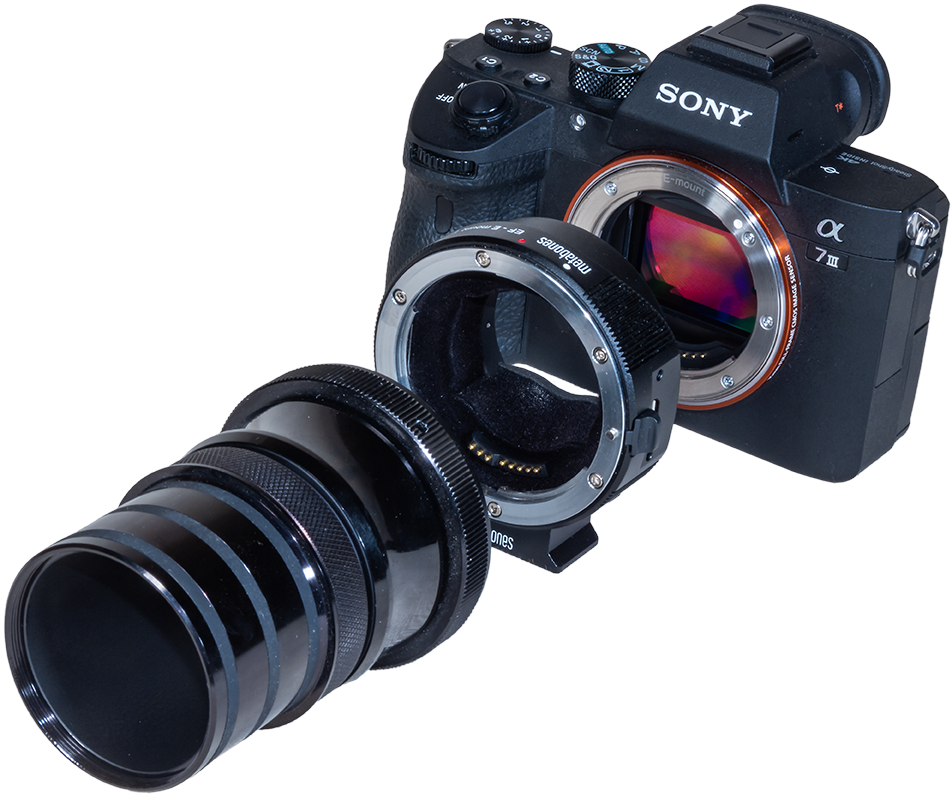
The MetaBones adapter, as will other brands, adds the correct lens flange to sensor distance for telescope field flatteners to work best.
Time-Lapse Controller Compatibility
Due to limitations set by Sony, controlling one of their cameras with an external controller can be problematic.
Devices that trigger only the shutter should be fine. That includes simple intervalometers like the Vello, the Syrp Genie Mini panning unit, and the Dynamic Perception and Rhino sliders, to name devices I use. However, all will need the right camera control cable, available from suppliers like B&H.
And, as I found, the Sony might need to be placed into Continuous shooting mode to have the shutter fire with every trigger pulse from the motion controller. When used with the Genie Mini (below) the Sony fired at only every other pulse if it was in Single shot mode, an oddity of Sony’s firmware.
Some time-lapse controllers are able to connect to a camera through its USB port and then adjust the ISO and aperture as well, for ramped “holy grail” sunset-to-Milky Way sequences.
For example, the TimeLapse+ View (see http://www.timelapseplus.com) works great for automated holy grails, but the developer recommends that with most Sonys the minimum allowed interval between shots is longer (8 to 14 seconds) than with Canons and Nikons. See http://docs.view.tl/#camera-specific-notes
With the Alpine Laboratories Radian2, exposure ramping is not possible with a Sony, only basic shutter triggering. See https://alpinelaboratories.com/pages/radian-2-support-get-started_s
The Sony A7III worked well with the Syrp Genie Mini motion controller with the right shutter cable but only when placed in Continuous mode.
Recommendations
In conclusion, here’s my summary recommendations for the three competitive cameras, rating them from Poor, to Fair, to Good, to Excellent.

SONY: I deducted marks from the Sony a7III for deep-sky imaging for its lack of a light frame buffer, poor red sensitivity, odd LENR performance, and purple amp glow not seen on the other cameras and that dark frames did not eliminate.
However, I did not consider “star eating” to be a negative factor, as the Sony showed just as many stars and as well-resolved as did the competitors, and what more could you ask for?
I rate the Sony excellent for nightscape imaging and for real-time aurora videos. I list it as just “good” for time-lapse work only because it will not be fully compatible with some motion controllers and rampers. So beware!
NIKON: I deducted points for real-time video of auroras – the D750 can do them but is pretty noisy with the high ISOs needed. Its red sensitivity is not bad, but its lack of a light frame buffer results a less productive imaging cycle when using LENR on deep-sky shooting.
I know … people shoot dark frames separately for subtracting later in processing. However, I’ve found these post-shoot darks rarely work well, as the dark frames are not at the same temperature as the light frames, and often add noise or dark holes.
CANON: The 6D MkII’s lack of an ISO invariant sensor rears its ugly head in underexposed shadows in dark-sky nightscapes. I like its image stacking options, which can help alleviate the noise and artifacts in still images, but aren’t practical for time-lapses. Thus my Good rating for nightscapes but Fair rating for time-lapses. (See my test at https://amazingsky.net/2017/08/09/testing-the-canon-6d-mark-ii-for-nightscapes/)
While the 6D MkII has HD video, it is incapable of any low-light video work.
But … when well exposed, such as in tracked deep-sky images, the 6D MkII performs well. (See my test at https://amazingsky.net/2017/09/07/testing-the-canon-6d-mkii-for-deep-sky/)
And its light-frame buffer is great for minimizing shooting time for a series of deep-sky images with in-camera LENR dark frames, which I find are the best for minimizing thermal noise. Give me a Canon full-frame any day for prime-focus deep-sky shooting.
It’s just a pity the 6D MkII has only a 3-frame buffer when using LENR. Really Canon? The 2008-vintage 5D MkII had a 5-frame buffer! Your cameras are getting worse for astrophotography while Sony’s are getting better.
| SONY a7III | NIKON D750 | CANON 6D Mk II | |
| Nightscapes |
Excellent |
Excellent | Good |
| Time-Lapse | Good | Excellent | Fair |
| Real-Time Video (Auroras) | Excellent | Fair | Poor |
| Wide-field Deep Sky | Good | Good | Excellent |
| Telescopic Deep Sky | Fair | Good | Excellent |
I trust you’ll find the review of value. Thanks for reading!
ADDENDUM as of JUNE 6, 2018
Since publishing the first results a number of people commented with suggestions for further testing, to check claims that:
- The Sony would perform better for noise under dark sky conditions, at high ISOs, rather than the moonlit scene above. OK, let’s try that.
- The Sony would perform better in an ISO Invariancy “face-off” if its ISOs were kept above 640, to keep all the images within the Sony’s upper ISO range of its dual-gain sensor design, with two ranges (100 to 400, and 640 on up). Fair enough.
- What little “star-eater” effect I saw might be mitigated by shooting on Continuous drive mode or by firing the shutter with an external timer. That’s worth a check, too.
For the additional tests, I shot all images within a 3-hour span on the night of June 5/6, using the Sony a7III, Nikon D750, and Canon 6D MkII, with the respective lenses: the Laowa 15mm lens at f/2, the Sigma 14mm Art at f/2, and the Rokinon 14mm SP at f/2.5.
The cameras were on a Star Adventurer Mini tracker to keep stars pinpoints, though the ground blurred in the longer exposures.
DARK SKY NOISE TEST
I show only the Sony and Nikon compared here, shot at the common range of ISOs used for nightscape shooting, 800 to 12800. All images are equally well exposed. The inset image at right in Photoshop shows the scene, the Milky Way above dark trees in my backyard!
To the eye, the Sony and Nikon look very similar for noise levels, just as in the moonlit scene. Both are very good – indeed, among the best performing cameras for high-ISO noise levels. But the Sony, being four years newer than the Nikon, is not better.
BUT … what the Sony did exhibit was better details in the shadows than the Nikon.
And this was with equal processing and no application of Shadow Recovery. This is where the Sony’s Backside Illuminated sensor with presumably higher quantum efficiency in gathering photons might be providing the advantage. With its good shadow details, you have to apply less shadow recovery in post-processing, which does keep noise down. So points to Sony here.
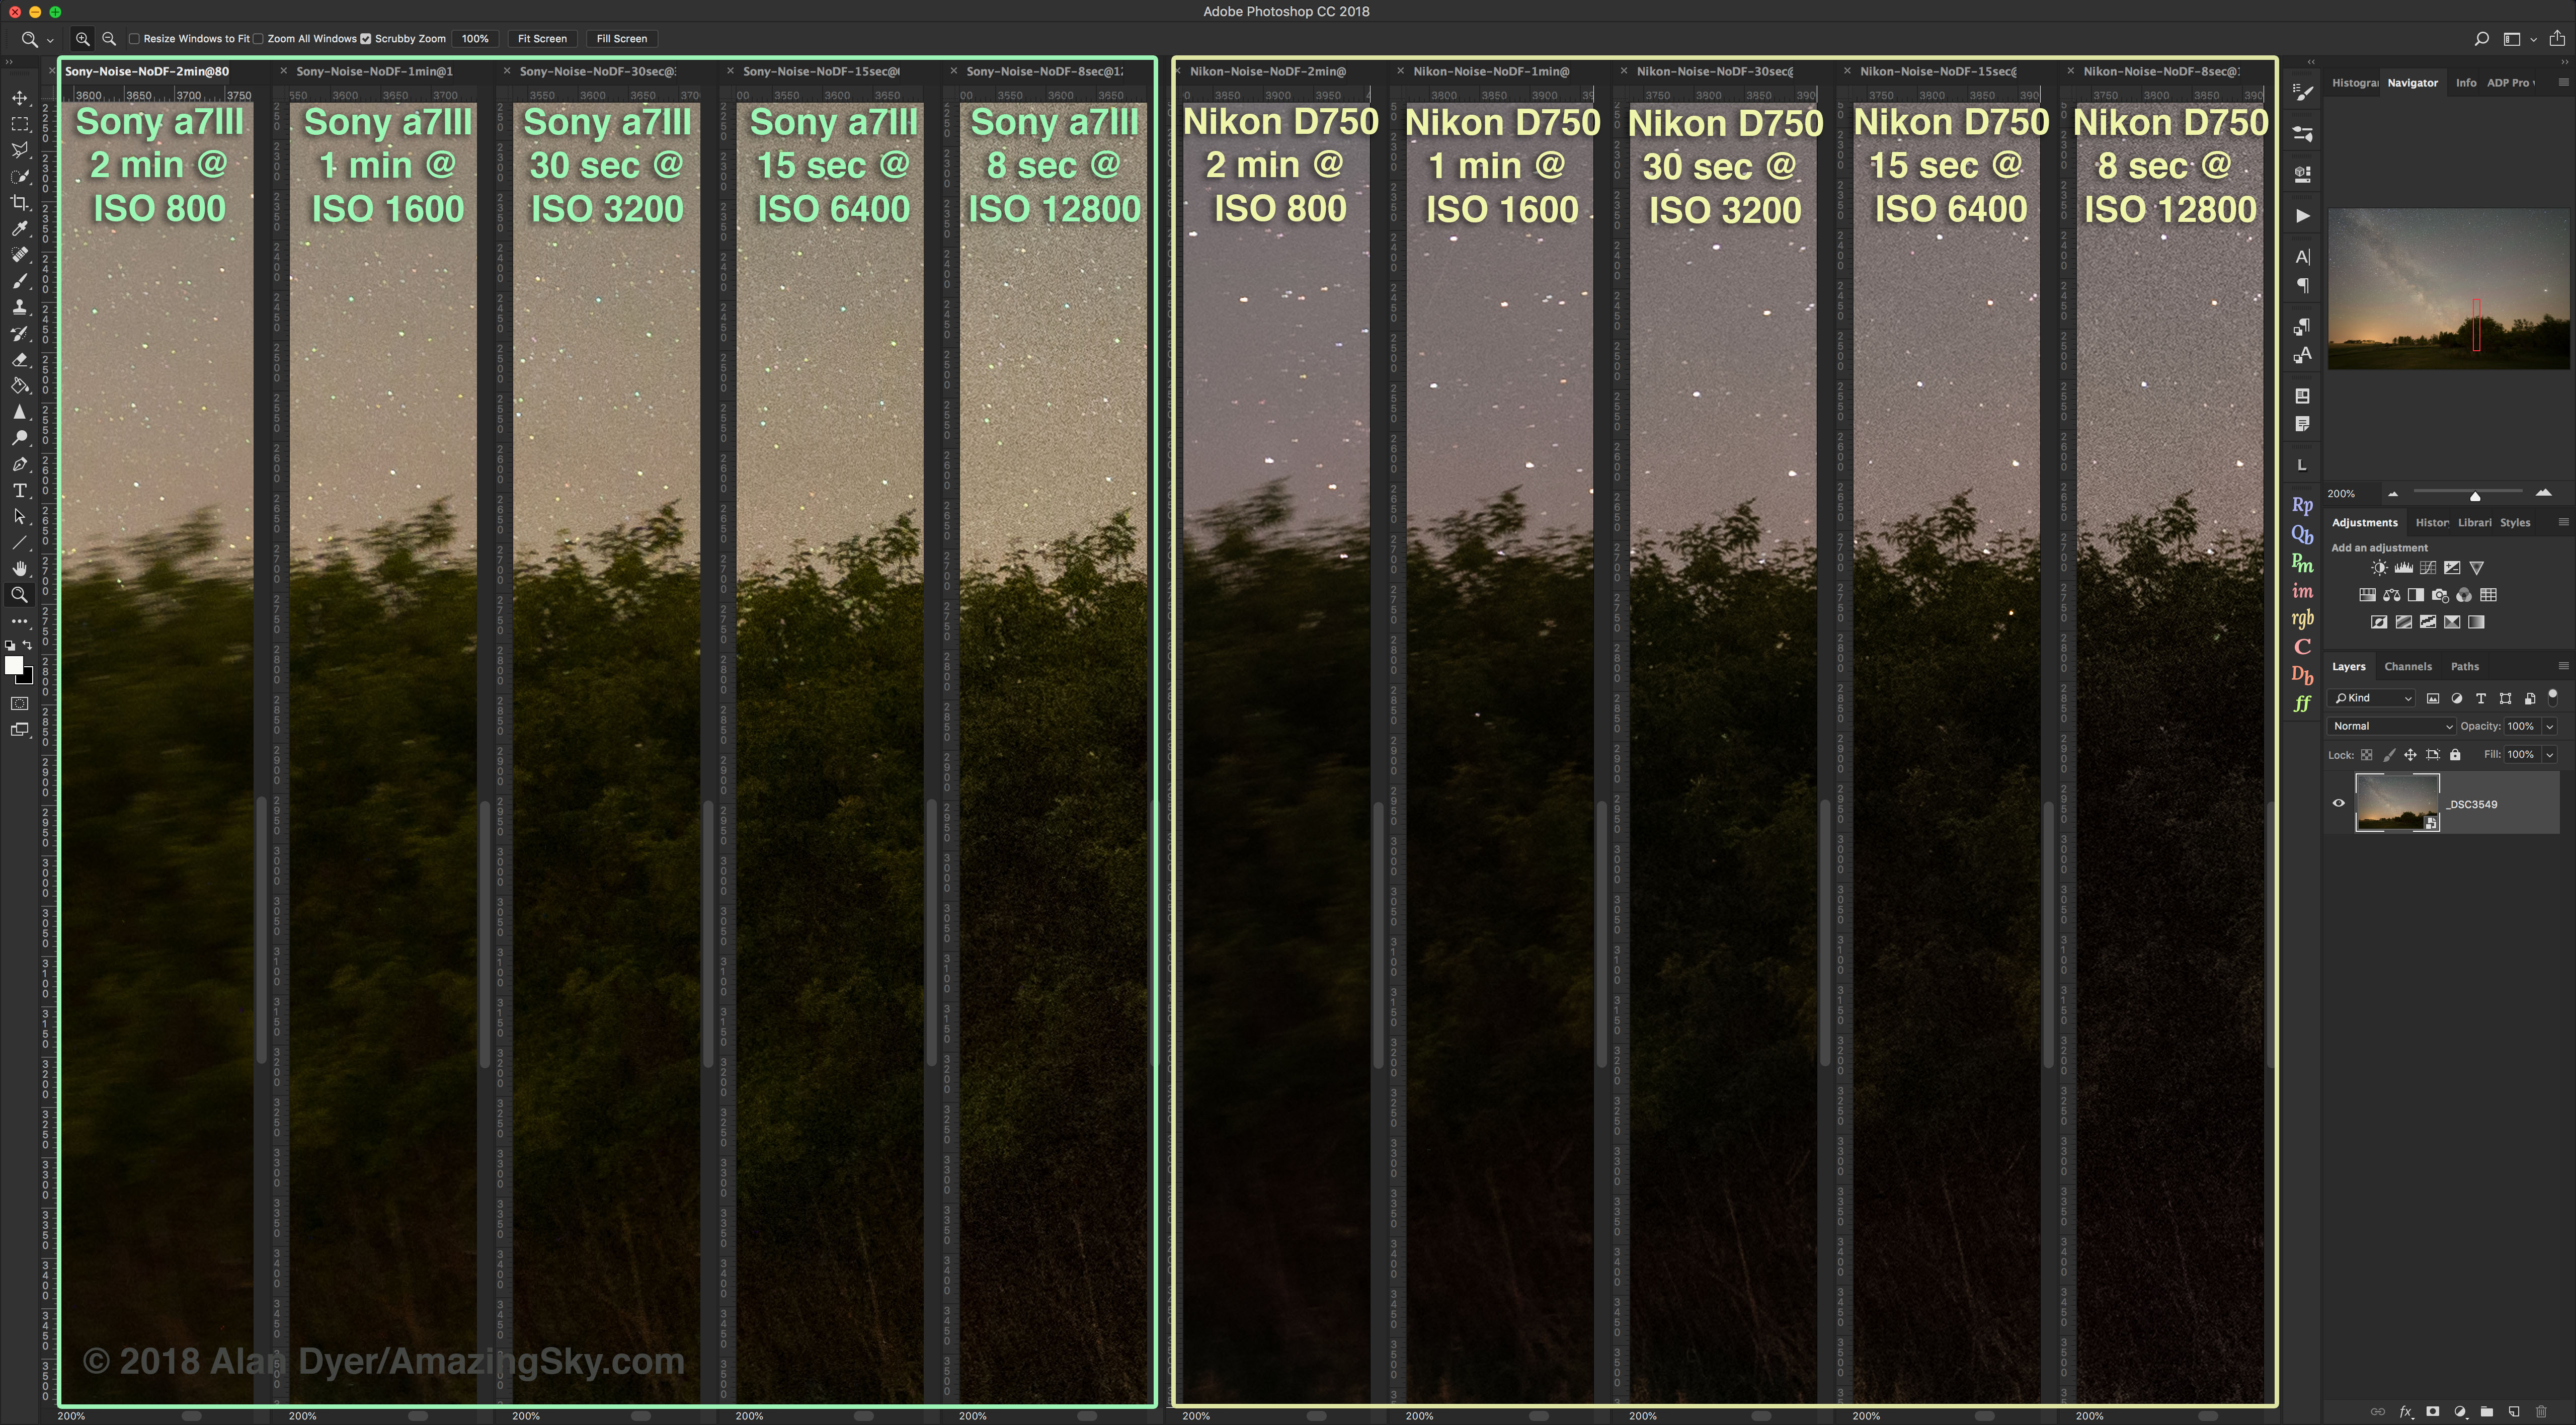
Noise levels appeared visually similar but the Sony showed more shadow details. Excellent!
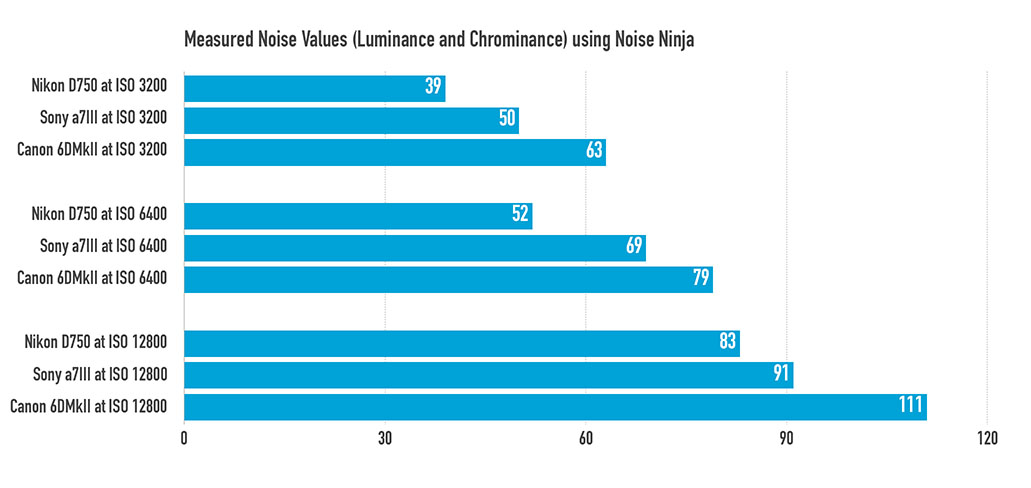
I did put all the high ISO images through the classic noise reduction program Noise Ninja to measure total Luminance and Chrominance noise, and included the Canon 6D MkII’s images.
The resulting values and graph show the Sony actually measured worse for noise than the Nikon at each high ISO speed, 3200 to 12800, though with both performing much better than the Canon.
The higher noise of the Canon is visually obvious, but I’d say the Sony a7III and Nikon D750 are pretty equal visually for noise, despite the numbers.
DARK SKY ISO INVARIANCY
Again, here I show only the Sony and Nikon, the two “ISO invariant” cameras. The correct exposure for the scene was 30 seconds at ISO 6400 and f/2. The images shown here were shot at lower ISOs to underexposure the dark scene by 2 to 4 stops or EV. Those underexposed images were then boosted later in processing (in Adobe Camera Raw) by the required Exposure Value to equalize the image brightness.
Contrary to expectations, the Sony did not show any great loss in image quality as it crossed the ISO 640 boundary into its lower ISO range. But the Nikon did show more image artifacts in the “odd-numbered” ISOs of 640 and 500. In this test, the Nikon did not perform as well as the Sony for ISO invariancy. Go figure!
Again, the differences are in images vastly underexposed. And both cameras performed much better than the ISO “variant” Canon in this test.

Here the Sony a7III performed well and better than the Nikon D750.
STAR EATER REVISITED
I shot images over a wide-range of exposures, from 2 seconds to 2 minutes, but show only the ones covering the 2-second to 4-second range, where the “star-eater” anti-aliasing or noise smoothing applied by Sony kicks in (above 3.2 seconds it seems).
I shot with the Sony a7III on Single shot drive mode, on Continuous Low drive mode (with the camera controlling the shutter speed in both cases), and a set with the Sony on Bulb and the shutter speed set by an external Vello intervalometer.
This is really pixel peeping at 400%. In Single drive mode, stars and noise soften ever so slightly at 4 seconds and higher. In Continuous mode, I think the effect is still there but maybe a little less. In shots on Bulb controlled by the External Timer, maybe the stars at 4 seconds are a little sharper still. But this is a tough call. To me, the star eater effect on the Sony a7III is a non-issue. It may be more serious on other Sony alphas.
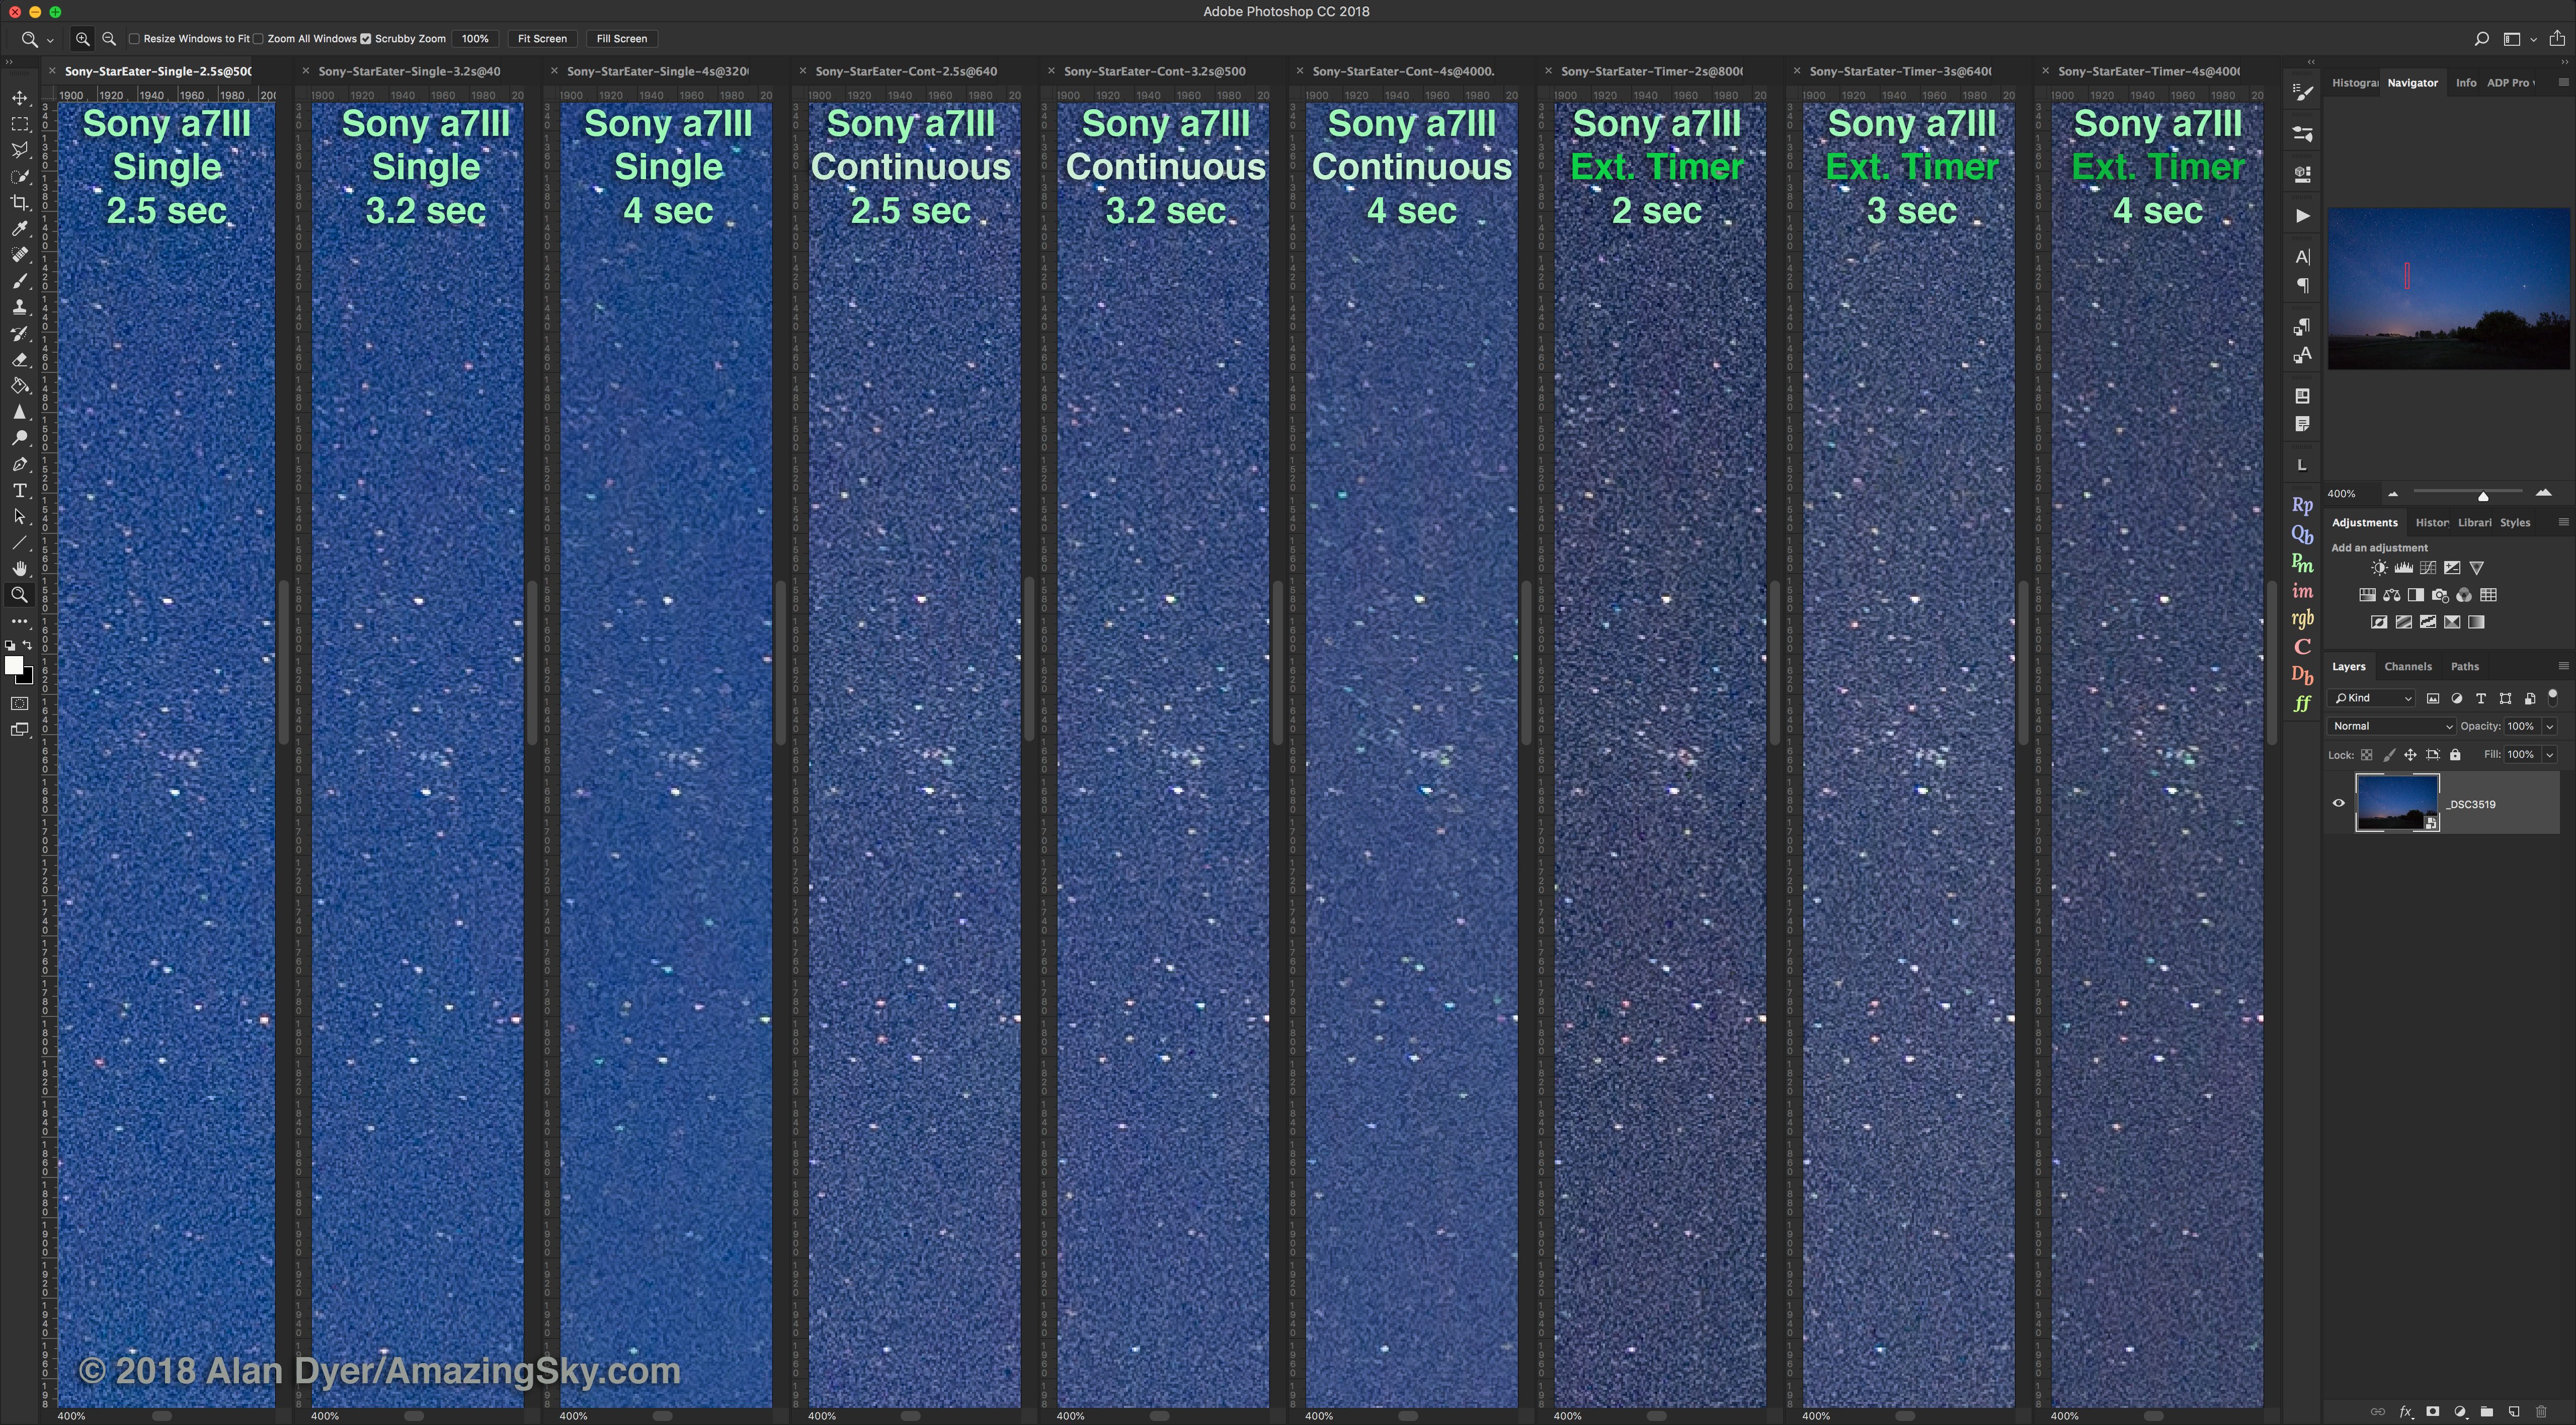
This series shows star sharpness in images taken in Single and Continuous drive modes, and in Externally Timed exposures.
DE-BAYERING STAR ARTIFACTS
An issue that, to me, has a more serious effect on star quality is the propensity of the Sony, and to some extent the Nikon, to render tiny stars as brightly colored points, unrealistically so. In particular, many stars look green, from the dominance of green-filtered photosites on Bayer-array sensors.
Here I compare all three cameras for this effect in two-minute tracked exposures taken with Long Exposure Noise Reduction (i.e. in-camera dark frame subtraction) off and on.
The Sony shows a lot of green stars with or without LENR. The Nikon seems to discolor stars only when LENR is applied. Why would that be? The Canon is free of any such issue – stars are naturally colored whether LENR dark frames are applied or not.
This is all with Raws developed with Adobe Camera Raw.
When opening the same Raws in other programs (ON1 Photo RAW, Affinity Photo, DxO PhotoLab, and Raw Therapee) the results can be quite different, with stars often rendered with fringes of hot, colored pixels. Or rendered with little or no color at all. Raw Therapee offers a choice of de-Bayering, or “de-mosaic,” routines, and each produces different looking stars, and none look great! Certainly not as good as the Canon rendered with Camera Raw.
What’s going on here is a mystery – it’s a combination of the cameras’ unique Raw file formats, anti-alias filter in front of the sensor (or lack thereof in the Sony), and the de-Bayering routines of all the many Raw developers wrestling with the task of rendering stars that occupy only a few pixels. It’s unfair to blame just the hardware or the software.
But this test re-emphasized my thoughts that Canon DSLRs remain the best for long-exposure deep-sky imaging where you can give images as much exposure time as they need, while the ISO invariant Sony and Nikons exceed at nightscape shooting where exposures are often limited and plagued by dark shadows and noise.
The Sony shows a propensity to render small stars in many vivid and unreal colors. The Nikon can do so after LENR is applied. The Canon is more neutral and natural.
So the pixel-peeping continues!
I hope you found these latest tests of interest.
— Alan, May 31, 2018 / Revised June 6, 2018, March 27, 2019 and March 27, 2021 / © 2018 Alan Dyer / AmazingSky.com

How many seconds do you recommend between shots on the Sony a7iii for MW stacked shots and then for Deep space object shots using an external intervalometer? Thanks for responding.
Hello, all you need to leave between shots is 1 or 2 seconds. Unless you are using LENR in which case the camera will take and subtract a dark frame between each shot. That might be needed on warm nights. Test for yourself.
Hi Steve,
With the SONY A7iii and astrophotography, I wonder if you have experienced – or have heard about – the issue of “shading” appearing at the top edge of your “flats” calibration files? These images are taken (for removing vignetting etc by stacking with your “Lights”) by shooting at a bright very bright light source at your highest speed (mine is 1/8000 sec) at any ISO, but more severe at the lower ISOs. Ive suddenly found this with my telescope or a 135mm prime lens attached, but not with my 70-200m zoom, or other lenses. I don’t have this issue when using my Canon. I can send you an example image if required.
Richard
Great info, thanks for sharing! But wasn’t the amp glow issue on the A7III fixed with a firmware update more than a year ago? I never seen this issue on my A7III. On the A7RIII there is an IR bleed which may cause what you describe, not on the A7III though. Also Spencer’s Cameras has listed the A7III in the Highly recommended Astrophotography and Nightscape cameras (https://www.spencerscamera.com/recommended-cameras-astro.cfm) maybe they changed their mind after more testing.
I noticed Spencer’s now lists the a7III on the “nice” list and not on their “naughty” list. So perhaps the amp glow issue is fixed. I updated the firmware some time back to the version that adds the intervalometer but have not checked since if there’s been a further update. The update process with Sony cameras is very convoluted. It does have odd sensor masking and the lack of anti-alias filter (I think!) produces green stars. So it isn’t my first choice for a deep sky camera. But it is a fine nightscape and time-lapse camera. And super for 4K aurora videos.
Hi Alan, Just wondering if you have done a test of the dark frame noise from the a7iii, or for any of your camera reviews. I.E. dark frame of the usual (for astro) exp and ISO and then in post, ramp the exposure up a few stops and the white levels up (70%) to see the consistency of the noise across the resulting image.
Thanks for a great web site.
Yes, and the a7III is poor in that it has the amp glow I show in the Deep-Sky images. Though noise Itself is uniform. I would not recommend the a7III for deep sky. And not for filter modification. Spencer’s Cameras who do mods says the same.
Thank you very much for the in-depth review. It is much appreciated even in 2019 December.
I have a Sony A7Sii and I have not used it for a night photography or for deep sky, but I’m going to now, I’ve been away from the Hobby for a while and want to get back into the deep sky stuff. You have ignited my fuse, thank you for that.
Herb
Hello Alan,
First of all congratulate you, a very good publication. I appreciate the work and dedication. I wanted to comment on one thing, after reading the entire publication, I have the question of whether the sony a7iii has to be compared with the canon 6d mark ii or with the 5d mark iv (and the same with nikon, although I don’t know the name of the model higher). I tell you this, since the price of the sony a7iii is much higher than that of the 6d mark ii, do you think the sony a7iii, would you continue to earn the 5d mark iv canon astrophotography? I would like to receive information about it! Thank you very much again!
Thanks! The three cameras I tested are comparable in specs but not price as the Canon and Nikon models are older. Wait 3 years and the a7III will sell for much less. The Canon 5D MkIV is $1000 more than the Sony here in Canada and is 30 Mp not 24 like the others, so not comparable in price or spec. Go to dpreview.com for comparison tools to allow you to judge any cameras you want on standard test charts.
The A7M3 continuously amazes me and your review is spot on. The one thing that I would like is the on camera apps that can be put on the M2 and below. I have found the use of the Digital Filter app really good to capture the Milky Way above Sky Glow. Doing two shots one below for the brightness (lower ISO/higher f//slower SS or any combination) and another for the sky above (last shot) (just opposite of first) getting a combo adjustable before saving and getting a raw to work in post. Sony says those buying a M3 camera are going to be pros and do not need the apps. Well pro’s use tools and programs (apps) on a camera that get the end result they want/need without hauling valuable gear to a site to capture. I keep my A7RM2 vs upgrading to the A7RM3 for that reason BUT BUT LOVE REALLY LOVE the A7M3 for the sensor (ISO Invariant) and the 10 frames per second and many other likes!!! If you have ever looked at the apps on Playmemories site (a selling point when I bought the A7S back in 2014 [no other camera offered and is ground breaking]). Just info for those who have never seen the apps. Imagine the ability to do more with less in your travel bag in a dark place out in a remote place you hiked for hours to get to for your imagined thought capture of your favorite place with tools in your little magic box so light and small and not on a wagon in toll….. If not room on the camera if only an offer to place on one of the memory cards, please! I would upgrade to M3 and above.
Interval meter is here now! With the latest firmware, A7 III, A7R III and A9 all get Interval Meter built into the camera.
Yes, I know. The addition of the intervalometer was noted in the review in an update. It works very well.
I updated the firmware on my a7III. For the intervalometer, I don’t see a setting for exposure duration, just interval, start time, and number of exposures. Does that mean you can’t go longer than 30s per exposure with this intervalometer (the max for bulb setting)? Or am I missing something obvious?
Yes, that’s right Steve. Exposure is set with the camera shutter speed making 30s the maximum. The Sony test report is revised to explain this. But that is true of all internal intervalometers — Pentax, Canon and Nikon. Even with Canons that have a Bulb Timer for exposures >30s you can’t use it with the internal intervalometer. So you still need an external intervalometer for time-lapses with frames over 30s long. And note that 15s shutter speed is really 16s, so with that shutter speed the interval has to be 17s, and that a 30s exposure is really 32s so the interval has to be 33s — that’s true of all cameras. All explained in my ebook! Cheers!
Thanks for such a great detailed review.
I think any really ‘serious’ astrophotography users would be looking at a dedicated astro camera (CCD or CMOS), but know you can get some amazing results with a ‘normal’ quality camera such as those compared in this review.
One area you don’t really call out is astrophotography software support, and support by programs such as AstroPhotography Toolkit (APT) or similar (BackyardEOS/BackyardNikon, etc).
This seems to be related to availability and quality of Sony SDKs, and is a big barrier for me. Having some investment in the Sony ecosystem (Nex 5N + various lenses), It’s an area I’d hope Sony address, and would remove an upgrade barrier for me that’s almost as significant as the start eater issue.
Hi and thanks! I did test and describe control options for the Sony in the test report I wrote for a recent issue of Sky and Telescope. Basically it’s this — “Unfortunately, Sony users are out of luck, as none of the popular control programs (AstroPhotography Tool, ImagesPlus, MaxIm DL, Nebulosity, or PRISM) support Sony cameras.”
And of course BackyardEOS or Nikon won’t work with Sony’s. Heck, BY EOS won’t even work with my 6D MkII — I just tested it again in preparation for a workshop I’m doing in a couple of weeks.
This is a very excellent and demanding review with a lot of effort on your part using 3 cameras at one time “BRAVO”. I have the A7S, A7RM2 and A7M3 and have been playing with the A7S since 2014, 2016 A7RM2 and 2018 A7M3 with Astro MW and other things. I think the most I have learned is from PhotoPills and now the Spot Stars part and the NPF rule for the different cameras and apertures selected giving shutter speeds versa the 500 rule. A shorter SS for the wider the Aperture (more lens being used) but learning that even a 10mm lens is 17.86 seconds for Accurate and 35.60 for standard so bulb mode not really needed. Also the best thing is ISO Invariance from 800 to 51200 with the least amount of noise for Mark 2 cameras and above. So even if you should only do a 12 second shot for no star trails with a 12mm f/4 for a big print you can increase the ISO or just leave at 800 and brighten in post. Also great for sunrise/sets without a tripod ISO 50 and A f/4 still detail and super bright. I have learned that night shots below 800 are noisier so for what it is worth. Even if super dark capture knowing post will be great. A great app I found with the A7S and A7RM2 was Digital Filter which is good for city lights below and dark sky above, you can capture two images in camera with different settings for the above and below and get a RAW combined in camera image to use in post instead of Photoshop blending, again just for thought. I may upgrade to A7SM2 and compare to A7M3. But a monster night shooter would be the A7SM3 if left at the larger pixels of 12mm not looking forward to Video stuff (people need to get a video camera look at all the attachments anyway leave the photo cameras alone)….
I just read your evaluation of the Sony A7III in Sky & Telescope. Great article. You obviously put some time into your tests. I am a Sony A7III owner and from what I have seen using this camera for the night sky I have to agree on most of the things you said. The thing I disagree about has nothing to do with this camera. It is about bigger pixels producing less noise in a photo as a whole which is probably a myth. If you measure the noise of individual pixels, larger pixels will have less noise simply because they are larger and can gather more light in any given amount of time. Iet’s say you are comparing similar size photos between sensors that have larger vs smaller pixels. If the sensors have the same area it is more likely you will see no difference in noise given the same level of technology. You will see more detail with smaller pixels but not more noise unless you are cropping photos from these different sensors to the same number of pixels. In that case you would get a wider angle photo with the larger pixels with less noise simply because you are using a larger part of the sensor. I believe it is more likely its all about total area of the sensor and not the size of the pixels.
Jeff — Thanks for your comments and interest.
You say “If you measure the noise of individual pixels, larger pixels will have less noise simply because they are larger and can gather more light in any given amount of time.”
Yes, that’s the point. Noise will be higher in sensors with smaller individual pixels. Sensors with 4 micron pixels will have more noise than sensors with 6 micron pixels, no matter what size the sensor is. Pixels, or photosites, do not “know” how large a sensor they belong to. They do not perform differently when in a large sensor vs in a small sensor.
I can’t attach a photo to this reply, so go here on DropBox.
https://www.dropbox.com/s/5vhcblsvfyvvoqd/NoiseComparisons.zip?dl=0
These are from DPReview’s noise comparison test images. I have chosen late model full-frame cameras and a cropped frame camera each from Sony, Canon, and Nikon. Which camera in the set has the lowest noise?
In models from a similar generation it will always be the ones with the larger pixels — regardless of sensor size. Full-frame and cropped-frame cameras with similar sized pixels have similar levels of noise. Older cropped-frame cameras (Canon 7D MKII) might have worse noise because they are older and use older firmware.
A Sony a7S II (8.5 microns) has lower noise than an a7III (6 microns) which has lower noise than an a7RIII (4.5 microns). It’s physics. The area of the sensor as a whole has nothing to do with if. If it did then the massive foot-wide cameras used at observatories would have no noise at all!
In fact, they have so much noise they are cooled with liquid nitrogen.
Don’t believe me? Take a full-frame camera and shoot a low-light, high-ISO image with it set to full-frame mode vs with it sent to take a cropped APS frame image. Which will have the lower noise? Do the test and let me know.
They will be the same, because it is the pixel size not the sensor area that matters. Plus the generation of the firmware.
But in my suggested test we are keeping the camera and sensor the same. The firmware, pixel size and pixel characteristics are also all the same. Use the same lens as well. Eliminate all the variables — except one — you’re just varying the collecting area.
In your theory the image taken with it set to shoot full frame should be less noisy. Is it?
The S/N ratio is determined by the individual pixels — they don’t know how big a sensor they belong to and won’t behave differently in a cropped sensor vs a large sensor.
If you wish to argue the point, do so with evidence. i.e. photos taken as I suggest. Not verbal arguments about how you think the sensor should behave. The world usually does not behave as we expect and argue it should. That’s why we do science! Forget the verbal arguments from authority — I invite you to do the experiment. — Alan
Hi Jeff, just a slightly diff angle of approach to AlanD re: your noise question. “Noise” is randomness in a physical quantity, or in the method of measurement, more or less. They can combine (dark noise, read noise if independent…). I just want to address, in amateur fashion, the very basic aspect: incoming photons collected by a pixel. The photon “stream” already fluctuates by itself even if you have a perfect collector (which doesn’t exist, I don’t think). The amount collected also fluctuates to a lesser or larger extent, depending on the quantum efficiency of the collector (pixel). However, if the collection area is large, the incident “stream”/pixel is larger = less affected by variations. Hence, all else being equal, a larger pixel will always result in less noise than a smaller one. Because by definition, noise is the randomness in the collected signal… (Of course, bad electronics, high dark current, etc, could cause the final conversion and readout of the photons to electrons exhibit a lot of noise. That’s why using exactly same sensor, different make and model cameras may produce diff quality images.)
What iso would you recommend for the a7iii if you could pick any iso (so not limited by individual situations)? Is it iso invariant enough that it doesn’t matter, or are certain iso’s slightly better in your opinion for night sky images than the tier 2 base iso of 640?
For nightscapes I would never shoot at a lower ISO than necessary with hopes of boosting exposure later. Even a supposedly ISO invariant Camera like the Sony can show noise and discoloration in underexposed images boosted later in exposure. Use the ISO that will produce a well exposed histogram for the shutter speed and aperture dictated by the scene.
Hi, Alan. Well, it seems a7iii can be used for astrophotography, then what about a7riii? Has anybody tested it yet?
I have not tested an a7rIII. And the new a7sIII rumoured to come out soon would also be interesting to test.
Hi Alan, thanks for this detailed review.
I’ve noticed you’ve used the Rokinon 14mm SP on the a7iii in your noise test.
Which lens do you like more between the Rokinon 14mm f2.4 SP and the Laowa 15mm f2?
Does adapting the Roki SP on the Sony body somehow compromises the image quality (in terms or sharpness, distortion, coma…)?
Coma wise, is the Laowa as good wide open as the Roki SP is?
Cheers!
I did notice the difference in detail between the Nikon and the Sony on the cropped in, ISO invariance test shots. The small tree at the top of the image looked very different with the two cameras. The Nikon had better uniform color but the Sony had noticeably better detail.
I have used Sony cameras for astrophotography for years and have never noticed a star eater problem. It could be my photos are not quite good enough to tell a difference but it seems to be mostly a non issue to me.
I think in the last few years the difference in the performance of higher end sensors have become harder to distinguish. I don’t know if Nikon is still using Sony sensors but both brands seem to be making very good cameras. Cannon doesn’t seem to be even trying to catch up.
“The 2008-vintage 5D MkII had a 5-frame buffer!”
While i know how to turn on LENR, does this apply only to jpegs, or to RAW shooting as well?
And for long exposures, my 5DMkII does not offer multiple exposure feature, however, how can i take advantage of 5-frame buffer? must i take 5 shots in succession in continuous shooting mode (RAW or jpeg?) with LENR “on” with “lens cap on” to get a larger sampling of dark frames, to manually subtract in post? (what software subtracts such dark frames? is this the opposite effect as stacking, which adds “other frsmes” with unwanted noise?)
With the Canon full-frames you simply fire the shutter again. With LENR on you will be able to take another shot, and another, before the dark frame kicks in and locks up the camera. The camera subtracts the single dark from the buffered lights. With the 5D MKII you could take 5 lights. With the 6D it was 4 if it was on Raw+JPG. With the 6D MkII it is 3 regardless of format. It varies with even Canon full-frame. Only the latest Canons offer in-camera stacking to average noise, which is not the same as dark-frame subtraction. With LENR on you don’t have to do anything like taking separate shots with the lens cap on. LENR does the dark frame taking and subtraction for you.
Dear Alan,
when i saw someone reporting an article that star eater was gone, i immediatly read your article. However, like other, i must say on that the star eater is not gone on the A7s3.
first, the stars on your images are extended typically on 3 pixels, so they are not as dramatically reduced as stars extended on a single pixel. then, even in your case with ~3pixels wide stars, the comparison between 3.2s and 4s clearly shows a reduction of the stars “peak” brigthness, and notably less weak stars.
to me, your tests are indeed showing that, even if your are not in a bad case scenario with ~3pixels wide stars, the star eater is definitely still there with all highest spatial frequencies decreased between 3.2s and 4s. it is to be expected that, on A7s3 with bigger pixels, the effect will still strongly show up and that sony is still turning a deaf ear to the astrophotographers
I’ll post the same reply as to James:
I would invite you to further read my comments and images added in the Addendum.
Yes, the a7III softens stars and noise slightly but I do not consider it to be “eating stars.” Stars are all there, to the same limiting magnitude in shots taken with other camera brands. I provide that evidence.
What we are seeing with “green” stars (in both the Sony and in the Nikon) is an effect of the de-Bayering of those cameras’ raw frames that varies considerably depending on the Raw developer you use and, in the case of Raw Therapee, the de-mosaic algorithm selected.
Perhaps I’ll add examples to show that, but I would invite you to take your own Raw files of tracked star images shot with a Sony, Nikon, and Canon camera and develop them with Adobe Camera Raw, Capture One, DxO, Affinity, Luminar, ON1 Photo RAW, and Raw Therapee’s various modes. You’ll see how different the stars are rendered with all those programs. Some show green stars, some red stars, some show stars with green hot pixels, some show stars with little color at all!
This is an issue of how software de-Bayers stars that occupy only one or a few pixels. I made that comment in the blog. But there are indeed differences between the various brands and Raw files from various models, because we know every camera has a different Raw format. It’s not strictly hardware nor just software.
But it is extreme pixel peeping. In real life images, such as I have shown, it makes very little difference even in deep-sky images which are the most demanding of star quality.
I can’t speak for other Sonys but in the a7III it is not so much an issue of “star eating” but “star rendering.” But Nikons have similar issues of oddly colored stars. I can assure you that even the ace programmers of Raw development software who I have spoken to are puzzled by this as well.
But I invite you to test your own images with various programs to see for yourself, and to not depend on second-hand reports like mine! Thanks! — Alan
I have updated the Review with some new tests to address questions raised by some of the commenters. Thanks for the suggestions!
Thank you, Alan! This has been so insightful for me as an amateur. I’ve been looking for a comprehensive review and comparison of this camera for a while now. Since night photography has become a bigger part of my hobby life, I’ve been considering this as a replacement for my aging a6000.
Obviously, anything will be better at this stage, but I have to say, this info has made me a lot more confident in sticking with Sony as I wasn’t keen on buying into a new lens system.
Thanks for the review, Alan. I have doubts about the noise comparison. You’re comparing noise in images where there’s a lot of light(which is equivalent to the fact that your test images don’t have really deep shadows that we encounter in astrophotography). This comparison will not show the real situation with the noise level. Almost any camera will behave well in this comparison. In order to see the real situation with the noise you need to compare pictures with a large lack of lighting. At the Raw-files from dpreview.com shows that a7rIII much less noisy than the Canon 6D and Nikon D750. You just need to compare the pictures where there is a real lack of light(such as on a moonless night or ISO 102400 on test images from dpreview.com).
You’re saying the a7III will show less noise than the competitors when used under very low light conditions. Do you know that for a fact from personal tests? We will see if your theory proves correct! That’ll be a good test to make. Thanks for the suggestion.
“1 stop better in low light” isn’t always a flat comparison of 200 being as clean as 100, 3200 being as clean as 1600 etc. I find there’s more of a gap the higher of an ISO you use. When comparing 1600 to 1600 from my a7ii to a7iii there isn’t much in it, 3200 vs 3200 it’s maybe half a stop – 6400 maybe 2/3 of a stop.
But when I’m pushing details of the milky way and using shadows pushed to the equivalence of iso 12,800-25,6000 there’s more like 2 stops cleaner, at least this is what I found processing astrophotos between the 2 bodies. This is much more apparent when comparing files of those ISO levels from dpreviews studio tests between the bodies.
You’re right about the benefits being more in the shadows than the highlights though.
Great article, I have to note one thing though. You mention with the a7iii that it’s not completely iso invariant and that the files when pushed 4 stops were not as clean as the shot taken at iso 6400. This is because the 4 stops underexposed image was at iso 400, just under the camera’s dual gain system in the sensor. If you compare iso 640, to shots at 3-4-5 stops higher, I believe you’ll see more similar results.
That will be an interesting test to make as well. You believe it will be the case, but did you know? Have you done this testing? Or is this just a theory of how it should behave? We will see if that theory proves correct. Thanks for the suggestion.
After reading about it myself, I tested what i’d read, and saw it to be true. On the a7iii the differences between iso 400 and iso 640 pushed to be equal exposure, the 640 image is cleaner even with a shorter shutter time due to the dual gain system ‘kicking in’ at iso 640. This would explain why in your first test the +4 EV image (iso 400) and in your second test the +3 and +4 EV images (iso 200, iso 400) appear iso variant.
Thank you for a detailed review of the Sony 7III. Now I know why I haven’t seen you on my email feed in awhile! A nice in depth article that answers many questions for me. Would you say the Sony is worth the $500 difference in price to the Nikon?
I use a Canon T5i right now as I’m new to the craft. A camera upgrade to a full frame is my next big purchase after I get some more experience with the T5i. I find your articles very helpful. Thanks again.
Hi, it all depends on what you want to buy or already have for lenses. And what you want to use the camera for. The Sony will be partly incompatible with some time lapse controllers. But it can take the Canon lenses you might already own. But figure in the cost of the adapter as well. But with the Nikon you would be buying all new lenses I would imagine.
Great review, and impressive for its detail. Unfortunately, I think that you’re conclusions re star-eater are based more on hope than reality. Jim Kasson’s testing (https://www.dpreview.com/forums/post/61074932) provides strongly conclusive evidence that it is still present, and your first comparison shot with the Canon 6d shows small stars in the Sony that are characteristically ragged and with a dominance of green colour – exactly the features explained in Mark Shelley’s reverse engineering of Sony’s latest spatial filtering algorithm. If you want an objective test, rather than comparing the Sony with Canon or Nikon images, you need to compare 3.2 with 4 second images, both shot on the Sony. Its a pity, because if it can deliver such good results with the star-eater still present, imagine what it would deliver if Sony would only gives us a menu option to disable it.
One of the test sets shows just what you asked for – exposures of varying length below and above 4 seconds. No difference. The colored stars you are seeing is from odd deBayering going on which is also present to some extent in the Nikon. Using other Raw converters might affect this. But in the end the Sony shots showed stars to the same limiting magnitude as the other cameras. And isn’t that what you care about? Ie. Sony not performing as good as competitors? And in identically exposed images. It showed all the same stars to the same limiting magnitude. What more do you want? There might be a deBayering issue going on, or something related to the anti-alias filter but I’ve seen that with other cameras (it’s there slightly with the Nikon) and varying from Raw developer to Raw developer. But that’s not removing stars. Look at the deep sky images. You would get more stars only by going to smaller pixels perhaps, but then there’d be more noise as well partly hiding the smallest stars.
Hi Alan, I don’t want to detract from an otherwise fantastic review, so feel free not to post this. To me your 2 versus 4 second exposure comparison also shows the tell-tale signs. I’m not here to knock Sony, in fact I shoot with one, using an A7R for my astro work because of this issue. Happy shooting, John
Hi John,
To my eye, the difference is nothing like the huge wiping out of stars reported and shown at Lonely Speck. I saw nothing to the extent Ian showed.
Between 2 and 4sec maybe there’s a slight softening, but there’s but no difference in limiting magnitude, unlike Ian’s test shots. And in tracked exposures over a minute where you’d really see the difference there is virtually no difference in sharpness, star count and limiting magnitude between the Sony and cameras not accused of eating stars. And what else could you compare it to?
I can’t see anyone being unhappy about the sharpness of the starfield and galaxy itself in the 4 minute galaxy shot compared to the Canon version, and Canon surely sets the standard.
If stars are colored and misshapen at the single pixel level that’s deBayering. If an anti-alias filter were responsible you’d see it on all images, not just long ones. But you can see that same effect a bit in the Nikon images, too. Stars 1 or 2 pixels wide are a little too colorful!
But it would be interesting to test Raw vs JPG on the Sony, to check Sony’s own deBayering. I shot nothing but Raws. If I get more results I’ll update the test. Thanks!
I’m sorry, but I have to agree with John on this one: Your comparison of different exposure times *clearly* shows, that the filtering is still in effect and it wipes the smallest stars (up to 4 or 5 pixels area). Slightly bigger stars are turned into green blobs or get a green halo. The red and blue colors of those stars are wiped by the filter – just as it has been since firmware update 4.0 on the A7RII. It’s not the debayering which causes the color shift, as those stars are white in images with 3.2 s and become green at 4 s exposure time.
The effects of the algorithm are clearly visible in your test images when comparing 3.2 and 4 s exposures. Please have a look at them again. Yes, they are not as bad anymore as on earlier A7RII firmwares, which originally created all the fuzz. But the A7III (as well as the A7RII, A7SII, A7RIII and A9) is still “eating stars”.
Further info on the algorithm and its effects (info is for A7RII/RIII, but should apply to A7III):
https://www.dpreview.com/forums/thread/4167521#forum-post-59686724
https://blog.kasson.com/a7riii/the-sony-a7riii-eats-stars/
https://blog.kasson.com/a7riii/sony-a7riii-star-spreading-raw-composites/
I would invite you to further read my comments and images added in the Addendum.
Yes, the a7III softens stars and noise slightly but I do not consider it to be “eating stars.” Stars are all there, to the same limiting magnitude in shots taken with other camera brands. I provide that evidence.
What we are seeing with “green” stars (in both the Sony and in the Nikon) is an effect of the de-Bayering of those cameras’ raw frames that varies considerably depending on the Raw developer you use and, in the case of Raw Therapee, the de-mosaic algorithm selected.
Perhaps I’ll add examples to show that, but I would invite you to take your own Raw files of tracked star images shot with a Sony, Nikon, and Canon camera and develop them with Adobe Camera Raw, Capture One, DxO, Affinity, Luminar, ON1 Photo RAW, and Raw Therapee’s various modes. You’ll see how different the stars are rendered with all those programs. Some show green stars, some red stars, some show stars with green hot pixels, some show stars with little color at all!
This is an issue of how software de-Bayers stars that occupy only one or a few pixels. I made that comment in the blog. But there are indeed differences between the various brands and Raw files from various models, because we know every camera has a different Raw format. It’s not strictly hardware nor just software.
But it is extreme pixel peeping. In real life images, such as I have shown, it makes very little difference even in deep-sky images which are the most demanding of star quality.
I can’t speak for other Sonys but in the a7III it is not so much an issue of “star eating” but “star rendering.” But Nikons have similar issues of oddly colored stars. I can assure you that even the ace programmers of Raw development software who I have spoken to are puzzled by this as well.
But I invite you to test your own images with various programs to see for yourself, and to not depend on second-hand reports like mine! Thanks! — Alan
Great review, Alan. Thanks for doing it. I’m really on the fence on whether to get this camera. I currently have an a7RII but have been considering the a7III, in part because I had read some things that seemed to indicate that it had better low light noise properties. But I don’t know if it’s a significant enough improvement. I also don’t really think I need the 42MP resolution I have with the a7RII (I thought I did, which is one reason I bought it), even though I do mostly landscapes and nightscapes. The images take up so much computer storage space! I like the fact that the a7III has way better battery life, too. I don’t know if you’ve ever used the a7Rii to be able to comment; probably not or you would have in the arrticle. I’ve read so many good things about the D750 for night photography, which your review corroborated, and seen so many great images taken with it, but I have all Canon-mount lenses, which wouldn’t be compatible, so probably don’t want to go there. Anyway, the a7III does look compelling. Thanks again for the detailed review.
Thanks Steve! As you surmised, the a7III is the first and only Sony mirrorless I’ve used. So I can’t compare it to the a7r or a7s models. None have been tempting until the a7III came out. Seeing people head into the field with a passel of batteries just to get thru a night of shooting put me off! The D750 is fabulous but the Sony is almost as good – much better for Live View – and accepts all lenses.