I test a trio of wide-angle, auto-focus lenses for astrophotography, all for Nikon Z mount: the Nikkor 20mm f/1.8 S, the Viltrox 16mm f/1.8, and the Laowa 10mm f/2.8 Zero D.
As a bonus, I also test a fourth lens: the TTArtisan manual-focus 7.5mm f/2 fish-eye.
NOTE: Images are large and may take a while to load.
While the selection of lenses for Nikon Z mirrorless cameras is not as diverse as it is for Sony E-mount, Nikon shooters have more brands of lenses to pick from than do users of Canon R mirrorless cameras. For nightscapes and Milky Way photography we want fast, wide-angle lenses, usually in the 14mm to 24mm range.
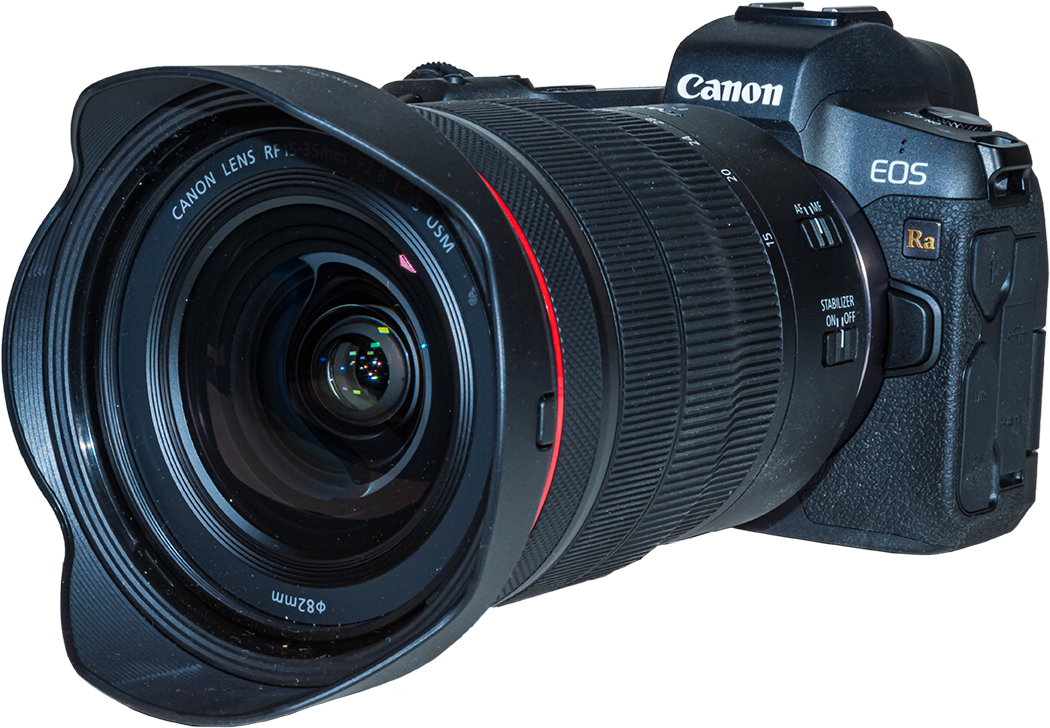
Canon, Nikon, and Sony all have excellent zoom lenses that cover the range. I use Canon’s RF 15-35mm L lens a lot, and reviewed it here on my blog from 2022.
But all these wide-angle zooms are f/2.8. While that’s a good speed for most astro work, having an even faster lens can be valuable. An aperture of f/2 or faster allows for:
— Shorter exposures for untrailed stars when shooting just on a tripod with no tracker.
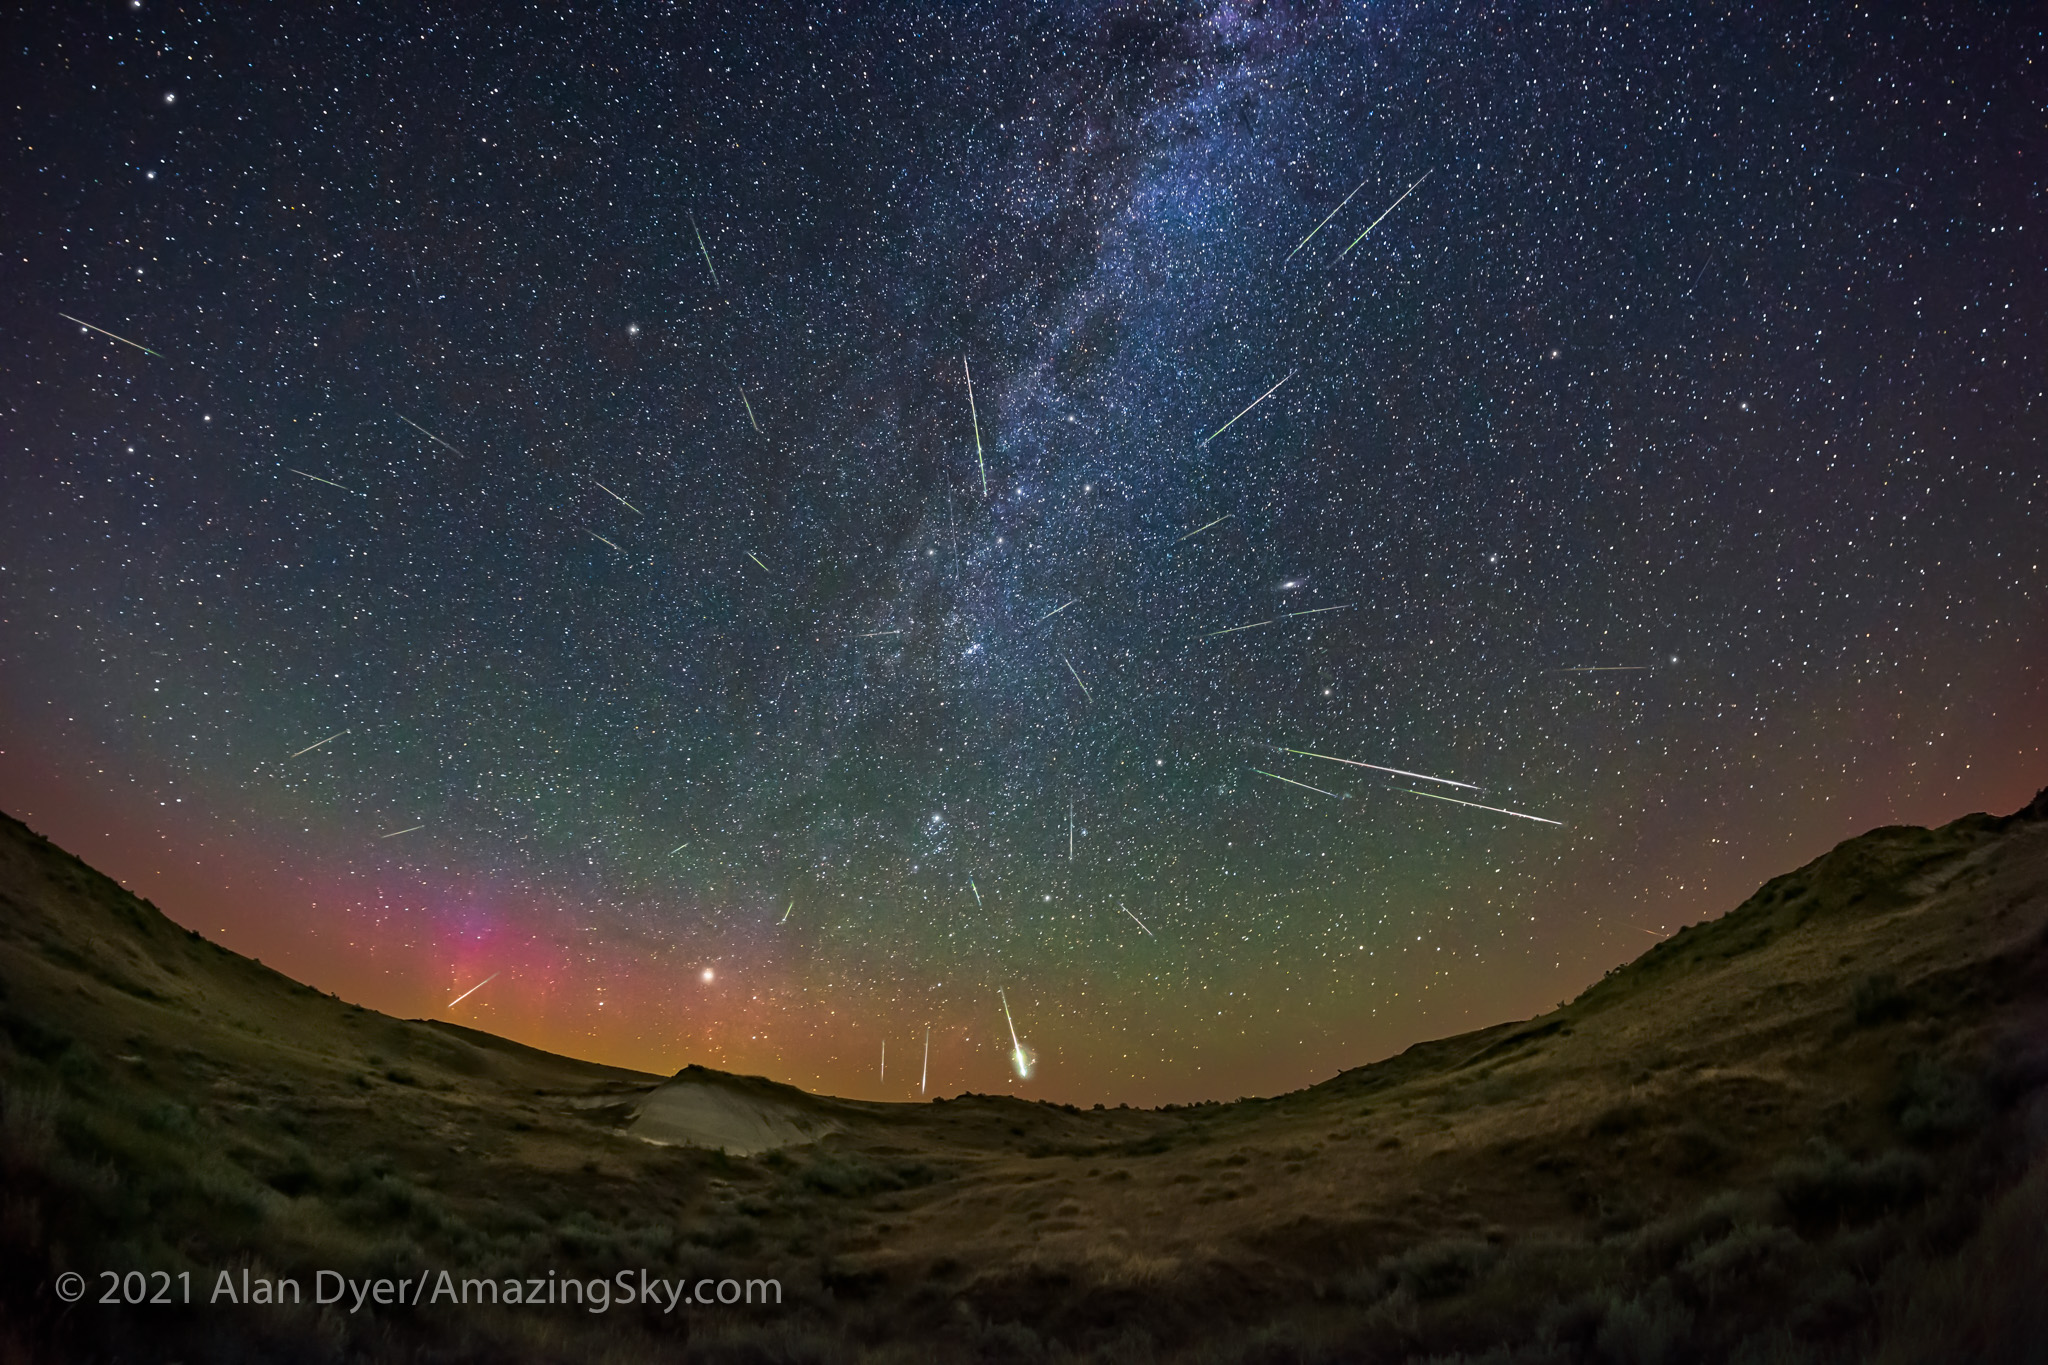
— Capturing fainter and more numerous meteors during a shower.
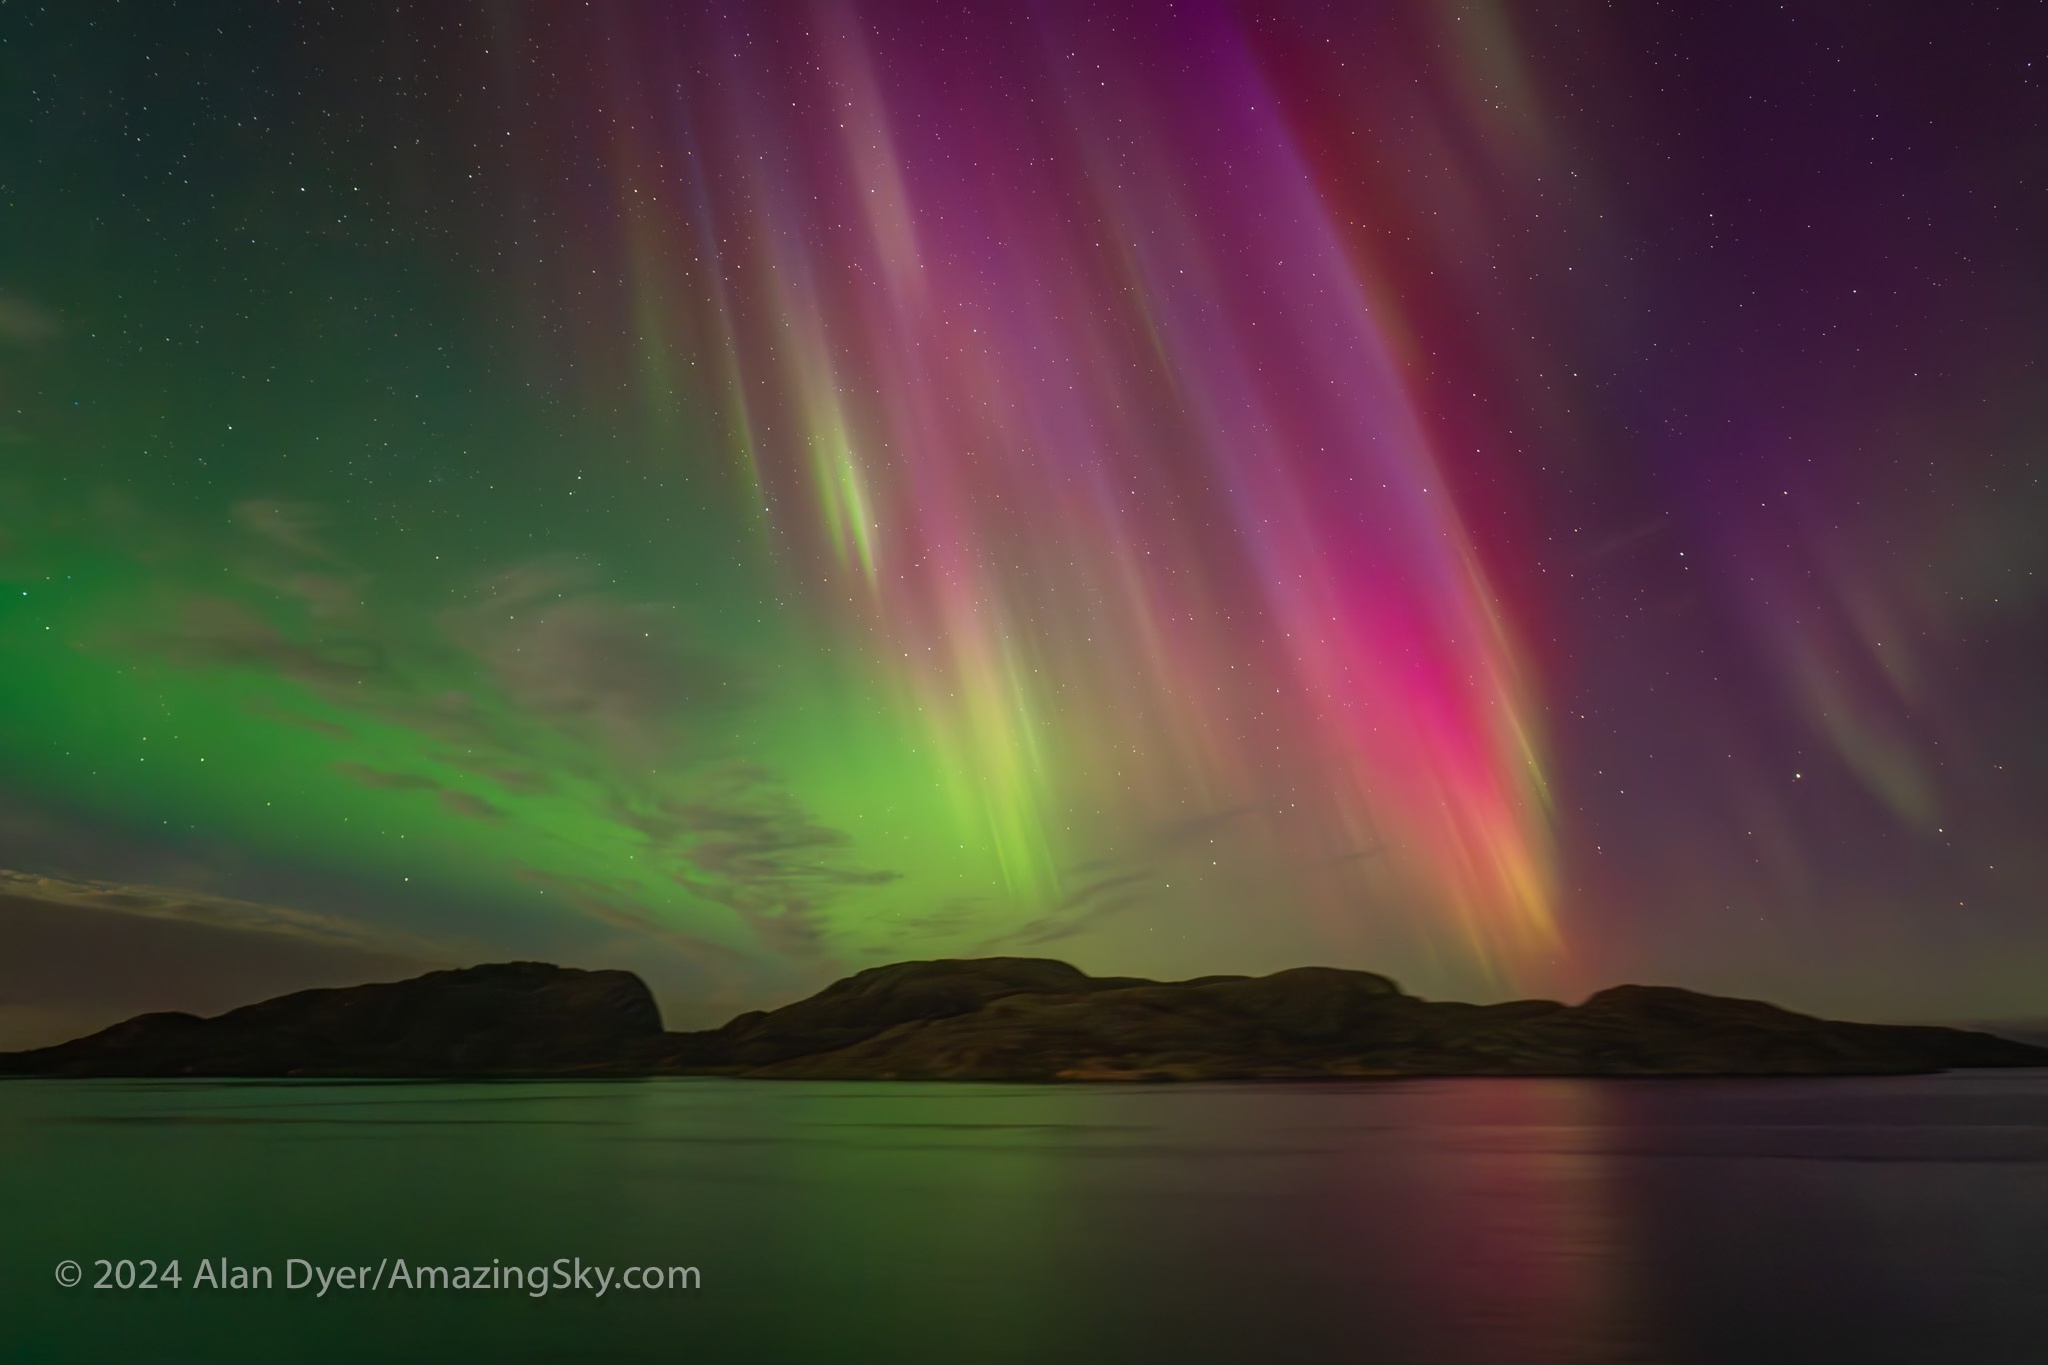
— Rapid-cadence time-lapses of auroras, freezing the motions of curtains.
— Real-time movies of auroras and satellite passages at lower, less noisy ISO settings.
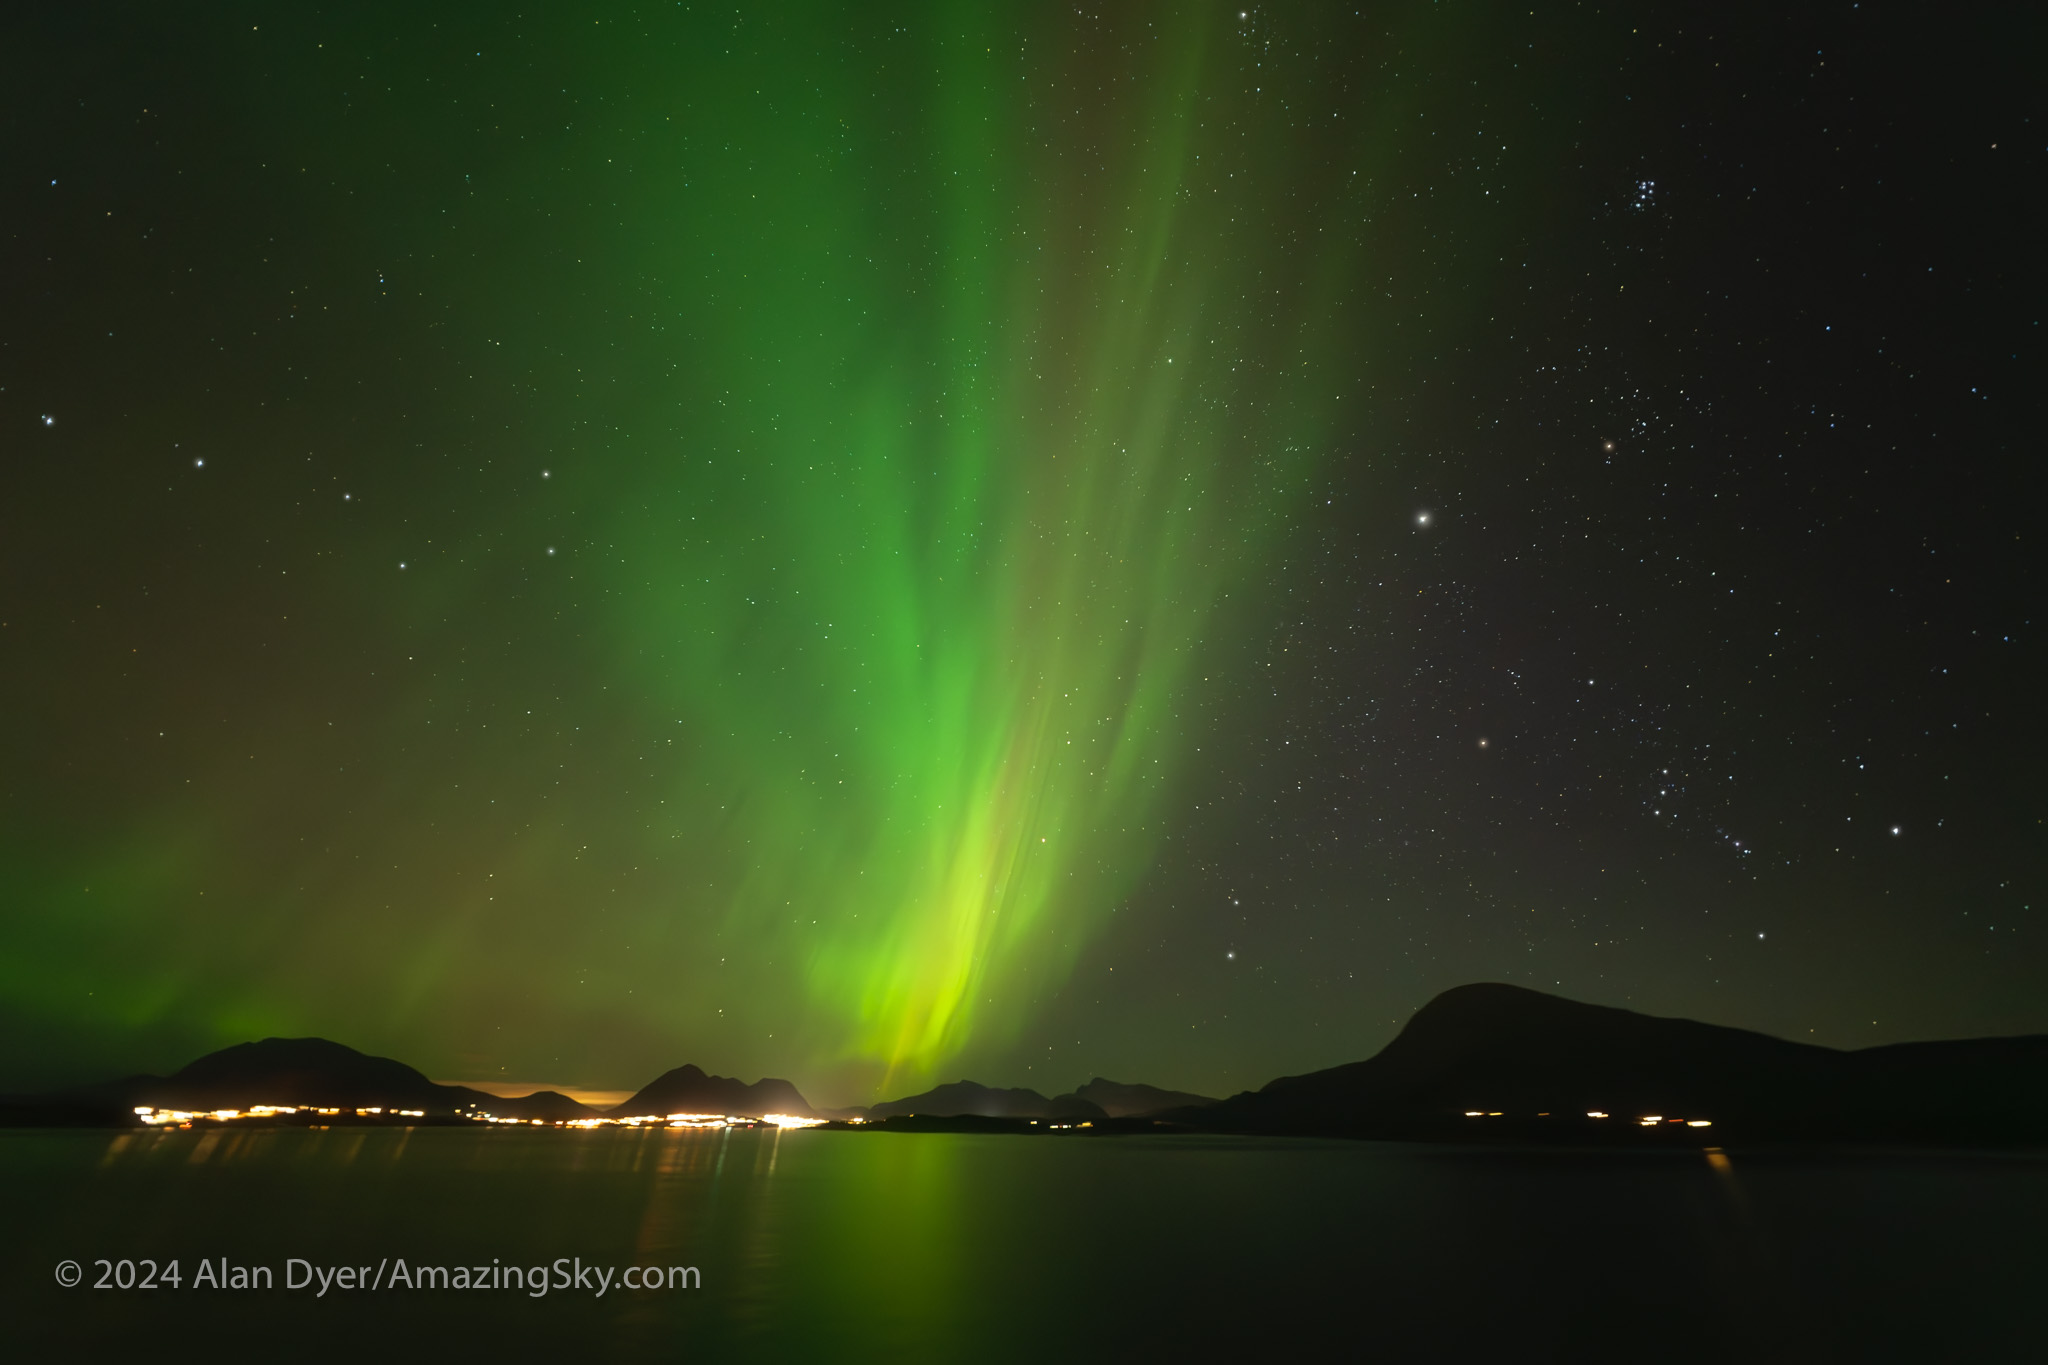
The Nikkor 20mm at f/1.8 allowed a short 1.3-second exposure for capturing the aurora from a ship off the coast of Norway, to minimize ship motion trailing the stars.
Also, stopping those faster lenses down to f/2.8 can sometimes yield better image quality than shooting with a native f/2.8 lens wide open.
Canon and Sony each have fast f/2 zooms that cover the range from 28mm to 70mm. While those focal lengths can be useful, both lenses are expensive and heavy. And they are still not wide enough for many astro subjects. For fast lenses with even shorter focal lengths we need to turn to “prime” lenses, ones with fixed focal lengths.
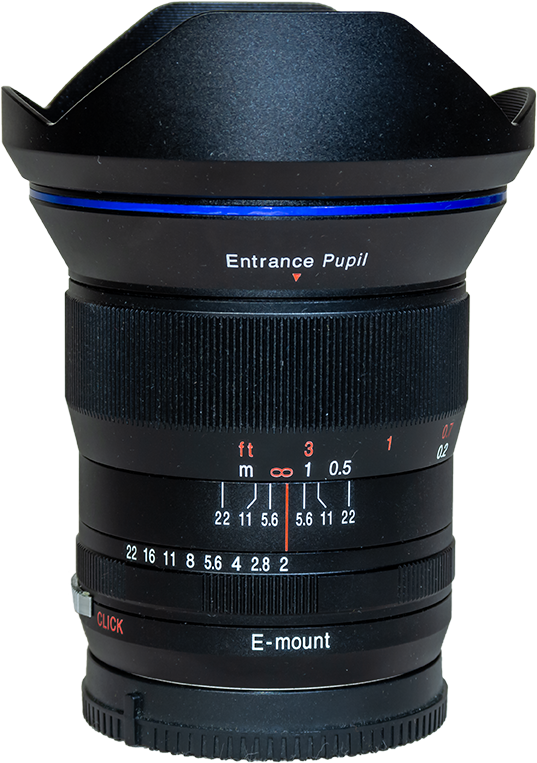
As of this writing Canon has few fast, wide primes for their RF lens mount (their new 24mm f/1.4 VCM is a costly choice designed primarily for video use). A few third-party lens makers offer fast (f/2 or faster) primes for Canon full-frame cameras, always as manual focus lenses. For example, Laowa has a 15mm f/2, and TTArtisan has a 21mm f/1.5.
Yes, Sigma now offers auto-focus 16mm and 23mm f/1.4 primes, and Samyang has a new 12mm f/2, but they are only for Canon RF-S cropped-frame cameras. Canon has yet to allow other companies to produce auto-focus lenses for their full-frame cameras.
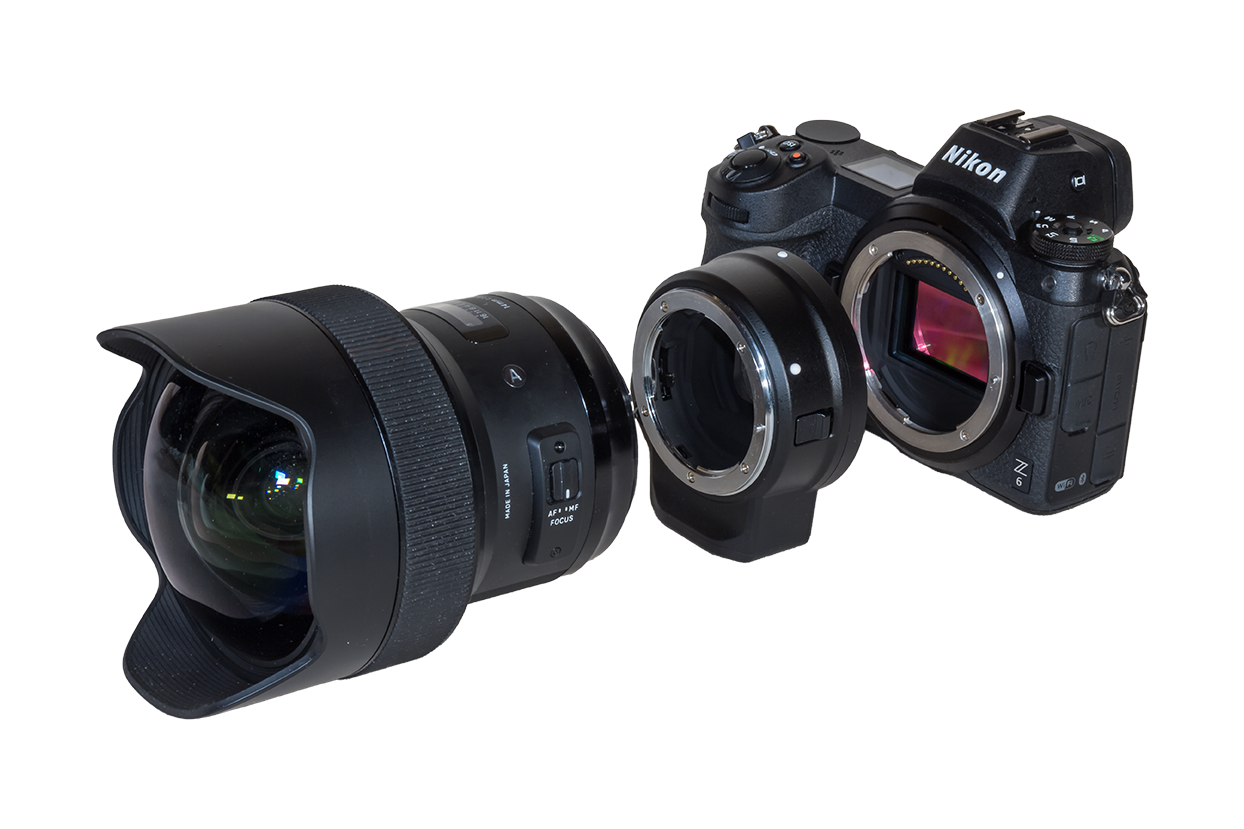
Nikon has been restrictive as well. Sigma’s much-lauded Art series that includes the 14mm rectilinear (i.e. the horizon remains straight) and 15mm fish-eye (with a curved horizon), both f/1.4 and aimed at astrophotographers, are not offered for Nikon or Canon, only for Sony E-mount and Panasonic/Leica L-mount cameras.
However, while Sigma lenses are missing, there is a wider choice of third-party lenses for Nikon Z-mount compared to Canon RF, plus Nikon itself makes a very fine 20mm prime in their premium S-series.
That’s what I test here — three wide-angle rectilinear primes for Nikon Z: A 20mm Nikkor, and two third-party primes: one from Viltrox, their 16mm; and one from Laowa, their new 10mm.
As a bonus, I add in a test of a fast fish-eye lens, from TTArtisan, their 7.5mm f/2.
NOTE: All test images can be downloaded as full-resolution JPGs for closer inspection. Click or tap on the images.
Prices are from B&H Photo, but will vary with sales and special promotions.
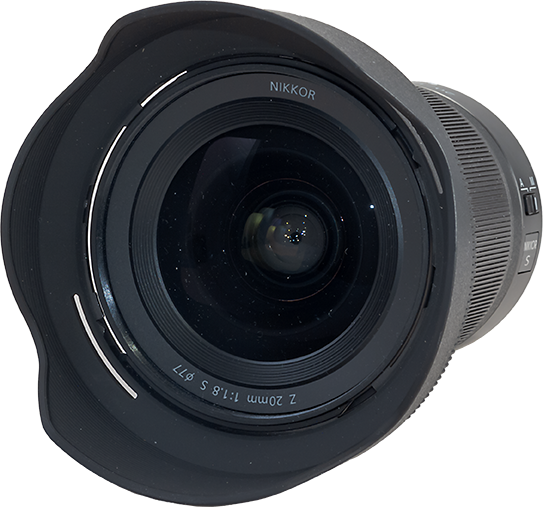
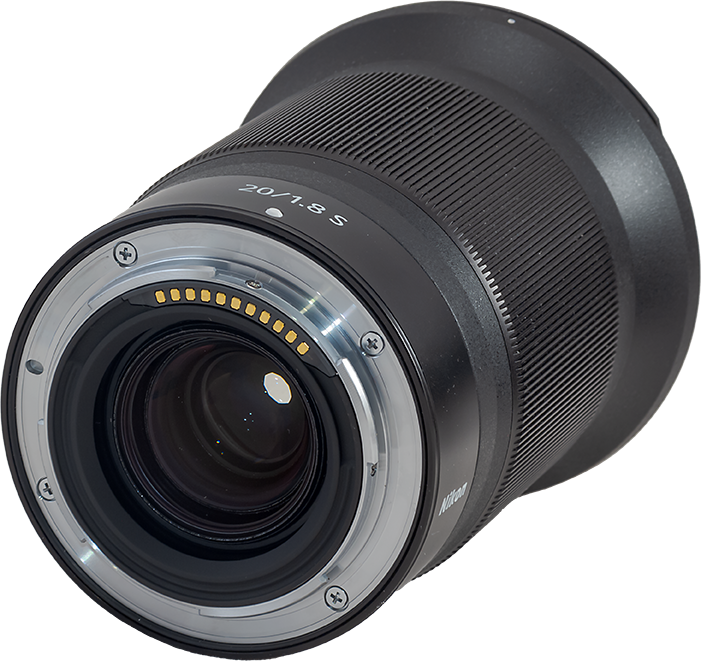
The Nikkor 20mm S-Line Lens ($1,050)
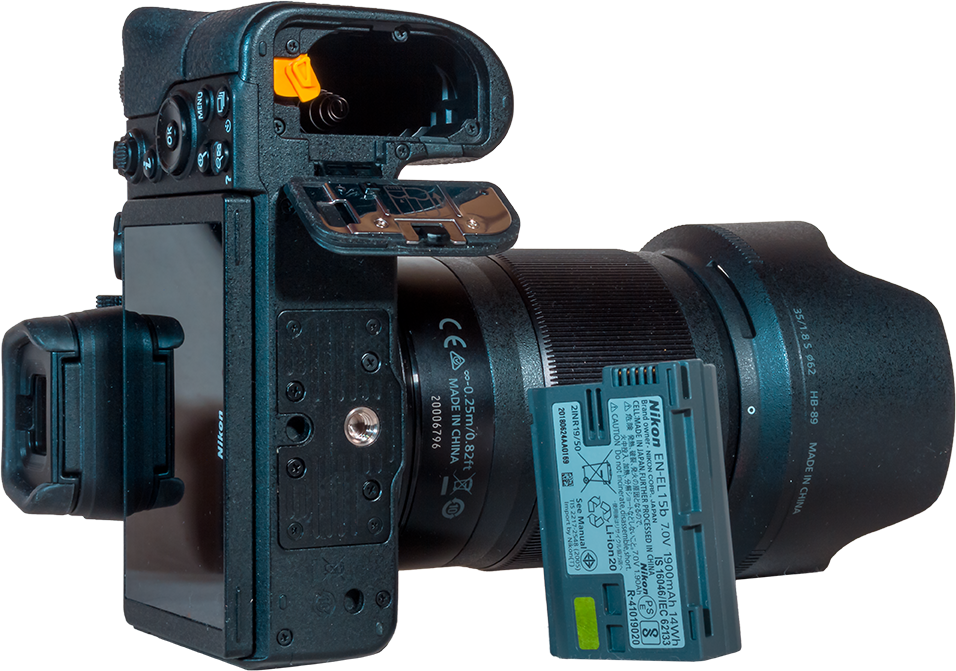
The Nikkor 20mm accepts 77mm filters.The rear mount has weather sealing.
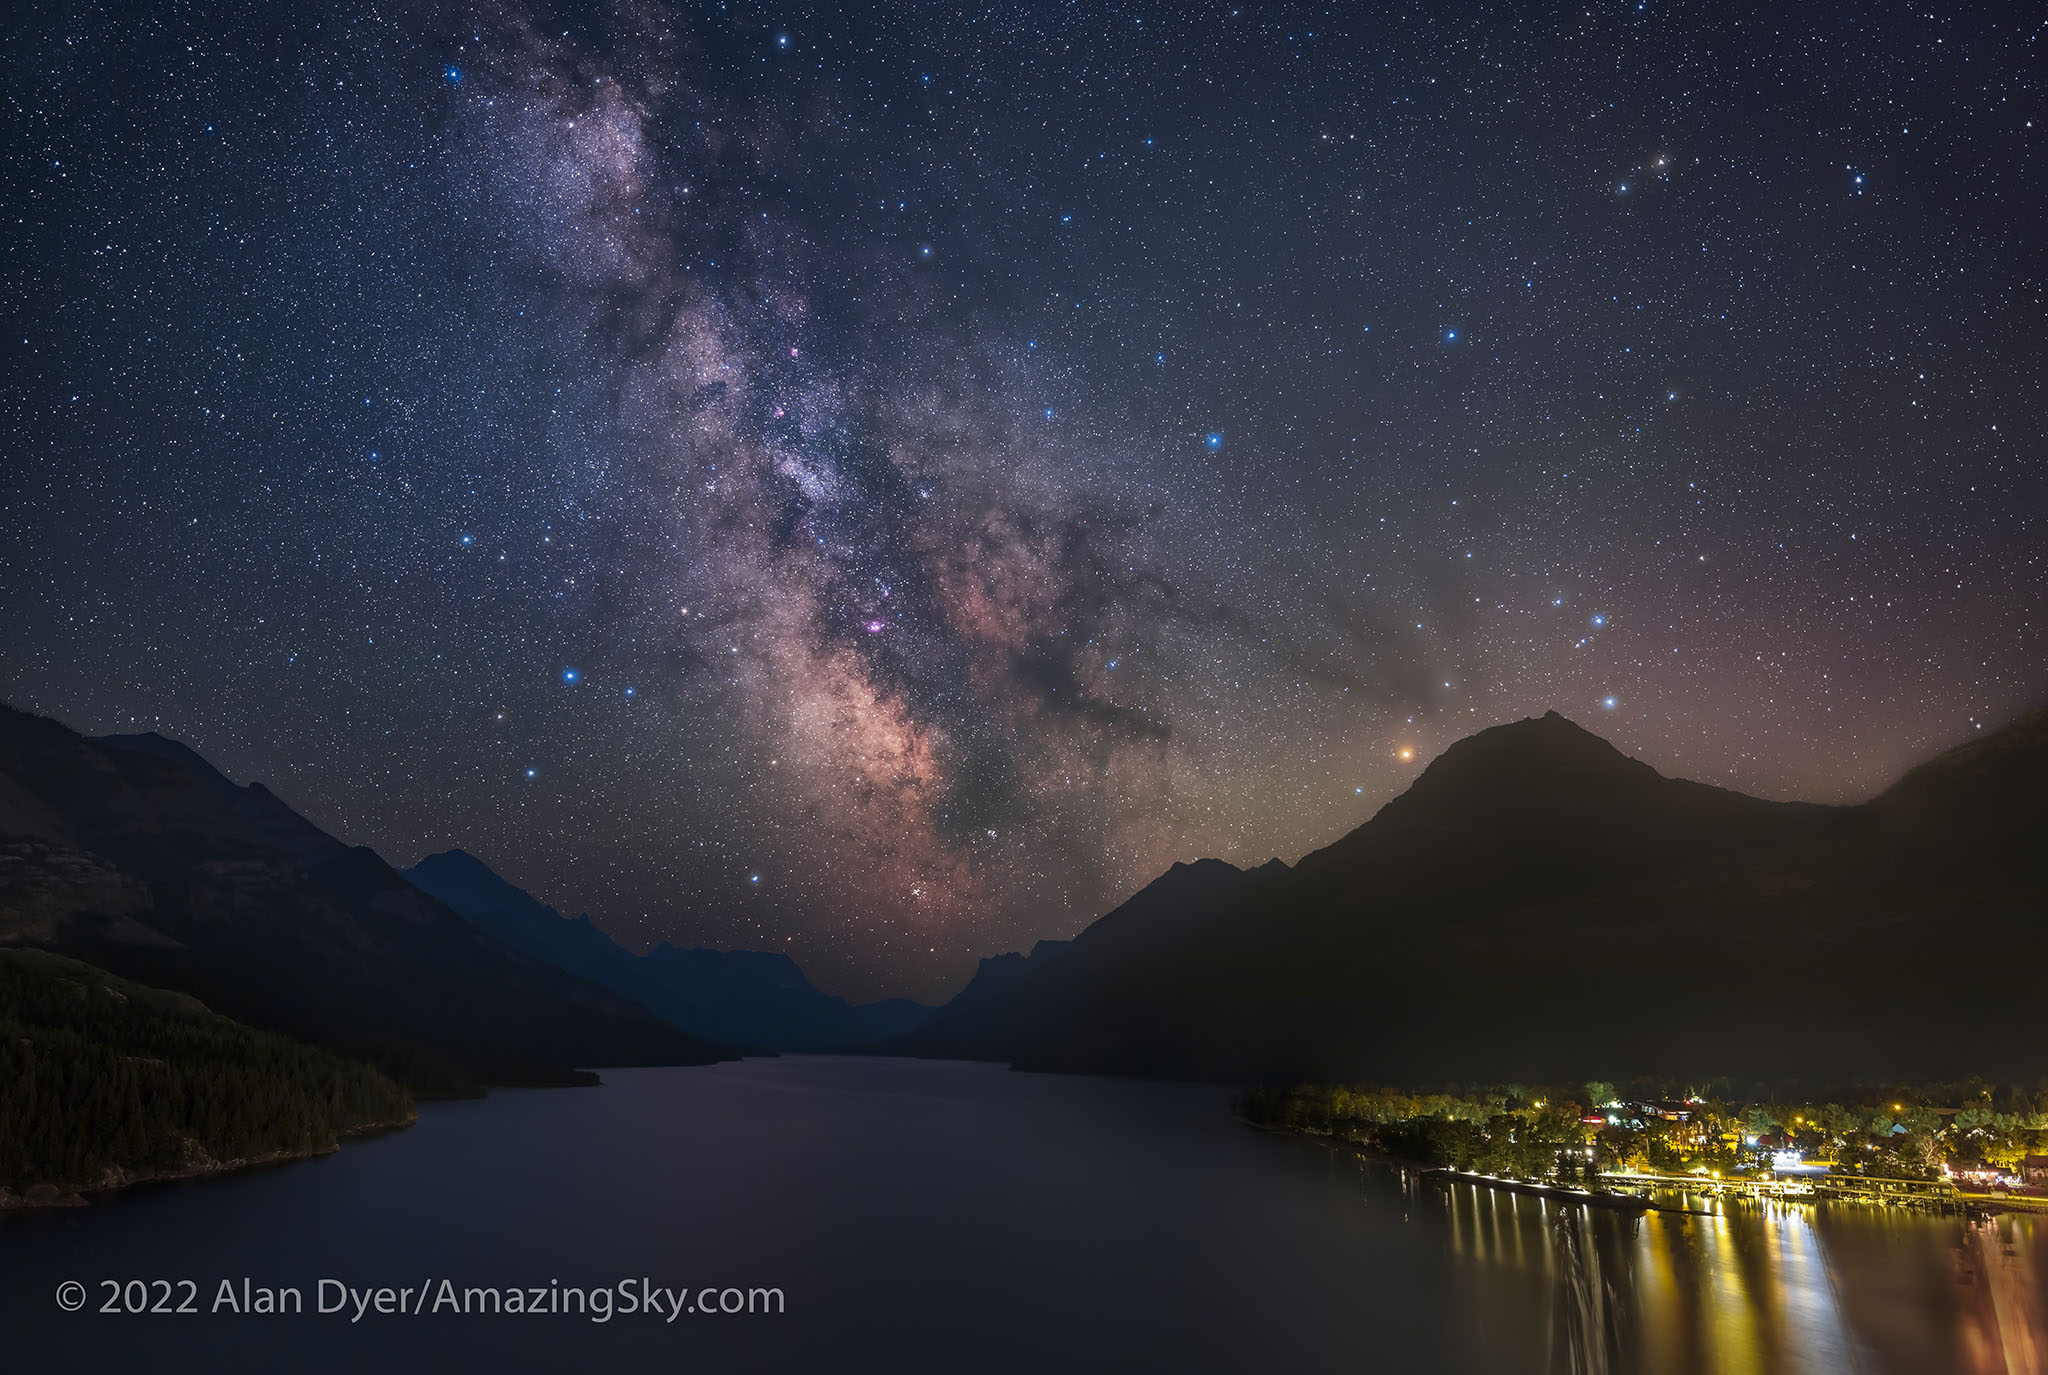
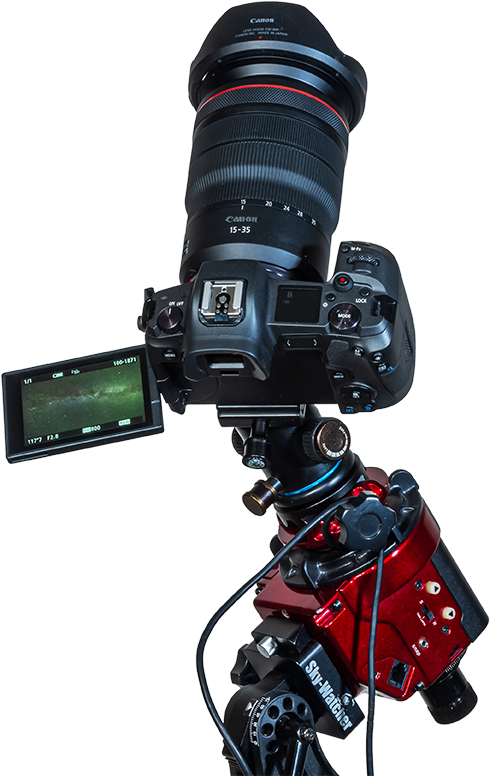
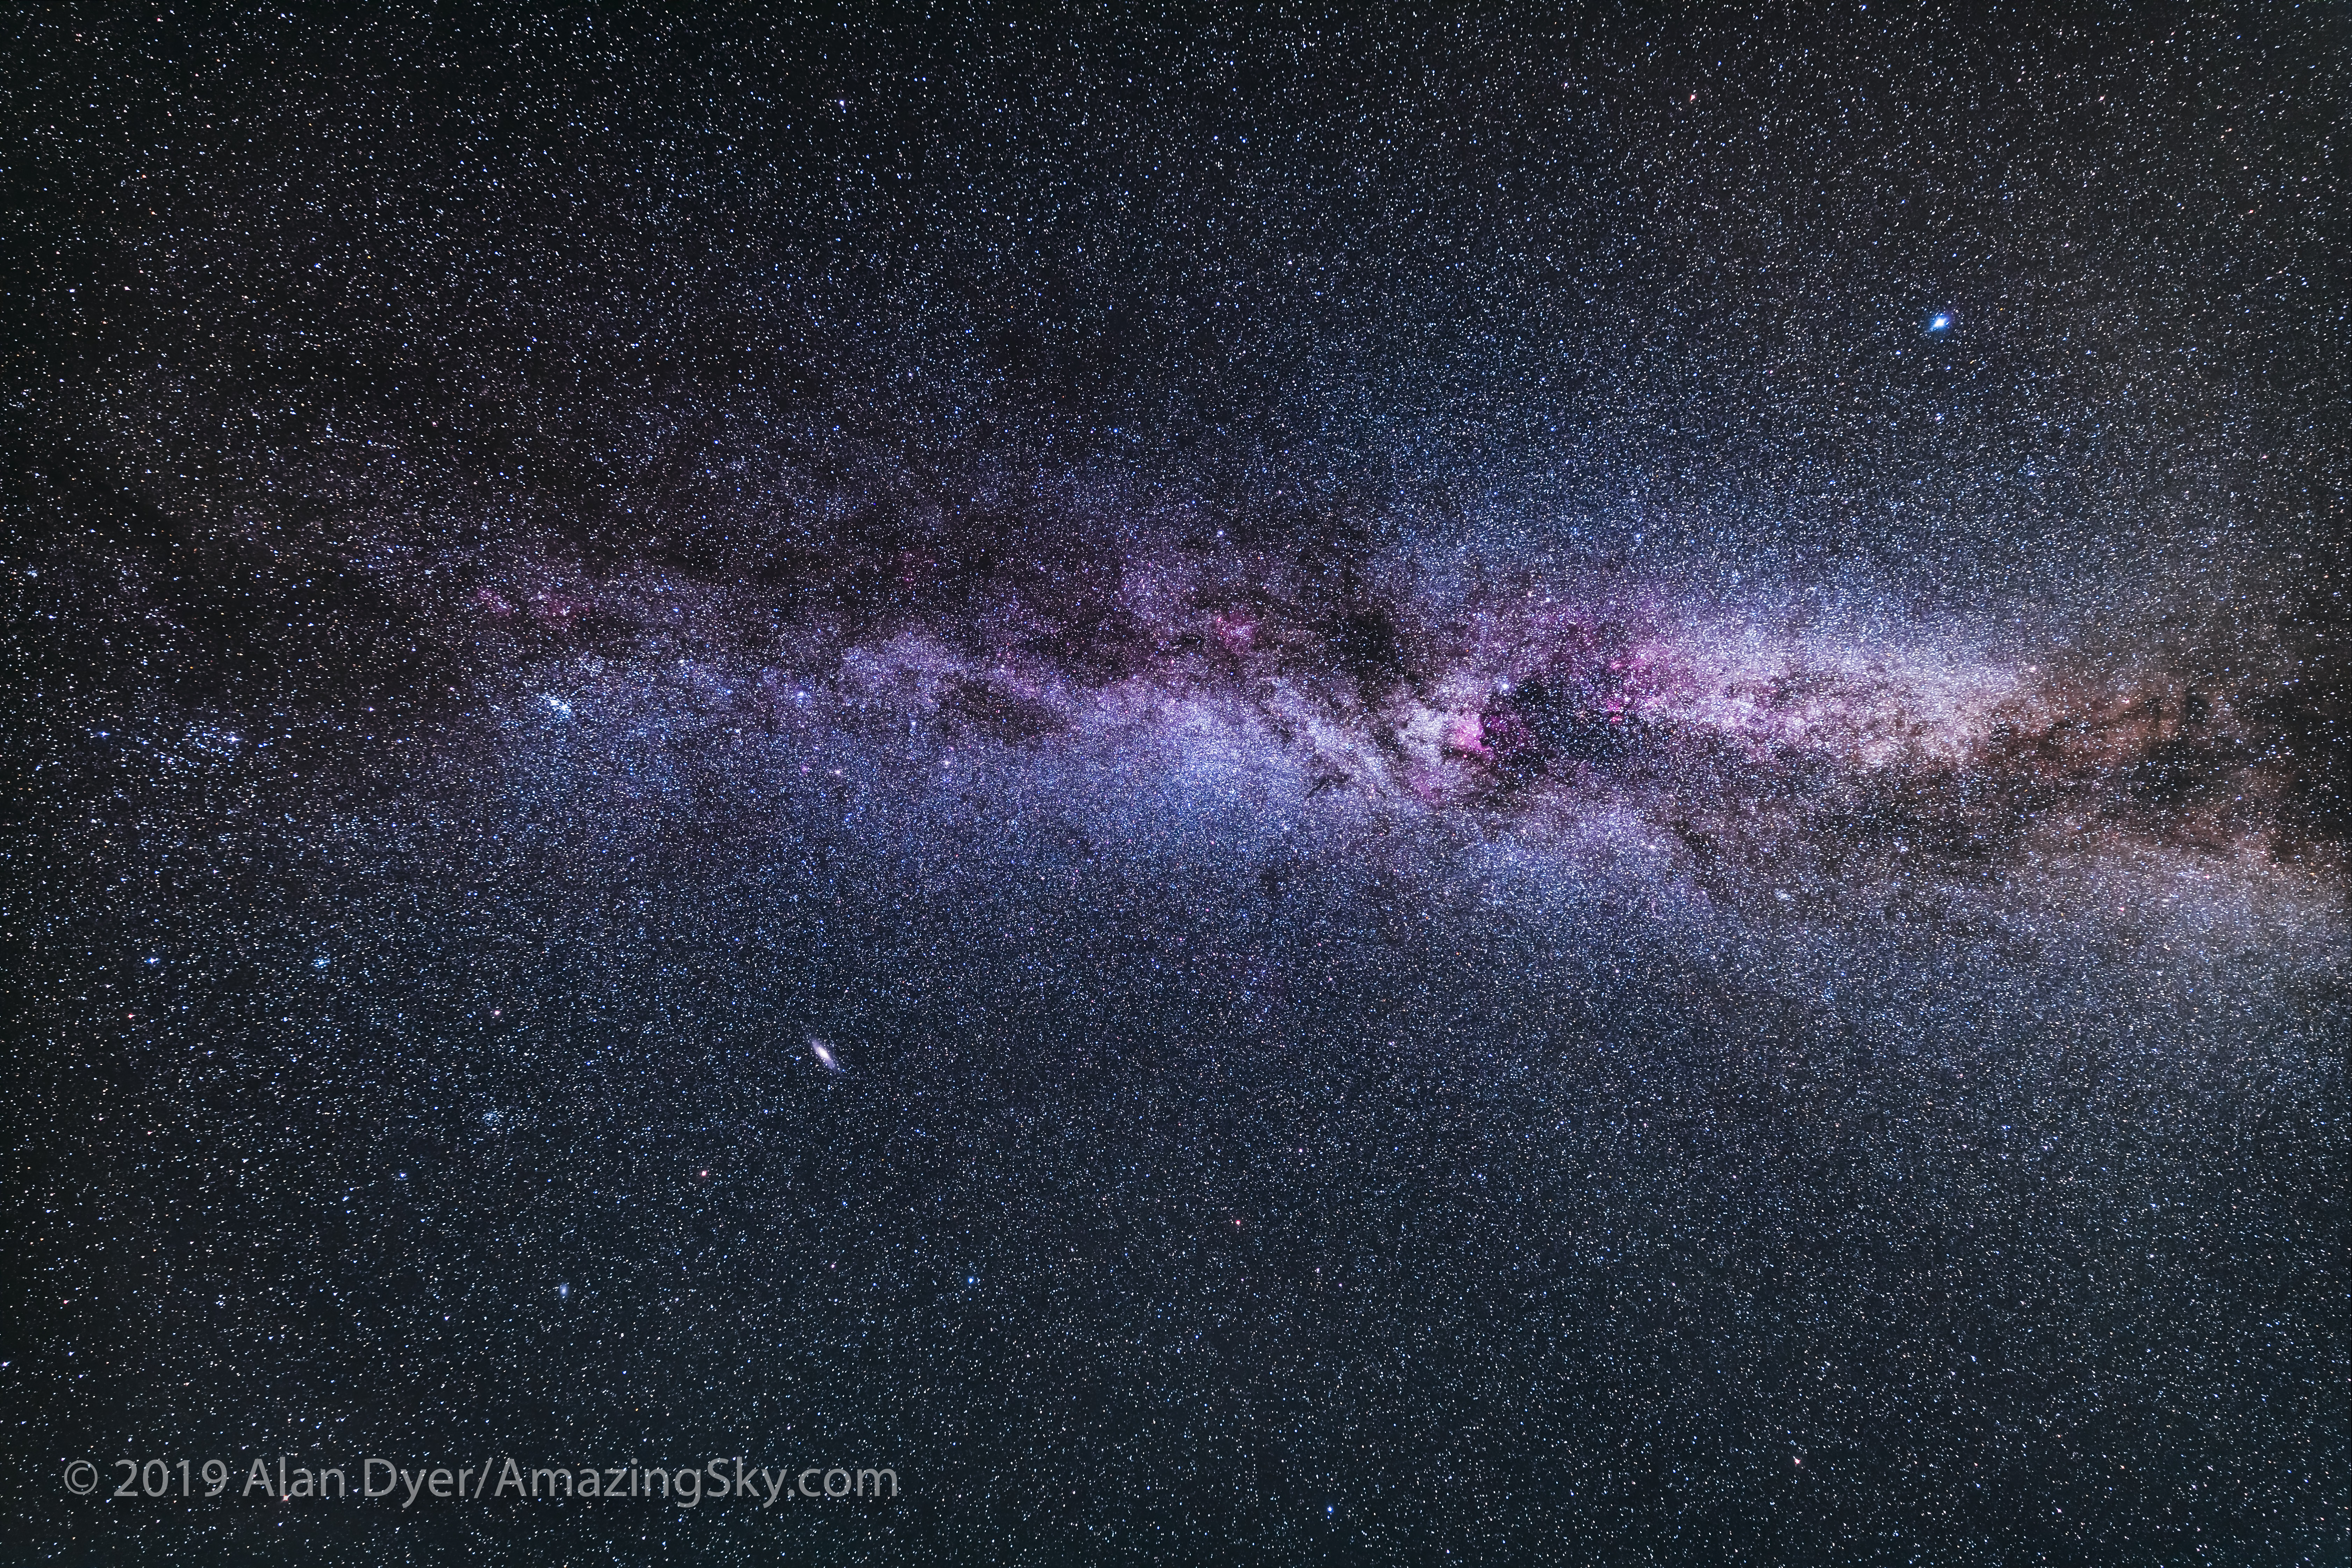
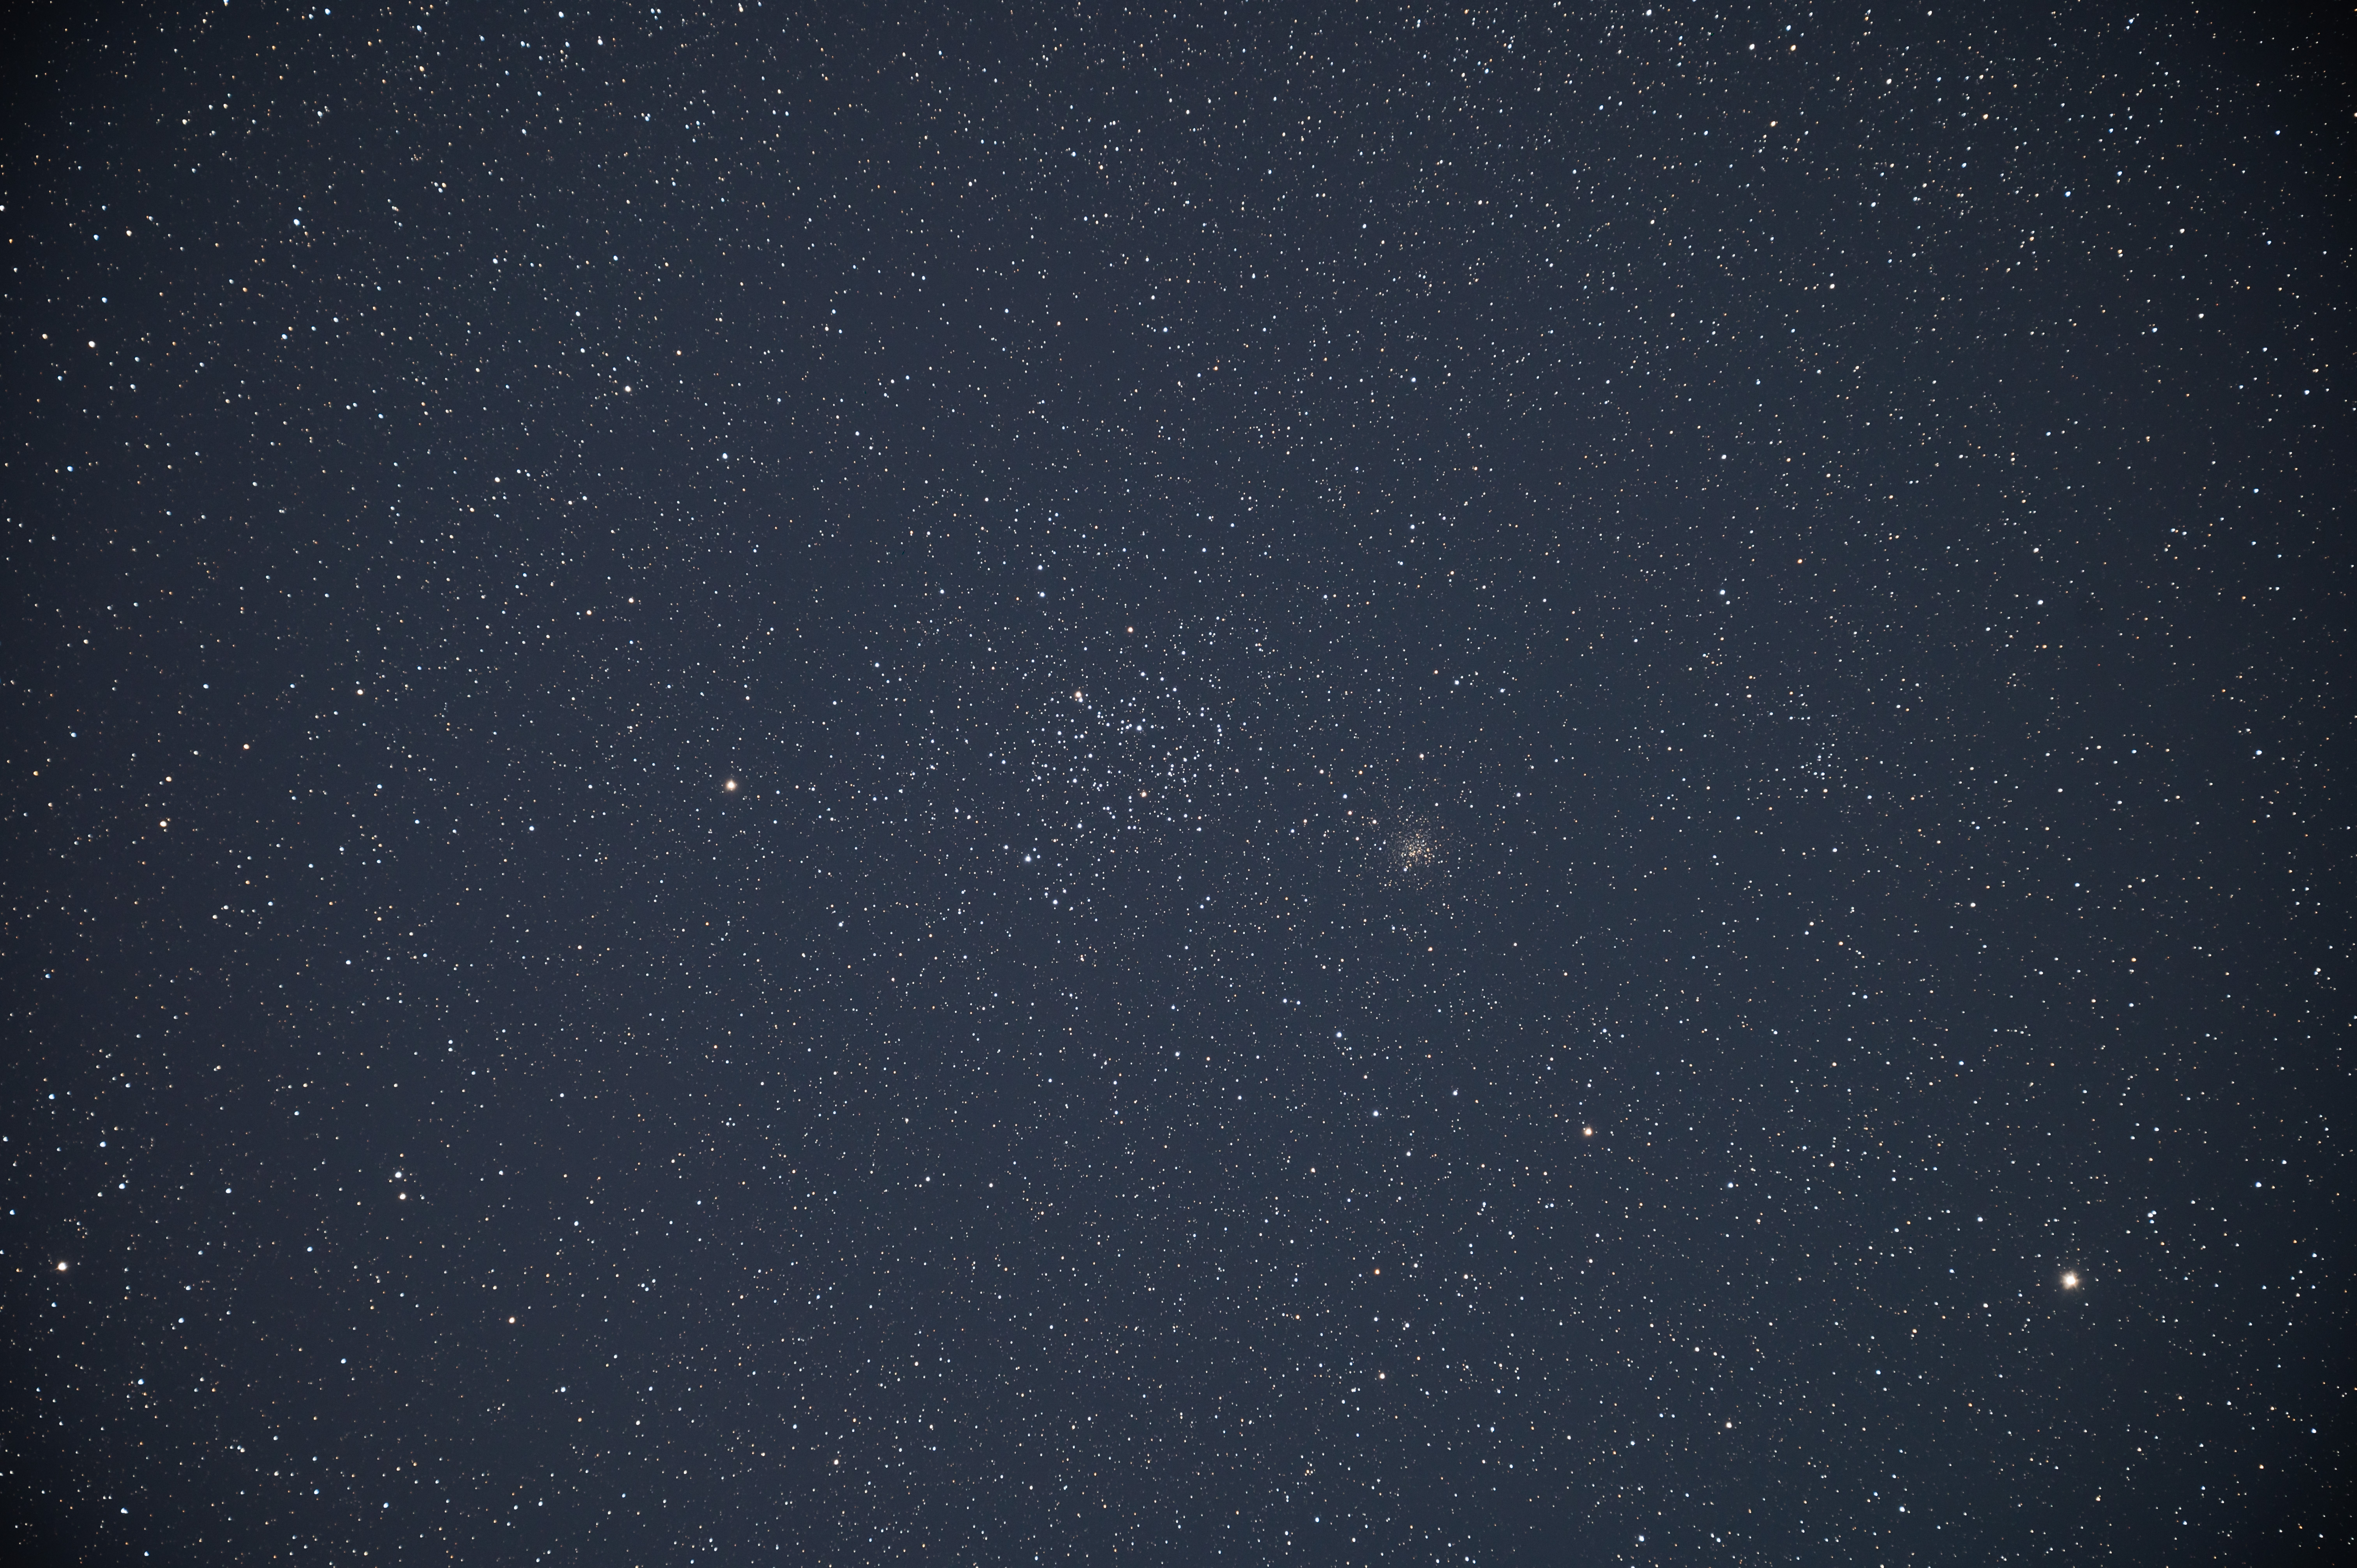
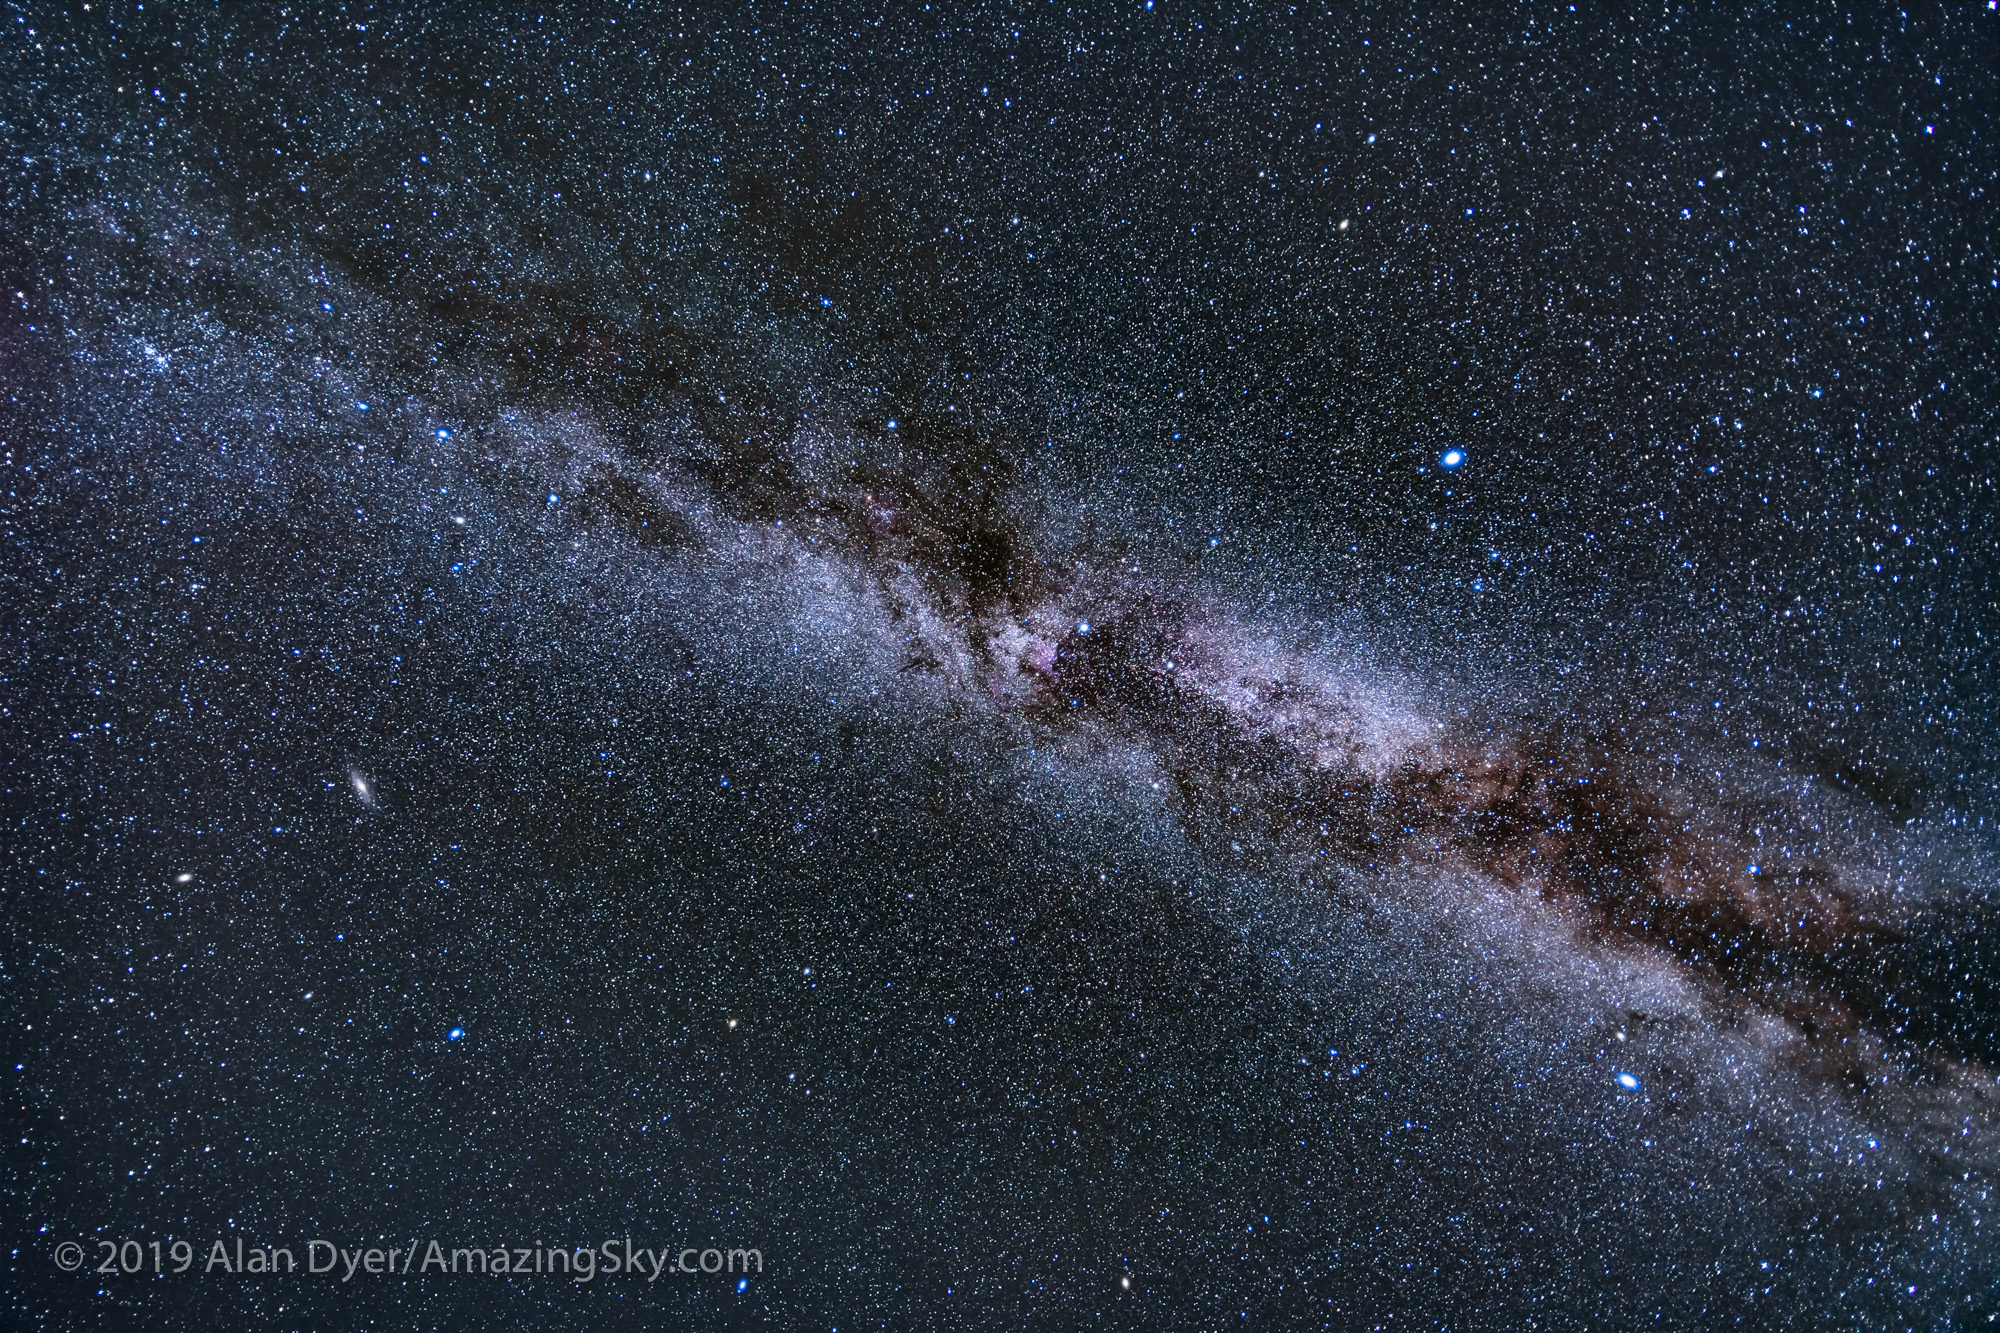
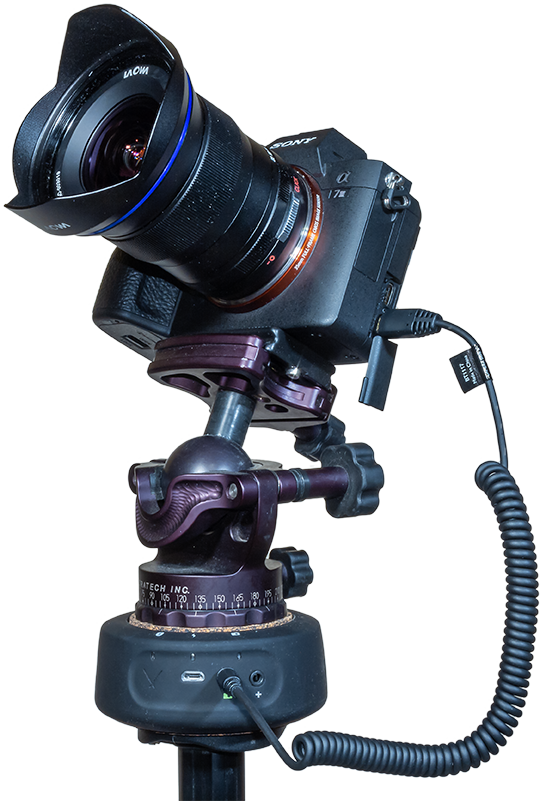
I shot the northern summer Milky Way (below) with the three rectilinear wide-angle lenses (meaning these are not fish-eyes) with the camera on a star tracker, to prevent star trailing. The tracker was the Move-Shoot-Move Nomad, reviewed here on my blog.
The Nikon Z6III and 20mm Nikkor on the MSM Nomad tracker.
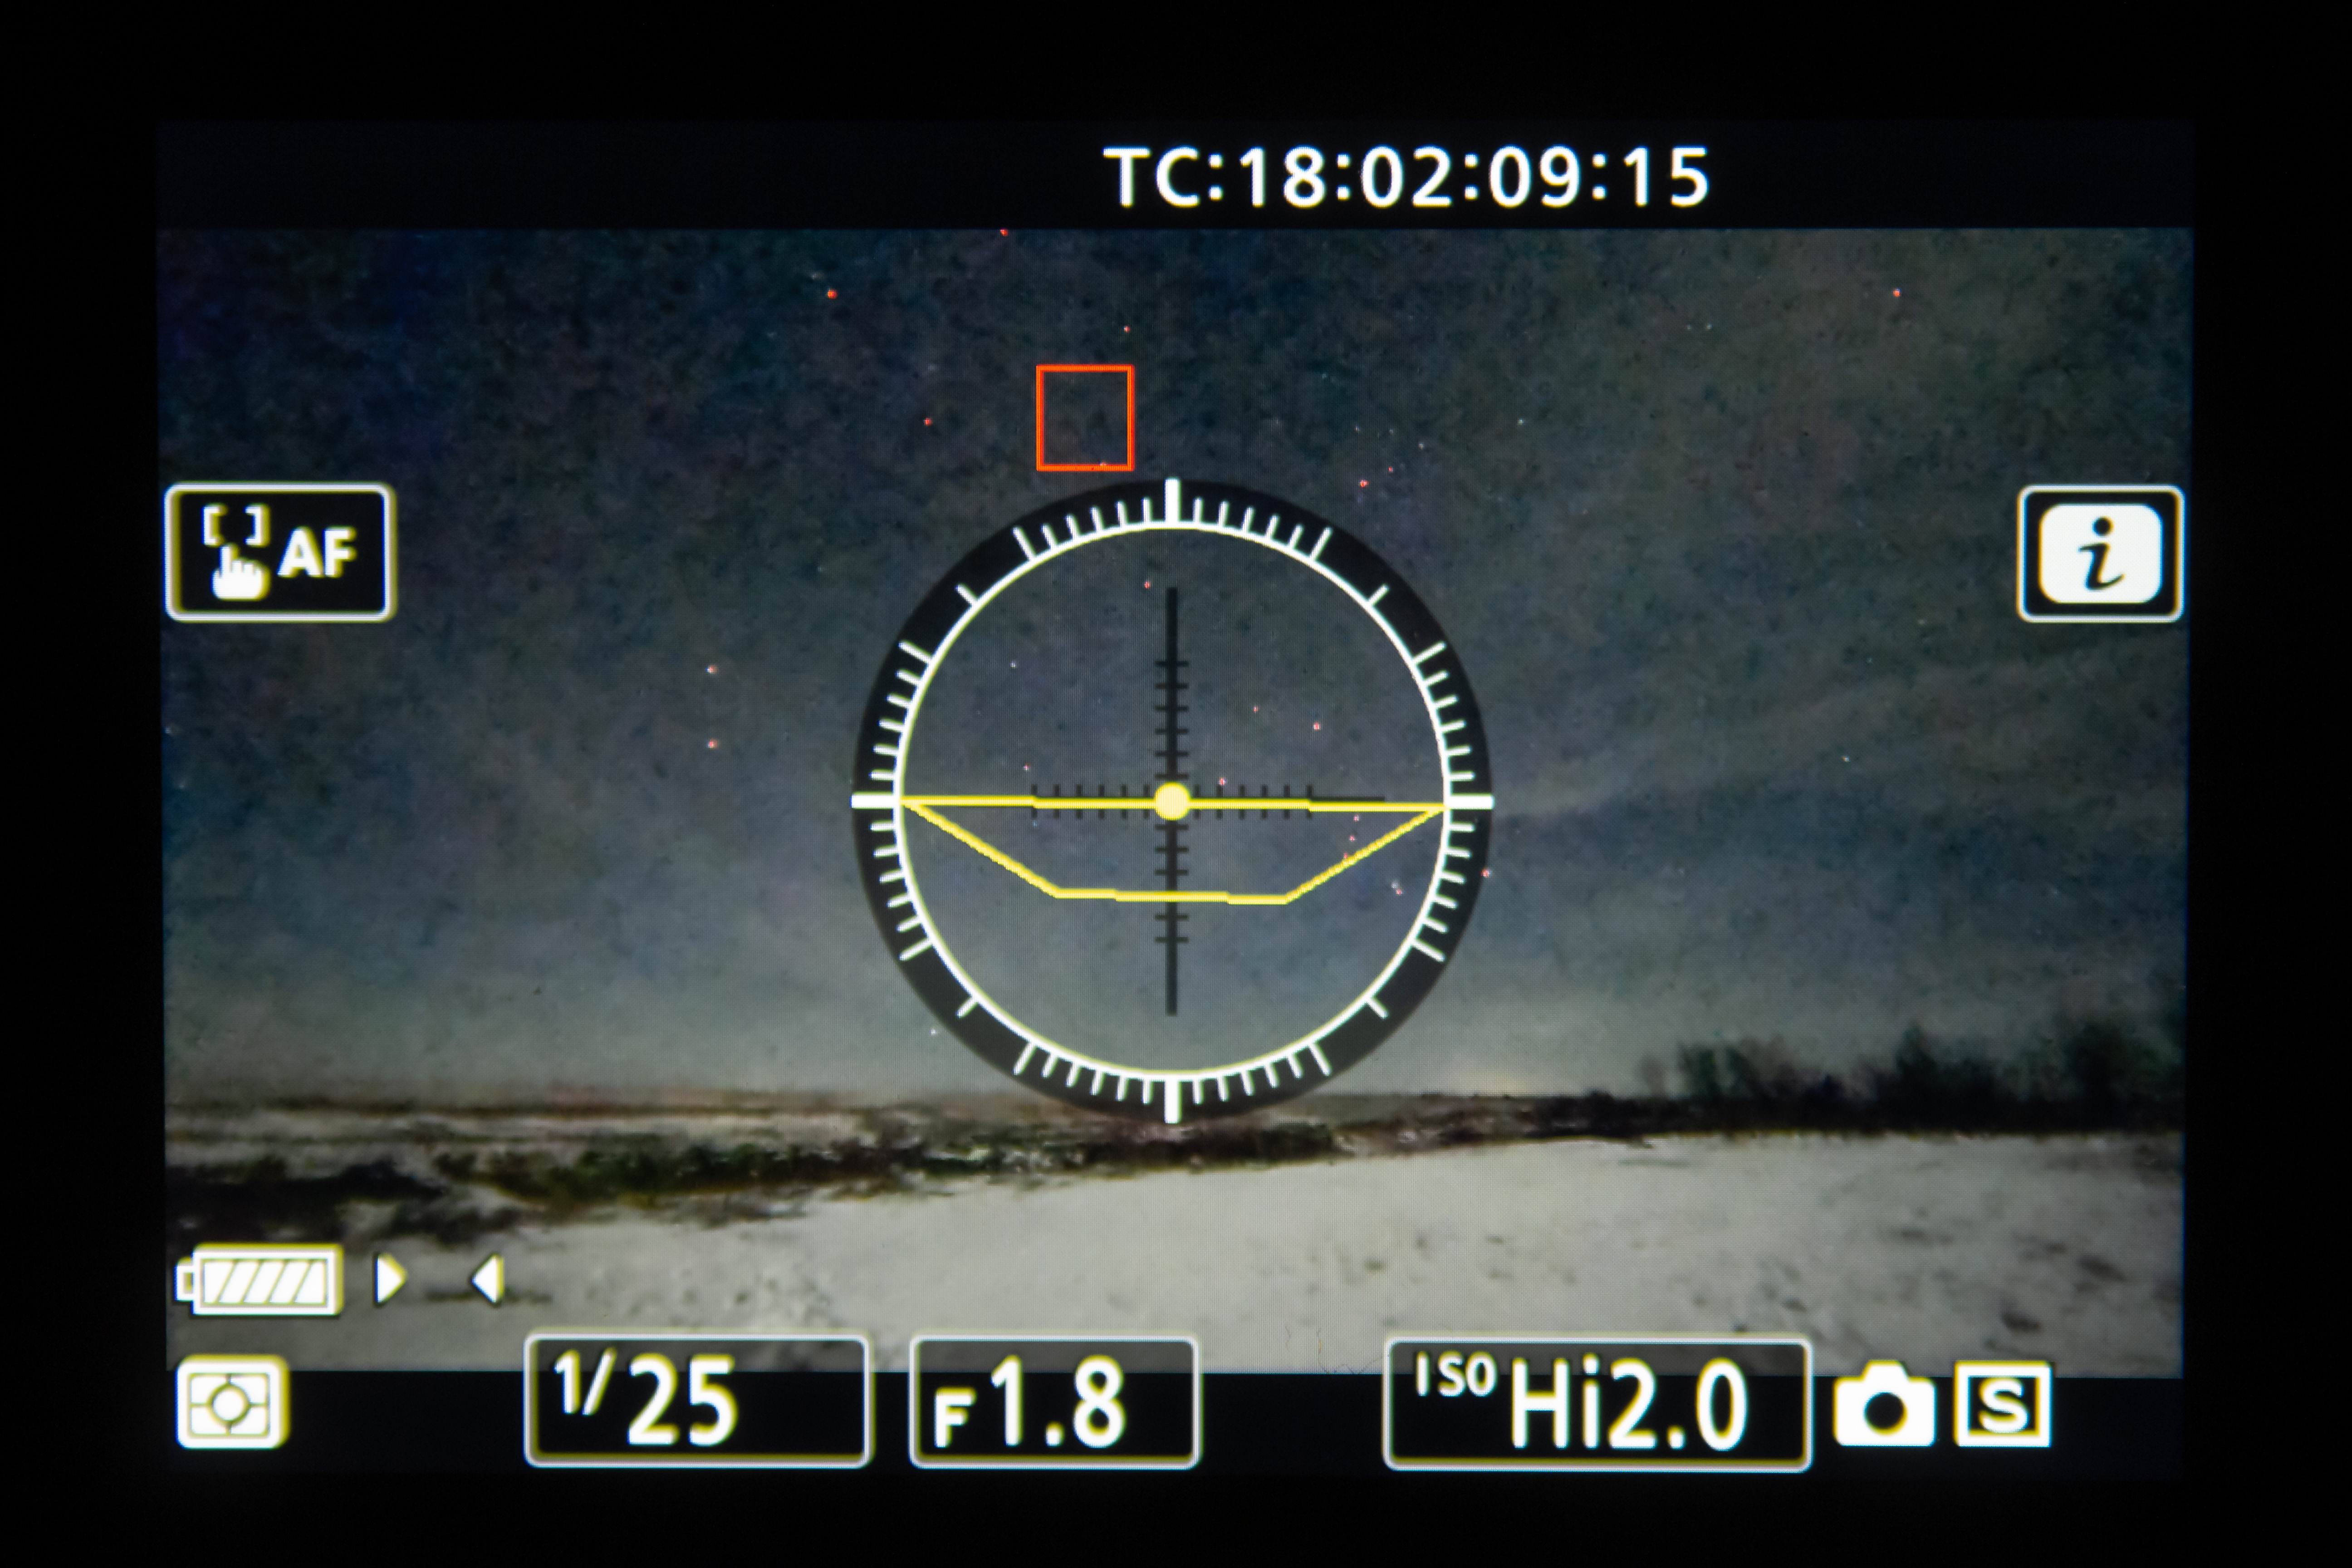
I shot with Nikon’s new Z6III, a 24-megapixel full-frame camera I reviewed in the December 2024 issue of Sky & Telescope magazine. It offers a number of excellent features for nightscape photography. Most notably, auto-focus lenses zip to the infinity focus point automatically when the camera is turned on, something I wish Canon cameras would do.
The Nikkor 20mm has a field of view along the long dimension of 84°.
The Nikkor 20mm is the widest prime lens in Nikon’s premium S-Line series. It offers what I consider to be an ideal focal length for most nightscape and wide-field Milky Way images.
While a 14mm lens is often thought of as the default nightscape lens, a 20mm presents less distortion (objects leaning in or stretched out at the corners) and a more natural perspective. Plus the lens can be made faster (in this case f/1.8), smaller, and not cost as much as an ultra-fast 14mm like the Sigma f/1.4 Art lens.
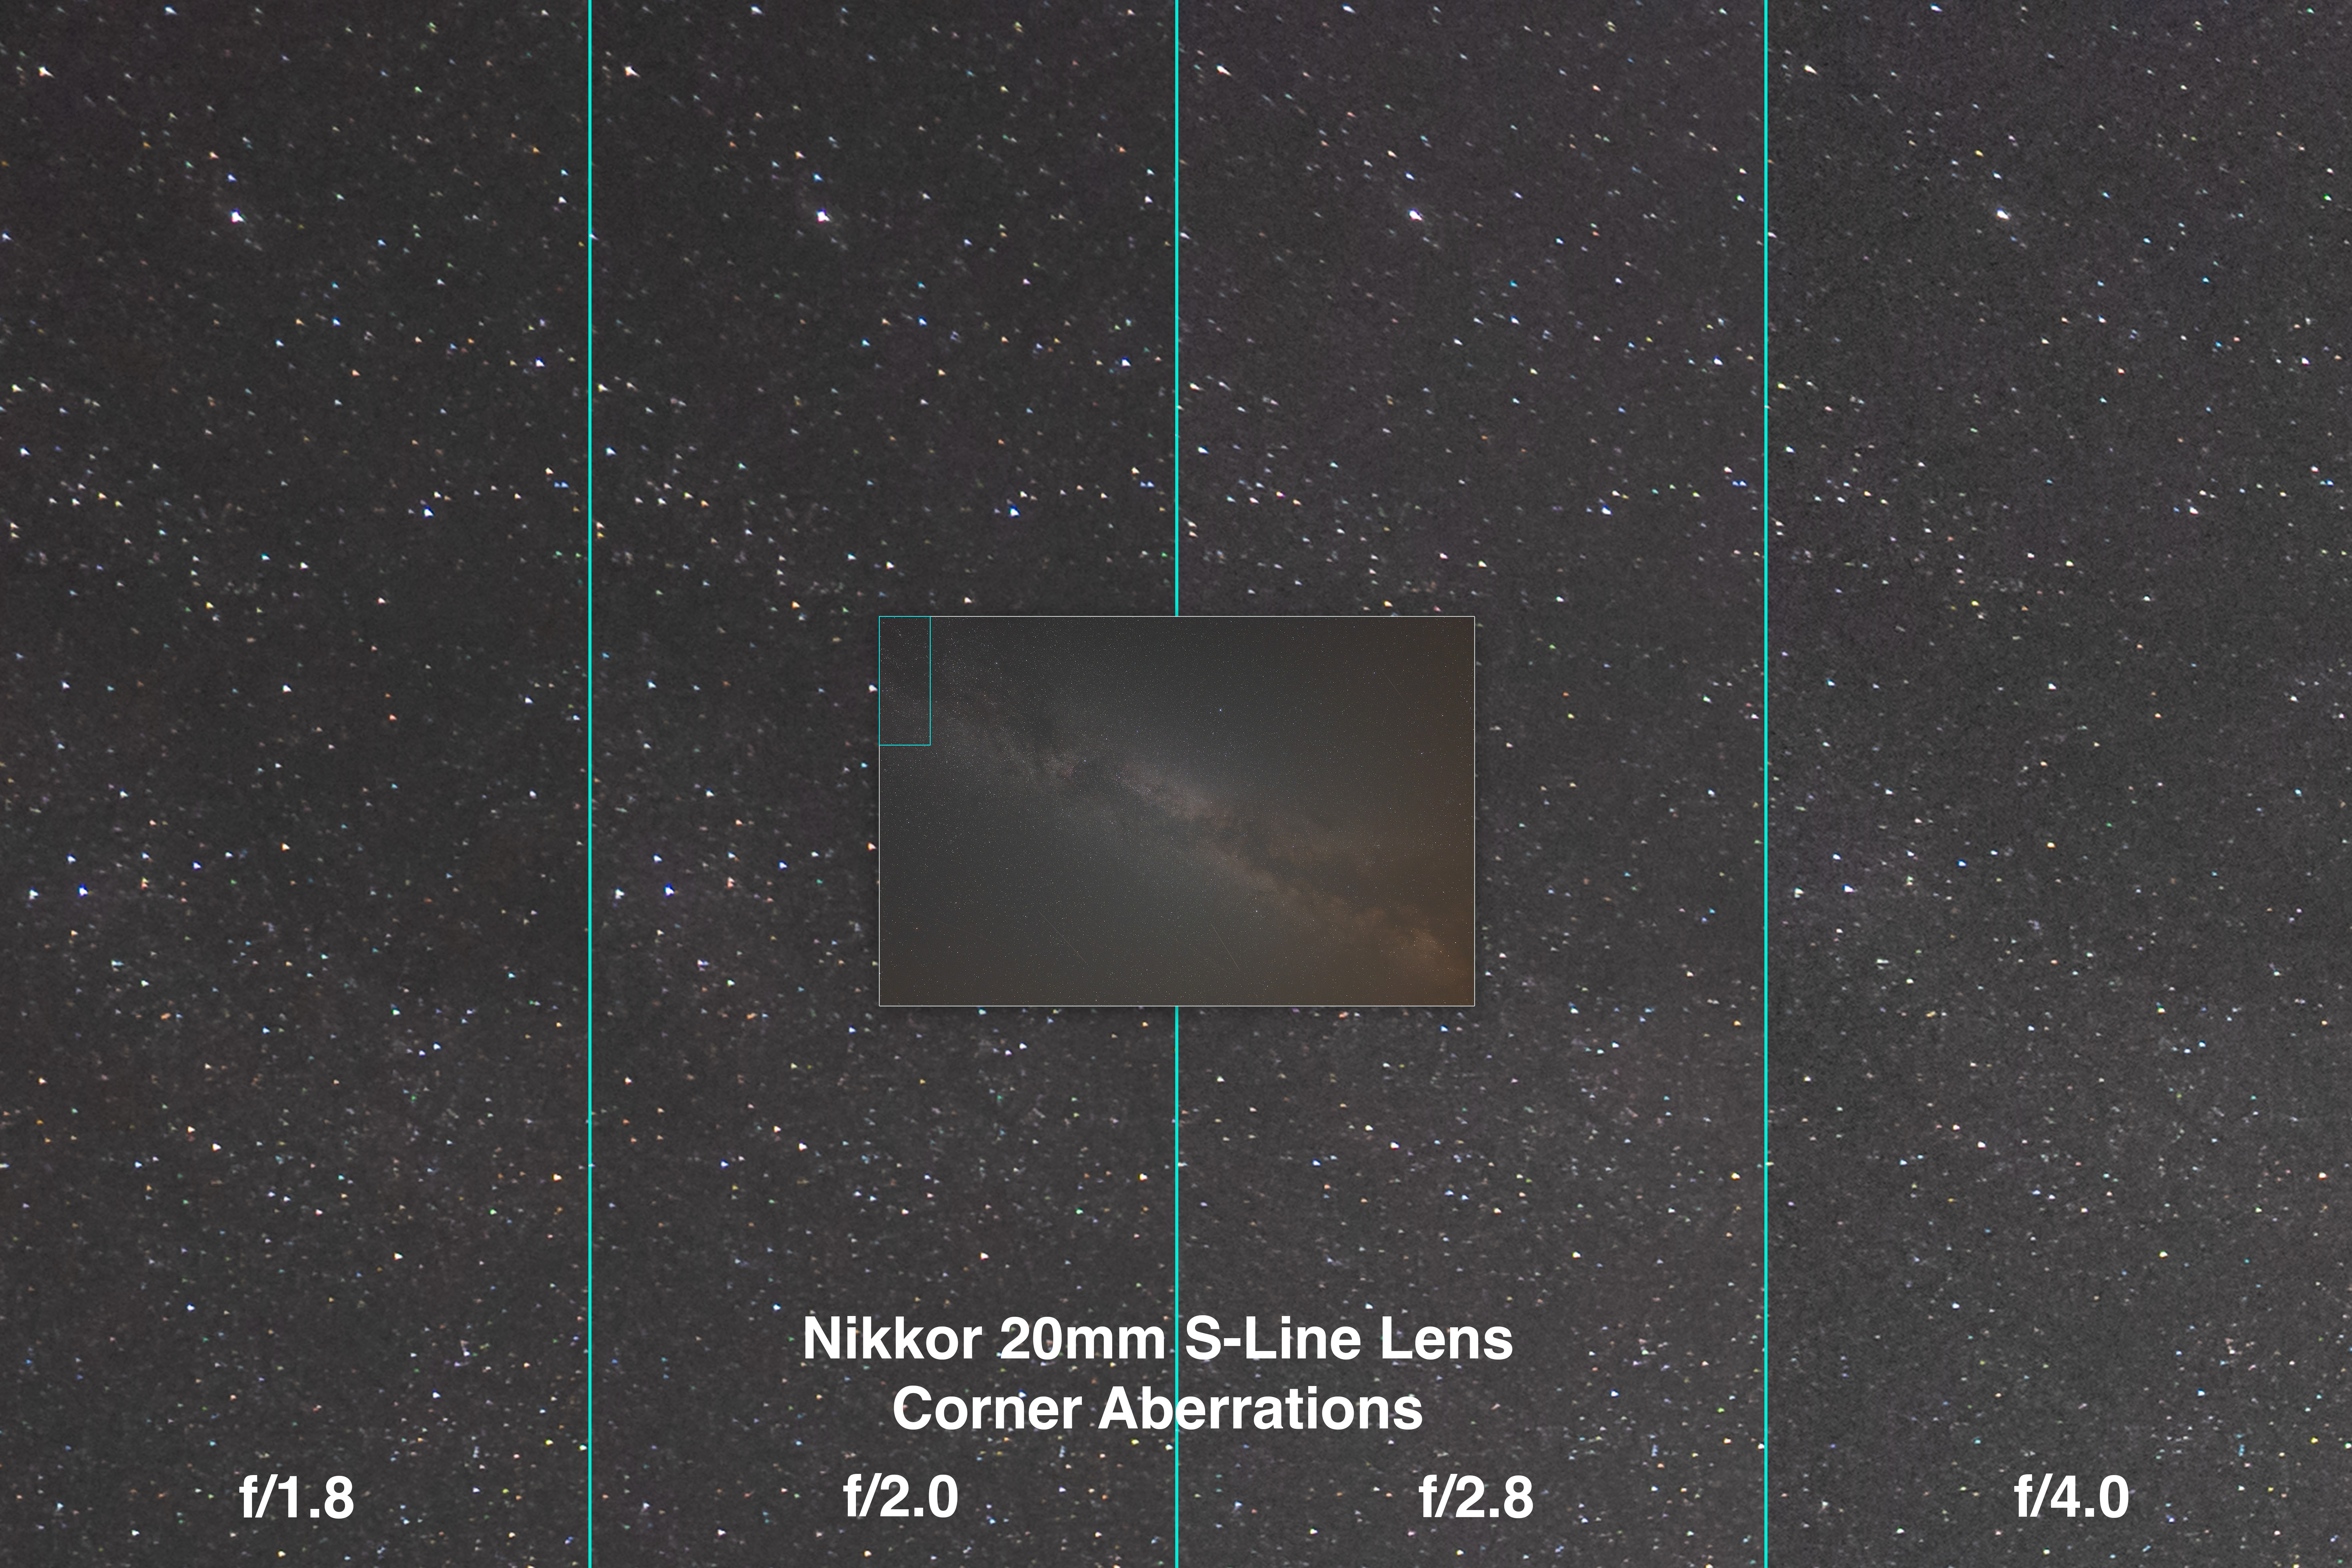
Nikkor 20mm Corner Aberrations
The four panels show the upper left corner, in the area outlined in the inset that shows the full frame.
Sharp stars right to the corners is the ideal for all forms of astro images. We don’t want stars to turn into winged seagulls or coloured streaks. They should remain as pinpoint as possible.
The Nikkor 20mm shows very little aberrations across the frame. Stars are elongated by tangential astigmatism and discoloured by lateral chromatic aberration only slightly and only at the extreme corners.
Stopping down the lens decreased the aberrations, but some residual astigmatism remained, even at f/4. However, the corner aberrations are low enough, and so restricted to the very corners, that this is a lens you can certainly use wide open at f/1.8, or perhaps at f/2, without any penalty of image sharpness.
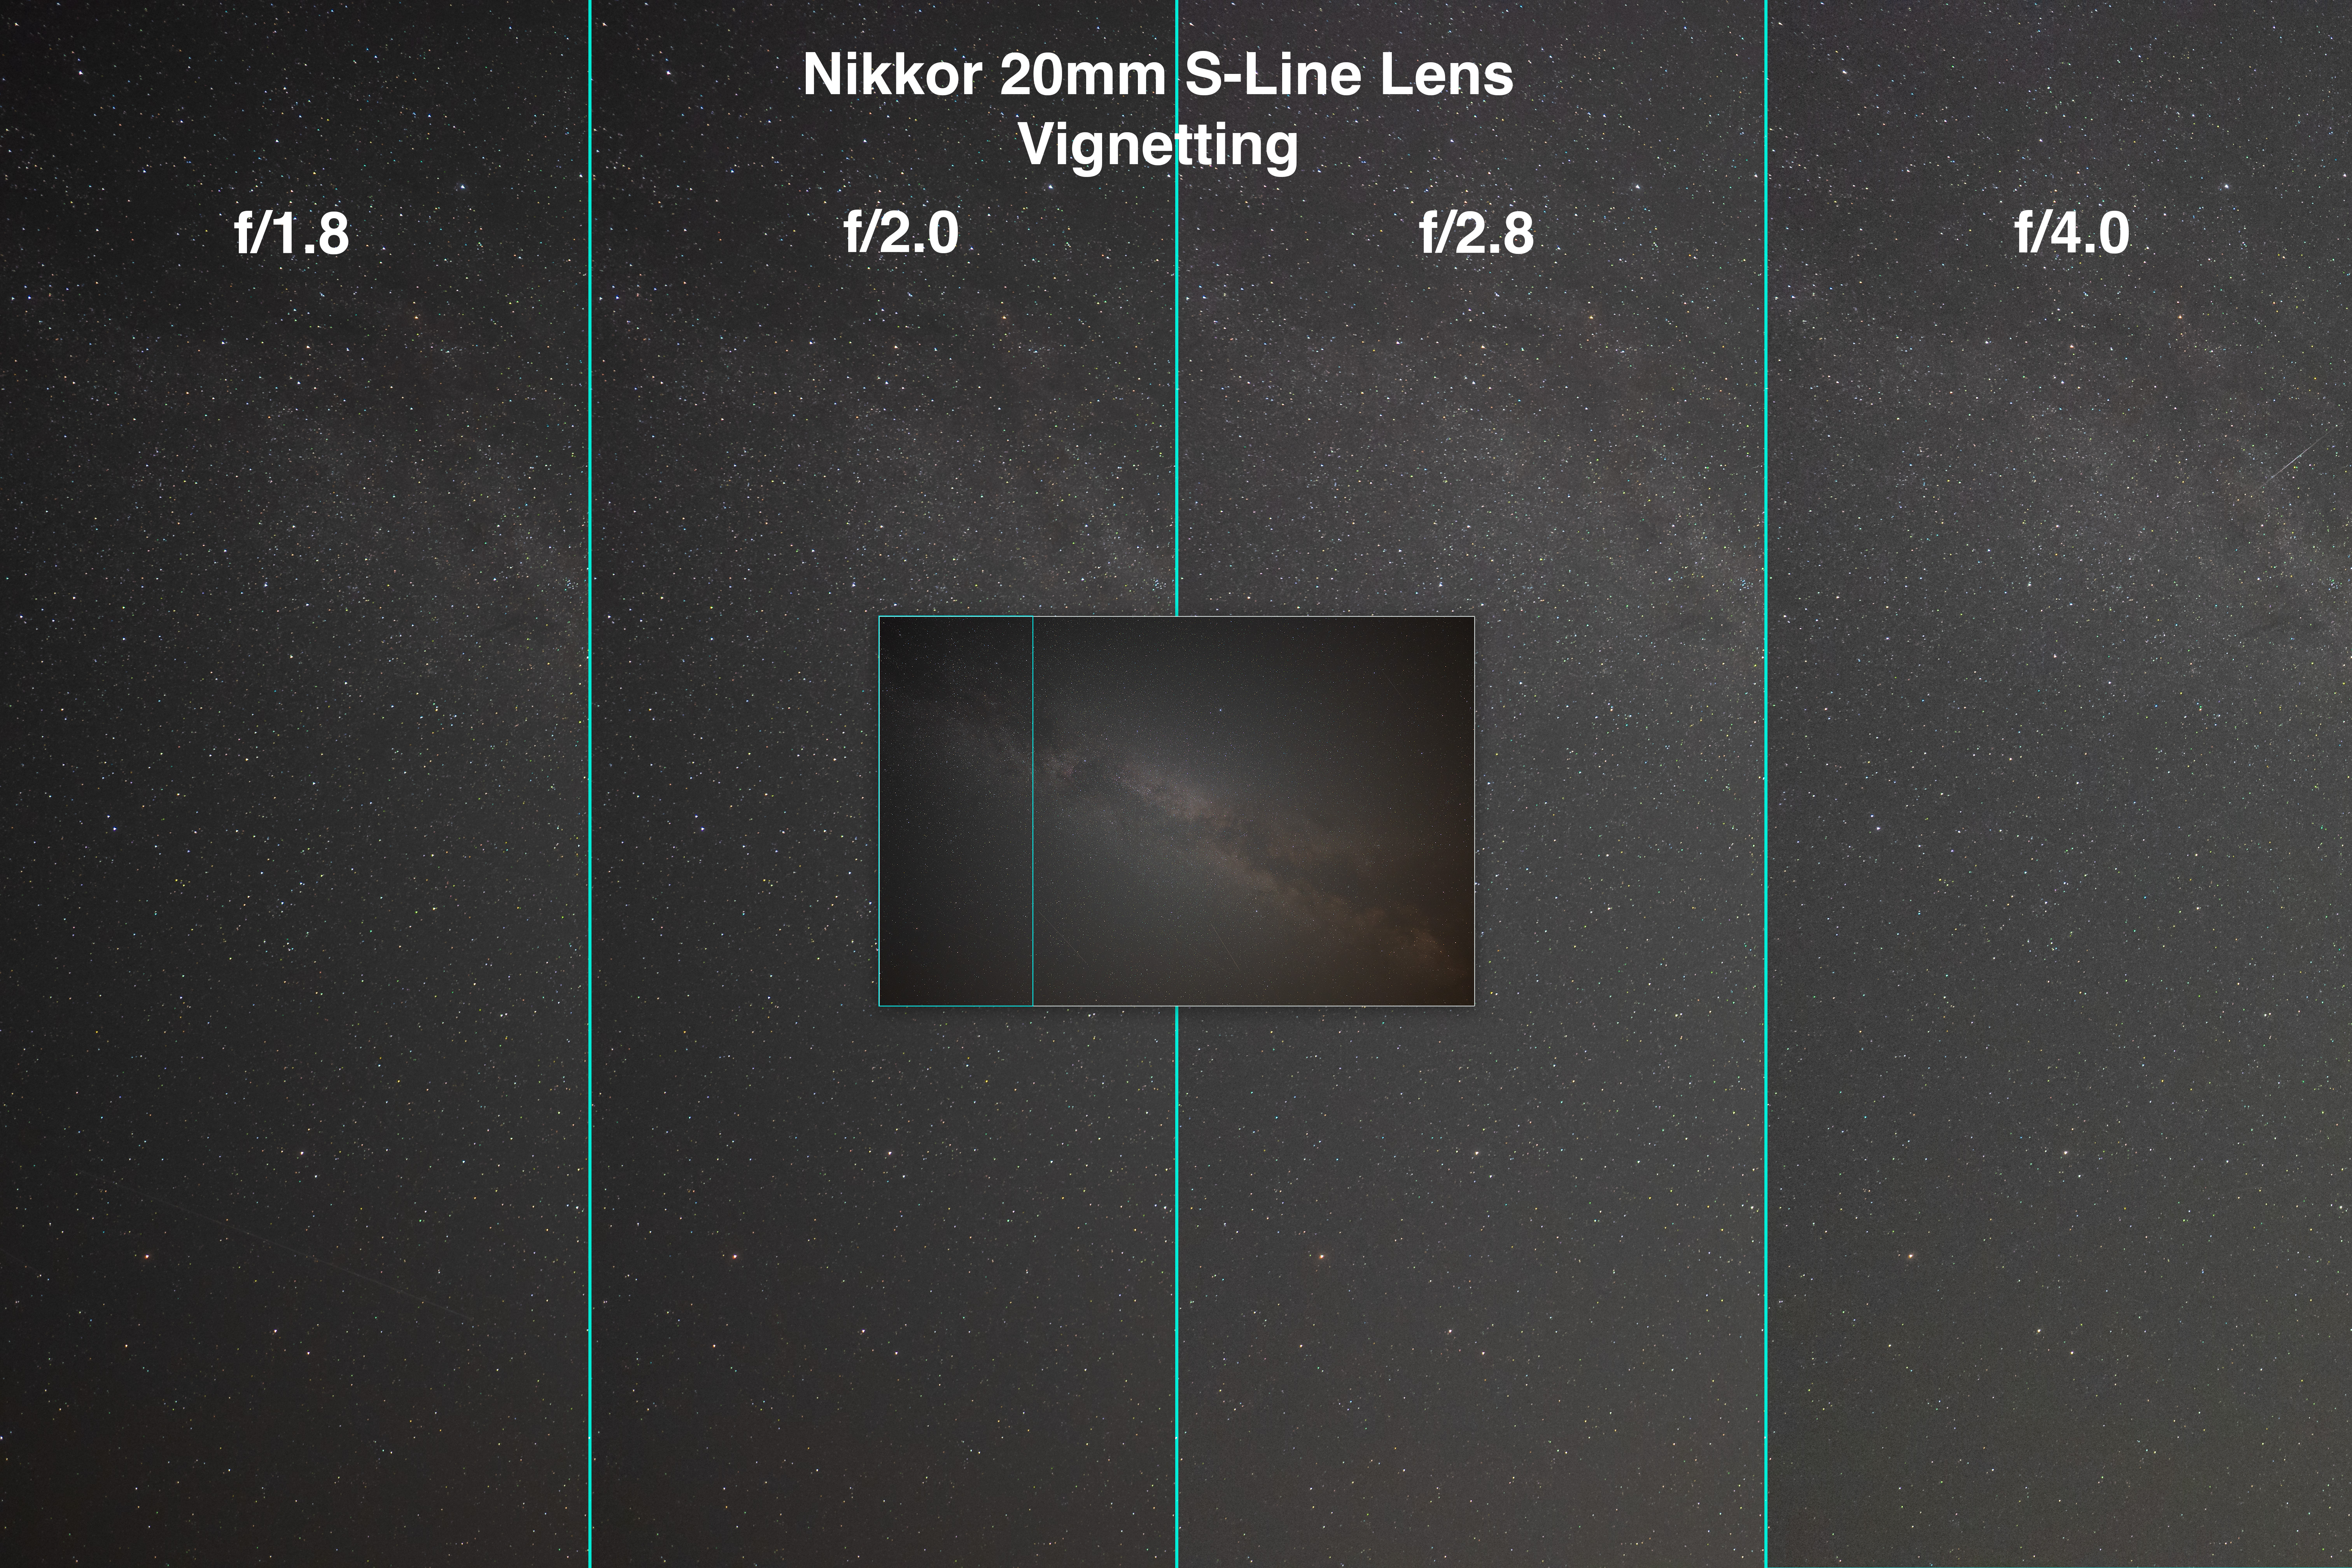
Nikkor 20mm Vignetting
The four panels show the left side, as outlined in the inset. The inset is the f/1.8 sample.
Ideally, we also want images to be as fully-illuminated across the frame as possible. Light fall-off, or vignetting, creates dark corners with less signal reaching the sensor. Less signal gives rise to more noise, noticeable when brightening the corners in processing. That can reveal unsightly noise, banding, and discolouration in nightscapes, especially in the ground, often the darkest part of a scene, not the starry sky.
The 20mm shows a fair degree of edge and corner darkening when wide open at f/1.8. Stopping the lens down to f/2 improves the field illumination notably. And by f/2.8 the field is fairly uniformly lit. There is little need to go as slow as f/4.
In all, the Nikkor 20mm S is a superb lens ideal for nightscapes and Milky Way images.
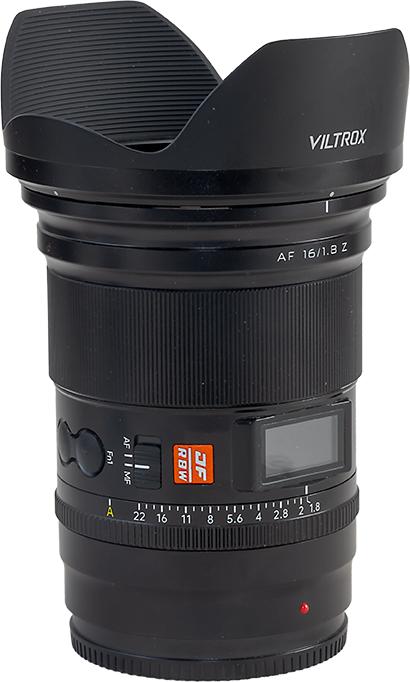
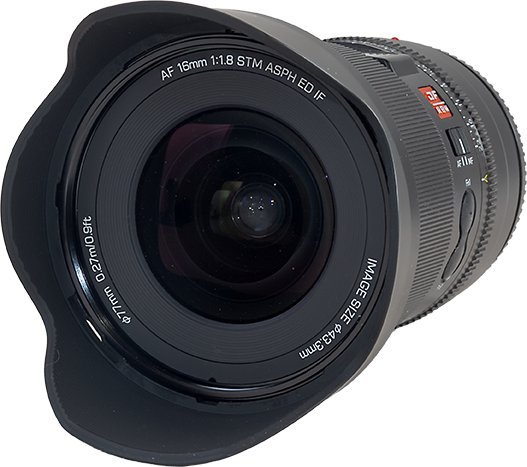
The Viltrox AF 16mm STM ASPH ED IF ($580)
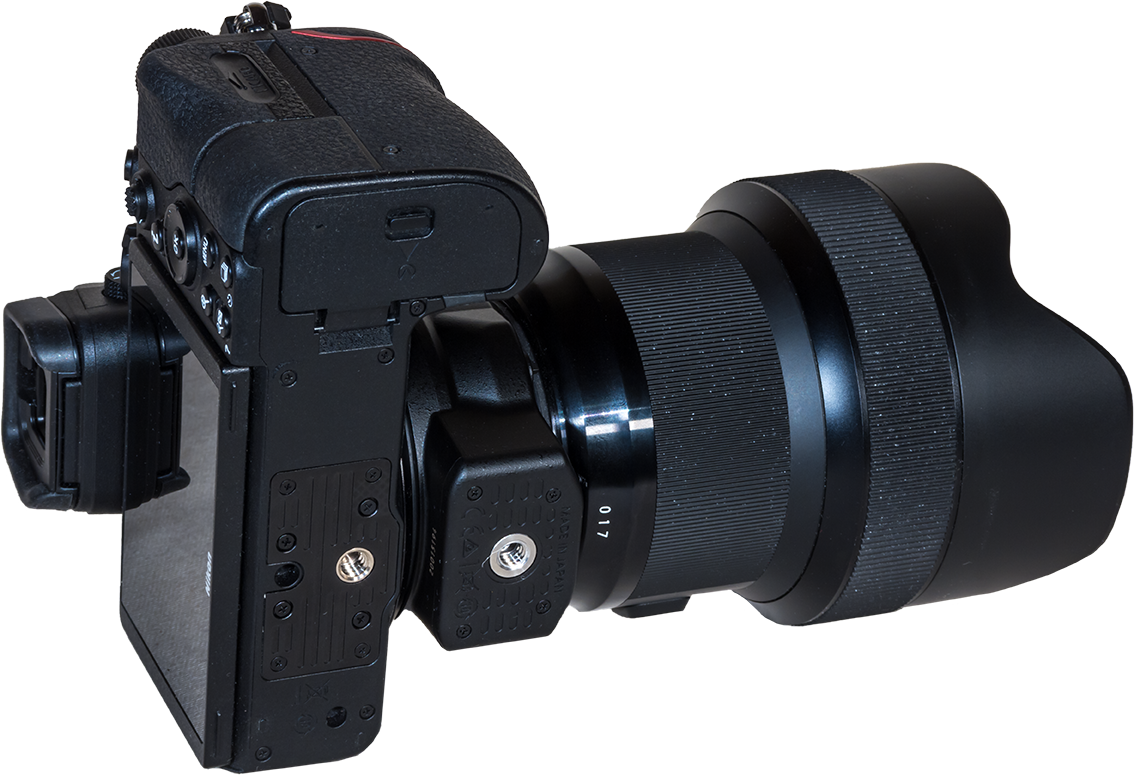
The Viltrox also accepts 77mm filters. The Viltrox has weather sealing and a USB port, obscured here, for powering the lens when not on a camera.
The new company Viltrox has been making a name for themselves recently with the introduction of a number of top-quality pro-grade lenses to compete with the best from any brand, and at much more affordable prices.
The horizontal field of view of the Viltrox 16mm is 100°.
Their 16mm is an auto-focus lens that, on the Nikon, can actually auto-focus on stars, as can the Nikkor 20mm. However, it, too, will zip to infinity focus when powered up. Plus two function buttons can be programmed to rack between two preset focus distances, one of which can be infinity.
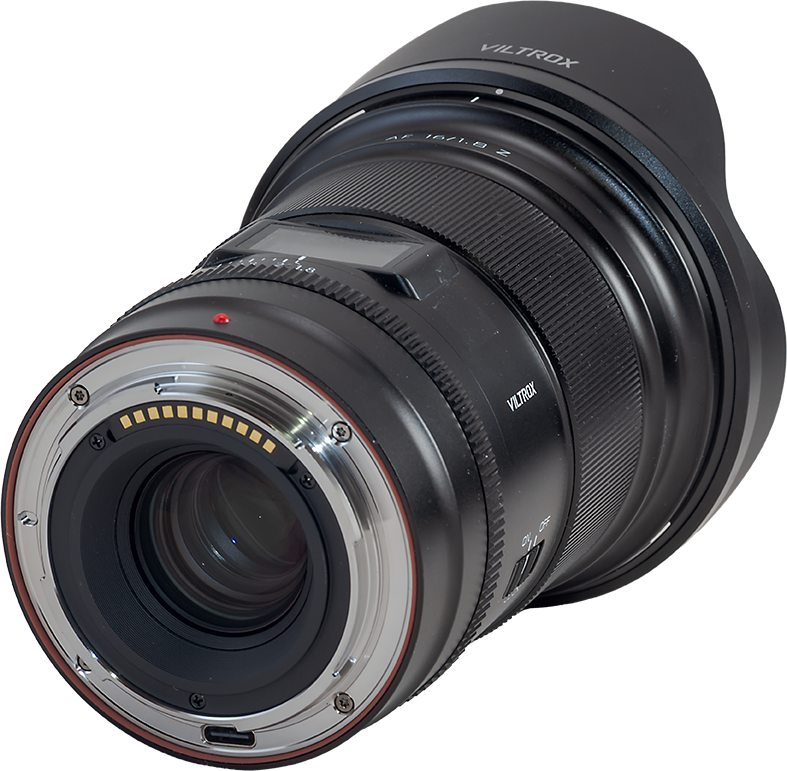
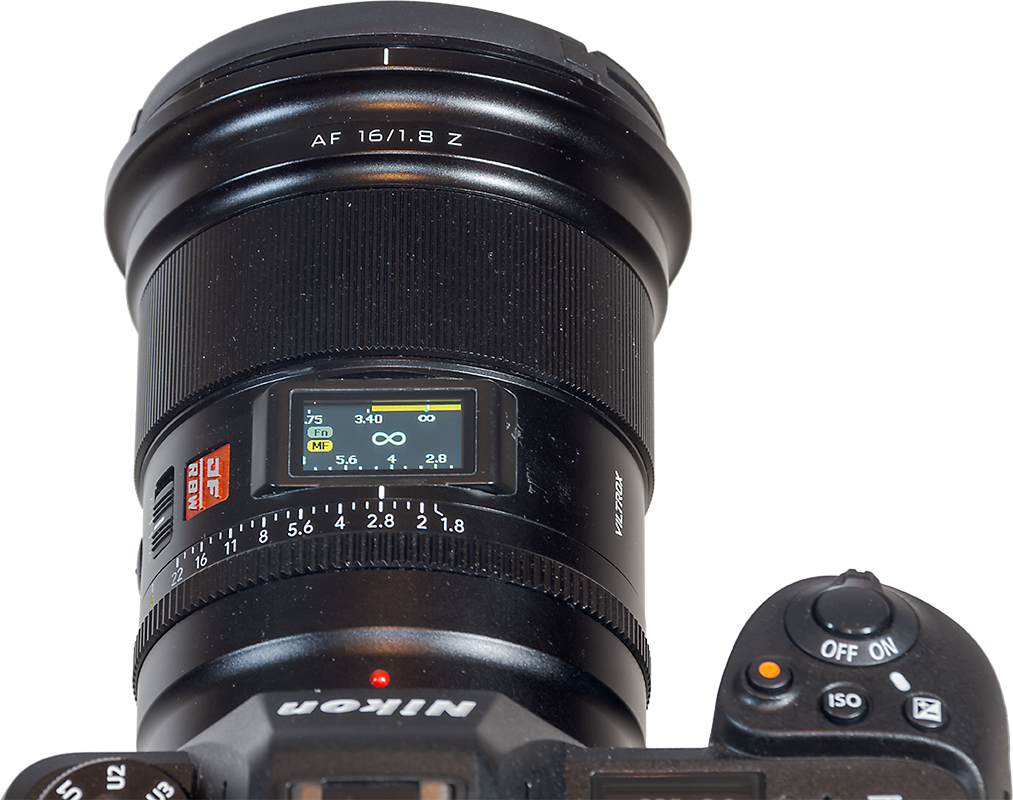
The buttons at left are for preset distances.The display shows depth of field as well as focus distance and aperture.
A manual aperture ring (above left) has 1/3rd-stop detents, or it can be set to A for controlling the aperture in the camera.
A colour OLED display (above right) shows the focus distance and aperture, a nice way to confirm your settings at night. The display is too bright on the darkest nights; I cover it with red gel.
An option to turn it red using the Viltrox app would be welcome. Or to turn it off! ….
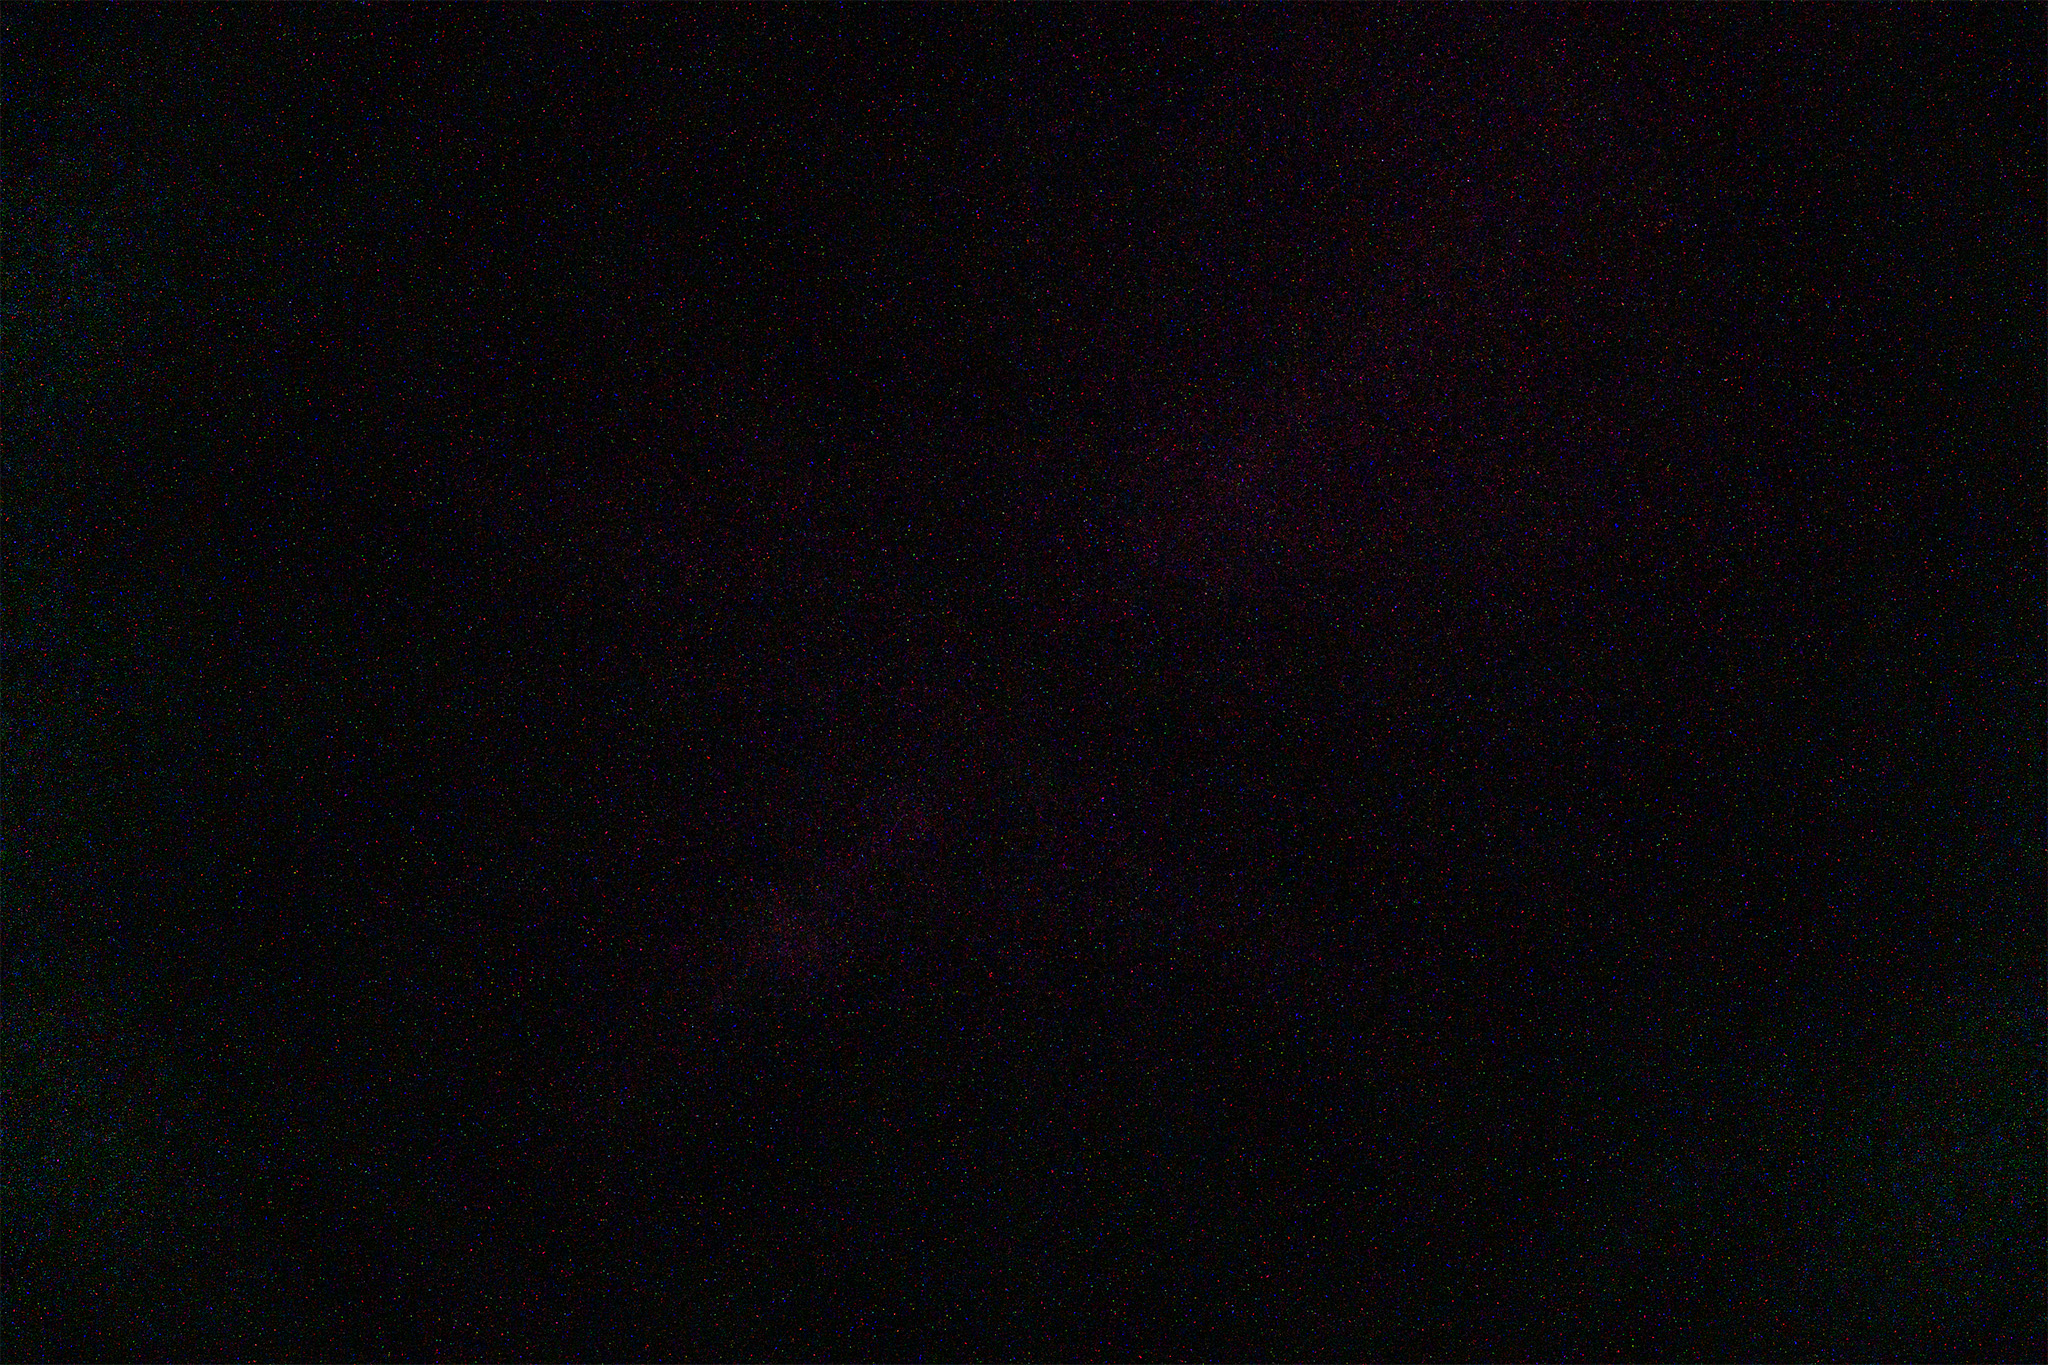
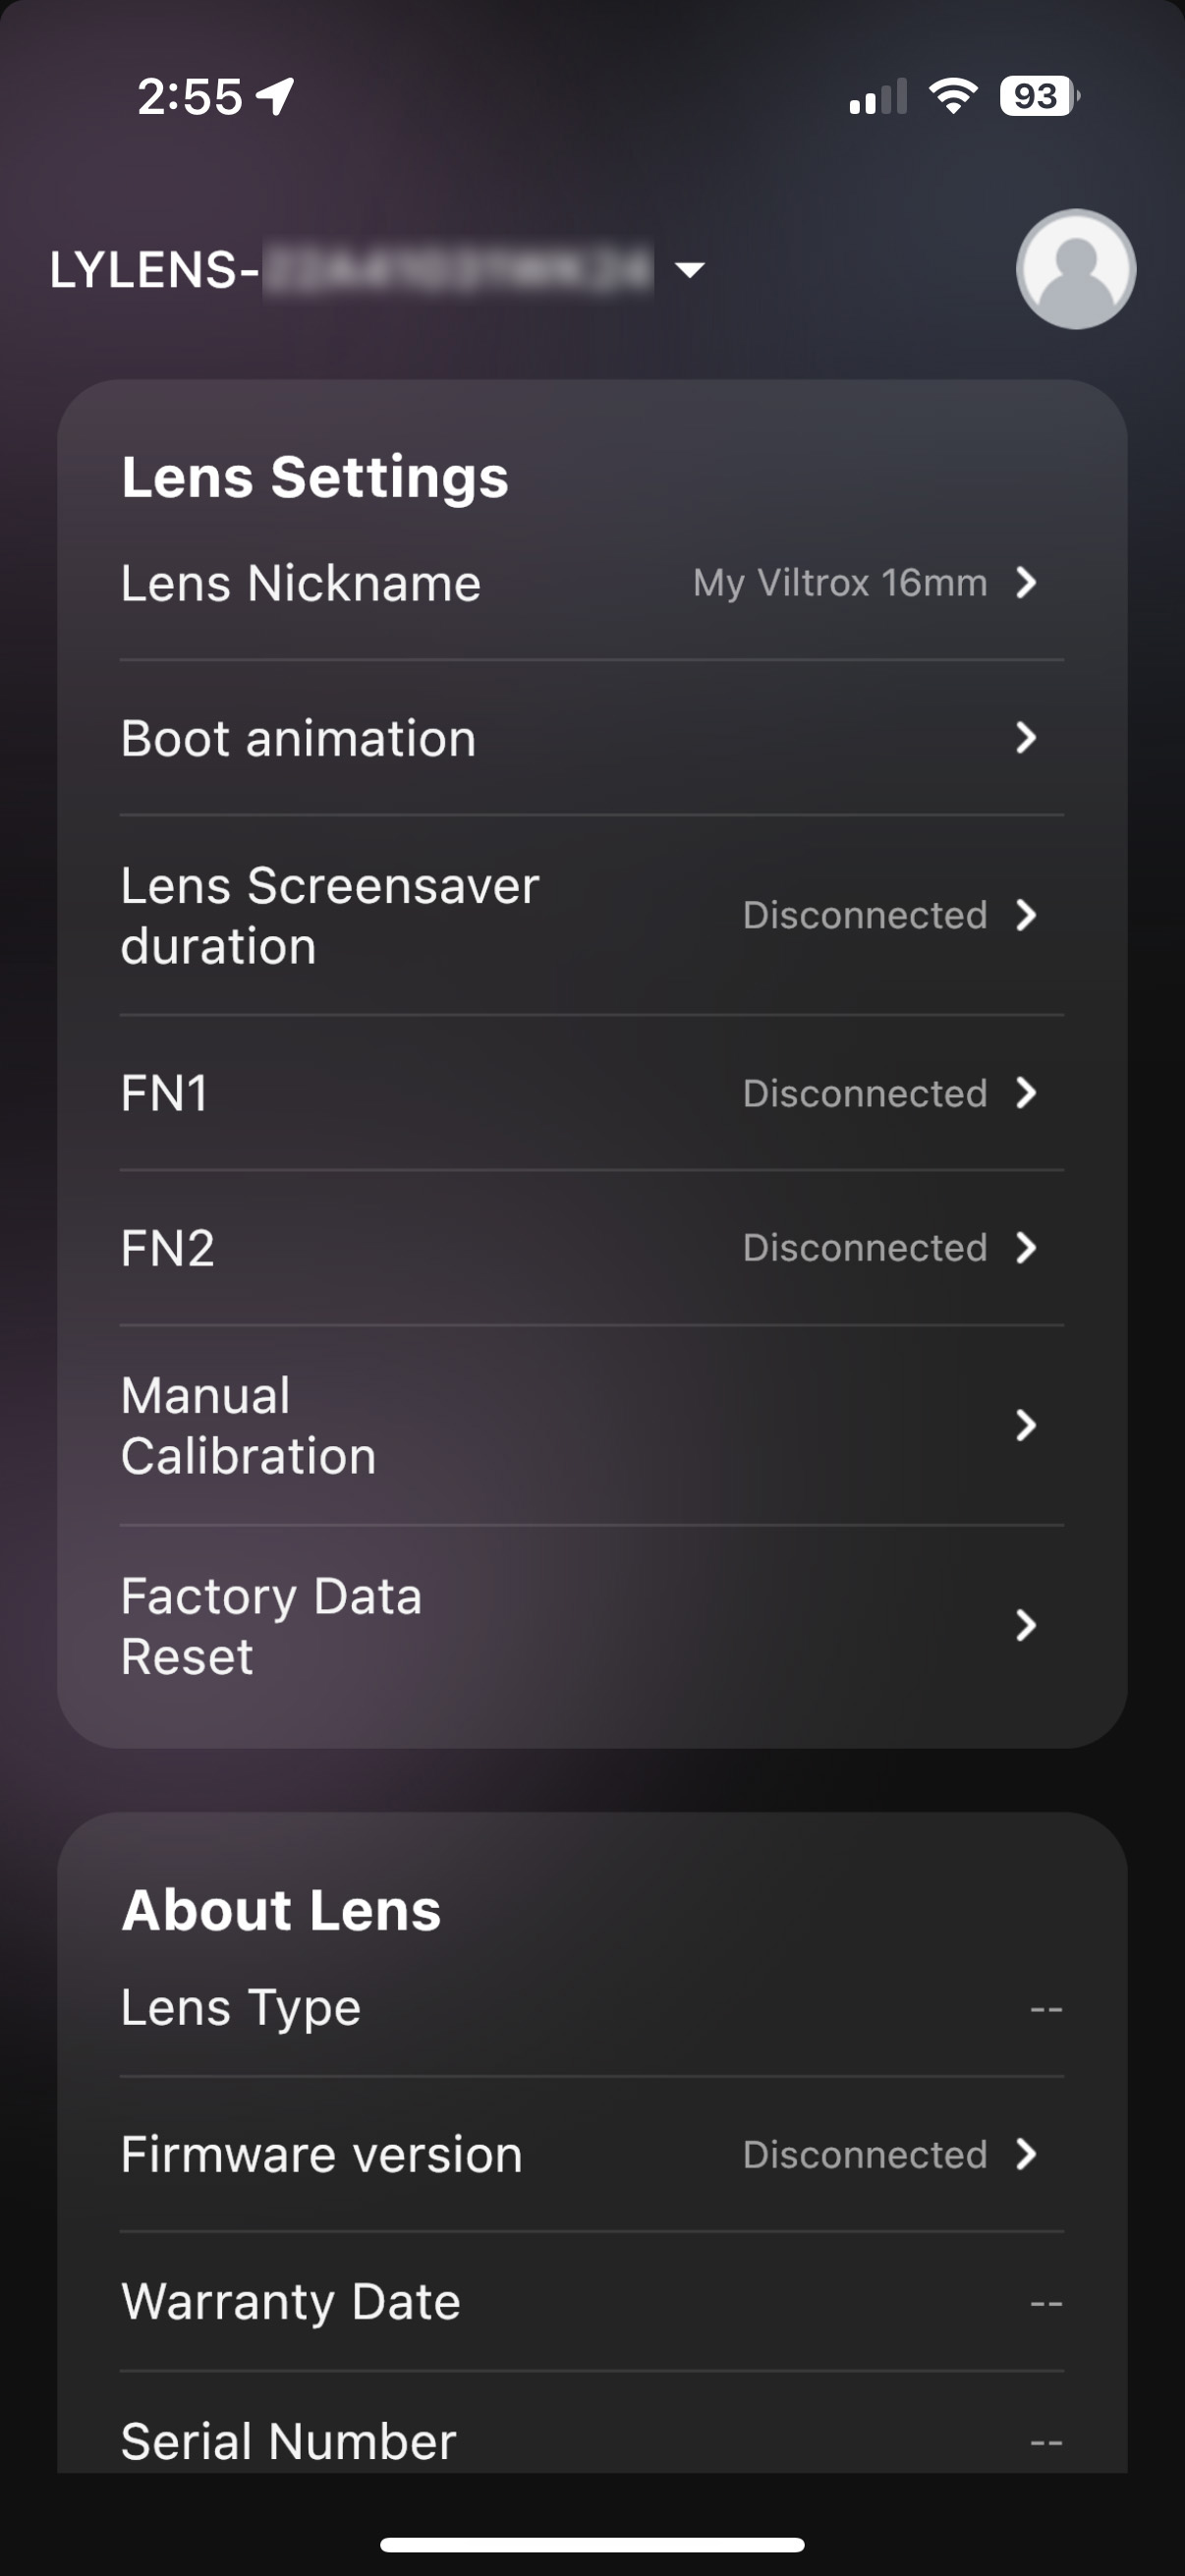
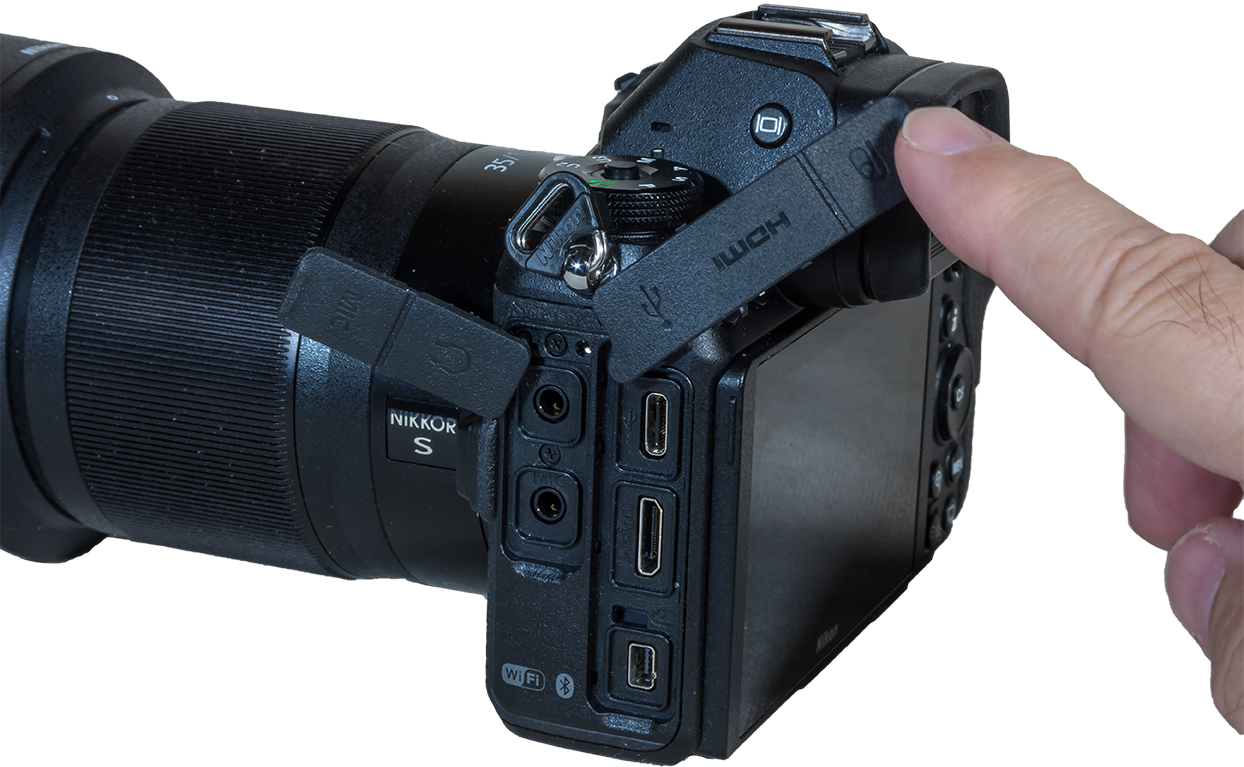
NOTE ADDED FEB 24, 2025 — I tested all lenses on a stock camera. But when used on an astro-modified camera with greater red and infra-red sensitivity, the Viltrox 16mm can add a noticeable red glow or flare to images, as a colleague has found and reported to me. I did confirm this with very long exposures and high ISOs with my stock Z6III. It barely shows up in dark frames boosted a lot for brightness (see below – it’s the faint magenta band across the centre of the frame).
But in modded cameras it is much more obvious. This comes from the lens’s top OLED display. The trick is to slightly dismount the lens, which turns the display off, but still maintains data contact to the camera. Viltrox is aware of the issue and has said they will fix it in a firmware update.
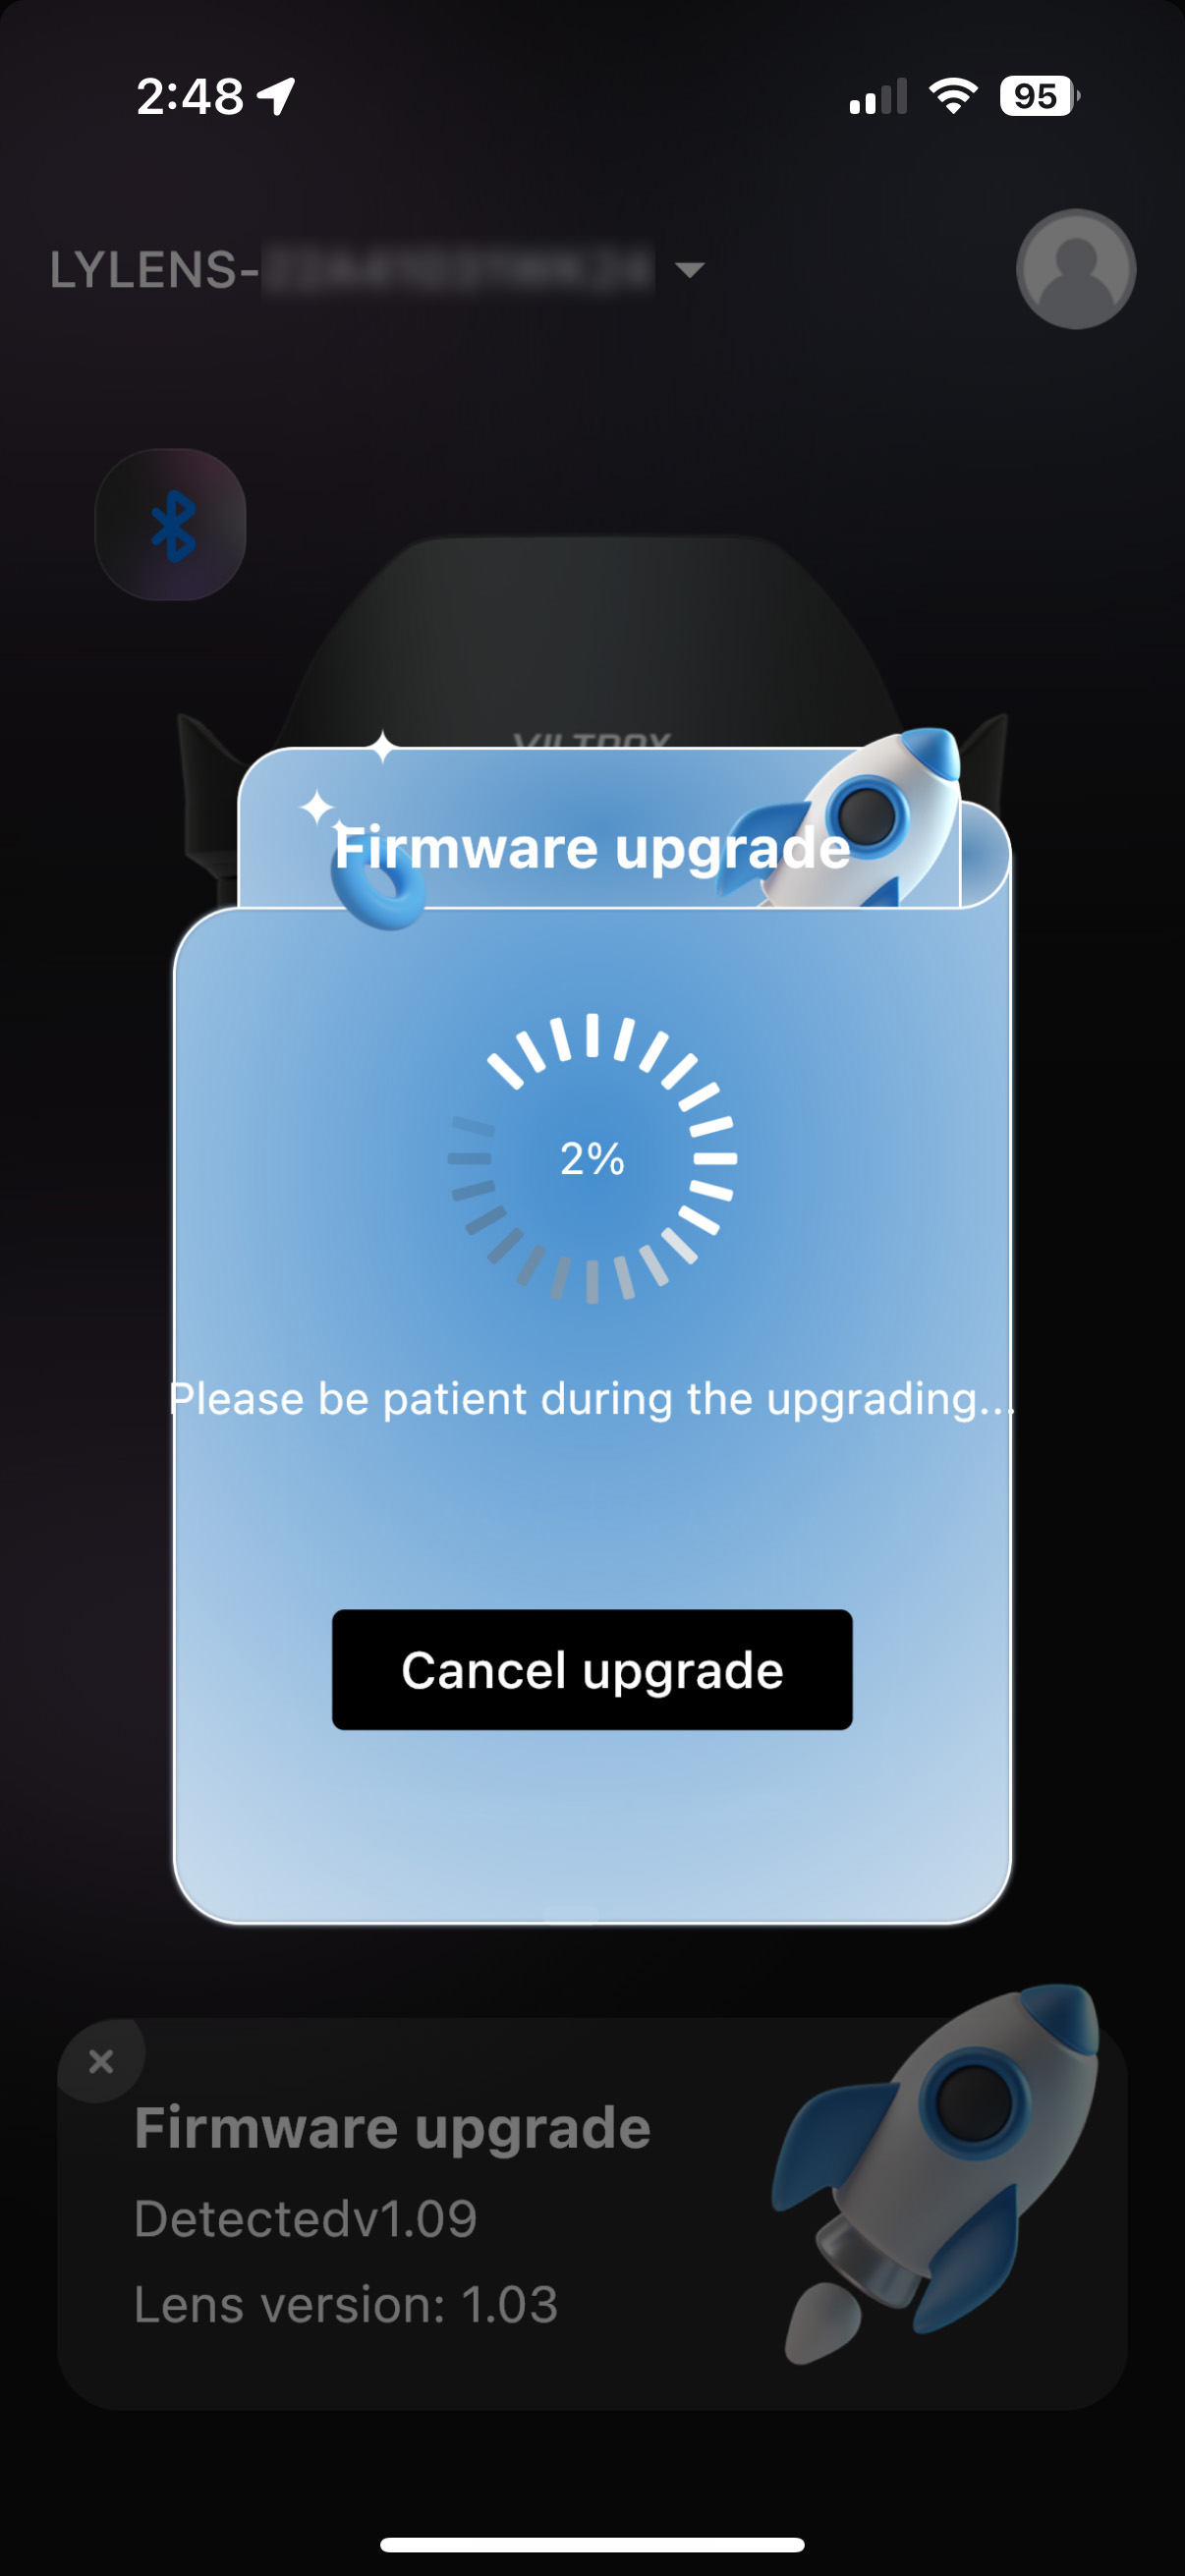
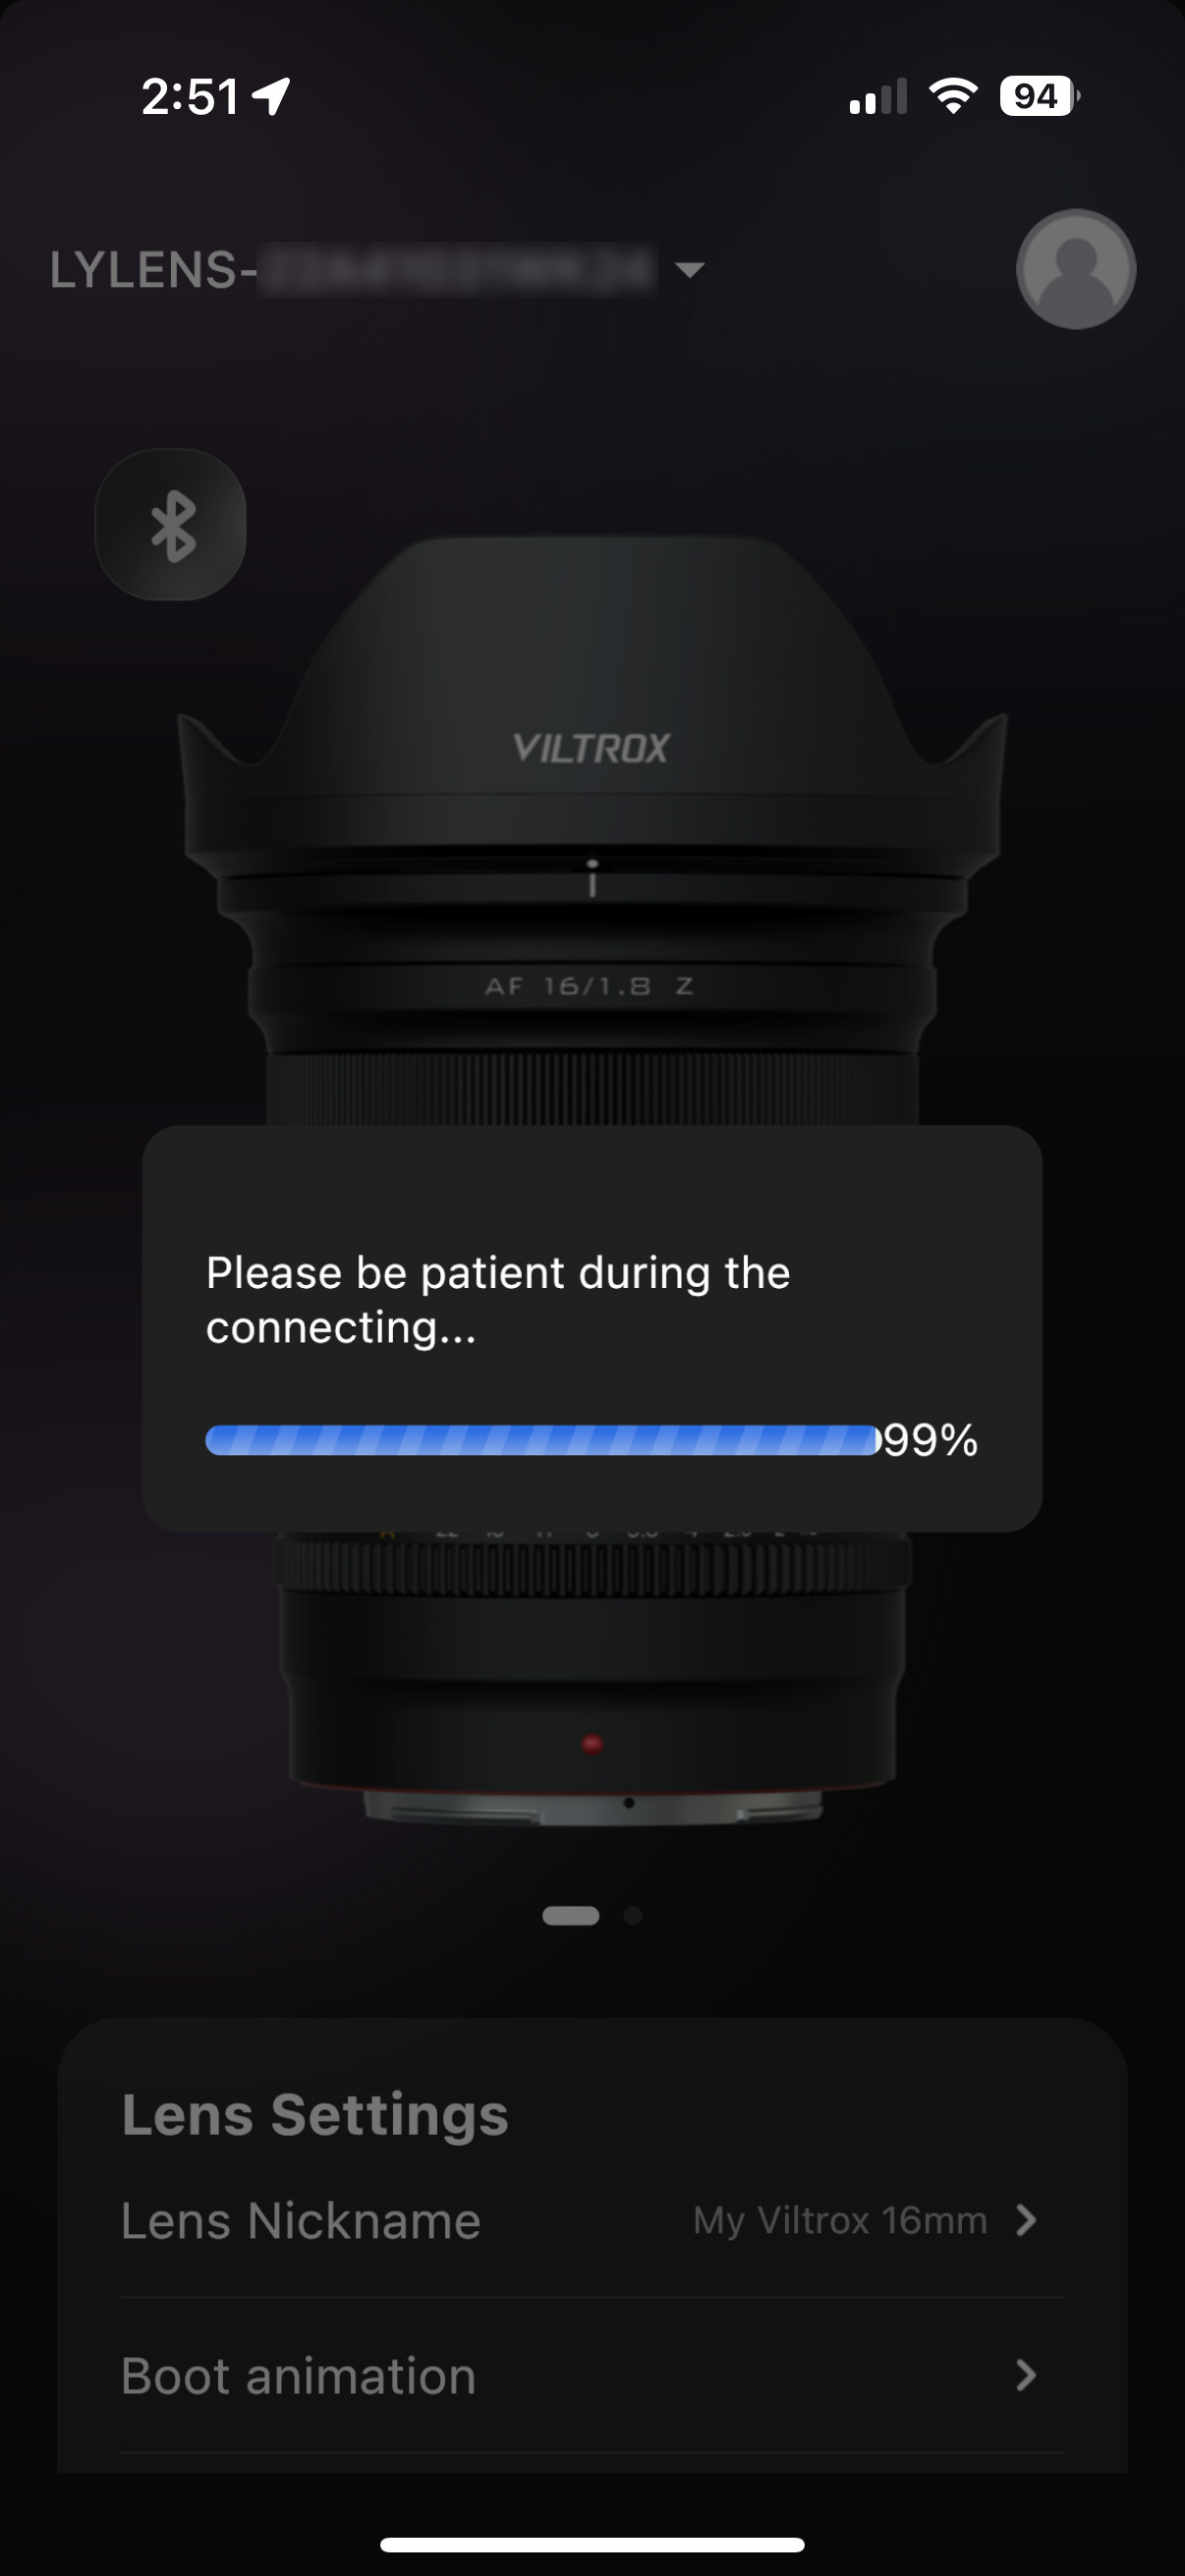
With Viltrox lens fully engaged and display ONUpdate at your risk!Connect if you can!Set if you can!
Uniquely, this and other Viltrox lenses have Bluetooth built in, for direct connection to a mobile device for firmware updates and lens settings, shown above. However, I found the app buggy; it would connect to the lens, but then refuse to allow settings to be changed, claiming the lens was not connected. Or the app would freeze, disconcerting during a firmware update. Luckily, that did not brick the lens.
Viltrox 16mm Corner Aberrations
The four panels show the small corner area outlined in the centre inset that shows the entire image.
At the extreme corners, the Viltrox shows some softness (perhaps from field curvature), but only minimal astigmatism and lateral chromatic aberration when wide open at f/1.8, and slightly sharper corners at f/2. At f/2.8 corner performance is nearly perfect, and certainly is at f/4.
This is a level of aberration correction even the most premium of lenses have a hard time matching.
Viltrox 16mm Vignetting
The panels show the left side outlined in the centre inset, which shows the f/1.8 image.
As is often the case with wider lenses, the Viltrox does show a great deal of vignetting at f/1.8, more so than the Nikkor 20mm. While this can be corrected in processing it will raise noise levels.
Stopping down to just f/2 helps, but the field becomes more uniform only at f/2.8, the sweet spot for this lens for the best all-round performance. But it offers the speed of f/1.8 when needed, such as for auroras.
If you prefer a wider field than a 20mm provides, the Viltrox 16mm (also available for Sony) is a great choice that won’t break the bank. Until Canon changes their third-party lens policy, Canon owners are out of luck getting this excellent lens.
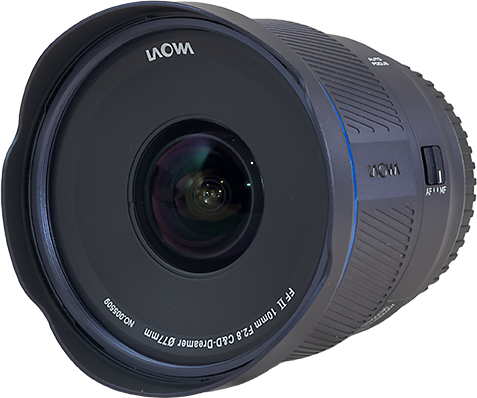
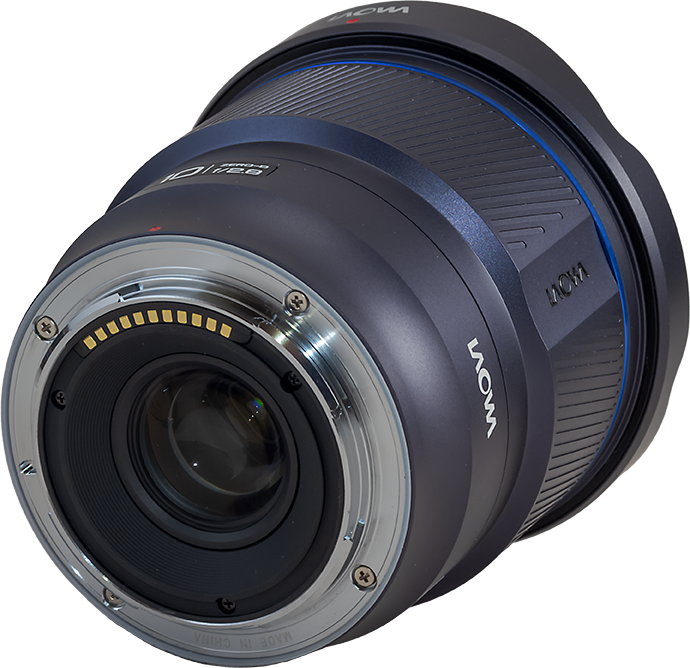
The Venus Optics/Laowa 10mm Zero-D FF ($800)
The Laowa also accepts 77mm filters, unusual for such a wide lens..The Laowa also has a weather-sealing gasket. The lens has a unique blue-grey finish.
The lens maker Venus Optics (aka Laowa) is known for its innovative and often unusual lens designs.
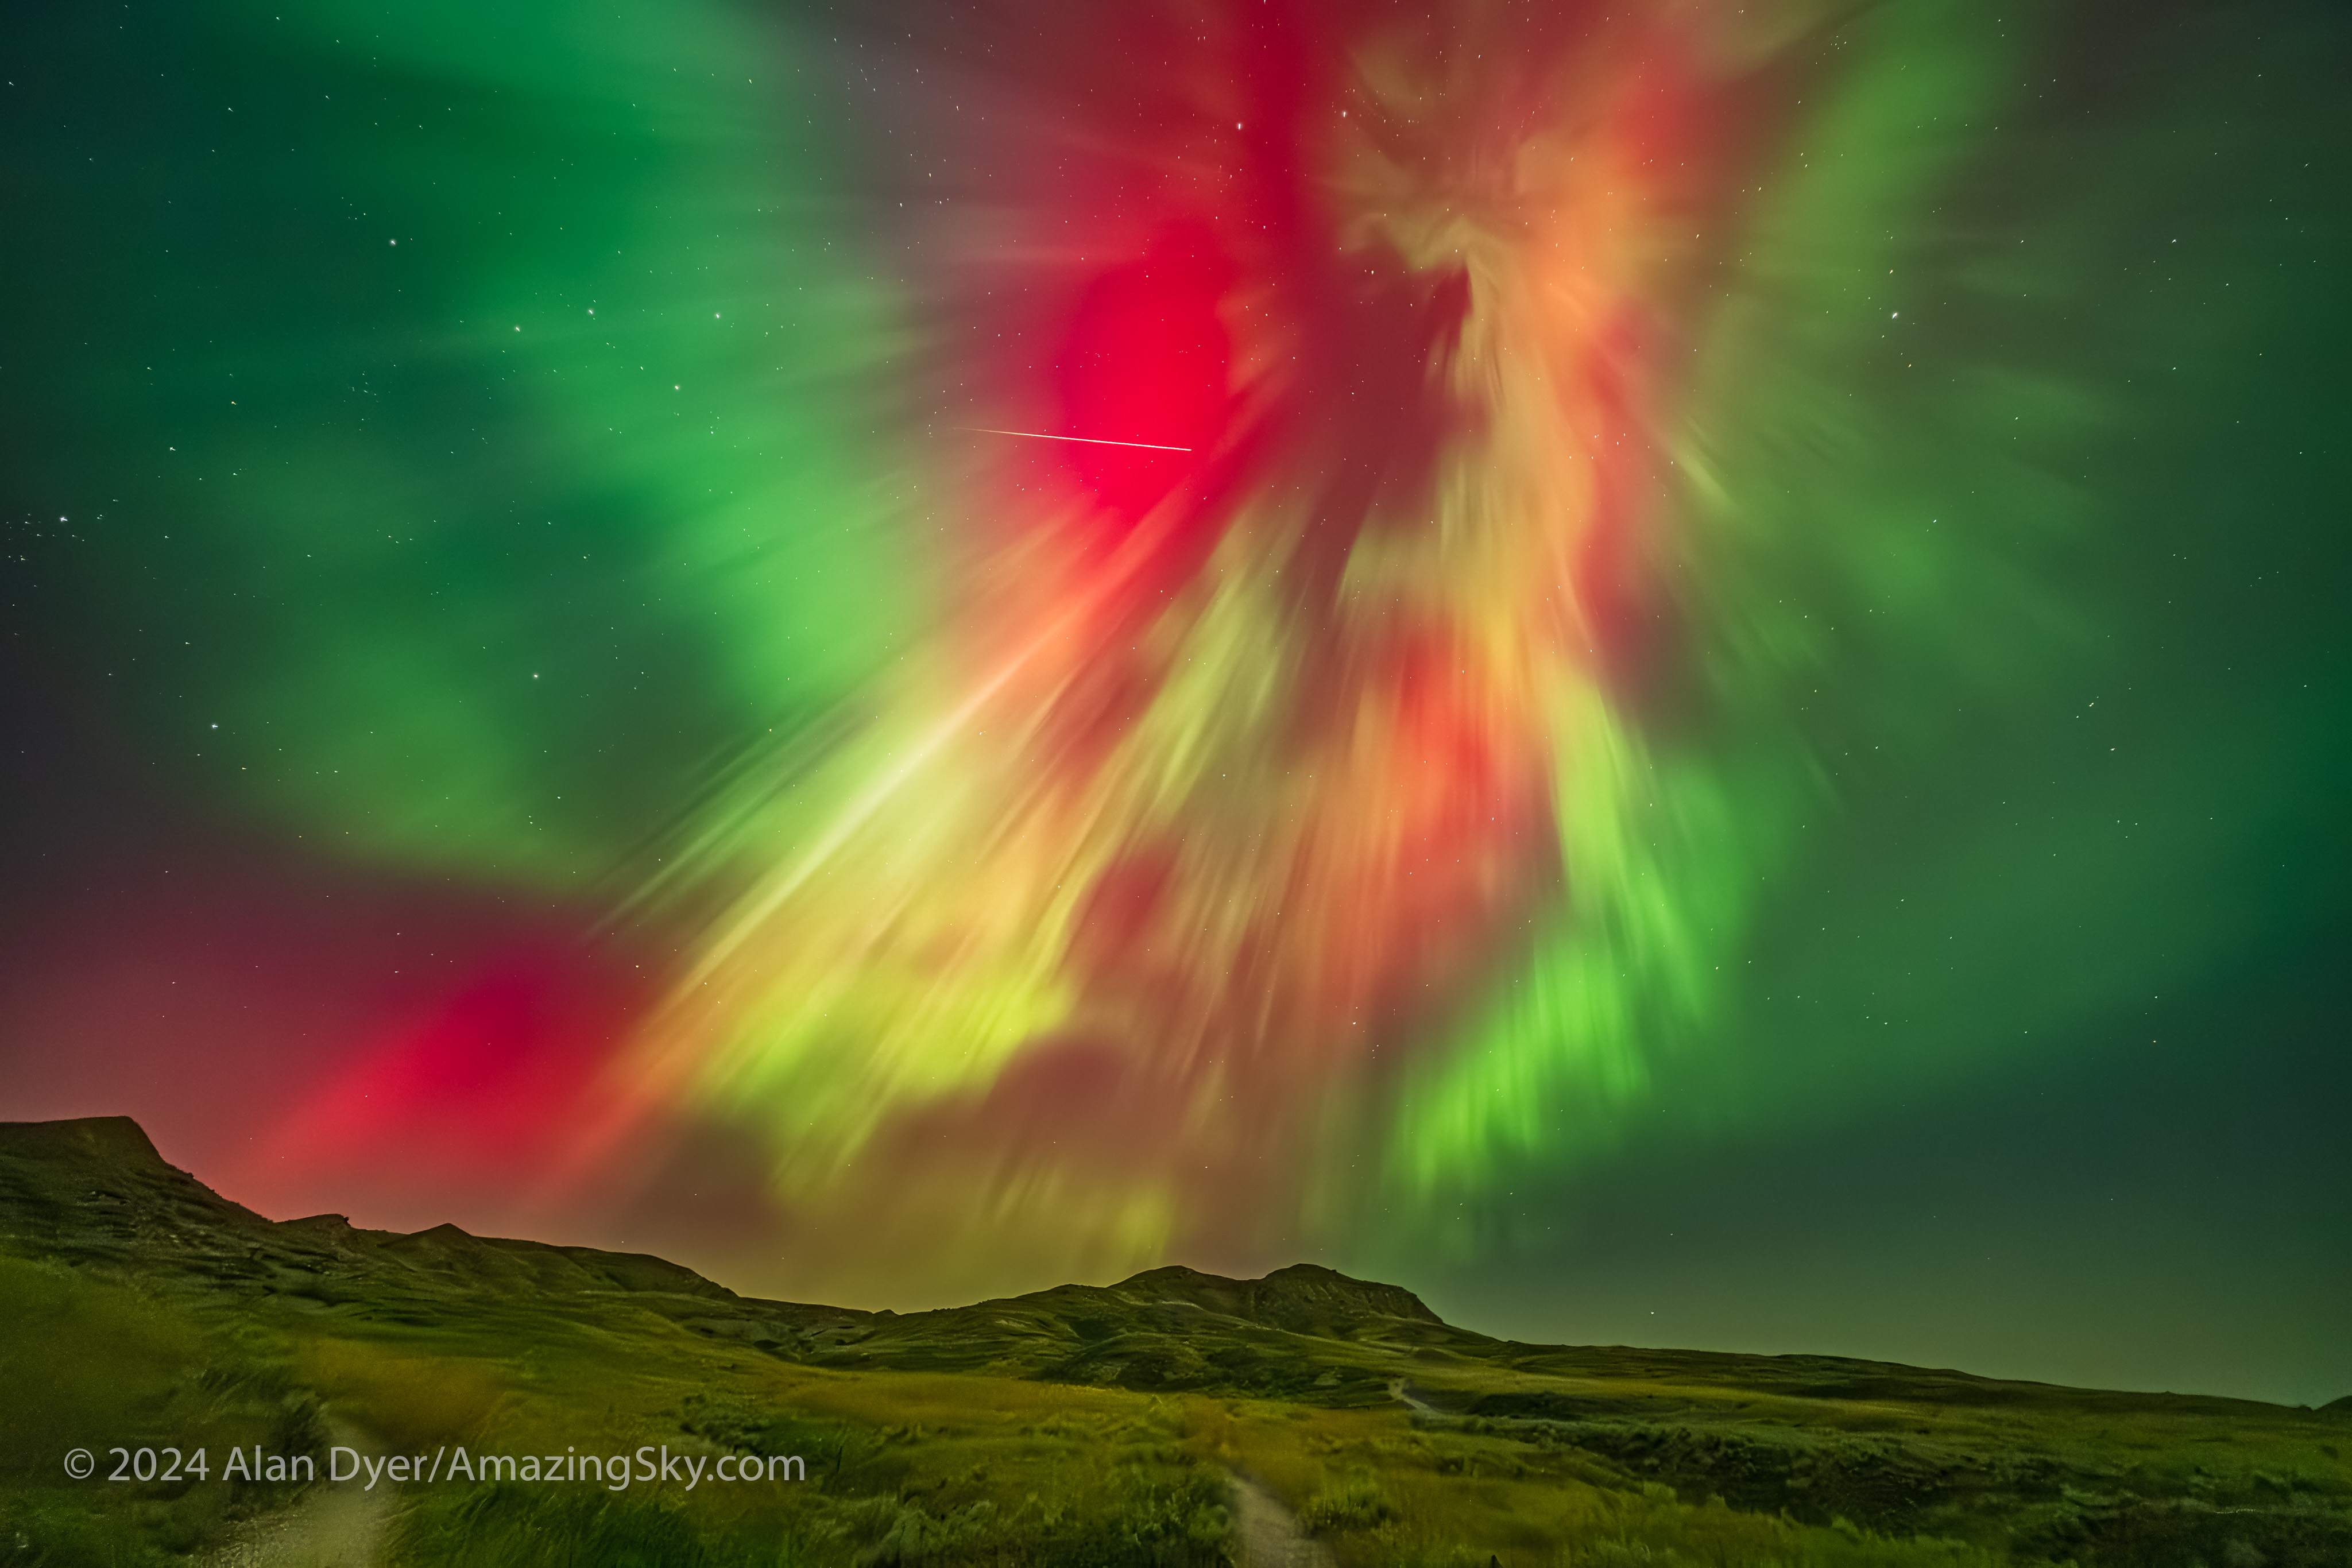
Introduced in 2024, their new 10mm offers the widest field available in a rectilinear (not fish-eye) lens for full-frame cameras. The “Zero-D” label is for the lens’s lack of pincushion or barrel distortion. Horizons remain straight no matter where they fall on the frame. However, objects at the corners become elongated a lot.
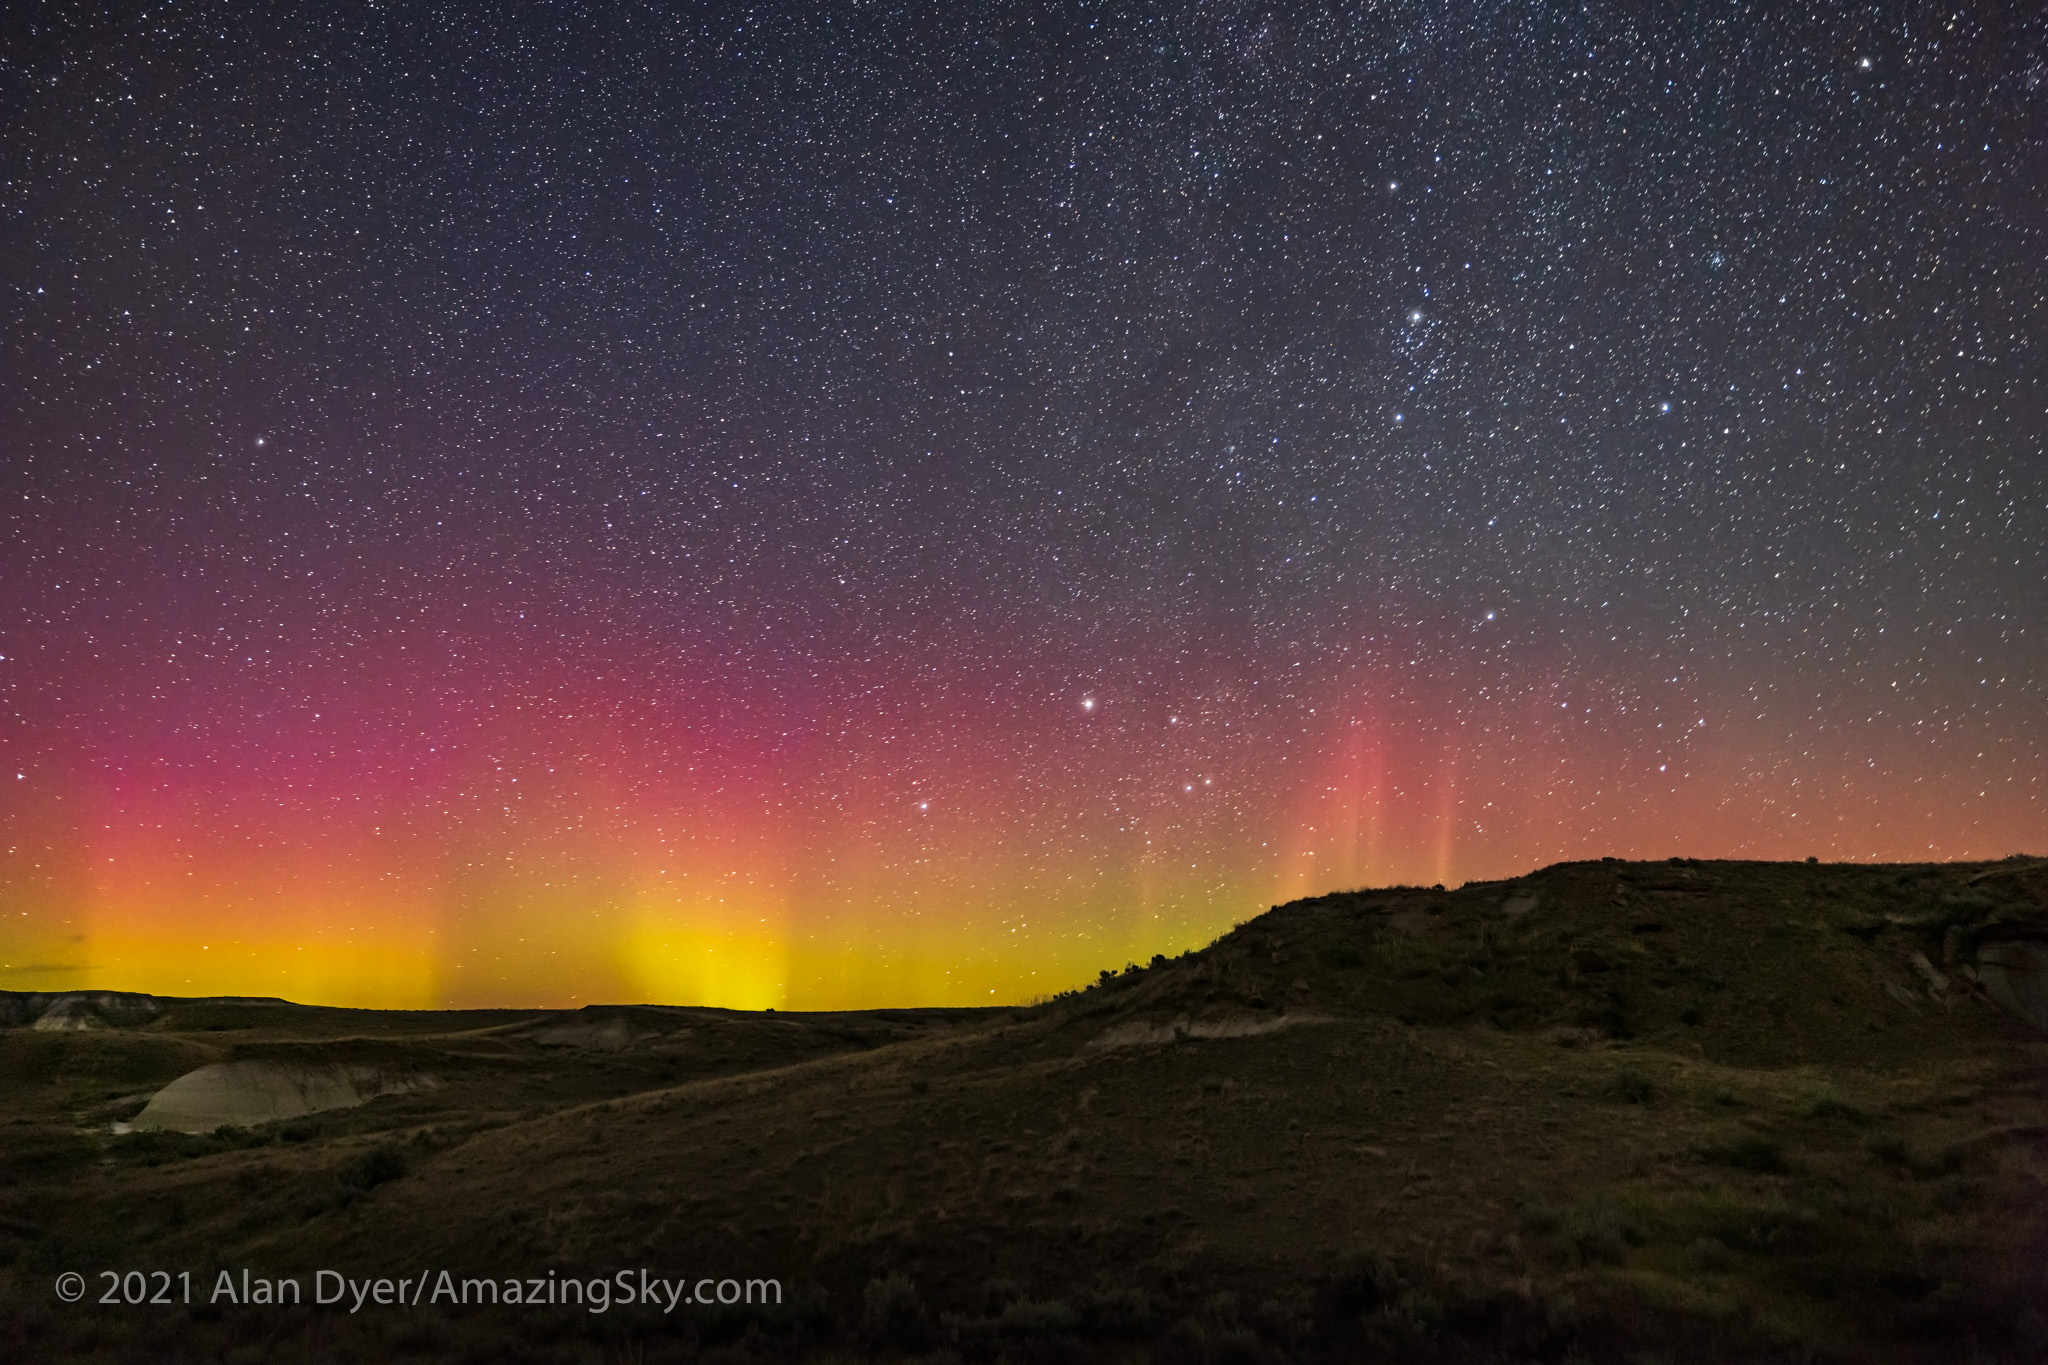
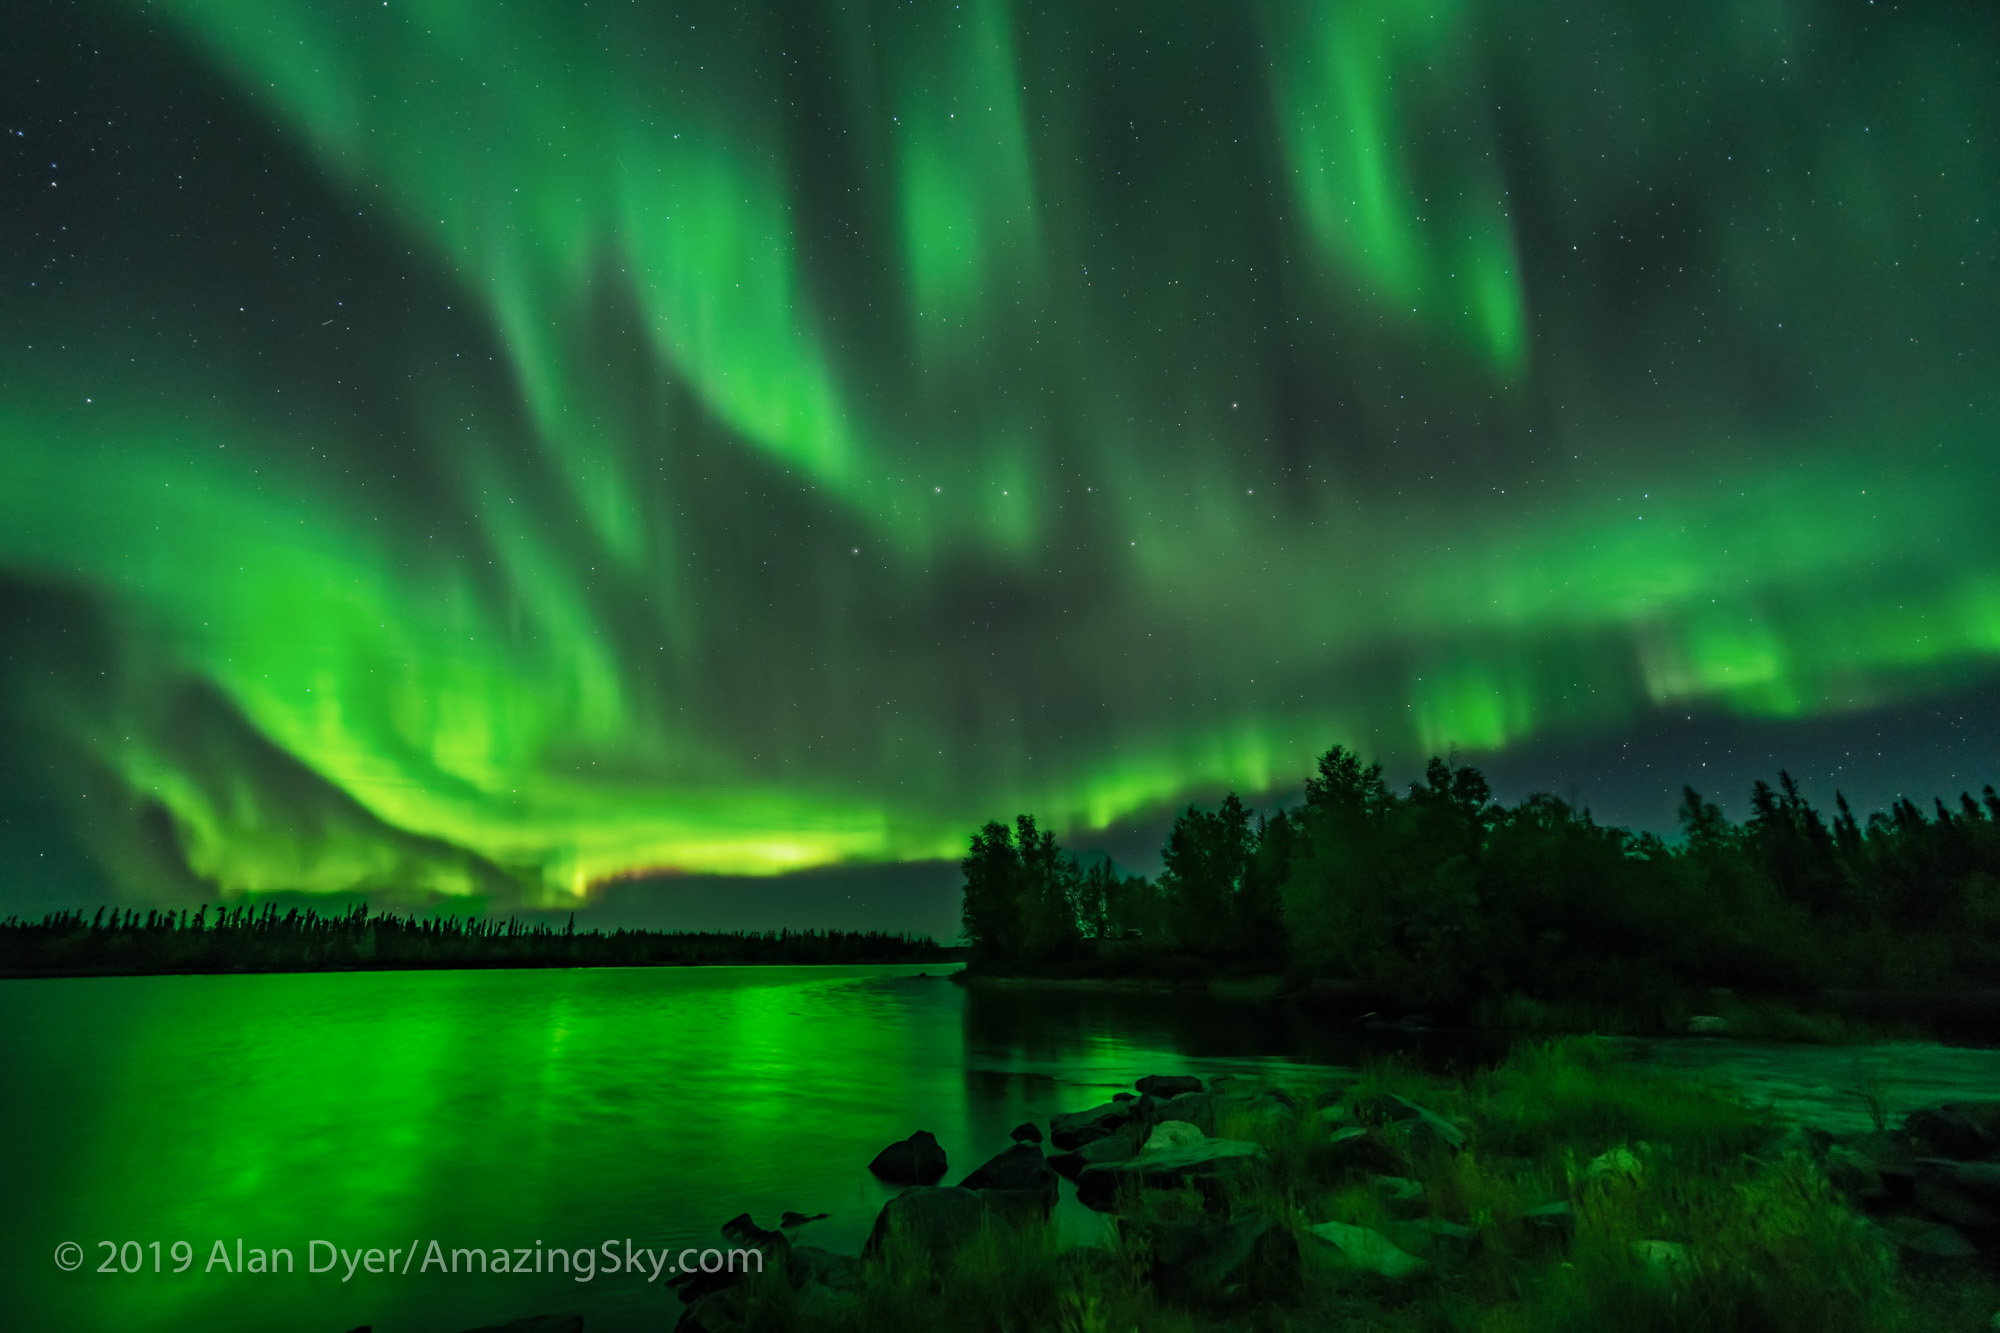
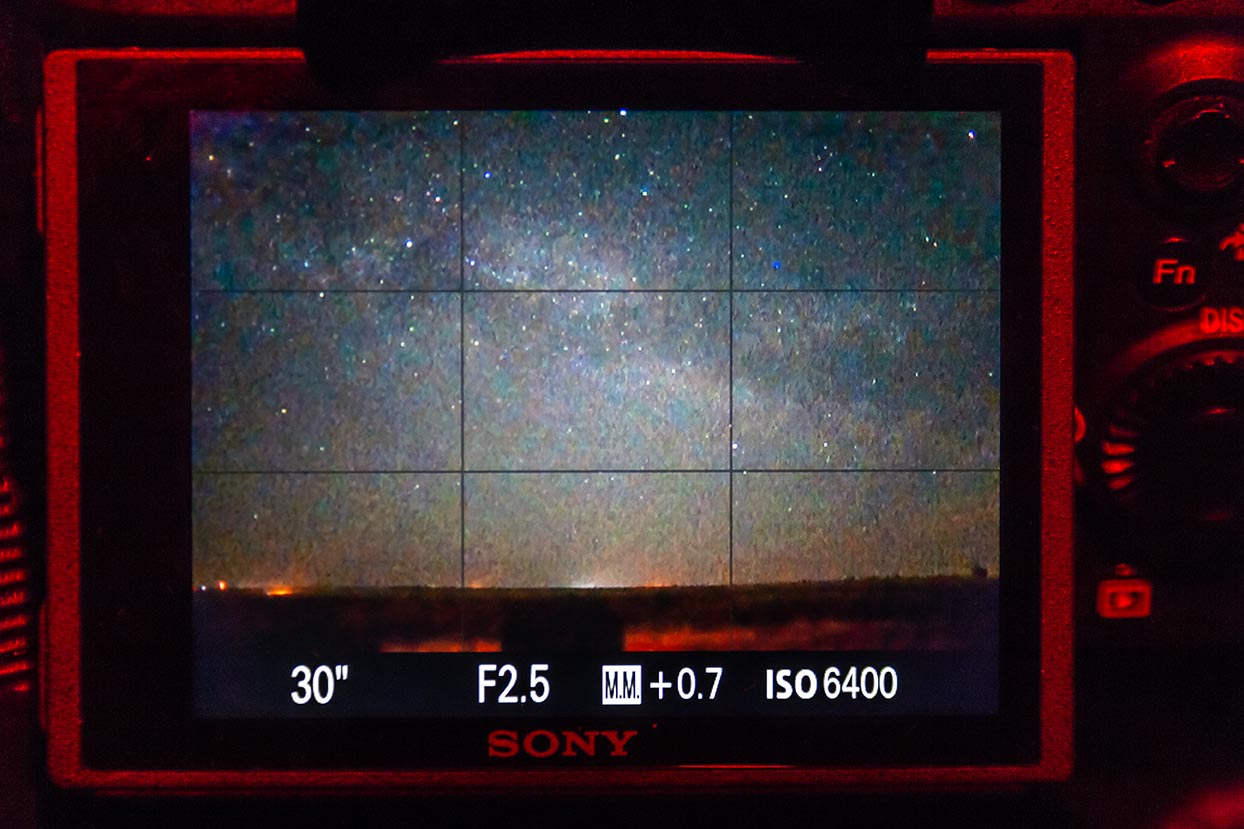
The Northern Lights in a superb display on August 11-12, 2024, at Grasslands National Park, Saskatchewan. This is with the Laowa 10mm wide open at f/2.8 on the Nikon Z6III at ISO 6400.
Even so, there’s a lot to be said for having a field that extends for 130° across the long dimension of a full-frame sensor. That’s more than enough to go from well below the horizon to past the zenith when the camera is in portrait orientation. Even in landscape orientation (as above) the lens covers nearly a 90° field across the short dimension, enough to go almost from horizon to zenith.
The f/2.8 speed is slower than the other lenses on test here, but is still faster than most ultra-wide lenses. Remarkably, it accepts common 77mm filters, the same as the Nikkor 20mm and Viltrox 16mm.
The 10mm is available as an auto-focus lens for Sony E and Nikon Z, and in manual focus versions for Canon RF and Panasonic L, oddly all at the same price.
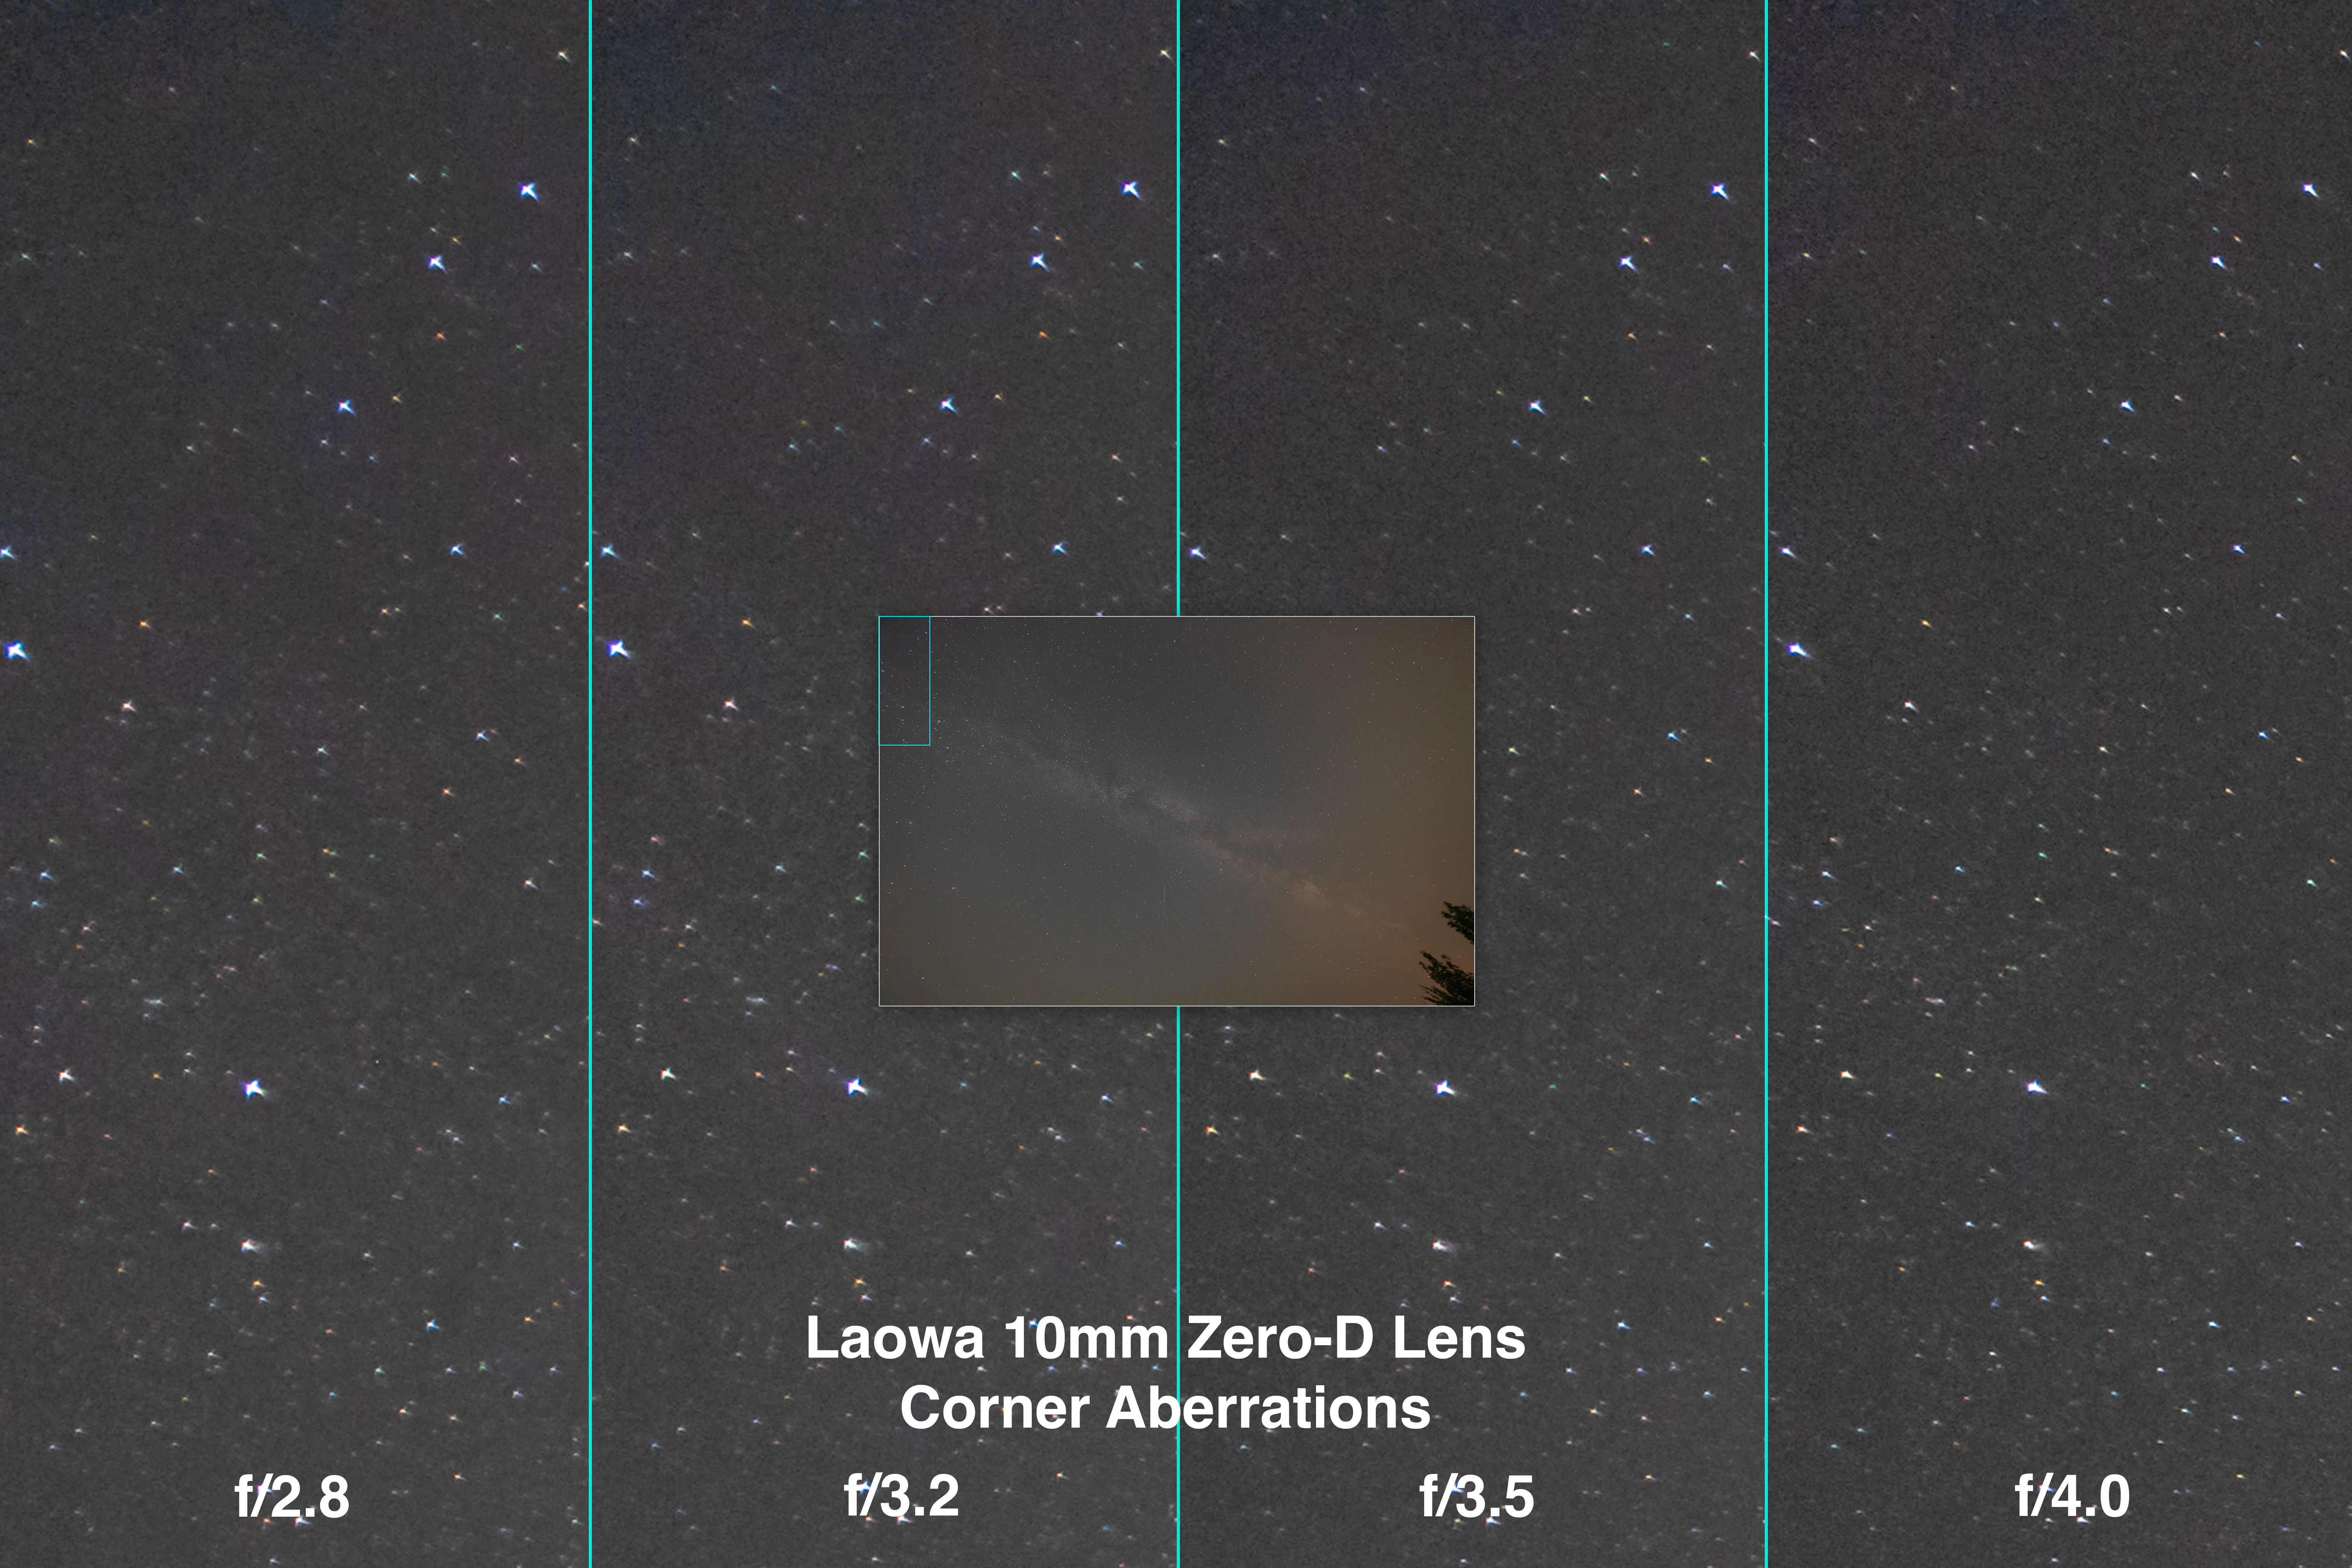
Laowa 10mm Corner Aberrations
The four panels show the corner area outlined in the inset, at four apertures between f/2.8 and f/4.
Corner aberrations are much worse than in the 20mm and 16mm lenses, showing a fair degree of tangential and sagittal astigmatism, elongating stars radially and adding wings to them, respectively. The aberrations are larger and reach deeper into the frame than in the Nikkor and Viltrox lenses.
There’s also some lateral chromatic aberration adding blue and purple fringes to the stars at the corners. Stopping down to f/4 improves, but doesn’t eliminate, the aberrations.
Laowa 10mm Vignetting
The four panels show the left side, as outlined in the inset, which shows the f/2.8 image.
Edge and corner darkening were also worse than in the other lenses and required about a +50 setting to correct in Adobe Camera Raw, far less than the maximum of +100. So it’s still quite acceptable and correctable.
However, while stopping the lens down to f/4 improves vignetting, it does not eliminate it, still requiring a +40 correction. Vignetting will be a factor to deal with in all astrophotos with this ultra-wide lens.
Laowa 10mm Lens Flares
Three panels showing the Moon framed in the left corner (L), centred (C), and in the right corner (R).
With such a wide lens, the Moon or other bright light sources are bound to be within the frame. The Laowa exhibits a prominent internal lens flare when bright objects are in the corners, but just in the corners. Objects near the edge but centered are fine.
Showing the effect of decreasing aperture on the lens flare and bright light source.
Stopping down the lens adds diffraction spikes (or “sunstars”) to bright lights, but doesn’t eliminate the circular internal reflection. None of this is a serious issue for most images, but it is something to be mindful of when framing nightscapes.
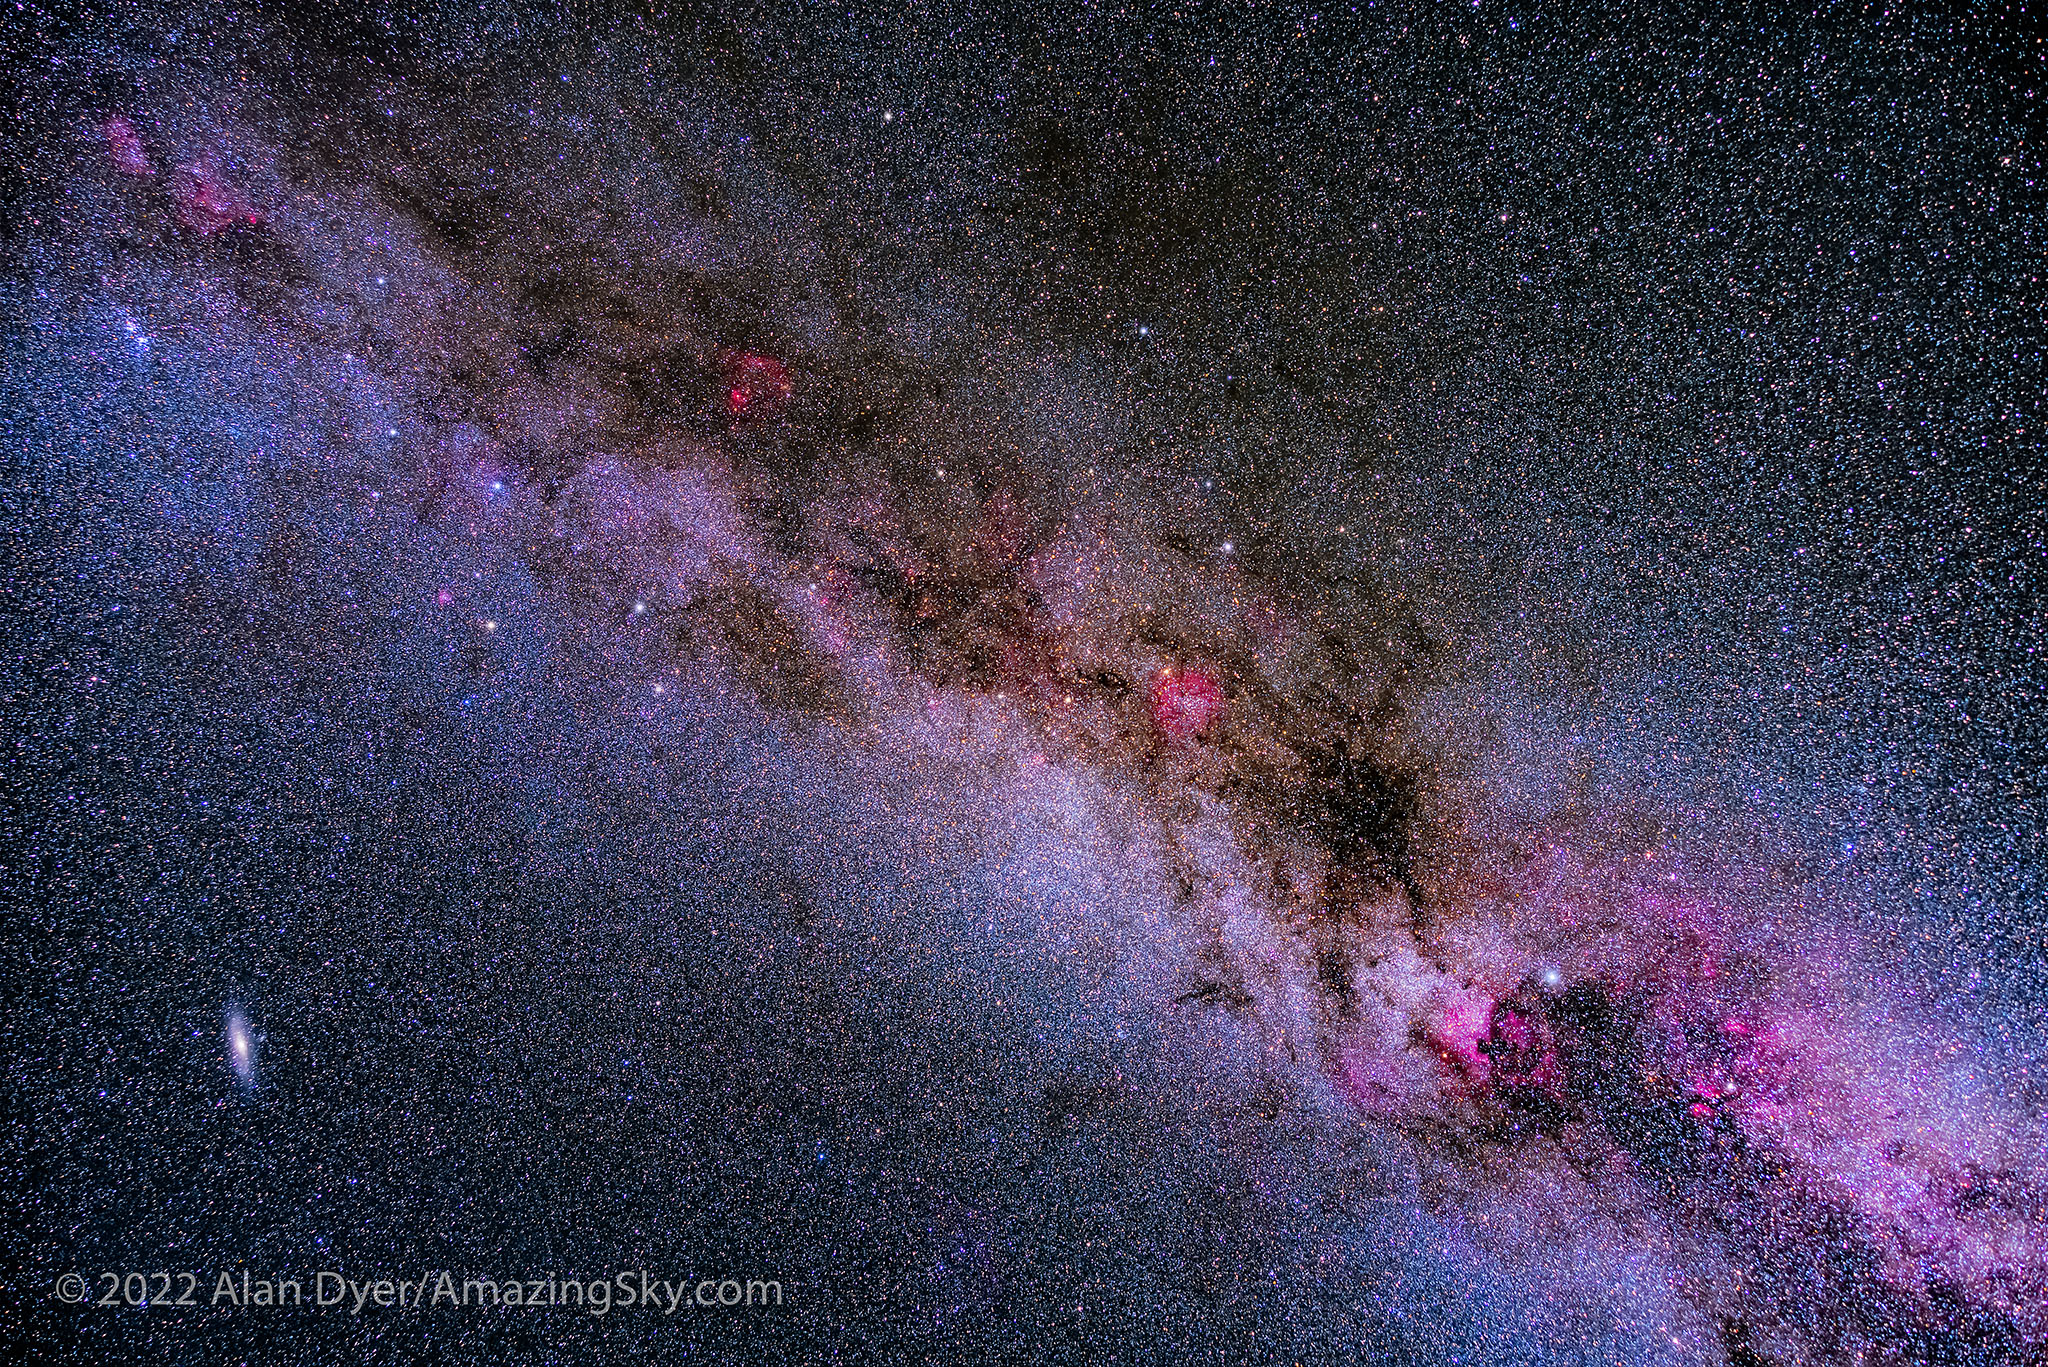
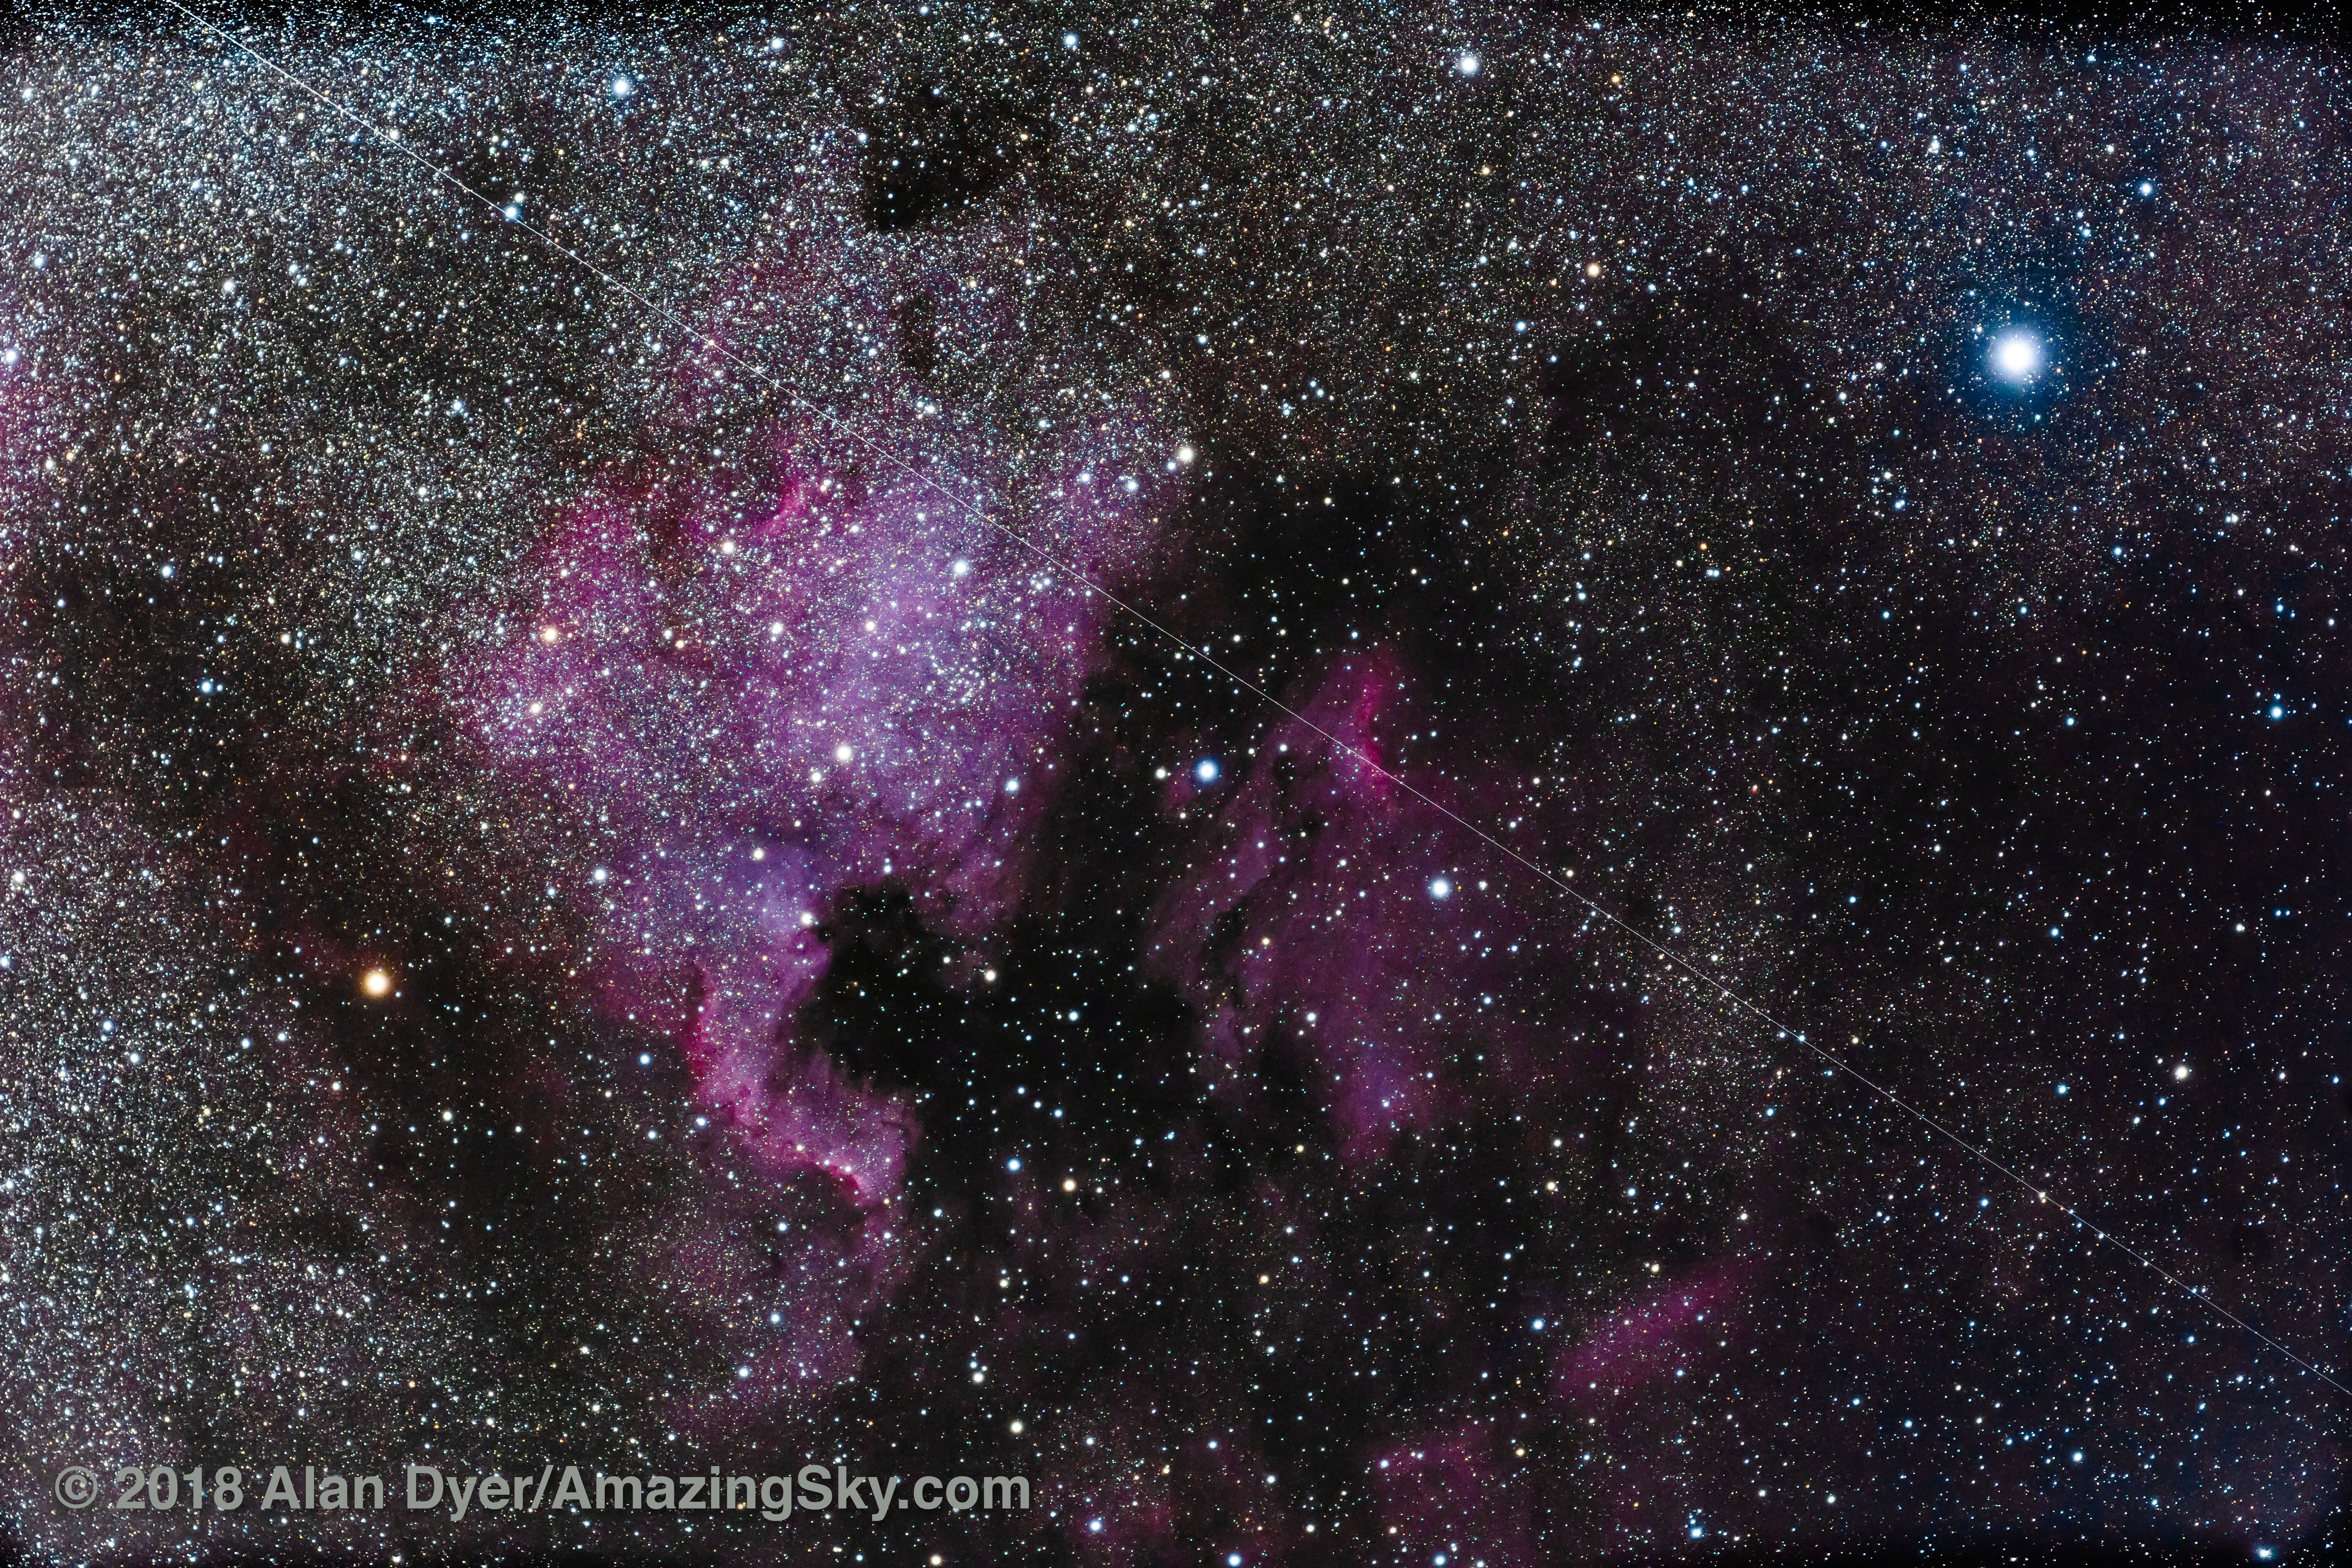
With the Laowa 10mm lens at f/2.8 on the Nikon Z6III at ISO 3200. Note the Big Dipper at left and Orion at right.
In Milky Way and starfield images, constellations in the corners can distort into unnatural shapes that look odd, as I show above. While the lens can take in a great swath of sky, its distortion and corner aberrations make it less than desirable for tracked Milky shots.
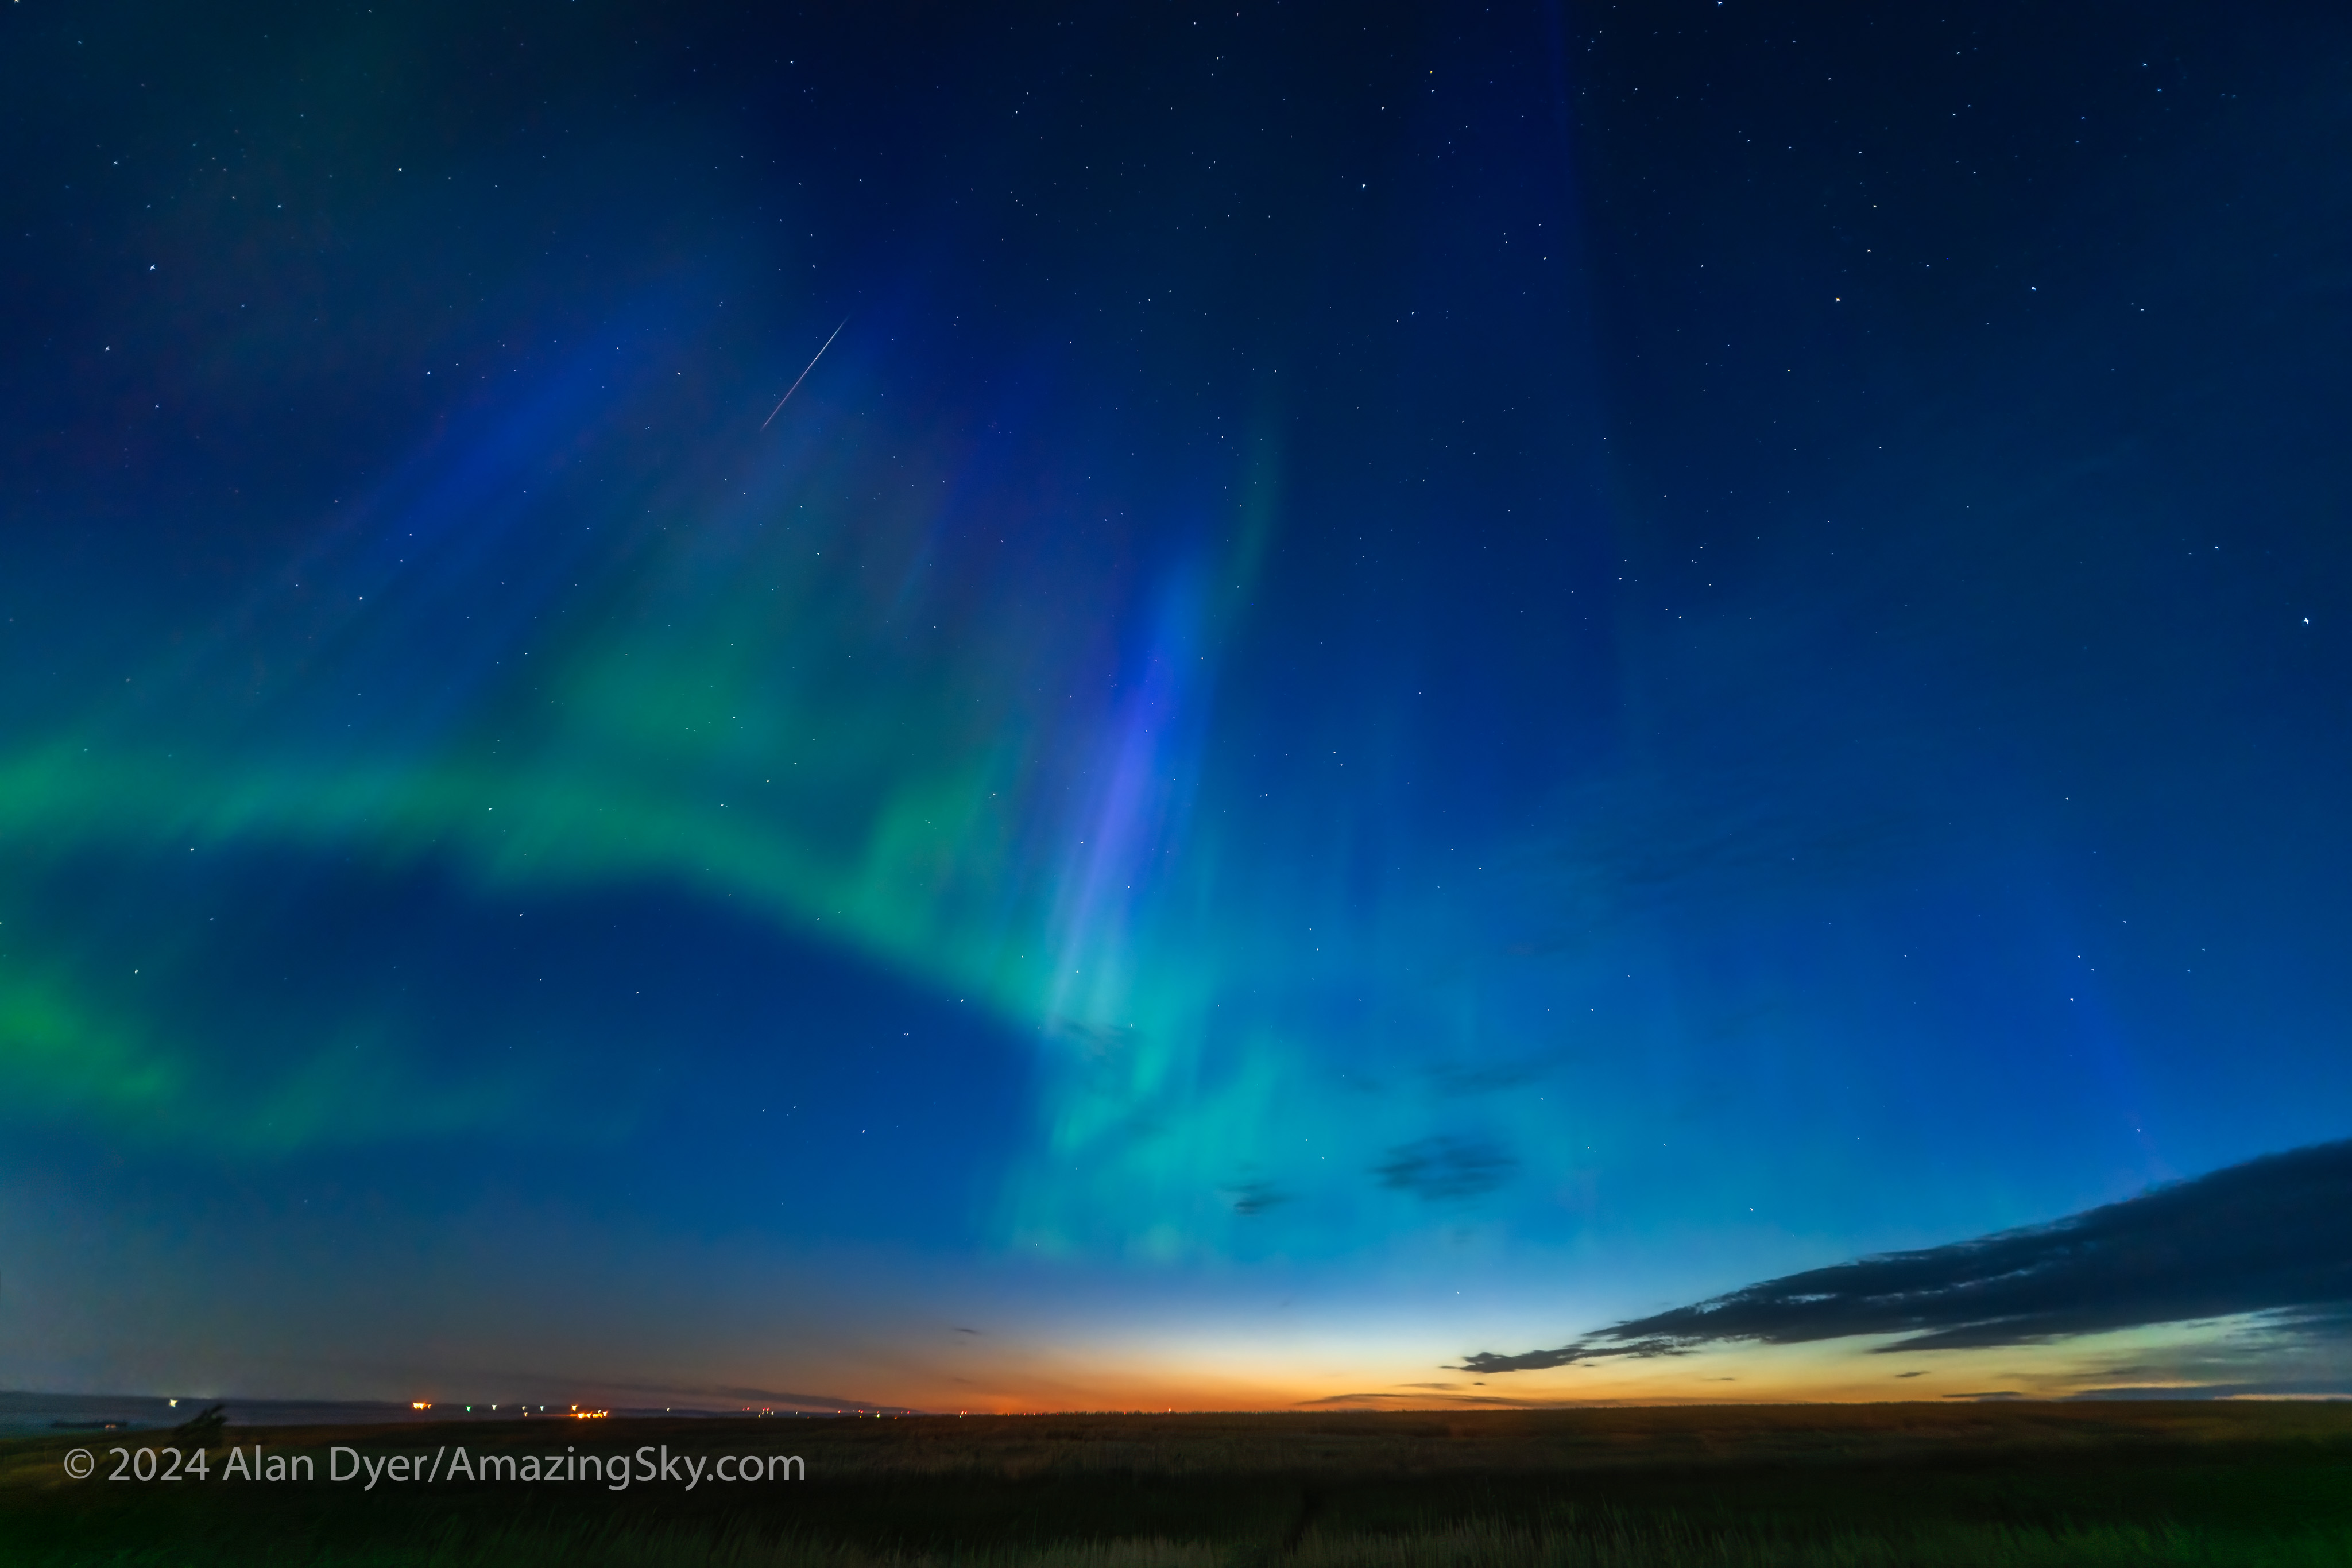
An aurora in the dawn twilight on September 17, 2024. A 4-second exposure with the Laowa 10mm at f/2.8.
Where the Laowa 10mm really proves its worth is for auroras, as above, which can require as wide a field as you can muster. Note the flat horizon.
For ultra-wide nightscapes in a single image (not a panorama) with a natural looking (not curved) horizon, and for meteor showers, the Laowa is just the ticket.
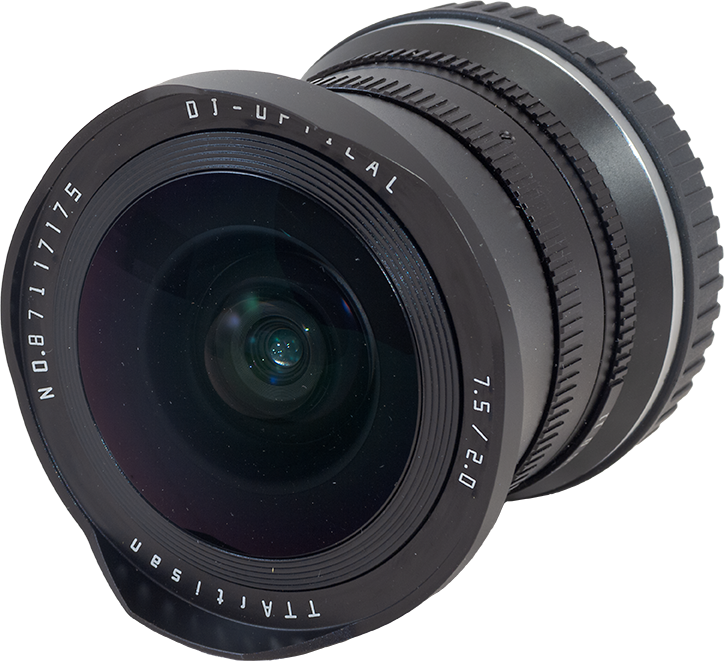
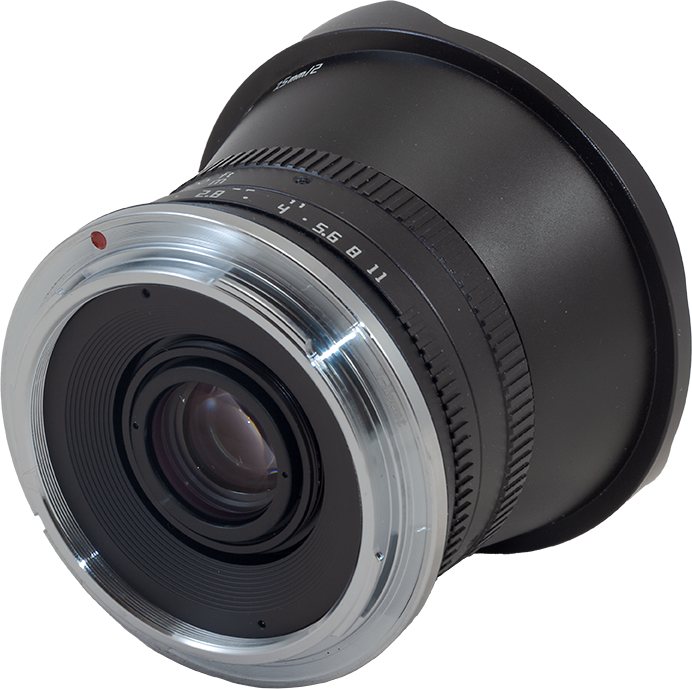
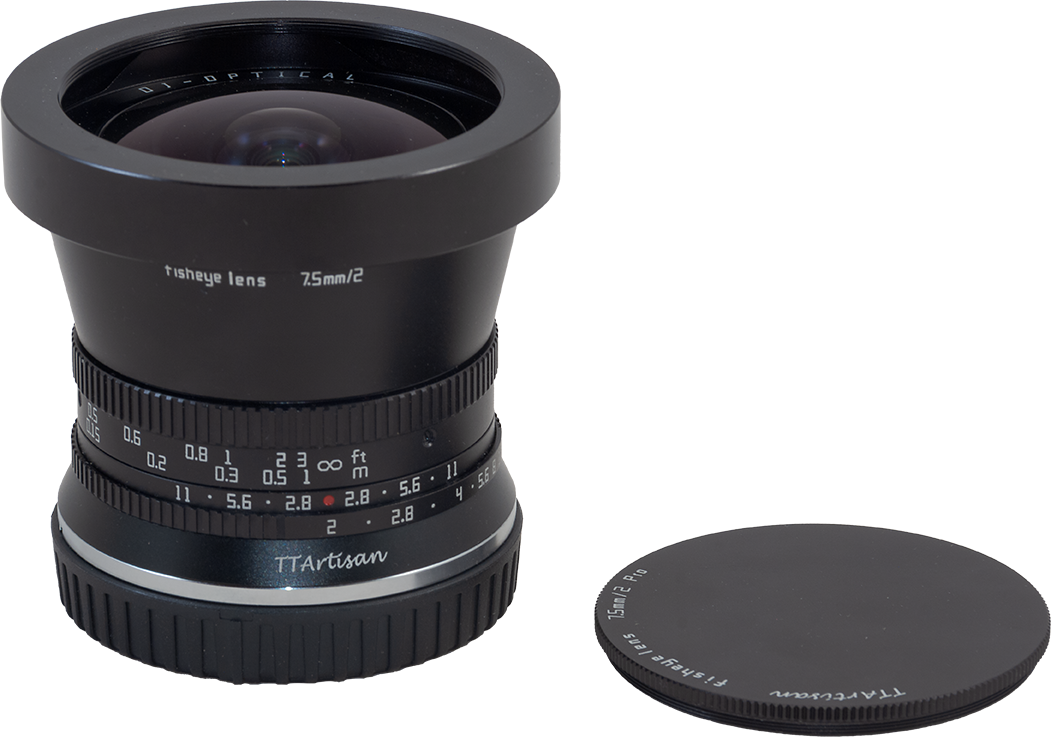
BONUS TEST: The TTArtisan 7.5mm f/2 Fish-Eye ($140)
The TTArtisan has a fixed lens hood. Front filters are not possible without vignetting. There’s no weather sealing or electrical connections at this price.
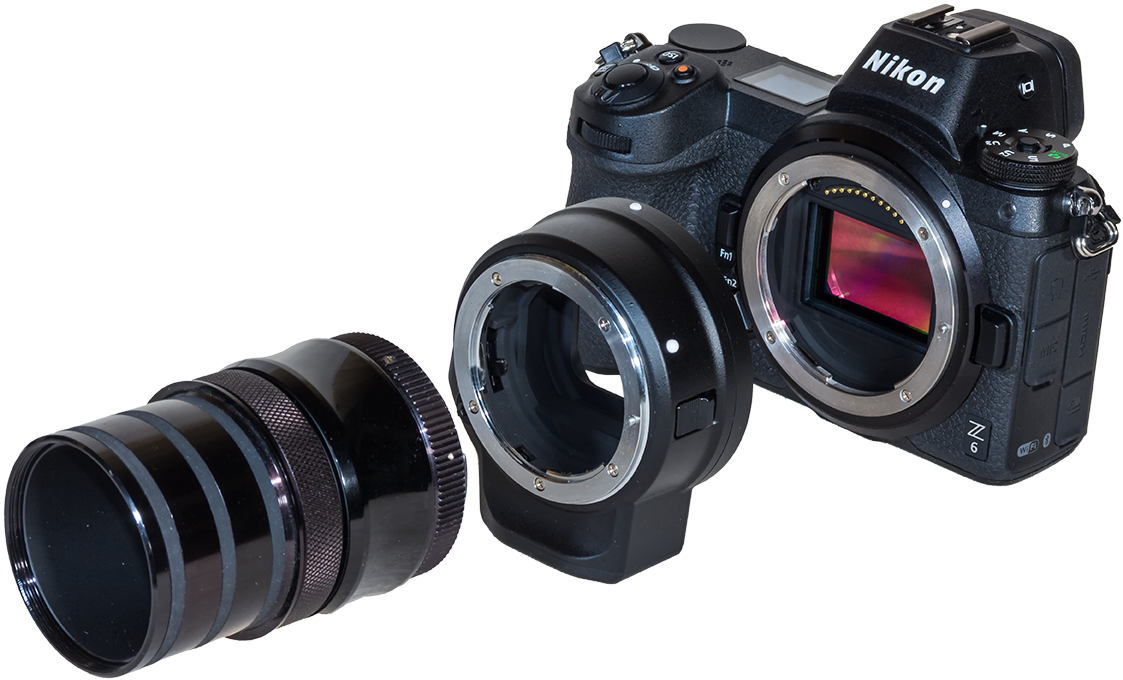
Technically, this lens is designed to be used on cropped-frame (or APS-sensor) cameras where it fills the frame with a curving horizon. But it works on a full-frame camera where it projects a circular image slightly larger in diameter than the short dimension of the frame, so not a complete circle as with a true circular fish-eye like the old Sigma 8mm f/3.5.
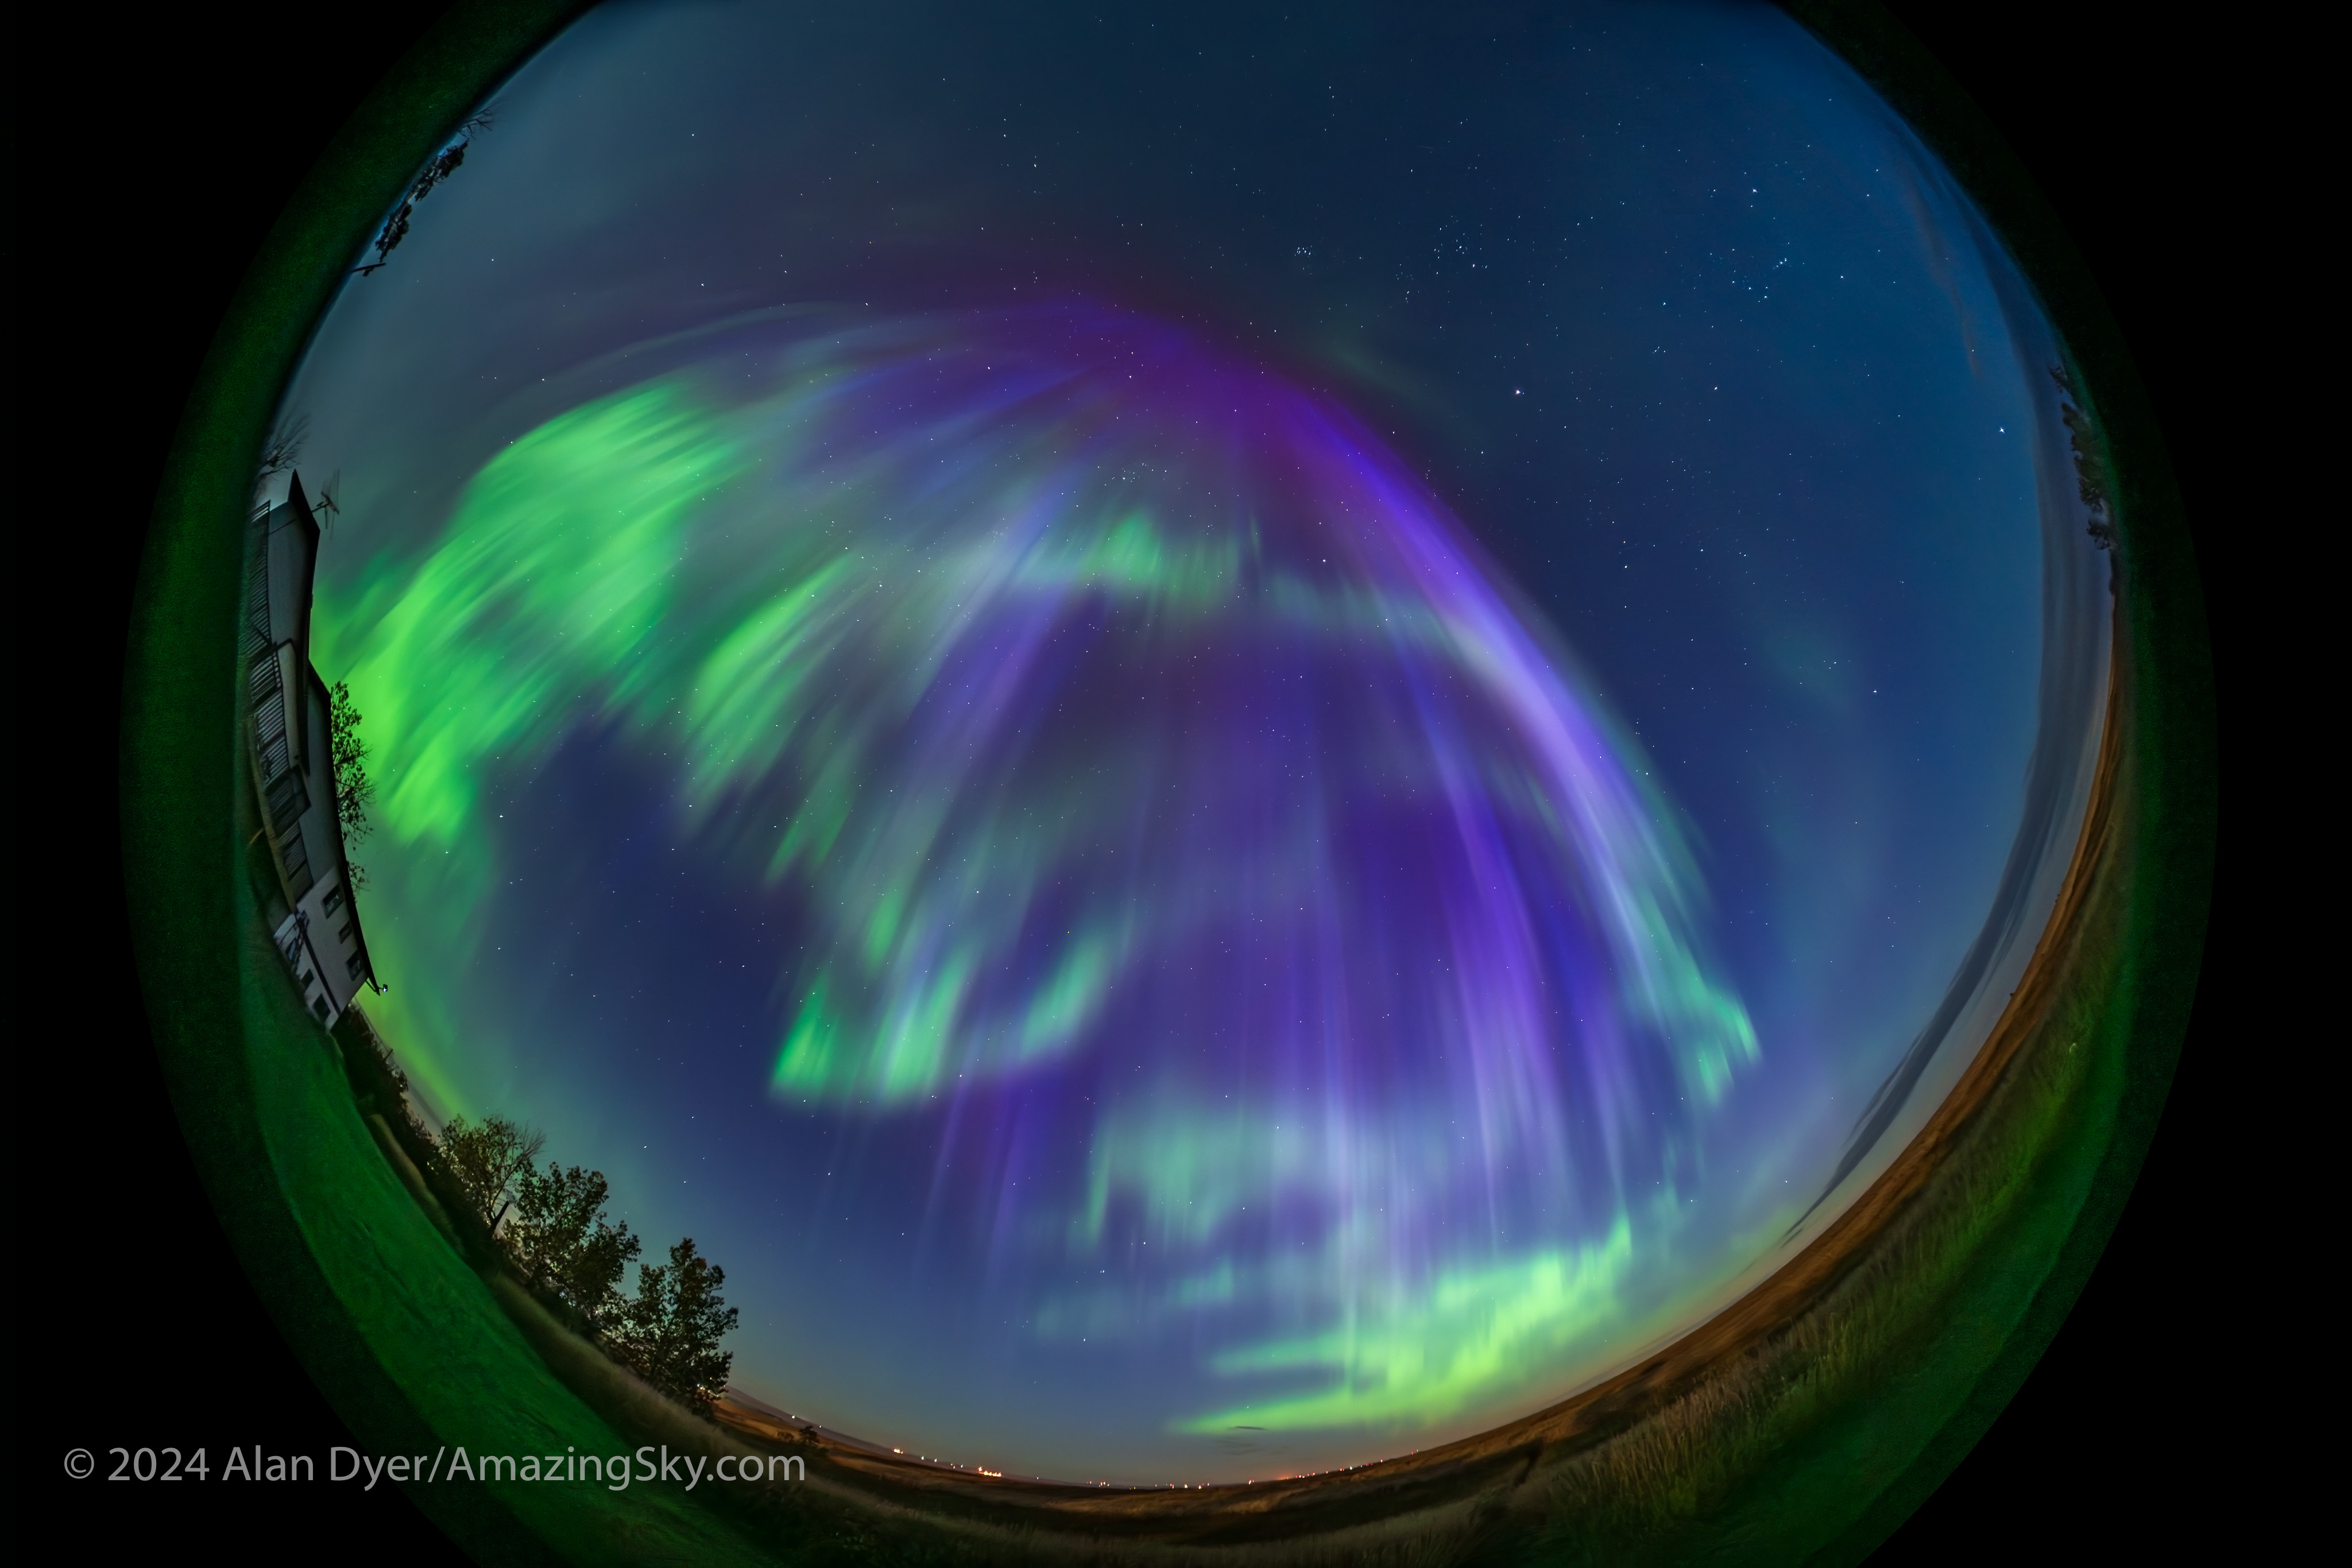
An aurora in the dawn twilight on September 17, 2024 in a 2-second exposure with the TTArtisan 7.5mm fish-eye lens at f/2 on the Nikon Z6III at ISO 800.
For all-sky auroras, this is ideal, where the TTArtisan’s fast f/2 speed is unprecedented in a fish-eye lens. That makes rapid-cadence time-lapses possible, as well as real-time movies. An example is here on my YouTube channel.
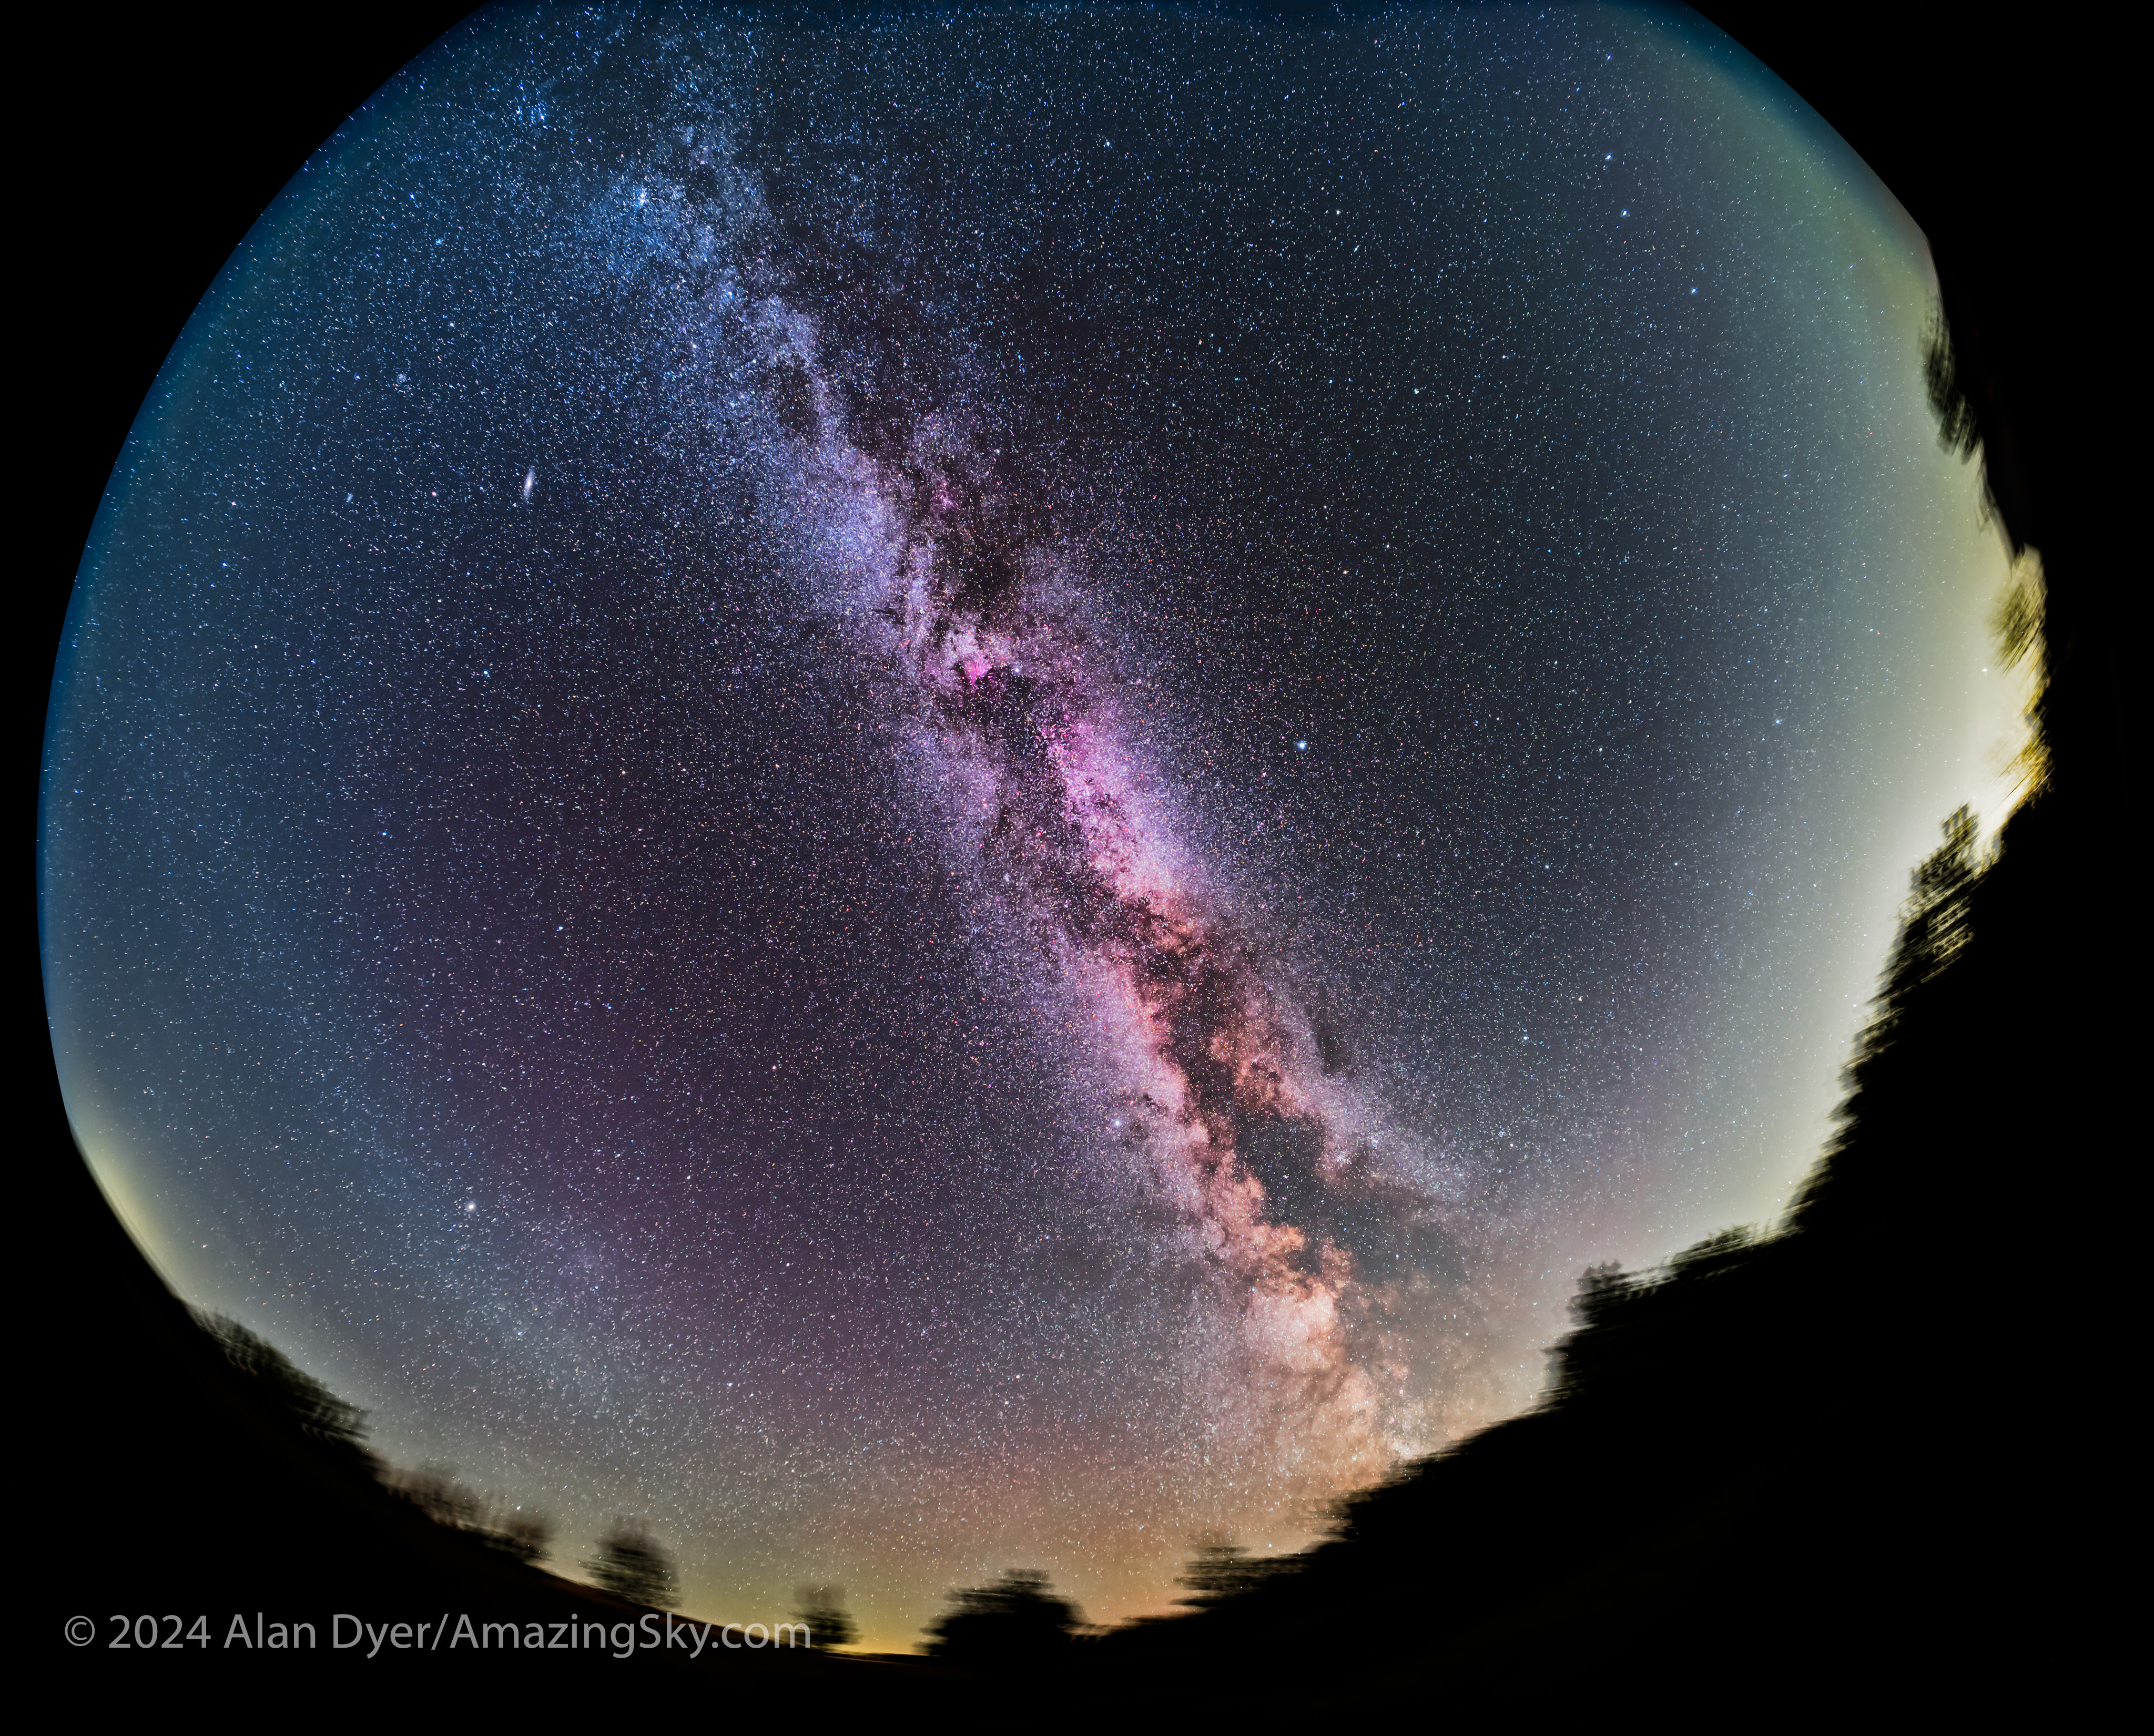
A stack of 4 x 4-minute exposures with the TTArtisan 7.5mm f/2 fish-eye lens stopped down to f/2.8 on the Nikon Z6III at ISO 1600, on the MSM Nomad tracker.
Or you can just capture the Milky Way from horizon to horizon, as above. For the latter, having stars sharp across the circular field is still desirable.
I have this lens for Canon RF as well, but that unit shows a noticeable softening of the left edge with defocused stars, likely from lens de-centering. I was told by TTArtisan that was a normal unit-to-unit variation and not a defect warranting replacement. Annoying!
I hesitated to buy one for my Nikon. But this is such a unique lens, and so affordable, I took the chance. The Nikon Z-mount version proved much better.
TTArtisan 7.5mm Edge Performance
There is no corner performance or vignetting to test here.
TTArtisan 7.5mm lens at f/2, showing the left side area shown in the blowups below.
Instead, I’m inspecting the same side on the Nikon Z version that caused a problem on my Canon version.
Comparing f/2 and f/2.8 edge aberrations.
The Nikon version looks fine, with stars sharp along the edge even at f/2, showing just a low level of astigmatism, to be expected in such a fast, wide lens. Stars tighten up a bit more at f/2.8. Most critically, the field was flat and in focus across the frame. There was no evidence of lens de-centering or optical defects.
The edges do show some discolouration and a soft edge to the image area. I also see two odd dark protrusions at the top of the frame. Looking through the lens, there’s nothing obvious intruding into the light path.
Keep in mind when used on a full-frame camera you’re seeing more of the projected image than was intended in the design.
The 7.5mm lens comes with a metal lens cap with a threaded centre disk. Remove it to create an aperture that vignettes the image to a smaller but complete circle.
The TTArtisan 7.5mm is a specialty lens to be sure. But at its low price it isn’t a big outlay to include in your lens arsenal, for unique all-sky images, of auroras, satellite passages, sky colours, and the Milky Way. And it is terrific for time-lapses and movies of the whole sky. It is a no-frills manual lens available for most camera mounts.
Recommendations
The Viltrox 16mm, Laowa 10mm and TTArtisan 7.5mm are all available for Sony E-mount. The Laowa and TTArtisan are available for Canon RF, but the Viltrox 16mm is not, as it is an auto-focus, full-frame lens, the class of lenses Canon has yet to allow on their RF mounts, much to the disdain of all concerned but Canon management it seems.
Viltrox 16mm — For nightscape use, the Viltrox 16mm might be the single best choice, as being the most versatile and affordable of the trio of wide-angle lenses. Its focal length is a good balance between the usual 14mm and what I think is a more useful 20mm.
Nikkor 20mm — I like the Nikkor 20mm for its lower level of vignetting, slightly tighter framing, and very sharp stars. I think a 20mm is an ideal focal length for many nightscapes and Milky Way scenes. But it is the most expensive lens tested here.
Laowa 10mm — While nearly as costly as the Nikkor 20mm, the Laowa 10mm is much more specialized and, I think, not as useful as the others for general nightscape and Milky Way shooting. But it is superb for auroras, if you are in a place where they are common, as they are here in Alberta. Otherwise, I think you’d find the 10mm a costly lens that might not see a lot of use for astrophotography. Its real forté is architecture and real-estate interiors.
TTArtisan 7.5mm — Ditto on its limited use. But it is so affordable it’s easy to justify even if it doesn’t get a lot of use. The astro images, time-lapses, and movies it can produce are unique and impossible to create any other way. Be sure to buy it from a source where you can return it easily if you find your sample defective.
Reason To Go Mirrorless
The quality of these and other premium lenses from Nikon, and also from Canon, Sony and third-party makers like Sigma and Viltrox, is one of the major benefits of migrating to mirrorless cameras. DSLRs, and the lenses made for them, are now effectively dead as new gear choices.
Yes, mirrorless cameras can be better in many aspects of their operation than DSLRs. But it is the lenses made for mirrorless that show the greatest improvement over their DSLR equivalents, many of which date back to the forgiving film days.
In a detailed review, I test a “holy trinity” of premium Canon RF zoom lenses, with astrophotography the primary purpose.
In years past, zoom lenses were judged inferior to fixed-focal length “prime” lenses for the demands of astrophotography. Stars are the severest test of a lens, revealing optical aberrations that would go unnoticed in normal images, or even in photos of test charts. Many older zooms just didn’t cut it for discerning astrophotographers, myself included.
The new generation of premium zooms for mirrorless cameras, from Canon, Nikon and Sony, are dispelling the old wisdom that primes are better than zooms. The new zooms’ optical performance is proving to be as good, if not better than the older generation of prime lenses for DSLR cameras, models often designed decades ago.
The shorter lens-to-sensor “flange distance” offered by mirrorless cameras, along with new types of glass, provide lens designers more freedom to correct aberrations, particularly in wide-angle lenses.
While usually slower than top-of-the-line primes, the advantage of zoom lenses is their versatility for framing and composing subjects, great for nightscapes and constellation shots. It’s nice to have the flexibility of a zoom without sacrificing the optical quality and speed so important for astrophotography. Can we have it all? The new zooms come close to delivering.
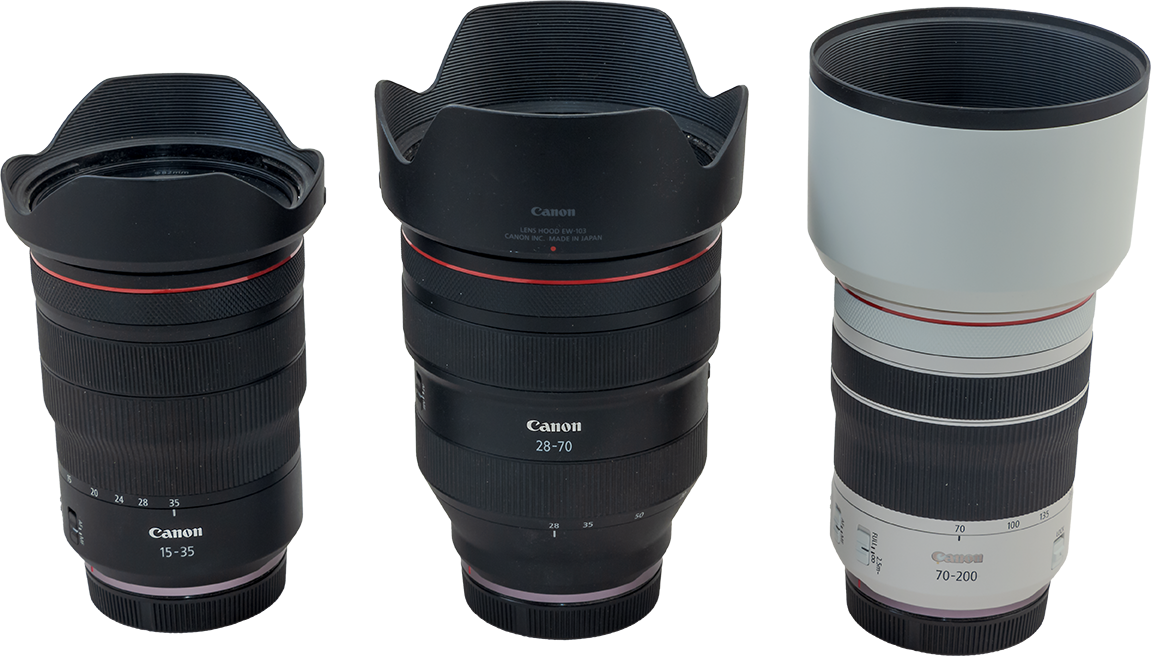
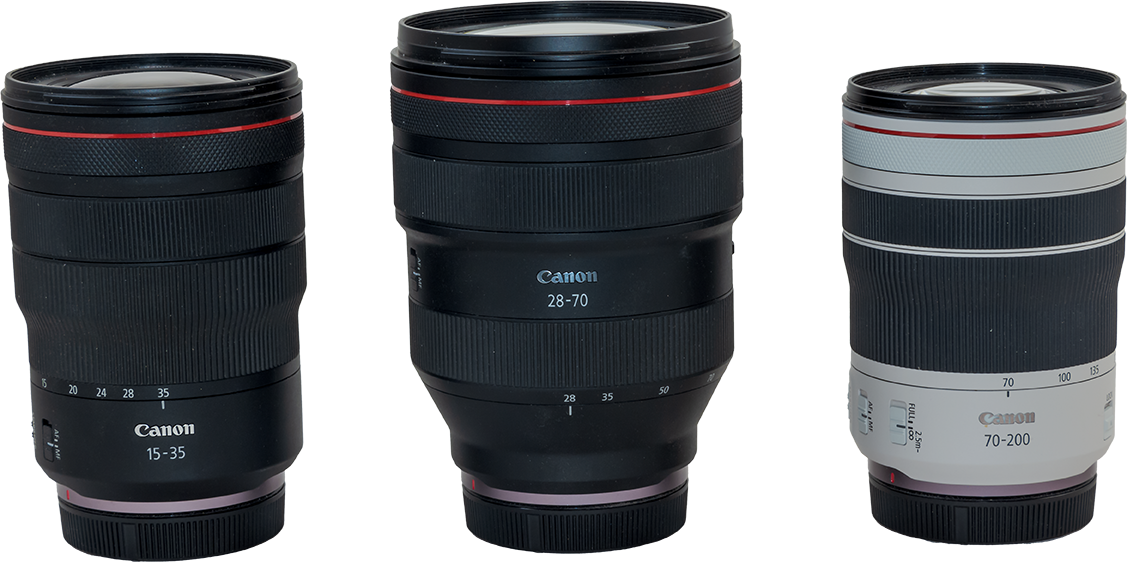
The “holy trinity” of Canon zooms tested were purchased in 2021 and 2022. From L to R they are: RF15-35mm, RF28-70mm, and RF70-200mm
A good thing, because with Canon we have little choice! For top-quality glass in wide-angle focal lengths at least, zooms are the only choice for their mirrorless R cameras. As of this writing in late 2022, Canon has yet to release any premium primes for their RF mount shorter than 50mm. Rumours are a 12mm, 24mm, 28mm, and 35mm are coming! But when?
The three zooms I tested are all “L” lenses, designating them as premium-performance models. I have not tested any of Canon’s “economy” line of RF lenses, such as their 24mm and 35mm Macro STM primes. Tests I’ve seen suggest they don’t offer the sharpness I desire for most astrophotography.
Contributing to the lack of choice, top-quality third-party lenses from the likes of Sigma (such as their new 20mm and 24mm Art lenses made for mirrorless cameras) have yet to appear in Canon RF mount versions. Will they ever? In moves that evoked much disdain, Samyang and Viltrox were both ordered by Canon to cease production of their RF auto-focus lenses.
For their mirrorless R cameras, Canon has not authorized any third-party lens makers, forcing you to buy costly Canon L glass, or settle for their lower-grade STM lenses, or opt for reverse-engineered manual-focus lenses from makers such as TTArtisan and Laowa/Venus Optics. While they are good, they are not up to the optical standards of Canon’s L-series glass.
I know, as I own several RF-mount TTArtisan wide-angle lenses and the Laowa 15mm f/2 lens. You can find my tests of those lenses at AstroGearToday.com. Look under Reviews: Astrophotography Gear.
RF lenses will fit only on Canon R-series mirrorless cameras. This shows the RF15-35mm on the Canon R5 used for the lens testing.
The trio of RF lenses tested here work on all Canon EOS R-series cameras, including their R7 and R10 cropped-frame cameras. However, they will not work on any Canon DSLRs.
Two of the lenses, the RF15-35mm F/2.8 and RF70-200mm F/4, are designs updated from older Canon DSLR lenses with similar specs. The RF28-70mm F/2 does not have an equivalent focal length range and speed in Canon’s DSLR lens line-up. Indeed, nobody else makes a lens this fast covering the “normal” zoom range.
Together, the three lenses cover focal lengths from 15mm to 200mm, with some overlap. A trio of zooms like this — a wide-angle, normal, and telephoto — is often called a “holy trinity” set, a popular combination all camera manufacturers offer to cover the majority of applications.
However, my interest was strictly for astrophotography, with stars the test subjects.
NOTE: CLICK or TAP on a test image to download a full-resolution image for closer inspection. The images, while low-compression JPGs, are large and numerous, and so will take time to fully load and display. Patience!
I tested the trio of lenses on same-night exposures of a starry but moonlit sky, using the 45-megapixel Canon R5 camera mounted on a motorized star tracker to follow the rotating sky. With one exception noted, any distortion of stars from perfect pinpoints is due to lens aberrations, not star trailing. The brighter moonlit sky helped reveal non-uniform illumination from lens vignetting.
I shot each lens wide-open at its maximum aperture, as well as one stop down from maximum, to see how aberrations and vignetting improved.
I did not test auto-focus performance, nor image stabilization (only the RF28-70mm lacks internal IS), nor other lens traits unimportant for astro work such as bokeh or close focus image quality.
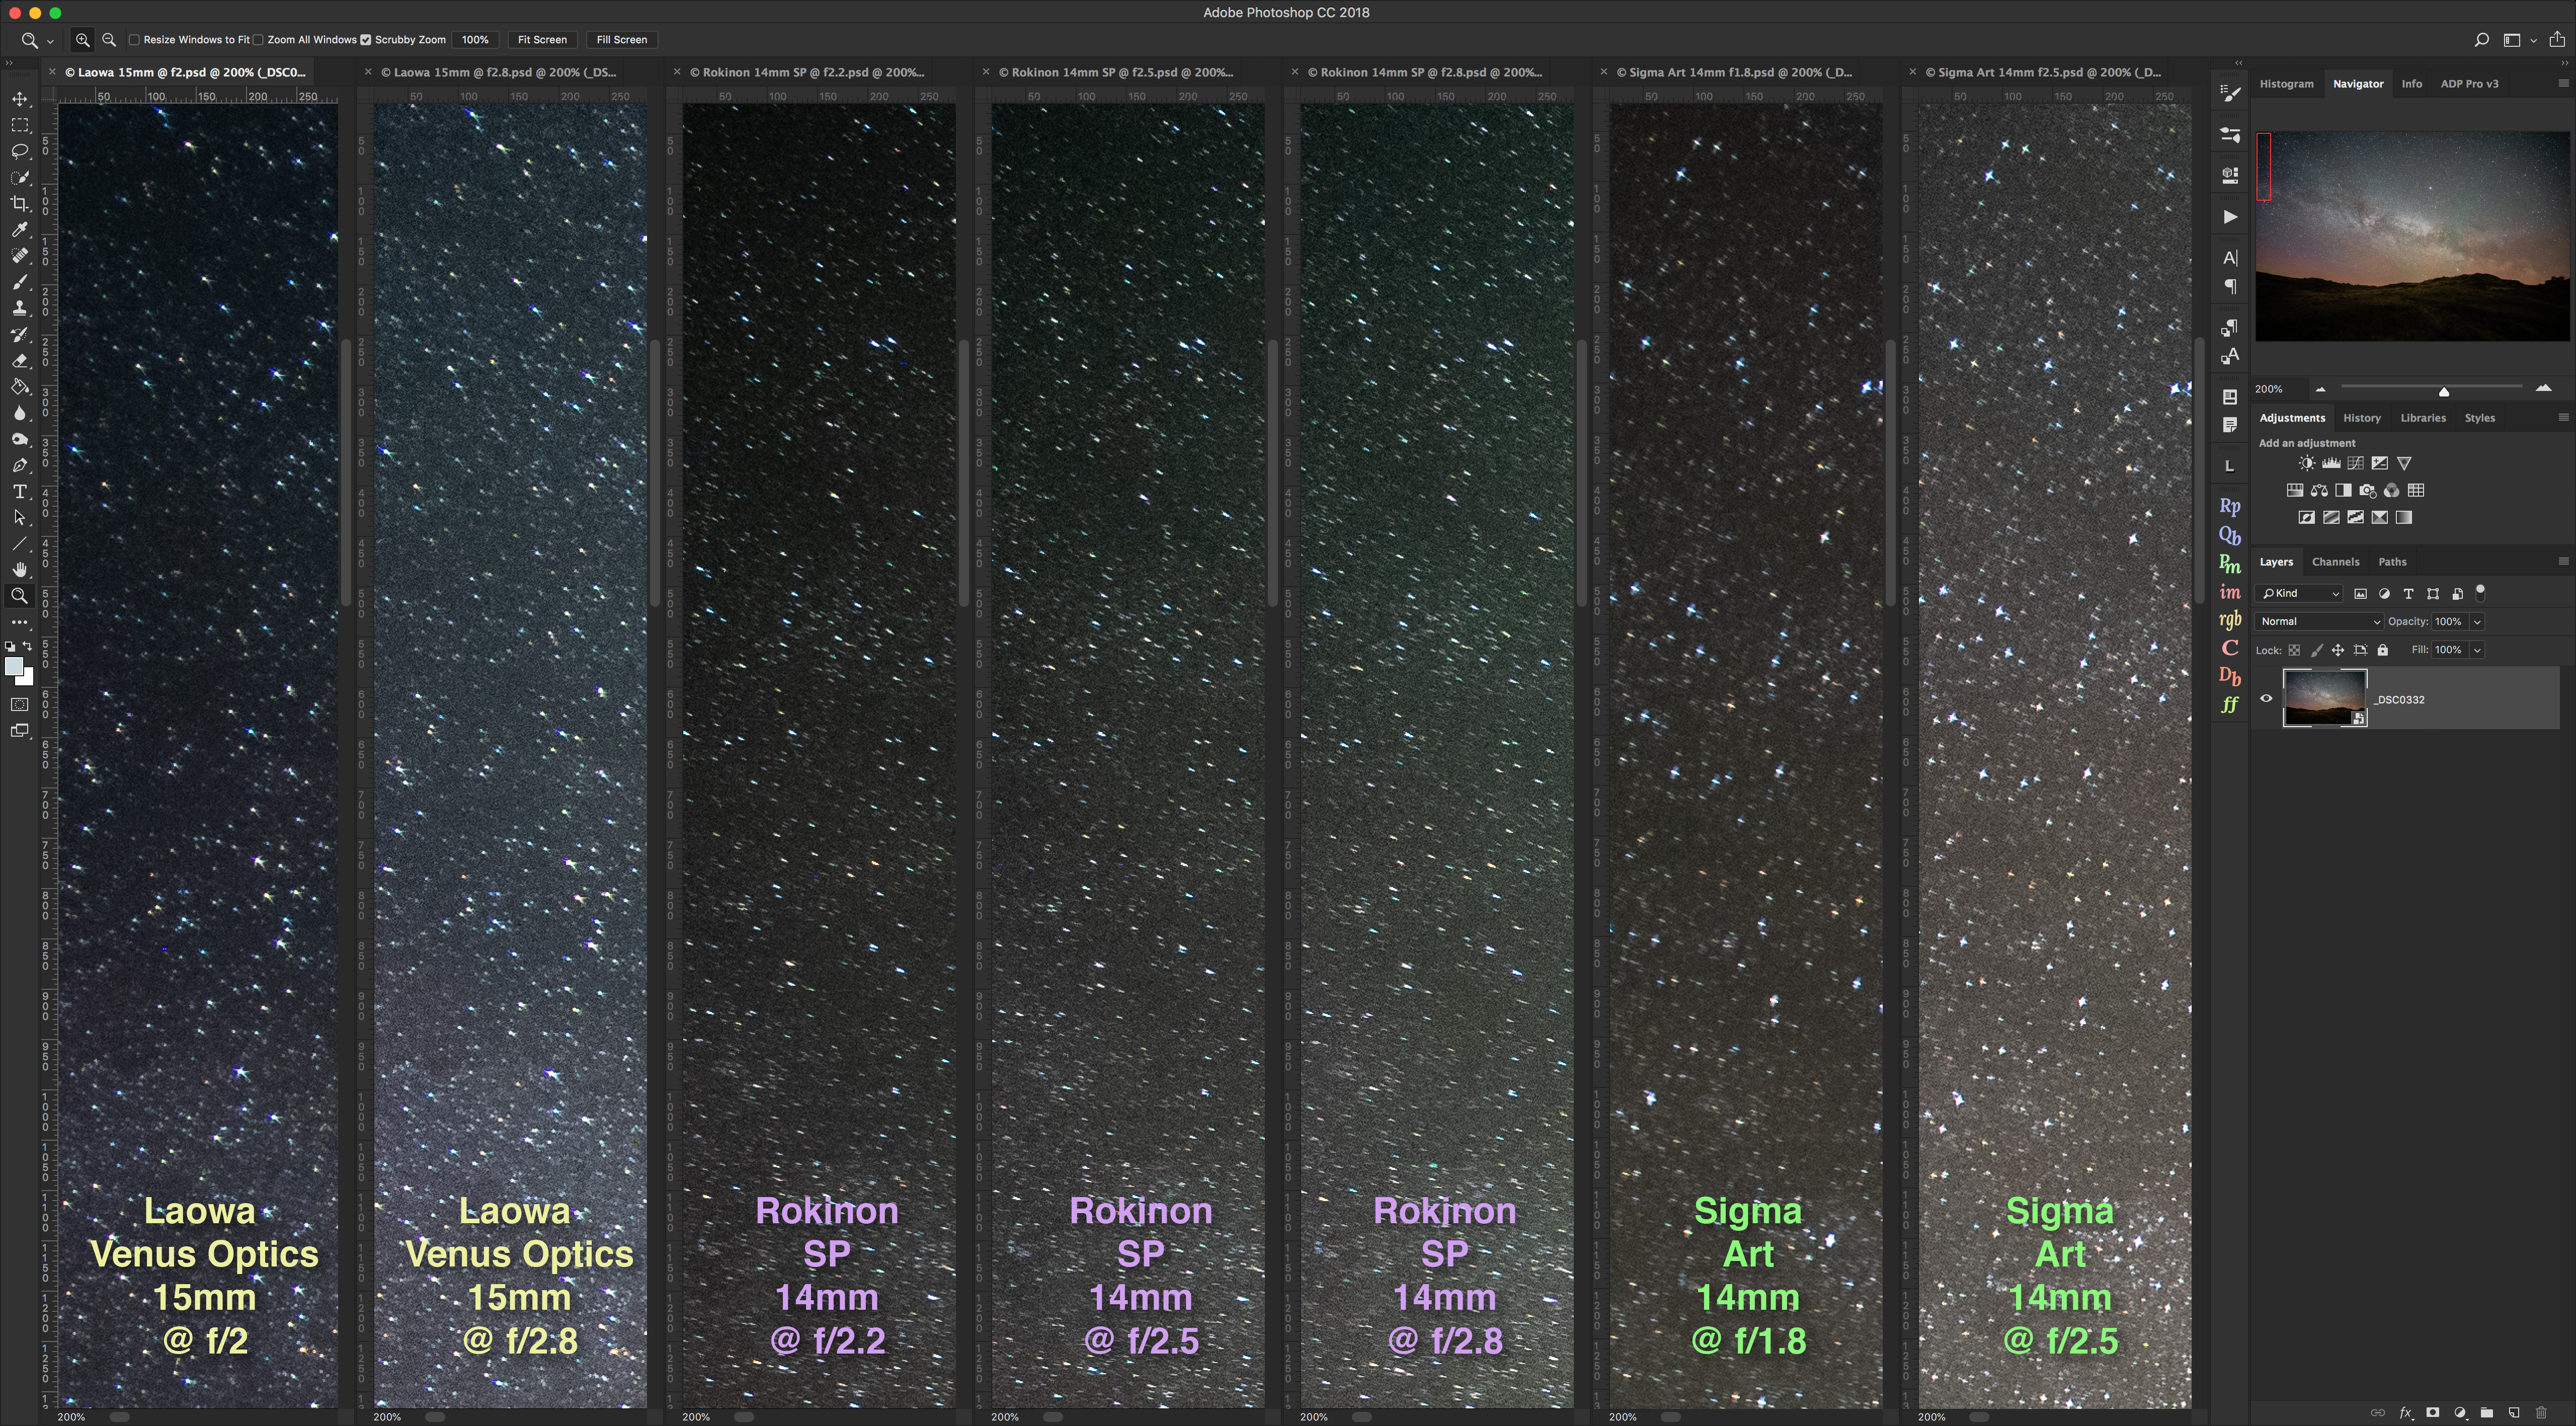
I also compared the RF15-35mm on same-night dark-sky tests against a trio of prime lenses long in my stable: the Rokinon 14mm SP, and Canon’s older L-series 24mm and 35mm primes, all made for DSLRs.
The lenses each come with lens hoods that use a click-on mechanism much easier to twist on and off than with the older design used on Canon EF lenses.
TL;DR SUMMARY
Each of the Canon “holy trinity” of zoom performs superbly, though not without some residual lens aberrations such as corner astigmatism and, in the RF28-70mm, slight chromatic aberration at f/2.
However, what flaws they show are well below the level of many older prime lenses made for DSLR cameras.
The RF lenses’ major optical flaw is vignetting, which can be quite severe at some focal lengths, such as in the RF70-200mm at 200mm. But this flaw can be corrected in processing.
These are lenses that can replace fixed-focal length primes, though at considerable cost, in part justifiable in that they negate the need for a suite of many prime lenses.
The performance of these and other new lenses made for mirrorless cameras from all brands is one good reason to switch from DSLR to mirrorless cameras.
Lens Specs and Applications
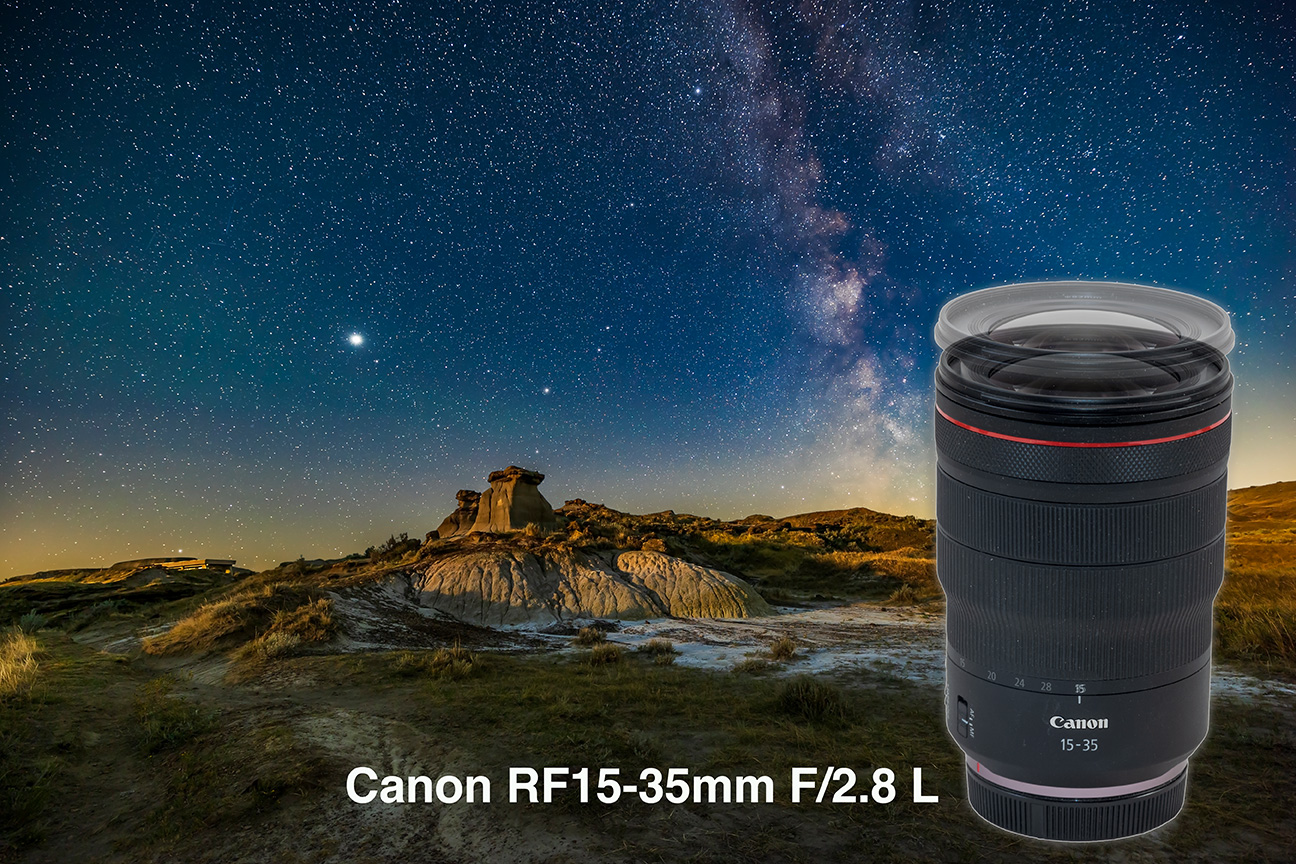
Canon RF15-35mm F/2.8 L IS USM
The RF15-35mm is a fine nightscape lens. It extends slightly when zooming with the lens physically longest at its shortest 15mm focal length.
The Canon RF15-35mm F/2.8 L is made primarily for urban photography and landscapes by day. My main application is using it to take landscapes by night, and auroras, where its relatively fast f/2.8 speed helps keeps exposure times short and ISO speeds reasonably low. However, the RF15-35mm can certainly be used for tracked wide-angle Milky Way and constellation portraits.
The lens weighs a moderate 885 grams (31 ounces or 1.9 pounds) with lens hood and end caps, and accepts 82mm filters, larger than the 72mm or 77mm filter threads of most astrophoto-friendly lenses. Square 100mm filters will work well on the lens, even at the 15mm focal length. There are choices, such as from KASE, for light pollution reduction and star diffusion filters in this size and format. I have reviews of these filters at AstroGearToday.com, both here for light pollution filters and here for starglow filters.
Canon offers a lower-cost alternative in this range, their RF14-35mm. But it is f/4, a little slow for nightscape, aurora, and Milky Way photography. I have not tested one.
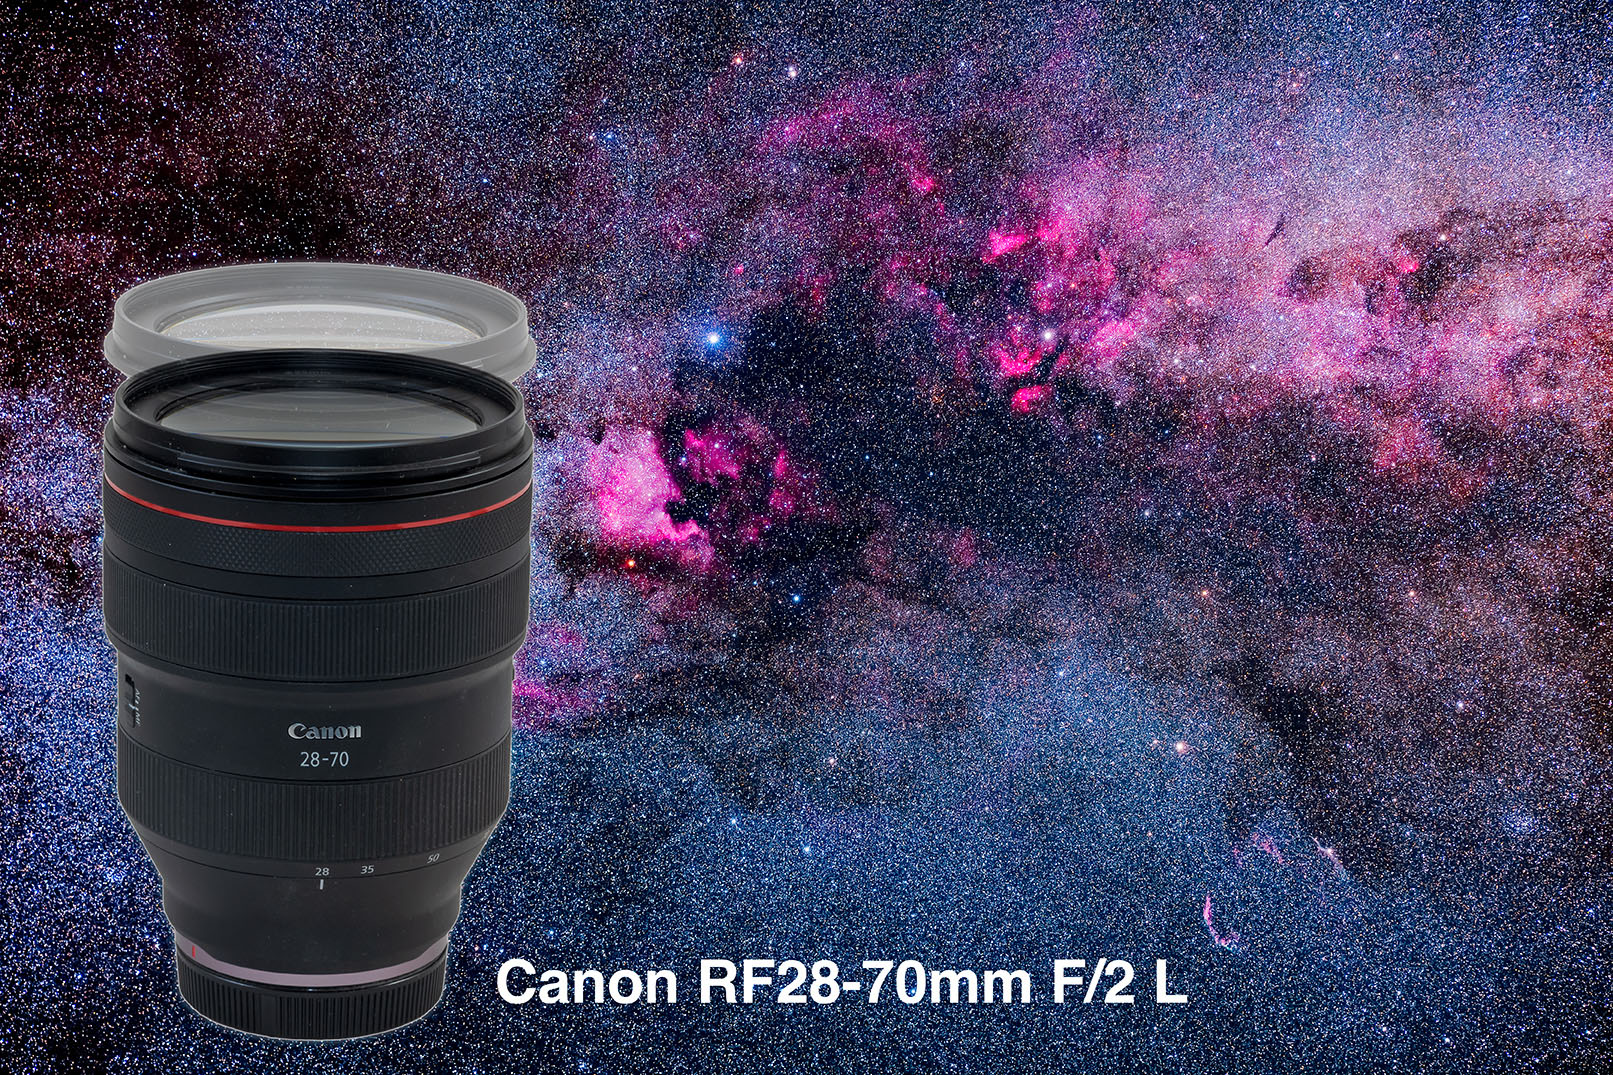
Canon RF28-70mm F/2 L USM
The RF28-70mm works great for tracked starfields and constellations. It extends when zooming, with it longest at its 70mm focal length.
The big Canon RF28-70mm F/2 is aimed at wedding and portrait photographers, though the lens is suitable for landscape work. While I do use it for nightscapes, my primary use is for tracked Milky Way and constellation images, where its range of fields of view nicely frames most constellations, from big to small.
I justified its high cost by deciding it replaces (more or less!) prime lenses in the common 24mm, 35mm, 50mm, and 85mm focal lengths. Its f/2 speed does bring it into fast prime lens territory. It’s handy to have just one lens to cover the range.
Canon offers a lower-cost alternative here, too, their RF24-70mm. But it is f/2.8. While this is certainly excellent speed, I like having the option of shooting at f/2. An example is when using narrowband nebula filters such as red hydrogen-alpha filters, where shooting at f/2 keeps exposures shorter and/or ISOs lower when using such dense filters. I use this lens with an Astronomik 12-nanometre H-α clip-in filter. An example is in one of the galleries below.
While a clip-in filter shifts the infinity focus point inward (to as close as the 2-metre mark with the RF28-70mm at 28mm, and to 6 metres at 70mm), I did not find that shift adversely affected the lens’s optical performance. That’s not true of all lenses.
Make no mistake, the RF28-70mm is one hefty lens, weighing 1530 grams (54 ounces or 3.4 pounds). Its front-heavy mass demands a solid tripod head. Its large front lens accepts big 95mm filters, a rare size with few options available. I found one broadband light pollution filter in this size, from URTH. Otherwise, you need to use in-body clip-in filters. Astronomik makes a selection for Canon EOS R cameras.
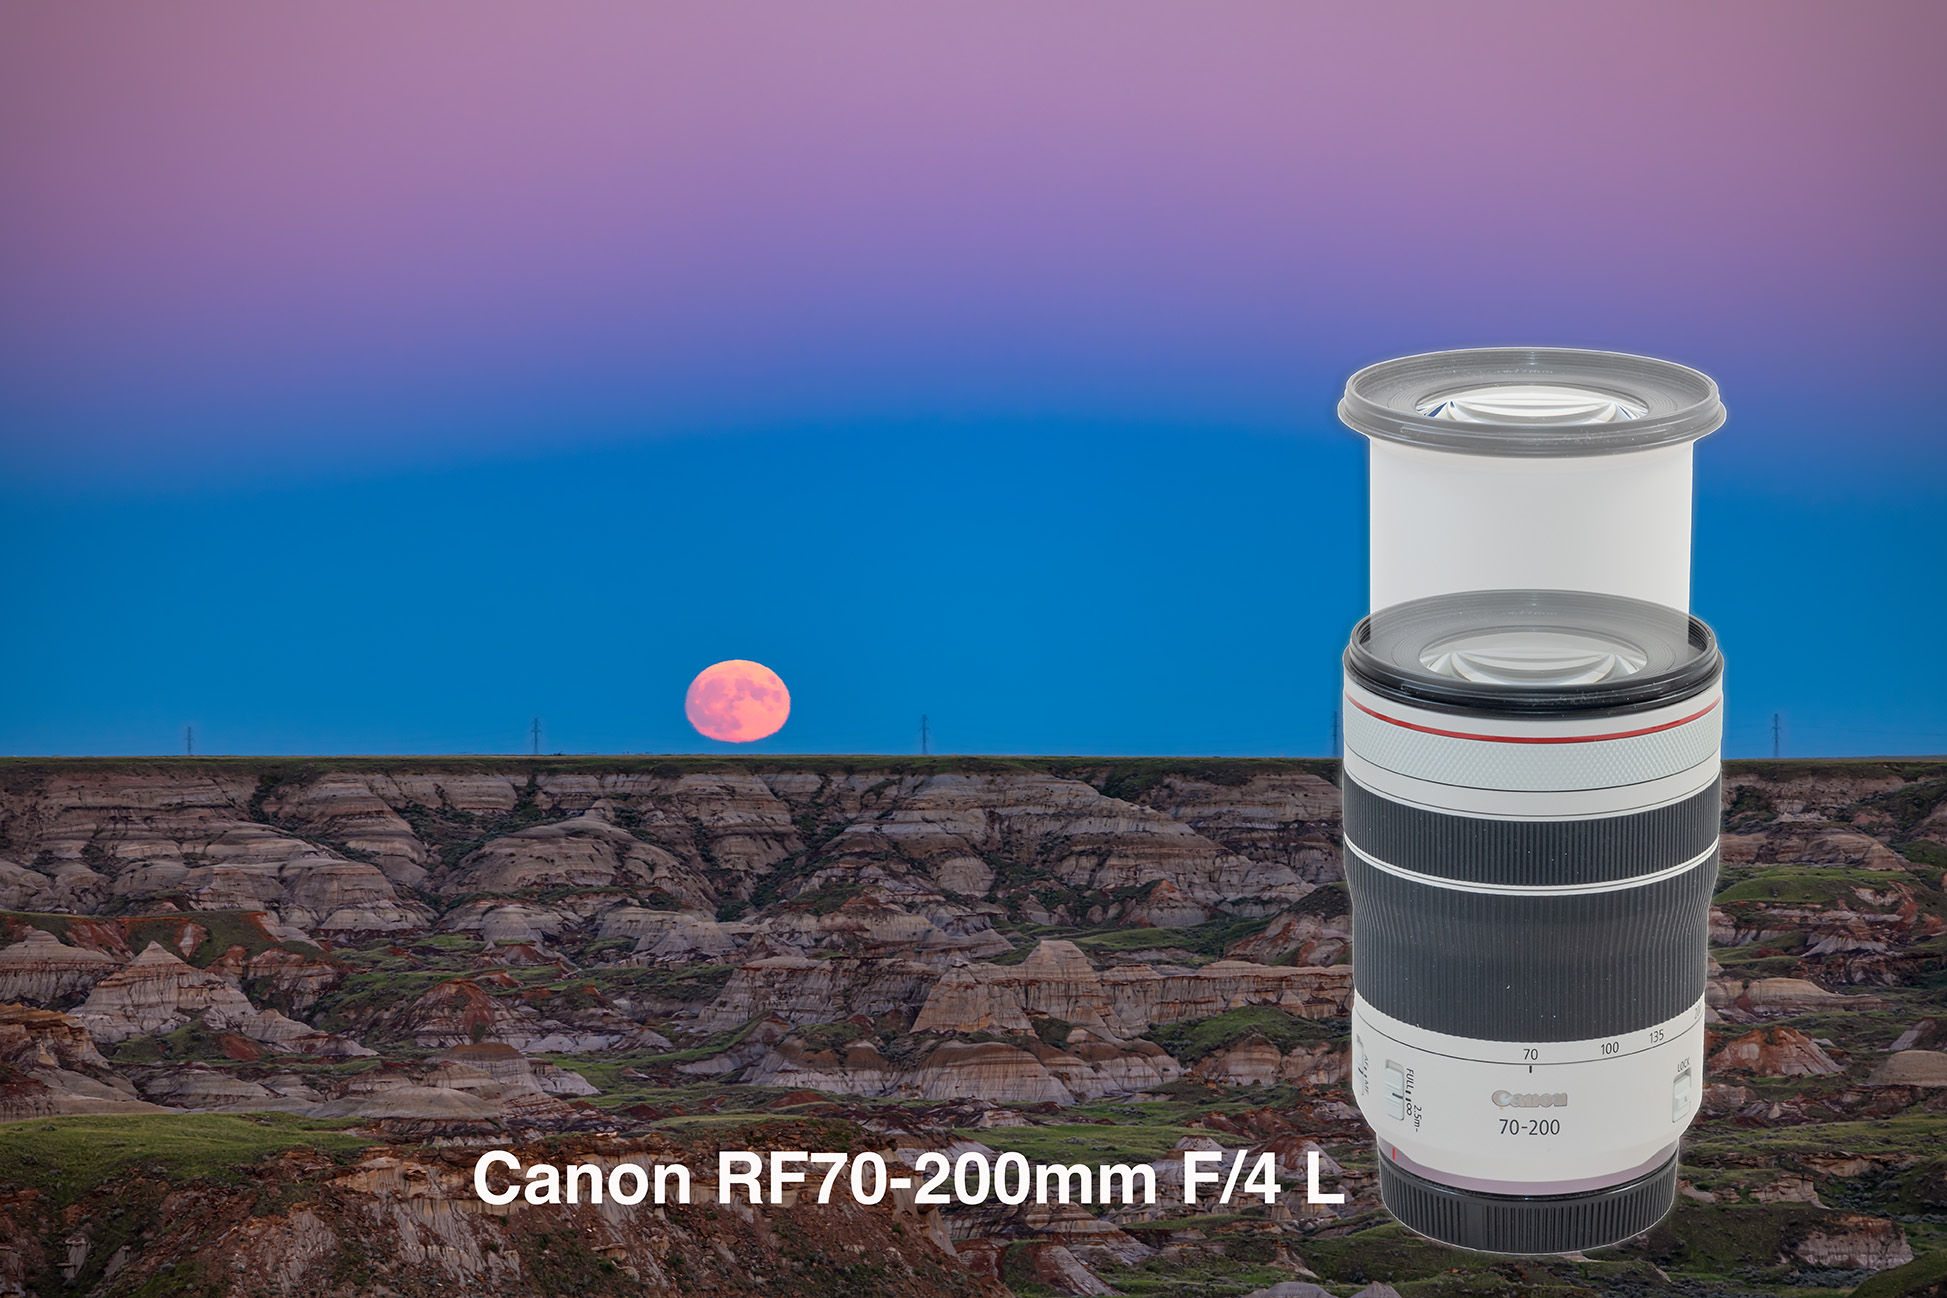
Canon RF70-200mm F/4 L IS USM
The RF70-200mm works well for closeups of landscape scenes such as moonrises. It extends the most of all the lenses when zooming to its longest focal length.
The Canon RF70-200mm F/4 is another portrait or landscape lens. I use it primarily for bright twilight planet conjunctions and moonrise scenes, where its slower f/4 speed is not a detriment. However, as my tests show, it can be used for tracked deep-sky images, where it is still faster than most short focal length telescopes.
The RF70-200mm lens weighs 810 grams (28 ounces, or 1.75 pounds) with lens hood and caps, so is light for a 70-to-200mm zoom. It is also compact. At just 140mm long when set to 70mm, it is actually the shortest lens of the trio. However, the barrel extends to 195mm long when zoomed out to 200mm focal length.
Canon offers the more costly and, at 1200 grams, heavier RF70-200mm F/2.8 lens which might be a better choice for deep-sky imaging where the extra stop of speed can be useful. But in this case, I chose the slower, more affordable – though still not cheap – f/4 version. It accepts common 77mm filters, as does the f/2.8 version.
Centre Sharpness
Canon RF15-35mm F/2.8 L IS USM
This compares 400% blow-ups of the frame centres at the two extreme focal lengths and at two apertures: wide open at f/2.8 and stopped down to f/4.
Like the other two zoom lenses tested, the RF15-35mm is very sharp on axis. Even wide open, there’s no evidence of softness and star bloat from spherical aberration, the bane of cheaper lenses.
Coloured haloes from longitudinal chromatic aberration are absent, except at 28mm and 35mm (shown here) when wide open at f/2.8, where bright stars show a little bit of blue haloing. At f/4, this minor level of aberration disappears.
Canon RF28-70mm F/2 L USM
This compares 400% blow-ups of the frame centres at the two extreme focal lengths and at two apertures: wide open at f/2 and stopped down to f/2.8.
The big RF28-70mm is also very sharp on-axis but is prone to more chromatic aberration at f/2, showing slight magenta haloes on bright stars at the shorter focal lengths and pale cyan haloes at 70mm in my test shots. Such false colour haloes can be very sensitive to precise focus, though with refractive optics the point of least colour is often not the point of sharpest focus.
At f/2, stars are a little softer at 70mm than at 28mm. Stopping down to f/2.8 eliminates this slight softness and most of the longitudinal chromatic aberration.
Canon RF70-200mm F/4 L IS USM
This compares 400% blow-ups of the frame centres at the two extreme focal lengths and at two apertures: wide open at f/4 and stopped down to f/5.6.
Unlike prime telephotos I’ve used, the RF70-200mm shows negligible chromatic aberration on-axis at all focal lengths, even at f/4. Stars are a little softer at the longest focal length at f/4, perhaps from slight spherical aberration, though my 200mm test shots are also affected by a little mistracking, trailing the stars slightly.
Stopping down to f/5.6 sharpens stars just that much more at 200mm.
Corner Aberrations
The corners are where we typically separate great lenses from the merely good. And it is where zoom lenses have traditionally performed badly. For example, my original Canon EF16-35mm f/2.8 lens was so bad off-axis I found it mostly unusable for astro work. Not so the new RF15-35mm, which is the RF replacement for Canon’s older EF16-35mm.
To be clear – in these test shots you might think the level of aberrations are surprising for premium lenses. But keep in mind, to show them at all I am having to pixel-peep by enlarging all the test images by 400 percent, cropping down to just the extreme corners.
Check the examples in the Compared to DSLR Lenses section and in the Finished ImagesGalleries for another look at lens performance in broader context.
Canon RF15-35mm F/2.8 L IS USM
This compares 400% blow-ups of the extreme corners at five focal lengths with the RF15-35mm wide open at f/2.8
Surprisingly, this RF’s best performance off-axis is actually at its shortest focal length. At 15mm it exhibits only some slight tangential astigmatism, elongating stars away from the frame centre. At 24mm aberrations appear slightly worse than at the other focal lengths, showing some flaring from sagittal astigmatism and perhaps coma as well, aberrations seen to a lesser degree at 28mm and 35mm, making stars look like little three-pointed triangles.
This compares 400% blow-ups of the extreme corners at five focal lengths with the RF15-35mm stopped down one stop to f/4.
The aberrations reduce when stopped down to f/4, but are still present, especially at 24mm, this lens’s weakest focal length, though only just.
While the RF15-35mm isn’t perfect, it outperforms other prime lenses I have, and that I suspect most users will own or have used in the past with DSLRs. Only new wide-angle premium primes for the RF mount, if and when we see them, will provide better performance.
Canon RF28-70mm F/2 L USM
This compare 400% blow-ups of the extreme corners at four focal lengths with the RF28-70mm wide open at f/2.
The RF28-70mm’s fast f/2 speed, unusual for any zoom lens, was surely a challenge to design for. Off-axis when wide open at f/2 it does show astigmatism at the extreme corners at all focal lengths, but the least at 50mm, and the worst at 28mm where a little lateral chromatic aberration is also visible, adding slight colour fringing.
This compare 400% blow-ups of the extreme corners at four focal lengths with the RF28-70mm stopped down one stop to f/2.8.
Sharpness off-axis improves markedly when stopped down one stop to f/2.8, where at 50mm stars are now nearly perfect to the corners. Indeed, performance is so good at 50mm, I think there would be little need to buy the Canon RF50mm prime, unless its f/1.2 speed is deemed essential.
With the RF28-70mm at f/2.8, stars still show some residual astigmatism at 28mm and 35mm, but only at the extreme corners.
Canon RF70-200mm F/4 L IS USM
This compare 400% blow-ups of the extreme corners at four focal lengths with the RF70-200mm wide open at f/4.
The RF70-200mm telephoto zoom shows some astigmatism and coma at the corners when wide open at f/4, with it worse at the shorter focal lengths. While lens corrections have been applied here, the 200mm image still shows a darker corner from the vignetting described below.
This compare 400% blow-ups of the extreme corners at four focal lengths with the RF70-200mm stopped down one stop to f/5.6.
Stopping down to f/5.6 eliminates most of the off-axis aberrations at 135mm and 200mm focal lengths but some remain at 70mm and to a lesser degree at 100mm.
This is a lens that can be used at f/4 even for the demands of deep-sky imaging, though perfectionists will want to stop it down. At f/5.6 it is similar in speed to many astrographic refractors, though most of those start at about 250mm focal length.
Frame Vignetting
In the previous test images, I applied lens corrections (but no other adjustments) to each of the raw files in Adobe Camera Raw, using the settings ACR automatically selects from its lens database. These corrections brightened the corners.
In this next set I show the lenses’ weakest point, their high level of vignetting. This light falloff darkens the corners by a surprising amount. In the new generation of lenses for mirrorless cameras, it seems lens designers are choosing to sacrifice uniform frame illumination in order to maximize aberration corrections. The latter can’t be corrected entirely, if at all, by software.
However, corrections applied either in-camera or at the computer can brighten corners, “flattening” the field. I show that improvement in the section that follows this one.
Canon RF15-35mm F/2.8 L IS USM
This compares the level of vignetting present in the RF15-35mm without the benefit of lens corrections, showing the difference at five focal lengths.
In the wide-angle zoom, vignetting darkens just the corners at 15mm, but widens to affect progressively more of the frame at the longer focal lengths. The examples show the entire right side of the frame. I show the effect just at f/2.8.
Though I don’t show examples with the two wider zooms, with all lenses vignetting decreases dramatically when each lens is stopped down by even one stop. The fields become much more evenly illuminated, though some darkening at the very corners remains one stop down.
Canon RF28-70mm F/2 L USM
This compares the level of vignetting present in the RF28-70mm without the benefit of lens corrections, showing the difference at four focal lengths.
In this “normal” zoom, vignetting performance is similar at all focal lengths, though it affects a bit more of the field at 70mm than at 28mm. Again, while I’m not presenting an example, vignetting decreases a lot when this lens is stopped down to f/2.8. While the extra stop of speed is certainly nice to have at times, I usually shoot the RF28-70mm at f/2.8.
Canon RF70-200mm F/4 L IS USM
This compares the level of vignetting present in the RF70-200mm without the benefit of lens corrections, showing the difference at four focal lengths.
In this telephoto zoom, vignetting is fairly mild at the shorter focal lengths but becomes severe at 200mm, affecting much of the field. It is far worse than I see with my older Canon EF200mm f/2.8 prime, a lens that is not as sharp at f/4 as the RF zoom.
The faster RF70-200mm f/2.8 lens, which I had the chance to test one night last year, showed as much, if not more, vignetting than the f/4 version. See my test here at AstroGearToday.com. I thought the f/4 version would be better for vignetting, but it is not.
This shows how much the RF-70-200mm’s vignetting improves when it is stopped down.
In this case, as the vignetting is so prominent at 200mm, I show above how much it improves when stopped down to f/5.6, in a comparison with the lens at f/4, both with no lens corrections applied in processing. The major improvement comes from the smaller aperture alone. For twilight scenes, I’d suggest stopping this lens down to better ensure a uniform sky background.
LENS Corrections
In this next set I show how well applying lens corrections improves the vignetting at the focal lengths where each of the lenses is at its worse, and with each at its widest aperture.
I show this with Adobe Camera Raw but Lightroom would provide identical results. I did not test lens corrections with other programs such as CaptureOne, DxO PhotoLab, or ON1 Photo Raw, which all have automatic lens corrections as well.
Canon RF15-35mm F/2.8 L IS USM
This compare the RF15-35mm lens at f/2.8 and 35mm with and without lens corrections applied, to show how much they improve the vignetting.
Applying lens corrections in Adobe Camera Raw certainly brightened the corners and edges, though still left some darkening at the very corners that can be corrected by hand in the Manual tab.
Canon RF28-70mm F/2 L USM
This compare the RF28-70mm lens at f/2 and 70mm with and without lens corrections applied, to show how much they improve the vignetting.
ACR’s lens corrections helped but did not completely eliminate the vignetting here. Corner darkening remained. Manually increasing the vignetting slider can provide that extra level of correction needed.
Canon RF70-200mm F/4 L IS USM
This compare the RF70-200mm lens at f/4 and 200mm with and without lens corrections applied, to show how much they improve the vignetting.
The high level of vignetting with this lens at 200mm largely disappeared with lens corrections, though not entirely. For deep-sky imaging, users might prefer to shoot and apply flat-field frames. I prefer to apply automatic and manual corrections to the raw files, to stay within a raw workflow as much as possible.
Same Focal Length Comparisons
With the trio of lenses offering some of the same focal lengths, here I show how they compare at three of those shared focal lengths. I zoom into the upper right corners here, as with the Corner Aberrations comparisons above.
RF15-35mm vs. RF28-70mm at 28mm
This compares the RF15-35mm at 28mm to the RF28-70mm also at 28mm and with both at f/2.8.
With both lenses at 28mm and at the same f/2.8 aperture (though the RF28-70mm is now stopped down one stop), it’s a toss up. Both show corner aberrations, though of a different mix, distorting stars a little differently. The RF28-70mm shows some lateral chromatic aberration, but the RF15-35mm shows a bit more flaring from astigmatism.
RF15-35mm vs. RF28-70mm at 35mm
This compares the RF15-35mm at 35mm to the RF28-70mm also at 35mm and with both at f/2.8.
The story is similar with each lens at 35mm. Stars seem a bit sharper in the RF15-35mm though are elongated more by astigmatism at the very corners. Lens corrections have been applied here and with the other two-lens comparison pairs.
RF28-70mm vs. RF70-200mm at 70mm
This compares the RF28-70mm at 70mm and f/2.8 to the RF70-200mm also at 70mm but wide open at f/4.
Here I show the RF28-70mm at f/2.8 and the RF70-200mm wide open at f/4, with both set to 70mm focal length. The telephoto lens shows a little more softening and star bloating from corner aberrations, though both perform well.
Compared to DSLR Lenses
Here I try to demonstrate just how much better at least one of the zooms on test here is compared to older prime lenses made for DSLRs. The Canon lenses are labeled EF, for Canon’s EF lens mount used for decades on their DSLRs and EOS film cameras. Both are premium L lenses.
I shot this set on a different night than the previous examples, with some light cloud present which added various amounts of glows around stars. But the test shots still show corner sharpness and aberrations well, in this case of the upper left corners of all frames.
Canon RF15-35mm at 35mm vs. Canon EF35mm L
This compares the RF15-35mm zoom at 35mm to the older EF35mm L prime lens. Some light cloud added the glows at right.
The Canon EF35mm is the original Mark I version, which Canon replaced a few years ago with an improved Mark II model. So I’m sure if you were to buy an EF35mm lens now (or if that’s the model you own) it will perform better than what I show here.
Both lenses are at f/2.8, wide open for the RF lens, but stopped down two stops for the f/1.4 EF lens.
The zoom lens is much sharper to the corners, with far less astigmatism and none of the lateral chromatic aberration and field curvature (softening stars at the very corner) of the old EF35mm prime. I thought the EF35mm was a superb lens, and used it a lot over the last 15 years for Milky Way panoramas. I would not use it now!
Canon RF15-35mm at 24mm vs. Canon EF24mm L
This compares the RF15-35mm zoom at 24mm to the older EF24mm L prime lens.Some light cloud added the glows at right.
Bought in the early years of DSLRs, the EF24mm tested here is also an original Mark I model, since replaced by an improved Mark II 24mm. The old 24mm is good, but shows more astigmatism than the RF lens, and some field curvature and purple chromatic aberration not present at all in the RF lens.
And this is comparing it to the RF lens at its weakest focal length, 24mm. It still handily outperforms the old EF24mm prime.
Canon RF15-35mm at 15mm vs. Rokinon 14mm SP
This compares the RF15-35mm at 15mm to the Rokinon 14mm SP prime lens.
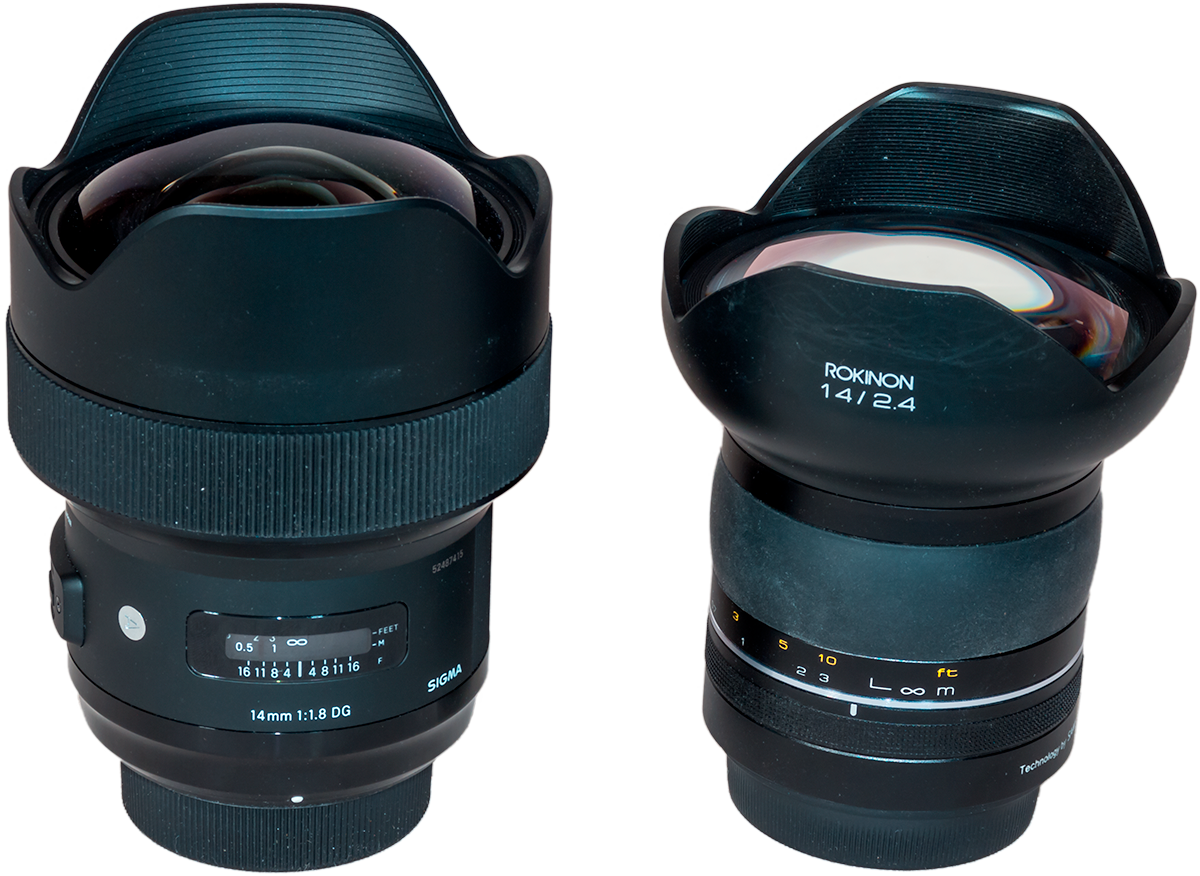
Canon once made an EF14mm f/2.8 L prime, but I’ve never used it. For a lens in this focal length, one popular with nightscape photographers, I’ve used the ubiquitous Rokinon/Samyang 14mm f/2.8 manual lens. While a bargain at about $300, I always found it soft and aberrated at the corners. See my test of 14mm ultra-wides here.
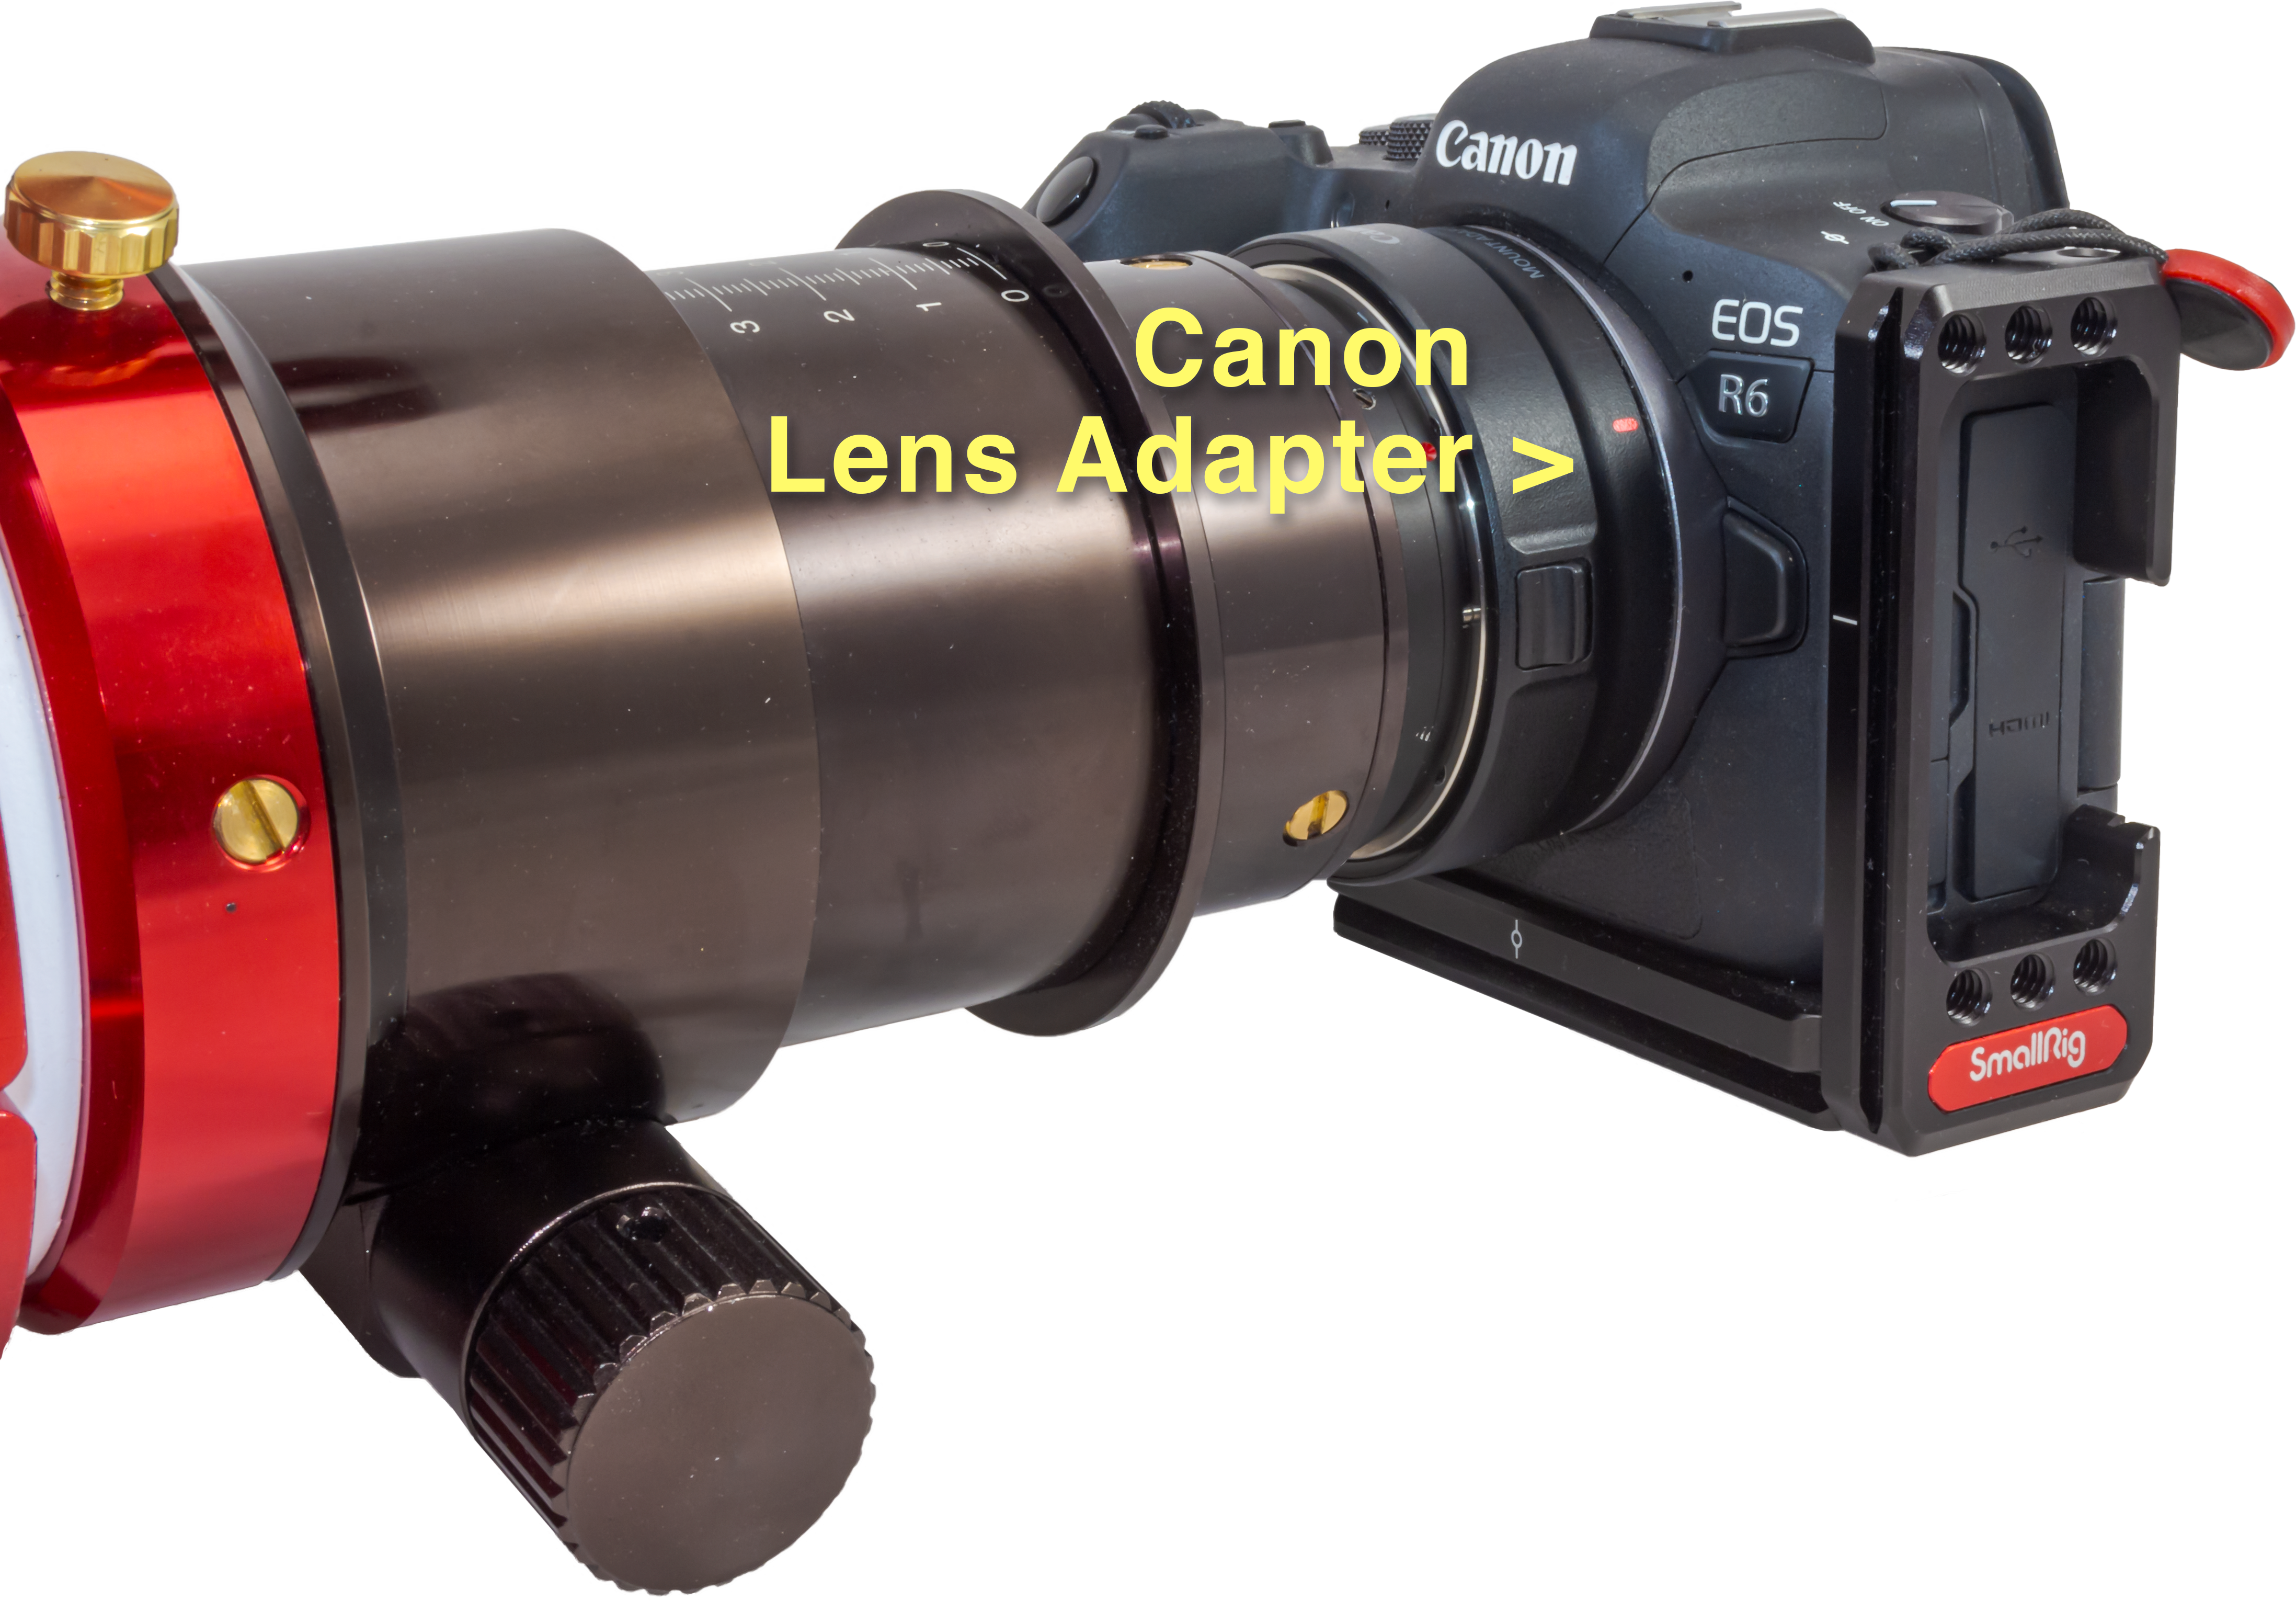
A few years ago I upgraded to the Rokinon 14mm f/2.4 lens in their premium SP series (about $800 for the EF-mount version). While a manual lens, it does have electrical contacts to communicate lens metadata to the camera. Like all EF-mount lenses from any brand, it can be adapted to Canon R cameras using Canon’s $100 EF-EOS R lens adapter.
Older DSLR lenses like the Rokinon SP can be adapted to all Canon R cameras with the Canon lens adapter ring which transmits lens data to the camera.
The Rokinon SP is the only prime I found that beat the RF zoom. It provided sharper images to the corners than the RF15-35mm at 15mm. The Rokinon also offers the slightly faster maximum aperture of f/2.4 (which Canon cameras register as f/2.5). Vignetting is severe, but like the RF lenses can be corrected – Camera Raw has this lens in its database. What is not so easy to correct is some slight colour shift at the corners.
Another disadvantage, as with many other 14mm lenses, is that the SP lens cannot accept front-mounted filters. The RF15-35mm can.
Nevertheless, until Canon comes out with a 12mm to 14mm RF prime, or allows Sigma to, an adapted Rokinon 14mm SP is a good affordable alternative to the RF15-35mm.
The RF15-35mm (left) takes 82mm filters, the RF28-70mm (centre) requires 95mm filters, but the RF70-200mm (right) can accept common 77mm filters.
Mechanical Points
All the RF lens bodies are built of weight-saving engineered plastic incorporating thorough weather sealing. There is nothing cheap about their fit, finish or handling. Each lens has textured grip rings for the zoom, focus and a control ring that can be programmed to adjust either aperture, ISO, exposure compensation or other settings of your choosing.
As with all modern auto-focus lenses, the manual focus ring on each lens does not mechanically move glass. It controls a motor that in turn focuses the lens, so-called “focus-by-wire.” However, I found that focus could be dialled in accurately. But if the camera is turned off, then on again, the lens will not return to its previous focus position. You have to refocus to infinity each time the camera is powered up, a nuisance.
Unlike some Nikon, Sony, Samyang, and Sigma lenses, none of the Canon lenses have a focus lock button, or any way of presetting an infinity focus point, or simply having the lens remember where it was last set. I would hope Canon could address that deficiency in a firmware update.
With all the zooms, I did not find any issue with “zoom creep.” The telescoping barrels remained in place during long exposures and did not slowly retract when aimed up. While the RF28-70mm and RF70-200mm each have a zoom lock switch, it locks the lens only at its shortest focal length.
Each lens is parfocal within its zoom range. Focus at one zoom position, and it will be in focus for all the focal lengths. I usually focus at the longest focal length where it is easiest to judge focus by eye, then zoom out to frame the scene.
FINISHED IMAGES GALLERIES
Here I present a selection of final, processed images (four for each lens), so you can better see how each performs on real-world celestial subjects. To speed download, the images are downsized to 2048 pixels wide.
As per my comments at top, the RF15-35mm is my primary nightscape lens, the RF28-70mm my lens for wide-field constellation and Milky Way shots, while the RF70-200mm is for conjunctions and Moon scenes. It would also be good for eclipses.
Image Gallery withCanon RF15-35mm F/2.8 L IS USM
Image Gallery withCanon RF28-70mm F/2 L USM
Orion in H-Alpha Light with Narrowband Filter
Image Gallery withCanon RF70-200mm F/4 L IS USM
Click on the images to bring them up full screen with caption information.
CONCLUSIONs and recommendations
If you are a Canon user switching from your aging but faithful DSLR to one of their mirrorless R cameras, each of these lenses will perform superbly for astrophotography. At a price! Each is costly. But the cost of older EF lenses has also increased in recent months.
The other native RF L-series lenses in this focal length range, Canon’s RF50mm and RF85mm f/1.2 primes, are stunning … but also expensive. As I’m sure any coming RF wide-angle L primes will be, if and when they ever appear!
This shows the relative difference in size and height of the lens trio, with all collapsed to their minimum size.
The cheaper alternative – not the least because you might already own them! – is using adapted EF-mount lenses made for DSLRs, either from Canon or other brands. But in many cases, as I’ve shown, the new RF glass is sharper, especially when on a high-resolution camera such as the Canon R5 I used for all the testing.
And there’s the harsh reality that Canon is discontinuing many EF lenses. You can now buy some only used. For example, the EF135mm f/2 L and EF200mm f/2.8 L are both gone.
Until Canon licenses other companies to issue approved lenses for their RF mount – if that happens at all – our choices for native RF lenses are limited. However, the quality of Canon’s L lenses is superb. I now use these zooms almost exclusively, and financed most of their considerable cost by selling off a ream of older cameras and lenses.
If there’s one lens to buy for most astrophotography, it might be the big RF28-70mm F/2, a zoom lens that comes close to offering it all: flexibility, optical quality and speed. The RF24-70mm F/2.8 is a more affordable choice, though I have not tested one.
If nightscapes are the priority, the RF15-35mm F/2.8 would see a lot of use, as perhaps the only lens you’d need.
Of the trio, the RF70-200mm was the lowest priority on my wish list. But it has proven to be very useful for framing horizon scenes.
The superb optics of these and other new lenses made for mirrorless cameras is one good reason to upgrade from a DSLR to a mirrorless camera, in whatever brand you prefer.
In an extensive technical blog, I put the Canon R6 mirrorless camera through its paces for the demands of astrophotography.
Every major camera manufacturer, with the lone exception of stalwart Pentax, has moved from producing digital lens reflex (DSLR) cameras, to digital single lens mirrorless (DSLM) cameras. The reflex mirror is gone, allowing for a more compact camera, better movie capabilities, and enhanced auto-focus functions, among other benefits.
But what about for astrophotography? I reviewed the Sony a7III and Nikon Z6 mirrorless cameras here on my blog and, except for a couple of points, found them excellent for the demands of most astrophotography.
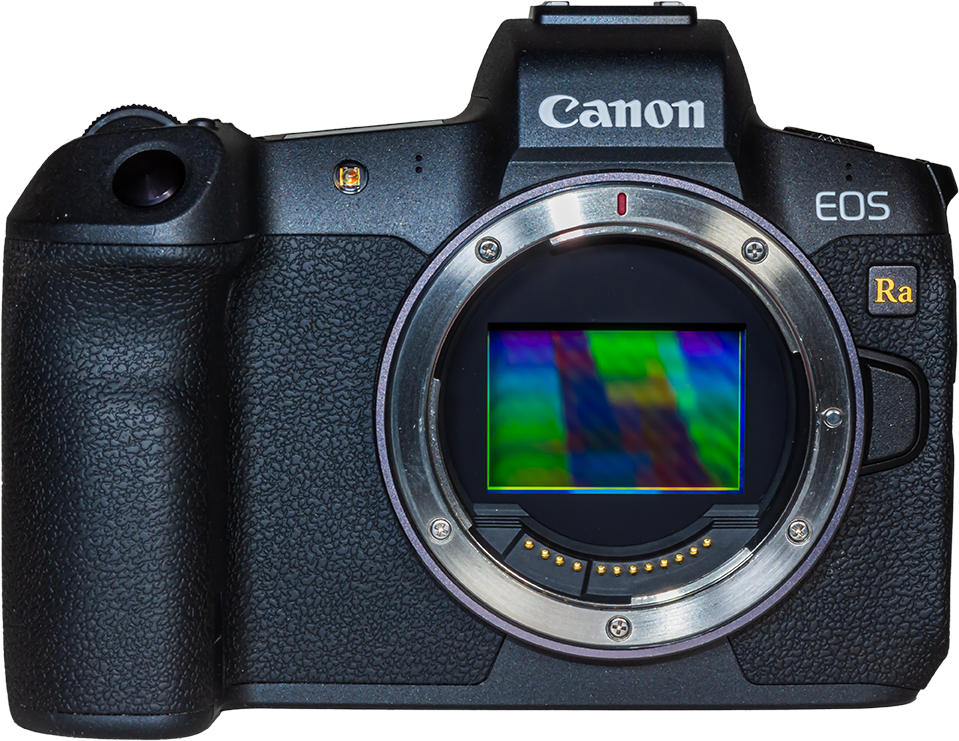
For the last two years I’ve primarily used Canon’s astro-friendly and red-sensitive EOS Ra mirrorless, a model sadly discontinued in September 2021 after just two years on the market. I reviewed that camera in the April 2020 issue of Sky & Telescope magazine, with a quick first look here on my blog.
The superb performance of the Ra has prompted me to stay with the Canon mirrorless R system for future camera purchases. Here I test the mid-priced R6, introduced in August 2020.
NOTE: In early November 2022 Canon announced the EOS R6 MkII, which one assumes will eventually replace the original R6 once stock of that camera runs out. The MkII has a 24 Mp sensor for slightly better resolution, and offers longer battery life. But the main improvements over the R6 is to autofocus accuracy, a function of little use to astrophotographers. Only real-world testing will tell if the R6 MkII has better or worse noise levels than the R6, or has eliminated the R6’s amp glow, reported on below.
M31, the spiral galaxy in Andromeda, with the Canon R6 mirrorless camera. It is a stack of 8 x 8-minute exposures at ISO 800, blended with a stack of 8 x 2-minute exposures at ISO 400 for the core, to prevent it from overexposing too much, all with a SharpStar 76mm apo refractor at f/4.5 with its field flattener/reducer.
TL;DR SUMMARY
The Canon R6 has proven excellent for astrophotography, exhibiting better dynamic range and shadow recovery than most Canon DSLRs, due to the ISO invariant design of the R6 sensor. It is on par with the low-light performance of Nikon and Sony mirrorless cameras.
The preview image is sensitive enough to allow easy framing and focusing at night. The movie mode produces usable quality up to ISO 51,200, making 4K movies of auroras possible. Canon DSLRs cannot do this.
Marring the superb performance are annoying deficiencies in the design, and one flaw in the image quality – an amp glow – that particularly impacts deep-sky imaging.
R6 pros
The Canon R6 is superb for its:
Low noise, though not exceptionally so
ISO invariant sensor performance for good shadow recovery
Sensitive live view display with ultra-high ISO boost in Movie mode
Relatively low noise Movie mode with full frame 4K video
Low light auto focus and accurate manual focus assist
Good battery life
R6 cons
The Canon R6 is not so superb for its:
Design Deficiencies
Lack of a top LCD screen
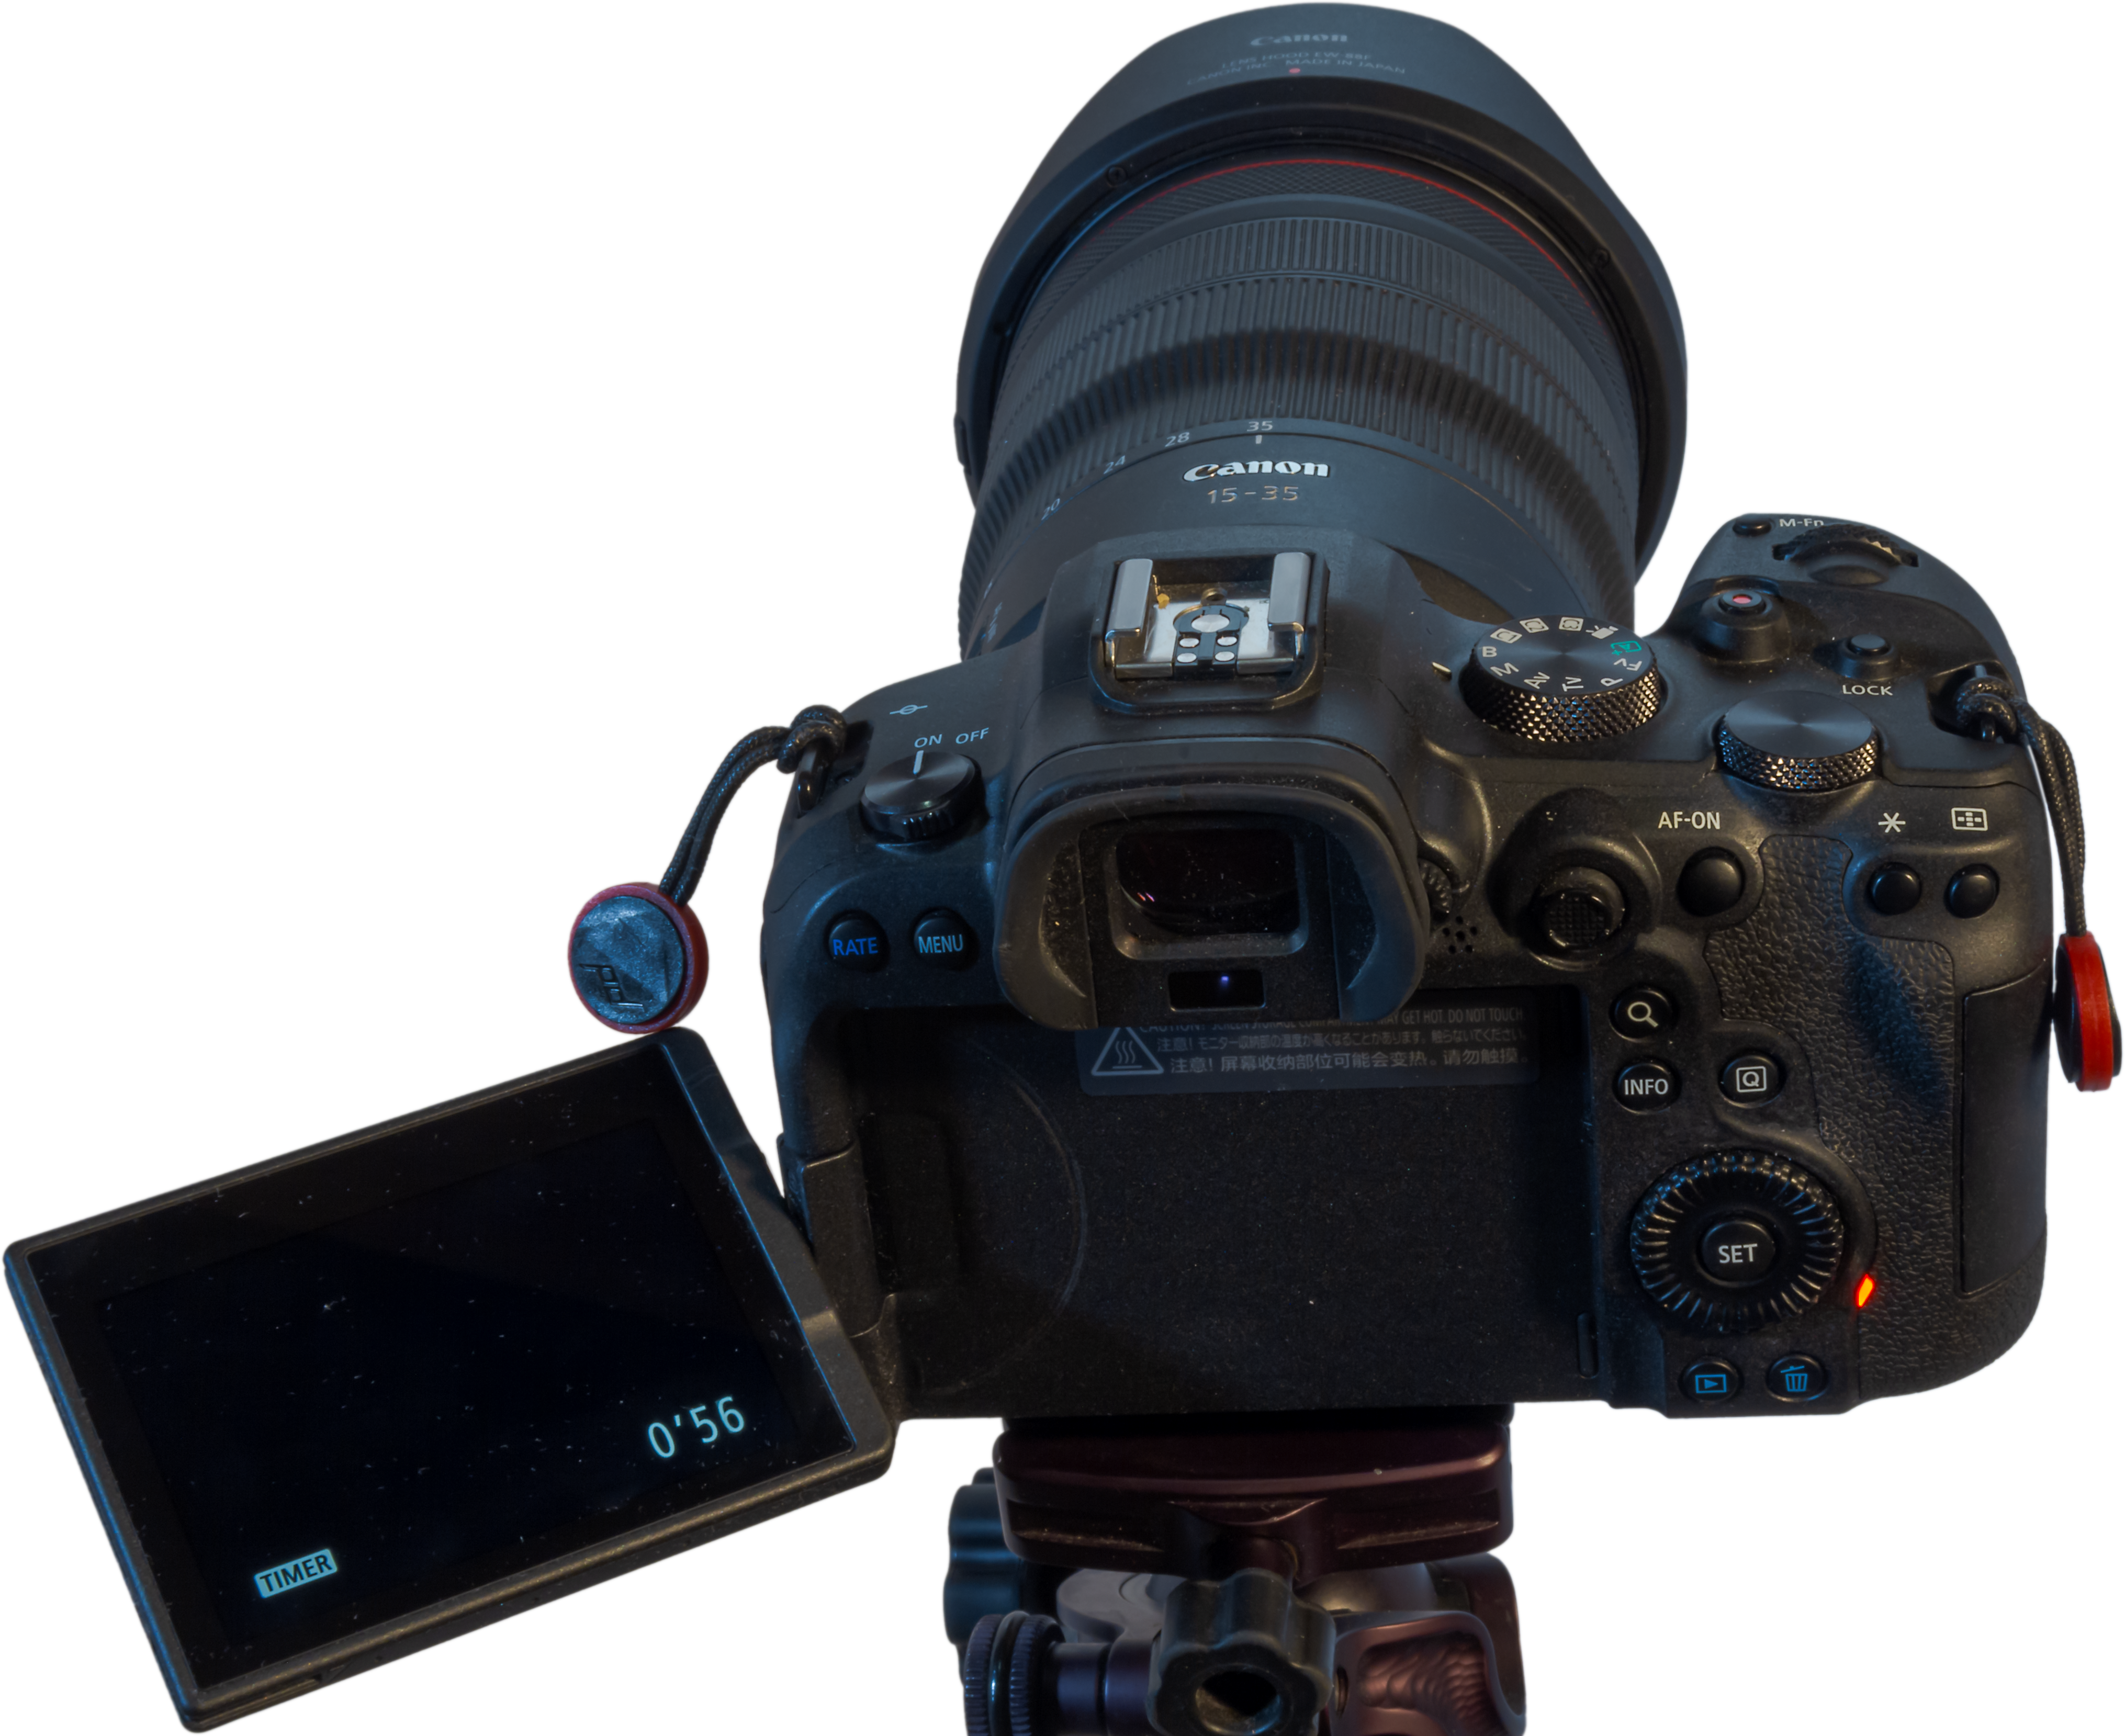
Bright timer display in Bulb on the rear screen
No battery level indication when shooting
Low grade R3-style remote jack, same as on entry-level Canon DSLRs
Image Quality Flaw
Magenta edge “amp glow” in long exposures
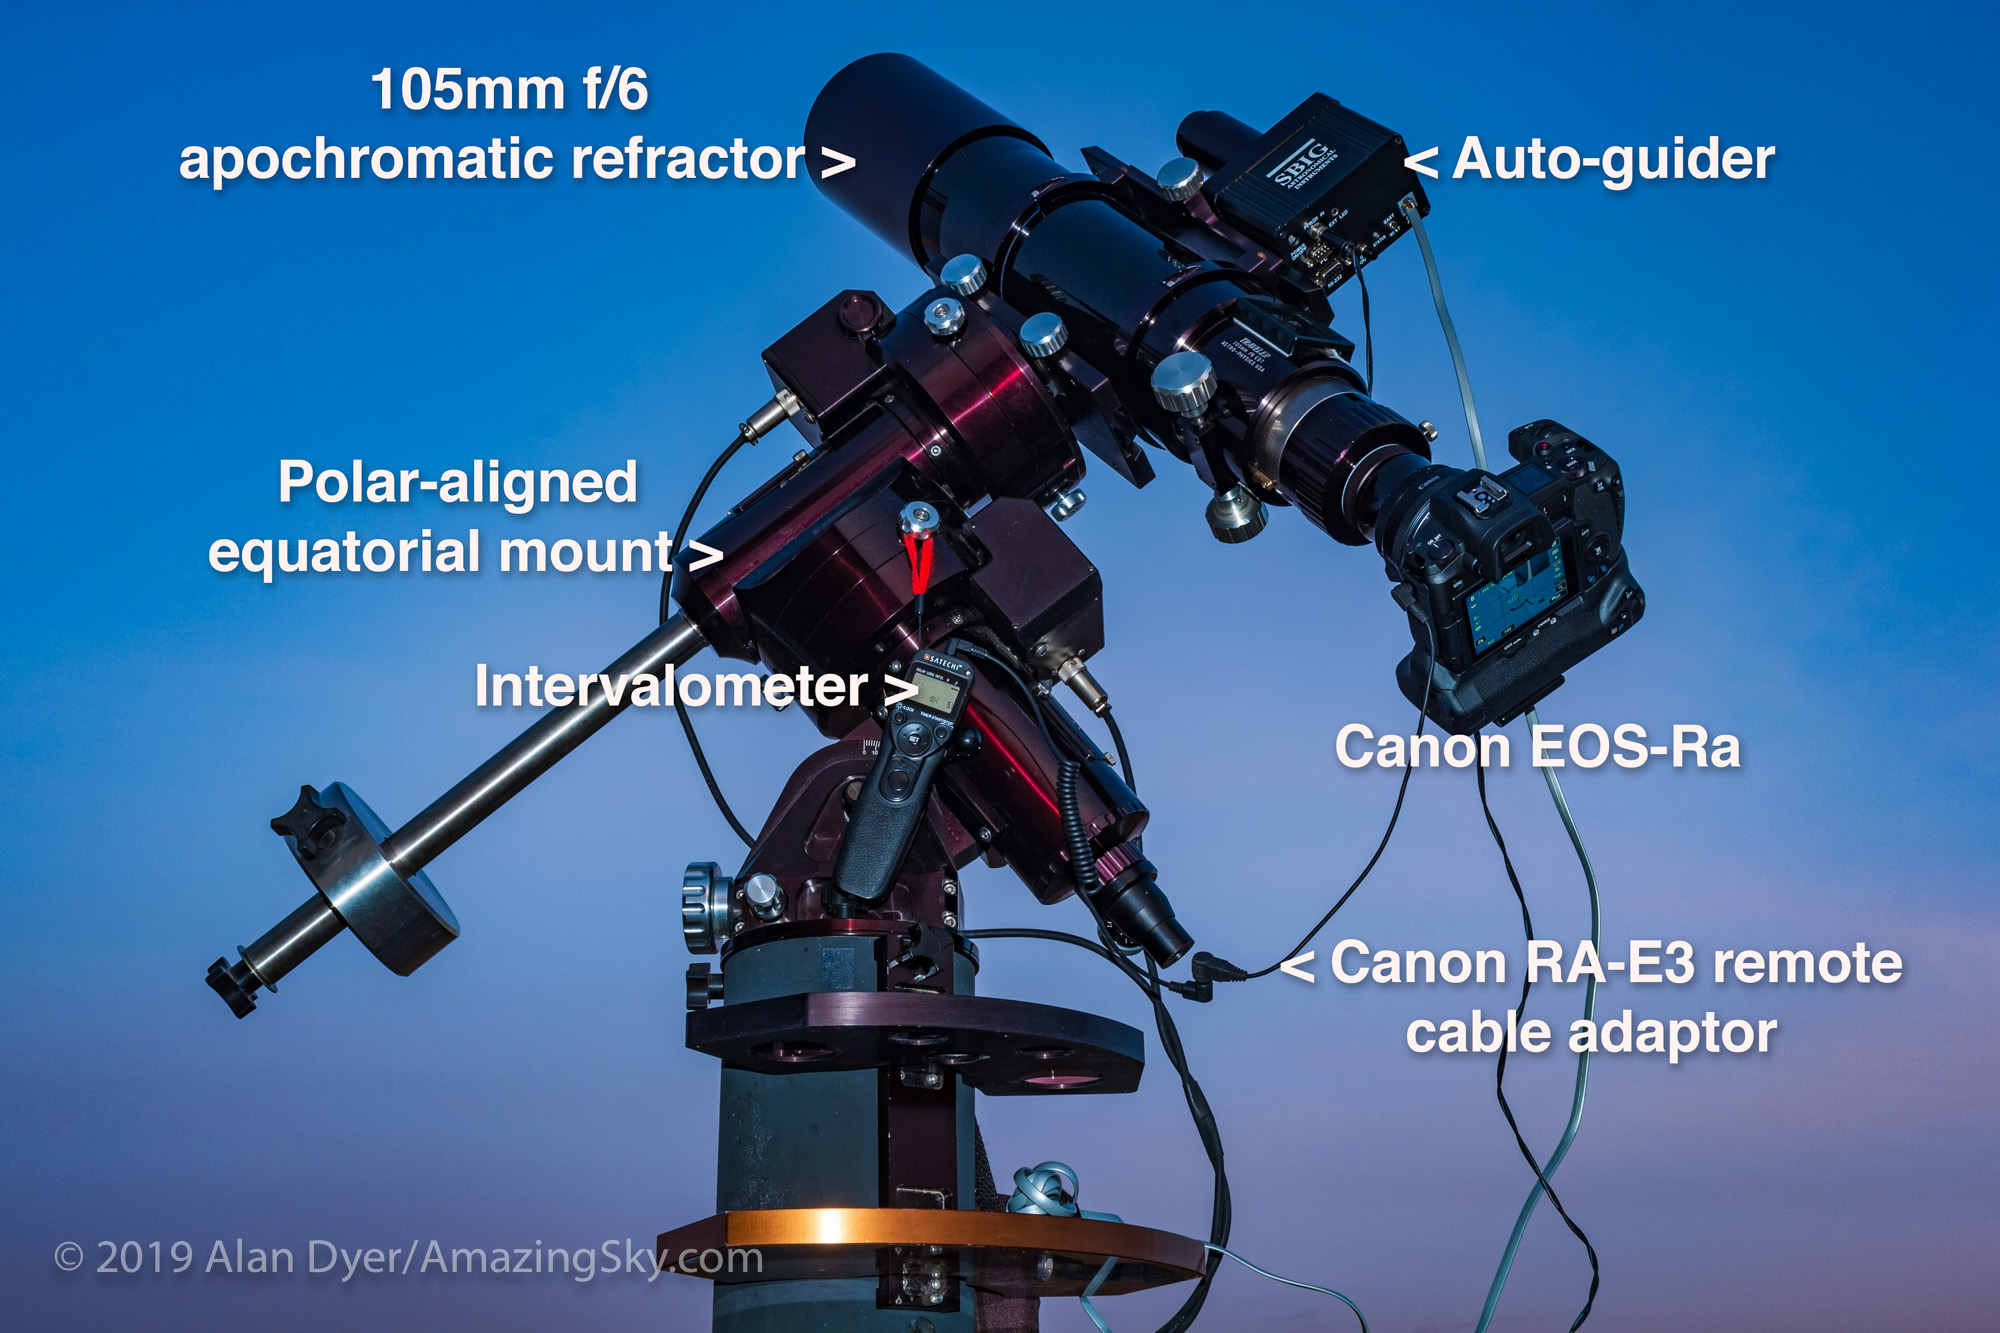
The Canon Ra on the left with the 28-70mm f/2 RF lens and the Canon R6 on the right with the 70-200mm f/2/8 RF lens, two superb but costly zooms for the R system cameras.
CHOOSING THE R6
Canon’s first full-frame mirrorless camera, the 30-megapixel EOS R, was introduced in late 2018 to compete with Sony. As of late-2021 the main choices in a Canon DSLM for astrophotography are either the original R, the 20-megapixel R6, the 26-megapixel Rp, or the 45-megapixel R5.
The new 24-megapixel Canon R3, while it has impressive low-noise performance, is designed primarily for high-speed sports and news photography. It is difficult to justify its $6,000 cost for astro work.
I have not tested Canon’s entry-level, but full-frame Rp. While the Rp’s image quality is likely quite good, its small battery and short lifetime on a single charge will be limiting factors for astrophotography.
Nor have I tested the higher-end R5. Friends who use the R5 for nightscape work love it, but with smaller pixels the R5 will be noisier than the R6, which lab tests at sites such as DPReview.com seem to confirm.
Meanwhile, the original EOS R, while having excellent image quality and features, is surely destined for replacement in the near future – with a Canon EOS R Mark II? The R’s successor might be a great astrophoto camera, but with the Ra gone, I feel the R6 is currently the prime choice from Canon, especially for nightscapes.
I tested an R6 purchased in June 2021 and updated in August with firmware v1.4. I’ll go through its performance and functions with astrophotography in mind. I’ve ignored praised R6 features such as eye tracking autofocus, in-body image stabilization, and high speed burst rates. They are of limited or no value for astrophotography.
Along the way, I also offer a selection of user tips, some of which are applicable to other cameras.
LIVE VIEW FOCUSING AND FRAMING
“Back-of-the-camera” views of the R6 in its normal Live View mode (upper left) and its highly-sensitive Movie Mode (upper right), compared to views with four other cameras. Note the Milky Way visible with the R6 in its Movie mode, similar to the Sony in Bright Monitoring mode.
The first difference you will see when using any new mirrorless camera, compared to even a high-end DSLR, is how much brighter the “Live View” image is when shooting at night. DSLM cameras are always in Live View – even the eye-level viewfinder presents a digital image supplied by the sensor.
As such, whether on the rear screen on in the viewfinder, you see an image that closely matches the photo you are about to take, because it is the image you are about to take.
To a limit. DSLMs can do only so much to simulate what a long 30-second exposure will look like. But the R6, like many DSLMs, goes a long way in providing a preview image bright enough to frame a dark scene and focus on bright stars. Turn on Exposure Simulation to brighten the live image, and open the lens as wide as possible.
The Canon R6 in its Movie Mode at ISO 204,800 and with a lens wide open.
But the R6 has a trick up its sleeve for framing nightscapes. Switch the Mode dial to Movie, and set the ISO up to 204,800 (or at night just dial in Auto ISO), and with the lens wide open and shutter on 1/8 second (as above), the preview image will brighten enough to show the Milky Way and dark foreground, albeit in a noisy image. But it’s just for aiming and framing.
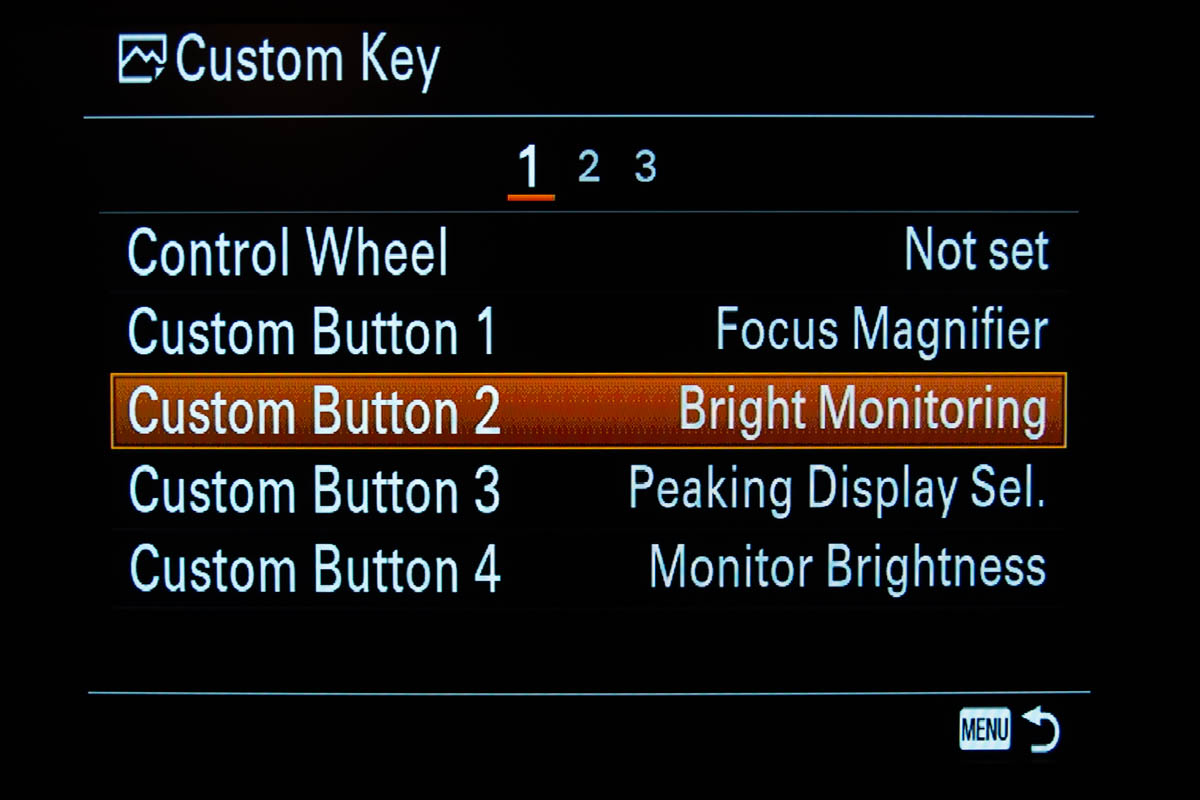
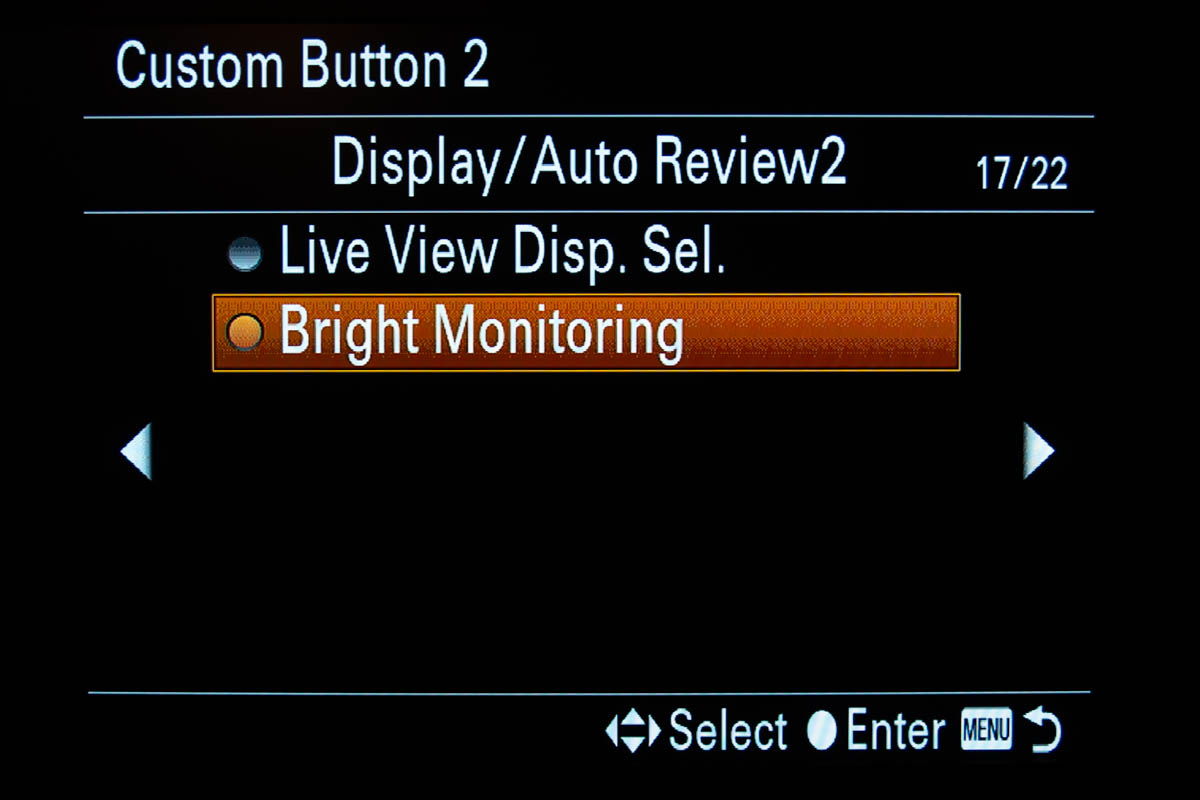
This is similar to the excellent, but well-hidden Bright Monitoring mode on Sony Alphas. This high-ISO Movie mode makes it a pleasure using the R6 for nightscapes. The EOS R and Ra do not have this ability. While their live view screens are good, they are not as sensitive as the R6’s, with the R and Ra’s Movie modes able to go up to only ISO 12,800. The R5 can go up to “only” ISO 51,200 in its Movie mode, good but not quite high enough for live framing on dark nights.
Comparing Manual vs. Auto Focus results with the R6.
The R6 will also autofocus down to a claimed EV -6.5, allowing it to focus in dim light for nightscapes, a feat impossible in most cameras. In practice with the Canon RF 15-35mm lens at f/2.8, I found the R6 can’t autofocus on the actual dark landscape, but it can autofocus on bright stars and planets (provided, of course, the camera is fitted with an autofocus lens).
Autofocusing on bright stars proved very accurate. By comparison, while the Ra can autofocus on distant bright lights, it fails on bright stars or planets.
Turning on Focus Peaking makes stars turn red, yellow or blue (your choice of colours) when they are in focus, as a reassuring confirmation.
The Focus Peaking and Focus Guide menu.The R6 live view display with Focus Guide arrows on and focused on a star, Antares.
In manual focus, an additional Focus Aid overlay provides arrows that close up and turn green when in focus on a bright star or planet. Or you can zoom in by 5x or 10x to focus by eye the old way by examining the star image. I wish the R6 had a 15x or 20x magnification; 5x and 10x have long been the Canon standards. Only the Ra offered 30x for ultra-precise focusing on stars.
In all, the ease of framing and focusing will be the major improvement you’ll enjoy by moving to any mirrorless, especially if your old camera is a cropped-frame Canon Rebel or T3i! But the R6 particularly excels at ease of focusing and framing.
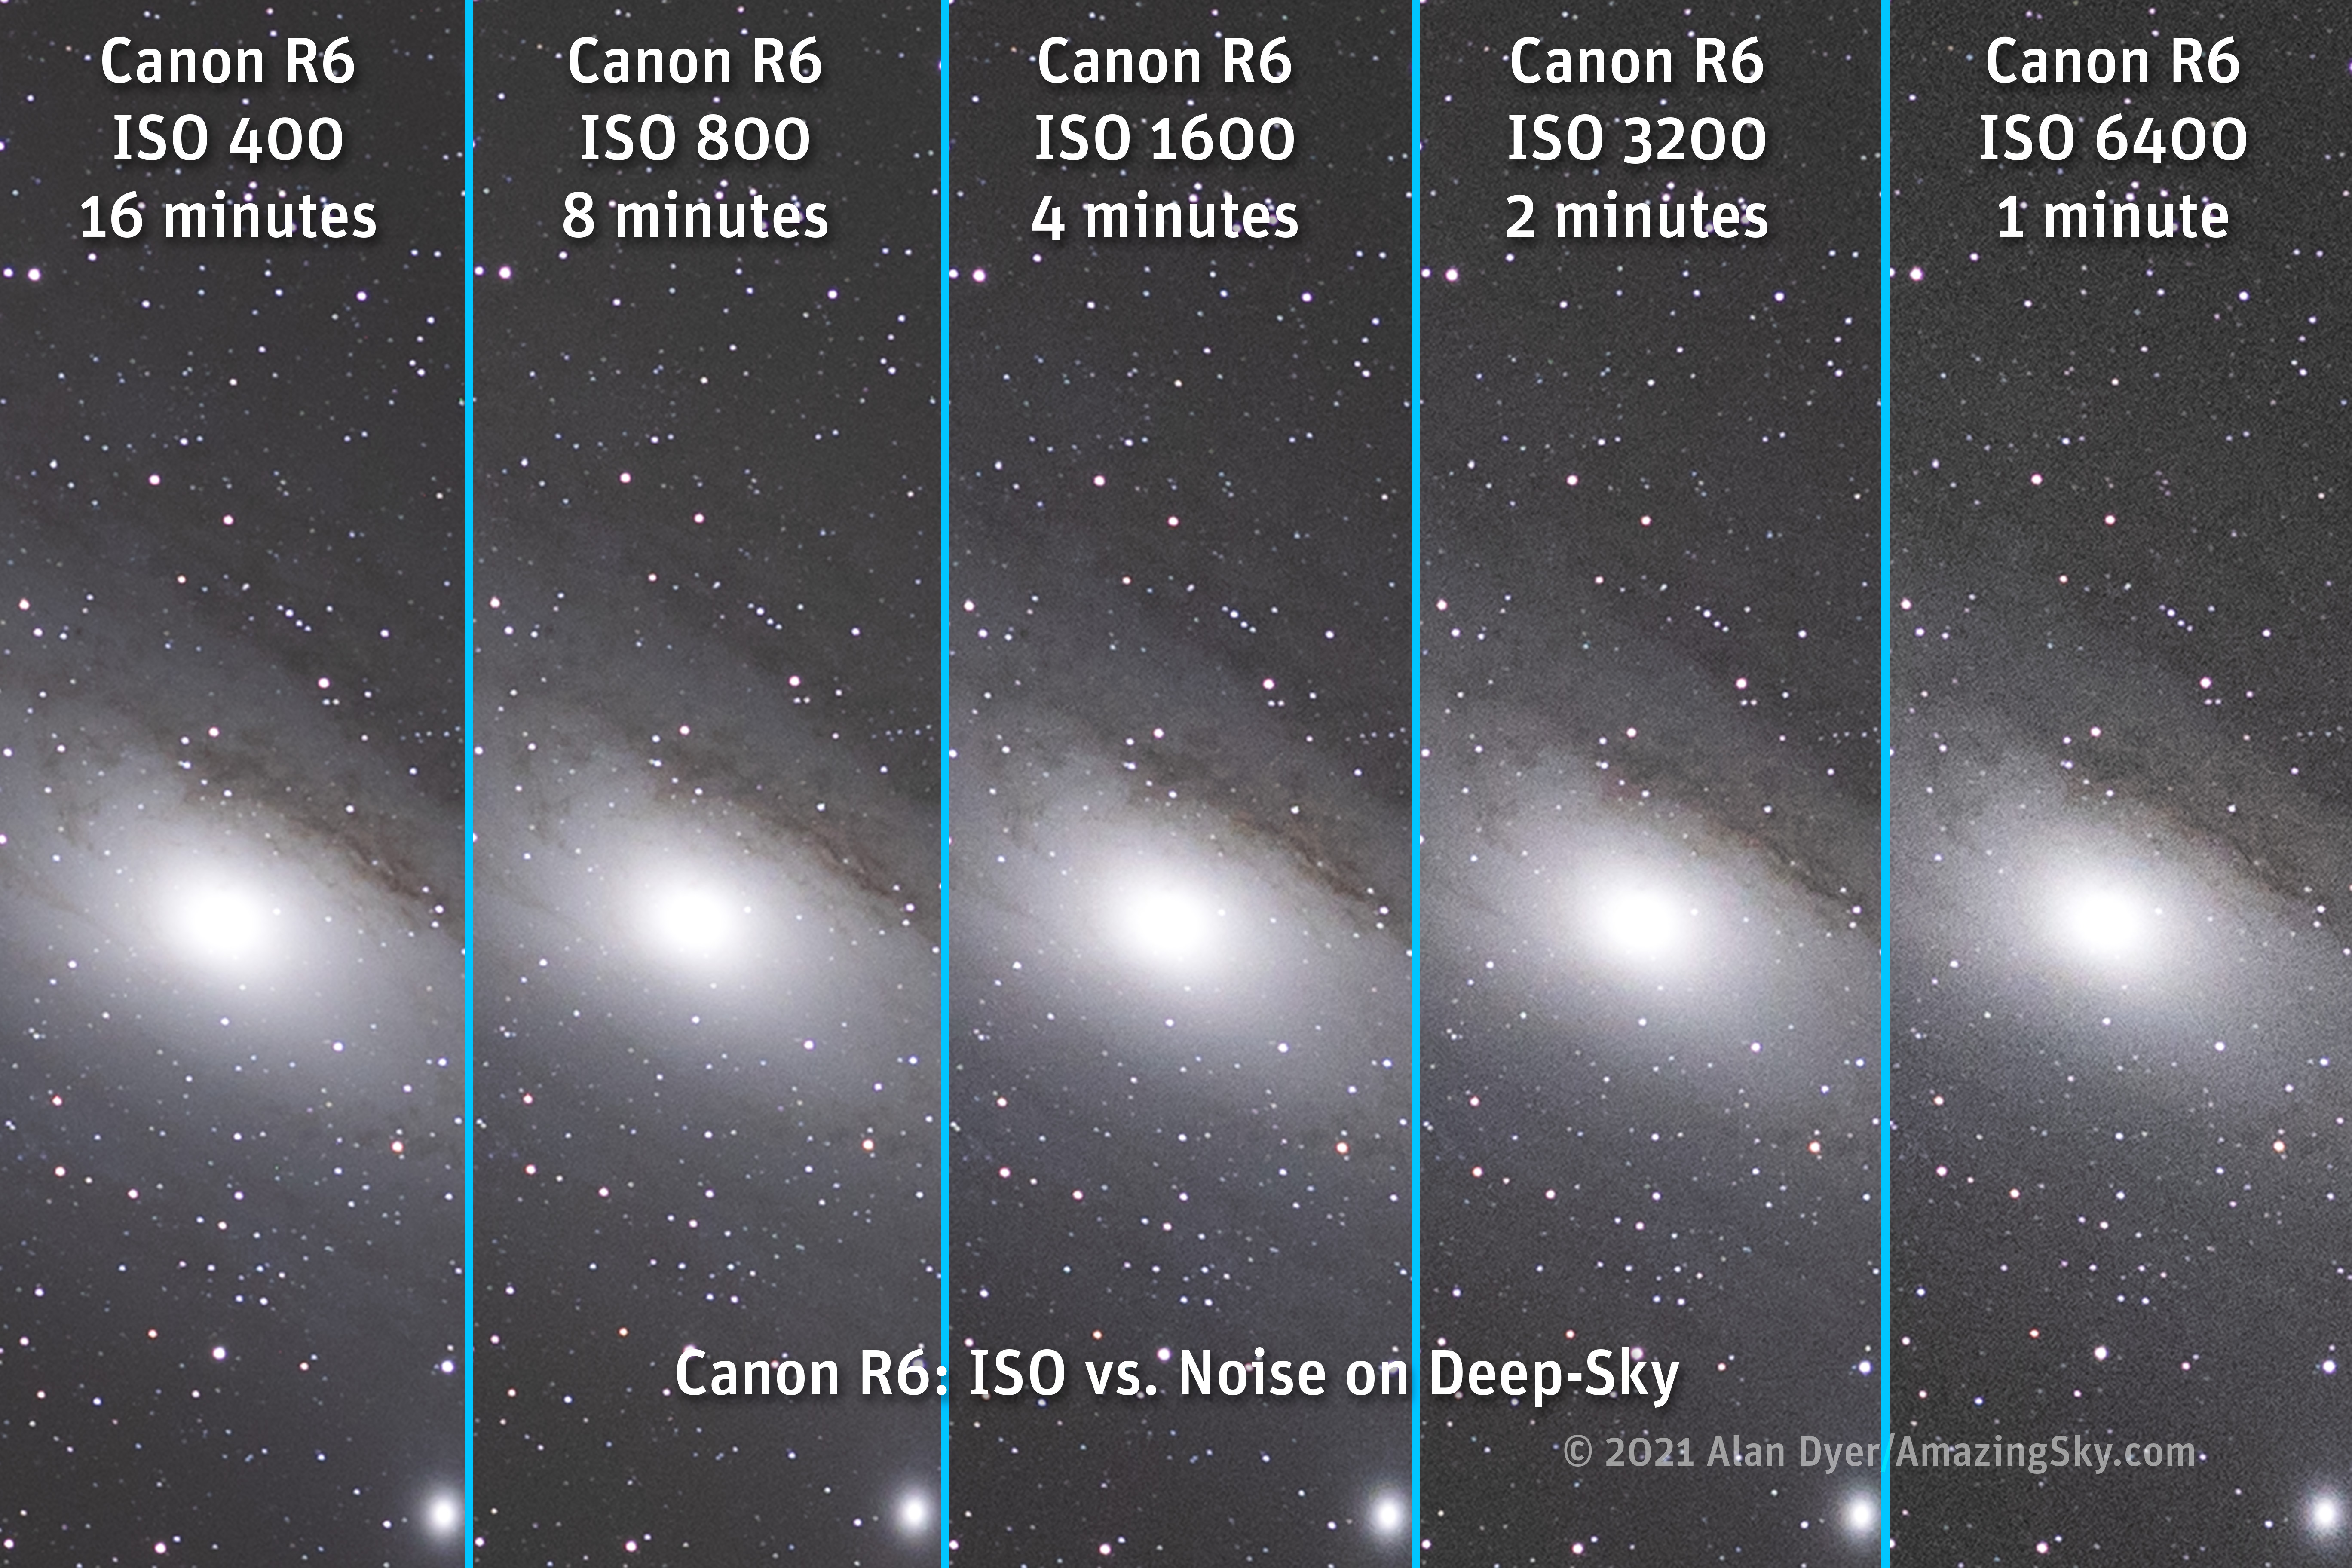
NOISE PERFORMANCE
The key camera characteristic for astrophoto use is noise. I feel it is more important than resolution. There’s little point in having lots of fine detail if it is lost in a blizzard of high-ISO noise. And for astro work, we are almost always shooting at high ISOs.
Comparing the R6’s noise at increasingly higher ISO speeds on a starlit nightscape.
With just 20 megapixels, low by today’s standards, the R6 has individual pixels, or more correctly “photosites,” that are each 6.6 microns in size, the “pixel pitch.”
By comparison, the 30-megapixel R (and Ra) has a pixel pitch of 5.4 microns, the 45-megapixel R5’s pixel pitch is 4.4 microns, while the acclaimed low-light champion in the camera world, the 12-megapixel Sony a7sIII, has large 8.5-micron photosites.
The bigger the photosites (i.e. the larger the pixel pitch), the more photons each photosite can collect in a given amount of time – and the more photons they can collect, period, before they overfill and clip highlights. More photons equals more signal, and therefore a better signal-to-noise ratio, while the greater “full-well depth” yields higher dynamic range.
Each generation of camera also improves the signal-to-noise ratio by suppressing noise via its sensor design and improved signal processing hardware and firmware. The R6 uses Canon’s latest DIGIC X processor shared by the company’s other mirrorless cameras.
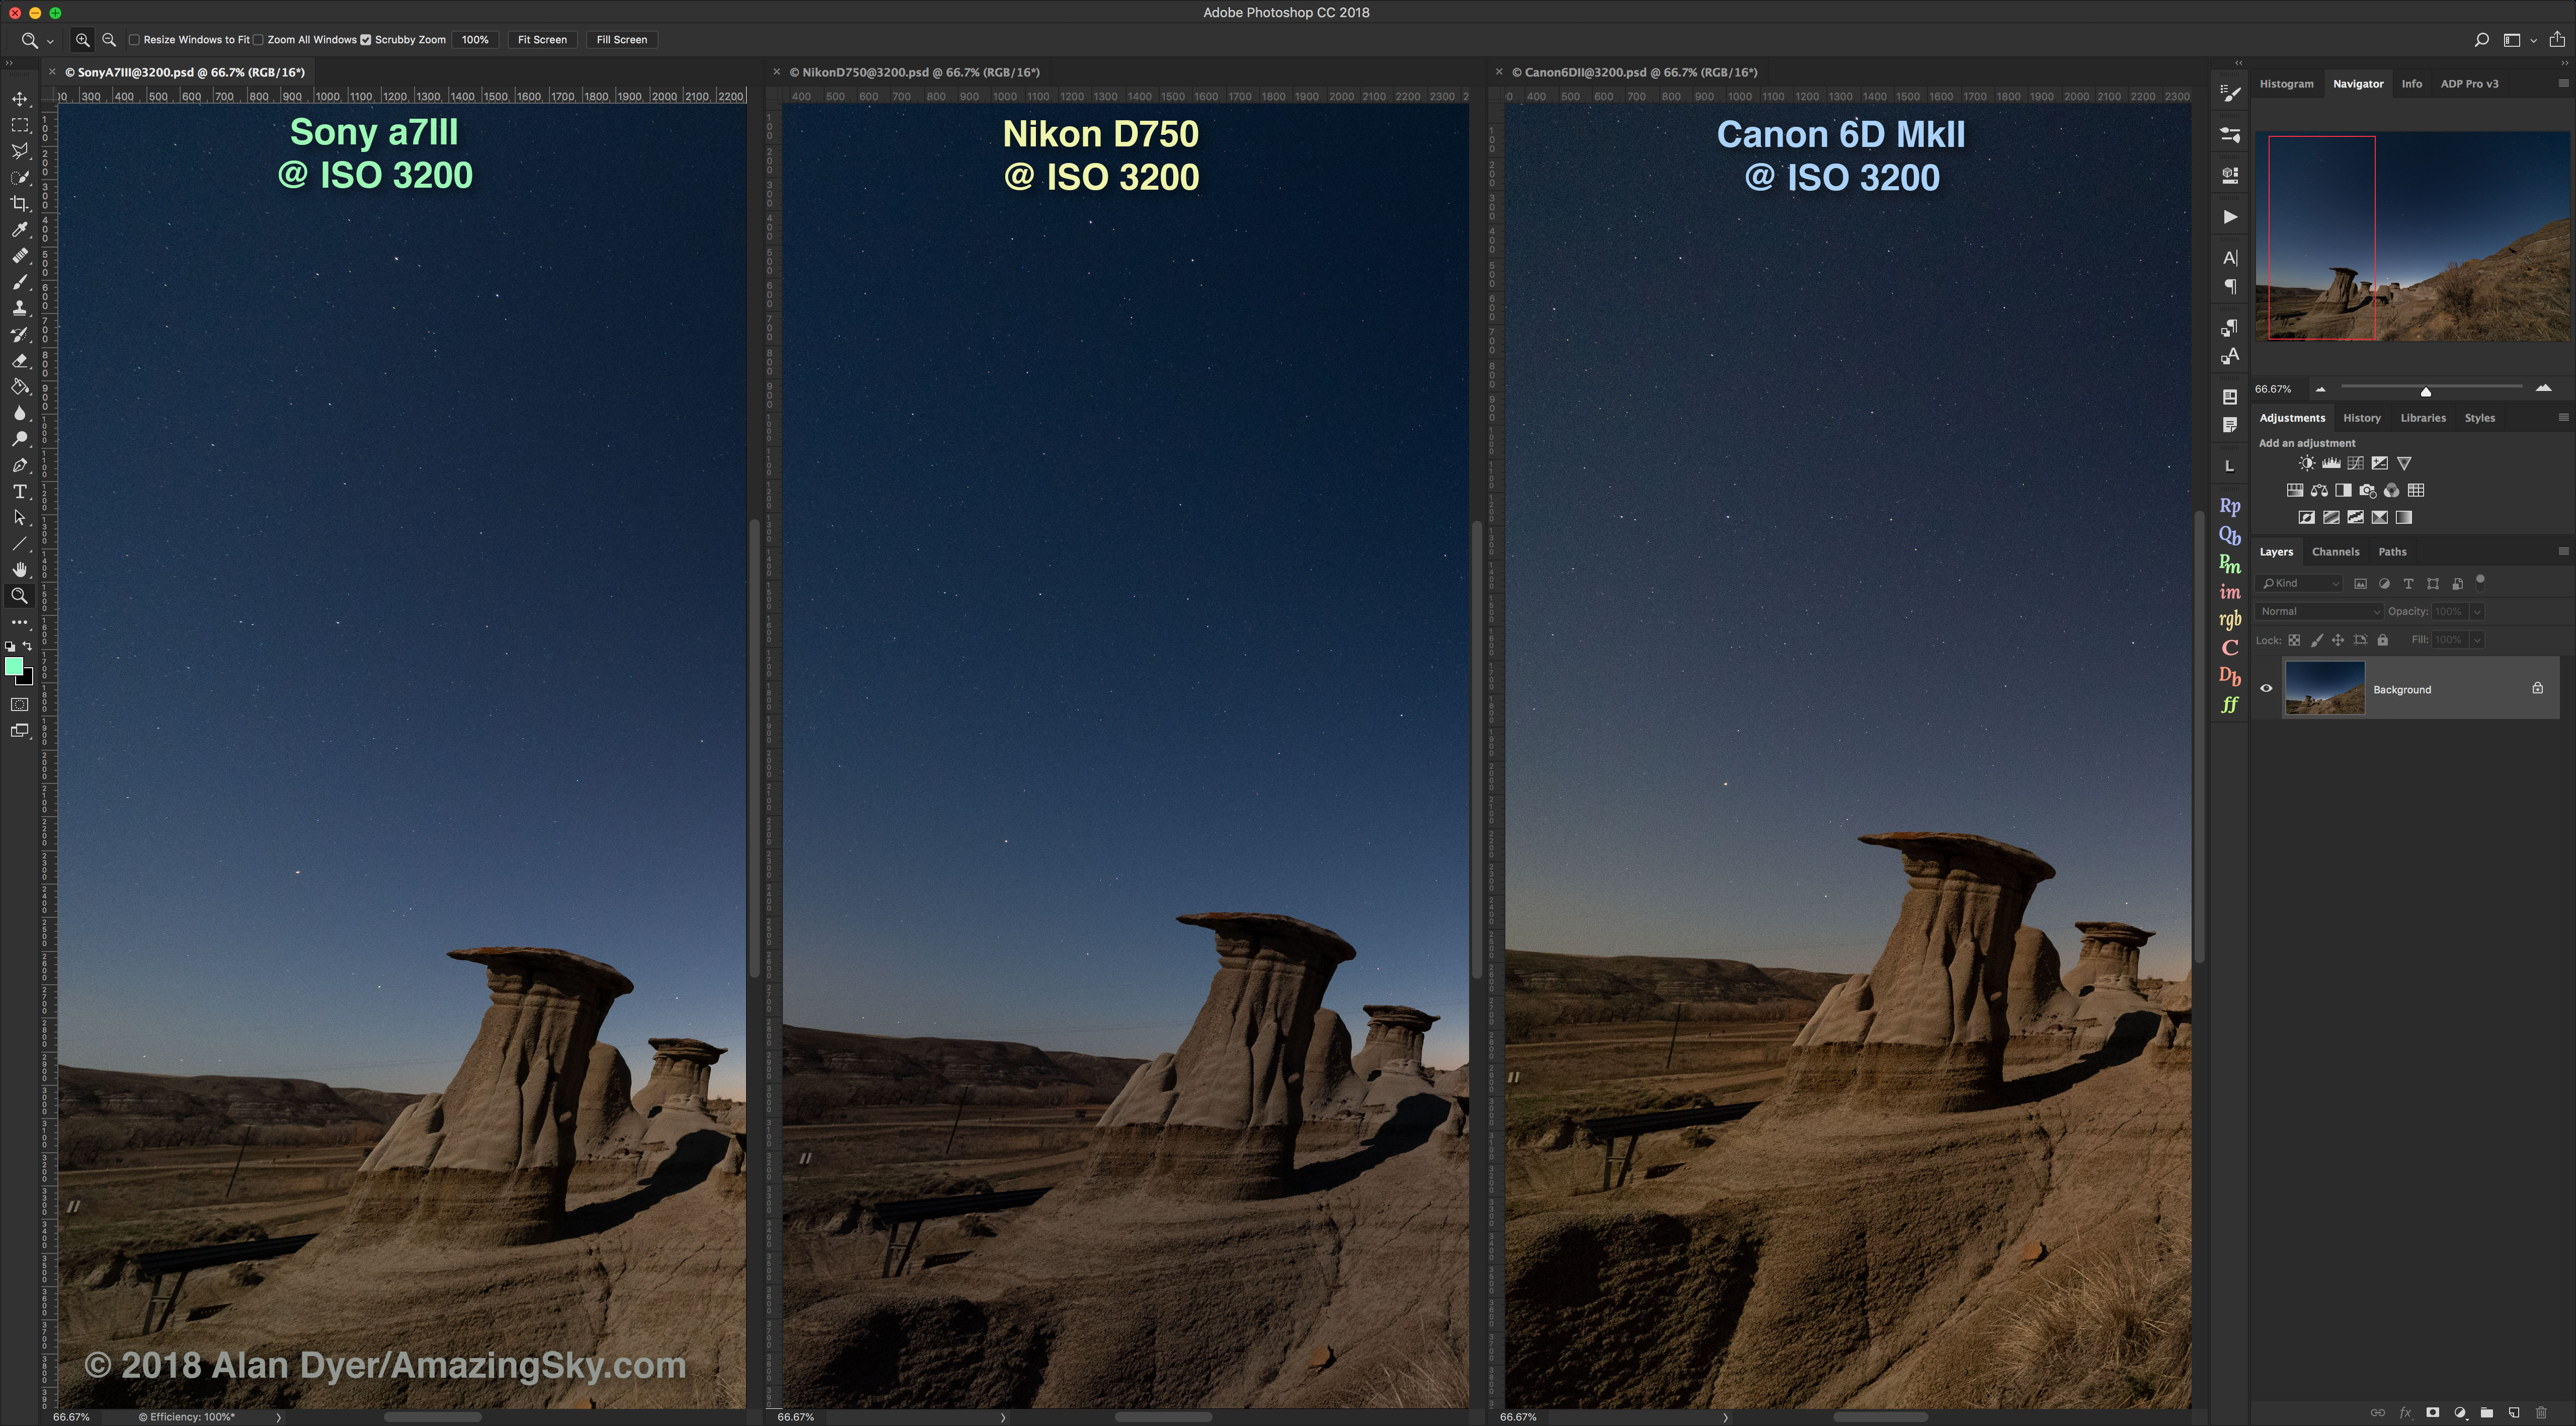
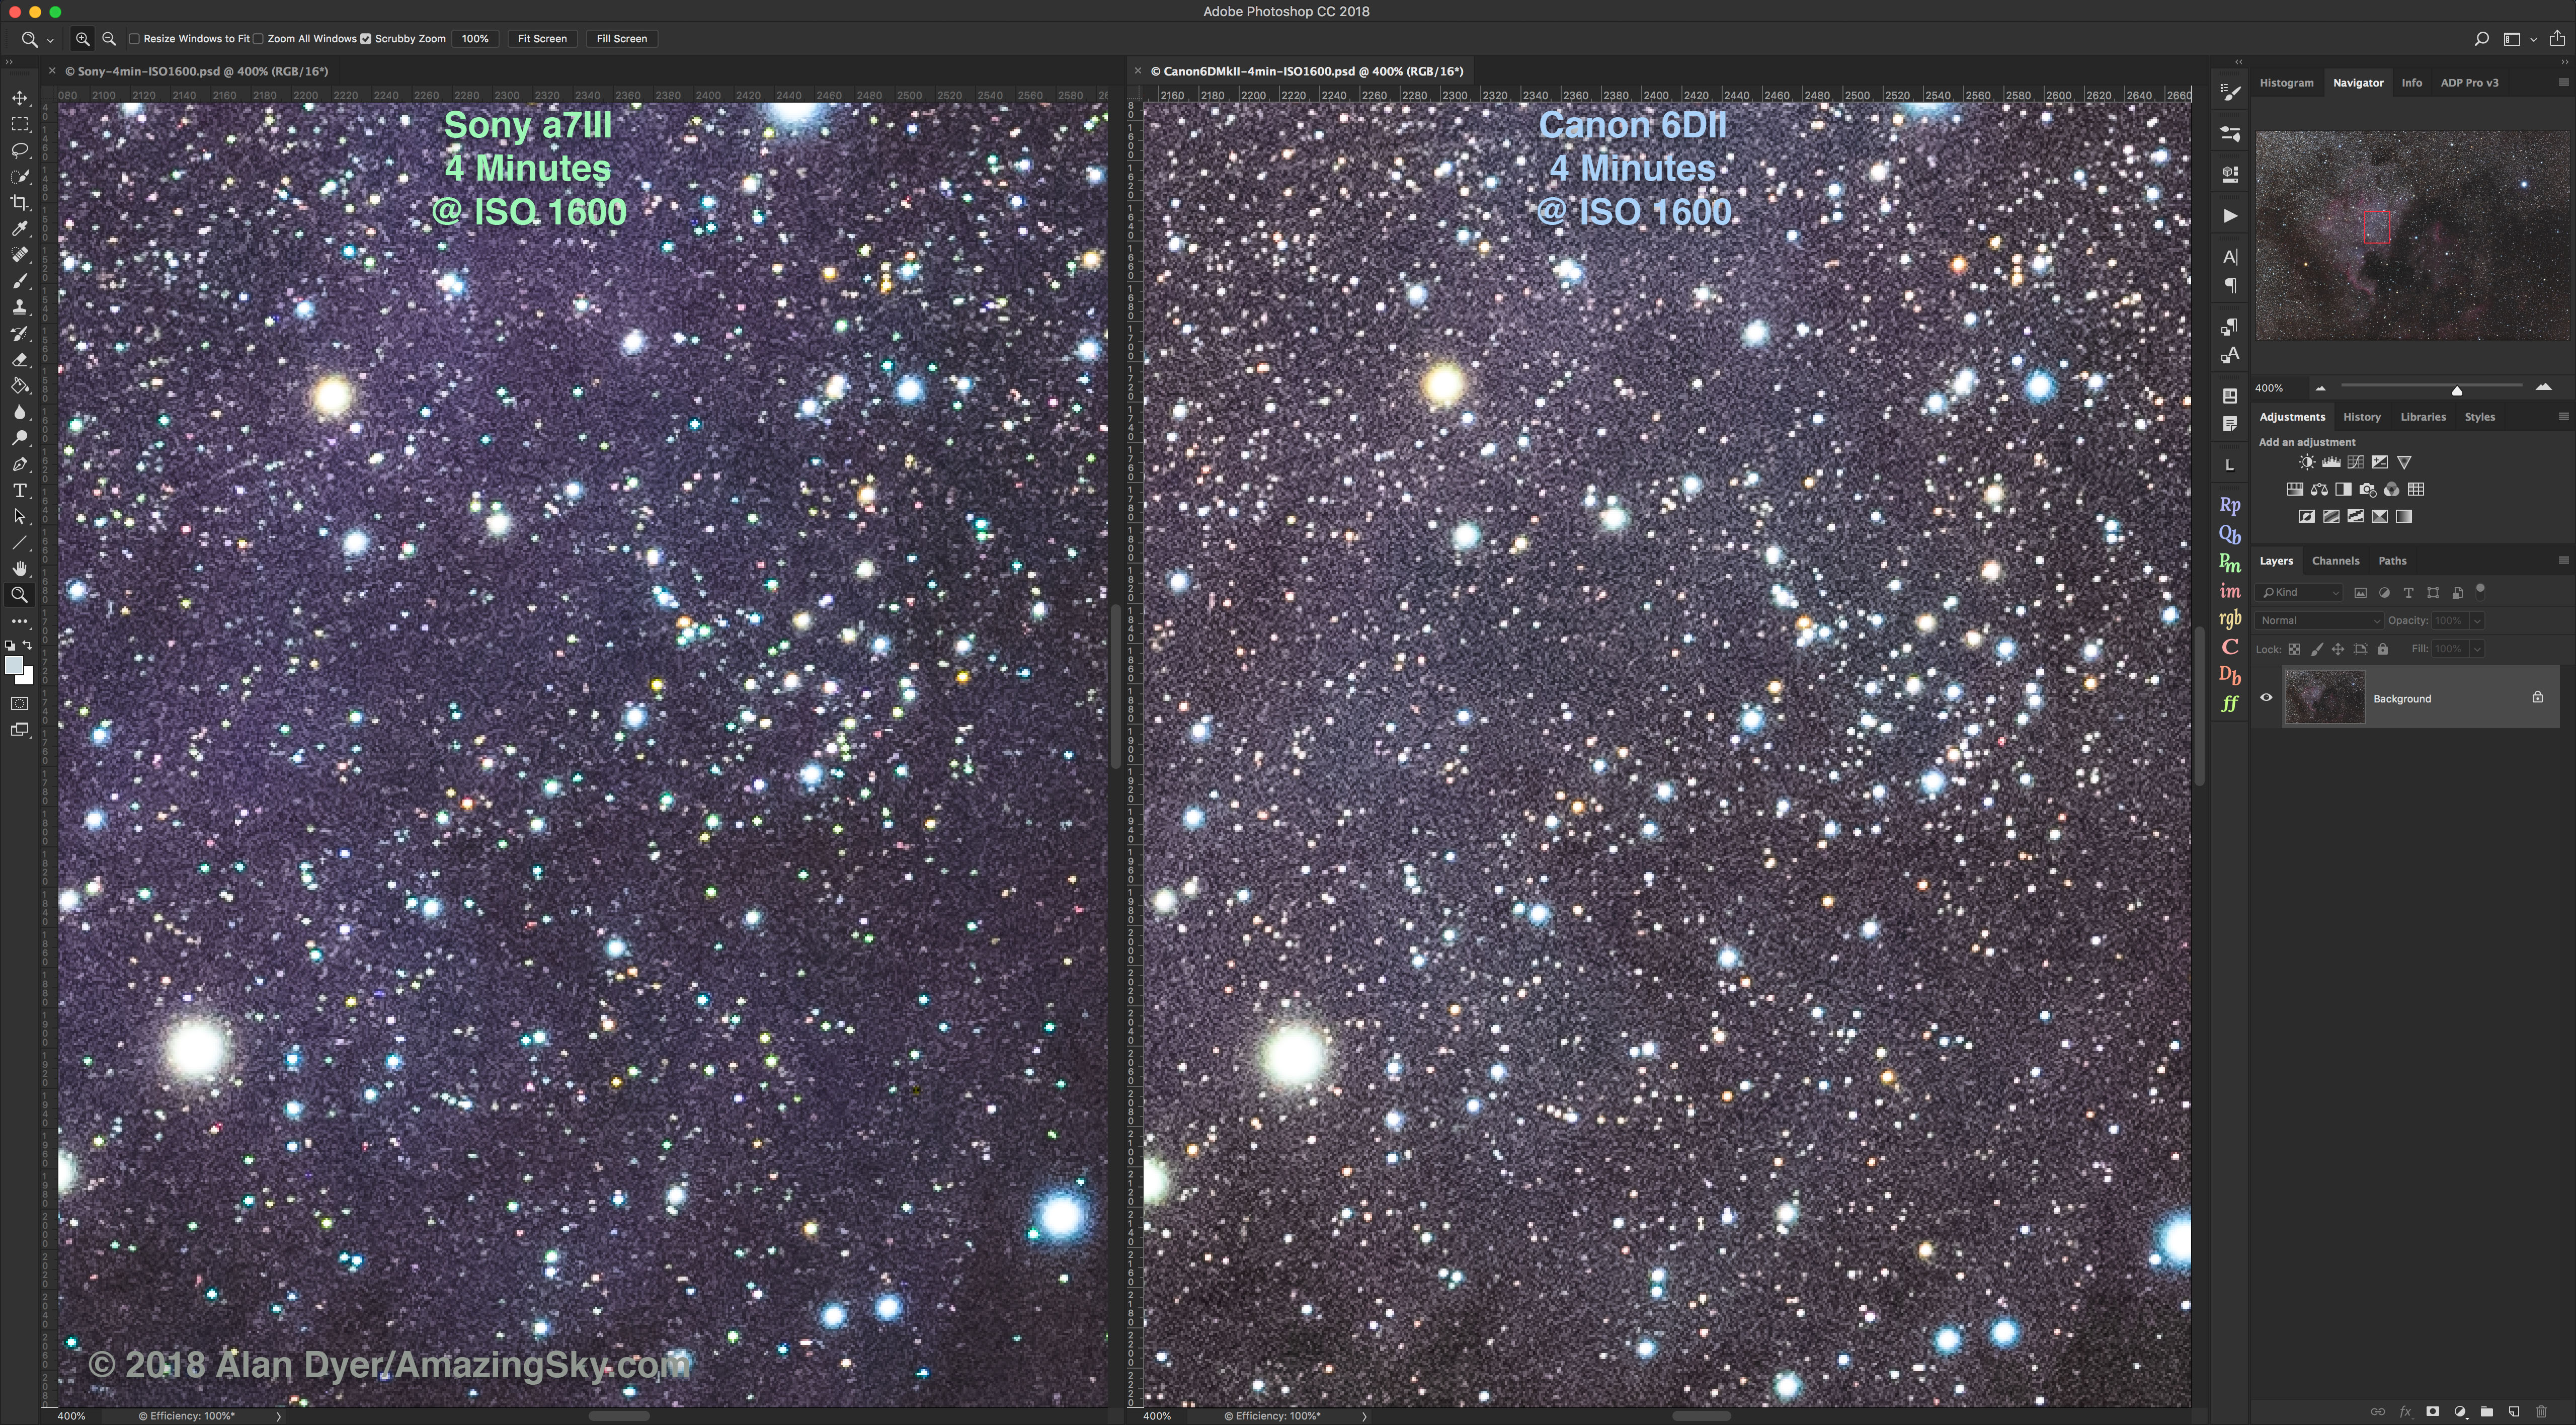
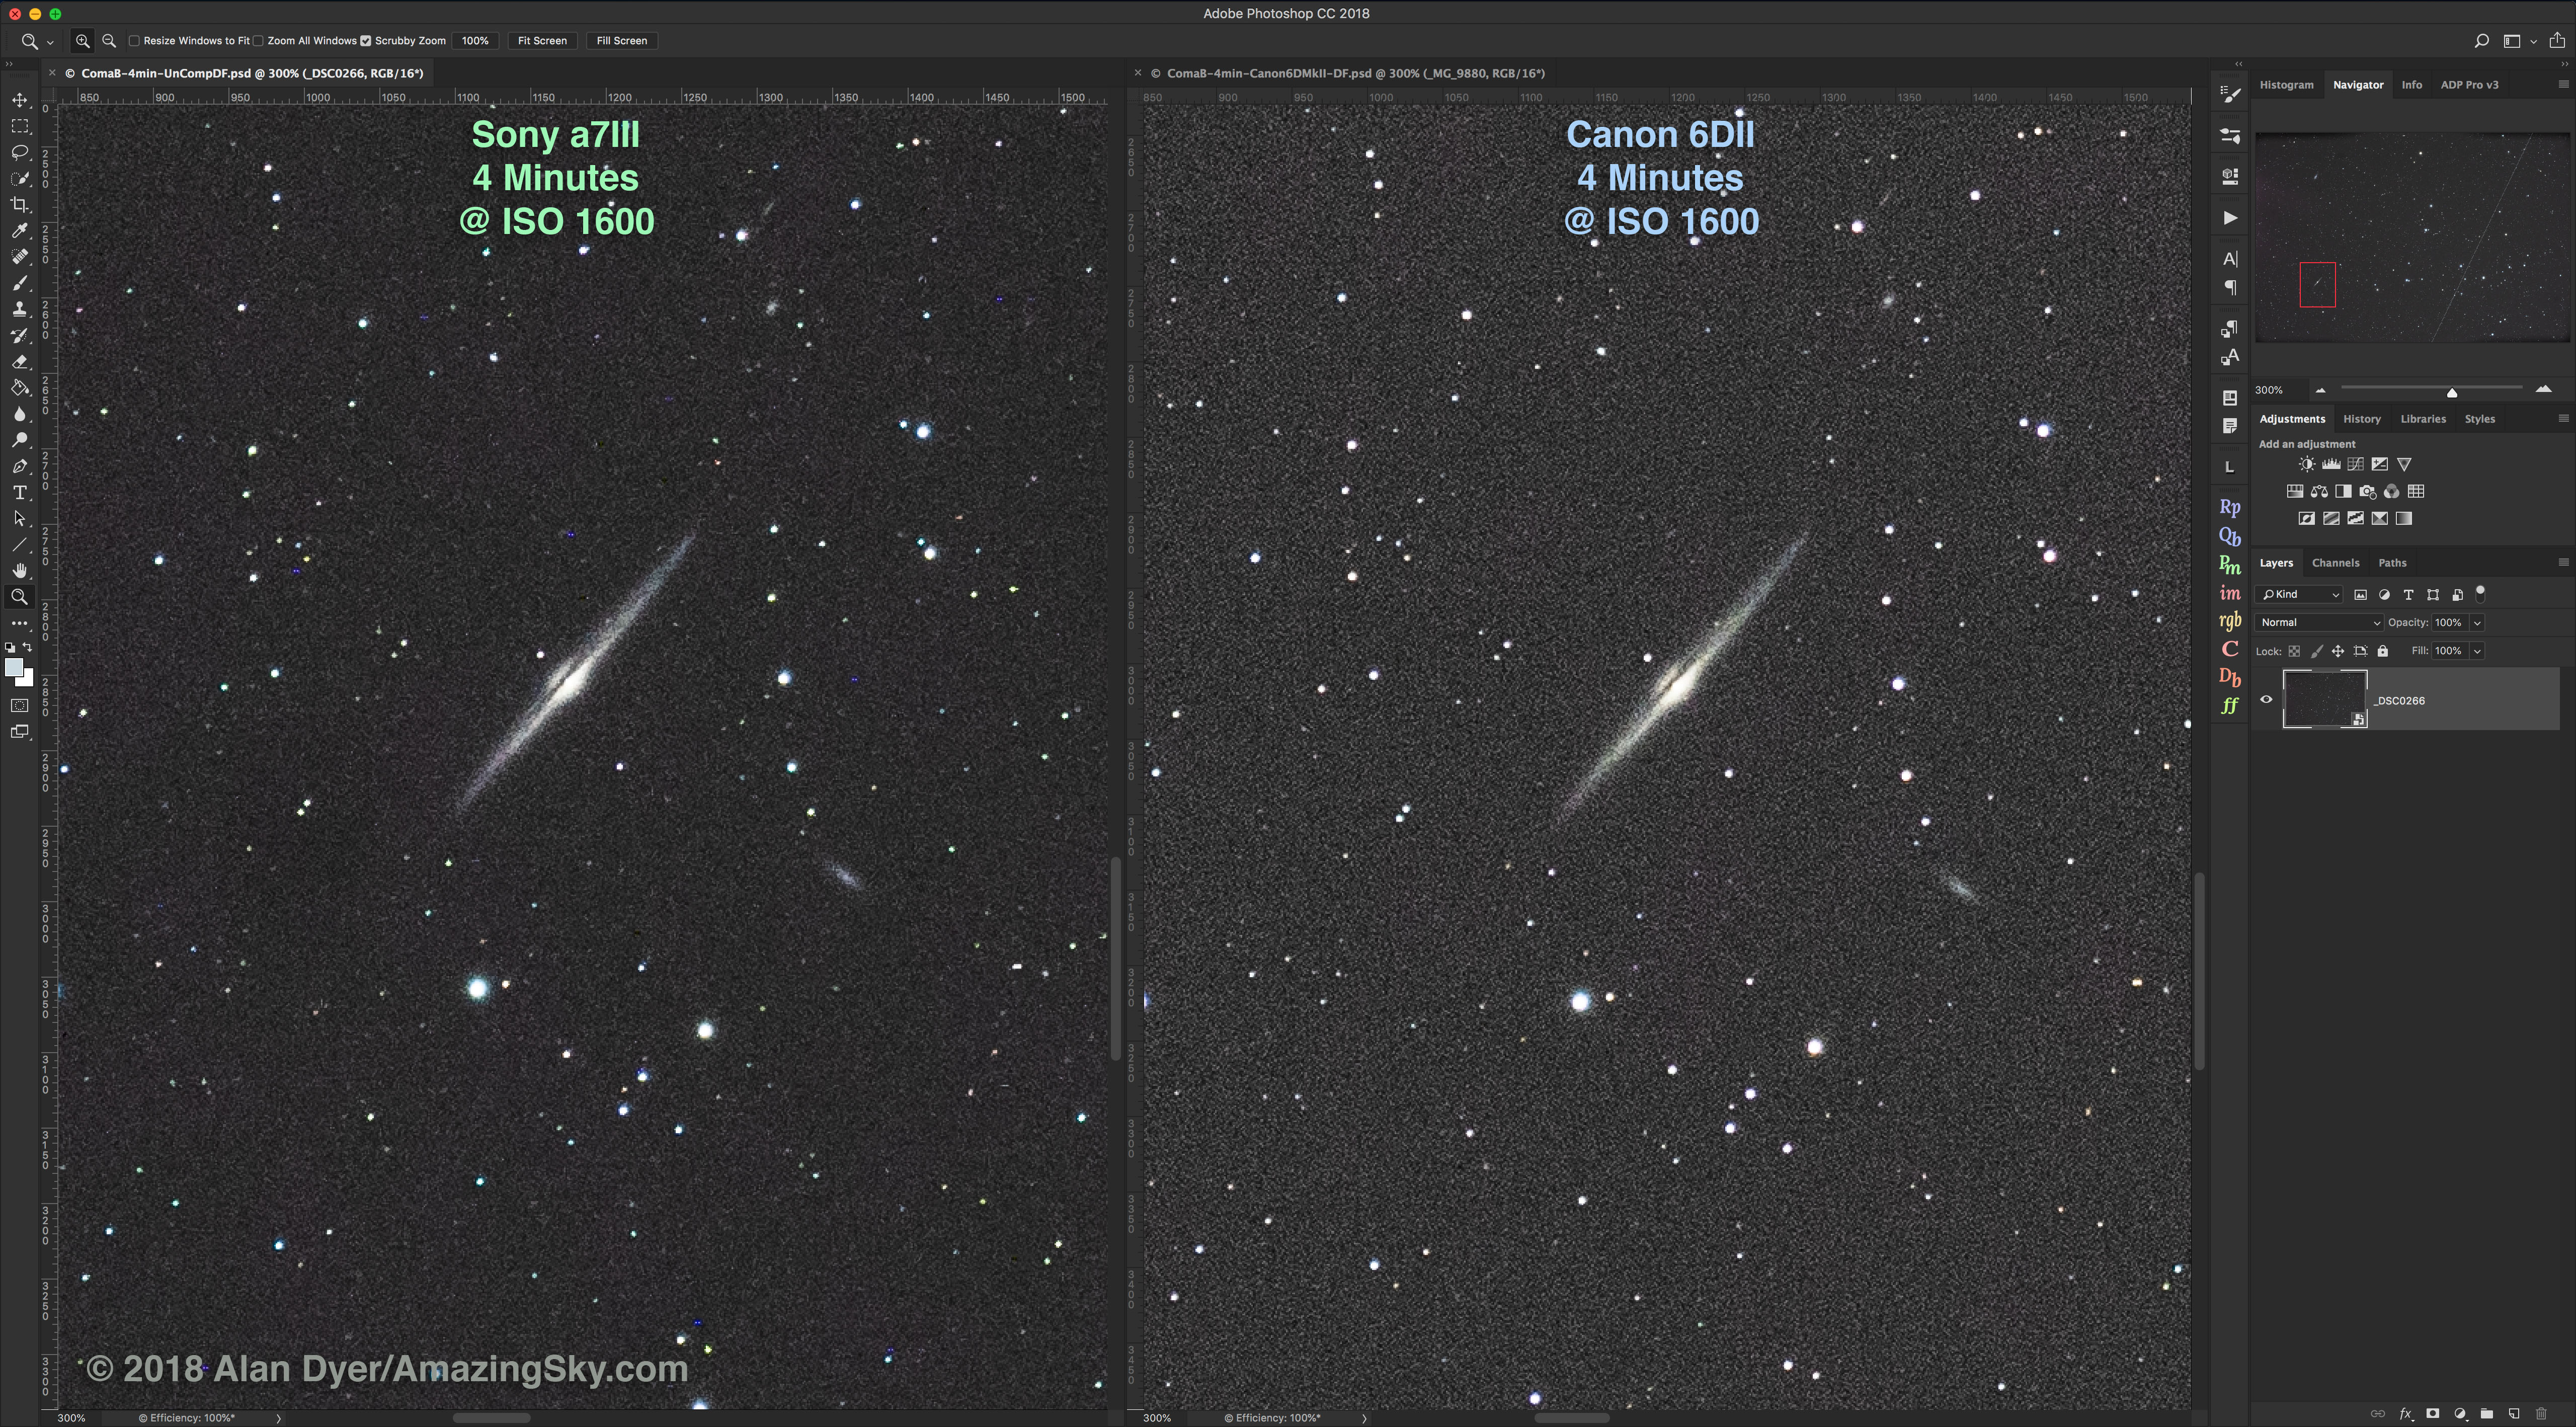
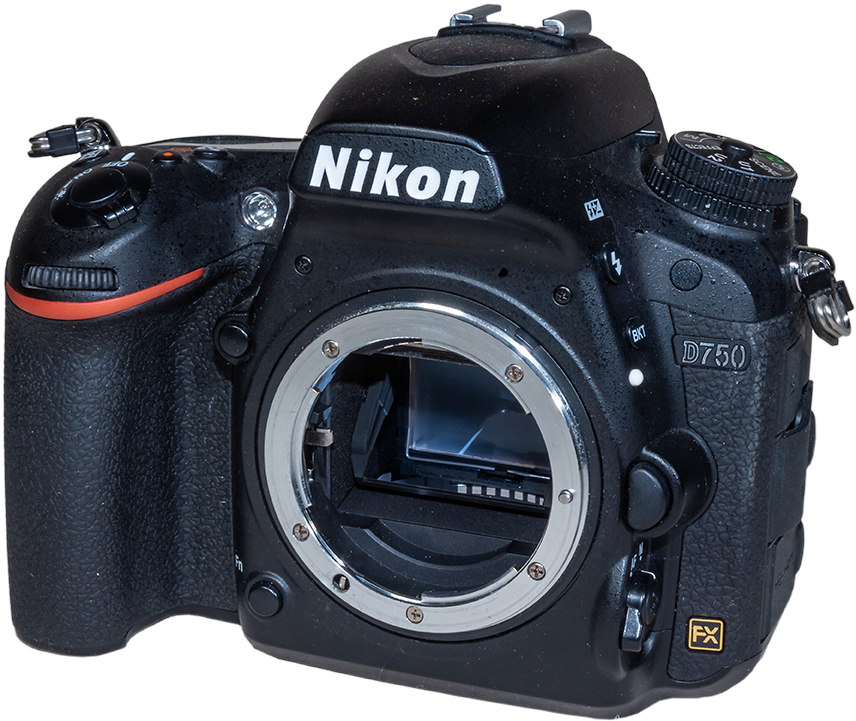
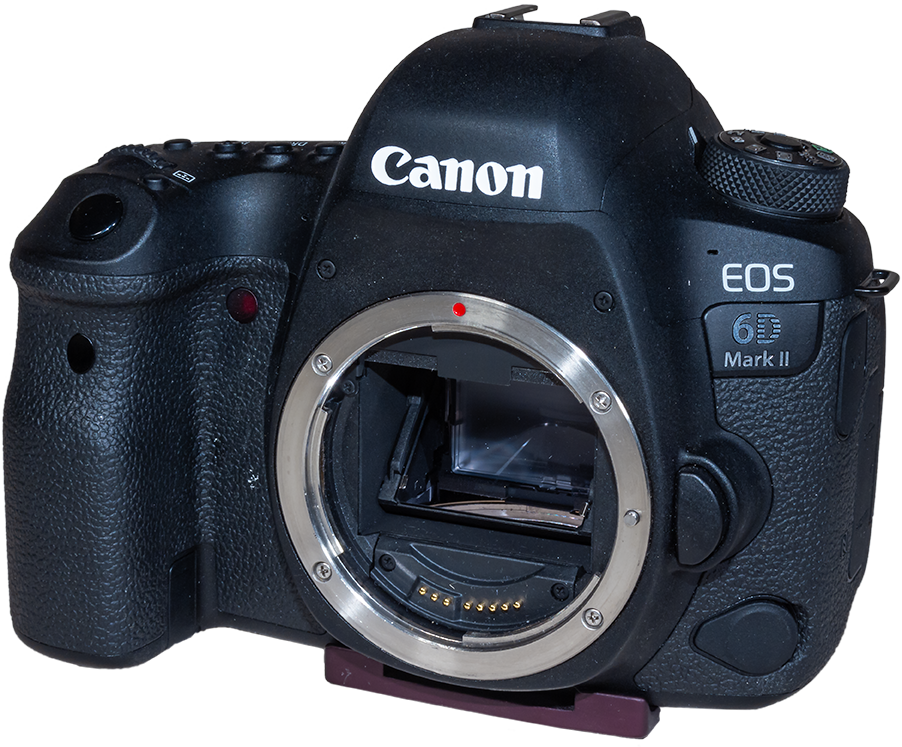
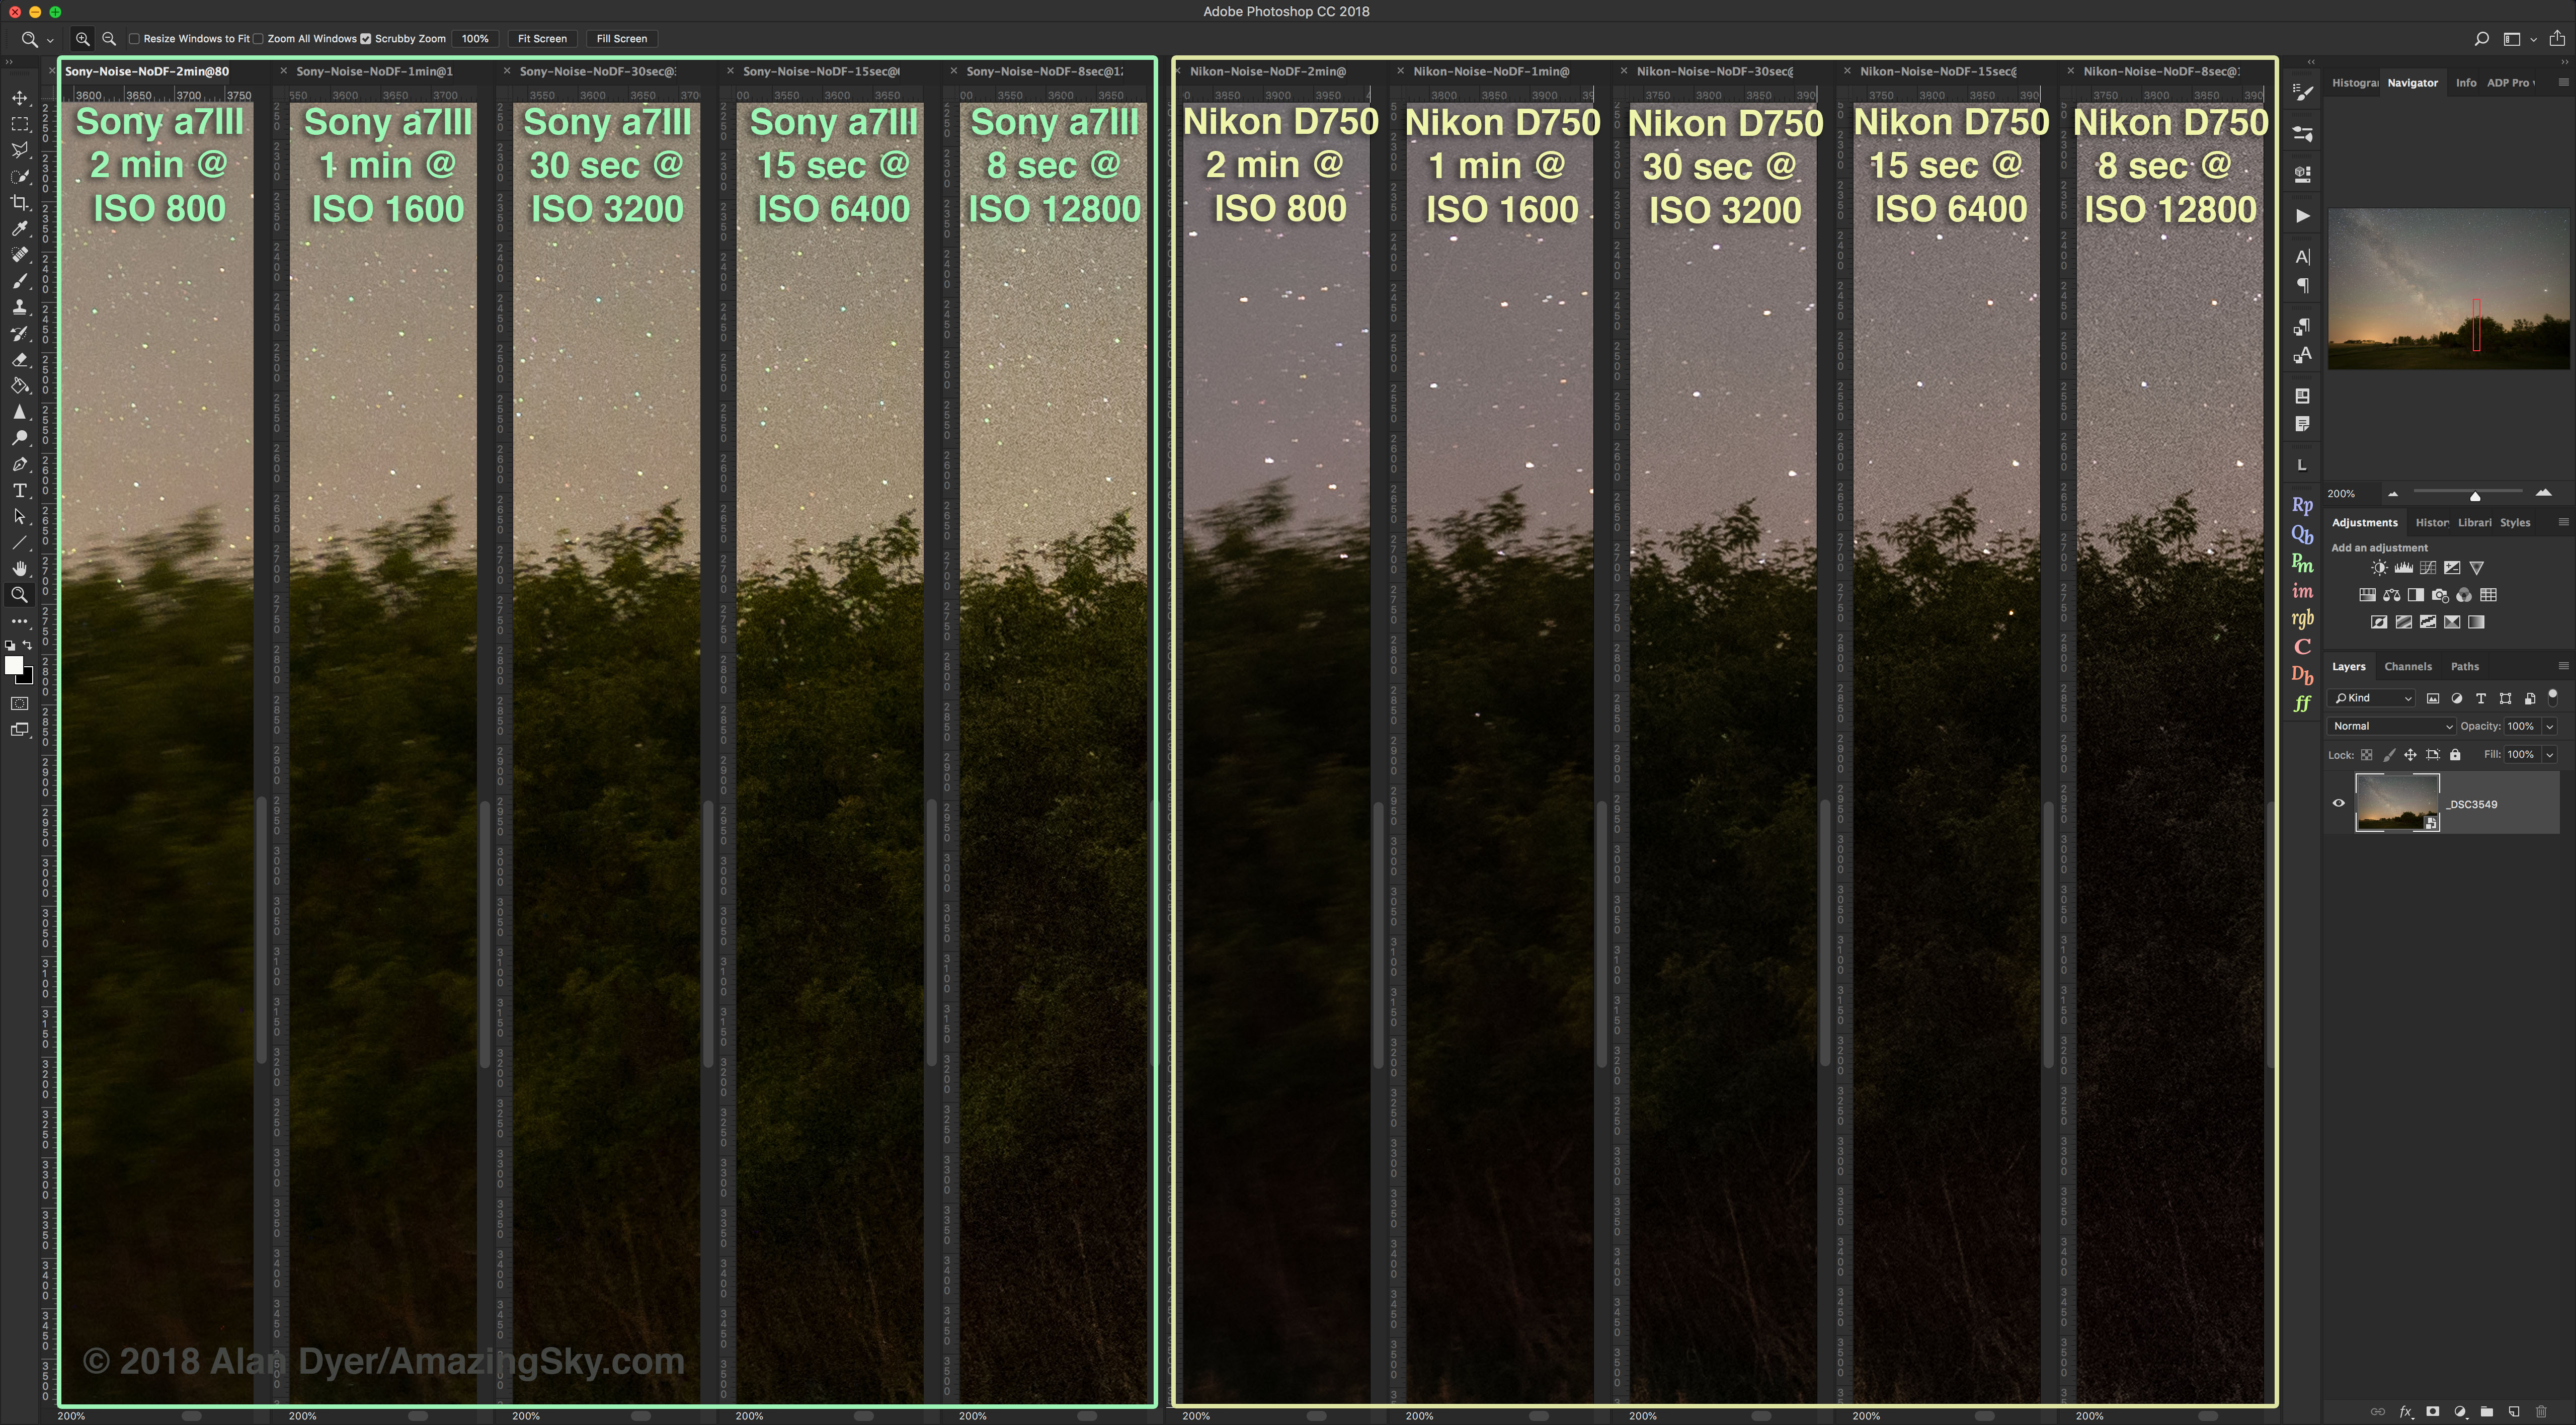
Comparing the R6noise with the 6D MkII and EOS Ra on a deep-sky subject, galaxies.
In noise tests comparing the R6 against the Ra and Canon 6D Mark II, all three cameras showed a similar level of noise at ISO settings from 400 up to 12,800. But the 6D Mark II performed well only when properly exposed. Both the R6 and Ra performed much better for shadow recovery in underexposed scenes.
Comparing the R6noise with with the 6D MkII and EOS Ra on a shadowed nightscape.Comparing the R6 noise with the EOS Ra on the Andromeda Galaxy at typical deep-sky ISO speeds.
In nightscapes and deep-sky images the R6 and Ra looked nearly identical at each of their ISO settings. This was surprising considering the Ra’s smaller photosites, which perhaps attests to the low noise of the astronomical “a” model.
Or it could be that the R6 isn’t as low noise as it should be for a 20 megapixel camera. But it is as good as it gets for Canon cameras, and that’s very good indeed.
I saw no “magic ISO” setting where the R6 performed better than at other settings. Noise increased in proportion to the ISO speed. It proved perfectly usable up to ISO 6400, with ISO 12,800 acceptable for stills when necessary.
ISO INVARIANCY
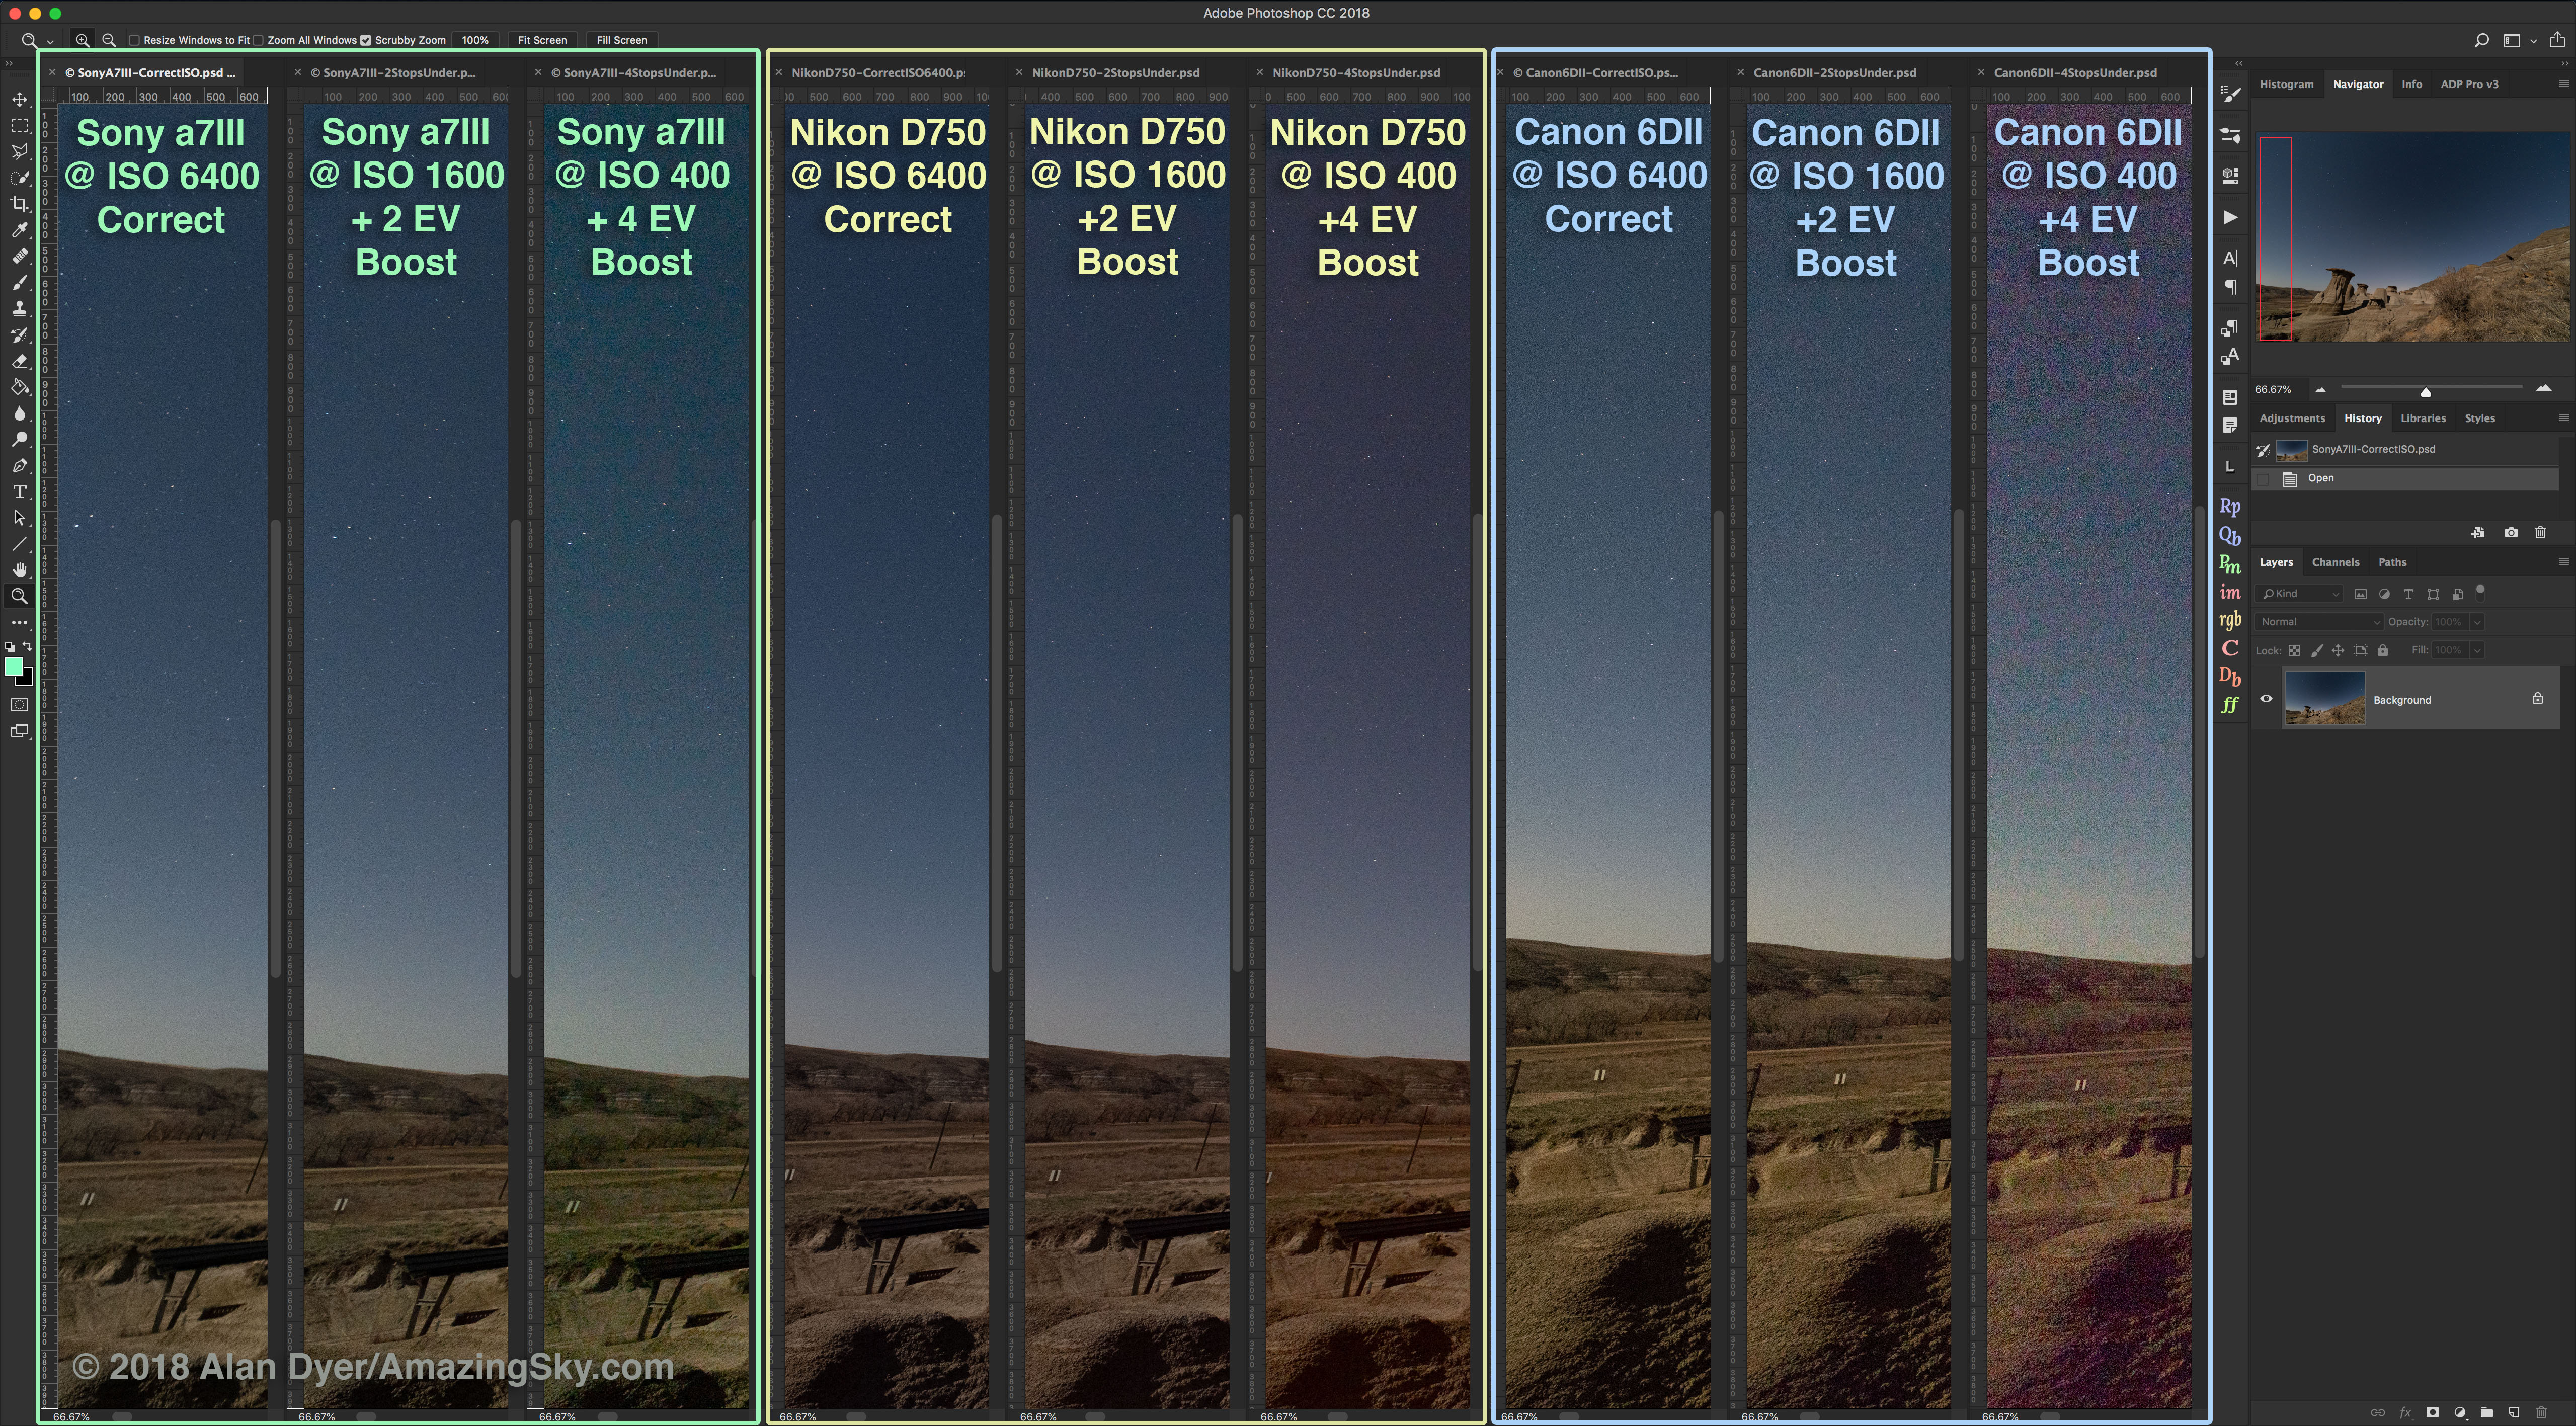
The flaw in many Canon DSLRs, one documented in my 2017 review of the 6D Mark II, was their poor dynamic range due to the lack of an ISO invariant sensor design.
The R6, as with Canon’s other R-series cameras, has largely addressed this weakness. The sensor in the R6 appears to be nicely ISO invariant and performs as well as the Sony and Nikon cameras I have used and tested, models praised for their ISO invariant behaviour.
Where this trait shows itself to advantage is on nightscapes where the starlit foreground is often dark and underexposed. Bringing out detail in the shadows in raw files requires a lot of Shadow Recovery or increasing the Exposure slider. Images from an ISO invariant sensor can withstand the brightening “in post” far better, with minimal noise increase or degradations such as a loss of contrast, added banding, or horrible discolourations.
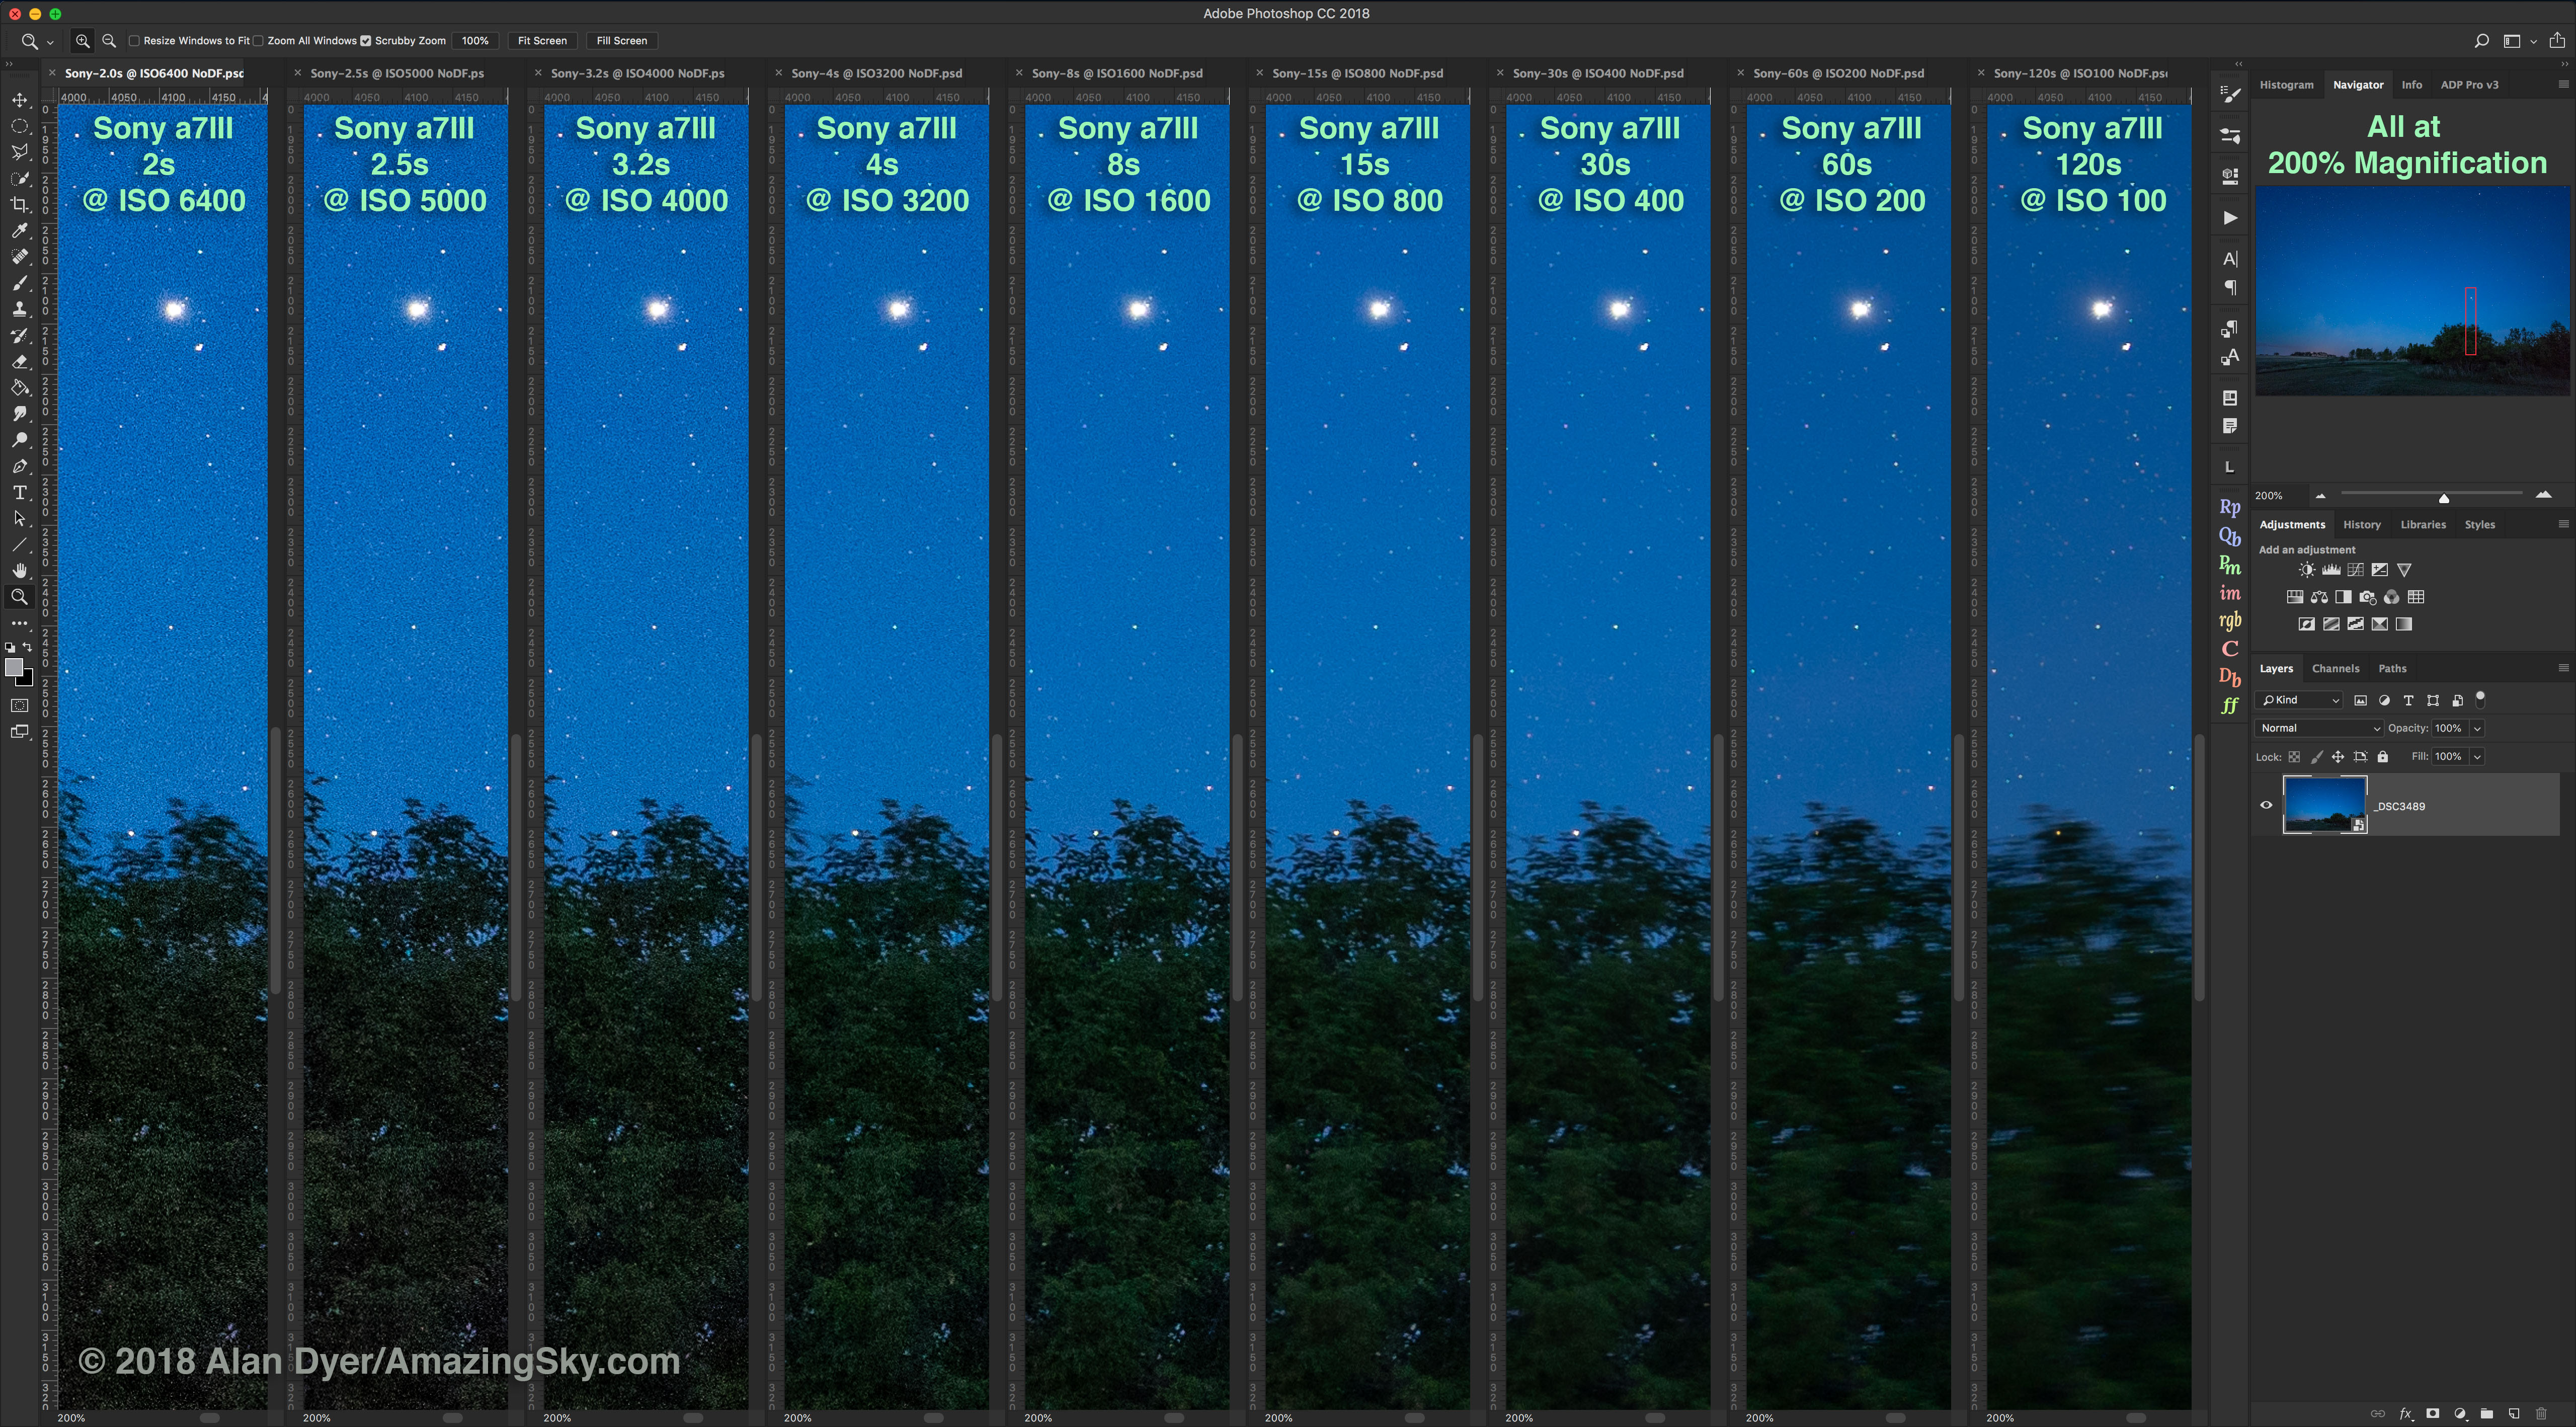
Comparing the R6 for ISO Invariancy on a starlit nightscape.
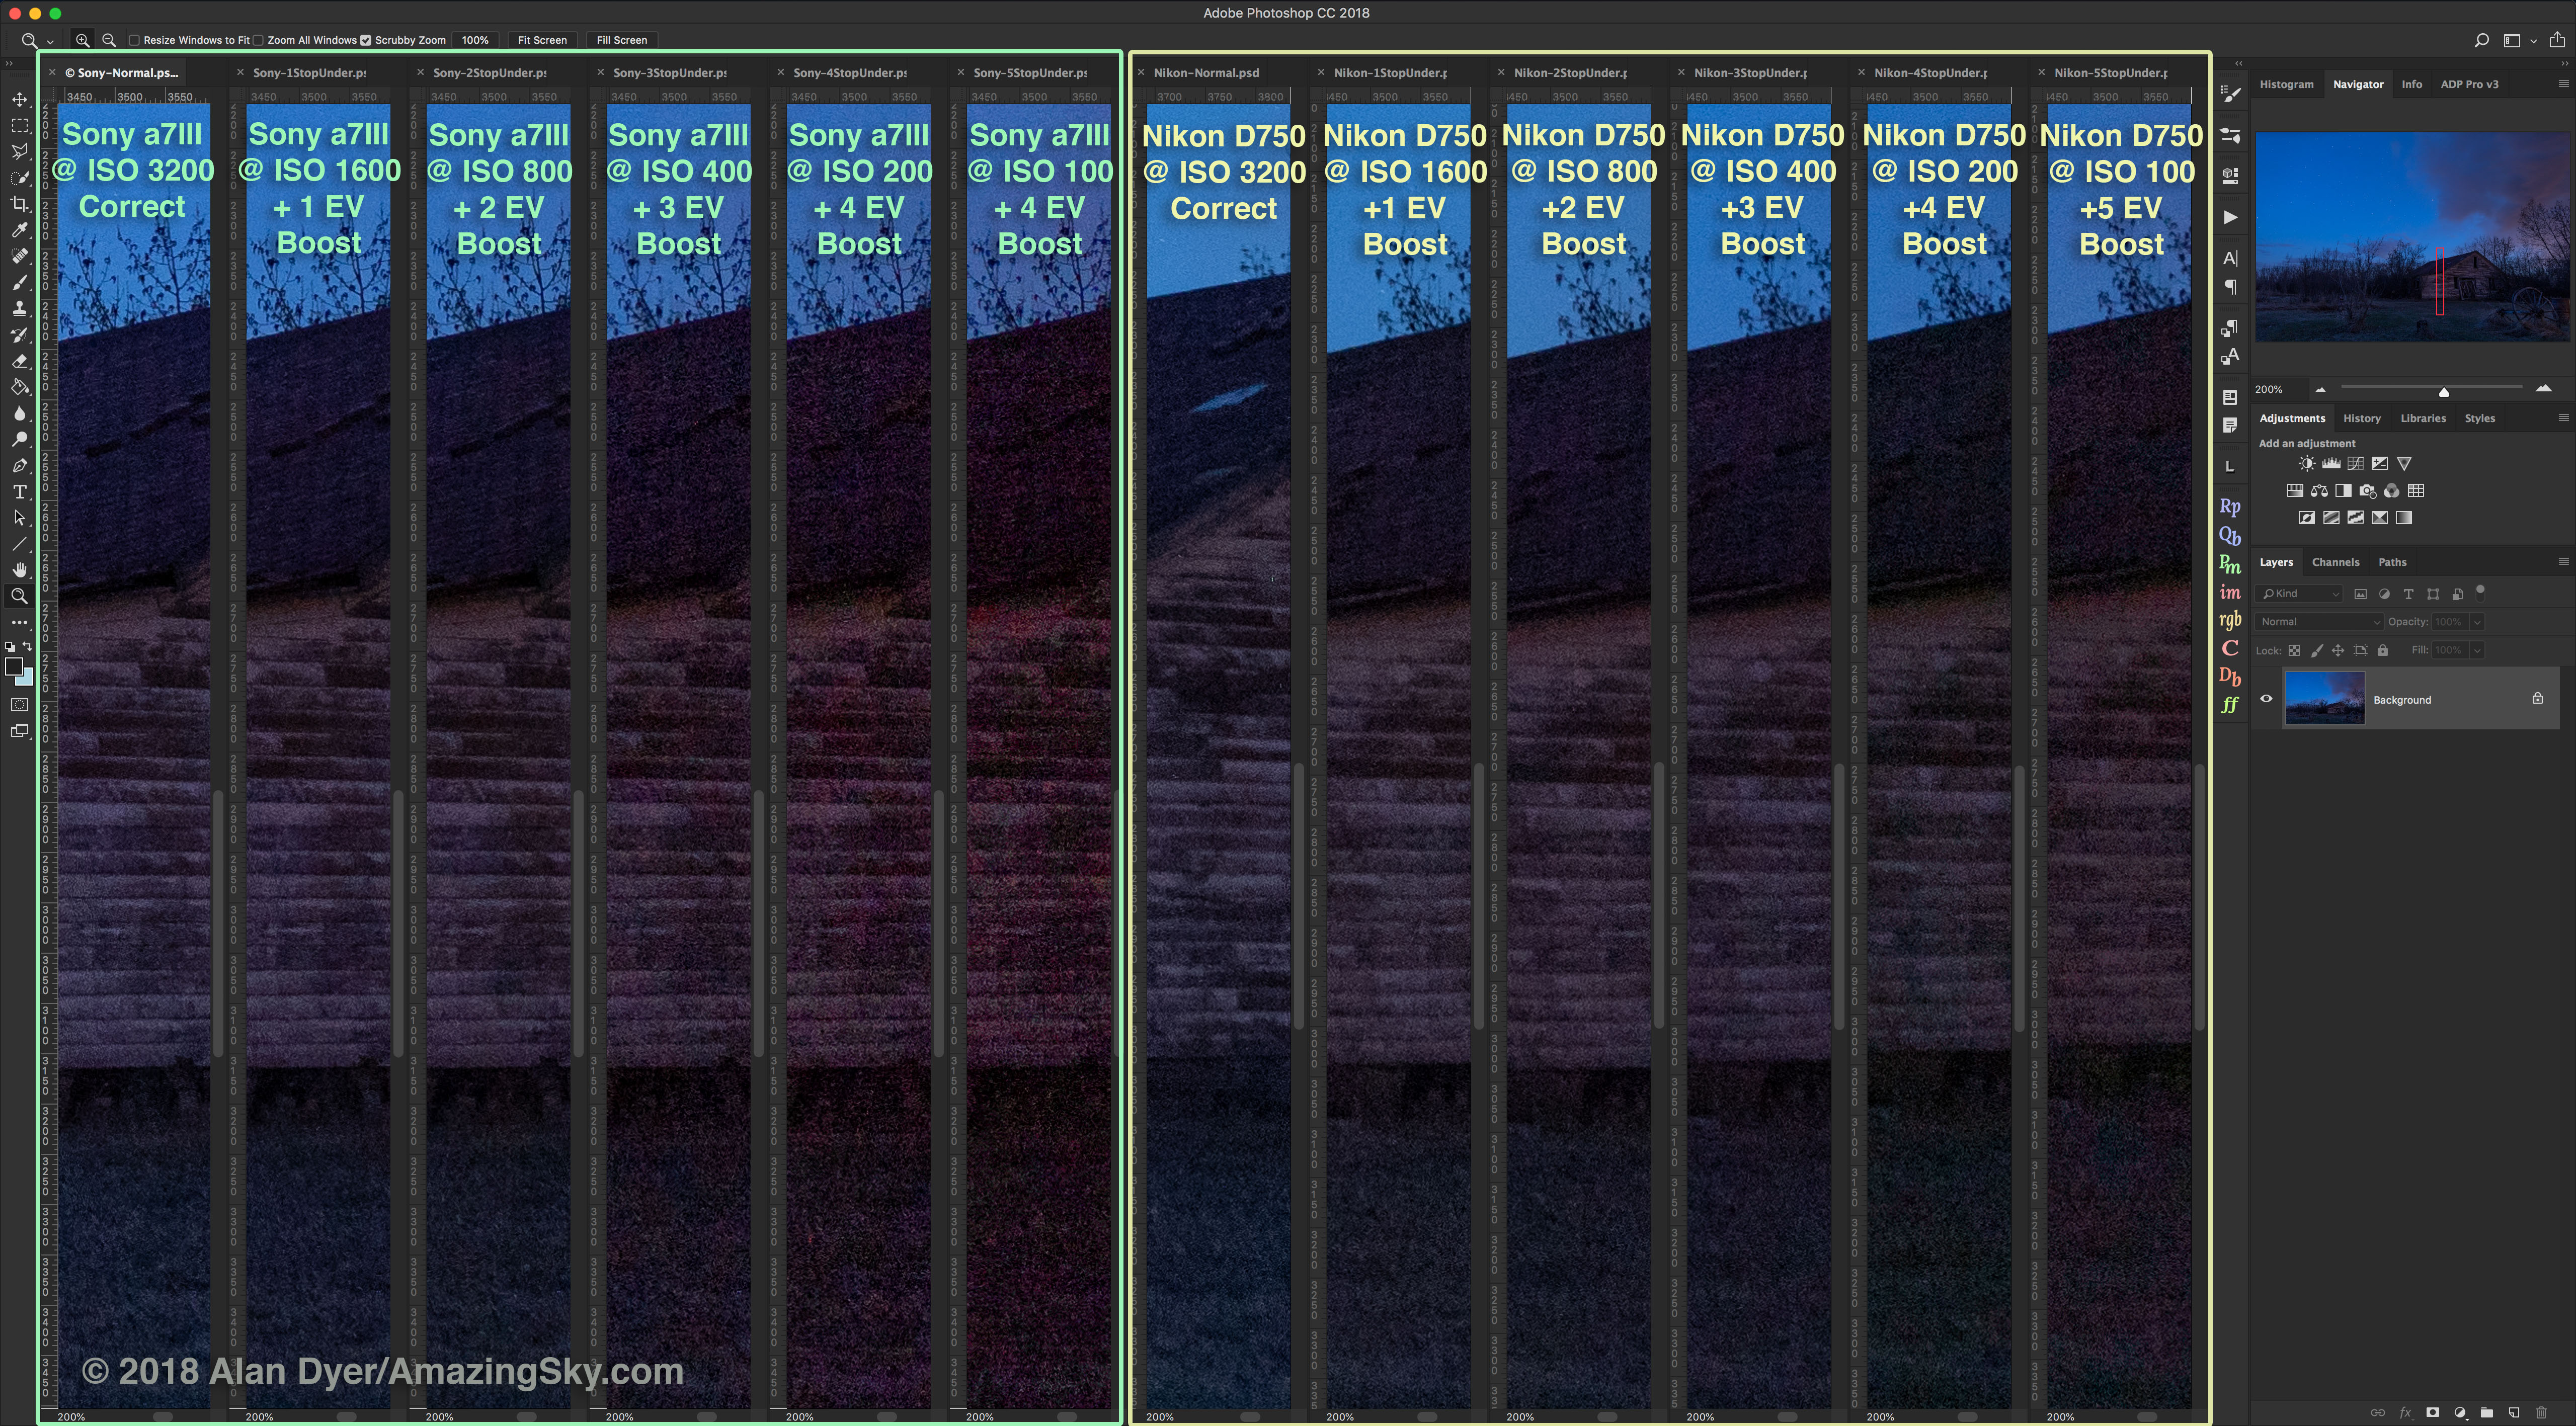
To test the R6, I shot sets of images at the same shutter speed, one well-exposed at a high ISO, then several at successively lower ISOs to underexpose by 1 to 5 stops. I then brightened the underexposed images by increasing the Exposure in Camera Raw by the same 1 to 5 stops. In an ideal ISO invariant sensor, all the images should look the same.
The R6 did very well in images underexposed by up to 4 stops. Images underexposed by 5 stops started to fall apart, but I’ve seen that in Sony and Nikon images as well.
Comparing the R6 for ISO Invariancy on a moonlit nightscape.
This behaviour applies to images underexposed by using lower ISOs than what a “normal” exposure might require. Underexposing with lower ISOs can help maintain dynamic range and avoid highlight clipping. But with nightscapes, foregrounds can often be too dark even when shot at an ISO high enough to be suitable for the sky. Foregrounds are almost always underexposed, so good shadow recovery is essential for nightscapes, and especially time-lapses, when blending in separate longer exposures for the ground is not practical.
With its improved ISO invariant sensor, the R6 will be a fine camera for nightscape and time-lapse use, which was not true of the 6D Mark II.
Comparing R6 images underexposed in 1-stop increments by using shorter shutter speeds.Comparing R6 images underexposed in 1-stop increments by using smaller apertures.
However, to be clear, ISO invariant behaviour doesn’t help you as much if you underexpose by using too short a shutter speed or too small a lens aperture. I tested the R6 in series of images underexposed by keeping ISO the same but decreasing the shutter speed then the aperture in one-stop increments.
The underexposed images fell apart in quality much sooner, when underexposed more than 3 stops. Again, this is behaviour similar to what I’ve seen in Sonys and Nikons. For the best image quality I feel it is always a best practice to expose well at the camera. Don’t count on saving images in post.
An in-camera image fairly well exposed with an ETTR histogram.
TIP: Underexposing by using too short an exposure time is the major mistake astrophotographers make, who then wonder why their images are riddled with odd artifacts and patten noise. Always Expose to the Right (ETTR), even with ISO invariant cameras. The best way to avoid noise is to give your sensor more signal, by using longer exposures or wider apertures. Use settings that push the histogram to the right.
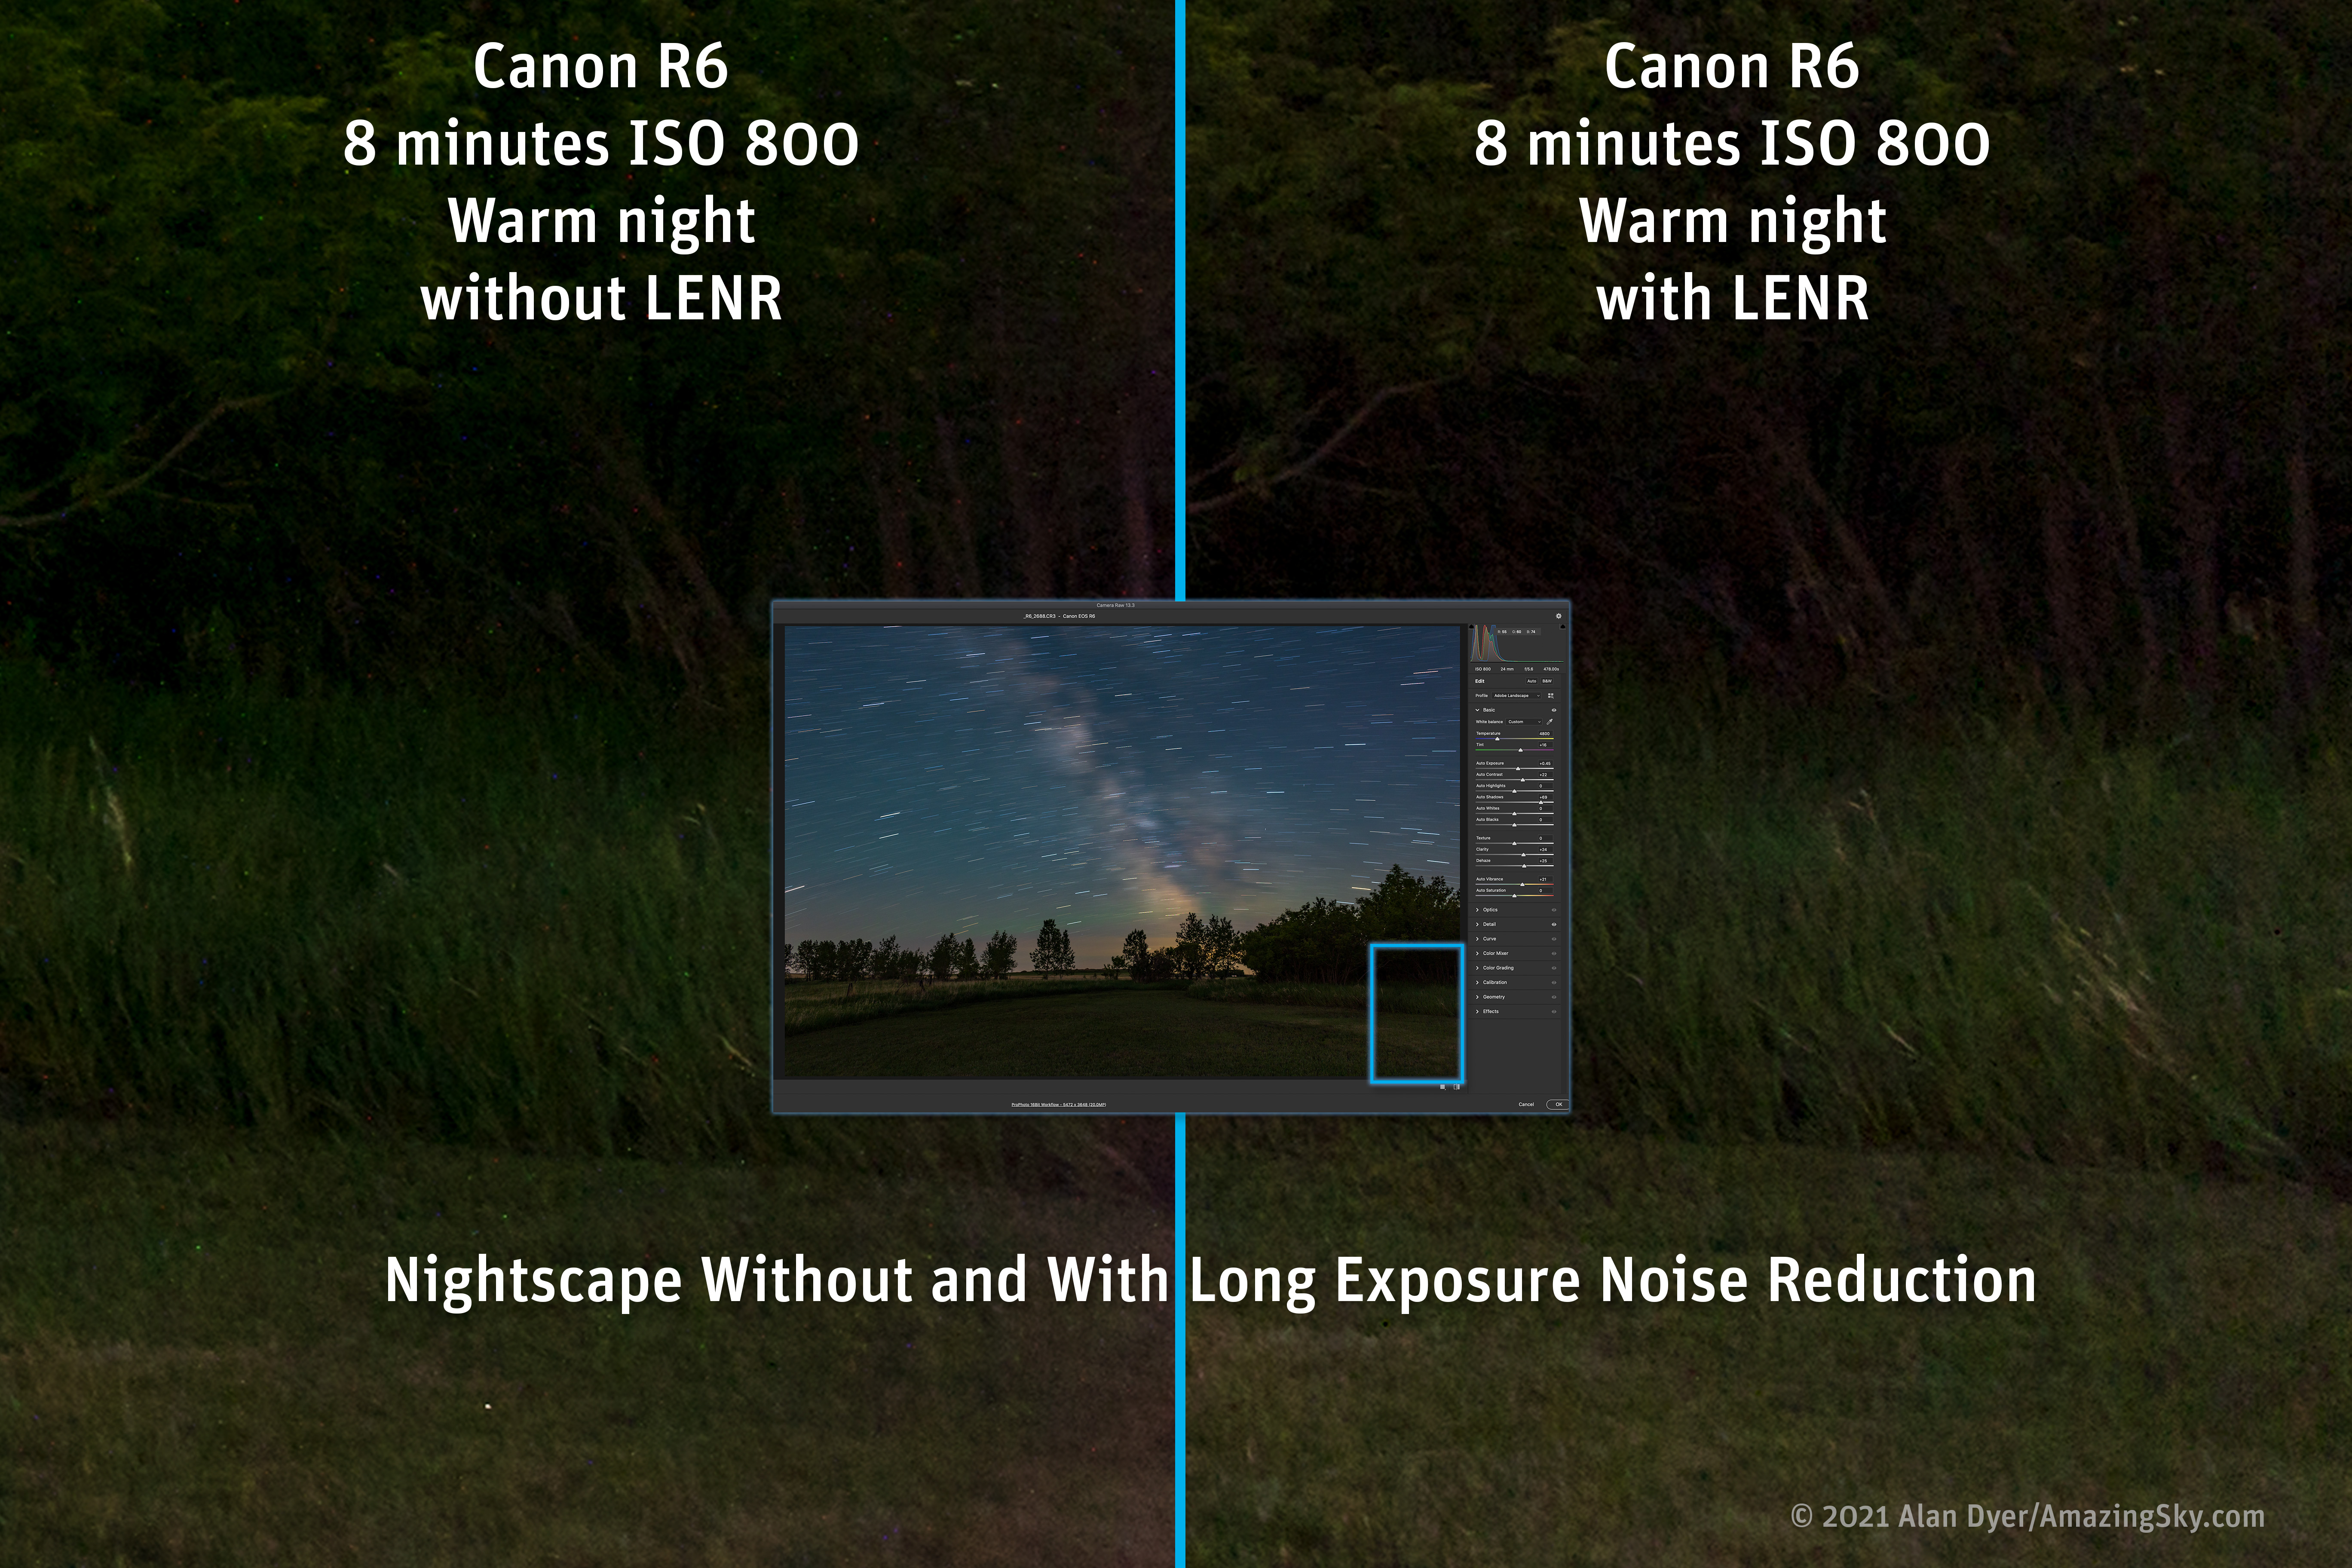
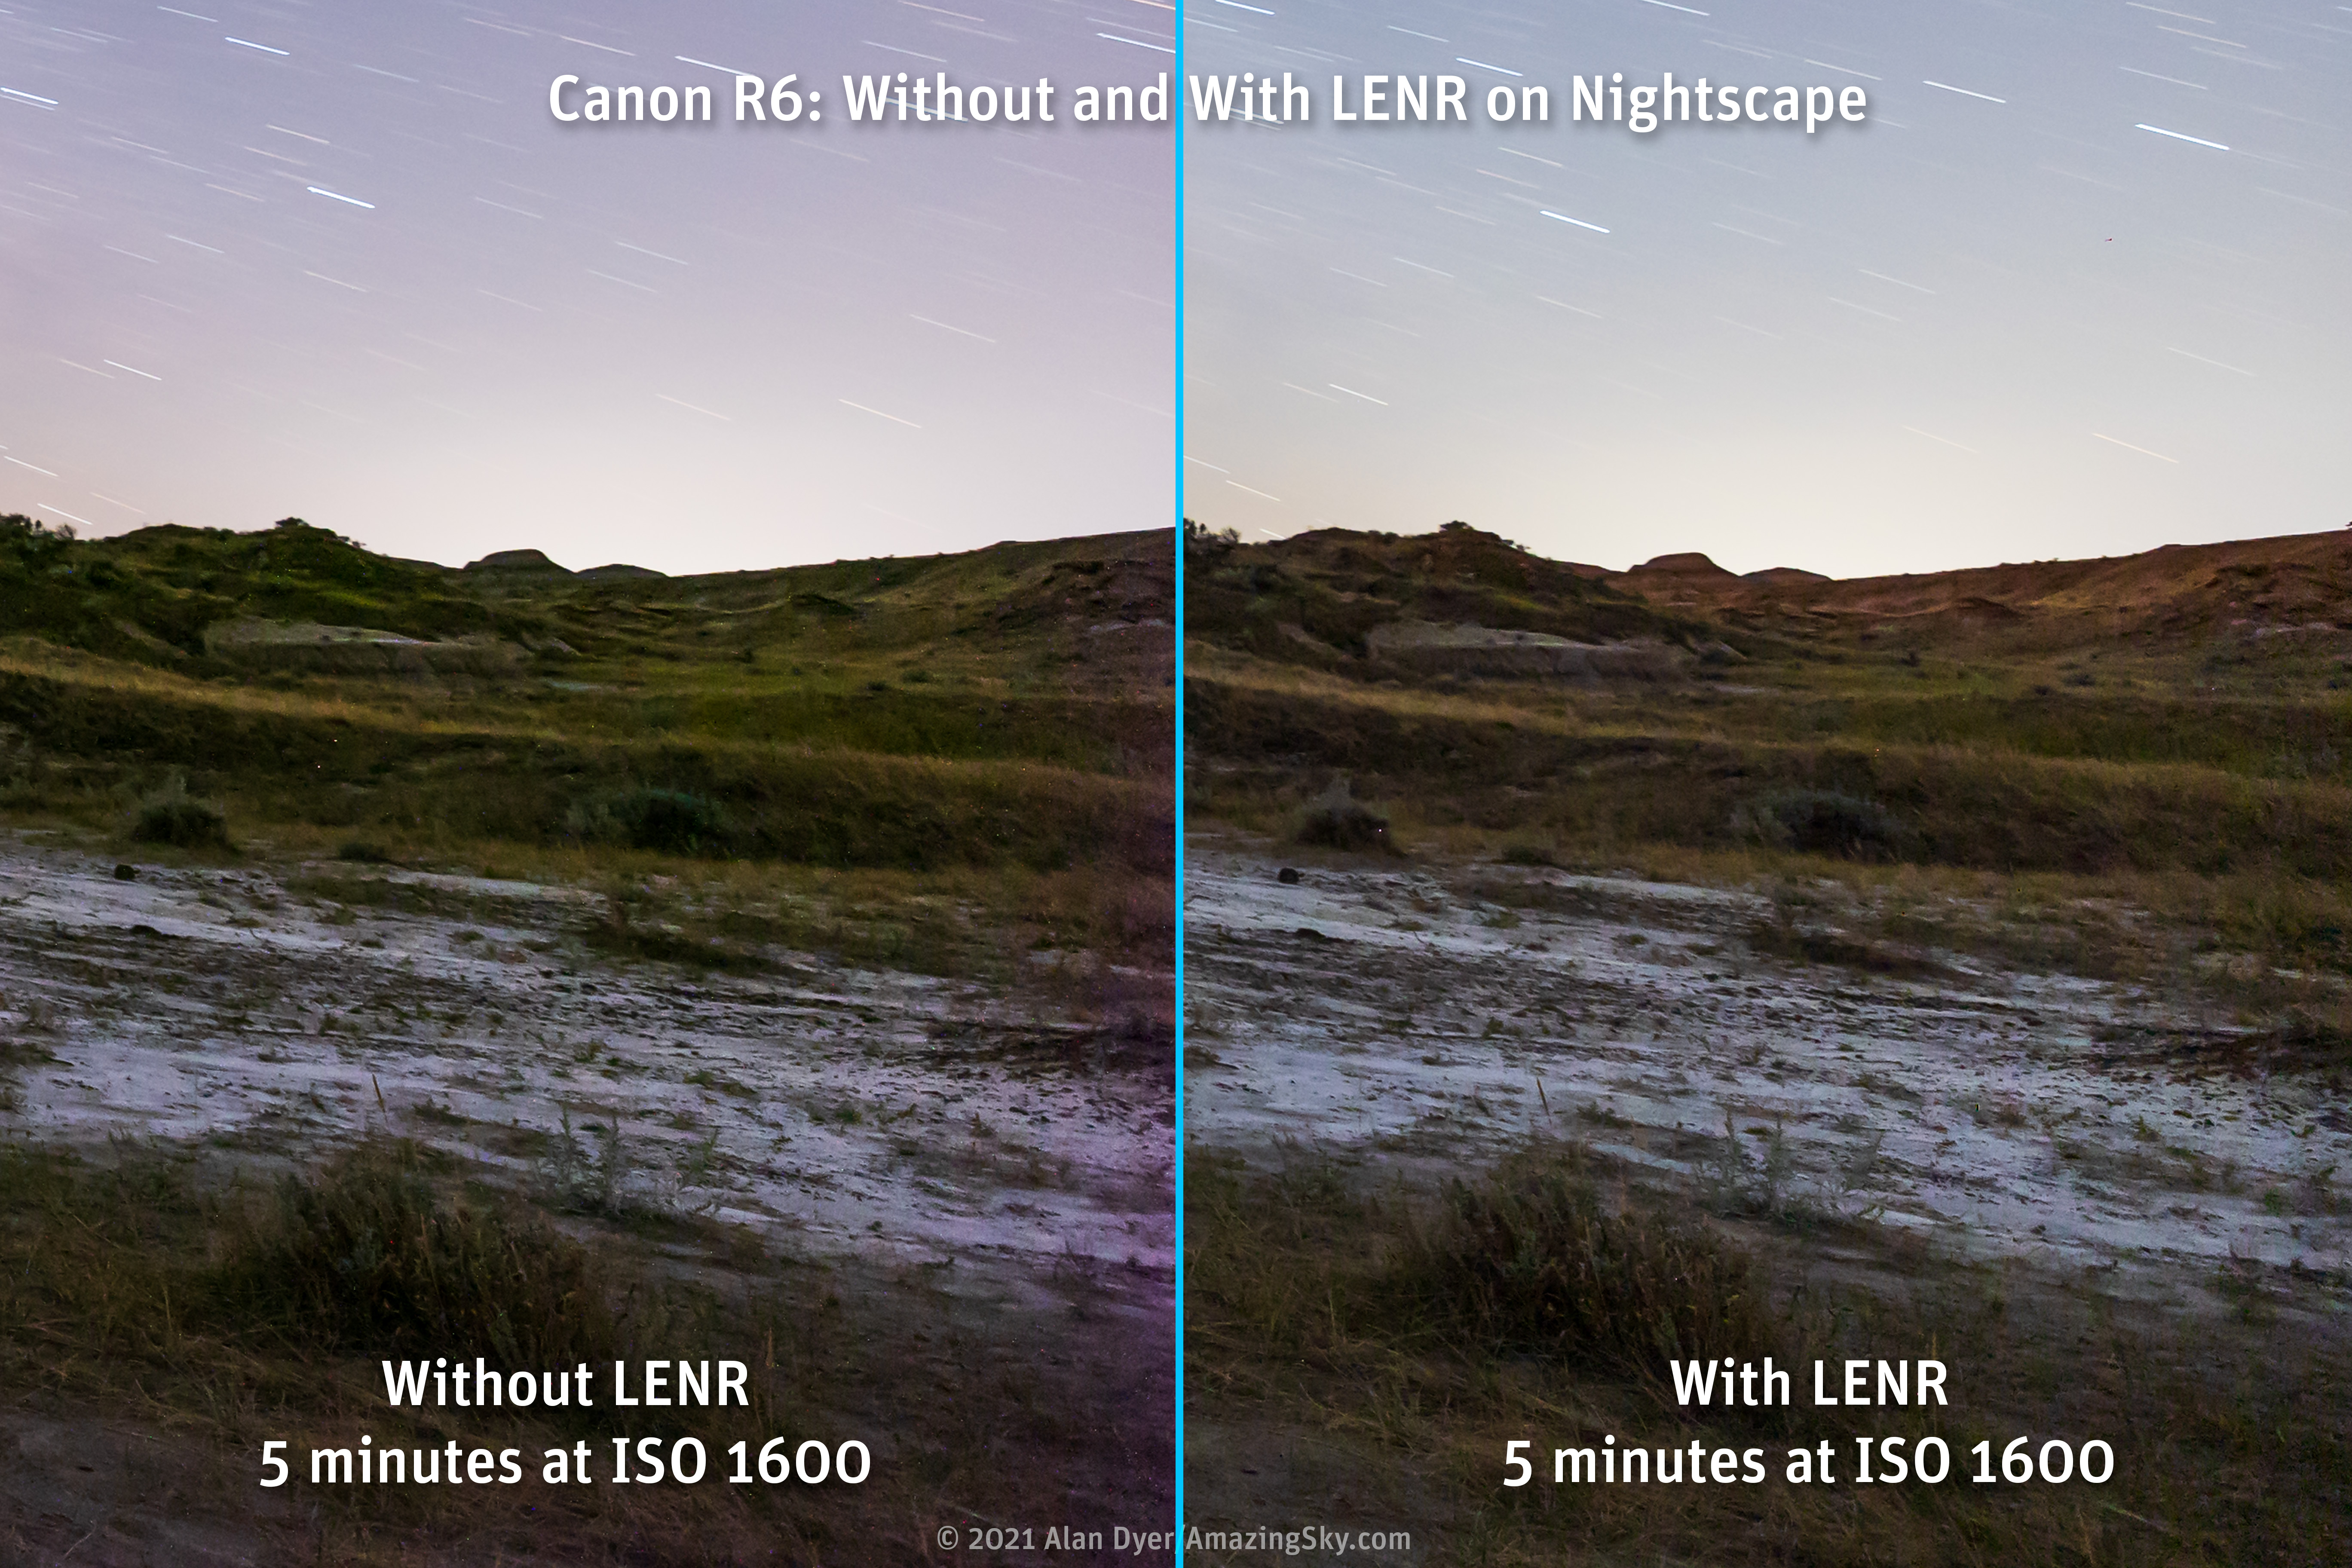
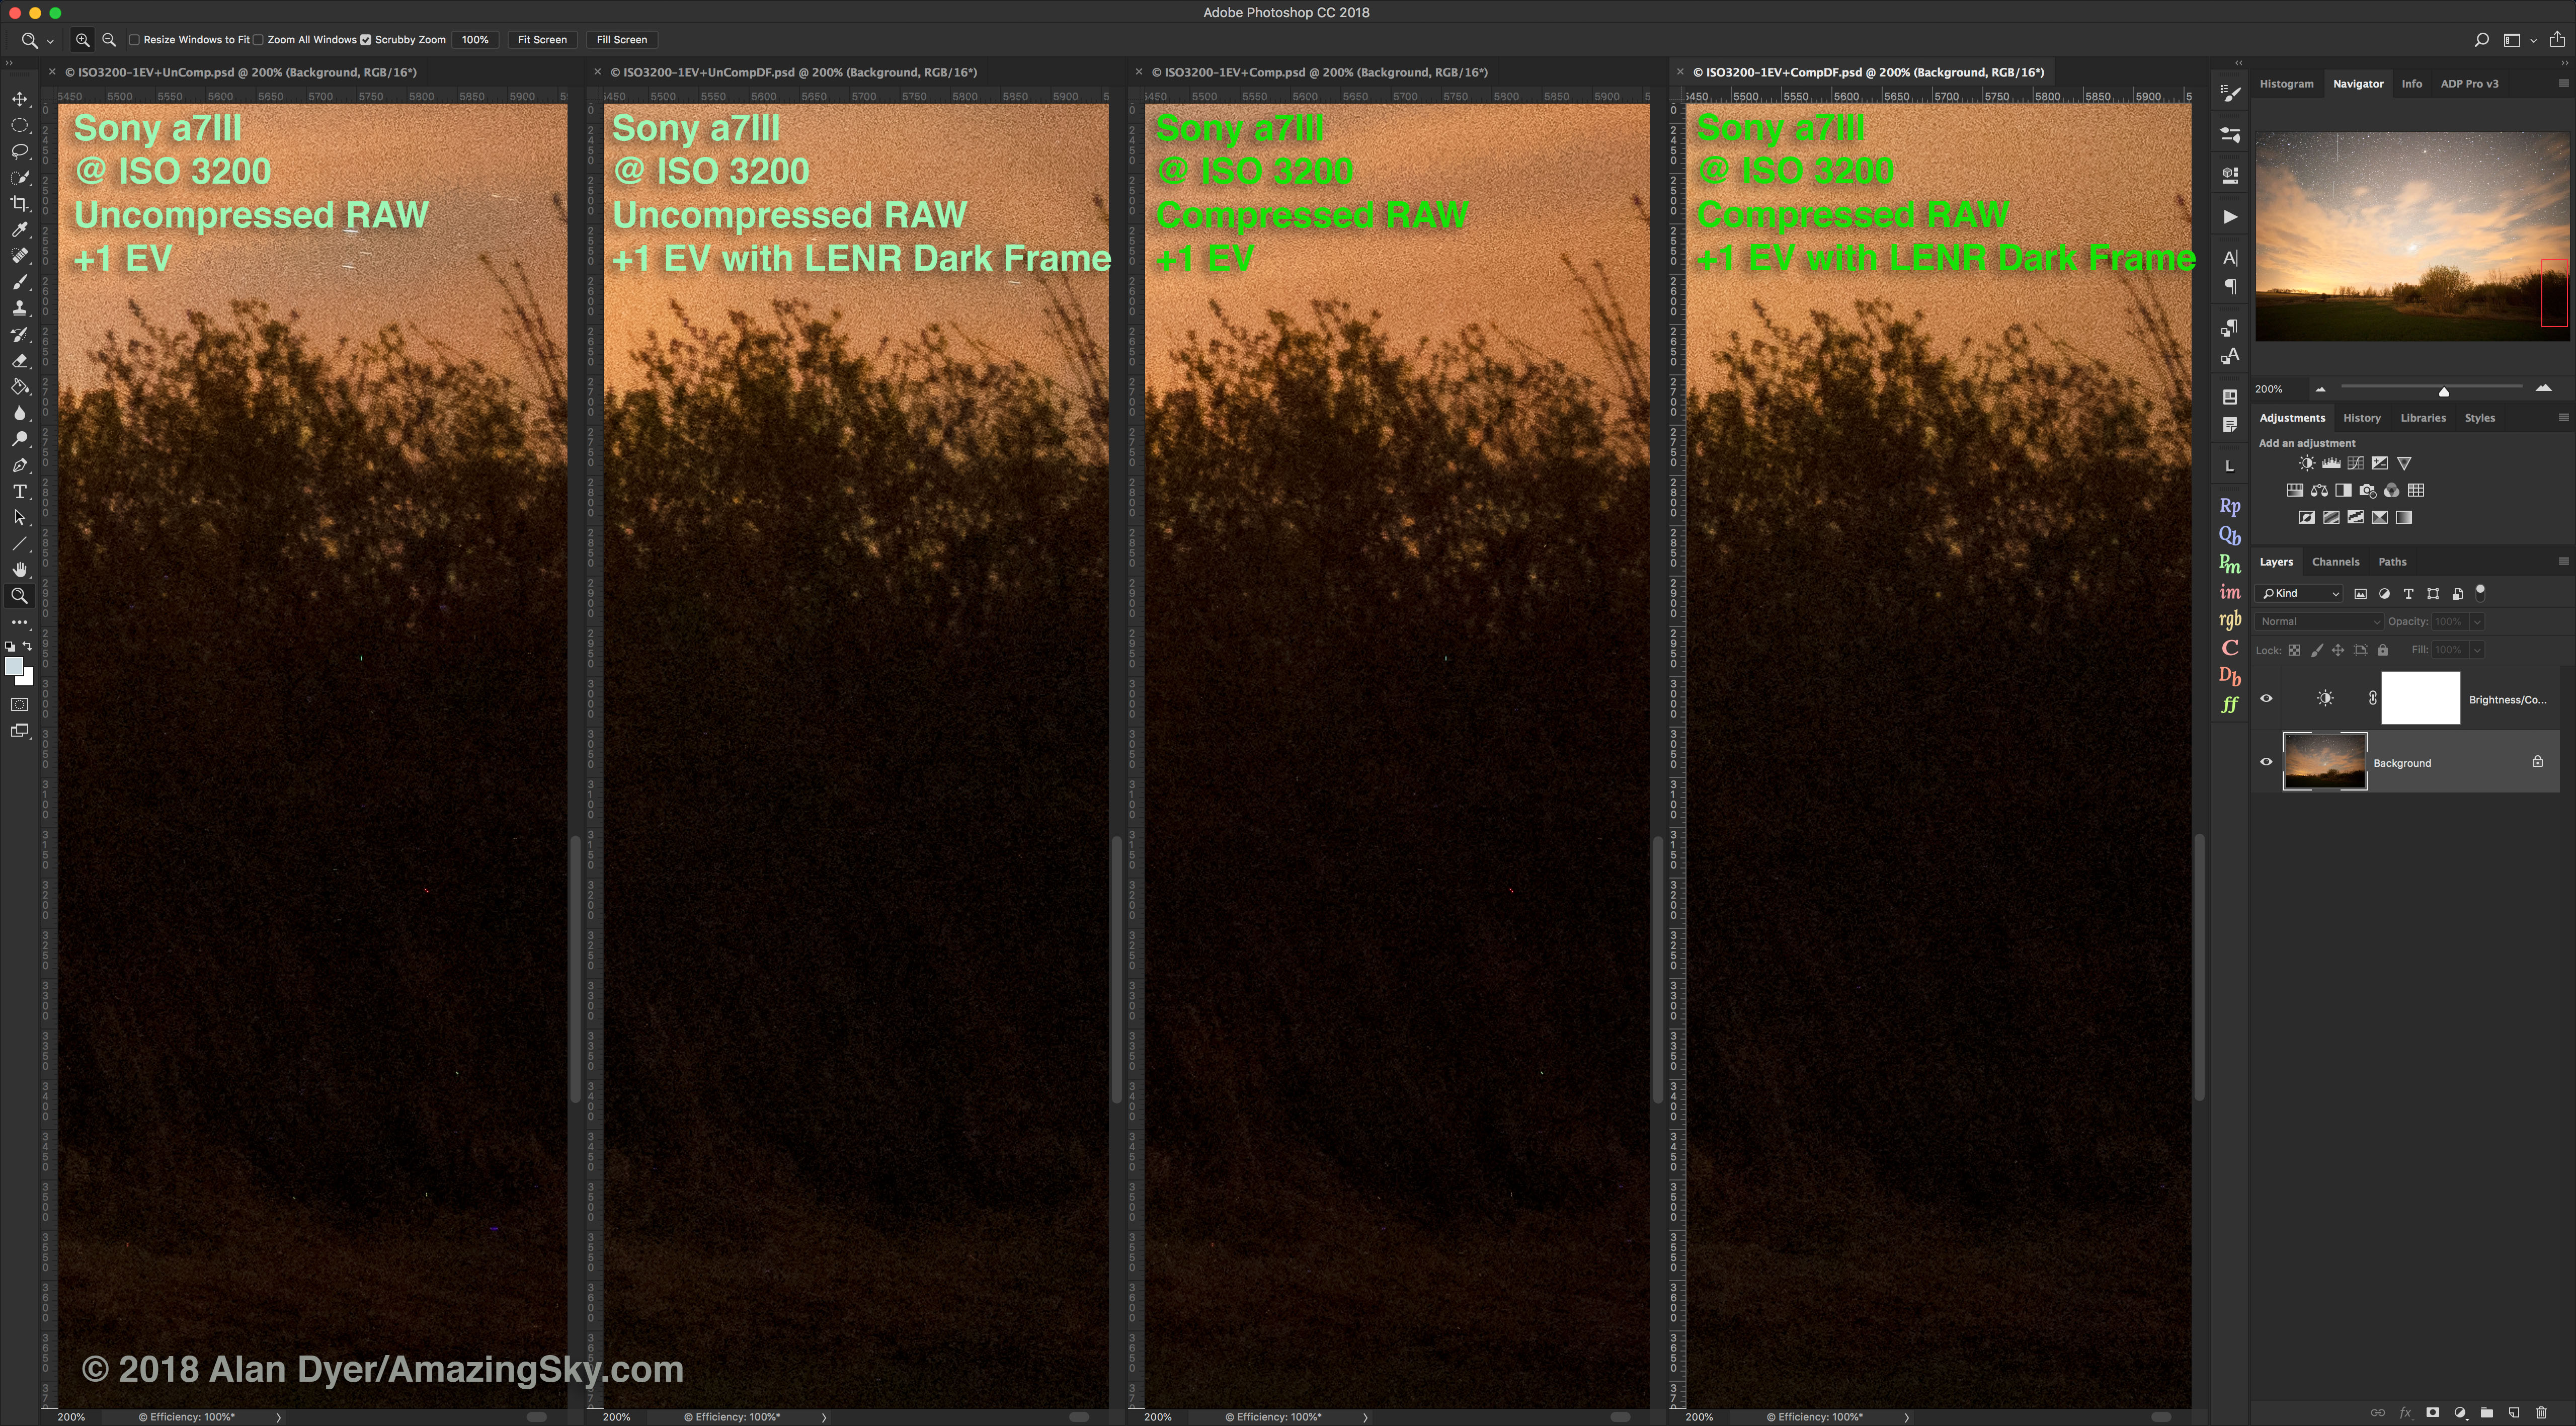
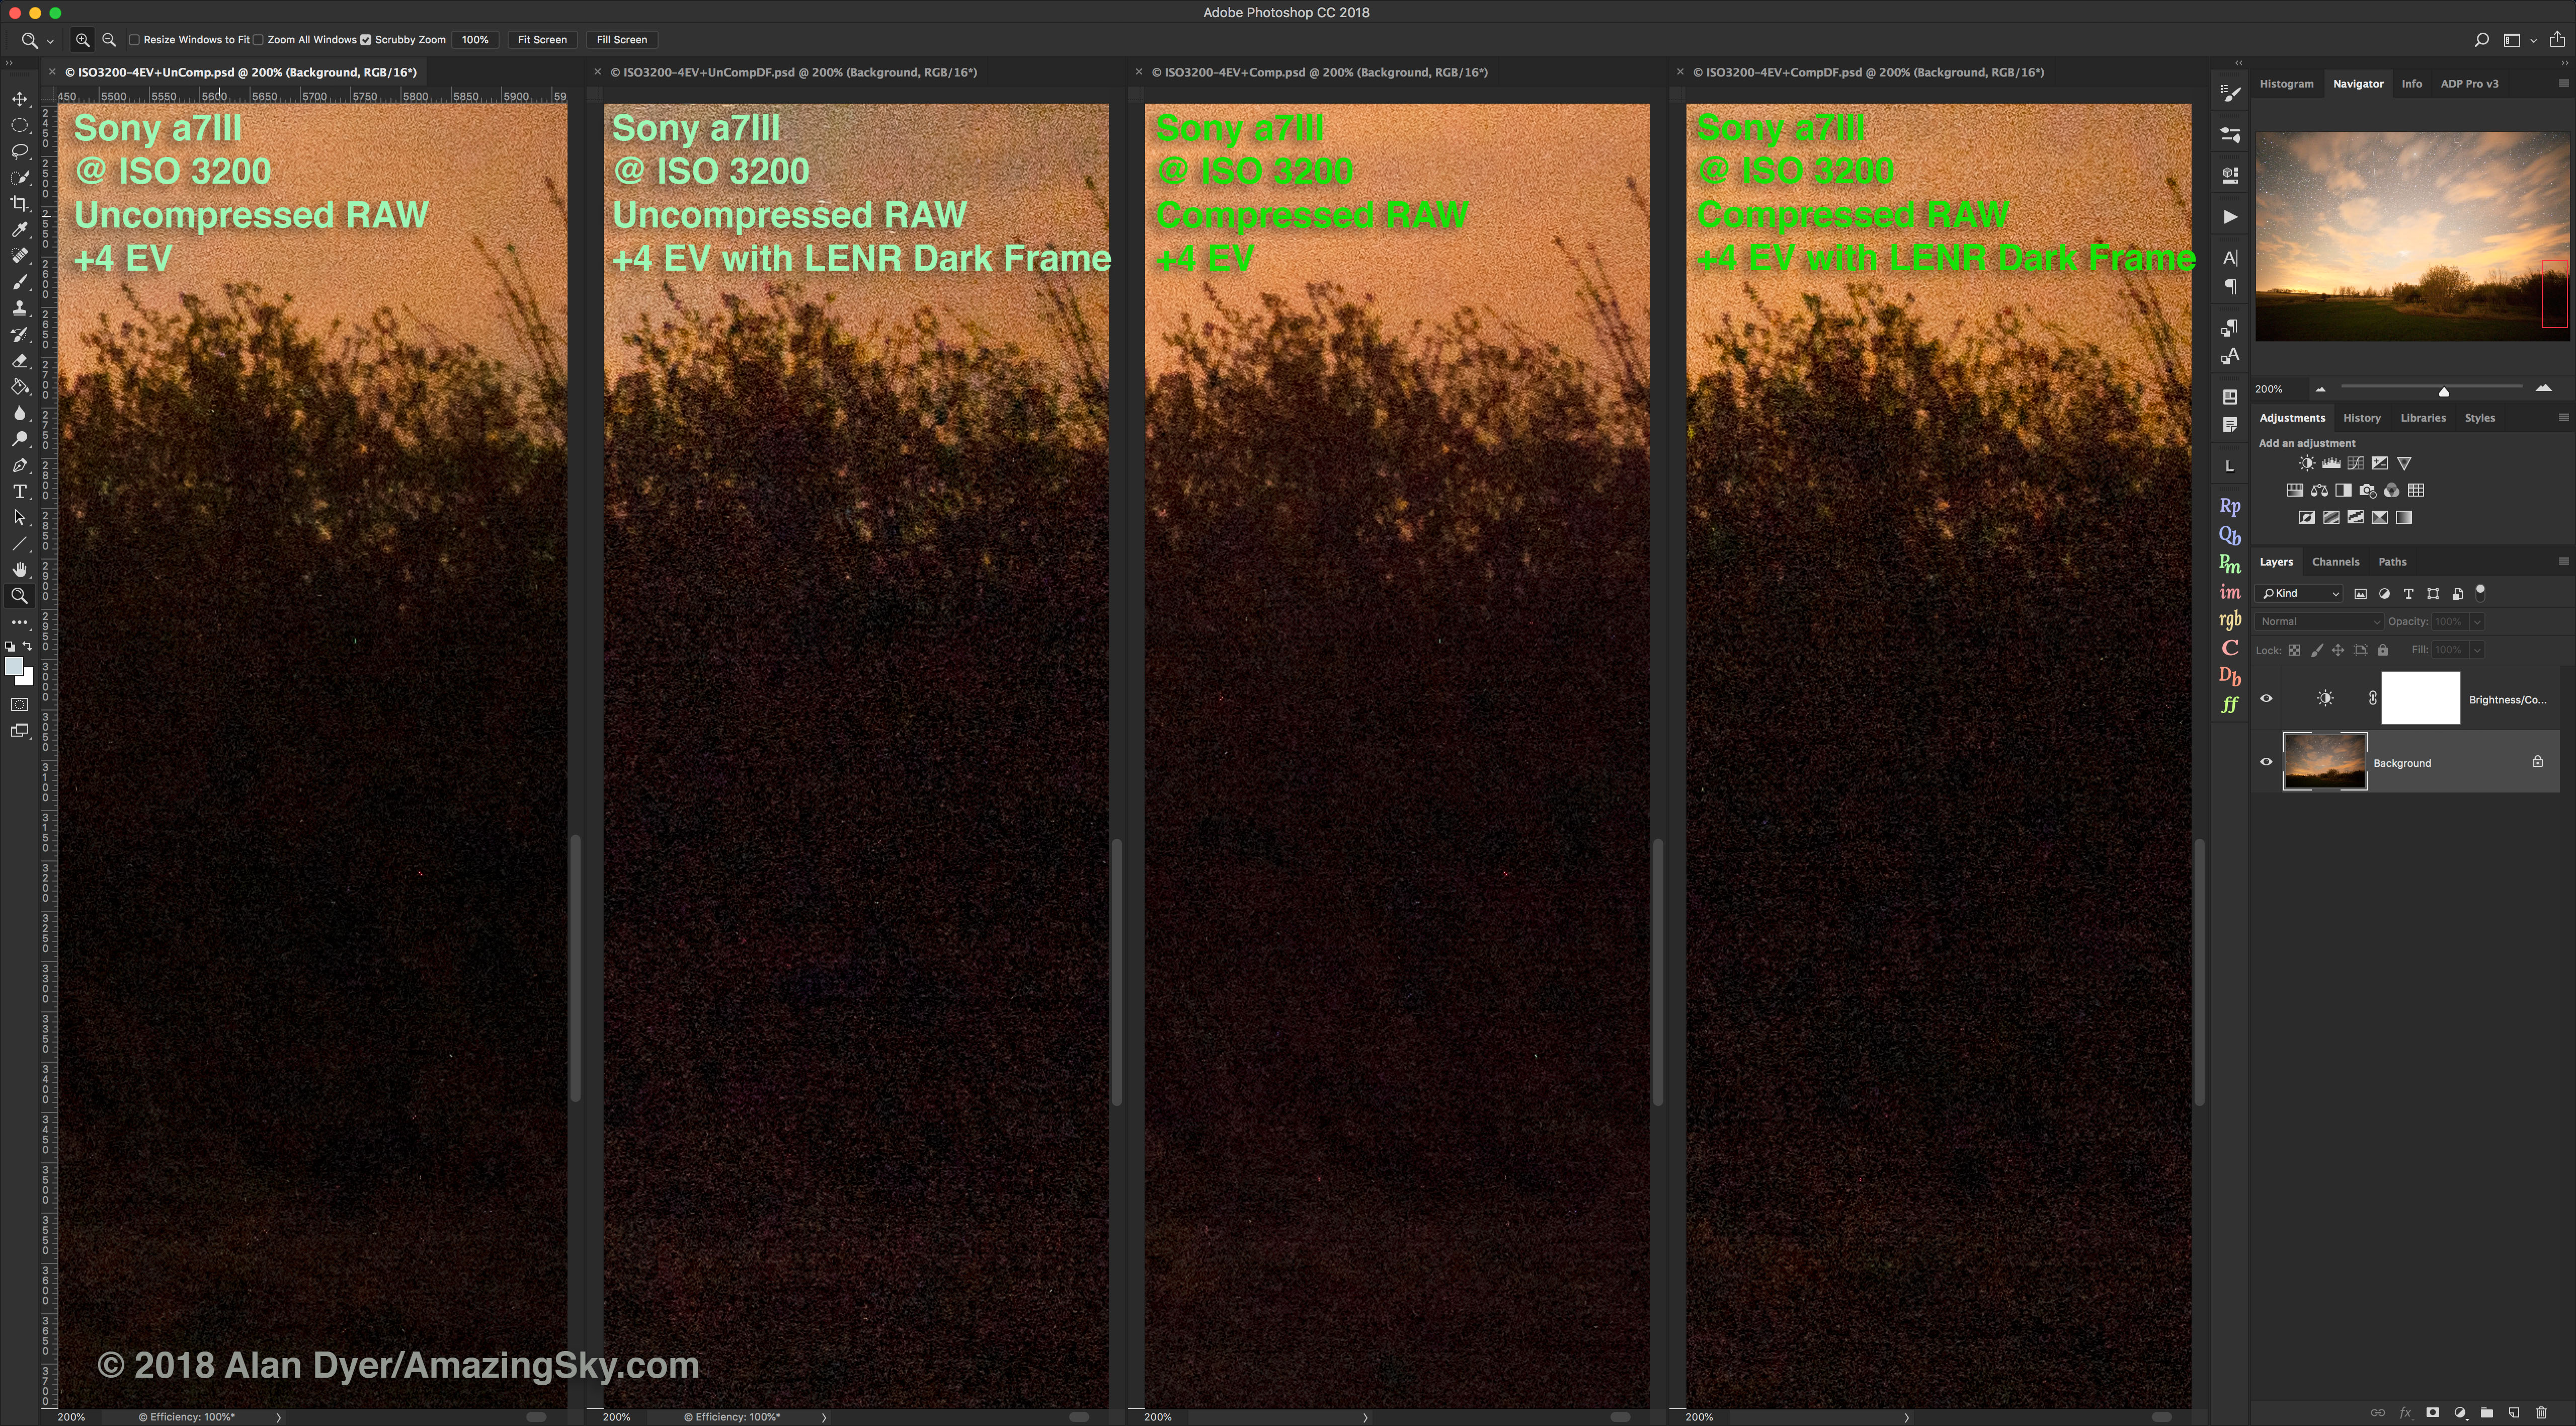
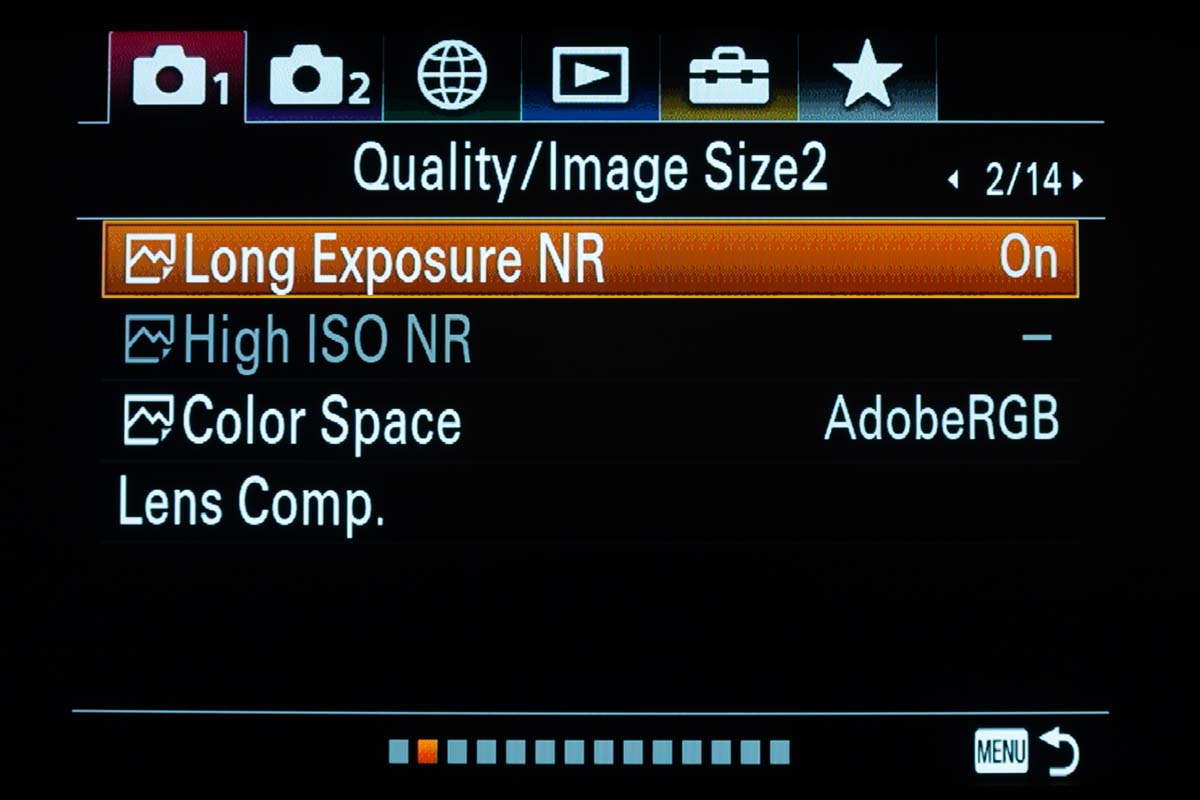
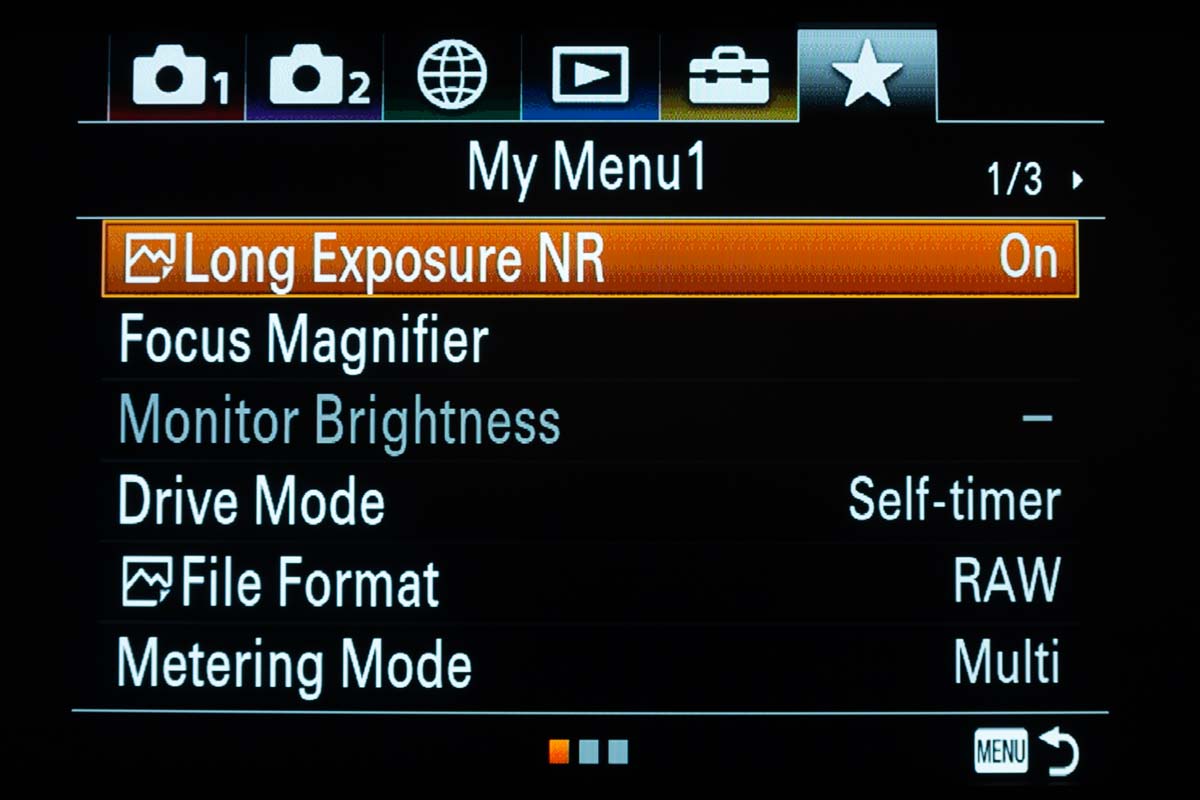
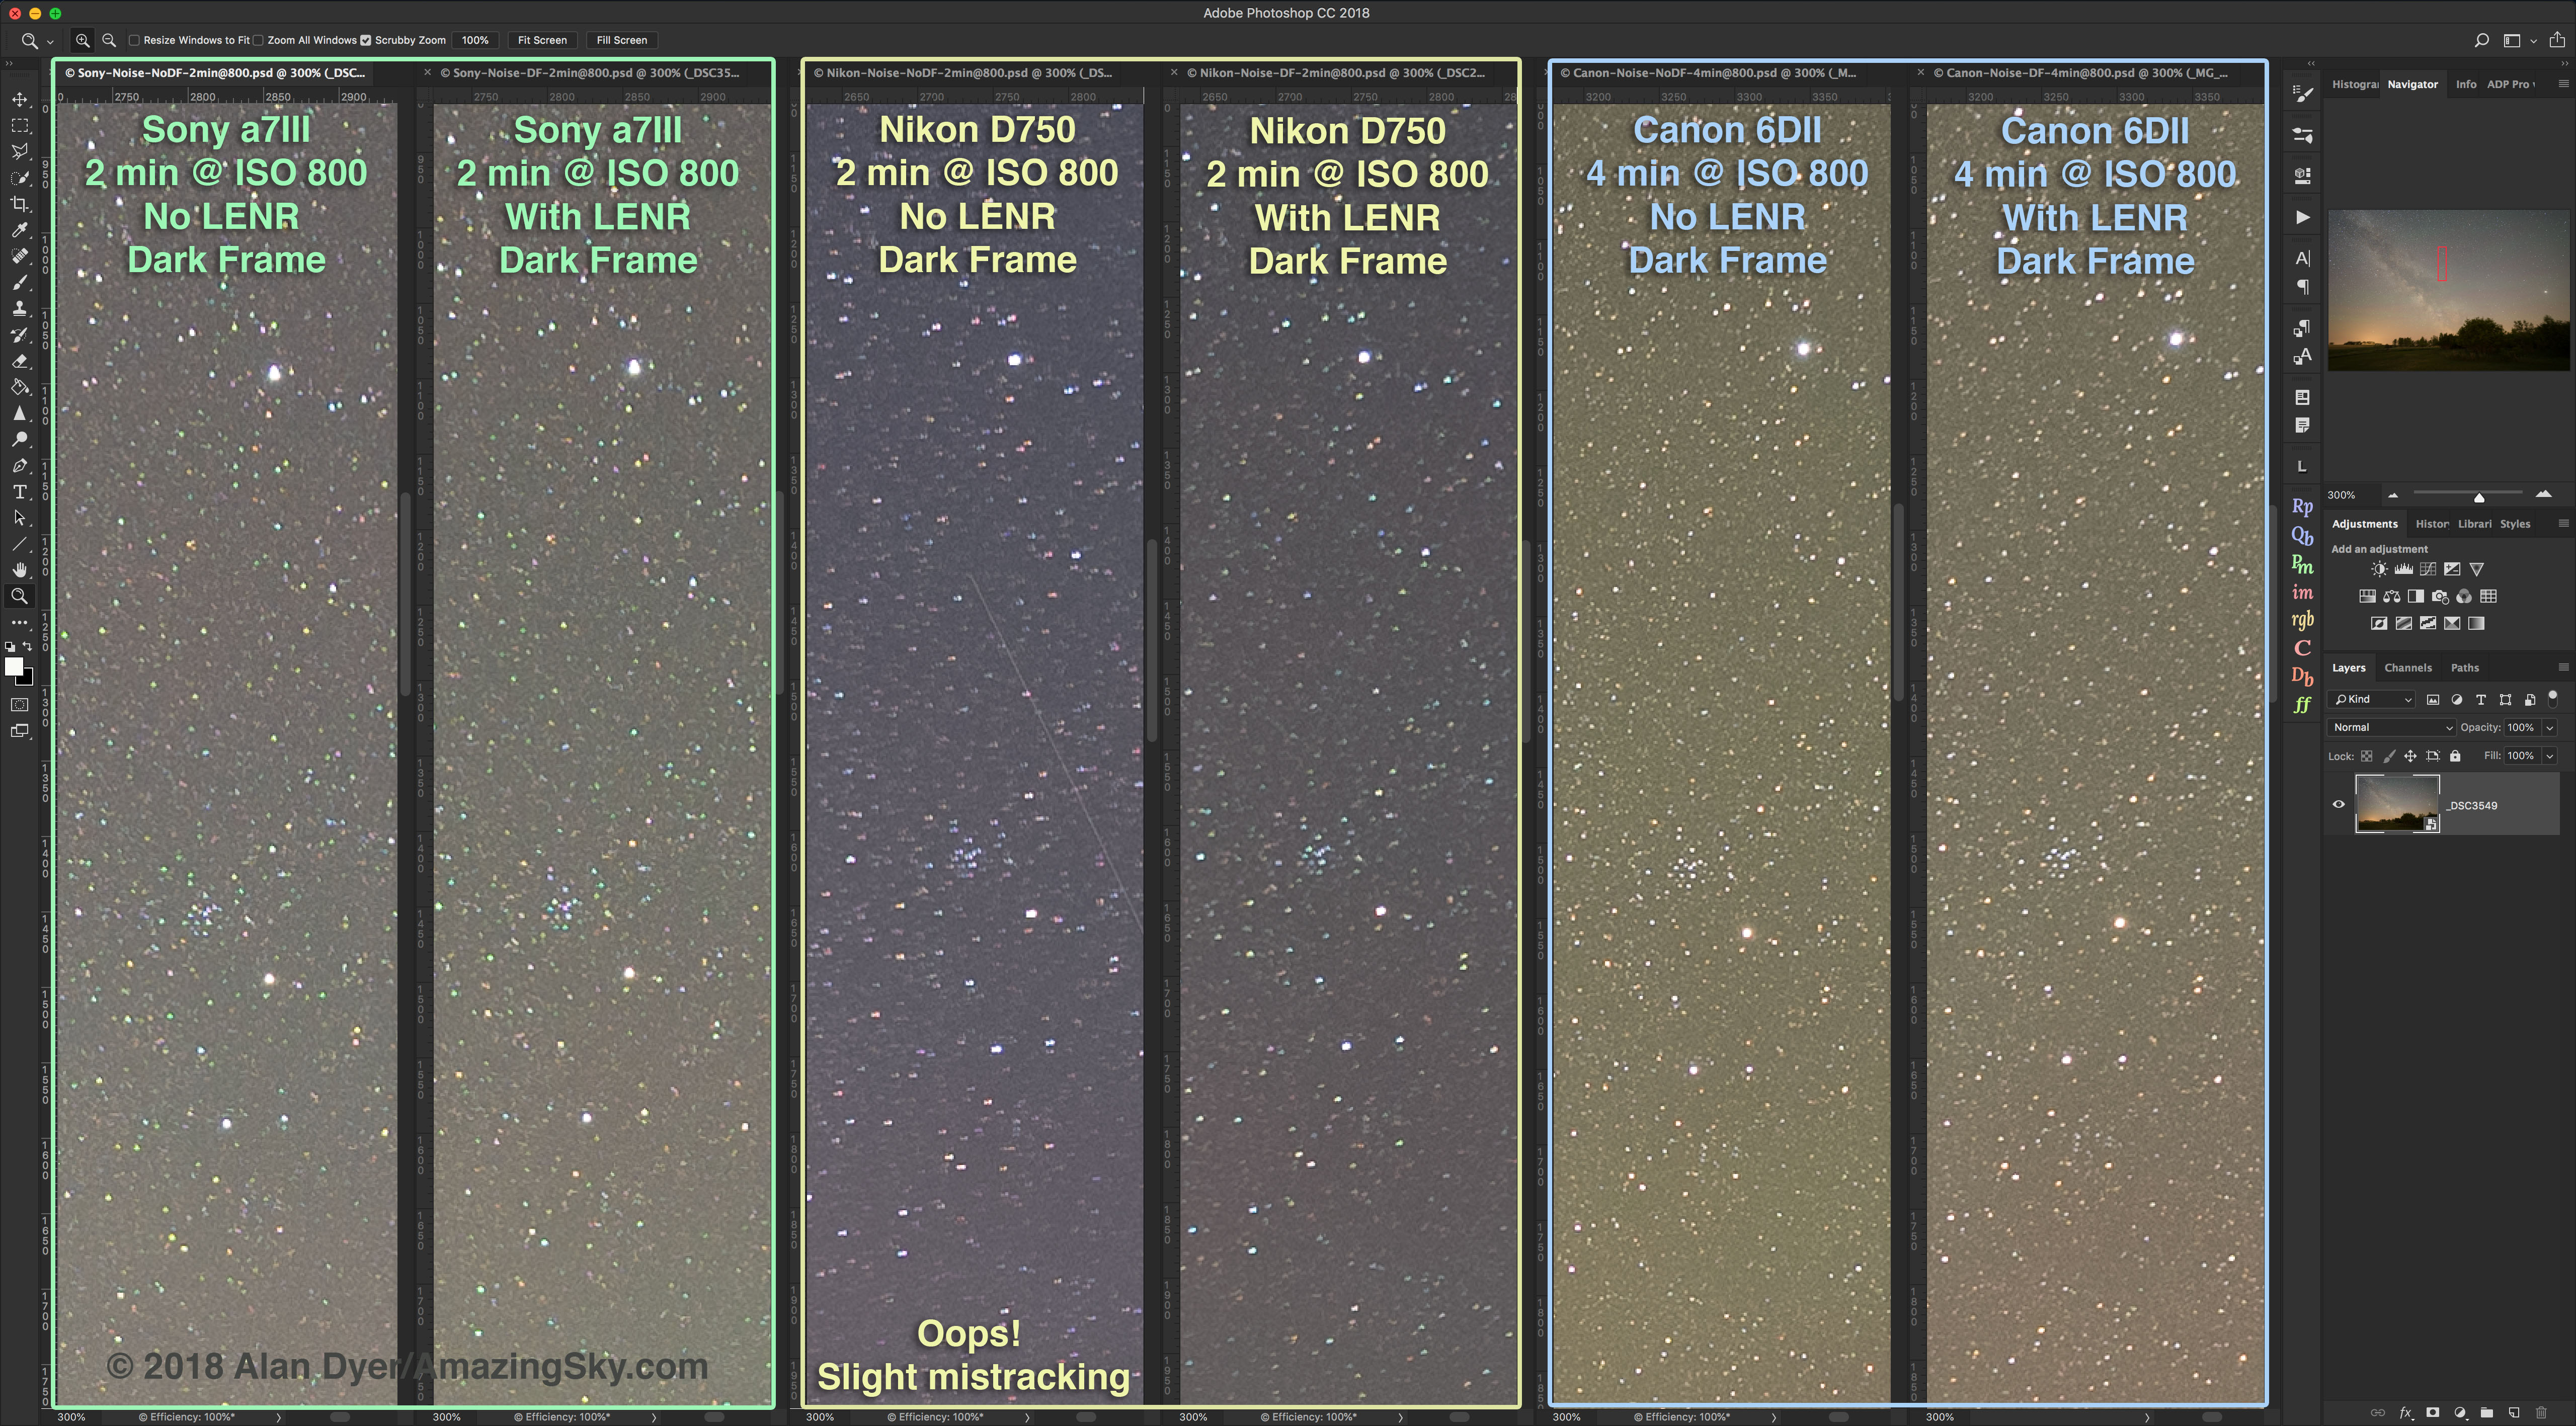
LONG EXPOSURE NOISE REDUCTION
All cameras will exhibit thermal noise in long exposures, especially on warm nights. This form of noise peppers the shadows with hot pixels, often brightly coloured.
This is not the same as the shot and read noise that adds graininess to high-ISO images and that noise reduction software can smooth out. This is a common misunderstanding, even among professional photographers who should know better!
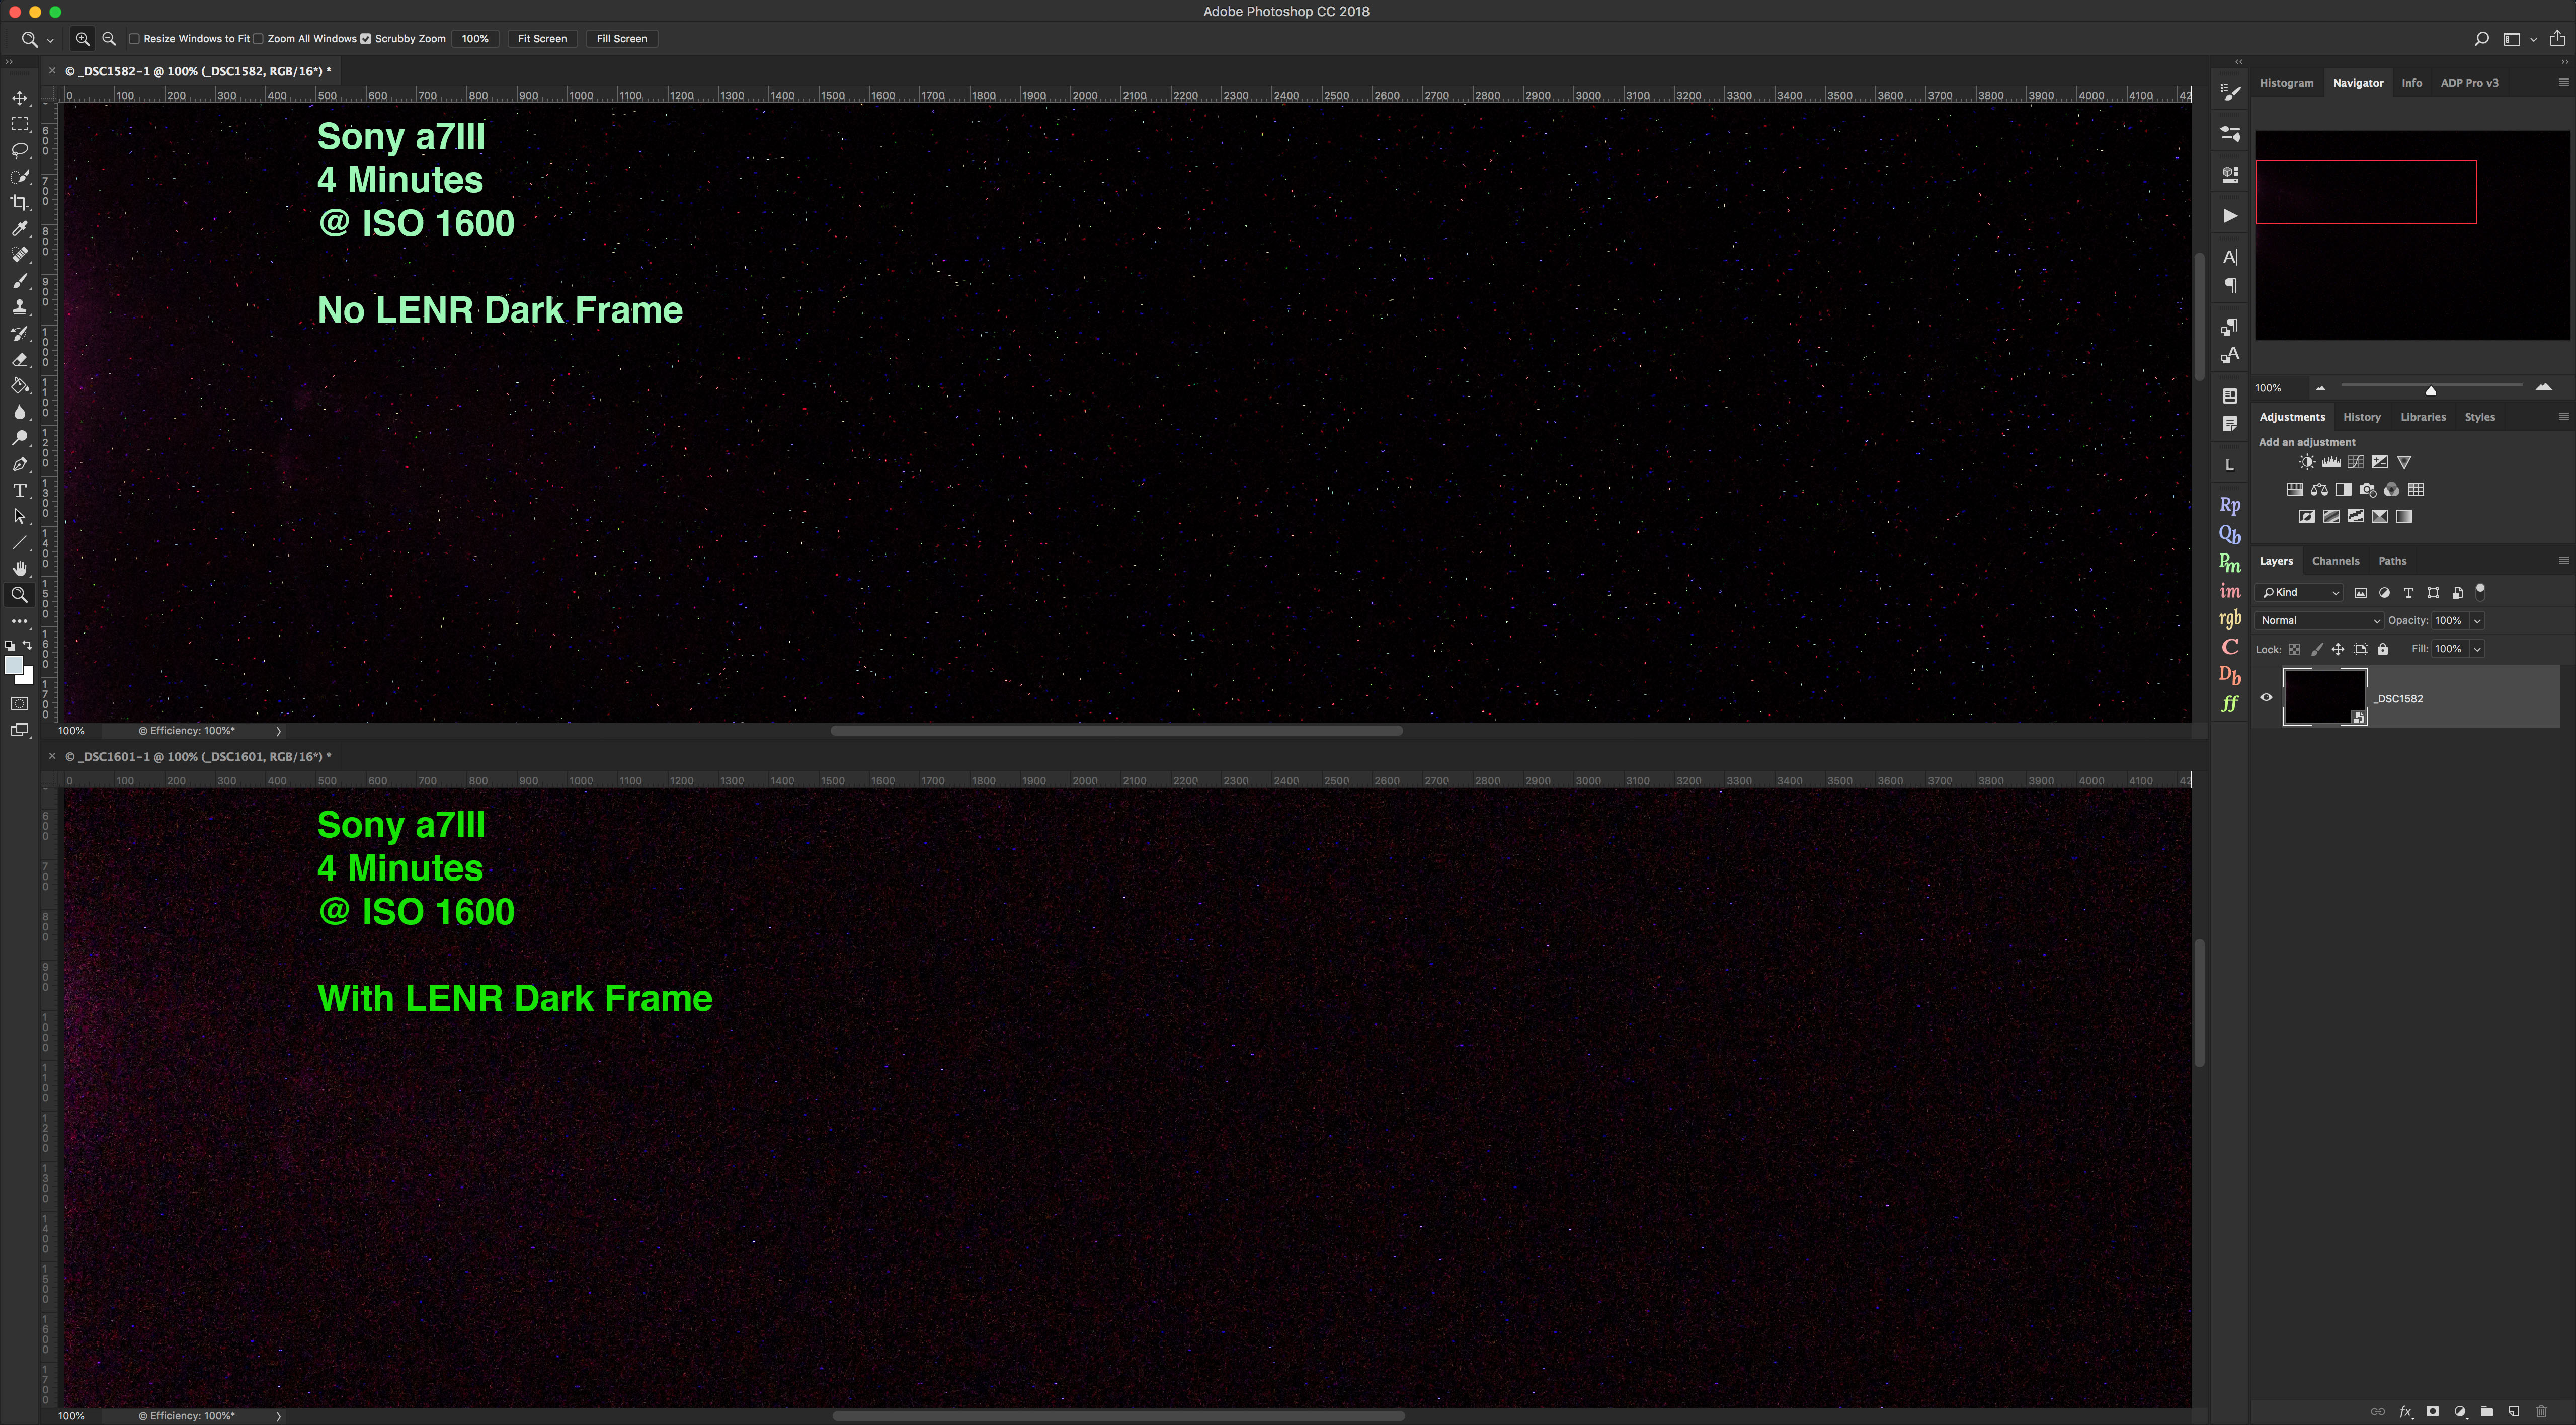
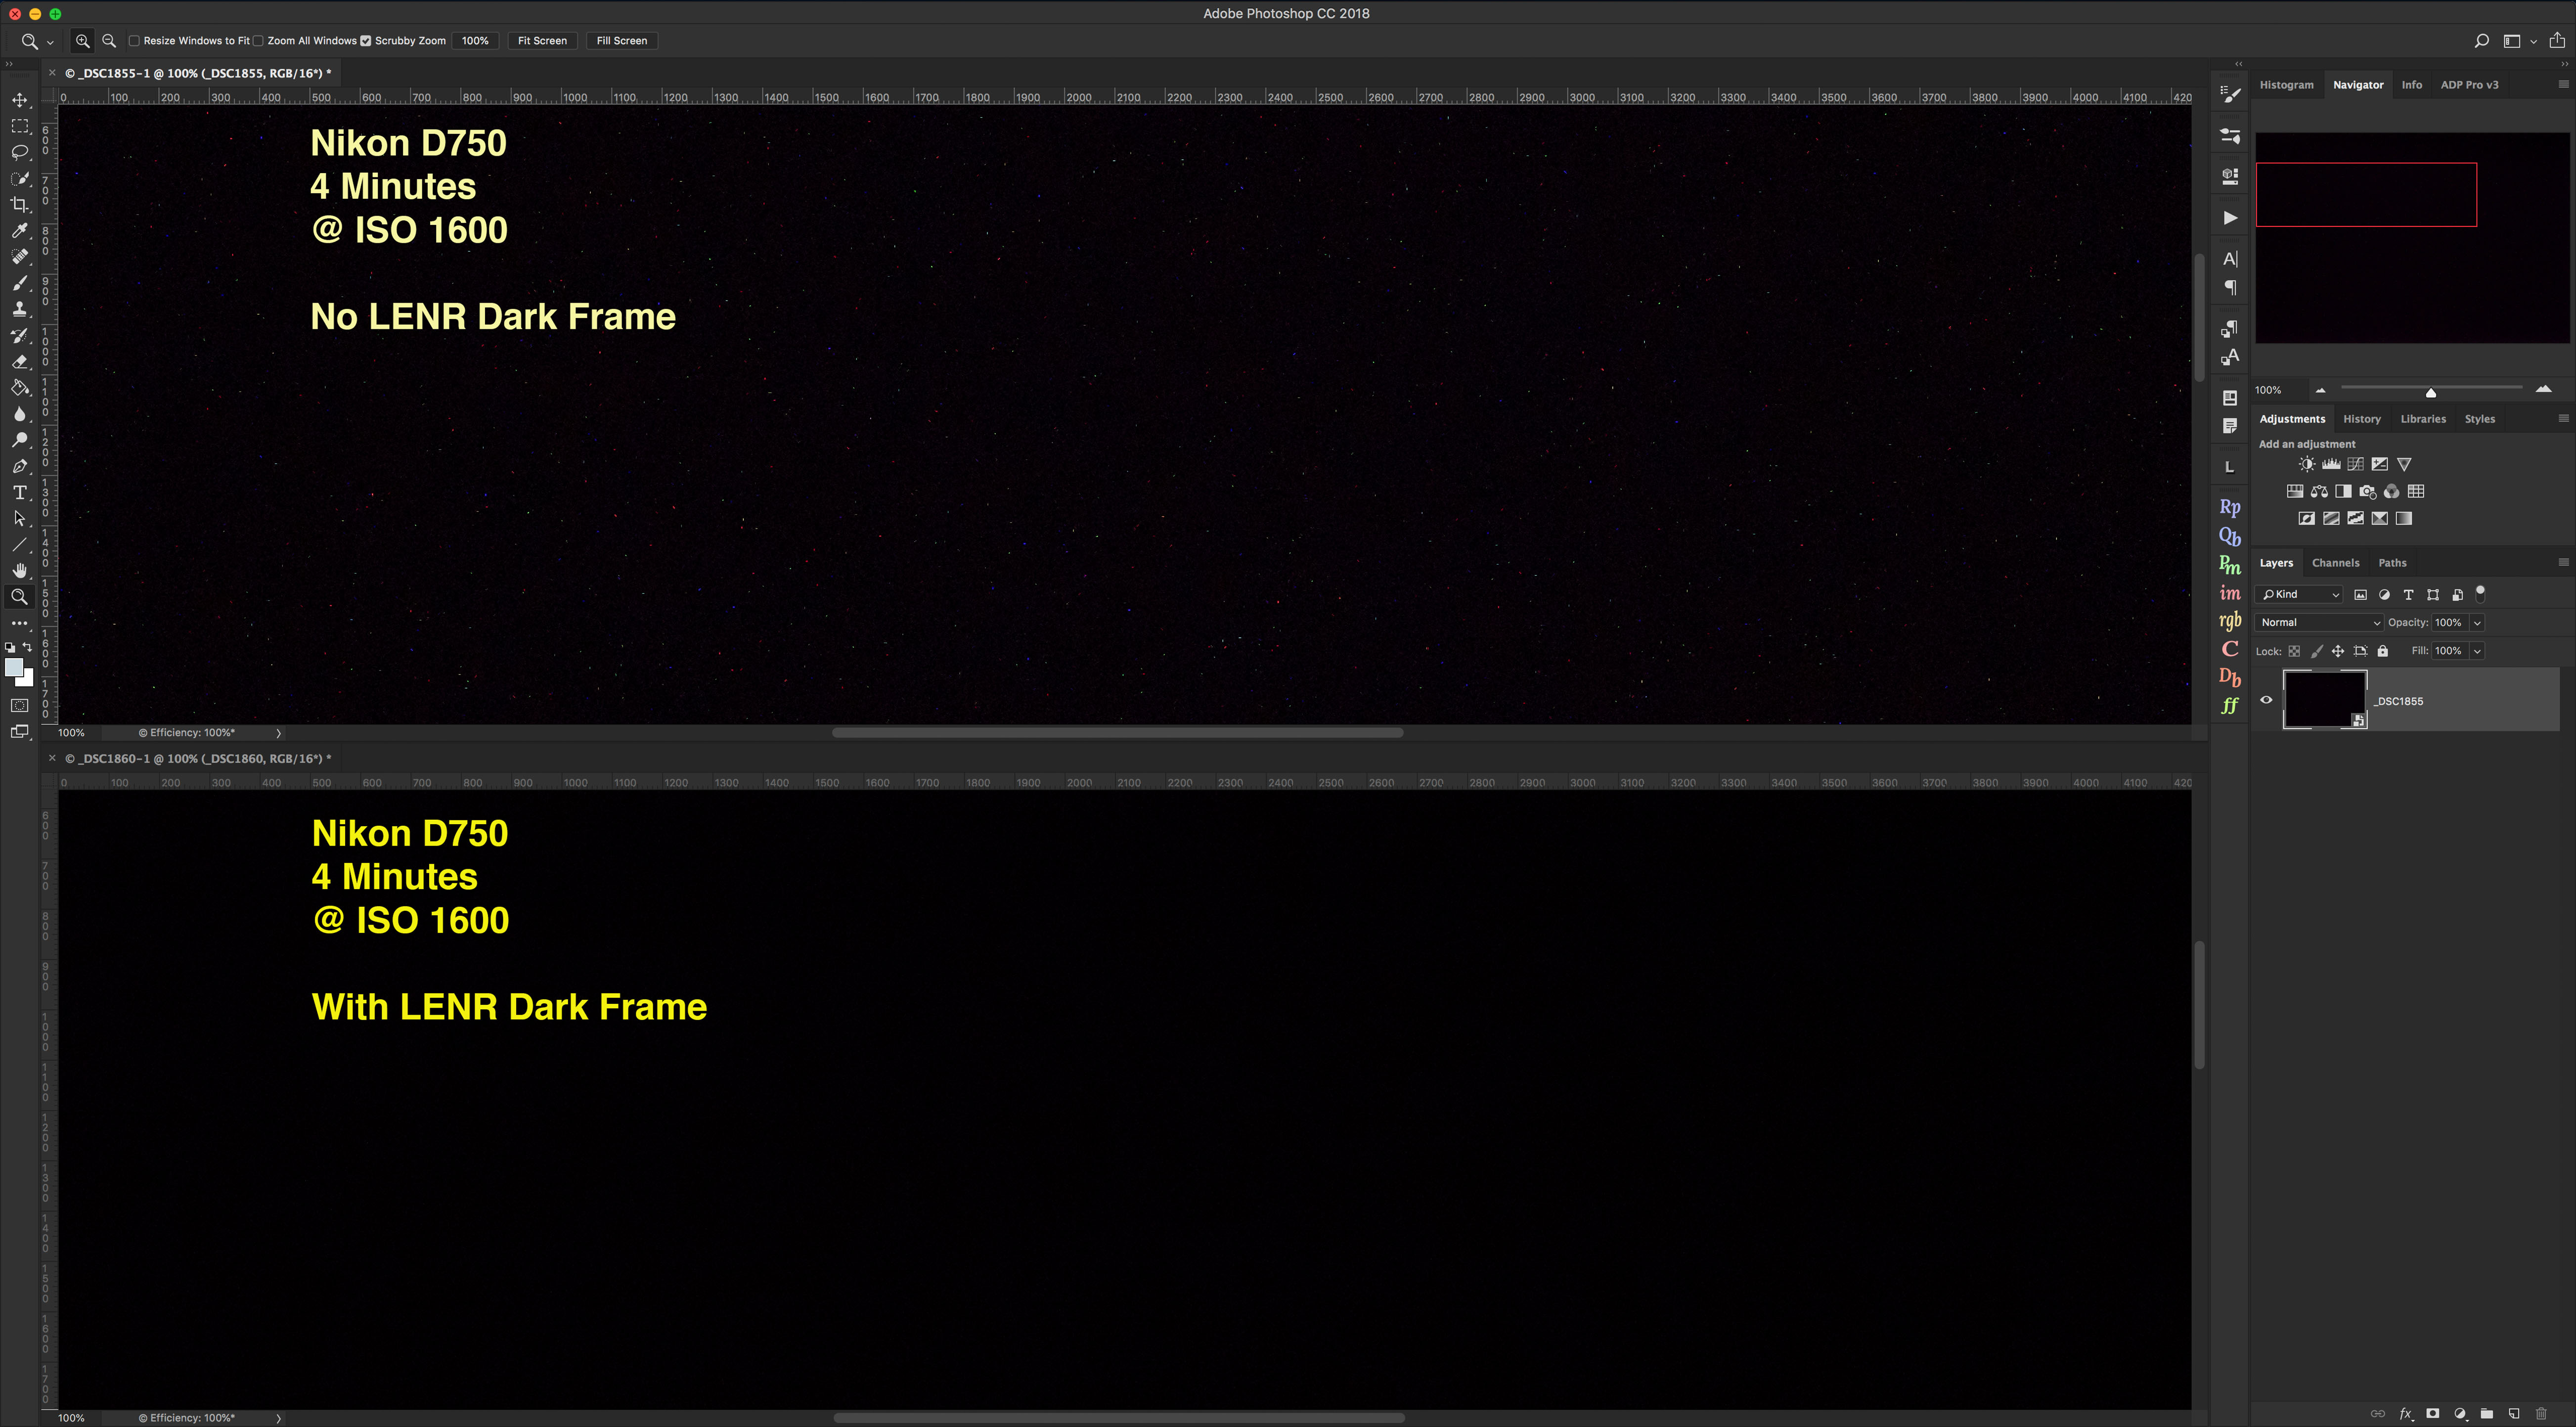
Long Exposure Noise Reduction (LENR) eliminates this thermal noise by taking a “dark frame” and subtracting it in-camera to yield a raw file free of hot pixels.
And yes, LENR does apply to raw files, another fact even many professional photographers don’t realize. It is High ISO Noise Reduction that applies only to JPGs, along with Color Space and Picture Styles.
Comparing a dark nightscape without and with LENR on a warm night. Hot pixels are mostly gone at right.
The LENR option on the R6 did eliminate most hot pixels, though sometimes still left, or added, a few. LENR is needed more on warm nights, and with longer exposures at higher ISOs. So the extent of thermal noise in any camera can vary a lot from shoot to shoot.
When LENR is active, the R6’s rear screen lights up with “Busy,” which is annoyingly bright. To hide this display, the only option is to close the screen.
As with the EOS Ra, and all mirrorless cameras, the R6 has no “dark frame buffer” that allows several exposures to be taken in quick succession even with LENR on. Canon’s full-frame DSLRs have this little-known buffer that allows 3, 4, or 5 “light frames” to be taken in a row before the LENR dark frame kicks in a locks up the camera on Busy.
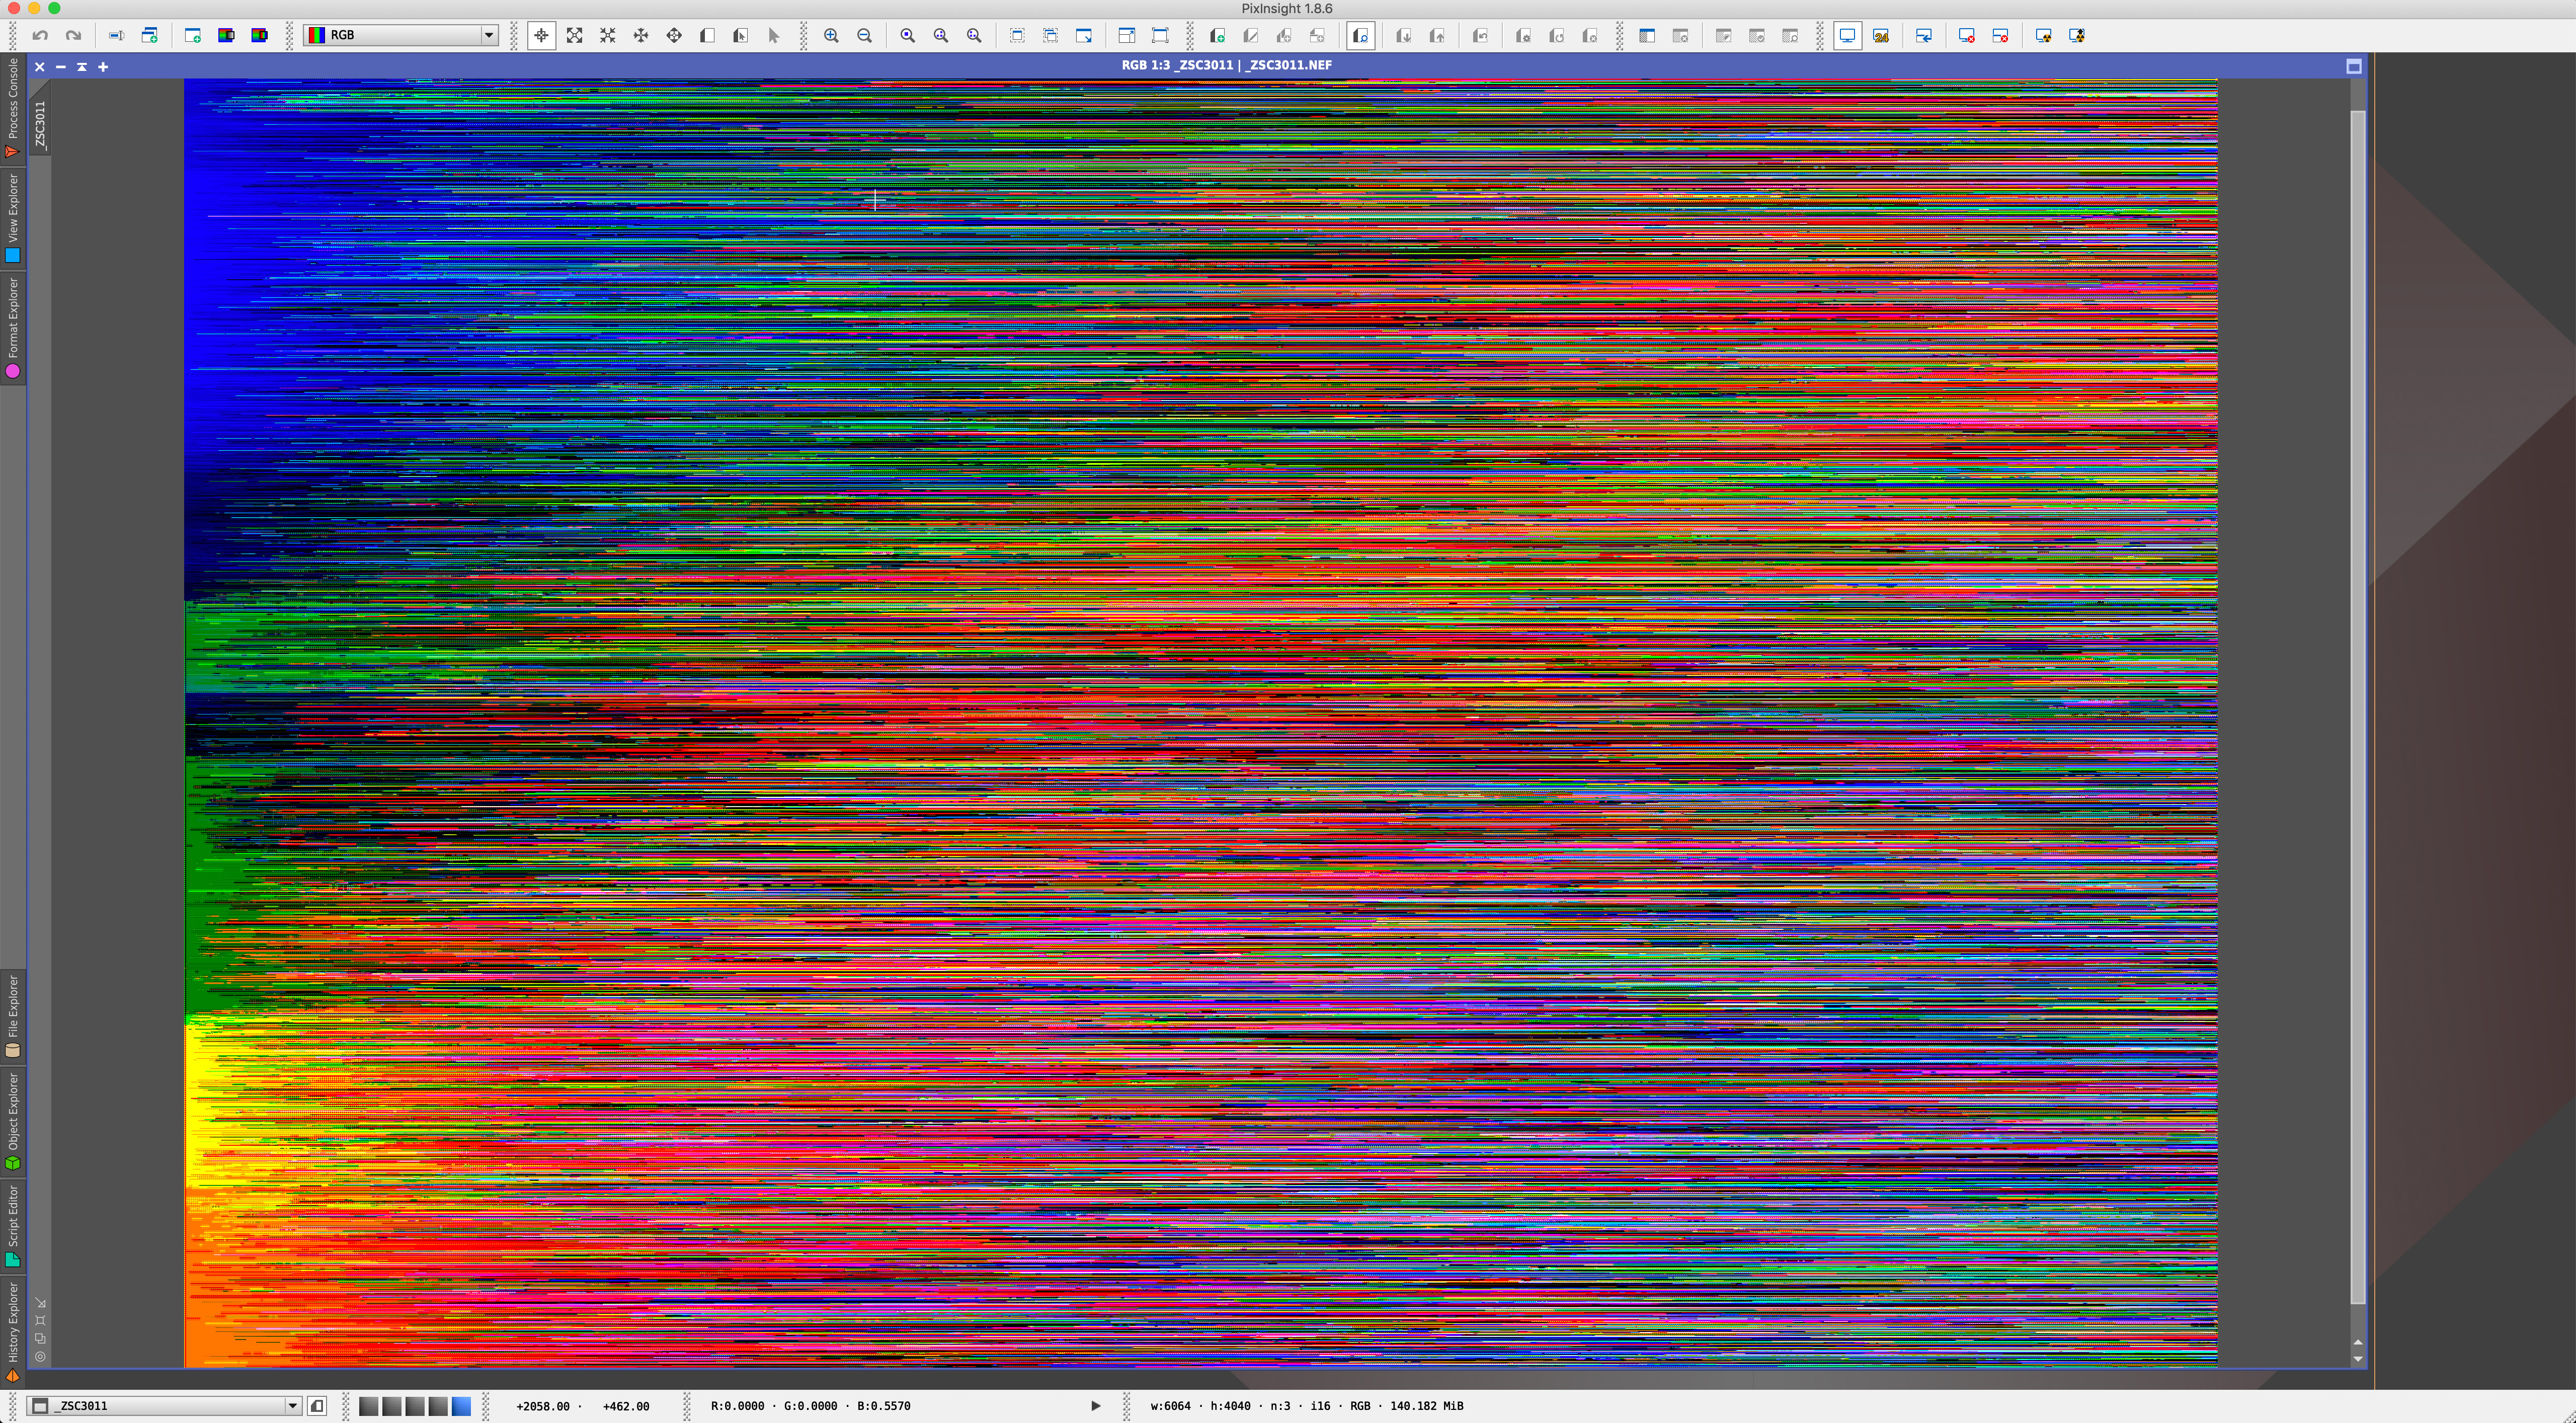
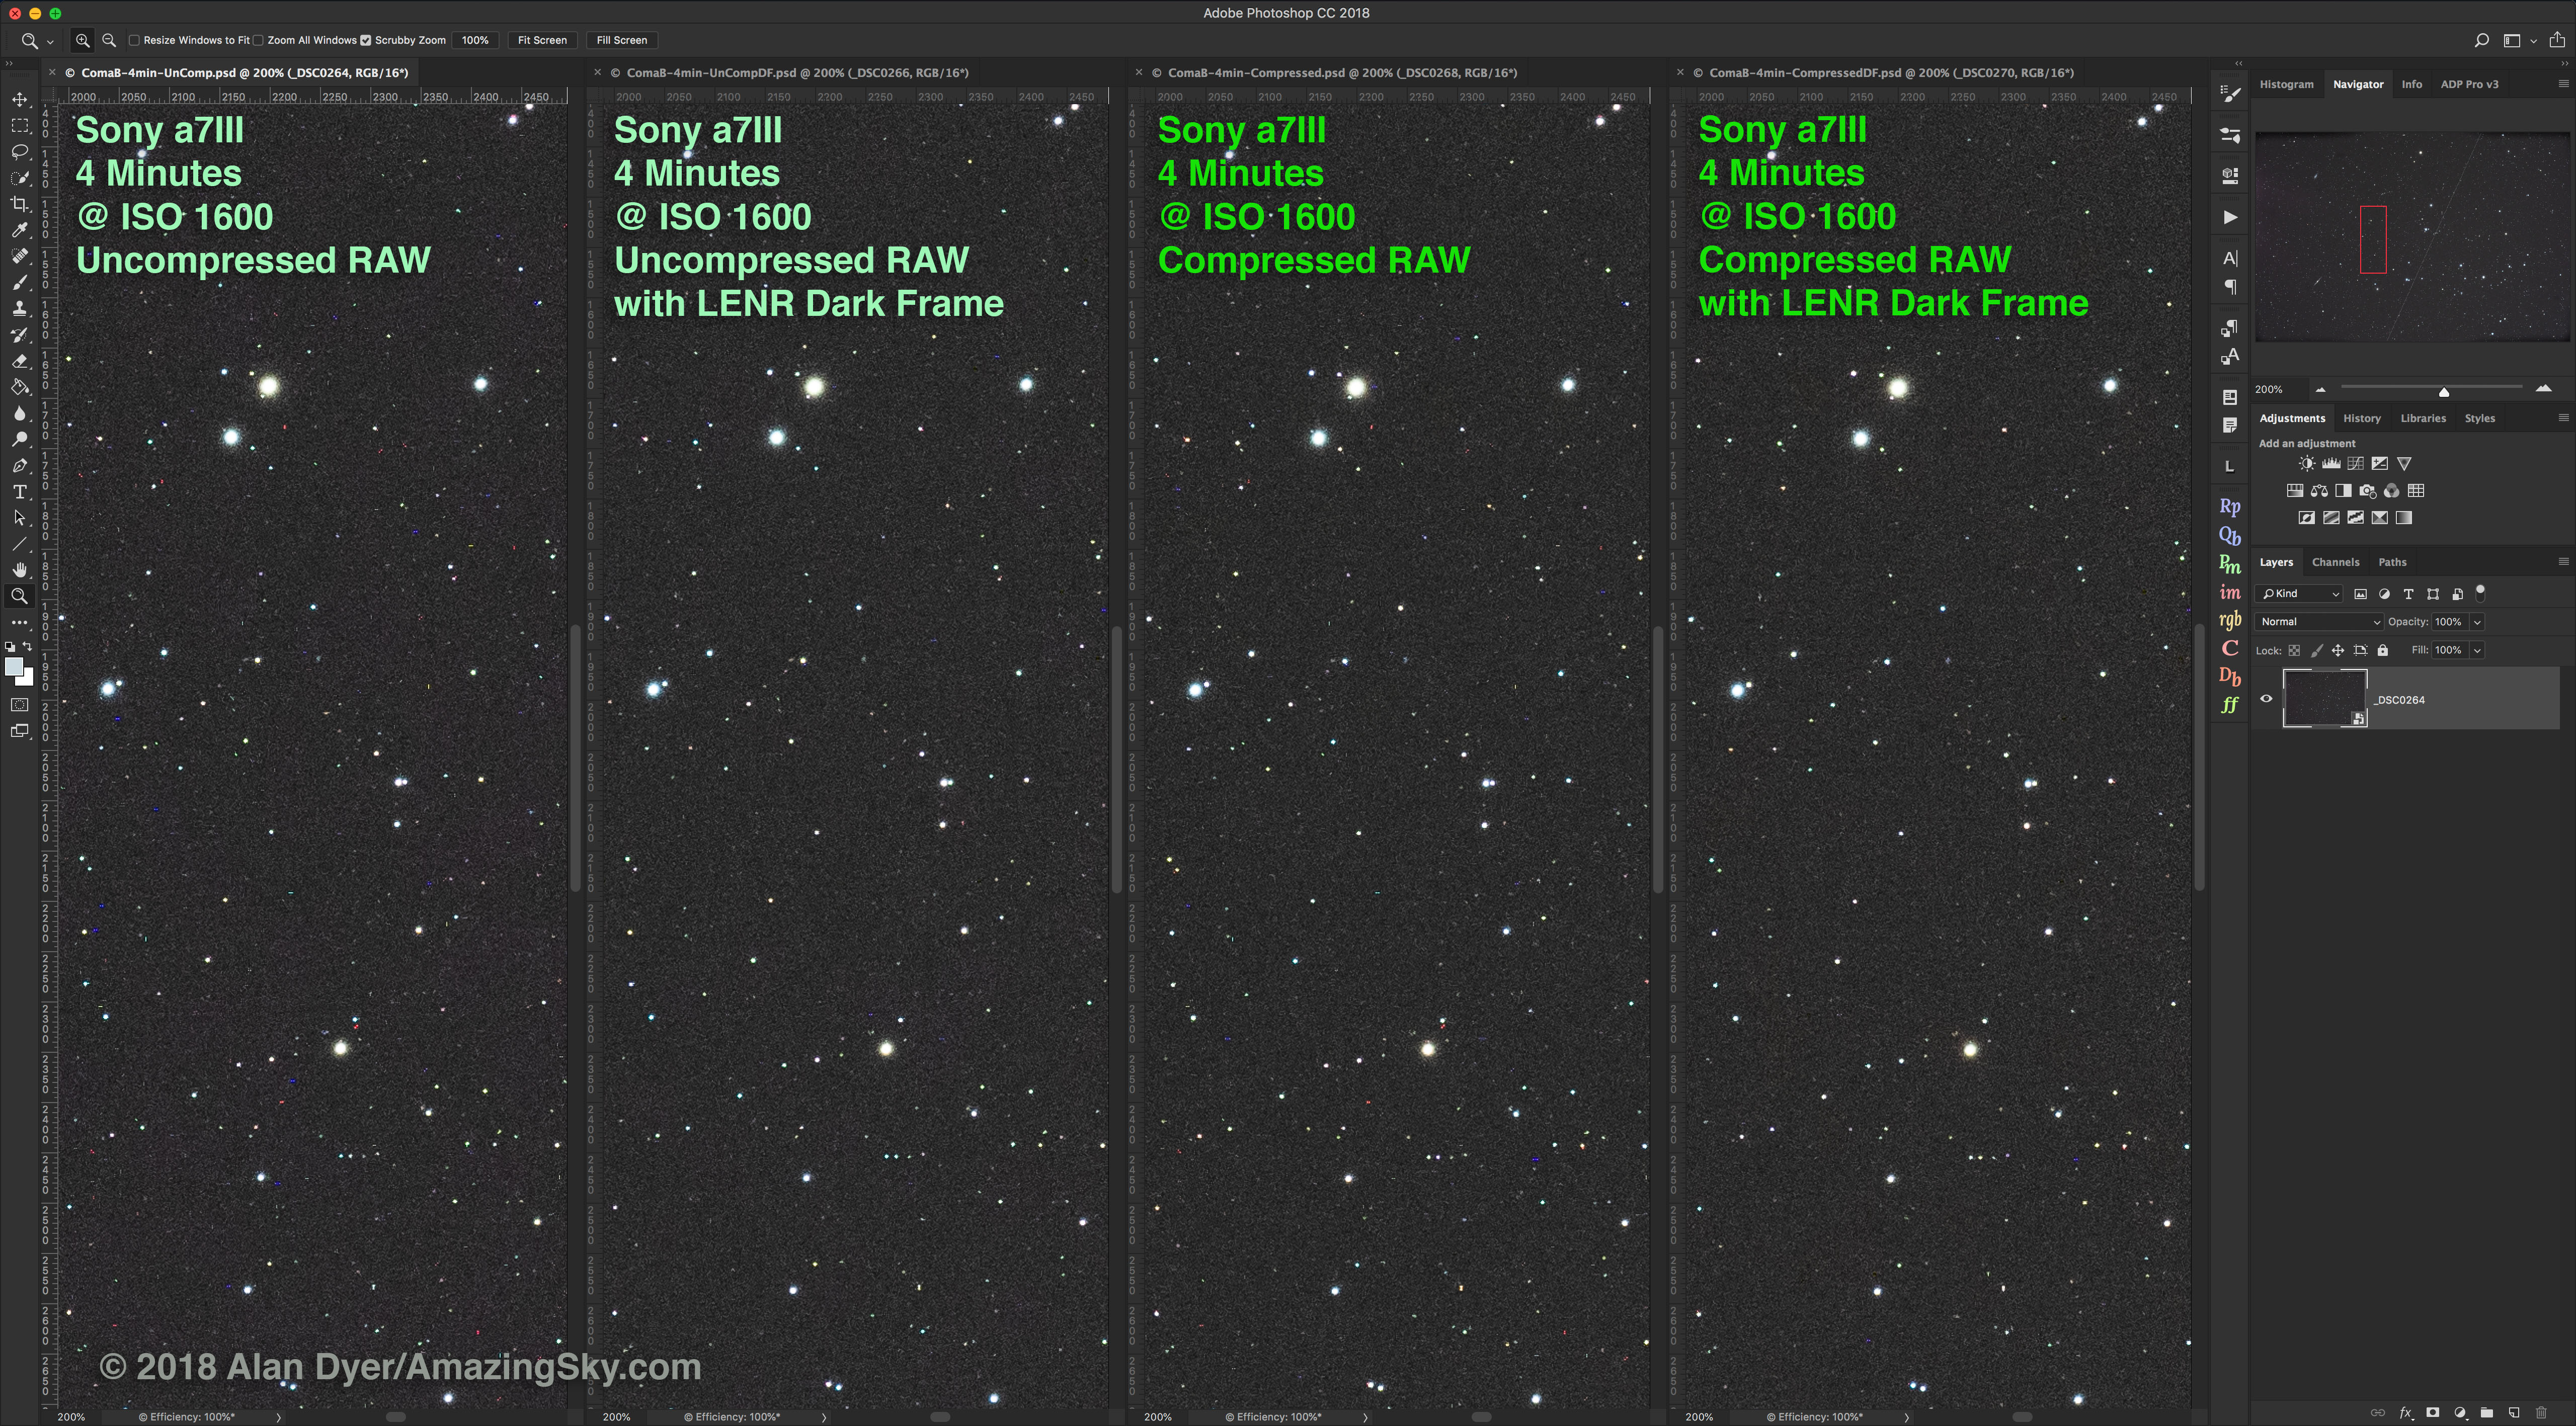
Comparing long exposure images with the lens cap on (dark frames), to show just thermal noise. The right edge of the frame is shown, blown up, to reveal the amp glow, which LENR removes.
With all Canon R cameras, and most other DSLRs, turning on LENR forces the camera to take a dark frame after every light frame, doubling the time it takes to finish every exposure. That’s a price many photographers aren’t willing to pay, but on warm nights it can be necessary, and a best practice, for the reward of cleaner images.
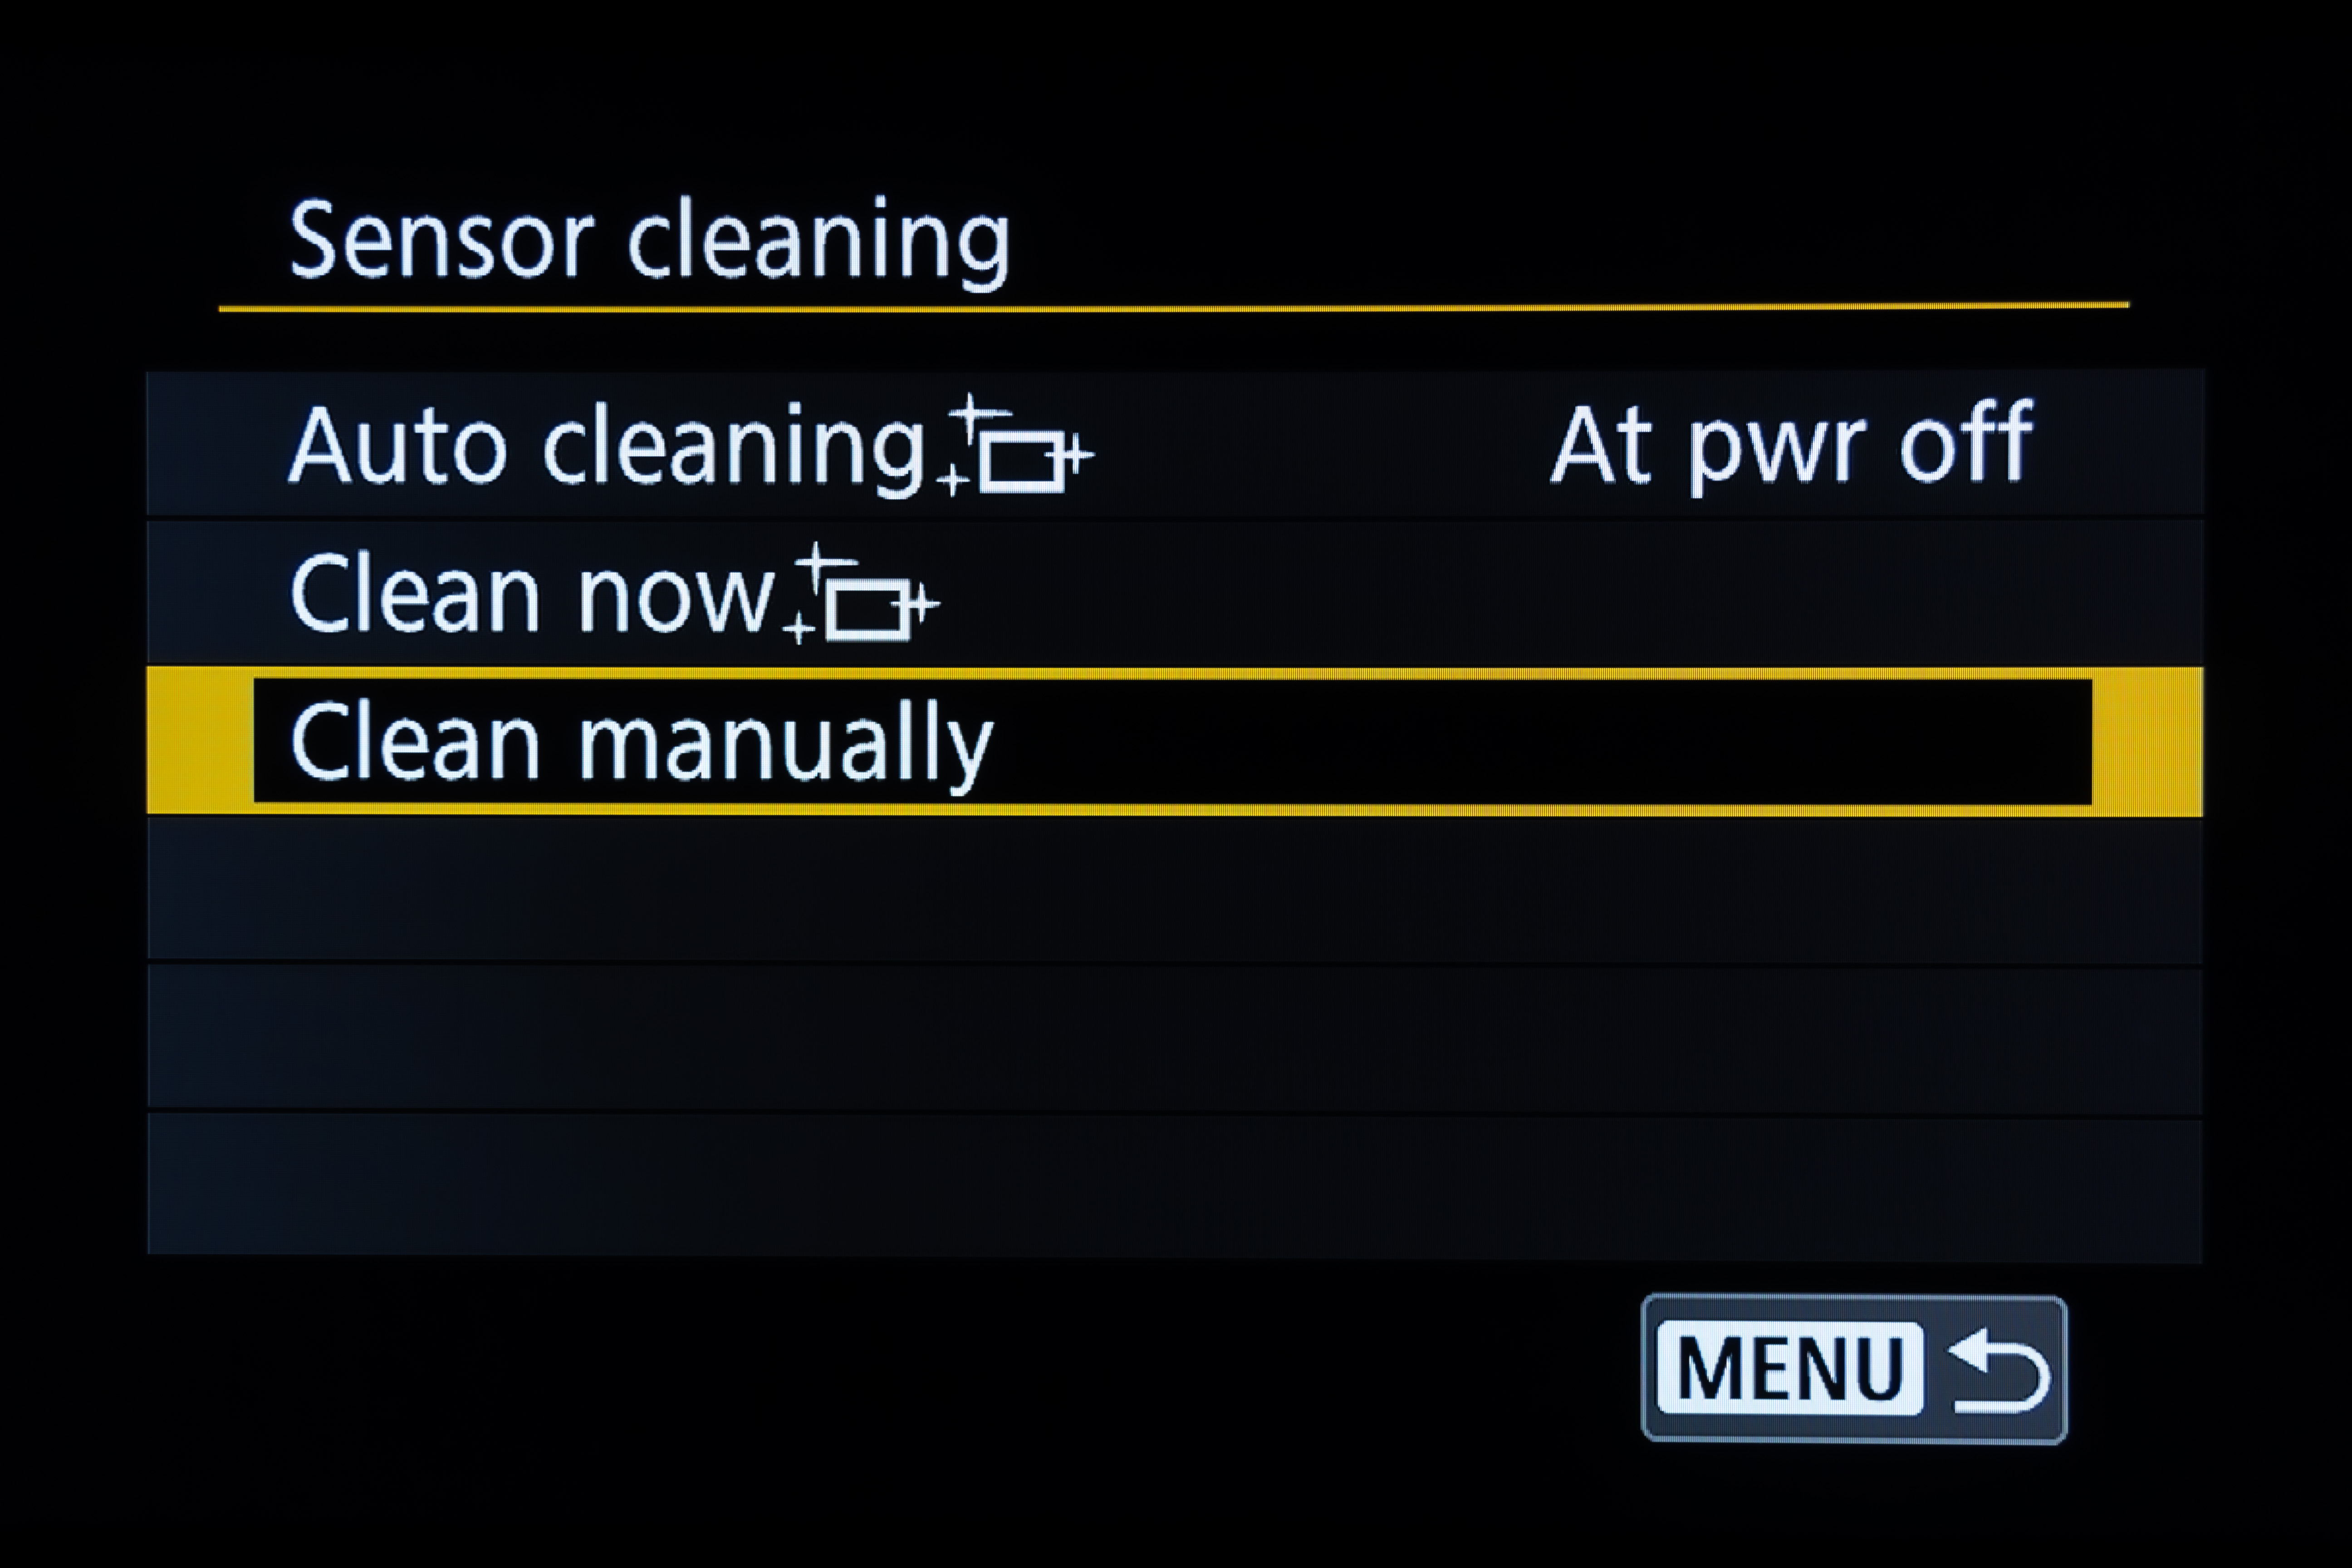
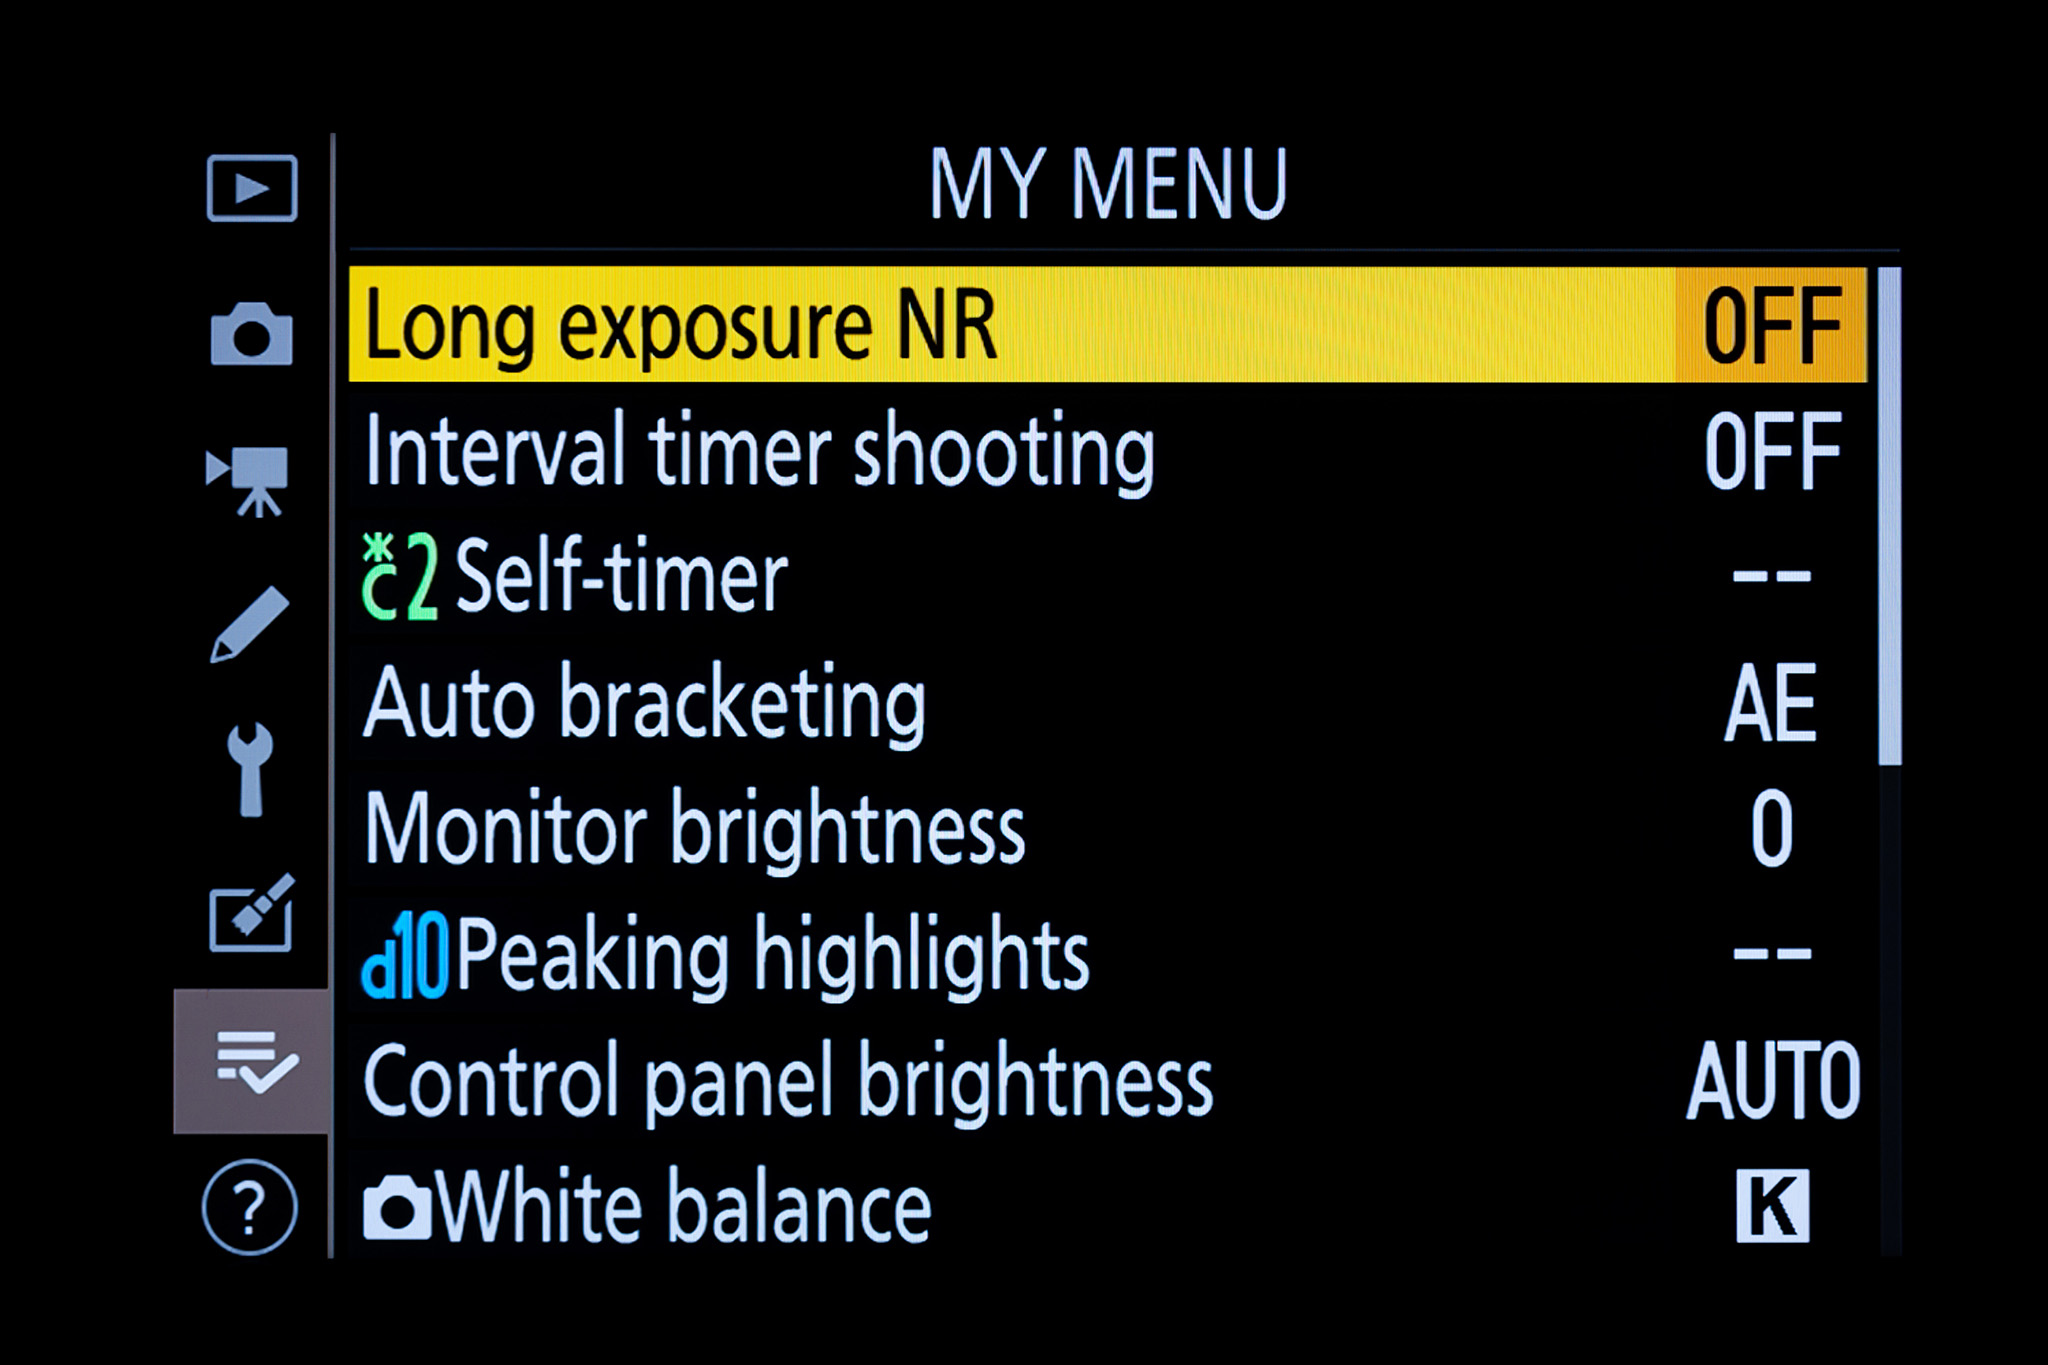
The standard Canon Sensor Cleaning menu.
TIP: If you find hot pixels are becoming more obvious over time, try this trick: turn on the Clean Manually routine for 30 seconds to a minute. In some cameras this can remap the hot pixels so the camera can better eliminate them.
STAR QUALITY
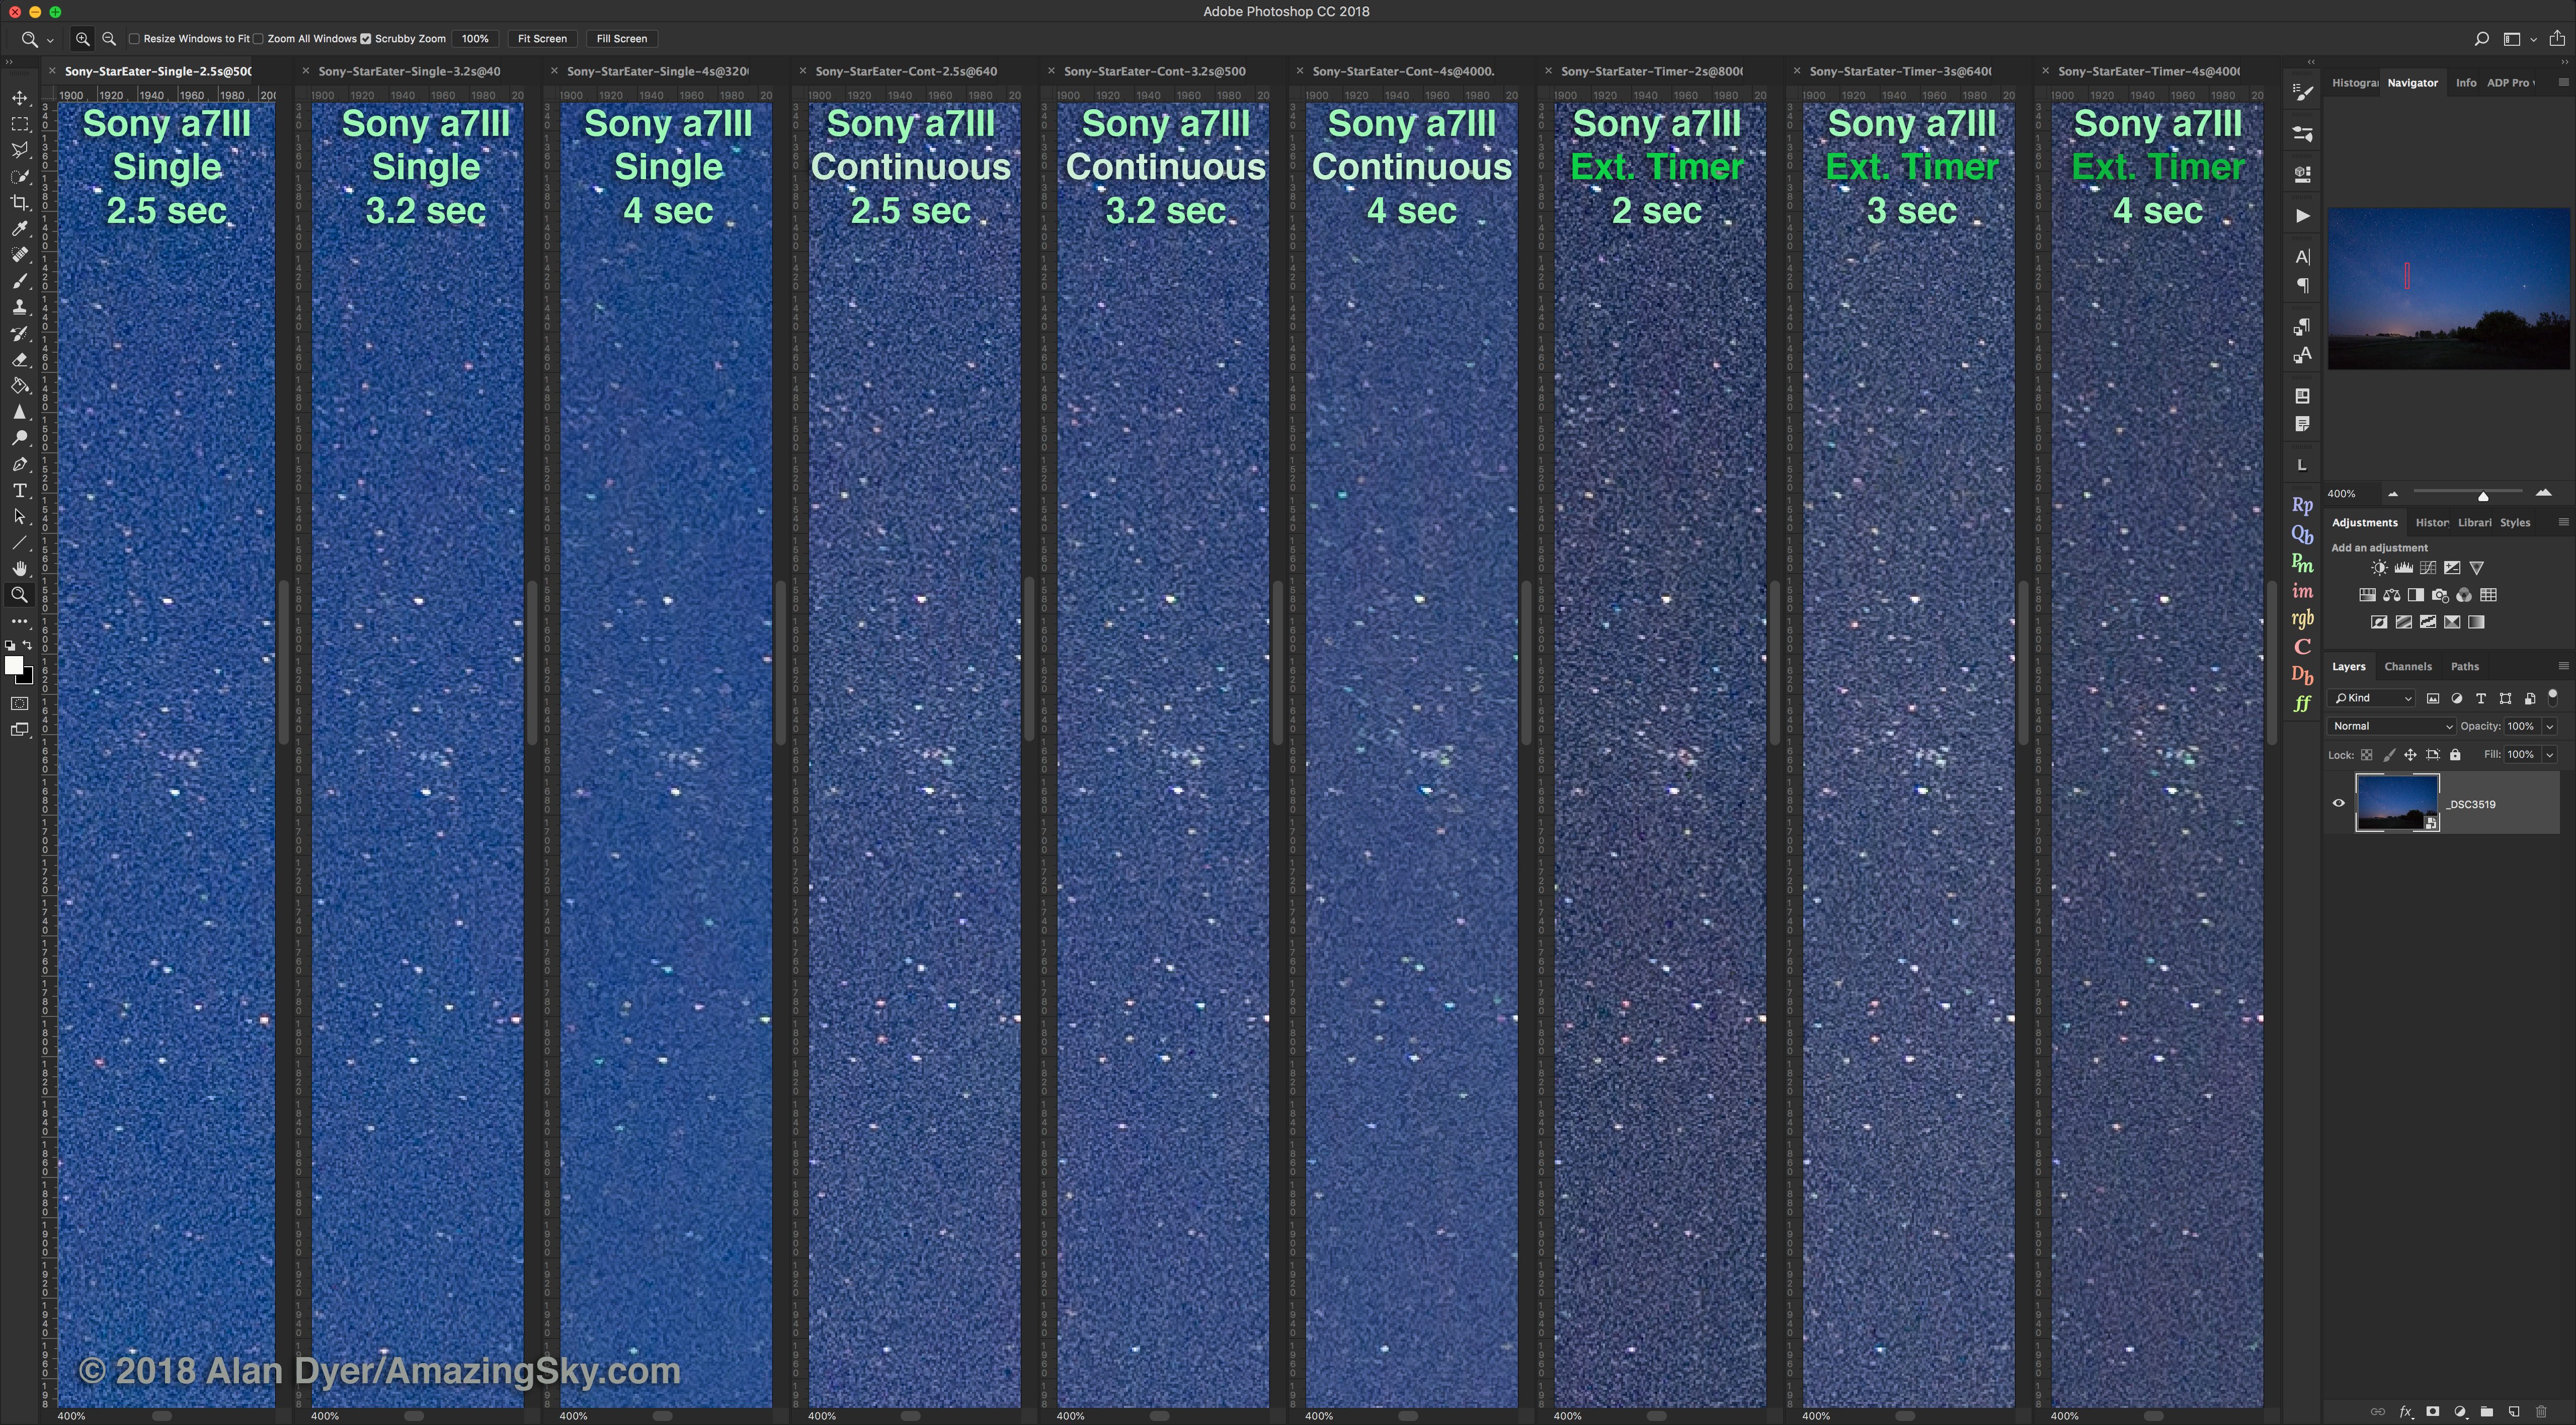
Using LENR with the R6 did not introduce any oddities such as oddly-coloured, green or wiped-out stars. Even without LENR I saw no evidence of green stars, a flaw that plagues some Sony cameras at all times, or Nikons when using LENR.
Comparing the R6 for noise and star colours at typical deep-sky ISOs and exposure times.
Canons have always been known for their good star colours, and the R6 is no exception. According to DPReview the R6 has a low-pass anti-alias filter in front of its sensor. Cameras which lack such a sensor filter do produce sharper images, but stars that occupy only one or two pixels might not de-Bayer properly into the correct colours. That’s not an issue with the R6.
I also saw no “star-eating,” a flaw Nikons and Sonys have been accused of over the years, due to aggressive in-camera noise reduction even on raw files. Canons have always escaped charges of star-eating.
VIGNETTING/SHADOWING
DSLRs are prone to vignetting along the top and bottom of the frame from shadowing by the upraised mirror and mirror box. Not having a mirror, and a sensor not deeply recessed in the body, largely eliminates this edge vignetting in mirrorless cameras.
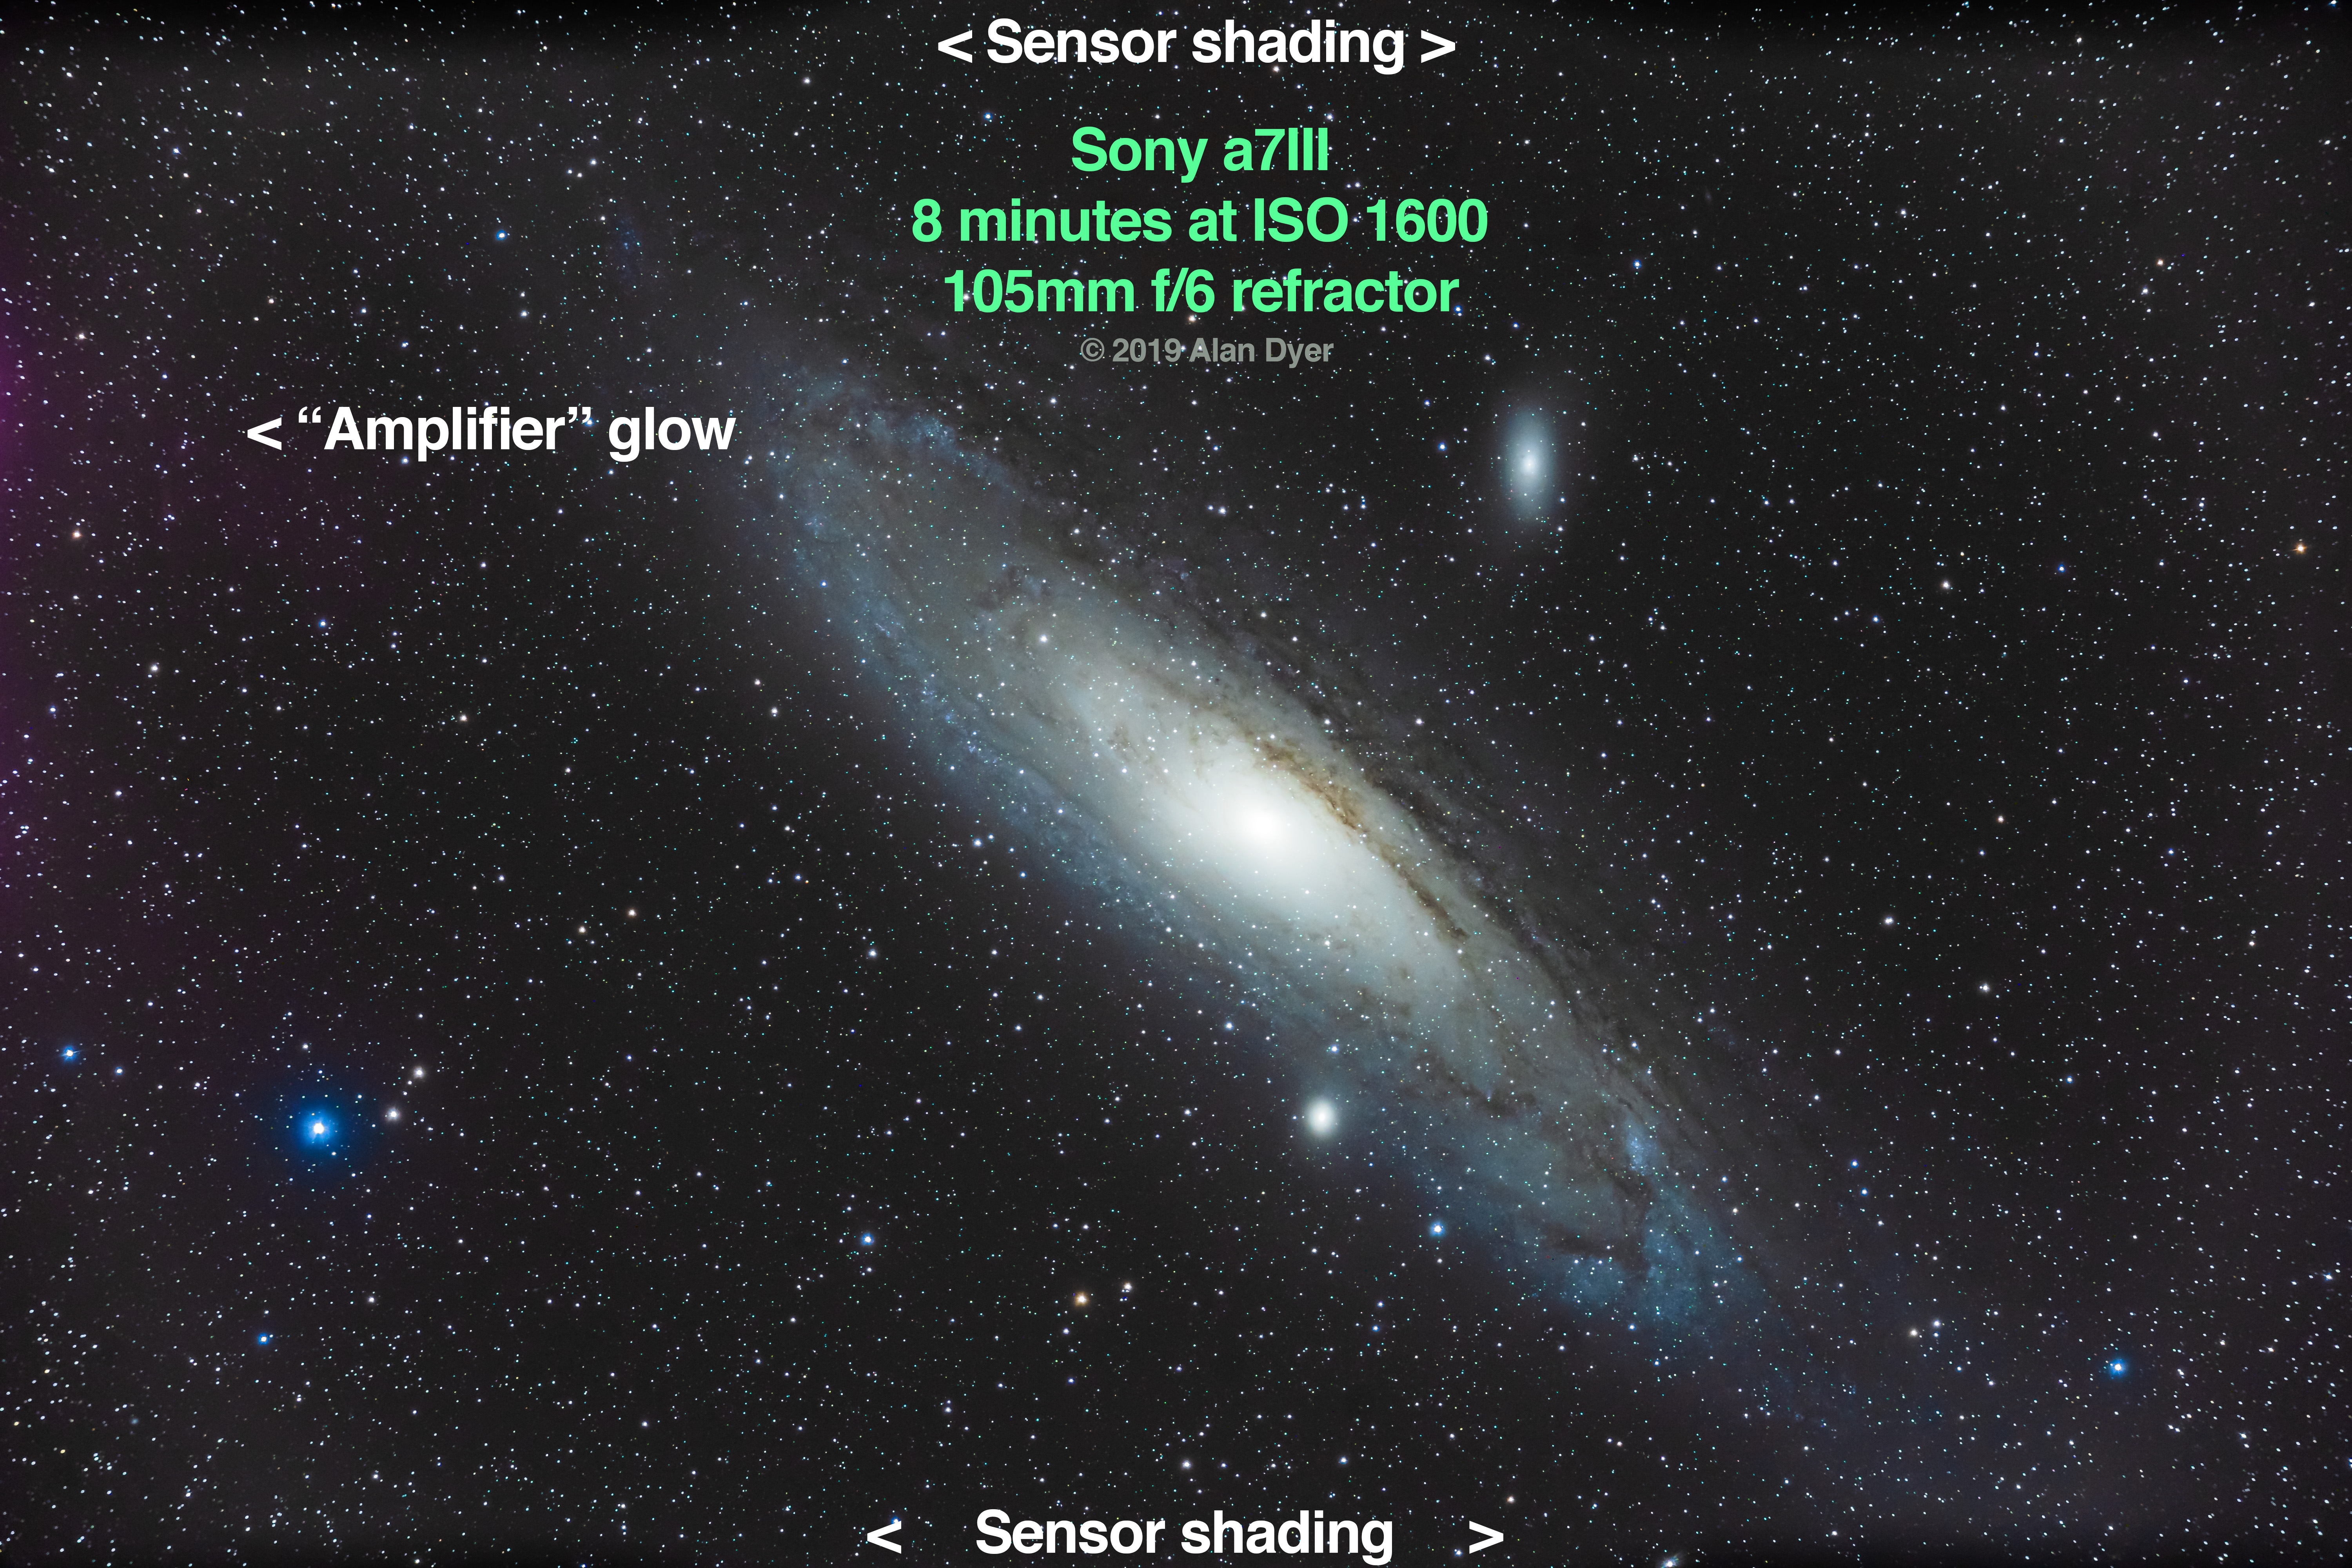
This illustrates the lack of edge shadows but magenta edge glows in a single Raw file boosted for contrast.
That is certainly true of the R6. Images boosted a lot in contrast, as we do with deep-sky photos, show not the slightest trace of vignetting along the top or bottom edges There were no odd clips or metal bits intruding into the light path, unlike in the Sony a7III I tested in 2018.
The full frame of the R6 can be used without need for cropping or ad hoc edge brightening in post. Except …
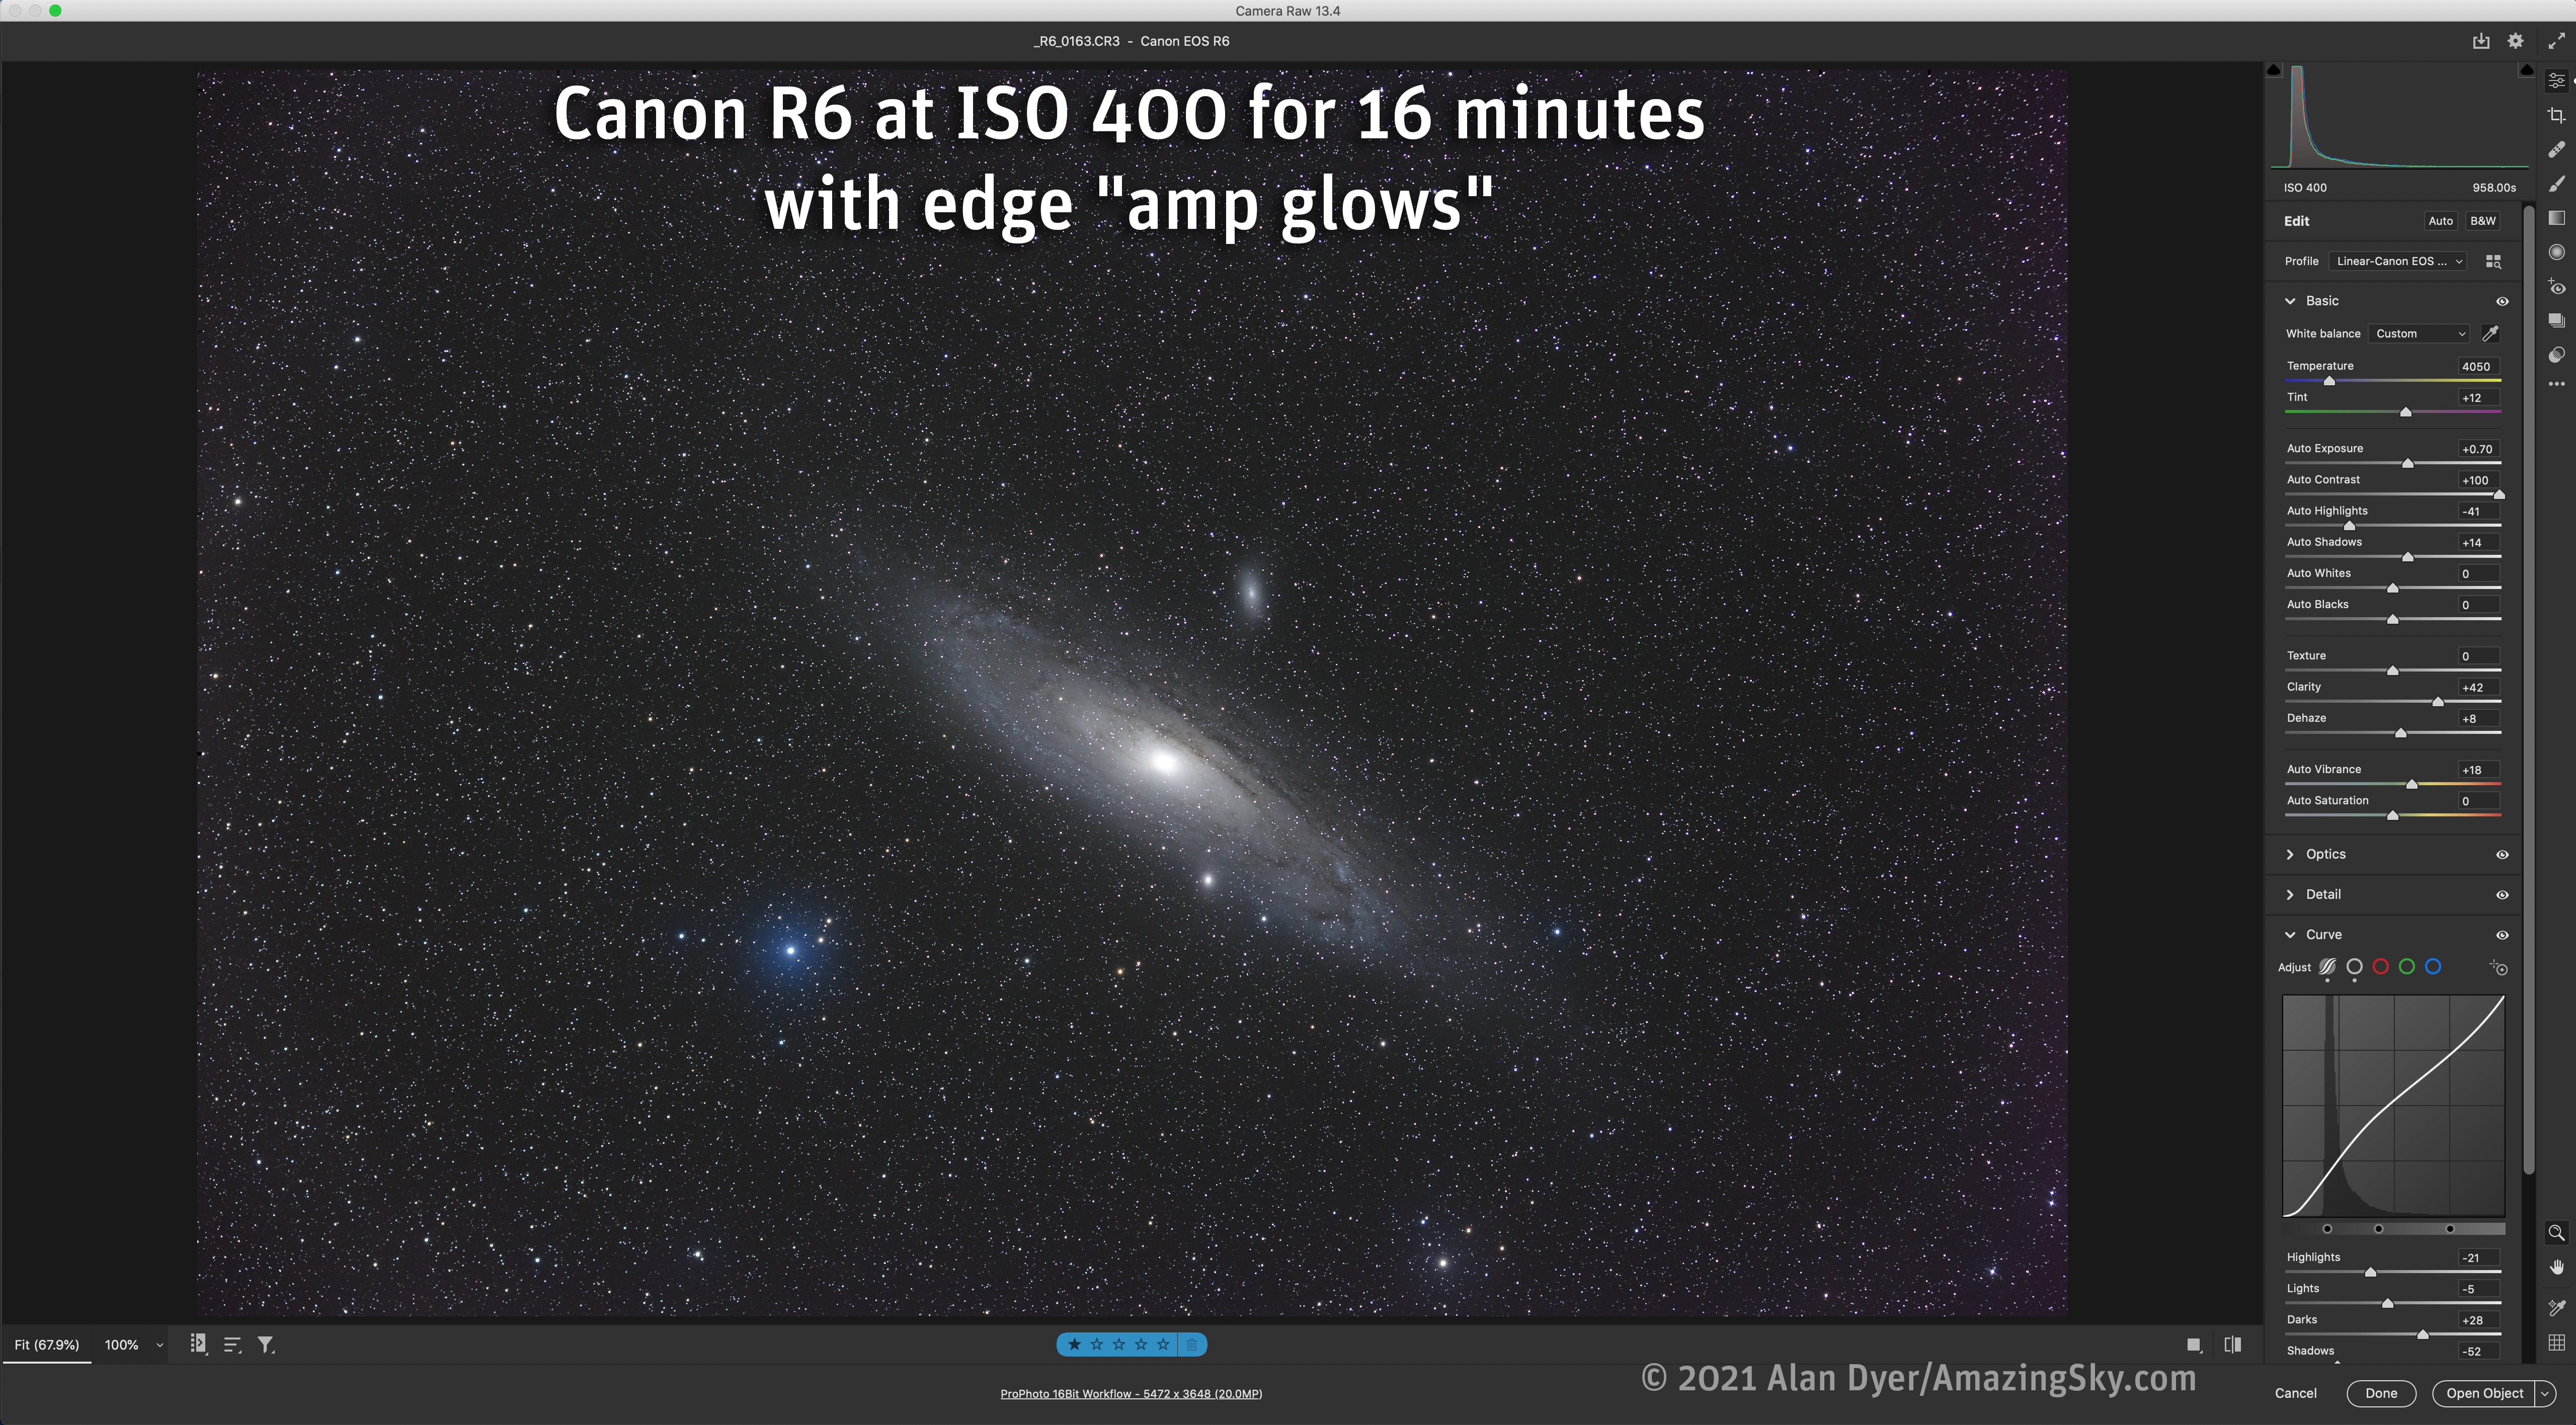
EDGE ARTIFACTS/AMP GLOWS
The R6 did exhibit one serious and annoying flaw in long-exposure high-ISO images – a magenta glow along the edges, especially the right edge and lower right corner.
Comparing a close-up of a nightscape, without and with LENR, to show the edge glow gone with LENR on.
Whether this is the true cause or not, it looks like “amplifier glow,” an effect caused by heat from circuitry illuminating the sensor with infra-red light. It shows itself when images are boosted in contrast and brightness in processing. It’s the sort of flaw revealed only when testing for the demands of astrophotography. It was present in images I took through a telescope, so it is not IR leakage from an auto-focus lens.
I saw this type of amp glow with the Sony a7III, a flaw eventually eliminated in a firmware update that, I presume, turned off unneeded electronics in long exposures.
Amp glow is something I have not seen in Canon cameras for many years. In a premium camera like the R6 it should not be there. Period. Canon needs to fix this with a firmware update.
UPDATE AUGUST 1, 2022: As of v1.6 of the R6 firmware, released in July 2022, the amp glow issue remains and has not been fixed. It may never be at this point.
It is the R6’s only serious image flaw, but it’s surprising to see it at all. Turning on LENR eliminates the amp glow, as it should, but using LENR is not always practical, such as in time-lapses and star trails.
For deep-sky photography high-ISO images are pushed to extremes of contrast, revealing any non-uniform illumination or colour. The usual practice of taking and applying calibration dark frames should also eliminate the amp glow. But I’d rather it not be there in the first place!
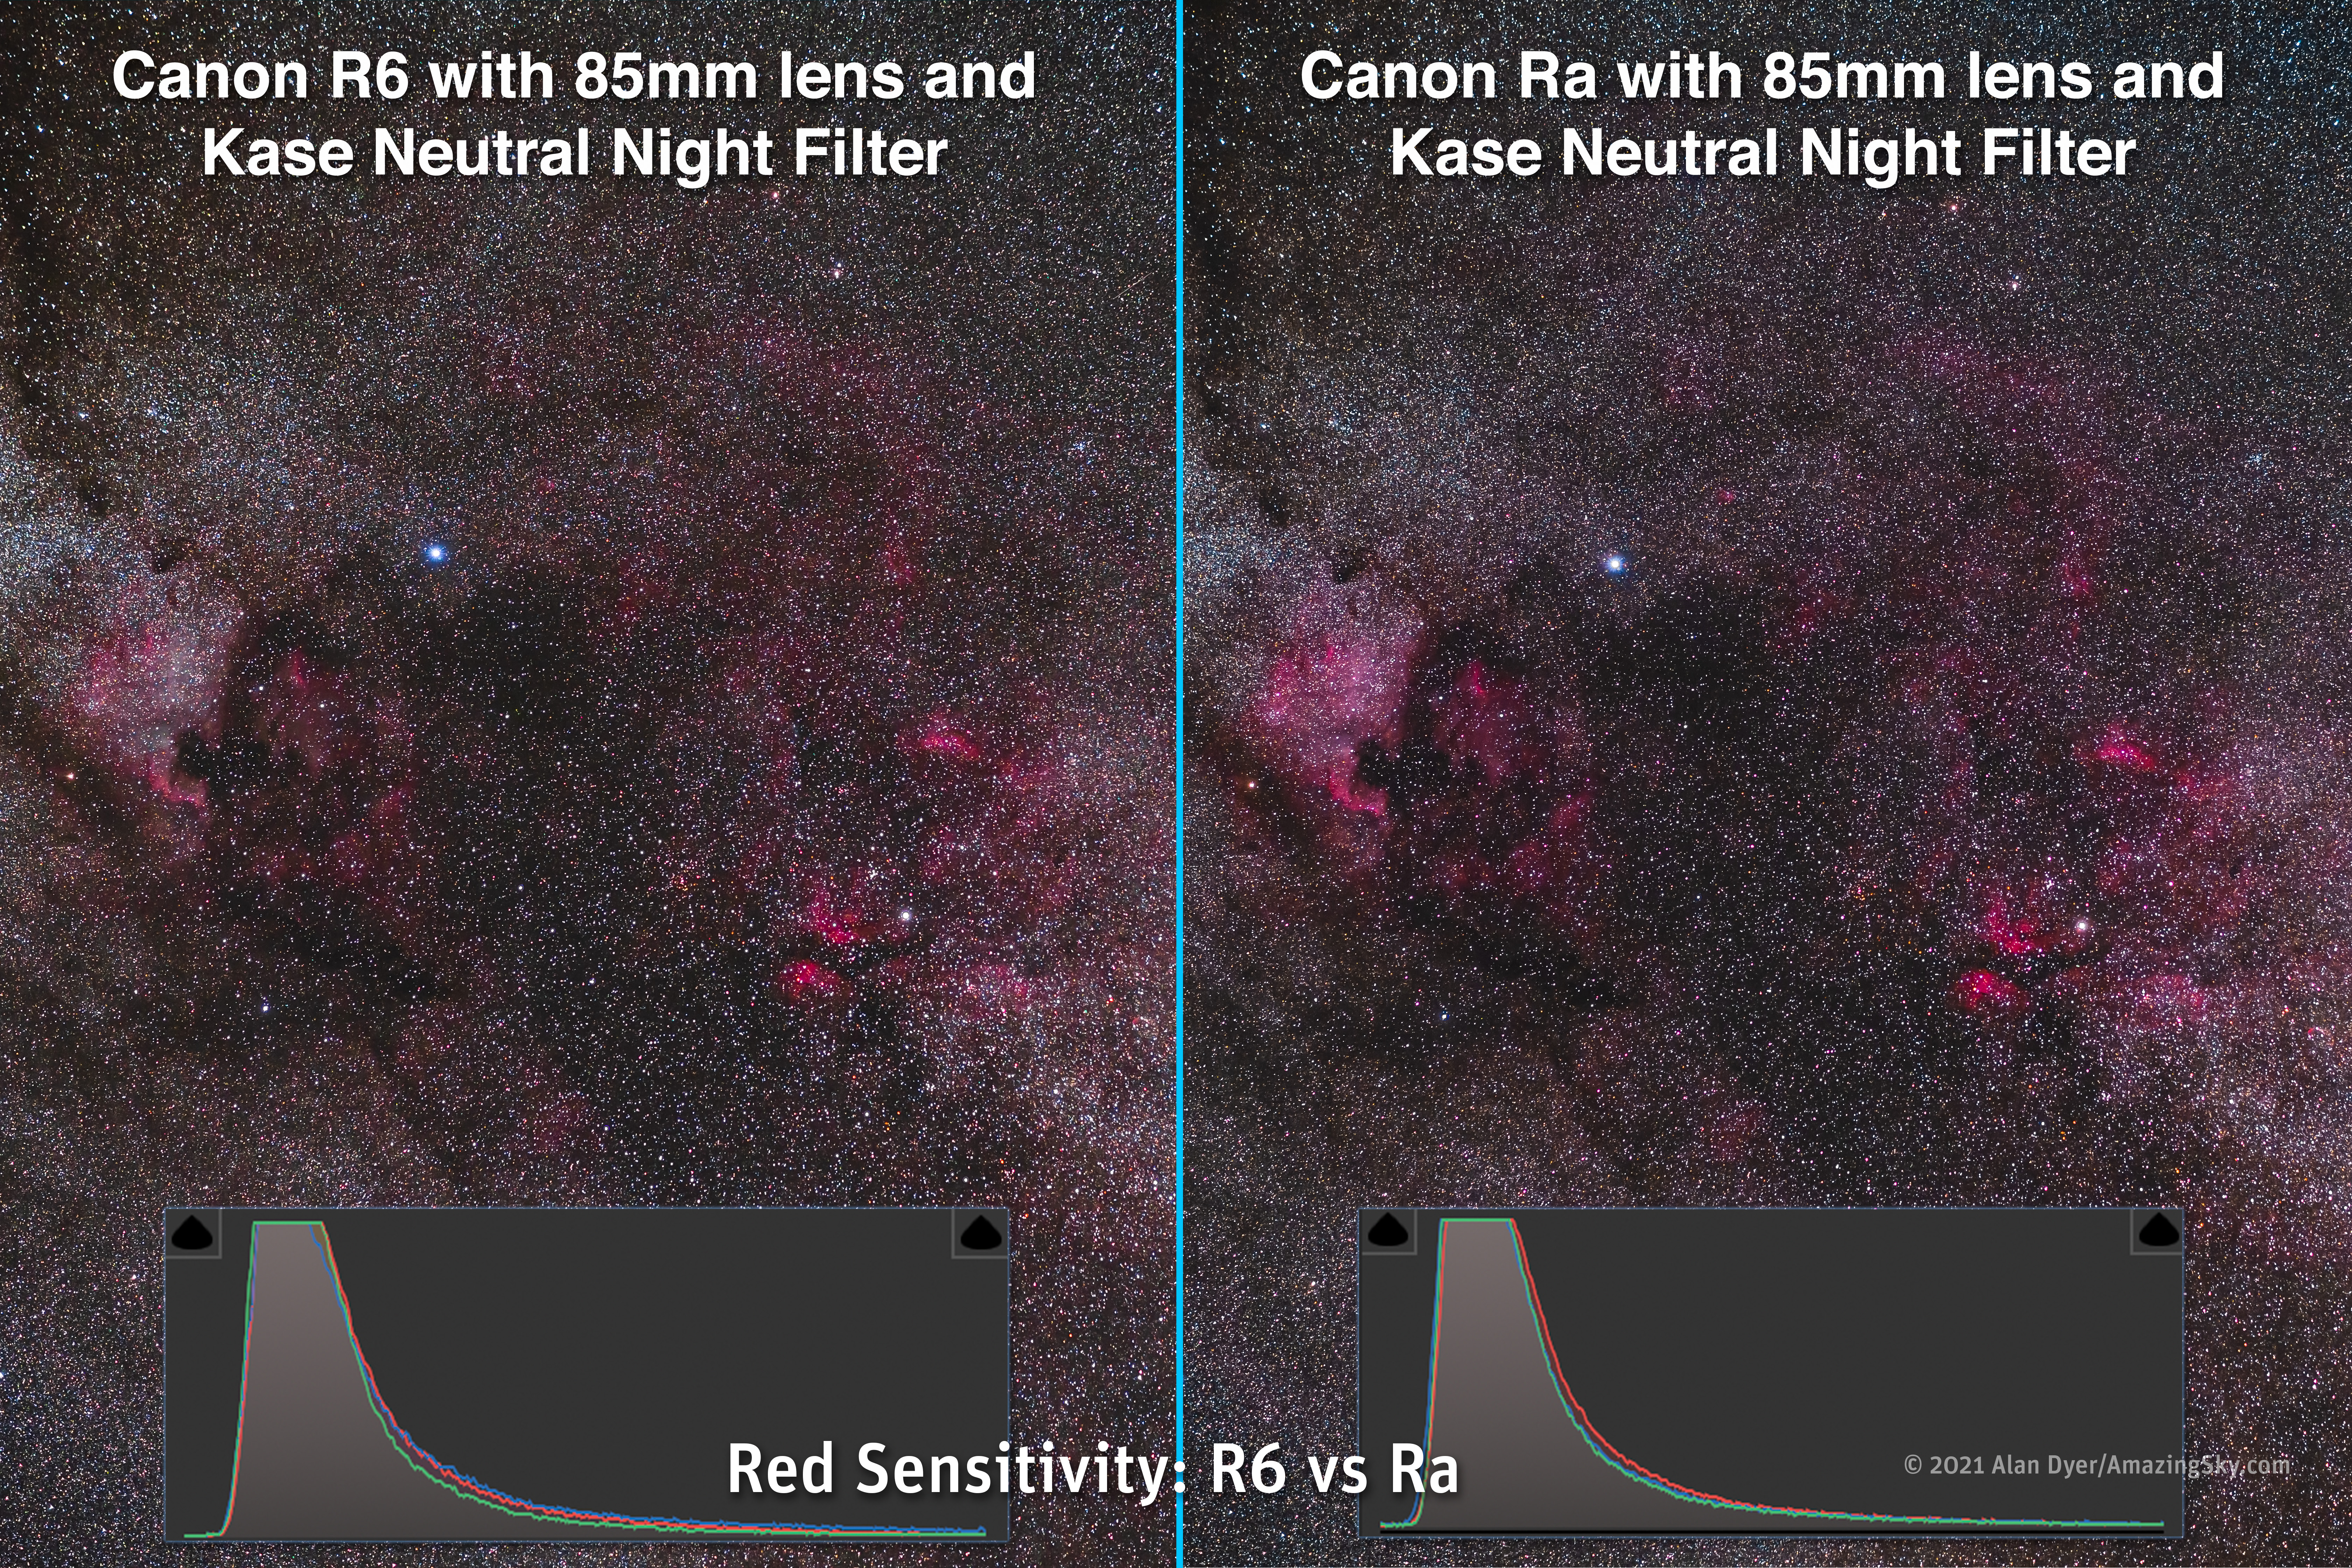
RED SENSITIVITY
The R6 I bought was a stock “off-the-shelf” model. It is Canon’s now-discontinued EOS Ra model that is (or was) “filter-modified” to record a greater level of the deep red wavelength from red nebulas in the Milky Way. Compared to the Ra, the R6 did well, but could not record the depth of nebulosity the Ra can, to be expected for a stock camera.
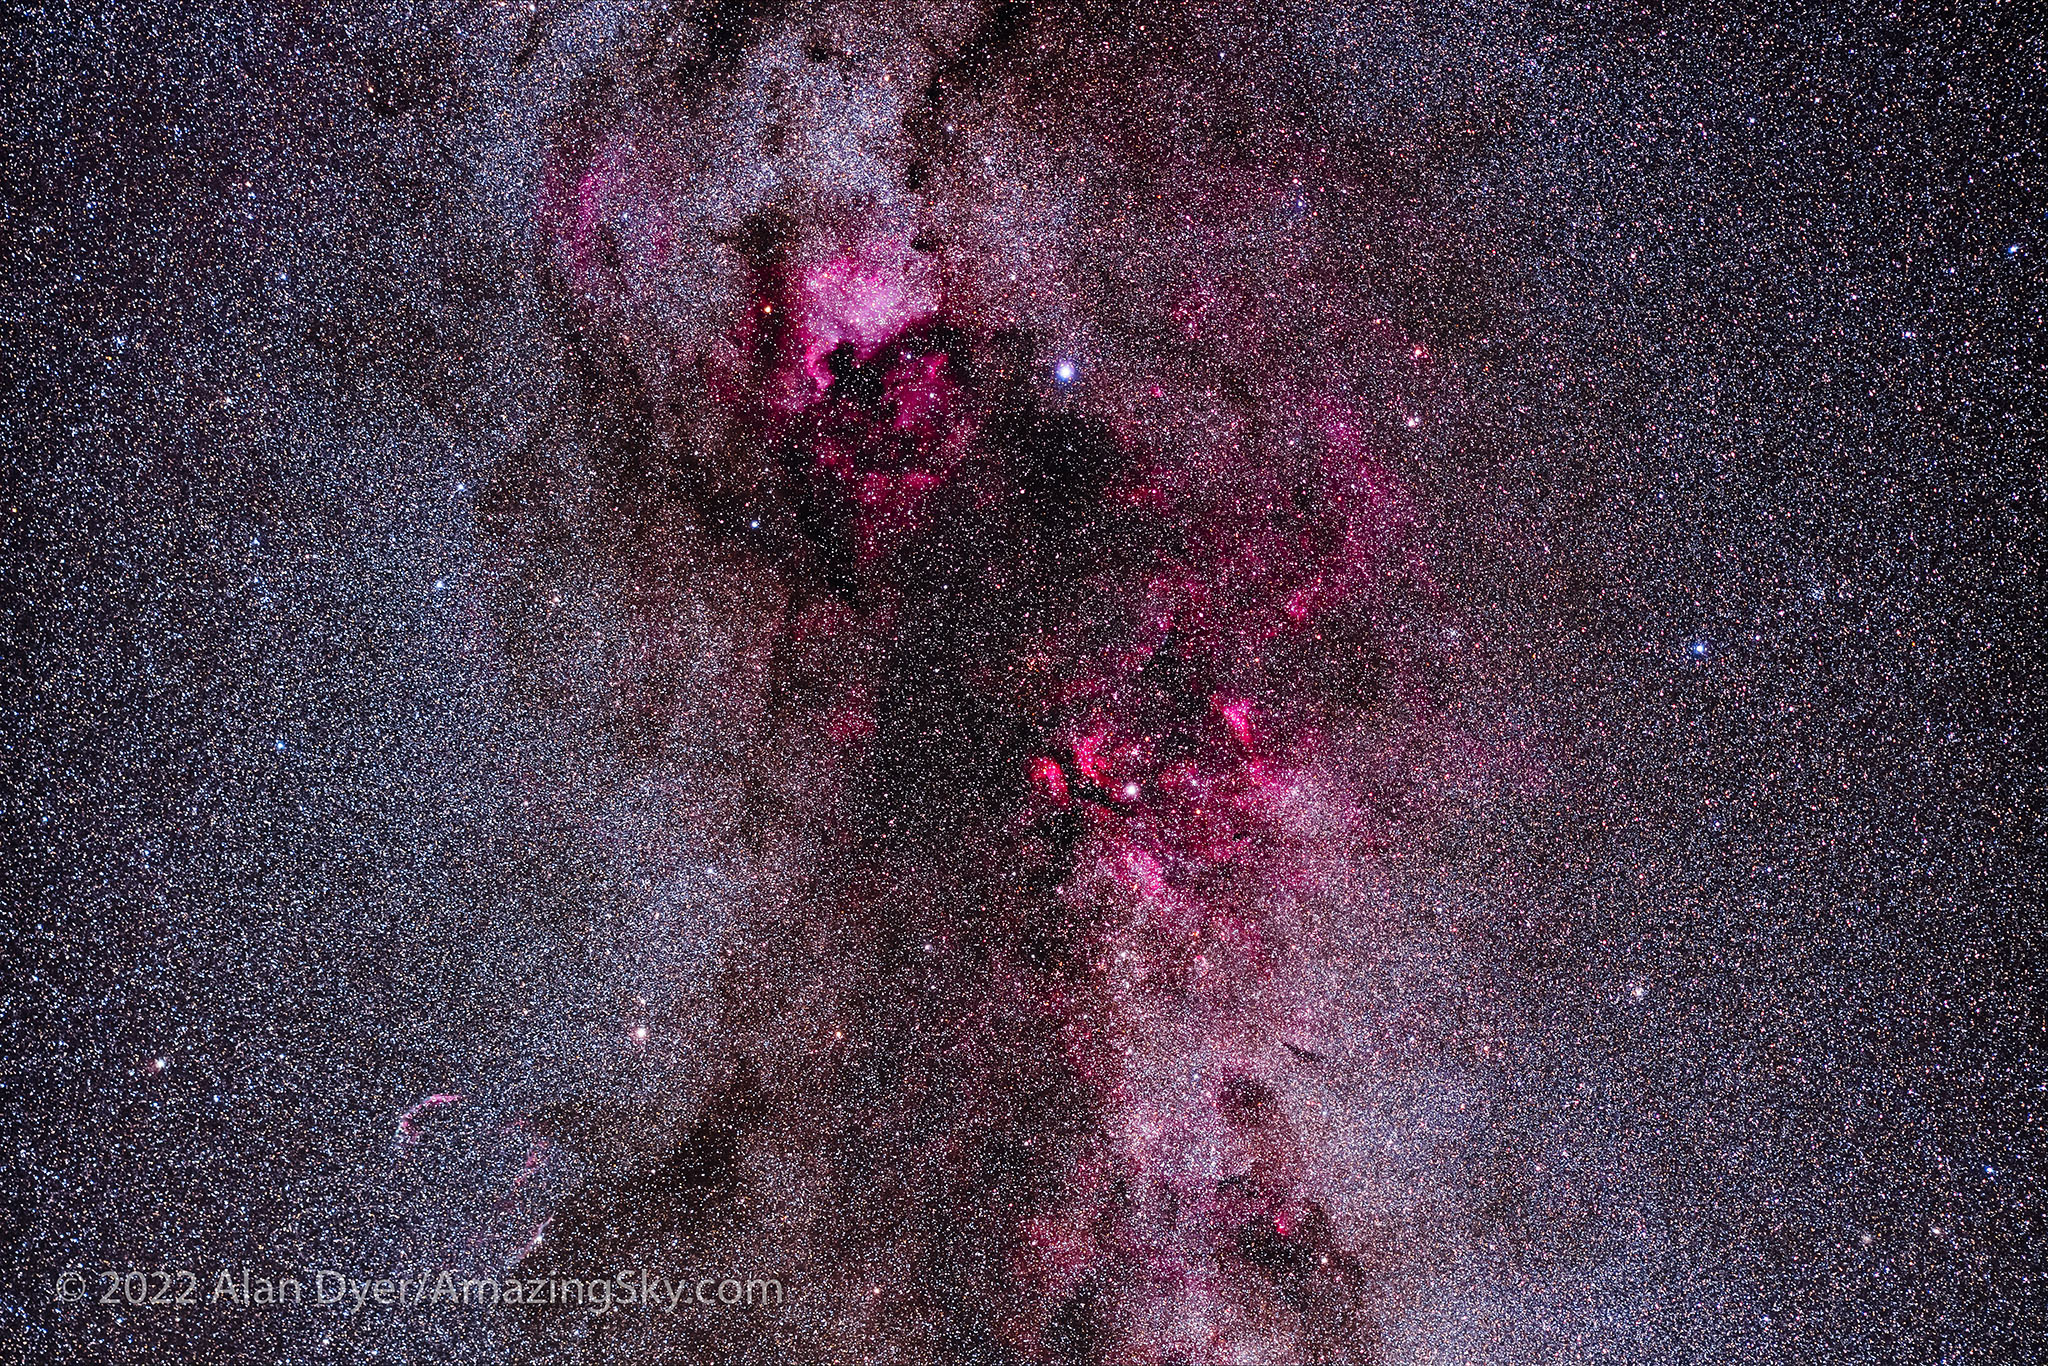
Comparing the stock R6 with the filter-modified Ra on Cygnus nebulosity.
In wide-field images of the Milky Way, the R6 picked up a respectable level of red nebulosity, especially when shooting through a broadband light pollution reduction filter, and with careful processing.
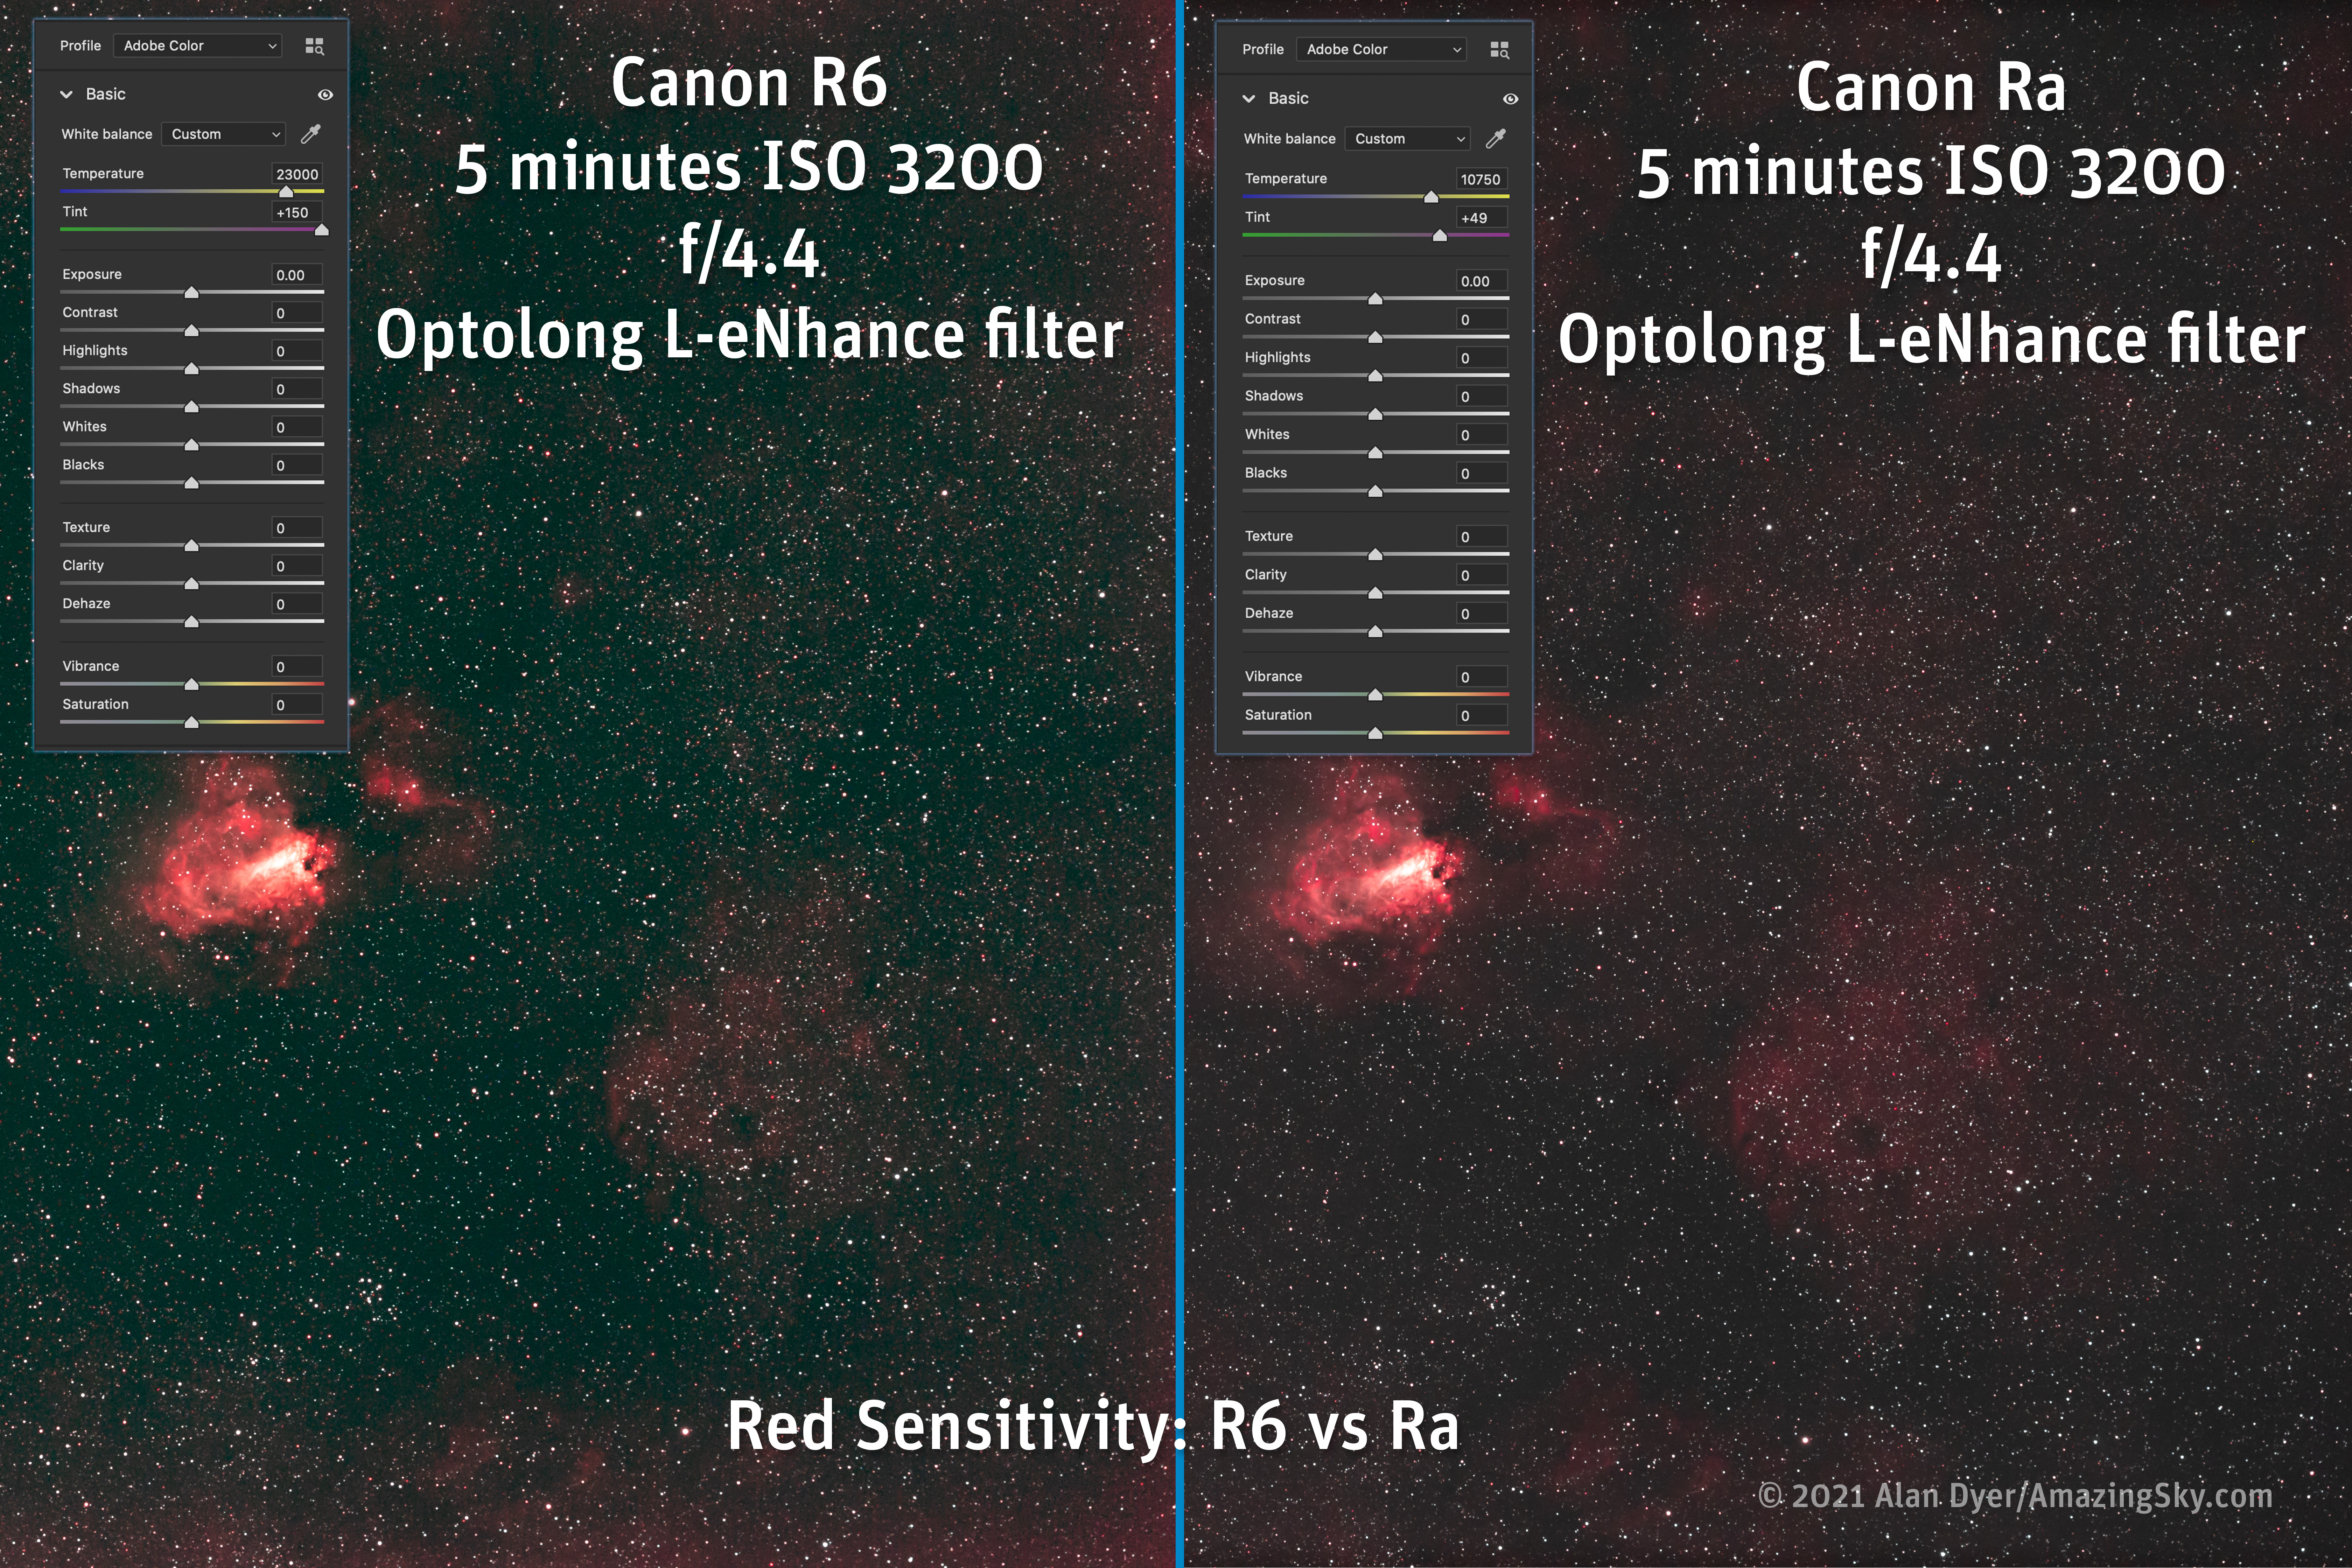
Comparing the stock R6 with the filter-modified Ra on the Swan Nebula with a telescope with minimal processing to the Raw images.Comparing the stock R6 with the filter-modified Ra on the Swan Nebula with a telescope with a dual narrowband filter and with colour correction applied to the single Raw images.
However, when going after faint nebulas through a telescope, even the use of a narrowband filter did not help bring out the target. Indeed, attempting to correct the extreme colour shift introduced by such a filter resulted in a muddy mess and accentuated edge glows with the R6, but worked well with the Ra.
While the R6 could be modified by a third party, the edge amp glow might spoil images, as a filter modification can make a sensor even more sensitive to IR light, potentially flooding the image with unwanted glows.
TIP: Buying a used Canon Ra (if you can find one) might be one choice for a filter-modified mirrorless camera, one much cheaper than a full frame cooled CMOS camera such as a ZWO ASI2400MC. Or Spencer’s Camera sells modified versions of all the R series cameras with a choice of sensor filters. But I have not used any of their modded cameras.
RESOLUTION
A concern of prospective buyers is whether the R6’s relatively low 20-megapixel sensor will be sharp enough for their purposes. R6 images are 5472 by 3648 pixels, much less than the 8000+ pixel-wide images from high-resolution cameras like the Canon R5, Nikon Z7II or Sony a1.
Unless you sell your astrophotos as very large prints, I’d say don’t worry. In comparisons with the 30-megapixel Ra I found it difficult to see a difference in resolution between the two cameras. Stars were nearly as well resolved in the R6, and only under the highest pixel-peeping magnification did stars look a bit more pixelated in the R6 than in the Ra. Faint stars were equally well recorded.
Comparing resolution of the R6 vs. Ra with a blow-up of wide-field 85mm imagesComparing resolution of the R6 vs. Ra on blow-ups of the Andromeda Galaxy with a 76mm apo refractor. The R6 is more pixellated but it takes pixel peeping to see it!
The difference between 20 and 30 megapixels is not as great as you might think for arc-second-per-pixel plate scale. I think it would take going to the R5 with its 45 megapixel sensor to provide enough of a difference in resolution over the R6 to be obvious in nightscape scenes, or when shooting small, detailed deep-sky subjects such as globular clusters.
If landscape or wildlife photography by day is your passion, with astrophotography a secondary purpose, then the more costly but highly regarded R5 might be the better choice.
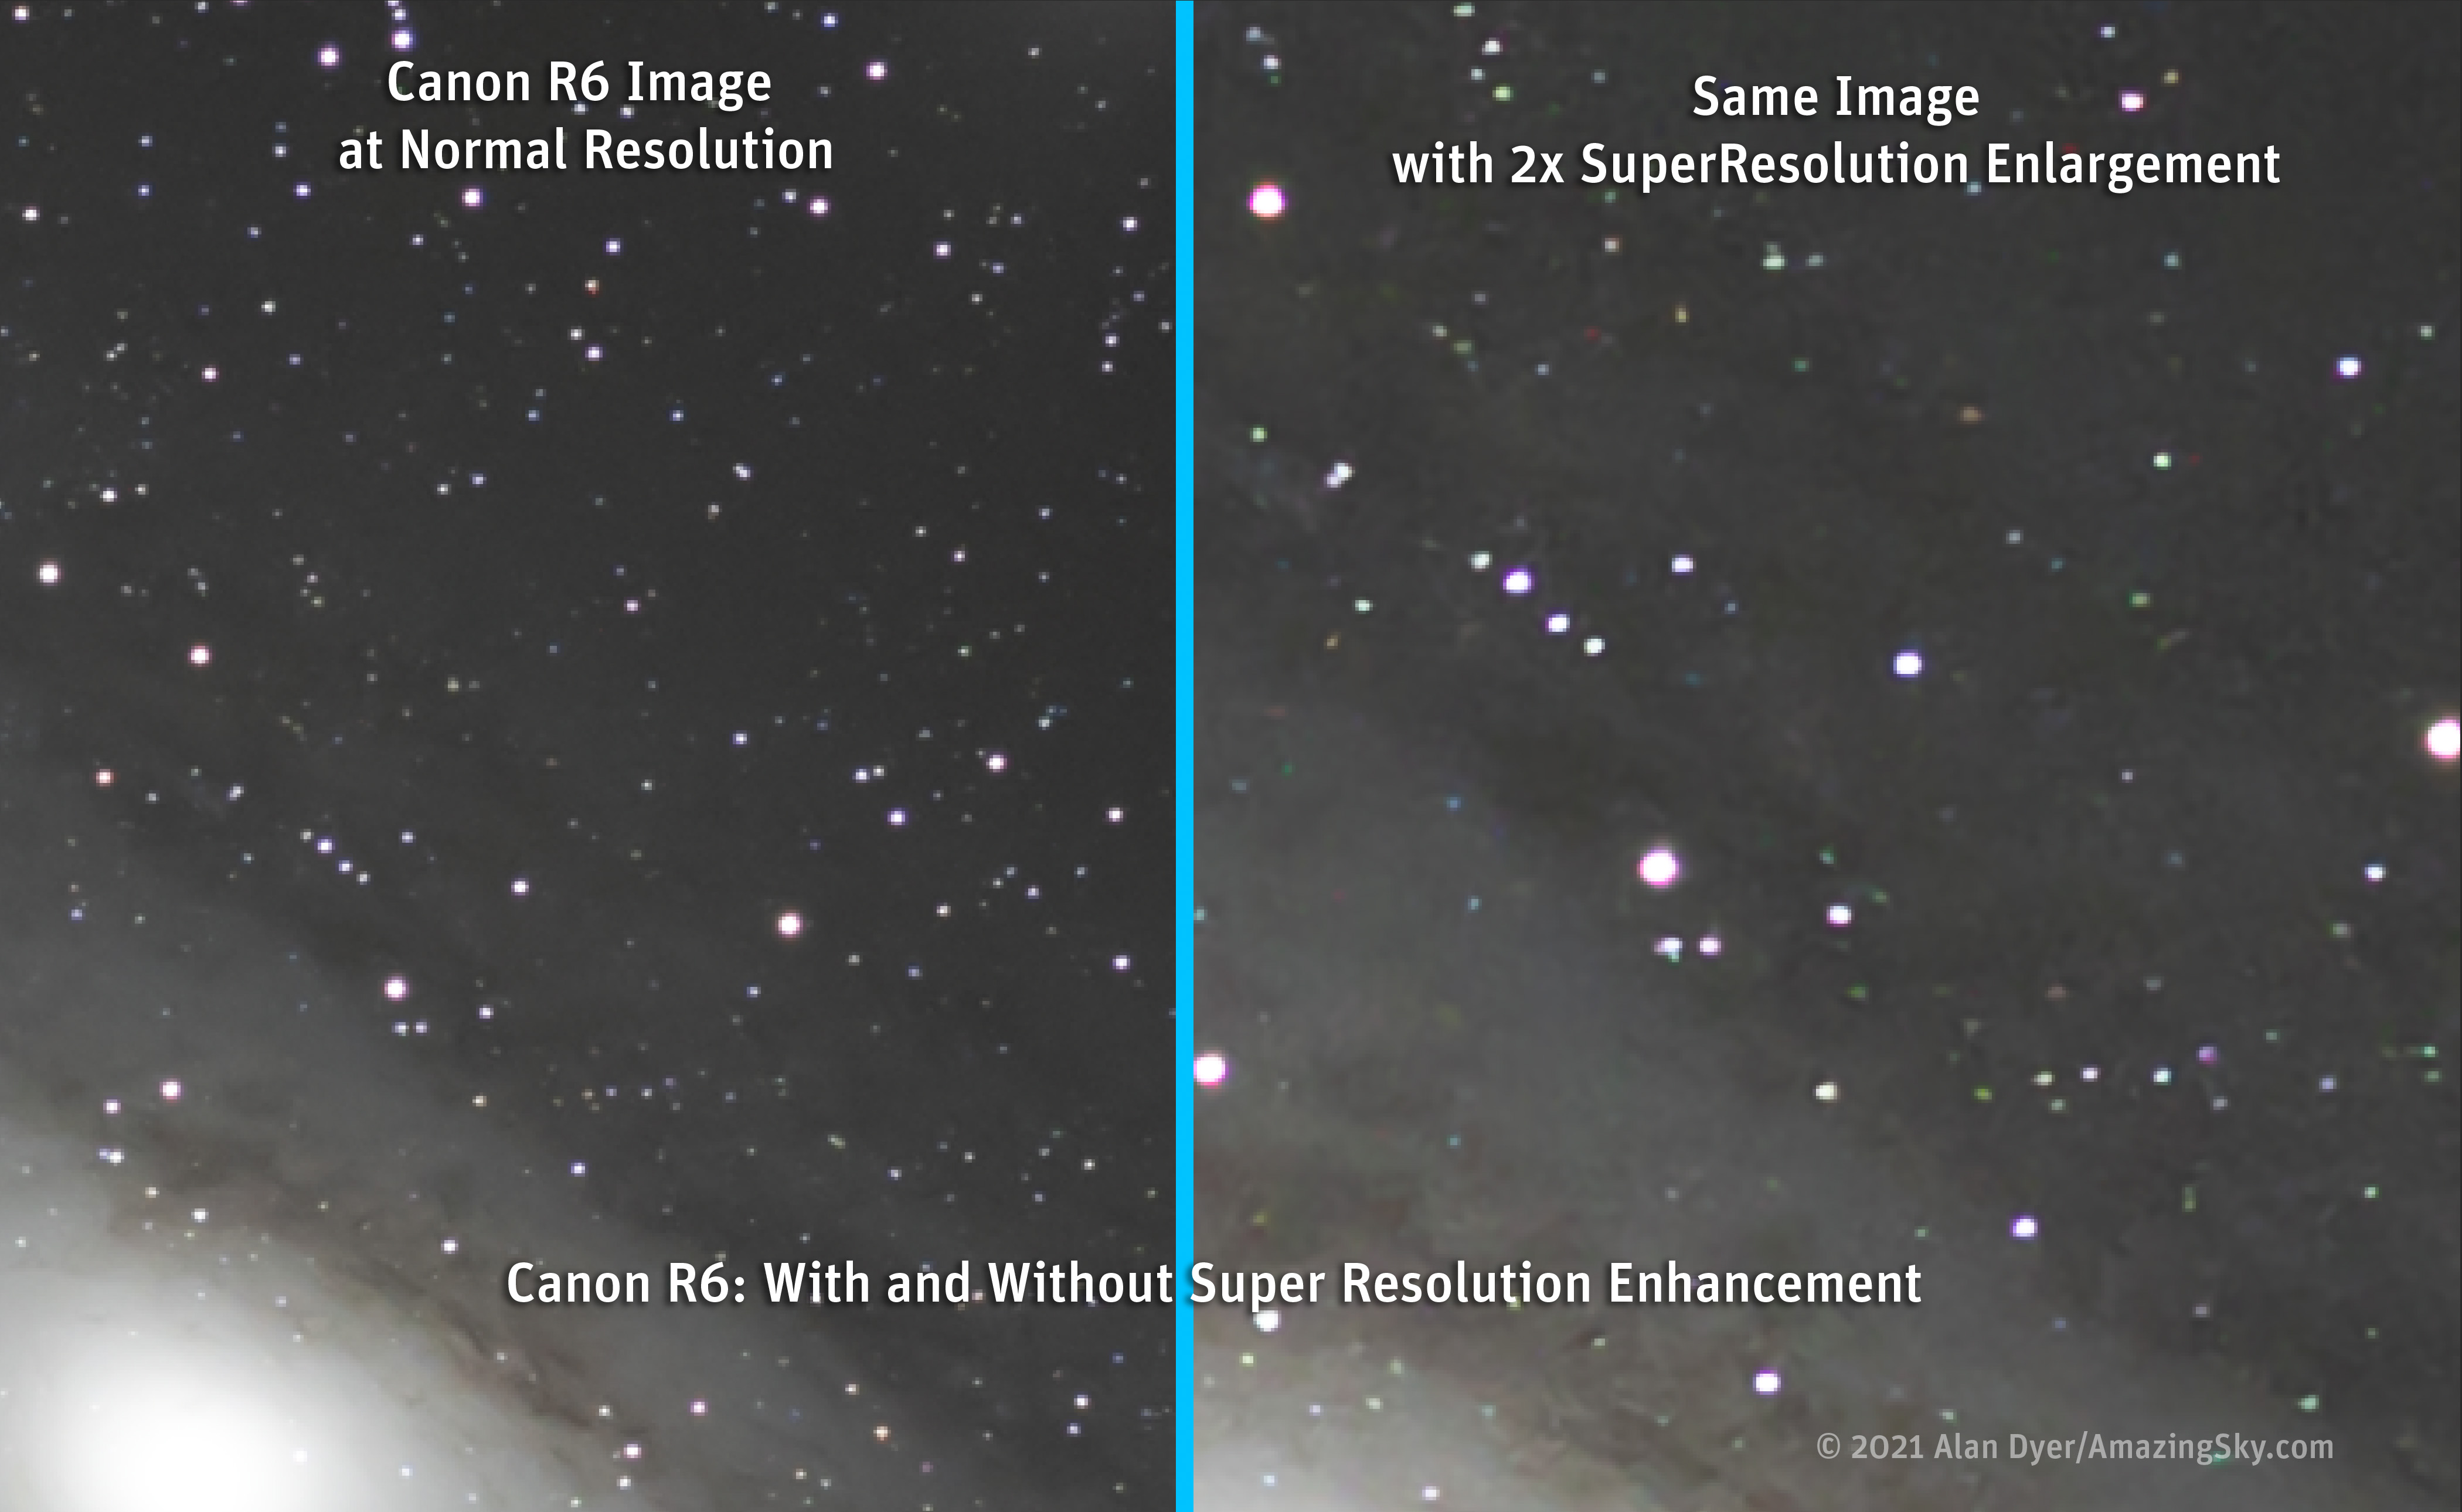
Super Resolution menu in Adobe Lightroom.
TIP: Adobe now offers (in Lightroom and in Camera Raw) a Super Resolution option, that users might think (judging by the rave reviews on-line) would be the answer to adding resolution to astro images from “low-res” cameras like the R6.
Comparing a normal R6 image with the same image upscaled with Super Resolution.
Sorry! In my tests on astrophotos I’ve found Super Resolution results unsatisfactory. Yes, stars were less pixelated, but they became oddly coloured in the AI-driven up-scaling. Green stars appeared! The sky background also became mottled and uneven.
I would not count on such “smart upscaling” options to add more pixels to astro-images from the R6. Then again, I don’t think there’s a need to.
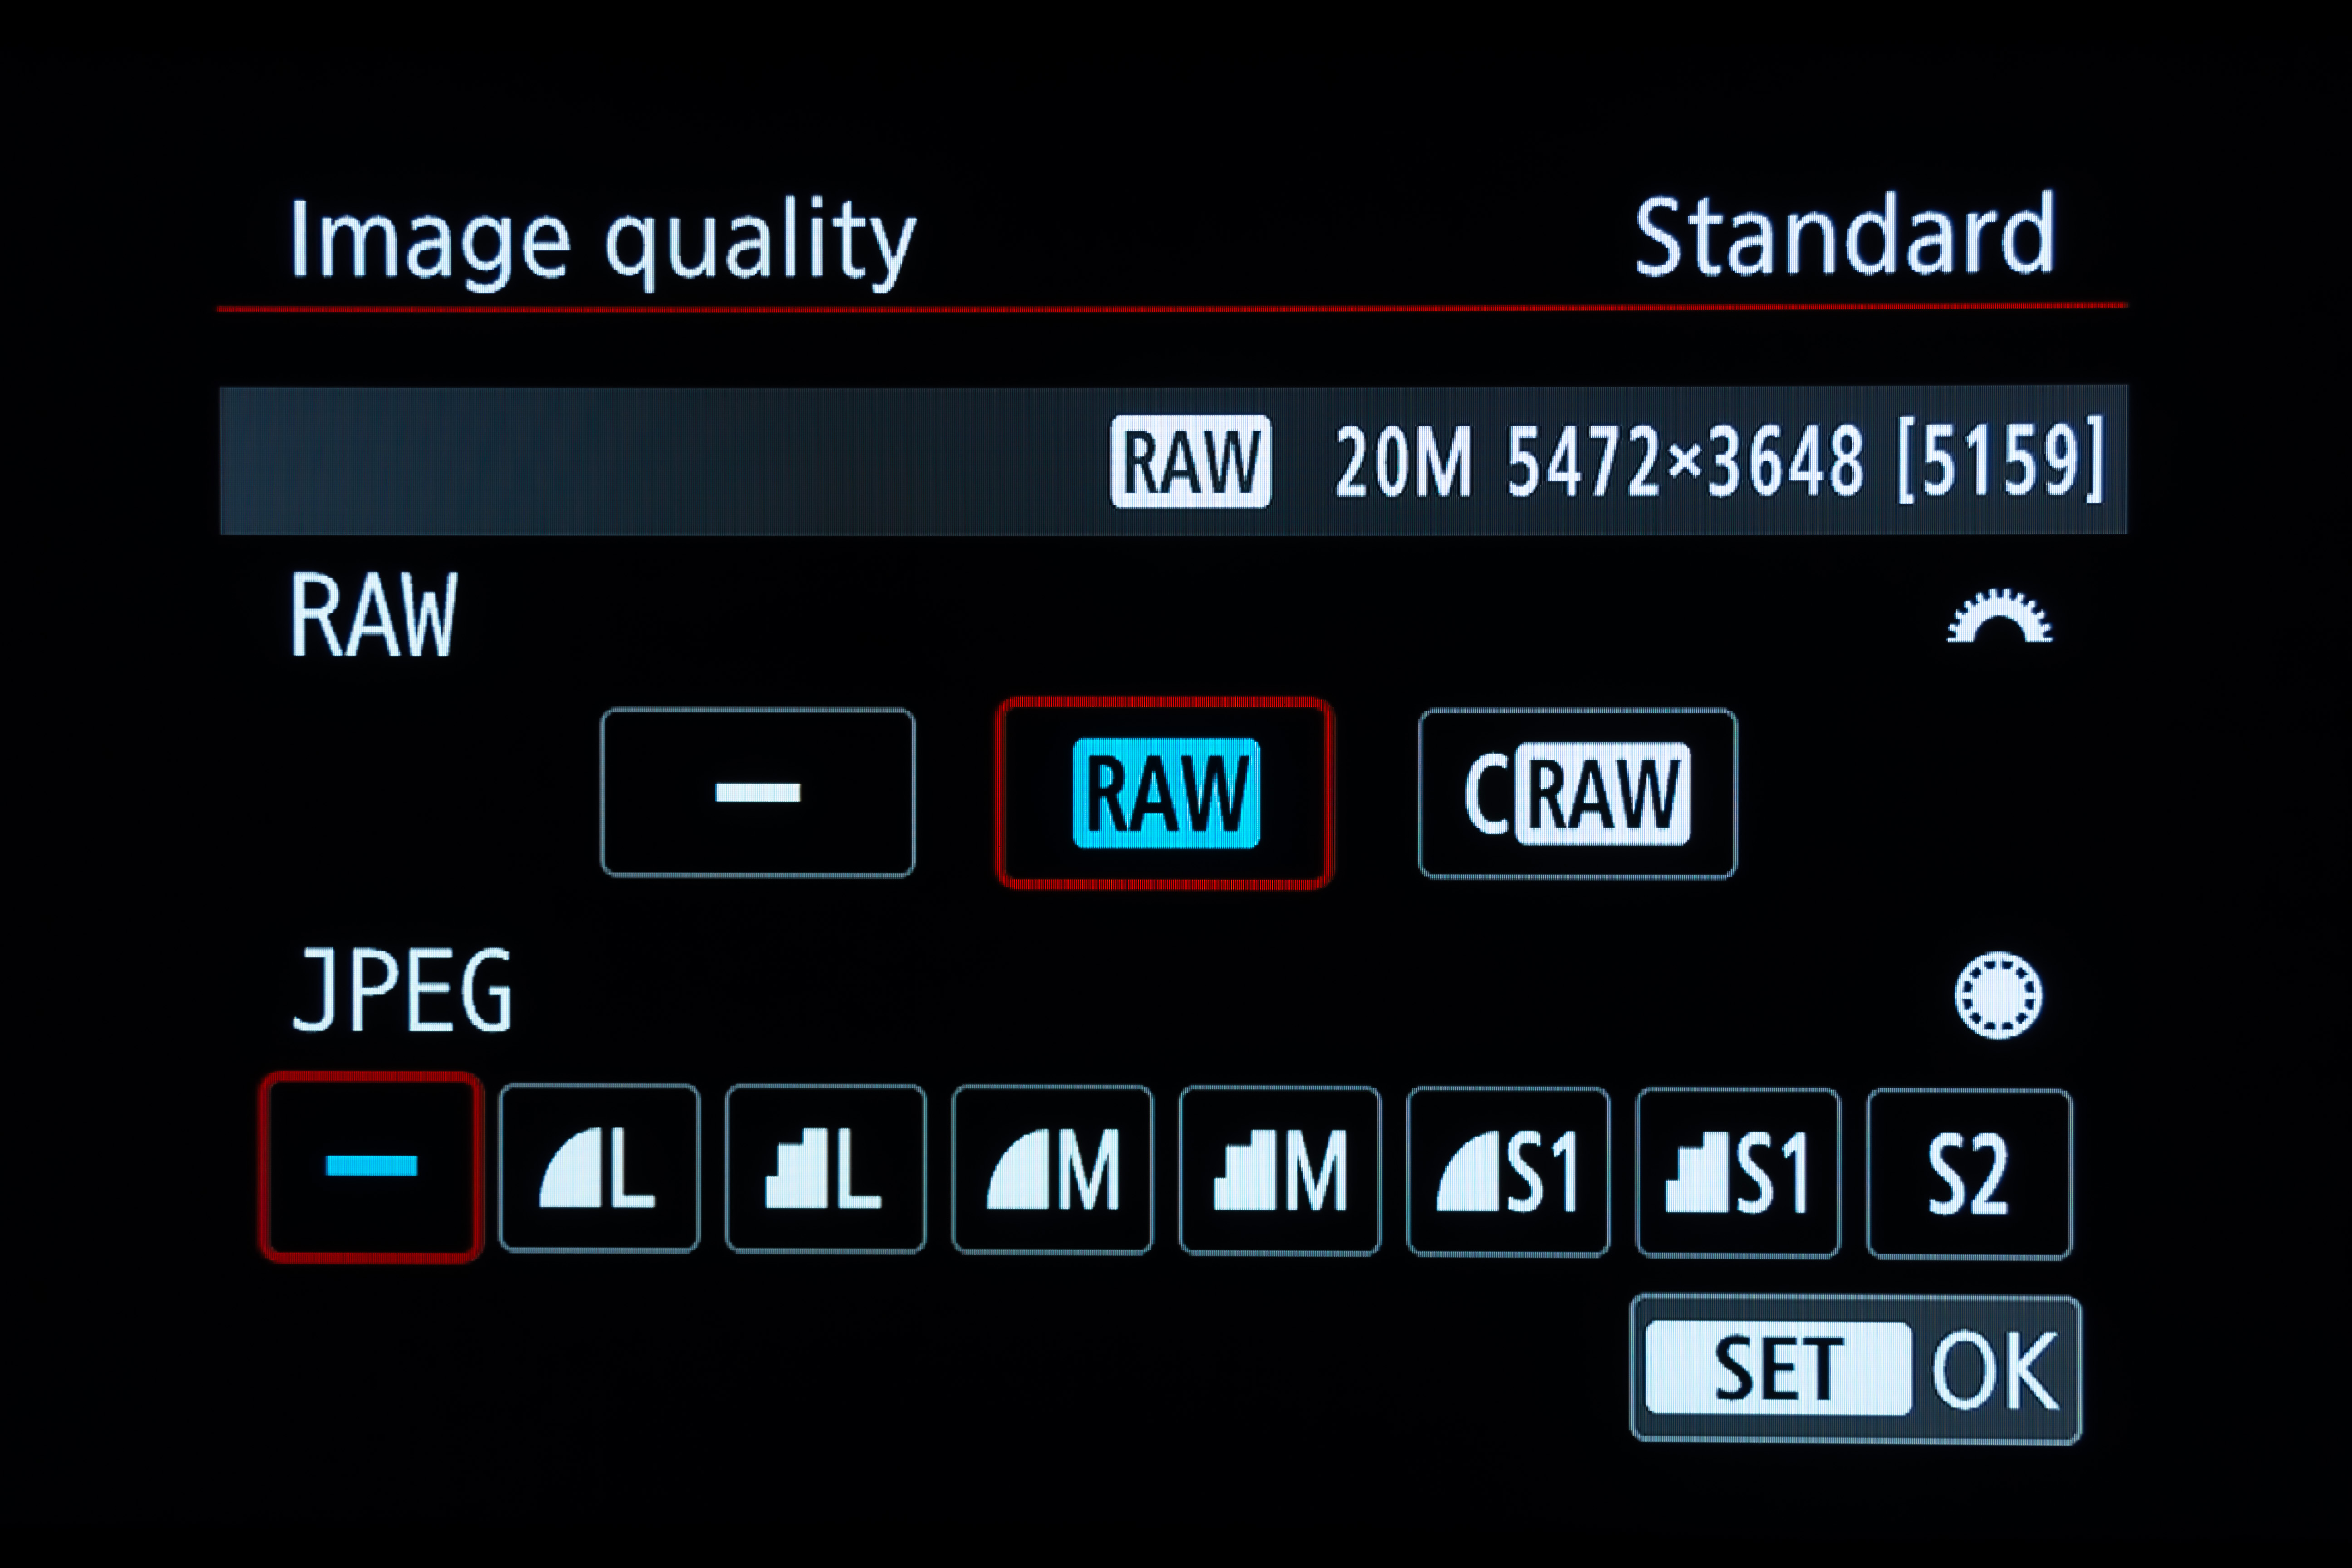
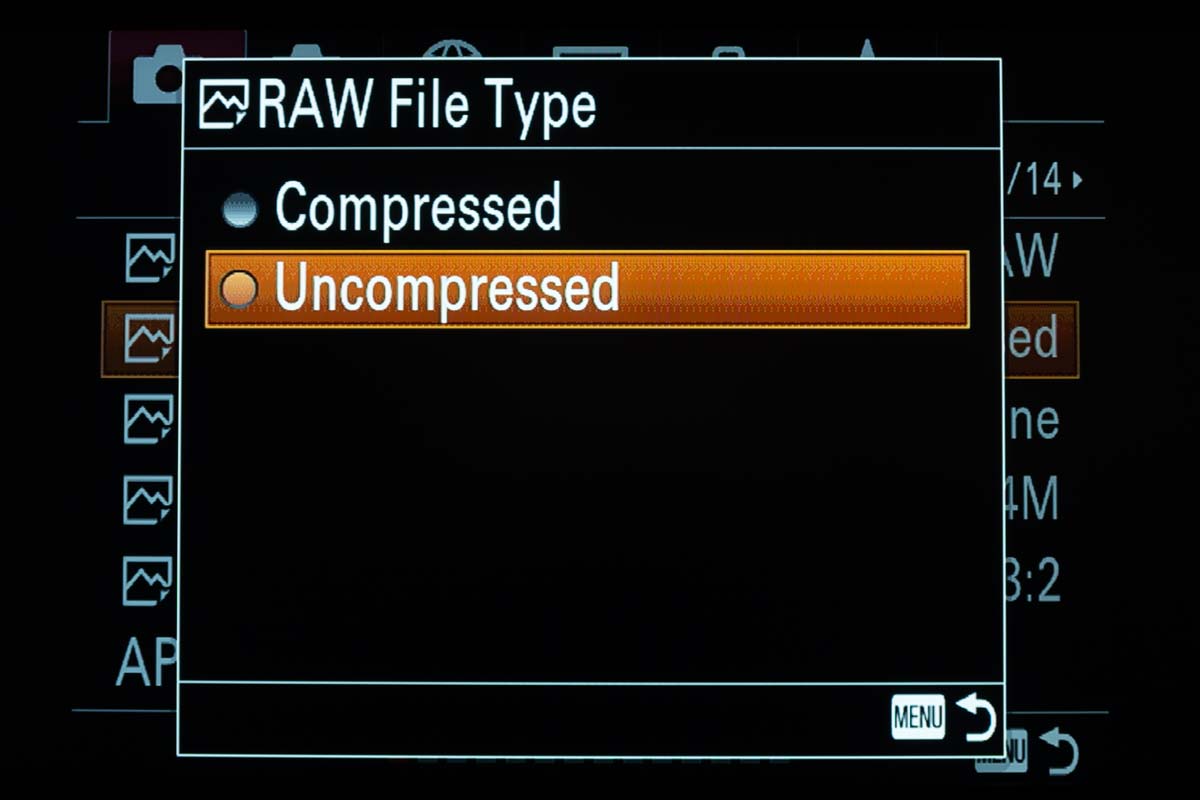
RAW vs. cRAW
Canon now offers the option of shooting either RAW or cRAW files, the latter being the same megapixel count but compressed in file size by almost a factor of two. This allows shooting twice as many images before card space runs out, perhaps useful for shooting lots of time-lapses on extended trips away from a computer.
The R6 Image Quality menu with the cRAW Option.Comparing an R6 cRAW with a RAW image.
However, the compression is not lossless. In high-ISO test images purposely underexposed, then brightened in post, I could see a slight degradation in cRAW images – the noise background looked less uniform and exhibited a blocky look, like JPG artifacts.
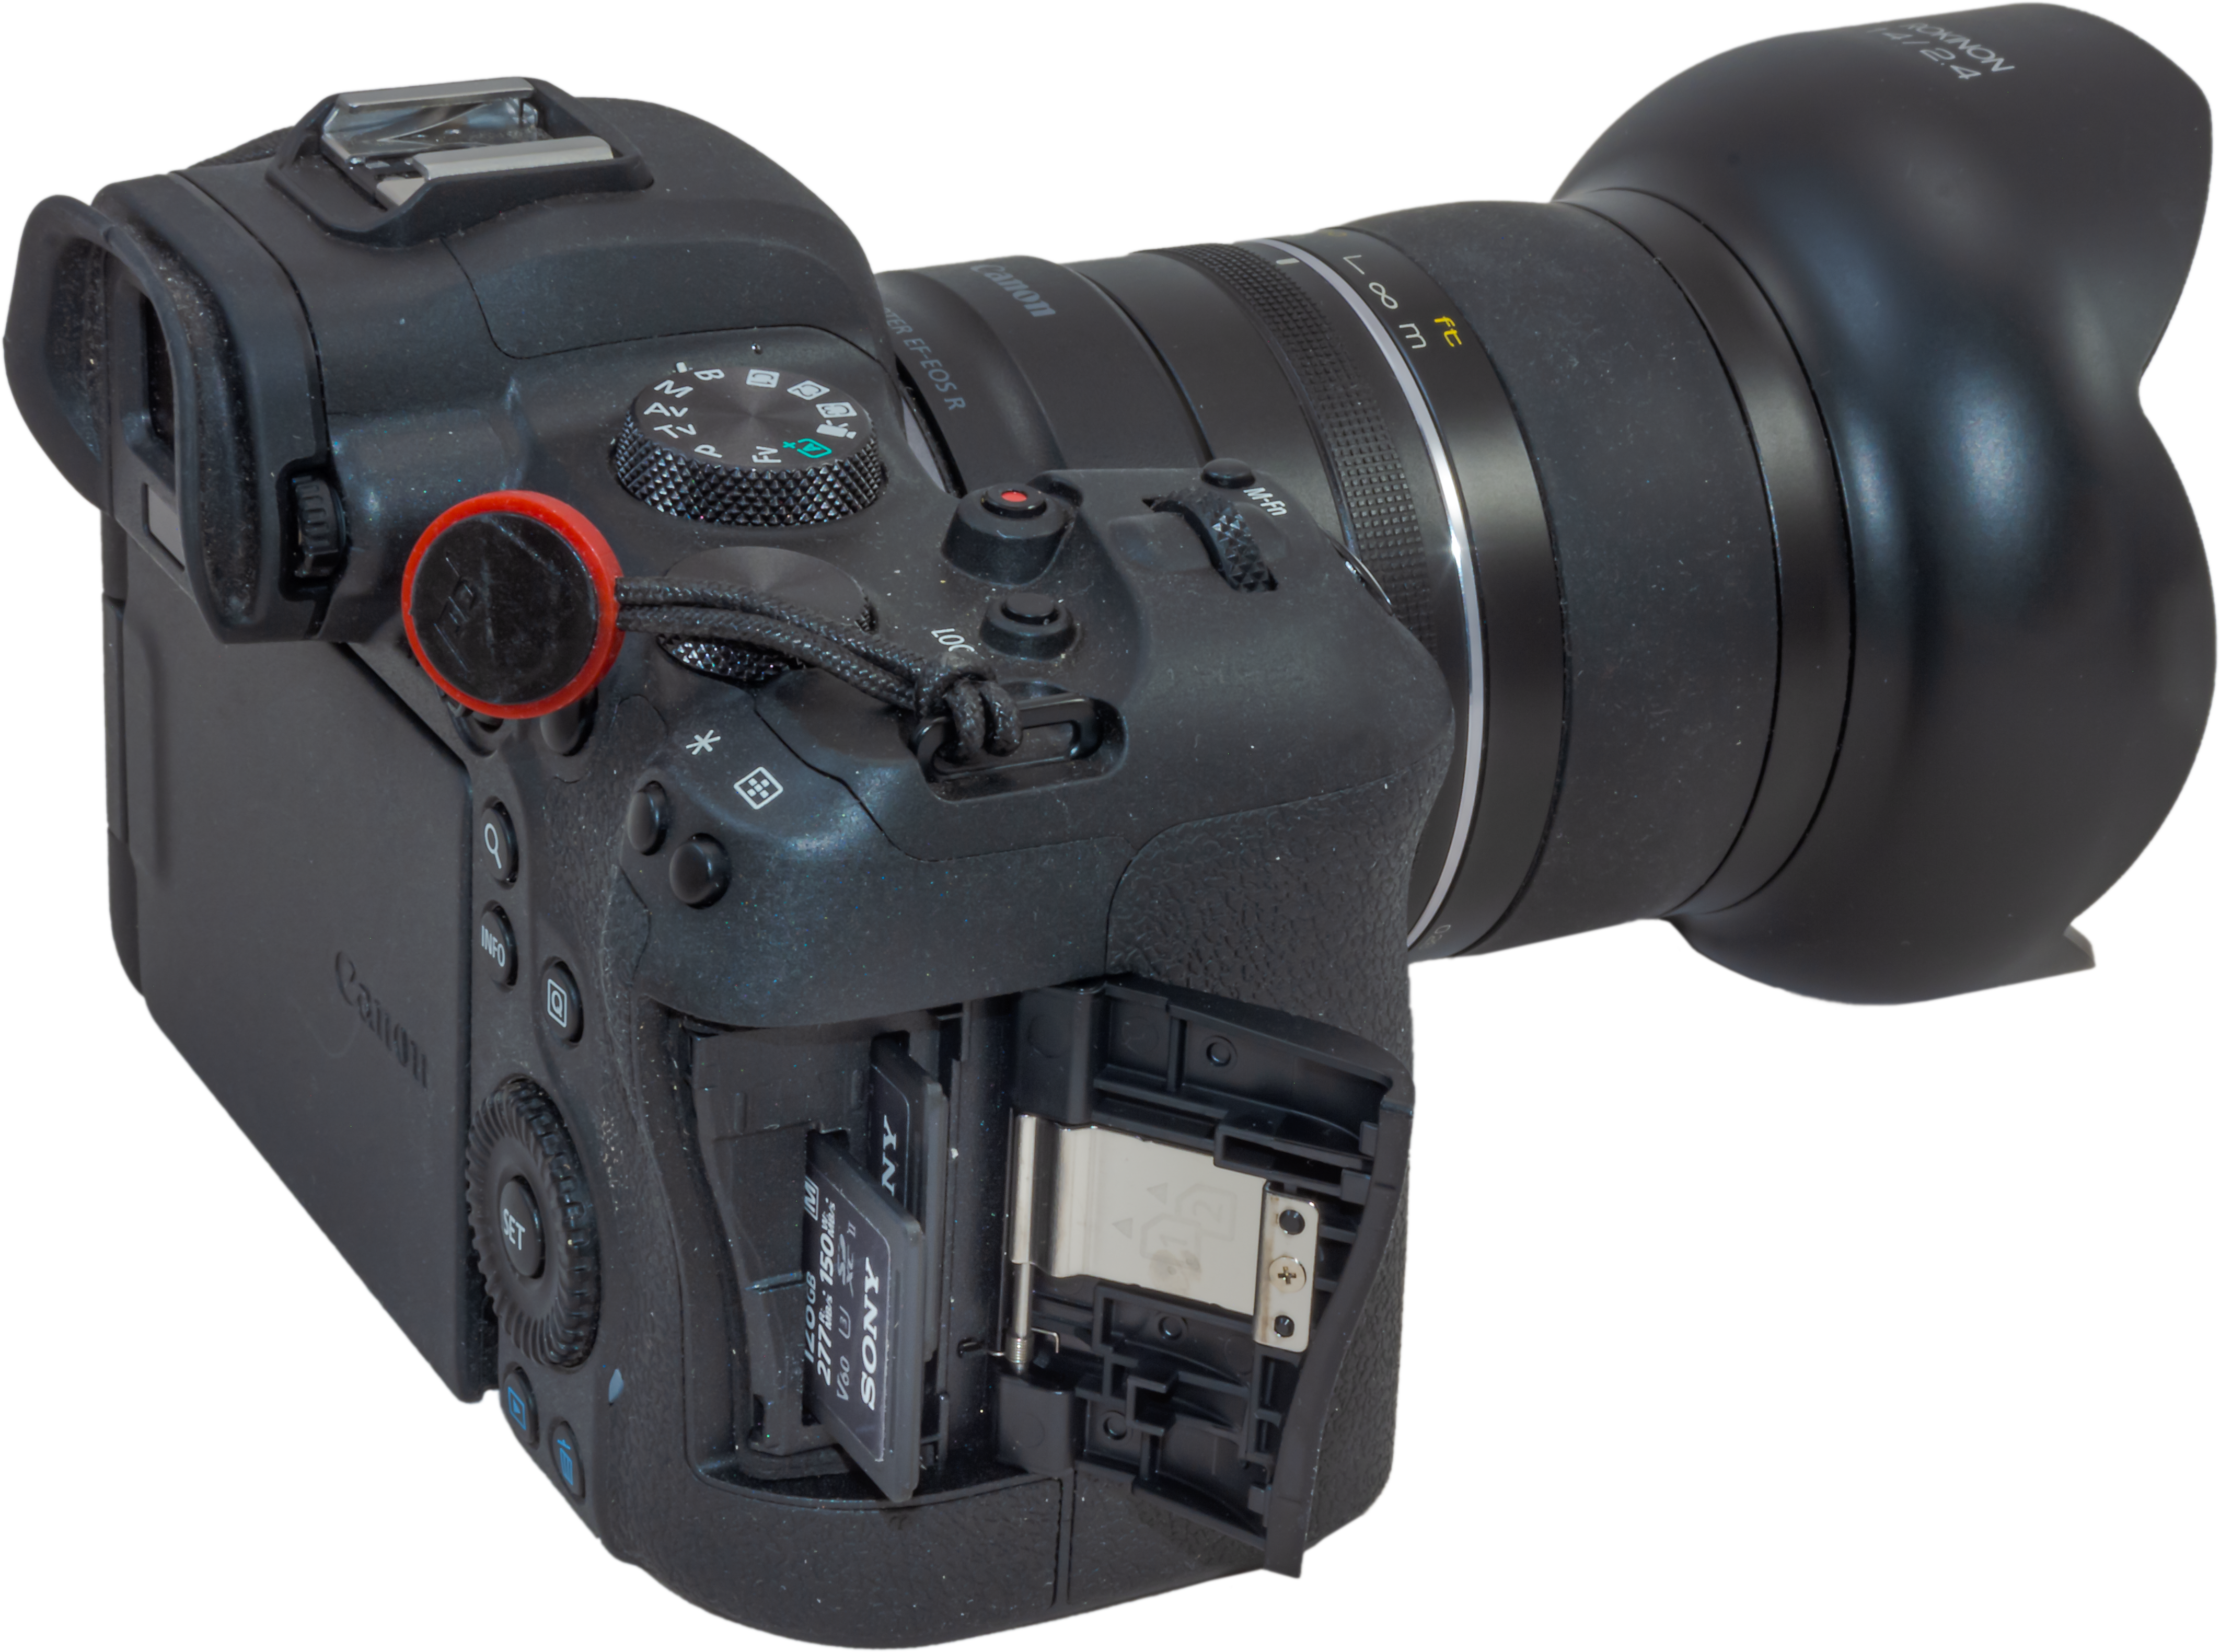
The R6’s dual SD card slots.
TIP: With two SD card slots in the R6 (the second card can be set to record either a backup of images on card one, or serve as an overflow card) and the economy of large SD cards, there’s not the need to conserve card space as there once was. I would suggest always shooting in the full RAW format. Why accept any compression and loss of image quality?
BATTERY LIFE
The R6 uses a new version of Canon’s standard LP-E6 battery, the LP-E6NH, that supports charging through the USB-C port and has a higher 2130mAh capacity than the 1800mAh LP-E6 batteries. However, the R6 is compatible with older batteries.
On warm nights, I found the R6 ran fine on one battery for the 3 to 4 hours needed to shoot a time-lapse sequence, with power to spare. However, as noted below, the lack of a top LCD screen means there’s no ongoing display of battery level, a deficiency for time-lapse and deep-sky work.
For demanding applications, especially in winter, the R6 can be powered by an outboard USB power bank that has “Power Delivery” capability. That’s a handy feature. There’s no need to install a dummy battery leading out to a specialized power source.
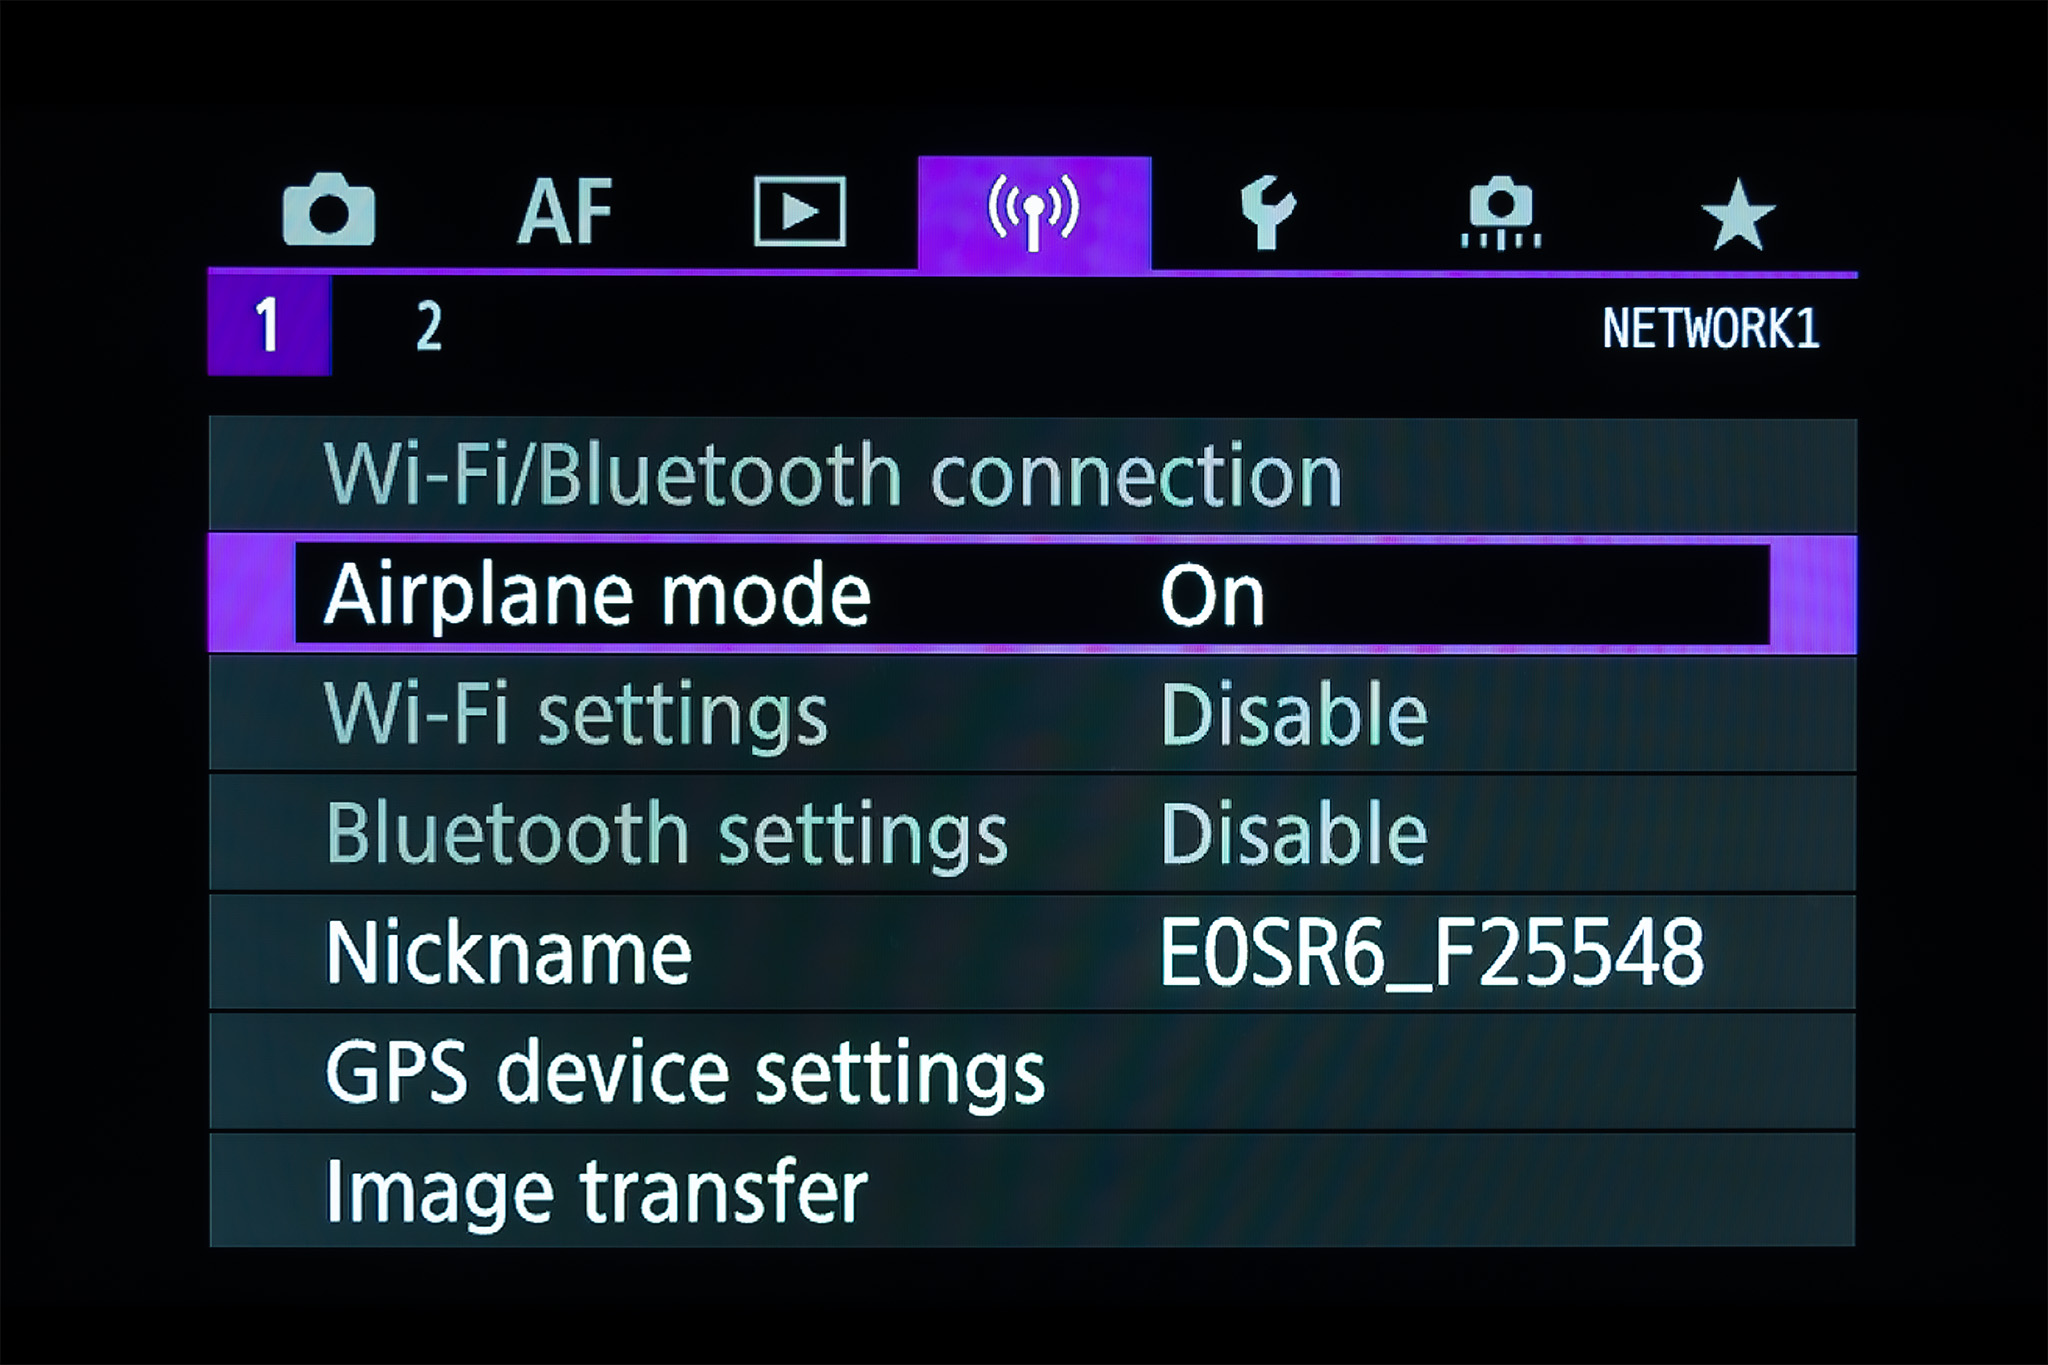
The R6’s Connection menu with Airplane mode to turn off battery-eating WiFi and Bluetooth.
TIP: Putting the camera into Airplane mode (to turn off WiFi and Bluetooth), turning off the viewfinder, and either switching off or closing the rear screen all helps conserve power. The R6 does not have GPS built in. Tagging images with location data requires connecting to your phone.
VIDEO USE
A major selling point for me was the R6’s low-light video capability. It replaces my Sony A7III, which had been my “go to” camera for real-time 4K movies of auroras.
As best I can tell (from the dimmer auroras I’ve shot to date), the R6 performs equally as well as the Sony. It is able to record good quality (i.e. acceptably noise-free) 4K movies at ISO 25,600 to ISO 51,200. While it can shoot at up to ISO 204,800, the excessive noise makes the top ISO an emergency-use only setting.
The R6’s Movie size and quality options, with 4K and Full HD formats and frame rates.
Comparing the R6 on a dim aurora at various high ISO speeds. Narrated at the camera — excuse the wind noise! Switch to HD mode for the best video playback quality. This was shot in 4K but WordPress plays back only in HD.
The R6 can shoot at a dragged shutter speed as slow as 1/8-second – good, though not as slow as the Sony’s 1/4-second slowest shutter speed in movie mode. That 1/8-second shutter speed and a fast f/1.4 to f/2 lens are the keys to shooting movies of the night sky. Only when auroras get shadow-casting bright can we shoot at the normal 1/30-second shutter speed and at lower ISOs.
As with Nikons (but not Sonys), the Canon R6 saves its movie settings separately from its still settings. When switching to Movie mode you don’t have to re-adjust the ISO, for example, to set it higher than it might have been for stills, very handy for taking both stills and movies of an active aurora, where quick switching is often required.
Unlike the R and Rp, the R6 captures 4K movies from the full width of the sensor, preserving the field of view of wide-angle lenses. This is excellent for aurora shooting.
The R6’s Movie Cropping menu option
A 4K movie of the Moon in full-frame and copped-frame modes, narrated at the camera. Again, this was shot in 4K but WordPress plays back only in HD.Comparing blow-ups of frame-grabbed stills from a full-frame 4K vs. Cropped frame 4K. The latter is less pixellated.
However, the R6 offers the option of a “Movie Crop” mode. Rather than taking the 4K movie downsampled from the entire sensor, this crop mode records from a central 1:1 sampled area of the sensor. That mode can be useful for high-magnification lunar and planetary imaging, for ensuring no loss of resolution. It worked well, producing videos with less pixelated fine details in test movies of the Moon.
Though of course I have yet to test it on one, the R6 should be excellent for movies of total solar eclipses. It can shoot 4K up to 60 frames per second in both full frame and cropped frame. It cannot shoot 6K (buy the R3!) or 8K (buy the R5!).
The R6’s Canon Log settings menu for video files.
Shooting in the R6’s Canon cLog3 profile records internally in 10-bit, preserving more dynamic range in movies, up to 12 stops. During eclipses, that will be a benefit for recording totality, with the vast range of brightness in the Sun’s corona. It should also aid in shooting auroras which can vary over a huge range in brightness.
Grading a cLog format movie in Final Cut under Camera LUT.
TIP: Processing cLog movies, which look flat out of camera, requires applying a cLog3 Look Up Table, or LUT, to the movie clips in editing, a step called “colour grading.” This is available from Canon, from third-party vendors or, as it was with my copy of Final Cut Pro, might be already installed in your video editing software. When shooting, turn on View Assist so the preview looks close to what the final graded movie will look like.
EXPOSURE TRACKING IN TIME-LAPSES
In one test, I shot a time-lapse from twilight to darkness with the R6 in Aperture Priority auto-exposure mode, of a fading display of noctilucent clouds. I just let the camera lengthen the shutter speed on its own. It tracked the darkening sky very well, right down to the camera’s maximum exposure time of 30 seconds, using a fish-eye lens at f/2.8. This demonstrated that the light meter in the R6 was sensitive enough to work well in dim light.
Other cameras I have used cannot do this. The meter fails at some point and the exposure stalls at 5 or 6 seconds long, resulting in most frames after that being underexposed. By contrast, the R6 showed excellent performance, negating the need for special bulb ramping intervalometers for some “holy grail” scenes. Here’s the resulting movie.
A time-lapse of 450 frames from 0.4 seconds to 30 seconds, with the R6 in Av mode. Set to 1080P for the best view! A screenshot from LRTimelapse showing the smoothness of the exposure tracking (the blue line) through the sequence,
In addition, the R6’s exposure meter tracked the darkening sky superbly, with nary a flicker or variation. Again, few cameras can do this. Nikons have an Exposure Smoothing option in their Interval Timers which works well.
The R6 has no such option but doesn’t seem to need it. The exposure did fail at the very end, when the shutter reached its maximum of 30 seconds. If I had the camera on Auto ISO, it might have started to ramp up the ISO to compensate, a test I have yet to try. Even so, this is impressive time-lapse performance in auto-exposure.
MISSING FEATURES
The R6, like the low-end Rp, lacks a top LCD screen for display of camera settings and battery level. In its place we get a traditional Mode dial, which some daytime photographers will prefer. But for astrophotography, a backlit top LCD screen provides useful information during long exposures.
The R6 top and back of camera view.
Without it, the R6 provides no indication of battery level while a shoot is in progress, for example, during a time-lapse. A top screen is also useful for checking ISO and other settings by looking down at the camera, as is usually the case when it’s on a tripod or telescope.
The lack of a top screen is an inconvenience for astrophotography. We are forced to rely on looking at the brighter rear screen for all information. It is a flip-out screen, so can be angled up for convenient viewing on a telescope.
The R6’s flip screen, similar to most other new Canon cameras.
The R6 has a remote shutter port for an external intervalometer, or control via a time-lapse motion controller. That’s good!
However, the port is Canon’s low-grade 2.5mm jack. It works, and is a standard connector, but is not as sturdy as the three-pronged N3-style jack used on Canon’s 5D and 6D DSLRs, and on the R3 and R5. Considering the cost of the R6, I would have expected a better, more durable port. The On/Off switch also seems a bit flimsy and easily breakable under hard use.
The R6’s side ports, including the remote shutter/intervalometer port.
These deficiencies provide the impression of Canon unnecessarily “cheaping out” on the R6. You can forgive them with the Rp, but not with a semi-professional camera like the R6.
INTERVAL TIMER
Unlike the Canon R and Ra (which still mysteriously lack a built-in interval timer, despite firmware updates), the R6 has one in its firmware. Hurray! This can be used to set up a time-lapse sequence, but on exposures only up to the maximum of 30 seconds allowed by the camera’s shutter speed settings, true of most in-camera intervalometers.
The Interval Timer menu page.
For 30-second exposures taken in succession as quickly as possible the interval on the R6 has to be set to 34 seconds. The reason is that the 30-second exposure is actually 32 seconds, true of all cameras. With the R6, having a minimum gap in time between shots requires an Interval not of 33 seconds as with some cameras, but 34 seconds. Until you realize this, setting the intervalometer correctly can be confusing.
Like all Canon cameras, the R6 can be set to take only up to 99 frames, not 999. That seems a dumb deficiency. Almost all time-lapse sequences require at least 200 to 300 frames. What could it possibly take in the firmware to add an extra digit to the menu box? It’s there at in the Time-lapse Movie function that assembles a movie in camera, but not here where the camera shoots and saves individual frames. It’s another example where you just can’t fathom Canon’s software decisions.
Setting the Interval Timer for rapid sequence shots with a 30-second exposure.
TIP: If you want to shoot 100 or more frames, set the Number of Frames to 00, so it will shoot until you tell the camera to stop. But awkwardly, Canon says the way to stop an interval shoot is to turn off the camera! That’s crude, as doing so can force you to refocus if you are using a Canon RF lens. Switching the Mode dial to Bulb will stop an interval shoot, an undocumented feature.
BULB TIMER
As with most recent Canon DSLRs and DSLMs, the menu also includes a Bulb Timer. This allows setting an exposure of any length (many minutes or hours) when the camera is in Bulb mode. This is handy for single long shots at night.
The Bulb Timer menu page. Bulb Timer only becomes an active choice when the camera is on Bulb.
However, it cannot be used in conjunction with the Interval Timer to program a series of multi-minute exposures, a pity. Instead, a separate outboard intervalometer has to be used for taking an automatic set of any exposures longer than 30 seconds, true of all Canons.
In Bulb and Bulb Timer mode, the R6’s rear screen lights up with a bright Timer readout. While the information is useful, the display is too bright at night and cannot be dimmed, nor turned red for night use, exactly when you are likely to use Bulb. The power-saving Eco mode has no effect on this display, precisely when you would want it to dim or turn off displays to prolong battery life, another odd deficiency in Canon’s firmware.
The Bulb Timer screen active during a Bulb exposure. At night it is bright!
The Timer display can only be turned off by closing the flip-out screen, but now the viewfinder activates with the same display. Either way, a display is on draining power during long exposures. And the Timer readout lacks any indication of battery level, a vital piece of information during long shoots. The Canon R, R3 and R5, with their top LCD screens, do not have this annoying “feature.”
TIP: End a Bulb Timer shoot prematurely by hitting the Shutter button. That feature is documented.
IN-CAMERA IMAGE STACKING
The R6 offers a menu option present on many recent Canon cameras: Multiple Exposure. The camera can take and internally stack up to 9 images, stacking them by using either Average (best for reducing noise) or Bright mode (best for star trails). An Additive mode also works for star trails, but stacking 9 images requires reducing the exposure of each image by 3 stops, say from ISO 1600 to ISO 200, as I did in the example below.
The Multiple Exposure menu page.
The result of the internal stacking is a raw file, with the option of also saving the component raws. While the options work very well, in all the cameras I’ve owned that offer such functions, I’ve never used them. I prefer to do any stacking needed later at the computer.
Comparing a single image with a stack of 9 exposures with 3 in-camera stacking methods.
TIP: The in-camera image stacking options are good for beginners wanting to get advanced stacking results with a minimum of processing fuss later. Use Average to stack ground images for smoother noise. Use Bright for stacking sky images for star trails. Activate one of those modes, then control the camera with a separate intervalometer to automatically shoot and internally stack several multi-minute exposures.
SHUTTER OPERATION
Being a mirrorless camera, there is no reflex mirror to introduce vibration, and so no need for a mirror lockup function. The shutter can operate purely mechanically, with physical metal curtains opening and closing to start and end the exposure.
However, the default “out of the box” setting is Electronic First Curtain, where the actual exposure, even when on Bulb, is initiated electronically, but ended by the mechanical shutter. That’s good for reducing vibration, perhaps when shooting the Moon or planets through a telescope at high magnification.
R6 Shutter Mode options.
In Mechanical, the physical curtains both start and end the exposure. It’s the mode I usually prefer, as I like to hear the reassuring click of the shutter opening. I’ve never found shutter vibration a problem when shooting deep sky images on a telescope mount of any quality.
In Mechanical mode the shutter can fire at up to 12 frames a second, or up to 20 frames a second in Electronic mode where both the start and end of the exposure happen without the mechanical shutter. That makes for very quiet operation, good for weddings and golf tournaments!
Electronic Shutter Mode is for fastest burst rates but has limitations.
Being vibration free, Electronic shutter might be great during total solar eclipses for rapid-fire bursts at second and third contacts when shooting through telescopes. Maximum exposure time is 1/2 second in this mode, more than long enough for capturing fleeting diamond rings.
Longer exposures needed for the corona will require Mechanical or Electronic First Curtain shutter. Combinations of shutter modes, drive rates (single or continuous), and exposure bracketing can all be programmed into the three Custom Function settings (C1, C2 and C3) on the Mode dial, for quick switching at an eclipse. It might not be until April 8, 2024 until I have a chance to test these features. And by then the R6 Mark II will be out!
TIP: While the R6’s manual doesn’t state it, some reviews mention (including at DPReview) that when the shutter is in fully Electronic mode the R6’s image quality drops from 14-bit to 12-bit, true of most other mirrorless cameras. This reduces dynamic range. I would suggest not using Electronic shutter for most astrophotography, even for exposures under 1/2 second. For longer exposures, it’s a moot point as it cannot be used.
The menu option that fouls up all astrophotographers using an R-series camera.
TIP: The R6 has the same odd menu item that befuddles many a new R-series owner, found on Camera Settings: Page 4. “Release Shutter w/o Lens” defaults to OFF, which means the camera will not work if it is attached to a manual lens or telescope it cannot connect to electronically. Turn it ON and all will be solved. This is a troublesome menu option that Canon should eliminate or default to ON.
OTHER MENU FEATURES
The rear screen is fully touch sensitive, allowing all settings to be changed on-screen if desired, as well as by scrolling with the joystick and scroll wheels. I find going back to an older camera without a touchscreen annoying – I keep tapping the screen expecting it to do something!
The Multi-Function Button brings up an array of 5 settings to adjust. This is ISO.
The little Multi-Function (M-Fn) button is a worth getting used to, as it allows quick access to a choice of five important functions such as ISO, drive mode and exposure compensation. However, the ISO, aperture and shutter speed are all changeable by the three scroll wheels.
The Q button brings up the Quick Menu for displaying and adjusting key functions.
There’s also the Quick menu activated by the Q button. While the content of the Quick menu screen can’t be edited, it does contain a good array of useful functions, adjustable with a few taps.
Under Custom settings, the Dials and Buttons can be re-assigned to other functions.
Unlike Sonys, the R6 has no dedicated Custom buttons per se. However, it does offer a good degree of customization of its buttons, by allowing users to re-assign them to other functions they might find more useful than the defaults. For example ….
This shows the AF Point button being re-assigned to the Maximize Screen Brightness (Temporary) command.
I’ve taken the AF Point button and assigned it to the Maximize Screen Brightness function, to temporarily boost the rear screen to full brightness for ease of framing.
The AE Lock button I assigned to switch the Focus Peaking indicators on and off, to aid manual focusing when needed.
The Depth of Field Preview button I assigned to switching between the rear screen and viewfinder, through that switch does happen automatically as you put your eye to the viewfinder.
The Set button I assigned to turning off the Rear Display, though that doesn’t have any effect when the Bulb Timer readout is running, a nuisance.
While the physical buttons are not illuminated, having a touch screen makes it less necessary to access buttons in the dark. It’s a pity the conveniently positioned but mostly unused Rate button can’t be re-programmed to more useful functions. It’s a waste of a button.
Set up the Screen Info as you like it by turning on and off screen pages and deciding what each should show.
TIP: The shooting screens, accessed by the Info button (one you do need to find in the dark!), can be customized to show a little, a lot, or no information, as you prefer. Take the time to set them up to show just the information you need over a minimum of screen pages.
LENS AND FILTER COMPATIBILITY
The new wider RF mount accepts only Canon and third-party RF lenses. However, all Canon and third-party EF mount lenses (those made for DSLRs) will fit on RF-mount bodies with the aid of the $100 Canon EF-to-RF lens adapter.
The Canon ER-to-RF lens adapter will be needed to attach R cameras to most telescope camera adapters and Canon T-rings made for older DSLR cameras.
This adapter will be necessary to attach any Canon R camera to a telescope equipped with a standard Canon T-ring. That’s especially true for telescopes with field flatterers where maintaining the standard 55mm distance between the flattener and sensor is critical for optimum optical performance.
The shallower “flange distance” between lens and sensor in all mirrorless cameras means an additional adapter is needed not just for the mechanical connection to the new style of lens mount, but also for the correct scope-to-sensor spacing.
The extra spacing provided by a mirrorless camera has the benefit of allowing a filter drawer to be inserted into the light path. Canon offers a $300 lens adapter with slide-in filters, though the choice of filters useful for astronomy that fit Canon’s adapter is limited. AstroHutech offers a few IDAS nebula filters.
Clip-in filters made for the EOS R, such as those offered by Astronomik, will also fit the R6. Though, again, most narrowband filters will not work well with an unmodified camera.
The AstroHutech adapter allows inserting filters into the light path on telescopes.
TIP: Alternatively, AstroHutech also offers its own lens adapter/filter drawer that goes from a Canon EF mount to the RF mount, and accepts standard 52mm or 48mm filters. It is a great way to add interchangeable filters to any telescope when using an R-series camera, while maintaining the correct back-focus spacing. I use an AstroHutech drawer with my Ra, where the modified camera works very well with narrowband filters. Using such filters with a stock R6 won’t be as worthwhile, as I showed above.
A trio of Canon RF zooms — all superb but quite costly.
As of this writing, the selection of third-party lenses for the Canon RF mount is limited, as neither Canon or Nikon have “opened up” their system to other lens makers, unlike Sony with their E-mount system. For example, we have yet to see much-anticipated RF-mount lenses from Sigma, Tamron and Tokina.
A trio of third party RF lenses — L to R: the TTArtisan 7.5mm f/2 and 11mm f/2.8 fish-eyes and the Samyang/Rokinon AF 85mm f/1.4.
The few third-party lenses that are available, from TTArtisan, Venus Optics and other boutique Chinese lens companies, are usually manual focus lenses with reverse-engineered RF mounts offering no electrical contact with the camera. Some of these wide-angle lenses are quite good and affordable. (I tested the TTArtisan 11mm fish-eye here.)
Until other lens makers are “allowed in,” if you want lenses with auto-focus and camera metadata connections, you almost have to buy Canon. Their RF lenses are superb, surpassing the quality of their older EF-mount equivalents. But they are costly. I sold off a lot of my older lenses and cameras to help pay for the new Canon glass!
Astrophotographers often like to operate their cameras at the telescope using computers running specialized control software. I tested the R6 with two popular Windows programs for controlling DSLR and now mirrorless cameras, BackyardEOS (v3.2.2) and AstroPhotographyTool (v3.88). Both recognized and connected to the R6 via its USB port.
Both programs recognized the Canon R6.
Another popular option is the ASIair WiFi controller from ZWO. It controls cameras via one of the ASIair’s USB ports, and not (confusingly) through the Air’s remote shutter jack marked DSLR. Under version 1.7 of its mobile app, the ASIair now controls Canon R cameras and connected to the R6 just fine, allowing images to be saved both to the camera and to the Air’s own MicroSD card.
With an update in 2021, the ZWOASIair now operates Canon R-series cameras.
The ASIair is an excellent solution for both camera control and autoguiding, with operation via a mobile device that is easier to use and power in the field than a laptop. I’ve not tried other hardware and software controllers with the R6.
TIP: While the R6, like many Canon cameras, can be controlled remotely with a smartphone via the CanonConnect mobile app, the connection process is complex and the connection can be unreliable. The Canon app offers no redeeming features for astrophotography, and maintaining the connection via WiFi or Bluetooth consumes battery power.
A dim red and green aurora from Dinosaur Provincial Park, Alberta, on August 29/30, 2021. This is a stack of 4 exposures for the ground to smooth noise and one exposure for the sky, all 30 seconds at f/2.8 with the Canon 15-35mm RF lens at 25mm and the Canon R6 at ISO 4000.
SUGGESTIONS TO CANON
To summarize, in firmware updates, Canon should:
Fix the low-level amp glow. No camera should have amp glow.
Allow either dimming the Timer readout, turning it red, or just turning it off!
Add a battery display to the Timer readout.
Expand the Interval Timer to allow up to 999 frames, as in the Time-Lapse Movie.
Allow the Rate button to be re-assigned to more functions.
Default the Release Shutter w/o Lens function to ON.
Revise the manual to correctly describe how to stop an Interval Timer shoot.
Allow programming multiple long exposures by combining Interval and Bulb Timer, or by expanding the shutter speed range to longer than 30 seconds, as some Nikons can do.
The Zodiacal Light in the dawn sky, September 14, 2021, from home in Alberta, with the winter sky rising. This is a stack of 4 x 30-second exposures for the ground to smooth noise, and a single 30-second exposure for the sky, all with the TTArtisan 7.5mm fish-eye lens at f/2 and on the Canon R6 at ISO 1600.
CONCLUSION
The extended red sensitivity of the Canon EOS Ra makes it better suited for deep-sky imaging. But with it now out of production (Canon traditionally never kept its astronomical “a” cameras in production for more than two years), I think the R6 is now Canon’s best camera (mirrorless or DSLR) for all types of astrophotography, both stills and movies.
However, I cannot say how well it will work when filter-modified by a third-party. But such a modification is necessary only for recording red nebulas in the Milky Way. It is not needed for other celestial targets and forms of astrophotography.
A composite showing about three dozen Perseid meteors accumulated over 3 hours of time, compressed into one image showing the radiant point of the meteor shower in Perseus. All frames were with the Canon R6 at ISO 6400 and with the TTArtisan 11mm fish-eye lens at f/2.8.
The low noise and ISO invariant sensor of the R6 makes it superb for nightscapes, apart from the nagging amp glow. That glow will also add an annoying edge gradient to deep-sky images, best dealt with when shooting by the use of LENR or dark frames.
As the image of the Andromeda Galaxy, M31, at the top of the blog attests, with careful processing it is certainly possible to get fine deep-sky images with the R6.
For low-light movies the R6 is Canon’s answer to the Sony alphas. No other Canon camera can do night sky movies as well as the R6. For me, it was the prime feature that made the R6 the camera of choice to complement the Ra.
I had the chance to test out an early sample of Canon’s new EOS Ra camera designed for deep-sky photography.
Once every 7 years astrophotographers have reason to celebrate when Canon introduces one of their “a” cameras, astronomical variants optimized for deep-sky objects, notably red nebulas.
In 2005 Canon introduced the ground-breaking 8-megapixel 20Da, the first DLSR to feature Live View for focusing. Seven years later, in 2012, Canon released the 18-megapixel 60Da, a camera I still use and love.
Both cameras were cropped-frame DSLRs.
Now in 2019, seven years after the 60Da, we have the newly-released EOS Ra, the astrophoto version of the 30-megapixel EOS R released in late 2018. The EOS R is a full-frame mirrorless camera with a sensor similar to what’s in Canon’s 5D MkIV DSLR.
Here, I present a selection of sample images taken with the new EOS Ra.
The large emission nebula IC 1805 in Cassiopeia, aka the Heart Nebula. The round nebula at top right is NGC 896. The large loose star cluster at centre is Mel 15; the star cluster at left is NGC 1027. The small cluster below NGC 896 is Tombaugh 4. This is a stack of 8 x 6-minute exposures with the Canon EOS Ra mirrorless camera at ISO 1600 through the Astro-Physics Traveler apo refractor at f/6 with the Hotech field flattener. Stacked, aligned and processed in Photoshop.
Both versions of the EOS R have identical functions and menus.
The big difference is that the EOS Ra, as did Canon’s earlier “a” models, has a factory-installed filter in front of the sensor that transmits more of the deep red “hydrogen-alpha” wavelength emitted by glowing nebulas.
Normal cameras suppress much of this deep-red light as a by-product of their filters cutting out the infra-red light that digital sensors are very sensitive to, but that would not focus well.
The North America Nebula, NGC 7000, in Cygnus, taken with the new Canon EOS Ra factory-modified “astronomical” version of the Canon EOS R mirrorless camera. This is a stack of 4 x 6-minute exposures, with LENR on and at ISO 1600, through the Astro-Physics Traveler 105mm f/6 apo refractor with the Hutech field flattener.
I was sent an early sample of the EOS Ra, and earlier this autumn also had a sample of the stock EOS R.
Both were sent for testing so I could prepare a test report for Sky and Telescope magazine. The full test report will appear in an upcoming issue.
The large emission nebula IC 1396 in Cepheus with the orange “Garnet Star” at top, and the Elephant Trunk Nebula, van den Bergh 142, at bottom as a dark lane protruding into the emission nebula. This is a stack of 5 x 6-minute exposures with the Canon EOS Ra mirrorless camera at ISO 1600 through the Astro-Physics Traveler apo refractor at f/6 with the Hotech field flattener. Stacked, aligned and processed in Photoshop.
• How the Ra compares to previous “a” models and third-party filter-modified cameras
• How the Ra works for normal daylight photography
• Noise levels compared to other cameras
• Features unique to the EOS Ra, such as 30x Live View focusing
Messier 52 open cluster, at left, and the Bubble Nebula, NGC 7635 below and to the right of it, at centre, plus the small red nebula NGC 7538 at right. The open cluster at lower right is NGC 7510. All in Cassiopeia. This is a stack of 8 x 6-minute exposures at ISO 1600 with the Canon EOS Ra camera and Astro-Physics Traveler apo refractor at f/6 with the Hotech field flattener. No LENR dark frame subtraction employed as the temperature was -15° C.
UPDATE — November 25, 2019
As part of further testing I shot the Heart and Soul Nebulas in Cassiopeia through my little Borg 77mm f/4 astrograph with both the EOS Ra and my filter-modified 5D MkII (modified years ago by AstroHutech) to compare which pulled in more nebulosity. It looked like a draw.
Both images are single 8-minute exposures, taken minutes apart and developed identically in Adobe Camera Raw, but adjusted for colour balance to equally neutralize the sky background. The histograms look similar. Even so, the Ra looks a little redder overall. But keep in mind a sky or nebula can be made to appear any shade of red you like in processing.
The question is which camera shows more faint nebulosity?
The modified 5D MkII has always been my favourite camera for this type of astrophotography, picking up more nebulosity than other “a” models I’ve tested, including the Nikon D810a.
But in this case, I’d say the EOS Ra is performing as well as, if not better than the 5D MkII. How well any third-party modified camera you buy now performs will depend which, if any, filter the modifier installs in front of the sensor. So your mileage will vary.
For most of my other testing I shot through my much-prized Astro-Physics Traveler, a 105mm aperture f/6 apochromatic refractor on the Astro-Physics Mach1 mount.
To connect the EOS Ra (with its new RF lens mount) to my existing telescope-to-camera adapter and field flattener lens I used one of Canon’s EF-EOS R lens adapters.
The bottom line is that the EOS Ra works great!
It performs very well on H-alpha-rich nebulas and has very low noise. It will be well-suited to not only deep-sky photography but also to wide-field nightscape and time-lapse photography, perhaps as Canon’s best camera yet for those applications.
WHAT ABOUT THE PRICE?
The EOS Ra will sell for $2,500 US, a $700 premium over the cost of the stock EOS R. Some complain. Of course, if you don’t like it, you don’t have to buy it. This is not an upgrade being forced upon you.
As I look at it, it is all relative. When Nikon’s astronomy DSLR, the 36 Mp D810a, came out in 2015 it sold for $3,800 US, $1,300 more than the EOS Ra. It was, and remains a fine camera, if you can find one. It is discontinued.
A 36 Mp cooled and dedicated CMOS astro camera, the QHY367, with the same chip as the D810a, goes for $4,400, $1,900 more than the Ra. Yes, it will produce better images I’m sure than the EOS Ra, but deep-sky imaging is all it can do. At a cost, in dollars and ease of use.
And yes, buying a stock EOS R and having it modified by a third party costs less, and you’ll certainly get a good camera, for $300 to $400 less than an Ra. But …
• The EOS Ra has a factory adjusted white balance for ease of “normal” use — no need to buy correction filters. So there’s a $$ saving there, even if you can find clip-in correction filters for the EOS R — you can’t.
• And the Ra retains the sensor dust cleaning function. Camera modifier companies remove it or charge more to reinstall it.
• And the 30x live view magnification is very nice.
• The EOS Ra also carries a full factory warranty.
Do I wish the EOS Ra had some other key features? Sure. A mode to turn all menus red would be nice. As would an intervalometer built-in, one that works with the Bulb Timer to allow sequences of programmed multi-minute exposures. Both could be added in with a firmware update.
And providing a basic EF-EOS R lens adapter in the price would be a welcome plus, as one is essential to use the EOS Ra on a telescope.
That’s my take on it. I’ll be buying one. But then again I bought the 20Da, twice!, and the 60Da, and I hate to think what I paid for those much less capable cameras.
BONUS TEST — The RF 15-35mm L Lens
Canon is also releasing an impressive series of top-class RF lenses for their R mirrorless cameras. The image below is an example astrophoto with the new RF 15-35mm f/2.8 L zoom lens, an ideal combination of focal lengths and speed for nightscape shooting.
Orion and the winter stars rising on a late October night, with Sirius just clearing the horizon at centre bottom, Capella and the Pleiades are at top. M44 cluster is at far left. Taken with the Canon 15-35mm RF lens at 15mm and f/2.8 and the EOS Ra camera at ISO 800 as part of testing. A stack of 4 x 2-minute exposures on the Star Adventurer tracker.
Below is a further set of stacked and processed images with the RF 15-35mm L lens, taken in quick succession, at 15mm, 24mm, and 35mm focal lengths, all shot wide open at f/2.8. The EOS Ra was on the Star Adventurer tracker (as below) to follow the stars.
Click or tap on the images below to view a full-resolution version for closer inspection.
15mm — Northern autumn Milky Way with RF 15-35mm at f/2.8 and at 15mm focal length. Taken with the EOS Ra at ISO 800 for a stack of 4 x 2-minute exposures.
24mm — Northern autumn Milky Way with RF 15-35mm at f/2.8 and at 24mm focal length. Taken with the EOS Ra at ISO 800 for a stack of 2 x 2-minute exposures.
35mm — Northern autumn Milky Way with RF 15-35mm at f/2.8 and at 35mm focal length. Taken with the EOS Ra at ISO 800 for a stack of 2 x 2-minute exposures.
The RF 15-35mm lens performs extremely well at 15mm exhibiting very little off-axis aberrations at the corners.
Off-axis aberrations do increase at the longer focal lengths but are still very well controlled, and are much less than I’ve seen on my older zoom and prime lenses in this focal length range.
The RF 15-35mm is a great complement to the EOS Ra for wide-field Milky Way images.
I was impressed with the new EOS Ra. It performs superbly for astrophotography.
I put the new Nikon Z6 mirrorless camera through its paces for astrophotography.
Following Sony’s lead, in late 2018 both Nikon and Canon released their entries to the full-frame mirrorless camera market.
Here I review one of Nikon’s new mirrorless models, the Z6, tested solely with astrophotography in mind. I did not test any of the auto-exposure, auto-focus, image stabilization, nor rapid-fire continuous mode features.
In my testing I compared the Nikon Z6 (at right above) to two competitive cameras, the relatively new Sony a7III mirrorless (at left above) and 2015-vintage Nikon D750 DSLR.
All three are “entry-level” full-frame cameras, with 24 megapixels and in a similar $2,000 price league, though the older D750 now often sells at a considerable discount.
Disclosure
I should state at the outset that my conclusions are based on tests conducted over only three weeks in mid-winter 2019 while I had the camera on loan from Nikon Canada’s marketing company.
I don’t own the camera and didn’t have many moonless nights during the loan period to capture a lot of “beauty” shots under the stars with the Z6.
An arc of the auroral oval across the northern horizon on the night of January 10-11, 2019. With the Sigma 14mm lens and Nikon Z6 for testing.
However, I think my testing was sufficient to reveal the camera’s main traits of interest — as well as deficiencies it might have — for astrophotography.
I should also point out that I do not participate in “affiliate links,” so I have no financial motivation to prompt you to buy gear from merchants.
In short — I found the Nikon Z6 superb for astrophotography.
Summary:
• It offers as low a noise level as you’ll find in a 24-megapixel full-frame camera, though its noise was not significantly lower than the competitive Sony a7III, nor even the older Nikon D750.
• The Z6’s ISO-invariant sensor proved excellent when dealing with the dark underexposed shadows typical of Milky Way nightscapes.
• The Live View was bright and easy to enhance to even brighter levels using the Movie mode to aid in framing nightscapes.
• When shooting deep-sky images through telescopes using long exposures, the Z6 did not exhibit any odd image artifacts such as edge vignetting or amplifier glows, unlike the Sony a7III. See my review of that camera in my blog from 2018.
Recommendations:
• Current owners of Nikon cropped-frame cameras wanting to upgrade to full-frame would do well to consider a Z6 over any current Nikon DSLR.
• Anyone wanting a full-frame camera for astrophotography and happy to “go Nikon” will find the Z6 nearly perfect for their needs.
Nikon Z6 vs. Z7
I opted to test the Z6 over the more expensive Z7, as the 24-megapixel Z6 has 6-micron pixels resulting in lower noise (according to independent tests) than the 46 megapixel Z7 with its 4.4 micron pixels.
In astrophotography, I feel low noise is critical, with 24-megapixel cameras hitting a sweet spot of noise vs. resolution.
However, if the higher resolution of the Z7 is important for your daytime photography needs, then I’m sure it will work well at night. The Nikon D850 DSLR, with a sensor similar to the Z7, has been proven by others to be a good astrophotography camera, albeit with higher noise than the lesser megapixel Nikons such as the D750 and Z6.
NOTE: Tap or click on images to download and display them full screen for closer inspection.
High ISO Noise
The three 24-megapixel cameras compared at three high ISO levels in a close-up of a dark-sky nightscape.
To test noise in a real-world situation, I shot a dark nightscape scene with the three cameras, using a 24mm Sigma Art lens on the two Nikons, and a 24mm Canon lens on the Sony via a MetaBones adapter. I shot at ISOs from 800 to 12,800, typical of what we use in nightscapes and deep-sky images.
The comparison set above shows performance at the higher ISOs of 3200 to 12,800. I saw very little difference among the trio, with the Nikon Z6 very similar to the Sony a7III, and with the four-year-old Nikon D750 holding up very well against the two new cameras.
The comparison below shows the three cameras on another night and at ISO 3200.
The three cameras compared for noise at properly exposed moonlit scenes at ISO 3200, a typical nightscape setting.
Both the Nikon Z6 and Sony a7III use a backside illuminated or “BSI” sensor, which in theory is promises to provide lower noise than a conventional CMOS sensor used in an older camera such as the D750.
In practice I didn’t see a marked difference, certainly not as much as the one- or even 1/2-stop improvement in noise I might have expected or hoped for.
Nevertheless, the Nikon Z6 provides as low a noise level as you’ll find in a camera offering 24 megapixels, and will perform very well for all forms of astrophotography.
ISO Invariance
The three cameras compared for ISO invariance at 0EV (well exposed) and -5EV (5 stops underexposed then brightened in processing).
Nikon and Sony both employ an “ISO-invariant” signal flow in their sensor design. You can purposely underexpose by shooting at a lower ISO, then boost the exposure later “in post” and end up with a result similar to an image shot at a high ISO to begin with in the camera.
I find this feature proves its worth when shooting Milky Way nightscapes that often have well-exposed skies but dark foregrounds lit only by starlight. Boosting the brightness of the landscape when developing the raw files reveals details in the scene without unduly introducing noise, banding, or other artifacts such as magenta tints.
That’s not true of “ISO variant” sensors, such as in most Canon cameras. Such sensors are far less tolerant of underexposure and are prone to noise, banding, and discolouration in the brightened shadows.
To test the Z6’s ISO invariance (as shown above) I shot a dark nightscape at ISO 3200 for a properly exposed scene, and also at ISO 100 for an image underexposed by a massive 5 stops. I then boosted that image by 5 stops in exposure in Adobe Camera Raw. That’s an extreme case to be sure.
I found the Z6 provided very good ISO invariant performance, though with more chrominance specking than the Sony a7III and Nikon D750 at -5 EV.
Below is a less severe test, showing the Z6 properly exposed on a moonlit night and at 1 to 4 EV steps underexposed, then brightened in processing. Even the -4 EV image looks very good.
This series taken under moonlight shows that even images underexposed by -4 EV in ISO and boosted later by +4 EV in processing look similar for noise and image quality as an image properly exposed in the camera (at ISO 800 here).
In my testing, even with frames underexposed by -5 EV, I did not see any of the banding effects (due to the phase-detect auto-focus pixels) reported by others.
As such, I judge the Z6 to be an excellent camera for nightscape shooting when we often want to extract detail in the shadows or dark foregrounds.
Compressed vs. Uncompressed / Raw Large vs. Small
Comparing Z6 images shot at full resolution and at Medium Raw size. to show resolution and noise differences.
The Z6, as do many Nikons, offers a choice of shooting 12-bit or 14-bit raws, and either compressed or uncompressed.
I shot all my test images as 14-bit uncompressed raws, yielding 46 megabyte files with a resolution of 6048 x 4024 pixels. So I cannot comment on how good 12-bit compressed files are compared to what I shot. Astrophotography demands the best original data.
However, as the menu above shows, Nikon now also offers the option of shooting smaller raw sizes. The Medium Raw setting produces an image 4528 x 3016 pixels and a 18 megabyte file (in the files I shot), but with all the benefits of raw files in processing.
The Z cameras use the XQD style memory cards and in a single card slot. The fast XQDs are ideal for recording 4K movies at high data rates but are more costly than the more common SD cards.
The Medium Raw option might be attractive when shooting time-lapses, where you might need to fit as many frames onto the single XQD card as possible, yet still have images large enough for final 4K movies.
However, comparing a Large Raw to a Medium Raw did show a loss of resolution, as expected, with little gain in noise reduction.
This is not like “binning pixels” in CCD cameras to increase signal-to-noise ratio. I prefer to never throw away information in the camera, to allow the option of creating the best quality still images from time-lapse frames later.
Nevertheless, it’s nice to see Nikon now offer this option on new models, a feature which has long been on Canon cameras.
Star Image Quality
The Orion Nebula with the Nikon Z6
The Orion Nebula with the Nikon D750
Above is the Orion Nebula with the D750 and with the Z6, both shot in moonlight with the same 105mm refractor telescope.
I did not find any evidence for “star-eating” that Sony mirrorless cameras have been accused of. (However, I did not find the Sony a7III guilty of eating stars either.) Star images looked as good in the Z6 as in the D750.
A single Orion Nebula image with the Z6 in a 600% blow-up in Adobe Camera Raw, showing clean artifact-free star images with good, natural colours.
Raw developers (Adobe, DxO, ON1, and others) decoded the Z6’s Bayer-array NEF files fine, with no artifacts such as oddly-coloured or misshapen stars, which can arise in cameras lacking an anti-alias filter.
LENR Dark frames
A blank long exposure with no LENR applied – click or tap to open the image full screen
A blank long exposure with LENR – tap or click to open the image full screen
Above, 8-minute exposures of nothing, taken with the lens cap on at room temperature: without LENR, and with LENR, both boosted a lot in brightness and contrast to exaggerate the visibility of any thermal noise. These show the reduction in noise speckling with LENR activated, and the clean result with the Z6. At small size you’ll likely see nothing but black!
For deep-sky imaging a common practice is to shoot “dark frames,” images recording just the thermal noise that can then be subtracted from the image.
The Long Exposure Noise Reduction feature offered by all cameras performs this dark frame subtraction internally and automatically by the camera for any exposures over one second long.
I tested the Z6’s LENR and found it worked well, doing the job to effectively reduce thermal noise (hot pixels) without adding any other artifacts.
The rear screen “i” menu as I had it customized for my testing, with functions for astrophotography such as LENR assigned to the 12 boxes.
NOTE:
Some astrophotographers dismiss LENR and never use it. By contrast, I prefer to use LENR to do dark frame subtraction. Why? Through many comparison tests over the years I have found that separate dark frames taken later at night rarely do as good a job as LENR darks, because those separate darks are taken when the sensor temperature, and therefore the noise levels, are different than they were for the “light” frames.
I’ve found that dark frames taken later, then subtracted “in post” inevitably show less or little effect compared to images taken with LENR darks. Or worse, they add a myriad of pock-mark black specks to the image, adding noise and making the image look worse.
The benefit of LENR is lower noise. The penalty of LENR is that each image takes twice as long to shoot — the length of the exposure + the length of the dark frame. Because …
As Expected on the Z6 … There’s no LENR Dark Frame Buffer
Only Canon full-frame cameras offer this little known but wonderful feature for astrophotography. Turn on LENR and it is possible to shoot three (with the Canon 6D MkII) or four (with the Canon 6D) raw images in quick succession even with LENR turned on. The Canon 5D series also has this feature.
The single dark frame kicks in and locks up the camera only after the series of “light frames” are taken. This is excellent for taking a set of noise-reduced deep-sky images for later stacking without need for further “image calibration.”
No Nikon has this dark frame buffer, not even the “astronomical” D810a. And not the Z6.
ANOTHER NOTE:
I have to mention this every time I describe Canon’s dark frame buffer: It works only on full-frame Canons, and there’s no menu function to activate it. Just turn on LENR, fire the shutter, and when the first exposure is complete fire the shutter again. Then again for a third, and perhaps a fourth exposure. Only then does the LENR dark frame lock up the camera as “Busy” and prevent more exposures. That single dark frame gets applied to each of the previous “light” frames, greatly reducing the time it takes to shoot a set of dark-frame subtracted images.
But do note that Canon’s dark frame buffer will not work if…:
a) You leave Live View on. Don’t do that for any long exposure shooting.
b) You control the camera through the USB port via external software. It works only when controlling the camera via its internal intervalometer or via the shutter port using a hardware intervalometer.
Sensor Illumination
A single 4-minute exposure of Messier 35 in moonlight at ISO 400 with the Z6 and 105mm apo refractor, with no flat fielding or lens correction applied, showing the clean edges and lack of amp glows. The darkening of the corners is inherent in the telescope optical system and is not from the camera.
With DSLRs deep-sky images shot through telescopes, then boosted for contrast in processing, usually exhibit a darkening along the bottom of the frame. This is caused by the upraised mirror shadowing the sensor slightly, an effect never noticed in normal photography.
Mirrorless cameras should be free of this mirror box shadowing. The Sony a7III, however, still exhibits some edge shadows due to an odd metal mask in front of the sensor. It shouldn’t be there and its edge darkening is a pain to eliminate in the final processing.
As I show in my review of the a7III, the Sony also exhibits a purple edge glow in long-exposure deep-sky images, from an internal light source. That’s a serious detriment to its use in deep-sky imaging.
Happily, the Z6 proved to be free of any such artifacts. Images are clean and evenly illuminated to the edges, as they should be. I saw no amp glows or other oddities that can show up under astrophotography use. The Z6 can produce superb deep-sky images.
Red Sensitivity
Messer 97 planetary nebula and Messier 108 galaxy in a lightly processed single 4-minute exposure at ISO 1600 with the 105mm refractor, again showing a clean field. The glow at top right is from a Big Dipper star just off the edge of the field.
During my short test period, I was not able to shoot red nebulas under moonless conditions. So I can’t say how well the Z6 performs for recording H-alpha regions compared to other “stock” cameras.
However, I would not expect it to be any better, nor worse, than the competitors. Indeed, the stock Nikon D750 I have does a decent job at picking up red nebulas, though nowhere near as well as Nikon’s sadly discontinued D180a. See my blog post from 2015 for an example shot with that camera.
With the D810a gone, if it is deep red nebulosity you are after with a Nikon, then consider buying a filter-modified Z6 or having yours modified.
Both LifePixel and Spencer’s Camera offer to modify the Z6 and Z7 models. However, I have not used either of their services, so cannot vouch for them first hand.
Live View Focusing and Framing
An image of the back of the camera with a scene under moonlight, with the Z6 set to the highest ISO speed in the movie mode, to aid framing the scene at night.
For all astrophotography manually focusing with Live View is essential. And with mirrorless cameras there is no optical viewfinder to look through to frame scenes. You are dependent on the live electronic image (on the rear LCD screen or in the eye-level electronic viewfinder, or EVF) for seeing anything.
Thankfully, the Z6 presents a bright Live View image making it easy to frame, find, and focus on stars. Maximum zoom for precise focusing is 15x, good but not as good as the D750’s 20x zoom level, but better than Canon’s 10x maximum zoom in Live View.
The Z6 lacks the a7III’s wonderful Bright Monitoring function that temporarily ups the ISO to an extreme level, making it much easier to frame a dark night scene. However, something similar can be achieved with the Z6 by switching it temporarily to Movie mode, and having the ISO set to an extreme level.
As with most Nikons (and unlike Sonys), the Z6 remembers separate settings for the still and movie modes, making it easy to switch back and forth, in this case for a temporarily brightened Live View image to aid framing.
That’s very handy, and the Z6 works better than the D750 in this regard, providing a brighter Live View image, even with the D750’s well-hidden Exposure Preview option turned on.
Video Capability
Comparing the three cameras using 1/25-second still frames grabbed from moonlit night movies (HD with the D750 and 4K with the Z6 and a7III) shot at ISO 51200, plus a similarly exposed frame from the a7III shot with a shutter speed of only 1/4 second allowing the slower ISO of 8000.
Where the Z6 pulls far ahead of the otherwise similar D750 is in its movie features.
The Z6 can shoot 4K video (3840 x 2160 pixels) at either 30, 25, or 24 frames per second. Using 24 frames per second and increasing the ISO to between 12,800 to 51,200 (the Z6 can go as high as ISO 204,800!) it is possible to shoot real-time video at night, such as of auroras.
But the auroras will have to be bright, as at 24 fps, the maximum shutter speed is 1/25-second, as you might expect.
The a7III, by comparison, can shoot 4K movies at “dragged” shutter speeds as slow as 1/4 second, even at 24 fps, making it possible to shoot auroras at lower and less noisy ISO speeds, albeit with some image jerkiness due to the longer exposures per frame.
The D750 shoots only 1080 HD and, as shown above, produces very noisy movies at ISO 25,600 to 51,200. It’s barely usable for aurora videos.
The Z6 is much cleaner than the D750 at those high ISOs, no doubt due to far better internal processing of the movie frames. However, if night-sky 4K videos are an important goal, a camera from the Sony a7 series will be a better choice, if only because of the option for slower dragged shutter speeds.
For examples of real-time auroras shot with the Sony a7III see my music videos shot in Yellowknife and in Norway.
Battery Life
The Z6 uses the EN-EL15b battery compatible with the battery and charger used for the D750. But the “b” variant allows for in-camera charging via the USB port.
In room temperature tests the Z6 lasted for 1500 exposures, as many as the D750 was able to take in a side-by-side test. That was with the screens off.
At night, in winter temperatures of -10 degrees C (14° F), the Z6 lasted for three hours worth of continuous shooting, both for long deep-sky exposure sets and for a test time-lapse I shot, shown below.
A time-lapse movie, downsized here to HD from the full-size originals, shot with the Z6 and its internal intervalometer, from twilight through to moonrise on a winter night. Processed with Camera Raw and LRTimelapse.
However, with any mirrorless camera, you can extend battery life by minimizing use of the LCD screen and eye-level EVF. The Z6 has a handy and dedicated button for shutting off those screens when they aren’t needed during a shoot.
The days of mirrorless cameras needing a handful of batteries just to get through a few hours of shooting are gone.
Lens and Telescope Compatibility
A 14mm Sigma Art lens with the Nikon FTZ lens adapter needed to attach any “legacy” F-mount lens to the Z6.
As with all mirrorless cameras, the Nikon Z cameras use a new lens mount, one that is incompatible with the decades-old Nikon F mount.
The Z mount is wider and can accommodate wider-angle and faster lenses than the old F mount ever could, and in a smaller package. While we have yet to see those lenses appear, in theory that’s the good news.
The bad news is that you’ll need Nikon’s FTZ lens adapter to use any of your existing Nikon F-mount lenses on either the Z6 or Z7. As of this writing, Nikon is supplying an FTZ free with every Z body purchase.
I got an FTZ with my loaner Z6 and it worked very well, allowing even third-party lenses like my Sigma Art lenses to focus at the same point as they normally do (not true of some thIrd-party adapters), preserving the lens’s optical performance. Autofocus functions all worked fine and fast.
The FTZ adapter needed to attach the Z6 to a telescope camera adapter (equipped with a standard Nikon T-ring) and field flattener lens for a refractor.
You’ll also need the FTZ adapter for use on a telescope, as shown above, to go from your telescope’s camera adapter, with its existing Nikon T-ring, to the Z6 body.
The reason is that the field flattener or coma corrector lenses often required with telescopes are designed to work best with the longer lens-to-sensor distance of a DSLR body. The FTZ adapter provides the necessary spacing, as do third-party adapters.
The FTZ lens adapter has its own tripod foot, useful for balancing front-heavy lenses like the big Sigma here.
The only drawback to the FTZ is that any tripod plate attached to the camera body itself likely has to come off, and the tripod foot incorporated into the FTZ used instead. I found myself often having to swap locations for the tripod plate, an inconvenience.
Camera Controller Compatibility
The port side of the Z6, with the DC2 shutter remote jack at bottom, and HDMI and USB-C ports above. There’s also a mic and headphone jack for video use.
Since it uses the same Nikon-type DC2 shutter port as the D750, the Z6 it should be compatible with most remote hardware releases and time-lapse motion controllers that operate a Nikon through the shutter port. An example are the controllers from SYRP.
On the other hand, time-lapse devices and external intervalometers that run Nikons through the USB port might need to have their firmware or apps updated to work with the Z6.
For example, as of early May 2019, CamRanger lists the Z6 as a supported camera; the Arsenal “smart controller” does not. Nor does Alpine Labs for their Radian and Pulse controllers, nor TimeLapse+ for its excellent View bramping intervalometer. Check with your supplier.
For those who like to use laptops to run their camera at the telescope, I found the Windows program Astro Photography Tool (v3.63) worked fine with the Z6, in this case connecting to the camera’s USB-C port using the USB-C to USB-A cable that comes with the camera. This allows APT to shift not only shutter speed, but also ISO and aperture under scripted sequences.
However, BackyardNikon v2.0, current as of April 2019, does not list the Z6 as a supported camera.
Raw File Compatibility
A Z6 Raw NEF file open in Raw Therapee 5.6, showing good star images and de-Bayering.
Inevitably, raw files from brand new cameras cannot be read by any raw developer programs other than the one supplied by the manufacturer, Nikon Capture NX in this case. However, even by the time I did my testing in winter 2019 all the major software suppliers had updated their programs to open Z6 files.
Adobe Lightroom and Photoshop, Affinity Photo, DxO PhotoLab, Luminar 3, ON1 PhotoRAW, and the open-source Raw Therapee all open the Z6’s NEF raw files just fine.
PixInsight 1.8.6 failing to open a Z6 raw NEF file.
Specialized programs for processing astronomy images might be another story. For example, as of v1.08.06, PixInsight, a favourite program among astrophotographers, does not open Z6 raw files. Nor does Nebulosity v4. But check with the developers for updates.
Other Features for Astrophotography
Here are other Nikon Z6 features I found of value for astrophotography, and for operating the camera at night.
Tilting LCD Screen
Like the Nikon D750 and Sony A7III, the Z6 offers a tilting LCD screen great for use on a telescope or tripod when aimed up at the sky. However, the screen does not flip out and reverse, a feature useful for vloggers, but seldom needed for astrophotography.
Showing the top OLED screen and dedicated ISO button that is easy to access in the dark. It works in conjunction with the top dial.
OLED Top Screen (Above)
The Sony doesn’t have one, and Canon’s low-cost mirrorless Rp also lacks one. But the top-mounted OLED screen of the Z6 is a great convenience for astrophotography. It makes it possible to monitor camera status and battery life during a shoot, even with the rear LCD screen turned off to prolong battery life.
Touch Screen
Sony’s implementation of touch-screen functions is limited to just choosing autofocus points. By contrast, the Nikon Z6 offers a full range of touchscreen functions, making it easy to navigate menus and choose settings.
I do wish there was an option, as there is with Pentax, to tint the menus red for preserving night vision.
Built-in Intervalometer
As with other Nikons, the Z6 offers an internal intervalometer capable of shooting time-lapses, just as long as individual exposures don’t need to be longer than 30 seconds.
In addition, there’s the Exposure Smoothing option which, as I have found with the D750, is great for smoothing flickering in time-lapses shot using auto exposure.
Sony has only just added an intervalometer to the a7III with their v3 firmware update, but with no exposure smoothing.
Custom i Menu / Custom Function Buttons
The Sony a7III has four custom function buttons users can assign to commonly used commands, for quick access. For example, I assign one Custom button to the Bright Monitoring function which is otherwise utterly hidden in the menus, but superb for framing nightscapes, if only you know it’s there!
The Nikon Z6 has two custom buttons beside the lens mount. However, I found it easier to use the “i” menu (shown above) by populating it with those functions I use at night for astrophotography. It’s then easy to call them up and adjust them on the touch screen.
Thankfully, the Z6’s dedicated ISO button is now on top of the camera, making it much easier to find at night than the awkwardly placed ISO button on the back of the D750, which I am always mistaking for the Image Quality button, which you do not want to adjust by mistake.
My Menu
As most cameras do, the Z6 also has a “My Menu” page which you can also populate with favourite menu commands.
The D750 (left) compared to the smaller and lighter Z6 (right). This shows the wider Z lens mount compared to Nikon’s old F-mount standard.
Lighter Weight / Smaller Size
The Z6 provides similar imaging performance, if not better (for movies) than the D750, and in a smaller and lighter camera, weighing 200 grams (0.44 pounds) less than the D750. Being able to downsize my equipment mass is a welcome plus to going mirrorless.
Extreme 800% blow-ups of the Moon show a slightly sharper image with the Z6 set to Silent Shutter.
Electronic Front Curtain Shutter / Silent Shooting
By design, mirrorless cameras lack any vibration from a bouncing mirror. But even the mechanical shutter can impart vibration and blurring to high-magnification images taken through telescopes.
The electronic front curtain shutter (lacking in the D750) helps eliminate this, while the Silent Shooting mode does just that — it makes the Z6 utterly quiet and vibration free when shooting, as all the shutter functions are now electronic. This is great for lunar and planetary imaging.
What’s Missing for Astrophotography (not much!)
Bulb Timer for Long Exposures
While the Z6 has a Bulb setting, there is no Bulb Timer as there is with Canon’s recent cameras. A Bulb Timer would allow setting long Bulb exposures of any length in the camera, though Canon’s cannot be combined with the intervalometer.
Instead, the Nikon must be used with an external Intervalometer for any exposures over 30 seconds long. Any number of units are compatible with the Z6, through its shutter port which is the same type DC2 jack used in the D750.
In-Camera Image Stacking to Raws
The Z6 does offer the ability to stack up to 10 images in the camera, a feature also offered by Canon and Pentax. Images can be blended with a Lighten (for star trails) or Average (for noise smoothing) mode.
However, unlike with Canon and Pentax, the result is a compressed JPG not a raw file, making this feature of little value for serious imaging. Plus with a maximum of only 10 exposures of up to 30-seconds each, the ability to stack star trails “in camera” is limited.
Illuminated Buttons
Unlike the top-end D850, the Z6’s buttons are not illuminated, but then again neither are the Z7’s.
As a bonus — the Nikon 35mm S-Series Lens
The upper left frame corner of a tracked star image shot with the 35mm S lens wide open at f/1.8 and stopped down at third stop increments.
With the Z6 I also received a Nikkor 35mm f/1.8 S lens made for the Z-mount, as the lens perhaps best suited for nightscape imaging out of the native Z-mount lenses from Nikon. See Nikon’s website for the listing.
If there’s a downside to the Z-series Nikons it’s the limited number of native lenses that are available now from Nikon, and likely in the future from anyone, due to Nikon not making it easy for other lens companies to design for the new Z mount.
In testing the 35mm Nikkor on tracked shots, stars showed excellent on- and off-axis image quality, even wide open at f/1.8. Coma, astigmatism, spherical aberration, and lateral chromatic aberration were all well controlled.
However, as with most lenses now offered for mirrorless cameras, the focus is “by-wire” using a ring that doesn’t mechanically adjust the focus. As a result, the focus ring turns continuously and lacks a focus scale.
So it is not possible to manually preset the lens to an infinity mark, as nightscape photographers often like to do. Focusing must be done each night.
Until there is a greater selection of native lenses for the Z cameras, astrophotographers will need to use the FTZ adapter and their existing Nikon F-mount or third-party Nikon-mount lenses with the Zs.
Recommendations
I was impressed with the Z6.
The Owl Nebula, Messier 97, a planetary nebula in our galaxy, and the edge-on spiral galaxy Messier 108, paired below the Bowl of the Big Dipper in Ursa Major. This is a stack of 5 x 4-minute exposures at ISO 1600 with the Nikon Z6 taken as part of testing. This was through the Astro-Physics Traveler refractor at f/6 with the Hotech field flattener and FTZ adapter.
For any owner of a Nikon cropped-frame DSLR (from the 3000, 5000, or 7000 series for example) wanting to upgrade to full-frame for astrophotography I would suggest moving to the Z6 over choosing a current DSLR.
Mirrorless is the way of the future. And the Z6 will yield lower noise than most, if not all, of Nikon’s cropped-frame cameras.
The Z6 with the Nikkor 35mm f/1.8 S lens native for the Z mount.
For owners of current Nikon DSLRs, especially a 24-megapixel camera such as the D750, moving to a Z6 will not provide a significant improvement in image quality for still images.
But … it will provide 4K video and much better low-light video performance than older DSLRs. So if it is aurora videos you are after, the Z6 will work well, though not quite as well as a Sony alpha.
In all, there’s little downside to the Z6 for astrophotography, and some significant advantages: low noise, bright live view, clean artifact-free sensor images, touchscreen convenience, silent shooting, low-light 4K video, all in a lighter weight body than most full-frame DSLRs.
I test out a fast and very wide lens designed specifically for Sony mirrorless cameras.
In a previous test I presented results on how well the Sony a7III mirrorless camera performs for nightscape and deep-sky photography. It works very well indeed.
But what about lenses for the Sony? Here’s one ideal for astrophotography.
TL;DR Conclusions
Made for Sony e-mount cameras, the Venus Optics 15mm f/2 Laowa provides excellent on- and off-axis performance in a fast and compact lens ideal for nightscape, time-lapse, and wide-field tracked astrophotography with Sony mirrorless cameras. (UPDATE: Venus Optics has announced versions of this lens for Canon R and Nikon Z mount mirrorless cameras.)
I use it a lot and highly recommend it.
Size and Weight
While I often use the a7III with my Canon lenses by way of a Metabones adapter, the Sony really comes into its own when matched to a “native” lens made for the Sony e-mount. The selection of fast, wide lenses from Sony itself is limited, with the new Sony 24mm G-Master a popular favourite (I have yet to try it).
However, for much of my nightscape shooting, and certainly for auroras, I prefer lenses even wider than 24mm, and the faster the better.
Aurora over Båtsfjord, Norway. This is a single 0.8-second exposure at f/2 with the 15mm Venus Optics lens and Sony a7III at ISO 1600.
The Laowa 15mm f/2 from Venus Optics fills the bill very nicely, providing excellent speed in a compact lens. While wide, the Laowa is a rectilinear lens providing straight horizons even when aimed up, as shown above. This is not a fish-eye lens.
The Venus Optics 15mm realizes the potential of mirrorless cameras and their short flange distance that allows the design of fast, wide lenses without massive bulk.
While compact, at 600 grams the Laowa 15mm is quite hefty for its size due to its solid metal construction. Nevertheless, it is half the weight of the massive 1250-gram Sigma 14mm f/1.8 Art. The Laowa is not a plastic entry-level lens, nor is it cheap, at $850 from U.S. sources.
For me, the Sony-Laowa combination is my first choice for a lightweight travel camera for overseas aurora trips
However, this is a no-frills manual focus lens. Nor does it even transfer aperture data to the camera, which is a pity. There are no electrical connections between the lens and camera.
However, for nightscape work where all settings are adjusted manually, the Venus Optics 15mm works just fine. The key factor is how good are the optics. I’m happy to report that they are very good indeed.
Testing Under the Stars
To test the Venus Optics lens I shot “same night” images, all tracked, with the Sigma 14mm f/1.8 Art lens, at left, and the Rokinon 14mm SP (labeled as being f/2.4, at right). Both are much larger lenses, made for DSLRs, with bulbous front elements not able to accept filters. But they are both superb lenses. See my test report on these lenses published in 2018.
The next images show blow-ups of the same scene (the nightscape shown in full below, taken at Dinosaur Provincial Park, Alberta), and all taken on a tracker.
I used the Rokinon on the Sony a7III using the Metabones adapter which, unlike some brands of lens adapters, does not compromise the optical quality of the lens by shifting its focal position. But lacking a lens adapter for Nikon-to-Sony at the time of testing, I used the Nikon-mount Sigma lens on a Nikon D750, a DSLR camera with nearly identical sensor specs to the Sony.
Vignetting
A tracked image with the Venus Optics Laowa 15mm at f/2. Click or tap on an image to download a full-resolution JPG for closer inspection.
Above is a tracked image (so the stars are not trailed, which would make it hard to tell aberrations from trails), taken wide open at f/2. No lens correction has been applied so the vignetting (the darkening of the frame corners) is as the lens provides.
As shown above, when used wide open at f/2 vignetting is significant, but not much more so than with competitive lenses with much larger lenses, as I compare below.
And the vignetting is correctable in processing. Adobe Camera Raw and Lightroom have this lens in their lens profile database. That’s not the case with current versions (as of April 2019) of other raw developers such as DxO PhotoLab, ON1 Photo RAW, and Raw Therapee where vignetting corrections have to be dialled in manually by eye.
A tracked image with the Venus Optics Laowa 15mm stopped down 1 stop to f/2.8.
When stopped down to f/2.8 the Laowa “flattens” out a lot for vignetting and uniformity of frame illumination. Corner aberrations also improve but are still present. I show those in close-up detail below.
Above, I compare the vignetting of the three lenses, both wide open and when stopped down. Wide open, all the lenses, even the Sigma and Rokinon despite their large front elements, show quite a bit of drop off in illumination at the corners.
The Rokinon SP actually seems to be the worst of the trio, showing some residual vignetting even at f/2.8, while it is reduced significantly in the Laowa and Sigma lenses. Oddly, the Rokinon SP, even though it is labeled as f/2.4, seemed to open to f/2.2, at least as indicated by the aperture metadata.
Above I show lens sharpness on-axis, both wide open and stopped down, to check for spherical and chromatic aberrations with the bright blue star Vega centered. The red box in the Navigator window at top right indicates what portion of the frame I am showing, at 200% magnification in Photoshop.
On-axis, the Venus Optics 15mm shows stars just as sharply as the premium Sigma and Rokinon lenses, with no sign of blurring spherical aberration nor coloured haloes from chromatic aberration.
Focusing is precise and easy to achieve with the Sony on Live View. My unit reaches sharpest focus on stars with the lens set just shy of the middle of the infinity symbol. This is consistent and allows me to preset focus just by dialing the focus ring, handy for shooting auroras at -35° C, when I prefer to minimize fussing with camera settings, thank you very much!
The Laowa and Sigma lenses show similar levels of off-axis coma and astigmatism, with the Laowa exhibiting slightly more lateral chromatic aberration than the Sigma. Both improve a lot when stopped down one stop, but aberrations are still present though to a lesser degree.
However, I find that the Laowa 15mm performs as well as the Sigma 14mm Art for star quality on- and off-axis. And that’s a high standard to match.
The Rokinon SP is the worst of the trio, showing significant elongation of off-axis star images (they look like lines aimed at the frame centre), likely due to astigmatism. With the 14mm SP, this aberration was still present at f/2.8, and was worse at the upper right corner than at the upper left corner, an indication to me that even the premium Rokinon SP lens exhibits slight lens de-centering, an issue users have often found with other Rokinon lenses.
Real-World Examples – The Milky Way
This is a stack of 8 x 2-minute exposures with the Venus Optics Laowa 15mm lens at f/2 and Sony a7III at ISO 800, on the Sky-Watcher Star Adventurer tracker. A single exposure taken through the Kenko Softon A filter layered in with Lighten mode adds the star glows, though exaggerates the lens distortion on the bright stars.This is a stack of 12 exposures for the ground, mean combined to smooth noise, and one exposure for the sky, all 30 seconds at f/2 with the Laowa 15mm lens on the Sony a7III camera at ISO 6400. These were the last frames in a 340-frame time-lapse sequence.
The fast speed of the Laowa 15mm is ideal for shooting tracked wide-field images of the Milky Way, and untracked camera-on-tripod nightscapes and time-lapses of the Milky Way.
Image aberrations are very acceptable at f/2, a speed that allows shutter speed and ISO to be kept lower for minimal star trailing and noise while ensuring a well-exposed frame.
Real World Examples – Auroras
Aurora over the Churchill Northern Studies Centre, Churchill, Manitoba. This is 6 seconds at f/2 with the 15mm Venus Optic lens and Sony a7III at ISO 3200.Aurora from near Yellowknife, NWT, September 8, 2018. This is 2.5-seconds at f/2 with the Venus Optics 15mm lens and Sony a7IIII at ISO 3200.The Northern Lights from at sea when leaving the Lofoten Islands, Norway heading toward the mainlaind, from Stamsund to Bodo, March 3, 2019. This was from the Hurtigruten ship the ms Trollfjord. This is a single 1-second exposure for at f/2 with the 15mm Venus Optics lens and Sony a7III at ISO 6400.
Where the Laowa 15mm really shines is for auroras. On my trips to chase the Northern Lights I often take nothing but the Sony-Laowa pair, to keep weight and size down.
Above is an example, taken from a moving ship off the coast of Norway. The fast f/2 speed (I wish it were even faster!) makes it possible to capture the Lights in only 1- or 2-second exposures, albeit at ISO 6400. But the fast shutter speed is needed for minimizing ship movement.
Video Links
The Sony also excels at real-time 4K video, able to shoot at ISO 12,800 to 51,200 without excessive noise.
Aurora Reflections from Alan Dyer on Vimeo.
The Sky is Dancing from Alan Dyer on Vimeo.
The Northern Lights At Sea from Alan Dyer on Vimeo.
Click through to see the posts and the videos shot with the Venus Optics 15mm.
As an aid to video use, the aperture ring of the Venus Optics 15mm can be “de-clicked” at the flick of a switch, allowing users to smoothly adjust the iris during shooting, avoiding audible clicks and jumps in brightness. That’s a very nice feature indeed.
In all, I can recommend the Venus Optics Laowa 15mm lens as a great match to Sony mirrorless cameras, for nightscape still and video shooting. UPDATE: Versions for Canon R and Nikon Z mount mirrorless cameras will now be available.
I put the new Sony a7III mirrorless camera through its paces for the features and functions we need to shoot the night sky.
Sony’s a7III camera has enjoyed rave reviews since its introduction earlier in 2018. Most tests focus on its superb auto exposure and auto focus capabilities that rival much more costly cameras, including Sony’s own a7rIII and a9.
For astrophotography, none of those auto functions are of any value. We shoot everything on manual. Indeed, the ease of manually focusing in Live View is a key function.
In my testing I compared the Sony a7III to two competitive DSLRs, the Canon 6D MkII and Nikon D750.
All three are “entry-level” full-frame cameras, with 24 to 26 megapixels and in a similar price league of $1,500 (Nikon) to 2,000 (Sony).
I tested a Sony a7III purchased locally. It was not supplied to me by Sony in return for an “influential” blog post.
I did this testing in preparation for the new third edition of my Nightscapes and Time-Lapse eBook, which includes information on Sony mirrorless cameras, as well as many, many other updates and additions!
NOTE:Click or Tap on most images to bring them up full-frame for inspection.
MILKY WAY AT DINOSAUR PARK A stack of 2 x 90-second exposures for the ground, to smooth noise, and at f/2.8 for better depth of field, plus a single 30-second untracked exposure at f/2 for the sky. All with the Laowa 15mm lens and Sony a7III at ISO 3200.
Mirrorless vs. DSLR
COMPACT CAMERA and LENS The Sony a7III with the compact but fast Laowa Venus Optics 15mm f/2 lens.
As with Sony’s other popular Alpha 7 and 9 series cameras, the new Alpha 7III is a full-frame mirrorless camera, a class of camera Canon and Nikon have yet to offer, though models are rumoured or promised.
In the meantime, Sony commands the full-frame mirrorless market.
As its name implies, a mirrorless camera lacks the reflex mirror of a digital single lens reflex camera that, in a DSLR, provides the light path for framing the scene though the optical viewfinder.
SONY LIVE VIEW The Sony a7III’s excellent Live View screen display. You can see the Milky Way!
In a mirrorless, the camera remains in “live view” all the time, with the sensor always feeding a live image to either or both the rear LCD screen and electronic viewfinder (EVF). While you can look through and frame using the EVF as you would with a DSLR, you are looking at an electronic image from the sensor, not an optical image from the lens.
The advantage of purely electronic viewing is that the image you are previewing matches the image you’ll capture, at least for short exposures. The disadvantage is that full-time live view draws more power, with mirrorless cameras notorious for being battery hungry.
Other mirrorless advantages include:
Compact size and lighter weight, yet offering all the image quality of a full-frame DSLR.
The thinner body allows the use of lenses from any manufacturer, albeit requiring the right adapter, an additional expense.
Lenses developed natively for mirrorless models can be smaller and lighter. An example is the Laowa 15mm f/2 I used for some of the testing.
The design lends itself to video shooting, with many mirrorless cameras offering 4K as standard, while often in DSLRs only high-end models do.
More rapid-fire burst modes and quieter shutters are a plus for action and wedding photographers, though they are of limited value for astrophotography.
Points of Comparison
CAMERA TRIO The Sony a7III, Nikon D750, and Canon 6D Mark II. Note the size difference.
In testing the Sony a7III I ignored all the auto functions. Instead, I concentrated on those points I felt of most concern to astrophotographers, such as:
Noise levels
Effectiveness of Long Exposure Noise Reduction (LENR)
Quality of Raw files, such as sharpness of stars
Brightness of Live View for framing and focusing
Uniformity of sensor illumination
Compatibility for time-lapse imaging
Battery life
TL;DR Conclusions
DEEP-SKY TEST The North America Nebula with the Sony a7III and a Meade 70mm f/5 astrographic refractor, for a single 4-minute exposure at ISO 1600. The reds have been boosted in processing.
Noise
Levels of luminance and chrominance noise were excellent and similar to – but surprisingly not better than – the Nikon D750.
Star Eater
The Star Eater is effectively gone. Stars are not smoothed out in long exposures.
ISO Invariance
The Sony exhibited good – though not great – “ISO invariant” performance.
Dark Frames
Dark frame subtraction using Long Exposure Noise Reduction removed most – but not all – hot pixels from thermal noise.
Live View Focusing and Framing
Live View was absolutely superb, though the outstanding Bright Monitoring function is as well-hidden as Sony could possibly make it.
Sensor Illumination Uniformity
The Sony showed some slight edge-of-frame shadowing from the mask in front of the sensor, as well as a weak purple amp glow.
Features
• The a7III lacks any internal intervalometer or ability to add one via an app. But it is compatible with many external intervalometers and controllers.
• The a7III’s red sensitivity for recording H-Alpha-emitting nebulas was poor.
• It lacks the “light-frame” buffer offered by full-frame Canons that allows shooting several frames in quick succession even with LENR turned on.
Video Capability
The a7III offers 4K video and, at 24 frames-per-second, is full-frame. Shutter speeds can be as slow as 1/4-second, allowing real-time aurora shooting at reasonable ISO speeds.
Battery Life
Shooting typical 400-frame time-lapses used about 40% of the battery capacity, similar to the other DSLRs.
Overall Recommendations
The Sony a7III is a superb camera for still and time-lapse nightscape shooting, and excellent for real-time aurora videos. It is good, though not great, for long-exposure deep-sky imaging.
STAR TRAILS and AURORA With the Laowa 15mm lens and Sony a7III, for 155 exposures, all 20 seconds at f/2.8 and at ISO 800, and taken as part of a 360-frame time-lapse.
Noise
The Sony a7III uses a sensor that is “Backside Illuminated,” a feature that promises to improve low-light performance and reduce noise.
I saw no great benefit from the BSI sensor. Noise at typical astrophoto ISO speeds – 800 to 6400 – were about equal to the four-year-old Nikon D750.
That was a bit surprising. I expected the new BSI-equipped Sony to better the Nikon by about a stop. It did not. This emphasizes just how good the Nikon D750 is.
Nevertheless, noise performance of the Sony a7III was still excellent, with both the Sony and Nikon handily outperforming the Canon 6D MkII, with its slightly smaller pixels, by about a stop in noise levels.
NOTE: I performed all Raw developing with Adobe Camera Raw v10.3. It is possible some of the artifacts I saw are due to ACR not handling the a7III’s .ARW files as well as it should. But to develop all the images from Sony, Nikon, and Canon equally for comparisons, ACR is the best choice.
COMPARING NOISE The Sony a7III exhibited noise levels similar to the Nikon D750 at high ISOs, with the Sony and Nikon each about a stop better for noise than the Canon 6D MkII.
NOISE AT ISO 3200 At ISO 3200, a common nightscape ISO speed, all three cameras performed well in this moonlit scene. The Canon shows a darker sky as its images were taken a few minutes later. The Nikon had the Sigma 14mm Art lens; the Canon and Sony used the same Rokinon 14mm SP lens.
NOISE AT ISO 6400 At ISO 6400, the Canon begins to show excessive noise, about a stop worse than the Nikon and Sony. No luminance noise reduction was applied to these images. All cameras show an equal number of stars recorded.
ISO Invariance
Both the Sony and Nikon use sensor and signal path designs that are “ISO invariant.” As a result, images shot underexposed at slower ISOs, then boosted in exposure later in processing look identical to properly exposed high-ISO images. Well, almost.
The Sony still showed some discoloration artifacts and added noise when boosting images by +4 EV that the Nikon did not. Even with uncompressed Raws, the Sony was not quite as ISO invariant as the Nikon, though the difference shows up only under extreme push-processing of badly underexposed frames.
Plus, the Sony was far better than the Canon 6D MkII’s “ISO variant” sensor. Canon really needs to improve their sensors to keep in the game.
ISO INVARIANCE COMPARISON Here I shot all three cameras at ISO 6400 for a correct exposure for the scene, and also at ISO 1600 and ISO 400, for images 2 and 4 stops underexposed respectively. These were then boosted in Adobe Camera Raw by 2 and 4 stops in Exposure Value (EV) to compensate. With ISO invariant sensors the boosted images should look similar to the well-exposed image.
ISO INVARIANCE CLOSE-UP A closeup of the scene shows the ISO variant Canon exhibited more noise and magenta discoloration in the +4 EV boosted image. The Nikon looks very clean, but the Sony also shows discoloration, green here, and an increase in noise. These are all uncompressed 14-bit Raw files.
SONY vs. NIKON Comparing just the two ISO-invariant cameras, the Sony and the Nikon, on another night, shows a similar performance difference when boosting underexposed slow-ISO images later in Camera Raw. The Sony begins to show more noise and now a magenta discoloration in the +3 and +4 EV images, similar to, but not as badly as does the ISO-variant Canon 6D MkII.
Compressed vs. Uncompressed
The Sony a7III offers a choice of shooting Uncompressed or Compressed Raw files. Uncompressed Raws are 47 Mb in size; Compressed Raws are 24 Mb.
In well-exposed images, I saw little difference in image quality.
But the dark shadows in underexposed nightscapes withstood shadow recovery better in the uncompressed files. Compressed files showed more noise and magenta discoloration in the shadows.
It is not clear if Sony’s compressed Raws are 12-bit vs. 14-bit for uncompressed files.
Nevertheless, for the demands of nightscape and deep-sky shooting and processing, I suggest shooting Uncompressed Raws. Use Compressed only if you plan to take lots of time-lapse frames and need to conserve memory card space on extended shoots.
UNCOMPRESSED vs. COMPRESSED Here I compare any image degradation from using compressed vs. uncompressed Raws, and from employing Long Exposure Noise Reduction. Images are only slightly underexposed and boosted by +1 EV in Camera Raw. Shadow noise is similar in all images, with the ones taken with LENR on showing elimination of colored hot pixels, as they should.
UNCOMPRESSED vs. COMPRESSED at -4EV The same scene but now underexposed by 4 stops and boosted by +4 EV later shows greater differences. The compressed image shows more noise and discoloration, and the images taken with LENR on, while eliminating hot pixels, show more random luminance noise. Keep in mind, these are vastly underexposed images.
UNCOMPRESSED vs. COMPRESSED DEEP-SKY A real-world deep-sky example shows the same comparison. All images are well-exposed, for tracked and guided 4-minute exposures. The ones taken with LENR on show fewer hot pixels. The compressed images appear identical to the uncompressed files for noise and star content.
Star Eater (Updated March 27, 2021)
Over the last year or so, firmware updates from Sony introduced a much-publicized penchant for Sony Alphas to “eat” stars even in Raw files, apparently due to an internal noise reduction or anti-aliasing routine users could not turn off. Stars were smoothed away along with the noise in exposures longer than 3.2 seconds in some Sony cameras (longer than 30 seconds in others).
I feel that in the a7III the Star Eater has been largely vanquished.
While others beg to differ and claim this camera still eats stars, they offer no evidence of it other than graphs and charts, not A-B photos of actual tracked starfields taken with the Sony vs. another camera thought not to eat stars.
As the images below show, there is a very slight one-pixel-level softening that kicks in at 4 seconds and longer but it did not eat or wipe out stars. Stars are visible to the same limiting magnitude and close double stars are just as well resolved across all exposures. Indeed, at slower ISOs and longer exposures, more stars are visible.
I saw none of the extreme effects reported by others with other Sonys, where masses of faint stars disappeared or turned into multi-colored blotches. It is possible the effect is still present in other Sony Alpha models. I have not tested those.
But in the a7III, I did not see any significant “star eating” in any long exposures even up to the 4 minutes I used for some deep-sky shots. In images taken at the same time with other cameras not accused of star eating, the Sony showed just as many faint stars as the competitors. Stars were visible to just as faint a limiting magnitude, and that’s what counts, NOT graphs and charts, especially when such results are not shown for other cameras.
In short, long exposures showed just as many stars as did short exposures.
This was true whether I was shooting compressed or uncompressed Raws, with or without Long Exposure Noise Reduction. Neither compression nor LENR invoked “star eating.”
STAR EATER SERIES at 200% This series of tracked images (shown here blown up 200%) goes from 2 seconds to 2 minutes, with decreasing ISO speed to equalize the exposure value across the series. Between 3.2s and 4s a very slight one-pixel-level softening does kick in, reducing noise and very slightly blurring stars. Yet, just as many stars are recorded and are resolved, and at the lower ISOs/longer exposures more stars are visible because faint stars are not lost in the noise.
STAR EATER SERIES at 400% This is the same series as above but now blown up 400% to better reveal the very subtle change in pixel-level sharpness as exposure lengthened from 3.2 to 4 seconds. Noise (most noticeable in the trees) is reduced and stars are very slightly softened. But none are “eaten” or wiped out. And star colors are not affected, though very small stars are sometimes green, an effect seen in other cameras due to de-Bayering artifacts.
STAR EATER DEEP-SKY #1 Tracked deep-sky images through a telescope using 4-minute exposures show the Sony a7III recording an equal number of faint stars as the Canon 6D MkII. No luminance noise reduction was applied to these images in processing.
STAR EATER DEEP-SKY #2 Another example with 4-minute exposures again demonstrates no problems recording faint stars. The Canon does show more noise than the Sony. No noise reduction was applied in processing.
SONY and NIKON COMPARED For yet more evidence, this is a comparison of the Sony a7III vs. the Nikon D750 in tracked 90-second exposures with 14mm lenses. Again, the Sony records just as many stars as the Nikon.
LENR Dark frames
For elimination of hot pixels from thermal noise I prefer to use Long Exposure Noise Reduction when possible for nightscape and deep-sky images, especially on warm summer nights.
Exceptions are images taken for star trail stacking and for time-lapses, images that must be taken in quick succession, with minimal time gap between frames.
Turning on LENR did eliminate most hot pixels in long exposures, but not all. A few remained. Also, when boosting the exposure a lot in processing, the images taken with LENR on showed more shot and read noise than non-LENR frames.
The dark frame the camera was taking and subtracting was actually adding some noise, perhaps due to a temperature difference. The cause is not clear.
Sony advises that when using LENR Raw images are recorded with only 12-bit depth, not 14-bit. This might be a contributing factor. Yet frames taken with LENR on were the same 47 Mb size as normal uncompressed frames.
For those who think this is normal for LENR use, the Nikon D750 shows nothing like this – frames taken with LENR on are free of all hot pixels and do not show more shot or read noise, nor deterioration of shadow detail from lower bit depths.
However, I emphasize that the noise increase from using LENR with the Sony was visible only when severely boosting underexposed images in processing.
In most shooting situations, I found using LENR provided the overriding positive benefit of reducing hot pixels. It just needs to be better, Sony!
SONY WITH AND WITHOUT LENR These are 4-minute exposures of dark frames (i.e. the lens cap on!) taken at room temperature with and without Long Exposure Noise Reduction. In the Sony, LENR did not eliminate all hot pixels nor the magenta amp glow at the left edge. LENR also added a background level of fine noise. These have had exposure and contrast increased to exaggerate the differences.
NIKON WITH AND WITHOUT LENR Dark frames taken with the Nikon D750 under the same circumstances and processed the same show none of the residual hot pixels and added background noise when LENR is employed. Nor is there any amp glow anywhere along the frame edges.
SONY REAL-WORLD LENR COMPARISON A real-world example with the Sony, with a properly exposed nightscape, shows that the ill effects of using LENR don’t show up under normal processing. You do get the benefit of reduced hot pixels in shadows, especially on a warm night like this was. This is a blow-up of the lower corner of the frame, as indicated.
Sensor Illumination
How evenly an image is illuminated is a common factor when testing lenses.
But astrophotography, which often requires extreme contrast boosts, reveals non-uniform illumination of the sensor itself, regardless of the optics, originating from hardware elements in front of the sensor casting shadows onto the sensor.
This is most noticeable – indeed usually only noticeable – when shooting deep-sky targets though telescopes.
With DSLRs it is the raised mirror which often casts a shadow, produced a dark vignetted band along the bottom of the frame. Its extent varies from camera model to model.
With a mirrorless camera the sensor is not set far back in a mirror box, as it is in a DSLR. As such, I would have expected a more uniformly illuminated sensor.
SENSOR CLOSE-UP showing intruding mask edges.
Instead, I saw a slight shadowing at the top and bottom edges but just at the corners. This is from a thin metal mask in front of the sensor. It intrudes into the light path ever so slightly. It shouldn’t.
This is an annoying flaw, though applying “flat fields” or ad hoc local adjustments should eliminate this. But that’s a nuisance to do, and should not be necessary with a mirrorless camera.
Worse is that long deep-sky exposures at high ISOs also exhibited a faint purple glow at the left edge, perhaps from heat from nearby electronics, a so-called “amp glow.” Or I’ve read where this is from an internal infrared source near the sensor.
Taking a dark frame with LENR did not eliminate this, and it should, demonstrating again that for whatever reason in the a7III LENR is not as effective as it should be.
I have not seen such “amp” glows in cameras (at least in the DSLRs I’ve used) for a number of years, so seeing it in the new Sony a7III was another surprise.
This would be much tougher to eliminate in deep-sky images where the extreme contrast boosts we typically apply to images of nebulas and galaxies will accentuate any odd glows.
UPDATE: March 27, 2021 — Subsequent firmware updates seem to have eliminated this amp glow. One supplier of filter-modified cameras, Spencer’s Camera, who had refused to modify Sonys because of this glow, now lists many Sony Alphas as suitable for modification. However, the sensor masks and “green stars” (described below) still make the Sony a7III less desirable for deep-sky imaging than other mirrorless cameras I’ve tested.
SONY FIELD ILLUMINATION #1 The full field of a deep-sky image taken through an f/5 70mm astrographic refractor shows the minor level of edge darkening at the corners from shadowing of the sensor in the Sony.
SONY FIELD ILLUMINATION #2 The full field of a deep-sky image taken through an f/6 105mm refractor shows the level of edge darkening at the edges from shadowing of the sensor in the Sony, and the purple “amplifier” glow at the left edge present in all very long exposures.
Red Sensitivity
When shooting deep-sky objects, particularly red nebulas, we like a camera to have a less aggressive infrared cutoff filter, to pick up as much of the deep red Hydrogen-Alpha emission line as possible.
The Sony showed poor deep-red sensitivity, though not unlike other cameras. It was a little worse than the stock Canon 6D MkII.
This isn’t a huge detriment, as anyone who really wants to go after deep nebulosity must use a “filter-modified” camera anyway.
Canon and Nikon both offered factory modified cameras at one time, notably the Canon 60Da and Nikon D810a. Sony doesn’t have an “a” model mirrorless.
To get the most out of the Sony for deep-sky imaging you would have to have it modified by a third-party, though the amp glow described above makes it a poor choice for modification.
RED SENSITIVITY COMPARED Three deep-sky exposures compare cameras for red sensitivity: a filter-modified Canon 5D MkII, a stock Canon 6D MkII, and the stock Sony a7III. As expected the filter-modified camera picks up much more red nebulosity. The Sony doesn’t do quite as well as the Canon 6D MkII.
Live View Focusing and Framing
Up to now my report on the Sony a7III hasn’t shown as glowing a performance as all the YouTube reviews would have you believe.
But Live Focus is where the a7III really stands out. I love it!
In Live View it is possible to make the image so bright you can actually see the Milky Way live on screen! Wow! This makes it so easy to frame nightscapes and deep-sky fields.
FINDING BRIGHT MONITORING The excellent Bright Monitoring function is accessible only off the Custom Key menu where it appears as a choice on the Display/Auto Review2 page (below) that can be assigned to a C button.
But this special “Bright Monitoring” mode is as well hidden as Sony could make it. Unless you actually read the full-length 642-page PDF manual (you have to download it), you won’t know about it. Bright Monitoring does not appear in any of the in-camera menus you can scroll through, so you won’t stumble across it.
Instead, you have to go to the Camera Settings 2 page, then select Still Image–Custom Key. In the menu options that appear you can now scroll to one called Bright Monitoring. Surprise! Assign it to one of the hardware Custom C buttons. I put it on C2, making it easy to call up when needed.
The other Live View function that works well, but also needs assigning to a C button is the Camera Settings 1 > Focus Magnifier. I put this on C1. It magnifies the Live View by 5.9x or 11.7x, allowing for precise manual focusing on a star.
Two other functions are useful for Live View:
Camera Settings 2 > Live View Display > Setting Effect ON. This allows the Live View image to reflect the camera settings in use, better simulating the actual exposure, even without Bright Monitoring on.
Camera Settings 1 > Peaking Setting. Turning this ON superimposes a shimmering effect on parts of an image judged in focus. This might be an aid, or an annoyance. Try it.
In all, the Sony provides superb, if well-hidden, Live View options that make accurately framing and focusing a nightscape or time-lapse scene a joy.
Great Features for Astrophotography
Here are some other Sony a7III features I found of value for astrophotography, and for operating the camera at night.
SONY TILTING SCREEN It tilts up and down but does not flip out as with the Canon 6D MkII’s. Still, this is a neck- and back-saving feature for astrophotography.
Tilting LCD Screen
Like the Nikon D750, the Sony’s screen tilts vertically up and down, great for use when on a telescope, or on any tripod when aimed up at the sky. As photographers age, this becomes a more essential feature!
Custom Buttons
The four C buttons can be programmed for oft-used functions, making them easy to access at night. Standard functions such as ISO and Drive Mode are easy to get at on the thumb wheel, unlike the Nikon D750 where I am forever hunting for the ISO or Focus Zoom buttons, or the Canon 6D MkII which successfully hides the Focus Zoom and Playback buttons at night.
My Menu
In new models, Sony now offers the option of a final “My Menu” page which you can populate with often-used functions from the other 35 pages of menu commands!
Adaptability to Many Lenses
Using the right lens adapter (I use one from Metabones), it is possible to use lenses with mounts made for Canon, Nikon, Sigma and others. Plus there are an increasing number of lenses from third parties offered with native Sony E-mounts. This is good news, as astrophotography requires fast, high-quality lenses, and the Sony allows more choices.
Lighter Weight / Smaller Size
The compact a7III body weighs a measured 750 grams, vs. 900 grams each for the Nikon D750 and Canon 6D MkII. The lower weight can be helpful for use on lightweight telescopes, on small motion control devices, and for simply keeping weight and bulk down when traveling.
Dual Card Slots
Not essential, but having two card slots is very helpful, for backup, for handling overflows from very long time-lapse shoots, or assigning them for stills vs. movies, or Raws vs. JPGs. Only Slot 1 will work with the fastest UHS II cards that are needed for recording the highest quality 4K video.
USB Power
It is possible to power the camera though the USB port (indeed that’s how you charge the battery, as no separate battery charger is supplied as standard, a deficiency). This might be useful for long shoots, though likely as not that same USB port will be needed for an intervalometer or motion control device. But if the Sony had a built-in intervalometer…!
Display Options
To reduce battery drain it is possible to turn off the EVF completely – I find I never use it at night – and to turn off the LCD display when shooting, though the latter is an option you have to activate to add to the Display button’s various modes.
The downside is that when shooting is underway you get no reassuring indication anything is happening, except for a brief LED flash when an image is written to a card.
Electronic Front Curtain Shutter
Most DSLRs do not offer this, but the Sony’s option of an electronic front curtain shutter and the additional Silent Shooting mode completely eliminates vibration, useful for some high-magnification shooting through telephotos and telescopes.
LUNAR CLOSE-UPS COMPARED This trio compares closeups of the Moon taken with and without electronic front curtain shutter. All were taken through a 130mm refractor telescope at f/12 using a Barlow lens. The image with e-shutter and in Silent Mode is a tad sharper, but that could be just as much from variations in seeing conditions as from the lower vibration from using the electronic shutter.
What’s Missing for Astrophotography
Intervalometer — NOW INCLUDED! UPDATE: In April 2019 Sony issued a v3 Firmware update for the a7III which added an internal intervalometer. I’ve used this new function and it works very well.
I had originally remarked that this useful function was missing. But no more! Thank you Sony!
While a built-in intervalometer is not essential, I find I often do use the Canon and Nikon in-camera intervalometers for simple shoots. So it is great to have one available on the Sony. However, like other brands’ internal intervalometers Sony’s is good only for exposures up to 30 seconds long.
Bulb Timer or Long Exposures
However, while the Sony has a Bulb setting there is no Bulb Timer as there is with the Canon. The Bulb Timer would allow setting long Bulb exposures of any length in the camera.
Instead, for any exposures over 30 seconds long (or time-lapses with >30-second-long frames) the Sony must be used with an external Intervalometer. I use a $50 Vello unit, and it works very well. It controls the Sony through the camera’s Multi USB port.
In-Camera Image Stacking
Also missing, and present on most new Canons, are Multiple Exposure modes for in-camera stacking of exposures in a Brighten mode (for star trails) or Averaging mode (for noise smoothing).
Yes, this can all be done later in processing, but having the camera do the stacking can often be convenient, and great for beginners, as long as they understand what those functions do, or even that they exist!
Time-Lapse Smoothing
When using its internal intervalometer, the Nikon D750 has an excellent Exposure Smoothing option. This does a fine job smoothing frame-to-frame flickering in time-lapses, something the Canon cannot do. Nor the Sony, as it has no intervalometer at all.
Light Frame Buffer in LENR
This feature is little known and utilized, and only Canon full-frame cameras offer it. Turn on LENR and it is possible to shoot three (with the 6D MkII) or four (with the 6D) Raw images in quick succession even with LENR turned on. The Canon 5D series also has this.
The dark frame kicks in and locks up the camera only after the series of “light frames” are taken. This is wonderful for taking a set of noise-reduced deep-sky images for later stacking. Nikons don’t have this, not even the D810a, and not Sonys.
Illuminated Buttons
The Sony’s buttons are not illuminated. While these might add glows to long exposure images, if they could be designed not to do that (i.e. they turn off during exposures), lit buttons would be very handy at night.
Limited Touch Screen Functions
An alternative would be an LCD screen that was touch sensitive. The Sony a7III’s screen is, but only to select an area for auto focus or zooming up an image in playback. The Canon 6D MkII has a fully functional touch screen which can be, quite literally, handy at night.
INTERVALOMETER For time-lapses, the Sony must be used with an external intervalometer like this Vello unit.
Video Capability
Here’s another area where the new Sony a7III really shines.
It offers 4K (or more precisely UltraHD) video recording for videos of 3840 x 2160 pixels. (True 4K is actually 4096 x 2160 pixels.)
With a fast enough UHS-II Class card it can record 4K video up to 30 frames per second and at a bit rate of either 60 or 100 Mbps.
At 24 fps videos are full-frame with no cropping. Hurray! You can take full advantage of wide-angle lenses, great for auroras. At 30 fps, 4K videos are cropped with a 1.2x crop factor.
In Movie Mode ISO speeds go up to ISO 102,400, but are pretty noisy, if unusable at such speeds.
But when shooting aurora videos I found, to my surprise, I could “drag” the shutter speeds as slow as 1/4-second, fully 4 stops better than the Nikon’s slowest shutter speed of 1/60 second in Full HD, and 3 stops better than the Canon’s slowest movie shutter of 1/30 second.
Coupled with a fast f/1.4 to f/2 lens, the slow shutter speed allows real-time aurora shooting at “only” ISO 6400 to 12,800, for quite acceptable levels of noise. I am very impressed!
Real-time video of auroras is not possible with anything like this quality with the Nikon (I’ve used it often), and absolutely not with the Canon. And neither are 4K.
Is the a7III as good for low-light video as the Sony a7s models, with their larger 8.5-micron pixels?
I would assume not, but not having an a7s (either Mark I or II) to test I can’t say for sure. But the a7III should do the job for bright auroras, the ones with rapid motion worth recording with video, plus offer 24 megapixels for high-quality stills of all sky subjects.
I think it’s a great camera for both astrophoto stills and video.
AURORA VIDEO FRAME This is a frame grab from a real-time 4K video of a “Steve” aurora.
An example is in a 4K video I shot on May 6, 2018 of an usual aurora known as “STEVE.”
Steve Aurora – May 6, 2018 (4K) from Alan Dyer on Vimeo.
For another example of using the Sony a7III for recording real-time video of the night sky see this video of the aurora shot from Norway in March 2019.
The Northern Lights At Sea from Alan Dyer on Vimeo.
Battery Life
I found the a7III would use up about about 40% of the battery capacity in a typical 400-frame time-lapse on mild spring nights, with 30-second exposures. This is with the EVF and rear LCD Display OFF, and the camera in Airplane mode to turn off wireless functions to further conserve battery power. I was using the wired Vello intervalometer.
This is excellent performance on par with the DSLRs I use. At last, we have a mirrorless camera that not only doesn’t eat stars, it also does not eat batteries!
One battery can get you through a night of shooting, though performance will inevitably decline in winter, as with all cameras.
MILKY WAY and PLANETS With the Sony a7III and Laowa 15mm lens at f/2 for a stack of 4 exposures for the ground to smooth noise and one exposure for the sky, all 30 seconds at ISO 3200.
Lens and Telescope Compatibility
As versatile as a mirrorless camera is for lens choice, making use of that versatility requires buying the right lens adapter(s). They can cost anywhere from $100 to $400. The lowest cost units just adapt the lens mechanically; the more costly units also transfer lens data and allow auto focusing with varying degrees of compatibility.
WITH METABONES CANON ADAPTER The MetaBones Canon EF-to-Sony E mount adapter transfers lens data and allows auto focus to function.
For use on telescopes, the simple adapters will be sufficient, and necessary as many telescope-to-camera adapters and field flatteners are optimized for the longer lens flange-to-sensor distance of a DSLR. Even if you could get a mirrorless camera to focus without a lens adapter to add the extra spacing, the image quality across the field might be compromised on many telescopes.
I used the Metabones Canon-to-Sony adapter when attaching the Sony to my telescopes using my existing Canon telescope adapters. Image quality was just fine.
ADAPTING TO A TELESCOPE The MetaBones adapter, as will other brands, adds the correct lens flange to sensor distance for telescope field flatteners to work best.
Time-Lapse Controller Compatibility
Due to limitations set by Sony, controlling one of their cameras with an external controller can be problematic.
Devices that trigger only the shutter should be fine. That includes simple intervalometers like the Vello, the Syrp Genie Mini panning unit, and the Dynamic Perception and Rhino sliders, to name devices I use. However, all will need the right camera control cable, available from suppliers like B&H.
And, as I found, the Sony might need to be placed into Continuous shooting mode to have the shutter fire with every trigger pulse from the motion controller. When used with the Genie Mini (below) the Sony fired at only every other pulse if it was in Single shot mode, an oddity of Sony’s firmware.
Some time-lapse controllers are able to connect to a camera through its USB port and then adjust the ISO and aperture as well, for ramped “holy grail” sunset-to-Milky Way sequences.
For example, the TimeLapse+ View (see http://www.timelapseplus.com) works great for automated holy grails, but the developer recommends that with most Sonys the minimum allowed interval between shots is longer (8 to 14 seconds) than with Canons and Nikons. See http://docs.view.tl/#camera-specific-notes
SONY WITH THE SYRP GENIE MINI The Sony A7III worked well with the Syrp Genie Mini motion controller with the right shutter cable but only when placed in Continuous mode.
Recommendations
In conclusion, here’s my summary recommendations for the three competitive cameras, rating them from Poor, to Fair, to Good, to Excellent.
SONY: I deducted marks from the Sony a7III for deep-sky imaging for its lack of a light frame buffer, poor red sensitivity, odd LENR performance, and purple amp glow not seen on the other cameras and that dark frames did not eliminate.
However, I did not consider “star eating” to be a negative factor, as the Sony showed just as many stars and as well-resolved as did the competitors, and what more could you ask for?
I rate the Sony excellent for nightscape imaging and for real-time aurora videos. I list it as just “good” for time-lapse work only because it will not be fully compatible with some motion controllers and rampers. So beware!
NIKON: I deducted points for real-time video of auroras – the D750 can do them but is pretty noisy with the high ISOs needed. Its red sensitivity is not bad, but its lack of a light frame buffer results a less productive imaging cycle when using LENR on deep-sky shooting.
I know … people shoot dark frames separately for subtracting later in processing. However, I’ve found these post-shoot darks rarely work well, as the dark frames are not at the same temperature as the light frames, and often add noise or dark holes.
CANON: The 6D MkII’s lack of an ISO invariant sensor rears its ugly head in underexposed shadows in dark-sky nightscapes. I like its image stacking options, which can help alleviate the noise and artifacts in still images, but aren’t practical for time-lapses. Thus my Good rating for nightscapes but Fair rating for time-lapses. (See my test at https://amazingsky.net/2017/08/09/testing-the-canon-6d-mark-ii-for-nightscapes/)
While the 6D MkII has HD video, it is incapable of any low-light video work.
And its light-frame buffer is great for minimizing shooting time for a series of deep-sky images with in-camera LENR dark frames, which I find are the best for minimizing thermal noise. Give me a Canon full-frame any day for prime-focus deep-sky shooting.
It’s just a pity the 6D MkII has only a 3-frame buffer when using LENR. Really Canon? The 2008-vintage 5D MkII had a 5-frame buffer! Your cameras are getting worse for astrophotography while Sony’s are getting better.
SONY a7III
NIKON D750
CANON 6D Mk II
Nightscapes
Excellent
Excellent
Good
Time-Lapse
Good
Excellent
Fair
Real-Time Video (Auroras)
Excellent
Fair
Poor
Wide-field Deep Sky
Good
Good
Excellent
Telescopic Deep Sky
Fair
Good
Excellent
I trust you’ll find the review of value. Thanks for reading!
ADDENDUM as of JUNE 6, 2018
Since publishing the first results a number of people commented with suggestions for further testing, to check claims that:
The Sony would perform better for noise under dark sky conditions, at high ISOs, rather than the moonlit scene above. OK, let’s try that.
The Sony would perform better in an ISO Invariancy “face-off” if its ISOs were kept above 640, to keep all the images within the Sony’s upper ISO range of its dual-gain sensor design, with two ranges (100 to 400, and 640 on up). Fair enough.
What little “star-eater” effect I saw might be mitigated by shooting on Continuous drive mode or by firing the shutter with an external timer. That’s worth a check, too.
For the additional tests, I shot all images within a 3-hour span on the night of June 5/6, using the Sony a7III, Nikon D750, and Canon 6D MkII, with the respective lenses: the Laowa 15mm lens at f/2, the Sigma 14mm Art at f/2, and the Rokinon 14mm SP at f/2.5.
The cameras were on a Star Adventurer Mini tracker to keep stars pinpoints, though the ground blurred in the longer exposures.
DARK SKY NOISE TEST
I show only the Sony and Nikon compared here, shot at the common range of ISOs used for nightscape shooting, 800 to 12800. All images are equally well exposed. The inset image at right in Photoshop shows the scene, the Milky Way above dark trees in my backyard!
To the eye, the Sony and Nikon look very similar for noise levels, just as in the moonlit scene. Both are very good – indeed, among the best performing cameras for high-ISO noise levels. But the Sony, being four years newer than the Nikon, is not better.
BUT … what the Sony did exhibit was better details in the shadows than the Nikon.
And this was with equal processing and no application of Shadow Recovery. This is where the Sony’s Backside Illuminated sensor with presumably higher quantum efficiency in gathering photons might be providing the advantage. With its good shadow details, you have to apply less shadow recovery in post-processing, which does keep noise down. So points to Sony here.
SONY vs NIKON HIGH ISO under DARK SKIES Noise levels appeared visually similar but the Sony showed more shadow details. Excellent!
I did put all the high ISO images through the classic noise reduction program Noise Ninja to measure total Luminance and Chrominance noise, and included the Canon 6D MkII’s images.
The resulting values and graph show the Sony actually measured worse for noise than the Nikon at each high ISO speed, 3200 to 12800, though with both performing much better than the Canon.
The higher noise of the Canon is visually obvious, but I’d say the Sony a7III and Nikon D750 are pretty equal visually for noise, despite the numbers.
COMPARING NOISE WITH NOISE NINJA
DARK SKY ISO INVARIANCY
Again, here I show only the Sony and Nikon, the two “ISO invariant” cameras. The correct exposure for the scene was 30 seconds at ISO 6400 and f/2. The images shown here were shot at lower ISOs to underexposure the dark scene by 2 to 4 stops or EV. Those underexposed images were then boosted later in processing (in Adobe Camera Raw) by the required Exposure Value to equalize the image brightness.
Contrary to expectations, the Sony did not show any great loss in image quality as it crossed the ISO 640 boundary into its lower ISO range. But the Nikon did show more image artifacts in the “odd-numbered” ISOs of 640 and 500. In this test, the Nikon did not perform as well as the Sony for ISO invariancy. Go figure!
Again, the differences are in images vastly underexposed. And both cameras performed much better than the ISO “variant” Canon in this test.
DARK SKY ISO INVARIANCY Here the Sony a7III performed well and better than the Nikon D750.
STAR EATER REVISITED
I shot images over a wide-range of exposures, from 2 seconds to 2 minutes, but show only the ones covering the 2-second to 4-second range, where the “star-eater” anti-aliasing or noise smoothing applied by Sony kicks in (above 3.2 seconds it seems).
I shot with the Sony a7III on Single shot drive mode, on Continuous Low drive mode (with the camera controlling the shutter speed in both cases), and a set with the Sony on Bulb and the shutter speed set by an external Vello intervalometer.
This is really pixel peeping at 400%. In Single drive mode, stars and noise soften ever so slightly at 4 seconds and higher. In Continuous mode, I think the effect is still there but maybe a little less. In shots on Bulb controlled by the External Timer, maybe the stars at 4 seconds are a little sharper still. But this is a tough call. To me, the star eater effect on the Sony a7III is a non-issue. It may be more serious on other Sony alphas.
STAR EATING vs DRIVE MODE This series shows star sharpness in images taken in Single and Continuous drive modes, and in Externally Timed exposures.
DE-BAYERING STAR ARTIFACTS
An issue that, to me, has a more serious effect on star quality is the propensity of the Sony, and to some extent the Nikon, to render tiny stars as brightly colored points, unrealistically so. In particular, many stars look green, from the dominance of green-filtered photosites on Bayer-array sensors.
Here I compare all three cameras for this effect in two-minute tracked exposures taken with Long Exposure Noise Reduction (i.e. in-camera dark frame subtraction) off and on.
The Sony shows a lot of green stars with or without LENR. The Nikon seems to discolor stars only when LENR is applied. Why would that be? The Canon is free of any such issue – stars are naturally colored whether LENR dark frames are applied or not.
This is all with Raws developed with Adobe Camera Raw.
When opening the same Raws in other programs (ON1 Photo RAW, Affinity Photo, DxO PhotoLab, and Raw Therapee) the results can be quite different, with stars often rendered with fringes of hot, colored pixels. Or rendered with little or no color at all. Raw Therapee offers a choice of de-Bayering, or “de-mosaic,” routines, and each produces different looking stars, and none look great! Certainly not as good as the Canon rendered with Camera Raw.
What’s going on here is a mystery – it’s a combination of the cameras’ unique Raw file formats, anti-alias filter in front of the sensor (or lack thereof in the Sony), and the de-Bayering routines of all the many Raw developers wrestling with the task of rendering stars that occupy only a few pixels. It’s unfair to blame just the hardware or the software.
But this test re-emphasized my thoughts that Canon DSLRs remain the best for long-exposure deep-sky imaging where you can give images as much exposure time as they need, while the ISO invariant Sony and Nikons exceed at nightscape shooting where exposures are often limited and plagued by dark shadows and noise.
COLORED STARS COMPARISON The Sony shows a propensity to render small stars in many vivid and unreal colors. The Nikon can do so after LENR is applied. The Canon is more neutral and natural.