

On Sunday, September 27 the Moon undergoes a total eclipse, the last we’ll see until January 2018.
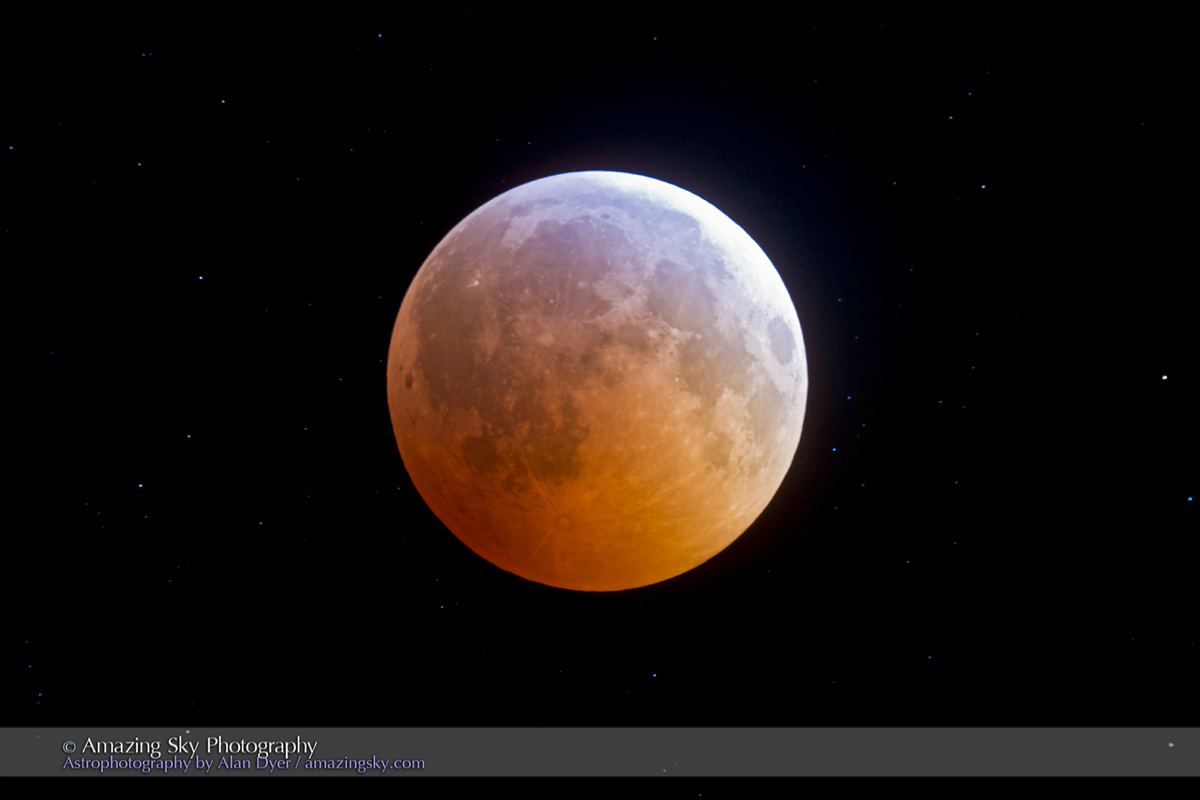
This is a sky event you don’t want to miss. Whether you photograph it or just enjoy the view, it will be a night to remember, as the Full Moon turns deep red during a total eclipse.
Note — For this article I’m giving times and sky directions for North America. For Europe the eclipse occurs early in the morning of September 28, as the Moon sets into the west. But for here in North America the timing could not be better. Totality occurs in the evening of Sunday, September 27 as the Moon rises into the east.

ECLIPSE BASICS
A total lunar eclipse occurs when the Moon — and it can only be Full — passes through the shadow cast into space by Earth. The Sun, Earth and Moon are in near-perfect alignment.
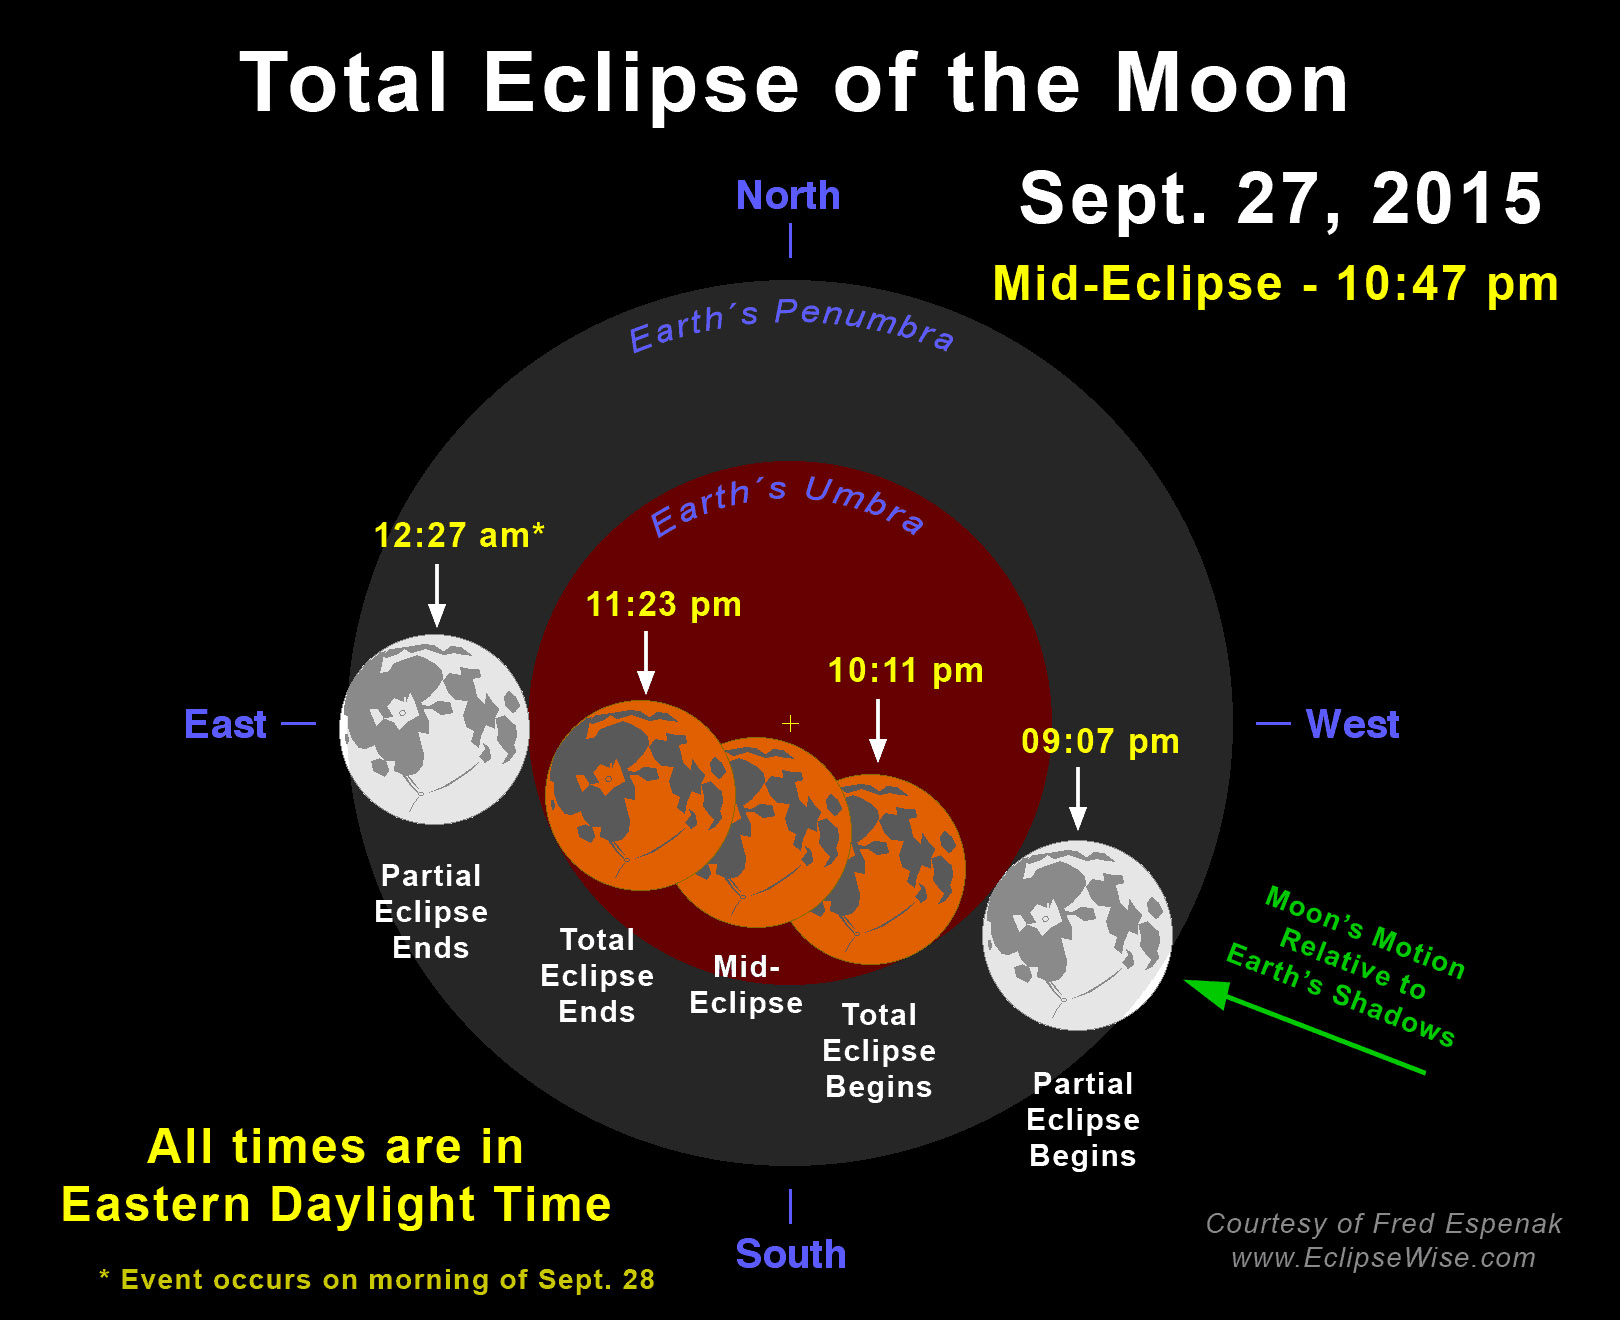
All total eclipses of the Moon consist of 3 main parts:
• The initial partial eclipse occurs as the Moon slowly enters the dark central portion of our planet’s shadow, the umbra. This lasts about an hour.
• Totality begins as the entire disk of the Moon is within the umbra. For this eclipse, totality lasts a generous 72 minutes.
• Totality ends as the Moon emerges from the umbra to begin the final partial eclipse lasting another hour.
WHERE TO SEE IT
All of North America, indeed most of the western hemisphere, can see this eclipse. In North America, the farther east you live on the continent the later in your evening the eclipse occurs and the higher the Moon appears in the southeast.
For example, in the Eastern time zone, totality begins at 10:11 p.m. EDT and ends at 11:23 p.m. EDT, with mid-totality is at 10:47 p.m. EDT with the Moon about 35 degrees up, placing it high in the southeast sky for southern Ontario, for example.
For me in the Mountain time zone, the total eclipse begins at 8:11 p.m. MDT and ends at 9:23 p.m. MDT, with mid-totality is at 8:47 p.m. MDT, with the Moon just 13 degrees up in the east from here in southern Alberta. From my time zone, and from most location in the Rocky Mountain regions, the Moon rises with the initial partial phases in progress.
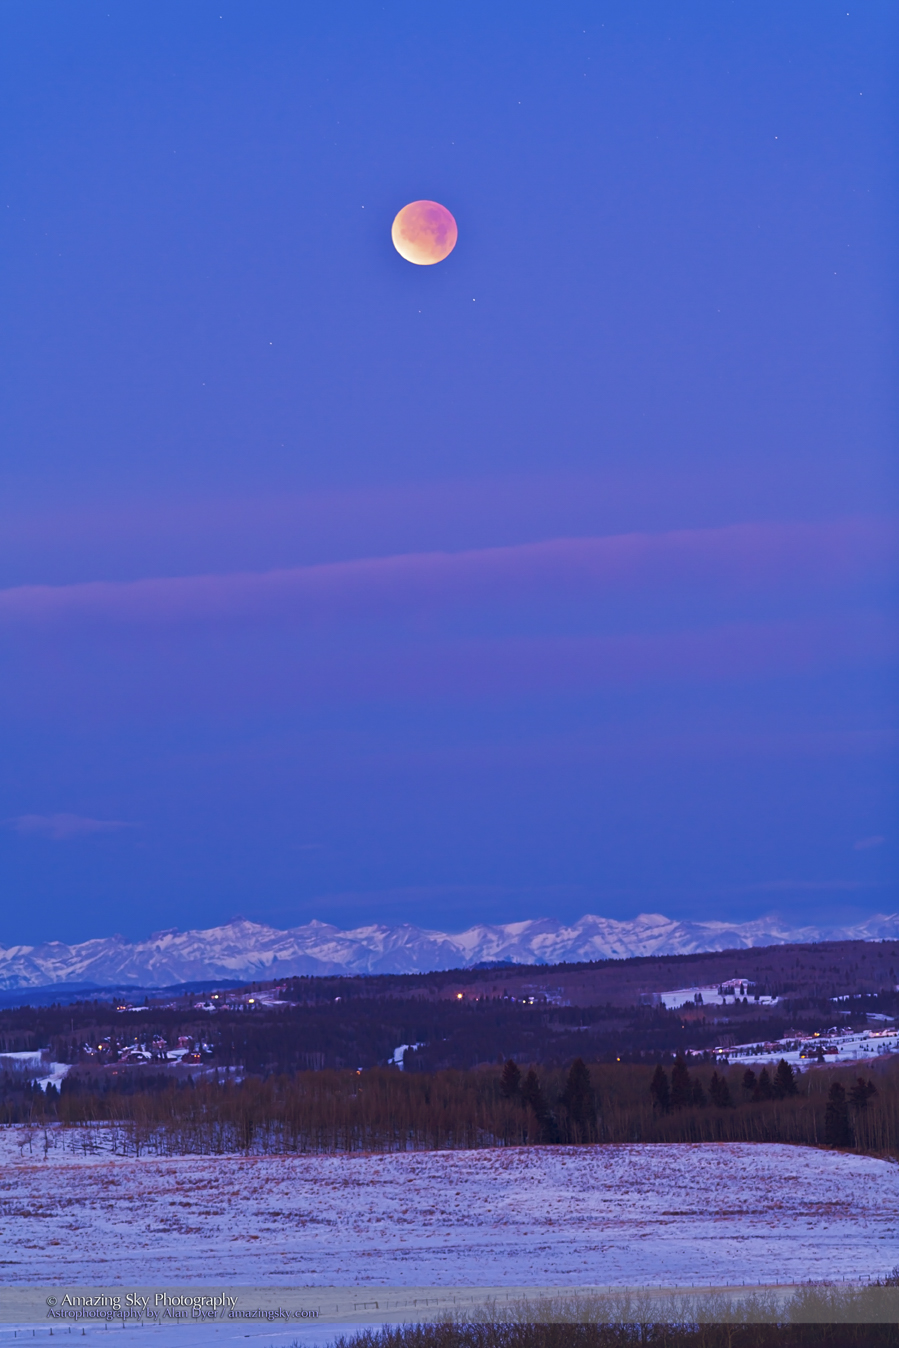
For locations on the west coast viewers miss most of the partial eclipse phase before totality. Instead, the Moon rises as totality begins, making for a more challenging observation. Viewers on the coast will need clear skies and a low horizon to the east, but the reward could be a beautiful sight and images of a red Moon rising.

“SUPERMOON” ECLIPSE
This eclipse of the Moon is the last in a series of four total lunar eclipses that occurred at six-month intervals over the last two years. We won’t enjoy another such “tetrad” of total lunar eclipses until 2032-33.
But this eclipse is unique in that it also coincides with the annual Harvest Moon, the Full Moon closest to the autumnal equinox. Harvest Moons are known for their orange tint as they rise into what is sometimes a dusty autumn evening.
But what is making internet headlines is that this Full Moon is also the year’s “supermoon,” the Full Moon of 2015 that comes closest to Earth. In recent years these “perigee” Full Moons have been dubbed “supermoons.”
Call it what you will, it does make this Full Moon a little larger than usual, though the difference is virtually impossible to detect by eye. And it makes little difference to the circumstances or appearance of the eclipse itself.

HOW TO SEE IT
Just look up! You can enjoy the eclipse with the unaided eye, and even from within city limits.
Unlike eclipses of the Sun, the eclipsed Moon is perfectly safe to look at with whatever you wish to use to enhance the view. The best views are with binoculars or a telescope at low power.
Look for subtle variations in the red colouring across the disk of the Moon, and even tints of green or blue along the dark edge of the Earth’s advancing or retreating shadow during the partial phases.
If you can, travel to a dark site to enjoy the view of the stars and Milky Way brightening into view as the Full Moon reddens and the night turns dark.
HOW TO SHOOT IT

1. On A Tripod
The easiest method is to use a camera on a tripod, with a remote release to fire the shutter and prevent vibration from blurring the image. What lens you use will depend on how you wish to frame the scene and how high the Moon is in your sky.
Lens Choice
From eastern North America you’ll need a wide-angle lens (14mm to 24mm) to frame the eclipsed Moon and the ground below. The Moon will appear as a small red dot.
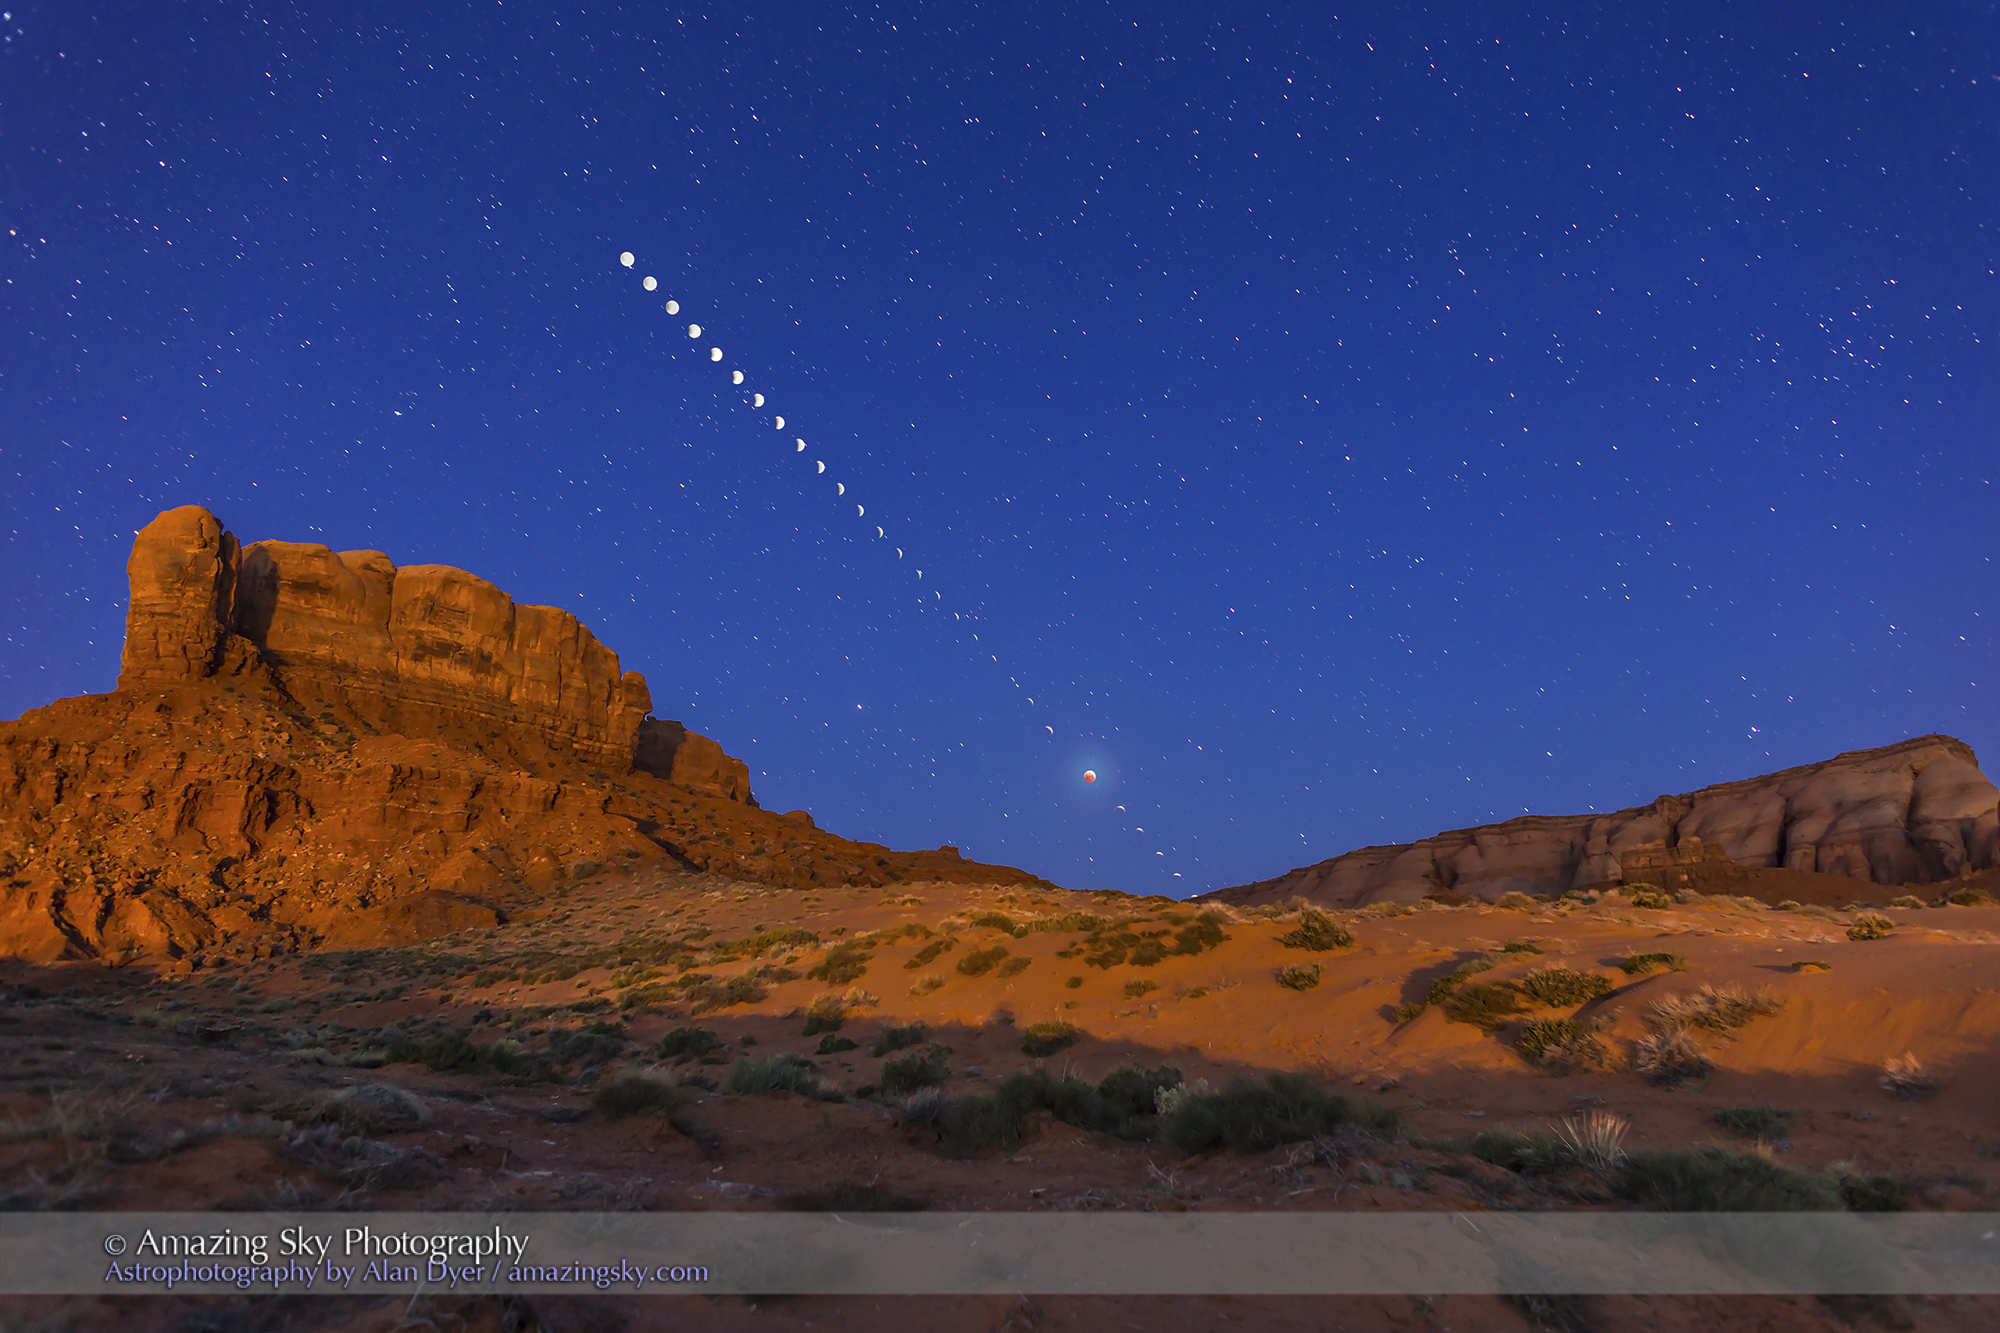
While you can shoot the Moon with longer focal lengths it takes quite a long lens (>300mm) to really make it worthwhile shooting just the Moon itself isolated in empty sky. Better to include a landscape to put the Moon in context, even if the Moon is small.
From western North America the lower altitude of the Moon allows it to be framed above a scenic landscape with a longer 35mm to 50mm lens, yielding a larger lunar disk.
From the west coast you could use a telephoto lens (135mm to 200mm) to frame the horizon and the eclipsed Moon as it rises for a dramatic photo.
Focusing
Use Live View (and zoom in at 10x magnification) to manually focus on the horizon, distant lights, or bright stars. The Moon itself my be tough to focus on.
Exposure Times
Exposures will depend on how bright your sky is. Use ISO 400 to 800 and try metering the scene as a starting point if your sky is still lit by twilight. Use wide lens apertures (f/4 to f/2) if you can, to keep exposures times as a short as possible.
The apparent motion of the Moon as the sky turns from east to west will blur the image of the Moon in exposures lasting more than a few seconds, especially ones taken with telephoto lenses.
The maximum exposure you can use before trailing sets in is roughly 500 / lens focal length.

2. On a Tracker or Equatorial Mount
If you can track the sky using a motorized tracker or telescope mount, you can take exposures up to a minute or more, to record the red Moon amid a starry sky.
For this type of shot, you’ll need to be at a dark site away from urban light pollution. But during totality the sky will be dark enough that the Milky Way will appear overhead. Use a wide-angle lens to capture the red Moon to the east of the summer Milky Way.

3. Through a Telescope
The most dramatic closeups of the eclipsed red Moon require attaching your camera body (with its lens removed) to a telescope. The telescope becomes the lens, providing a focal length of 600mm or more, far longer than any telephoto lens most of us own.
You’ll need the appropriate “prime focus” camera adapter and, to be blunt, if you don’t have one now, and have never shot the Moon though your telescope then plan on shooting with another method.
But even if you have experience shooting the Moon through your telescope, capturing sharp images of the dim red Moon demand special attention.
The telescope must be on a motorized mount tracking the sky, preferably at the “lunar,” not sidereal, drive rate. Focus on the Moon during the partial phases when it is easier to focus on the bright edge of the Moon.
Exposures during totality typically need to be 5 to 30 seconds at ISO 800 to 3200, depending on the focal ratio of your telescope. Take lots of exposures at various shutter speeds. You have over an hour to get it right!
4. Time-Lapses
I’d suggest attempting time-lapses only if you have lots of experience with lunar eclipses.
Exposures can vary tremendously over the partial phases and then into totality. Any time-lapse taken through a telescope, or even with a wide-angle lens, will require a lot of manual attention to ensure each frame is well-exposed as the sky and Moon darken.
However, even if you do not get a complete set of frames suitable for a smooth, continuous time-lapse, selected frames taken every 5 to 10 minutes may work well in creating a multiple-exposure composite (as above), by layering exposures later in Photoshop.
Whatever method – or methods — you use, don’t get so wrapped up in fussing with cameras you forget to simply enjoy the eclipse for the beautiful sight it is.
This is the last total eclipse of the Moon anyone on Earth will see until January 31, 2018. So enjoy the view of the deep red Moon in the autumn sky.
— Alan, September 20, 2015 / © 2015 Alan Dyer / www.amazingsky.com

As luck would have it, I will be on Joshua Tree National Park on the night of the eclipse, the total phase of which begins just after moonrise at about 6:40 p.m. We are going to scout out a great location beforehand.
Excellent! Wish I could be there as the local forecast here just turned bad for Sunday. And, of course, just for Sunday.