I’ve been an avowed Canon DSLR user for a decade. I may be ready to switch!
[NOTE: This review dates from 2015. Tests done today with current models would certainly differ. Canon’s EOS R mirrorless series, for example, offer much better ISO Invariancy performance but lack the “dark frame buffer” advantage of Canon DSLRs. And indeed, I have used the Nikon D750 a lot since 2015. But I did not give up my Canons!]
Here, in a technical blog, I present my tests of two leading contenders for the best DSLR camera for nightscape and astronomical photography: the Canon 6D vs. the Nikon D750. Which is better?
To answer, I subjected both to side-by-side outdoor tests, using exposures you’ll actually use in the field for typical nightscapes and for deep-sky images.
Both cameras are stock, off-the-shelf models. They have not had their filters modified for astronomy use. Both are 20- to 24-megapixel, full-frame cameras, roughly competitive in price ($1,900 to $2,300).
For images shot through lenses, I used the Canon L-Series 24mm on the Canon 6D, and the Sigma 24mm Art lens on the Nikon D750.
The bottom line: Both are great cameras, with the Nikon D750 having the edge for nightscape work, and the Canon 6D the edge for deep-sky exposures.
NOTE: Click on the test images for higher-resolution versions for closer inspection. All images and text © 2015 Alan Dyer and may not be reproduced without my permission.
TEST #1 — Noise
The 24.3-megapixel Nikon D750 has 5.9-micron pixels, while the 20.2-megapixel Canon 6D has slightly larger 6.5-micron pixels which, in theory, should lead to lower noise for the Canon. How do they compare in practice?

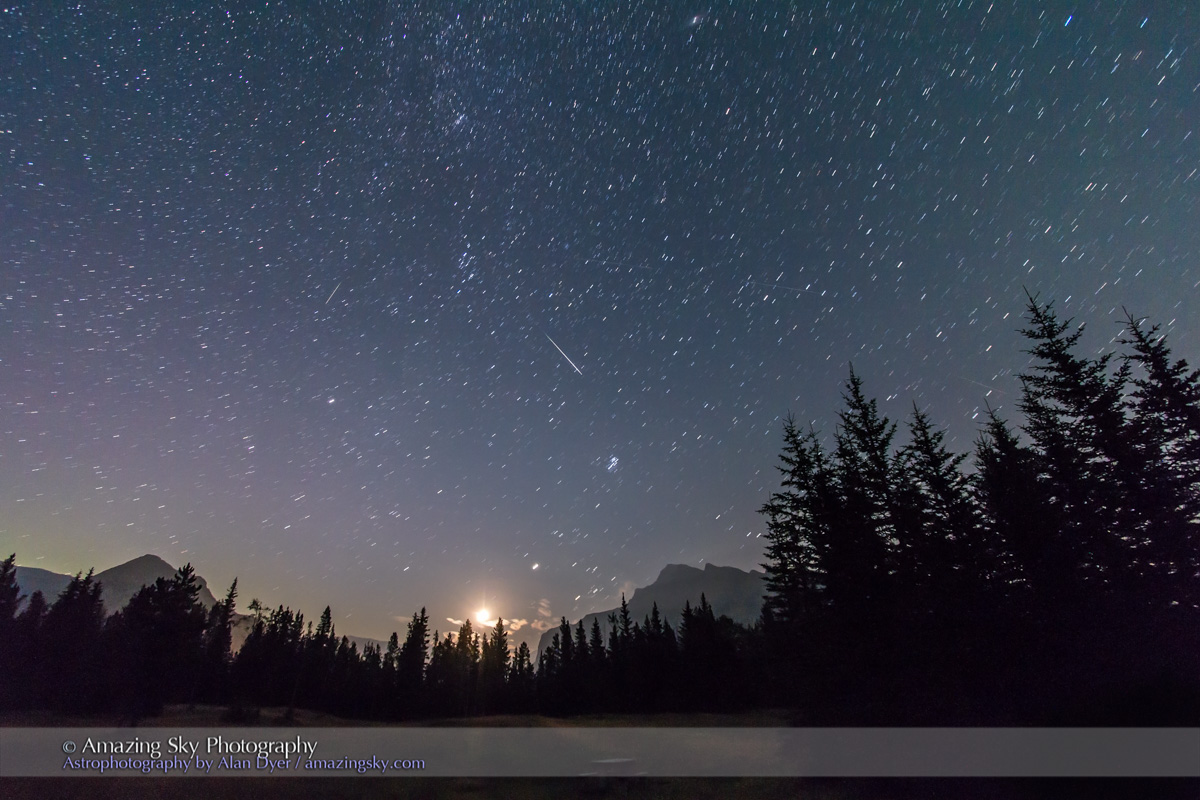
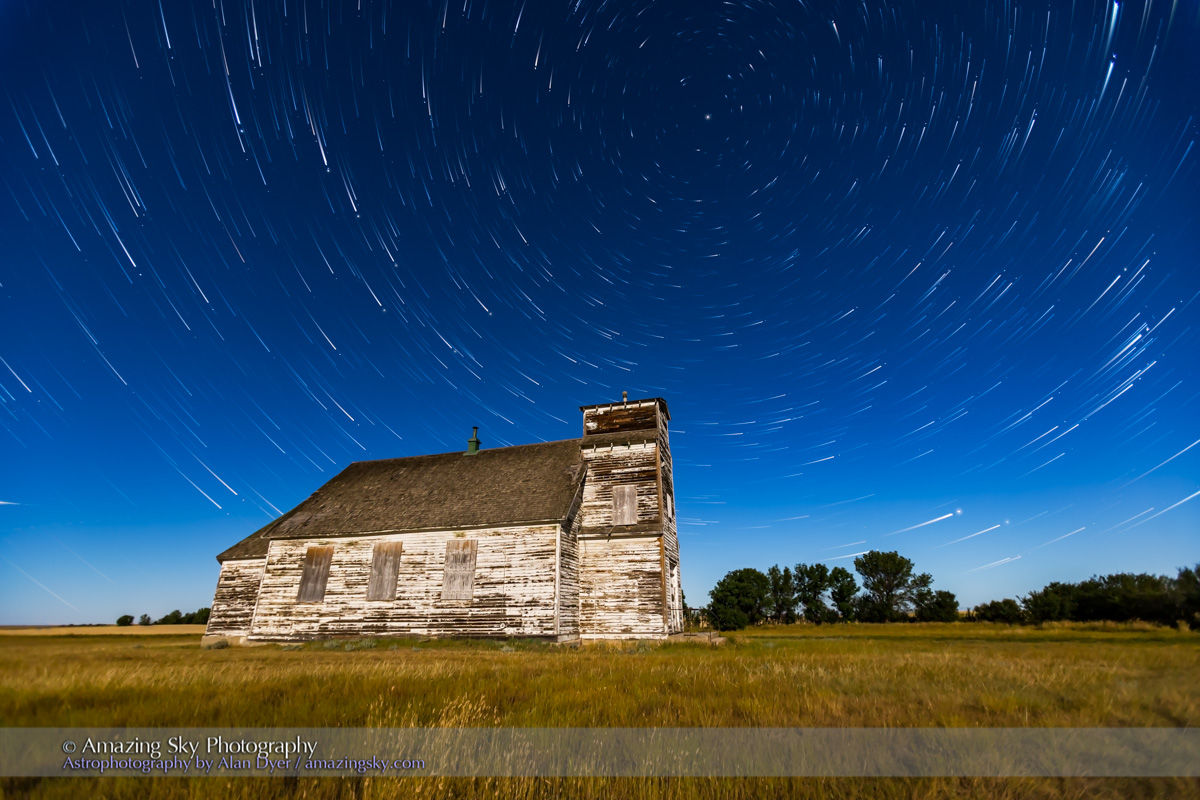
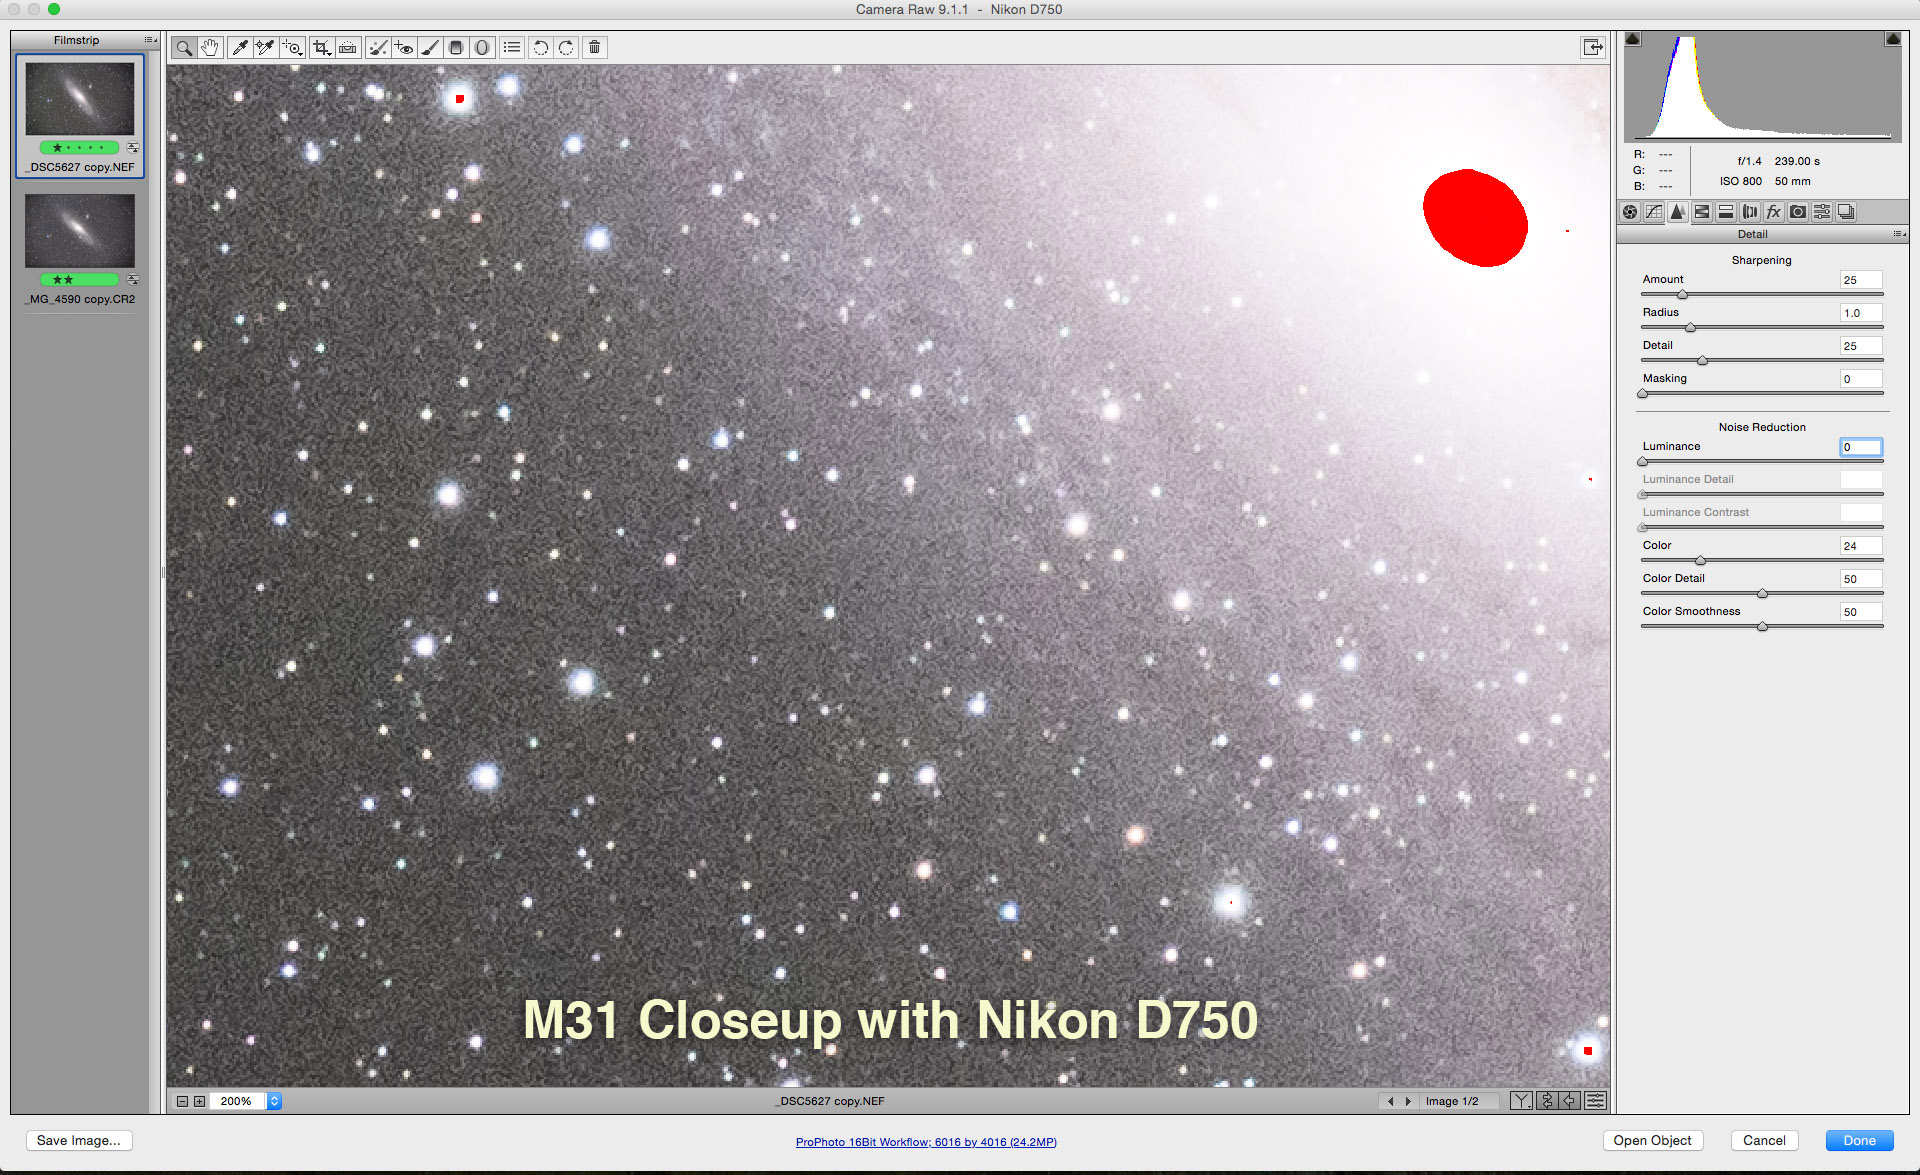
I shot a moonlit nightscape scene (above) at five ISO settings, from 800 to 12800, at increasingly shorter exposures to yield identically exposed frames. I processed each frame as shown above, with boosts to shadows, clarity, and contrast typical for nightscapes. However, I applied no noise reduction (either luminance or color) in processing. Nor did I take and apply dark frames.
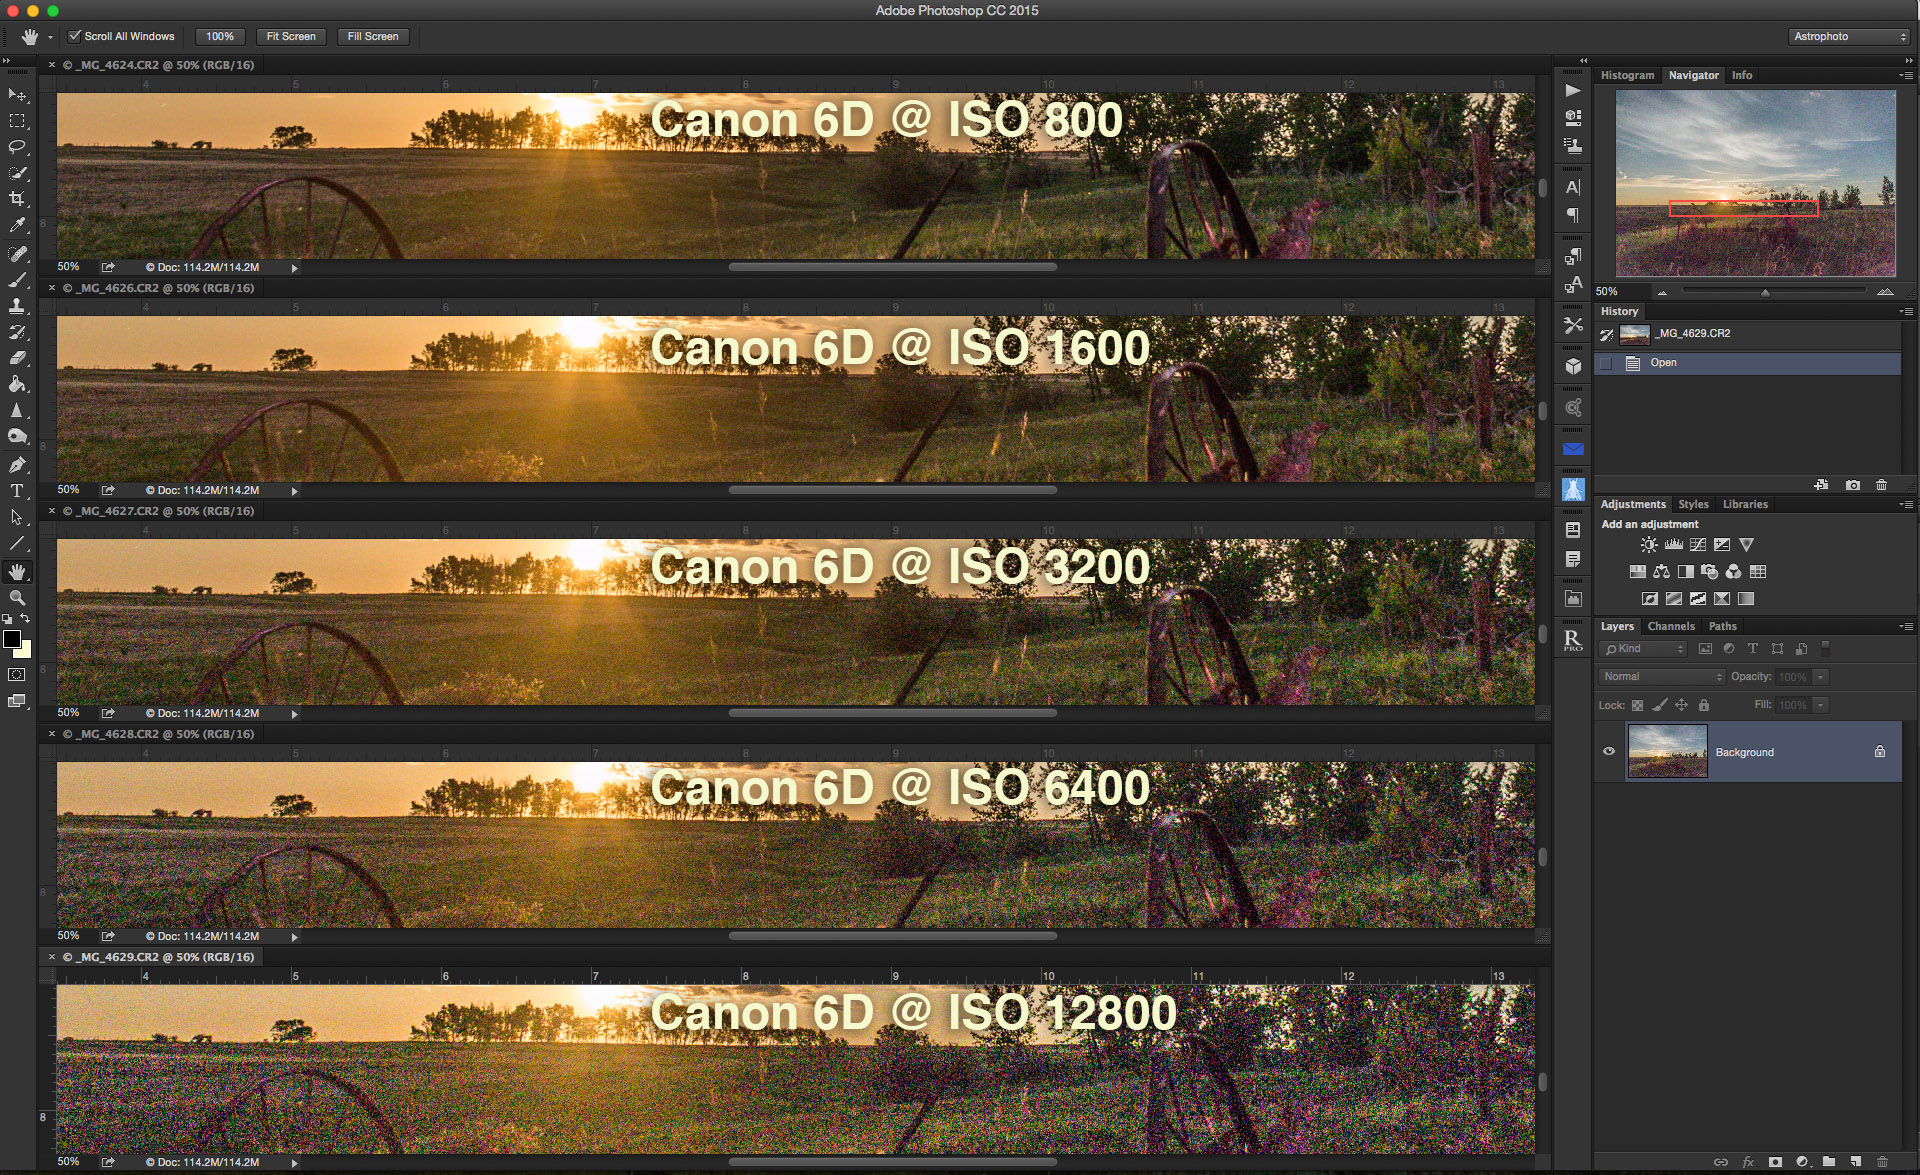

The blowups of a small section of the frame (outlined in the box in the upper right of the Photoshop screen) show very similar levels of luminance noise. The Canon shows slightly more color noise, in particular more magenta pixels in the shadows at high ISOs. Its larger pixels didn’t provide the expected noise benefit.
TEST #2 — Resolution
Much has been written about the merits of Canon vs. Nikon re: the most rigorous of tests, resolving stars down at the pixel level.
I shot the images below of the Andromeda Galaxy the same night through a 92mm aperture apo refractor. They have had minimal but equal levels of processing applied. At this level of inspection the cameras look identical.


But what if we zoom in?
For many years Nikon DSLRs had a reputation for not being a suitable for stellar photography because of a built-in noise smoothing that affected even Raw files, eliminating tiny stars along with noise. Raw files weren’t raw. Owners worked around this by turning on Long Exposure Noise Reduction, then when LENR kicked in after an exposure, they would manually turn off the camera power.
This so-called “Mode 3” operation yielded a raw frame without the noise smoothing applied. Clearly, this clumsy workaround made it impossible to automate the acquisition of raw image sequences with Nikons.
Are Nikons still handicapped? In examining deep-sky images at the pixel-peeping level (below), I saw absolutely no difference in resolution or the ability to record tiny and faint stars. With its 4-megapixel advantage the Nikon should resolve finer details and smaller stars, but in practice I saw little difference.

4 minute exposure at ISO 800
No noise reduction applied in processing
4 minute exposure at ISO 800
No noise reduction applied in processing
On the other hand I saw no evidence for Nikon’s “star eater” reputation. I think it is time to lay this bugbear of Nikons to rest. The Nikon D750 proved to be just as sharp as the Canon 6D.
Note that in the closeups above, the red area marks a highlight (the galaxy core) that is overexposed and clipped. Nikon DSLRs also have a reputation for having sensors with a larger dynamic range than Canon, allowing better recording of highlights before clipping sets in.
However, in practice I saw very little difference in dynamic range between the two cameras. Both clipped at the same points and to the same degree.
TEST #3 — Mirror Box Shadowing
An issue little known outside of astrophotography is that a DSLR’s deeply-inset sensor can be shadowed by the upraised mirror and sides of the mirror box. Less light falls on the edges of the sensor.
The vignetting effect is noticeable only when we boost the contrast to the high degree demanded by deep-sky images, and when shooting through fast telescope systems.
Here I show the vignetting of the Canon and Nikon when shooting through my 92mm refractor at f/4.5.
The circular corner vignetting visible in the images below is from the field flattener/reducer I employed on the telescope. It can be compensated for by using Lens Correction in Adobe Camera Raw, or eliminated by taking flat fields.
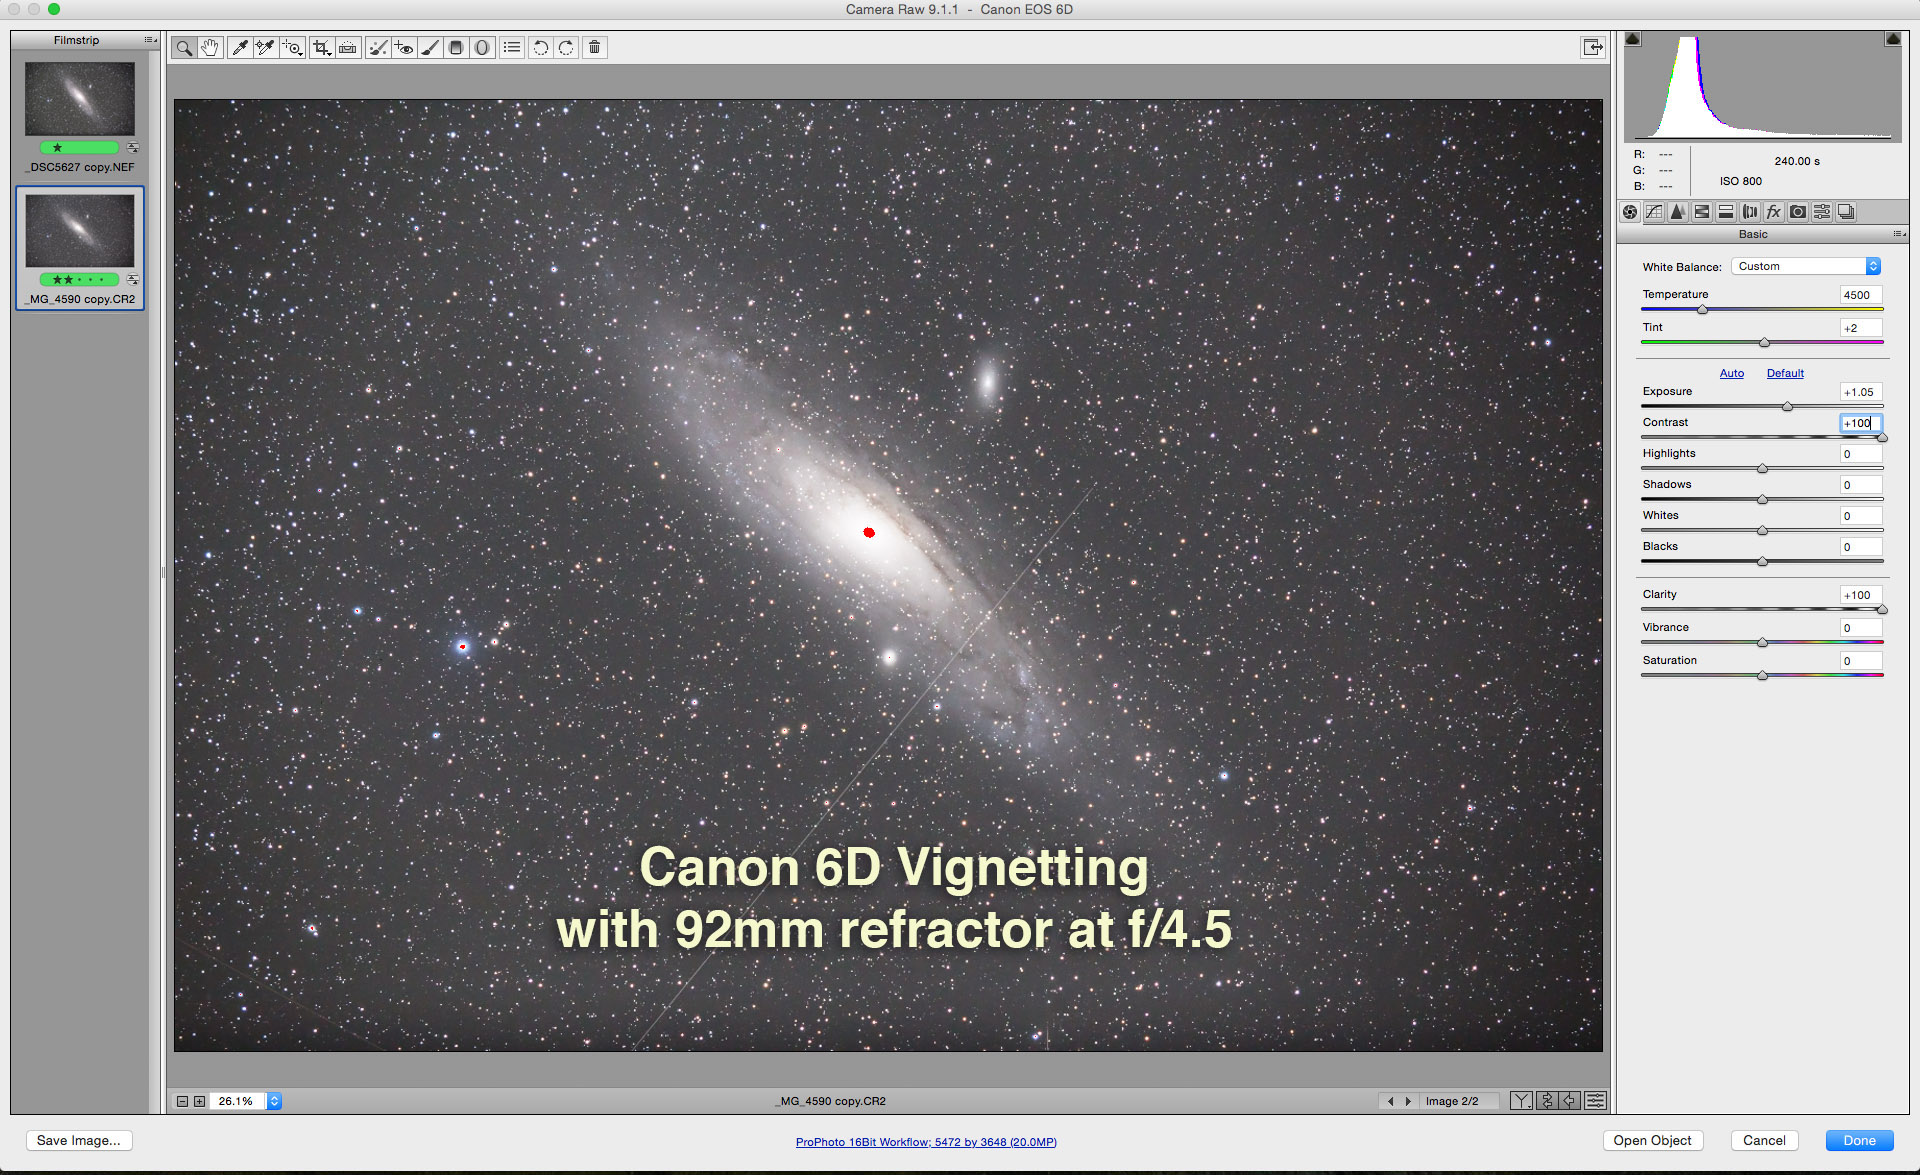
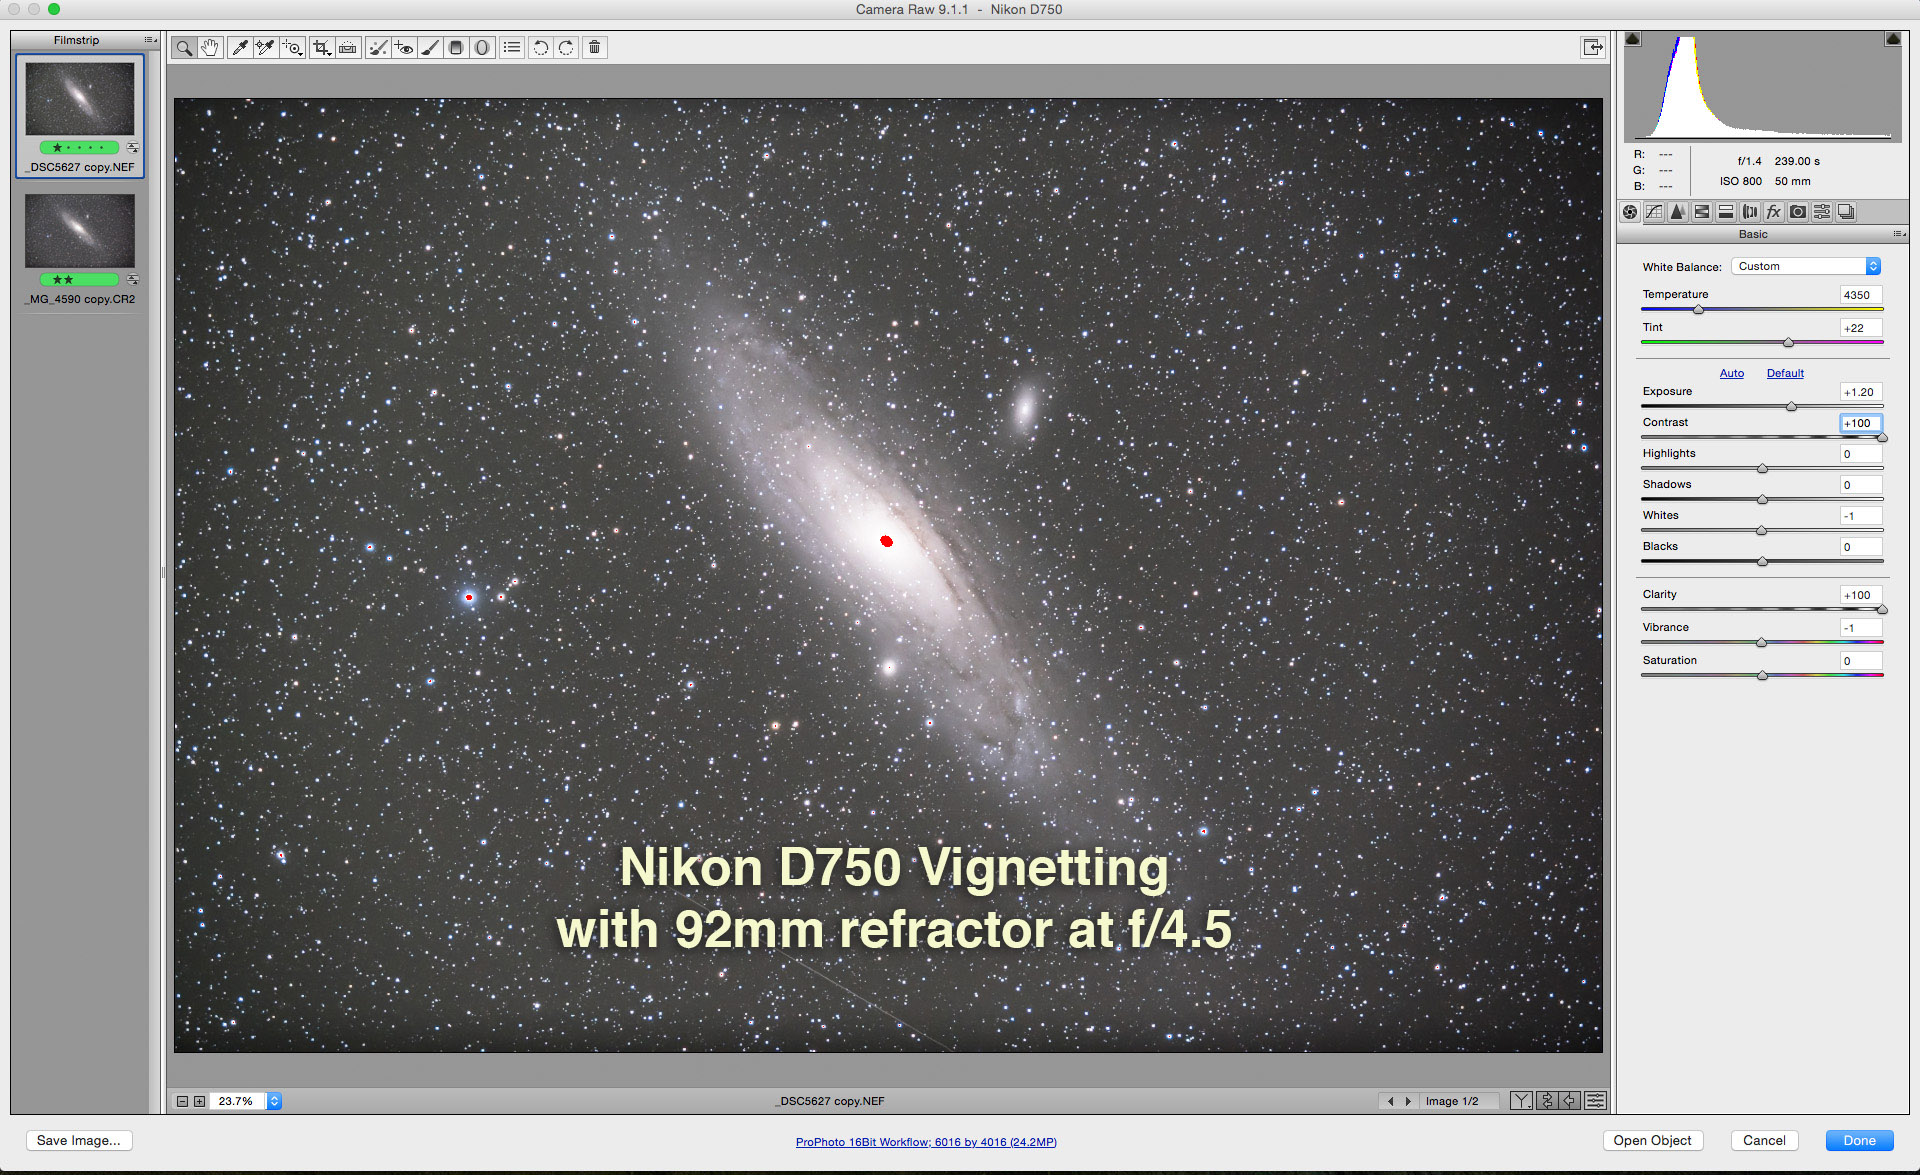
The dark edge at the bottom of the frame is from shadowing by the upraised mirror. It can be eliminated only by taking flat fields, or reduced by using masked brightness adjustments in processing.
Both cameras showed similar levels of vignetting, with the Canon perhaps having the slight edge.
TEST #4 — ISO Invariancy
So far the Nikon D750 and Canon 6D are coming up fairly equal in performance. But not here. This is where the Nikon outperforms the Canon by quite a wide margin.
Sony sensors (used in Sony cameras and also used by Nikon) have a reputation for being “ISO Invariant.”
What does that mean?
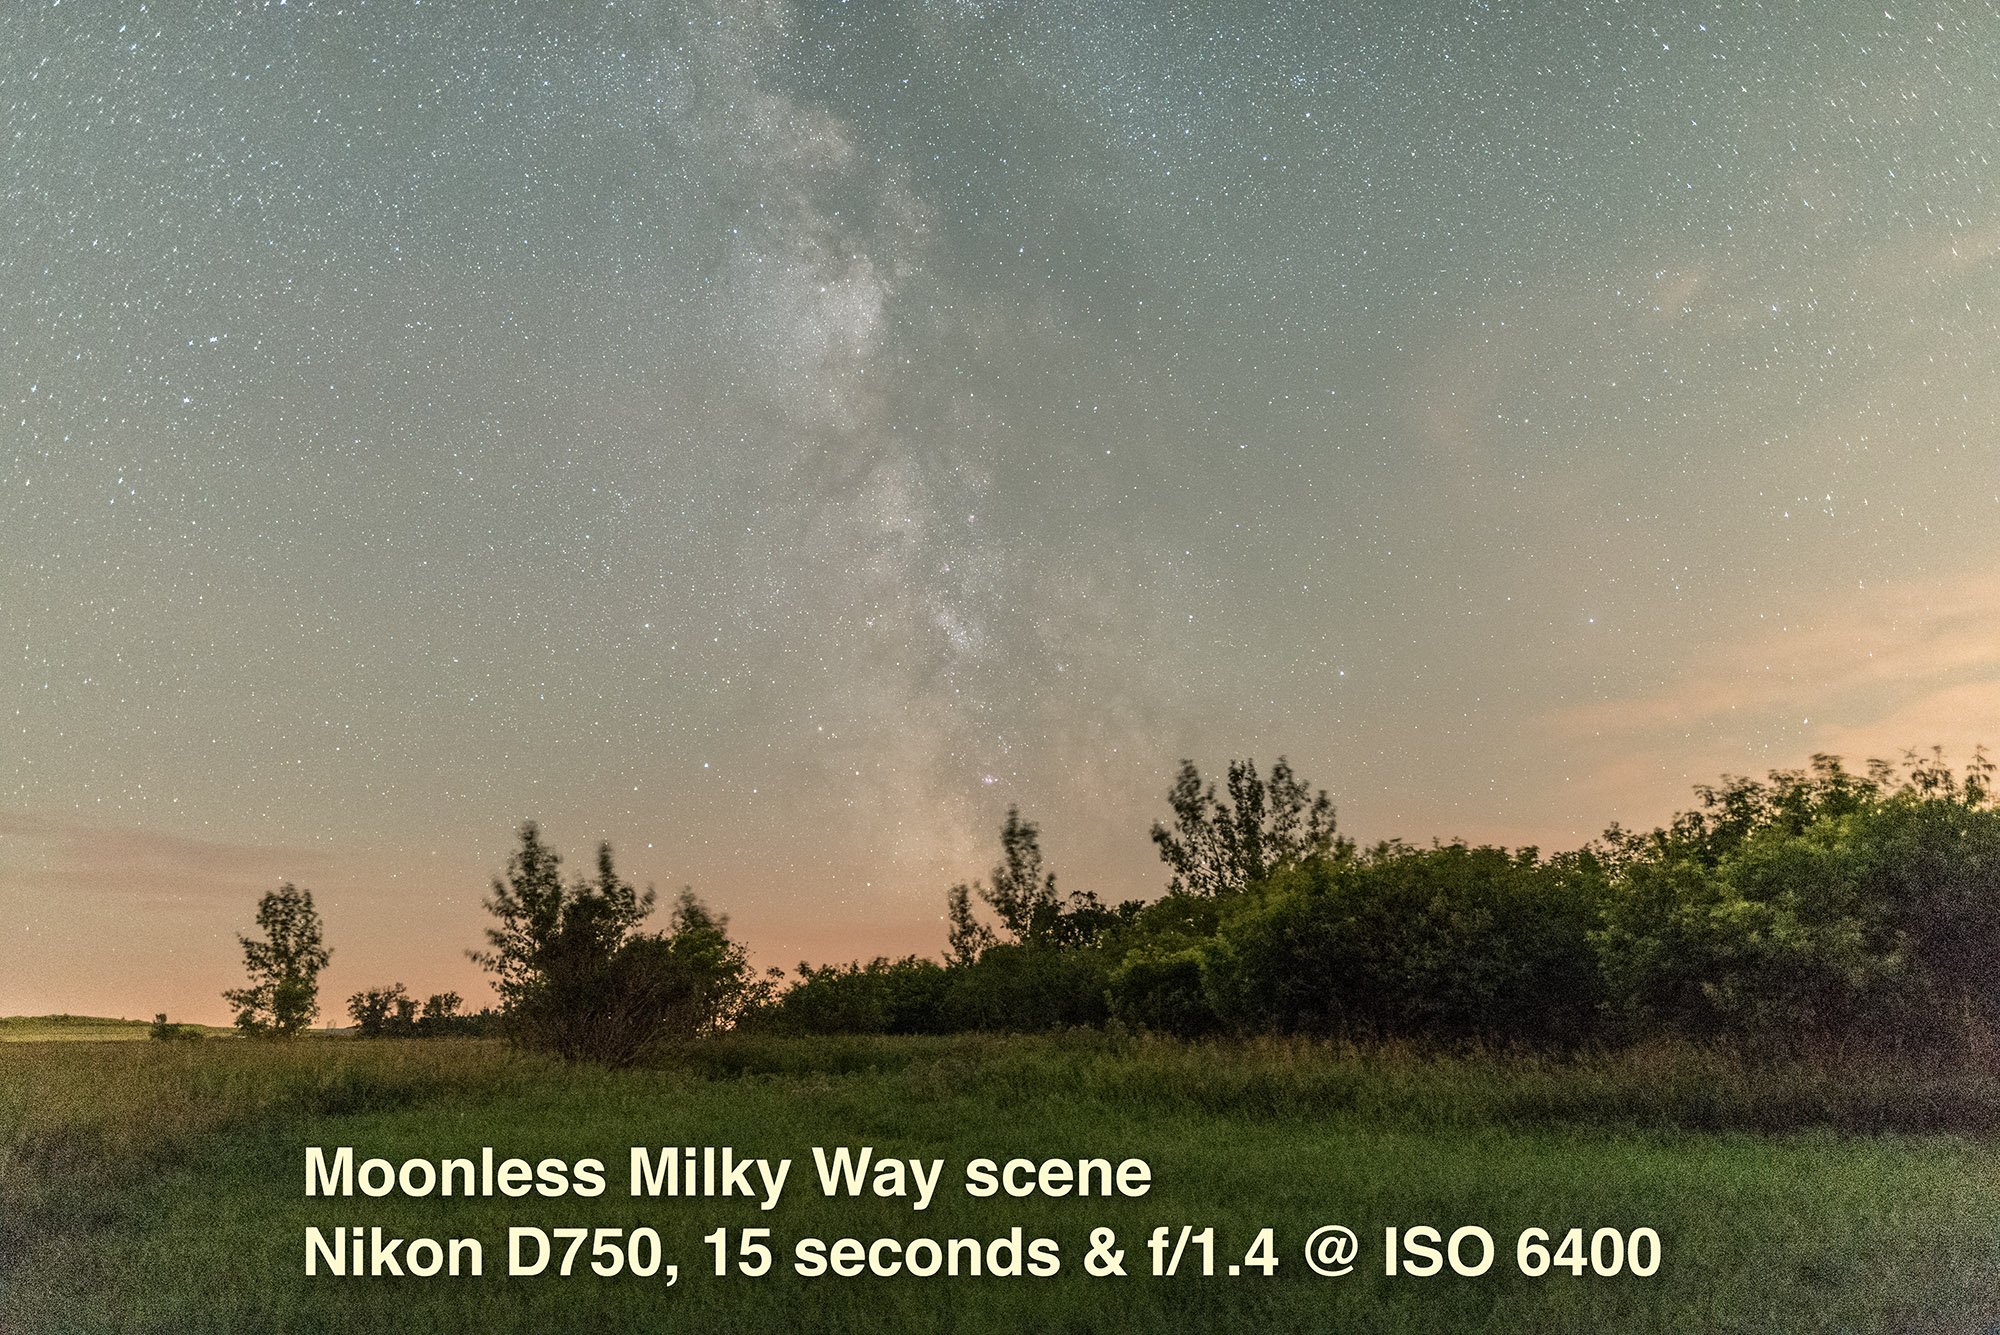
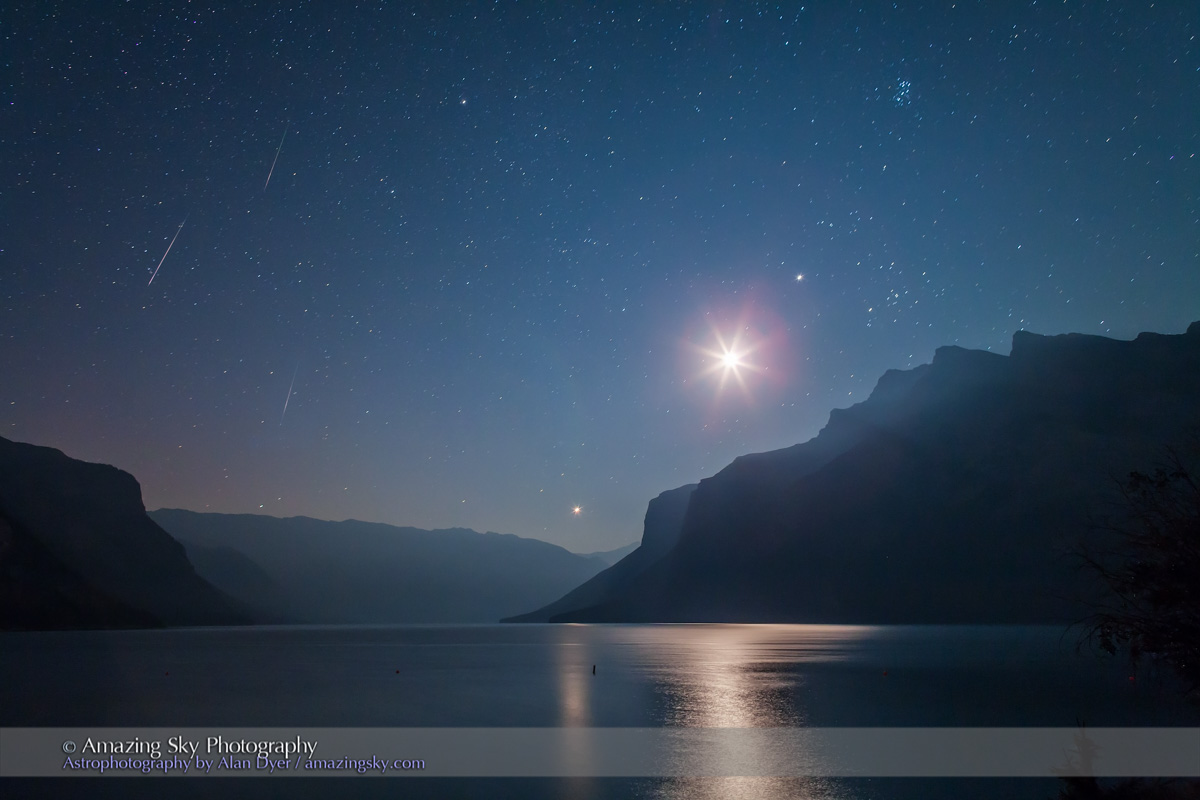
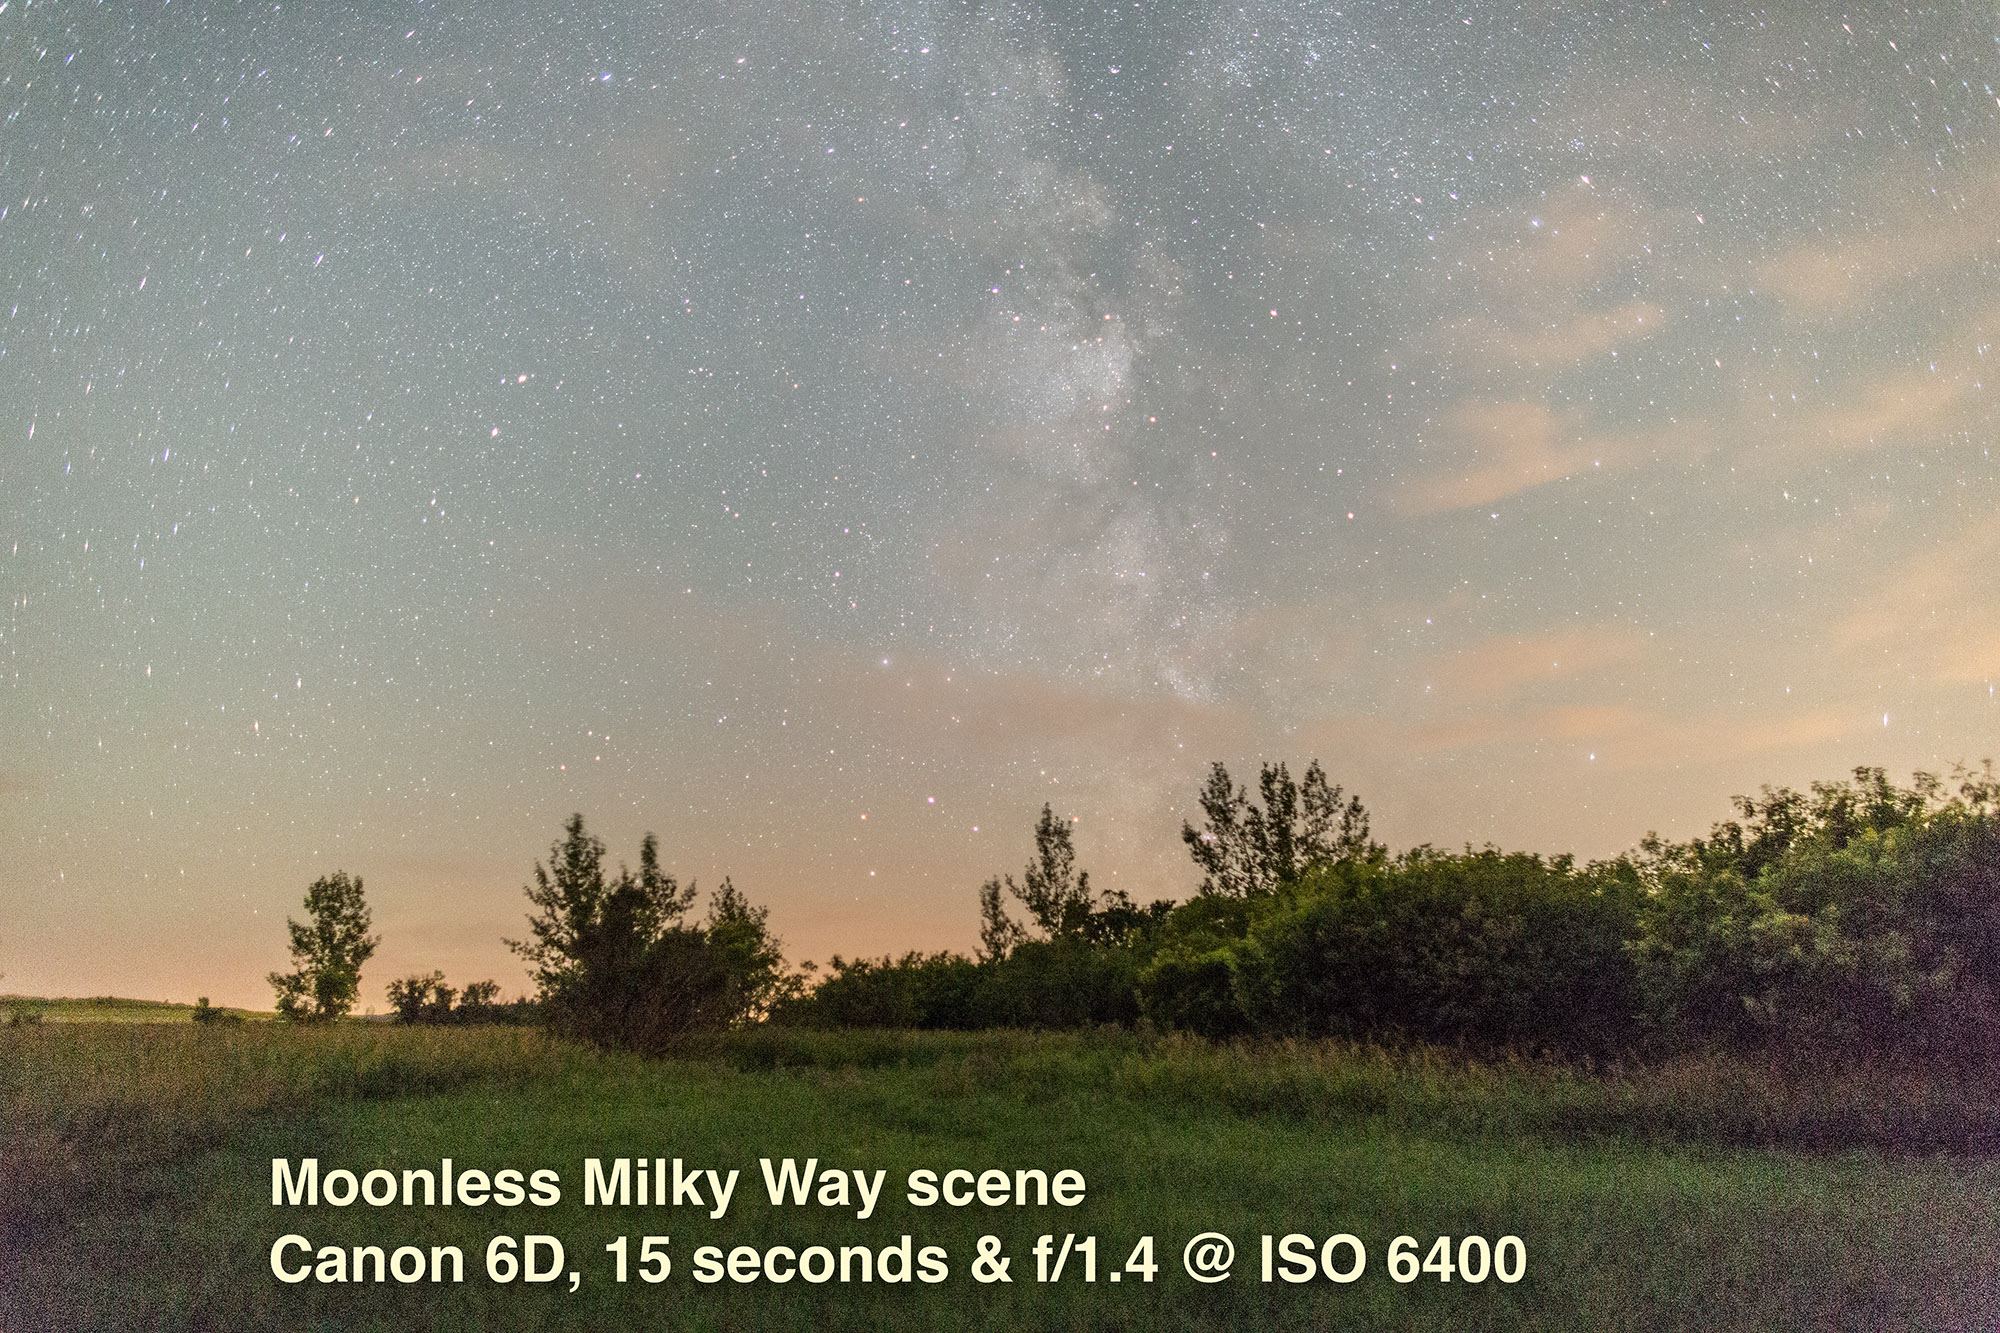
With no Moon, shot at very high ISO of 6400 and wide aperture of f/1.4 to show image quality under these demanding shooting circumstances.
Lens correction and basic development setttings applied.
With no Moon, shot at very high ISO of 6400 and wide aperture of f/1.4 to show image quality under these demanding shooting circumstances.
Lens correction and basic development setttings applied.
In the examples above, the correct exposure for the starlit scene was 15 seconds at f/1.4 at ISO 6400. See how the two cameras rendered the scene? Very similar, albeit with the Canon showing more noise and discoloration in the dark frame corners.
What if we shoot at the same 15 seconds at f/1.4 … but at ISO 3200, 1600, 800, and 400? These are now 1-, 2-, 3-, and 4-stops underexposed, respectively.
Then we boost the Exposure setting of the underexposed Raw files later in processing, by 1, 2, 3 or 4 f-stops. What do we see?

With the Nikon (above) we see images that look nearly identical for noise to what we got with the properly exposed ISO 6400 original. It really didn’t matter what ISO speed the image was shot at – we can turn it into any ISO we want later with little penalty.
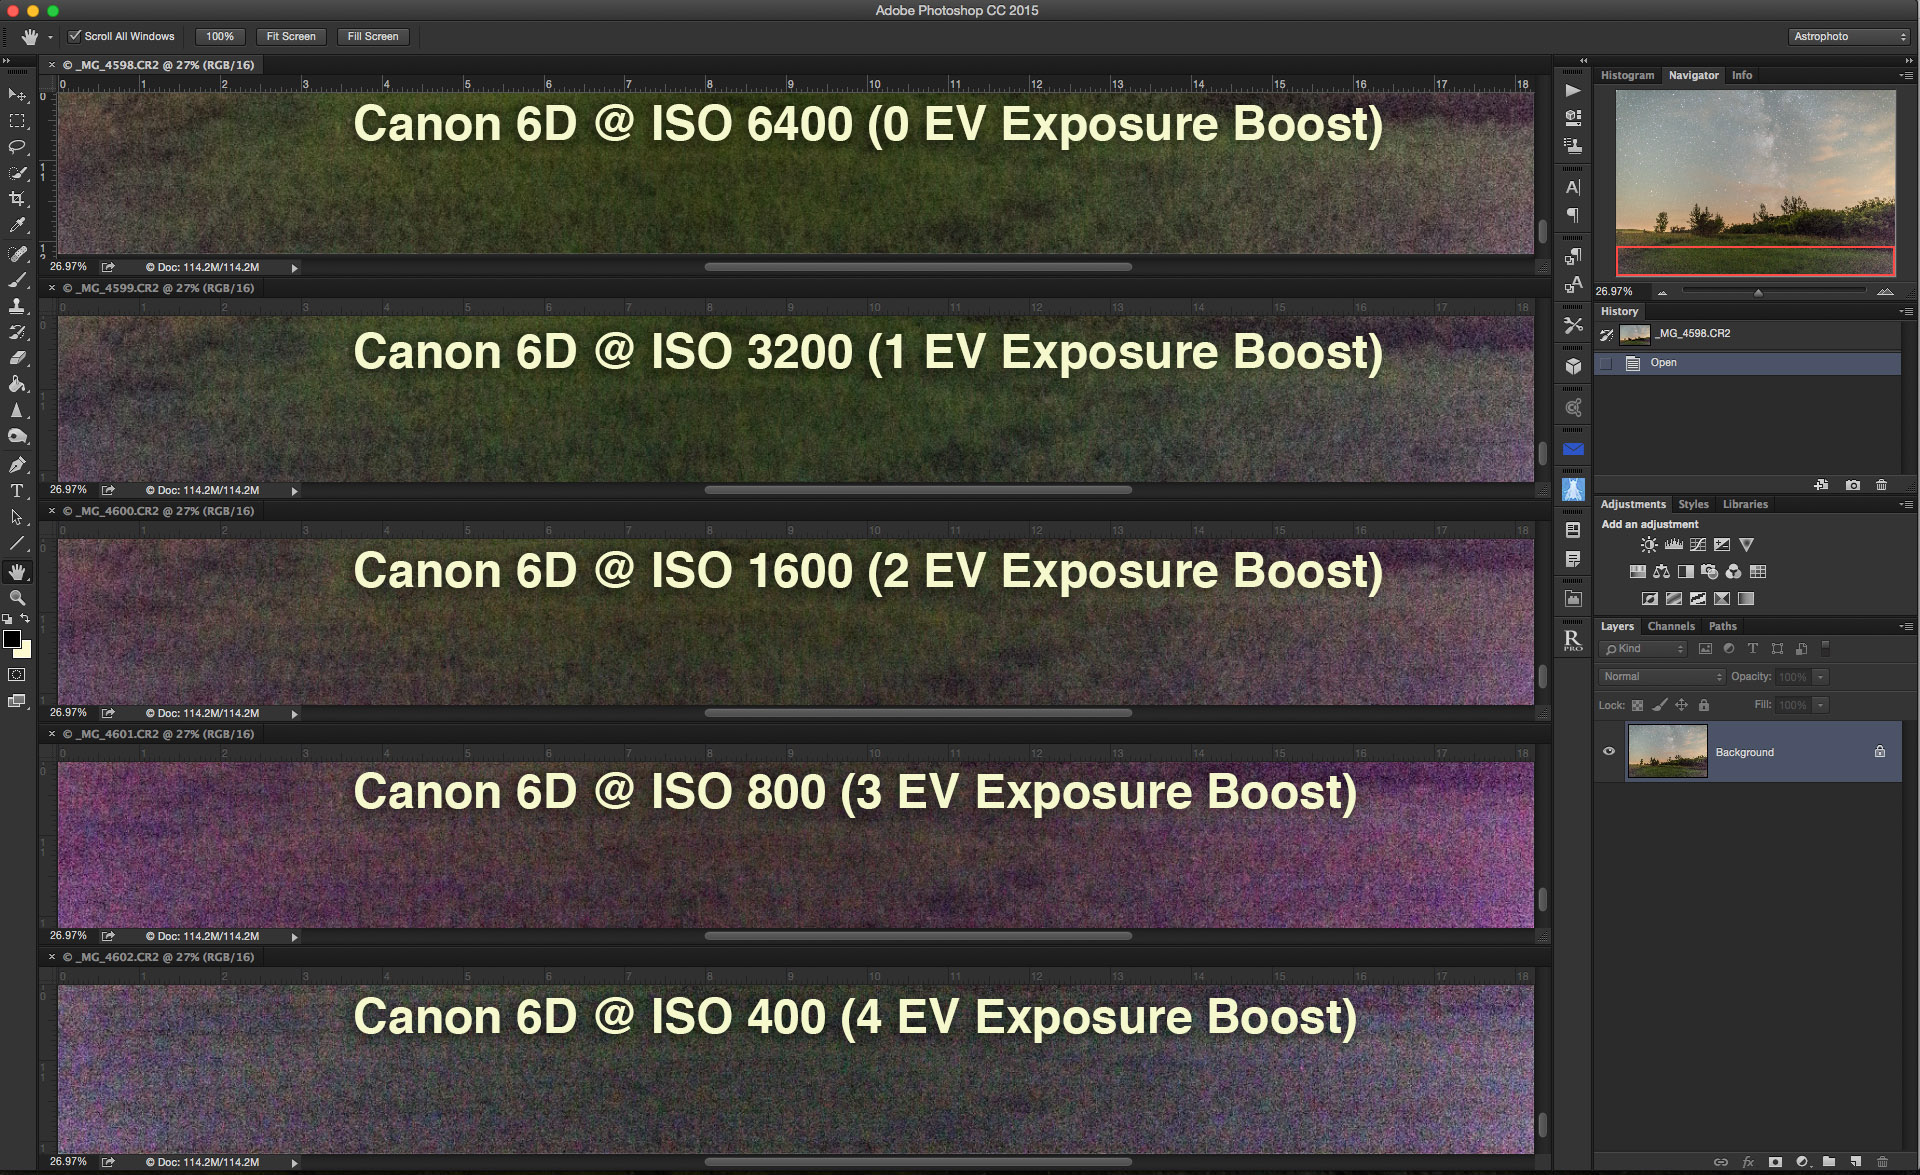
With the Canon (above) we get images with grossly worse noise in the shadows and with ugly magenta discoloration. Canons cannot be underexposed. You must use as high an ISO as needed for the correct exposure.
This “ISO Invariant” advantage of Nikon over Canon is especially noticeable in nightscapes scenes lit only by starlight, as above. The Canon turns ugly purple at -3EV underexposure, and loses all detail and contrast at -4EV underexposure.
For nightscape imaging this is an important consideration. We are limited in exposure time and aperture, and so are often working at the ragged edge of exposure. Dark areas of a scene are often underexposed and prone to noise. With the Nikon D750 these areas may still look noisy, but not much more so than they would be at that ISO speed.
With the Canon 6D, underexpose the shadows and you pay the price of increased noise and discoloration when you try to recover details in the shadows.
For more technical information on the topic of ISO invariancy, see DPReview.com and many of their recent reviews of DSLRs, such as this page about the Canon 5Ds/r models.
Apparently, the difference comes from where the manufacturer places the analog-to-digital circuitry: on the sensor (ISO invariant) or outboard on a separate circuit (ISO variant), and thus where in the signal path the amplification occurs when we boost ISO speed.
TEST #6 — Features
One could go on endlessly about features, but here I compare the two cameras on just a few key operating features very important to astrophotographers.
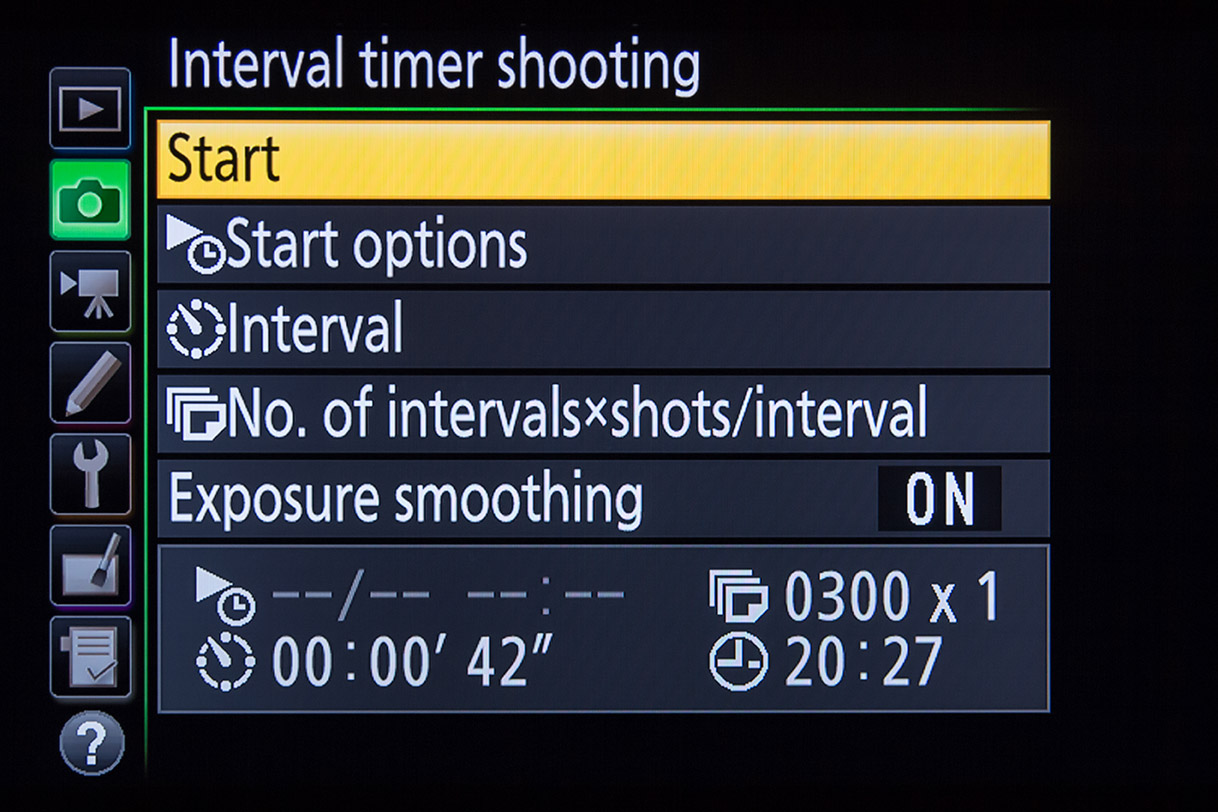
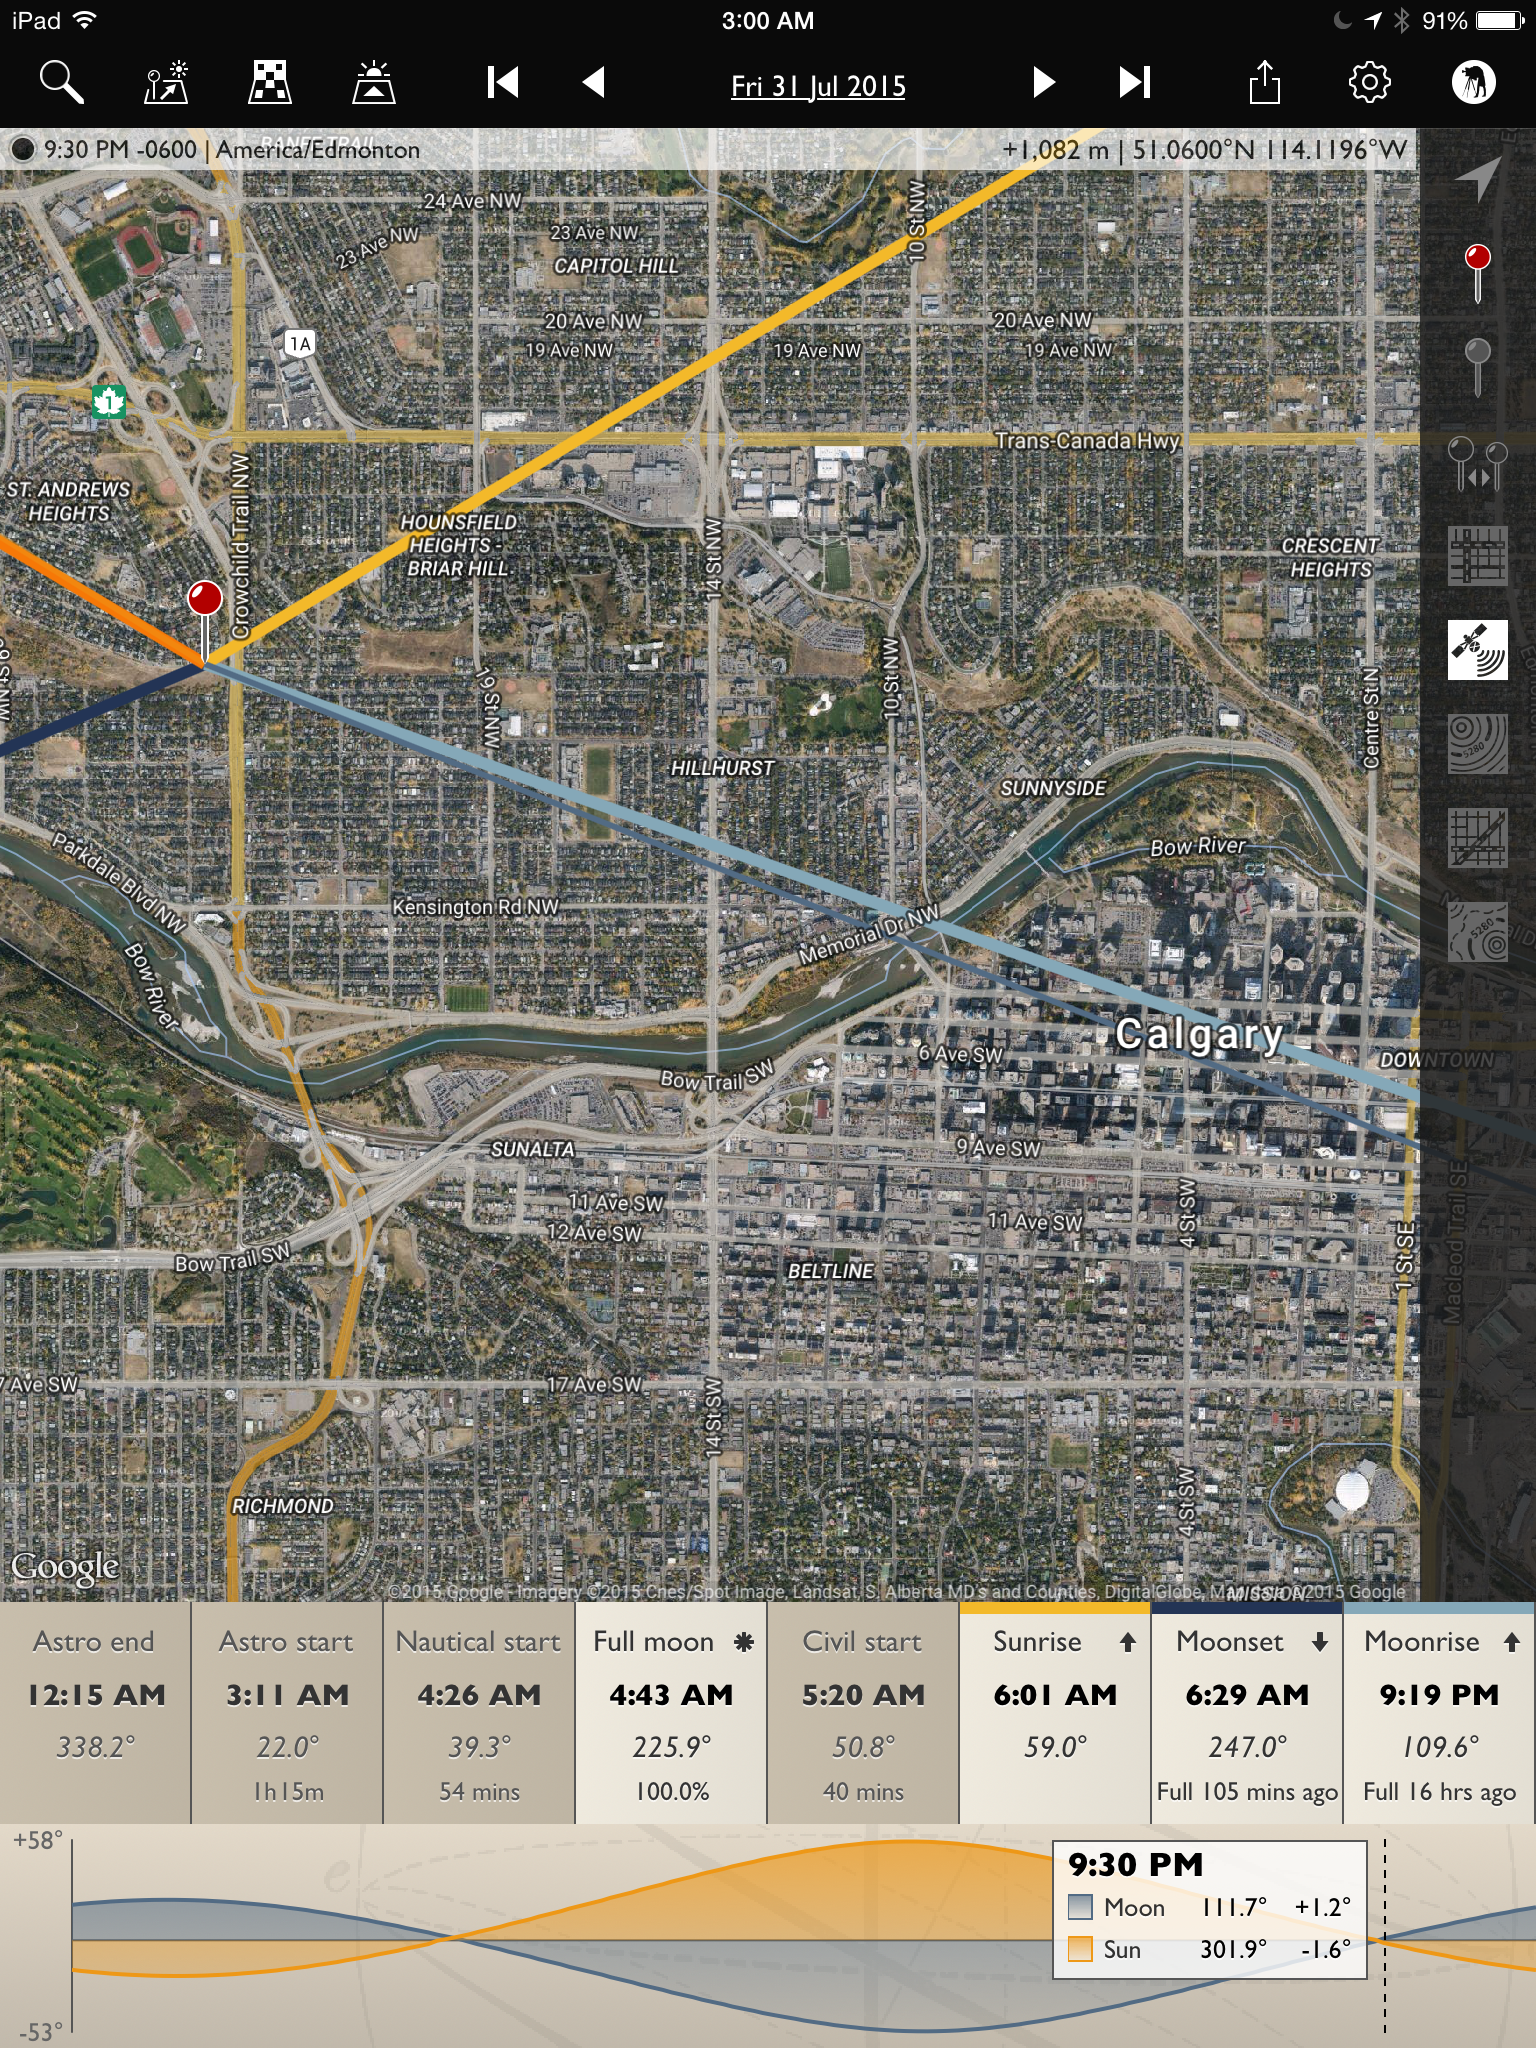
Intervalometer:
The Canon 6D has none, though newer Canons do. The Nikon D750, as do many Nikons, has a built-in intervalometer (shown above), even with a deflickering “Exposure Smoothing” option. However, exposure time is limited to the camera’s maximum of 30 seconds. Any longer requires an outboard intervalometer, as with the Canon.
If you use your camera with any motion control time-lapse unit, then it becomes the intervalometer, negating any capability built into the camera. But it’s nice to have.
Small Advantage: Nikon
Interval Length:
REVISED JUNE 2020:
When taking time-lapse or star trail images with the Canon I can set an interval as short as 1 second between frames, for a minimum of gaps or jumps in the stars. With the Nikon, controlled internally by its built-in intervalometer, a 1-second interval is possible but only if you set the interval to 33 seconds for a 30-second shutter speed.
That’s true of Canon and Sony built-in intervalometers as well, because on all cameras setting the exposure to 30 seconds really gives you a 32-second exposure. A little known fact! So the interval between shutter firings has to be set to 33 seconds. It’s tricky.
Advantage: None to either

Tiltable LCD Screen:
The Canon 6D has none. The Nikon D750 has a very useful tilt-out screen as shown above. This is hugely convenient for all forms of astrophotography. Only cropped-frame Canons have tilt-out screens. This feature might add weight, but it’s worth it!
Big Advantage: Nikon
Dark Frame Buffer:
The Nikon has none. With Long Exposure Noise Reduction ON, the Canon 6D allows up to four exposures to be shot in quick succession before the dark frame kicks in and locks up the camera. (Put the camera into Raw+JPG.)
[JUNE 2020: With the Canon 6D MkII the buffer allows three frames to be taken in quick succession.]
This is very useful for deep-sky imaging, for acquiring a set of images for stacking that have each had a dark frame subtracted in-camera, with a minimum of “down-time” at the camera.
Big Advantage: Canon
Live View Screen Brightness:
As pointed out to me by colleague Christoph Malin, with the Nikon you cannot dim the screen when in Live View mode and with Exposure Simulation ON. So it can be too bright at night. With the Canon you can dim the Live View screen — the LCD Brightness control affects the screen both during Live View as well as during playback of images.
Small Advantage: Canon

Software Compatibility:
Canon EOS cameras are well supported by advanced software, such as GBTimelapse (above) that controls only Canons, not Nikons, in complex time-lapse sequences, and Nebulosity, popular among deep-sky imagers for DSLR control.
Small Advantage: Canon
My take-away conclusions:
• Nikon DSLRs now are just as good for astrophotography as Canons, though that wasn’t always the case – early models did suffer from more noise and image artifacts than their Canon counterparts.
• Canon DSLRs, due to their sensor design, are more prone to exhibiting noise and image artifacts when images are greatly underexposed then boosted later in processing. Just don’t underexpose them – good advice for any camera.
All images and text are © 2015 Alan Dyer.
– Alan, August 27, 2015 & Revised June 25, 2020 / © 2015 Alan Dyer / www.amazingsky.com