On December 21 we have a chance to see and shoot a celestial event that no one has seen since the year 1226.
As Jupiter and Saturn each orbit the Sun, Jupiter catches up to slower moving Saturn and passes it every 20 years. For a few days the two giant planets appear close together in our sky. The last time this happened was in 2000, but with the planets too close to the Sun to see.
Back on February 18, 1961 the two planets appeared within 14 arc minutes or 0.23° (degrees) of each other low in the dawn sky.
But on December 21 they will pass each other only 6 arc minutes apart. To find a conjunction that close and visible in a darkened sky you have to go all the way back to March 5, 1226 when Jupiter passed only 3 arc minutes above Saturn at dawn. Thus the media headlines of a “Christmas Star” no one has seen for 800 years!
Photographing the conjunction will be a challenge precisely because the planets will be so close to each other. Here are several methods I can suggest, in order of increasing complexity and demands for specialized gear.
Easy — Shooting Nightscapes with Wide Lenses
This shows the field of view of various lenses on full-frame cameras (red outlines) and a 200mm lens with 1.4x tele-extender on a cropped frame camera (blue outline). The date is December 17 when the waxing crescent Moon also appears near the planet pair for a bonus element in a nightscape image.
Conjunctions of planets in the dusk or dawn twilight are usually easy to capture. Use a wide-angle (24mm) to short telephoto (85mm) lens to frame the scene and exposures of no more than a few seconds at ISO 200 to 400 with the lens at f/2.8 to f/4.
The sky and horizon might be bright enough to allow a camera’s autoexposure and autofocus systems to work.
Indeed, in the evenings leading up to and following the closest approach date of December 21 that’s a good method to use. Capture the planet pair over a scenic landscape or urban skyline to place them in context.
For most locations the planets will appear no higher than about 15° to 20° above the southwestern horizon as it gets dark enough to see and shoot them, at about 5 p.m. local time. A 50mm lens on a full-frame camera (or a 35mm lens on a cropped frame camera) will frame the scene well.
This was Jupiter and Saturn on December 3, 2020 from the Elbow Falls area on the Elbow River in the Kananaskis Country southwest of Calgary. This is a blend of 4 untracked images for the dark ground, stacked to smooth noise, for 30 seconds each, and one untracked image for the bright sky for 15 seconds to preserve colours and highlights, all with the 24mm Sigma lens and Canon EOS Ra at ISO 200.
NIGHTSCAPE TIP — Use planetarium software such as Stellarium (free), SkySafari, or StarryNight (what I used here) to simulate the framing with your lens and camera. Use that software to determine where the planets will be in azimuth, then use a photo planning app such as PhotoPills or The Photographer’s Ephemeris to plan where to be to place the planets over the scene you want at that azimuth (they’ll be at about 220° to 230° — in the southwest — for northern latitude sites).
This was Jupiter and Saturn on December 10, 2020 from Red Deer River valley, north of Drumheller, Alberta. This is a blend of 4 images for the dark ground, stacked to smooth noise, for 20 seconds each at f/5.6, and a single image for the sky for 5 seconds at f/2.8, all with the 35mm Canon lens and Canon EOS Ra at ISO 400. All untracked.
Harder — Shooting With Longer Lenses
The planet pair will sink lower and closer to the horizon, to set about 7:00 to 7:30 p.m. local time each night.
As the sky darkens and the planet altitude decreases you can switch to ever-longer lenses to zoom in on the scene and still frame the planets above a carefully-chosen horizon, assuming you have very clear skies free of haze and cloud.
For example, by 6 p.m. they will be low enough to allow a 135mm telephoto to frame the planets and still have the horizon in the frame. Using a longer lens has the benefit or resolving the two planets better, showing them as two distinct objects, which will become more of a challenge the closer you are to December 21.
On December 21 wide-angle and even short telephoto lenses will likely show the two planets as an unresolved point of light, no brighter than Jupiter on its own.
On closest approach day the planets will be so close that using a wide-angle or even a normal lens might only show them as an unresolved blob of light. You’ll need more focal length to split the planets well into two objects.
However, using longer focal lengths introduces a challenge — the motion of the sky will cause the planets to trail during long exposures, turning them from points into streaks. That trailing will get more noticeable more quickly the longer the lens you use.
A rule-of-thumb says the longest exposure you can employ before trailing becomes apparent is 500 / the focal length of the lens. So for a 200mm lens, maximum exposure is 500 / 200 = 2.5 seconds.
To be conservative, a “300 Rule” might be better, restricting exposures with a 200mm telephoto to 300 / 200 = 1.5 seconds. Now, 1.5 seconds might be long enough for the scene, especially if you use a fast lens wide open at f/2.8 or f/2 and a faster ISO such as 400 or 800.
This shows the motion of Jupiter relative to Saturn from December 17 to 25, with the outer frame representing the field of view of a 200mm lens and 1.4x tele-extender on a cropped frame camera. The smaller frame shows the field of a telescope with an effective focal length of 1,200mm.
TELEPHOTO TIP — Be sure to focus carefully using Live View to manually focus on a magnified image of the planets. And refocus through an evening of shooting. While people fuss about getting the one “correct” exposure, it is poor focus that ruins more astrophotos.
Even More Demanding — Tracking Longer Lenses
This one popular sky tracker, the iOptron SkyGuider Pro, here with a telephoto lens. It and other trackers such as the Sky-Watcher Star Adventurer seen in the opening image, can be used with lenses and telescopes up to about 300mm focal length, if they are balanced well. Even longer lenses might work for the short exposures needed for the planets, but vibration and wind can blur images.
However, longer exposures might be needed later in the evening when the sky is darker, to set the planets into a starry background. After December 17 we will have a waxing Moon in the evening sky to light the sky and foreground, so the sky will not be dark, even from a rural site.
Even so, to ensure untrailed images with long telephotos — and certainly with telescopes — you will need to employ a sky tracker, a device to automatically turn the camera to follow the sky. If you don’t have one, it’s probably too late to get one and learn how to use it! But if you have one, here’s a great opportunity to put it to use.
Polar align it (you’ll have to wait for it to get dark enough to see the North Star) and then use it to take telephoto close-up images of the planets with exposure times that can now be as long as you like, though they likely won’t need to be more than 10 to 20 seconds.
You can now also use a slower ISO speed for less noise.
TRACKER TIP — Use a telephoto to frame just the planets, or include some foreground content such as a hilltop, if it can be made to fit in the frame. Keep in mind that the foreground will now blur from the tracking, which might not be an issue. If it is, take exposures of the foreground with the tracker motor off, to blend in later in processing.
The Most Difficult Method — Using a Telescope
An alt-azimuth mounted GoTo scope like this Celestron SE6 can work for short exposures of the planets, provided it is aligned and is tracking properly. Good focus will be critical.
Capturing the rare sight of the planets as two distinct disks (not just dots of light) accompanied by their moons, all together in the same frame, is possible anytime between now and the end of the year.
But … resolving the disks of the planets takes focal length — a lot of focal length! And that means using a telescope on a mount that can track the stars.
While a sky tracker might work, they are not designed to handle long and heavy lenses and telescopes. You’d need a telescope on a solid mount, though it could be a “GoTo” telescope on an alt-azimuth mount. Such a mount, while normally not suited for long-exposure deep-sky imaging, will be fine for the short exposures needed for the planets.
You will need to attach your camera to the telescope using a camera adapter, so the scope becomes the lens. If you have never done this, to shoot closeups of the Moon for example, and don’t have the right adapters and T-rings, then this isn’t the time to learn how to do it.
A simulation of the view with a 1,200mm focal length telescope on December 21. Even with such a focal length the planet disks still appear small.
TELESCOPE TIP — As an alternative, it might be possible to shoot the planets using a phone camera clamped to the low-power eyepiece of a telescope, but focusing and setting the exposure can be tough. It might not be worth the fuss in the brief time you have in twilight, perhaps on the one clear night you get! Just use your telescope to look and enjoy the view!
But if you have experience shooting the Moon through your telescope with your DSLR or mirrorless camera, then you should be all set, as the gear and techniques to shoot the planets are the same.
This is the setup I might use for a portable rig best for a last-minute chase to clear skies. It’s a Sky-Watcher EQM-35 mount with a 105mm apo refractor (the long-discontinued Astro-Physics Traveler), and here with a 2x Barlow to double the effective focal length to 1,200mm.
However, once again the challenge is just how close the planets are going to get to each other. Even a telescope with a focal length of 1200mm (typical for a small scope) still gives a field of view 1° wide using a cropped frame camera. That’s 60 arc minutes, ten times the 6 arc minute separation of Jupiter and Saturn on December 21!
TELESCOPE TIP — Use a 2x or 3x Barlow lens if needed to increase the effective focal length of the scope. Beware that introducing a Barlow into the light path usually requires racking the focus out and/or adding extension tubes to reach focus. Test your configuration as soon as possible to make sure you can focus it.
TELESCOPE TIP — With such long focal lengths shoot lots of exposures. Some will be sharper than others.
TELESCOPE TIP — But be sure to focus precisely, and refocus over the hour or so you might be shooting, as changing temperatures will shift the focus. You can’t fix bad focus!
Jupiter and Saturn in the same telescope field on December 5, 2020. Some of the moons are visible in this exposure taken in twilight before the planets got too low in the southwest. This is a single exposure with a 130mm Astro-Physics apo refractor at f/6 (so 780mm focal length) for 4 seconds at ISO 200 with the Canon 6D MkII. The disks of the planets are overexposed to bring out the moons.
Short exposures under one second might be needed to keep the planet disks from overexposing. Capturing the moons of Jupiter (it has four bright moons) and Saturn (it has two, Titan and Rhea, that are bright) will require exposures of several seconds. Going even longer will pick up background stars.
Or … with DSLRs and mirrorless cameras, try shooting HD or 4K movies. They will likely demand a high and noisy ISO, but might capture the view more like you saw and remember it.
FINAL TIP — Whatever combination of gear you decide to use, test it! Don’t wait until December 21 to see if it works, nor ask me if I think such-and-such a mount, telescope or technique will work. Test for yourself to find out.
Jupiter and Saturn taken in the deep twilight on December 3, 2020 from the Allen Bill flats area on the Elbow River in the Kananaskis Country southwest of Calgary, Alberta. This is a blend of 4 untracked images for the dark ground, stacked to smooth noise, for 2 minutes each at ISO 400, and two tracked images for the sky (and untrailed stars) for 30 seconds each at ISO 400, all with the 35mm Canon lens at f/2.8 and Canon EOS Ra. The tracker was the Sky-Watcher Star Adventurer 2i.
Don’t Fret or Compete. Enjoy!
The finest images will come from experienced planetary imagers using high-frame-rate video cameras to shoot movies, from which software extracts and stacks the sharpest frames. Again, if you have no experience with doing that (I don’t!), this is not the time to learn!
And even the pros will have a tough time getting sharp images due to the planets’ low altitude, even from the southern hemisphere, where some pro imagers have big telescopes at their disposal, to get images no one else in the world can compete with!
In short, use the gear you have and techniques you know to capture this unique event as best you can. And if stuff fails, just enjoy the view!
Jupiter and Saturn taken December 3, 2020 from the Allen Bill flats area on the Elbow River in the Kananaskis Country southwest of Calgary, Alberta. This is a blend of 4 untracked images for the dark ground, stacked to smooth noise, for 2 minutes each at ISO 400, and two tracked images for the sky for 30 seconds at ISO 1600, all with the 35mm Canon lens at f/2.8 and Canon EOS Ra. The tracker was the Sky-Watcher Star Adventurer 2i.
If you miss closest approach day due to cloud, don’t worry.
Even when shooting with telephoto lenses the photo ops will be better in the week leading up to and following December 21, when the greater separation of the planets will make it easier to capture a dramatic image of the strikingly close pairing of planets over an Earthly scene.
We’ve embarked upon a new project to produce a comprehensive tutorial on deep-sky imaging with DSLR cameras.
This past week we launched a new KickStarter campaign to fund the production of a new multi-hour video course on how to capture deep-sky objects using entry-level telescope gear and DSLR cameras.
The emphasis in the course will be on techniques for taking and processing publication-quality images as simply and easily as possible.
The final video course will consist of several programs, including a video of one of our annual “Deep-Sky with Your DSLR” workshops presented locally here in Alberta. We’ve often had requests for a video version of those workshops, for those who cannot attend in person.
This is it! Here’s a short preview of some of the content.
We include the Workshop video, but we supplement it with much more: with video segments shot in the field by day and by night, showing how to setup and use gear, and shot in the studio showing how to process images.
While much of the content has been shot and edited, there’s more to do yet. Thus our KickStarter campaign to complete the funding and production. Backers of the project through KickStarter will get the final videos at a substantial discount off the final retail price.
All the details are on the project’s KickStarter page. Click through for the listing of course content, and options for funding levels. An FAQ page answers many of the common questions.
A week into the campaign and we’re just over 50% funded, but we have a way to go yet!
We hope you’ll consider backing our project, which we think will be unique on the market.
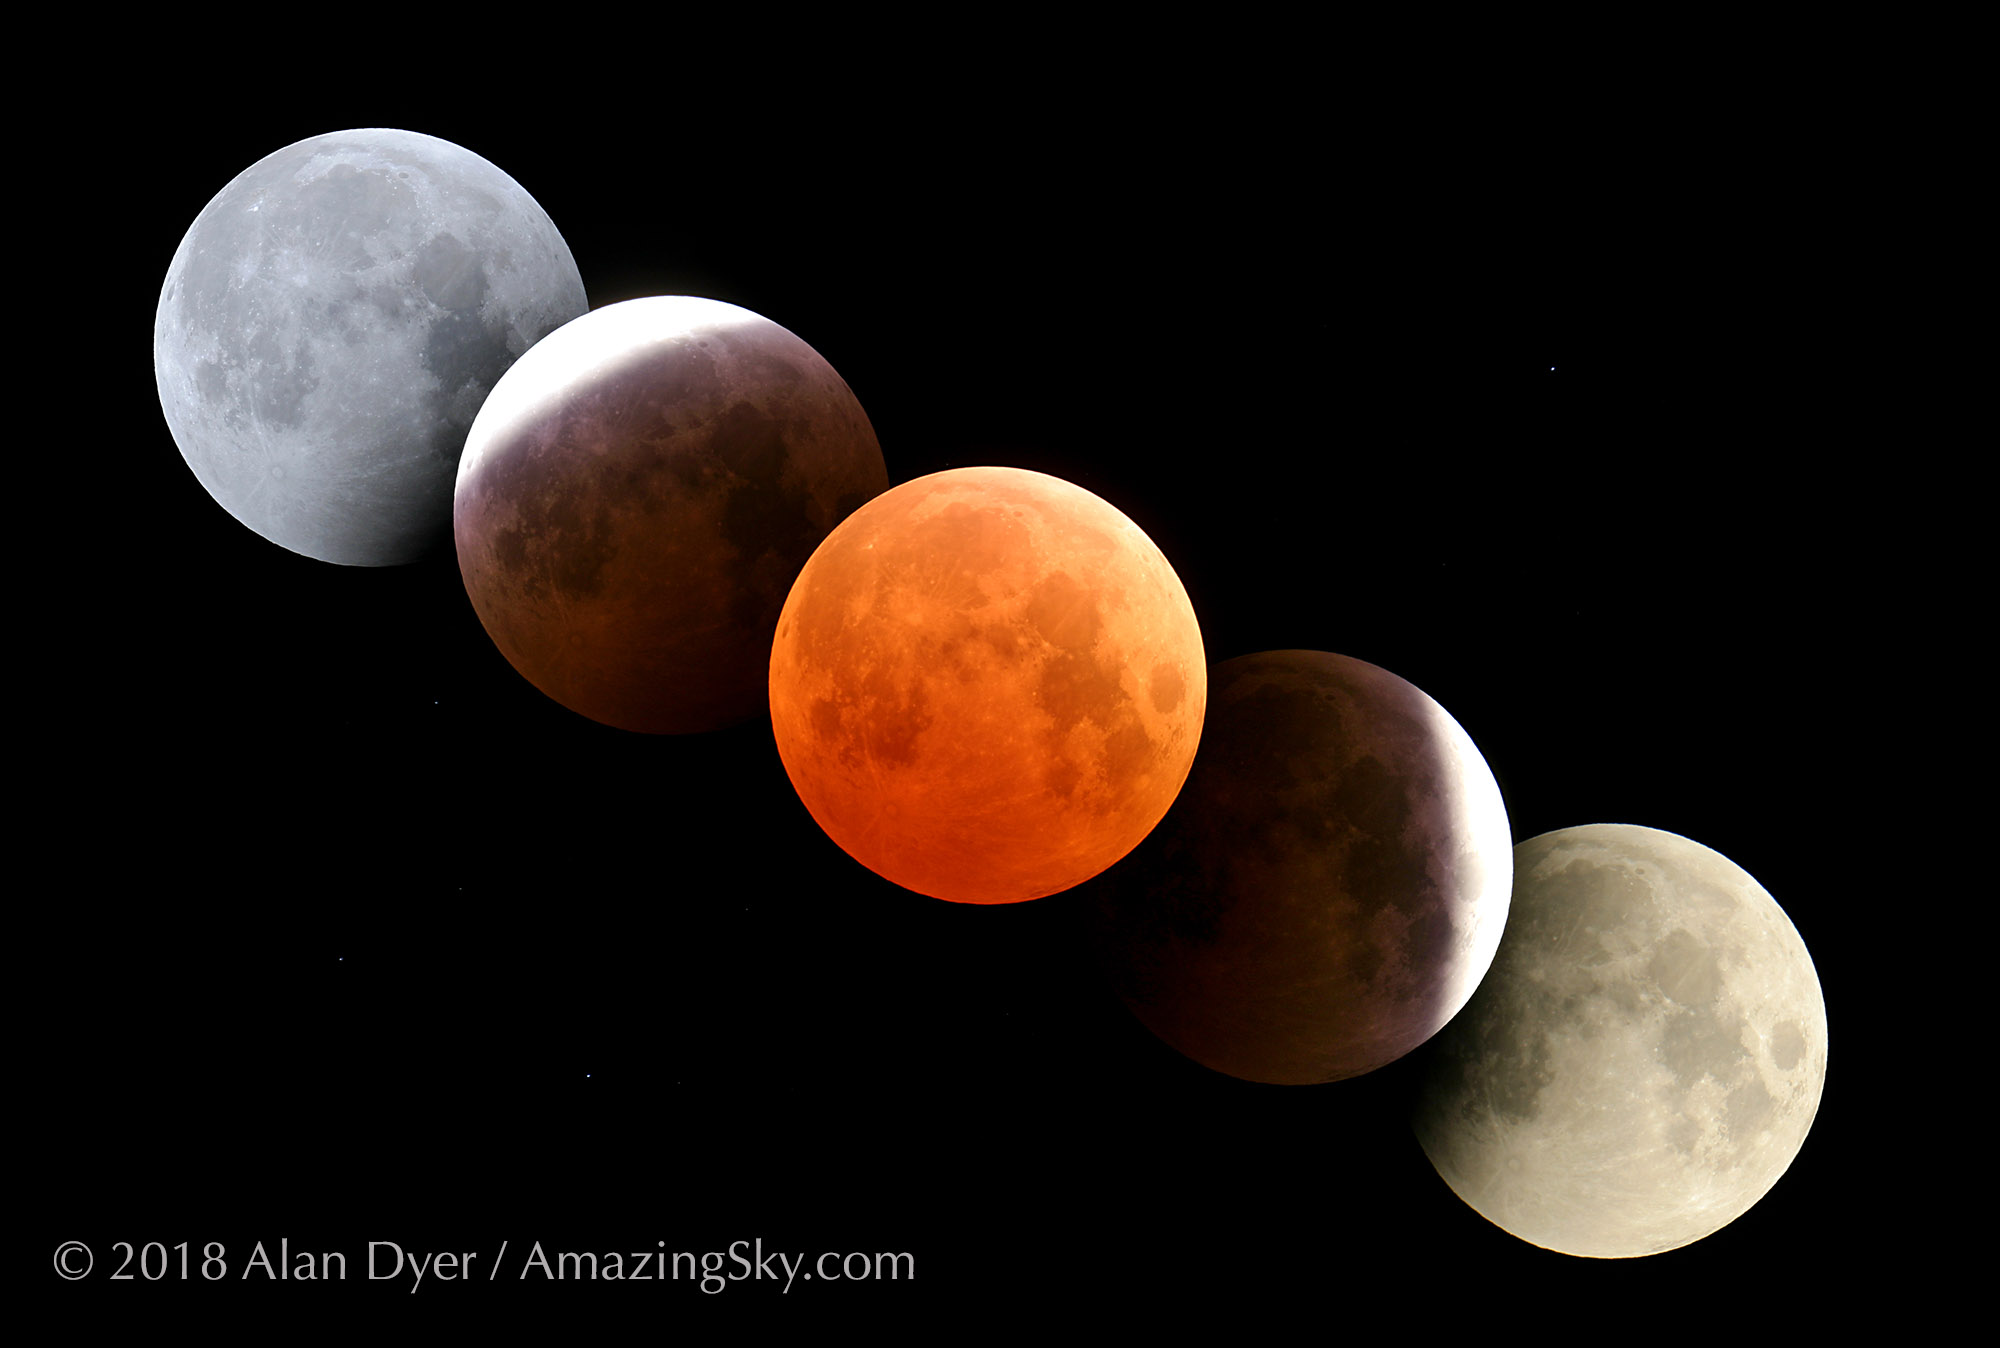
On the evening of January 20 for North America, the Full Moon passes through the umbral shadow of the Earth, creating a total eclipse of the Moon.
No, this isn’t a “blood,” “super,” nor “wolf” Moon. All those terms are internet fabrications designed to bait clicks.
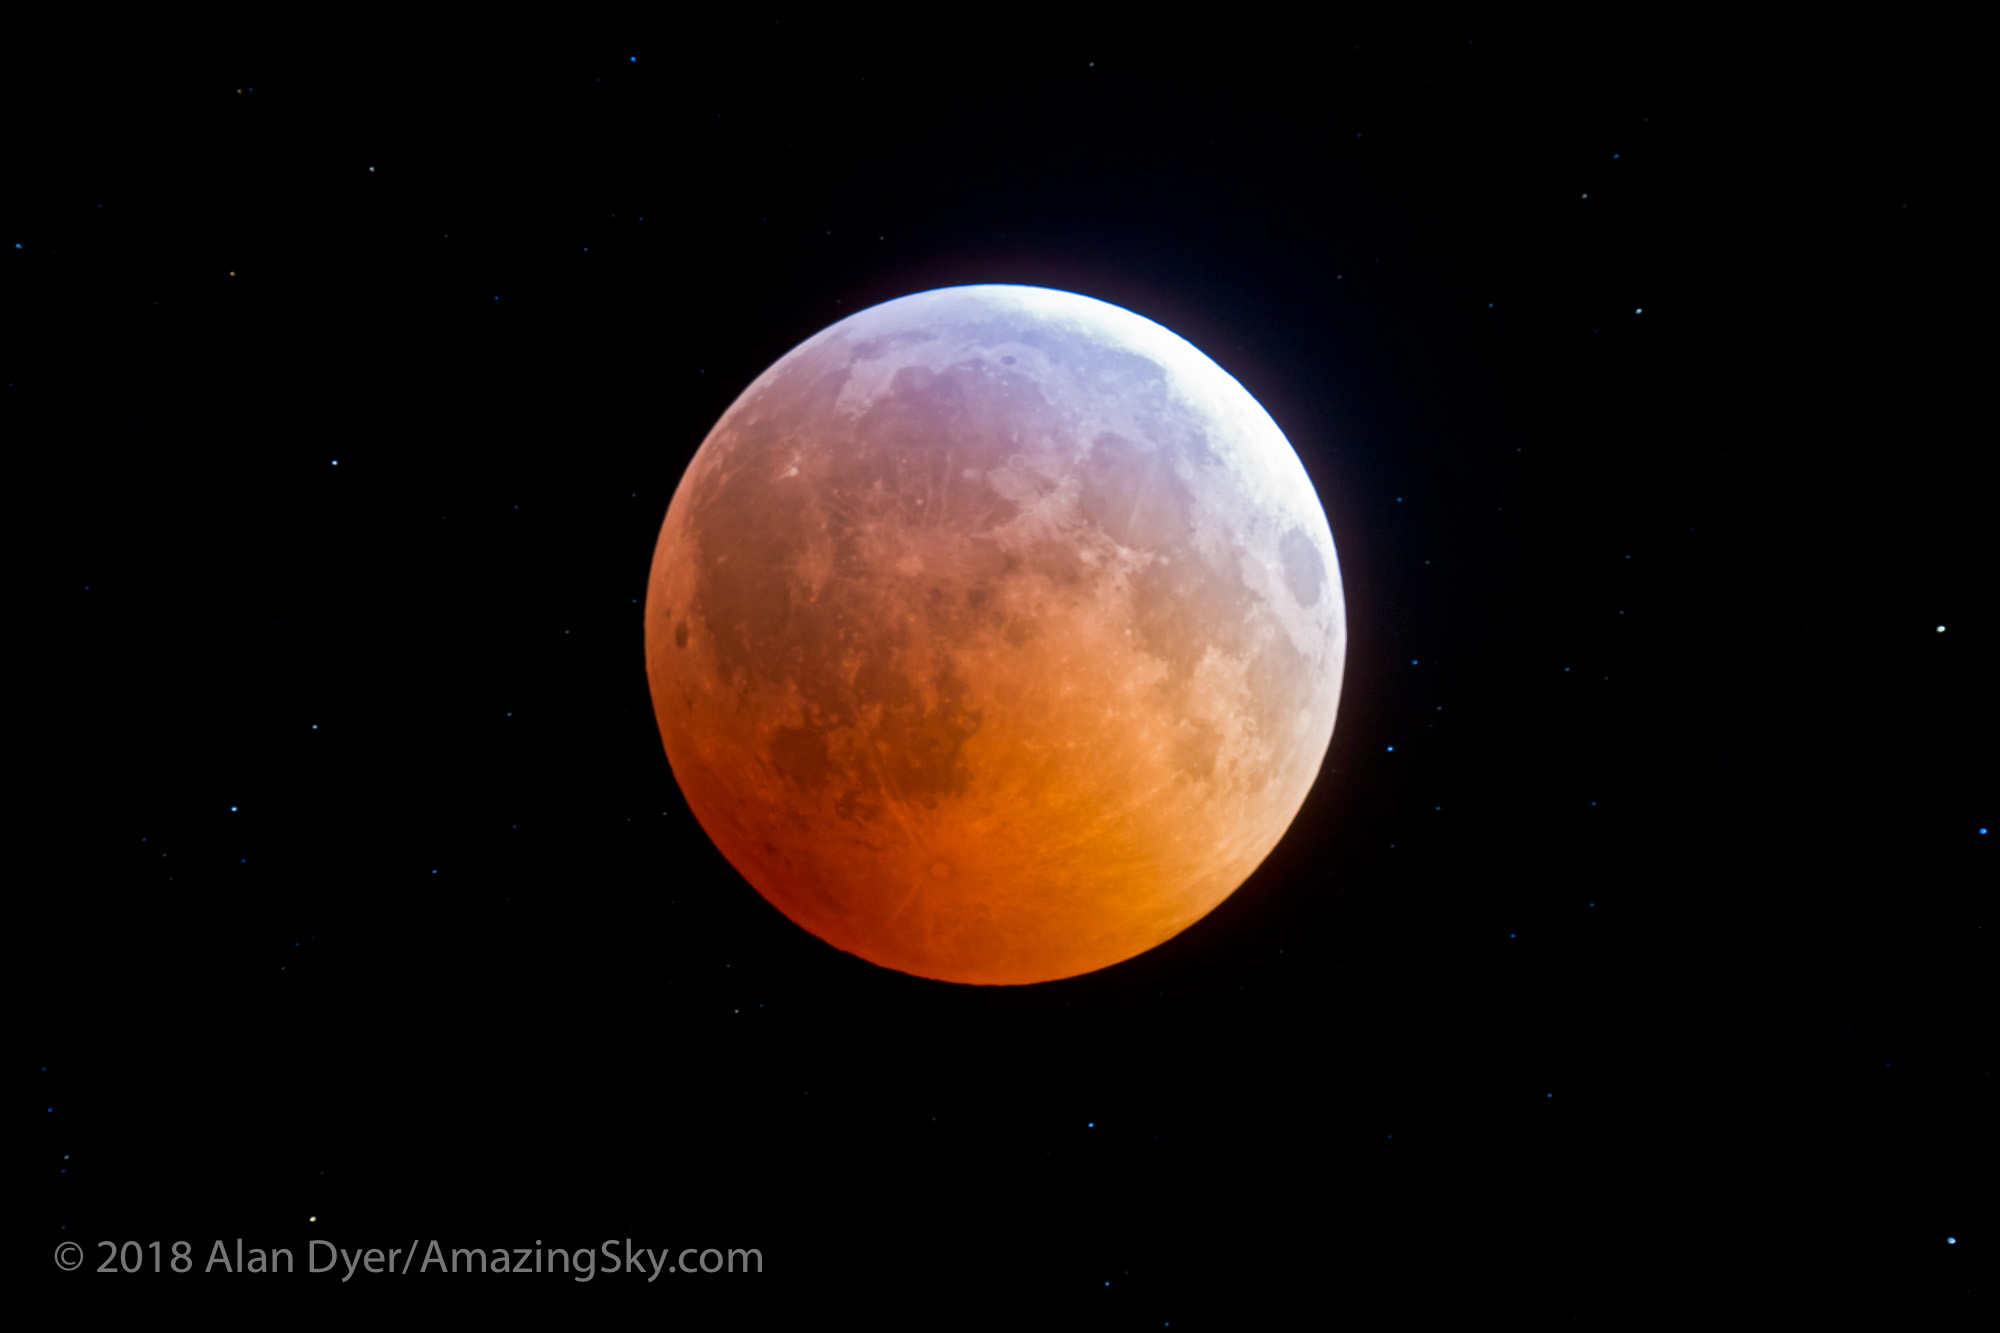
It is a totallunareclipse — an event that doesn’t need sensational adjectives to hype, because they are always wonderful sights! And yes, the Full Moon does turn red.
As such, on January 20 the evening and midnight event provides many opportunities for great photos of a reddened Moon in the winter sky.
Here’s my survey of tips and techniques for capturing the eclipsed Moon.
First … What is a Lunar Eclipse?
As the animation below shows (courtesy NASA/Goddard Space Flight Center), an eclipse of the Moon occurs when the Full Moon (and they can happen only when the Moon is exactly full) travels through the shadow of the Earth.
The Moon does so at least two times each year, though often not as a total eclipse, one where the entire disk of the Moon enters the central umbral shadow. Many lunar eclipses are of the imperceptible penumbral variety, or are only partial eclipses.
Total eclipses of the Moon can often be years apart. The last two were just last year, on January 31 and July 27, 2018. However, the next is not until May 26, 2021.
At any lunar eclipse we see an obvious darkening of the lunar disk only when the Moon begins to enter the umbra. That’s when the partial eclipse begins, and we see a dark bite appear on the left edge of the Moon.
While it looks as if Earth’s shadow sweeps across the Moon, it is really the Moon moving into, then out of, our planet’s umbra that causes the eclipse. We are seeing the Moon’s revolution in its orbit around Earth.
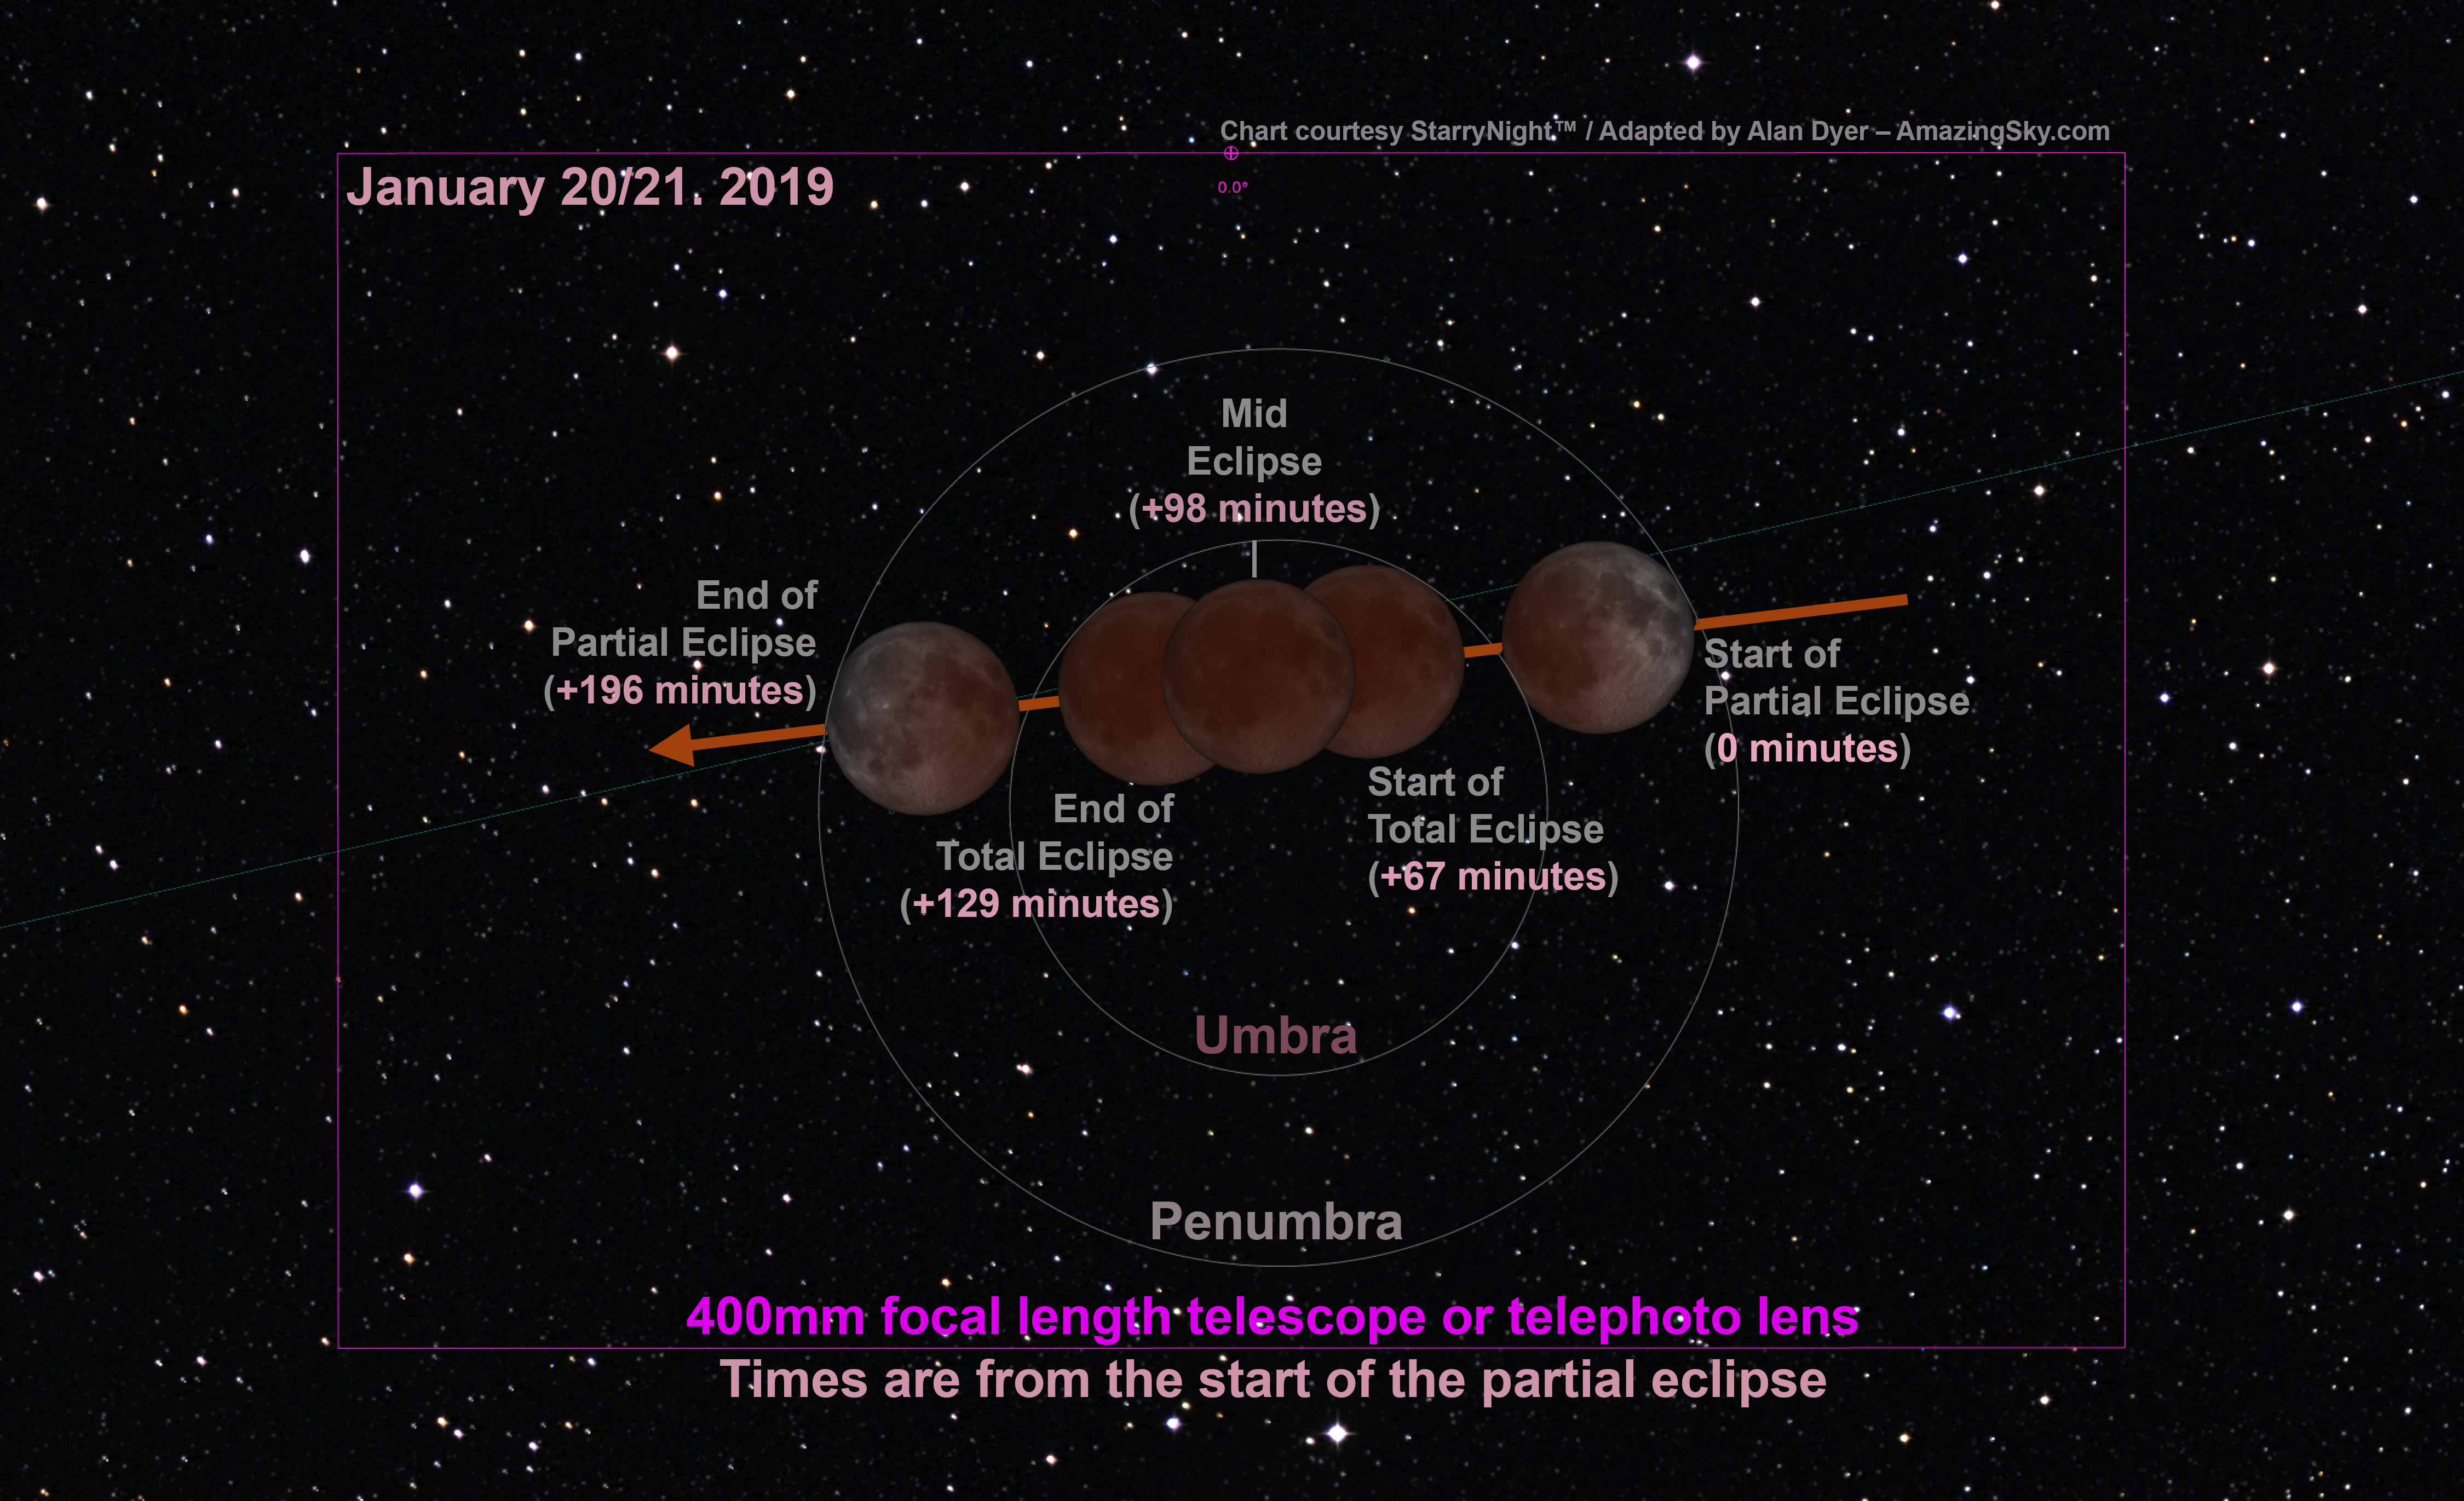
At this eclipse the partial phases last 67 minutes before and after totality.
This shows the length of the eclipse phases relative to the start of the partial eclipse as the Moon begins to enter the umbra at right. The Moon’s orbital motion takes it through the umbra from right to left (west to east) relative to the background stars. The visible eclipse ends 196 minutes (3 hours and 16 minutes) after it began. Click or tap on the charts to download a high-res version.
Once the Moon is completely immersed in the umbra, totality begins and lasts 62 minutes at this eclipse, a generous length.
The Moon will appear darkest and reddest at mid-eclipse. During totality the lunar disk is illuminated only by red sunlight filtering through Earth’s atmosphere. It is the light of all the sunsets and sunrises going on around our planet.
And yes, it is perfectly safe to look at the eclipsed Moon with whatever optics you wish. Binoculars often provide the best view. Do have a pair handy!
Total eclipse of the Moon, December 20/21, 2010, taken from home with 130mm AP apo refractor at f/6 and Canon 7D at ISO 400 for 4 seconds, single exposure, shortly after totality began.
At this eclipse because the Moon passes across the north half of the umbra, the top edge of the Moon will always remain bright, as it did above in 2010, looking like a polar cap on the reddened Moon.
Near the bright edge of the umbra look for subtle green and blue tints the eye can see and that the camera can capture.
Where is the Eclipse?
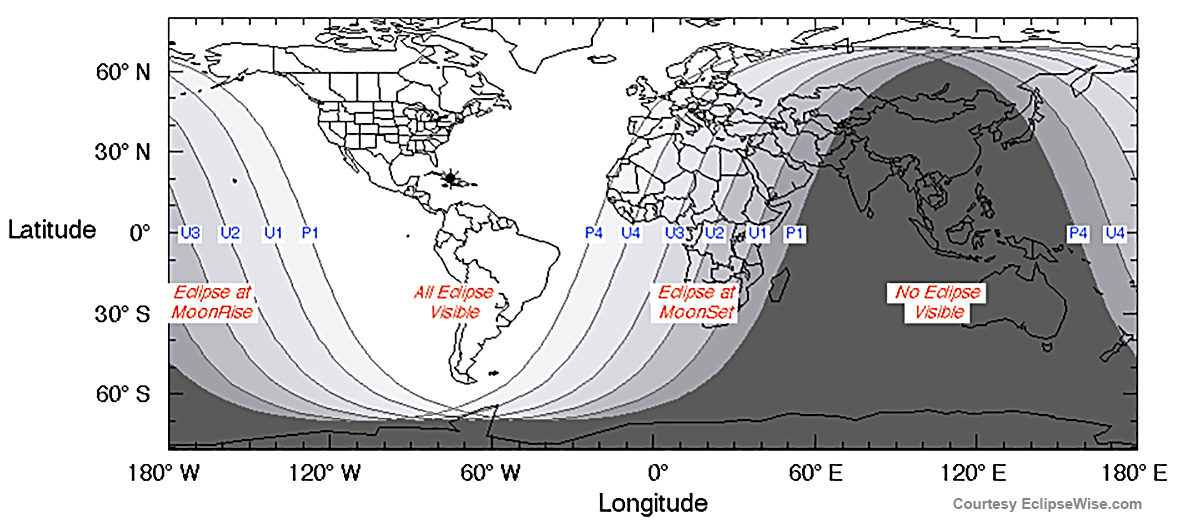
As the chart below shows, all of the Americas can see the entire eclipse, with the Moon high in the evening or late-night sky. For the record, the Moon will be overhead at mid-eclipse at local midnight from Cuba!
All of the Americas can see this eclipse. The eclipse gets underway as the Moon sets at dawn over Europe. Diagram courtesy EclipseWise.com
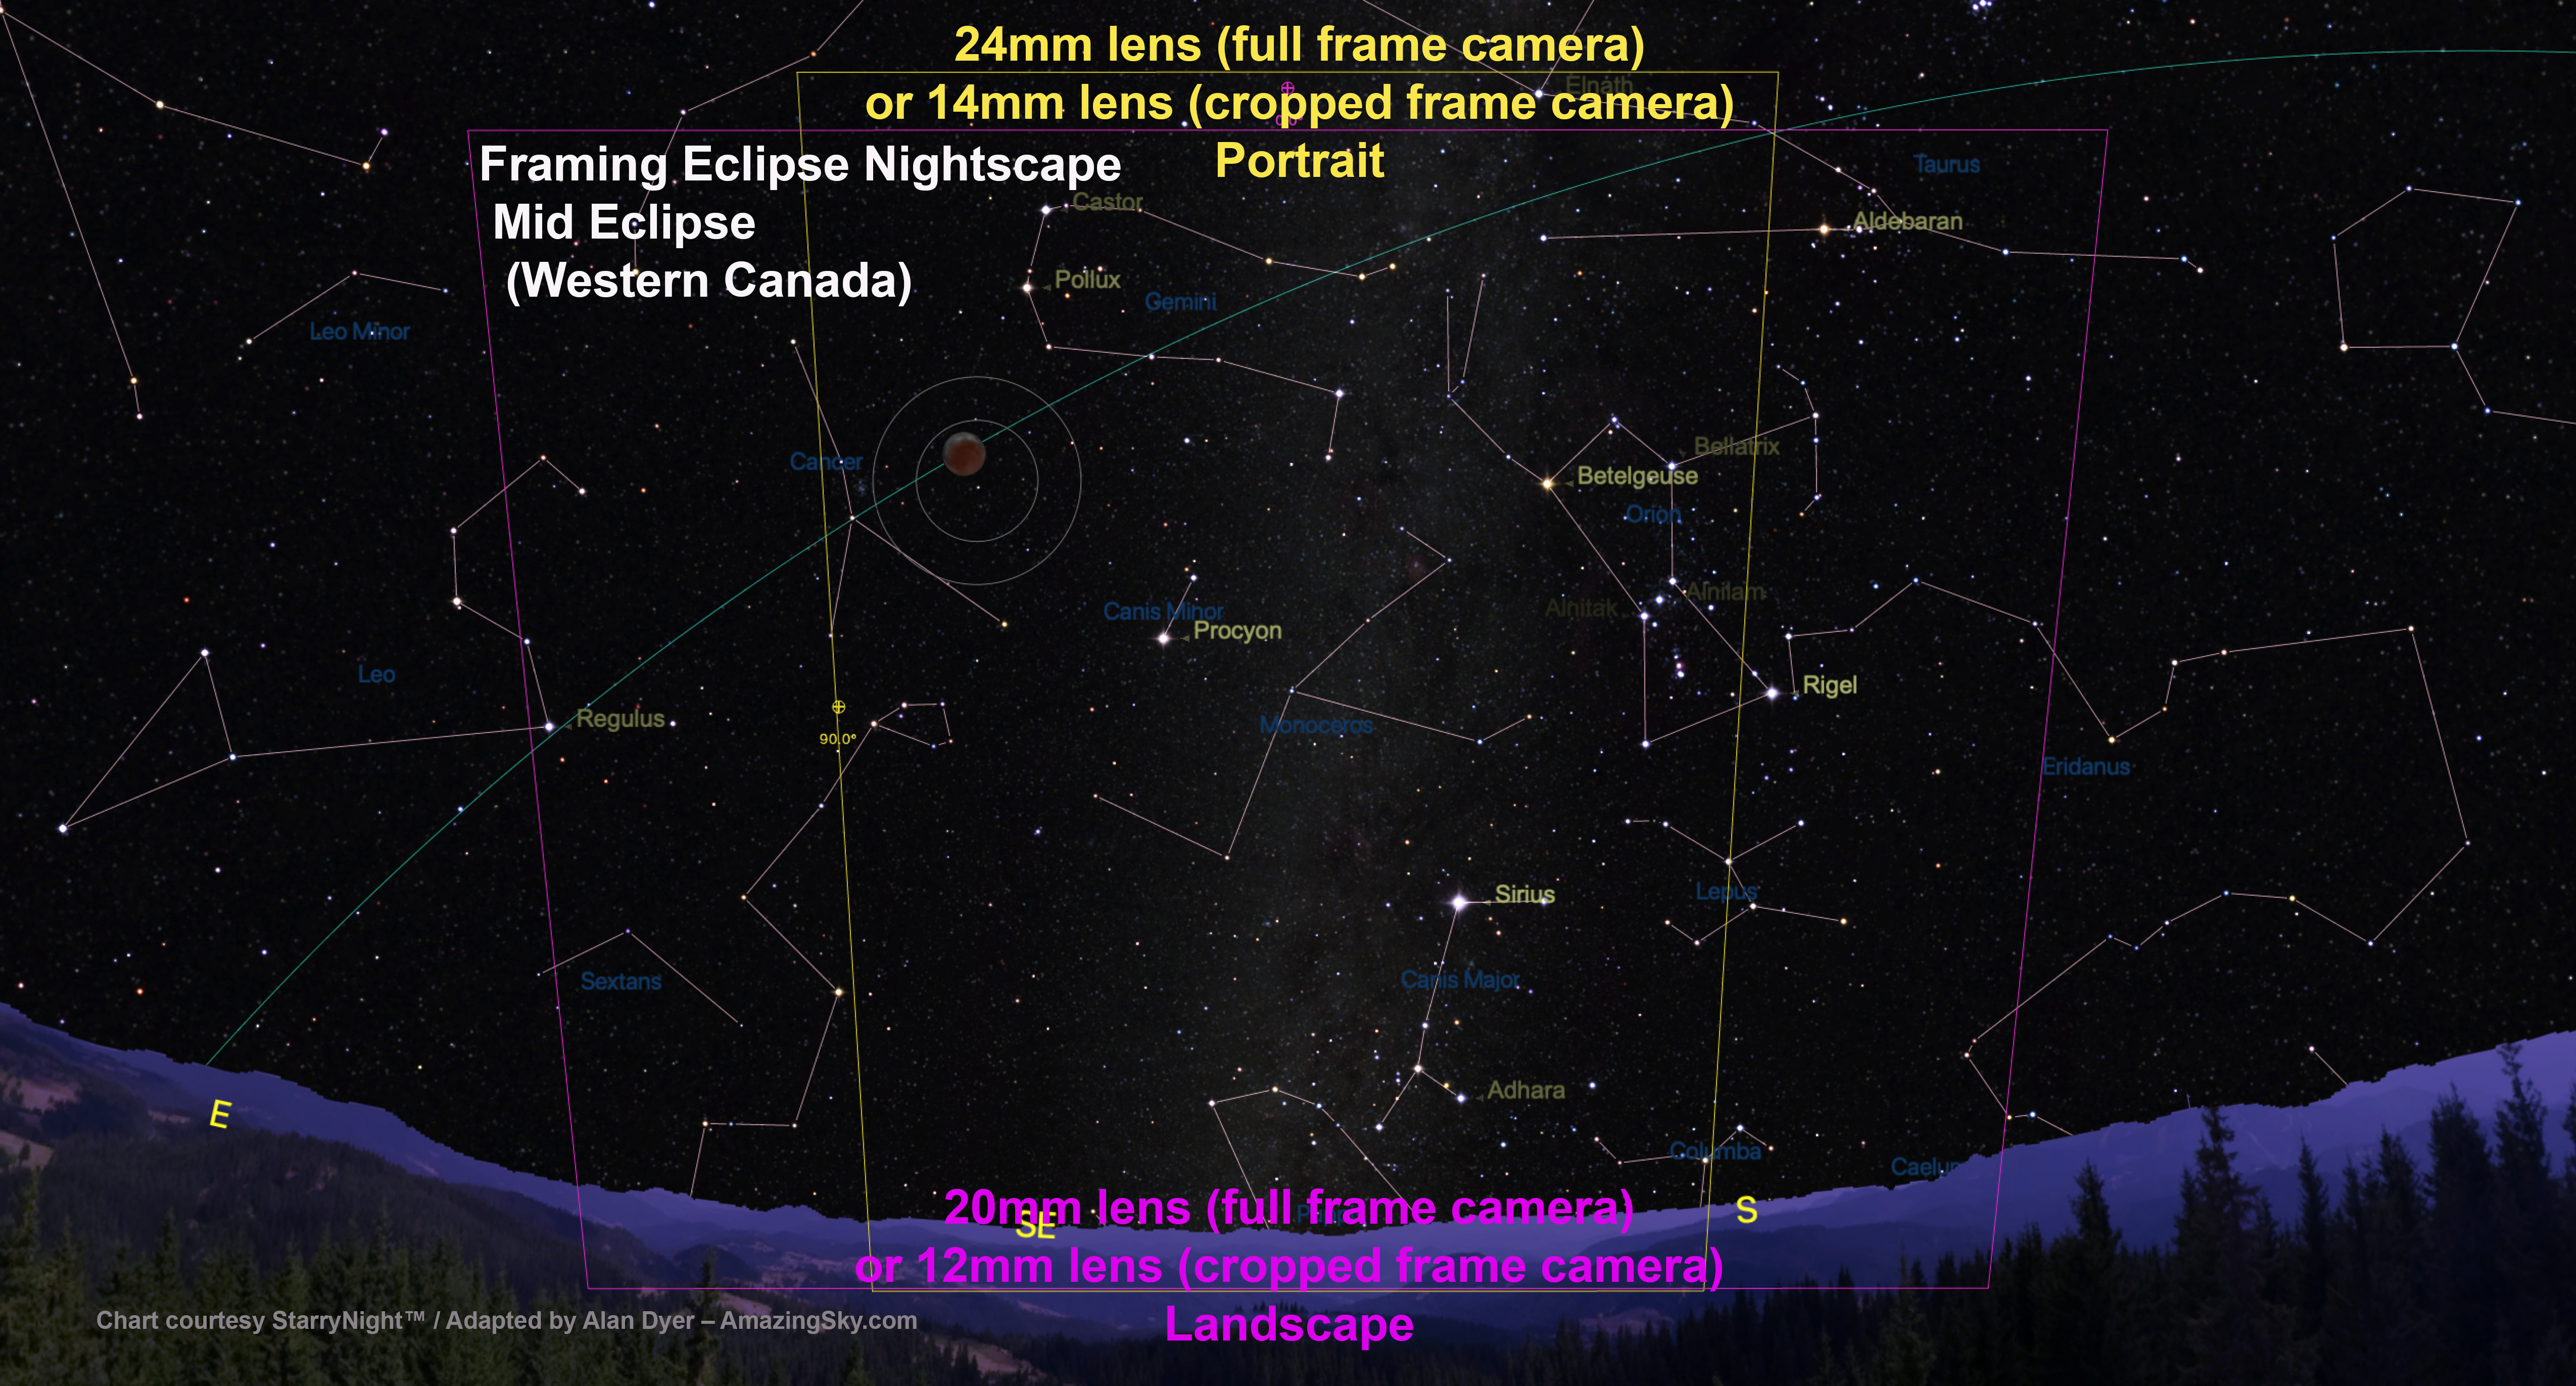
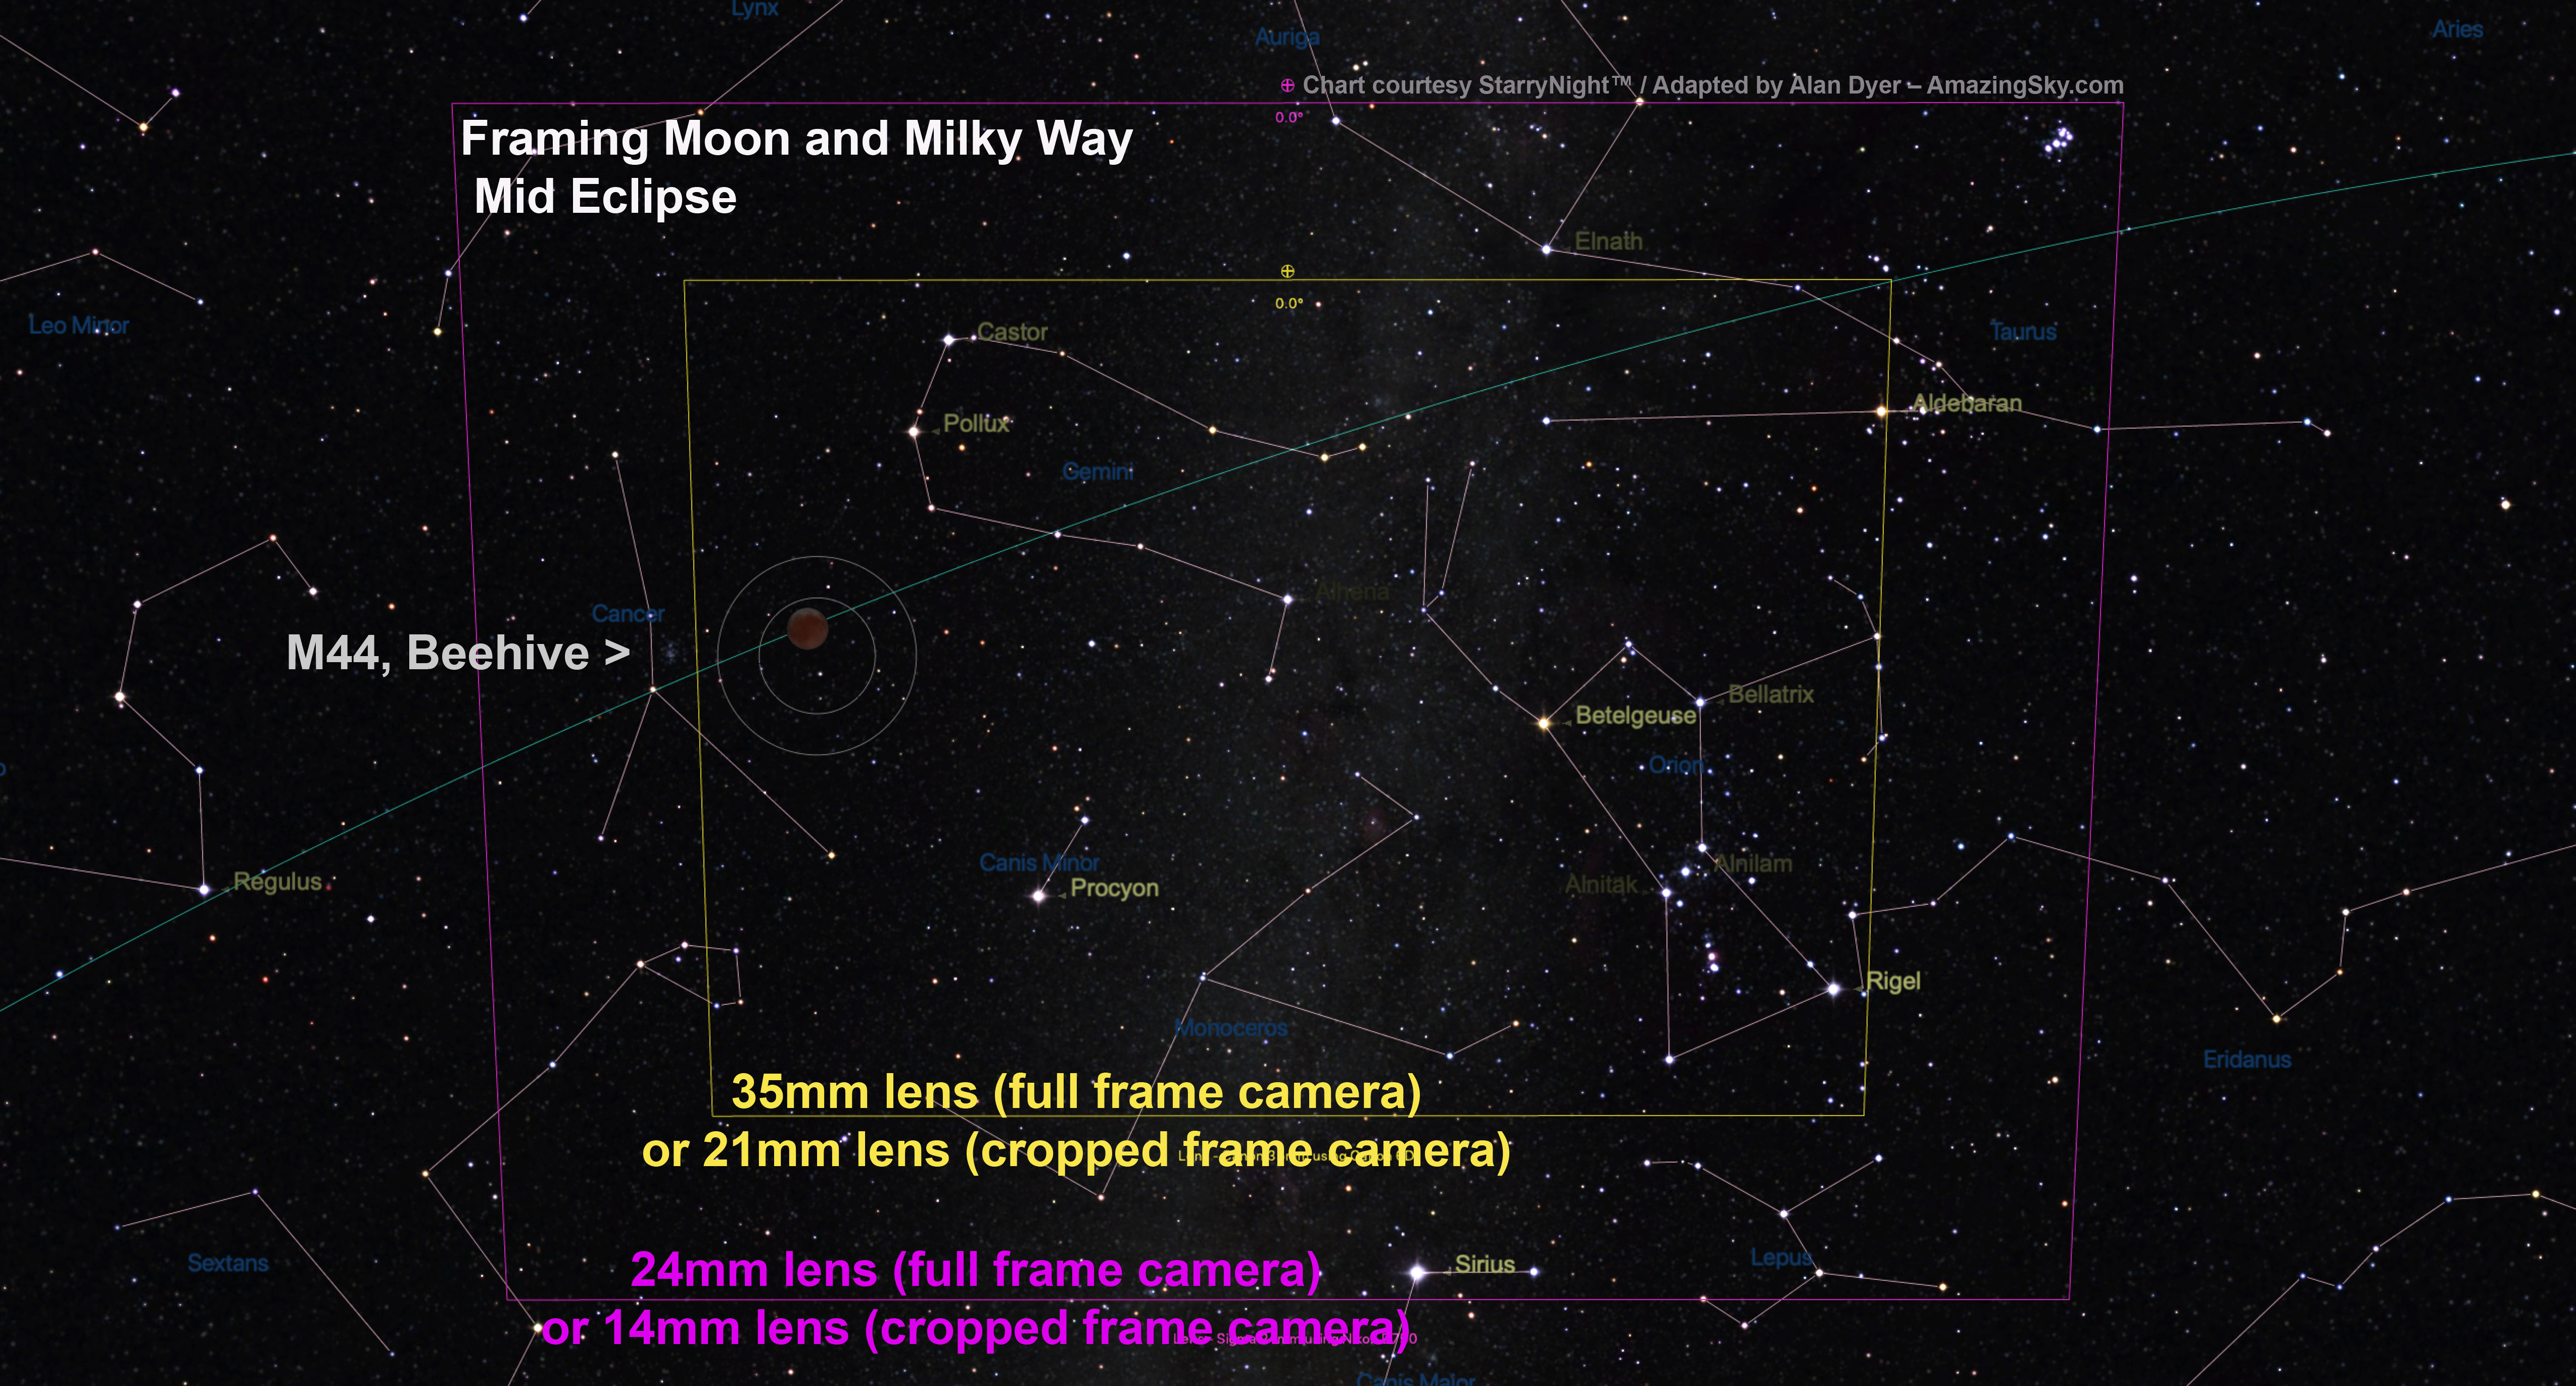
I live in Alberta, Canada, at a latitude of 50 degrees North. And so, the sky charts I provide here are for my area, where the Moon enters the umbral shadow at 8:35 p.m. MST with the Moon high in the east. By the end of totality at 10:44 p.m. MST the Moon shines high in the southeast. This sample chart is for mid-eclipse at my site.
The sky at mid-eclipse from my Alberta site. Created with the planetarium software Starry Night, from Simulation Curriculum.
I offer them as examples of the kinds of planning you can do to ensure great photos. I can’t provide charts good for all the continent because exactly where the Moon will be during totality, and the path it will take across your sky will vary with your location.
In general, the farther east and south you live in North America the higher the Moon will appear. But from all sites in North America the Moon will always appear high and generally to the south.
To plan your local shoot, I suggest using planetarium software such as the free Stellarium or Starry Night (the software I used to prepare the sky charts in this post), and photo planning apps such as The Photographer’s Ephemeris or PhotoPills.
The latter two apps present the sightlines toward the Moon overlaid on a map of your location, to help you plan where to be to shoot the eclipsed Moon above a suitable foreground, if that’s your photographic goal.
When is the Eclipse?
While where the Moon is in your sky depends on your site, the various eclipse events happen at the same time for everyone, with differences in hour due only to the time zone you are in.
While all of North America can see the entirety of the partial and total phases of this eclipse (lasting 3 hours and 16 minutes from start to finish), the farther east you live the later the eclipse occurs, making for a long, late night for viewers on the east coast.
Those in western North America can enjoy all of totality and be in bed at or before midnight.
Here are the times for the start and end of the partial and total phases. Because the penumbral phases produce an almost imperceptible darkening, I don’t list the times below for the start and end of the penumbral eclipse.
PM times are on the evening of January 20.
AM times are after midnight on January 21.
Note that while some sources list this eclipse as occurring on January 21, that is true for Universal Time (Greenwich Time) and for sites in Europe where the eclipse occurs at dawn near moonset.
For North America, if you go out on the evening of January 21 expecting to see the eclipse you’ll be a day late and disappointed!
Picking a Photo Technique
Lunar eclipses lend themselves to a wide range of techniques, from a simple camera on a tripod, to a telescope on a tracking mount following the sky.
If this is your first lunar eclipse I suggest keeping it simple! Select just one technique, to focus your attention on only one camera on a cold and late winter night.
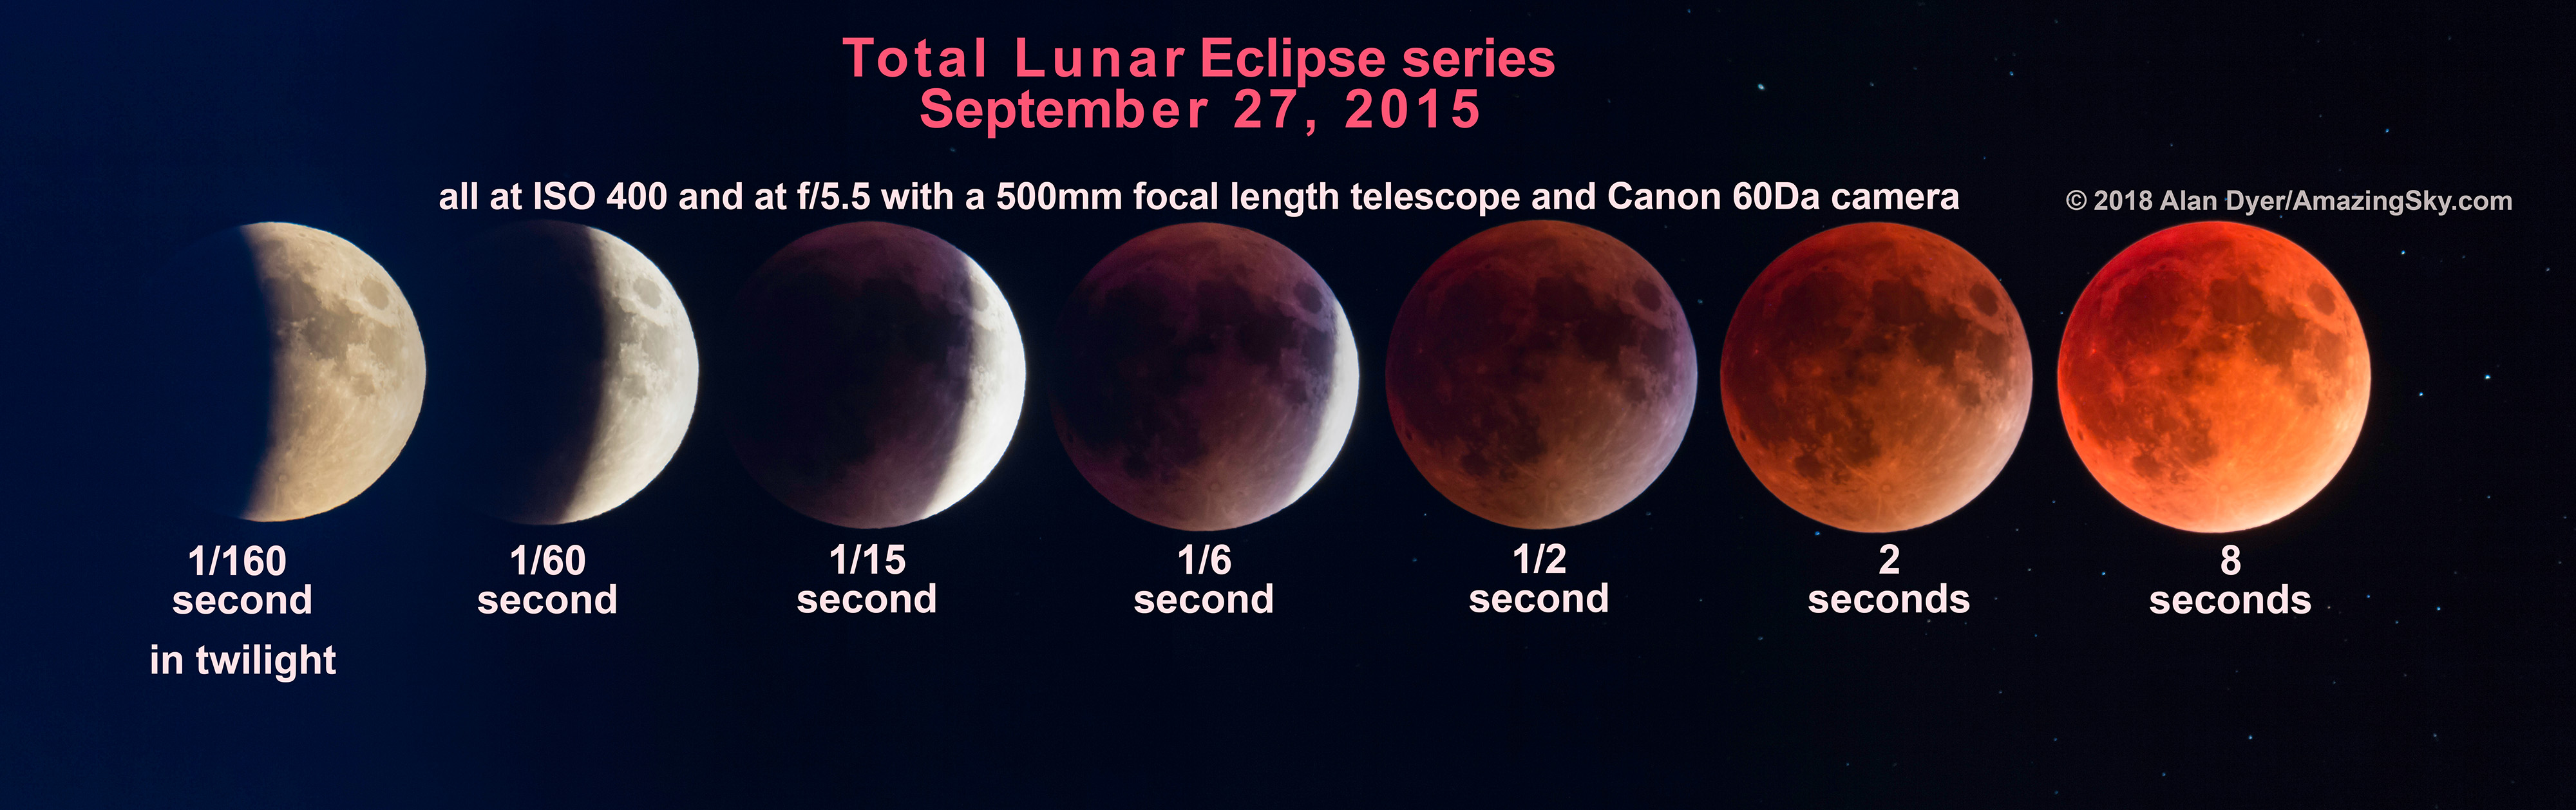
The total eclipse of the Moon of September 27, 2015, through a telescope, at mid-totality with the Moon at its darkest and deepest into the umbral shadow, in a long exposure to bring out the stars surrounding the dark red moon. This is a single exposure taken through a 92mm refractor at f/5.5 for 500mm focal length using the Canon 60Da at ISO 400 for 8 seconds. The telescope was on a SkyWatcher HEQ5 equatorial mount tracking at the lunar rate.
Then during the hour of totality take the time to enjoy the view through binoculars and with the unaided eye. No photo quite captures the glowing quality of an eclipsed Moon. But here’s how to try it.
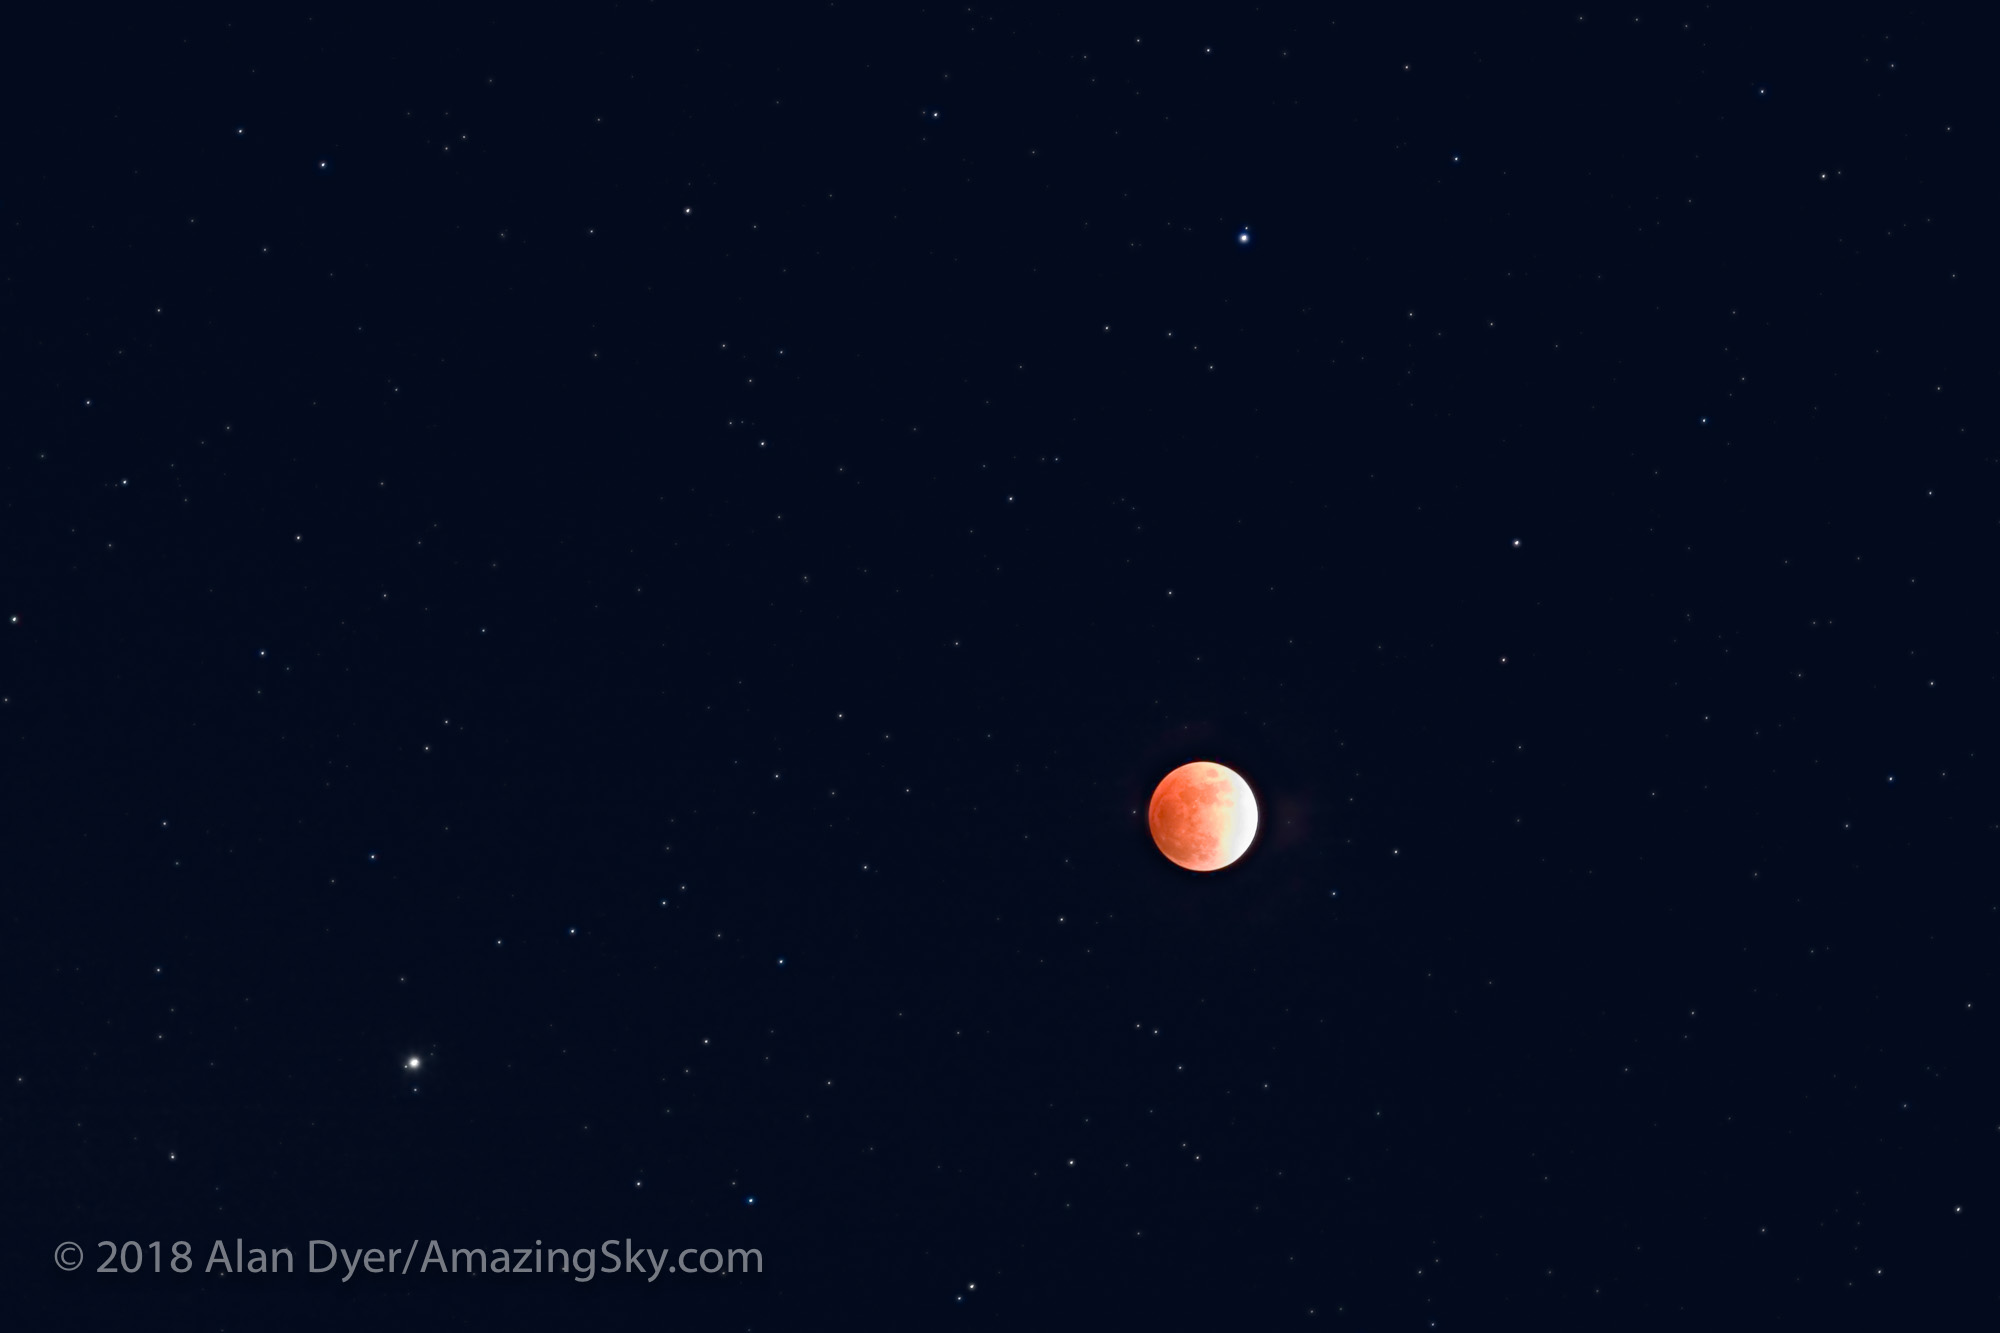
Option 1: Simple — Camera-on-Tripod
The easiest method is to take single shots using a very wide-angle lens (assuming you also want to include the landscape below) with the camera on a fixed tripod. No fancy sky trackers are needed here.
During totality, with the Moon now dimmed and in a dark sky, use a good DSLR or mirrorless camera in Manual (M) mode (not an automatic exposure mode) for settings of 2 to 20 seconds at f/2.8 to f/4 at ISO 400 to 1600.
That’s a wide range, to be sure, but it will vary a lot depending on how bright the sky is at your site. Shoot at lots of different settings, as blending multiple exposures later in processing is often the best way to reproduce the scene as your eyes saw it.
Shoot at a high ISO if you must to prevent blurring from sky motion. However, lower ISOs, if you can use them by choosing a slower shutter speed or wider lens aperture, will yield less digital noise.
Focus carefully on a bright star, as per the advice below for telephoto lenses. Don’t just set the lens focus to infinity, as that might not produce the sharpest stars.
Total eclipse of the Moon, December 20/21, 2010, with 15mm lens at f/3.2 and Canon 5D MkII at ISO 1600 for a 1-minute tracked exposure. Without a tracker, use shorter exposures (less than 20 seconds) and higher ISOs or wider apertures to avoid trailing,
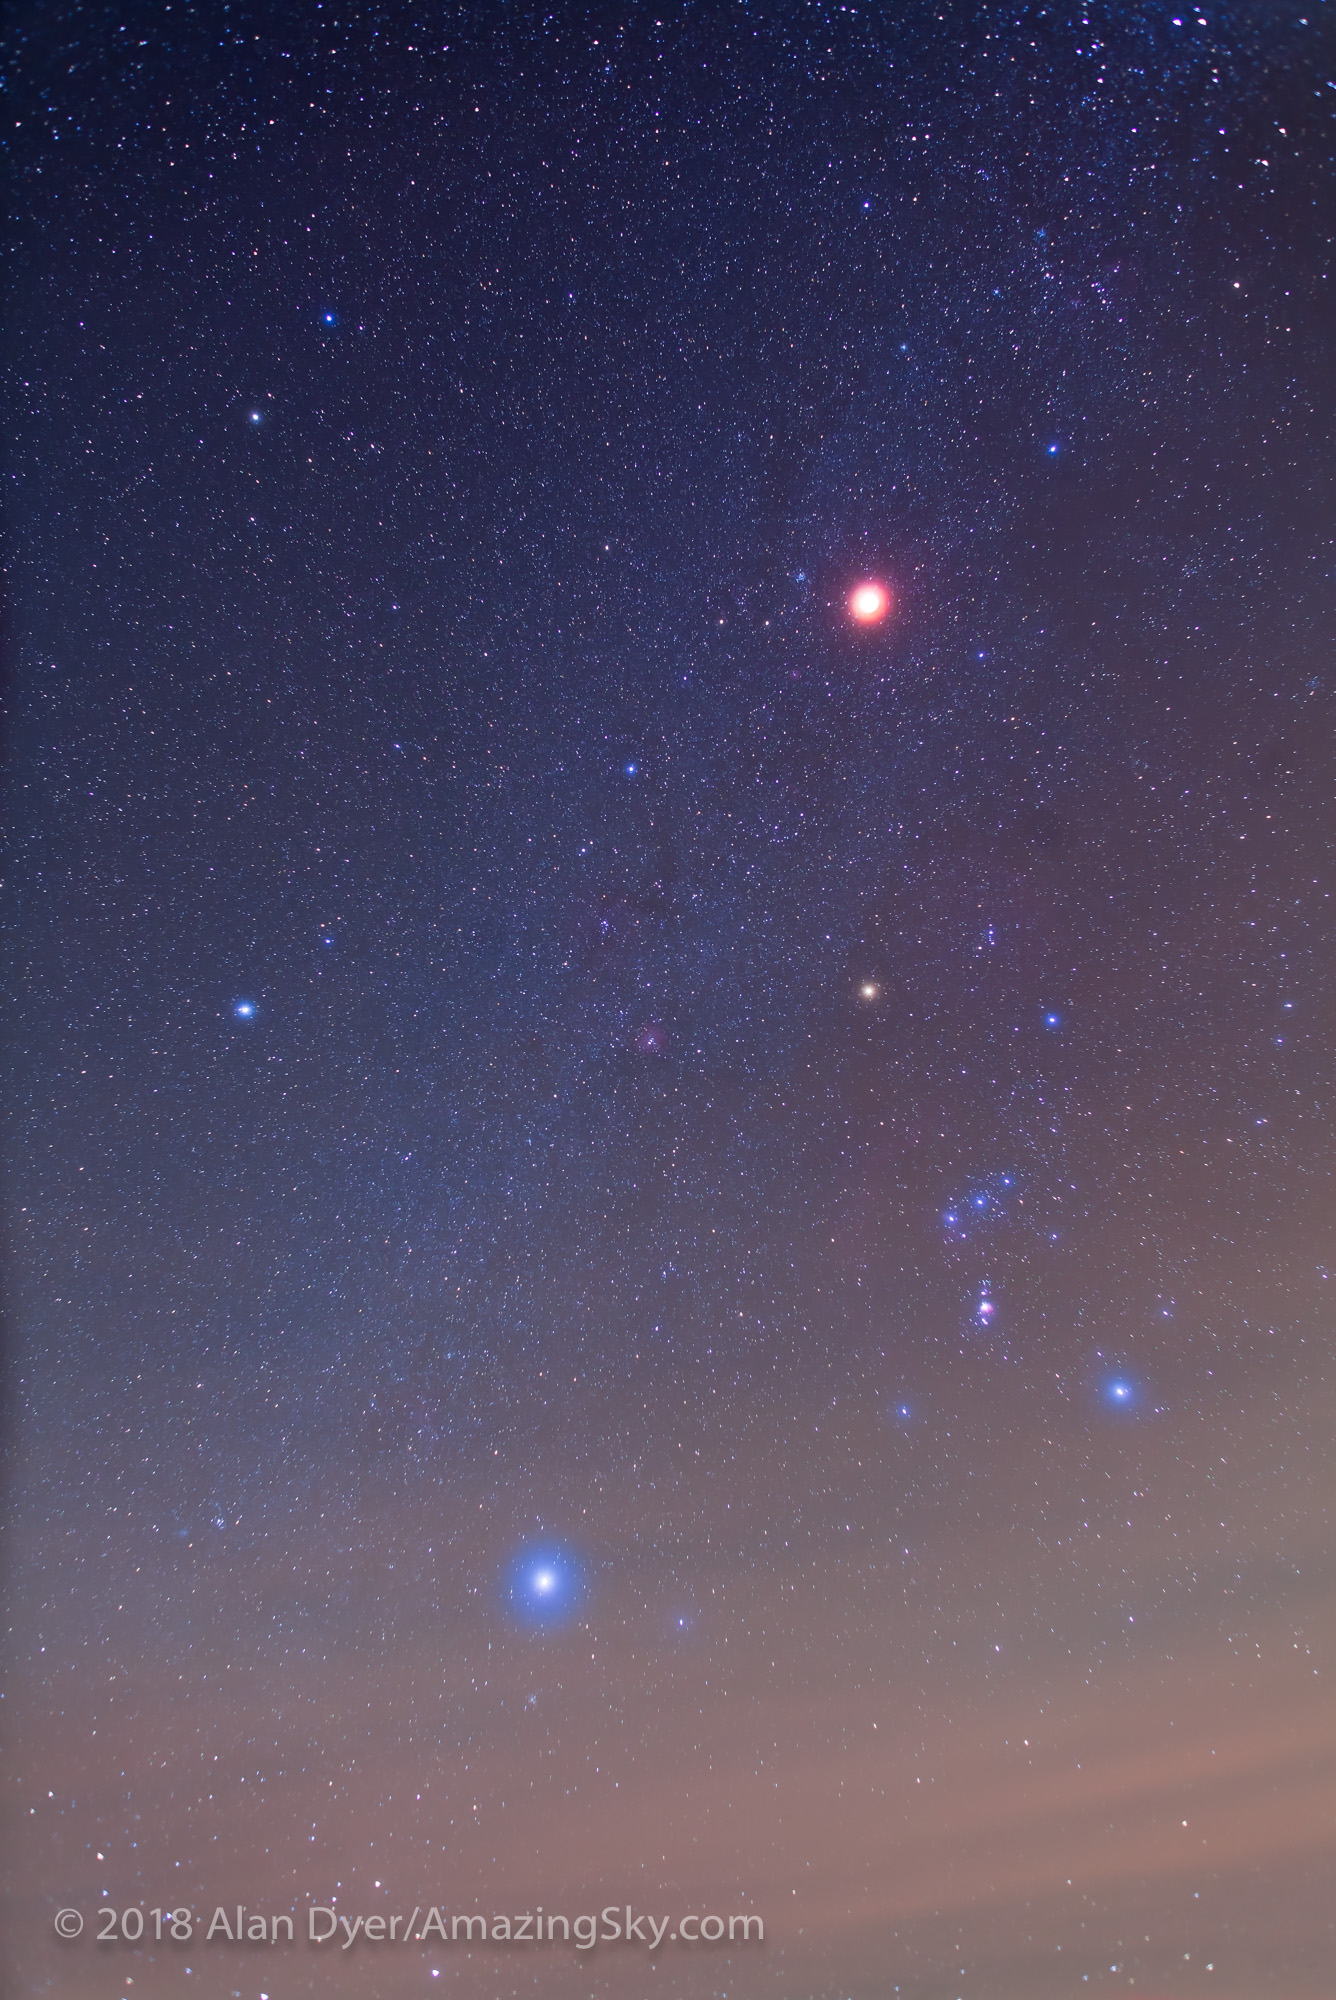
One scene to go for at this eclipse is similar to the above photo, with the reddened Moon above a winter landscape and shining east of Orion and the winter Milky Way. But that will require shooting from a dark site away from urban lights. But when the Moon is totally eclipsed, the sky will be dark enough for the Milky Way to appear.
Click or tap on any of the charts to download a high-resolution copy.
The high altitude of the Moon at mid-eclipse from North America (with it 40 to 70 degrees above the horizon) will also demand a lens as wide as 10mm to 24mm, depending whether you use portrait or landscape orientation, and if your camera uses a cropped frame or full frame sensor. The latter have the advantage in this category of wide-angle nightscape.
Alternatively, using a longer 14mm to 35mm lens allows you to frame the Moon beside Orion and the winter Milky Way, as above, but without the landscape. Again, this will require a dark rural site.
If you take this type of image with a camera on a fixed tripod, use high ISOs to keep exposures below 10 to 20 seconds to avoid star trailing. You have an hour of totality to shoot lots of exposures to make sure some will work best.
Total eclipse of the Moon, December 20/21, 2010, with Canon 5D MKII and 24mm lens at f2.8 for stack of four 2-minute exposures at ISO 800. Taken during totality using a motorized sky tracker. The eclipsed Moon is the red object above Orion, and the stars appear bloated due to high haze and fog rolling in.
If you have a sky tracker to follow the stars, as I did above, exposures can be much longer — perhaps a minute to pick up the Milky Way really well — and ISOs can be lower to avoid noise.
Option 1 Variation — Urban Eclipses
Unfortunately, point-and-shoot cameras and so-called “bridge” cameras, ones with non-interchangeable lenses, likely won’t have lenses wide enough to capture the whole scene, landscape and all. Plus their sensors will be noisy when used at high ISOs. Those cameras might be best used to capture moderate telephoto closeups at bright urban sites.
With any camera, at urban sites look for scenic opportunities to capture the eclipsed Moon above a skyline or behind a notable landmark. By looking up from below you might be able to frame the Moon beside a church spire, iconic building, or a famous statue using a normal or short telephoto lens, making this a good project for those without ultra-wide lenses.
Lunar eclipse, Feb 20, 2008 with a 135mm telephoto and Canon 20Da camera showing the Moon’s size with such a lens and cropped-frame camera. This is a blend of 8-second and 3-second exposures to bring out stars and retain the Moon. Both at ISO200 and f/2.8. Saturn is at lower left and Regulus at upper right.
Whatever your lens or subject, at urban sites expose as best you can for the foreground, trying to avoid any bright and bare lights in the frame that will flood the image with lens flares in long exposures.
Capturing such a scene during the deep partial phases might produce a brighter Moon that stands out better in an urban sky than will a photo taken at mid-totality when the Moon is darkest.
TIP: Practice, Practice, Practice!
With any camera, especially beginner point-and-shoots, ensure success on eclipse night by practicing shooting the Moon before the eclipse, during the two weeks of the waxing Moon leading up to Full Moon night and the eclipse.
The crescent Moon with Earthshine on the dark side of the Moon is a good stand-in for the eclipsed Moon. Set aside the nights of January 8 to 11 to shoot the crescent Moon. Check for exposure and focus. Can you record the faint Earthshine? It’s similar in brightness to the shadowed side of the eclipsed Full Moon.
The next week, on the nights of January 18 and 19, the waxing gibbous Moon will be closer to its position for eclipse night and almost as bright as the uneclipsed Full Moon, allowing some rehearsals for shooting it near a landmark.
Option 2: Advanced — Multiple Exposures
An advanced method is to compose the scene so the lens frames the entire path of the Moon for the 3 hours and 16 minutes from the start to the end of the partial eclipse.
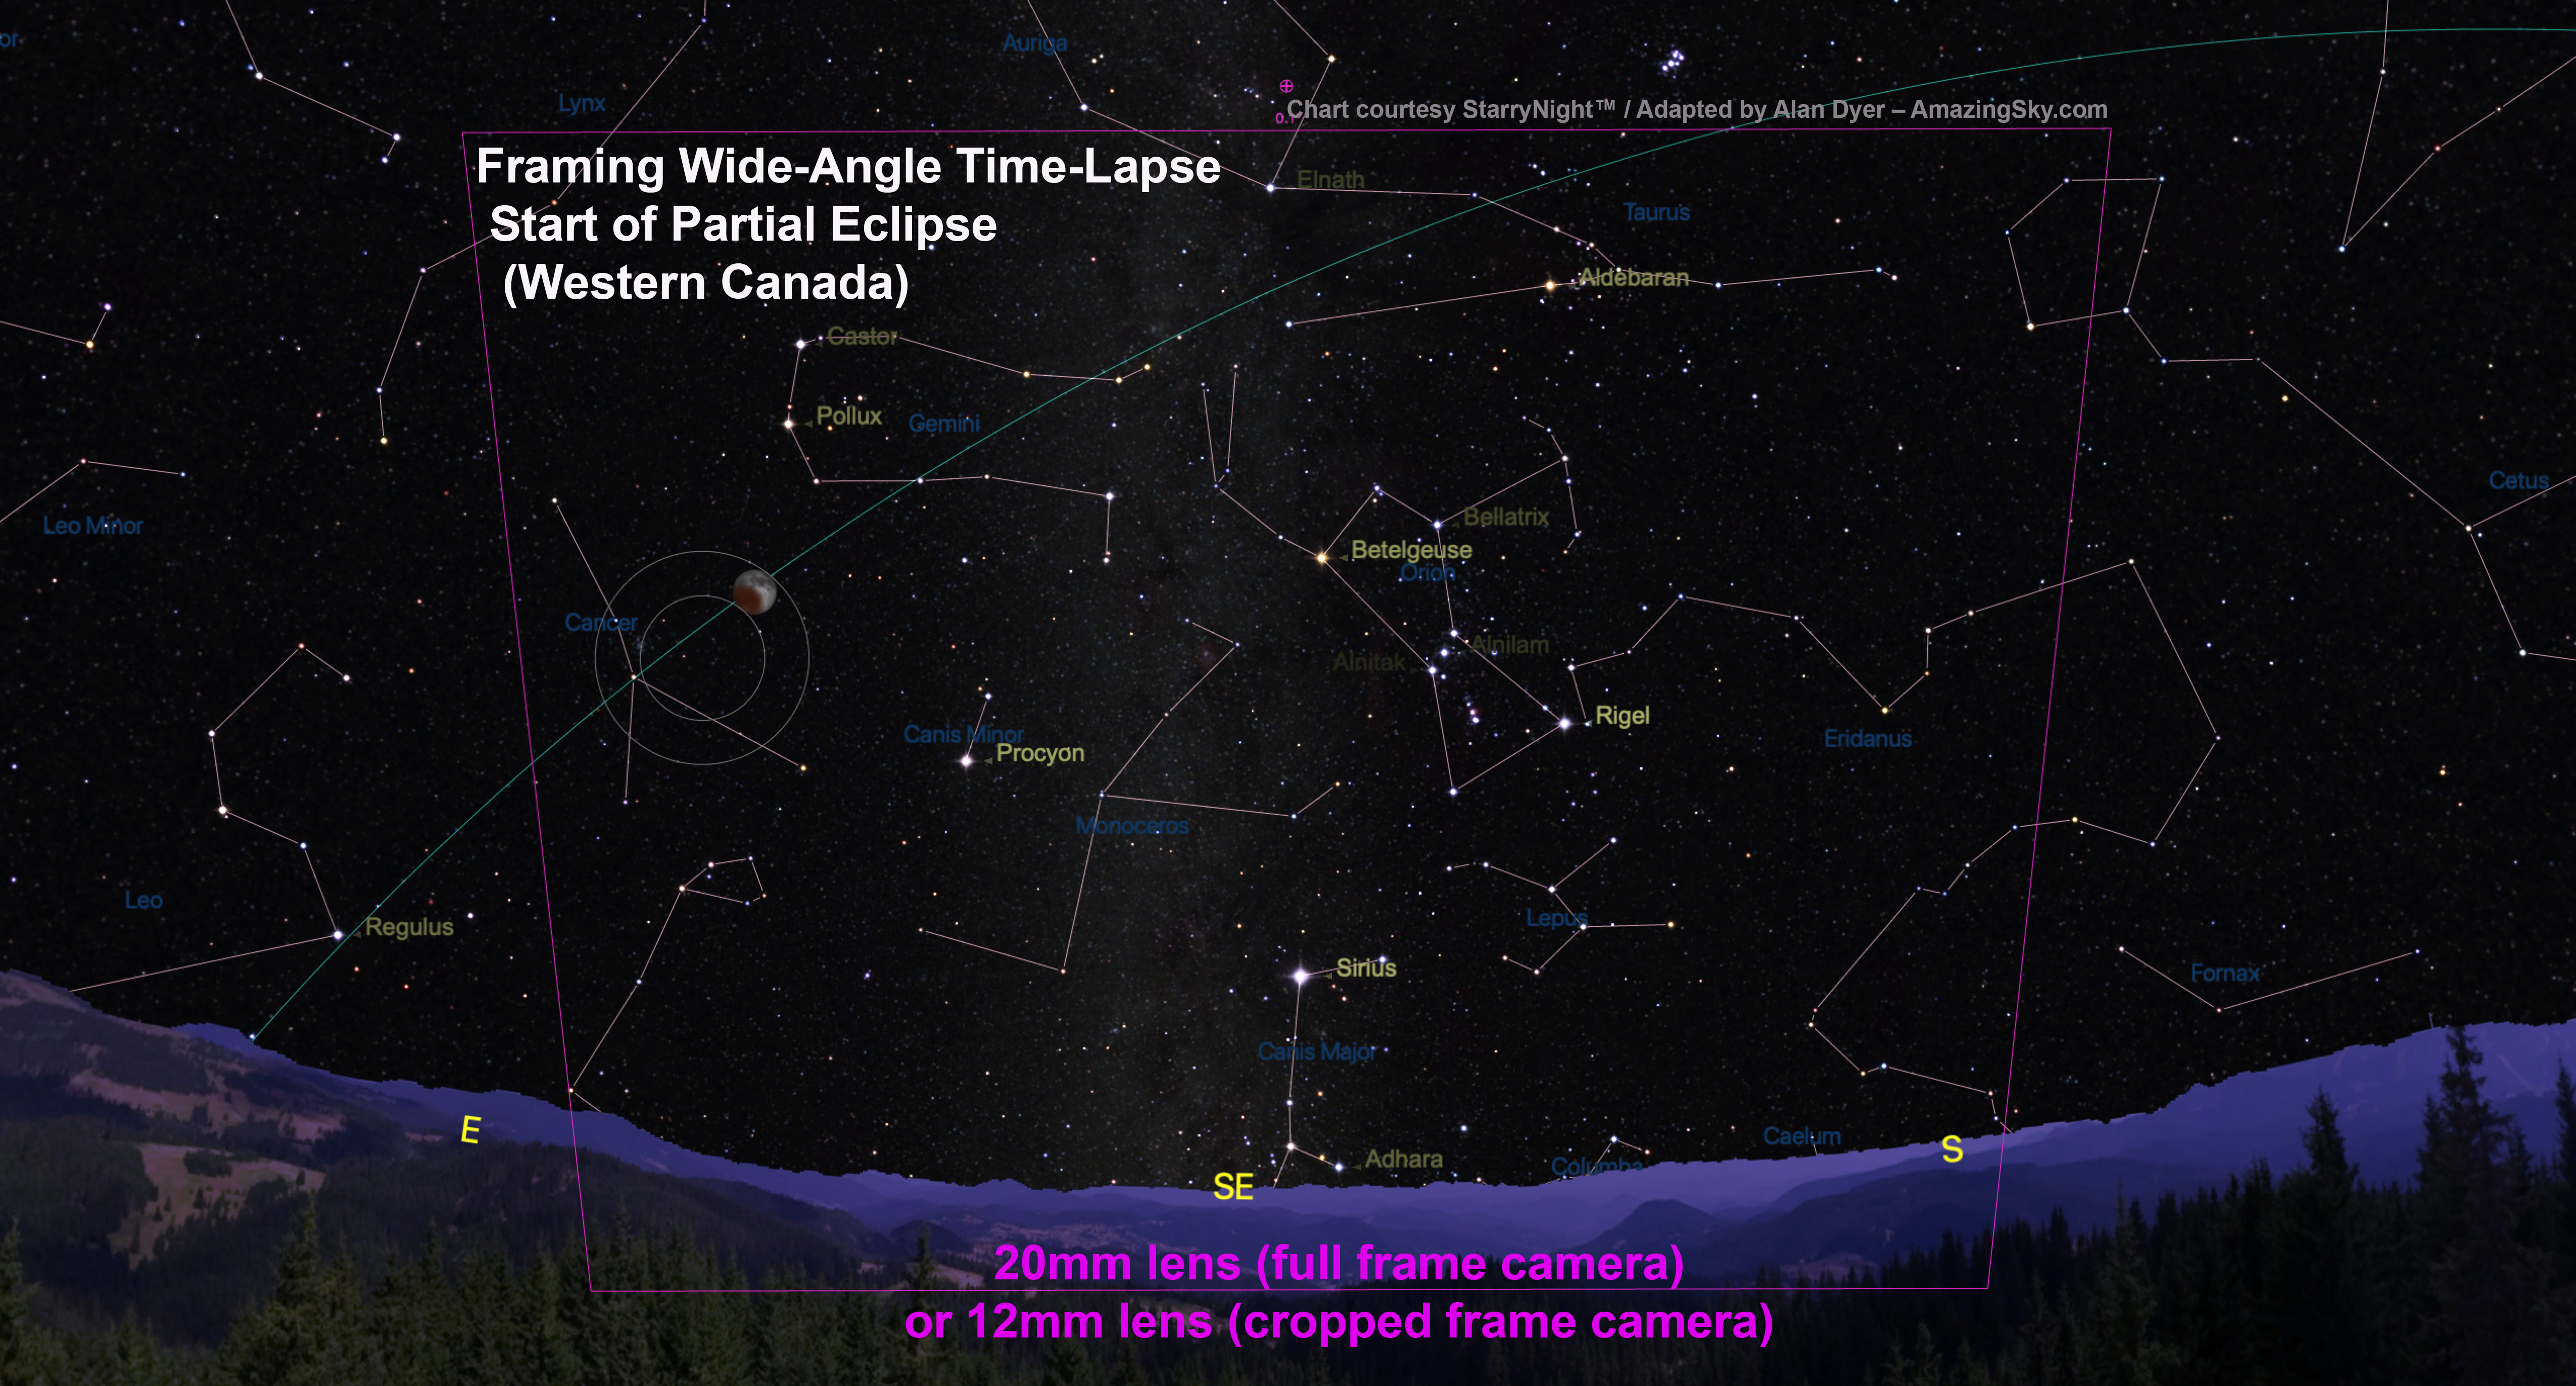
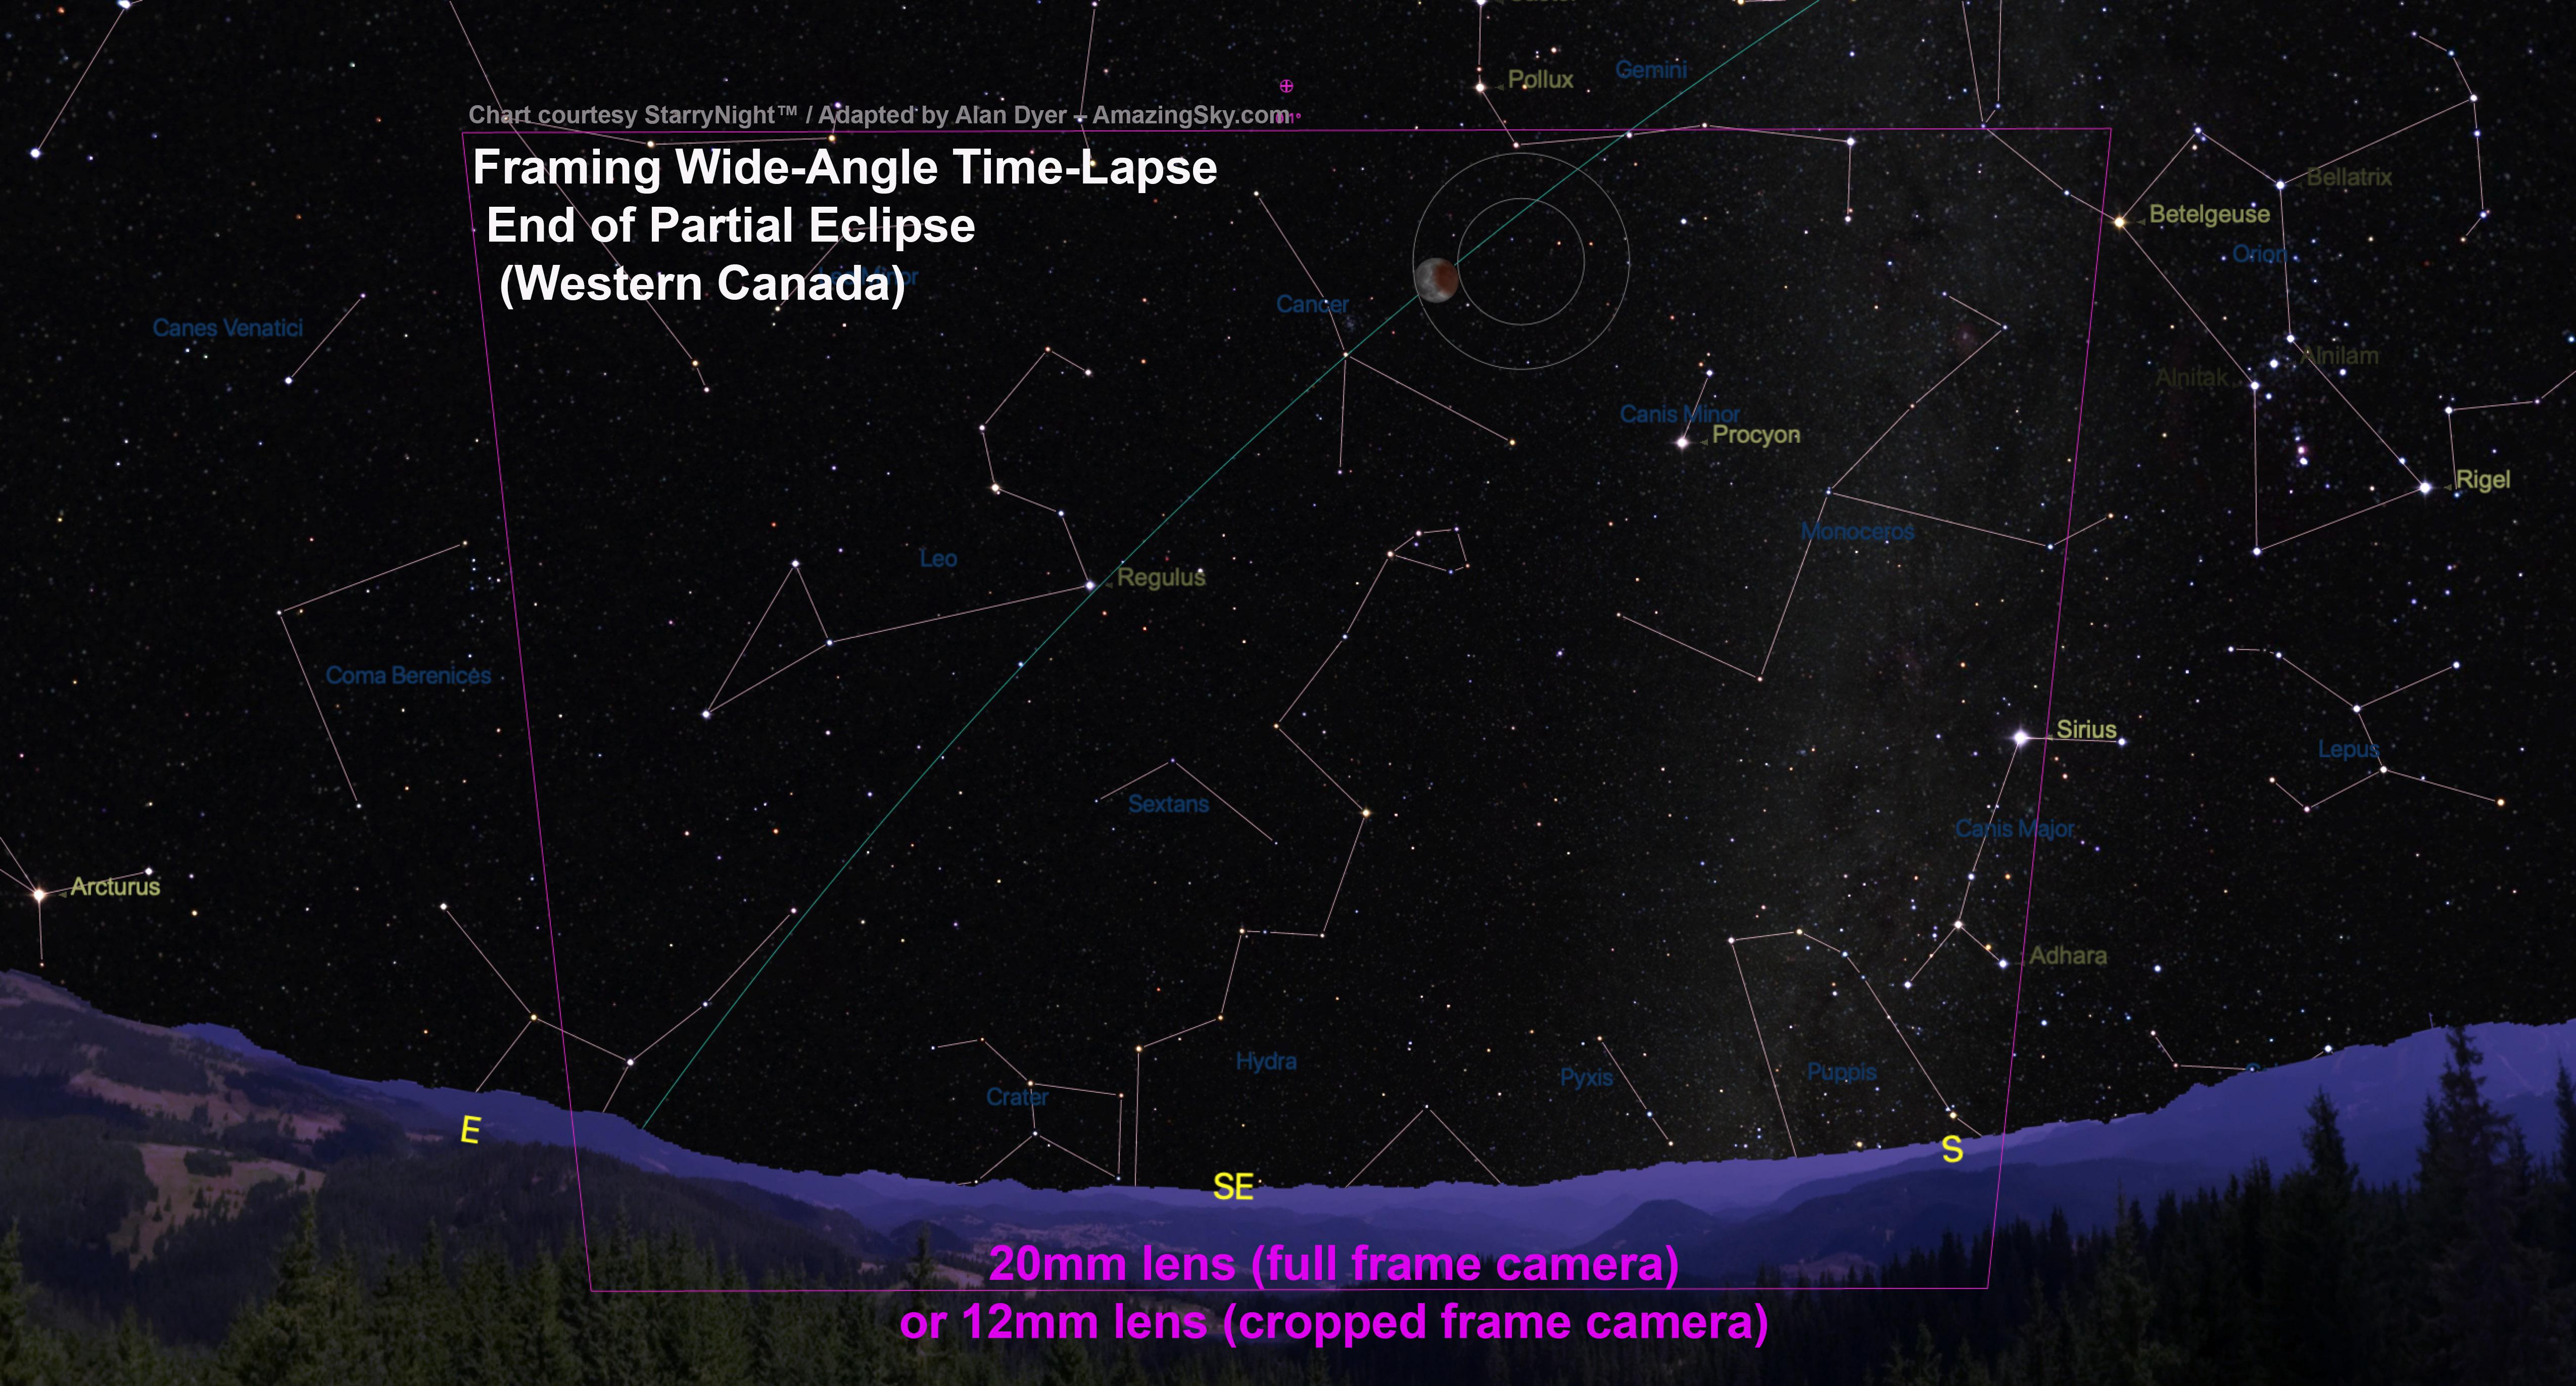
This set of 3 charts shows the position of the Moon at the start, middle, and end of the eclipse, for planning lens choice and framing of the complete eclipse path. The location is Alberta, Canada.
As shown above, including the landscape will require at least a 20mm lens on a full frame camera, or 12mm lens on a cropped frame camera. However, these charts are for my site in western Canada. From sites to the east and south where the Moon is higher an even wider lens might be needed, making this a tough sequence to take.
With wide lenses, the Moon will appear quite small. The high altitude of the Moon and midnight timing won’t lend itself to this type of multiple image composite as well as it does for eclipses that happen near moonrise or moonset, as per the example below.
This is a multiple-exposure composite of the total lunar eclipse of Sunday, September 27, 2015, as shot from Writing-on-Stone Provincial Park, Alberta, Canada. For this still image composite of the eclipse from beginning to end, I selected just 40 frames taken at 5-minute intervals, out of 530 I shot in total, taken at 15- to 30-second intervals for the full time-lapse sequence included below.
A still-image composite with the lunar disks well separated will need shots only every 5 minutes, as I did above for the September 27, 2015 eclipse.
Exposures for any lunar eclipse are tricky, whether you are shooting close-ups or wide-angles, because the Moon and sky change so much in brightness.
As I did for the image below, for a still-image composite, you can expose just for the bright lunar disk and let the sky go dark.
Exposures for just the Moon will range from very short (about 1/500th second at f/8 and ISO 100) for the partials, to 1/2 to 2 seconds at f/2.8 to f/4 and ISO 400 for the totals, then shorter again (back to 1/500 at ISO 100) for the end shots when the Full Moon has returned to its normal brilliance.
That’ll take constant monitoring and adjusting throughout the shoot, stepping the shutter speed gradually longer thorough the initial partial phase, then shorter again during the post-totality partial phase.
You’d then composite and layer (using a Lighten blend mode) the well-exposed disks (surrounded by mostly black sky) into another background image exposed longer for 10 to 30 seconds at ISO 800 to 1600 for the sky and stars, shot at mid-totality.
To maintain the correct relative locations of the lunar disks and foreground, the camera cannot move.
The total lunar eclipse of April 4, 2015 taken from near Tear Drop Arch, in western Monument Valley, Utah. I shot the totality images during the short 4 minutes of totality. The mid-totality image is a composite of 2 exposures: 30 seconds at f/2.8 and ISO 1600 for the sky and landscape, with the sky brightening blue from dawn twilight, and 1.5 seconds at f/5.6 and ISO 400 for the disk of the Moon itself. Also, layered in are 26 short exposures for the partial phases, most being 1/125th sec at f/8 and ISO 400, with ones closer to totality being longer, of varying durations.
That technique works best if it’s just a still image you are after, such as above. This image is such a composite, of the April 4, 2015 total lunar eclipse from Monument Valley, Utah.
This type of composite takes good planning and proper exposures to pull off, but will be true to the scene, with the lunar disk and its motion shown to the correct scale and position as it was in the sky. It might be a composite, but it will be accurate.
My Rant!
That’s in stark contrast to the flurry of ugly “faked” composites that will appear on the web by the end of the day on January 21, ones with huge telephoto Moons pasted willy-nilly onto a wide-angle sky.
Rather than look artistic, most such attempts look comically cut-and-pasted. They are amateurish. Don’t do it!
Option 3: Advanced — Wide-Angle Time-Lapses
If it’s a time-lapse movie you want (see the video below), take exposures every 10 to 30 seconds, to ensure a final movie with smooth motion.
Unlike shooting for a still-image composite, for a time lapse each frame will have to be exposed well enough to show the Moon, sky, and landscape.
That will require exposures long enough to show the sky and foreground during the partial phases — likely about 1 to 4 seconds at f/2.8 and ISO 400. In this case, the disk of the partially-eclipsed Moon will greatly overexpose, as it does toward the end of the above time-lapse from September 27, 2015..
But the Moon will darken and become better exposed during the late stages of the partial eclipse and during totality when a long exposure — perhaps now 10 to 20 seconds at f/2.8 and ISO 800 to 1600 — will record the bright red Moon amid the stars and winter Milky Way.
Maintaining a steady cadence during the entire sequence requires using an interval long enough throughout to accommodate the expected length of the longest exposure at mid-totality, with similar camera settings to what you’ve used for other Milky Way nightscapes. If you’ve never taken those before, then don’t attempt this complex sequence.
After totality, as the Moon and sky re-brighten, exposures will have to shorten again, andsymmetrically in reverse fashion for the final partial phases.
Such a time-lapse requires consistently and incrementally adjusting the camera over the three or more hours of the eclipse on a cold winter night. The high altitude of the Moon and its small size on the required wide angle lenses will make any final time lapse less impressive than at eclipses that occur when the Moon is rising or setting.
But … the darkening of the sky and “turning on” of the Milky Way during totality will make for an interesting time-lapse effect. The sky and scene will be going from a bright fully moonlit night to effectively a dark moonless night, then back to moonlit. It’s a form of “holy grail” time lapse, requiring advanced processing with LRTimelapse software.
Again, do not move the camera. Choose your lens and frame your camera to include the entire path of the Moon for as long as you plan to shoot.
Even if the final movie looks flawed, individual frames should still produce good still images, or a composite built from a subset of the frames.
Option 4: Simple — Telephoto Close-Ups
The first thought of many photographers is to shoot the eclipse with as long a telephoto lens as possible. That can work, but …
The harsh reality is that the Moon is surprisingly small (only 1/2-degree across) and needs a lot of focal length to do it justice, if you want a lunar close-up.
You’ll need a 300mm to 800mm lens. Unfortunately, the Moon and sky are moving and any exposures over 1/4 to 2 seconds (required during totality) will blur the Moon badly if its disk is large on the frame and all you are using is a fixed tripod.
If you don’t have a tracking mount, one solution is to keep the Moon’s disk small (using no more than a fast f/2 or f/2.8 135mm to 200mm lens) and exposures short by using a high ISO speed of 1600 to 3200. Frame the Moon beside the Beehive star cluster as I show below.
Take a range of exposures. But … be sure to focus!
TIP: Focus! And Focus Again!
Take care to focus precisely on a bright star using Live View. That’s true of any lens but especially telephotos and telescopes.
Focus not just at the start of the night, but also more than once again later at night. Falling temperatures on a winter night will cause long lenses and telescopes to shift focus. What was sharp at the start of the eclipse won’t be by mid totality.
The catch is that if you are shooting for a time-lapse or composite you likely won’t be able to re-point the optics to re-focus on a star in mid-eclipse. In that case, be sure to set up the gear well before you want to start shooing to let it cool to ambient air temperature. Now focus on a star, then frame the scene. Then hope the lens doesn’t shift off focus. You might be able to focus on the bright limb of the Moon but it’s risky.
Fuzzy images, not bad exposures, are the ruin of most attempts to capture a lunar eclipse, especially with a telephoto lens. And the Moon itself, especially during totality, is not a good target to focus on. Use a bright star. The winter sky has lots!
Option 5: Advanced — Tracked Telescopic Close-Ups
If you have a mount that can be polar aligned to track the sky, then many more options are open to you.
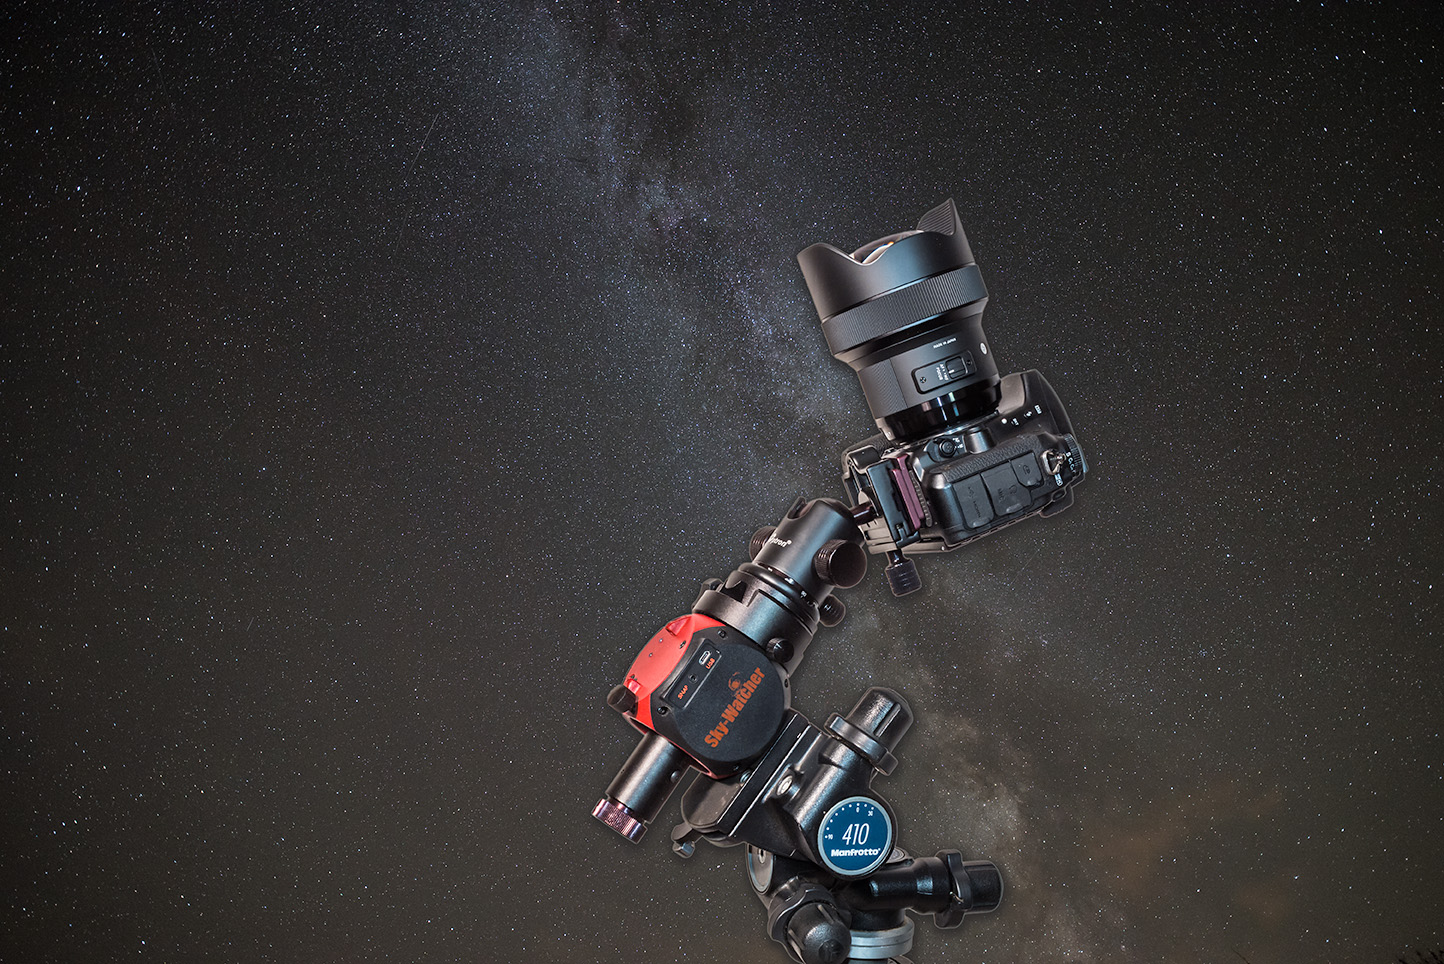
You can use a telescope mount or one of the compact and portable trackers, such as the Sky-Watcher Star Adventurer (I show the Mini model above) or iOptron Sky Tracker units. While these latter units work great, you are best to keep the payload weight down and your lens size well under 300mm.
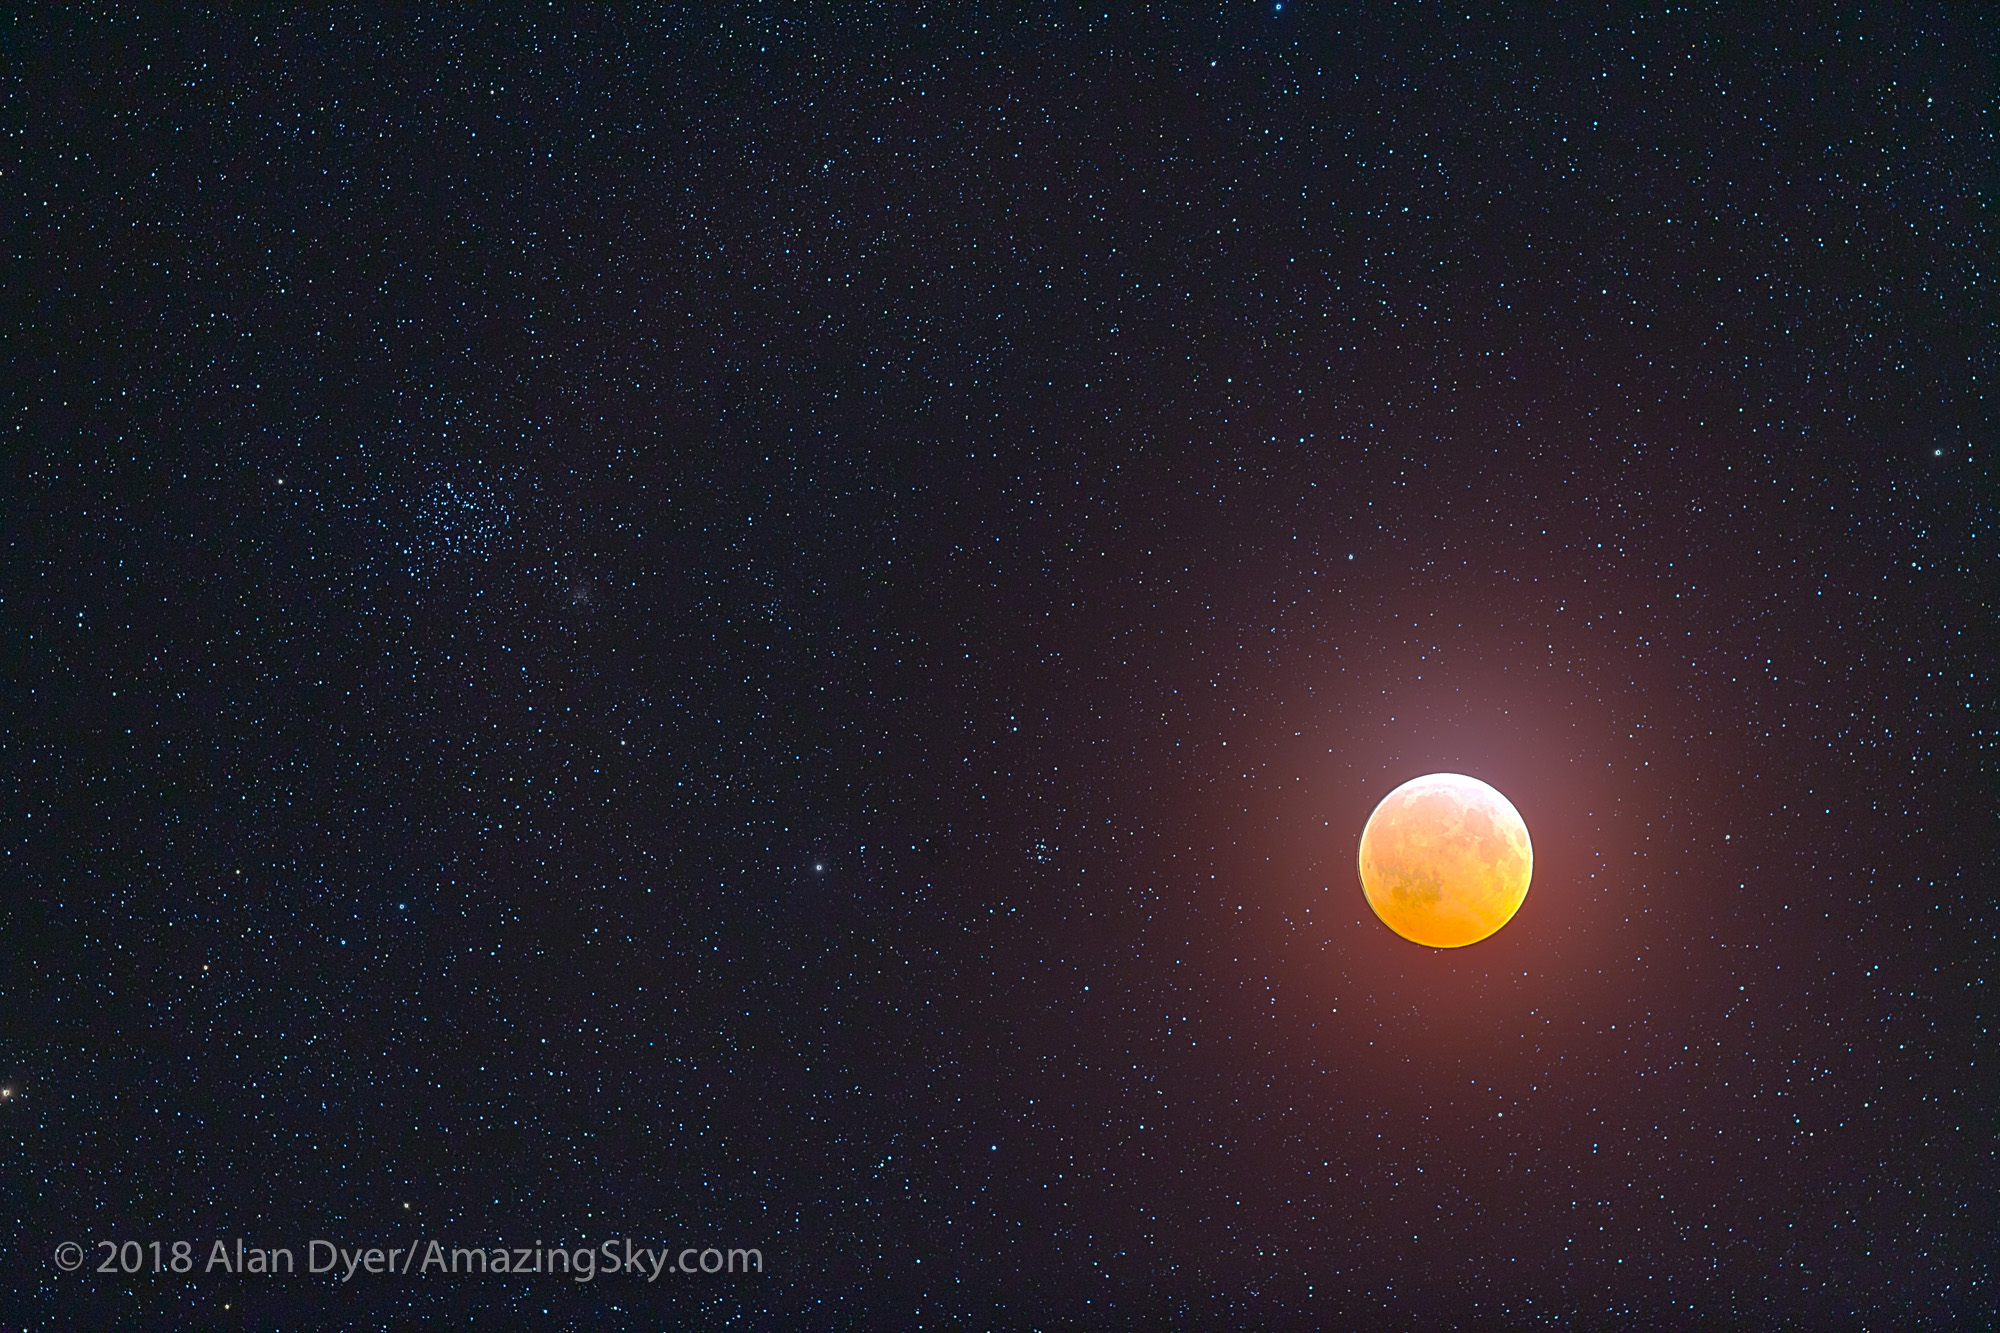
That’s just fine for this eclipse, as you really don’t need a frame-filling Moon. The reason is that the Moon will appear about 6 degrees west of the bright star cluster called the Beehive, or Messier 44, in Cancer.
As shown above, a 135mm to 200mm lens will frame this unique pairing well. For me, that will be the signature photo of this eclipse. The pairing can happen only at lunar eclipses that occur in late January, and there won’t be any more of those until 2037!
That’s the characteristic that makes this eclipse rare and unique, not that it’s a “super-duper, bloody, wolf Moon!” But it doesn’t make for a catchy headline.
A High Dynamic Range composite of 7 exposures of the Dec 20/21, 2010 total lunar eclipse, from 1/2 second to 30 seconds, to show the more normally exposed eclipsed Moon with the star cluster M35, at left, in Gemini, to show the scene as it appeared in binoculars. Each tracked photo taken with a 77mm Borg apo refractor at f/4.2 (300mm focal length) and Canon 5D MkII at ISO 1600.
Exposures to show the star cluster properly might have to be long enough (30 to 120 seconds) that the Moon overexposes, even at mid-totality. If so, take different exposures for the Moon and stars, then composite them later, as I did above for the December 20, 2010 eclipse near the Messier 35 star cluster in Gemini.
If really you want to shoot with even more focal length for framing just the Moon, a monster telephoto lens will work, but a small telescope such as an 80mm aperture f/6 to f/7 refractor will provide enough focal length and image size at much lower cost and lighter weight, and be easier to attach to a telescope mount.
But even with a 500mm to 800mm focal length telescope the Moon fills only a small portion of the frame, though cropped frame cameras have the advantage here. Use one if it’s a big Moon you’re after!
No matter the camera, the lens or telescope should be mounted on a solid equatorial telescope mount that you must polar align earlier in the night to track the sky.
Alternatively, a motorized Go To telescope on an alt-azimuth mount will work, but only for single shots. The rotation of the field with alt-az mounts will make a mess of any attempts to shoot multiple-exposure composites or time-lapses, described below.
Whatever the mount, for the sharpest lunar disks during totality, use the Lunar tracking rate for the motor.
This series shows the need to constantly shift exposure by lengthening the shutter speed as the eclipse progresses. Do the same to shorten the exposure after totality. The exposures shown here are typical.
Assuming an f-ratio of f/6 to f/8, exposures will vary from as short as 1/250th second at ISO 100 to 200 for the barely eclipsed Moon, to 4 to 20 seconds at ISO 400 to 1600 for the Moon at mid-totality.
It’s difficult to provide a precise exposure recommendation for totality because the brightness of the Moon within the umbra can vary by several stops from eclipse to eclipse, depending on how much red sunlight manages to make it through Earth’s atmospheric filter to light the Moon.
TIP: Shoot for HDR
Total eclipse of the Moon, December 20/21, 2010, with 5-inch refractor at f/6 (780mm focal length) and Canon 7D (cropped frame camera) at ISO 400. This is an HDR blend of 9 images from 1/125 second to 2 seconds, composited in Photoshop. Note the blue tint along the shadow edge.
As I did above, during the deep partial phases an option is to shoot both long, multi-second exposures for the red umbra and short, split-second exposures for the bright part of the Moon not yet in the umbra.
Take 5 to 7 shots in rapid succession, covering the range needed, perhaps at 1-stop increments. Merge those later with High Dynamic Range (HDR) techniques and software, or with luminosity masks.
Even if you’re not sure how to do HDR processing now, shoot all the required exposures anyway so you’ll have them when your processing skills improve.
Option 6: Advanced — Close-Up Composites and Time-Lapses
With a tracking telescope on an equatorial mount you could fire shots every 10 to 30 seconds, and then assemble them into a time-lapse movie, as below.
But as with wide-angle time-lapses, that will demand constant attention to gradually and smoothly shift exposures, ideally by 1/3rd-stop increments every few shots during the partial and total phases. Make lots of small adjustments, rather than fewer large ones.
If you track at the lunar rate, as I did above, the Moon should stay more or less centred while it drifts though the stars, assuming your mount is accurately polar aligned, an absolutely essential prerequisite here.
Composite image digitally created in Photoshop of images taken during October 27, 2004 total lunar eclipse, from Alberta Canada. Images taken through 5-inch apo refractor at f/6 with Canon Digital Rebel 300D camera at ISO 200.
Conversely, track at the sidereal rate and the stars will stay more or less fixed while the Moon drifts through the frame from right to left (west to east) as I show above in a composite of the October 27, 2004 eclipse.
But such a sequence takes even more careful planning to position the Moon correctly at the start of the sequence so it remains “in frame” for the duration of the eclipse, and ends up where you want at the end.
In the chart below, north toward Polaris is at the top of the frame. Position the Moon at the start of the eclipse so it ends up just above the centre of the frame at mid-eclipse. Tricky!
Repeated from earlier, this chart shows the path of the Moon through the north half of the umbra, a path that will be the same for any site, as will be the timing. North is up here.
As I show above, for this type of “Moon-thru-shadow” sequence a focal length of about 400mm is ideal on a full frame camera, or 300mm on a cropped frame camera.
From such a time-lapse set you could also use several frames selected from key stages of the eclipse, as I did in 2004, to make up a multiple-image composite showing the Moon moving through the Earth’s shadow.
Again, planetarium software such as Starry Night I used above, which can be set to display the field of view of the camera and lens of your choice, is essential to plan the shoot. Don’t attempt it without the right software to plan the framing.
I would consider the telescopic time-lapse method the most challenging of techniques. Considering the hour of the night and the likely cold temperatures, your best plan might be to keep it simple.
It’s what I plan to do.
I’ll be happy to get a tracked telephoto close-up of the Moon and Beehive cluster as my prime goal, with a wide-angle scene of the eclipsed Moon beside Orion and the Milky Way as a bonus. A few telescope close-ups will be even more of a bonus.
The Astrospheric website, with astronomy-oriented weather predictions. It’s also available as a great mobile app.
However, just finding clear skies might be the biggest challenge!
Try the Astrospheric app for astronomy-oriented weather predictions. The Environment Canada data it uses has led me to clear skies for several recent eclipses that other observers in my area missed.
It’ll be worth the effort to chase!
The next total eclipse of the Moon anywhere on Earth doesn’t occur until May 26, 2021 in an event visible at dawn from Western North America. The next total lunar eclipse visible from all of North America comes a lunar year later, on May 15, 2022.
Total Lunar Eclipse from Alan Dyer on Vimeo.
I leave you with a music video of the lunar eclipse of September 27, 2015 that incorporates still and time-lapse sequences shot using all of the above methods.
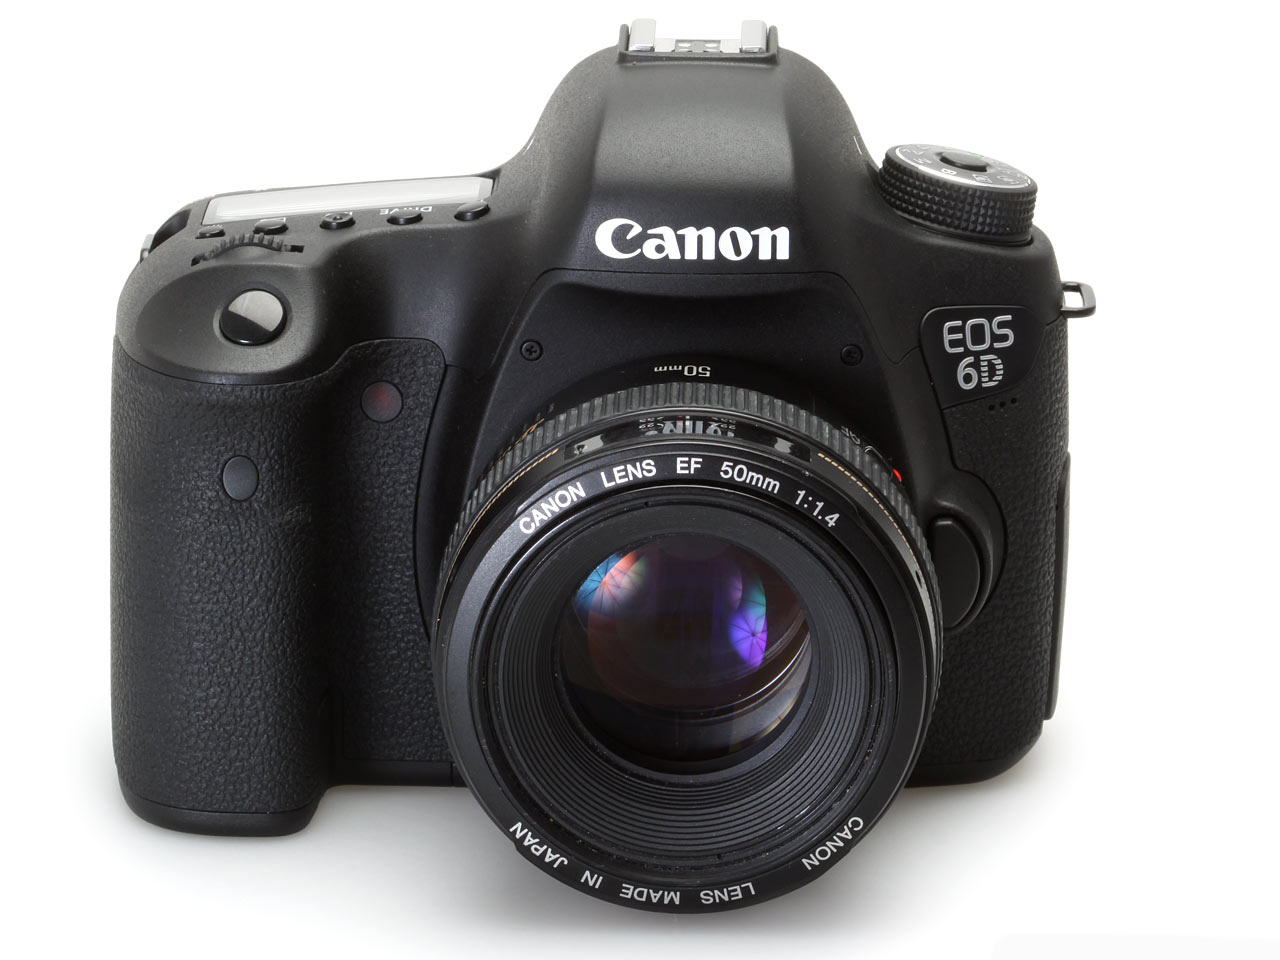
In a technical blog I compare the new Canon 6D Mark II camera with its predecessor, the Canon 6D, with the focus on performance for nightscape astrophotography.
No pretty pictures in this blog I’m afraid! This is a blog for gear geeks.
The long-awaited Canon 6D Mark II camera is out, replacing the original 6D after that camera’s popular 5-year reign as a prime choice among astrophotographers for all kinds of sky images, including nightscapes and time-lapses.
As all new cameras do, the 6D Mark II is currently fetching a full list price of $2000 U.S. Eventually it will sell for less. The original 6D, introduced in 2012 at that same list price, might still be available from many outlets, but for less, likely below $1500 US.
Shown on the left, above, the 6D Mark II is similar in size and weight to the original 6D.
However, the new Mark II offers 6240 x 4160 pixels for 26 megapixels, a bump up in resolution over the 5472 x 3648 20-megapixel 6D. The pixel pitch of the Mark II sensor is 5.7 microns vs. 6.6 microns for the 6D.
One difference is that the port for a remote release is now on the front, but using the same solid 3-pin N3 connector as the 6D and other full-frame Canons. That makes it compatible with all external controllers for time-lapse shooting.
TESTING FOR THE NIGHT
My interest is in a camera’s performance for long-exposure astrophotography, with images taken at high ISO settings. I have no interest in auto-focus performance (we shoot at night with focus set manually), nor how well a camera works for high-speed sports shooting.
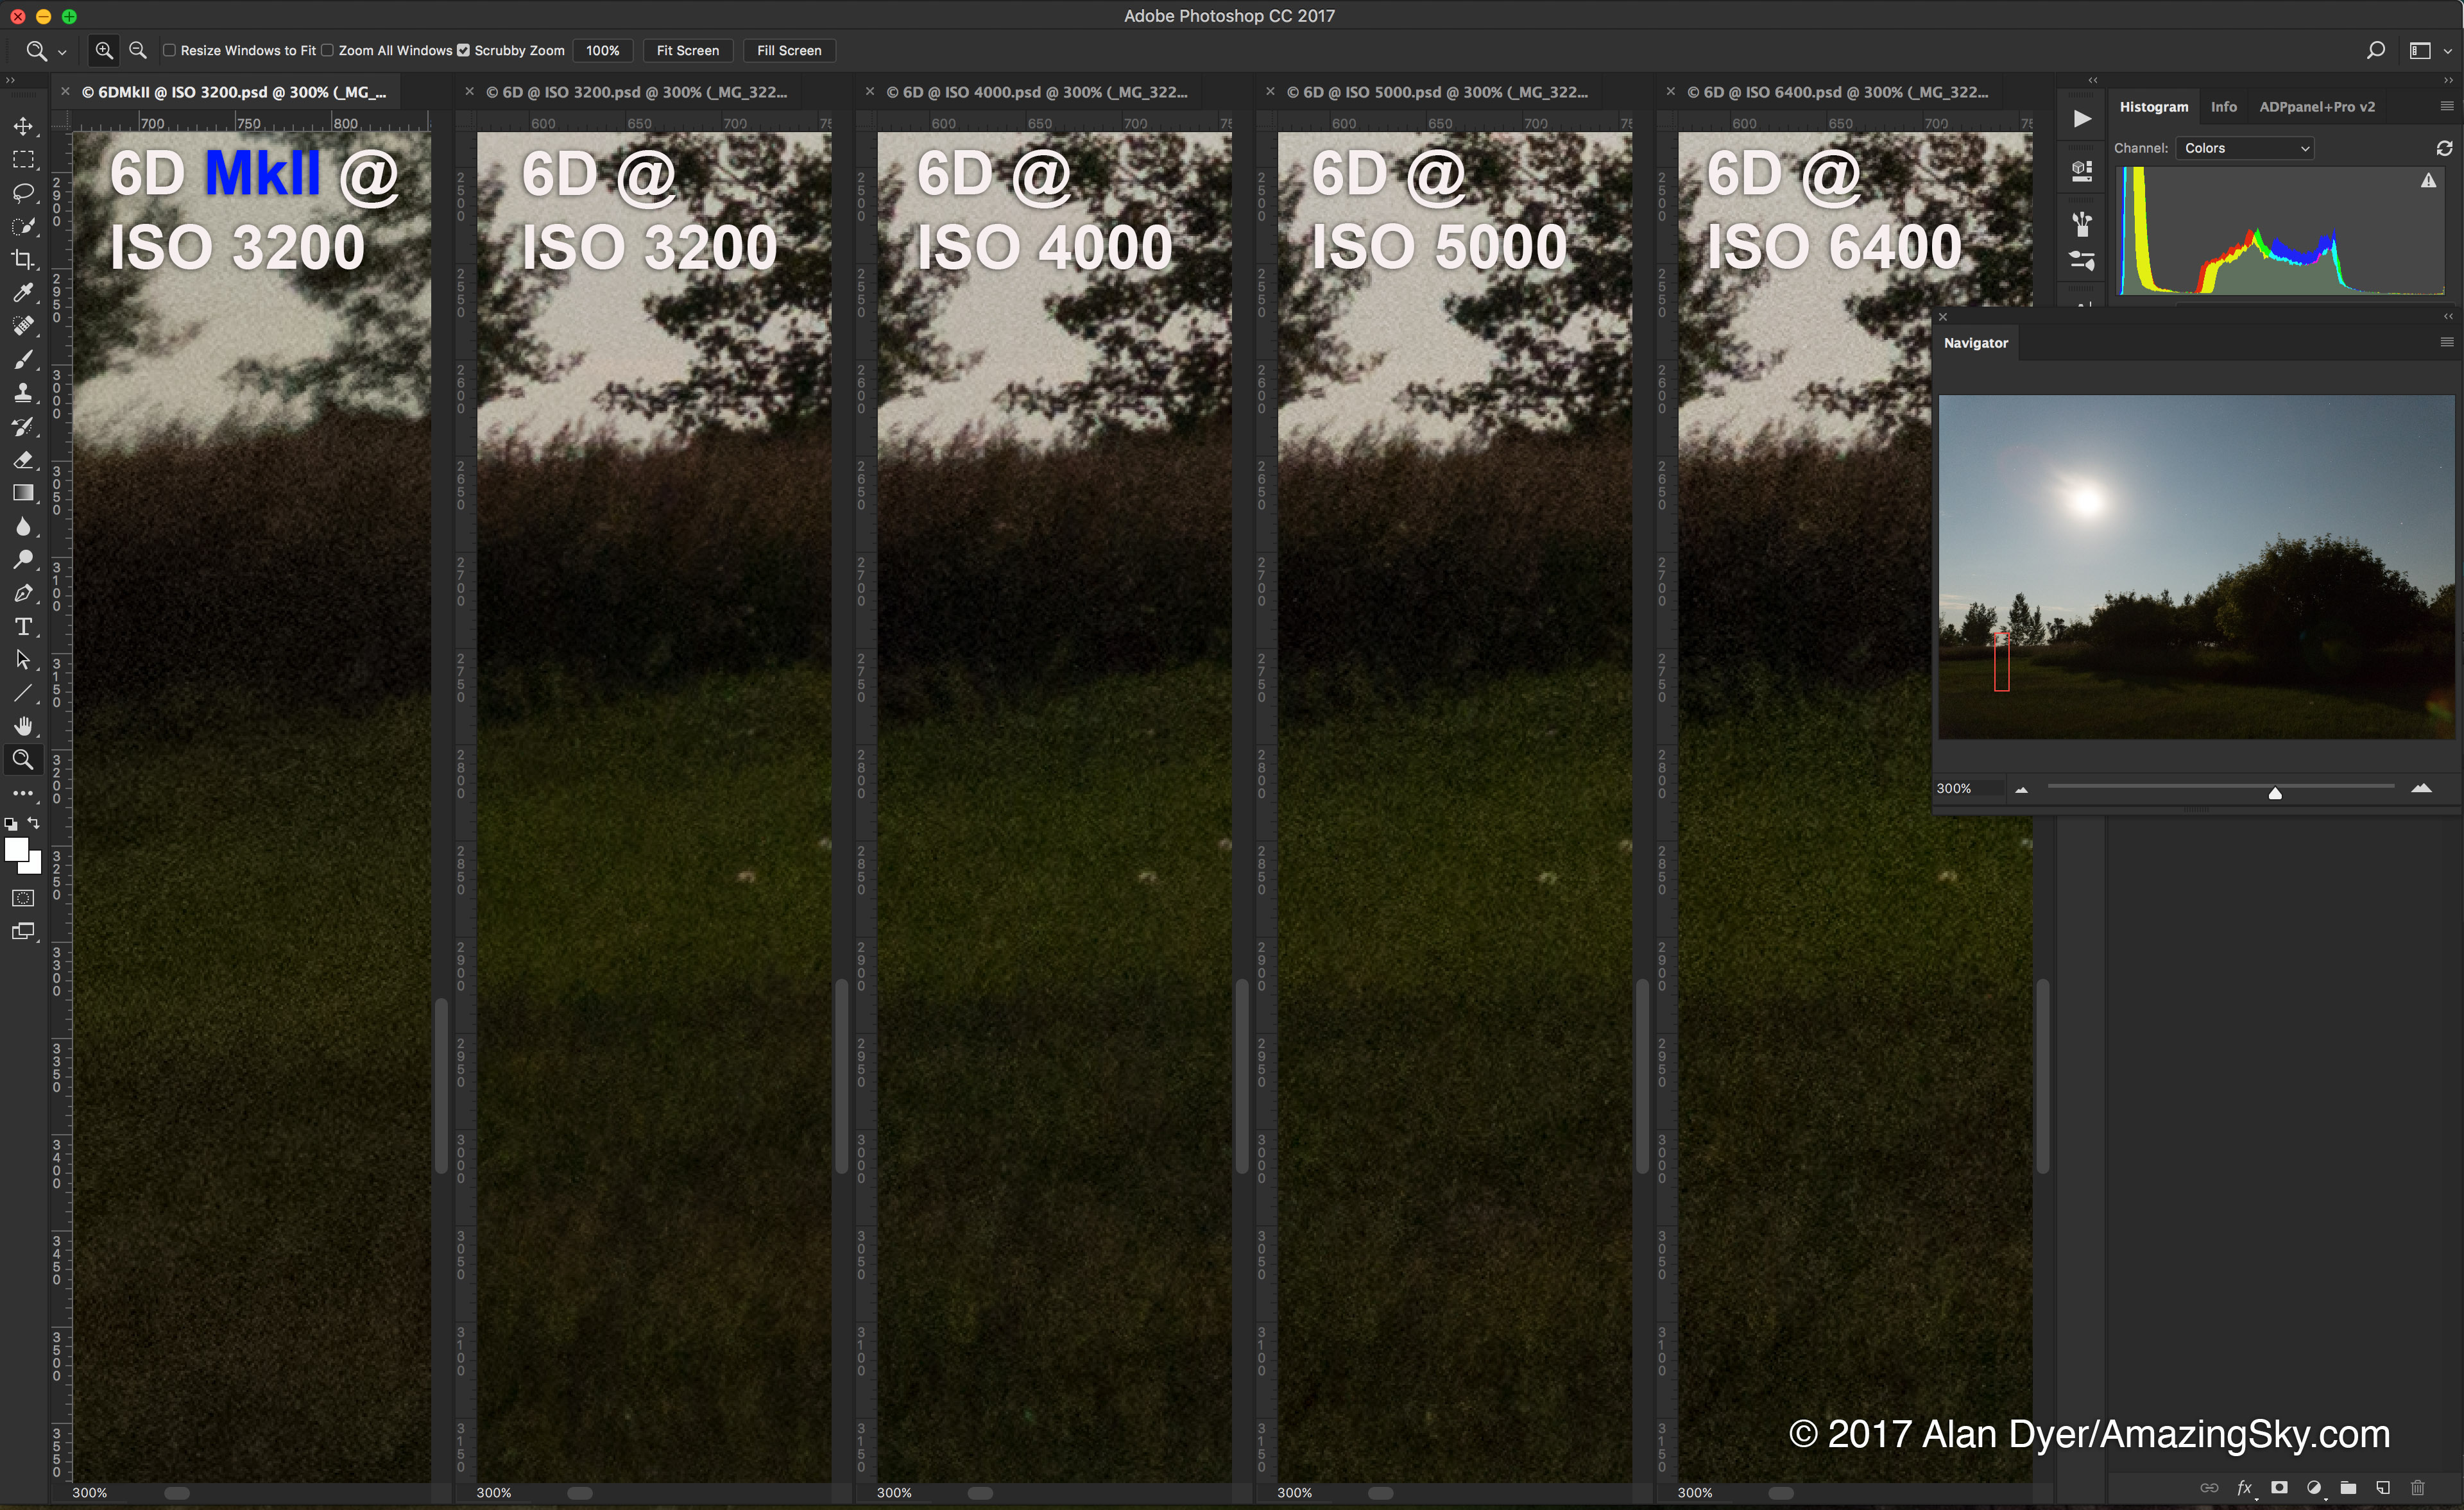
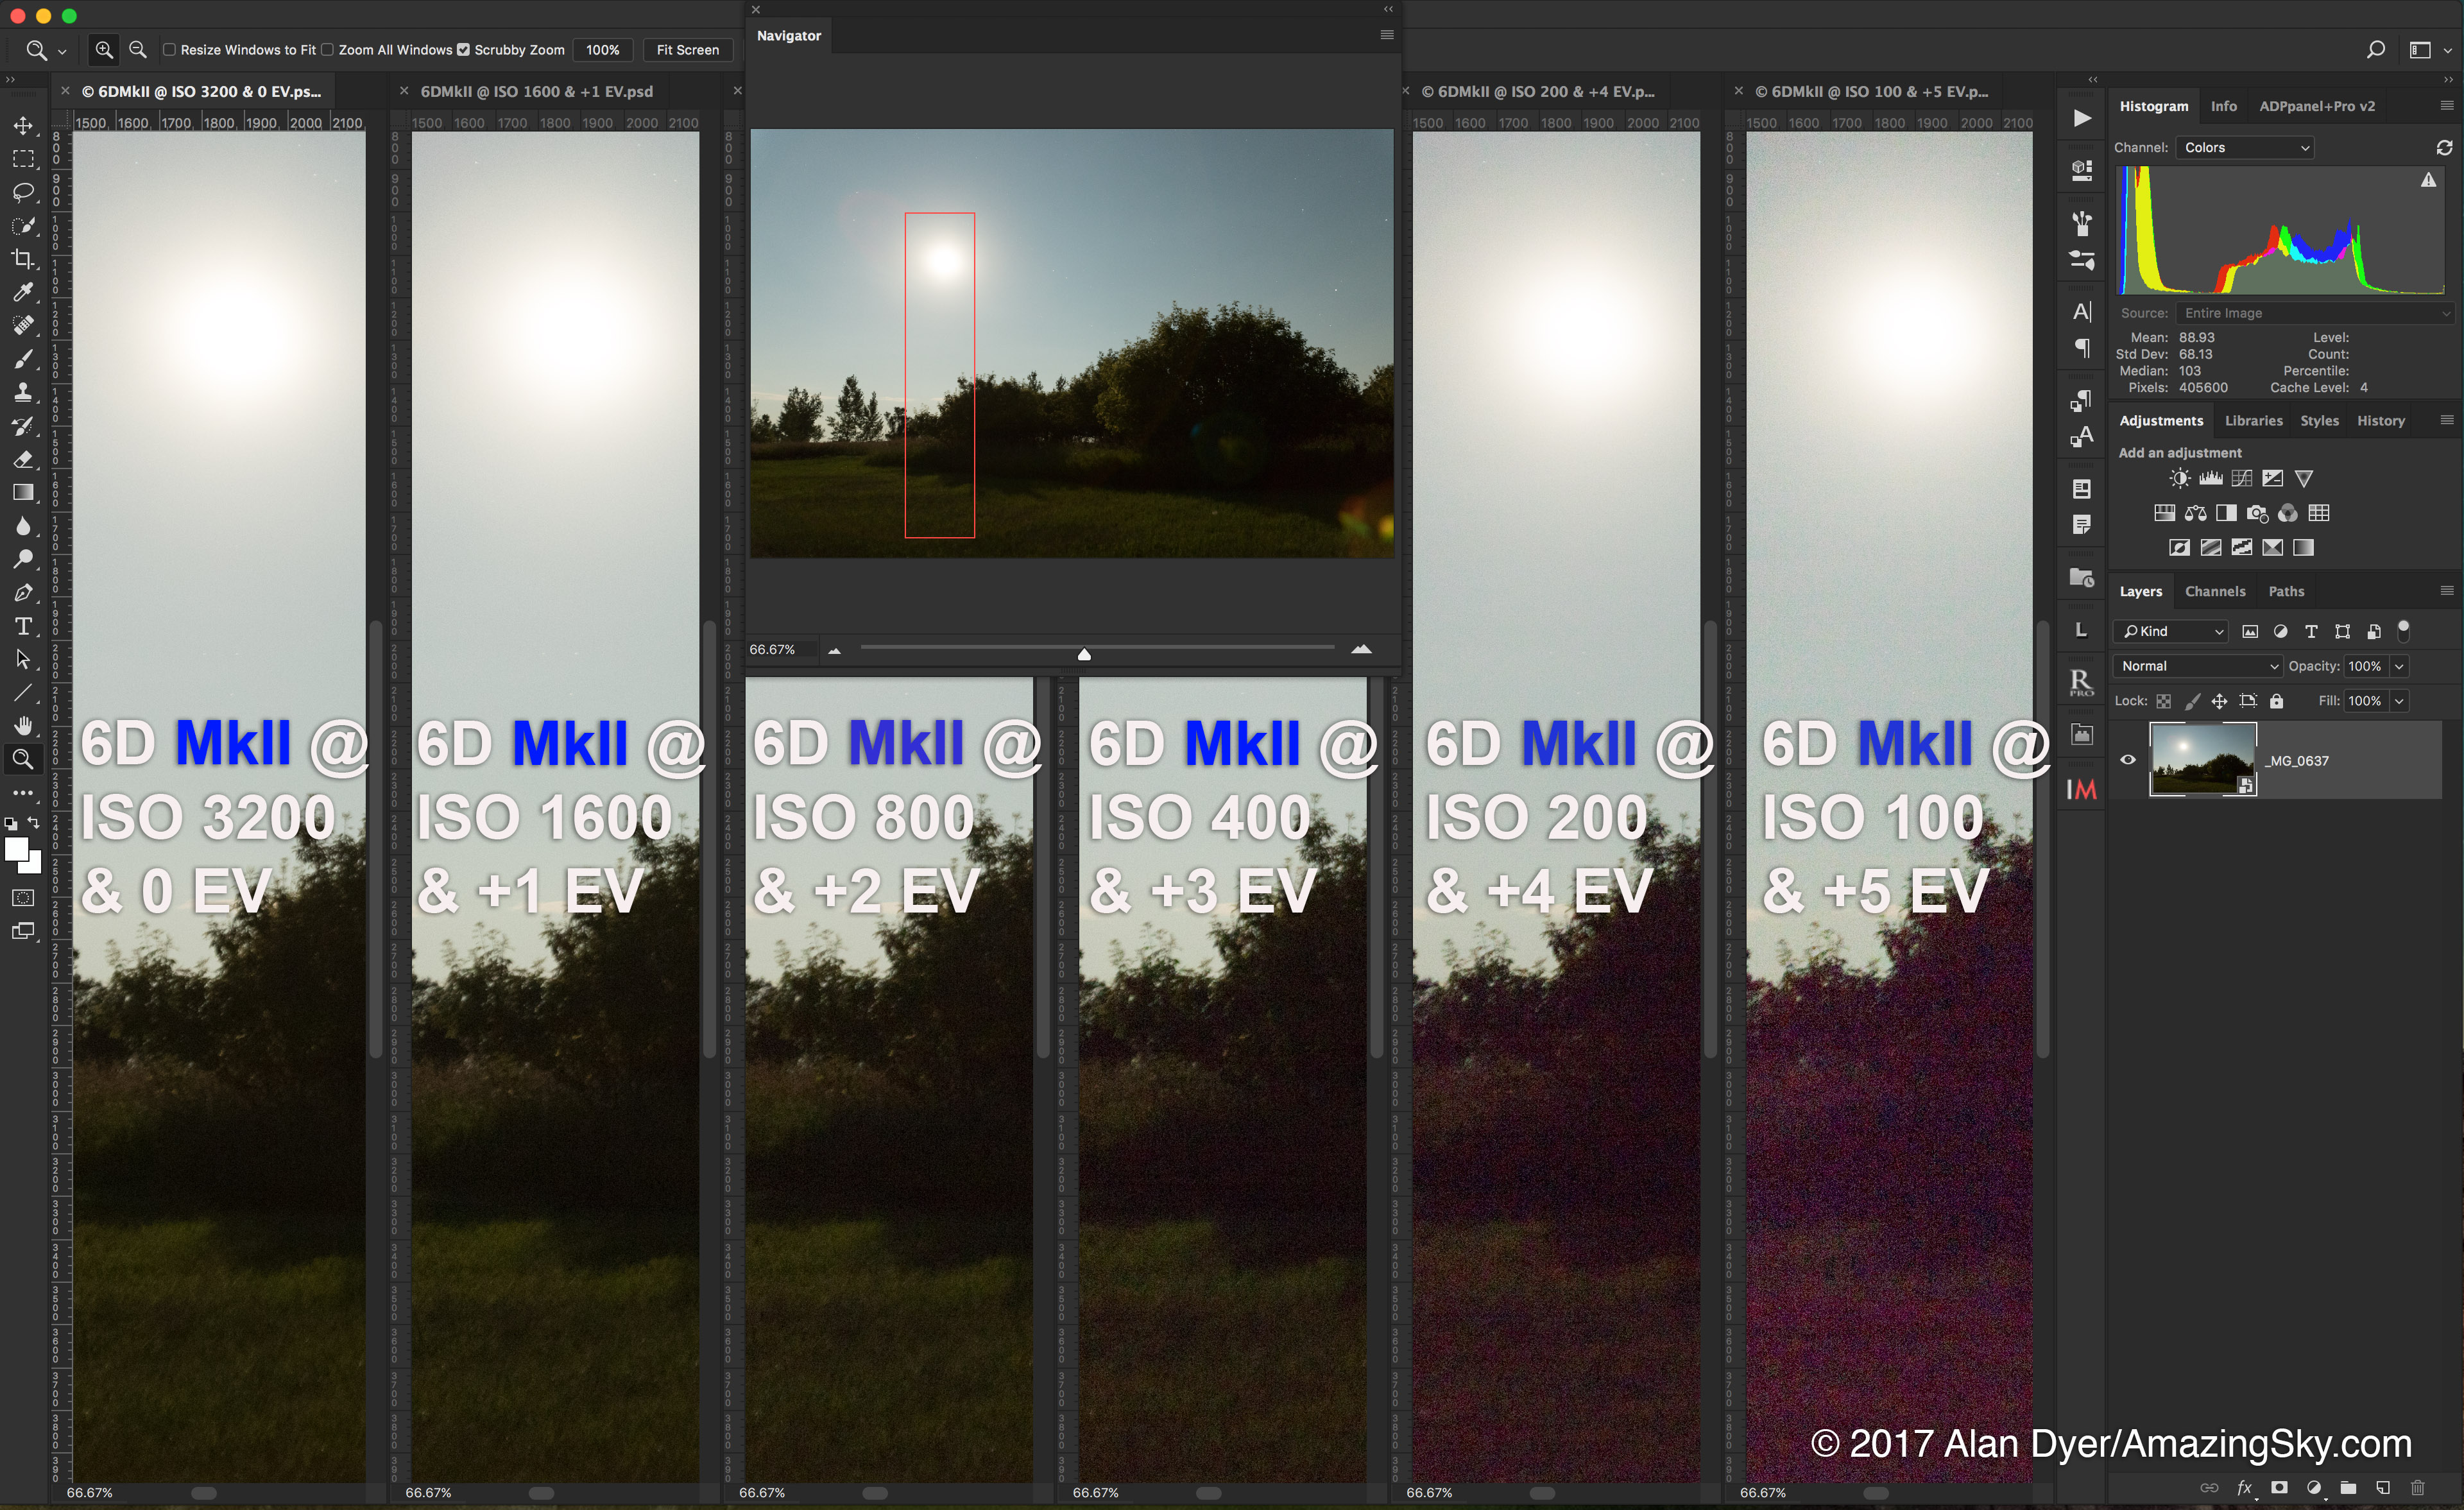
To test the Mark II against the original 6D I took test shots at the same time of a high-contrast moonlit scene in the backyard, using a range of ISO speeds typical of nightscape scenes.
The comparisons show close-ups of a scene shown in full in the smaller inset screen.
COMPARING NOISE
The key characteristic of interest for night work is noise. How well does the camera suppress the noise inherent in digital images when the signal is boosted to the high ISO settings we typically use?
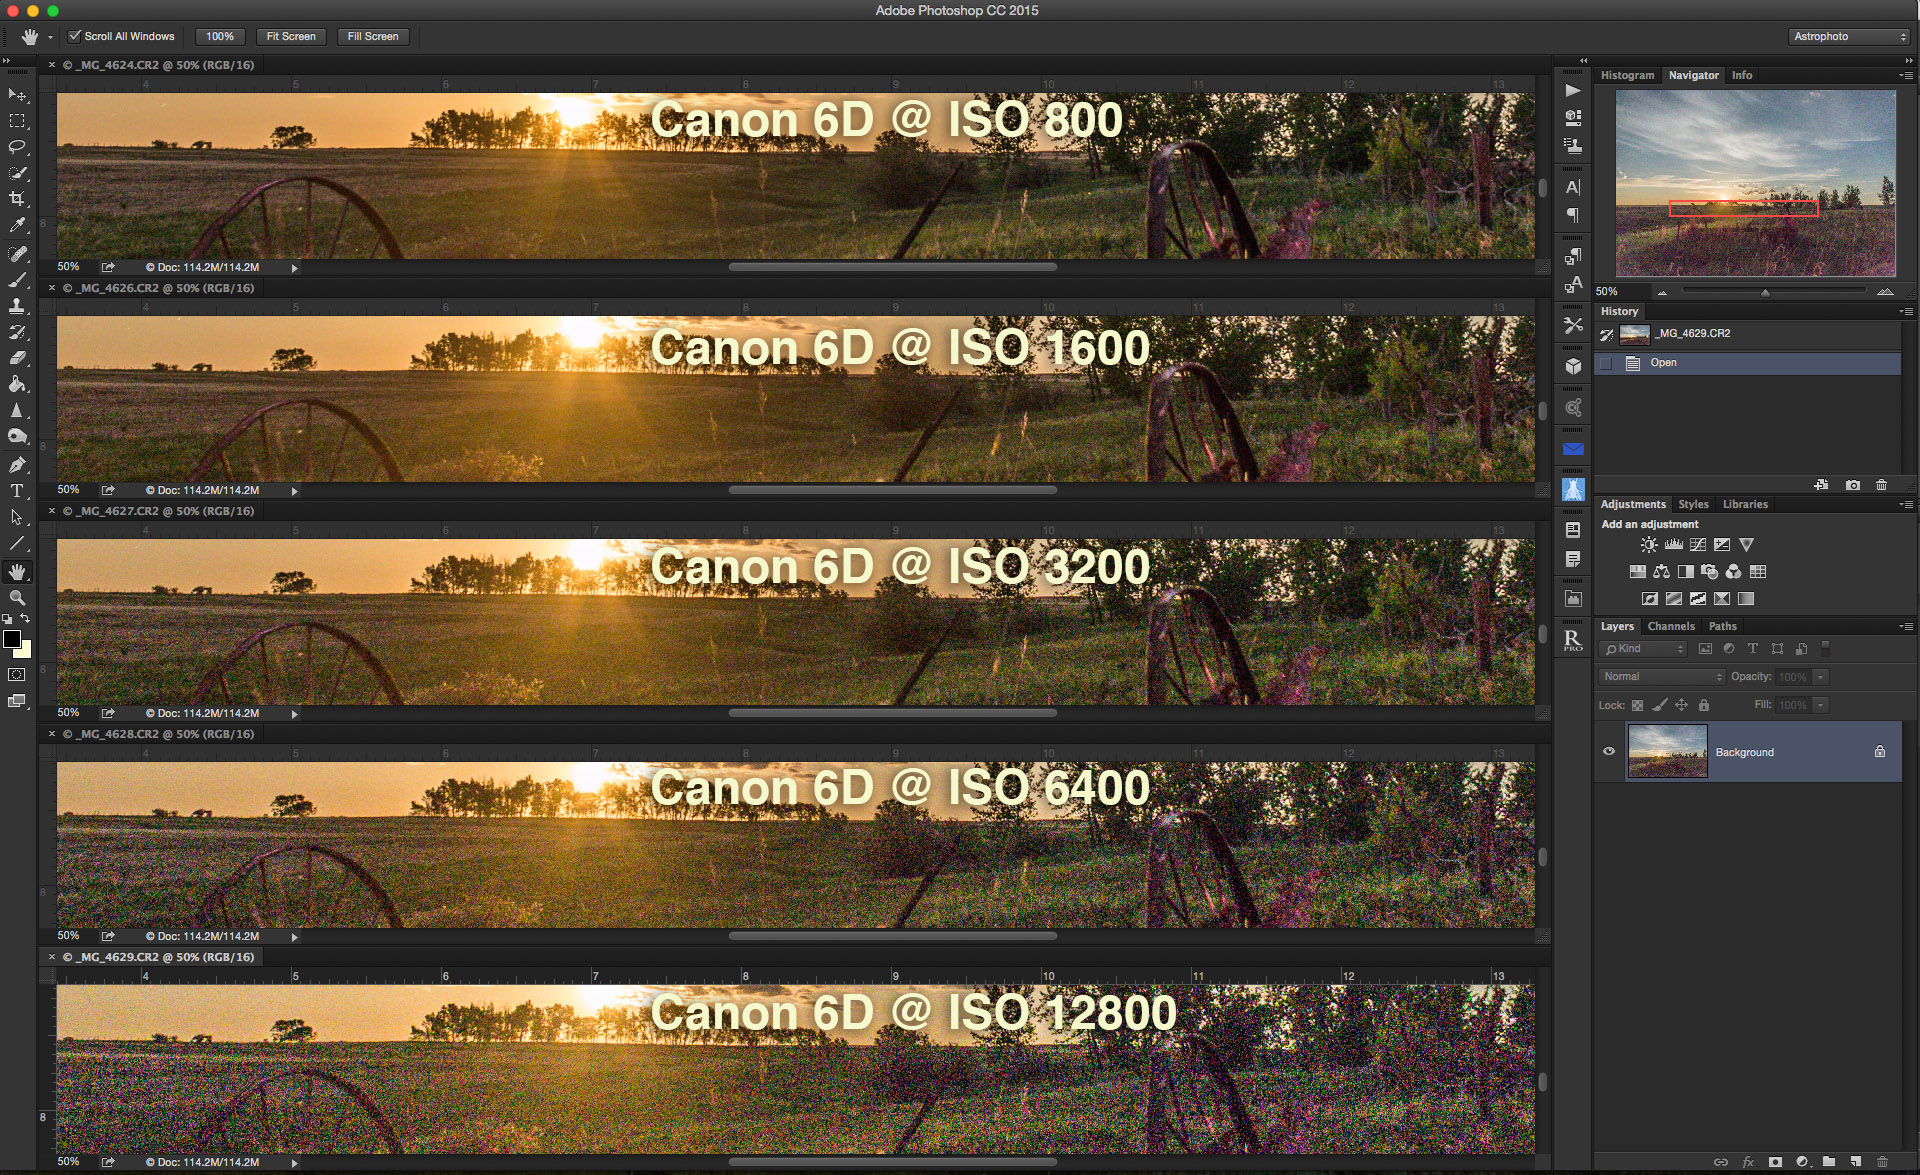
6D Mark II noise at 5 ISO speeds
This set shows the 6D MkII at five ISOs, from ISO 1600 all the way up to the seldom-used ISO 25,600, all shot in Raw, not JPG. In all cases, no noise reduction was applied in later processing, so the results do look worse than what processed images would.
Click or tap on all images to expand each image to full screen for closer inspection.
6D noise at 5 ISO speeds
This set shows the same range of ISOs with the original 6D. All were taken at the same aperture, f/2.8, with a 35mm lens. Exposures were halved for each successive bump up in ISO speed, to ensure equally exposed images.
Comparing the sets, the 6D MkII shows a much greater tendency to exhibit a magenta cast in the shadows at very high ISOs, plus a lower contrast in the shadows at increasing ISOs, and slightly more luminance noise than the 6D.
How much more noise the 6D MkII exhibits is demonstrated here.
6D MkII noise at ISO 3200 compared to 6D
To me, visually, the MkII presents about 1/2 stop, or EV, worse noise than the 6D.
In this example, the MkII exhibits a noise level at ISO 3200 (a common nightscape setting) similar to what the 6D does if set between ISO 4000 and 5000 – about 1/2 stop worse noise.
Frankly, this is surprising.
Yes, the MkII has a higher pixel count and therefore smaller pixels (5.7 microns in this case) that are always more prone to noise. But in the past, advances to the in-camera signal processing has prevented noise from becoming worse, despite increasing pixel count, or has even produced an improvement in noise.
For example, the 2012-vintage 6D is better for noise than Canon’s earlier 2008-era 5D MkII model by about half a stop, or EV.
After five years of camera development I would have expected a similar improvement in the 6D MkII. After all, the 6D MkII has Canon’s latest DIGIC 7 processor, vs. the older 6D’s DIGIC 5+.
Instead, not only is there no noise improvement, the performance is worse.
That said, noise performance in the 6D MkII is still very good, and better than you’ll get with today’s 24 megapixel cropped-frame cameras with their even smaller 4 micron pixels. But the full frame 6D MkII doesn’t offer quite as much an improvement over cropped-frame cameras as does the five-year-old 6D.
ISO INVARIANCY
In the previous sets all the images were well-exposed, as best they could be for such a contrasty scene captured with a single exposure.
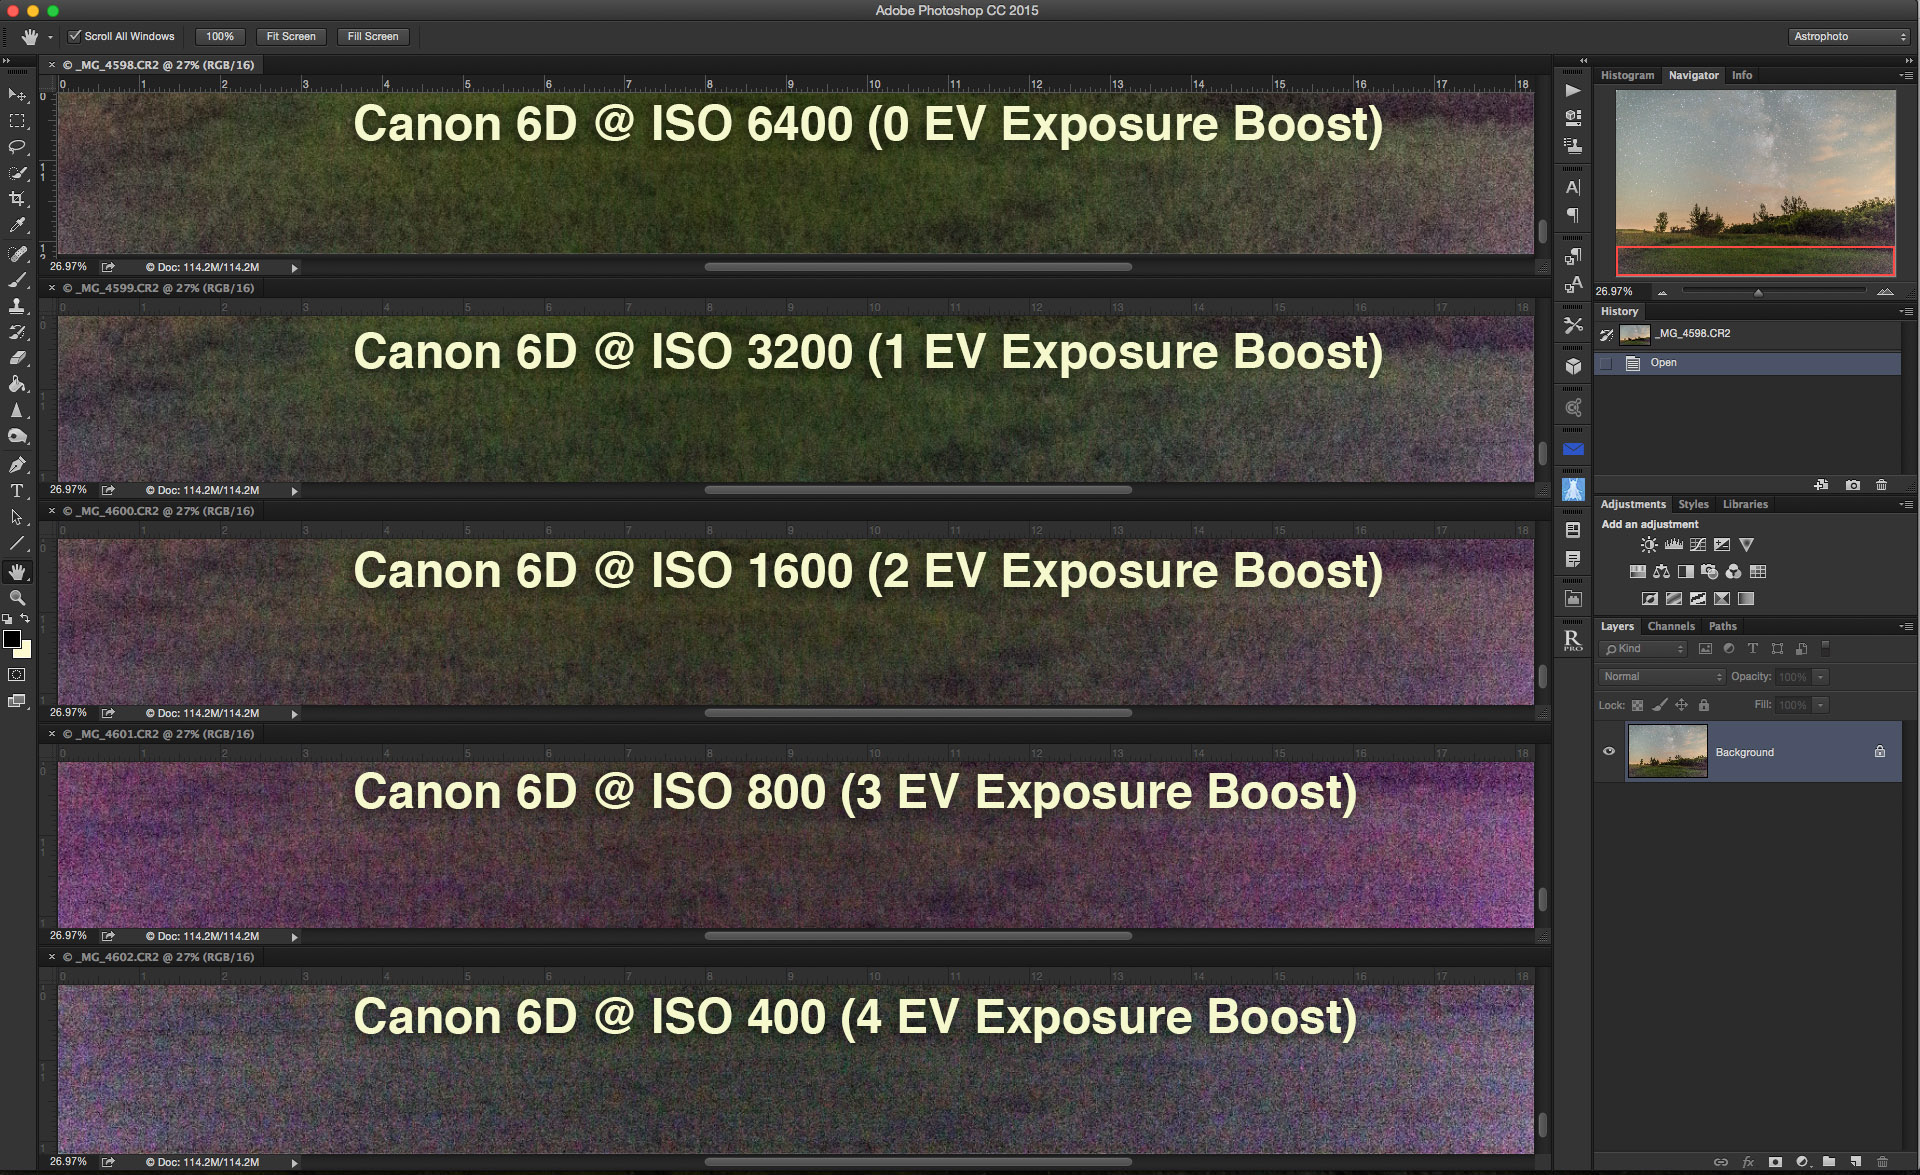
What happens when Raw images are underexposed, then boosted later in exposure value in processing?
This is not an academic question, as that’s often the reality for nightscape images where the foreground remains dark. Bringing out detail in the shadows later requires a lot of Shadow Recovery or increasing the Exposure. How well will the image withstand that work on the shadows?
To test this, I shot a set of images at the same shutter speed, but at successively slower ISOs, from a well-exposed ISO 3200, to a severely underexposed ISO 100. I then boosted the Exposure setting later in Raw processing by an amount that compensated for the level of underexposure in the camera, from a setting of 0 EV at ISO 3200, to a +5 EV boost for the dark ISO 100 shots.
This tests for a camera’s “ISO Invariancy.” If a camera has a sensor and signal processing design that is ISO invariant, a boosted underexposed image at a slow ISO should look similar to a normally exposed image at a high ISO.
You’re just doing later in processing what a camera does on its own in-camera when bumping up the ISO.
But cameras that use ISO “variant” designs suffer from increased noise and artifacts when severely underexposed images are boosted later in Raw processing.
The Canon 6D and 6D MkII are such cameras.
6D Mark II ISO Invariancy
This set above shows the results from the 6D Mark II. Boosting underexposed shadows reveals a lot of noise and a severe magenta cast.
These are all processed with Adobe Camera Raw, identical to the development engine in Adobe Lightroom.
6D ISO Invariancy
This set above shows the results from the 6D. The older camera, which was never great for its lack of ISO Invariancy performance, is still much better than the new Mark II.
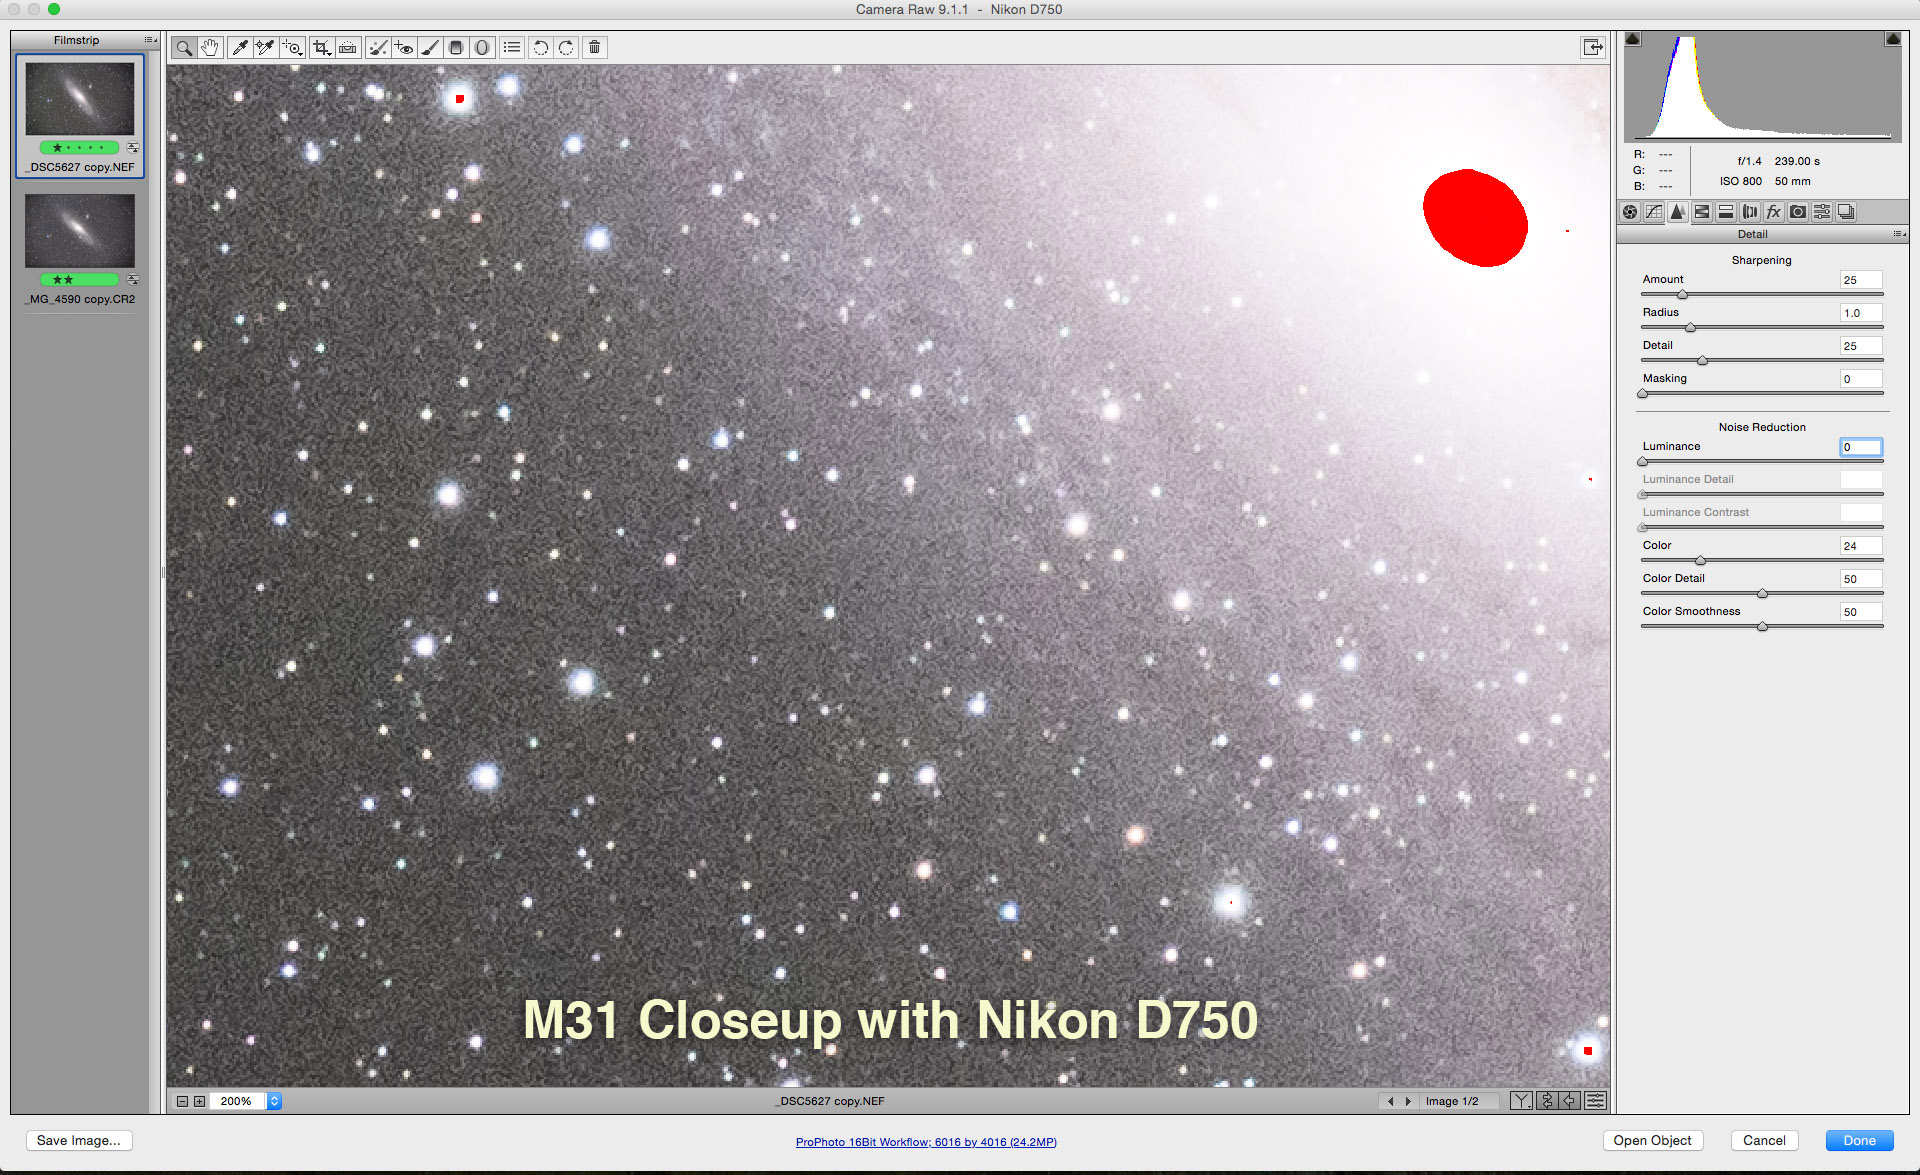
Underexposed shadows show less noise and discolouration in the 6D. For a comparison of the Canon 6D with the ISO Invariant Nikon D750, see my earlier Nikon vs. Canon blog from 2015. The Nikon performs much better than the 6D.
Effectively, this is the lack of dynamic range that others are reporting when testing the 6D MkII on more normal daytime images. It really rears its ugly head in nightscapes.
The lesson here is that the Mark II needs to be properly exposed as much as possible.
Don’t depend on being able to extract details later from the shadows. The adage “Expose to the Right,” which I explain at length in my Nightscapes eBook, applies in spades to the 6D MkII.
DARK FRAME BUFFER
All the above images were taken with Long Exposure Noise Reduction (LENR) off. This is the function that, when turned on, forces the camera to take and internally subtract a dark frame – an image of just the noise – reducing thermal noise and discolouration in the shadows.
A unique feature of Canon full-frame cameras is that when LENR is on you can take several exposures in quick succession before the dark frame kicks in and locks up the camera. This is extremely useful for deep-sky shooting.
The single dark frame then gets applied to the buffered “light frames.”
The 6D Mark II, when in either Raw or in Raw+JPG can take 3 shots in succession. This is a downgrade from the 6D which can take 4 shots when in Raw+JPG. Pity.
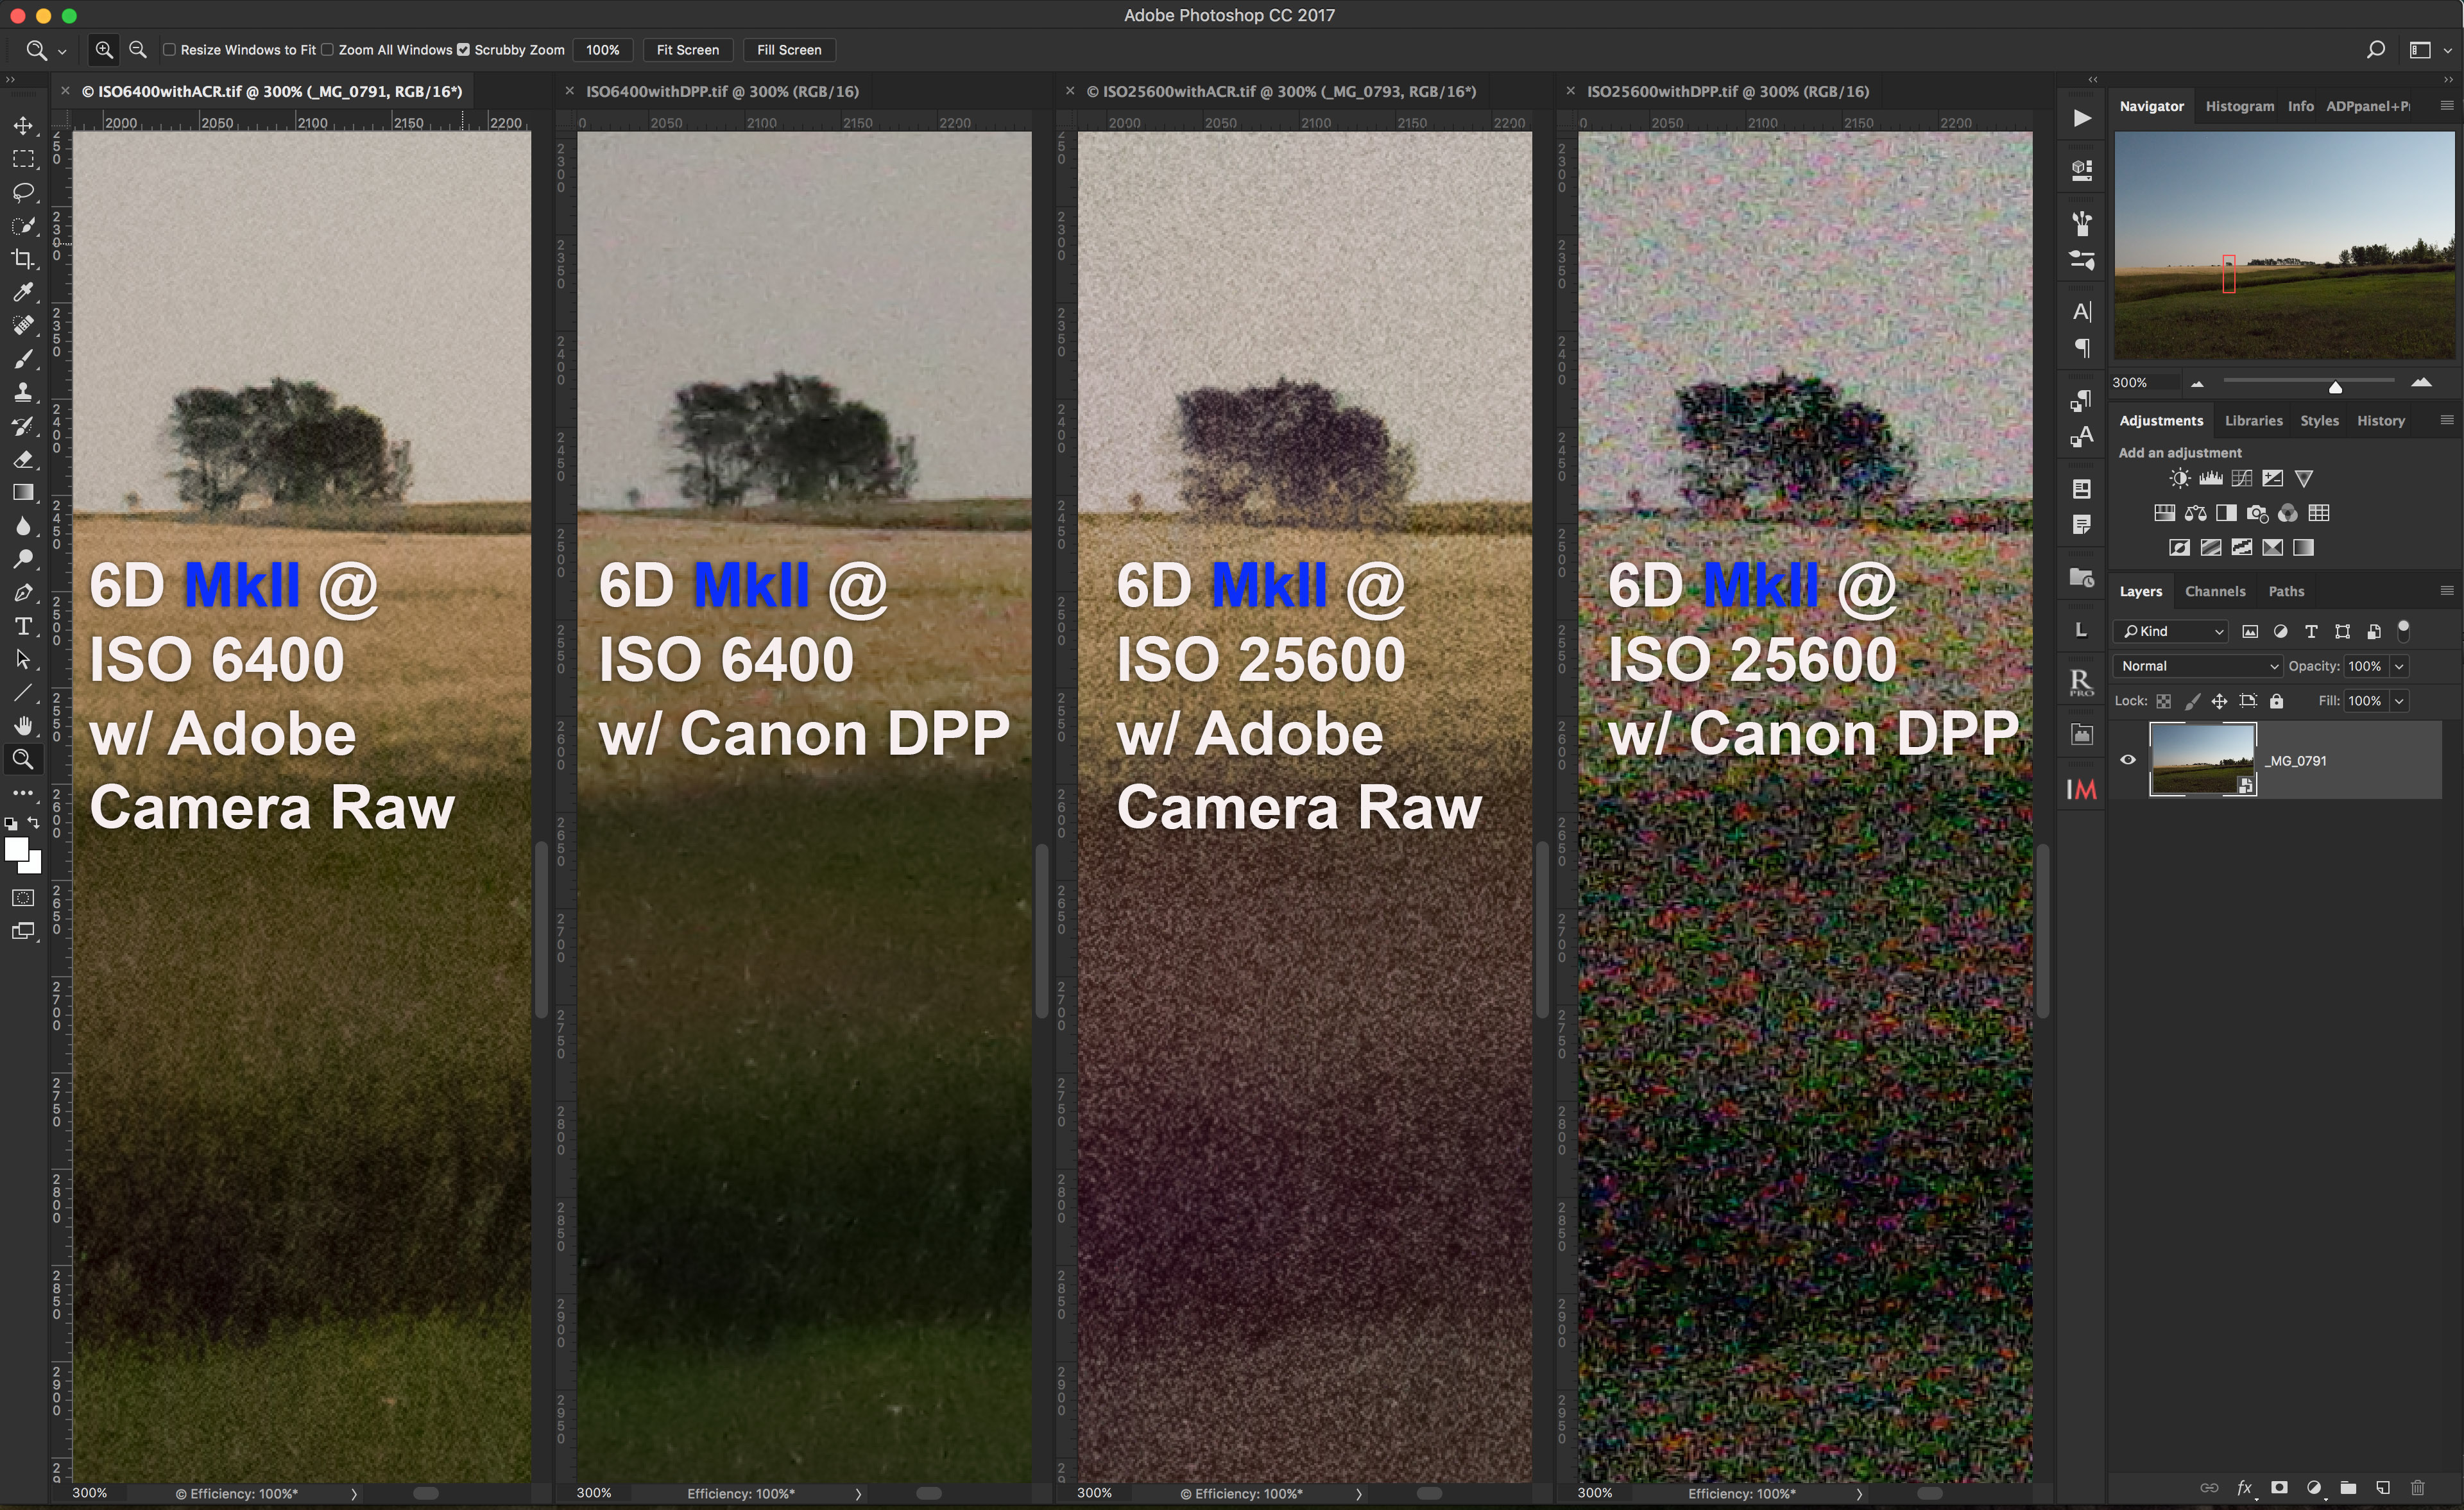
ADOBE CAMERA RAW vs. DIGITAL PHOTO PROFESSIONAL
My next thought was that Adobe Camera Raw, while it was reading the Mark II files fine, might not have been de-Bayering or developing them properly. So I developed the same image with both Raw developers, Adobe’s and Canon’s latest version of their own Digital Photo Professional (DPP).
ACR vs. DPP
Here I did apply a modest and approximately similar level of noise reduction to both images:
In ACR: Color at 25, Luminosity at 40, with Sharpness at 25
In DPP: Chrominance at 8, Luminosity at 8, with Sharpness at 2
Yes, DPP did do a better job at eliminating the ugly magenta cast, but did a much worse job at reducing overall noise. DPP shows a lot of blockiness, detail loss, and artifacts left by the noise reduction.
Adobe Camera Raw and/or Lightroom remain among the best of many Raw developers.
IMAGE AVERAGING
A new feature the 6D Mark II offers is the ability to shoot and stack images in-camera. It can either “Add” the exposure values, or, most usefully, “Average” them, as shown here.
6D Mark II Multiple Exposure screen
Other newer Canon DSLRs also offer this feature, notably the 7D MkII, the 5D MkIV, the 5Ds, and even the entry-level 80D. So the 6D MkII is not unique. But the feature was not on the 6D.
Here’s the benefit.
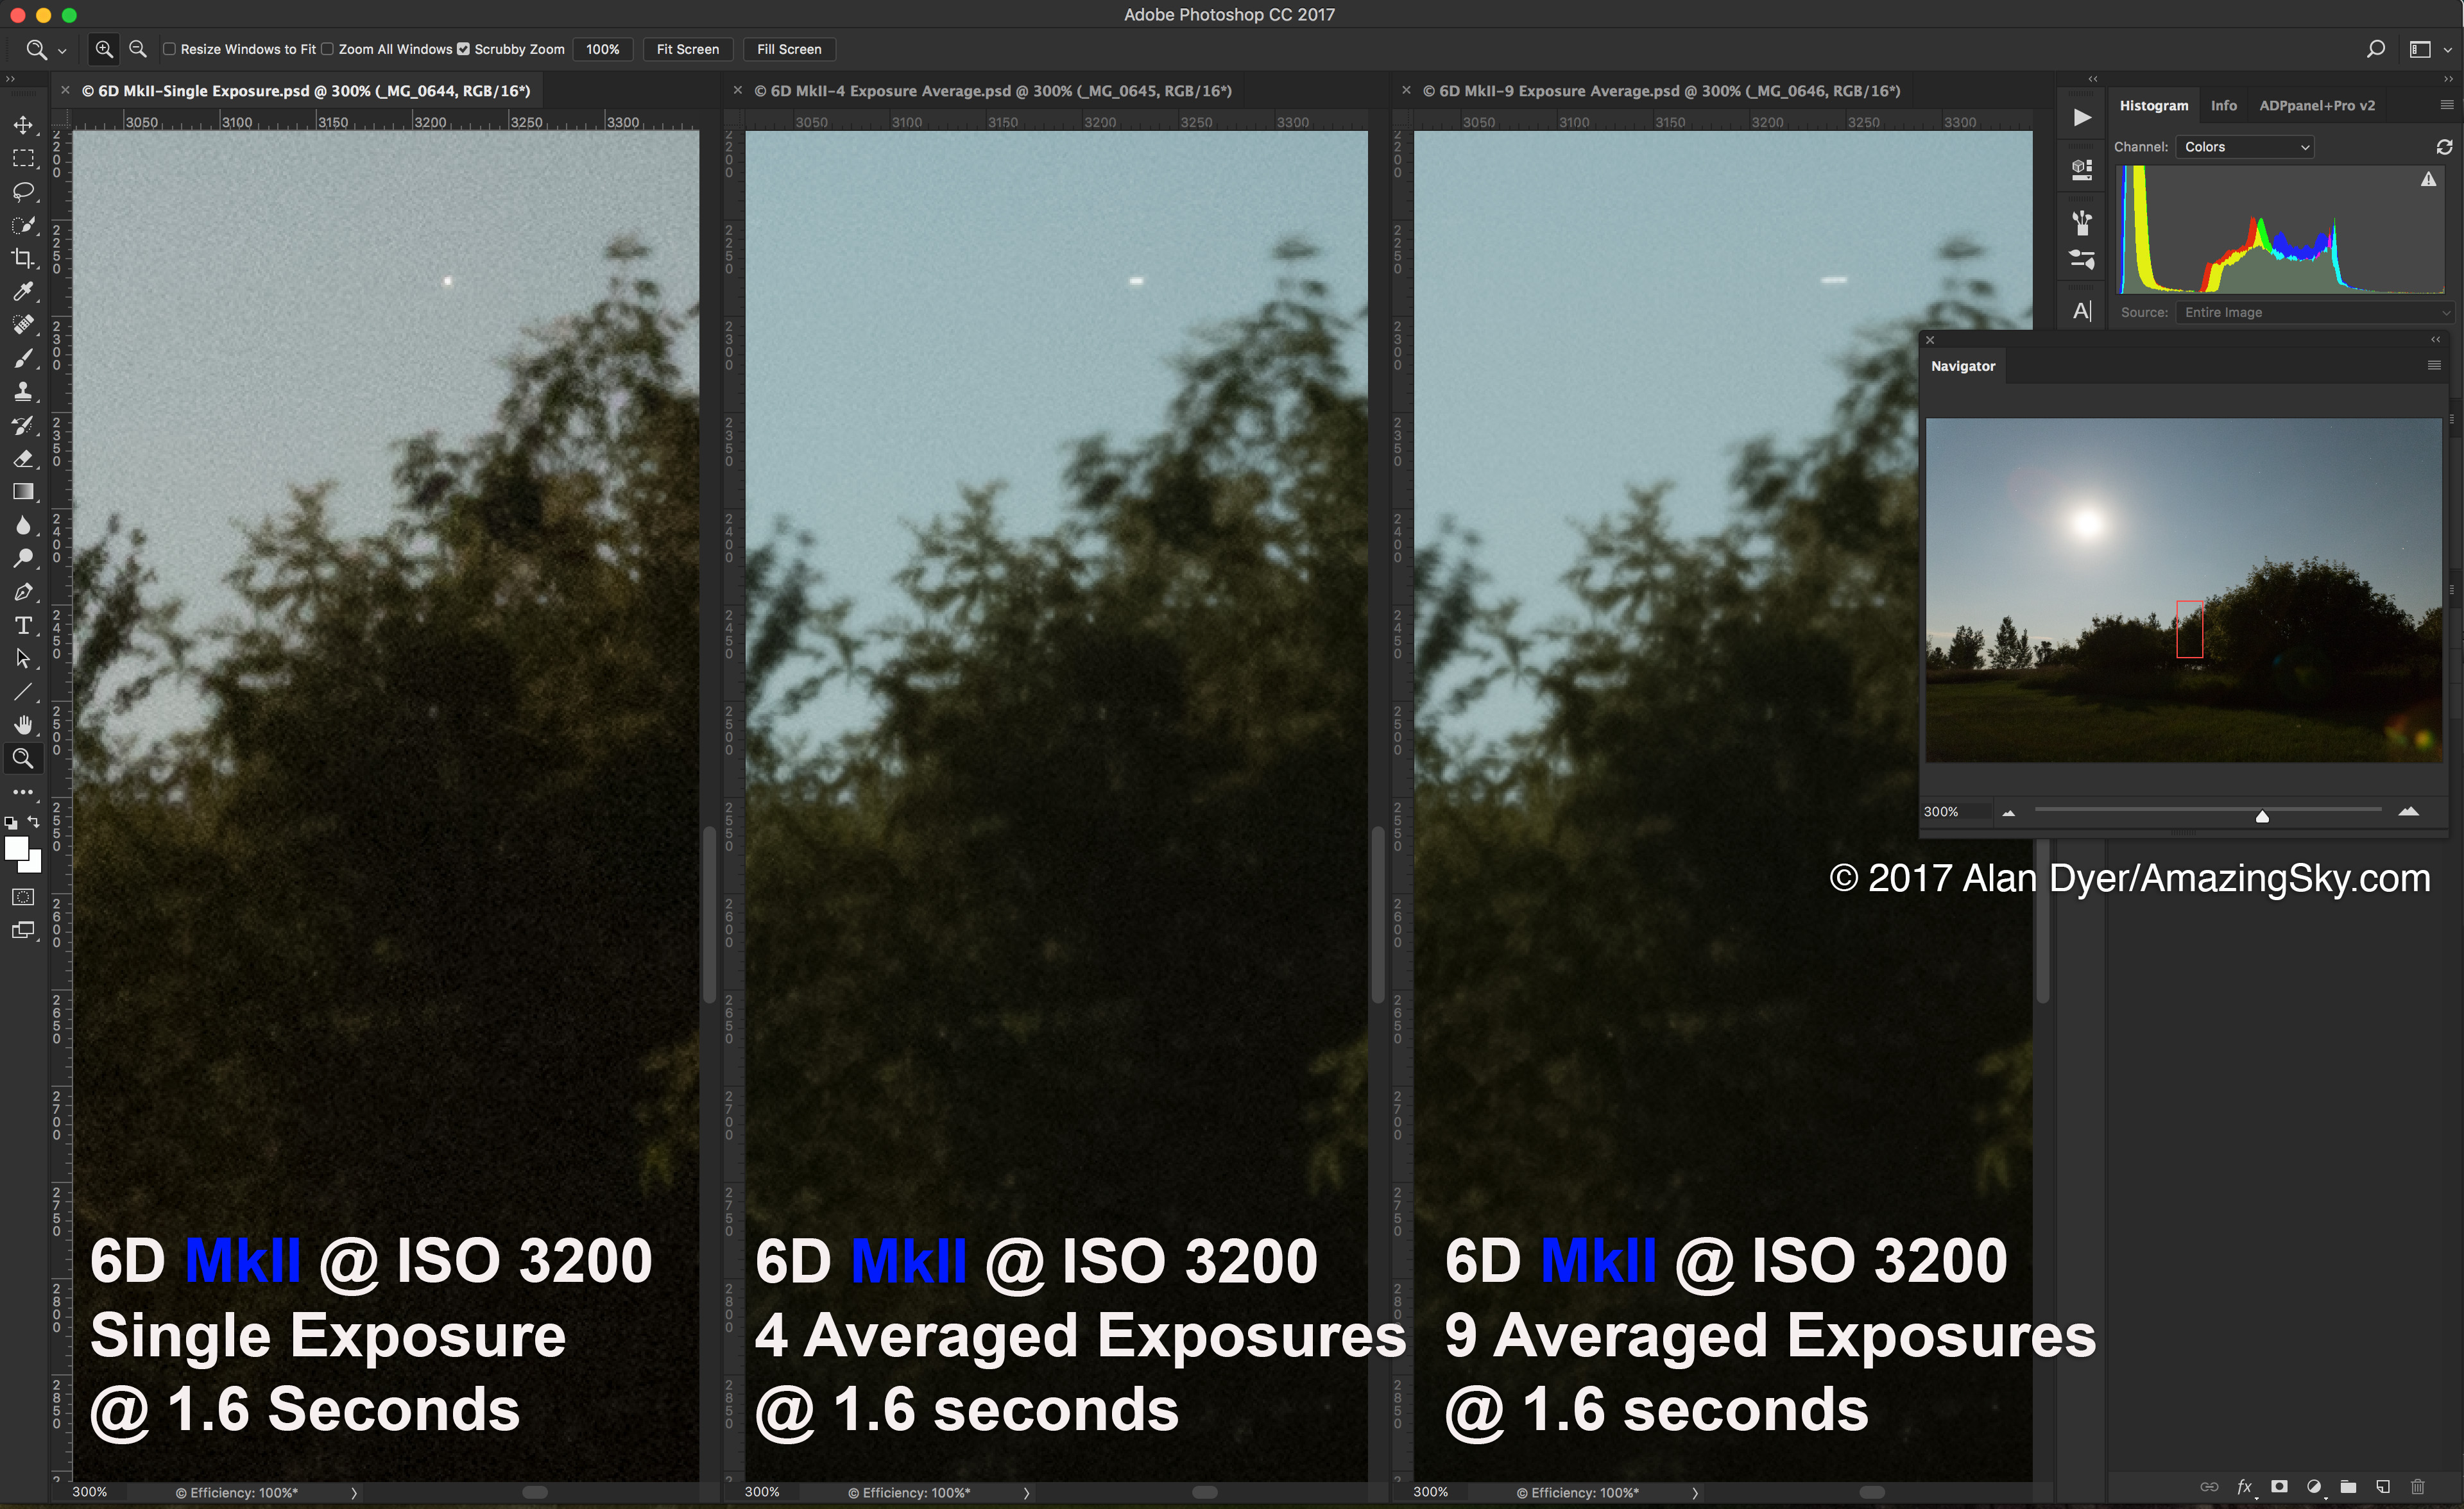
6D Mark II Averaging results
The left image is a single exposure; the middle is an average stack of 4 exposures stacked in camera; the right image an average stack of 9 exposures, the maximum allowed.
Noise smooths out a lot, with less noise the more images you stack. The result is a single Raw file, not a JPG. Excellent!
While this kind of stacking can be done later in processing in Photoshop, or in any layer-based program, many people might find this in-camera function handy.
Except, as you can see, the sky will exhibit star trails, and not as well defined as you would get from stacking them with a “Lighten” blend mode, as all star trail stacking routines use.
So this averaging method is NOT the way to do star trails. The Mark II does not offer the Brighten mode some other new Canons have that does allow for in-camera star trail stacking. Again, a pity in a camera many will choose for astrophotography.
Nevertheless, the Average mode is a handy way to create foreground landscapes with less noise, which then have to be composited later with a sky image or images.
OTHER FEATURES
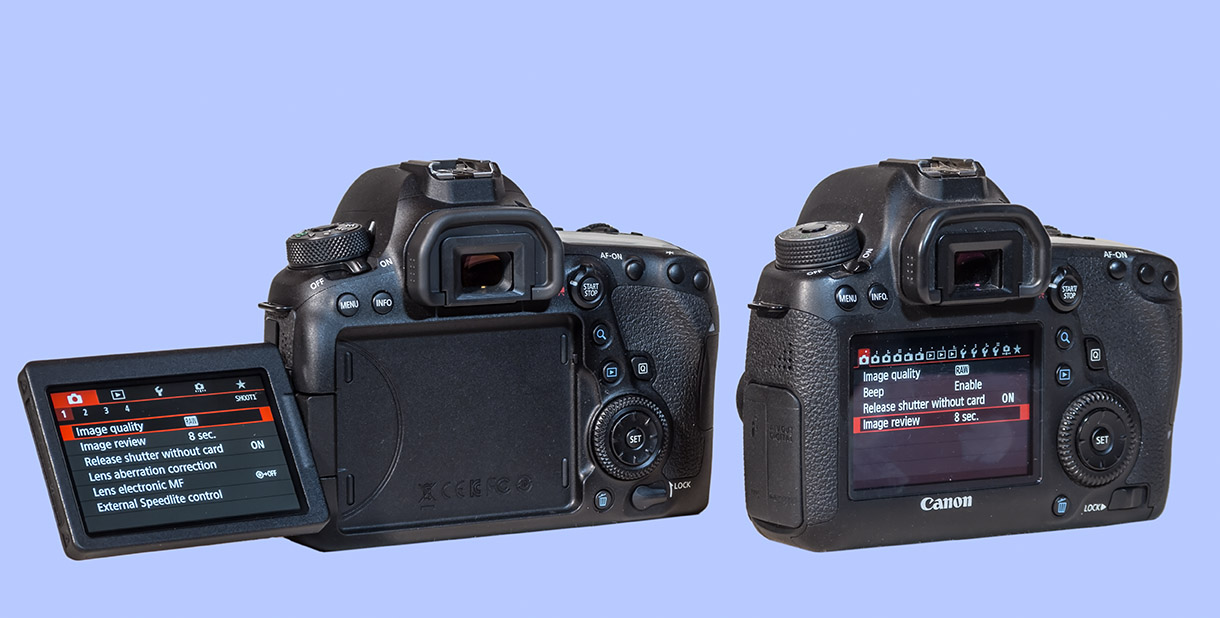
On the left, below, the Mark II has a nearly identical layout of buttons and controls to the 6D on the right. So owners of the older model will feel right at home with the Mark II. That’s handy, as we astrophotographers work in the dark by feel!
6D Mark II (left) and 6D rear views
Of course the big new feature, a first for Canon in a full-frame camera, is the Mark II’s fully articulated screen. It flips out, tilts, and even flips around to face forward. This is super-great for all astrophotography, especially when conducted by aging photographers with aching backs!
And the screen, as with the entry-level cropped-frame Canons, is a touch screen. For someone who hasn’t used one before – me! – that’ll take some getting used to, if only in just remembering to use it.
And it remains to be seen how well it will work in the cold. But it’s great to have.
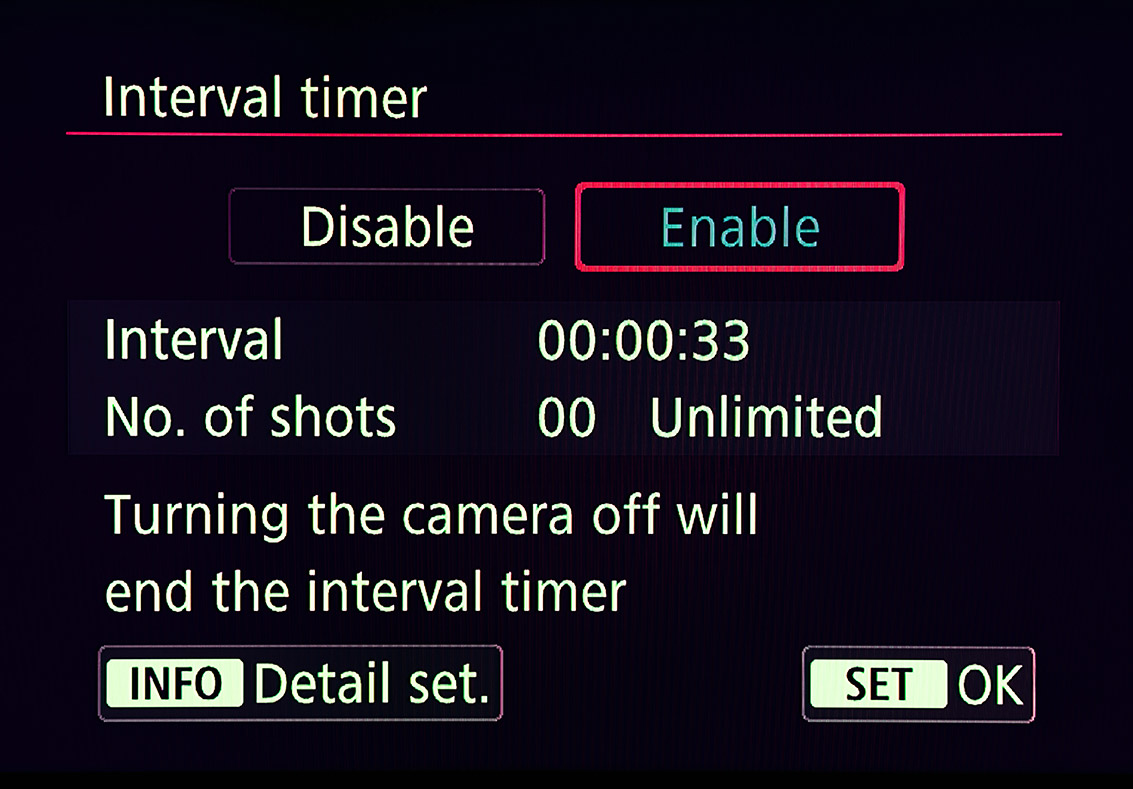
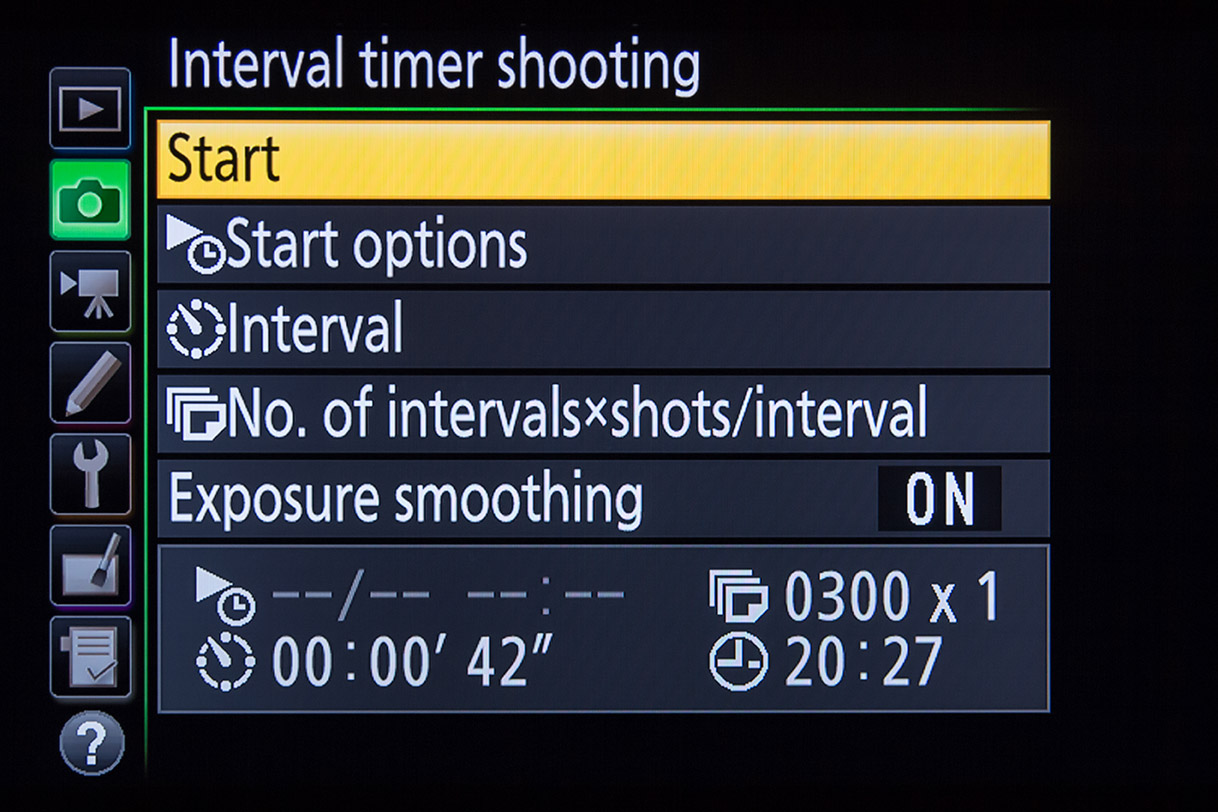
INTERVAL TIMER
Like other late-model Canon DSLRs, the 6D MkII has a built-in intervalometer. It works fine but is useable only on exposures with internally set shutter speeds up to 30 seconds.
6D Mark II Interval Timer screen
However, setting the Interval so it fires the shutter with a minimal gap of 1 second between shots (our usual requirement for night time-lapses) is tricky: You have to set the interval to a value not 1 second, but 2 to 3 seconds longer than the shutter speed. i.e. an exposure of 30 seconds requires an interval of 33 seconds, as shown above. Anything less and the camera misses exposures.
Why? Well, when set to 30 seconds the camera actually takes a 32-second exposure. Surprise!
Other cameras I’ve used and tested with internal intervalometers (Nikon and Pentax) behave the same way. It’s confusing, but once you are used to it, the intervalometer works fine.
Except … the manual suggests the only way to turn it off and stop a sequence is to turn off the camera. That’s crude. A reader pointed out that it is also possible to stop a time-lapse sequence by hitting the Live View Start/Stop button. However, that trick doesn’t work on sequences programmed with only a second between frames, as described above. So stopping a night time-lapse is inelegant to say the least. With Nikons you can hold down the OK button to stop a sequence, with the option then of restarting it if desired.
Also, the internal Intervalometer cannot be used for exposures longer than 30 seconds. Again, that’s the case with all in-camera intervalometers in other models and brands.
BULB TIMER
As with many other new Canons, the Mark II has a Bulb Timer function.
6D Mark II Bulb Timer screen
When on Bulb you can program in exposure times of any length. That’s a nice feature that, again, might mean an external intervalometer is not needed for many situations.
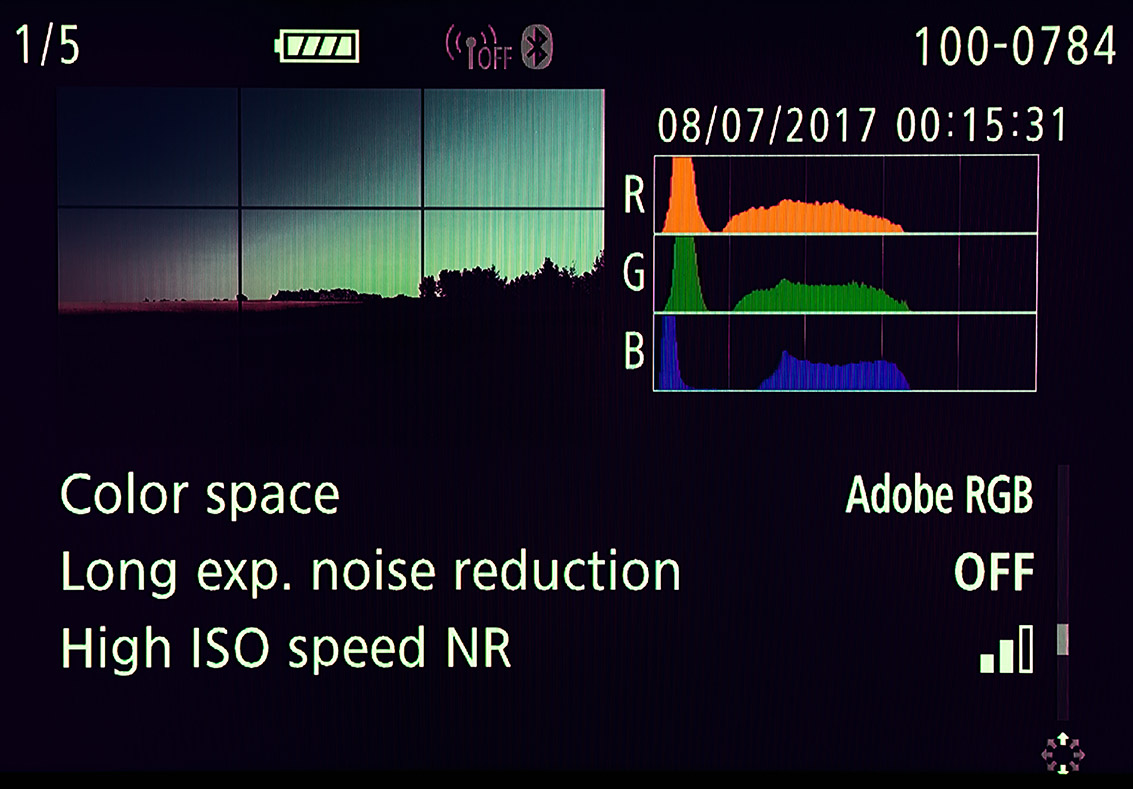
PLAYBACK SCREEN
A new feature I like is the greatly expanded information when reviewing an image.
6D Mark II Playback screen
One of the several screens you can scroll to shows whether you have shot that image with Long Exposure Noise Reduction on or not.
Excellent! I have long wanted to see that information recorded in the metadata. Digital Photo Professional also displays that status, but not Adobe Camera Raw/Lightroom.
CONCLUSION
While this has been a long report, this is an important camera for us astrophotographers.
I wish the news were better, but the 6D Mark II is somewhat of a disappointment for its image quality. It isn’t bad. It’s just that it isn’t any better than than the older 6D, and in some aspects is worse.
The 6D Mark II as part of the rig for shooting the total solar eclipse. The articulated screen will be very nice!
Canon has clearly made certain compromise decisions in their sensor design. Perhaps adding in the Dual-Pixel Autofocus for rapid focusing in Movie Mode has compromised the signal-to-noise ratio. That’s something only Canon can explain.
But the bottom-line recommendations I can offer are:
If you are a Canon user looking to upgrade to your first full-frame camera, the 6D Mark II will provide a noticeable and welcome improvement in noise and performance over a cropped-frame model. But an old 6D, bought new while they last in stock, or bought used, will be much cheaper and offer slightly less noise. But the Mark II’s flip-out screen is very nice!
If you are a current 6D owner, upgrading to a Mark II will not get you better image quality, apart from the slightly better resolution. Noise is actually worse. But it does get you the flip-out screen. I do like that!
If you are not wedded to Canon, but want a full-frame camera for the benefits of its lower noise, I would recommend the Nikon D750. I have one and love it. I have coupled it with the Sigma Art series lenses. I have not used any of the Sony a7-series Mirrorless cameras, so cannot comment on their performance, but they are popular to be sure.
However, I hope this review aimed specifically at nightscape shooters will be of value. I have yet to test the 6D Mark II for very long-exposure tracked deep-sky images.
Last night I shot into the autumn Milky Way at the Heart Nebula.
I’m currently just finishing off a month of testing the new Nikon D810a camera, a special high-end DSLR aimed specifically at astrophotographers.
I’ll post a more thorough set of test shots and comparisons in a future blog, but for now here are some shots from the last couple of nights.
Above is the setup I used to shoot the image below, shot in the act of taking the image below!
The Nikon is at the focus of my much-loved TMB 92mm refractor, riding on the Astro-Physics Mach One mount. The mount is being “auto-guided” by the wonderful “just-press-one-button” SG-4 auto-guider from Santa Barbara Instruments. The scope is working at a fast f/4.4 with the help of a field flattener/reducer from Borg/AstroHutech.
I shot a set of 15 five-minute exposures at ISO 1600 and stacked, aligned and averaged them (using mean stack mode) in Photoshop. I explain the process in my workshops, but there’s also a Ten Steps page at my websitewith my deep-sky workflow outlined.
The Heart Nebula, IC 1805, in Cassiopeia, with nebula NGC 896 at upper right and star cluster NGC 1027 at left of centre. This is a stack of 15 x 5-minute exposures with the Nikon D810a as part of testing, at ISO 1600, and with the TMB 92mm apo refractor at f/4.4 with the Borg 0.85x field flattener. Taken from home Nov 29, 2015.
The main advantage of Nikon’s special “a” version of the D810 is its extended red sensitivity for a capturing just such objects in the Milky Way, nebulas which shine primarily in the deep red “H-alpha” wavelength emitted by hydrogen.
It works very well! And the D810a’s 36 megapixels really do resolve better detail, something you appreciate in wide-angle shots like this one, below, of the autumn Milky Way.
It’s taken with the equally superb 14-24mm f/2.8 Nikkor zoom lens. Normally, you would never use a zoom lens for such a demanding subject as stars, but the 14-24mm is stunning, matching or beating the performance of many “prime” lenses.
The Milky Way from Perseus, at left, to Cygnus, at right, with Cassiopeia (the “W”) and Cepheus at centre. Dotted along the Milky Way are various red H-alpha regions of glowing hydrogen. The Andromeda Galaxy, M31, is at botton. The Double Cluster star cluster is left of centre. Deneb is the bright star at far right, while Mirfak, the brightest star in Perseus, is at far left. The Funnel Nebula, aka LeGentil 3, is the darkest dark nebula left of Deneb. This is a stack of 4 x 1-minute exposures at f/2.8 with the Nikkor 14-24mm lens wide open, and at 24mm, and with the Nikon D810a red-sensitive DSLR, at ISO 1600. Shot from home, with the camera on the iOptron Sky-Tracker.
The D810a’s extended red end helps reveal the nebulas along the Milky Way. The Heart Nebula, captured in the close-up at top, is just left of centre here, left of the “W” forming Cassiopeia.
The Nikon D810a is a superb camera, with low noise, high-resolution, and features of value to astrophotographers. Kudos to Nikon for serving our market!
The summer Milky Way sets into the southwest on a late November night.
On Saturday, November 28, well into winter here in Alberta, the stars of the Summer Triangle and the summer Milky Way set into the southwest on a clear, though slightly hazy, late November night.
This is the last of the summer Milky Way, with the centre of the Galaxy now long gone, but the Summer Triangle stars remaining in the evening sky well into autumn. Glows from light pollution in the west light the horizon, in a quick series of images shot in my rural backyard.
In the Summer Triangle, Vega is at right, as the brightest star; Deneb is above centre, and Altair is below centre, farthest south in the Milky Way.
I shot this as a test image for the Nikkor 14-24mm lens, here wide-open at f/2.8 and at 14mm, where it performs beautifully, with very tight star images to the corners. It does very well at 24mm, too! This is astonishing performance for a zoom lens. It matches or beats many “prime” lenses for quality.
The camera was the 36-megapixel Nikon D810a, Nikon’s “astronomical DSLR” camera, also on test. Here it shows its stuff by picking up the red nebulas in Cygnus and Cepheus.
Thorough tests of both the camera and lens will appear later in the year. Stay tuned.
Do subscribe to my blog (click below) to get email notices of new entries.
For the even more technically-minded, this image is a stack, mean combined, of five 2-minute tracked exposures, at f/2.8 and ISO 800. The camera was on the iOptron Sky-Tracker. So the stars are not trailed but the ground is! I made no attempt here to layer in an untracked ground shot, as there isn’t much detail of interest worth showing, quite frankly.
At least not in the ground. But the Milky Way is always photogenic.
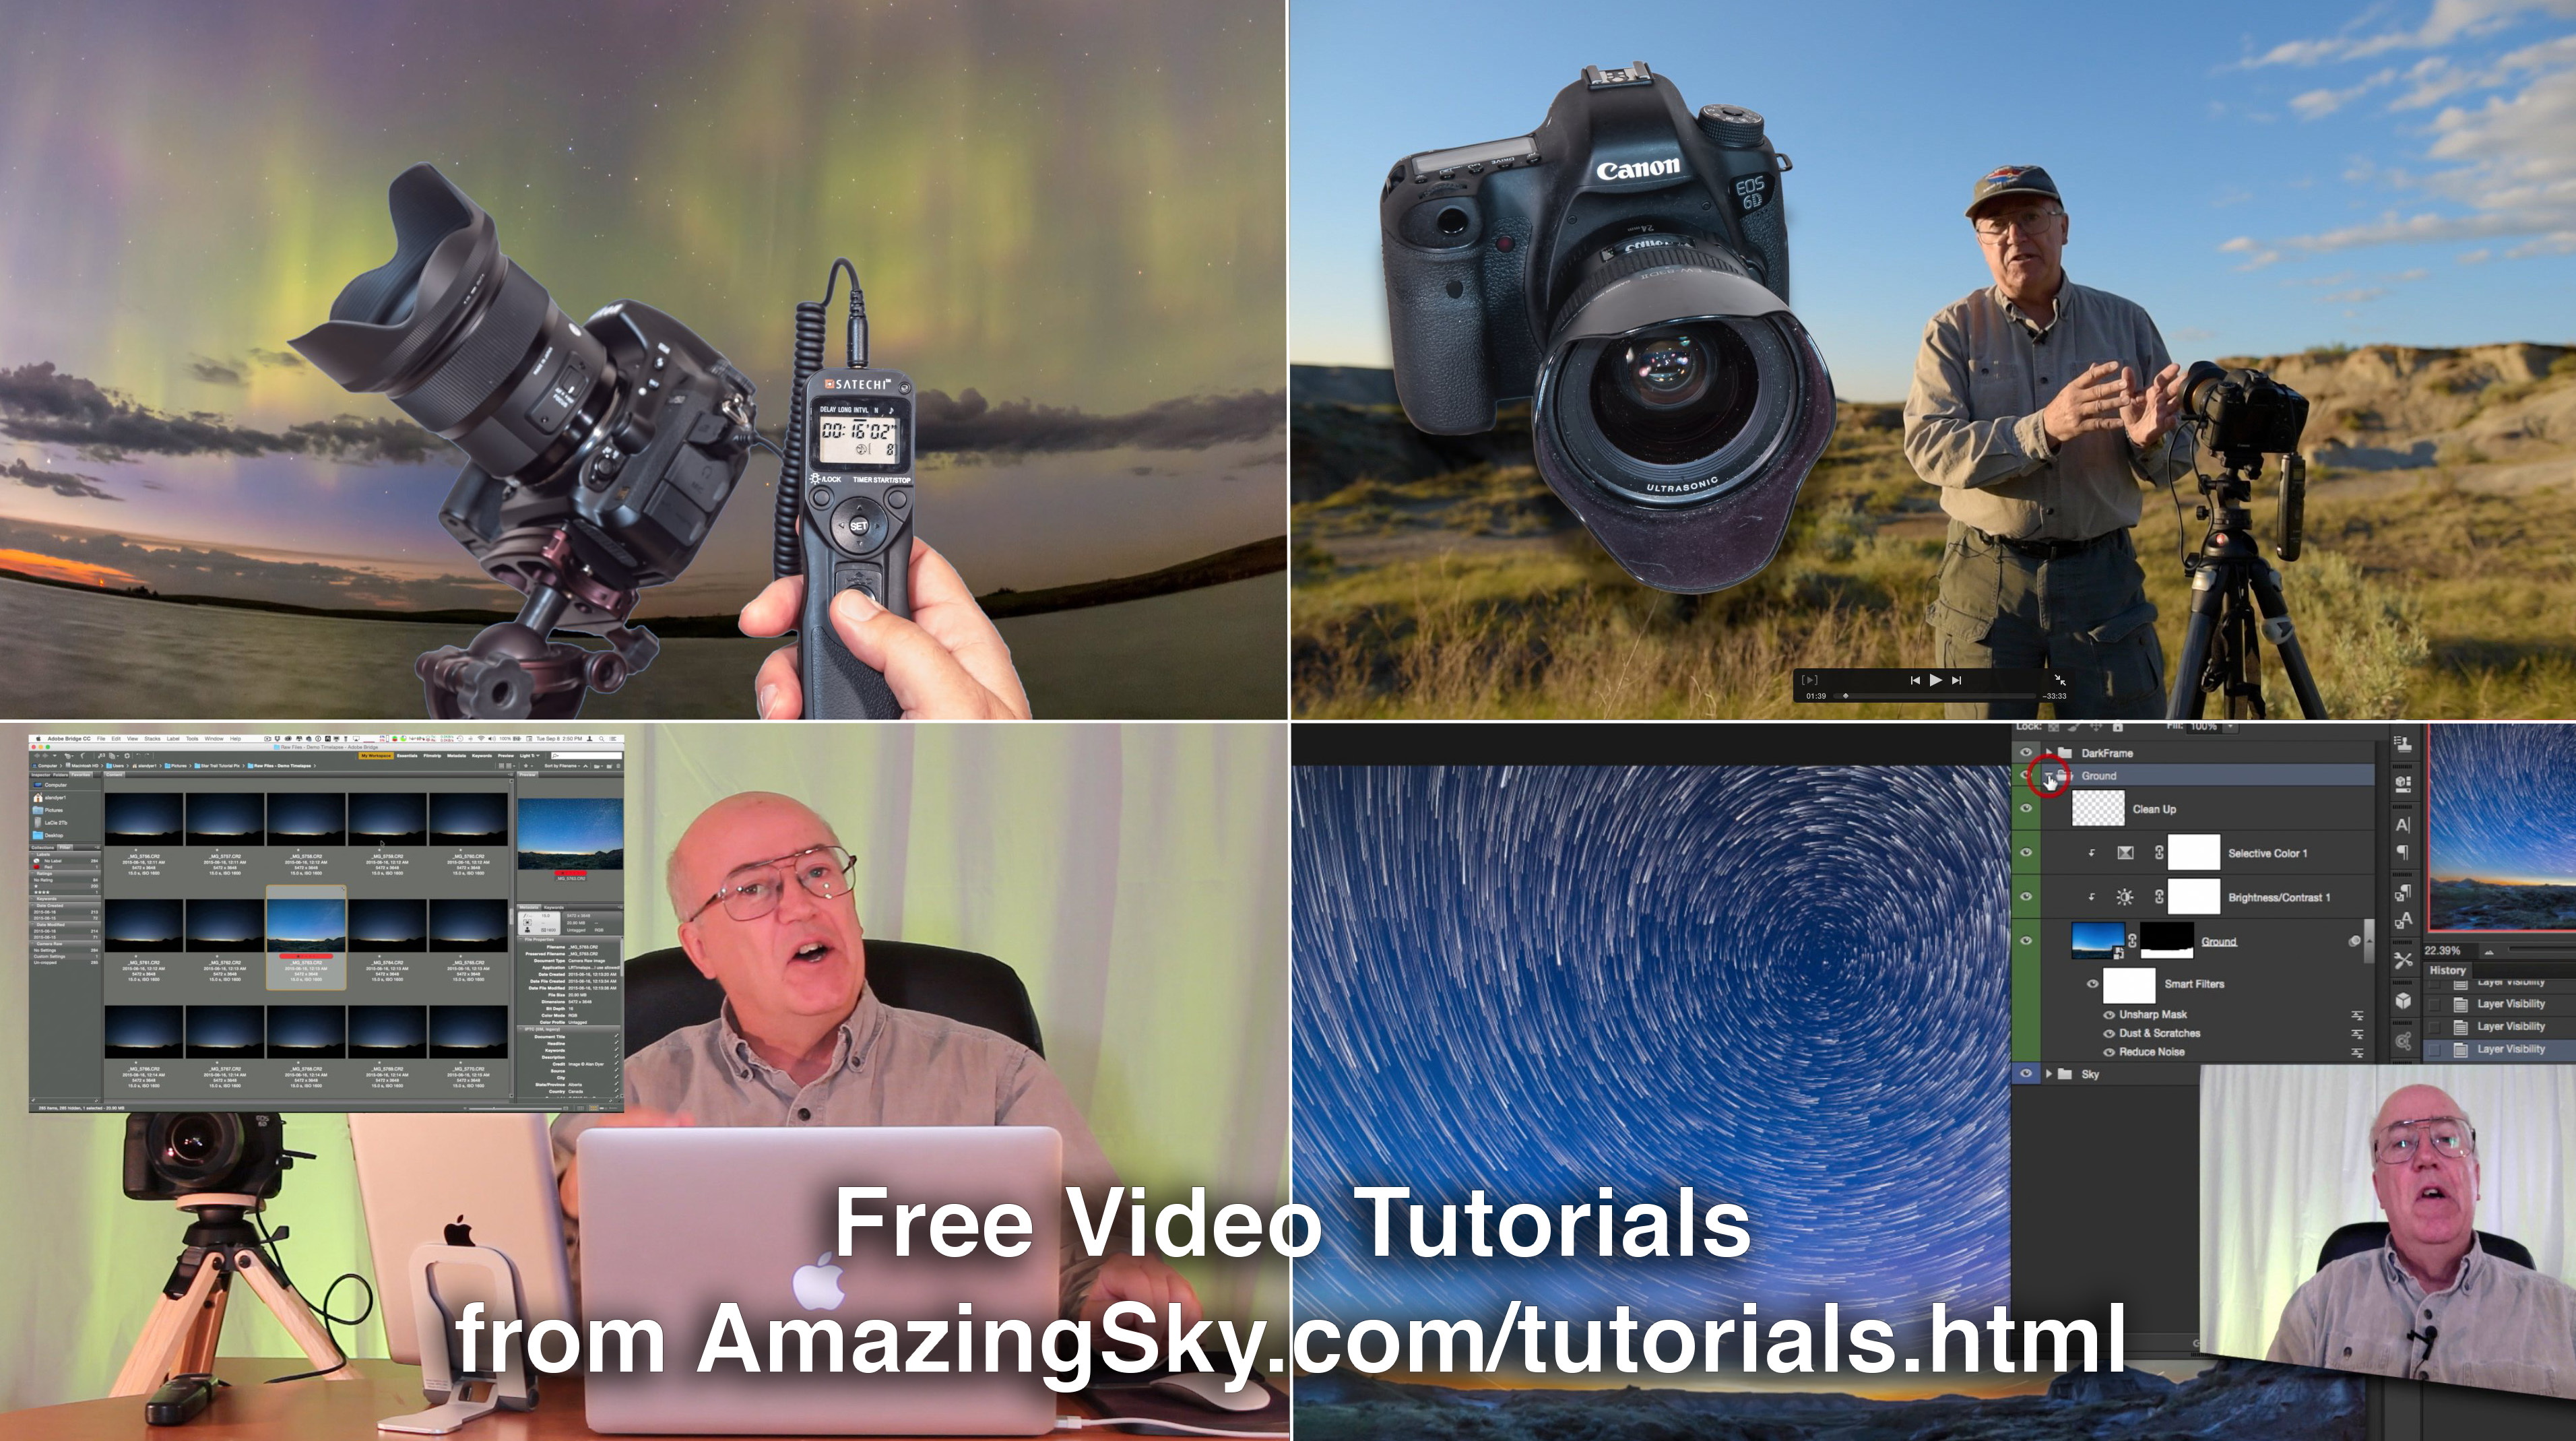
Learn the basics of shooting nightscape and time-lapse images with my three new video tutorials.
In these comprehensive and free tutorials I take you from “field to final,” to illustrate tips and techniques for shooting the sky at night.
At sites in southern Alberta I first explain how to shoot the images. Then back at the computer I step you through how to process non-destructively, using images I shot that night in the field.
Tutorial #1 – The Northern Lights
This 24-minute tutorial takes you from a shoot at a lakeside site in southern Alberta on a night with a fine aurora display, through to the steps to processing a still image and assembling a time-lapse movie.
Tutorial #2 – Moonlit Nightscapes
This 28-minute tutorial takes you from a shoot at Waterton Lakes National Park on a bright moonlit night, to the steps for processing nightscapes using Camera Raw and Photoshop, with smart filters, adjustment layers and masks.
Tutorial #3 – Star Trails
This 35-minute tutorial takes you from a shoot at summer solstice at Dinosaur Provincial Park, then through the steps for stacking star trail stills and assembling star trail time-lapse movies, using specialized programs such as StarStaX and the Advanced Stacker Plus actions for Photoshop.
As always, enlarge to full screen for the HD versions. These are also viewable at my Vimeo channel.
Here are my top tips for shooting terrific still-image nightscapes … and time-lapse movies of the night sky.
1. Go for pixel size, not pixel count
When choosing a camera for night sky scenes, the most important characteristic is not number of megapixels. Just the opposite.
The best cameras are usually models with more modest megapixel counts. Each of their individual pixels is larger and so collects more photons in a given exposure time, yielding higher a signal-to-noise ratio – or lower noise, critical for night shooting.
Cameras with pixels (the “pixel pitch”) 6 to 8 microns across are best. Many high-megapixel cameras have tiny 4-micron pixels.
Large-pixel cameras are often the full-frame models, such as the Canon 5D MkIII and 6D, the Nikon D610, D750, and Df, and the Sony a7s and a7S II.
Many “cropped-frame” cameras are now 18- to 24-megapixel models with smaller, noise-prone pixels. They can certainly be used, but will require more care in exposing well at lower ISOs, and in processing to smooth out noise without blurring detail.
2. Learn to fly on manual
While DSLRs and Compact System Cameras have amazing automatic functions we use none of them at night.
Instead, we use the camera on Manual or Bulb, dialling in shutter speed, aperture and ISO speed manually. We also have to focus manually, using Live View mode to focus on a bright star or distant light.
Learn the tradeoffs involved: Increasing ISO sensitivity of the sensor keeps exposure times down but increases noise. Opening up the lens aperture to f/2 or f/1.4 also keeps exposures short but introduces image-blurring aberrations, especially at the frame corners.
To prevent stars from trailing due to the sky’s motion adhere to the “500 Rule:” the maximum exposure time is roughly 500 divided by the focal length of your lens.
3. Expose to the right
At night, always give the sensor plenty of signal.
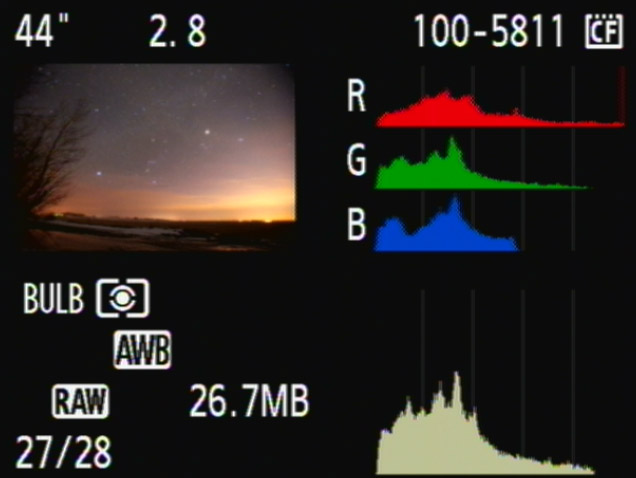
Use whatever combination of shutter speed, aperture and ISO will provide a well-exposed image. The image “histogram,” the graph of number of pixels at each brightness level shown above, should never be slammed to the left.
It should be a well-distributed “mountain range” of pixels, extending well to the right. If the 500 Rule restricts your shutter speed, and your desire for sharp images across the frame demands you shoot at f/2.8 or even slower, then don’t be afraid to bump up the ISO speed to whatever it takes to produce a good histogram and a well-exposed image.
Noise will look far worse if you underexpose, then try to boost the image brightness later in processing. Expose to the right!
4. Shoot Raw!
Shoot Raw. Period.
When comparing Raw and compressed JPG versions of the same image, you can be fooled into thinking the JPGs look better (i.e. smoother) because of the noise reduction the camera has applied to the JPG that is beyond your control. However, that smoothing has also wiped out fine detail, like stars.
By shooting Raw you get to control whatever level of noise reduction and sharpening the image needs later in processing.
JPGs are also 8-bit images with a limited tonal range – or palette – in which to record the subtle gradations of brightness and colour present in our images.
Imported Raw files are 16-bit, with a much wider tonal scale and colour palette. That’s critical for all astrophotos when, even with a well-exposed image, many tonal values are down in the dark end of the range. Processing Raw images makes it possible to extract detail in the shadows and highlights.
Even when shooting a time-lapse sequence, shoot Raw.
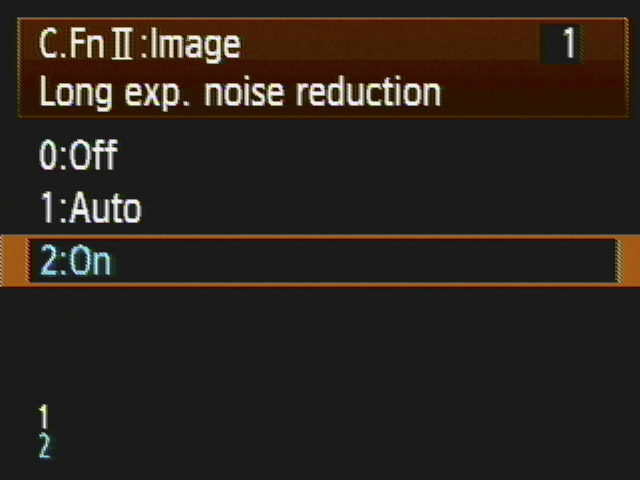
5. Take dark frames (sometimes!)
LENR reduces noise.
It’s a topic of some debate, but in my experience it is always better to turn on the camera’s Long Exposure Noise Reduction (LENR) function when shooting individual nightscape images. Doing so forces the camera to take a “dark frame,” an exposure of equal length but with the shutter closed.
It records just the noise, which the camera then subtracts from the image. Yes, it takes twice as long to acquire an image, but the image is cleaner, with fewer noisy pixels.
This is especially true when shooting on hot summer nights (the warmer the sensor the higher the noise). That said, you cannot use LENR when shooting frames for star trail composites or time-lapse movies.
For those, the interval between images should be no more than 1 to 5 seconds. Using LENR would introduce unsightly gaps in the trails or jumps in the star motion in time-lapses.
As an alternative, it is possible to take separate dark frames at the end of the night by simply covering the lens and taking exposures of the same duration and at the same ISO as your “light frames.”
Some stacking software, such as StarStax and the Advanced Stacker Actions have places to put these dark frames, to subtract them from the stack later in processing.
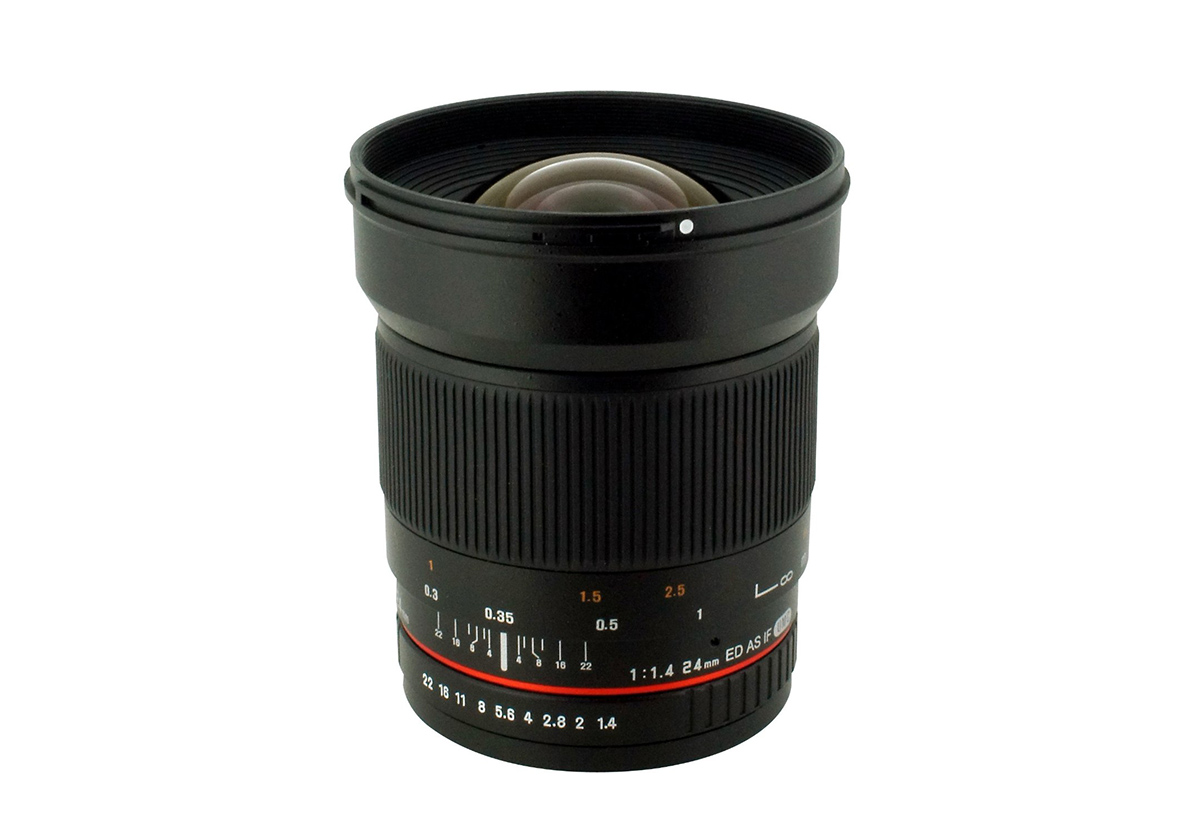
6. Use fast lenses
A fast lens is your best accessory.
While the “kit zoom” lenses that come with many DSLRs are great for shooting bright twilight or Full Moon scenes, they will prove too slow for dark starlit scenes with the Milky Way.
In addition to exposing to the right and shooting Raw, the secret to great nightscapes is to shoot with fast lenses, usually “prime” lenses with fixed focal lengths. They are usually faster and have better image quality than zooms.
Your most-used lens for nightscape and time-lapse shooting is likely to be a 14mm to 24mm f/2 to f/2.8 lens.
Fortunately, because we don’t need (and indeed can’t use) autofocus we can live happily with low-cost manual lenses, such as the models made in Korea and sold under brands such as Rokinon, Samyang and Bower. They work very well.
7. Get to know the Moon & Milky Way
For many nightscape and time-lapse shoots, the Moon is your light source for illuminating the landscape.
When the Moon is absent, the Milky Way is often your main sky subject.
Knowing where the Moon will be in the sky at its various phases, and when it will rise (in its waning phases after Full Moon) or set (in its waxing phases before Full) helps you a plan a shoot, so you’ll know whether a landscape will be well lit.
Astronomy apps for desktop computers and mobile devices are essential planning aids. A good one specifically for photographers is The Photographer’s Ephemeris.
Knowing in what season and time of night the Milky Way will be visible is essential if you want to capture it. Don’t try for Milky Way shots in spring – it isn’t up!
8. Keep it simple to start
Don’t be seduced by the fancy gear.
Time-lapse imaging has blossomed into a field replete with incredible gear for moving a camera incrementally during a shoot, and for automating a shoot as day turns to night.
I explain how to use all the fancy gear in my ebook, linked to below, however … Great time-lapses, and certainly still-frame nightscapes, can be taken with no more than a DSLR camera with a good fast lens and mounted on a sturdy tripod. Invest in the lens and don’t scrimp on the tripod.
Another essential for shooting multi-frame star trails and time-lapses is a hardware intervalometer ($50 to $150).
9. Learn the intricacies of intervals
For time-lapses, an intervalometer is essential.
Mastering exposure and focus in still images is essential for great time-lapse movies because they are simply made of hundreds of well-exposed still frames.
But move to time-lapses and you have additional factors to consider: how many frames to shoot and how often to shoot them. A good rule of thumb is to shoot 200 to 300 frames per sequence, shot with an interval of no more than 1 to 5 seconds between exposures, at least for starry night sequences.
However, most intervalometers (the Canon TC-80N3 is an exception) define their “Interval” setting to mean the time from when the shutter opens to when it opens again. In that case, you set the Interval to be a value 1 to 5 seconds longer than the exposure time you are using. That’s also true of the intervalometer function Nikon builds into their internal camera firmware.
Test first!
10. Go to beautiful places
While the gear can be simple, great shots demand an investment in time.
By all means practice at home and at nearby sites that are quick to get to. Try out gear and techniques at Full Moon when exposures are short (the Full Moon is bright!) and you can see what you are doing.
But beautiful images of landscapes lit by moonlight or starlight require you to travel to beautiful locations.
When you are on site, take the time to frame the scene well, just as you would during the day. Darkness is no excuse for poor composition!
While shooting nightscapes and time-lapses can be done with a minimal investment in hardware and software, it does require an investment in time – time to travel and spend nights shooting at wonderful places under the stars.
Enjoy the night!
I cover all these topics, and much more, in detail in my ebook How to Photograph & Process Nightscapes and Time-Lapses. Click the link below to learn more.
I’ve been an avowed Canon DSLR user for a decade. I may be ready to switch!
[NOTE:This review dates from 2015. Tests done today with current models would certainly differ. Canon’s EOS R mirrorless series, for example, offer much better ISO Invariancy performance but lack the “dark frame buffer” advantage of Canon DSLRs. And indeed, I have used the Nikon D750 a lot since 2015. But I did not give up my Canons!]
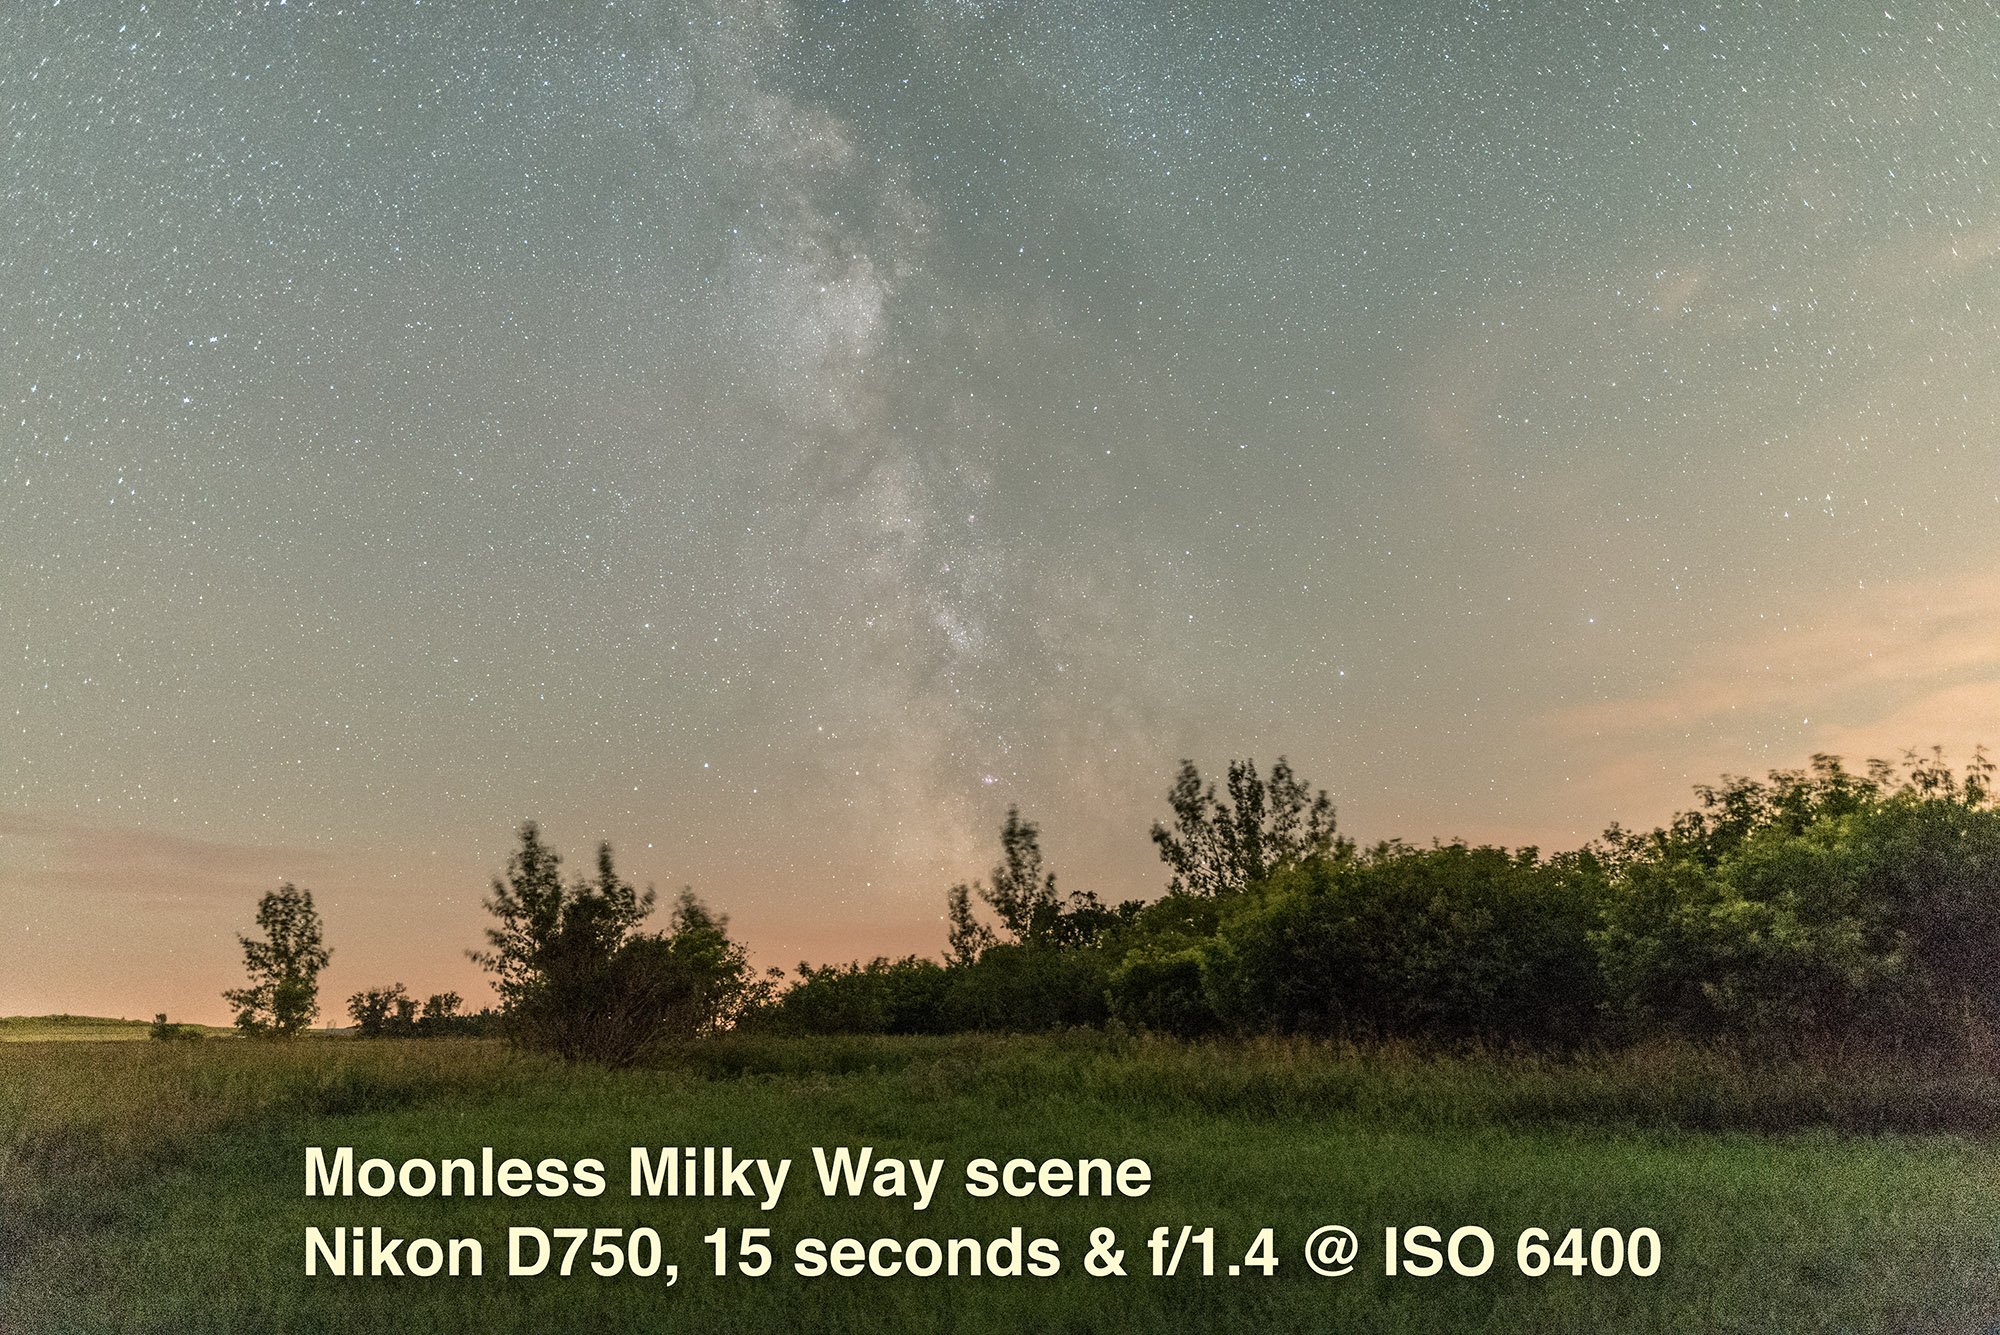
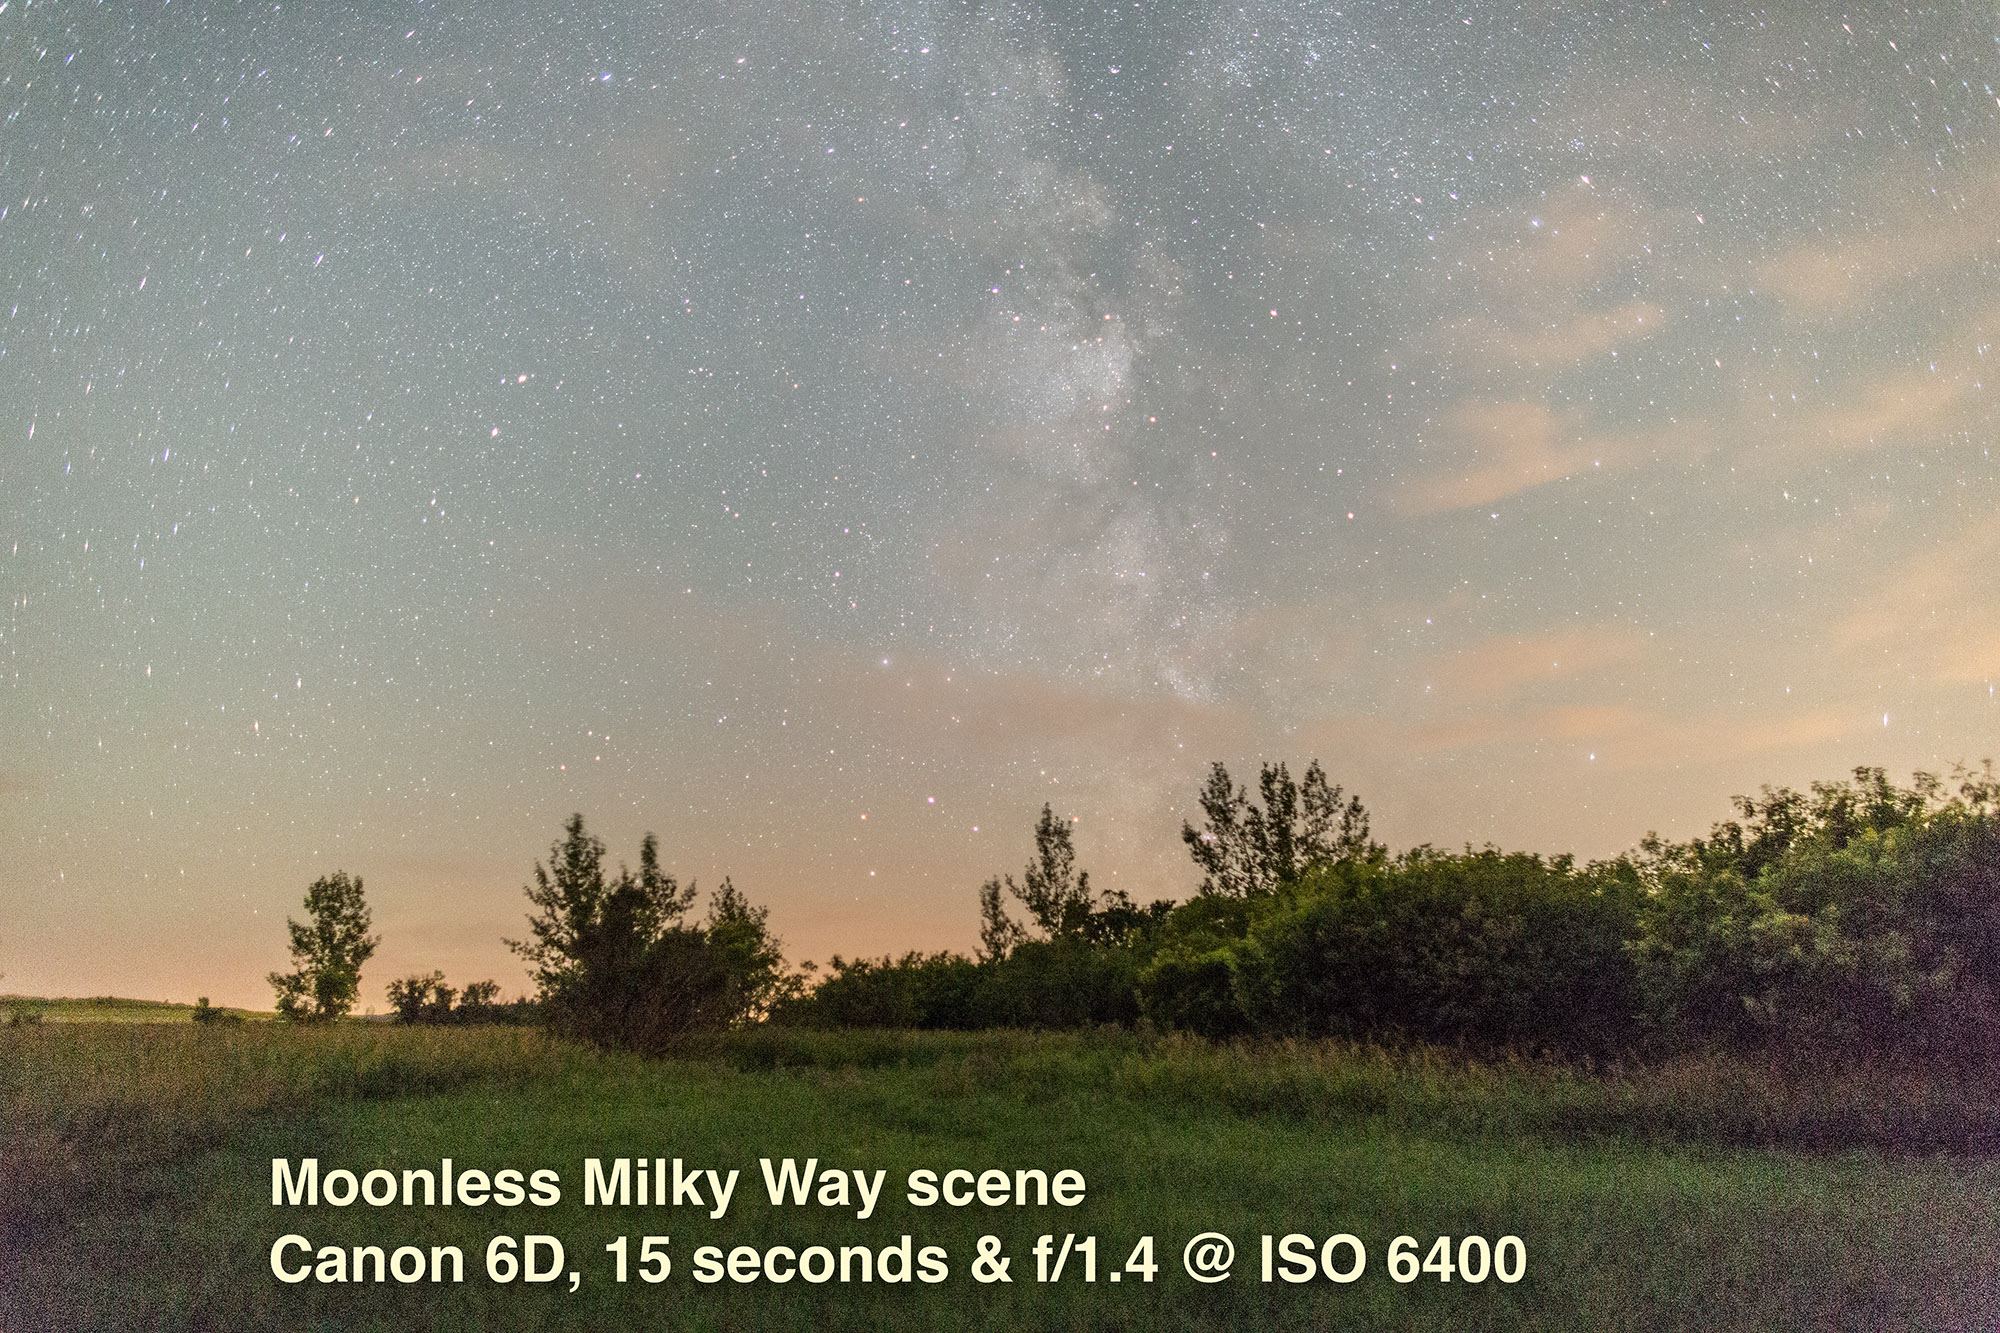
Here, in a technical blog, I present my tests of two leading contenders for the best DSLR camera for nightscape and astronomical photography: the Canon 6D vs. the Nikon D750. Which is better?
To answer, I subjected both to side-by-side outdoor tests, using exposures you’ll actually use in the field for typical nightscapes and for deep-sky images.
Both cameras are stock, off-the-shelf models. They have not had their filters modified for astronomy use. Both are 20- to 24-megapixel, full-frame cameras, roughly competitive in price ($1,900 to $2,300).
For images shot through lenses, I used the Canon L-Series 24mm on the Canon 6D, and the Sigma 24mm Art lens on the Nikon D750.
The bottom line:Both are great cameras, with the Nikon D750 having the edge for nightscape work, and the Canon 6D the edge for deep-sky exposures.
The 24.3-megapixel Nikon D750 has 5.9-micron pixels, while the 20.2-megapixel Canon 6D has slightly larger 6.5-micron pixels which, in theory, should lead to lower noise for the Canon. How do they compare in practice?
The scene used to test for noise (here with the Nikon images) showing the development settings applied to both the Nikon and Canon sets. NO noise reduction (colour or lunminance) was applied to any of the images, but Exposure, Shadows, Contrast and Clarity were boosted, and Highlights reduced.
I shot a moonlit nightscape scene (above) at five ISO settings, from 800 to 12800, at increasingly shorter exposures to yield identically exposed frames. I processed each frame as shown above, with boosts to shadows, clarity, and contrast typical for nightscapes. However, I applied no noise reduction (either luminance or color) in processing. Nor did I take and apply dark frames.
The blowups of a small section of the frame (outlined in the box in the upper right of the Photoshop screen) show very similar levels of luminance noise. The Canon shows slightly more color noise, in particular more magenta pixels in the shadows at high ISOs. Its larger pixels didn’t provide the expected noise benefit.
TEST #2 — Resolution
Much has been written about the merits of Canon vs. Nikon re: the most rigorous of tests, resolving stars down at the pixel level.
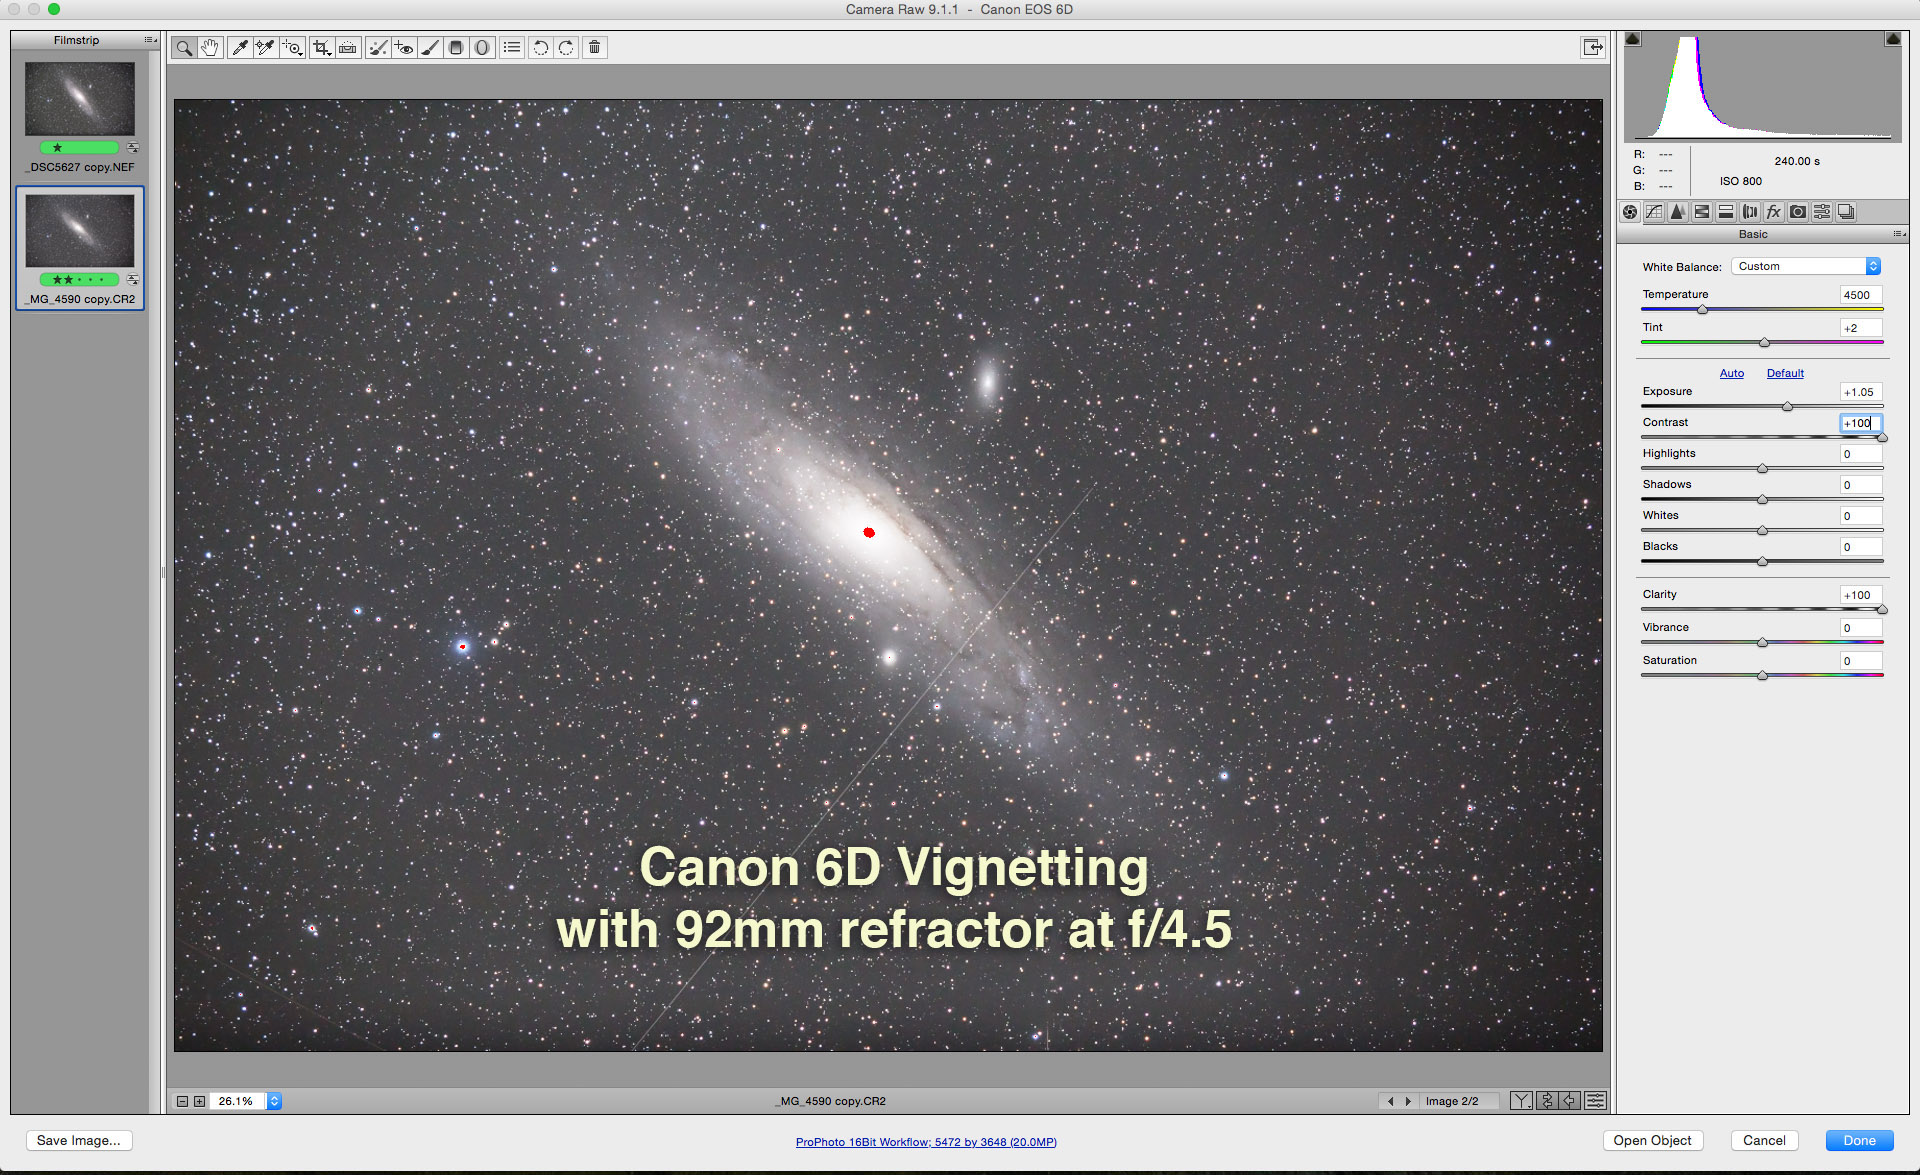
I shot the images below of the Andromeda Galaxy the same night through a 92mm aperture apo refractor. They have had minimal but equal levels of processing applied. At this level of inspection the cameras look identical.
But what if we zoom in?
For many years Nikon DSLRs had a reputation for not being a suitable for stellar photography because of a built-in noise smoothing that affected even Raw files, eliminating tiny stars along with noise. Raw files weren’t raw. Owners worked around this by turning on Long Exposure Noise Reduction, then when LENR kicked in after an exposure, they would manually turn off the camera power.
This so-called “Mode 3” operation yielded a raw frame without the noise smoothing applied. Clearly, this clumsy workaround made it impossible to automate the acquisition of raw image sequences with Nikons.
Are Nikons still handicapped? In examining deep-sky images at the pixel-peeping level (below), I saw absolutely no difference in resolution or the ability to record tiny and faint stars. With its 4-megapixel advantage the Nikon should resolve finer details and smaller stars, but in practice I saw little difference.
Closeup of telescope view of Andromeda Galaxy with Canon 6D 4 minute exposure at ISO 800 No noise reduction applied in processing
Closeup of telescope view of Andromeda Galaxy with Nikon D750 4 minute exposure at ISO 800 No noise reduction applied in processing
On the other hand I saw no evidence for Nikon’s “star eater” reputation. I think it is time to lay this bugbear of Nikons to rest. The Nikon D750 proved to be just as sharp as the Canon 6D.
Note that in the closeups above, the red area marks a highlight (the galaxy core) that is overexposed and clipped. Nikon DSLRs also have a reputation for having sensors with a larger dynamic range than Canon, allowing better recording of highlights before clipping sets in.
However, in practice I saw very little difference in dynamic range between the two cameras. Both clipped at the same points and to the same degree.
TEST #3 — Mirror Box Shadowing
An issue little known outside of astrophotography is that a DSLR’s deeply-inset sensor can be shadowed by the upraised mirror and sides of the mirror box. Less light falls on the edges of the sensor.
The vignetting effect is noticeable only when we boost the contrast to the high degree demanded by deep-sky images, and when shooting through fast telescope systems.
Here I show the vignetting of the Canon and Nikon when shooting through my 92mm refractor at f/4.5.
The circular corner vignetting visible in the images below is from the field flattener/reducer I employed on the telescope. It can be compensated for by using Lens Correction in Adobe Camera Raw, or eliminated by taking flat fields.
Demonstrating the level of vignetting and mirror-box shadowing with the Canon 6D on a TMB 92mm apo refractor with a 0.85x field flattener/reducer lens
Demonstrating the level of vignetting and mirror-box shadowing with the Nikon D750 on a TMB 92mm apo refractor with a 0.85x field flattener/reducer lens
The dark edge at the bottom of the frame is from shadowing by the upraised mirror. It can be eliminated only by taking flat fields, or reduced by using masked brightness adjustments in processing.
Both cameras showed similar levels of vignetting, with the Canon perhaps having the slight edge.
TEST #4 — ISO Invariancy
So far the Nikon D750 and Canon 6D are coming up fairly equal in performance. But not here. This is where the Nikon outperforms the Canon by quite a wide margin.
Sony sensors (used in Sony cameras and also used by Nikon) have a reputation for being “ISO Invariant.”
What does that mean?
A typical Milky Way nightscape with the Nikon D750 and Sigma 24mm Art lens. With no Moon, shot at very high ISO of 6400 and wide aperture of f/1.4 to show image quality under these demanding shooting circumstances. Lens correction and basic development setttings applied.
A typical Milky Way nightscape with the Canon 6D and Canon 24mm L lens (original model). With no Moon, shot at very high ISO of 6400 and wide aperture of f/1.4 to show image quality under these demanding shooting circumstances. Lens correction and basic development setttings applied.
In the examples above, the correct exposure for the starlit scene was 15 seconds at f/1.4 at ISO 6400. See how the two cameras rendered the scene? Very similar, albeit with the Canon showing more noise and discoloration in the dark frame corners.
What if we shoot at the same 15 seconds at f/1.4 … but at ISO 3200, 1600, 800, and 400? These are now 1-, 2-, 3-, and 4-stops underexposed, respectively.
Then we boost the Exposure setting of the underexposed Raw files later in processing, by 1, 2, 3 or 4 f-stops. What do we see?
Nikon D750 – Comparing ISO Invariancy from ISO 6400 to 400 (Nightscape)
With the Nikon (above) we see images that look nearly identical for noise to what we got with the properly exposed ISO 6400 original. It really didn’t matter what ISO speed the image was shot at – we can turn it into any ISO we want later with little penalty.
Canon 6D – Comparing ISO Invariancy from ISO 6400 to 400 (Nightscape)
With the Canon (above) we get images with grossly worse noise in the shadows and with ugly magenta discoloration. Canons cannot be underexposed. You must use as high an ISO as needed for the correct exposure.
This “ISO Invariant” advantage of Nikon over Canon is especially noticeable in nightscapes scenes lit only by starlight, as above. The Canon turns ugly purple at -3EV underexposure, and loses all detail and contrast at -4EV underexposure.
For nightscape imaging this is an important consideration. We are limited in exposure time and aperture, and so are often working at the ragged edge of exposure. Dark areas of a scene are often underexposed and prone to noise. With the Nikon D750 these areas may still look noisy, but not much more so than they would be at that ISO speed.
With the Canon 6D, underexpose the shadows and you pay the price of increased noise and discoloration when you try to recover details in the shadows.
Apparently, the difference comes from where the manufacturer places the analog-to-digital circuitry: on the sensor (ISO invariant) or outboard on a separate circuit (ISO variant), and thus where in the signal path the amplification occurs when we boost ISO speed.
TEST #6 — Features
One could go on endlessly about features, but here I compare the two cameras on just a few key operating features very important to astrophotographers.
Intervalometer:
The Canon 6D has none, though newer Canons do. The Nikon D750, as do many Nikons, has a built-in intervalometer (shown above), even with a deflickering “Exposure Smoothing” option. However, exposure time is limited to the camera’s maximum of 30 seconds. Any longer requires an outboard intervalometer, as with the Canon.
If you use your camera with any motion control time-lapse unit, then it becomes the intervalometer, negating any capability built into the camera. But it’s nice to have.
Small Advantage: Nikon
Interval Length:
REVISED JUNE 2020:
When taking time-lapse or star trail images with the Canon I can set an interval as short as 1 second between frames, for a minimum of gaps or jumps in the stars. With the Nikon, controlled internally by its built-in intervalometer, a 1-second interval is possible but only if you set the interval to 33 seconds for a 30-second shutter speed.
That’s true of Canon and Sony built-in intervalometers as well, because on all cameras setting the exposure to 30 seconds really gives you a 32-second exposure. A little known fact! So the interval between shutter firings has to be set to 33 seconds. It’s tricky.
Advantage: None to either
Tiltable LCD Screen:
The Canon 6D has none. The Nikon D750 has a very useful tilt-out screen as shown above. This is hugely convenient for all forms of astrophotography. Only cropped-frame Canons have tilt-out screens. This feature might add weight, but it’s worth it!
Big Advantage: Nikon
Dark Frame Buffer:
The Nikon has none. With Long Exposure Noise Reduction ON, the Canon 6D allows up to four exposures to be shot in quick succession before the dark frame kicks in and locks up the camera. (Put the camera into Raw+JPG.)
[JUNE 2020: With the Canon 6D MkII the buffer allows three frames to be taken in quick succession.]
This is very useful for deep-sky imaging, for acquiring a set of images for stacking that have each had a dark frame subtracted in-camera, with a minimum of “down-time” at the camera.
Big Advantage: Canon
Live View Screen Brightness:
As pointed out to me by colleague Christoph Malin, with the Nikon you cannot dim the screen when in Live View mode and with Exposure Simulation ON. So it can be too bright at night. With the Canon you can dim the Live View screen — the LCD Brightness control affects the screen both during Live View as well as during playback of images.
Small Advantage: Canon
Software Compatibility:
Canon EOS cameras are well supported by advanced software, such as GBTimelapse (above) that controls only Canons, not Nikons, in complex time-lapse sequences, and Nebulosity, popular among deep-sky imagers for DSLR control.
Small Advantage: Canon
My take-away conclusions:
• Nikon DSLRs now are just as good for astrophotography as Canons, though that wasn’t always the case – early models did suffer from more noise and image artifacts than their Canon counterparts.
• Canon DSLRs, due to their sensor design, are more prone to exhibiting noise and image artifacts when images are greatly underexposed then boosted later in processing. Just don’t underexpose them – good advice for any camera.
He’s certainly the sky’s most photogenic mythological figure. Here’s my full-length portrait of Orion the hunter, captured from Alberta.
I’ve shot him many times before but this was a new combination of gear: the Canon 60Da camera and the Sigma 50mm lens, nicely framing the hunter in portrait format. This version of Orion isn’t as deep as the one I took last month from Australia. But skies were darker there, and I used my filter-modified Canon 5D MkII for his Oz portrait, a camera which picks up more faint red nebulosity than does the 60Da, Canon’s own specialized DSLR camera for astronomy. The 60Da does do a very good job though, much better than would a normal DSLR.
For this shot, as I do for many constellation images, I layered in exposures taken through a soft-focus filter, the Kenko Softon, to enlarge and “fuzzify” the stars! It really helps bring out their colours, contrasting cool, orange Betelgeuse with the hot blue-white stars in the rest of Orion.
I shot this January 4 on a fine clear winter night, the classic hunting ground for Orion.


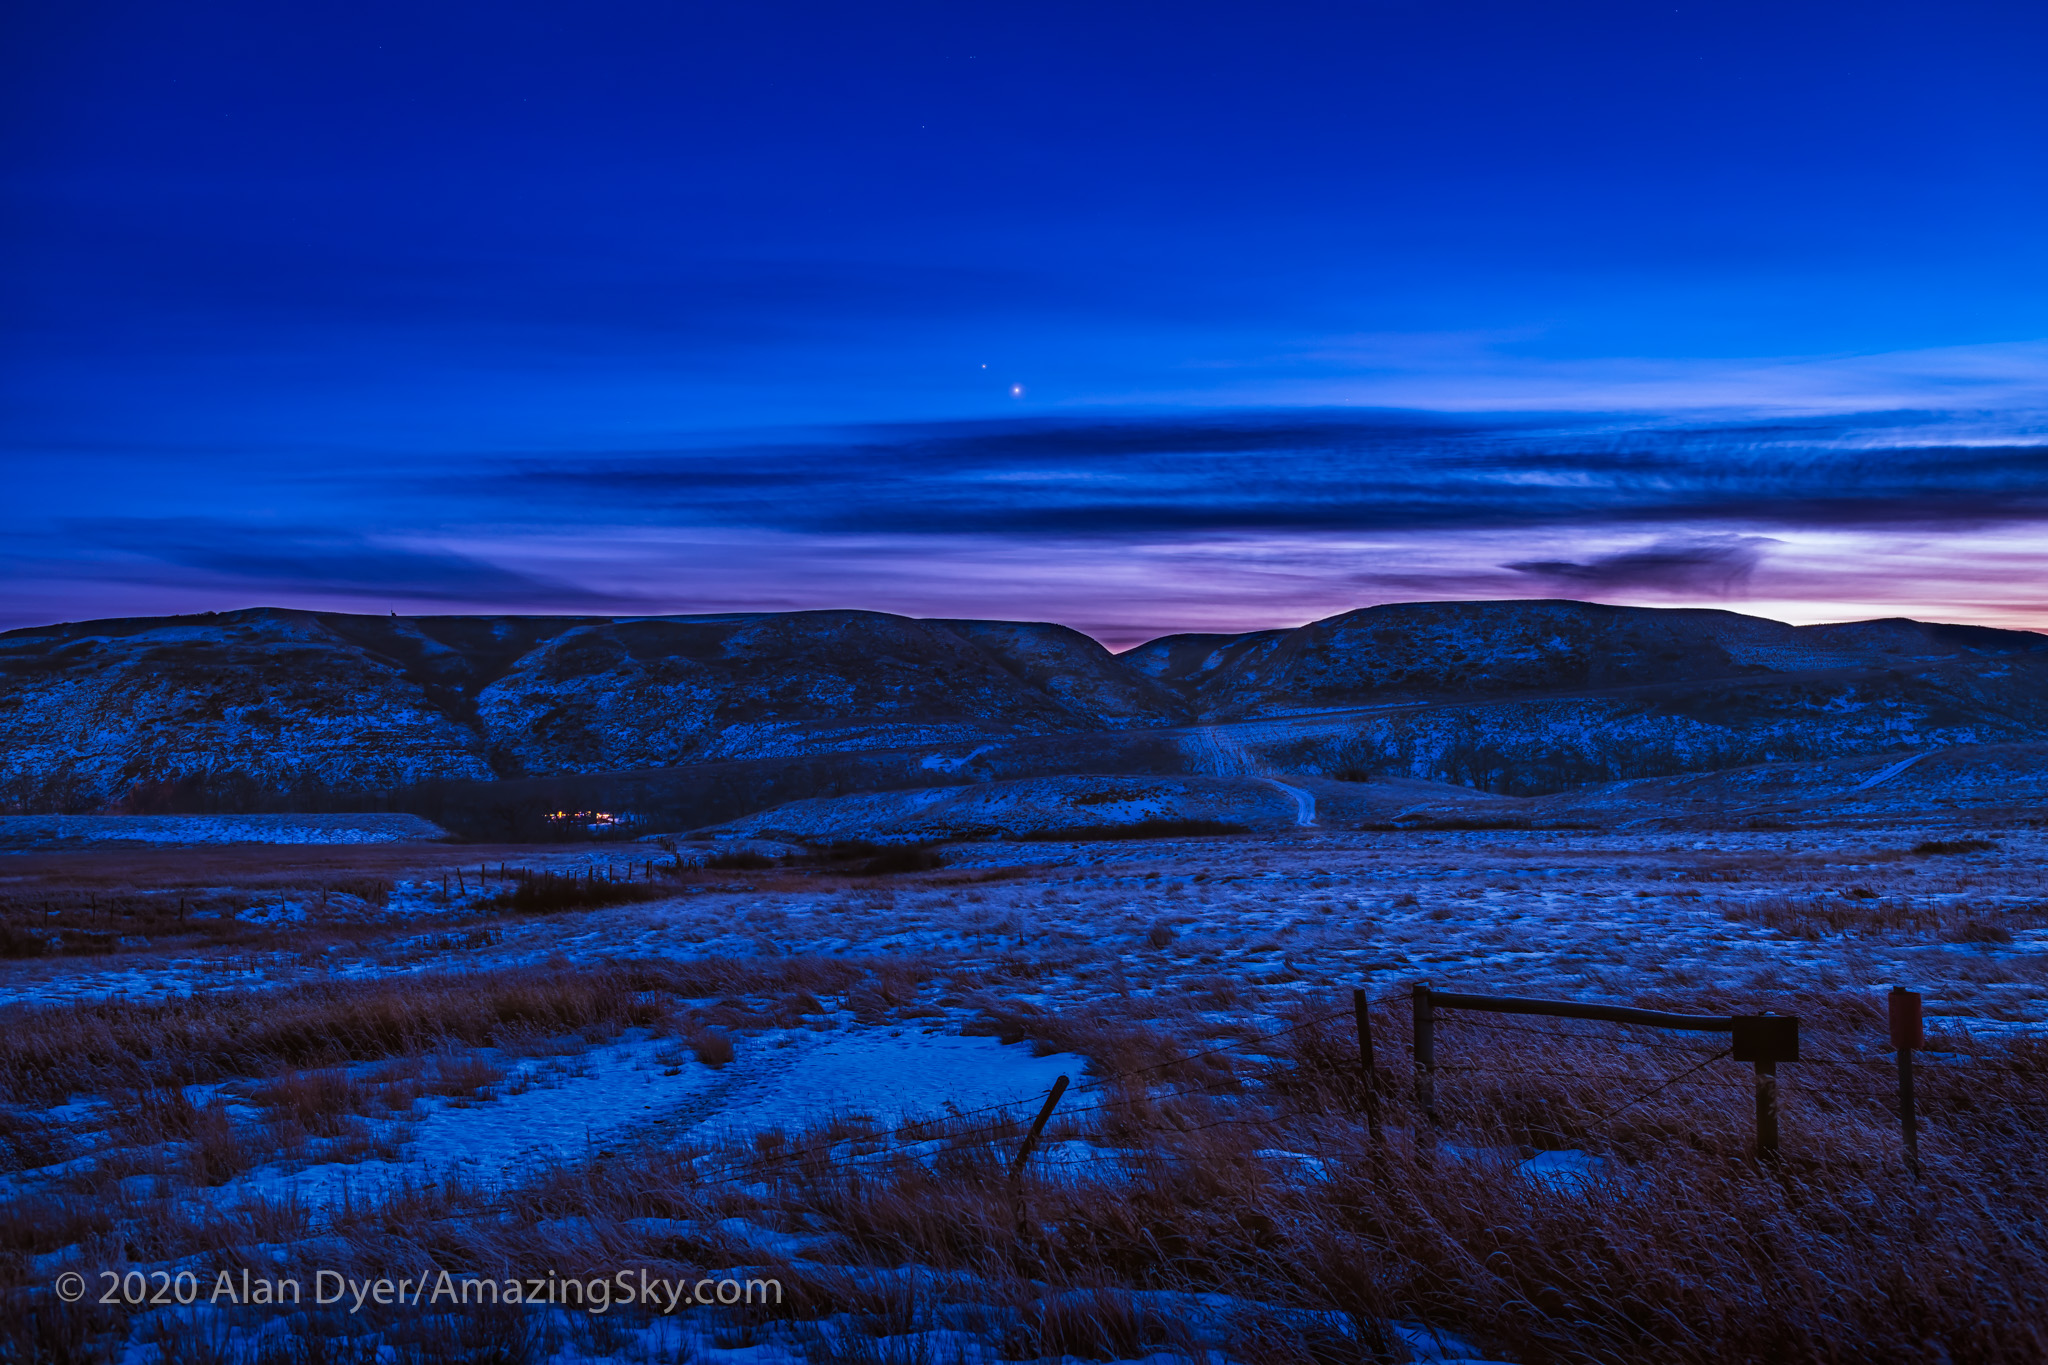
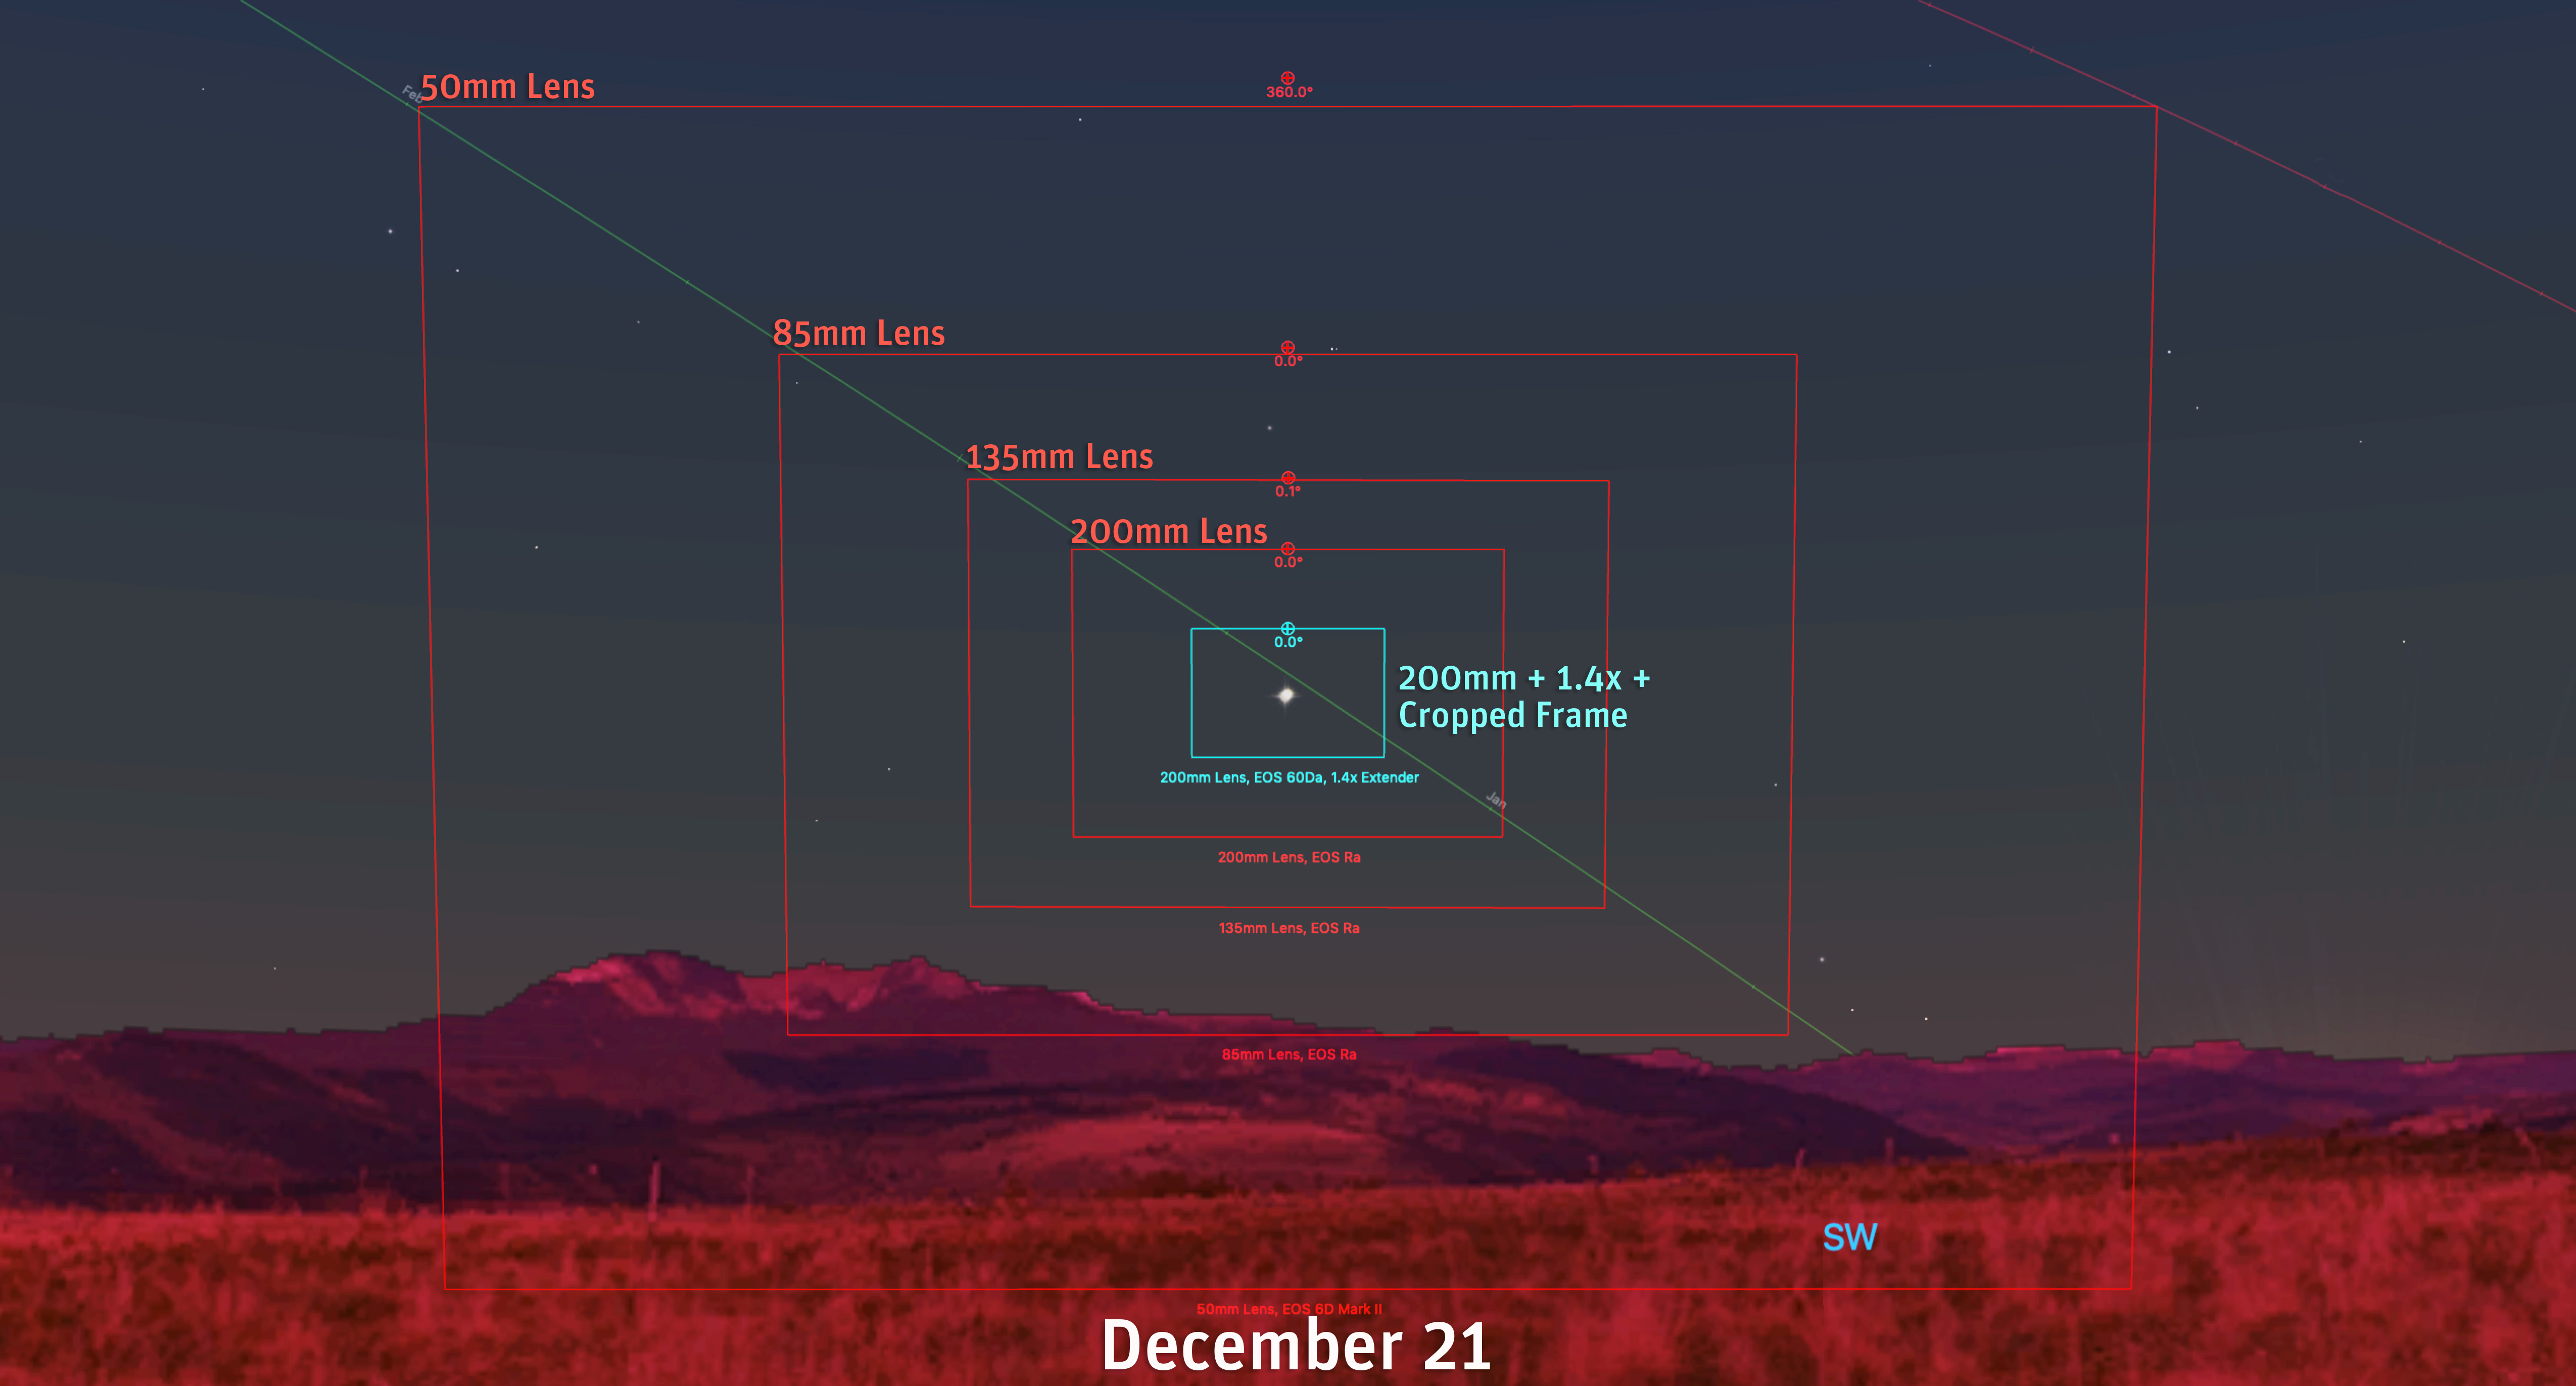
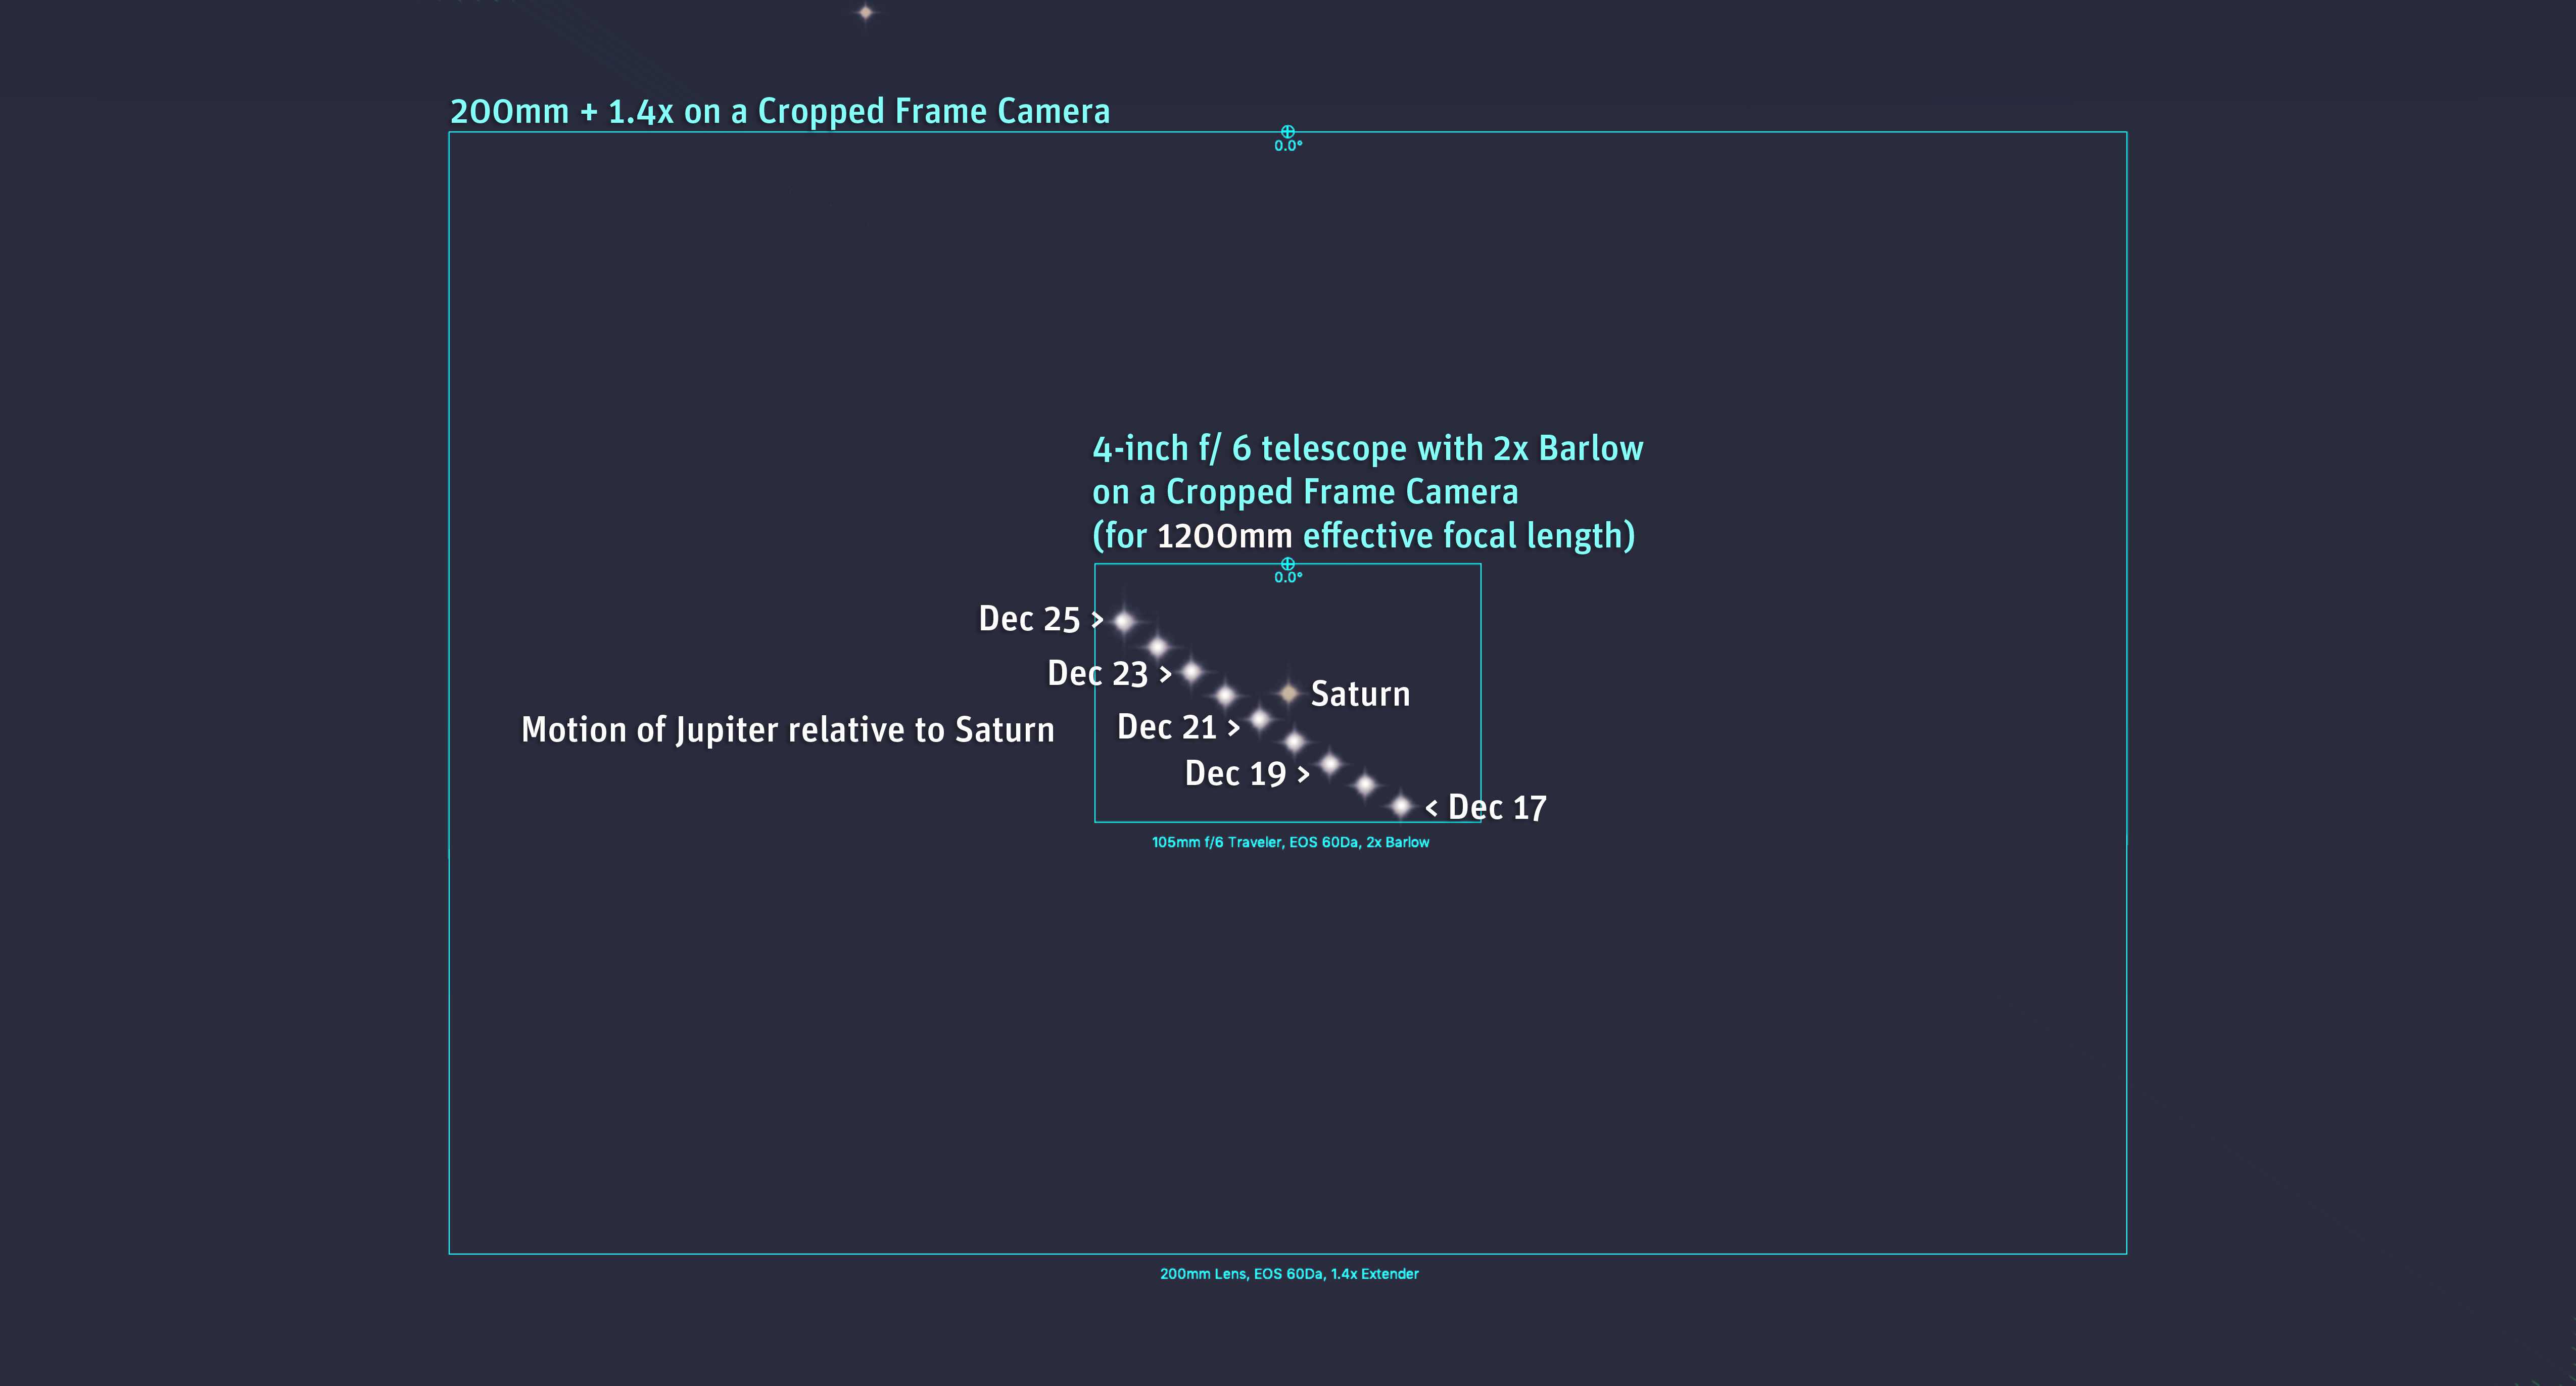


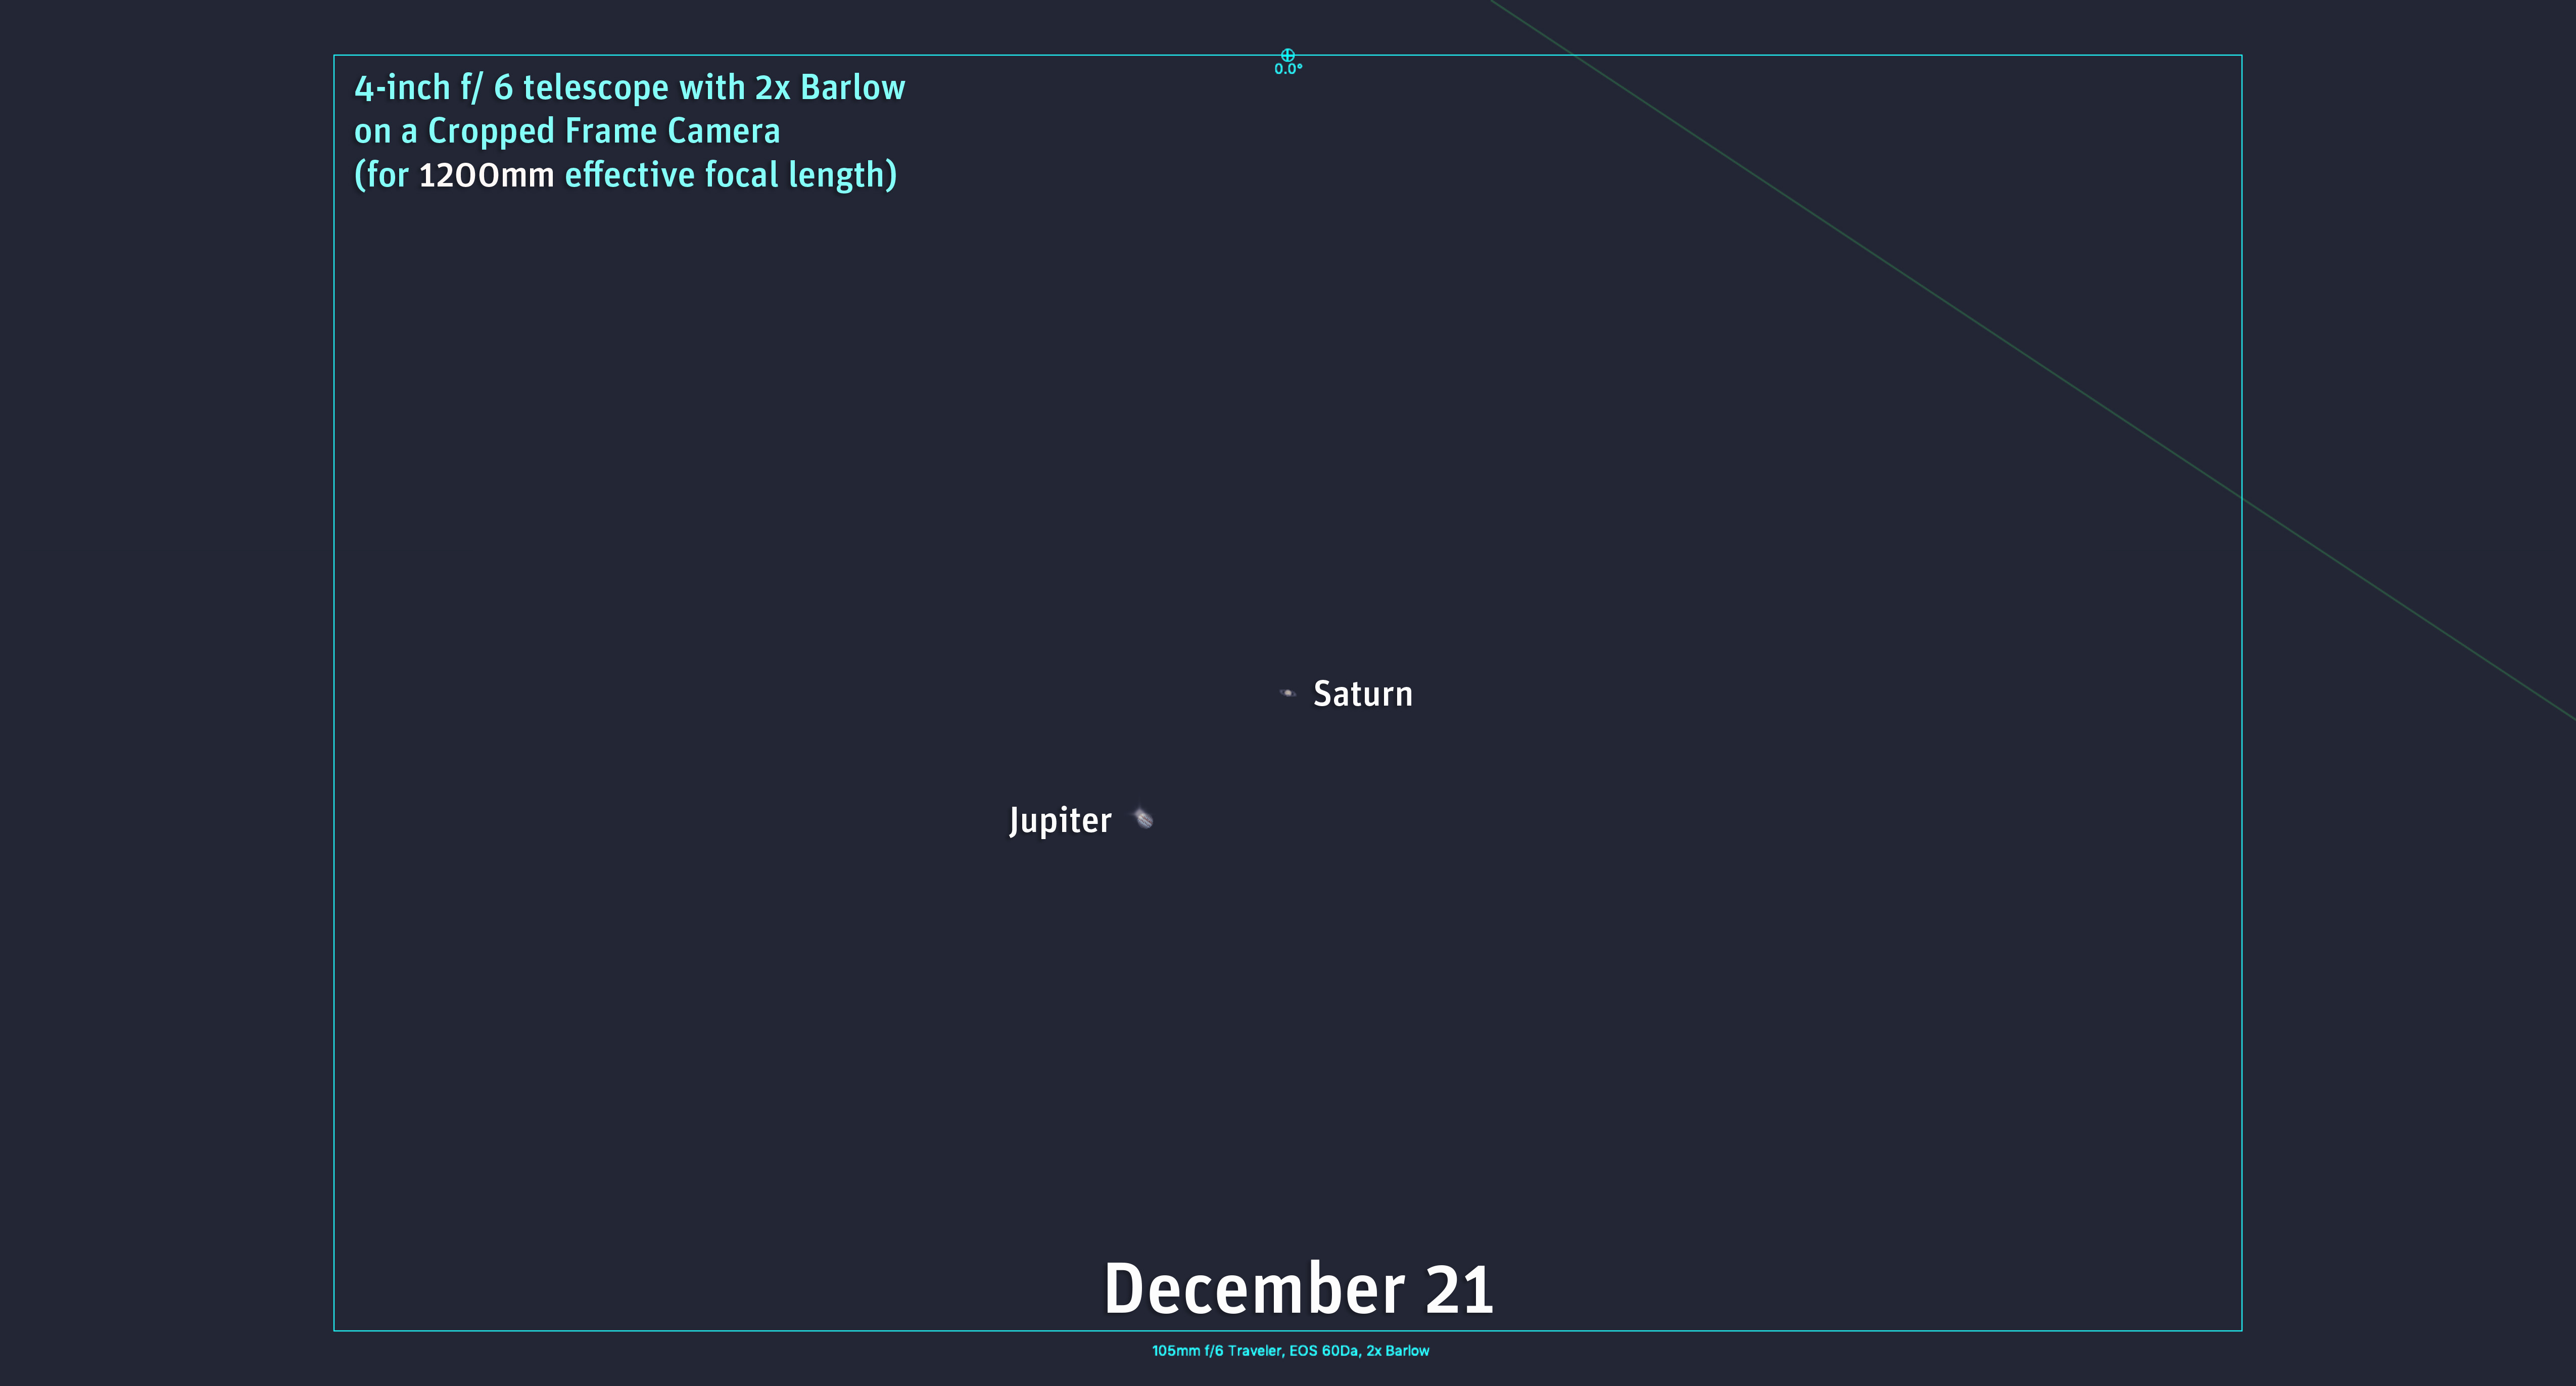

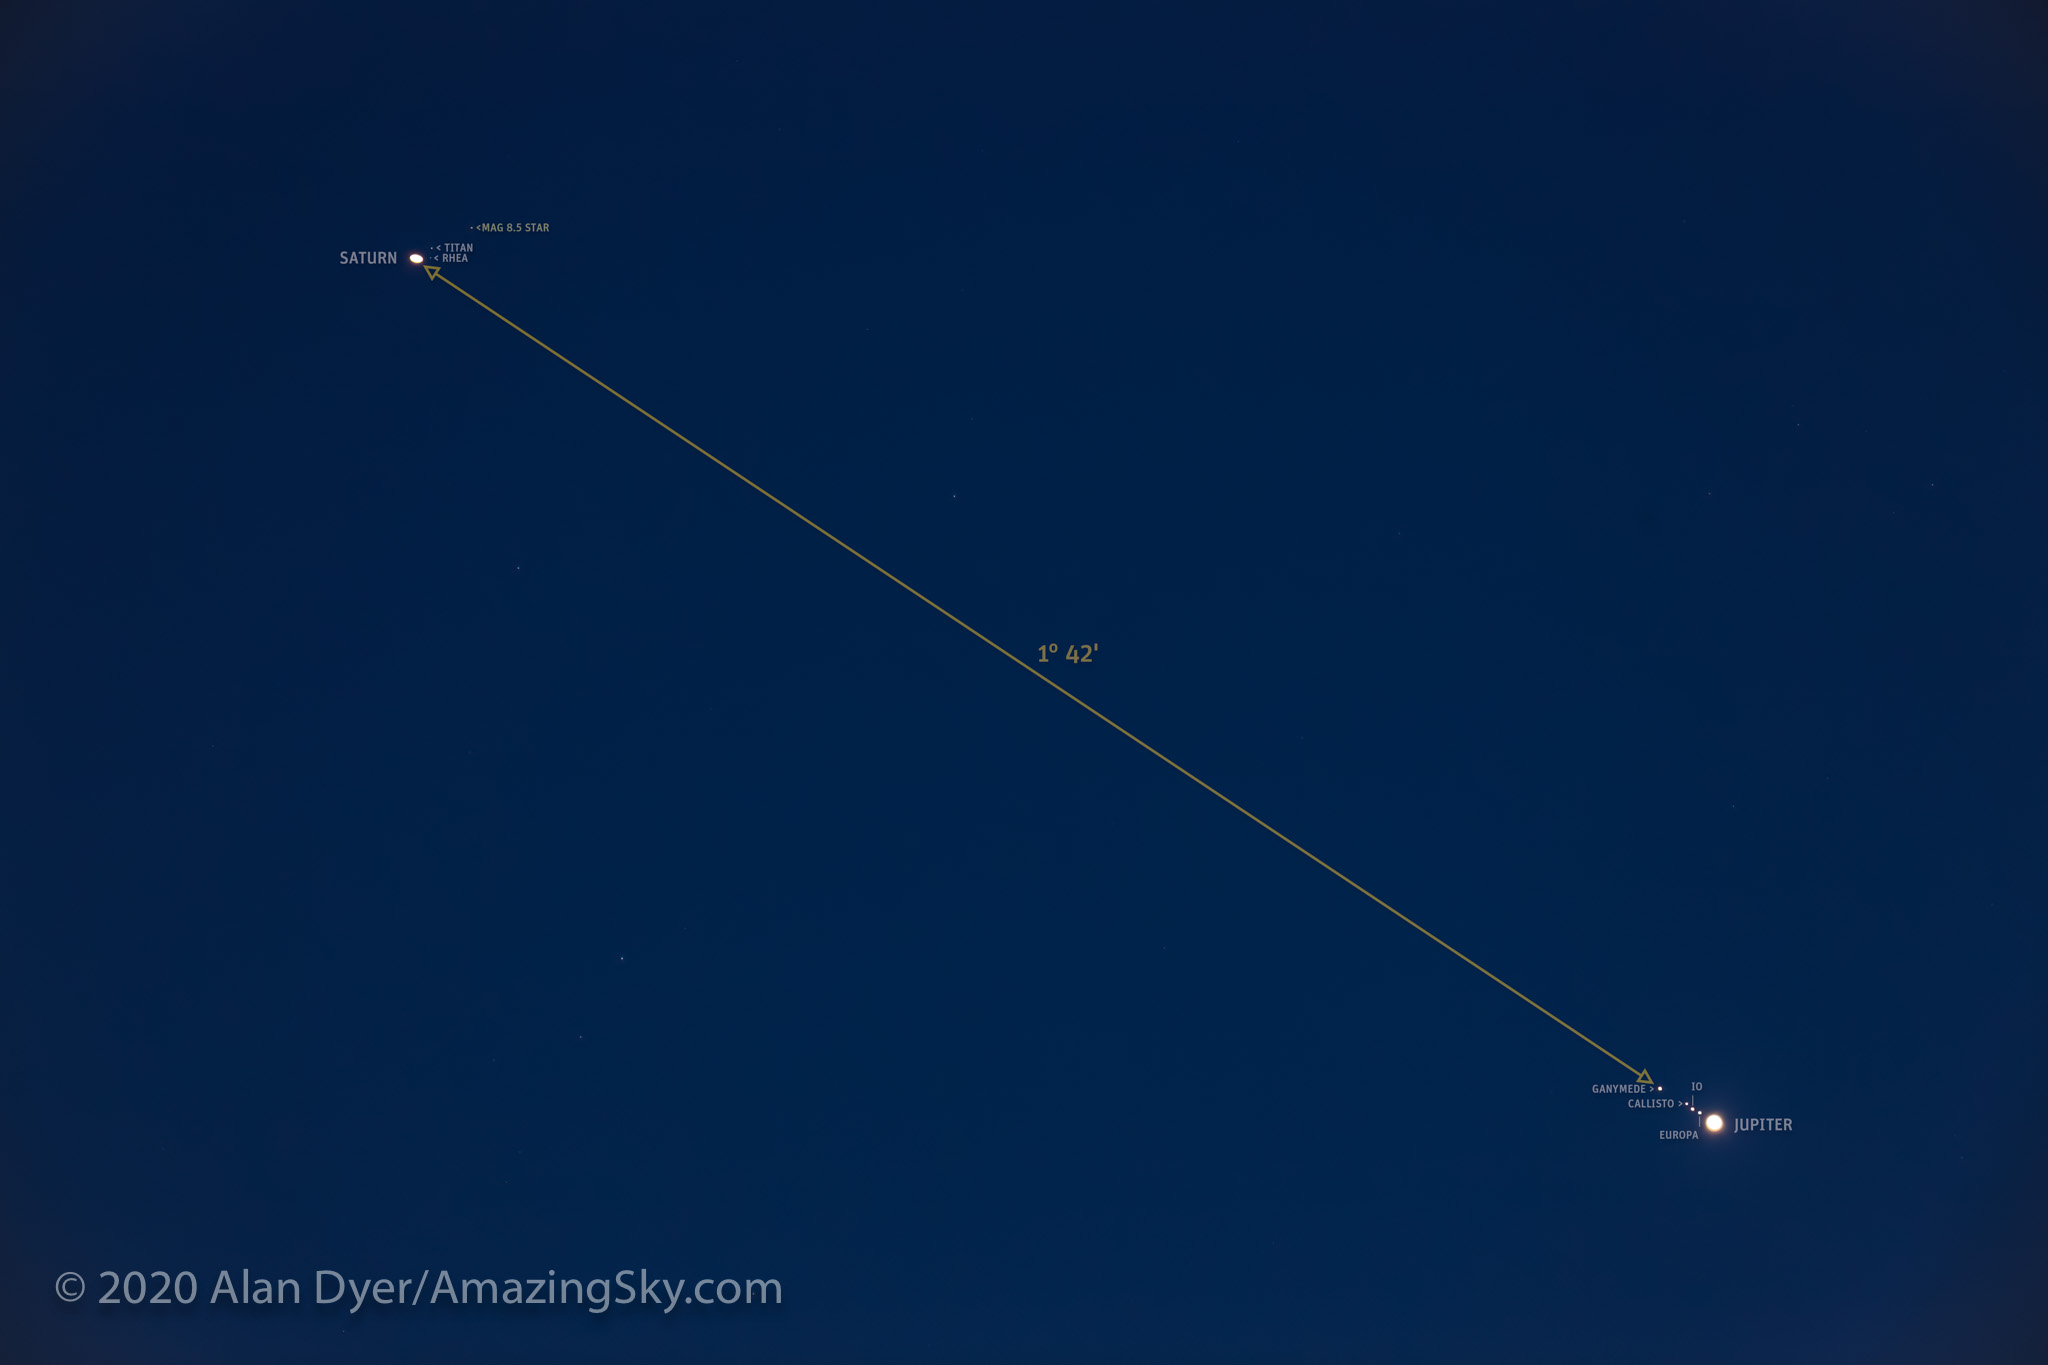
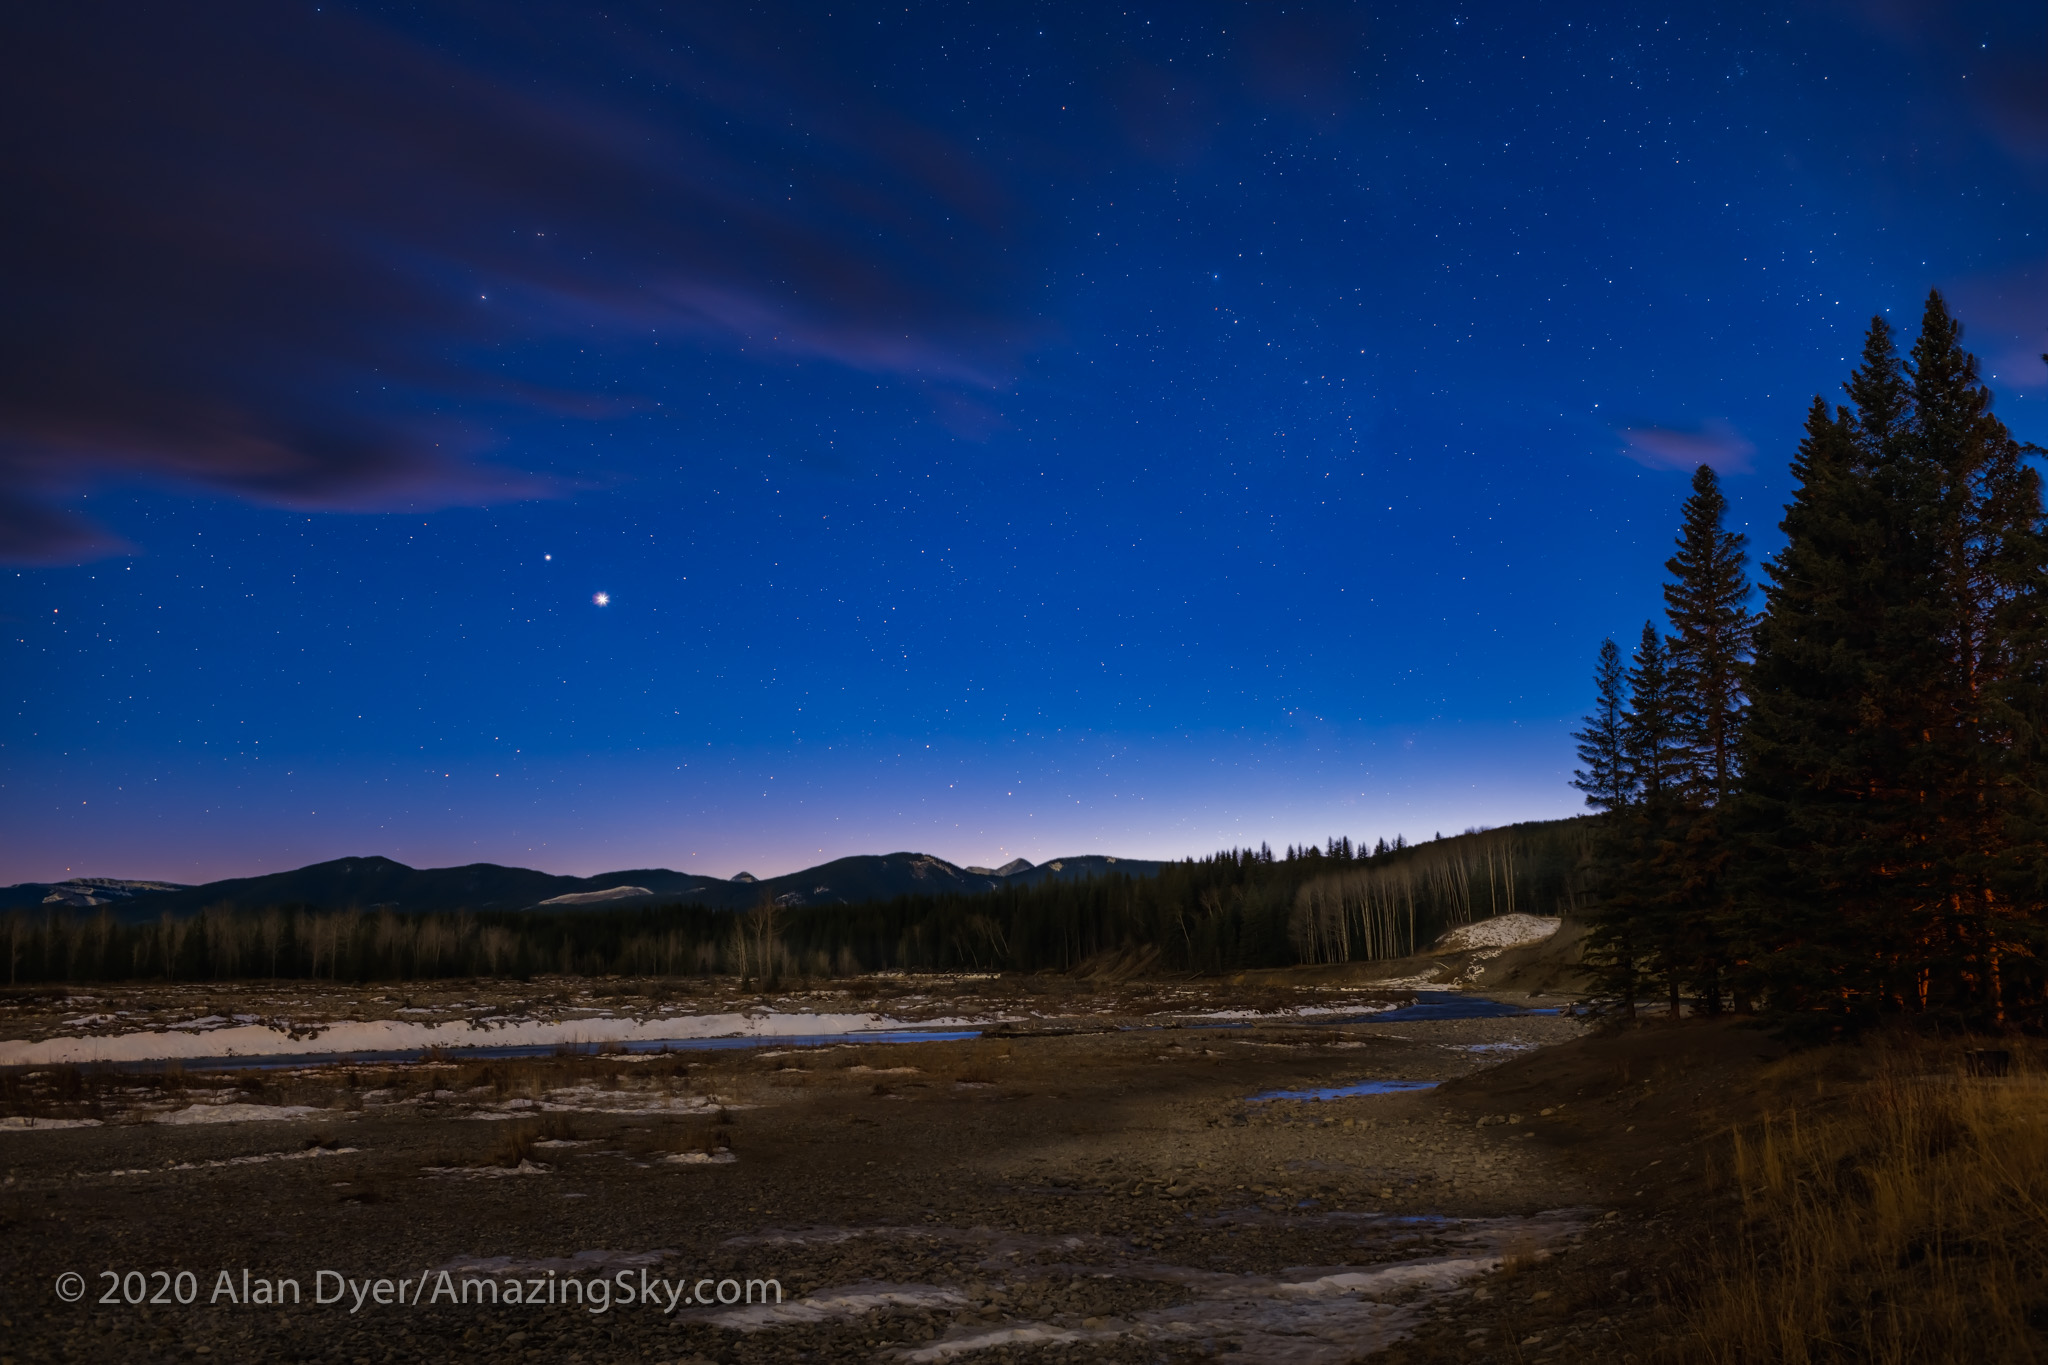

 We’ve embarked upon a new project to produce a comprehensive tutorial on deep-sky imaging with DSLR cameras.
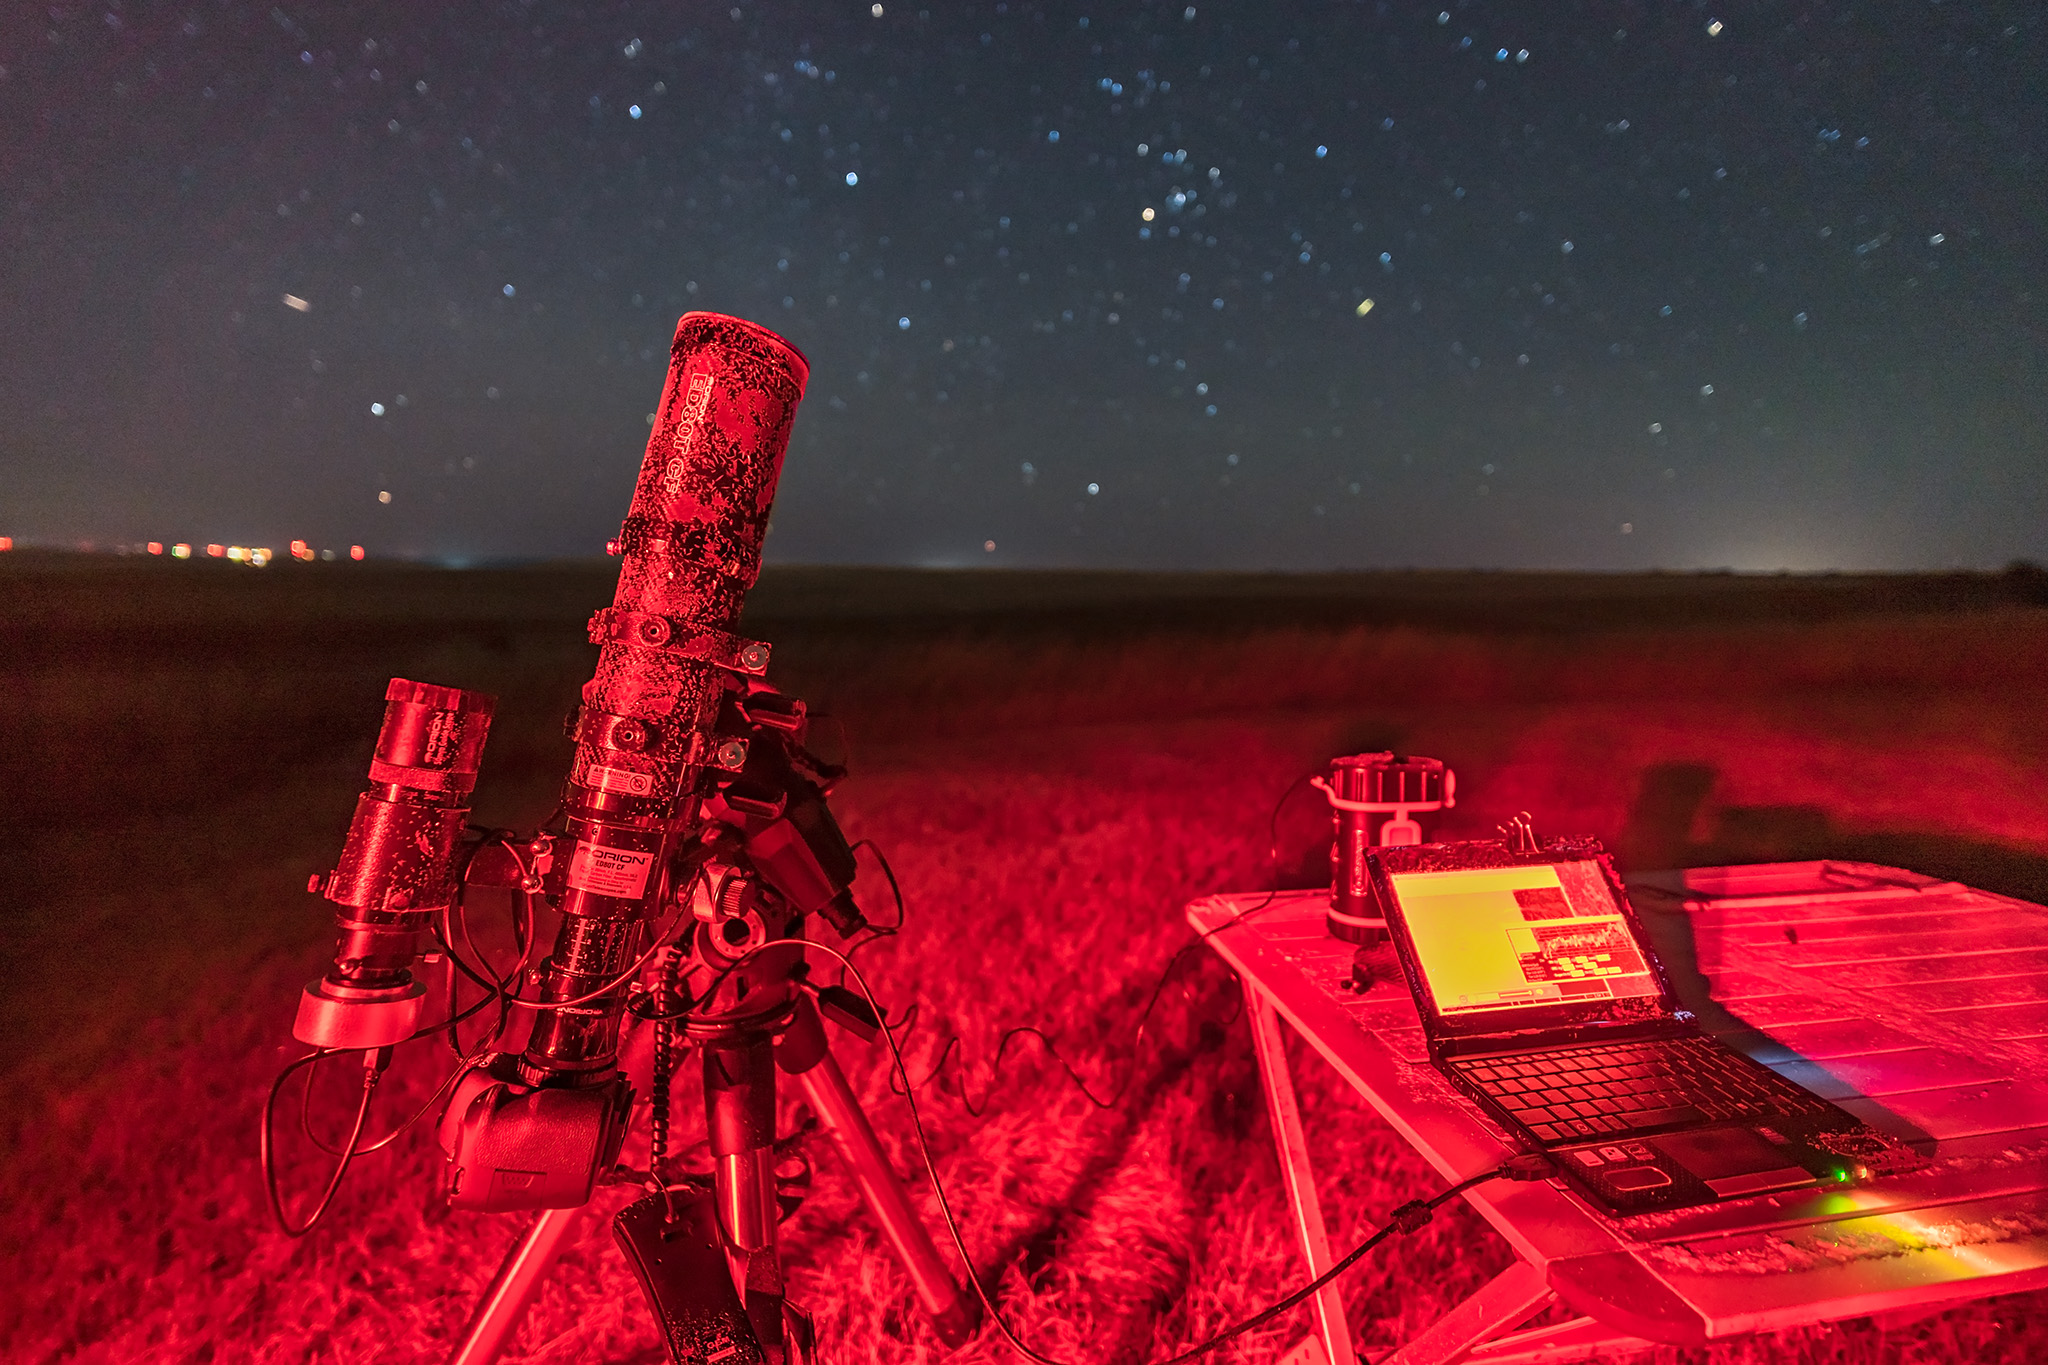
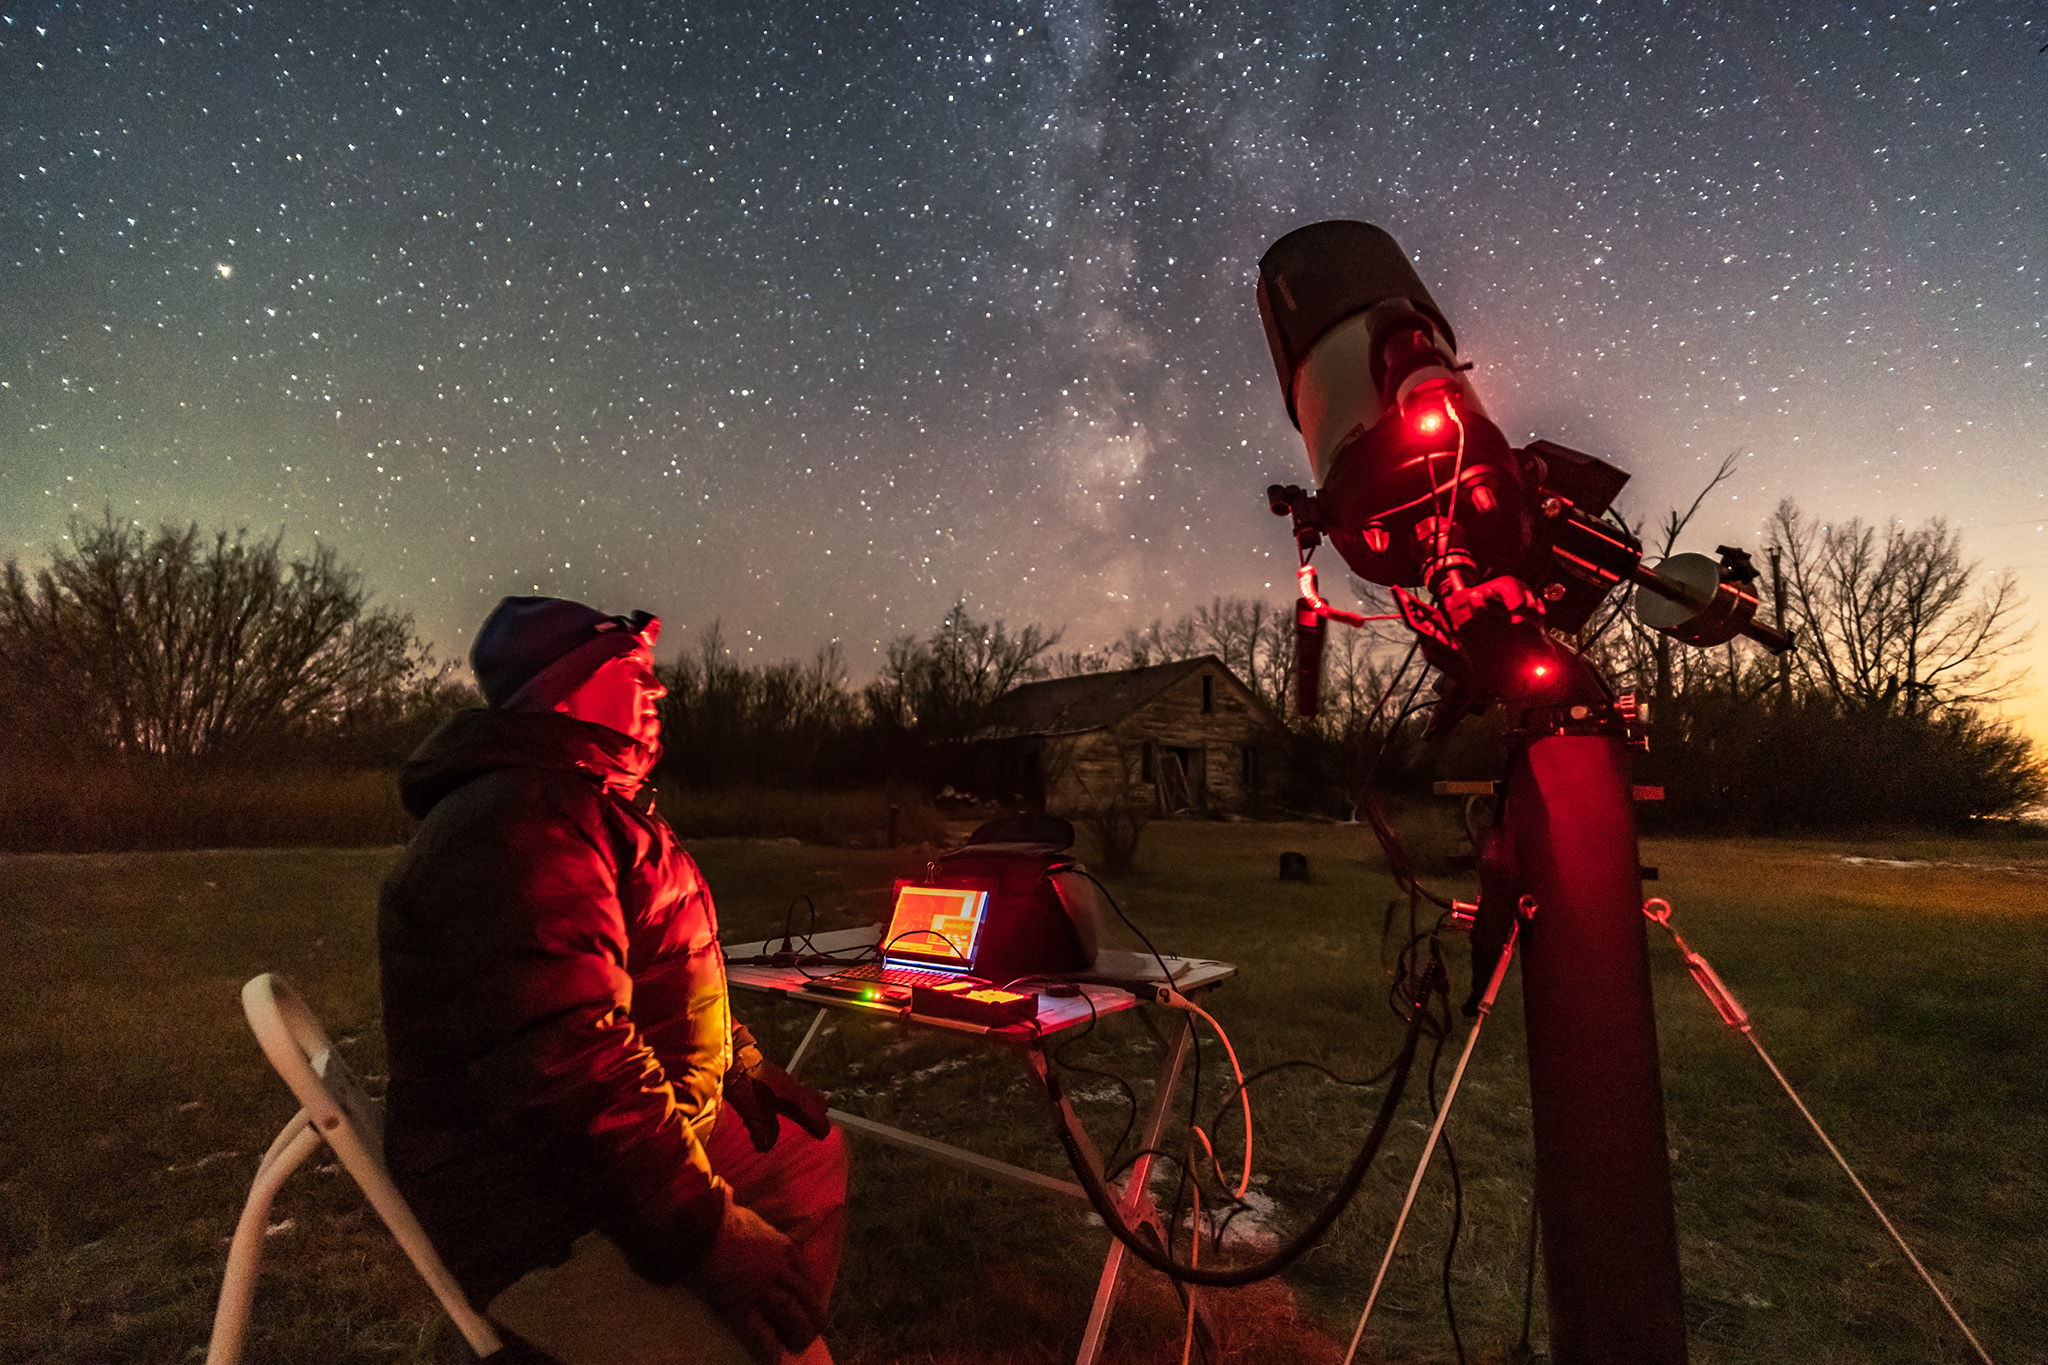
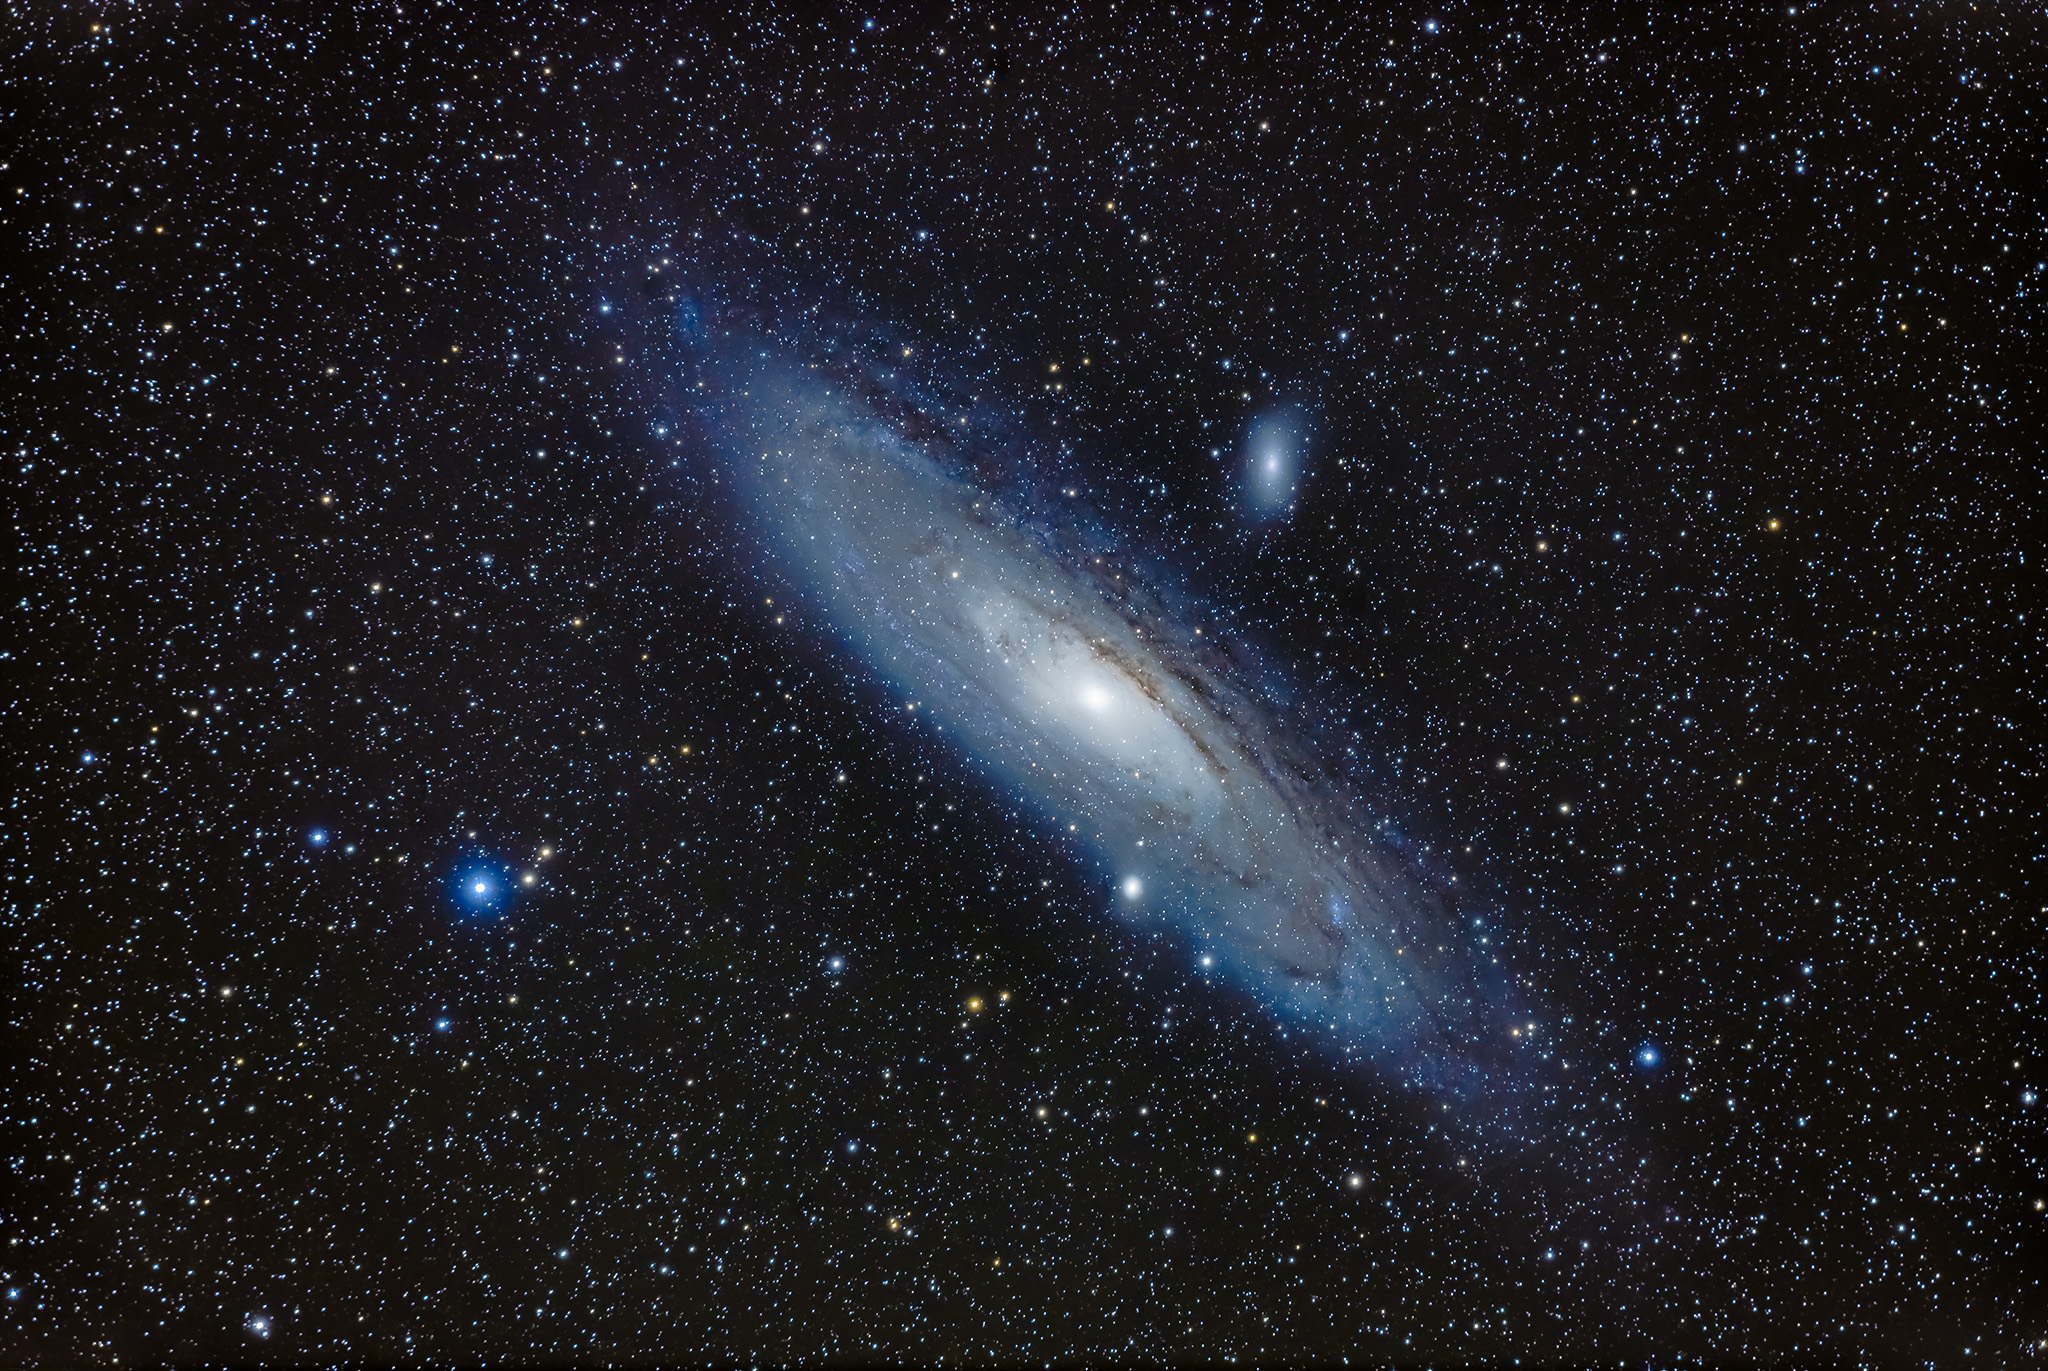
 On the evening of January 20 for North America, the Full Moon passes through the umbral shadow of the Earth, creating a total eclipse of the Moon.