

I present my top 10 tips for capturing time-lapses of the moving sky.
If you can take one well-exposed image of a nightscape, you can take 300. There’s little extra work required, just your time. But if you have the patience, the result can be an impressive time-lapse movie of the night sky sweeping over a scenic landscape. It’s that simple.
Or is it?
Here are my tips for taking time-lapses, in a series of “Do’s” and “Don’ts” that I’ve found effective for ensuring great results.
But before you attempt a time-lapse, be sure you can first capture well-exposed and sharply focused still shots. Shooting hundreds of frames for a time-lapse will be a disappointing waste of your time if all the images are dark and blurry.
For that reason many of my tips apply equally well to shooting still images. But taking time-lapses does require some specialized gear, techniques, planning, and software. First, the equipment.
NOTE: This article appeared originally in Issue #9 of Dark Sky Travels e-magazine.
SELECTING EQUIPMENT
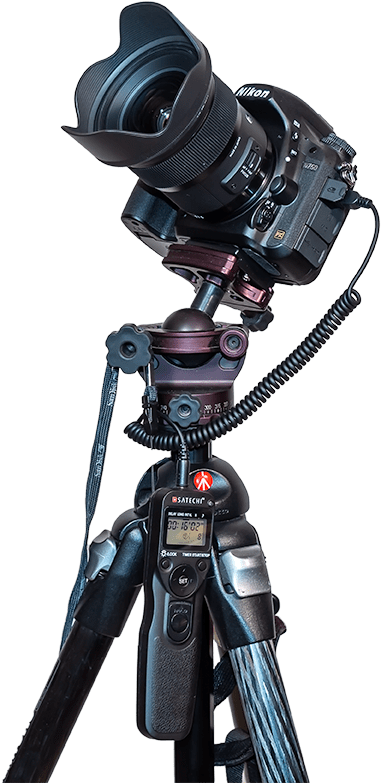
Time-lapse photography requires just the camera and lens you might already own, but on a solid tripod (a carbon-fibre Manfrotto with an Acratech ball-head is shown here), and with an intervalometer.
TIP 1 — DO: Use a solid tripod
A lightweight travel tripod that might suffice for still images on the road will likely be insufficient for time-lapses. Not only does the camera have to remain rock steady for the length of the exposure, it has to do so for the length of the entire shoot, which could be several hours. Wind can’t move it, nor any camera handling you might need to do mid-shoot, such as swapping out a battery.
The tripod needn’t be massive. For hiking into scenic sites you’ll want a lightweight but sturdy tripod. While a carbon fibre unit is costly, you’ll appreciate its low weight and good strength every night in the field. Similarly, don’t scrimp on the tripod head.
TIP 2 — DO: Use a fast lens

A fast lens is especially critical for time-lapses to allow capturing good sky and ground detail in each exposure, as compositing later won’t be feasible. This is the Sigma 20mm f/1.4 Art lens.
As with nightscape stills, the single best purchase you can make to improve your images of dark sky scenes is not buying a new camera (at least not at first), but buying a fast, wide-angle lens.
Ditch the slow kit zoom and go for at least an f/2.8, if not f/2, lens with 10mm to 24mm focal length. This becomes especially critical for time-lapses, as the fast aperture allows using short shutter speeds, which in turn allows capturing more frames in a given period of time. That makes for a smoother, slower time-lapse, and a shoot you can finish sooner if desired.
TIP 3 — DO: Use an intervalometer


The intervalometer is also key. For cameras without an internal intervalometer (screens from a Canon and a Nikon are shown above), an outboard unit like one of these, is essential. Be sure to get the model that fits your camera’s remote control jack.
Time-lapses demand the use of an intervalometer to automatically fire the shutter for at least 200 to 300 images for a typical time-lapse. Many cameras have an intervalometer function built into their firmware. The shutter speed is set by using the camera in Manual mode.
Just be aware that a camera’s 15-second exposure really lasts 16 seconds, while a 30-second shot set in Manual is really a 32-second exposure.
So in setting the interval to provide one second between shots, as I advise below, you have to set the camera’s internal intervalometer for an interval of 17 seconds (for a shutter speed of 15 seconds) or 33 seconds (for a shutter speed of 30 seconds). It’s an odd quirk I’ve found true of every brand of camera I use or have tested.
Alternatively, you can set the camera to Bulb and then use an outboard hardware intervalometer (they sell for $60 on up) to control the exposure and fire the shutter. Test your unit. Its interval might need to be set to only one second, or to the exposure time + one second.
How intervalometers define “Interval” varies annoyingly from brand to brand. Setting the interval incorrectly can result in every other frame being missed and a ruined sequence.
SETTING YOUR CAMERA
TIP 4 — DON’T: Underexpose
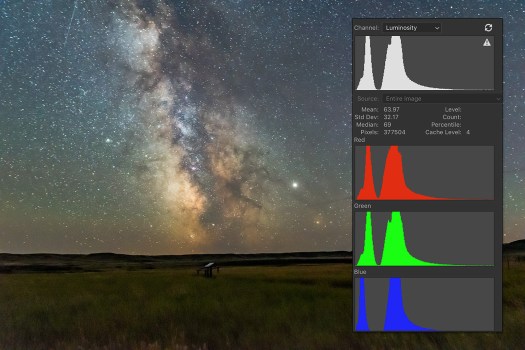
When shooting, choose settings that will yield a histogram that is not slammed to the left, but is shifted to the right to minimize noise and lift details in the shadows.
As with still images, the best way to beat noise is to give the camera signal. Use a wider aperture, a longer shutter speed, or a higher ISO (or all of the above) to ensure the image is well exposed with a histogram pushed to the right.
If you try to boost the image brightness later in processing you’ll introduce not only the very noise you were trying to avoid, but also odd artifacts in the shadows such as banding and purple discolouration.
With still images we have the option of taking shorter, untrailed images for the sky, and longer exposures for the dark ground to reveal details in the landscape, to composite later. With time-lapses we don’t have that luxury. Each and every frame has to capture the entire scene well.
At dark sky sites, expose for the dark ground as much as you can, even if that makes the sky overly bright. Unless you outright clip the highlights in the Milky Way or in light polluted horizon glows, you’ll be able to recover highlight details later in processing.
After poor focus, underexposure, resulting in overly noisy images, is the single biggest mistake I see beginners make.
TIP 5 — DON’T: Worry about 500 or “NPF” Exposure Rules
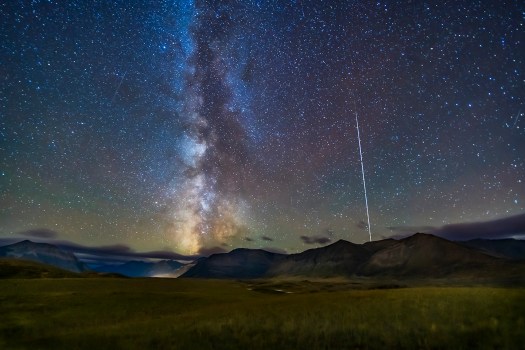
A stack of single frames from a time-lapse sequence can often make a good still image, such as this scene of the Space Station rising over Waterton Lakes National Park. The 30-second exposures were just within the “500 Rule” for the 15mm lens used here, but minor star trailing won’t be that noticeable in a final movie.
While still images might have to adhere to the “500 Rule” or the stricter “NPF Rule” to avoid star trailing, time-lapses are not so critical. Slight trailing of stars in each frame won’t be noticeable in the final movie when the stars are moving anyway.
So go for rule-breaking, longer exposures if needed, for example if the aperture needs to be stopped down for increased depth of field and foreground focus. Again, with time-lapses we can’t shoot separate exposures for focus stacking later.
Just be aware that the longer each exposure is, the longer it will take to shoot 300 of them.
Why 300? I find 300 frames is a good number to aim for. When assembled into a movie at 30 frames per second (a typical frame rate) your 300-frame clip will last 10 seconds, a decent length of time in a final movie.
You can use a slower frame rate (24 fps works fine), but below 24 the movie will look jerky unless you employ advanced frame blending techniques. I do that for auroras.

Apps such as PhotoPills offer handy calculators for juggling exposure time vs. the number of frames to yield the length of the time-lapse shoot.
Bonus Tip
How long it will take to acquire the needed 300 frames will depend on how long each exposure is and the interval between them. An app such as PhotoPills (via its Time lapse function) is handy in the field for calculating exposure time vs. frame count vs. shoot length, and providing a timer to let you know when the shoot is done.
TIP 6 — DO: Use short intervals
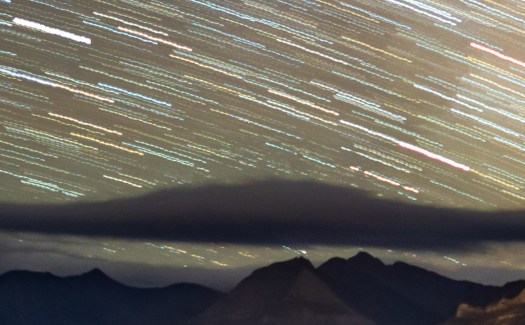
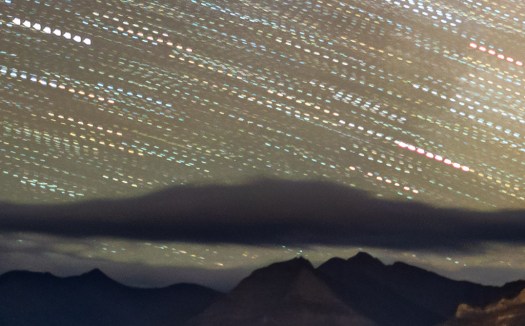
At night use intervals as short as possible to avoid gaps in time, simulated here (at top) by stacking several time-lapse frames taken at a one-second interval into one image. Using too long an interval, as demonstrated just above, yields gaps in time and jumps in the star motion, simulated here by stacking only every other frame in a sequence.
At night, the interval between exposures should be no more than one or two seconds. By “interval,” I mean the time between when the shutter closes and when it opens again for the next frame.
Not all intervalometers define “Interval” that way. But it’s what you expect it means. If you use too long an interval then the stars will appear to jump across the sky, ruining the smooth motion you are after.
In practice, intervals of four to five seconds are sometimes needed to accommodate the movement of motorized “motion control” devices that turn or slide the camera between each shot. But I’m not covering the use of those advanced units here. I cover those options and much, much more in 400 pages of tips, techniques and tutorials in my Nightscapes ebook, linked to above.
However, during the day or in twilight, intervals can be, and indeed need to be, much longer than the exposures. It’s at night with stars in the sky that you want the shutter to be closed as little as possible.
TIP 7 — DO: Shoot Raw
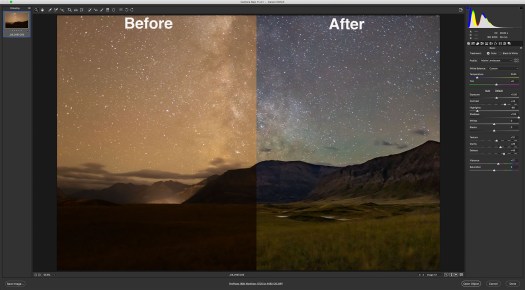
Shooting raw, even for time-lapse frames that will eventually be turned into JPGs, allows for maximum control of shadows, highlights, colour balance, and noise reduction. “Before” is what came out of the camera; “After” is with the development settings shown applied in Camera Raw.
This advice also applies to still images where shooting raw files is essential for professional results. But you likely knew that.
However, with time-lapses some cameras offer a mode that will shoot time-lapse frames and assemble them into a movie right in the camera. Don’t use it. It gives you a finished, pre-baked movie with no ability to process each frame later, an essential step for good night time-lapses. And raw files provide the most data to work with.
So even with time-lapses, shoot raw not JPGs.
If you are confident the frames will be used only for a time-lapse, you might choose to shoot in a smaller S-Raw or compressed C-Raw mode, for smaller files, in order to fit more frames onto a card.
But I prefer not to shrink or compress the original raw files in the camera, as some of them might make for an excellent stacked and layered still image where I want the best quality originals (such as for the ISS over Waterton Lakes example above).
To get you through a long field shoot away from your computer buy more and larger memory cards. You don’t need costly, superfast cards for most time-lapse work.
PLANNING AND COMPOSITION
TIP 8 — DO: Use planning apps to frame
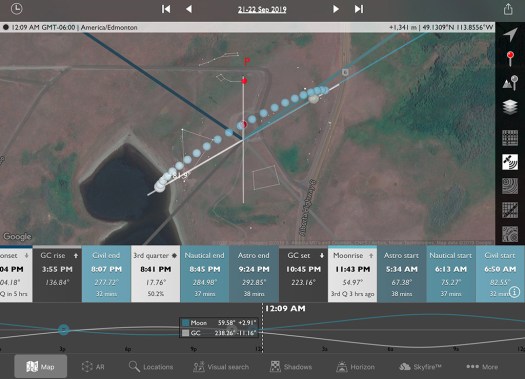
Apps such as The Photographer’s Ephemeris (shown here set for the author’s Waterton Lakes site for moonrise) help in planning where the Sun, Moon and Milky Way will be from your site during the shoot.
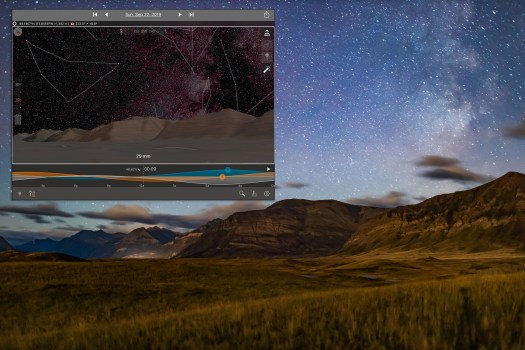
The companion app to The Photographer’s Ephemeris, TPE 3D, shown above in the inset, exactly matches the real scene for the mountain skyline, placement of the Milky Way, and lighting from the rising Moon.
All nightscape photography benefits from using one of the excellent apps we now have to assist us in planning a shoot. They are particularly useful for time-lapses.
Apps such as PhotoPills and The Photographer’s Ephemeris are great. I like the latter as it links to its companion TPE 3D app to preview what the sky and lighting will look like over the actual topographic horizon from your site. You can scrub through time to see the motion of the Milky Way over the scenery. The Augmented Reality “AR” modes of these apps are also useful, but only once you are on site during the day.
For planning a time-lapse at home I always turn to a “planetarium” program to simulate the motion of the sky (albeit over a generic landscape), with the ability to add in “field of view” indicators to show the view your lens will capture.
You can step ahead in time to see how the sky will move across your camera frame during the length of the shoot. Indeed, such simulations help you plan how long the shoot needs to last until, for example, the galactic core or Orion sets.
Planetarium software helps ensure you frame the scene properly, not only for the beginning of the shoot (that’s easy — you can see that!), but also for the end of the shoot, which you can only predict.
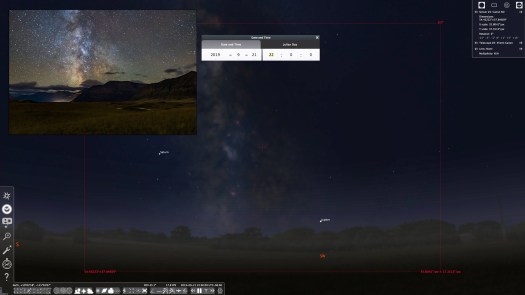
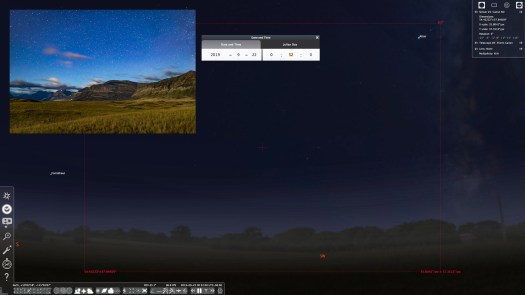
An alternative is to use a planetarium program such as the free Stellarium, shown above, which can display lens fields of view. These scenes show the simulated vs. real images (insets) for the start (top) and end (bottom) of the Waterton Lakes time-lapse with a 35mm lens frame, outlined in red.
To save you from guessing wrong, try the free Stellarium (stellarium.org), or the paid Starry Night (starrynight.com) or SkySafari (skysafariastronomy.com). I use Starry Night.
Bonus Tip
If your shoot will last as long as three hours, do plan to check the battery level and swap batteries before three hours is up. Most cameras, even new mirrorless models, will now last for three hours on a full battery, but likely not any longer. If it’s a cold winter night, expect only one or two hours of life from a single battery.
PROCESSING
TIP 9 — DO: Develop one raw frame and apply settings to all


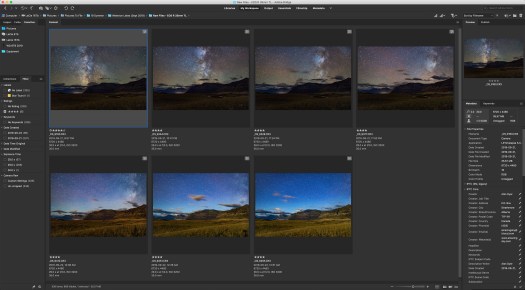
Most raw developers or photo library programs (Adobe Bridge is shown here) offer the essential ability to copy settings from one image and paste them onto hundreds of others in a folder, developing all the time-lapse frames in a snap.
Processing the raw files takes the same steps and settings as you would use to process still images.
With time-lapses, however, you have to do all the processing required within your favourite raw developer software. You can’t count on bringing multiple exposures into a layer-based processor such as Photoshop to stack and blend images. That works for a single image, but not for 300.
I use Adobe Camera Raw out of Adobe Bridge to do all my time-lapse processing. But many photographers use Lightroom, which offers all the same settings and non-destructive functions as Adobe Camera Raw.
For those who wish to “avoid Adobe” there are other choices, but for time-lapse work an essential feature is the ability to develop one frame, then copy and paste its settings (or “sync” settings) to all the other frames in the set.
Not all programs allow that. Affinity Photo does not. Luminar doesn’t do it very well. DxO PhotoLab, ON1 Photo RAW, and the free Raw Therapee, among others, all work fine.
HOW TO ASSEMBLE A TIME-LAPSE
Once you have a set of raws all developed, the usual workflow is to export all those frames out as high-quality JPGs which is what movie assembly programs need. Your raw developing software has to allow batch exporting to JPGs — most do.
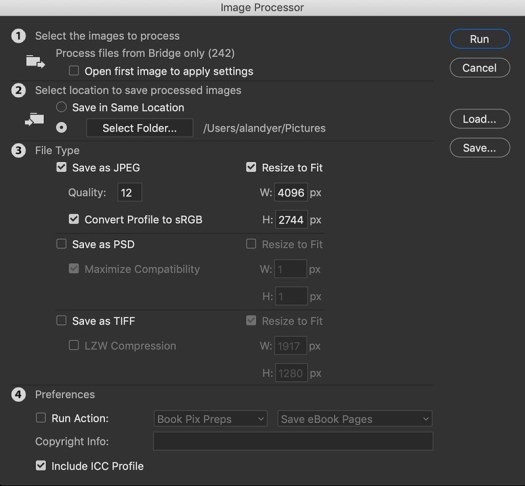
Raw developers usually have a batch export function. So does Photoshop, via its Image Processor utility, shown here (found under File>Scripts>Image Processor) that can export a folder of raws into JPGs or TIFFs, and re-size them, often needed for final 4K or HD movies.
However, none of the programs above (except Photoshop and Adobe’s After Effects) will create the final movie, whether it be from those JPGs or from the raws.

The author’s favourite assembly program is TimeLapse DeFlicker (TLDF). It can turn a folder of JPGs into movies as large as 8K and with ProRes codecs for the highest quality.
So for assembling the intermediate JPGs into a movie, I often use a low-cost program called TLDF (TimeLapse DeFlicker) available for MacOS and Windows (timelapsedeflicker.com). It offers advanced functions such as deflickering (i.e. smoothing slight frame-to-frame brightness fluctuations) and frame blending (useful to smooth aurora motions or to purposely add star trails).
While there are many choices for time-lapse assembly, I suggest using a program dedicated to the task and not, as many do, a movie editing program. For most sequences, the latter makes assembly unnecessarily difficult and harder to set key parameters such as frame rates.
TIP 10 — DO: Try LRTimelapse for more advanced processing
The advanced processing program LRTimelapse creates several keyframes through the sequence (seven are shown here in Adobe Bridge) which you develop so each looks its best. During this sequence, the Moon rose changing the lighting toward the end of the shoot (in the last three keyfames).
Get serious about time-lapse shooting and you will want — indeed, you will need — the program LRTimelapse (LRTimelapse.com). A free but limited trial version is available.
This powerful program is for sequences where one setting will not work for all the frames. One size does not fit all.
Instead, LRTimelapse allows you to process a few keyframes throughout a sequence, say at the start, middle, and end. It then interpolates all the settings between those keyframes to automatically process the entire set of images to smooth (or “ramp”) and deflicker the transitions from frame to frame.

LRTimelapse reads your developed keyframe data and applies smooth transitions of all settings to each of the raw files between the keyframes. The result is a seamless and smooth final movie. The pink curve shows how the scene brightened at moonrise. The blue diamonds on the yellow line mark the seven keyframes.
This is essential for sequences where the lighting changes during the shoot (say, the Moon rises or sets), and for so-called “holy grails.” Those are advanced sequences that track from daylight or twilight to darkness, or vice versa, over a wide range of camera settings.
However, LRTimelapse works only with Adobe Lightroom or the Adobe Camera Raw/Bridge combination. So for advanced time-lapse work Adobe software is essential.
A Final Bonus Tip
Keep it simple. You might aspire to emulate the advanced sequences you see on the web, where the camera pans and dollies during the movie. I suggest avoiding complex motion control gear at first to concentrate on getting well-exposed time-lapses with just a static camera. That alone is a rewarding achievement.
But before that, first learn to shoot still images successfully. All the settings and skills you need for a great looking still image are needed for a time-lapse. Then move onto capturing the moving sky.
I end with a link to an example music video, shot using the techniques I’ve outlined. Thanks for reading and watching. Clear skies!
The Beauty of the Milky Way from Alan Dyer on Vimeo.© 2019 Alan Dyer
Alan Dyer is author of the comprehensive ebook How to Photograph and Process Nightscapes and Time-Lapses. His website is www.amazingsky.com
For a channel of his time-lapse movies, music videos, and tutorials on Vimeo see https://vimeo.com/channels/amazingsky

Loved reading thhis thank you
Hi Alan. Just wanted to say thanks for the tip in this email to use TLDF for assembling a time-lapse. I got the urge to shoot NEOWISE early this morning, and in spite of my bone head idea of shooting roadside (blasts of car lights) I still salvaged something sort of ok. TLDF was super easy to use. So thanks again. I have to look for a dew heater now. I believe Dave Lane was you last recommendation.
Here’s the video, just out of curiosity https://vimeo.com/438292819 . Don’t hurt yourself laughing.
Stu McNair
Thank you Alan, awesome tips here as always from the Master himself…