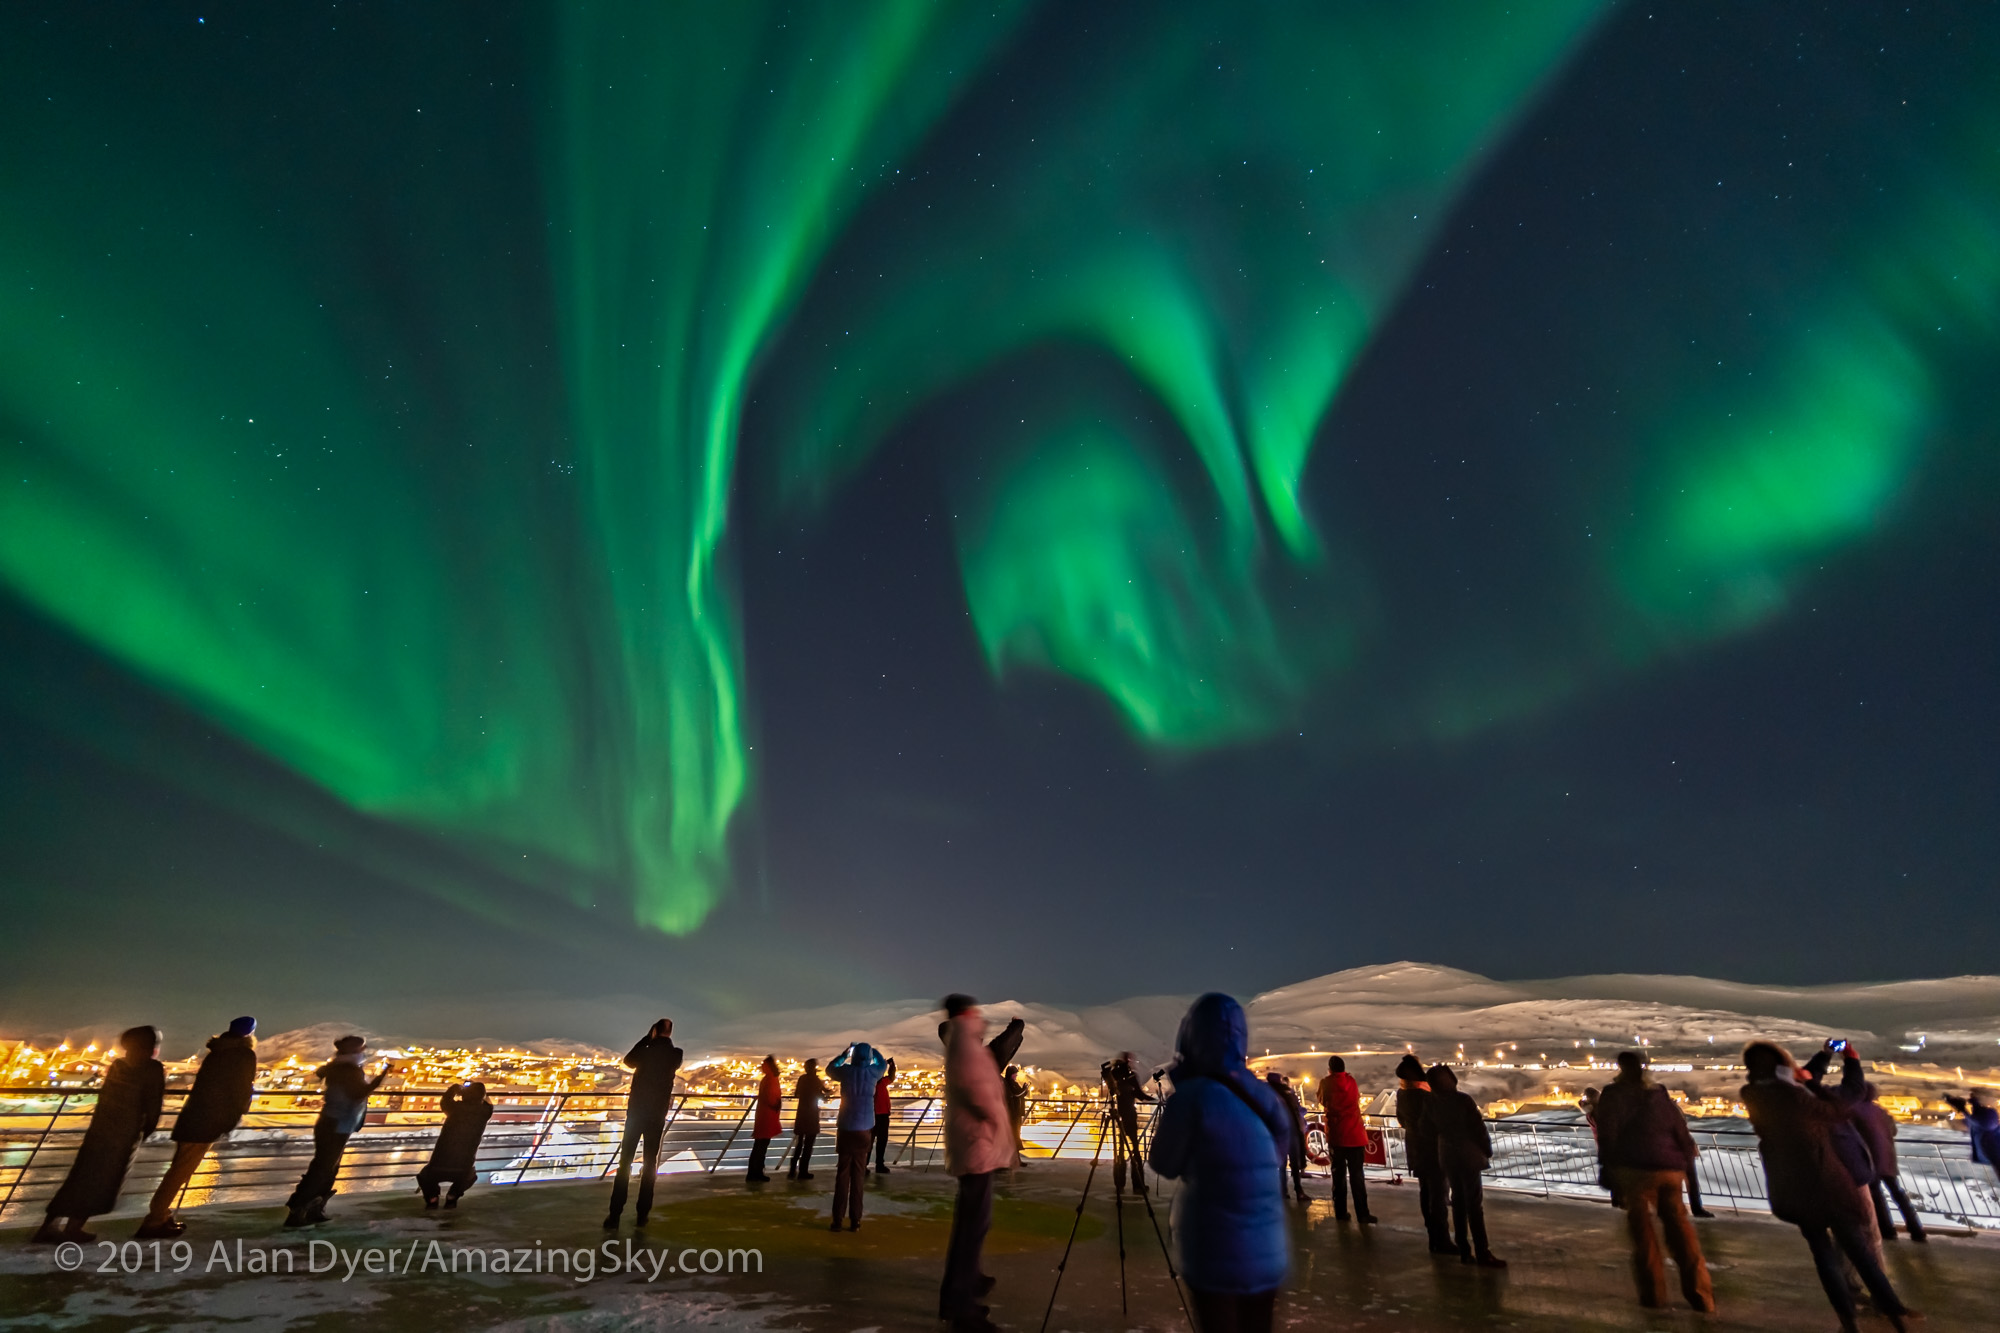
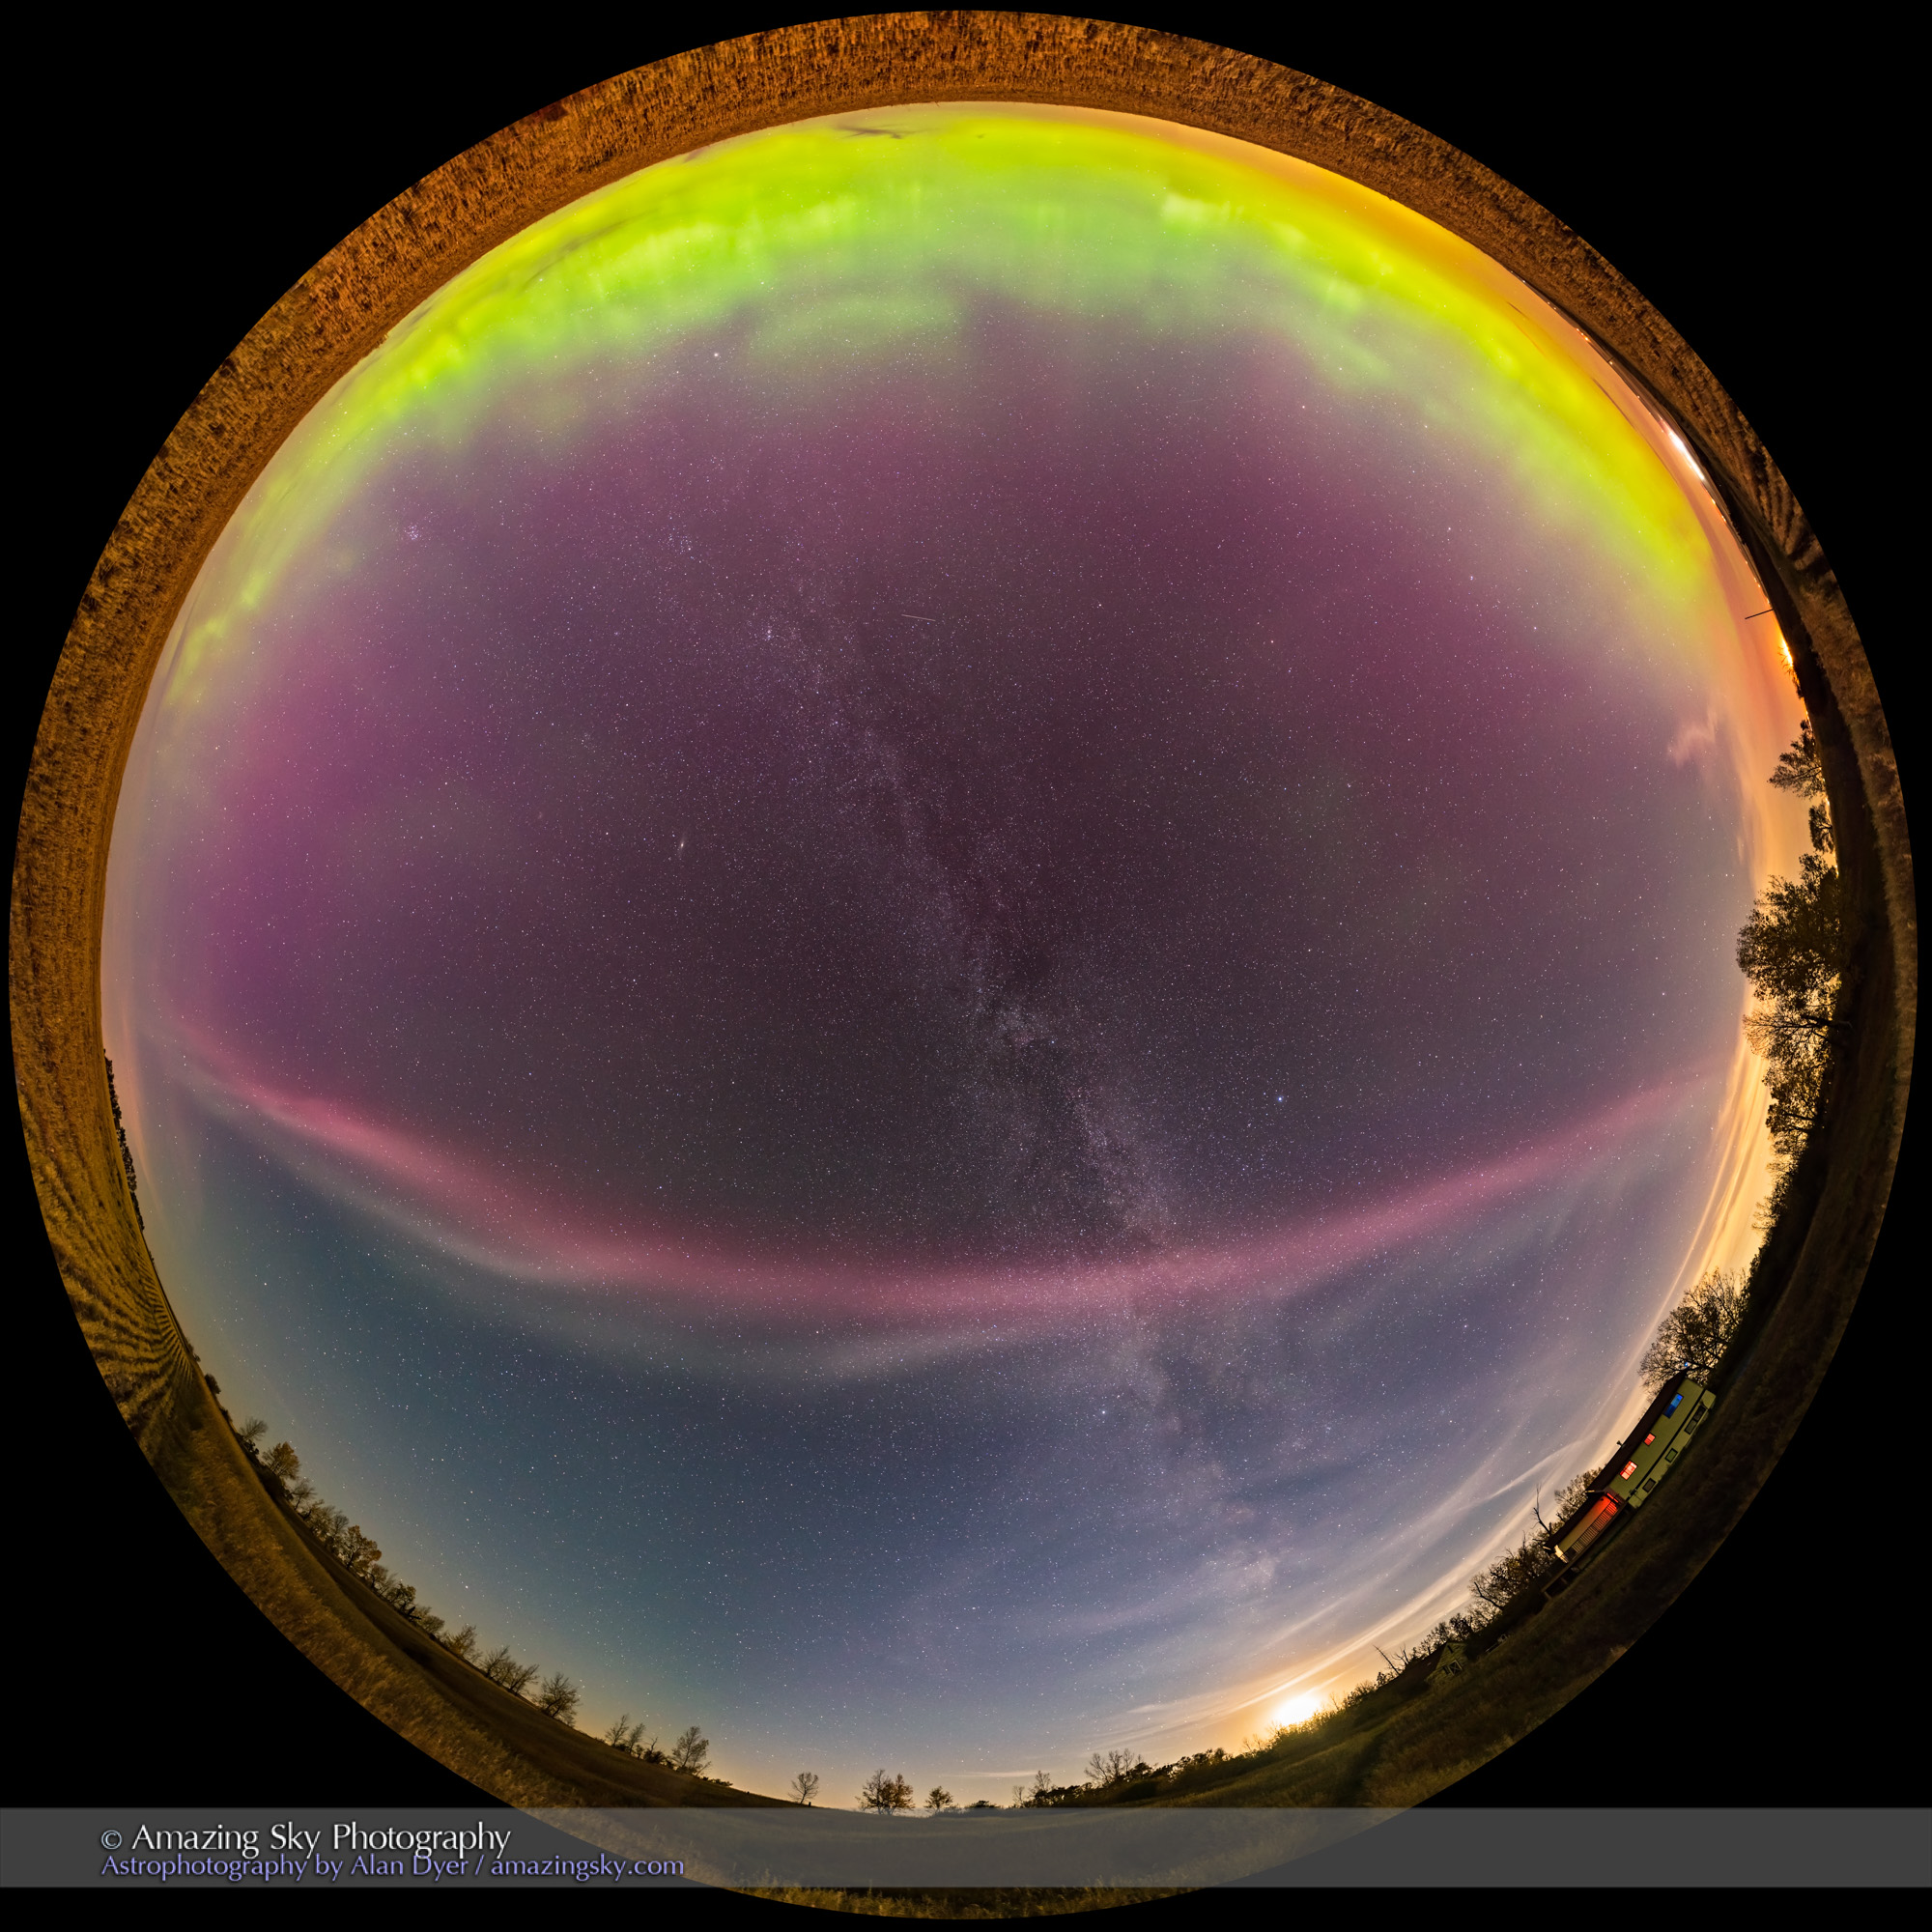
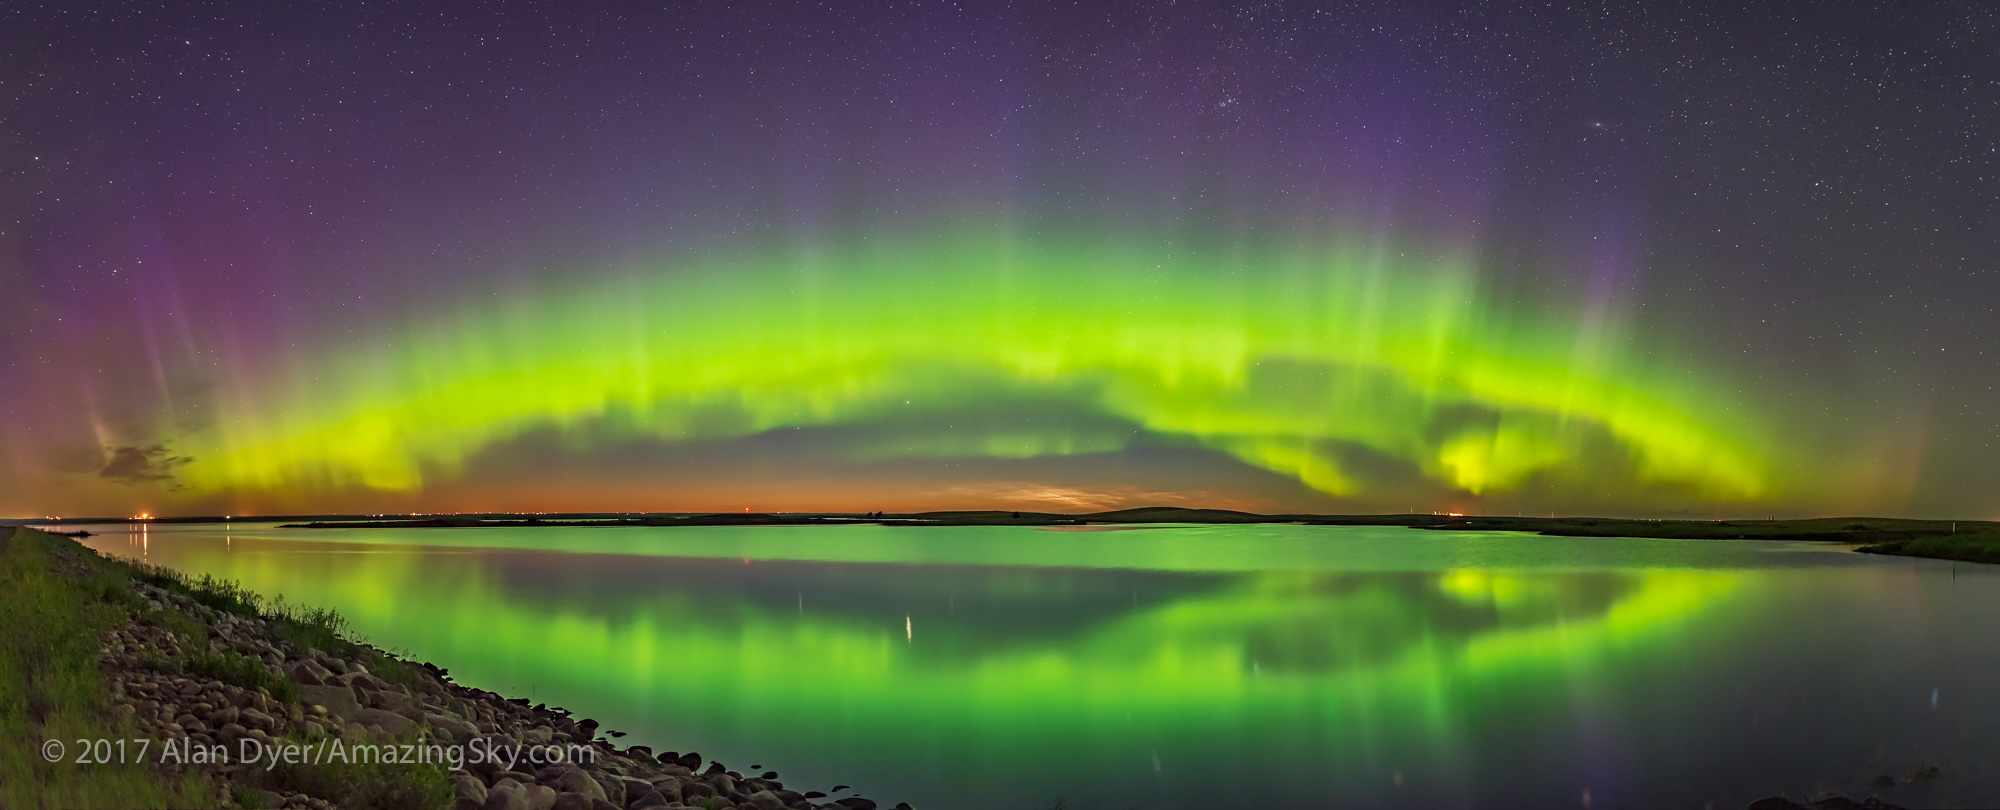
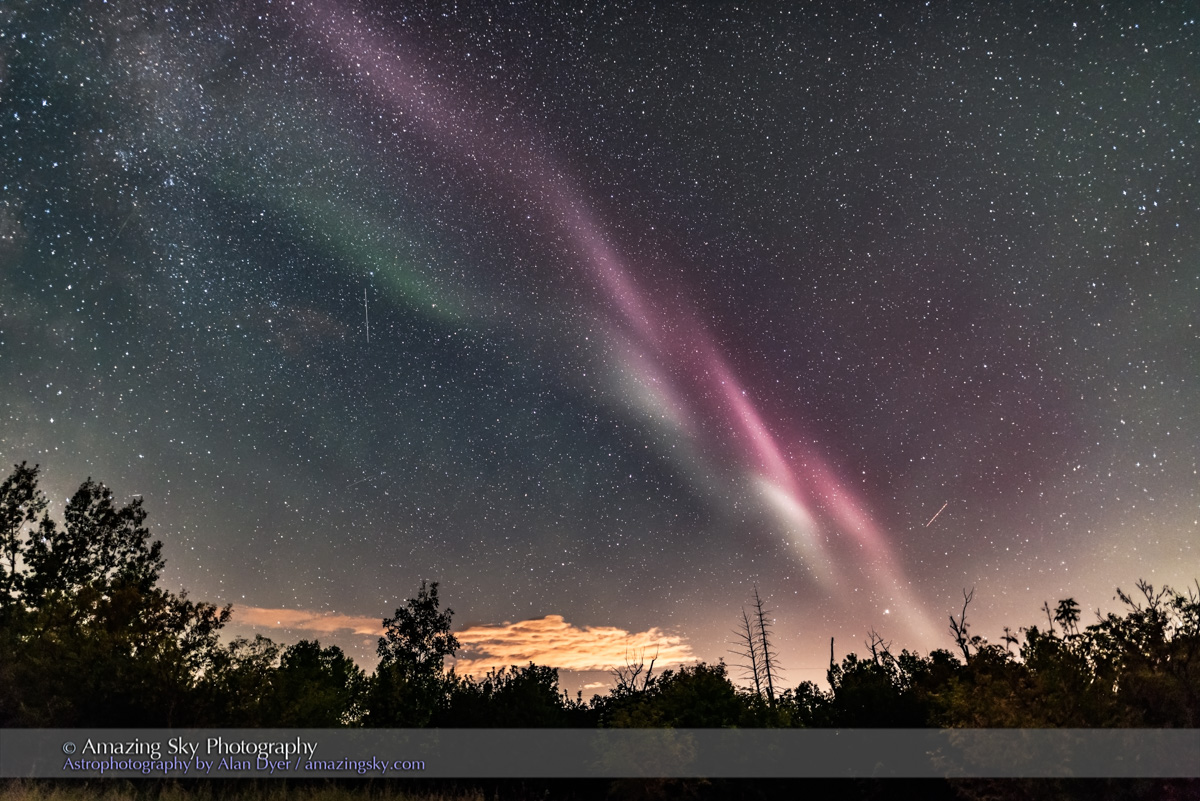
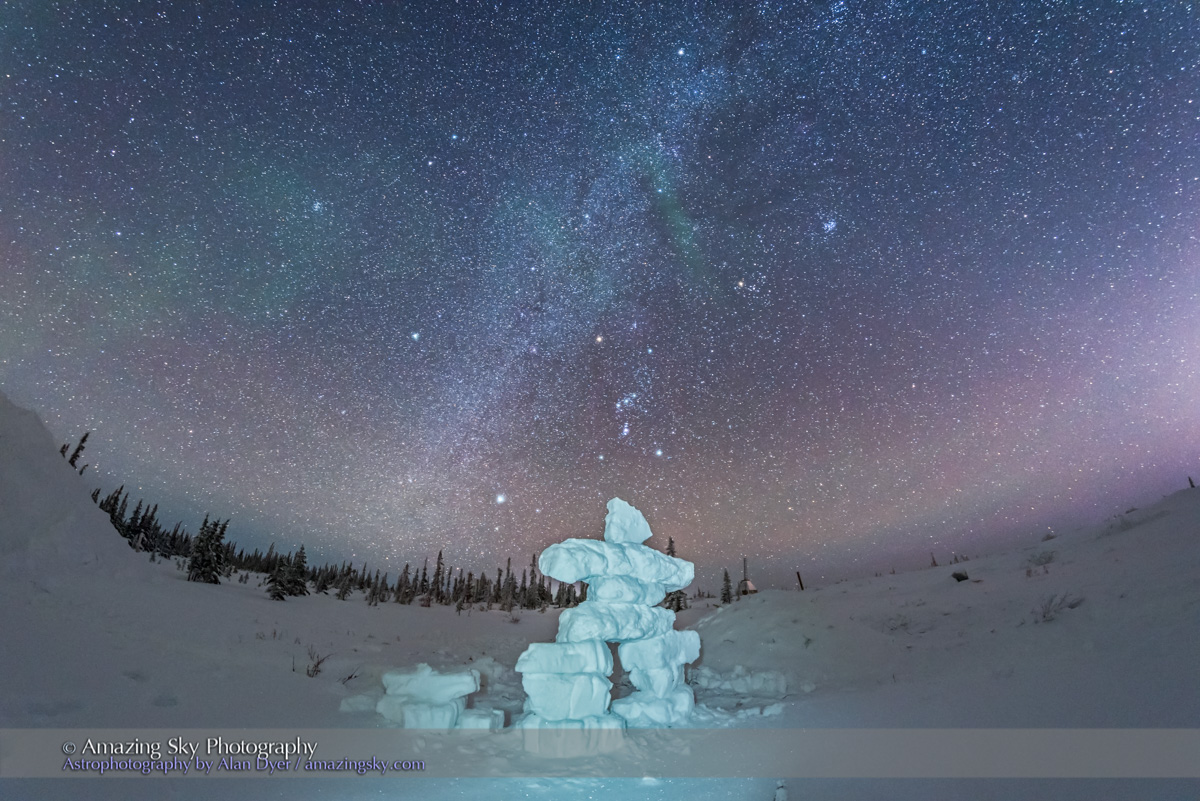
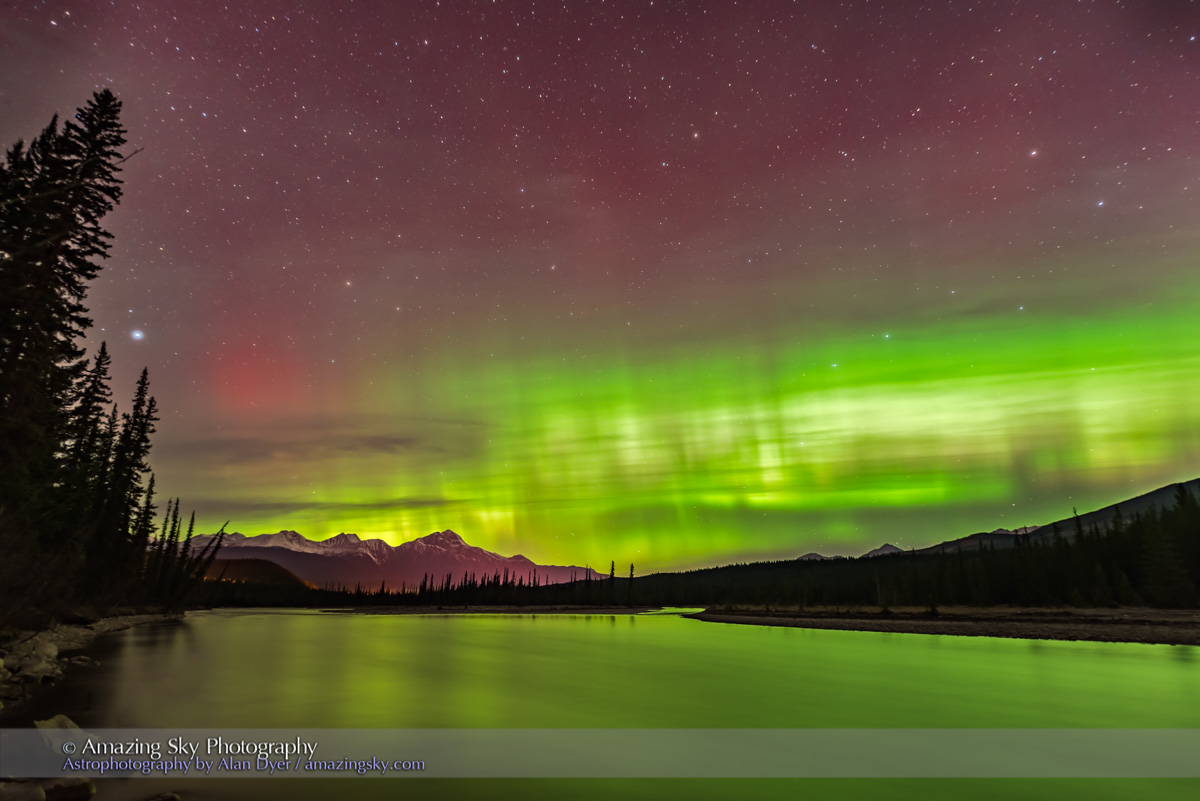
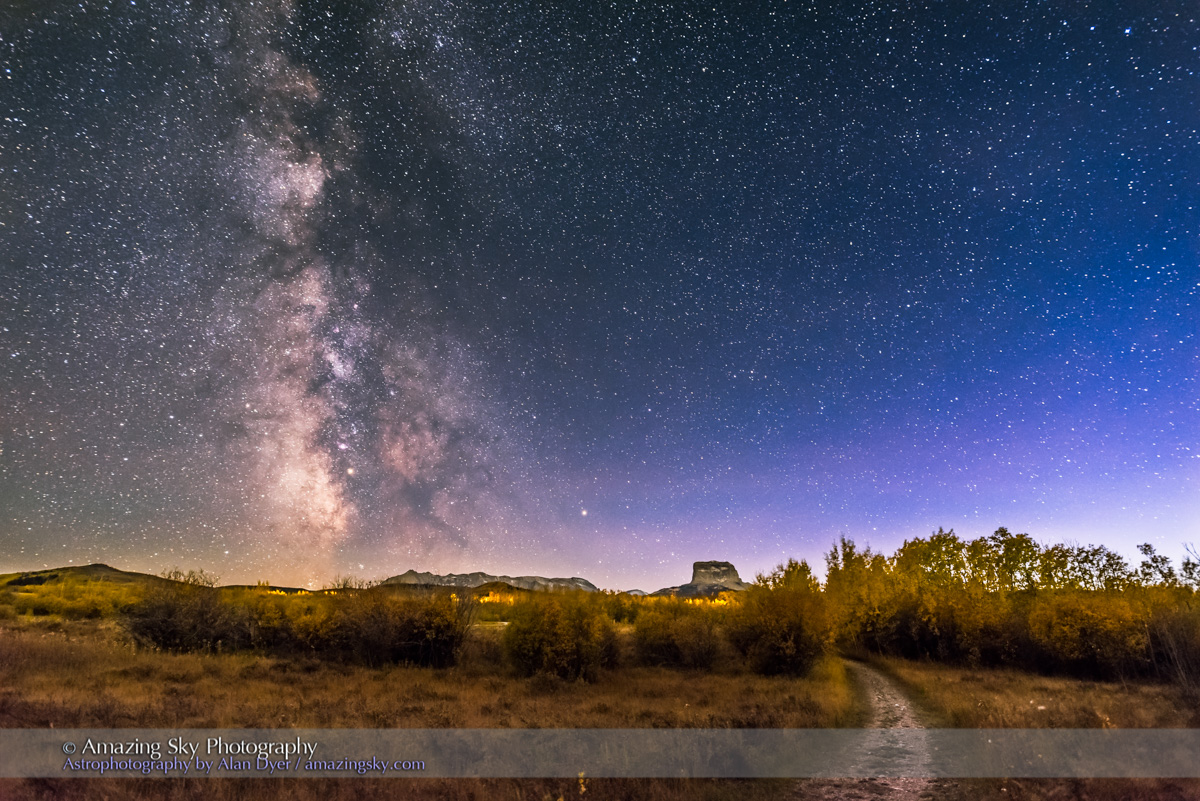
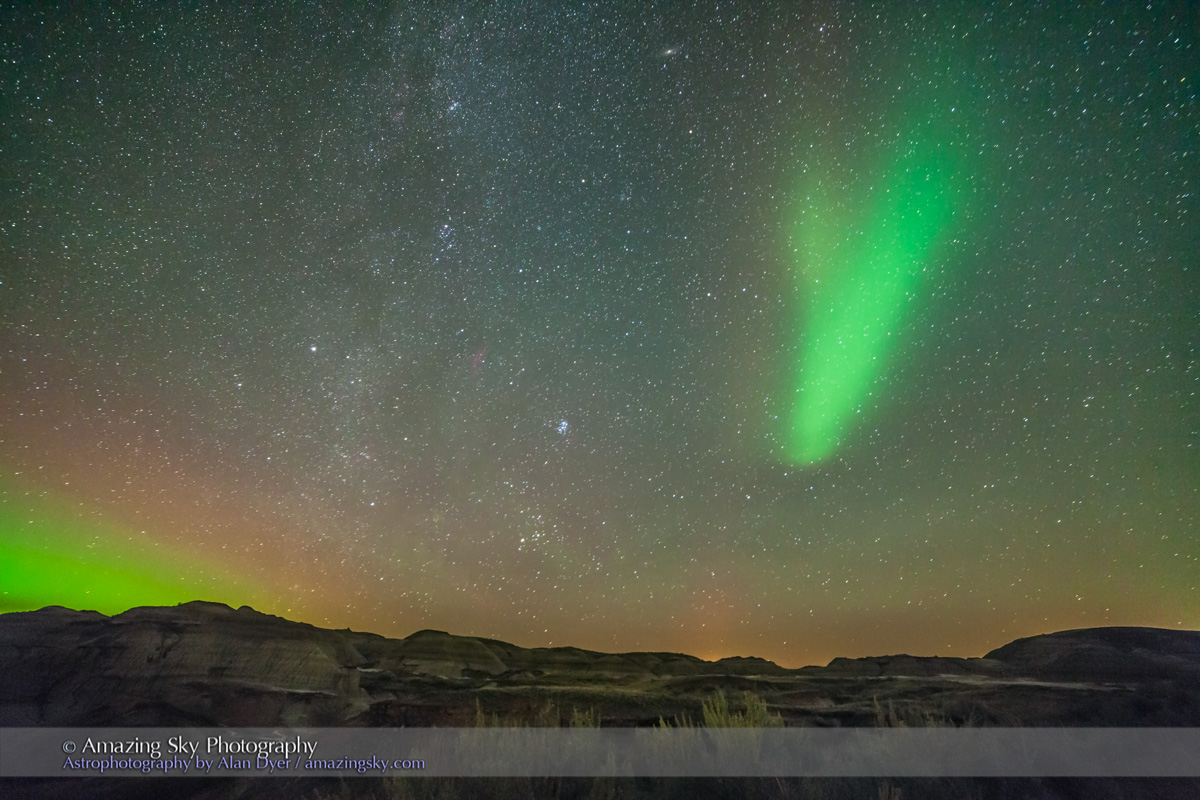
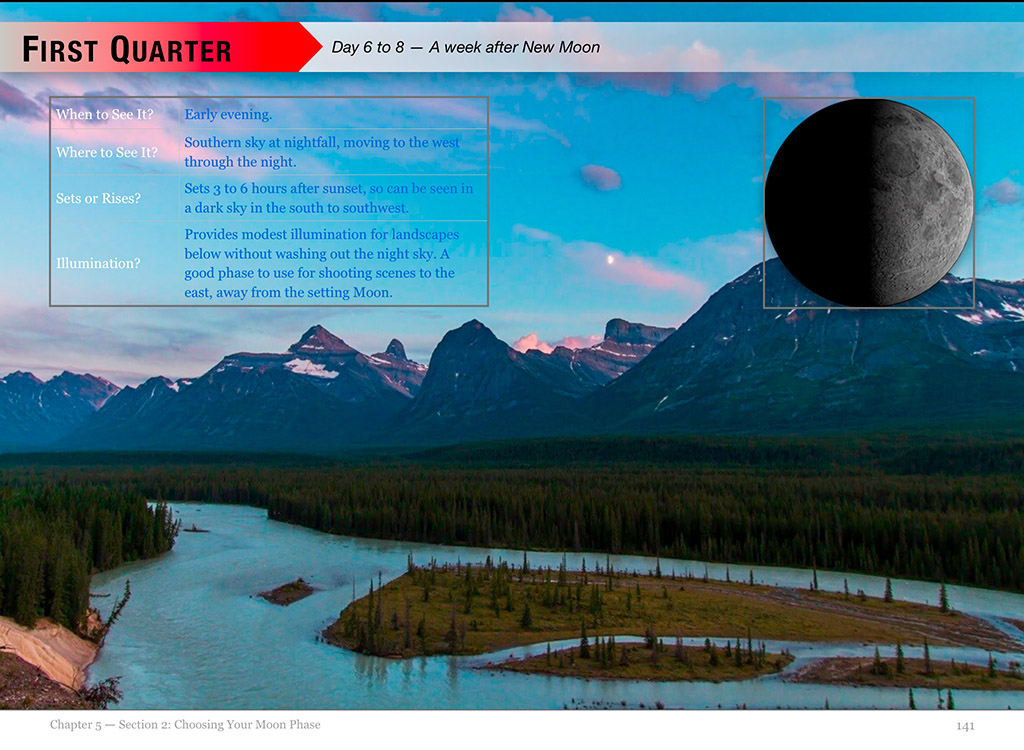
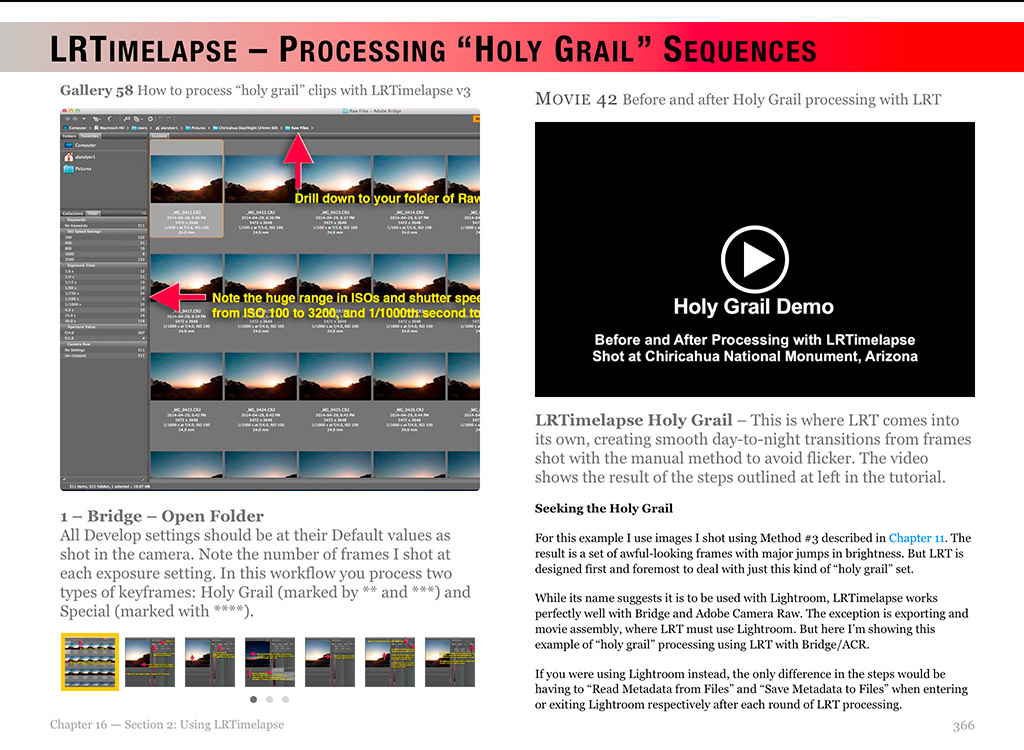
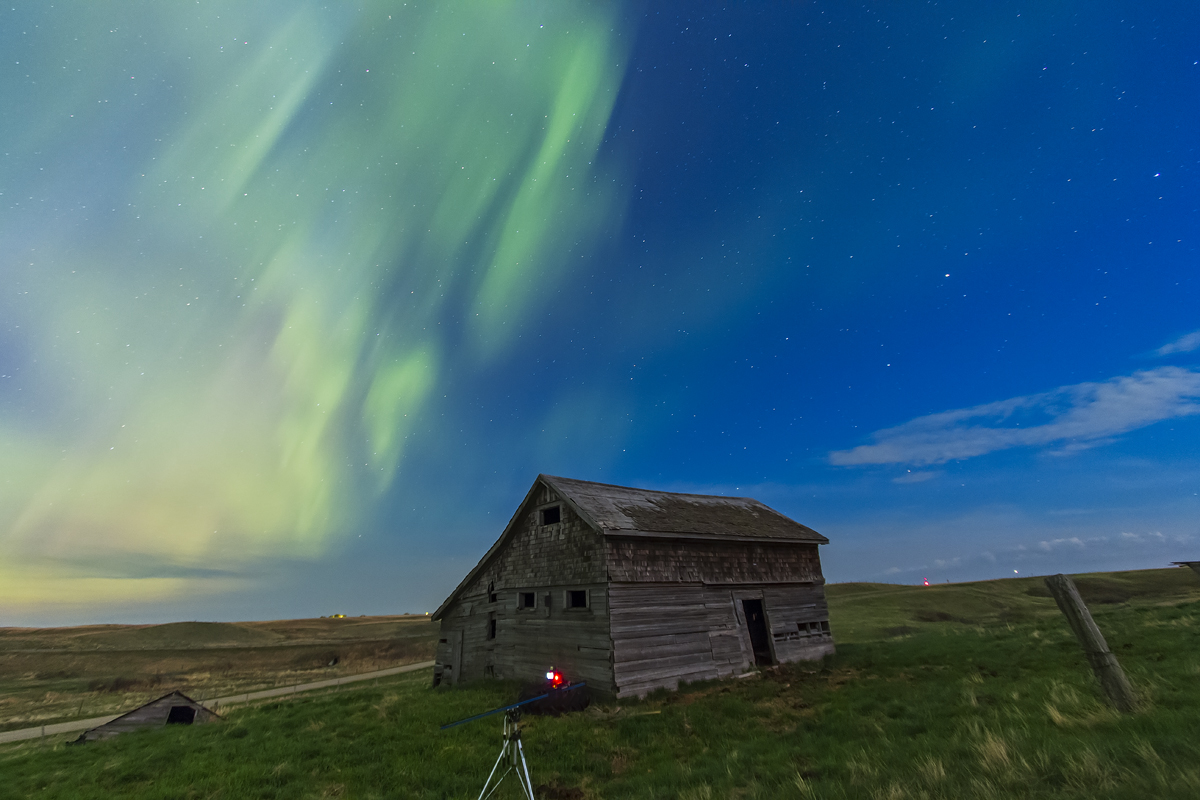
On November 11, 2025 the sky erupted with a swath of red Northern Lights seen over much of North America.
It is rare when those living at southerly latitudes can see Northern Lights. Instead of having to travel north to Arctic sites, the aurora comes south to them. That’s what happened on November 11, 2025 when one of the largest solar storms in recent years brought the aurora down over much of the North America.
This was the latest in a set of wonderful aurora shows we’ve enjoyed in the last two years, as the Sun reached the peak of its 11-year cycle of activity.
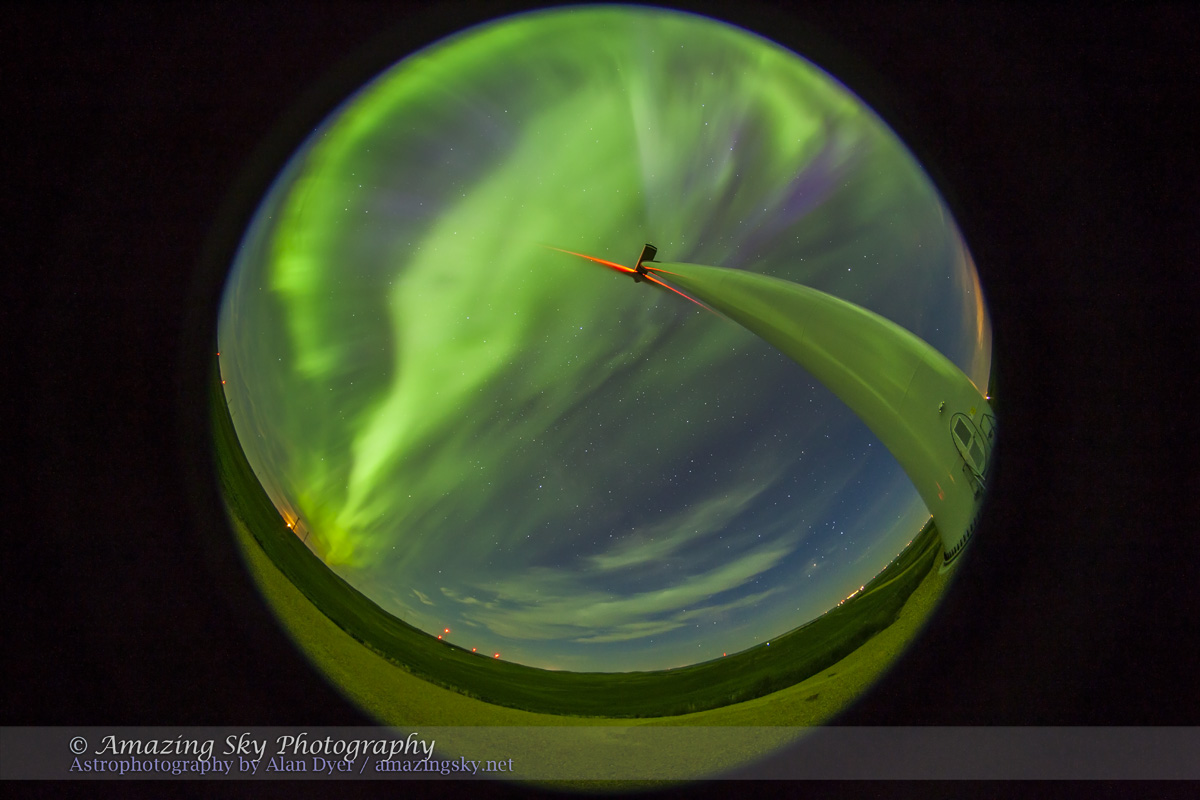
As I show below, the apps and indicators were registering extreme conditions, with the “Kp Index” peaking at 8 out of a maximum of 9, and the auroral “Ovation” oval lighting up red, indicating a major geomagnetic storm was underway. In the lingo of the local Alberta Aurora Chasers Facebook group, it was most definitely a “pants on” night!
Kp 8! Red Alert!
The source of the storm was two major flares on the Sun in quick succession. In only a day the high-speed “coronal mass ejections” they had unleashed reached Earth and lit up the sky.
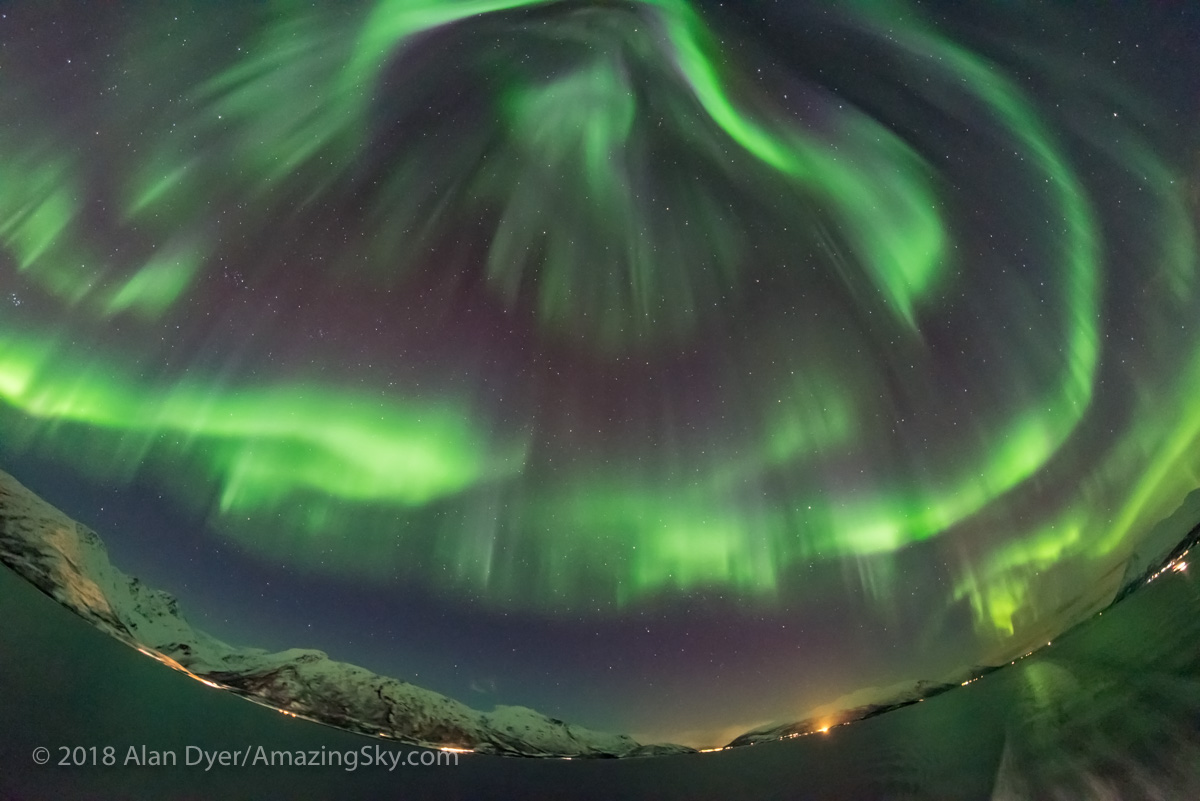
As a result the ring of aurora borealis which usually circles the Arctic moved down over southern Canada and the northern United States. I was under that ring of lights!
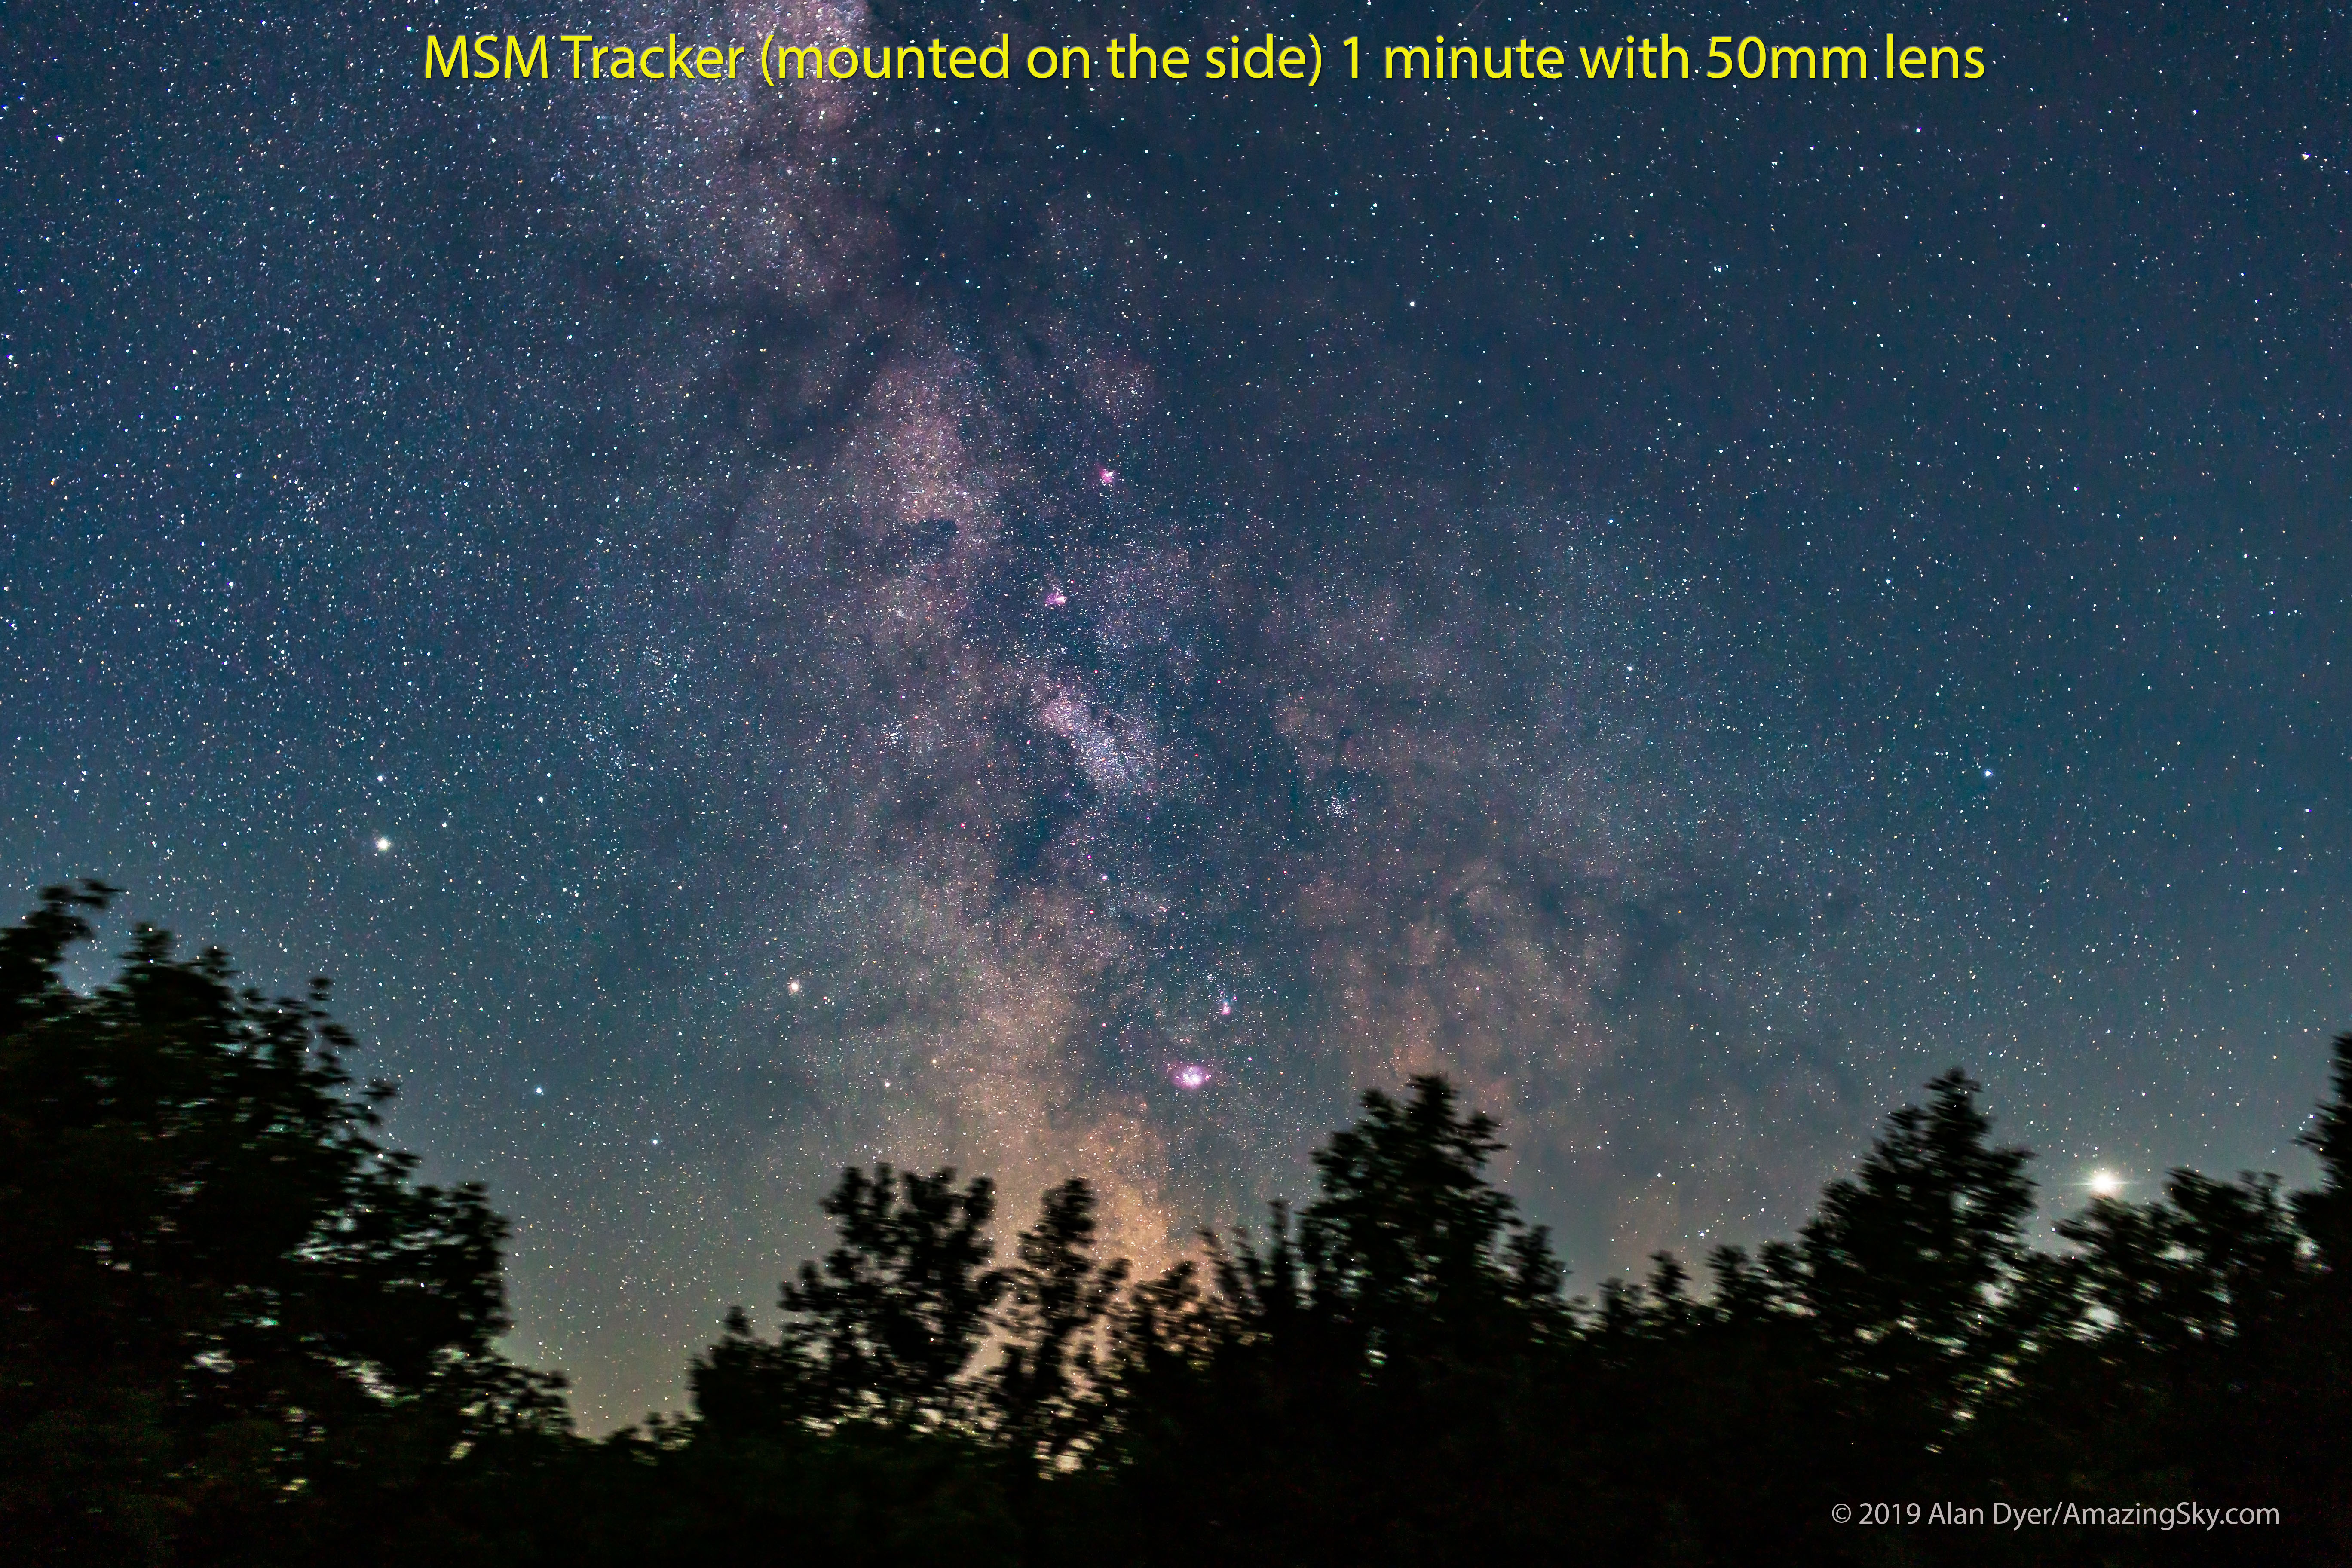
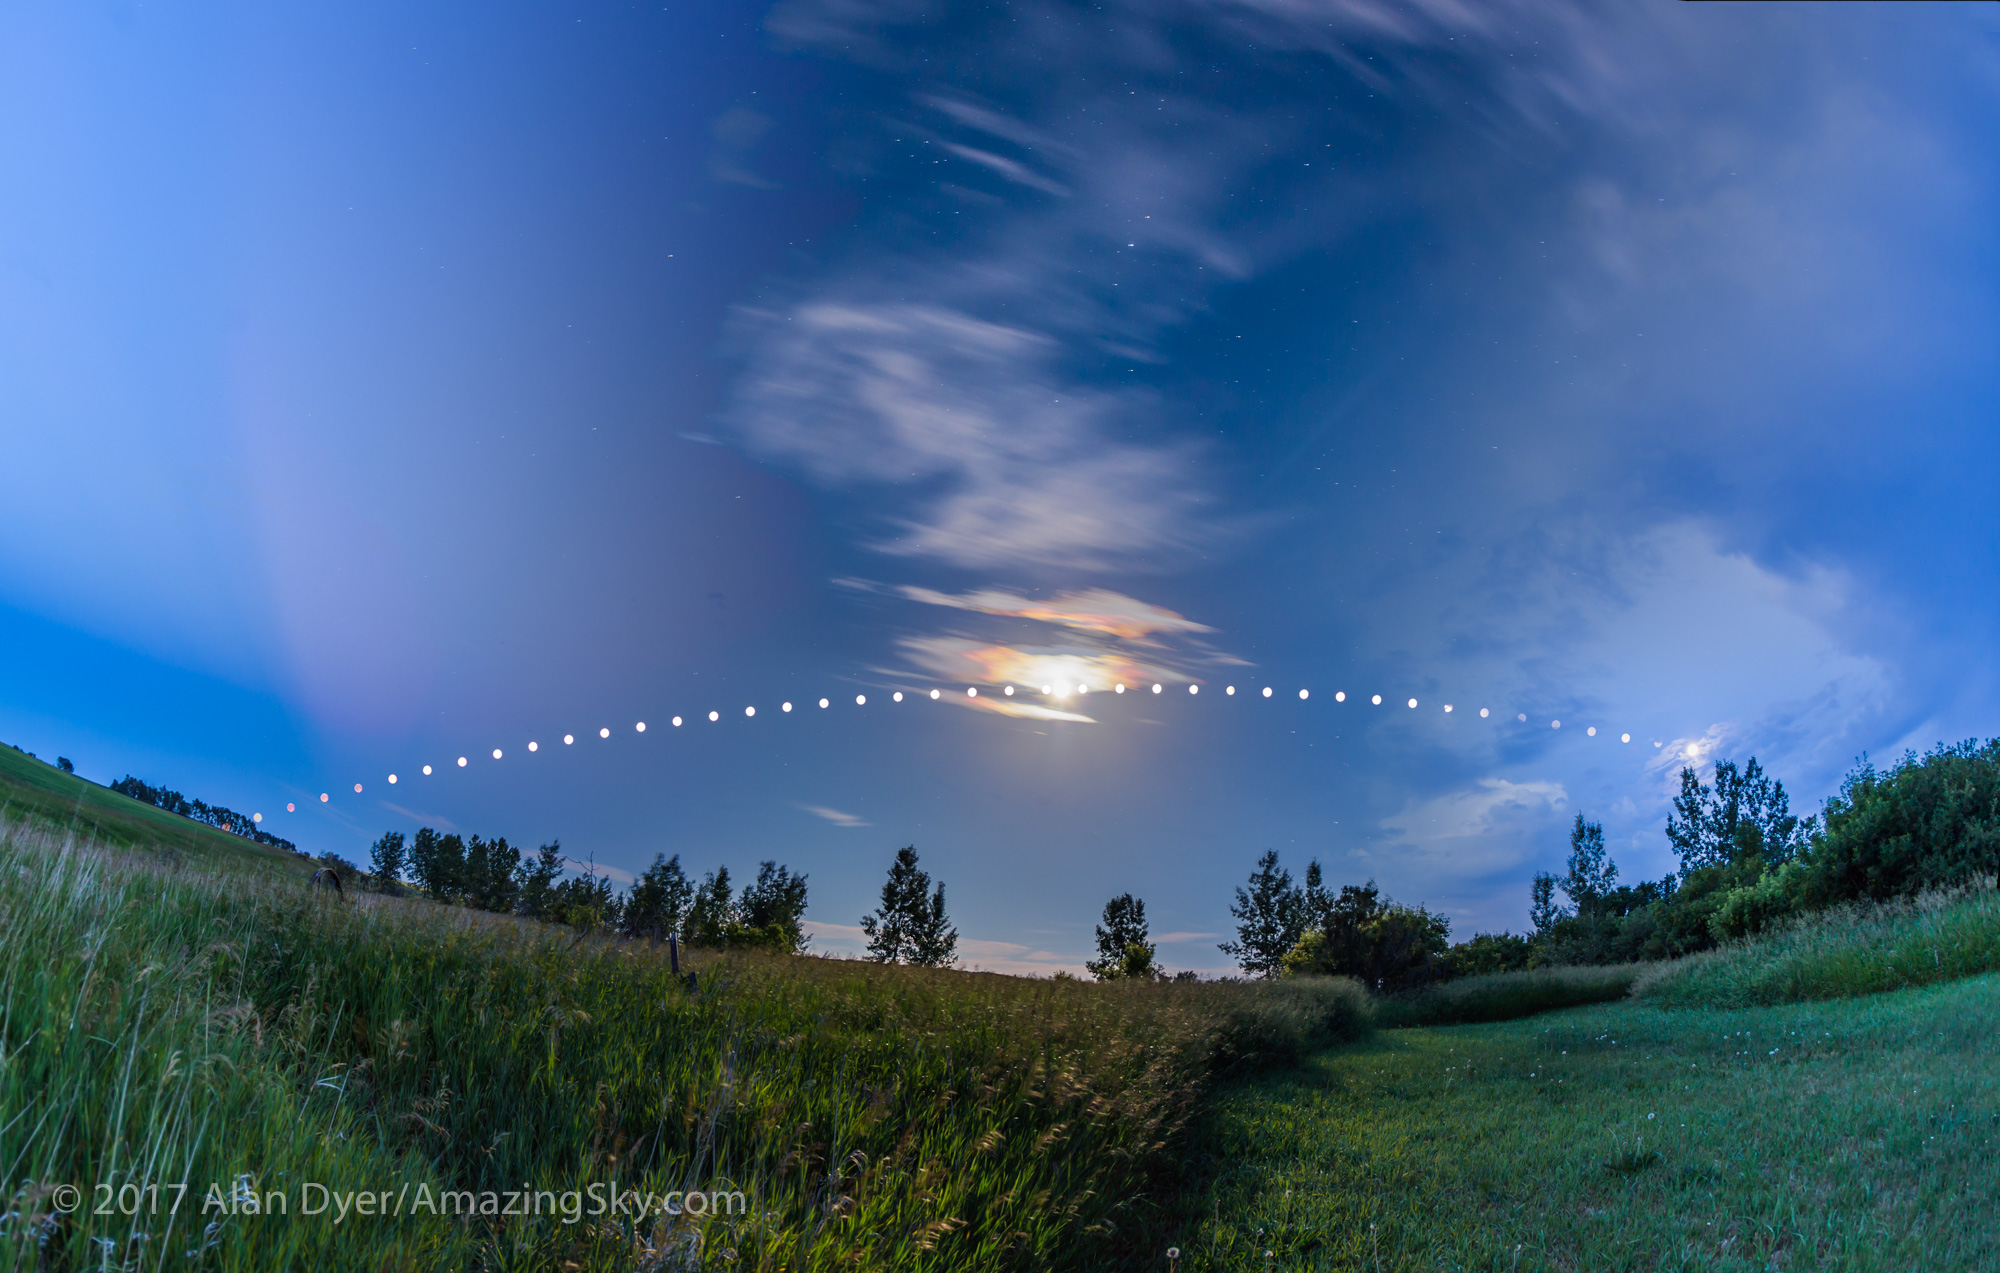
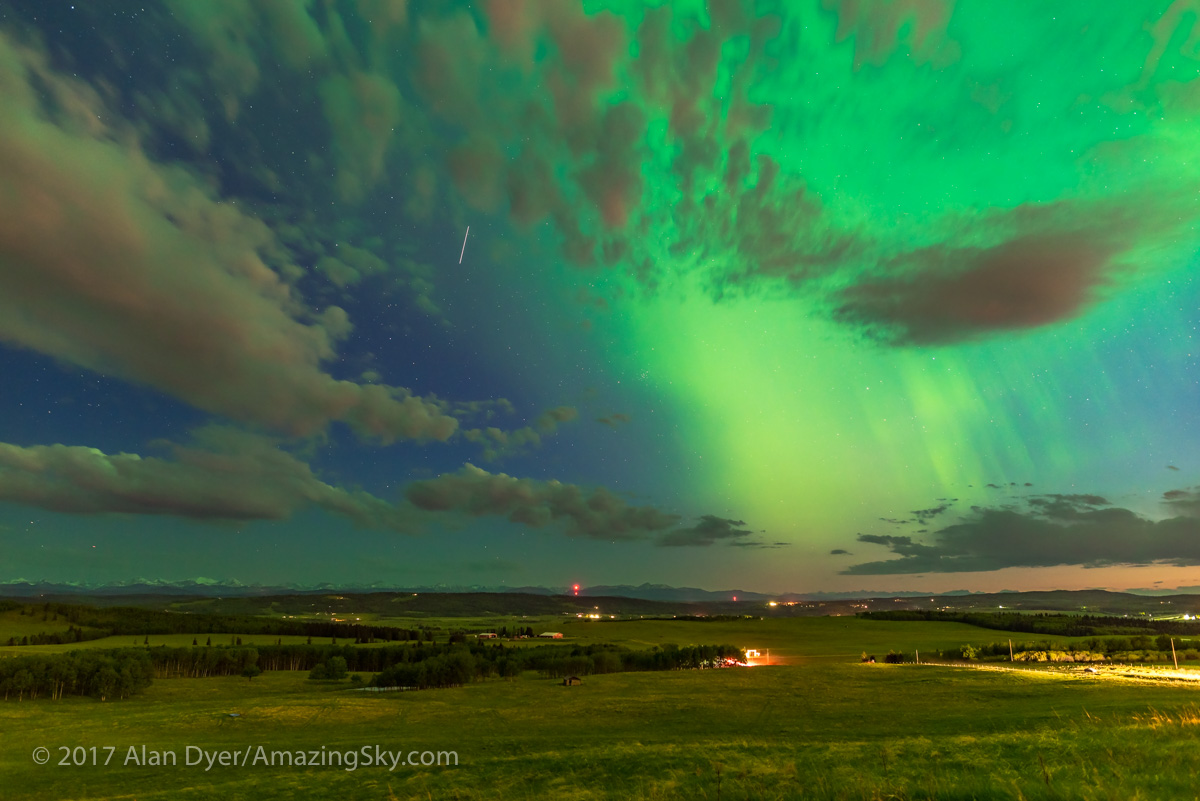
This is a blend of two exposures, for sky and ground, both 8 seconds at f/2.8 with the TTArtisan 11mm full-frame fish-eye lens on the Canon R5 at ISO 1600.
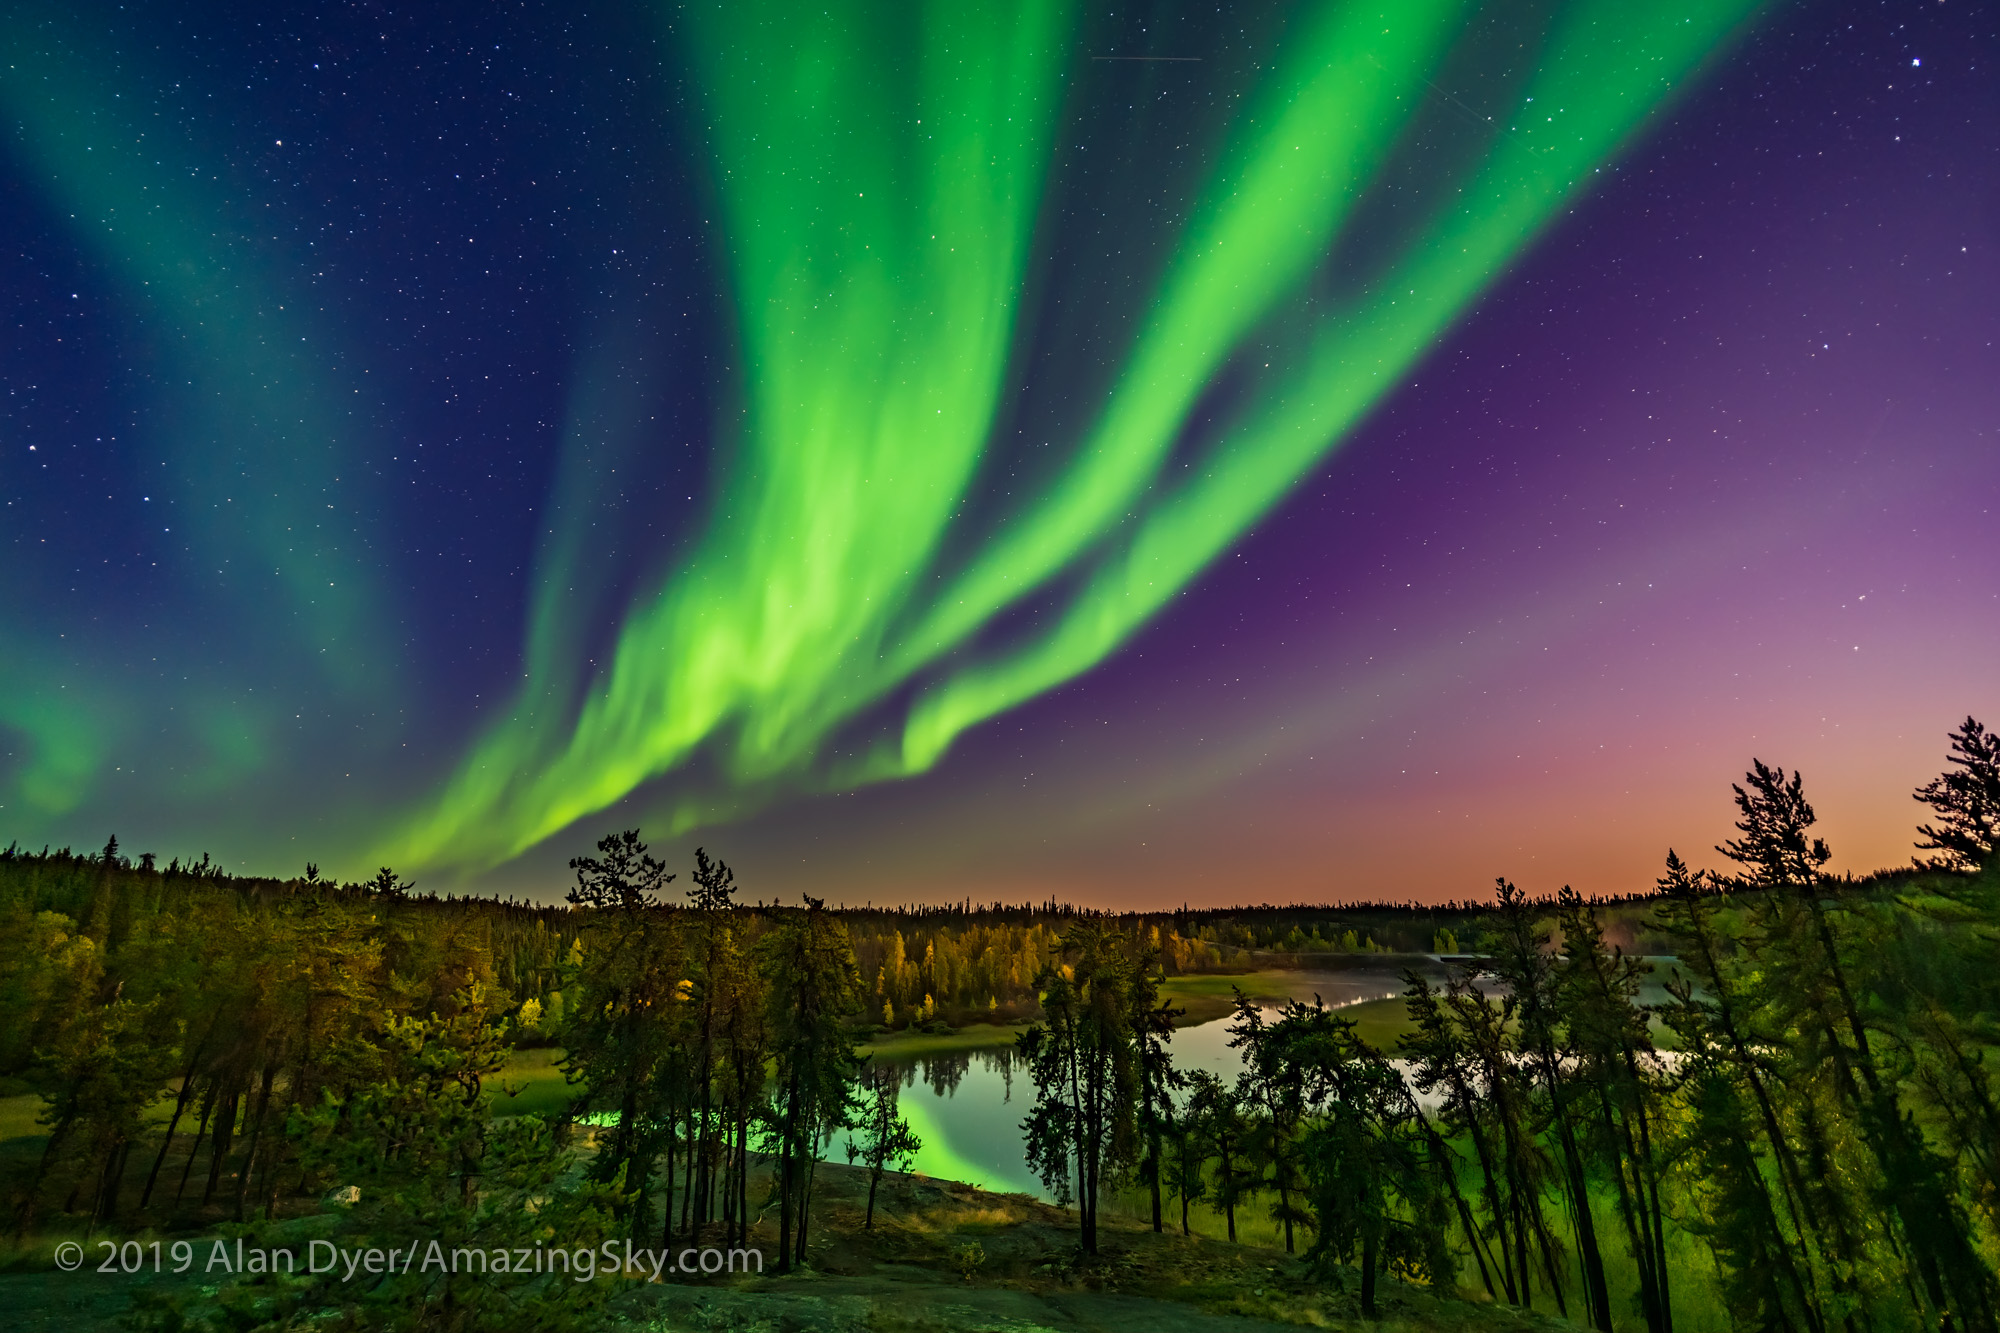
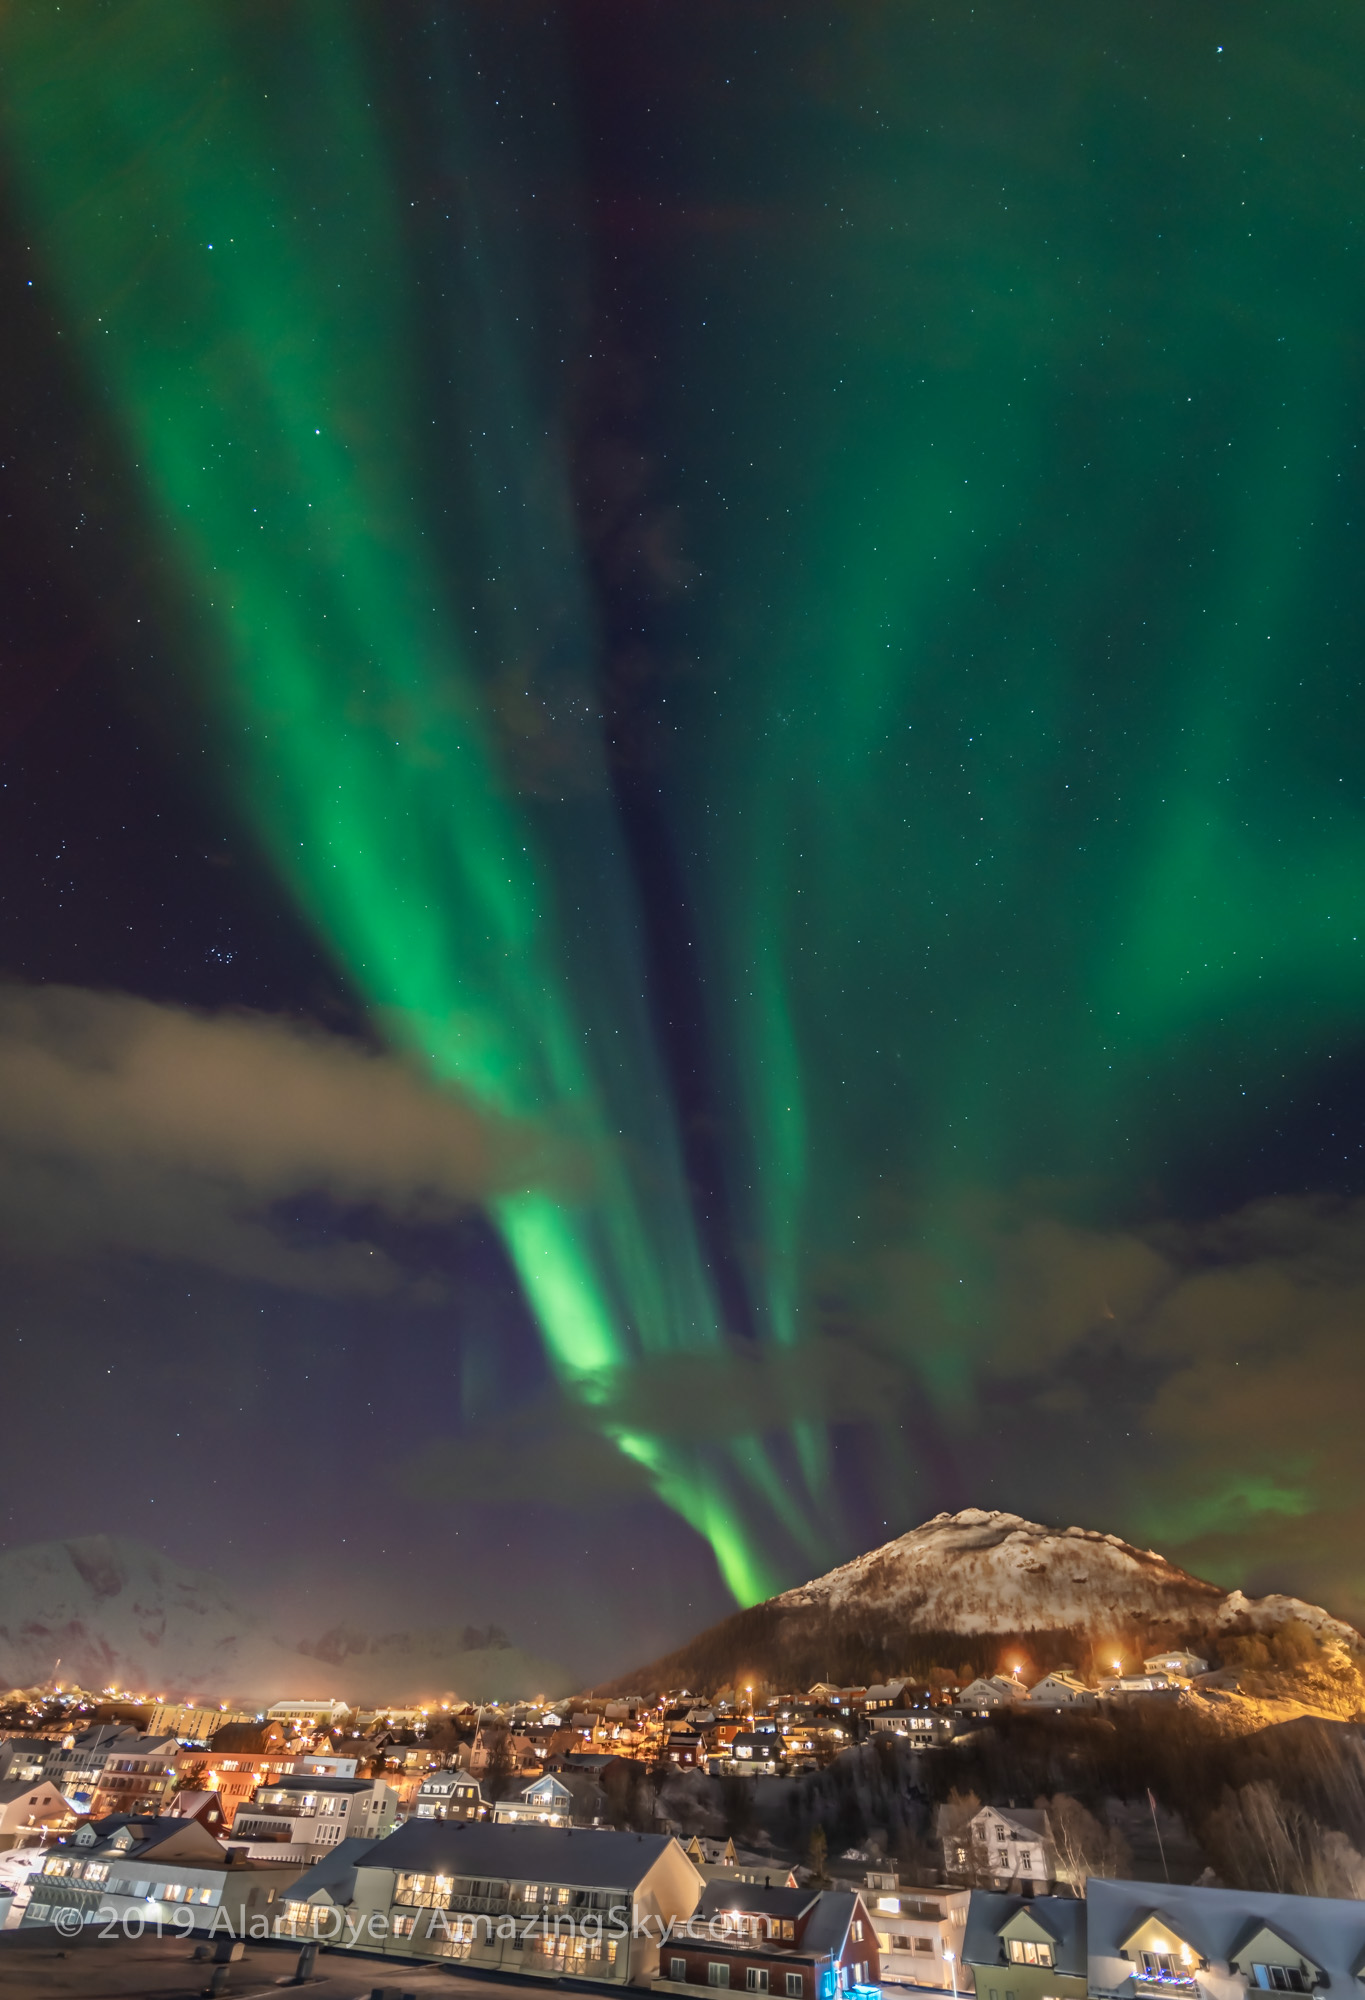
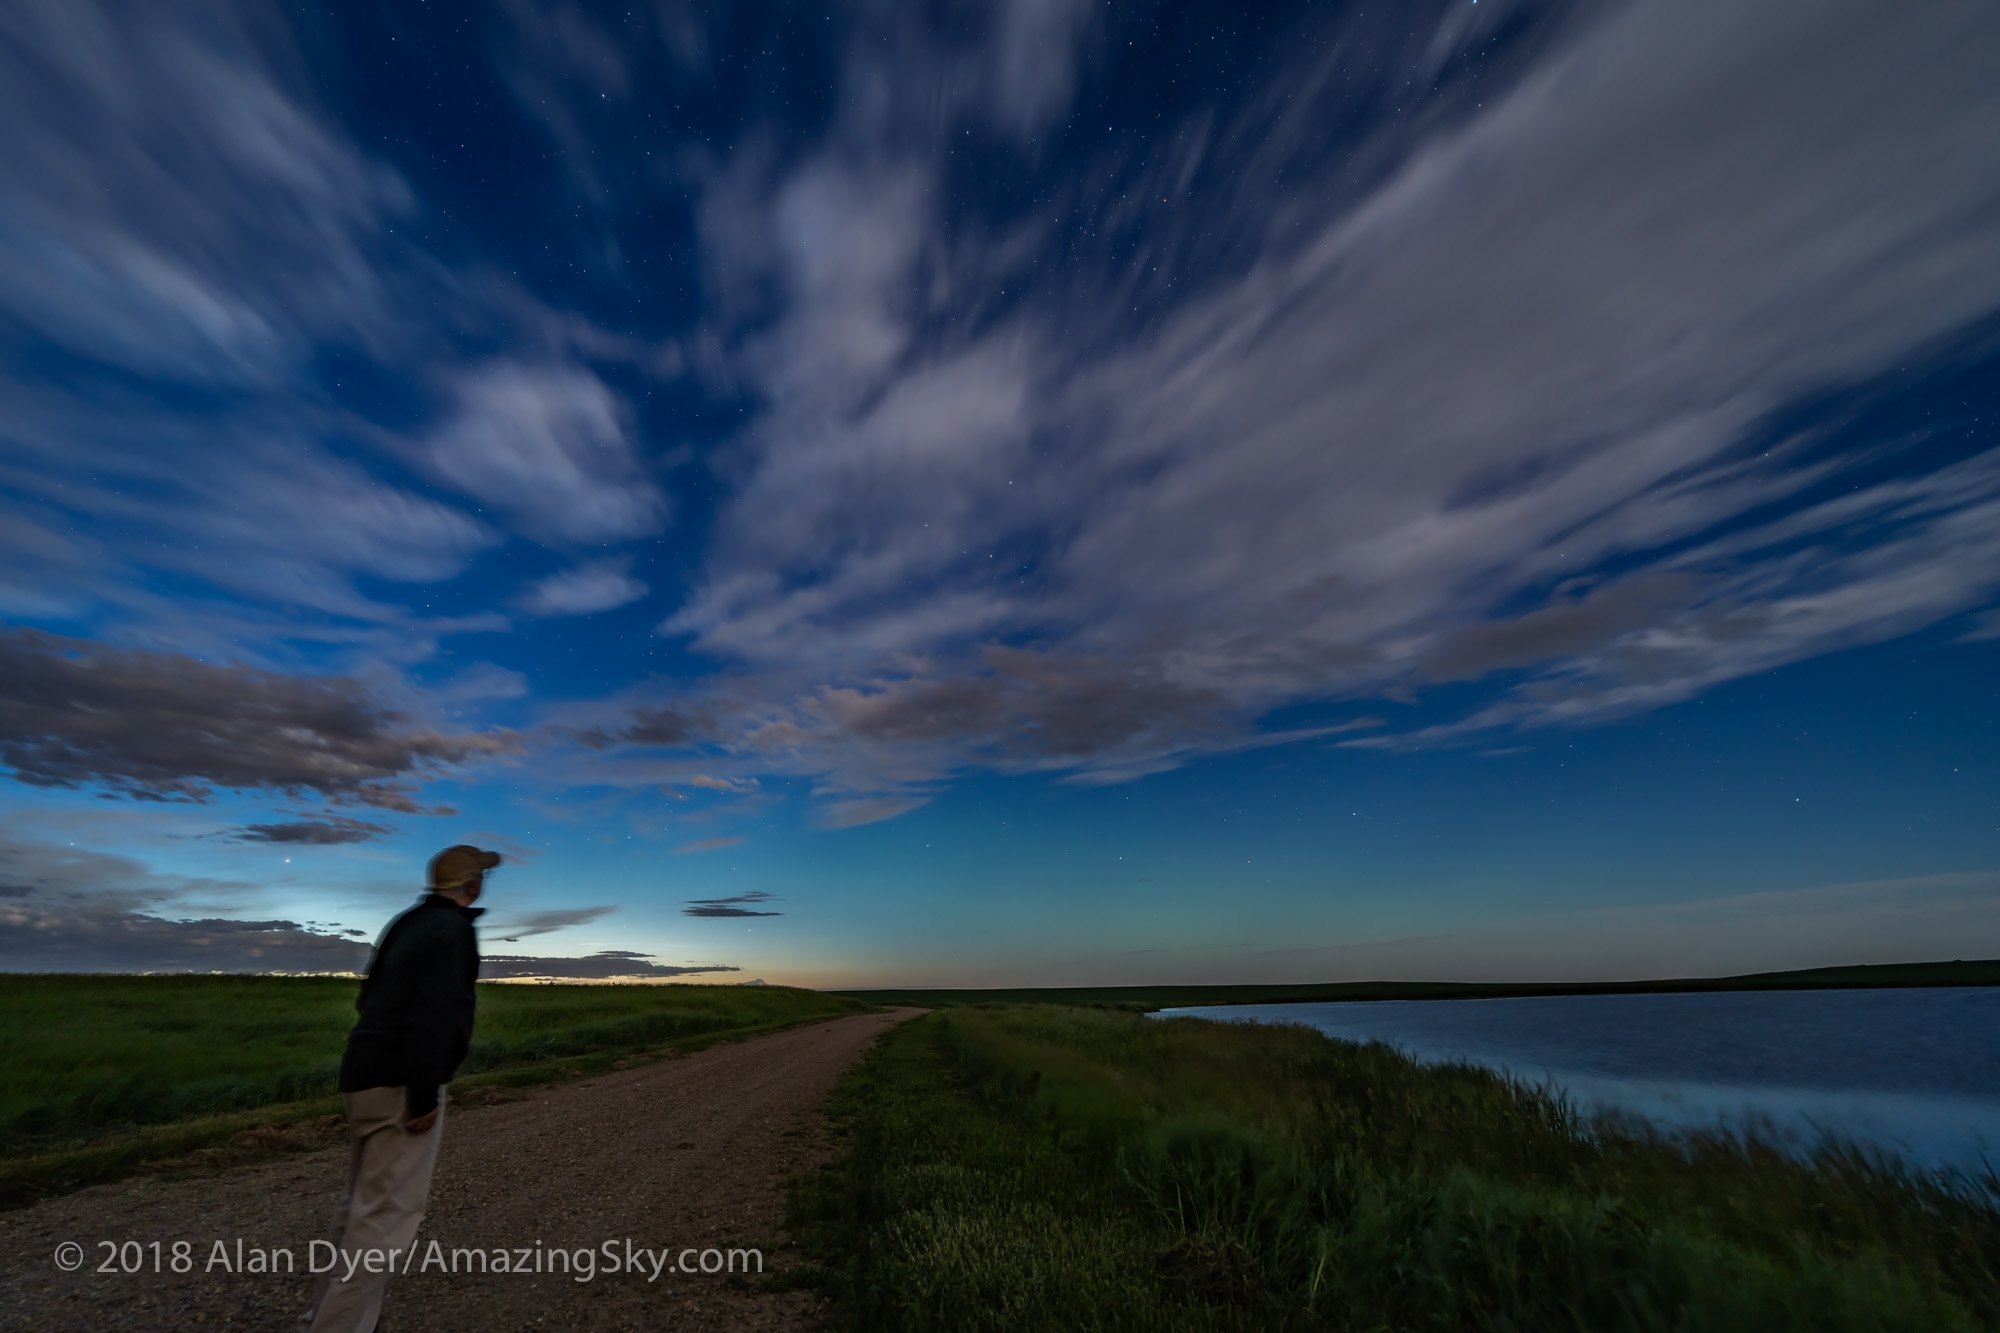
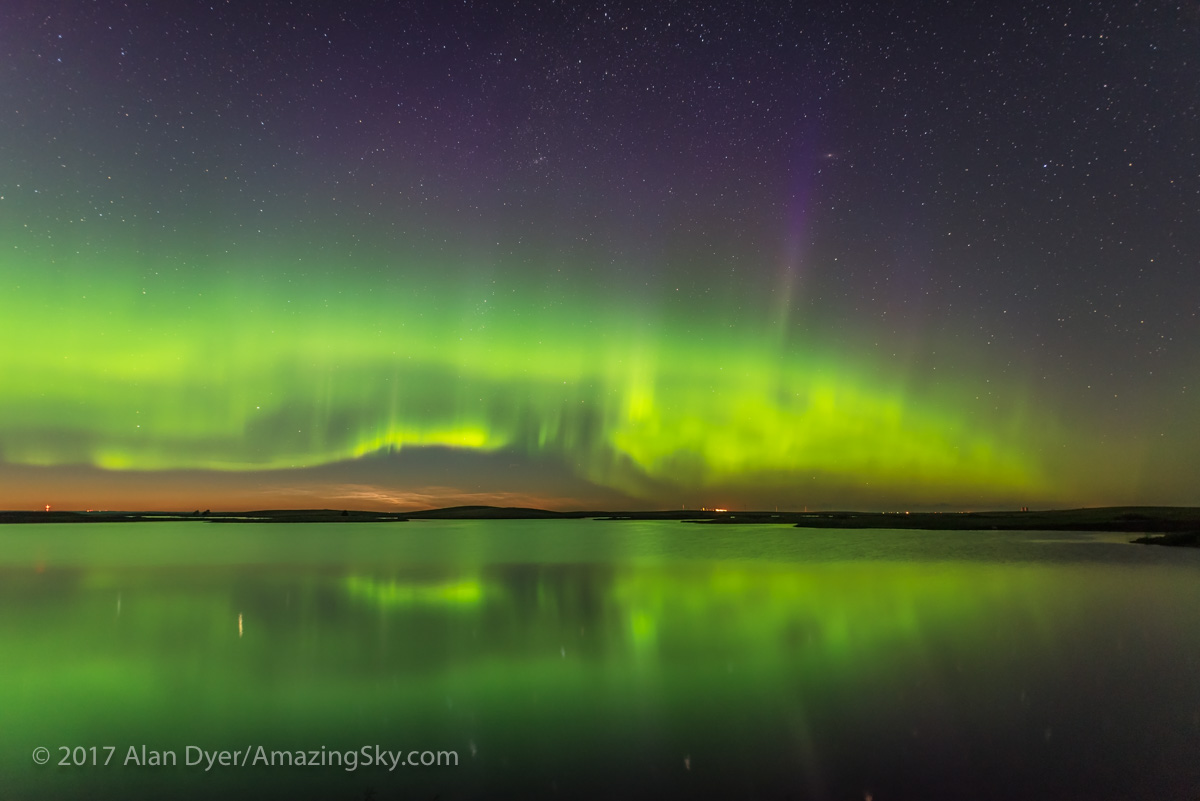
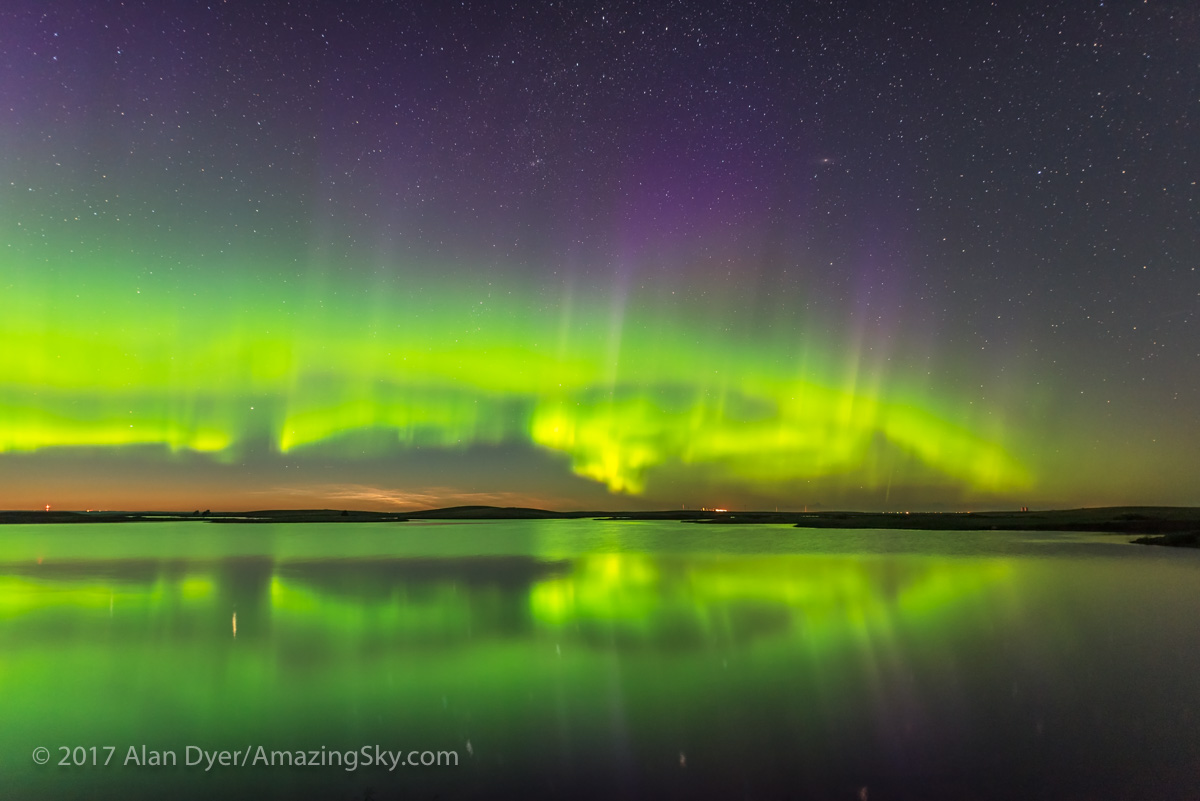
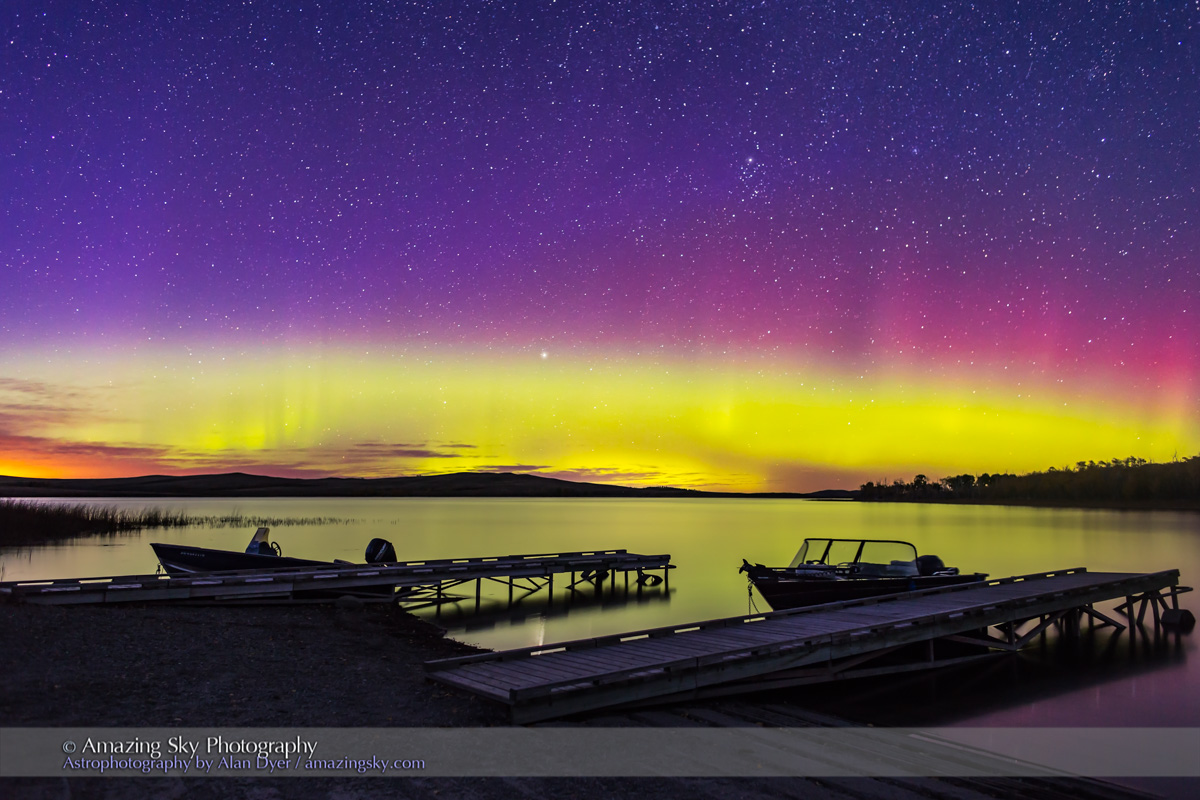
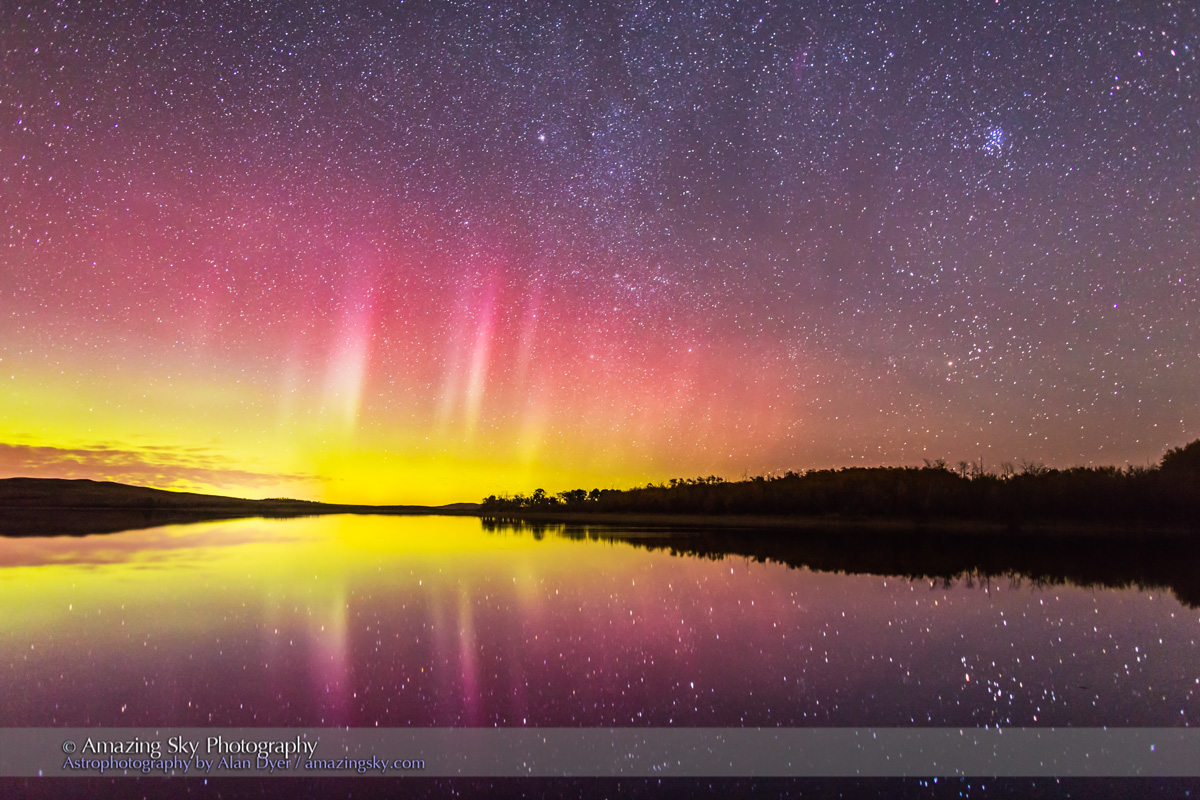
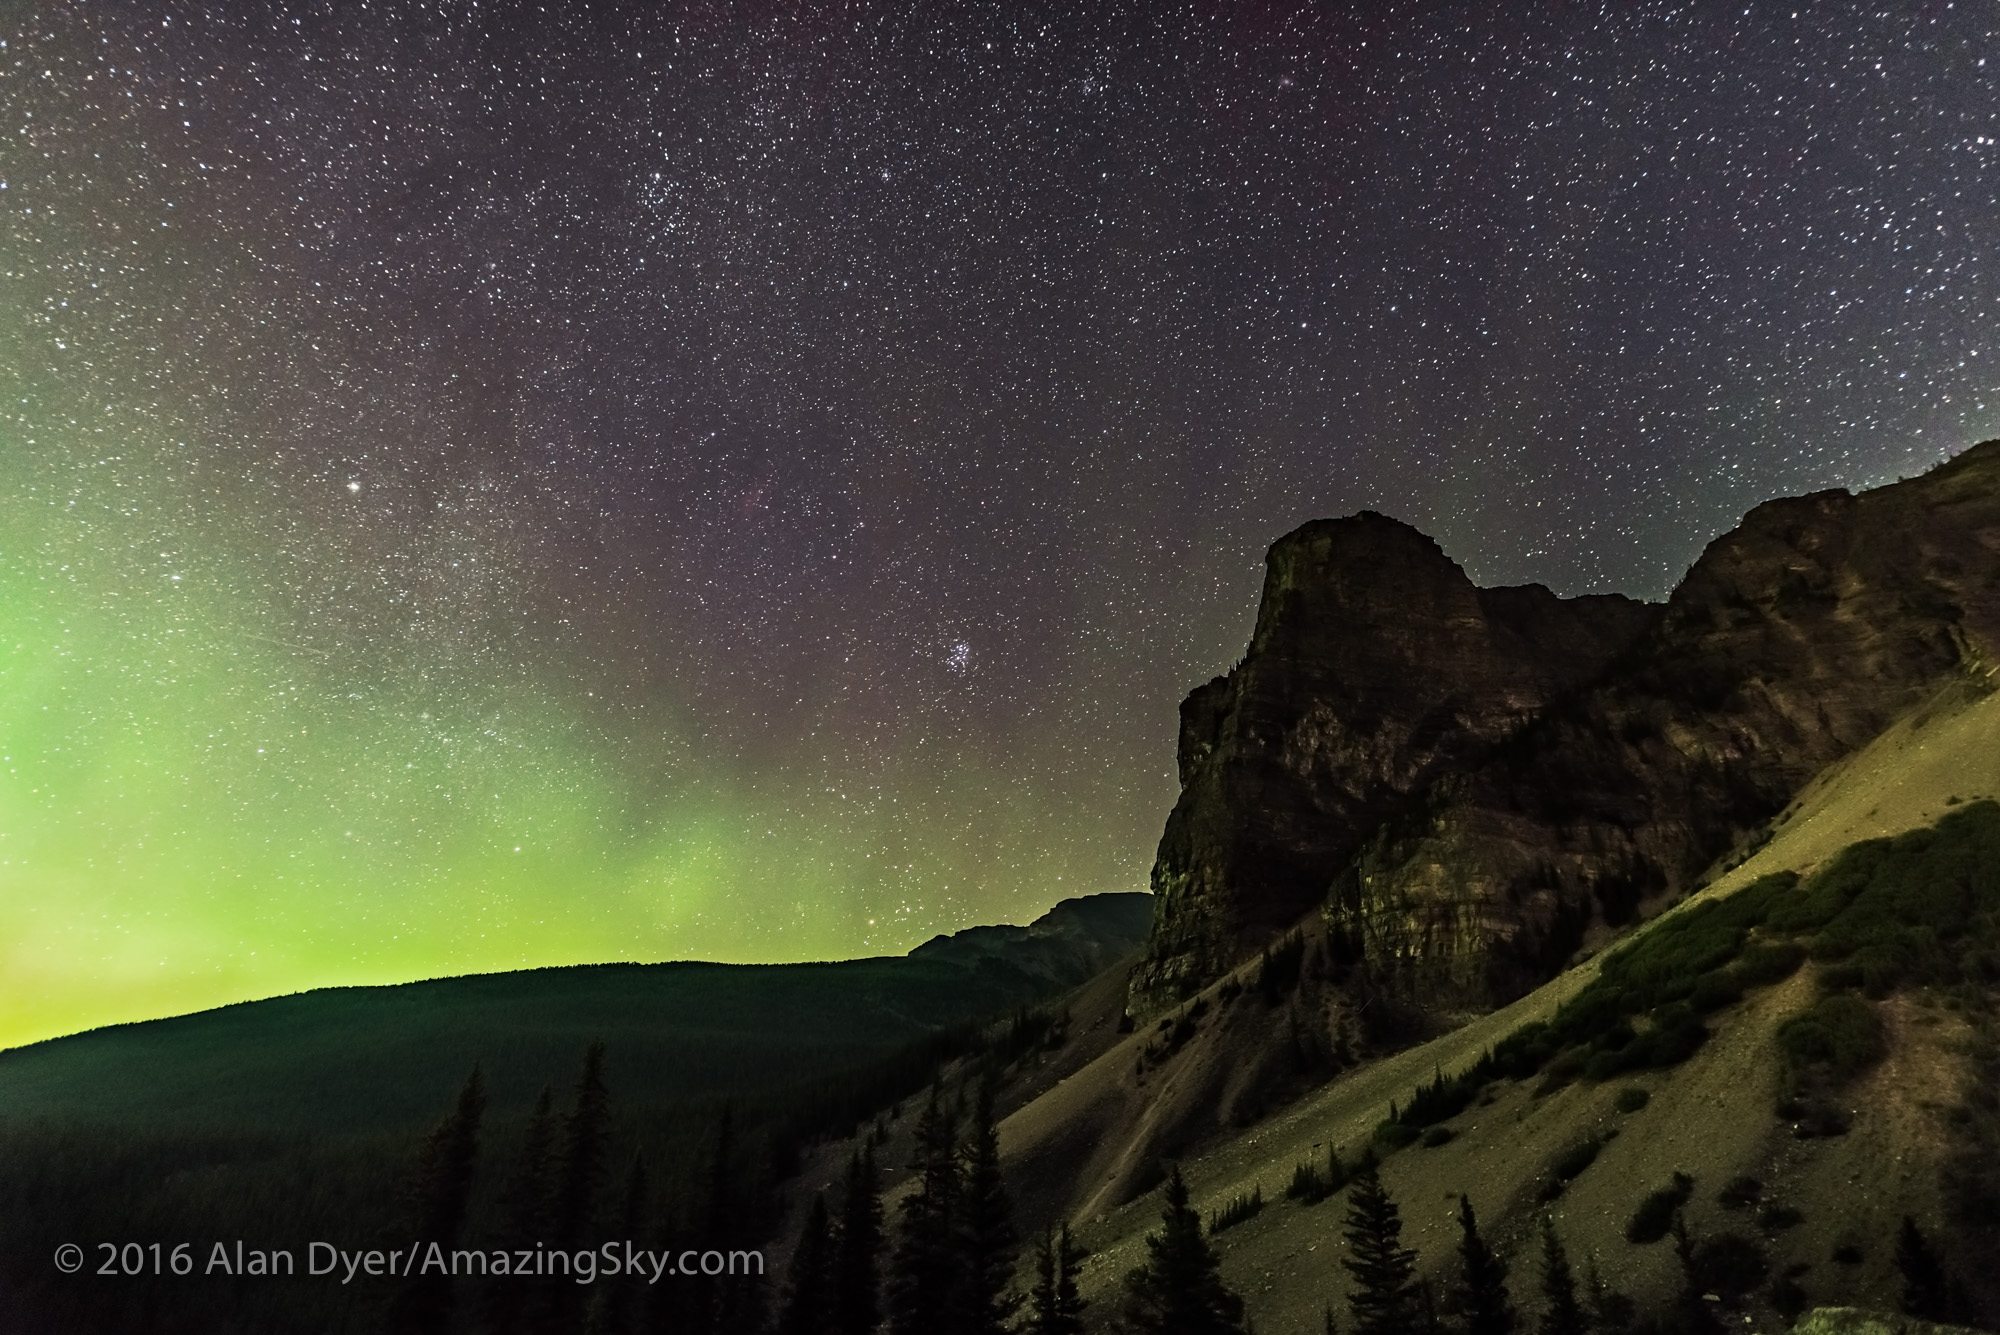
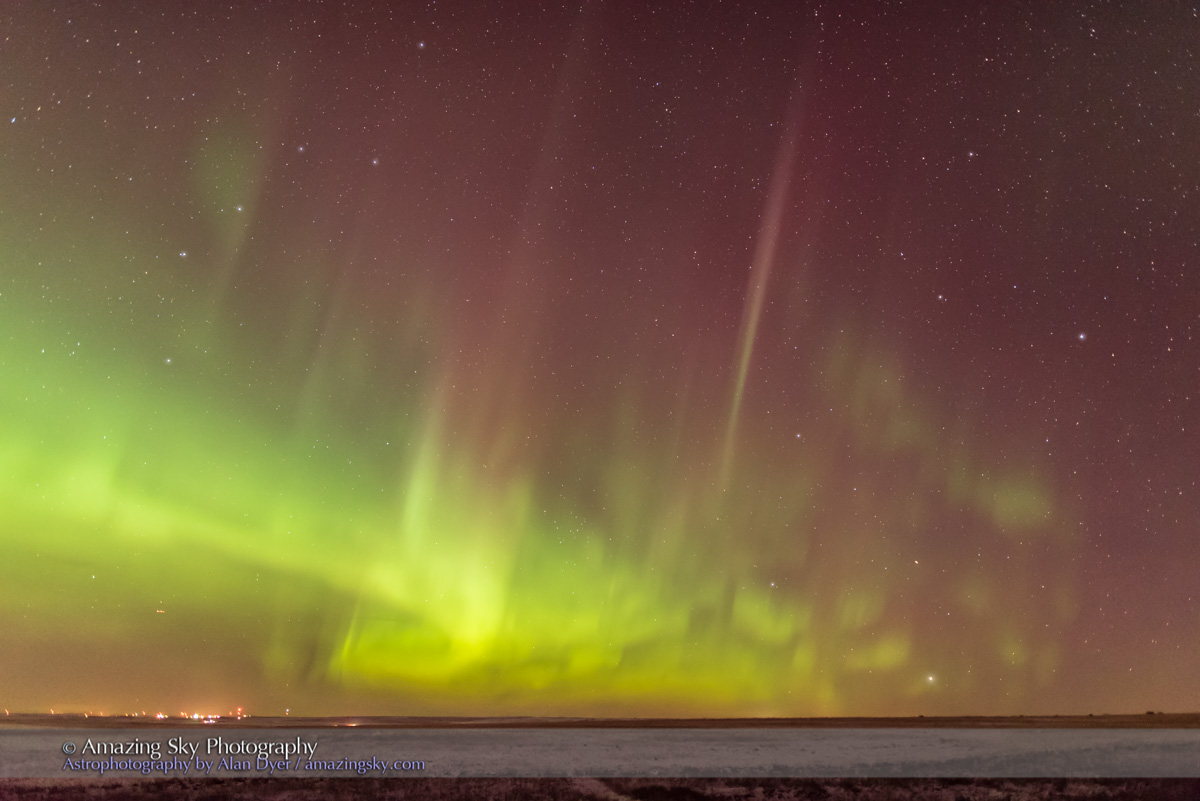
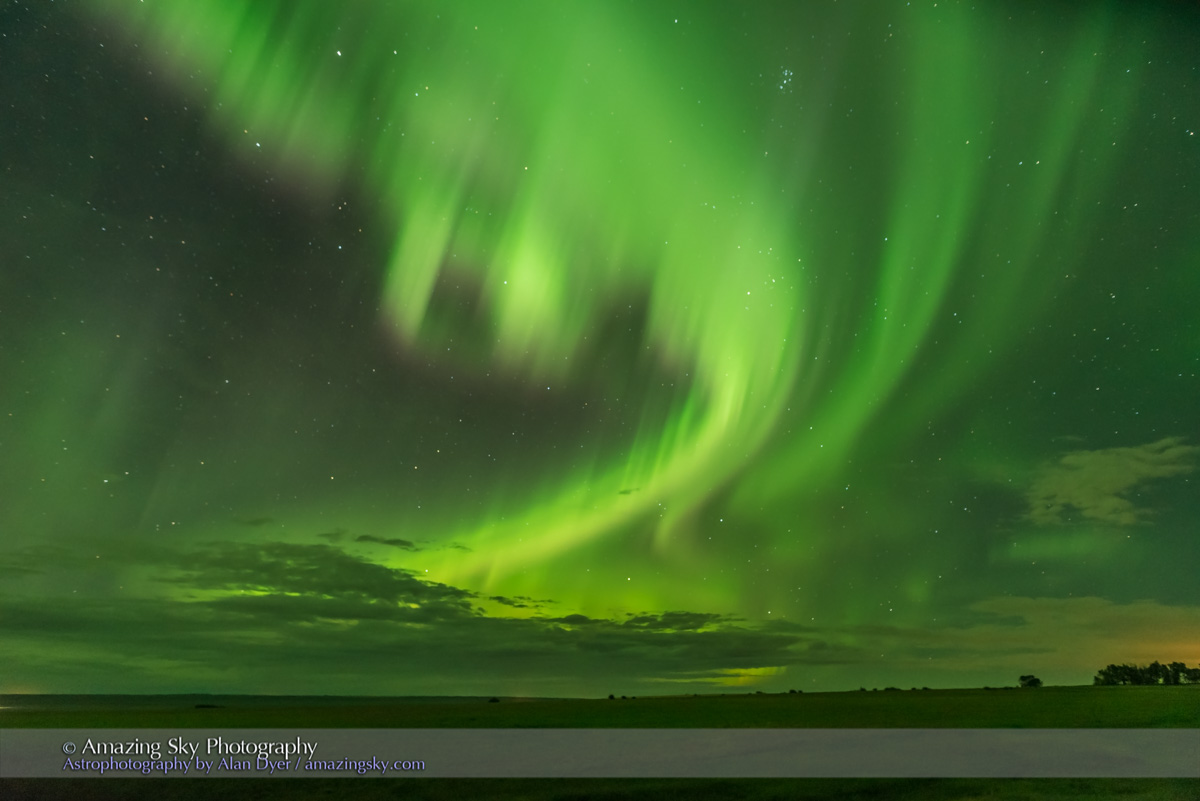
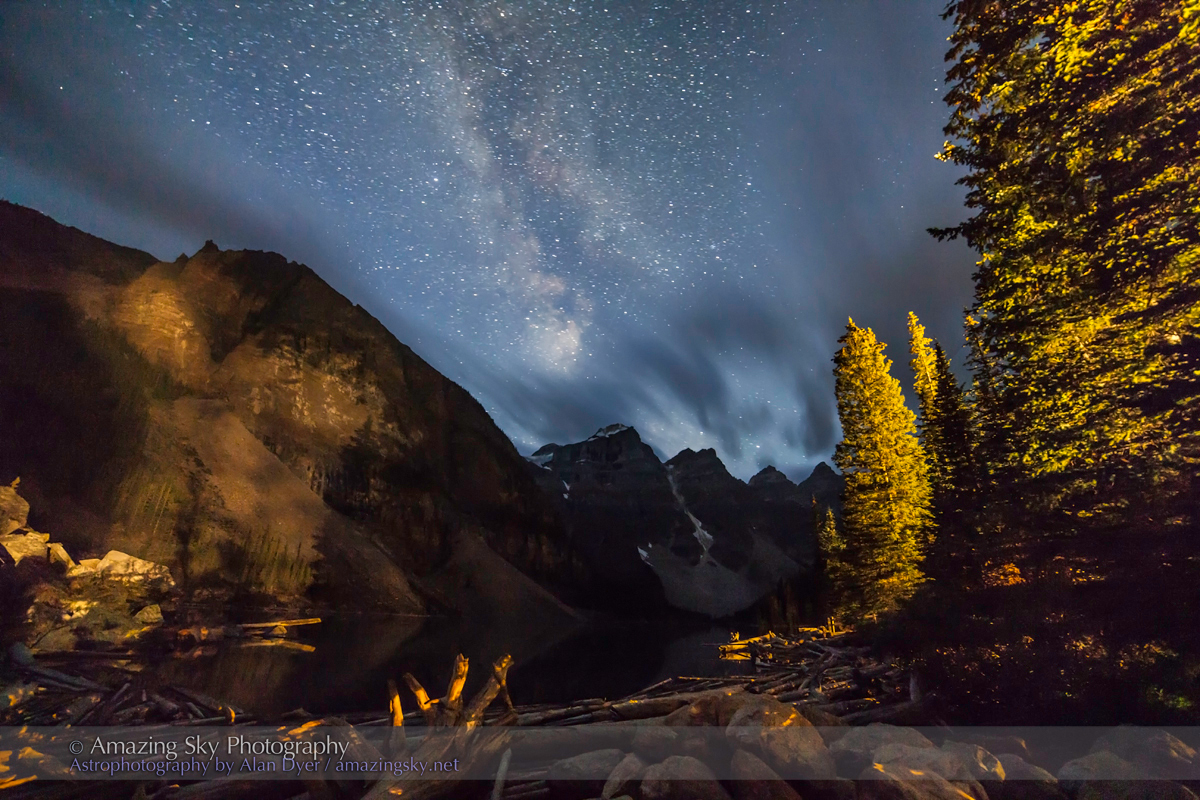
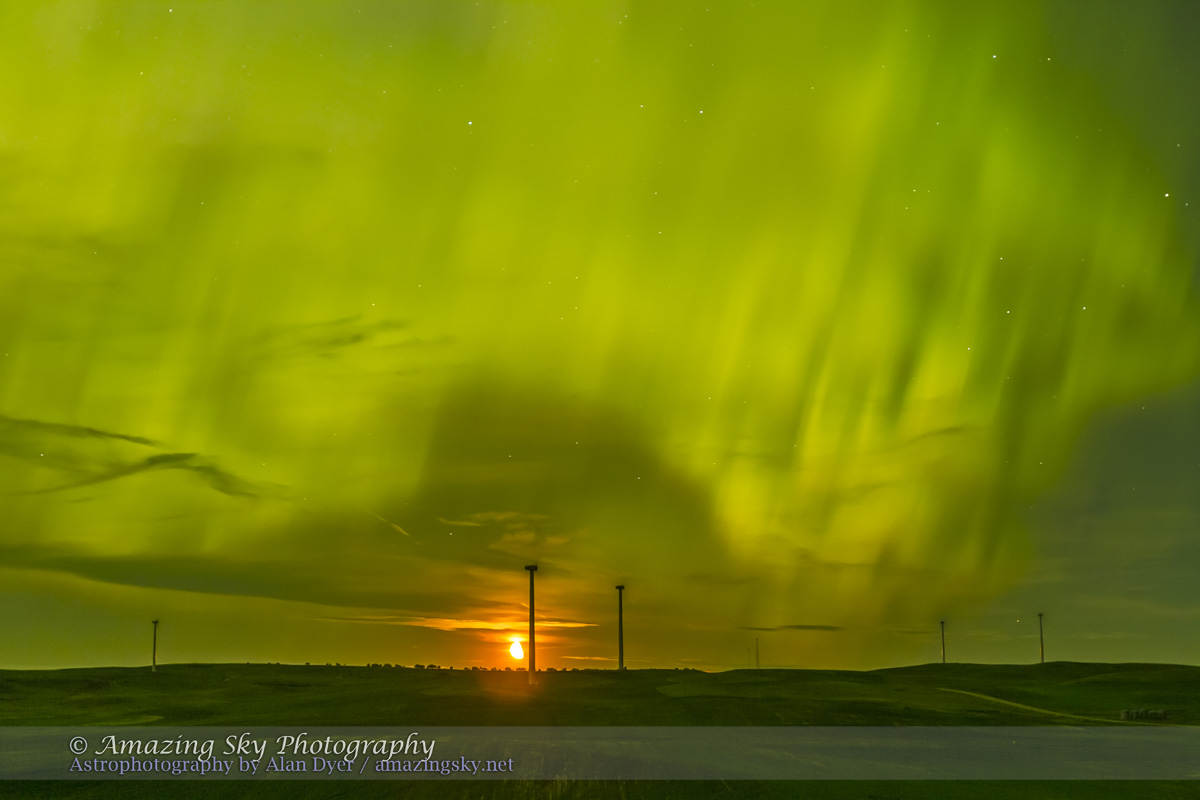
As it got dark this night, large swaths of red were easily visible to the eye, especially to the northwest as above, and below.
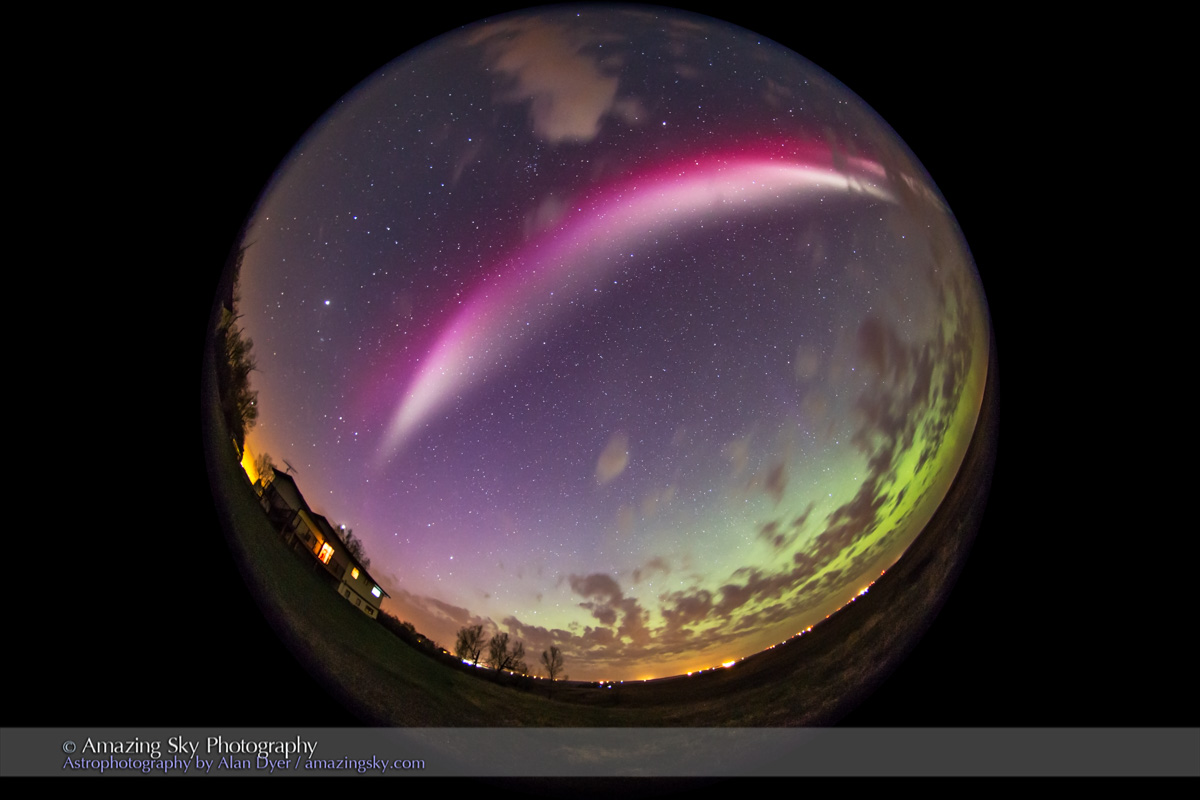
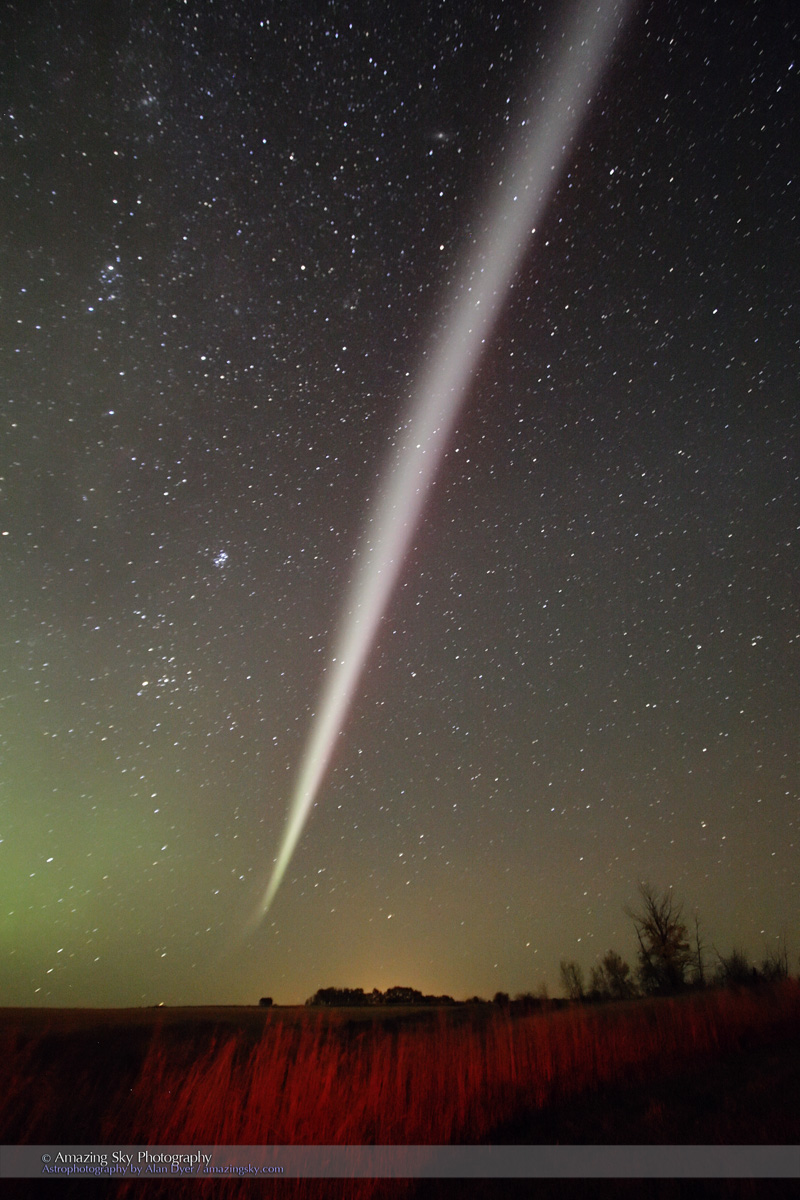
A single 5-second exposure at f/2.8 with the TTArtisan 11mm lens on the Canon R5 at ISO 1600.
Early on a large curtain of red extended across the sky, from northwest to southeast. It is rare to see bright reds with the eye, and unusual to see the reds so extensive and sky-spanning.
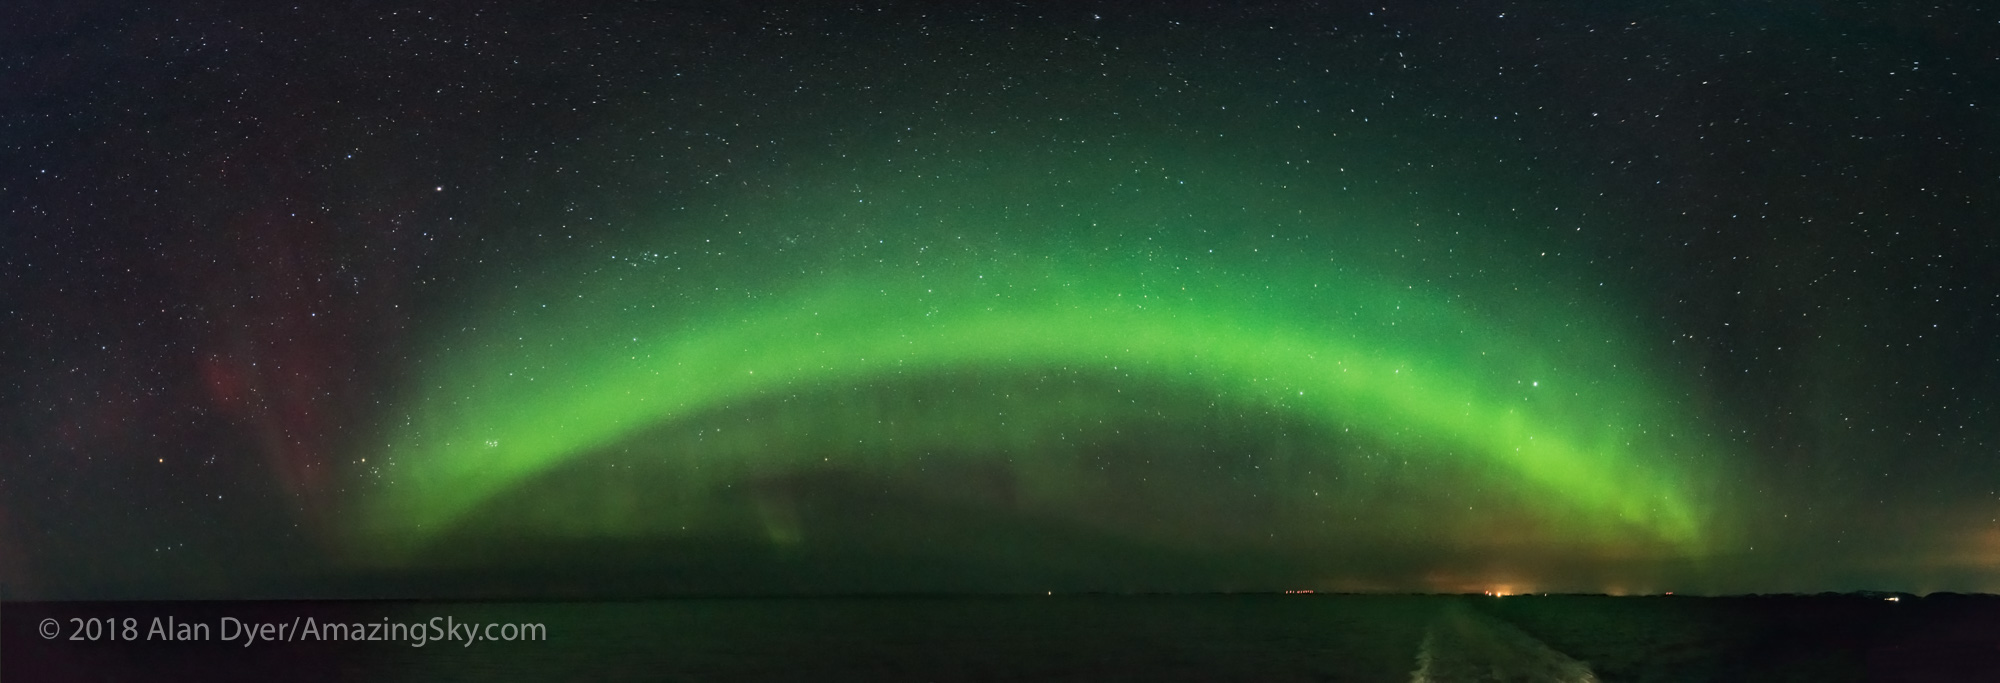
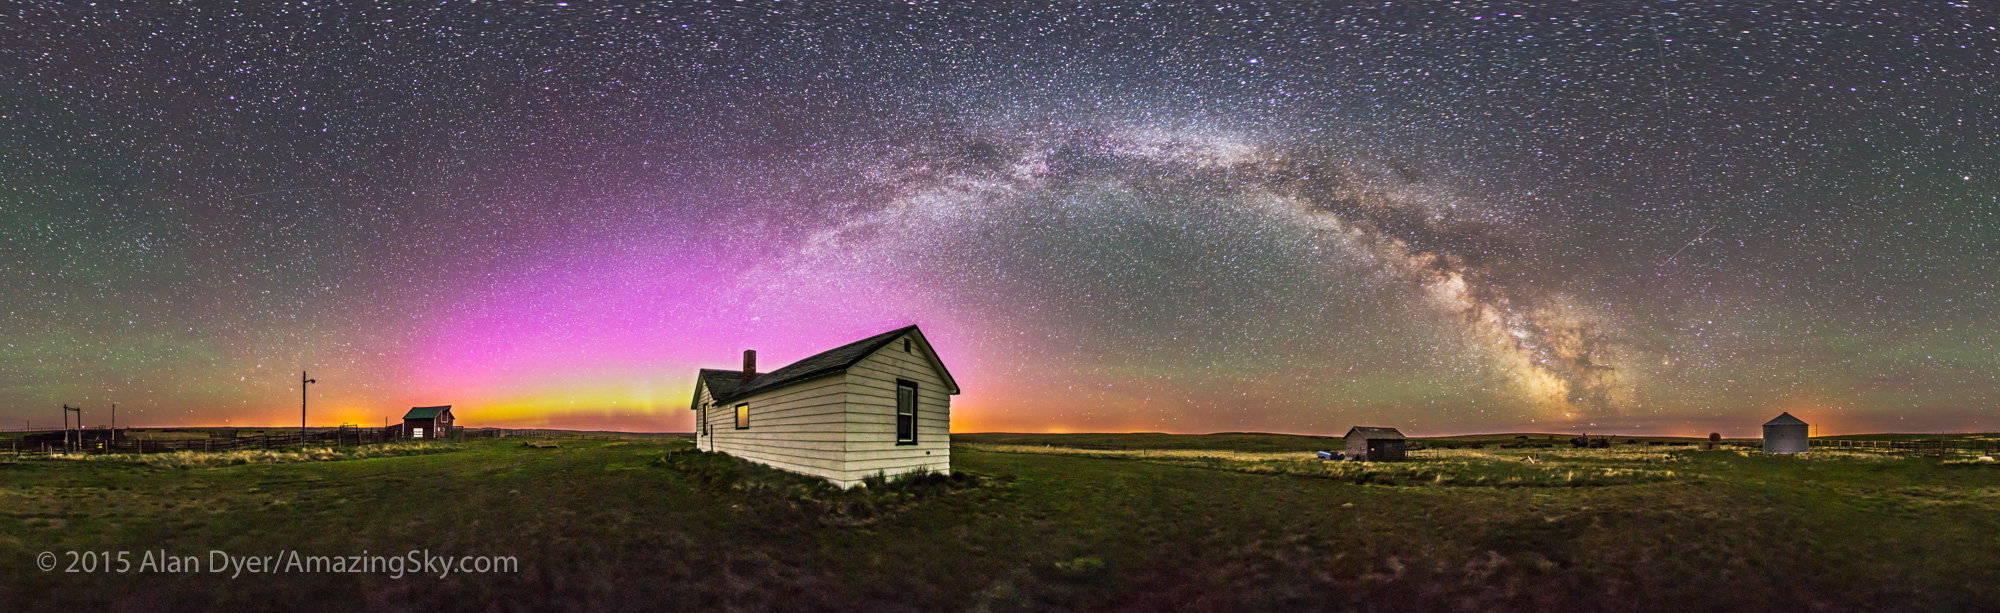
This 360º panorama is a stitch of 6 segments, 60º apart, each 5-second exposures at f/2.8 with the TTArtisan 11mm full-frame fish-eye lens on the Canon R5 at ISO 1600, and in landscape orientation.
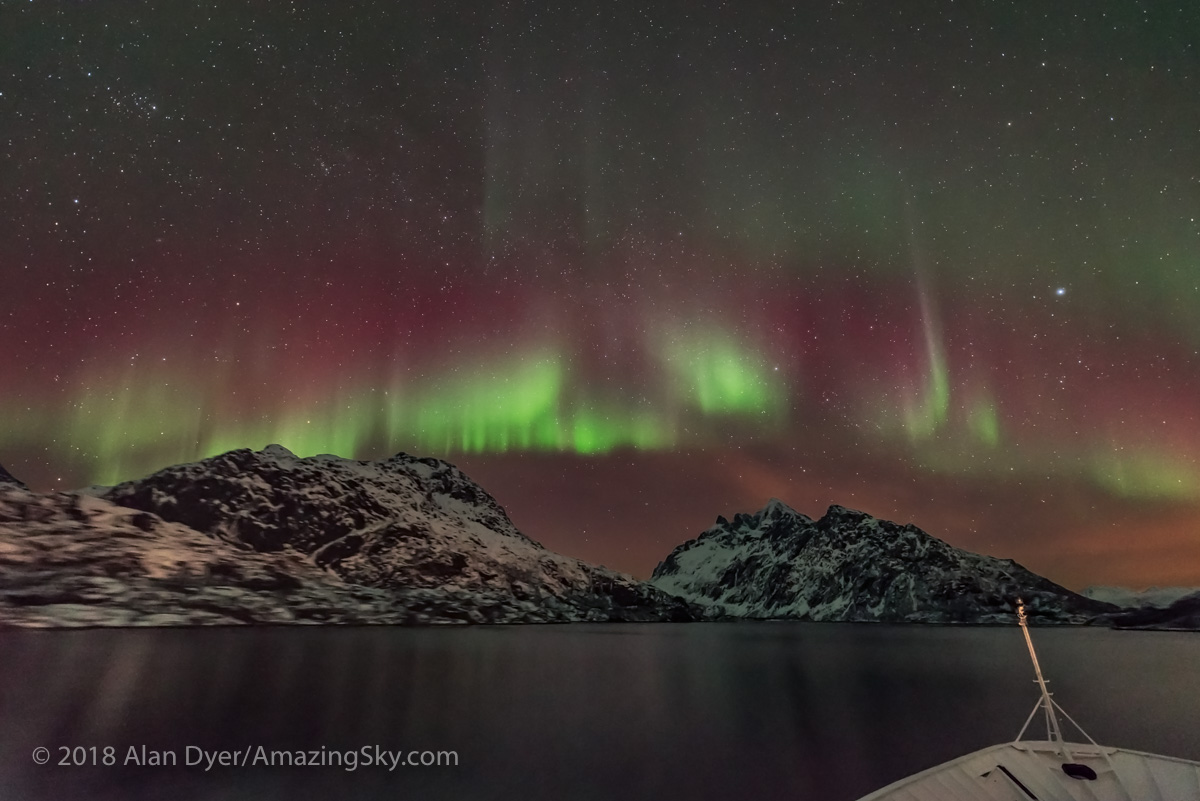
The reds are mostly from oxygen atoms, but can also come from nitrogen molecules, which require the input of a lot of energy to get excited and glow! They certainly were this night.
The reds mixed with the more common green light from oxygen to produce shades of yellow and orange, and with blues from nitrogen to produce vivid pinks and magentas. While the eye could see some of these subtle colours, a camera (with its longer exposure and wider aperture lens compared to the human eye) was best for picking up the full range of what this show had on display.
This 360º panorama is a stitch of 10 segments, 36º apart, each 4-second exposure at f/2.8 with the Laowa 10mm rectilinear wide-angle lens on the Nikon Z8 at ISO 1600, and in portrait orientation.
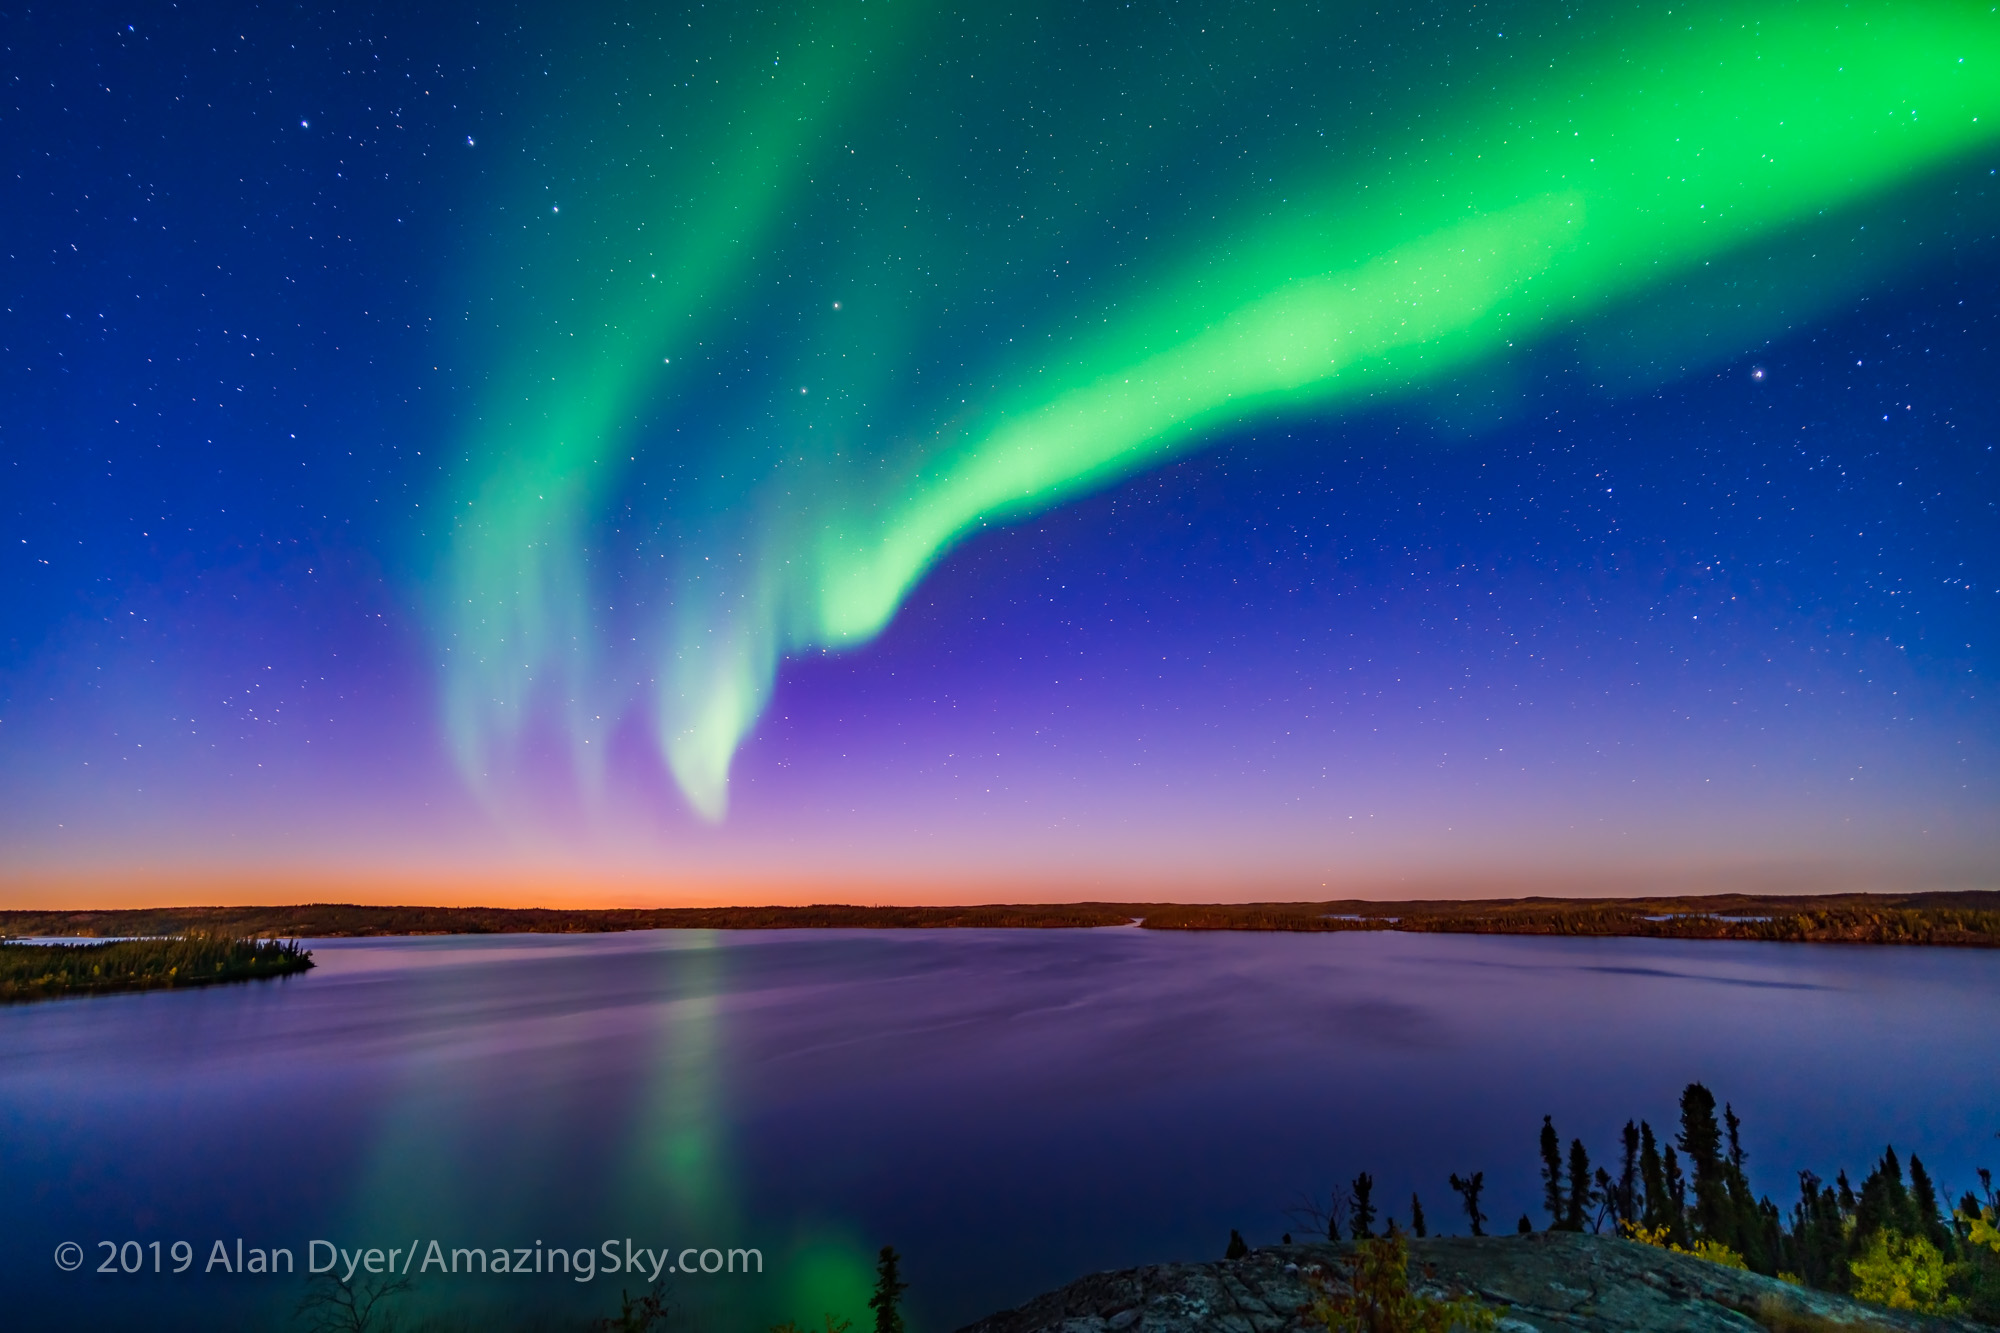
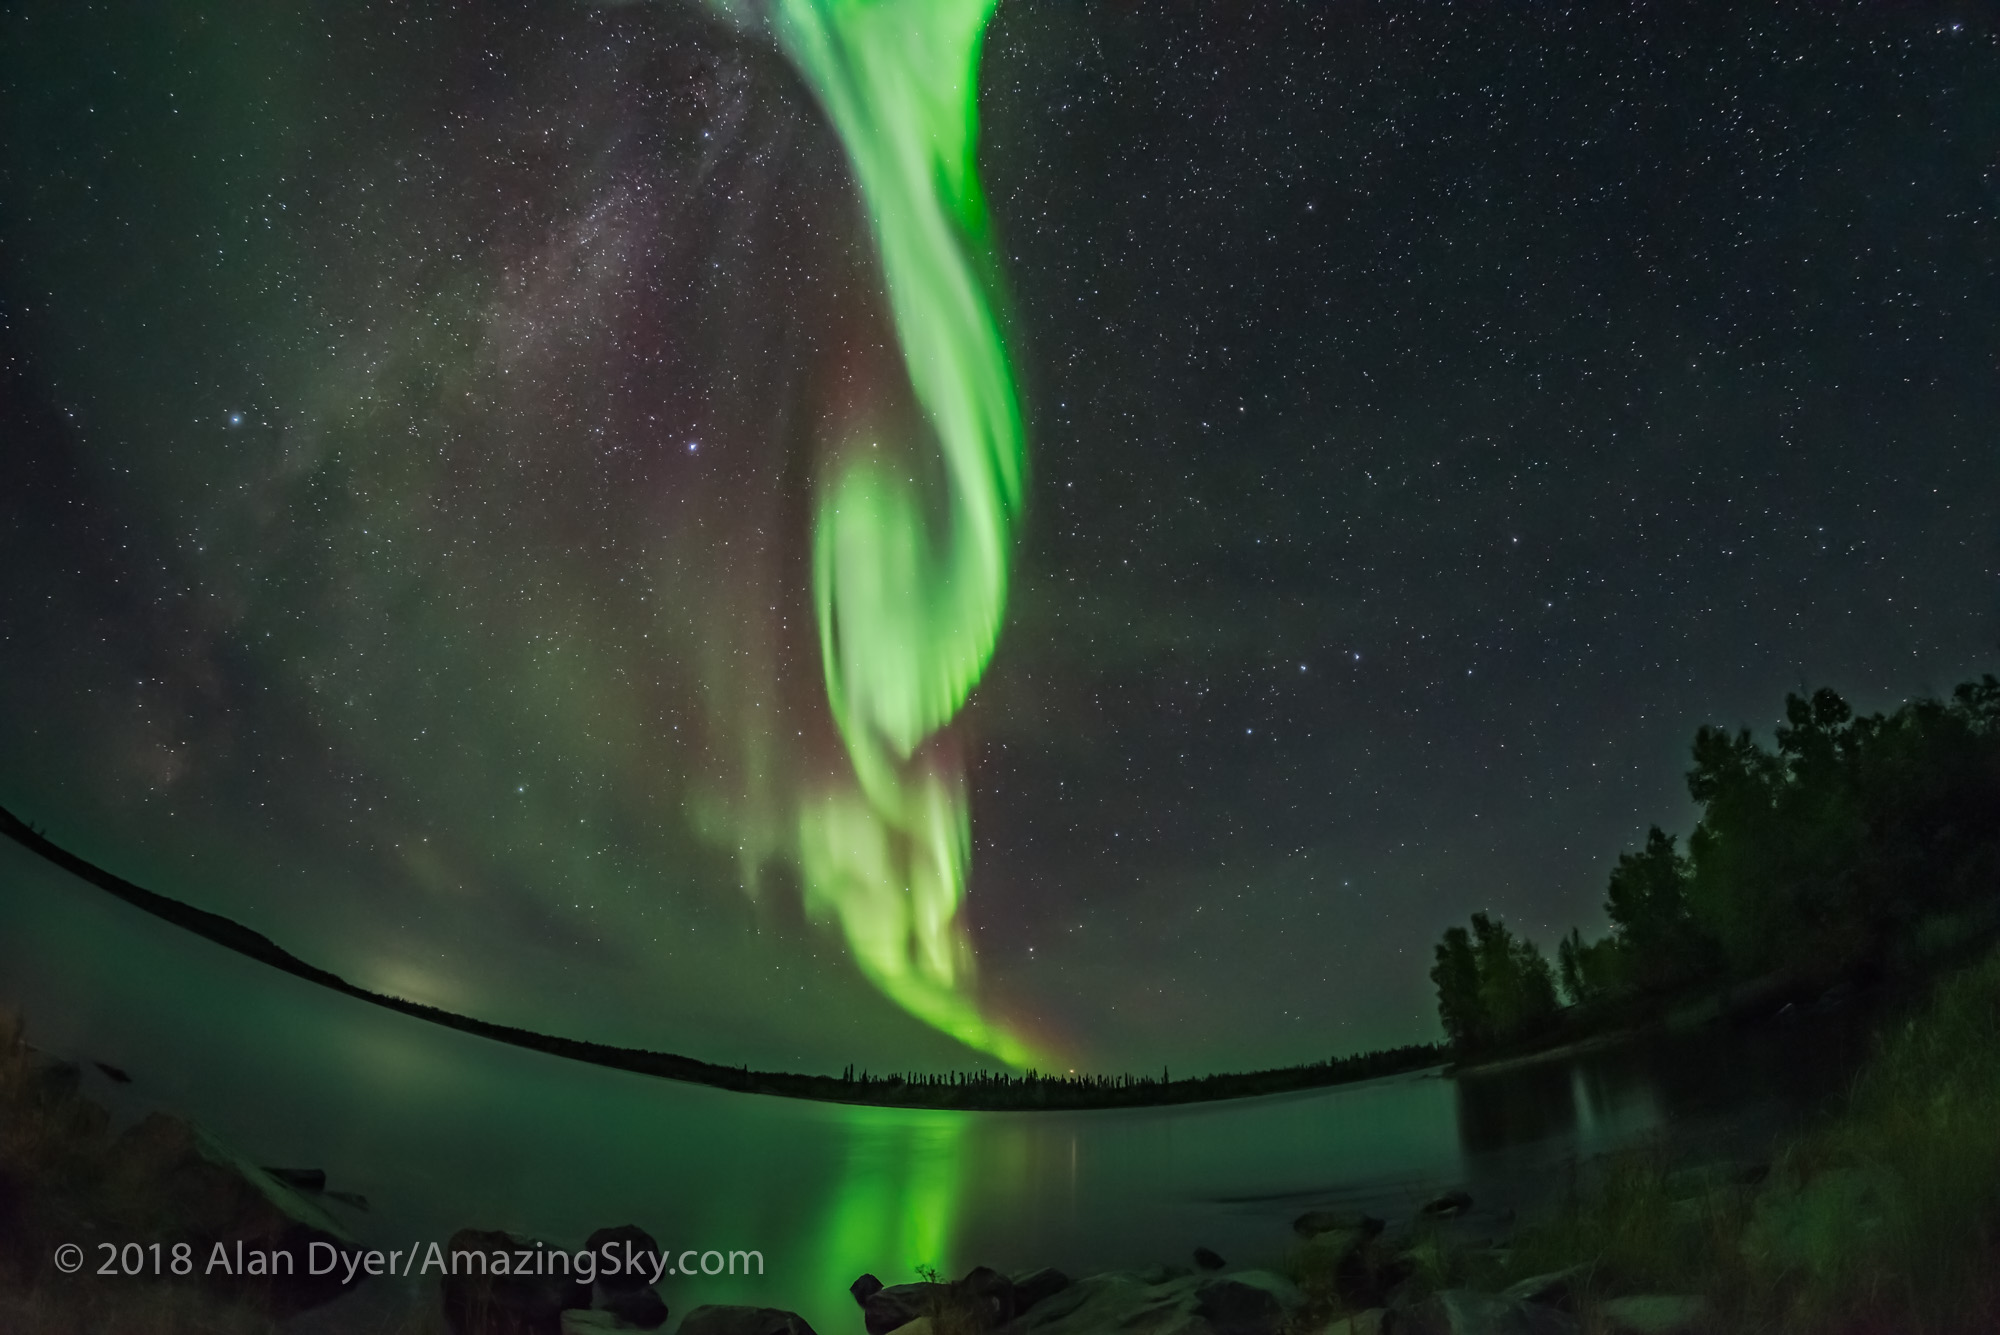
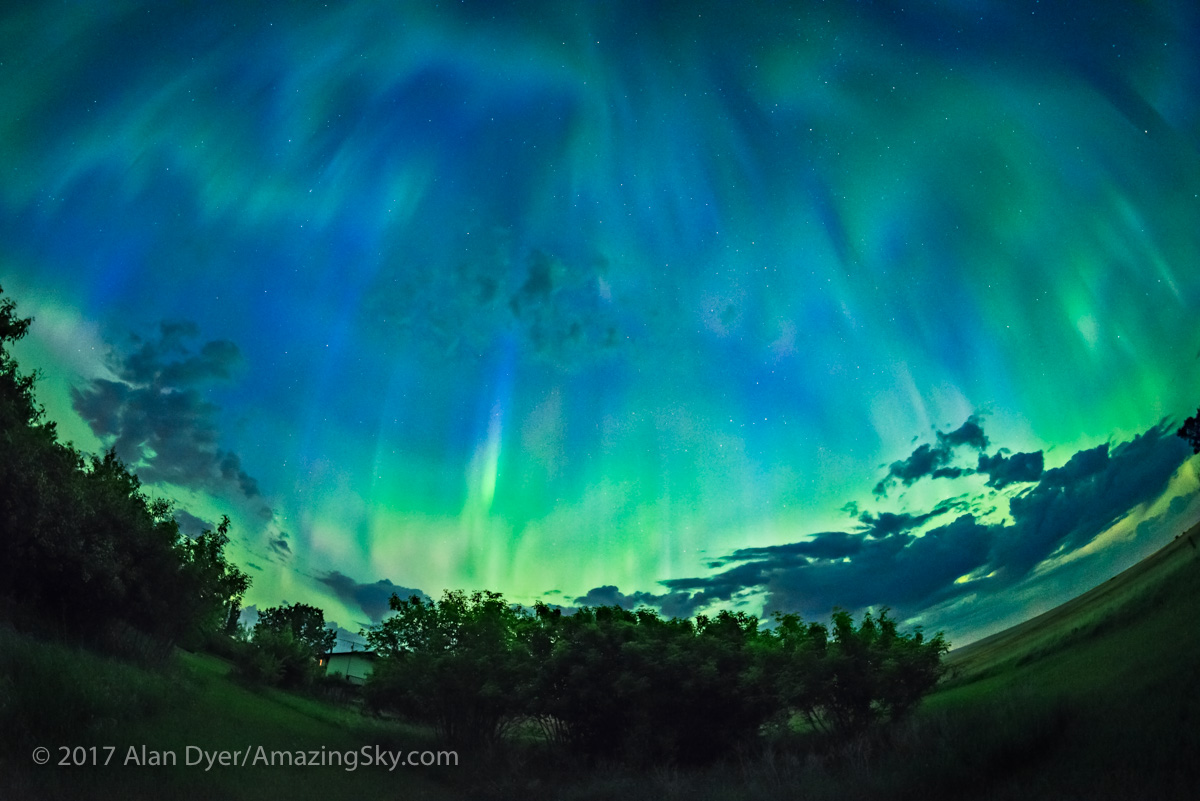
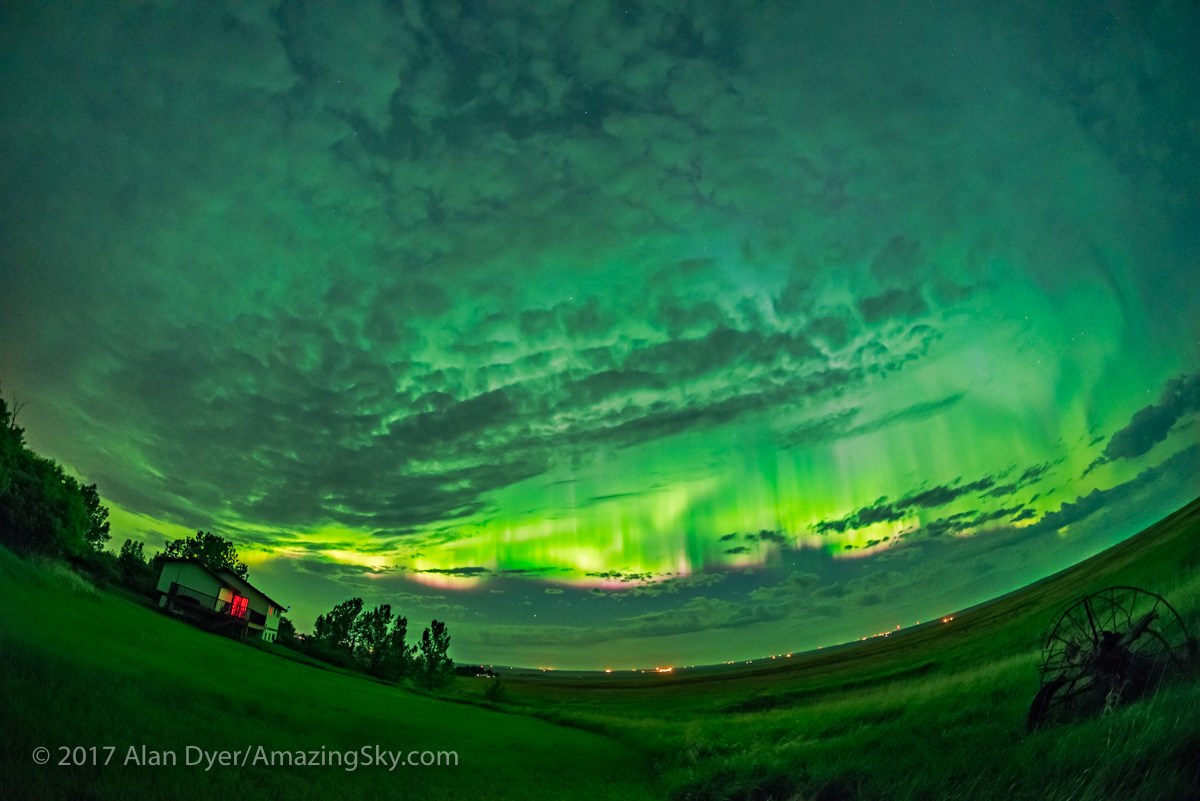
The panorama above taken about 2 hours after the previous all-sky scene, shows a quieter aurora but still with curtains covering the sky and converging to the “magnetic zenith,” a little south of the point straight overhead.
Such an all-sky show of aurora is among the sky’s finest spectacles.
A real-time video with the Nikon Z6III at ISO 25600 and Viltrox 16mm lens at f/1/8.
In the video above taken early in the evening I pan around the horizon over the full 360º to take in the scene much as the eye did see it. Video uses shorter exposures more like the eye does. I narrate the video at the camera.
All single 4-second exposures at f/2.8 with the Laowa 10mm rectilinear wide-angle lens on the Nikon Z8 at ISO 1600.
When the aurora covers the sky it’s hard to take it all in and capture it on camera. The 10mm ultra-wide lens I used for the images above sweep up well past the zenith to show the converging curtains, forming shapes that kept changing by the minute.
In the video below I used the same lens with the camera turned to portrait orientation to create a “vertical video,” again narrated at the camera. It shows how the aurora was changing, but slowly this night. It did not have the rapid dynamics I’ve seen with other bright displays, despite the obvious high energies involved here to excite the reds.
Real-time video with the Laowa 10mm lens at f/2.8 and Nikon Z8 at ISO 25,600 & 1/4 second shutter.
Again, this real-time video captures the scene much as the unaided eye saw it. I’ve not processed either of these real-time videos, other than what the camera itself did.
This is a panorama of 12 segments, each 1 second at f/1.8 with the Viltrox 16mm lens on the Nikon Z6III at ISO 1600. Stitched in Adobe Camera Raw.This is a stitch of 6 segments, 60º apart, each 4-second exposure at f/2.8 with the TTArtisan 11mm full-frame fish-eye lens on the Canon R5 at ISO 1600, in landscape orientation. Stitched in PTGui.
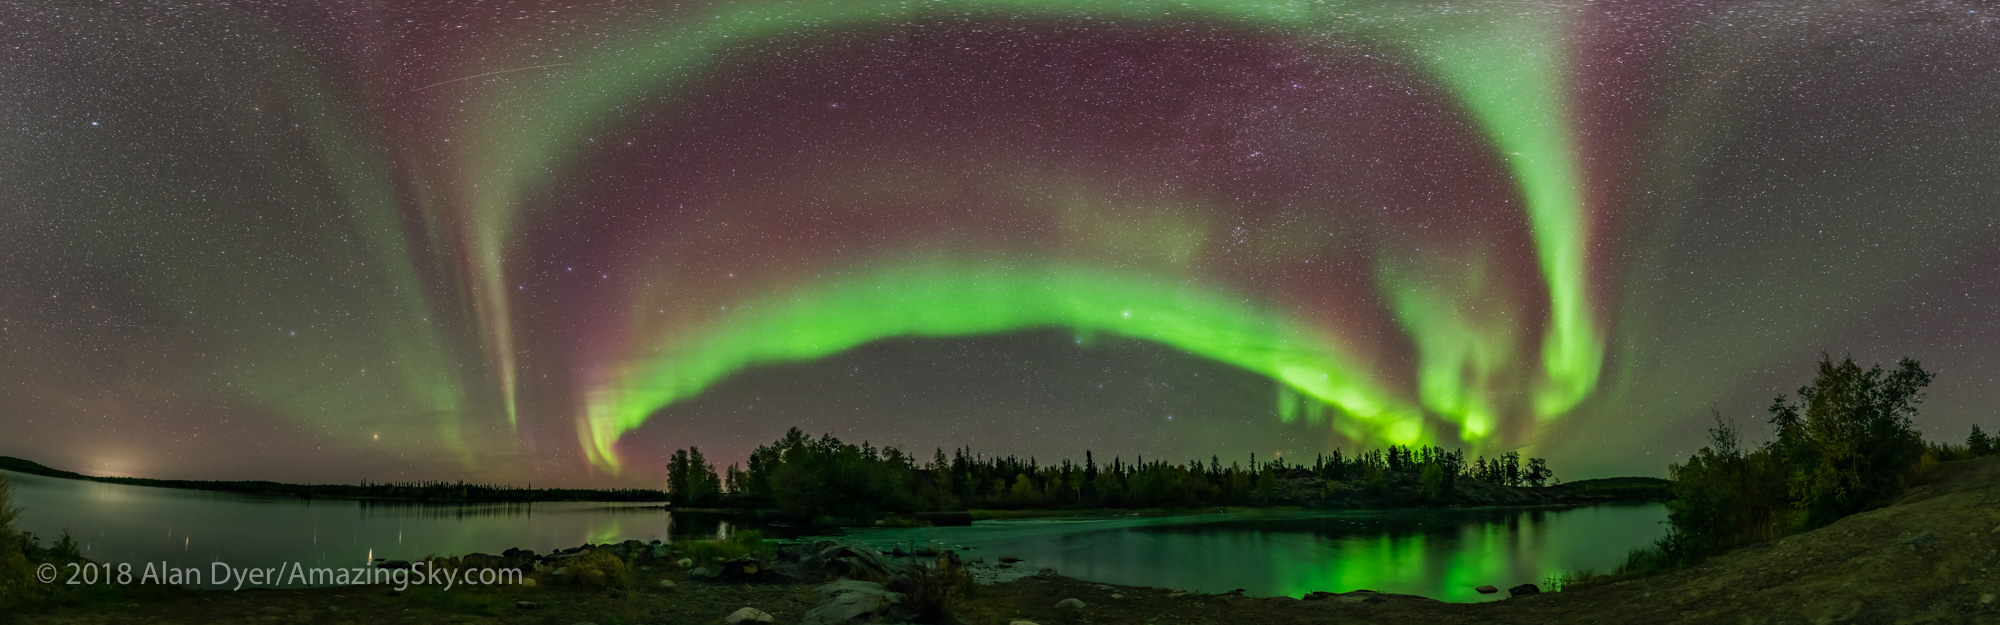
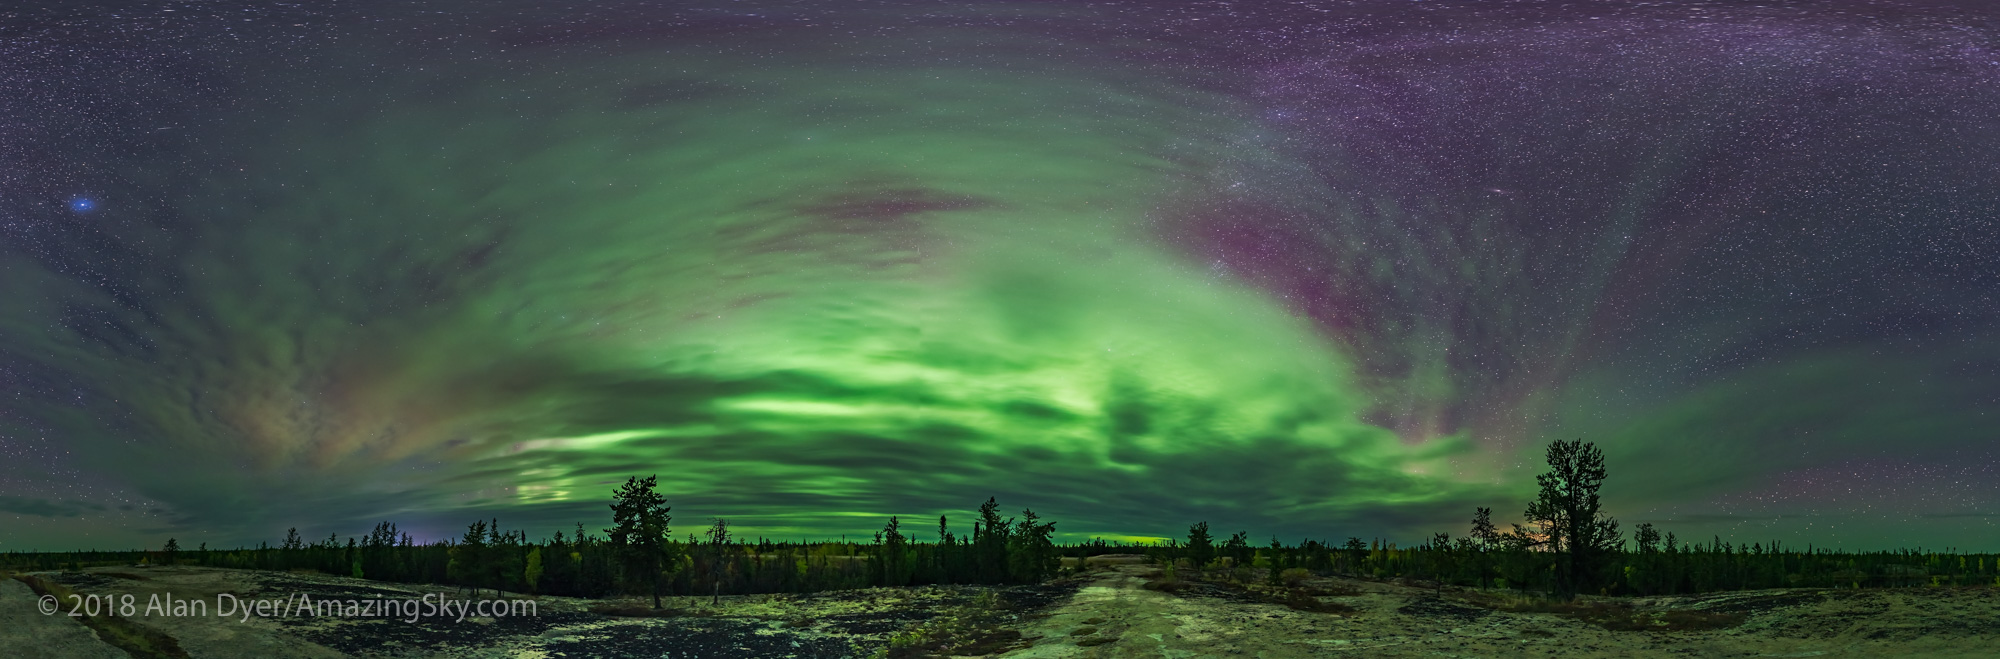
On a night like this, I try to shoot not only single still images and videos, but also multi-image panoramas, such as the circular images earlier and these two rectangular “panos” above. Both cover a full 360º in width but don’t go up to the zenith.
Again, they record the range of colours that were on show on this Kp8 night, which were more visible and extensive than usual for an all-sky display.
I also shot two time-lapse sequences. These form the main visuals for this edited music video I produced around the time-lapses.
The link takes you to my Vimeo channel to watch the video. Do enlarge it to full screen!
A single 2.5-second exposure at f/1.8 with the Viltrox 16mm lens on the Nikon Z6III at ISO 1600.
I also always try to take some selfies at every great aurora show, with me often lit just by aurora light! They’re fun to use for talks and “bio pix.”
This is a single 4-second exposure at f/2.8 with the Laowa 10mm lens on the Nikon Z8 at ISO 1600.
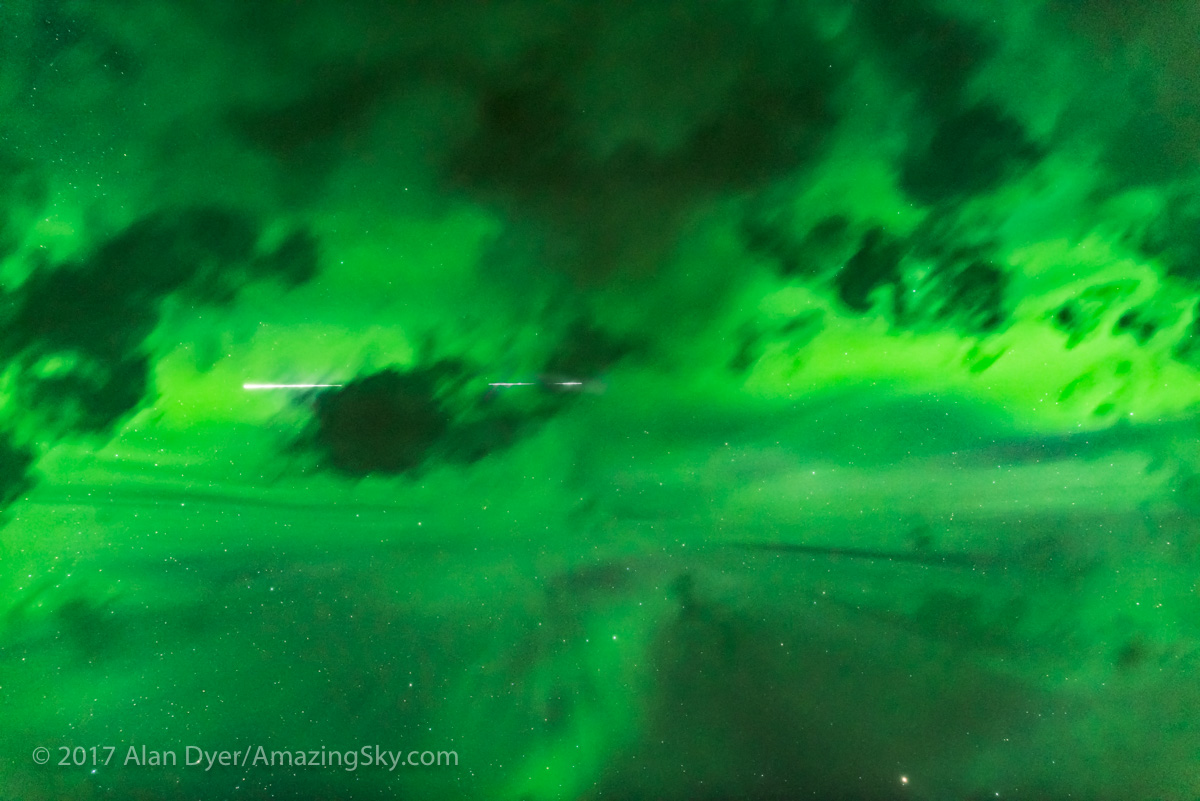
As a final bonus this night, one of the fish-eye lens time-lapse frames happened to capture a bright meteor. You see it briefly in a flash in the music video above, but below is the single frame.
A single 4-second exposure at f/2 with the TTArtisan 7.5mm circular fish-eye lens on the Nikon Z8 at ISO 1600. Taken as part of a 780-frame time-lapse.
Because it is streaking away from the constellation of Taurus, this is likely a member of the annual Taurid meteor shower which was in its final nights of the long period it is active in late October and early November. In fact, there are two Taurid showers, Northern and Southern, active at once and coming from similar spots in Taurus. They are known to produce bright fireballs and this was certainly one!
While the Sun is now in the downward slope of its cycle, coming off “solar max” last year, we may still see more major storms and aurora shows like this. Historically, the biggest solar flares and aurora displays often occur in the 2 or 3 years after solar maximum.
So stay tuned! The sky may still light up red with Northern Lights!
It has been many years since we were treated to an aurora as widely seen as the show on May 10, 2024. Here’s my tale of the great display.
As the sky darkened around the world on May 10/11, 2024, sky watchers in both the northern and southern hemispheres were amazed to see the sky lit by the deep reds, greens and pinks of a massive display of aurora. For me, this was my first Kp8 to 9 show (to use one measure of aurora intensity) in more than 20 years, back in the film era!
Throughout the day, aurora chasers’ phones (mine included) had been beeping with alerts of the arrival of a major solar storm, with the usual indicators of auroral activity pinned to the top of the scale.
A NOAA satellite’s eye view of the ring of aurora May 10/11, showing it south of me in Alberta, and across the northern U.S. People in the southern U.S. saw it to their north.
As I show below, the graphic of the intensity of the band of aurora, the auroral oval, was lit up red and wide. This was a night we didn’t have to chase north to see the Northern Lights or aurora borealis — they were coming south to meet us (as I show above).
The Kp Index was reading 9 on SpaceWeatherLiveThe auroral oval was lit up red in the Ovation mapThe 3-hour predictions called for red and magenta alerts!
Observers in the southern hemisphere had the normally elusive aurora australis move much farther north than usual, bringing the Southern Lights even to tropical latitudes in Australia, South America and Africa.
The cause was a massive sunspot group on the Sun which had let off several intense solar flares.
Sunspot group 3664 was so big it could be seen with the naked eye, using solar eclipse glasses. Photo courtesy NASA.
The flares had in turn blown off parts of the Sun’s atmosphere, the corona, that anyone who saw the total eclipse a month earlier had admired so much. But a month later, the corona was being blown our way, in a series of Coronal Mass Ejections (CMEs), to collide with Earth.
A movie of six CMEs blasting toward Earth, captured by the SOHO satellite. Courtesy NASA/ESA.
As it happened I was scheduled to give a community talk in the nearby town early in the evening of May 10, on the topic of The Amazing Sky! Watching the indicators, I could more or less promise the audience that we would indeed see an amazing sky later that evening as it got dark.
Post talk, I hurried home to get the cameras ready, choosing to forgo more hurried driving out to a scenic site in southern Alberta, for the convenience of shooting from my rural backyard. As the sky darkened, the clouds were lit purple, and curtains of aurora appeared in the clear patches.
Clouds and aurora in twilight with the 11mm TTArtisan full-frame fish-eye lens.A bright arc of aurora shining through the purple clouds, with the 7.5mm TTArtisan circular fish-eye lens.
Something big was going on! This was promising to be the best show of Northern Lights I had seen from home in a year. (Spring 2023 had three great shows at monthly intervals, followed by an aurora drought for many months. See The Great April Aurora.)
A selfie at the start of the great aurora show of May 10, 2024.
I shot with four cameras (a Canon EOS R, Ra, R5 and R6) — two for time-lapses, one for real-time movies, and one for still images. I used the latter to take many multi-image panoramas, as they are often the best way to capture the wide extent of an aurora across the sky.
The arc of aurora in purple and white across the northern sky from home in Alberta at the start of the great display (about 11:30 p.m. MDT).
Early in the evening the arc of aurora wasn’t the usual green from oxygen, but shades of purple, pink, and even white, likely from sunlit nitrogen. The panorama above is looking north toward a strangely coloured arc of nitrogen (?) aurora.
Then after midnight a more normal curtain appeared suddenly, but toward the south, brightening and rising to engulf much of the southern sky and the sky overhead.
Looking south with the 15mm wide-angle lens.
It is at local midnight to 1 a.m. when substorms usually hit, as we are then looking straight down Earth’s magnetic tail, toward the rain of incoming aurora particles bombarding the Earth. During a substorm, the rain turns into a deluge — the intensity of the incoming electrons increases, sparking a sudden brightening of the aurora, making it dance all the more rapidly.
This is a 300° panorama of my home sky now filled with colourful curtains.
As the aurora explodes in brightness it often swirls up to the zenith (or more correctly, the magnetic zenith) to form one of the sky’s greatest sights, a coronal outburst. Rays and beams converge overhead to form a tunnel effect. It is jaw-dropping.
I’ve seen this many times from northern sites such as Churchill and Yellowknife, where the aurora often dances straight up. And from my latitude of 51° N in western Canada, the aurora does often come down to us.
But this night, people at latitudes where, at best, the aurora might be seen just as a glow on the horizon, saw it dance overhead in a corona show to rival the solar eclipse, and that other corona we saw on April 8!
This is a panorama of a substorm outburst creating an overhead corona with rays converging to the magnetic zenith (south of the true zenith), and amid clouds. The rays show a rich mix of oxygen greens and reds, as well as nitrogen blues blending to create purples. Some greens and reds are mixing to make yellows.
Yes, the long exposures of aurora photos (even those taken with phone cameras) show the colours better than your eye can see them (insensitive as our eyes are to colour in dim light). But this night portions of the arcs and rays were bright enough that greens and pinks were easily visible to the naked eye.
This is a single 9-second exposure of the peak of a bright outburst at 1 a.m. MDT. It was with the Laowa 7.5mm circular fish-eye lens at f/2 on the Canon R5 at ISO 800. It is one frame from a time-lapse sequence. A brief outburst of a substorm created an overhead corona with bright rays converging to the magnetic zenith (south of the true zenith).The corona shows a mix of oxygen greens and reds, as well as nitrogen blues blending to create purples. Some greens and reds mix to make yellows.
At its peak the show was changing rapidly enough, I couldn’t get to all the cameras to aim and frame them, especially the movie camera. The brightest outburst at 1 a.m. lasted just a minute — the time-lapse cameras caught it. The sequence below shows the view in 9-second exposures taken consecutively just 1 second apart.
This series shows a brief outburst of bright aurora at the magnetic zenith overhead. The time between these 7 consecutive 9-second exposures is only 1 second, so this bright outburst did not last long (little more than a minute). With the TTArtisan 7.5mm f/2 fish-eye lens on the Canon R5. Click or tap to enlarge to full screen.
Here’s another sequence of frames taken as part of a time-lapse sequence with the 11mm lens. It shows the change in the aurora over the 80 minutes or so that it was most active for me at my site.
The time between these 12 images is usually 8 minutes, though to include some interesting activity at a bright outburst, the interval is 5 minutes for three of the images around 1 a.m. Each is a 7- or 9-second exposure taken as part of a time-lapse sequence using the 11mm TTArtisan lens at f/2.8 on the Canon R at ISO 800 or 1600.
Shooting time-lapses with fish-eye lenses captures the show with a minimum of attention needed (except to adjust ISO or exposure times when the aurora brightens!). I could use the still camera (with the Laowa 15mm f/2 lens) to take individual shots, such as more selfies and home shots.
This is a single 6-second exposure with the Laowa 15mm lens at f/2 and Canon Ra at ISO 2000.This is a single 4-second exposure with the Laowa 15mm lens at f/2 and Canon Ra at ISO 1600. This is a single 8-second exposure with the Laowa 15mm lens at f/2 on the Canon Ra at ISO 800. Another camera taking a time-lapse is in the scene. I had four going this night.
As colourful as the aurora was at its best between midnight and 1:30 a.m., I think the most unique shots came after the show had subsided to appear just as faint rays across the north again, much as it had begun. To the eye it didn’t look like much, but even on the camera’s live screen I could see unusual colours.
I took more panoramas, to capture one of the most unusual auroral arcs I’ve even seen — a blue and magenta aurora across the north, similar to how the night started.
This a stitch of 11 segments, each 13-second exposures, with the Laowa 15mm lens at f/2 on the Canon Ra camera at ISO 800, and turned to portrait orientation. Processed in Camera Raw and stitched with PTGui.
The colours may be from nitrogen glowing, which tends to light up in blues and purples, especially when illuminated by sunlight at high altitudes. At 2 to 2:30 a.m. the Sun might have been illuminating the aurora at a height of 150 to 400 km, and far to the north.
I’d seen blue-topped green auroras before (and there’s a green aurora off to the west at left here). But this was the first time I’d seen an all-blue aurora, no doubt a product of the intense energy flowing in the upper atmosphere this night. And the season and my latitude.
The panorama is a spherical projection spanning 360º, and reaching to the zenith 90° high at centre. This a stitch of 20 segments, each 13-second exposures, with the Laowa 15mm lens at f/2 on the Canon Ra camera at ISO 800, and turned to portrait orientation. Processed in Camera Raw and stitched with PTGui.
The weirdest aurora was at 2:30 a.m., when in addition to the blue rays of nitrogen, an odd white and magenta patch appeared briefly to the south. What was that??
The lesson here? During a bright show do not go back to sleep when things seem to be dying down. Interesting phenomena can appear in the post-storm time, as we’ve learned with STEVE and other odd red arcs and green proton blobs that we aurora photographers have helped document.
I end with a finale music video, mostly made of the time-lapses I shot this night.
Enjoy!
Bring on more aurora shows as the Sun peaks in activity, perhaps this year. But the best shows often occur in the 2 or 3 years after solar max. So we have several more years to look forward to seeing the Lights dance in our skies.
Watch in full screen and in 4K if you can. For all the tech details click through to YouTube and check the description below the video.
I present a two-minute video set to music of the April 8, 2024 total solar eclipse.
In my previous blog Chasing the Cross Continental Eclipse I told the tale of my chase to see the total eclipse of the Sun. I ended up under mostly clear skies in the Eastern Townships of Québec, Canada, not Texas, my original destination.
Here I present the result of shooting with four cameras that afternoon, taking still images, time-lapses, and a 4K movie.
Be sure to watch in 4K!
The site worked out very well, as the lower Sun in eastern Canada lent itself to views framing the eclipse over a landscape below, in this case a very wavy lake. But I was lucky to have open water as other lakes in the area were still frozen.
My post-eclipse selfie at the Lac Brome site in Quebec for the April 8, 2024 total eclipse of the Sun.
As it was, a snow storm a few days earlier left lots of snow in the area to be included in my post-eclipse selfie.
This was only the third total solar eclipse I’ve seen from Canada, after February 26, 1979 from Manitoba, and August 1, 2008 from the air out of Cambridge Bay, Nunavut in the Canadian Arctic. The next total eclipse from Canada passes over my home in Alberta. But it is not until August 22, 2044!
Like all eclipses, seeing the October 14 annular eclipse of the Sun was not a certainty. As good luck and planning would have it, the sky and location could not have been better!
Annular eclipses of the Sun don’t present the spectacle of a total eclipse. Because the Moon is near its farthest point from Earth, its disk is not large enough to completely cover the Sun. At mid-eclipse, as I show below, a ring of sunlight (dubbed a “ring of fire”) remains, still too bright to view without a solar filter.
The October 14, 2023 annular solar eclipse, in a single image captured at mid-eclipse, at 10:29 am MDT at the Ruby’s Inn Overlook on the rim of Bryce Canyon, Utah, a site well south of the centreline, with 3m03s of annularity.
While lacking the jaw-dropping beauty of a total, annular eclipses are rare and unique enough that every ardent skywatcher should make a point of seeing one.
Prior to October 14, I had seen only one, on May 10, 1994, from southeast Arizona, an event I captured on film of course back then.
My 1994 annular eclipse setup in ArizonaMy 2023 annular eclipse setup in Utah
A sunset annular on June 10, 2002 that I traveled to Puerto Vallarta, Mexico to see was mostly clouded out. The annular of May 20, 2012 traced a similar path across the U.S. Southwest as the 2023 eclipse. But work commitments at the science centre in Calgary kept me home for that one. A sunrise annular on June 10, 2021 in Northwestern Ontario was essentially out of reach due to COVID travel restrictions.
With no other annular eclipses within easy reach in North America until 2039 and 2046, this was my next, and perhaps last, opportunity to see one, unless I chose to travel the world.
Eclipse site and pathSite close upEclipse details at my final site
I had planned for several months to watch the annular eclipse from southern Utah, ideally from Bryce Canyon National Park, shown above. (Clicking on the images brings them up full screen.) I booked accommodations in January 2023, finding even then that popular hotels in the area were already sold out.
The final spot for the wide-angle composite shown below. The camera had to be next to that very fence post to frame the scene well.
The attraction was the landscape below the morning Sun, for a planned composite image of the eclipse over the hoodoos of Bryce. However, I had learned weeks earlier that traffic was going to be restricted to just park shuttle buses on eclipse day. Should Plan A not work out then Plan B was Kodachrome Basin, a state park nearby, which a park employee assured me would be open to cars well before sunrise on eclipse day.
Seen on I-15 past Salt Lake City. Eclipse ahead!
So I made my plans to drive south, taking with me a carload of telescope and camera gear, an array I would never be able to take to an overseas eclipse. The centrepiece was my venerable Astro-Physics Traveler 105mm (4-inch) refractor, a telescope created for the 1991 total eclipse in Mexico. Since I bought mine in 1992 I’ve used it for five central solar eclipses, including now two annulars. It’s in the 1994 and 2023 site images above.
A week before the eclipse (as above at left), the weather prospects for the entire southwest looked poor. It was to be clouds everywhere. I even considered Plan S – Stay Home! And watch the 60% partial eclipse from Alberta where skies were to be clear.
But undaunted, six days before the eclipse, I headed south on Interstate 15, checking the weather each day, and seeking out Plan C sites in New Mexico or Texas south of the projected mass of clouds. I checked where accommodation could be had at the last minute.
At my stop in Richfield, Utah, four days before the eclipse, I had a crossroads turning point: either continue south to Bryce down US-89 (above), or head east on I-70, then south into New Mexico or Texas, with enough time to get there if needed.
But by now the weather prospects were turning around. By three days out, and with the forecasts now much more reliable, it looked like southern Utah would be in the clear. I continued with my original plan to Bryce. But where exactly?
TPE site overview with anglesTPE 3D showing Sun pathGoogle Earth 3D
I had looked at possible sites on Google Earth and with the Sun-angle planning apps I use (such as The Photographer’s Ephemeris, or TPE) and found one just outside the Park that I hoped would be accessible to drive into.
Upon arriving in the area three days early, the first priority was to inspect the site in person. It looked perfect! Almost too good to be true!
A panorama of the Ruby’s Inn site with the eclipse in progress. My wide-angle camera is at left by that fencepost.
The site, known as the Ruby’s Inn Overlook, provided a great view toward the eclipse with a stunning landscape below, including a river! (Well, it was actually an irrigation channel called the Tropic Ditch.) And I could park right next to my wide-angle landscape camera, to keep an eye on it over the five hours of shooting, while setting up the scope gear next to my car.
I stayed at the Bryce View Lodge on eclipse eve, a hotel just a few hundred metres from the site. So no long pre-dawn drive on eclipse morn. However, the gated site was not going to be open until 7 a.m. on eclipse day. And admission was $20 per car, a cash donation to the Bryce Canyon City school sports teams. Fine!
As it turned out, by the time I got on site and setup the priority wide-angle camera for the base-image sunrise shots at 7:30 a.m., the sky was too bright to polar align the telescope mount on Polaris, for accurate tracking of the Sun across the sky.
It turned out that was the least of my concerns.
My three eclipse cameras: the wide-angle, the one on the 105mm refractor telescope (with a smaller 60mm scope on top for visual views with a Herschel Solar Wedge), and one with a 100-400mm lens on the tripod.
As I unpacked the carload of scope gear at 8 a.m. I realized I had forgotten a crucial cable to connect the mount to the drive electronics. So the mount was not going to be able to track anyway!
So much for my plans for a time-lapse through the scope. I had to manually centre the Sun every minute or so. I took lots of photos, but gave up on any effort to take them at a regular cadence. But I had enough images for the singles and composites shown here.
This is a composite of the October 14, 2023 annular solar eclipse with a sequence of six images showing the Moon advancing across a sunspot, the largest one visible on the Sun that day. The images are placed for a photogenic spacing, with time running forward from lower left to upper right, to reflect the Sun’s motion up across the morning sky.
Of course, once I got home the first thing I did was look downstairs in my scope room. Sure enough there was the cable, mixed up with the similar electronics from another mount I have from the same company, as I had been testing both prior to the eclipse. So much for my checklists! They’re only good if they list every critical bit, and if you use them.
So that was one big user error.
You don’t want to see this at an eclipse!
The other was a camera error, in fact Error70! I had set my main telescope camera to take rapid bursts of images (at up to 20 frames per second) at the crucial second and third contacts when annularity began and ended. With the Moon’s rough limb tangent to the inside edge of the Sun, you see beads of light rapidly form and disappear at the contacts.
This is a composite of the October 14, 2023 annular solar eclipse at second contact. It illustrates the irregular edge of the Moon breaking up the rim of sunlight as the dark disk of the Moon became tangent to the inner edge of the Sun at second contact at the start of annularity. 15 exposures taken over 20 seconds at second contact are combined with a single exposure taken about 1.5 minutes later at mid-annularity.
The camera worked great at second contact, shooting 344 frames over 20 seconds. A composite of 15 of those frames is above, layered to exaggerate the rough lunar limb and its mountain peaks. A time-lapse from those frames is below.
A time-lapse of second contact from 344 frames over ~20 seconds.
And it appeared to be working at third contact three minutes later. Until I looked down and saw the dreaded error message. In checking the camera later, none of the third contact images had recorded to either memory card.
It is a known but intermittent bug in Canon firmware that can happen when the camera is not connected to a Canon lens (it was on a telescope it cannot communicate with). I saw the error once in testing. And I had a hard time reproducing it to take the screen shot above once I got home. But if something can go wrong …!
This is a portrait of the October 14, 2023 annular eclipse of the Sun, captured in a sequence of images taken from the rim of Bryce Canyon, Utah, from sunrise until nearly the end of the eclipse before noon local time. This is a composite blend of unfiltered exposures taken at sunrise for the landscape lit by the rising Sun, and for the dawn sky. Onto the base panorama of the ground and sky I layered in 66 filtered images of the Sun, as it rose into the morning sky, and with the Moon moving across its disk over nearly 3 hours, reaching mid-eclipse at about 10:29 local MDT at upper right. It then appears as a ring, or annulus of light for one frame.
Despite the errors both human and machine, I count eclipse day as successful, considering a week earlier prospects had looked so poor. As it was, apart from some thin but inconsequential cloud that drifted through before mid-eclipse, the sky was perfect.
As was the site. I enabled me to get the main shot I was after, the wide-angle composite, above. It’s a winner! And it accurately depicts the size of the Sun and its motion across the sky, albeit set into a twilight sky taken at sunrise.
As it had been 29 years since my last annular, I wasn’t sure what to expect. But the darkening of the sky and eerie level of sunlight, despite a blazing Sun in the day sky, were impressive. The morning just looked strange! It was a taste of the total to come.
Venus at its widest angle west of the Sun was easy to spot in the deep blue sky. I regret not thinking to shoot even a phone camera image of that sight.
Projecting the solar crescents with a made-on-the-spot pinhole projection sign.
I had pleasant chats with other folks at the site, and enjoyed showing them telescopic views though the smaller visual scope I had piggybacked on the main scope, one that was just for looking through. Plus folks shot phone pix of my camera screen.
The October 14, 2023 annular solar eclipse, in a single image captured at second contact with the Moon tangent to the inside limb of the Sun, at 10:27 am MDT at the site I used.
But at the critical contacts, I was glued to that visual scope for the amazing sight of the horns of the crescent Sun rapidly wrapping around the Moon at second contact, then unwrapping at third contact.
The October 14, 2023 annular solar eclipse, in a series of images captured at second contact with the Moon tangent to the inside limb of the Sun, at 10:27 am MDT at the site I used. The 7 frames here were selected from a set of 344 shot in high-speed continuous mode at 20 frames per second.
The breakup of the rim of sunlight into beads of light along the cratered and mountainous edge of the Moon was also impressive. I was not at the optimum site for seeing those beads, as the landscape dictated my choice of location. But those that I saw at each of the internal contacts were a fine bonus to a memorable morning.
This is a composite that records the sequence around mid-eclipse of the October 14, 2023 annular eclipse of the Sun. This is a blend of 8 exposures each taken 2.25 minutes apart, about the minimum time to keep the disks separate and avoid them overlapping.
A third camera shooting a sequence with an untracked 400mm telephoto lens worked well. I used a subset of its images to create a still-image composite (above) and the full set for a time-lapse (below), with the position and motion of the Sun authentic, produced by the natural east-to-west motion of the sky. But against that you see the Moon’s orbital motion moving its dark disk down across the disk of the Sun.
A time-lapse from 300 frames taken at 4-second intervals with the sky’s motion carrying the Sun across the frame.
As soon as annularity ended, everyone else started to pack up and leave. For them the show was over. Understandably. On many total eclipse tours I’ve been on we’ve been on the road back to the hotel after totality and the requisite happy group shot.
Eclipse success! The trophy shot after everyone else had left.
But at this eclipse my shooting plan dictated that I stick it out. By the end of the eclipse I was the last one standing, alone to enjoy last contact and then lunch, killing time for any road congestion to diminish, as I had to head to another motel for the post-eclipse night, in nearby Panguitch.
I had a celebratory dinner and Moab-brewed beer that night at Cowboy’s, the best restaurant in Panguitch, sporting my Annular 2023 eclipse hat!
But the next day I started the drive north again, for the three-day trek back up I-15 to the border, then home.
Priority one upon getting home was to finish processing images, and to include them in a revised version of my ebook How to Photograph the Solar Eclipses. It is linked to above and here on the title. Images of some sample pages from the revised edition are in the slide show below.
Post-annular, the book’s title remains the same, but I revised the pages in Chapter 4 on planning for the 2023 eclipse with pages on “lessons learned!” And there were several!
I expanded Chapter 11 on processing to include tutorials on assembling annular eclipse composites, now that I actually have some!
Such as the composite of first- to last-contact telescopic close-ups below.
This is a composite of the various stages of the entire October 14, 2023 annular solar eclipse, from start (lower left) to end (upper right), with mid-eclipse at centre. So time runs forward from left to right, with the Suns positioned to reflect the approximate motion of the Sun in the morning sky when this eclipse occured at my site, with it rising higher through the progress of the eclipse. North is up in this image.
The new version of my ebook is 20 pages larger than the pre-annular edition.
An email has gone out from eJunkie to all buyers of the earlier-edition PDF to alert them to the new version, and with a download link. Apple Books readers should get a notice when they open the book on their Mac or iPad in the Books app that a new version is available.
I suspect that will be the last revision of my ebook before the big event – the total eclipse of the Sun on April 8, 2024.
Here’s wishing us all clear skies for that one! That eclipse will indeed require a drive to Texas. This time I’ll remember that damned cable!
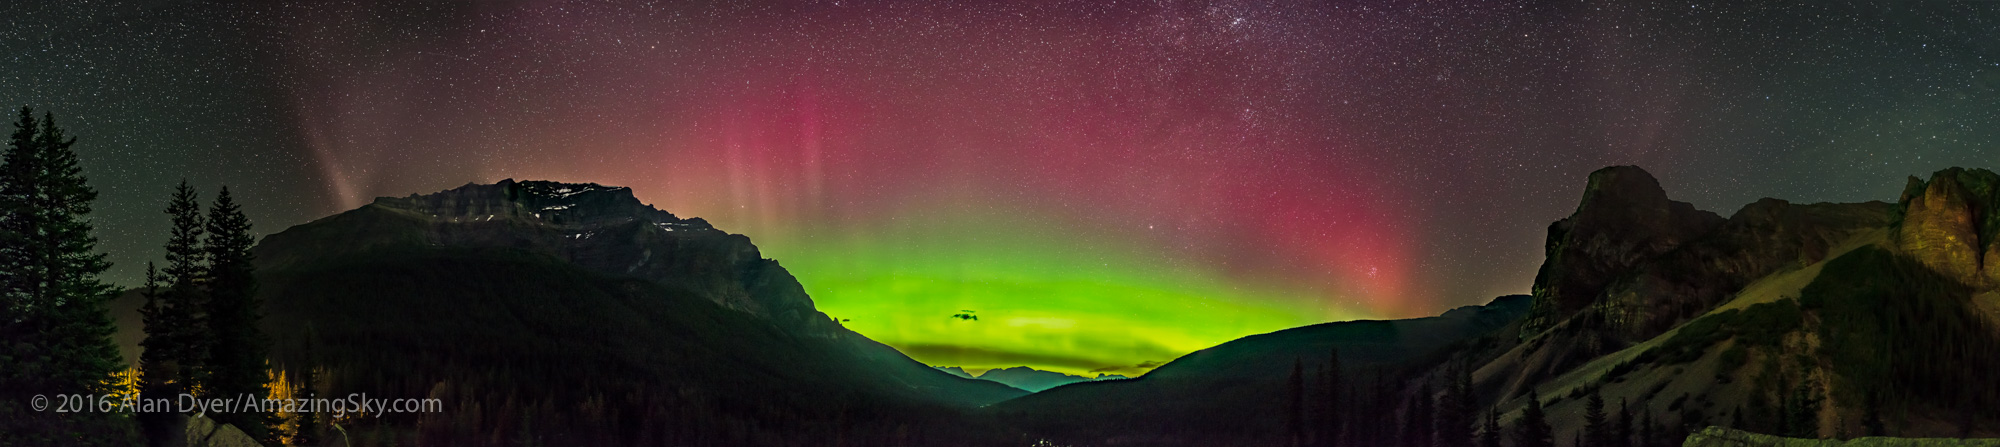
On April 23, 2023 the sky erupted with a massive solar storm, bringing the aurora to millions of people around the word.
On April 23 warnings went out alerting aurora watchers that a solar storm was imminent. And as the sky darkened that night locations all across the Northern and Southern Hemispheres were treated to a great sky show.
This is what we want to see in our aurora apps! Code Red and a vast auroral oval.
When we see this on our phone apps, we know we’ll get a great show. This was the auroral oval, lit up red, as the display was underway at my location in Alberta, Canada.
All indicators were great!
The strength of the interplanetary field (Bt) was high and the direction of the field (Bz) was well south, all welcome indicators of a superb show.
Sure enough, as it got dark that night, and from my location after the clouds cleared, an aurora was underway covering much of the sky.
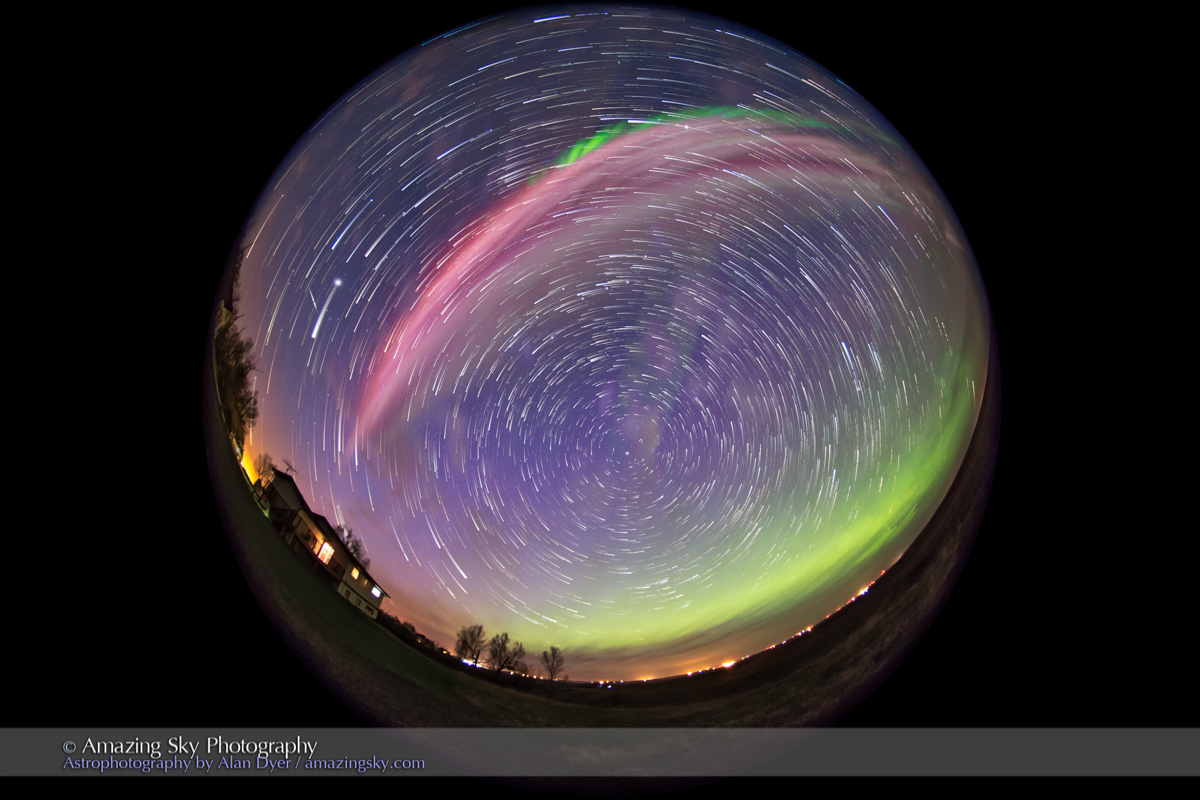
A fish-eye 360° view of the Great April Aurora of April 23, 2023, from home in southern Alberta, Canada. The Kp level reached 7 to 8 this day. The Big Dipper is above centre. This is looking north.
A single 5-second exposure with the TTArtisan 7.5mm circular fish-eye lens at f/2 and Canon R6 at ISO 3200.
The aurora moved south to occupy just the southern half of the sky, but with incredible ribbons crossing from east to west, rippling and pulsating off and on. Seeing patches of aurora pulse off and on and flaming up to the zenith is not uncommon toward the end of a substorm outburst. But this was the first time I can recall seeing pulsating ribbons.
At times, there was a dark ribbon across the sky, as the aurora formed a gap in its curtains, looking like a “dark aurora.”
A fish-eye 360° view of the Great April Aurora of April 23, 2023, from home in southern Alberta, Canada. The Kp level reached 7 to 8 this day. The Big Dipper is above centre. This is looking south.
A single 5-second exposure with the TTArtisan 7.5mm circular fish-eye lens at f/2 and Canon R6 at ISO 1600.A fish-eye 360° view of the Great April Aurora of April 23, 2023, from home in southern Alberta, Canada. The Kp level reached 7 to 8 this day. The Big Dipper is above centre. This is looking south.
A single 5-second exposure with the TTArtisan 7.5mm circular fish-eye lens at f/2 and Canon R6 at ISO 1600.A view of the great April aurora show of April 23, 2023, looking up to the zenith near the top, with a set of finely-structured parallel ribbons of aurora crossing the sky from east (left) to west (right). This is looking south. The Big Dipper is at top. Taken from home in southern Alberta, Canada.
This is a single 10-second exposure with the Canon Ra at ISO 1600 and 11mm TTArtisan full-frame fish-eye lens at f/2.8.A view of the great April aurora show of April 23, 2023, looking to the south, with diffuse curtains across the sky forming a dark gap at the zenith. Taken from home in southern Alberta, Canada.
This is a single 1.6-second exposure with the Canon Ra at ISO 5000 and 11mm TTArtisan full-frame fish-eye lens at f/2.8.
The view looking straight up is always the most jaw-dropping when an aurora fills the sky. Rays and curtains converge at the magnetic zenith to form a “corona.”
The aurora of April 23, 2023, looking straight up to the zenith to capture the converging curtains in a coronal display. The Big Dipper is at top.
A single 3.2-second exposure with the Canon R5 at ISO 800 and Laowa 15mm lens at f/2.
I shot with three cameras, taking stills, time-lapses, and real-time movies. I edited them together here in a music video. Enlarge to full screen to view it. I hope you enjoy it!
A 3-minute video of the April 23, 2023 aurora show from Alberta.An aurora selfie with the great all-sky Kp6 to 8 level aurora of April 23, 2023. This is looking south toward Arcturus and Spica. The Coma Berenices cluster is at top near the convergence point for the auroral curtains.
Shot from home with the Canon Ra and 11mm TTArtisan full-frame fish-eye lens at f/2.8.
With the Sun ramping up in activity, we should get more great shows of Northern – and Southern! – Lights around the world in the next few years,
On August 7, 2022 we were treated to a fine aurora and a superb showing of the anomalous STEVE arc across the sky.
Where I live in southern Alberta we are well positioned to see a variety of so-called “sub-auroral” phenomena — effects in the upper atmosphere associated with auroras but that appear south of the main auroral arc, thus the term “sub-auroral.”
An arc of a Kp-5 aurora early in the evening just starting a show, but with a fading display of noctilucent clouds low in the north as well.
The main auroral band typically lies over Northern Canada, at latitudes 58° to 66°, though it can move south when auroral activity increases. However, on August 7, the Kp Index was predicted to reach Kp5, on the Kp 0 to 9 scale, so moderately active, but not so active it would bring the aurora right over me at latitude 51° N, and certainly not down over the northern U.S., which normally requires Kp6 or higher levels.
An arc of a Kp-5 aurora over a wheatfield from home in southern Alberta. The panorama takes in the northern stars, from the Big Dipper and Ursa Major at left, to the W of Cassiopeia at top right of centre, with Perseus below Cassiopeia, and Andromeda and Pegasus at right.
So with Kp5, the aurora always appeared in my sky this night to the north, though certainly in a fine display, as I show above.
However, at Kp5, the amount of energy being pumped into the magnetosphere and atmosphere around Earth is high enough to trigger (through mechanisms only beginning to be understood) some of the unique phenomena that occur south of the main aurora. These often appear right over me. That was the case on August 7.
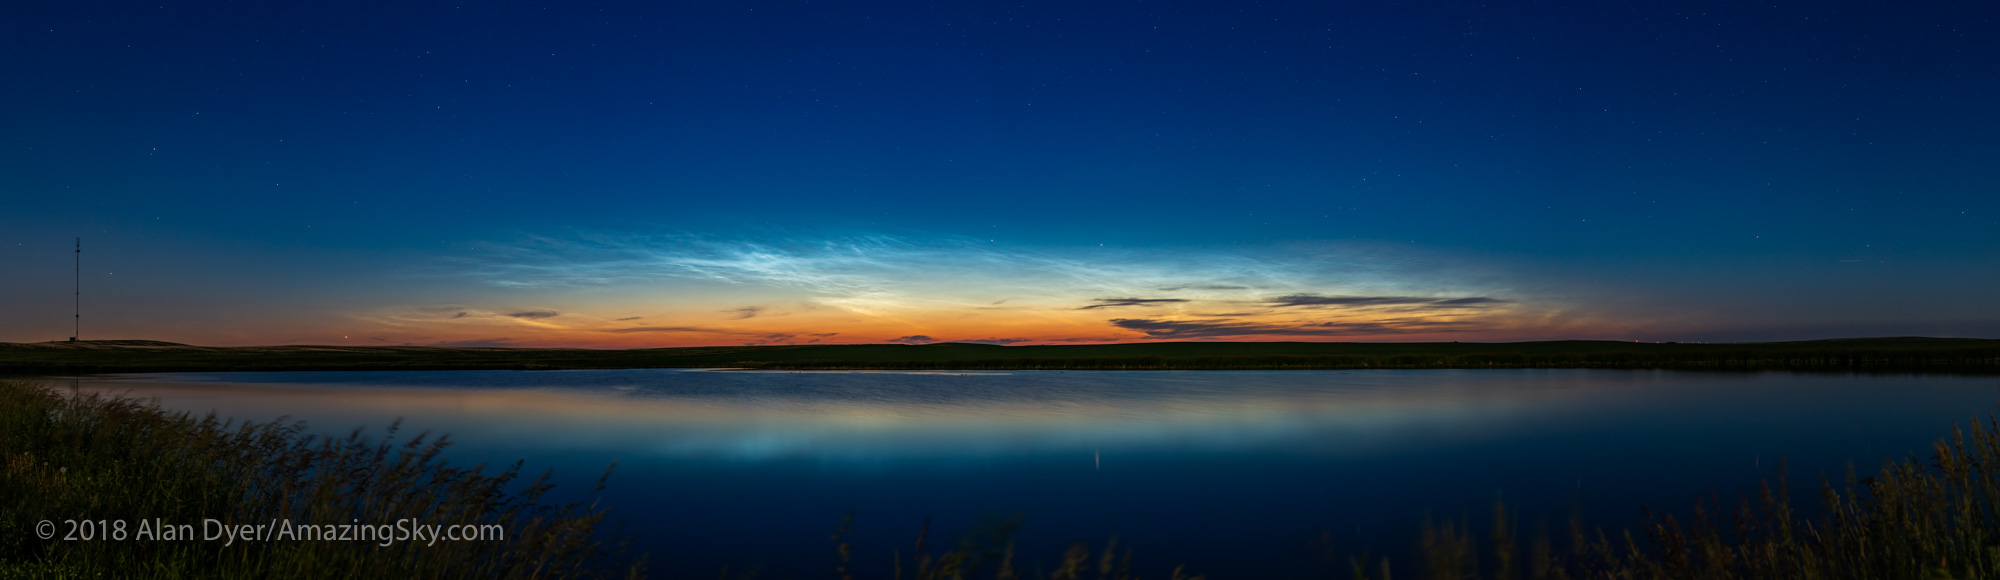
This is a telephoto lens panorama of a low and late-season display of noctilucent clouds in the north on August 7, 2022. This was the latest I had seen NLCs from my latitude of 51° N.
I captured the above panoramas of the aurora early in the night, when we also were treated to a late season display of noctilucent clouds low in the north. These are high altitude water-vapour clouds up almost as high as the aurora. They are common in June and July from here (we are also in an ideal latitude for seeing them). But early August was the latest I had ever sighted NLCs.
A display of a Kp-5 aurora near its peak of activity on August 7, 2022, taken from home in southern Alberta, over the wheatfield next to my acreage. STEVE appeared later this night. Moonlight from the waxing gibbous Moon low in the southwest illuminates the scene.
As the NLCs faded, the auroral arc brightened, promising a good show, in line with the predictions (which don’t always come true!). The main aurora reached a peak in activity about 11:30 pm MDT, when it was bright and moving along the northern and northeastern horizon. It then subsided in brightness and structure, giving the impression the show was over.
But that’s exactly when STEVE can — and this night did! — appear.
A portrait of the infamous STEVE arc of hot flowing gas associated with an active aurora, here showing his distinctive pink colour and the fleeting appearance of the green picket fence fingers that often show up hanging down from the main arc.
Sure enough, about 12:15 am, a faint arc appeared in the east, which slowly extended to cross the sky, passing straight overhead. This was STEVE, short for Strong Thermal Emission Velocity Enhancement.
STEVE is not an aurora per se, which is caused by electrons raining down from the magnetosphere. STEVE is a ribbon of hot (~3000°) gas flowing east to west. STEVE typically appears for no more than an hour, often less, before he fades from view.
A fish-eye view looking straight up. On this night the green fingers lasted no more than two minutes.
At his peak, STEVE is often accompanied by green “picket-fence” fingers hanging down from the main pink band, which also have a westward rippling motion. These do seem to be caused by vertically moving electrons.
This night I shot with three cameras, with lenses from 21mm to 7.5mm, including two fish-eye lenses needed to capture the full extent of sky-spanning STEVE. I shot still, time-lapses, and real-time videos, compiled below.
Amateur photos like mine have been used to determine the height of STEVE, which seems to be 250 to 300 km, higher than the main components of a normal aurora. Indeed, previous images of mine have formed parts of the data sets for two research papers, with me credited as a citizen scientist co-author.
A closeup of the STEVE arc of hot flowing gas associated with an active aurora.
STEVE is a unique example of citizen scientists working with the professional researchers to solve a mystery that anyone who looks up at the right time and from the right place can see. August 7-8, 2022 and my backyard in Alberta was such a time and place.
A dim Perseid meteor (at top) streaking near the Milky Way on the night of Aug 7-8, 2022, taken as part of a time-lapse set for the STEVE auroral arc in frame as the pink band.
As a bonus, a few frames recorded Perseid meteors, with the annual shower becoming active.
For a video compilation of some of my stills and videos from the night, see this Vimeo video.
A 2.5-minute music video of stills, time-lapses, and real-time videos of STEVE from August 7-8, 2022.
This short video, below, captures time-lapses of the trails of geostationary satellites through southern Orion. It demonstrates the “crowded sky” we now have above us.
If you have tried photographing the Orion Nebula and Sword of Orion area with long tracked exposures you have no doubt seen these trails in your photos. Here I shot to purposely capture them in a time-lapse, for demonstration purposes.
Please note, these are not Starlink satellites. So do not blame Elon Musk for these!
These are the much more established geostationary or “geosynchronous” satellites that orbit 35,785 kilometres above Earth and so take 24 hours to orbit the planet. As such they remain apparently motionless over the same spot on Earth, allowing fixed dish antennas to aim at them.
The camera is on a mount that is tracking the sky as it turns from east to west, so the stars are staying still. What would normally be satellites fixed in one spot in the sky (after all, they are called “geostationary” for a reason) instead trail into short streaks traveling from west to east (right to left) in the frame. But in reality, it is the stars that are in motion behind the satellites.
The region of sky in Orion below the Orion Nebula (the object at top) lies south of the line that bisects the sky into northern and southern halves called the “celestial equator.” Most geostationary satellites also orbit in Earth’s equatorial plane and so appear along a belt near the celestial equator in the sky.
This chart from SkySafari shows the belt of geosats through southern Orion with the satellites identified. The green box is the field of view of the telescope (shown below) that I used to take the time-lapses.
In this video, however, they appear about 5° to 7° south of the celestial equator (which runs through the famous Belt of Orion off frame at top). That’s because I live north of the equator of the Earth, at a latitude of 51° north. So parallax makes the geosat belt appears south of the celestial equator in my sky. From a site in the southern hemisphere the geosat belt would appear north of the celestial equator.
You’ll notice some satellites travelling diagonally — they are not geosats. You’ll also see some flashing or pulsing satellites — they are likely tumbling objects, perhaps spent rocket boosters.
The satellites are visible because they are high enough to reflect sunlight even in the middle of the night, as the sequences each end about 11:30 to midnight local time.
But in this video the satellites are not flaring — this is their normal brightness. During flare season around the two equinoxes geosats can become bright enough to be seen with the unaided eye. For a video of that phenomenon see my video shot in October 2020, below.
TECH DETAILS FOR “TRACKS OF THE GEOSATS” VIDEO:
The video at top contains time-lapses shot on two nights: January 18 and 20, 2021. Both are made from hundreds of frames taken through a William Optics RedCat astrograph at f/5 with a 250mm focal length. The field of view is 8° by 5.5°.
The William Optics RedCat 51mm f/5 astrographic refactor.
Each exposure is 30 seconds long, taken at a one second interval. The camera was a Canon 6D MkII at ISO 3200 on January 18 and ISO 1600 on January 20 in the brighter moonlight that night.
In the first sequence from January 18 the equatorial mount, an Astro-Physics Mach1, is left to track on its own and is unguided. So the stars wobble back and forth slightly due to periodic error in the mount. The field also drifts north due to slight misalignment on the pole. Clouds pass through the field during the shoot.
In the second clip from January 20, taken with a quarter Moon lighting the sky, the mount was autoguided, using an MGEN3 auto-guider. So the stars remained better fixed over the 5.5 hours of shooting. A slight glitch appears near the end where I swapped camera batteries, and the camera turned ever so slightly causing the stars to enlarge a bit for a moment.
LRTimelapse at work processing the second sequence, deflickering some of the oddly exposed frames.
The frames were processed in Adobe Camera Raw and LRTimelapse
TimeLapse DeFlicker at work assembling the video, showing its All Frames + Lighten blend mode for the Accumulating version of clip #2.
I then assembled exported JPGs with TimeLapseDeFlicker, using a 3-frame Lighten blend mode to lengthen the trails. The final version was assembled with TLDF’s All Frames mode (shown above) where every frame gets stacked for an accumulated total, to show the busy sky traffic!
On two clear evenings the Harvest Moon rose red and and large over the Alberta prairie.
I present a short music video (linked to below) of time-lapse sequences of the Harvest Moon of 2020 rising. I shot the sequences through a small telescope to zoom in on the Moon’s disk as it rose over the flat horizon of the prairie near where I live. I love being able to see the horizon!
Note the effects of atmospheric refraction squishing the Moon’s disk close to the horizon. The Moon becomes more normal and spherical as it rose higher.
People sometimes think the refraction effect is responsible for making the Full Moon appear large on the horizon, but the atmosphere has nothing to do with it. The effect is strictly an optical illusion. The Moon is no bigger on the horizon than when it is higher in the sky.
The photo below shows a composite of images taken September 30, 2020.
The rising of the nearly Full Moon, the Harvest Moon of 2020, on September 30, from a site near home in Alberta, looking just south of due east this night. Refraction distorts the disk and atmospheric absorption reddens the disk toward the horizon.
This is a multiple exposure composite of 6 images with the Canon 6D MkII through the 80mm A&M apo refractor at f/6 without field flattener. Taken as part of a time-lapse sequence with images every 2 seconds. The frames for this blend were taken 2 minutes apart, so selected from every 60 frames out of the sequence. All were at 1/8 second at ISO 100. Images stacked in Photoshop and blended with Lighten mode. The ground comes from the first image.
Note in the image below, from October 1, how much redder the Moon appears. That’s the effect of atmospheric absorption, in this case from dust and smoke in the air dimming and reddening the Moon (the same happens to the rising or setting Sun). At times this evening it looked like the Moon was in a total eclipse.
The Harvest Moon (the Full Moon of October 1, 2020) rising almost due east at the end of a country road in southern Alberta, near home. The horizon was smoky or dusty, so the Moon was very red as it rose, and looking almost like a totally eclipsed Moon.
This is a blend of 6 exposures, all 1/2-second with the A&M 80mm f/6 apo refractor (for 480mm focal length) and Canon 6D MkII at ISO 400, taken as part of a 460-frame time-lapse sequence, with shots every 2 seconds. For this composite I choose 6 images at 2-minute intervals, so the Moon rose its own diameter between frames. The ground comes from the first image in the sequence when the lighting was brightest. The Moon rose at 7:35 pm this night, about 30 minutes after sunset. A mild Orton glow effect added to the ground with Luminar 4.
Below is the link to the time-lapse music video on Vimeo. It is in 4K. I used Adobe Camera Raw, Adobe Bridge, and LRTimelapse to process the component images as raw files for the time-lapse sequences, as per tutorials in my Nightscape and Time-Lapse ebook, above.
I present my top 10 tips for capturing time-lapses of the moving sky.
If you can take one well-exposed image of a nightscape, you can take 300. There’s little extra work required, just your time. But if you have the patience, the result can be an impressive time-lapse movie of the night sky sweeping over a scenic landscape. It’s that simple.
Or is it?
Here are my tips for taking time-lapses, in a series of “Do’s” and “Don’ts” that I’ve found effective for ensuring great results.
But before you attempt a time-lapse, be sure you can first capture well-exposed and sharply focused still shots. Shooting hundreds of frames for a time-lapse will be a disappointing waste of your time if all the images are dark and blurry.
For that reason many of my tips apply equally well to shooting still images. But taking time-lapses does require some specialized gear, techniques, planning, and software. First, the equipment.
NOTE: This article appeared originally in Issue #9 of Dark Sky Travels e-magazine.
SELECTING EQUIPMENT
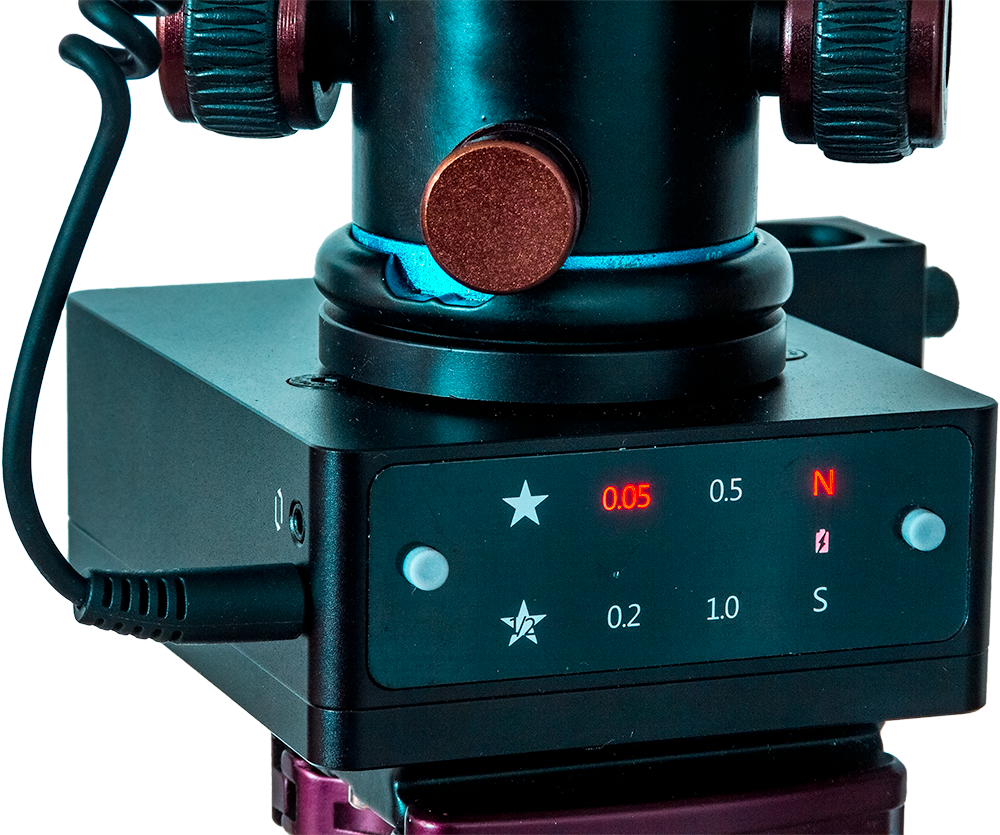
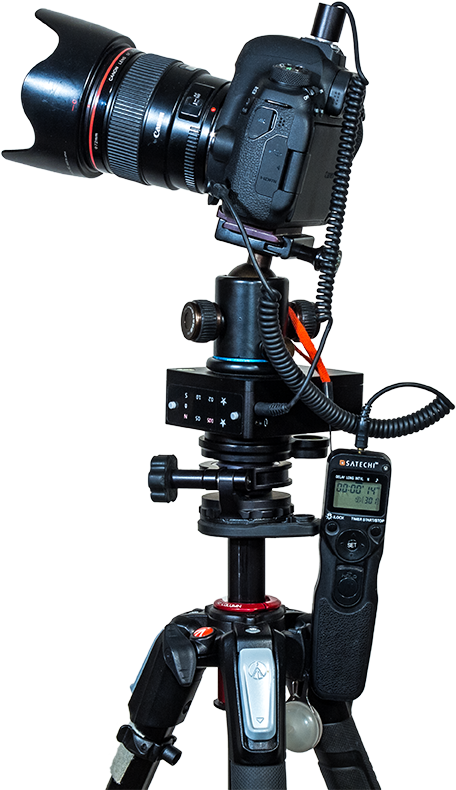
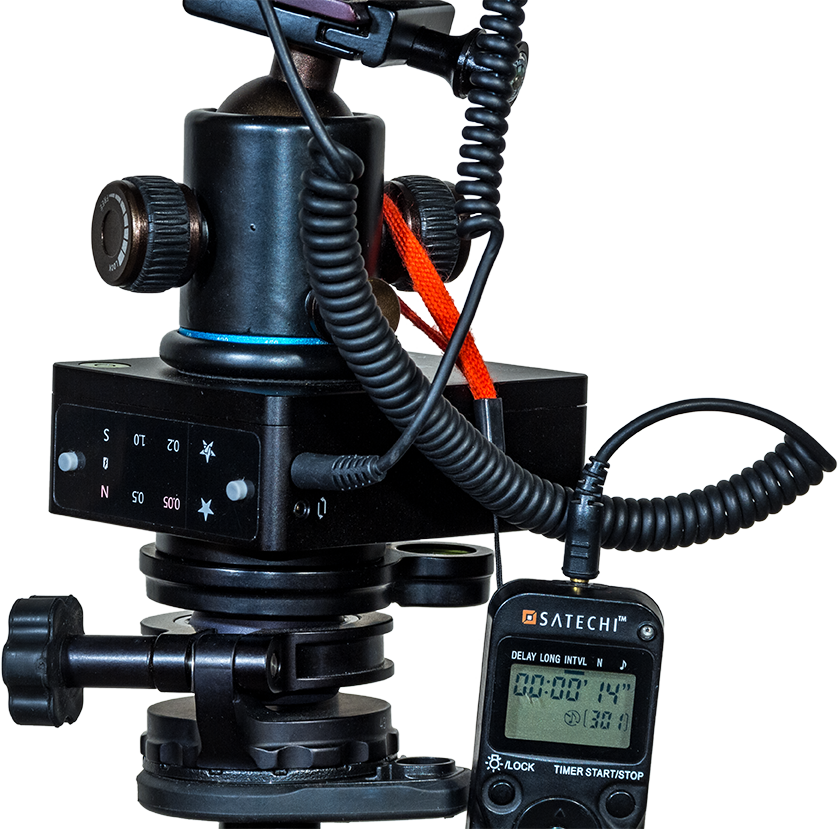
Essential Gear Time-lapse photography requires just the camera and lens you might already own, but on a solid tripod (a carbon-fibre Manfrotto with an Acratech ball-head is shown here), and with an intervalometer.
TIP 1 — DO: Use a solid tripod
A lightweight travel tripod that might suffice for still images on the road will likely be insufficient for time-lapses. Not only does the camera have to remain rock steady for the length of the exposure, it has to do so for the length of the entire shoot, which could be several hours. Wind can’t move it, nor any camera handling you might need to do mid-shoot, such as swapping out a battery.
The tripod needn’t be massive. For hiking into scenic sites you’ll want a lightweight but sturdy tripod. While a carbon fibre unit is costly, you’ll appreciate its low weight and good strength every night in the field. Similarly, don’t scrimp on the tripod head.
TIP 2 — DO: Use a fast lens
The All-Important Lens A fast lens is especially critical for time-lapses to allow capturing good sky and ground detail in each exposure, as compositing later won’t be feasible. This is the Sigma 20mm f/1.4 Art lens.
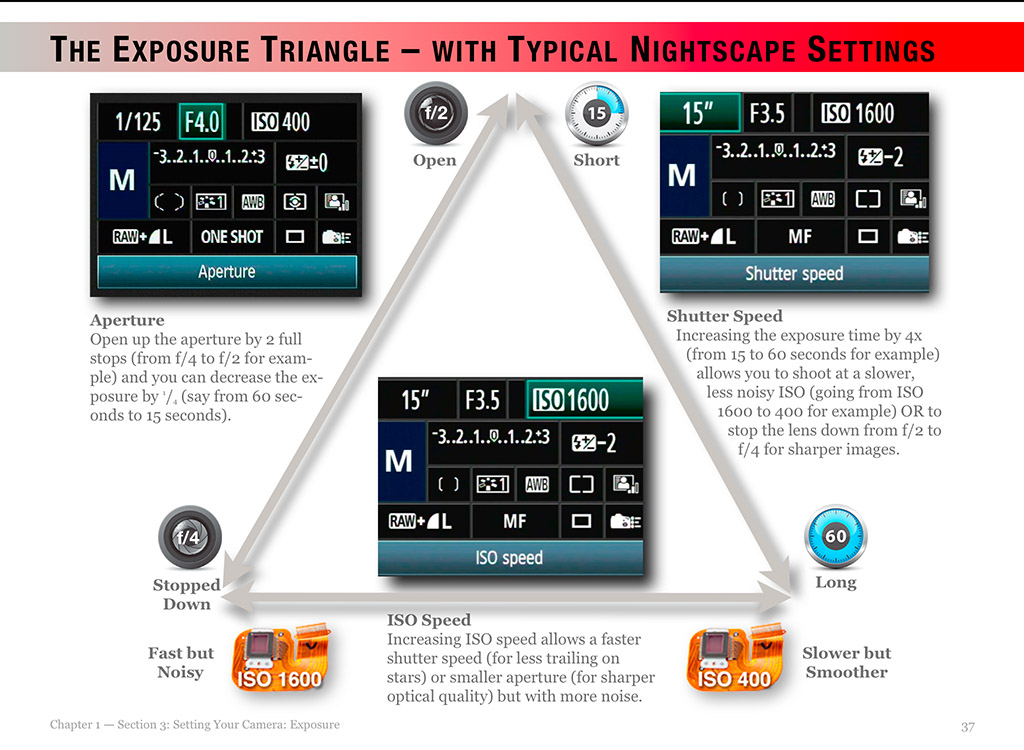
As with nightscape stills, the single best purchase you can make to improve your images of dark sky scenes is not buying a new camera (at least not at first), but buying a fast, wide-angle lens.
Ditch the slow kit zoom and go for at least an f/2.8, if not f/2, lens with 10mm to 24mm focal length. This becomes especially critical for time-lapses, as the fast aperture allows using short shutter speeds, which in turn allows capturing more frames in a given period of time. That makes for a smoother, slower time-lapse, and a shoot you can finish sooner if desired.
TIP 3 — DO: Use an intervalometer
Canon intervalometer functions
Nikon intervalometer functions
Automating the Camera The intervalometer is also key. For cameras without an internal intervalometer (screens from a Canon and a Nikon are shown above), an outboard unit like one of these, is essential. Be sure to get the model that fits your camera’s remote control jack.
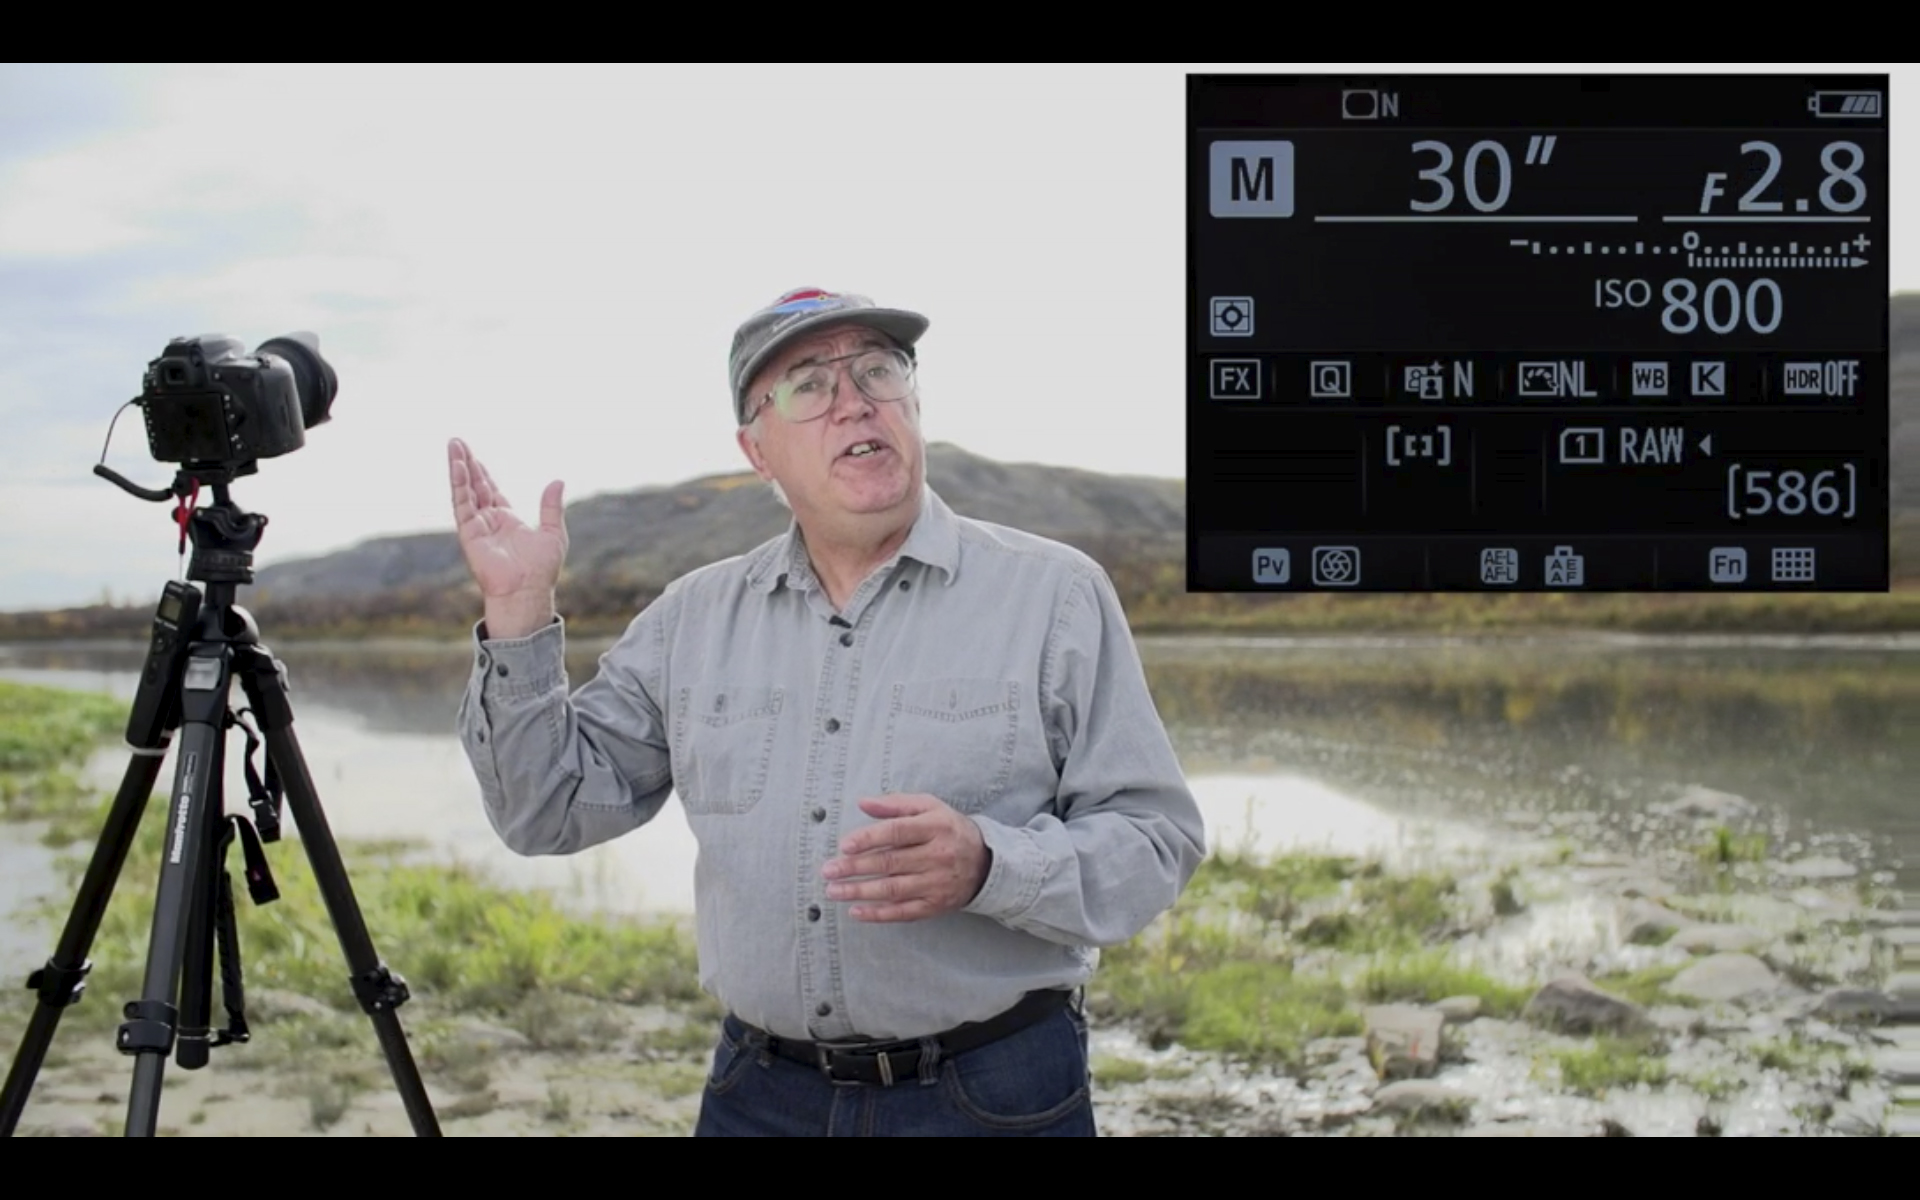
Time-lapses demand the use of an intervalometer to automatically fire the shutter for at least 200 to 300 images for a typical time-lapse. Many cameras have an intervalometer function built into their firmware. The shutter speed is set by using the camera in Manual mode.
Just be aware that a camera’s 15-second exposure really lasts 16 seconds, while a 30-second shot set in Manual is really a 32-second exposure.
So in setting the interval to provide one second between shots, as I advise below, you have to set the camera’s internal intervalometer for an interval of 17 seconds (for a shutter speed of 15 seconds) or 33 seconds (for a shutter speed of 30 seconds). It’s an odd quirk I’ve found true of every brand of camera I use or have tested.
Alternatively, you can set the camera to Bulb and then use an outboard hardware intervalometer (they sell for $60 on up) to control the exposure and fire the shutter. Test your unit. Its interval might need to be set to only one second, or to the exposure time + one second.
How intervalometers define “Interval” varies annoyingly from brand to brand. Setting the interval incorrectly can result in every other frame being missed and a ruined sequence.
SETTING YOUR CAMERA
TIP 4 — DON’T: Underexpose
Expose to the Right When shooting, choose settings that will yield a histogram that is not slammed to the left, but is shifted to the right to minimize noise and lift details in the shadows.
As with still images, the best way to beat noise is to give the camera signal. Use a wider aperture, a longer shutter speed, or a higher ISO (or all of the above) to ensure the image is well exposed with a histogram pushed to the right.
If you try to boost the image brightness later in processing you’ll introduce not only the very noise you were trying to avoid, but also odd artifacts in the shadows such as banding and purple discolouration.
With still images we have the option of taking shorter, untrailed images for the sky, and longer exposures for the dark ground to reveal details in the landscape, to composite later. With time-lapses we don’t have that luxury. Each and every frame has to capture the entire scene well.
At dark sky sites, expose for the dark ground as much as you can, even if that makes the sky overly bright. Unless you outright clip the highlights in the Milky Way or in light polluted horizon glows, you’ll be able to recover highlight details later in processing.
After poor focus, underexposure, resulting in overly noisy images, is the single biggest mistake I see beginners make.
TIP 5 — DON’T: Worry about 500 or “NPF” Exposure Rules
Stills from a Sequence A stack of single frames from a time-lapse sequence can often make a good still image, such as this scene of the Space Station rising over Waterton Lakes National Park. The 30-second exposures were just within the “500 Rule” for the 15mm lens used here, but minor star trailing won’t be that noticeable in a final movie.
While still images might have to adhere to the “500 Rule” or the stricter “NPF Rule” to avoid star trailing, time-lapses are not so critical. Slight trailing of stars in each frame won’t be noticeable in the final movie when the stars are moving anyway.
So go for rule-breaking, longer exposures if needed, for example if the aperture needs to be stopped down for increased depth of field and foreground focus. Again, with time-lapses we can’t shoot separate exposures for focus stacking later.
Just be aware that the longer each exposure is, the longer it will take to shoot 300 of them.
Why 300? I find 300 frames is a good number to aim for. When assembled into a movie at 30 frames per second (a typical frame rate) your 300-frame clip will last 10 seconds, a decent length of time in a final movie.
You can use a slower frame rate (24 fps works fine), but below 24 the movie will look jerky unless you employ advanced frame blending techniques. I do that for auroras.
PhotoPills Calculator Apps such as PhotoPills offer handy calculators for juggling exposure time vs. the number of frames to yield the length of the time-lapse shoot.
Bonus Tip
How long it will take to acquire the needed 300 frames will depend on how long each exposure is and the interval between them. An app such as PhotoPills (via its Time lapse function) is handy in the field for calculating exposure time vs. frame count vs. shoot length, and providing a timer to let you know when the shoot is done.
TIP 6 — DO: Use short intervals
Mind the Gap! At night use intervals as short as possible to avoid gaps in time, simulated here (at top) by stacking several time-lapse frames taken at a one-second interval into one image. Using too long an interval, as demonstrated just above, yields gaps in time and jumps in the star motion, simulated here by stacking only every other frame in a sequence.
At night, the interval between exposures should be no more than one or two seconds. By “interval,” I mean the time between when the shutter closes and when it opens again for the next frame.
Not all intervalometers define “Interval” that way. But it’s what you expect it means. If you use too long an interval then the stars will appear to jump across the sky, ruining the smooth motion you are after.
In practice, intervals of four to five seconds are sometimes needed to accommodate the movement of motorized “motion control” devices that turn or slide the camera between each shot. But I’m not covering the use of those advanced units here. I cover those options and much, much more in 400 pages of tips, techniques and tutorials in my Nightscapes ebook, linked to above.
However, during the day or in twilight, intervals can be, and indeed need to be, much longer than the exposures. It’s at night with stars in the sky that you want the shutter to be closed as little as possible.
TIP 7 — DO: Shoot Raw
The Power of Raw Shooting raw, even for time-lapse frames that will eventually be turned into JPGs, allows for maximum control of shadows, highlights, colour balance, and noise reduction. “Before” is what came out of the camera; “After” is with the development settings shown applied in Camera Raw.
This advice also applies to still images where shooting raw files is essential for professional results. But you likely knew that.
However, with time-lapses some cameras offer a mode that will shoot time-lapse frames and assemble them into a movie right in the camera. Don’t use it. It gives you a finished, pre-baked movie with no ability to process each frame later, an essential step for good night time-lapses. And raw files provide the most data to work with.
So even with time-lapses, shoot raw not JPGs.
If you are confident the frames will be used only for a time-lapse, you might choose to shoot in a smaller S-Raw or compressed C-Raw mode, for smaller files, in order to fit more frames onto a card.
But I prefer not to shrink or compress the original raw files in the camera, as some of them might make for an excellent stacked and layered still image where I want the best quality originals (such as for the ISS over Waterton Lakes example above).
To get you through a long field shoot away from your computer buy more and larger memory cards. You don’t need costly, superfast cards for most time-lapse work.
PLANNING AND COMPOSITION
TIP 8 — DO: Use planning apps to frame
Planning the Shoot Apps such as The Photographer’s Ephemeris (shown here set for the author’s Waterton Lakes site for moonrise) help in planning where the Sun, Moon and Milky Way will be from your site during the shoot.
Simulating the Shoot The companion app to The Photographer’s Ephemeris, TPE 3D, shown above in the inset, exactly matches the real scene for the mountain skyline, placement of the Milky Way, and lighting from the rising Moon.
All nightscape photography benefits from using one of the excellent apps we now have to assist us in planning a shoot. They are particularly useful for time-lapses.
Apps such as PhotoPills and The Photographer’s Ephemeris are great. I like the latter as it links to its companion TPE 3D app to preview what the sky and lighting will look like over the actual topographic horizon from your site. You can scrub through time to see the motion of the Milky Way over the scenery. The Augmented Reality “AR” modes of these apps are also useful, but only once you are on site during the day.
For planning a time-lapse at home I always turn to a “planetarium” program to simulate the motion of the sky (albeit over a generic landscape), with the ability to add in “field of view” indicators to show the view your lens will capture.
You can step ahead in time to see how the sky will move across your camera frame during the length of the shoot. Indeed, such simulations help you plan how long the shoot needs to last until, for example, the galactic core or Orion sets.
Planetarium software helps ensure you frame the scene properly, not only for the beginning of the shoot (that’s easy — you can see that!), but also for the end of the shoot, which you can only predict.
Planetarium Planning An alternative is to use a planetarium program such as the free Stellarium, shown above, which can display lens fields of view. These scenes show the simulated vs. real images (insets) for the start (top) and end (bottom) of the Waterton Lakes time-lapse with a 35mm lens frame, outlined in red.
If your shoot will last as long as three hours, do plan to check the battery level and swap batteries before three hours is up. Most cameras, even new mirrorless models, will now last for three hours on a full battery, but likely not any longer. If it’s a cold winter night, expect only one or two hours of life from a single battery.
PROCESSING
TIP 9 — DO: Develop one raw frame and apply settings to all
Copy and Paste Settings Most raw developers or photo library programs (Adobe Bridge is shown here) offer the essential ability to copy settings from one image and paste them onto hundreds of others in a folder, developing all the time-lapse frames in a snap.
Processing the raw files takes the same steps and settings as you would use to process still images.
With time-lapses, however, you have to do all the processing required within your favourite raw developer software. You can’t count on bringing multiple exposures into a layer-based processor such as Photoshop to stack and blend images. That works for a single image, but not for 300.
I use Adobe Camera Raw out of Adobe Bridge to do all my time-lapse processing. But many photographers use Lightroom, which offers all the same settings and non-destructive functions as Adobe Camera Raw.
For those who wish to “avoid Adobe” there are other choices, but for time-lapse work an essential feature is the ability to develop one frame, then copy and paste its settings (or “sync” settings) to all the other frames in the set.
Not all programs allow that. Affinity Photo does not. Luminar doesn’t do it very well. DxO PhotoLab, ON1 Photo RAW, and the free Raw Therapee, among others, all work fine.
HOW TO ASSEMBLE A TIME-LAPSE
Once you have a set of raws all developed, the usual workflow is to export all those frames out as high-quality JPGs which is what movie assembly programs need. Your raw developing software has to allow batch exporting to JPGs — most do.
Photoshop Batch Export Raw developers usually have a batch export function. So does Photoshop, via its Image Processor utility, shown here (found under File>Scripts>Image Processor) that can export a folder of raws into JPGs or TIFFs, and re-size them, often needed for final 4K or HD movies.
However, none of the programs above (except Photoshop and Adobe’s After Effects) will create the final movie, whether it be from those JPGs or from the raws.
Assembling JPGs The author’s favourite assembly program is TimeLapse DeFlicker (TLDF). It can turn a folder of JPGs into movies as large as 8K and with ProRes codecs for the highest quality.
So for assembling the intermediate JPGs into a movie, I often use a low-cost program called TLDF (TimeLapse DeFlicker) available for MacOS and Windows (timelapsedeflicker.com). It offers advanced functions such as deflickering (i.e. smoothing slight frame-to-frame brightness fluctuations) and frame blending (useful to smooth aurora motions or to purposely add star trails).
While there are many choices for time-lapse assembly, I suggest using a program dedicated to the task and not, as many do, a movie editing program. For most sequences, the latter makes assembly unnecessarily difficult and harder to set key parameters such as frame rates.
TIP 10 — DO: Try LRTimelapse for more advanced processing
Working on Keyframes The advanced processing program LRTimelapse creates several keyframes through the sequence (seven are shown here in Adobe Bridge) which you develop so each looks its best. During this sequence, the Moon rose changing the lighting toward the end of the shoot (in the last three keyfames).
Get serious about time-lapse shooting and you will want — indeed, you will need — the program LRTimelapse (LRTimelapse.com). A free but limited trial version is available.
This powerful program is for sequences where one setting will not work for all the frames. One size does not fit all.
Instead, LRTimelapse allows you to process a few keyframes throughout a sequence, say at the start, middle, and end. It then interpolates all the settings between those keyframes to automatically process the entire set of images to smooth (or “ramp”) and deflicker the transitions from frame to frame.
LRTimelapse Ramping LRTimelapse reads your developed keyframe data and applies smooth transitions of all settings to each of the raw files between the keyframes. The result is a seamless and smooth final movie. The pink curve shows how the scene brightened at moonrise. The blue diamonds on the yellow line mark the seven keyframes.
This is essential for sequences where the lighting changes during the shoot (say, the Moon rises or sets), and for so-called “holy grails.” Those are advanced sequences that track from daylight or twilight to darkness, or vice versa, over a wide range of camera settings.
However, LRTimelapse works only with Adobe Lightroom or the Adobe Camera Raw/Bridge combination. So for advanced time-lapse work Adobe software is essential.
A Final Bonus Tip
Keep it simple. You might aspire to emulate the advanced sequences you see on the web, where the camera pans and dollies during the movie. I suggest avoiding complex motion control gear at first to concentrate on getting well-exposed time-lapses with just a static camera. That alone is a rewarding achievement.
But before that, first learn to shoot still images successfully. All the settings and skills you need for a great looking still image are needed for a time-lapse. Then move onto capturing the moving sky.
I end with a link to an example music video, shot using the techniques I’ve outlined. Thanks for reading and watching. Clear skies!
The Beauty of the Milky Way from Alan Dyer on Vimeo.
On November 11, I traveled to the near-flung corners of my backyard to observe the rare transit of Mercury across the Sun.
History is replete with tales of astronomers traveling to the far corners of the Earth to watch dark objects pass in front of the Sun — the Moon in eclipses, and Mercury and Venus in transits.
On November 11, to take in the last transit of Mercury until 2032, I had planned a trip to a location more likely to have clear skies in November than at home. A 3-day drive to southern Arizona was the plan.
But to attend to work and priorities at home I cancelled my plans. Instead, I decided to stay home and take my chances with the Alberta weather, perhaps making a run for it a day’s drive away if needed to chase into clear skies.
As it turned out, none of that was necessary. The forecast for clear, if cold, skies held true and we could not have had a finer day for the transit. Even the -20° C temperatures were no problem, with no wind, and of course sunshine!
Plus being only steps from home and a warming coffee helped!
As it turned out, the site in Arizona I had booked to stay was clouded out for the entire event. So I was happy with my decision!
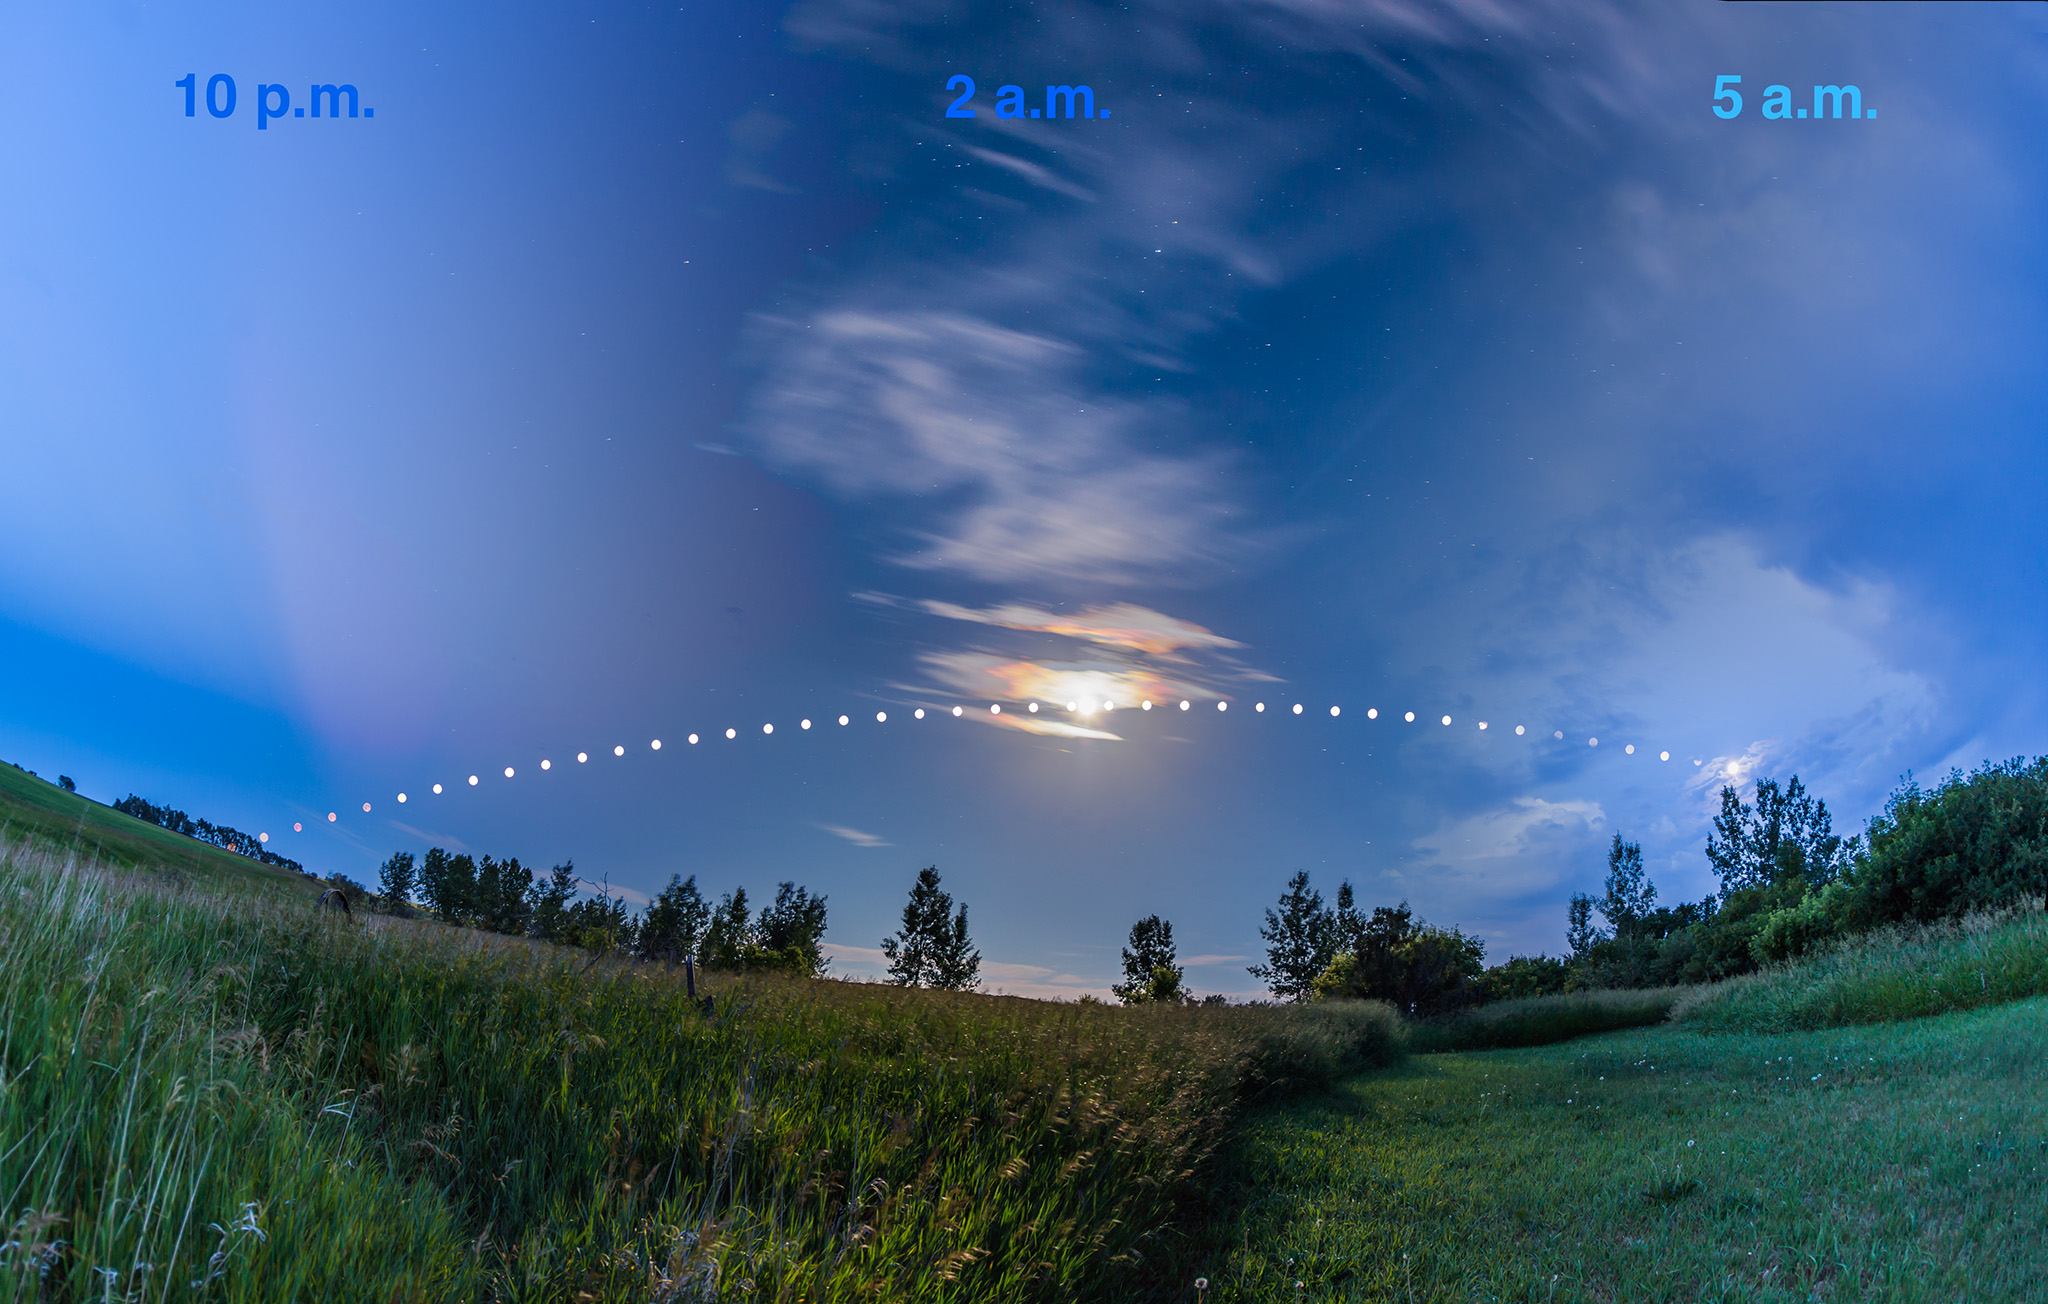
For my site in Alberta, as for all of western North America, the Sun rose with the transit in progress. But as soon as the Sun cleared the horizon there was Mercury, as a small, if fuzzy, black dot on the Sun.
As the Sun rose the view became sharper, and was remarkable indeed — of a jet black dot of a tiny planet silhouetted on the Sun.
I shot through two telescopes, my 4-inch and 5-inch refractors, both equipped with solar filters of course. I viewed through two other telescopes, for white-light and hydrogen-alpha filtered views.
I was able to follow the transit for three hours, for a little more than half the transit, until Mercury exited the Sun just after 11 a.m. MST. The view below is from moments before Mercury’s exit, or “egress.”
I shot still frames every 15 seconds with each of the two cameras and telescopes, for a time-lapse, plus I shot real-time videos.
At this transit Mercury passed closer to the centre of the Sun’s disk than it will for any other transit in the 21st century, making this event all the more remarkable. That point is recorded above, from a shot taken at 8:19 a.m. MST.
Stacking a selection of the time-lapse frames, ones taken 1-minute intervals, produced this composite of the transit, from just before mid-transit until Mercury’s egress.
I assembled all the best images and 4K videos together into a movie, which I narrated live at the telescope as the transit was happening. I hope this provides a sense of what it was like to view this rare event.
The Transit of Mercury from Alan Dyer on Vimeo.
We won’t see another until 2032, but not from North America. The next transit of Mercury viewable from here at home is not until 2049! This was likely my last transit, certainly for a while!
P.P.S.: And for tech details on the images and videos in this blog, please click through to Vimeo and the video description I have there of cameras, scopes, and settings.
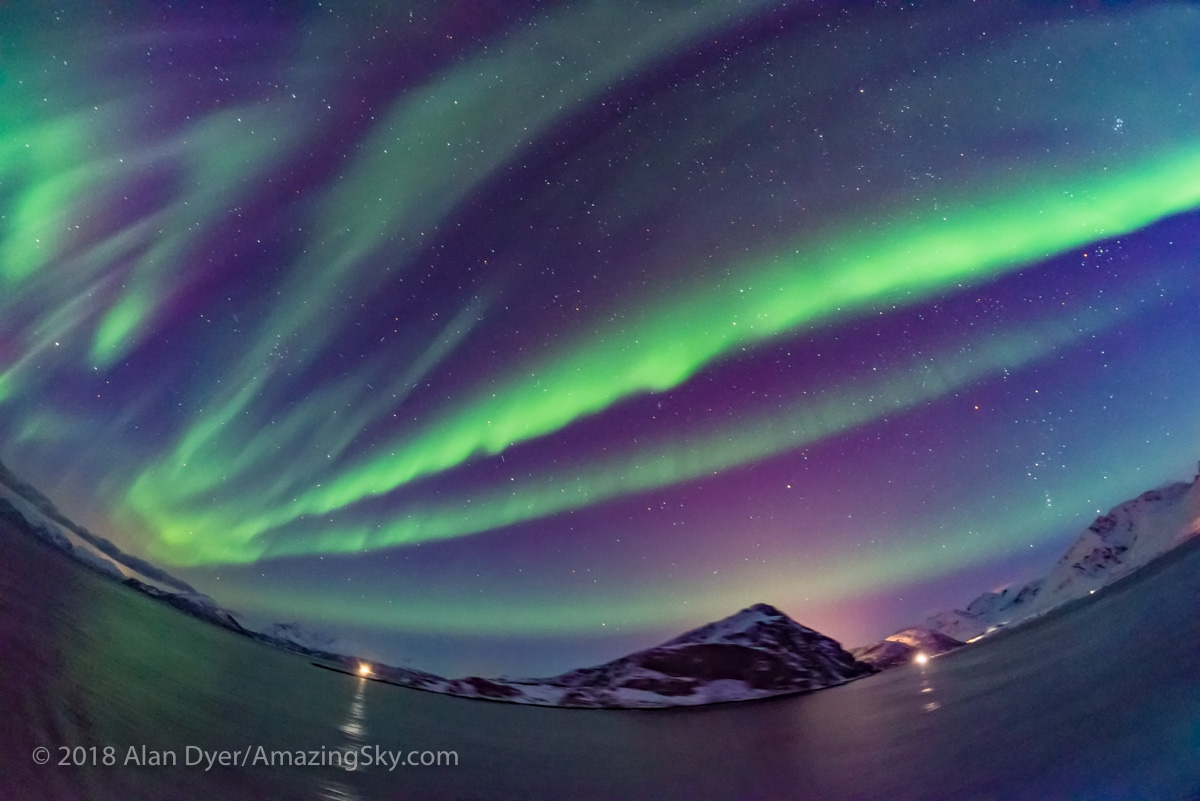
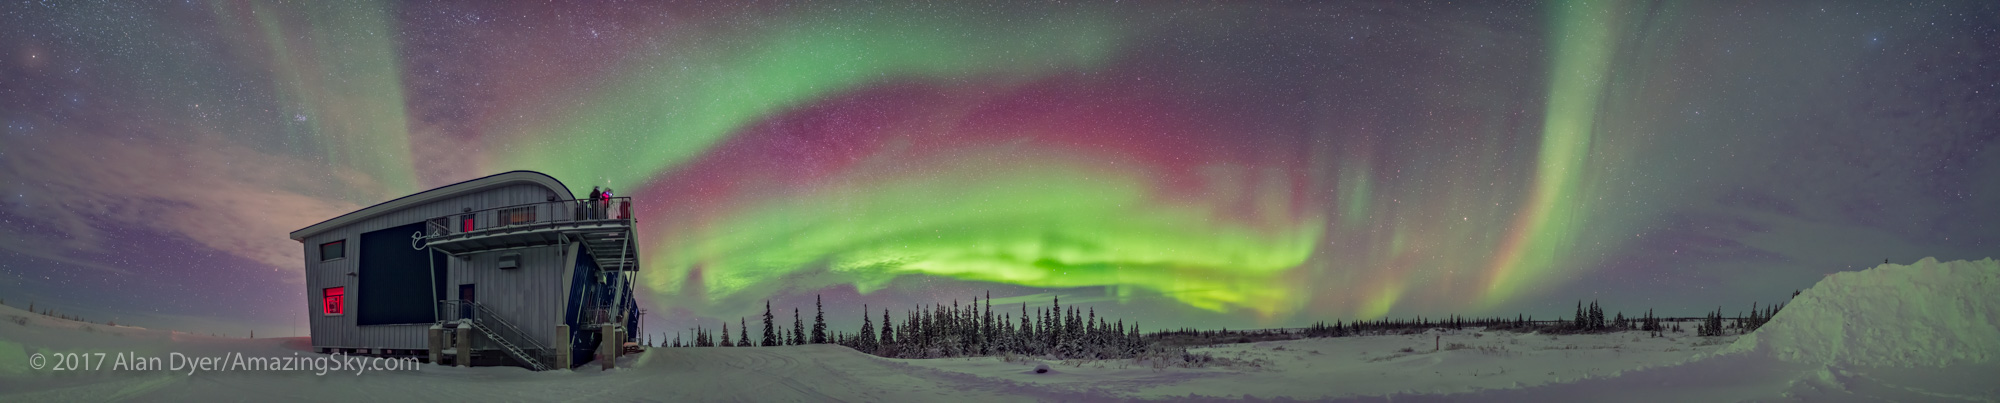
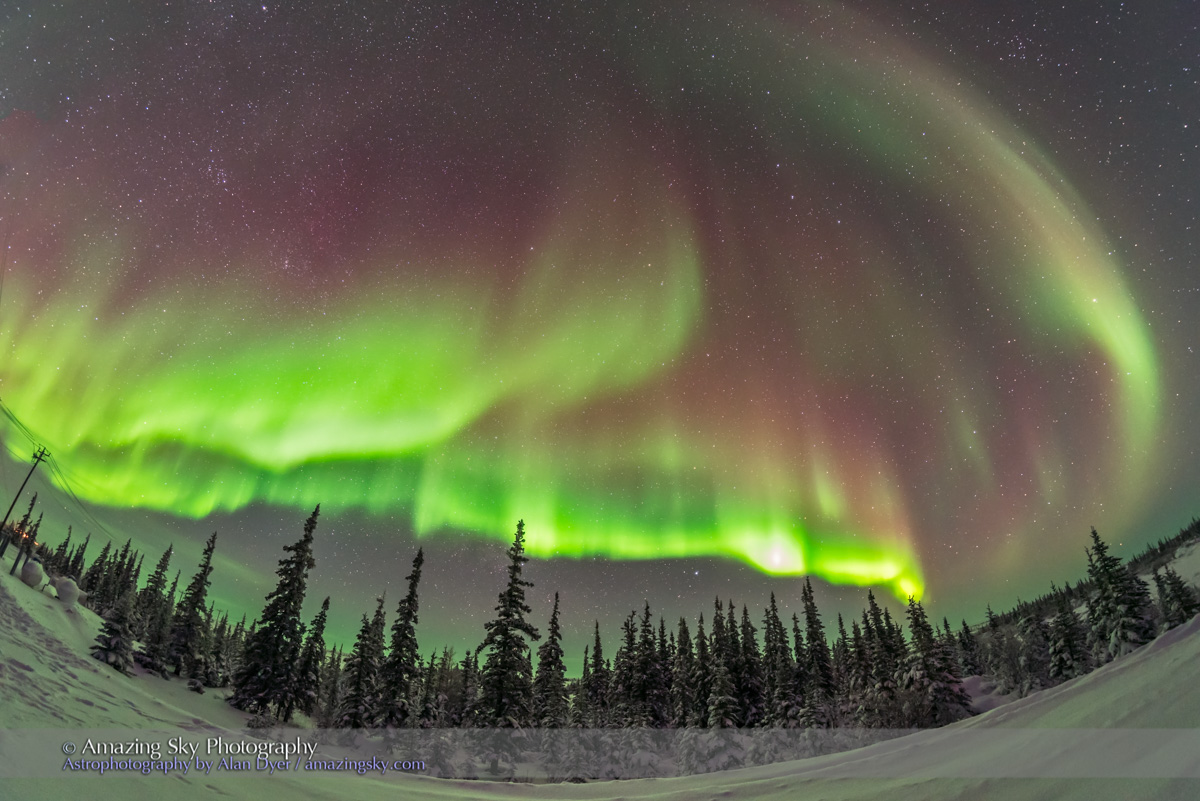
It was a fabulous week of clear skies and dancing auroras in and around Yellowknife in Canada’s North.
For the second year in a row I traveled due north from home in Alberta to visit Yellowknife, capitol of Canada’s Northwest Territories. At a latitude of 62° North, Yellowknife lies directly under the auroral oval and so enjoys views of the Northern Lights on almost every clear night.
During my 8-night stay from September 3 to 10 almost every night was clear and filled with auroras.
Somba K’e Park
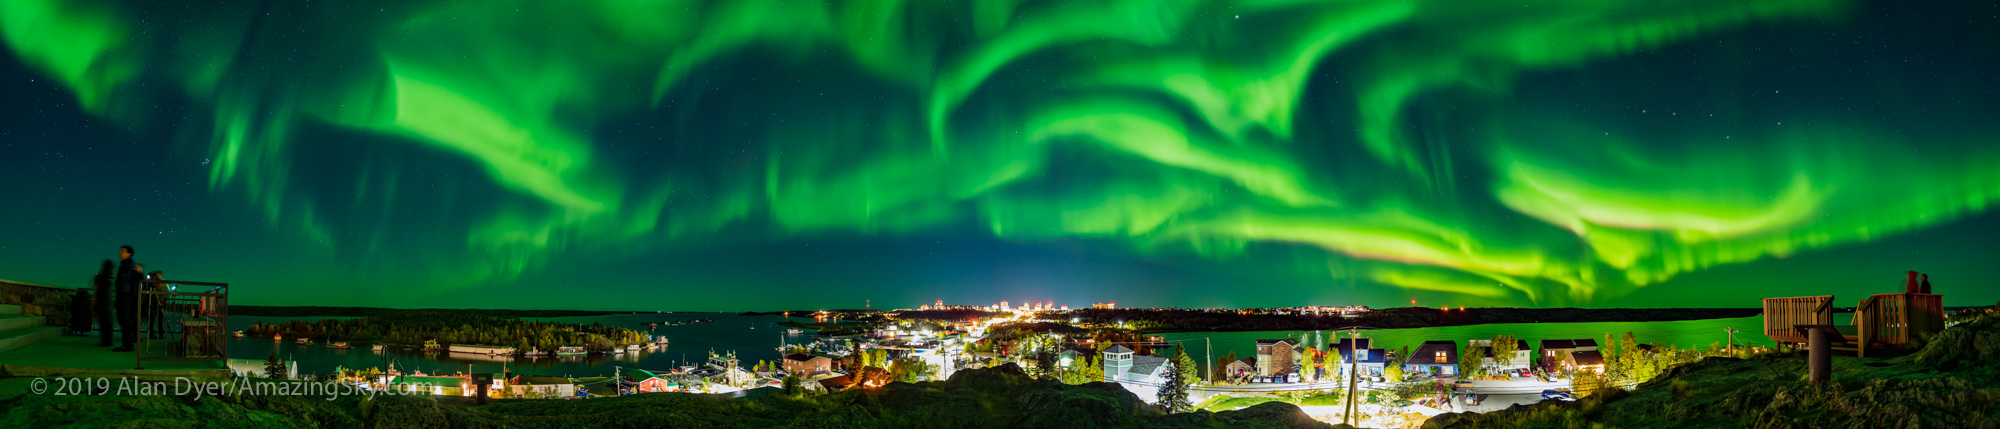
The Lights can be seen even from within the downtown core, as the opening image shows, taken from the urban Sombe K’e Park looking over Frame Lake and the Prince of Wales Museum.
The Museum is lit with rippling bands of coloured light that emulate the aurora borealis.
Pilot’s Monument
A favourite urban site for viewing the Lights is the Pilot’s Monument lookout in the middle of Yellowknife’s Oldtown district. This panorama sweeps from northeast at left to west at far right, looking mostly south over the downtown core.
This night even the urban lights were not enough to wash out the Lights as they brightened during a brief substorm.
This is a 300° panorama of the Northern Lights over Yellowknife, NWT on the night of Sept 6-7, 2019, during a sub-storm outbreak at 12:45 a.m. when the sky went wild with aurora. This is a 9-segment panorama with the 15mm Laowa lens at f/2 and Sony a7III at ISO 800, for 10 seconds each.
Rotary Park
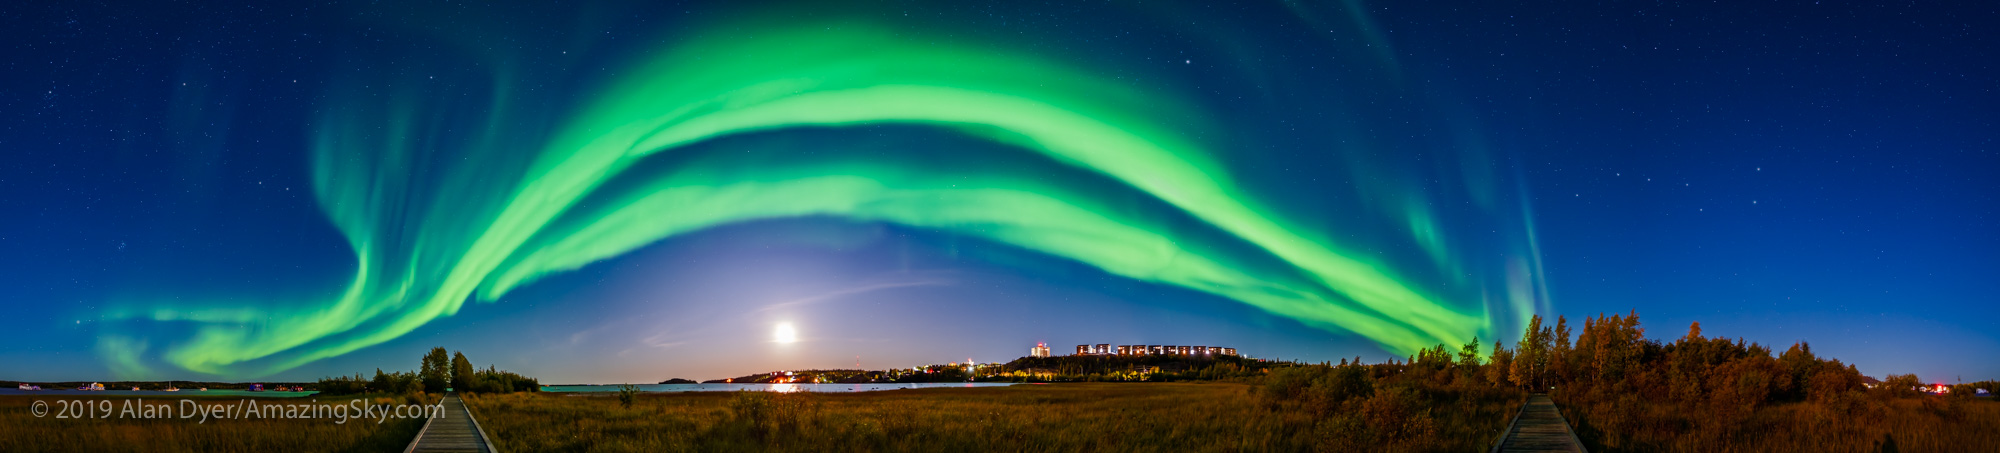
Another good urban site that gets you away from immediate lights is the open spaces of Rotary Park overlooking the houseboats anchored in Yellowknife Bay. This panorama again sweeps from east to west, looking toward to the waxing Moon low in the south.
Again, despite the urban lights and moonlight, the Lights were spectacular.
A 240° panorama of the Northern Lights from the Boardwalk in the urban Rotary Park in Yellowknife, NWT, on Sept 10, 2019. A waxing gibbous Moon is bright to the south and lights the sky and landscape. This is a 7-segment panorama, each segment 8 seconds at f/2 with the Venus Optics 15mm lens and Sony a7III at ISO 1600. Stitched with Adobe Camera Raw.
Prosperous Lake
The main viewing sites for the Northern Lights are down Highway 4, the Ingraham Trail east of the city away from urban lights.. One of the closest stops is a parking lot on the shore of a backwater bay of Prosperous Lake. It’s where many tourist buses stop and unload their passengers, mostly to get their selfies under the Lights.
But with patience you can get your own photos unencumbered by other lights and people, as I show below.
A group of aurora tourists take their aurora selfies at Prosperous Lake, near Yellowknife, NWT, a popular spot on the Ingraham Trail for aurora watching. This was about 1:15 a.m. MDT. This is a single 5-second exposure with the 20mm Sigma Art lens at f/2 and Nikon D750 at ISO800.
The Northern Lights over the end of Prosperous Lake, on the Ingraham Trail near Yellowknife, NWT, a popular spot for aurora watching in the area. This is a single 8-second exposure with the Sigma 20mm lens at f/2 and Nikon D750 at ISO 800.
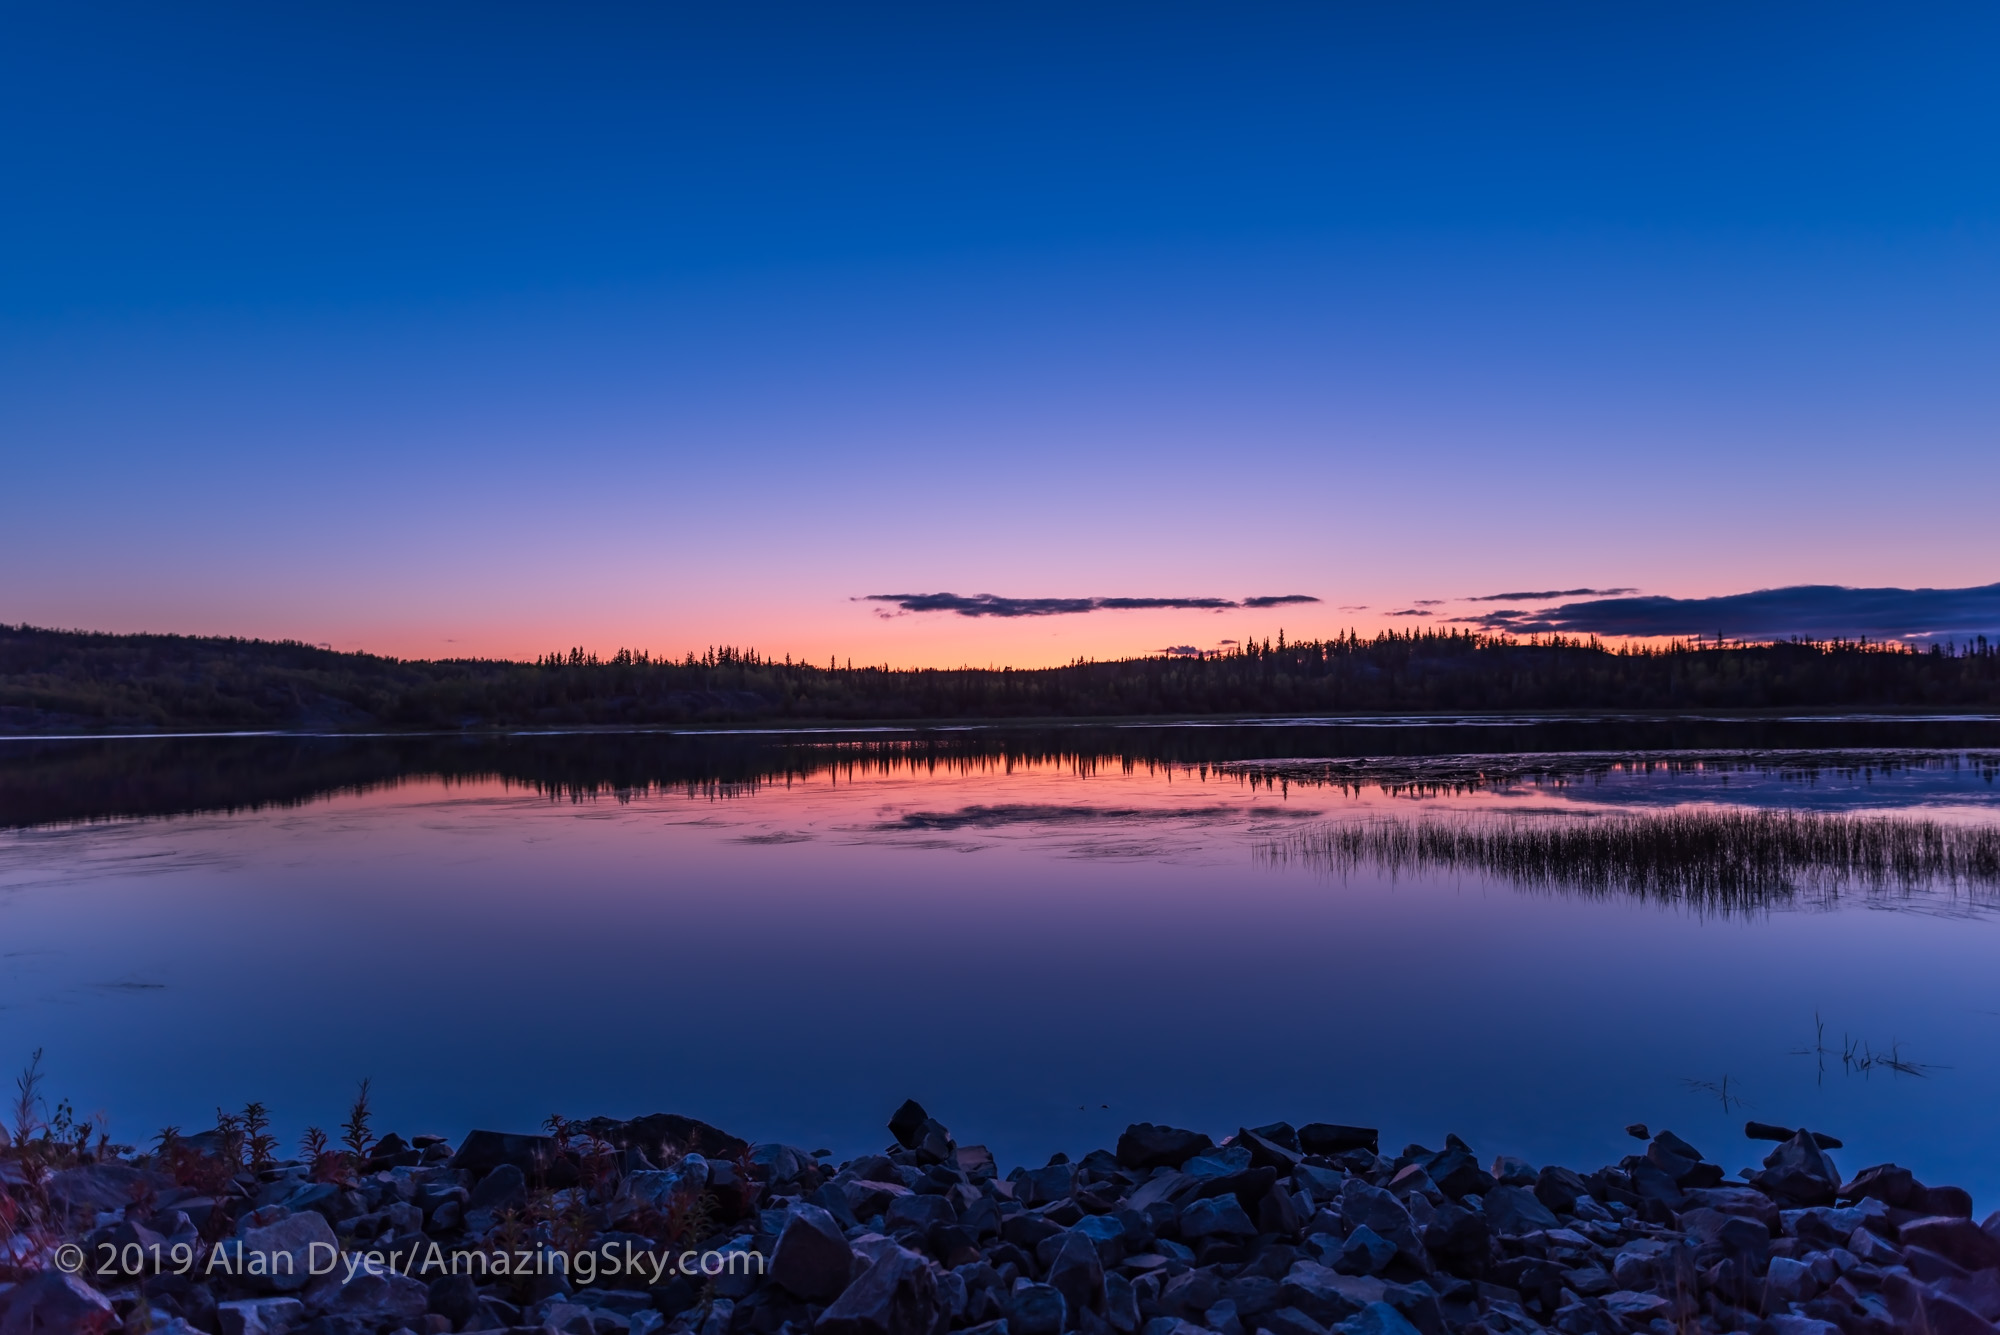
On one of my nights I stopped at Prosperous on the way to sites farther down Ingraham Trail to catch the twilight colours in the stunningly clear sky.
Twilight at Prosperous Lake on the Ingraham Trail, near Yellowknife, NWT, Sept. 7, 2019. The colours are accentuated by volcanic ash in the atmosphere.
Madeline Lake
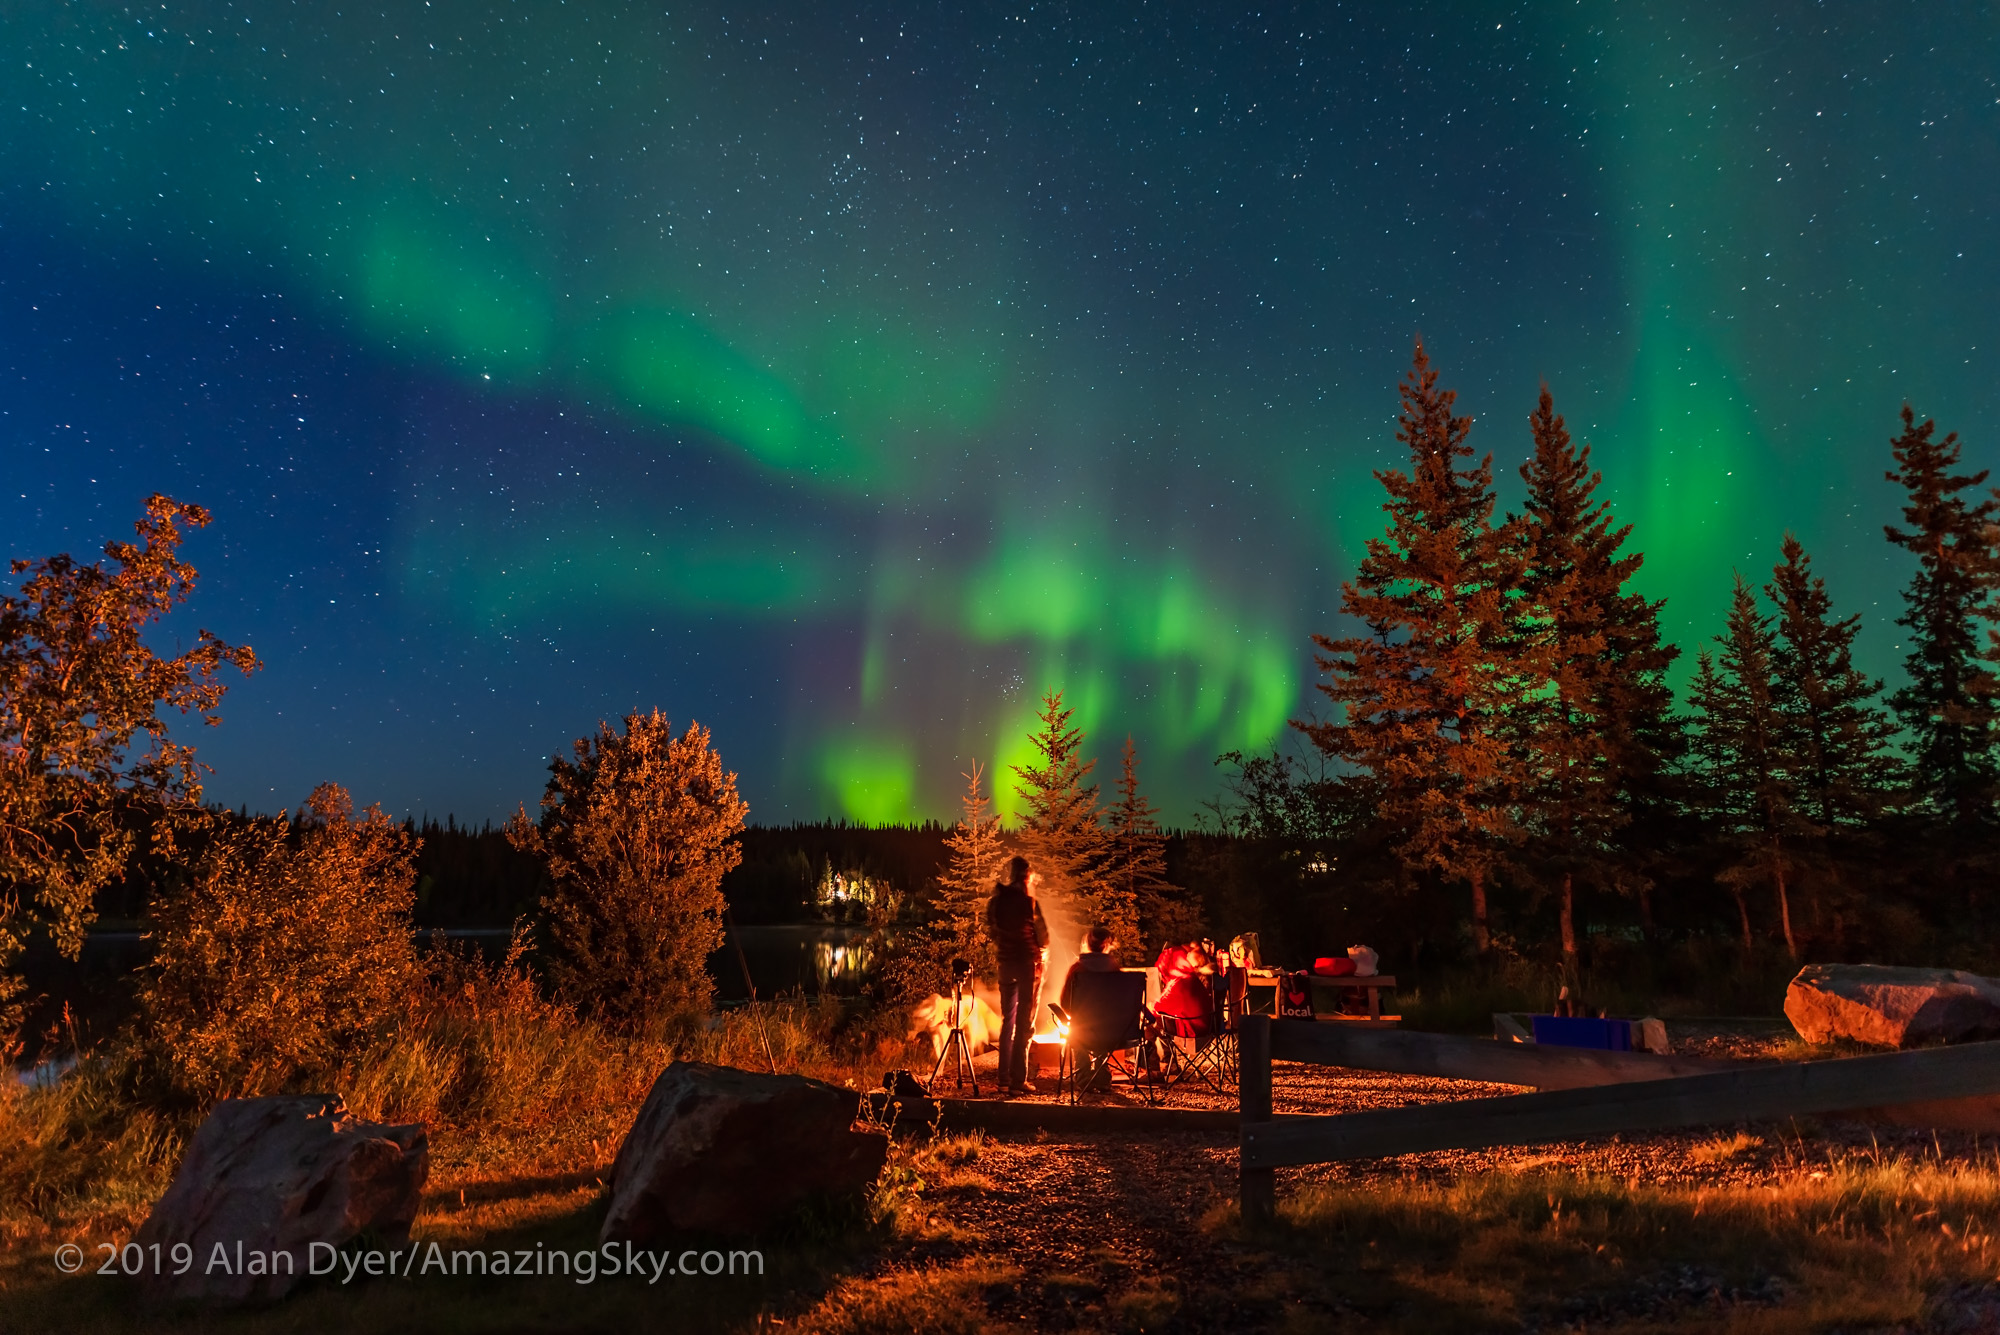
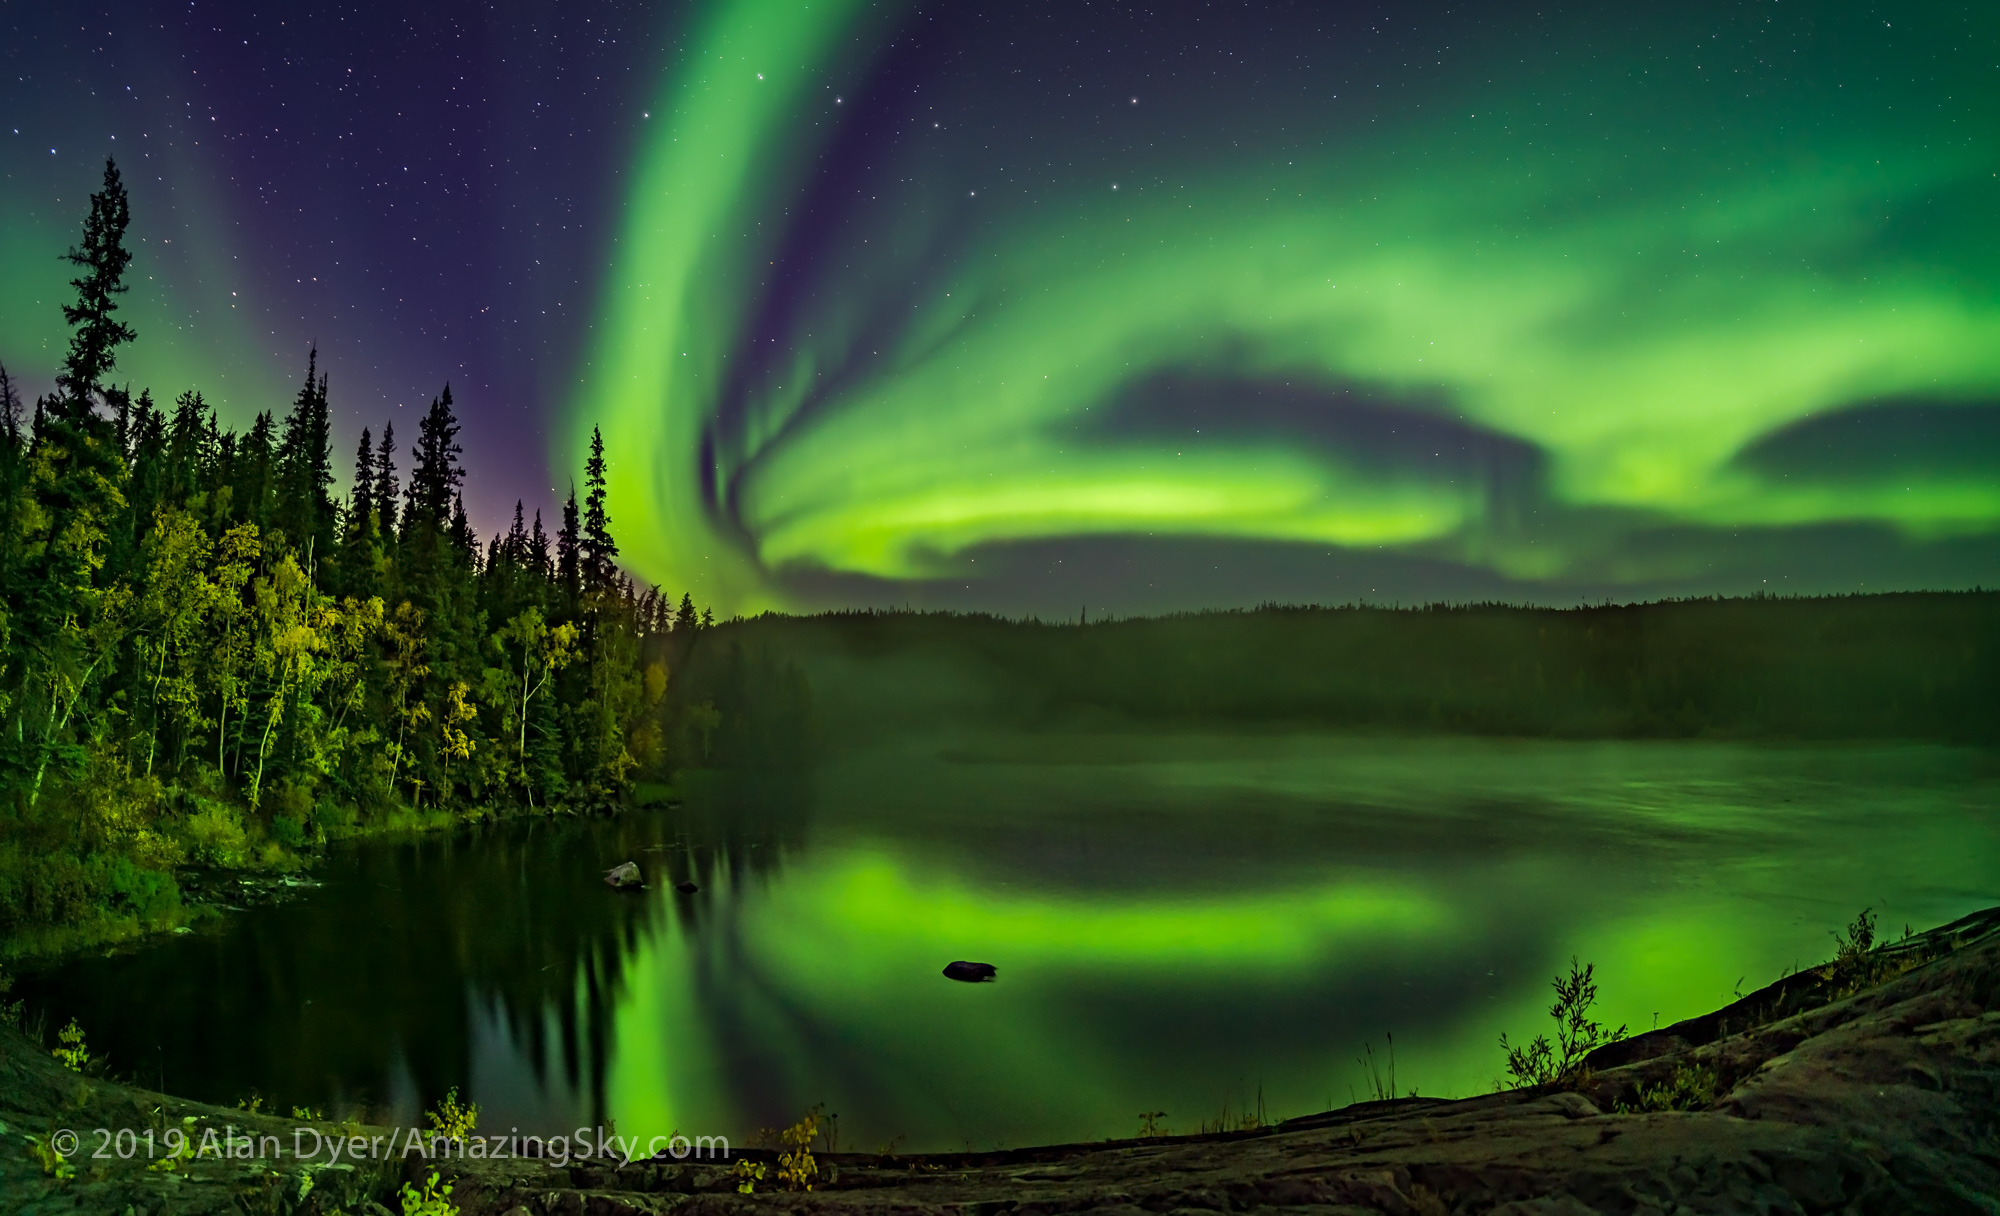
This small lake and picnic site farther along the Trail serves as a great place to shoot the Lights reflected in the calm waters and looking north. I spent one of my nights at Madeline Lake, a popular spot for local residents to have a campfire under the Lights.
Enjoying a campfire on a fine September Saturday night under the brightening Northern Lights, at Madeline Lake on the Ingraham Trail near Yellowknife. This is a single 10-second exposure with the 20mm Sigma lens at f/2 and Nikon D750 at ISO 800.
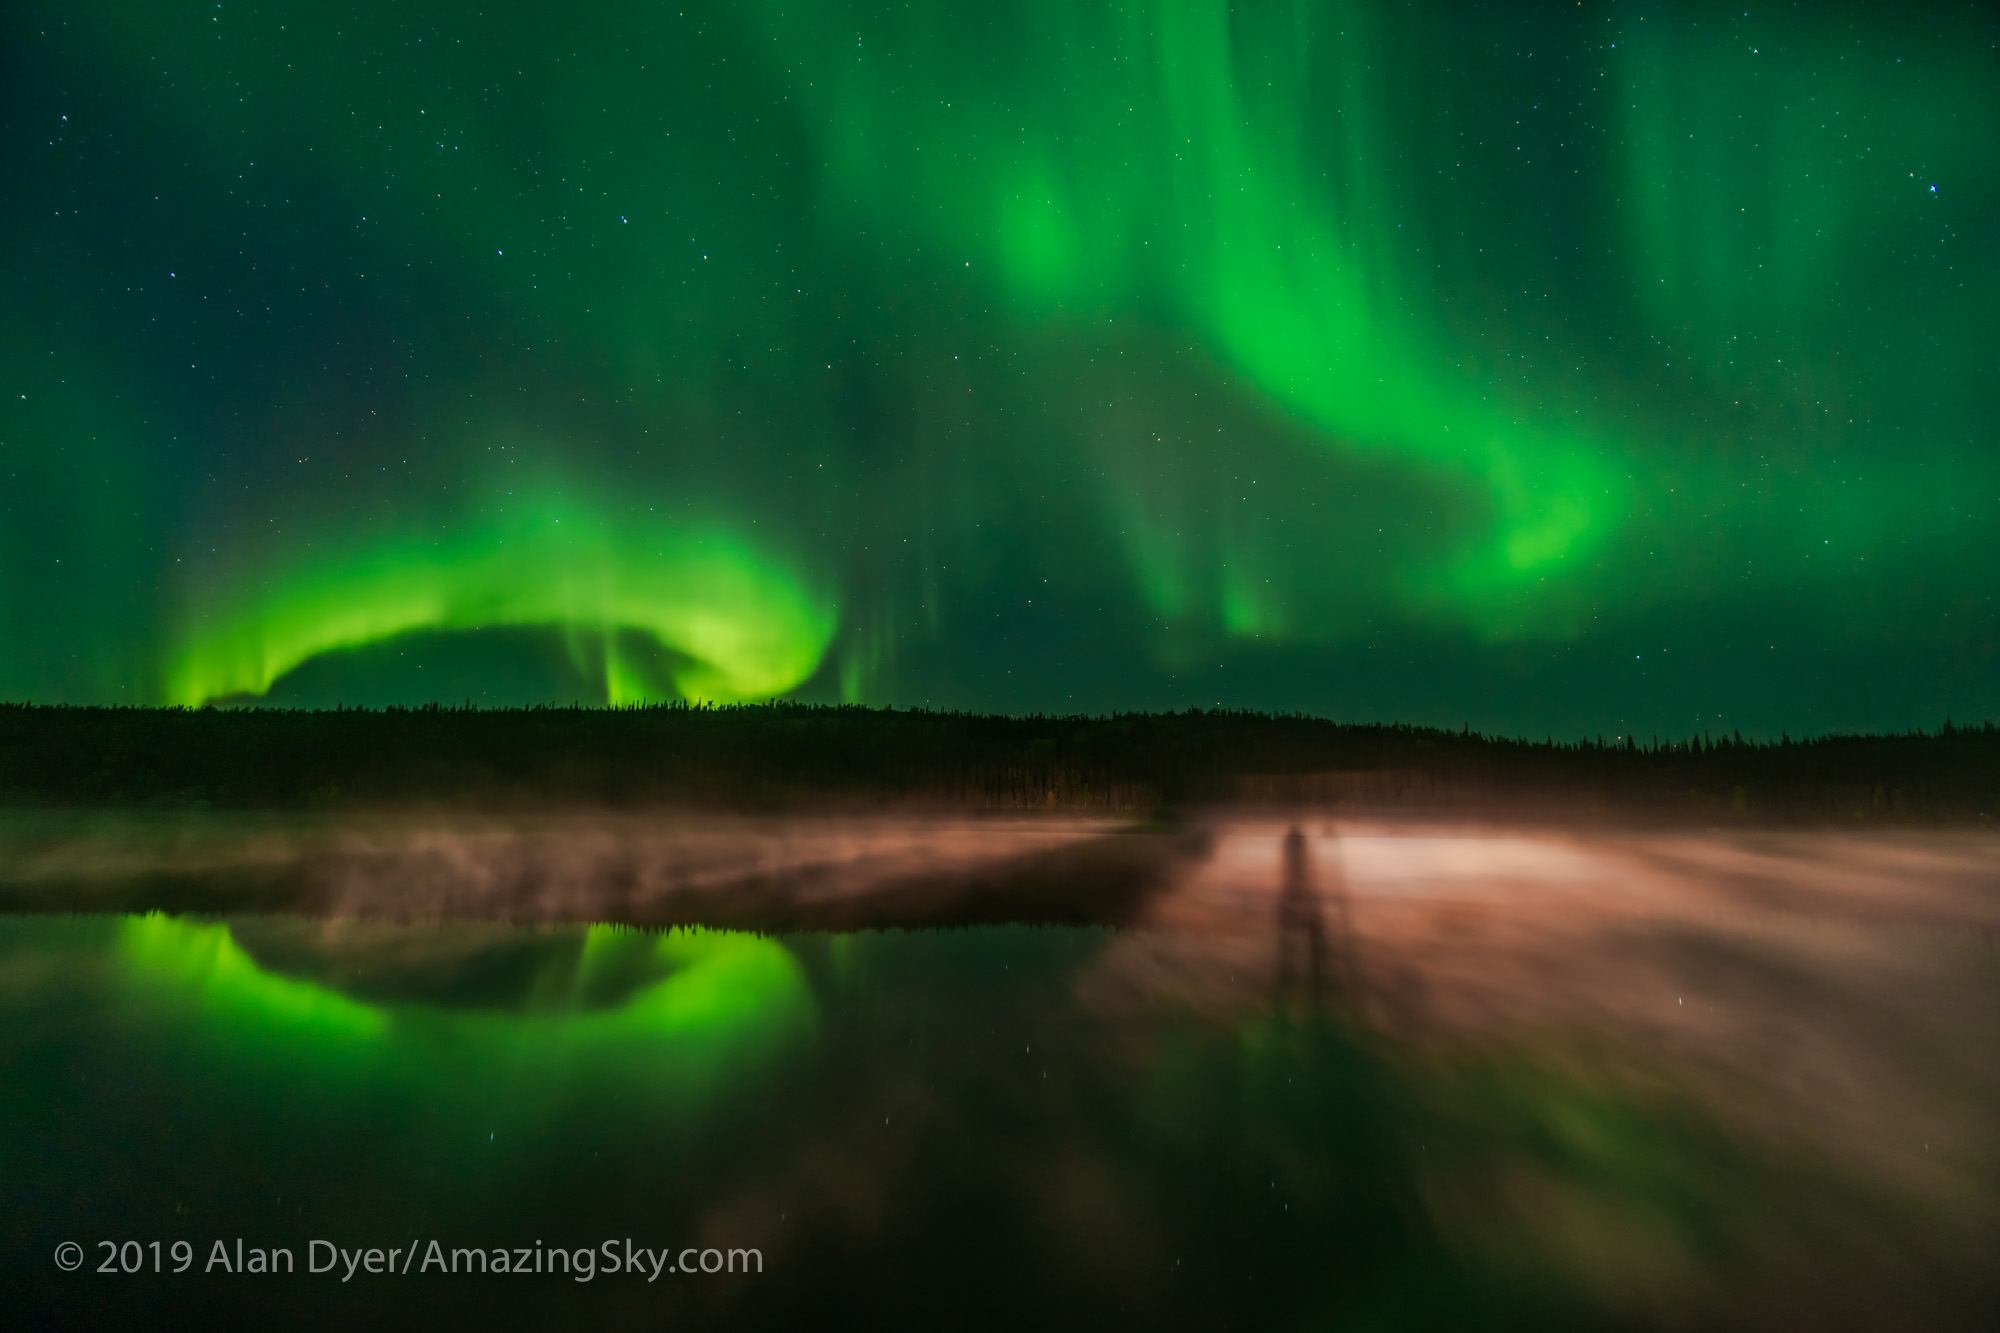
And it’s popular for tour buses, whose headlights shine out across the lake as they arrive through the night, in this case casting my long shadow across the misty lake.
A novelty shot of the shadow of me and my tripod projected across a misty Madeline Lake by car headlights from arriving aurora tourists at this popular spot on the Ingraham Trail near Yellowknife. This was September 7, 2019. A single exposure.
A group of aurora tourists take in the show at Madeline Lake, on the Ingraham Trail near Yellowknife, NWT, a popular spot for the busloads of visitors being shuttled around each night. The Big Dipper is at centre. This is a single exposure, 6 seconds at ISO 3200 with the Laowa 15mm lens at f/2 and Sony a7III.
However, again with patience it is possible to get clean images of the aurora and its reflections in the lake.
Reflections of the Northern Lights in the calm and misty waters of Madeline Lake on the Ingraham Trail near Yellowknife, NWT on Sept 7, 2019. This is one of a series of “reflection” images. The Big Dipper is at left. Capella is at right. This is a single 13-second exposure with the 15mm Laowa lens at f/2 and Sony a7III at ISO 1600.
Reflections of the Northern Lights in the calm waters of Madeline Lake on the Ingraham Trail near Yellowknife, NWT on Sept 7, 2019. This is one of a series of “reflection” images. The Big Dipper is at left; Capella at far right. This is a single 8-second exposure with the 15mm Laowa lens at f/2 and Sony a7III at ISO 1600.
The Northern Lights in a subtle but colourful display over the still waters of Madeline Lake on the Ingraham Trail near Yellowknife, NWT. This was the night of September 7-8, 2019. This is a 4-segment panorama, each 13 seconds at ISO 1600 with the Venus Optics 15mm lens at f/2 and Sony a7III camera.
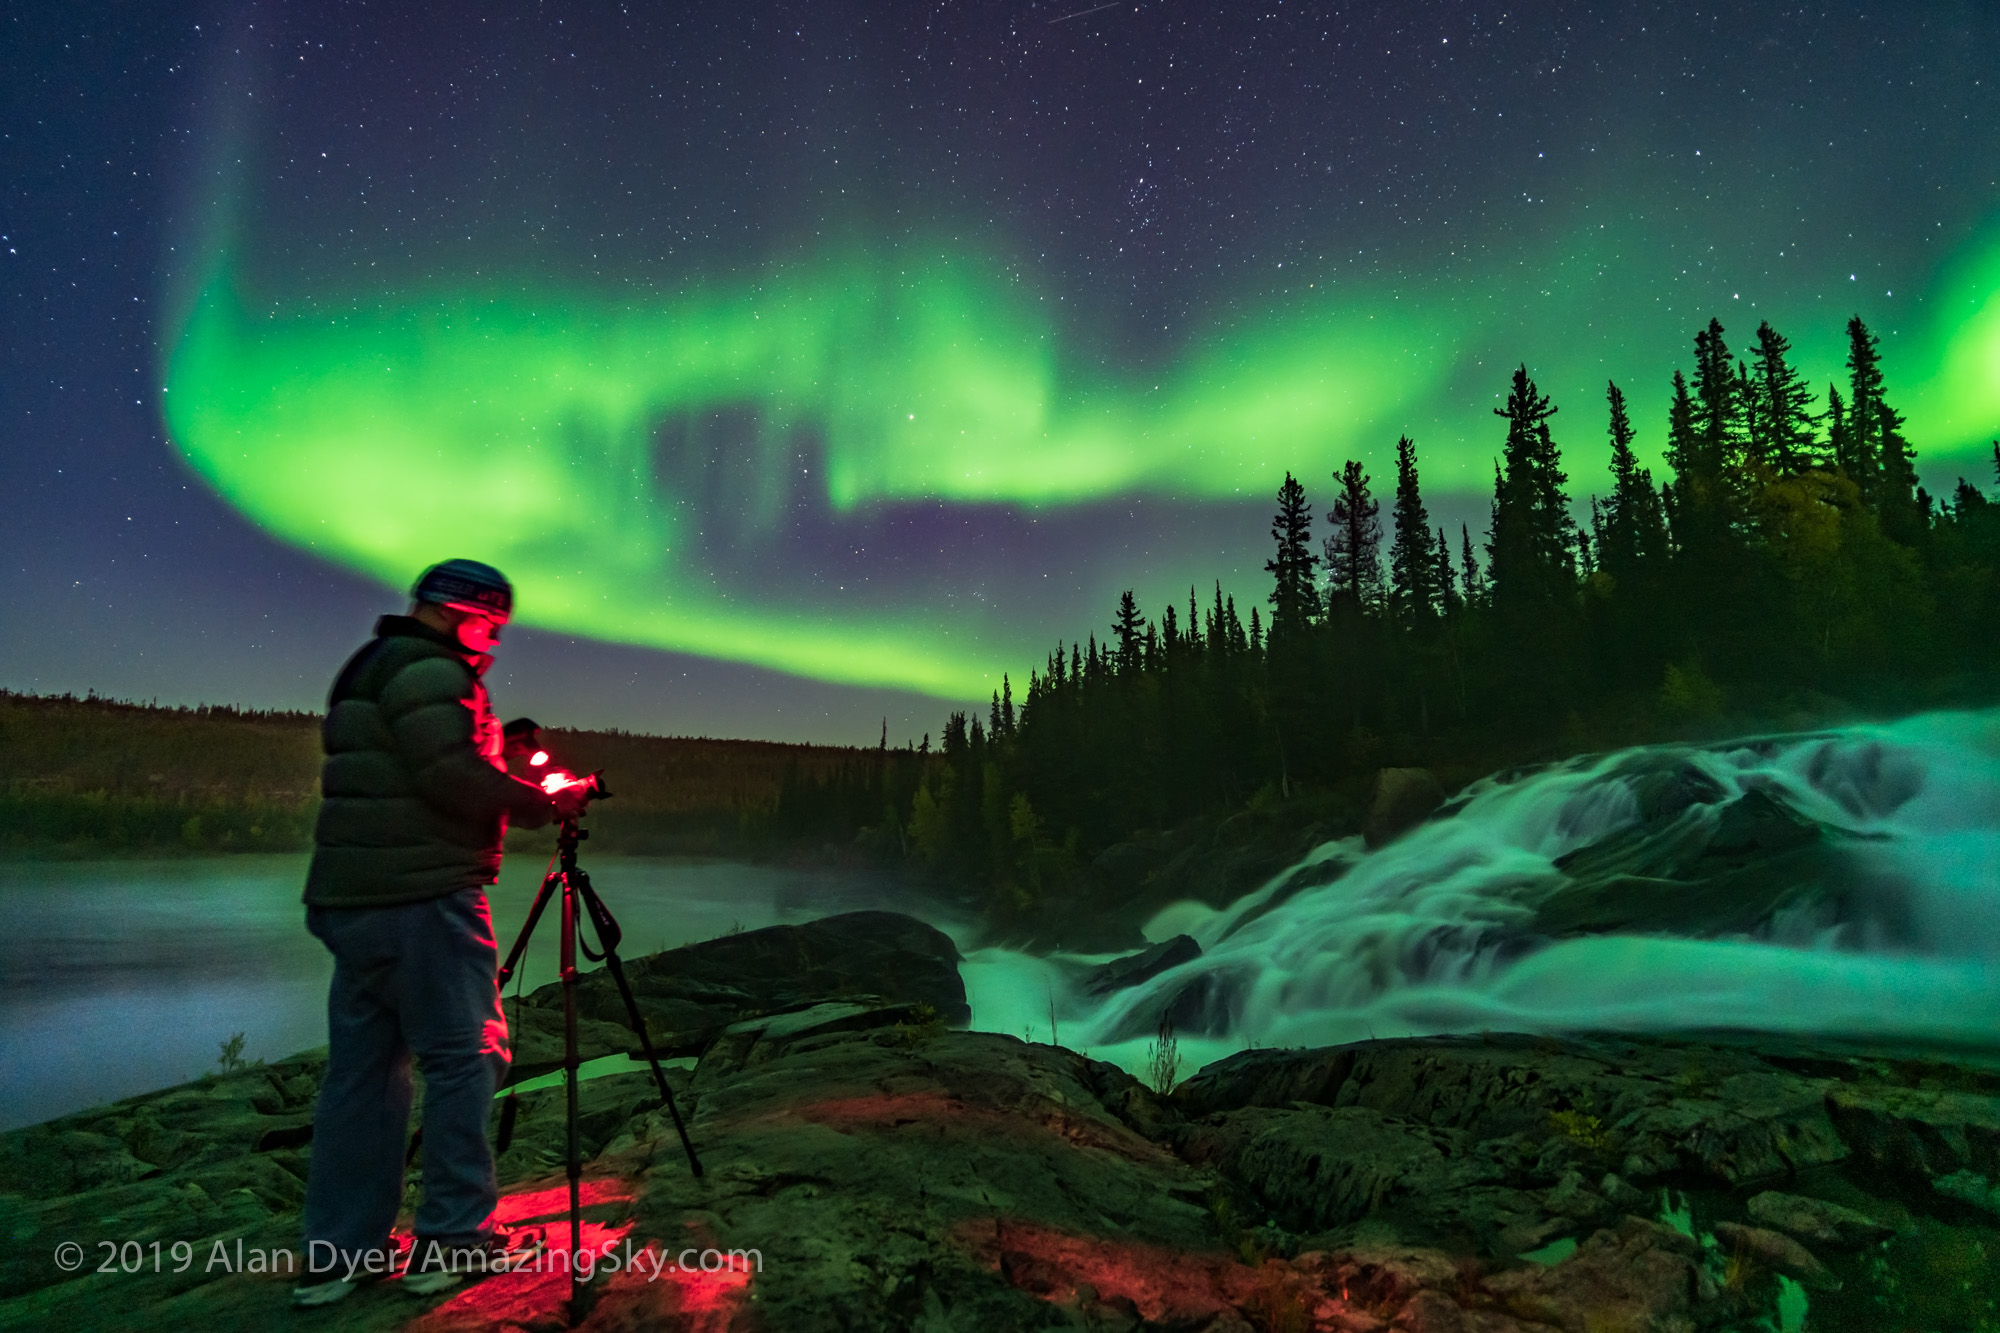
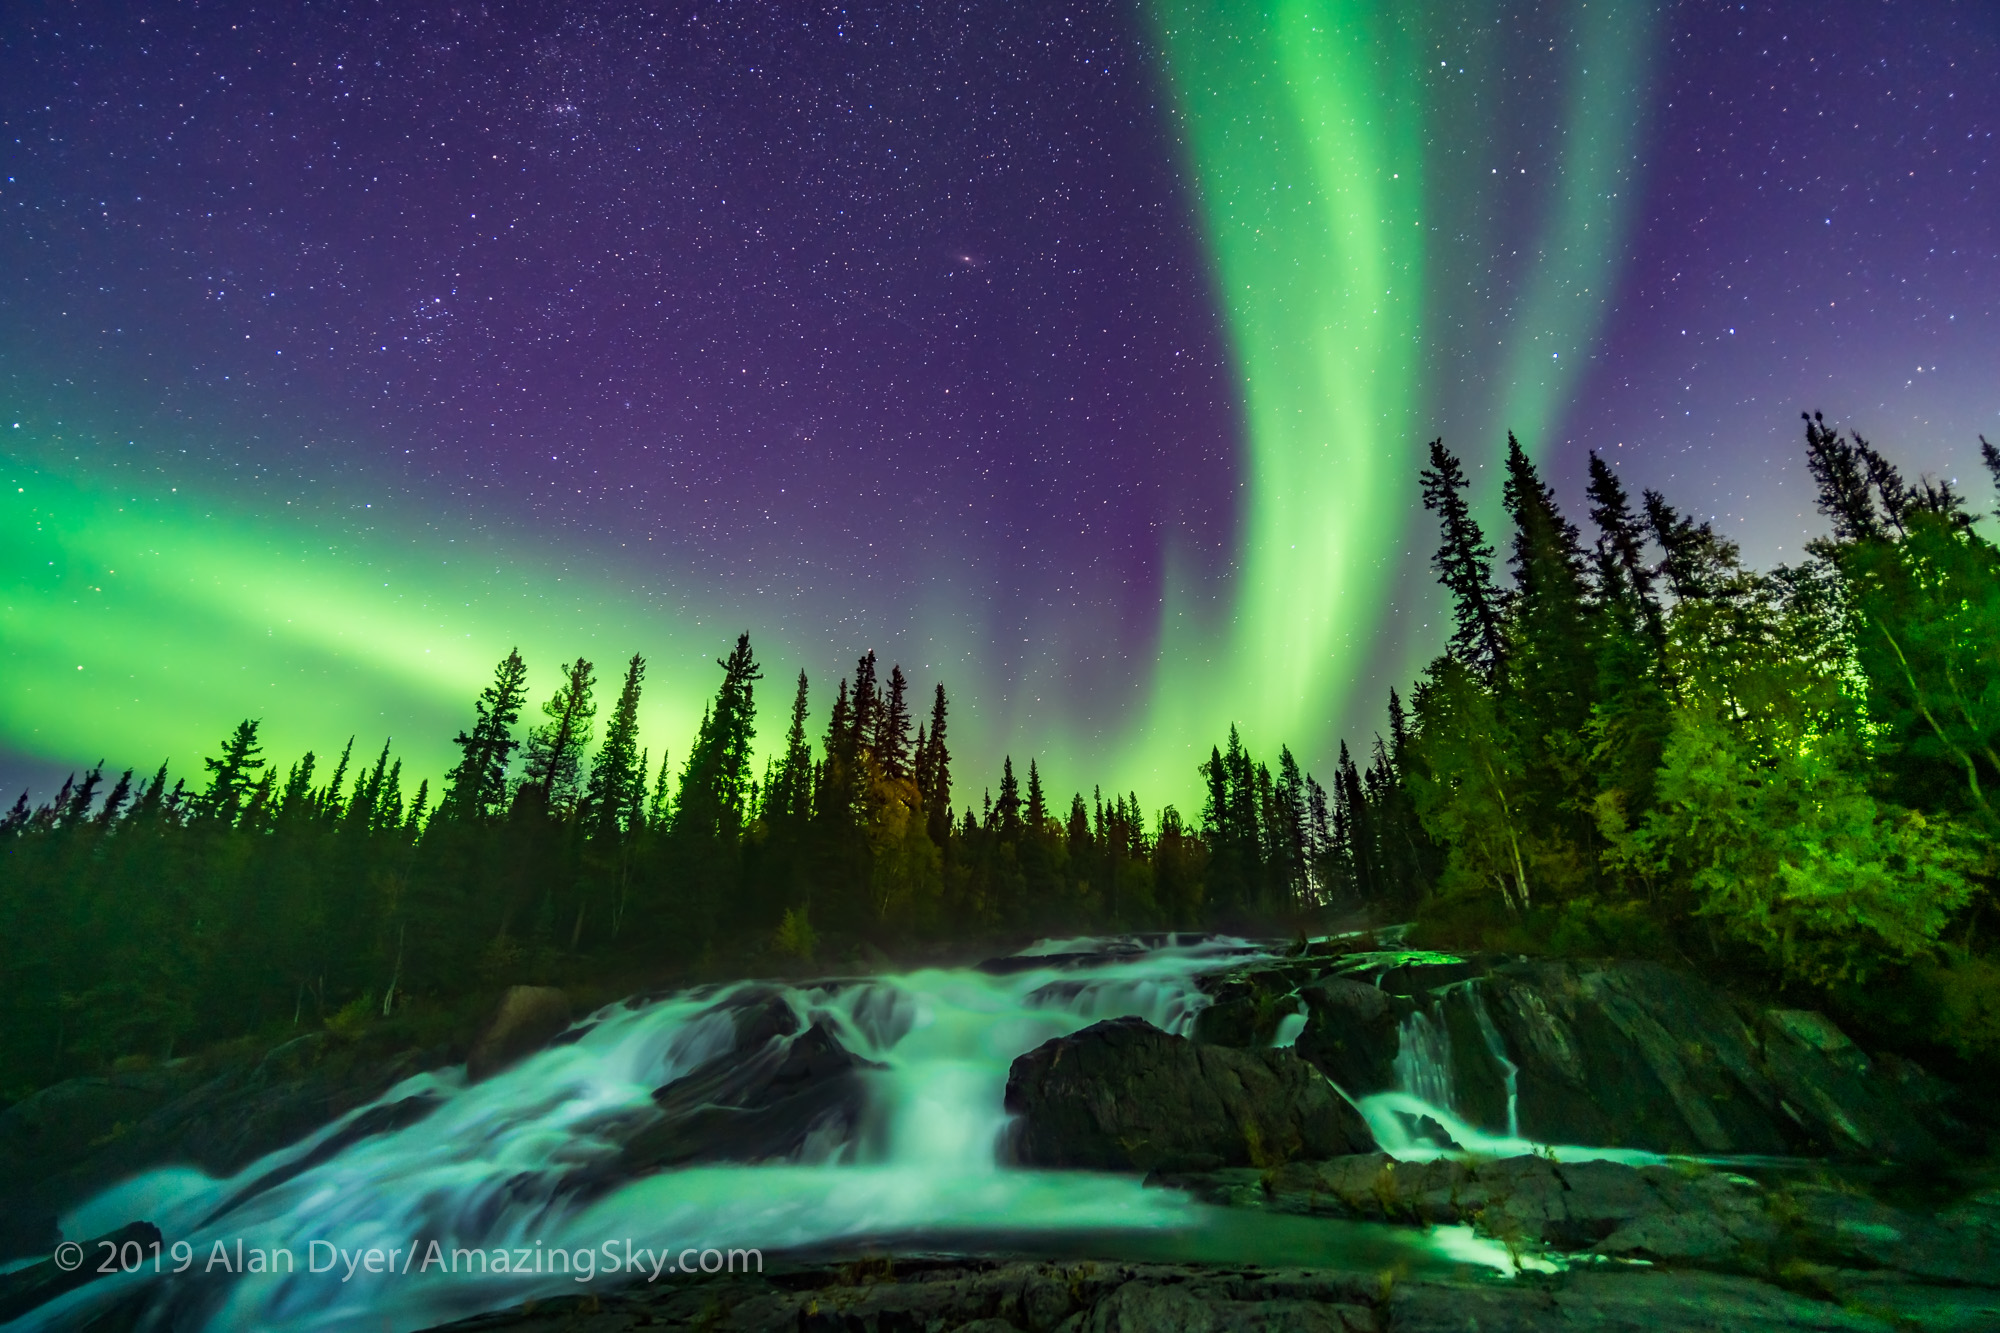
The Ramparts
Farther down the Trail is a spot the tour buses will not go to as a visit to the Ramparts waterfall on the Cameron River requires a hike down a wooded trail, in the dark with bears about. Luckily, my astrophoto colleague, amateur astronomer, and local resident Stephen Bedingfield joined me for a superb shoot with us the only ones present at this stunning location.
Photographer Stephen Bedingfield is shooting the Northern Lights at the Ramparts waterfalls on the Cameron River, September 8, 2019. This is a single 8-second exposure with the Laowa 15mm lens at f/2 and Sony a7III at ISO 3200.
The Northern Lights over the waterfalls known as the Ramparts on the Cameron River east of Yellowknife, NWT, on September 8, 2019. This is a single exposure of 20 seconds with the 15mm Laowa lens at f/2 and Sony a7III at ISO 1600, blended with two light painted exposures of the same duration but with the water illuminated to make it more white.
The view looking the other way north over the river was equally wonderful. What a place for viewing the Northern Lights!
The Northern Lights in an arc across the northern sky over the Cameron River, downriver from the Ramparts Falls. This was September 8, 2019 with the trees turning in their fall colours. The Big Dipper at top centre. This is a two-segment panorama, each 25 seconds at f/2 with the Laowa 15mm lens and Sony a7III at ISO 800. Stitched with ACR.
The view from a viewpoint early on the trail down to the Ramparts and overlooking the Cameron River yielded a superb scene with the low Moon and twilight providing the illumination as the Lights kicked up early in the evening.
The curtains of an early evening aurora starting to dance in the twilight and with the western sky lit by moonlight from the waxing gibbous Moon low in the sky and off-frame to the right. This is from the Cameron River viewpoint off the Ramparts falls trail on the Ingraham trail near Yellowknife. This is a single 15-second exposure with the 15mm Laowa lens at f/2 and Sony a7III at ISO 1600.
Prelude Lake
A favourite spot is the major camping and boat launch area of Prelude Lake Territorial Park. But to avoid the crowds down by the shoreline, Stephen and I hiked up to the overlook above the lake looking north. A few other ardent photographers joined us. This was another spectacular and perfect night.
An arc of Northern Lights appears in the evening twilight over Prelude Lake near Yellowknife, NWT, on September 9, 2019. This is a single 25-second exposure at f/2 with the Venus Optics 15mm lens and Sony a7III at ISO 800.
September is a superb time to visit as the lakes are still open and the autumn colours make for a good contrast with the sky colours.
The panorama below takes in the Big Dipper at left, Capella at centre, and with the Pleiades and Hyades rising at right of centre.
The arc of Northern Lights starting a show in the deep twilight over Prelude Lake on the Ingraham Trail near Yellowknife, NWT. This was September 9, 2019. Light from the waxing gibbous Moon behind the camera also illuminates the scene. This is a 5-segment panorama with the 15mm Laowa lens at f/2 and Sony a7III at ISO 800 and all at 25 seconds. Stitched with PTGui, as ACR and Photoshop refused to joint the left segments.
I used the 8mm fish-eye lens to capture the entire sky, the only way you can really take in the whole scene on camera. When the Lights fill the sky you don’t know which way to look or aim your camera!
A 360° fish-eye view of the Northern Lights over Prelude Lake near Yellowknife, NWT, Canada, on September 9, 2019, with photographers in the foreground shooting the Lights from the viewpoint above the lake. Polaris is near the centre; the Big Dipper and Ursa Major are at lower left; Cassiopeia is at upper right. Andromeda and Pegasus are rising at far right. Arcturus is setting at far left. This is a single shot with the 8mm Sigma lens at f/3.5 on the Sony a7III for 10 seconds at ISO 3200. Moonlight also provides some of the illumination. Accent AI filter applied to the ground with Topaz Studio 2.0
A 360° fish-eye view of the Northern Lights over Prelude Lake near Yellowknife, NWT, Canada, on September 9, 2019. Polaris is near the centre; the Big Dipper and Ursa Major are at lower left; Cassiopeia is at upper right. Andromeda and Pegasus are rising at far right. Arcturus is setting at far left. This is a single shot with the 8mm Sigma lens at f/3.5 on the Sony a7III for 20 seconds at ISO 1000. Moonlight also provides some of the illumination. Accent AI filter applied to the ground with Topaz Studio 2.0
There are many other scenic spots along the Trail, such as Pontoon Lake, Reid Lake, and Tibbitt Lake at the very end of Ingraham Trail. For images and movies I shot last year at Tibbitt Lake, see my blog post at Aurora Reflections in Yellowknife.
But in my 8 nights in Yellowknife this year I managed to hit many of the key aurora spots for photography and viewing. I recommend a visit, especially in September before autumn clouds roll in later in the season, and while the lakes are not frozen and nighttime temperatures are mild.
Here’s a 3-minute music video of clips I shot from all these sites showing the motion of the Lights as it appeared to the eye in “real-time,” not sped up or in time-lapse.
The Northern Lights of Yellowknife from Alan Dyer on Vimeo.
A new low-cost sky tracker promises to simplify not only tracking the sky but also taking time-lapses panning along the horizon. It works but …
If you are an active nightscape photographer chances are your social media feeds have been punctuated with ads for this new low-cost tracker from MoveShootMove.com.
For $200, much less than popular trackers from Sky-Watcher and iOptron, the SiFo unit (as it is labelled) offers the ability track the sky, avoiding any star trails. That alone would make it a bargain, and useful for nightscape and deep-sky photographers.
But it also has a function for panning horizontally, moving incrementally between exposures, thus the Move-Shoot-Move designation. The result is a time-lapse movie that pans along the horizon, but with each frame with the ground sharp, as the camera moves only between exposures, not during them.
The Move-Shoot-Move Tracker The $200 MSM can be polar aligned using the optional laser, shown here, or an optical polar scope to allow to follow the sky. The ball head is user supplied.
Again, for $200 this is an excellent feature lacking in trackers like the Sky-Watcher Star Adventurer or iOptron SkyTracker. The Sky-Watcher Star Adventurer Mini does, however, offer both tracking and “move-shoot-move” time-lapse functions, but at a cost of $300 to $400 U.S., depending on accessories.
All these functions are provided in a unit that is light (weighing 700 grams with a tripod plate and the laser) and compact (taking up less space in your camera bag than most lenses). By comparison, the Star Adventurer Mini weighs 900 grams with the polar scope, while the original larger Star Adventurer is 1.4 kg, double the MSM’s weight.
Note, that the MSM’s advertised weight of 445 grams does not include the laser or a tripod plate, two items you need to use it. So 700 grams is a more realistic figure, still light, but not lighter than the competition by as much as you might be led to believe.
Nevertheless, the MSM’s small size and weight make it attractive for travel, especially for flights to remote sites. Construction is solid and all-metal. This is not a cheap plastic toy.
But does it work? Yes, but with several important caveats that might be a concern for some buyers.
What I Tested
I purchased the Basic Kit B package for $220 U.S., which includes a small case, a laser pointer and bracket for polar alignment (and with a small charger for the laser’s single 3.7-volt battery), and with the camera sync cable needed for time-lapse shooting.
I also purchased the new “button” model, not the older version that used a knob to set various tracking rates.
MSM Fitted Out Keep in mind that to use any tracker like the MSM you will need a solid tripod with a head good enough to hold the tracker and camera steady when tipped over when polar aligned, and another ball head on the tracker itself.
The ball head needed to go on top of the tracker is something you supply. The kit does come with two 3/8-inch stud bolts and a 3/8-to1/4-inch bushing adapter, for placing the tracker on tripods in the various mounting configurations I show below.
The first units were labelled as ‘SiFo,” but current units now carry the Gauda brand name. I’ll just call it the MSM.
I purchased the gear from the MSM website, and had my order fulfilled and shipped to me in Canada from China with no problems.
Tracking the Sky in Nightscapes
The attraction is its tracking function, allowing a camera to follow the sky and take exposures longer than any dictated by “500” or “NPF” Rules to avoid any star trailing.
Exposures can be a minute or more to record much more depth and detail in the Milky Way, though the ground will blur. But blending tracked sky exposures with untracked ground exposures gets around that, and with the MSM it’s easy to turn on and off the tracking motor, something not possible with the low-cost wind-up Mini Track from Omegon.
Mounting on the Side The MSM is shown in illustrations and instructions mounted by its side panel bolt hole. This works, but produced problems with the gears not meshing well and the MSM not tracking at all for initial exposures.
The illustrations and instructions (in a PDF well-hidden off the MSM Buy page) show the MSM mounted using the 1/4-20 bolt hole on the side of the unit opposite the LED-illuminated control panel. While this seems to be the preferredmethod, in the first unit I tested I found it produced serious mis-tracking problems.
50mm Lens Set, Mounted on the Side A set of five consecutive 1-minute exposures taken with the original SiFo-branded MSM mounted by its side bolt hole showed the MSM’s habit of taking several minutes for the gears to mesh and to begin tracking. Tap or click to download full-res version.
With a Canon 6D MkII and 50mm f/1.4 lens (not a particularly heavy combination), the MSM’s gears would not engage and start tracking until after about 5 minutes. The first exposures were useless. This was also the case whenever I moved the camera to a new position to re-frame the scene or sky. Again, the first few minutes produced no or poor tracking until the gears finally engaged.
This would be a problem when taking tracked/untracked sets for nightscapes, as images need to be taken in quick succession. It’s also just plain annoying.
However, see the UPDATE at the end for the performance of a new Gauda-branded unit that was sent to me.
50mm Nightscape With patience and persistence you can get well-tracked nightscapes with the MSM. This is a single 1-minute exposure with a 50mm lens. Tap or click to download full-res version.
Mounting Options
The solution was to mount the MSM using the 3/8-inch bolt hole on the back plate of the tracker, using the 1/4-20 adapter ring to allow it to attach to my tripod head. This still allowed me to tip the unit up to polar align it.
Mounting on the Back Mounting the MSM using its back plate produced more reliable tracking results, though requires swapping mounting bolts and 3/8-1/4-inch adapter rings from the preferred method of mounting the MSM for time-lapse work.
Tracking was now much more consistent, with only the first exposure usually badly trailed. But subsequent exposures all tracked, but with varying degrees of accuracy as I show below.
When used as a tracker, you need to control the camera’s exposure time with an external intervalometer you supply, to allow setting exposures over 30 seconds long.
The MSM offers a N and S setting, the latter for use in the Southern Hemisphere. A 1/2-speed setting turns the tracker at half the normal sidereal rate, useful for nightscapes as a compromise speed to provide some tracking while minimizing ground blurring.
Polar Alignment
For any tracker to track, its rotation axis has to be aimed at the Celestial Pole, near Polaris in the Northern Hemisphere, and near Sigma Octantis in the Southern Hemisphere.
Polar Aligning on Polaris The MSM’s bright laser pointer is useful for aiming the tracker at the North Celestial Pole, located about a degree away from Polaris in the direction of Alkaid, the end star in the Handle of the Big Dipper or Plough.
I chose the laser pointer option for this, rather than the polar alignment scope. The laser attaches to the side of the MSM using a small screw-on metal bracket so that it points up along the axis of rotation, the polar axis.
The laser is labeled as a 1mw unit, but it is far brighter than any 1mw I’ve used. This does make it bright, allowing the beam to show up even when the sky is not dark. The battery is rechargeable and a small charger comes with the laser. Considering the laser is just a $15 option, it’s a bargain. But ….
UPDATE ADDED SEPTEMBER 1
Since I published the review, I have had the laser professionally tested, and it measured as having an output of 45 milliwatts. Yet it is labeled as being under 1 milliwatt. This is serious misrepresentation of the specs, done I can only assume to circumvent import restrictions. In Canada it is now illegal to import, own, or use any green laser over 5 milliwatts, a power level that would be sufficient for the intended use of polar aligning. 45mw is outright illegal.
So be warned, use of this laser will be illegal in some areas. And use of any green laser will be illegal close to airports, and outlawed entirely in some jurisdictions such as Australia, a fact the MSM website mentions.
The legal alternative is the optical polar alignment scope. I already have several of those, but my expectation that I could use one I had with the same bracket supplied with the laser were dashed by the fact that the bracket’s hole is too narrow to accept any of the other polar alignment scopes I have, which are all standard items. I you want a polar scope, buy theirs for $70.
However, if you can use it where you live, the laser works well enough, allowing you to aim the tracker at the Pole just by eye. For the wide lenses the tracker is intended to be used with, eyeball alignment proved good enough.
Just be very, very careful not to accidentally look down the beam. Seriously. It is far too easy to do by mistake, but doing so could damage your eye in moments.
Tracking the Sky in Deep-Sky Images
How well does the MSM actually track? In tests of the original SiFo unit I bought, and in sets of exposures with 35mm, 50mm, and 135mm lenses, and with the tracker mounted on the back, I found that 25% to 50% of the images showed mis-tracking. Gear errors still produced slightly trailed stars. This gear error shows itself more as you shoot with longer focal lengths.
35mm Lens Set, Mounted on the Back A set of 2-minute exposures with the MSM mounted by its back plate showed better tracking with quicker gear meshing, though still with some frames showing trailing. Tap or click to download full-res version.
The MSM is best for what it is advertised as — as a tracker for nightscapes with forgiving wide-angle lenses in the 14mm to 24mm range. With longer lenses, expect to throw away a good number of exposures as unusable. Take twice as many as you think you might need.
135mm Telephoto Lens Set A set of 20 one-minute exposures with a 135mm lens showed more than half with unusable amounts of mis-tracking. But enough worked to be usable! Tap or click to download full-res version.
With a 135mm lens taking Milky Way closeups, more than half the shots were badly trailed. Really badly trailed. This is not from poor polar alignment, which produces a gradual drift of the frame, but from errors in the drive gears, and random errors at that, not periodic errors.
To be fair, this is often the case with other trackers as well. People always want to weight them down with heavy and demanding telephotos for deep-sky portraits, but that’s rarely a good idea with any tracker. They are best with wide lenses.
That said, I found the MSM’s error rate and amount to be much worse than with other trackers. With the Star Adventurer models and a 135mm lens for example, I can expect only 20% to 25% of the images to be trailed, and even then rarely as badly as what the MSM exhibited.
See the UPDATE at the end for the performance of the replacement Gauda-branded unit sent to me with the promise of much improved tracking accuracy.
Sagitta and Area with the 135mm The result of the above set was a stack of 8 of the best for a fine portrait of the Milky Way area in Sagitta, showing the Dumbbell Nebula and Coathanger asterism. Each sub-frame was 1 minute at f/2 and ISO 1600. Tap or click to download full-res version.
Yes, enough shots worked to be usable, but it took using a fast f/2 lens to keep exposure times down to a minute to provide that yield. Users of slow f/5.6 kit-zoom lenses will struggle trying to take deep-sky images with the MSM.
In short, this is a low-cost tracker and it shows. It does work, but not as well as the higher-cost competitors. But restrict it to wide-angle lenses and you’ll be fine.
Panning the Ground
The other mode the MSM can be used in is as a time-lapse motion controller. Here you mount the MSM horizontally so the camera turns parallel to the horizon (or it can be mounted vertically for vertical panning, a mode I rarely use and did not test).
The MSM at Work I performed all the time-lapse testing from my rural backyard on nights in mid-August 2019 with a waning Moon lighting the sky.
This is where the Move-Shoot-Move function comes in.
The supplied Sync cable goes from the camera’s flash hot shoe to the MSM’s camera jack. What happens is that when the camera finishes an exposure it sends a pulse to the MSM, which then quickly moves while the shutter is closed by the increment you set.
There is a choice of 4 speeds, marked in degrees-per-move: 0.05°, 0.2°, 0.5°, and 1.0°. For example, as the movie below shows, taking 360 frames at the 1° speed results in a complete 360° turn.
Time-Lapse Speeds The control panel offers a choice of N and S rotation directions, a 1/2-speed rate for partially tracked nightscapes, and Move-Shoot-Move rates per move of 0.05°, 0.2°, 0.5° and a very fast 1° setting. The Sync cable plugs into the jack on the MSM. The other jack is for connecting to a motion control slider, a function I didn’t test.
The MSM does the moving, but all the shutter speed control and intervals must be set using a separate intervalometer, either one built into the camera, or an outboard hardware unit. The MSM does not control the camera shutter. In fact, the camera controls the MSM.
Intervals should be set to be about 2 seconds longer than the shutter speed, to allow the MSM to perform its move and settle.
This connection between the MSM and camera worked very well. It is unconventional, but simple and effective.
Mounting for Time-Lapse The preferred method of mounting the MSM for time-lapses is to do so “upside-down” with its rotating top plate at bottom attached to the tripod. Thus the whole MSM and camera turns, preventing the Sync cable from winding up during a turn.
Too Slow or Too Fast
The issue is the limited choice of move speeds. I found the 0.5° and 1° speeds much too fast for night use, except perhaps for special effects in urban cityscapes. Even in daytime use, when exposure times are very short, the results are dizzying, as I show below.
Even the 0.2°-per-move speed I feel is too fast for most nightscape work. Over the 300 exposures one typically takes for a time-lapse movie, that speed will turn the MSM (300 x 0.2°) = 60 degrees. That’s a lot of motion for 300 shots, which will usually be rendered out at 24 or 30 frames per second for a clip that lasts 10 to 12 seconds. The scene will turn a lot in that time.
On the other hand, the 0.05°-per-move setting is rather slow, producing a turn of (300 x 0.05°) = 15° during the 300 shots.
That works, but with all the motion controllers I’ve used — units that can run at whatever speed they need to get from the start point to the end point you set — I find a rate of about 0.1° per move is what works best for a movie that provides the right amount of motion. Not too slow. Not too fast. Just right.
Inverted Control Panel When mounted as recommended for time-lapses, the control panel does end up upside-down.
UPDATE ADDED DECEMBER 21, 2019
From product photos on the MoveShootMove.com website now it appears that the tracker is now labeled MSM, as it should have been all along.
Most critically, perhaps in response to this review and my comments here, the time-lapse speeds have been changed to 0.05, 0.075, 0.1 and 0.125 degrees per move, adding the 0.1°/move speed I requested below and deleting the overly fast 0.5° and 1.0° speeds.
Plus it appears the new units have the panel labels printed the other way around so they are not upside down for most mounting situations.
I have not tested this new version, but these speeds sound much more usable for panning time-lapses. Bravo to MSM for listening!
Following the Sky in a Time-Lapse
The additional complication is trying to get the MSM to also turn at the right rate to follow the sky — for example, to keep the galaxy core in frame during the time-lapse clip. I think doing so produces one of the most effective time-lapse sequences.
But to do that with any device requires turning at a rate of 15° per hour, the rate the sky moves from east to west.
Because the MSM provides only set fixed speeds, the only way you have of controlling how much it moves over a given amount of time, such as an hour, is to vary the shutter speed.
I found that to get the MSM to follow the Milky Way in a time-lapse using the 0.05° rate and shooting 300 frames required shooting at a shutter speed of 12 seconds. No more, no less.
Top Plate Display When mounted “upside-down” for a time-lapse the top surface provides the N-S direction arrows (N moves clockwise) and a small, handy bubble level.
Do the Math
Where does that number come from?
At its rate of 0.05°/move, the MSM will turn 15° over 300 shots. The sky moves 15° in one hour, or 3600 seconds. So to fit 300 shots into 3600 seconds means each shot has to be no longer than (3600/300) = 12 seconds long.
The result works, as I show in the sampler movie.
But 12 seconds is a rather short shutter speed on a dark, moonless night with the Milky Way.
For properly exposed images you would need to shoot at very fast apertures (f/1.4 to f/2) and/or high and noisy ISO speeds. Neither are optimal. But they are forced upon you by the MSM’s restricted rates.
Using the faster 0.2° rate (of the original model) yields a turn of 60° over 300 shots. That’s four hours of sky motion. So each exposure now has to be 48 seconds long for the camera to follow the sky, four times longer because the drive rate is now four times faster.
A shutter speed of 48 seconds is a little too long in my opinion. Stars in each frame will trail. Plus a turn of 60° over 300 shots is quite a lot, producing a movie that turns too quickly.
Alternative Time-Lapse Configuration The other option is to mount the MSM so the control panel is right-side-up and the top turn-table (the part that turns and that the camera is attached to) is on top. Now only the camera turns; the MSM does not. This works but the Sync cable can wrap around and bind in long turns. For short turns of 30° to 60° it is fine.
By far the best speed for motion control time-lapses would be 0.1° per move. That would allow 24-second exposures to follow the sky, allowing a stop less in aperture or ISO speed. (DECEMBER 21 UPDATE: That speed seems to now be offered.)
Yes, having only a limited number of pre-wired speeds does make the MSM much easier to program than devices like the Star Adventurer Mini or SYRP Genie Mini that use wireless apps to set their functions. No question, the MSM is better suited to beginners who don’t want to fuss with lots of parameters.
As it is, getting a decent result requires some math and juggling of camera settings to make up for the MSM’s limited choices of speeds.
Time-Lapse Movie Examples
This compilation shows examples of daytime time-lapses taken at the fastest and dizzying 0.5° and 1.0° speeds, and night time-lapses taken at the slower speeds. The final clip is taken at 0.05°/move and with 12-second exposures, a combination that allowed the camera to nicely follow the Milky Way, albeit at a slow pace. Taking more than the 300 frames used here would have produced a clip that turned at the same rate, but lasted longer.
Battery Life
The MSM is powered off an internal rechargeable battery, which can be charged from any 5-volt charger you have from a mobile phone.
The MSM uses a USB-C jack for the power cable, but a USB-A to USB-C cord is supplied, handy as you might not have one if you don’t have other USB-C devices.
The battery lasted for half a dozen or more 300-shot time-lapses, enough to get you through at least 2 or 3 nights of shooting. However, my testing was done on warm summer nights. In winter battery life will be less.
While the built-in battery is handy, in the field should you find battery level low (the N and S switches blink as a warning) you can’t just swap in fresh batteries. Just remember to charge up before heading out. Alternatively, it can be charged from an external 5V battery pack such as used to prolong cell phone life.
The constellations of Hercules and Corona Borealis in the northern spring and summer sky. This is a stack of 3 x 2-minute exposures with the 50mm Sigma lens at f/2.8 and Canon 6D at ISO 800, plus an additional 2 min exposure through the Kenko Softon filter to add the star glows. All tracked on the original MSM SiFo Tracker from China. Tap or click to download full-res version.
Other Caveats
The MSM does not offer, nor does it promise, any form of automated panorama shooting. This is where the device turns by, say, 15° to 45° between shots, to shoot the segments for a still-image panorama. More sophisticated motion controllers from SYRP and Edelkrone offer that function, including the ability to mate two devices for automated multi-tier panoramas.
Nor does the MSM offer the more advanced option of ramping speeds up and down at the start and end of a time-lapse. It moves at a constant rate throughout.
While some of the shortcomings could perhaps be fixed with a firmware update, there is no indication anywhere that its internal firmware can be updated through the USB-C port.
UPDATE ADDED OCTOBER 7, 2019
Since I published the review, MSM saw the initial test results and admitted that the earlier units like mine (ordered in June) exhibited large amounts of tracking error. They sent me a replacement unit, now branded with the Gauda label. According to MSM it contains a more powerful motor promised to improve tracking accuracy and making it possible to take images with lenses as long as 135mm.
I’m sorry to report it didn’t.
This shows 300% blow-ups of a star field rising in the northeast sky taken with the new Gauda unit and with a 135mm lens, each for 2 minutes in quick succession. Less than 50% of the frames were useable and untrailed. (The first frames were shot through high clouds.)
Taken the same night as the previous set, this shows 24 shots taken in quick succession with the same 135mm lens for 2 minutes each but with the camera aimed overhead to the zenith. None of the images were usable. All were trailed, most very badly.
In tests with the 135mm lens the new, improved MSM still showed lots of tracking error, to the point that images taken with a lens as long as this were mostly unusable.
Tap or click on the images to download full-res versions.
The short movie above takes the full-frame images from the zenith set of 24 frames taken over 48 minutes and turns them into a little time-lapse. It shows how the mechanism of the MSM seems to be wobbling the camera around in a circle, creating the mis-tracking.
Comparison with the Star Adventurer
As a comparison, the next night I used a Sky-Watcher Star Adventurer (the full-size model not the Mini) to shoot the same fields in the northeast and overhead with the same 135mm lens and with the same ball-head, to ensure the ball-head was not at fault. Here are the results:
The same field looking northeast, with 300% blow-ups of 2-minute exposures with the 135mm lens and Star Adventurer tracker. As is usual with this unit, about 20% of the frames show mis-tracking, but none as badly as the MSM.
Aiming the camera to the zenith the Star Adventurer again showed a good success rate with a slightly greater percentage trailed, but again, none as badly as the MSM.
The Star Adventurer performed much better. Most images were well-tracked. Even on those frames that showed trailing, it was slight. The Star Adventurer is a unit you can use to take close-ups of deep-sky fields with telephoto lenses, if that’s your desire.
By contrast, the MSM is best used — indeed, I feel can only be used practically — with wide-angle lenses and with exposures under 2 minutes. Here’s a set taken with a 35mm lens, each for 2 minutes.
This is a set of consecutive 2-minute exposures with a 35mm lens and Canon 6D MkII on the MSM tracker, with the tracker mounted using the side 1/4-20 bolt hole. It was aimed to the northeast. About half the images showed significant trailing.
With the more forgiving 35mm lens, while more images worked, the success rate was still only 50%.
What I did not see with the new Gauda unit was the 5-minute delay before the gears meshed and tracking began. That issue has been resolved by the new, more powerful motor. The new Gauda model does start tracking right away.
But it is still prone to significant enough drive errors that stars are often trailed even with a 35mm lens (this was on a full-frame Canon 6D MkII).
UPDATED CONCLUSIONS (December 21, 2019)
The MSM tracker is low-cost, well-built, and compact for easy packing and travel. It performs its advertised functions well enough to allow users to get results, either tracked images of the Milky Way and constellations, or simple motion-control time-lapses.
But it is best used — indeed I would suggest can only be used — with wide-angle lenses for tracked Milky Way nightscapes. Even then, take more shots than you think you need to be sure enough are well-tracked and usable.
It can also be used for simple motion-control time-lapses, provided you do to the math to get it to turn by the amount you want, working around the too-slow or too-fast speeds. The new 0.1° per move speed (added in models as of December 2019) seems a reasonable rate for most time-lapses.
However, I think aspiring time-lapse photographers will soon outgrow the MSM’s limitations for motion-control sequences. But it can get you started.
If you really value its compactness and your budget is tight, the MSM will serve you well enough for tracked nightscape shooting with wide-angle lenses.
But if you wish to take close-ups of starfields and deep-sky objects with longer lenses, consider a unit like the Sky-Watcher Star Adventurer for its lower tracking errors. Or the Star Adventurer Mini for its better motion-control time-lapse functions.
To mark the 50th anniversary of Apollo 11, my contribution was to produce a planetarium show about the missions.
I’ve been retired from active planetarium show production and science centre work for more than 5 years now. But it’s great to get back in the Dome now and then.
The opportunity came this summer with the hugely popular 50th anniversary of the first Moon landing by Apollo 11. Everyone was hosting events and parties.
To contribute to the local science centre’s event, TELUS Spark in Calgary kindly gave me the keys to the Evans and Sutherland Digistar planetarium system to produce a special lecture/show for the Dome about the Apollo landings.
It was part of Spark’s well-attended Moon Landing Party night July 20. A collage of iPhone images shows some of the other activities that evening.
It was a capacity crowd, and both my shows were “sold out” with full houses. Indeed, I’m presenting extra shows by popular demand in the coming week so those who couldn’t get tickets on July 20 can see the program.
For you to see the show, and to document it for my posterity, I shot time-lapses of me presenting the show, first in rehearsal with some staff present shot from the audience point of view, then in the first presentation from the stage (my) point of view.
The time-lapses compressed the hour-long show into two 1-minute clips. It really wasn’t that frantic in real life! Here’s the video, from my YouTube channel.
I was impressed and surprised at how popular the Apollo anniversary has been. For most today the Moon landings are old history, before their time. Yet, the Apollo missions continue to inspire and amaze.
As I do a couple of times a year, earlier this month I was cruising the coast of Norway chasing the Northern Lights – successfully!
One of my “retirement gigs” is to serve as a lecturer for the educational travel company Road Scholar (formerly Elderhostel) on some of their aurora cruises along the Norwegian coast on one of the Hurtigruten ferry ships.
This time, as I was last autumn, I was on Hurtigruten’s flagship coastal ferry, the m/s Trollfjord.
The Northern Lights over the Norwegian Sea south of the small fishing village of Oksfjord, from the Hurtigruten ferry ship the m/s Trollfjord on the northbound voyage from Bergen to Kirkenes. This was during a minor geomagnetic storm producing an all-sky aurora with a Kp Index however of no more Kp 3 – 4 this night. A break in the clouds allowed a glimpse of the Lights for about an hour at 11 pm. This is looking north. This is a single 1.6-second exposure at f/2 with the Venus Optics 15mm lens and Sony a7III at ISO 6400. Ship motion inevitably adds some star trailing.
Our tour group was treated to five fine nights with auroras, an unusually good take out of the 12-day round trip cruise from Bergen to Kirkenes and back to Bergen. Our first look, above, was on February 27, but through cloud.
Swirls of auroral curtains over Båtsfjord, Norway while we were in port on the southbound portion of the Hurtigruten coastal cruise on the ms Trollfjord. This was March 1, 2019. The stars of Taurus and the Pleiades are at left; Cassiopeia at upper right. This is a single 0.8-second exposure at f/2 with the 15mm Venus Optics lens and Sony a7III at ISO 1600.
But after we reached the top end at Kirkenes and turned around for the southbound voyage, skies cleared remarkably. We had a wonderful four clear days and nights in a row, all with Northern Lights.
Auroral curtains in an overhead coronal burst swirling at the zenith during a fine display on March 1, 2019, as seen from the deck of the Hurtigruten ferry ship the ms Trollfjord, while in port in Båtsfjord, Norway. The Big Dipper is at upper right; Cassiopeia at lower left, and Polaris in the centre amid the aurora. This is a single 1-second exposure at f/2 with the Venus Optics 15mm lens and Sony a7III at ISO 3200. It was taken from port with the ship stationary and amid the port lights.
The best show was March 1, and when we were in port in the northern coastal village of Båtsfjord. The Lights danced overhead in the best show I had seen from Norway.
The Northern Lights over the village of Skjervøy on the northern coast of Norway north of Tromsø. Taken from the deck of the Hurtigruten ship the ms Trollfjord while in port, March 2, 2019. Looking west with Cassiopeia at right and the Pleiades at left. This is a blend of two exposures: a long 4-second exposure for the sky and aurora, and a short 0.8-second exposure for the ground and city lights. All at f/2 with the 15mm Venus Optics lens and Sony a7III at ISO 800.
The next night we got a good show while we were in the port of Skjervøy.
As we continued south we emerged out from under the auroral oval zone, placing the Lights to the north, back in the direction we had come from.
A self-portrait on the back deck of the ms Trollfjord, southbound out of Berlevag this night and under the Northern Lights.
Aurora photographers and observers on the rear deck 9 area of the Hurtigruten ferry ship the ms Trollfjord on the southbound voyage along the Norwegian coast, on March 2, 2019. This is a single 1.6-second exposure at f/2 with the 15mm Venus Optics lens and Sony a7III at ISO 6400.
Curtains of Northern Lights over the Hurtigruten ferry ship the ms Trollfjord on March 1, 2019. This is a single 1.6-second exposure at f/2 with the 15mm Venus Optics lens and Sony a7III at ISO 10000.
A low arc of aurora late in the voyage south on March 4, 2019, our last sighting for the cruise, after we crossed the Arctic Circle. A single exposure at ISO 10000 due to the large motion of the ship. The smoke from the ship is at top, illuminated by the funnel lights that were not turned off this night.
An example of multiple concentric auroral curtains, here over the Norwegian coast on the southbound Hurtigruten ship ms Trollfjord on March 2, 2019. This is a single 1.6-second exposure at f/2 with the Venus Optics 15mm lens and Sony a7III at ISO 10000.
Equally spectacular in my mind were some of the sunsets and twilight skies we enjoyed as we sailed through the Lofoten Islands, including on our visit to the narrow Trollfjord fjord for which the ship is named.
Sunset in Norway from the ms Trollfjord on the southbound voyage, on March 2, 2019.
The mouth of the Trollfjord in the Lofoten Islands, Norway, at twilight taken from the forward Deck 6 of the ms Trollfjord, the Hurtigruten ferry ship named for the narrow fjord. This is a 4-section handheld panorama with the Venus Optics 15mm lens at f/8 and Sony a7III camera at ISO 100. Stitched with ACR.
A panorama of the Raftsundet Strait at sunset with alpenglow on the peaks and evening twilight colours to the right at the sunset point. This was March 3, 2019 on the southbound voyage on the ms Trollfjord as we approached the Trollfjord itself. This is a 7-section panorama, handheld, with the Venus Optics 15mm lens and Sony a7III, stitched with ACR.
On our aurora nights I mostly shot “real-time” video of the Lights, using the low-light capability and 4K functions of the Sony a7III camera. The result is a music video linked to below.
The Northern Lights At Sea from Alan Dyer on Vimeo.
I hope you enjoy it. Do view it full-screen and at 4K resolution.
For details on this cruise (I’ll be on the October 10 trip this fall) see the Road Scholar page for this Arctic Skies trip. Autumn is a spectacular time in the fjords and along the coast, as the mountainsides are in fall colours.
The Northern Lights are amazing from Yellowknife, in Canada’s Northwest Territories.
A handful of locations in the world are meccas for aurora chasers. Yellowknife is one of them and, for me, surprisingly accessible with daily flights north.
In a two-hour flight from Calgary you can be at latitude 62° North and standing under the auroral oval with the lights dancing overhead every clear night.
The attraction of going in early September, as I did, is that the more persistent clouds of late autumn have not set in, and the many lakes and rivers are not yet frozen, making for superb photo opportunities.
A single image from a time-lapse sequence, of the auroral curtains converging toward the zenith during the display on September 8/9, 2018, from near Yellowknife, NWT. The curtains show some fringes of pink from nitrogen. This is 2.5 seconds at f/2.8 with the 12mm Rokinon full-frame fish-eye lens and Nikon D750 at ISO 6400.
A faint green and red auroral curtain to the northwest over Tibbitt Lake on the Ingraham Trail near Yellowknife, NWT. The Big Dipper is right of centre; Arcturus setting on the horizon. This was September 8, 2018. This is a mean-combined stack of 8 exposures for the ground and water to smooth noise, and a single exposure for the sky, all 25 seconds at f/2 with the 15mm Laoawa lens and Sony A7III at ISO 1600.
A display of Northern Lights starting up in the twilight, over the river leading out of Tibbitt Lake, at the end of the Ingraham Trail near Yellowknife NWT, on September 8, 2018. This was the start of a fabulous display this night. Capella and Auriga are at left; the Pleiades is rising left of centre; the Andromeda Galaxy is at top. This is a mean-combined stack of 7 exposures for the ground to smooth noise and one exposure for the sky and partially for the reflection, all 25 seconds at f/2.5 with the 14mm Sigma Art lens and Nikon D750 at ISO 1600.
A single image from a time-lapse sequence, of the auroral curtains converging toward the zenith during the display on September 8/9, 2018, from near Yellowknife, NWT. This is 2.5 seconds at f/2.8 with the 12mm Rokinon full-frame fish-eye lens and Nikon D750 at ISO 6400.
Lakes down Highway 4, the Ingraham Trail, such as Prosperous, Prelude, and Pontoon are popular spots for the busloads of tourists who fly in every year from around the world.
On one magical night I and my local host and guide, Stephen Bedingfield, went to the end of the Trail, to where the Ice Road begins, to Tibbitt Lake, and had the site to ourselves. The aurora was jaw-dropping that night.
On other nights with less certain prospects I stayed in town, and still got a fine show on several nights, the Lights so bright they show up well even from within urban Yellowknife.
A curtain of aurora sweeps over the houseboats moored on Yellowknife Bay in Yellowknife, NWT, on September 11, 2018. The Pleiades and Hyades star clusters in Taurus are rising at left. This is a mean-combined stack of 8 images to smooth noise for the ground and water, and a single exposure for the sky and houseboats themselves (as they were moving slightly from exposure to exposure). Each was 13 seconds at f/2 with the Venus Optics 15mm lens and Sony a7III at ISO 3200.
An all-sky display of Northern Lights in the city of Yellowknife, from the end of the boardwalk at Rotary Park looking over the bay. This was on the night of Sept. 10/11, 2018 during a major solar storm, but in the subsiding hours after the sky cleared at about 2 am. The winter stars of Taurus and Gemini are rising. The Big Dipper is at far left. Cassiopeia is at the zenith. The view is looking east at centre. This is a mean stack of 8 exposures smoothed to reduce noise for the ground and one exposure for the sky, all 6 seconds at f/3.5 with the Sigma 8mm lens and Sony a7III at ISO 3200. The focus is soft.
The Northern Lights over the “United in Celebration” sculpture at the Somba K’e Civic Plaza on Frame Lake in downtown Yellowknife, NWT, on September 14, 2018. The Prince of Wales Museum is at far right. This is a stack of 5 images for the ground to smooth noise and one image for the sky, all 6 seconds at f/2 with the 15mm Laoawa lens and Sony a7III at ISO 400.
A selfie portrait under an all-sky display of Northern Lights in the city of Yellowknife, from the boardwalk at Rotary Park. This was on the night of Sept. 10/11, 2018 during a major solar storm, but in the subsiding hours after the sky cleared at about 2 am. The Big Dipper is at right. The Summer Triangle is at left. Cassiopeia is at the zenith. The view is looking northwest at centre. This is a mean stack of 6 exposures smoothed to reduce noise for the ground and one exposure for the sky and me, all 6 seconds at f/3.5 with the Sigma 8mm lens and Sony a7III at ISO 3200. The focus is soft.
On another night we chased into clear skies down Highway 3 to the west, to a rocky plateau on the Canadian Precambrian Shield. Even amid the clouds, the aurora was impressive.
But it was the night at Tibbitt that was the highlight.
Here is the finale music video from movies shot that night, September 8, 2018, with two cameras: the Sony a7III used to take “real-time” 4K videos of the aurora motion, and the Nikon D750 used to take time-lapses.
The movie is in 4K. The music, Eternal Hope, is by Steven Gutheinz and is used by permission of West One Music.
Aurora Reflections from Alan Dyer on Vimeo.
Click through to Vimeo for more technical info about the video.
Enjoy! And do share!
And make Yellowknife one of your bucket-list locations.
Three perfect nights in July provided opportunities to capture the night sky at popular sites in Banff National Park.
When the weather forecast in mid-July looked so promising I made an impromptu trip to Banff to shoot nightscapes and time-lapses under unusually clear skies. Clouds are often the norm in the mountains or, increasingly these days, forest fire smoke in late summer.
But from July 15 to 17 the skies could not have been clearer, except for the clouds that rolled in late on my last night, when I was happy to pack up and get some sleep.
My first priority was to shoot the marvellous close conjunction of the Moon and Venus on July 15. I did so from the Storm Mountain viewpoint on the Bow Valley Parkway, with a cooperative train also coming through the scene at the right time.
This was the view later with the Milky Way and Mars over Bow Valley and Storm Mountain.
The next night, July 16, was one of the most perfect I had ever seen in the Rockies. Crystal clear skies, calm winds, and great lake reflections made for a picture-perfect night at Bow Lake on the Icefields Parkway. Above is a 360° panorama shot toward the end of the night when the galactic centre of the Milky Way was over Bow Glacier.
Streaks of green airglow arc across the south, while to the north the sky is purple from a faint display of aurora.
This is a rare appearance of the unusual STEVE auroral arc on the night of July 16-17, 2018, with a relatively low Kp Index of only 2 to 3. While the auroral arc was visible the ISS made a bright pass heading east. This is a blend of a single 15-second exposure for the sky and ground, with seven 15-second exposures for the ISS, but masked to reveal just the ISS trail and its reflection in the water. The ISS shots were taken at 3-second intervals, thus the gaps. All with the Sigma 20mm Art lens at f/2 and Nikon D750 at ISO 6400. Taken from Bow Lake, Banff National Park, Alberta.
The unusual STEVE auroral arc across the northern sky at Bow Lake, Banff National Park, Alberta on the night of July 16-17, 2018. The more normal green auroral arc is lower across the northern horizon. But STEVE here appears more pink. The STEVE aurora was colourless to the eye but did show faint fast-moving rays, here blurred by the long exposure. They were moving east to west. The Big Dipper is at left. The lights are from Num-Ti-Jah Lodge. This is a single exposure for the sky and a mean-stacked blend of 3 exposures for the ground to smooth noise. All 15 seconds at f/2 with the Sigma 20mm Art lens and Nikon D750 at ISO 6400.
Earlier that night the usual auroral arc known as Steve put in an unexpected appearance. It was just a grey band to the eye, but the camera picked up Steve’s usual pink colours. Another photographer from the U.S. who showed up had no idea there was an aurora happening until I pointed it out.
My last night was at Herbert Lake, a small pond great for capturing reflections of the mountains around Lake Louise, and the Milky Way. Here, brilliant Mars, so photogenic this summer, also reflects in the still waters.
A blend of images to show the stars of the southern sky moving from east to west (left to right) over the peaks of the Continental Divide at Herbert Lake near Lake Louise, in Banff, Alberta. The main peak at left is Mount Temple. A single static image shows the Milky Way and stars at the end of the motion sequence. The star trails and Milky Way reflect in the calm waters of the small Lake Herbert this night on July 17, 2018. This is a stack of 100 images for the star trails, stacked with the Long Streak function of Advanced Stacker Plus actions, plus a single exposure taken a minute or so after the last star trail image. The star trail stack is dropped back a lot in brightness, plus they are blurred slightly, so as to not overwhelm the fixed sky image. The sky images are blended with a stack of 8 images for the ground, mean combined to smooth noise in the ground. All are 30 seconds at f/2.8 with the 24mm Sigma lens and Nikon D750 at ISO 3200. All were taken as part of a time-lapse sequence. Clouds moving in added the odd dark patches in the Milky Way that look like out of place dark nebulas. The reflected star trails are really there in the water and have not be copied, pasted and inverted from the sky image. They look irregular because of rippling in the water.
A blend of images to show the stars of the southern sky moving from east to west (left to right) over the Rocky Mountains at Bow Lake, in Banff, Alberta. The main peak at centre is Bow Peak. Crowfoot Glacier is at far left; Bow Glacier is at right below the Milky Way. A single static image shows the Milky Way and stars at the end of the motion sequence. The star trails and Milky Way reflect in the calm waters of Bow Lake this night on July 16, 2018, though they appear large and out of focus. This is a stack of 300 images for the star trails, stacked with the Ultrastreak function of Advanced Stacker Plus actions, plus a single exposure taken a minute or so after the last star trail image. The star trail stack is dropped back a lot in brightness, plus they are blurred slightly, so as to not overwhelm the fixed sky image. The sky images are blended with a stack of 8 images for the ground, mean combined to smooth noise in the ground. All are 30 seconds at f/2 with the 15mm Laowa lens and Sony a7III at ISO 3200. All were taken as part of a time-lapse sequence. Bands of airglow add the green streaks to the sky.
The stars trailing as they move east to west (left to right), ending with the Milky Way and Galactic Centre (right) over Storm Mountain and the Vermilion Pass area of the Continental Divide in Banff National Park, Alberta. Mars is the bright trail at left. Saturn is amid the Milky Way at right. This was July 15, 2018. The lights at left are from the Castle Mountain interchange at Highways 1 and 93. This is a stack of 8 exposures, mean combined to smooth noise, for the ground, plus 200 exposures for the star trails, and one exposure, untracked, for the fixed sky taken about a minute after the last star trail image. All 30 seconds at f/2.8 with the 24mm Sigma lens, and Nikon D750 at ISO 6400. The frames were taken as part of a time-lapse sequence. Dynamic Contrast filter from ON1 applied to the ground, and Soft and Airy filter from Luminar applied to the sky for a soft Orton effect.
At each site I shot time-lapses, and used those frames to have some fun with star trail stacking, showing the stars turning from east to west and reflected in the lake waters, and with a single still image taken at the end of the sequence layered in to show the untrailed sky and Milky Way.
But I also turned those frames into time-lapse movies, and incorporated them into a new music video, along with some favourite older clips reprocessed for this new video.
Banff by Night (4K) from Alan Dyer on Vimeo.
Enjoy! And do enlarge to full screen. The video is also in 4K resolution.
Solstice nights have been filled with twilights, planets, and noctilucent clouds.
Astronomers tend to curse the short nights and late sunsets of summer solstice. But the bright nights do offer unique sights.
Over the last few nights I’ve set up at what I call “Solstice Pond,” a prairie slough near home ideal for shooting the aurora to the north and, at this time of year, the glow of twilight and noctilucent clouds.
Below is the view on the night before solstice, looking north toward the glow of “perpetual twilight” that lights the northern horizon at solstice time from my latitude of 50° north.
A 120° panorama of the summer solstice twilight (at 12:30 am local time) looking north over the prairie pond near home in southern Alberta, taken June 19/20, 2018. Some very faint noctilucent clouds are at left but fading, while some very faint rays of auroral curtains are also visible in the photo but were invisible to the eye. The bright star Capella is at centre and reflected in the calm waters. Perseus is at right of centre. The red lights at right are from the wind turbines at the Wintering Hills Wind Farm. This is a stitch of 6 segments, with the 35mm lens at f/2.5 for 20 seconds each with the Canon 6DMkII at ISO 400.
From farther north the twilight would be more prominent, while above the Arctic Circle at 66° N latitude, the twilight turns to full daylight as the Sun never sets.
The view looking south this night, with the Moon just off frame at right, includes the Milky Way at centre, with Saturn embedded, flanked by bright Jupiter at right and reddish Mars at left, both casting shimmering “glitter paths” on the still waters.
A 160° panorama looking south near summer solstice time in June 2018, with the bright planets Mars (left) and Jupiter (right) and their glitter paths on the water flanking the Milky Way and Saturn in Sagittarius above the pinkish Lagoon Nebula. The waxing Moon is setting off frame at right brightening the sky and lighting the landscape. The sky is also blue from the solstice twilight. The stars of Scorpius shine between Jupiter and the Milky Way. Some faint bands of red and green airglow are visible at left, despite the bright sky. This is a stitch of 8 segments, all for 25 seconds with the 35mm lens at f/2.2 and Canon 6D MkII at ISO 800.
A few nights later (below), on June 24, the star of the solstice sky put in an appearance. Bright noctilucent clouds (NLCs) shone to the north, reflected in the pond.
These are water vapour clouds 80 kilometres high at the edge of the atmosphere – in the mesosphere – almost in space. They form over the Arctic in summer, and are high enough to remain sunlit even in the middle of the night as they catch the Sun shining over the pole.
Southern Western Canada – the Prairies where I live – is well-placed to see them, as we are far enough north to see them in our sky, but not so far north that our sky is too bright.
A fine display of noctilucent clouds (NLCs) or polar mesospheric clouds, reflected in a local prairie pond near home in southern Alberta. The display started with wisps much higher in the north but they faded as the Sun dropped lower, with the display at this extent by the time I reached my spot and took this panorama. Leo and Regulus are setting at far left in the west, as is Venus just above the horizon at left. Capella and Auriga are at centre, and circumpolar, while the stars of Perseus at right, rising. This is a panorama of 9 segments, at 15° spacings, with the 35mm lens at f/2.8 for 13 second exposures with the Canon 6D MkII at ISO 400. Stitched with Adobe Camera Raw.
An even better display appeared two nights later, on June 26, brighter and with more structure.
The curving arc of the top of the display defines the most southerly edge where sunlight is able to reach. That edge drops lower through the first part of the night, as the Sun itself drops lower below the horizon. This causes less of the NLC display to be sunlit.
A panorama of a fine display of noctilucent clouds across the northern horizon over an angle of about 60°. This was on June 26, 2018 at about 11:45 pm. Capella is just left of centre. The display faded as the solar illumination dropped and the clouds darkened from the top down. This was from the small pond near home in southern Alberta. This is a stitch of 7 segments, each 2 seconds at f/2.8 with the 85mm Rokinon lens and Canon 6D MkII at ISO 400. Stitched with ACR.
You can see this effect of the changing illumination of the clouds in this time-lapse compilation from June 26 (below).
Also notice the waving motion of the clouds. It is as if the NLC material is flowing over standing waves in the atmosphere – and it is! The waves are called “gravity waves,” and are bumps in the high atmosphere created by disturbances far below in the normal layers of the atmosphere, the stratosphere and troposphere.
The video includes two clips shot simultaneously: from a camera with a 24mm wide-angle lens, and from a camera with an 85mm moderate telephoto. Expand to view full screen in HD.
The motion, here over an hour or more, is hypnotic. The NLCs move right to left (east to west), while the dark normal weather clouds on the horizon are blowing left to right (west to east). The stars are also turning left to right. The water ripples in the wind, while ducks swim by.
I present a short video, in 4K, of two video clips of the International Space Station in two successive passages across the sky on May 24/25, 2018.
The location was my backyard in southern Alberta.
The clips were shot in 4K in real-time video at 24 frames per second but with a 1/4-second shutter speed with a Sony a7III camera, and with 15mm full-frame fish-eye (first clip) and 8mm circular fish-eye lenses. ISO speeds were 6400 and 16,000.
The clips are sped up by 2x and 4X in post-production to make a shorter video for the web. The background sounds of the night are real-time and were recorded live with the videos.
What I cannot capture is the smell!
The lilacs were in bloom and lent a wonderful fragrant scent to the night air, which added to the sights and sounds of a spring night.
Thus the title of the video.
Much of North America is now enjoying great passes of the ISS. To find out when you can see it from your backyard see NASA’s Spot the Station website and enter your location.
A clear day on Easter Eve allowed me to photograph the setting Full Moon in the morning and the rising Full Moon in the evening.
This was another of the year’s special Full Moons, and this time for a valid historical reason.
This was the “paschal” Full Moon, the one used to determine the date of Easter. It was the first Full Moon after the vernal equinox. The first Sunday after that Full Moon is Easter. This year, the Moon was full about an hour before sunrise on the morning of Saturday, March 31. Easter was the next day, Sunday, April 1.
Below is the view of the Full Moon not long after it was officially Full, as it was setting into the west as the first rays of sunlight lit the foreground at dawn on March 31.
The setting Full Moon on the morning of Saturday, March 31, 2018, the day before Easter. At this time, at about 7:20 a.m. MDT, the Moon was a little less than an hour after the moment of exact Full Moon, so the Sun had already risen before the Moon set. This was with the Canon 6D MkII and 200mm lens with 1.4x convertor, shot from home.
To be precise, the actual paschal Full Moon is a fictional or calculated Moon that occurs 14 days into the lunar cycle, and isn’t an observed Moon. But this year, we really did have a Full Moon just before Easter Sunday, and on the first day of Passover, from which we get the term “paschal.”
Later on March 31, after sunset, the Moon was now half a day past Full, causing it to rise a good half hour after sunset. However, the lighting and sky colour was still good enough to place a reddened Moon rising into a deep blue sky for a wonderful colour contrast.
This was also touted as a “blue Moon,” as it was the second Full Moon in March, and it was also the second blue Moon of 2018. (January had one, too.) But as you can see the Moon was hardly “blue!” It was a fine pink Moon.
This is a stack of 424 exposueres, taken at 3-second intervals for a time-lapse, but here stacked with Lighten blend mode to create a moon trail streak. I used the Advanced Stacker Plus actions in Photoshop. The final Moon disk comes from the last image in the sequence, while the ground comes from the first image in the sequence. I shot this sequence from home, using a 200mm Canon lens and 1.4x convertor, on the Canon 6D MkII. Exposures ranged from 0.8 second to 1/15 second, all at ISO 100 and f/4.
The above image is a little fun with Photoshop, and stacks hundreds of images of the rising Moon to create a “Moon trail,” showing the change in colour of the Moon as it rose.
This short HD movie includes two versions of the full time-lapse sequence:
• One showing the Moon rising normally, though the sky and ground come from the first image in the sequence.
• The second is another bit of Photoshop fun, with the Moon leaving disks behind it as it rose.
For the technically minded, I created both movies using Photoshop’s video editing capabilities to layer in various still images on top of the base video file. The stills are layered with a Lighten blend mode to superimpose them onto the background sky and video.
A screen shot of the Photoshop layers used to create the Moon disk composite time-lapse.
While Easter is a spring holiday, it hardly seems spring here in Alberta. The coldest Easter weekend in decades and lots of snow on the ground made this a winter scene.
With luck, spring will arrive here well before the next Full Moon.
The skies of Norway provided superb nights of Northern Lights as I sailed the coast.
As I did last autumn, I was able to join a cruise along the Norwegian coast, instructing an aurora tour group from Road Scholar. We were on one of the Hurtigruten ferry ships that ply the coast each day, the m/s Nordnorge, on a 12-day trip from Bergen to Kirkenes at the top end of Norway, then back again to Bergen.
Auroral curtains in twilight on March 14, 2018 from at sea north of Tromsø, Norway, on the Hurtigruten ship the m/s Nordnorge, with the curtains showing a purple tinge at the tops, likely from scattered blue sunlight mixing with the red oxygen colours. The Big Dipper is at centre in a view looking north. This is a single 2-second exposure with the Rokinon 12mm full-frame fish-eye at f/2.8 and Nikon D750 at ISO 8000.
In all, we had three very clear nights, with good auroras on two of those nights. Several other nights had bright auroras but seen through broken cloud.
Aurora tourists taking in the sky show on March 14, 2018 from the aft deck of the Hurtigruten ship the m/s Nordnorge on the journey south, from a location north of Tromsø this night. This is a single 2-second exposure with the Rokinon 12mm full-frame fish-eye lens and Nikon D750 at ISO 8000.
All observing and photography is done from the ship deck as we sailed among the fjords and sounds along the coast.
Auroral curtains in twilight on March 14, 2018 from at sea north of Tromsø, Norway, on the Hurtigruten ship the m/s Nordnorge, with the curtains showing a purple tinge to the background sky, likely from scattered blue sunlight mixing with the red oxygen colours. The Big Dipper is at upper left; Orion is at far right; Leo is left of centre, in a view looking south. This is a single 2-second exposure with the Rokinon 12mm full-frame fish-eye at f/2.8 and Nikon D750 at ISO 8000.
The best night was an all-sky display on March 14 seen from north of Tromsø as we sailed back south from our farthest north of 71° latitude.
A sky-covering aurora on March 14, 2018, as seen from the Hurtigruten ship the m/s Nordnorge, as we sailed south toward Tromsø, Norway. The view is looking east. The curtains are converging to the zenith at top. This is a single 1.6-second exposure with the Rokinon 12mm full-frame fish-eye lens at f/2.8 and Nikon D750 at ISO 8000.
Earlier, on the trip north, we had a great night as the aurora danced over the Lofoten Islands and we entered the Trollfjord. There is no finer scenery on Earth for framing the Lights.
A scene from the Norwegian coast and the Loftoten Islands of the aurora over the entrance to the Trollfjorden fjord, from the forward deck of the Hurtigruten ferry ship the m/s Nordnorge. Cassiopeia and Perseus are at left. Vega (brightest) and Deneb are at lower right, high above the northern horizon from this latitude of 68° North. Taken March 10, 2018. I used the 14mm Sigma Art lens at f/1.8 and Nikon D750 at ISO 3200, for a 2-second exposure.
As is the custom, the captain enters the fjord by searchlight, a scene depicted below.
A scene from the Norwegian coast and the Loftoten Islands of the aurora over the entrance to the Trollfjorden fjord, from the forward deck of the Hurtigruten ferry ship the m/s Nordnorge. The ship is using its searchlights to mark the entrance to the narrow fjord. Cassiopeia and Perseus are at left. Vega (brightest) and Deneb are at lower right, high above the northern horizon from this latitude of 68° North. Taken March 10, 2018. I used the 14mm Sigma Art lens at f/1.8 and Nikon D750 at ISO 3200, for a 2-second exposure.
I shot very few time-lapses on this trip (unlike my trip in October 2017, which you can see in a music video at a previous blog post).
However, here’s a short music video of two clips I did shoot, including a time-lapse of us approaching the Trollfjord entrance.
As we sailed south, we left the aurora behind. Our last look was of the arc of the auroral oval across the north, seen from south of Rorvik.
A 180° panorama of the sweep of the auroral oval, from due west, at left, to due east, at right, with due north near the image centre. Orion is just setting into the sea at far left. Cassiopeia is at centre. Deneb and Vega are the bright stars low in the sky and circumpolar shining just right of centre. I shot this on the evening of March 16, 2018 from at sea on the coast of Norway south of Rorvik, with the ship sailing south away from the aurora. This was from the aft deck of the m/s Nordnorge, one of the Hurtigruten ferry ships. The latitude was about 63° N. This is a panorama from 8 segments, stitched with PTGui, and shot with the Sigma 14mm Art lens at f/1.8, for a series of 1-second exposures at ISO 6400 with the Nikon D750.
However, for several nights prior we had been under the auroral oval and the Lights had danced for us over the sky.
Norway is one of the world’s best sites for seeing the Northern Lights – the “nordlys” – and taking a Hurtigruten cruise along the coast is a great way to see the Lights and incredible scenery that changes by the minute.
I present a new 4-minute music video (in 4K resolution) featuring time-lapses of the Milky Way.
One of the most amazing sights is the Milky Way slowly moving across the sky. From Canada we see the brightest part of the Milky Way, its core region in Sagittarius and Scorpius moving across the souther horizon in summer.
But from the southern hemisphere, the galactic core rises dramatically and climbs directly overhead, providing a jaw-dropping view of our edge-on Galaxy stretching across the sky. It is a sight all stargazers should see.
I shot the time-lapses from Alberta, Canada and from Australia, mostly in 2016 and 2017.
I include a still-image mosaic of the Milky Way from Aquila to Crux shot in Chile in 2011.
Do watch in 4K if you can! And in Full-Screen mode.
Locations include Writing-on-Stone and Police Outpost Provincial Parks, and Banff and Jasper National Parks in Alberta.
In Australia I shot from the Victoria coast and from inland in New South Wales near Coonabarabran, with some scenes from the annual OzSky Star Safari held each April.
The clouds cleared to present a magical night under the Moon in the Badlands of southern Alberta.
At last, a break in the incessant clouds of November, to provide me with a fine night of photography at one of my favourite places, Dinosaur Provincial Park, declared a U.N. World Heritage Site for its deposits of late Cretaceous fossils.
I go there to shoot the night sky over the iconic hoodoos and bentonite clay hills.
November is a great time to capture the equally iconic constellation of Orion rising in the east in the early evening. The scene is even better if there’s a Moon to light the landscape.
November 27 presented the ideal combination of circumstances: clear skies (at least later at night), and a first quarter Moon to provide enough light without washing out the sky too much and positioned to the south and west away from the target of interest – Orion and the winter sky rising in the east.
Below is a slide show of some of the still images I shot, all with the Canon 6D MkII camera and fine Rokinon 14mm f/2.5 lens, used wide open. Most are 15-second exposures, untracked.
This slideshow requires JavaScript.
I kept another camera, the Nikon D750 and Sigma 24mm Art lens, busy all night shooting 1200 frames for a time-lapse of Orion rising, with clouds drifting through, then clearing.
Below is the resulting video, presented in two versions: first with the original but processed frames assembled into a movie, followed by a version where the movie frames show accumulating star trails to provide a better sense of sky motion.
To create the frames for this version I used the Photoshop actions Advanced Stacker Plus, from StarCircleAcademy. They can stack images then export a new set of frames each with the tapering trails, which you then assemble into a movie. I also used it to produce the lead image at top.
The techniques and steps are all outlined in my eBook, highlighted at top right.
The HD movie is just embedded here, and is not published on Vimeo or YouTube. Expand to fill your screen.
To help plan the shoot I used the astronomy software Starry Night, and the photo planning software The Photographer’s Ephemeris, or TPE. With it, you can place yourself at the exact spot to see how the Sun, Moon and stars will appear in sightlines to the horizon.
Here’s the example screen shot. The spheres across the sky represent the Milky Way.
Look east to see Orion now in the evening sky. Later this winter, Orion will be due south at nightfall.
I present a music video of time-lapses of the Northern Lights from Norway, shot from the ship the aptly named m/s Nordlys.
The Nordlys is one of many ferry ships in the Hurtigruten cruise line (the name means “fast route”) that ply the Norwegian coast, with daily departures from Bergen (at latitude 60° N) to Kirkenes at the top of Norway (at 71° N). At the top end of Norway you are under the auroral oval and almost always see some level of auroral activity, if skies cooperate.
This 11-day cruise was blessed with five clear nights with active auroras. I was serving as an instructor for a tour group of 30 from the U.S.-based Road Scholar tour company.
Sailing to the Northern Lights from Alan Dyer on Vimeo.
The final sequence is of the ship entering the Trollfjorden – a narrow fjord often entered in darkness under searchlight. This was a dramatic sight with the aurora dancing overhead.
For a selection of still images from this trip and from the second cruise I did immediately following, see my previous blog post, The Nordlys of Norway.
Technical Info:
All exposures were about 1 to 1.3 seconds only, to minimize blurring during each exposure, shot with the Nikon D750 at ISO 6400, and with mostly the Sigma 14mm Art lens at f/1.8.
One sequence is with the Rokinon 12mm full-frame fish-eye at f/2.8. Intervals were 1 to 2 seconds, providing a rapid cadence.
In assembly I applied a 4-frame blur to smooth the frame-to-frame motion. All processing with Adobe Camera Raw and assembly with the Mac app Time-Lapse from MicroProjects.ca (an app no longer available – a pity).
Music is by the Hollywood soundtrack artists AudioMachine, and is used with permission under “social media” licence. It is the track “Above and Beyond” from their album Tree of Life.
October has brought clear skies and some fine celestial sights. Here’s a potpourri of what was up from home.
We’ve enjoyed some lovely early autumn weather here in southern Alberta, providing great opportunities to see and shoot a series of astronomical events.
Conjunctions
Venus and Mars in close conjunction in the dawn sky on October 5, 2017. Venus is the brightest object; Mars is below it; while the star above Venus is 4th magnitude Sigma Leonis. The foreground is illuminated by light from the setting Full Moon in the west. This is a single 1-second exposure with the 135mm lens at f/2 and Canon 60Da at ISO 800.
On October 5, Venus and Mars appeared a fraction of a degree apart in the dawn twilight. Venus is the brightest object, just above dimmer but red Mars. This was one of the closest planet conjunctions of 2017. Mars will appear much brighter in July and August 2018 when it makes its closest approach to Earth since 2003.
Satellites: The Space Station
An overhead pass of the ISS on October 5, 2017, with the Full Moon rising in the east at left. The ISS is moving from west (at right) to east (at left), passing nearly overhead at the zenith at centre. North is at the top, south at bottom in this fish-eye lens image with an 8mm Sigma fish-eye lens on the Canon 6D MkII camera. This is a stack of 56 exposures, each 4 seconds long at an interval of 1 second.
The Space Station made a series of ideal evening passes in early October, flying right overhead from my site at latitude 51° N. I captured it in a series of stacked still images, so it appears as a dashed line across the sky. In reality it looks like a very bright star, outshining any other natural star. Here, it appears to fly toward the rising Moon.
Satellites: Iridiums
A pair of nearly simultaneous and parallel Iridium satellite flares, on October 9, 2017, as they descended into the north. The left or westerly flare was much brighter and with a sharp rise and fall in brightness. While it was predicted to be mag. -4.4 I think it got much brighter, perhaps mag -7, but very briefly. These are Iridium 90 (left) and Iridium 50 (right). This is a stack of 40+ exposures each, 2 seconds at 1-second intervals, with the Sigma 24mm lens at f/1.4 and Nikon D750 at ISO 6400.
Often appearing brighter than even the ISS, Iridium satellite flares can blaze brighter than even Venus at its best. One did so here, above, in another time-lapse of a pair of Iridium satellites that traveled in parallel and flared at almost the same time. But the orientation of the reflective antennas that create these flares must have been better on the left Iridium as it really shot up in brilliance for a few seconds.
Auroras
A circumpolar star trail composite with Northern Lights, on October 13, 2017, shot from home in southern Alberta. The Big Dipper is at bottom centre; Polaris is at top centre at the axis of the rotation. The bottom edge of the curtains are rimmed with a pink fringe from nitrogen. This is a stack of 200 frames taken mostly when the aurora was a quiescent arc across the north before the substorm hit. An additional single exposure is layered in taken about 1 minute after the main star trail set to add the final end point stars after a gap in the trails. Stacking was with the Advanced Stacker Plus actions using the Ultrastreaks mode to add the direction of motion from the tapering trails. Each frame is 3 seconds at f/2 and ISO 6400 wth the Sigma 14mm lens and Nikon D750.
Little in the sky beats a fine aurora display and we’ve had several of late, despite the Sun being spotless and nearing a low ebb in its activity. The above shot is a composite stack of 200 images, showing the stars circling the celestial pole above the main auroral arc, and taken on Friday the 13th.
A decent aurora across the north from home in southern Alberta, on Friday the 13th, October, 2017, though these frames were taken after midnight MDT. 3 seconds at f/2 and ISO 6400 wth the Sigma 14mm lens and Nikon D750.
This frame, from some 1300 I shot this night, October 13, captures the main auroral arc and a diffuse patch of green above that pulsed on and off.
You can see the time-lapse here in my short music video on Vimeo.
Friday the 13th Aurora from Alan Dyer on Vimeo.
It’s in 4K if your monitor and computer are capable. It nicely shows the development of the aurora this night, from a quiescent arc, through a brief sub-storm outburst, then into pulsing and flickering patches. Enjoy!
What all these scenes have in common is that they were all shot from home, in my backyard. It is wonderful to live in a rural area and to be able to step outside and see these sites easily by just looking up!
I’ve assembled a music video of time-lapse clips and still images of the fine aurora of September 27, with Steve making a cameo appearance.
The indicators this night didn’t point to a particularly great display, but the sky really performed.
The Northern Lights started low across the north, in a very active classic arc. The display then quietened.
But as it did so, and as is his wont, the isolated arc that has become known as Steve appeared across the south in a sweeping arc. The Steve arc always defines the most southerly extent of the aurora.
Steve faded, but then the main display kicked up again and began to fill the sky with a post-sub-storm display of pulsing rays and curtains shooting up to the zenith. Only real-time video can really capture the scene as the eye sees it, but the fast time-lapses I shot do a decent job of recording the effect of whole patches of sky turning on and off.
The display ended with odd pulsing arcs in the south.
Here’s the video, available in 4K resolution.
Alberta Aurora (Sept. 27, 2017) from Alan Dyer on Vimeo.
I present the final cut of my eclipse music video, from the Teton Valley, Idaho.
I’ve edited my images and videos into a music video that I hope captures some of the awe and excitement of standing in the shadow of the Moon and gazing skyward at a total eclipse.
Totality over the Tetons from Alan Dyer on Vimeo.
The video can be viewed in up to 4K resolution. Music is by the Hollywood session group and movie soundtrack masters, Audiomachine. It is used under license.
Me at the 2017 total solar eclipse celebrating post-eclipse with four of the camera systems I used, for close-up stills through a telescope, for 4K video through a telephoto lens, and two wide-angle time-lapse DSLRs. A fifth camera used to take this image shot an HD video selfie.Never before have I been able to shoot a total eclipse with so many cameras to capture the scene from wide-angles to close-ups, in stills, time-lapses, and videos, including 4K. Details on the setup are in the caption for the video on Vimeo. Click through to Vimeo.
I scouted this site north of Driggs, Idaho two years earlier, in April 2015. It was perfect for me. I could easily set up lots of gear, it had a great sightline to the Grand Tetons, and a clear horizon for the twilight effects. And I had the site almost to myself. Observing with a crowd adds lots of energy and excitement, but also distraction and stress. I had five cameras to operate. It was an eclipse experience I’ll likely never duplicate.
If you missed this eclipse, you missed the event of a lifetime. Sorry. Plain and simple.
A composite of the 2017 eclipse with time running from left to right, depicting the onset of totality at left, then reappearance of the Sun at right. Taken with the 4-inch telescope shown above.If you saw the eclipse, and want to see more, then over the next few years you will have to travel far and wide, mostly to the southern hemisphere between now and 2024.
But on April 8, 2024 the umbral shadow of the Moon once again sweeps across North America, bringing a generous four minutes of totality to a narrow path from Mexico, across the U.S., and up into eastern Canada.
It will be the Great North American Eclipse. Seven years to go!
The summer Full Moon arcs low across the southern sky, mimicking the path of the winter Sun.
This is a project I had in mind for the last month, and hoped to capture at the July Full Moon. A clear, dry, and cooperative night provide the chance.
The still images are composites of 40 images of the Moon traveling across the sky from dusk to dawn, taken at 10-minute intervals. They are layered onto a blend of background images of the 10 p.m. dusk sky (left), 2 a.m. middle-of-the-night sky (middle), and 5 a.m dawn sky (right).
As a bonus, the 10 p.m. sky shows some dark crepuscular rays in the twilight, while at 2 a.m. the Moon was in light cloud and surrounded by iridescent colours. By 5 a.m. denser clouds were moving in to obscure the Moon.
I shot the still image composite (above) and time-lapse movie (below) to illustrate the low arc of a summer Full Moon. In summer (June or July) the Full Moon sits at a similar place near the ecliptic as does the Sun in winter near the December solstice.
From the northern hemisphere the low position of the winter Sun gives us the short, cold days of winter. In summer, the similar low position of the Full Moon simply gives us a low Full Moon! But it is one that can be impressive and photogenic.
The time-lapse movie uses all 400 frames of the moving Moon superimposed onto the same background sky images, but now dissolving from one to the other.
The movie is 4K in resolution, though can be viewed at a smaller resolution to speed up playback if needed.
For the technically minded:
The Moon disks in the time-lapse and still composite come from a series of short 1/15-second exposures, short enough to record just the disks of the bright Moon set against a dark, underexposed sky.
I took these shots every minute, for 400 in total. They are blended into the bright background sky images using a Lighten blend mode, both in Photoshop for the still image, and in Final Cut for the movie.
The background sky images are longer exposures to record the sky colours, and stars (in the case of the 2 a.m. image). They are blended with gradient masks for the still image, but dissolved from one to the other in the time-lapse movie.
I shot the frames with a 15mm full-frame fish-eye lens and Canon 6D, with the camera not moved during the 7-hour shoot.
The Northern Lights dance in the solstice sky over a prairie lake.
This was a surprise display. Forecasts called for a chance of Lights on Saturday, June 24, but I wasn’t expecting much.
Nevertheless, I headed to a nearby lake (Crawling Lake) to shoot north over the water, not of the Lights, but of noctilucent clouds, a phenomenon unique to the summer solstice sky and our latitudes here on the Canadian prairies.
But as the night darkened (quite late at solstice time) the aurora began to appear in the deepening twilight.
I started shooting and kept shooting over the next four hours. I took a break from the time-lapses to shoot some panoramas, such as the headline image at top, capturing the sweep of the auroral oval over the lake waters.
Just on the horizon you can see some noctilucent clouds (NLCs) as well – clouds so high they are lit by the Sun all night long. NLCs sit at the same height as the bottom of the auroral curtains. But they appear here lower and much farther away, which they likely were, sitting farther north than the auroral band.
A 360° panorama of the aurora and Milky Way in the twilight sky of a summer solstice evening.
I also shot this 360° panorama (above) capturing the arc of the aurora and of the Milky Way. This is a stitch of 8 segments with a 14mm lens mounted in portrait mode.
I’ve assembled the several time-lapse sequences I shot into a short music video. Check it out on Vimeo here. Click through to the Vimeo page for more technical information on the video sequences.
As always click HD, and relax and enjoy the dancing lights over the calm waters of a prairie lake on a summer evening.
The Full Moon of June rose into a twilight sky over a prairie pond.
On June 9, the clouds cleared to present an ideal sky for capturing the rising of the so-called “Strawberry Moon,” the popular name for the Full Moon of June.
The lead image is a composite of 15 frames, taken at roughly 2.5-minute intervals and stacked in Photoshop with the Lighten blend mode.
The image below is a single frame.
The rising Full Moon of June, dubbed the “Strawberry Moon” in the media, as seen rising over a prairie pond in southern Alberta, on June 9, 2017. This is a single exposure stack, from a time-lapse sequence of 1100 frames, with images taken at two second intervals. Shot with the Canon 6D and 200mm lens.I set up beside a small local prairie pond, to shoot the moonrise over the water. Ducks enjoyed the view and a muskrat swam by at one point.
I shot over 1100 frames, at two-second intervals to create a time-lapse of the rising Moon, as it brightened and turned from yellow-orange (not quite strawberry pink) to a bright white.
Here’s the time-lapse vignette.
Click on HD for the best view.
While the Harvest Moon gets lots of PR, as this sequence shows any Full Moon can provide a fine sight, and look yellow, due to absorption of the blue wavelengths by the atmosphere as the Moon rises, or as it sets.
However, the timing can vary from Full Moon to Full Moon. This one was ideal, with it rising right at sunset. If the Moon comes up too late, the sky might have already darkened, producing too great a difference in brightness between the Moon and background sky to be photogenic.
But what of these Moon names? How authentic are they?
Who called this the Strawberry Moon? Native Americans? No. Or at best only one or two nations.
Check the site at Western Washington University at http://www.wwu.edu/depts/skywise/indianmoons.html and you’ll see there were an enormous number of names in use, assuming even this listing is authentic.
The names like “Strawberry Moon” that are popularized in the media today come from the American Farmers Almanac, and everyone – science writers and bloggers – ends up copying and pasting the same wrong, or at best misleading, information from the Almanac.
Search for “Strawberry Moon” or “Moon names” and you’ll find the same explanation repeated verbatim and unquestioned by many writers. Alas, the Almanac is not an authoritative source – after all, they were the source of a misleading definition of Blue Moon decades ago.
No one predicted this spectacle. But on May 27 the last-minute warnings went out to look for a fabulous show as night fell.
And what a show it was! As darkness fell the sky was lit with green curtains. After midnight the curtains converged at the zenith for that most spectacular of sky sights, a coronal burst.
As the night began I was at the Rothney Observatory helping out with the public stargazing night.
We saw the Space Station rise out of the west over the Rockies and pass through the Northern Lights.
It then headed off east, appearing here as the streak amid the Lights and light pollution of Calgary.
To continue to shoot the display I, too, decided to head east, to home. I should have gone west, to the mountains.
I drove through rain to get home, and missed the peak of the display, judging by images from others in the Rockies, and those to the north.
But as I got home clouds began to clear enough for a glimpse of the Space Station, on its next pass, flying overhead, again through the aurora. I wonder what the astronauts might have been seeing looking down.
From home, I caught another bright sub-storm outburst to the north, as the curtains suddenly exploded in brightness and rapid motion, with characteristic pink fringes at the bottoms, from nitrogen molecules.
What impressed me about this display was the smell! Yes, you see auroras and some claim to hear them. But this display is one I’ll remember for the springtime scent of lilacs in the night air as the Lights danced.
The Great Aurora of May 27 from Alan Dyer on Vimeo.
Here is a short music video of several time-lapse sequences I shot, of the sub-storm then post-storm subsidence into the patchy flaming and flickering effect that we often see at the end of a great display. And this was certainly one of them.
We southerners were treated to the class of display you usually have to travel north the Arctic and auroral oval to see.
Stargazers in western Canada will have seen him – Steve, the odd auroral arc.
There’s been a lot of publicity lately about an unusual form of aurora that appears as a stationary arc across the sky, isolated from the main aurora to the north. It usually just sits there – motionless, featureless, and colourless to the eye, though the camera can pick up magenta and green tints.
We often see these strange auroral arcs from western Canada.
In lieu of a better name, and lacking a good explanation as to their cause, these isolated arcs have become labelled simply as “Steve” by the aurora chasing community (the Alberta Aurora Chasers Facebook group) here in Alberta.
In a gathering of aurora chasers at Calgary’s Kilkenny Pub, aurora photographer extraordinaire and AAC Facebook group administrator Chris Ratzlaff suggested the name. It comes from the children’s movie Over the Hedge, where a character calls anything he doesn’t understand “Steve.” The name has stuck!
The 270° panorama from March 2, 2017 shows Steve to the west (right) and east (left) here, and well isolated from the main aurora to the north.
This is the view of that same March 2, 2017 arc looking straight up, showing Steve’s characteristic gradient from pink at top though white, then to subtle “picket-fence” fingers of green that are usually very short-lived.
The view above is Steve from exactly 6 months earlier, on September 2, 2016. Same features. I get the impression we’re looking up along a very tall but thin curtain.
Another view of the September 2, 2016 Steve shows his classic thin curtain and gradation of colours, here looking southeast.
Looking southwest on September 2, 2016, Steve takes on more rippled forms. But these are very transient. Indeed, Steve rarely lasts more than 30 minutes to an hour, and might get bright for only a few minutes. But even at his brightest, he usually looks white or grey to the eye, and moves very slowly.
Here’s a classic Steve, from October 1, 2006 – a white featureless arc even to the camera in this case.
So what is Steve?
He is often erroneously called a “proton arc,” but he isn’t. True auroral proton arcs are invisible to the eye and camera, emitting in wavelengths the eye cannot see. Proton auroras are also diffuse, not tightly confined like Steve.
Above is Steve from August 5, 2005, when he crashed the Saskatchewan Summer Star Party, appearing as a ghostly white band across the sky. But, again, the camera revealed his true colours.
Steve Auroras in 2015 from Alan Dyer on Vimeo.
Here are a couple of time-lapses from 2015 of the phenomenon, appearing as an isolated arc overhead in the sky far from the main auroral activity to the north. I shot these from my backyard in southern Alberta. In both clips the camera faces north, but takes in most of the sky with a fish-eye lens.
In the first video clip, note the east-to-west flow of structure, as in classic auroras. In the second clip, Steve is not so well-defined. Indeed, his usual magenta band appears only briefly for a minute or so. So I’m not sure this second clip does show the classic Steve arc.
The origin and nature of Steve are subjects of investigation, aided by “citizen science” contributors of photos and videos.
Local aurora researcher Dr. Eric Donovan from the University of Calgary has satellite data from the ESA Swarm mission to suggest Steve is made of intensely hot thermal currents, and not classic electrons raining down as in normal auroras. He has back-acronymed Steve to mean Strong Thermal Emission Velocity Enhancement.
Learning more about Steve will require a unique combination of professional and amateur astronomers working together.
Now that he has a name, Steve won’t be escaping our attention any longer. We’ll be looking for him!
The Northern Lights once again performed beautifully from Churchill, Manitoba, making the sky dance with colours.
As I do each winter, I spent time in Churchill, Manitoba at the wonderful Churchill Northern Studies Centre, attending to groups of “aurora tourists” there to check an item off their bucket list – seeing the Northern Lights.
In the 30 years the courses have been presented only one group has ever come away not seeing the Lights. Well, make that two now. A bout of unseasonably warm weather in my first week brought clouds every night. Mild temperatures to be sure. But we want it to be -25° C! That’s when it is clear.
Our first clear night was very clear, affording us a wonderful view of the winter Milky Way before the Lights came out. Such a view is unusual from the North, as the Lights usually wash out the sky, which they did later this night. Even here, you can see some wisps of green aurora.
Normal temperatures didn’t return until week 2 of my stay. The second group fared much better, getting good displays on 4 of their 5 nights there, more typical of Churchill.
A few determined die-hards from Group 1 (here shooting the Lights) stayed on a couple of more nights, and were rewarded with the views they had come for. They were happy!
In the images here, at no time did the auroral activity exceed a level of Kp 3 (on a scale of 0 to 9) and was often just Kp 1 or 2. Farther south no one would see anything. But at latitude 58° N Churchill lies under the auroral oval where even on quiet nights the aurora is active and often spectacular.
In speaking to a Dene elder who presents a cultural talk to each of the CNSC groups, Caroline said that to the Dene of northern Canada their word for the Lights translates to “the sky is dancing.” Wonderful! It did for us.
The Auroras of Churchill from Alan Dyer on Vimeo.
This music video presents a montage of time-lapse movies I shot over four nights, from January 25 to 29, 2017. They provide an idea of what we saw under the dancing sky.
As usual, choose HD and enlarge to full screen to view the movie. Or go to Vimeo with the V button.
The annual Dark Sky Festival in Jasper National Park ended with the best finale – dark skies, on a beautiful star-filled night.
On Saturday night, October 22, I left the final set of science talks in the Big Tent at the heart of the Festival and headed out down the Icefields Parkway for a night of shooting Jasper by starlight.
The lead image is of the winter stars, including the Pleiades, rising above Mt. Kerkeslin at Athabasca Falls.
The Pleiades star cluster and the other stars of Taurus rising above Mount Kerkeslin at Athabasca Falls, in Jasper National Park, Alberta, October 22, 2016. The sky is brightening with the rising waning Moon off frame at left. Some cloud adds star glows and hazy patches to the sky. This is a stack of 15 exposures, mean combined to smooth noise, for the ground and one exposure for the sky. All are 25 seconds at f/2 with the Sigma 20mm Art lens and Nikon D750 at ISO 6400.
I shot the image above moments later, from the usual viewpoint overlooking the Falls, reduced to a trickle in late autumn. Illumination is solely by starlight – no artificial and glaring light painting here.
The autumn constellations of Perseus, Cassiopeia and Andromeda over Mount Kerkeslin at the Athabasca River Viewpoint on the Icefields Parkway, in Jasper National Park, Alberta. The Andromeda Galaxy is at upper right. The Pleiades are just clearing the mountain top at lower right. Thin clouds add the natural glows around the stars. Illumination is from starlight. This is a stack of 8 exposures, mean combined to smooth noise, for the ground and one exposure for the sky, all 25 seconds at f/2 with the Sigma 20mm lens and Nikon D750 at ISO 6400.
Earlier in the night, I stopped at the Athabasca River Viewpoint and shot the autumn stars of Cassiopeia, Andromeda, and Perseus above Mt. Kerkeslin. The Pleiades are just appearing above the mountain ridge.
The autumn stars of the watery constellations of Capricornus, Aquarius, Piscis Austrinus, and Cetus over the Athabasca River and the peaks of the Continental Divide, from the Athabasca River Viewpoint (the “Goats and Glaciers” viewpoint) on the Icefields Parkway, Jasper National Park, Alberta. Thin cloud provides the natural glows around the stars. This is a stack of 8 exposures for the ground, mean combined to smooth noise, and one exposure for the sky, all 25 seconds at f/2 with the Sigma 20mm Art lens, and Nikon D750 at ISO 6400.
From that viewpoint I shot a scene looking south over the river and with the stars of Capricornus and Aquarius above the Divide.
The Milky Way over the region of Athabasca Pass, as seen from the highway viewpoint on the Icefields Parkway, in Jasper National Park, Alberta, Oct 22, 2016. The Milky Way here is the section through Aquila, with Altair at top and Mars bright above the peaks of the Continental Divide. This is a stack of 8 exposures, mean combined to smooth noise, for the ground and one exposure for the sky, all 25 seconds at f/2 with the Sigma 20mm lens, and Nkion D750 at ISO 6400.
At the start of the night I stopped at the viewpoint for Athabasca Pass far in the distance. The summer Milky Way was setting over the pass. This historic pass was used by David Thompson in the late 1700s and early 1800s as his route into B.C. to extend the fur trade across the Divide. Thompson writes in his Journal about one particularly clear night on the pass:
“My men were not at their ease, yet when night came they admired the brilliancy of the Stars, and as one of them said, he thought he could almost touch them with his hand.”
The night ended with a display of Northern Lights over the Athabasca River. What a superb night under the stars in Jasper!
The Northern Lights over the Athabasca River in Jasper National Park, Alberta, Canada, on October 22/23 at about 1:30 am. I shot this from an access point to the Athabasca River by the bridge on Highway 93 on the Icefields Parkway. Pyramid Mountain is at left near the town of Jasper. Vega is the bright star at left; the Big Dipper is at right. The image is a stack of 10 exposures for the ground, mean combined to smooth noise and to smooth the water, and one exposure for the sky and aurora. All 15 seconds at ISO 1600 at f2 with the Sigma 20mm lens and Nikon D750.
As a finale, here’s a music video collecting together still images and time-lapse movies shot this night, and on two other nights during the Dark Sky Festival, including at the big Lake Annette “Beyond the Stars” star party I spoke at.
Enjoy!
As usual, enlarge to full screen and go to HD for the best view.
I’m pleased to announce that after a year in production, our video tutorial series, Nightscapes and Time-Lapses: From Field to Photoshop, is now available.
It’s been quite a project! Over the last few years I’ve presented annual astrophoto workshops in conjunction with our local telescope dealer All-Star Telescope to great success.
However, we always had requests for the workshops on video. Attempts to video the actual workshops never produced satisfactory results. So we spent a year shooting in the field and in the studio to produce a “purpose-built” series of programs.
They are available now as a set of three programs, totalling 4 hours of instruction, for purchase and download at Vimeo at
For those wanting “hard copies” we will also be selling the programs on mailed USB sticks. See All-Star Telescope for info and prices. The downloaded version can also be ordered from there.
This series deals with the basics of capturing, then processing nightscape still images and time-lapse movies of the night sky and landscapes lit by moonlight and starlight.
Here’s the content outline:
Program 1 – Choosing Equipment (1 Hour)
• Tips for Getting Started • Essential Gear • Choosing A Camera • Photo 101 – Exposure Triangle • Setting Exposure • Expose to the Right • Setting a Camera – File Types • Photo 101 – Noise Sources • Setting a Camera – Noise Reduction • Setting a Camera – Focusing • Setting a Camera – Other Menus • Choosing Lenses • Choosing an IntervalometerSummary and Tips
Program 2 – Shooting in the Field (1 hour)
• Climbing the Learning Curve • Twilights • Astronomy 101 – Conjunctions • Shooting Conjunctions • Moonrises • Shooting Auroras • Astronomy 101 – Auroras • Photo 101 – Composing • Moonlit Nightscapes • Astronomy 101 – Where is the Moon? • Choosing a Location • Shooting the Milky Way • Astronomy 101 – Where is the Milky Way? • Astronomy 101 – Daily Sky Motion • Tracking the Sky • Shooting Star Trails • Shooting Time-Lapses • Calculating Time-Lapses • A Pre-Flight Checklist • Summary and Tips
Program 3 – Processing Nightscapes and Time-Lapses (2 hours)
• Workflows • Using Adobe Bridge – Importing and Selecting • Photo 101 – File Formats • Using Adobe Lightroom – Importing and Selecting • Adobe Camera Raw – Essential Settings • Adobe Camera Raw – Developing Raw Images • Adobe Lightroom – Develop Module • Adobe Photoshop – Introduction • Photoshop – Setup • Photoshop – Smart Filters • Photoshop – Adjustment Layers • Photoshop – Masking • Photoshop – Processing Star Trails & Time-Lapses • Stacking Star Trails • Assembling Time-Lapse Movies • Archiving • Summary & Finale
If this first introductory series is successful we may produce follow-up programs on more advanced techniques.
It was a perfect night at a dark site in southern Alberta. The Milky Way shone to the south and aurora danced to the north.
I had scouted out this location in June and marked it on my calendar to return in the fall when the centre of the Milky Way would be well-placed to the southwest.
The site is Police Outpost Provincial Park, named for the North West Mounted Police fort that once occupied the site, guarding Canada’s sovereignty in the late 1800s.
One result from the night of shooting is the opening image, the first frame from a time-lapse taken while deep blue twilight still coloured the sky. The main peak is Chief Mountain in Montana.
A fairly mild dispay of aurora in the darkening deep blue twilight over the lake at Police Outpost Provincial Park, in southern Alberta, on September 26, 2016, with the stars of Perseus rising, and with Capella low in the northeast at centre. This is a stack of 4 x 20 second exposures for the dark ground and water to smooth noise and one 20-second exposure for the sky, all with the 25mm Canon lens at f/2.8 and Canon 6D at ISO 2000.
To the north an aurora display kicked up over the lake. While it never got very bright, it still provided a photogenic show over the still waters.
A fairly mild dispay of aurora over the lake at Police Outpost Provincial Park, in southern Alberta, on September 26, 2016, with the stars of Auriga and Taurus rising, including the Pleiades at upper right. The Hyades in Taurus are the most prominent stellar reflections at lower right, in the still water this evening. Capella is the bright star above centre; Aldebaran is at right. This is a stack of 4 x 20 second exposures for the dark ground to smooth noise and one 20-second exposure for the sky and water, all with the 25mm Canon lens at f/2.2 and Canon 6D at ISO 3200.
The waters were calm on this windless night (rare for southern Alberta), and so reflected the stars and Northern Lights beautifully.
The Big Dipper reflected in the still waters of the lake at Police Outpost Provincial Park, in southern Alberta, on September 26, 2016, with an aurora to the north at right. Only in autumn can one shoot the Dipper reflected in the water in the evening sky, as it is then riding low along the northern horizon. This is from a latitude of 49° N where the Dipper is circumpolar. This is a stack of 4 x 25 second exposures for the dark ground to smooth noise and one 25-second exposure for the sky and water, all with the 25mm Canon lens at f/2.2 and Canon 6D at ISO 3200.
Here, the Big Dipper reflects in the lake as we look north to the Lights. The movie below compiles still images and two time-lapse sequences, of the Lights and Milky Way. The sounds are the natural sounds I recorded on site, as flocks of geese were getting ready to migrate and the owls hooted.
Enjoy! — As always, for the best view, enlarge to full screen or click through to Vimeo with the V button.
What a night this was – perfect skies over an iconic location in the Rockies. And an aurora to top it off!
On August 31 I took advantage of a rare clear night in the forecast and headed to Banff and Moraine Lake for a night of shooting. The goal was to shoot a time-lapse and stills of the Milky Way over the lake.
The handy planning app, The Photographer’s Ephemeris, showed me (as below) that the Milky Way and galactic centre (the large circles) would be ideally placed over the end of the lake as astronomical twilight ended at 10:30 p.m. I began the shoot at 10 p.m. as the sky still had some twilight blue in it.
I planned to shoot 600 frames for a time-lapse. From those I would extract select frames to create a still image. The result is below.
This is looking southwest with the images taken about 11:15 pm on August 31, 2016.The ground is illuminated by a mix of starlight, lights from the Moraine Lake Lodge, and from a display of aurora brightening behind the camera to the north. The starclouds of Scutum and Sagittarius are just above the peaks of the Valley of Ten Peaks. This is a stack of 16 images for the ground, mean combined to smooth noise, and one exposure for the sky, untracked, all 15 seconds at f/2 with the Sigma 20mm Art lens and Nikon D750 at ISO 6400. The frames are part of a 450-frame time-lapse.
As the caption explains, the still is a composite of one exposure for the sky and 16 in succession for the ground, averaged together in a technique to smooth noise. The camera wasn’t tracking the sky, so stacking sky images isn’t feasible, as much as I might like to have the lower noise there, too. (There are programs that attempt to align and stack the moving sky but I’ve never found they work well.)
About midnight, the Valley of Ten Peaks around the lake began to light up. An aurora was getting active in the opposite direction, to the north. With 450 frames shot, I stopped the Milky Way time-lapse and turned the camera the other way. (I was lazy and hadn’t hefted a second camera and tripod up the steep hill to the viewpoint.)
The lead-image panorama is the first result, showing the sweeping arc of Northern Lights over Desolation Valley.
The Northern Lights in a fine Level 4 to 5 display over Desolation Valley at Moraine Lake, Banff National Park, on the night of August 31/Sept 1. This is one frame from a 450-frame time-lapse with the aurora at its best. This is a 2-second exposure at f/2 with the Sigma 20mm Art lens and Nikon D750 at ISO 5000.
Still images shot, I began a time-lapse of the Lights, grabbing another 450 frames, this time using just 2-second exposures at f/1.6 for a rapid cadence time-lapse to help freeze the motion of the curtains.
The final movies and stills are in a music video here:
I ended the night with a parting shot of the Pleiades and the winter stars rising behind the Tower of Babel formation. I last photographed that scene with those same stars in the 1980s using 6×7 film.
The early winter stars rising behind the Tower of Babel formation at Moraine Lake, Banff National Park, with a bright aurora to the north at left. Visible are the Pleiades at centre, and Capella and the stars of Auriga at left. Just above the mountain are the Hyades and Taurus rising. At top are the stars of Perseus. Aries is just above the peak of Babel. The aurora in part lights the landscape green. This is a stack of 16 images for the ground, mean combined to smooth noise, and 1 image for the sky, untracked, all for 15 seconds at f/2.2 with the Sigma 20mm Art lens, and Nikon D750 at ISO 3200. All with LENR turned on.
In a summer of clouds and storms, this was a night to make up for it.
Saturn, Mars and the Milky Way appeared in the twilight over the Bow River.
I shot this scene on August 24 from the viewpoint at Blackfoot Crossing Historical Park, overlooking the Bow River. Mars appears between Saturn above and Antares below, in a line of objects west of the Milky Way.
The valley below is the traditional meeting place of the Blackfoot Nation, and the site of the signing of Treaty Seven between Chief Crowfoot and Colonel MacLeod of the North West Mounted Police in 1877.
The image is a panorama of two images, each 20-second exposures at f/2 and ISO 1600 with the 24mm lens. I shot them just prior to shooting time-lapses of the moving sky, using two cameras to create a comparison pair of videos, to illustrate the choices in setting the cadence when shooting time-lapses.
The movies, embedded here, will be in the next edition of my Nightscapes and Time-Lapse ebook, with the current version linked to below. The text explains what the videos are showing.
Choose Your Style
When shooting frames destined for a time-lapse movie we have a choice:
Shoot fewer but longer exposures at slower ISOs and/or smaller apertures.
OR …
Shoot lots of short exposures at high ISOs and/or wide apertures.
The former yields greater depth of field; the latter produces more noise. But with time-lapses, the variations also affect the mood of a movie in playback.
This comparison shows a pair of movies, both rendered at 30 frames per second:
Clip #1 was taken over 2 hours using 20-second exposures, all at ISO 2000 and f/2 with 1-second intervals. The result was 300 frames.
Clip #2 was taken over 1 hour using 5-second exposures also at f/2 and 1-second intervals, but at ISO 8000. The result was 600 frames: twice as many frames in half the time.
Clip #2 exhibits enough noise that I couldn’t bring out the dark foreground as well as in Clip #1. Clip 2 exhibits a slower, more graceful motion. And it better “time-resolves” fast-moving content such as cars and aircraft.
Which is better? It depends …
Long = Fast
The movie taken at a longer, slower cadence (using longer exposures) and requiring 2 hours to capture 300 frames resulted in fast, dramatic sky motion when played back. Two hours of sky motion are being compressed into 10 seconds of playback at 30 frames per second. You might like that if you want a dramatic, high-energy feel.
Short = Slow
By comparison, the movie that packed 600 frames into just an hour of shooting (by using short exposures taken at fast apertures or fast ISOs) produced a movie where the sky moves very slowly during its 10 seconds of playback, also at 30 frames per second. You might like that if you want a slow, peaceful mood to your movies.
So, if you want your movie to have a slow, quiet feel, shoot lots of short exposures. But, if you want your movie to have a fast, high-energy feel, shoot long exposures.
As an aside – all purchasers of the current edition of my ebook will get the updated version free of charge via the iBooks Store once it is published later this year.
I present a montage of time-lapses illustrating the motion of the sky in the Northern Hemisphere.
Any stargazer should be familiar with how the sky moves, with stars rising in the east and setting in the west.
From the northern hemisphere, when we look north we see the sky rotating counter-clockwise around the North Celestial Pole, near Polaris. As you’ll see in the video, even Polaris moves, though not much over the night. The stars that never set, but just move across the northern horizon, are the circumpolar stars.
When we look south we see the seasonal constellations, the ones that rise and set, and change over the seasons.
I shot the images for these sequences from southern Arizona, in early December 2015.
So the night starts with the summer stars setting in the west and the autumn stars dominating the sky. But then Orion and the winter stars rise and march across the sky over the night, setting before dawn, as the spring stars rise.
The south-looking movie is a dusk-to-dawn sequence. Note the Zodiacal Light in the west at right in the early evening, then reappearing in the east at left before dawn brightens the sky, and as Venus and the Moon rises.
Also note the moving bands of red and green airglow, a natural phenomenon of the upper atmosphere.
I posted a matching set of moviesin my previous blog post, shot from the Southern Hemisphere. But here’s the link to the movie.
Both sets of movies were shot from nearly identical latitudes – about 31°, but 31° N for Portal, Arizona and 31° S for Coonabarabran, Australia.
As such the Celestial Poles appear at equal altitudes above the horizon. And the angles that the stars rise and set at in relation to the horizon are the same.
But the direction they move is opposite. When looking 180° away from the Pole, the seasonal stars move from left to right in the Northern Hemisphere, but from right to left in the Southern Hemisphere.
Visitors from one hemisphere to the other are bound to get turned around!
Nothing amazes even the most inveterate skywatcher more than traveling to another hemisphere and seeing sky move. It moves the wrong way!
Whether you are from the southern hemisphere traveling north, or as I do, travel south from the Northern Hemisphere, watching how the sky moves can be disorienting.
Here I present a video montage of time-lapses shot last April in Australia, at the annual OzSky Star Party near Coonabarabran in New South Wales.
Select HD and Enlarge button to view at full screen at best quality.
You’ll see the sky set in the west but traveling in arcs from right to left, then in the next clip, rise in the east, again moving from right to left. That’s the wrong angle for us northerners.
Looking north you see the seasonal constellations, the ones that rise and set over a night and that change with the seasons. In this case, the night starts with Orion (upside-down!) to the north but setting over in the west, followed by Leo and bright Jupiter. The sky is moving from east to west, but that’s from right to left here. The austral Sun does the same thing by day.
Looking south, we see the circumpolar constellations, the ones that circle the South Celestial Pole. Only there’s no bright “South Star” to mark the pole.
The sky, including the two Magellanic Clouds (satellite galaxies to the Milky Way) and the spectacular Milky Way itself, turns around the blank pole, moving clockwise – the opposite direction to what we see up north.
I shot the sequences over four nights in early April, as several dozen stargazers from around the world revelled under the southern stars, using an array of impressive telescopes supplied by the Three Rivers Foundation, Australia, for us to explore the southern sky.
I am pleased to present my latest music video featuring Alberta Skies in motion, set to the music of Ian Tyson.
My 5-minute video features time-lapse imagery shot over the last three years in the plains, badlands, and mountains of Alberta.
Do click through to Vimeo and view in HD for the best quality.
The footage is set to the music of Alberta singer/songwriter Ian Tyson, and his superb rendition of Home on the Range. It is used by kind permission of Ian Tyson and Stony Plain Records. Thanks!
It was hearing Ian’s version of this song on CBC one day in 1992 when his album And Stood There Amazed came out that inspired me to move back to Alberta and the great landscapes of the west that I knew I wanted to capture.
Little did I know at the time how it was going to be possible in the 2000s to do it in time-lapse.
Our video tutorial project is now live on Kickstarter!
For the last two years I’ve been involved in a project to produce a set of comprehensive video tutorials on how to shoot and process Nightscapes and Time-Lapses, to complement my ebook by the same name.
If you’ve not been able to attend my workshops – or even if you have! – these videos will provide you with all the information, and more, in a format you can review over and over.
We’ve shot all the field and studio footage, but to complete the production, we need your help. Back us on Kickstarterand we’ll be able to make the programs available this September, as downloads and on a shipped USB drive.
Our Kickstarter page has all the details. Early backers can purchase the tutorial programs now for as little as $55 – and that’s Canadian! – vs. $80 for the final retail price. The final programs will provide several hours of instruction, both in the field and at the computer.
If you have not participated in a Kickstarter campaign before, it is no risk. Nothing is charged to your credit card until and when the project is successfully funded after the 30-day campaign. If it isn’t successful, you are charged nothing.
Here’s our promo video describing the programs.
We have 30 days to make our goal. We invite you to join us in making our project a reality.
This is a video 37 years in the making, compiling images and videos I’ve shot of total solar eclipses since my first in 1979.
Though I’ve “sat out” on the last couple of total eclipses of the Sun in 2015 and 2016, I’m looking forward to once again standing in the shadow of the Moon in 2017 – on August 21.
If you have not yet seen a total eclipse of the Sun, and you live in North America, next year is your chance to. It is the most spectacular and awe-inspiring event you can witness in nature.
I hope my video montage relays some of the excitement of being there, as the Moon eclipses the Sun.
As always, click HD and enlarge to full screen.
My montage features images and movies shot in:
• Manitoba (1979)
• Chile (1994)
• Curaçao (1998)
• Turkey (1999)
• Zimbabwe (2001)
• Australia (2002)
• Over Antarctica (2003)
• South Pacific near Pitcairn Island (2005)
• Libya (2006)
• Over Arctic Canada (2008)
• South Pacific near the Cook Islands (2009)
• Australia (2012)
• Mid-Atlantic Ocean (2013)
Out of the 15 total solar eclipses I have been to, only the 1991 and 2010 eclipses that I did go to are not represented in the video, due to cloud. Though we did see much of the 1991 eclipse from Baja, clouds intervened part way through, thwarting my photo efforts.
And I only just missed the 2010 eclipse from Hikueru Atoll in the South Pacific as clouds came in moments before totality. Of course, it was clear following totality.
Cameras varied a lot over those years, from Kodachrome film with my old Nikon F, to digital SLRs; from 640×480 video with a Sony point-and-shoot camera, to HD with a DSLR.
I shot images through telescopes to capture the corona and prominences, and with wide-angle lenses to capture the landscape and lunar shadow. I rarely shot two eclipses the same way or with the same gear.
I hope you enjoy the video and will be inspired to see the August 21, 2017 eclipse. For more information about that eclipse, visit:
Mars is approaching! It now shines brightly in the midnight sky as a red star in Scorpius.
You can’t miss Mars now. It is shining brighter than it has since 2005, and is about to come as close to Earth as it has in 11 years as well.
Mars is now approaching opposition, when the Earth comes closest to Mars, and the Sun, Earth and Mars lie along the same line. Opposition date is May 22. That’s when Mars shines at its brightest, at magnitude -2.1, about as bright as Jupiter. Only Venus can be a brighter planet and it’s not in our sky right now.
A week later, on May 30, Mars comes closest to Earth, at a distance of 75 million kilometres. That’s when the disk of Mars looks largest in a telescope. And you will need a telescope at high power (150x to 250x) to make out the dark markings, north polar cap, and bright white clouds on Mars.
Mars above Antares, with Saturn to the left, low in the south on May 13, 2016, in the moonlight of a waxing quarter Moon, from home in Alberta. This was one week before opposition and two weeks before closest approach, so Mars is particularly bright and red. However, from my latitude of 50° N Mars appears low in the south. This is a single 15-second exposure, untracked, at f/2.5 with the 35mm lens and Canon 6D at ISO 2000.
In these views, I show Mars shining as a bright reddish star low in my western Canadian sky. I shot the lead image from Dinosaur Provincial Park on May 16. The image just above was from my backyard the night before.
This week, Mars is passing between Beta and Delta Scorpii, two bright stars in the head of Scorpius, as the red planet retrogrades westward against the background stars.
Saturn shines to the east (left) of Mars now, with both planets shining above the red giant star Antares in Scorpius. In these photos they form a neat triangle.
Even without a telescope to magnify the view, it’ll be rewarding to watch Mars with the unaided eye or binoculars as it treks west out of Scorpius into Libra this spring and summer. It stops retrograding on June 30, then starts looping back into Scorpius, for a rendezvous with Antares and Saturn in late August.
This little compilation of time-lapse movies shows Mars, Saturn, and the rest of the sky, rising into the southeast and across the south on two nights this past week.
Be sure to explore Mars this month and next, whether by eye or by telescope. It’s the best we’ve seen it in a decade.
It’s next close approach in 2018 will be even better, though Mars will appear even lower in our northern sky.
My latest music video includes images, time-lapses and real-time videos of the Northern Lights shot in February and March 2016 in Churchill.
While I’ve posted my recent images of the aurora here and at many social media sites, all the videos I shoot take more work before they are ready to unveil to the public. Videos work best when set to music.
In this case, I’m very pleased to have received permission from EverSound Music to incorporate the music of one of my favourite artists, John Adorney, in my latest music video montage. The selection is If a Rose Could Speak, from his 2013 album The Wonder Well. It features vocals by Daya.
The video incorporates still images, as well as time-lapse sequences, and real-time videos of the Northern Lights.
The all-sky time-lapses are intended to be projected in digital planetarium theatres, recreating the scene on their 360° domes.
Please click on the V for Vimeo button to really see the video well. And select 1080p HD for the best image quality. And do share!
ABOUT THE VIDEO
I shot all scenes at the Churchill Northern Studies Centre, near Churchill, Manitoba, on the shore of Hudson Bay at a latitude of 58° North. Churchill’s location places it under the usual location of the auroral oval, providing spectacular displays of Northern Lights even on nights when locations to the south are seeing nothing.
I was at the CNSC to present sets of 5-night aurora viewing programs to guests from across North America. Click the link above for more details on their programs. The 2016 aurora season is over, but we’ll have more aurora programs in January and February of next year.
TECHNICAL
I shot all images with Canon 6D and Nikon D750 DSLR cameras, usually at ISO 3200. The fish-eye all-sky sequences were with a Sigma 8mm lens on the Canon, while most of the still images and other full-frame time-lapses were with the Sigma 20mm Art lens on the Nikon. For the “rapid-cadence” time-lapses I used 1- to 2-second exposures at an interval of one second.
The real-time video clips were with the Nikon – set to ISO 25600 – and the Sigma wide open at f/1.4. While these clips are prone to digital noise, they do record the fast movement and subtle colour of the aurora much as the eye saw it. See my earlier music video with real-time clips shot February 12 for more examples of these.
The all-sky sequences were processed through LRTimelapse v4 software, to handle the huge range in brightness of the Lights. Real-time video clips were processed in Photoshop with the Camera Raw filter.
Temperatures ranged from a bitter -35° C to just (!) -15° C on most nights.
I kept the long-duration, all-sky, time-lapse camera going by placing it in a Camera Parka (www.atfrostedlens.com) and inserting disposable hand warmer packs inside the insulated parka. It worked very well, making it possible to shoot for up to 3 hours. Without it, the battery died after an hour.
My 10-minute video captures the Northern Lights in real-time video – no time-lapses here!
I hadn’t tried this before but the display of February 12, 2016 from Churchill, Manitoba was so active it was worth trying to shoot it with actual video, not time-lapse still frames.
I used very high ISO speeds resulting in very noisy frames. But I think the motion and colours of the curtains as they ripple and swirl more than overpower the technical limitations. And there’s live commentary!
Select HD and Enter Full Screen for the best quality.
Scenes have been edited for length, and I did not use all the scenes I shot in the final edit. So the scenes you see in the 10-minute video actually took place over about 20 minutes. But each scene is real-time. They show the incredibly rapid motion and fine structure in the auroral curtains, detail blurred in long multi-second exposures.
I used a Nikon D750 camera at ISO speeds from 12,800 to 51,200. While it is certainly very capable of shooting low-light video, the D750 is not optimized for it. A Sony a7s, with its larger pixels and lower noise, would have been a better camera. Next time!
The lens, however, was key. I used the new Sigma 20mm Art lens which, at f/1.4, is the fastest lens in its focal length class. And optical quality, even wide open, is superb.
The temperature was about -30 degrees C, with a windchill factor of about -45 C. It was cold! But no one in the aurora tour group of 22 people I was instructing was complaining. Everyone was outside, bundled up, and enjoying the show.
It was what they had traveled north to see, to fulfill a life-long desire to stand under the Northern Lights. Everyone could well and truly check seeing the aurora off their personal bucket lists this night.
For more information about aurora and other northern eco-tourism tours offered by the Churchill Northern Studies Centre, see churchillscience.ca
The New Year’s sky was filled with Northern Lights, a panorama of stars, and a comet at dawn.
It was a busy night for stargazing as 2015 turned to 2016. A fine display of Northern Lights kicked off the celebrations, as curtains danced in the east as Orion rose (below).
Toward midnight the Lights kicked up again, now with Jupiter (on the horizon) and Leo rising in the east (below).
I shot hundreds of frames for time-lapse sequences, and assembled them into a short music video. Click on the buttons to enlarge it to HD.
Just before midnight, while the second time-lapse was going and the aurora was still active, but before the Last Quarter Moon rose to light the sky, I shot a set of tracked images taking in the entire winter sky from horizon to well past the zenith.
That image is at top. It takes in the winter sky and northern winter Milky Way, from Canis Major just above the horizon, up past Orion, then on up to Perseus and Cassiopeia at top right.
It shows how Orion and Sirius, the night sky’s brightest star, stand nearly due south at midnight on New Year’s Eve.
Comet Catalina (C/2013 US10) near Arcturus in the constellation of Bootes, at pre-dawn on the morning of January 1, 2016, with the Last Quarter Moon nearby illluminating the sky. A long, faint ion tail is visible extending 2 to 3 degrees to the right while a brighter but stubby dust tail extends down to the south. Shot from home using the 200mm Canon telephoto and 1.4x extender at f/4.5 for a stack of 8 x 2-minute exposures at ISO 800 with the Canon 6D. Median combined stacked to eliminate satellite trails. The comet is slightly blurred due to its own motion in that time.The final show of the night, now before dawn on New Year’s Day 2016, was Comet Catalina sitting right next to the bright spring star Arcturus. The comet was visible in the moonlight as a fuzzy object next to brilliant Arcturus, but the photo begins to show its faint tails, just standing out in the moonlit sky.
The comet will become more visible later this month once the waning Moon exits the dawn sky, as Catalina is expected to remain a nice binocular comet for most of the month as it heads high into northern sky.
Orion ascends into the sky on a clear autumn night, with its stars drawing trails behind it as it rises.
Only on November nights is it possible to capture Orion rising in the evening sky. Here, I used the light of the waxing gibbous Moon to illuminate the landscape … and the sky, creating the deep blue tint.
The lead image above is an example of a star trail, a long exposure that uses Earth’s rotation to turn the stars into streaks across the sky. In the old days of film you would create such an exposure by opening the shutter for an hour or more and hoping for the best.
Today, with digital cameras, the usual method is to shoot lots of short exposures, perhaps no more than 20 to 40 seconds each in rapid succession. You then stack them later in Photoshop or other specialized software to create the digital equivalent of a single long exposure.
The image above is a stack of 350 images taken over 2.5 hours.
With a folder of such images, you can either stack them to create a single image, such as above, or string them together in time to create a time-lapse of the stars moving across the sky. The short video below shows the result. Enlarge the screen and click HD for the best quality.
For the still image and time-lapse, I used the Advanced Stacker Plus actions from StarCircleAcademyto do the stacking in Photoshop and create the tapering star trail effect. A separate exposure after the main trail set added the point-like stars at the end of the trails.
My tutorial on Vimeo provides all the details on how to shoot, then stack, such a star trail image…
… While this video illustrates how to capture and process nightscapes shot under the light of the Moon.
Learn the basics of shooting nightscape and time-lapse images with my three new video tutorials.
In these comprehensive and free tutorials I take you from “field to final,” to illustrate tips and techniques for shooting the sky at night.
At sites in southern Alberta I first explain how to shoot the images. Then back at the computer I step you through how to process non-destructively, using images I shot that night in the field.
Tutorial #1 – The Northern Lights
This 24-minute tutorial takes you from a shoot at a lakeside site in southern Alberta on a night with a fine aurora display, through to the steps to processing a still image and assembling a time-lapse movie.
Tutorial #2 – Moonlit Nightscapes
This 28-minute tutorial takes you from a shoot at Waterton Lakes National Park on a bright moonlit night, to the steps for processing nightscapes using Camera Raw and Photoshop, with smart filters, adjustment layers and masks.
Tutorial #3 – Star Trails
This 35-minute tutorial takes you from a shoot at summer solstice at Dinosaur Provincial Park, then through the steps for stacking star trail stills and assembling star trail time-lapse movies, using specialized programs such as StarStaX and the Advanced Stacker Plus actions for Photoshop.
As always, enlarge to full screen for the HD versions. These are also viewable at my Vimeo channel.
The Northern Lights dance over the badlands of Dinosaur Provincial Park, a World Heritage Site.
Aurora alerts called for a fine display on Friday, September 11. Forewarned, I headed to one of my favourite shooting spots at Dinosaur Provincial Park, and aimed three cameras at the sky. It didn’t take long before the lights appeared, right on cue.
The display started out with lots of promise, but did fade after 12:30 a.m., just when it was supposed to be peaking in intensity. I let the cameras run for a while but eventually stopped the shutters and packed it in…
…But not before I captured this odd bit of aurora in the east, shown below, that appeared as an isolated and stationary band pulsing up and down in brightness, but with little movement.
I’ve seen these before and have never heard a good explanation of what process creates such an effect, with a patch of sky appearing to “turn on” and off.
You can see the effect at the end of the time-lapse compilation, linked below from Vimeo.
As usual, please enlarge to full-screen and watch in HD for the best quality.
Unfortunately, a patrolling park official checking on things, spoiled some frames with her truck’s headlights. It’s one of the hazards of time-lapse imaging.
As a final image, here are all the fish-eye lens frames stacked into one image, to create a single star trail showing the sky rotating about the celestial pole.
Each exposure was 20 seconds at f/3.5 with the Sigma 8mm lens and at ISO 6400 with the Canon 6D. The ground comes from a stack of 16 images taken early in the sequence turned into a smart object and mean combined with Mean stack mode, to average out and smooth noise. The sky comes from 198 exposures, Lighten stacked using the Advanced Stacker Actions from StarCircleAcademy.com.
It’s been a good week for auroras, with a promise of more to come perhaps, as we approach equinox, traditionally a good time for magnetic field lines to align, funnelling solar storm particles into our magnetosphere.
The lights came out and danced in my sky in the early morning hours.
The early warning signs weren’t calling for anything too impressive for a display last night, September 8/9, but the sky surprised us with a fantastic display of Northern lights.
I shot with one camera – it was very late, or very early! – but shot enough frames to create this short 1.5-minute music video.
I photographed the sequence with a single fixed-camera aimed east toward a bright auroral curtain, showing fast pulsing forms common to the later stages of a substorm. But then a new bright curtain sweeps in from the north and the display brightens even more in a new substorm. The display then fades.
The exposures were taken over an hour from 1:30 a.m. to 2:30 a.m. MDT. Each was a 2-second exposure with an interval of 2 seconds, shot with the Nikon D750 at ISO 3200 and Sigma 24mm lens at f/2, for a total of just over 850 frames.
Nothing demonstrates the power of the sky to affect the Earth better than the daily ebb and flow of the tides.
For a few days earlier this week I was fortunate to visit Nova Scotia, to speak at the annual Nova East Star Party.
A scene at the Nova East Star Party near Windsor, Nova Scotia, in August 2015.I took advantage of my visit to Canada’s east coast to shoot time-lapses of one of nature’s most amazing phenomena, the daily pulse of the tides.
The coastal regions around the Bay of Fundy, particularly on the Nova Scotia shore, and around the Minas Basin, experience the highest tides in the world. The range can be as much as 16 metres. Only remote Leaf Basin on Ungava Bay in northern Québec matches the Minas Basin for tidal range.
The reason is not, as is sometimes stated, the funnel shape of the Bay of Fundy, but rather its length. It takes about 12 hours and 25 minutes for an ocean wave to traverse the length of the Bay, equal to the time between successive high tides. This creates a resonance, with the incoming and outgoing waves building upon each other and increasing the height of the twice-a-day tides.
The amount of water moving back and forth is mind-boggling: some 9 to 16 billion tonnes of water flows daily into and out of the Minas Basin alone, enough to tilt the land.
For the time-lapse videos I shot at two locations:
Evangeline Beach on Minas Basin, with vast tidal flats that are engulfed twice a day.
And Halls Harbour on the Fundy shore, a great spot for watching boats go from grounded to afloat in just an hour or so.
I timed my arrival at both sites to be there near lowest tide and shoot for about 3 hours as the tide came in, then stop shooting at about high tide.
Luckily, high tide on both days was about 3 p.m. making for convenient shoots on a summer afternoon. Being just after New Moon, the tides were near their highest.
Earth experiences two tides a day, at an interval of about 12 hours and 25 minutes, with the extra 25 minutes coming from the motion of the Moon around the Earth during that half-day interval. It takes another 25 minutes for us to line up with the Moon again.
But why two tides a day? If the Moon pulls at our water why isn’t there just one high tide, when the Moon is highest in our sky?
The Moon doesn’t pull on just the water. It pulls on everything.
And it isn’t the Moon’s gravity per se that raises the tides, it is the difference in the strength of that gravitational pull across an object.
The side of the Earth closest to the Moon feels the strongest pull, raising the tides on the side facing the Moon. But the Earth itself is also pulled toward the Moon, but to a lesser extent because the centre of our planet lies farther from the Moon.
In effect, the Moon pulls the Earth away from the water on the far side of the Earth, the side away from the Moon. This raises a bulge of water on the other side of our planet, the side that feels the least gravitational pull from the Moon because it is farthest from the Moon.
So as Earth rotates we pass through two tidal bulges, one facing the Moon and one facing away from the Moon.
It wasn’t until Isaac Newton came along in the mid-17th century that we had an explanation for and an ability to predict the tides accurately. Even Galileo got it wrong. It was Newton’s mathematical explanation of how gravity fell off with increasing distance that led to an accurate theory of the tides. See Wikipedia for much more detail.
The tree above is a direct descendent of the famous “Newton’s Apple” tree that inspired his theory of universal gravitation. It is an apple tree on the picturesque grounds of Acadia University in Wolfville, Nova Scotia, and was grown from a cutting from the famous apple tree at Woolsthorpe Manor where Newton grew up and took refuge during the outbreak of plague in the cities.
It was during this retreat that, story has it – a story told by Newton himself – that an apple falling on his head inspired him to wonder if the same force that was causing the apple to fall was also keeping the Moon in perpetual orbit around the Earth.
Today, we can turn the pull of the Moon into power, as here at Annapolis Royal where Nova Scotia Power operates the only tidal power station in North America, driven by water pouring into and out of the Annapolis River. The pull of the Moon here generates 20 megawatts of electricity.
New submerged turbines are now being tested in the Minas Basin, using a variety of technologies. A previous underwater turbine at the same site was ripped to pieces by the force of the water. Harnessing the tides is not so easy.
Tide watchers take note: The Full “supermoon” of September 27 (when there is also a total eclipse of the Moon) will be especially close. Favourable geometry will raise the highest tides in 18 years in the two days that follow the Full Moon.
The Moon truly has the power to move the waters and the Earth.
I present a short time-lapse vignette of scenes shot under moonlight on the Alberta prairie.
The movie linked below features sequences shot July 29 and 30, 2015 on beautifully clear moonlit nights at locations south of Bow Island, Alberta, on the wide open prairie. The three-minute video features two photogenic pioneer sites.
The church is the now derelict St. Anthony’s Church, a former Roman Catholic church built in 1911 by English and Russian-German immigrants. It served a dwindling congregation until as late as 1991 when it closed. At that time workers found a time capsule from 1915 with names of the priest and parisioners of the day.
The wood church seems to have been largely neglected since.
In the summer of 2014 the Church suffered its latest indignity when the iron cross on its steeple tower was stolen. I also shot in the pioneer cemetery of the Church.
The other site is a nearby farmhouse with photogenic textures and accompanied by rustic out buildings that are barely managing to stand.
Illumination was from a waxing gibbous Moon, just 1 to 2 days before the infamous “Blue Moon” of July 31. Its bright light turned the sky blue, and lit the landscape with the same quality as sunlight, because it is sunlight!
Enlarge the video to full screen for the full HD version.
For the technically inclined:
I shot the scenes with three cameras – a Canon 60Da, Canon 6D, and Nikon D750.
The Nikon, with a 24mm lens, was on the Dynamic Perception Stage Zero Dolly and Stage R panning unit, while the 60Da, with a 14mm lens, was on the compact Radian panning unit. The third camera, the 6D, with a 16-35mm lens, was on a fixed tripod for the star trail sequences and stills.
The music is by Adi Goldstein (AGSoundtrax.com), whose music I often use in my sequences. It just seems to work so well, and is wonderfully melodic and powerful. Thank you, Adi!
To process the several thousand frames that went into the final movie, I used Adobe Bridge and Adobe Camera Raw, supplemented by the latest Version 4.2 of LRTimelapse (lrtimelapse.com). Its new “Visual Deflicker” workflow does a beautiful job smoothing out frame-to-frame flickering in sequences shot in twilight under darkening lighting conditions. Thank you Gunther!
For the star trail sequences and the still images above I used the Advanced Stacker Actions from StarCircleAcademy.com. Unlike most other stacking programs, the Stacker Actions work from within Adobe Bridge and Photoshop directly, using the processed Raw images, with no need to create intermediate sets of JPGs. Thank you Steven!
The much-publicized “Blue Moon” of July rises over the skyline of Calgary.
Last night, July 31, many people looked east to see a wonderful moonrise. Did it look different than any other moonrise? No. But did it look great? You bet.
I set up my cameras at a site in northwest Calgary, picked for its sightline looking east-southeast over the downtown core of Calgary and directly toward the moonrise point.
I used the software The Photographer’s Ephemeris to plan the location and angles. It is wonderful for making sure you are in the right place at the right time for catching a photogenic moonset or moonset.
Here’s the screen shot from TPE that showed me where to be Friday evening. The blue line aims to the moonrise point.
Of course, despite the planning the Moon did not look blue! Blue Moons, as they have come to be defined, never do. The term now means the second Full Moon in a calendar month. We had a Full Moon on Canada Day, July 1, and then enjoyed a second July Full Moon one lunar cycle later on July 31.
I shot the scene with two cameras, each shooting hundreds of frames for time-lapses, from which I extracted still images.
A short 1-minute music video of the result is here at Vimeo. Enlarge the screen and be sure HD is selected.
As a technical note, for the processing I used the latest version 4.2 ofLRTimelapse and its new “Visual Deflicker” workflow which very nicely smooths out all the frame-to-frame flickering that can plague daytime and twilight shots taken under Auto Exposure.
While the shutter speed does constantly decrease, it does so in 1/3rd-f/stop steps, yielding stair-step jumps in brightness. LRT smooths all that out, with v4.2 doing a much better job than earlier versions.
It was a full house for my Live from Pluto talk at TELUS Spark!
Something a little different from me this time. Not images or time-lapses of scenic places, but of me presenting a lecture and planetarium show!
This past two weeks I was immersed back into the world of planetarium programming.
Last night, July 16, was the culmination, as I presented a talk and planetarium show devoted to viewing the amazing new images from Pluto and the New Horizons probe … and to taking the audience through the solar system courtesy of the planetarium theatre’s Digistar 5 projection system.
The lecture was in the Digital Dome at TELUS Spark, the science centre in Calgary, Alberta. As you can see, it played to a packed “standing room only” house in the dome. The short time-lapse compresses my one-hour lecture into one minute!
In it, you can get a fast-paced taste of the visuals and immersive scenes I was able to program and project onto the dome with the Digistar.
That’s me down front on stage, running the show off the Digistar’s iPad.
What a way to present a lecture! I spent 40 years producing and presenting planetarium shows, but these new tools for visualizing the universe in the dome are jaw-dropping. It was fun to get back using them again, to bring this historic flyby event to the public in a unique way.
The movie begins with the audience entering, and ends with the Q&A and audience exiting. It includes scenes where we fly alongside New Horizons out to Pluto, then orbit Ceres with Dawn, plus land on a comet with Rosetta and Philae.
I shot the time-lapse with a Canon 6D and 15mm full-frame fish-eye lens shooting under Auto Exposure for a total of 1177 frames, taken at an interval of 8 seconds, played back here at 15 frames per second. The camera was behind the dome in the cove, where it would not be disturbed. Music is by Adi Goldstein.
Many thanks to the staff at TELUS Spark (sparkscience.ca) for making the event possible.
On June 22 I shot the great all-sky aurora with three cameras all shooting time-lapse frames. Here’s the result!
The rapidly moving and astonishing patterns of the aurora are ideal for time-lapse photography. Except for a total eclipse of the Sun, nothing else in the sky changes with such dramatic and jaw-dropping intensity.
For the June 22 outbreak of Northern Lights across the sky, I shot some 2,200 frames, and assembled them into the time-lapse compilation here.
One sequence records the entire sky and the complete development of the display, from when it first appeared in twilight about 11:15 p.m., to when it faded into a diffuse glow across the sky by 1:15 a.m. I shot that sequence with an 8mm fish-eye lens, to capture a scene suitable for projection in a digital planetarium theatre.
I shot the other sequences with 15mm and 24mm lenses. All total, the 3-minute movie comes from about 50 gigabytes of images.
Still images from this night, and from the time-lapse sequences, are in my previous blog post.
I hope you enjoy the video. Do enlarge it to full screen 1080p HD.
The Space Station is now continuously lit by sunlight, allowing me to capture dusk-to-dawn passages of the ISS.
On the night of May 31/June 1 I was able to shoot four passages of the International Space Station on successive orbits, at 90-minute intervals, from dusk to dawn.
The first passage, at 11:06 p.m., was low across the south. It’s the image at top.
Then at 12:45 a.m. the Space Station came over again, now directly overhead. It’s the image above. The Moon is the bright glow at bottom.
One orbit later, at 2:21 a.m., the Station came over in another overhead pass in the bright moonlight.
The final passage of the night came at 3:55 a.m. as the sky was brightening with dawn twilight and the Moon was setting. This was another passage across the south, and made for the most photogenic pass of the night.
Here’s an edited movie of the four passes, with a little music just for fun.
Seeing the Space Station on not one but two, three, or even four orbits in one night is possible at my latitude of 50 degrees north around summer solstice because the Station is now continuously lit by sunlight — the Sun never sets from the altitude of the ISS.
When the ISS should be entering night, sunlight streaming over the north pole still lights the Station at its altitude of 400 km.
To shoot the time-lapse clips and stills I used 8mm and 15mm fish-eye lenses, and a 14mm ultra-wide lens.
The bright moonlight made it possible to use short 2- to 4-second exposures, allowing me to record enough frames at each passage to make the little movies of the ISS flying across the sky. Keep in mind, to the eye, the ISS looks like a bright star. Some image processing trickery adds the tapering trails.
I used the Advanced Stacker Actions from StarCircleAcademy.com to create the trail effects, and to stack the time-lapse frames into single composite still images. The gaps in the trails are from the one second interval between frames.
The skies were spectacular at a pioneer homestead on the Saskatchewan prairie.
Canada’a province of Saskatchewan bills itself as the “Land of Living Skies,” and that was certainly true last week when I spent three perfect nights under some of the darkest skies in the country.
The location was the Old Man on His Back Prairie & Heritage Conservation Area, deep in dry southwest Saskatchewan, between Grasslands National Park and Cypress Hills Interprovincial Park, two favourite places of mine for nightscape photography and astronomy.
The Conservation Area reclaims and preserves original short grass prairie habitat. It is named for the formation to the west that is said to resemble the profile of Napi, the creator being of Siksika legends, who after creating the world, lay back here to rest.
The land was once a working ranch first settled by the Butala family. The white pioneer house in my photos dates from that time. It was built in Montana and moved here in the 1920s.
In the mid-1990s Peter and Sharon Butala transferred their land to the Nature Conservancy of Canada, to create an island of original prairie amid the heavily grazed land around it.
For astronomers, the Area serves also as an island of darkness amid intruding light pollution. The region is very dark, with few lights and manmade sky-glows on the horizon.
My 360° panorama above shows that the greatest glows come from the arc of the aurora to the north and the arch of the Milky Way stretching across the sky. This is a stargazer’s paradise.
My 2-minute compilation of time-lapse videos and still images taken over three crystal clear nights attempts to capture the wonder of the night sky from such a dark site. Be sure to enlarge the video to full screen to view it.
It was in the little white house that Sharon Butala wrote some of her best-selling books retelling stories of her life on the prairie, notably The Perfection of the Morning, and Wild Stone Heart.
In the latter book, Sharon writes:
“At night the Milky Way glittered and gleamed above us, fathomlessly deep and numberless, the constellations wheeled slowly across the sky with the seasons, and the moon came and went, sometimes white as a maiden’s face, sometimes a looming orange sphere … under such an endless, open sky.”
– Sharon Butala, Wild Stone Heart (Harper Collins, 2000)
A strange red arc of aurora moved slowly across the sky on May 10.
All indicators looked favourable early in the evening on May 10 for a good auroral display later that night, and sure enough we got one. But it was an unusual display.
From my site in southern Alberta, the northern sky did have a diffuse glow of “normal” green aurora that never did take much form or structure.
But overhead the aurora took the form of an arc across the sky, starting as an isolated ray in the southeast initially, then reaching up to arch across the sky with what looked to the eye like a colourless band.
But the camera showed it as a red arc, with just a fringe of green curtains appearing for a few minutes.
Be sure to click HD and enlarge the video to fill your screen.
The time-lapse movie shows the sequence, over about 90 minutes, with 170 frames playing back at 12 frames per second. You can see the red arc develop, then become more narrow, then exhibit a few green curtains. Then it fades away.
Large-scale pulses also brighten the whole sky momentarily.
The other images are individual frames taken during the evening, showing snapshots of the red arc development, as it became more narrow in structure and gained green curtain-like fringes.
Presumably the red structure was very high in the atmosphere while the green curtains attached to it that did appear hung down from the high-altitude red arc.
I shot all images with an 8mm fish-eye lens to capture most of the sky. The camera is looking north toward Polaris, with the Big Dipper almost directly overhead near the centre of the frames.
The main image at top is a star-trail stack of 80 frames showing the sky’s circumpolar motion around Polaris and the aurora blurred and blended over 45 minutes of motion. I stacked the frames with the Advanced Stacker Actions from StarCircleAcademy.com
My new 3-minute music video compiles still and time-lapse imagery of the aurora I shot in February 2015 from Churchill, Manitoba.
Churchill’s location at 58° North on the shore of Hudson Bay puts it directly under the main auroral oval, the zone of greatest auroral activity. Over the 9 nights, 2 were cloudy, with a roaring blizzard.
But on the 8 clear nights we saw aurora every night. I shot time-lapses on 6 of those nights, shooting about 3,500 frames, most of which appear in the final cut of this movie.
Despite the amazing displays we saw, on no night was the auroral activity index (on a scale of 0 to 9) higher than 2 or 3. These were all “normal” quiet nights for auroras in Churchill. Anyone farther south would have seen little in their sky on most of these nights.
I shot many of the time-lapses with an 8mm spherical fish-eye lens, to create sequences suitable for projection in digital planetarium domes. One other time-lapse sequence (the last in this movie) I shot with a 15mm full-frame fish-eye. Even it is not wide enough to take in the entire display when the Lights fill the sky.
Exposures were typically 10 to 15 seconds at f/3.5 and ISO 1600 to 4000, all with the Canon 6D. I powered it from its lone internal battery. Amazingly, despite temperatures that were considered extreme even for Churchill (often -32° C at night) the batteries lasted 90 to 150 minutes allowing me to take lots of frames with no battery change or perhaps just one battery change. Churchill is very dry and only on one night did I have an issue with the lens frosting up.
Music is by Dan Phillipson, his composition “Into the Unknown,” purchased for royalty-free use through Triple Scoop Music. I edited the movie in Apple Aperture, with a title sequence created in Photoshop. Processing of the original images was with Adobe Camera Raw, Photoshop, and LRTimelapse, with assembly of movie frames done with Sequence for MacOS.
I hope you enjoy it! Do click on the Enlarge button to watch it full screen. It may take a while to start playing.
Comet Lovejoy is now at its best. I captured a time-lapse of it moving through the stars.
Last night I shot Comet Lovejoy with a couple of cameras. One, using a telephoto lens, captured the green comet with its long blue ion tail near the blue Pleiades star cluster (at top). The comet is passing west of the Pleiades over the next few nights, providing some wonderfully photogenic compositions.
Clear skies most of the night allowed me to also shoot through the telescope, taking 280 close-up images of the comet over 5 hours as the telescope tracked the stars. Assembled into a time-lapse movie, the result shows the comet slowly gliding against the background stars in its orbit around the Sun.
Expand the video frame to see it properly.
Each of the 280 frames is a 1-minute exposure, taken at ISO 6400, using a TMB 92mm refractor at f/4.4. I started the sequence just before 7pm and ended it just before midnight. So the movie records about 5 hours of motion.
Toward the end some cloud drifting through causes the stars to bloat up momentarily. And as the comet set lower into the west sky conditions got worse compared to the start of the sequence when the comet was at its highest in the south.
However, judicious processing using the time-lapse software LRTimelapse and Sequence helped compensate for the changing sky conditions.
Do take a look at this fine comet. The tail is visible in binoculars from a dark site.
50 embedded HD videos (no internet connection required) demonstrating time-lapse techniques.
60 multi-page tutorials with step-by-step instructions of how to use software: Adobe Bridge, Adobe Camera Raw, Photoshop, Lightroom, LRTimelapse, Advanced Stacker Actions, StarStaX, Panolapse, Sequence, GBTimelapse, and more.
Numerous Photo 101 sections explaining the basic concepts of photography and video production (f-stops, ISOs, file types, aspect ratios, frame rates, compression, etc.).
Numerous Astronomy 101 sections explaining the basics of how the sky works (how the sky moves, where the Moon can be found, when the Milky Way can be seen, when and where to see auroras).
Reviews of gear – I don’t just mention that specialized gear exists, I illustrate in detail how to use popular units such as the Time-Lapse+, Michron, and TriggerTrap intervalometers, and the All-View mount, Radian, Mindarin Astro, eMotimo, and Dynamic Perception motion-control units, with comments on what’s good – and not so good – to use.
You’ll learn —
• What are the best cameras and lenses to buy (cropped vs. full-frame, Canon vs. Nikon, manual vs. automatic lenses, zooms vs. primes).
• How to set your cameras and lenses for maximum detail and minimum noise (following the mantra of “exposing to the right” and using dark frames).
• How to shoot auroras, conjunctions, satellites, comets, and meteor showers.
• How to shoot nightscapes lit only by moonlit, and how to determine where the Moon will be to plan a shoot.
• How to shoot & stitch panoramas of the night sky and Milky Way, using Photoshop and PTGui software.
• How to shoot tracked long exposures of the Milky Way using camera trackers such as the iOptron Star Tracker and Sky-Watcher Star Adventurer.
• How to develop Raw files, the essential first step to great images and movies.
• How to process nightscape stills using techniques such as compositing multiple exposures, masking ground and sky, and using non-destructive adjustment layers and smart filters.
• How to shoot and stack star trail images made of hundreds of frames.
• How to assemble time-lapse movies from those same hundreds of frames.
• How to plan a time-lapse shoot and calculate the best balance of exposure time vs. frame count vs. length of shoot, and recommended apps to use.
• How to process hundreds of frames using Adobe Camera Raw, Bridge, Photoshop, and Lightroom.
• How to shoot and process advanced “Holy Grail” time-lapse transitions from day to night.
• How to shoot motion-control sequences using specialized dolly and pan/tilt devices.
• How to use time-lapse processing tools such as LRTimelapse, Panolapse, Sequence, and Advanced Stacker Actions.
• What can go wrong and how best to avoid problems in the field.
It’s a large, multi-media book available only for MacOS and iPads through the Apple iBookstore.
For technical and economic reasons, the book’s size and media content prevent it from being offered via other platforms such as Kindles and Android devices. It is not available as a static PDF or traditional print book. It’s subject makes use of an ebook’s ability to contain interactive and video content.
See http://tiny.cc/urdoqx for more about the book at iTunes. Available worldwide. It’s $24.95 in the U.S.
My new 4-minute video presents time-lapse and still images shot in the Rockies this past summer.
It’s been a busy summer for shooting. Since July I’ve spent a week each in Banff, Jasper and Waterton Lakes National Parks shooting nightscape stills and time-lapse videos of Alberta’s famous Rocky Mountain landscapes by night.
This compilation includes some of the best footage, plus some panned still images, set to a wonderful piece of royalty-free (i.e. legal!) music by Adi Goldstein.
For many of the sequences I employed “motion control” (MoCo) devices that incrementally move the cameras during the one to three hours that they are taking the 200 to 450 frames needed for a time-lapse sequence.
I used the compact single-axis Radian, the 2-axis eMotimo, and the Dynamic Perception Stage Zero dolly, now equipped with their new Stage R single-axis panning unit. This was the first summer with the eMotimo and Stage R, so I’m still learning their best settings for speed, angles, and ramping rates.
In recent blogs you’ve seen many still images shot as part of these sequences, or with other cameras dedicated to shooting stills. Now you get to see some of the time-lapse videos that represent many nights of shooting, and many hours sitting in the car waiting for the automated camera gear to finish its shooting task.
Time-lapse shooting is an exercise in dedication and self-denial!
I hope you enjoy the result. Do click on the Enlarge button to go full-screen. Or visit my Vimeo site to watch the video, and others, there.
I present a set of short time-lapse videos shot at the Table Mountain Star Party.
At the star party in Washington state last week I shot about a 3-hour-long set of images each night for assembly into time-lapse movies. Here’s the compilation.
Click the Enlarge button for a full-screen view.
For the first two clips I used the eMotimo motion controller to pan across the star party field looking south to the Milky Way.
For the last two clips I used a static camera aimed north to capture the turning sky around the north celestial pole. I took the same 350 frames and assembled them two ways: as a standard movie and as an “accumulating star trails” movie where the stars seem to draw themselves across the sky like a sky full of comets.
That clip cross-fades to the still image above, created with the Advanced Stacker Plus actions that automatically stacks and blends images via a choice of effects. I used the “elastic stars” effect for the still image.
Many thanks to the organizers and volunteers at the Table Mountain Star Party for the opportunity to attend and speak at the party. I was a great three nights. I highly recommend the site and event.
It was windy day out on the wind farm, with some wonderful cloudscapes blowing by.
Shooting time-lapse movies by day is so much easier than shooting at night! Yesterday, to try out some new gear and grab footage for some demo videos, I drove to the nearby Wintering Hills Wind Farm, site of some previous images and movies I’ve posted. It’s a wonderful place for nightscapes, but in this case I shot cloudscapes by day.
The movie compiles five time-lapse clips into a short demo of cloudscapes and time-lapse techniques: using fixed cameras and using cameras on motorized devices that move the camera a little between each time-lapse frame – what’s called “motion control.”
It might take a moment to load and play through. But do expand it to full screen.
For two clips in the movie I used a Dynamic Perception Stage Zero dolly rail, a unit I bought two years ago and have used a lot for time-lapse shooting.
Here I show it on the new pair of Induro tripods, a much more stable arrangement than the single large tripod I had been using up to now. What’s also new is the Stage R panning unit, now attached to the dolly platform, here on the left (the controller is on the right).
What this motorized unit does is allow the camera to slowly turn in azimuth as it is running down the rail, to keep the camera aimed at a foreground subject, or to pan along the horizon, as I do in one of the clips in the movie.
This is a brand new piece of kit, purchased last month through Dynamic Perception’s Kickstarter campaign. I got one of the first batch of units shipped out. It works very well but takes a little practice to get the speeds set right. I’m still working on that!
I hope you enjoy the little demo movie. It shows that even cloudy skies can be photogenic at times!
What a fabulous night this was! Forewarned about an impending solar storm I headed to the site of a rustic barn near home to shoot the Northern Lights.
The night started with cloud but upon looking out after midnight (it pays never to go to bed too early!) the skies were clear. Checking Spaceweather.com showed an active auroral oval lit up red and Storm in Progress warnings!
That was all the cue I needed to pack up the gear and head over to the old barn site where I have been shooting time-lapses all this week.
The aurora remained quiet and diffuse for the first hour and a half, but then about 2 a.m., the substorm hit. Within seconds the curtains began to light up with well-defined rays and beams shooting to the zenith. And they danced.
The notable feature of this display, as with one in May 2013, was the blue and purple colour of the tops of the curtains. I think this is partly due to sunlight illuminating the tops of the curtains, possible at this time of year when the upper atmosphere is perpetually lit by the midnight Sun.
From the start I shot with two cameras taking time-lapses (the main still image at top is a frame from one of the movies). Then toward the end of the night I switched to just shooting still images framed to suit the curtains towering up to the zenith.
As above, I also shot a “selfie” of me shooting the vertical image in the middle of the set.
But below is the result of a night of shooting time-lapse movies and stills, in a montage set to music. The link takes you to my Vimeo site. Do turn on HD mode.
May ends with a thin waxing Moon returning to the evening sky.
This was the scene on a fine Friday evening, May 30, as the two-day-old Moon returned to the western sky.
Mercury was not far away, and is in this frame but at far upper right. I wasn’t really framing the shot with Mercury in mind, but the Moon and clouds.
This frame is one of 440 I shot for a time-lapse sequence of the setting Moon and moving clouds. This is the result, nicely deflickered with LRTimelapse software, an essential tool for time-lapse processing.
How many times have I tried to shoot the Moon or Mercury low in the west and been foiled by cloud near the horizon? Notice the rain falling from the western cloud. Some place near Calgary was getting wet!
The historic pioneer church at Morley, Alberta stands under moonlight on the banks of the Bow.
Last night, after presenting a talk on time-lapse techniques to the Cochrane Camera Club, I headed west on Highway 1A to the historic McDougall Memorial United Church, long on my target list for time-lapse photography. It was Full Moon, which helped mask the lighting from nearby town lights and the urban sky glow of Cochrane and Calgary.
The wooden church stands on the benchlands north of the Bow River, near Morley, Alberta. Rev. George McDougall built it in 1875 to minister to the Cree. He lies buried on the Church grounds — that’s his grave in the foreground in the main image above, with the Full Moon shining above the headstone.
In this image, Mars stands directly above the Church steeple. The Full Moon shines in the clouds to the south. Both still images are frames from time-lapse movies, shot with two cameras. One was on the Dynamic Perception Stage Zero dolly, the other was a static tripod-mounted camera.
This little compilation shows the movies I shot last night, under moonlight on the banks of the Bow. It may take a moment to load. I hope you enjoy it!
Watch waves of aurora wash over the sky rising out of the west to swirl overhead.
This was the spectacle we saw Friday night at the Churchill Northern Studies Centre, as the northern lights filled our sky. I set up my camera on the east side of the main building, out of the bitterly cold west wind. The fish-eye lens is aimed west but its view takes in most of the sky.
The bright object at lower left is the Moon.
The still image above is a frame from the 349-frame time-lapse movie below.
Each frame is a 7-second exposure at f/3.5 and ISO 1250. The interval is 1 second.
The movie covers about 45 minutes of time, compressed into 30 seconds. It shows the aurora peaking in intensity, then fading out behind the ever-present thin cloud drifting through all night.
What amazes me are the waves and loops of auroral curtains that come at us from the west (bottom behind the building) then swirl around the zenith overhead. They move off to the east and north at the top of the frame.
Even watching this in real-time the scene was astonishing. The curtains rippled so quickly, forming and reforming over the sky, you didn’t know where to look. As the image above shows, people just stood amazed.
My 2-minute music video looks back at some of the celestial highlights of 2013, in images and videos I captured.
Some of the events and scenes I show were accessible to everyone who looked up. But some required a special effort to see.
• In 2013 we had a couple of nice comets though not the spectacle hoped for from Comet ISON.
• Chris Hadfield became a media star beaming videos and tweets from the Space Station. We on Earth could look up and see his home sailing through the stars.
• The sky hosted a few nice conjunctions of planets, notably Mars, Venus and Jupiter in late May.
• The Sun reached its peak in solar activity (we think!) unleashing solar storms and some wonderful displays of northern lights.
• Locally, record rain storms in Alberta unleashed floods of devastating consequences in June, with a much publicized super moon in the sky.
• For me, the summer proved a productive one for shooting the “star” of the summer sky, the Milky Way.
• But the year-end finale was most certainly the total eclipse of the Sun on November 3. Few people saw it. I did, from a ship in the Atlantic Ocean. The video ends with that sight and experience, the finest the sky has to offer.
I hope you enjoy this music video mix of time-lapse, real-time video and still images, shot from Alberta, New Mexico and from the Atlantic.
You can watch a better quality version of this video at my Vimeo channel.
It was a good year for time-lapse photography at home. Here’s my compilation of Alberta time-lapses in a 3-minute music video.
For a year-end look back at 2013 I assembled these highlights of my year of shooting time-lapse movies of the Alberta sky, by day and night.
I’ve included clips shot around home in rural southern Alberta, and further afield at popular photo spots around the province such as Waterton Lakes National Park, Banff, Writing-on-Stone Provincial Park, and Cypress Hills Provincial Park.
I hope you enjoy it! Be sure to maximize the video screen and select HD. Or for a better grade version check out my Vimeo channel.
________________________________________________
Some technical background:
I shot all the frames for the movies (150 to 300 frames for each clip) with either a Canon 5D MkII or a Canon 60Da camera, equipped with various lenses from 8mm to 200mm. For many of the clips the cameras were on motion control devices: the Radian azimuth panning unit, an Orion TeleTrack mount, or aDynamic Perception Stage Zerodolly unit. You see the latter in action behind the credits.
I superimposed the actual footage of Comet ISON passing by the Sun onto a graphic simulating its predicted path around the Sun at perihelion. They match!
This is an animation of Comet ISON at perihelion. I superimposed the actual SOHO satellite movie footage, released Friday, Nov 29, onto a still-image sky background (created with Starry Night™ software) that shows the scene at the moment of perihelion, and that displays the predicted orbital path of ISON plus labels the stars.
You’ll see the star fields (real and simulated) register fairly closely (check Antares at lower left) around the time of perihelion. It’s neat how the comet follows its predicted path! Well, of course! Newtonian gravity stills rules the solar system.
But I am amazed at how well the simulation (which is done from the viewpoint of the surface of Earth) lines up with the real movie (which was taken by the SOHO satellite from the L1 point 1.5 million km away from Earth but in the Earth-Sun line).
Here’s the Atlantic Crossing eclipse in time-lapse from the deck of the spv Star Flyer.
The above image is a still frame from the time-lapse movie I took on November 3, 2013 of the 44-second-long total eclipse of the Sun from the mid-Atlantic Ocean. It shows the first diamond ring (second contact) as totality began.
Below is the full time-lapse.
The movie is from 385 frames shot from before totality until well after. It shows just how lucky were were at seeing this eclipse, with the Sun coming out into a deep blue sky moments before totality and going back into thin cloud just as the total eclipse ends.
You’ll also appreciate the rolling of the ship, sped up here in the time-lapse, with frames taken one second apart.
Below is a still frame of the final diamond ring (third contact). Notice the difference in the brightness of the distant clouds in this image versus the one above. In the main image at top the clouds below the Sun had not yet entered the Moon’s umbral shadow.
But in the image below, the clouds are immersed in the lunar shadow and are about to be lit up again as the shadow races away from us in the direction toward the Sun.
In the time-lapse you can see the shadow enter the scene at top, then depart at the bottom of the frame below the Sun. As it shoots away from us, the shadow darkens the horizon far in the distance further down the path, bringing totality to those on the path to the east.
I try for this shot every year, and every year I’m thwarted by low clouds over the Rockies to the west.
So here’s the shot from tonight, Monday, September 23, the night after equinox. Had the horizon been perfectly clear tonight the Sun would have appeared right at the end of the Trans-Canada Highway as it set behind the Rockies. Instead, it disappeared higher up and to the left, behind low cloud.
At equinox (fall or spring) the Sun rises due east and sets due west. So tonight, it was shining into the eyes of all the drivers as they headed west into Calgary – a little demonstration of the annual motion of the Sun.
The previous night, Sunday, Sept. 22, I shot a time-lapse movie of the scene, again hoping for a clear shot to the setting Sun. Alas! A neat movie but still not quite what I was after.
There’s always 2014. But I think I need to aim east and catch the rising Sun at equinox instead. The mountains attract too many clouds.
The Harvest Moon rises into the dark arc of the Earth’s shadow.
What a perfect night this was. The Full Moon rose into a crystal clear sky, tinted with the dark blue shadow of our planet arching across the eastern sky.
The main image above is a 7-section panorama sweeping from northeast to southeast, but centred on the rising Harvest Moon rising almost due east.
The Moon came up just before the Sun set. The panorama below shows that scene. It’s a crop of a full 360°, 45,000-pixel-wide panorama, taken just as the Sun was setting almost due west and the Moon was rising 180° away in the east.
I took both panoramas with a Canon 5D MkII and 50mm Sigma lens, with the segments at a 30° spacing. That way I take 12 segments to cover a full 360°, a habit leftover from the days of shooting photo pans for planetarium projection systems consisting of 12 Kodak slide projectors.
My previous post showed some still frames from a time-lapse movie of the rising Harvest Moon. The final movie is above, assembled from 670 frames taken at 2-second intervals with the Canon 60Da and 200mm lens. I’ve shot this subject a few times now, but this was my best capture of the rising Full Moon at harvest time, always the most photogenic Moon it seems.
The summer Milky Way shines from behind clouds coming over the Continental Divide at Moraine Lake, Banff.
Earlier in the day, thousands of people stood here, admiring the famous view of Moraine Lake set in the Valley of Ten Peaks. This was the view by night, before the waning Moon rose to light the scene. I was the only one there.
A couple of hours after I took this image, the peaks were well lit by moonlight, but clouds had moved in to obscure the stars. This shot from the start of the night shows the sky at its clearest and darkest.
The last time I visited Moraine Lake at night was back in the 1990s shooting with 6×7 film. I’ve wanted to get back with digital cameras for some years. Last Sunday, August 25 was my chance.
Despite the encroaching clouds, I managed to shoot time-lapses with three cameras: a dolly shot with the Dynamic Perception Stage Zero, a pan in azimuth with the new Radian controller, and a tilt-pan with the Sky-Watcher AllView mount. All worked well, but had the night been perfectly clear the movie clips and stills would have been all the nicer. But you go with what the mountains deliver.
This is one of the best of the frames from the night’s shoot, taken with a 14mm Rokinon lens for 60 seconds at f/2.8 and Canon 5D MkII at ISO 4000.
It shows one of the issues with shooting near lodges and resorts – yes, it’s convenient and safe (I’m reluctant to hike far in the dark alone, with Grizzly in Area and Travel in Groups signs about!) but even the most eco-friendly of resorts fail to realize the effects of their lights spilling out over the natural landscape. In this case, they do help light the dark scene, but they are pollution. When, oh when, will parks and resort operators begin to realize that the night is an environment to be protected as well, and not a jurisdiction to be ruled by lawyers and planners who dictate that the worst and usually cheapest types of lighting be installed.
The Northern Lights danced all night, as Earth was buffeted by winds from the Sun.
As soon as I saw the warning notices at Spaceweather.com I was hoping we would be in for a wonderful night of aurora watching. I wasn’t disappointed.
Forewarned, I headed out to the Wintering Hills Wind Farm near my home in southern Alberta. I thought it would be neat to get shots of the effects of the solar wind from beneath and beside the wind turbines of the farm. The shot above is from a time-lapse movie taken with a fish-eye lens that will look great when projected in a full-dome digital planetarium.
I shot with three cameras, with two aimed east to where the brightest part of the auroral arc usually sits. It was also exactly where the Moon would rise after midnight. This shot, above, captures the scene right at moonrise, which was also right when the aurora kicked into high gear as a sub-storm of solar particles rained down on our upper atmosphere. The ground lit up green with the glow of oxygen in the mesosphere, some 100 kilometres up.
This shot, taken moments later with a longer focal length lens, grabs the waning Moon shining behind the distant wind machines, and beneath the arc of auroral curtains.
In all, I shot 50 gigabytes of raw images, both still images and frames for time-lapse movies. I’ve assembled most of them into a musical collage that honours the night. In the final sequence of the movie, it almost looks like the wind machine is facing into the brunt of the solar wind, as pulses of aurora surge from out of the east toward the turbine towering overhead.
The music is by a new favourite artist of mine, the Italian composer Ludovico Einaudi. His latest album of alt-classical/new age music is called “In a Time Lapse.” How could you not like that?! Buy it on iTunes. It’s stunning.
I hope you got to see the Night of the Northern Lights in person. If not, I trust these images and movies give you a sense of the wonder of what the solar wind can do.
It was a beautiful summer evening, with stars wheeling overhead in a moonlit sky and the only clouds far away and interesting.
This was one of those nights we get once or twice a summer when the much-anticipated noctilucent clouds – the clouds of summer – put on a perfect show. In my previous post I featured an image from early in the night, last night, June 26, 2013.
These are images and time-lapse movies from later in the night. The composite image above shows stars trailing over 90 minutes with the brilliant noctilucent clouds on the horizon, and fringed by a rosy glow of red twilight where the southern edge of the cloud display, which sits over the Northwest Territories, is being lit by a setting Sun with red sunlight filtering through our atmosphere as it passes over the North Pole.
This telephoto lens shot above captures a close-up of the rosy-fringed noctilucent clouds, behind a lightning-lit thunderstorm rolling through storm alley in central Alberta. The storms can stay there! We’ve had enough of them for a while!
My time-lapse sequence extends over about 90 minutes and opens with a wide-angle view of the display as it appeared low on the horizon. What follows are two closeup views that really show the intricate wave-like motion of these high-altitude mesospheric clouds, and their changing lighting and colours.
These are beautiful clouds drifting on the edge of space but it takes time-lapse to reveal their fluid-like motion.
What strange clouds these are, moving where there shouldn’t be winds, and forming where there’s barely any air.
These are noctilucent clouds, sometimes called polar mesospheric clouds. Their icy strands form around particles at the top of the atmosphere some 80 km up. There’s almost no air up there so just how these clouds form has always been a mystery. They may be condensing around meteoric dust particles. They may also be more common now than in past decades and centuries, as the upper atmosphere cools due to an odd quirk of global warming that sees the lower troposphere warm while the upper mesosphere cools.
This was the first display of NLCs I’ve seen so far this season. They can only be seen, and indeed they only form, in summer. Sunlight streams over the pole and lights these clouds all night long. They are literally “night-shining” clouds. Only from a latitude range of 45° to 60° north and around summer solstice is the geometry right to see the clouds, usually as electric blue cirrus strands moving slowly along the northern horizon.
The time-lapse movies capture their motion over 30 to 90 minutes of shooting.
The 40-second movie contains three clips:
• The first, a wide-angle view of the amazing aurora that danced in fast accompaniment to the slow noctilucent clouds.
• The second clip, very short, zooms in a little more to the northern horizon. However, I cut that sequence short so I could switch lenses and take the next clip.
• The third scene is with a telephoto lens, framing the east-to-west slow motion of the clouds. I took 4-second exposures at 1-second intervals so it shows some pretty fine motion.
This was certainly one of the best NLC displays I’d seen and my best shot at capturing them.
What was especially rare was seeing them accompanied by auroral curtains actually moving among the clouds (or so it appeared). Both are up high in the near vacuum of near space, but they may have been miles apart in latitude.
The stars wheel above the Cretaceous-age sediments of Dinosaur Provincial Park.
One of the most powerful techniques in the nightscape photographer’s arsenal is to stack lots of short-exposure images together to create the equivalent of one long exposure showing the motion of the stars. A creative tool to do this in Photoshop is the “Advanced Stacking Actions” from Steven Christenson who maintains a blog and eStore called Star Circle Academy.
I used one of his Actions to create the feature image above. Unlike more run-of-the-mill stacking procedures, Christenson’s nifty Actions can create star trails that look like comets or streaks fading off into the sky at their tail end. It’s a clever bit of Photoshop work achieved by stacking each successive image at slightly lower opacity.
You can use his Actions to create a single composite still image, as above, or to create a set of “intermediate” frames that can be turned into a time-lapse movie with stars turning across the sky and drawing trails behind them. My movie shows several variations. Click the Expand button on the movie to have it fill the screen and reveal the sub-titles.
In Clip #1 I stacked the original set of 360 images without any trailing, using the original frames that came from the camera, albeit with each frame processed to enhance contrast and colour.
In Clip #2 I stacked the images using the “Comet Trails” Action, one that produces very short comet-like streaks.
In Clip #3 I used the “Long Streak” Action to produce longer star trails, but the process also creates unusual cloud streaks as well. Rather neat.
In Clip #4 I used the more conventional “Lighten Mode” to create trails that accumulate over the entire sequence and never fade out. The result on this night was pretty wild and excessive, with the twilight and moonlight adding other-worldly colours.
I certainly recommend the Star Circle Academy Photoshop Actions. While there is a basic Test Set available for free, the full Advanced set is well worth the $30.
The stars shine in a bright moonlit sky over the Alberta Badlands.
My feature image above is one of several still frames I took at the end of 4-hour photo shoot last Sunday at Dinosaur Provincial Park. The nearly Full Moon provides the illumination on an eroded landscape originally cut by water from retreating ice age glaciers.
But the volcanic ash layers hold treasures much older, from 70 million years ago. This area contains the world’s richest collection of late Cretaceous fossils of dinosaurs and other flora and fauna from near the end of the dinosaurs’ reign.
The movie below is a 300-frame time lapse of the stars turning behind the hoodoos. It’s a dolly shot, using the Dynamic Perception Stage Zero rail and controller.
The system works very well, but such shots demand a site with a suitable immediate foreground, as well as a good view to the distant sky. It is the parallax motion between foreground and background that makes a dolly move interesting.
I planned this shot to begin at twilight and continue as the sky was darkening, then into the rest of the night with the Moon rising and lighting up the landscape. The moving clouds were perfectly timed and placed!
Time-lapse shooting has become immensely popular of late, but there’s nothing like a dolly shot to add interest to a scene .
Among the more advanced techniques for shooting time-lapse movies is to place the camera on a motorized track for a cinematic “dolly” shot.
These are easy to do in the daytime as the camera simply needs to slide down a rail at a constant rate. But at night, time-lapse dolly shots become more complex. Exposures are often 15 to 60 seconds even in bright moonlight, as here. During each exposure the camera shouldn’t move. The slide down the track should happen only in the brief time between exposures, typically 2 to 5 seconds.
Accomplishing this “shoot-move-shoot” routine requires a specialized bit of kit. In my case, I use the Stage Zero dolly and MX2 controller from Dynamic Perception.
It works great, and sends the camera down the 6-foot rail at a speed you determine. The controller also operates the camera shutter, ensuring sync between the exposures and dolly motion. You can see the setup in operation below, in a 2-part movie. The first scene shows the dolly and camera in operation over the 2-hour shoot, while the second clip shows the time-lapse sequence the dolly-mounted camera took.
This was one of the easiest time-lapse sequences I’ve shot, as I had to travel no more than 100 feet from my house to do it.
I was after a couple of sequences just to use for demo purposes, and didn’t want to tackle a long shoot far from home on a weeknight.
The bright moonlight on May 20 also meant exposures could be short, so that collecting the 300 frames I typically shoot for a time-lapse could be accomplished in well under 2 hours. Getting to bed before 1 am is a rare treat on a time-lapse night!
As the Northern Lights dance they light up an old barn on a moonlit night.
The still frame above is from the movie down below, a 3-hour-long time-lapse taken on May 17, the night of the big aurora display. I shot this with a camera riding along on a motorized dolly track, to provide the panning motion to the scene.
You can see the rig in this image just below, which I took with another camera framing the entire scene.
Using the second camera, I was intending to take shots showing a motion-control time-lapse sequence being taken, for illustration in talks and publications.
The aurora quickly forced me to change plans with camera #2. But I let the main motion-control camera continue down its track for the rest of the night, resulting in the movie below. At one point in the movie I briefly appear at right, as I moved the second camera to the south side of the barn to look north to the main area of the display.
In the movie, the stars of Virgo and the planet Saturn rise into a sky lit blue by moonlight early in the evening. As the Moon sets, the shadows rise and engulf the barn.
While catching stars rising behind the rustic old building was the original intention of the shot, the Northern Lights added a bonus. Not only do they dance in the sky behind the barn, but the north face of the old grey barn, in shadow from the moonlight, lights up green from the glow of aurora shining in the north.
Very nice. It certainly made for a colourful scene under the skies of southern Alberta.
Here’s the movie I show being taken in my previous blog. This is my first attempt at a motion-control time-lapse.
In this movie the camera shifted position during the 3 hours of shooting by sliding along a rail, with the movement controlled by a little computer box that opened and closed the shutter (in this case for 15 seconds for each frame), then between each exposure it pulsed the motor to shift the camera a centimetre or so down the dolly’s rail.
Pretty nifty! And until this unit, the Stage Zero Dolly, came along this capability would have cost much more money, from some Hollywood cinema supplier.
This was only a test, and I did mess up at one point (where I appear in the frame in the previous blog’s movie) as I tried to adjust the speed in mid-track, resulting in some dead motion for a few frames. So the motion comes to a halt briefly. It will take some learning to know how to set the speed right for the number of frames and exposure times I typically shoot.
But the ramping up in speed at the beginning of this movie is intentional, and is one of the motion control variables you can program in.
The Stage Zero Dolly unit is from Dynamic Perception LLC. Lots of time-lapse shooters are employing it now, for their cinema-like pans and moves. I’ve been inspired by the work of Randy Halverson at http://dakotalapse.com/ . Amazing stuff — representing a whole new level of time-lapse techniques.
So now I know what I’ll be doing now on moonlit evenings!
I’ve been taking lots of time-lapse movies of late. But this one is a time-lapse movie of my other camera taking a time-lapse movie.
Here you see my Canon 7D camera riding aboard my latest tool (or toy!), a motion-control dolly. The camera takes its series of still images (that will be later stitched together into a movie) while it tracks down a rail, riding on a motorized cart.
The unit is called the Stage Zero Dolly, from Dynamic Perception LLC. It is a nifty device that fires the camera shutter for the exposure time and interval you desire. In between each exposure it also moves the camera a small amount down the track. The result can be seen in the next blog, a time-lapse movie with a changing perspective, giving a cinema-style dolly shot. Except, I took this one over 3 hours.
While this scene might look like I took it during the day, it is the middle of the night (witness the moving stars). The blue sky is due to moonlight, from an almost Full Moon on September 10.
The Stage Zero Dolly takes some work to set up and program right, but the results open up a whole new dimension (literally!) in time-lapse shooting.
Here is the time-lapse movie I took last Saturday night, August 20, on a perfect night at Bow Lake in Banff, Alberta.
The sequence starts in bright twilight then darkens to full night with the Milky Way over the mountain silhouettes. The peaks then light up as they catch the light of the rising last quarter Moon coming up about 11:30 pm in the east. The moonlight creeps down the mountains to light up the entire valley and the lake. The sky brightens to deep blue again. The sequence ends about 3:30 am.
There was hardly a cloud in the sky all night, unusual for locations near the large icefields that straddle the continental divide.
I assembled the movie from 454 frames, each 40 seconds in exposure time, and taken 1 second apart.
Here is the time-lapse movie I took last Saturday night at Lake Louise, Alberta, under the light of the Full Moon. My previous blog featured a still frame from the beginning of this sequence.
The night starts clear, but as often happens, clouds move in, blowing off the cold icefields of the continental divide. It does make for a nice effect in time-lapse, one of few instances in astronomy where some clouds can be useful!
Also notice how the reflection disappears as the lake breaks up into waves briefly, as wind blows in now and then through the night. The Full Moon is rising behind the camera, causing the lake to light up as moonlight illuminates more of the lake’s surface. Shadows move across the mountainsides. Arcturus is the bright star setting at right. The red object at left is a moored canoe, moving about on the lake.
I took this movie over 4 hours from 10:30 pm to 2:30 am, taking 477 frames with the Canon 7D and 10mm lens. For time-lapse movies like this, I process the full-size RAW files in Adobe Camera Raw and Bridge, then use Photoshop’s Image Processor to export them all to smaller size JPGs. From that set, I use Photoshop CS5 Extended’s “Motion” feature to assemble the folder of JPGs into a movie, in this case at 24 frames per second, a little fast perhaps for this sequence, but it’s easy to change if needed. Photoshop then renders that image file out as a Quicktime movie. What you see here is a tiny version of the final HD-sized video.
One of the trickiest subjects for a time-lapse sequence is a smooth and seamless day-to-night transition. Exposure times vary from fractions of a second before sunset to several seconds at night fall.
How to do it? Manually shifting exposures is too much work and prone to error. Putting the camera on Automatic can work but inevitably results in an effect known in the time-lapse world as “flickering.” The camera’s automatically-judged exposures aren’t consistent from frame to frame so the final movie shows minor bright/dark flickering, making it look jerky.
For this test sequence of sunset over the Calgary skyline, I tried a new toy for the first time, as a solution.
The device is called the Little Bramper (for Bulb Ramping). It is a custom-made intervalometer that fires the camera shutter every few seconds (at whatever interval you desire). Nothing new there. But what’s unique is that it can be set to slowly increment the exposure time by as little as 1/1000th of a second from frame to frame, gradually increasing the exposure (“ramping” it) to accommodate the darkening scene. The result is a smooth transition from day to night with no flickering.
This was my first use of the Bramper and it wasn’t without its glitches. The shortest exposure the Bramper can provide (it always controls the camera thru its Bulb setting) is about 1/10th of a second (I had no idea camera shutters can fire as quickly as that even on Bulb).
But at the beginning of a sequence like this, with a bright sky, achieving that exposure (still quite long) means using a small f-stop, a slow ISO speed, or a neutral density filter, or all of the above. But as the sky darkens and exposures lengthen, exposures would become too long to fit within the desired interval between frames (typically no more than 5 to 10 seconds for a smooth sequence). So, to shorten the exposures you then have to open up the lens, switch to a faster ISO, or remove the ND filter, while also commanding the Bramper to quickly reduce its exposure time, all in one exposure cycle (i.e. 5 to 10 seconds) so as not to lose or ruin frames. Takes some coordination and practice (hit the Bramper’s button, adjust the camera, all within 5 seconds), and I didn’t get it right the first couple of times.
But overall, for a first test, the sequence turned out very well. The $80 Little Bramper does the job, though it does take careful monitoring through the sequence, not just to perform the exposure swaps, but to also watch that the ramping rate (adjustable on the fly) matches what the scene is doing and you aren’t under- or over-exposing. It’ll take a little more practice, but the results certainly are worth it.
Here is nearly two hours of auroral dancing compressed into 25 seconds.
This was the “all-sky” aurora of August 5/6, 2011, widely seen over North America but perhaps (from early reports) best from the western half, especially Canada, favoured for Northern Lights due to our latitude.
I shot this with the 8mm fish-eye lens and the Canon 5D MkII. The movie consists of 255 frames, each 24 to 30 seconds in exposure duration, taken one second apart. ISO speed was 1600 and aperture f/3.5. The playback frame rate is 10 fps.
This display was quite chaotic, without the graceful rippling curtains present in many displays, but rather huge patches of sky turning off and on. This is typical of an aurora in the declining part of the storm — it had already been raging for several hours by the time it got dark here in Alberta.
Nor was the display very bright, so the longer exposures needed to record it well further blur any fine motion. Nevertheless, you get a good idea of the intense activity this aurora displayed. The magnetosphere was jumping last night!
Here’s my time-lapse sequence of the hoodoos at Writing-on-Stone Park lighting up as the Moon rises and the Milky Way sets.
The sky starts off dark but lights up as the waning Moon, off frame behind the camera, rises and lights up the foreground and sky. The sequence ends as the sky brightens with the onset of dawn.
Waning moons are great nights for this type of shooting as the changing lighting produces dramatic effects as the landscape lights up at moonrise. The problem is, the Moon doesn’t rise till very late, making for a long night of shooting.
I assembled this sequence from 290 frames, each a 60-second exposure, taken at 1-second intervals over about 4 hours. The camera was the Canon 7D and the lens the 10-22mm Canon EF-S zoom at 10mm. I also shot a matching sequence simultaneously with the 8mm fish-eye and Canon 5D MkII camera, for an all-sky sequence for planetarium use.
My previous blog featured a still frame from a time-lapse movie I took of sunset on the Sweetgrass Hills and Writing-on-Stone Provincial Park. Here’s the full movie, taken at sunset on July 22, 2011.
I assembled the movie in Photoshop Extended CS5 from 678 frames taken over nearly an hour, at 5-second intervals, beginning before sunset and continuing until well after sunset. The camera was the Canon 7D and lens the 10-22mm lens at 10mm.
Putting the camera into automatic Aperture-priority mode keeps the exposure uniform as the lighting level drops but does induce some slight flickering from minor shot-to-shot variations in exposure. That can be fixed in “post!” But it’ll be a while before I get around to that!

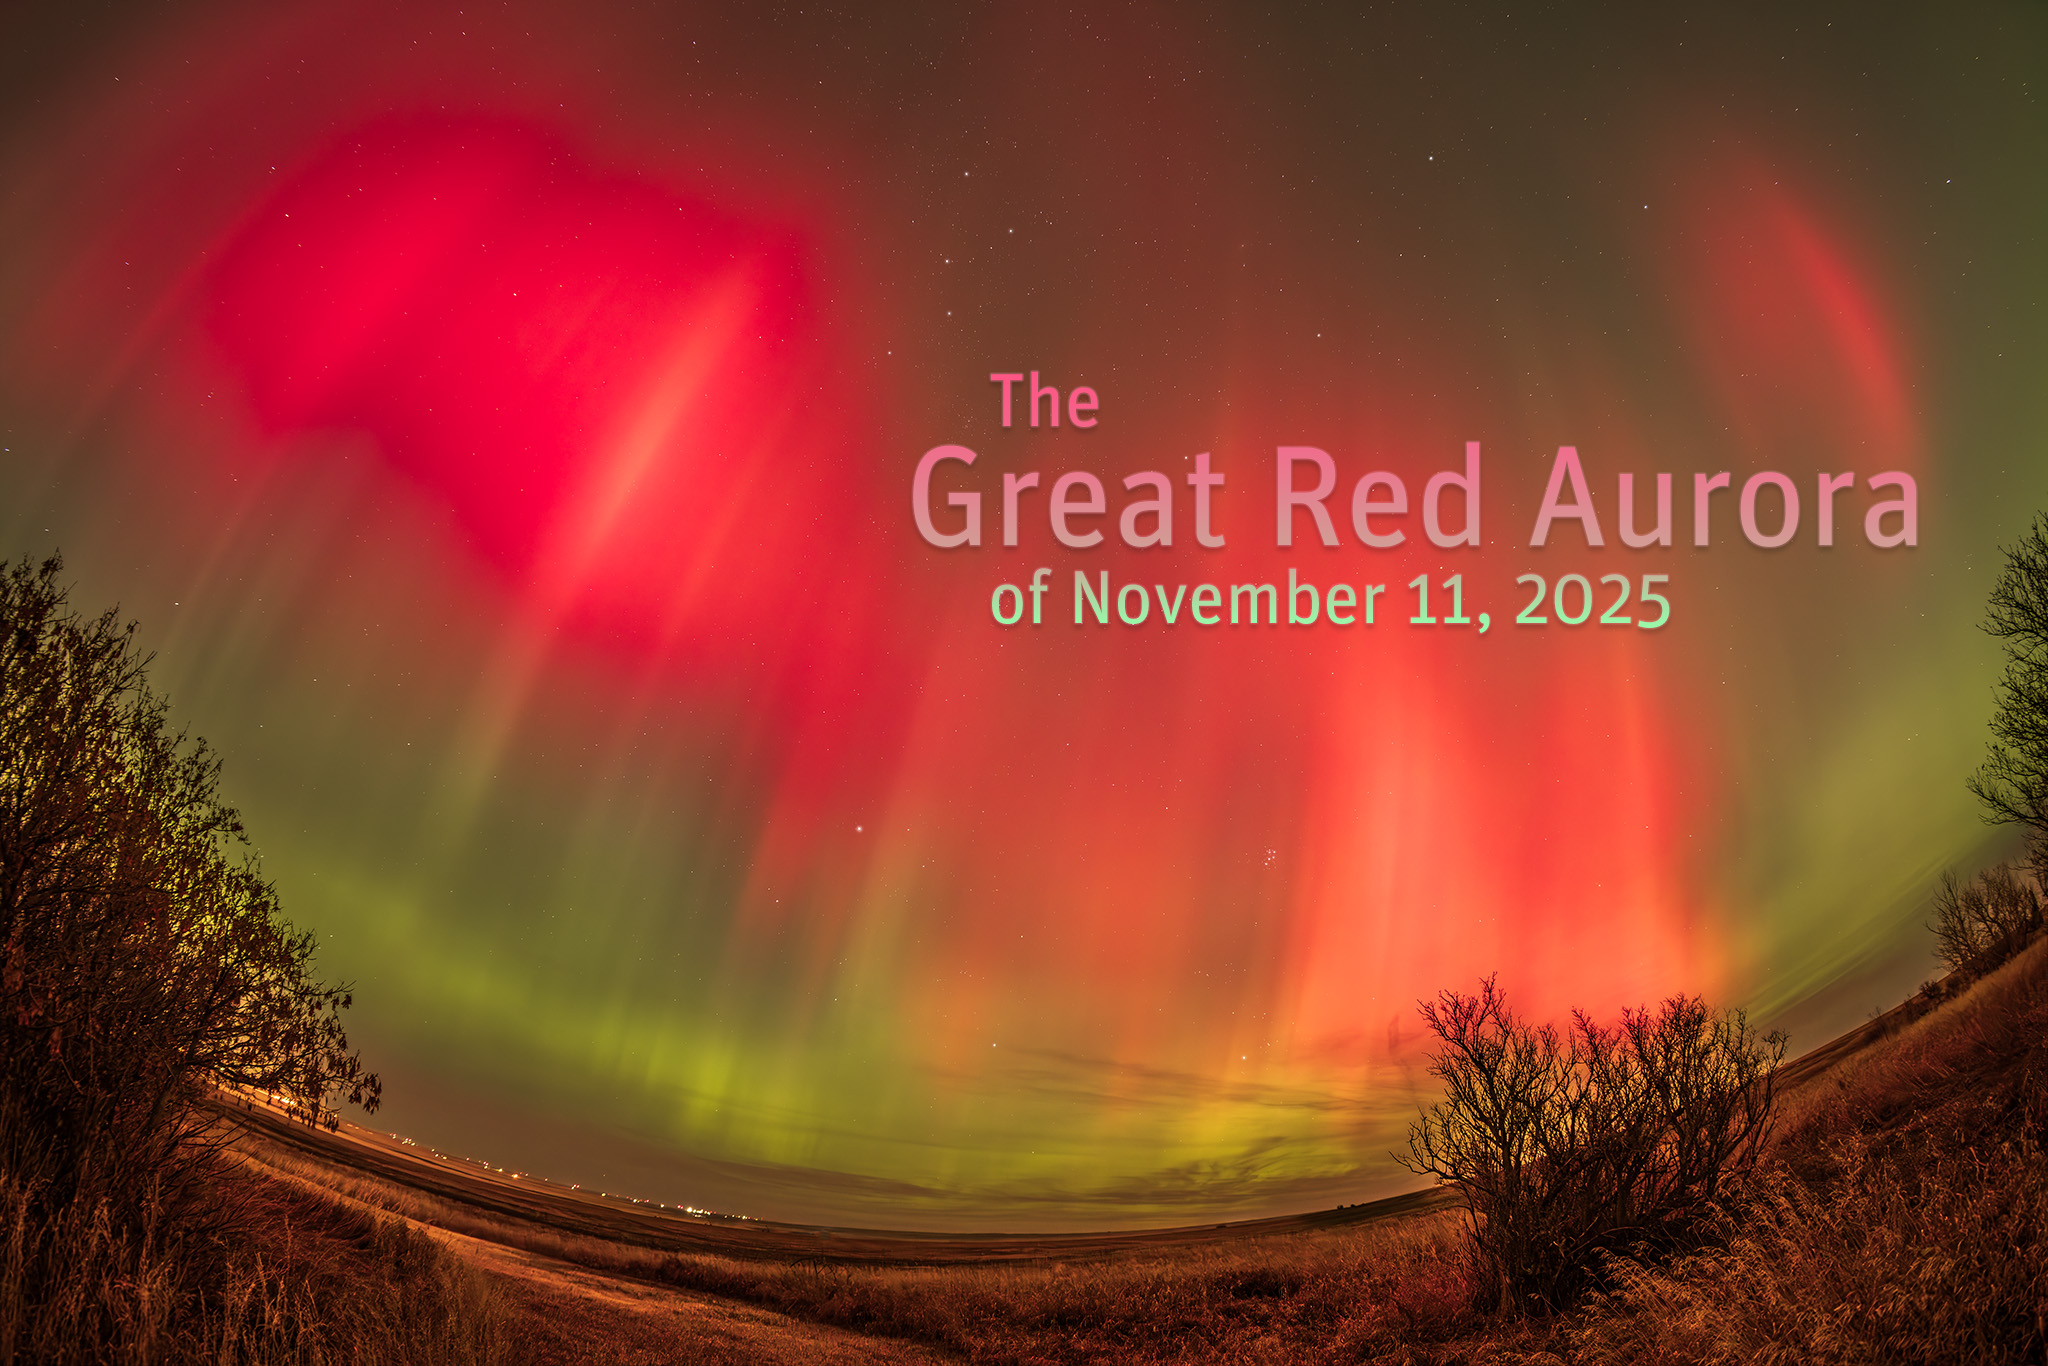
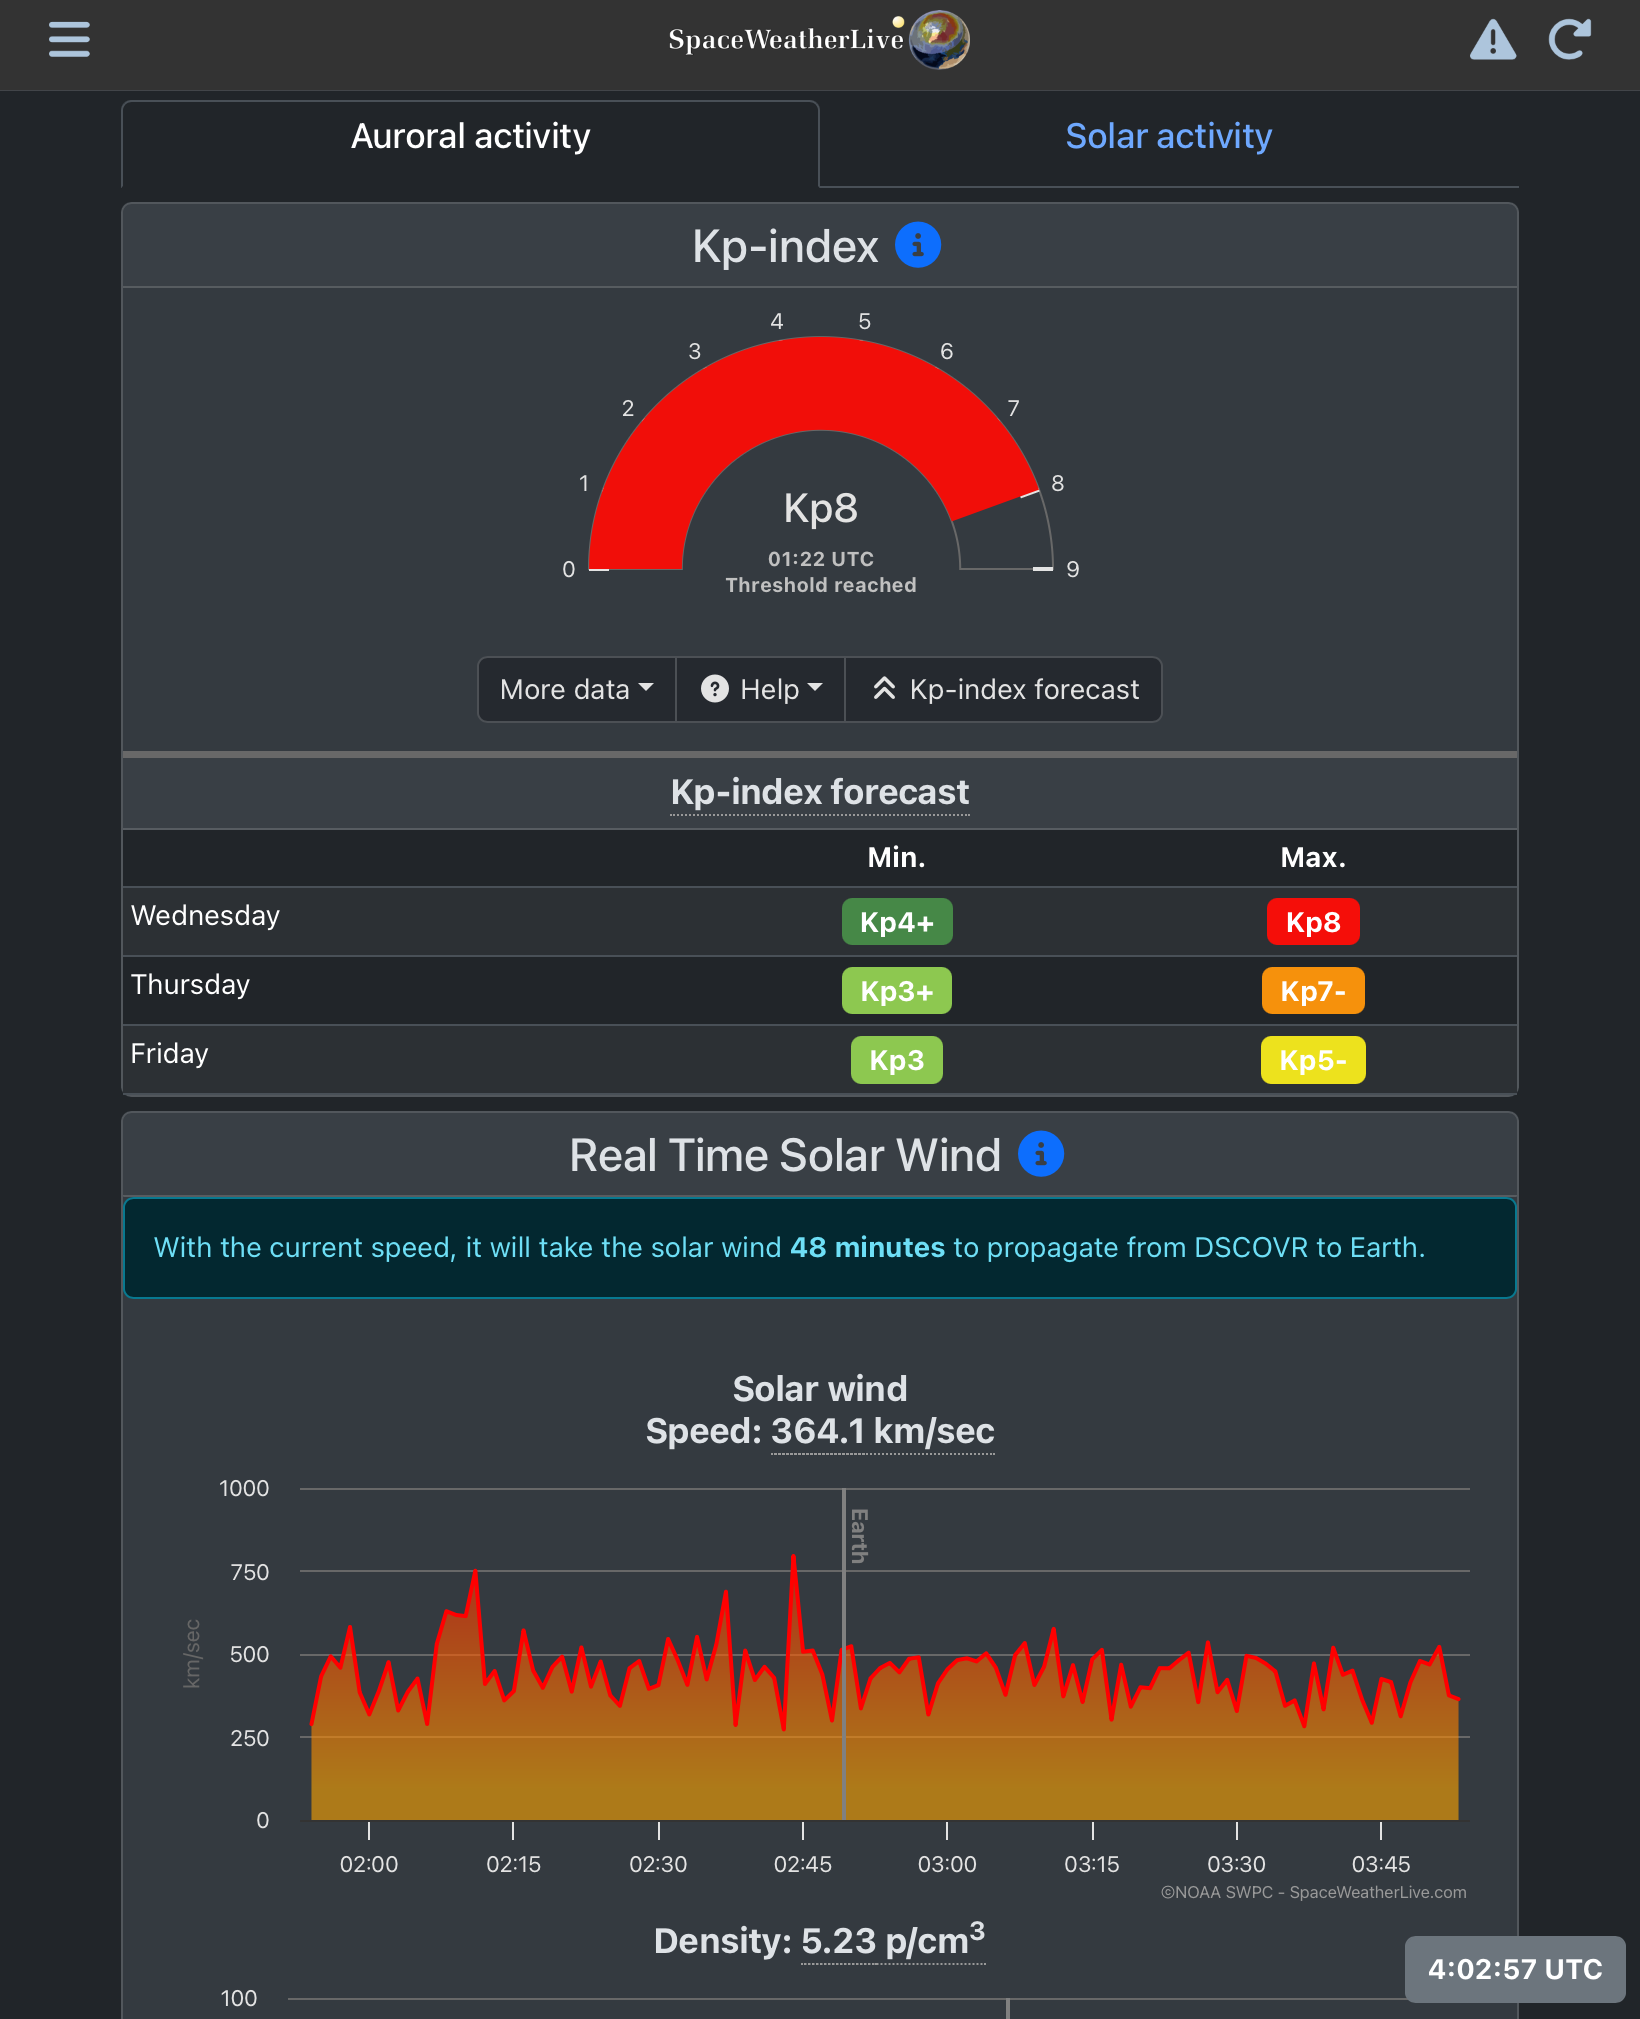
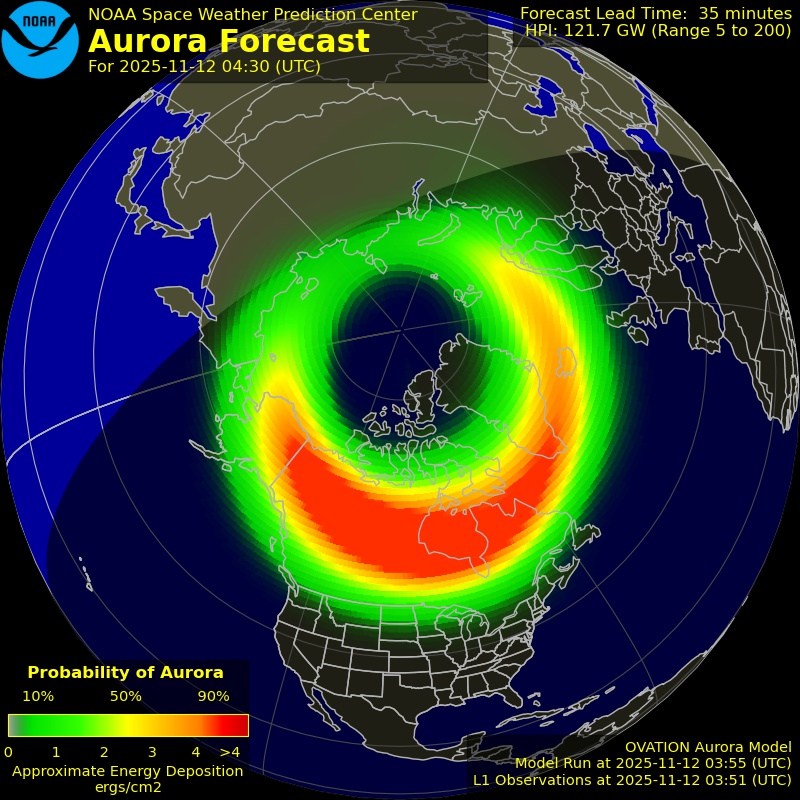
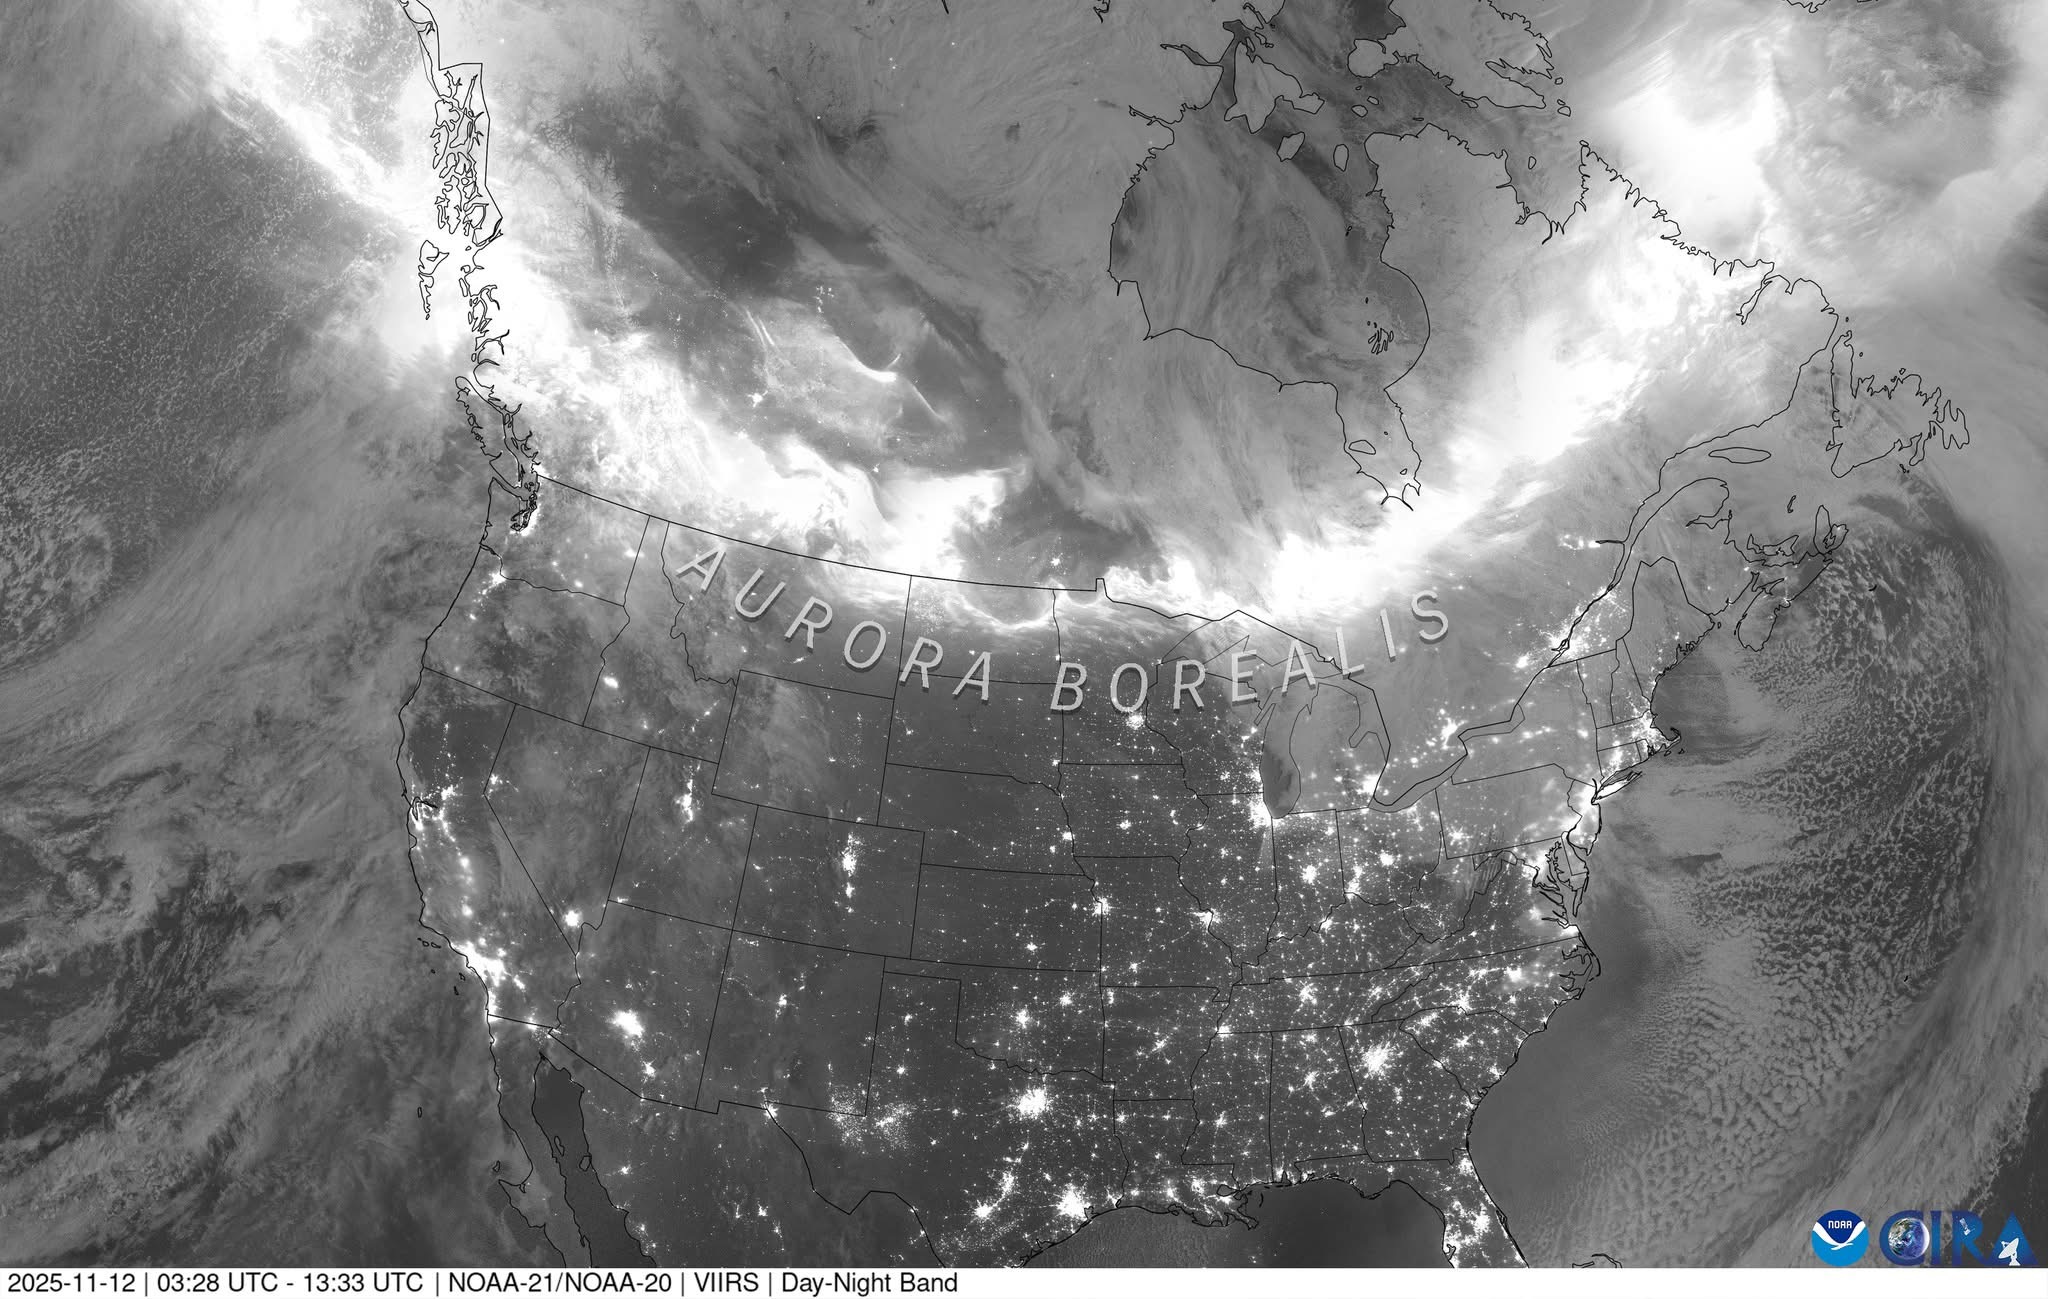

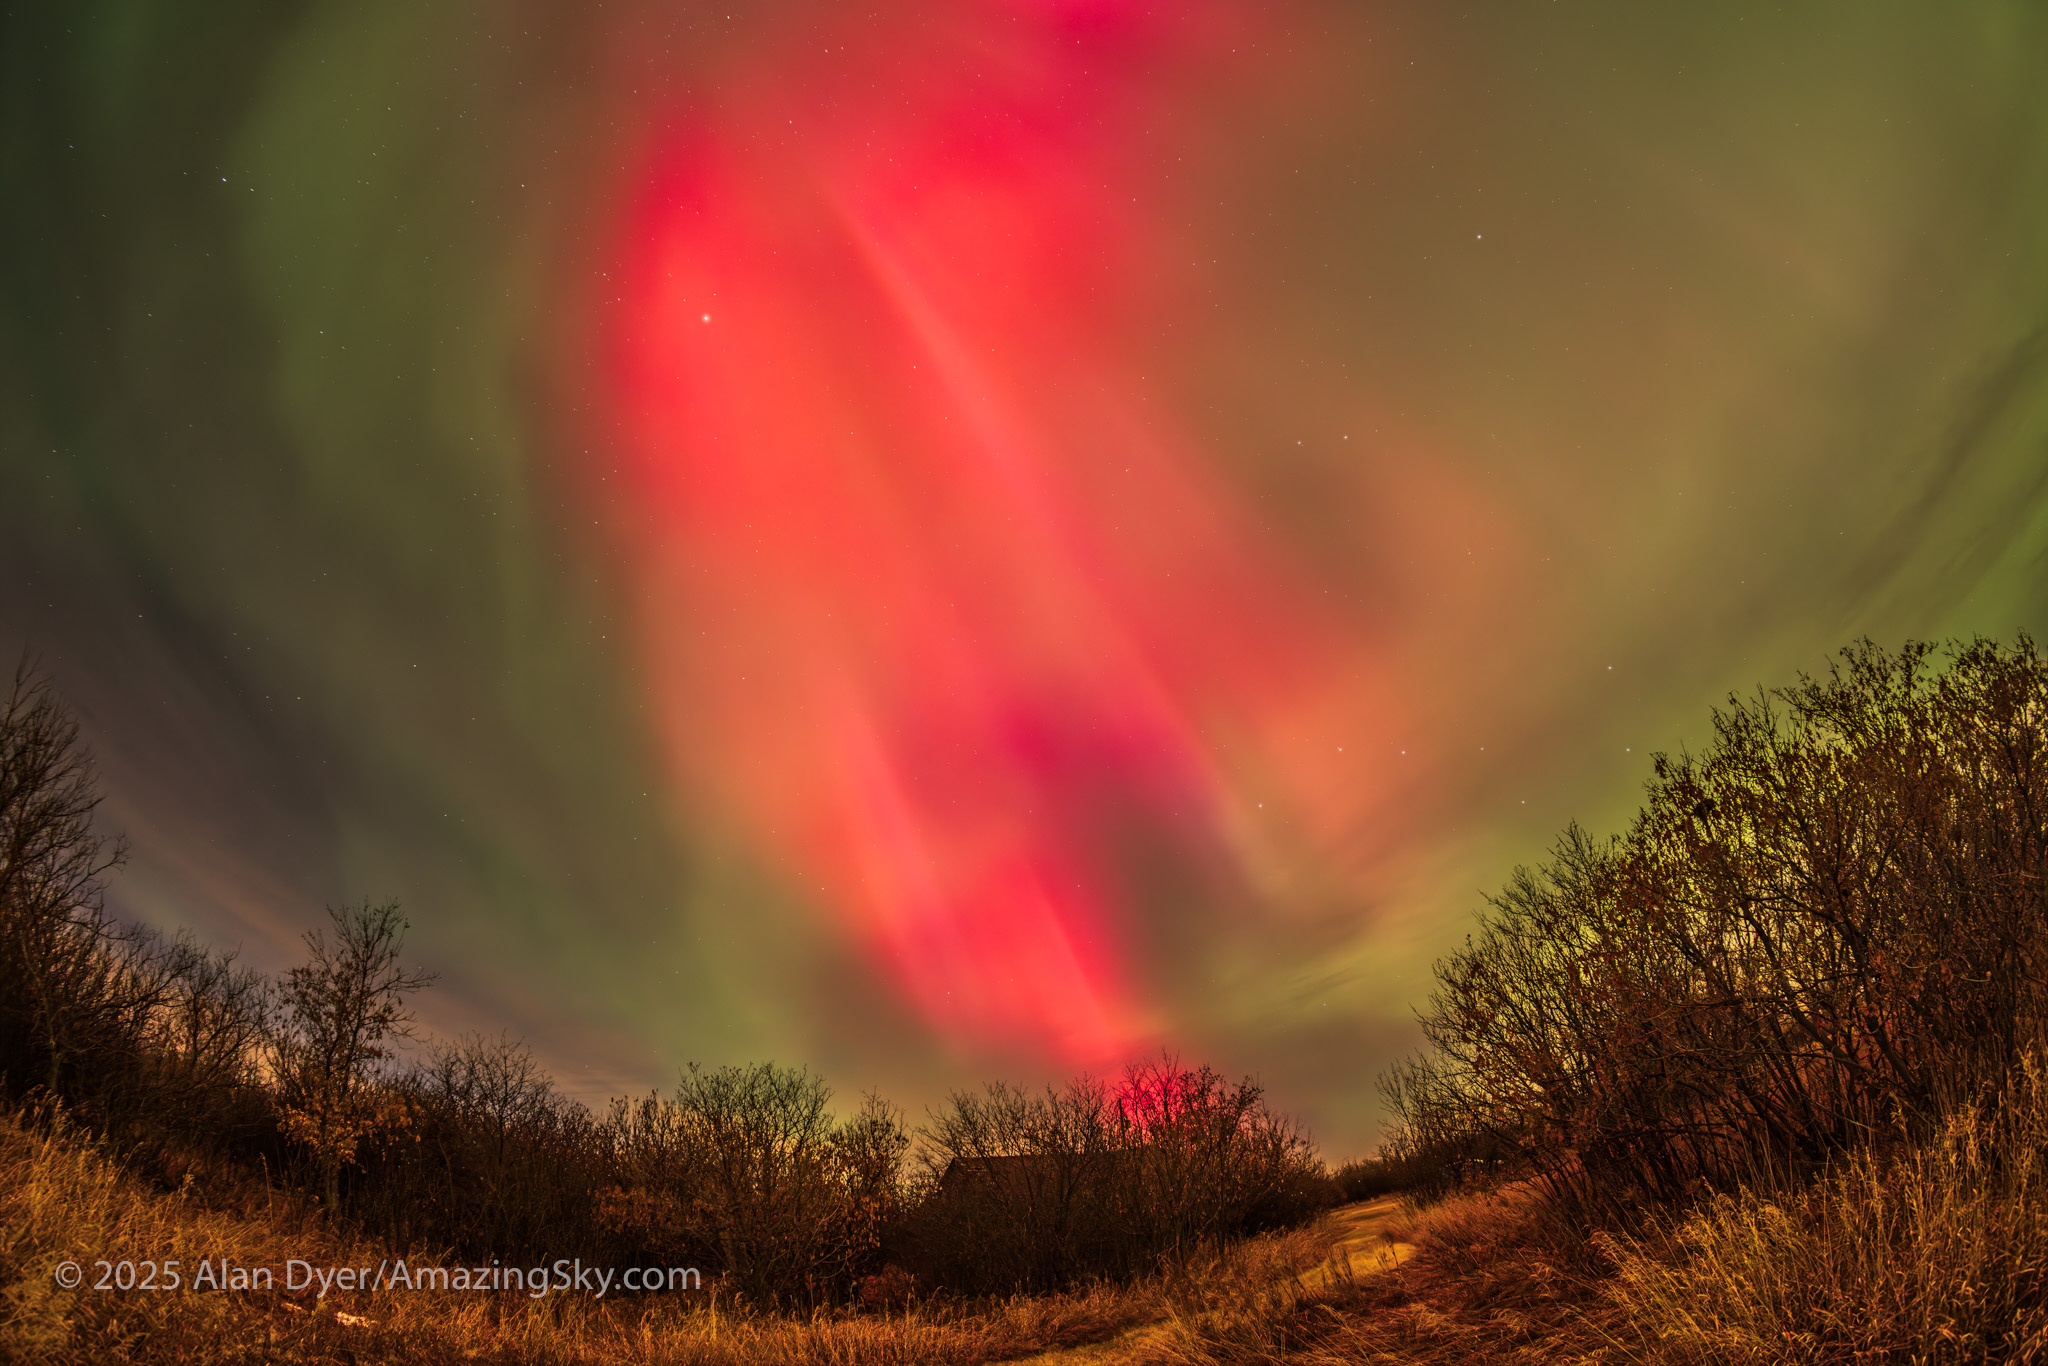
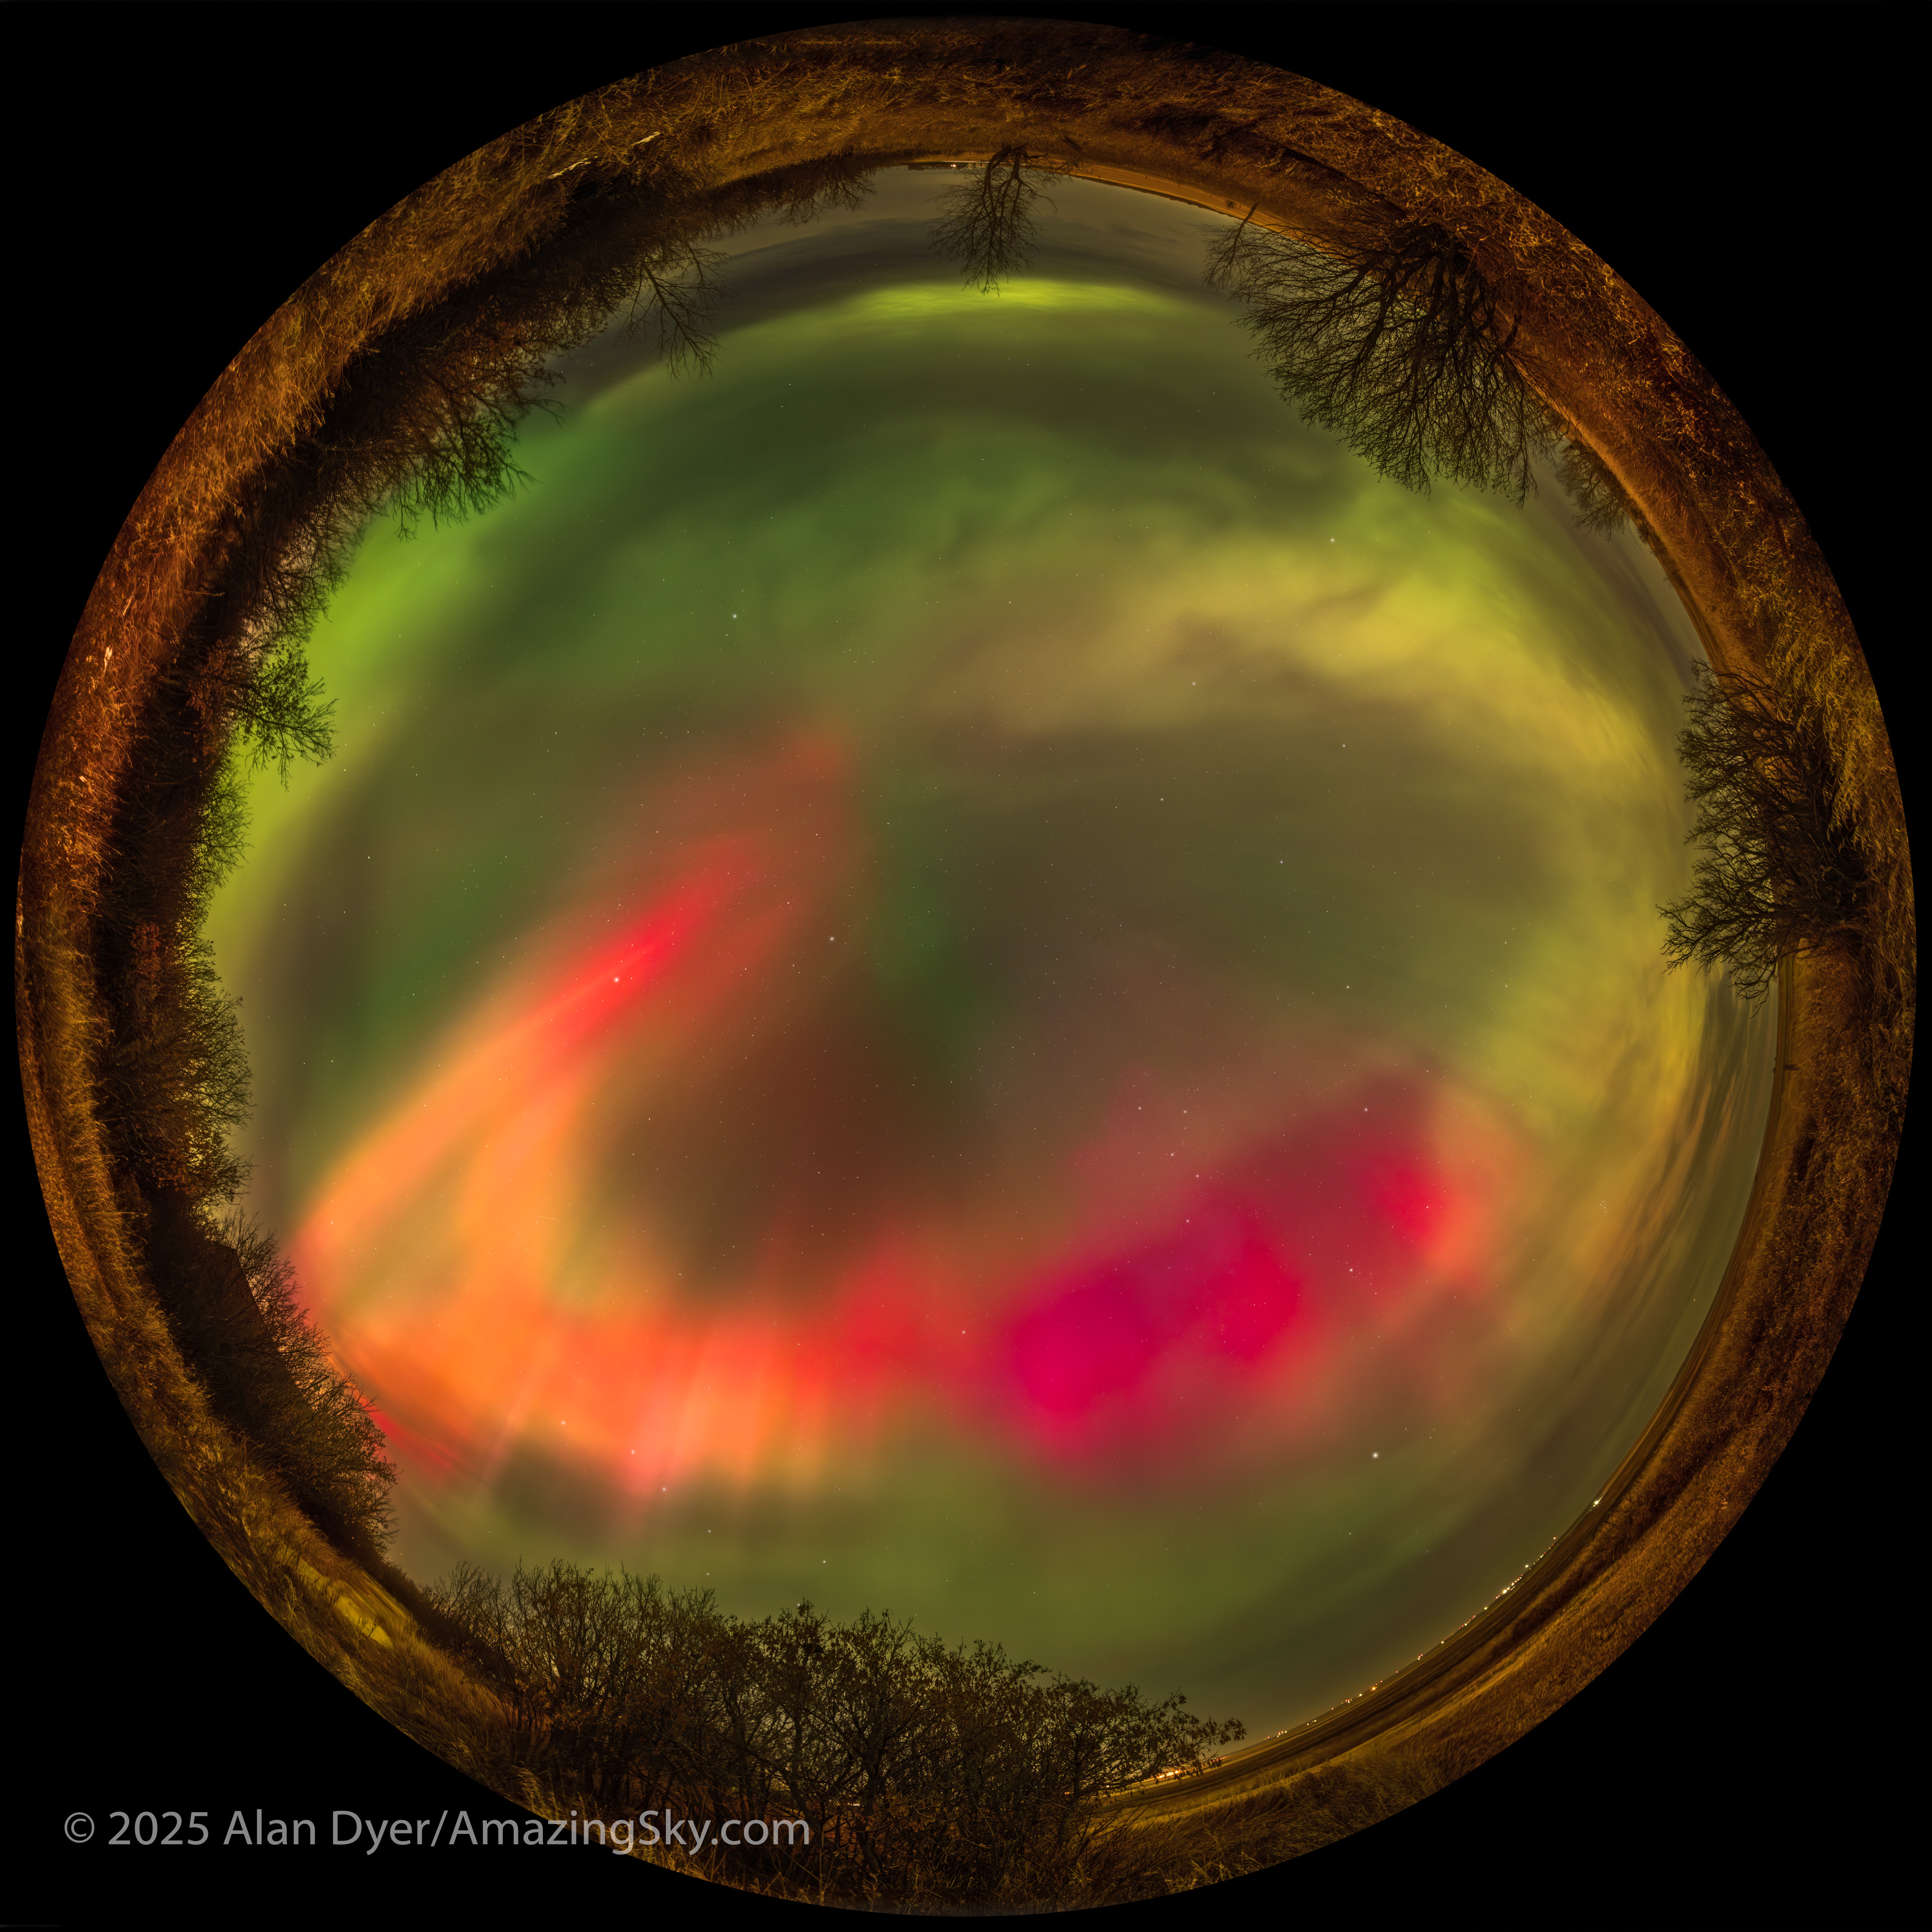
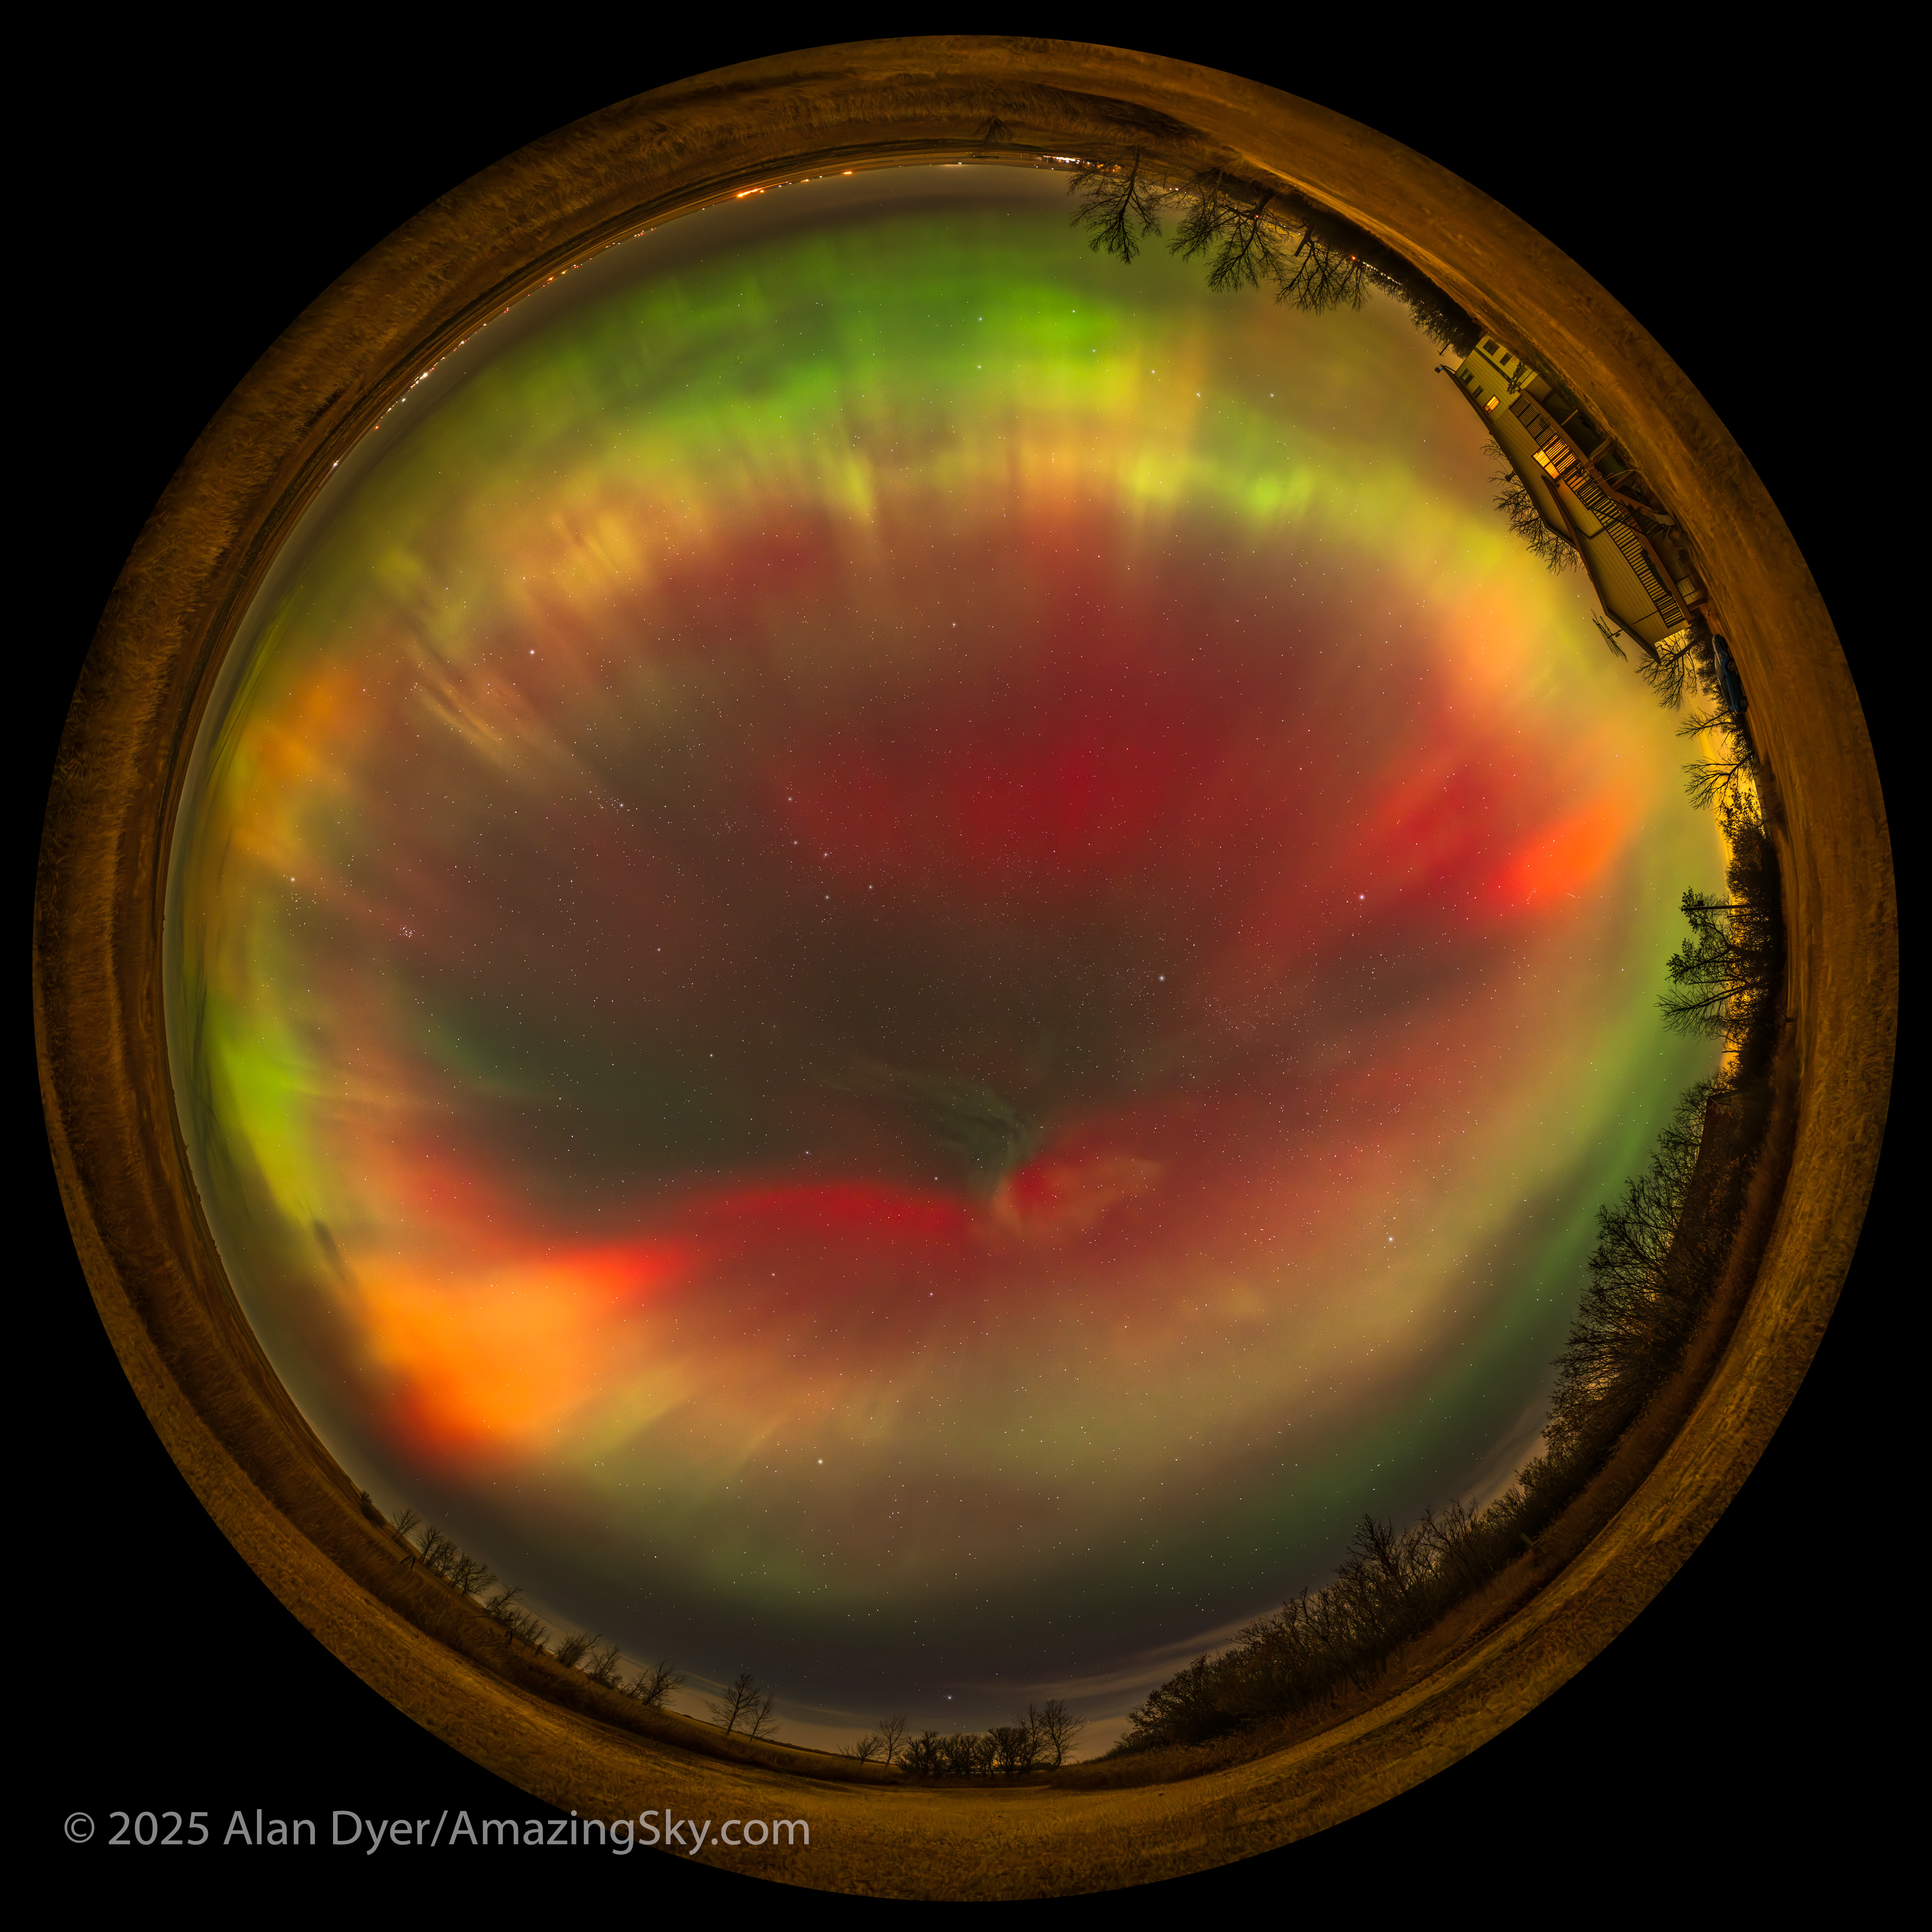
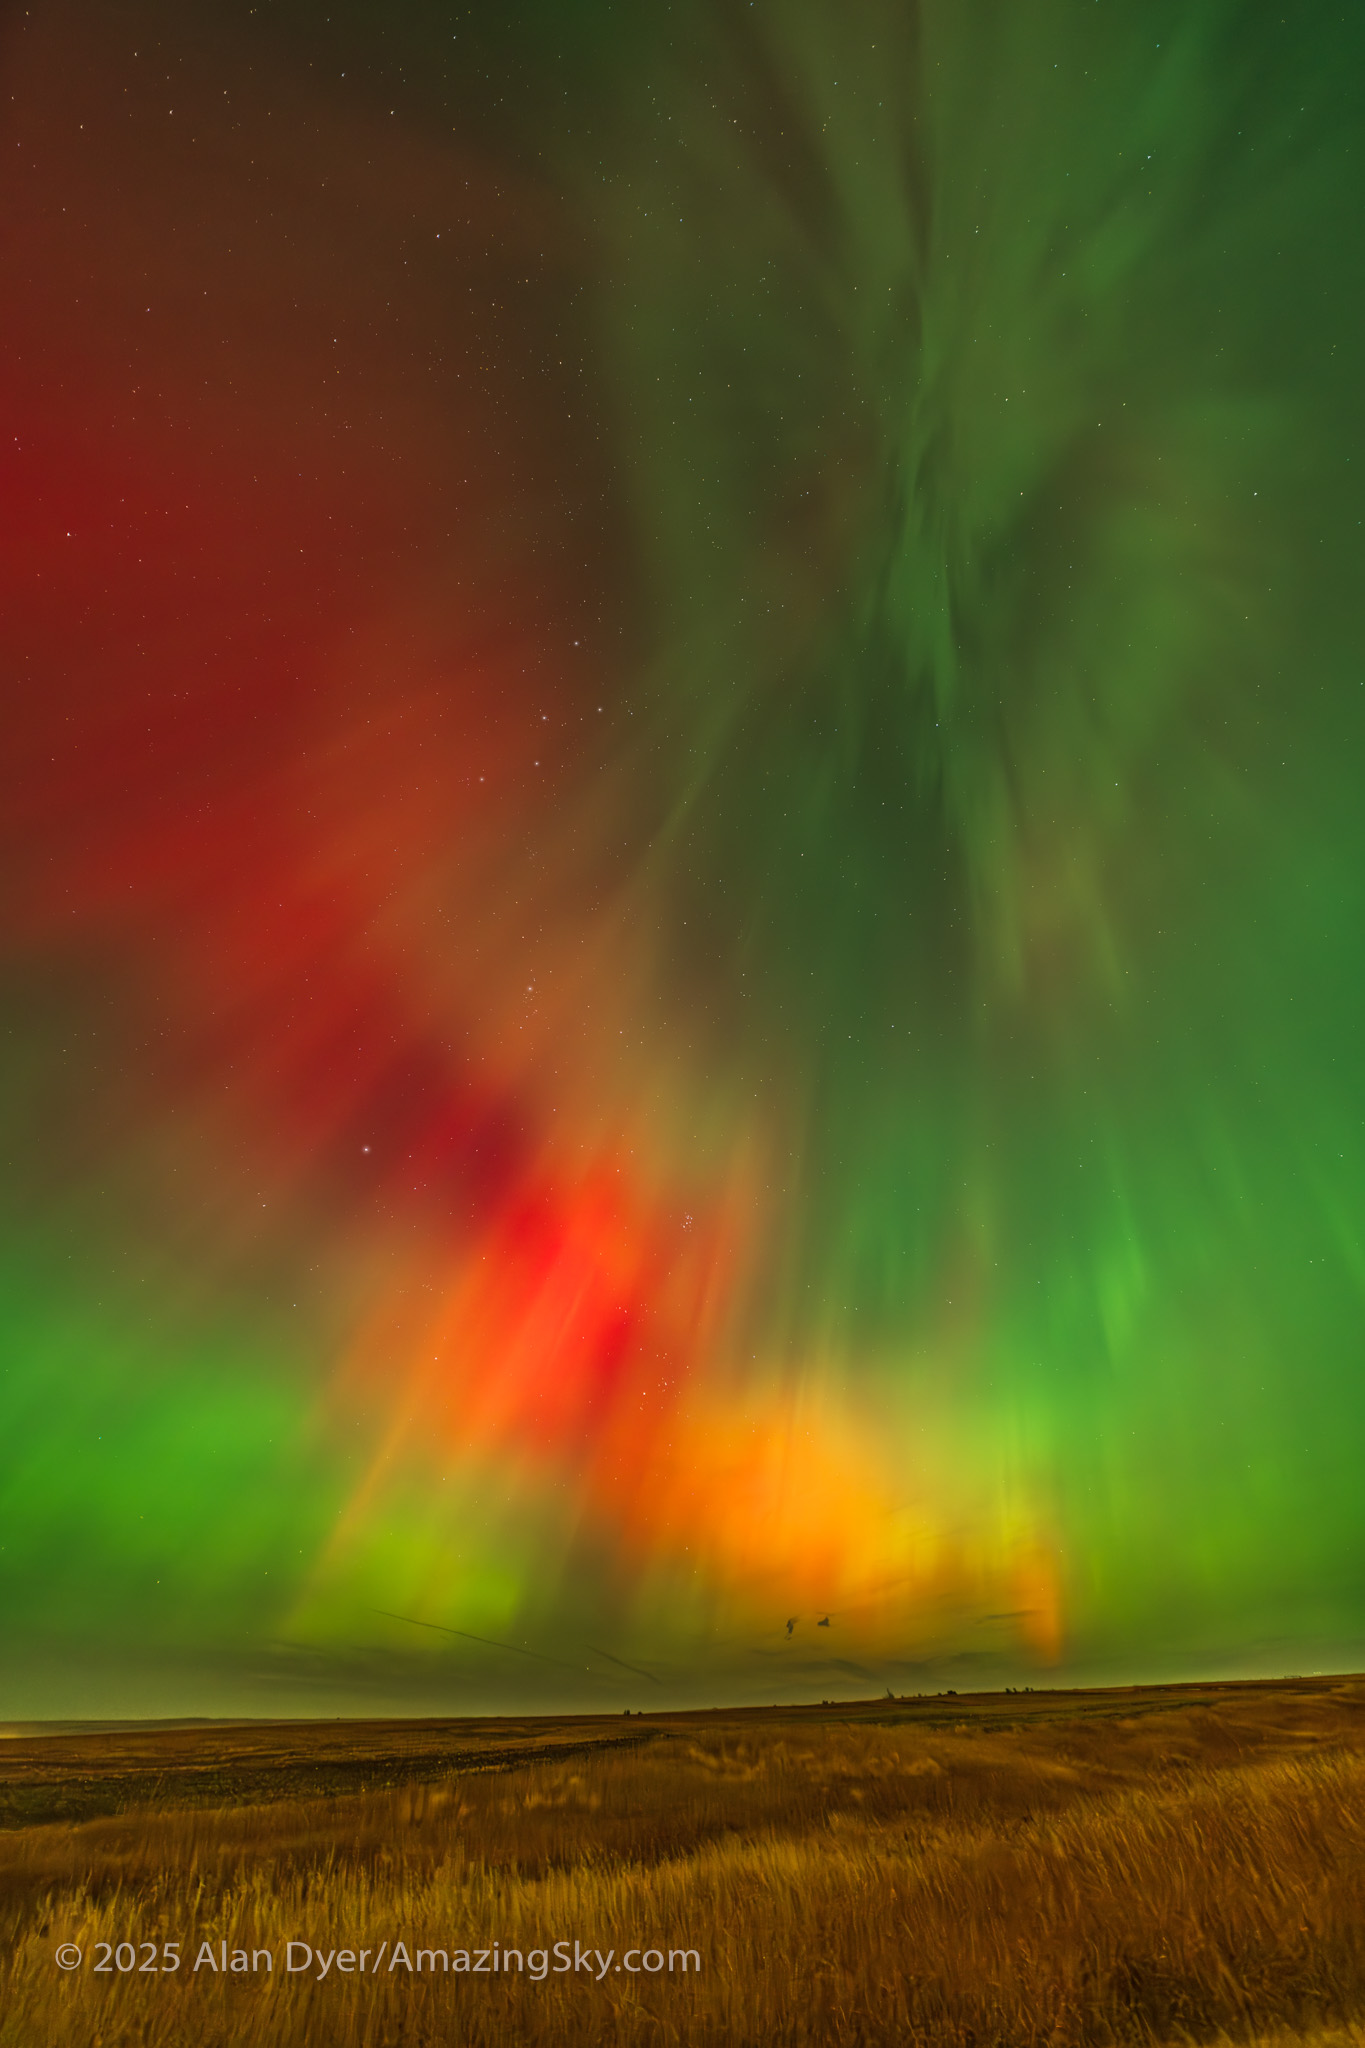
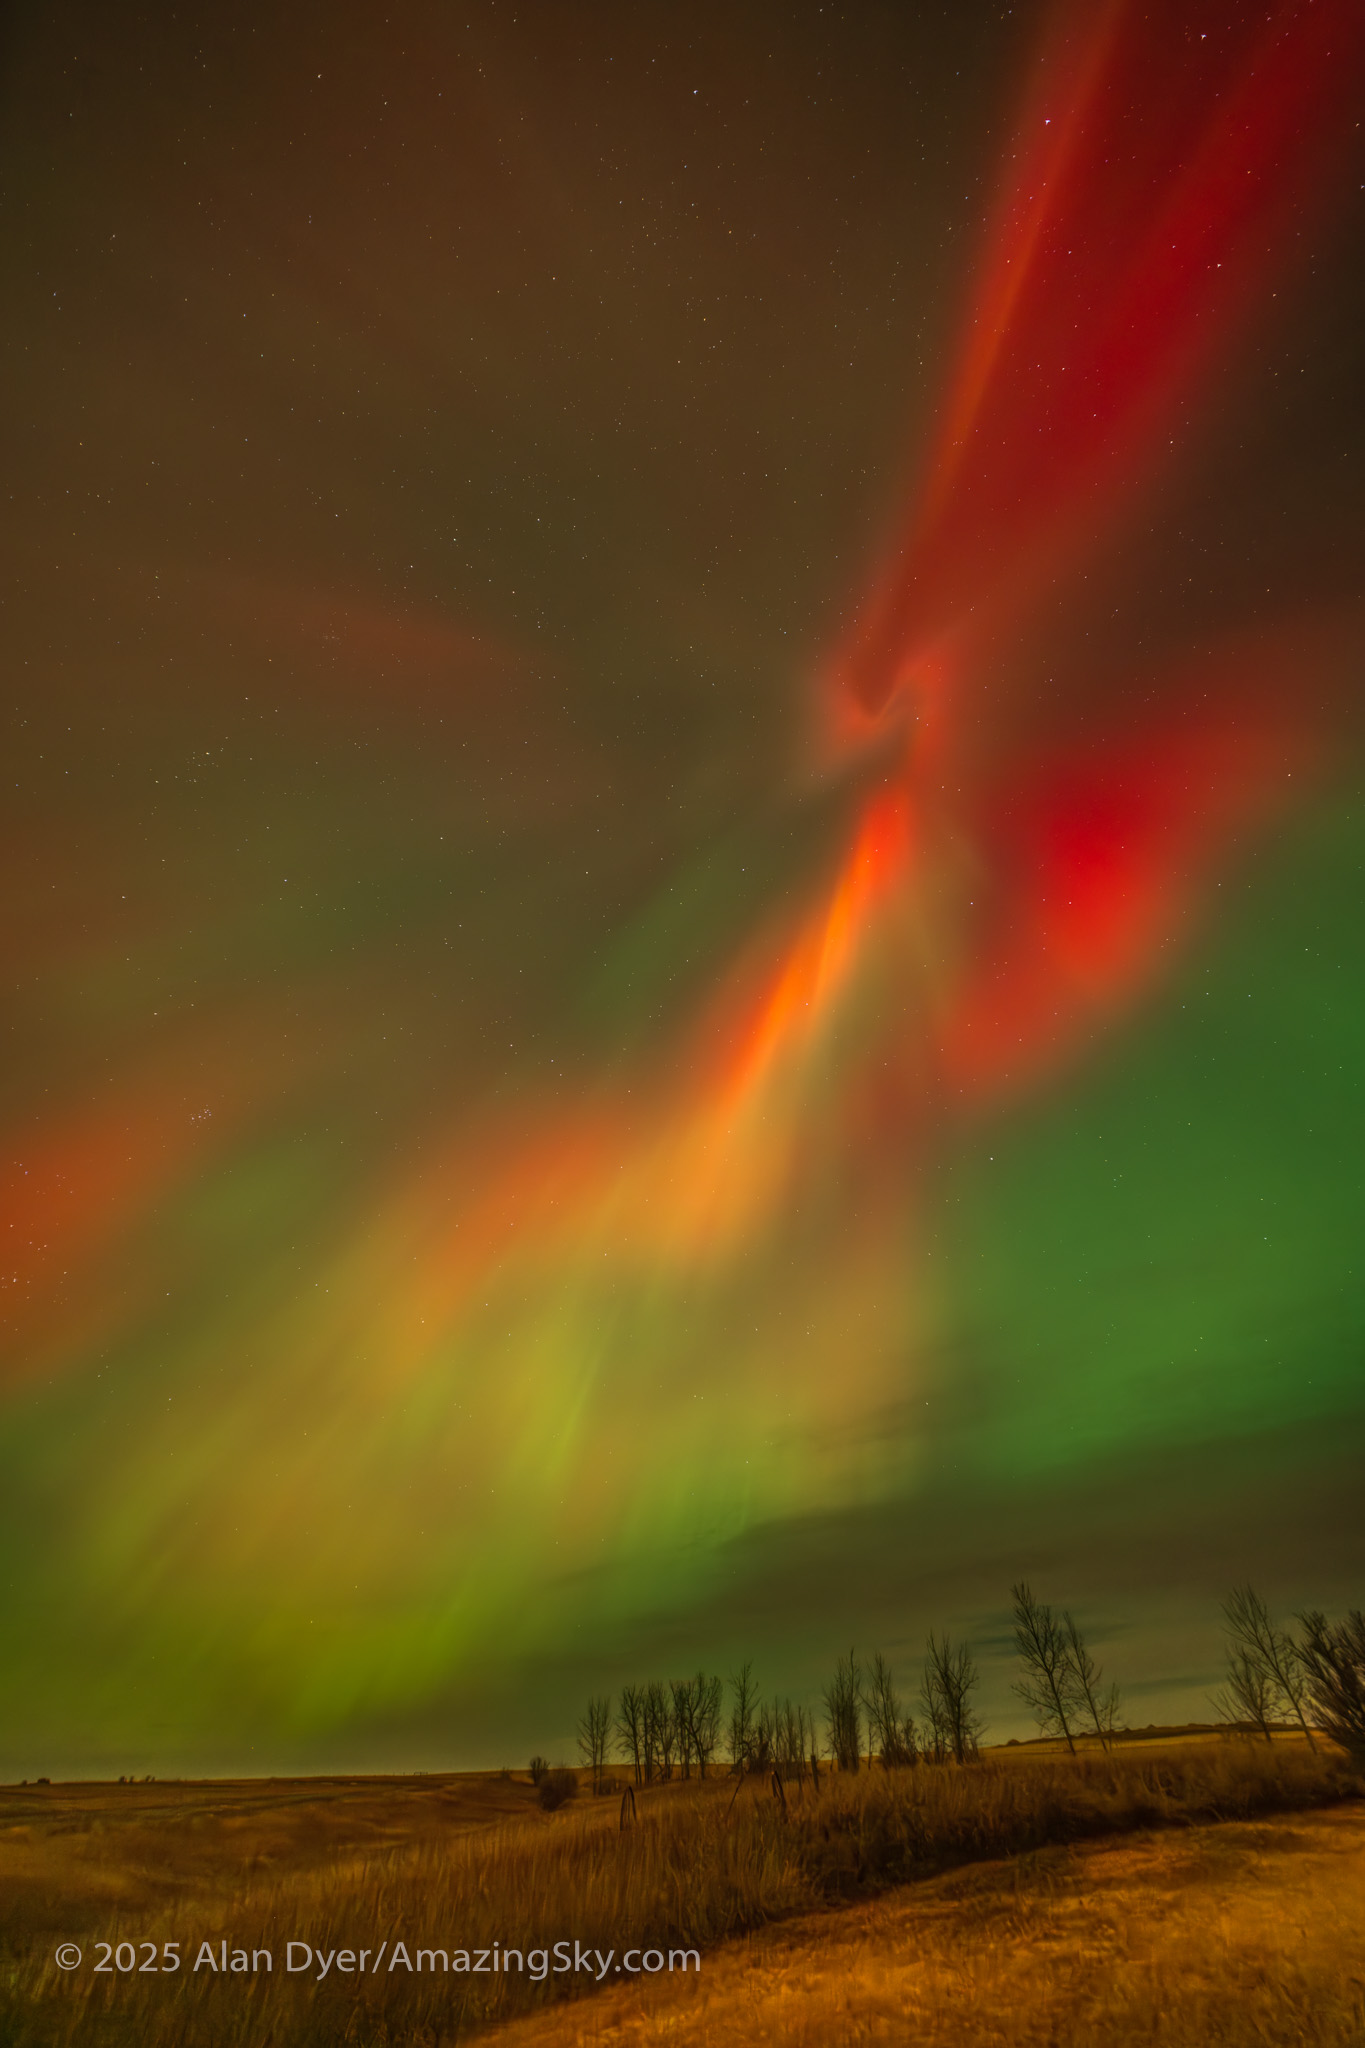
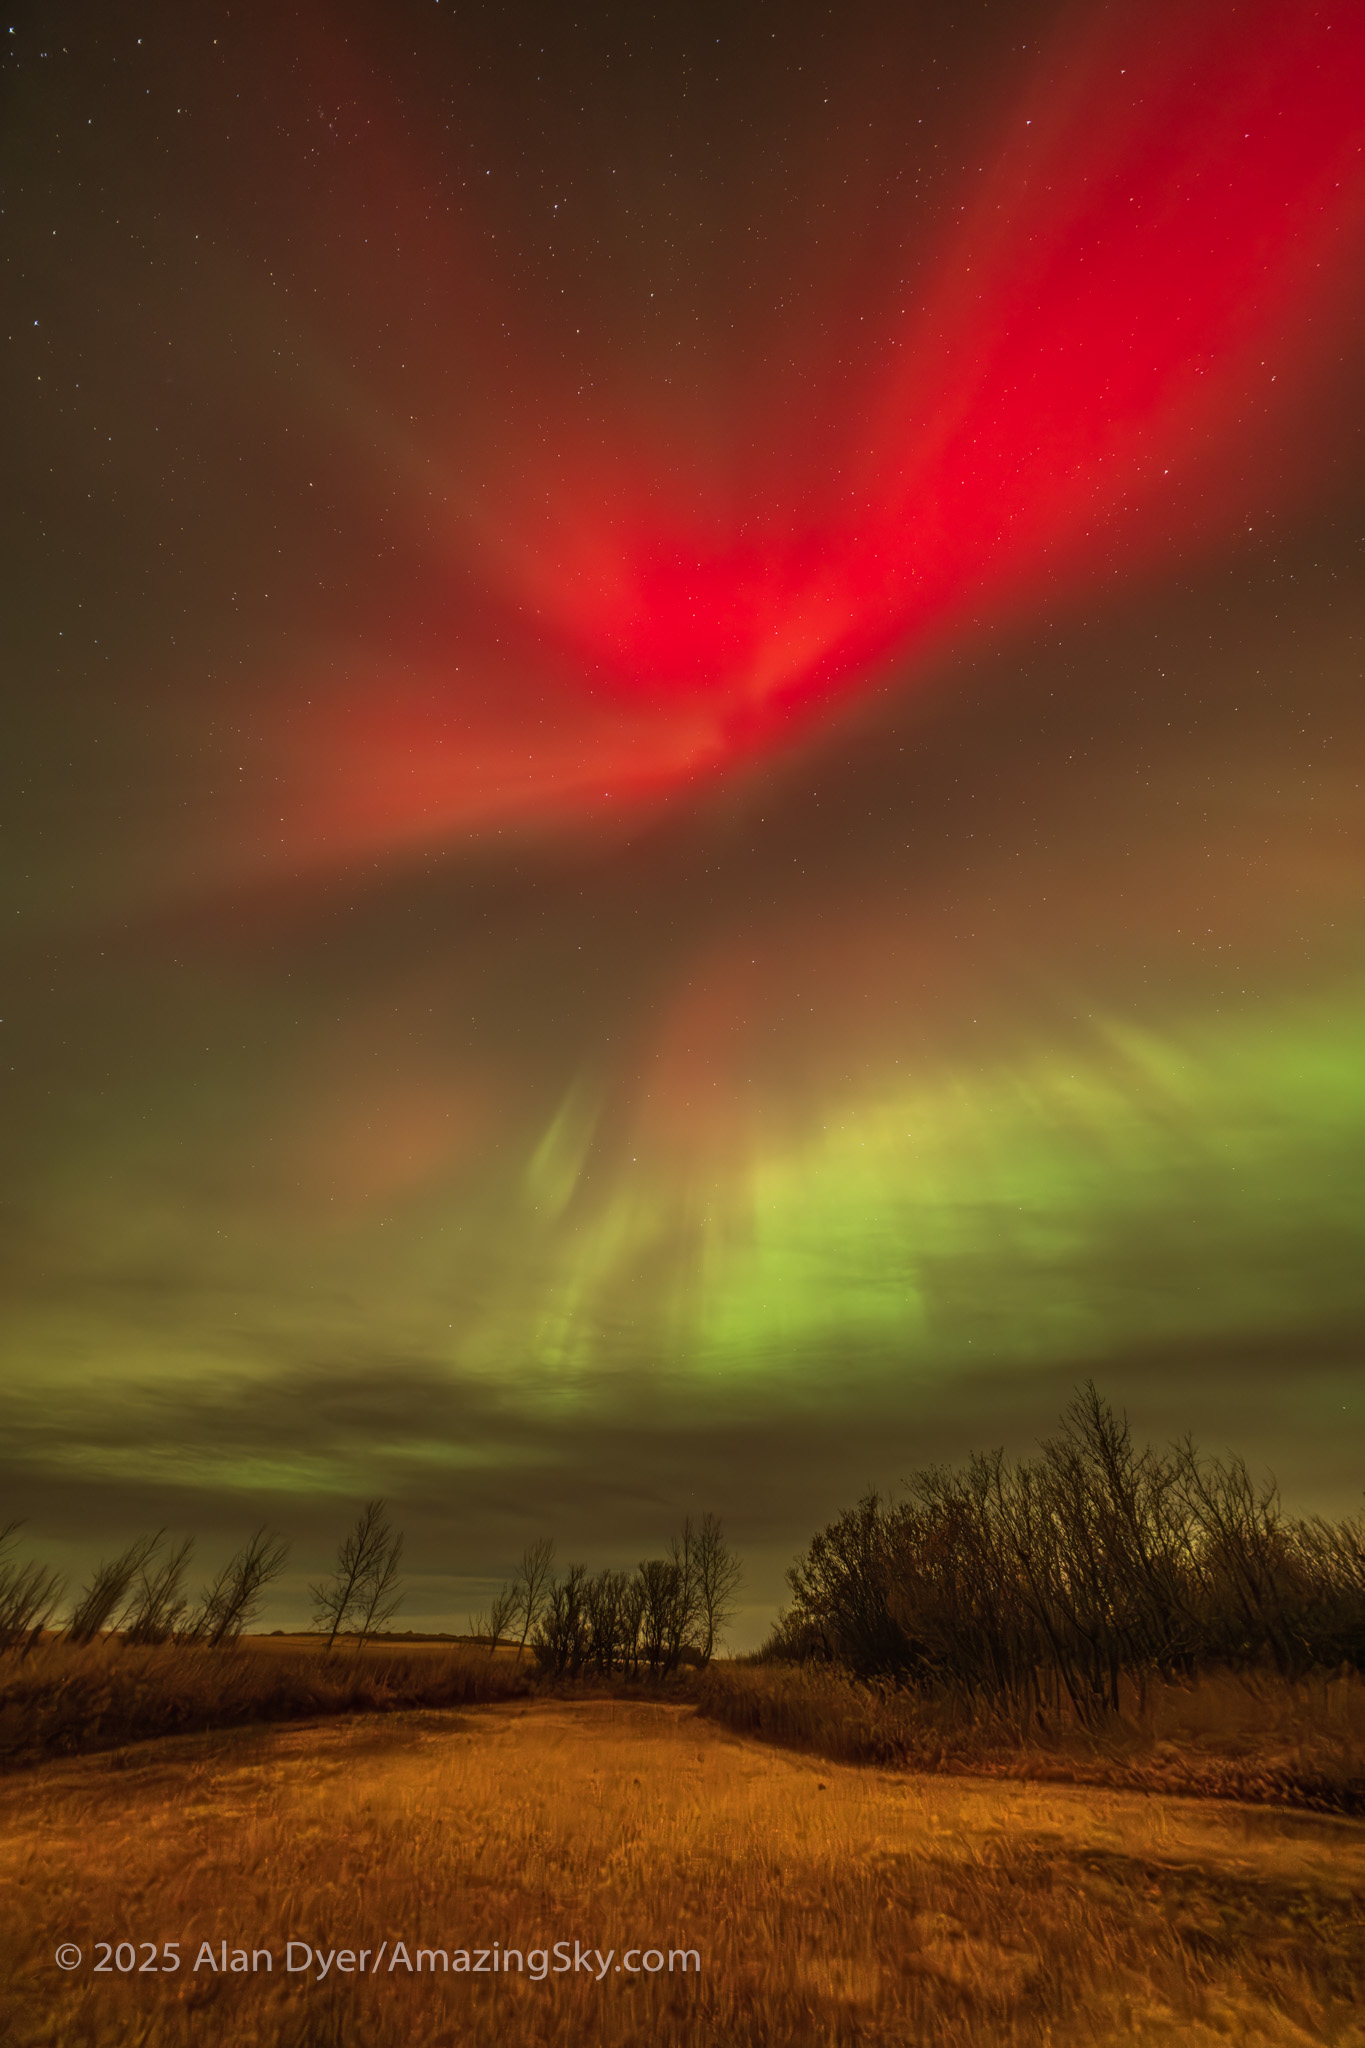
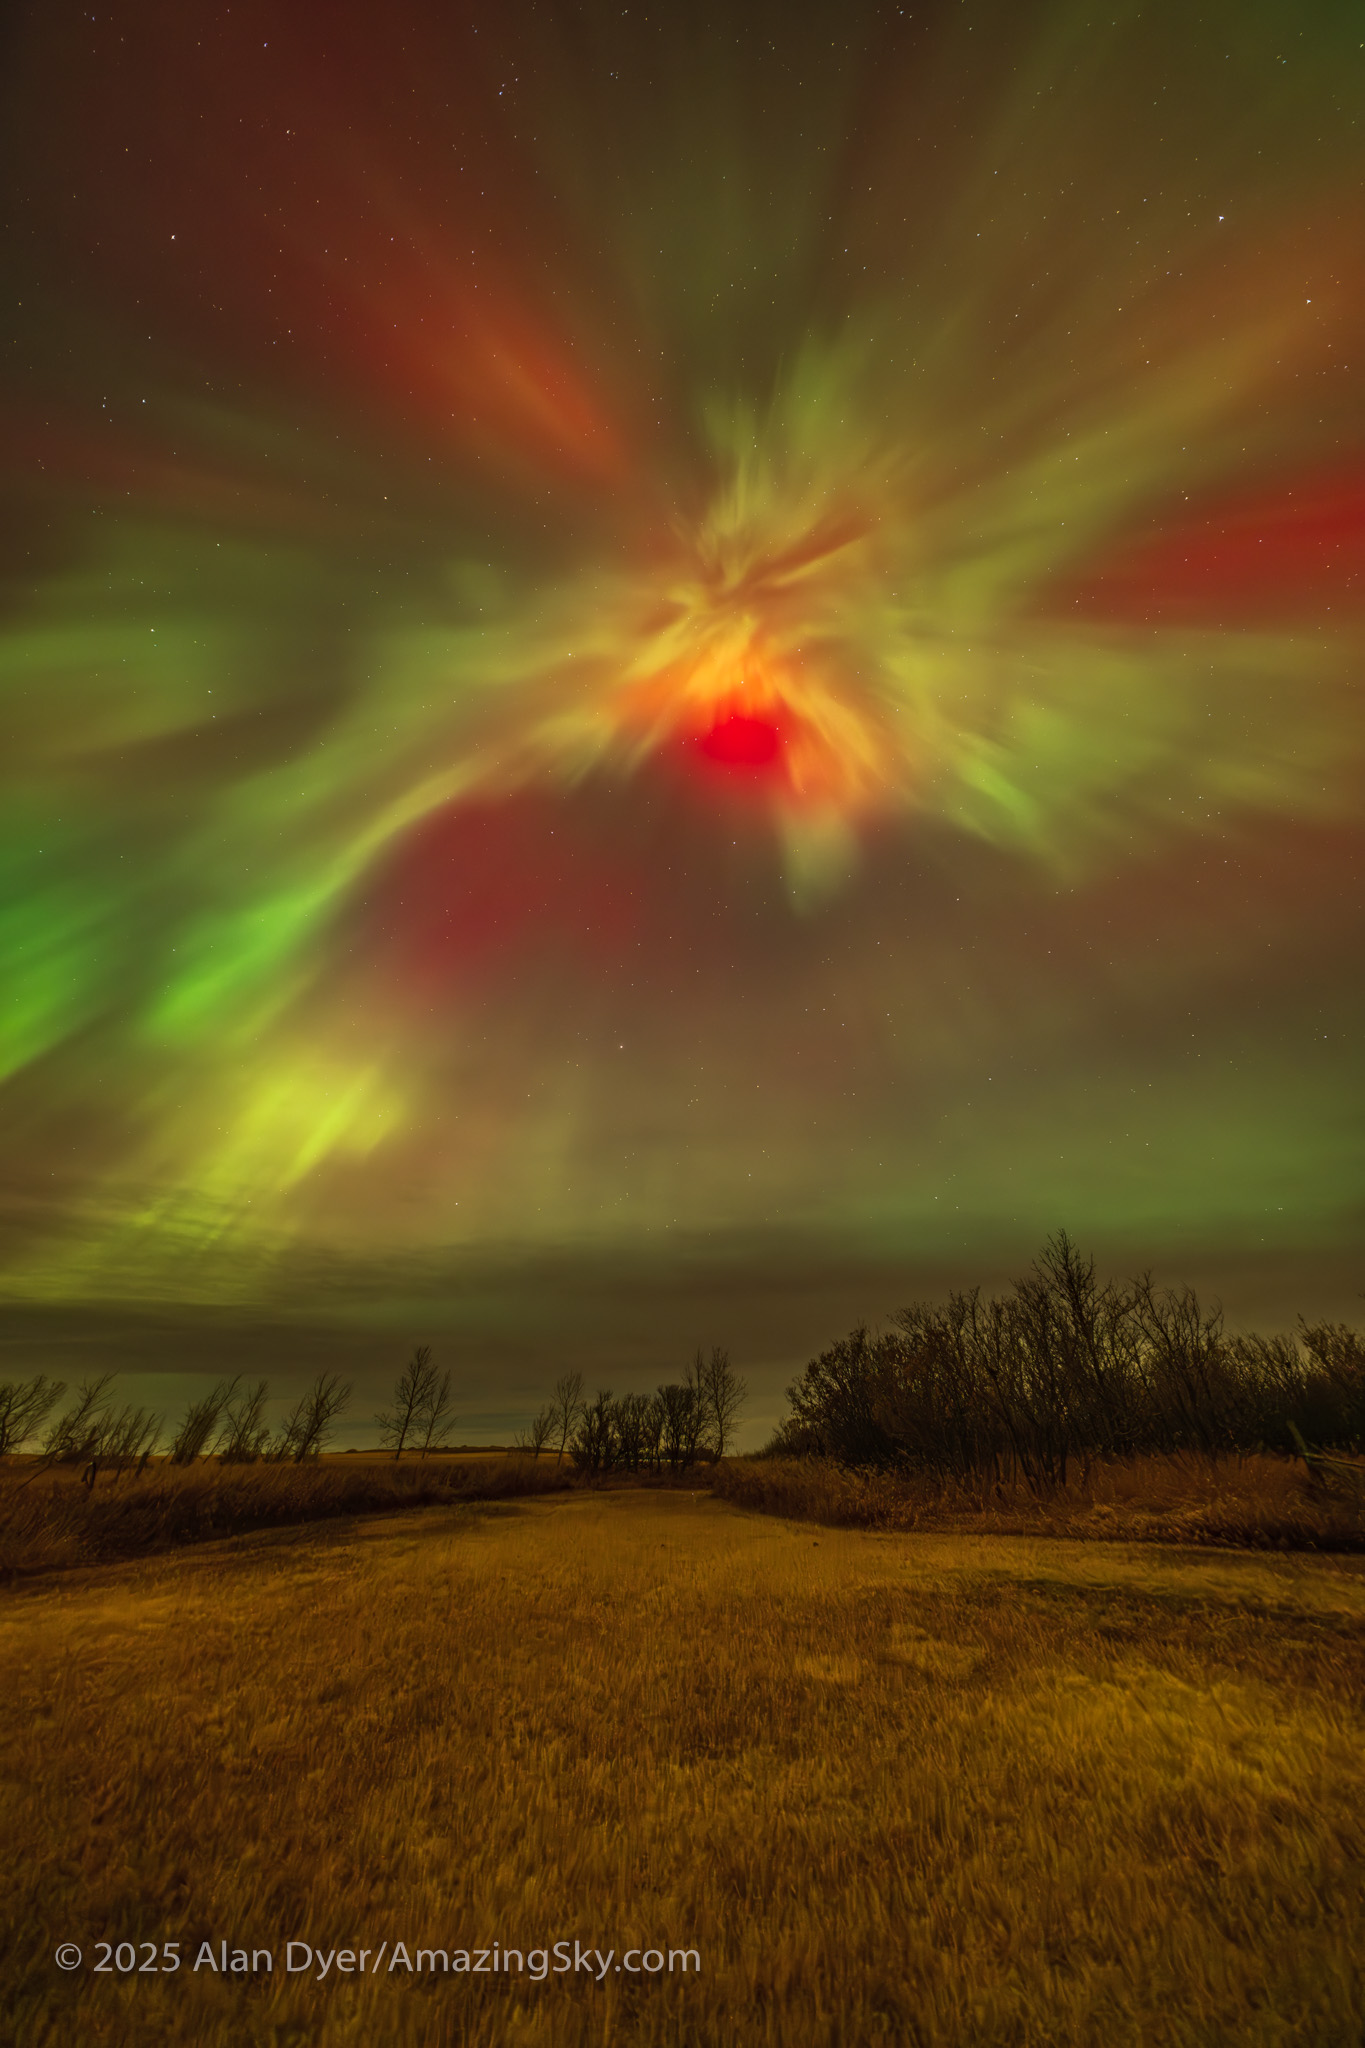
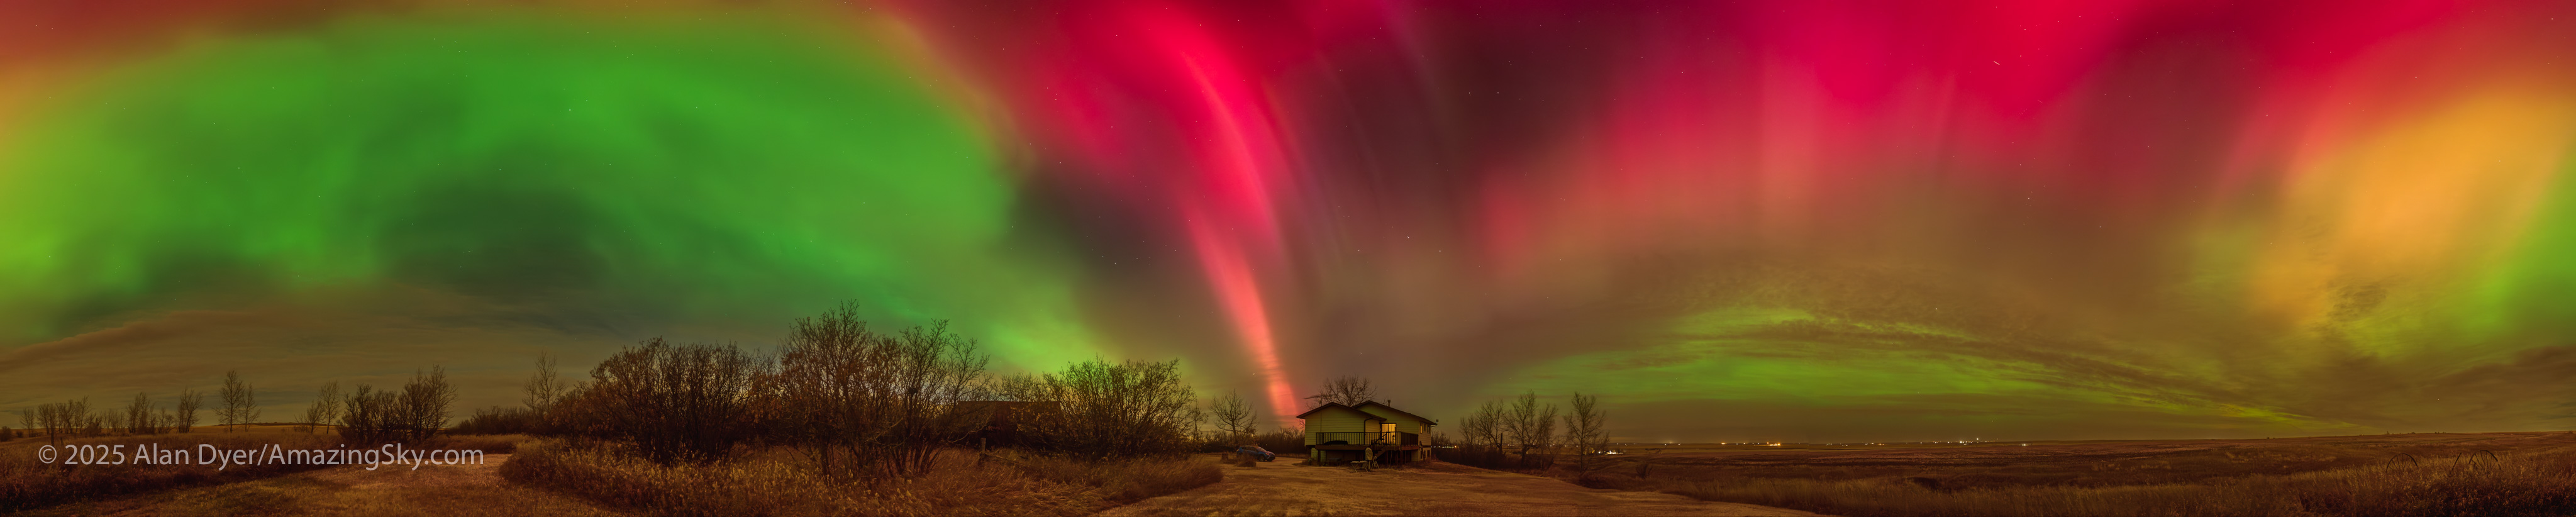
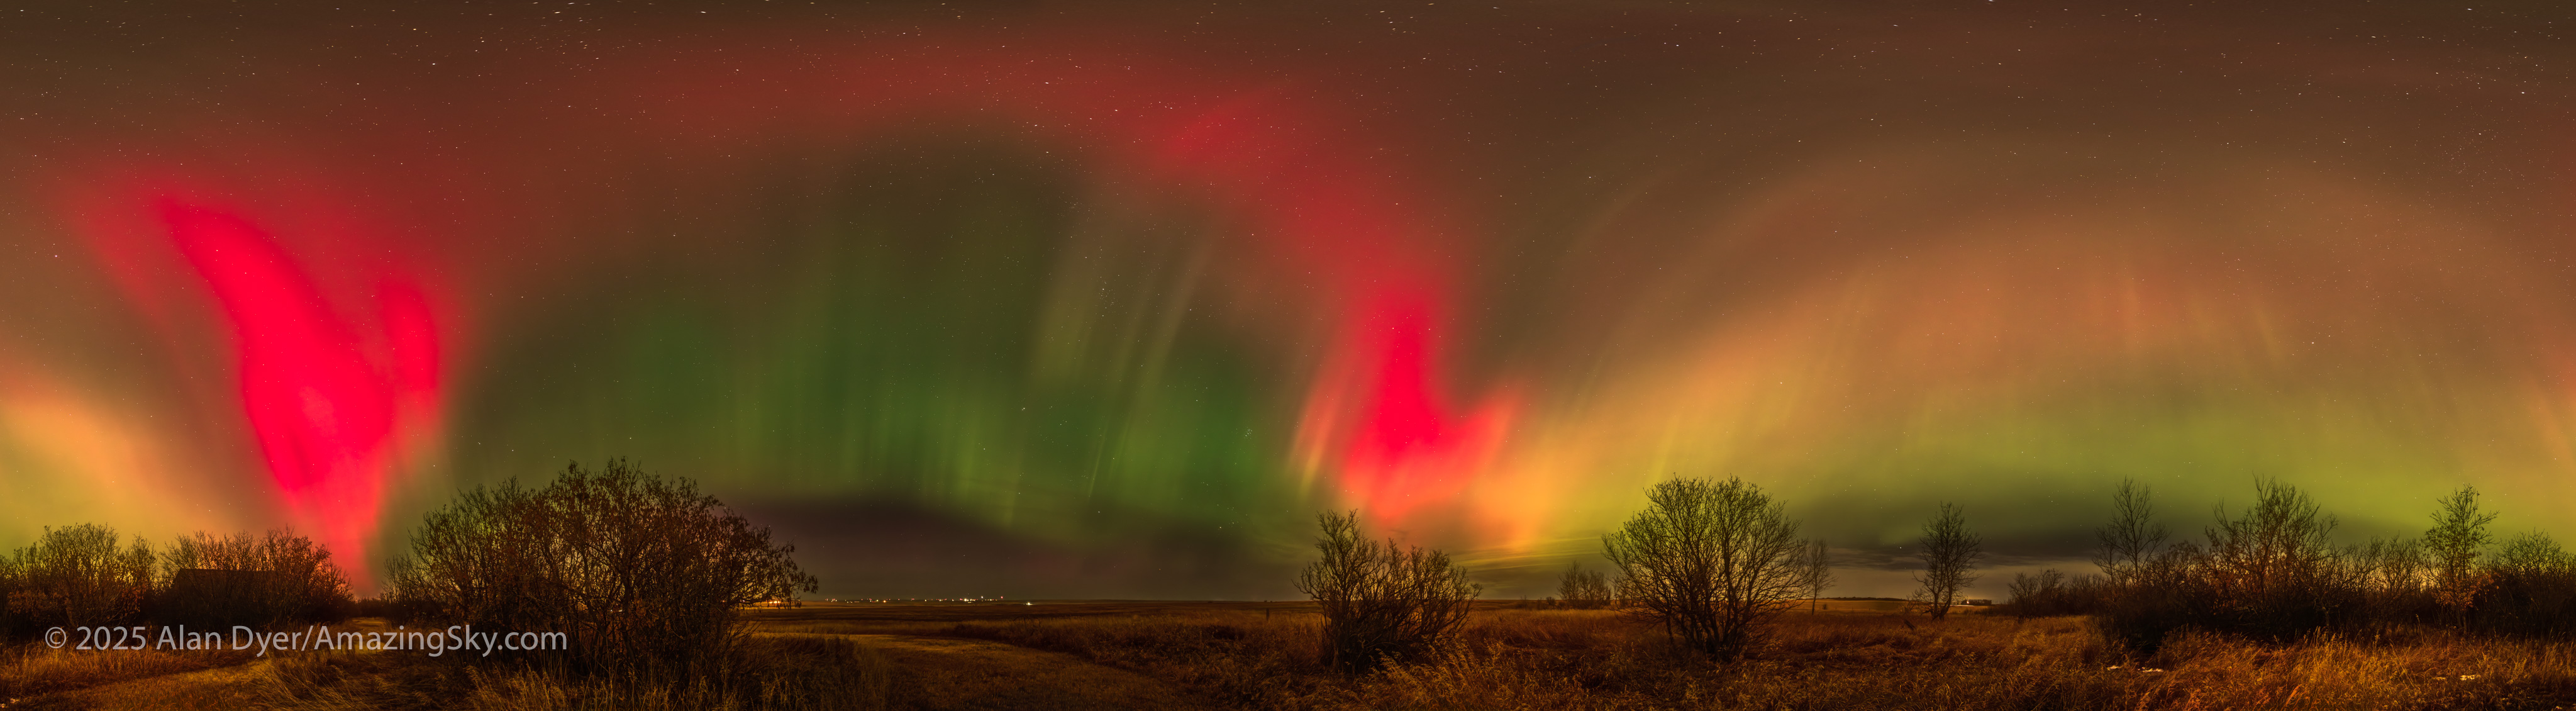
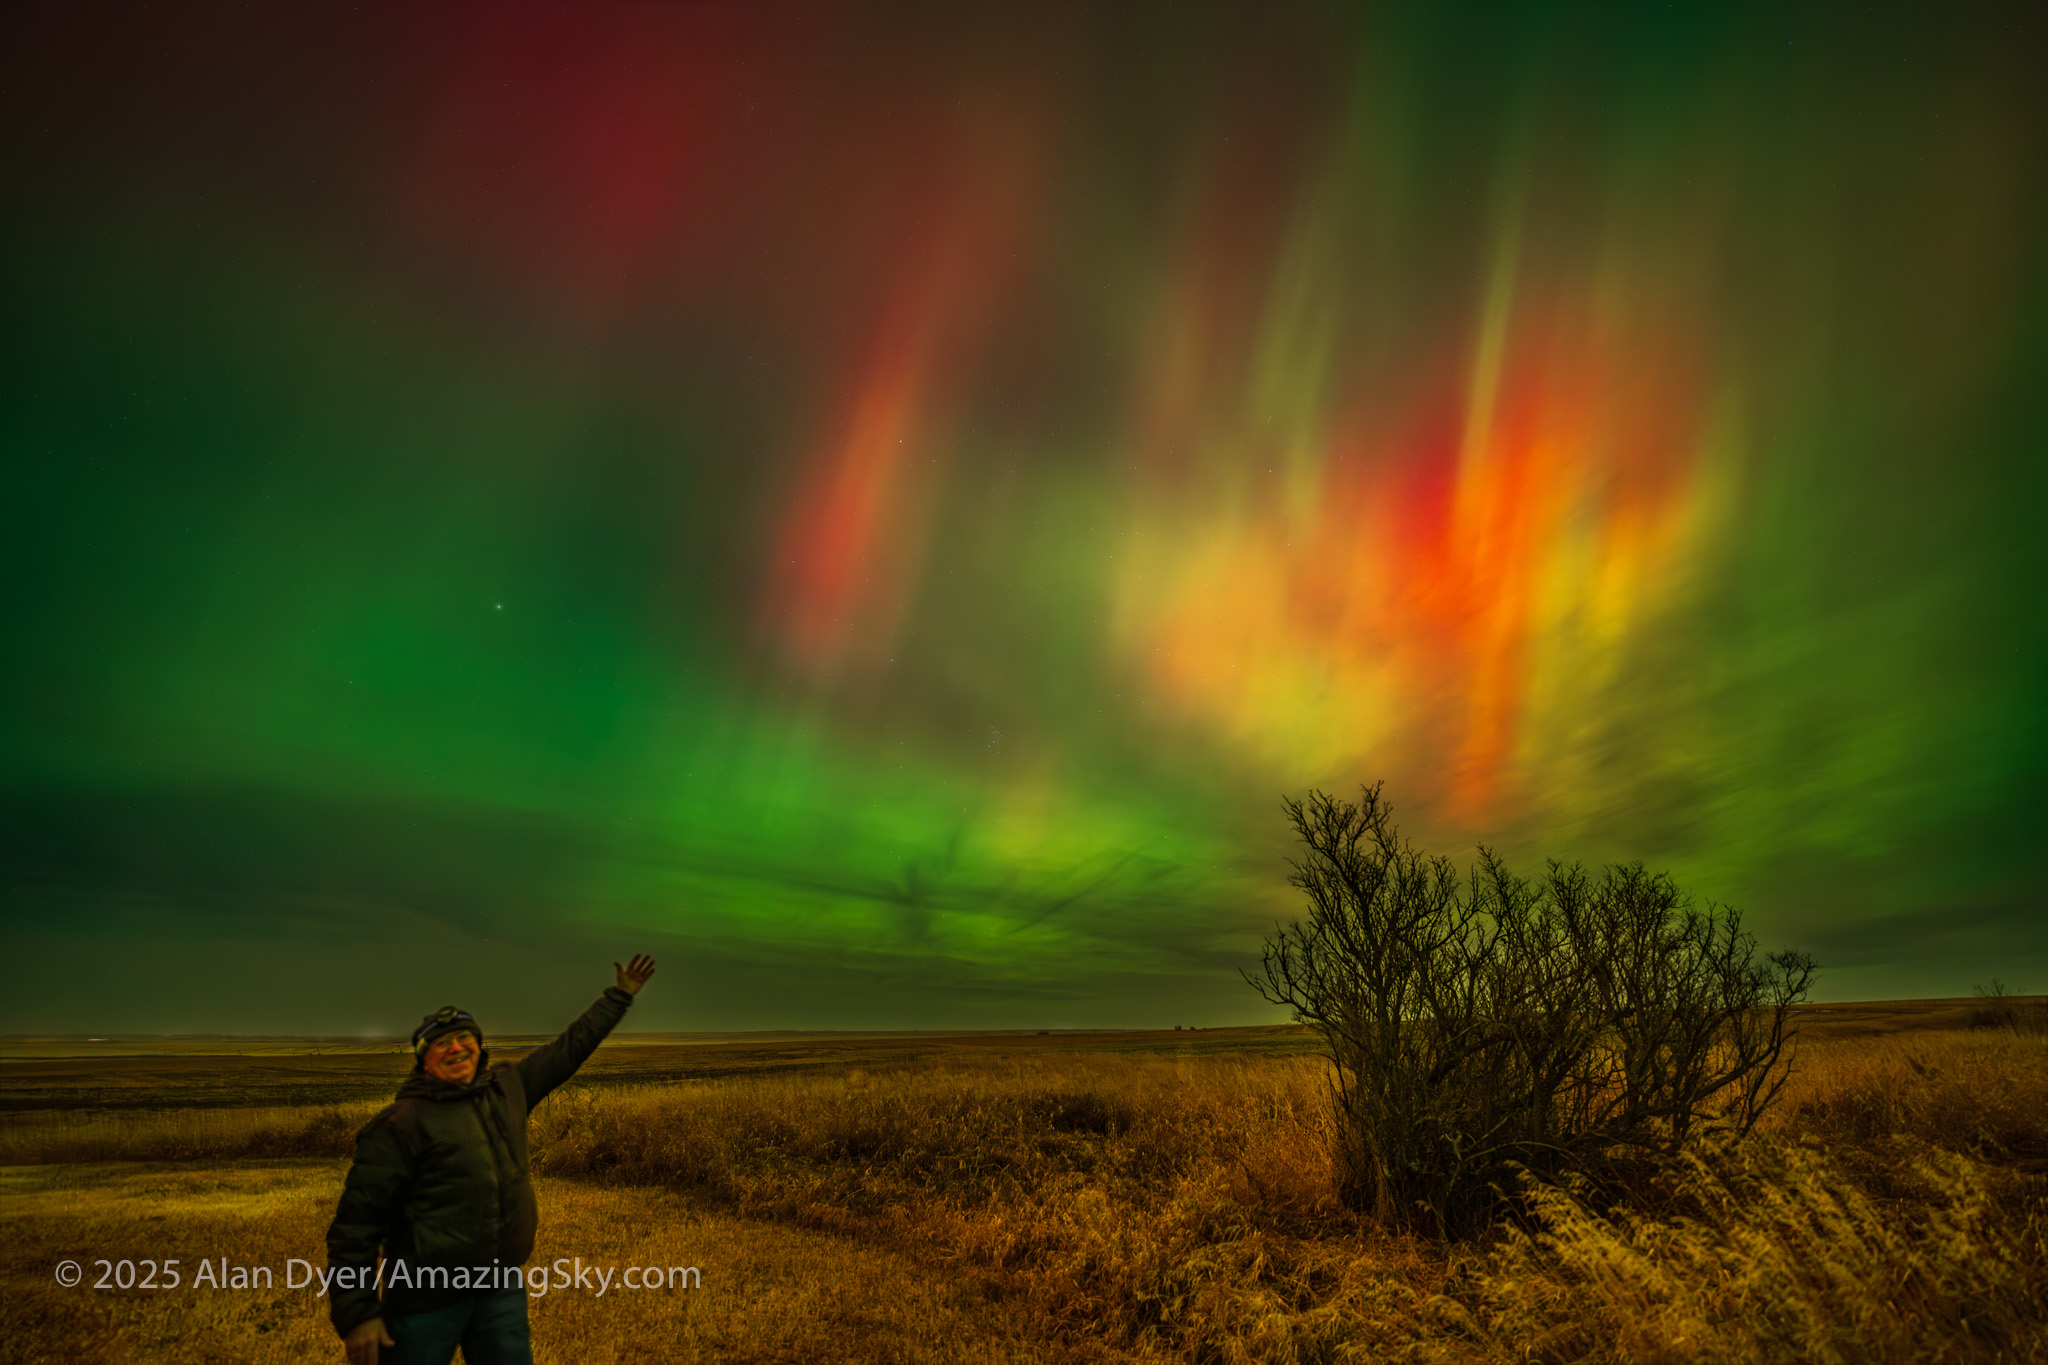
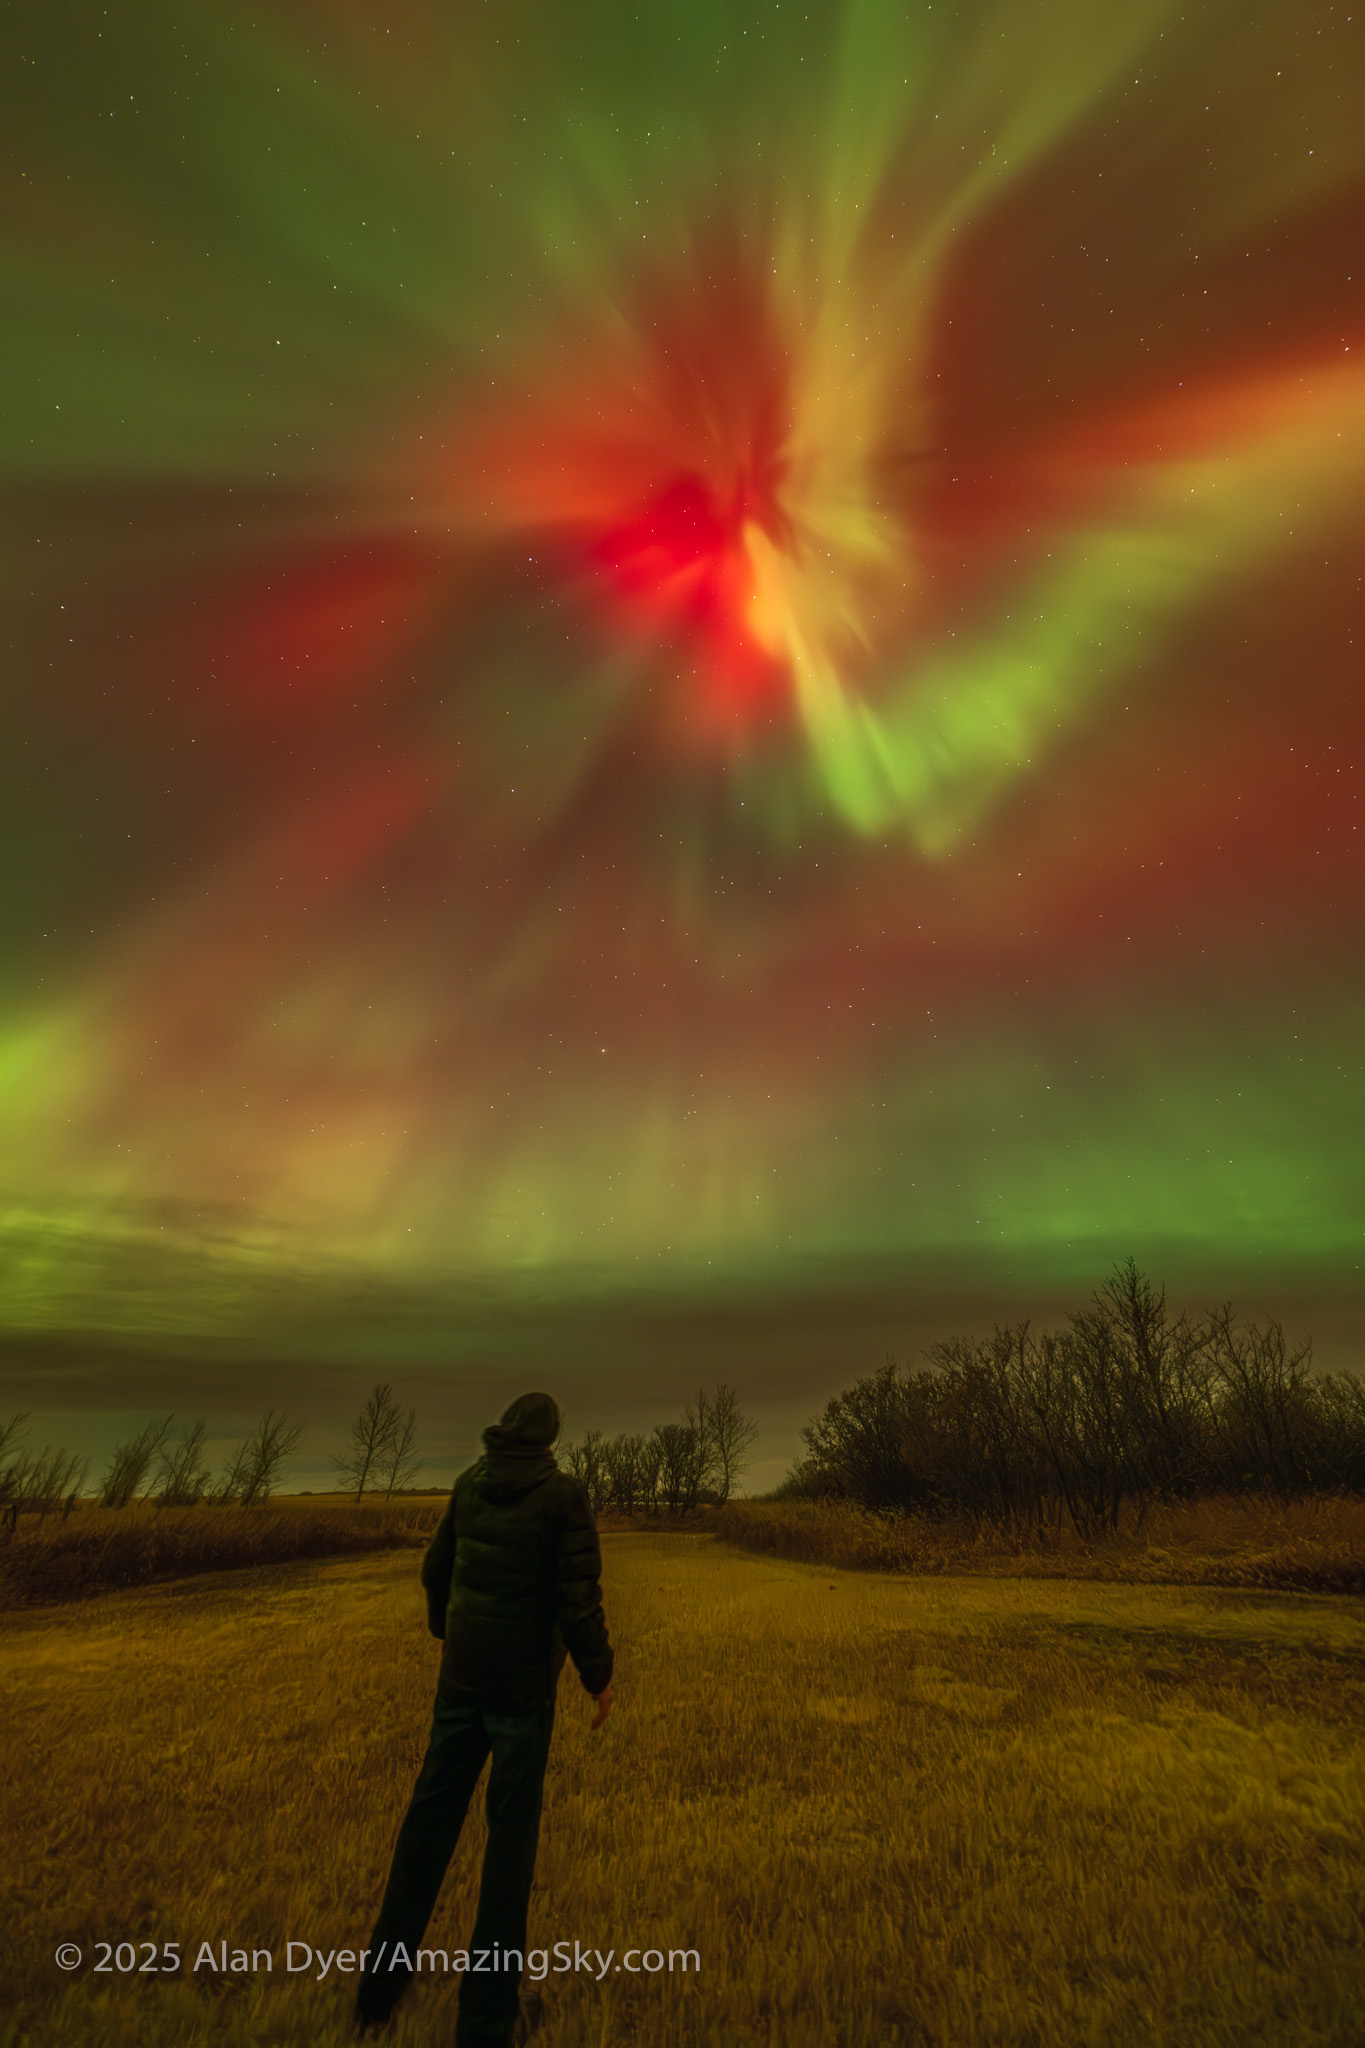
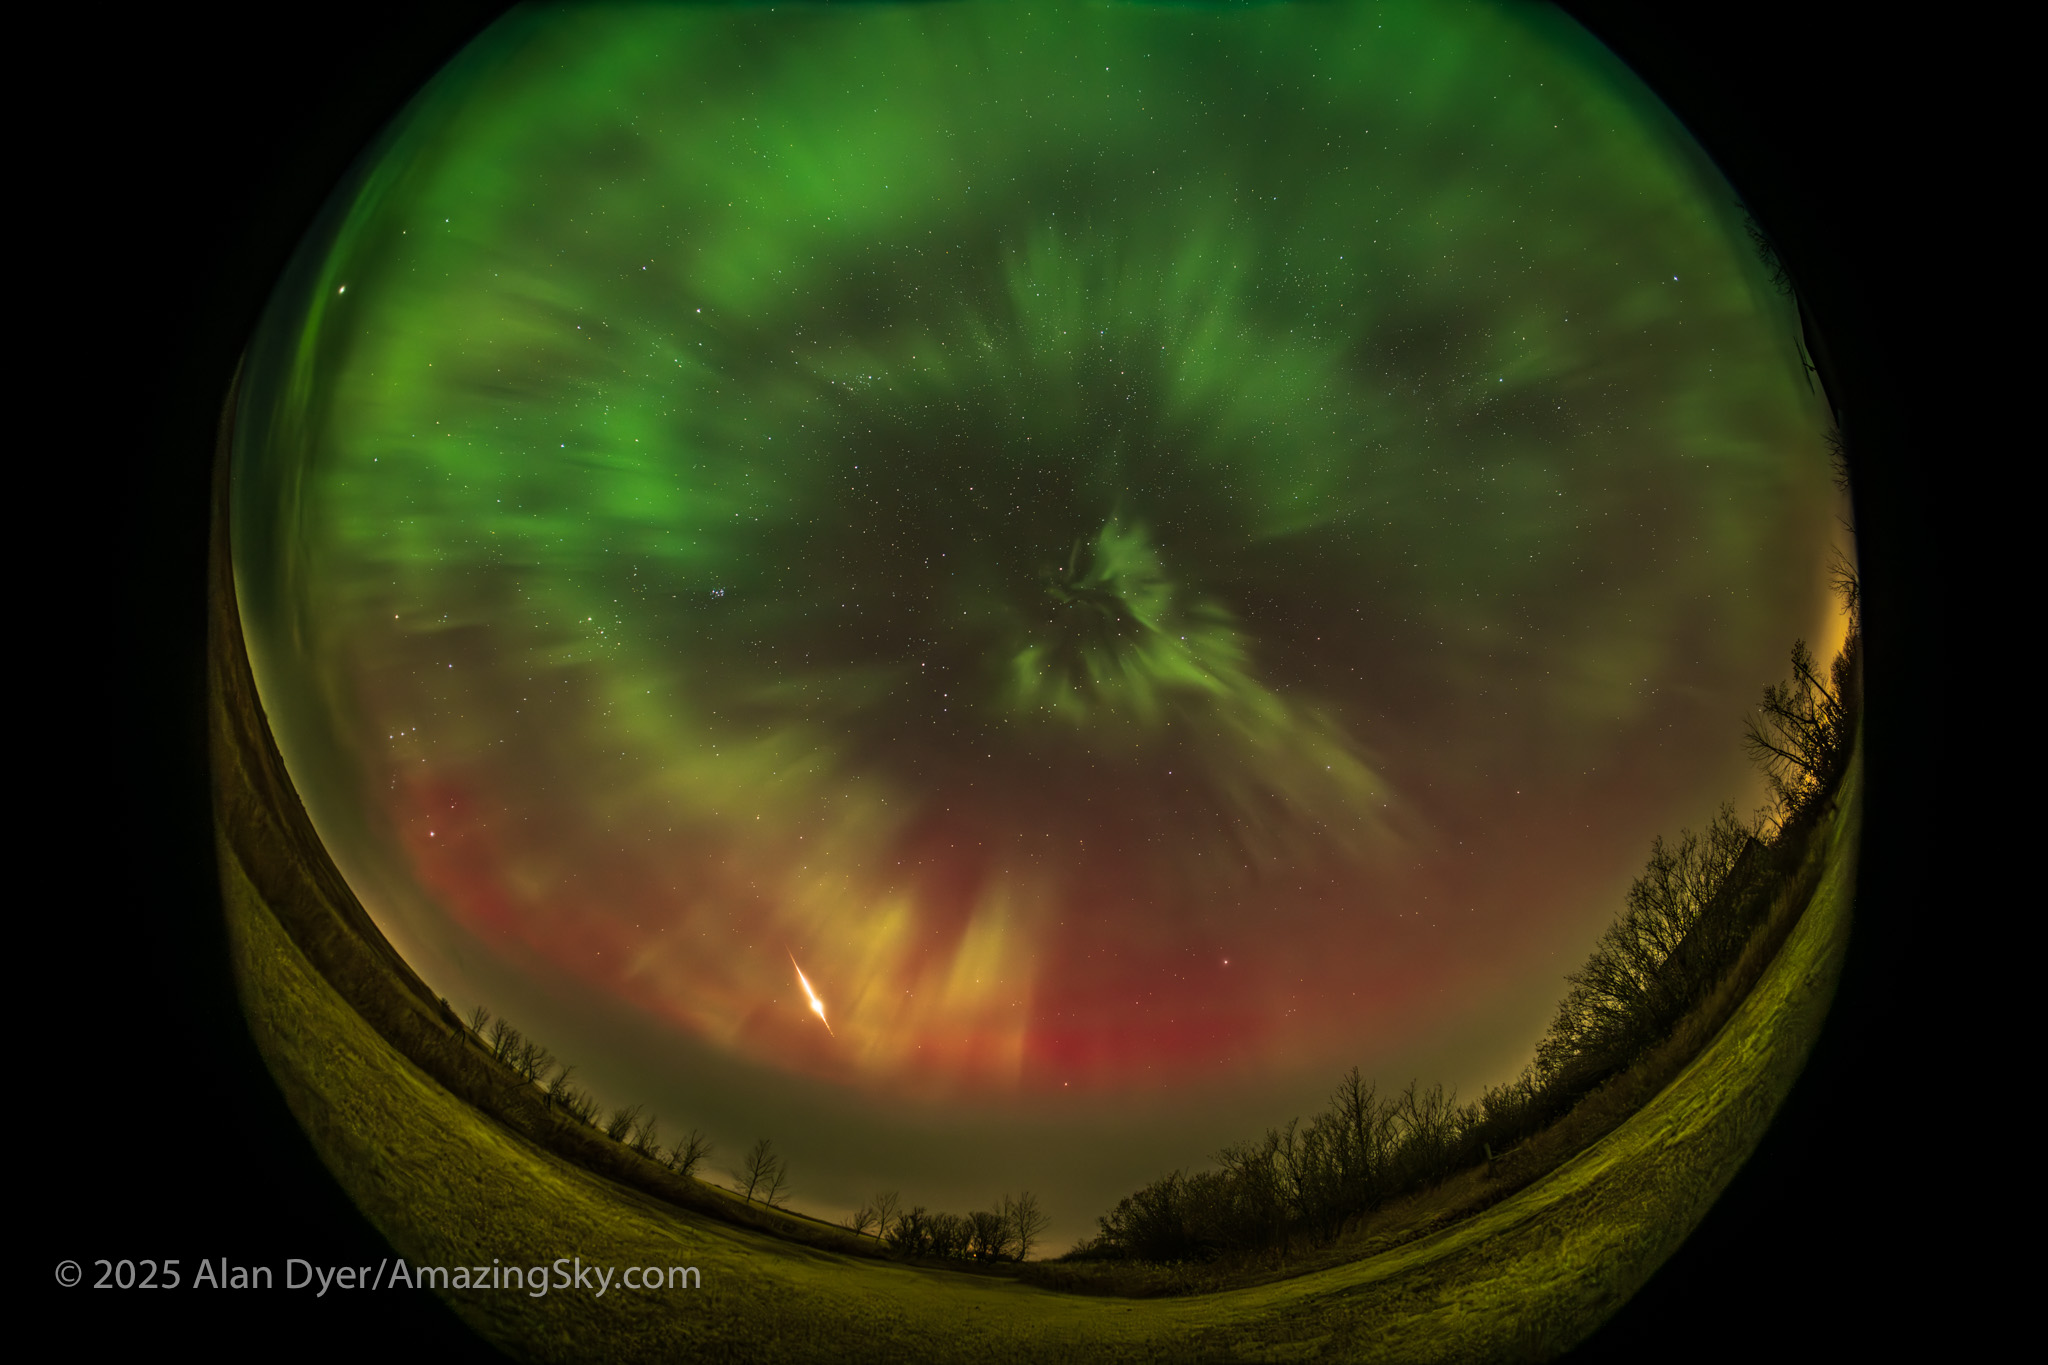
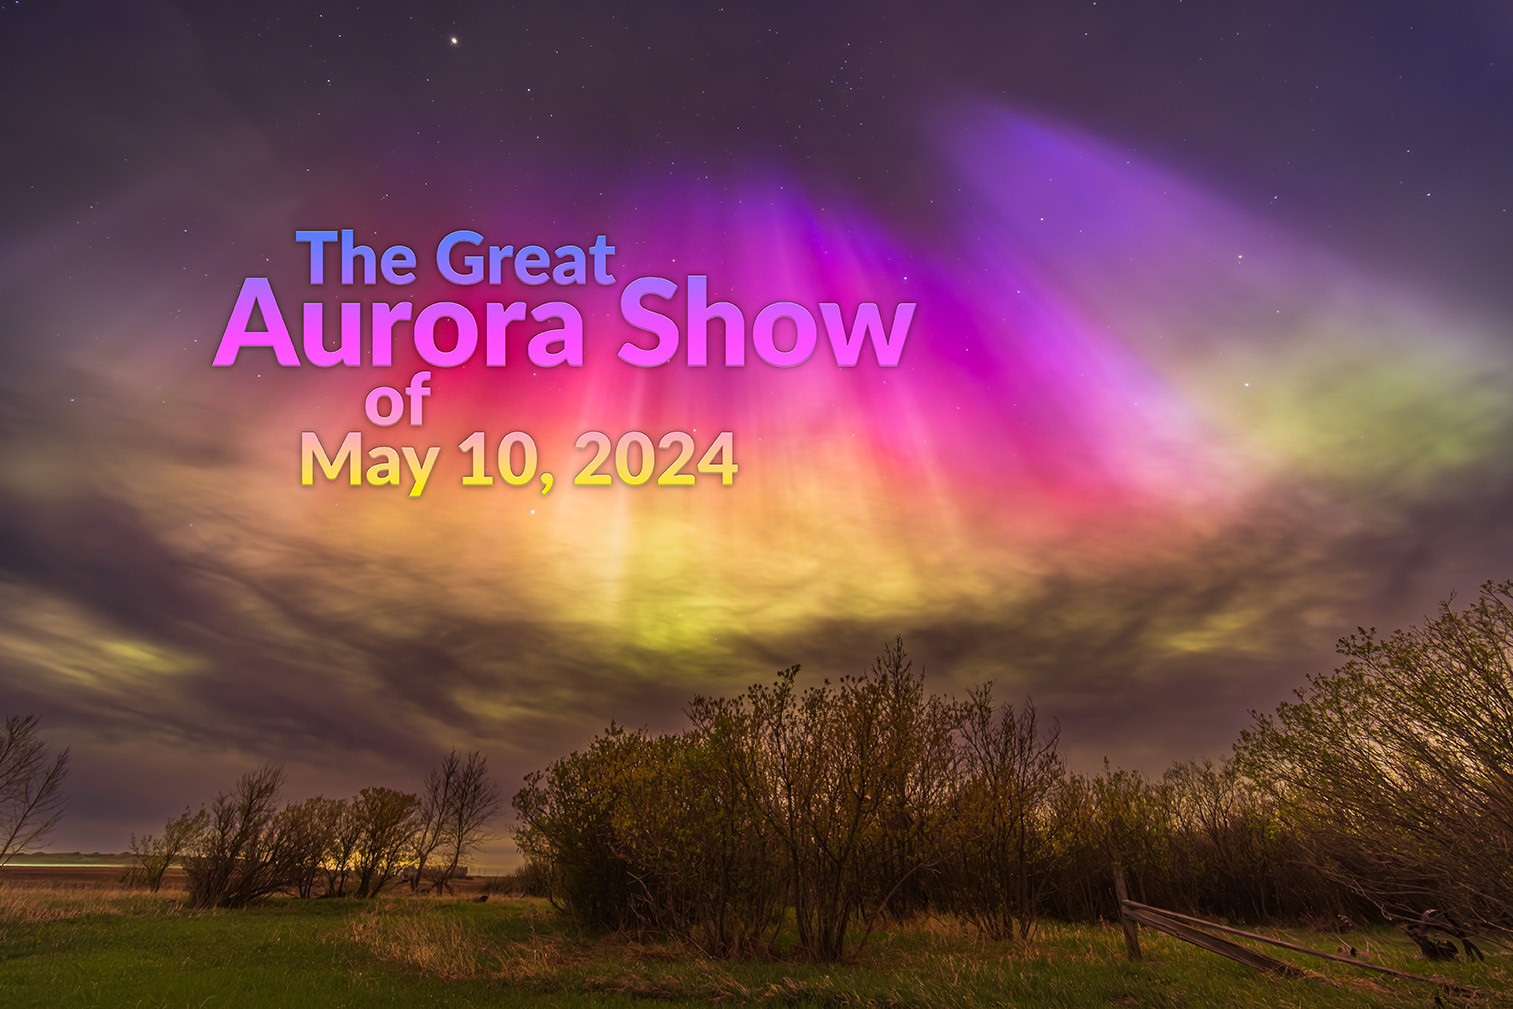
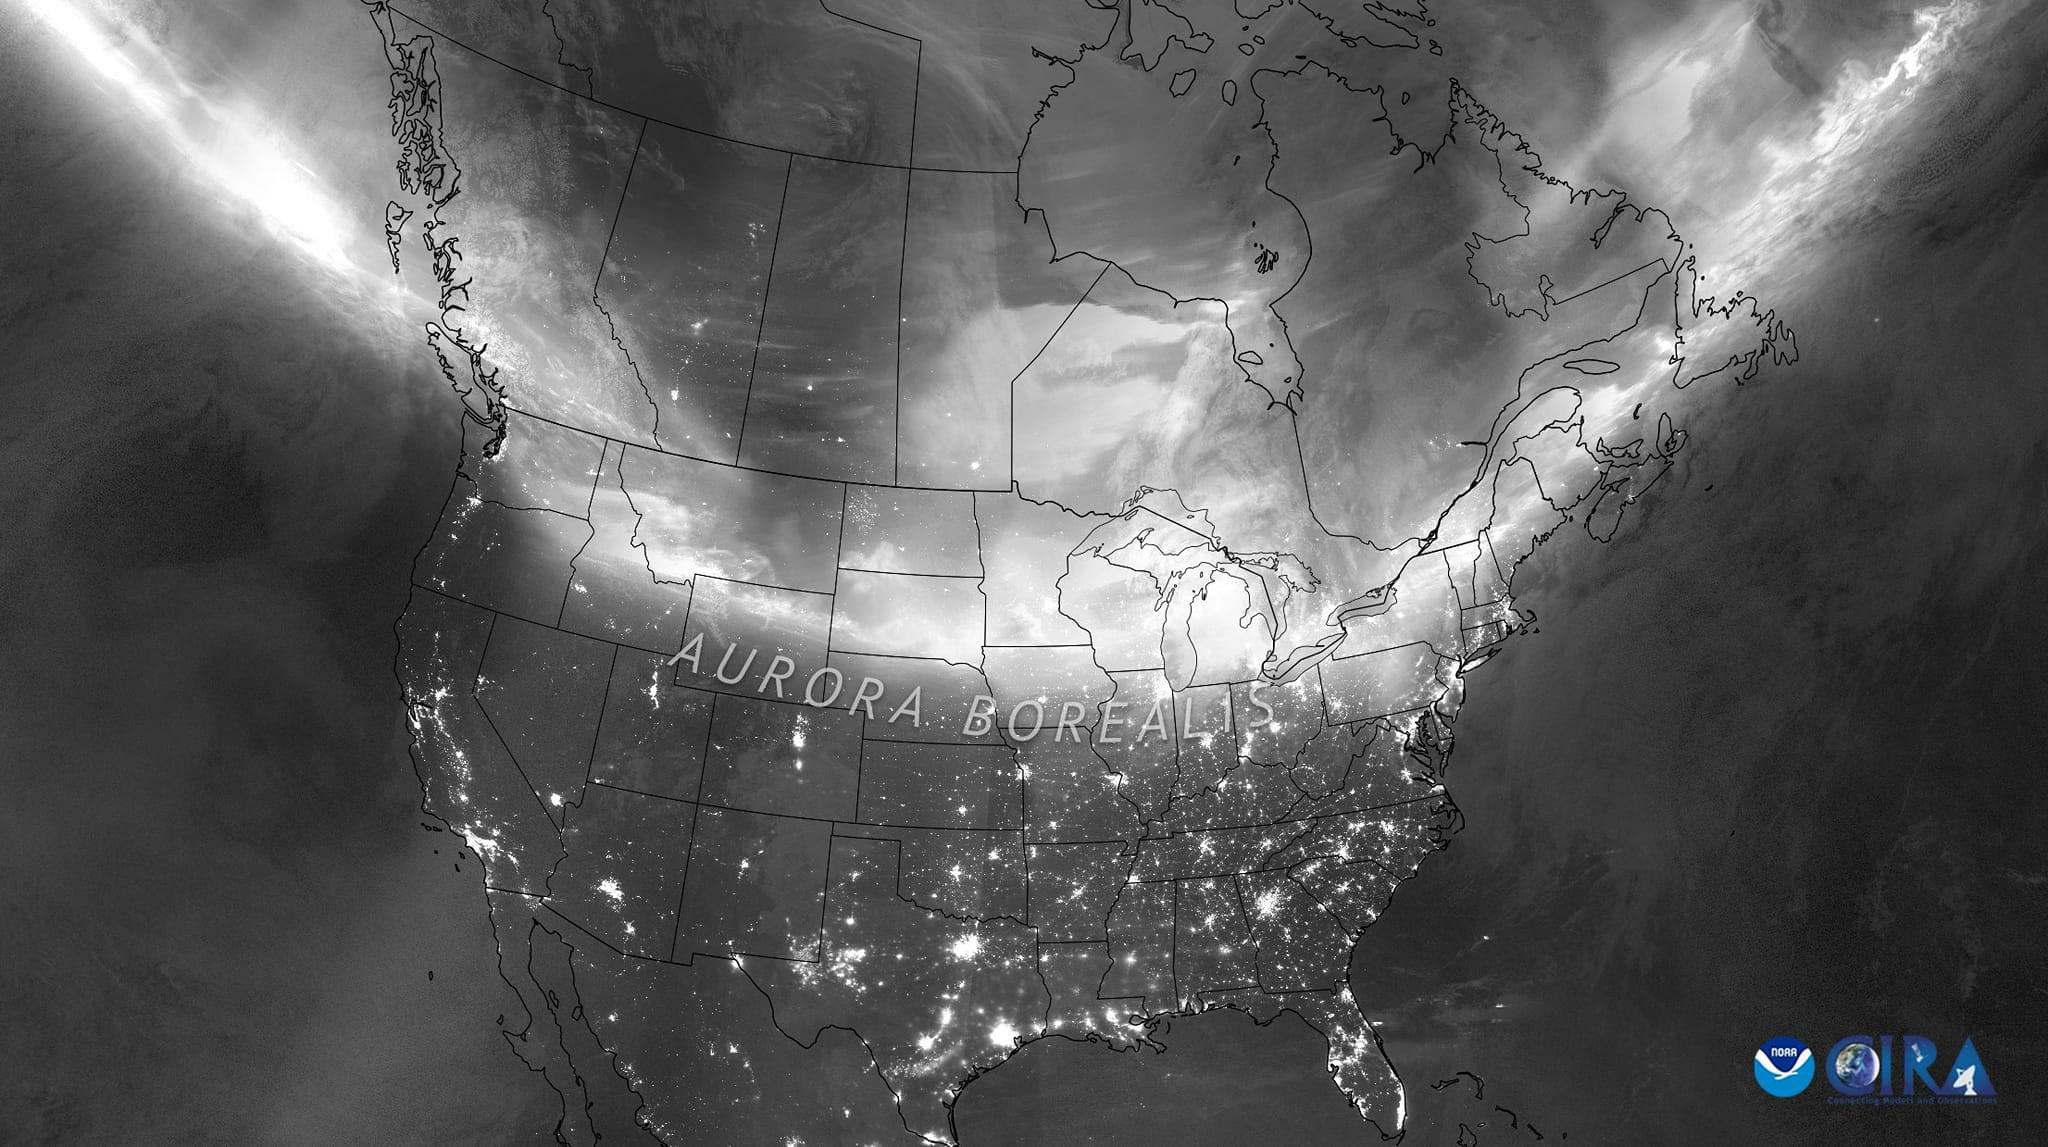
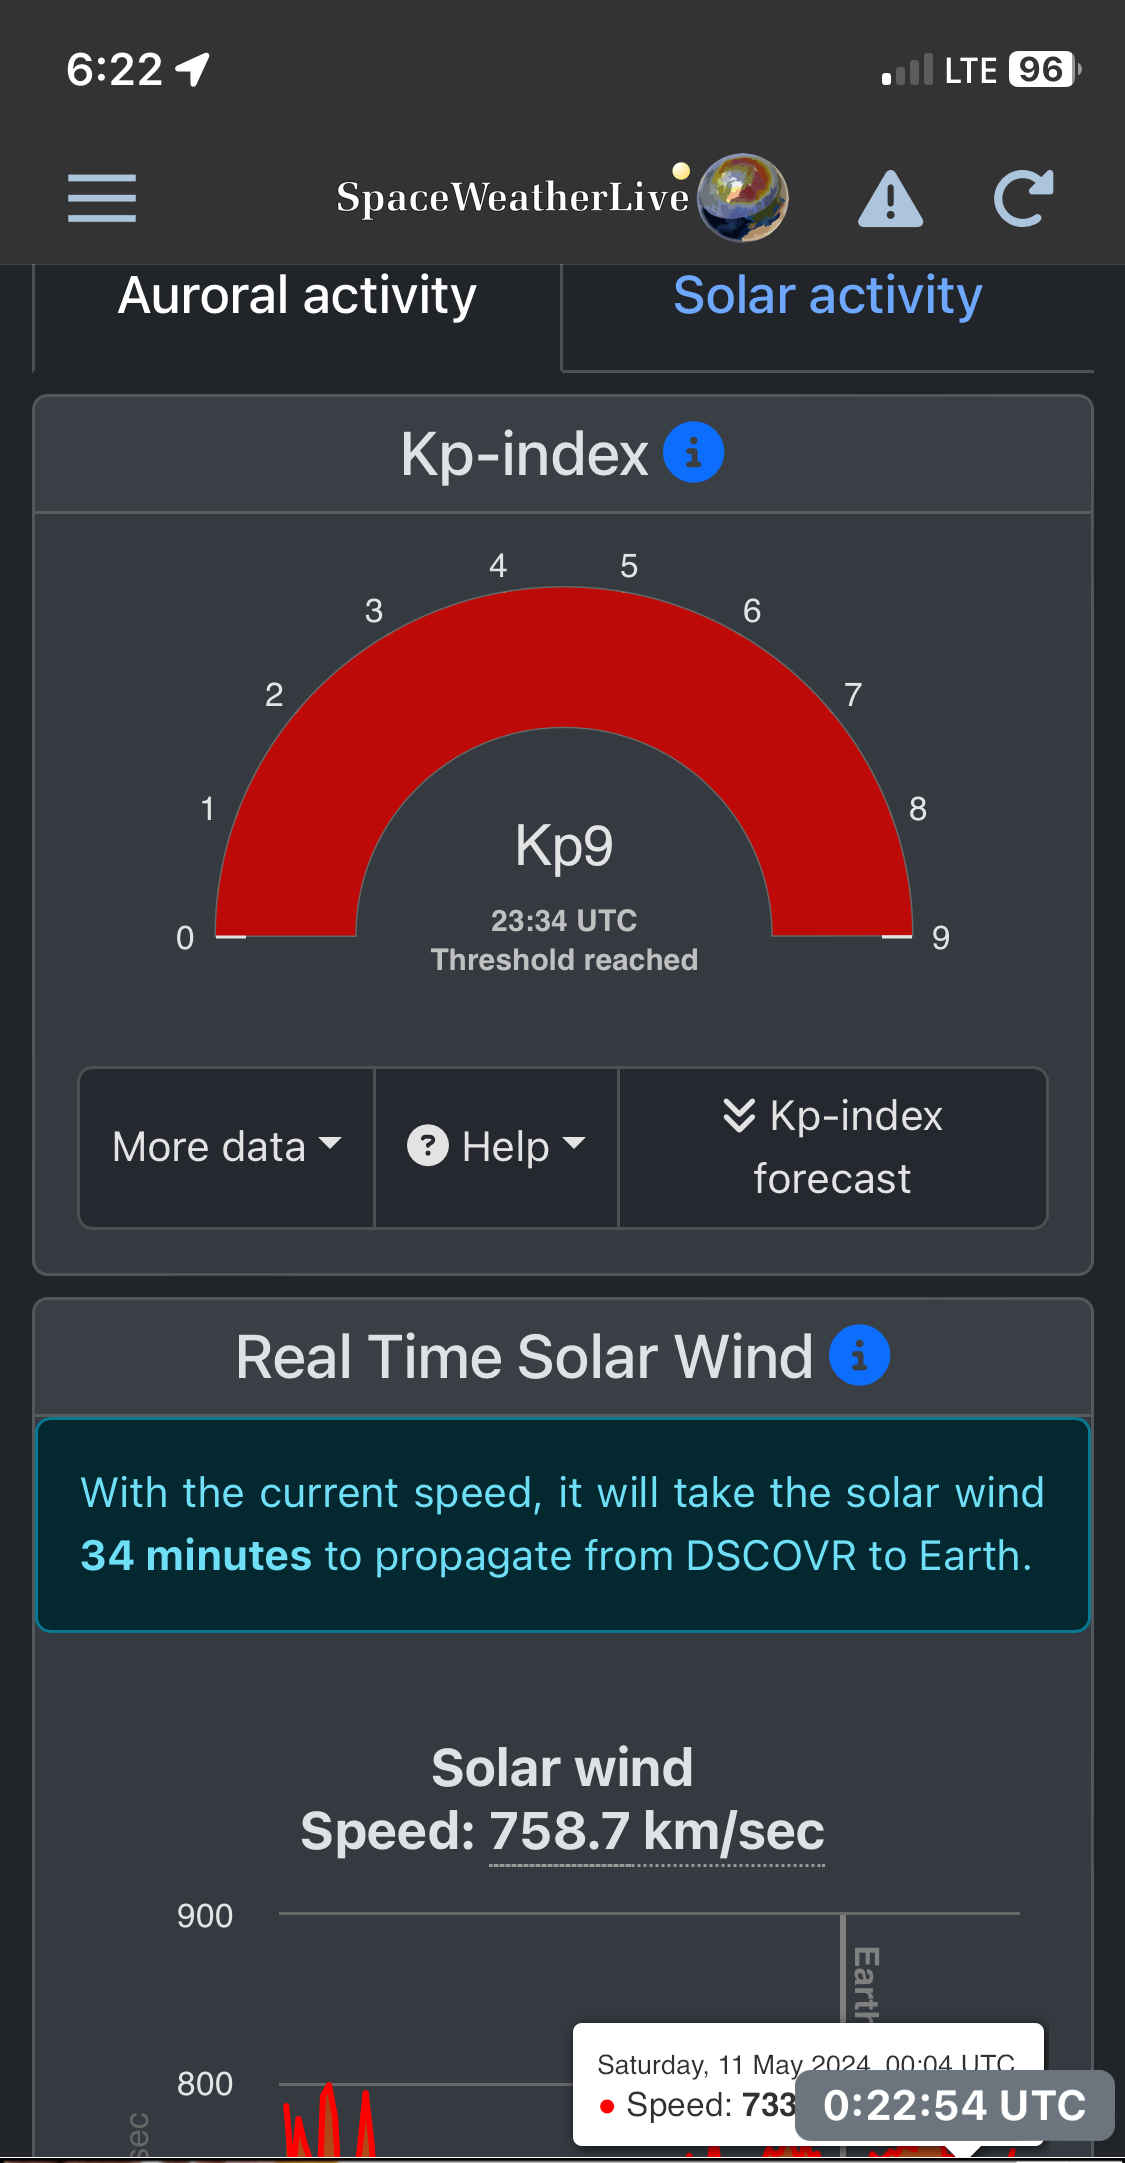

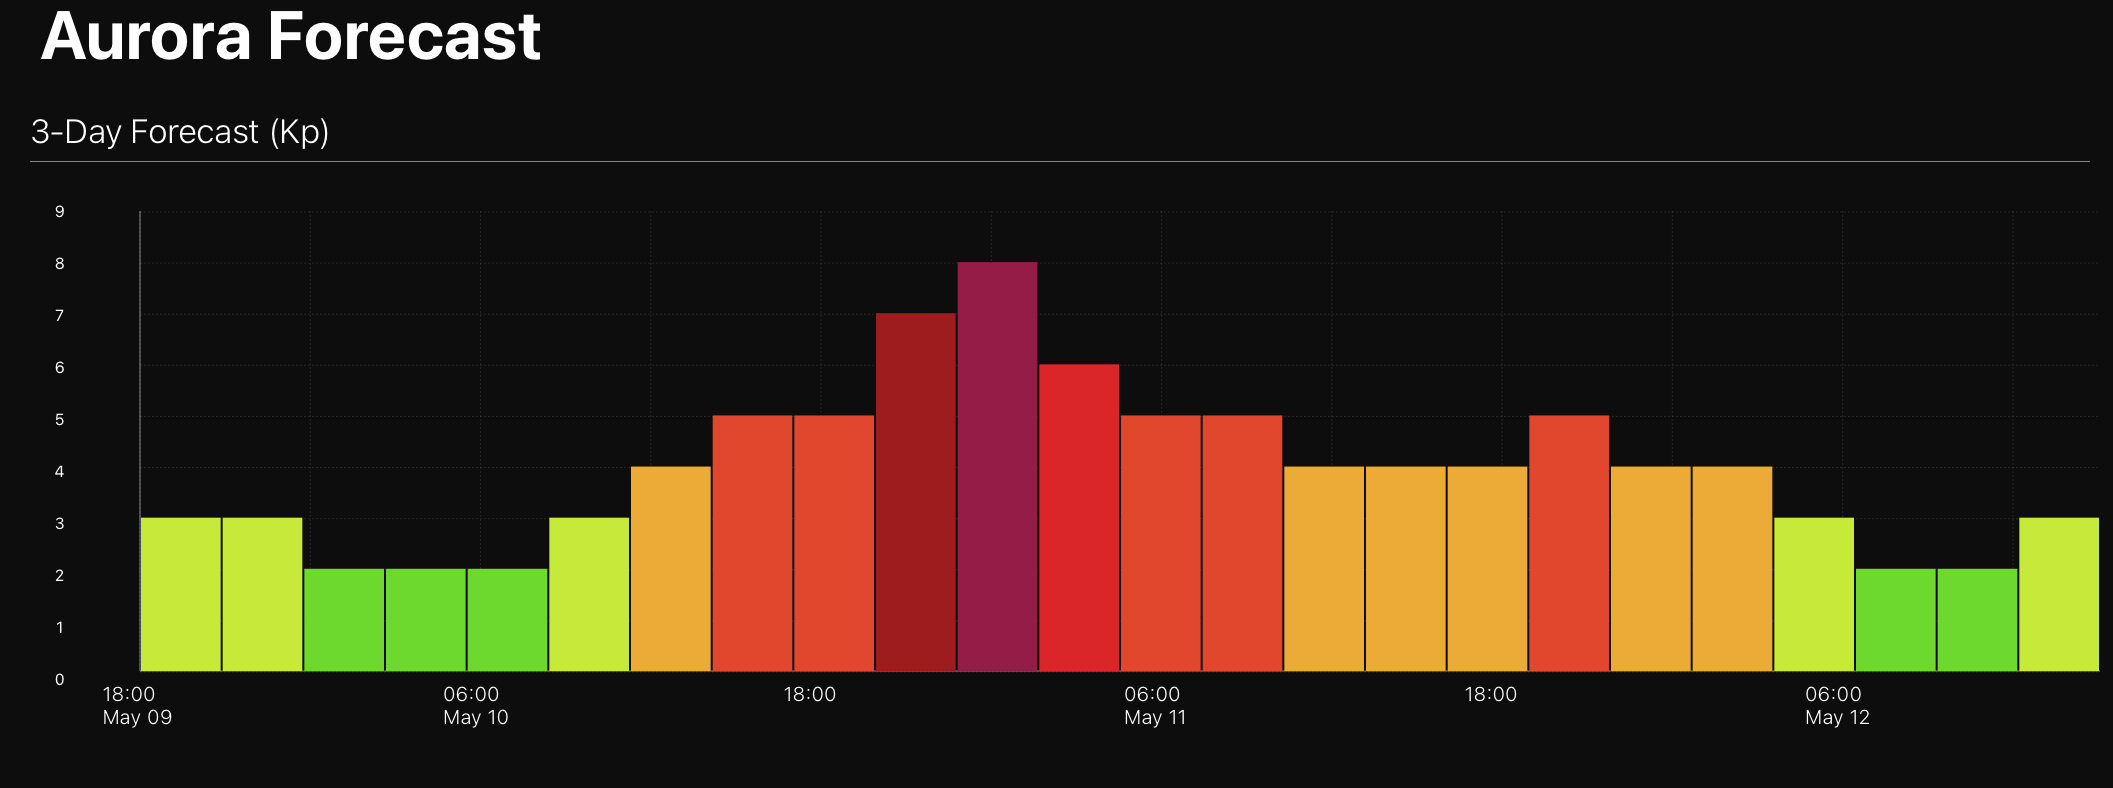
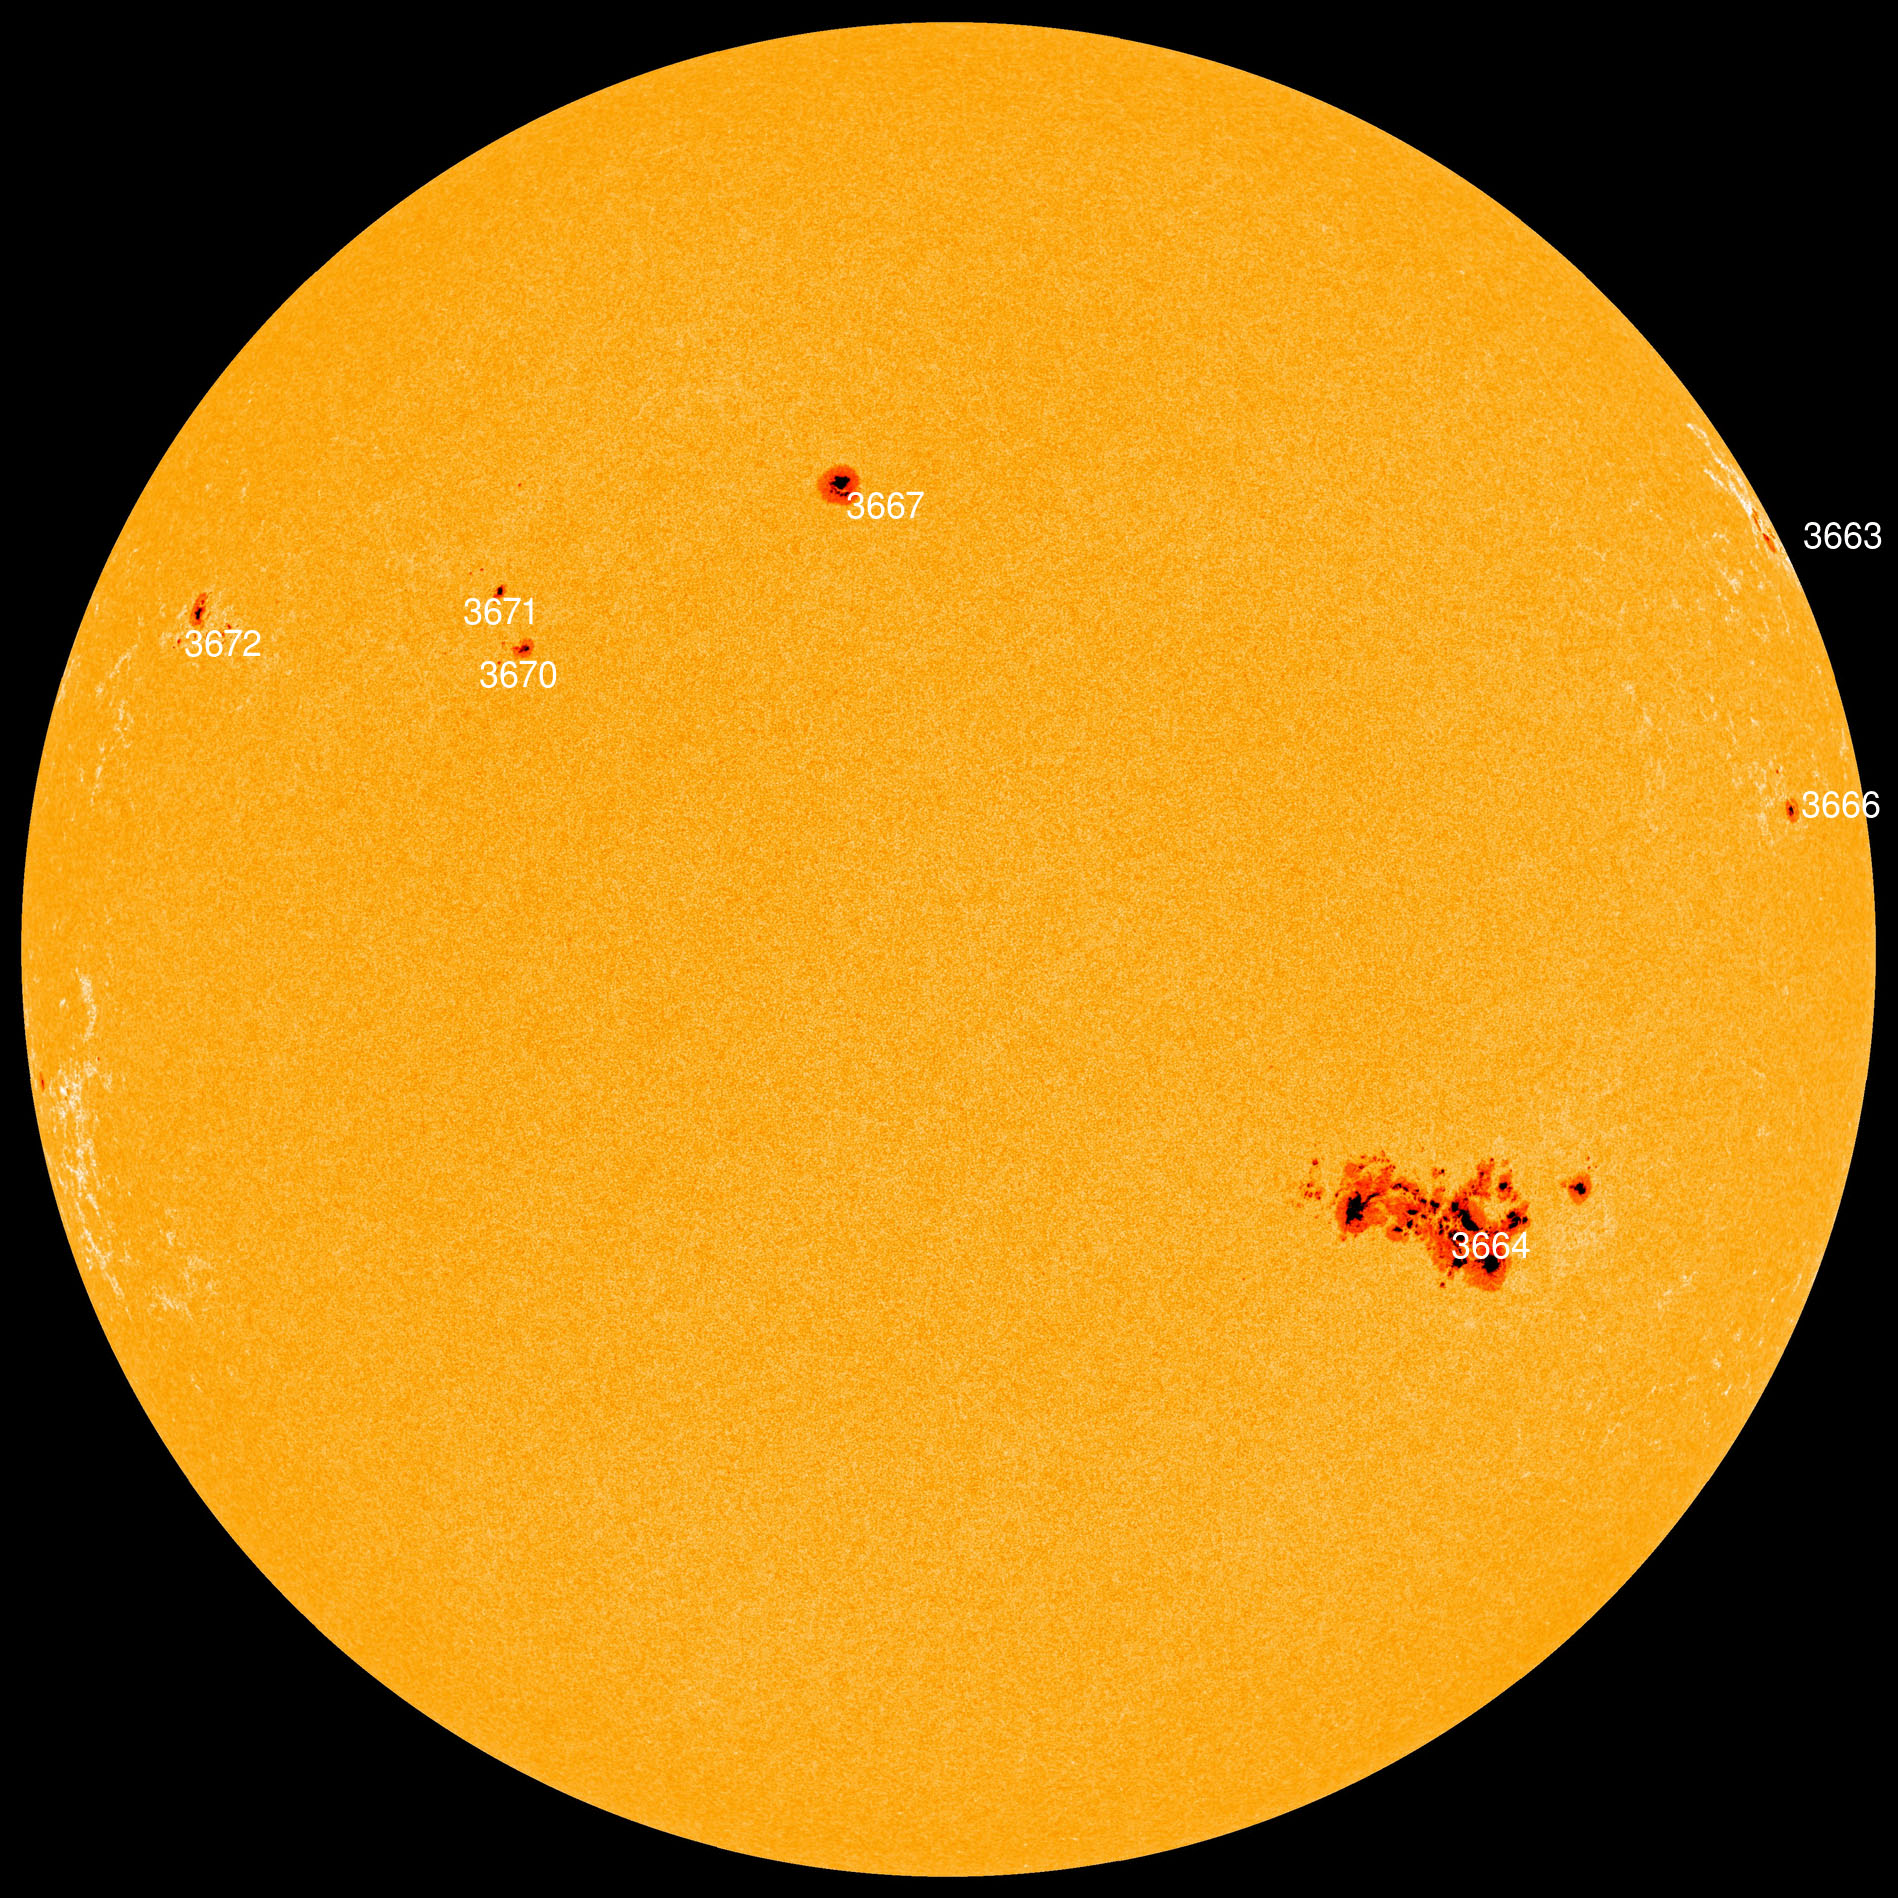
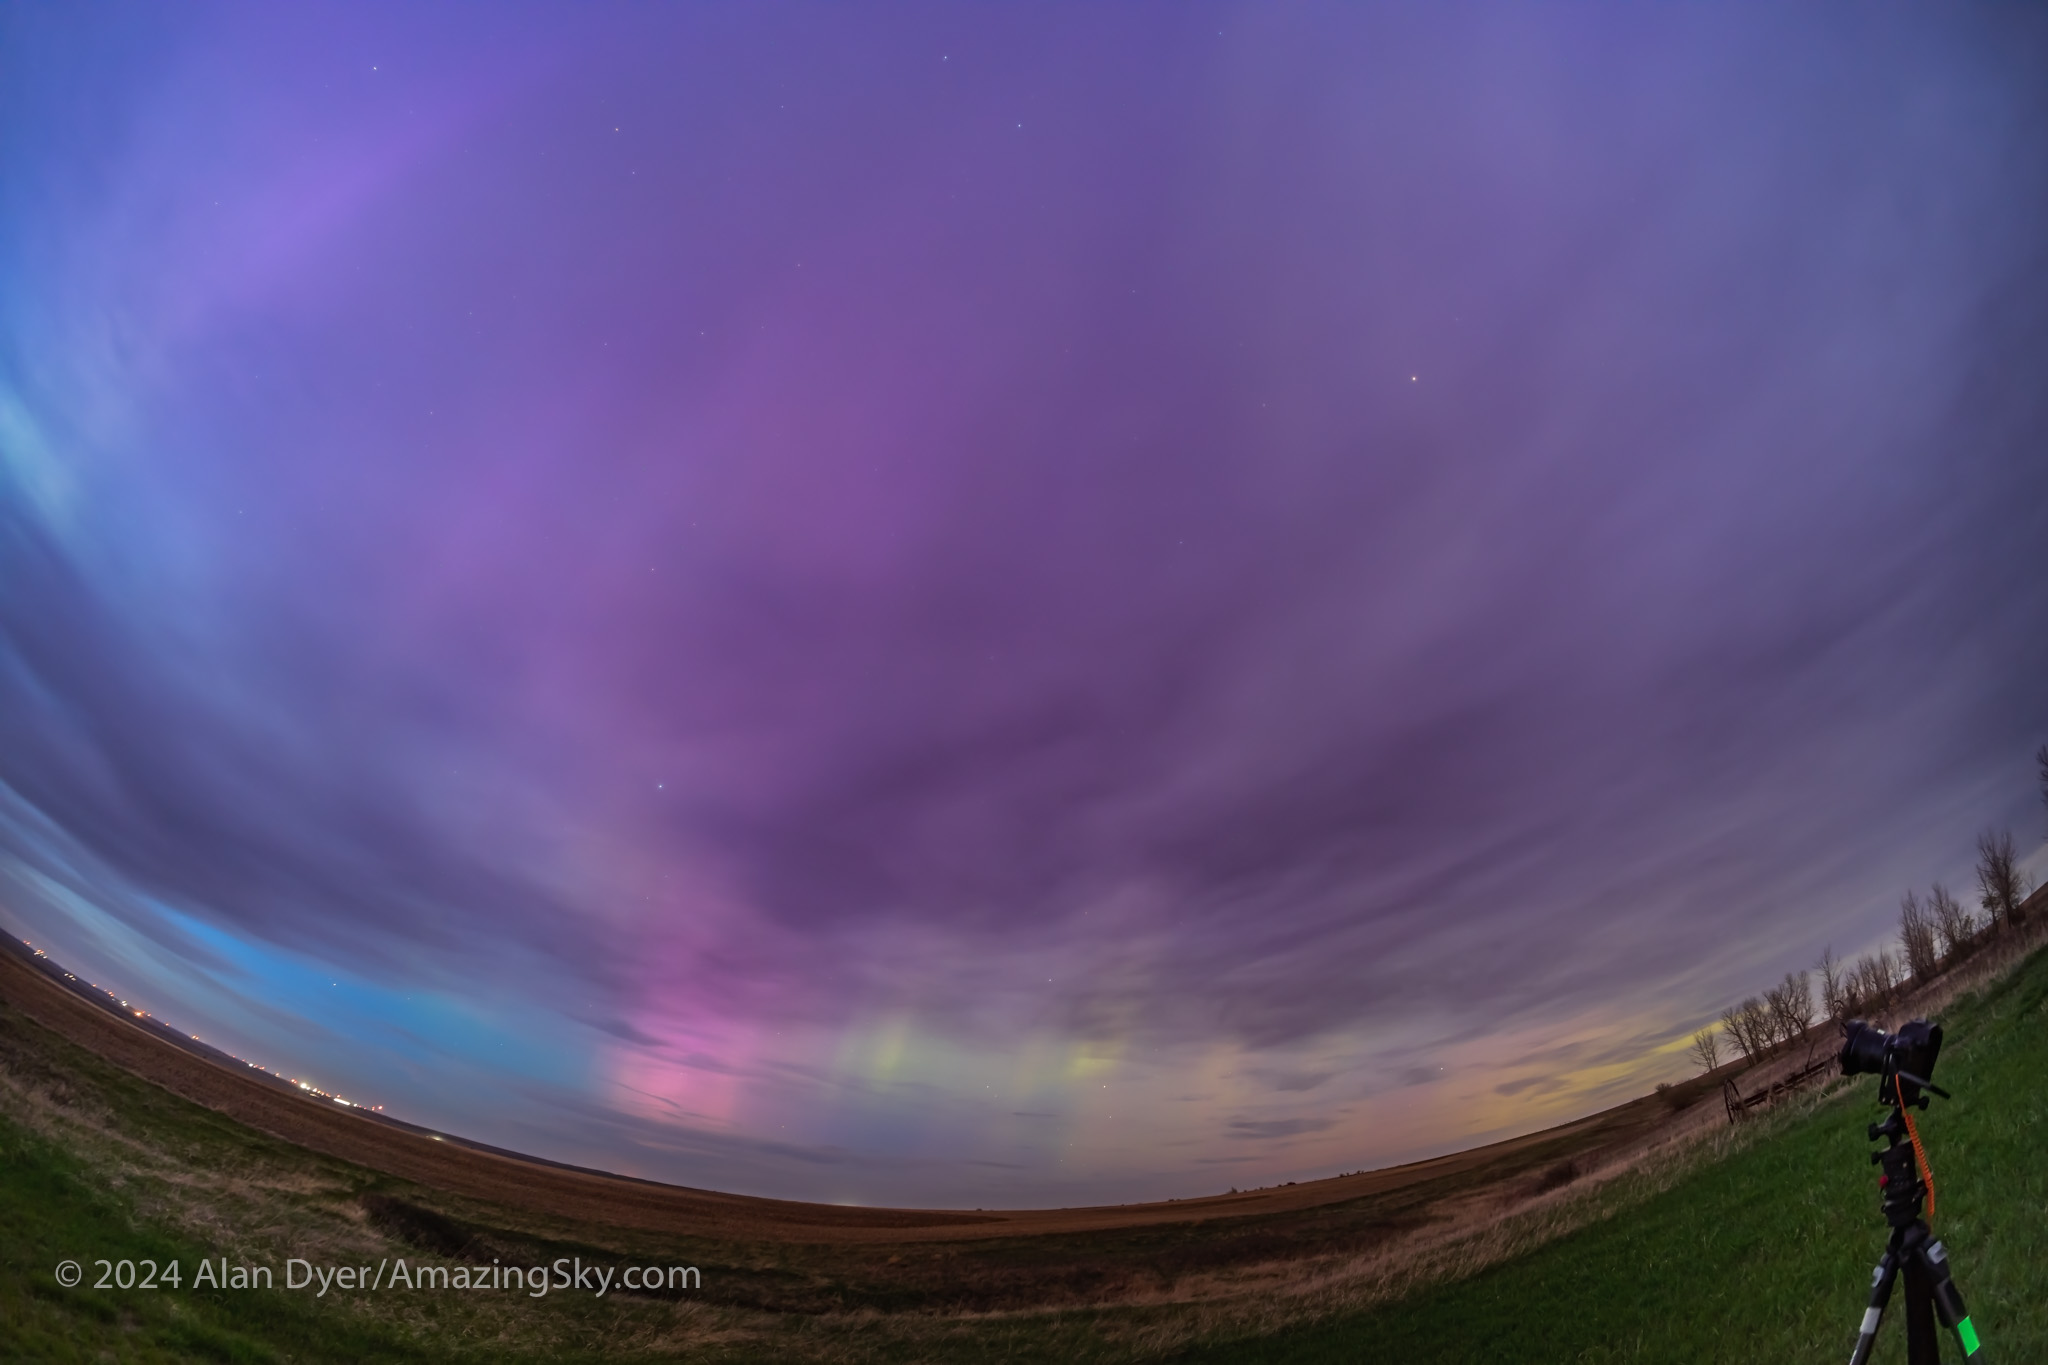


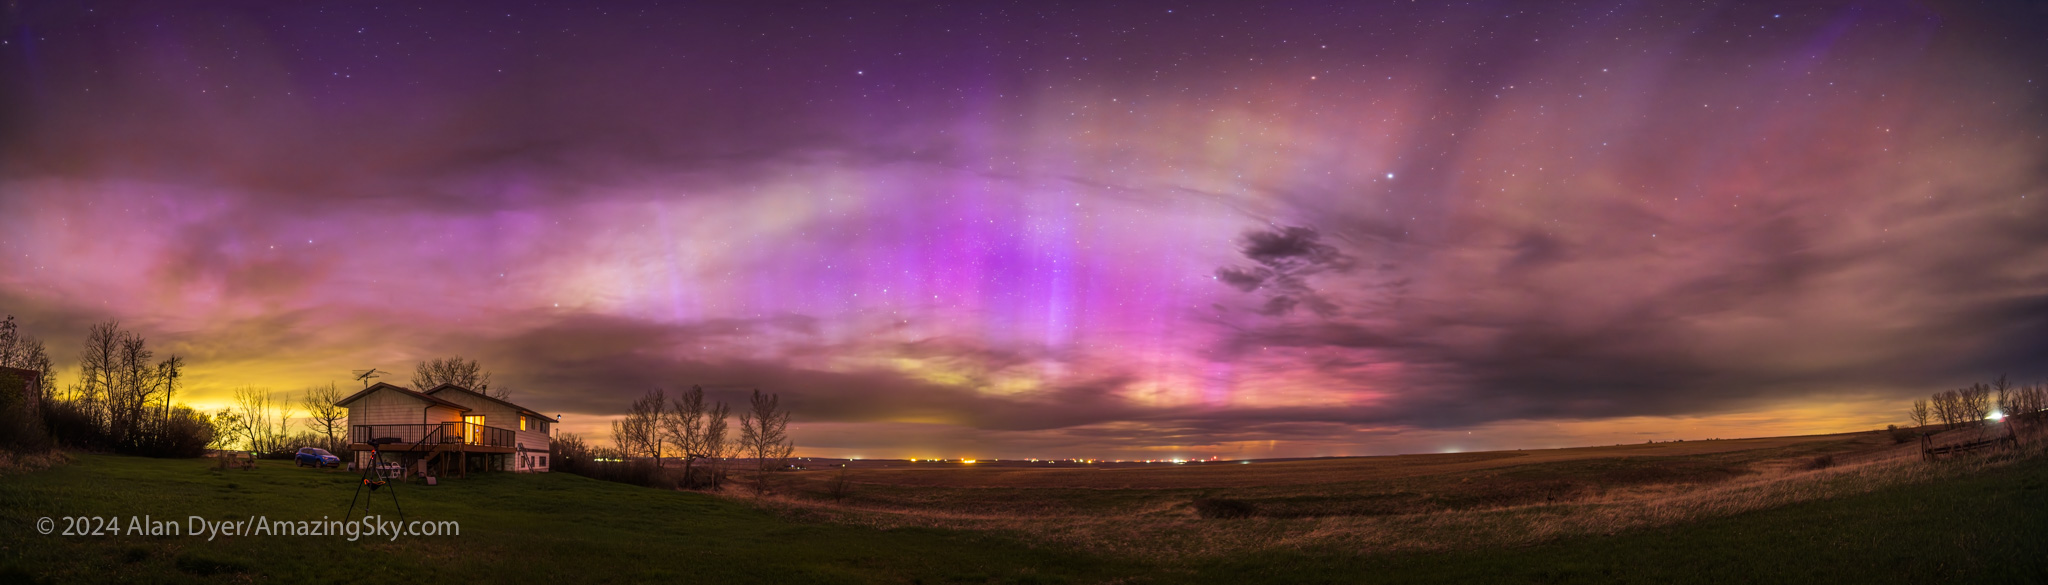

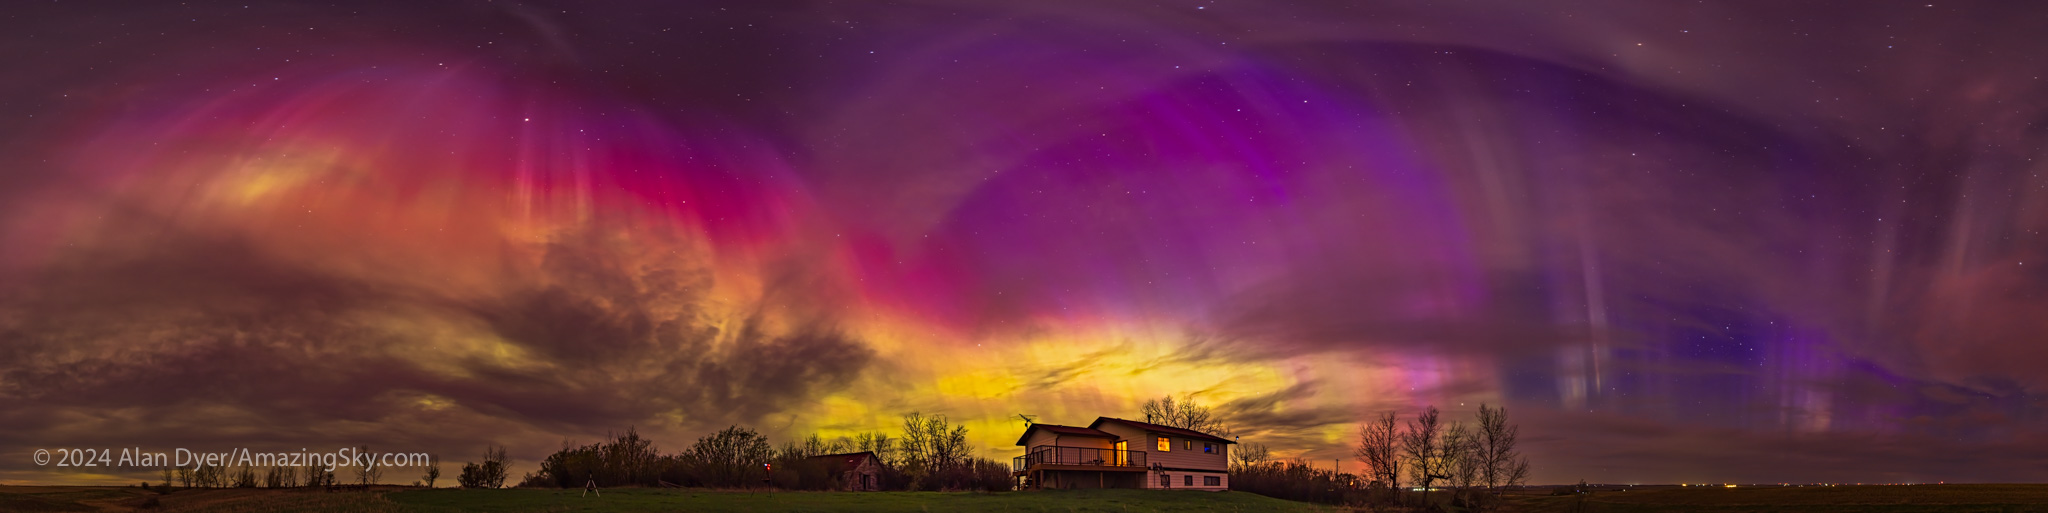
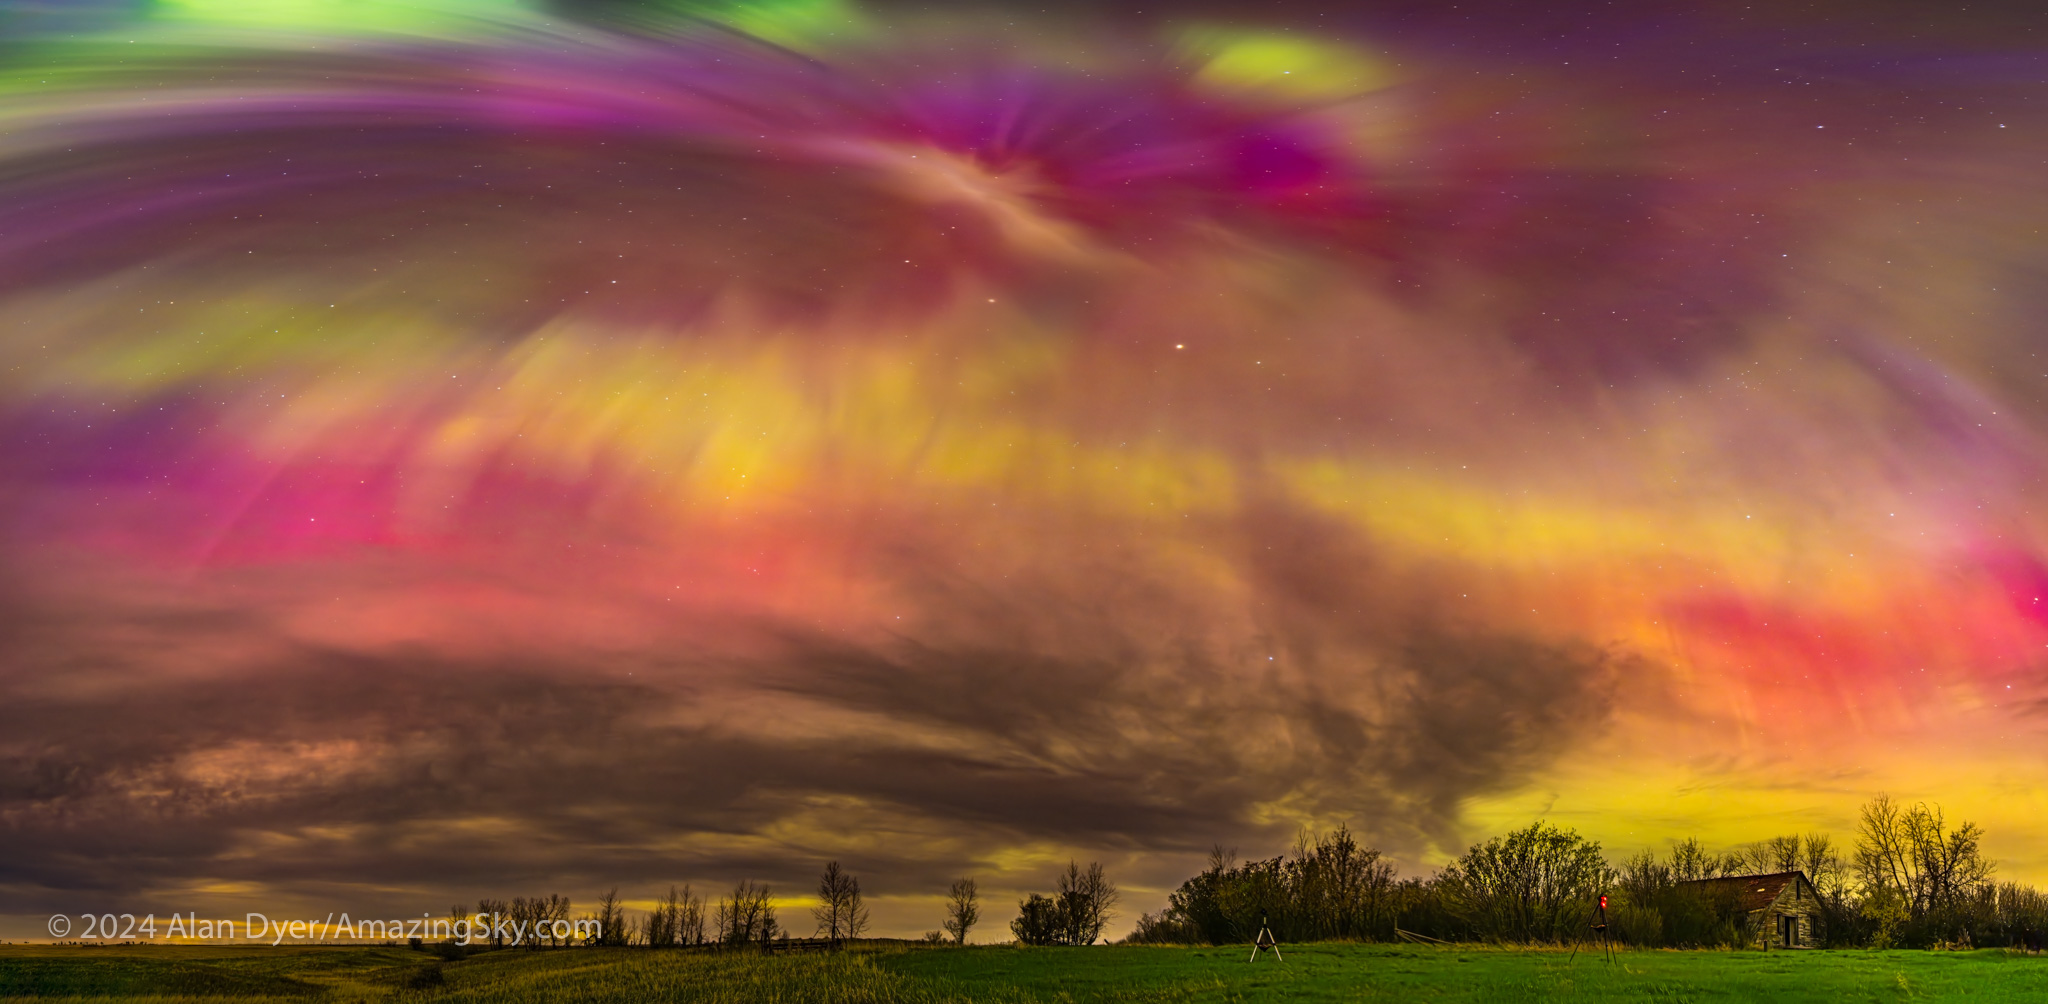
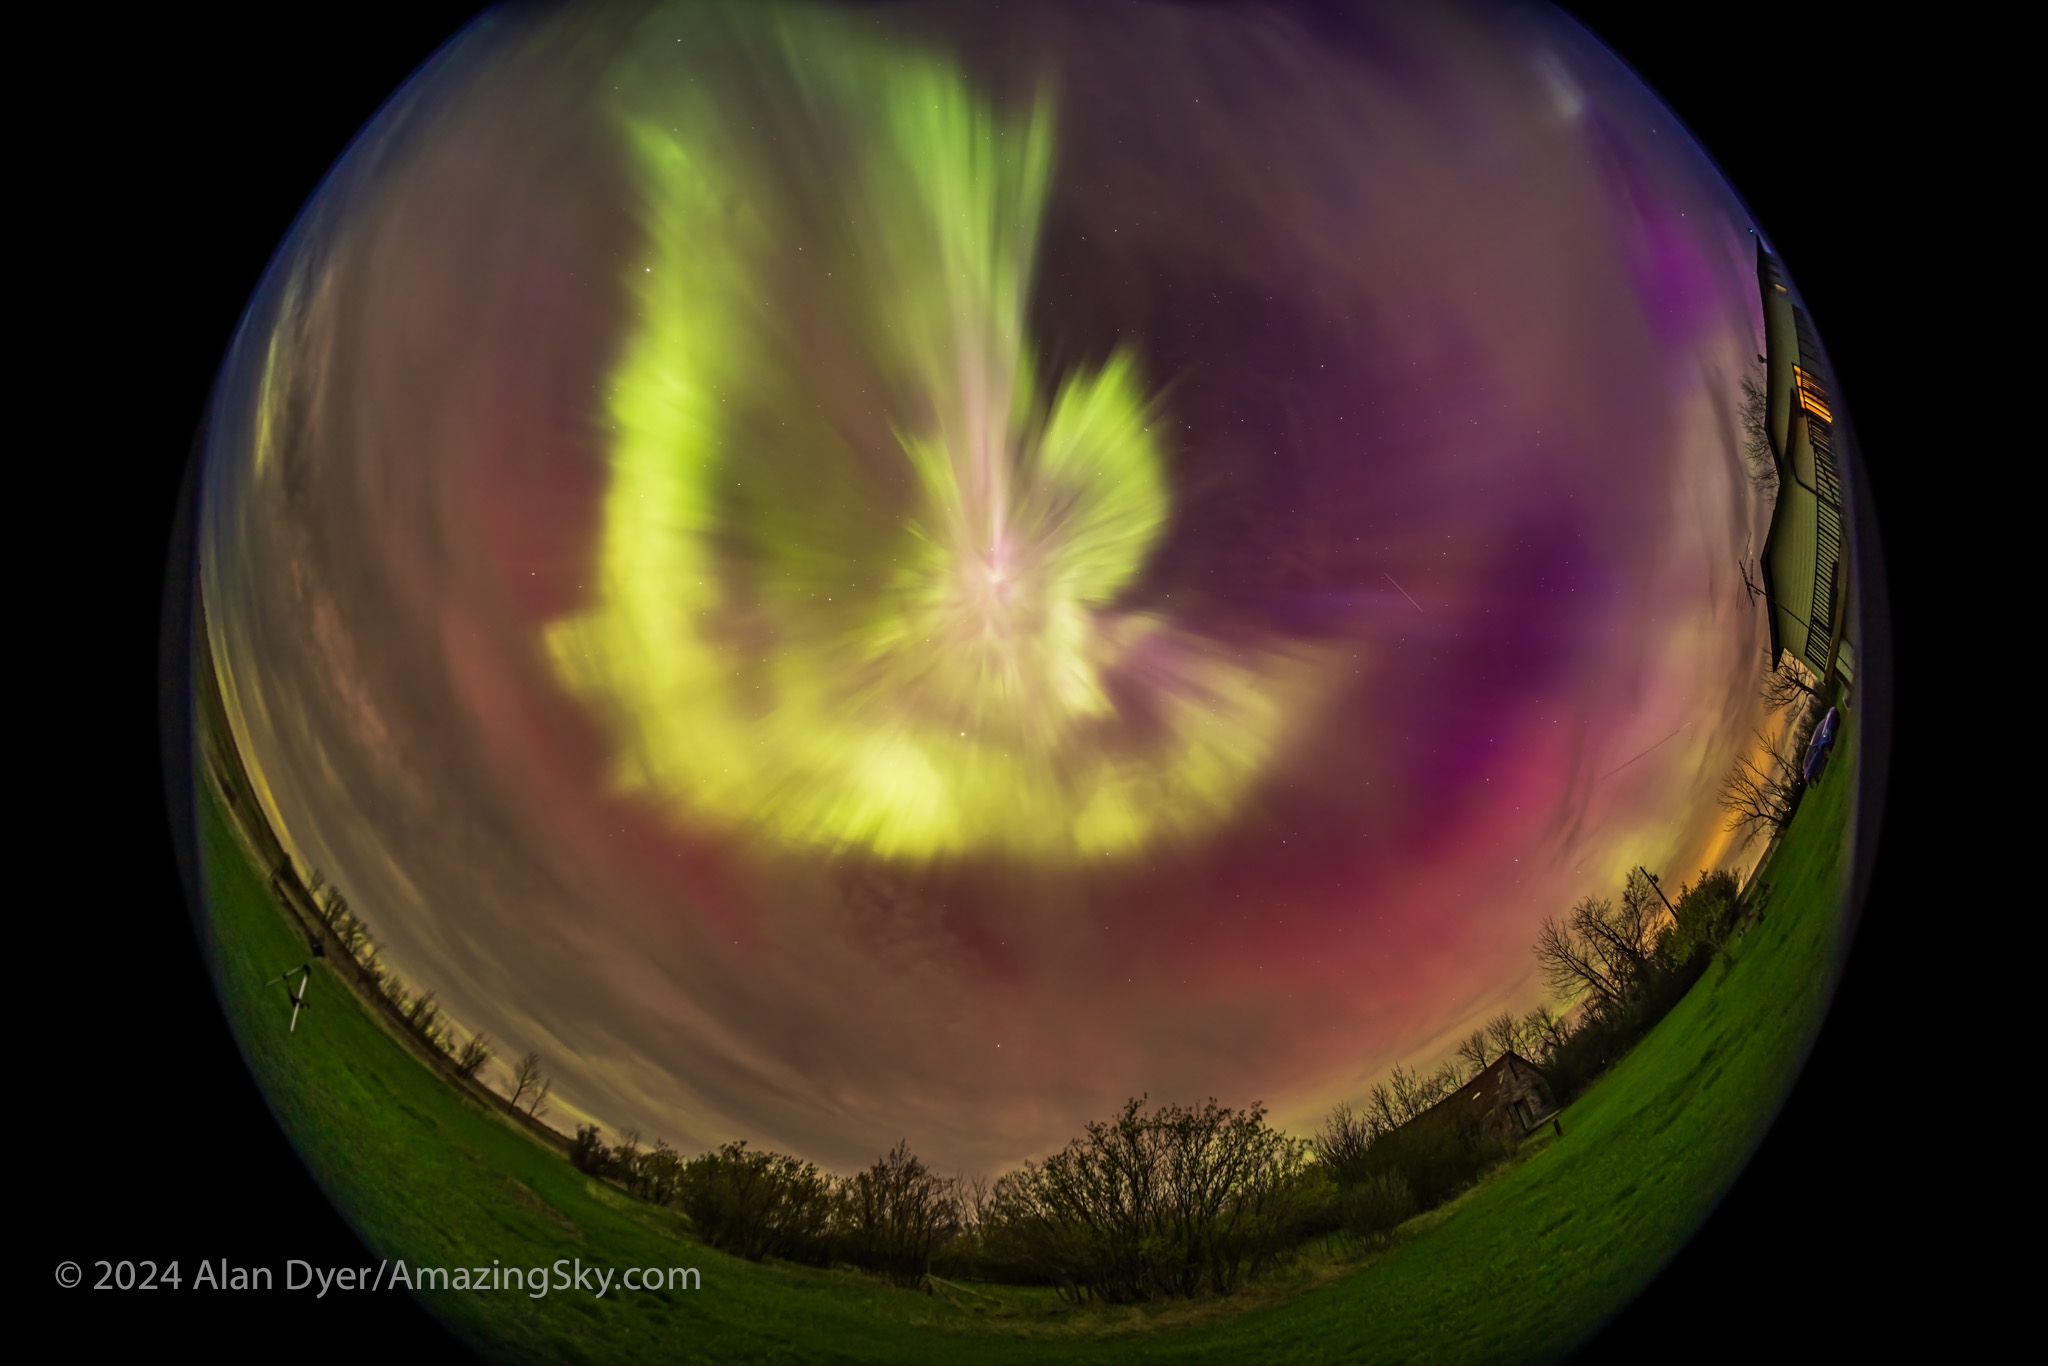


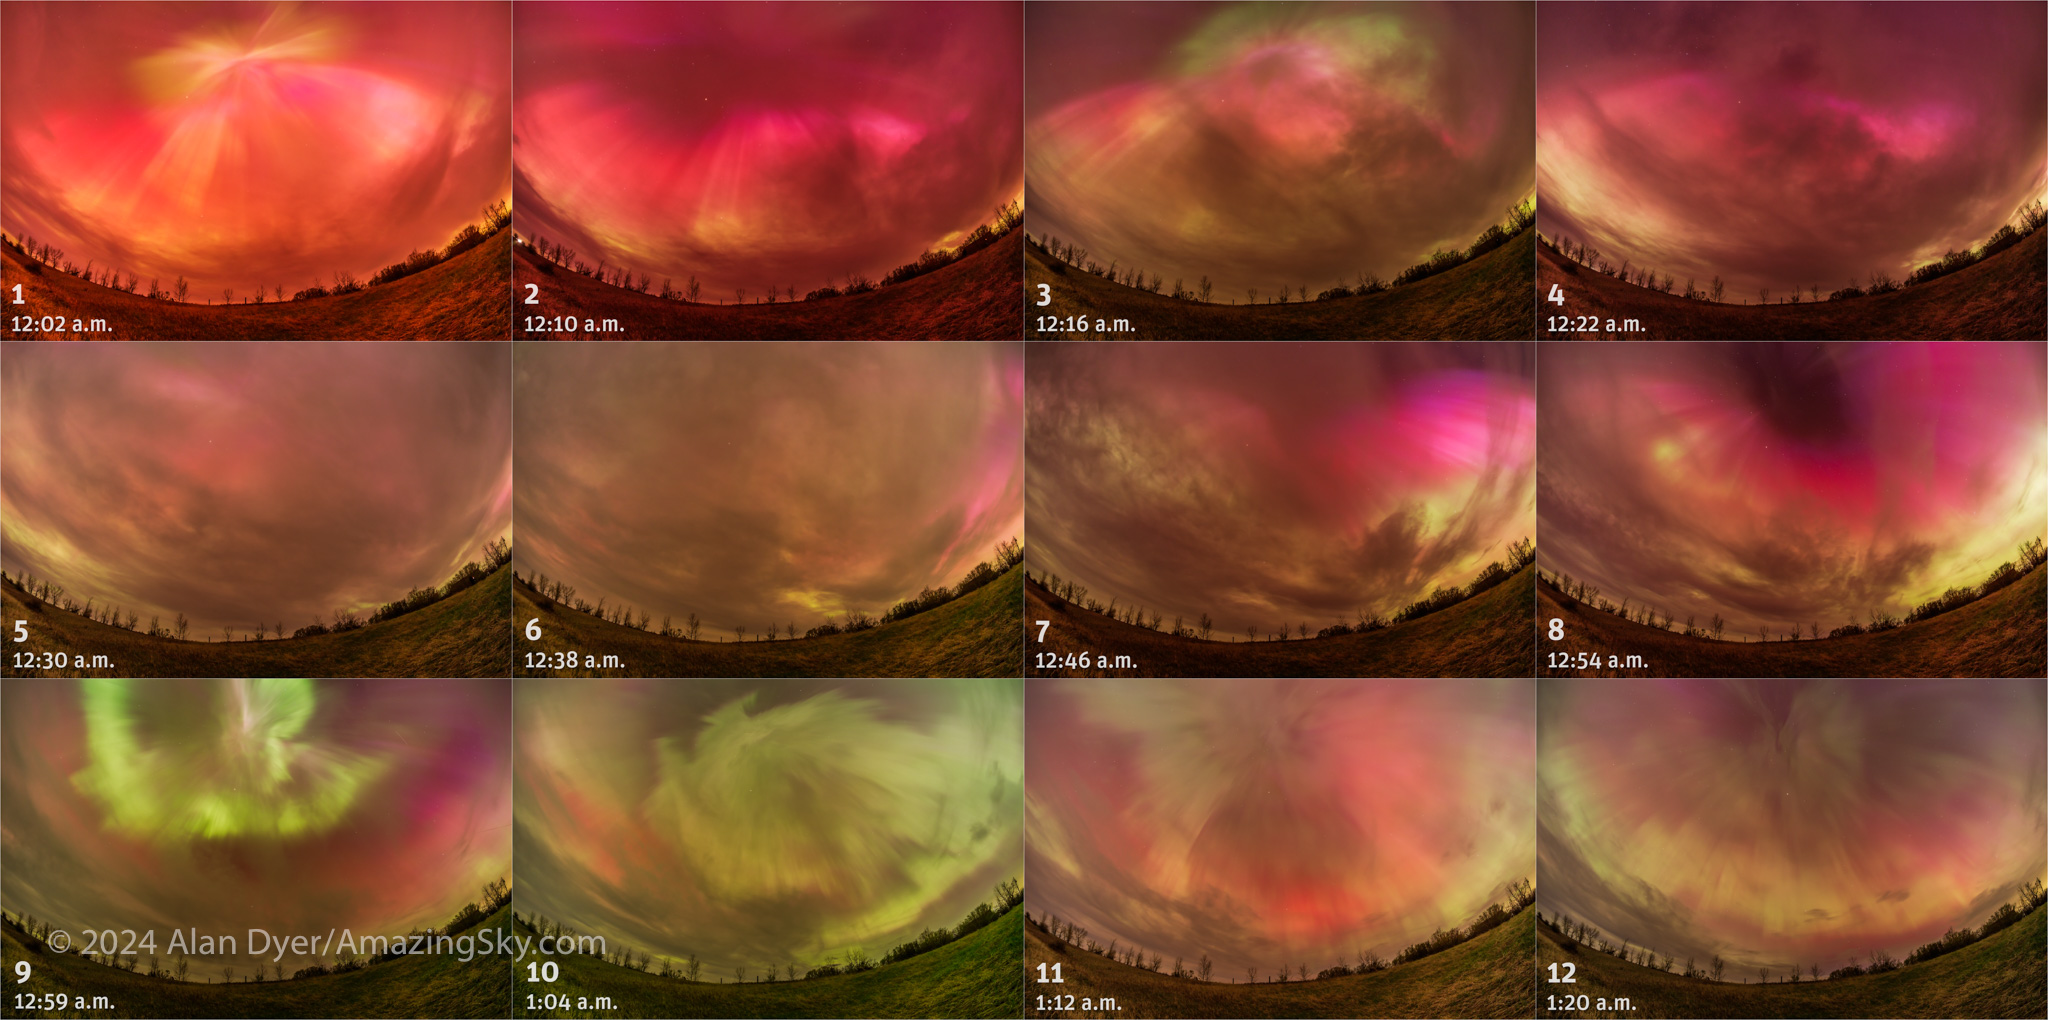
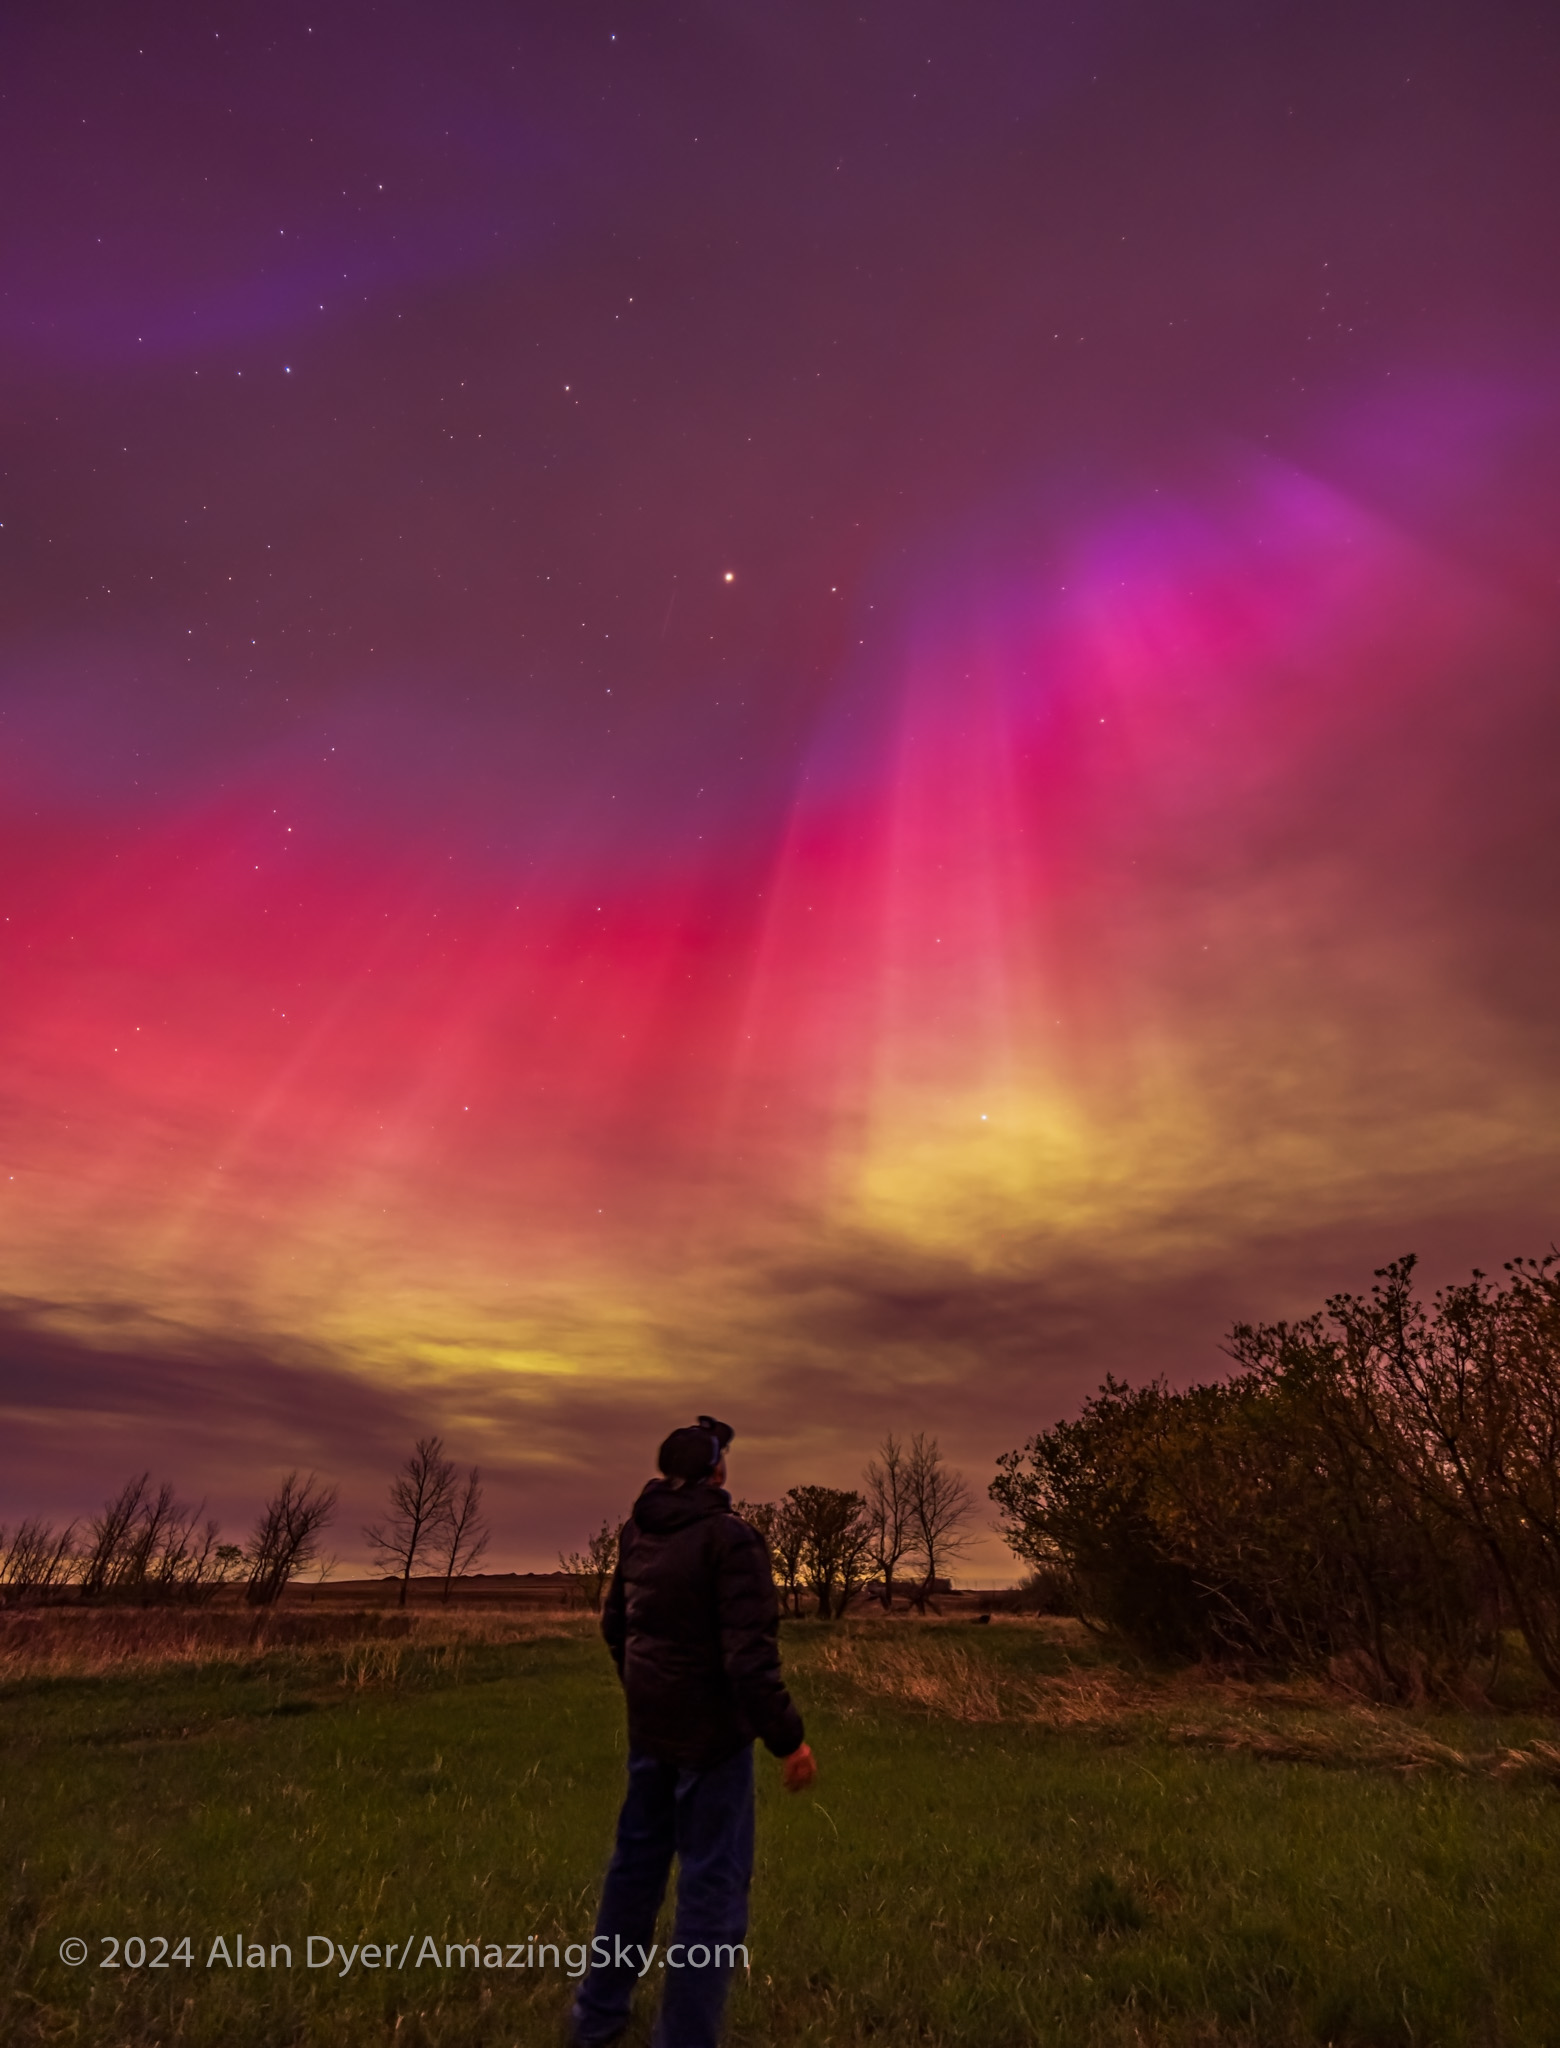
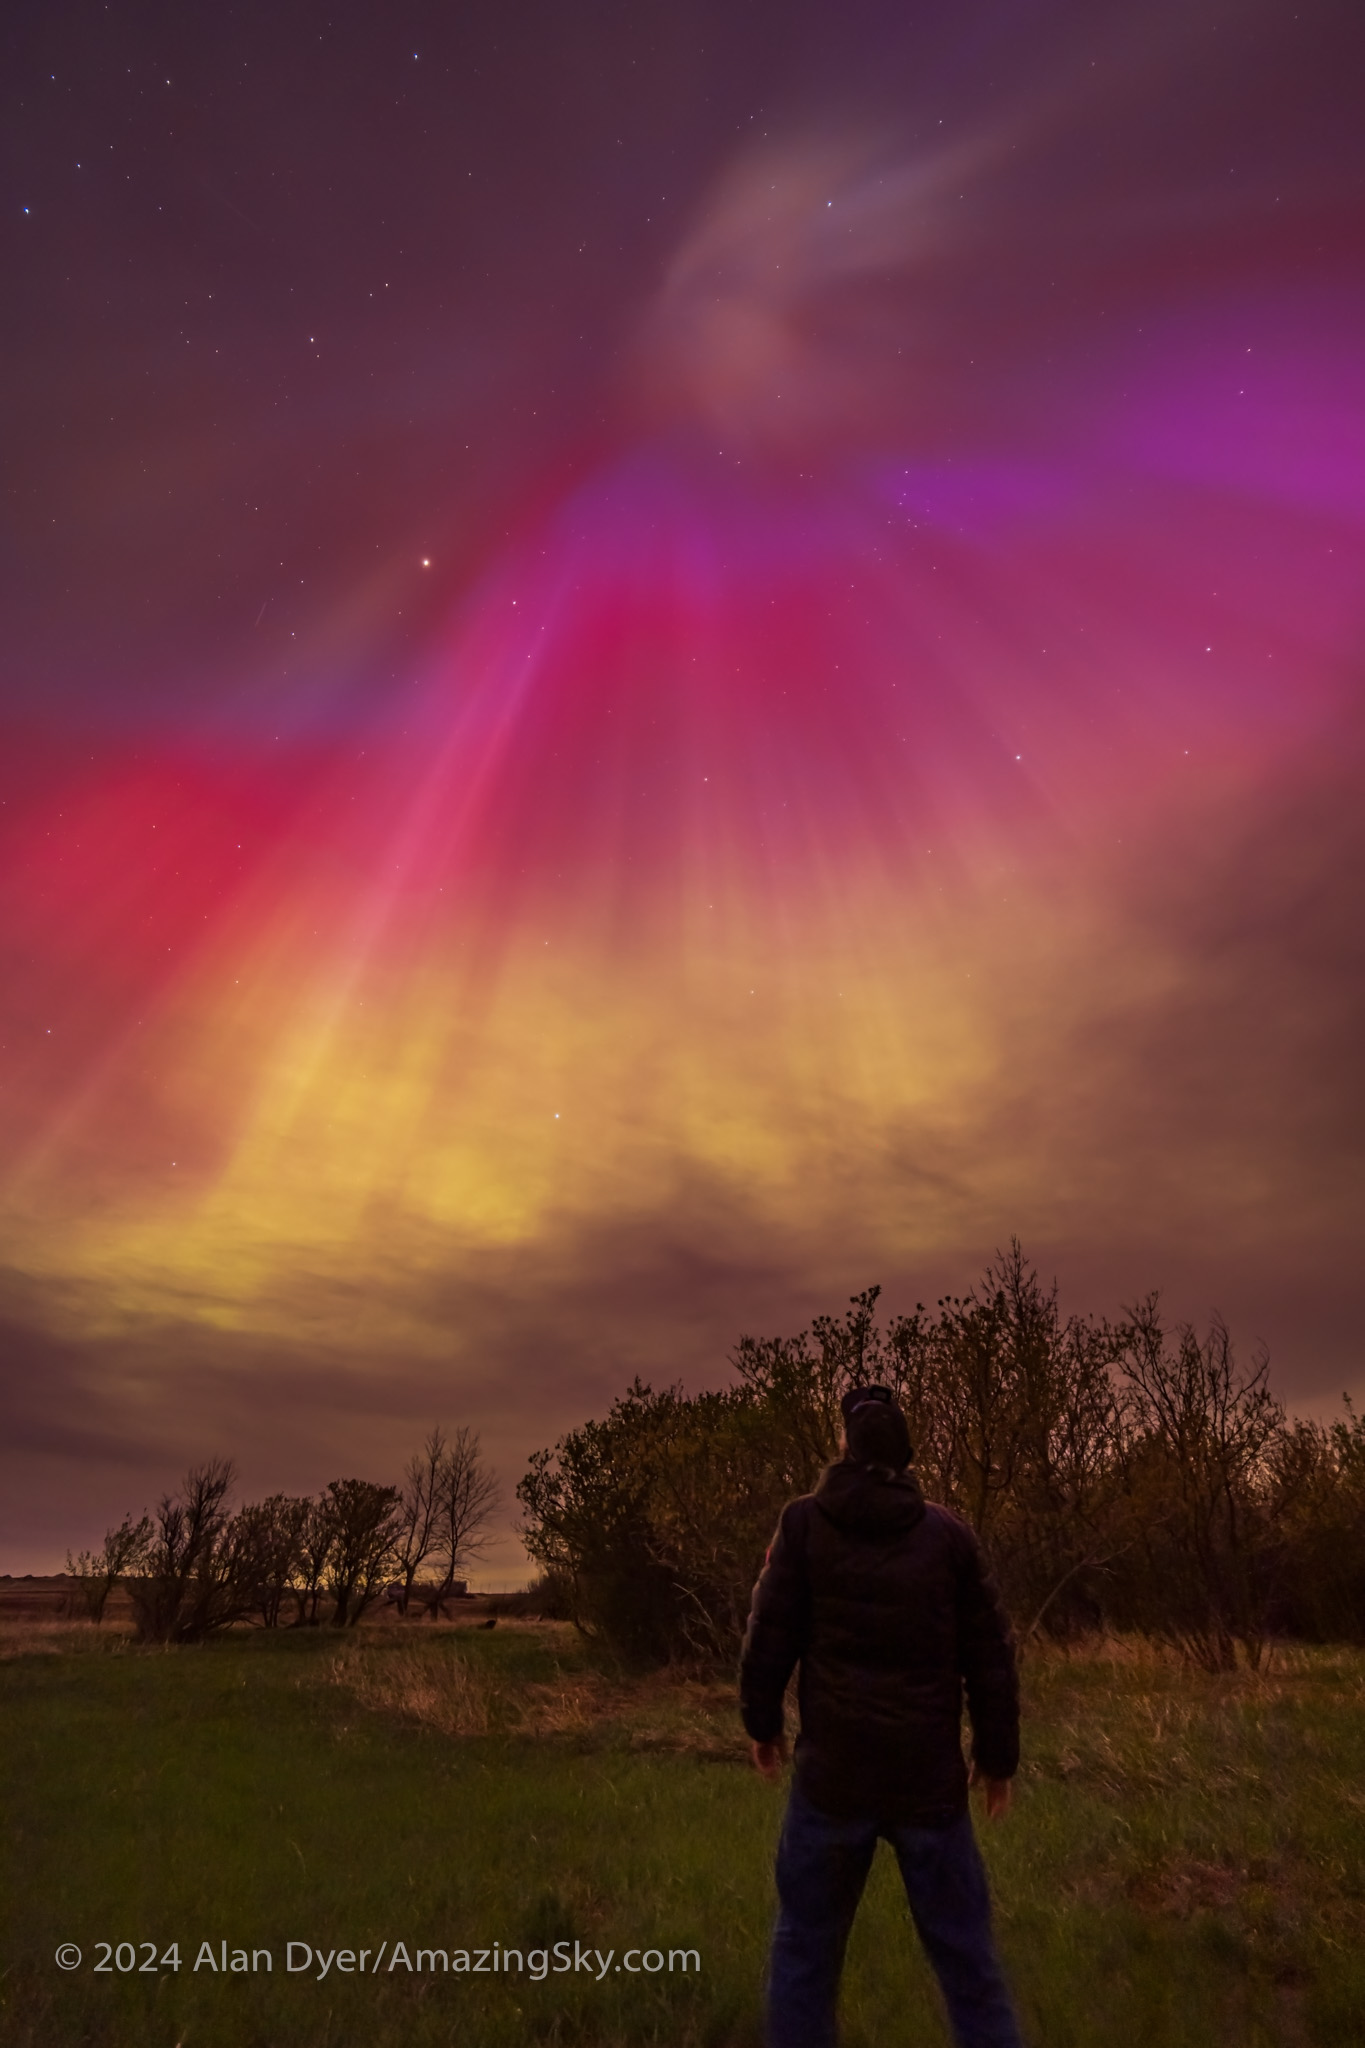

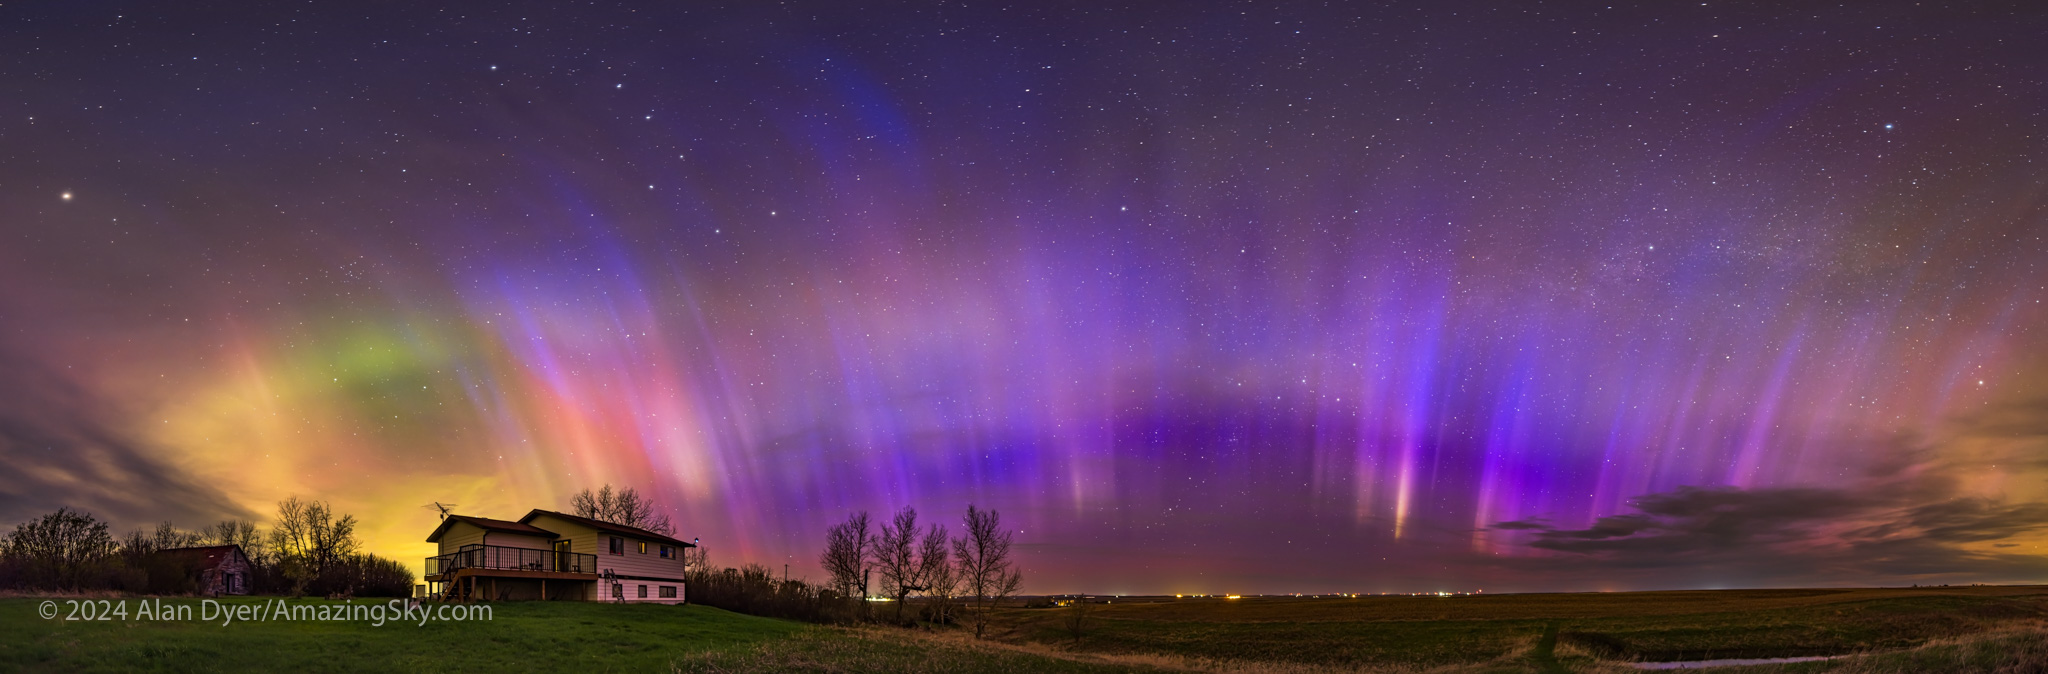
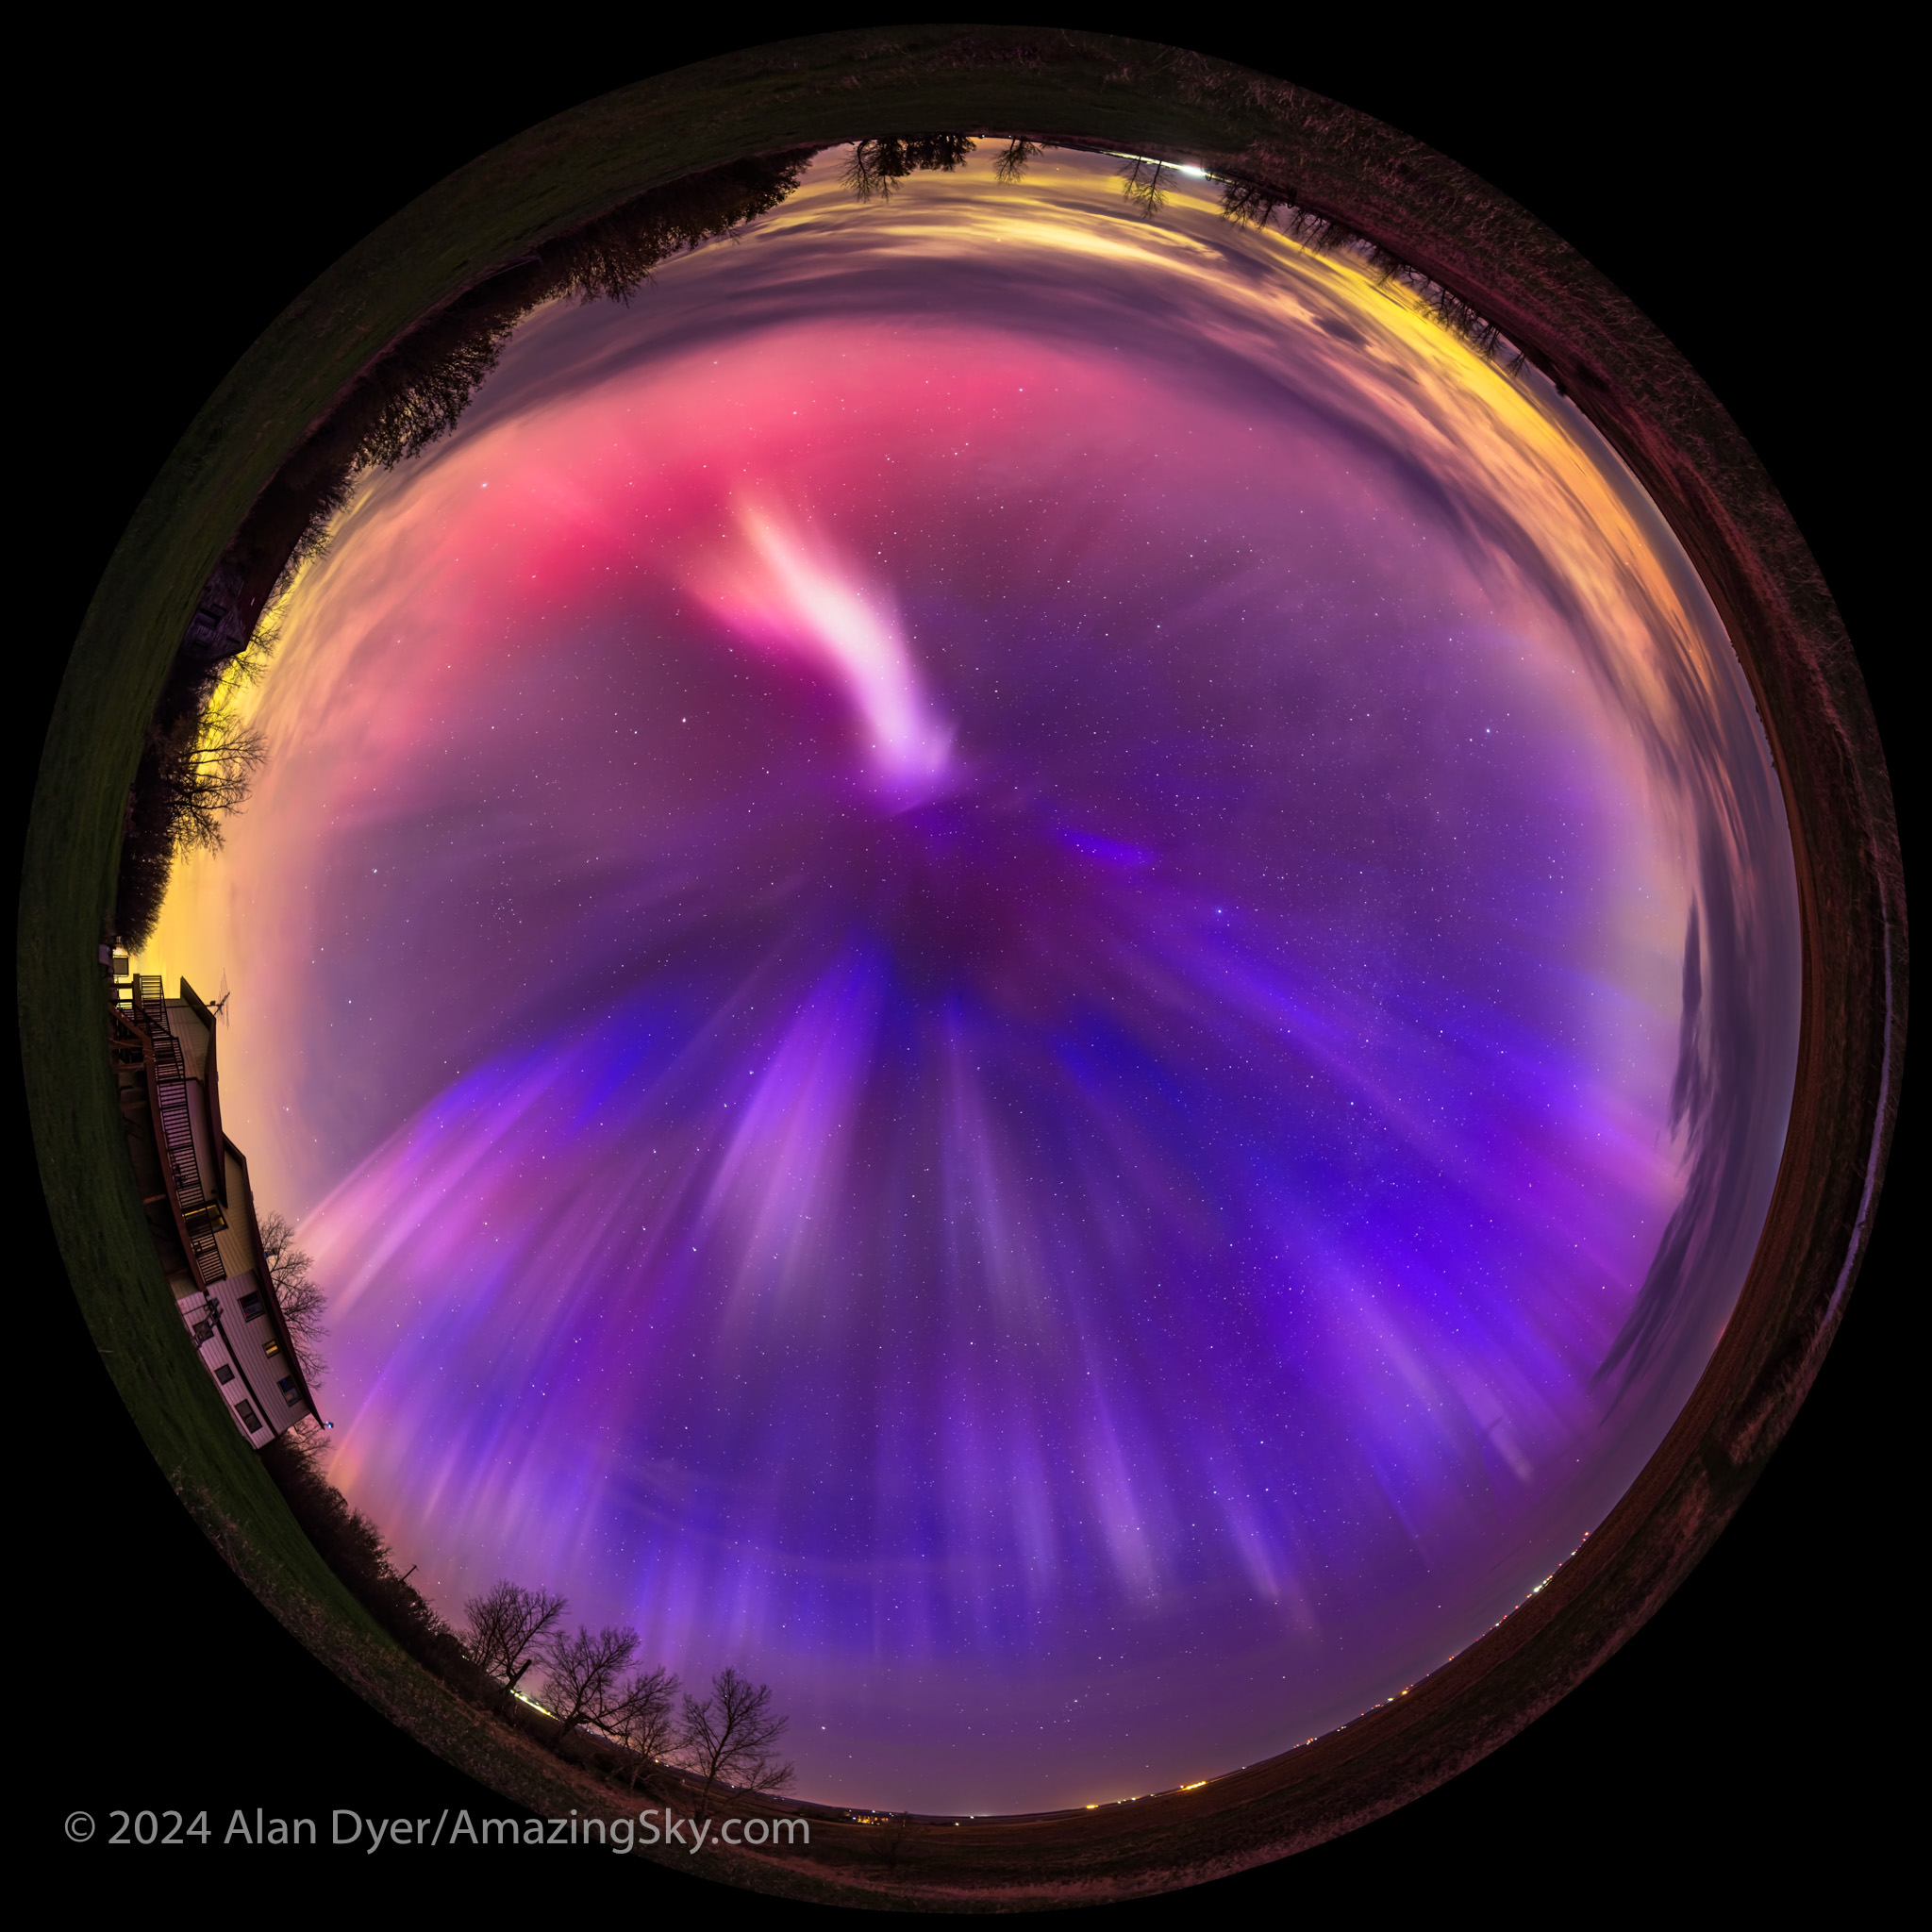

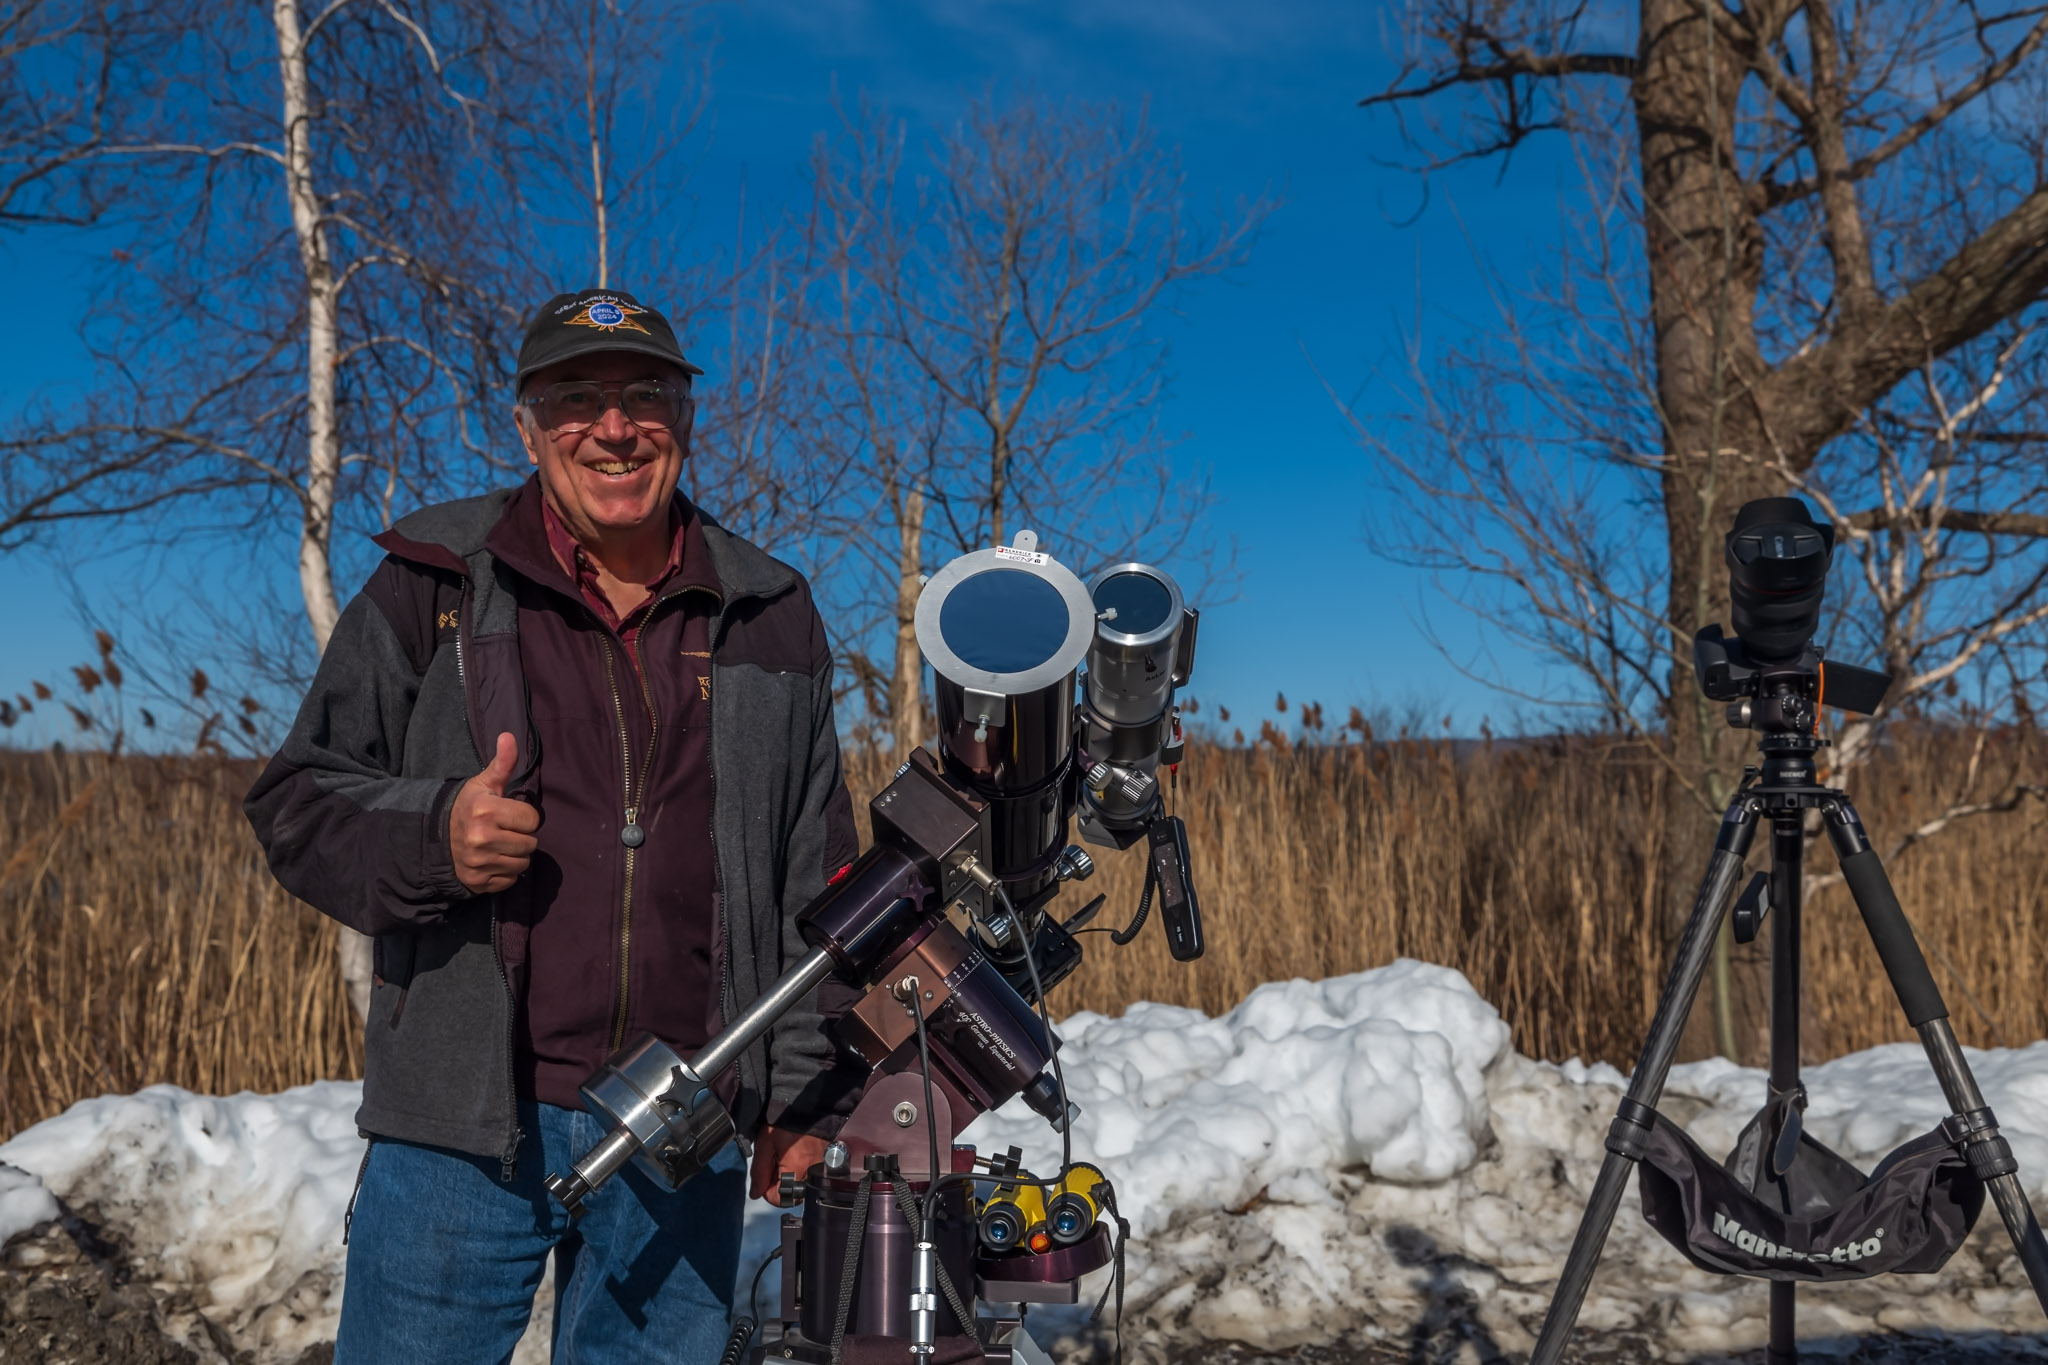


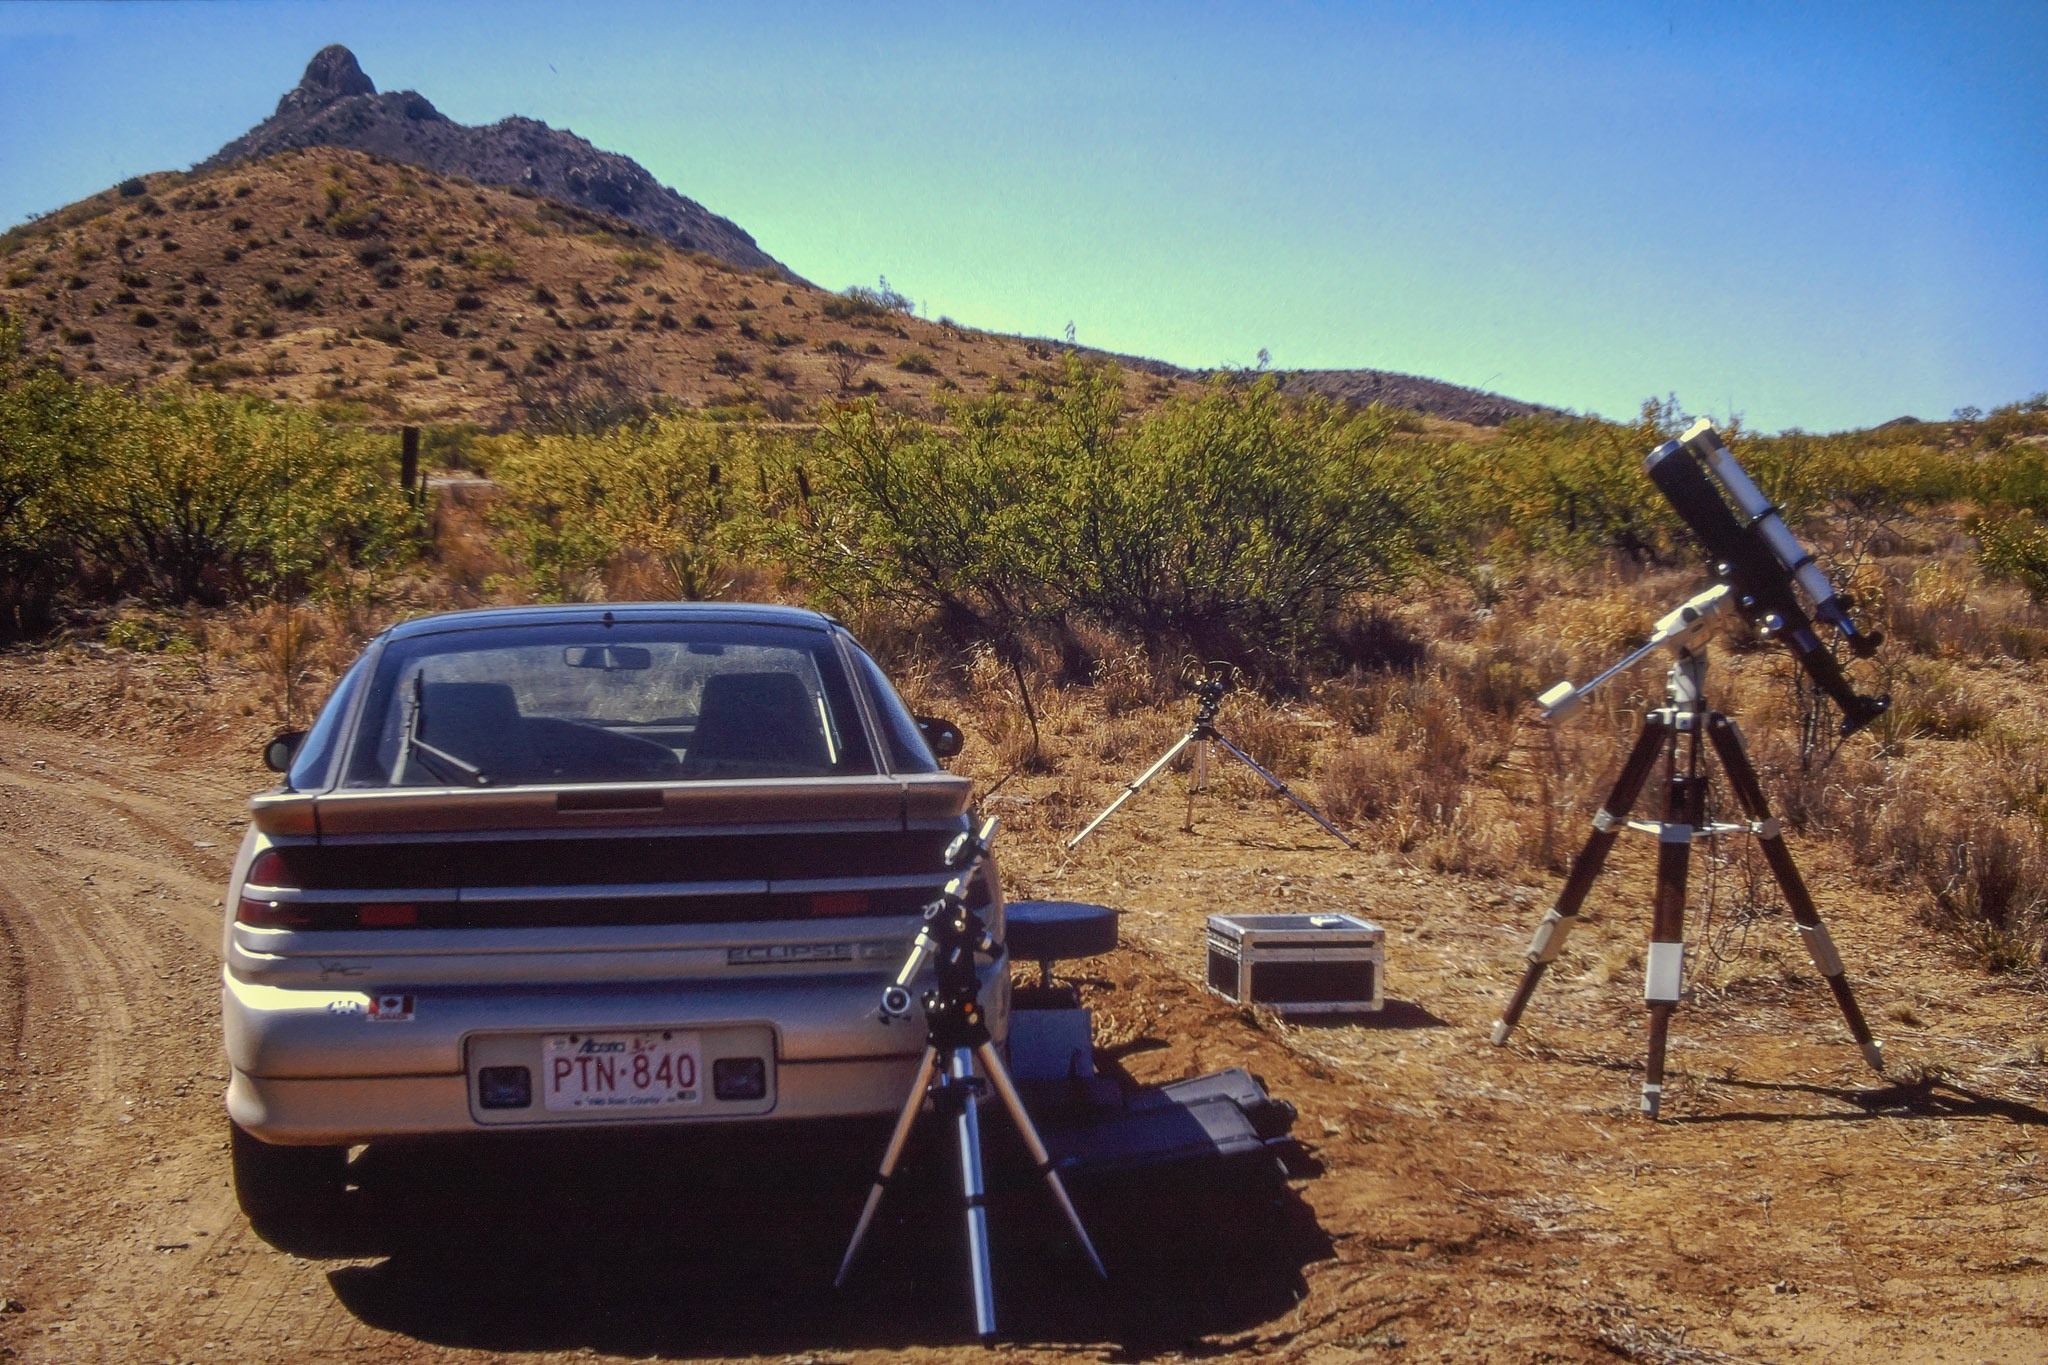
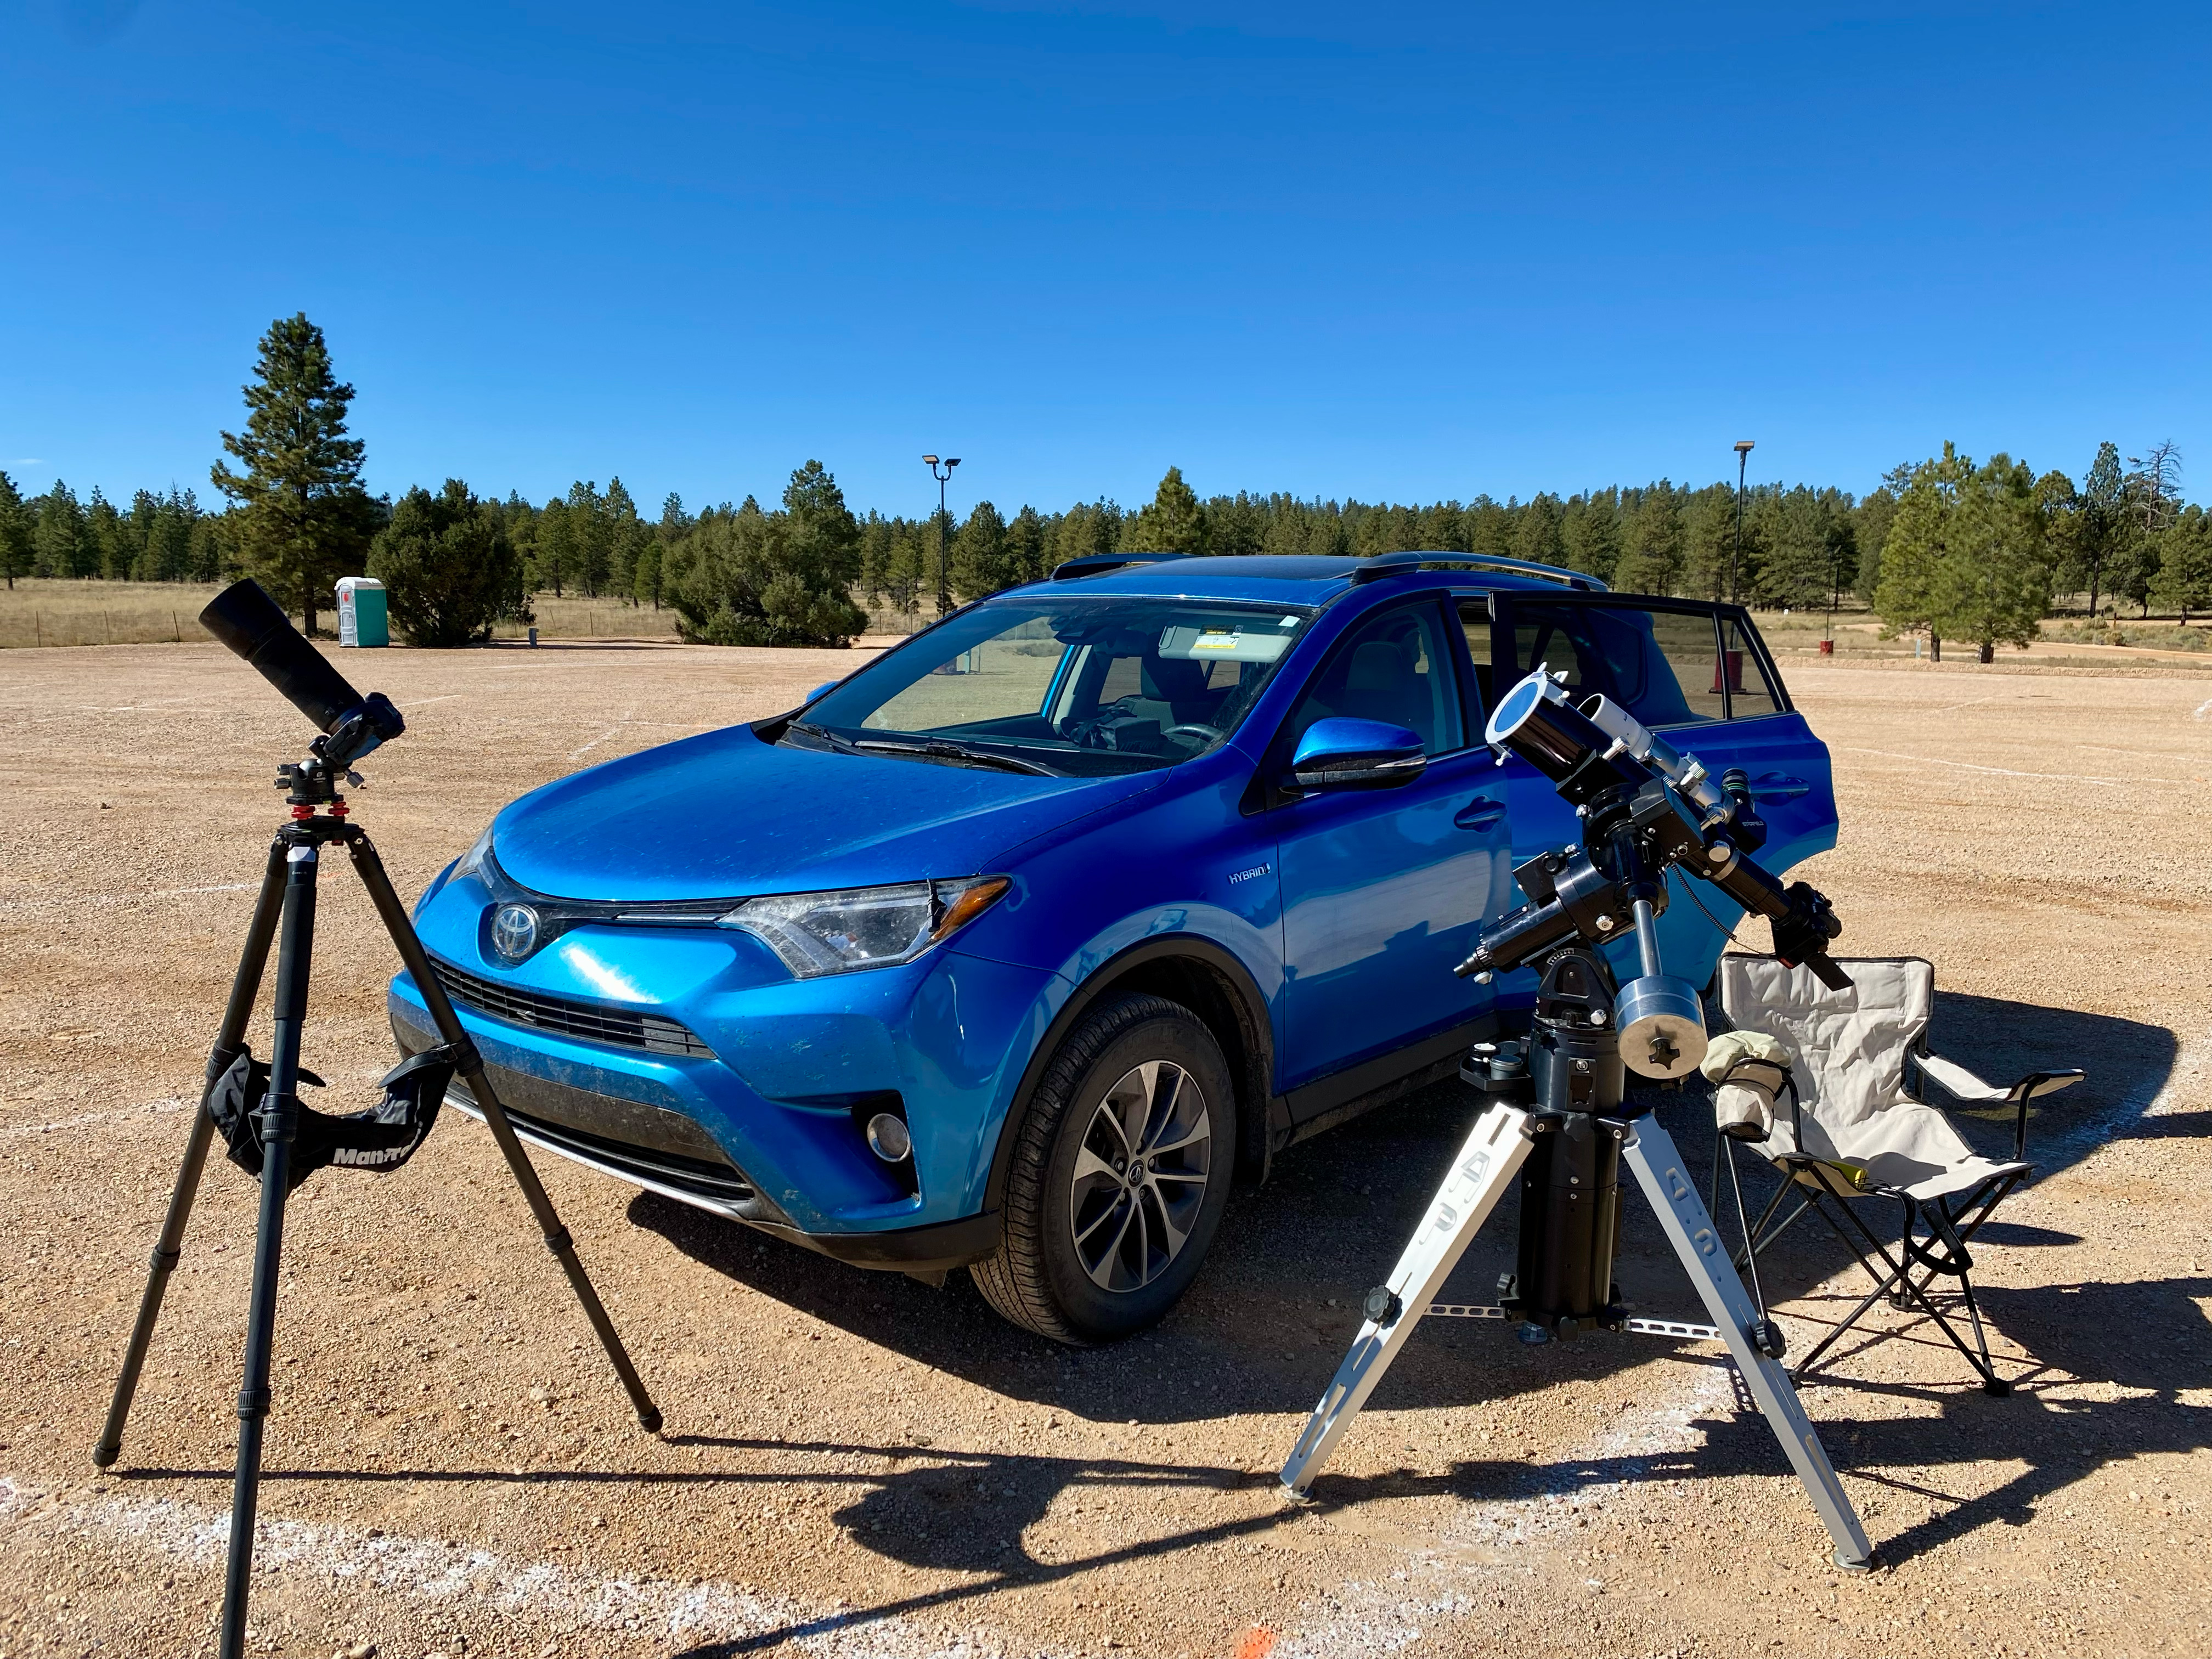

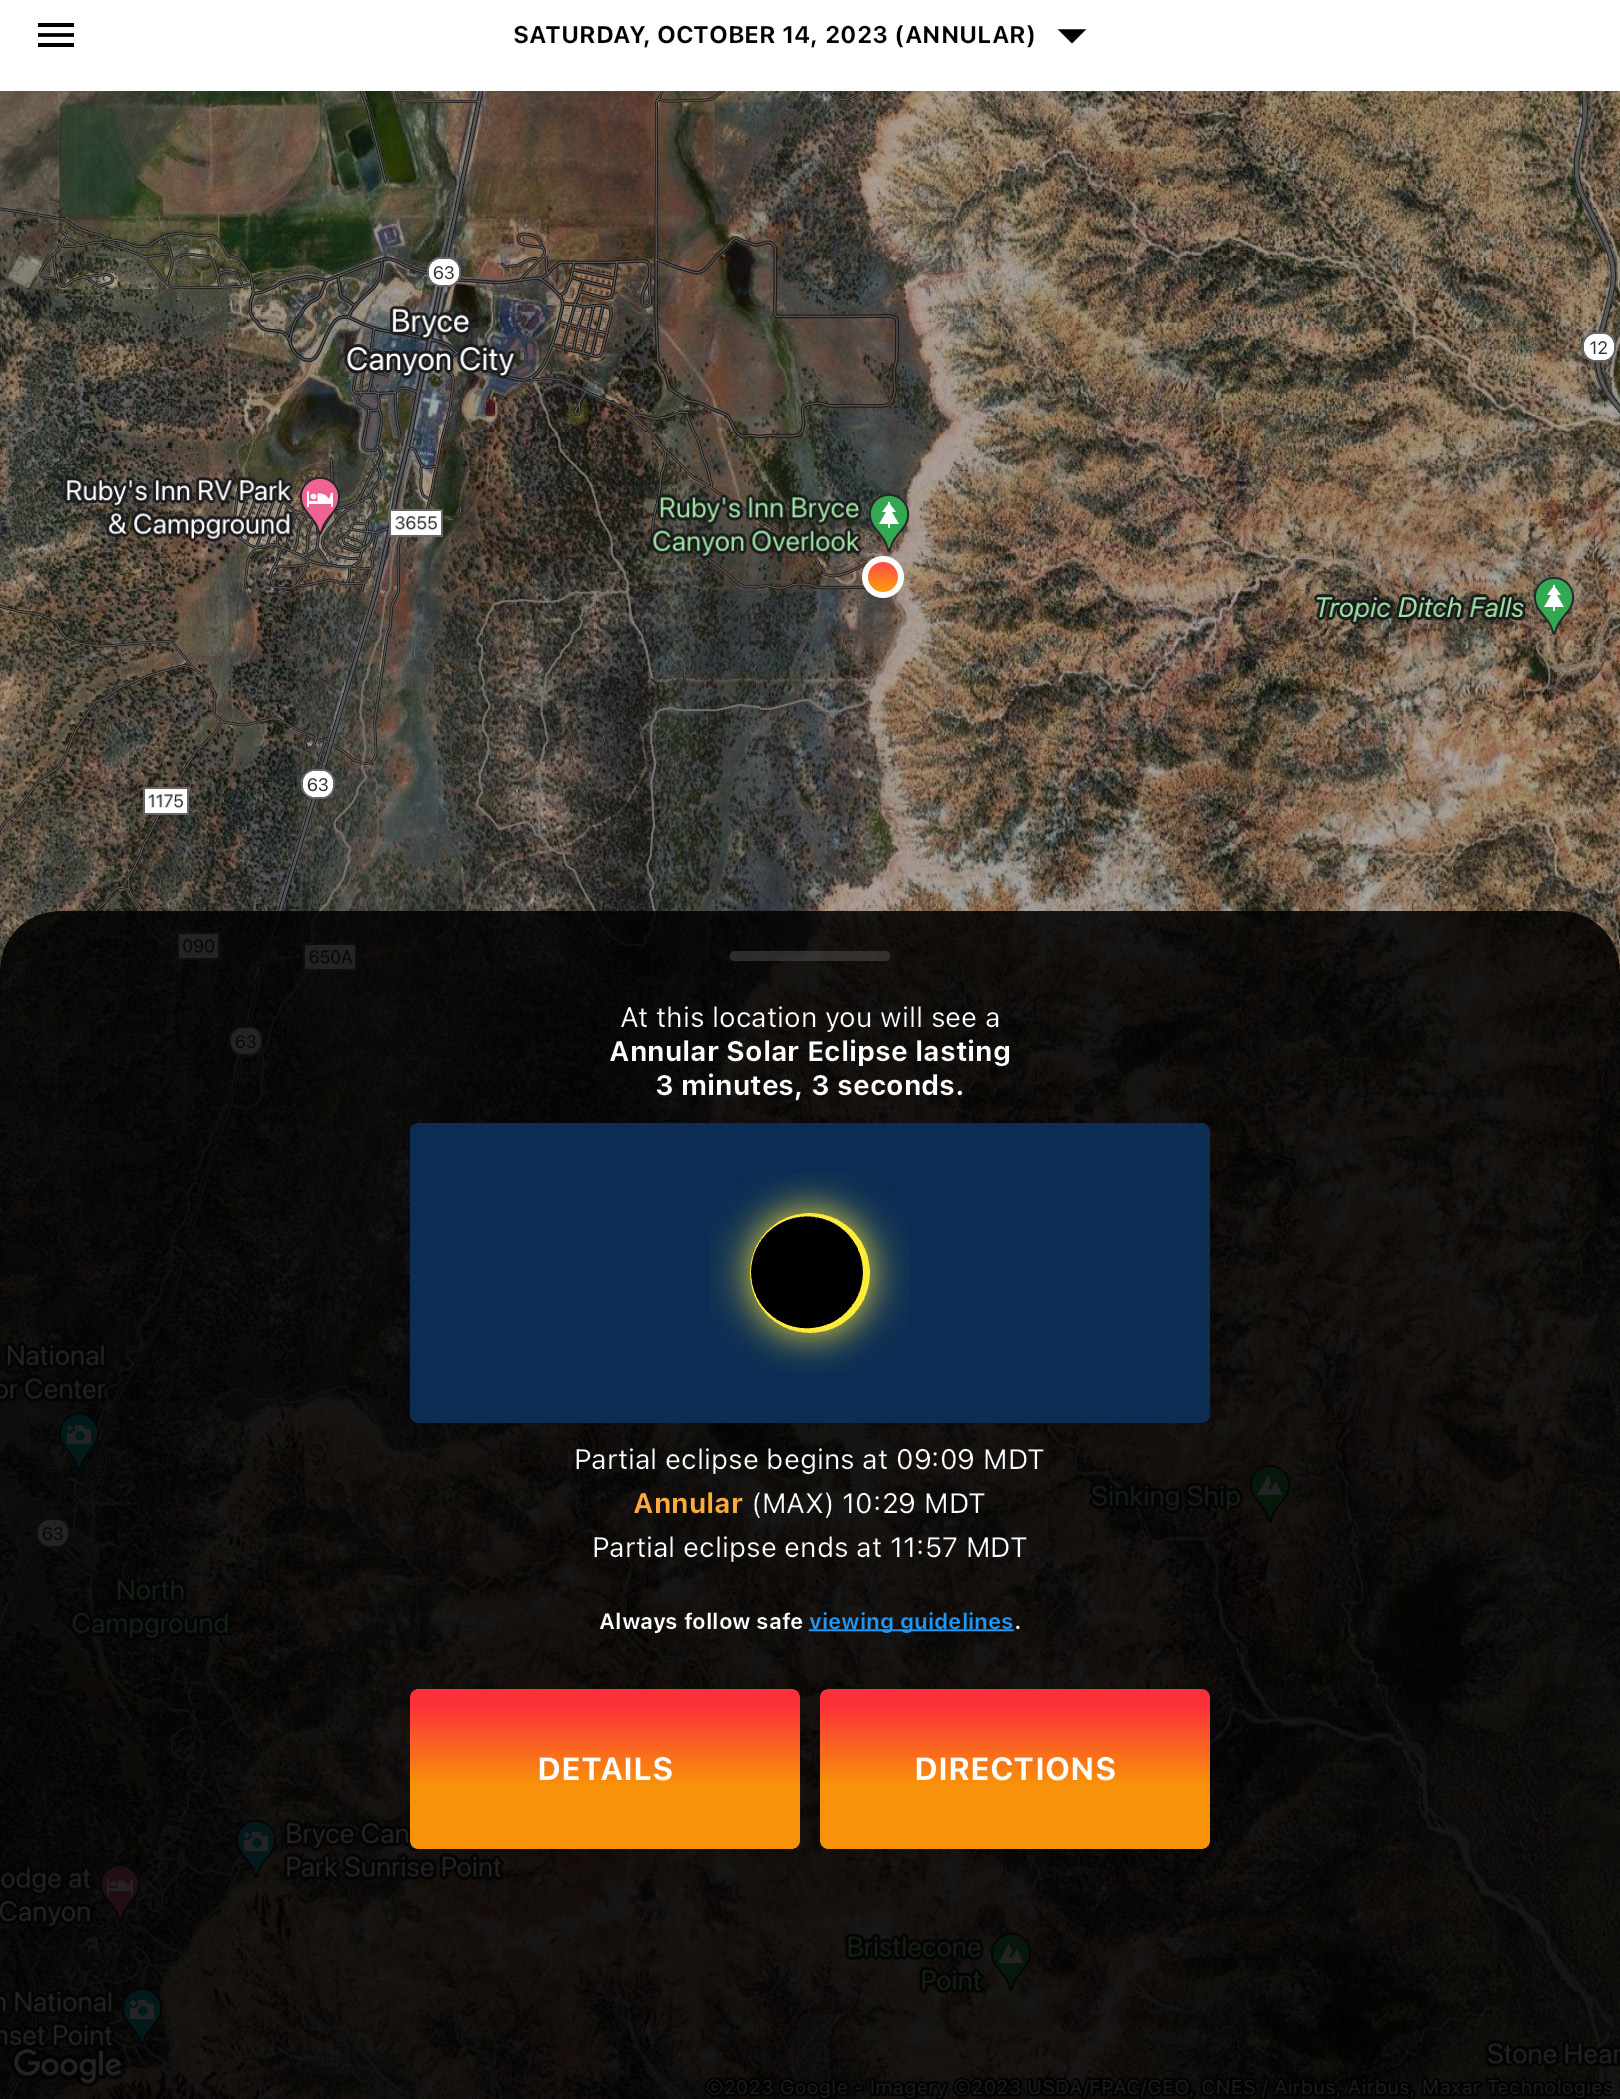


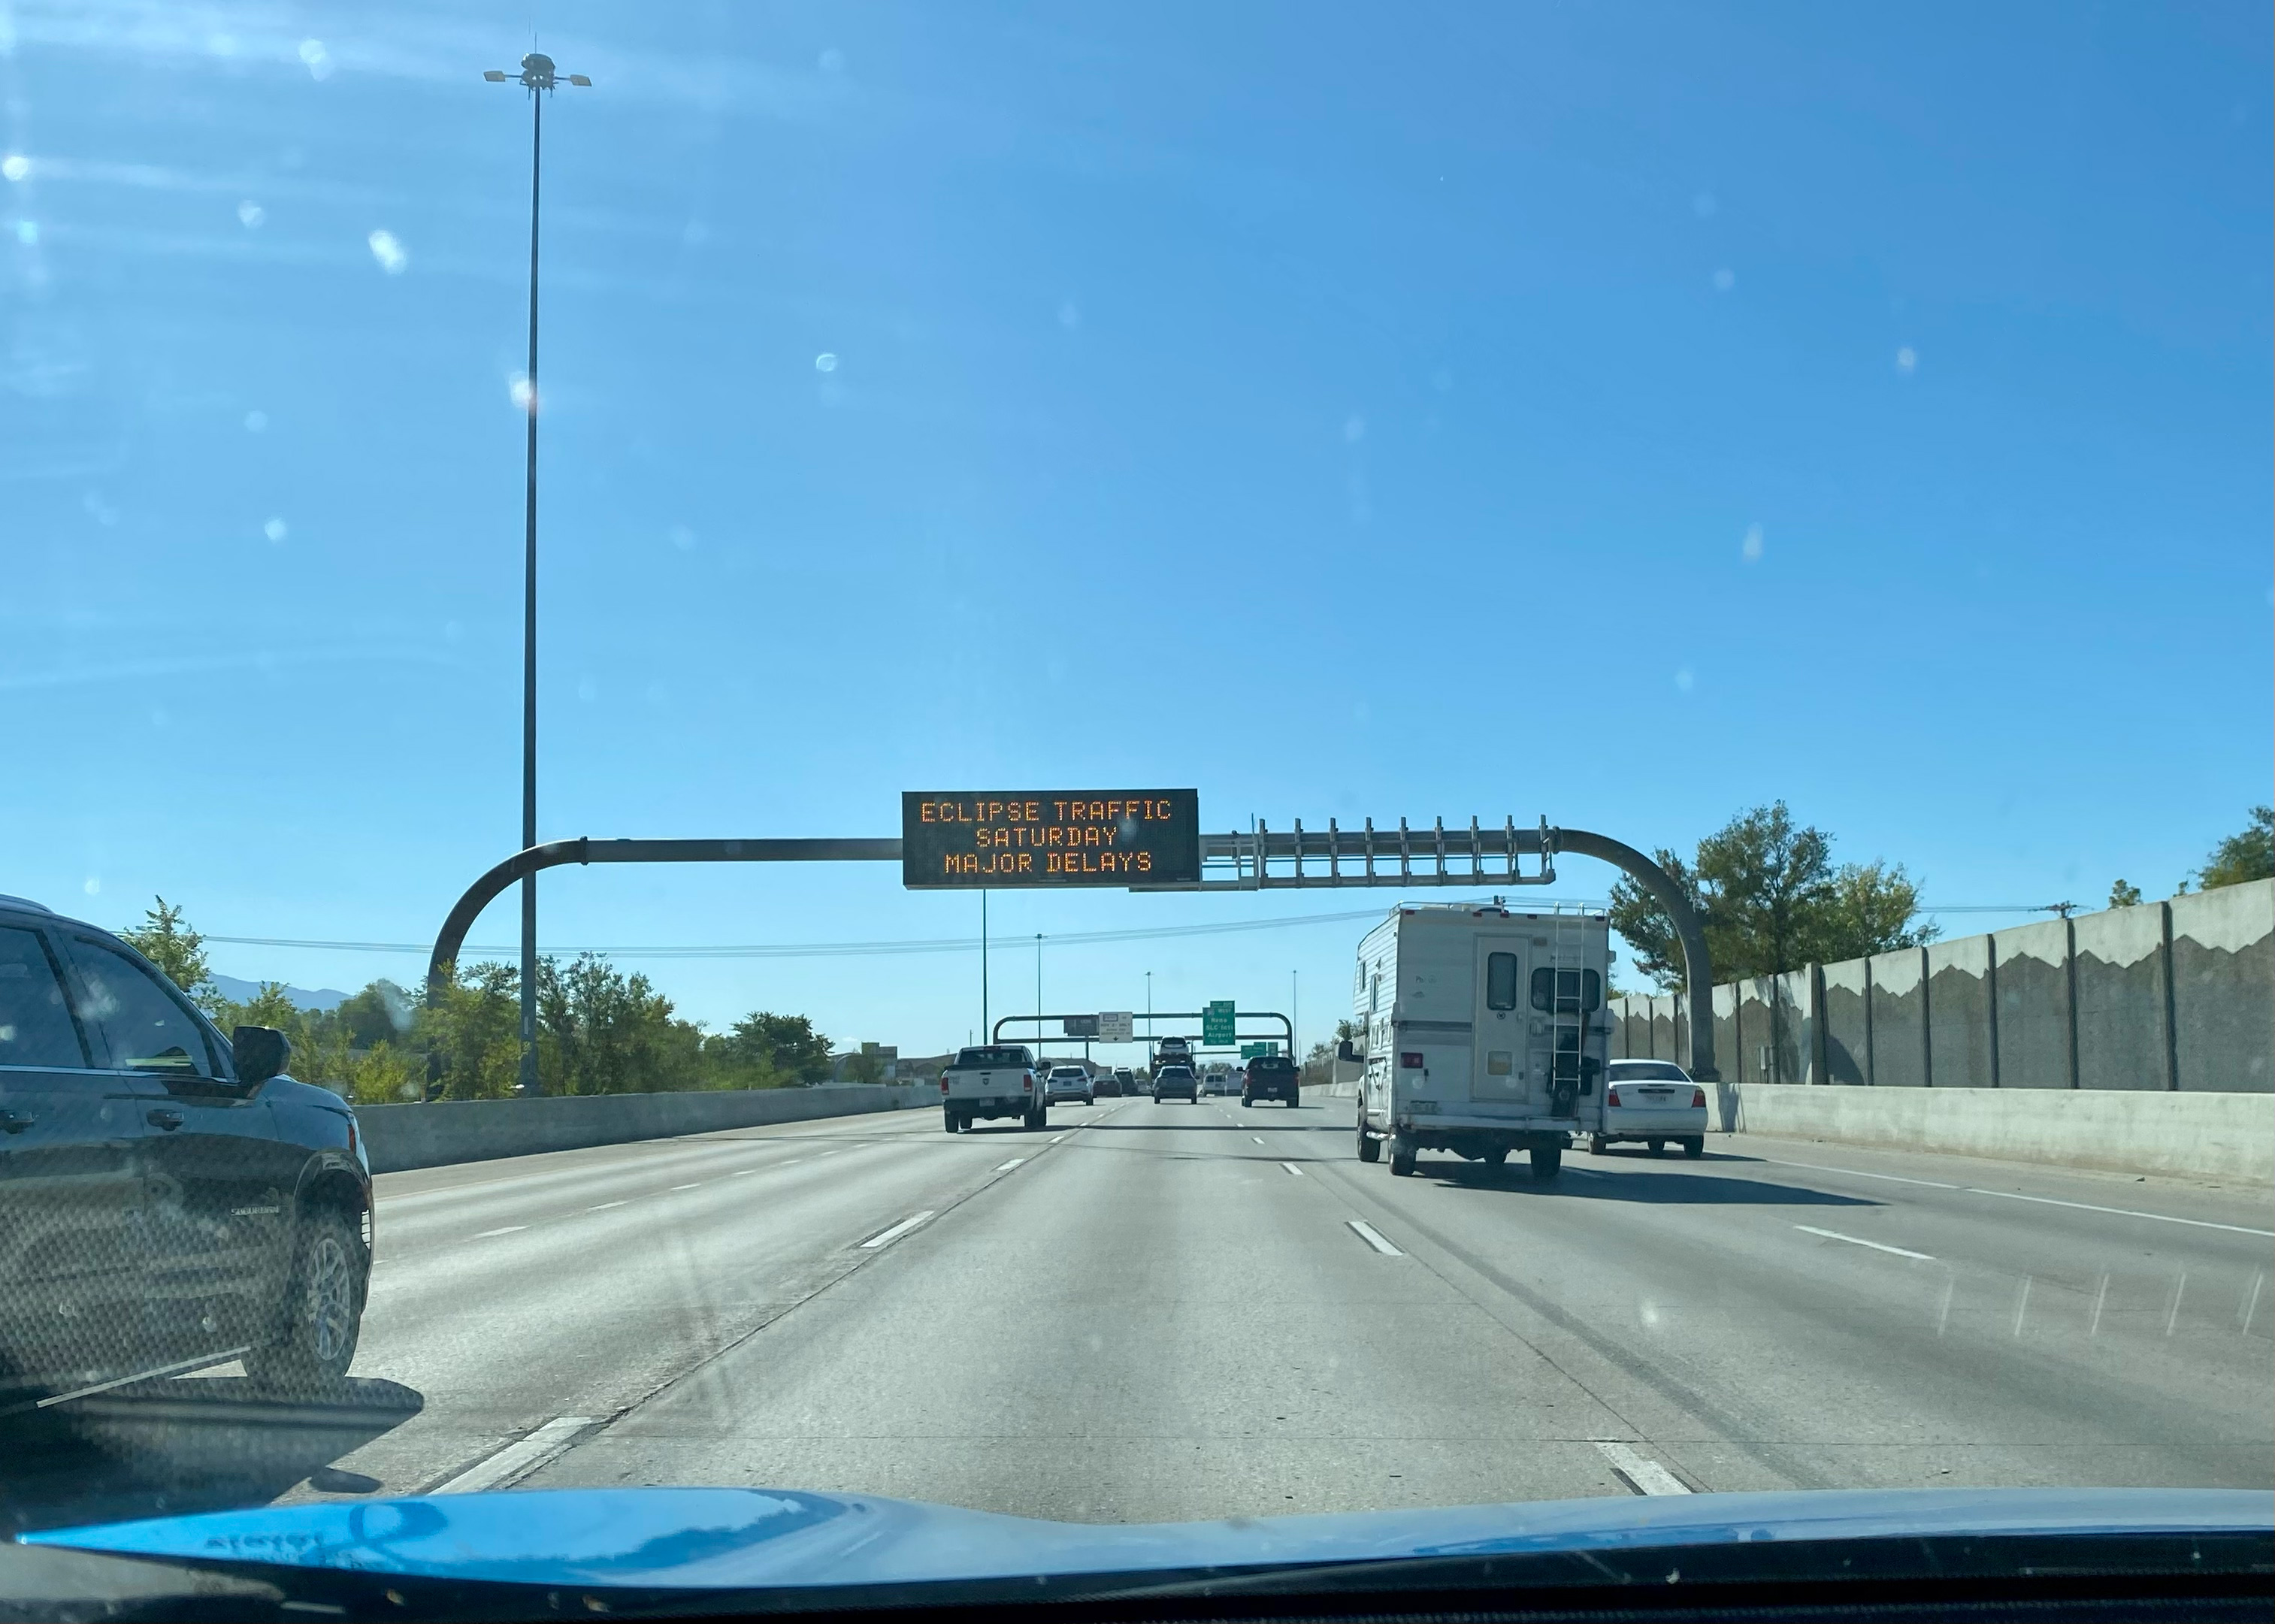

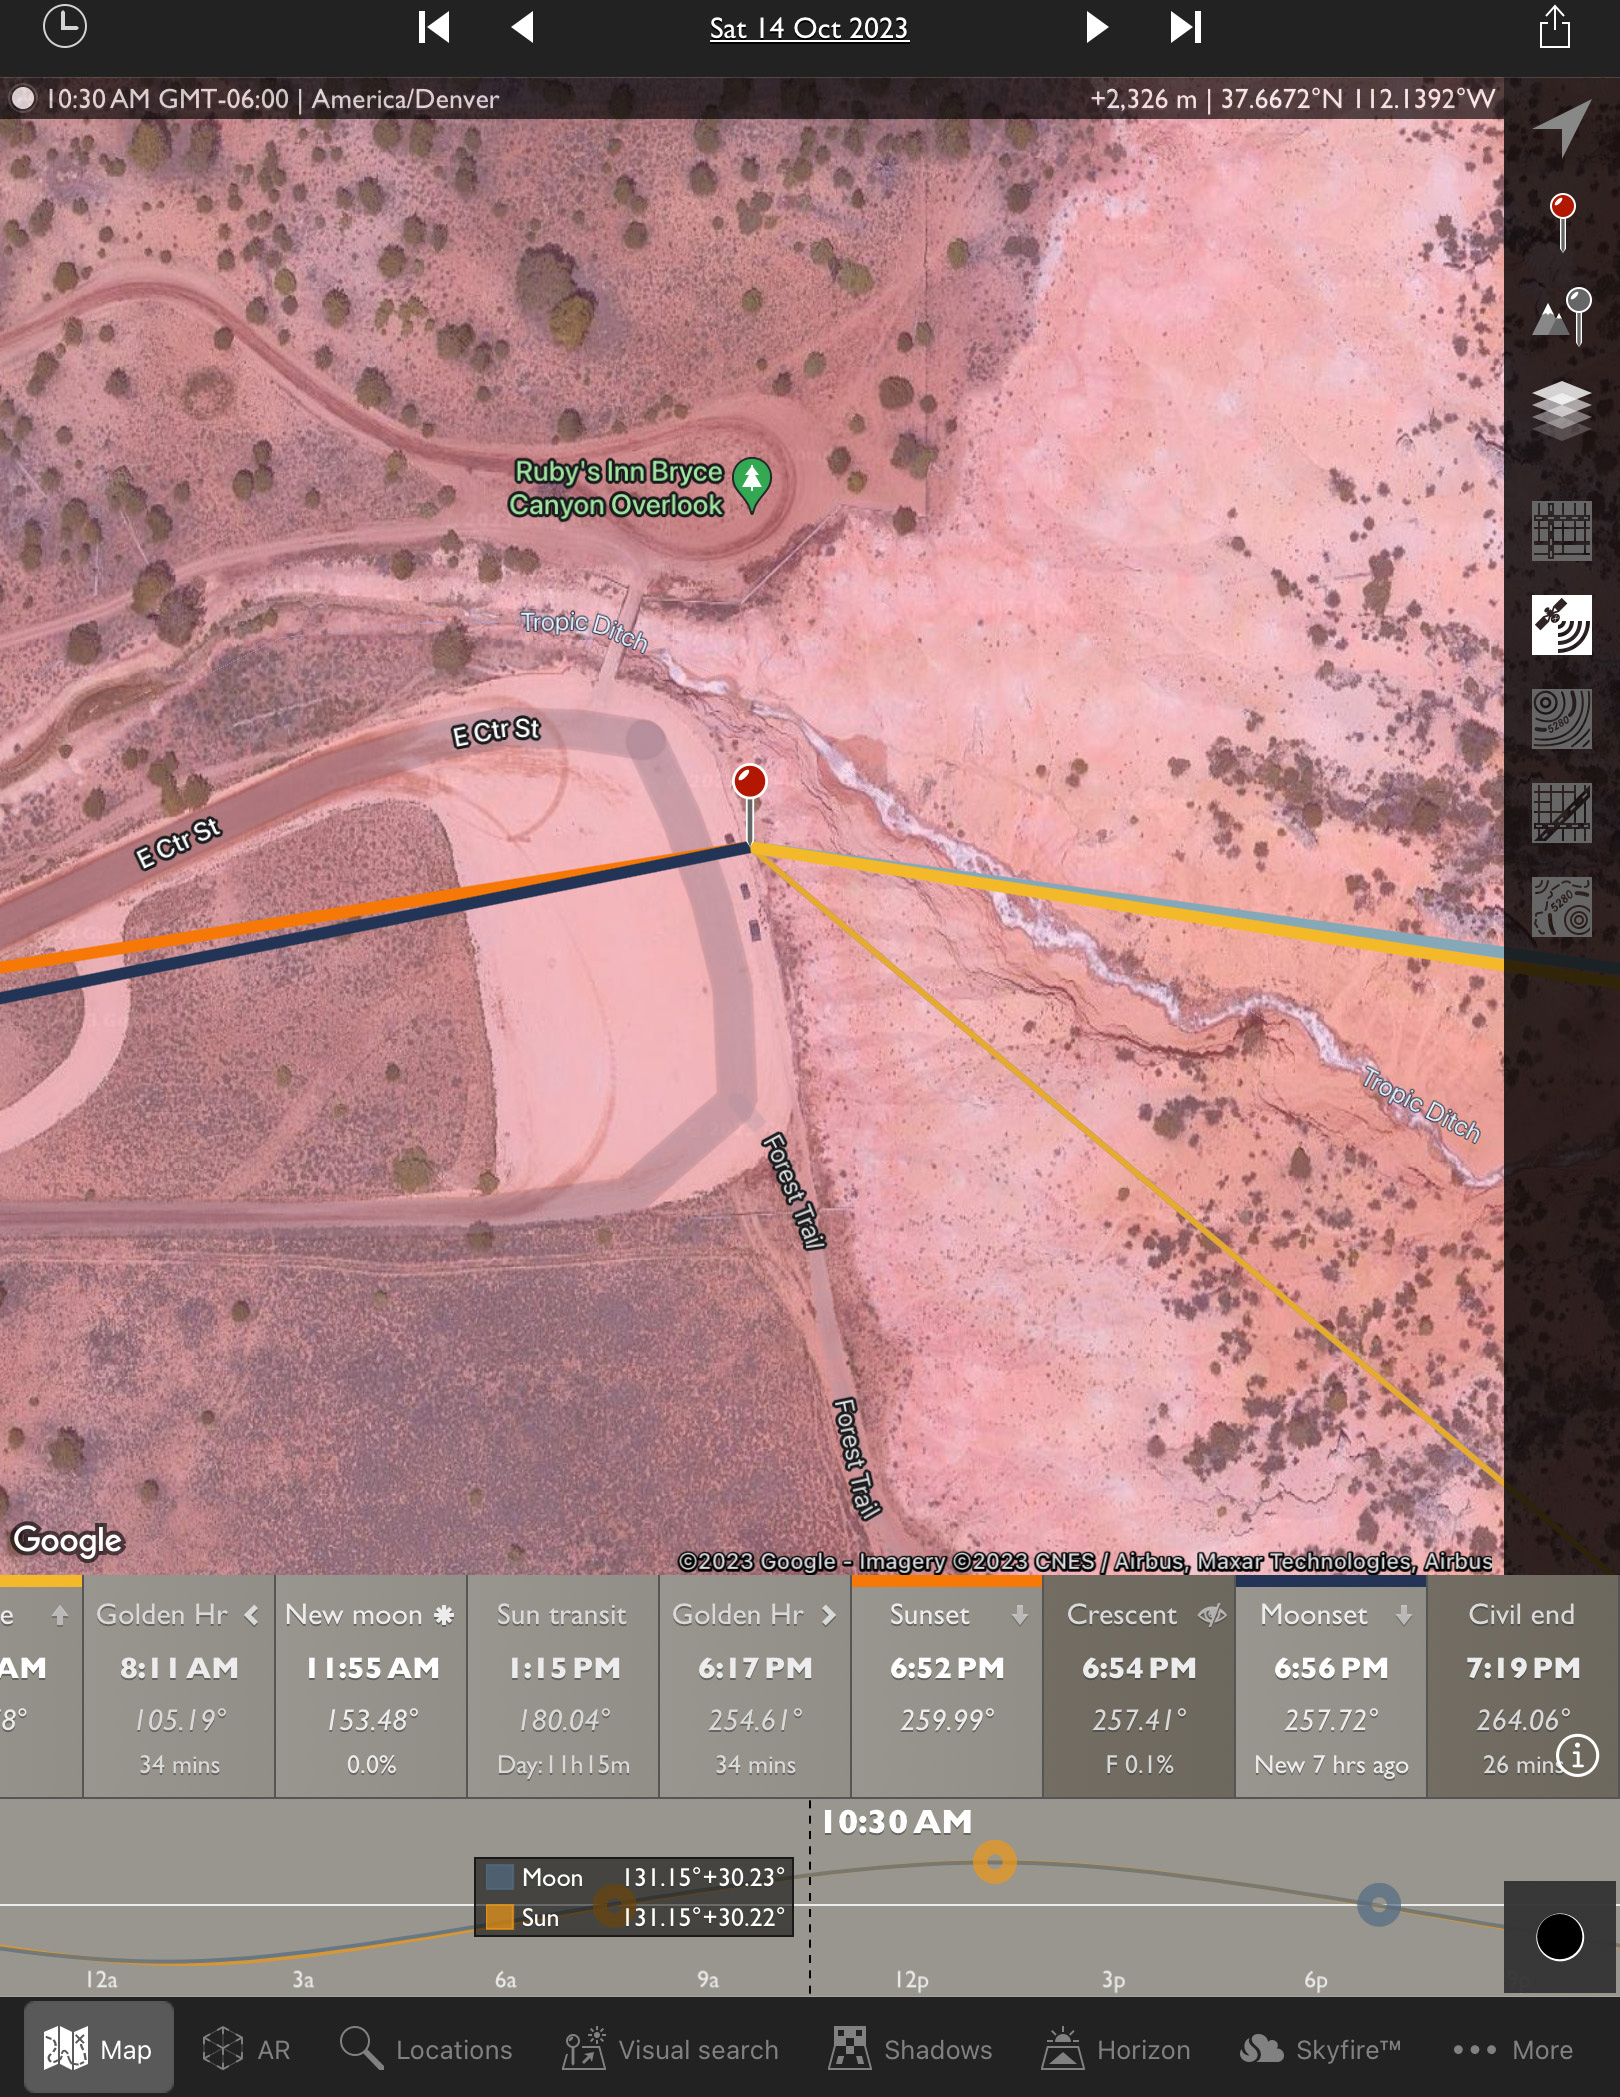
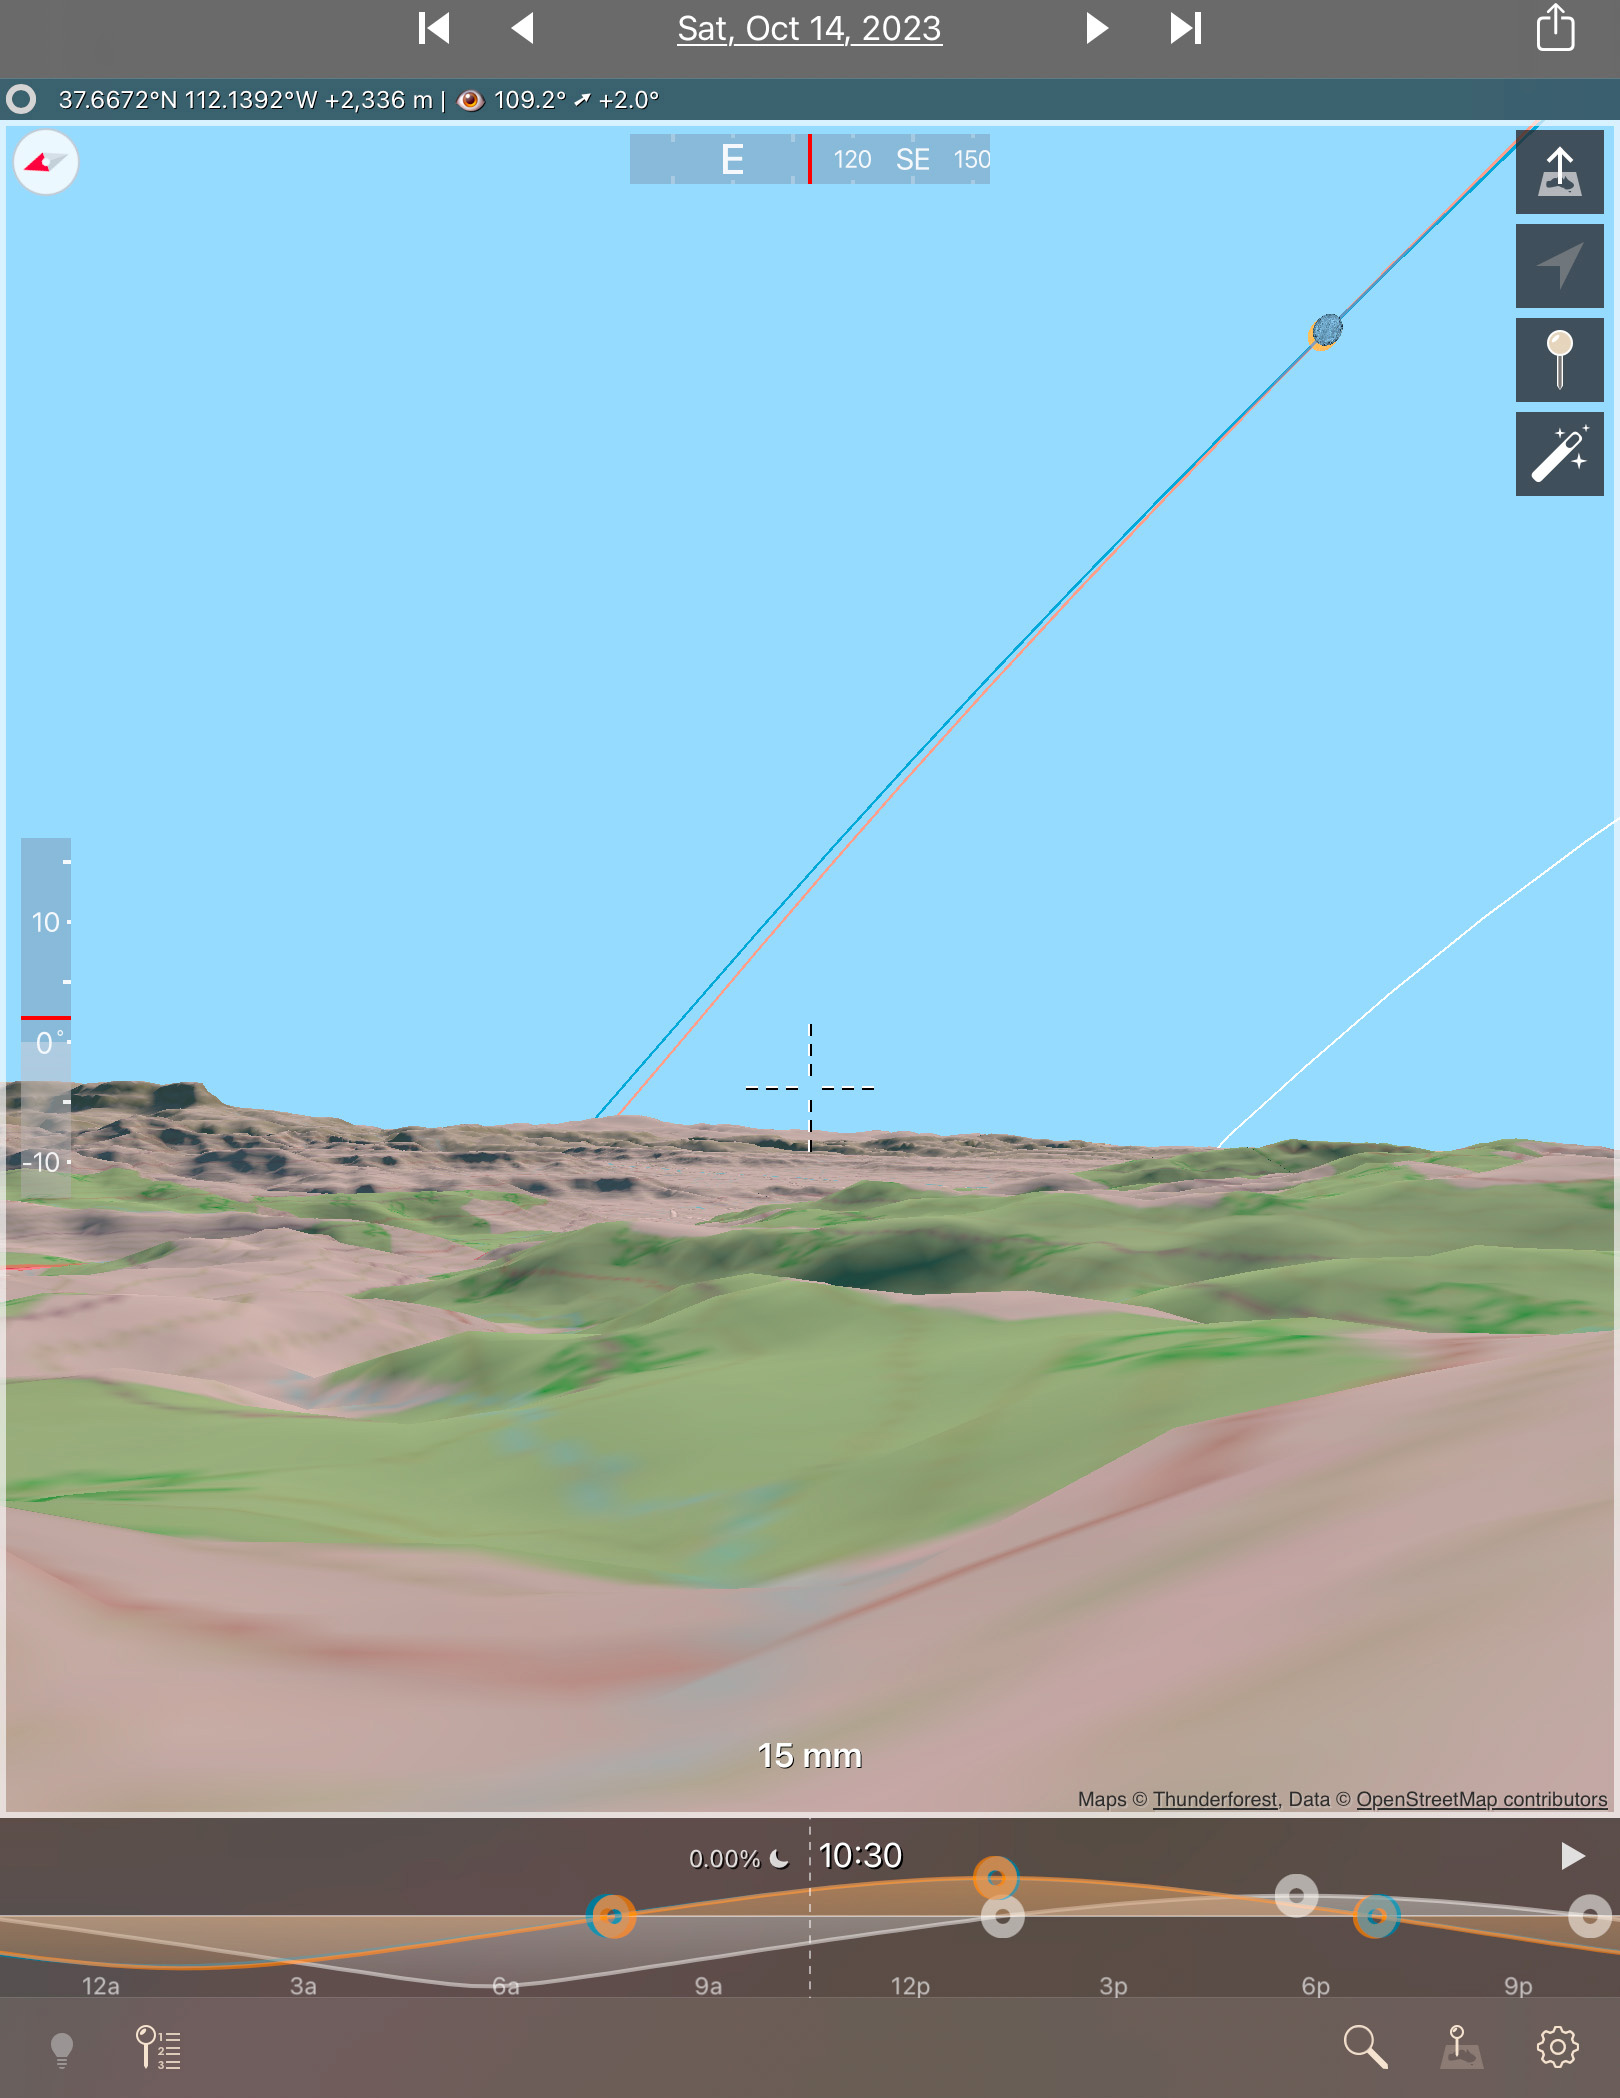
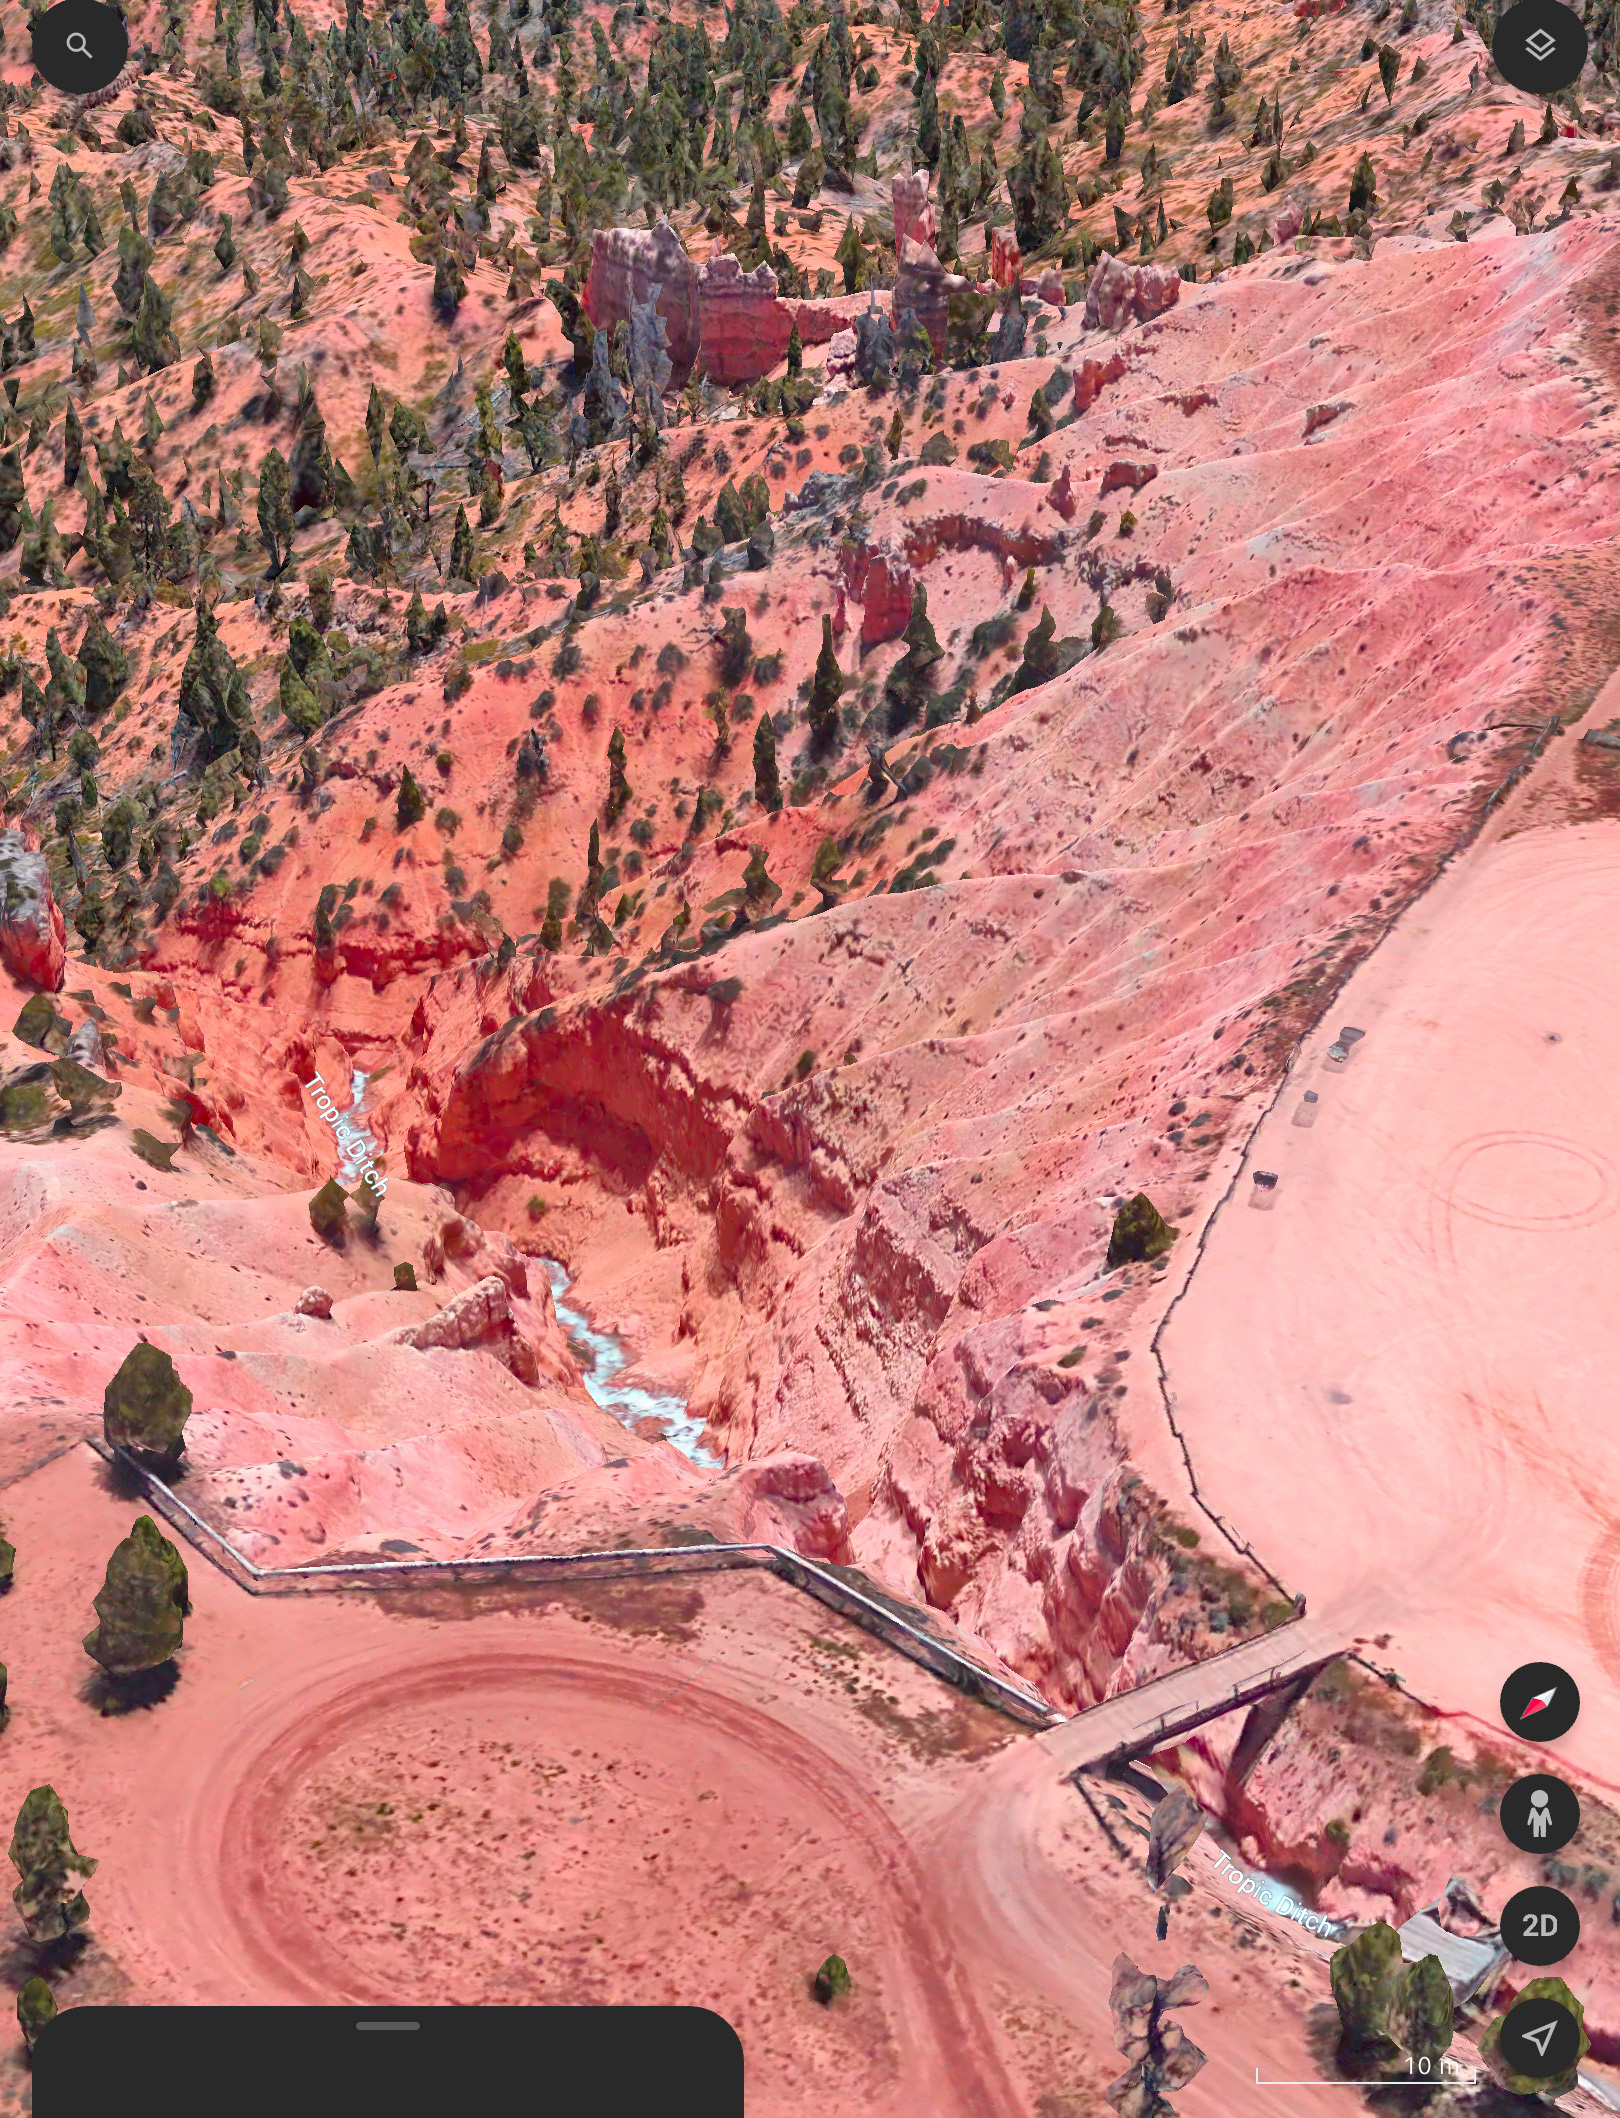


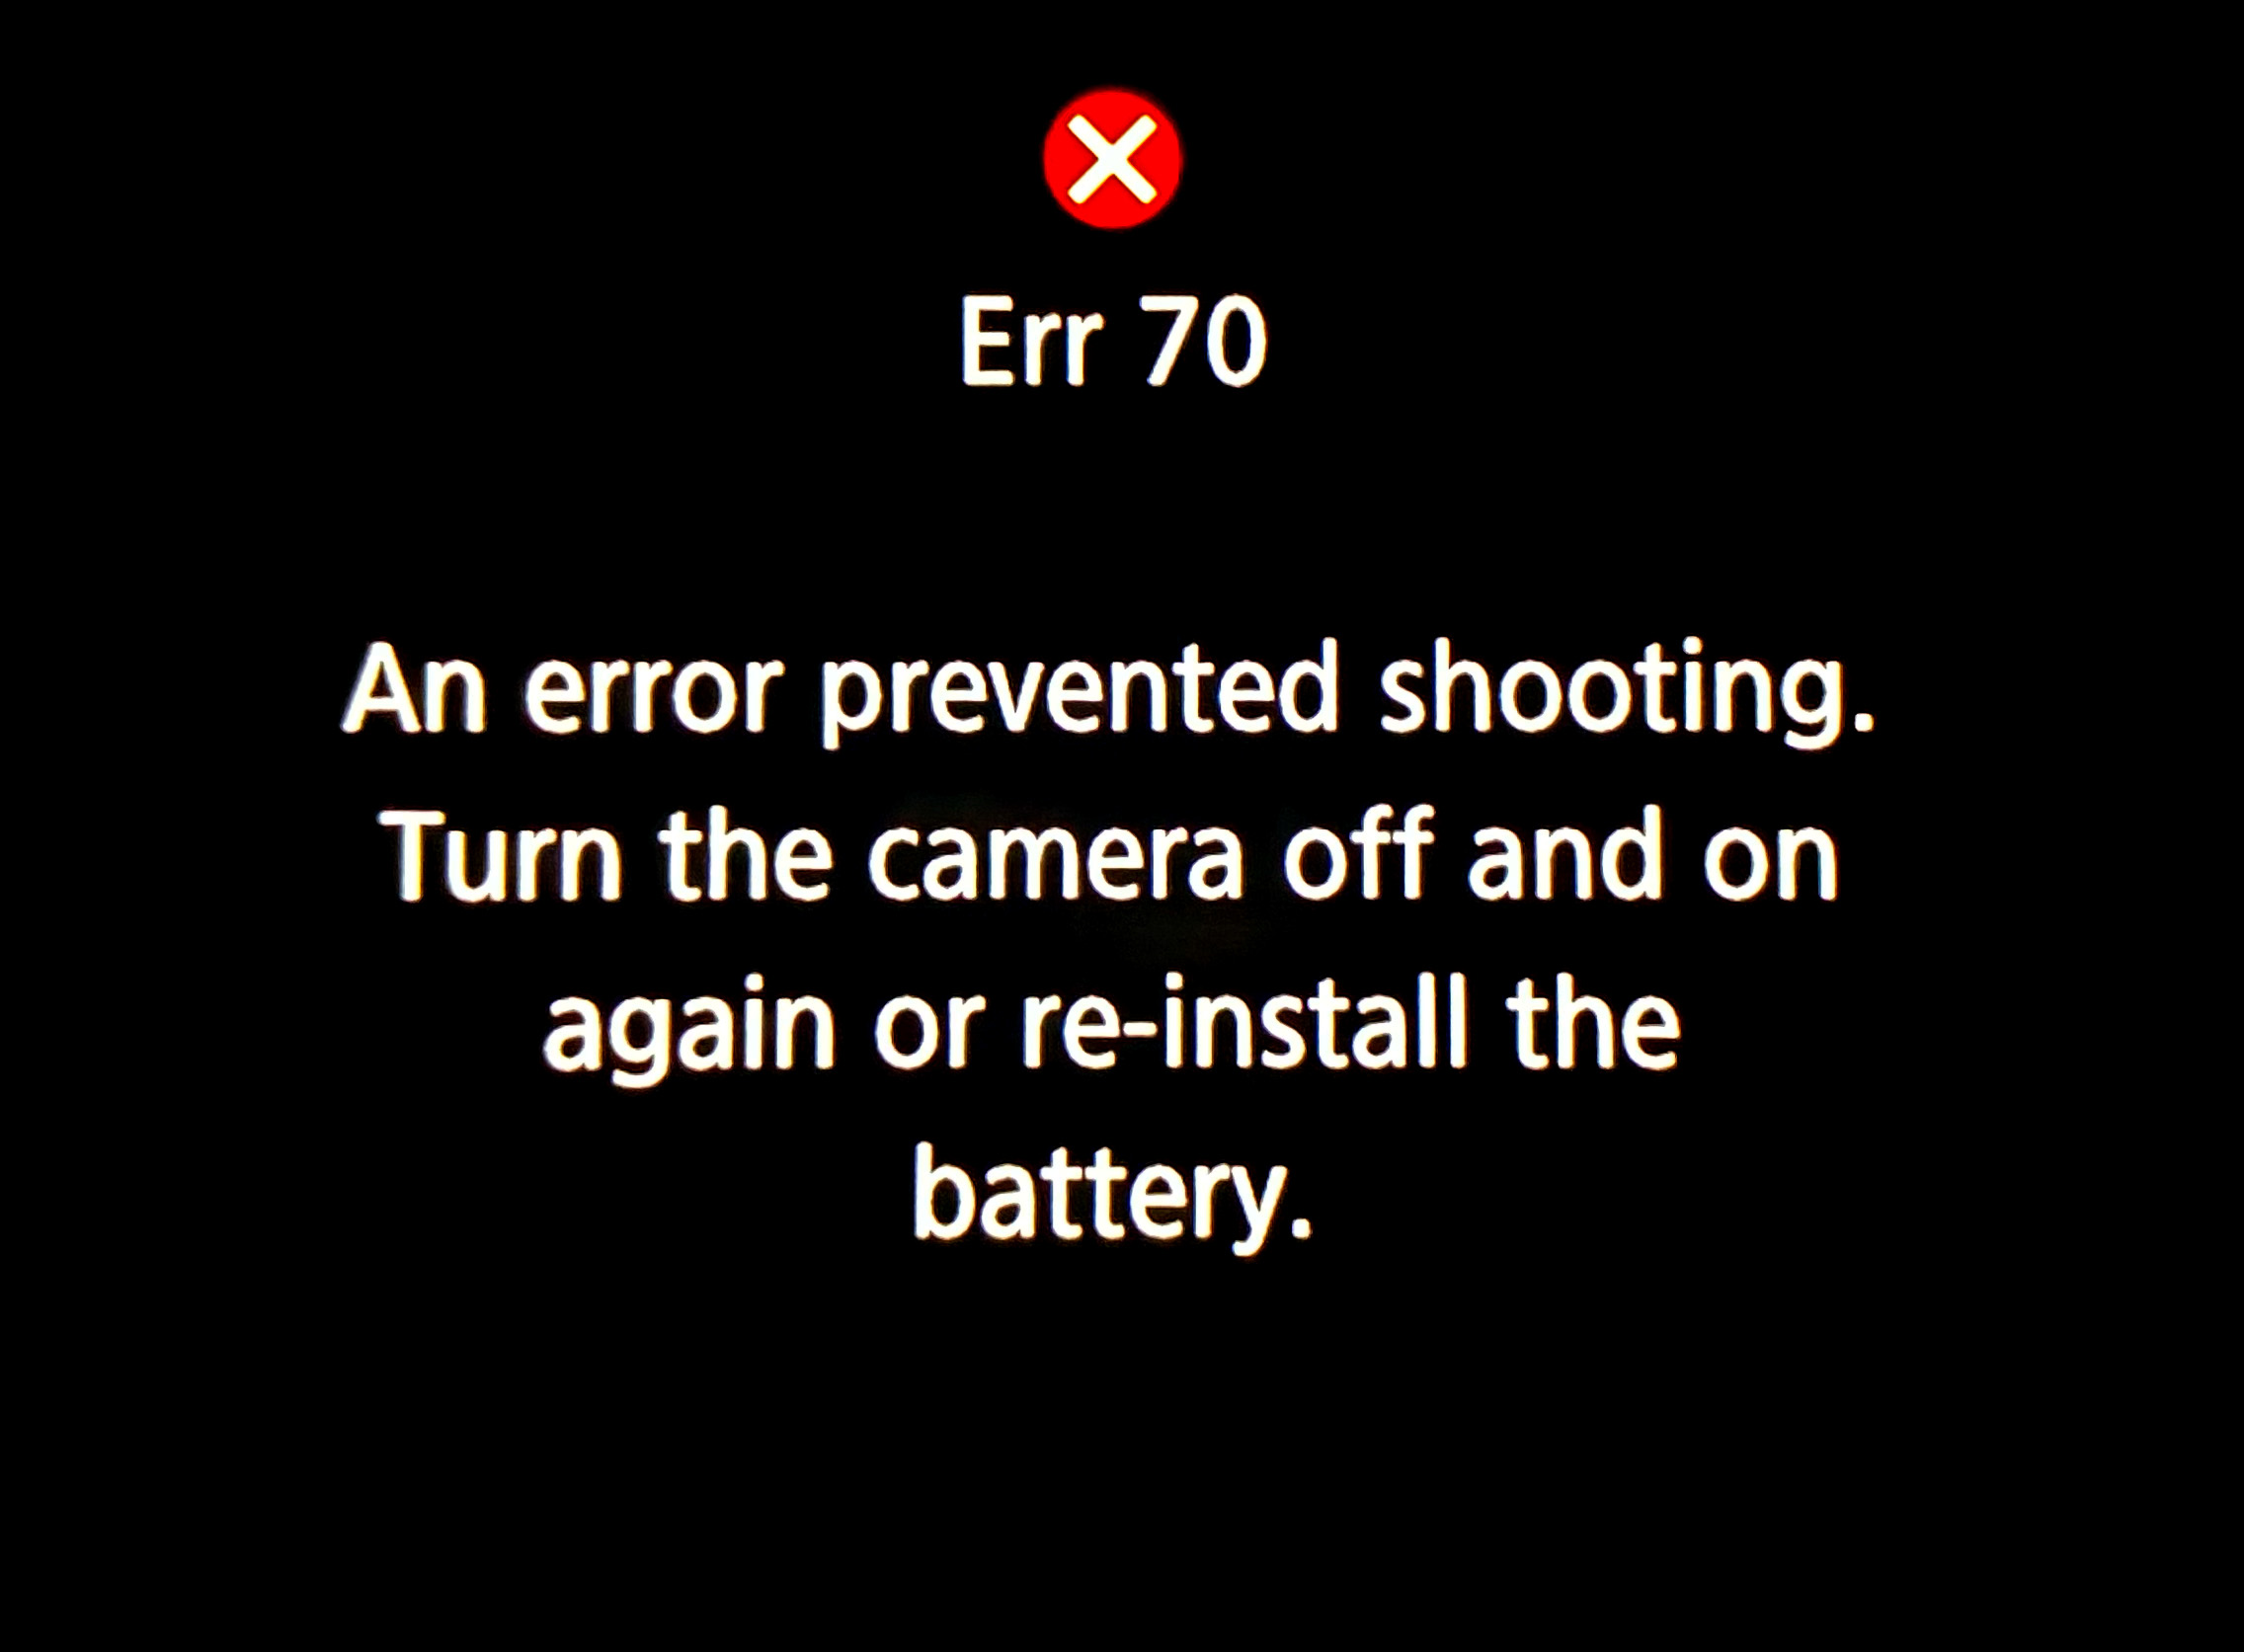

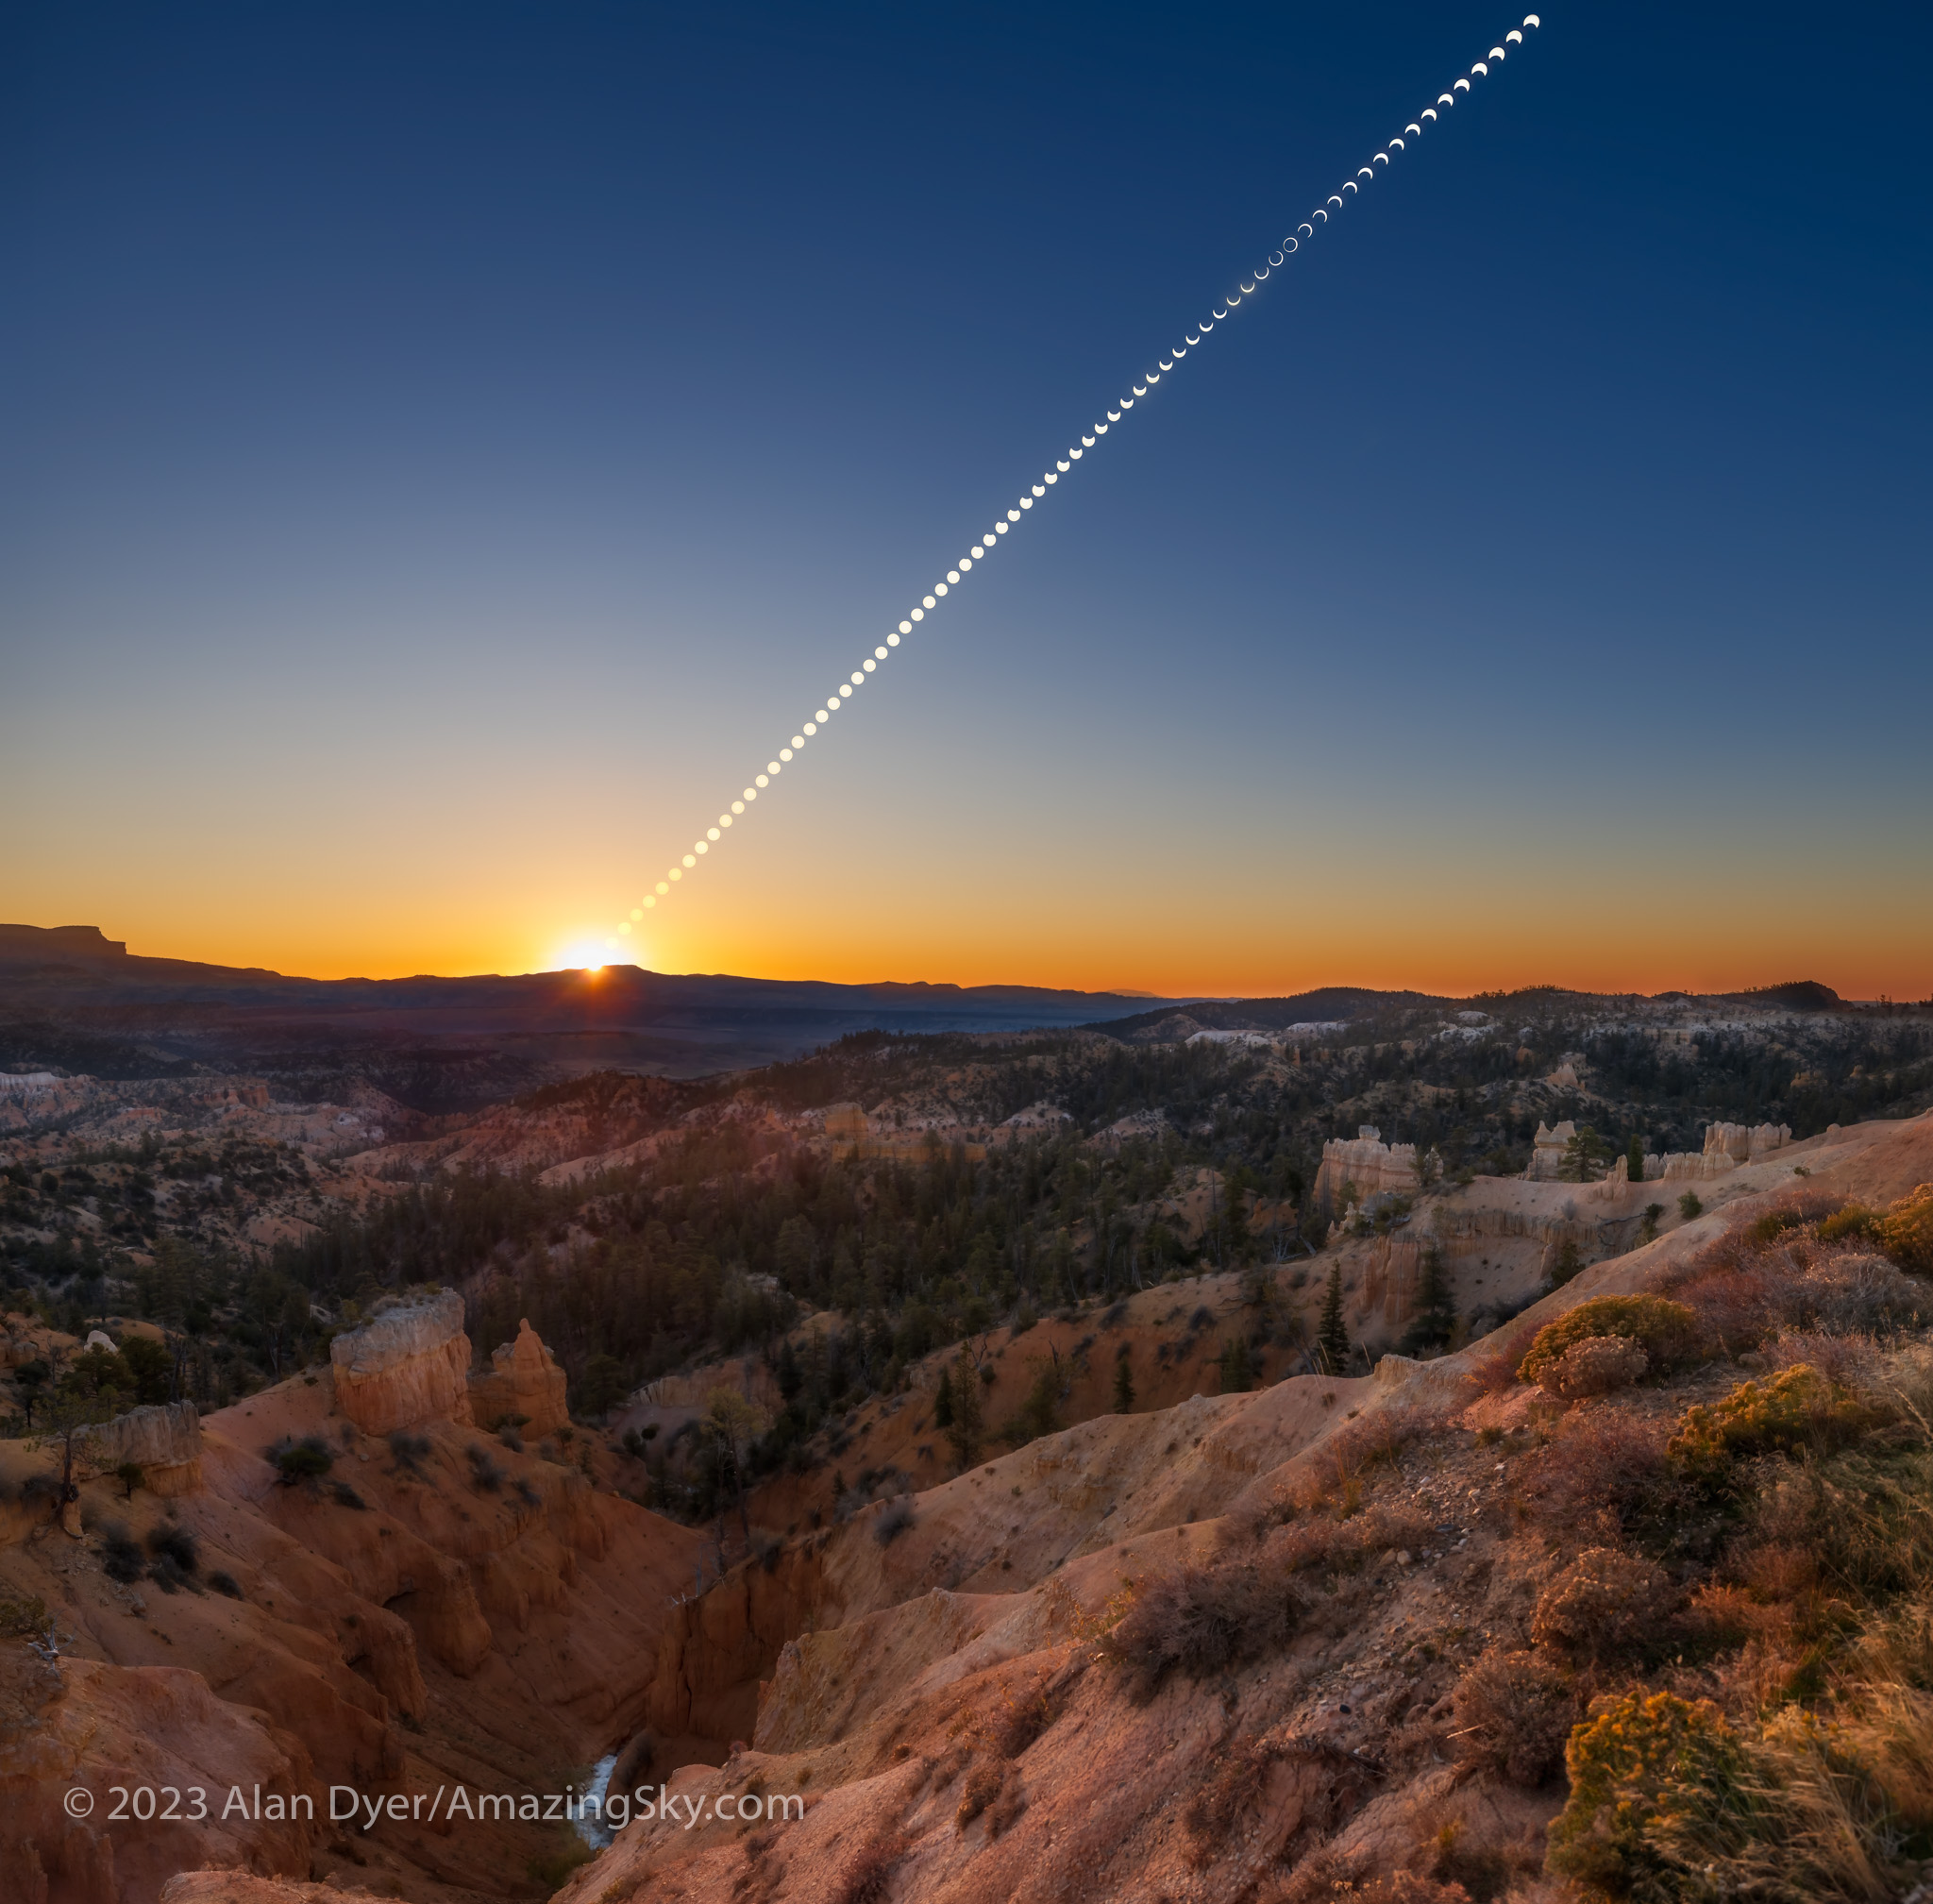
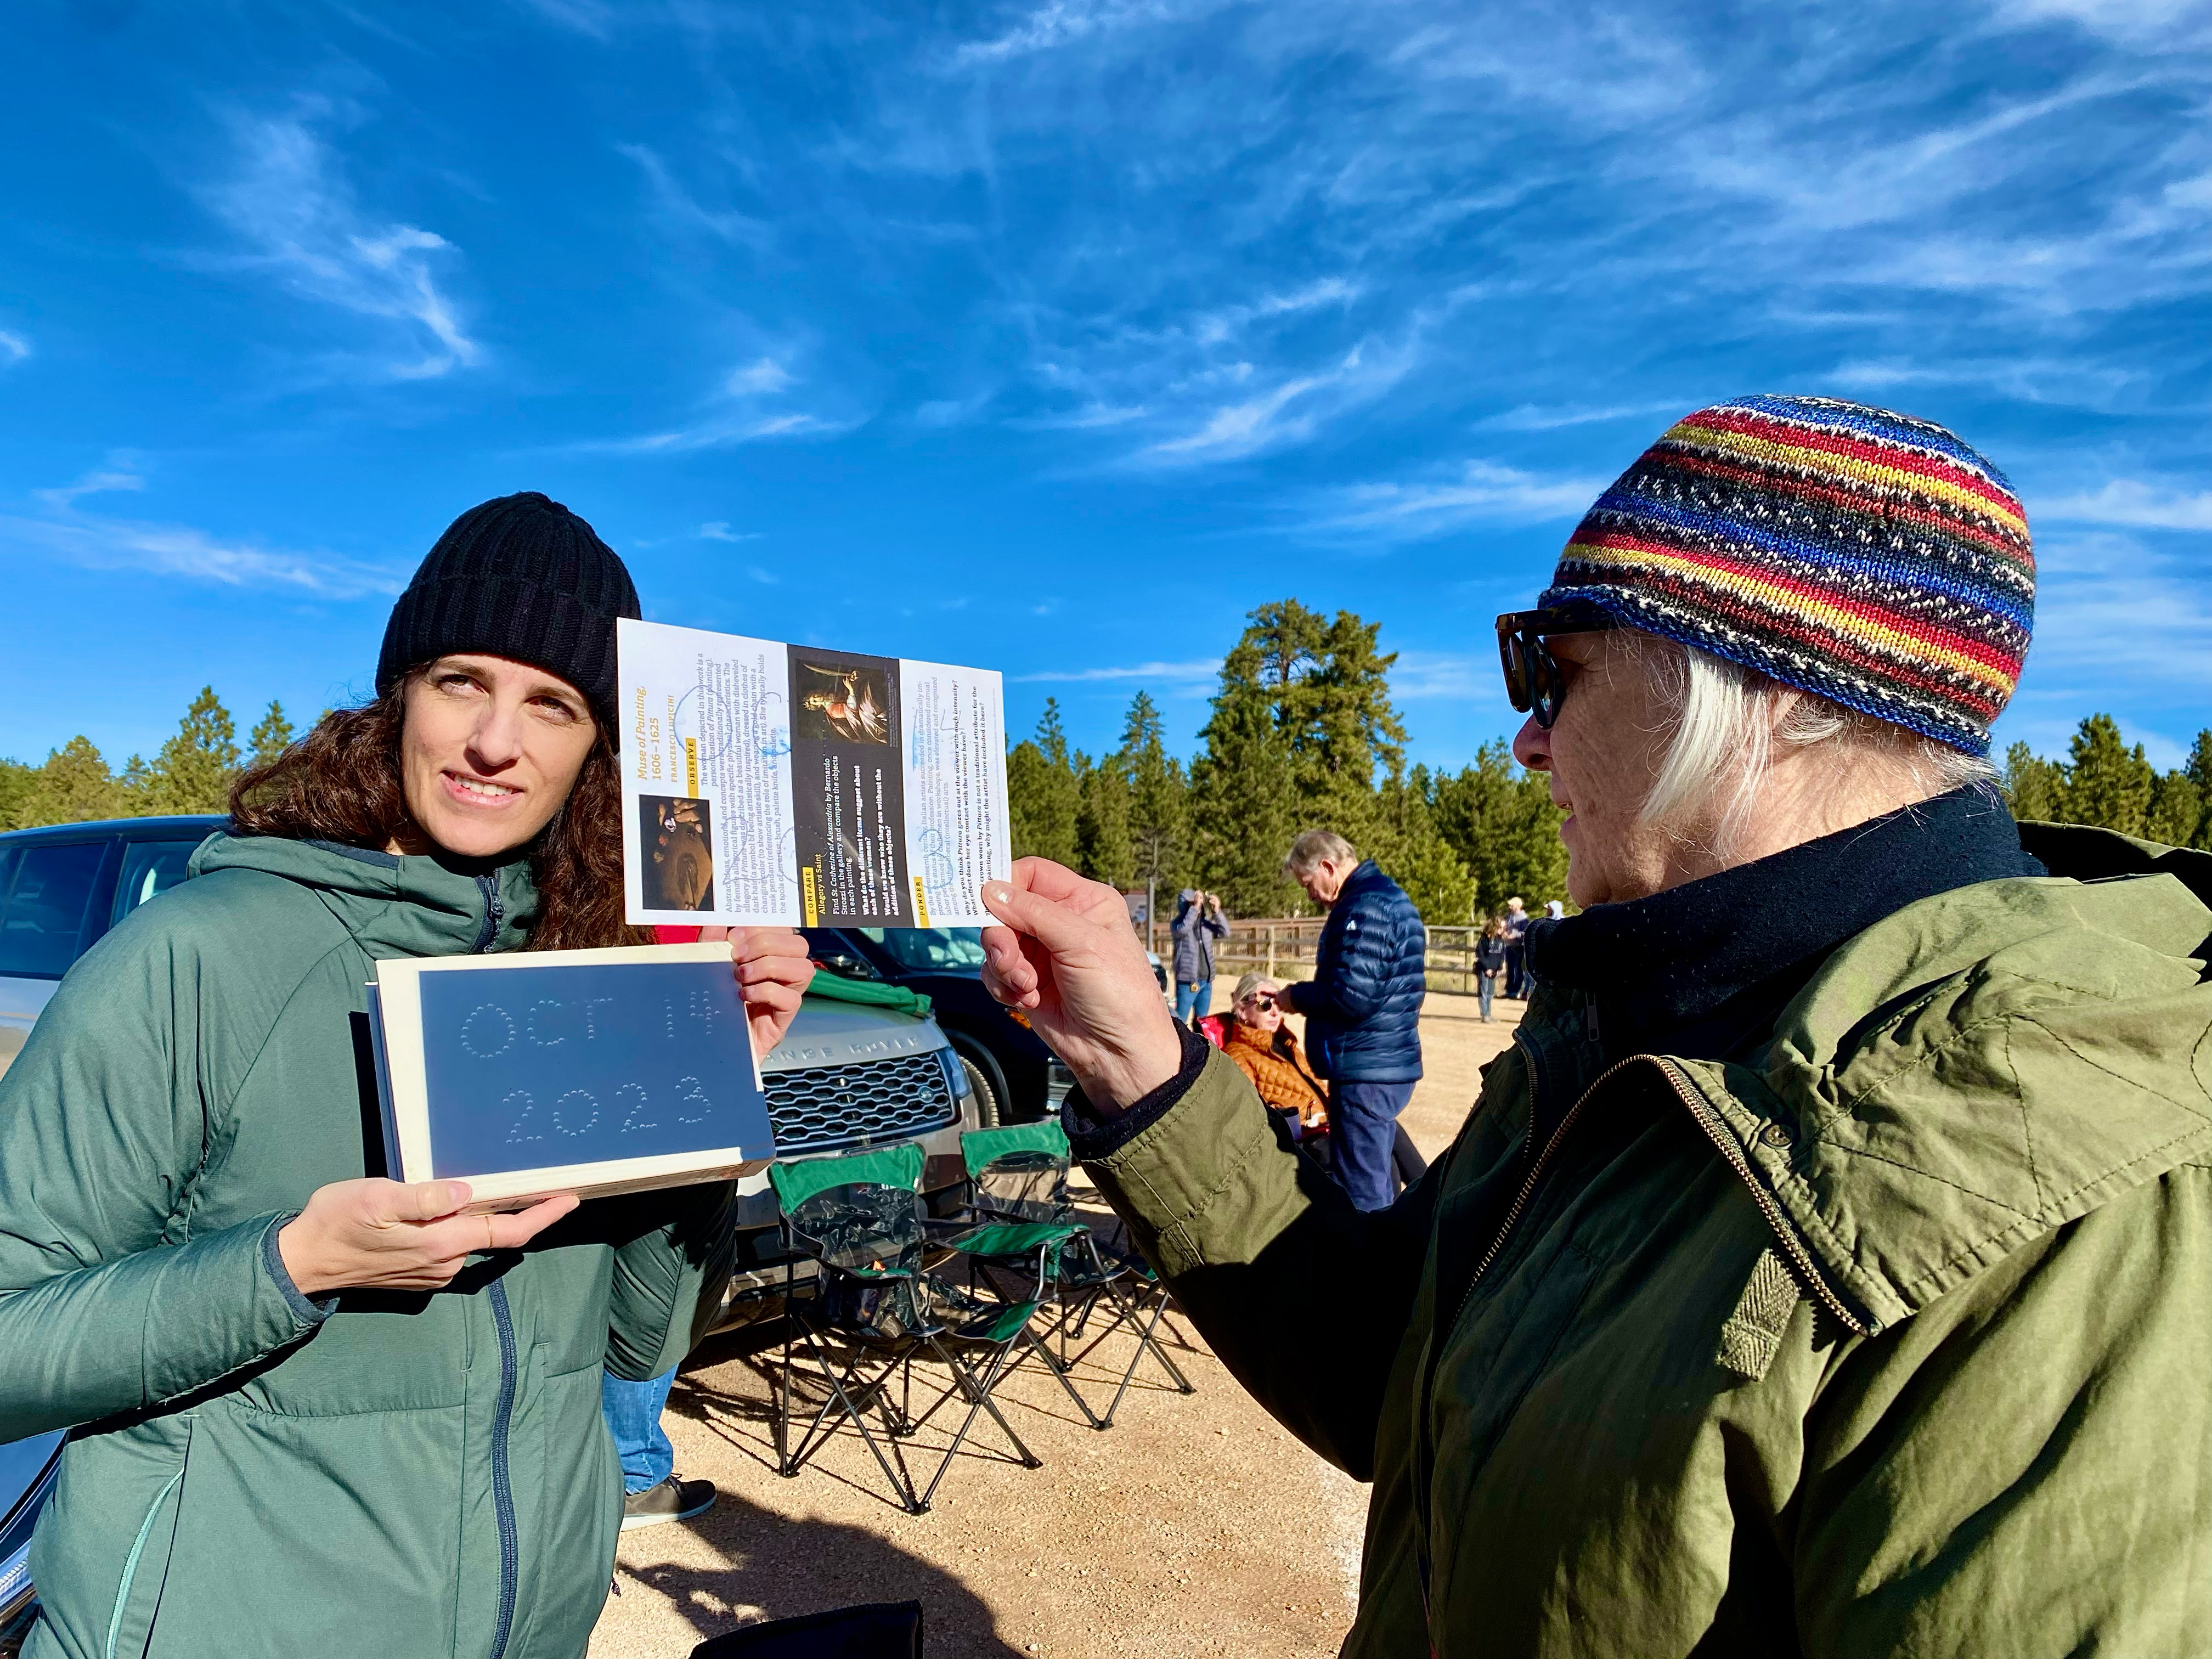
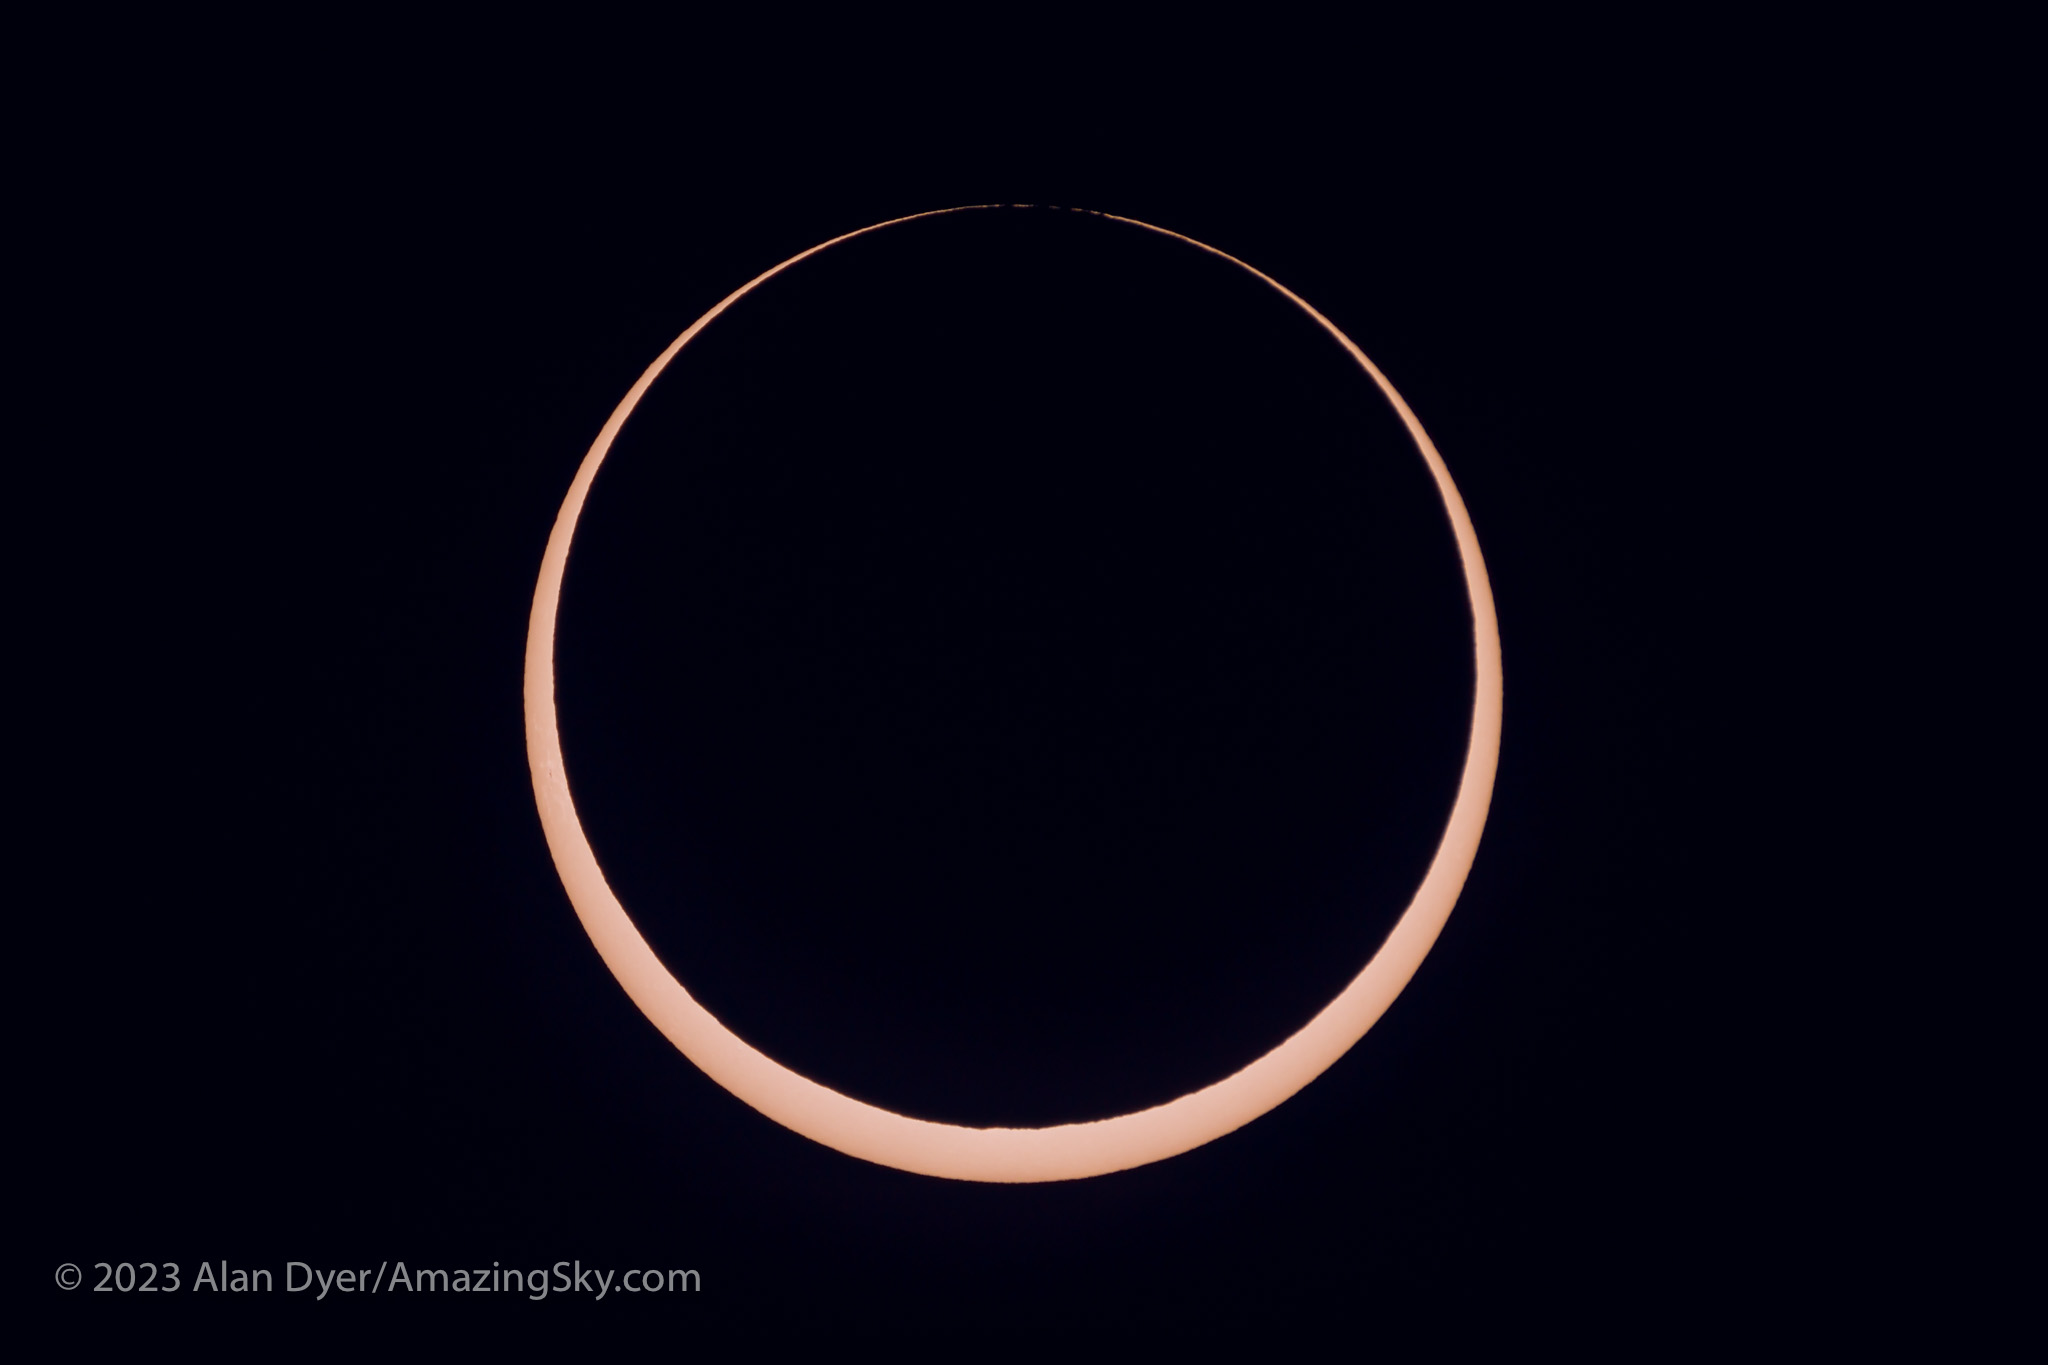

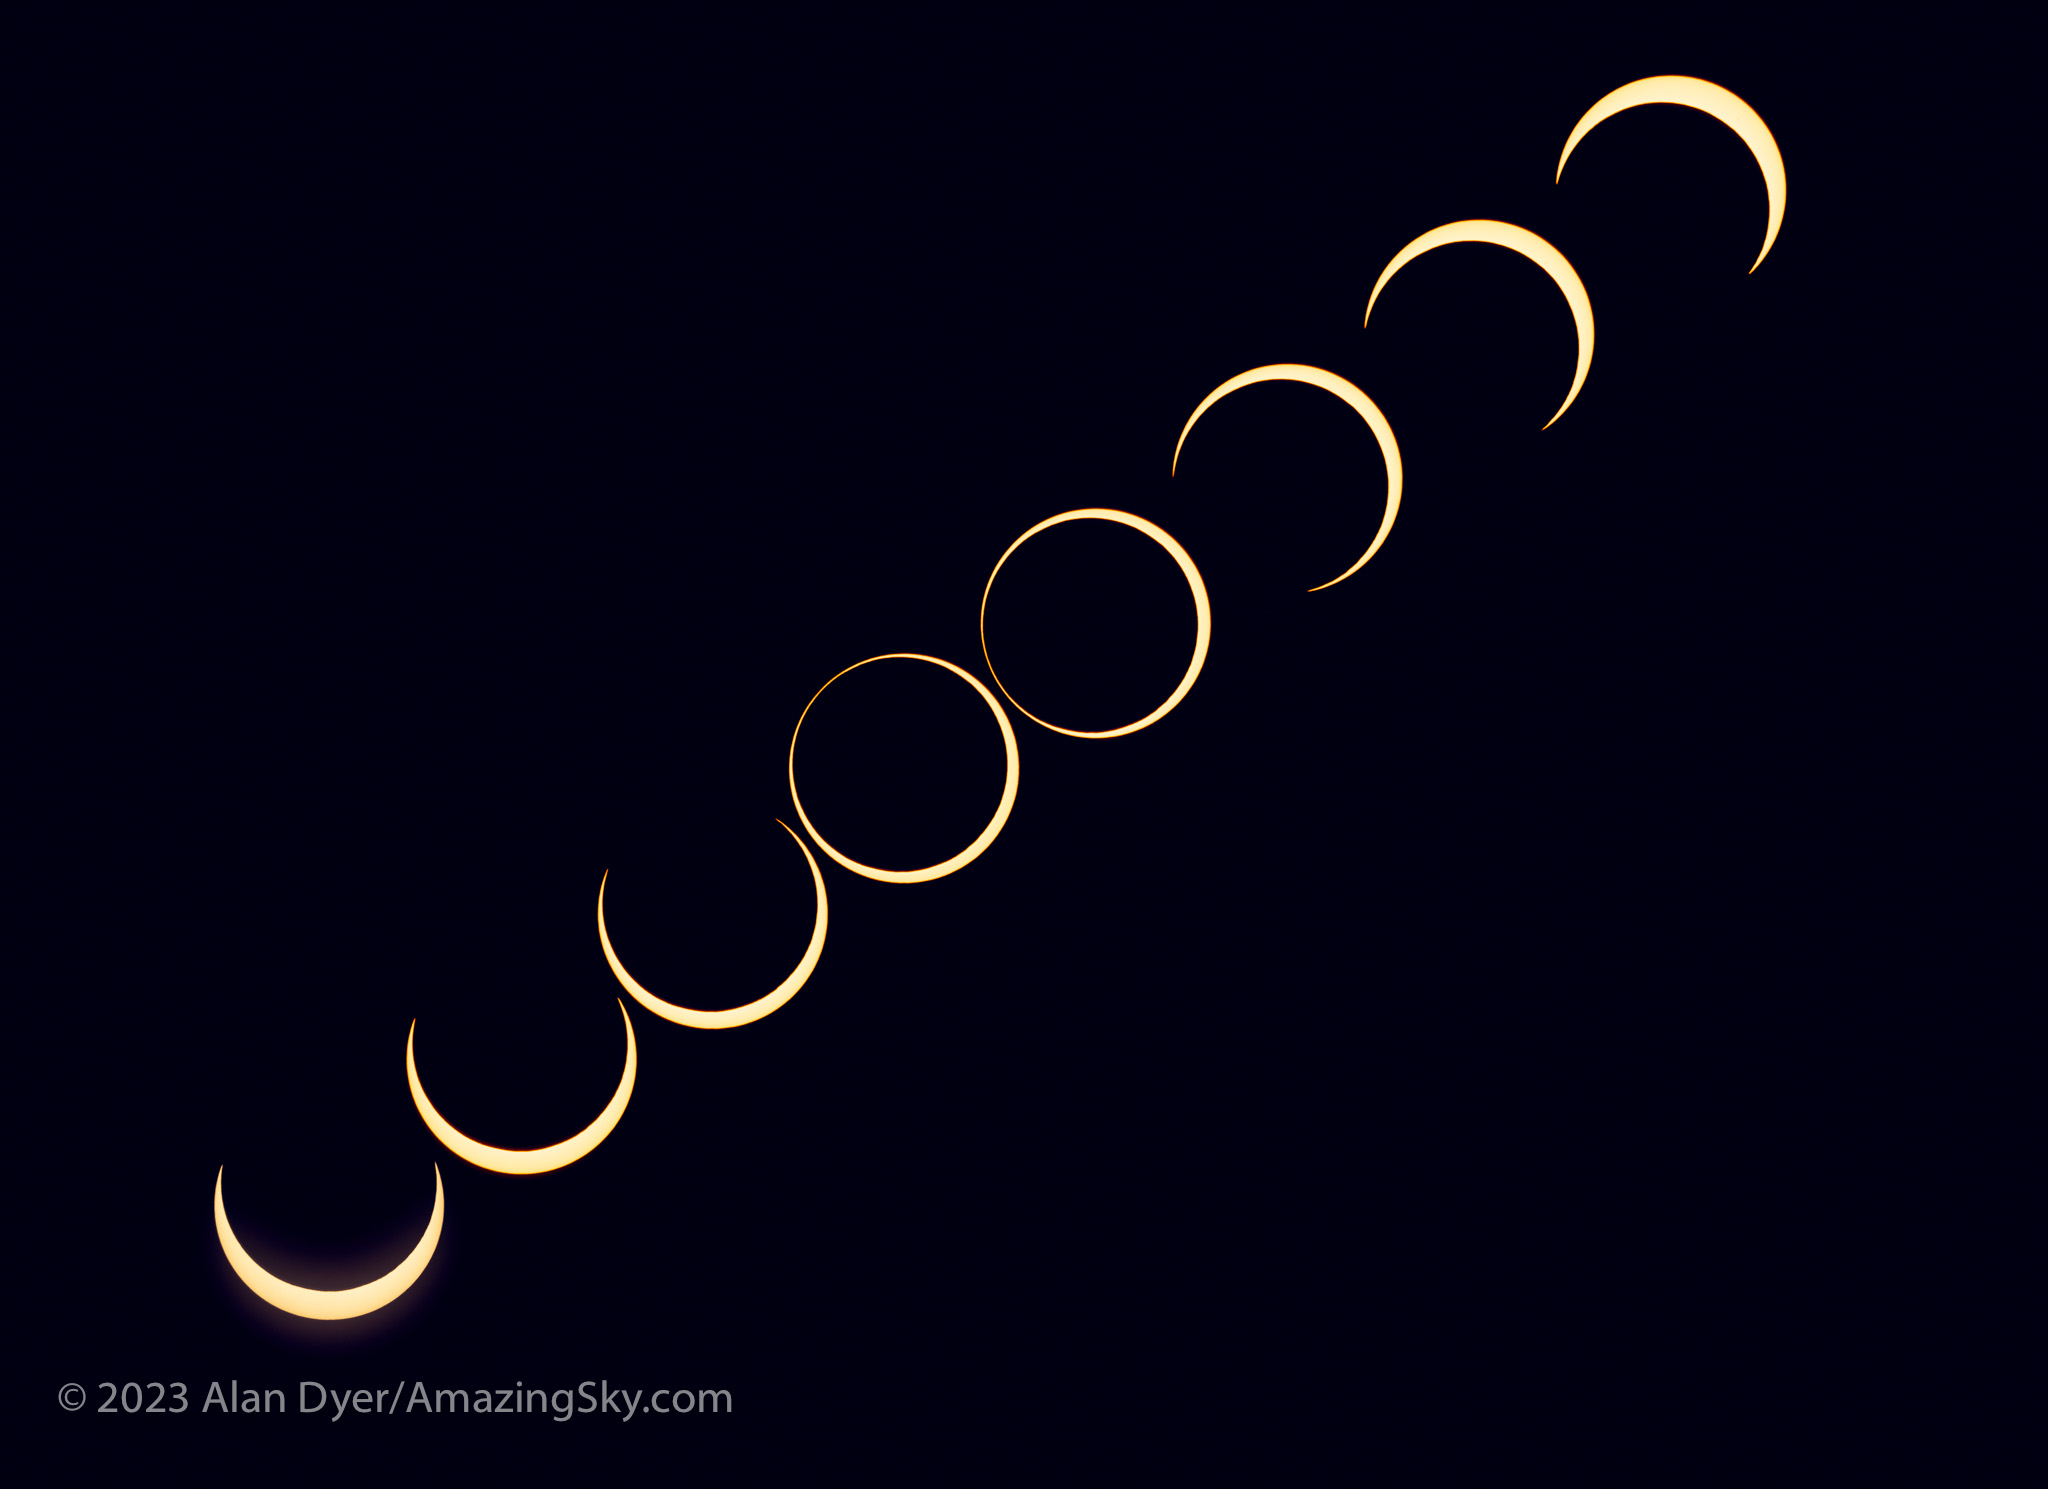
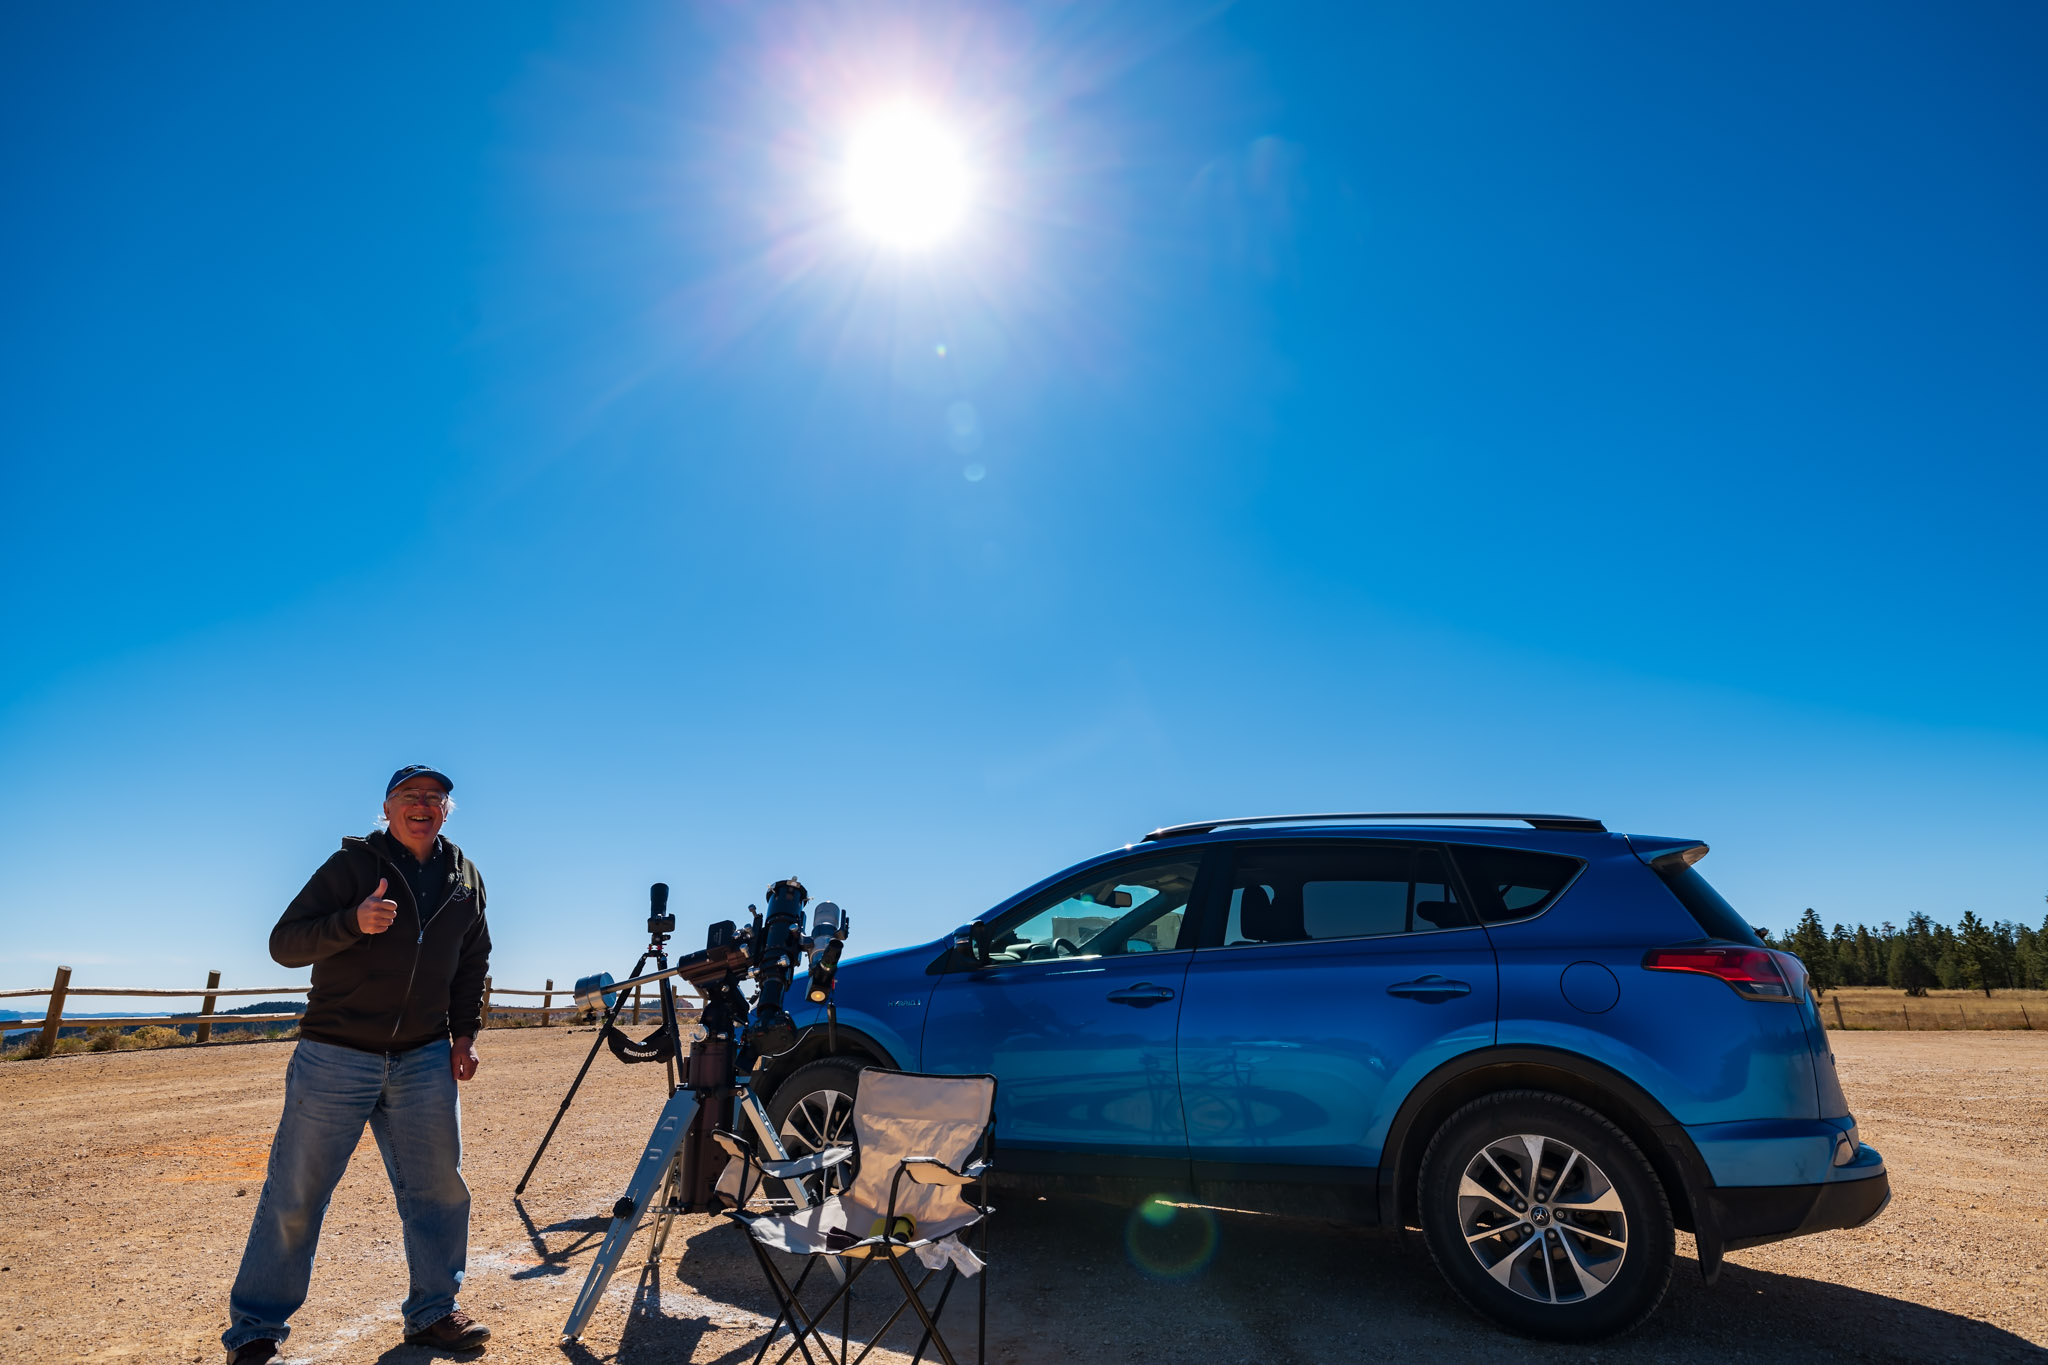

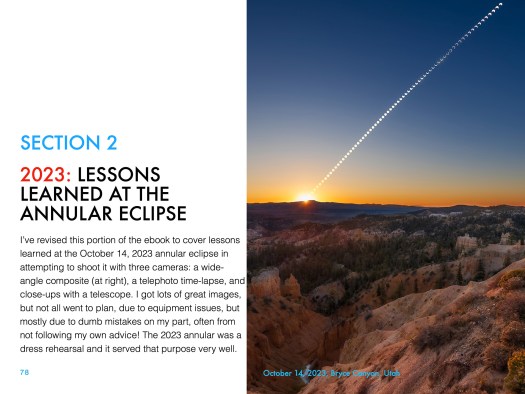

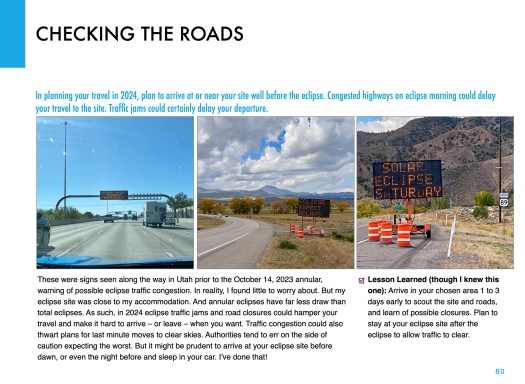

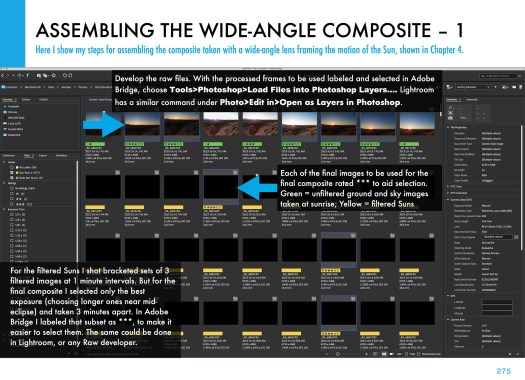


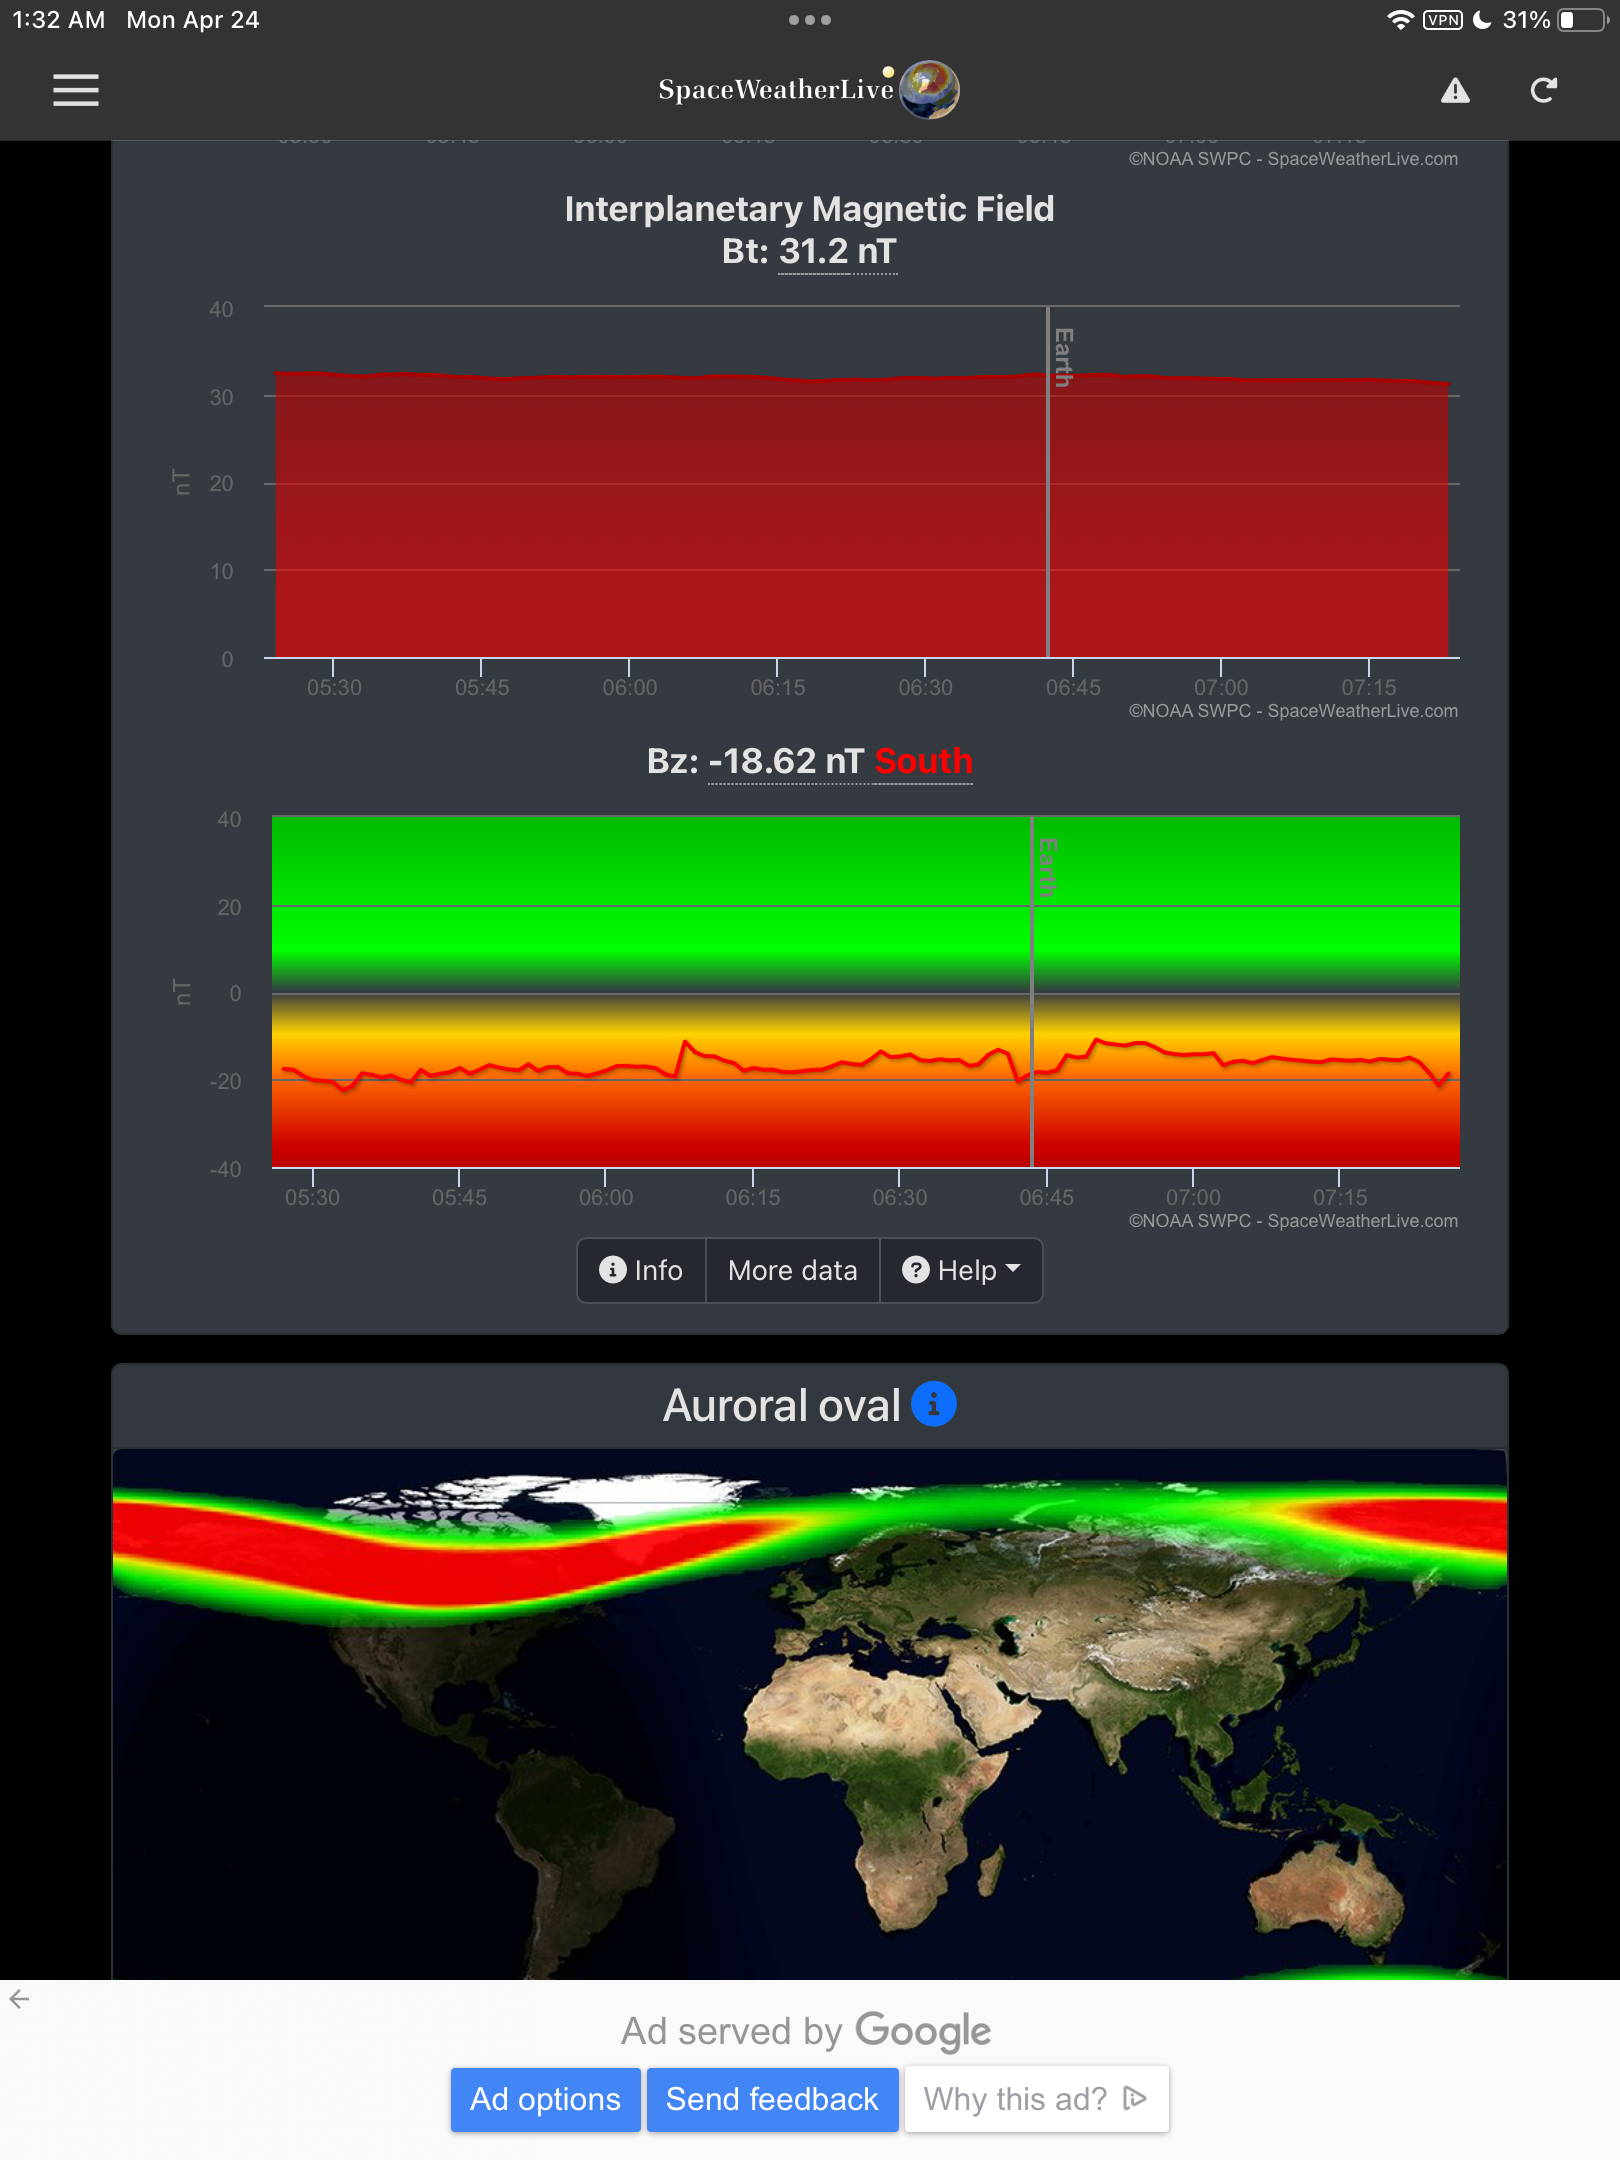
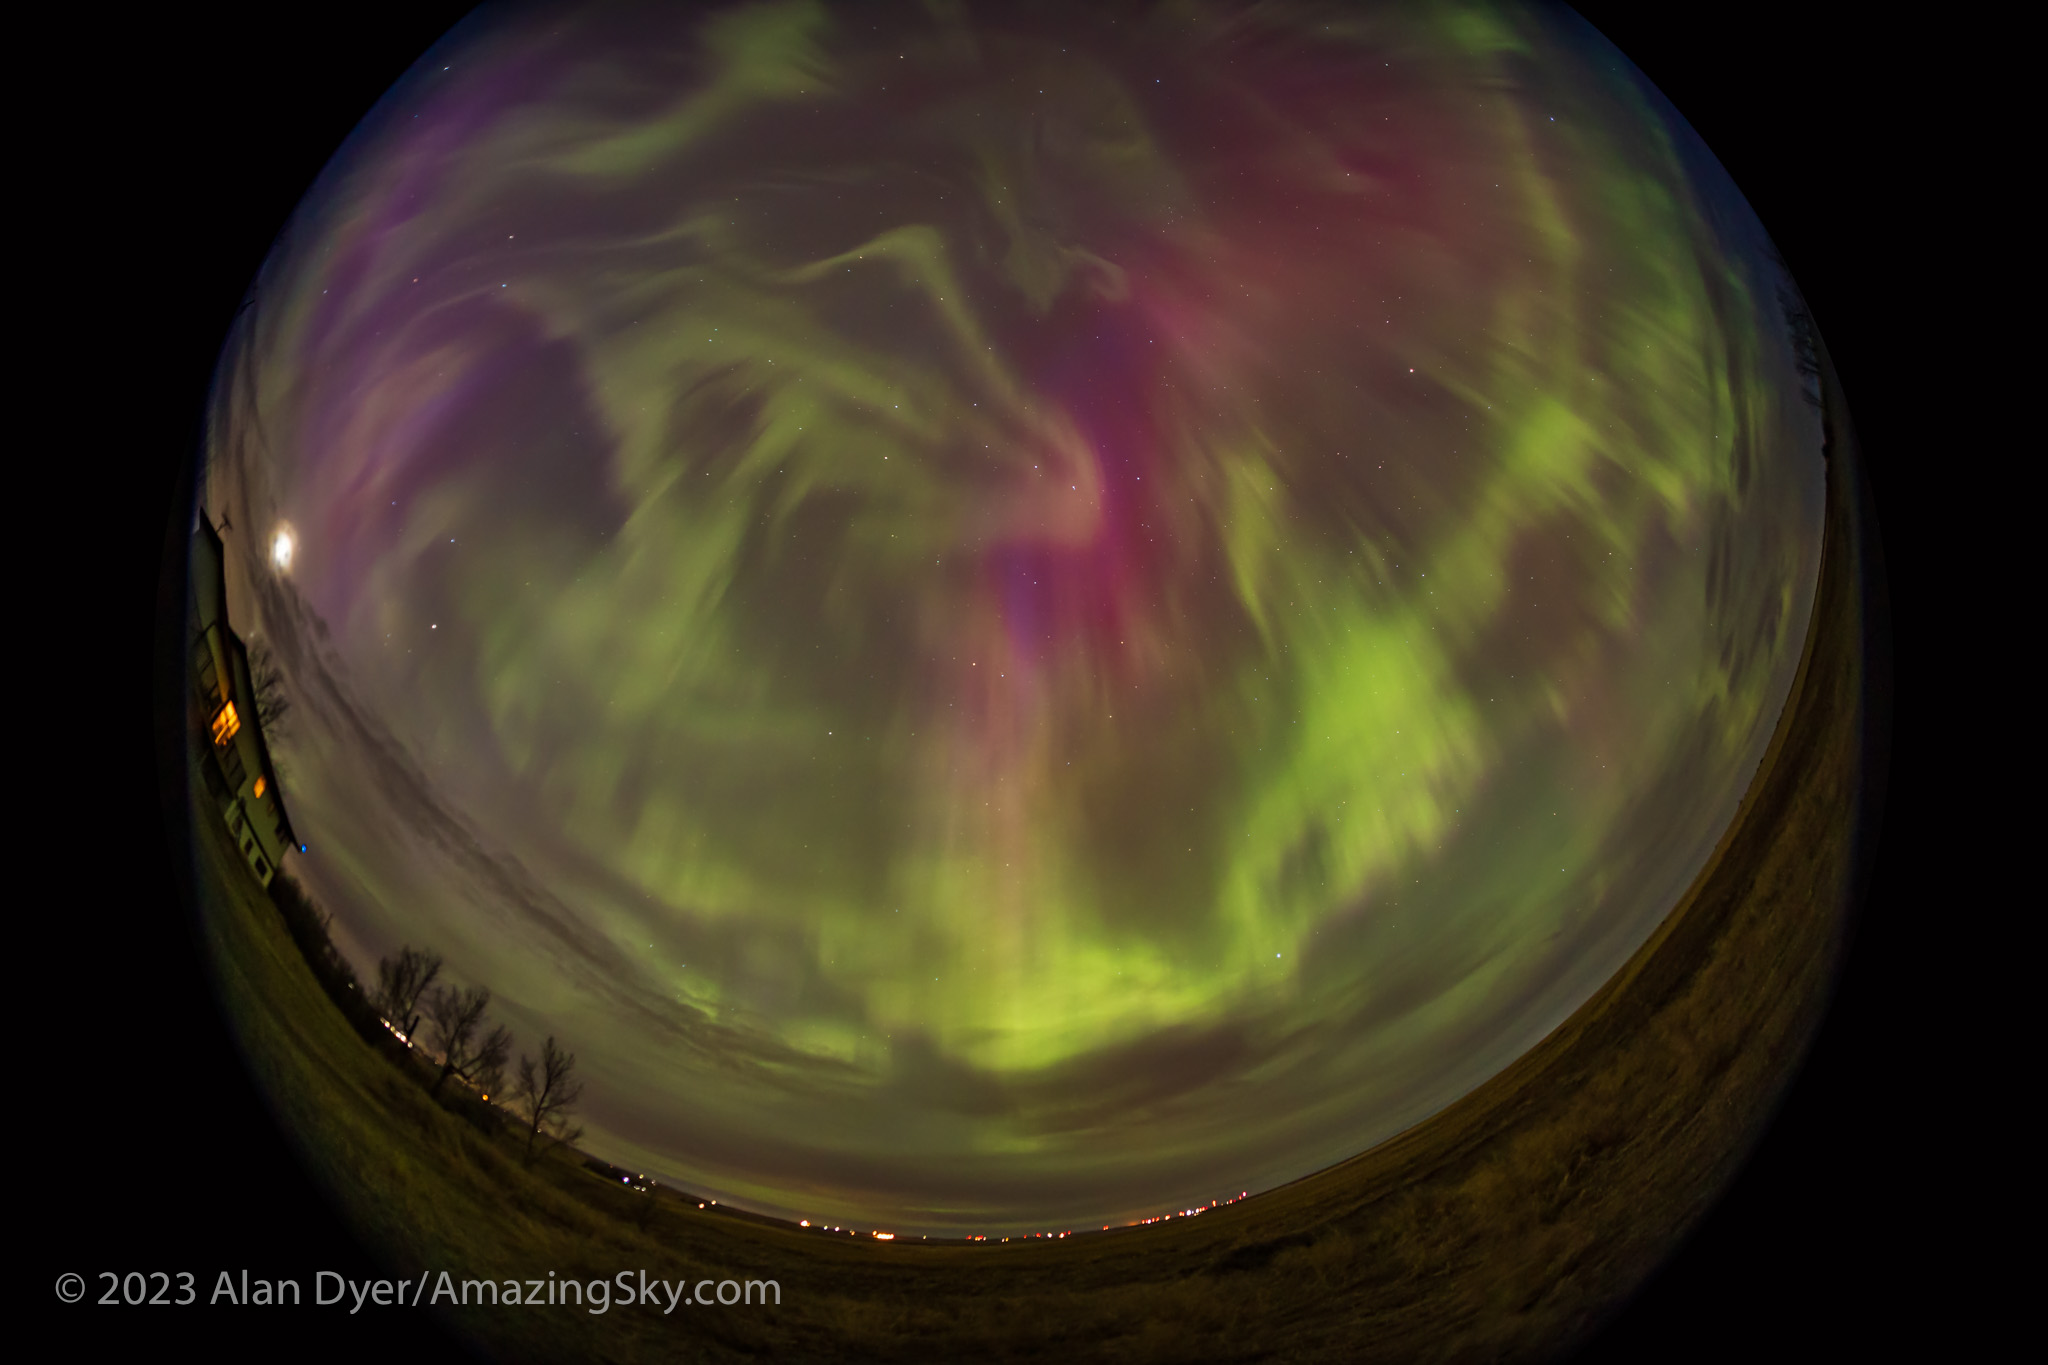
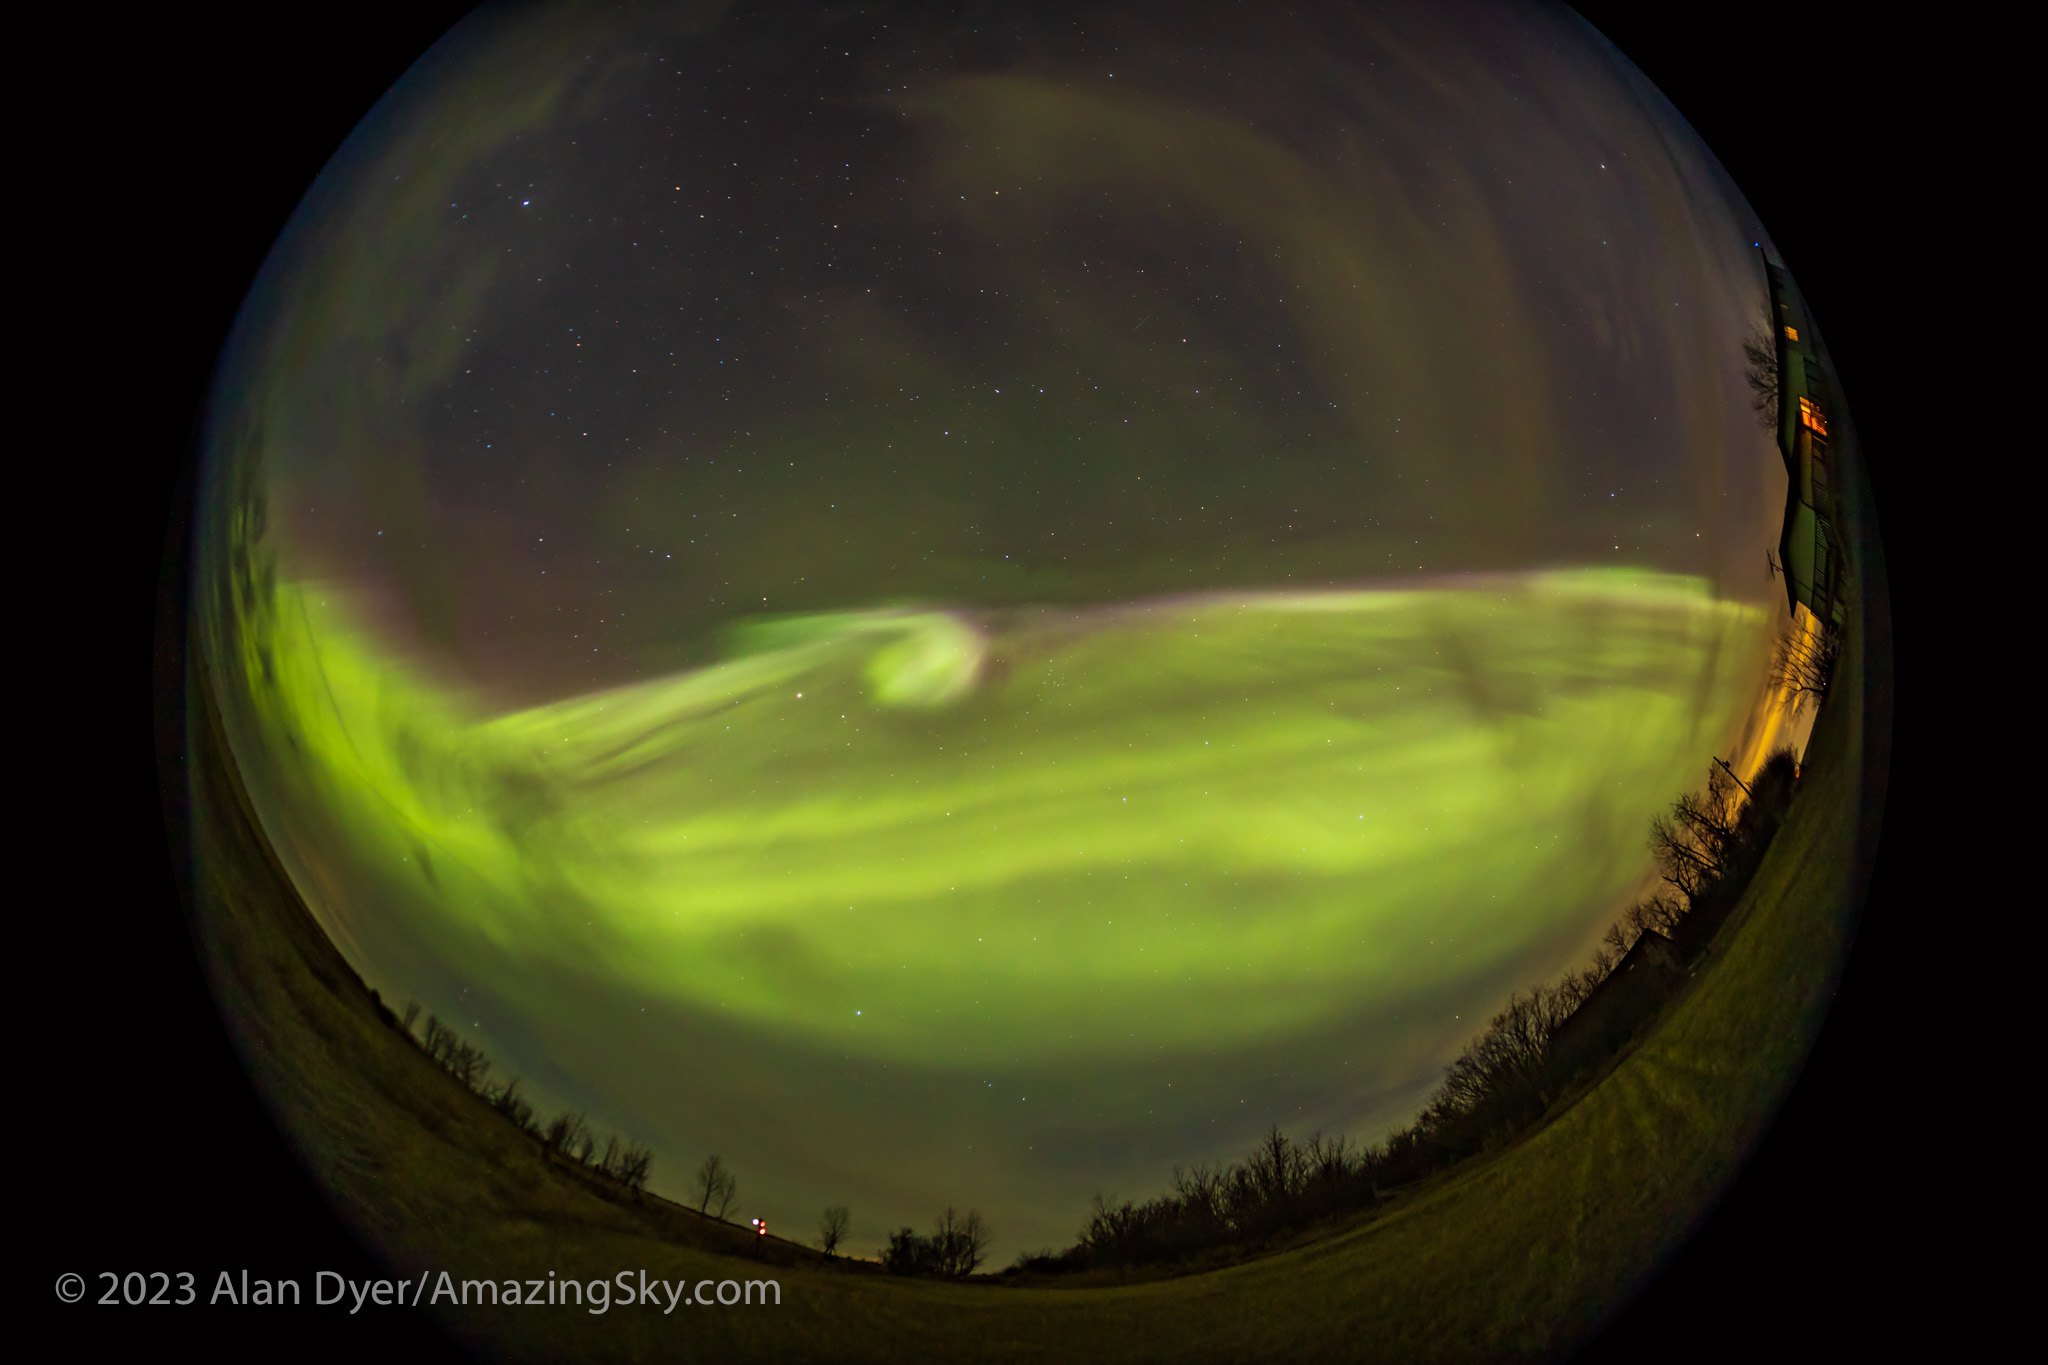
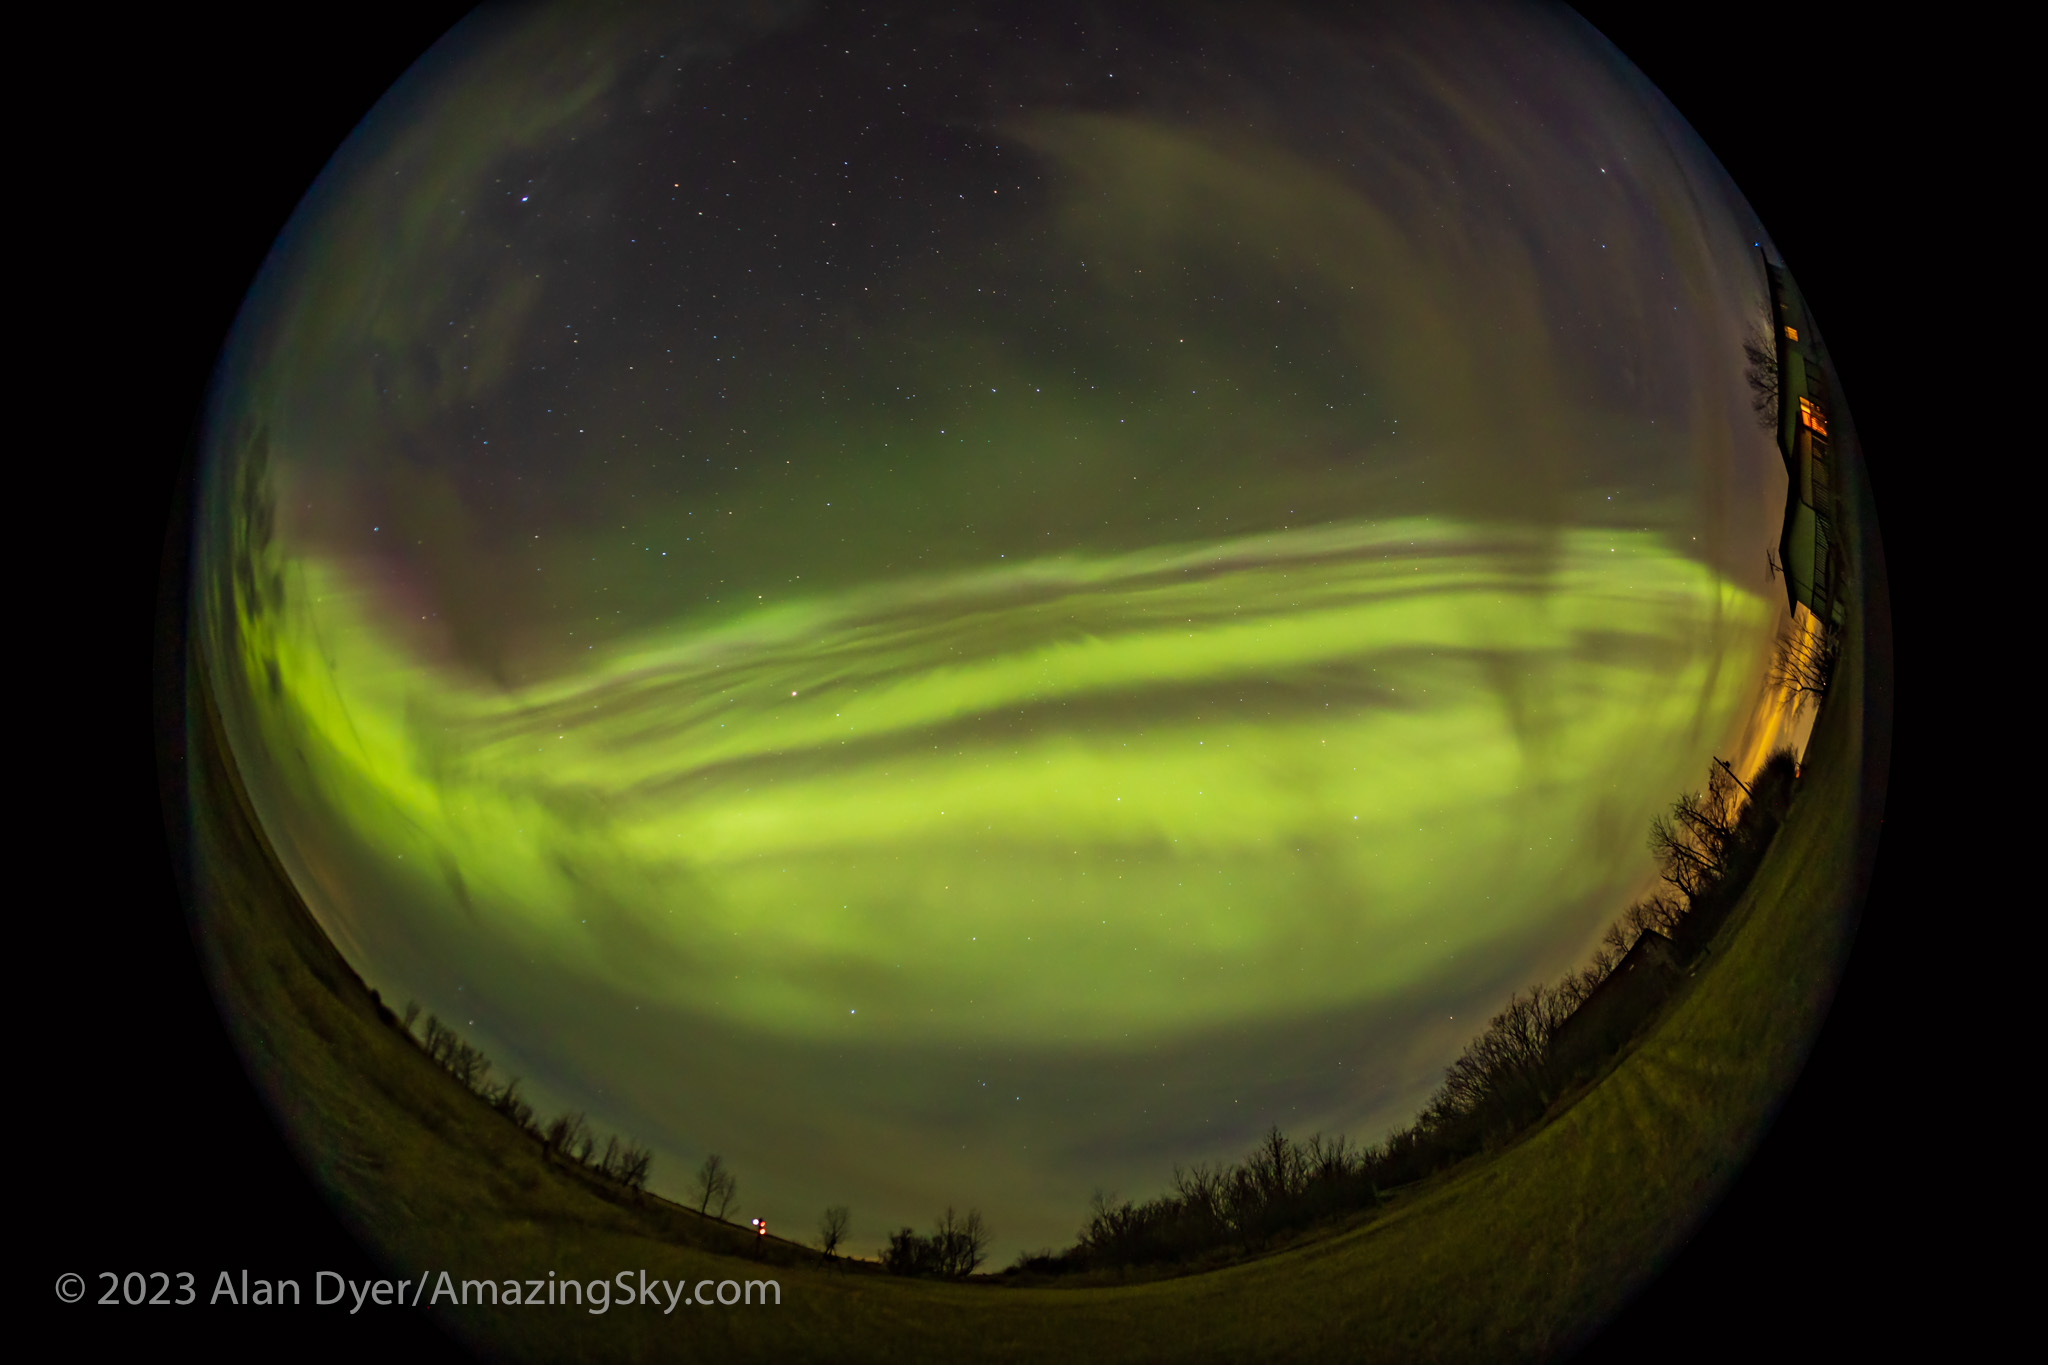
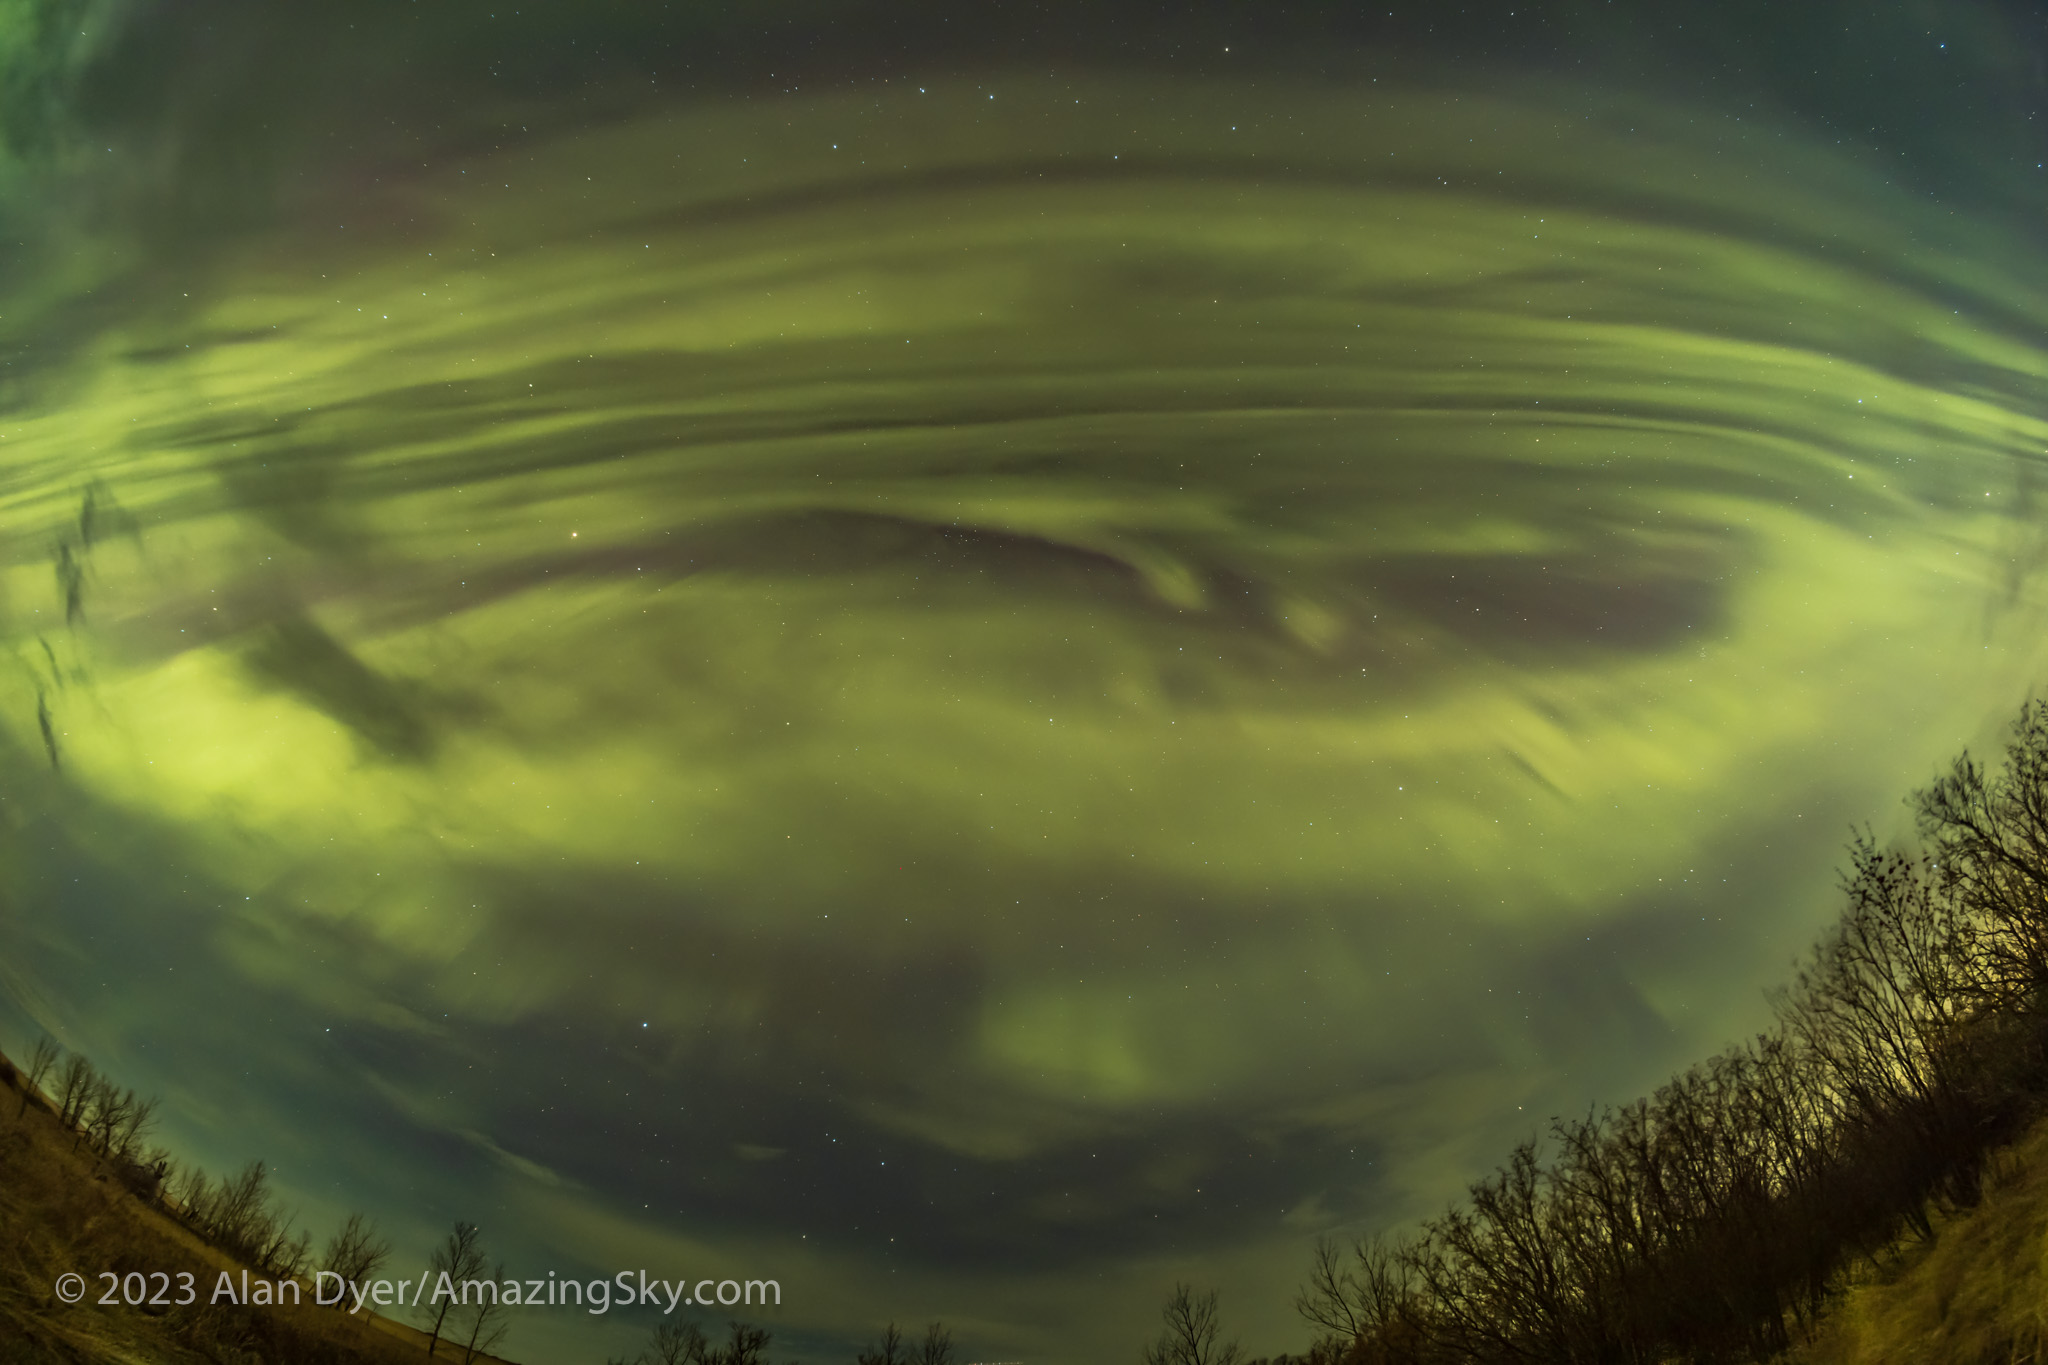
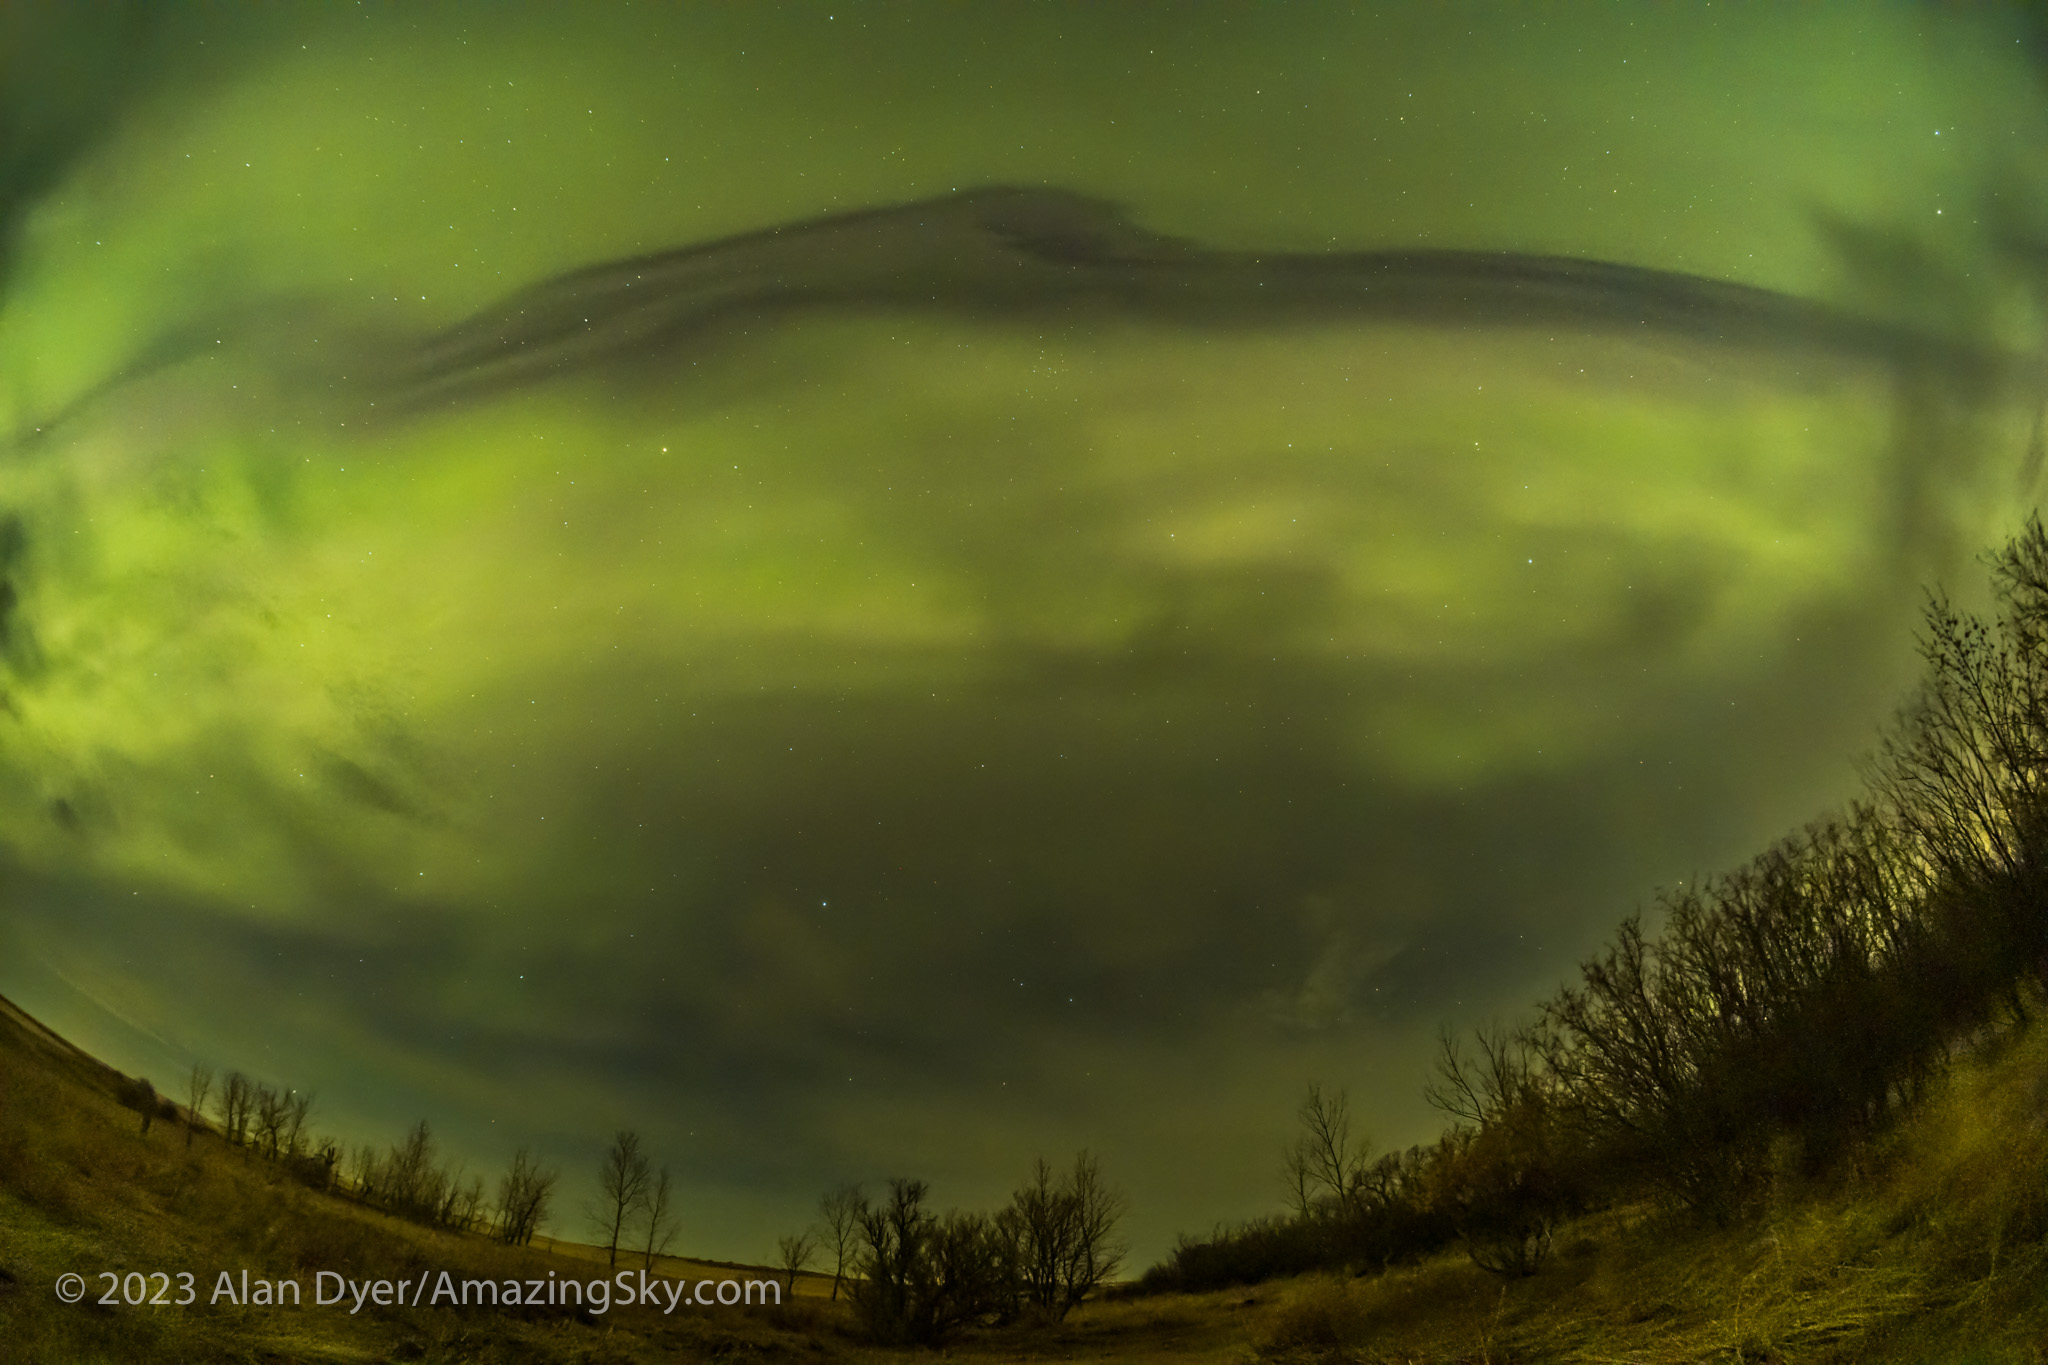
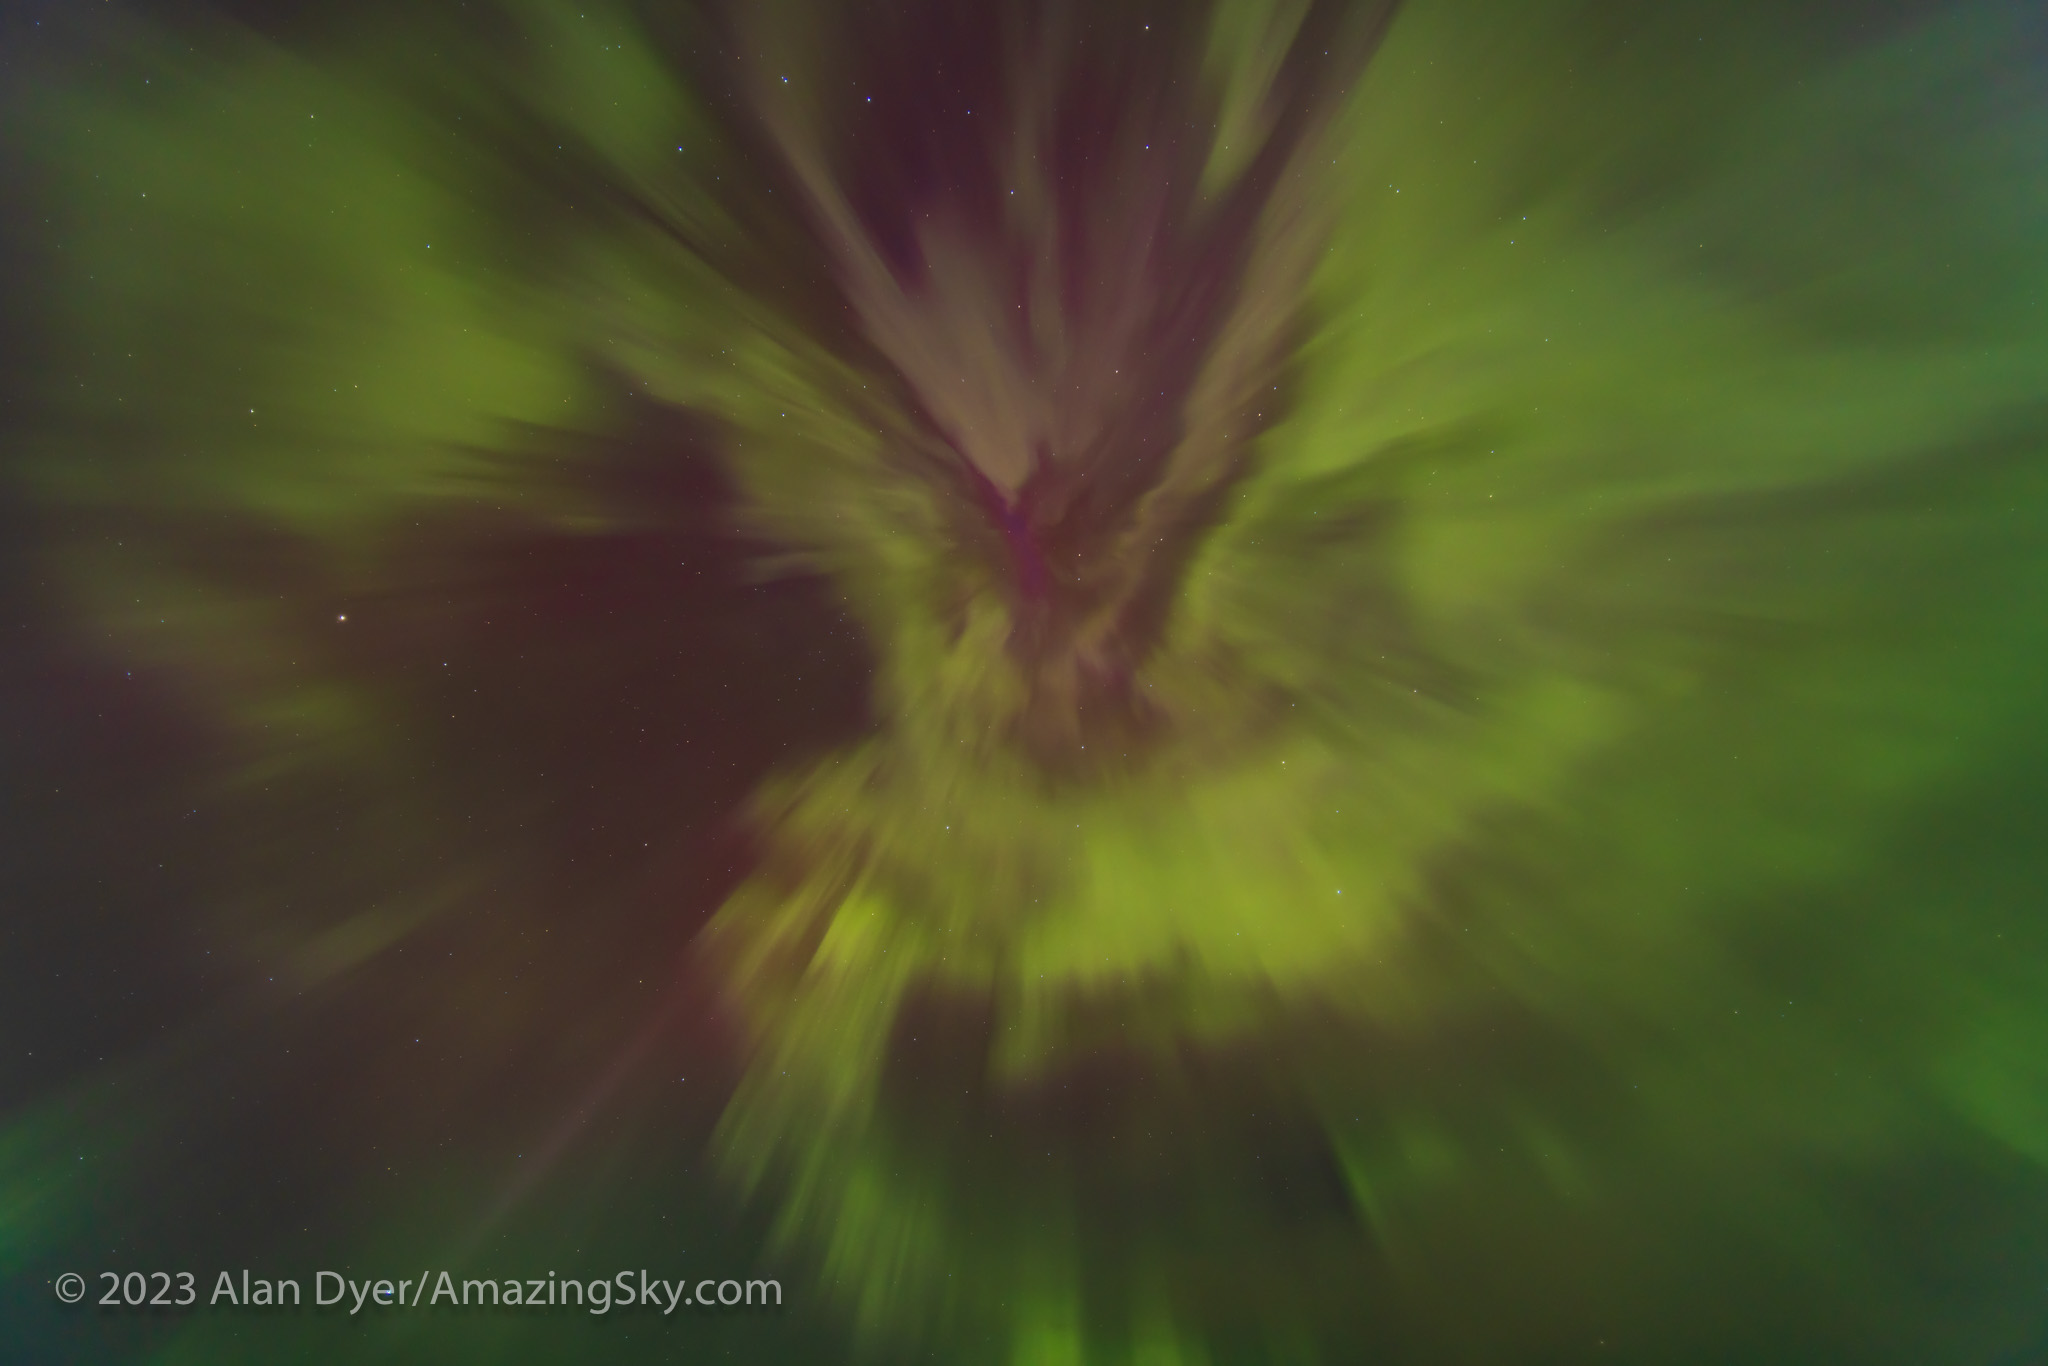
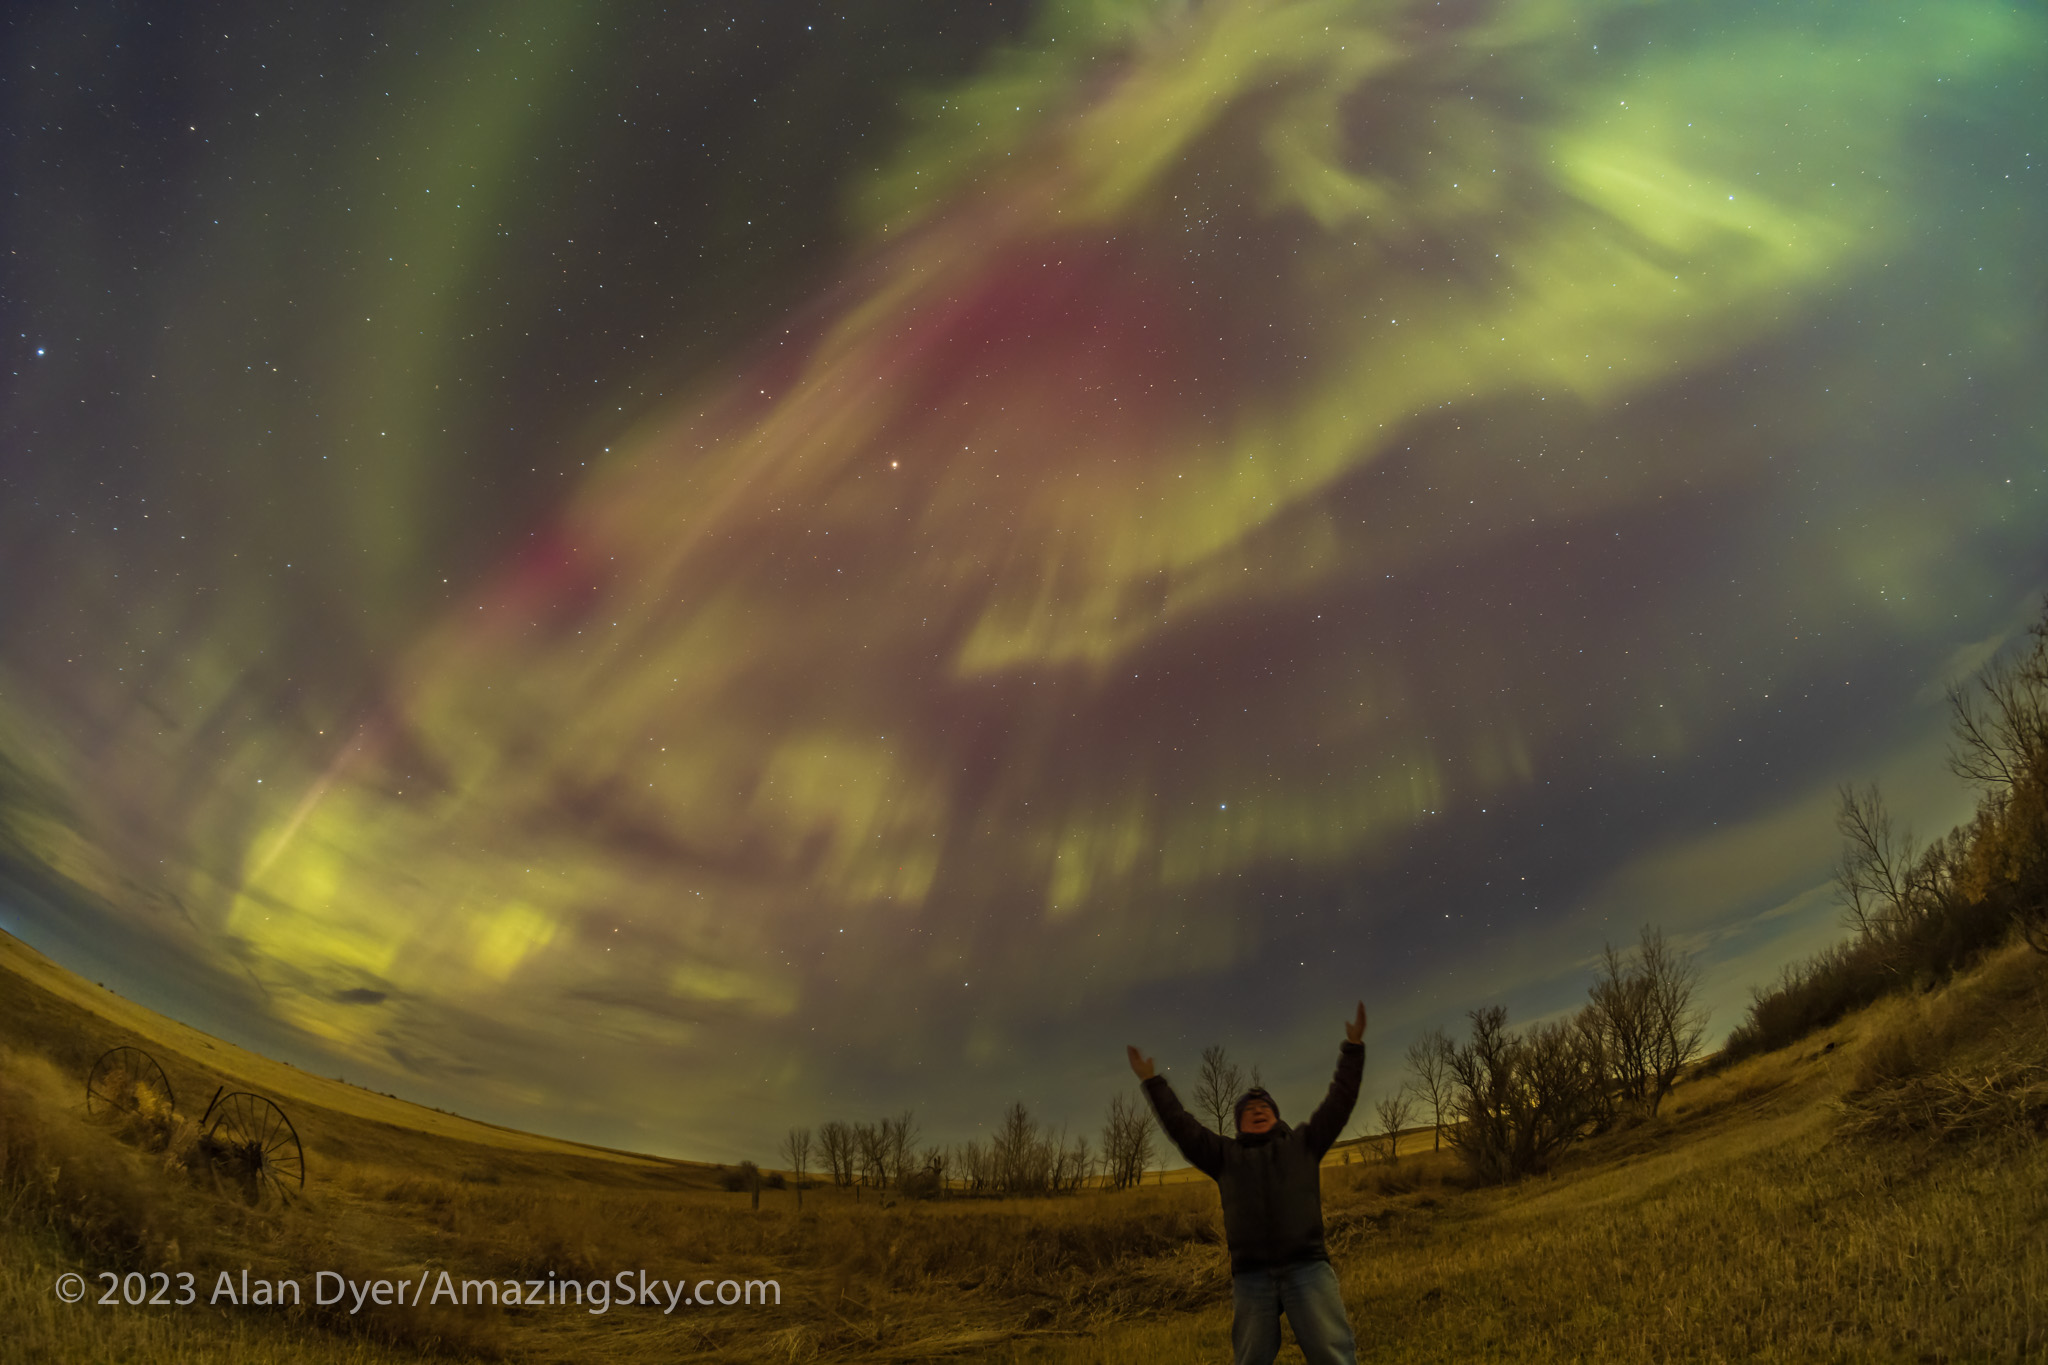


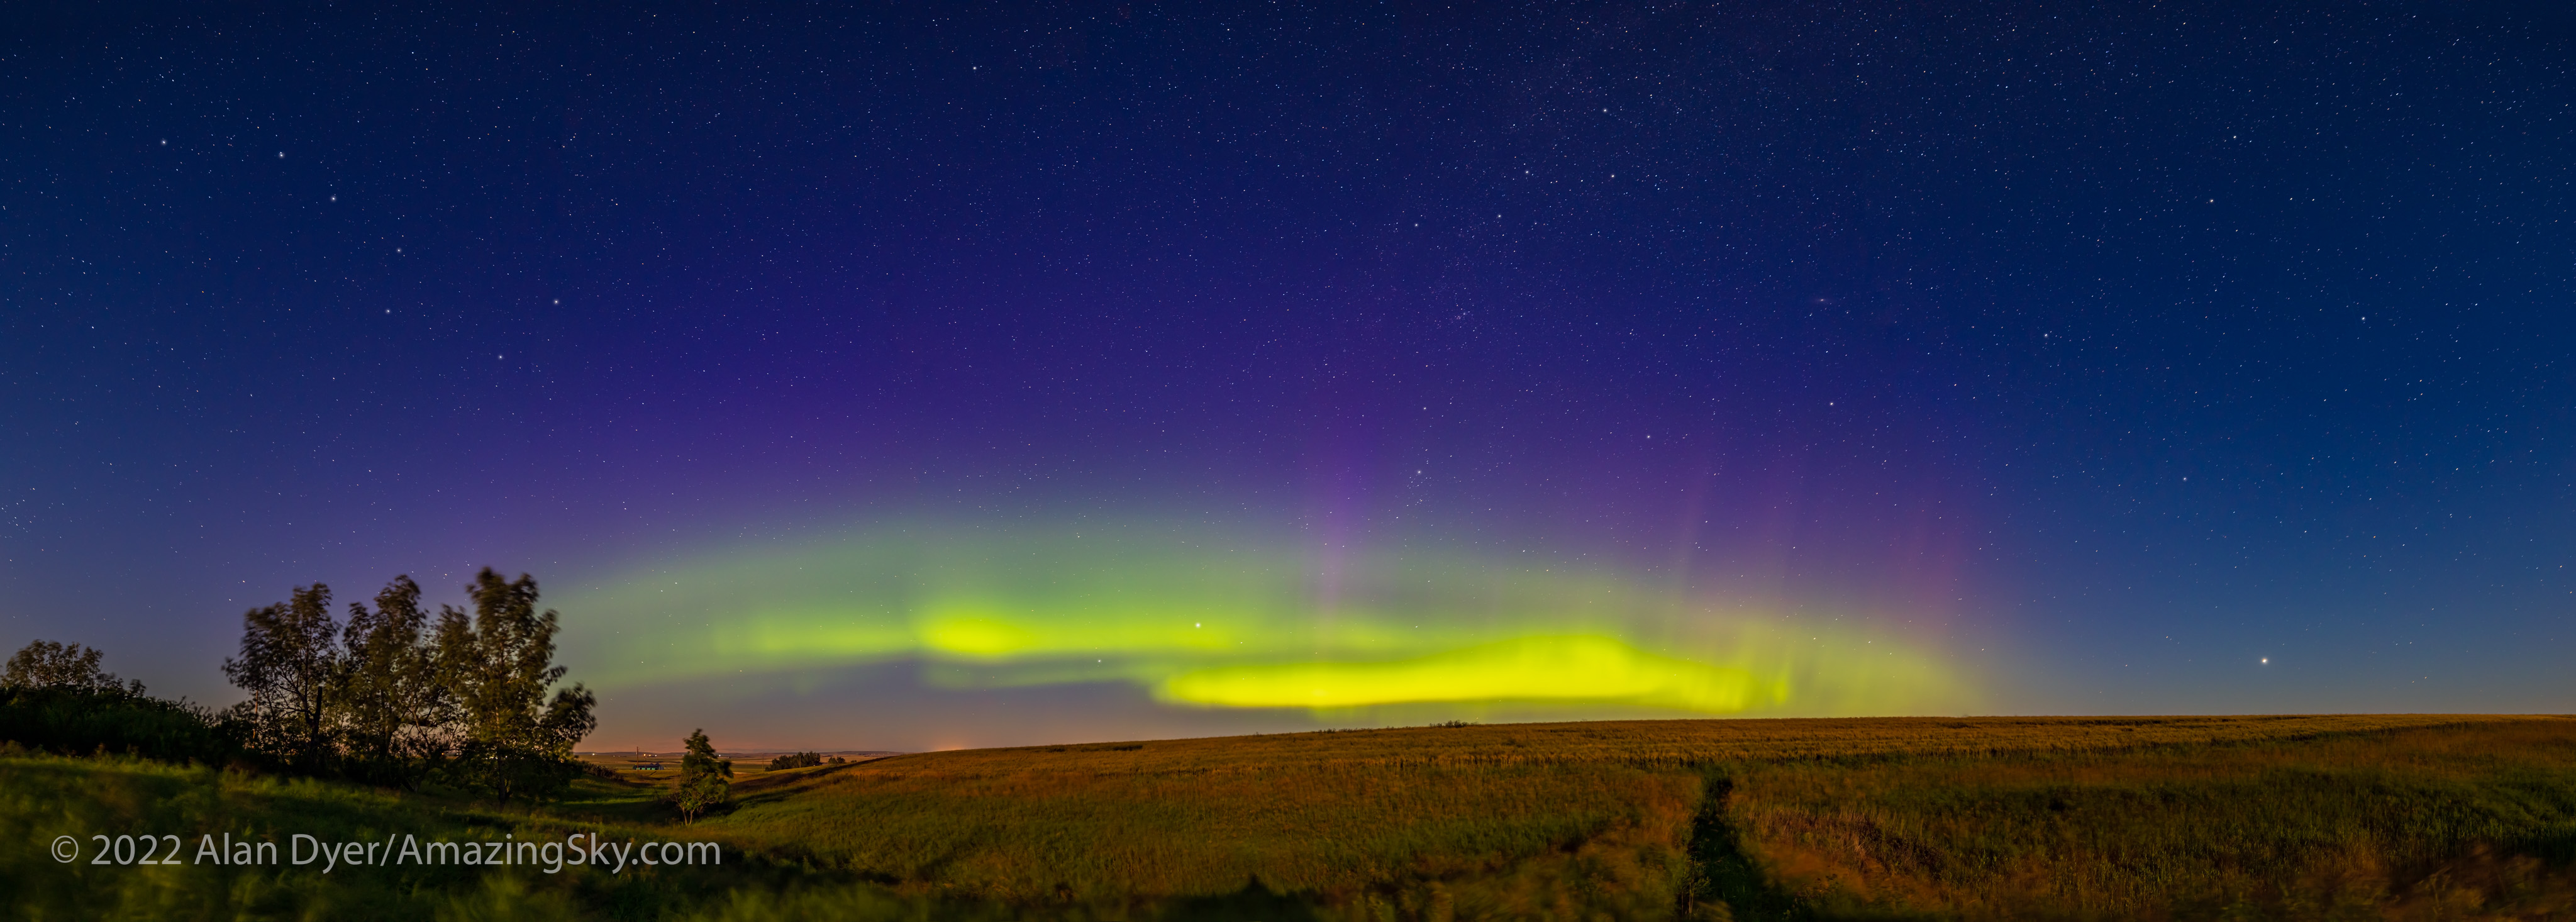


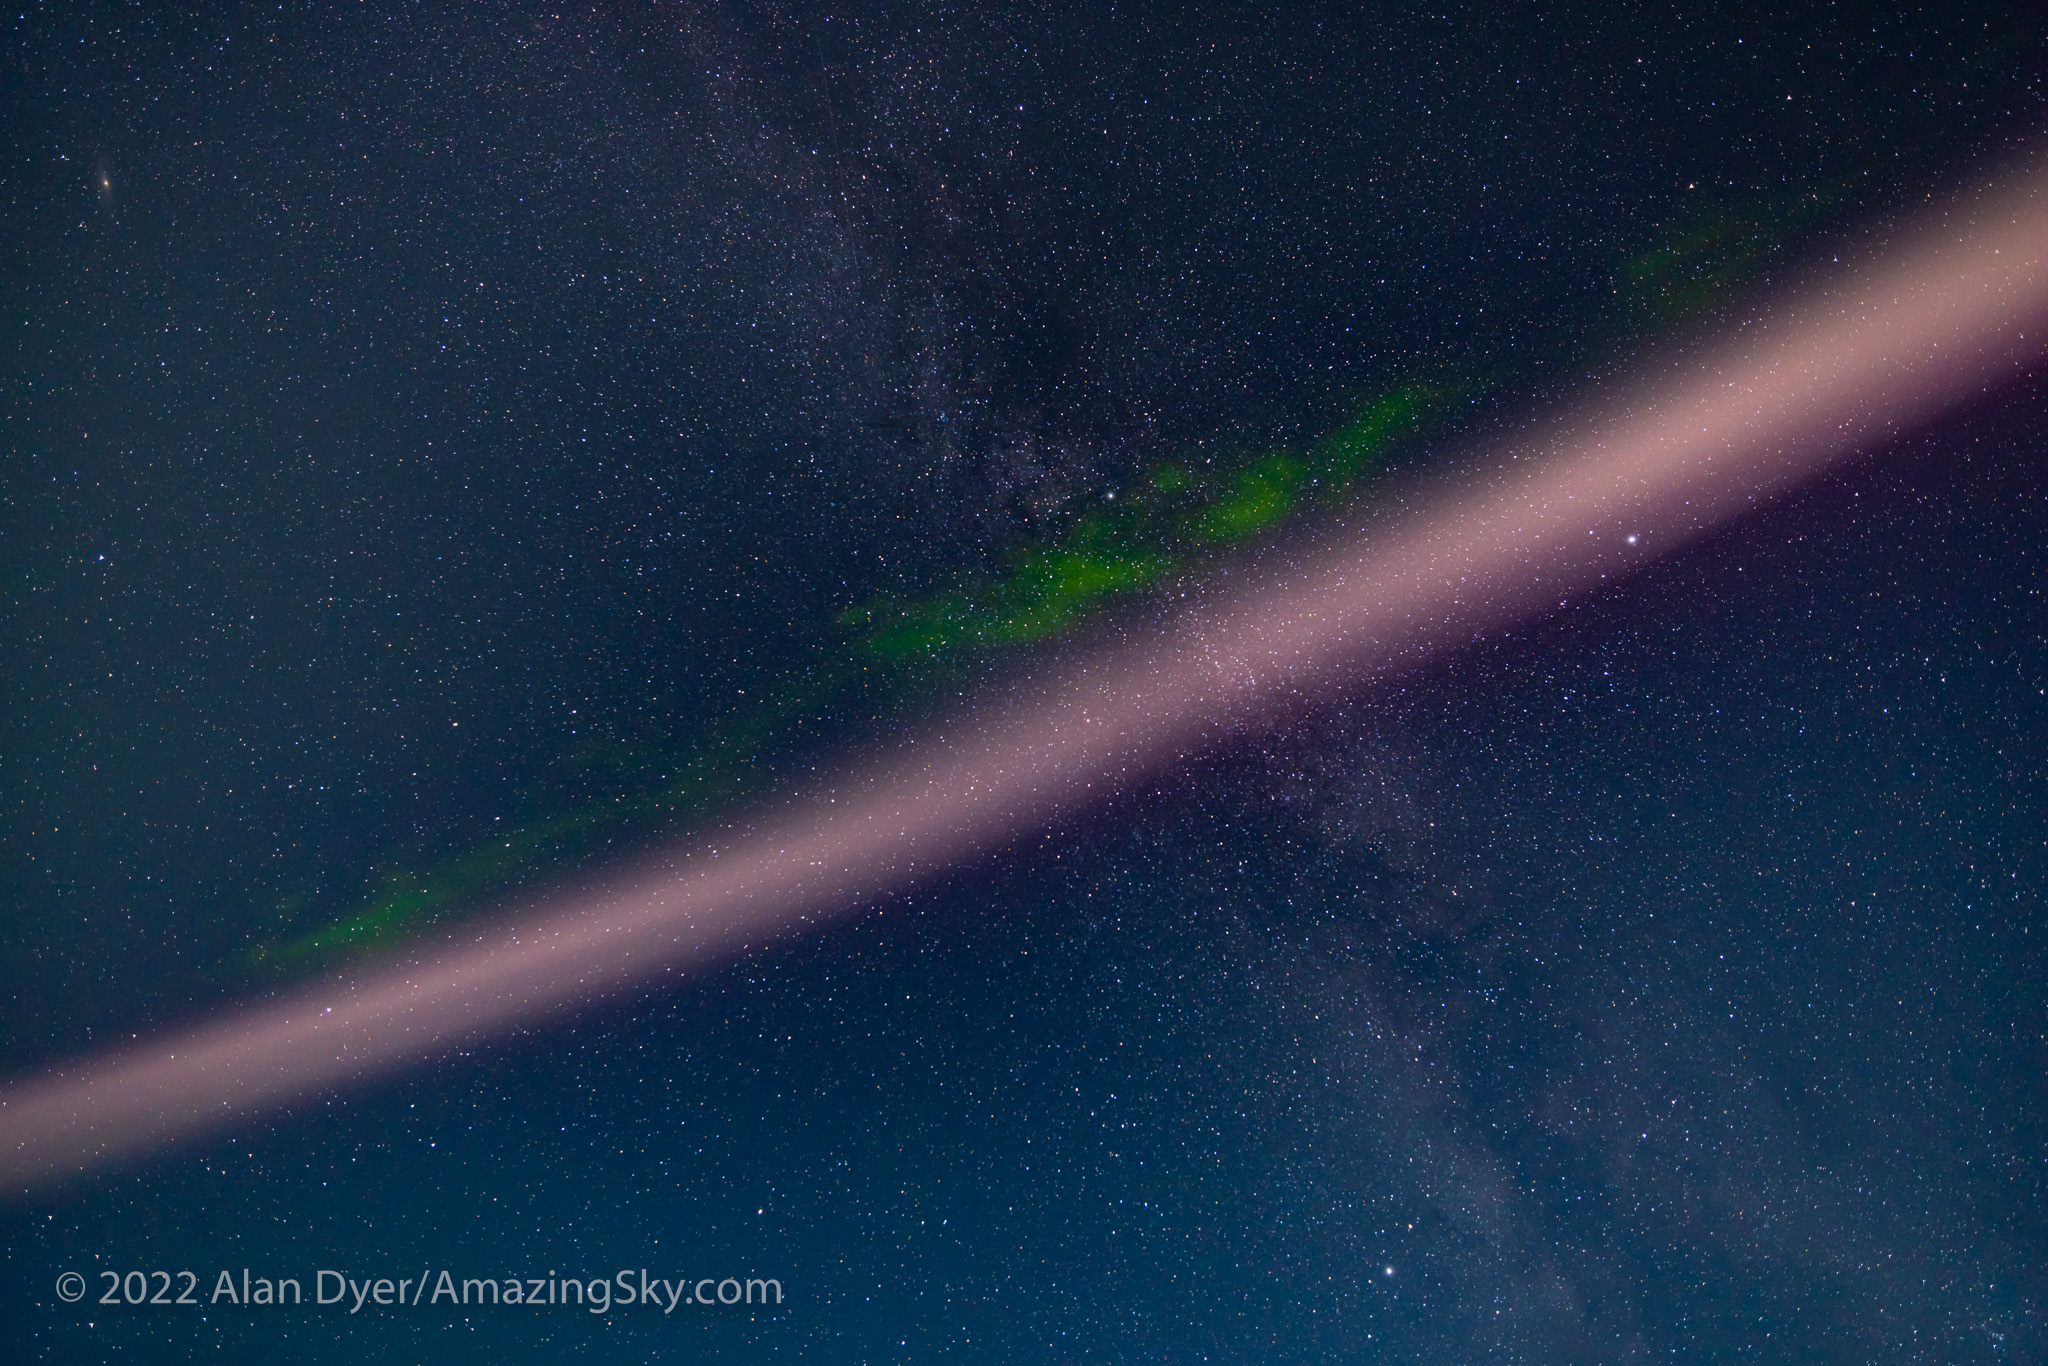

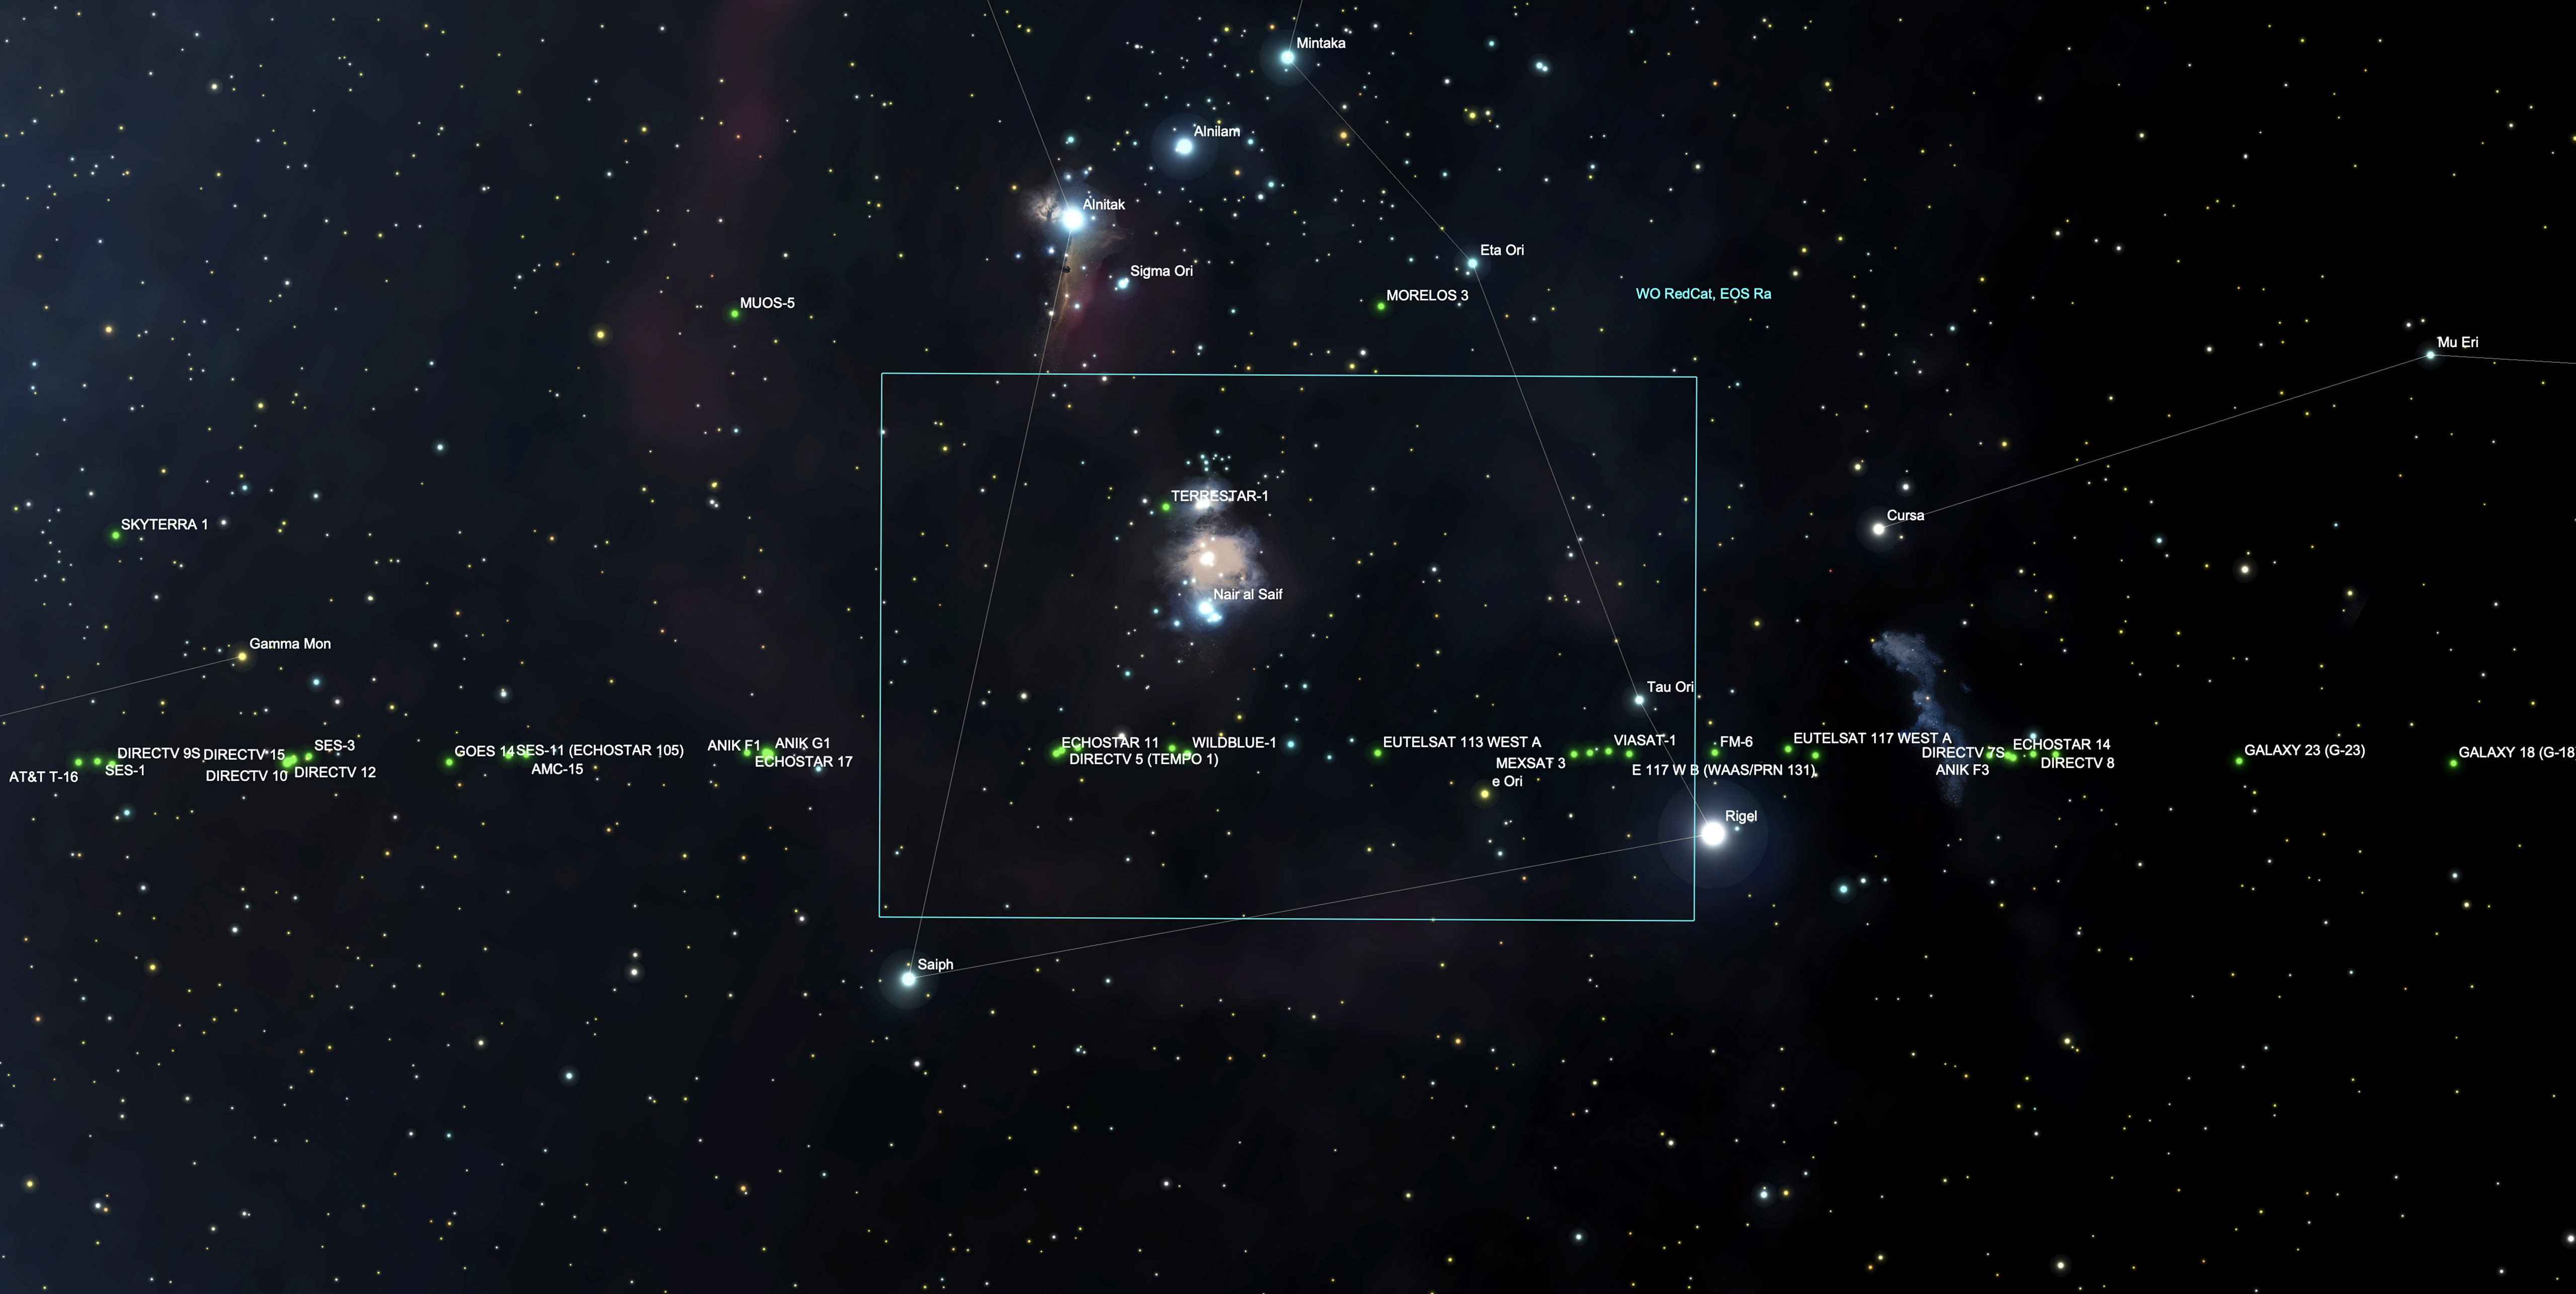
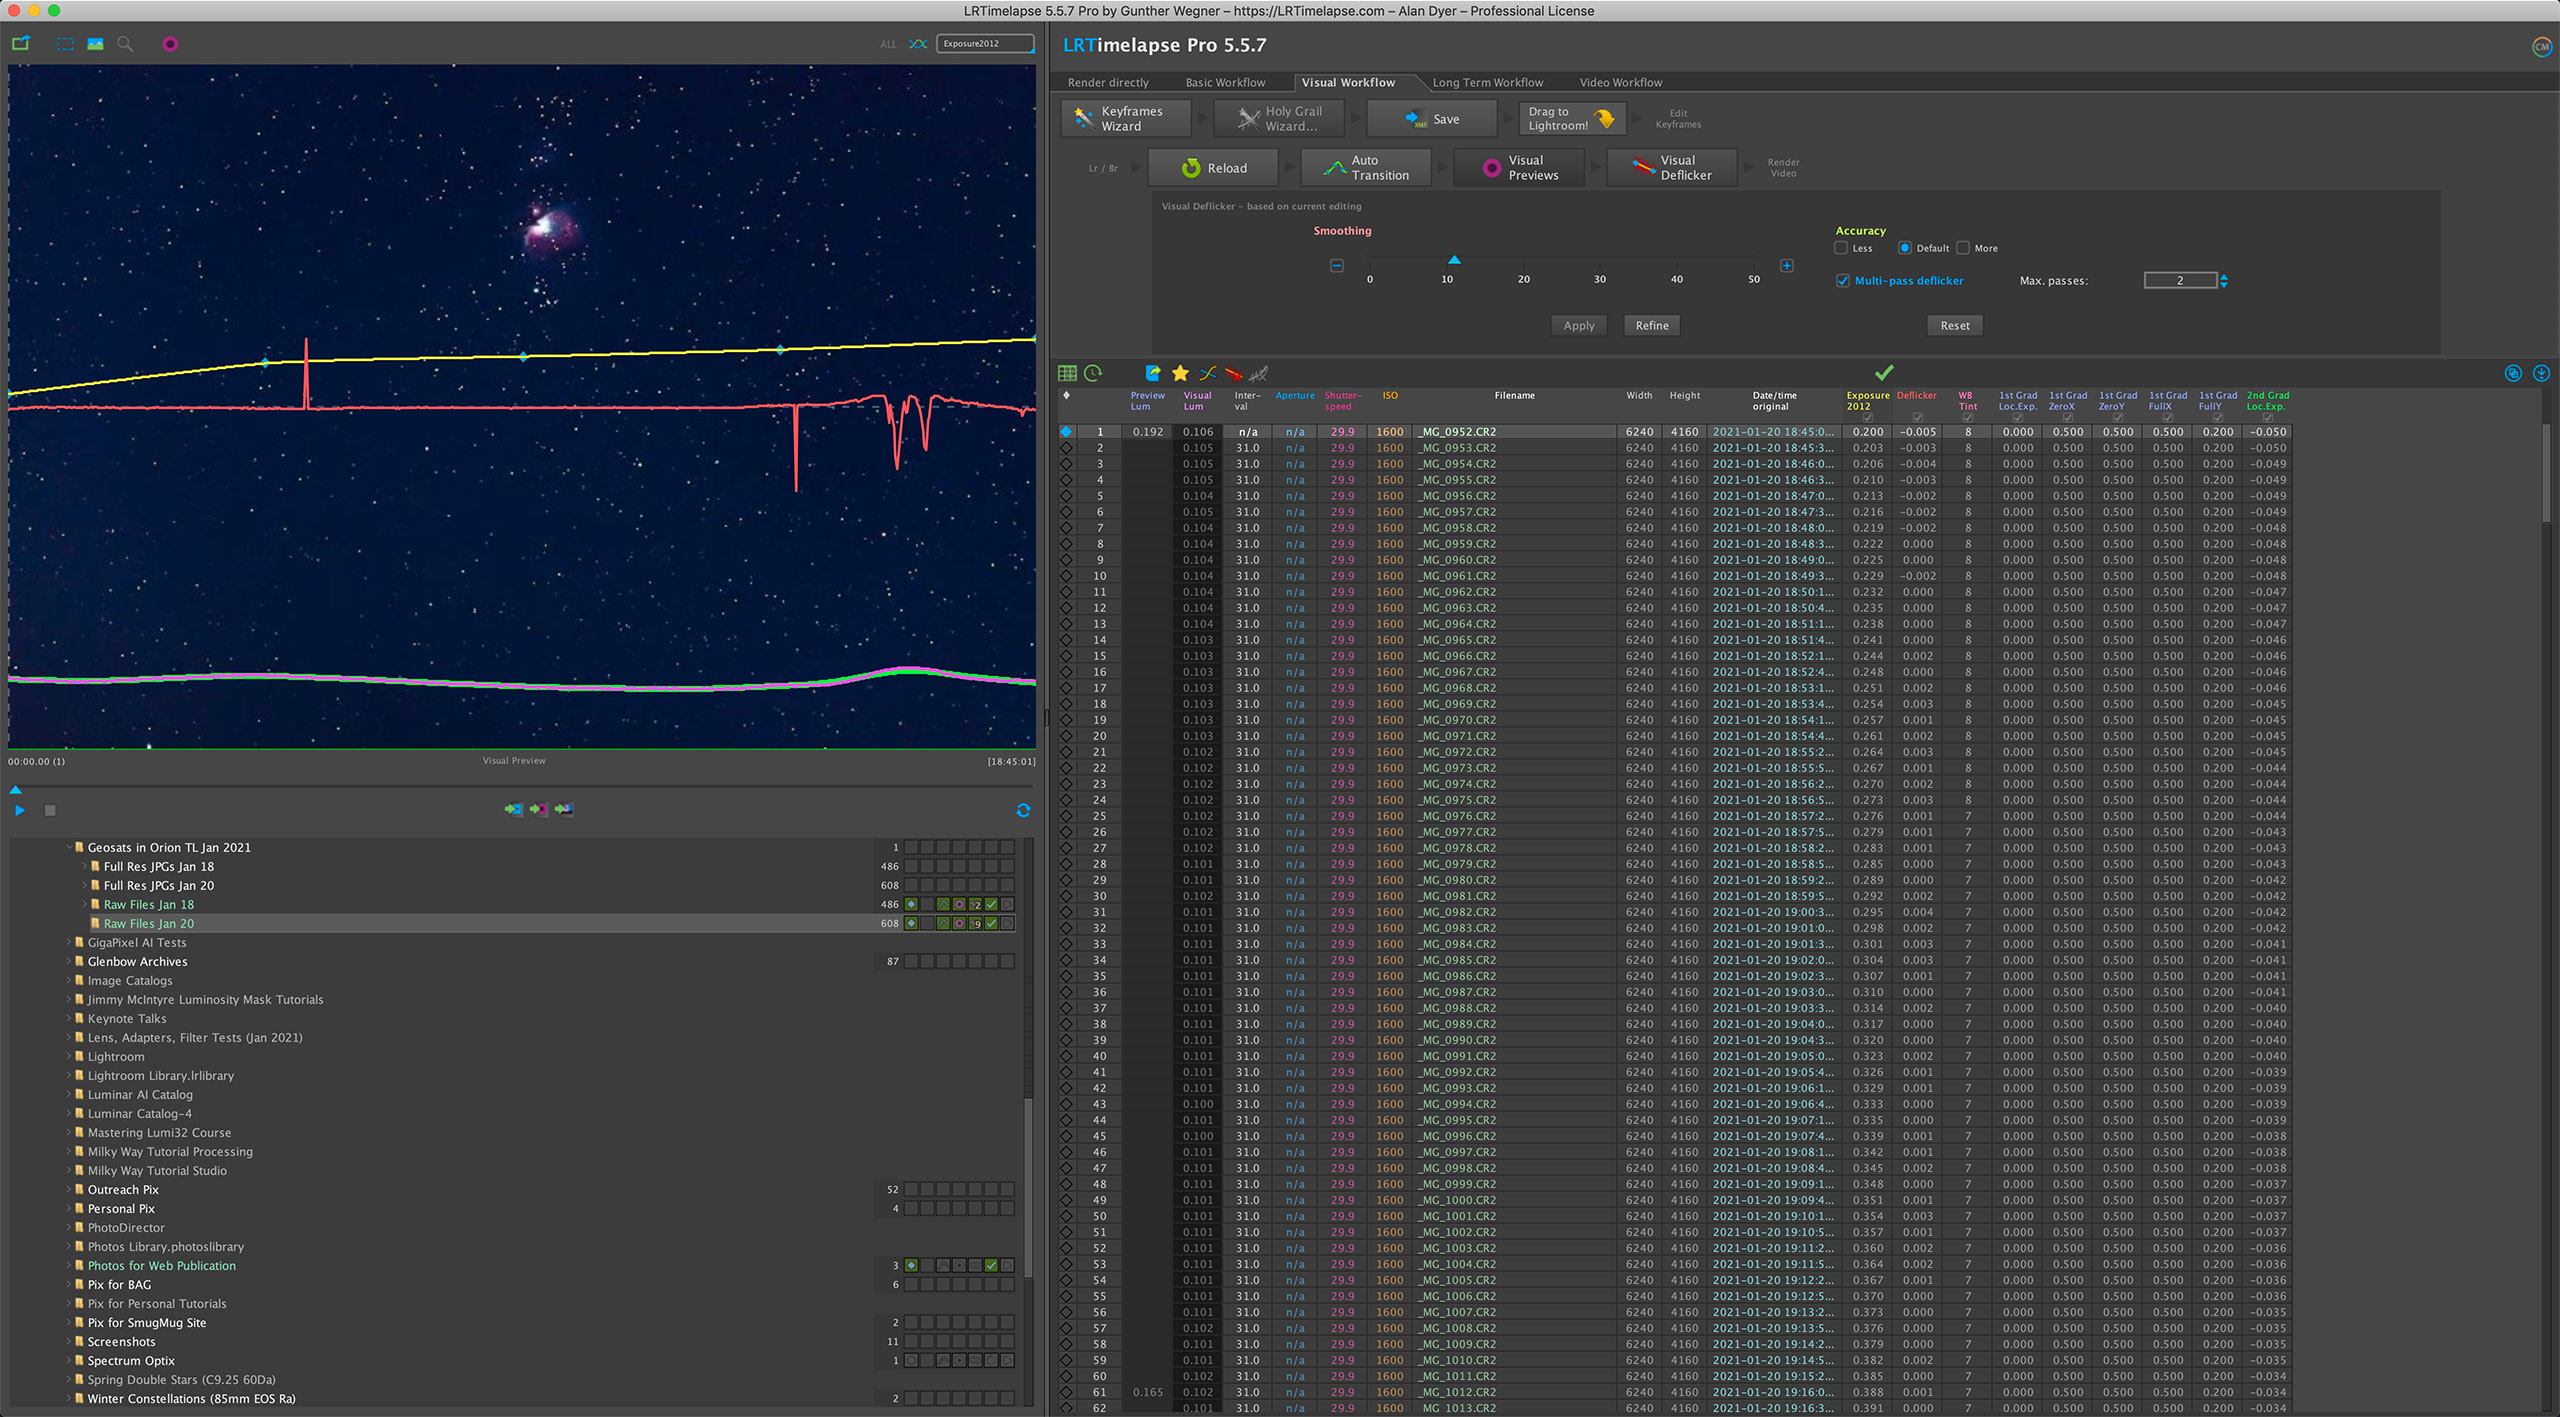


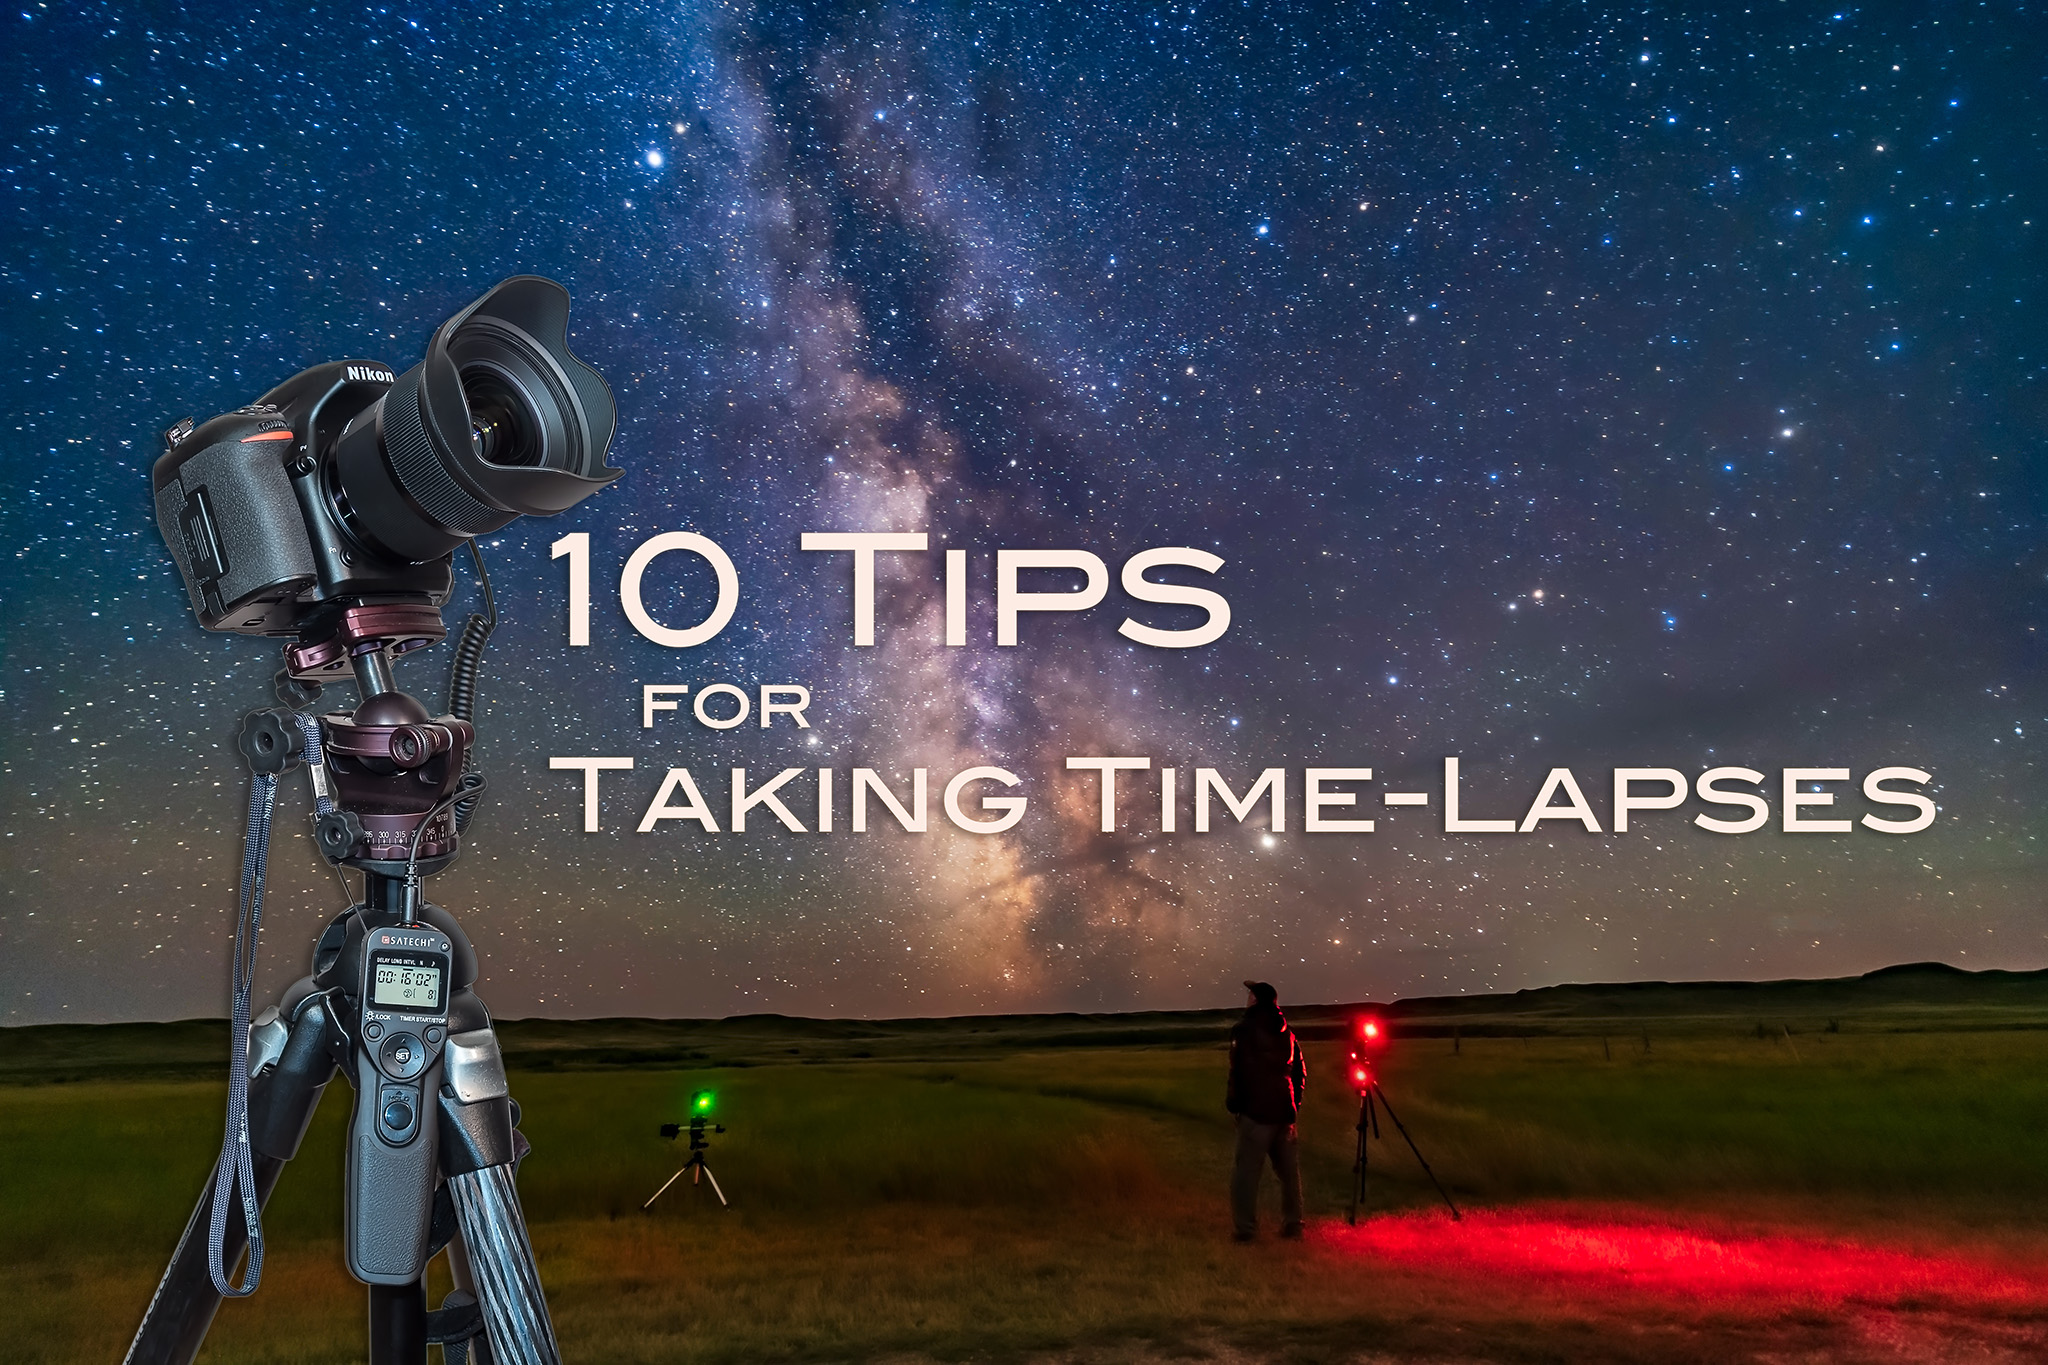
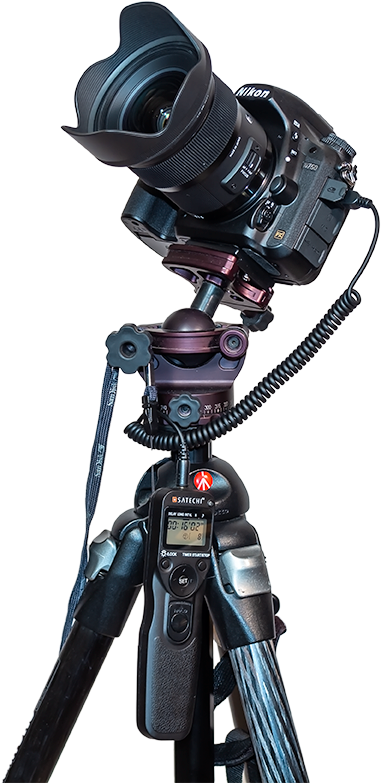
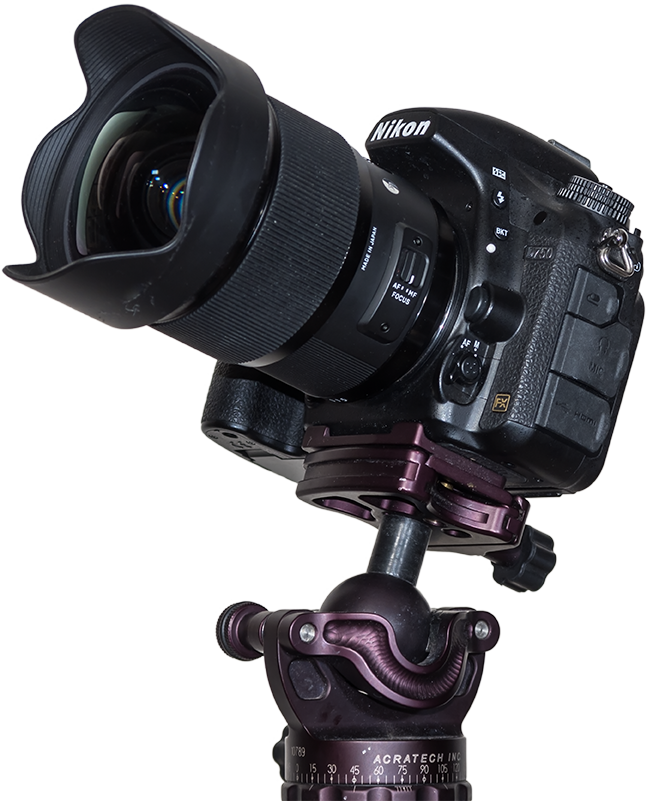
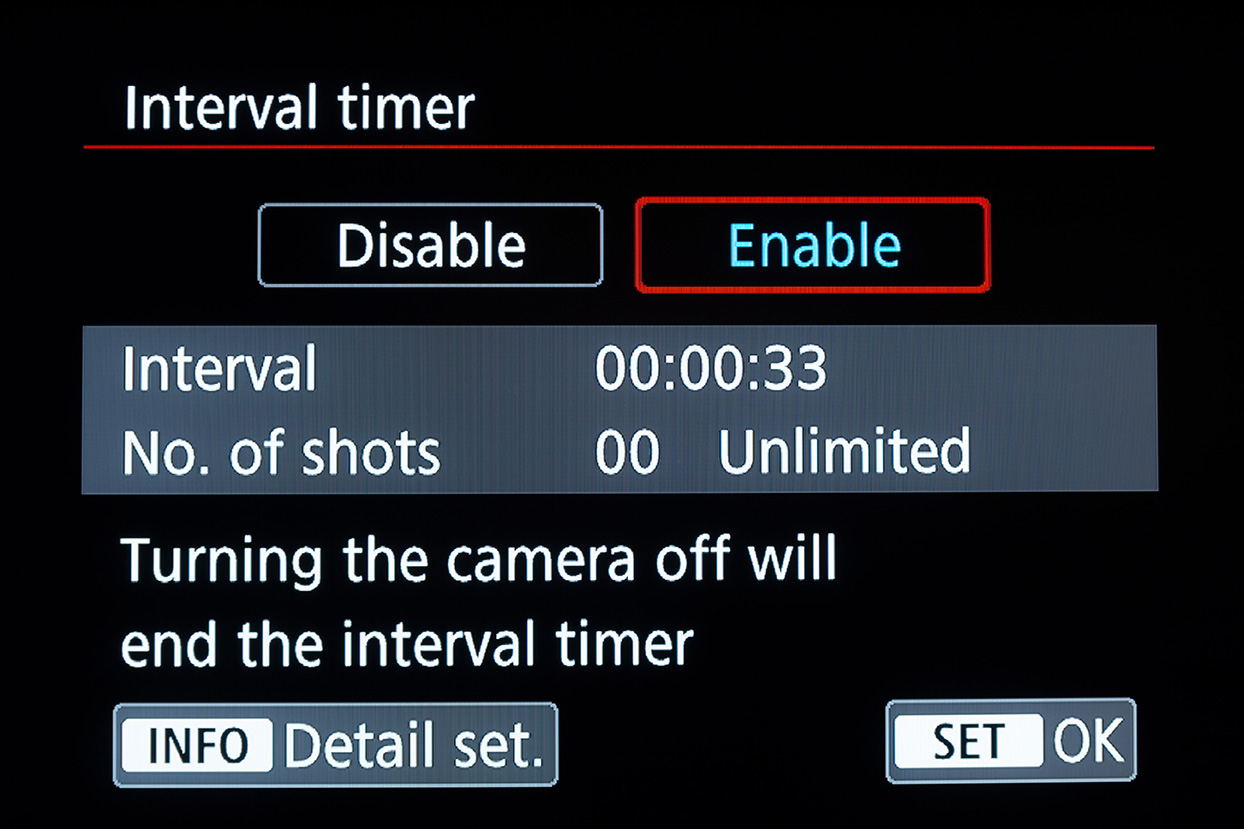
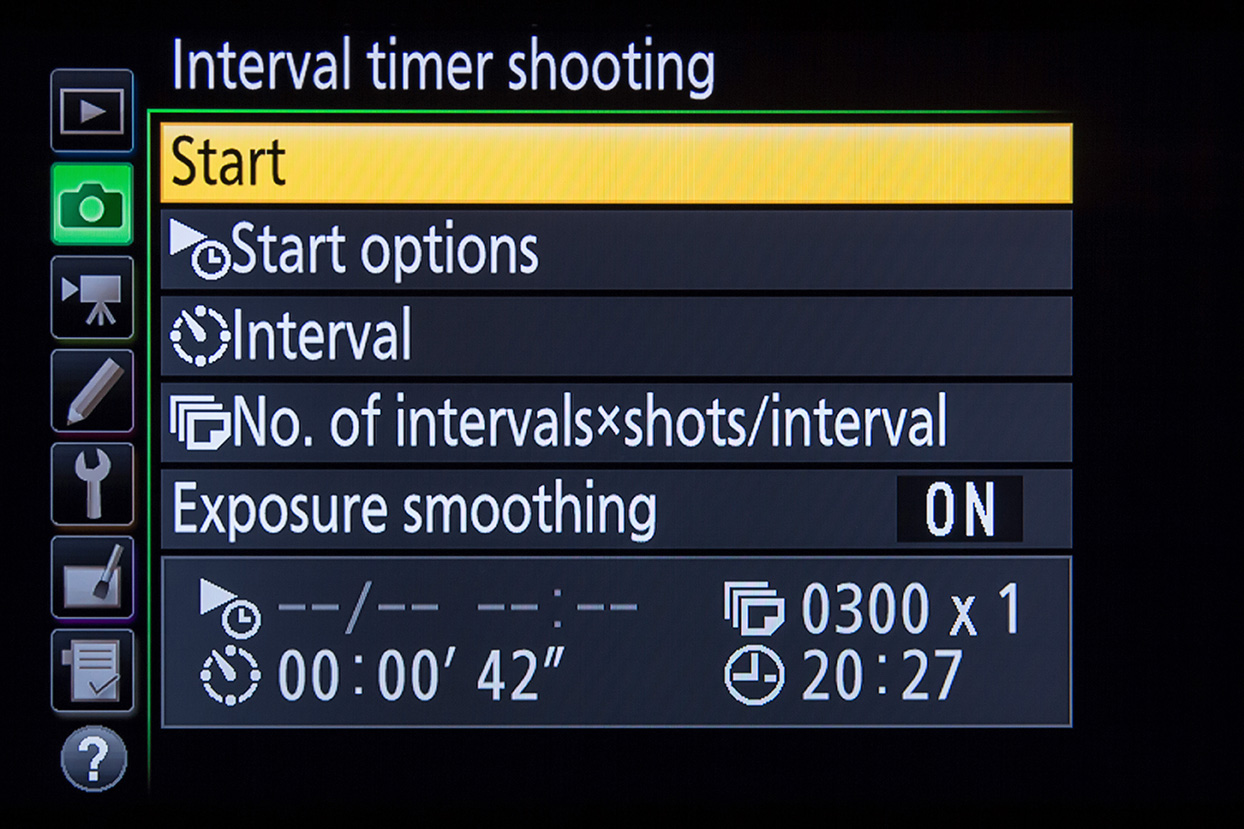
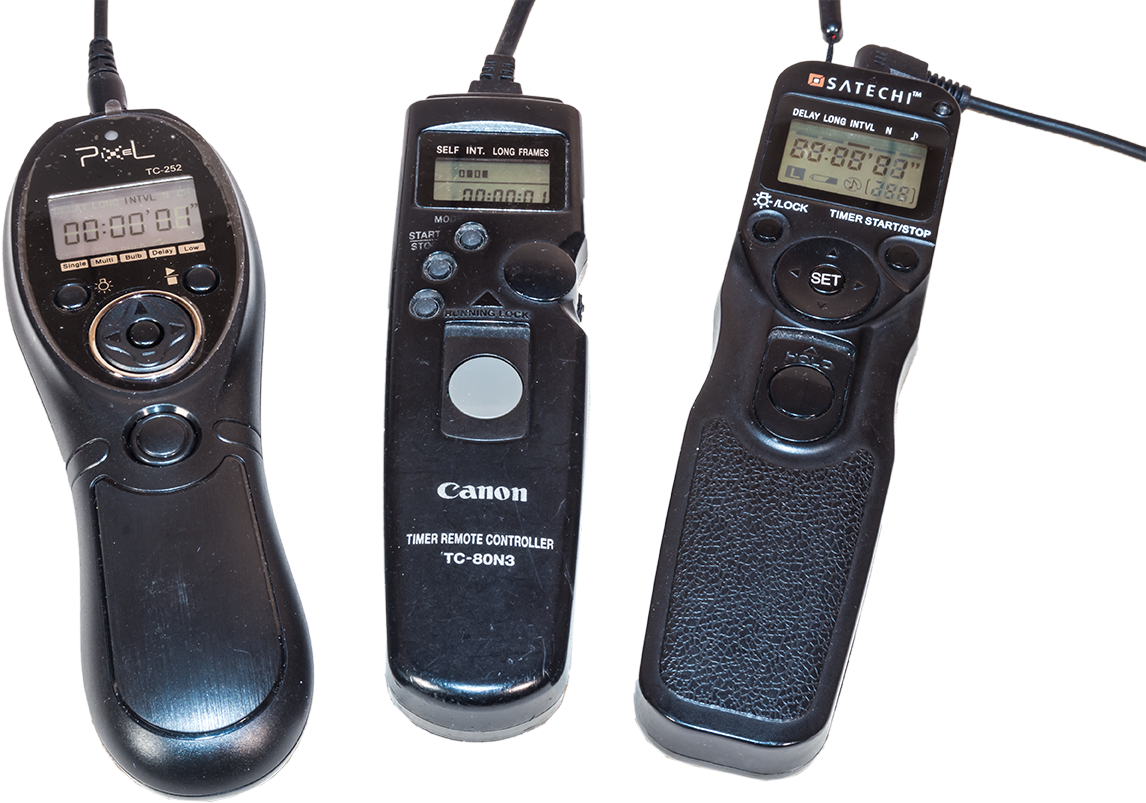
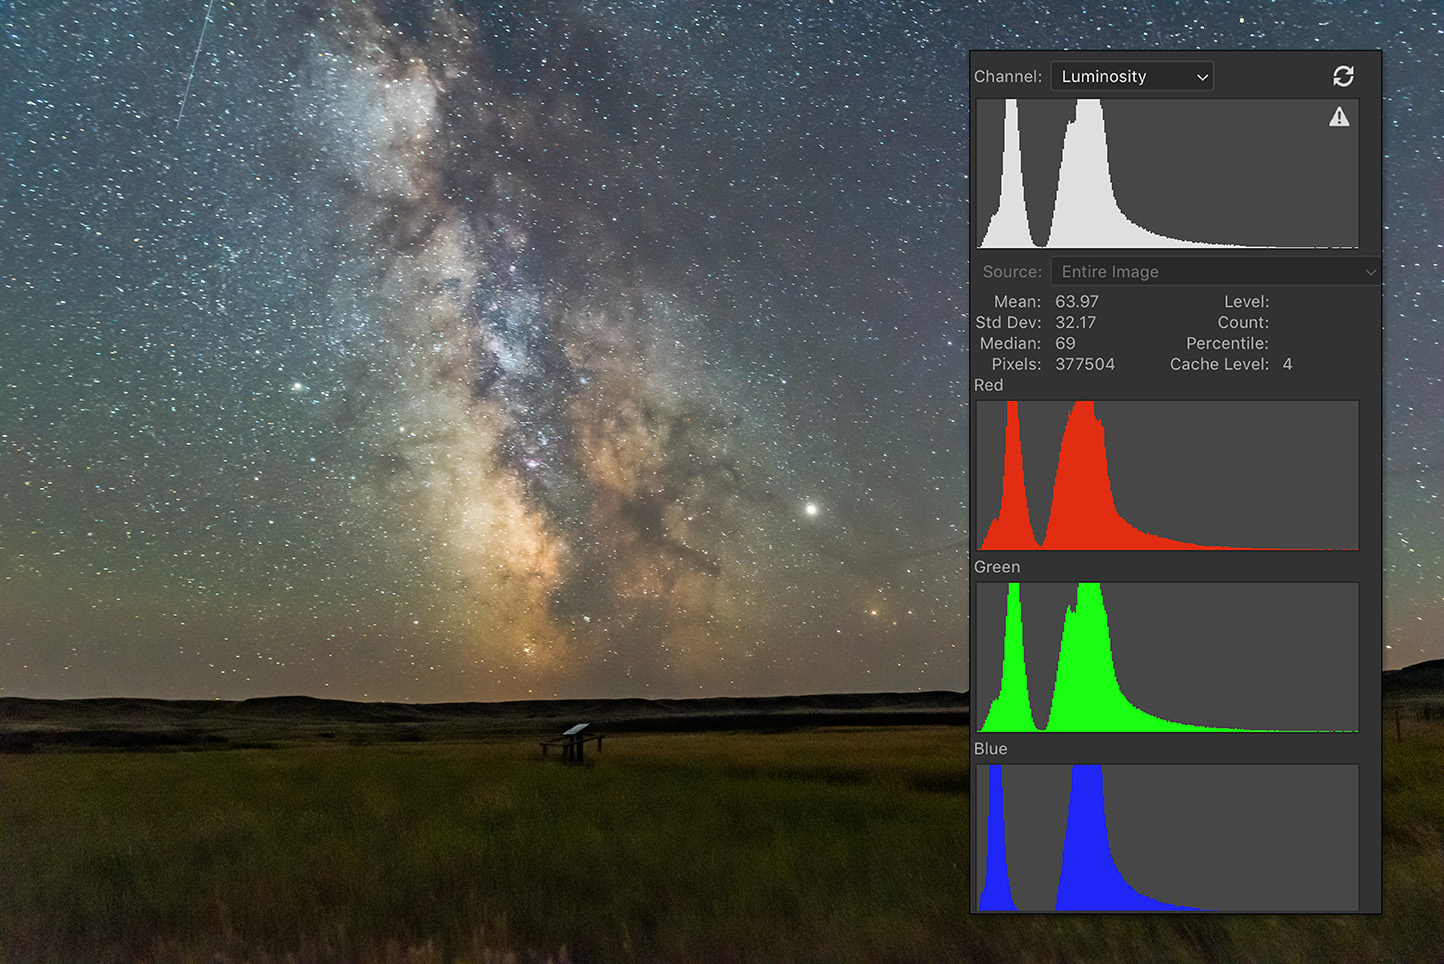
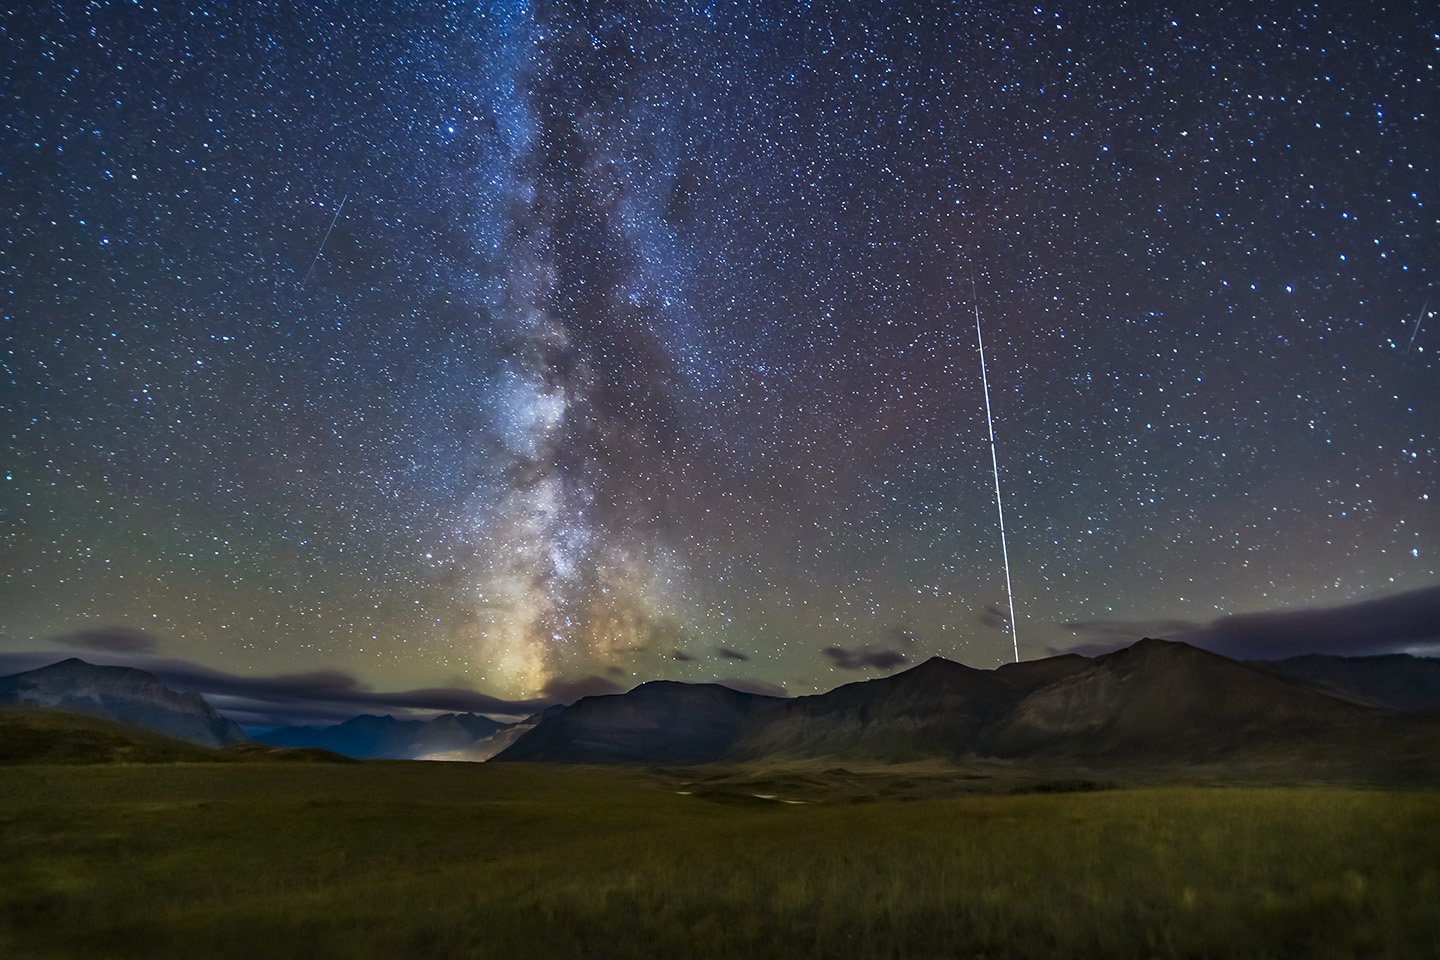
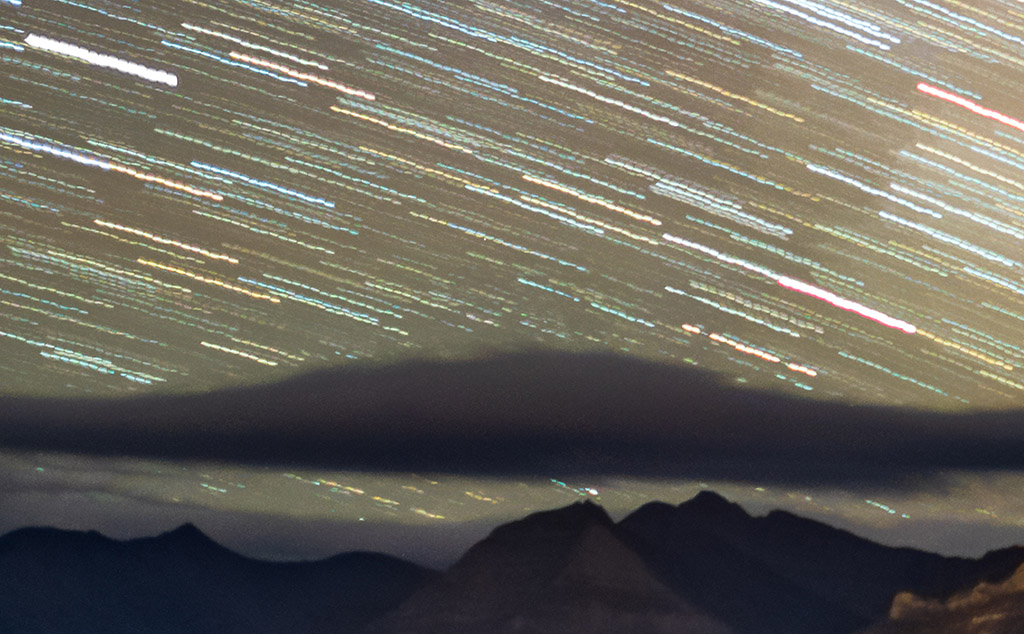
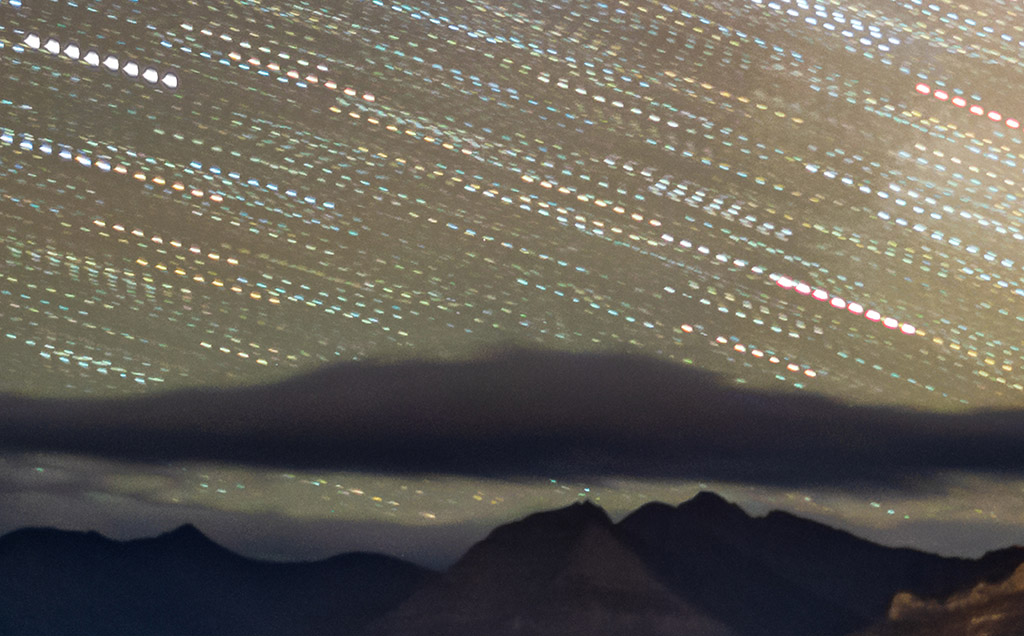
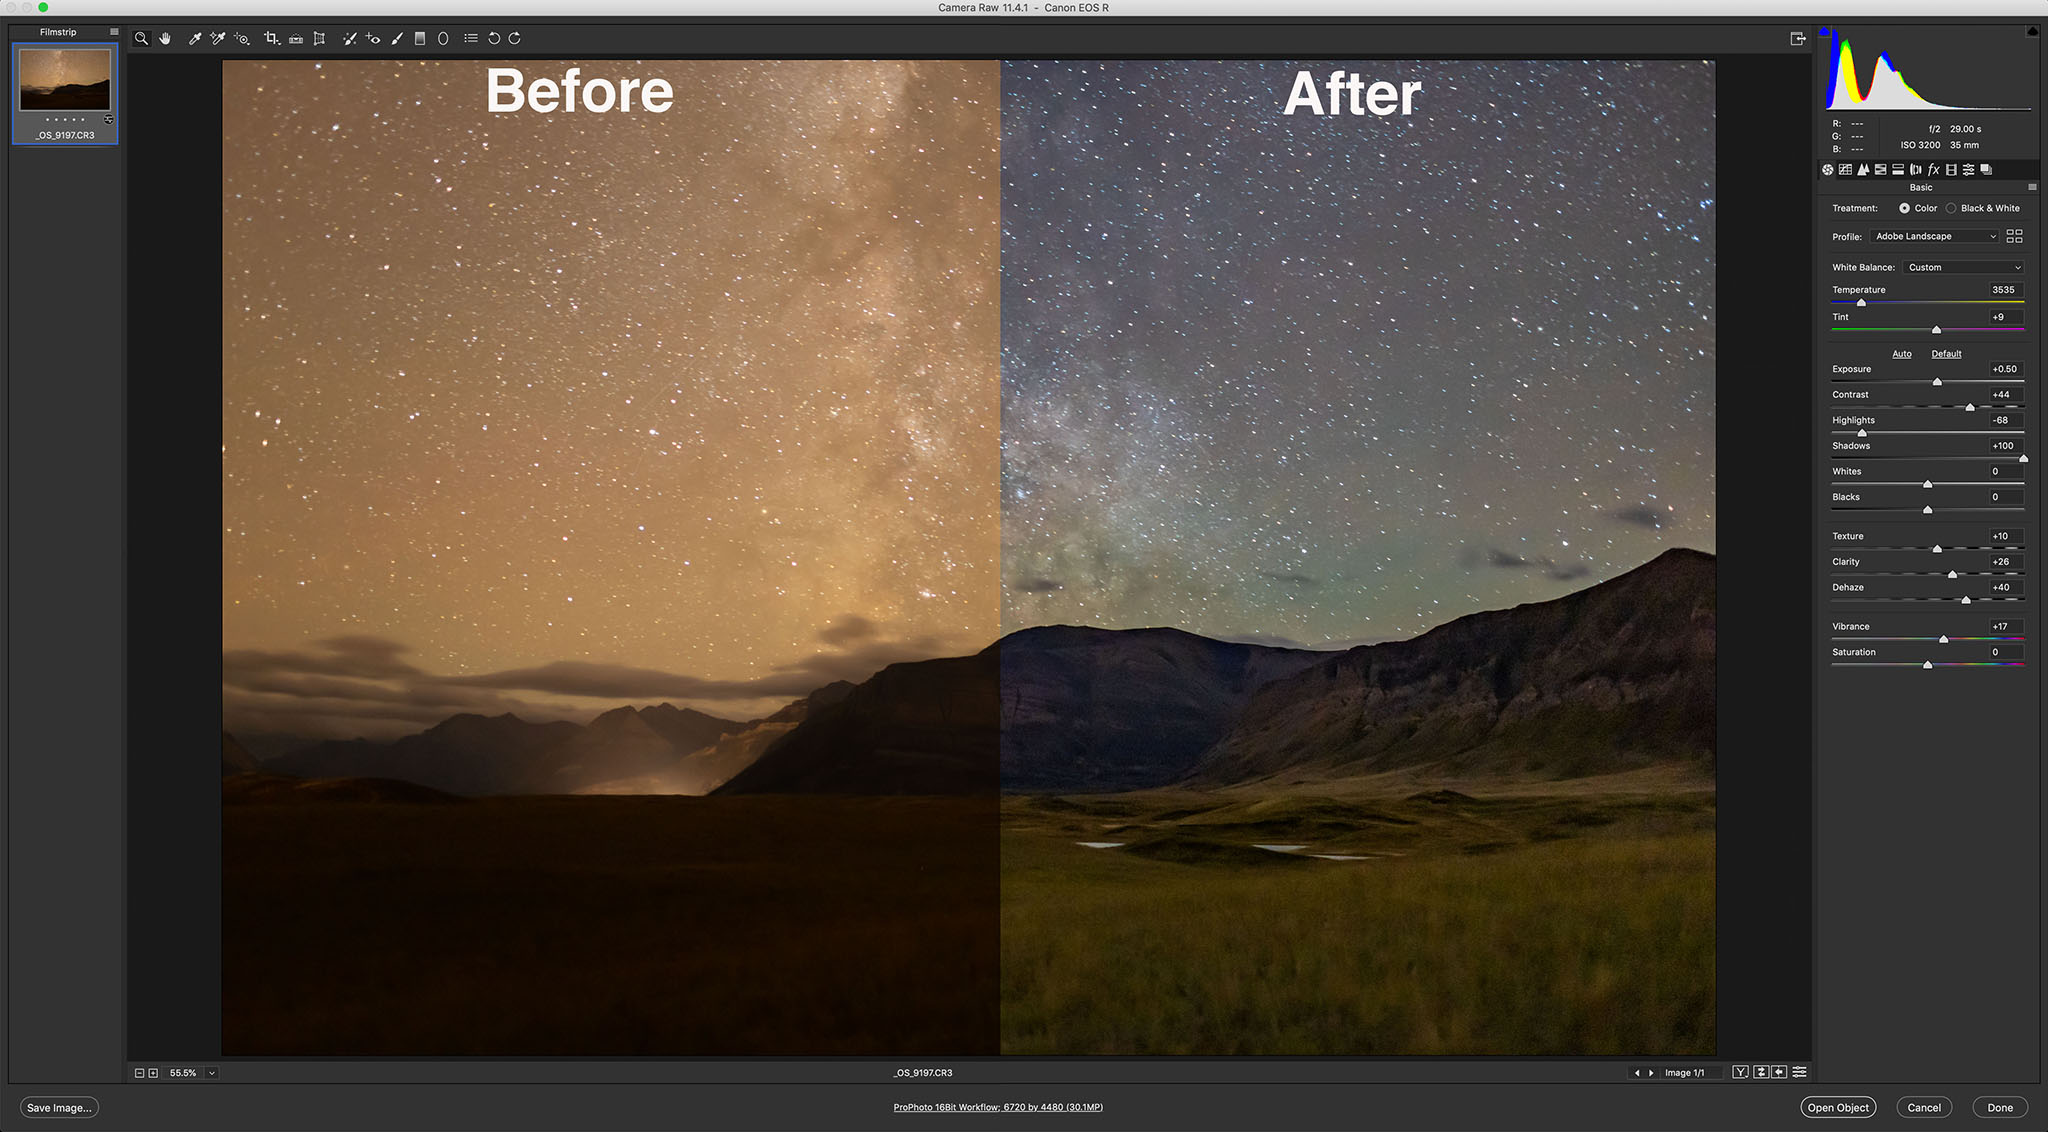

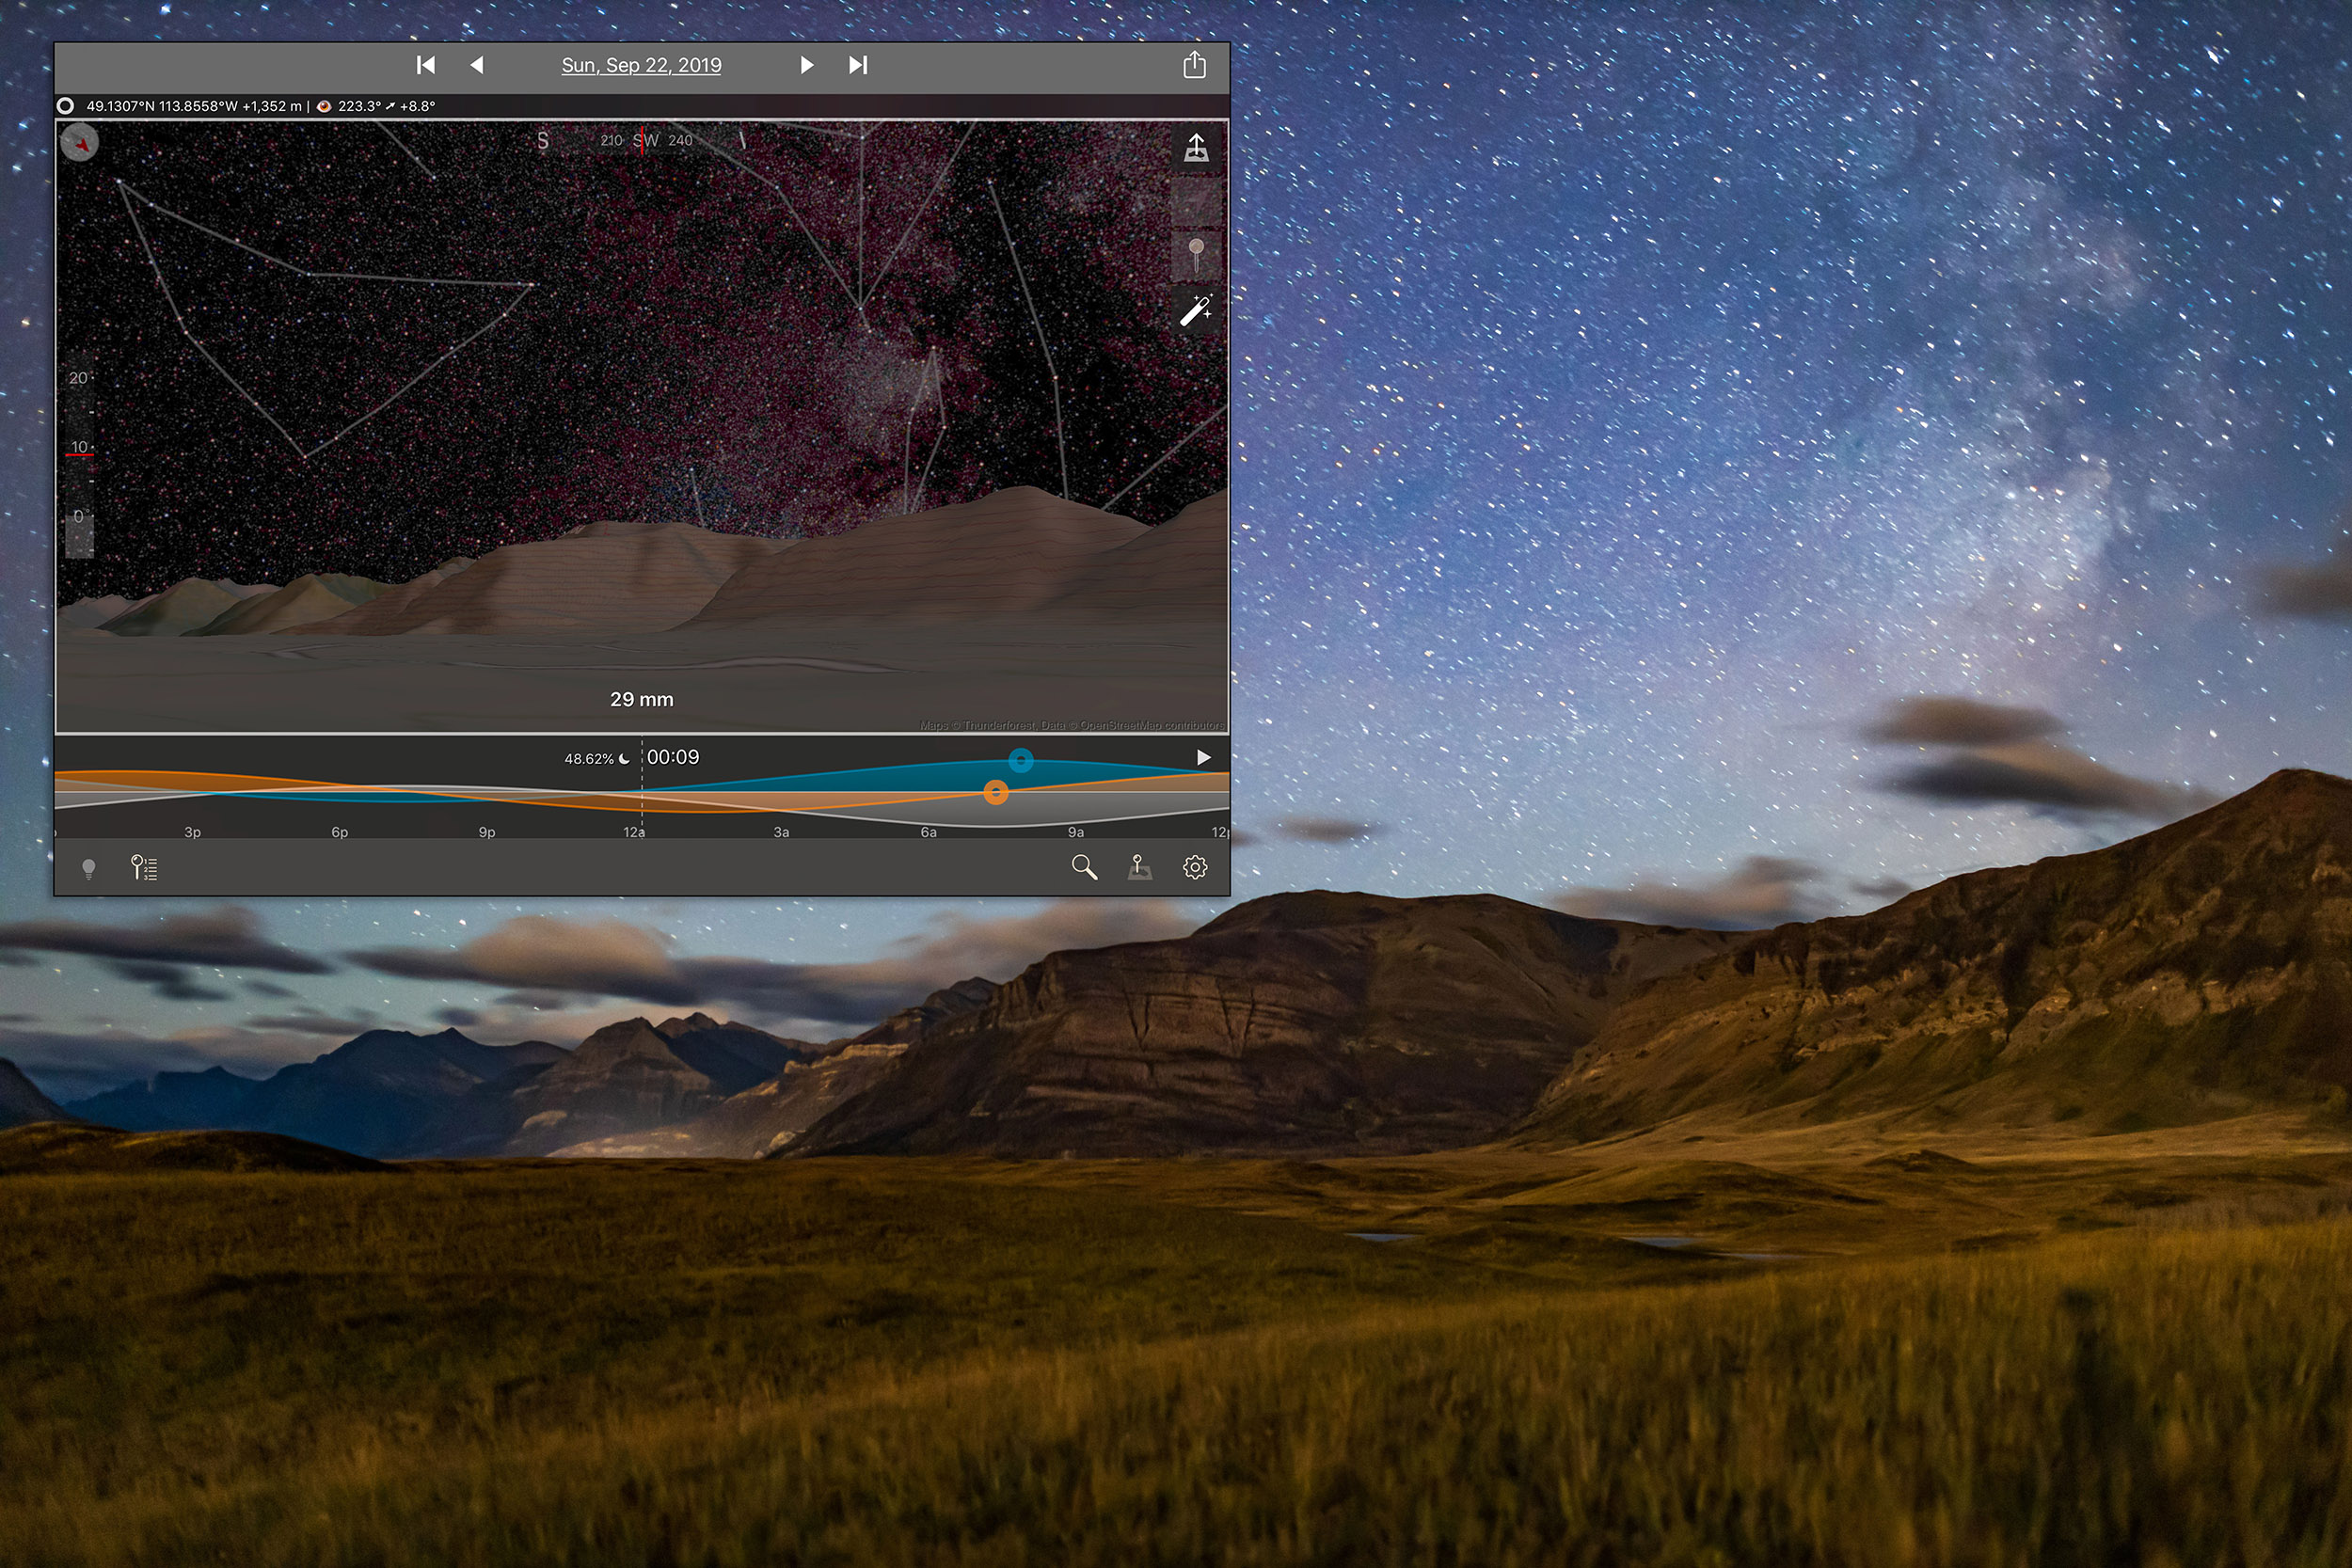
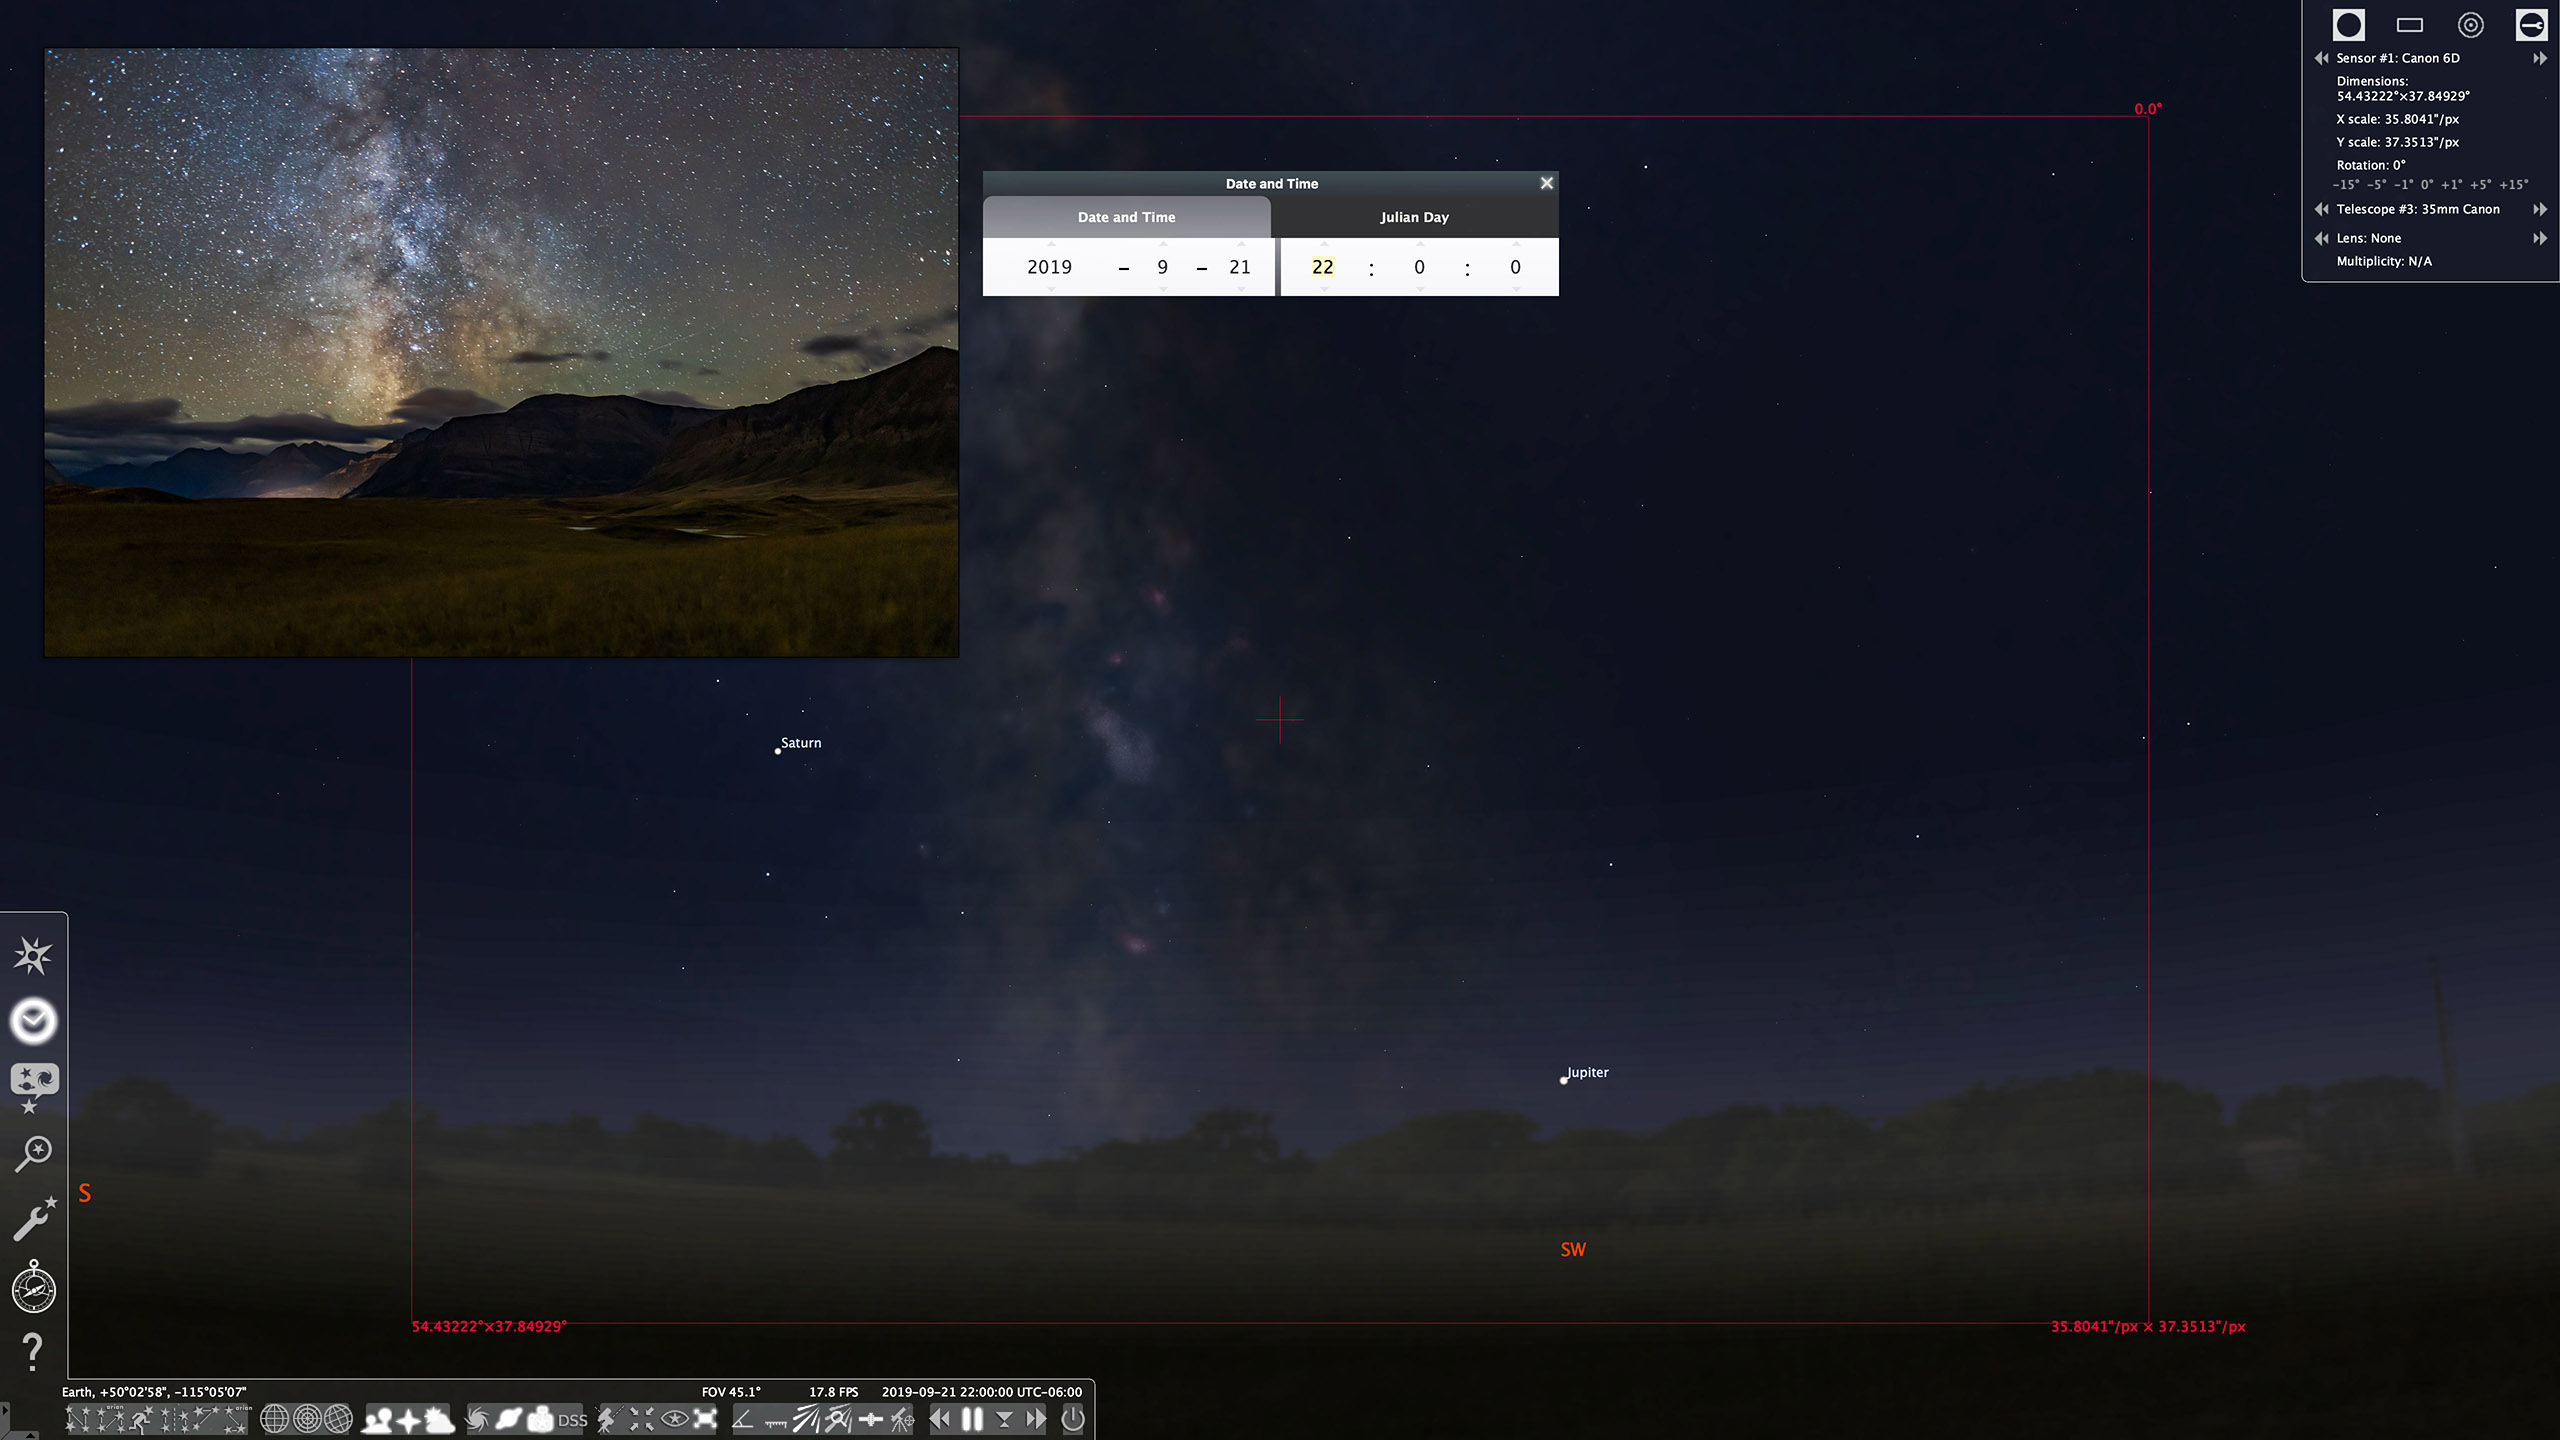
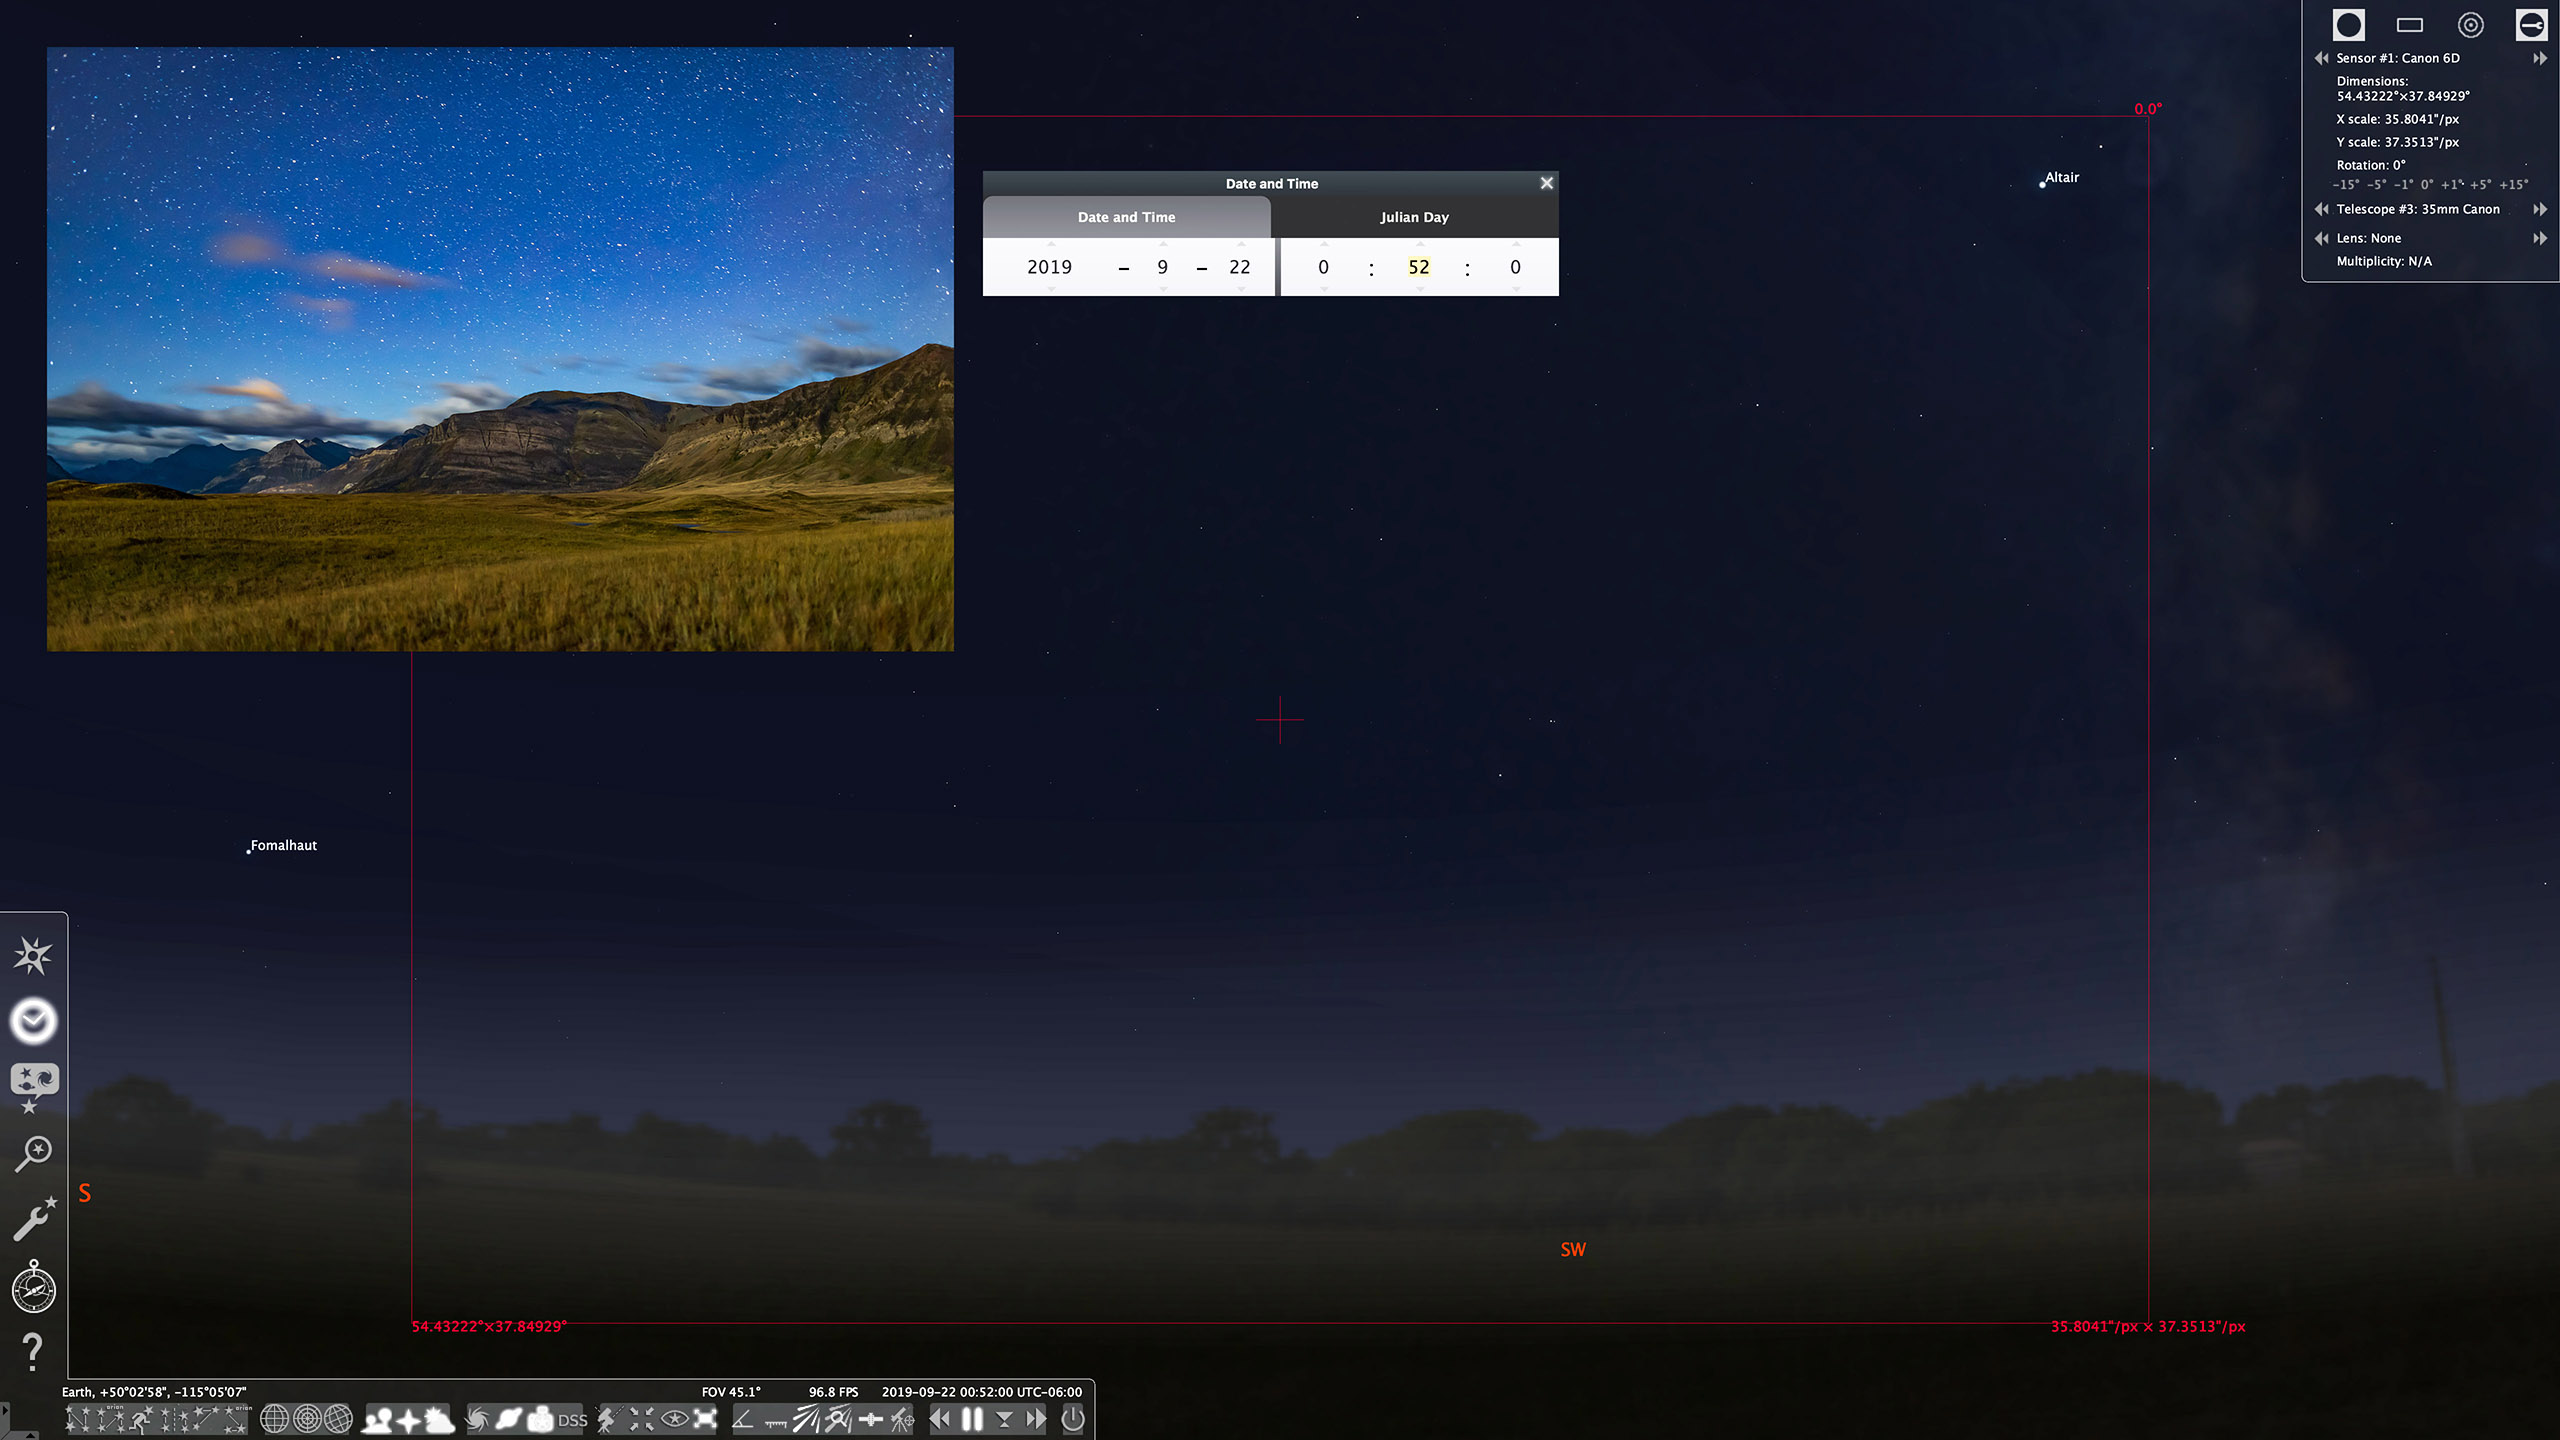
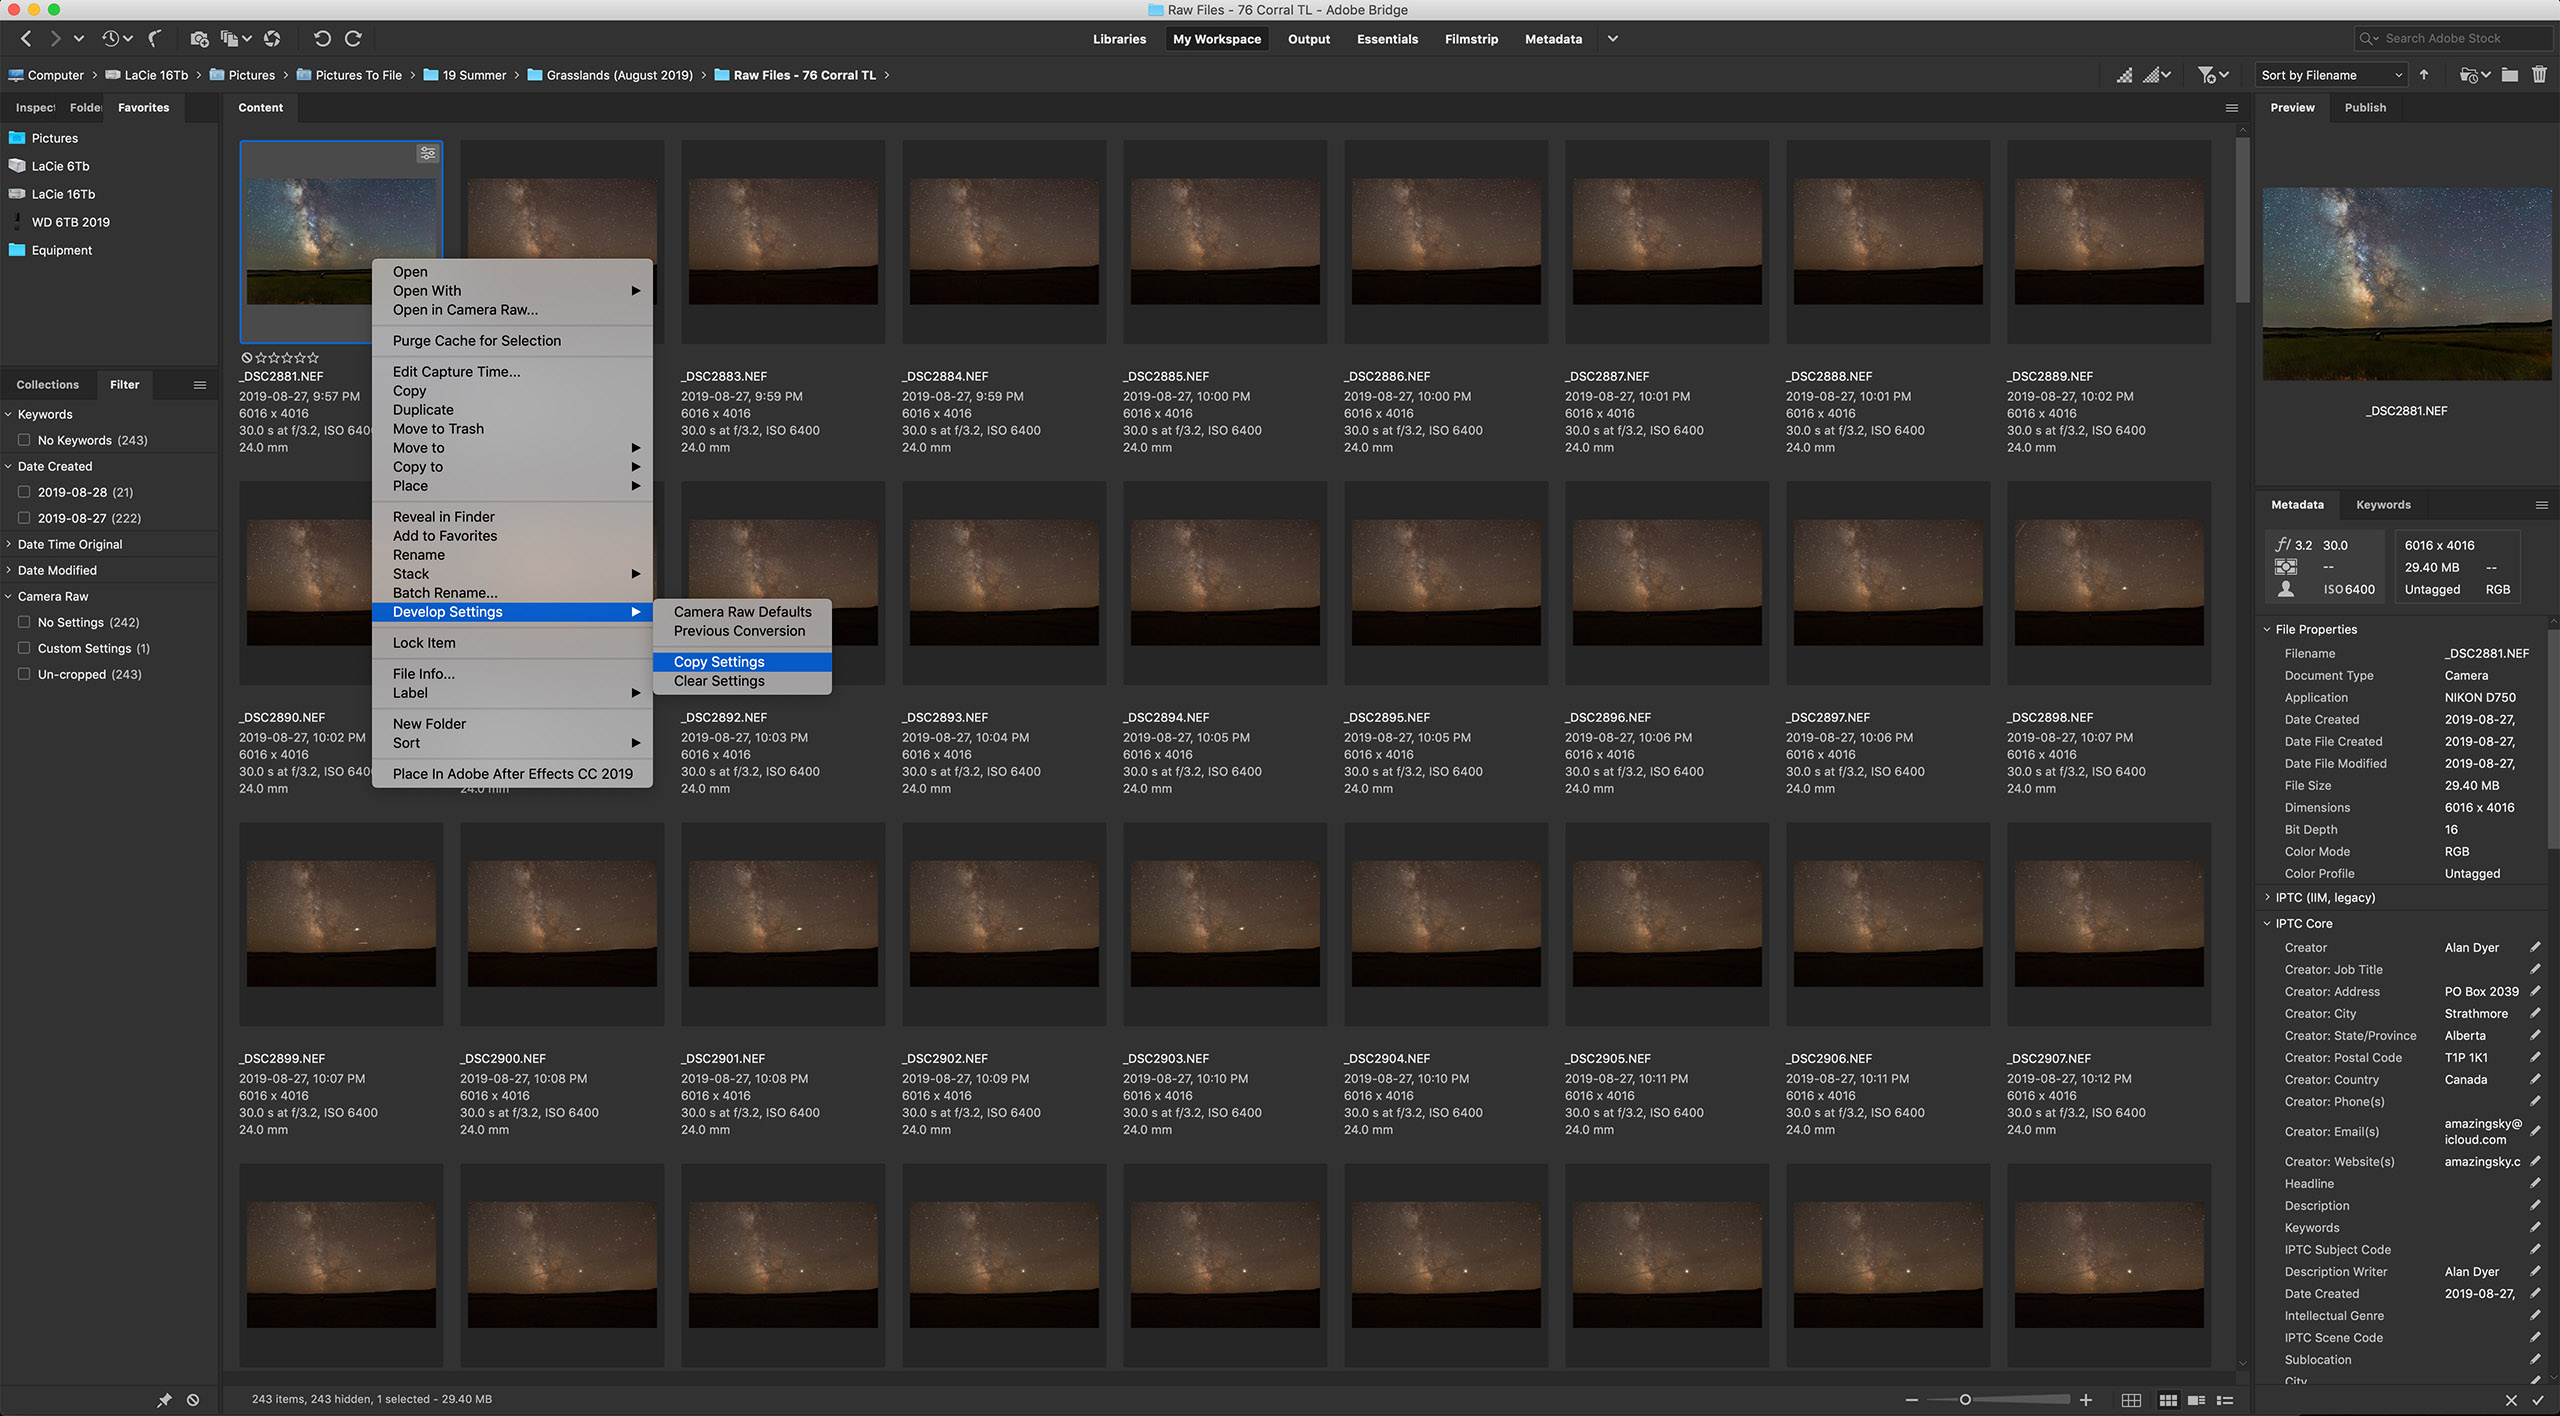
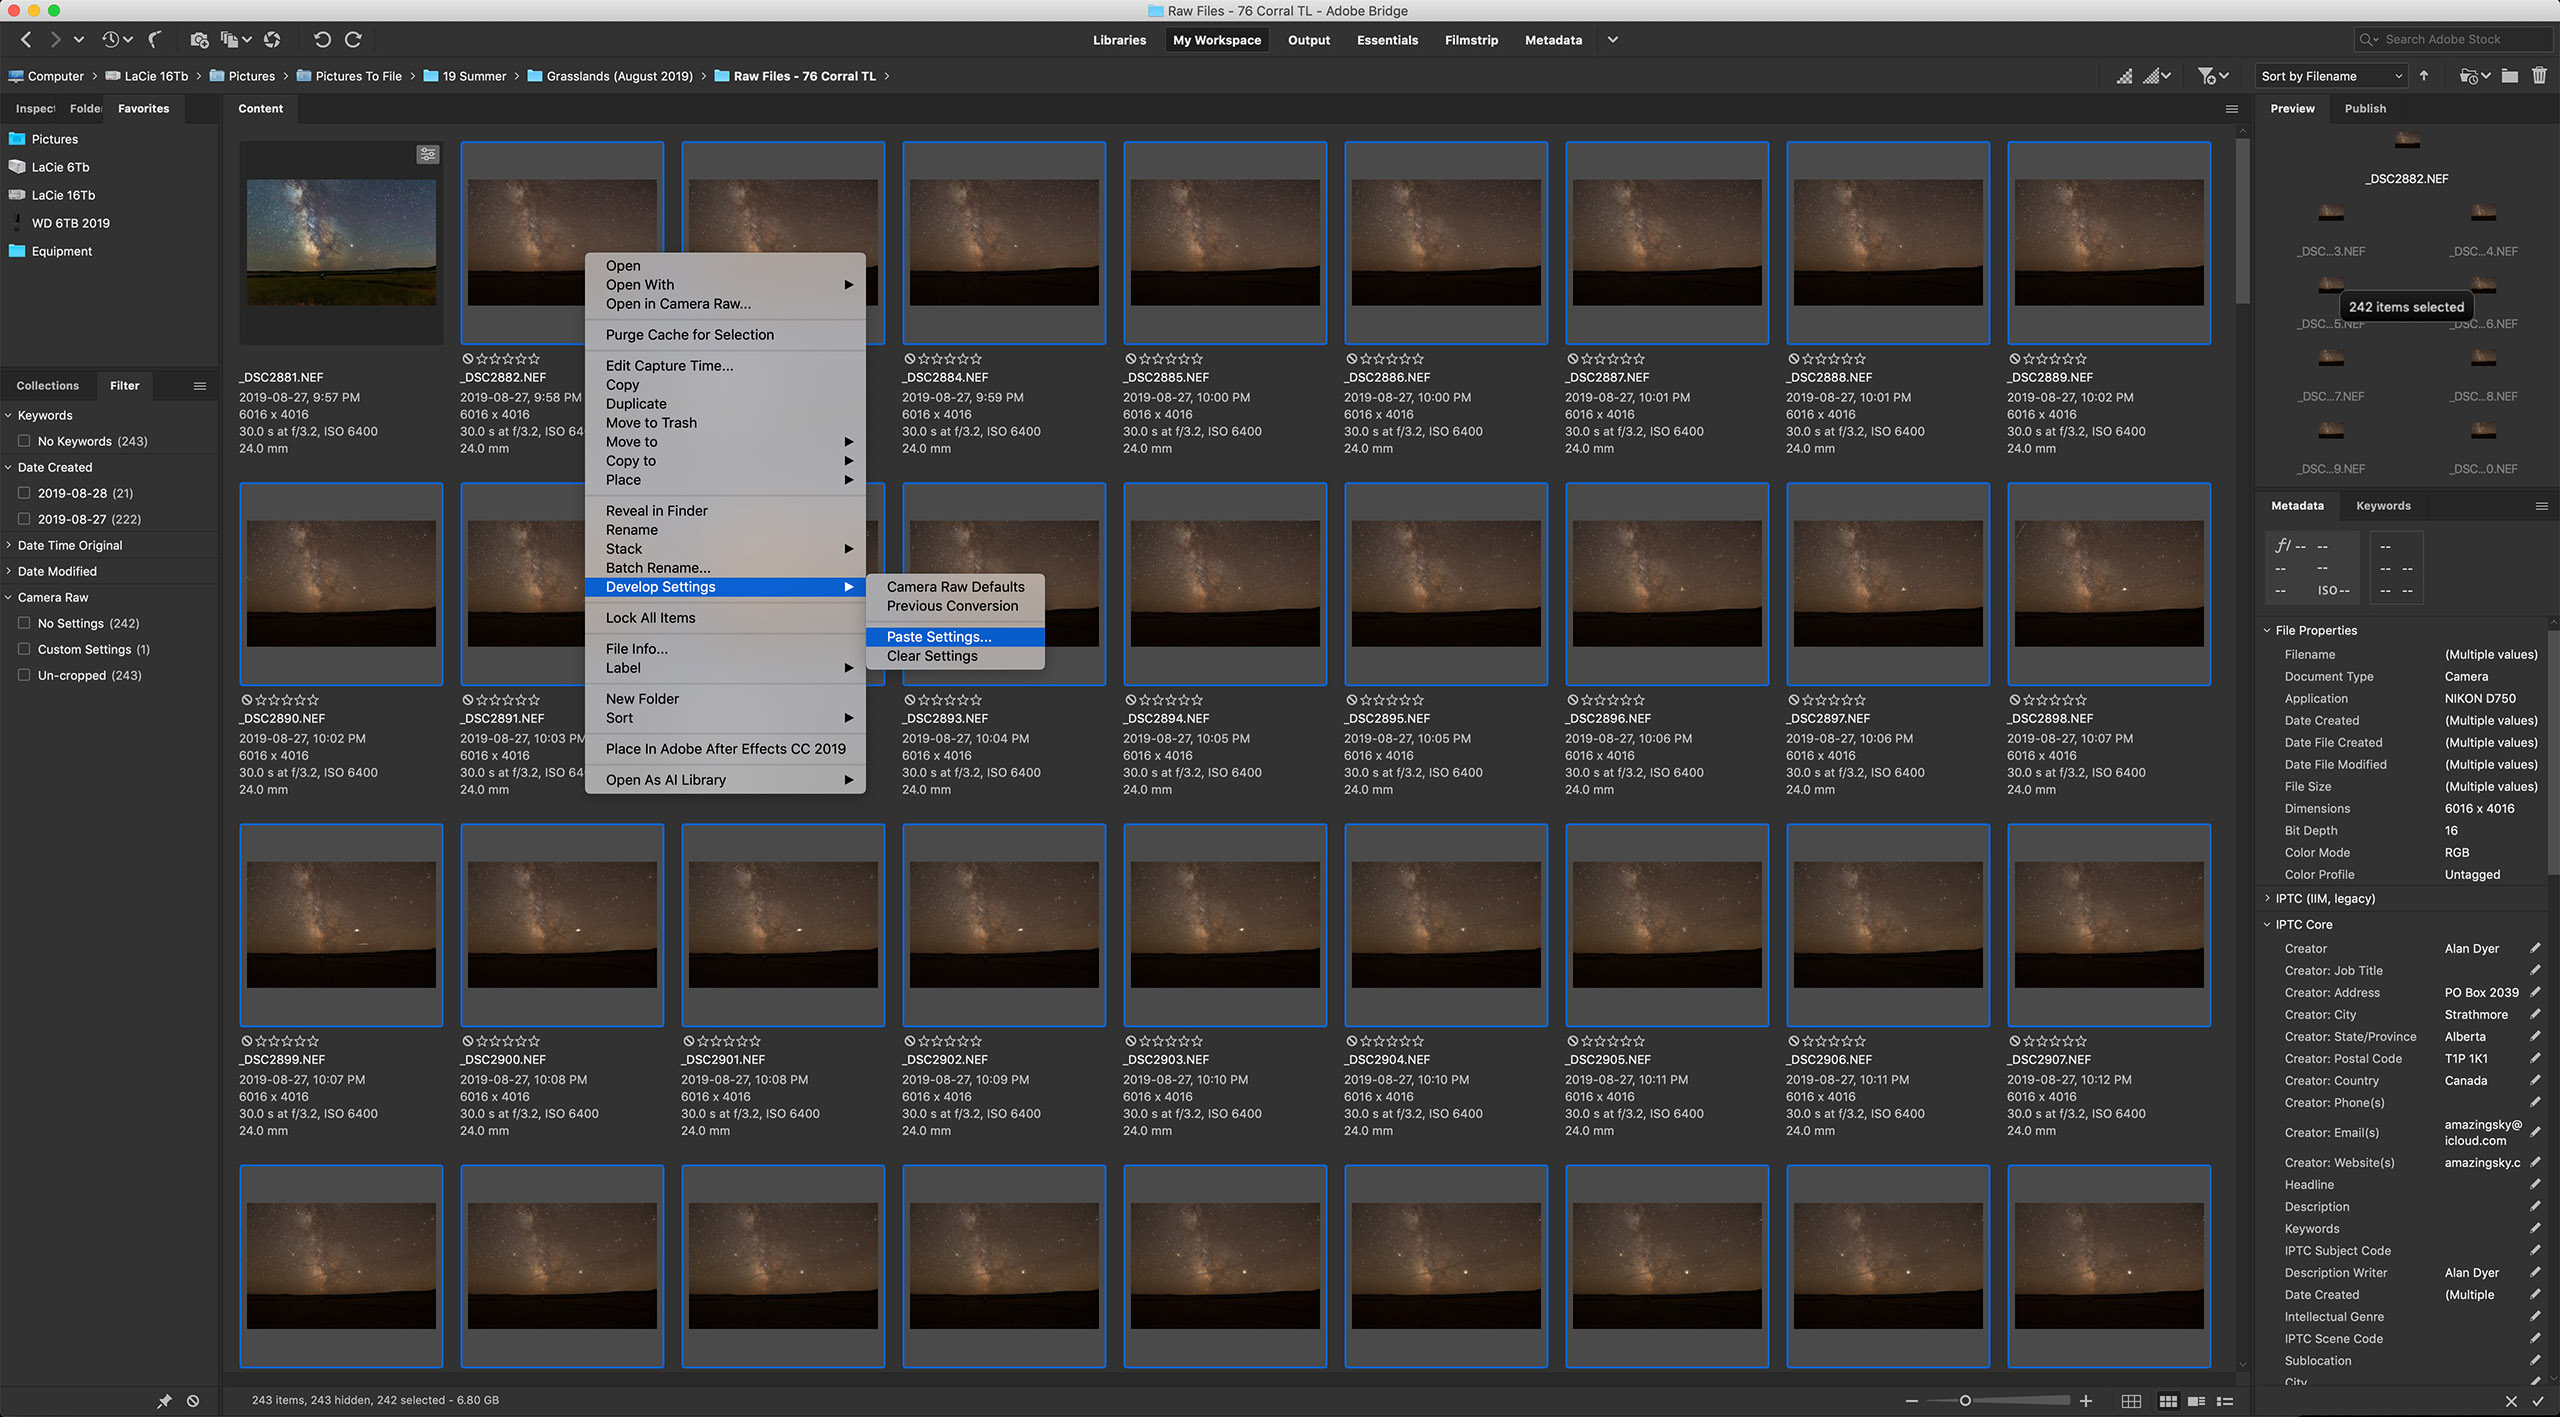
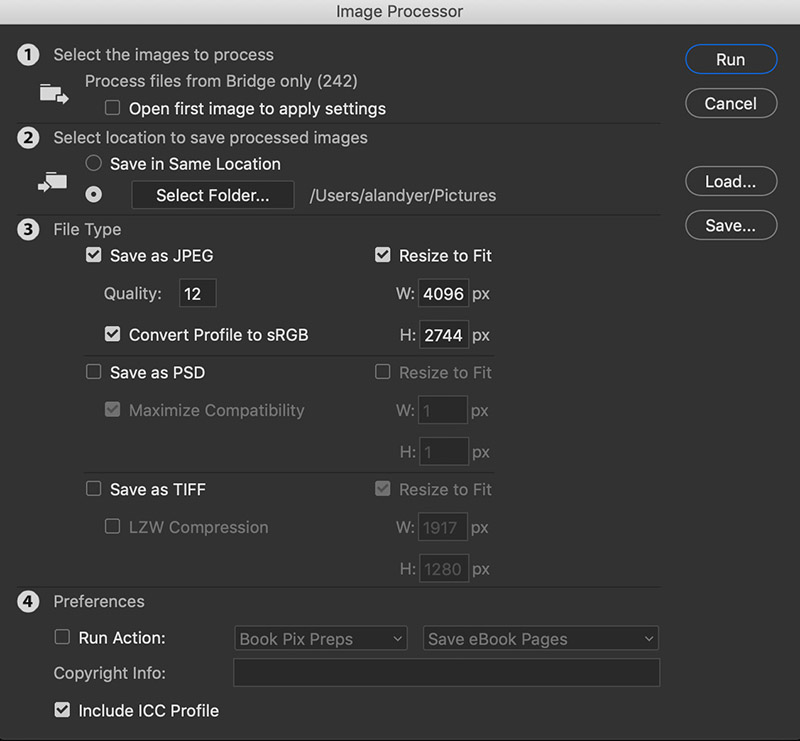
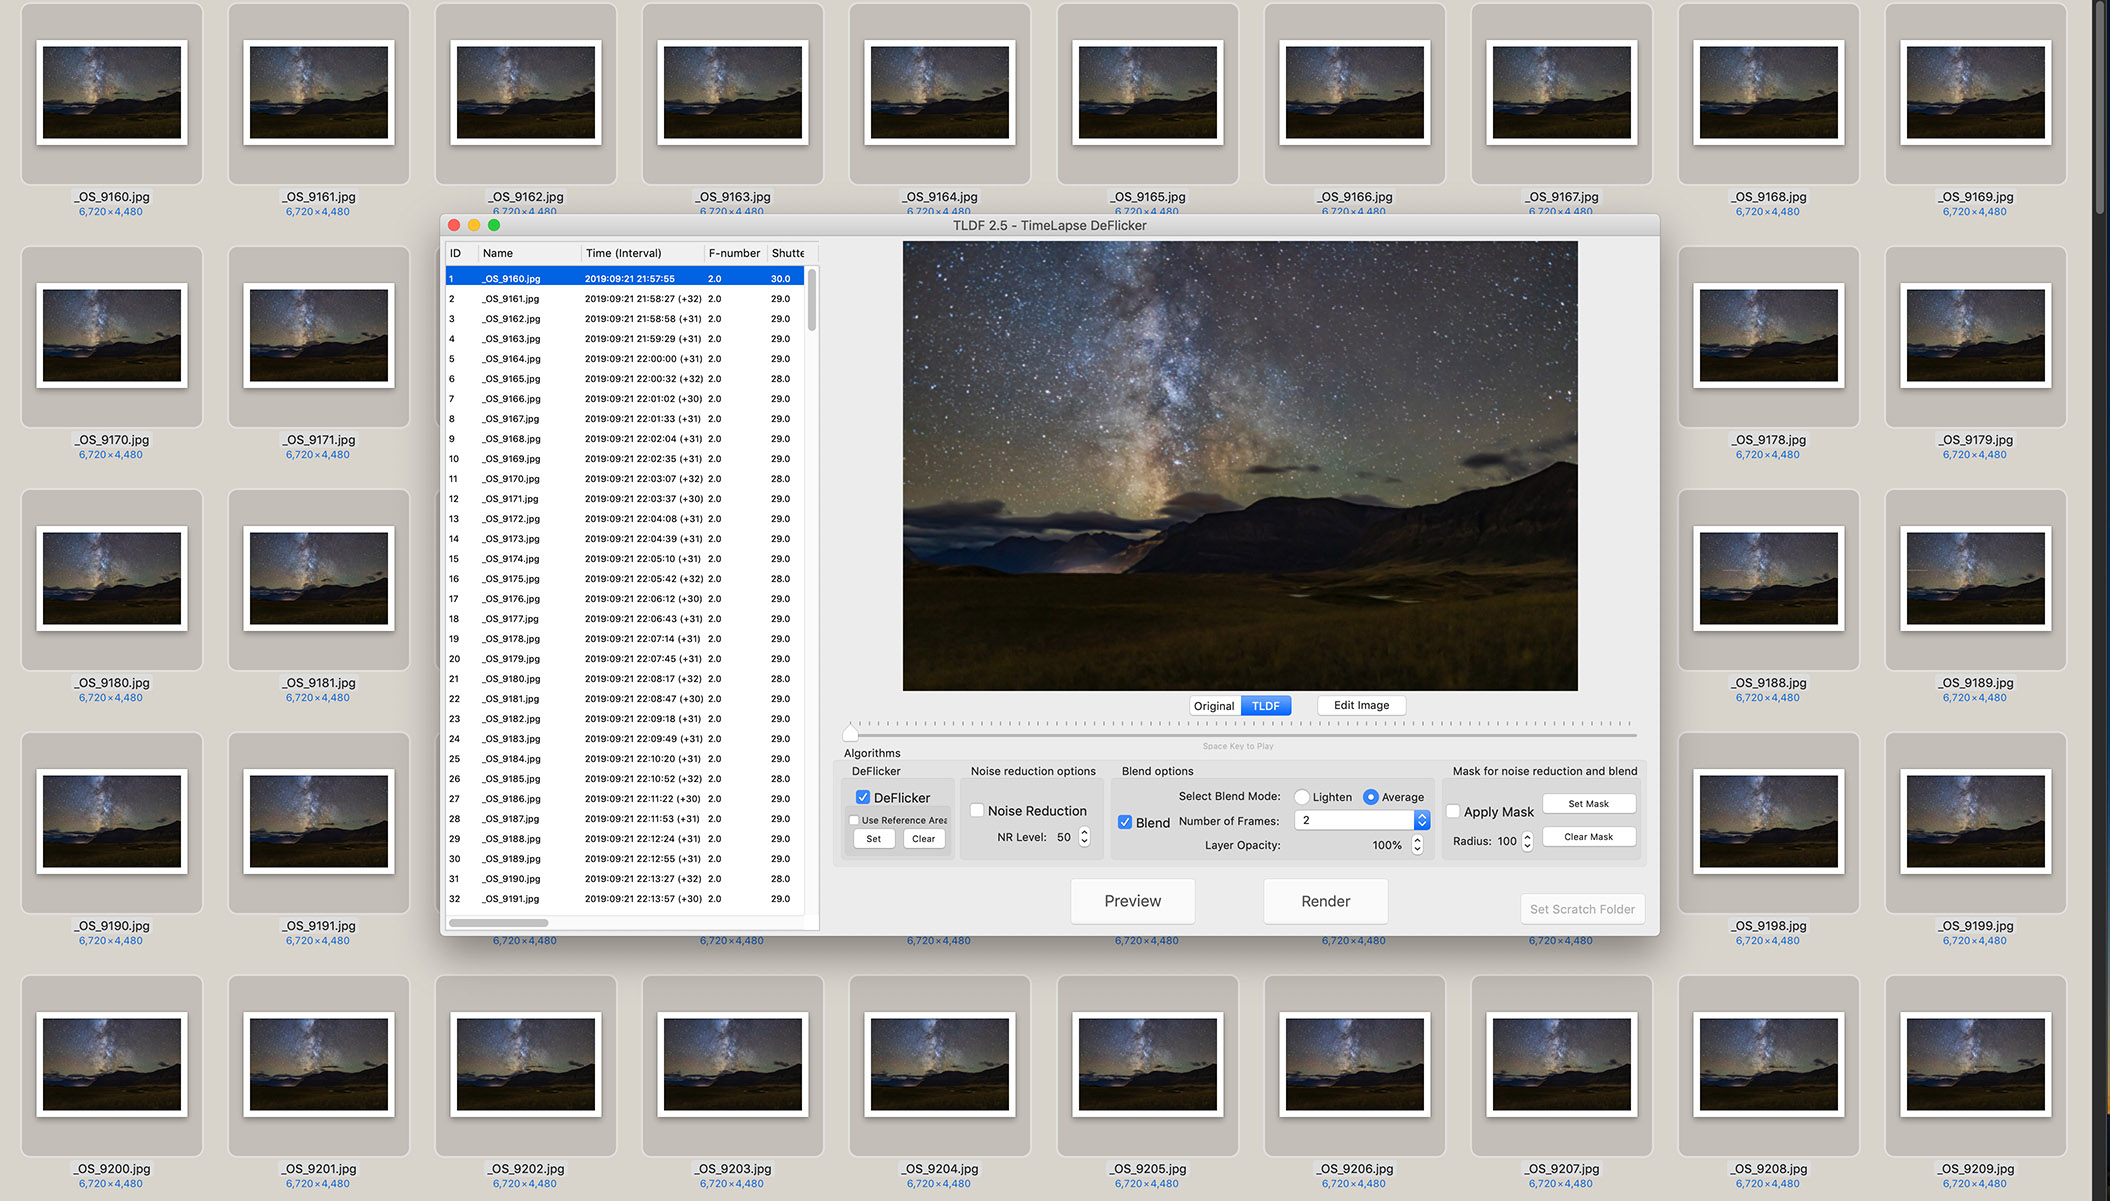
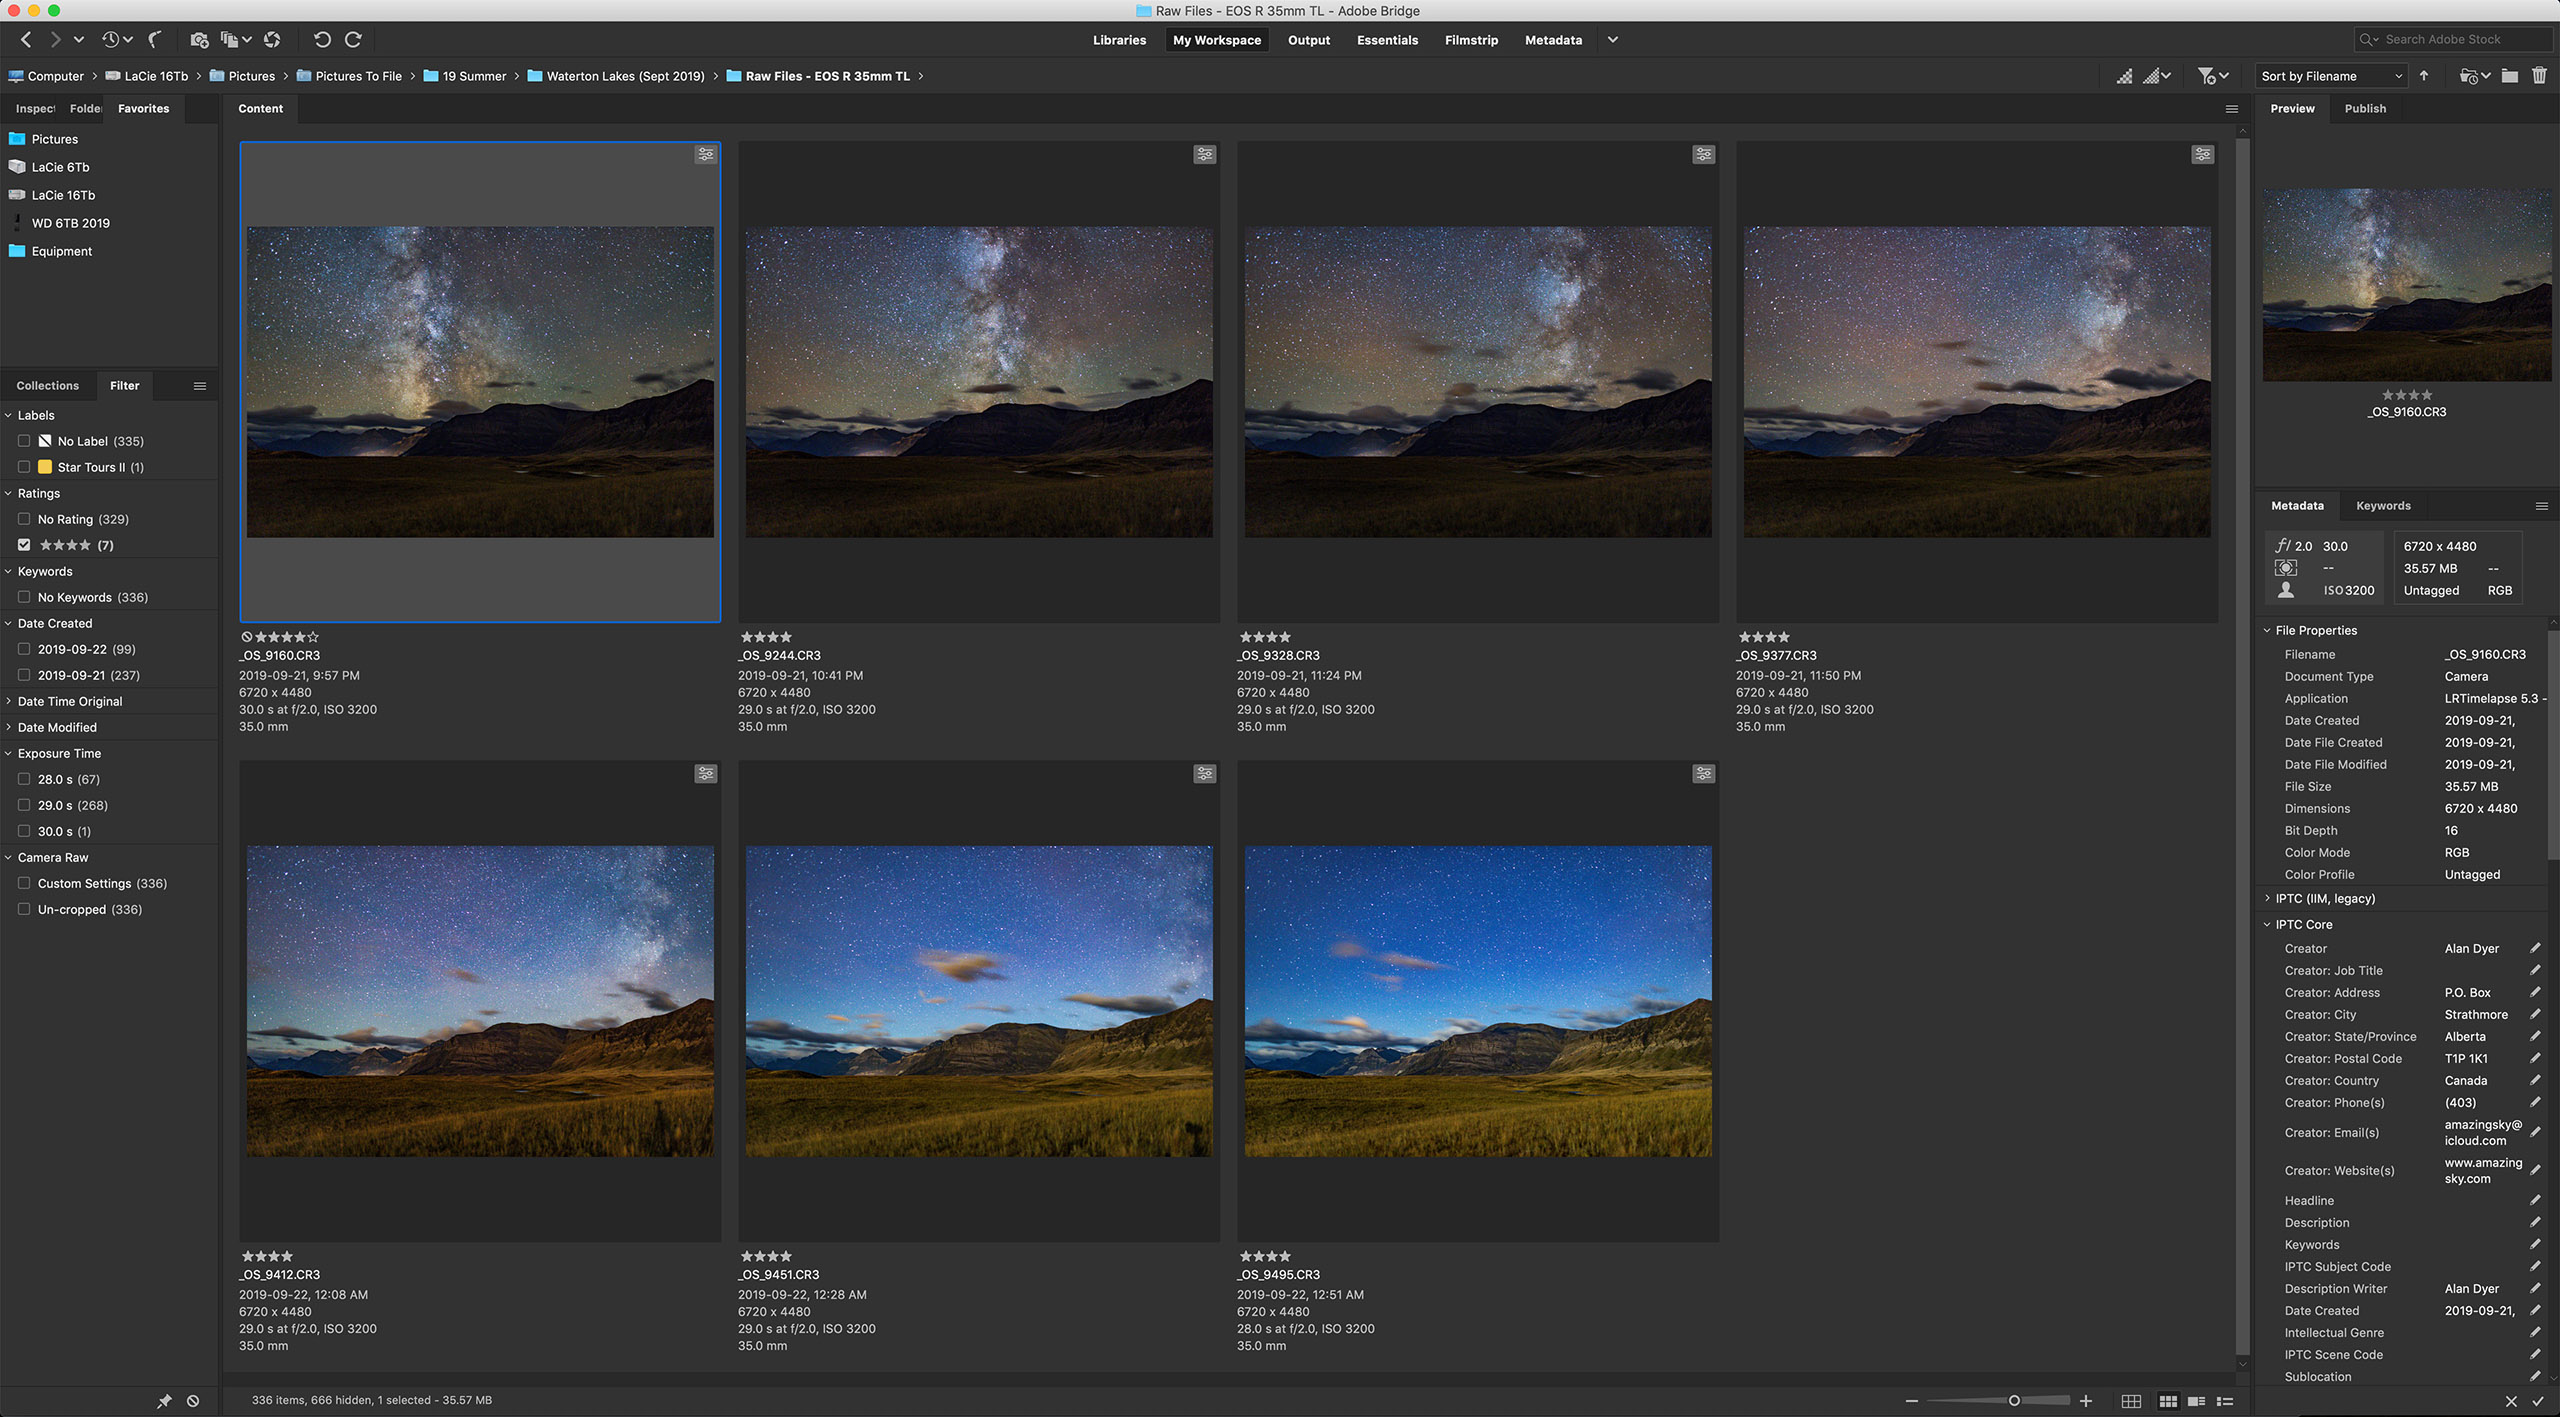
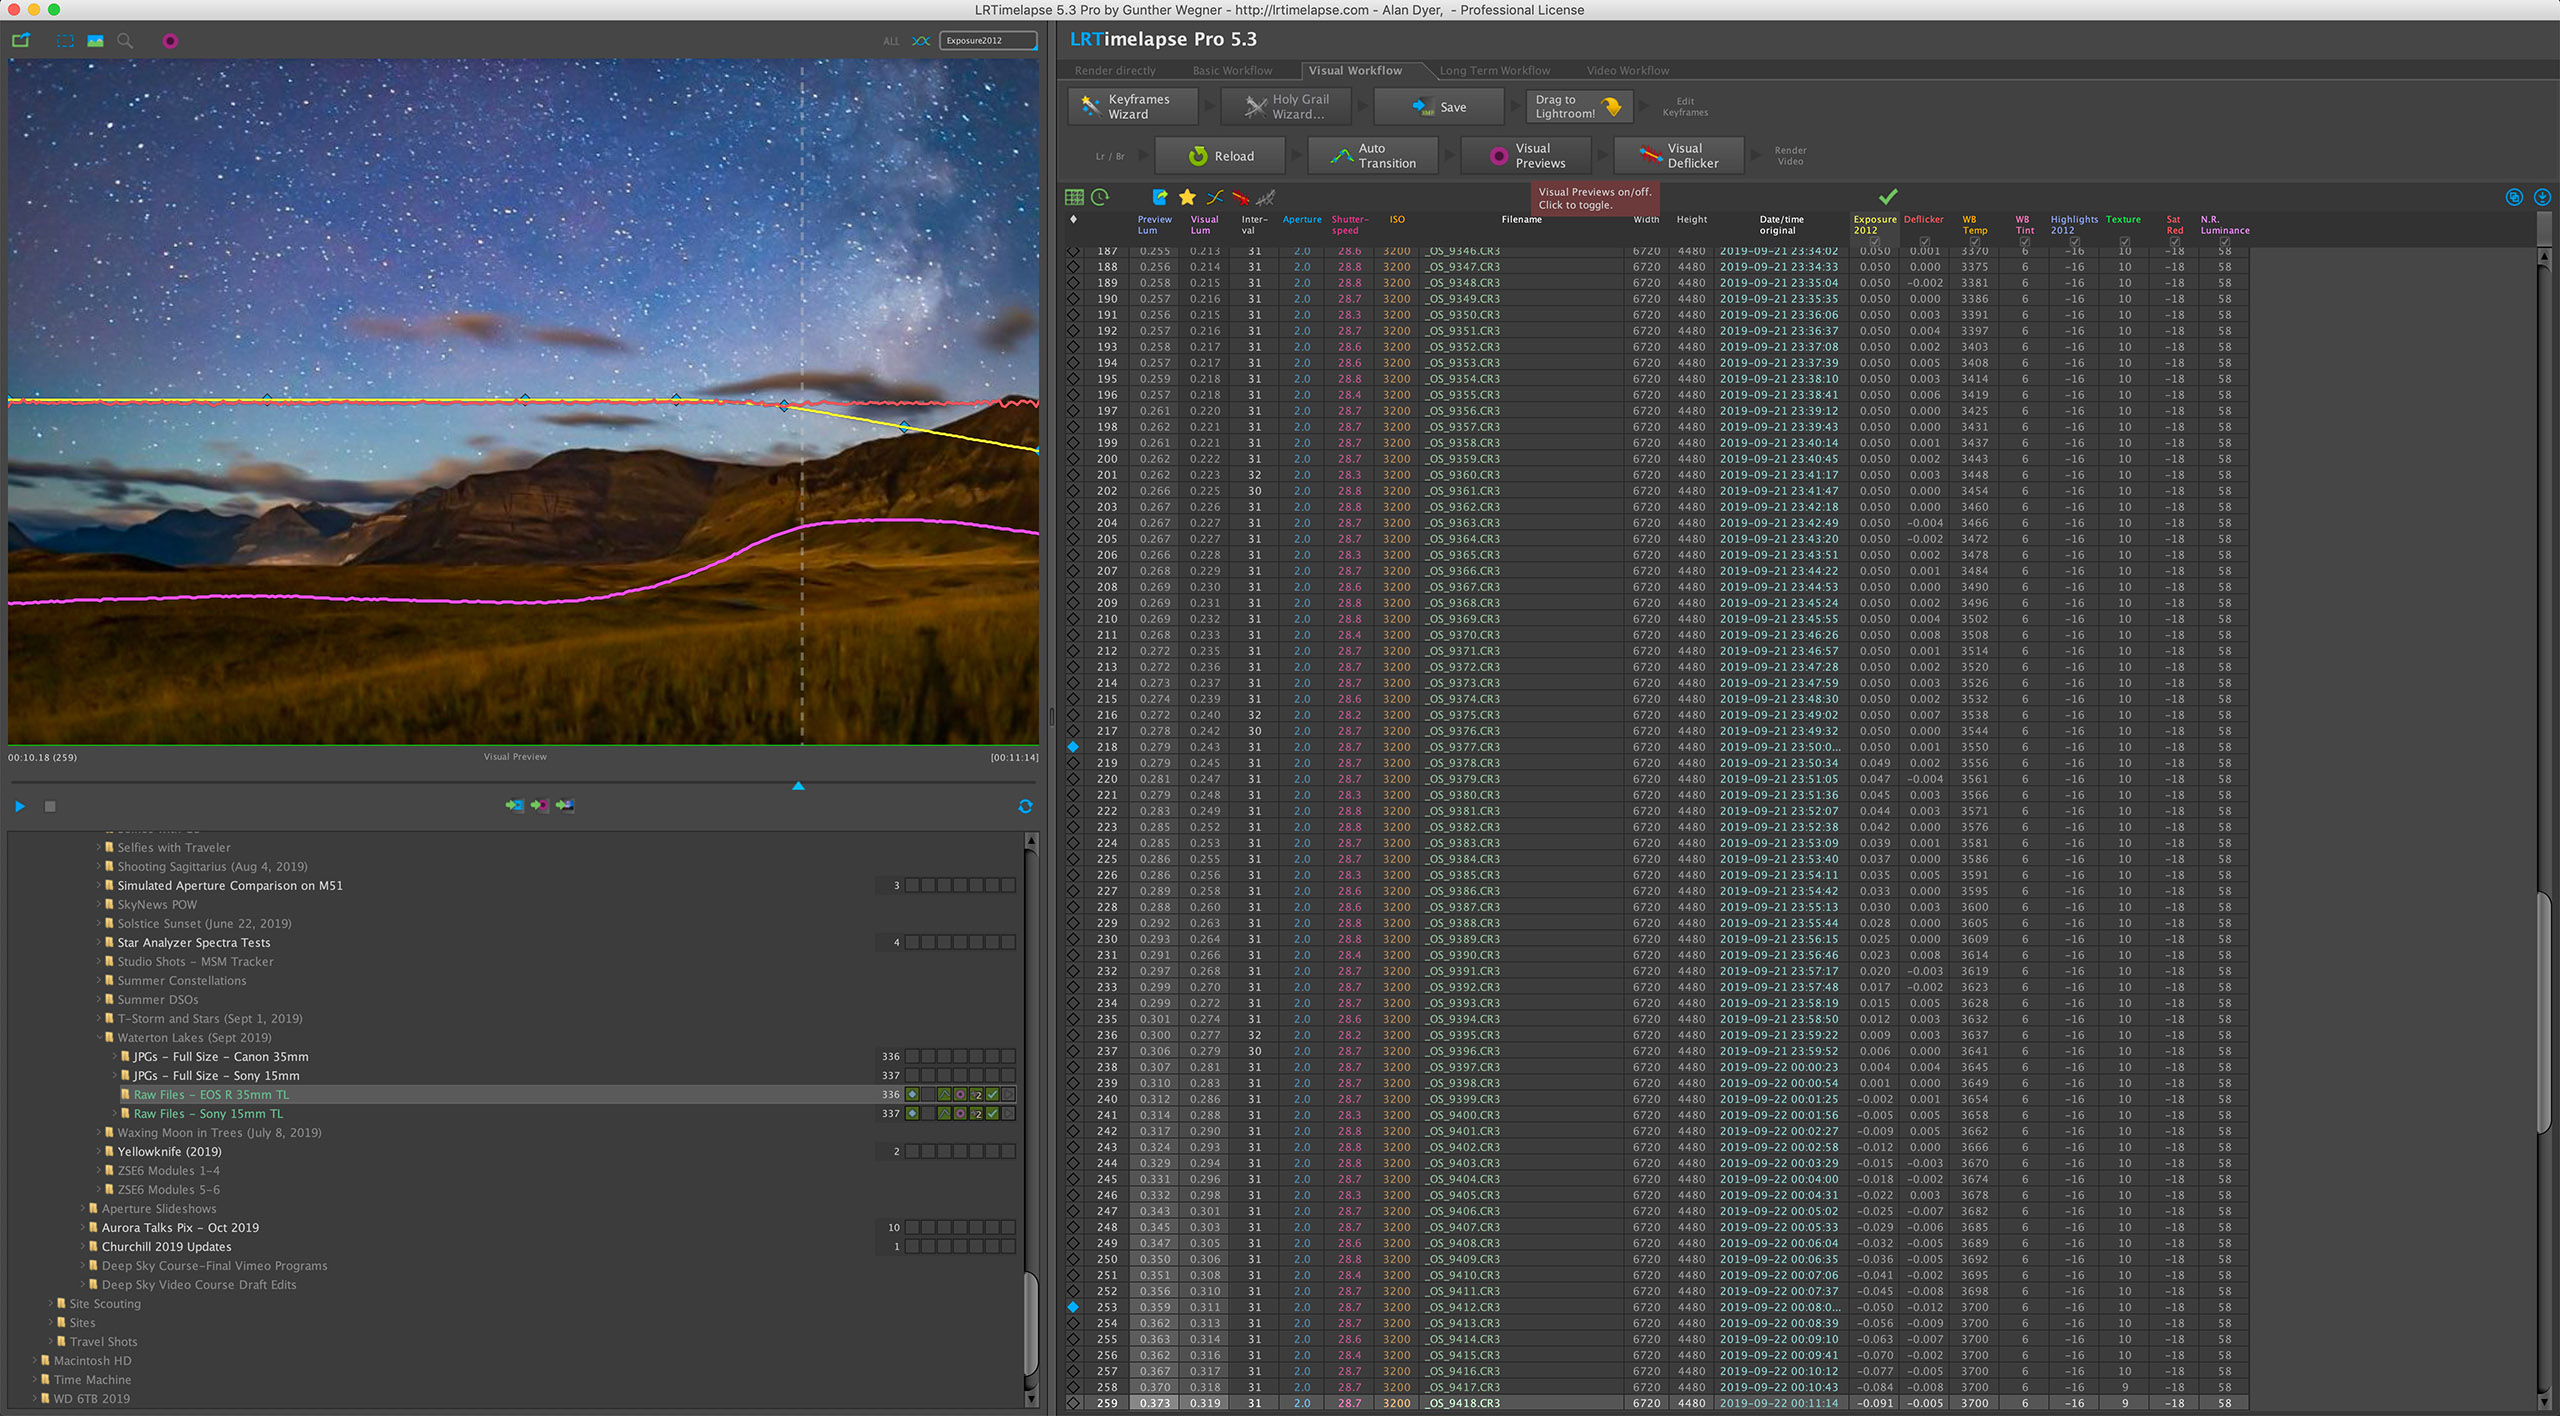
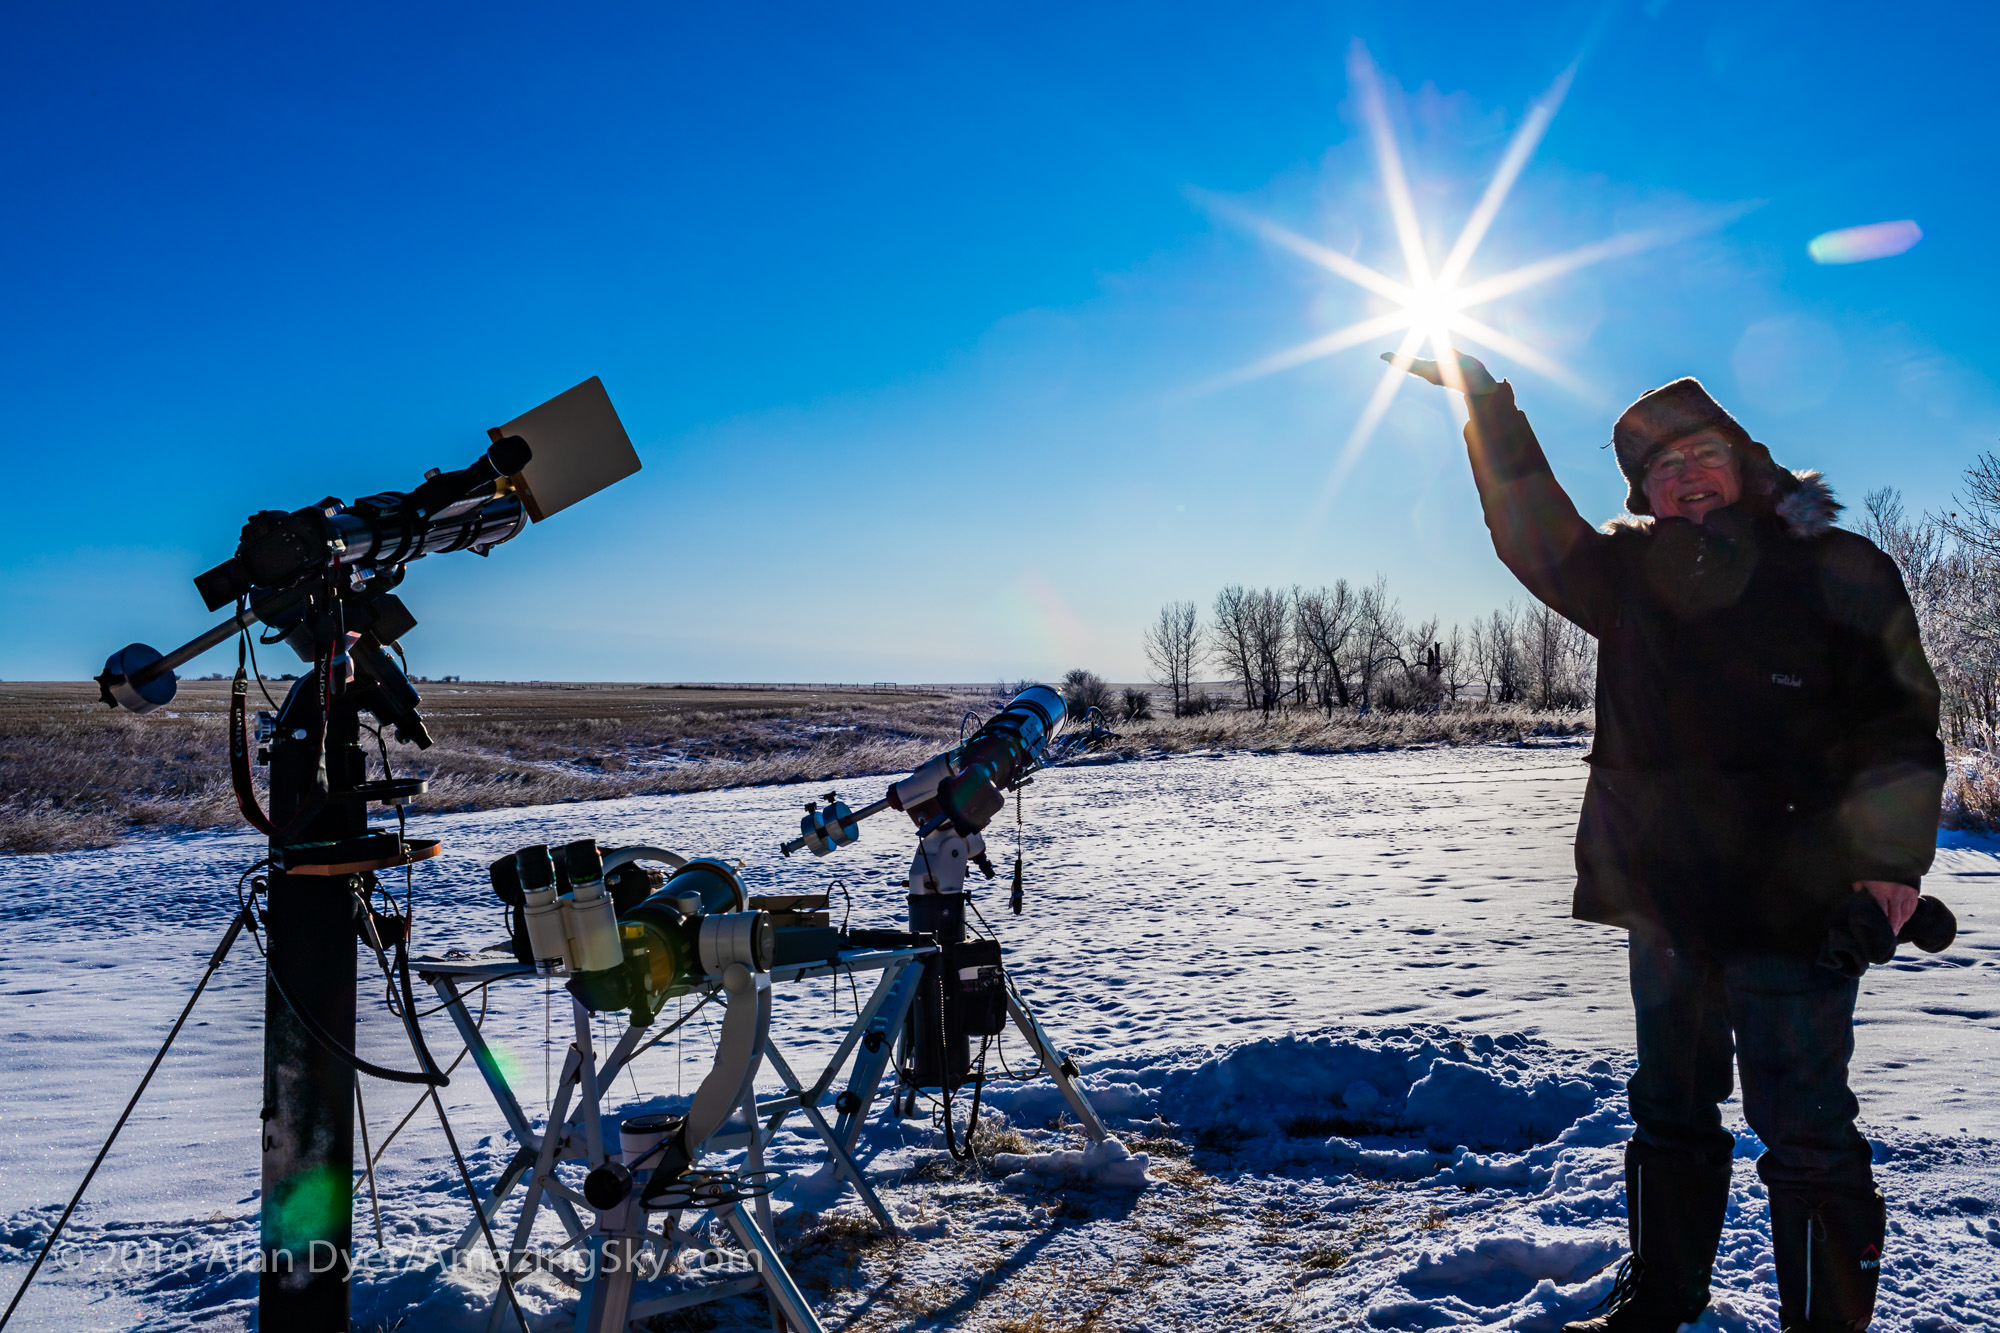
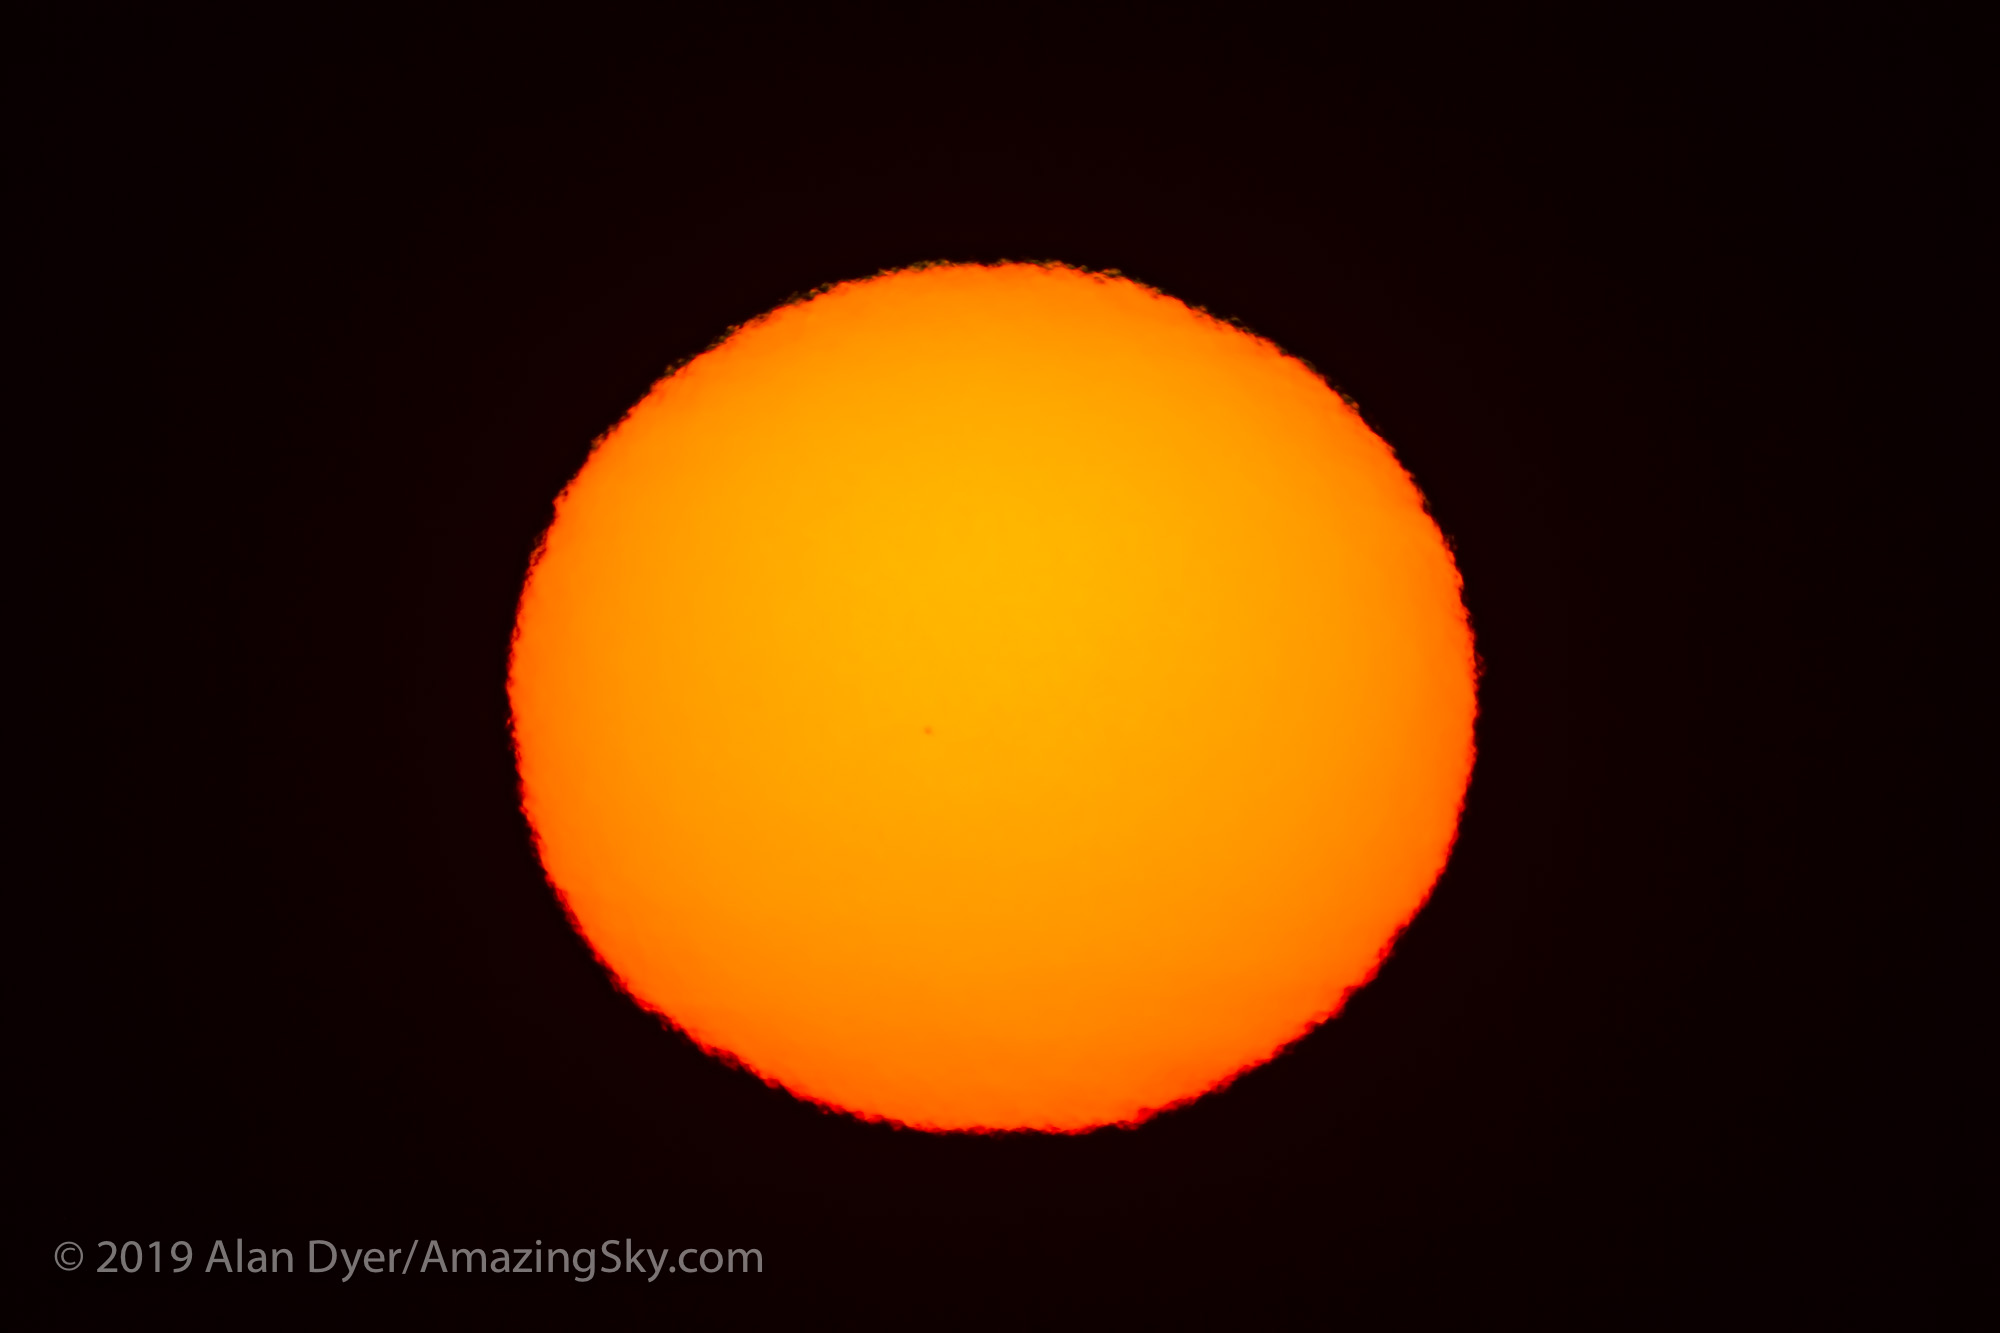
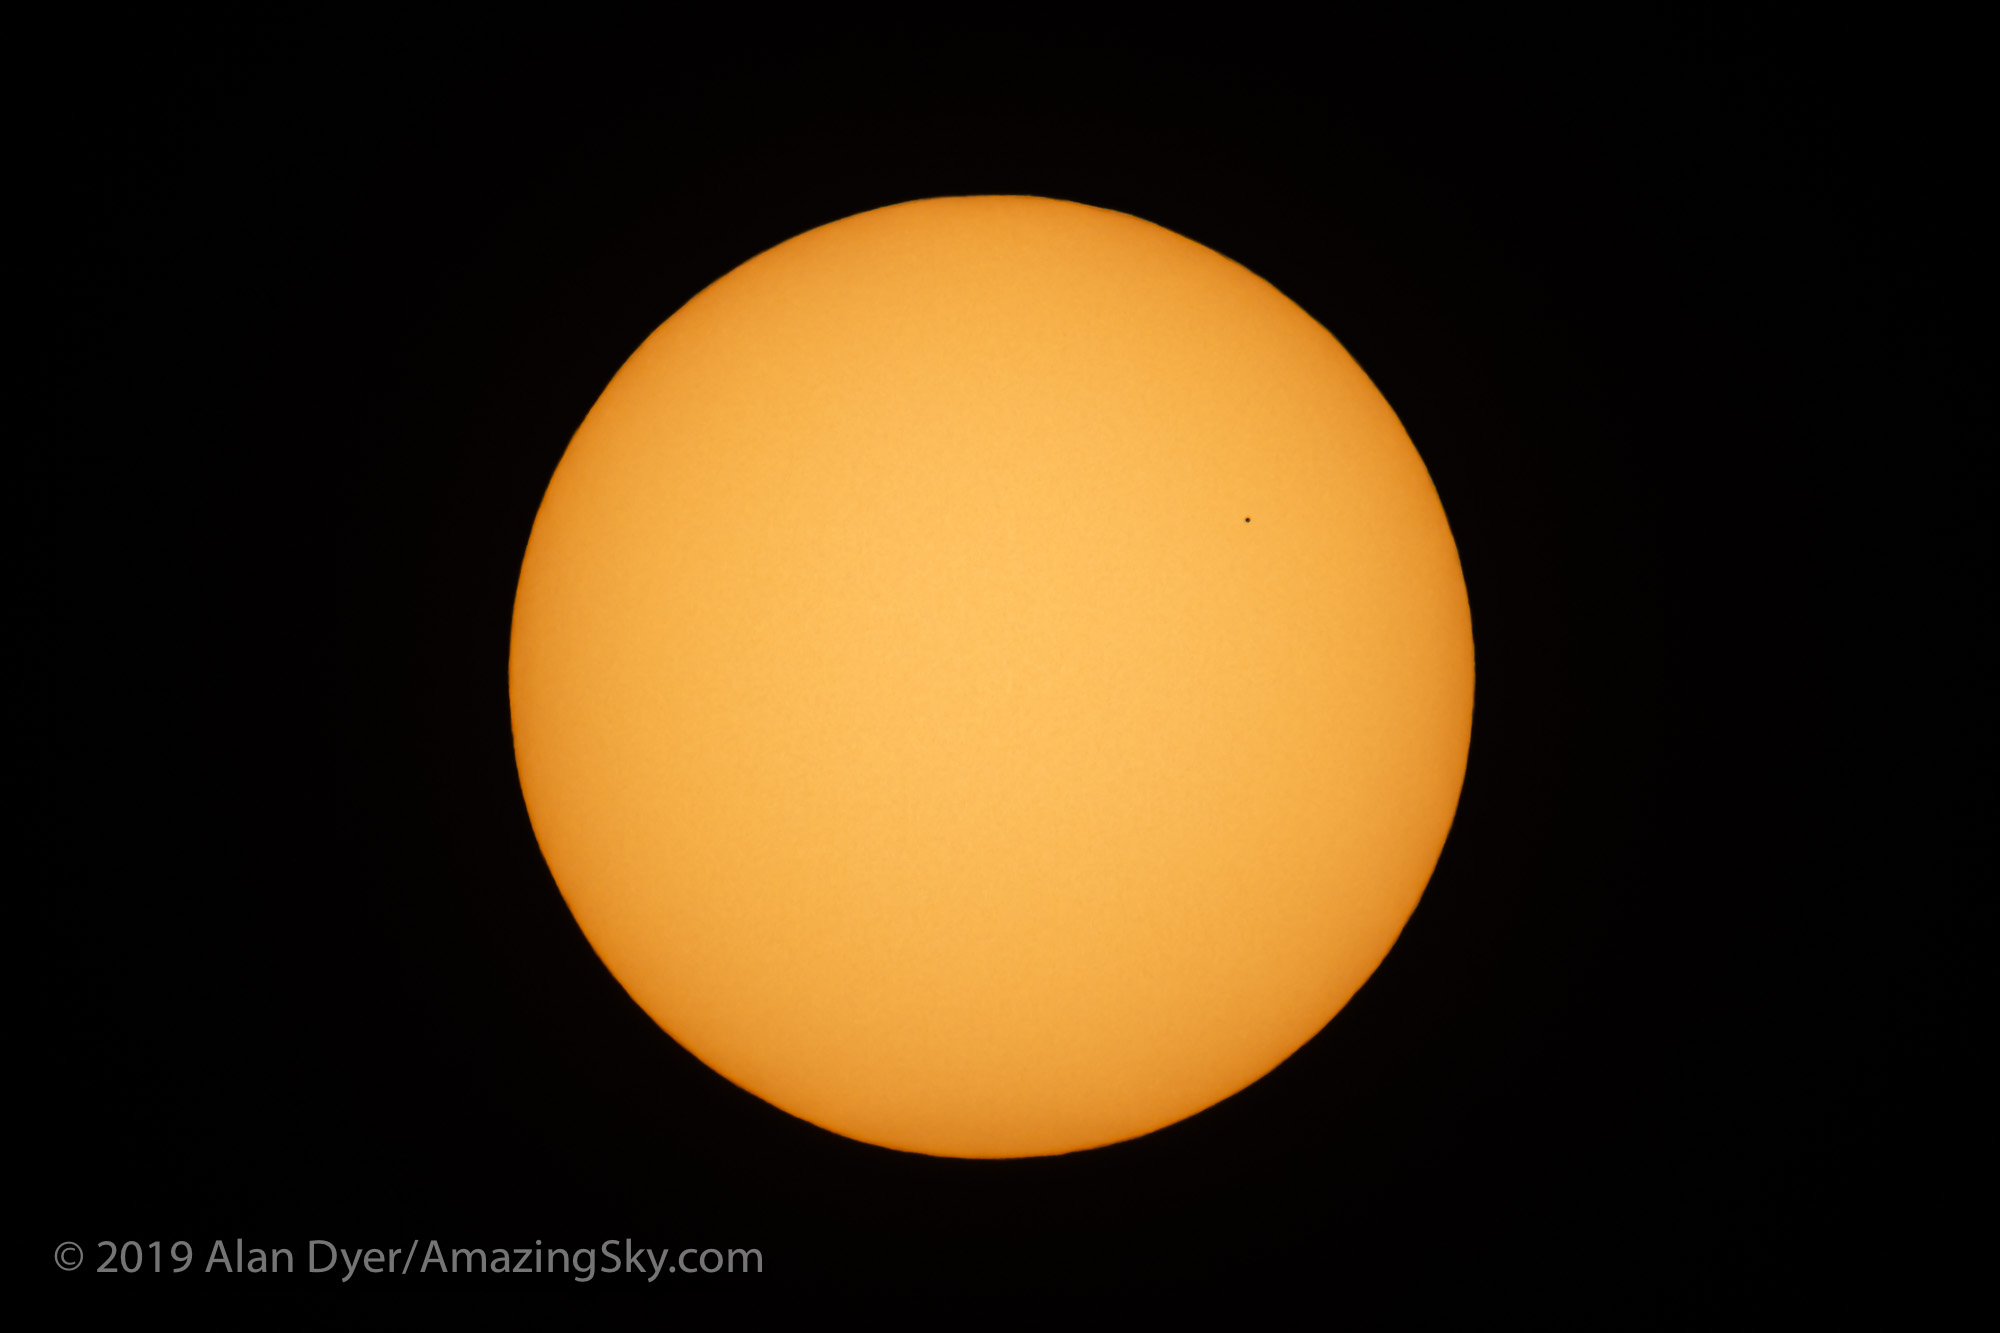
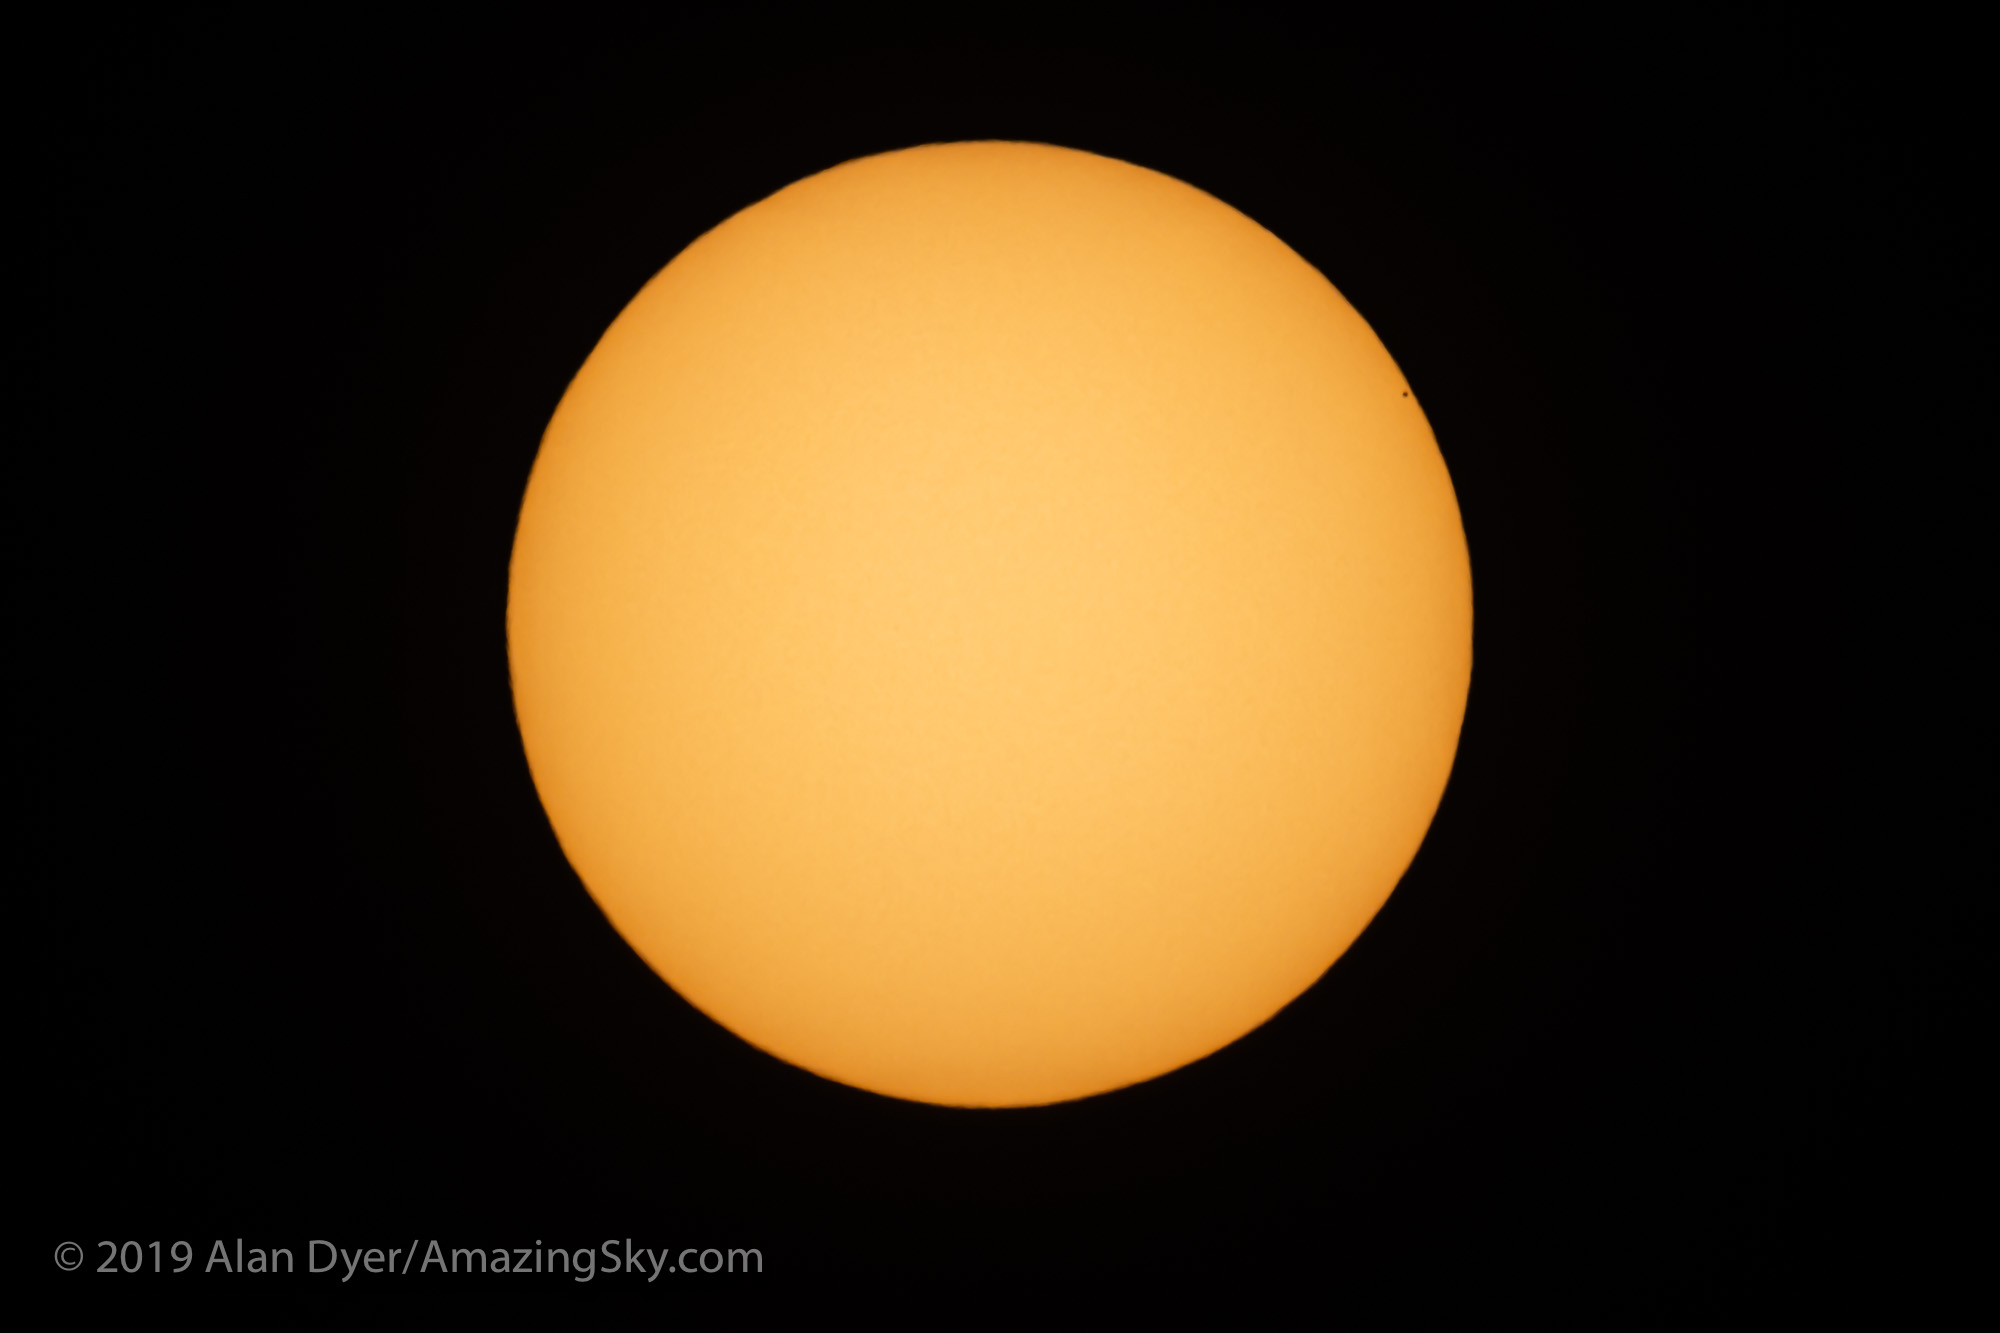
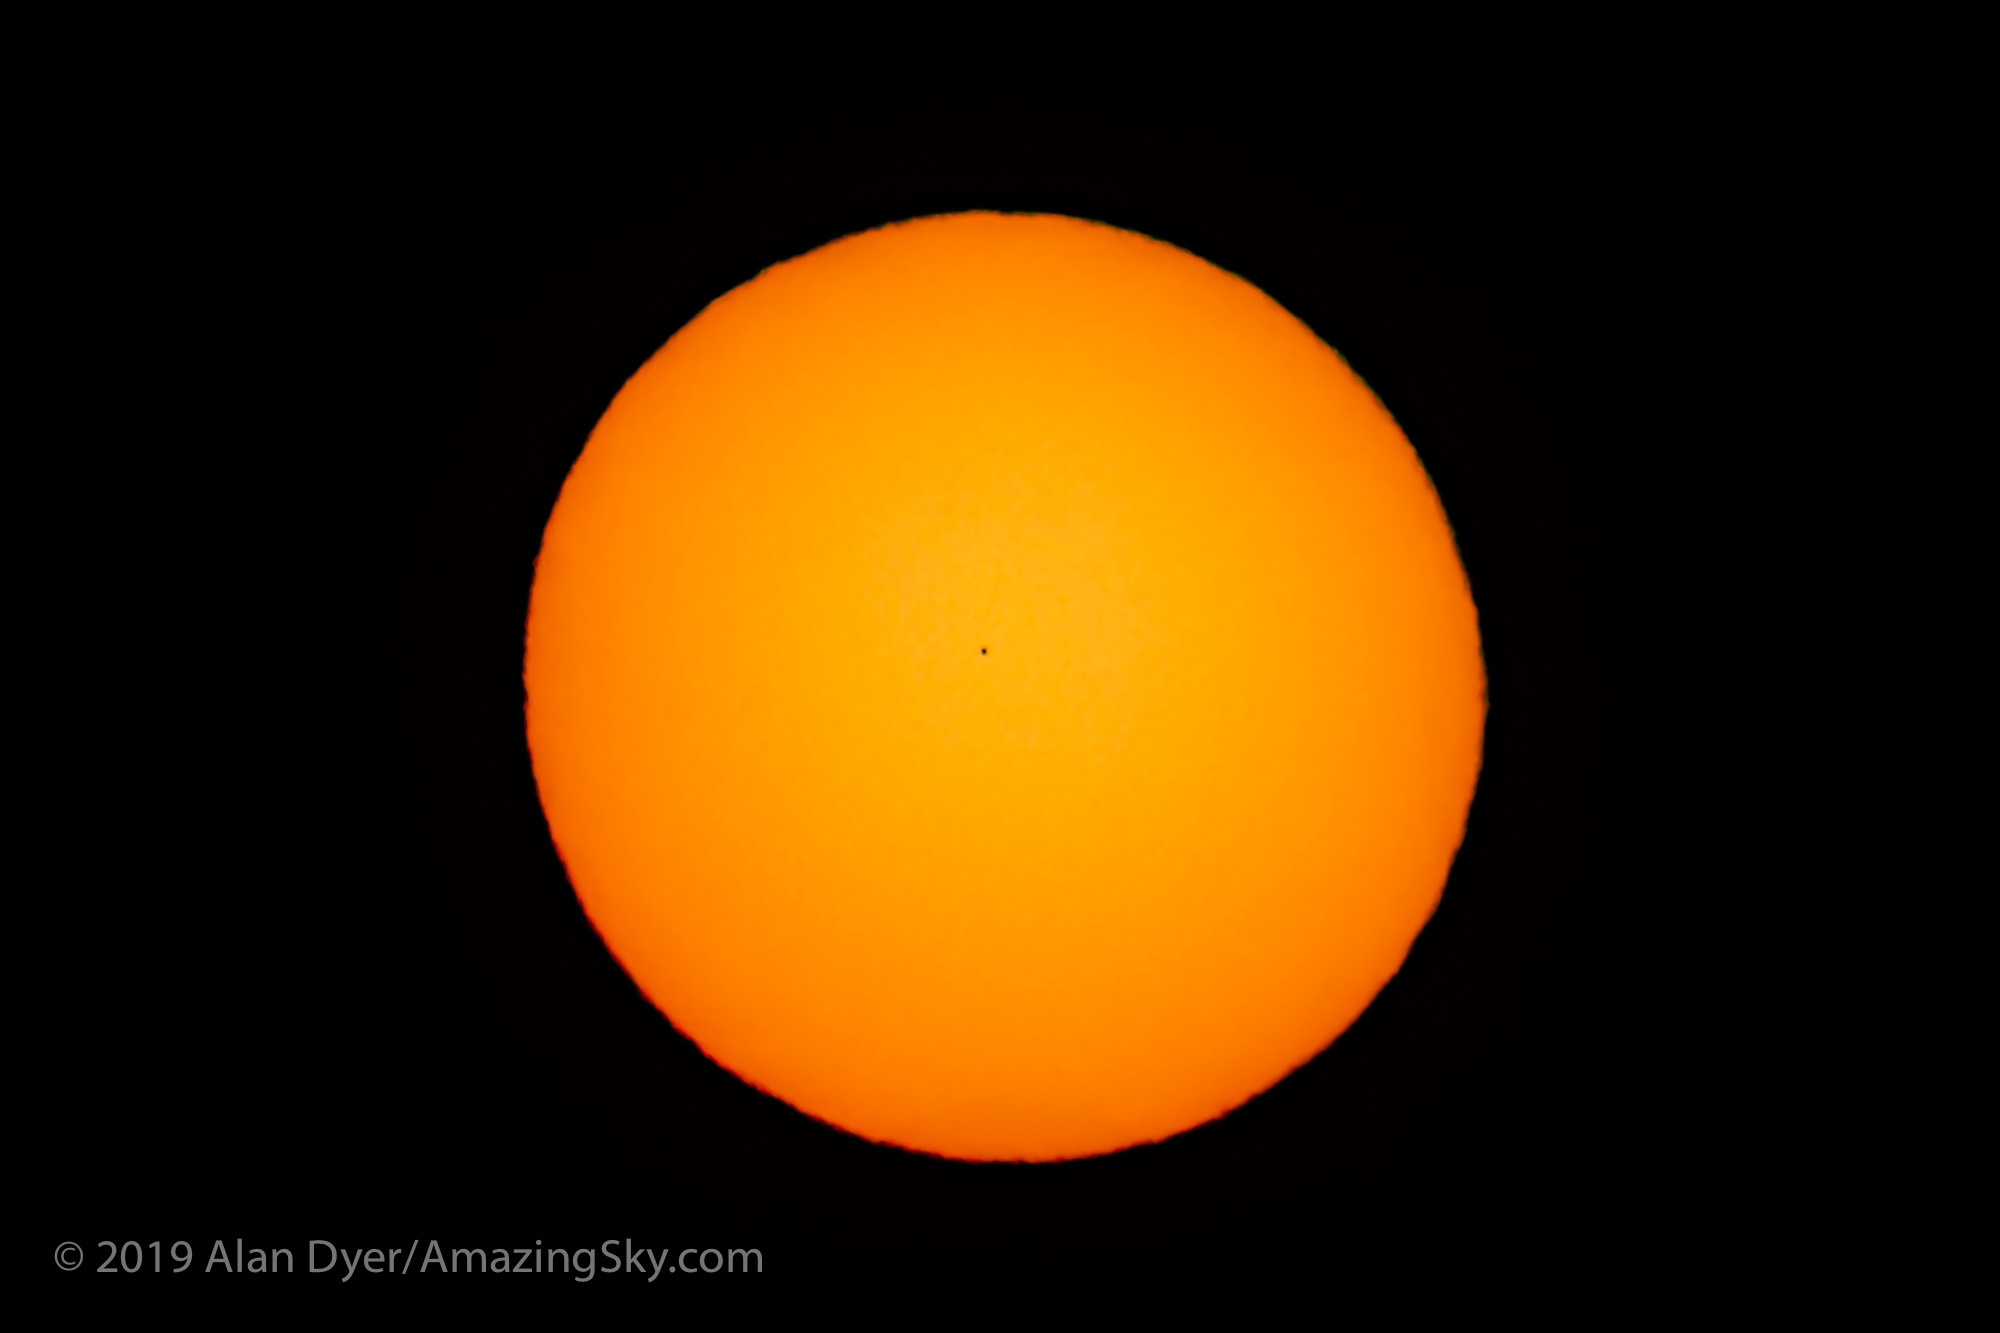
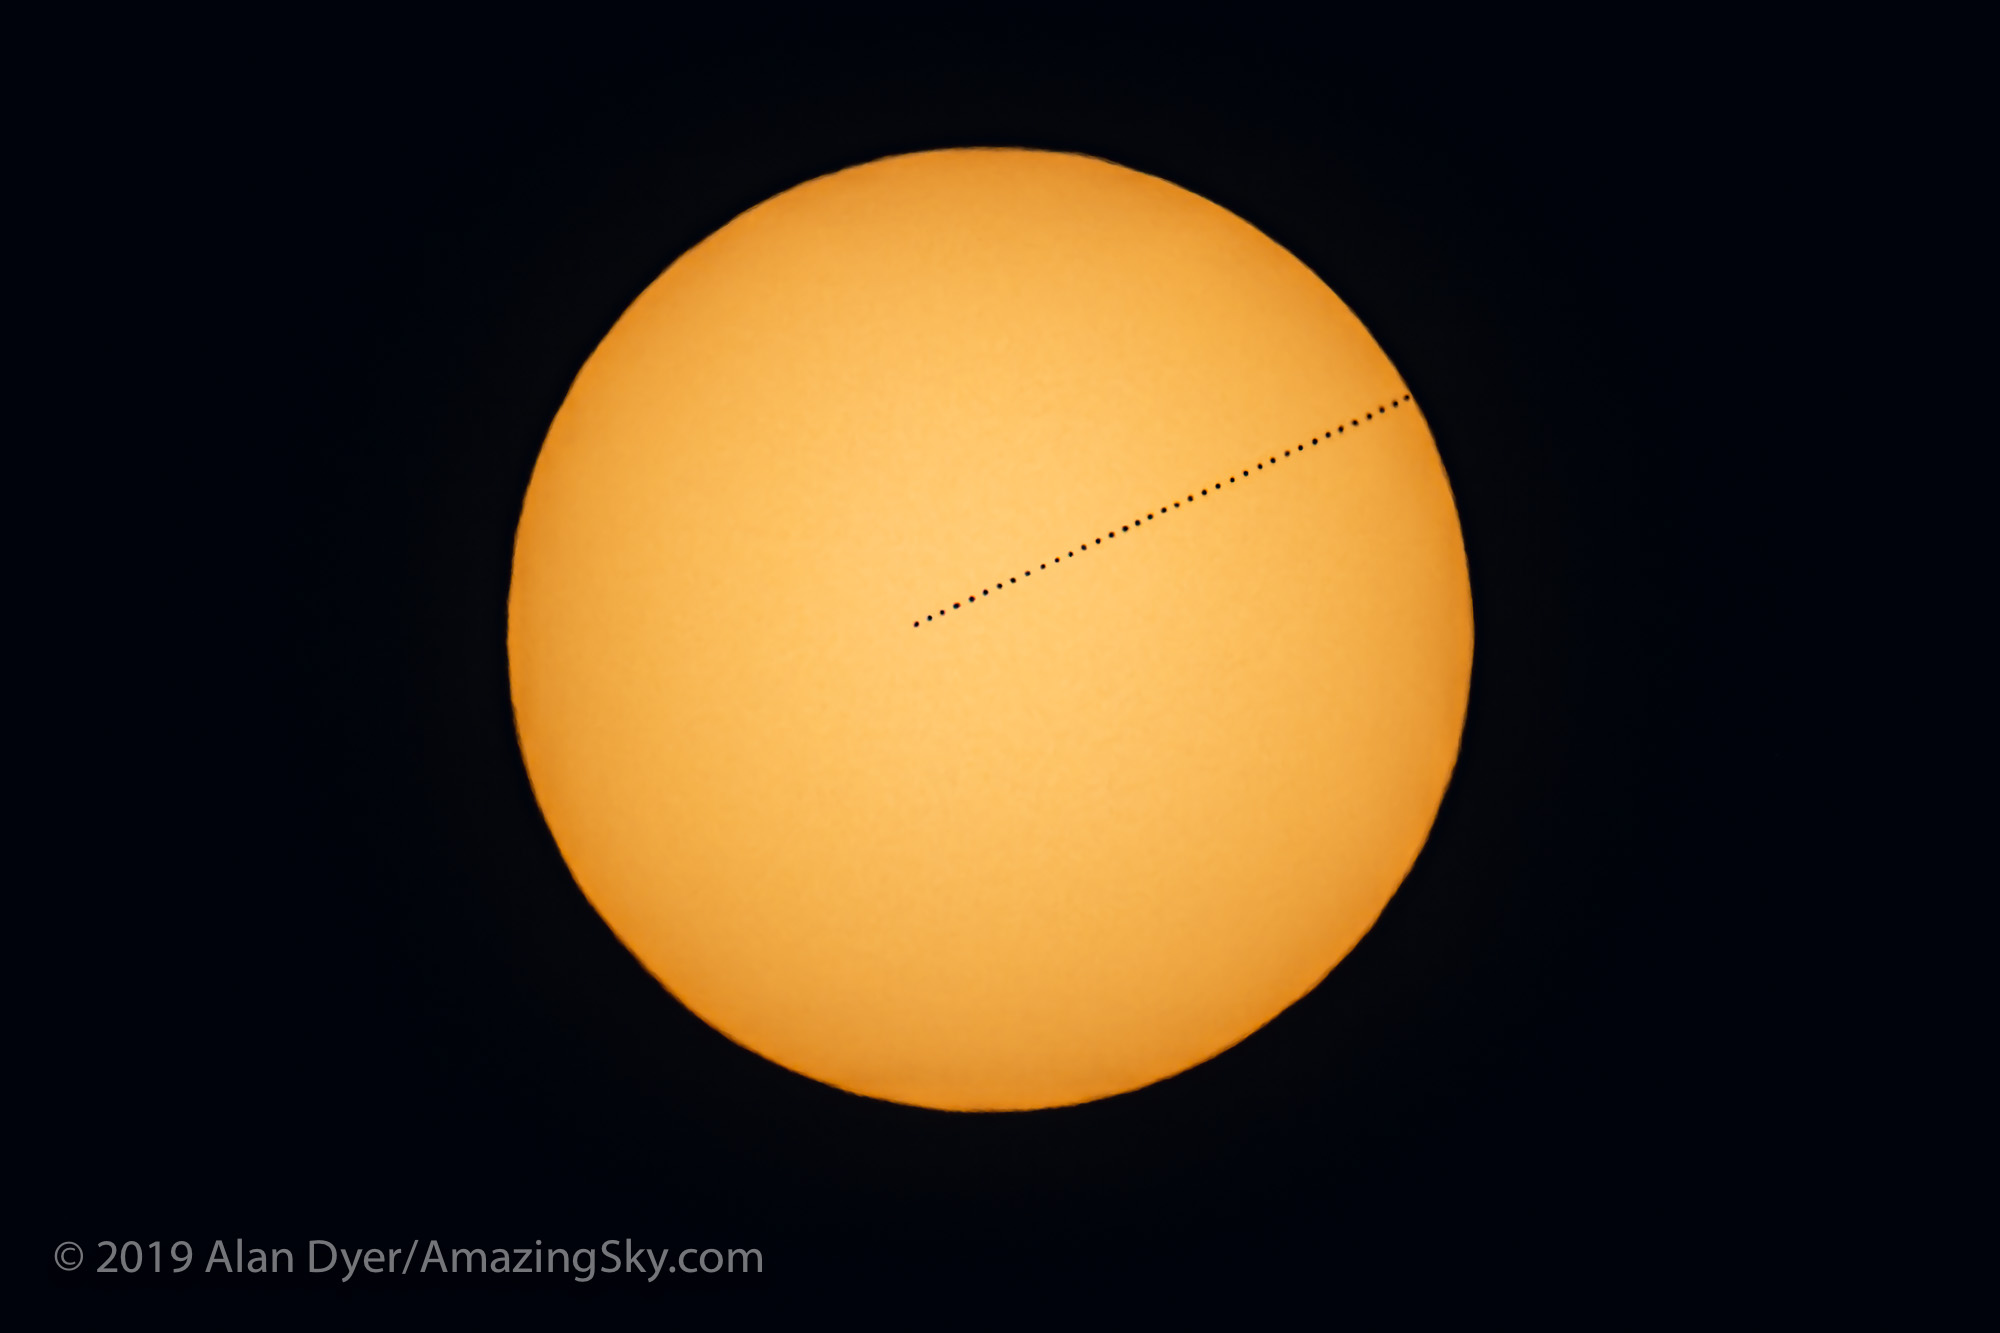

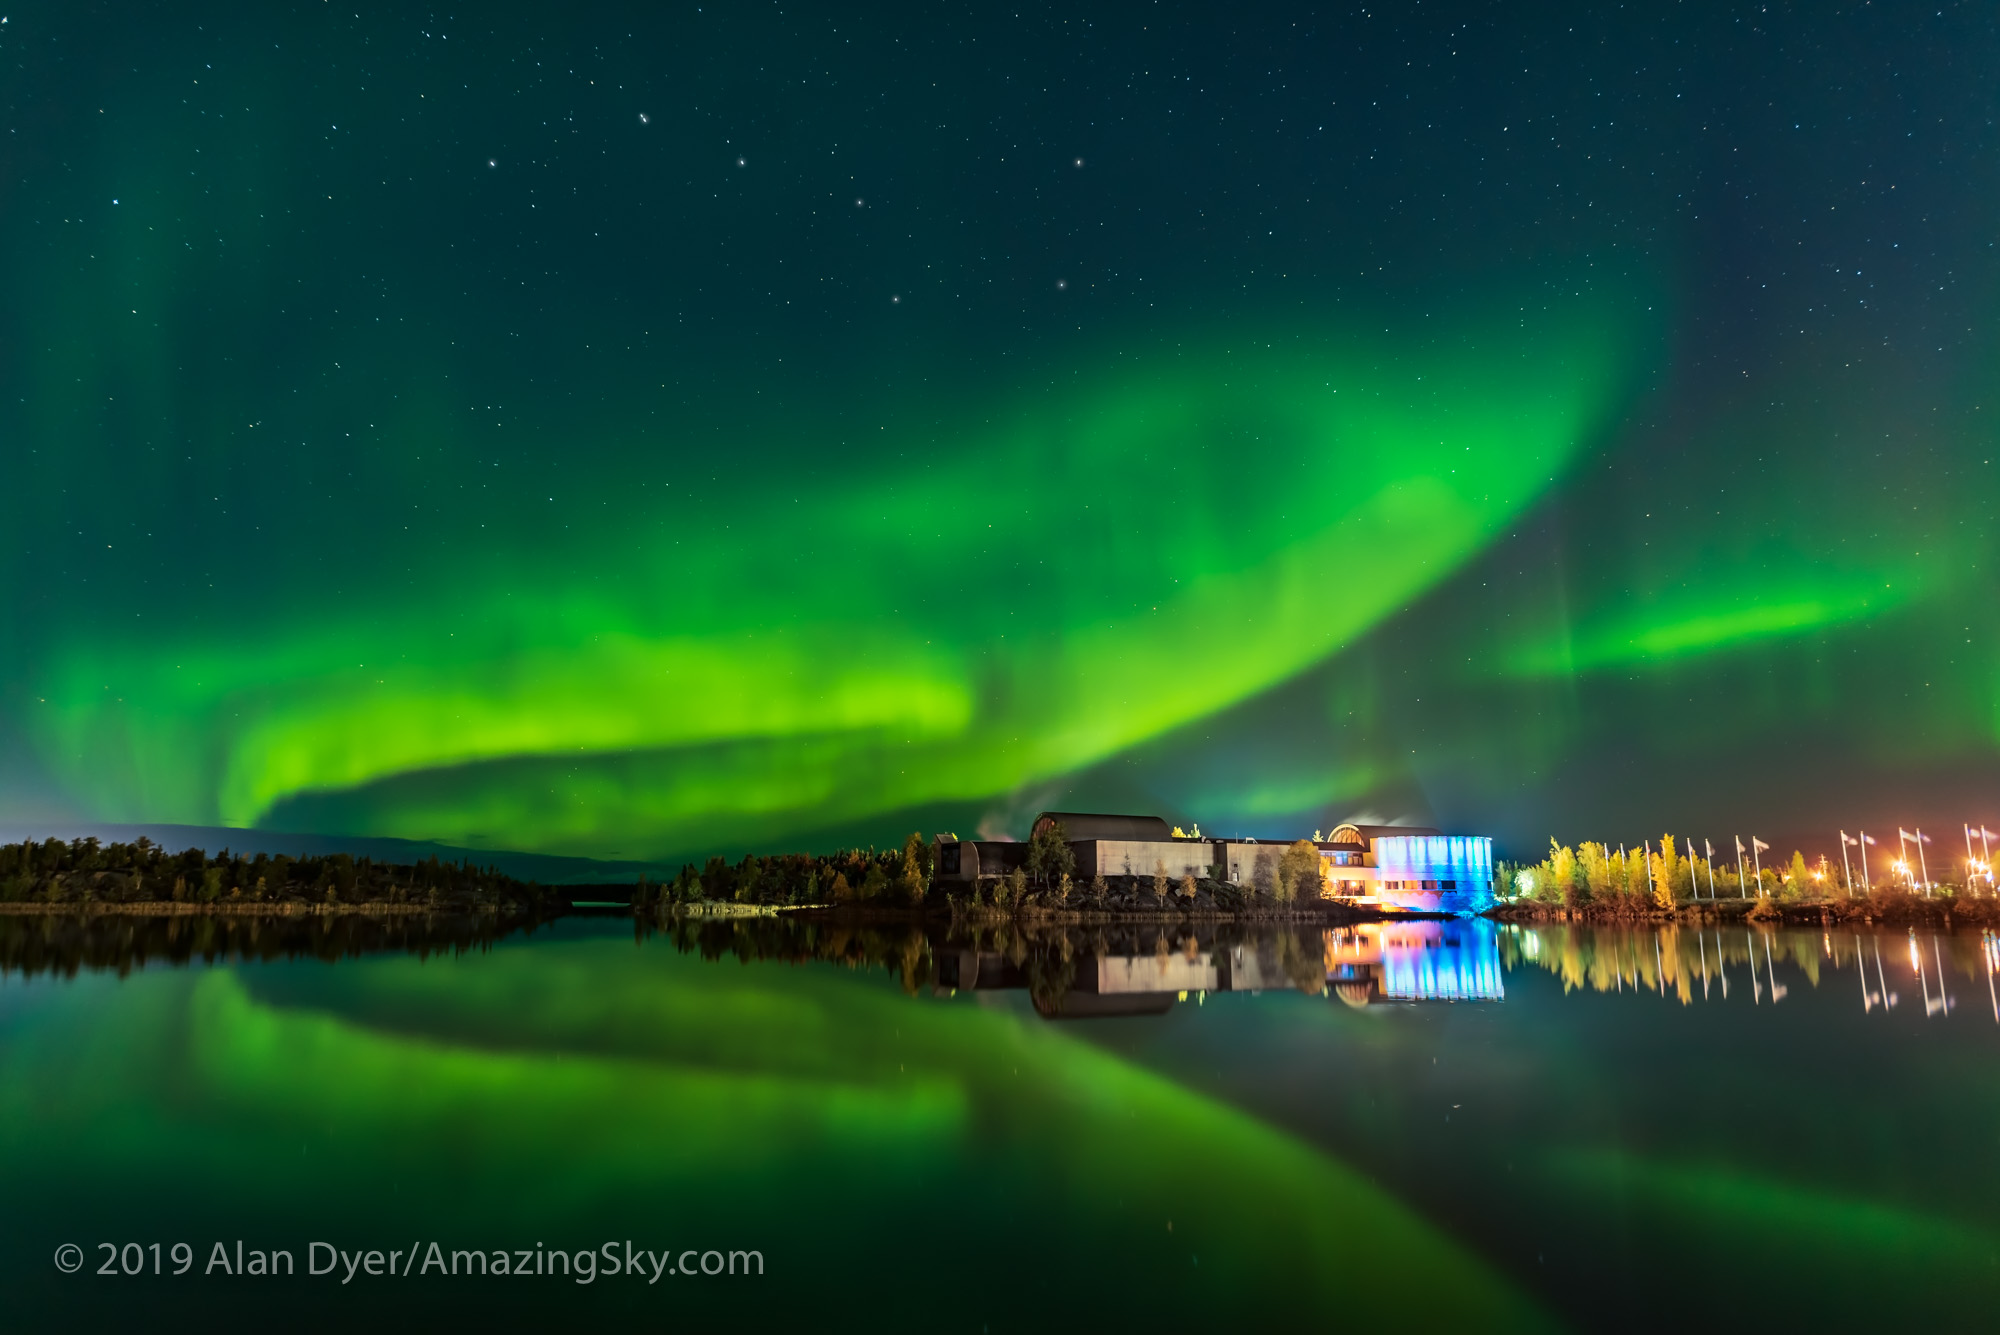 It was a fabulous week of clear skies and dancing auroras in and around Yellowknife in Canada’s North.