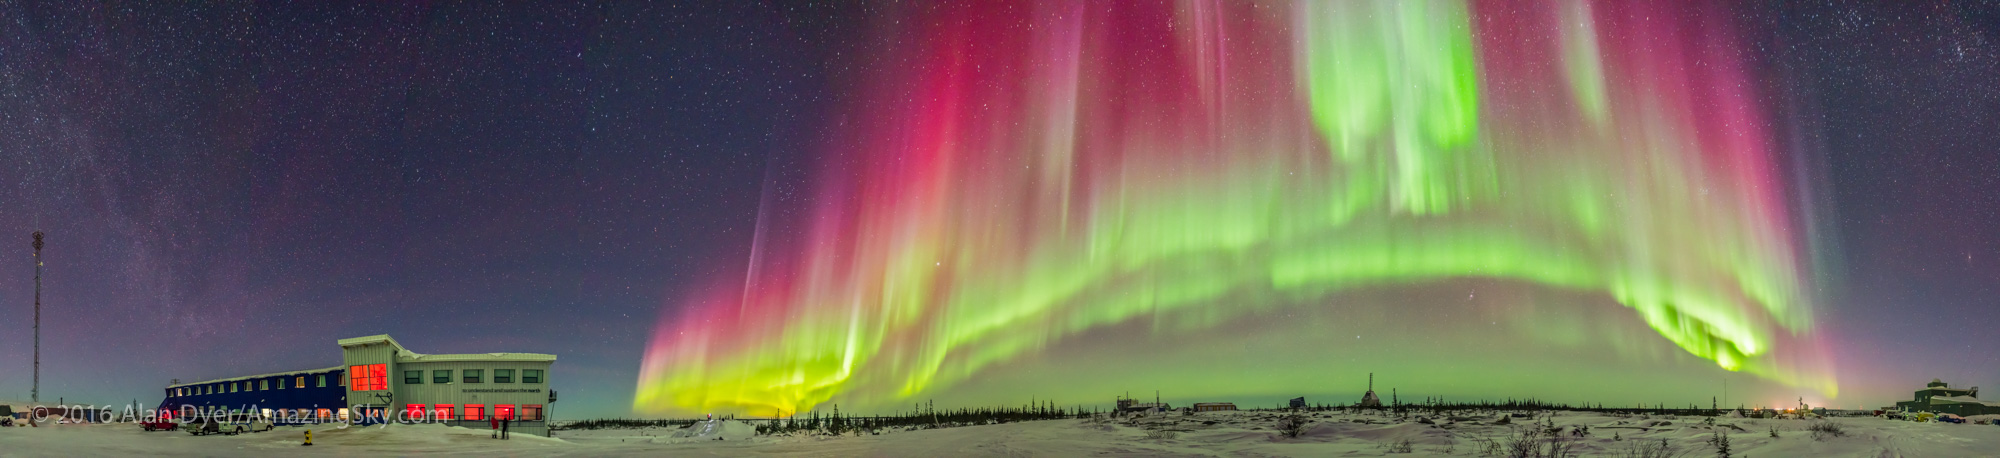
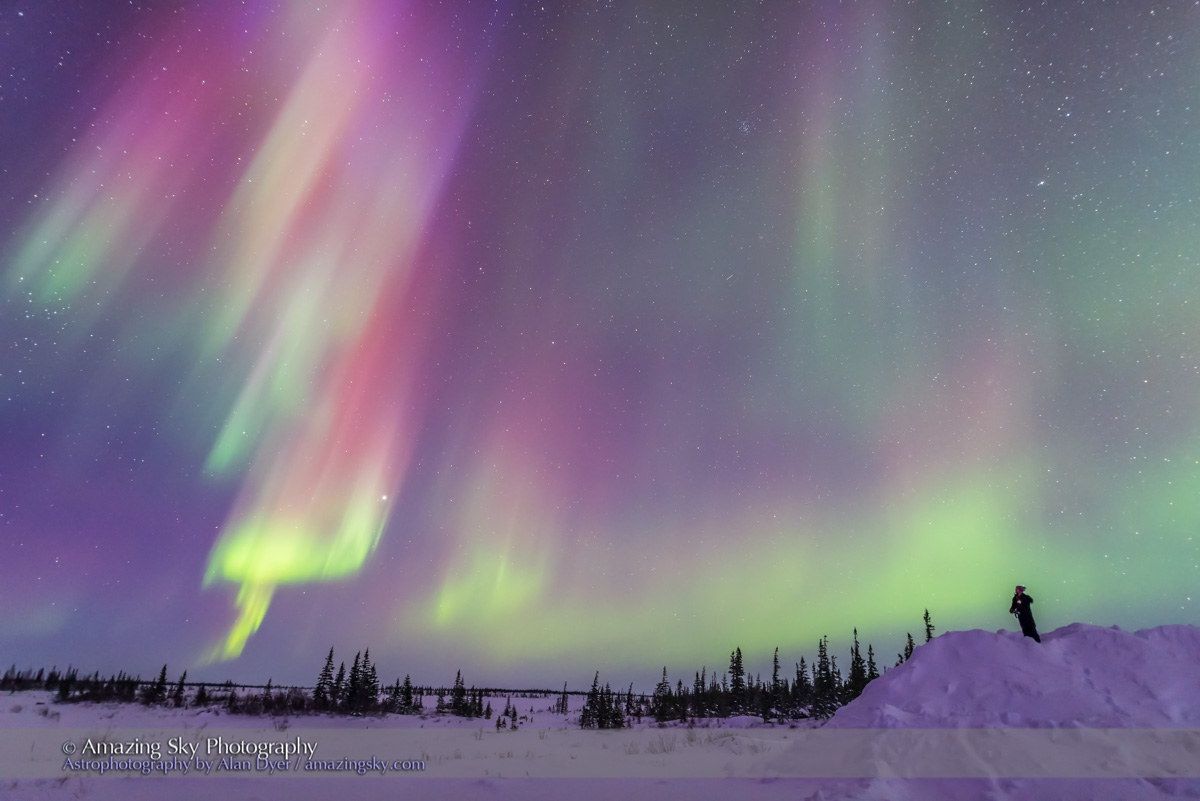
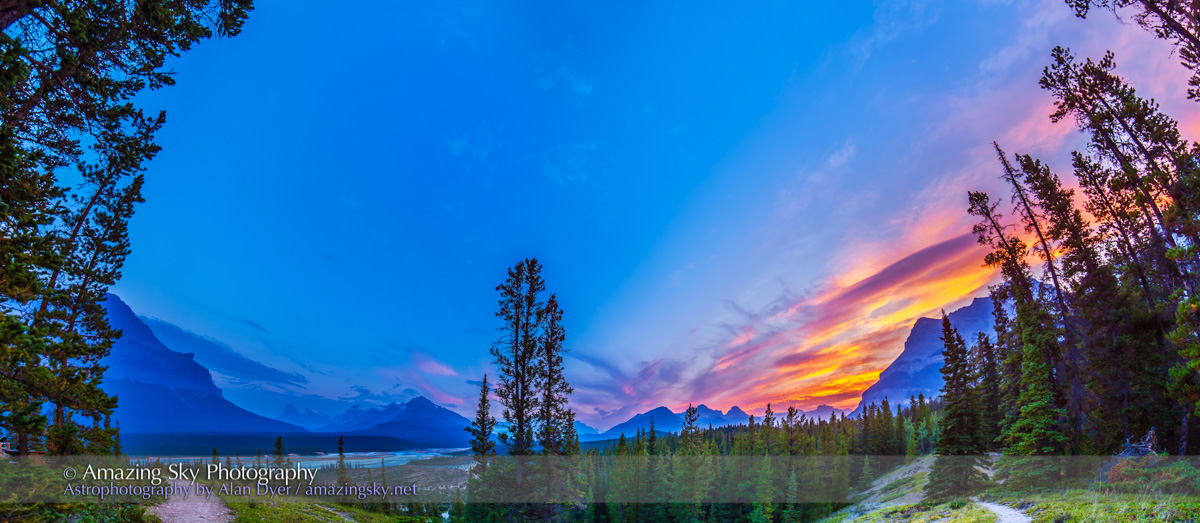
On November 11, 2025 the sky erupted with a swath of red Northern Lights seen over much of North America.
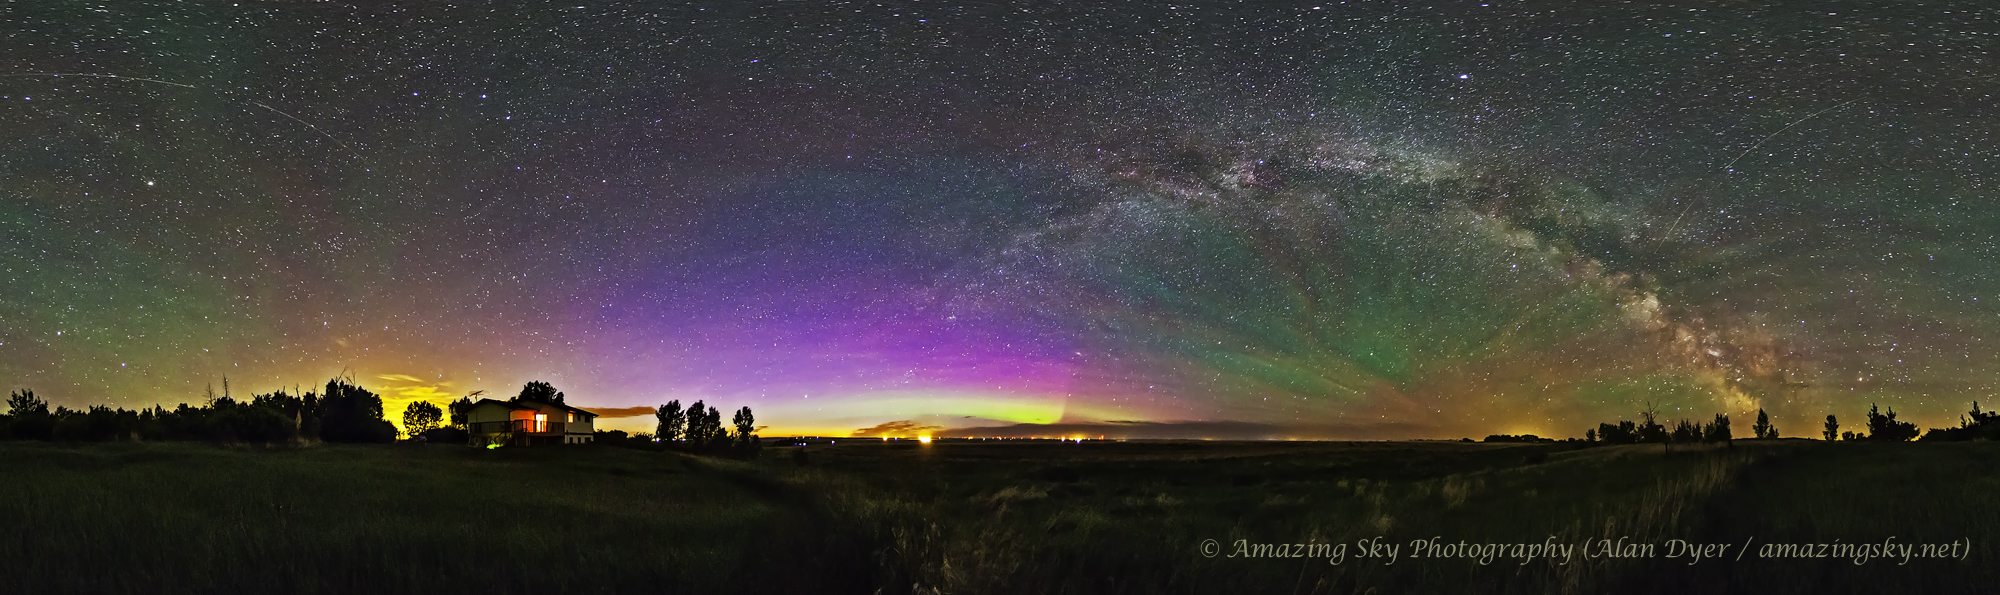
It is rare when those living at southerly latitudes can see Northern Lights. Instead of having to travel north to Arctic sites, the aurora comes south to them. That’s what happened on November 11, 2025 when one of the largest solar storms in recent years brought the aurora down over much of the North America.
This was the latest in a set of wonderful aurora shows we’ve enjoyed in the last two years, as the Sun reached the peak of its 11-year cycle of activity.
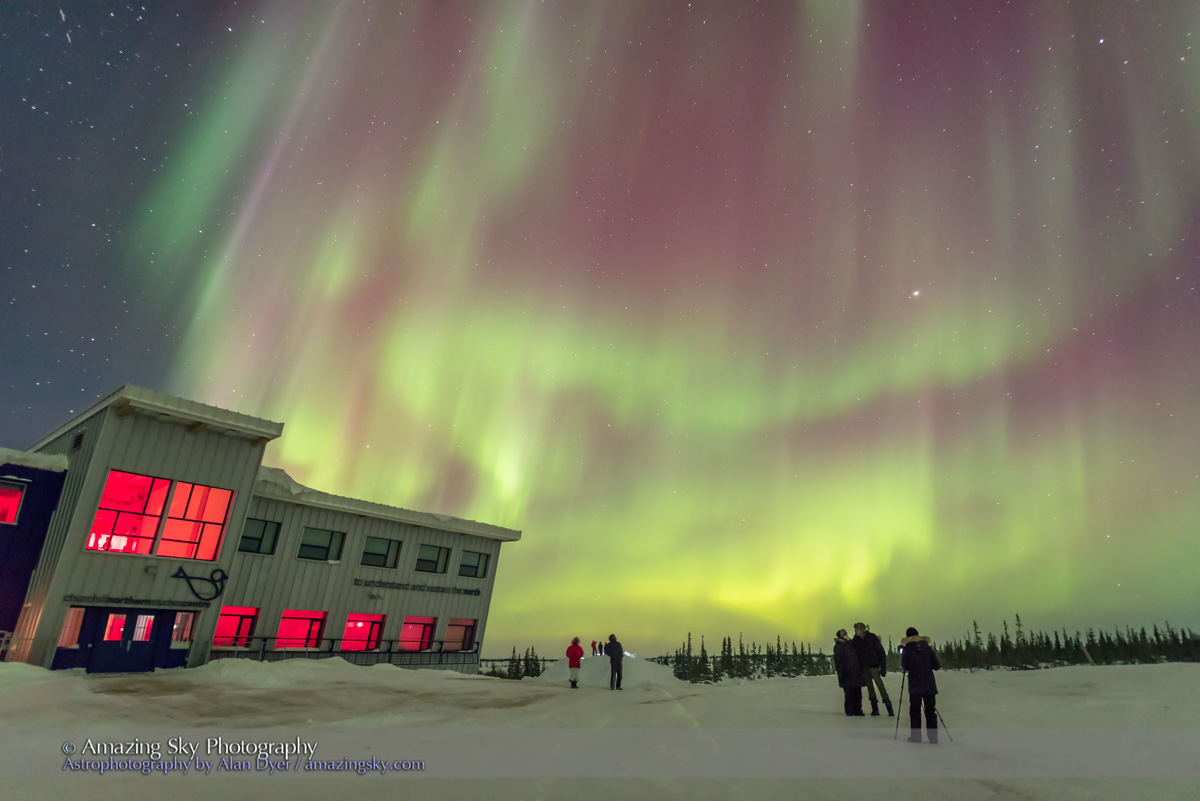
As I show below, the apps and indicators were registering extreme conditions, with the “Kp Index” peaking at 8 out of a maximum of 9, and the auroral “Ovation” oval lighting up red, indicating a major geomagnetic storm was underway. In the lingo of the local Alberta Aurora Chasers Facebook group, it was most definitely a “pants on” night!
Kp 8! Red Alert!
The source of the storm was two major flares on the Sun in quick succession. In only a day the high-speed “coronal mass ejections” they had unleashed reached Earth and lit up the sky.
As a result the ring of aurora borealis which usually circles the Arctic moved down over southern Canada and the northern United States. I was under that ring of lights!
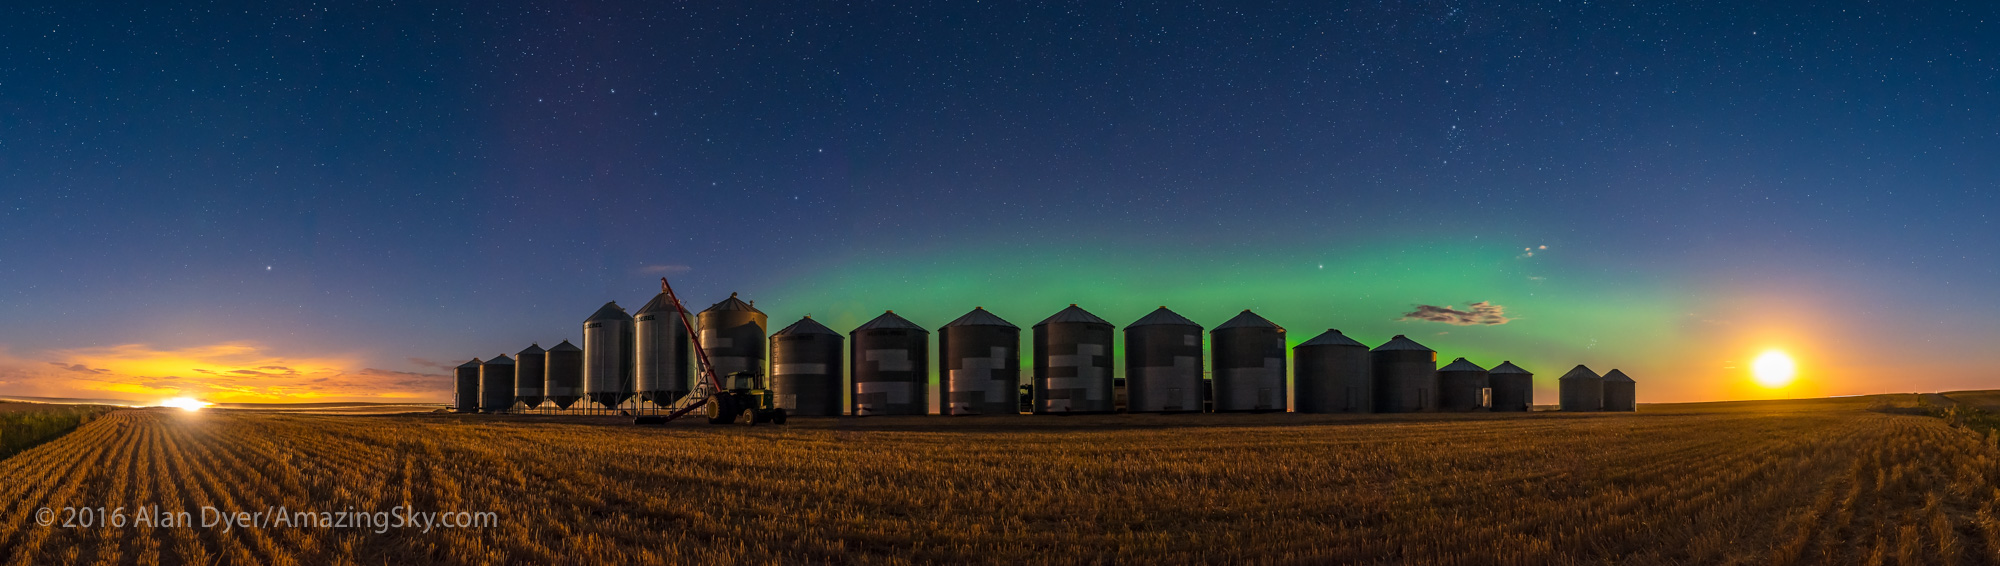
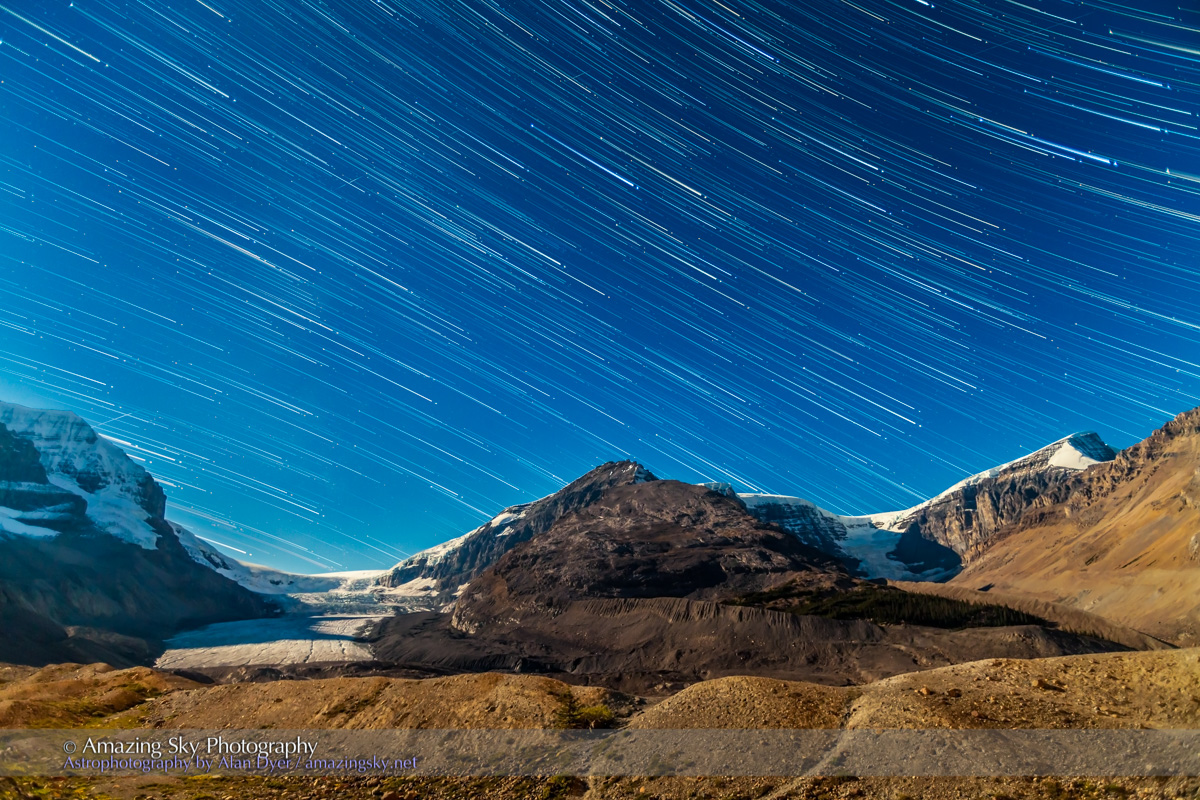
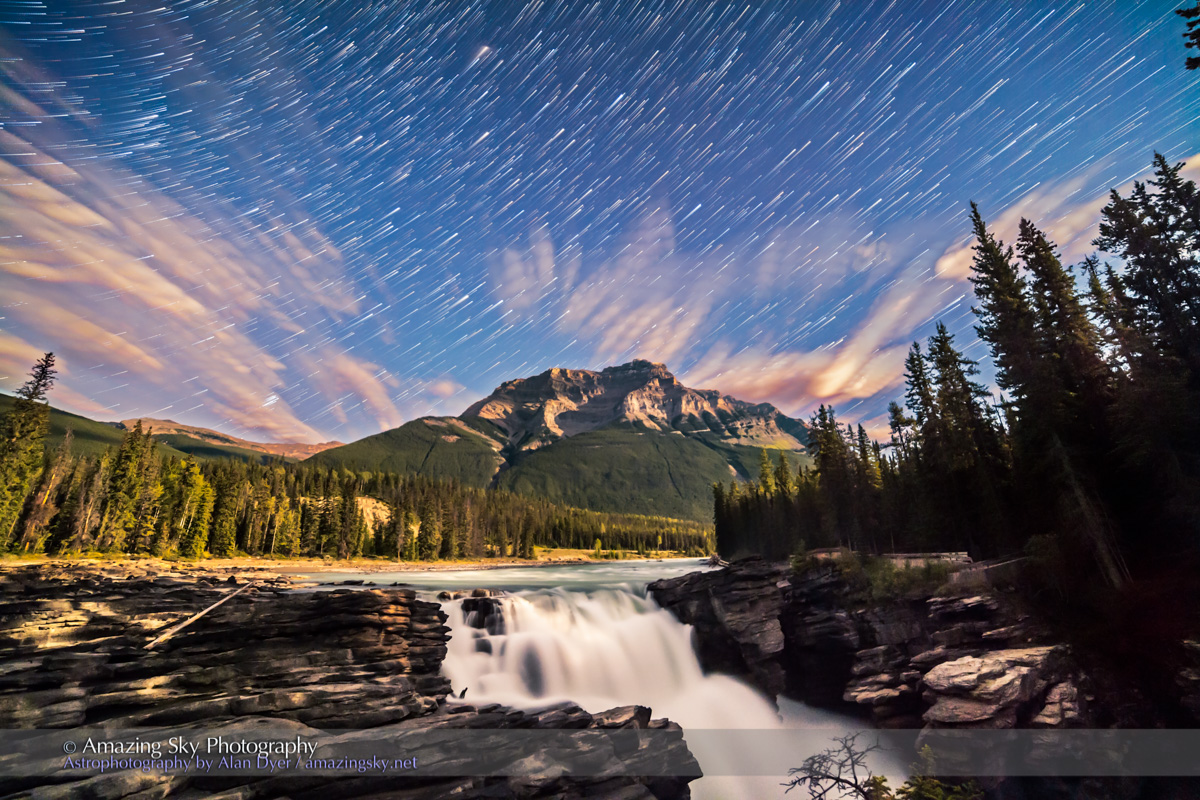
This is a blend of two exposures, for sky and ground, both 8 seconds at f/2.8 with the TTArtisan 11mm full-frame fish-eye lens on the Canon R5 at ISO 1600.
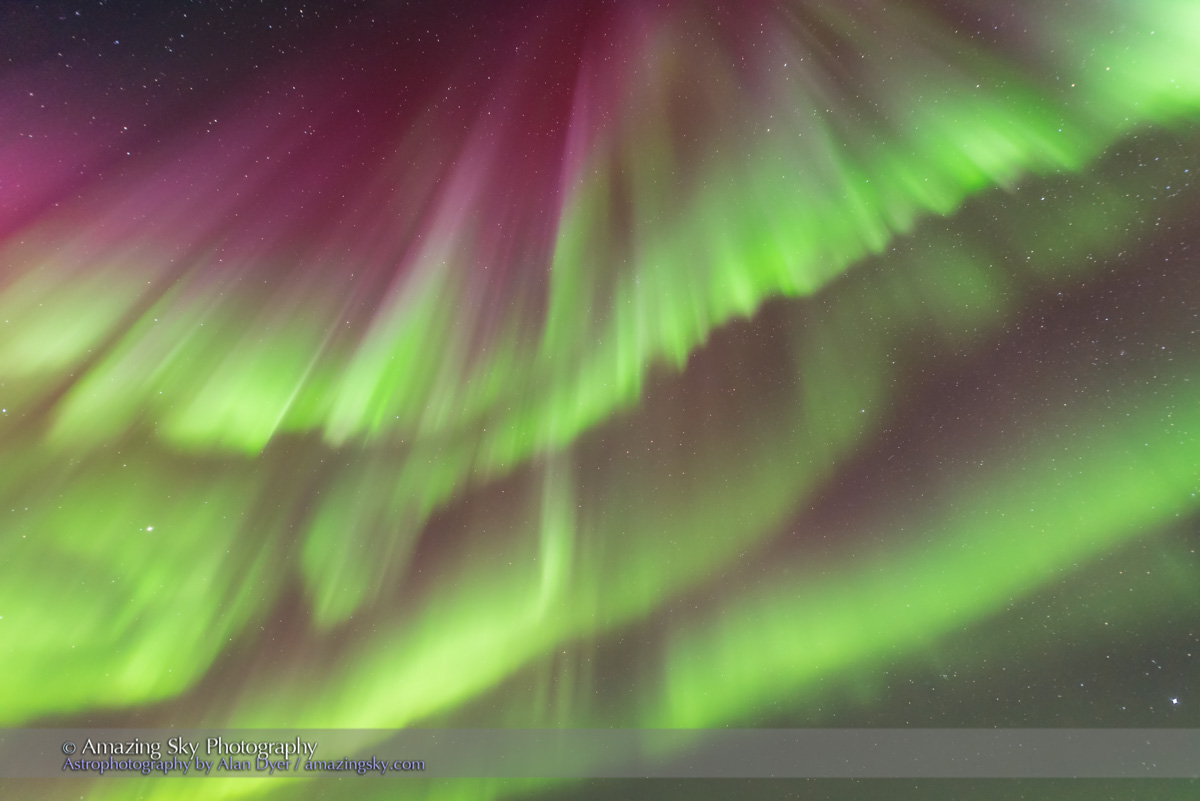
As it got dark this night, large swaths of red were easily visible to the eye, especially to the northwest as above, and below.
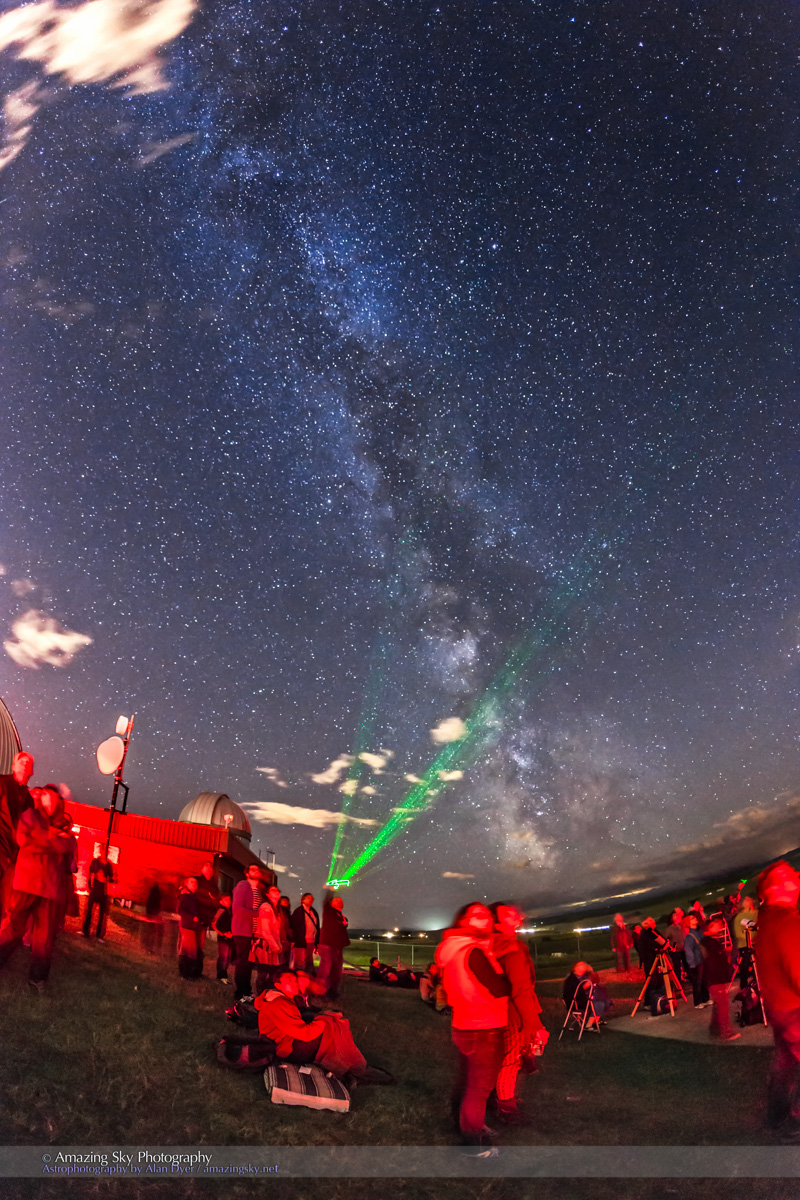
A single 5-second exposure at f/2.8 with the TTArtisan 11mm lens on the Canon R5 at ISO 1600.
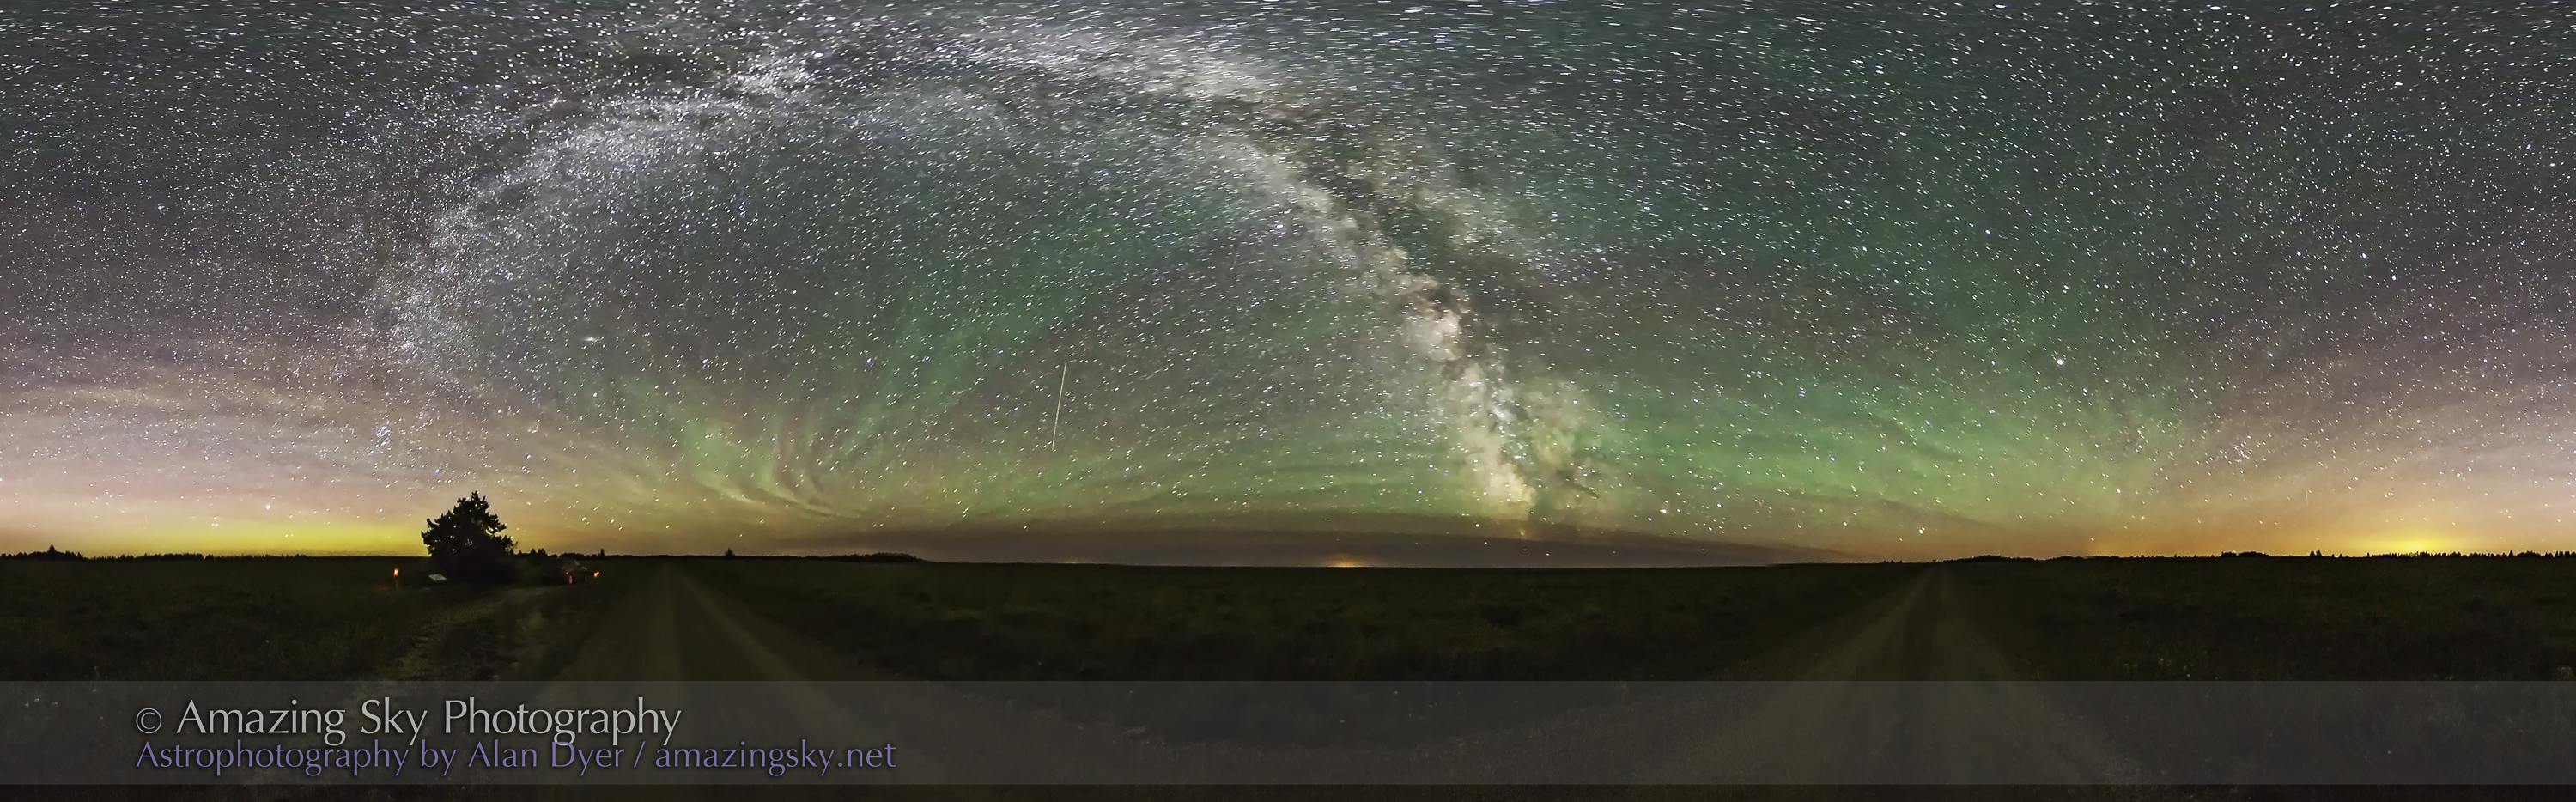
Early on a large curtain of red extended across the sky, from northwest to southeast. It is rare to see bright reds with the eye, and unusual to see the reds so extensive and sky-spanning.
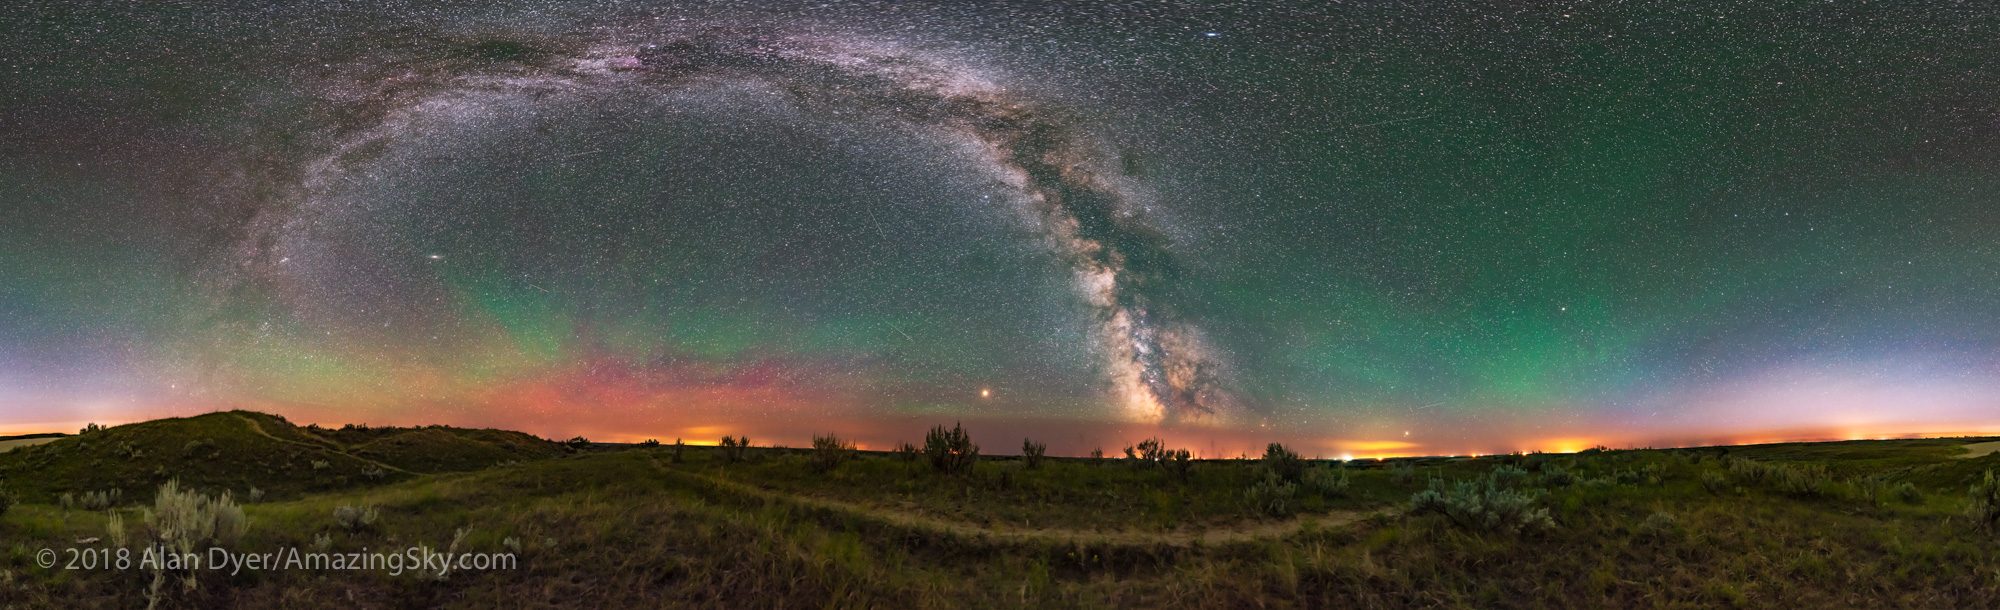
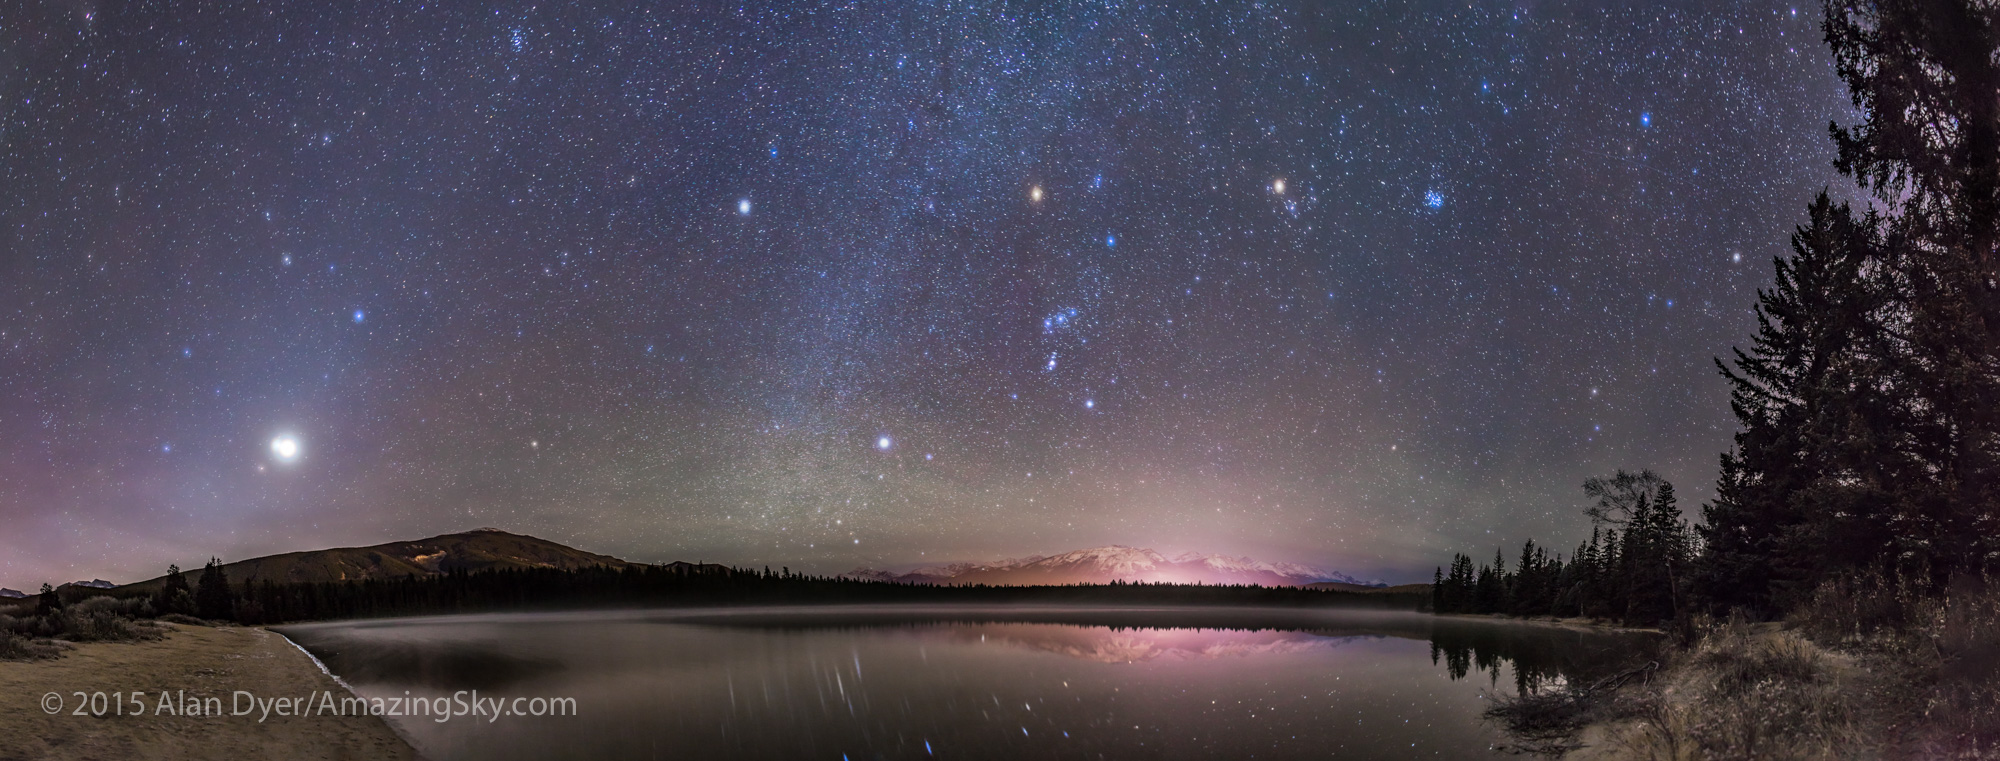
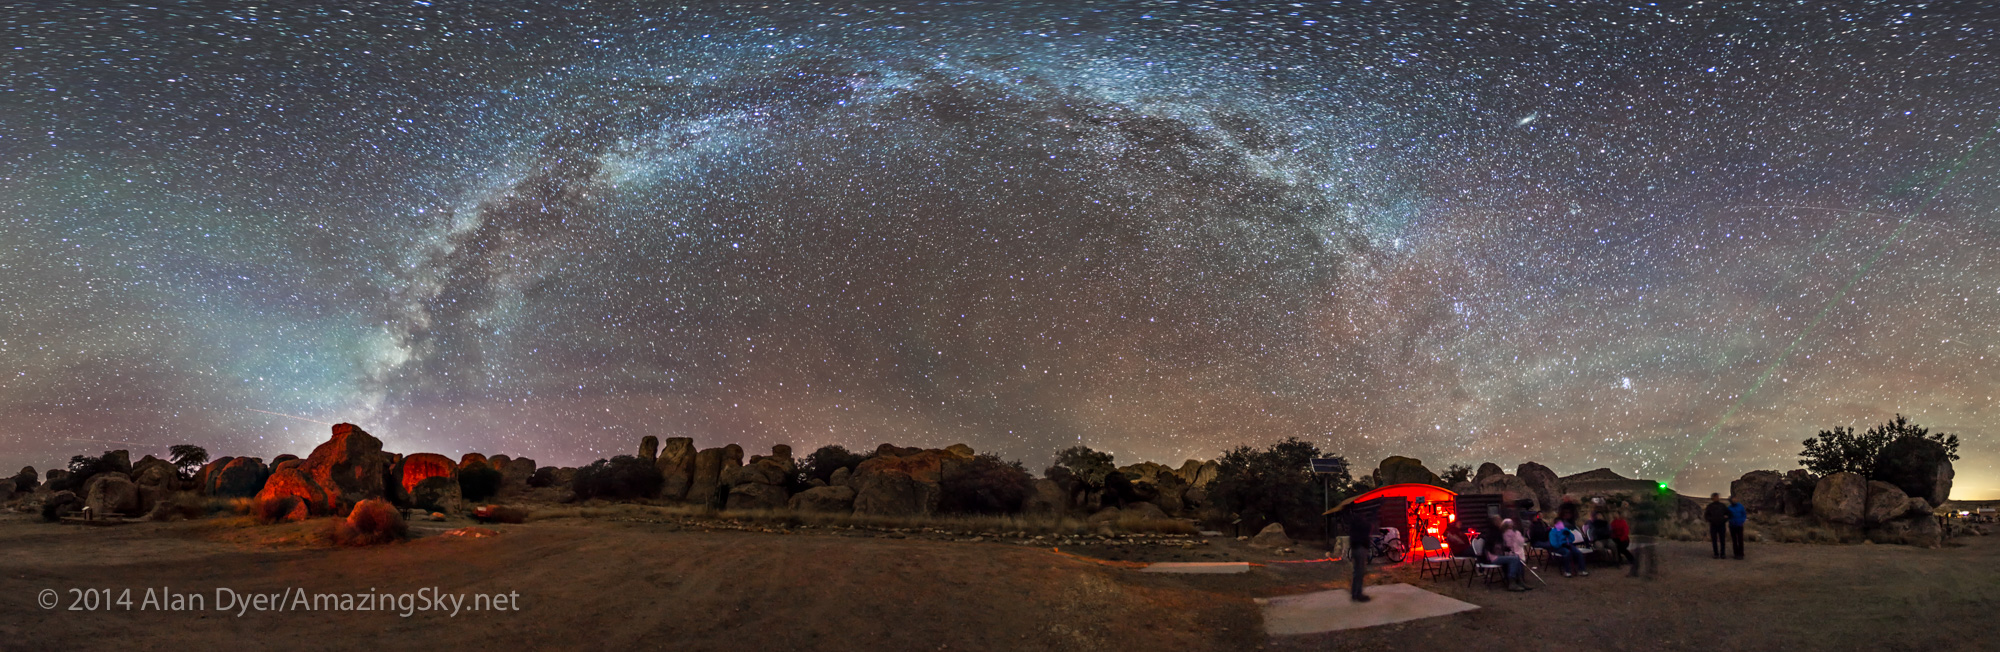
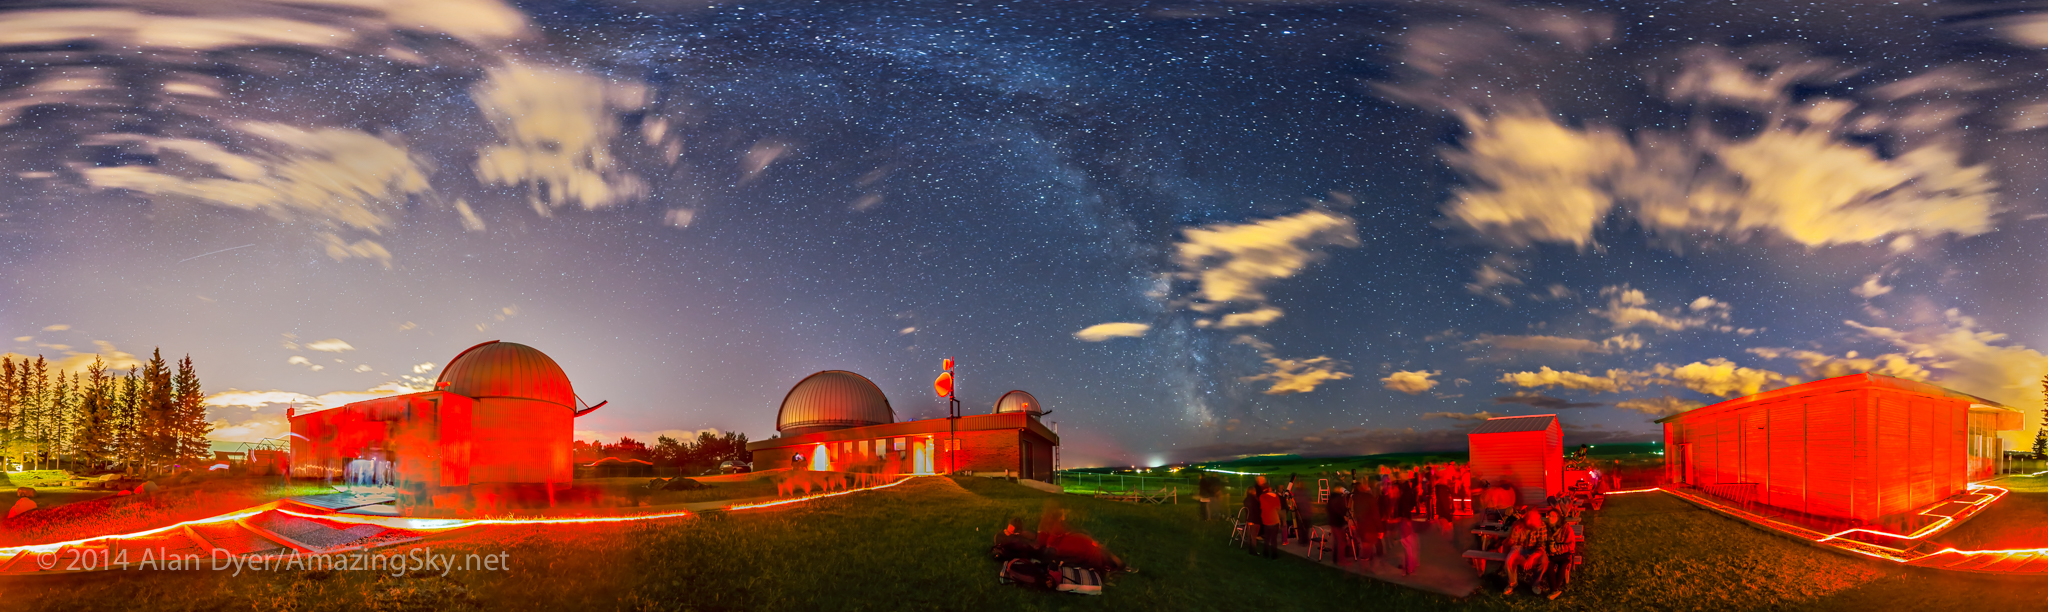
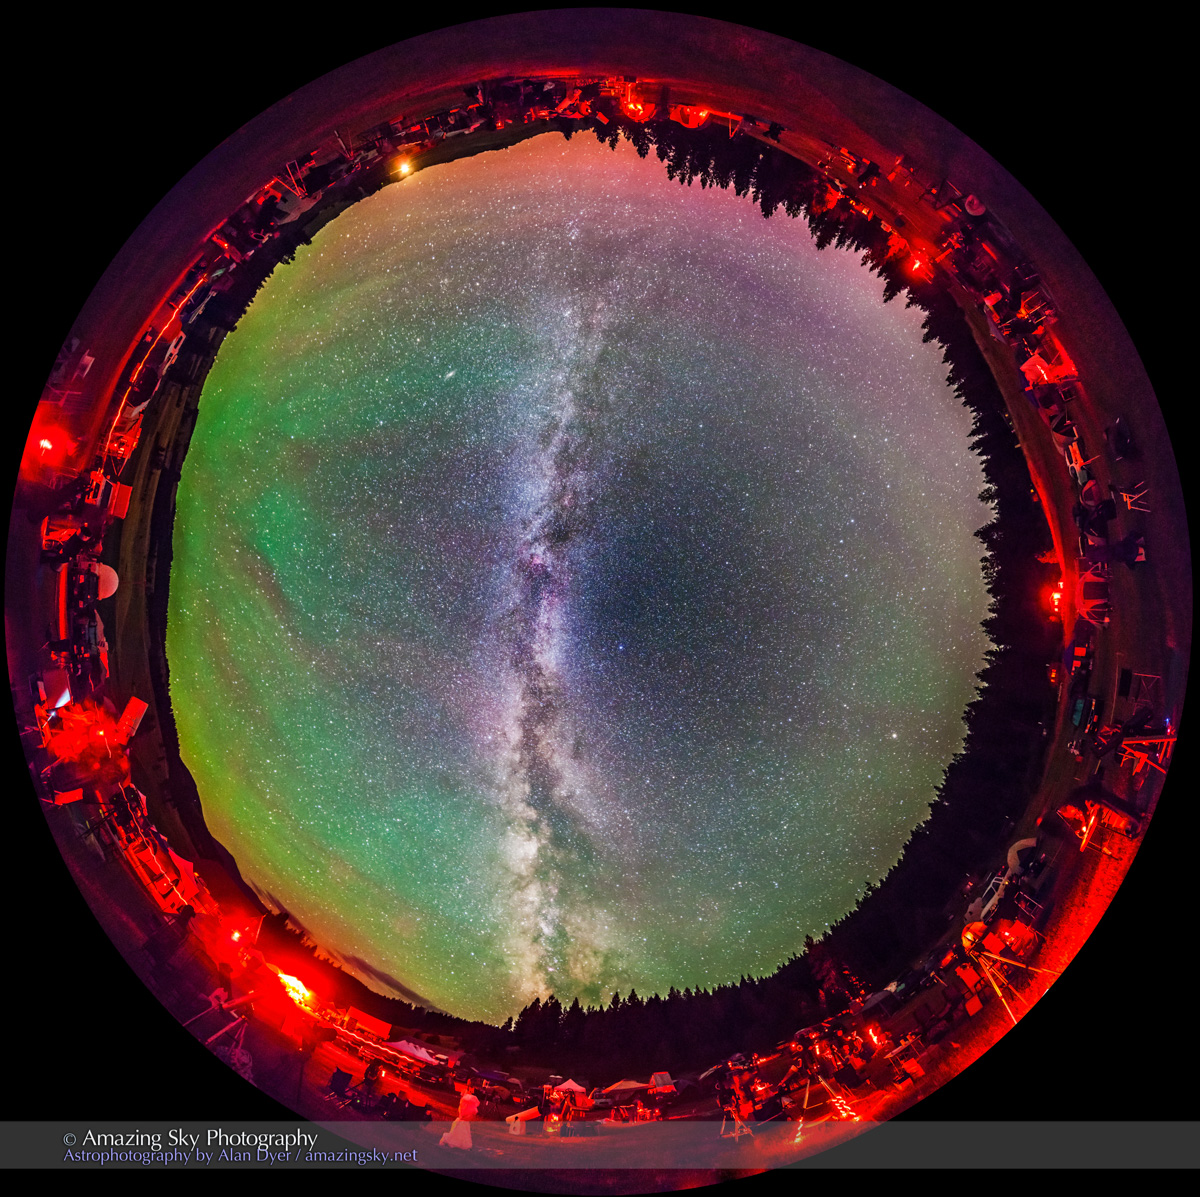
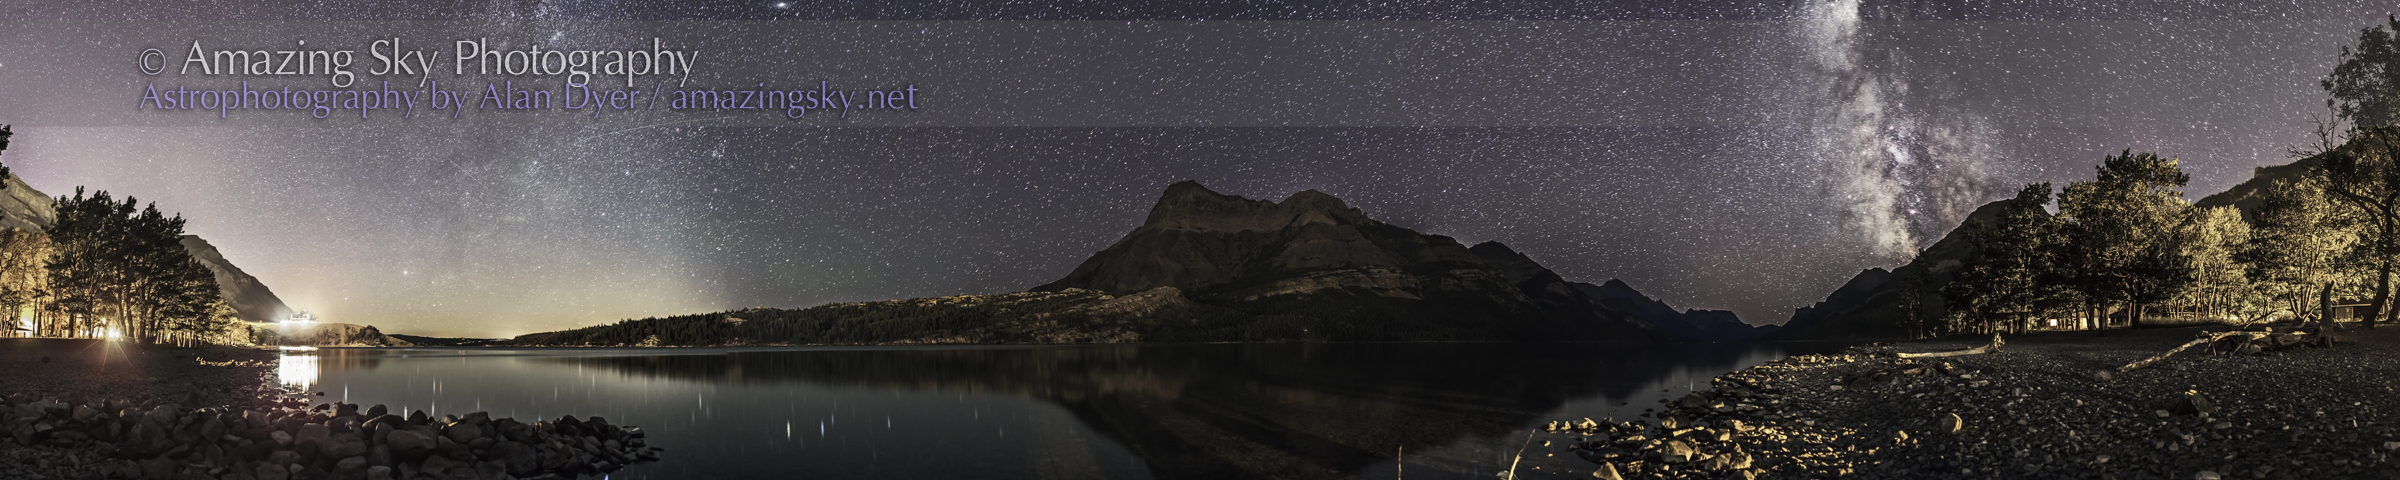
This 360º panorama is a stitch of 6 segments, 60º apart, each 5-second exposures at f/2.8 with the TTArtisan 11mm full-frame fish-eye lens on the Canon R5 at ISO 1600, and in landscape orientation.
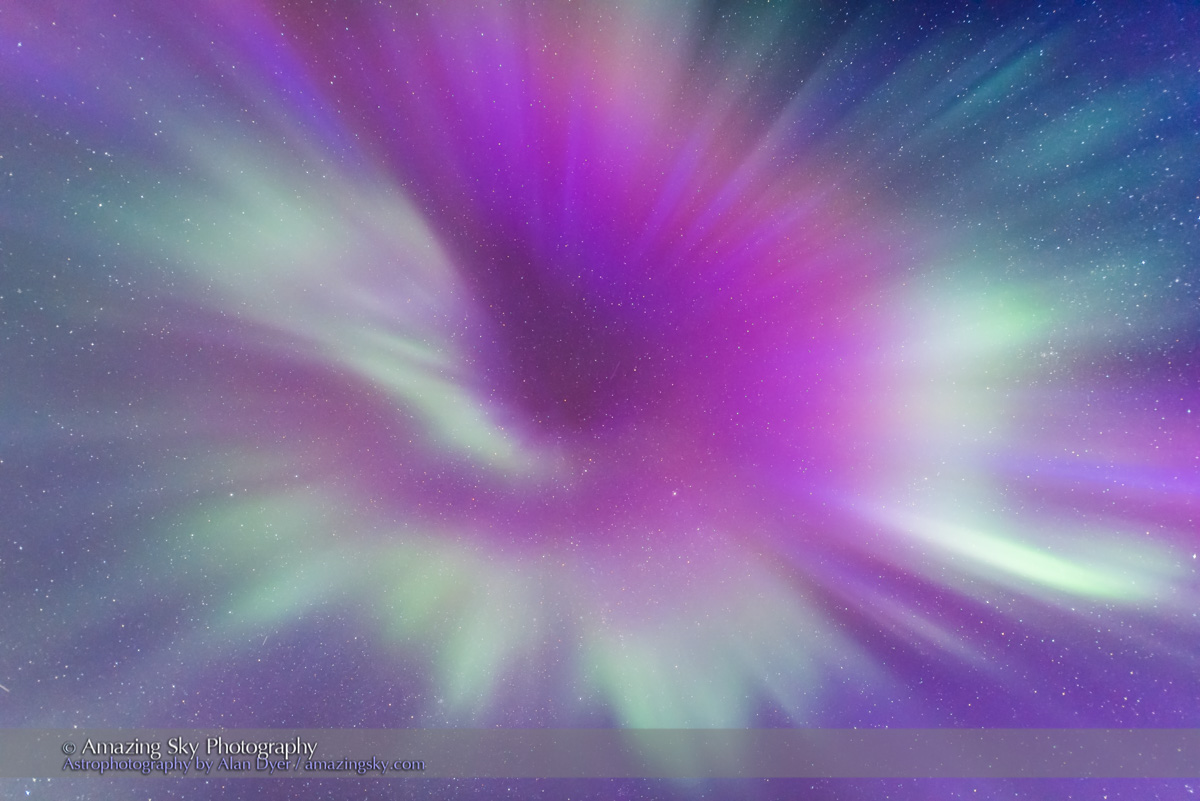
The reds are mostly from oxygen atoms, but can also come from nitrogen molecules, which require the input of a lot of energy to get excited and glow! They certainly were this night.
The reds mixed with the more common green light from oxygen to produce shades of yellow and orange, and with blues from nitrogen to produce vivid pinks and magentas. While the eye could see some of these subtle colours, a camera (with its longer exposure and wider aperture lens compared to the human eye) was best for picking up the full range of what this show had on display.
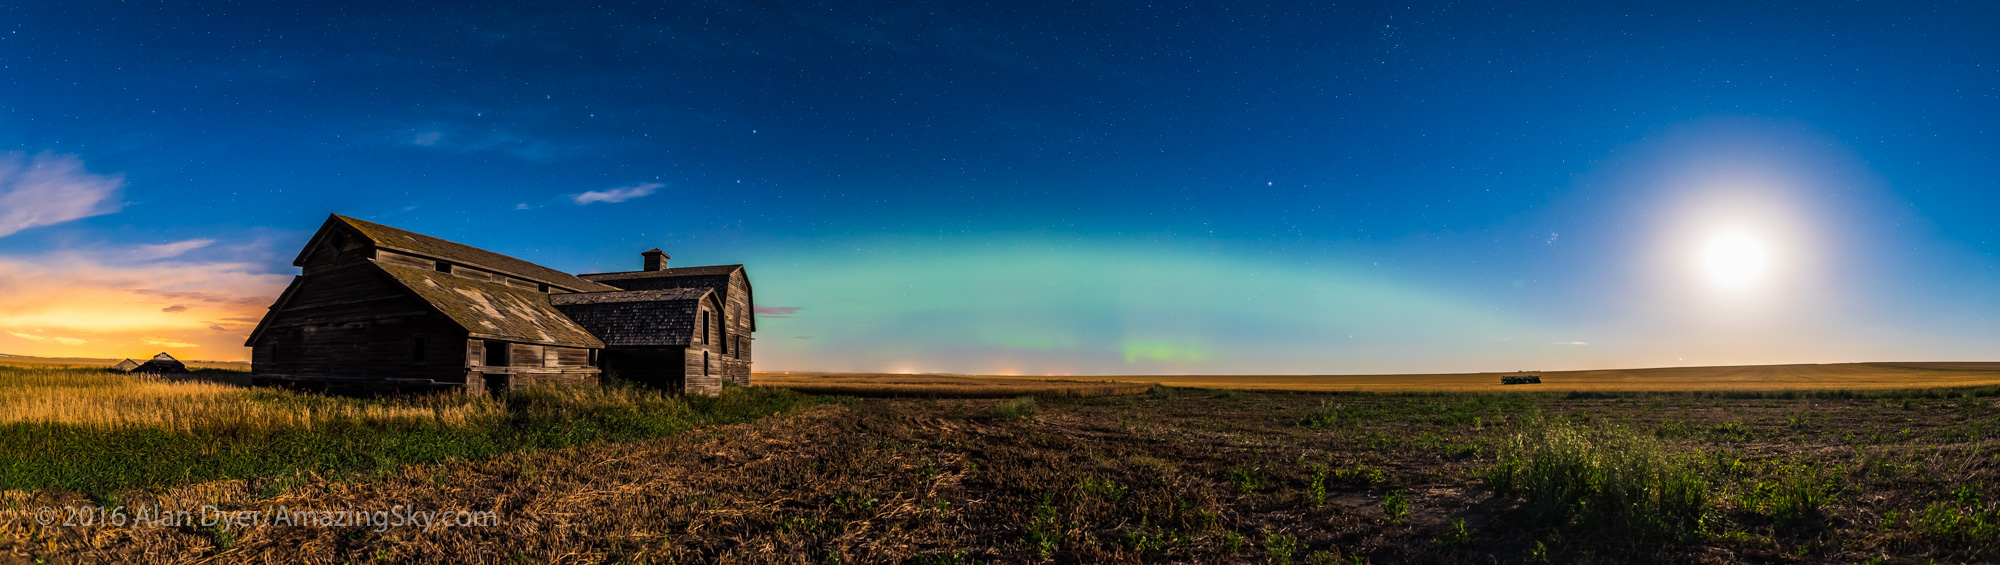
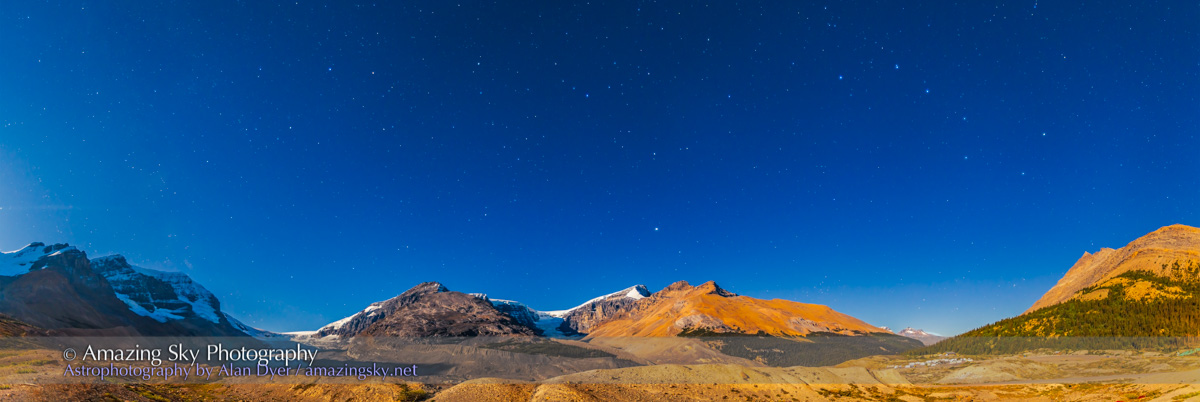
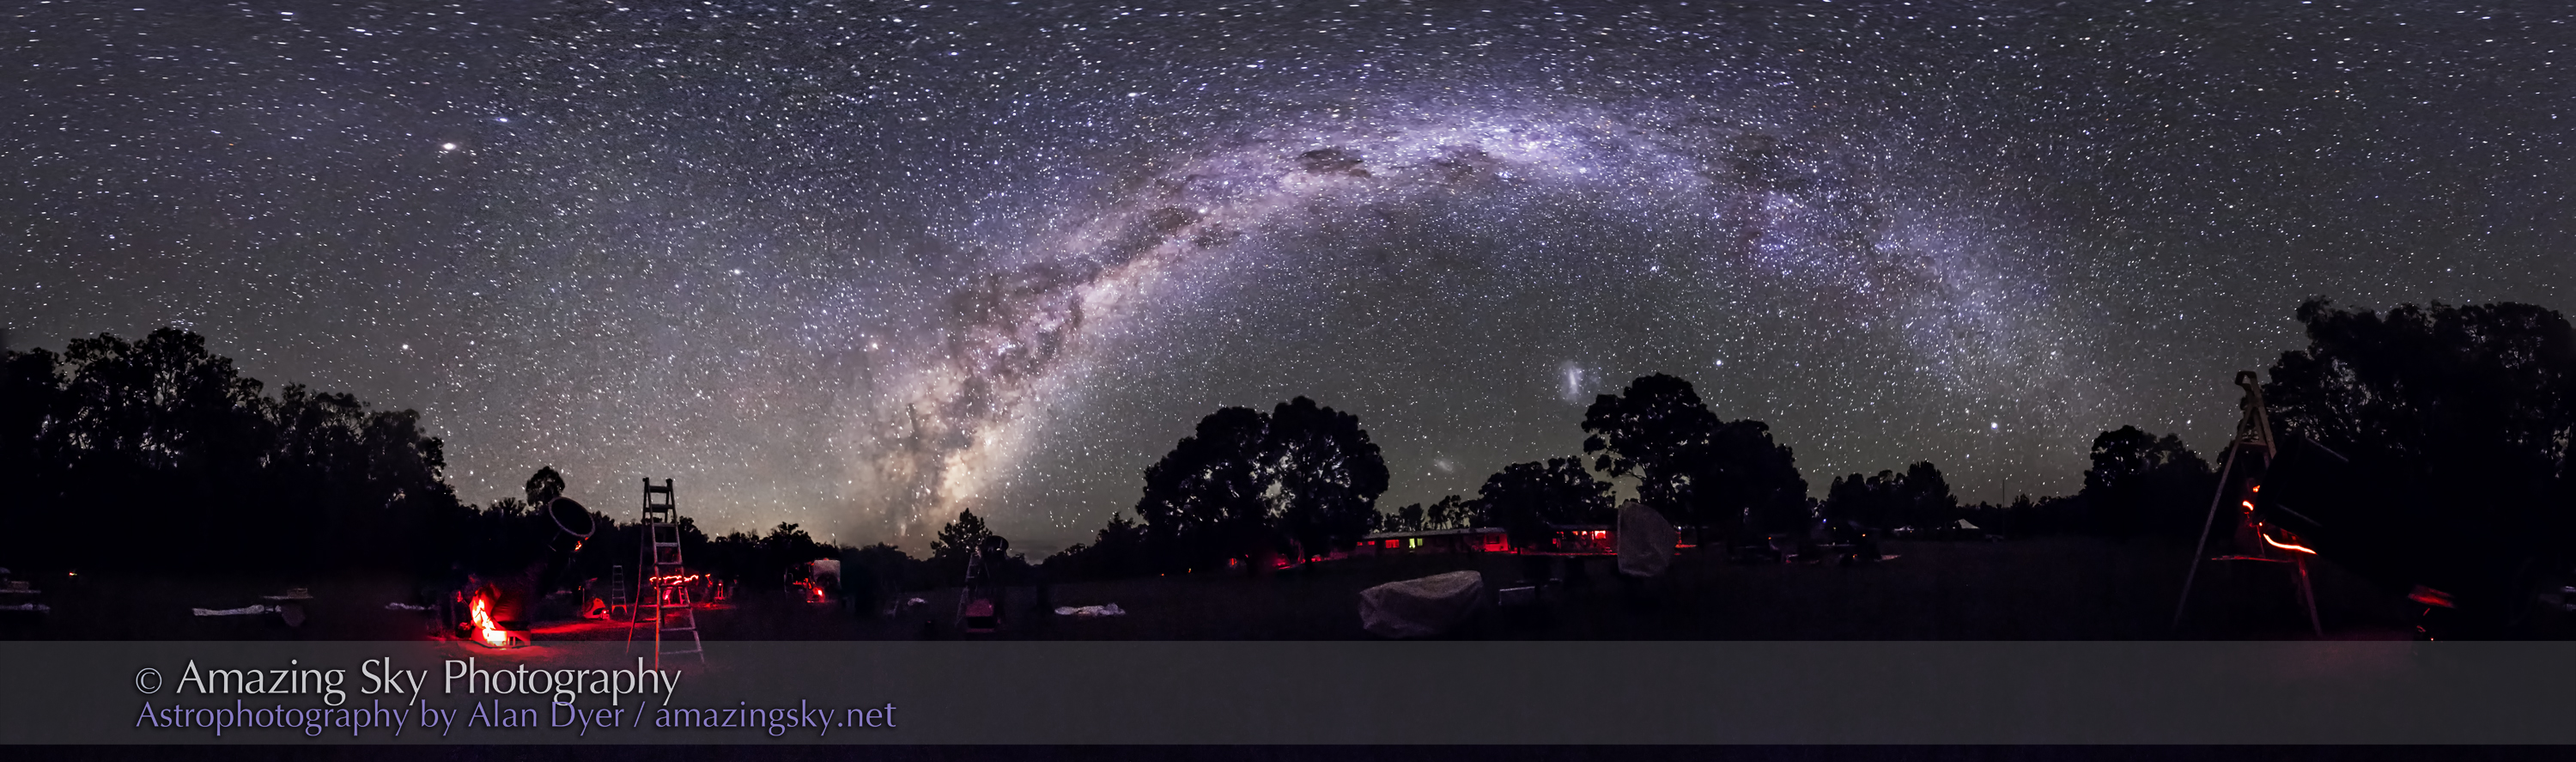
This 360º panorama is a stitch of 10 segments, 36º apart, each 4-second exposure at f/2.8 with the Laowa 10mm rectilinear wide-angle lens on the Nikon Z8 at ISO 1600, and in portrait orientation.
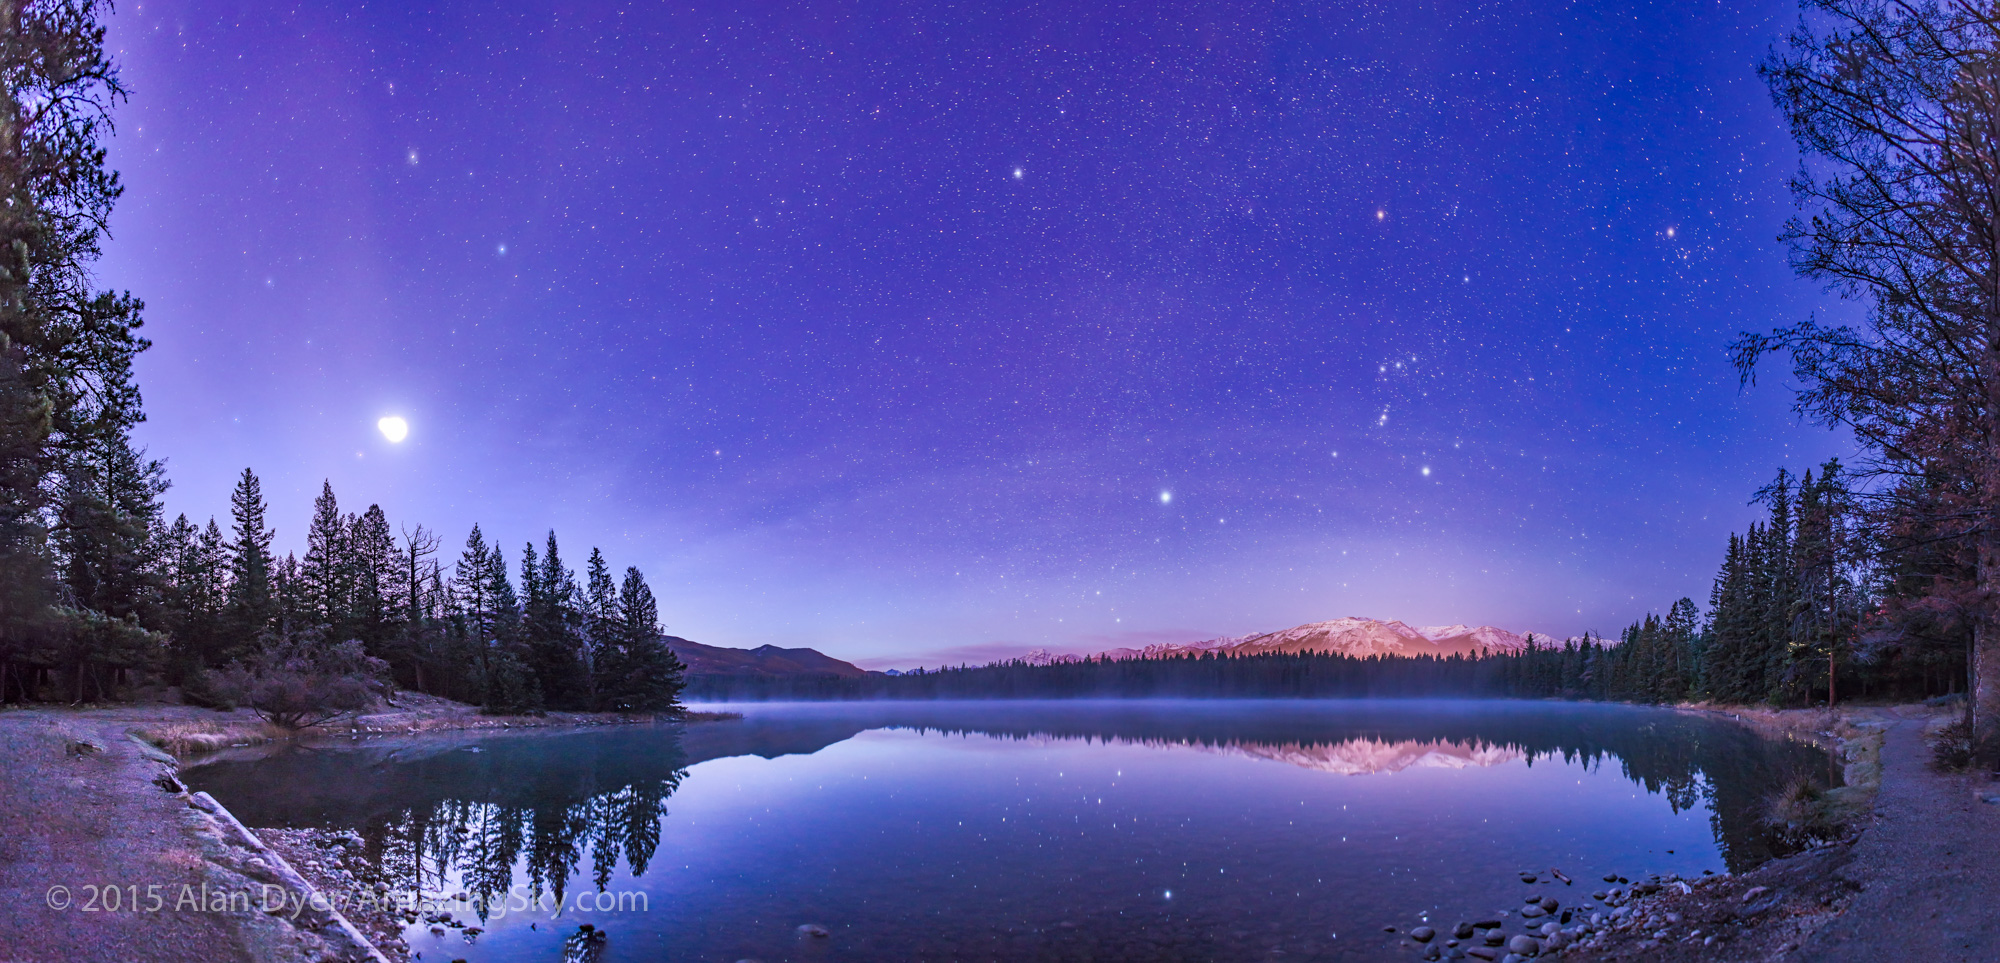
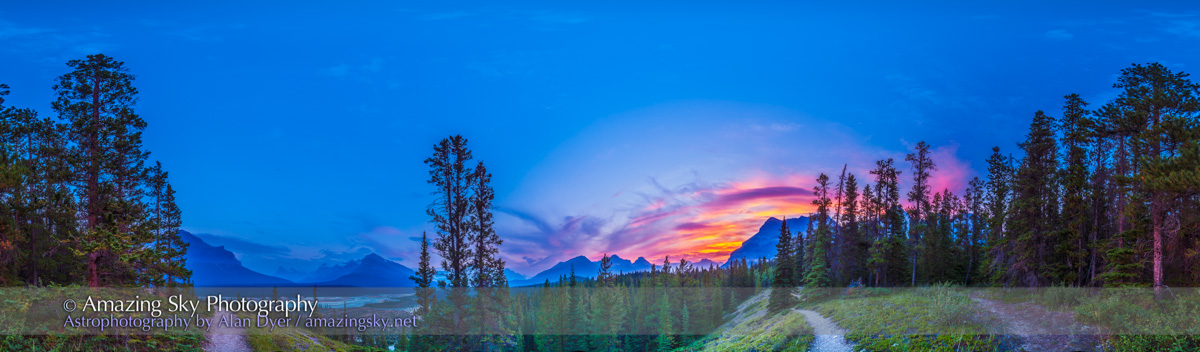
The panorama above taken about 2 hours after the previous all-sky scene, shows a quieter aurora but still with curtains covering the sky and converging to the “magnetic zenith,” a little south of the point straight overhead.
Such an all-sky show of aurora is among the sky’s finest spectacles.
A real-time video with the Nikon Z6III at ISO 25600 and Viltrox 16mm lens at f/1/8.
In the video above taken early in the evening I pan around the horizon over the full 360º to take in the scene much as the eye did see it. Video uses shorter exposures more like the eye does. I narrate the video at the camera.
All single 4-second exposures at f/2.8 with the Laowa 10mm rectilinear wide-angle lens on the Nikon Z8 at ISO 1600.
When the aurora covers the sky it’s hard to take it all in and capture it on camera. The 10mm ultra-wide lens I used for the images above sweep up well past the zenith to show the converging curtains, forming shapes that kept changing by the minute.
In the video below I used the same lens with the camera turned to portrait orientation to create a “vertical video,” again narrated at the camera. It shows how the aurora was changing, but slowly this night. It did not have the rapid dynamics I’ve seen with other bright displays, despite the obvious high energies involved here to excite the reds.
Real-time video with the Laowa 10mm lens at f/2.8 and Nikon Z8 at ISO 25,600 & 1/4 second shutter.
Again, this real-time video captures the scene much as the unaided eye saw it. I’ve not processed either of these real-time videos, other than what the camera itself did.
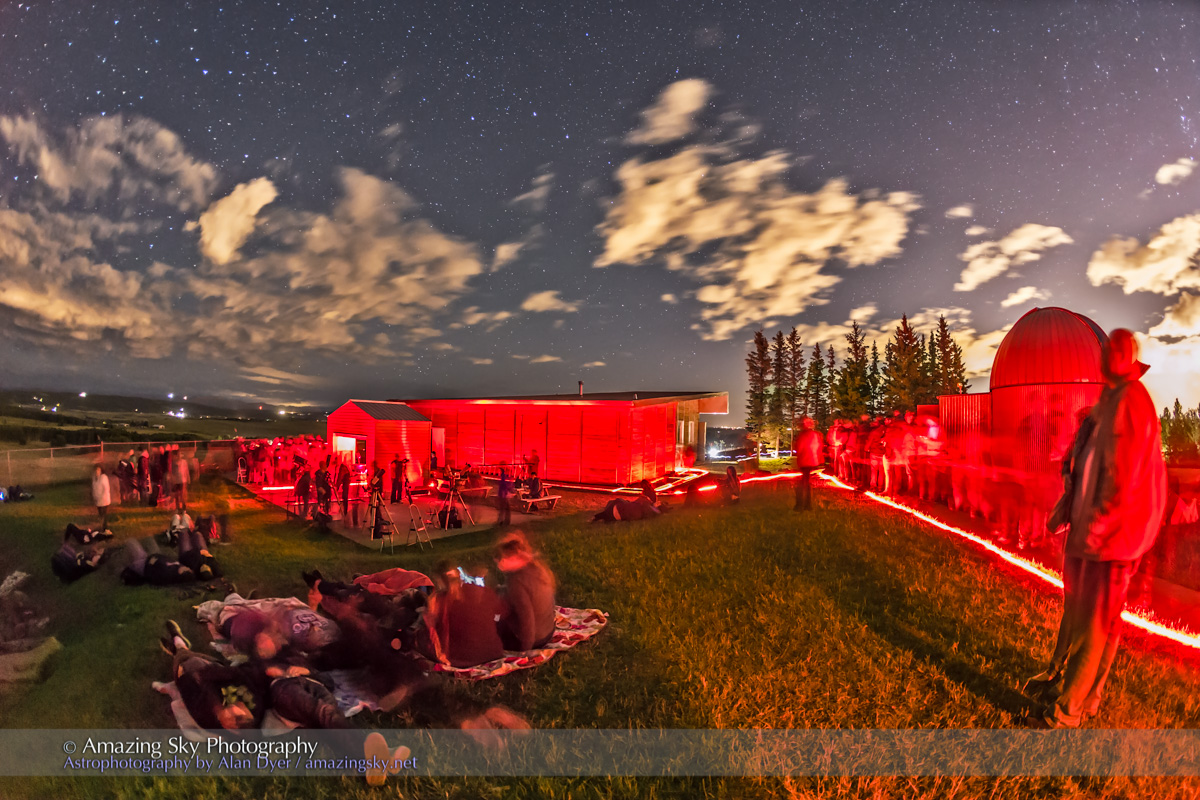
This is a panorama of 12 segments, each 1 second at f/1.8 with the Viltrox 16mm lens on the Nikon Z6III at ISO 1600. Stitched in Adobe Camera Raw.This is a stitch of 6 segments, 60º apart, each 4-second exposure at f/2.8 with the TTArtisan 11mm full-frame fish-eye lens on the Canon R5 at ISO 1600, in landscape orientation. Stitched in PTGui.
On a night like this, I try to shoot not only single still images and videos, but also multi-image panoramas, such as the circular images earlier and these two rectangular “panos” above. Both cover a full 360º in width but don’t go up to the zenith.
Again, they record the range of colours that were on show on this Kp8 night, which were more visible and extensive than usual for an all-sky display.
I also shot two time-lapse sequences. These form the main visuals for this edited music video I produced around the time-lapses.
The link takes you to my Vimeo channel to watch the video. Do enlarge it to full screen!
A single 2.5-second exposure at f/1.8 with the Viltrox 16mm lens on the Nikon Z6III at ISO 1600.
I also always try to take some selfies at every great aurora show, with me often lit just by aurora light! They’re fun to use for talks and “bio pix.”
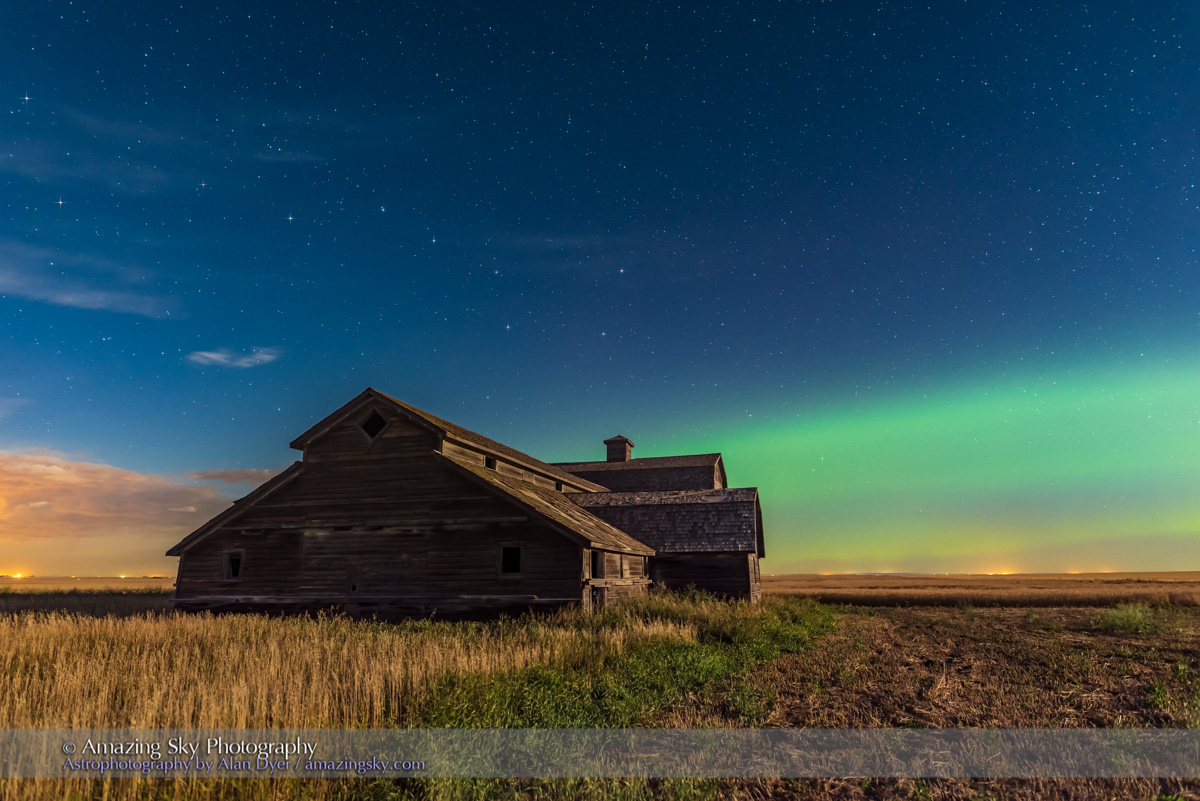
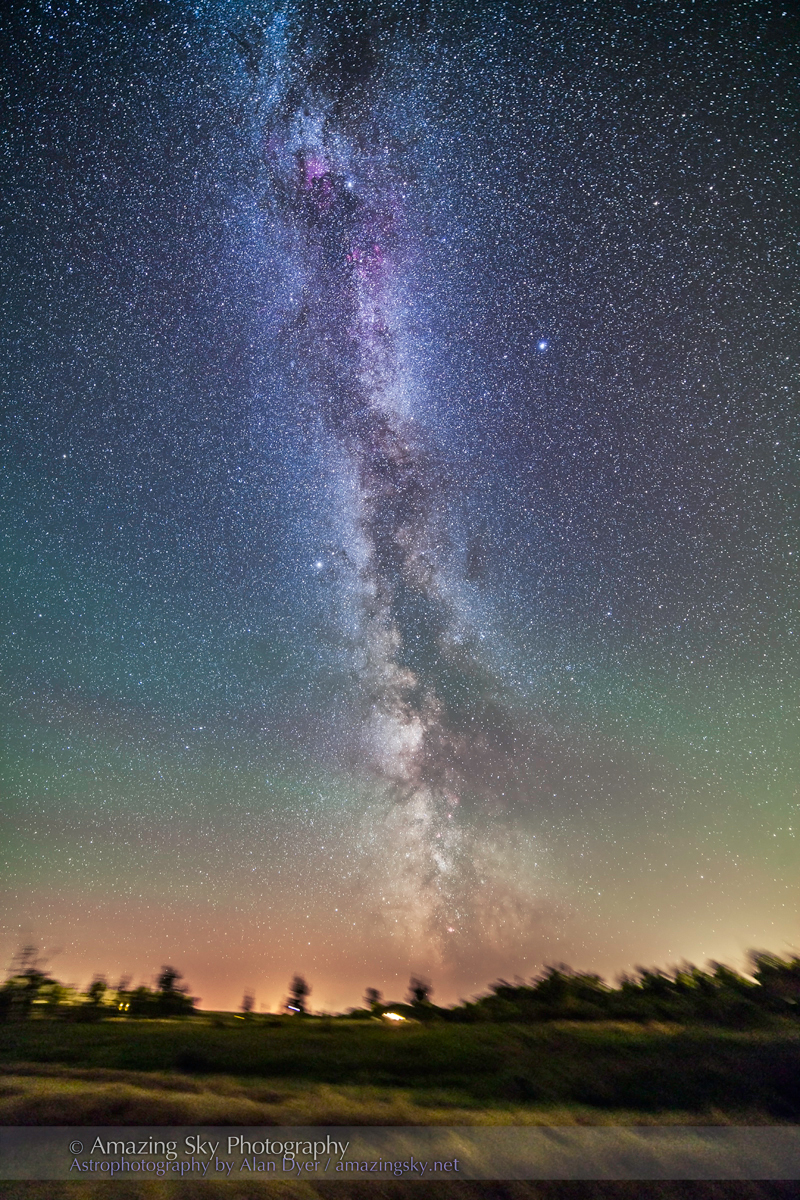
This is a single 4-second exposure at f/2.8 with the Laowa 10mm lens on the Nikon Z8 at ISO 1600.
As a final bonus this night, one of the fish-eye lens time-lapse frames happened to capture a bright meteor. You see it briefly in a flash in the music video above, but below is the single frame.
A single 4-second exposure at f/2 with the TTArtisan 7.5mm circular fish-eye lens on the Nikon Z8 at ISO 1600. Taken as part of a 780-frame time-lapse.
Because it is streaking away from the constellation of Taurus, this is likely a member of the annual Taurid meteor shower which was in its final nights of the long period it is active in late October and early November. In fact, there are two Taurid showers, Northern and Southern, active at once and coming from similar spots in Taurus. They are known to produce bright fireballs and this was certainly one!
While the Sun is now in the downward slope of its cycle, coming off “solar max” last year, we may still see more major storms and aurora shows like this. Historically, the biggest solar flares and aurora displays often occur in the 2 or 3 years after solar maximum.
So stay tuned! The sky may still light up red with Northern Lights!
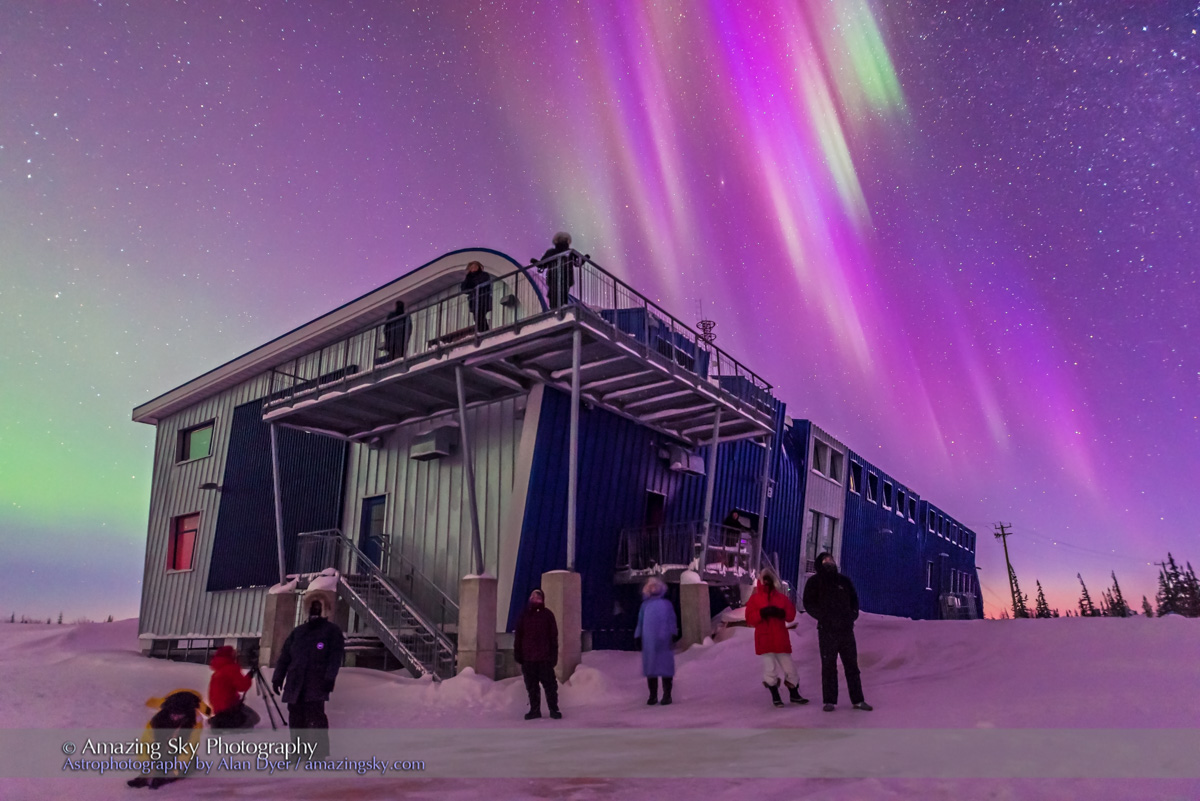
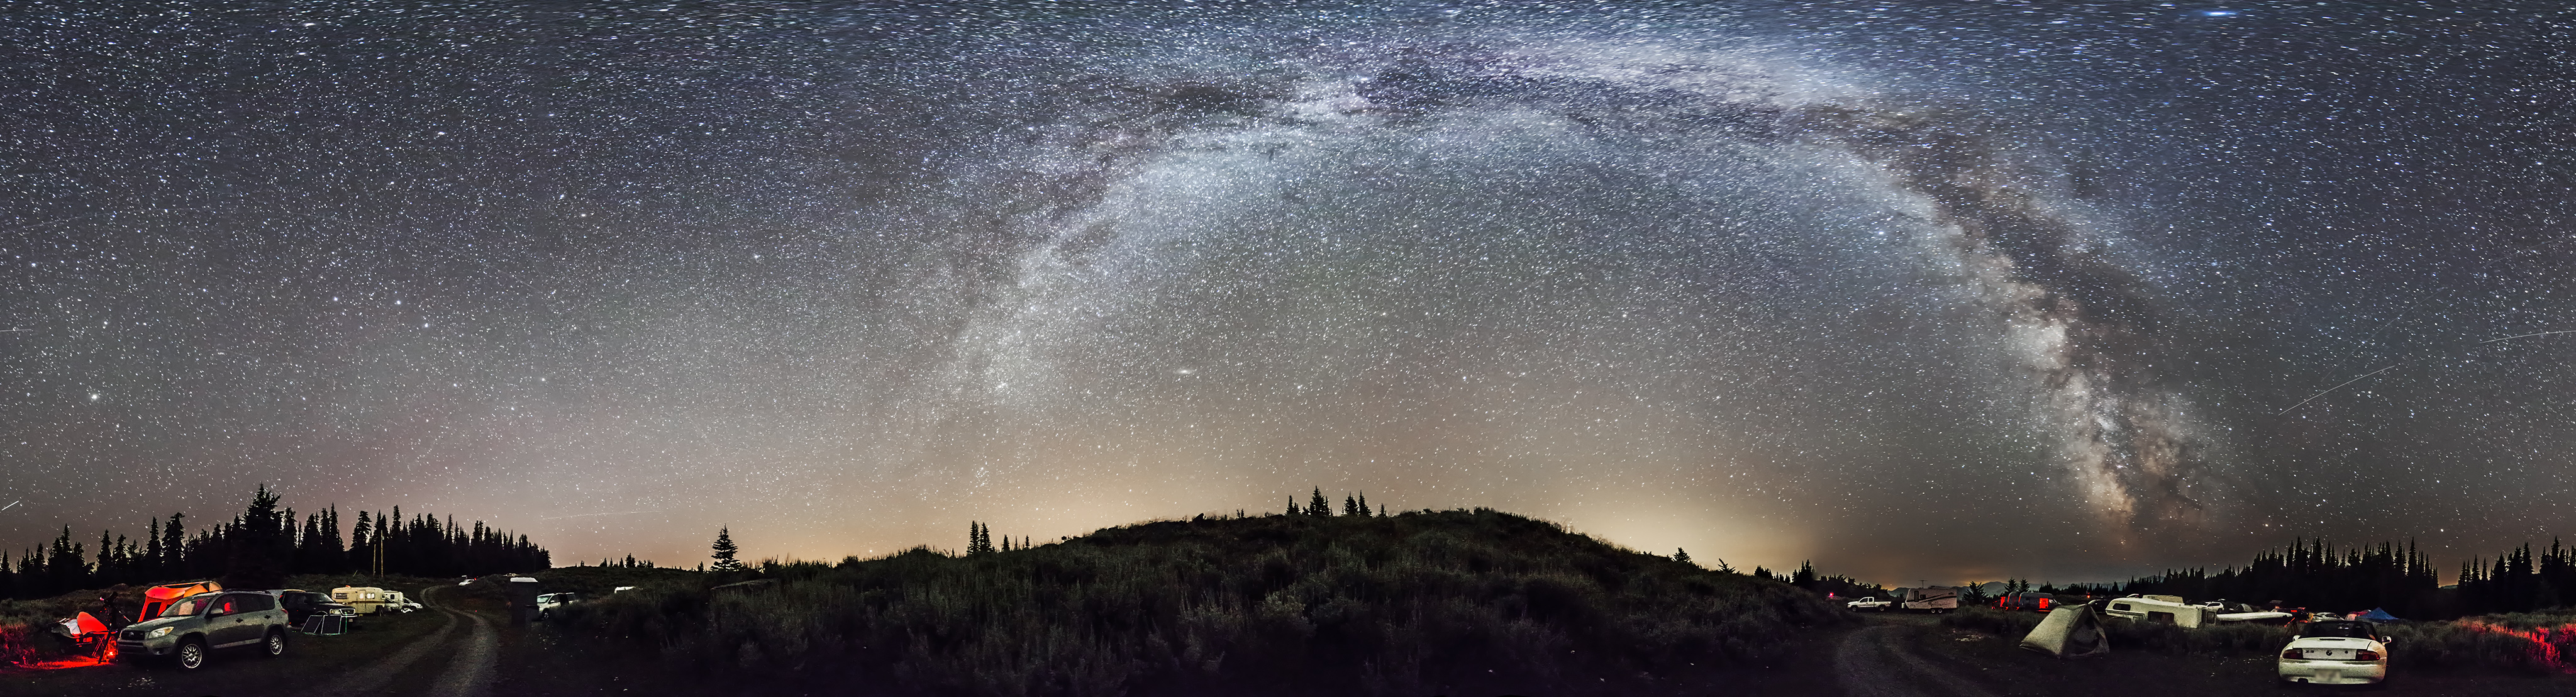
It was a fabulous week of clear skies and dancing auroras in and around Yellowknife in Canada’s North.
For the second year in a row I traveled due north from home in Alberta to visit Yellowknife, capitol of Canada’s Northwest Territories. At a latitude of 62° North, Yellowknife lies directly under the auroral oval and so enjoys views of the Northern Lights on almost every clear night.
During my 8-night stay from September 3 to 10 almost every night was clear and filled with auroras.
Somba K’e Park
The Lights can be seen even from within the downtown core, as the opening image shows, taken from the urban Sombe K’e Park looking over Frame Lake and the Prince of Wales Museum.
The Museum is lit with rippling bands of coloured light that emulate the aurora borealis.
Pilot’s Monument
A favourite urban site for viewing the Lights is the Pilot’s Monument lookout in the middle of Yellowknife’s Oldtown district. This panorama sweeps from northeast at left to west at far right, looking mostly south over the downtown core.
This night even the urban lights were not enough to wash out the Lights as they brightened during a brief substorm.
This is a 300° panorama of the Northern Lights over Yellowknife, NWT on the night of Sept 6-7, 2019, during a sub-storm outbreak at 12:45 a.m. when the sky went wild with aurora. This is a 9-segment panorama with the 15mm Laowa lens at f/2 and Sony a7III at ISO 800, for 10 seconds each.
Rotary Park
Another good urban site that gets you away from immediate lights is the open spaces of Rotary Park overlooking the houseboats anchored in Yellowknife Bay. This panorama again sweeps from east to west, looking toward to the waxing Moon low in the south.
Again, despite the urban lights and moonlight, the Lights were spectacular.
A 240° panorama of the Northern Lights from the Boardwalk in the urban Rotary Park in Yellowknife, NWT, on Sept 10, 2019. A waxing gibbous Moon is bright to the south and lights the sky and landscape. This is a 7-segment panorama, each segment 8 seconds at f/2 with the Venus Optics 15mm lens and Sony a7III at ISO 1600. Stitched with Adobe Camera Raw.
Prosperous Lake
The main viewing sites for the Northern Lights are down Highway 4, the Ingraham Trail east of the city away from urban lights.. One of the closest stops is a parking lot on the shore of a backwater bay of Prosperous Lake. It’s where many tourist buses stop and unload their passengers, mostly to get their selfies under the Lights.
But with patience you can get your own photos unencumbered by other lights and people, as I show below.
A group of aurora tourists take their aurora selfies at Prosperous Lake, near Yellowknife, NWT, a popular spot on the Ingraham Trail for aurora watching. This was about 1:15 a.m. MDT. This is a single 5-second exposure with the 20mm Sigma Art lens at f/2 and Nikon D750 at ISO800.
The Northern Lights over the end of Prosperous Lake, on the Ingraham Trail near Yellowknife, NWT, a popular spot for aurora watching in the area. This is a single 8-second exposure with the Sigma 20mm lens at f/2 and Nikon D750 at ISO 800.
On one of my nights I stopped at Prosperous on the way to sites farther down Ingraham Trail to catch the twilight colours in the stunningly clear sky.
Twilight at Prosperous Lake on the Ingraham Trail, near Yellowknife, NWT, Sept. 7, 2019. The colours are accentuated by volcanic ash in the atmosphere.
Madeline Lake
This small lake and picnic site farther along the Trail serves as a great place to shoot the Lights reflected in the calm waters and looking north. I spent one of my nights at Madeline Lake, a popular spot for local residents to have a campfire under the Lights.
Enjoying a campfire on a fine September Saturday night under the brightening Northern Lights, at Madeline Lake on the Ingraham Trail near Yellowknife. This is a single 10-second exposure with the 20mm Sigma lens at f/2 and Nikon D750 at ISO 800.
And it’s popular for tour buses, whose headlights shine out across the lake as they arrive through the night, in this case casting my long shadow across the misty lake.
A novelty shot of the shadow of me and my tripod projected across a misty Madeline Lake by car headlights from arriving aurora tourists at this popular spot on the Ingraham Trail near Yellowknife. This was September 7, 2019. A single exposure.
A group of aurora tourists take in the show at Madeline Lake, on the Ingraham Trail near Yellowknife, NWT, a popular spot for the busloads of visitors being shuttled around each night. The Big Dipper is at centre. This is a single exposure, 6 seconds at ISO 3200 with the Laowa 15mm lens at f/2 and Sony a7III.
However, again with patience it is possible to get clean images of the aurora and its reflections in the lake.
Reflections of the Northern Lights in the calm and misty waters of Madeline Lake on the Ingraham Trail near Yellowknife, NWT on Sept 7, 2019. This is one of a series of “reflection” images. The Big Dipper is at left. Capella is at right. This is a single 13-second exposure with the 15mm Laowa lens at f/2 and Sony a7III at ISO 1600.
Reflections of the Northern Lights in the calm waters of Madeline Lake on the Ingraham Trail near Yellowknife, NWT on Sept 7, 2019. This is one of a series of “reflection” images. The Big Dipper is at left; Capella at far right. This is a single 8-second exposure with the 15mm Laowa lens at f/2 and Sony a7III at ISO 1600.
The Northern Lights in a subtle but colourful display over the still waters of Madeline Lake on the Ingraham Trail near Yellowknife, NWT. This was the night of September 7-8, 2019. This is a 4-segment panorama, each 13 seconds at ISO 1600 with the Venus Optics 15mm lens at f/2 and Sony a7III camera.
The Ramparts
Farther down the Trail is a spot the tour buses will not go to as a visit to the Ramparts waterfall on the Cameron River requires a hike down a wooded trail, in the dark with bears about. Luckily, my astrophoto colleague, amateur astronomer, and local resident Stephen Bedingfield joined me for a superb shoot with us the only ones present at this stunning location.
Photographer Stephen Bedingfield is shooting the Northern Lights at the Ramparts waterfalls on the Cameron River, September 8, 2019. This is a single 8-second exposure with the Laowa 15mm lens at f/2 and Sony a7III at ISO 3200.
The Northern Lights over the waterfalls known as the Ramparts on the Cameron River east of Yellowknife, NWT, on September 8, 2019. This is a single exposure of 20 seconds with the 15mm Laowa lens at f/2 and Sony a7III at ISO 1600, blended with two light painted exposures of the same duration but with the water illuminated to make it more white.
The view looking the other way north over the river was equally wonderful. What a place for viewing the Northern Lights!
The Northern Lights in an arc across the northern sky over the Cameron River, downriver from the Ramparts Falls. This was September 8, 2019 with the trees turning in their fall colours. The Big Dipper at top centre. This is a two-segment panorama, each 25 seconds at f/2 with the Laowa 15mm lens and Sony a7III at ISO 800. Stitched with ACR.
The view from a viewpoint early on the trail down to the Ramparts and overlooking the Cameron River yielded a superb scene with the low Moon and twilight providing the illumination as the Lights kicked up early in the evening.
The curtains of an early evening aurora starting to dance in the twilight and with the western sky lit by moonlight from the waxing gibbous Moon low in the sky and off-frame to the right. This is from the Cameron River viewpoint off the Ramparts falls trail on the Ingraham trail near Yellowknife. This is a single 15-second exposure with the 15mm Laowa lens at f/2 and Sony a7III at ISO 1600.
Prelude Lake
A favourite spot is the major camping and boat launch area of Prelude Lake Territorial Park. But to avoid the crowds down by the shoreline, Stephen and I hiked up to the overlook above the lake looking north. A few other ardent photographers joined us. This was another spectacular and perfect night.
An arc of Northern Lights appears in the evening twilight over Prelude Lake near Yellowknife, NWT, on September 9, 2019. This is a single 25-second exposure at f/2 with the Venus Optics 15mm lens and Sony a7III at ISO 800.
September is a superb time to visit as the lakes are still open and the autumn colours make for a good contrast with the sky colours.
The panorama below takes in the Big Dipper at left, Capella at centre, and with the Pleiades and Hyades rising at right of centre.
The arc of Northern Lights starting a show in the deep twilight over Prelude Lake on the Ingraham Trail near Yellowknife, NWT. This was September 9, 2019. Light from the waxing gibbous Moon behind the camera also illuminates the scene. This is a 5-segment panorama with the 15mm Laowa lens at f/2 and Sony a7III at ISO 800 and all at 25 seconds. Stitched with PTGui, as ACR and Photoshop refused to joint the left segments.
I used the 8mm fish-eye lens to capture the entire sky, the only way you can really take in the whole scene on camera. When the Lights fill the sky you don’t know which way to look or aim your camera!
A 360° fish-eye view of the Northern Lights over Prelude Lake near Yellowknife, NWT, Canada, on September 9, 2019, with photographers in the foreground shooting the Lights from the viewpoint above the lake. Polaris is near the centre; the Big Dipper and Ursa Major are at lower left; Cassiopeia is at upper right. Andromeda and Pegasus are rising at far right. Arcturus is setting at far left. This is a single shot with the 8mm Sigma lens at f/3.5 on the Sony a7III for 10 seconds at ISO 3200. Moonlight also provides some of the illumination. Accent AI filter applied to the ground with Topaz Studio 2.0
A 360° fish-eye view of the Northern Lights over Prelude Lake near Yellowknife, NWT, Canada, on September 9, 2019. Polaris is near the centre; the Big Dipper and Ursa Major are at lower left; Cassiopeia is at upper right. Andromeda and Pegasus are rising at far right. Arcturus is setting at far left. This is a single shot with the 8mm Sigma lens at f/3.5 on the Sony a7III for 20 seconds at ISO 1000. Moonlight also provides some of the illumination. Accent AI filter applied to the ground with Topaz Studio 2.0
There are many other scenic spots along the Trail, such as Pontoon Lake, Reid Lake, and Tibbitt Lake at the very end of Ingraham Trail. For images and movies I shot last year at Tibbitt Lake, see my blog post at Aurora Reflections in Yellowknife.
But in my 8 nights in Yellowknife this year I managed to hit many of the key aurora spots for photography and viewing. I recommend a visit, especially in September before autumn clouds roll in later in the season, and while the lakes are not frozen and nighttime temperatures are mild.
Here’s a 3-minute music video of clips I shot from all these sites showing the motion of the Lights as it appeared to the eye in “real-time,” not sped up or in time-lapse.
The Northern Lights of Yellowknife from Alan Dyer on Vimeo.
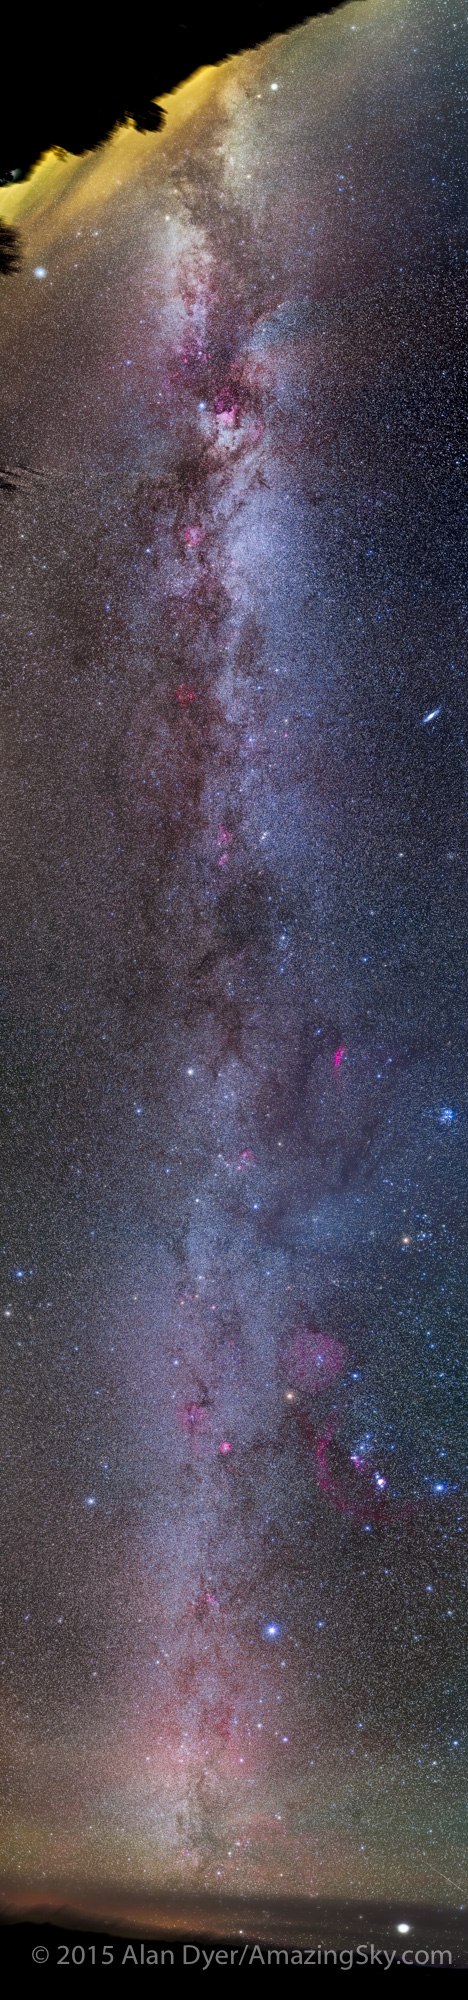
Panoramas featuring the arch of the Milky Way have become the icons of dark sky locations. “Panos” can be easy to shoot, but stitching them together can present challenges. Here are my tips and techniques.
My tutorial complements the much more extensive information I provide in my eBook, at right. Here, I’ll step through techniques for simple to more complex panoramas, dealing first with essential shooting methods, then reviewing the workflows I use for processing and stitching panoramas.
What software works best depends on the number of segments in your panorama, or even on the focal length of the lens you used.
PART 1 — SHOOTING
What Equipment Do You Need?
Nightscape panoramas don’t require any more equipment than what you likely already own for shooting the night sky. For Milky Way scenes you need a fast lens and a solid tripod, but any good DSLR or mirrorless camera will suffice.
Pano Gear A tripod head with a scale marked in degrees is essential. Here it sits on a levelling head with its own bubble level that makes it easy to level the camera. An L-bracket allows the camera to rotate directly above the vertical axis, handy when shooting in portrait mode, as here with a 15mm full-frame fish-eye lens, one option for horizon-to-zenith panoramas. The tripod accessories here are by Acratech.
The tripod head can be either a ball head or a three-axis head, but it should have a horizontal axis marked with a degree scale. This allows you to move the camera at a correct and consistent angle from segment to segment. I think that’s essential.
What you don’t need is a special, and often costly, panorama head. These rotate the camera around the so-called “nodal point” inside the lens, avoiding parallax shifts that can make it difficult to align and stitch adjacent frames. Parallax shift is certainly a concern when shooting interiors or any scenes with prominent content close to the camera. However, in most nightscapes our scene content is far enough away that parallax simply isn’t an issue.
Though not a necessity, I find a levelling base a huge convenience. As I show above, this specialized ball head goes under the usual tripod head and makes it easy to level the main head. It eliminates all the fussing with trial-and-error adjustments of the length of each tripod leg.
On the Level Most cameras now have an electronic level built in that is handy for ensuring the panorama does not end up tilted. This is from a Canon 6D MkII.
Then to level the camera itself, I use the electronic level now in most cameras. Or, if your camera lacks that feature, an accessory bubble level clipped into the camera’s hot shoe will work.
Having the camera level is critical. It can be tipped up, of course, but not tilted left-right. If it isn’t level the whole panorama will be off kilter, requiring excessive straightening and cropping in processing, or the horizon will wave up and down in the final stitch, perhaps causing parts of the scene to go missing.
NOTE: Click or tap on the panorama images to open a high-res version for closer inspection.
Aurora in the Winter Sky To capture this panorama I used a Sigma 14mm lens on a Nikon D750, mounted in portrait orientation with the gear shown above, to shoot eight segments 45° apart, each 13 seconds at f/2 and ISO 3200. Stitching was with Adobe Camera Raw. The aurora lies to the north at left, while Orion and the winter Milky Way are to the south at right.
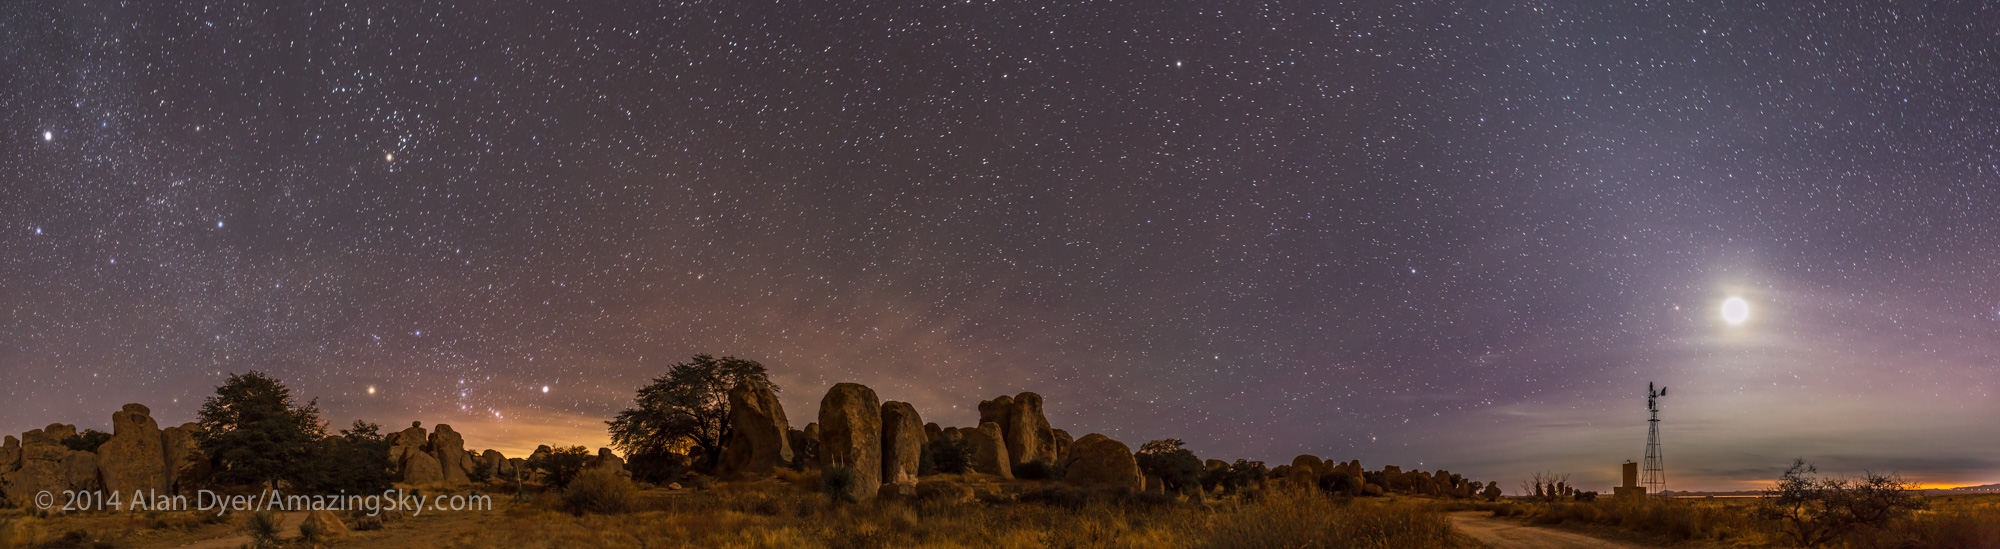
Shooting Horizon Panoramas
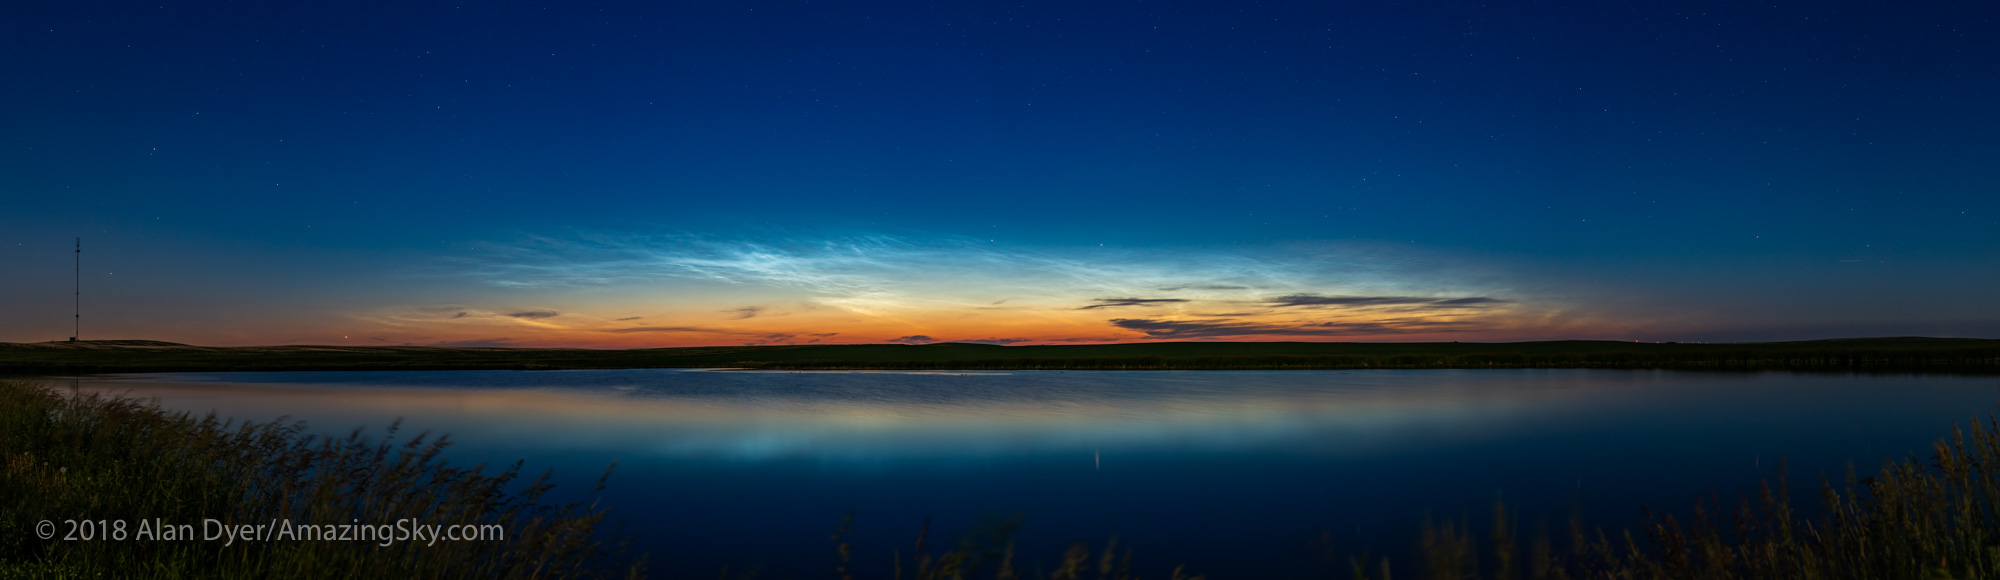
While panoramas spanning the entire sky might be what you are after, I suggest starting simpler, with panos that take in just a portion of the 360° horizon and only a part of the 180° of the sky. These “partial panos” are great for auroras (above) or noctilucent clouds, (below), or for capturing just the core of the Milky Way over a landscape.
The key to all panorama success is overlap. Segments should overlap by 30 to 50 percent, enabling the stitching software to align the segments using the content common to adjacent frames. Contrary to some users, I’ve never found an issue with having too much overlap, where the same content is present on several frames.
Noctilucent Clouds in Summer NLCs are good panorama subjects. I captured this display on June 19, 2019 using a Sony a7III camera at ISO 400, and a Sigma 50mm lens at f/2 for a set of six segments stitched with Adobe Camera Raw
For a practical example, let’s say you shoot with a 24mm lens on a full-frame camera, or a 16mm lens on a cropped-frame camera. Both combinations yield a field of view across the long dimension of the frame of roughly 80°, and across the short dimension of the frame of about 55°.
That means if you shoot with the camera in “landscape” orientation, panning the camera by 40° between segments would provide a generous 50 percent overlap. The left half of each segment will contain the same content as the right half of the previous segment, if you take your panos by turning from left to right.
TIP: My habit is to always shoot from left to right, as that puts the segments in the correct order adjacent to each other when I view them in browser programs such as Lightroom or Adobe Bridge, with images sorted in chronological order (from first to last images in a set) as I typically prefer. But the stitching will work no matter which direction you rotate the camera.
In the example of a 24mm lens and a camera in landscape orientation you could turn at a 45° or 50° spacing and yield enough overlap. However, turning the camera at multiples of 15° is usually the most convenient, as tripod heads are often graduated with markings at 5° increments, and labeled every 15° or 30°.
Some will have coarser and perhaps unlabeled markings. If so, determine what each increment represents, then take care to move the camera consistently by the amount that will provide adequate overlap.
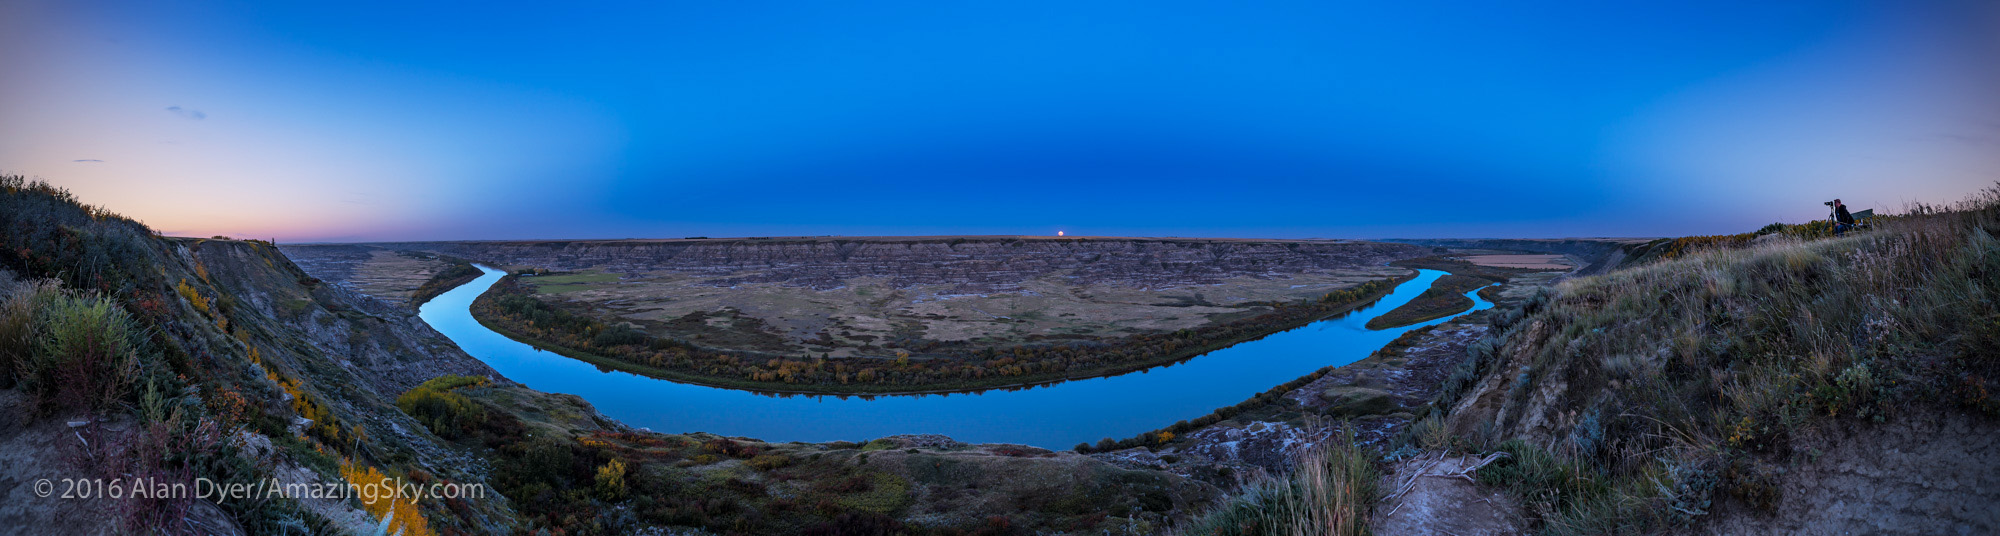
Moonrise over the Red Deer River Not all panoramas have to be of the Milky Way. This captures the sweeping arc of Earth’s blue shadow rising in the eastern sky as the Harvest Moon comes up amid the shadow. This is a 7-section single-tier panorama with the 20mm Sigma lens and Nikon D750 at ISO 100. It stitched fine with Adobe Camera Raw.
To maximize the coverage of the sky while still framing a good amount of foreground, a common practice is to shoot panoramas with the camera in portrait orientation. That provides more vertical but less horizontal coverage for each frame. In that case, for adequate overlap with a 24mm lens and full-frame camera shoot at 30° spacings.
TIP: When shooting a partial panorama, for example just to the south for the Milky Way, or to the north for the aurora borealis, my practice is to always shoot a segment farther to the left and another to the right of the main scene. Shoot more than you need. Those end segments can get distorted when stitching, but if they don’t contain essential content, they can be cropped out with no loss, leaving your main scene clean and undistorted.
Shooting with a longer lens, such as a 50mm (or 35mm on a cropped frame camera), will yield higher resolution in the final panorama, but you will have much less sky coverage, unless you shoot multiple tiers, as I describe below. You would also have to shoot more segments, at 15° to 20° spacings, taking longer to complete the shoot.
Morant’s Curve in the Moonlight Not all panoramas have to be shot under dark skies, or encompass 360°. Moonlight illuminates the famous viewpoint called Morant’s Curve in Banff National Park, with Orion setting over the peaks of the Continental Divide, as a train speeds east through the March night. This is a panorama of 12 segments, each with a 24mm Sigma lens and Nikon D750 in portrait orientation, stitched with PTGui.
As the number of segments goes up shooting fast becomes more important, to minimize how much the sky moves from segment to segment, and during each exposure itself, to aid in stitching. Remember, the sky appears to be turning from east to west, but the ground isn’t. So a prolonged shoot can cause problems later as the stitching software tries to align on either the fixed ground or the moving stars.
Panoramas on moonlit nights, as I show above, are relatively easy because exposures are short.
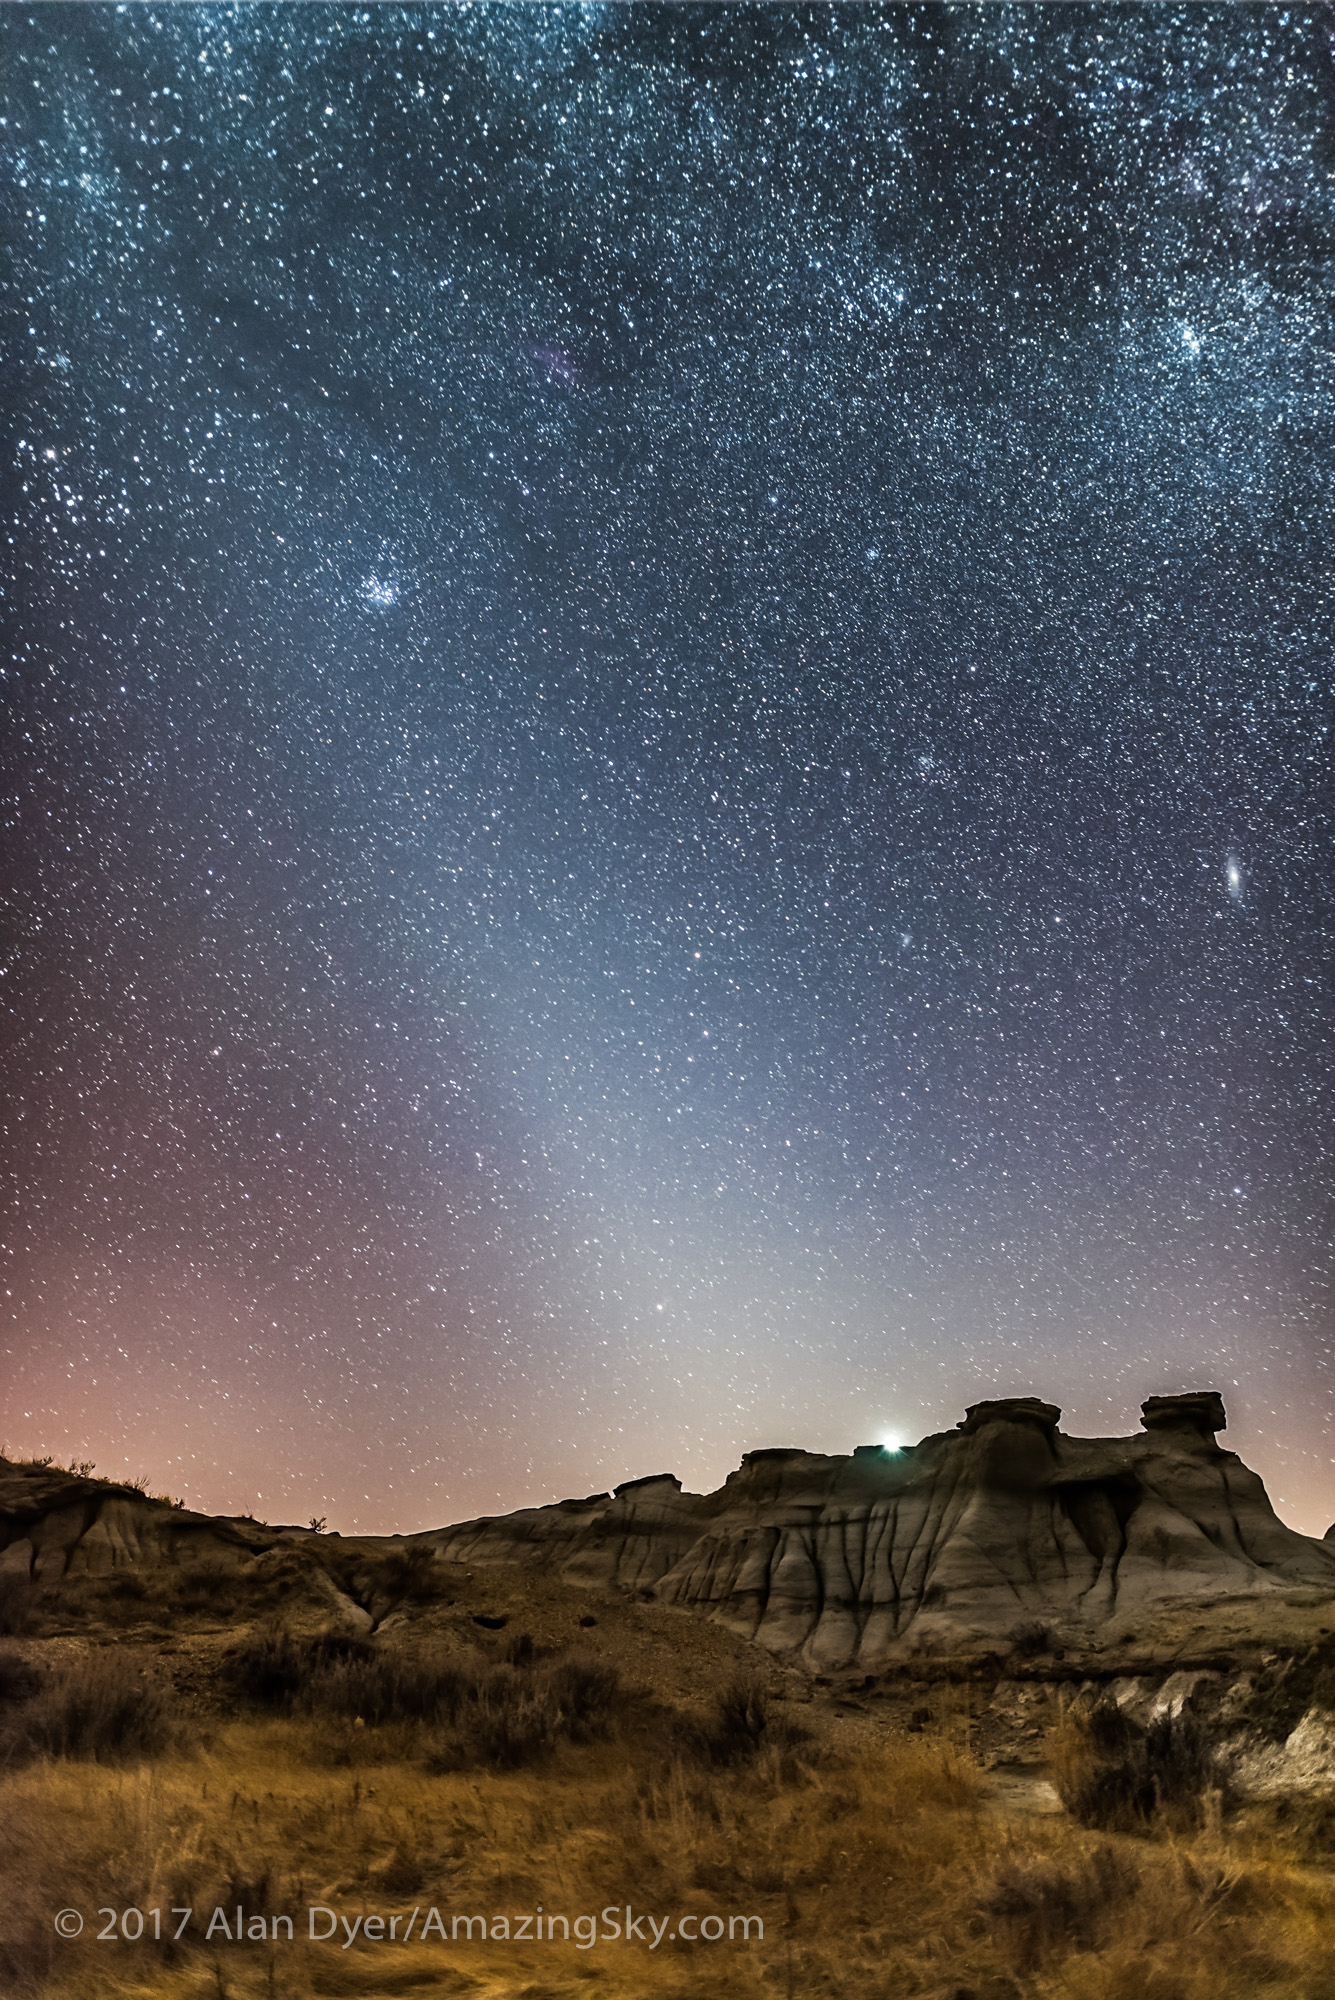
Milky Way over the Buffalo Jump A moonless night in early May was perfect for a panorama of the Milky Way arching over the Badlands of Dry Island Buffalo Jump in Alberta. This is a multi-tier panorama of 3 tiers of 7 segments each, with exposures of 30 seconds at f/2 with a 20mm Sigma Art lens and Nikon D750 at ISO 6400.
Milky Way panoramas taken on dark, moonless nights are tougher. They require fast apertures (f/2 to f/2.8) and high ISOs (ISO 3200 to 6400), to keep individual exposures no more than 30 to 40 seconds long.
Expose to the Right Minimize noise in the shadows by exposing so the histogram is shifted to the right, and not slammed to the left. Underexposure is the most common cardinal sin of newbie nightscape photographers.
Noise lives in the dark foregrounds, so I find it best to err on the side of overexposure, to ensure adequate exposure for the ground, even if it means the sky is bright and the stars slightly trailed. It’s the “Expose to the Right” philosophy I espouse at length in my eBook.
Advanced users can try shooting in two passes: one at a low ISO and with a long exposure for the fixed ground, and another pass at a higher ISO and a shorter exposure for the moving sky. But assembling such a set will take some deft work in Photoshop to align and mask the two stitched panos. None of the examples here are “double exposures.”
Shooting 360° Panoramas
Milky Way at Waterton Lakes While covering 360° in azimuth, this panorama from July 2018 goes only partway up the sky, to capture the Milky Way core to the south and the solstice twilight glow to the north. This is a 10-segment panorama, with each segment 30 seconds at f/2 with a Sigma 24mm Art lens and Nikon D750 at ISO 6400. Adobe Camera Raw stitched this nicely.
More demanding than partial panoramas are full 360° panoramas, as above. Here I find it is best to start the sequence with the camera aimed toward the celestial pole (to the north in the northern hemisphere, or to the south in the southern hemisphere). That places the area of sky that moves the least over time at the two ends of the panorama, again making it easier for software to align segments, with the two ends taken farthest apart in time meeting up in space.
In our 24mm lens example, to cover the entire 360° scene shooting with a 45° spacing would require at least eight images (8 x 45 = 360). I used 10 above. Using that same lens with the camera in portrait orientation will require at least 12 segments to cover the entire 360° landscape.
Shooting 360° by 180° Panoramas
Capturing STEVE This 360° panorama captures the infamous STEVE auroral arc across the south, with a normal auroral display to the north at right. This was from six segments, each 10 seconds at ISO 2500, with a Sigma 14mm lens at f/1.8 and Nikon D750 in portrait orientation.
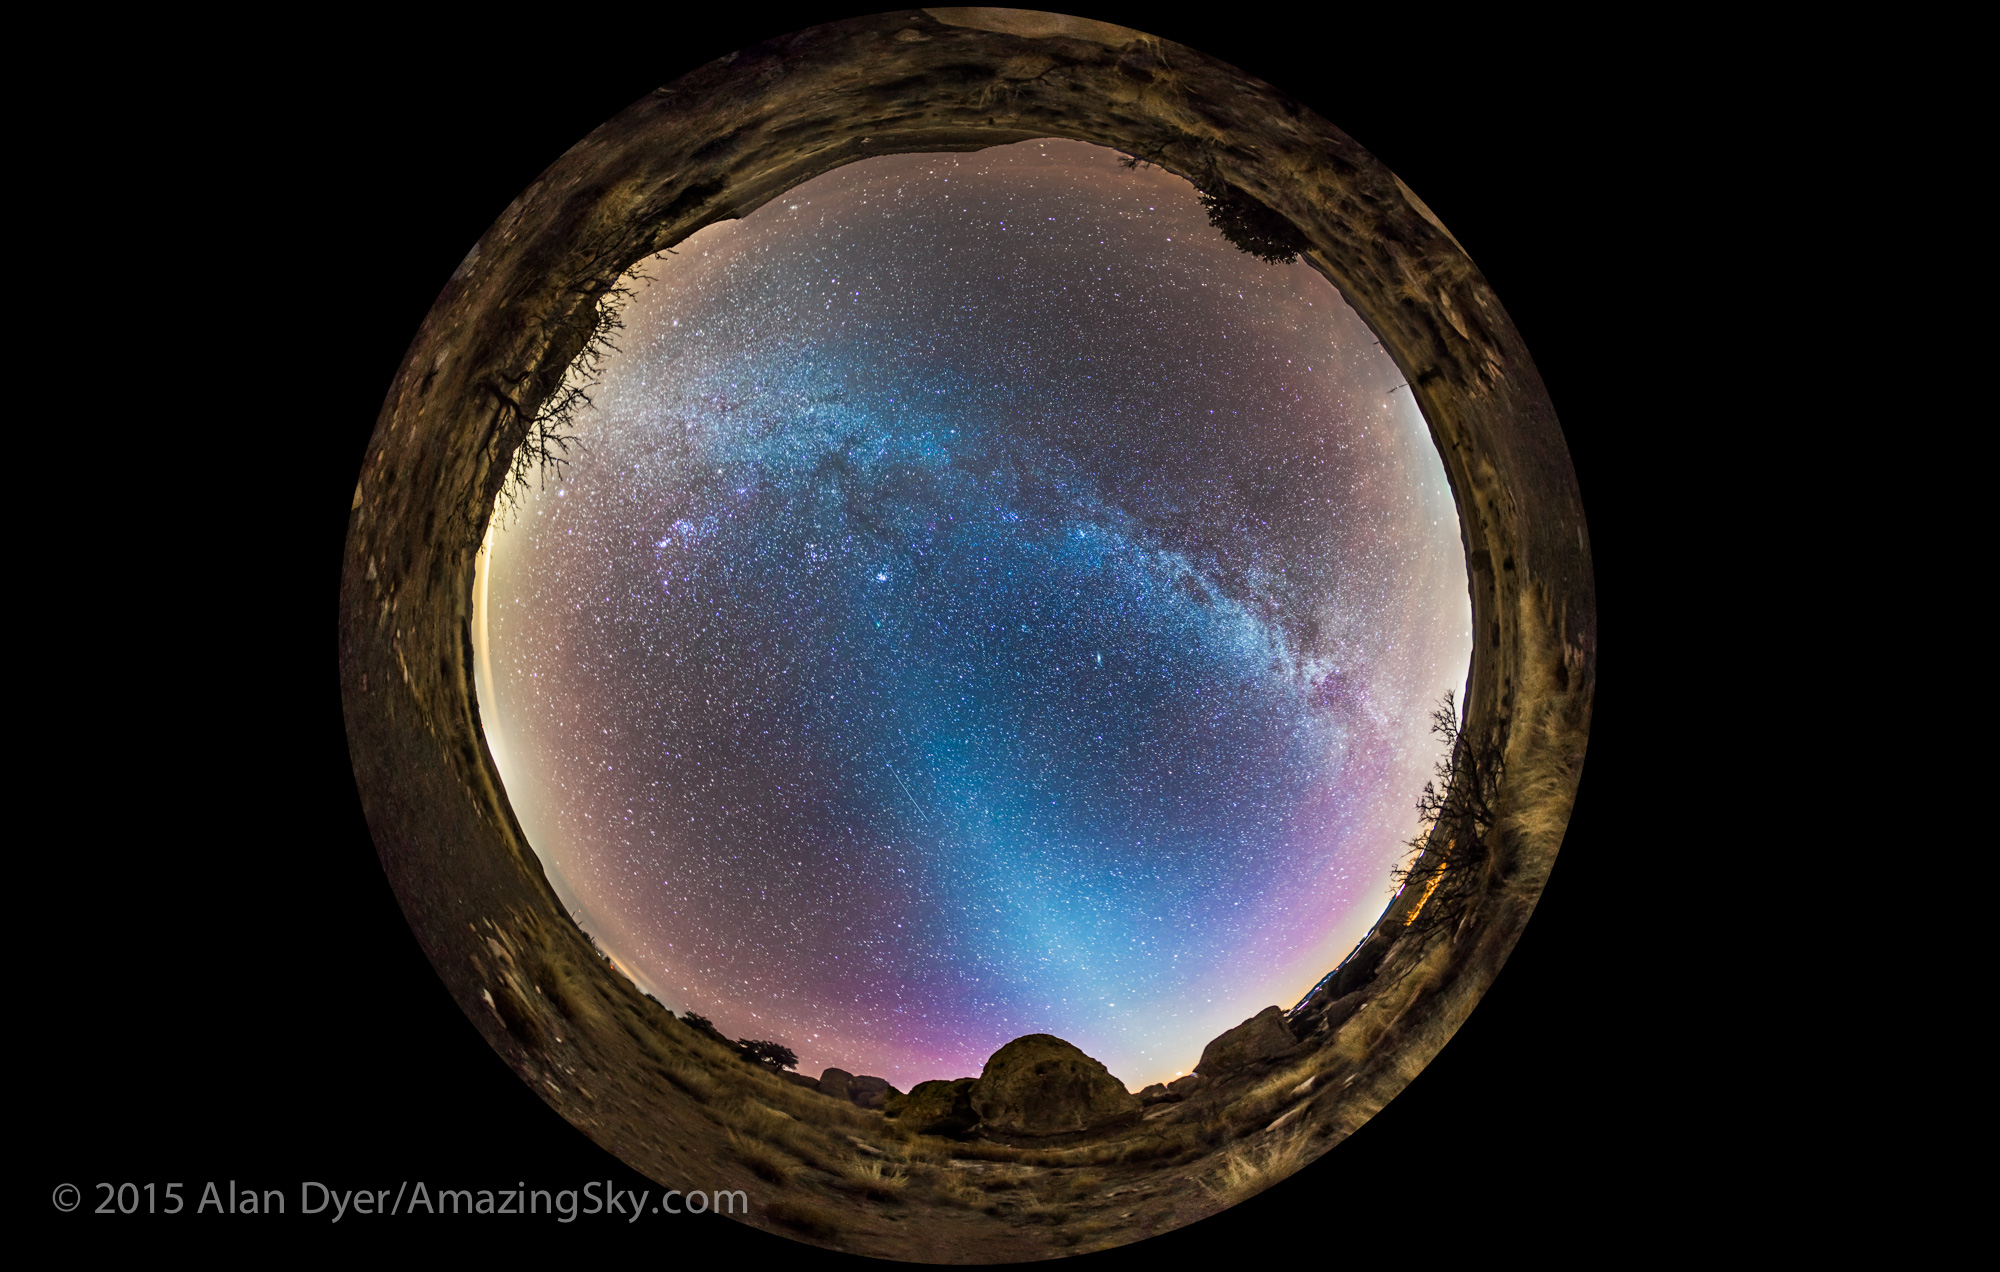
More demanding still are 360° panoramas that encompass the entire sky, from the ground below the horizon to the zenith overhead. Above is an example.
To do that with a single row of images requires shooting in portrait orientation with a very wide 14mm rectilinear lens on a full-frame camera. That combination has a field of view of about 100° across the long dimension of the sensor.
That sounds generous, but reaching up to the zenith at an altitude of 90° means only a small portion of the landscape will be included along the bottom of the frame.
To provide an even wider field of view to take in more ground, I use full-frame fish-eye lenses on my full-frame cameras, such as Canon’s old 15mm lens (as shown at top) or Rokinon’s 12mm. Even a circular-format fish-eye will work, such as an 8mm on a full-frame camera or 4.5mm on a cropped-frame camera.
All such fish-eye lenses produce curved horizons, but they take in a wide swath of sky, making it possible to include lots of foreground while reaching well past the zenith. Conventional panorama assembly programs won’t work with such wide and distorted segments, but the specialized programs described below will.
Shooting Multi-Tier Panoramas
Bow Lake by Night The summer Milky Way arches over iconic Bow Lake in Banff on a perfect night in July 2018. This is a stitch, using PTGui, of three tiers of 7 segments each, with a 20mm Sigma lens and Nikon D750, with a Genie Mini automating the horizontal panning and shutter release, as shown above. Each frame was 30 seconds at f/2 and ISO 6400. I used this same set to test the programs described below.
The alternative technique for “all-sky” panos is to shoot multiple tiers of images: first, a lower row covering the ground and partway up the sky, followed by an upper row completing the coverage of just the sky at top.
The trick is to ensure adequate overlap both horizontally and vertically. With the camera in landscape orientation that will require a 20mm lens for full-frame cameras, or a 14mm lens for cropped-frame cameras. Either combination can cover the entire sky plus lots of foreground in two tiers, though I usually shoot three, just to be sure!.
Shooting with longer lenses provides incredible resolution for billboard-sized “gigapan” blow-ups, but will require shooting three, if not more, tiers, each with many segments. That starts to become a chore to do manually. Some motorized assistance really helps when shooting multi-tier panoramas.
Automating the Pan Shooting
The dedicated pano shooter might want to look at a device such as the GigaPan Epic models or the iOptron iPano, (shown below), all about $800 to $1000.
iPano Panorama Machine The iOptron iPano automates all shooting and movement, making even the most complex panoramas easy to shoot. It can also be used for two-axis motion-control time-lapses.
I’ve tested the latter and it works great. You program in the lens, overlap, and angular sweep desired. The iPano works out how many segments and tiers will be required, and automates the shooting, firing the shutter for the duration you program, then moving to the new position, firing again, and so on. I’ve shot four-tier panos effortlessly and with great success.
iPano Control The iPano’s on-board screen provides all the menus and options for setting up a shoot. This screen shows that this multi-tier pano will take 6m37s to complete.
However, these devices are generally bigger and heavier than I care to heft around in the field.
Instead, I use the original Genie Mini from SYRP, (below), a $250 device primarily for shooting motion control time-lapses. But the wireless app that programs the Genie also has a panorama function that automatically slews the camera horizontally between exposures, again based on the lens, overlap, and angular sweep you enter. The just-introduced Genie Mini II is similar, but with even more capabilities for camera control.
The SYRP Genie Mini A lower-cost option for automated shooting, the Genie Mini also provides time-lapse motion control. Here, I show it with a conventional 3-axis head on top, for shifting the camera up in altitude manually for multi-tier panos, while the Mini handles the horizontal motion and exposures.
While combining two Genie Minis allows programming in a vertical motion as well, I’ve been using just a regular tripod head atop the Mini to manually move the camera vertically between each of the horizontal tiers. I don’t feel the one or two moves needed to go from tier to tier too arduous to do manually, and I like to keep my field gear compact and easy to use.
Wireless Control The original Genie App (Apple iOS or Android) connects to the Genie via Bluetooth. This screen shows a 360° panorama programmed for a 20mm lens with 37% percent overlap, requiring eight segments. The shutter will fire after each move for 40 seconds.
The Genie Mini (now replaced by the Mini II) works great and I highly recommend it, even if panoramas are your only interest. But it is also one of the best, yet most affordable, single-axis motion control devices on the market for time-lapse work.
When to Shoot the Milky Way
While the right gear and techniques are important, go out on the wrong night and you won’t be able to capture the Milky Way as the great sweeping arch you might have hoped for.
In the northern hemisphere the Milky Way arches directly overhead from late July to October for most of the night. That’s fine for spherical fish-eye panoramas, but in rectangular images when the Milky Way is overhead it gets stretched and distorted across the top of the final panorama. For example, in the Bow Lake by Night panorama above, I cropped out most of this distorted content.
Capturing the Arch I captured this 360° pano of the summer Milky Way arching over the sandstone formations of Writing-on-Stone Provincial Park in southern Alberta in early June 2018. At that time of year the Milky Way is still confined to the eastern sky. This is a 21-panel panorama, shot in three tiers of seven panels each, with the Nikon D750 and Sigma 20mm Art lens on the Genie Mini, with each segment 30 seconds at f/2 and ISO 6400.
The prime season for Milky Way arches is therefore before the Milky Way climbs overhead, while it is still across the eastern sky, as above. That’s on moonless nights from March to early July, with May and June best for catching it in the evening, and not having to wait up until dawn, as is the case in early spring.
Simulating the Scene I often use Starry Night™ (shown here) to simulate the sky for the place and date I want, to preview where and when the Milky Way will appear and how it will move. The red box shows the field of view of a rectilinear 14mm lens in portrait orientation, showing it covering from the zenith (at top) to just below the horizon.
TIP: The best way to figure out when and where the Milky Way will appear is to use a desktop planetarium program such as Starry Night or Sky Safari or the free Stellarium. All can realistically depict the Milky Way for your location and date. You can then step through time to see how the Milky Way will move through the night, and how it will frame with your camera and lens combination using the “field of view” indicators the programs provide.
The Great Southern Sky A 360° panorama from April 2017 captures the arc of the southern Milky Way over the OzSky star party near Coonabarabran, NSW, Australia. This is 8 segments, each 30 seconds at ISO 6400 and f/2.5 with a Rokinon 14mm lens on a Canon 6D in portrait orientation, and stitched with PTGui.
When shooting in the southern hemisphere I like the April to June period for catching the sweep of the southern Milky Way and the galactic core rising in late evening. By contrast, during mid austral winter in July and August the galactic centre shines directly overhead in the evening, a spectacular sight to be sure, but tough to capture in a panorama except in a spherical or fish-eye scene.
The Other Milky Way This 360° panorama, shot in a single tier with a 14mm Sigma lens and Nikon D750 in portrait orientation, captures the winter Milky Way arching across the western sky on an early spring night at Dinosaur Provincial Park in Alberta. Also in the pano is the sweep of the faint Zodiacal Light. This is a stitch, using PTGui, of 12 segments, each 30 seconds at f/2.8 and ISO 4000.
That said, I always like to put in a good word for the often sadly neglected winter Milky Way (the summer Milky Way for those “down under”). While lacking the spectacle of the galactic core in Sagittarius, the “other” Milky Way has its attractions such as Orion and Taurus. The best months for a panorama with that Milky Way in an arch across a rectangular frame are January to March. The Zodiacal Light can be a bonus at that season, as it was above.
TIP: Always shoot raw files for the widest dynamic range and flexibility in recovering details in the highlights and shadows. Even so, each segment has to be well exposed and focused out in the field.
And unless you are doing a “two-pass” double exposure, always shoot each segment with identical exposure settings. This is especially critical for bright sky scenes such twilights or moonlit scenes. Vary the exposure and you might get unsightly banding at the seams.
There’s nothing worse than getting home only to find one or more segments was missed, or was out of focus or badly exposed, spoiling the set.
PART 2 — STITCHING
Developing Panorama Segments
Once you have your panorama segments, the next step is to develop and assemble them. For my workflow, the process of assembling a panorama from its constituent segments begins with developing each of those segments identically.
NOTE: Click or tap on the software screen shots to open a high-res version for closer inspection.
Developing with Adobe Camera Raw This shows one segment of the multi-tier example before (on the left) and after applying development settings in the Basic panel of Adobe Camera Raw. By selecting all the images, the Sync Settings command (at top left) will apply the settings of one image to the rest of the set.
I like to develop each segment’s raw file as fully as possible at this first stage in the workflow, applying noise reduction, colour correction, contrast adjustments, shadow and highlight recovery, and any special settings such as dehaze and clarity that can make the Milky Way pop.
I also apply lens corrections to each raw image. While some feel doing so produces problems with stitching later on, I’ve never found that. I prefer to have each frame with minimal vignetting and distortion when going into stitching. I use Adobe Camera Raw out of Adobe Bridge, but Lightroom Classic has identical functions.
There are several other raw developers that can work well at this stage. In other tests I’ve conducted, Capture One and DxO PhotoLab stand out as producing good results on nightscapes. See my blog from 2017 for more on software choices.
Developing with DxO Among a host of programs competing with Adobe, DxO PhotoLab does a good job developing raw files, with the ability to copy and paste settings from one image to many. It has excellent noise reduction and shadow detail recovery. However, it cannot layer images.
The key is developing each raw file identically, usually by working on one segment, then copying and pasting its settings to all the others in a set. Not all raw developers have this “Copy Settings” function. For example, Affinity Photo does not. It works very well as a layer-based editor to replace Photoshop, but is crude in its raw developing “Persona” functions.
While panorama stitching software will apply corrections to smooth out image-to-image variations, I find it is best to ensure all the segments look as similar as possible at the raw stage for brightness, contrast, and colour correction.
Do be aware that among social media groups and chat rooms devoted to nightscape imaging a lot of myth and misinformation abounds about how to process and stitch panoramas, and why some don’t work. Someone having a problem with a particular pano will ask why, and get ten different answers from well-meaning helpers, most of them wrong!
Stitching Simple Panoramas
For example, if your segments don’t join well it likely isn’t because you needed to use a panorama head (one oft-heard bit of advice). I never do. The issue is usually a lack of sufficient overlap. Or perhaps the image content moved too much from frame to frame as the photographer took too long to shoot the set.
Or, even when quickly-shot segments do have lots of overlap, stitching software can still get confused if adjoining segments contain featureless content or content that changes, such as segments over rippling water with no identifiable “landmarks” for the software to latch onto.
The primary problems, however, arise from using software that just isn’t up to the task. Programs that work great on simple panoramas (as the next three examples show) will fail when trying to stitch a more demanding set of segments.
Stitching with Adobe Camera Raw The panorama function in all recent versions of Adobe Camera Raw (Lightroom Classic has the same feature) can do a superb job on simple panoramas, such as the moonlit Morant’s Curve pano, with the magical Boundary Warp option allowing you to fill the frame without cropping and losing content.
For example, for partial horizon panos shot with 20mm to 50mm lenses, I’ll use the panorama function now built into Adobe Camera Raw (ACR) and Adobe Lightroom Classic, and also in the mobile-friendly Lightroom app. As I show above, ACR can do a wonderful job, yielding a raw DNG file that can continue to be edited non-destructively. It’s by far the easiest and fastest option, and is my first choice.
Another choice, not shown here, is the Photomerge function from within Photoshop, which yields a layered and masked master file, and provides the option for “content-aware” filling of missing areas. It can sometimes work on panos that ACR balks at.
Stitching with ON1 PhotoRAW The Adobe competitor ON1 PhotoRAW also provides a good panorama stitching feature that can work with both simple and many multi-tier panos. It provides a flattened result, even when exporting as a .PSD Photoshop file.
Two programs popular as Adobe alternatives, ON1 PhotoRAW (above) and the aforementioned Affinity Photo (below), also have very capable panorama stitching functions.
However, in testing both programs with the demanding Bow Lake multi-tier panorama I used below with other programs, ON1 2019.5 did an acceptable job, while Affinity 1.7 failed. It works best on simpler panoramas, like this partial scene with a 24mm lens.
Stitching with Affinity Photo Another program vying to unseat Adobe products is Affinity Photo. It, too, does a fine job on simple panos, but tends to fail on multi-tier panoramas. There is no choice of panorama projections or option to export a layered master.
Even if they succeed when stitching 360° panoramas, such general-purpose editing programs, Adobe’s included, provide no option for choosing how the final scene gets framed. You have no control over where the program puts the ends of the scene.
Or the program just fails, producing a result like this.
When Stitching Goes Awry Throw a multi-tier pano at Adobe Camera Raw and you might end up with this type of unsalvageable result. Here’s where you have to turn to specialized panorama software
Warp Factor Even single-tier panos but shot with 14mm rectilinear (in this case) or fish-eye lenses will create warped results with ACR, only partly correctable with Boundary Warp.
Far worse is that multi-tier panoramas or, as I show above, even single-tier panos shot with very wide lenses, will often completely befuddle your favourite editing software, with it either refusing to perform the stitch or producing bizarre results.
Some photographers attempt to correct such wild distortions with lots of ad hoc adjustments with image-warping filters. But that’s completely unnecessary if you use the right software to begin with.
Stitching Complex Panoramas
When conventional software fails, I turn to the dedicated stitching program PTGui, $150 for MacOS or Windows. The name comes from “Panorama Tools – Graphical User Interface.”
Stitching with PTGui PTGui handles whatever complexity of panorama you can throw at it, either single or multi-tier (in this example), offering an accurate preview, a choice of projection modes (this is “equirectangular”), and the ability to quickly move the pano around to frame it as you like before exporting either a flattened or a layered master.
While PTGui can read raw files from most cameras, it will not read any of the development adjustments you made to those files using Lightroom, Camera Raw, or any other raw developers.
So, my workflow is to develop all the raw segments, export them out as 16-bit TIFFs, then import those into PTGui. It can detect what lens was used to take the images, information PTGui needs to stitch accurately. If you used a manual lens you can enter the lens focal length and type (rectilinear or fish-eye) yourself.
Spherical Scene with PTGui PTGui makes it easy to re-project the same set of images into other map projections, in this case as a circular fish-eye scene which can be rotated as desired.
I include a full tutorial on using PTGui in my eBook linked to above, but suffice to say that the program usually does a superb job first time and very quickly. You can drag the panorama around to frame the scene as you like, and change the projection at will to create rectangular or spherical format images, as above, and even so-called “little planet” projections that appear as if you were looking down at the scene from space.
Occasionally PTGui complains about some frames, requiring you to manually intervene to pick the same stars or horizon features in adjacent frames to provide enough matching alignment points until it is happy. Its interface also leaves something to be desired, with essential floating windows disappearing behind other mostly blank panels.
Adjusting Layers The layered output from PTGui produces a massive image but one that allows fine adjustments to the masks (by using a white paint brush) to correct mismatches like we see see here along the mountain peak.
When exporting the finished panorama I usually choose to export it as a layered 16-bit Photoshop .PSD or, with big panos, as a Photoshop .PSB “big” document.
The reason is that in aligning the moving stars PTGui (indeed, all programs) can produce a few “fault lines” along the horizon, requiring a manual touch up to the masks to clean up mismatched horizon content, as I show above. Having a layered and masked master makes this easy to do non-destructively, though that’s best done in Photoshop.
Opening with Affinity Affinity Photo is one of the few non-Adobe programs that can open large Photoshop .PSB files, and honour the layers, keeping them and the masks that PTGui exports intact.
However, Affinity Photo (above) can also read layered .PSD and .PSB Photoshop files, preserving the layers. By comparison, ON1 PhotoRAW flattens layered Photoshop files when it imports them, one deficiency that prevents this program from being a true Photoshop alternative.
Compressing the Milky Way A common final step is to compress the long dimension of the image to change its aspect ratio to one better suited to publication. But doing so highly distorts the grand sweep of the Milky Way.
Once a 360° panorama is in a program like Photoshop, some photographers like to “squish” the panorama horizontally to make it more square, for ease of printing and publication. I prefer not to do that, as it makes the Milky Way look overly tall, distorted, and in my opinion, ugly. But each to their own style.
You can test out a limited trial version of PTGui for free, but I think it is worth the cost as an essential tool for panorama devotees.
Other Stitching Options
Stitching with Microsoft ICE Image Composite Editor, for Windows only but free from Microsoft Research, also does a superb job on all panoramas (as it did with this test case), with accurate stitching and preview, a choice of projections, cropping, and the option for a layered output.
However, Windows users can also try Image Composite Editor (ICE), free from Microsoft Research. As shown above in my test 3-tier pano, ICE works very well on complex panoramas, has a clean, user-friendly interface, offers a choice of geometric projections, and can export a master file with each segment on its own layer, if desired, for later editing.
Stitching with HugIn The open-source program HugIn is free, but suffers from an inaccurate preview, complex interface and workflow, and technical displays and functions only a programmer will love.
The free, open source program HugIn is based on the same Panorama Tools root software that PTGui uses. However, I find HugIn’s operation clunky and overly technical. Its export process is arcane yet renders out only a flattened image.
HugIn Fail The export of the same multi-tier pano that worked fine with PTGui and ICE failed with HugIn, with missing content and numerous mis-aligned areas of the landscape, tough to fix in the flattened output.
In testing it with the same three-tier 21-segment pano that PTGui and ICE handled perfectly, HugIn failed to properly include one segment. However, it is free for MacOS and Windows, and so the price is right and is well worth a try.
Fish-Eye Milky Way In summer with the Milky Way overhead, a spherical projection is often best for presenting the Milky Way as your eye saw it, as a majestic band of light from horizon to horizon across the sky passing through the zenith.
With the superb tools now at our disposal, it is possible to create detailed panoramas of the night sky that convey the majesty of the Milky Way – and the night sky – as no single image can. Have fun!
There’s a slogan used in the U.S. National Parks that “half the Park is after dark.” It is certainly true at Dinosaur Provincial Park in Alberta.
Last Friday night, March 29, I spent the evening at one of my favourite nightscape sites, Dinosaur Provincial Park, about an hour’s drive east of my home. It was one of those magical nights – clear, mild, dry, and no mosquitoes! Yet!
I wanted to shoot Orion and the photogenic winter sky setting into the evening twilight over the Badlands landscape. This was the last moonless weekend to do so.
I shot some individual images (such as above) and also multi-panel panoramas, created by shooting a series of overlapping images at equal spacings, then stitching them later at the computer.
This is a 240° panorama stitched from 17 segments, all with the 24mm Sigma Art lens and Nikon D750 in portrait orientation, each segment 20 seconds at f/1.4 and ISO 3200. Stitched with Adobe Camera Raw.
There’s a narrow window of time between twilight and full darkness when the Milky Way shows up well but the western sky still has a lingering blue glow. This window occurs after the normal “blue hour” favoured by photographers.
The panorama above shows the arch of the winter Milky Way but also the towering band of the Zodiacal Light rising out of the twilight and distant yellow glow of Calgary. Zodiacal Light is sunlight scattering off meteoric and cometary dust orbiting in the inner solar system, so this is a phenomenon in space not in our atmosphere. However, the narrow streak is an aircraft contrail.
A 360° panorama of the spring sky over the Badlands of Dinosaur Provincial Park, Alberta. This is a panorama of 12 segments taken with the 14mm Sigma Art lens and Nikon D750 in portrait orientation, all for 30 seconds at f/2.8 and ISO 4000. Taken at 30° spacings. Stitched with PTGui.
Later that night, when the sky was fully dark I shot this complete panorama showing not only the Milky Way and Zodiacal Light to the west, but also the faint arc of the Zodiacal Band continuing on from the pyramid-shaped Zodiacal Light over into the east, where it brightens into the subtle glow of Gegenschein. This is caused by sunlight reflecting off interplanetary dust particles in the direction opposite the Sun.
Both the Band and Gegenschein were visible to the naked eye, but only if you knew what to look for, and have a very dark sky.
This is a panorama stitched from 3 segments, all with the 24mm Sigma Art lens and Nikon D750, for 20 seconds at f/2.2 and ISO 4000. Stitched with Adobe Camera Raw.
A closeup shows the Zodiacal Light in the west as the subtle blue glow tapering toward the top as it meets the Milky Way.
It takes a dark site to see these subtle glows. Dinosaur Park is not an official Dark Sky Preserve but certainly deserves to be. Now if we could only get Calgary, Brooks and Bassano to turn down and shield their lights!
A 180° panorama of the spring sky and constellations rising in the east over the Badlands of Dinosaur Provincial Park, Alberta on March 29, 2019. This is a stitch of 6 segments, each with the 14mm Sigma Art lens and Nikon D750 in portrait mode, each 30 seconds at f/2.8 and ISO 4000. Stitched with PTGui.
A closeup facing the other way, to the east, shows the area of sky opposite the Milky Way, in the spring sky. The familiar Big Dipper, now high our spring sky, is at top with its handle pointing down to Arcturus and Spica (just rising above the horizon) – remember to “arc to Arcturus, and speed on to Spica.”
Leo is at right of centre, flanked by the Beehive and Coma Berenices star clusters.
Polaris is at left — however, the distortion introduced by the panorama stitching at high altitudes stretches out the sky at the top of the frame, so the Dipper’s Pointer stars do not point in a straight line to Polaris.
The faint Zodiacal Band is visible at right, brightening toward the horizon in the Gegenschein.
I shoot images like these for use as illustrations in future eBook projects about stargazing and the wonders of the night sky. Several are in the works!
For two magical nights I was able to capture the Rockies by moonlight, with the brilliant stars of winter setting behind the mountains.
I’ve been waiting for nights like these for many years! I consider this my “25-Year Challenge!”
Back during my early years of shooting nightscapes I was able to capture the scene of Orion setting over Lake Louise and the peaks of the Continental Divide, with the landscape lit by the Moon.
Such a scene is possible only in late winter, before Orion sets out of sight and, in March, with a waxing gibbous Moon to the east to light the scene but not appear in the scene. There are only a few nights each year the photograph is possible. Most are clouded out!
Orion over Lake Louise, Banff National Park, Alberta March 1995 at Full Moon 28mm lens at f/2.8 Ektachrome 400 slide film
Above is the scene in March 1995, in one of my favourite captures on film. What a night that was!
But it has taken 24 years for my schedule, the weather, and the Moon phase to all align to allow me to repeat the shoot in the digital age. Thus the Challenge.
Here’s the result.
Orion setting over the iconic Victoria Glacier at Lake Louise, with the scene lit by the light of the waxing Moon, on March 19, 2019. This is a panorama of 3 segments stitched with Adobe Camera Raw, each segment 8 seconds at f/3.5 with the Sigma 24mm Art lens and Nikon D750 at ISO 800.
Unlike with film, digital images make it so much easier to stitch multiple photos into a panorama.
In the film days I often shot long single exposures to produce star trails, though the correct exposure was an educated guess factoring in variables like film reciprocity failure and strength of the moonlight.
Below is an example from that same shoot in March 1995. Again, one of my favourite film images.
Orion setting over Mount Temple, near Lake Louise, Banff National park, Alberta. March 1995. On Ektachrome 100 slide film, with a 28mm lens at f/8 for a roughly 20 minute exposure. Full moonlight provides the illumination
This year, time didn’t allow me to shoot enough images for a star trail. In the digital age, we generally shoot lots of short exposures to stack them for a trail.
Instead, I shot this single image of Orion setting over Mt. Temple.
The winter stars of Orion (centre), Canis Major (left) and Taurus (upper right) over Mt. Temple in Banff National Park. This is from the Morant’s Curve viewpoint on the Bow Valley Parkway, on March 19, 2019. Illumination is from moonlight from the waxing gibbous Moon off frame to the left. This is a single 8-second exposure at f/3.2 with the 24mm Sigma Art lens and Nikon D750 at ISO 800.
Plus I shot the panorama below, both taken at Morant’s Curve, a viewpoint named for the famed CPR photographer Nicholas Morant who often shot from here with large format film cameras. Kevin Keefe of Trains magazine wrote a nice blog about Morant.
A panorama of Morant’s Curve, on the Bow River in Banff National Park, with an eastbound train on the CPR tracks under the stars of the winter sky. Illumination is from the 13-day gibbous Moon off frame at left. Each segment is 8 seconds at f/3.2 and ISO 800 with the 24mm Sigma Art lens and Nikon D750 in portrait orientation.
I was shooting multi-segment panoramas when a whistle in the distance to the west alerted me to the oncoming train. I started the panorama segment shooting at the left, and just by good luck the train was in front of me at centre when I hit the central segment. I continued to the right to catch the blurred rest of the train snaking around Morant’s Curve. I was very pleased with the result.
The night before I was at another favourite spot, Two Jack Lake near Banff, to again shoot panoramas of the moonlit scene below the bright stars of the winter sky.
These are the iconic red chairs of Parks Canada, here at frozen Two Jack Lake, Banff National Park, and under the moonlit winter sky. This was March 18, 2019, with the scene illuminated by the gibbous Moon just at the frame edge here. This is a panorama of 11-segments, each 10 seconds at f/4 with the Sigma 24mm Art lens and Nikon D750 at ISO 800.
A run up to the end of the Vermilion Lakes road at the end of that night allowed me to capture Orion and Siris reflected in the open water of the upper lake.
The winter stars setting at Vermilion Lakes in Banff National Park, on March 18, 2019. This is a panorama cropped from a set of 11 images, all with the 24mm Sigma Art lens at f/3.2 for 10 seconds each and the Nikon D750 at ISO 800, in portrait orientation.
Unlike in the film days, today we also have some wonderful digital planning tools to help us pick the right sites and times to capture the scene as we envision it.
This is a screen shot of the PhotoPills app in its “augmented reality” mode, taken by day during a scouting session at Two Jack, but showing where the Milky Way will be later that night in relation to the real “live” scene shot with the phone’s camera.
PhotoPills
The app I like for planning before the trip is The Photographer’s Ephemeris. This is a shot of the plan for the Lake Louise shoot. The yellow lines are the sunrise and sunset points. The thin blue line at lower right is the angle toward the gibbous Moon at about 10 p.m. on March 19.
The Photographer’s Ephemeris
Even better than TPE is its companion program TPE 3D, which allows you to preview the scene with the mountain peaks, sky, and illumination all accurately simulated for your chosen location. I am impressed!
TPE 3D
Compare the simulation above to the real thing below, in a wide 180° panorama.
A panorama of Lake Louise in winter, in Banff National Park, Alberta, taken under the light of the waxing gibbous Moon, off frame here to the left. This was March 19, 2019. This is a crop from the original 16-segment panorama, each segment with the 24mm Sigma Art lens and Nikon D750, oriented “portrait.” Each segment was 8 seconds at f/3.2 and ISO 800.
These sort of moonlit nightscapes are what I started with 25 years ago, as they were what film could do well.
These days, everyone chases after dark sky scenes with the Milky Way, and they do look wonderful, beyond anything film could do. I shoot many myself. And I include an entire chapter in my ebook above about shooting the Milky Way.
But … there’s still a beauty in a contrasty moonlit scene with a deep blue sky from moonlight, especially with the winter sky and its population of bright stars and constellations.
These are the iconic red chairs of Parks Canada, here on the Tunnel Mountain Drive viewpoint overlooking the Bow River and Mount Rundle, in Banff National Park, and under the moonlit winter sky. This is a panorama cropped from the original 12-segments, each 15 seconds at f/4 with the Sigma 24mm Art lens and Nikon D750 at ISO 800.
I’m glad the weather and Moon finally cooperated at the right time to allow me to capture these magical moonlit panoramas.
I spent a wonderful week touring the star-filled nightscapes of southwest Saskatchewan.
On their license plates Saskatchewan is billed as the Land of Living Skies. I like the moniker that Saskatchewan singer-songwriter Connie Kaldor gives it – the sky with nothing to get in the way.
Grasslands National Park should be a mecca for all stargazers. It is a Dark Sky Preserve. You can be at sites in the Park and not see a light anywhere, even in the far distance on the horizon, and barely any sky glows from manmade sources.
The lead image shows the potential for camping in the Park under an amazing sky, an attraction that is drawing more and more tourists to sites like Grasslands.
This is a multi- panel panorama of the Milky Way over the historic 76 Ranch Corral in the Frenchman River Valley, once part of the largest cattle ranch in Canada. Mars shines brightly to the east of the galactic core.
Mars and the Milky Way over the tipis at Two Trees area in Grasslands National Park, Saskatchewan on August 6, 2018. Some light cloud added the haze and glows to the planets and stars. Illumination is by starlight. No light painting was employed here. This is a stack of 8 exposures for the ground, mean combined to smooth noise, and a single untracked exposure for the sky, all 30 seconds at f/2.8 with the Sigma 20mm lens, and Nikon D750 at ISO 6400 with LENR on.
Mars (at left) and the Milky Way (at right) over a single tipi (with another under construction at back) at the Two Trees site at Grasslands National Park, Saskatchewan, August 6, 2018. I placed a low-level warm LED light inside the tipi for the illumination. This is a stack of 6 exposures, mean combined to smooth noise, for the ground, and one untracked exposure for the sky, all 30 seconds at f/2.2 with the 20mm Sigma lens and Nikon D750 at ISO 3200.
The Big Dipper and Arcturus (at left) over a single tipi at the Two Trees site at Grasslands National Park, Saskatchewan, August 6, 2018. This is a stack of 10 exposures, mean combined to smooth noise, for the ground, and one untracked exposure for the sky, all 30 seconds at f/2.8 with the 20mm Sigma lens and Nikon D750 at ISO 6400. Light cloud passing through added the natural star glows, enlarging the stars and making the pattern stand out. No soft focus filter was employed, and illumination is from starlight. No light painting was employed. Some airglow and aurora colour the sky. A Glow filter from ON1 Photo Raw applied to the sky to further soften the sky.
At the Two Trees site visitors can stay in the tipis and enjoy the night sky. No one was there the night I was shooting. The night was warm, windless, and bug-less. It was a perfect summer evening.
From Grasslands I headed west to the Cypress Hills along scenic backroads. The main Meadows Campground in Cypress Hills Interprovincial Park, another Dark Sky Preserve, is home every year to the Saskatchewan Summer Star Party. About 350 stargazers and lovers of the night gather to revel in starlight.
The Perseid meteor shower over the Saskatchewan Summer Star Party, on August 10, 2018, with an aurora as a bonus. The view is looking north with Polaris at top centre, and the Big Dipper at lower left. The radiant point in Perseus is at upper right. The sky also has bands of green airglow, which was more prominent in images taken earlier before the short-lived aurora kicked up. The aurora was not obvious to the naked eye. However, the northern sky was bright all night with the airglow and faint aurora. This is a composite of 10 images, one for the base sky with the aurora and two faint Perseids, and 9 other images, each with Perseids taken over a 3.3 hour period, being the best 9 frames with meteors out of 360. Each exposure was 30 seconds at f/2 with the 15mm Laoawa lens and Sony a7III at ISO 4000. I rotated all the additional meteor image frames around Polaris to align the frames to the base sky image, so that the added meteors appear in the sky in the correct place with respect to the background stars, retaining the proper perspective of the radiant point.
A Perseid meteor streaks down the Milky Way over the Saskatchewan Summer Star Party in the Cypress Hills of southwest Saskatchewan, at Cypress Hills Interprovincial Park, a Dark Sky Preserve. The Milky Way shines to the south. About 350 stargazers attend the SSSP every year. Observers enjoy their views of the sky at left while an astrophotographer attends to his camera control computer at right. This is a single exposure, 25 seconds, with the Laowa 15mm lens at f/2 and Sony a7III camera at ISO 3200.
This year coincided with the annual Perseid meteor shower and we saw lots!
Most nights were clear, and warmer than usual, allowing shirt-sleeve observing. It was a little bit of Arizona in Canada. Everyone enjoyed the experience. I know I did!
SSSP and Cypress Hills are stargazing heaven in Canada.
From Cypress Hills I drove due north to finally, after years of thinking about it, visit the Great Sandhills near Leader, Saskatchewan. Above is a panorama from the “Boot Hill” ridge at the main viewing area.
The Sandhills is not a provincial park but is a protected eco zone, though used by local ranchers for grazing. However, much of the land remains uniquely prairie but with exposed sand dunes among the rolling hills.
There are farm lights in the distance but the sky above is dark and, in the panorama above, colored by twilight and bands of red and green airglow visible to the camera. It’s dark!
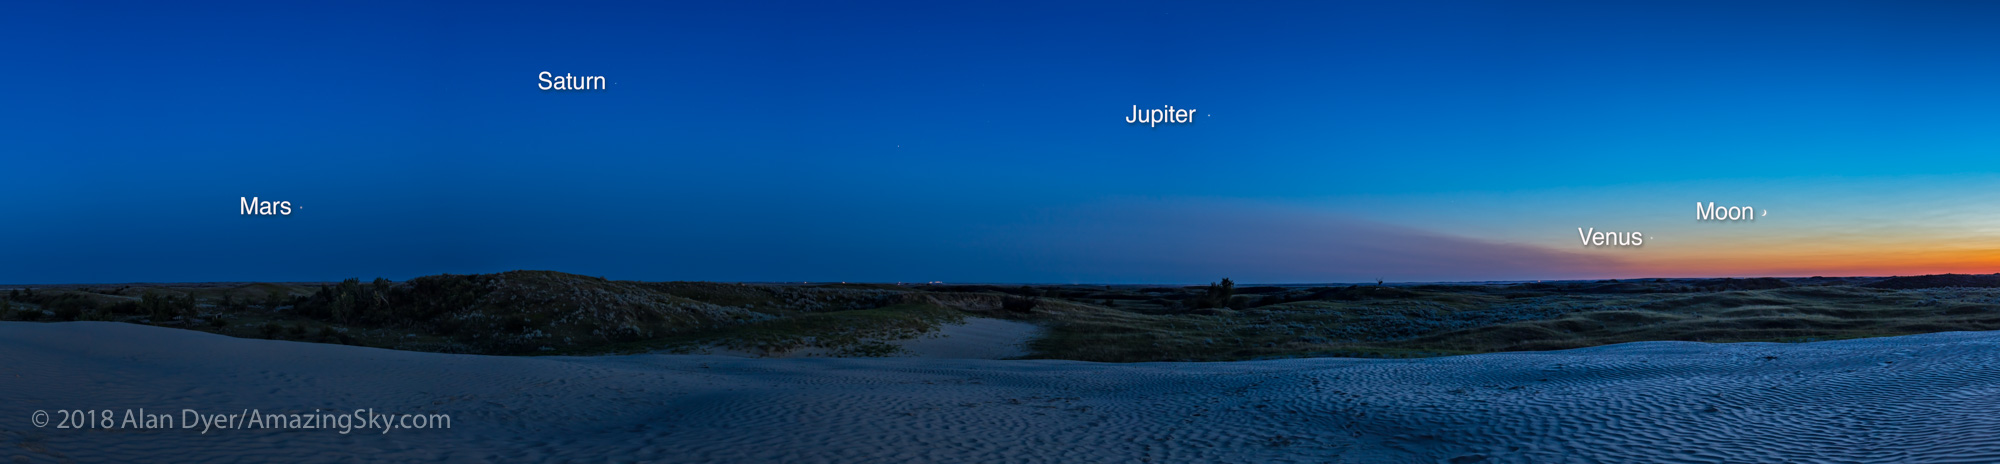
In the twilight, from the top of one of the accessible sand dunes, I shot a panorama of the array of four planets currently across the sky, from Venus in the southwest to Mars in the southeast.
This is the kind of celestial scene you can see only where the sky has nothing to get in the way.
If you are looking for a stellar experience under their “living skies,” I recommend Saskatchewan.
Solstice nights have been filled with twilights, planets, and noctilucent clouds.
Astronomers tend to curse the short nights and late sunsets of summer solstice. But the bright nights do offer unique sights.
Over the last few nights I’ve set up at what I call “Solstice Pond,” a prairie slough near home ideal for shooting the aurora to the north and, at this time of year, the glow of twilight and noctilucent clouds.
Below is the view on the night before solstice, looking north toward the glow of “perpetual twilight” that lights the northern horizon at solstice time from my latitude of 50° north.
A 120° panorama of the summer solstice twilight (at 12:30 am local time) looking north over the prairie pond near home in southern Alberta, taken June 19/20, 2018. Some very faint noctilucent clouds are at left but fading, while some very faint rays of auroral curtains are also visible in the photo but were invisible to the eye. The bright star Capella is at centre and reflected in the calm waters. Perseus is at right of centre. The red lights at right are from the wind turbines at the Wintering Hills Wind Farm. This is a stitch of 6 segments, with the 35mm lens at f/2.5 for 20 seconds each with the Canon 6DMkII at ISO 400.
From farther north the twilight would be more prominent, while above the Arctic Circle at 66° N latitude, the twilight turns to full daylight as the Sun never sets.
The view looking south this night, with the Moon just off frame at right, includes the Milky Way at centre, with Saturn embedded, flanked by bright Jupiter at right and reddish Mars at left, both casting shimmering “glitter paths” on the still waters.
A 160° panorama looking south near summer solstice time in June 2018, with the bright planets Mars (left) and Jupiter (right) and their glitter paths on the water flanking the Milky Way and Saturn in Sagittarius above the pinkish Lagoon Nebula. The waxing Moon is setting off frame at right brightening the sky and lighting the landscape. The sky is also blue from the solstice twilight. The stars of Scorpius shine between Jupiter and the Milky Way. Some faint bands of red and green airglow are visible at left, despite the bright sky. This is a stitch of 8 segments, all for 25 seconds with the 35mm lens at f/2.2 and Canon 6D MkII at ISO 800.
A few nights later (below), on June 24, the star of the solstice sky put in an appearance. Bright noctilucent clouds (NLCs) shone to the north, reflected in the pond.
These are water vapour clouds 80 kilometres high at the edge of the atmosphere – in the mesosphere – almost in space. They form over the Arctic in summer, and are high enough to remain sunlit even in the middle of the night as they catch the Sun shining over the pole.
Southern Western Canada – the Prairies where I live – is well-placed to see them, as we are far enough north to see them in our sky, but not so far north that our sky is too bright.
A fine display of noctilucent clouds (NLCs) or polar mesospheric clouds, reflected in a local prairie pond near home in southern Alberta. The display started with wisps much higher in the north but they faded as the Sun dropped lower, with the display at this extent by the time I reached my spot and took this panorama. Leo and Regulus are setting at far left in the west, as is Venus just above the horizon at left. Capella and Auriga are at centre, and circumpolar, while the stars of Perseus at right, rising. This is a panorama of 9 segments, at 15° spacings, with the 35mm lens at f/2.8 for 13 second exposures with the Canon 6D MkII at ISO 400. Stitched with Adobe Camera Raw.
An even better display appeared two nights later, on June 26, brighter and with more structure.
The curving arc of the top of the display defines the most southerly edge where sunlight is able to reach. That edge drops lower through the first part of the night, as the Sun itself drops lower below the horizon. This causes less of the NLC display to be sunlit.
A panorama of a fine display of noctilucent clouds across the northern horizon over an angle of about 60°. This was on June 26, 2018 at about 11:45 pm. Capella is just left of centre. The display faded as the solar illumination dropped and the clouds darkened from the top down. This was from the small pond near home in southern Alberta. This is a stitch of 7 segments, each 2 seconds at f/2.8 with the 85mm Rokinon lens and Canon 6D MkII at ISO 400. Stitched with ACR.
You can see this effect of the changing illumination of the clouds in this time-lapse compilation from June 26 (below).
Also notice the waving motion of the clouds. It is as if the NLC material is flowing over standing waves in the atmosphere – and it is! The waves are called “gravity waves,” and are bumps in the high atmosphere created by disturbances far below in the normal layers of the atmosphere, the stratosphere and troposphere.
The video includes two clips shot simultaneously: from a camera with a 24mm wide-angle lens, and from a camera with an 85mm moderate telephoto. Expand to view full screen in HD.
The motion, here over an hour or more, is hypnotic. The NLCs move right to left (east to west), while the dark normal weather clouds on the horizon are blowing left to right (west to east). The stars are also turning left to right. The water ripples in the wind, while ducks swim by.
“No ocean of water in the world can vie with its gorgeous sunsets; no solitude can equal the loneliness of a night-shadowed prairie.” – William Butler, 1873
In the 1870s, just before the coming of the railway and European settlement, English adventurer William Butler trekked the Canadian prairies, knowing what he called “The Great Lone Land” was soon to disappear as a remote and unsettled territory.
The quote from his book is on a plaque at the site where I took the lead image, Sunset Point at Writing-on-Stone Provincial Park.
The night was near perfect, with the Milky Way standing out down to the southern horizon and the Sweetgrass Hills of Montana. Below, the Milk River winds through the sandstone rock formations sacred to the Blackfoot First Nations.
The next night (last night, July 26, as I write this) I was at another unique site in southern Alberta, Red Rock Coulee Natural Area. The sky presented one of Butler’s unmatched prairie sunsets.
This is “big sky” country, and this week is putting on a great show with a succession of clear and mild nights under a heat wave.
The waxing crescent Moon adds to the western sky and the sunsets. But it sets early enough to leave the sky dark for the Milky Way to shine to the south.
This was the Milky Way on Wednesday night, July 27, over Red Rock Coulee. Sagittarius and the centre of the Galaxy lie above the horizon. At right, Saturn shines amid the dark lanes of the Dark Horse in the Milky Way.
I’m just halfway through my week-long photo tour of several favourite sites in this Great Lone Land. Next, is Cypress Hills and the Reesor Ranch.
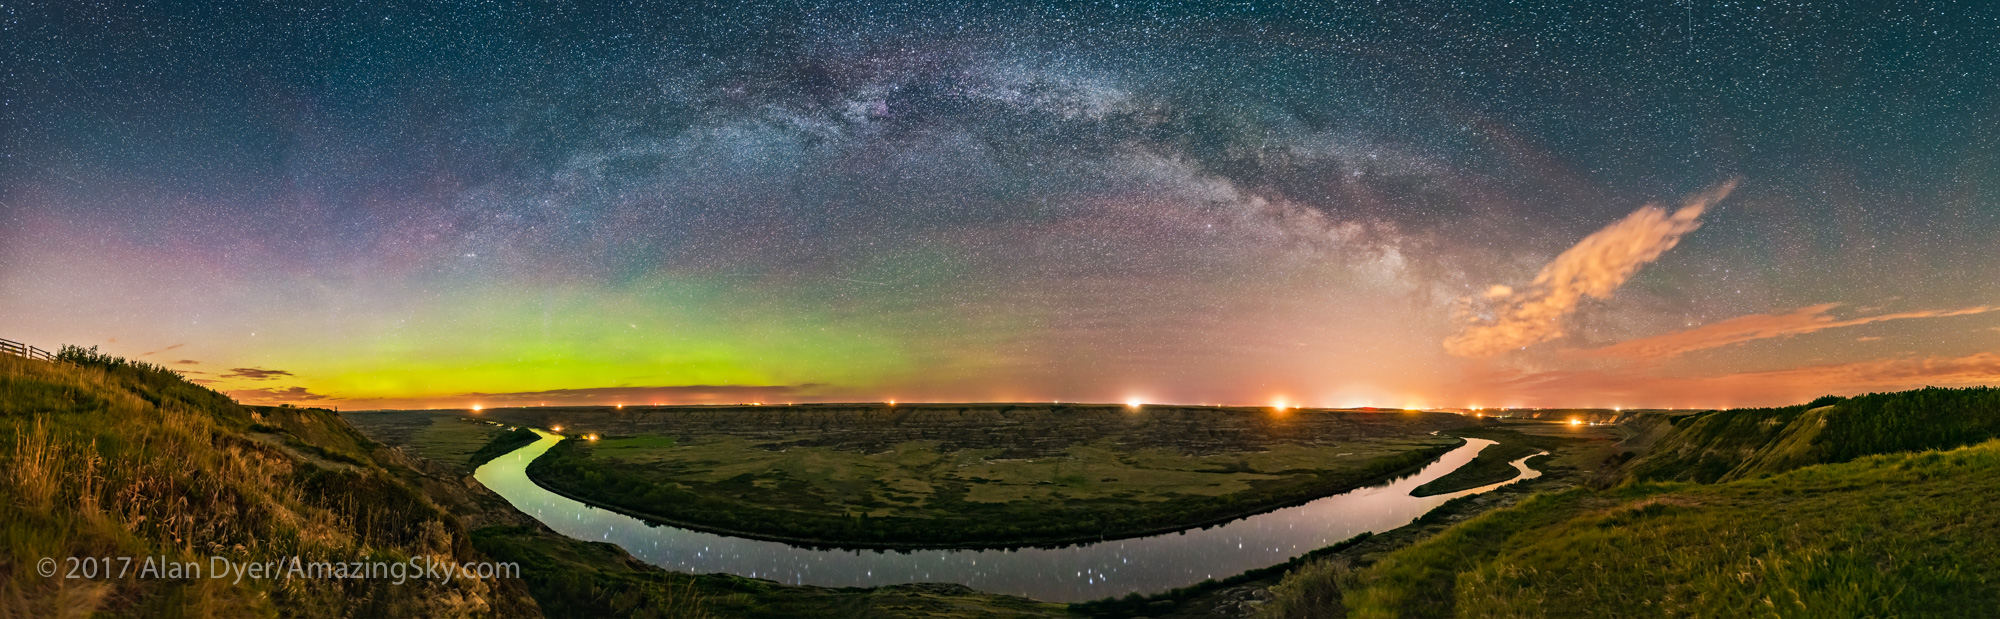
The arch of the Milky Way mirrors the sweep of the Red Deer River on a magical night in the Alberta Badlands.
Images of the Milky Way arching across the sky are now iconic. They are almost always assembled from individual frames stitched together to make a seamless panorama.
From the northern hemisphere, spring is the best season to shoot such a panorama as the Milky Way then remains confined to the eastern sky.
Later in summer, when the Milky Way passes directly overhead, panoramas are still possible, but the Milky Way looks distorted. The process of mapping a round sky onto a rectangular image, as I show here, inevitably stretches out the Milky Way near the zenith.
Last Saturday, in search of the Milky Way during prime panorama season, I set up for the night at Orkney Viewpoint overlooking the Red Deer River in the Alberta Badlands north of Drumheller. There, the river performs a grand curve through the valley below.
Above, the Milky Way, often described as a river of stars, sweeps in mirror-image fashion above the earthly river.
This is a stitch of 8 segments with the Sigma 20mm Art lens, in portrait mode, and Nikon D750. Each 30 seconds at f/2 and ISO 3200. Stitched with Adobe Camera Raw. Taken on a mild and moonless night, May 20, 2017.
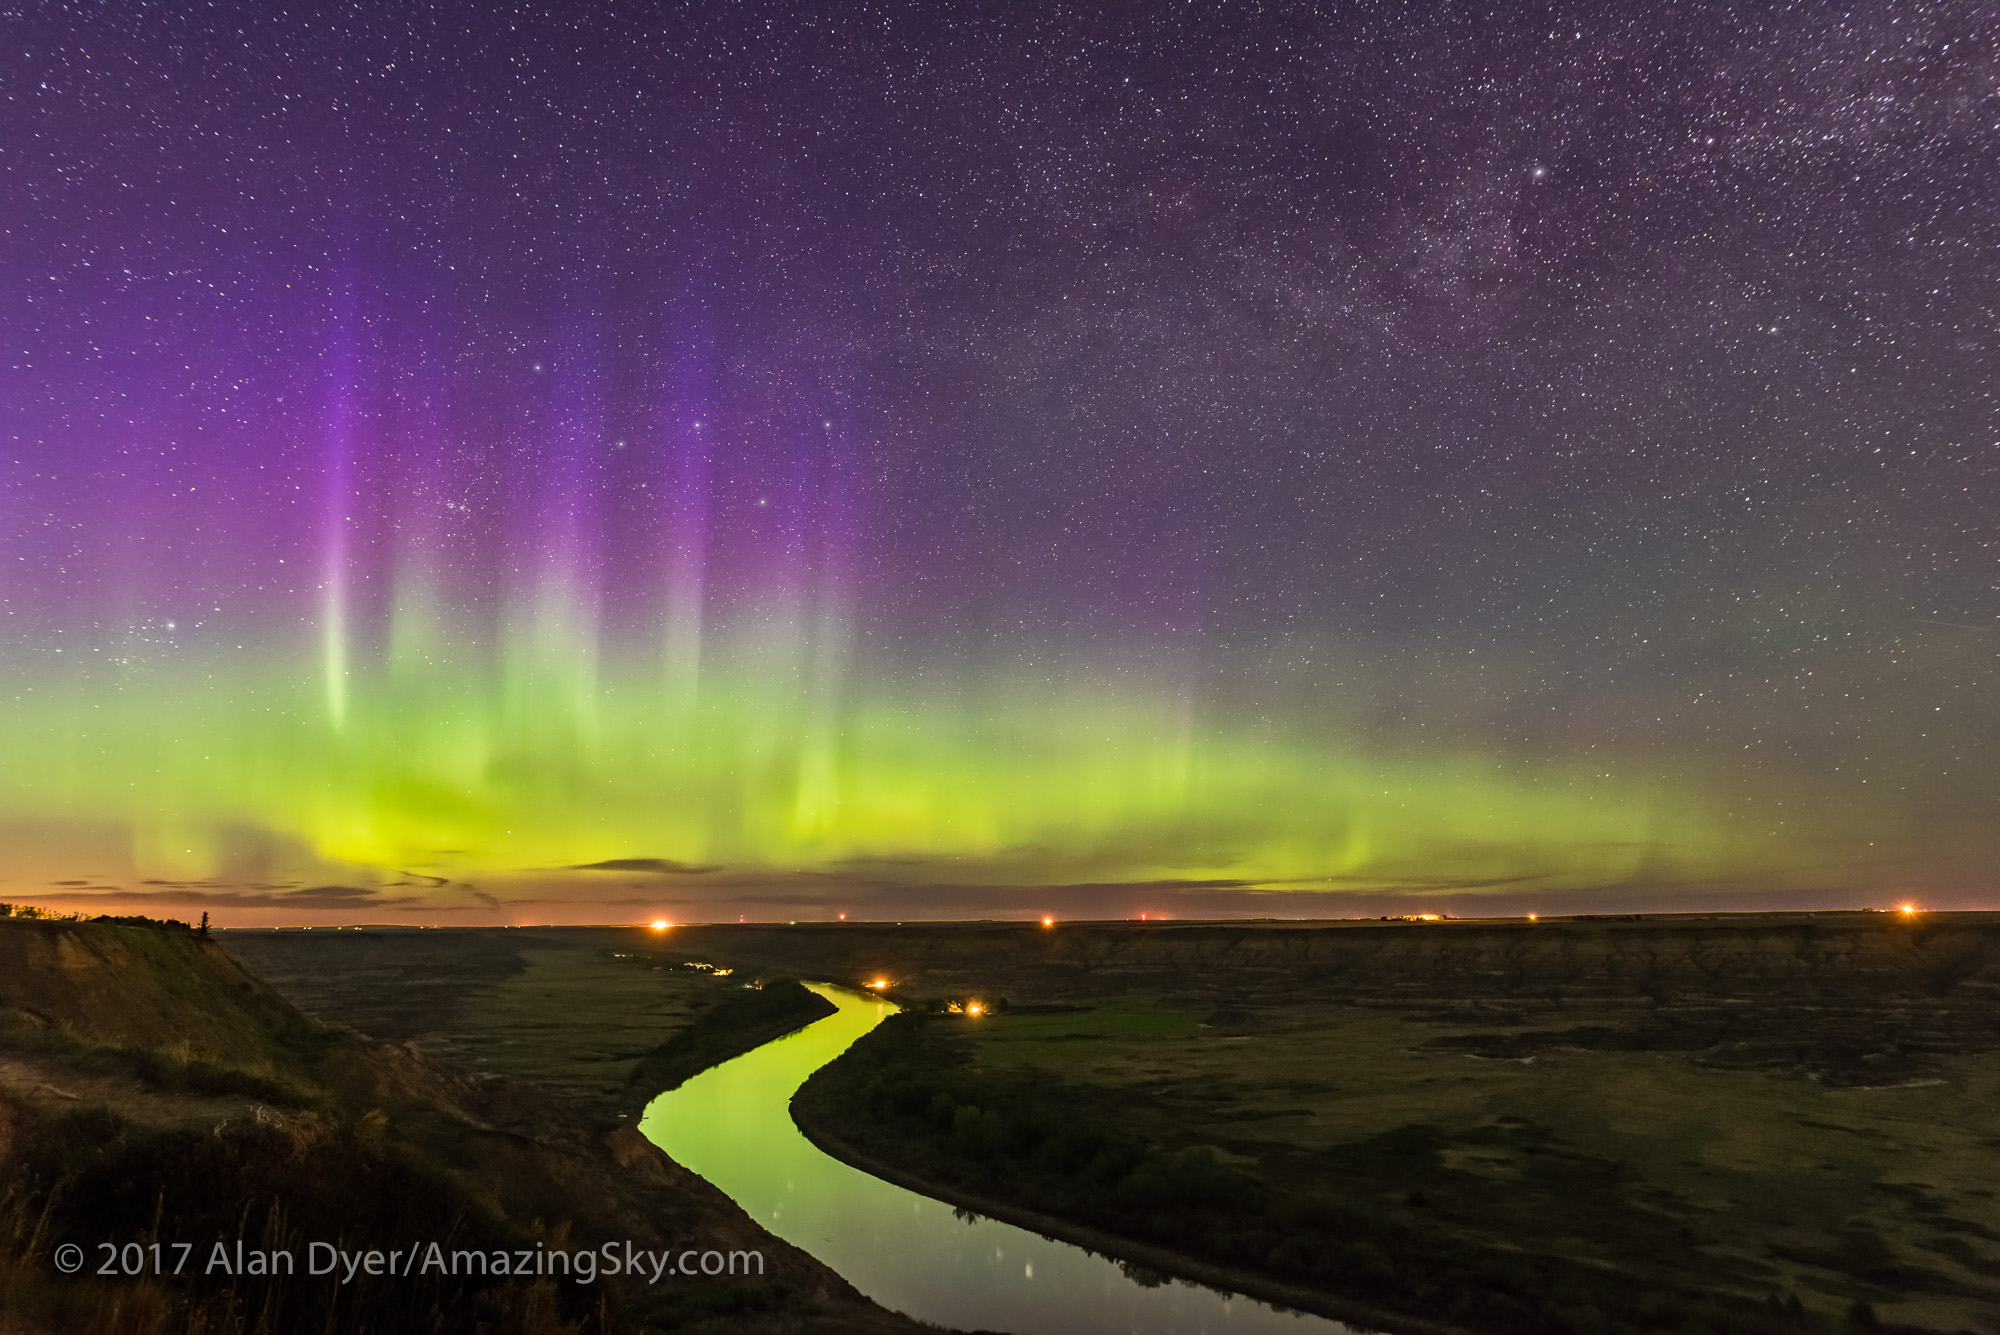
The panorama above contains the reflection of stars – of the constellation of Delphinus in particular – in the smooth water on a windless night.
To the north at left, the Northern Lights put on a subtle show. While never spectacular to the eye, the camera records the aurora’s colour and forms that often elude the naked eye.
This is a stack of 4 x 15-second exposures for the ground to smooth noise, and one 15-second exposure for the sky, all with the 20mm Sigma lens at f/2.8 and Nikon D750 at ISO 3200. They were part of a 250-frame time-lapse.
The display was brightest early in the evening – that’s 11 p.m. now in May at my latitude.
The display then faded in intensity before I shot the two panoramas about 1 a.m., but the last few frames of the time-lapse show a final burst of colour from a lone curtain reflected in the river.
This is a stack of 84 x 15-second exposures for the ground to smooth noise, and one 15-second exposure for the sky, all with the 20mm Sigma lens at f/2.8 and Nikon D750 at ISO 3200. They were part of a 250-frame time-lapse.
This was a magical night indeed. And a rare one this spring with clouds more often the norm at night.
The next dark of the Moon coincides with summer solstice. So while the moonlight won’t interfere, critical for shooting the Milky Way, the glow of perpetual twilight at my latitude will. The Milky Way will be set in a deep blue sky.
By July’s dark of the Moon the Milky Way will be high overhead, making panorama arches tough to assemble. It looks like this might have been my one best night to capture such a scene this year. But it was a good one.
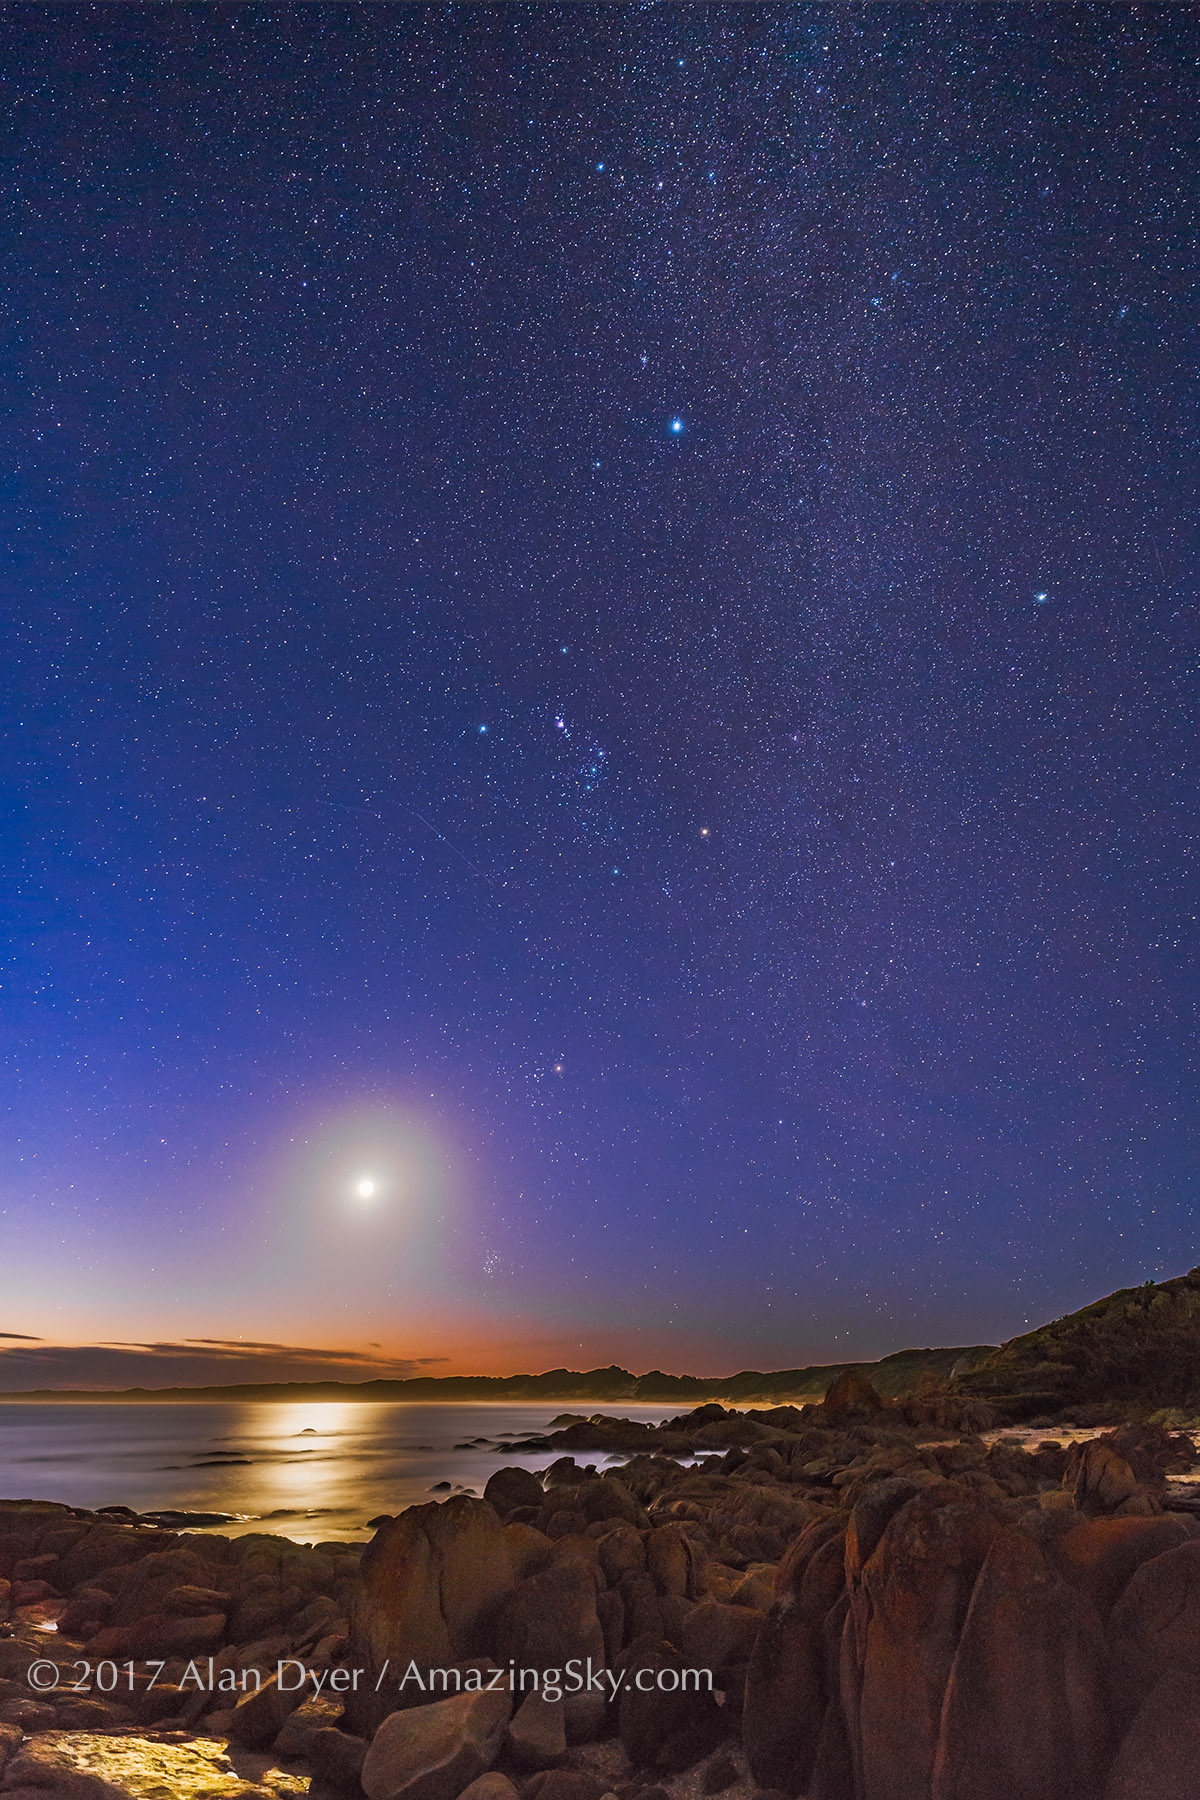
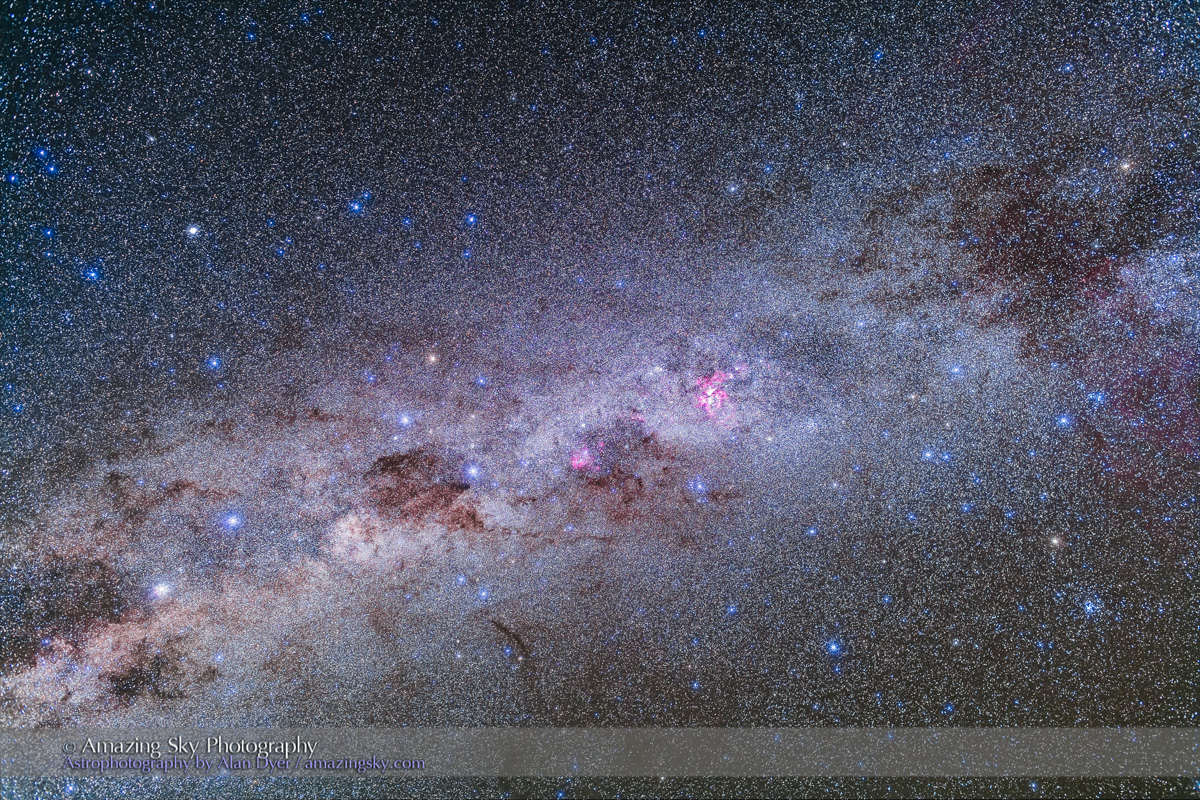
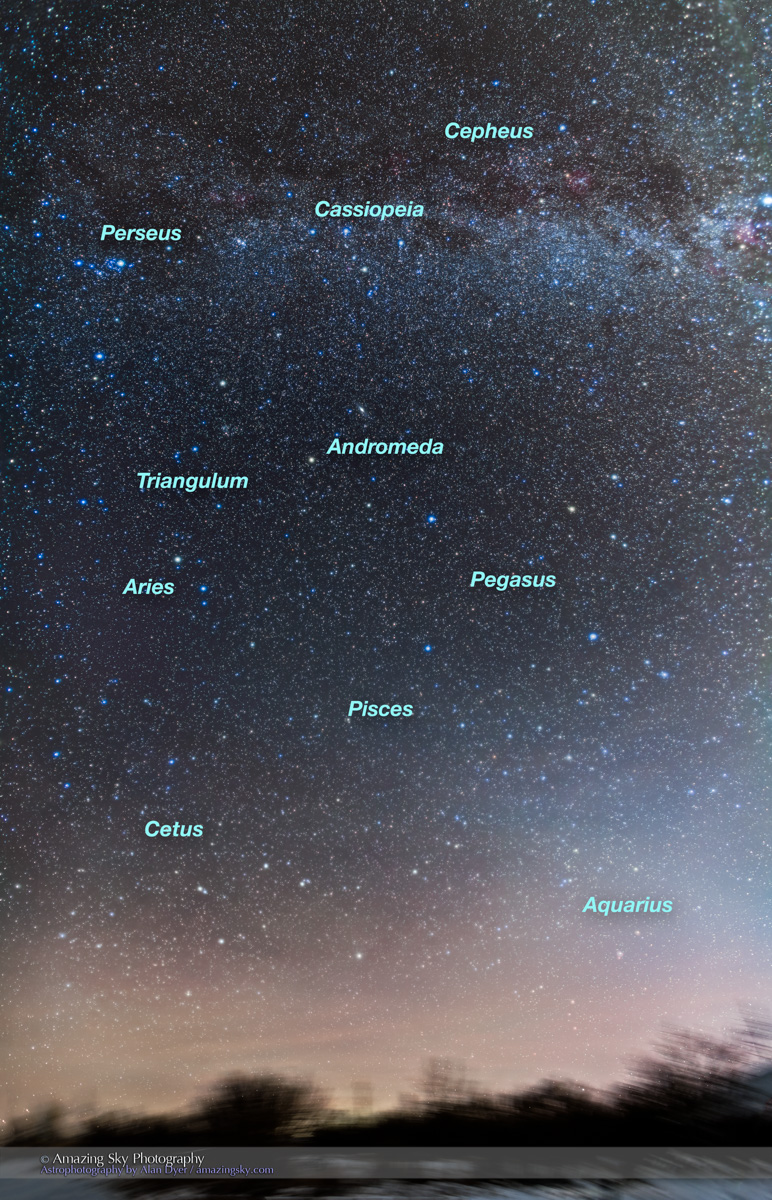
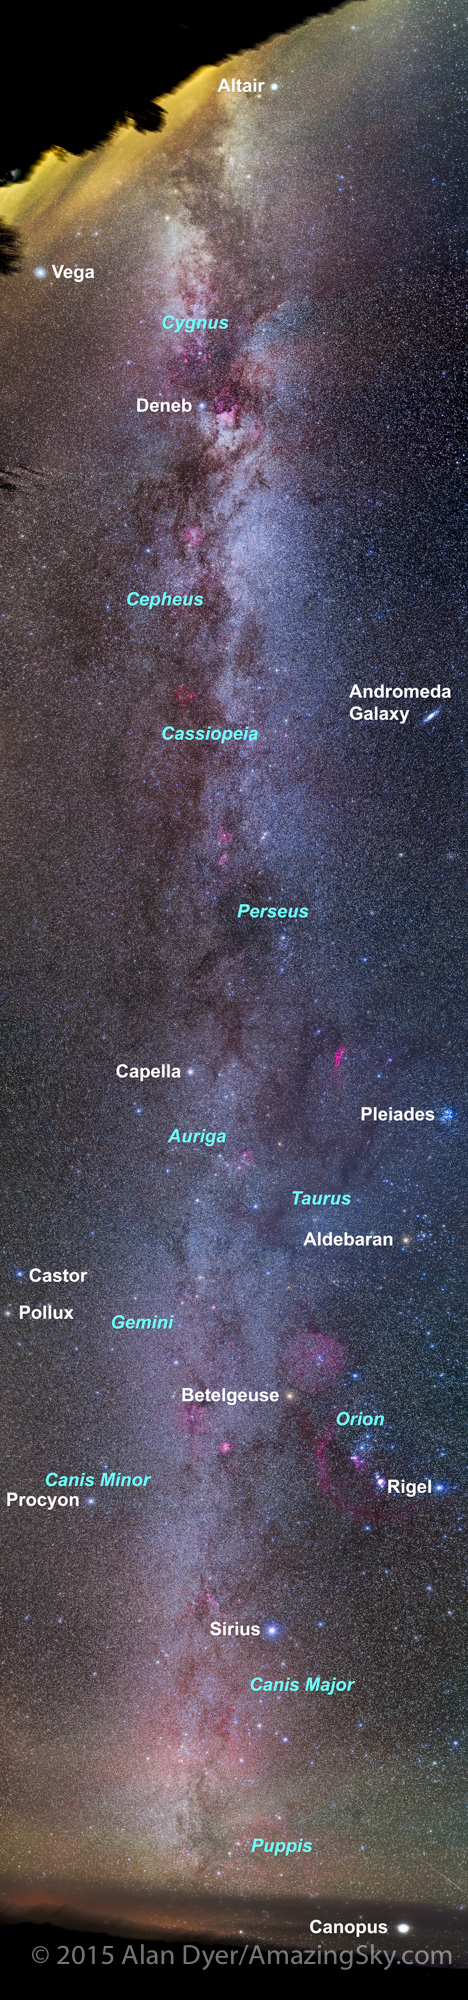
This post shows that same area of sky (here at top) also setting into the west. But that’s the only area of sky familiar to northern hemisphere stargazers.
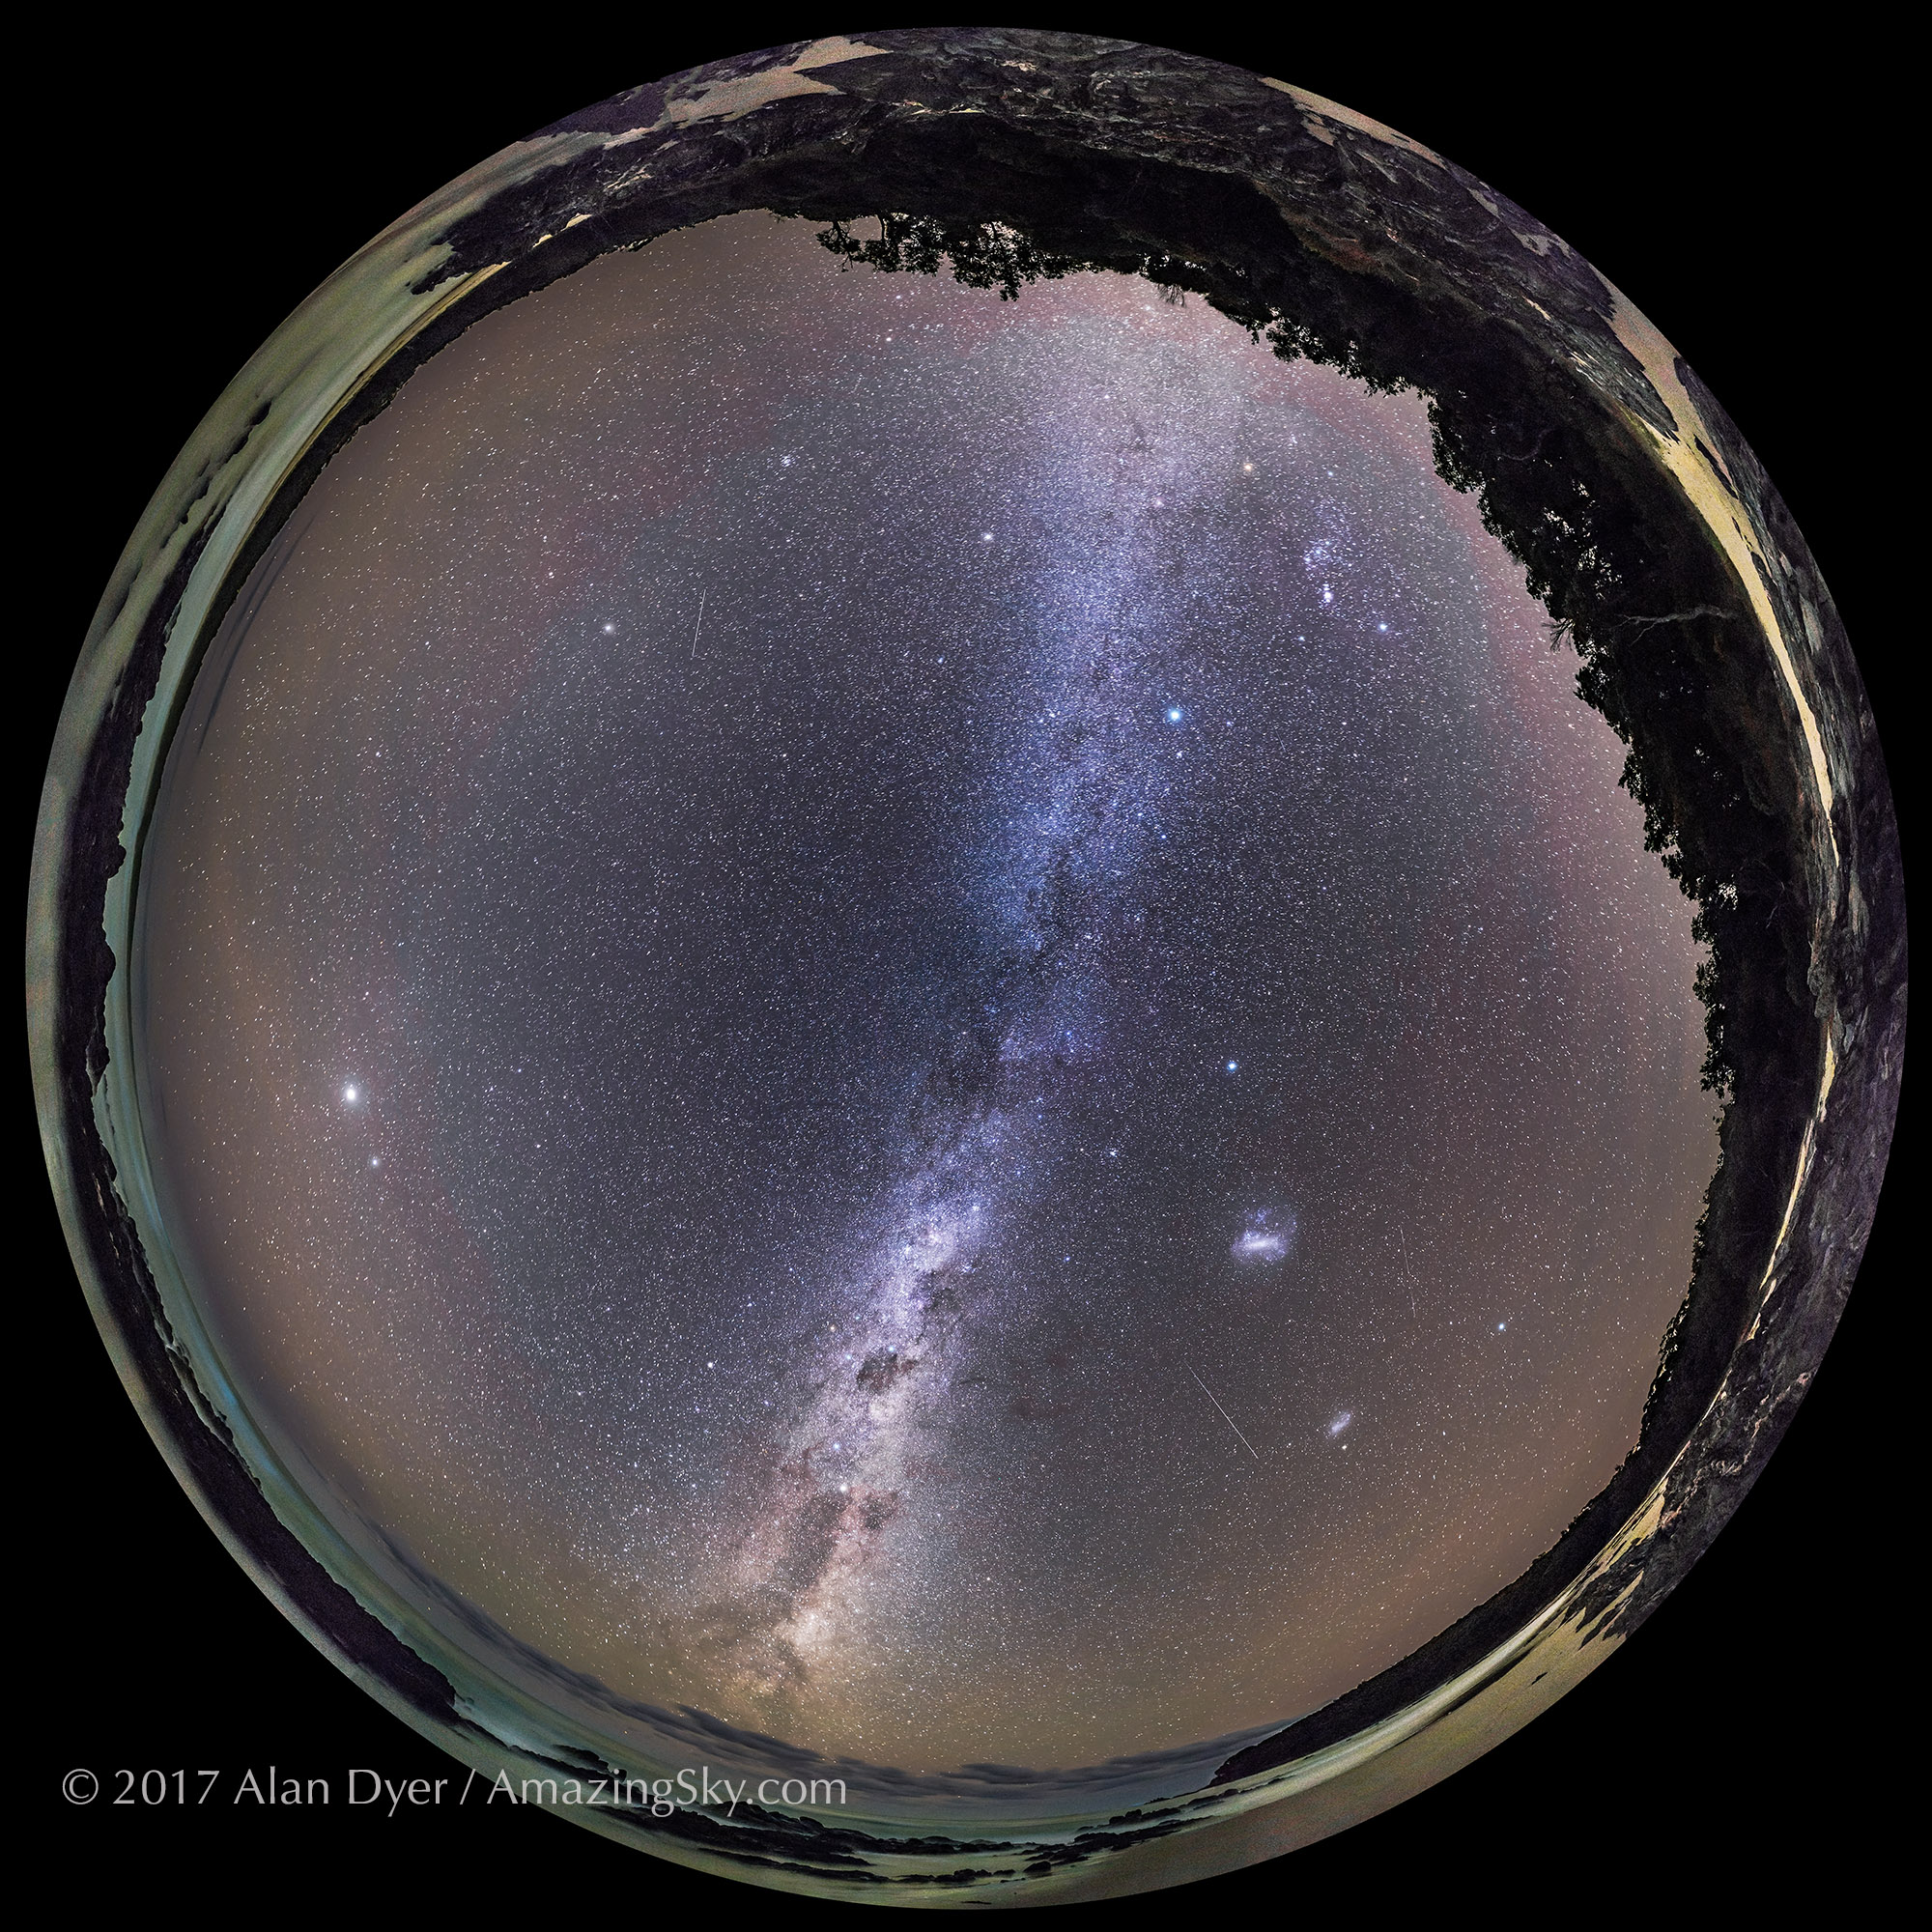
Everything below Orion and Sirius is new celestial territory for the northern astronomer. Welcome to the fabulous southern hemisphere sky.
And to the autumn sky – From home it is spring. From here in the southern hemisphere summer is giving way to cool nights of autumn.
Straight up, at centre, is the faint Milky Way area containing the constellations of Puppis and Vela, formerly in the constellation of Argo Navis.
Below, the Milky Way brightens in Carina and Crux, the Southern Cross, where dark lanes divide the Milky Way.
At right, the two patches of light are the Large and Small Magellanic Clouds, satellite galaxies of our Milky Way.
The bright object at left is Jupiter rising over the Tasman Sea.
I shot this 360° panorama on March 31, 2017 from Cape Conran on the Gippsland Coast of Victoria, Australia, at a latitude of 37° South.
I’ve turned the panorama so Orion appears as we’re used to seeing him, head up and feet below. But here in the southern hemisphere the image below despicts what he looks like, as he dives headfirst into the west in the evening twilight.
The bright object here is the waxing crescent Moon, here in Taurus. Taurus is below Orion, while Sirius (the bright star at top) and the stars of Canis Major are above Orion.
This view above takes in more of Canis Major. Note the Pleiades to the right of the Moon.
Visiting the southern hemisphere is a wonderful experience for any stargazer. The sky is disorienting, but filled with new wonders to see and old sights turned quite literally on their heads!
It takes a dark spring night to see it well, but now lurking near Jupiter is a ghostly sky glow called Gegenschein.
This diffuse glow lies directly opposite the Sun. It is caused by sunlight reflecting off interplanetary dust particles in the outer solar system. They reflect light more effectively at the anti-Sun point where each dust particle is fully lit by the Sun.
Like the Sun, the Gegenschein moves around the sky along the ecliptic, moving about a degree from west to east from night to night. March and April provide good nights for seeing the Gegenschein as it then lies in an area of sky far from the Milky Way.
Even so, it is very subtle to the unaided eye. Look south at about 1 a.m. local daylight time.
However, this year, in early April the Gegenschein will be more difficult as it will then lie right on top of Jupiter, as that planet reaches its point opposite the Sun on April 7. Jupiter will then be superimposed on the Gegenschein.
The main image at top is a 7-image vertical panorama of the spring sky, from Corvus and Virgo above the horizon, up past Leo, into Ursa Major and the Big Dipper overhead. Spica lies below bright Jupiter, Arcturus in Böotes is at left, while Regulus in Leo is at right. The grouping of stars near centre is the Coma Berenices star cluster.
Earlier in the night, I shot the sky’s other main glow – the Milky Way, as the winter portion of the Milky Way around Orion set into the southwest.
But over in the west, at the right edge of the frame, is the Zodiacal Light, caused by the same dust particles that create the Gegenschein, but that are located in the inner solar system between us and the Sun.
We bid adieu to the winter Milky Way now. As it departs we are left with an evening sky without the Milky Way visible at all. As seen from northern latitudes it lies along the horizon.
But later in spring, late at night, we’ll see the summer Milky Way rising, beginning its seasons of prominence until late autumn.
In a winter of cloud, the skies cleared for a magical night in the Alberta Badlands.
Two weeks ago, on February 28, I took advantage of a rare and pristine night to head to one of my favourite spots in Dinosaur Provincial Park, to shoot nightscapes of the winter sky over the Badlands.
A spate of warm weather had melted most of the snow, so the landscape doesn’t look too wintery. But the stars definitely belong to winter in the Northern Hemisphere.
The main image above shows the winter Milky Way arching across the sky from southeast (at left) to northwest (at right). The tower of light in the west is the Zodiacal Light, caused by sunlight reflecting off dust particles in the inner solar system. It is an interplanetary, not atmospheric, effect.
This is a stitch of 6 segments with the 12mm Rokinon lens at f/2.8 for 30 seconds each, with the Nikon D750 at ISO 6400, mounted portrait. Stitched with PTGui.
Above, this 360° version of the scene records the entire sky, with the winter Milky Way from horizon to horizon. With a little averted imagination you can also trace the Zodiacal Light from west (right) over to the eastern sky (left), where it brightens in the diffuse glow of the Gegenschein, where dust opposite the Sun in the outer solar system reflects light back to us.
This is a stitch of 6 segments taken with the 12mm full-fame fish-eye Rokinon lens at f/2.8, all 30-second exposures with the Nikon D750 at ISO 6400. The camera was aimed portrait with the segments at 60° spacings. Stitched with PTGui using equirectangular projection with the zeith pulled down slightly.
A rectangular version of the panorama wraps the sky around from east (left), with Leo rising, to northeast (right), with the Big Dipper standing on its handle. I’ve added the labels in Photoshop of course.
This is a stack of 8 x 30-second exposures for the ground, mean combined to smooth noise, plus one 30-second exposure for the sky. All at f/2.2 with the Sigma 20mm Art lens and Nikon D750 at ISO 6400.
Here, in a single-frame shot, Orion is at centre, Canis Major (with Sirius) is below left, and Taurus (with Aldebaran) is at upper right. The Milky Way runs down to the south. The clusters M35, M41, M46 and M47 are visible as diffuse spots, as is the Orion Nebula, M42, below Orion’s Belt.
The late winter evening Zodiacal Light, from at Dinosaur Provincial Park, Alberta, February 28, 2017. This is a stack of 7 x 30-second exposures for the ground, mean combined for lower noise, plus one 30-second exposure for the sky, all at f/2 with the 20mm Sigma Art lens, and Nikon D750 at ISO 6400.
This is certainly my best shot of the evening Zodiacal Light from my area in Alberta. It is obvious at this time of year on moonless nights, but requires a site with little urban skyglow to the west.
It is best visible in the evening from northern latitudes in late winter and spring.
Here, Venus is just setting above the badlands landscape. The Andromeda Galaxy is at right, the Pleiades at left. The Milky Way runs across the frame at top.
There is a common belief among nightscape photographers that the Milky Way can be seen only in summer. Not so.
What they mean is that the brightest part of the Milky Way, the galactic centre, is best seen in summer. But the Milky Way can be seen in all seasons, with the exception of spring when it is largely absent from the early evening sky, but rises late at night.
With the harvest in full swing, the aurora and Moon lit the fields on a clear September evening.
This night, September 19, showed prospects for a good display of Northern Lights, and sure enough as it got dark a bright, well-defined arc of Lights danced to the north.
I headed off to some photogenic spots near home, on the prairies of southern Alberta. By the time I got in place, the aurora had already faded.
However, the arc still photographed well and provided a great backdrop to these rural scenes. The rising Moon, then 3 days past full, lit the foreground. In the lead image, lights from combines and trucks working the field behind the bins are at left.
A diffuse arc of aurora and the rising waning gibbous Moon light the sky over the old barn near home at harvest time, September 19, 2016. The glows from Strathmore and Calgary light the clouds to the west at far left. The Big Dipper shines over the barn, with Capella and the stars of Perseus at right. The Pleiades are rising to the left of the Moon. This is a panorama of 5 segments, with the 20mm lens and Nikon D750. Stitched with ACR.
The image above was from later in the night, just down the road at a favourite and photogenic grand old barn.
The Big Dipper and a diffuse aurora over the old barn near home, in southern Alberta, on September 16, 2016. The waning gibbous Moon off camera at right provides the illumination. This is a stack of 4 exposures, averaged, for the ground to smooth noise and one exposure for the sky to keep the stars untrailed. All 13 seconds at f/2.8 with the Sigma 20mm lens, and ISO 1600 with the Nikon D750. Diffraction spikes on stars added with Noel Carboni’s Astronomy Tools actions.
Note the Big Dipper above the barn. A waning and rising Moon like this is great for providing warm illumination.
The time around equinox is usually good for auroras, as the interplanetary and terrestrial magnetic fields line up better to let in the electrons from the Sun. So perhaps we’ll see more Lights, with the Moon now gradually departing the evening sky.
On Friday night the Harvest Moon rose amid the arching shadow of the Earth.
This was the view on Friday, September 16 at moonrise on the Red Deer River. The view is from the Orkney Viewpoint overlooking the Badlands and sweeping curve of the river.
Above is the wide arch of the dark shadow of the Earth rising into the deepening twilight. Almost dead centre in the shadow is the Full Moon, the annual Harvest Moon.
Hours earlier the Moon passed through the shadow of our planet out at the Moon’s distance from Earth, creating a minor penumbral eclipse. No part of that eclipse, such as it was anyway, was visible from here.
But the alignment did place the Moon in the middle of our planet’s shadow projected into our atmosphere, as it does at every sunset and sunrise.
But it takes a very clear sky for the shadow to stand out as well as this in the darkening sky. I like how the curve of the shadow mirrors the curve of the river.
This is a marvellous spot for photography. I shared the site with one other photographer, at far right, who also came to capture the rising of the Harvest Moon.
The image is a 7-segment panorama with a 20mm lens, stitched with Adobe Camera Raw.
The nights were short and never fully dark, but early June provided a run of clear nights in the Rockies to enjoy Mars and the Milky Way.
Weather prospects looked good for a run of five nights last week so I took advantage of the opportunity to shoot nightscapes from Banff and, as shown here, in Yoho National Park across the Continental Divide in B.C.
The lead image above is a sweeping panorama at Emerald Lake, one of the jewels of the Rockies. Though taken at 1:30 a.m., the sky still isn’t dark, but has a glow to the north that lasts all night near summer solstice. Even so, the sky was dark enough to reveal the Milky Way arching across the sky.
The mountain at centre is Mt. Burgess, home of the famous Burgess Shale Fossils, an incredible collection of fossilized creatures from the Cambrian explosion.
The image is a panoramic stitch of 24 segments but cropped in quite a bit from the original, and all shot with an iPano motorized panning unit. Each exposure was 30 seconds at f/2.2 with the Sigma 24mm lens and Nikon D750 at ISO 4000. One short exposure of the lodge was blended in to reduce its light glare. The original, stitched with PTGui software, is 15,000 x 9,000 pixels.
The Milky Way over the side pond at Emerald Lake, Yoho National Park, BC., from the bridge to the Lodge. This is a stack of 8 x 25-second exposures for the foreground (mean combined to smooth noise), and one untracked exposure for the sky (to minimize trailing), all at f/2.8 with the Rokinon 14mm lens and Canon 6D at ISO 6400.
The view above, a single frame image, shows the view to the south as the Milky Way and galactic centre descend toward the horizon over the south end of the lake. Lights from the Lodge illuminate the trees.
Mars, at right, reflected in Emerald Lake at twilight in Yoho National Park, BC, June 7, 2016. This is a single 6-second exposure at f/3.2 with the Sigma 20mm lens and Nikon D750 at ISO 100.
The next night (above) I was at the same spot to shoot Mars in the deepening twilight, and reflected in the calm waters of Emerald Lake, with Cathedral Peak at left.
This is a vertical panorama of 4 segments, taken with the iPano unit, and with each segment a 30-second exposure at f/2.2 with the Sigma 24mm Art lens and Nikon D750 at ISO 4000. Stitched with Adobe Camera Raw.
Another multi-frame panorama, this time sweeping up from the horizon, captures Cassiopeia (the “W”) and the rising autumn constellations reflected in the lake waters.
Vega is at top, Deneb below it, while the stars of Perseus and Pegasus are just rising.
It was a magical two nights in Yoho, a name that means “wonderful!” Both by day and by night.
Mars is now shining brightly in the evening sky, as close and as bright as it has been since 2005.
Look southeast to south after dark and you’ll see a brilliant reddish “star.” That’s Mars, now at opposition, and retrograding slowly westward each night through Scorpius into Libra.
My image above captures Mars set in the entirety of the northern spring sky, complete with the arch of the Milky Way, twilight glows to the north (at left), some satellite trails …
… and Mars itself as the brightest object just right of centre shining above the landscape of Dinosaur Provincial Park.
Just to the left of Mars is Saturn, while below both is the star Antares in Scorpius, for a neat triangle of objects. Jupiter is the bright object in Leo at far right.
Technical: I shot the lead image on the evening of May 25. It is a 360° and horizon-to-zenith panorama stitched from 44 images, taken in 4 tiers of 11 panels each, shot with a motorized iOptron iPano mount. I used a 35mm Canon lens at f/2.8 for 30-second exposures with the Canon 6D at ISO 6400. I stitched the images with PTGui. The original image is a monster 32,500 pixels wide by 8,300 pixels high.
This is a stitch in Adobe Camera Raw of 9 segments, each with the Canon 35mm lens at f/5.6 and Canon 6D at ISO 800.
I shot the panorama above earlier in the evening, when Mars and Saturn were just rising in the southeast at left, and the sky to the northwest at right was still bright with twilight.
This shows the geometry of Mars at opposition. It lies opposite the Sun and is so rising at sunset and directly opposite the sunset point. The Sun, Earth and Mars are in a straight line across the solar system with Earth in the middle and as close to Mars as we get.
Actual date of opposition was May 22 but Earth is closest to Mars on May 30. That’s when it will look largest in a telescope. But to the unaided eye it appears as a bright red star.
The sky and sea present an ever-changing panorama of light and colour from the view point of an Australian lighthouse.
Last week I spent a wonderful four nights at the Smoky Cape Lighthouse, in Hat Head National Park, on the Mid-North Coast of New South Wales. I was after panoramas of seascapes and cloudscapes, and the skies didn’t disappoint.
At sunset, as below, the sky to the east glowed with twilight colours, with the bright clouds providing a beautiful contrast against the darkening sky. The kangaroo at far right was an added bonus as he hopped into frame just at the right time.
A 270° or so panorama of the Smoky Cape Lighthouse near South West Rocks on Trial Bay, NSW, Australia, and in Hat Head National Park. This is a stitch of 12 segments, each a single 1.6-second exposure at f/8 with the 35mm lens in landscape orientation. Stitching with Adobe Camera Raw.
At sunrise, the Sun came up over the ocean to the east, providing a stunning scene to begin the day.
I shot this at dawn on April 28, 2016. This is a 7-section panorama with each section being a 5-exposure HDR stack, all stacked and stitched in Adobe Camera Raw.
The Smoky Cape Lighthouse was lit up for the first time in 1891. It was staffed for decades by three keepers and their families who lived in the cottages visible in the panoramas above. They tended to the kerosene lamps, to cleaning the lenses, and to winding the weight-driven clockwork mechanism that needed resetting every two hours to keep the reflector and lens assembly turning. By day, they would draw the curtains across to keep the Sun from heating up the optics.
The huge optical assembly uses a set of nine lenses, each a massive fresnel lens, to shot focused beams out to sea. The optics produce a trio of beams, in three sets.
Each night you could see the nine beams sweeping across the sky and out to sea, producing a series of three quick flashes followed by a pause, then another three flashes, the characteristic pattern of the Smoky Bay Light. Each lighthouse has its own flashing pattern.
Beams from the Smoky Cape Lighthouse in the twilight sky, beaming out beside the stars of the Southern Cross and the Pointers (Alpha and Beta Centauri) below, rising into the southeast sky in the deepening blue twilight. This is a single 0.6-second exposure at f/2.8 with the 35mm lens and Canon 6D at ISO 6400.
The lead photo, repeated above, shows the beams in the twilight, with the stars of the Southern Cross as a backdrop. Three beams are aimed toward the camera while the other two sets of beam trios are shooting away out to sea.
The image below shows the beam trio shining out over the water toward one of the dangerous rocks off shore.
The trio of beams from the Smoky Cape Lighthouse scanning across the sea and sky in an exposure shot as short as possible to freeze the beams. This is a single 1.6-second exposure at f/1.4 and ISO 12800, wide and fasrt to keep the beams from blurring too much.
The Lighthouse was converted to electricity in 1962, when staff was reduced. Then in the 1980s all lighthouses were automated and staff were no longer needed.
While we might romanticize the life of a lighthouse keeper, it was a lonely and hard life. Keepers were usually married, perhaps with children. While that may have lessened the isolation, it was still a difficult life for all.
Today, some of the cottages have been converted into rentable rooms. I stayed in the former house of the main light keeper, filled with memorabilia from the glory days of staffed lighthouses.
The Southern Cross, Crux, and the Pointer Stars, Alpha and Beta Centauri, above in the moonlight of the waning gibbous Moon before dawn, from the Smoky Cape Lighthouse looking southwest, on the coast of New South Wales, Australia. The Cape was named by James Cook in 1770 for the fires he saw on shore here. This is a single 5-second exposure at f/2.8 with the 35mm lens and Canon 6D at ISO 1000.
The image above takes in the Southern Cross over the moonlit beach in the dawn twilight.
The last image below is my final astrophoto taken on my current trip to Australia, a 360° panorama of the Milky Way and Zodiacal Light from the back garden of the Lighthouse overlooking the beach at Hat Head National Park.
A 360° panorama and from horizon to zenith of the southern sky and Milky Way from Smoky Cape and the grounds of the Lighthouse and Cottages. The panorama is a stitch of 9 segments, each shot with the 15mm full-frame fish-eye lens in portrait orientation, and at f/2.8 with the Canon 6D at ISO 3200. All exposures 1 minute, untracked on a tripod. Stitched in PTGui using equirectangular projection.
It’s been a superb trip, with over half a terabyte of images shots and processed! The last few blogs have featured some of the best, but many more are on the drives for future posts.
The Southern Cross, the iconic constellation of the southern sky, shines high in the south on austral autumn nights.
I’m in one of my favourite places, Australia, in particular at its self-proclaimed “astronomy capital,” Coonabarabran in New South Wales. Down the road from me is the Siding Spring Observatory.
But for 3 weeks I’m using my own telescope gear to observe and photograph the fabulous southern skies.
For part of my time here I’m attending the annual OzSky Star Party, a small and rather exclusive event for observers from around the world who come here to revel in celestial wonders visible only from southern latitudes.
The lead image at top is a 7-panel panorama of the star party in action, on the grounds of the Warrumbungles Mountain Motel, with a dozen or more large and premium telescopes set up for our use.
Overhead is the arch of the southern Milky Way, with the Southern Cross here at its highest about local midnight now in early April at the start of autumn. Below the Milky Way is the Large Magellanic Cloud, a companion galaxy to the Milky Way, itself a superb target for telescopes.
To the far right in the Milky Way is Sirius amid the gum trees, and the stars of Canis Major diving into the west. To the far left are the bright star clouds of Scorpius and Sagittarius rising in the east, bringing the glowing core of our Galaxy high into the austral sky. Bright Mars and Saturn shine in and around Scorpius.
This is a view of the Milky Way everyone should see – it is should be one of the top items on any amateur astronomer’s bucket list.
Circumpolar star trails over the OzSky star party near Coonabarabran, NSW, Australia, on April 3, 2016. This is a stack of 49 frames, each 45 seconds at f/2.8 with the 15mm fish-eye lens on the Canon 6D at ISO 4000. The ground comes from three frames in the sequence. Stacked with Advanced Stacker Plus actions using Streaks mode.
Here, above, I’ve stacked images from a time-lapse to create a star trail scene with the stars of the southern sky rotating about the blank South Celestial Pole. Again, the Southern Cross is at top.
The deep south Milky Way from Alpha and Beta Centauri (at left) to the False Cross in Vela and Carina (at right). This is a stack of 5 x 4 minute exposures at f/2.8 with the 35mm Canon L-series lens and filter-modified Canon 5D MkII at ISO 1000, with an additional similar exposure layered in taken through the Kenko Softon A filter to provide the star glows. Tracked on the iOptron Sky Tracker.
This view, above, focuses on the Milky Way of the deep south, from Vela to Centaurus, passing through Carina and Crux, with the bright Carina Nebula, the Southern Cross, and the dark Coal Sack front and centre.
A 3-panel mosaic of the Southern Cross, Crux, shot April 5, 2016 from Tibuc Cottage, Coonabarabran, NSW, Australia. This is a moasic of 3 panels, each a stack of 4 x 4-minute exposures with the Borg 77mm f/4 astrograph and filter-modified Canon 5D MkII at ISO 1600. Stacked and stitched in Photoshop.
Here I zoom into the Southern Cross itself, in a mosaic of 3 panels to cover the smallest constellation using a high-resolution astrograph, a 300mm f/4 lens. The Coal Sack is at lower left while numerous star clusters lie embedded within and around the Cross, including the famous “Jewel Box” at left, next to Beta Cruxis, aka Becrux.
The deep southern Milky Way arching across the sky, from Puppis and Vela at upper right, to Centaurus at lower left. The two Magellanic Clouds are at lower centre, with the Large Cloud at top. This is a stack of 5 x 1.5-minute exposures, all tracked on the iOptron Sky Tracker, at f/2.8 with the 15mm fish-eye lens, and Canon 5D MkII at ISO 3200. The ground comes from just one of the tracked exposures to minimize blurring. Taken from the Tibuc Gardens Cottage near Coonabarabran, NSW, Australia on March 30, 2016.
I shot the Crux mosaic from my cottage site at Tibuc Gardens, a superb dark sky site and home to a new cottage built after the devastating bush fires of 2013 which destroyed all the other cottages I had stayed at in previous years.
There’s much more to come, as I rapidly fill up my hard drive with time-lapses and deep-sky images of the southern sky. I already have several blogs worth of images processed or about to be. In the meantime, check my Flickr site for the latest images hot off the hard drive and uploaded as best my Oz internet connectivity allows.
It was a night to remember, when the sky exploded with a jaw-dropping display of Northern Lights.
Warnings went out around the world and the aurora meters were hitting high numbers. By sunset we were charged up with high expectations of seeing the aurora in high gear dancing in the twilight. We were not disappointed.
From our location at the Churchill Northern Studies Centre near Churchill, Manitoba (latitude 58° North), we see aurora almost every clear night, even when indicators are low.
But this night, the Index was reading 7 on the scale of 0 to 9. I was afraid, after all the effort to come north to see the Lights, the Lights would abandon us and head south. Not so!
The night did start with the Lights in the south, as shown in the panorama image at top. It takes in a full 360°, with the aurora arcing from east to west across the southern sky in Orion. The north over the Centre is clear.
But the curtains soon moved back north and engulfed most of our sky for most of the rest of the night.
Participants in our aurora tour group took their aurora “selfies,” and just looked up in awe at one of nature’s great sky shows. When the last of the group turned in at 2:30 a.m. the Lights were still going.
What follows is a selection — just a few! — of the still shots I took. I also shot time-lapse sequences and real-time videos. All those will take more editing to turn them into a music video, still to come.
Enjoy!
A lone observer gazes skyward at the start of a wonderful aurora display on March 6, 2016, as the curtains begin to appear and dance in the deep blue twilight. This was at the Churchill Northern Studies Centre, Churchill, Manitoba.
A lone observer gazes at an array of colourful curtains of aurora during an active display, March 6, 2016, with curtains in the evening twilight adding blue tints to the sky and tops of the curtains, as well as the greens and reds from oxygen. Curtains toward the horizon are more yellow due to atmospheric extinction. Jupiter is rising at left, then near opposition.
Auroral curtains converge at the zenith in the evening twilight during a Kp Index 7 night of aurora in Churchill, Manitoba. Blue twilight adds the blue tints to the sky and curtains.
Our group of Learning Vacations tourists enjoy the start of a fine display of Northern Lights at the Churchill Northern Studies Centre, March 6, 2016. As curtains appear to the east, another array of curtains shines to the west behind them with a strong purple tint lighting the sky and ground. The Andromeda Galaxy sits amid the curtains.
Aurora watchers looking south to a bright curtain of Northern Lights while other curtains rippled behind them to the north. This was a fabulous all-sky display, March 6, 2016. The temperature was about -25° C.
The green aurora lights the ground and snow green in a spectacular display March 6, 2016. This is looking northeast from the Churchill Northern Studies Centre, Churchill, Manitoba.
A series of curtains of aurora, in a layered series across the sky, from the March 6, 2016 display in Churchill, Manitoba,
The aurora over the Churchill Northern Studies Centre building, home to Arctic research and to many programs for tourists about northern ecology and science. The March Learning Vacations aurora tour group experienced a fabulous display this night, March 6, 2016.
Some of our group of Learning Vacations aurora tourists outside the Churchill Northern Studies Centre enjoying the sky show on March 6, 2016 on a night with a Level 5 to 7 aurora.
What do you see in the swirling patterns of aurora curtains at the zenith? They rapidly take many forms as they move about. This was the wonderful display of March 6, 2016.
I present a sweeping panorama of the winter and spring stars on a February night.
The lead image is a panorama I shot last Saturday, February 27 that takes in about 200° of sky from northeast to west, and nearly to the zenith. It encompasses most of the northern spring and winter stars and constellations.
I’ve added the labels to help you pick out the celestial highlights. The winter sky, containing Orion as the central constellation, is at right setting into the west. This area of sky contains a rich collection of bright stars and identifiable constellations.
The left side of the sky contains the spring constellations, now coming into view in the east. Note how that area of sky is sparsely populated by bright stars. You can see the Big Dipper, Regulus in Leo, and Arcturus rising at lower left.
The reason for the difference is the Milky Way – you can see it at right arcing up from the southern horizon passing by Orion and through Gemini, Taurus and Auriga. In that direction we are looking into the outlying spirals arms of our galaxy, toward rich areas of star formation.
To the east, at left, we are looking at right angles out of the plane of our spiral galaxy, toward the galactic North Pole, here just left of Leo. In that direction there are very few bright stars between us and the starless depths of intergalactic space. The spring sky is rather blank compared to the rich winter sky.
But you can see Jupiter, the brightest object in view here, and now prominent in the evening sky.
Note one other subtle glow just above Jupiter. That diffuse glow is the Gegenschein, caused by sunlight reflecting off interplanetary dust opposite the Sun in our solar system and in the plane of the ecliptic.
Jupiter is just east (left) of the Gegenschein here, as Jupiter was then just over a week before its date of opposition, March 8. By then the Gegenschein will have moved to superimpose right over Jupiter, as both then lie opposite the Sun.
I shot this scene from home on February 27, 2016, using the new iOptron iPano motorized “gigapan” unit, which I programmed to move and shoot 36 exposures with the Canon 5D MkII and 35mm lens, arranged in 4 rows high with 9 panels wide in each row from east to west. The result is a huge mosaic, 24,000 by 10,000 pixels.
Each exposure was 25 seconds at f/2 and at ISO 3200. The camera was not tracking the sky. I stitched the 36 segments with PTGui using its Spherical Fisheye projection. The image has black margins but I think the circular format is more suggestive of the spherical dome of the sky above and around you. But that’s me, a longtime planetarium show producer.
Next time I will shoot the zenith cap images as well!
I present a horizon-to-zenith panorama of the pantheon of autumn constellations.
Yes, I know it’s winter, but as it gets dark each night now in early January the autumn stars are still front and centre. I took the opportunity during a run of very clear nights at home to shoot a panorama of the autumn sky.
It is a mosaic that sweeps up the sky and frames many related Greek mythological constellations:
• from the watery constellations of Aquarius, Pisces, and Cetus at the bottom near the horizon…
• to Pegasus and Aries in mid-frame…
• on up to Andromeda and Perseus at upper left…
• and finally Cassiopeia and Cepheus at the top of frame embedded in the Milky Way overhead. The Andromeda Galaxy, M31, is just above centre.
Here, I’ve labeled the participating constellations, though only a few, such as the “square” of Pegasus and the “W” of Cassiopeia, have readily identifiable patterns.
Most of these constellations are related in Greek mythology, with Princess Andromeda being the daughter of Queen Cassiopeia and King Cepheus, who was rescued from the jaws of Cetus the Sea Monster by Perseus the Hero, who rode on Pegasus the Winged Horse in some accounts.
Zodiacal Light brightens the sky at bottom right in Aquarius, and angles across the frame to the left.
TECHNICAL:
I shot this from home on a very clear night January 2, 2016 with the Zodiacal Light plainly visible to the naked eye.
This is a mosaic of 5 panels, each a stack of 5 x 2 minute exposures, plus each panel having another stack of 2 x 2 minute exposures blended in, and taken through the Kenko Softon filter to add the fuzzy star glows to make the constellations stand out.
All were shot with the 24mm Canon lens at f/2.8 and Canon 5DMkII at ISO 1600. All tracked on the AP Mach One mount.
All stacking and stitching in Photoshop CC 2015. Final image size is 8500 x 5500 pixels and 3.6 gigabytes for the layered master.
In a sweeping panorama, here is the entire northern hemisphere Milky Way from horizon to horizon.
This is the result of one of the major projects on my recent trek to Arizona and New Mexico – a mosaic of images shot along the Milky Way over several hours.
The goal is a complete 360° panorama of the entire Milky Way, and I’ve got most of the other segments in previous shoots from Alberta, Australia and Chile. But I did not have good shots of the northern autumn segments, until now.
The panorama sweeps from Cygnus (at top, setting in the western sky in the evening), across the sky overhead in Perseus, Auriga and Taurus (in the middle), and down into Orion, Canis Major, and Puppis (at bottom, low in the southern sky at midnight).
The view is looking outward to the near edge of our Milky Way, in the direction opposite the centre of our Galaxy. In this direction the Milky Way becomes dimmer and less defined. Notable are the many red H-alpha emission regions along the Milky Way, as well as the many lanes of dark interstellar dust nearby and obscuring the more distant stars.
However, a diffuse glow in Taurus partly obscures its Taurus Dark Clouds — that’s the Gegenschein, caused by sunlight reflecting off cometary dust particles directly opposite the Sun and marking the anti-solar point this night, by coincidence then close to galactic longitude of 180° opposite the galactic centre.
Here I provide a guided map of the mosaic. Orion is at lower right, while the Pleiades and Andromeda Galaxy lie near the right edge. The Andromeda Galaxy is the only thing in this image that is not part of the Milky Way.
The bright star Canopus is just rising at bottom, in haze. Vega and Altair are just setting at the very top. So the panorama sweeps from Altair to Canopus.
The sky isn’t perfect! Haze and airglow in our atmosphere add discolouration, especially close to the horizon. In my final 360° pan, I’ll use only the central portions of this panorama.
Now let’s put the horizon-to-horizon panorama into cosmic perspective…
In this diagram, based on art from NASA’s Spitzer Space Telescope Institute, I show my Northern Milky Way Panorama in perspective to the “big picture” of our entire Galaxy, using artwork based on our best map of how our Galaxy is thought to look.
We are looking in a “god’s eye” view across our Galaxy from a vantage point on the far side of the Galaxy.
Where we are is marked with the red dot, the location of our average Sun in a minor spiral arm called the Orion Spur.
The diagram places my panorama image in the approximate correct location to show where its features are in our Galaxy. As such it illustrates how my panorama taken from Earth shows our view of the outer portions of our Galaxy, from the bright Cygnus area at right, to Perseus in the middle, directly opposite the centre of the Galaxy, then over to Orion at left.
The panorama sweeps from a “galactic longitude” of roughly 90° at right in Cygnus, to 180° in Perseus, over to 240° in Orion and Canis Major at left.
In the northern autumn and early winter seasons we are looking outward toward the outer Perseus Arm. So the Milky Way we see in our sky is fainter than in mid-summer when we are looking the other way, toward the dense centre of the Galaxy and the rich inner Norma and Sagittarius arms.
Yet, this outer region contains a rich array of star-forming regions, which mostly show up as the red nebulas. But this region of the Milky Way is also laced with dark lanes of interstellar “stardust.”
The panorama is composed of 14 segments, most being stacks 5 x 2.5-minute exposures with the filter-modified Canon 5D MkII at ISO 1600 and 35mm lens at f/2.8.
The end segments near the horizons at top and bottom are stacks of 2 x 2.5-minute exposures.
Each segment also has an additional image shot through a Kenko Softon filter to add the star glows, to make the bright stars show up better.
The camera was oriented with the long dimension of the frame across the Milky Way, not along it, to maximize the amount of sky framed on either side of the Milky Way.
The camera was on the iOptron Sky-Tracker. I shot the segments for this pan from Quailway Cottage, Arizona on December 8/9, 2015, with the end segments taken Dec 10/11, 2015. I decided to add in the horizon segments for completeness, and so shot those two nights later when sky conditions were a little different.
Skies were clear at dawn this morning for a fabulous view of the rare conjunction of three planets. And I could not have been at a more photogenic site.
This was the view before dawn on October 25, as brilliant Venus and dimmer Jupiter shone just a degree apart in the dawn sky. Mars, much fainter, shines just below the close duo. The three planets could easily be contained in a high power binocular field.
Not until November 2111 will these three planets be this close together again in a darkened sky.
Indeed, Venus could not have been higher, as it is just now reaching its maximum elongation from the Sun, placing it high in the eastern morning sky.
I shot from the shores of Lake Annette, site of one of the major events, the Friday star party, at the annual Jasper Dark Sky Festival which just concluded, in Jasper National Park, Alberta. The Festival celebrates the Park’s status as one of the world’s largest Dark Sky Preserves.
The hotels and restaurants were full with stargazers from around the world, making the Festival a huge success, both educationally and financially. I was honoured to be able to present some of the public and school talks.
But this dawn sky was a fine way to end a fabulous weekend of astronomy.
The image above is a panorama in the twilight, sweeping from the planets in the east, to the winter stars and constellations, including iconic Orion, in the south and southwest.
Earlier in the morning, before twilight began to brighten the sky, I shot another even wider panorama from the south shore of the lake.
In this and other photos, high haze adds the glows around the stars and planets naturally. No special effects filters here!
But Venus and Jupiter are so close and bright their images almost merge into one glow.
Here they are, with Mars below, shining in the dark sky over the Watchtower peak and over the misty waters of Lake Annette.
Keep an eye on the sky at dawn, as these three worlds will be close to each other for the next few mornings. See my earlier blog for details.
The Moon, planets and Northern lights provided a wonderful show in the dawn sky.
What a superb scene this was. On October 8 the waning crescent Moon shone near Venus (brightest) and Regulus, with red Mars and bright Jupiter paired below.
If that wasn’t enough, as the wide-angle panorama below shows, the Northern Lights were also ending a night of performance, with an arc along the horizon and pulsing waves rising up the sky to the northeast near the planet grouping.
The panorama also sweeps right, to the south, to take in the winter Milky Way and constellations of Orion and Canis Major. Click on the image to bring it up full screen.
The Moon will appear near Mars and Jupiter on the morning of October 9, and then the three planets will begin to converge for a tight gathering for a few mornings around October 25.
Be sure to wake early for the dawn sky show that continues all this month!
The Full Moon rises behind the famous Mitten buttes at Monument Valley.
I spent a fabulous weekend capturing sunsets and nightscapes at the iconic Monument Valley on the Utah/Arizona border, the photogenic outdoor set of dozens movies over the decades.
On the eve of the total lunar eclipse I shot the nearly Full Moon rising behind the West (left) and East (centre) Mittens and Merrick Butte (at right). On the evening of Friday, April 3 the Moon rose and sat amid the sunlit clouds with the Sun still up.
The alignment that would place the Moon directly opposite the Sun to create the eclipse was still 11 hours away.
Note how the butte’s shadows point almost, but not quite directly, at the nearly Full Moon. They point at the place in the sky the Moon would be before dawn at the end of that night.
But on eclipse eve the Moon rose 30 minutes before the Sun set, providing a chance to catch the Moon behind the still sunlit red buttes.
I shot this image about 20 minutes after sunset on April 3, so the foreground is now in shadow but the Moon appears in a more richly tinted twilight sky.
Later on April 3 I captured this scene, with the Tear Drop and Rock Door Mesas now lit by a bright Full Moon, and with the stars of the winter sky setting into the west. Canis Major and Orion are at left, while Taurus, including the Pleiades star cluster and brilliant Venus, are at right.
The Orion & Venus image is a 2-panel panorama.
On the evening of April 4, clouds thwarted plans for a long star trail sequence above a moonlit foreground.
Instead, I shot toward the Moon and clouds, to capture subtle moonbeams radiating out from the Moon, now some 14 hours after the eclipse, rising behind Merrick Butte. I shot this from the dusty Loop Road that winds through the valley floor.
Instead of lots of images for a star trail composite, I was content to shoot this one image, catching the Big Dipper in a brief hole in the drifting clouds, hanging in the sky over the West Mitten butte. The foreground is lit by the partly obscured Full Moon. The long exposure streaks the moving clouds.
Night or day, it’s hard not to take a great photo here, clouds or not!
On my final evening at Monument Valley, high winds common to the area, blowing dust, and the closed Loop Road, scuttled plans again for long star trail sequences from the valley floor.
So on Easter Sunday, April 5, I settled for a panorama from the classic viewpoint showing the setting Sun lighting the buttes and mesas of Monument Valley.
It is an amazing place, but one that still requires patience to wait out the clouds and dust storms.
A truly dark sky isn’t dark. It is filled with glows both subtle and spectacular.
Last night, March 10, I drove up into the heart of the Gila Wilderness in southern New Mexico, to a viewpoint at 7,900 feet in altitude. I was in search of the darkest skies in the area. I found them! There was not a light in sight.
The featured image is a 180° panorama showing:
– the Zodiacal Light (at right in the west)
– the Milky Way (up from the centre, in the south, to the upper right)
– the Zodiacal Band (faintly visible running from right to left across the frame at top)
– the Gegenschein (a brightening of the Zodiacal Band at left of frame, in the east in Leo)
The Zodiacal Light, Zodiacal Band, and the Gegenschein are all part of the same phenomenon, glows along the ecliptic path – the plane of the solar system – caused by sunlight reflecting off cometary and meteoric dust in the inner solar system.
The Gegenschein, or “counterglow,” can be seen with the naked eye as a large and diffuse brightening of the sky at the spot exactly opposite the Sun. It is caused by sunlight reflecting directly back from comet dust, the scattering effect greatest at the point opposite the Sun.
The Zodiacal Light requires reasonably dark skies to see, but the fainter Zodiacal Band and Gegenschein require very dark skies.
Now is prime season for all of them, with the Moon out of the way, and the Zodiacal Light angled up high in the western as twilight ends. In March, the Gegenschein is now located in a relatively blank area of sky in southern Leo.
The Milky Way is much more obvious. Along the northern winter Milky Way here you can see dark lanes of interstellar dust, particularly in Taurus above and to the right of Orion. Red nebulas of glowing gas also lie along the Milky Way, such as Barnard’s Loop around Orion.
– Orion is at centre, in the south, with Canis Major and the bright star Sirius below and to the left of Orion. Canopus is just setting on the southern horizon at centre. It barely clears the horizon from 32° North latitude.
– To the right of Orion is Taurus and the Pleiades star cluster at the top of the Zodiacal Light pyramid.
– Venus is the bright object in the Zodiacal Light at right, in the west, while fainter Mars is below Venus.
– At far right, in the northwest, is the Andromeda Galaxy, M31.
– Jupiter is the bright object at upper left, in the east, in the Zodiacal Band, and near the Beehive star cluster.
– The Zodiacal Light, Band and Gegenschein all lie along the ecliptic, as do Mars, Venus and Jupiter.
Glows on the horizon are from distant SIlver City, Las Cruces and El Paso. The brighter sky at right is from the last vestiges of evening twilight. Some green and red airglow bands also permeate the sky.
I shot this March 10, 2015 from the summit of Highway 15, The Trail of the Mountain Spirits, that twists and winds through the Gila Wilderness.
It was a stunning night, clear, calm, and silent. Just me under the ghostly glows of a truly dark sky.
NOTE: I first published this March 11 but had to republish this blog March 15 after WordPress deleted the original post in a software bug. Thanks WordPress!
Tonight the Full Moon rose paired with Jupiter, in the colourful twilight over Silver City, New Mexico.
Using The Photographer’s Ephemeris app, I scouted out the location last night for the shoot tonight, February 3.
I drove west of Silver City to a viewpoint on Boston Hill overlooking the town east to the rising Moon.
The Full Moon of February has come to be called the “Snow Moon,” appropriate for many parts of the continent now enduring record snowfalls. But here, we enjoyed summer-like temperatures and a decided lack of snow.
The Moon rose into a clear sky accompanied by Jupiter, now 4 days before its annual opposition date. At opposition we pass between the Sun and an outer planet, in this case Jupiter. This puts Jupiter opposite the Sun, so it rises as the Sun sets.
The Full Moon also always lies opposite the Sun, so tonight the Full Moon joined Jupiter in the sky.
To capture the scene I shot several panoramas, each consisting of several segments, to take in the broad sweep of the horizon. The scene above records the pink “Belt of Venus,” created by sunlight lighting the upper atmosphere to the east in the half hour or so after sunset down here on Earth.
Once the sky got darker, Jupiter stood out better, shining to the left of the Moon.
Jupiter is now also closest to Earth and brightest for 2015. It will dominate our eastern sky for the rest of the winter and early spring, eventually shining to the south as night falls in late spring.
What a fabulous night! The desert sky was full of subtle glows and myriad stars.
Friday, January 16 was a stunning evening for stargazing. I took the opportunity to shoot a 360° panorama of the evening sky, recording a host of subtle glows.
The Zodiacal Light reaches up from the western horizon and the last vestiges of evening twilight. This is the glow of sunlight reflecting off cometary dust particles in the inner solar system. From the clear desert skies it is brilliant.
The dark of the Moon periods in January, February and March are the best times of the year to see the evening Zodiacal Light from the northern hemisphere.
The Milky Way arches across the eastern sky from Cygnus to Canis Major. That’s light from billions of stars in our Galaxy.
At centre, in the circular fish-eye image above, is the small wisp of green Comet Lovejoy, near the zenith overhead and appearing at the apex of the Zodiacal Light’s tapering pyramid of light.
This view is from the same images used to create the circular all-sky scene at top, but projected in a rectangular 360° format.
Technical notes:
I shot 8 segments for the panorama, each a 1-minute exposure at f/2.8 with a 15mm lens oriented in portrait mode, and using a Canon 6D at ISO 3200. There was no tracking – the camera was just on a tripod. Each segment is 45° apart.
I used PTGui software to stitch the segments into one seamless scene.
This was the sky on the night before Christmas, with the Moon setting and Orion rising.
It was a crisp and calm night on Christmas Eve, with the waxing Moon shining beside Mars in the west at right. The western sky was marked by the faint tower of light called the Zodiacal Lights. To the east at left, Orion was rising beside the Milky Way.
The main image is a 180° panorama taken at the City of Rocks State Park, south of Silver City, New Mexico, and a particularly photogenic site for nightscape images.
This was the scene earlier in the evening with the Moon beside Mars, and the pair well above Venus down in the twilight, all framed by one of the park’s windmills.
Here is a close-up of Orion climbing over the rock formations in the state park. This is a single exposure with the foreground lit by the waxing crescent Moon.
What a wonderful night for stargazing under the Milky Way and amid the rock formations of southern New Mexico.
This was the scene last night, November 22, at a monthly stargazing session hosted by the City of Rocks State Park and the local Silver City Astronomy Club. You couldn’t ask for a better night … and site.
The Milky Way swept overhead, from Sagittarius setting in the west at left, to Taurus rising in the east at right. The faint glow of Zodiacal Light sweeps up from the last glow of western twilight to the left. Some faint green bands of airglow that only the camera can capture are also visible near the horizon.
Matt is doing a laser tour, following which the group convened to the beautiful roll-off roof observatory that houses a Meade 14-inch telescope. It was a fine evening indeed.
Technical notes:
The panorama, which spans about 300° (I cropped the edges a little from the full 360°) consists of 8 segments, shot at 45° spacings, with a 15mm full-frame fish-eye lens at f/2.8, for 1 minute untracked exposures for each frame at ISO 800 with the Canon 6D. I stitched the segments in PTGui software, but processed them in Adobe Camera Raw and Photoshop.
The Milky Way spans the sky and reflects in the calm waters of Cameron Lake, in Waterton Lakes National Park.
This week I’m spending a few nights, at dark-of-the-Moon, back at Waterton Lakes, at a stunning time of year. The aspens are golden, the sky is blue, and the nights are even warm.
Though it is officially autumn, the weather is better now than we had it some weeks in summer. Plus, the Park is now quiet as businesses wind down, preparing to close up for the winter.
I’m shooting night sky panoramas in Waterton, with Cameron Lake one of the wonderful sites I visited last night in a whirlwind tour around the Park to take advantage of a stunningly clear night.
In summer, Cameron Lake is home to docks for canoes and paddle boats. But all are gone now. By winter this lake is home to huge snowfalls, as its location in extreme southwestern Alberta catches the full onslaught of moist Pacific air.
But now, with the early onset of darkness and fine weather, the lake and the Park are superb places for nightscape photography.
I shot this Sunday night, September 21. This is a stitch of 8 segments, each shot with a 15mm lens at f/2.8 for 1 minute at ISO 4000 with the Canon 6D. I used PTGui to stitch the panorama.
The Milky Way towers over the moonlit peaks around the Columbia Icefields
Last Sunday was a productive night, resulting in several 5 Star images in my catalog!
This is another, shot shortly after the Galaxy and Glacier image. In that image the sky was still dark. In this image the sky is beginning to light up with moonlight from the rising waxing Moon.
The peaks are being lit by the Moon, though the valley below is still in moonshadow.
What light there is on the foreground moraines is from starlight, and from the unfortunate wash from unshielded sodium vapour lights on the Icefields Centre. They proudly claim their lights are dark-sky friendly. They aren’t! This is proof.
The top image is a stack of tracked (for the sky) and untracked (for the ground) exposures to create a deep, rich Milky Way over a sharp landscape.
The image is helped by being shot with a filter-modified camera that records the red nebulas along the Milky Way better than stock cameras. That’s why the North America Nebula at top in Cygnus really pops!
This 360° panorama image is a stitch of 8 segments at 45° spacings, each untracked, shot in rapid succession with the same 15mm ultra-wide lens I used for the main image, again oriented portrait, with the frames stitched in PTGui.
I shot it on the road, literally, that leads down to the toe of Athabasca Glacier.
I took the pan just after the image at top, so the peaks are lit more and the sky is bluer with moonlight. The Moon itself is still behind the mountains to the left (east) about to clear the ridge moments after I finished this pan. It was a busy night of getting shots timed right!
But waning Moon nights are superb for nightscape imaging as they provide both dark and moonlit skies but without the immense light of a Full Moon that tends to wash out the sky too much. Waning Moon nights are great for shooting landscape features to the west, as they get lit by the rising Moon after midnight.
P.S.: A tip – hit “Tips and Techniques” under Category at left for more blogs with tips and techniques!
The stars trail over the glaciers of the Columbia Icefields.
What an amazing night this was! You rarely get pristine cloudless skies over the Icefields. Some cloud is almost always blowing off the ice. But last Saturday in Jasper National Park was as clear as it gets.
The Moon was bright, as a waxing gibbous just off frame at left. It lit the landscape like it was day.
I shot with two cameras, one doing a time-lapse motion control sequence panning across the scene. The other was a fixed camera shooting 20-second exposures at 1-second intervals. The resulting frames from the fixed camera, 270 in this case, are multi-purpose:
– I stacked about 100 of them to make the star trail composite above. Two frames supplied the stars at the beginning and end of the trails. Another single frame supplied the ground, to avoid the shadows being blurred by the Moon’s motion if you used the ground composited from all 100 frames.
– I can also take the full set of 270 frames and sequence them into a time-lapse movie of the stars moving over the landscape.
Before beginning the time-lapse sequences I shot this 180° panorama, made of 5 segments stitched in PTGui software. It extends from the southwest at left, where the Milky Way is barely visible, to the north at right, with the Big Dipper over the Icefields Parkway.
Click on it for a bigger view.
This is the camera setup, with the camera on the right taking the star trail image I feature at top.
The Athabasca Glacier is at left, the Stutfield Glacier at right.
Midnight under moonlight is when to see the Icefields! This is the lower parking lot, at the start of the trail up to Athabasca Glacier. This is packed with cars, RVs and buses by day, but at night I was the only one there.
The stars of the summer sky shine over the North Face of Mt. Edith Cavell.
The valley below Mt. Edith Cavell in Jasper National Park is one of the most impressive locations in the Canadian Rockies. At few other sites do you get the sense of standing at the foot of a vertical mountain face.
I shot this view last Friday night, when the waxing Moon was behind the mountain, lighting the clouds and sky but not the mountain and valley directly.
But enough scattered light came from the sky to light the foreground and mountain face to make a nice photo with detail in both earth and sky.
Use of highlight and shadow recovery in Adobe Camera Raw also helps a lot!
This view is a 360° ground-to-zenith panorama I shot earlier in the evening in twilight. It’s from the Trail of the Glacier path, where the path crosses Cavell Creek.
Mt. Edith Cavell was named in 1916 after the World War One nurse who was executed by the Germans for assisting allied soldiers escape occupied Belgium.
The sky presents a panoramic show from Pyramid Island in Jasper National Park.
What a wonderful place to watch the stars. Last night I walked out to Pyramid Island in Jasper, via the historic boardwalk built in the 1930s. The site provides a panorama view around the lake and sky.
To the left is the “mainland.” Just left of centre the waxing gibbous Moon is setting over Pyramid Lake.
To the right of centre, the boardwalk leads out the small island, with Pyramid Mountain behind it.
To the right of the frame, a faint aurora glows to the northeast over the still waters of the lake.
This is a 360° panorama shot with the 15mm full-frame fish-eye lens in portrait orientation, with the segments stitched with PTGui software.
After shooting some panoramas I walked to the end of the island and shot this view looking north and northwest to Pyramid Mountain. The Big Dipper is to the right of the peak, and the aurora lights up the northern horizon at right.
As I shot these images, the night was absolutely quiet. Until the wolves began to howl at the north end of the lake, in mournful howls that echoed across the waters.
It was one of the most spine-chilling moments I’ve experienced in many years of shooting landscapes at night.
The autumn stars rise in trails over Athabasca Falls and Mt. Kerkeslin in Jasper National Park.
Last night was a good one for shooting nightscapes in Jasper. Skies cleared for a beautiful moonlit night, ideal for nightscape shooting.
I went to Athabasca Falls, a popular scenic attraction in Jasper but deserted after dark. I set up cameras at the usual overlook, shooting both a time-lapse and star trail set.
The main image above is the result of stacking 100 images in the star trail set. I used the Advanced Stacker Plus actions from Star Circle Academy.
The foreground comes from one image, shot early in the sequence when the Moon lit more of the landscape. The Falls themselves remained in shadow, as I had expected from my lighting angle calculation and knowing the site.
The star trail image shows the autumn stars of Andromeda, Cassiopeia ad Perseus rising over Mt. Kerkeslin, the famous backdrop to Athabasca Falls on the Athabasca River, making its way to the Arctic Ocean
This image is a 4-segment panorama I shot earlier in the evening in the twilight, with the waxing Moon over the Athabasca River.
In the early 1800s, after explorer, astronomer, and fur trader David Thompson had to abandon his original route over the Rockies at Howse Pass, he came north, and followed the Athabasca and Whirlpool Rivers up over the Athabasca Pass, his new main route to the B.C. interior.
People gather at a rural observatory to gaze at the Milky Way on a summer night.
The clouds drifted through now and then but skies were mostly clear for the last of the Rothney Astrophysical Observatory‘s annual Milky Way Nights for 2014.
A tradition since 2009 and the Year of Astronomy, these dark-of-the-moon nights at the Observatory have proven hugely popular each summer despite the 10 p.m. start and 2 a.m. finish!
The main image at top shows a 360° panorama as people were gathering at the portable telescopes and lining up – in a blur – for a look inside the observatory domes.
Roland from the Royal Astronomical Society of Canada provided laser-guided star tours. How did we point out the stars and constellations before green lasers? In the hands of responsible astronomers they are a great tool for public education.
Here he’s pointing out Vega and the stars of the Summer Triangle. Look way up!
About 400 people attended on Saturday night, the last in a trio of nights this past week. As you can see, the event attracts people of all ages. It’s even a popular date night attraction.
At these summer stargazing sessions many people bring blankets to just lie back and look up, at a site away from the ugly glow of the city, here lighting up the clouds to the north.
The northern lights dance, and light the pioneer homes at the old Larson Ranch in Grasslands National Park.
What a night this was! I arrived at the Larson Ranch site in the Frenchman River valley to shoot some Milky Way panoramas, when, right on cue, the aurora broke loose.
Some aurora had been there since nightfall as a diffuse arc, but about 11 p.m. local time (Central Standard Time in Saskatchewan) the curtains began to dance and pulse with activity as a sub-storm hit, raining solar particles onto our atmosphere from down the magnetic tail of the Earth.
The aurora glow lit the old pioneer buildings of the Larson Ranch, one of the stops on the scenic backroad drive through the Park.
The Larsons ran their ranch by the Frenchman, or Whitemud River, from the 1920s until 1985 when they sold their ranch to the National Park system, forming the first land for the new Grasslands National Park.
The house at left is the original home of cowboy author Will James, who lived here for a time working on ranches in the valley before moving to the United States. He was from Quebec, where he was Ernest Dufault.
I shot this 360° panorama using a 15mm lens, shooting 8 segments at 45° spacings, each a 1-minute exposure at ISO 2500 and f/3.2 with the Canon 6D. I used PTGui software to stitch the segments into a equi-rectangular projection pan.
Grasslands National Park is one of the finest places in Canada to revel in the dark night sky.
This was the scene last night, in far south Saskatchewan, under clear and super dark night skies, at long last after a week of rain, wind and wintery cold.
I’m at Grasslands National Park south of Val Marie, Saskatchewan, to shoot night sky panoramas in what must rank as Canada’s darkest Dark Sky Preserve.
The park itself is new, created only a decade and half ago. It preserves original prairie grasses and is home to unique and rare species. Bison roam here, allowing you to travel back to pre-European times as you gaze out onto a landscape much as it was for thousands of years.
But look up at night and you can gaze at a sky as it was seen for thousands of years, mostly unblemished by the artificial glows of light pollution. Grasslands National Park is a “dark sky preserve,” allowing visitors to see the stars and Milky Way as they should be seen.
I shot this 360° panorama from the Eagle Butte Loop Trail just inside the boundary of the Park. The main hill is 70 Mile Butte, a landmark to the early NorthWest Mounted Police as it lay 70 miles from their posts at Wood Mountain to the east and Eastend to the west.
This view looks out across the farmland to the west and a handful of yard lights. But little else spoils the view around the rest of the horizon. The last vestiges of evening twilight provide a backdrop for the lone silhouette.
The Milky Way arches overhead, and some bands of green airglow, a natural night sky phenomenon, stretch from east to west. The centre of the Milky Way Galaxy lies to the far right, with its glowing clouds of stars.
The setting sun lights the clouds over the river plains of the North Saskatchewan.
This was the panoramic view two evenings ago from the Howse Pass viewpoint on the Icefields Parkway in Banff.
We’re looking south over the North Saskatchewan River near its junction with the Howse and Mistaya Rivers. The spot is near where Highway 11, the David Thompson Highway, comes in from the east to join the Parkway. It’s a modern highway now but 200 years ago this was a main canoe route for the fur trade.
The area is known as David Thompson Country, named for the great explorer, surveyor, and celestial navigator who mapped much of western Canada in the early 1800s.
Until about 1810, Thompson passed this way every year en route to the fur trade forts he set up in the B.C. interior, his main job for the North West Company.
Conflicts with the local Pikanii people, who objected to Thompson trading with and arming their traditional enemies, the Kootenais, forced Thompson to find a new route across the Rockies, the Athabasca Pass in what is now Jasper National Park.
The top image is a 180° panorama, the bottom image is a full 360° panorama from the viewpoint. In the distance are Mt. Murchison, at left, and Mt. Cephren in the far distance, the prominent peak by Waterfowl Lakes.
I shot these with a 14mm lens, in portrait orientation, and stitched them withPTGui software. The top image is made from 6 segments, the bottom from 12 segments.
The software blended them perfectly, no small feat in such a uniform twilight sky. I’m always impressed with it!
What a spectacular sunset tonight. The Sun is just going down in a blaze of red, while the waxing Moon shines in the deep blue twilight.
I grabbed the camera fast when I saw this happening out my front window, and raced out to the ripening wheat field across the road.
The top image is a 360° panorama of the sky, with the Sun at right and the Moon left of centre. The zenith is along the top of the image.
I used a 14mm lens in portrait mode to cover the scene from below the horizon to the zenith, taking 7 segments to sweep around the scene.
You can see the darkening of the sky at centre, 90° away from the Sun, due to natural polarization of the skylight.
I shot this sunset image a little earlier, when the Sun was higher but still deep red in the smoky haze that has marked the sky of late. It certainly gives the scene a divine appearance!
This is a 5-exposure high-dynamic-range composite to capture the tonal range from bright sky to darker ground, the wheat field. I increased the contrast to bring out the cloud shadows – crepuscular rays.
I boosted colour vibrancy but didn’t alter the actual colours – it was a superb sky.
I used PTGui v10 to stitch the panorama at top and Photomatix Pro to stack and tone the HDR set. While Photoshop is wonderful it did not work for assembling either of these images.
The Milky Way towers over the pine trees and sagebrush of Mt. Kobau in the South Okanagan, BC.
It’s been a fine two nights renewing friendships and seeing stars at the summit of Mount Kobau near Osoyoos. I’ve not been here for a dozen years but the timing worked out this year for me to visit the annual Mt. Kobau Star Party, the first star party I attended back in the 1980s.
It’s a rough road to the summit but the reward is a beautiful landscape and skyscape.
The main image above is from Monday night and takes in the Milky Way from horizon to zenith, from Sagittarius to Cygnus. I used a 15mm lens and Canon 5D MkII riding on a new Sky-Watcher Star Adventurer tracking unit, which worked beautifully.
This image, similar to one I took a few nights ago at the Table Mountain Star Party, is a 360° panorama of the land and sky at the Kobau summit. It is a stitch of 8 segments, each 45-second exposures at ISO 6400 with the Canon 6D and 14mm Rokinon lens.
Unfortunately, it shows the light pollution glows from Osoyoos and Oliver that have grown over the last 3 decades and now impinge upon the Kobau skies.
This image is a tracked closeup of the Cygnus and Lyra area of the Milky Way, taken with a 50mm lens and the 5D Mark II riding on the Star Adventurer for a stack of five 10-minute exposures. It is rich in the red nebulosity of the Cygnus spiral arm and takes in the field that the Kepler satellite stared at for 4 years looking for alien planets.
I’m heading home but the star party continues all week, building to the weekend when most people will be attending, under prospects of clear skies and warm weather.
The Milky Way spans the sky on a summer night at a dark-sky star party.
What a fabulous weekend! For the last few nights I’ve enjoyed the skies and hospitality of the Table Mountain Star Party in northern Washington state, near Oroville, just south of the Canada-US border. The site is the Eden Valley Guest Ranch, under superbly dark skies.
About 300 people, mostly from Washington, enjoyed getting under the Milky Way.
As I wandered around the telescope field I heard all kinds of excited comments in the dark: “Wow, look at that!” “Hey, take a look at the Swan Nebula!” “Want to see the Veil Nebula?”
I was impressed with the great mix of ages and demographics at the TMSP – it wasn’t just “old timers.” There were young families, couples, teens, even a pair of grannies pulled in for a look at the starry sky!
The summer Milky Way arches across the sky in these 360-degree “pans.”
But the other main feature is the green fingers of airglow rising out of the east (at left in the circular image above). Only the camera picked these up – the sky looked very dark to the eye. There’s even a faint magenta glow on the northern horizon (at top in the circular image) from aurora.
Both images capture the entire sky, in a panorama set I took using a 14mm Rokinon lens, shooting vertically for 8 segments at 45° spacings. Each frame was a 45-second exposure at f/2.8 and ISO 6400, on a standard tripod, no tracking.
I used PTGui software to stitch and blend the images, then Photoshop CC 2014 to finish them off.
The top image uses “equirectangular” projection; the bottom image “stereographic” projection for a fish-eye effect. Both take in the entire sky from horizon to horizon, plus a lot of ground, filled with red-lighted and happy observers.
The Milky Way arches over our observing field at the OzSky star party in Australia.
What an amazing few nights it has been. We’ve enjoyed several clear nights under the fabulous southern Milky Way. About 40 people from around the world have had access to telescopes from 14-inch to 30-inch aperture to explore the wonders of the southern sky from a dark site near Coonabarabran, New South Wales.
I’ve seen lifetime-best views of the Tarantula Nebula, the Carina Nebula, the Horsehead Nebula, the Omega Centauri cluster, and on and on! But the views of Mars have been incredible, the best I’ve seen the planet in a decade as it is now close to Earth and high in our southern sky.
The panorama above is a stitch of 6 untracked segments taken with a Canon 60Da and 8mm fish-eye lens. Each segment is a 60-second exposure at ISO 3200.
The 360° panorama takes in the Milky Way from Canis Major setting at right, over to Scorpius and Sagittarius and the centre of the Galaxy rising at left. At top centre is the wonderful Carina and Crux area. The two Magellanic Clouds are just above the trees at centre.
At upper left is Mars, and just to the left of it is a diffuse glow – the Gegenschein, sunlight reflected of comet dust in the direction opposite the Sun. Mars is near that point now. You can just see a faint band running from the Gegenschein to the Milky Way — the Zodiacal Band of comet dust.
Here, one of our observers takes in a view through a 24-inch reflector telescope under the stars of the Southern Cross, the pattern in the Milky Way behind him.
The nights have been warm and wonderful, though a little damp and dewy after midnight. However, rain is in the forecast again, a welcome relief for most local residents who want the rain. They can have it now. We’re happy!
A mix of sky glows fills the pre-dawn sky in New Mexico.
To the eye the sky looked dark, marred only by some high haze drifting through. But the camera reveals a sky filled with an amazing wealth of colourful glows.
I took this 360° panorama in the pre-dawn hours (4:45 a.m.) this morning (December 8) from the Painted Pony Resortin southwest New Mexico. It reveals a swath of green airglow to the north, the zodiacal light, and the Milky Way. At northern latitudes there was bright aurora visible last night. We might have seen some sign of it here in New Mexico in the form of increased airglow activity.
The panorama takes in, from left to right:
• Arcturus, shining like an ornament on the treetop
• the zodiacal light rising up from the east
• red Mars embedded in the zodiacal light below Leo
• the Milky Way from Puppis and Canis Major at left arching up and across the sky down into Perseus at right
• Sirius the brightest star
• Orion setting over the main house
• Jupiter, the bright object at top centre in Gemini
• Aldebaran and the Pleiades setting right of the main house in Taurus
• Polaris over the smaller house at right
• the Big Dipper at upper right pointing down to Polaris
• a green glow along the northern horizon above the smaller house that is likely intense airglow.
• green and red bands throughout the sky are airglow, caused by atmospheric molecules flourescing at night
• bands of high cloud also permeate the sky adding natural glows around the stars.
I stitched this panorama using PTGui software, from 6 segments, all tracked, taken with the 14mm Rokinon lens at f/2.8 for 2.5 minutes each and with the Canon 5D MkII at ISO 1600.
The Milky Way sweeps in a great arch of light across the sky.
It’s been a wonderful week for shooting the Milky Way. I had a very clear night on Tuesday but ventured no further than a few hundred feet from home to the harvested canola field next door.
The Milky Way was beautifully placed, as it always is at this time of year, right across the sky from northeast to southwest, with the starclouds of Cygnus passing directly overhead.
The top photo is a panorama of 8 shots, with a camera on a tripod, and each exposure being just 60 seconds with a 14mm lens in portrait orientation. I stitched the segments with PTGui software,rendering the scene with its spherical projection mode which wraps the dome of the sky onto a flat surface in a way that retains the zenith detail as your eye saw it, but greatly distorts the extremities of the scene at either end.
My house is at lower right.
For this image, I used the same lens to take a single view from horizon to well past the zenith. Here the camera was tracking the stars for a set of stacked 5-minute exposures to grab even more detail in the Milky Way.
What stands out as much as the Milky Way are the green fingers of airglow stretching across the sky. These were invisible to the eye but the camera sure picks them up.
Airglow is caused by oxygen atoms, in this case, fluorescing at night as they release some of the energy they absorbed by day. It’s not aurora and generally covers more of the sky, sometimes with a diffuse glow or, as here, with more structured bands that slowly shift over minutes. It varies from night to night and can occur at any latitudes. But usually only cameras pick it up. To the eye, airglow just makes the sky look inexplicably a little less dark than you think it should be on such a clear night.
Two panoramas compare the view of Waterton Lakes National Park by night and by day.
Last night was as perfect as it gets here in the southwest corner of Alberta. The sky was crystal clear and the wind was calm, unusual for Waterton Lakes.
I spend the night travelling around the Park shooting nightscapes, including this night pan taken from the shoreline in the townsite, again contending with the light pollution of unshielded town streetlights, and the glare from lights on the Prince of Wales Hotel. But even they can’t wash out the marvellous Milky Way.
Just after taking this I went up to the Hotel to shoot scenes from its overlook, back toward the town. As I walked up to the Hotel, a guest was getting out of her car and waving an iPhone around with an astronomy app, hoping to see the stars. I overheard her saying, “I guess we won’t see a lot of stars from here,” referring to the glare of the lights of the Hotel.
The night panorama sweeps from northwest to southwest over 270°. At left we’re looking north toward the prairies. An aurora there would have been well-placed and timed. As it is, there is just the faintest hint of Northern Lights. At right, is the centre of the Galaxy area of the Milky Way.
Stars shine reflected in the unusually clam waters of Upper Waterton Lake.
This day panorama takes in a smaller angular sweep. I took it from a similar shoreline location just at sunset, as the last rays of the Sun lit Vimy Peak in alpenglow. Returning to dock on the last voyage of the day is the historic tour boat, The International, a wood-hulled ship built in 1927, the same year the Prince of Wales Hotel opened. It plies these waters every summer and by winter is stored in a dry dock down the lake on the U.S. side.
It’s been a wonderful weekend here. More photos are in the processing pipeline. But for now, it’s off to Writing-on-Stone Provincial Park.
The floral emblem of Alberta, the wild rose, appears in front of a twilit starry sky.
Last night was another good one on the Ranch! I had three cameras shooting from my log cabin front yard – I had no ambition to travel farther afield this night, after 6 nights in a row of shooting around the Cypress Hills. This is a scene from one of the time-lapses taken from “home,” of prairie flowers in front of a prairie sky.
I also took the opportunity to reshoot the popular “Milky Way over Log Cabin” scene, getting better results I think than the shot I posted from the first night I was here a week ago. This was with the specially-modified camera that picks up the red nebulosity in the Milky Way better. The colours are much nicer.
Finally, this is a 360° panorama of the scene from last night, taken before the Moon set but when it was behind the trees out of sight. Its light still illuminates the sky blue, yet the Milky Way still stands out. The red lights are from two other cameras shooting time-lapses. This is big sky country for sure!
It’s been a wonderful week of shooting on the century-old Reesor Ranch in the Cypress Hills. I highly recommend the location for anyone who wants an authentic western experience in a stunning setting. I’m sure I’ll be back.
The silvery Milky Way and green bands of airglow stretch across the high plains and big sky of the Cypress Hills.
The Moon had long set and the night looked as dark as it could be. No lights interrupted the flat clear horizon. These are the high plains of the Cypress Hills, the highest place in Canada between Labrador and the Rockies.
And yet, in the panoramic photos I took last night the sky revealed its true colours.
In the 360° panorama above, the Milky Way arches overhead from northeast to southwest. It was obvious to the naked eye. But stretching across the sky from east to west are also bands of green and red airglow that were completely invisible to the eye, except perhaps for making the sky look more grey than it might have otherwise.
These aren’t aurora but are emissions of light caused by oxygen atoms fluorescing as they give off some of the energy they absorbed by day. Time-lapse sequences show these bands moving slowly across the sky.
I drove up the Graburn Road last night, to the plateau of Cypress Hills, to shoot a time-lapse of the Milky Way moving above this lone tree on the plains. It’s called the Survivor Tree, subject to drought, blizzards fire, cattle, and even being cut down at one time. But still it survives. With a cold wind blowing last night I had a taste of what this tough Lodgepole Pine has had to endure.
This is one frame from the final movie clip, with the tree and sky still lit by the light of the setting waxing Moon. An enduring tree beneath the timeless stars.
Early in the evening the northern sky was also marked by another sky phenomenon, noctilucent clouds – very high altitude clouds still lit by sunlight long after the Sun has set locally. These clouds made for a nice photo for a few minutes but soon faded from view as the Sun set even as seen from where these clouds live at the edge of space.
The night was left dark, with no aurora tonight – just the Milky Way and the faint wisps of airglow over the high plains of southern Alberta.
This is not a picture of the amazing sky but a document of what the sky can do when it decides to be merciless.
No one has seen anything like this in living memory, with homes under water and the river swollen to a lake engulfing the Bow River Valley.
These panoramas depict the heart of the Siksika First Nation, part of the Blackfoot Confederacy. It was in this valley, where the Blackfoot had traditionally held their summer camps, that Treaty 7 was signed in 1877 between Chief Crowfoot and James Macleod of the NWMP. The history of the area is presented at the beautiful Blackfoot Crossing Historical Park interpretive centre, shown in the image below. We’ve held several popular public stargazing sessions there. It was closed today, ironically due to a lack of safe water.
It was here at this spot in the Bow River Valley that nomadic hunters could easily cross the river. Up to this weekend a bridge, seen in the distance in the image below, had allowed modern travellers to make the crossing. But no more. The bridge is closed and may never reopen, until it is rebuilt. Today, water was roaring just below the bridge deck. And waters have receded in the last 24 hours.
There is some fear that a ferry downstream, the Crowfoot Ferry, one of the last river ferries in Alberta, might break loose and crash into the Bassano Dam.
Dozens of homes are underwater and hundreds of people displaced to evacuation shelters. The water came up so fast many people had just minutes to get out.
Those I spoke to today, including one 68-year-old resident, said they have never seen the Bow flood as bad as this. The high waters, having breached the Carseland Dam upstream from here, are now heading downstream to fill the Bassano Dam and flood the lower Bow and South Saskatchewan River through Medicine Hat. As those upstream clean up, those downstream prepare for the onslaught of water.
What colour is the dark night sky? Depending on conditions, it can be any colour you want.
I shot this 360° panorama last night from my backyard under what looked like a clear and fairly dark, moonless sky. Looks can certainly be deceiving. The camera picked up all kinds of colours the eye couldn’t see.
Let’s review what’s causing the colours:
• To the north just left of centre the horizon is rimmed with a bright yellow glow from all-night perpetual twilight present around summer solstice at my mid-northern latitude.
• Above that shines a green and magenta band from a low-level aurora just visible to the naked eye.
• Much of the sky is tinted with bands of green from ever-present airglow, caused by oxygen atoms at the top of the atmosphere giving off at night some of the energy they absorbed by day. I had thought the sky would look blue from the perpetual twilight but the airglow seems to overwhelm that.
• Yellow glows around the horizon at left (west) and right (southeast) are from urban light pollution from towns 50 km away.
• Some strands of remaining cloud from a departing thunderstorm add streams of brown as they reflect lights from below.
• Finally, the Milky Way shows up in shades of yellow and pale blue, punctuated here and there by red patches of glowing hydrogen hundreds of light years away.
The only thing missing this night was a display of electric blue noctilucent clouds.
The sources of most of these colours are an anathema to observers of faint deep-sky objects. Aurora, airglow and certainly light pollution just get in the way and hide the light from the distant deep sky.
A word on technique:
I shot this panorama using an 8mm fish-lens to shoot 8 segments at 45° spacings. I used the excellent software PTGui to stitch the segments together, which it did seamlessly and flawlessly. Each segment was an untracked 1 minute exposure at ISO 3200 and f/3.5. The panorama covers 360° horizontally and nearly 180° vertically, from the ground below to the zenith above. It takes in everything except the tripod and me!
As we end 2012 and start a new year, I wish everyone a very happy 2013 and leave you with this view of a very amazing sky.
This is a 360° panorama of the Milky Way over Timor Cottage on a very clear night in mid-December in New South Wales, Australia. May all your skies be as wonderful and as inspiring as this in the coming year.
Indeed, we have some potentially remarkable sights to look forward to, with the prospects of two bright comets in 2013: Comet PANSTARRS in March and Comet ISON in November and December.
Let’s hope for more amazing skies in 2013. Keep looking up!
This is the southern hemisphere sky in a 360° panorama.
From left to right in the sky, you can see:
– in the South: the two Magellanic Clouds, satellite galaxies of the Milky Way
– in the West: the diagonal glow of Zodiacal Light
– in the North: Orion, Jupiter and the Pleiades above the outline of Timor Rock
– in the East: the southern Milky Way just rising
I shot this last night in the early evening, Sunday, December 9, from my observing site in Australia, Timor Cottage at Coonabarabran, NSW. It’s a panorama of 8 images, each a 1 minute untracked exposure with the 10-22mm lens at 10mm. I’m amazed at how well the sections join together, considering the stars are moving from one frame to the next and about 16 minutes separates the beginning and end frames.
It’s taken me a few months to get around to the task, but at last! — my mosaic of the Milky Way I shot in Chile back in May.
The panorama is made up of 6 frames, stitched and blended together, extending from Crux, the Southern Cross (at right) to Aquila the eagle (at left) — a sweep of the Milky Way from Acrux to Altair! The mosaic is centred on the core of the Galaxy in Sagittarius and Scorpius.
Panoramas like this allow you to step back a distance and take in the big picture:
— You can see the large-scale structure of the dust clouds and the odd diagonal sweep of many of the clouds cutting across the plane of the Galaxy. I’ve never heard an explanation of why the dust lanes seem to have that structure and direction. I also see a 3D effect, with the nearby dust clouds hanging in front of and obscuring the bright starclouds of the distant inner spirals arms of our Galaxy.
— Also apparent are the extensive dust clouds at left extending from Ophiuchus (at top) down into Aquila, well below the plane of the Galaxy. Most wide-angle shots of the Milky Way I see tend to process out the subtle brown clouds that extend far off the Galactic plane. And they are brown, not black.
— And what really stands out is the band of bright blue stars from Scorpius (at top centre) to the right above the Milky Way through Lupus, Centaurus then down into Crux. This is a section of Gould’s Belt, a ring of hot blue stars around the sky that runs at an angle of about 20° to the Milky Way. This ring of hot, nearby stars surrounds us in our spiral arm and is thought to be only about 65 million years old, likely caused by some disturbance in our spiral arm which set off a wave of star formation close to us.
— And … as my Australian friends will point out, you can see the entire Dark Emu, made of the dust lanes from the Coal Sack in Crux at right (his head and beak), through the curving lanes in Centaurus (his neck), then sweeping up and over the centre of the Galaxy (his body) then down into Scutum and Aquila (his two feet and his tail).
I took this panorama from the Atacama Lodge in north central Chile, using the Canon 5D MkII and Canon 35mm lens. Each of the 6 segments that went into this pan was itself a stack of 4 x 6 minute exposures, plus a fifth exposure through a soft-focus filter, all at f/4 and ISO 800. The camera was on a Kenko SkyMemo tracking platform. I assembled the pan with Photoshop CS5’s Photomerge command. This is actually only half of the full panorama mosaic, which extends for another 5 segments to the right along the Milky Way to Orion, taking in the entire southern portion of the Milky Way. But this is the best bit!

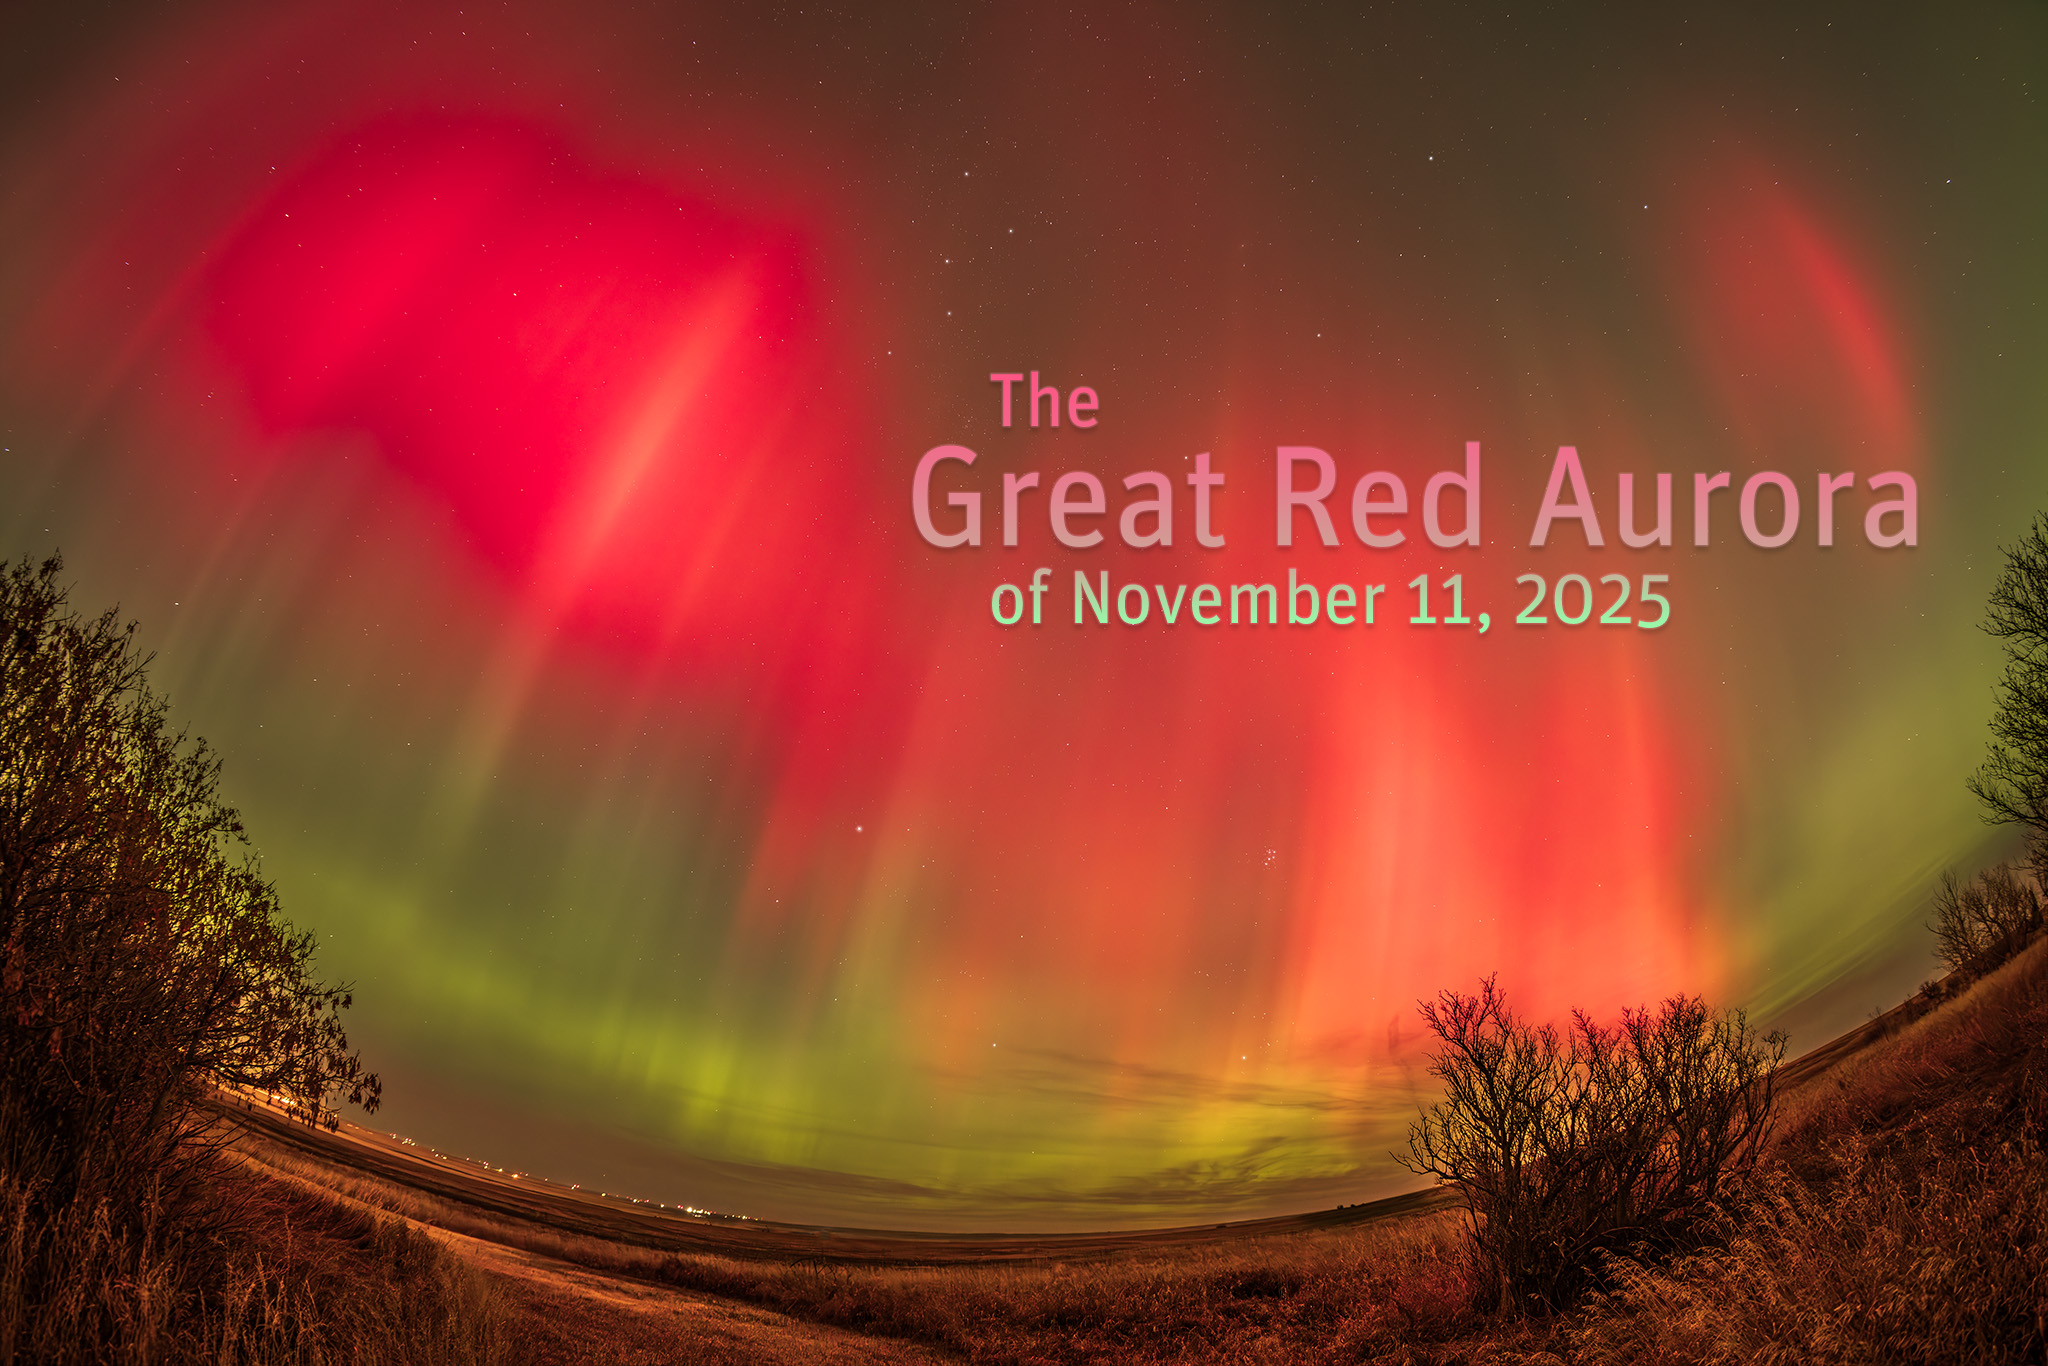
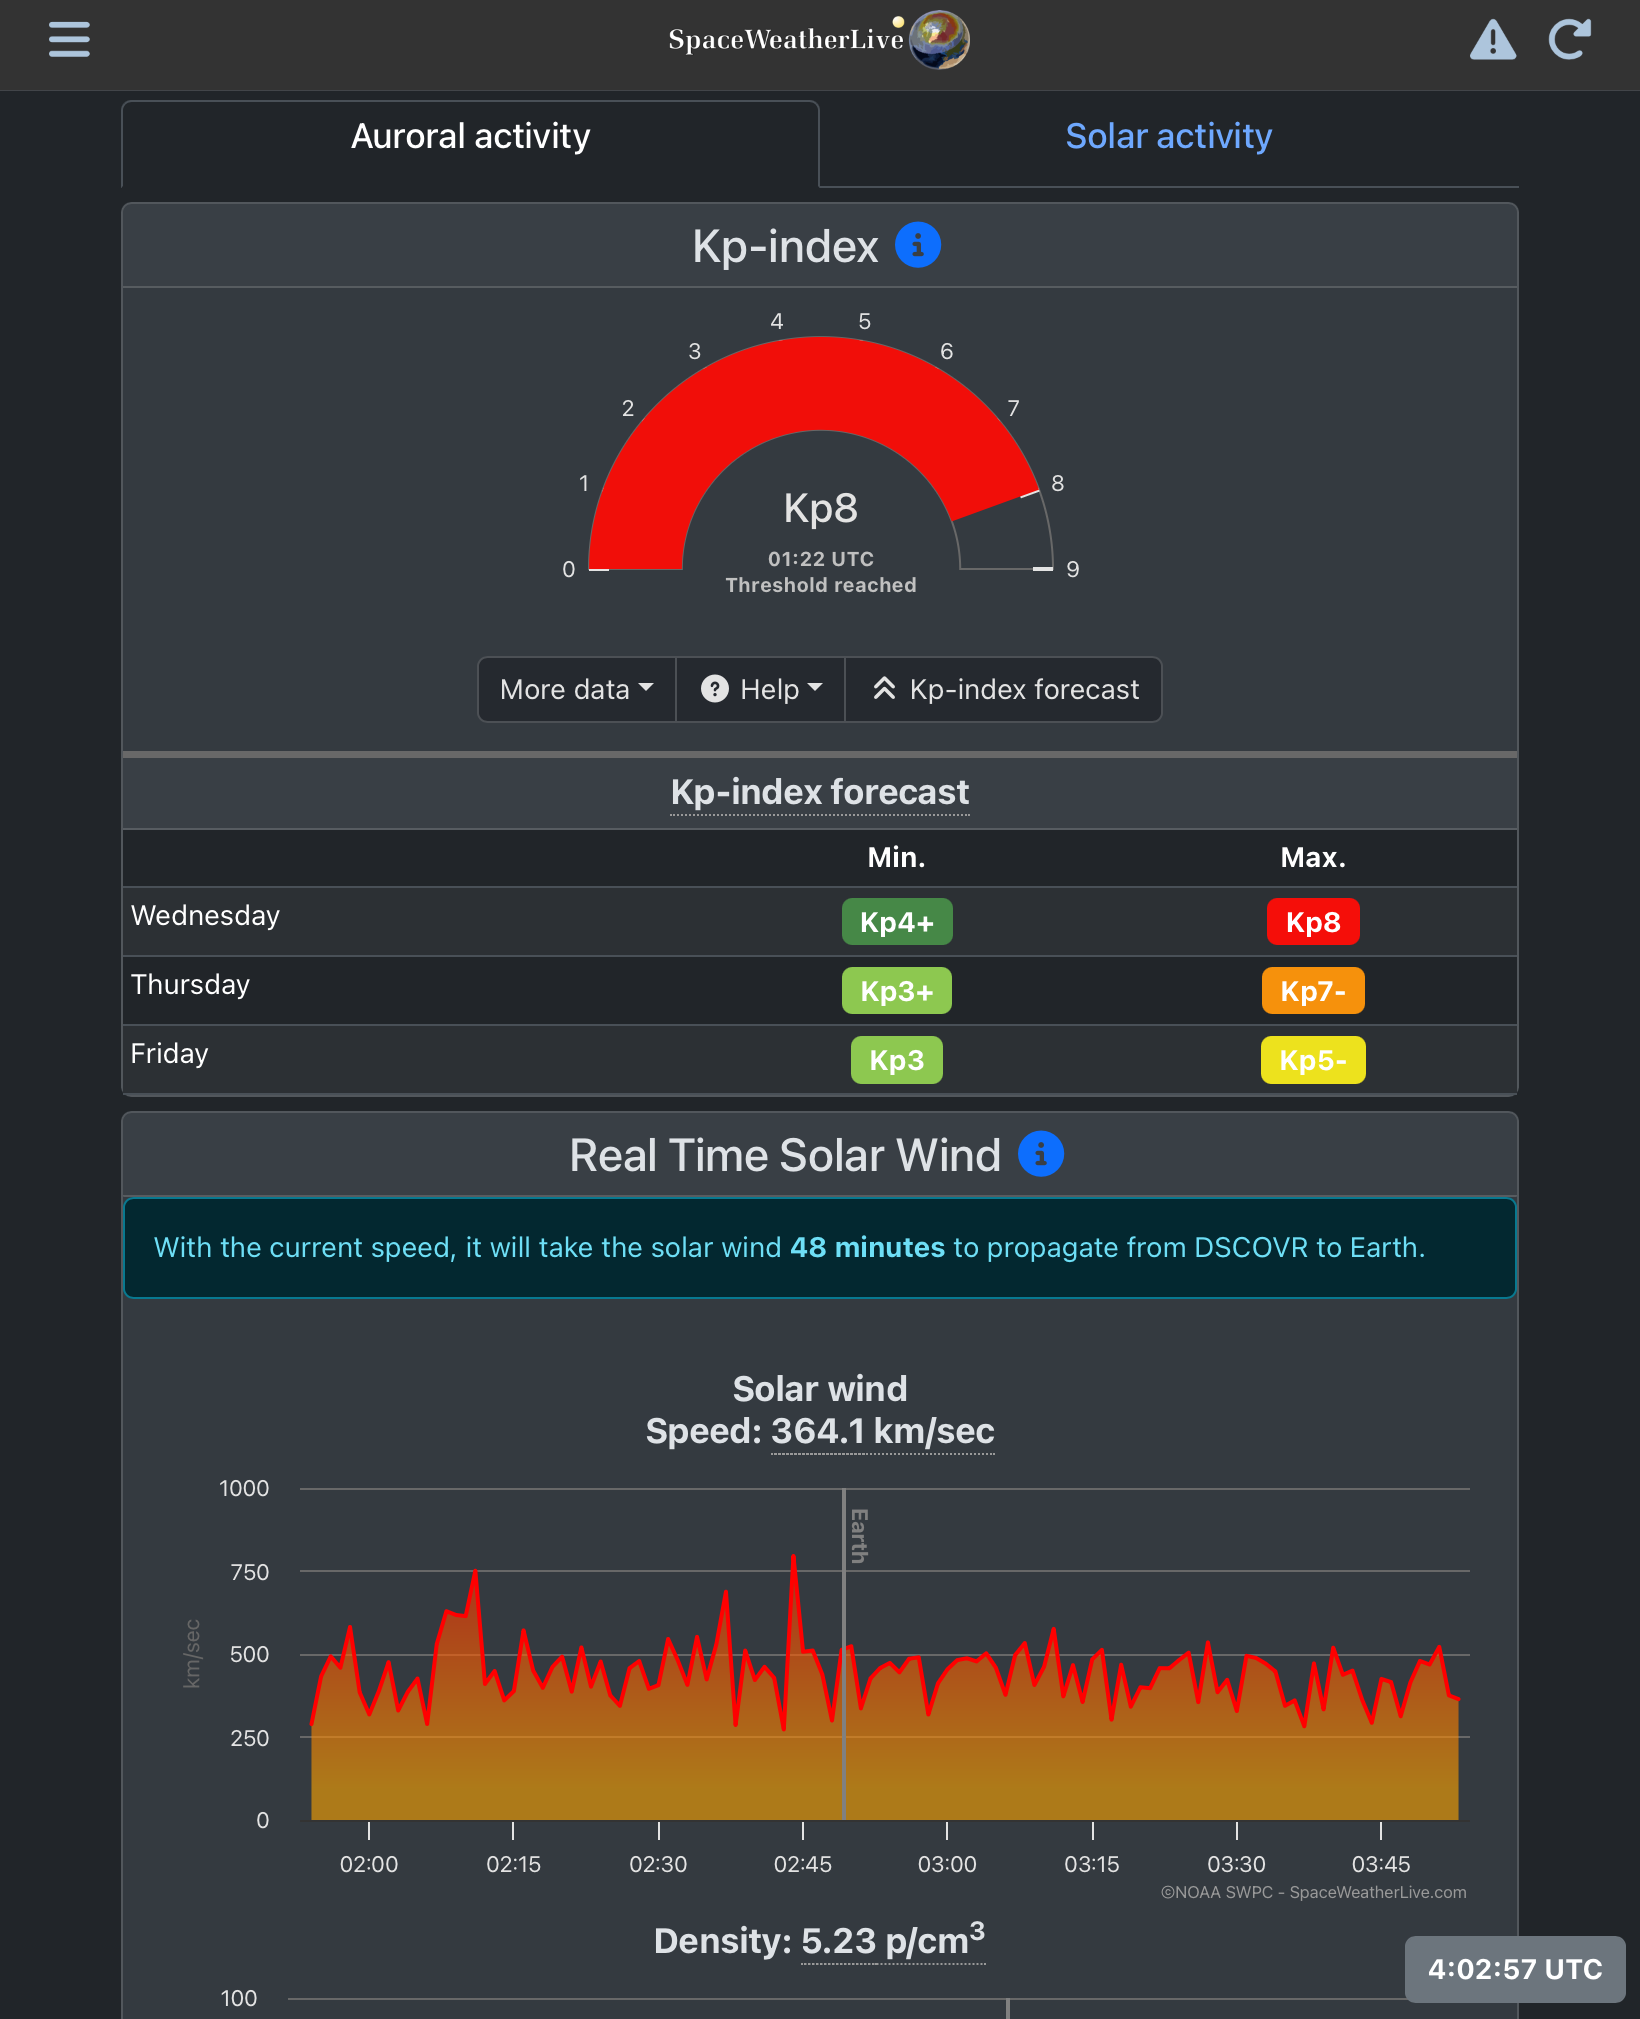
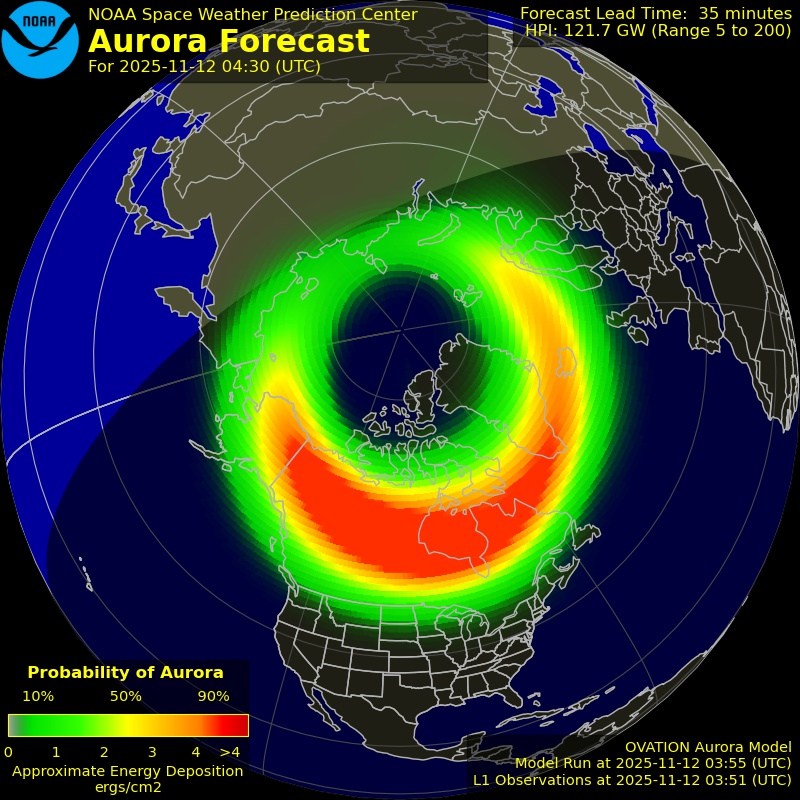
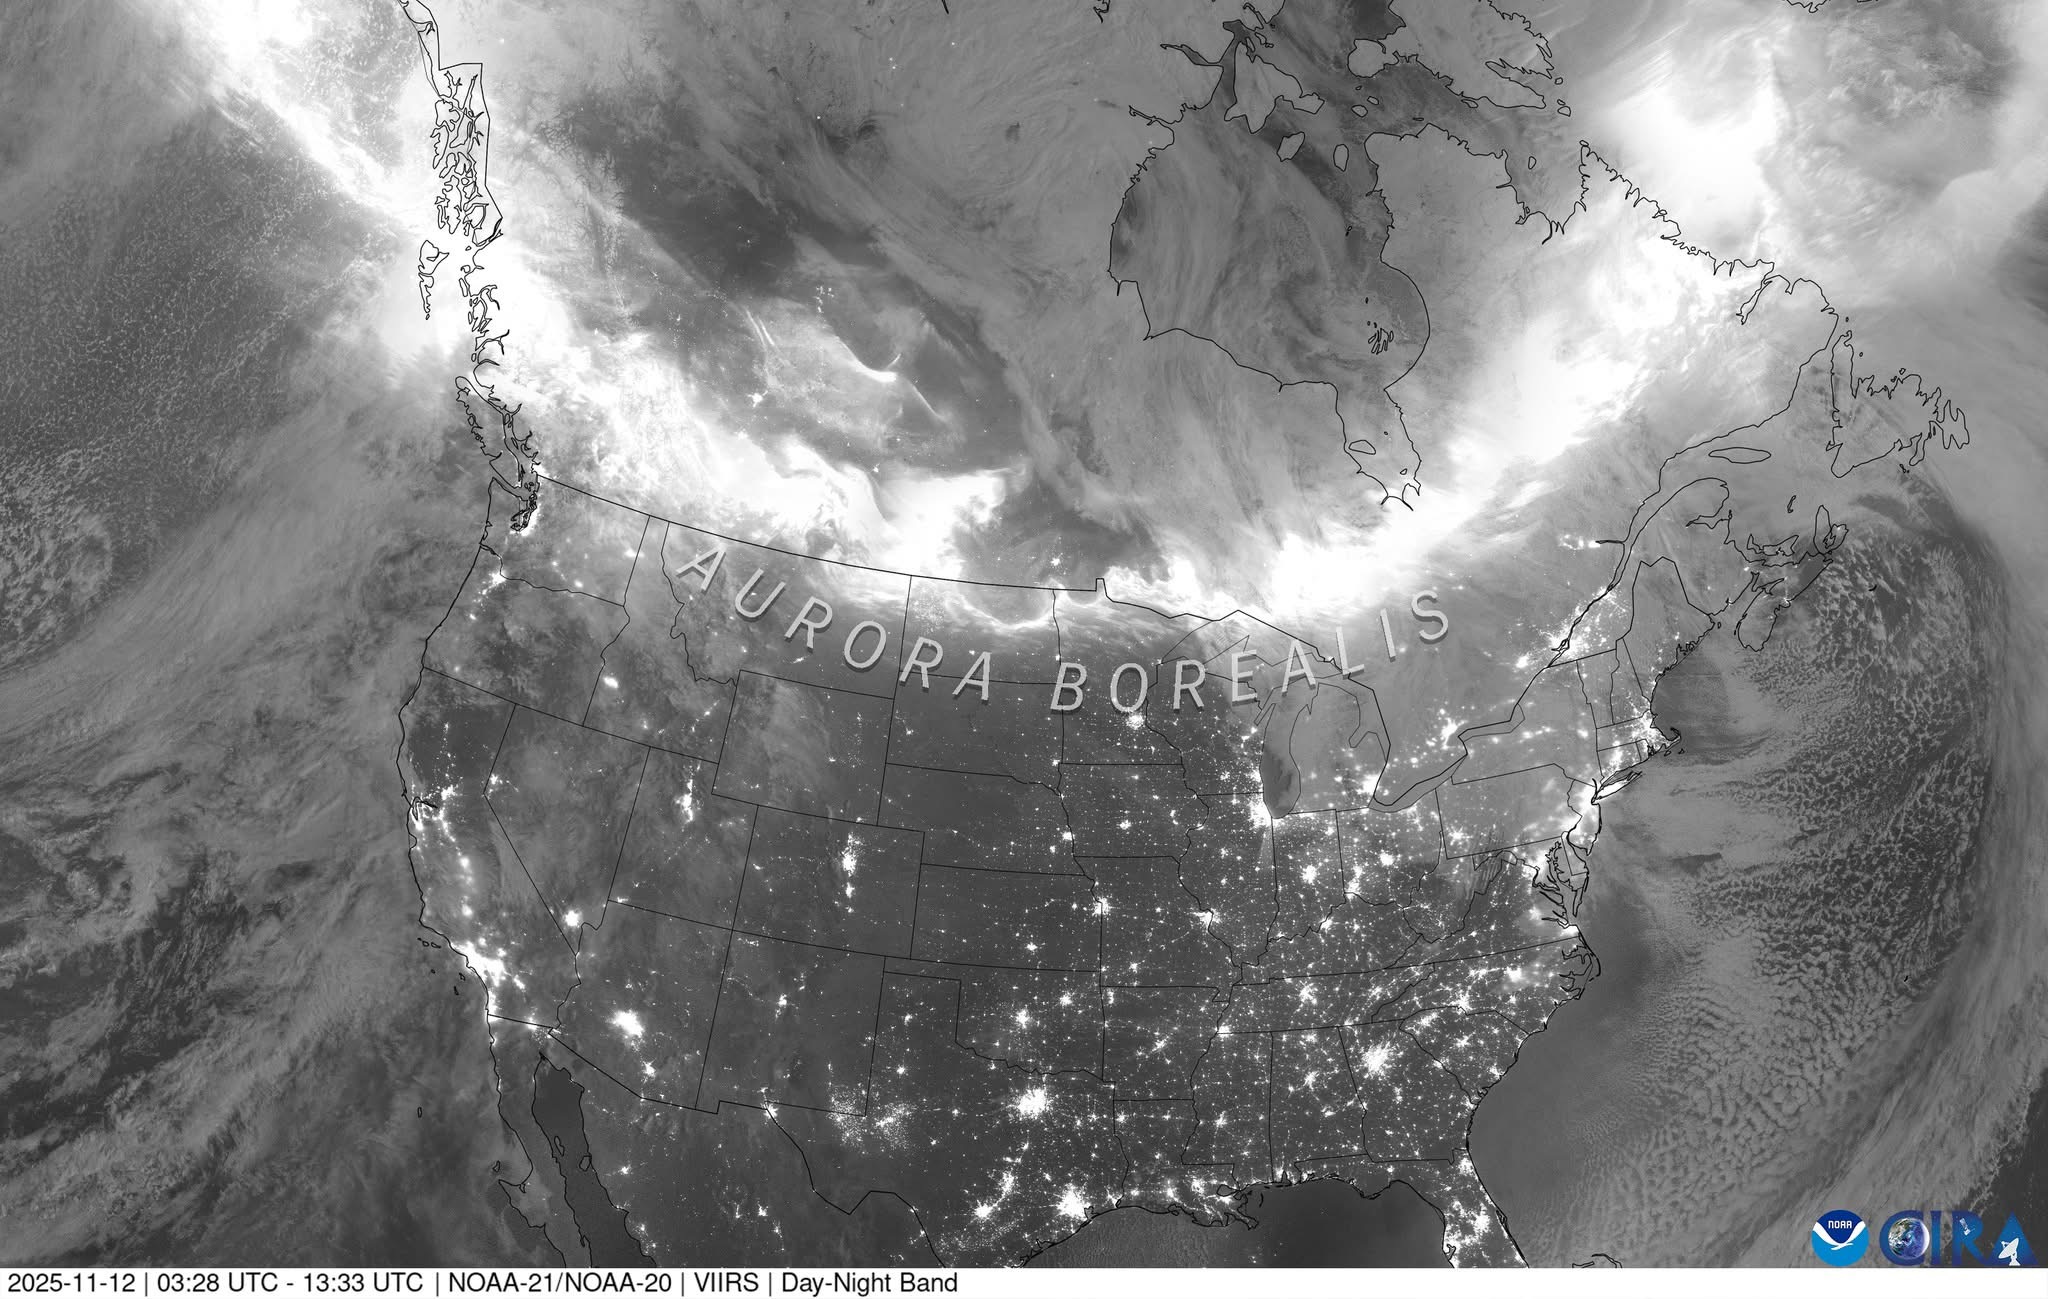

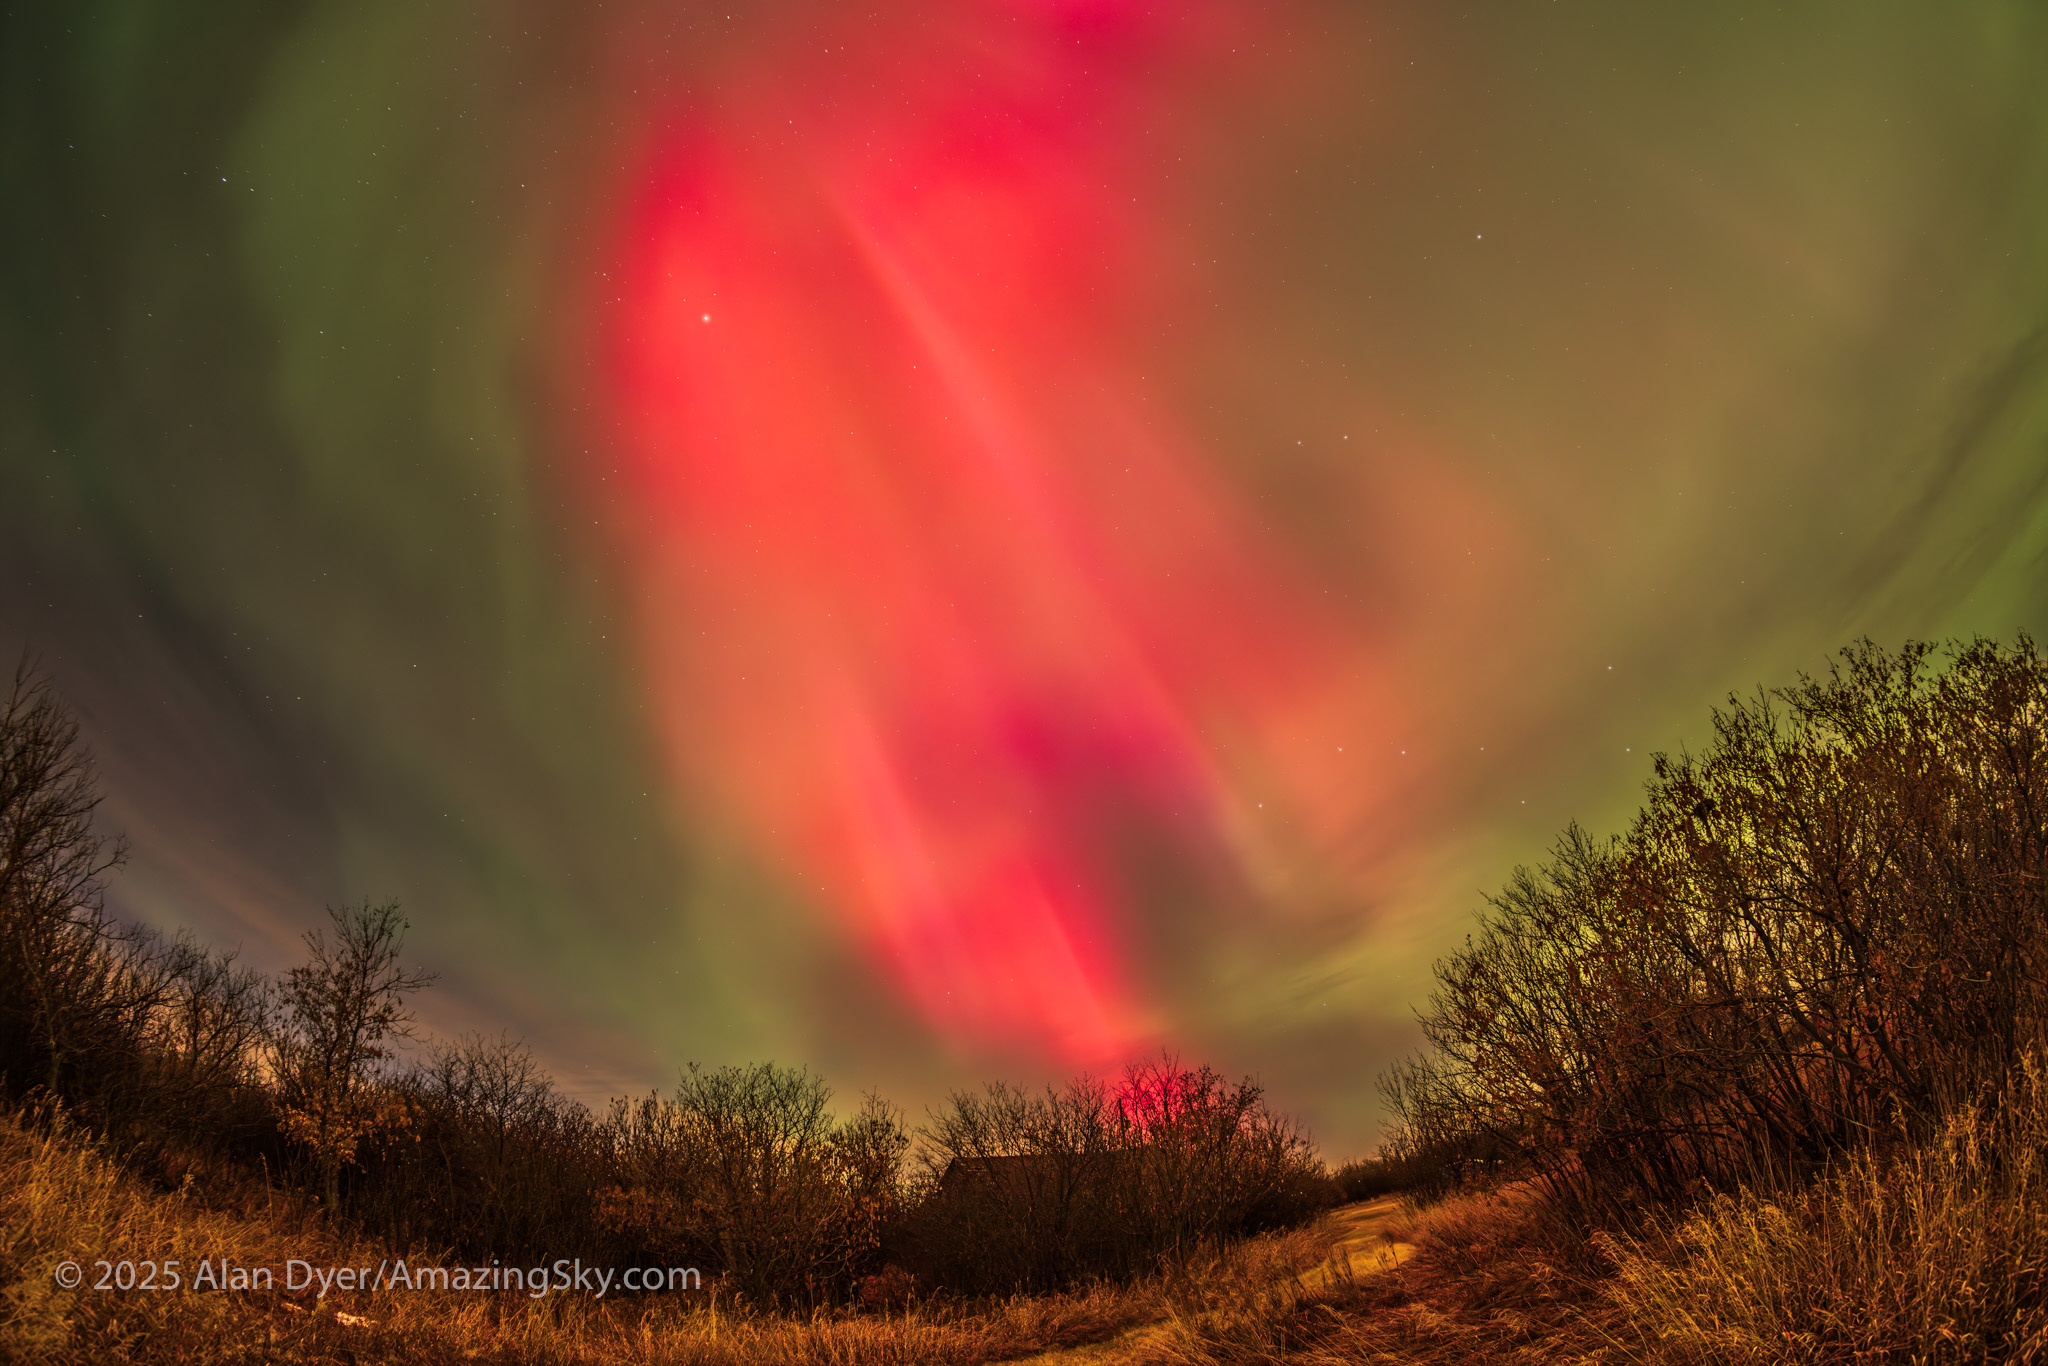
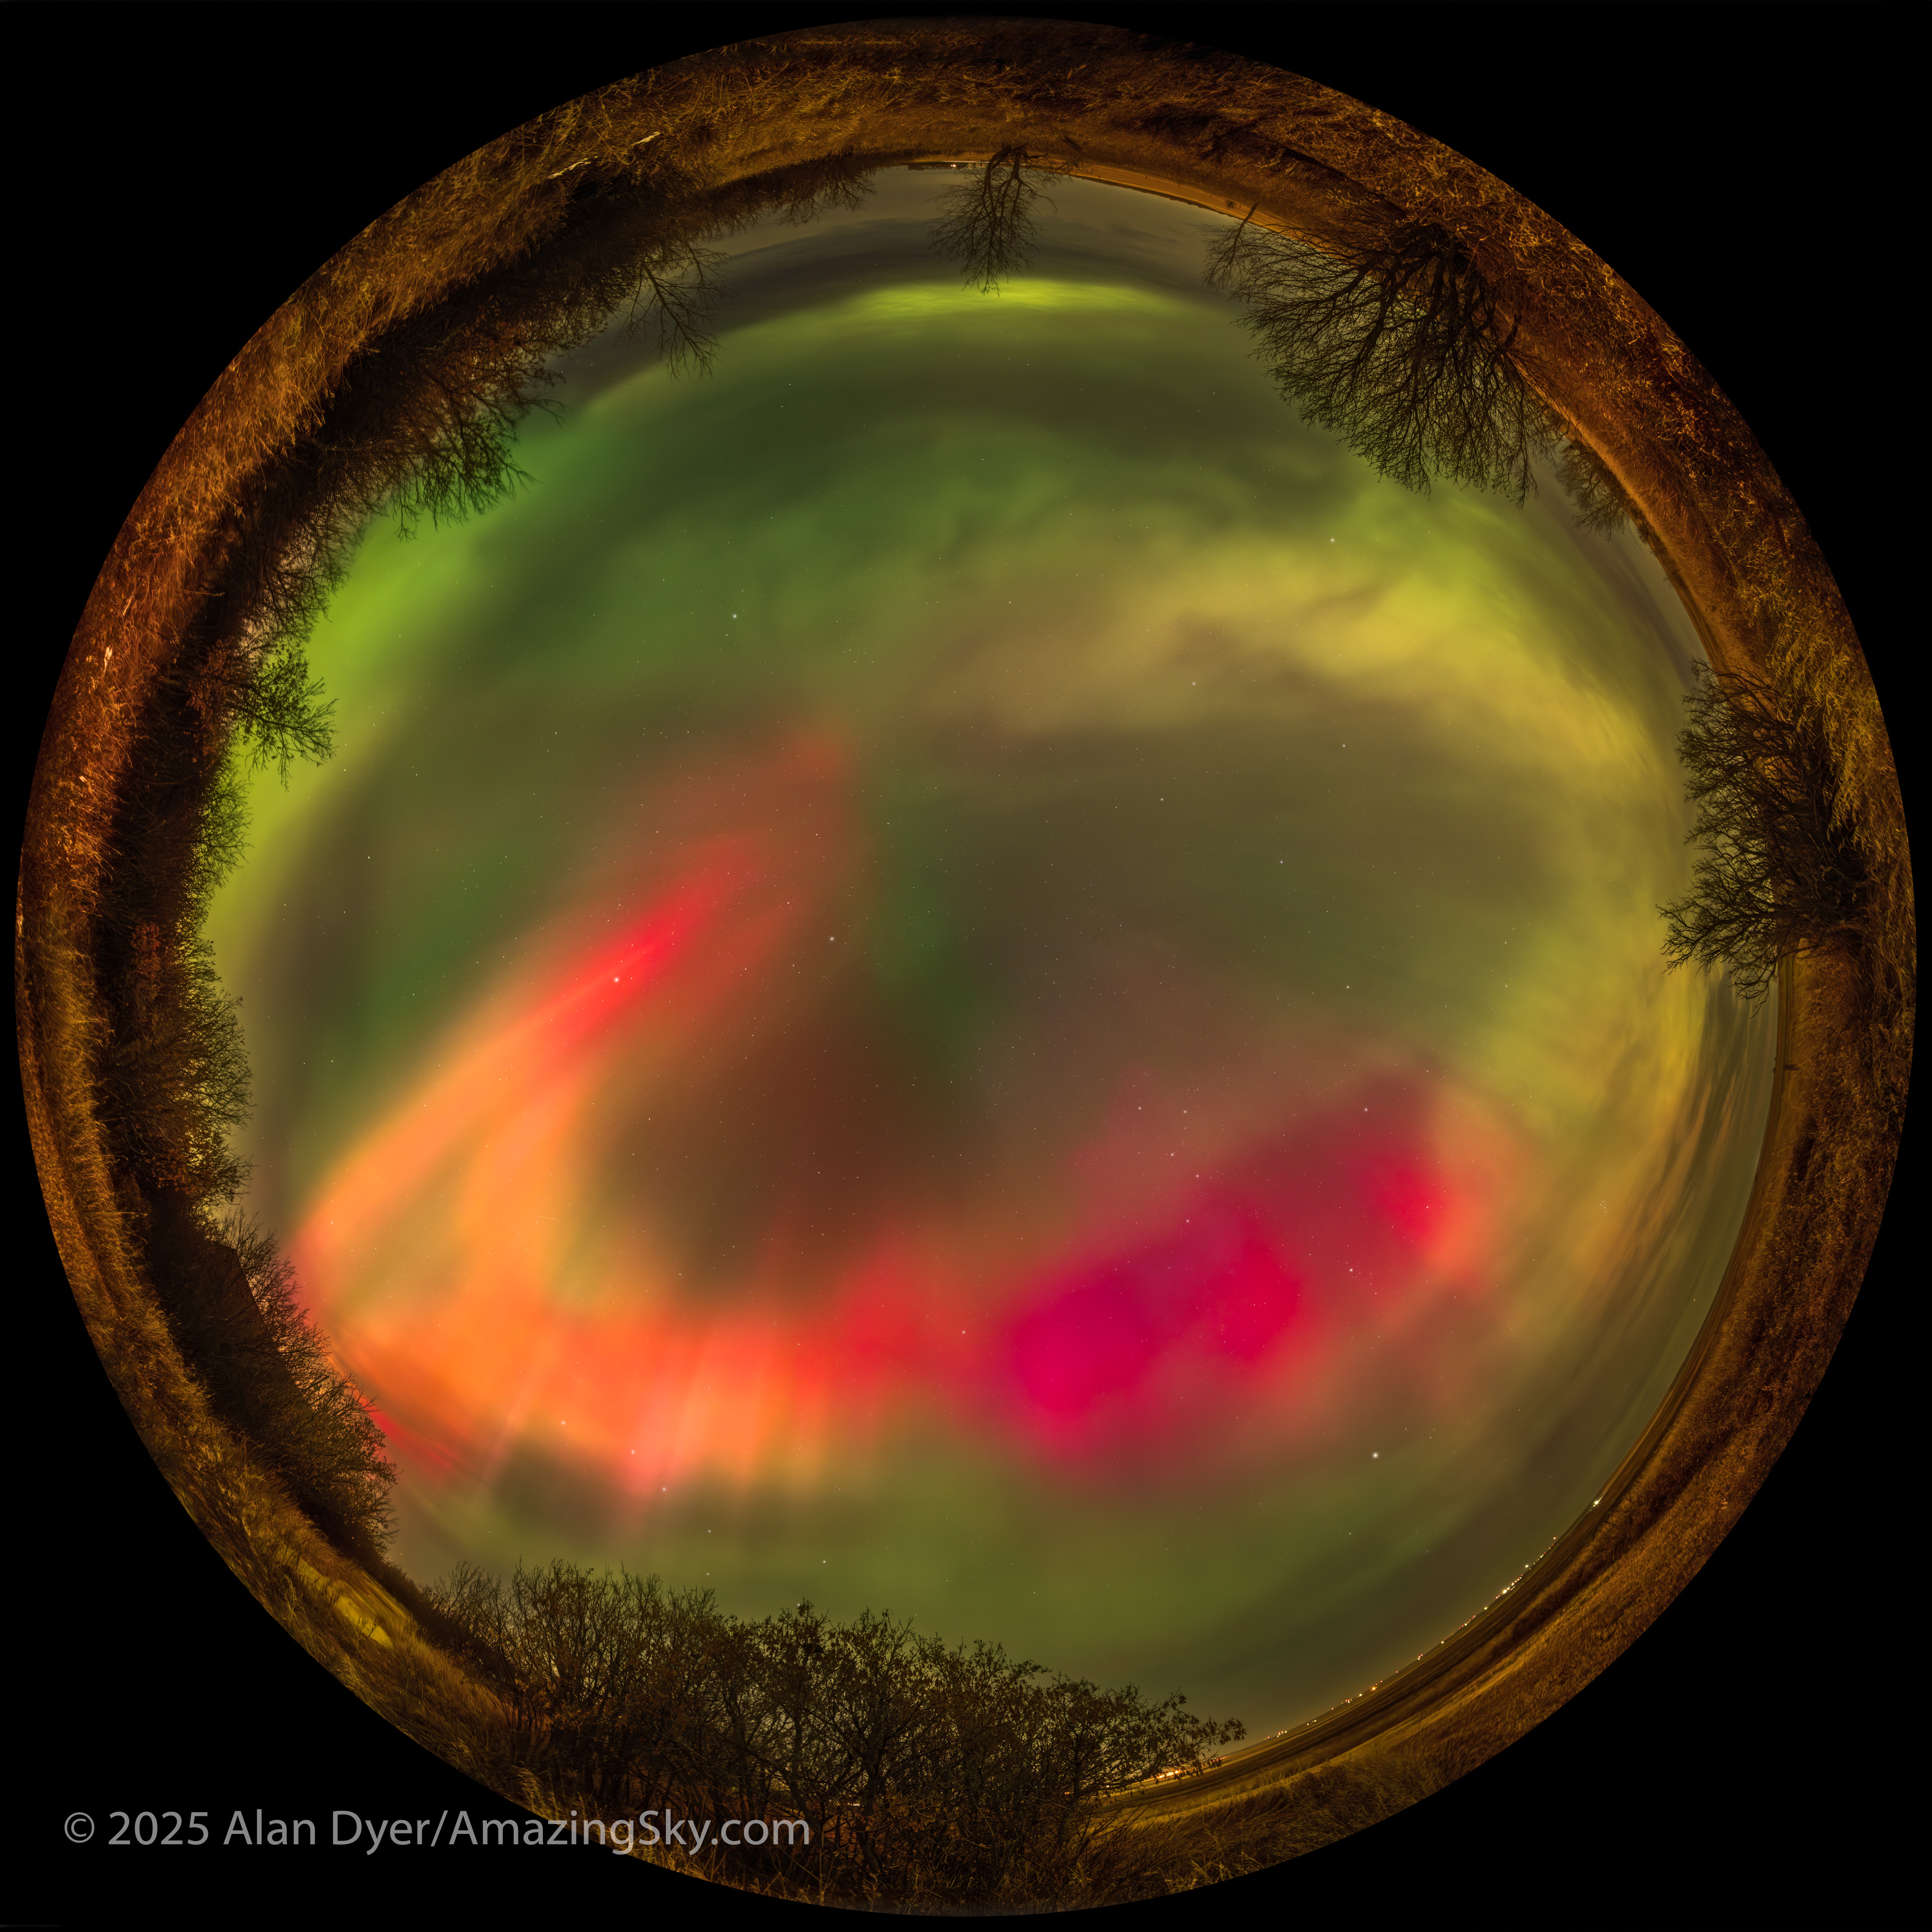
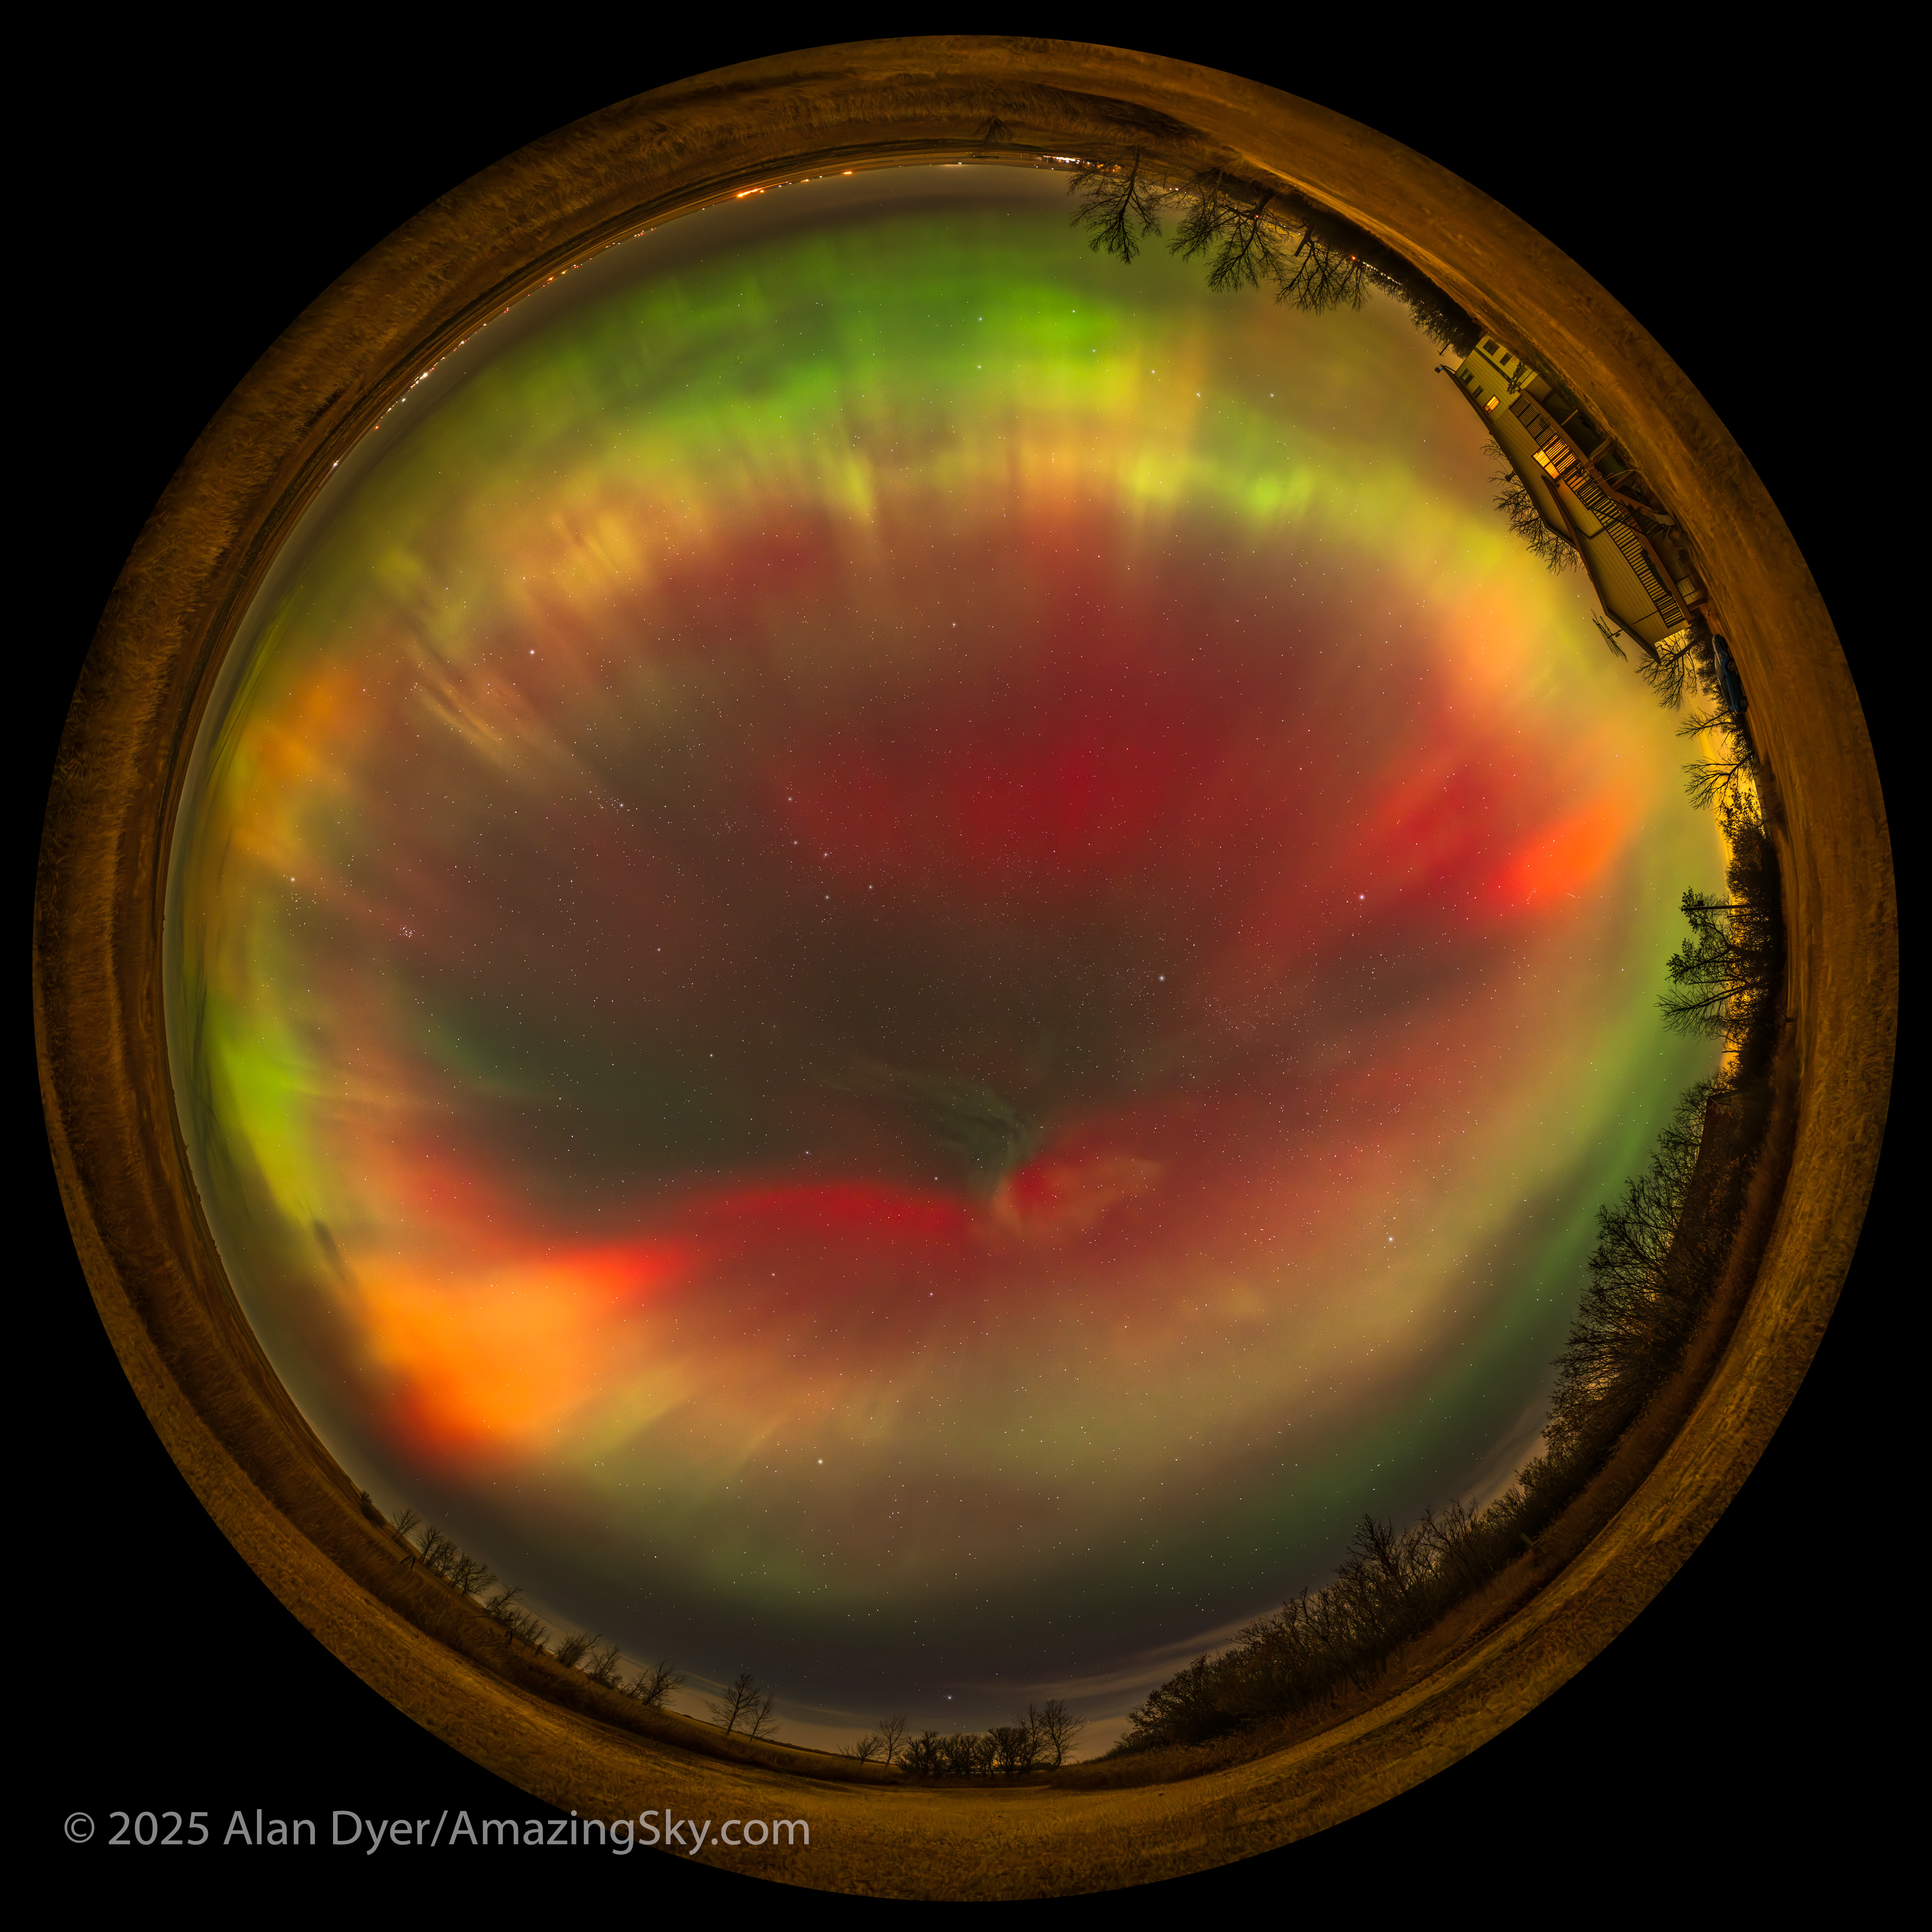
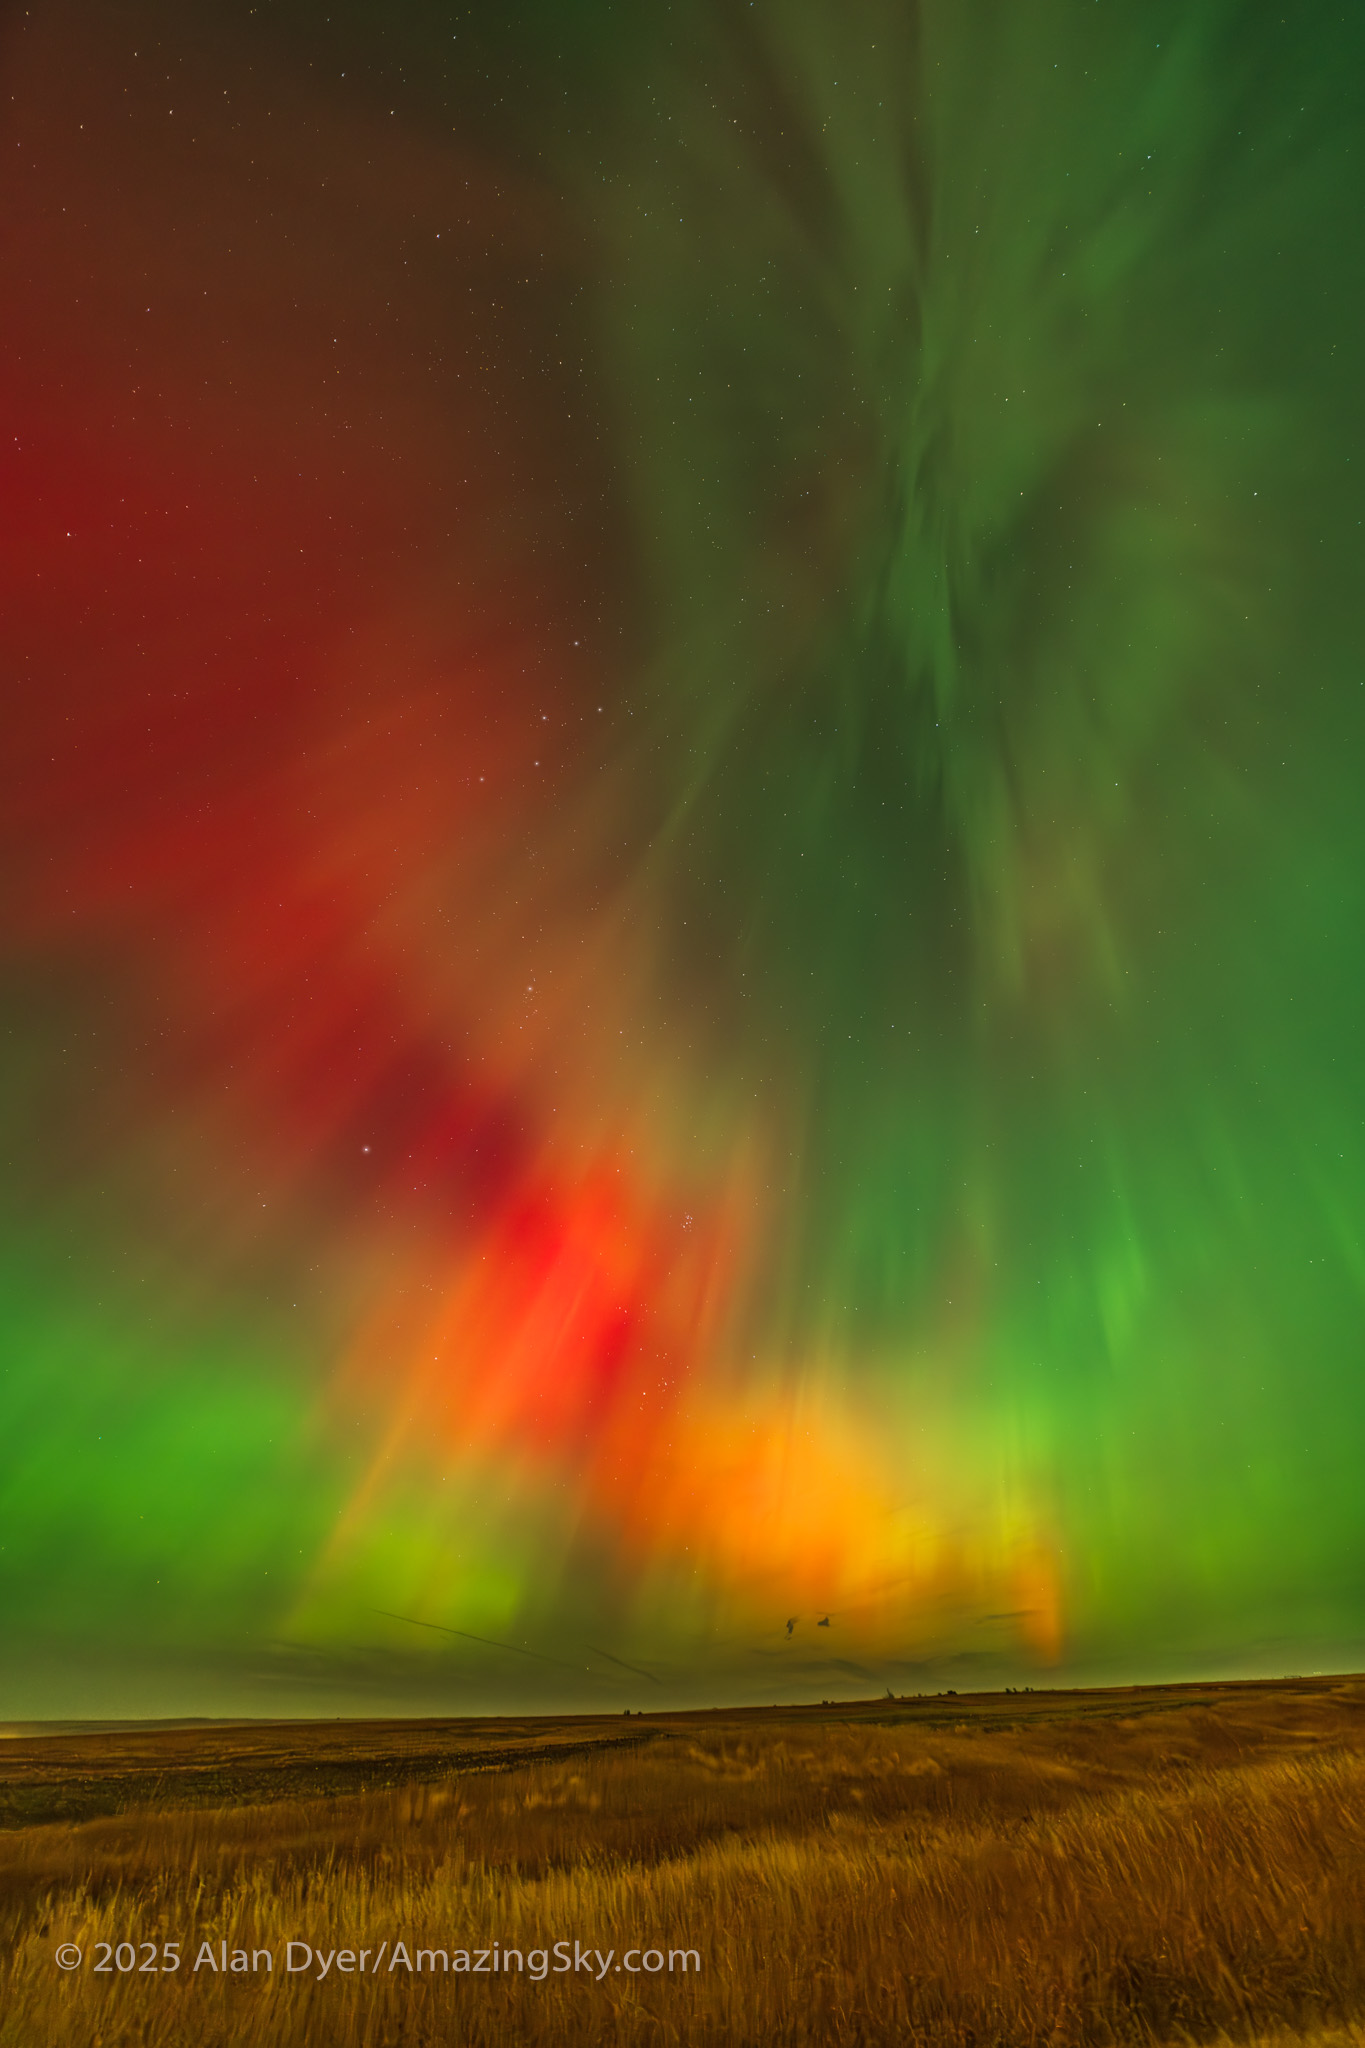
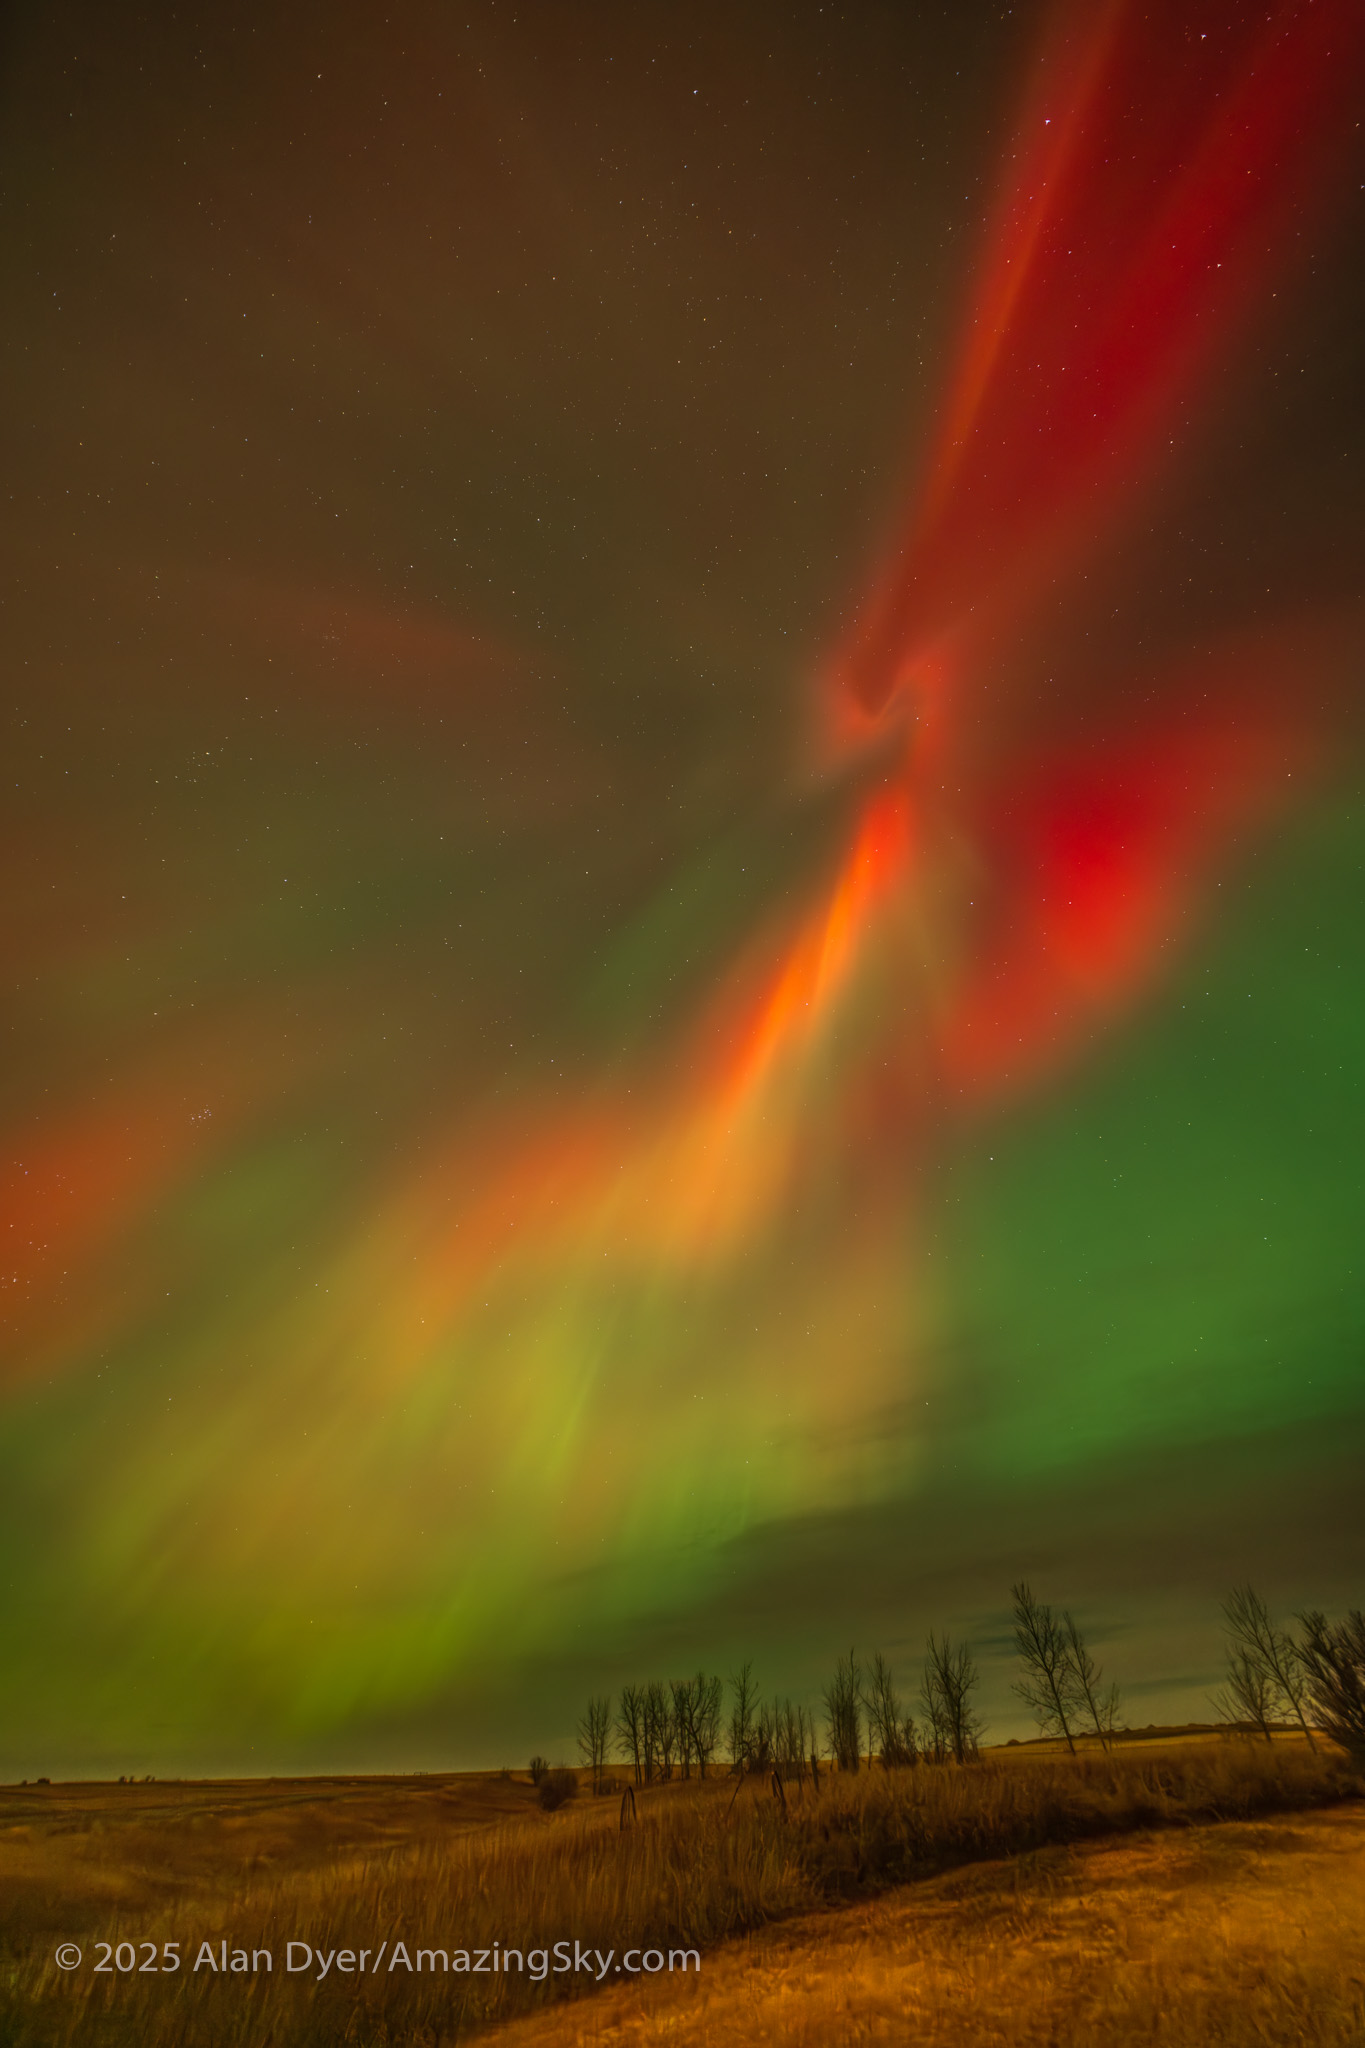
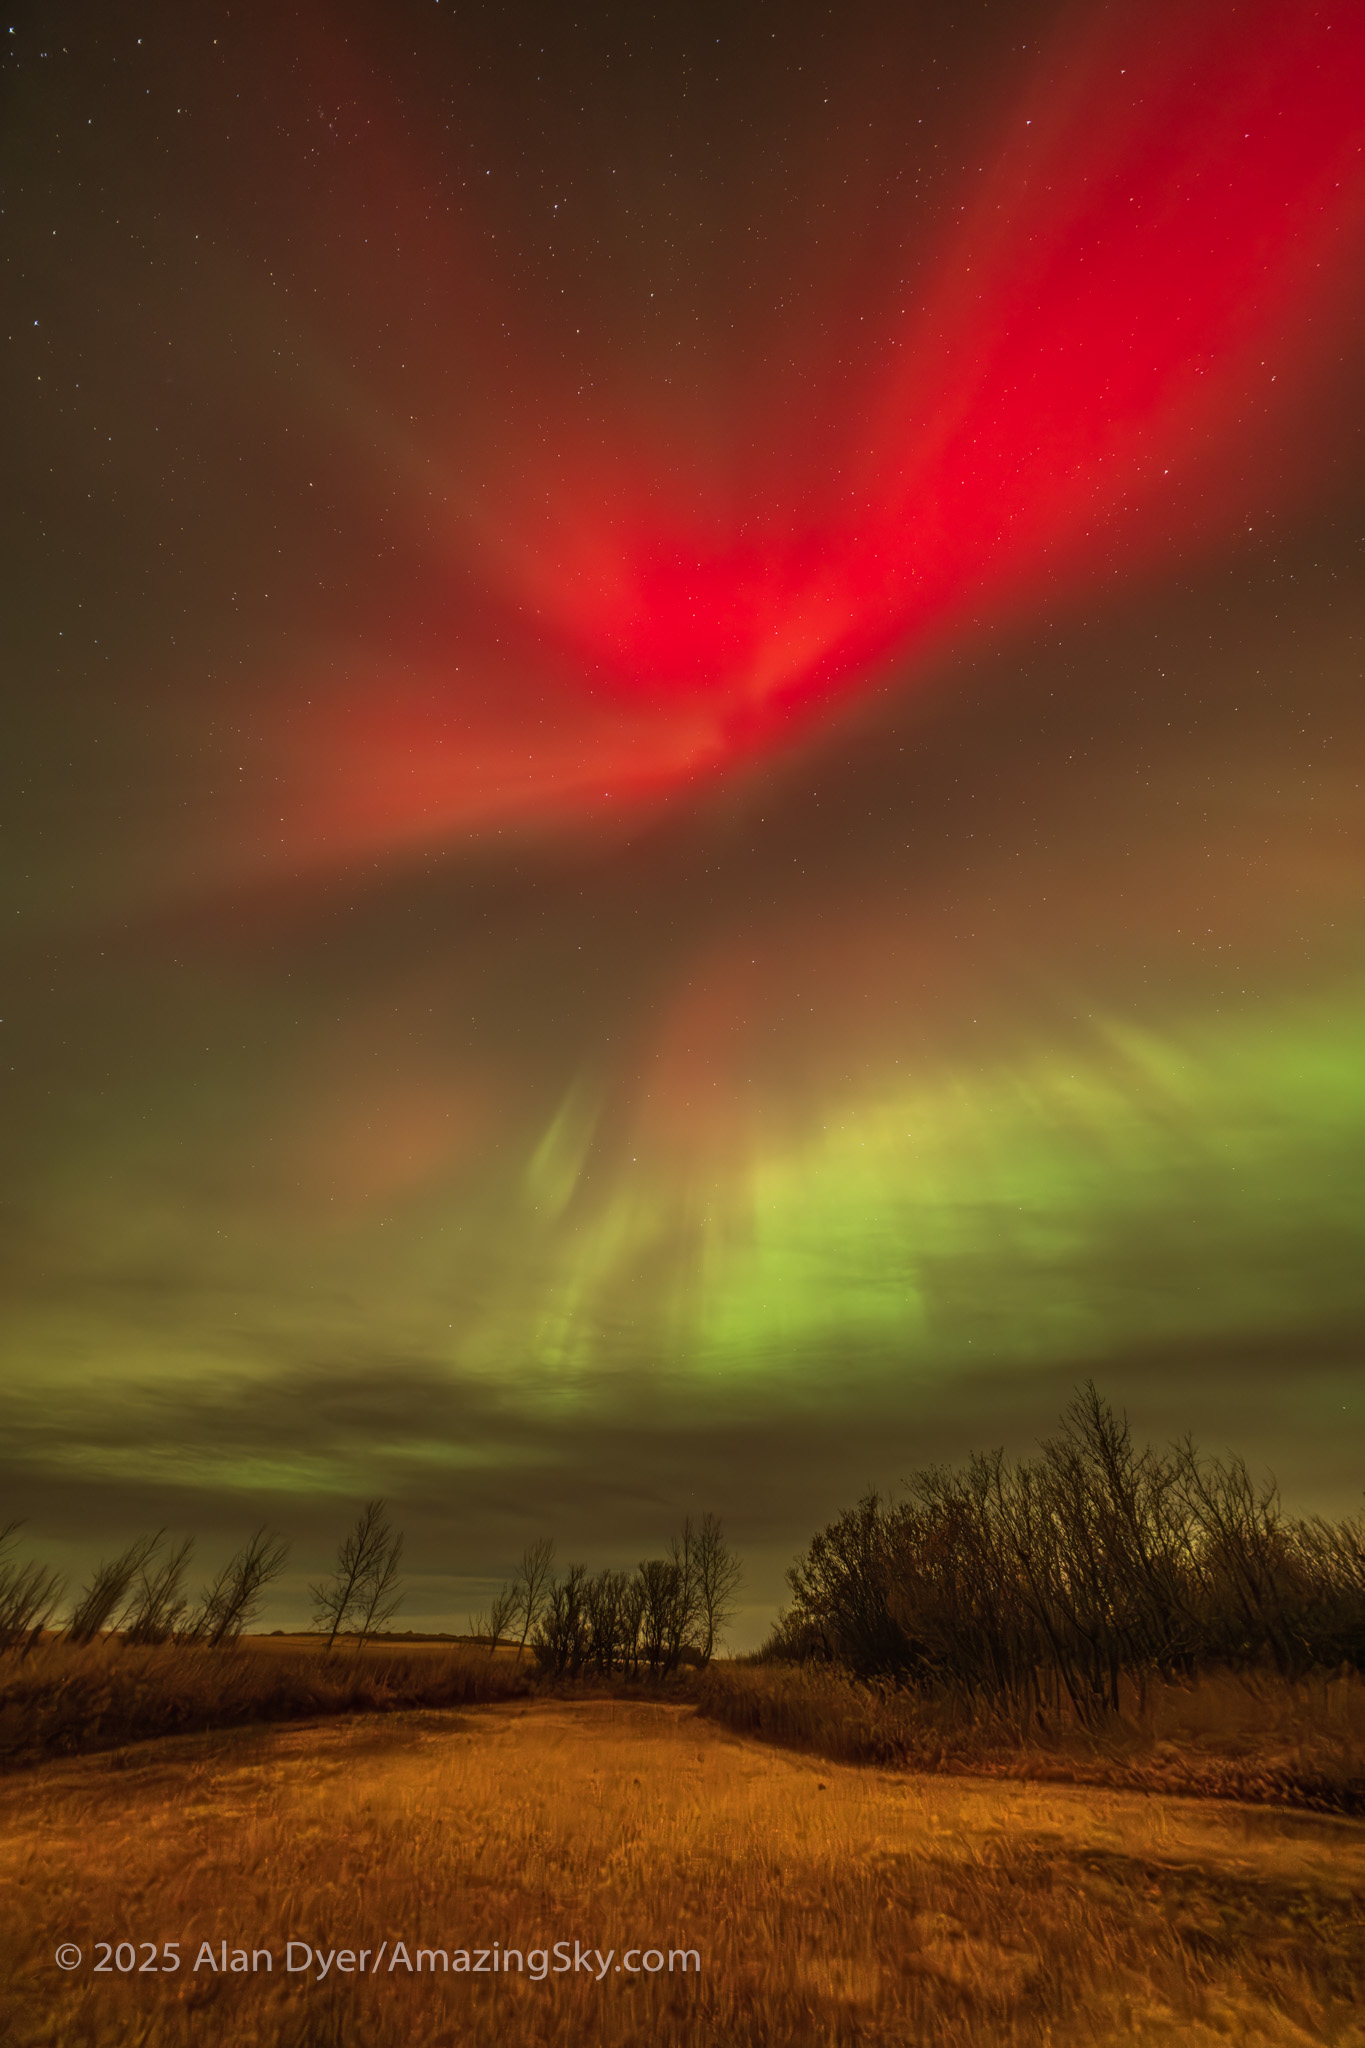
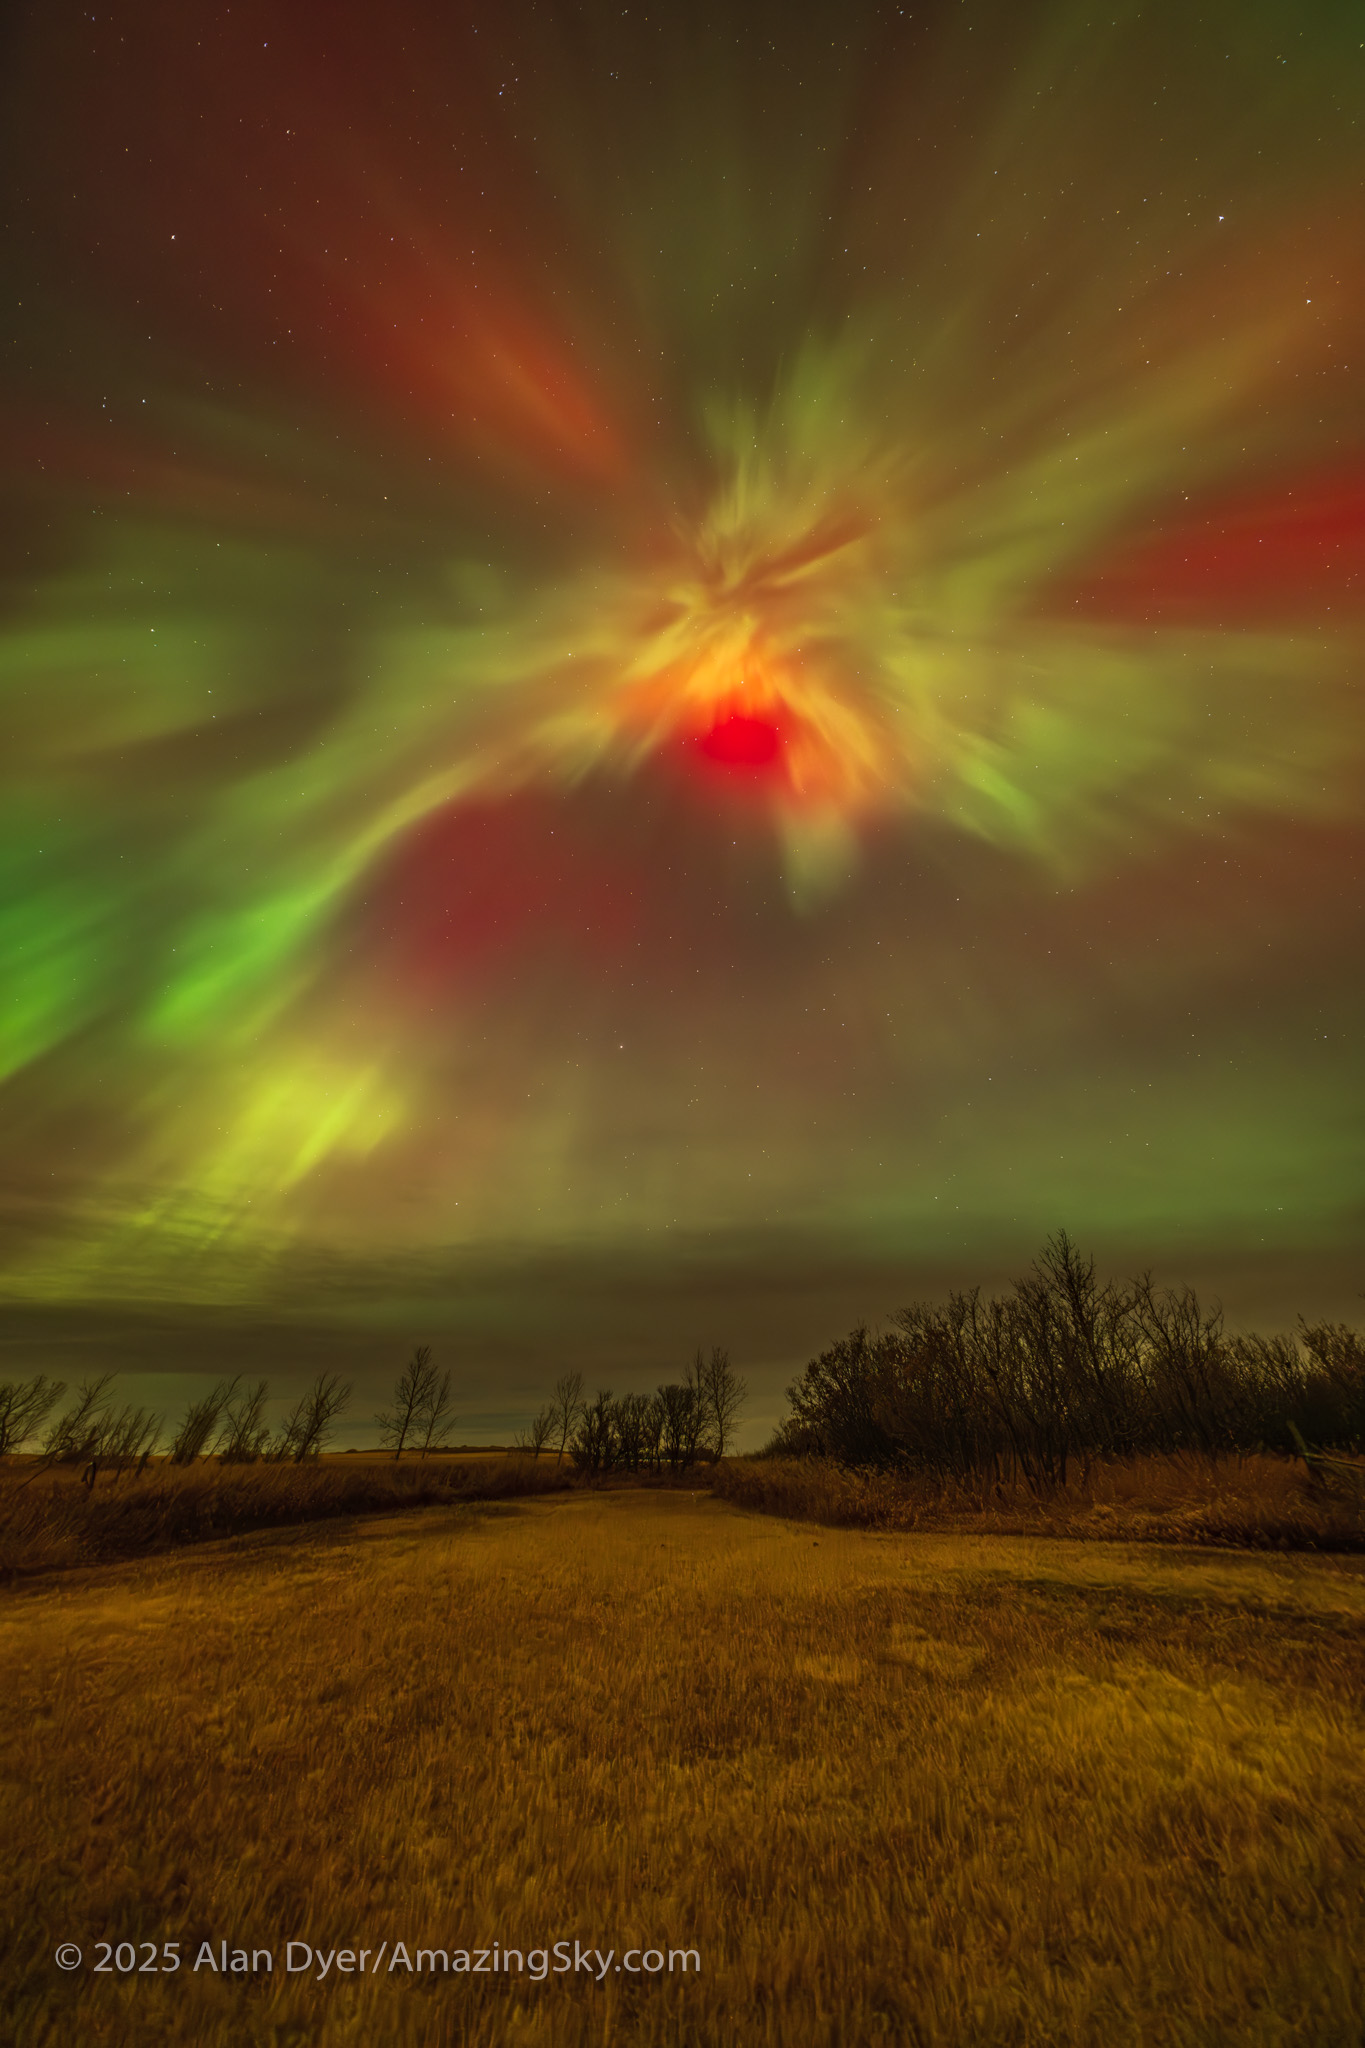
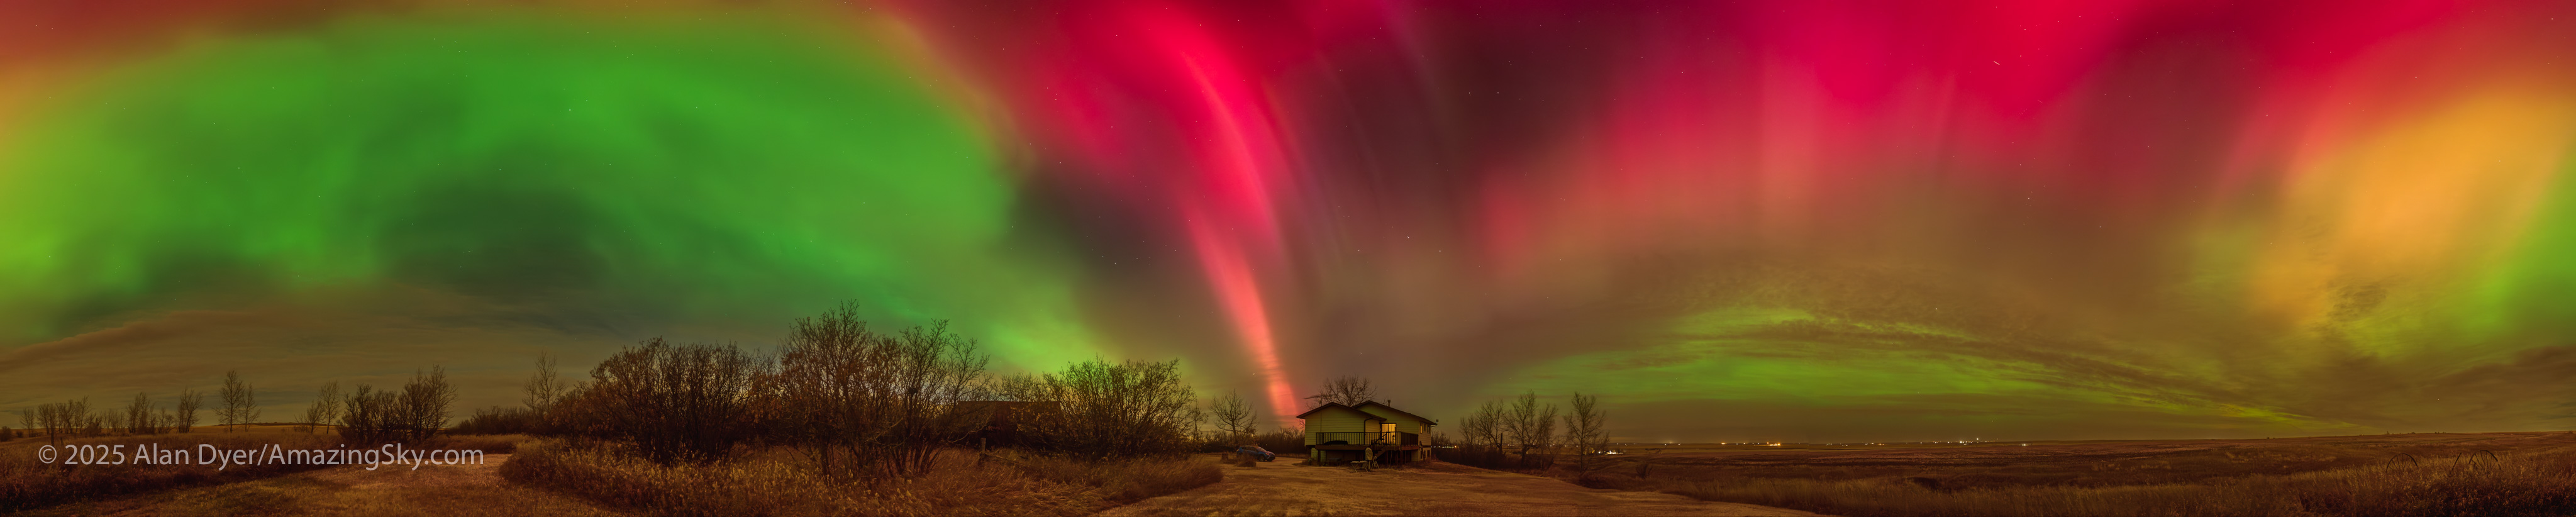
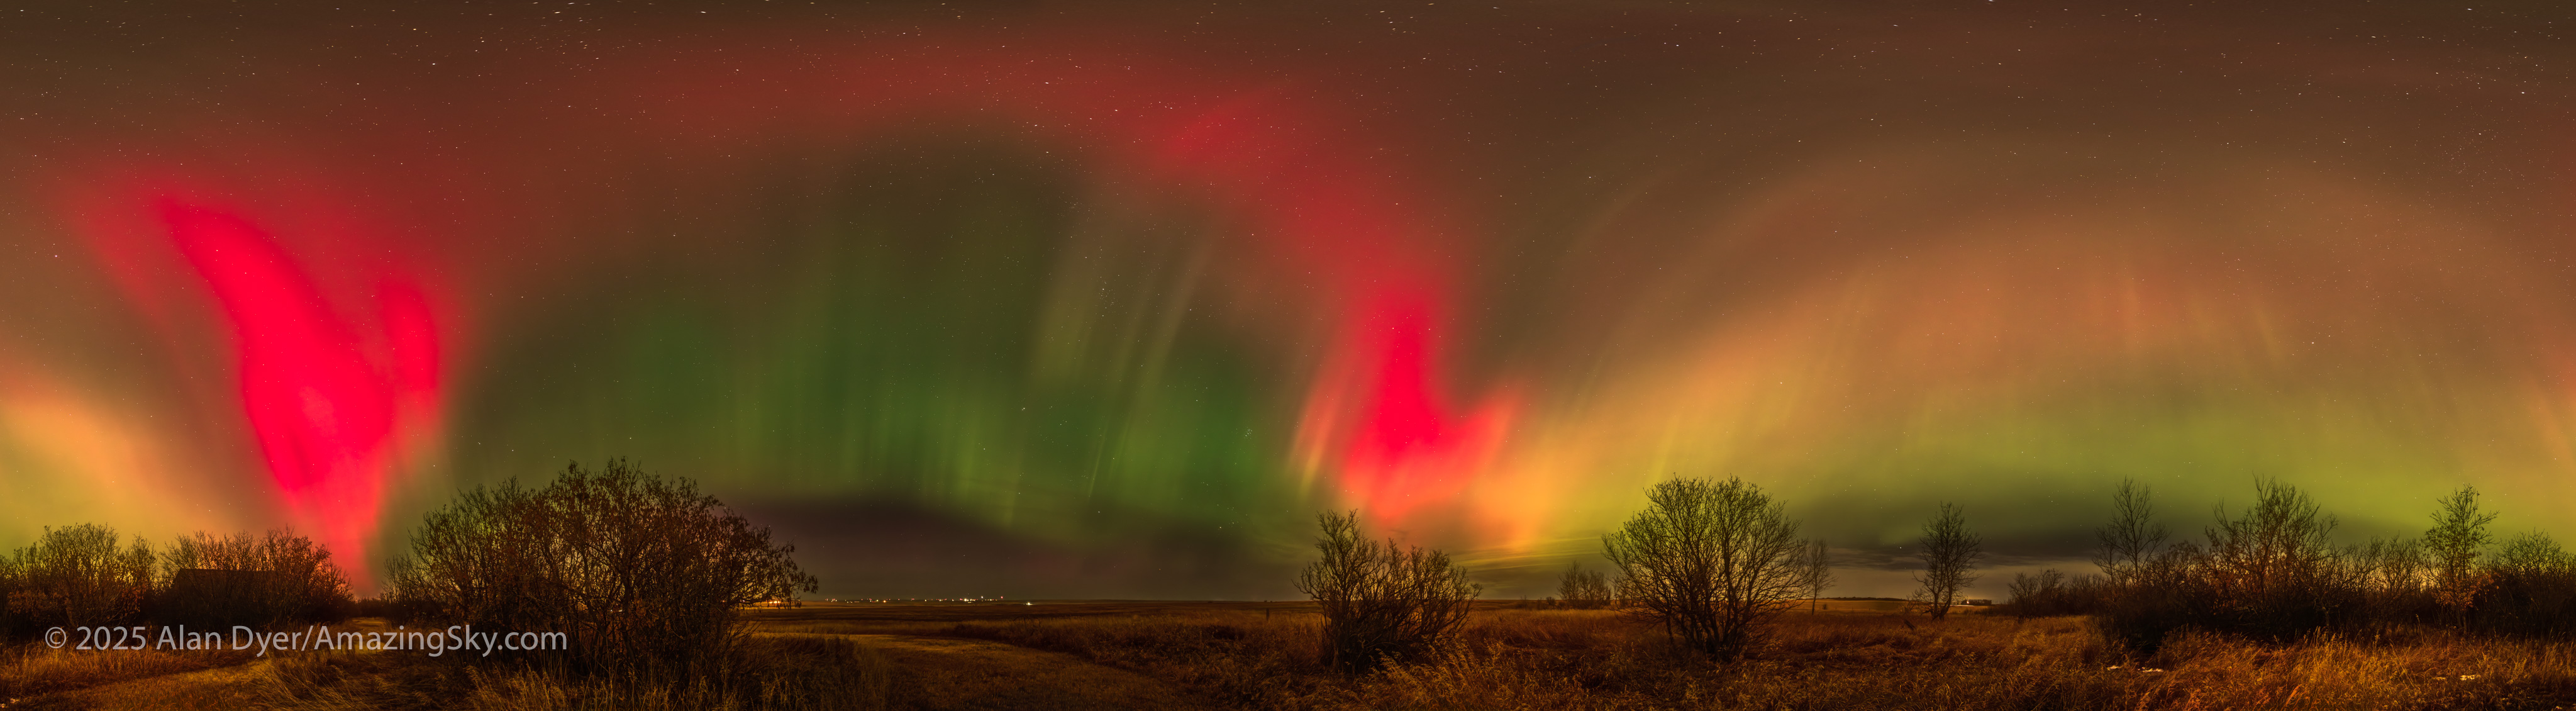
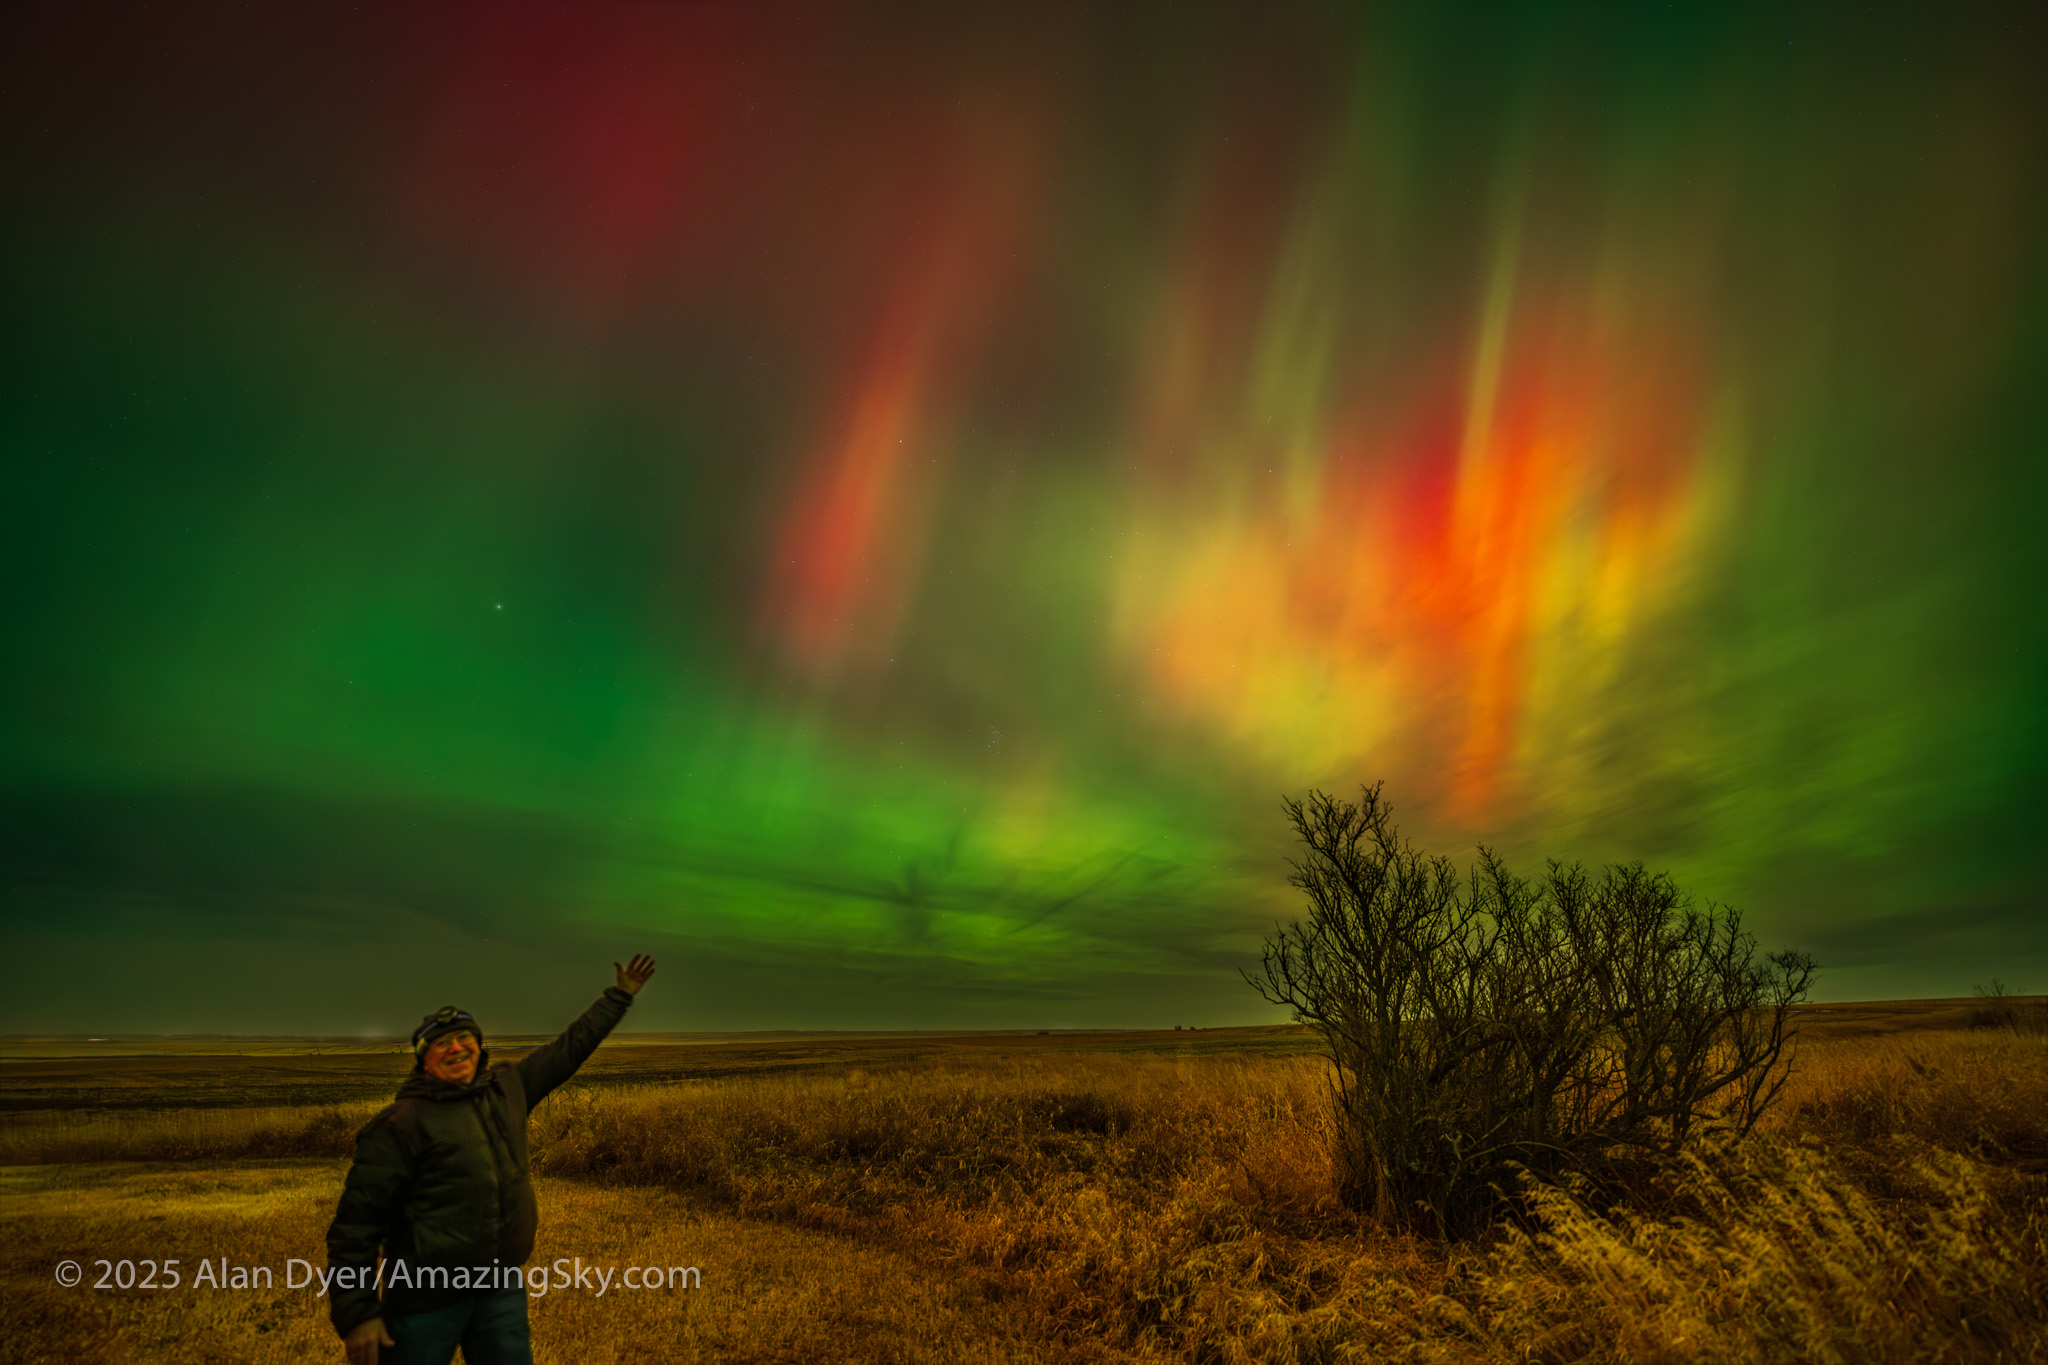
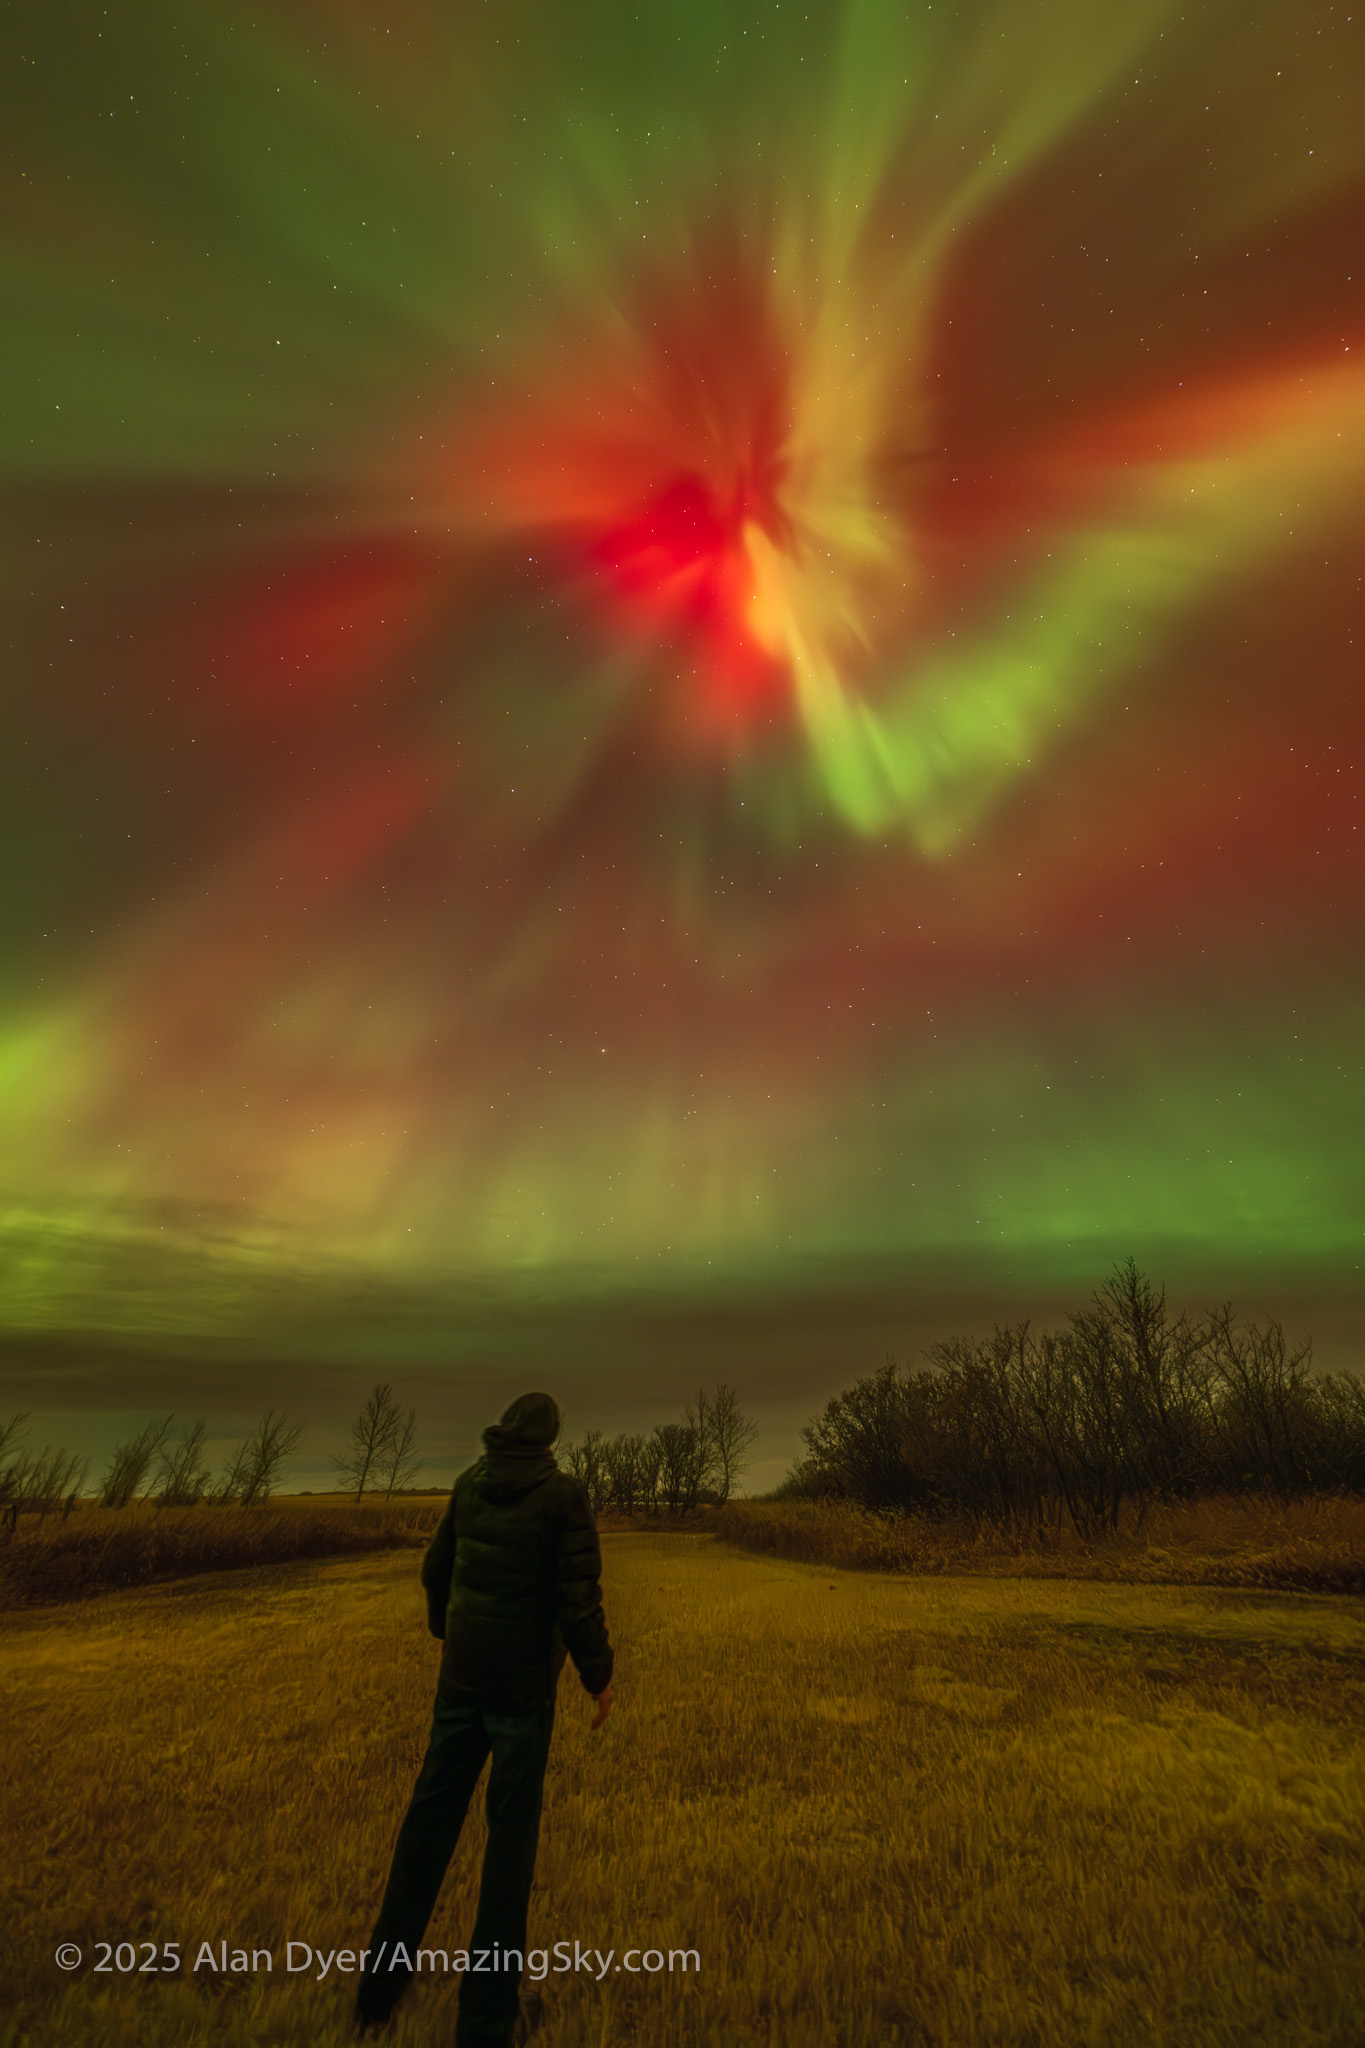
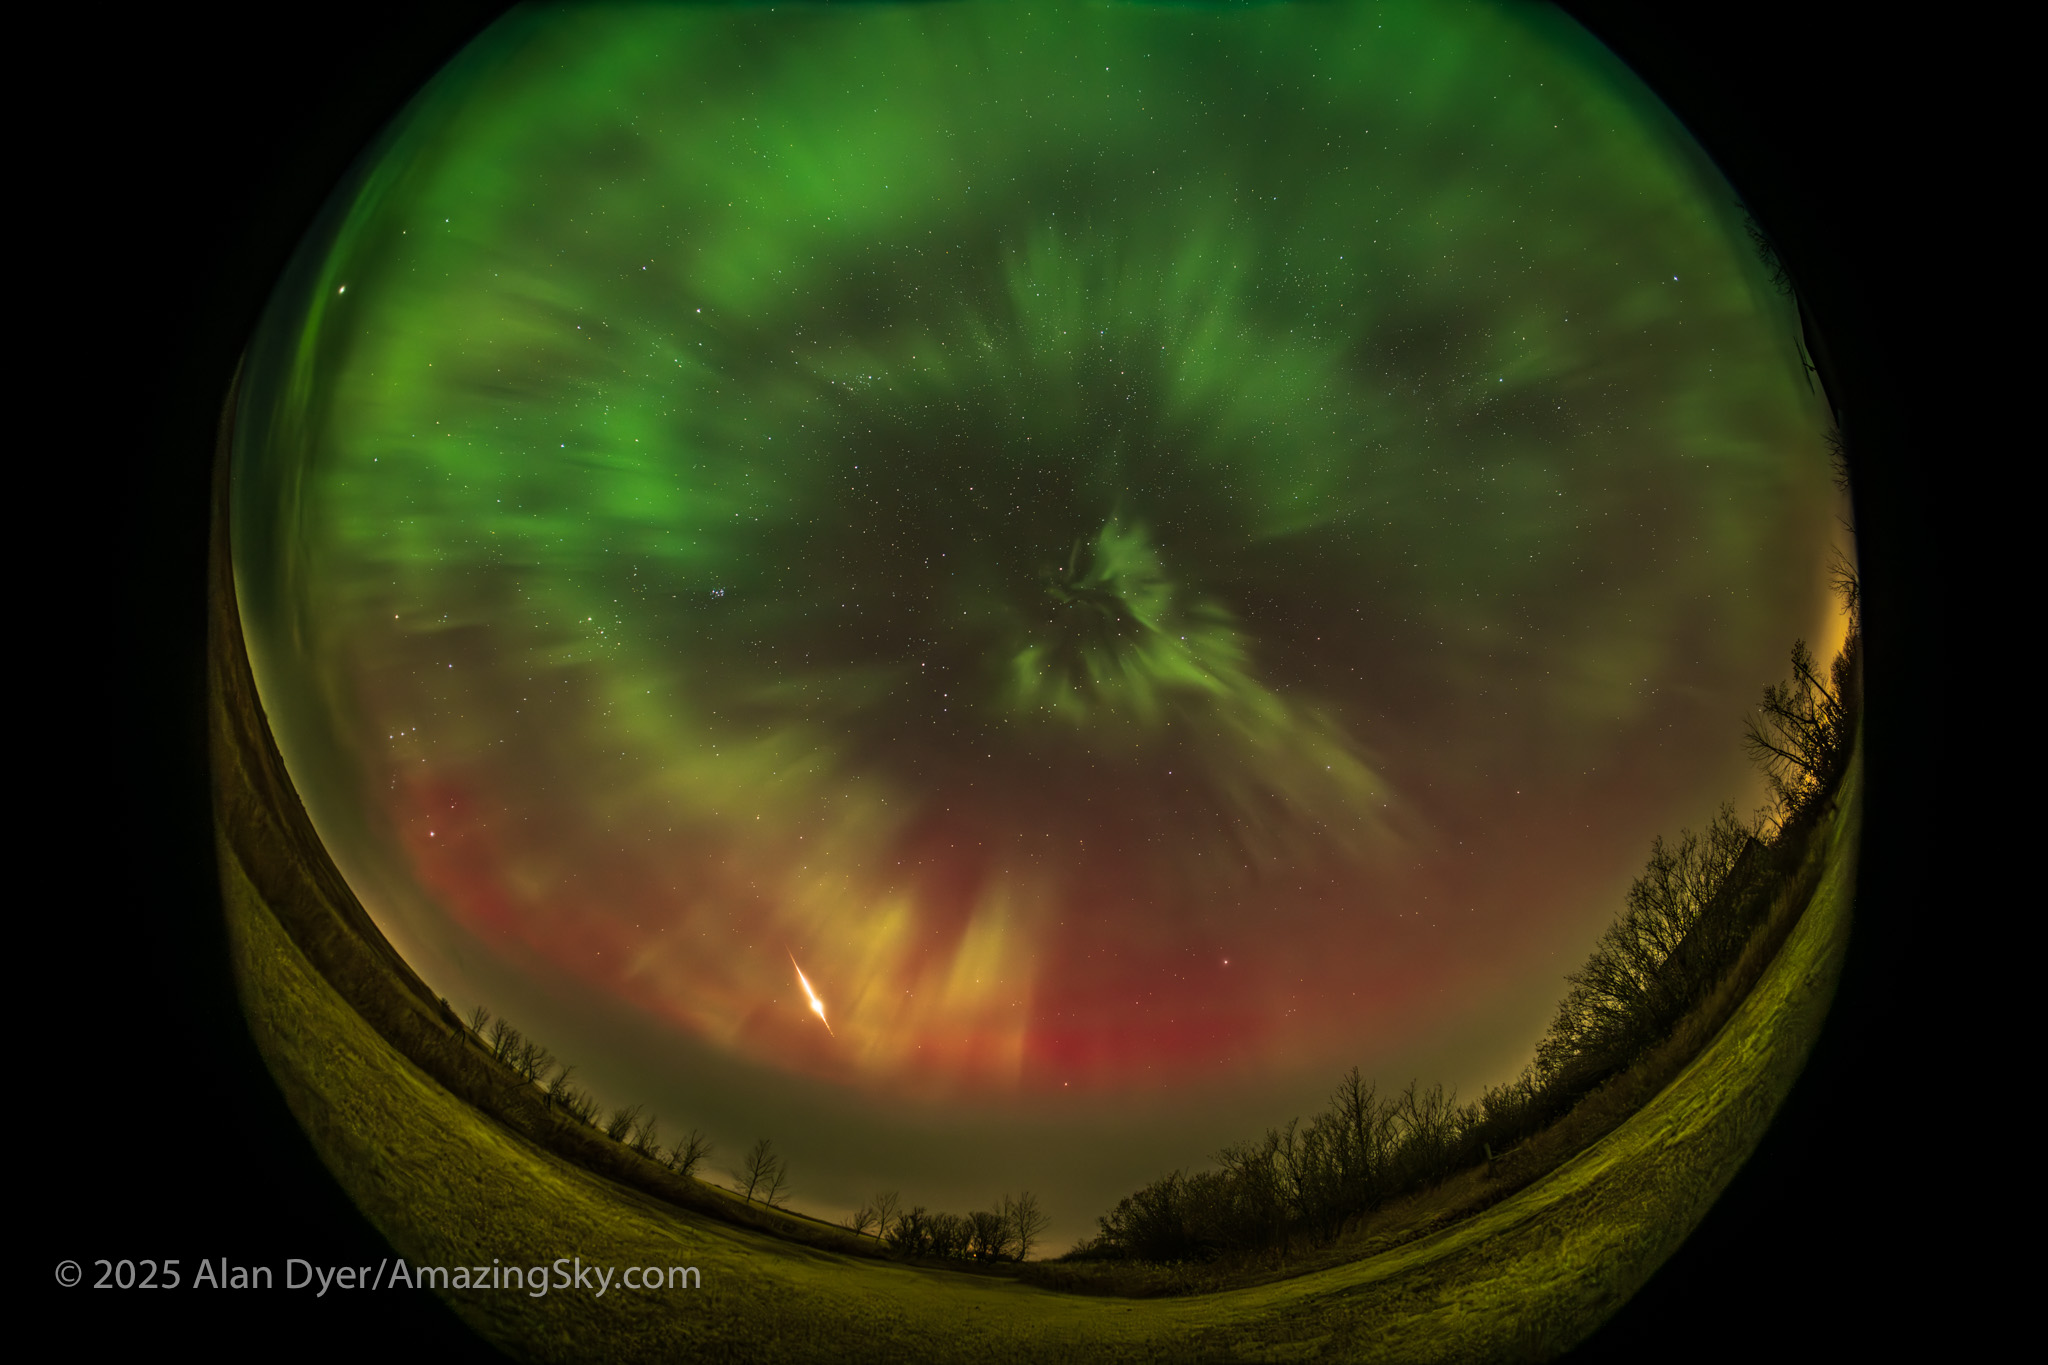
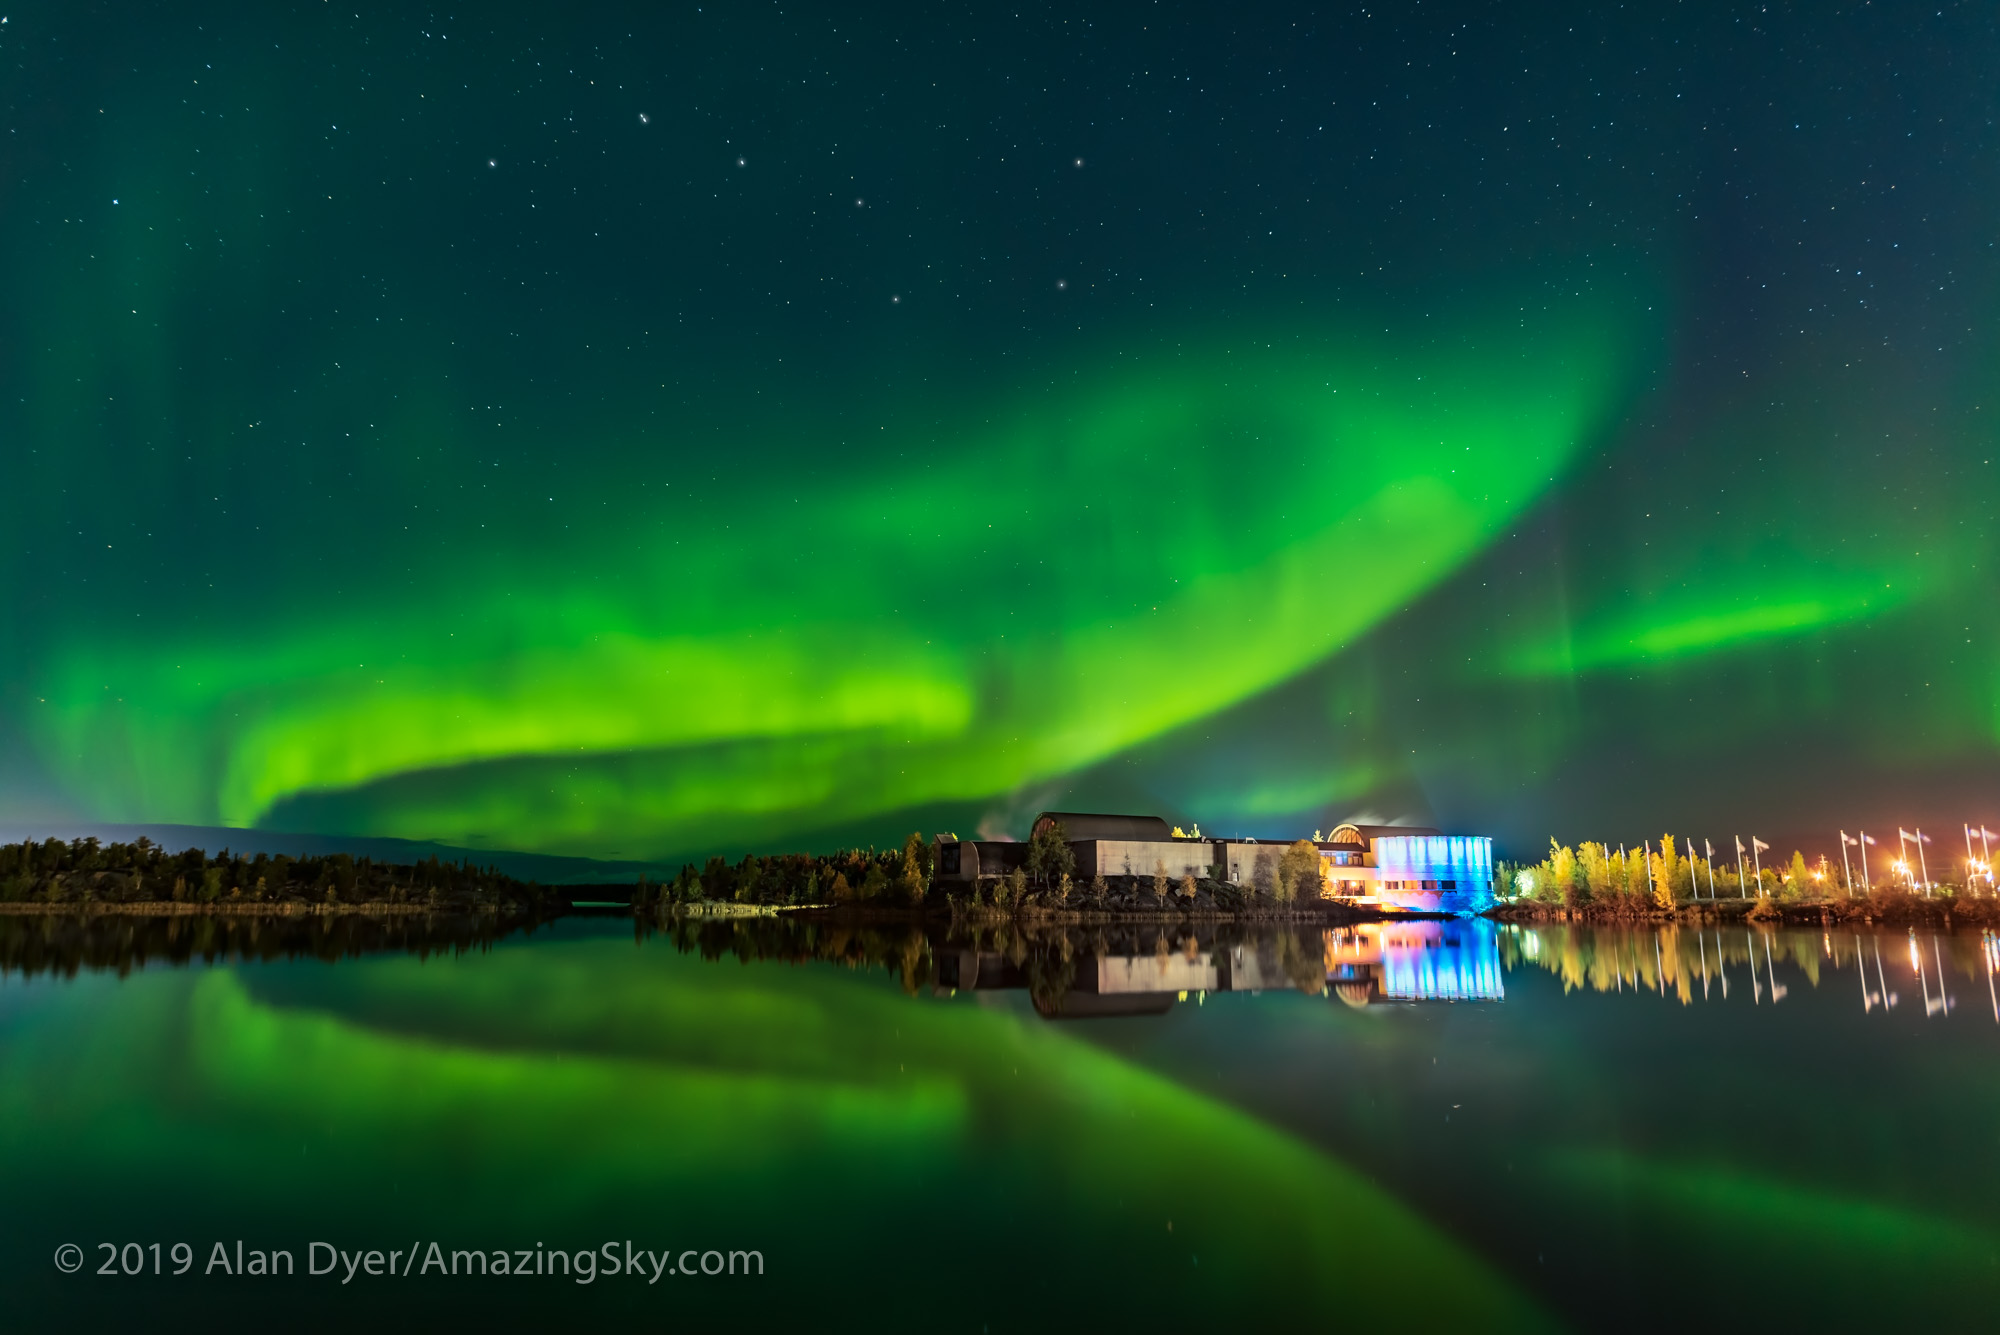 It was a fabulous week of clear skies and dancing auroras in and around Yellowknife in Canada’s North.
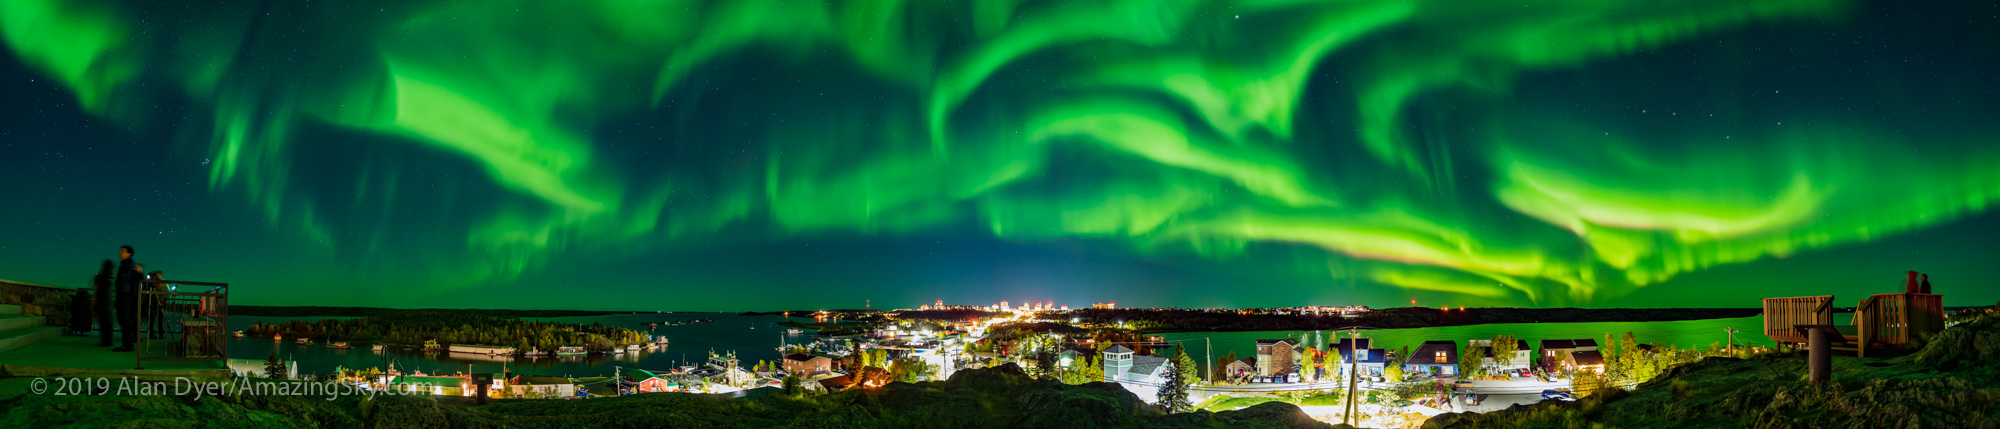
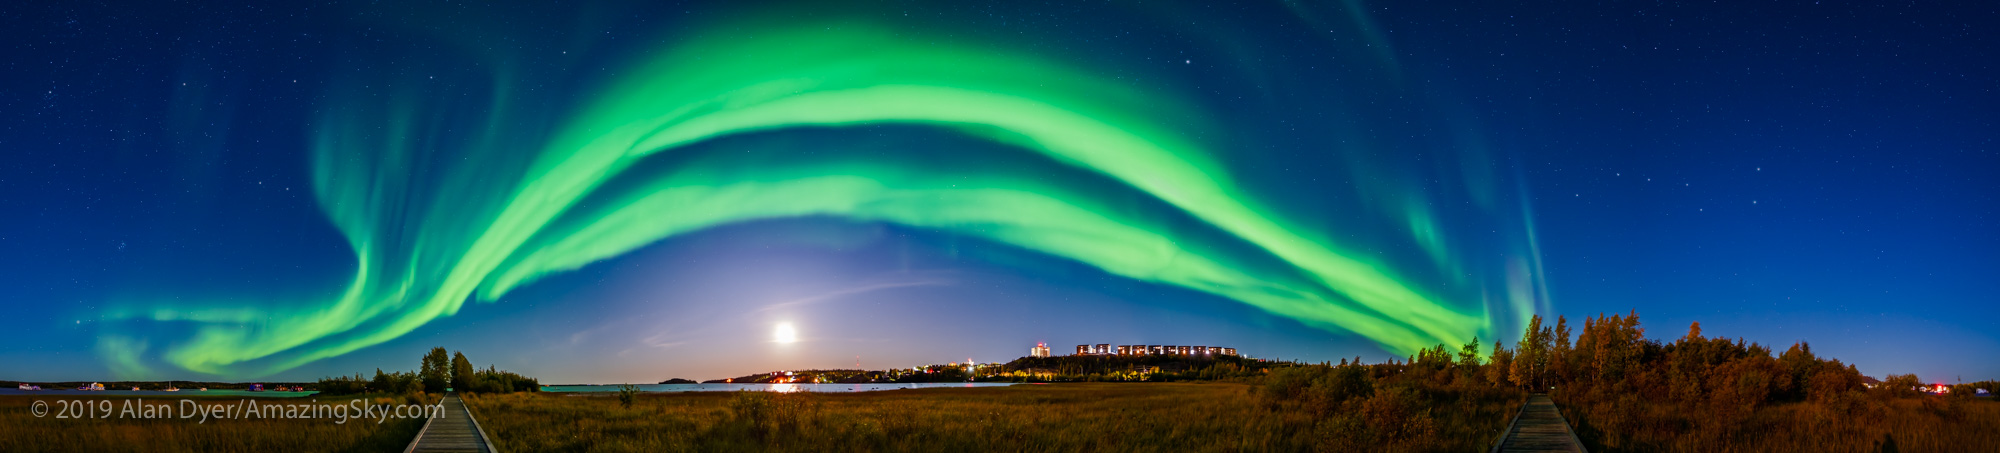


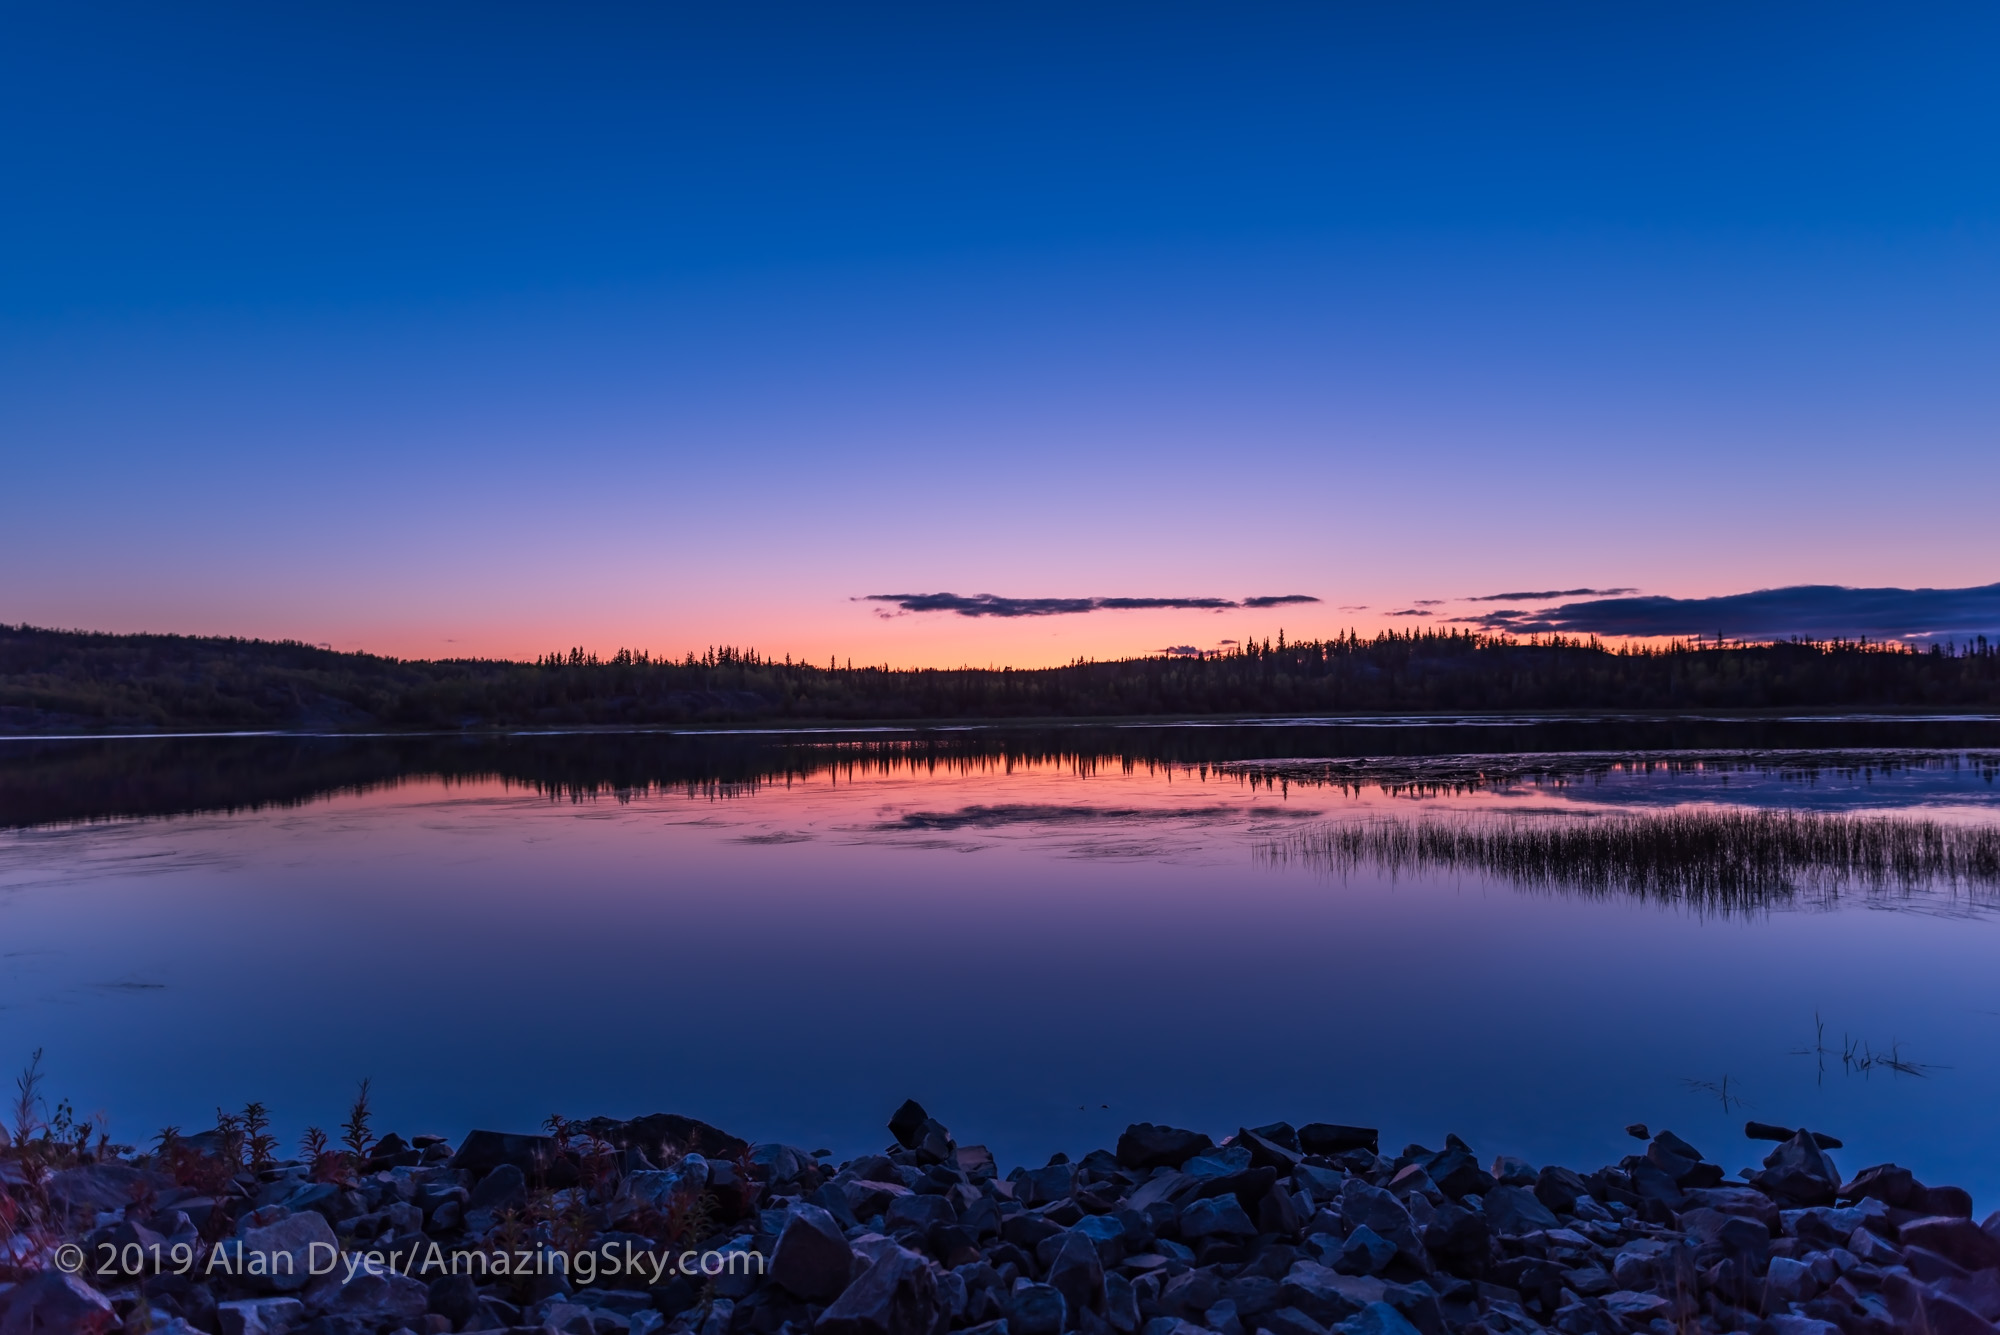
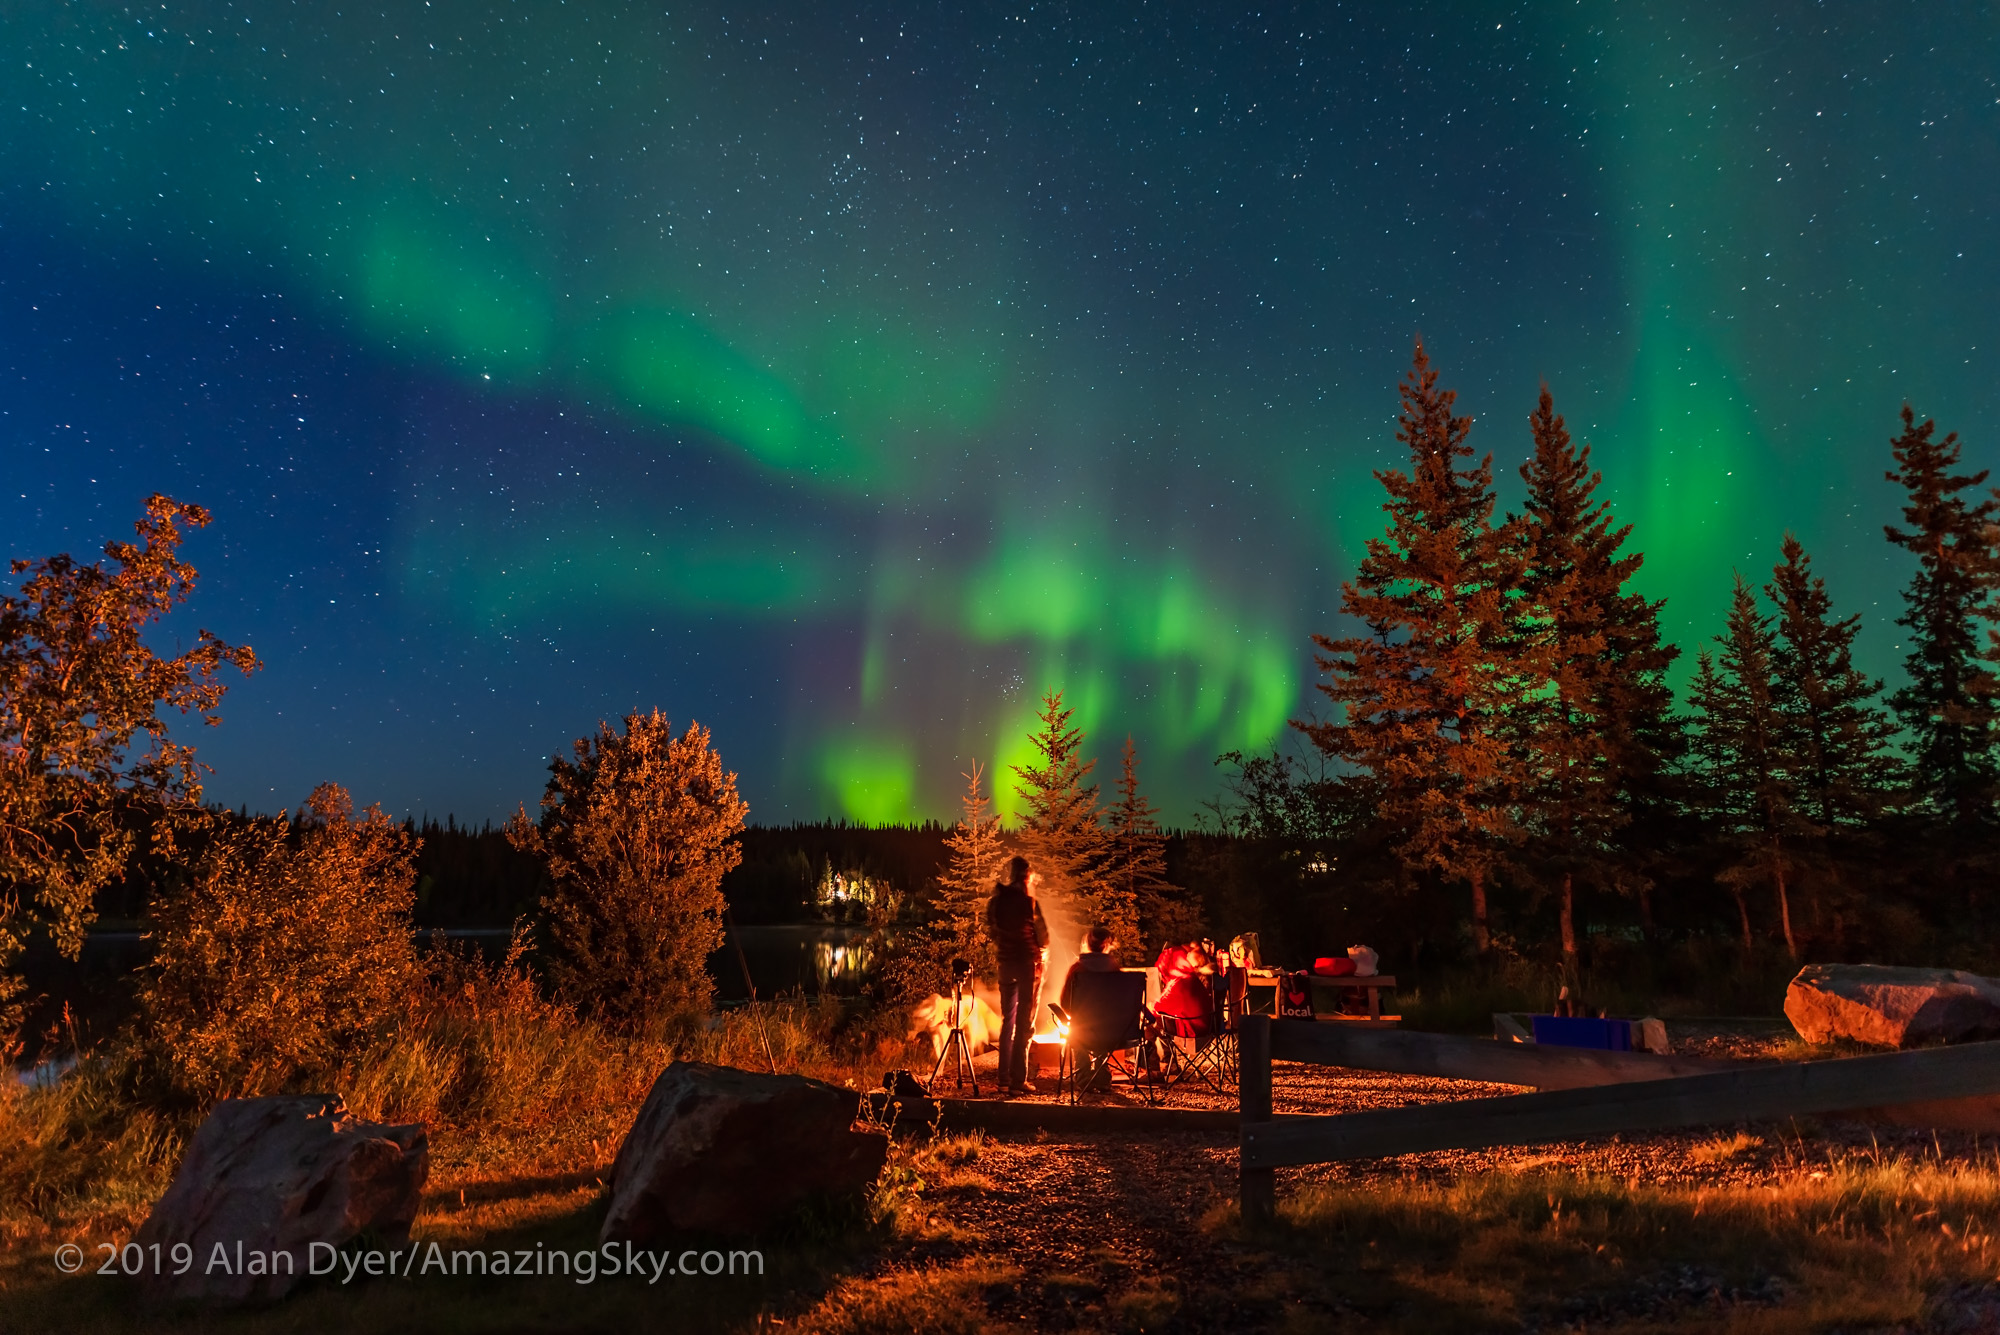
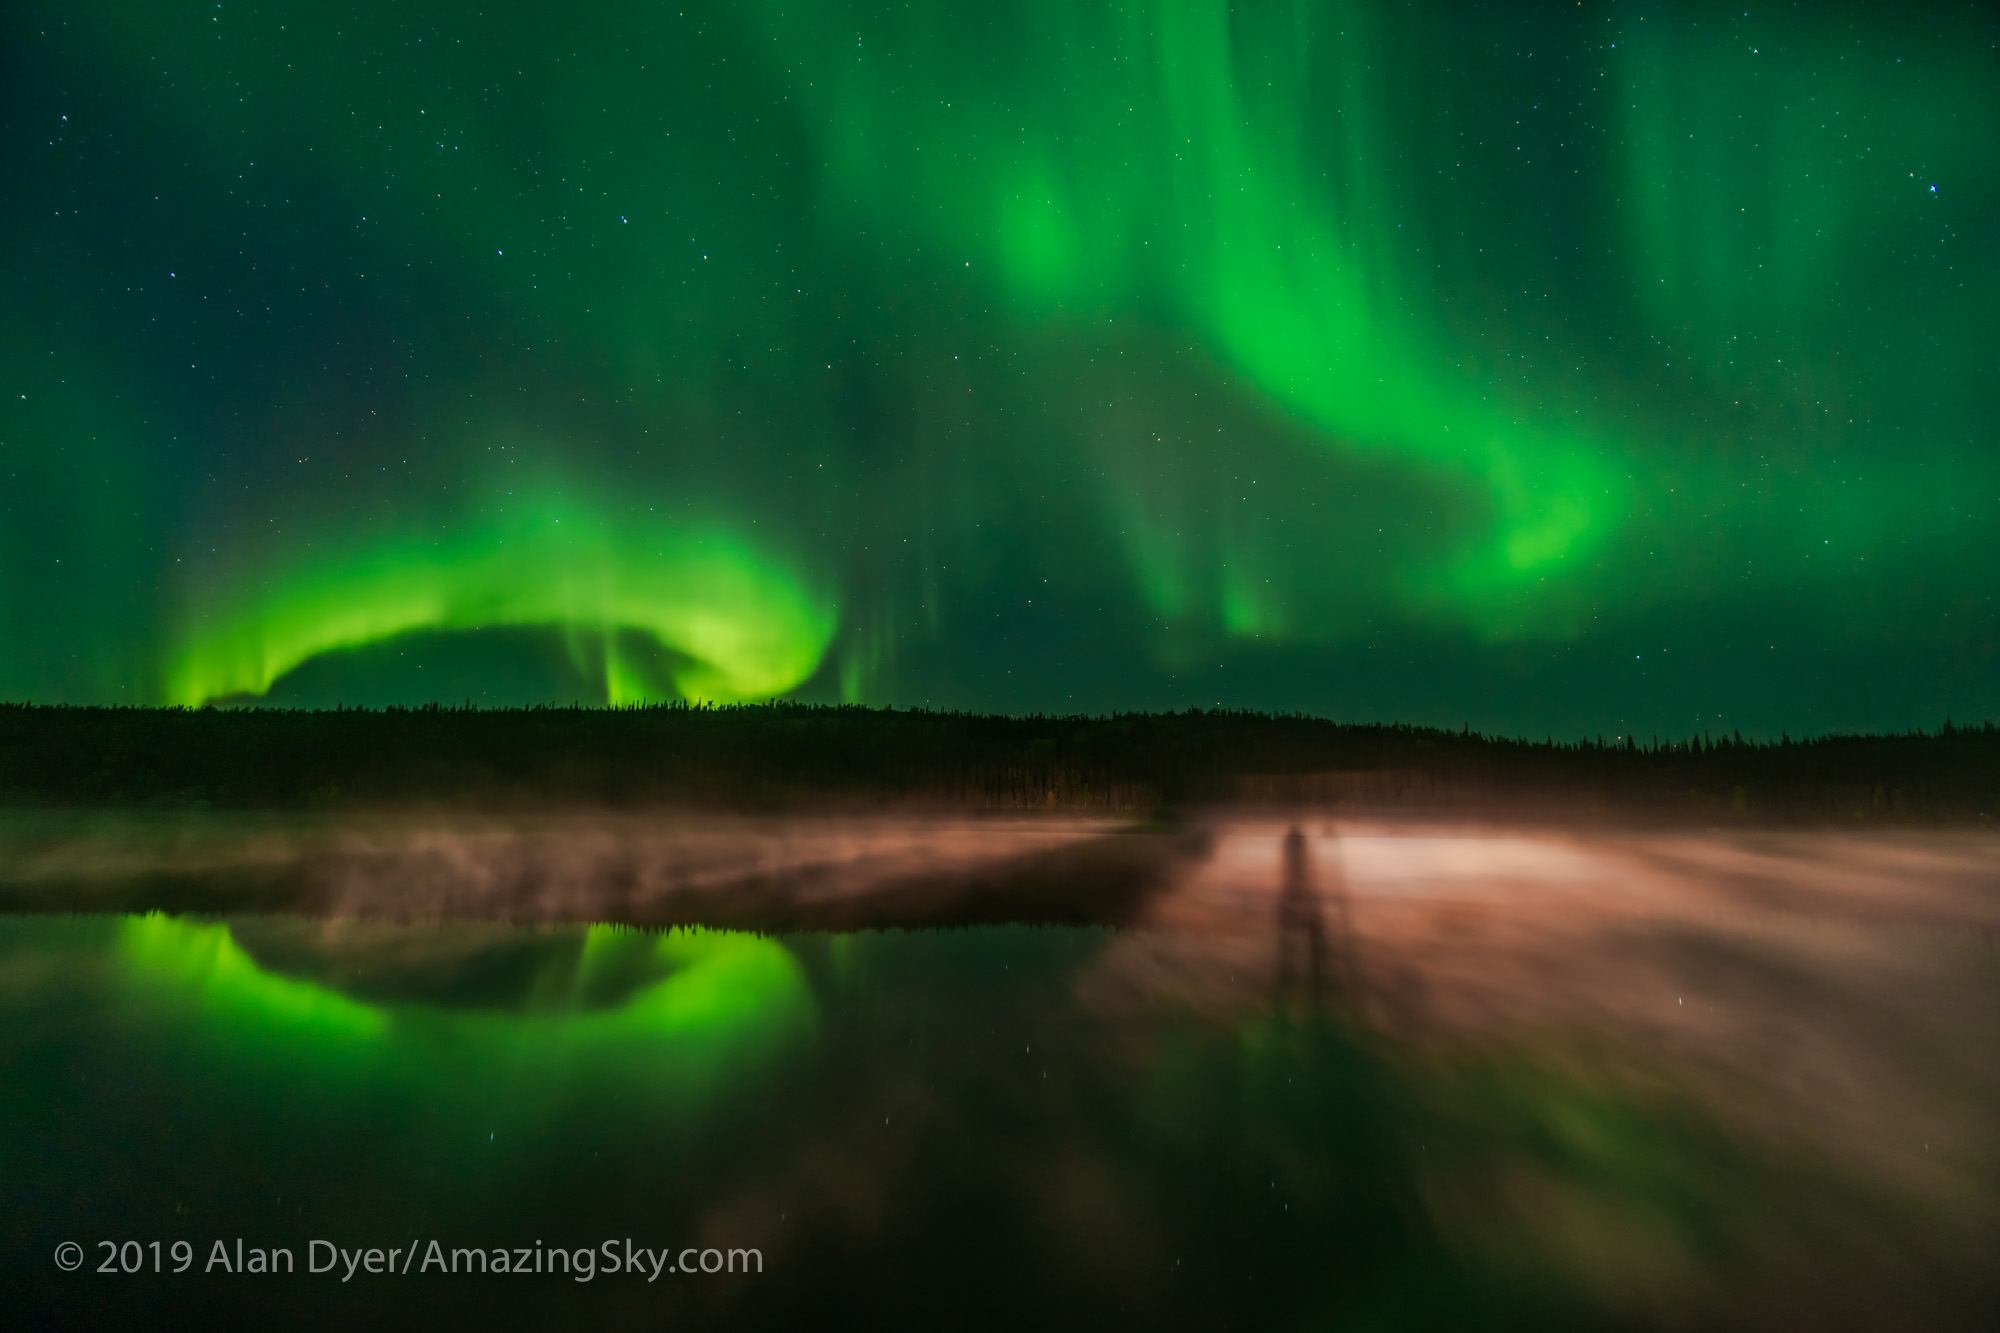


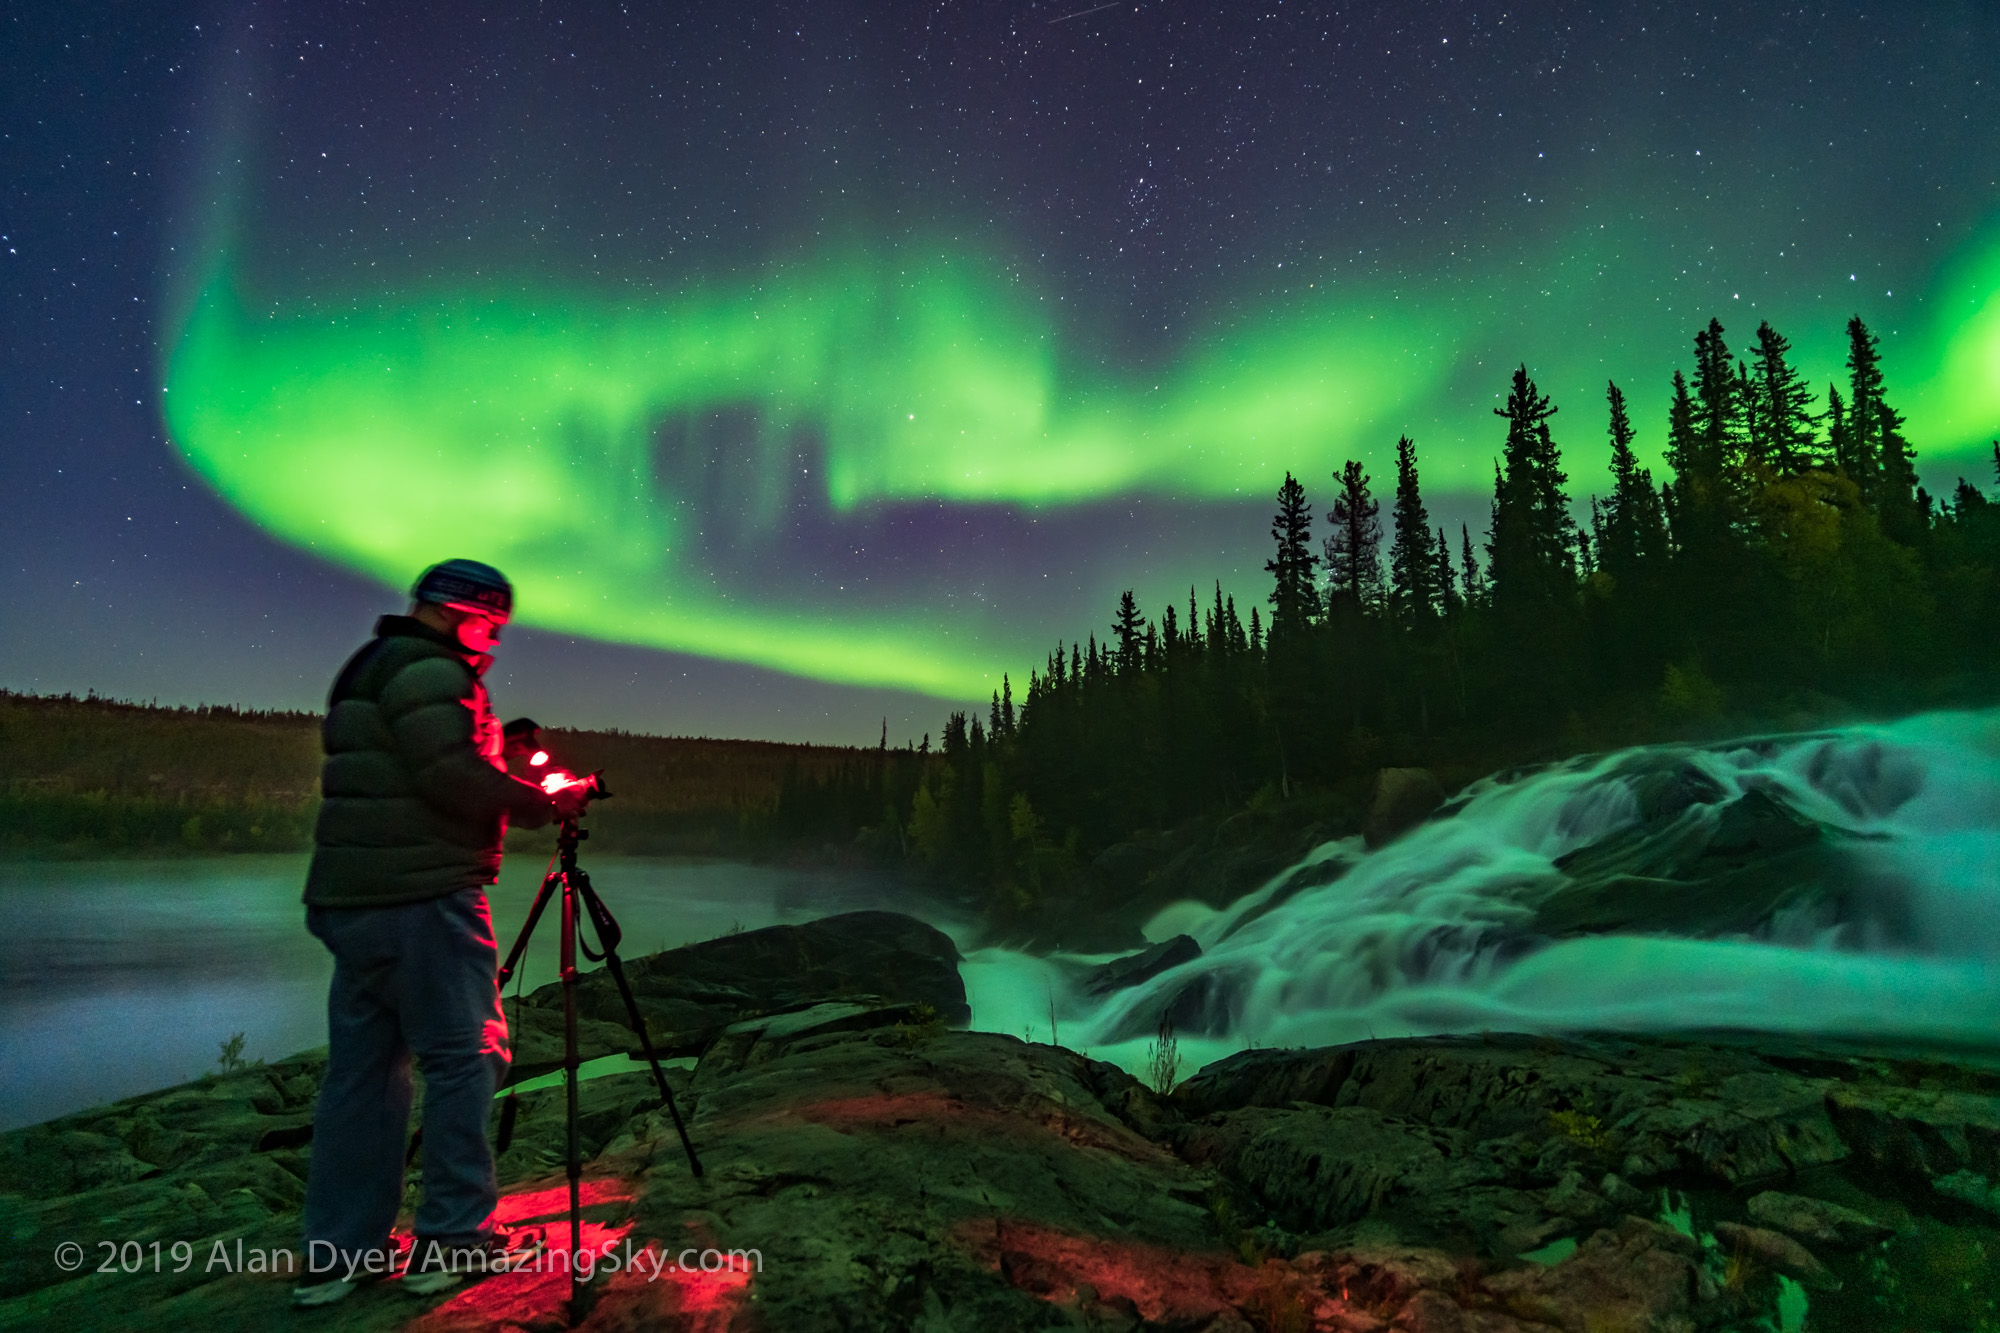
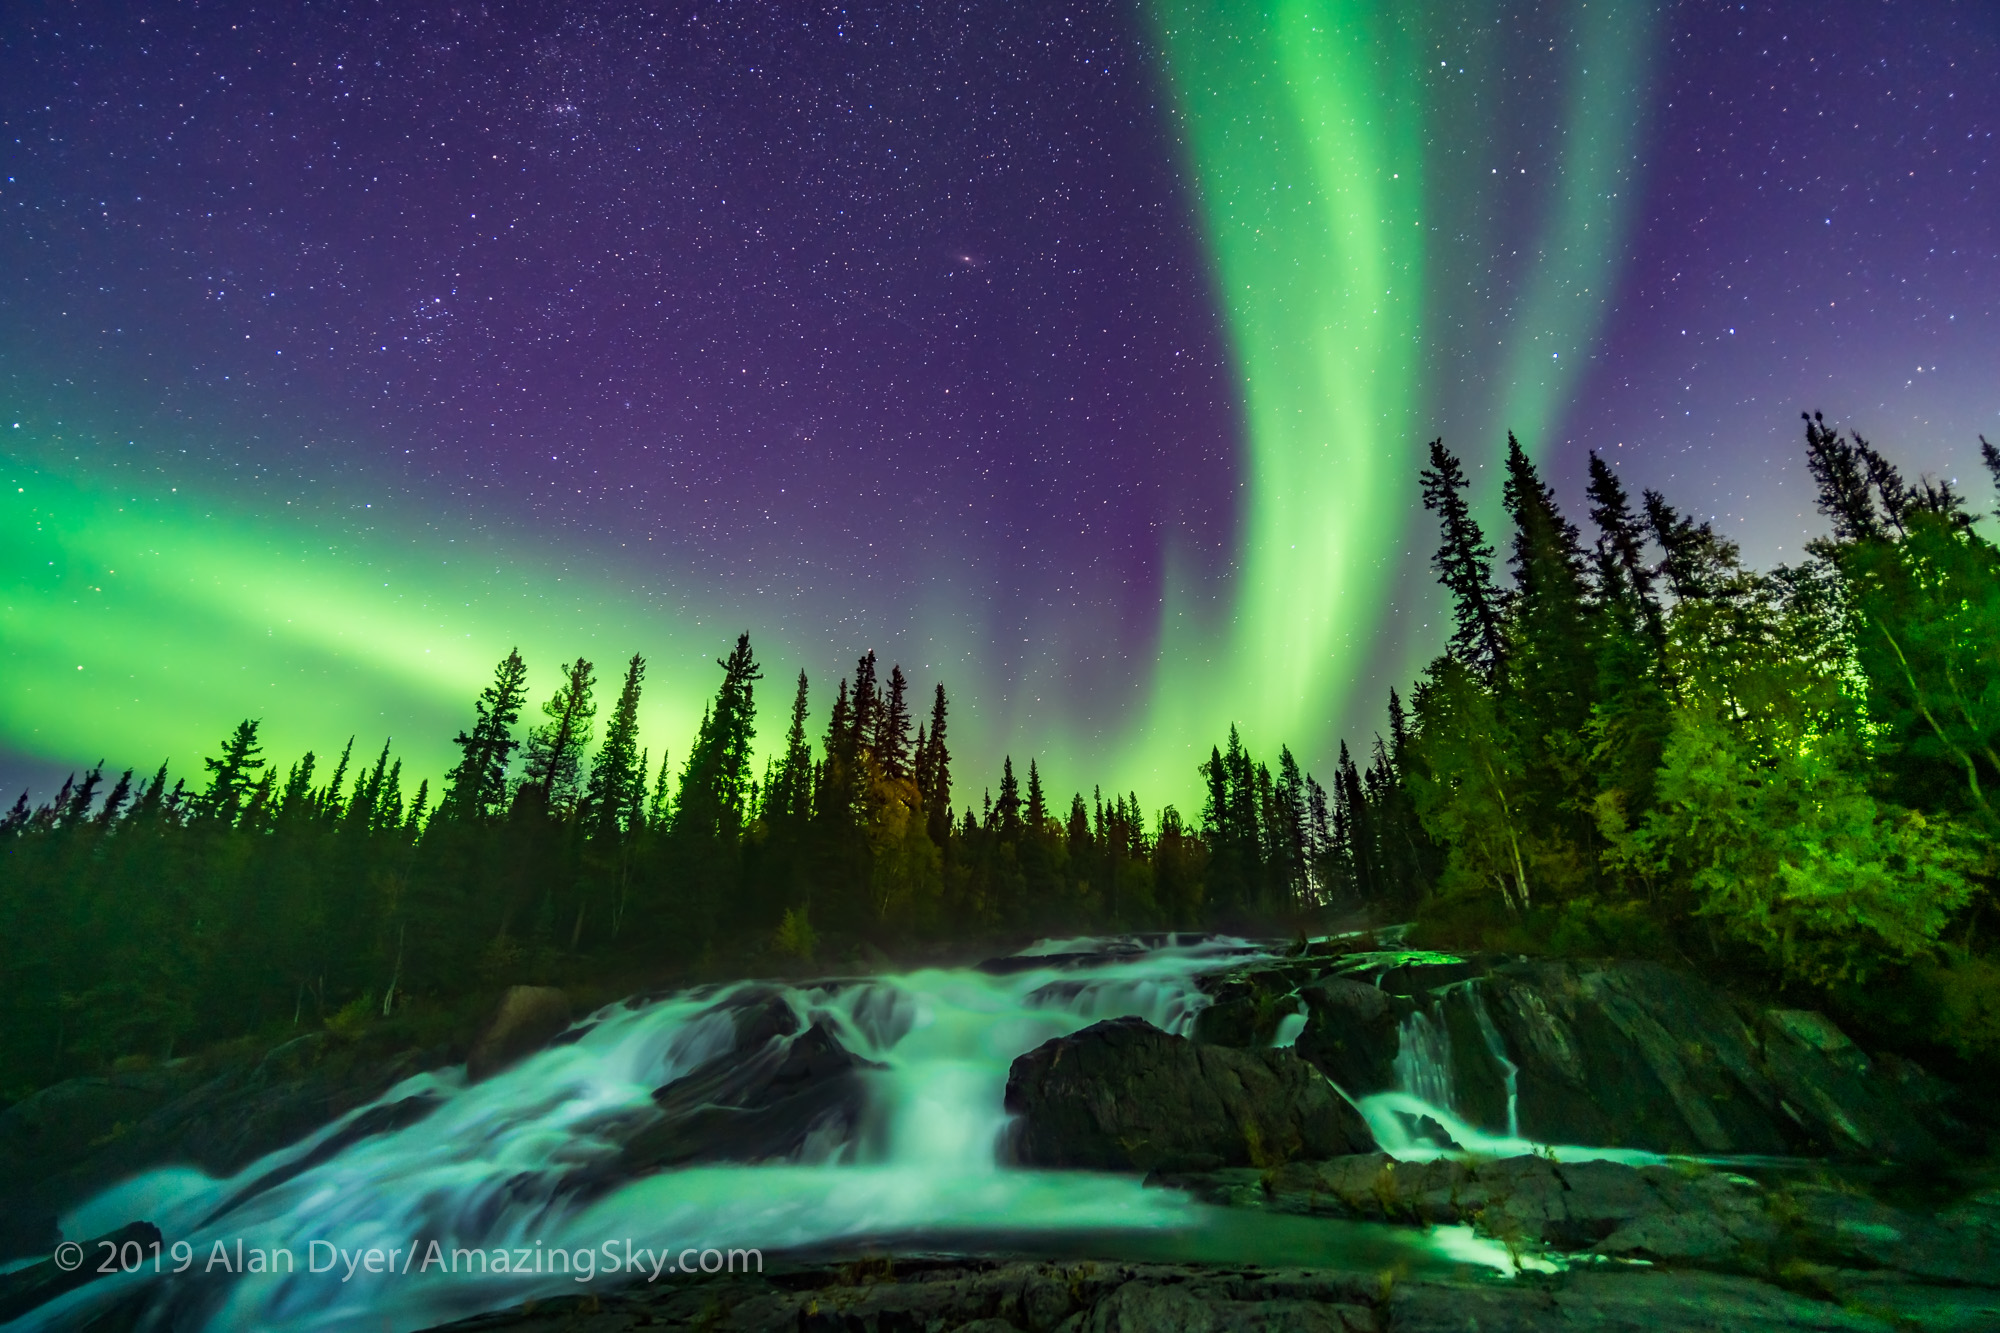
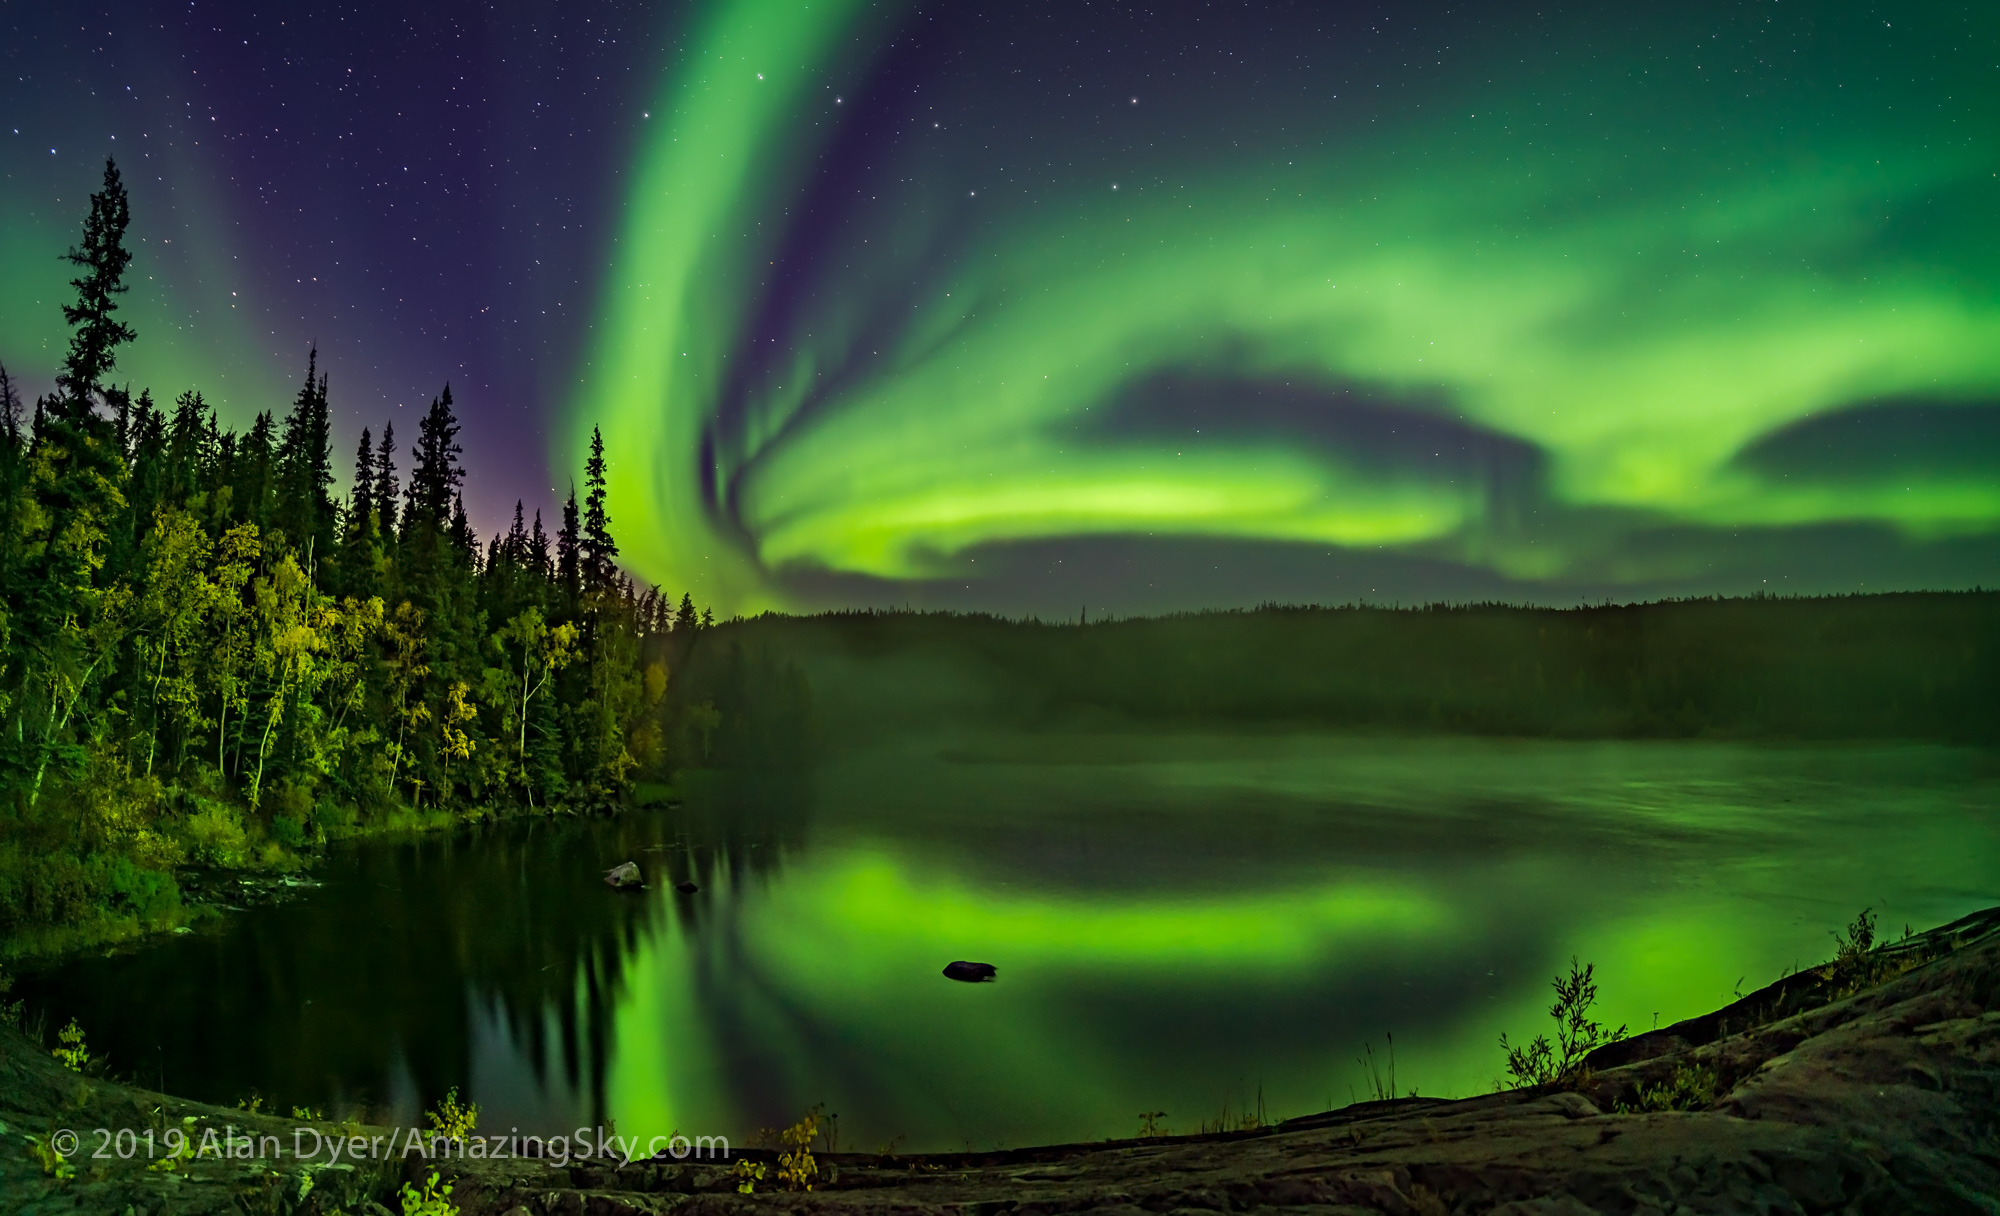
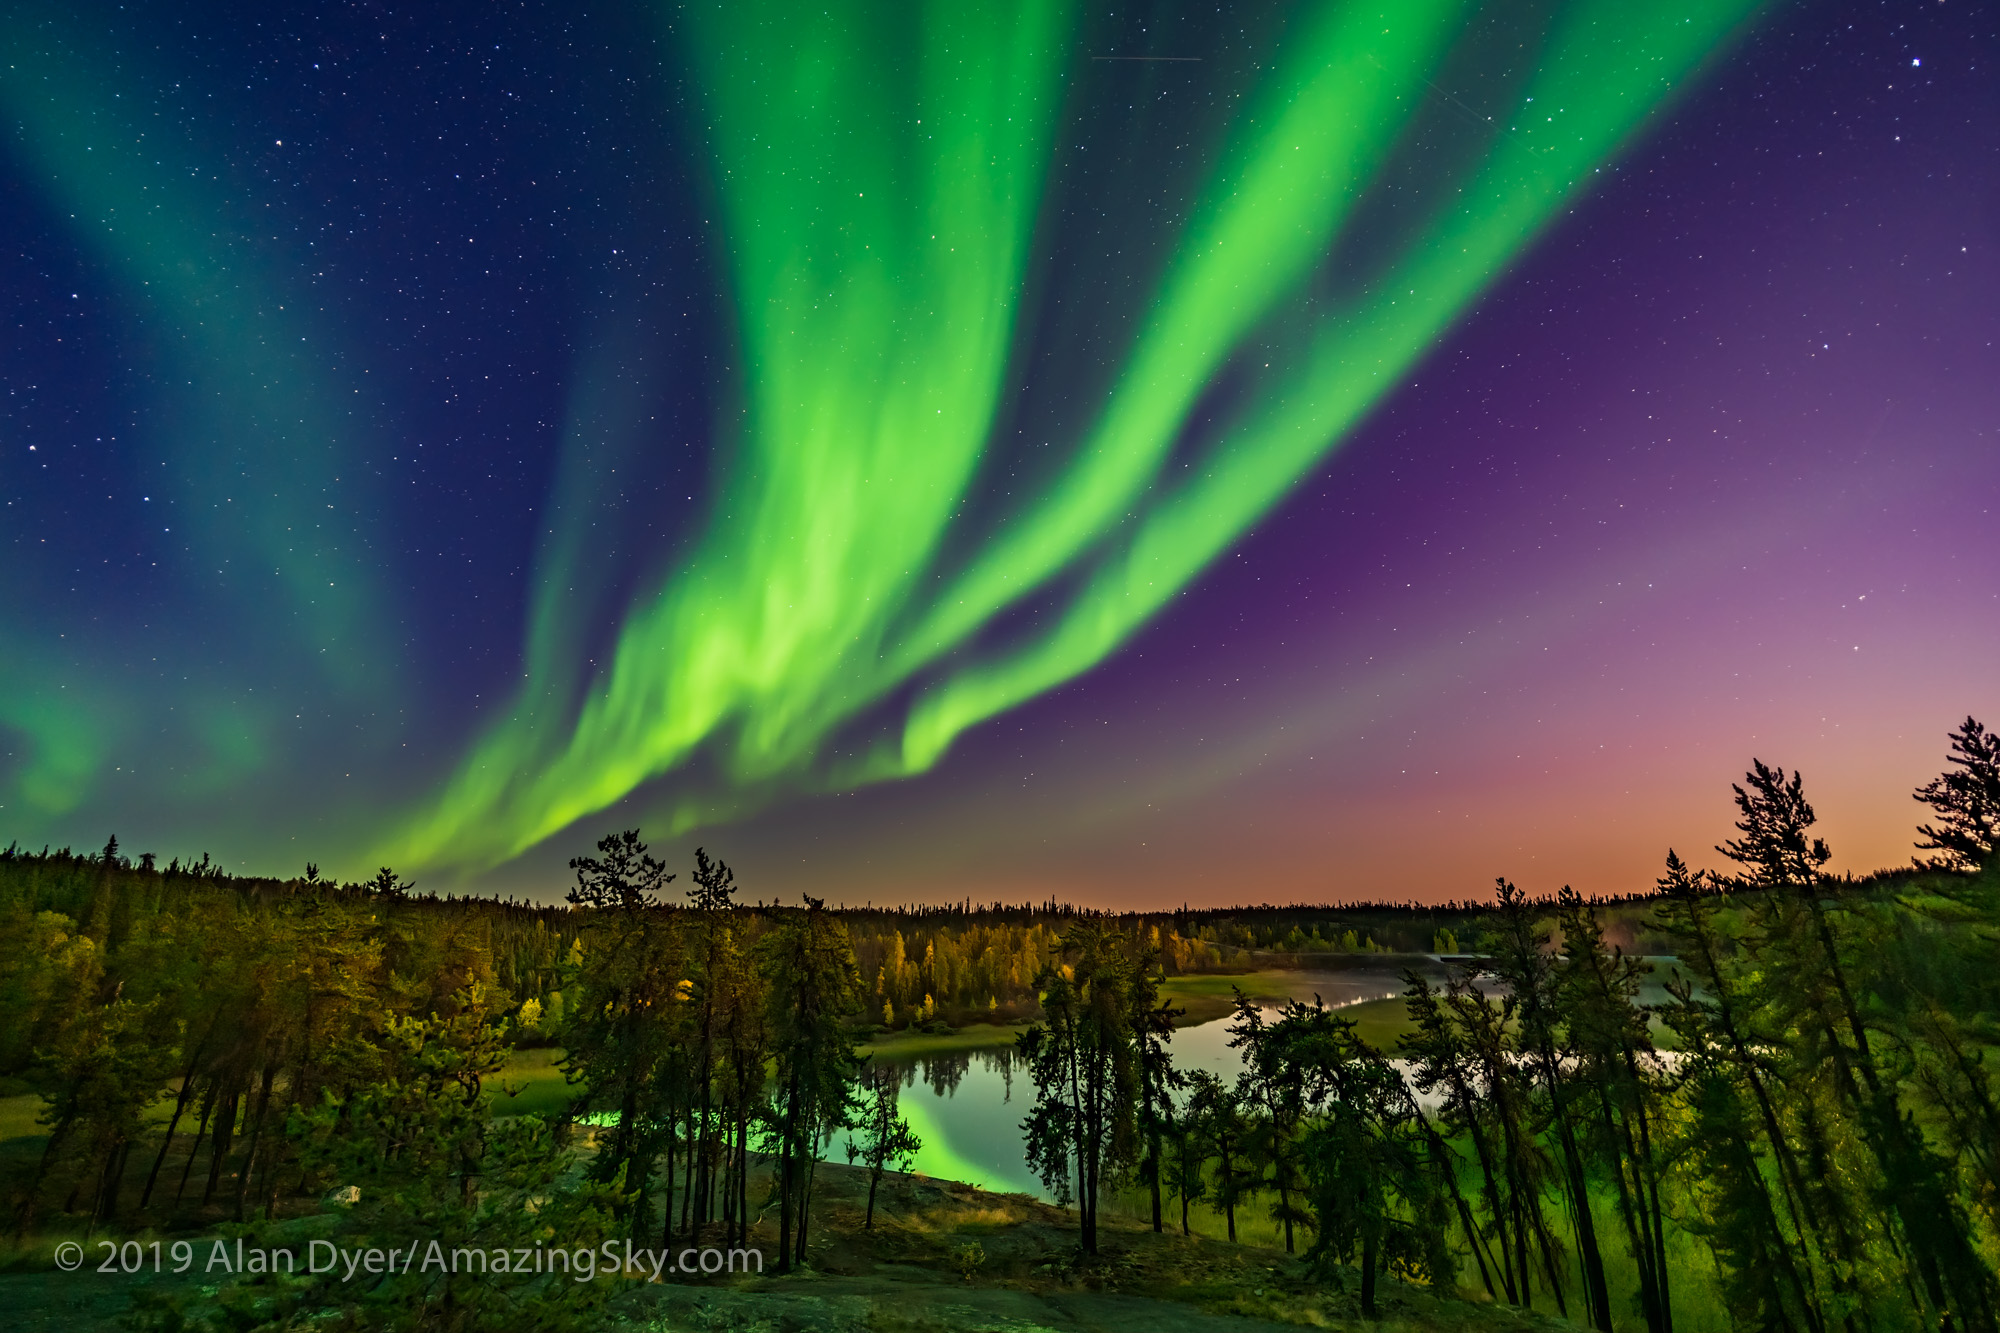
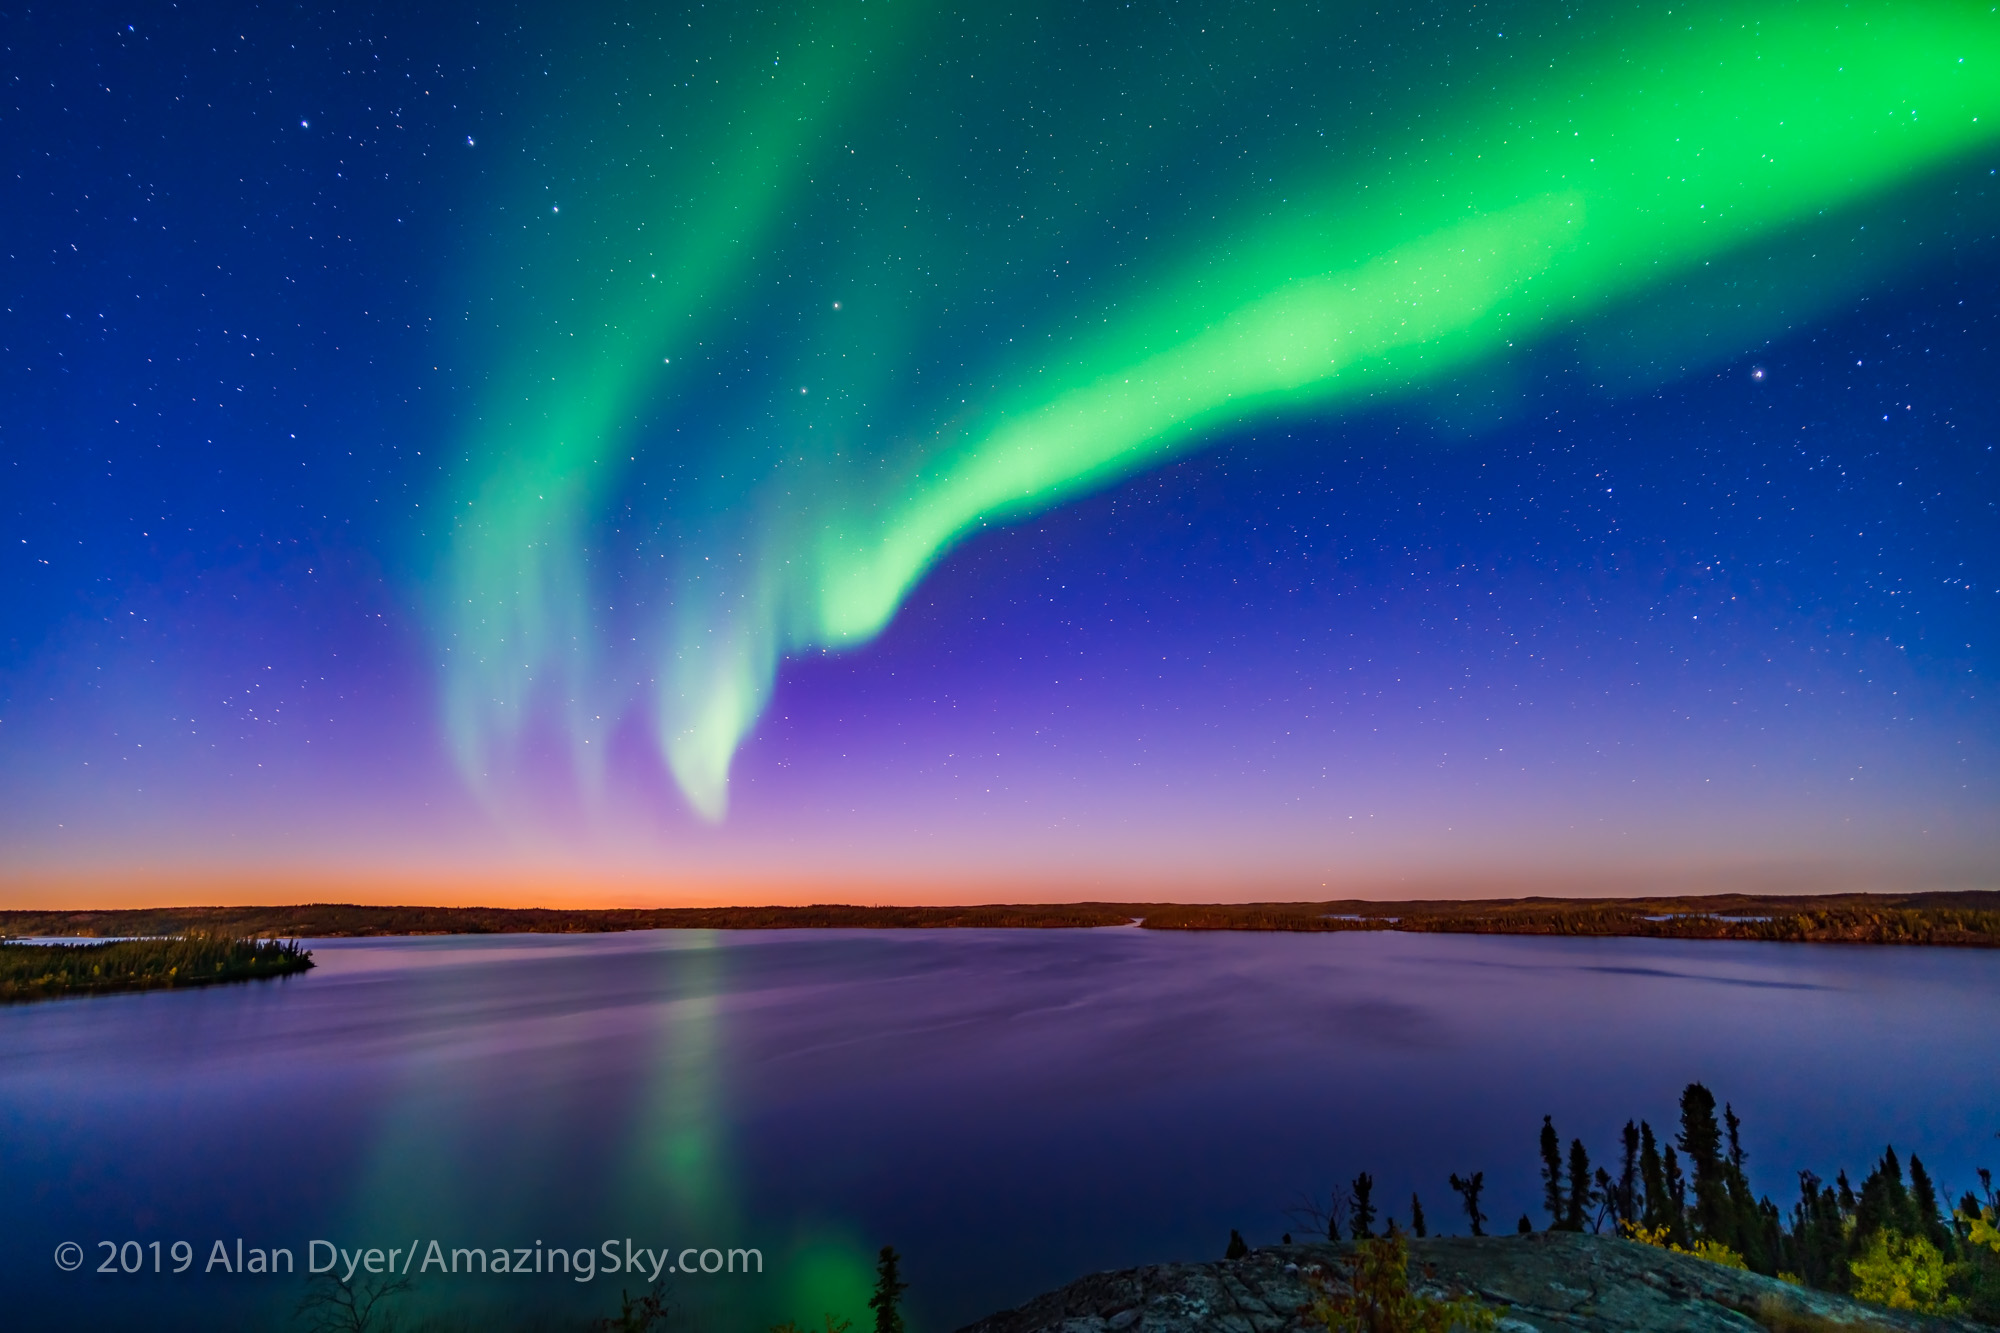


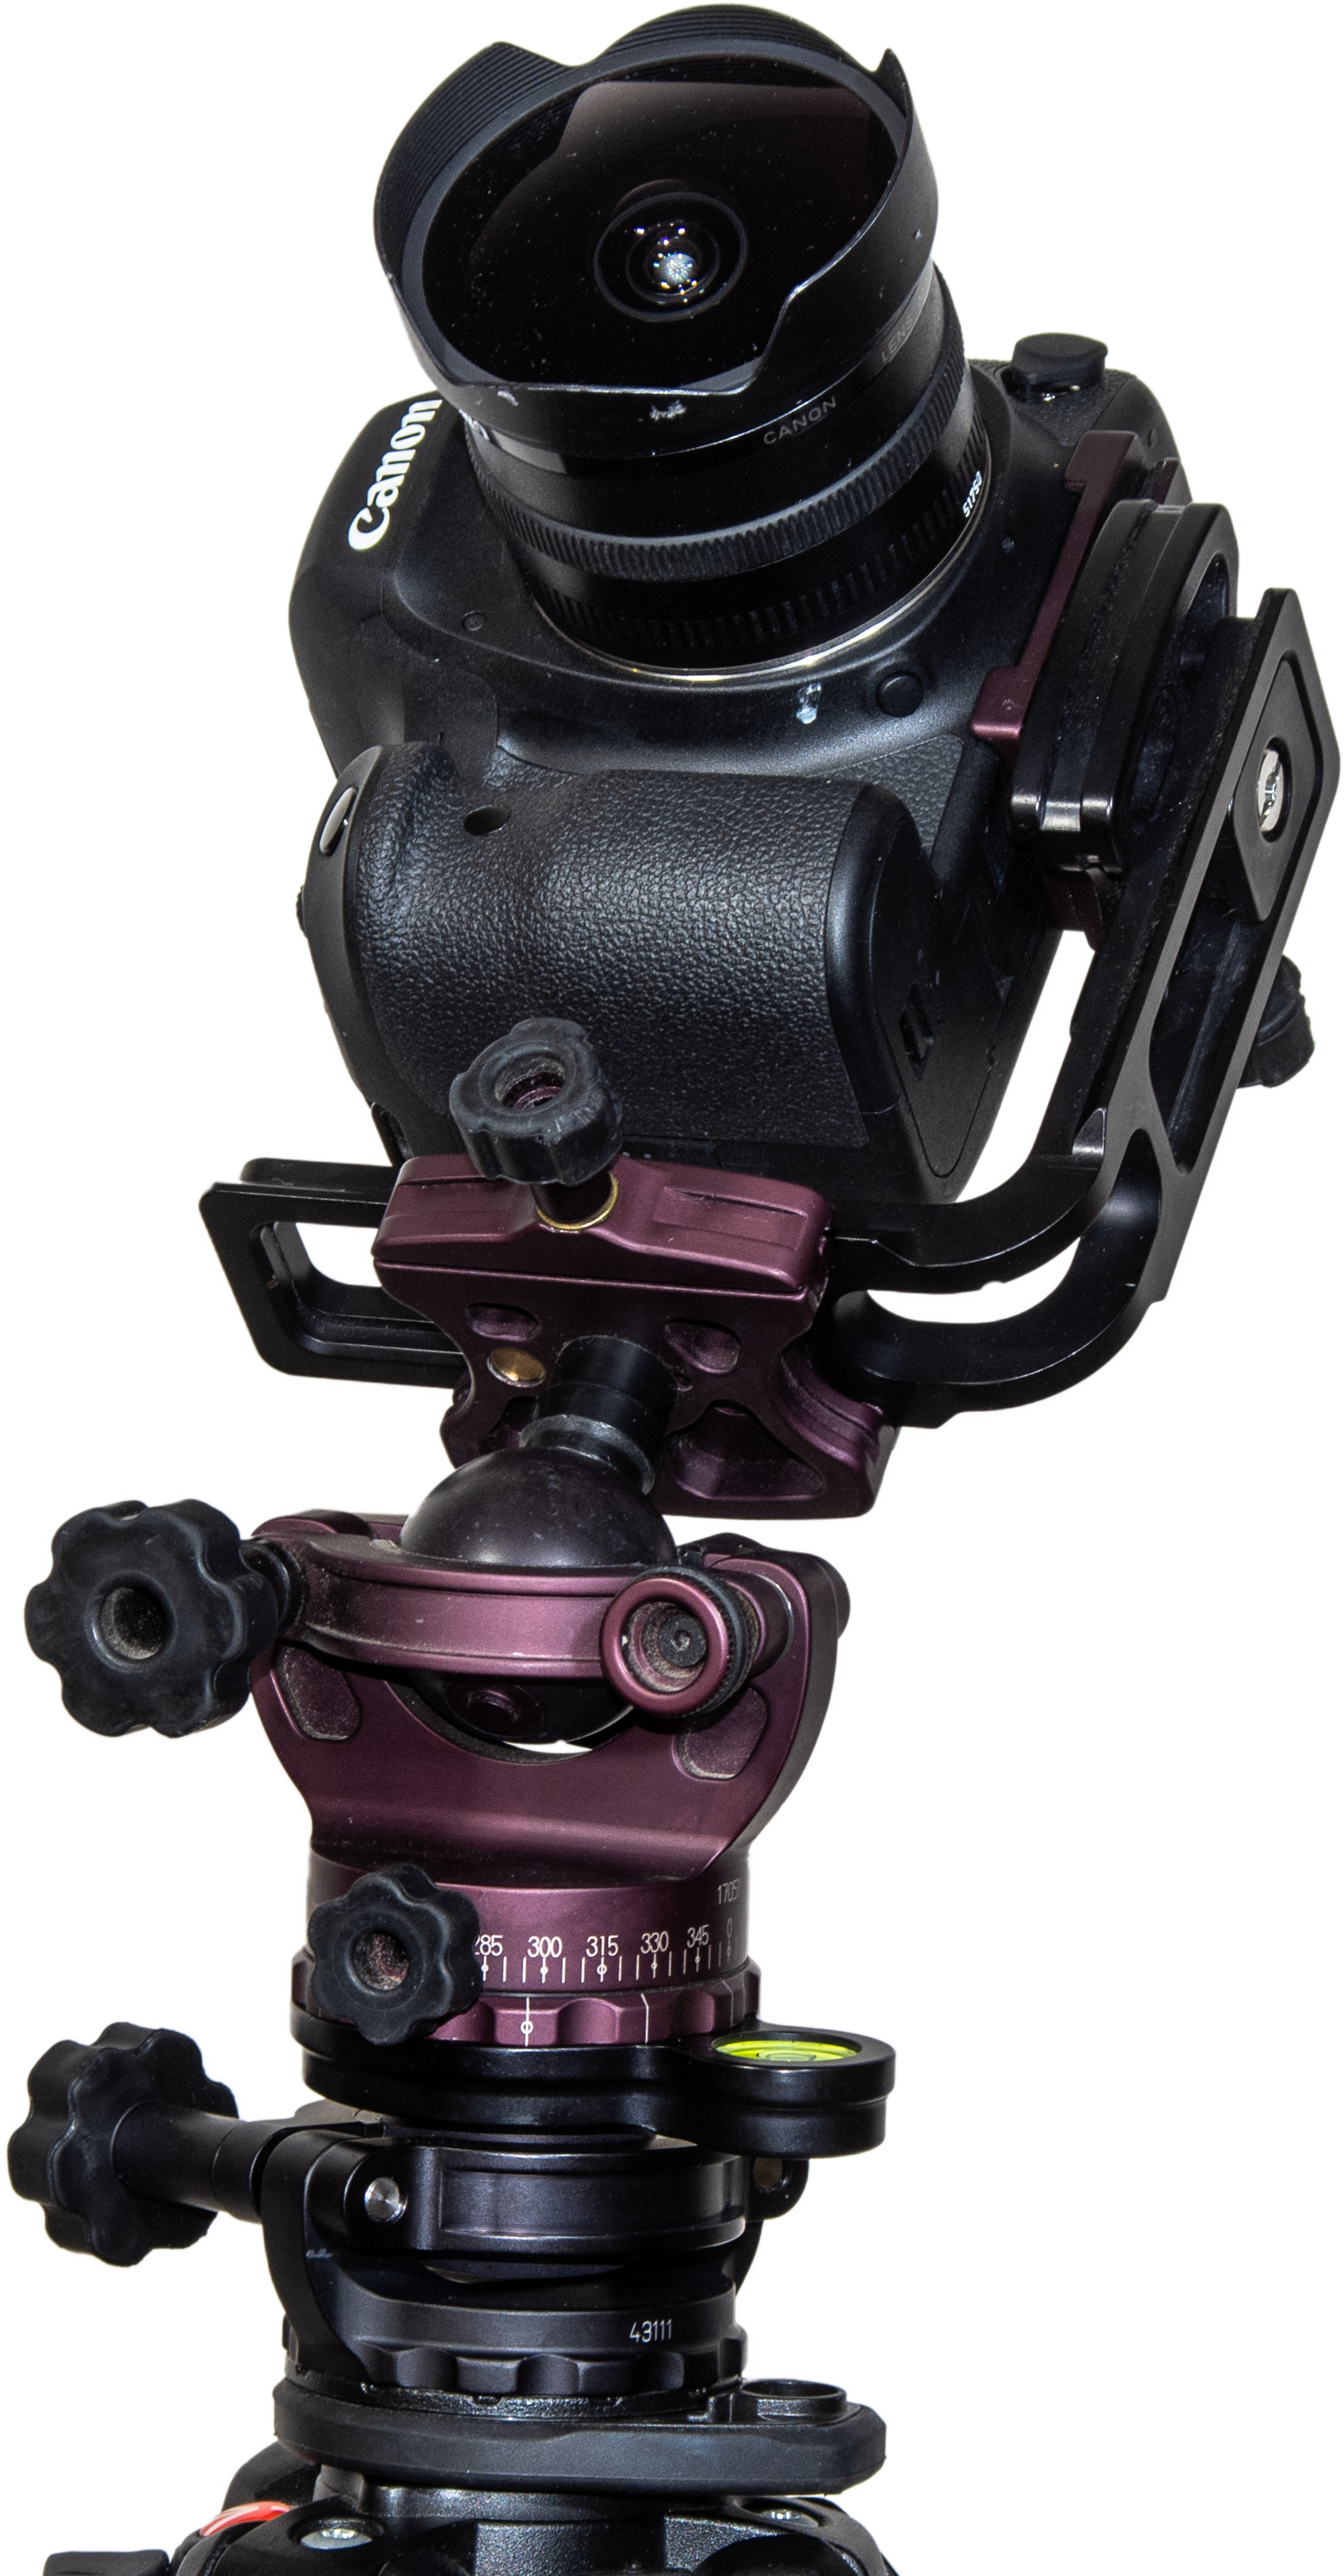
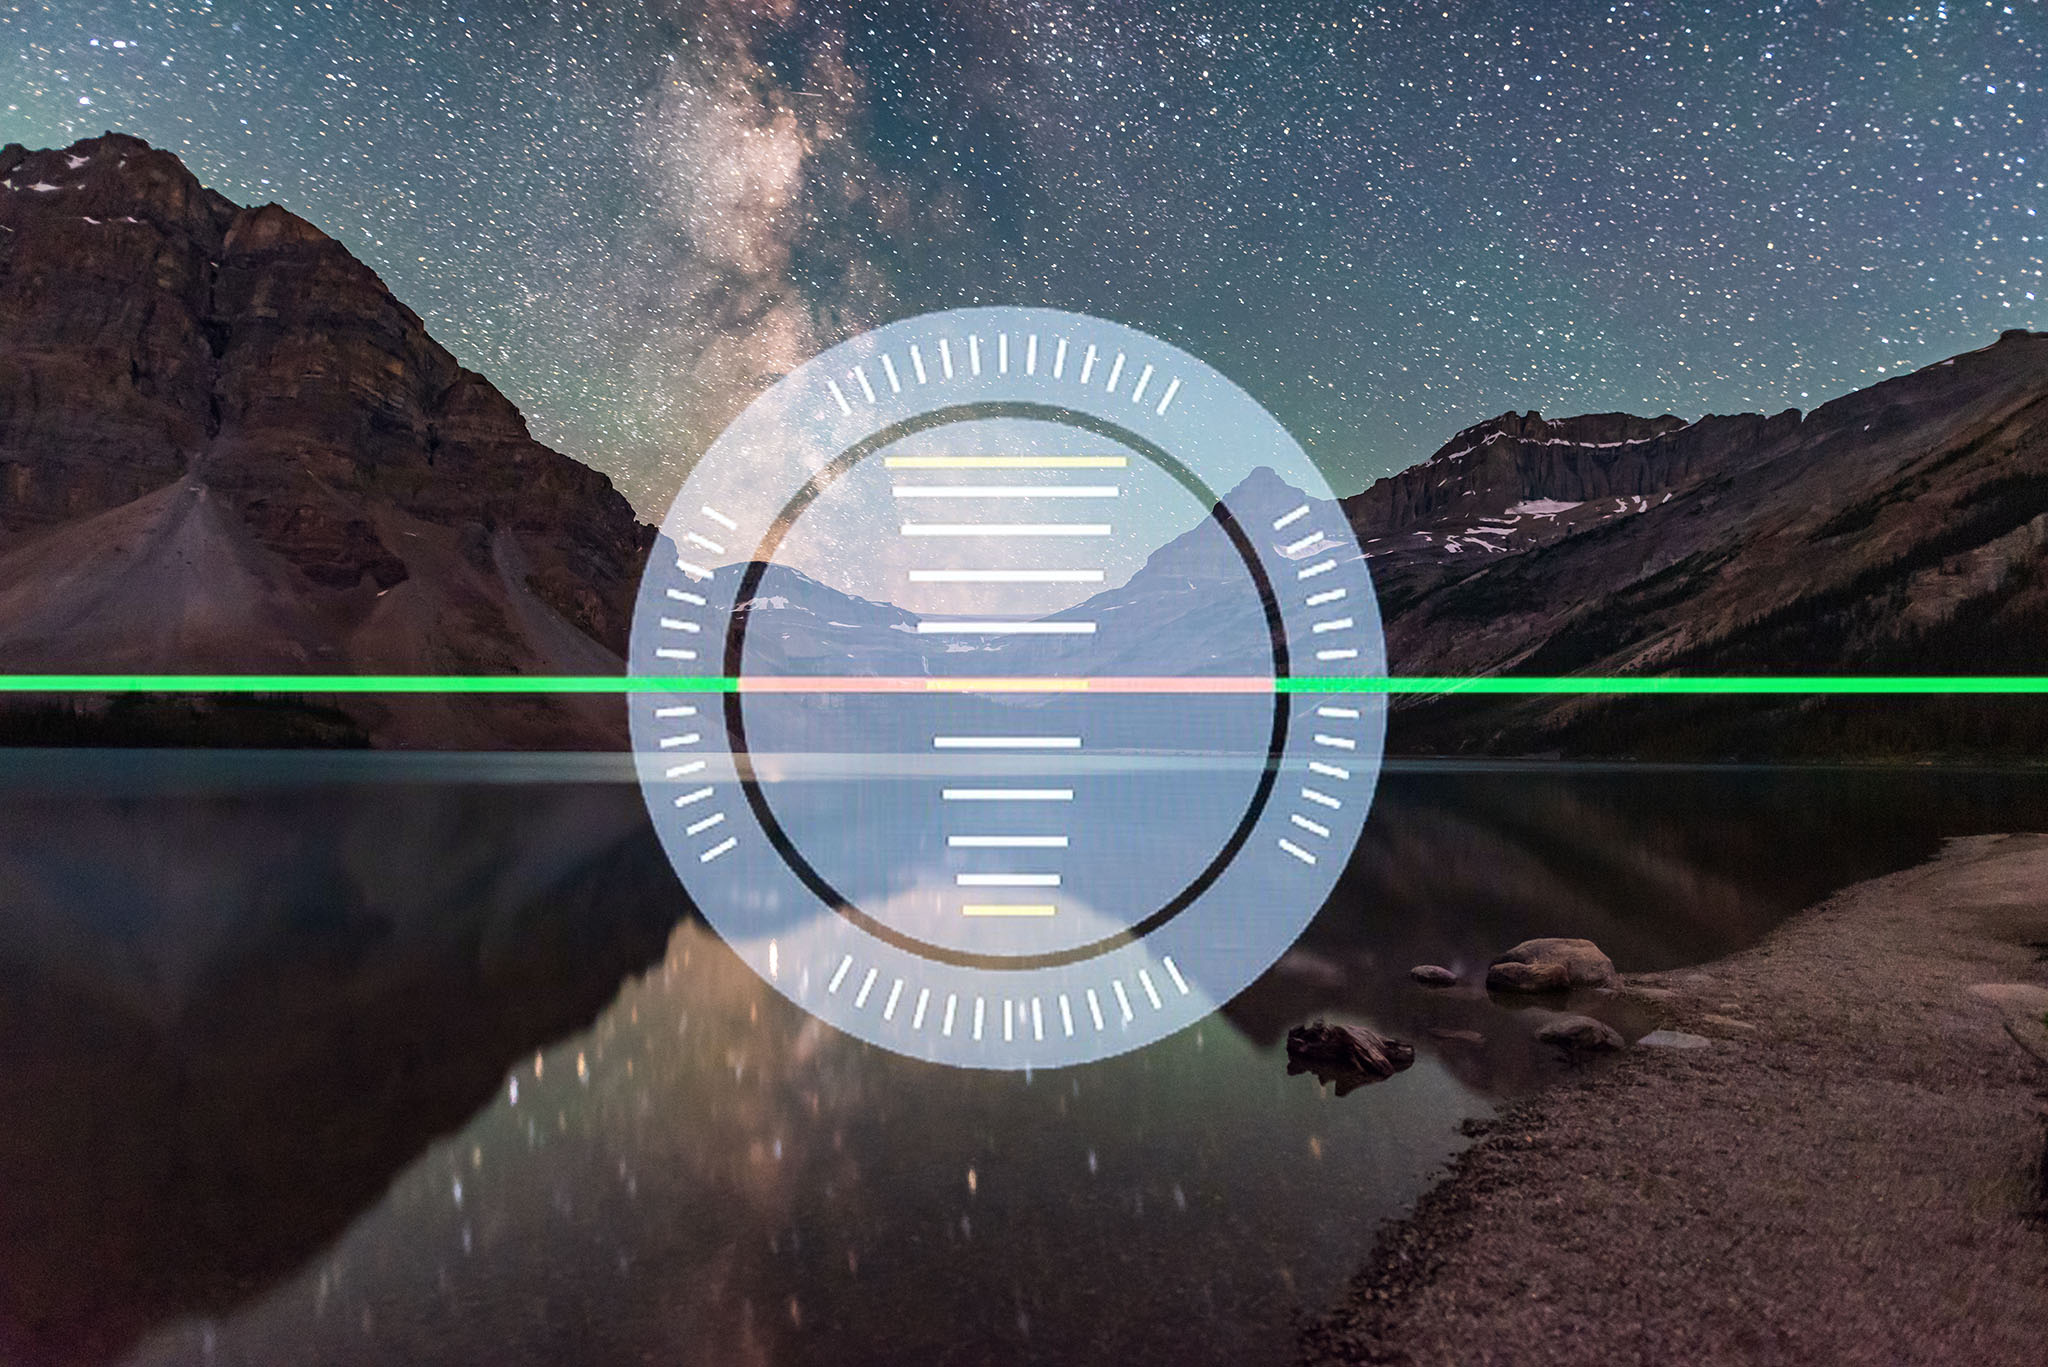


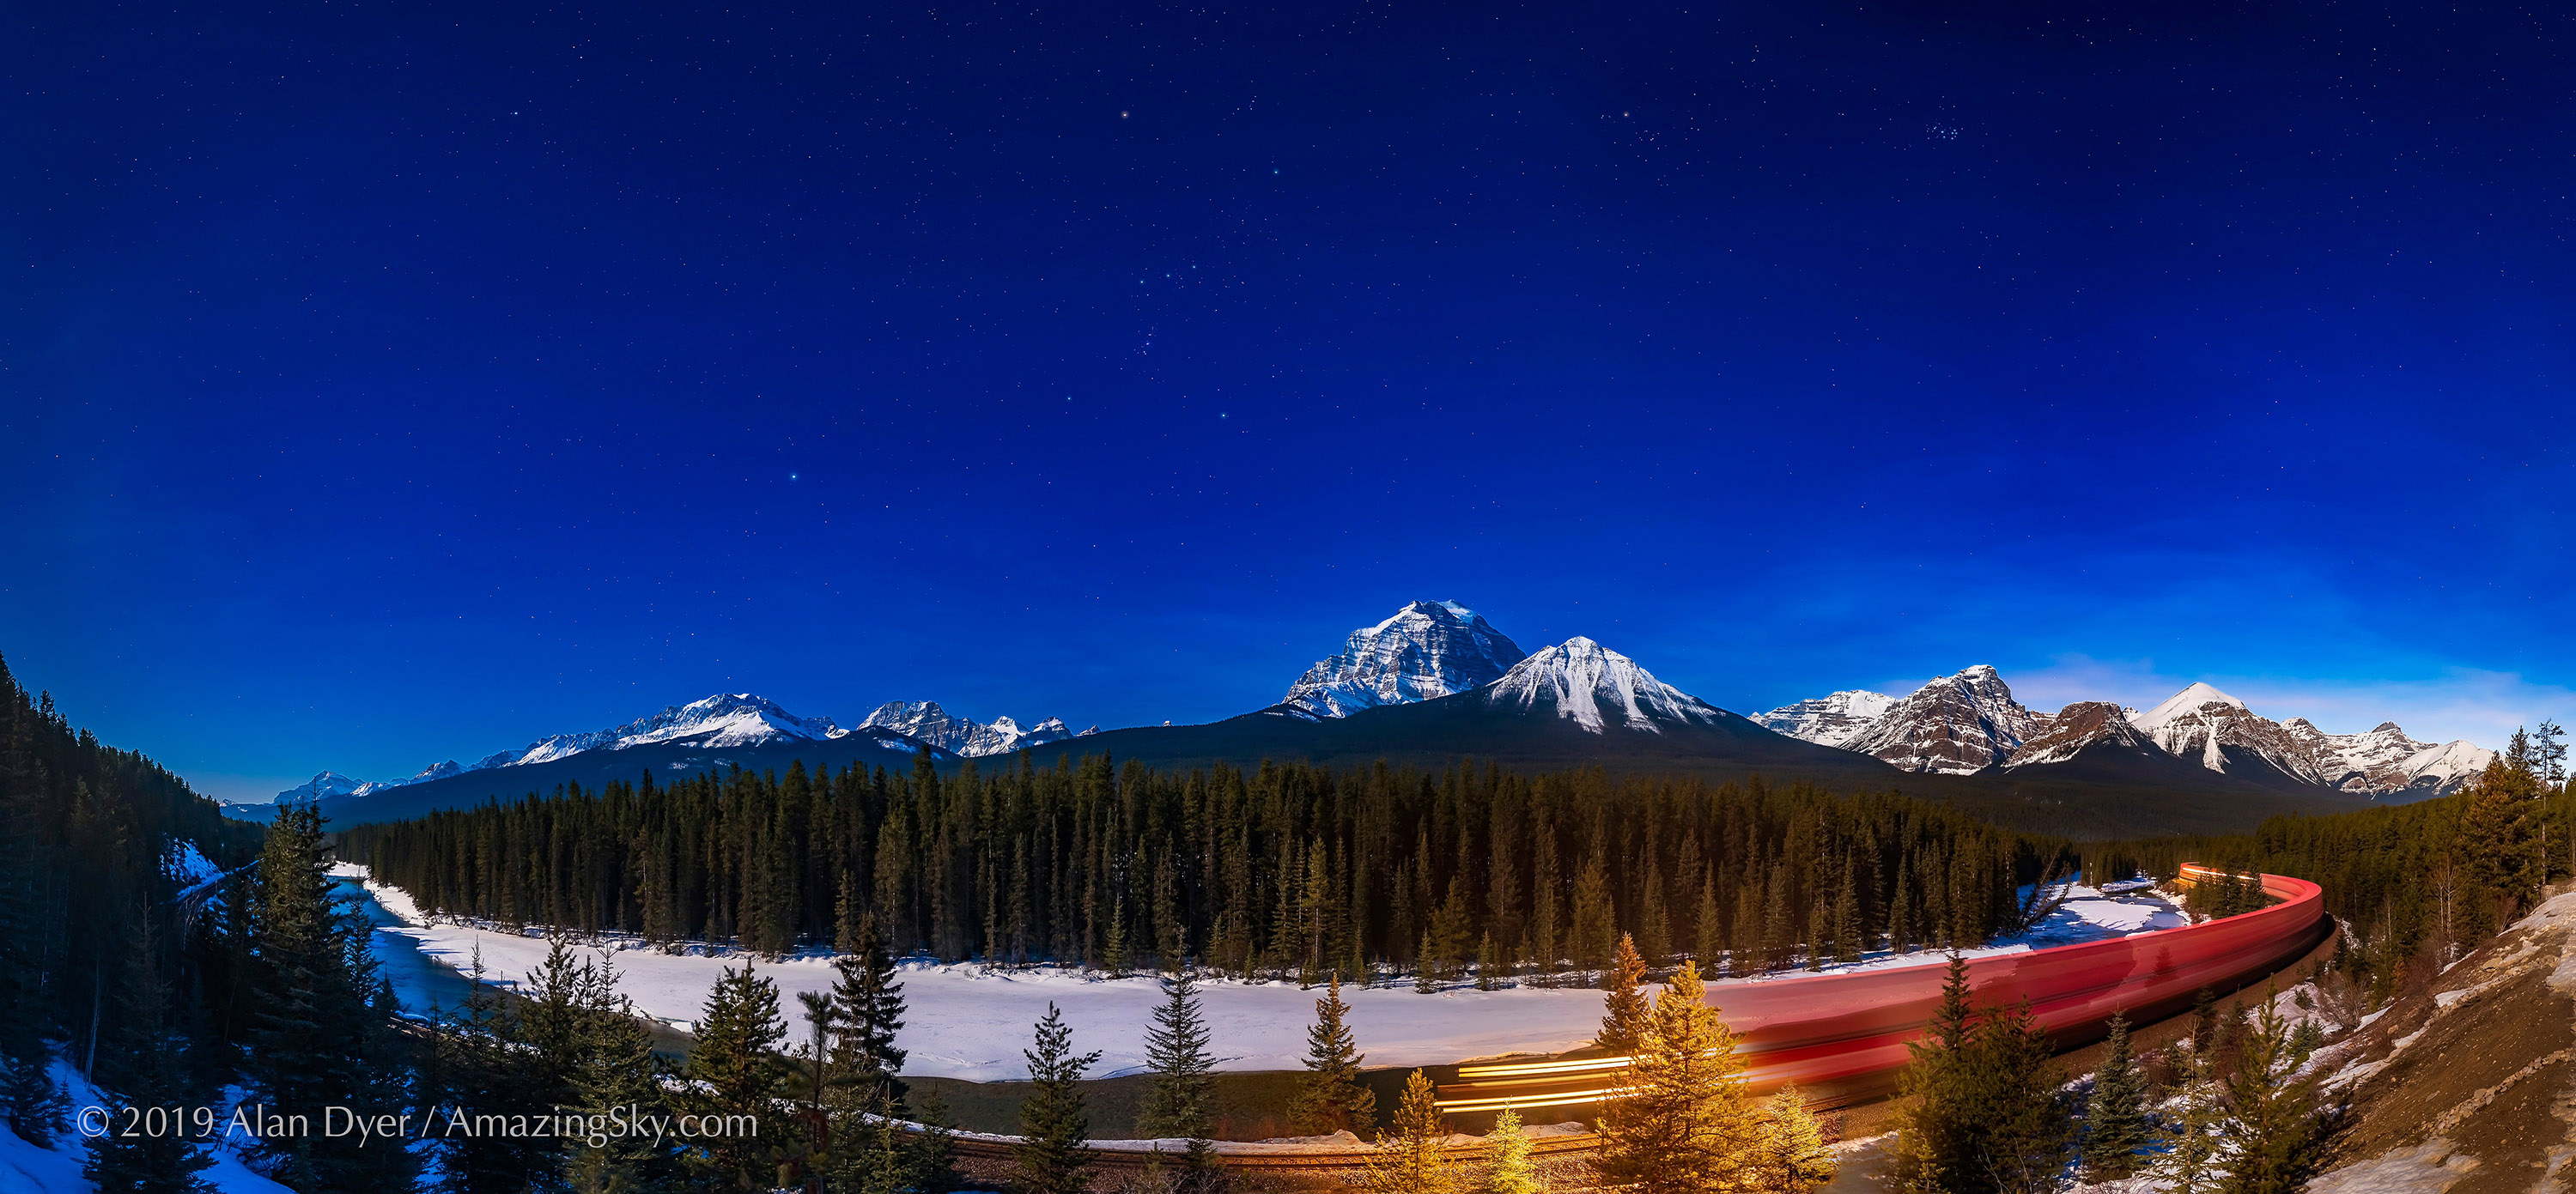

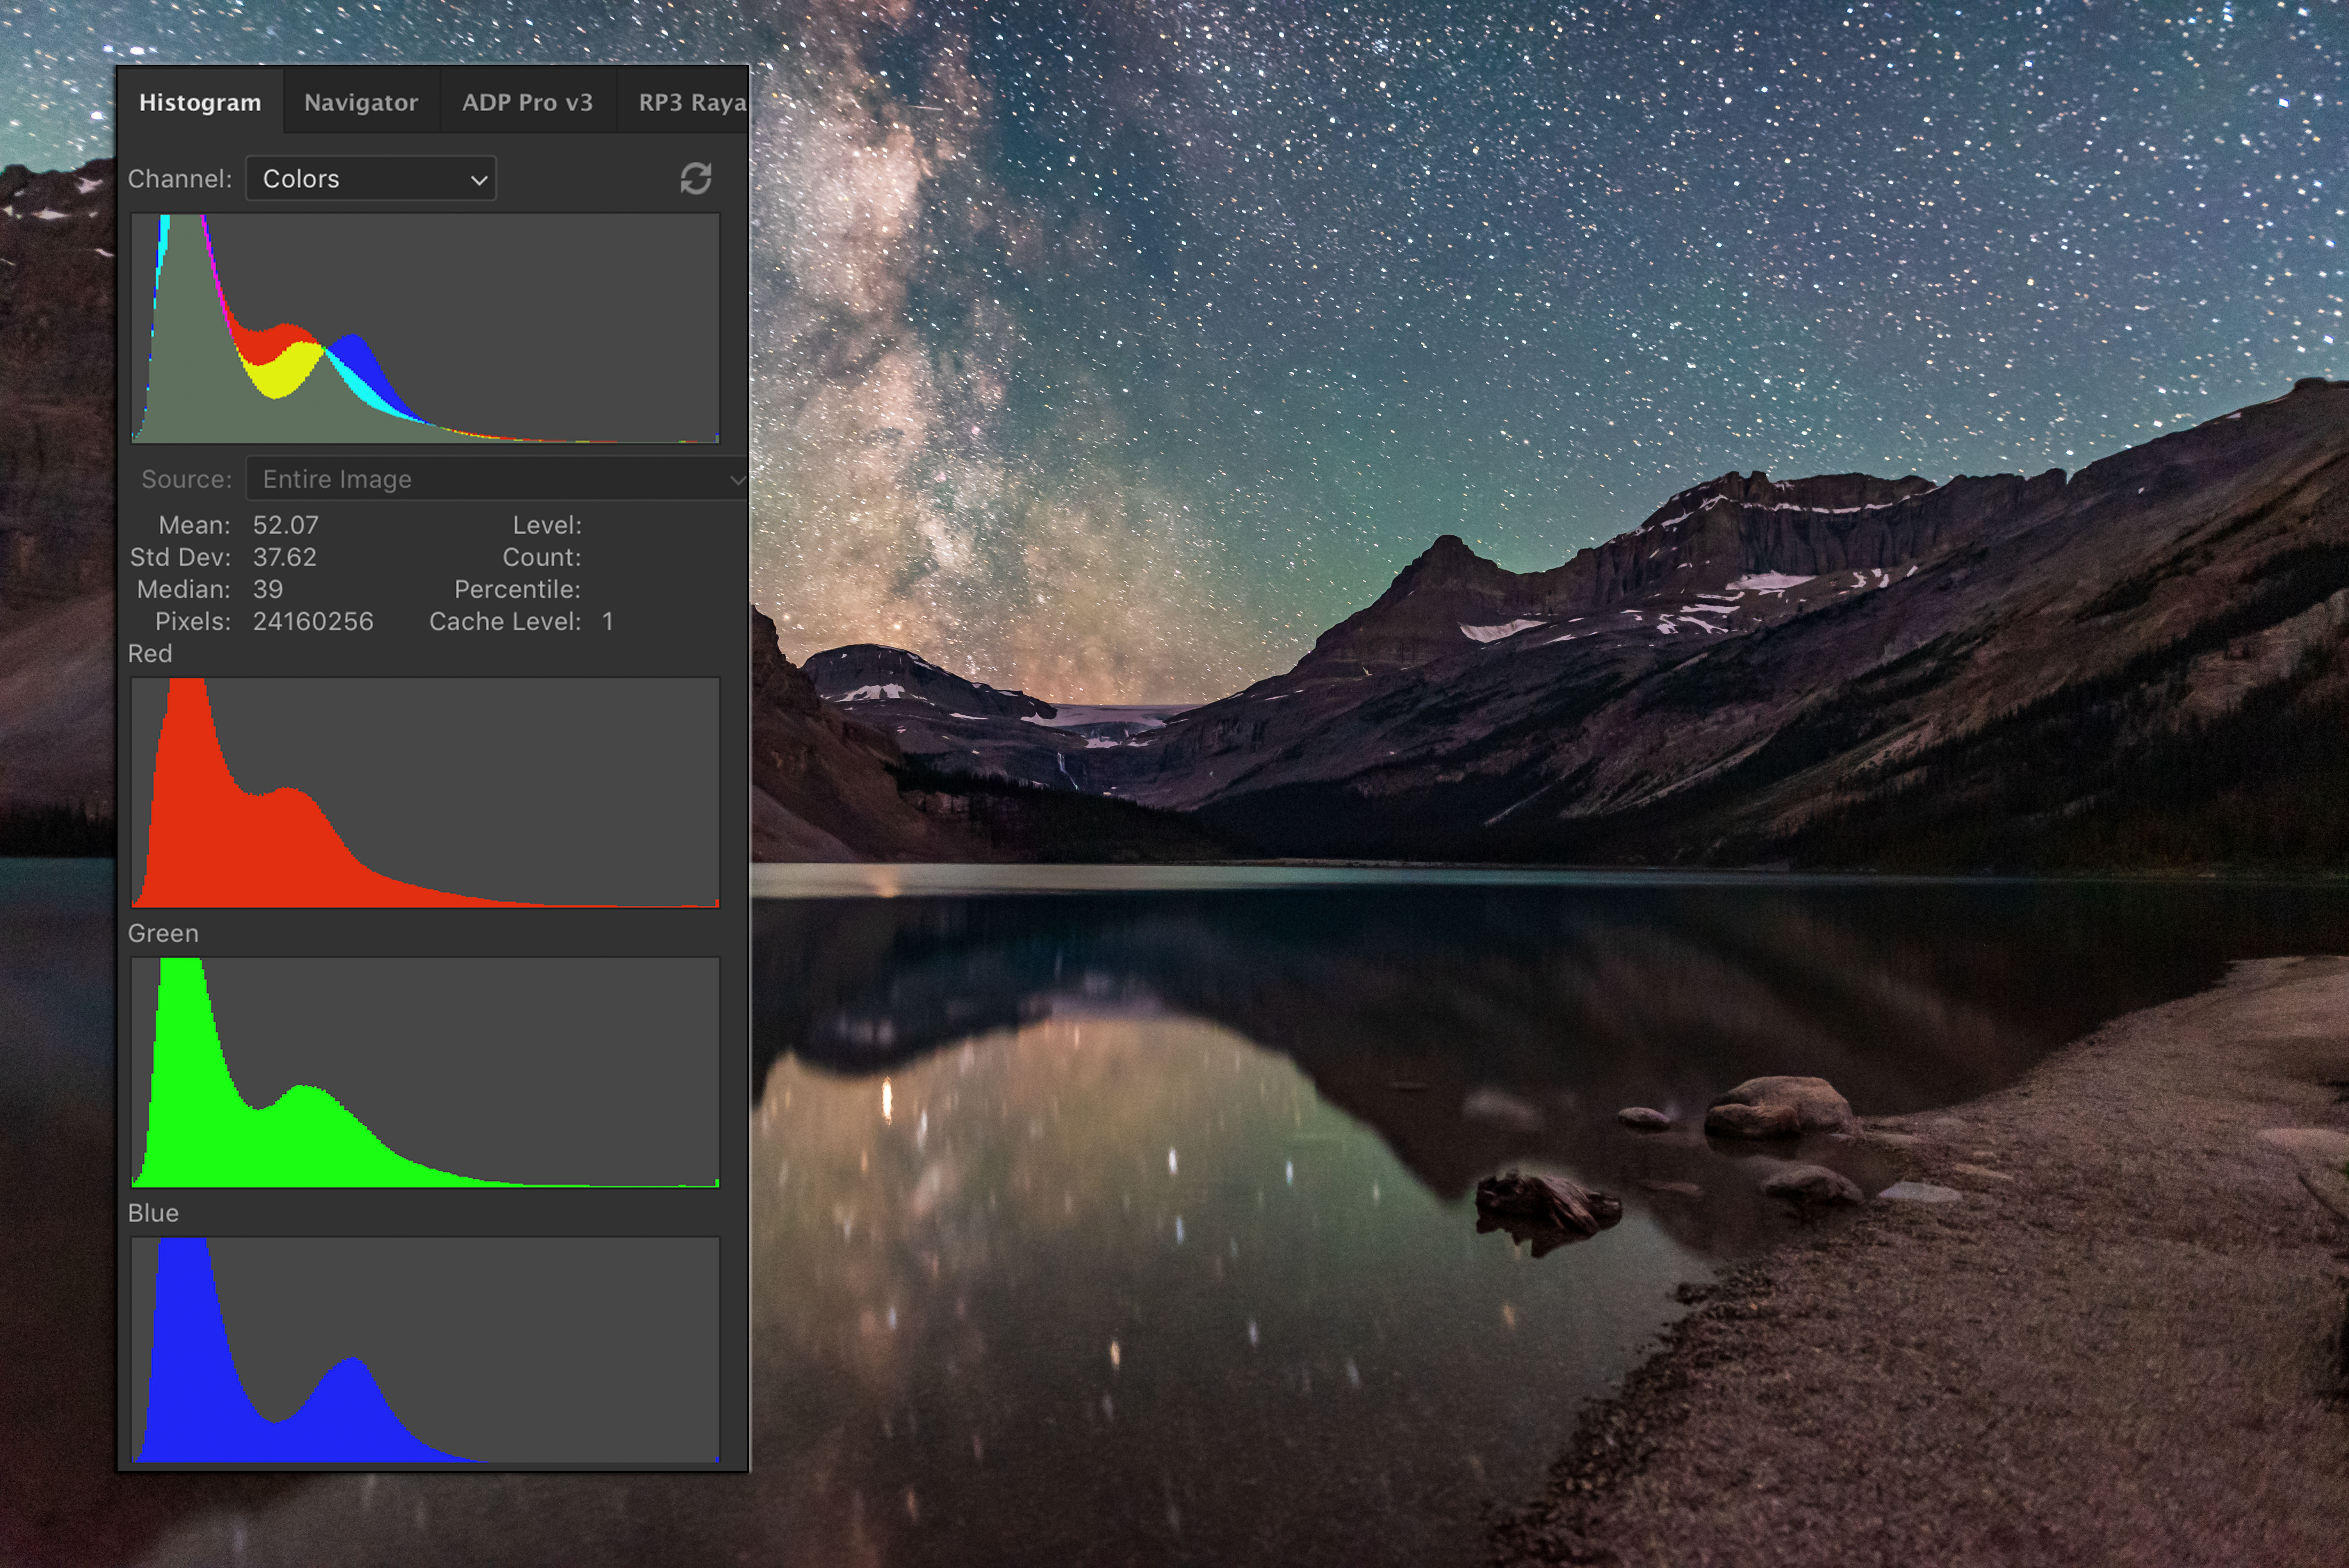


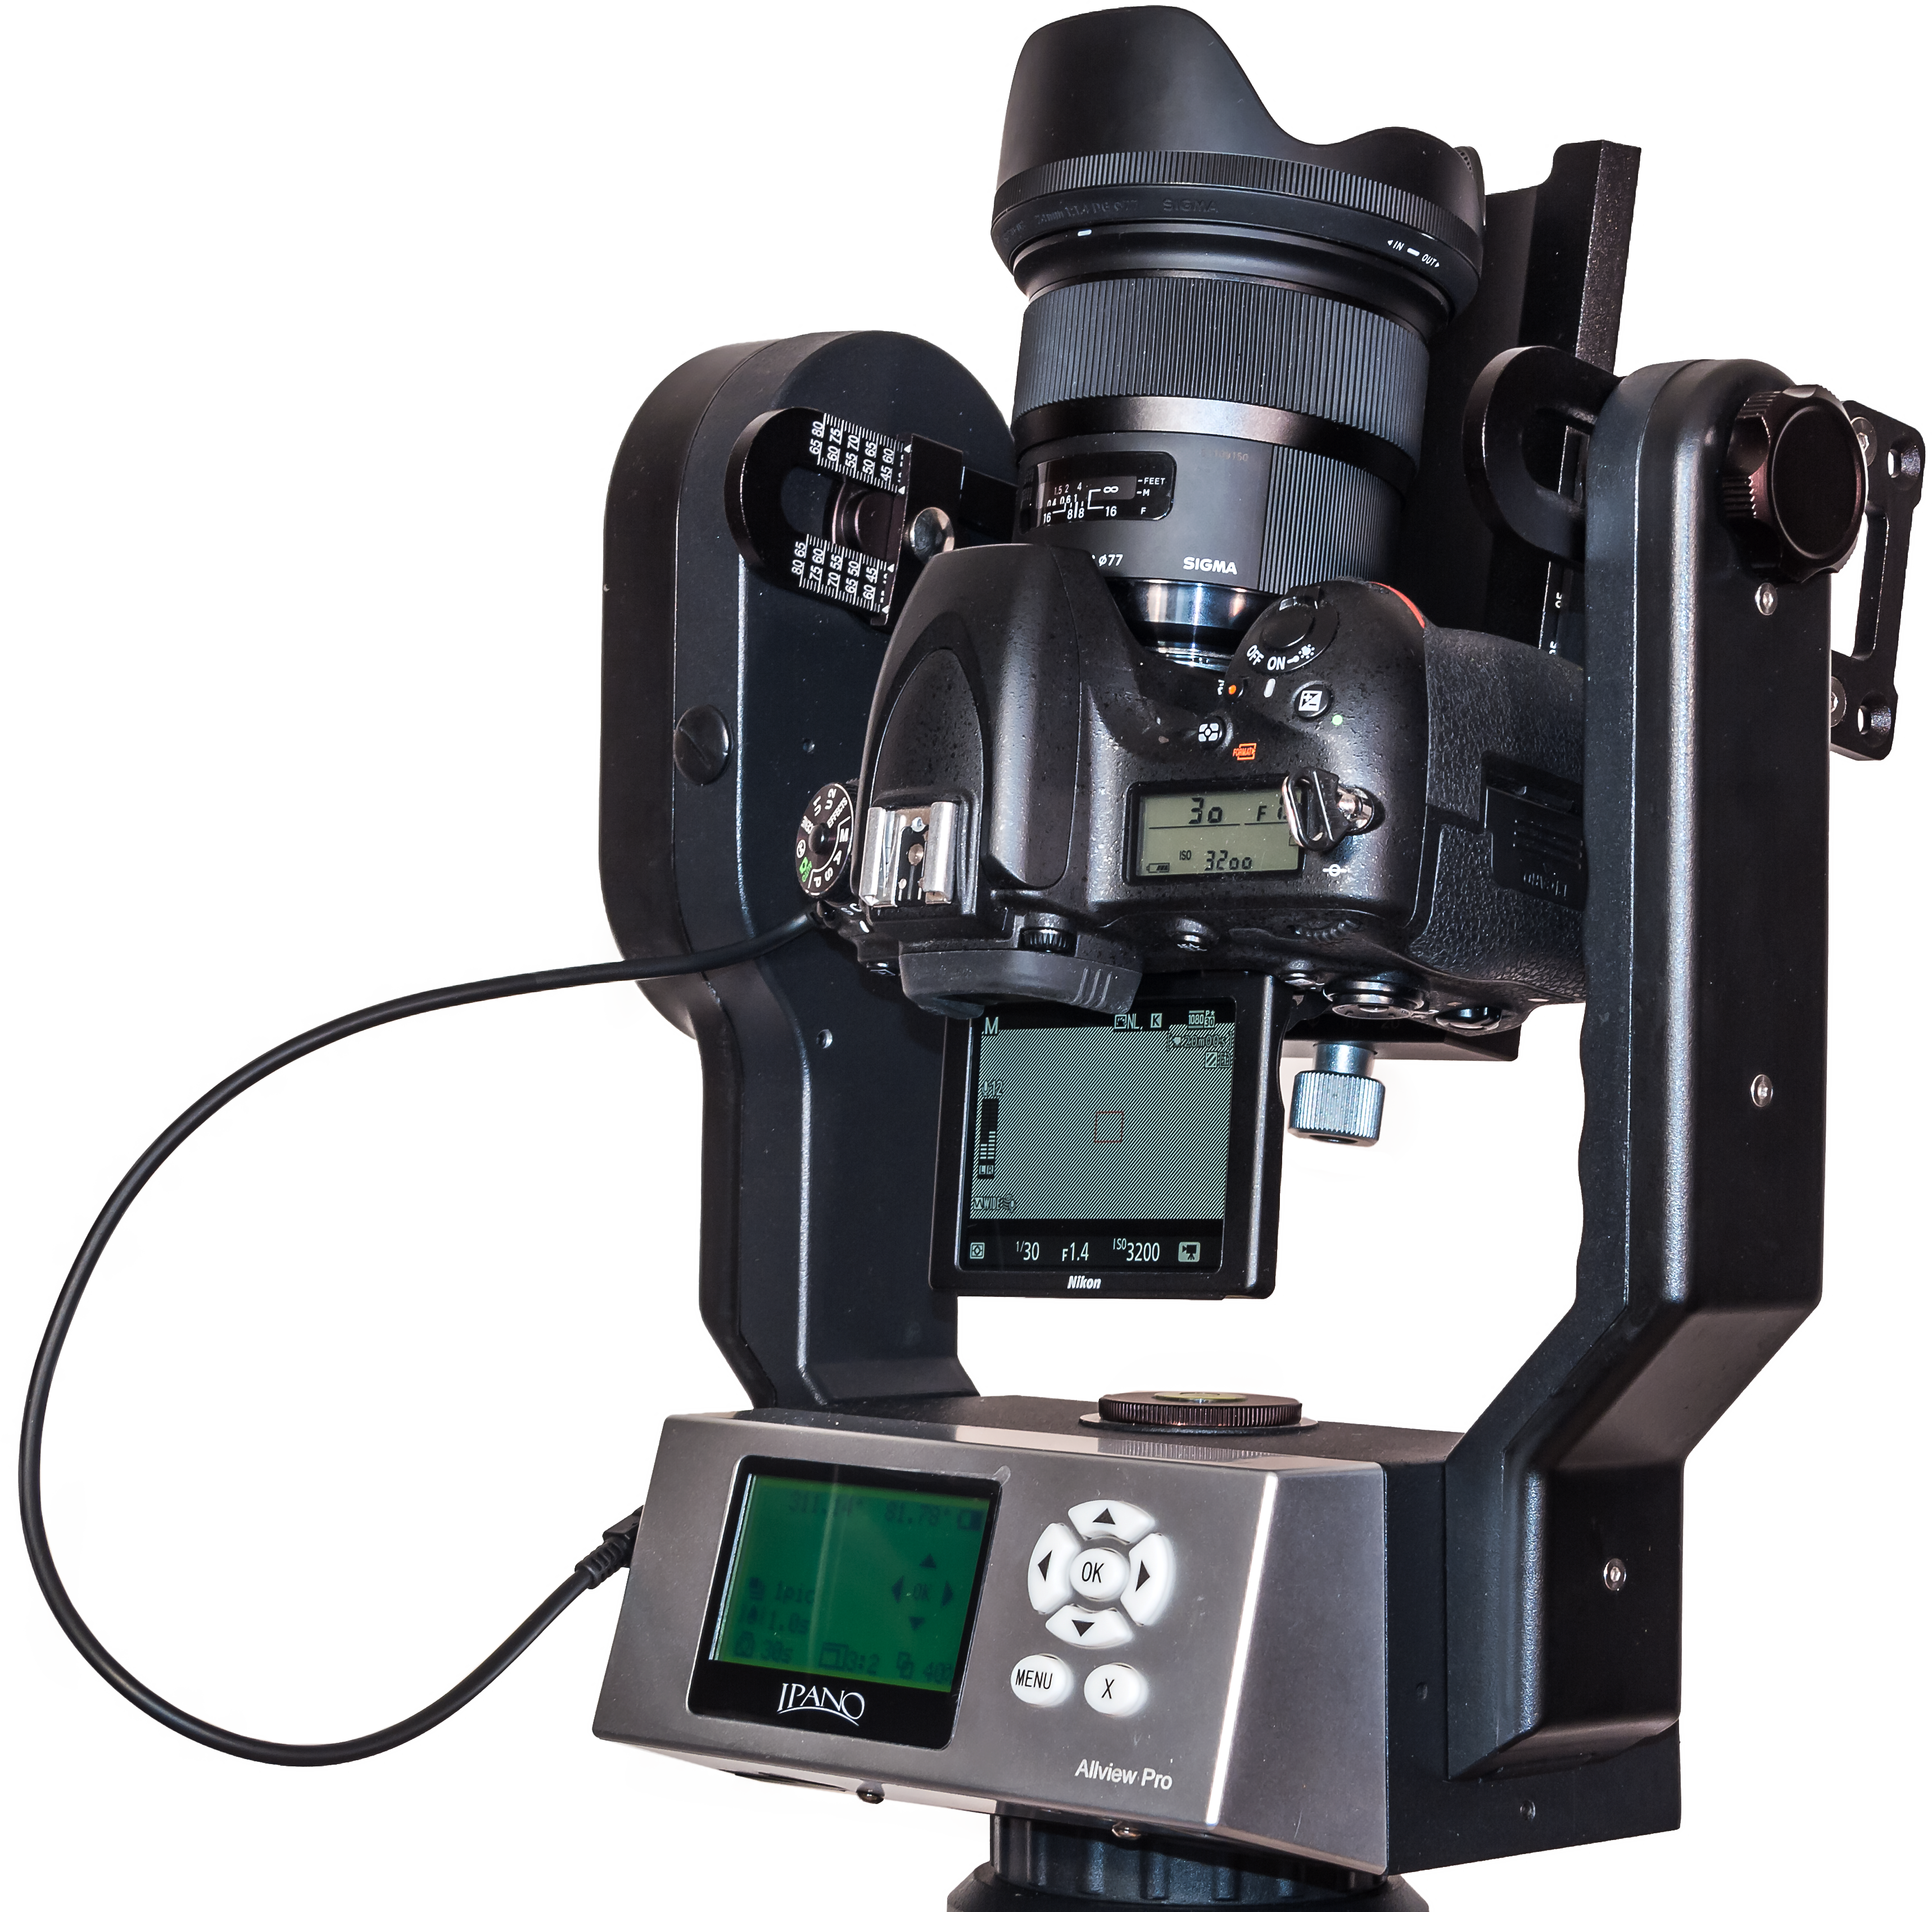
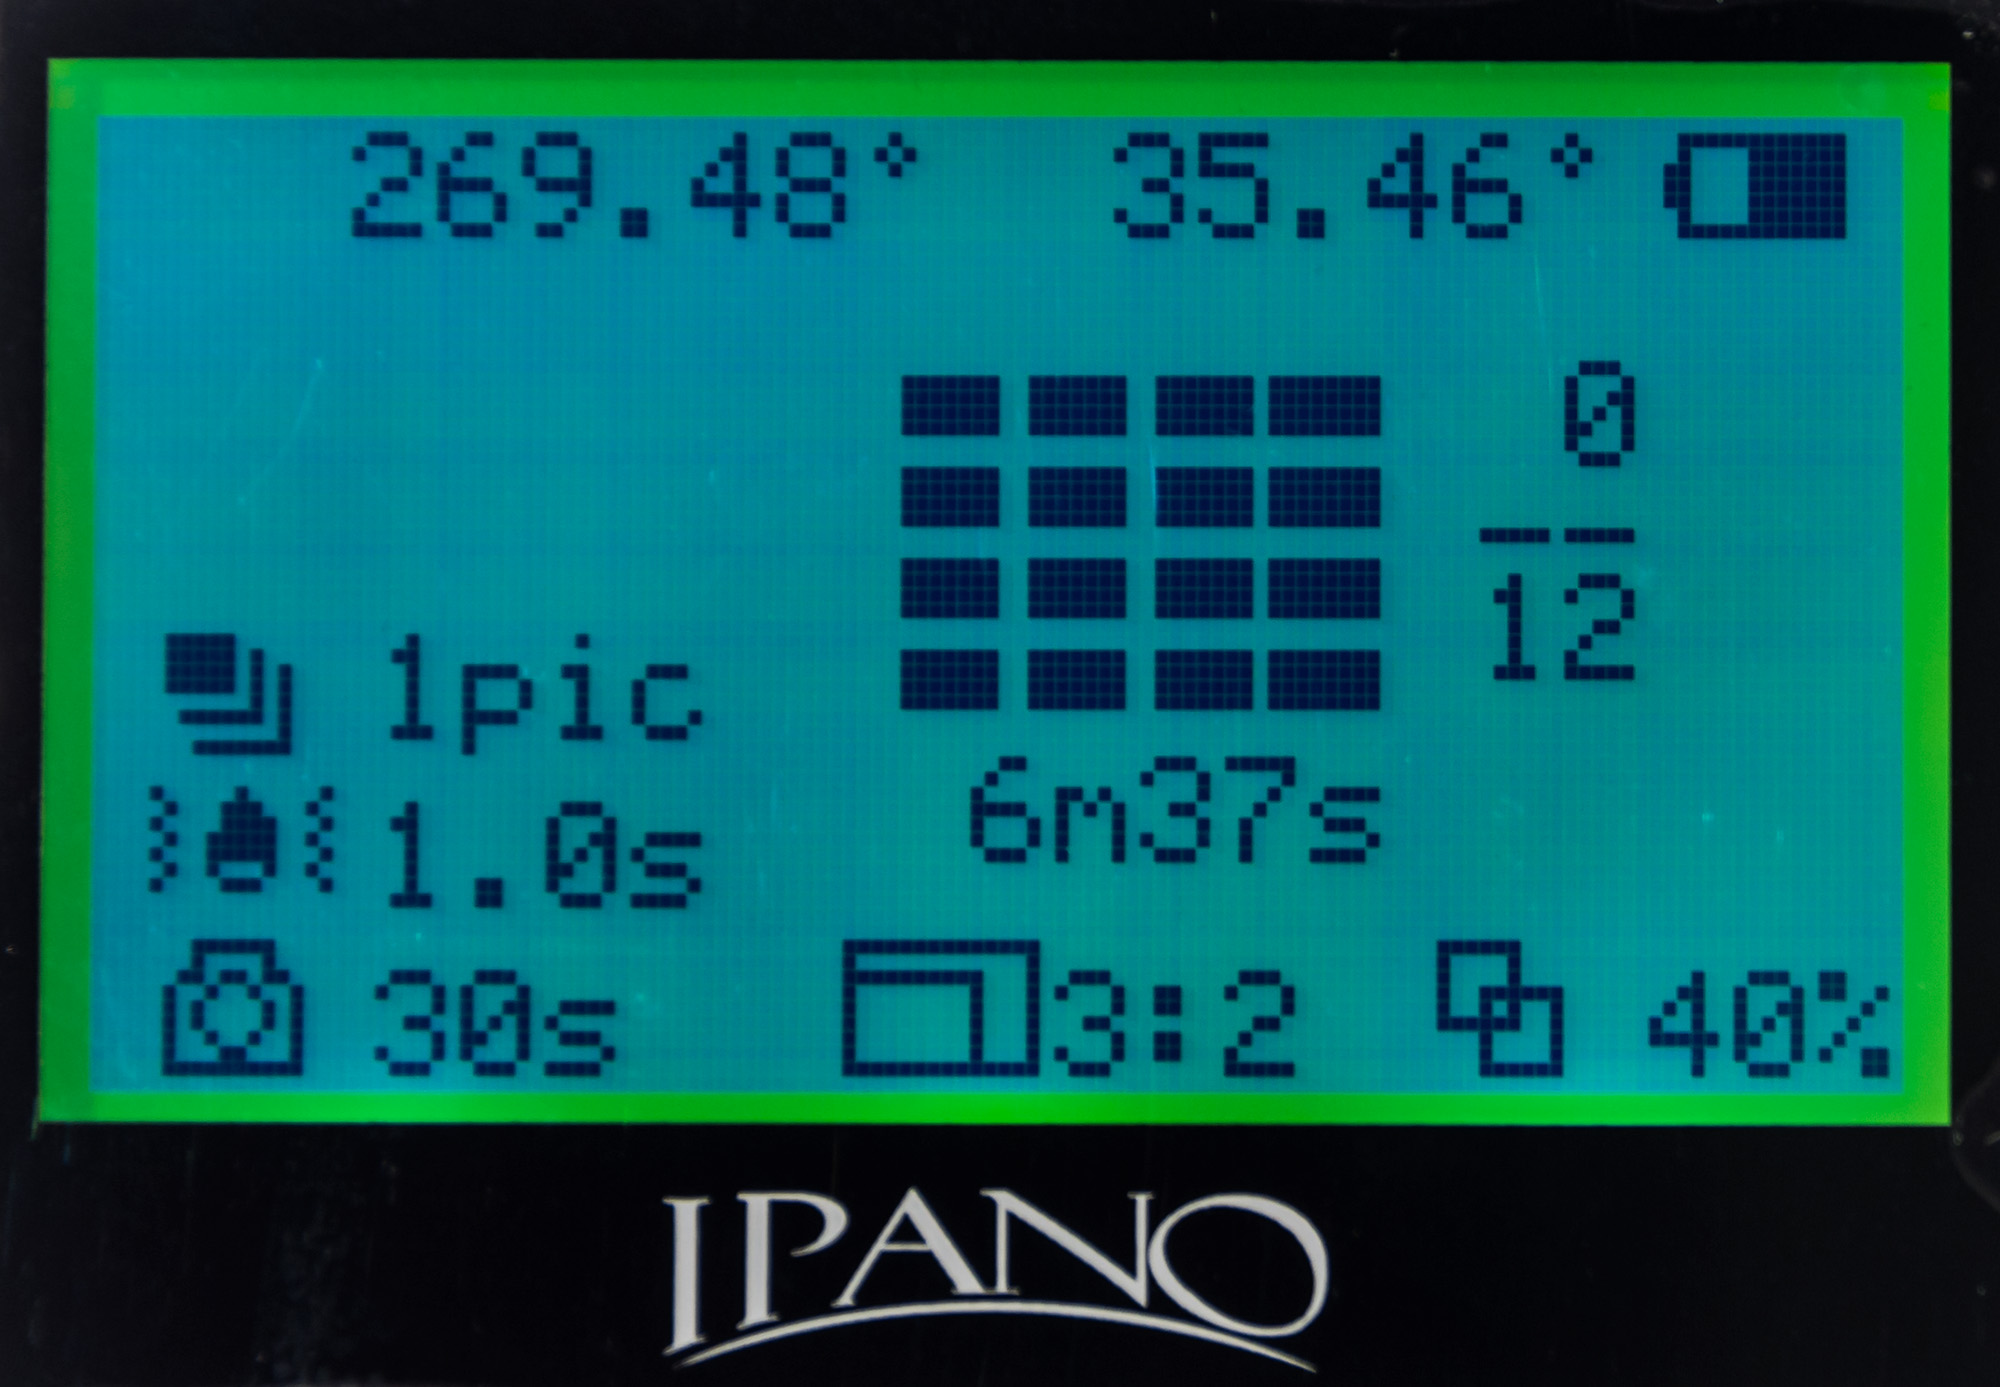
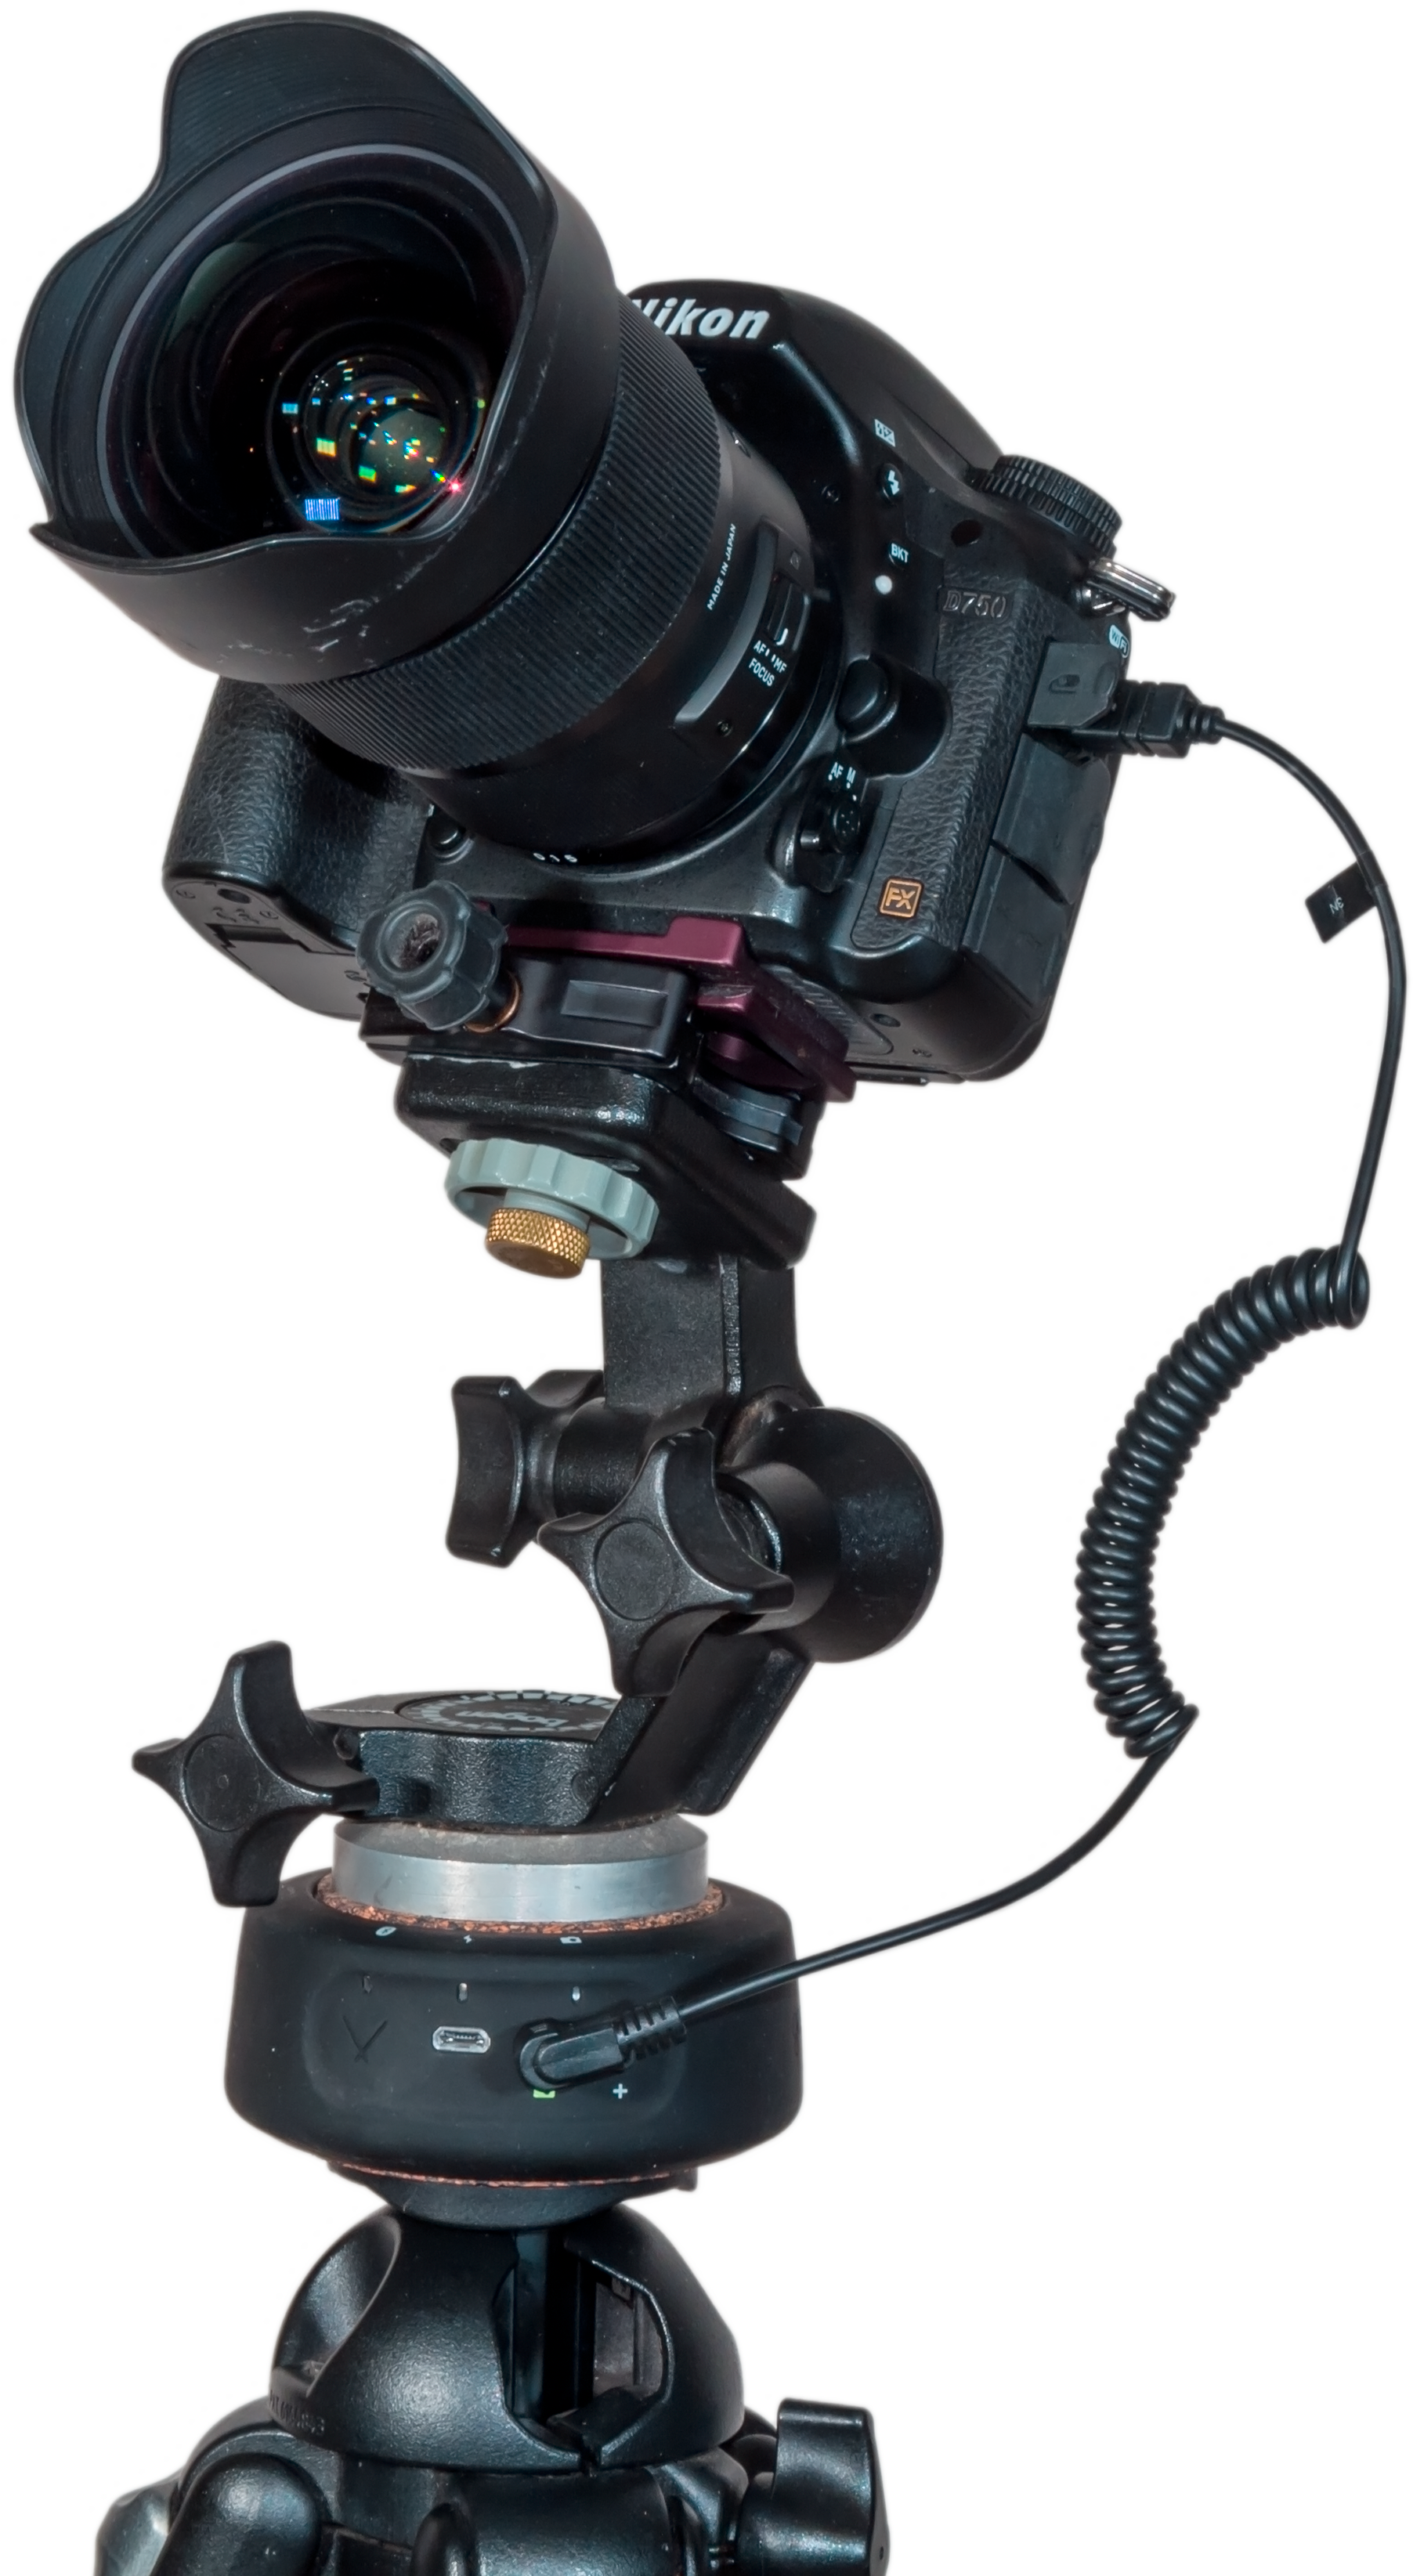
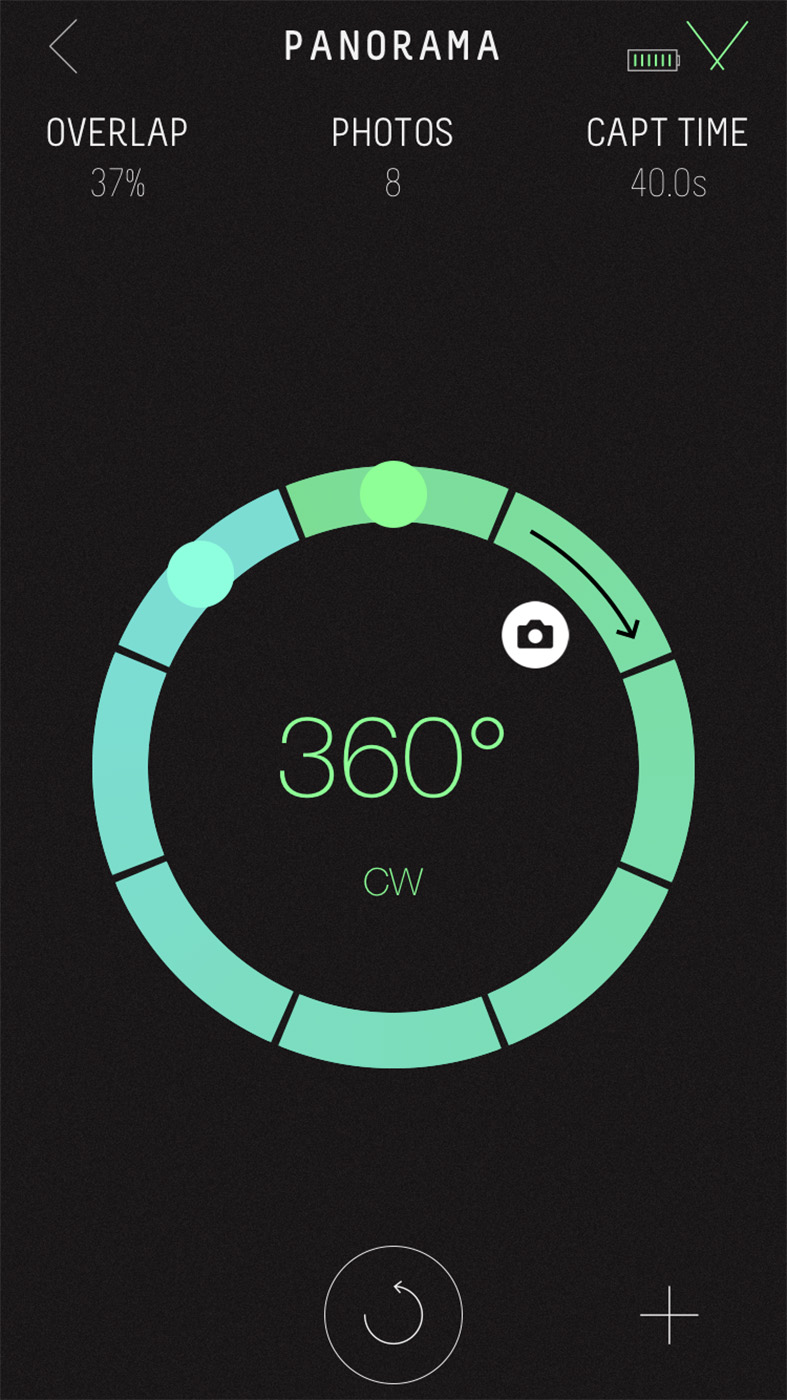
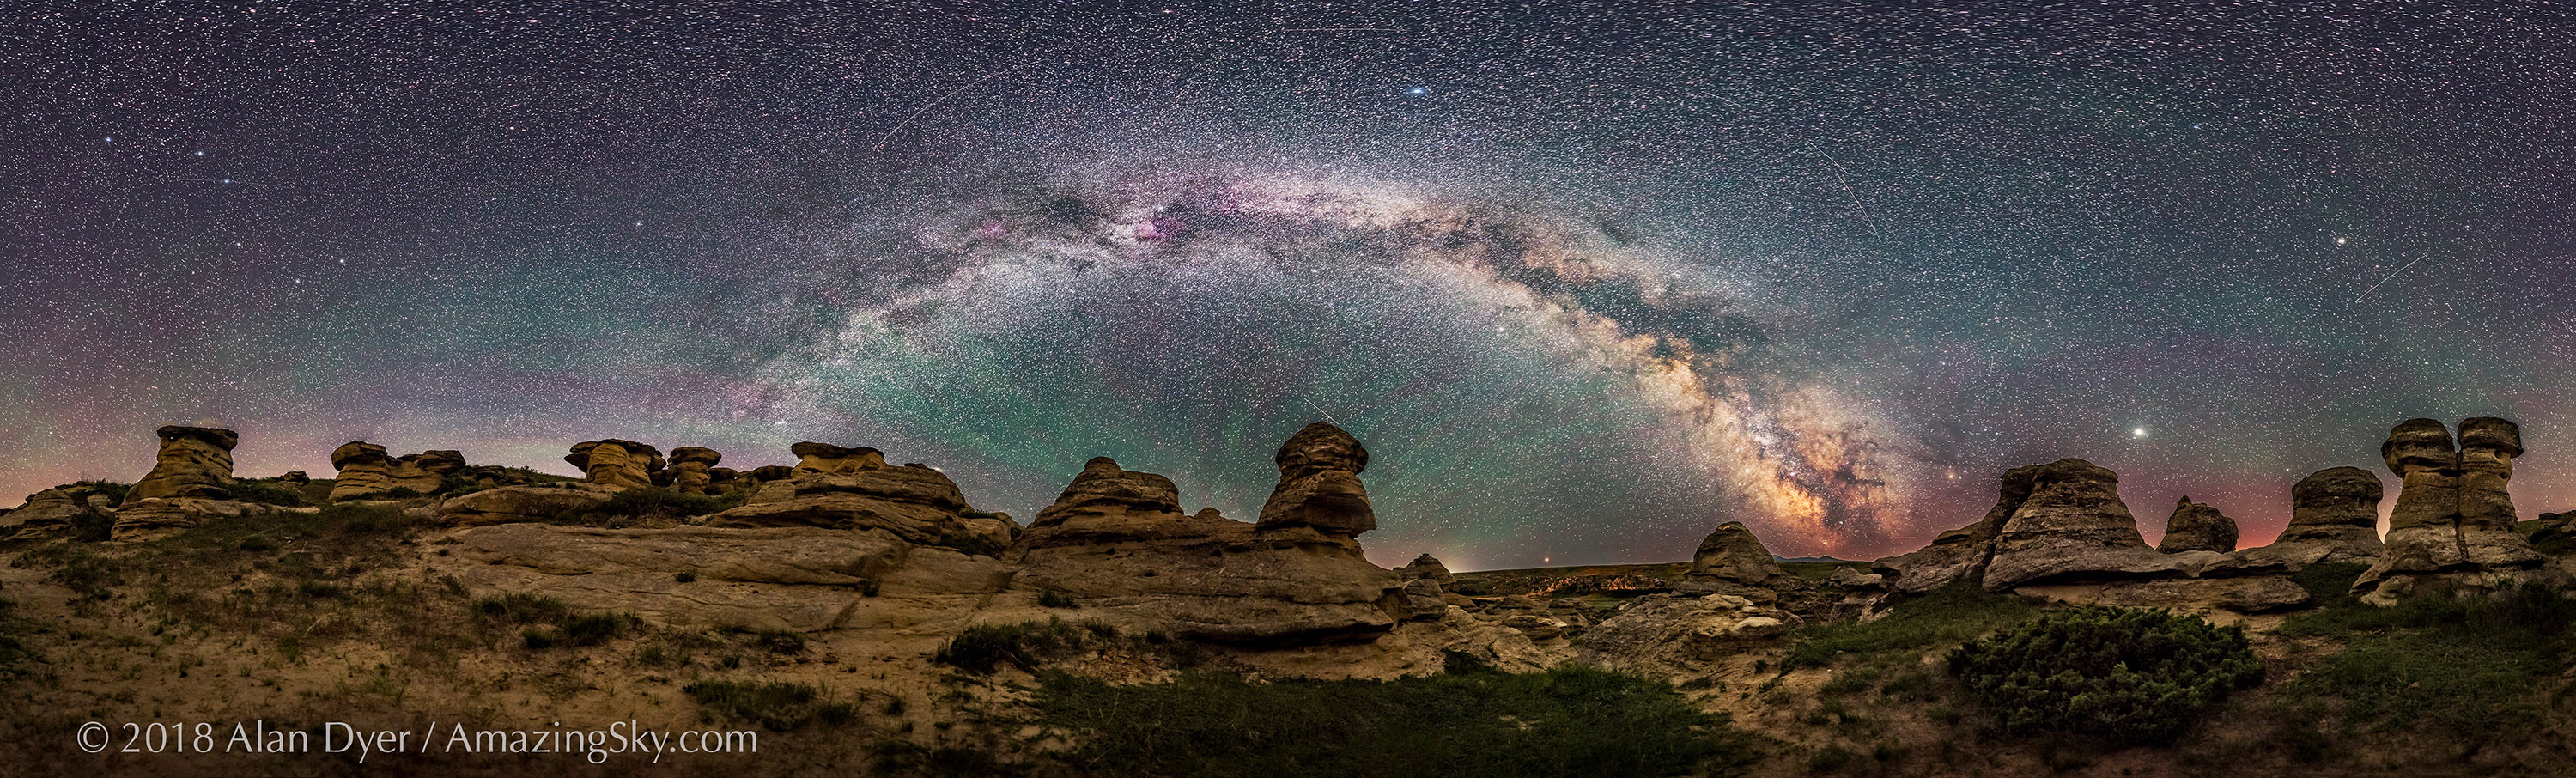


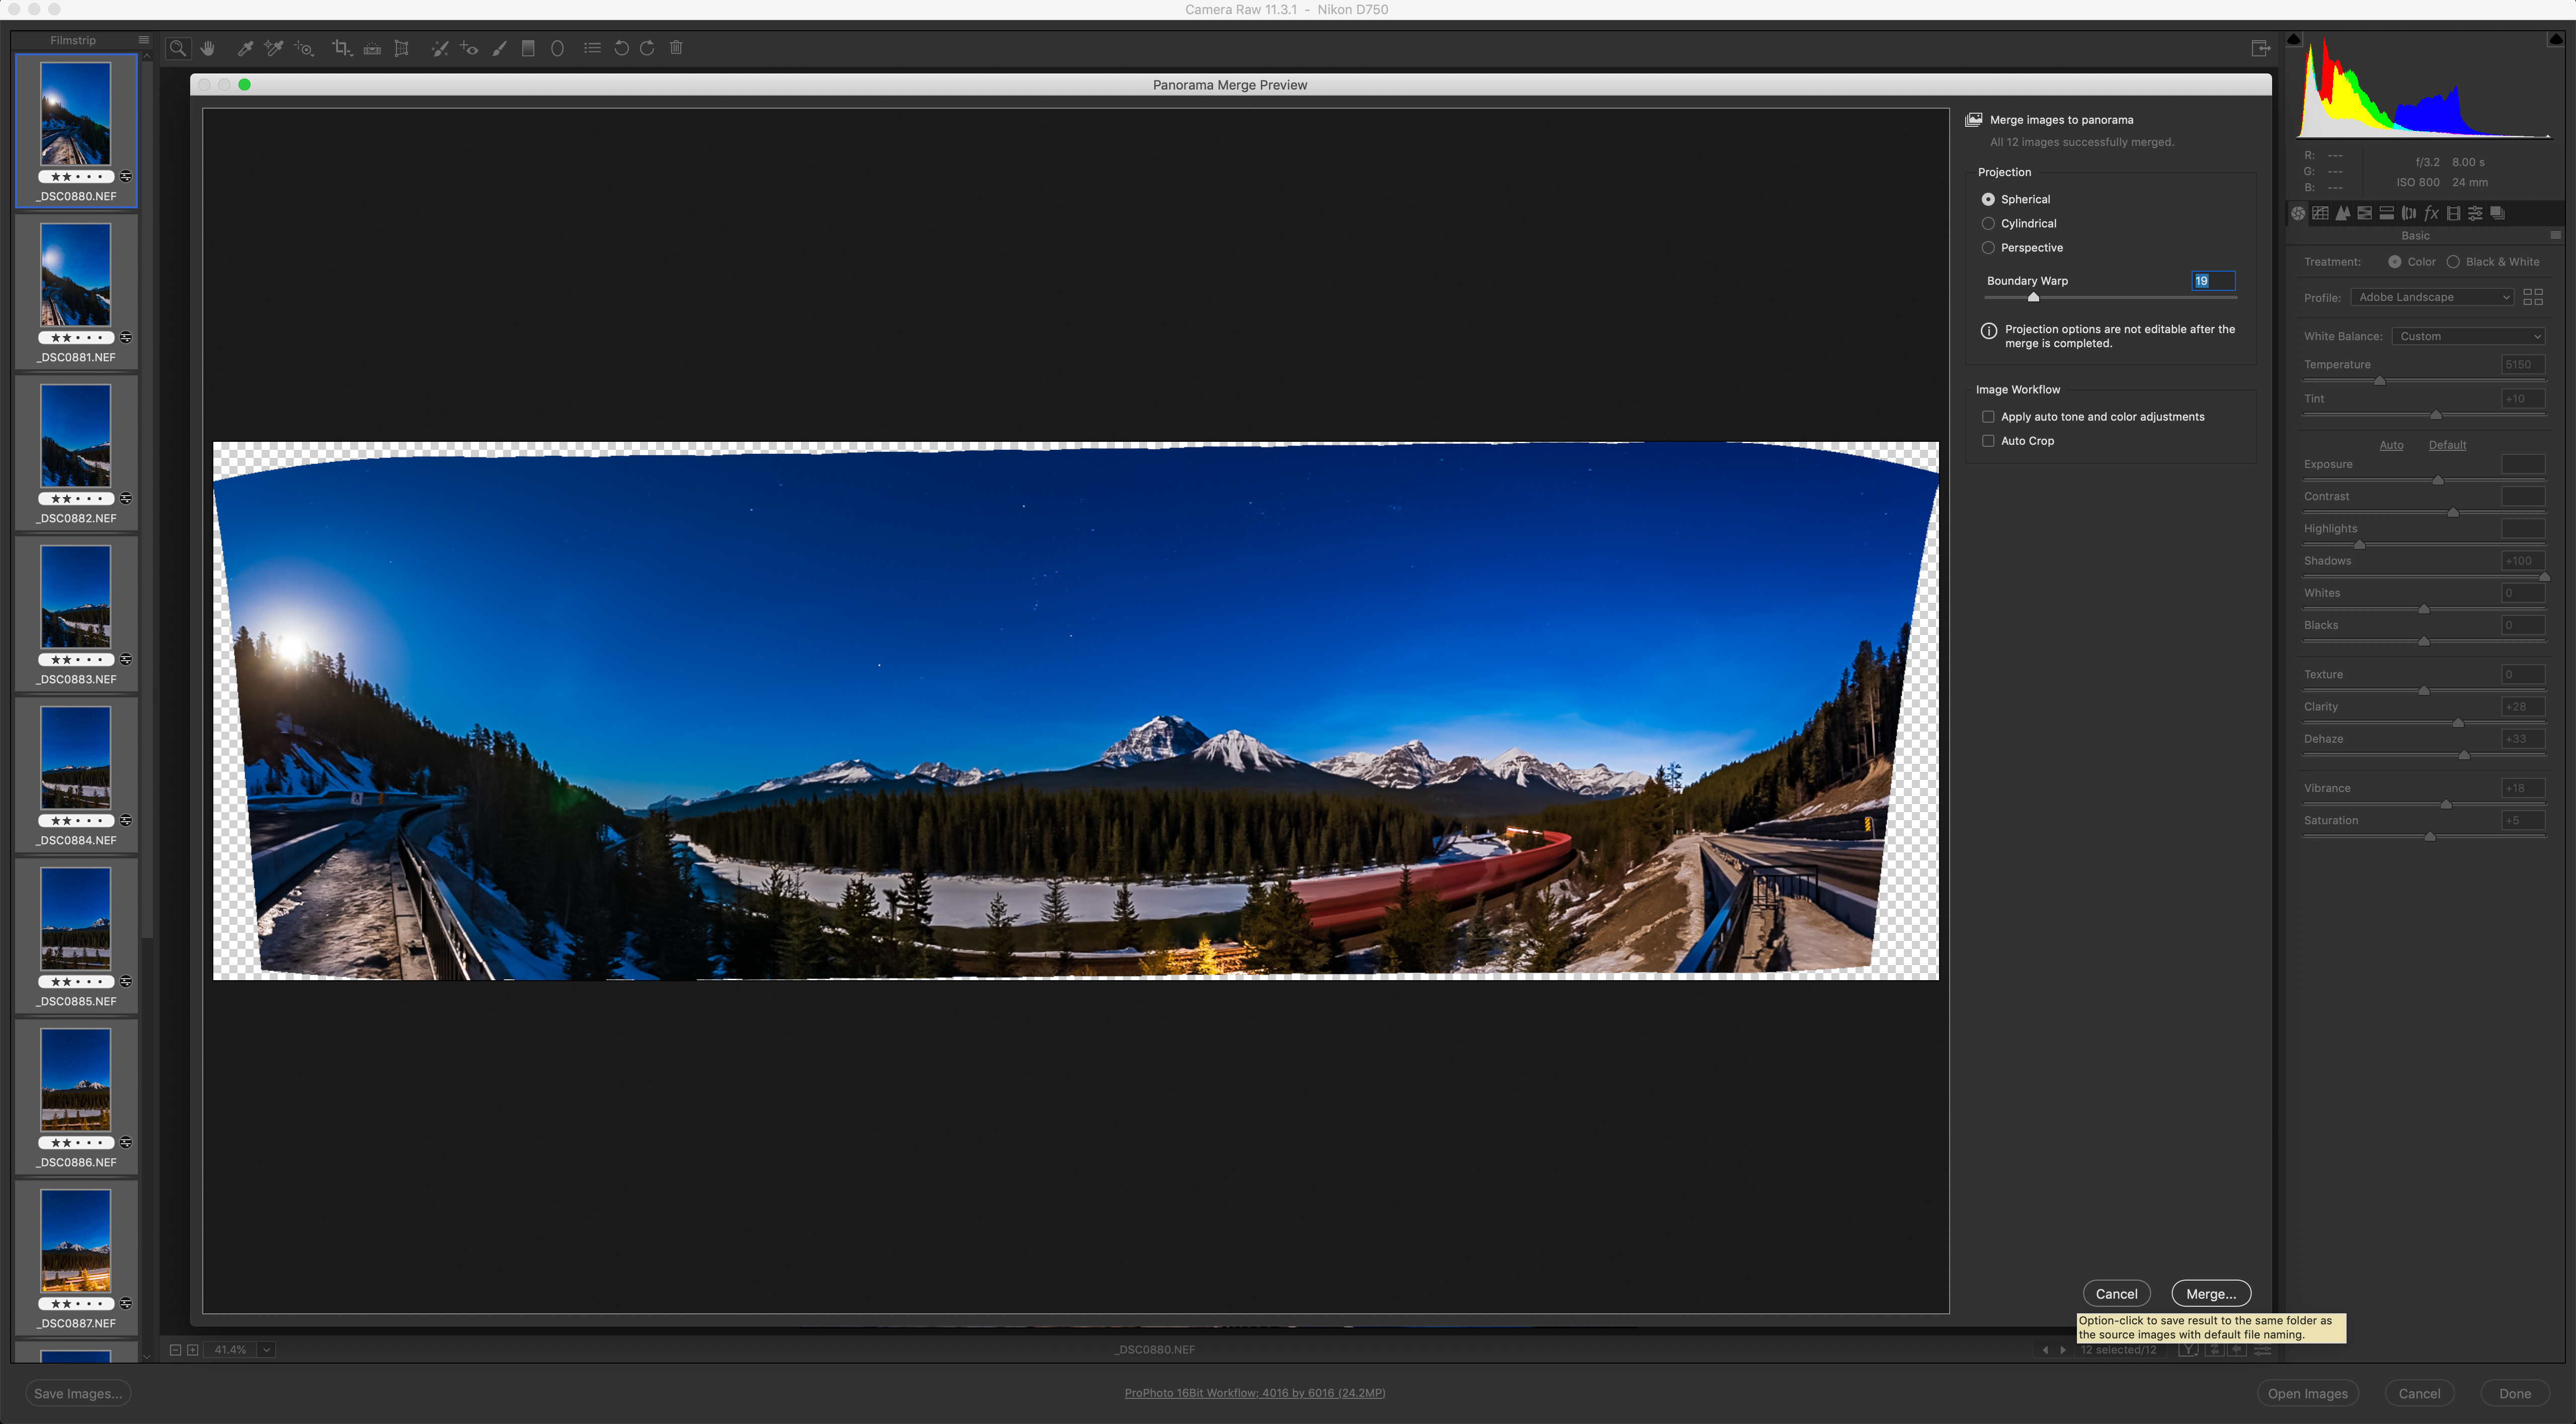
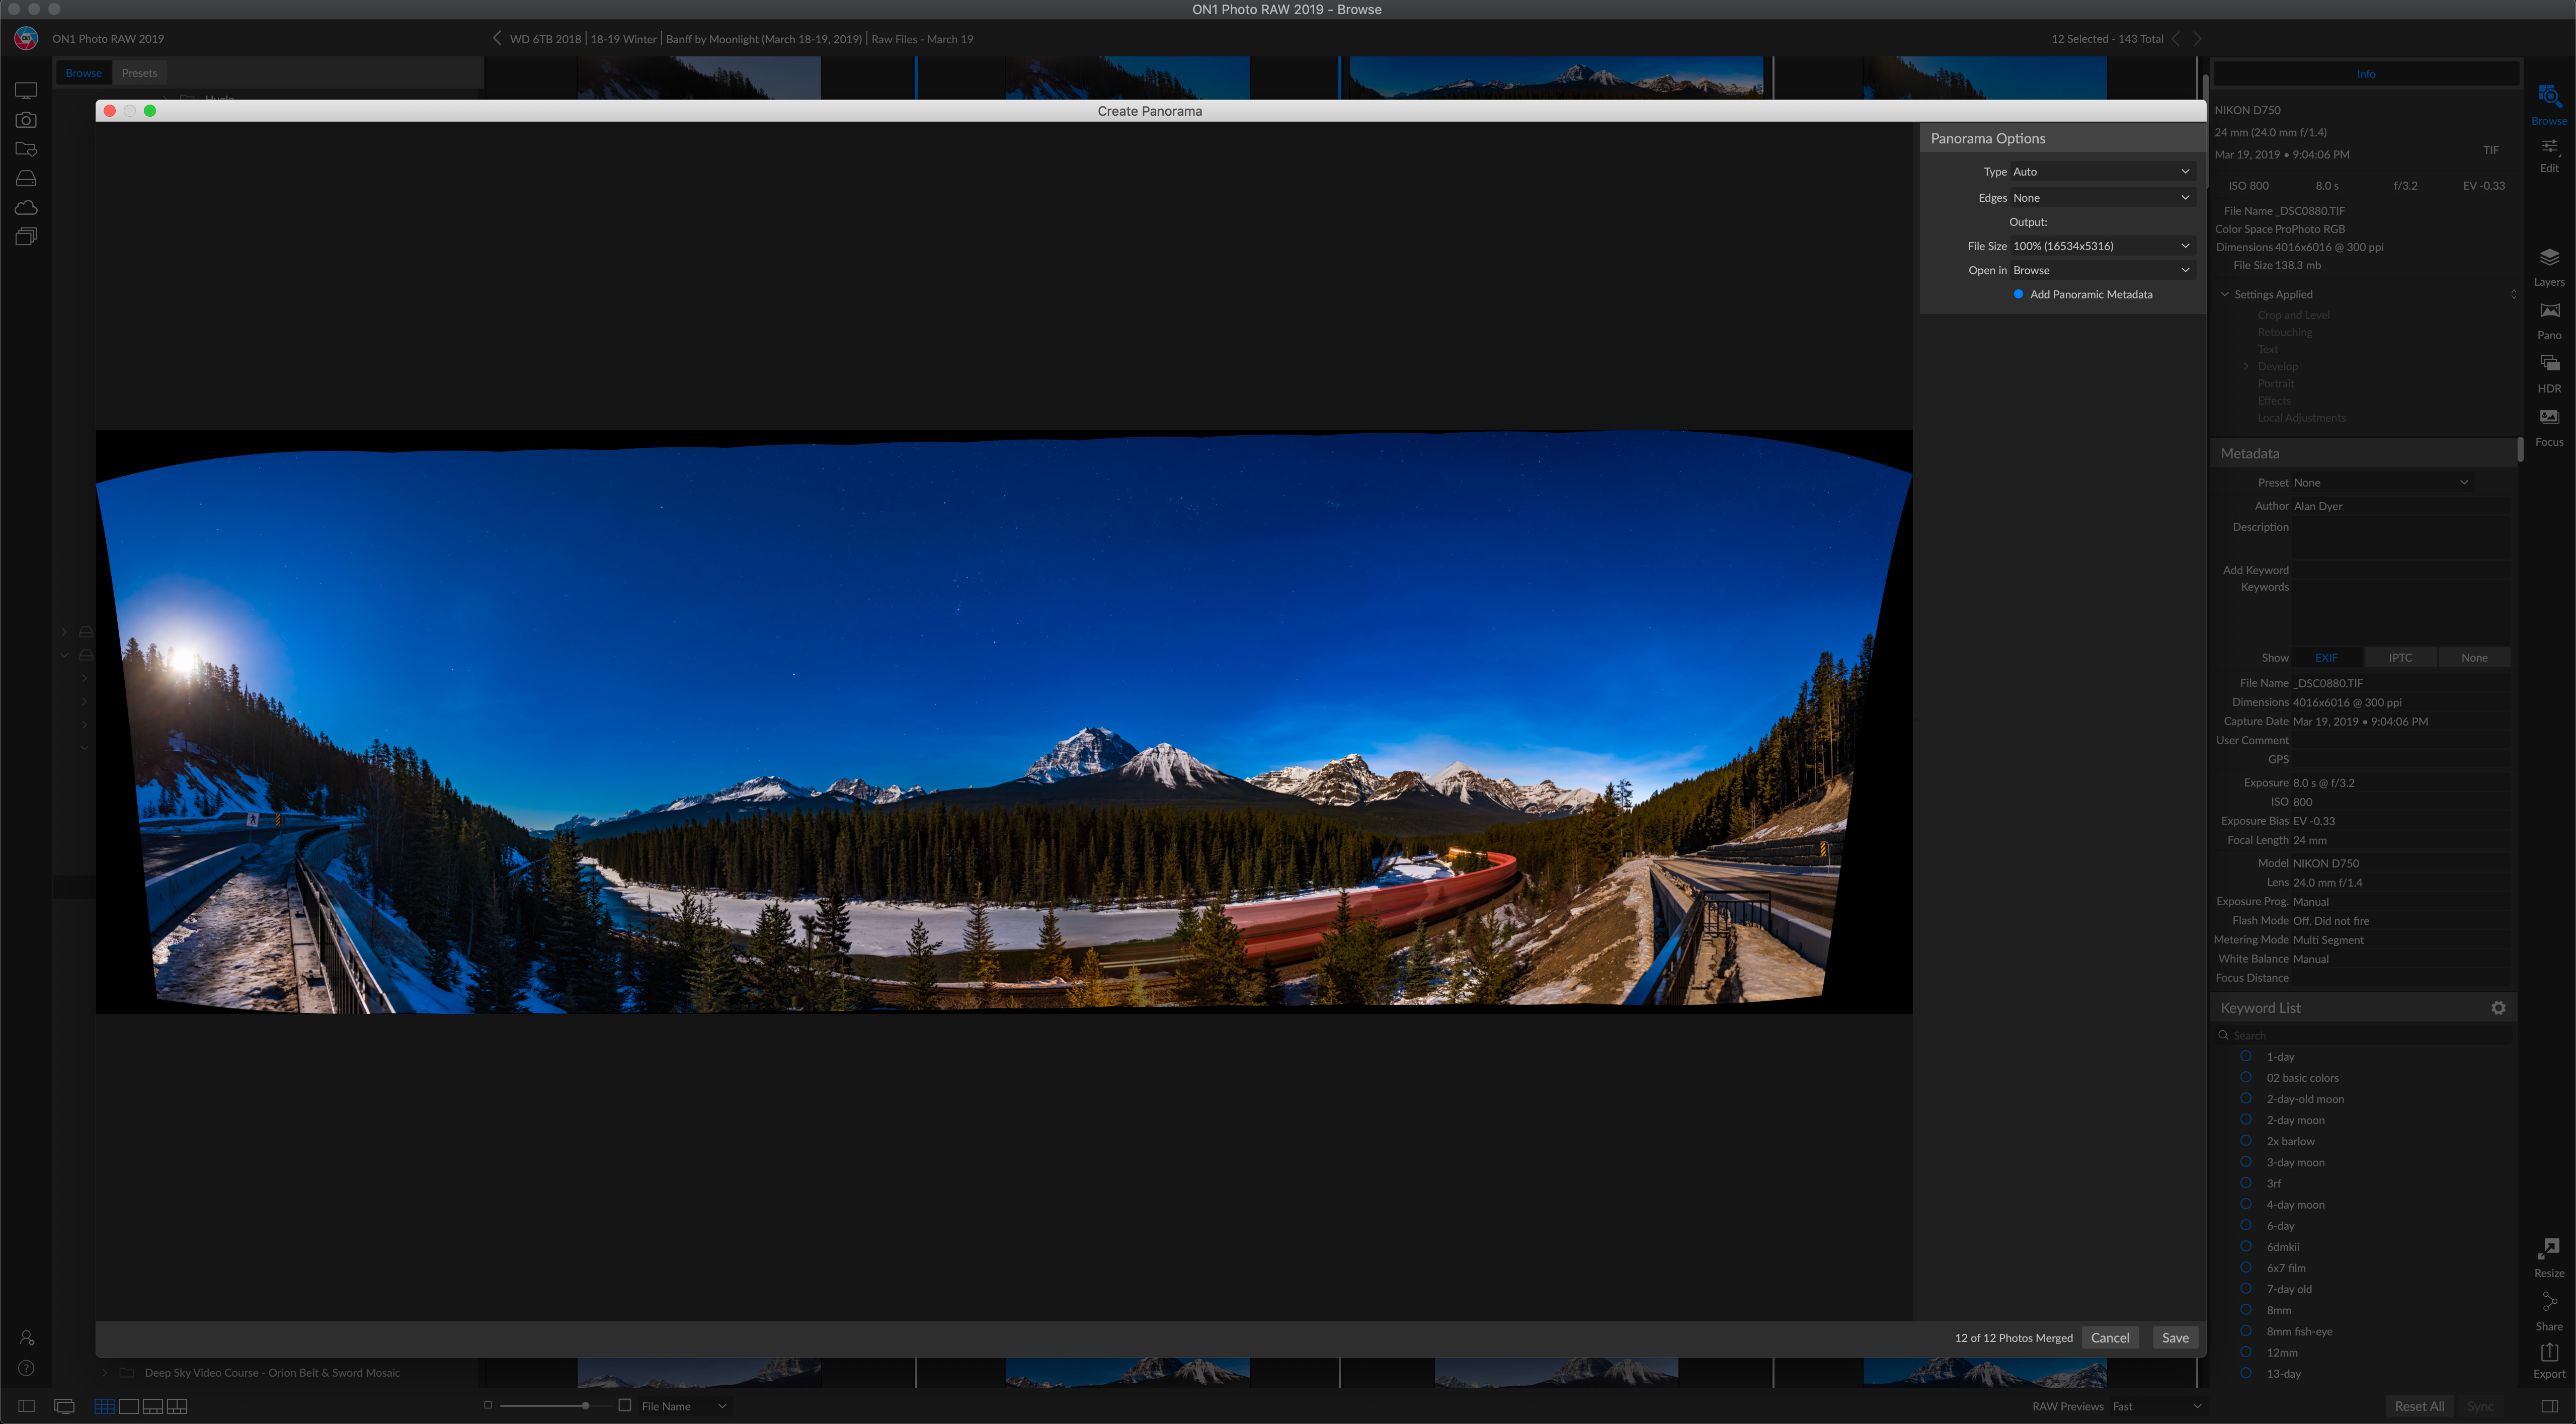

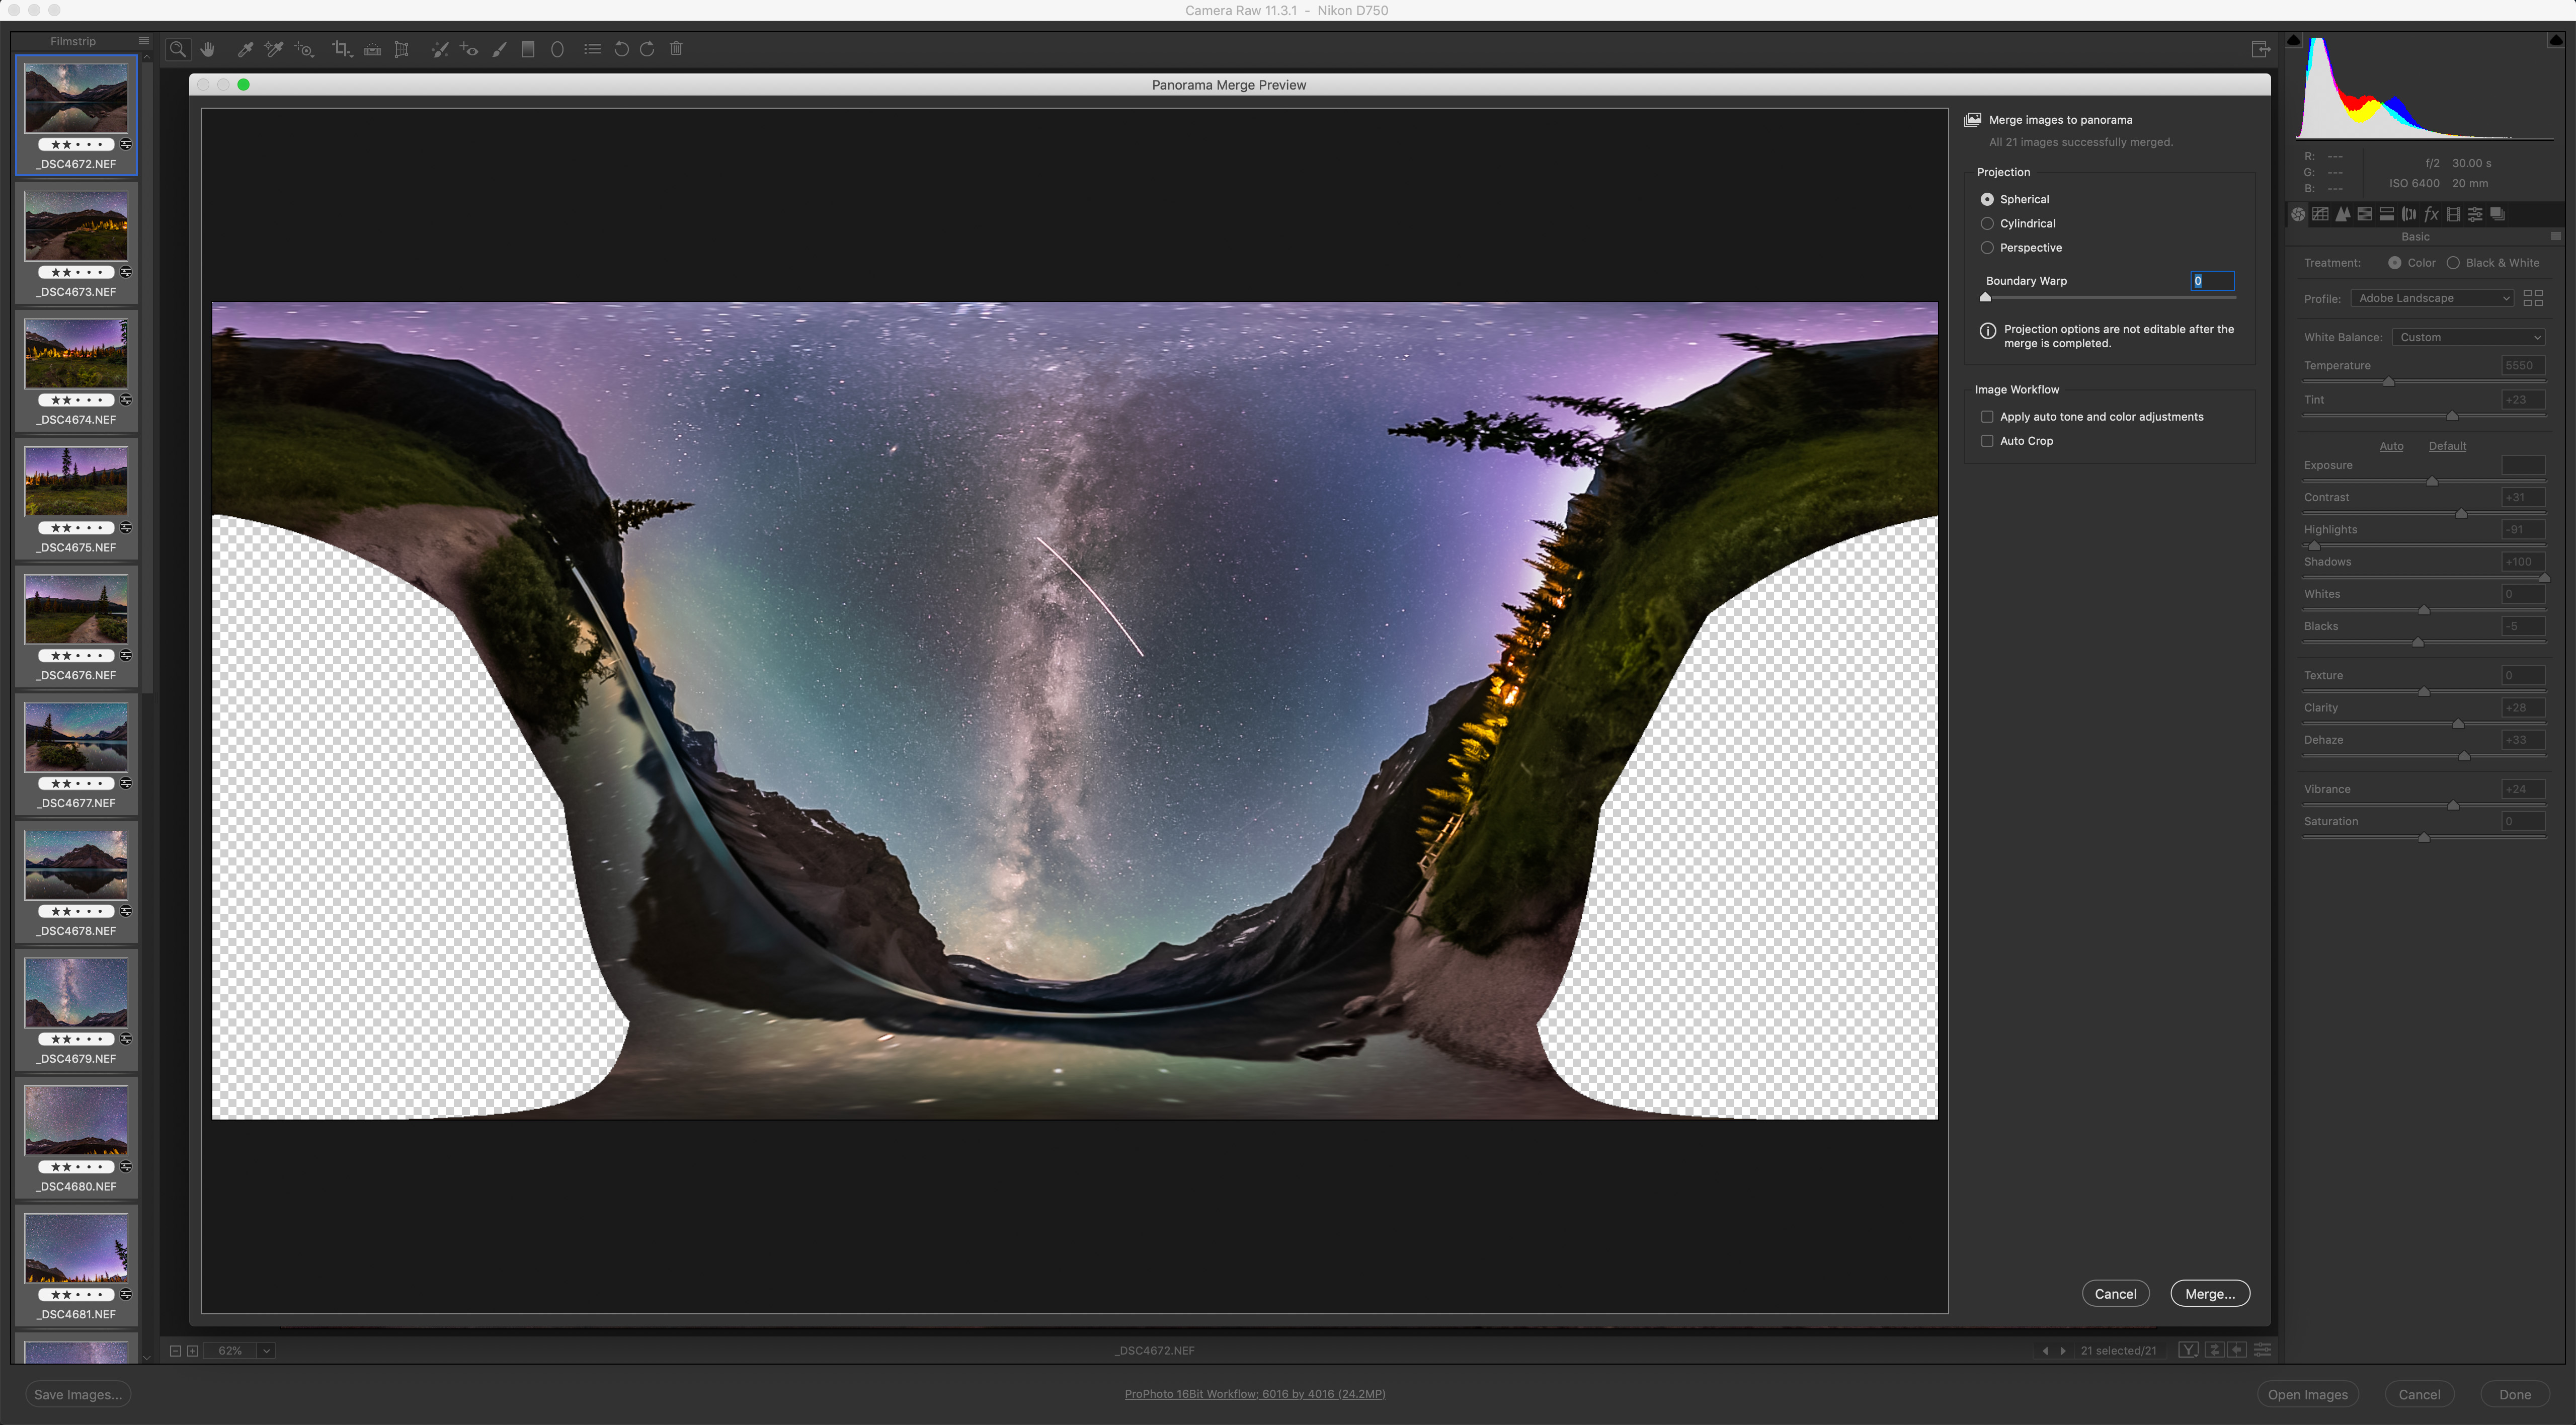
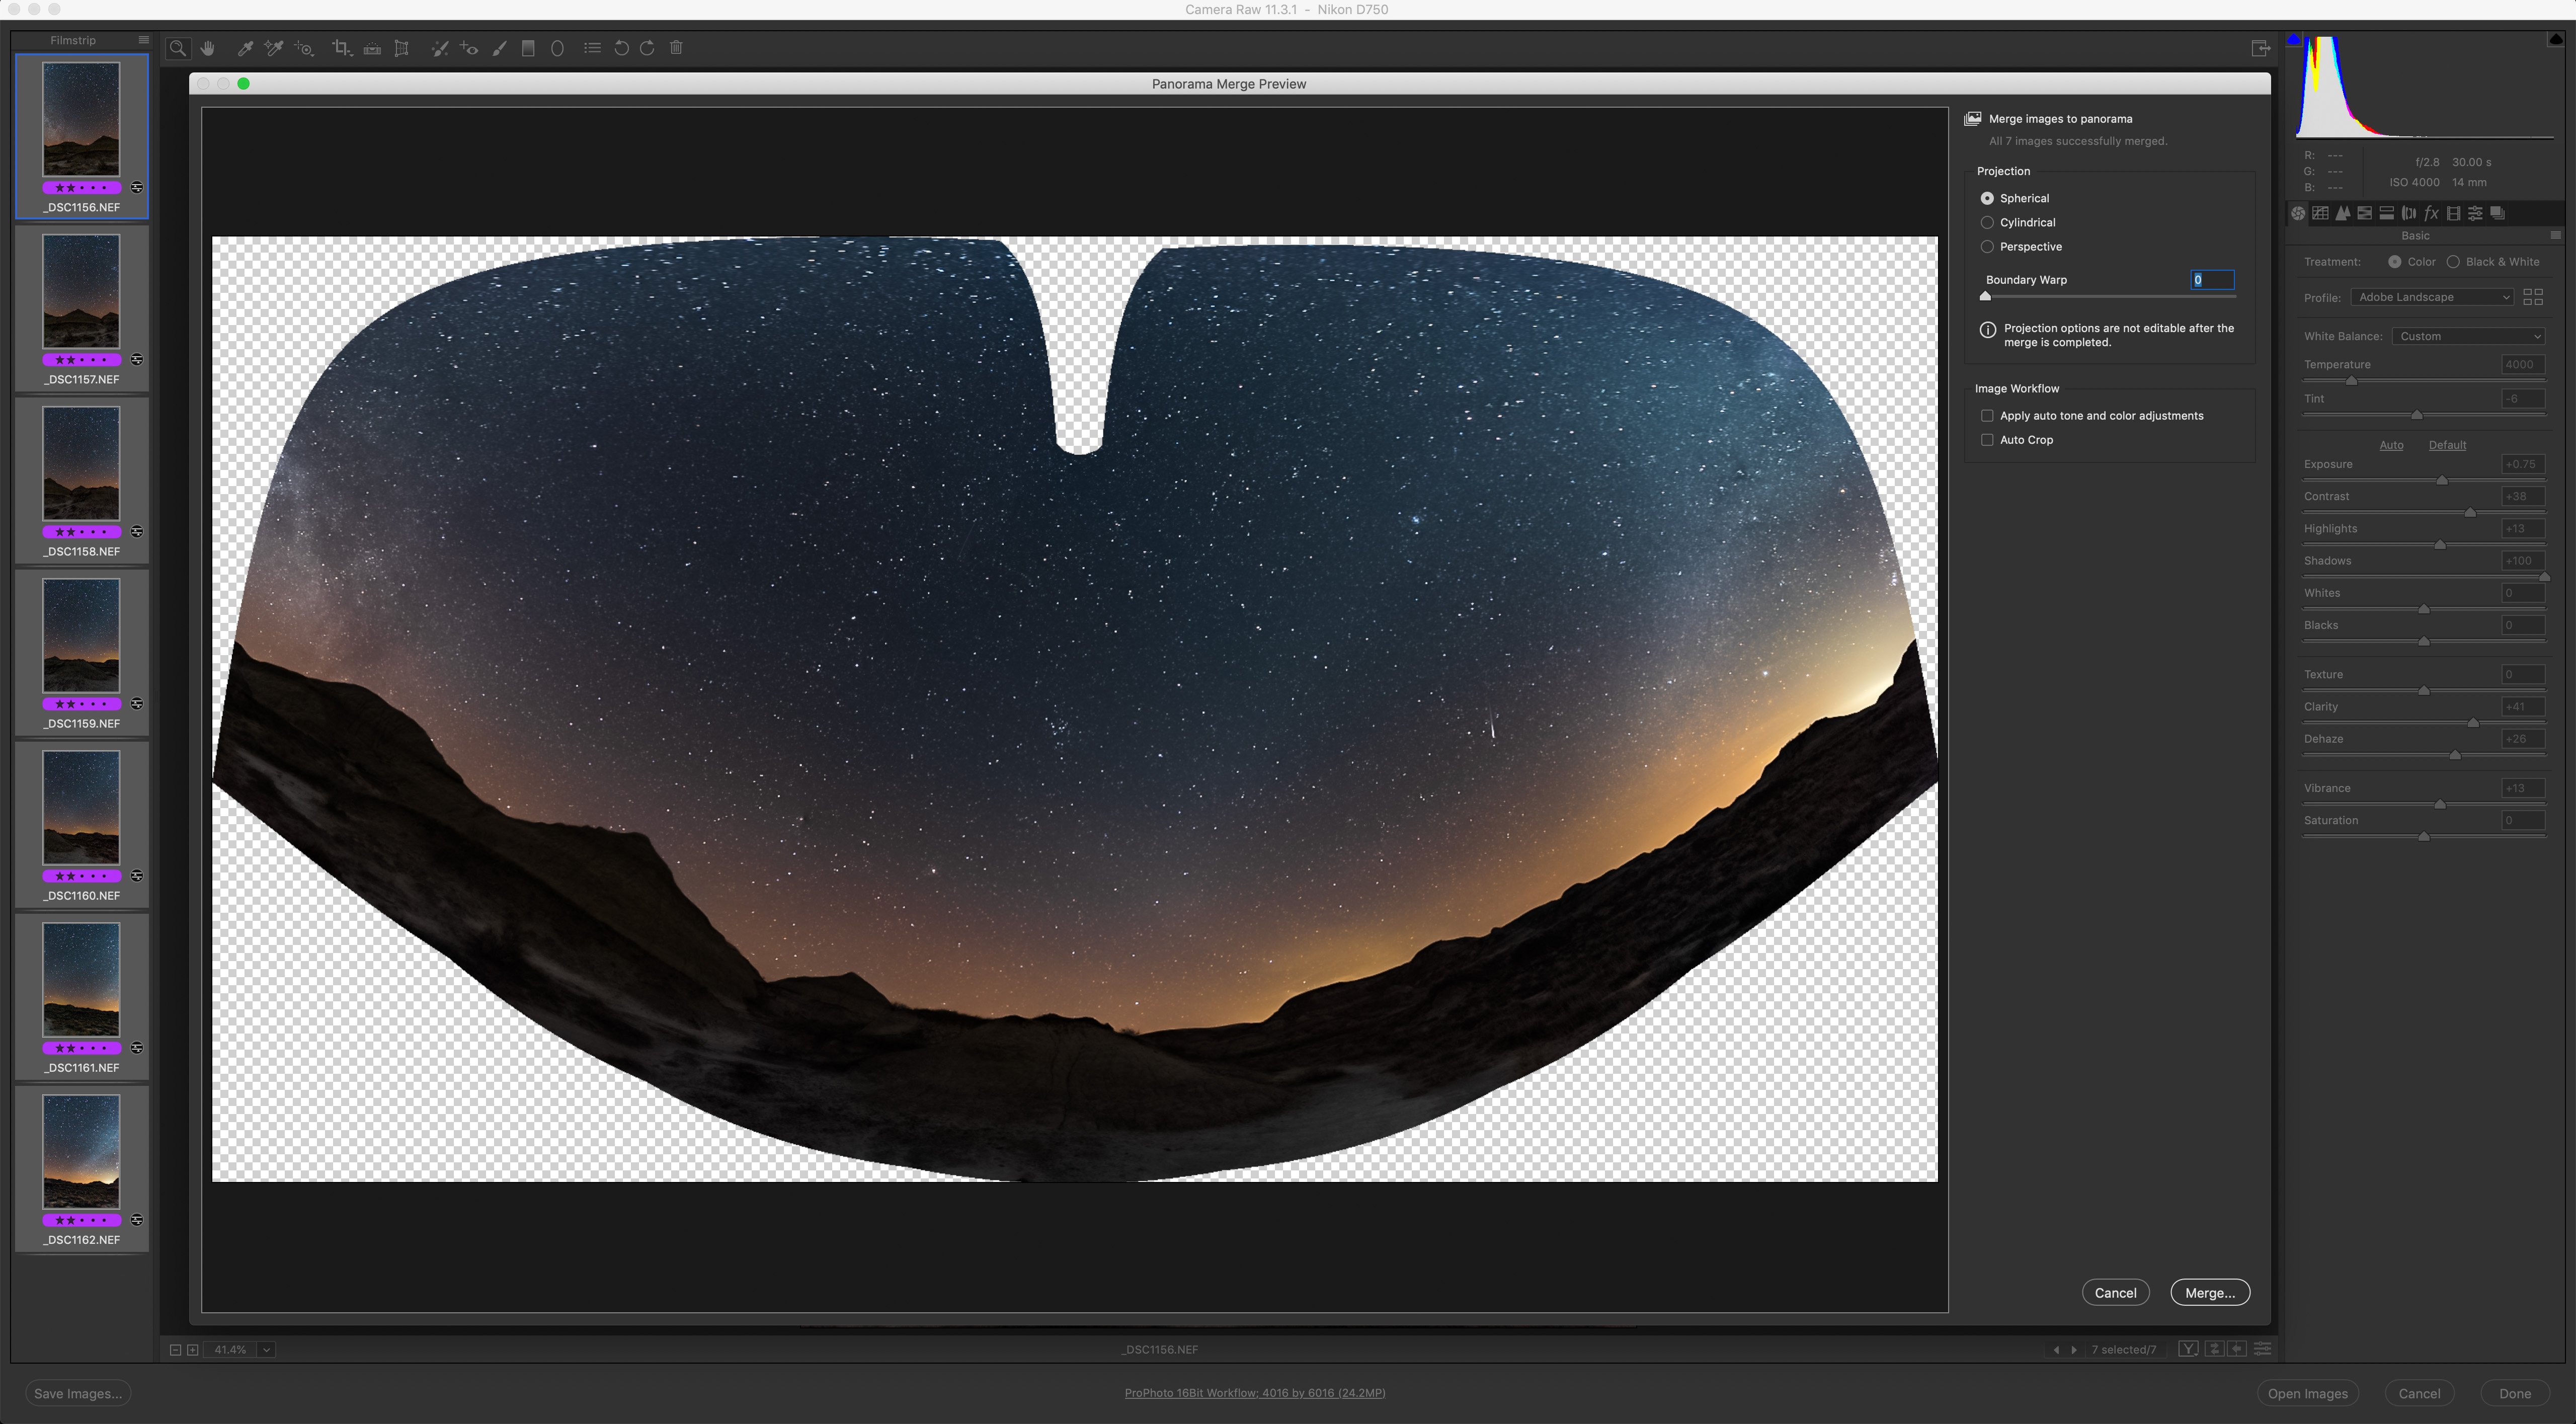

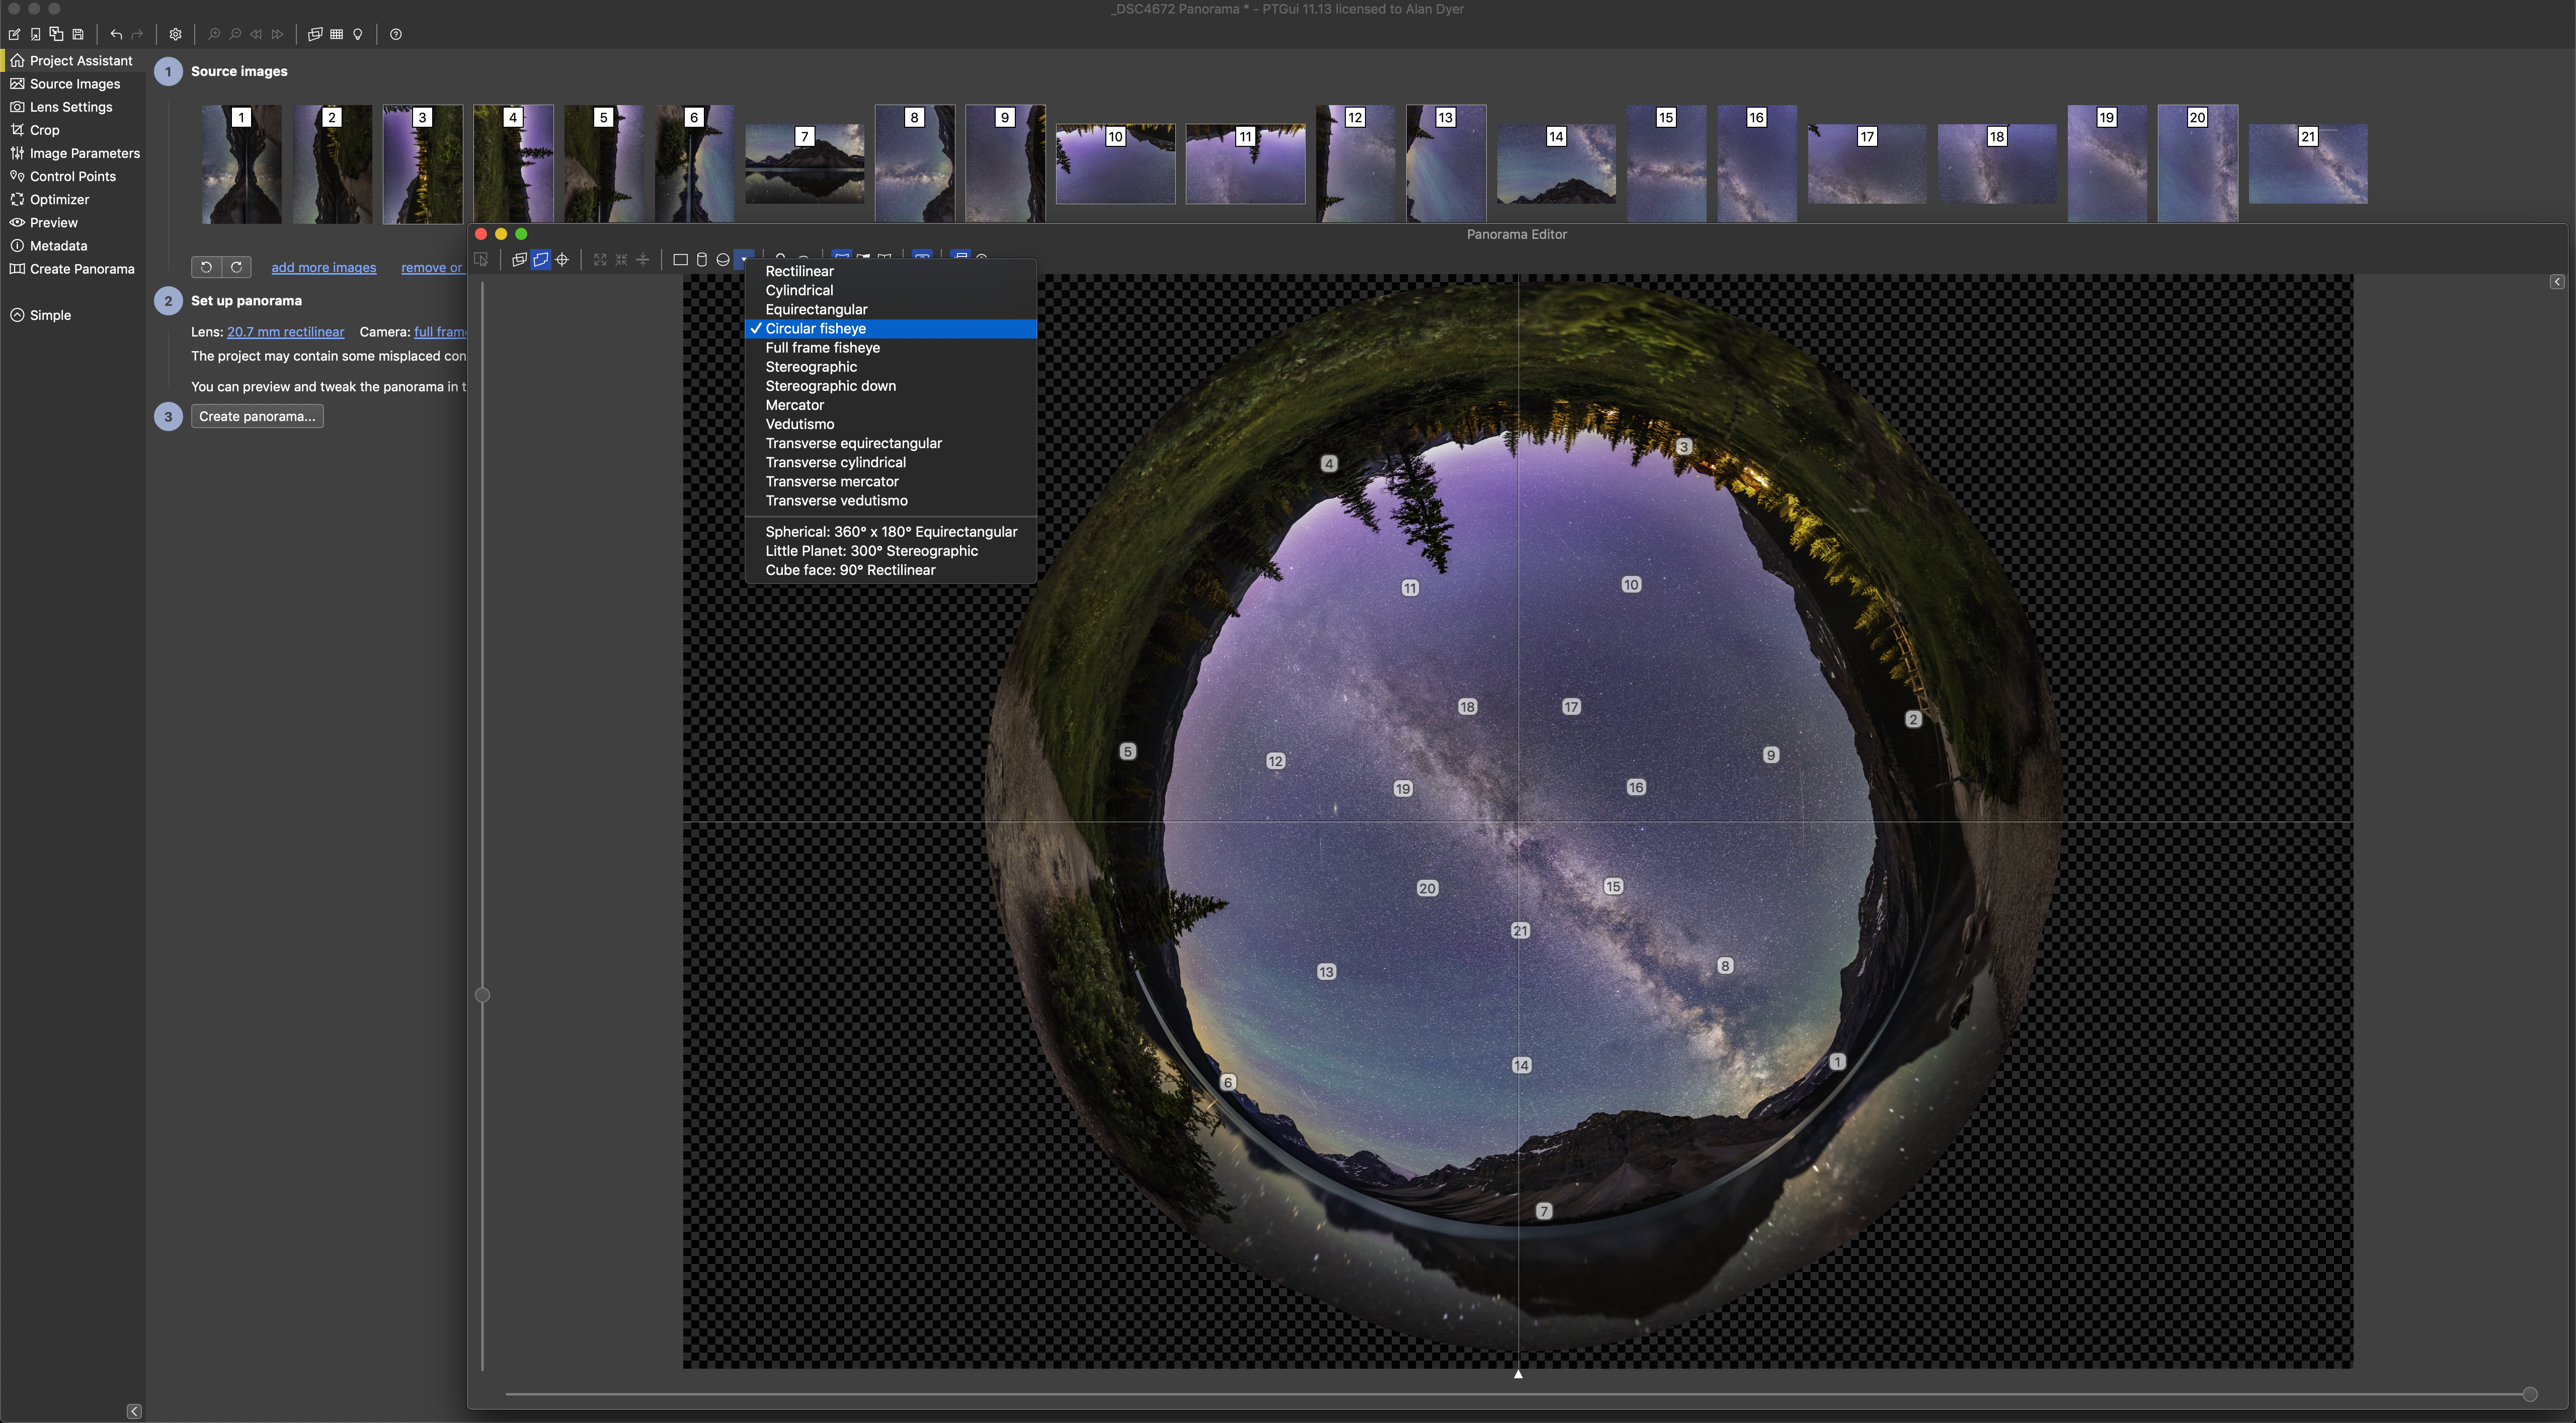
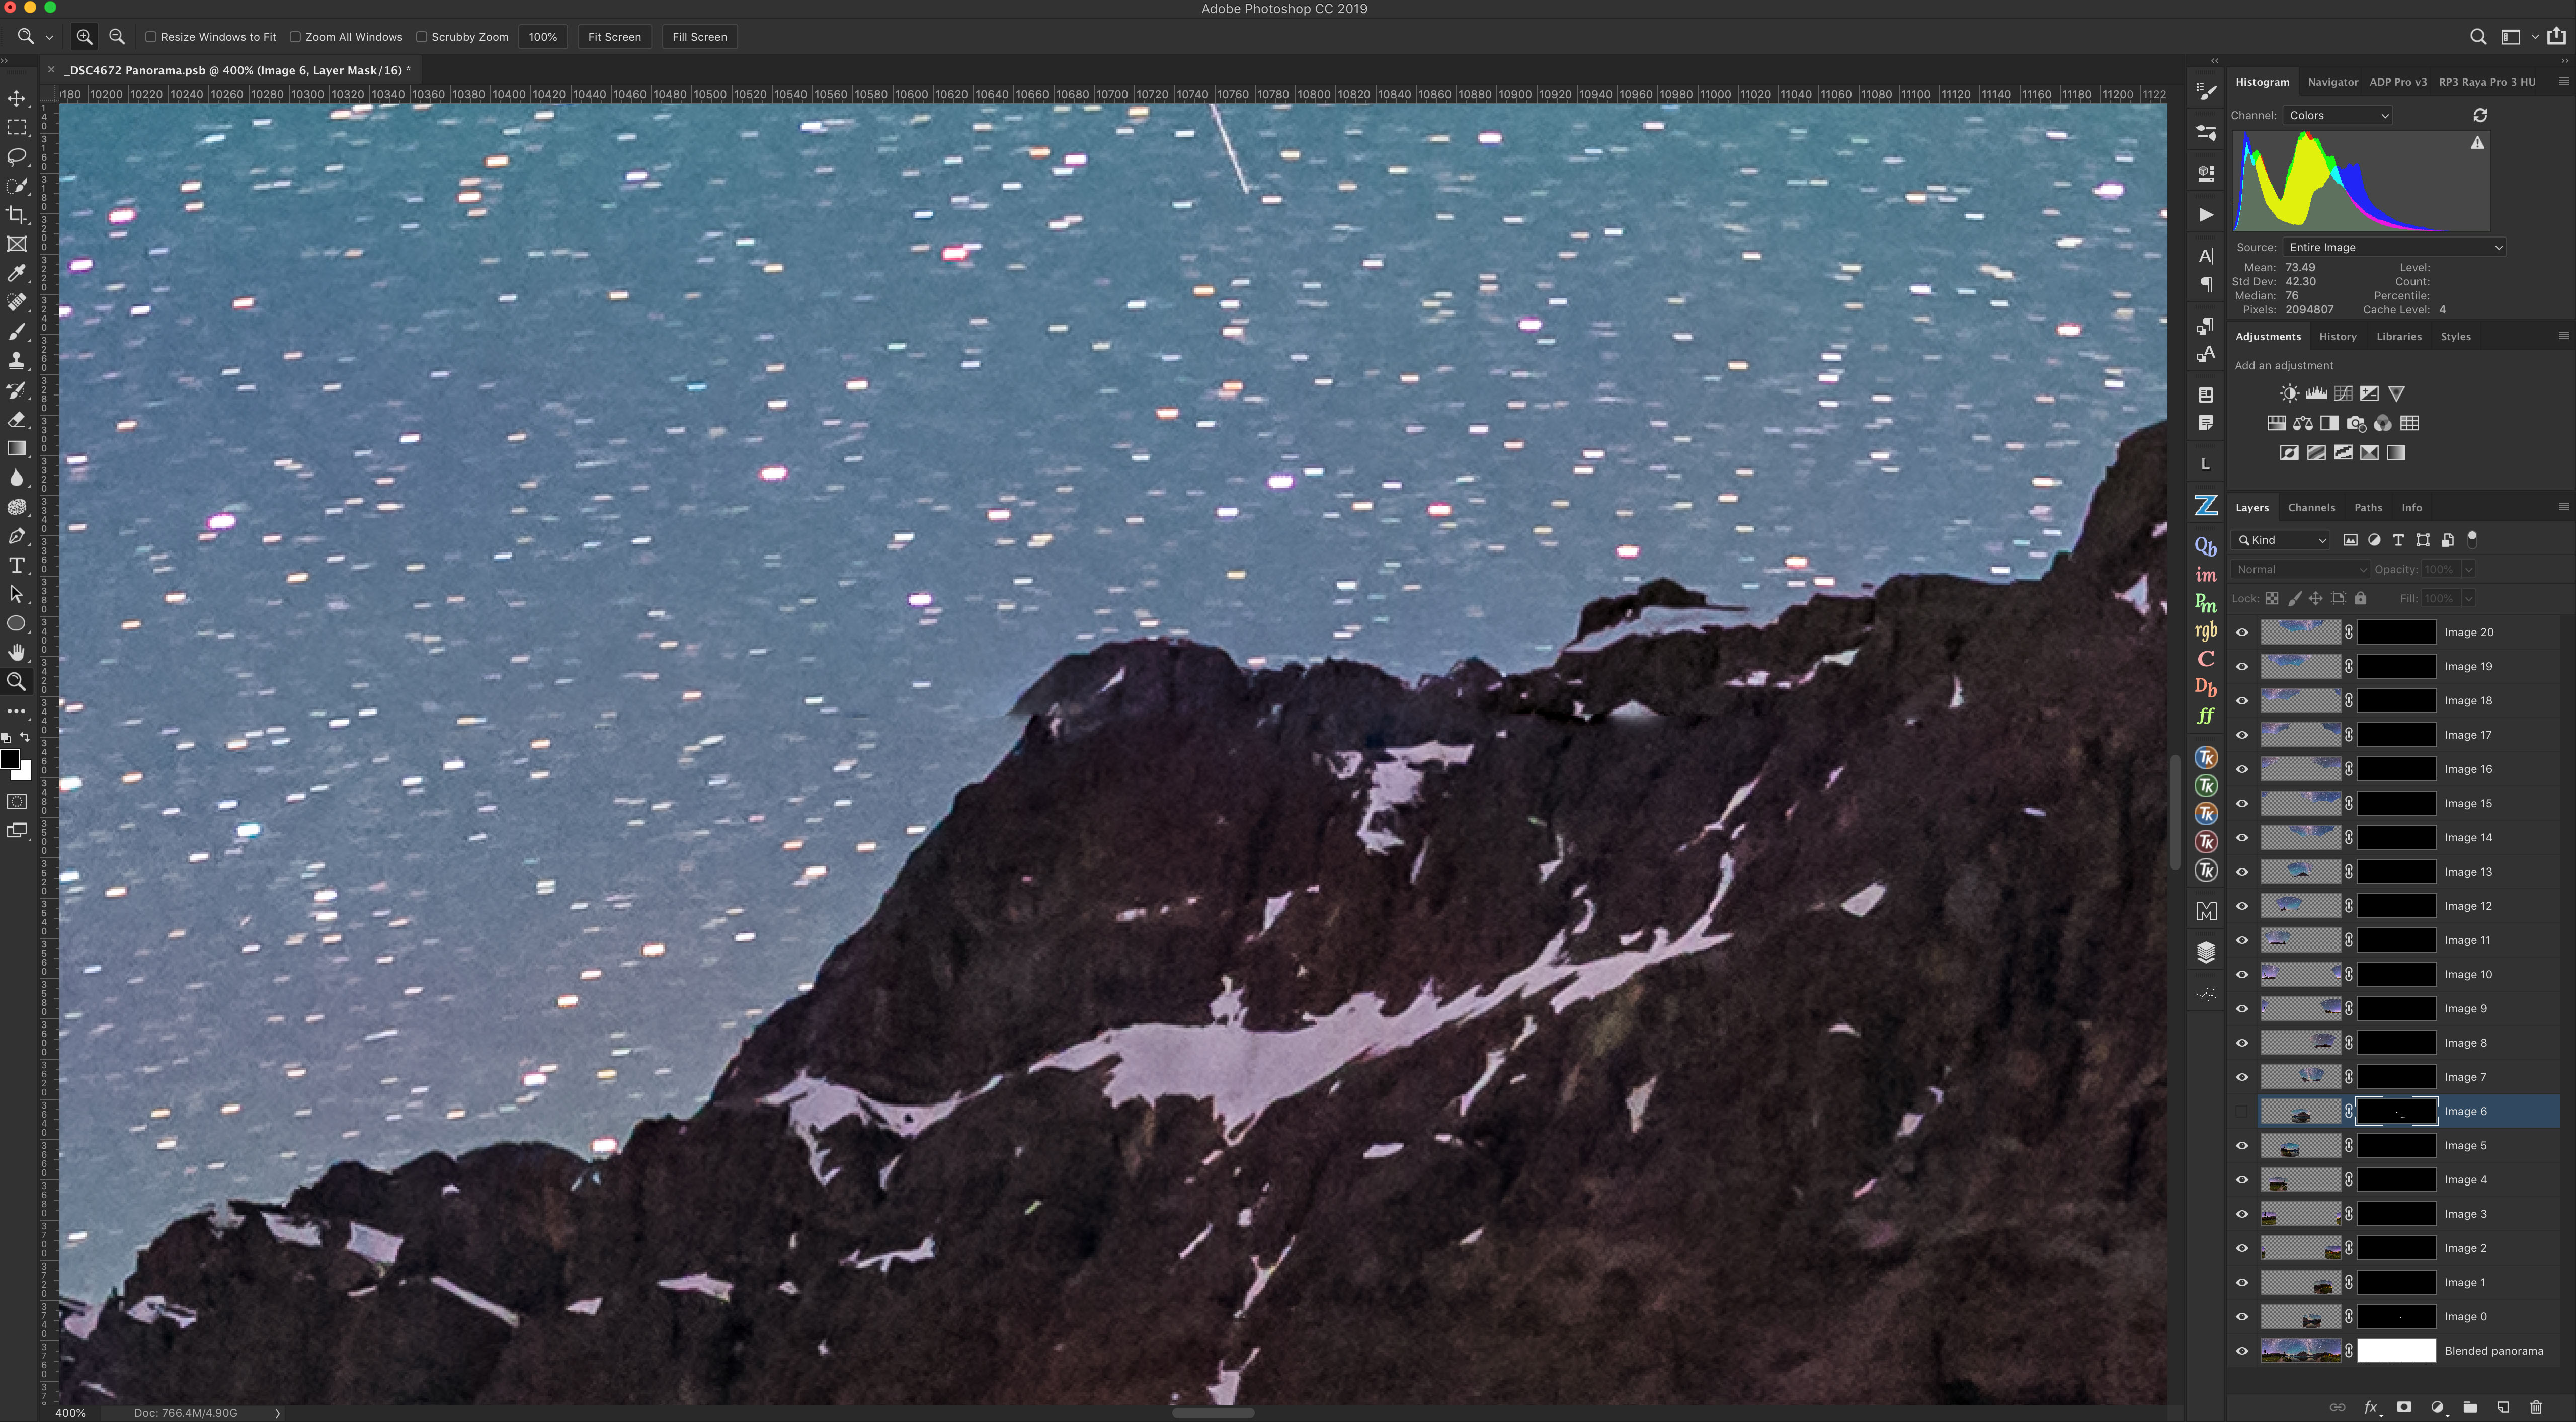


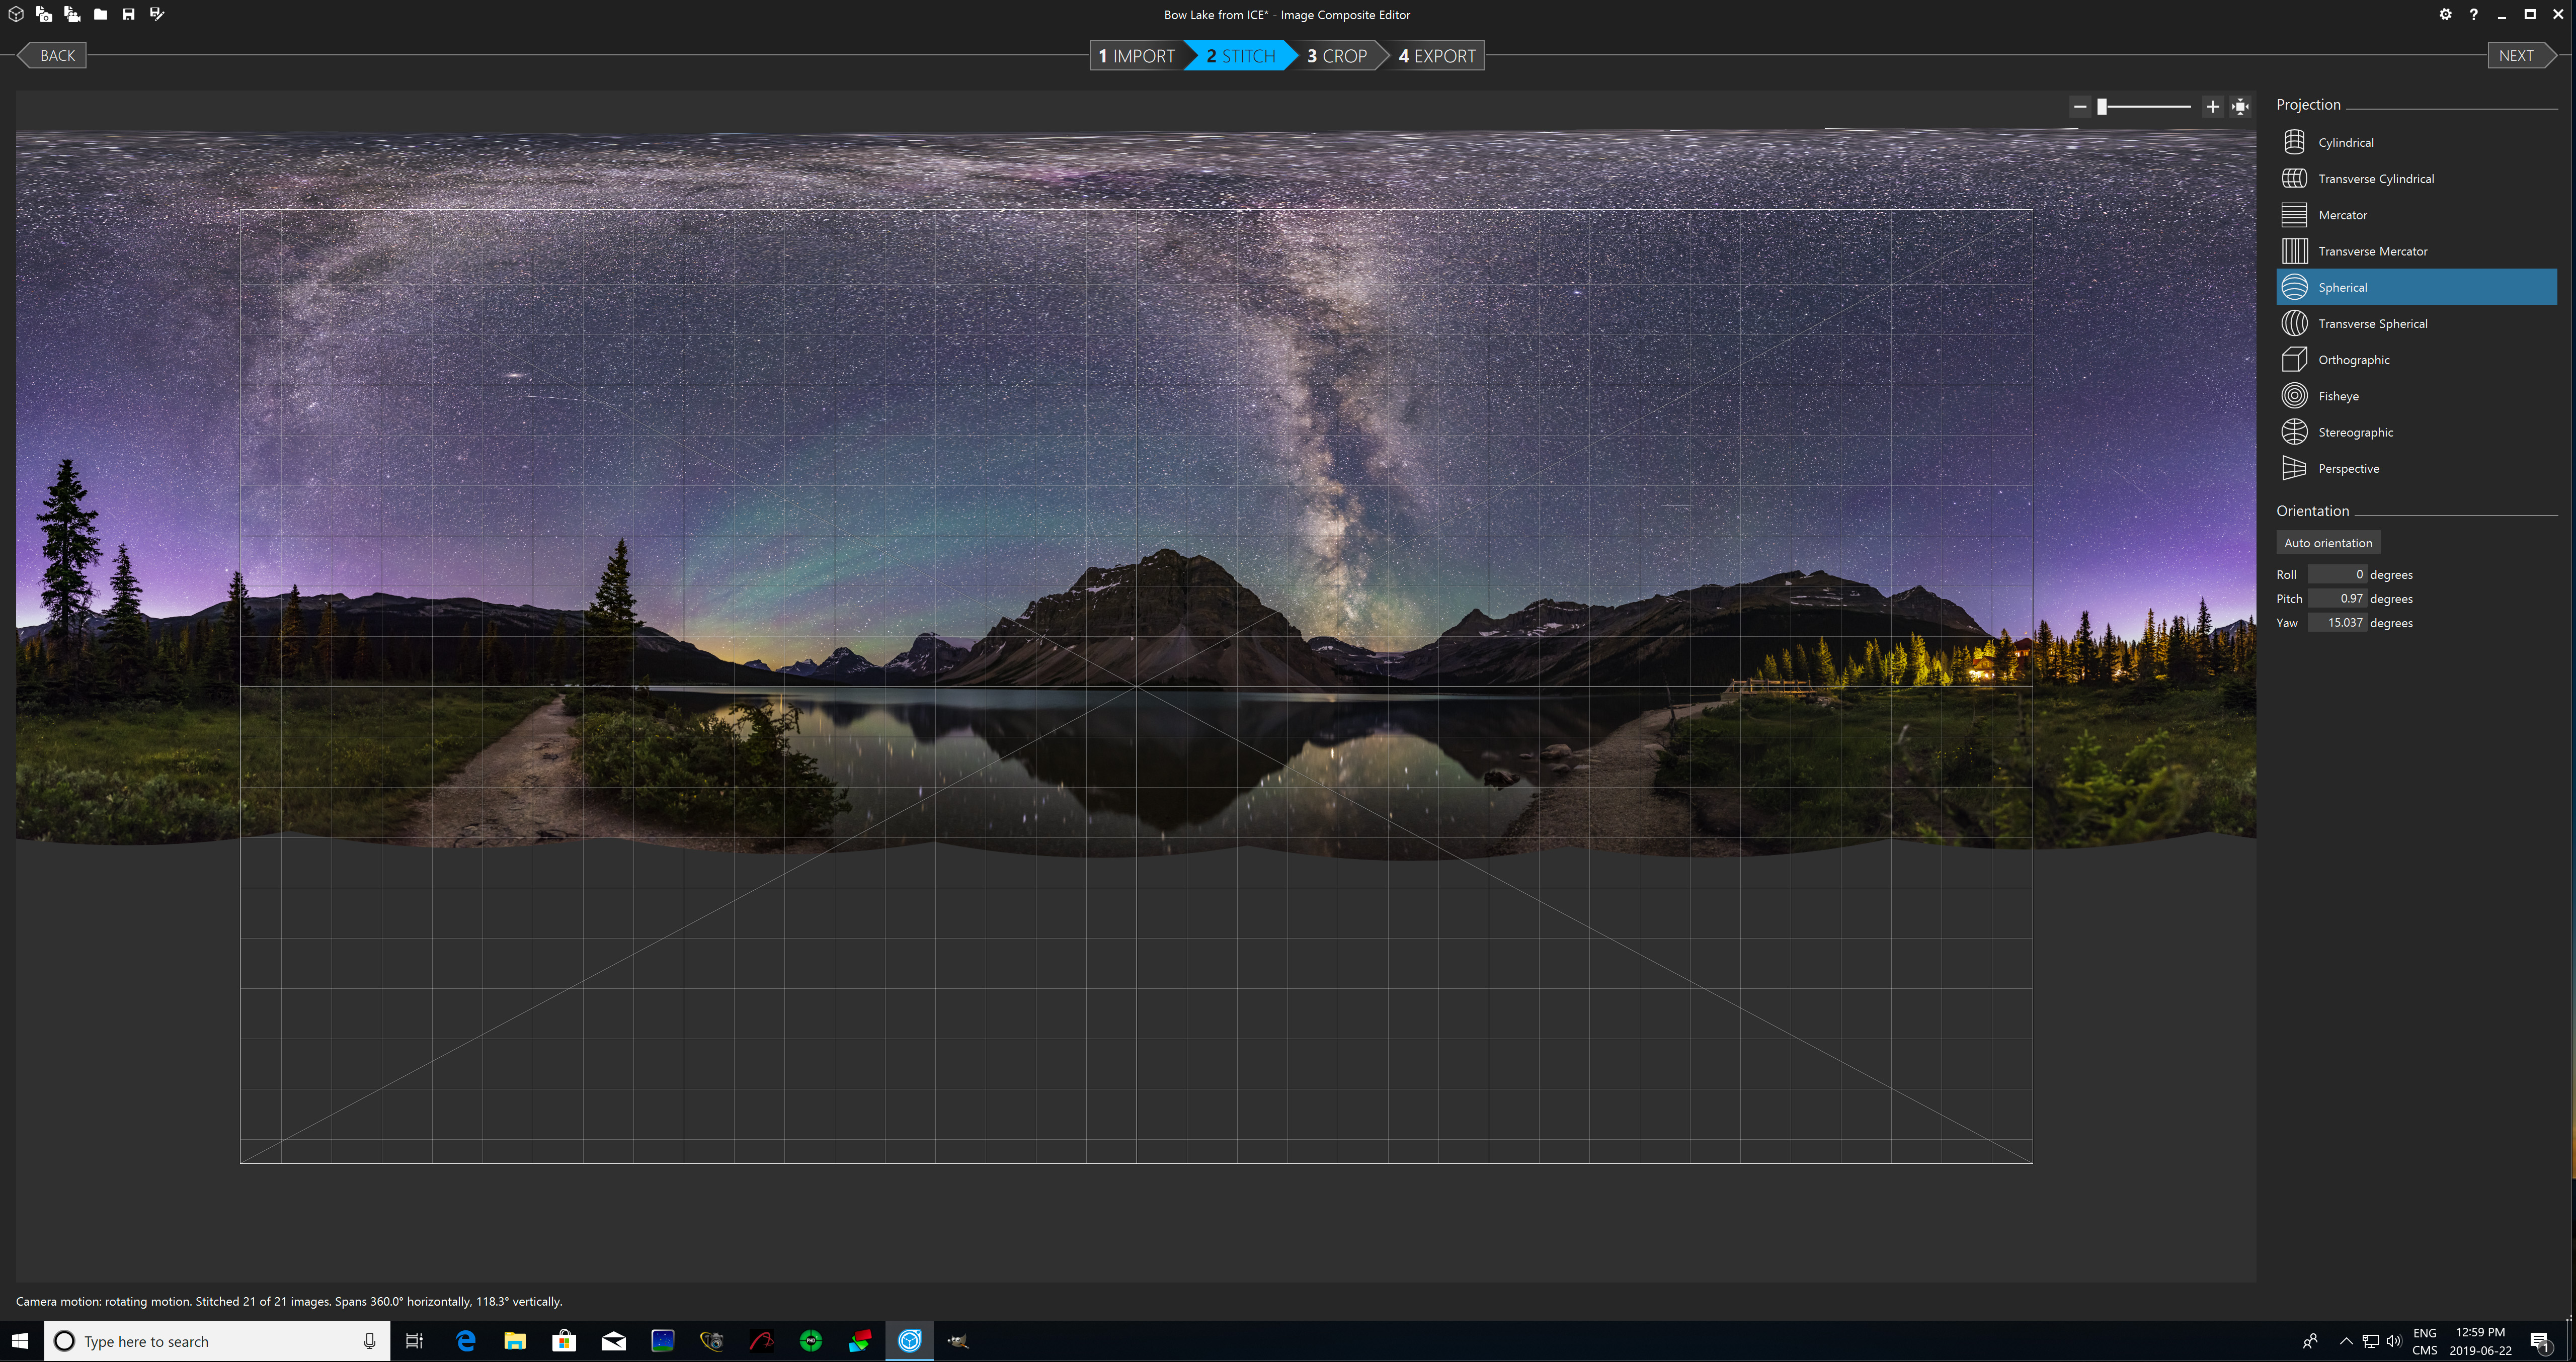
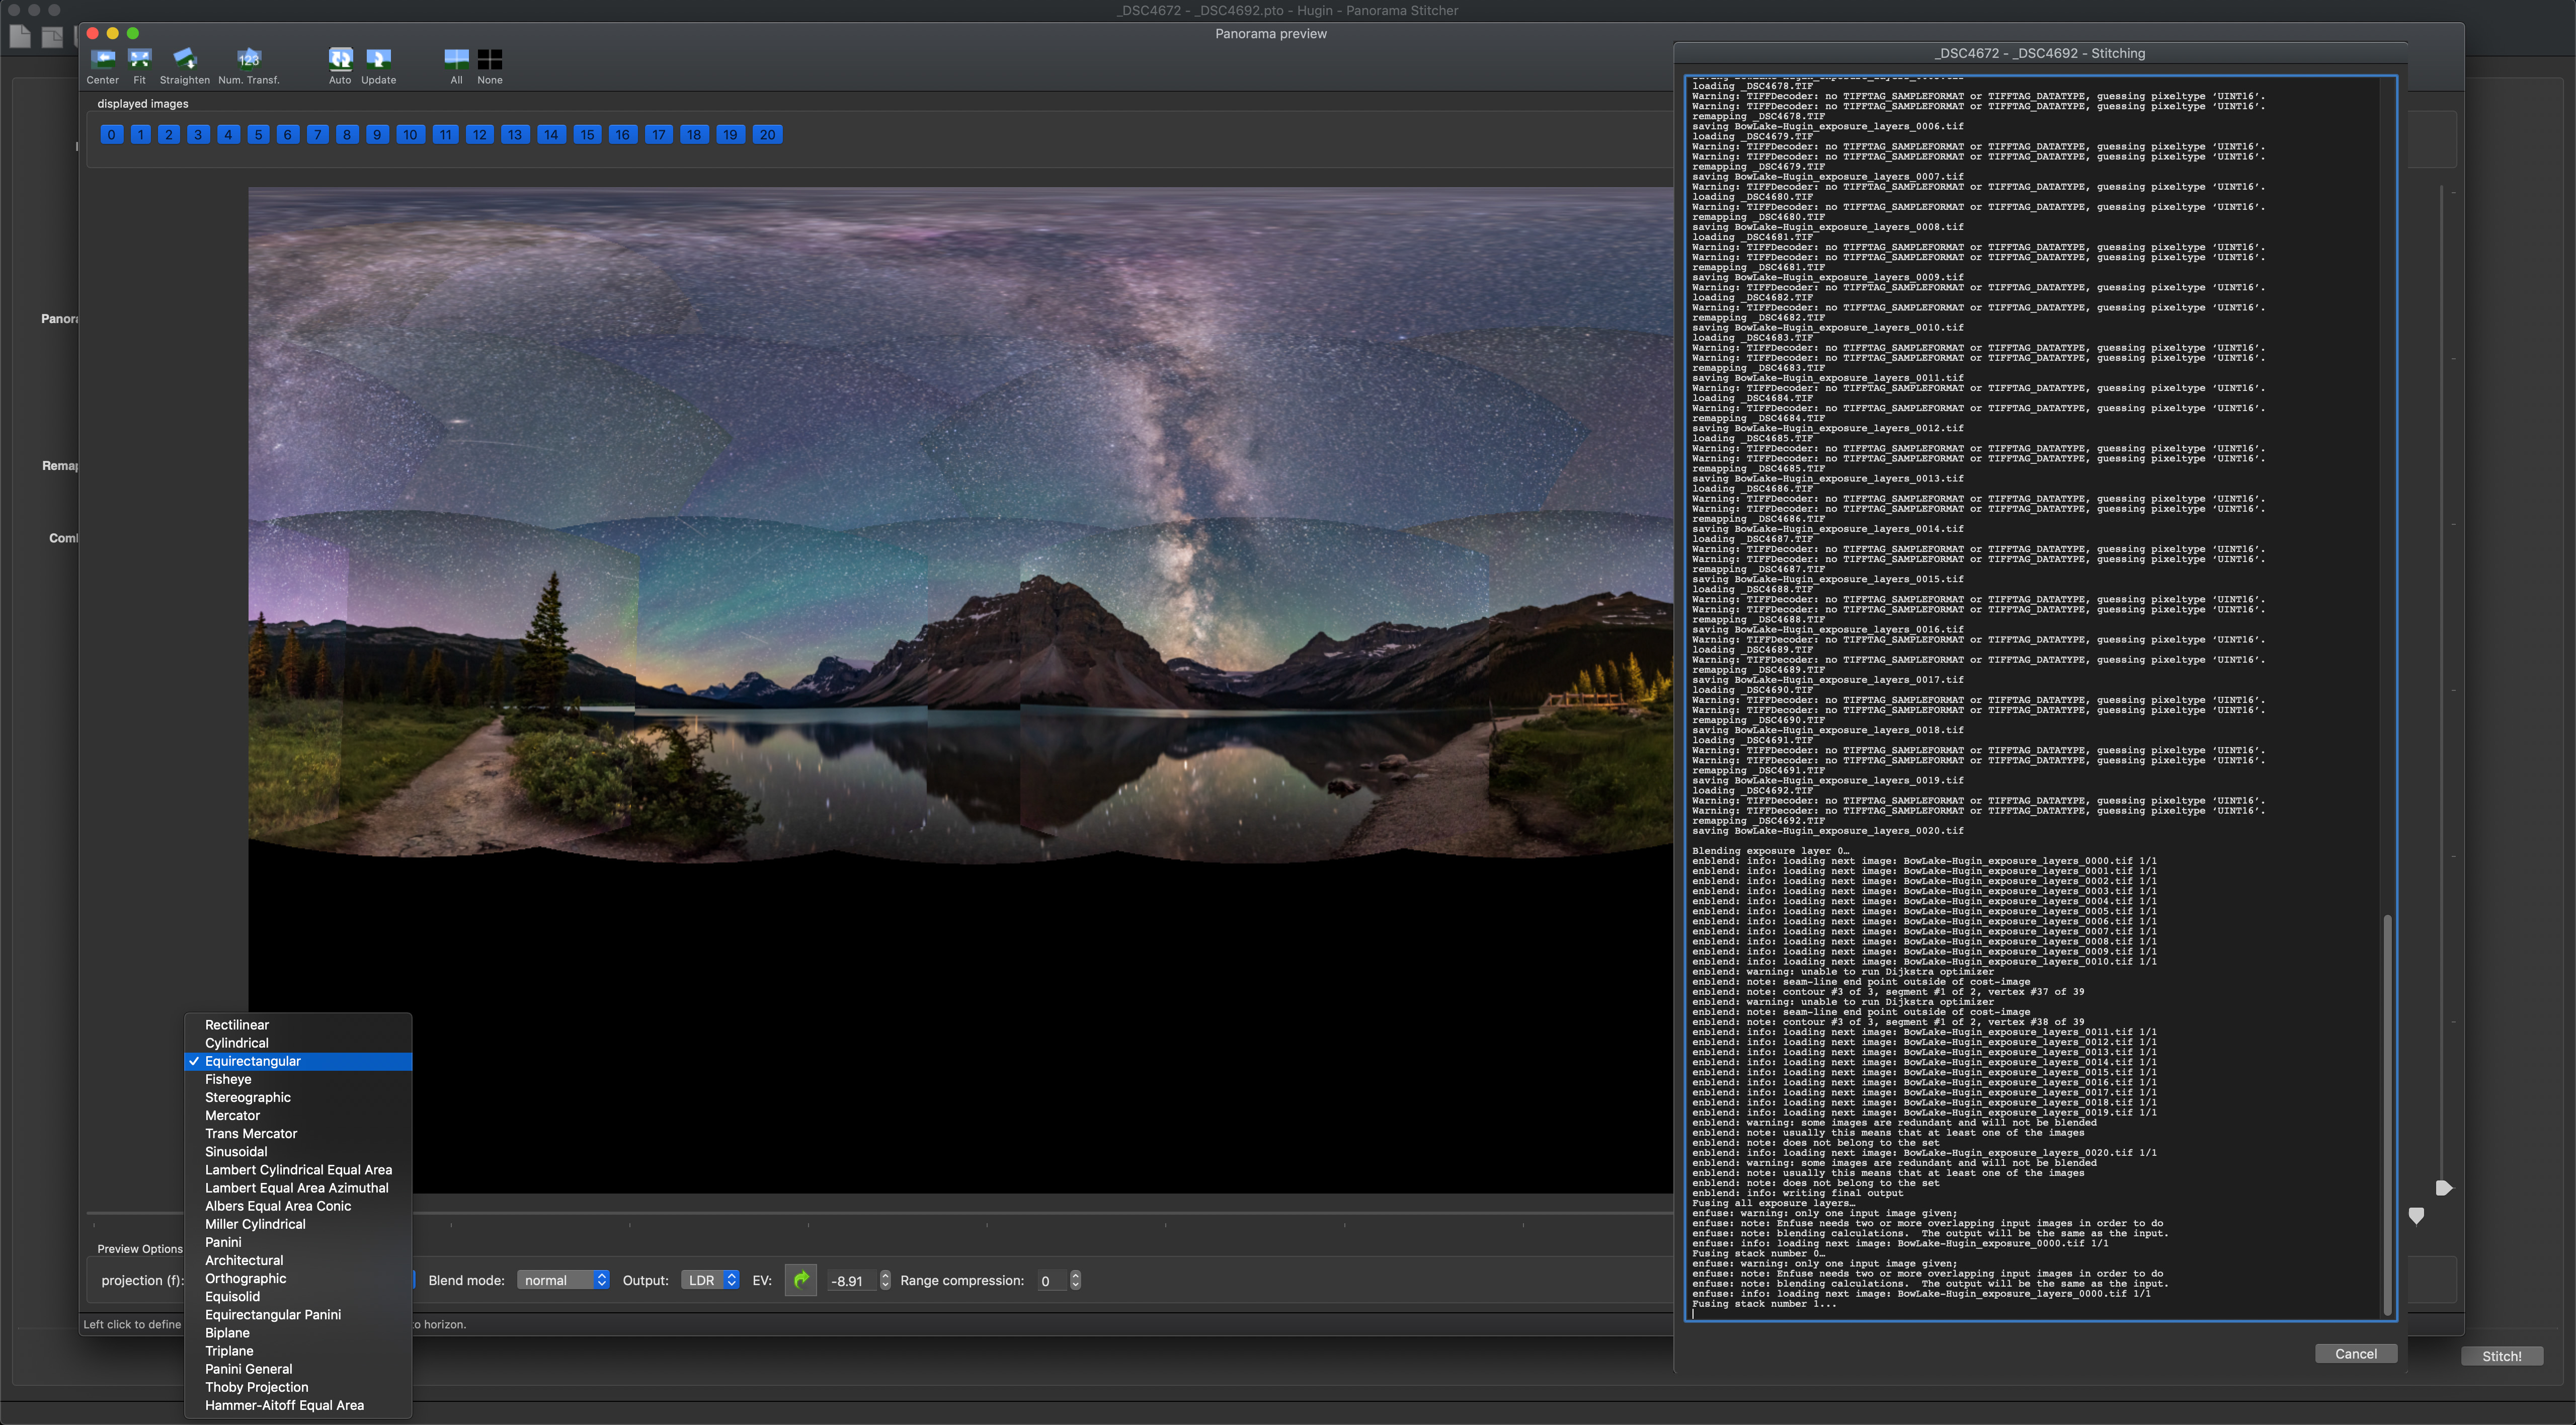

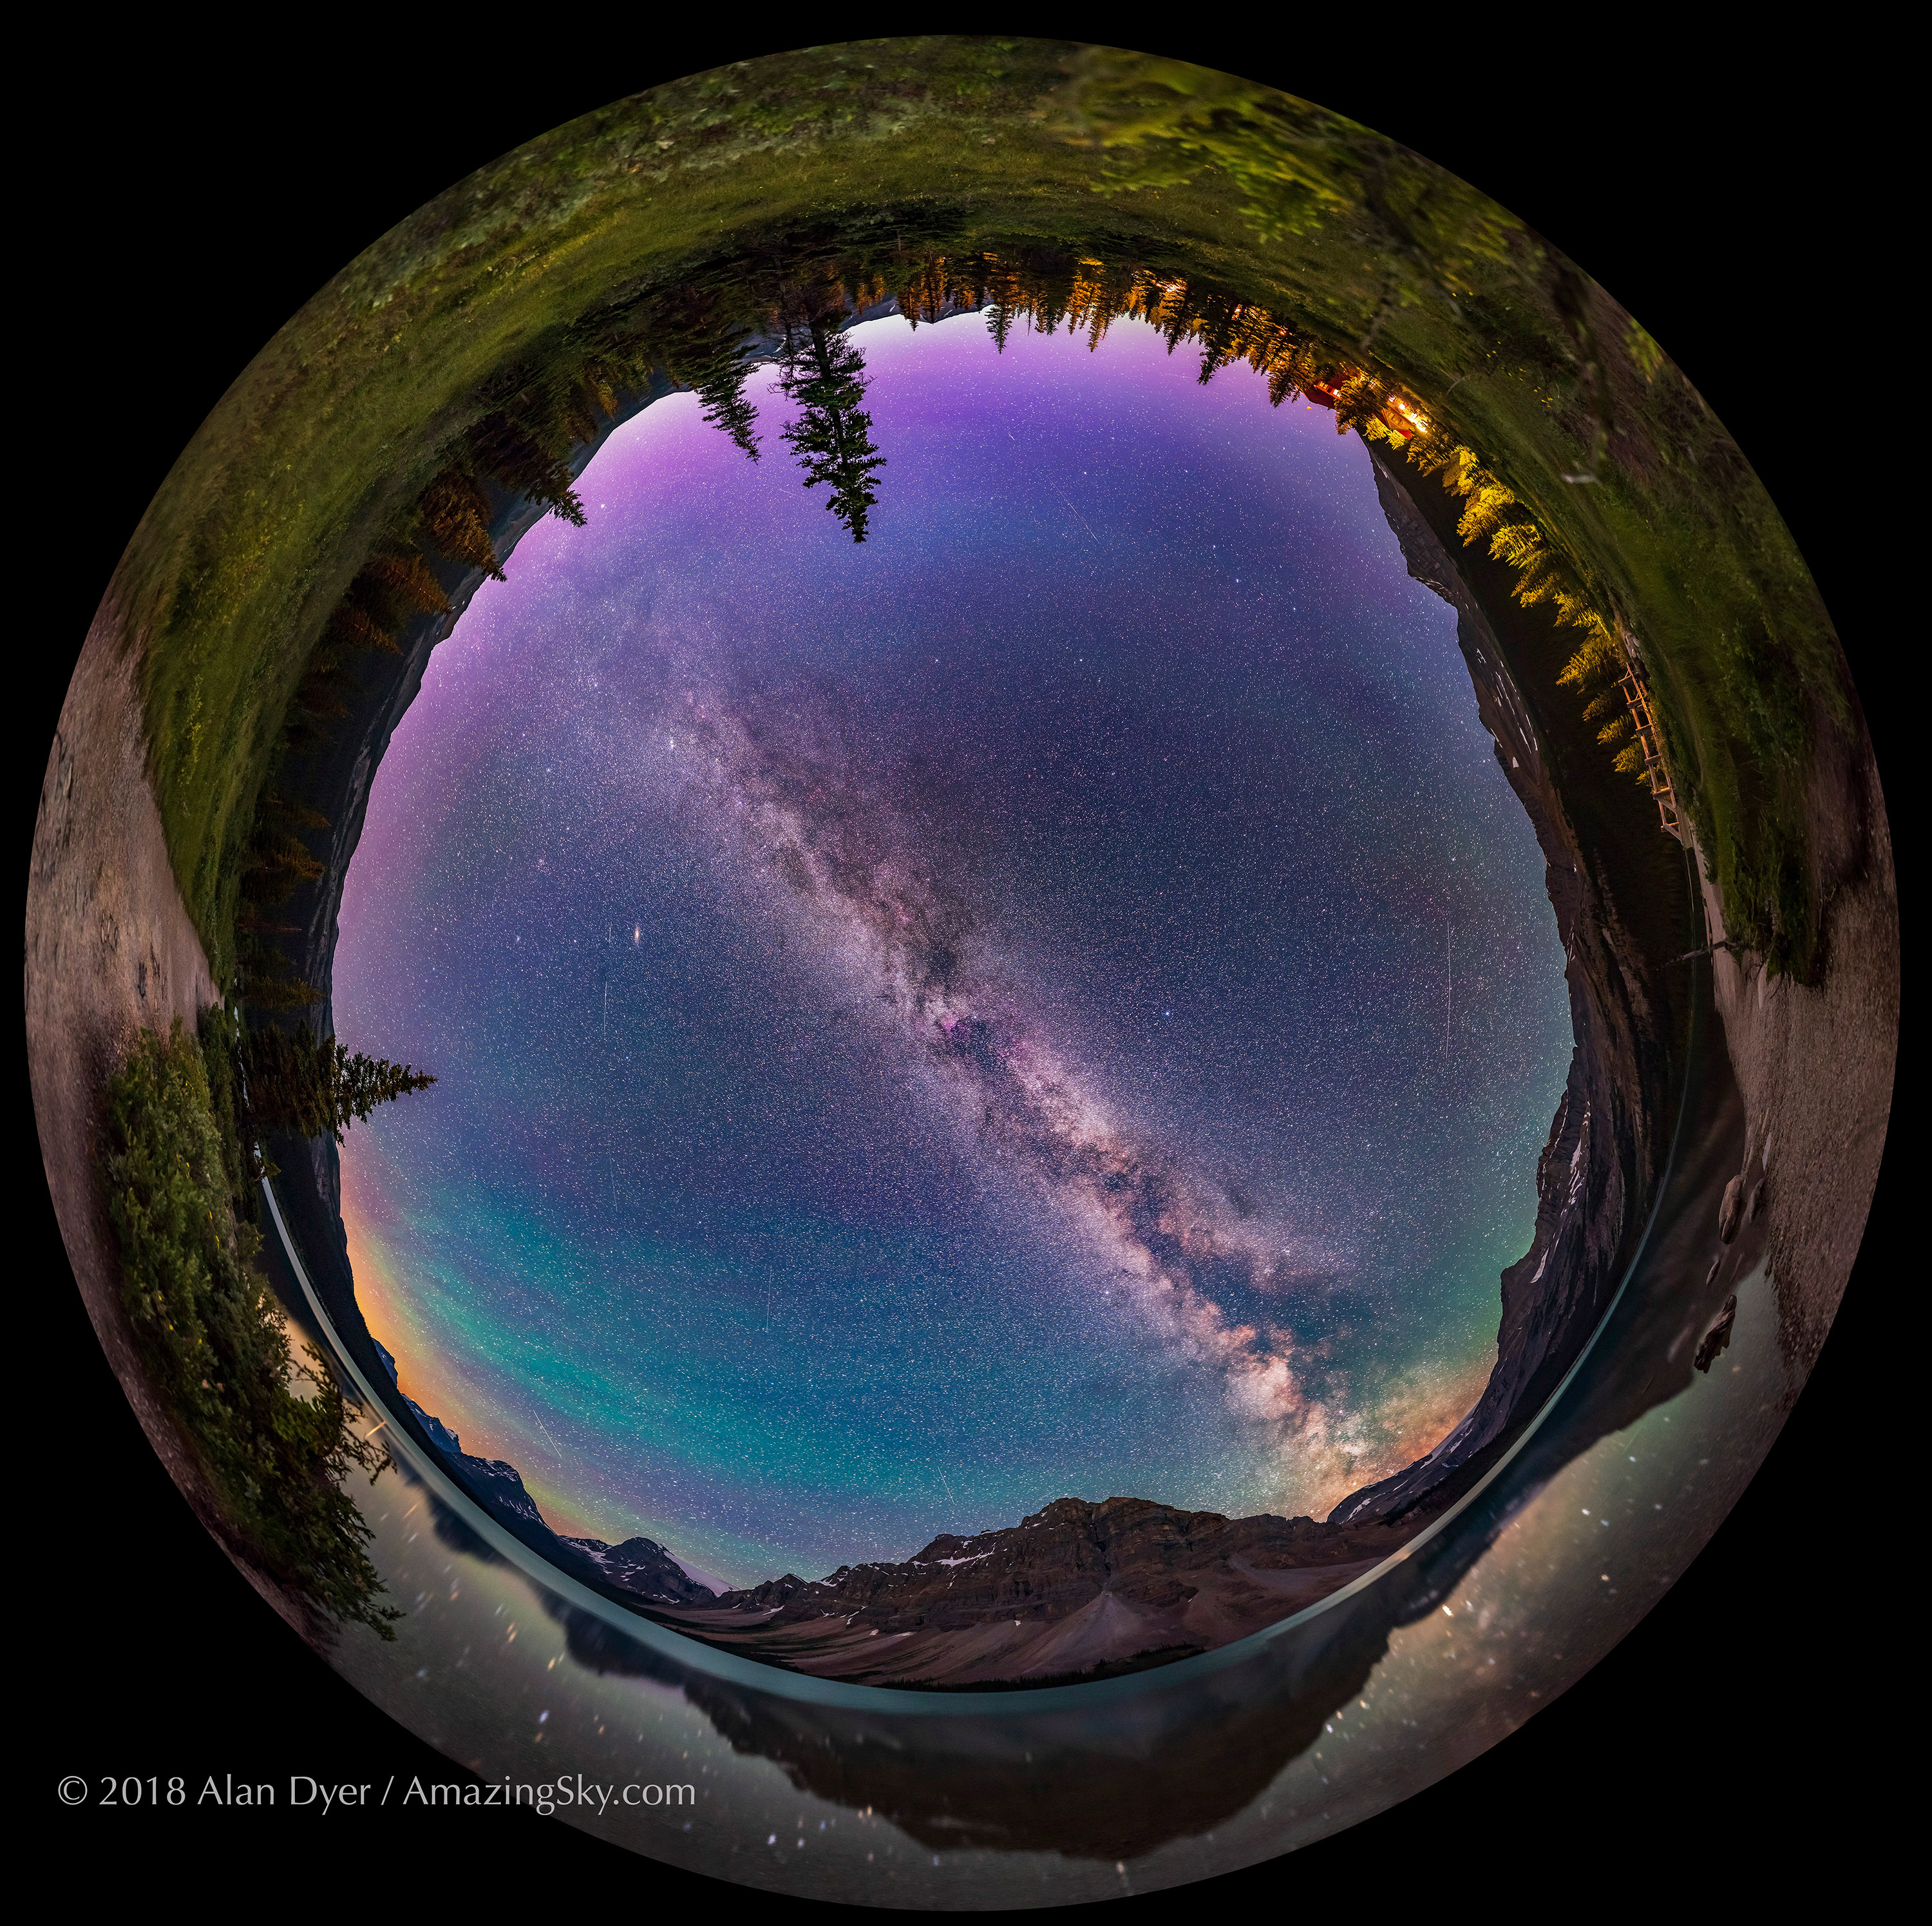
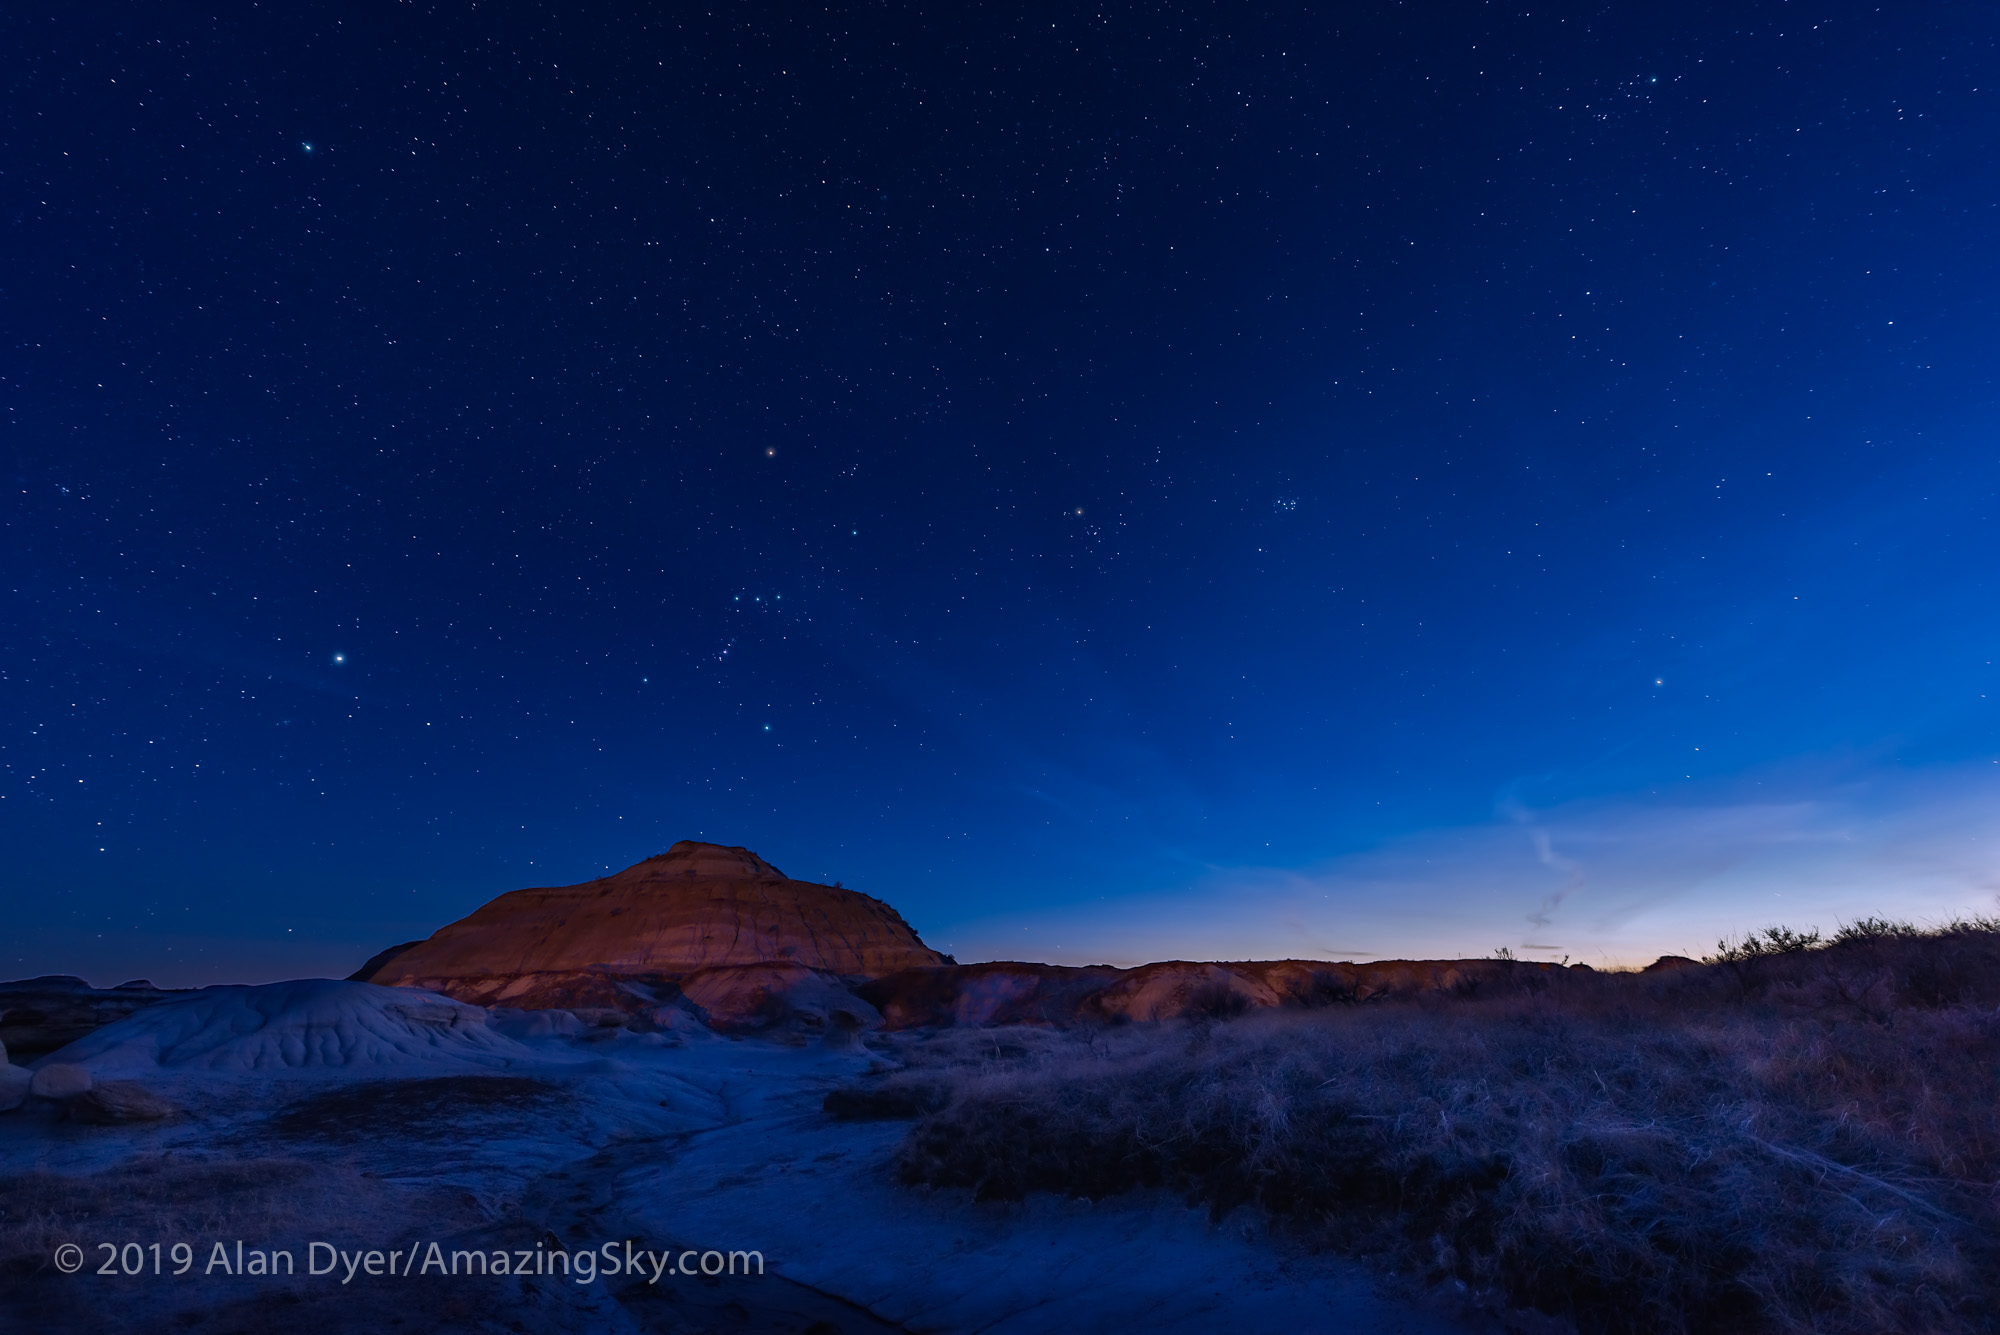
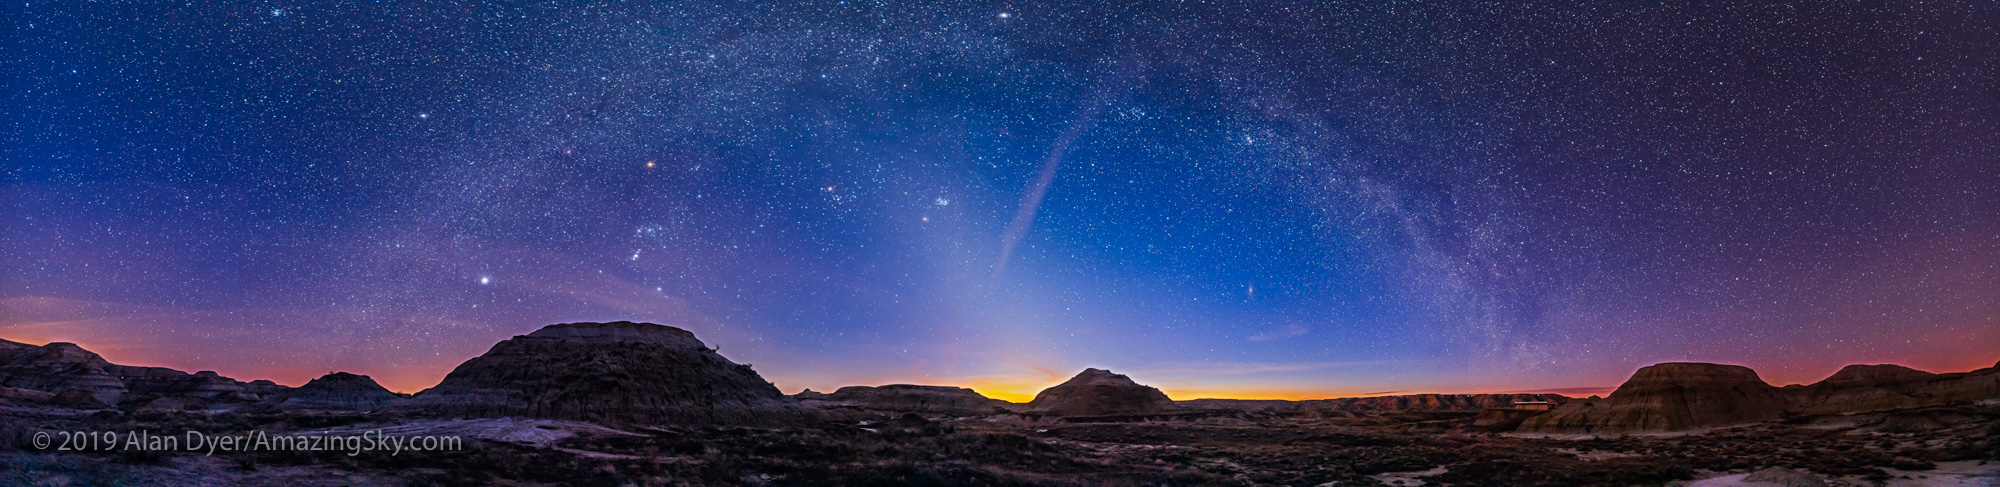
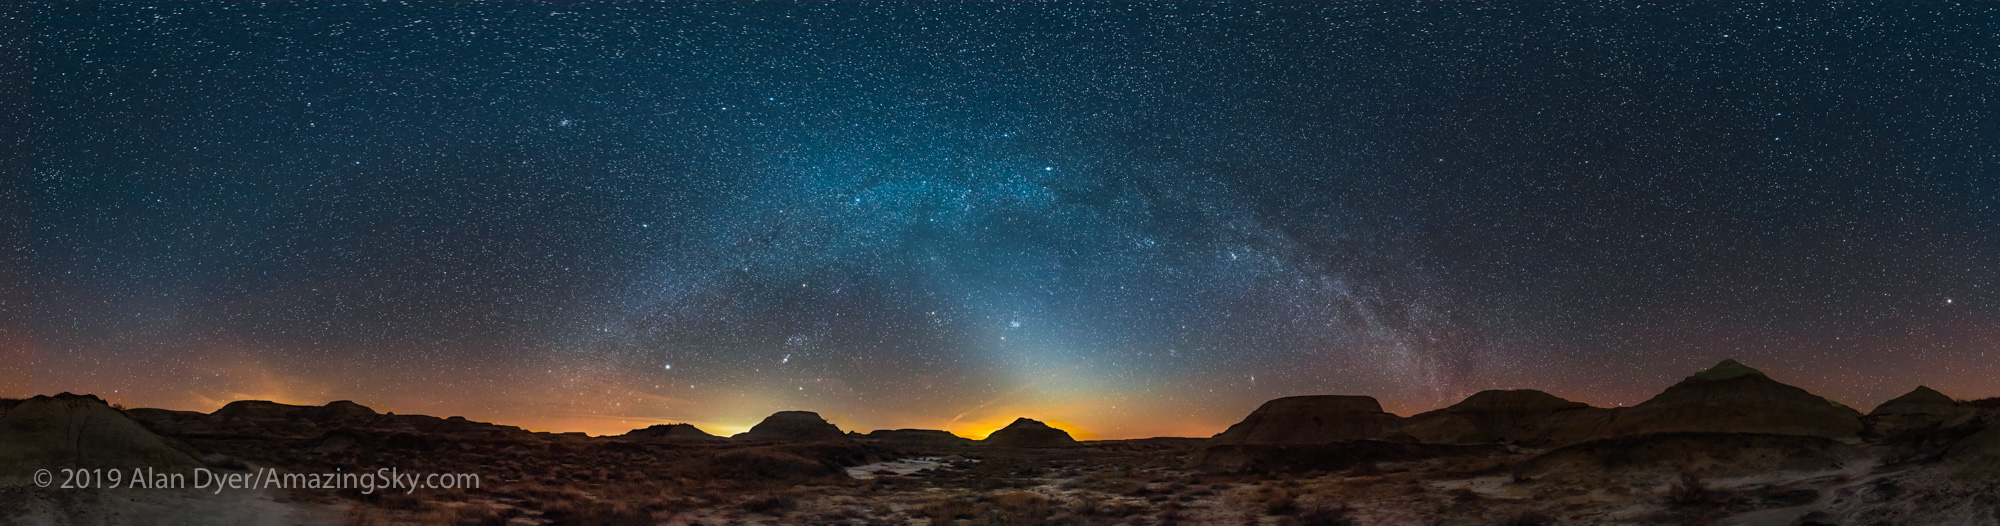
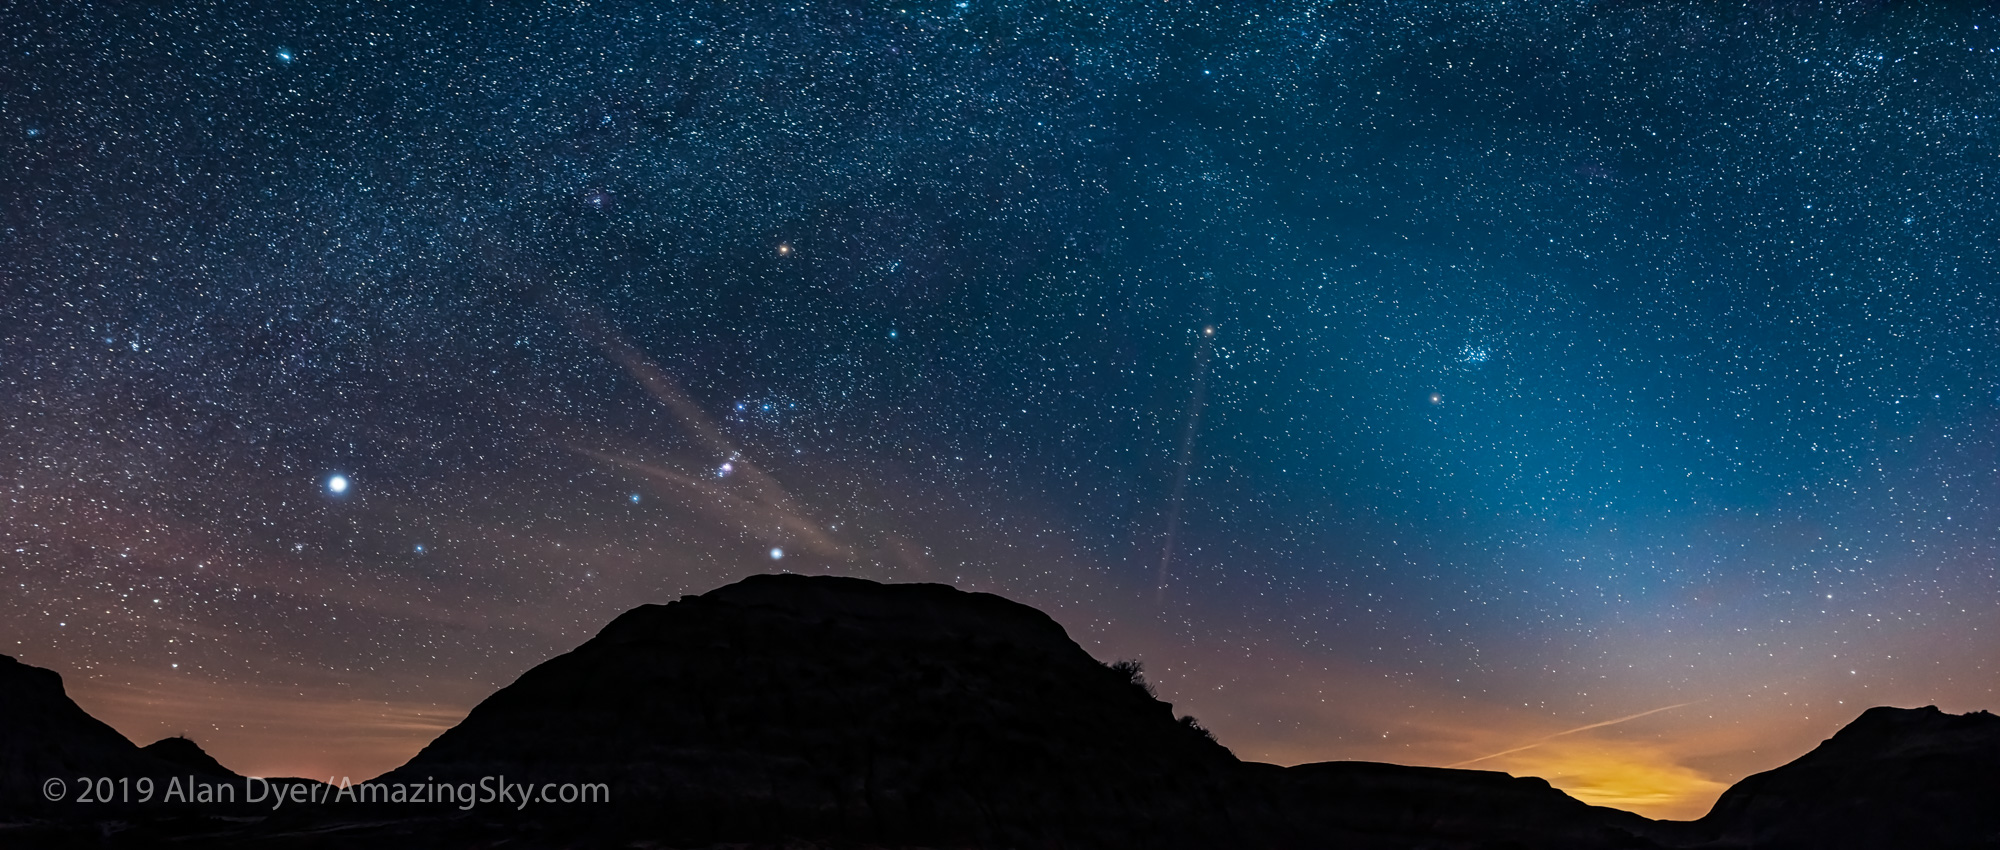

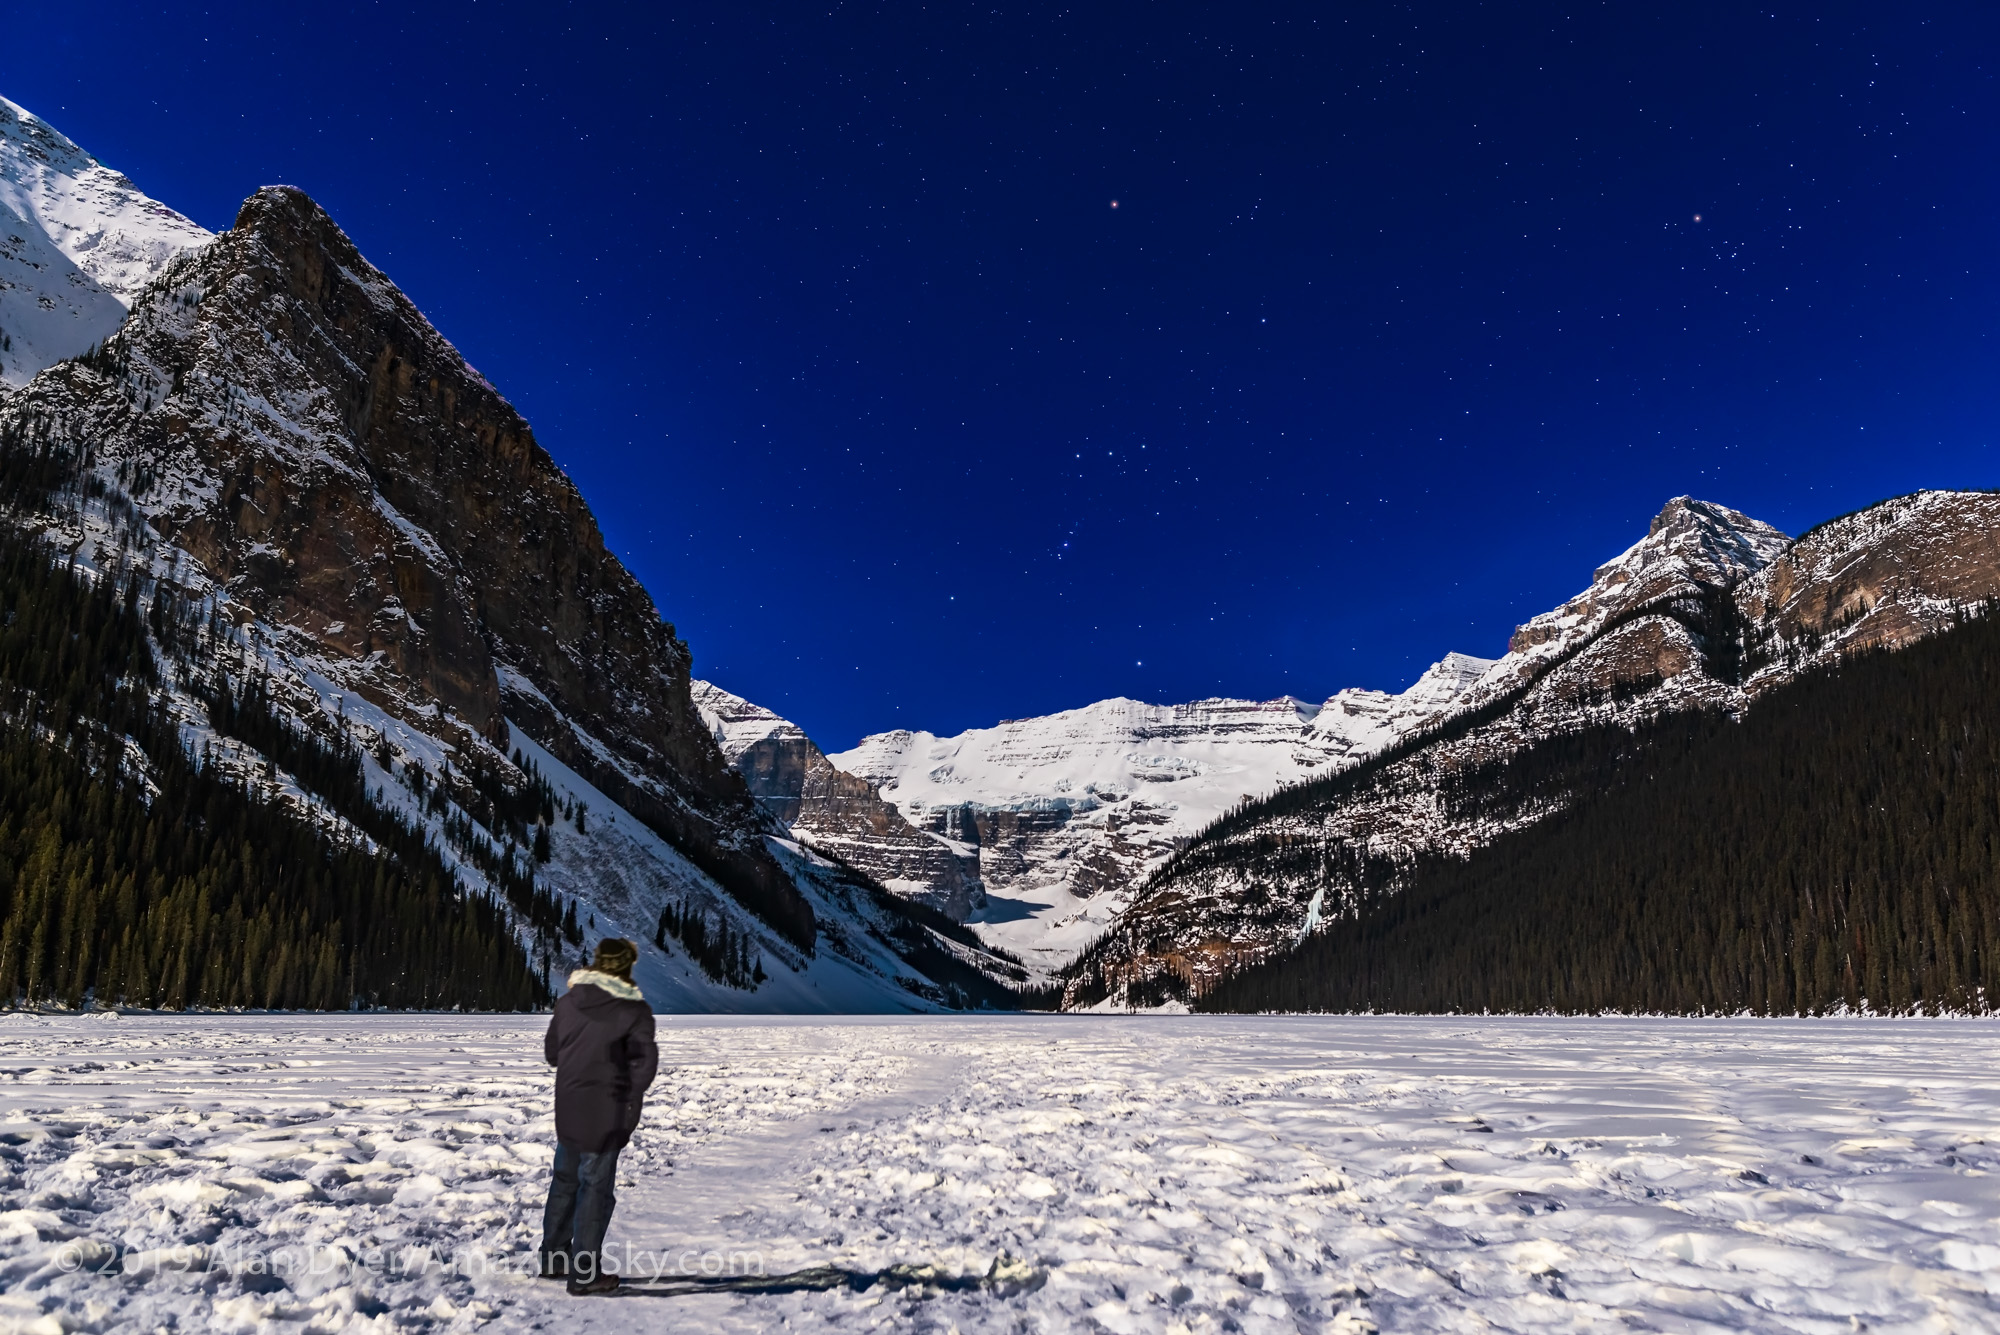


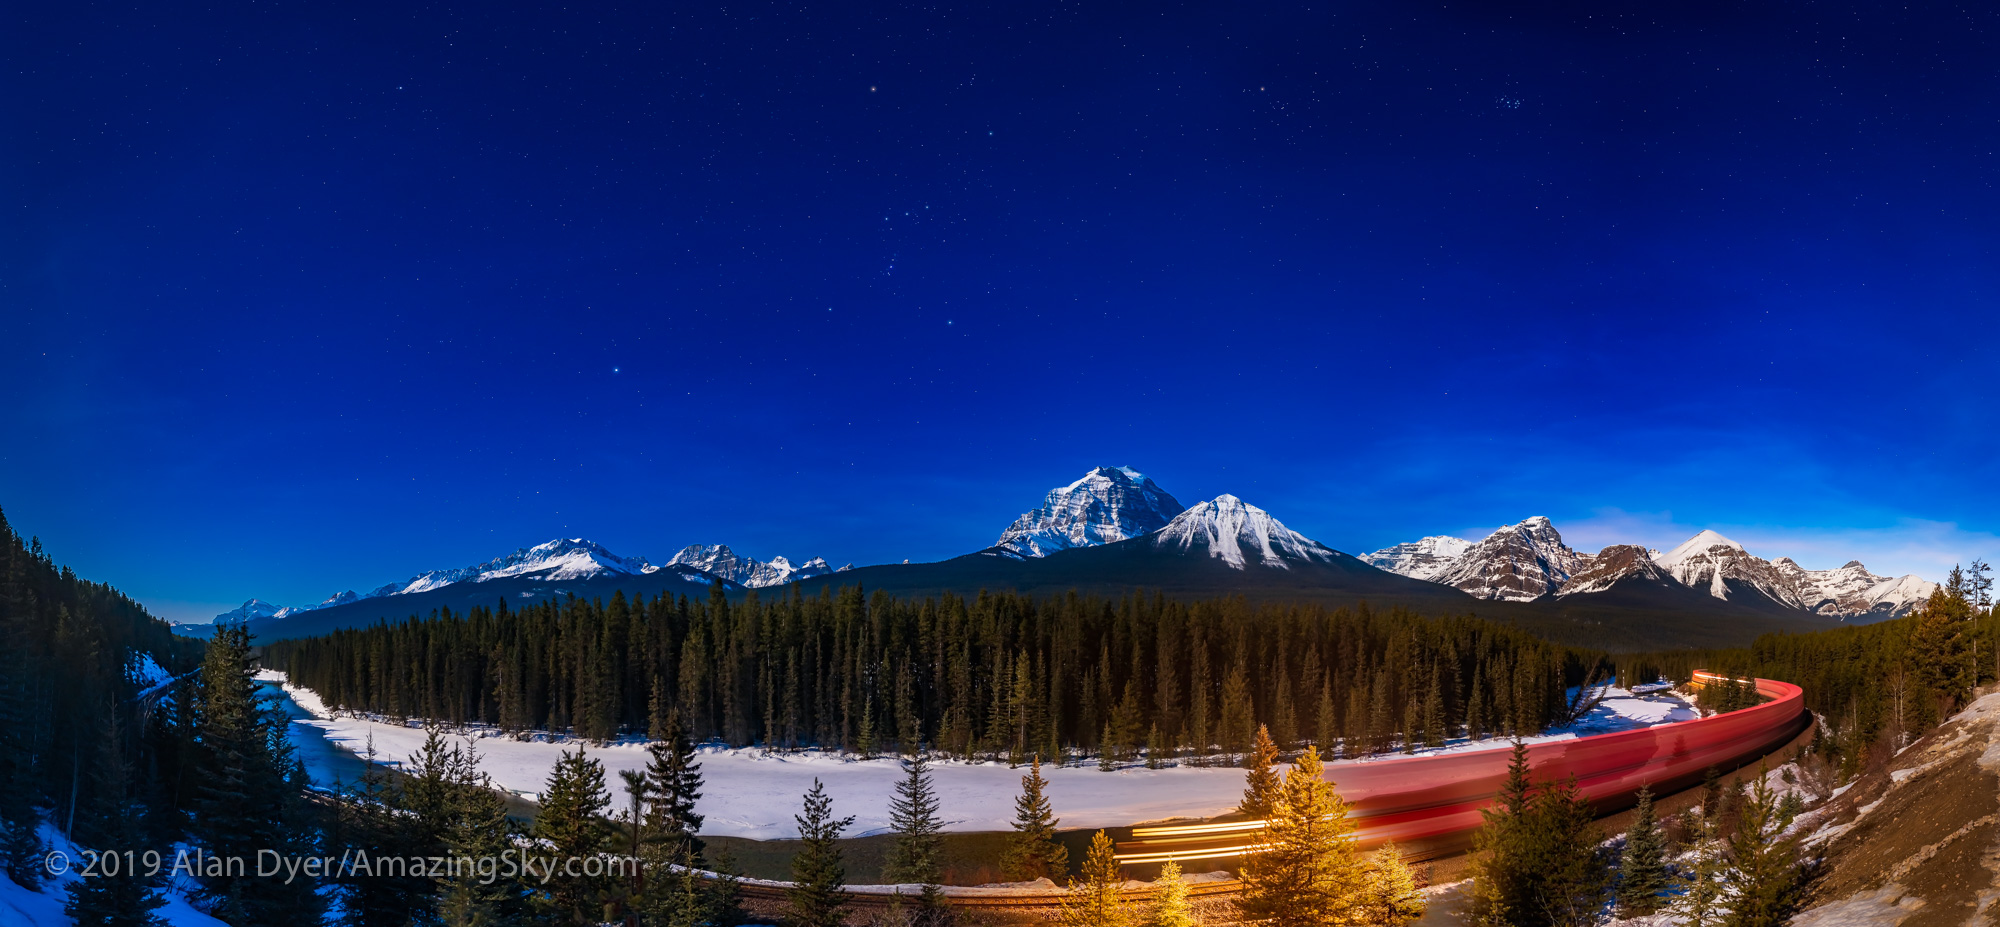

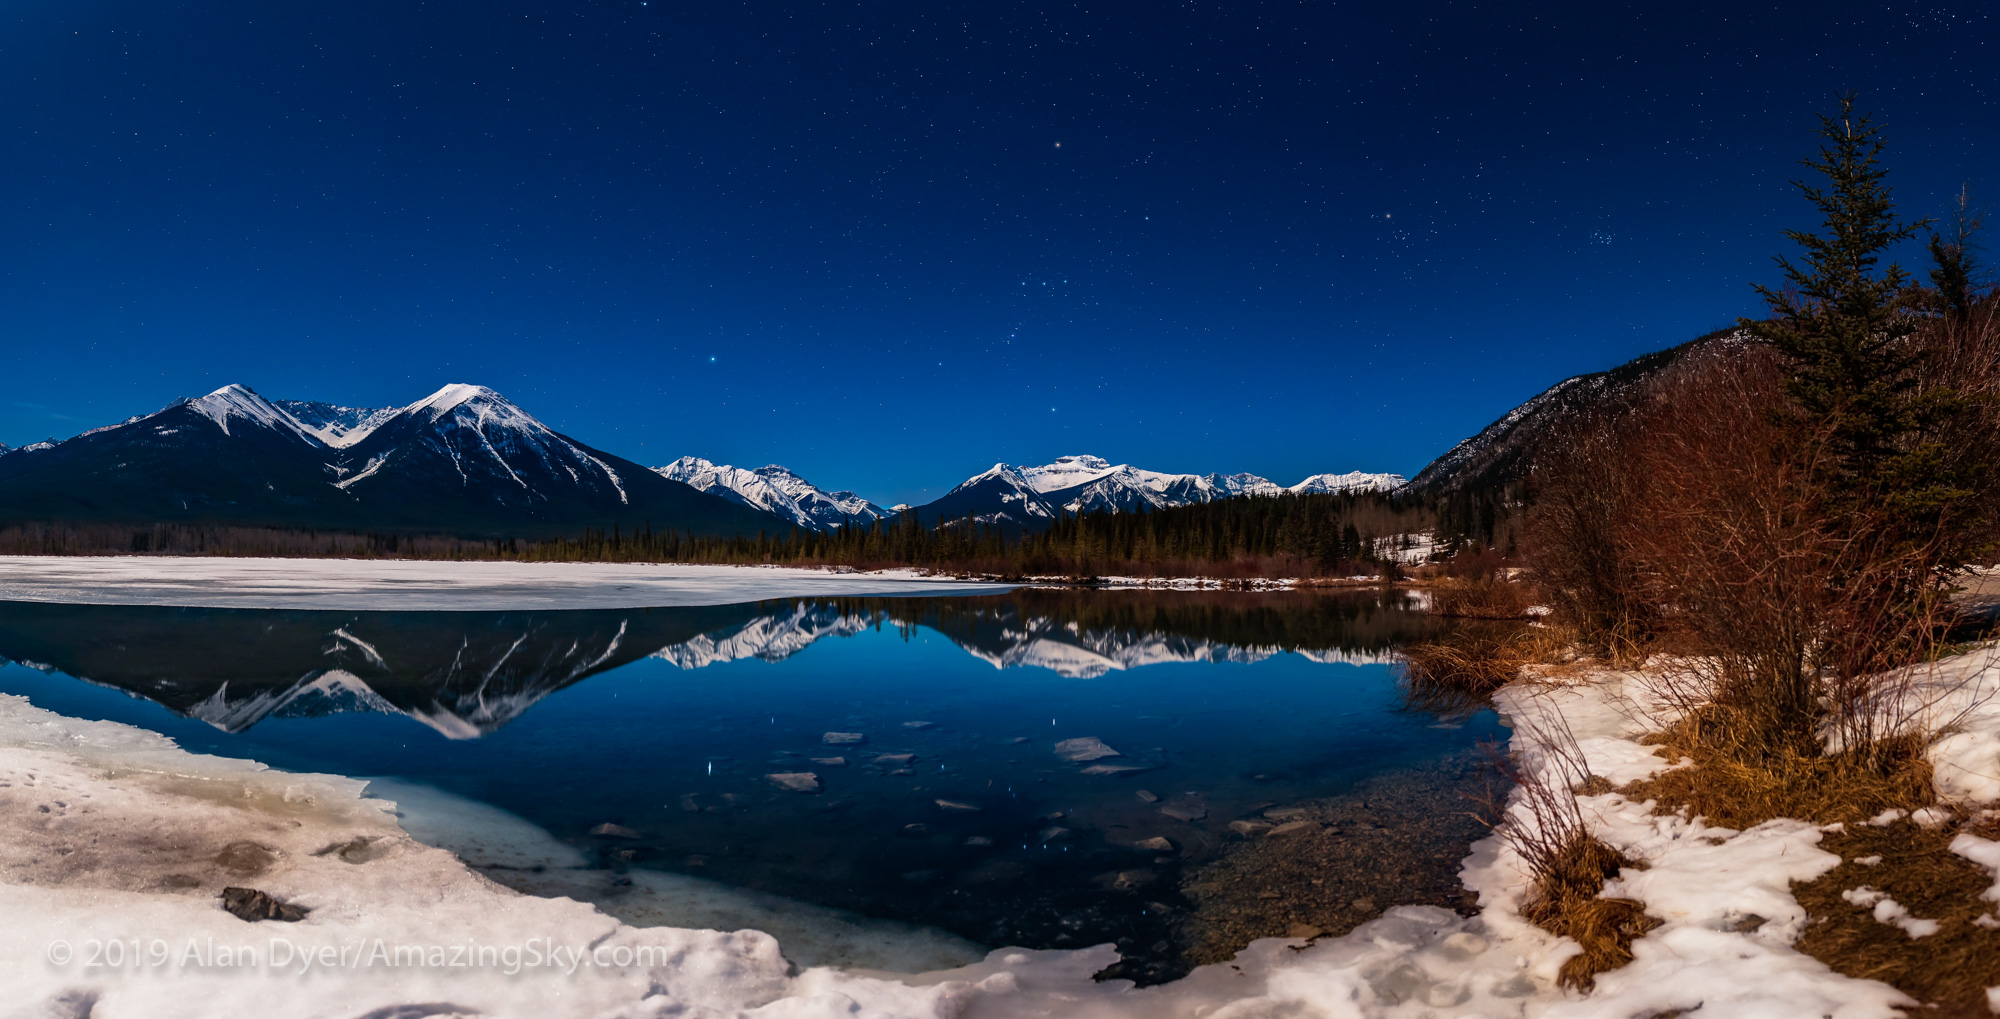
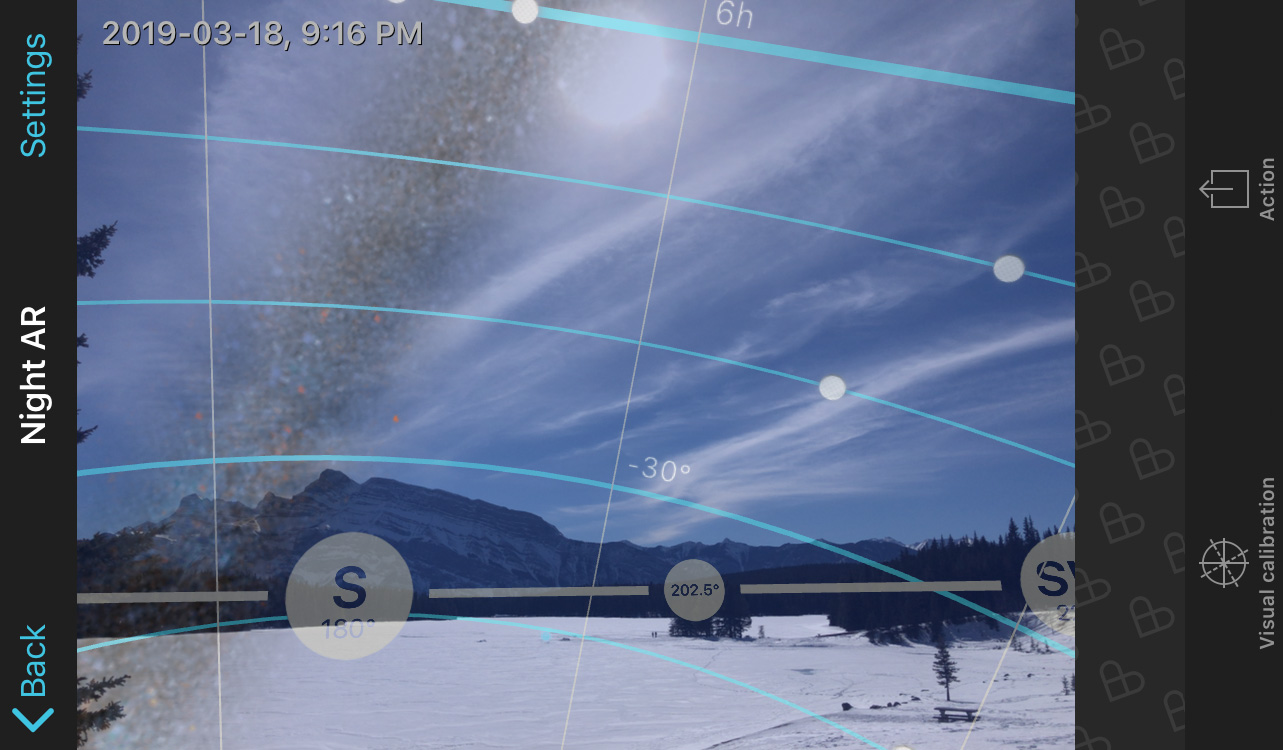
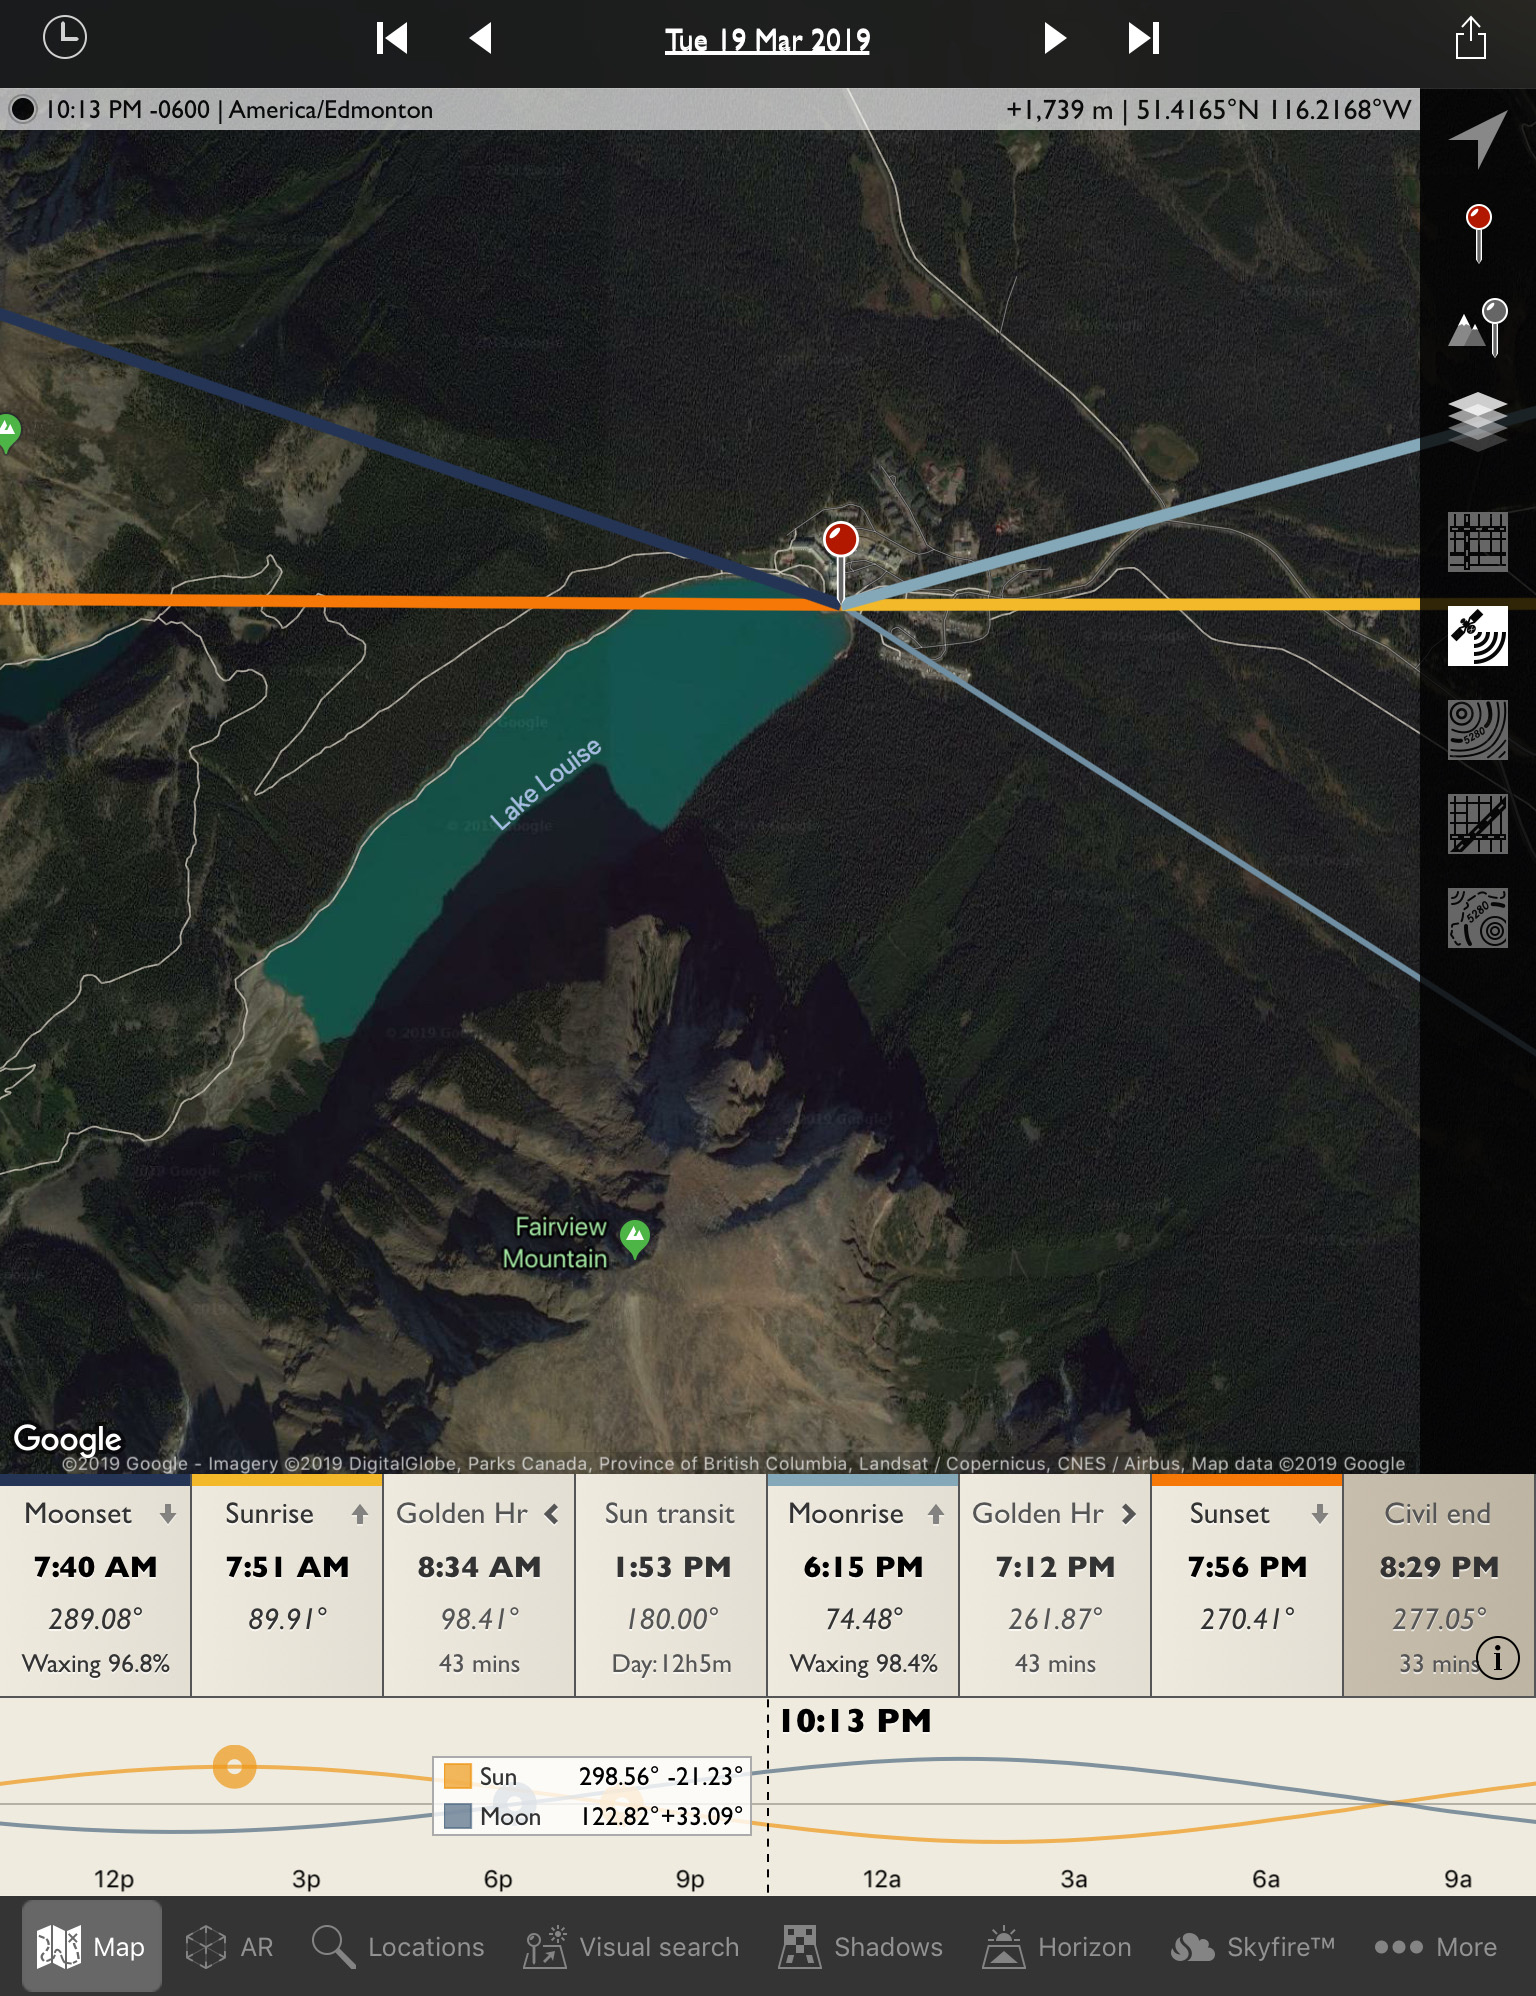
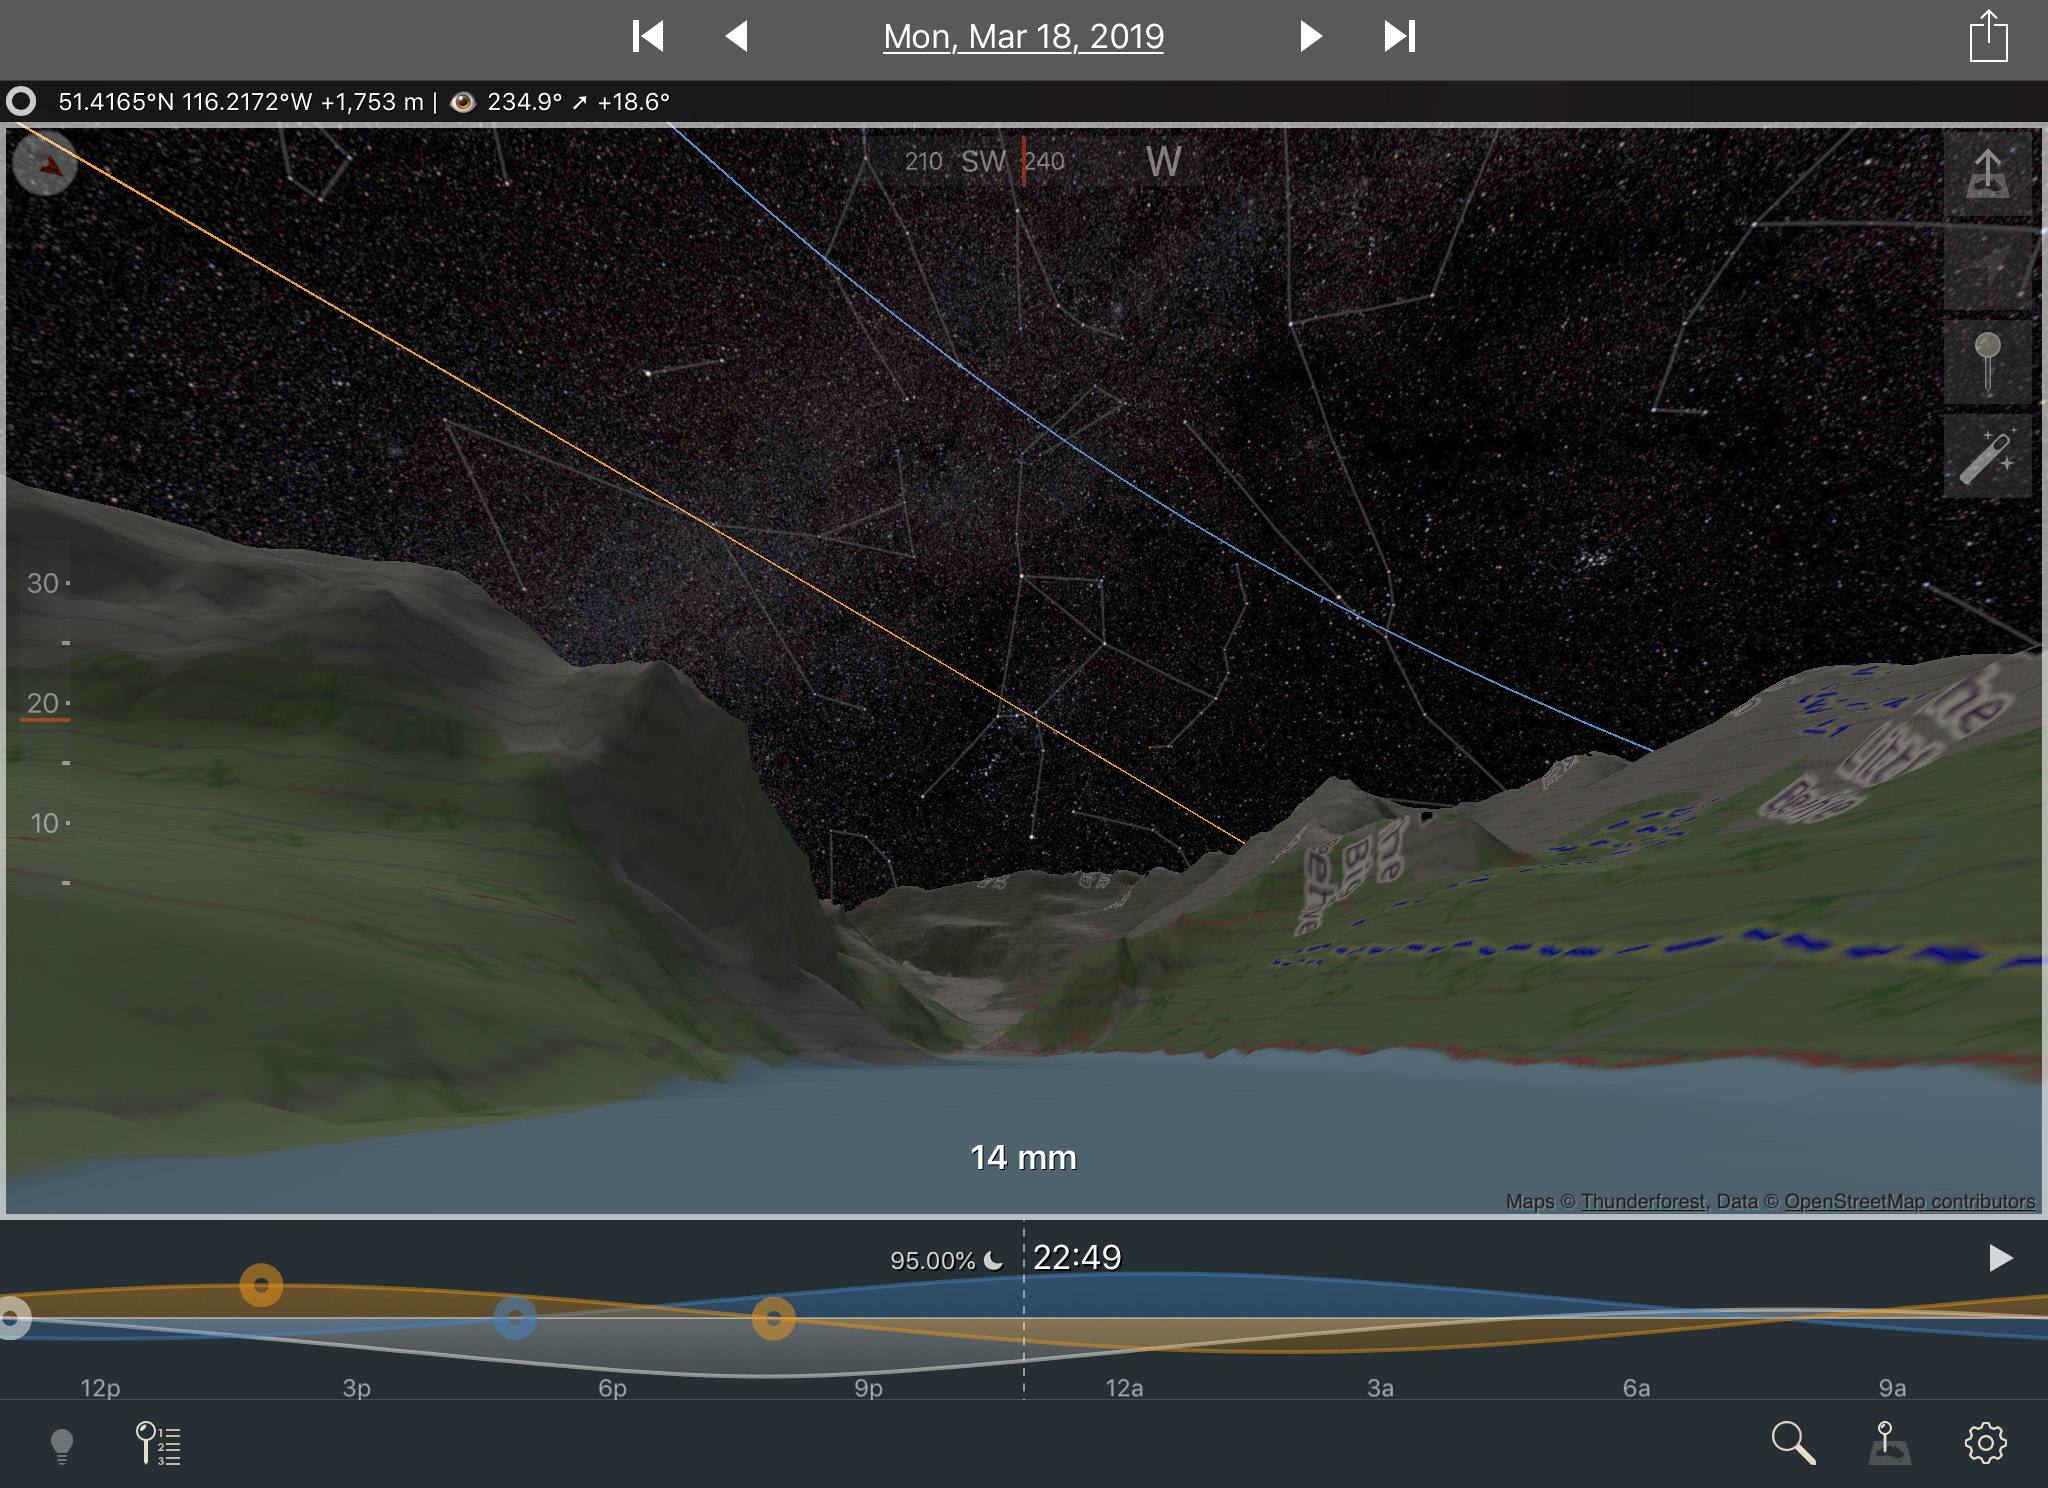


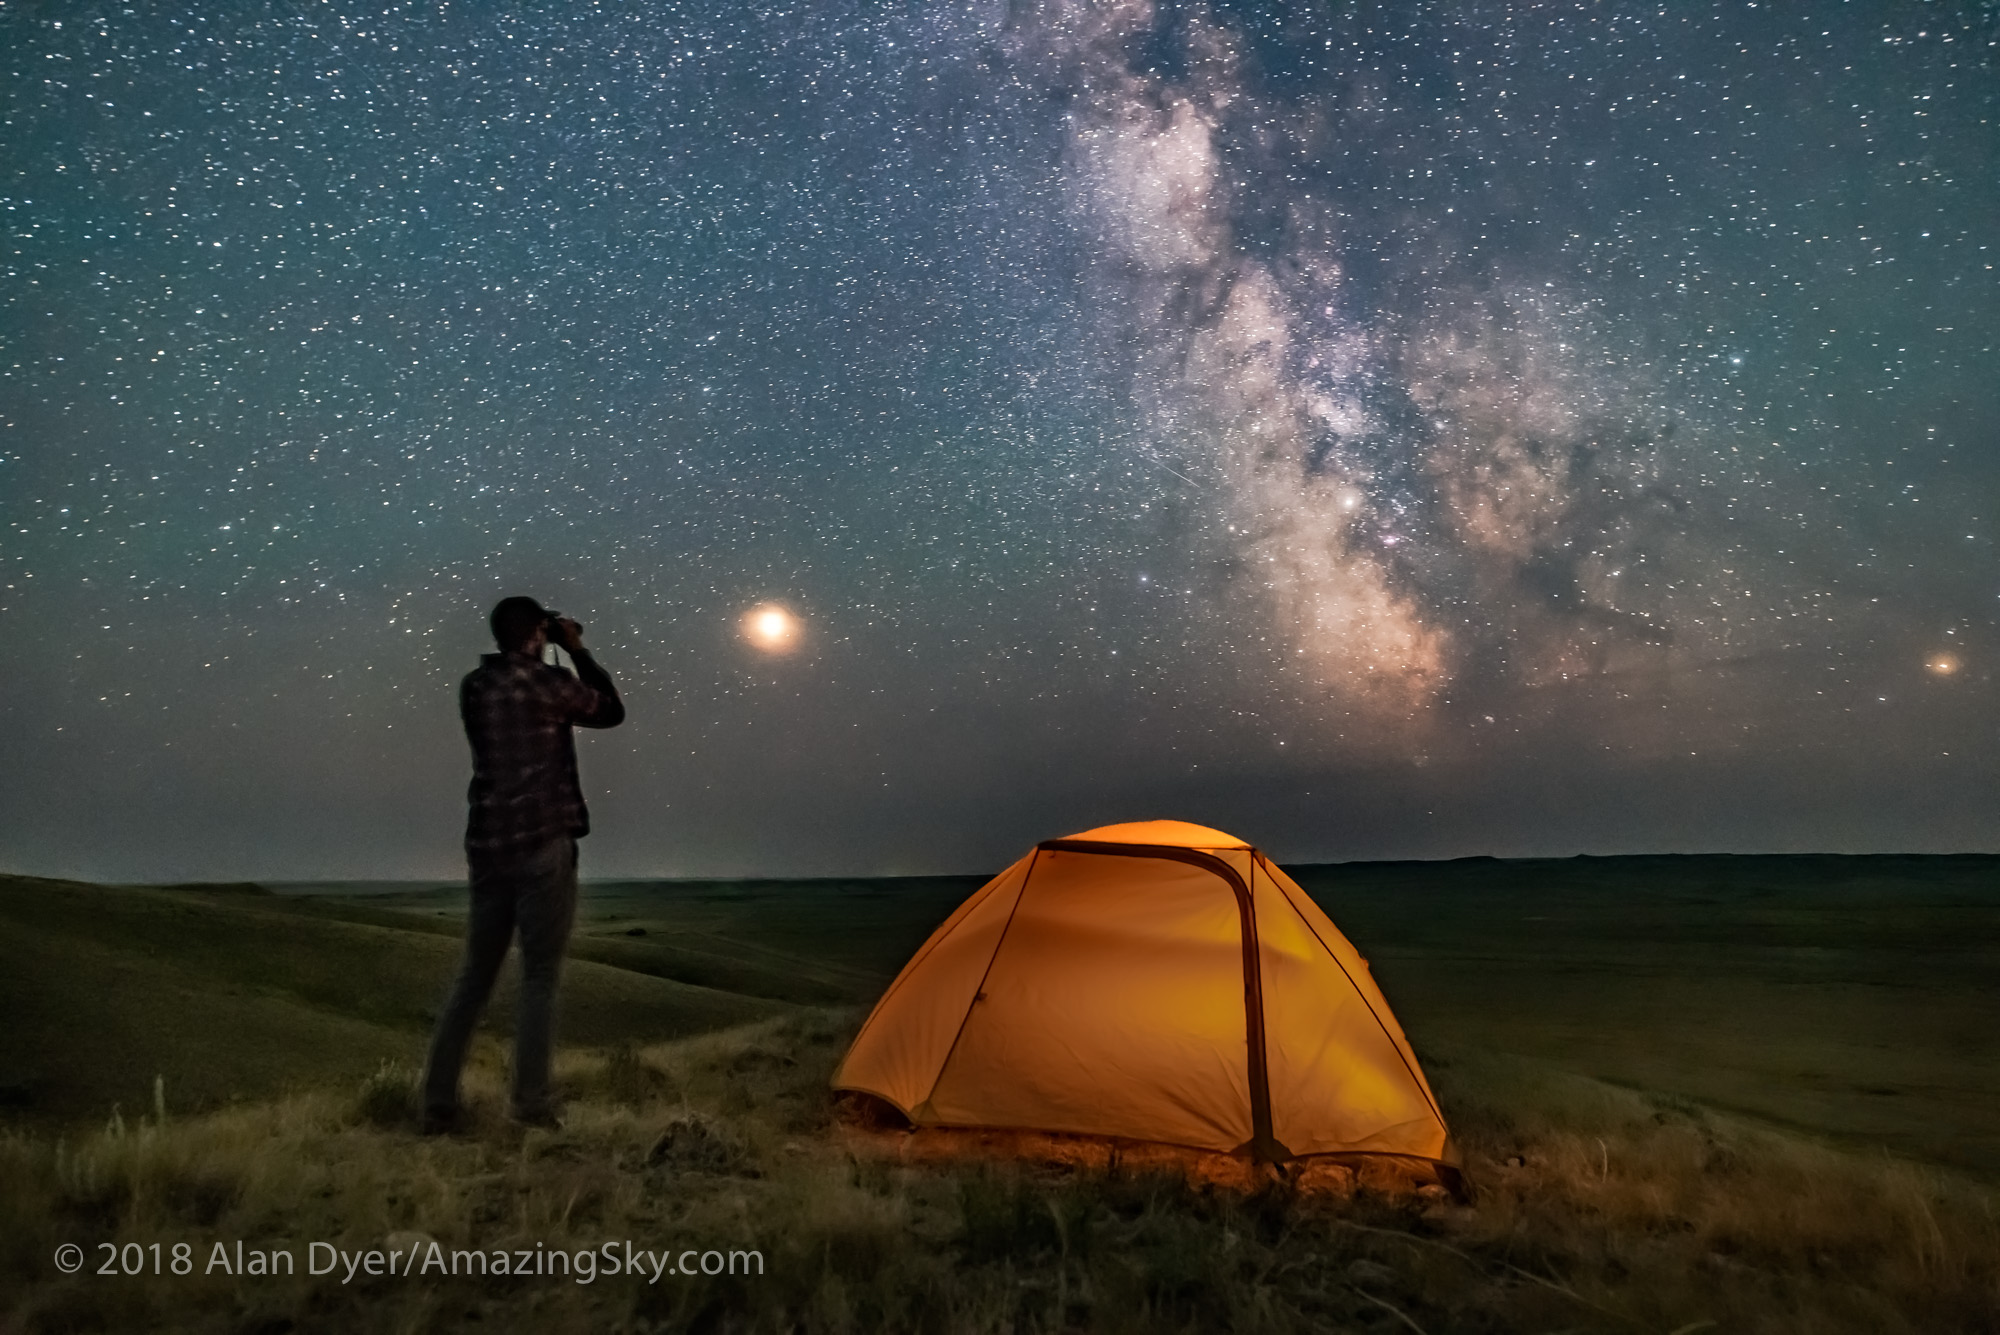
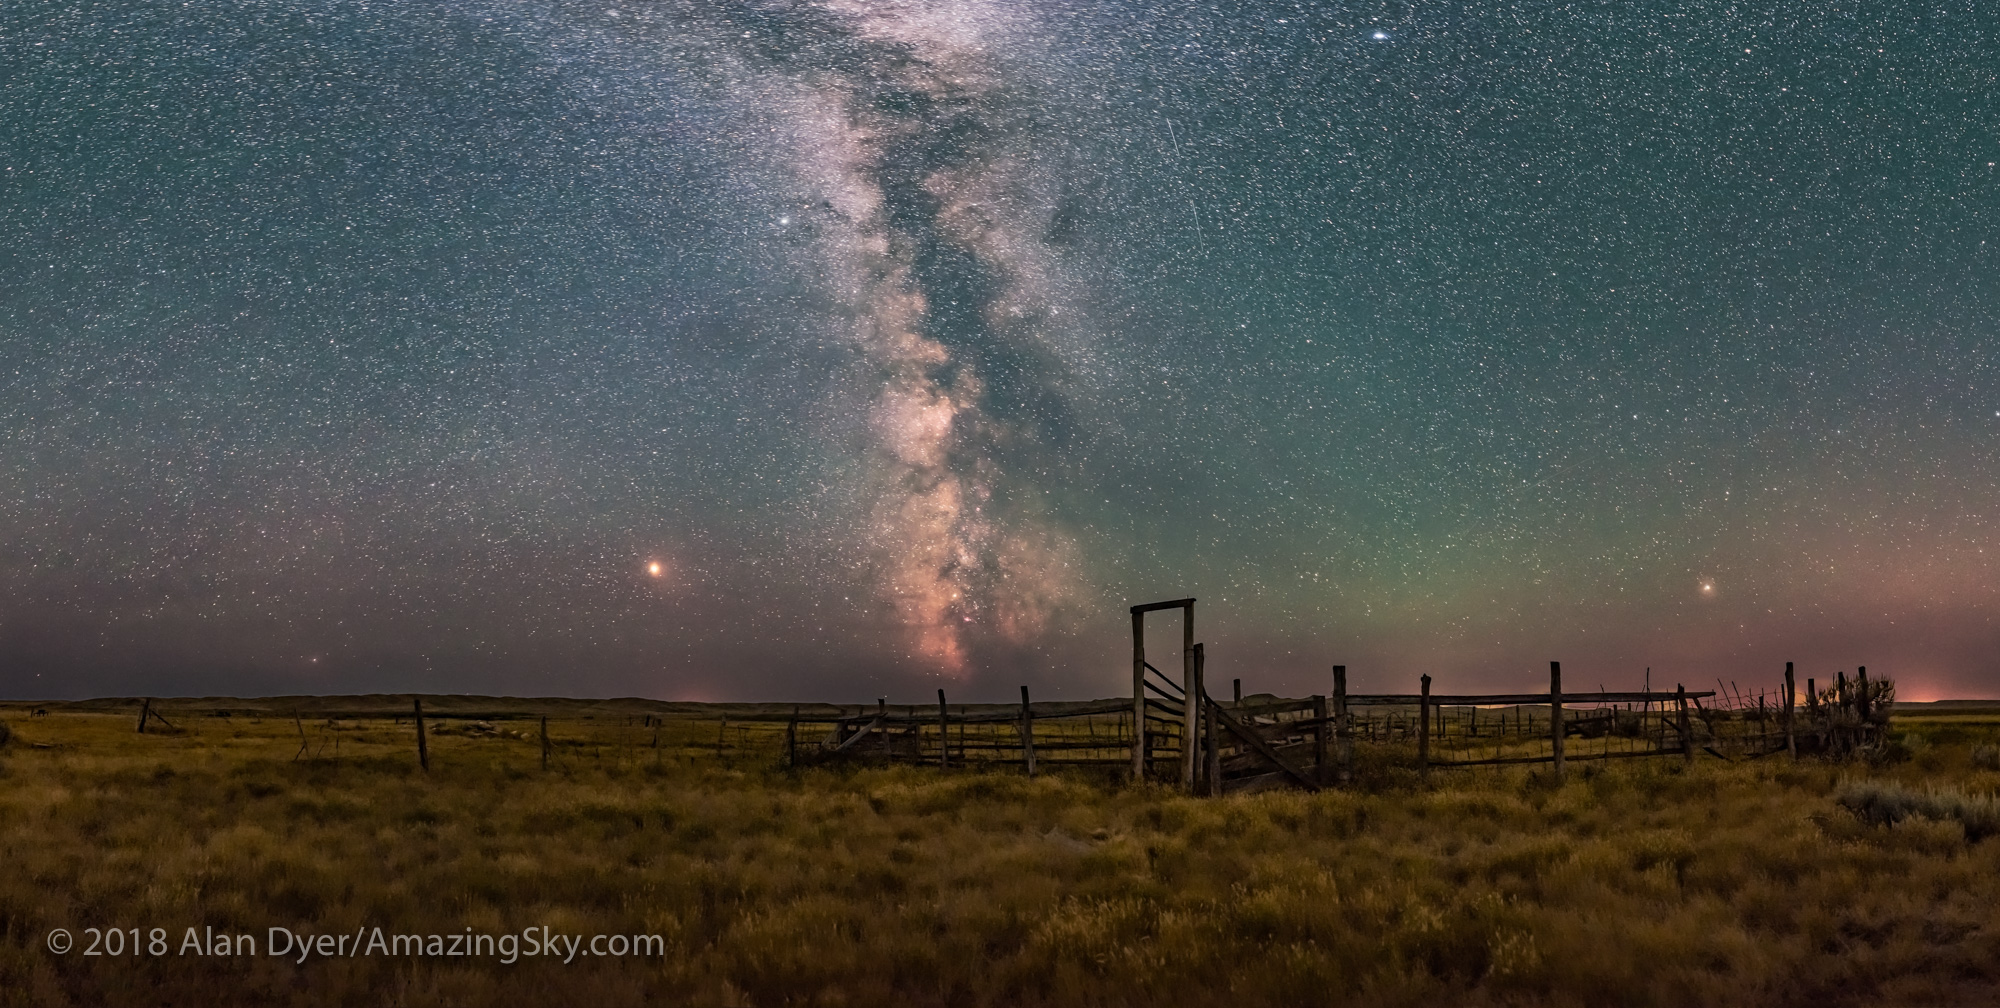


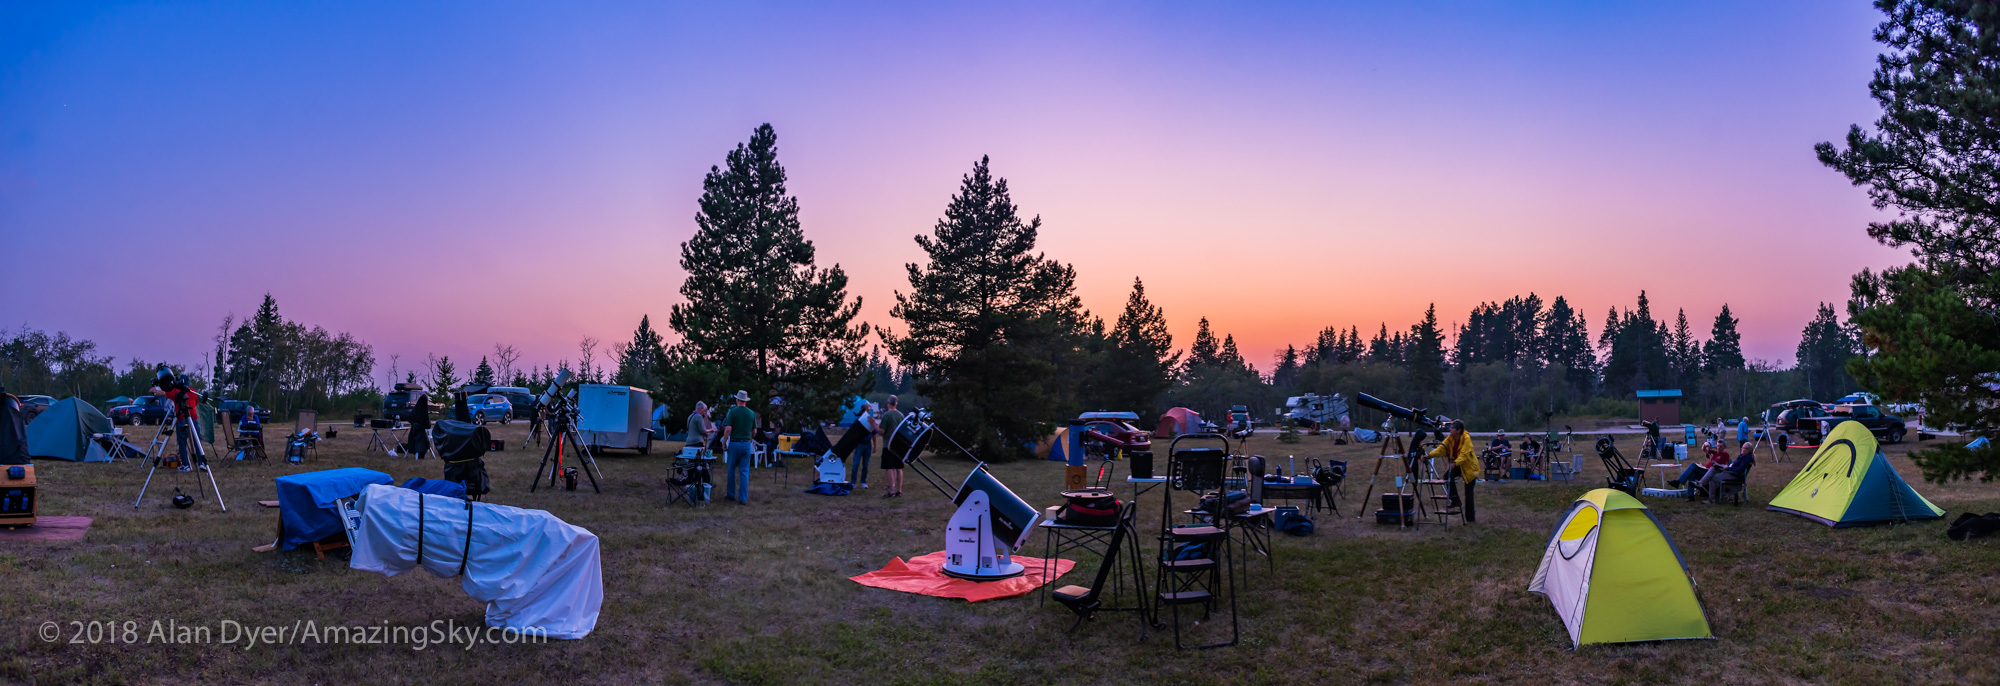
")