

Can the new version of ON1 Photo RAW match Photoshop for astrophotography?
The short TL;DR answer: No.
But … as always, it depends. So do read on.
Released in mid-November 2018, the latest version of ON1 Photo RAW greatly improves a non-destructive workflow. Combining Browsing, Cataloging, Raw Developing, with newly improved Layers capabilities, ON1 is out to compete with Adobe’s Creative Cloud photo suite – Lightroom, Camera Raw, Bridge, and Photoshop – for those looking for a non-subscription alternative.
Many reviewers love the new ON1 – for “normal” photography.
But can it replace Adobe for night sky photos? I put ON1 Photo RAW 2019 through its paces for the demanding tasks of processing nightscapes, time-lapses, and deep-sky astrophotos.
The Conclusions
In my eBook “How to Photograph and Process Nightscapes and Time-Lapses” (linked to at right) I present dozens of processing tutorials, including several on how to use ON1 Photo RAW, but the 2018 edition. I was critical of many aspects of the old version, primarily of its destructive workflow when going from its Develop and Effects modules to the limited Layers module of the 2018 edition.
I’m glad to see many of the shortfalls have been addressed, with the 2019 edition offering a much better workflow allowing layering of raw images while maintaining access to all the original raw settings and adjustments. You no longer have to flatten and commit to image settings to layer them for composites. When working with Layers you are no longer locked out of key functions such as cropping.
I won’t detail all the changes to ON1 2019 but they are significant and welcome.
The question I had was: Are they enough for high-quality astrophotos in a non-destructive workflow, Adobe Photoshop’s forté.
While ON1 Photo RAW 2019 is much better, I concluded it still isn’t a full replacement of Adobe’s Creative Cloud suite, as least not for astrophotography.
NOTE: All images can be downloaded as high-res versions for closer inspection.
ON1 2019 is Better, But for Astrophotography …
- Functions in Layers are still limited. For example, there is no stacking and averaging for noise smoothing. Affinity Photo has those.
- Filters, though abundant for artistic special effect “looks,” are limited in basic but essential functions. There is no Median filter, for one.
- Despite a proliferation of contrast controls, for deep-sky images (nebulas and galaxies) I was still not able to achieve the quality of images I’ve been used to with Photoshop.
- The lack of support for third-party plug-ins means ON1 cannot work with essential time-lapse programs such as Timelapse Workflow or LRTimelapse.

Recommendations
Nightscapes: ON1 Photo RAW 2019 works acceptably well for nightscape still images:
- Its improved layering and excellent masking functions are great for blending separate ground and sky images, or for applying masked adjustments to selected areas.
Time-Lapses: ON1 works is just adequate for basic time-lapse processing:
- Yes, you can develop one image and apply its settings to hundreds of images in a set, then export them for assembly into a movie. But there is no way to vary those settings over time, as you can by mating Lightroom to LRTimelapse.
- As with the 2018 edition, you still cannot copy and paste masked local adjustments from image to image, limiting their use.
- Exporting those images is slow.
Deep-Sky: ON1 is not a program I can recommend for deep-sky image processing:
- Stars inevitably end up with unsightly sharpening haloes.
- De-Bayering artifacts add blocky textures to the sky background.
- And all the contrast controls still don’t provide the “snap” and quality I’m used to with Photoshop when working with low-contrast subjects.
Library / Browse Functions
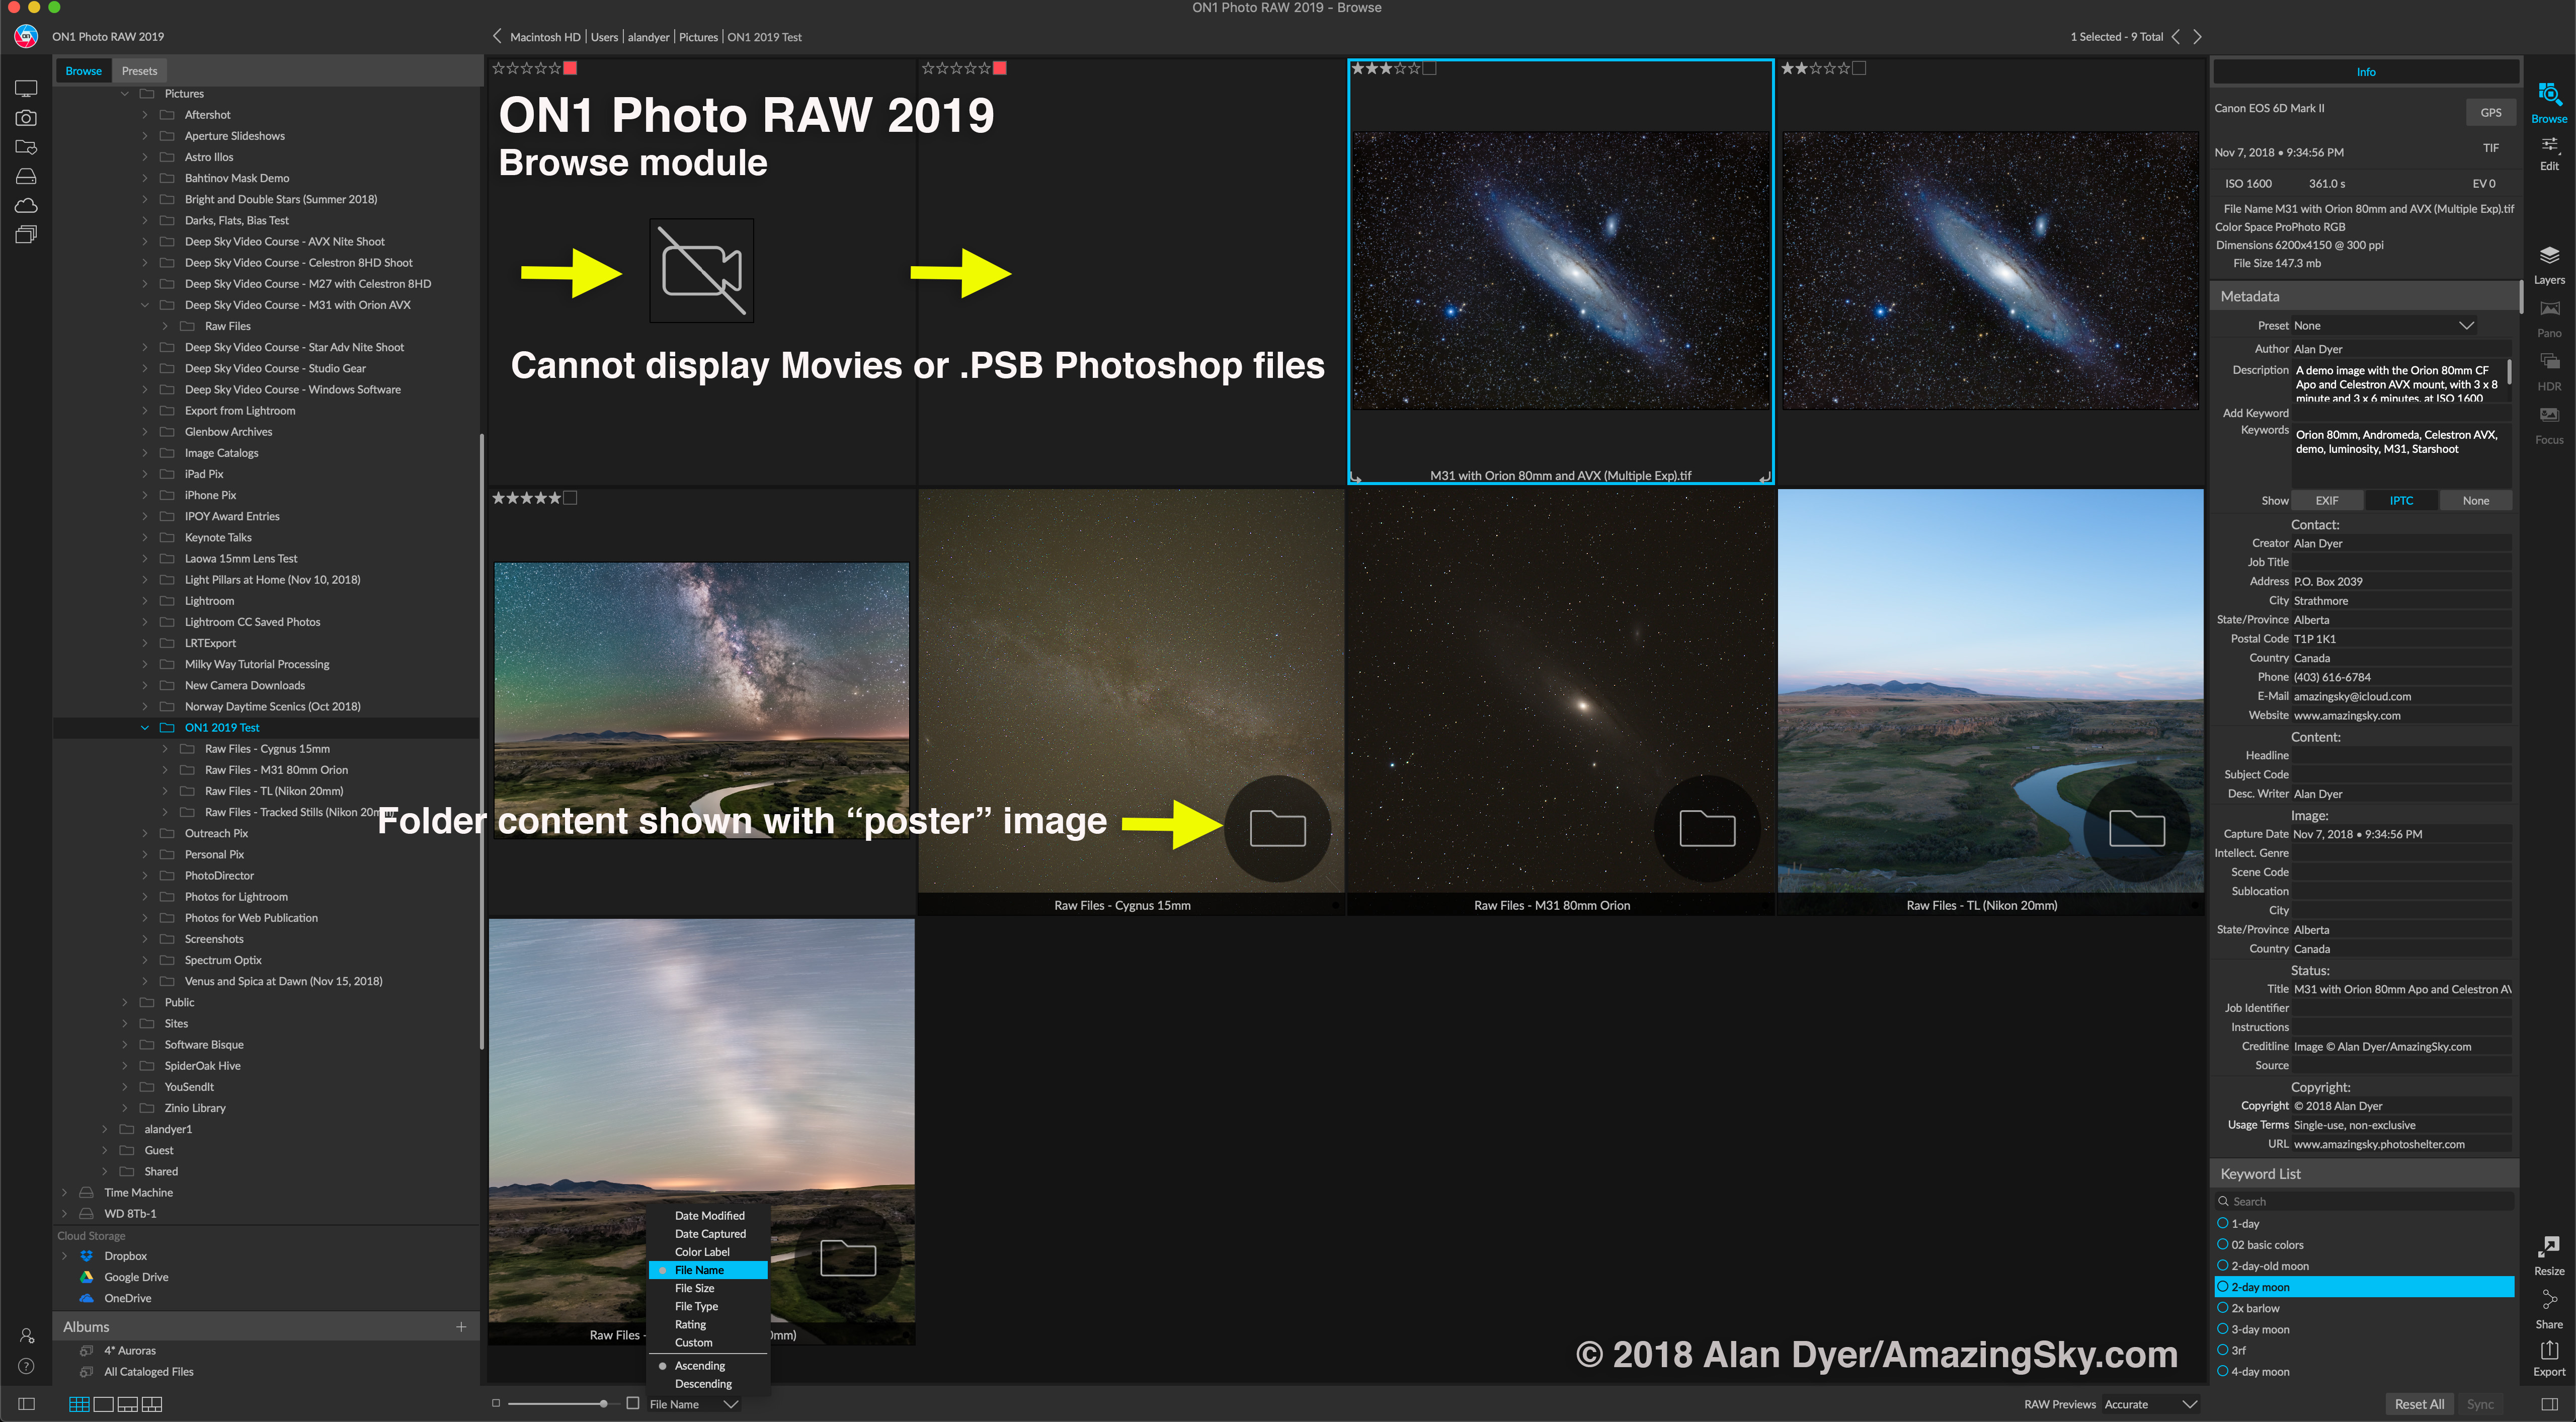
ON1 is sold first and foremost as a replacement for Adobe Lightroom, and to that extent it can work well. Unlike Lightroom, ON1 allows browsing and working on images without having to import them formally into a catalog.
However, you can create a catalog if you wish, one that can be viewed even if the original images are not “on-line.” The mystery seems to be where ON1 puts its catalog file on your hard drive. I was not able to find it, to manually back it up. Other programs, such as Lightroom and Capture One, locate their catalogs out in the open in the Pictures folder.
For those really wanting a divorce from Adobe, ON1 now offers an intelligent AI-based function for importing Lightroom catalogs and transferring all your Lightroom settings you’ve applied to raw files to ON1’s equivalent controls.
However, while ON1 can read Photoshop PSD files, it will flatten them, so you would lose access to all the original image layers.
ON1’s Browse module is good, with many of the same functions as Lightroom, such as “smart collections.” Affinity Photo – perhaps ON1’s closest competitor as a Photoshop replacement – still lacks anything like it.
But I found ON1’s Browse module buggy, often taking a long while to allow access into a folder, presumably while it is rendering image previews.
There are no plug-ins or extensions for exporting directly to or synching to social media and photo sharing sites.
Nightscape Processing – Developing Raw Images

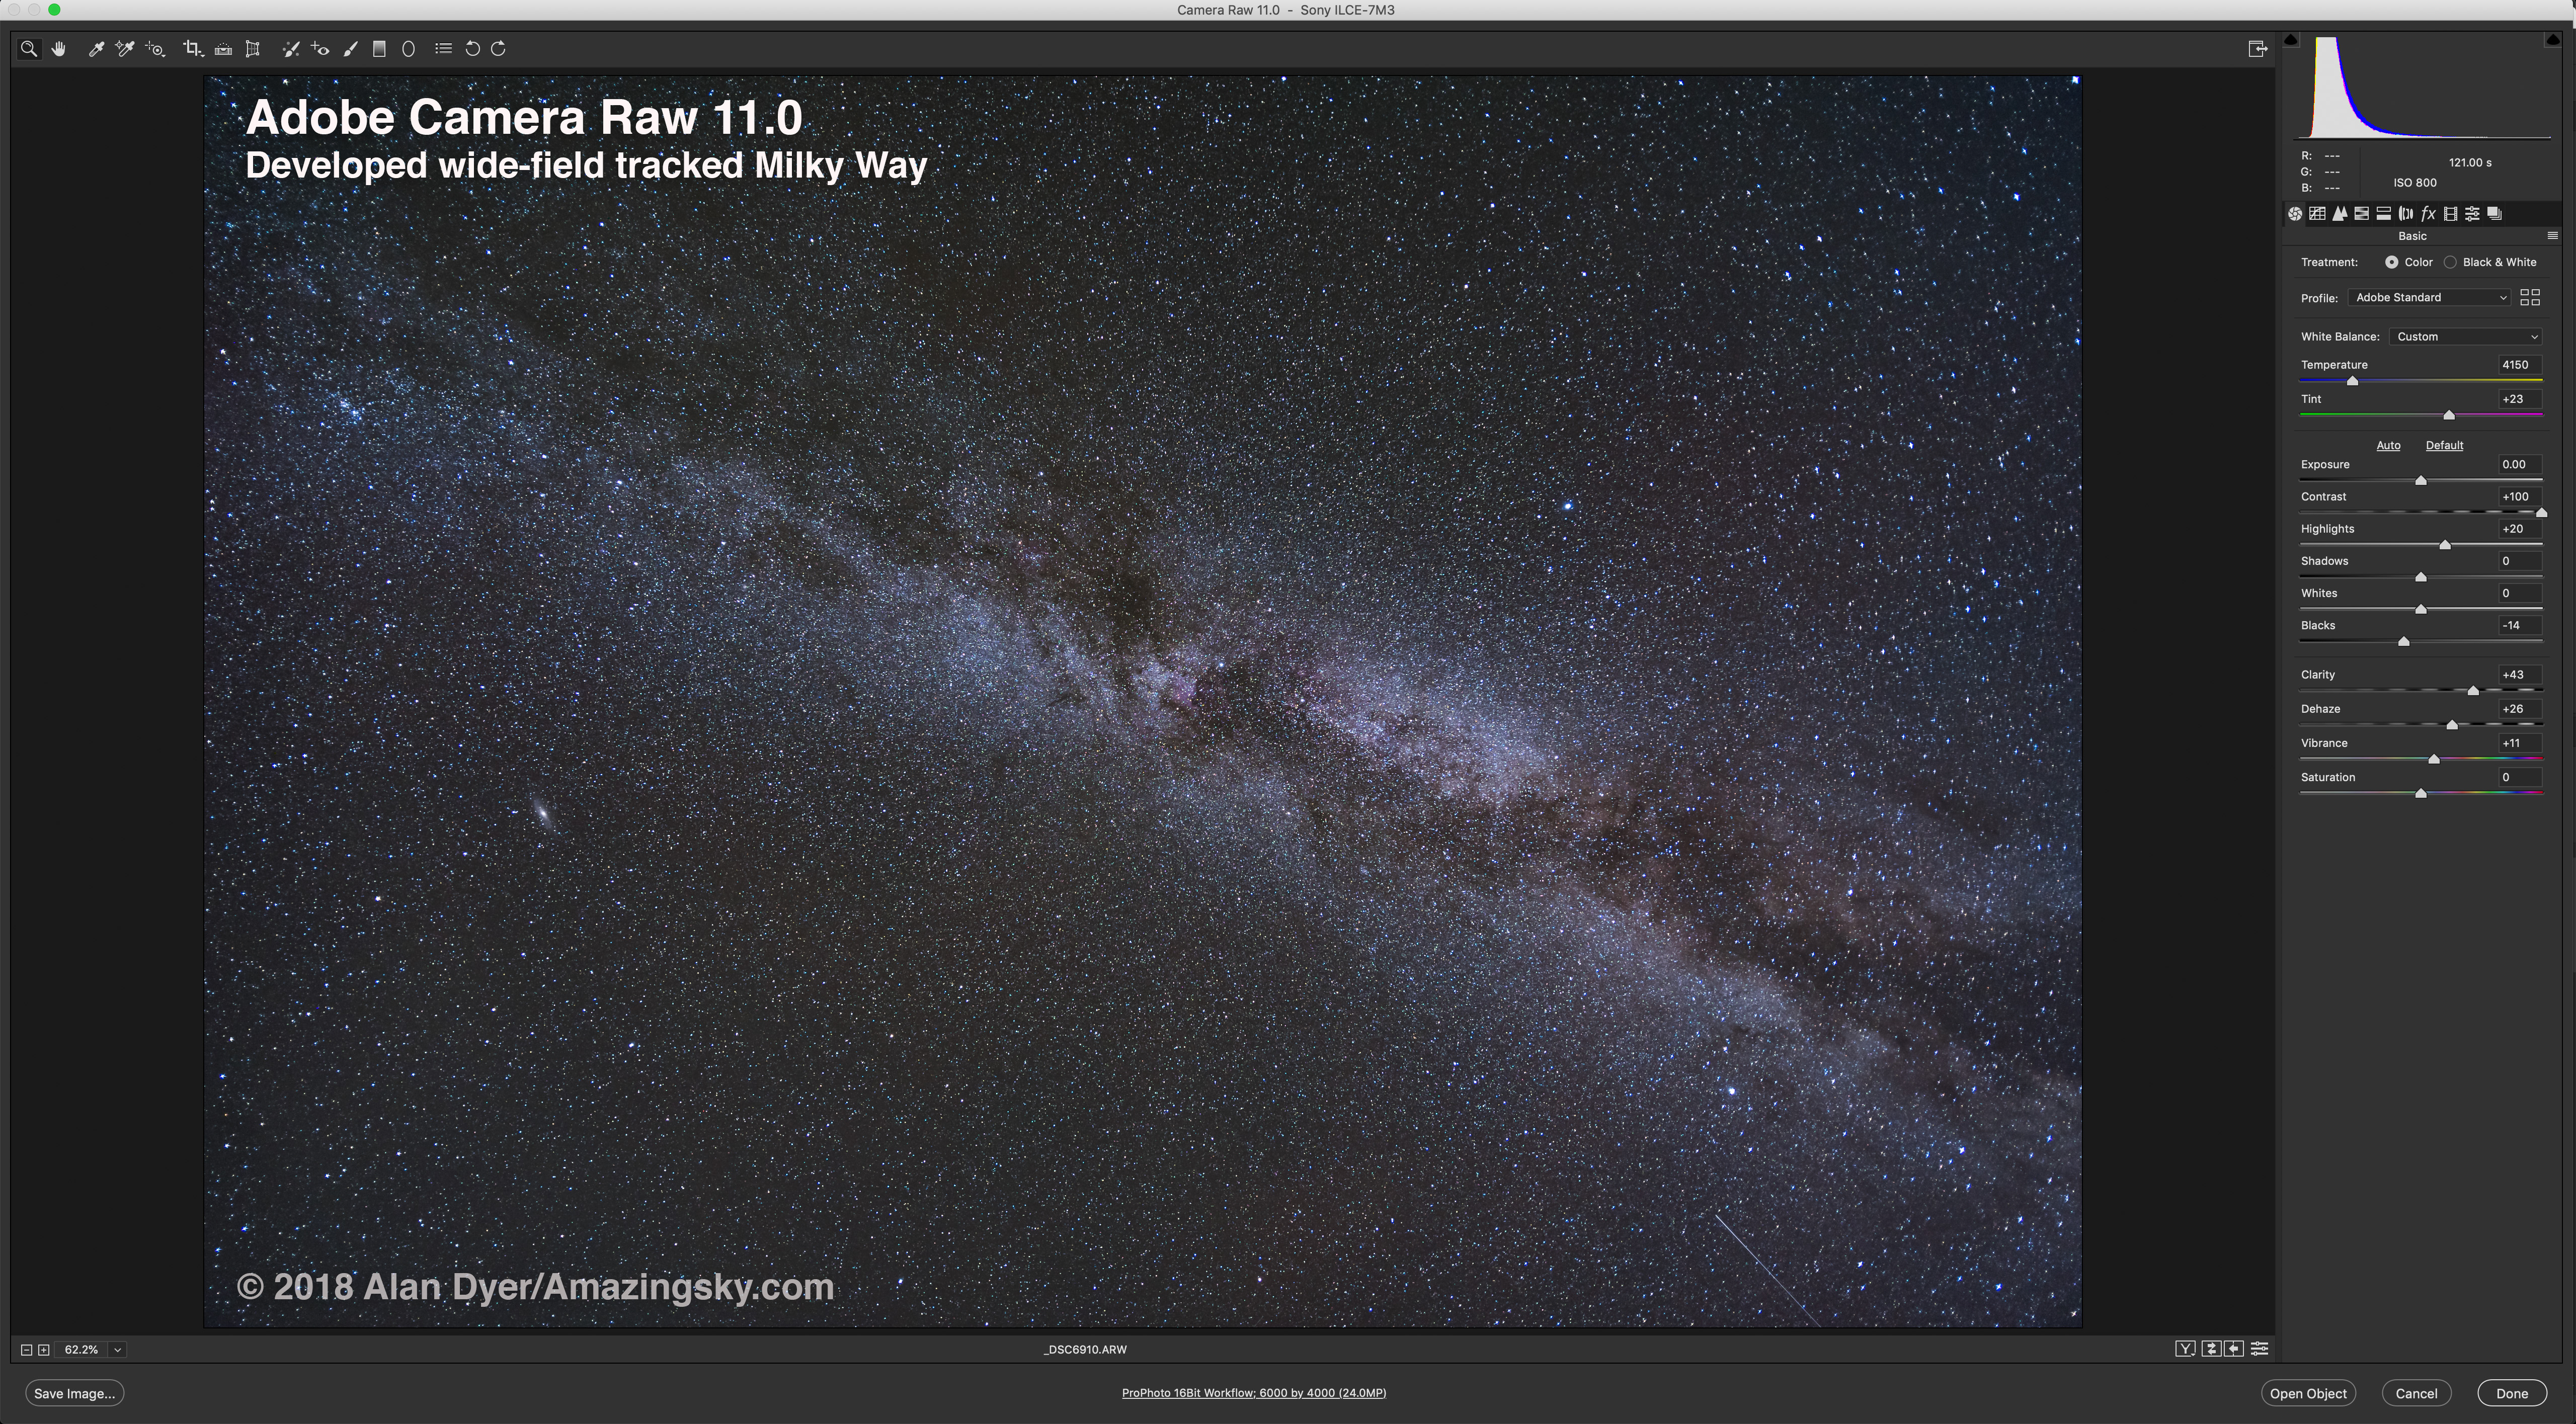
For this test I used the same nightscape image I threw at Adobe competitors a year ago, in a test of a dozen or more raw developers. It is a 2-minute tracked exposure with a Sigma 20mm Art lens at f/2 and Nikon D750 at ISO 1600.
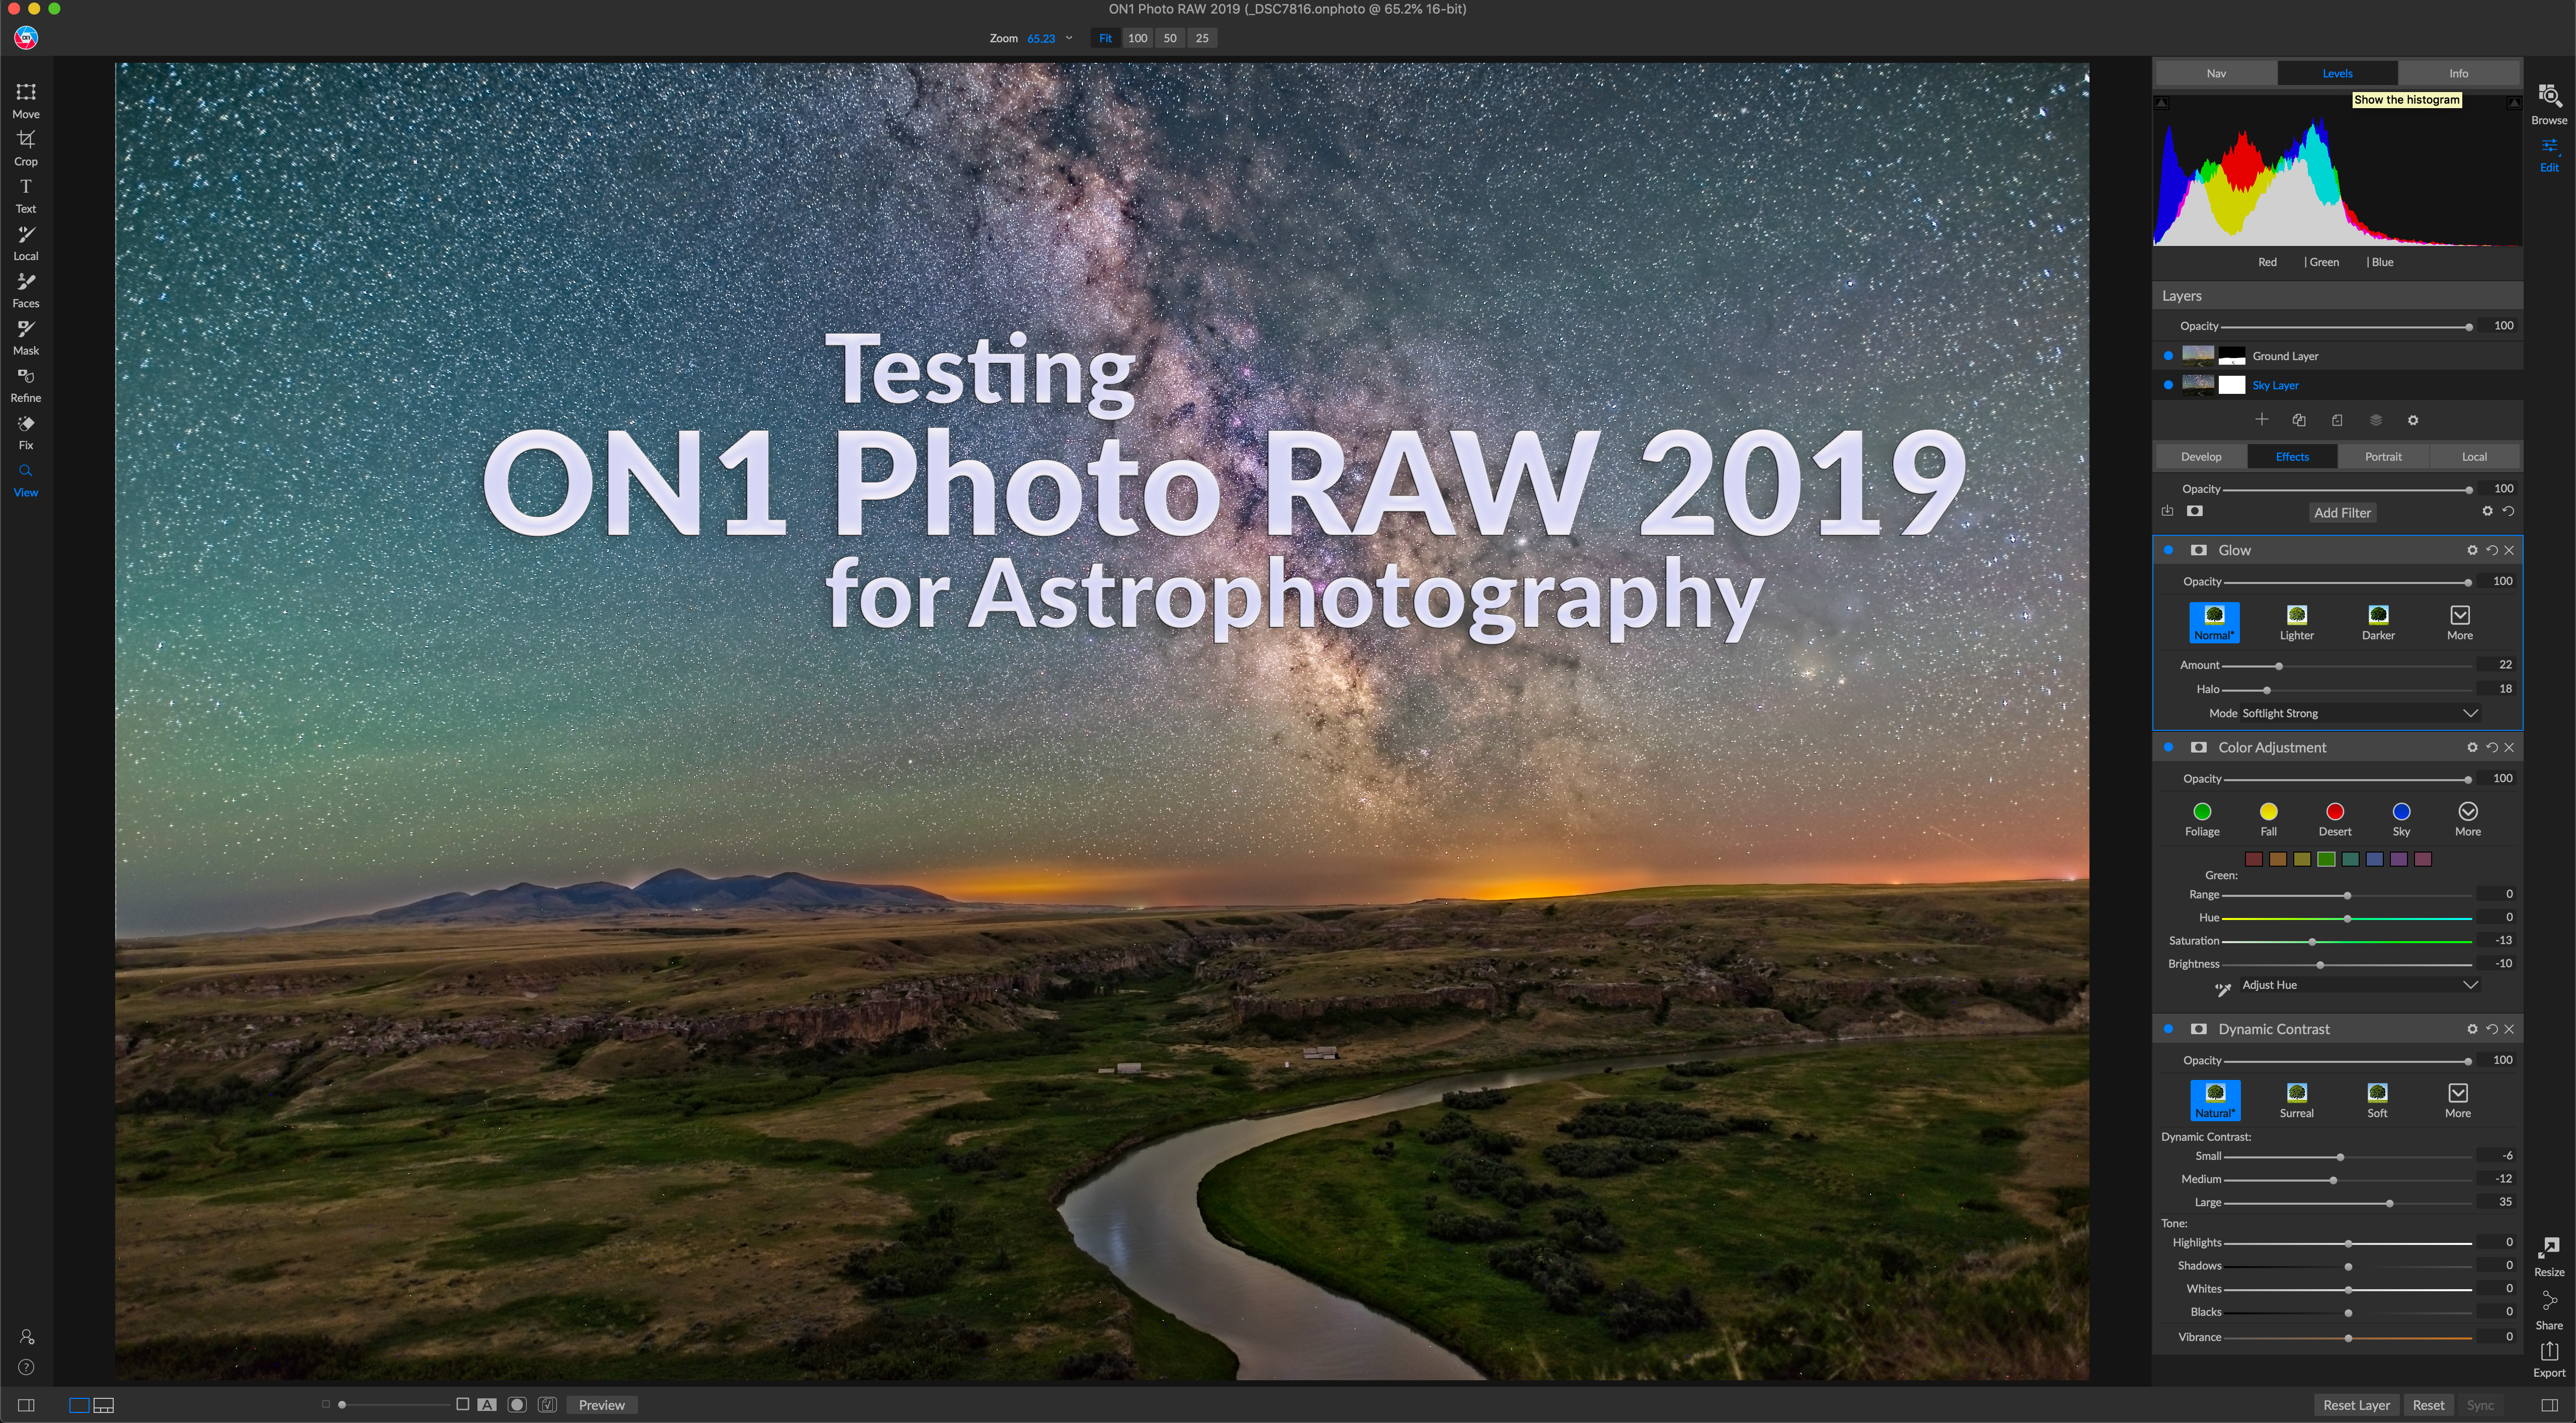
ON1 did a fairly good job. Some of its special effect filters, such a Dynamic Contrast, Glow, and Sunshine, can help bring out the Milky Way, though do add an artistic “look” to an image which you might or might not like.
Below, I compare Adobe Camera Raw (ACR) to ON1. It was tough to get ON1’s image looking the same as ACR’s result, but then again, perhaps that’s not the point. Does it just look good? Yes, it does.

Compared to Adobe Camera Raw, which has a good array of basic settings, ON1 has most of those and more, in the form of many special Effects, with many combined as one-click Presets, as shown below.

A few presets and individual filters – the aforementioned Dynamic Contrast and Glow – are valuable. However, most of ON1’s filters and presets will not be useful for astrophotography, unless you are after highly artistic and unnatural effects.
Noise Reduction and Lens Correction

Critical to all astrophotography is excellent noise reduction. ON1 does a fine job here, with good smoothing of noise without harming details.
Lens Correction works OK. It detected the 20mm Sigma art lens and automatically applied distortion correction, but not any vignetting (light “fall-off”) correction, perhaps the most important correction in nightscape work. You have to dial this in manually by eye, a major deficiency.
By comparison, ACR applies both distortion and vignetting correction automatically. It also includes settings for many manual lenses that you can select and apply in a click. For example, ACR (and Lightroom) includes settings for popular Rokinon and Venus Optics manual lenses; ON1 does not.
Hot Pixel Removal
I shot the example image on a warm summer night and without using in-camera Long Exposure Noise Reduction (to keep the gap between exposures short when shooting sets of tracked and untracked exposures for later compositing).
However, the penalty for not using LENR to expedite the image taking is a ground filled with hot pixels. While Adobe Camera Raw does have some level of hot pixel removal working “under the hood,” many specks remained.
ON1 showed more hot pixels, until you clicked Remove Hot Pixels, found under Details. As shown at centre above, it did a decent job getting rid of the worst offenders.
But as I’ll show later, the penalty is that stars now look distorted and sometimes double, or you get the outright removal of stars. ON1 doesn’t do a good job distinguishing between true sharp-edged hot pixels and the softer images of stars. Indeed, it tends to over sharpen stars.
A competitor, Capture One 11, does a better job, with an adjustable Single Pixel removal slider, so you can at least select the level of star loss you are willing to tolerate to get rid of hot pixels.
Star Image Quality

Yes, we are pixel peeping here, but that’s what we do in astrophotography. A lot!
Stars in ON1 don’t look as good as in Camera Raw. Inevitably, as you add contrast enhancements, stars in ON1 start to exhibit dark and unsightly “sharpening haloes” not present in ACR, despite me applying similar levels of sharpening and contrast boosts to each version of the image.
Camera Raw has been accused of producing images that are not as sharp as with other programs such as Capture One and ON1.
There’s a reason. Other programs over-sharpen, and it shows here.
We can get away with it here in wide-field images, but not later with deep-sky close-ups. I don’t like it. And it is unavoidable. The haloes are there, albeit at a low level, even with no sharpening or contrast enhancements applied, and no matter what image profile is selected (I used ON1 Standard throughout).
De-Bayering Artifacts


You might have to download and closely inspect these images to see the effect, but ON1’s de-Bayering routine exhibits a cross-hatched blocky pattern at the pixel-peeping level. ACR does not.
I see this same effect with some other raw developers. For example, the free Raw Therapee shows it with many of its choices for de-Bayering algorithms, but not all. Of the more than a dozen raw developers I tested a year ago, ACR and DxO PhotoLab had (and still have) the most artifact-free de-Bayering and smoothest noise reduction
Again, we can get away with some pixel-level artifacts here, but not later, in deep-sky processing.
Nightscape Processing — Layering and Compositing

Compositing
The 2018 version of ON1 forced you to destructively flatten images when bringing them into the Layers module.
The 2019 version of ON1 improves that. It is now possible to composite several raw files into one image and still retain all the original Develop and Effects settings for non-destructive work.
You can then use a range of masking tools to mask in or out the sky.
For the example above, I have stacked tracked and untracked exposures, and am starting to mask out the trailed stars from the untracked exposure layer.
To do this with Adobe, you would have to open the developed raw files in Photoshop (ideally using “smart objects” to retain the link back to the raw files). But with ON1 we stay within the same program, to retain access to non-destructive settings. Very nice!
To add masks, ON1 2019 does not have the equivalent of Photoshop’s excellent Quick Selection Tool for selecting the sky or ground. It does have a “Perfect Brush” option which uses the tonal value of the pixels below it, rather than detecting edges, to avoid “painting over the lines.”
While the Perfect Brush does a decent job, it still requires a lot of hand painting to create an accurate mask without holes and defects. There is no non-destructive “Select and Mask” refinement option as in Photoshop.
Yes, ON1’s Refine Brush and Chisel Mask tools can help clean up a mask edge but are destructive to the mask. That’s not acceptable to my non-destructive mindset!
Local Adjustments

The masking tools are also applicable to adding “Local Adjustments” to any image layer, to brighten or darken regions of an image for example.
These work well and I find them more intuitive than the “pins” ACR uses on raw files, or DxO PhotoLab’s quirky “U-Point” interface.
ON1’s Local Adjustments work more like Photoshop’s Adjustment Layers and are similarly non-destructive. Excellent.
Luminosity Masks
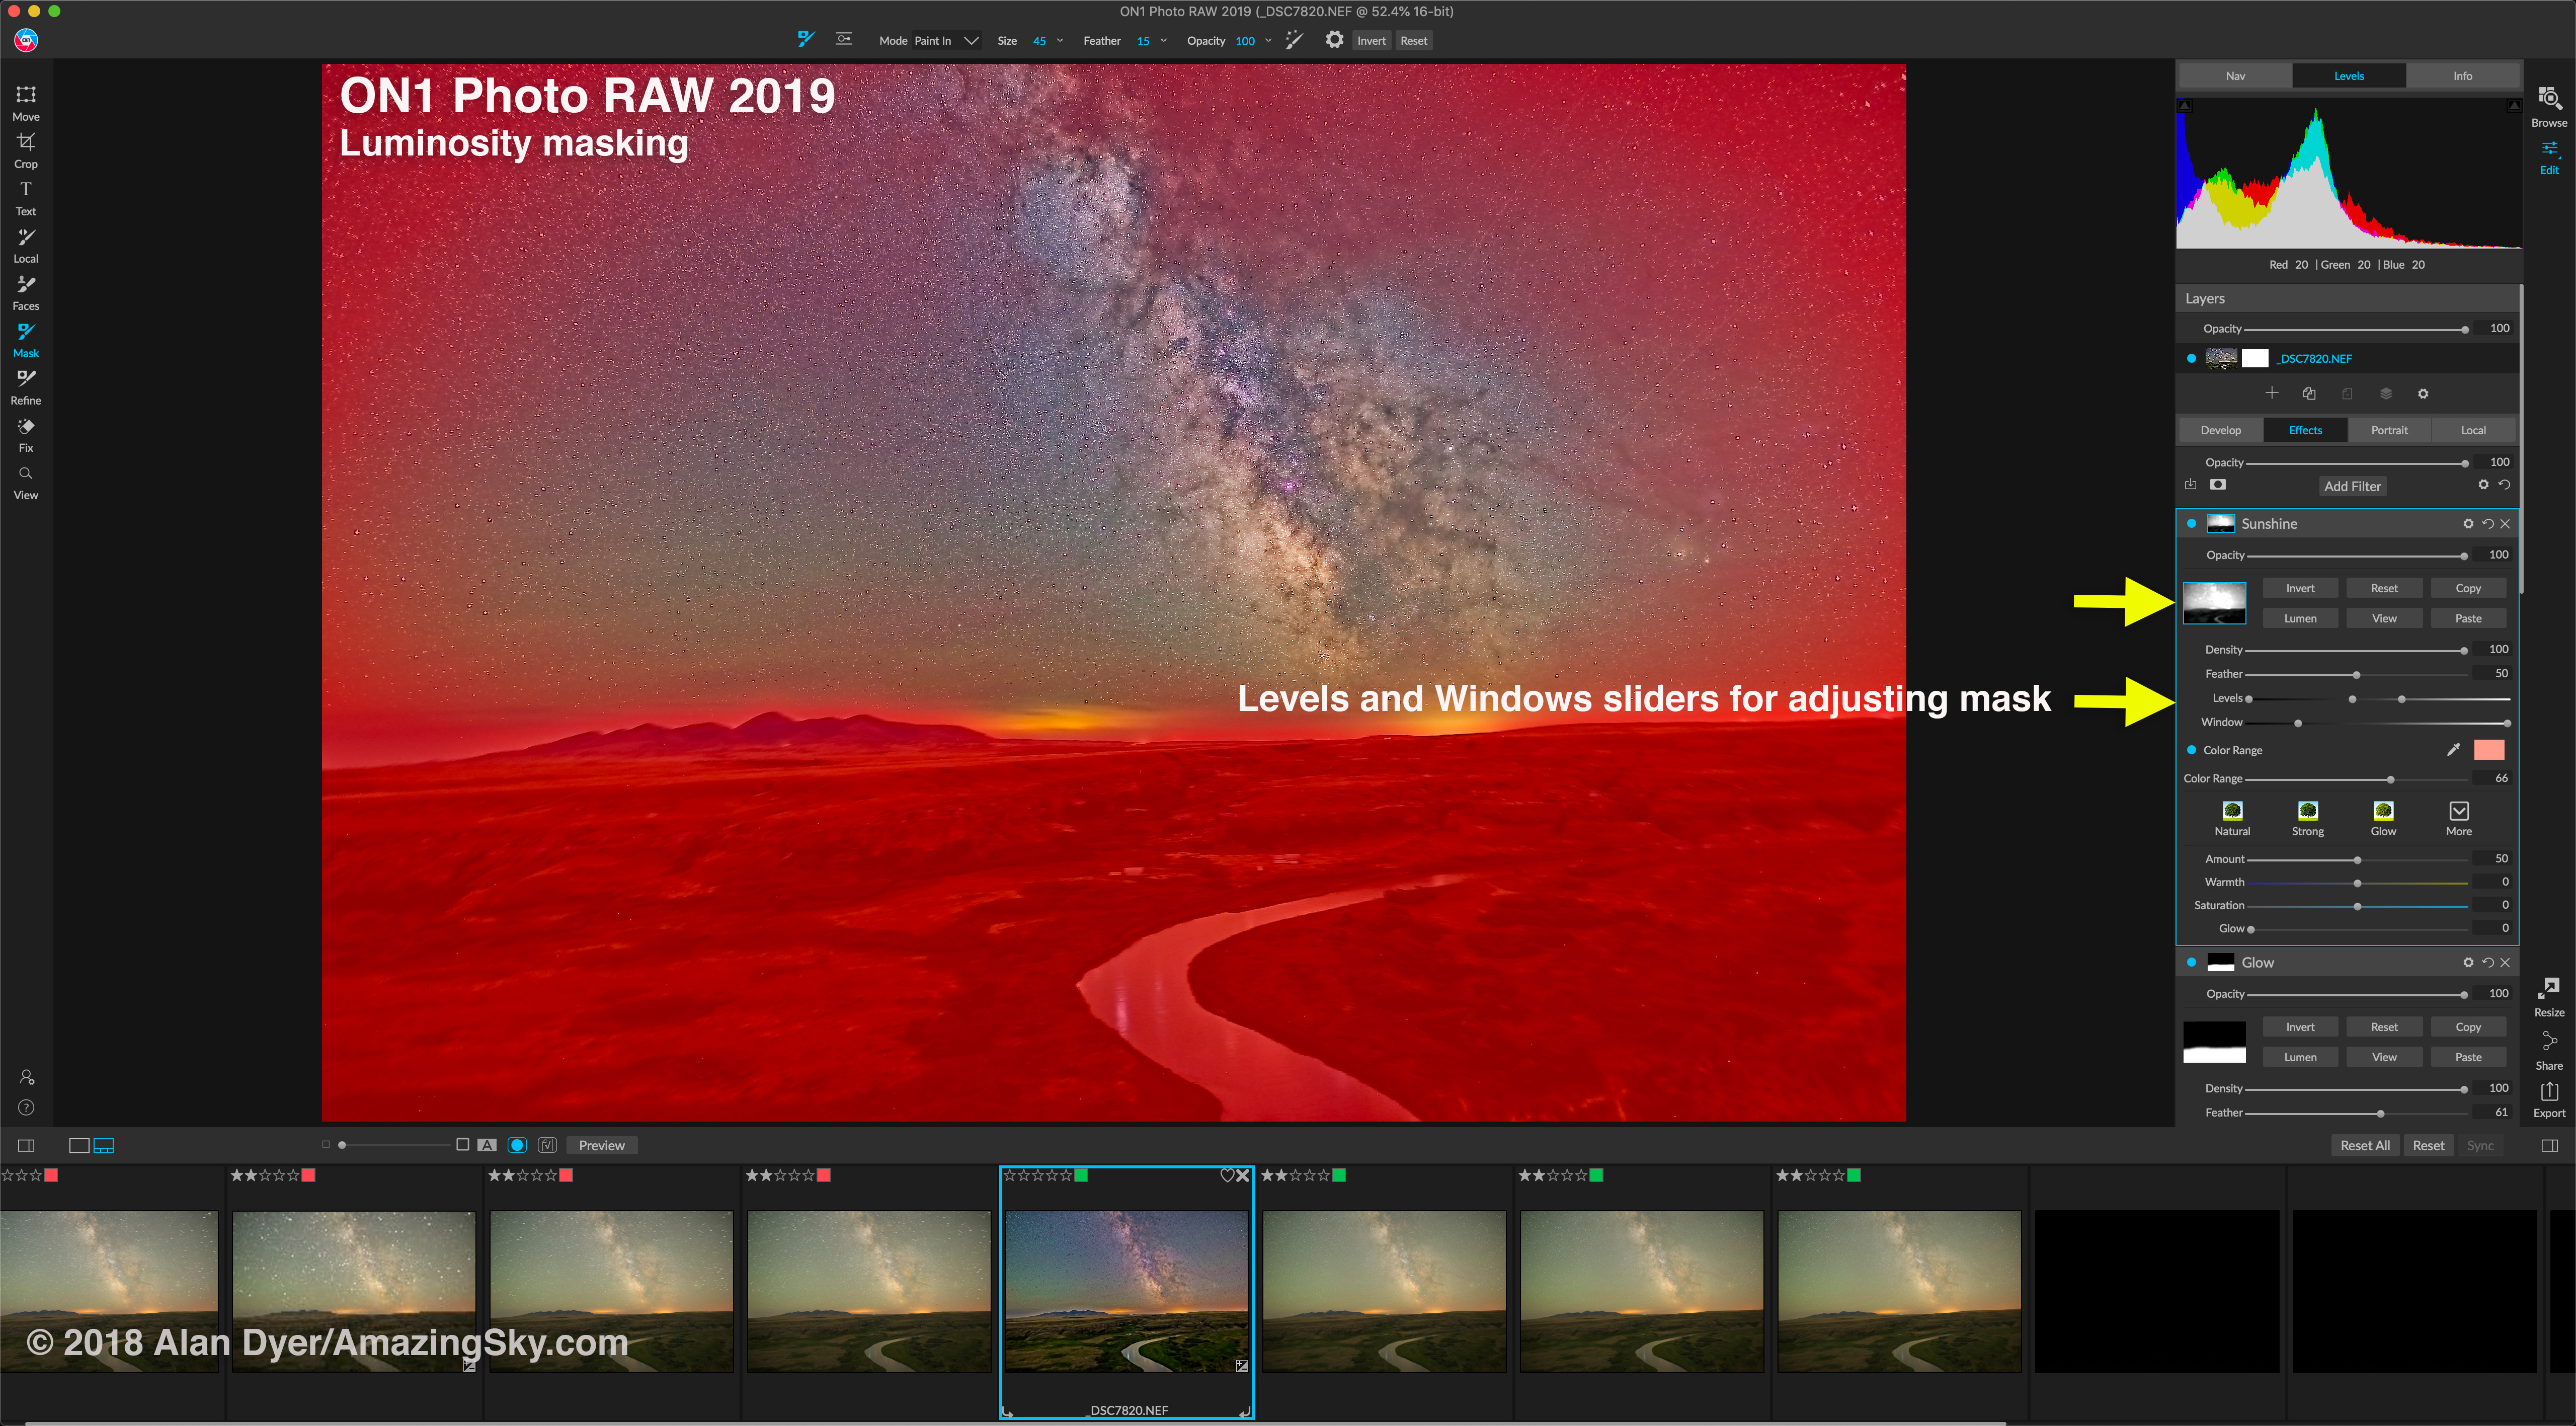
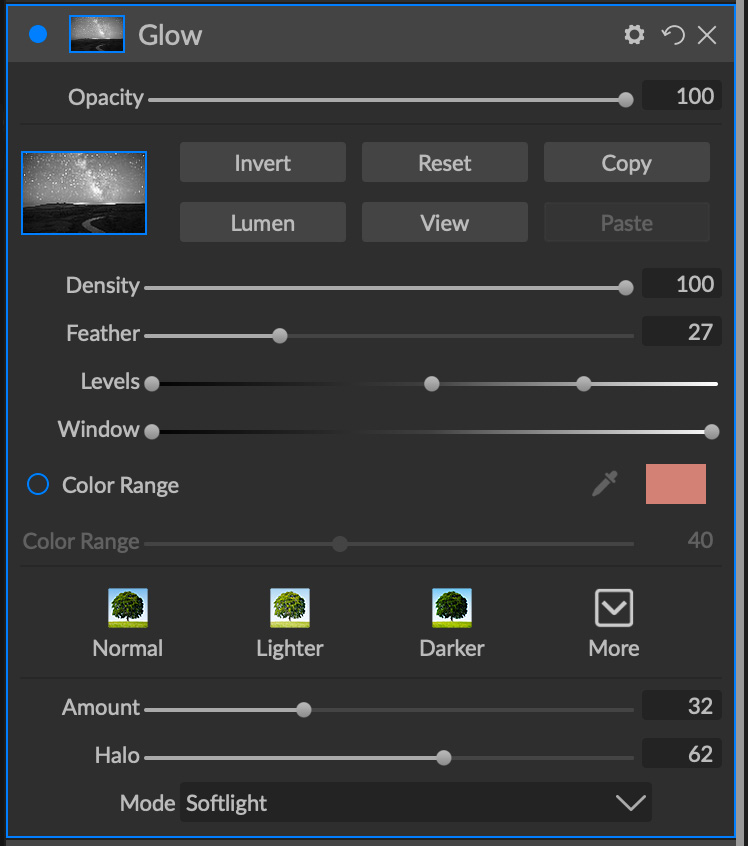
A very powerful feature of ON1 is its built-in Luminosity masking.
Yes, Camera Raw now has Range Masks, and Photoshop can be used to create luminosity masks, but making Photoshop’s luminosity masks easily adjustable requires purchasing third-party extension panels.
ON1 can create an adjustable and non-destructive luminosity mask on any image or adjustment layer with a click.
While such masks, based on the brightness of areas, aren’t so useful for low-contrast images like the Milky Way scene above, they can be very powerful for merging high-contrast images (though ON1 also has an HDR function not tested here).
ON1 has the advantage here. Its Luminosity masks are a great feature for compositing exposures or for working on regions of bright and dark in an image.
Final Composite
Here again is the final result, above.
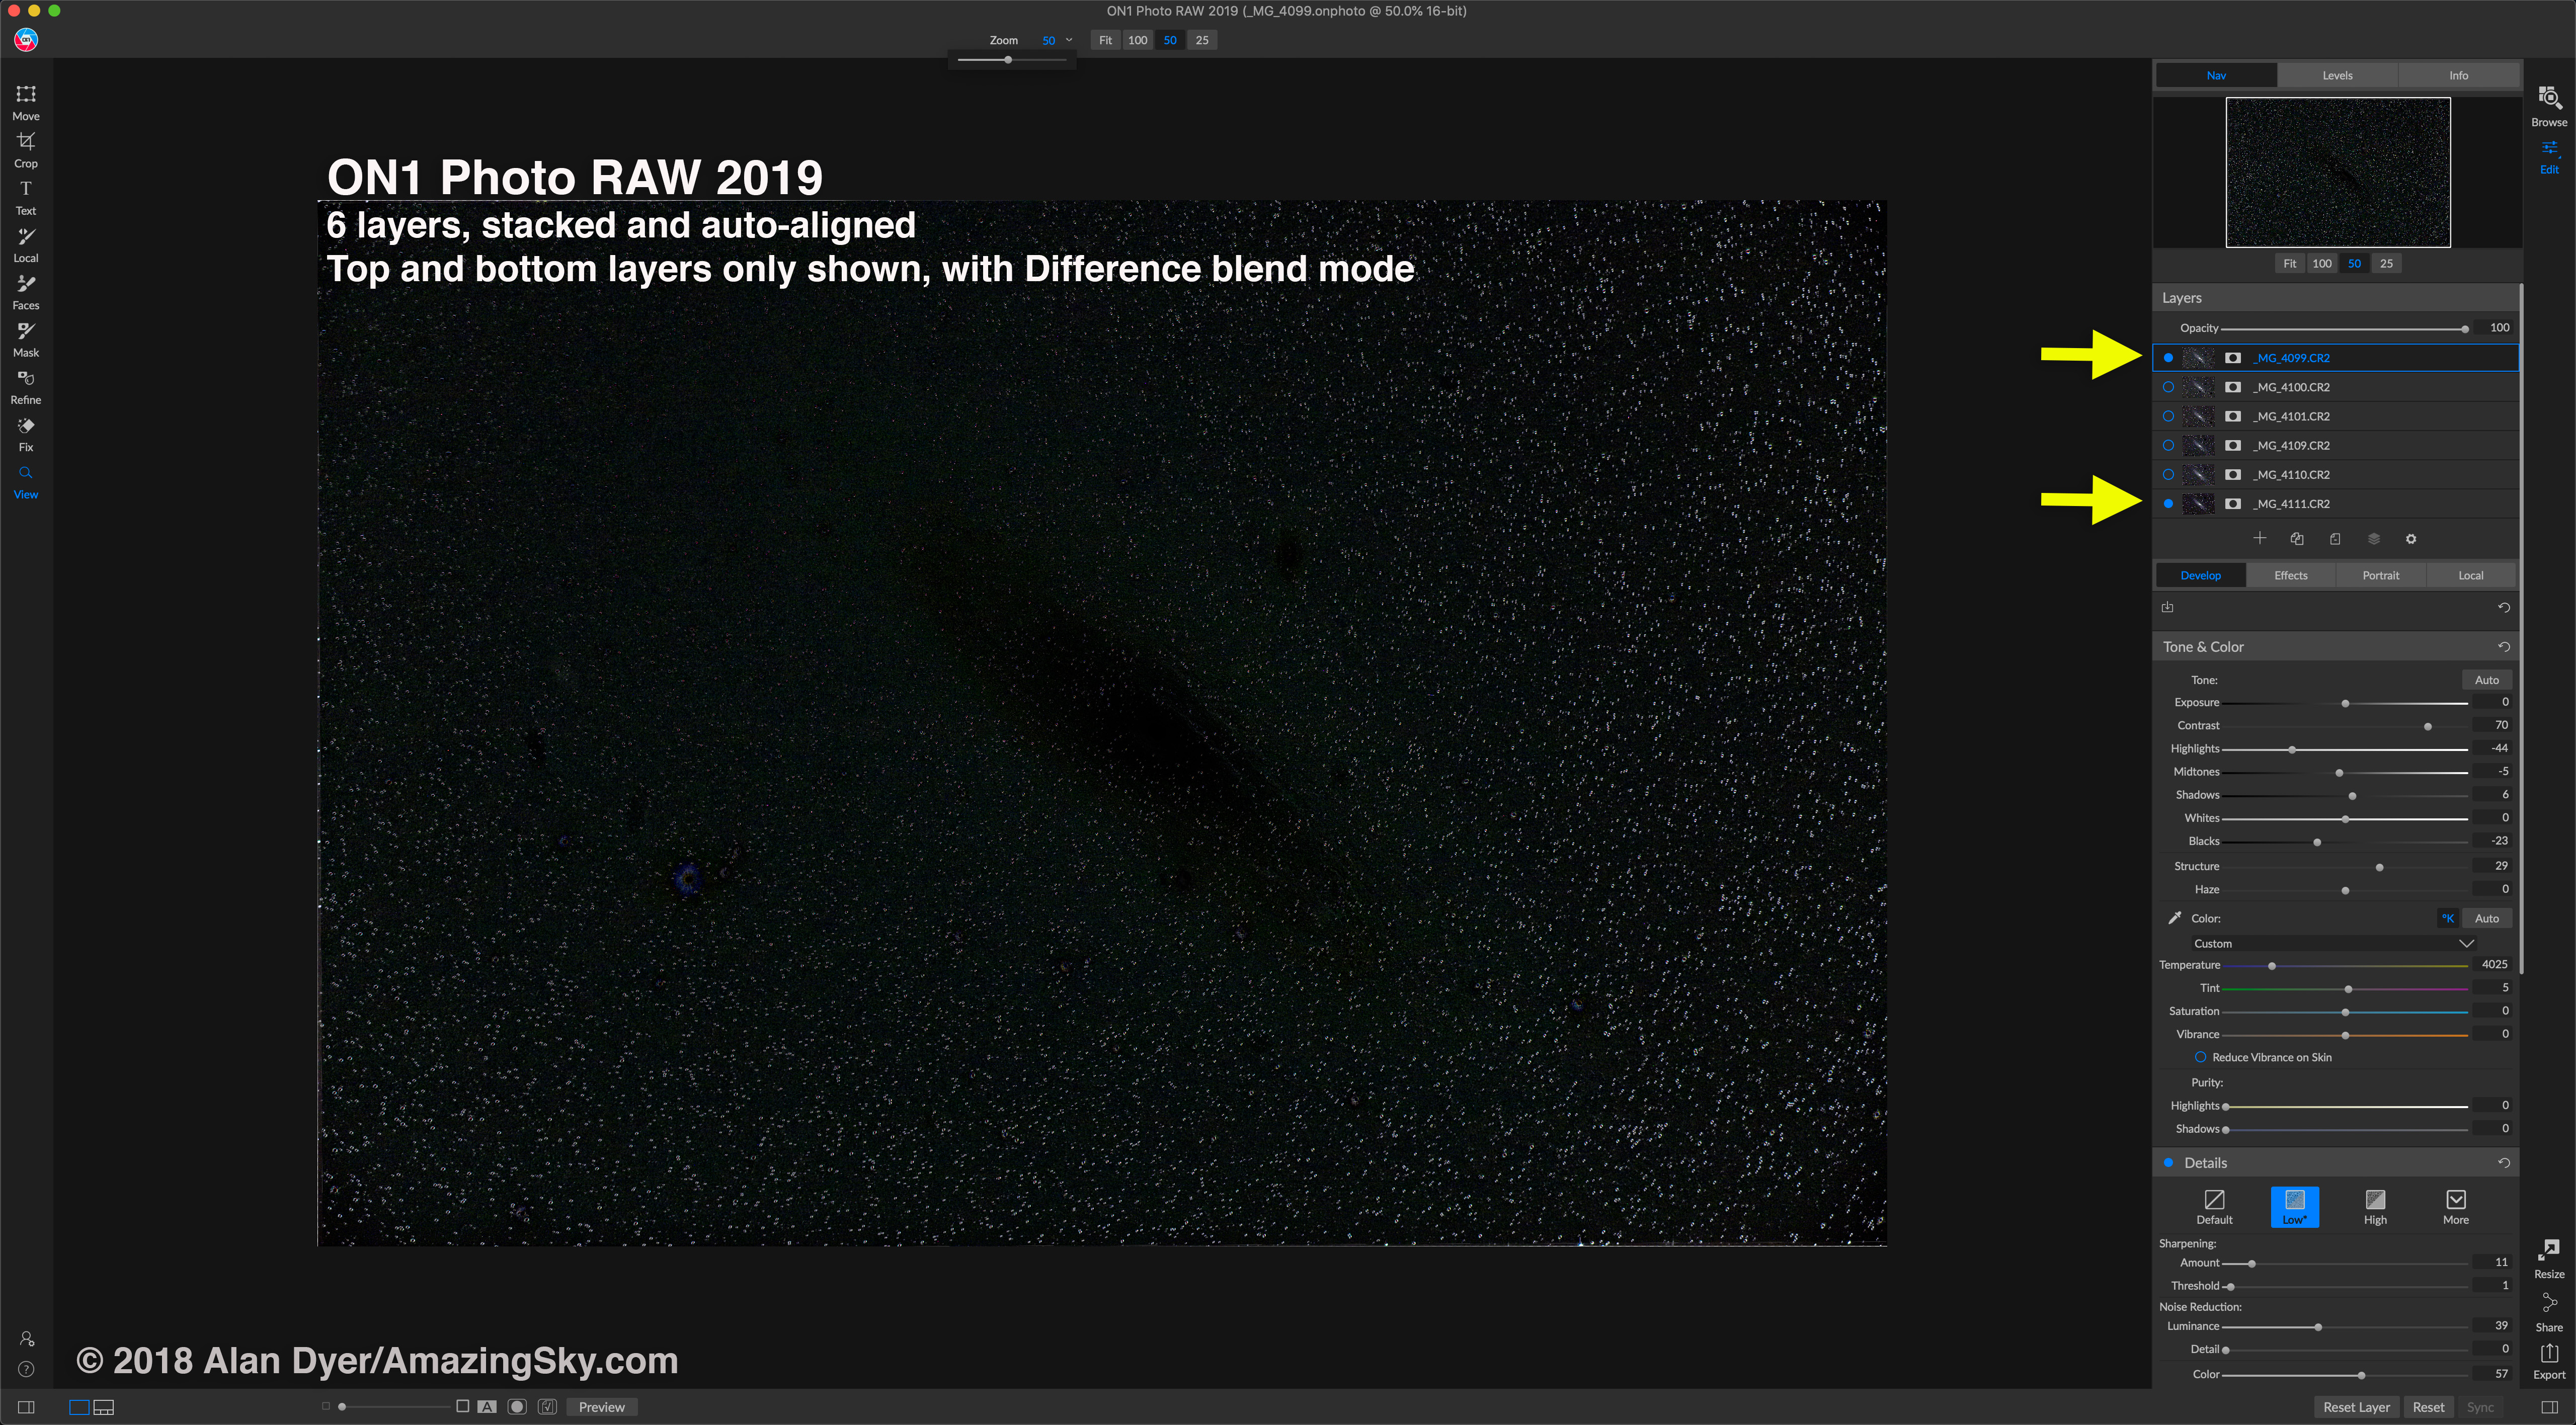
It is not just one image each for the sky and ground, but is instead a stack of four images for each half of the composite, to smooth noise. This form of stacking is somewhat unique to astrophotography, and is commonly used to reduce noise in nightscapes and in deep-sky images, as shown later.
Stacking
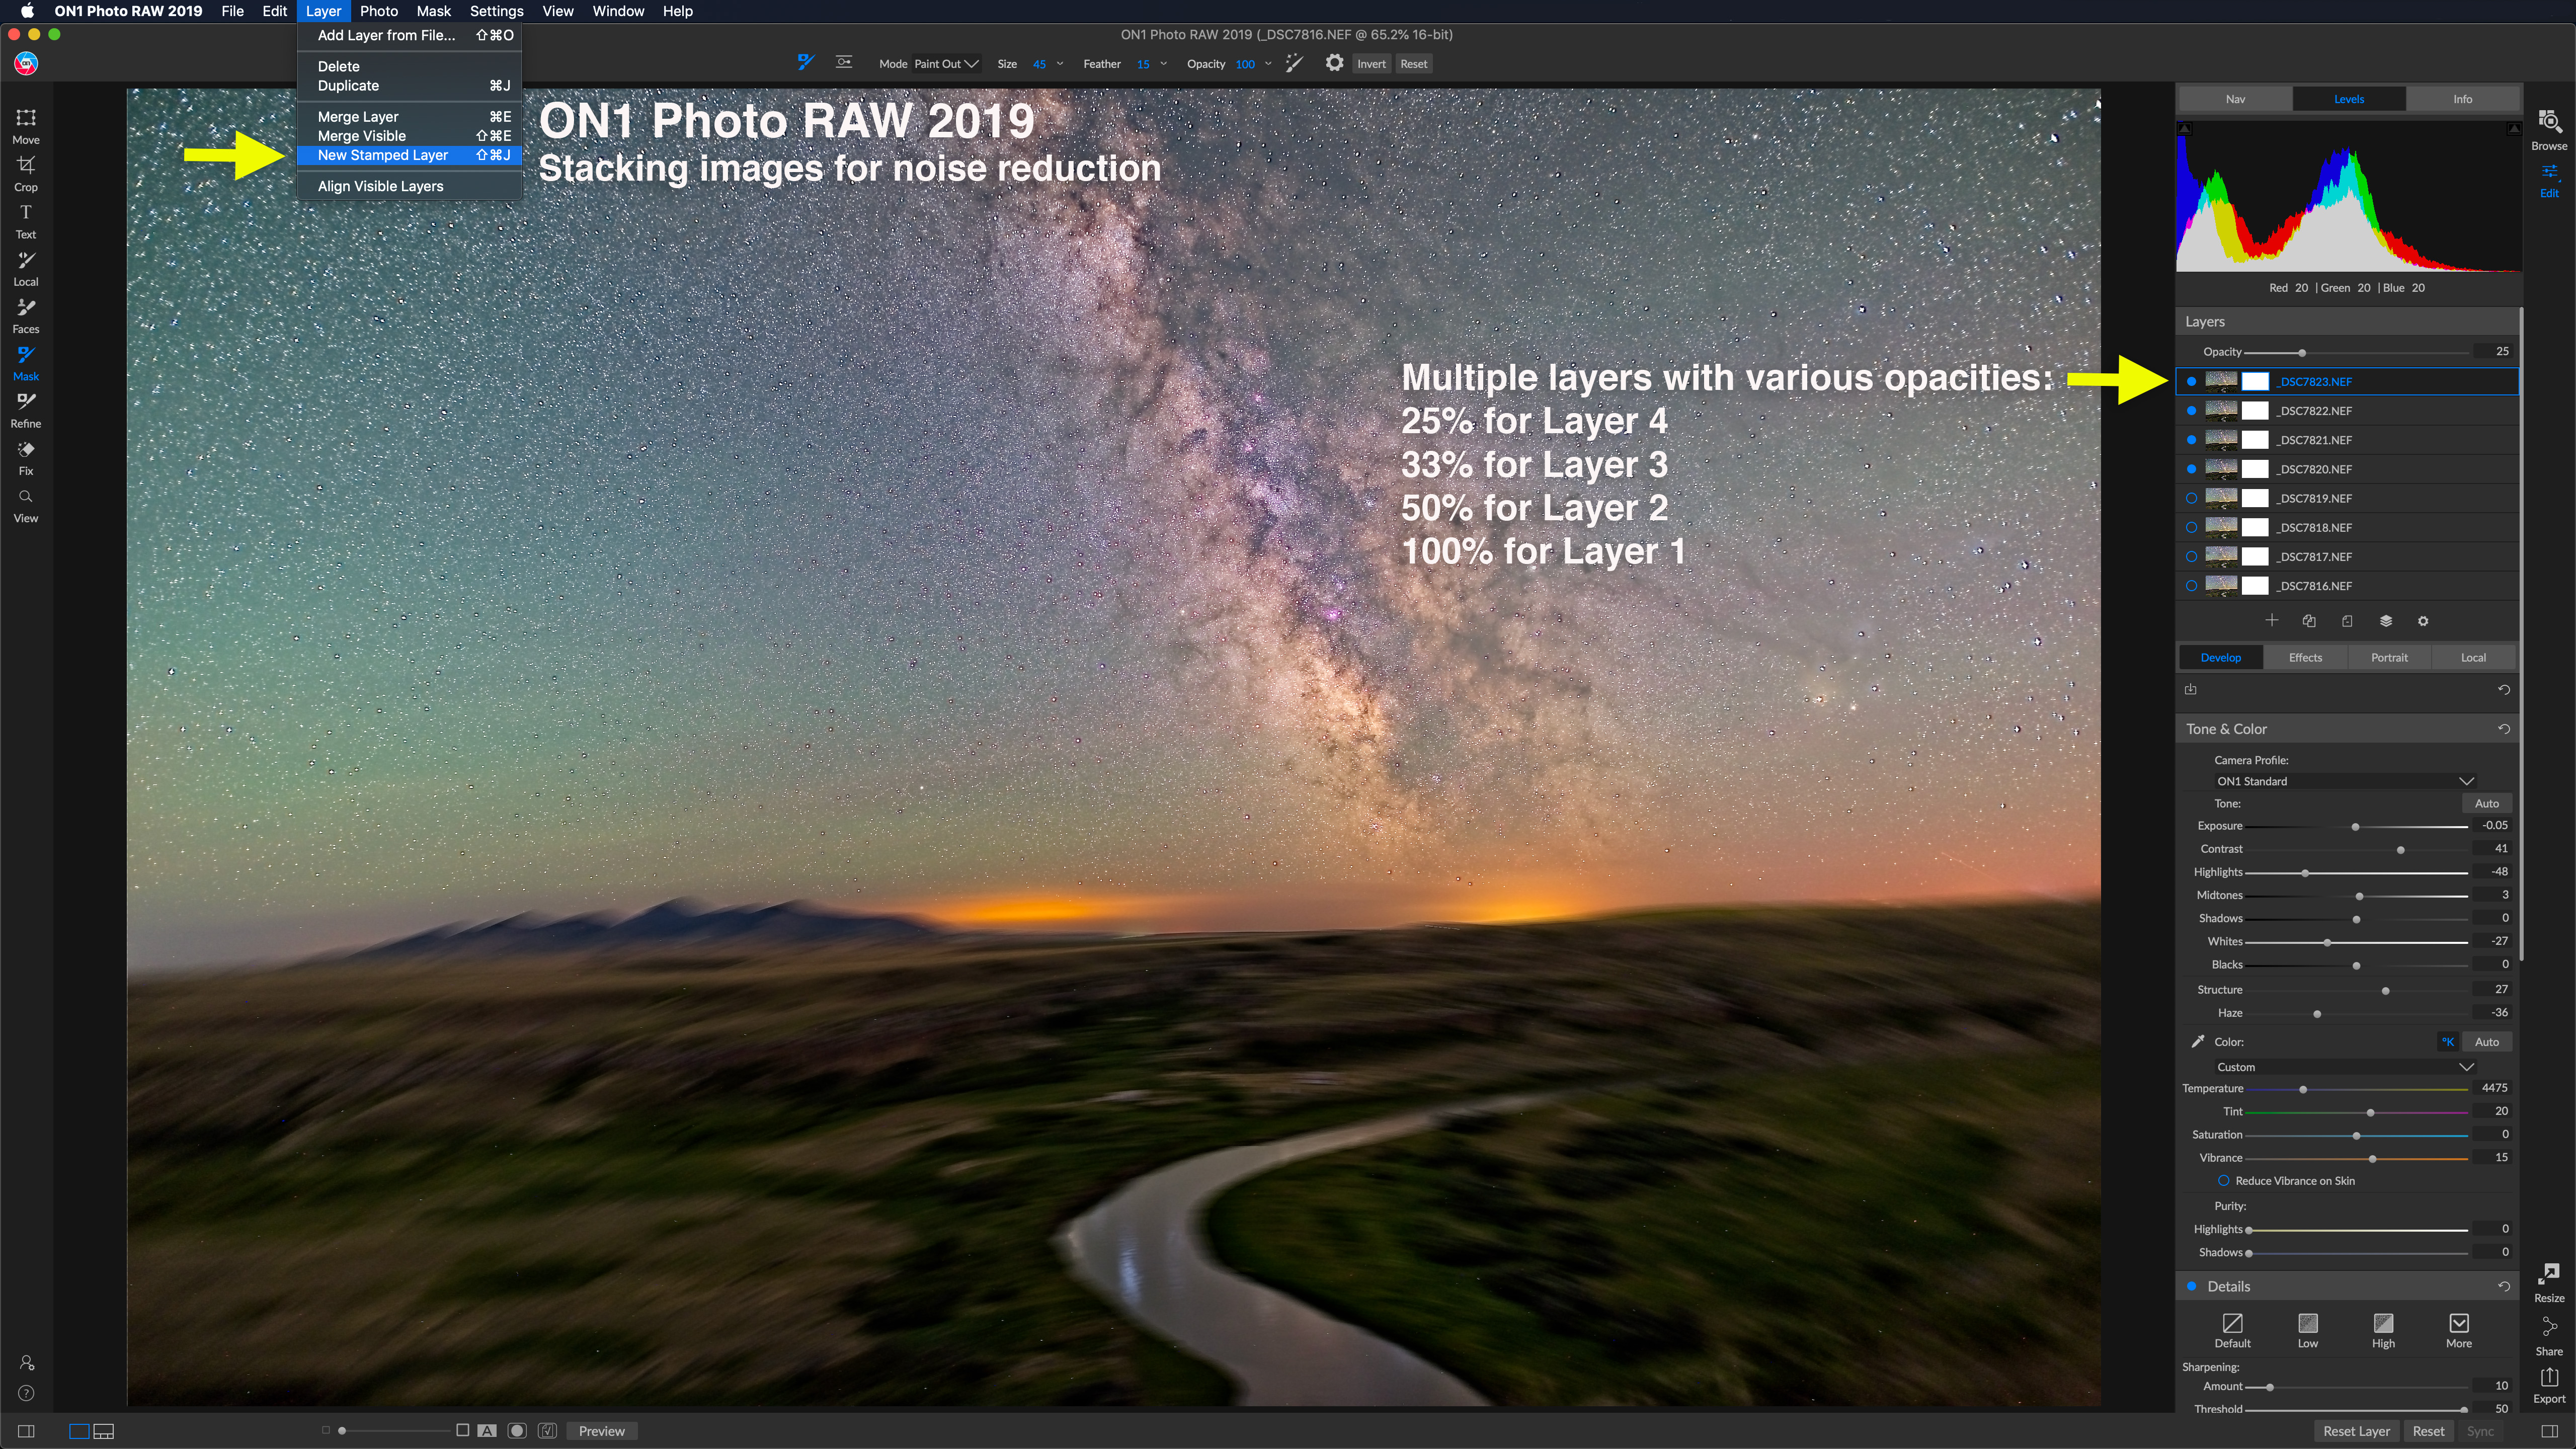
Here I show how you have to stack images in ON1.
Unlike Photoshop and Affinity Photo, ON1 does not have the ability to merge images automatically into a stack and apply a mathematical averaging to the stack, usually a Mean or Median stack mode. The averaging of the image content is what reduces the random noise.
Instead, with ON1 you have perform an “old school” method of average stacking – by changing the opacity of the layers, so that Layer 2 = 50%, Layer 3 = 33%, Layer 4 = 25%, and so on. The result is identical to performing a Mean stack mode in Photoshop or Affinity.
Fine, except there is no way to perform a Median stack, which can be helpful for eliminating odd elements present in only one frame, perhaps an aircraft trail.
Copy and Paste Settings
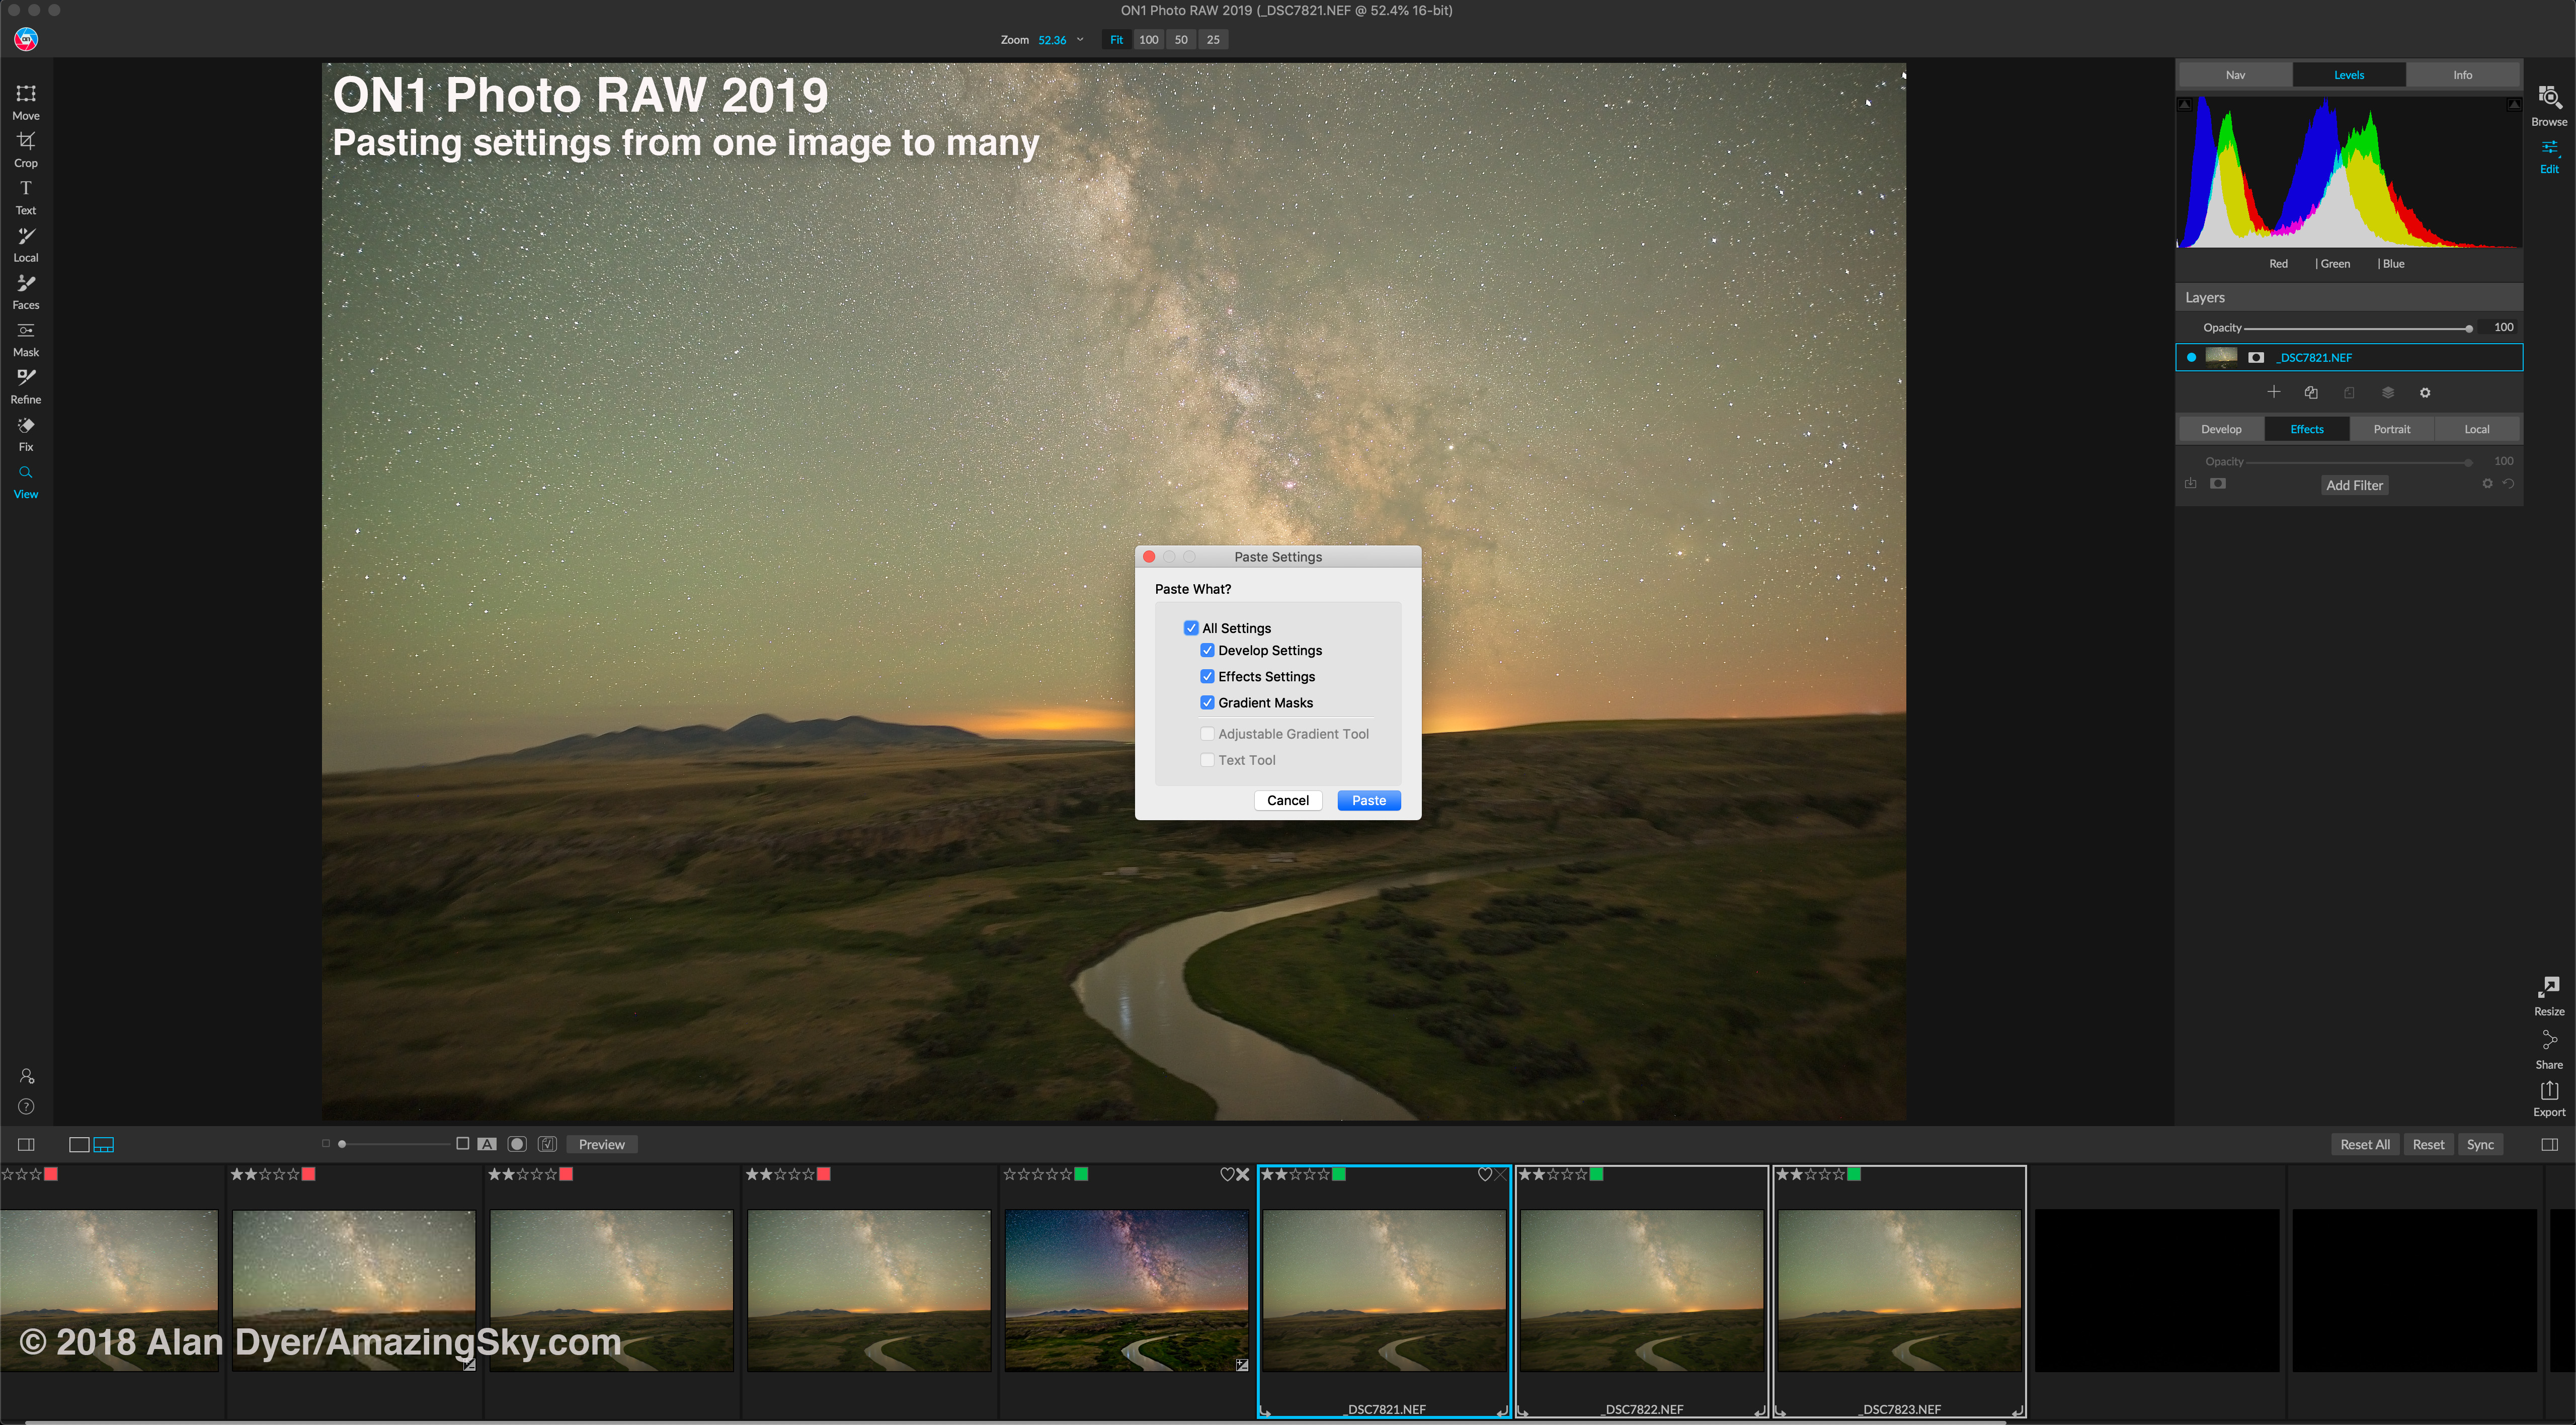
Before we even get to the stacking stage, we have to develop and process all the images in a set. Unlike Lightroom or Camera Raw, ON1 can’t develop and synchronize settings to a set of images at once. You can work on only one image at a time.
So, you work on one image (one of the sky images here), then Copy and Paste its settings to the other images in the set. I show the Paste dialog box here.
This works OK, though I did find some bugs – the masks for some global Effects layers did not copy properly; they copied inverted, as black instead of white masks.
However, Luminosity masks did copy from image to image, which is surprising considering the next point.
The greater limitation is that no Local Adjustments (ones with masks to paint in a correction to a selected area) copy from one image to another … except ones with gradient masks. Why the restriction?
So as wonderful as ON1’s masking tools might be, they aren’t of any use if you want to copy their masked adjustments across several images, or, as shown next, to a large time-lapse set.
While Camera Raw’s and Lightroom’s Local Adjustment pins are more awkward to work with, they do copy across as many images as you like.
Time-Lapse Processing

A few Adobe competitors, such as Affinity Photo (as of this writing) simply can’t do this.
By comparison, with the exception of Local Adjustments, ON1 does have good functions for Copying and Pasting Settings. These are essential for processing a set of hundreds of time-lapse frames.
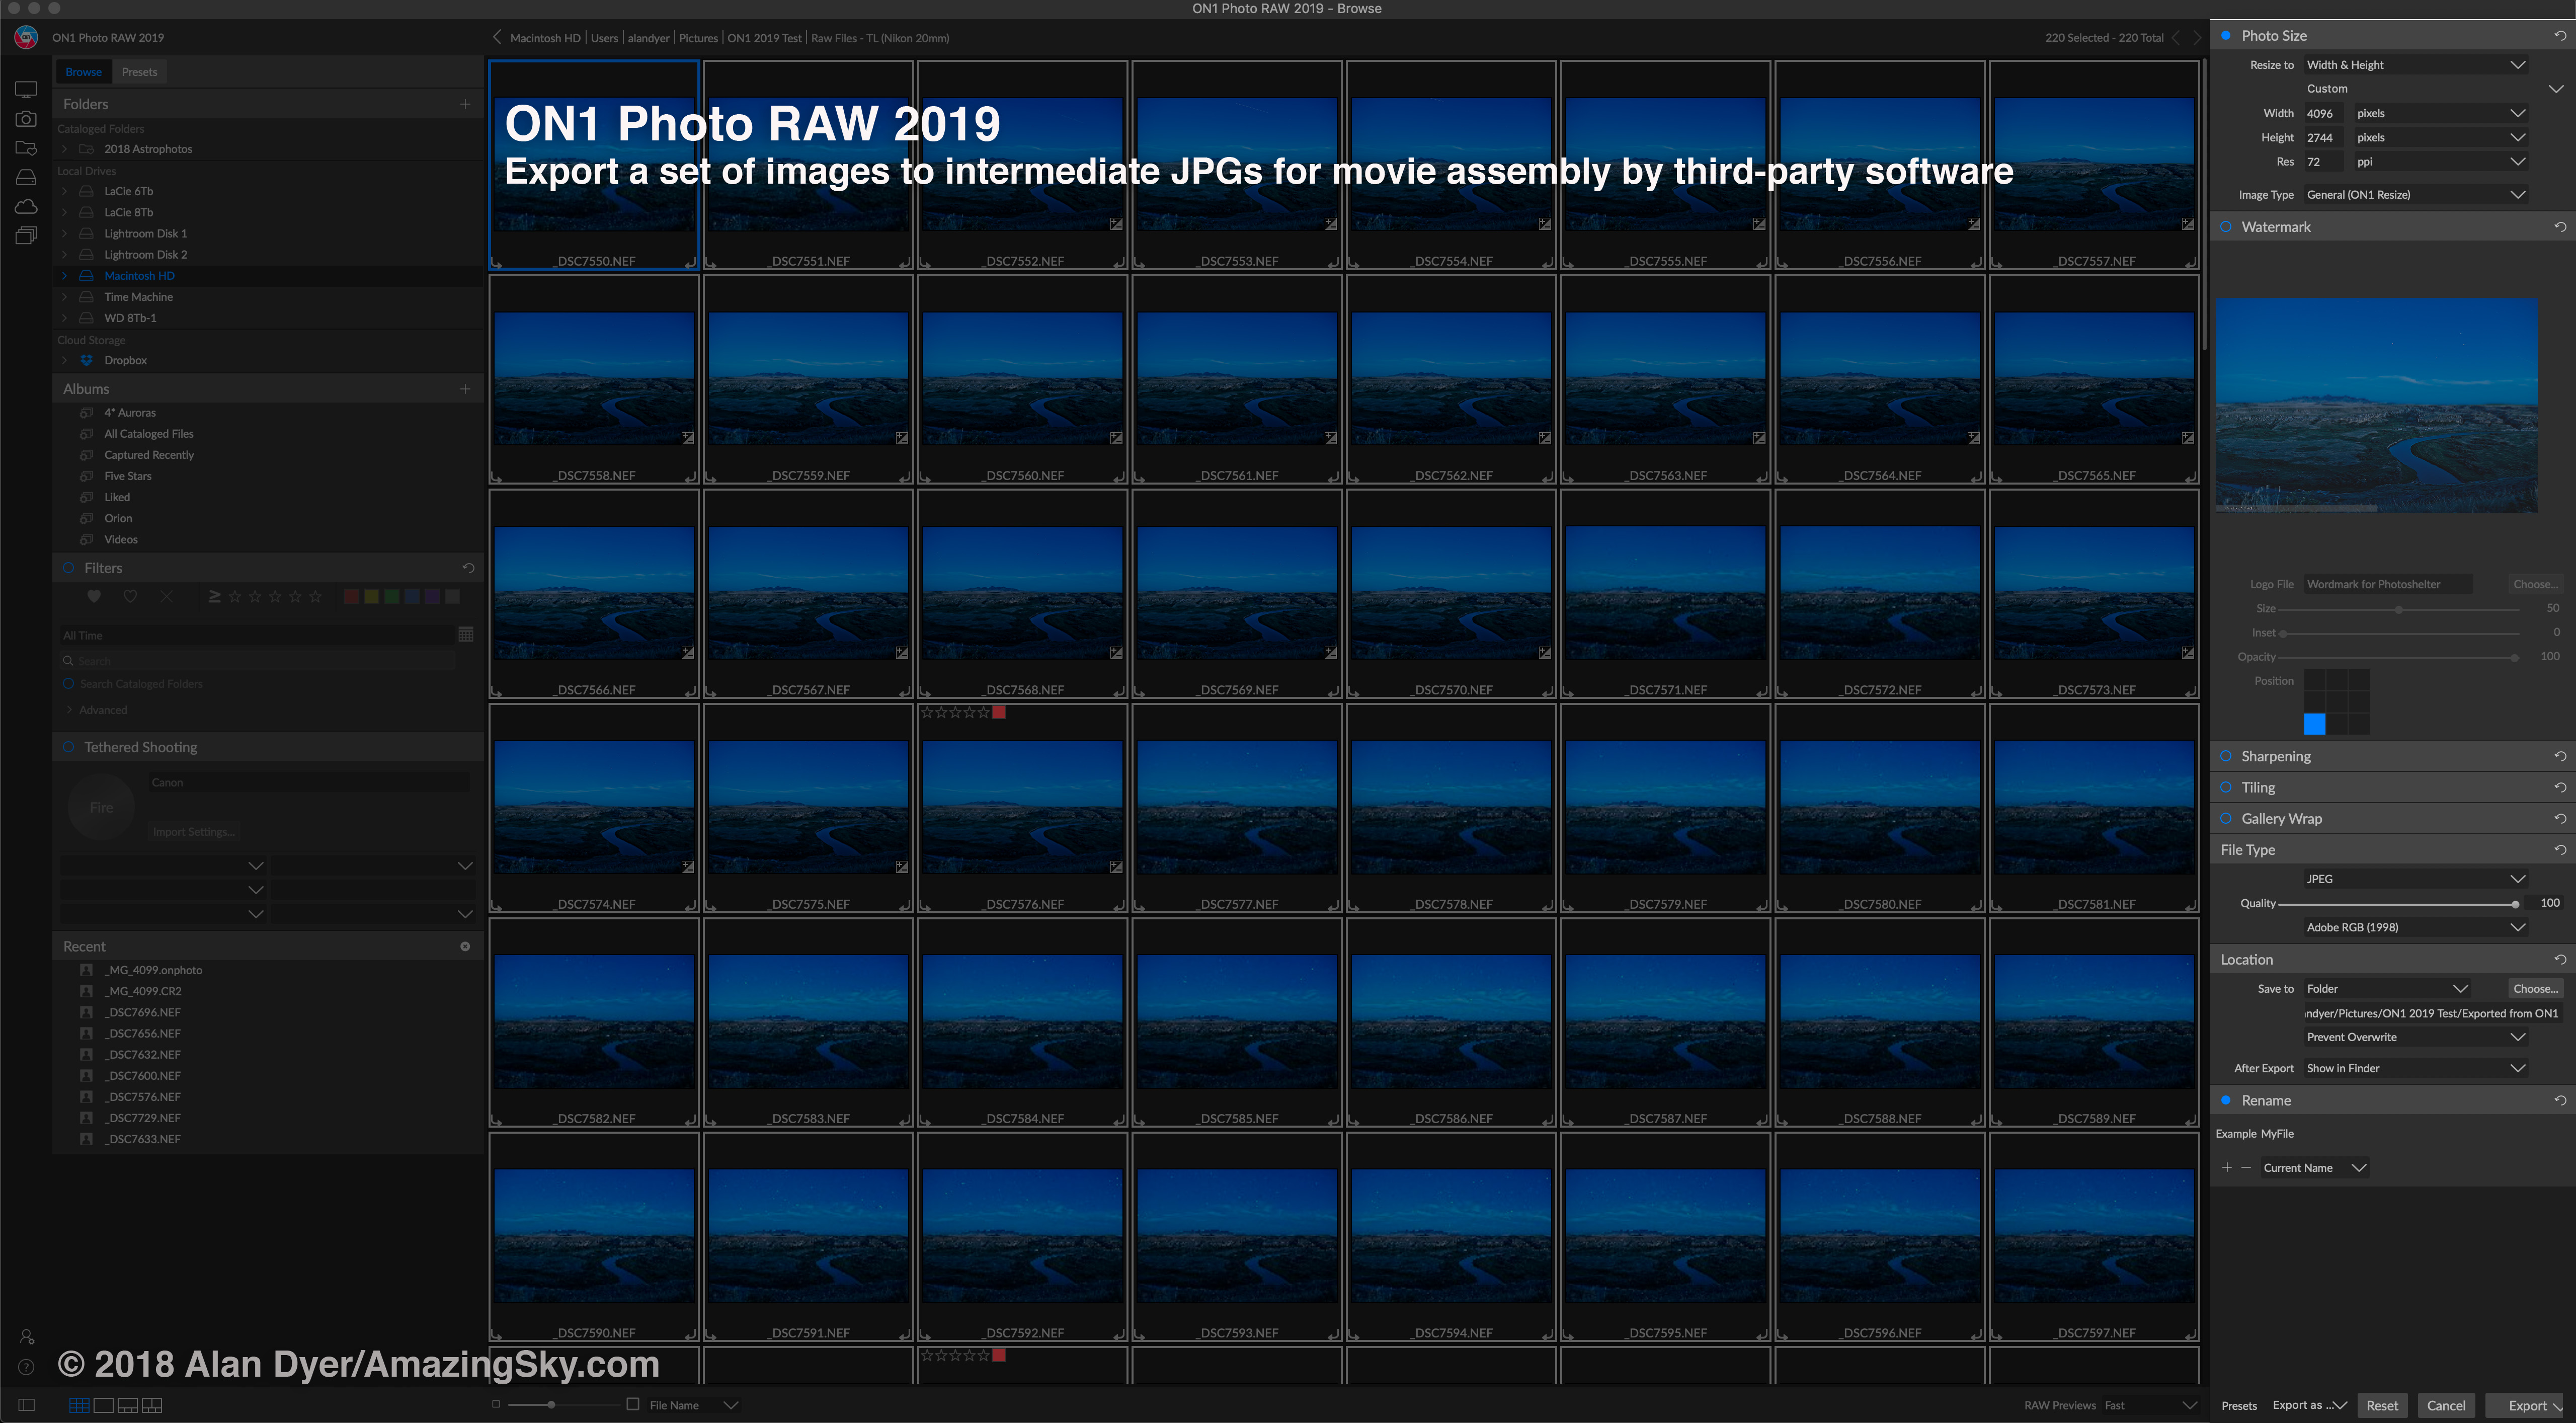
Once all the images are processed – whether it be with ON1 or any other program – the frames have to exported out to an intermediate set of JPGs for assembly into a movie by third-party software. ON1 itself can’t assemble movies, but then again neither can Lightroom (as least not very well), though Photoshop can, through its video editing functions.
For my test set of 220 frames, each with several masked Effects layers, ON1 took 2 hours and 40 minutes to perform the export to 4K JPGs. Photoshop, through its Image Processor utility, took 1 hour and 30 minutes to export the same set, developed similarly and with several local adjustment pins.
ON1 did the job but was slow.
A greater limitation is that, unlike Lightroom, ON1 does not accept any third party plug-ins (it serves as a plug-in for other programs). That means ON1 is not compatible with what I feel are essential programs for advanced time-lapse processing: either Timelapse Workflow (from https://www.timelapseworkflow.com) or the industry-standard LRTimelapse (from https://lrtimelapse.com).
Both programs work with Lightroom to perform incremental adjustments to settings over a set of images, based on the settings of several keyframes.
Lacking the ability to work with these programs means ON1 is not a program for serious and professional time-lapse processing.
Deep-Sky Processing

Wide-Angle Milky Way
Now we come to the most demanding task: processing long exposures of the deep-sky, such as wide-angle Milky Way shots and close-ups of nebulas and galaxies taken through telescopes. All require applying generous levels of contrast enhancement.
As the above example shows, try as I might, I could not get my test image of the Milky Way to look as good with ON1 as it did with Adobe Camera Raw. Despite the many ways to increase contrast in ON1 (Contrast, Midtones, Curves, Structure, Haze, Dynamic Contrast and more!), the result still looked flat and with more prominent sky gradients than with ACR.
And remember, with ACR that’s just the start of a processing workflow. You can then take the developed raw file into Photoshop for even more precise work.
With ON1, its effects and filters all you have to work with. Yes, that simplifies the workflow, but its choices are more limited than with Photoshop, despite ON1’s huge number of Presets.
Deep-Sky Close-Ups
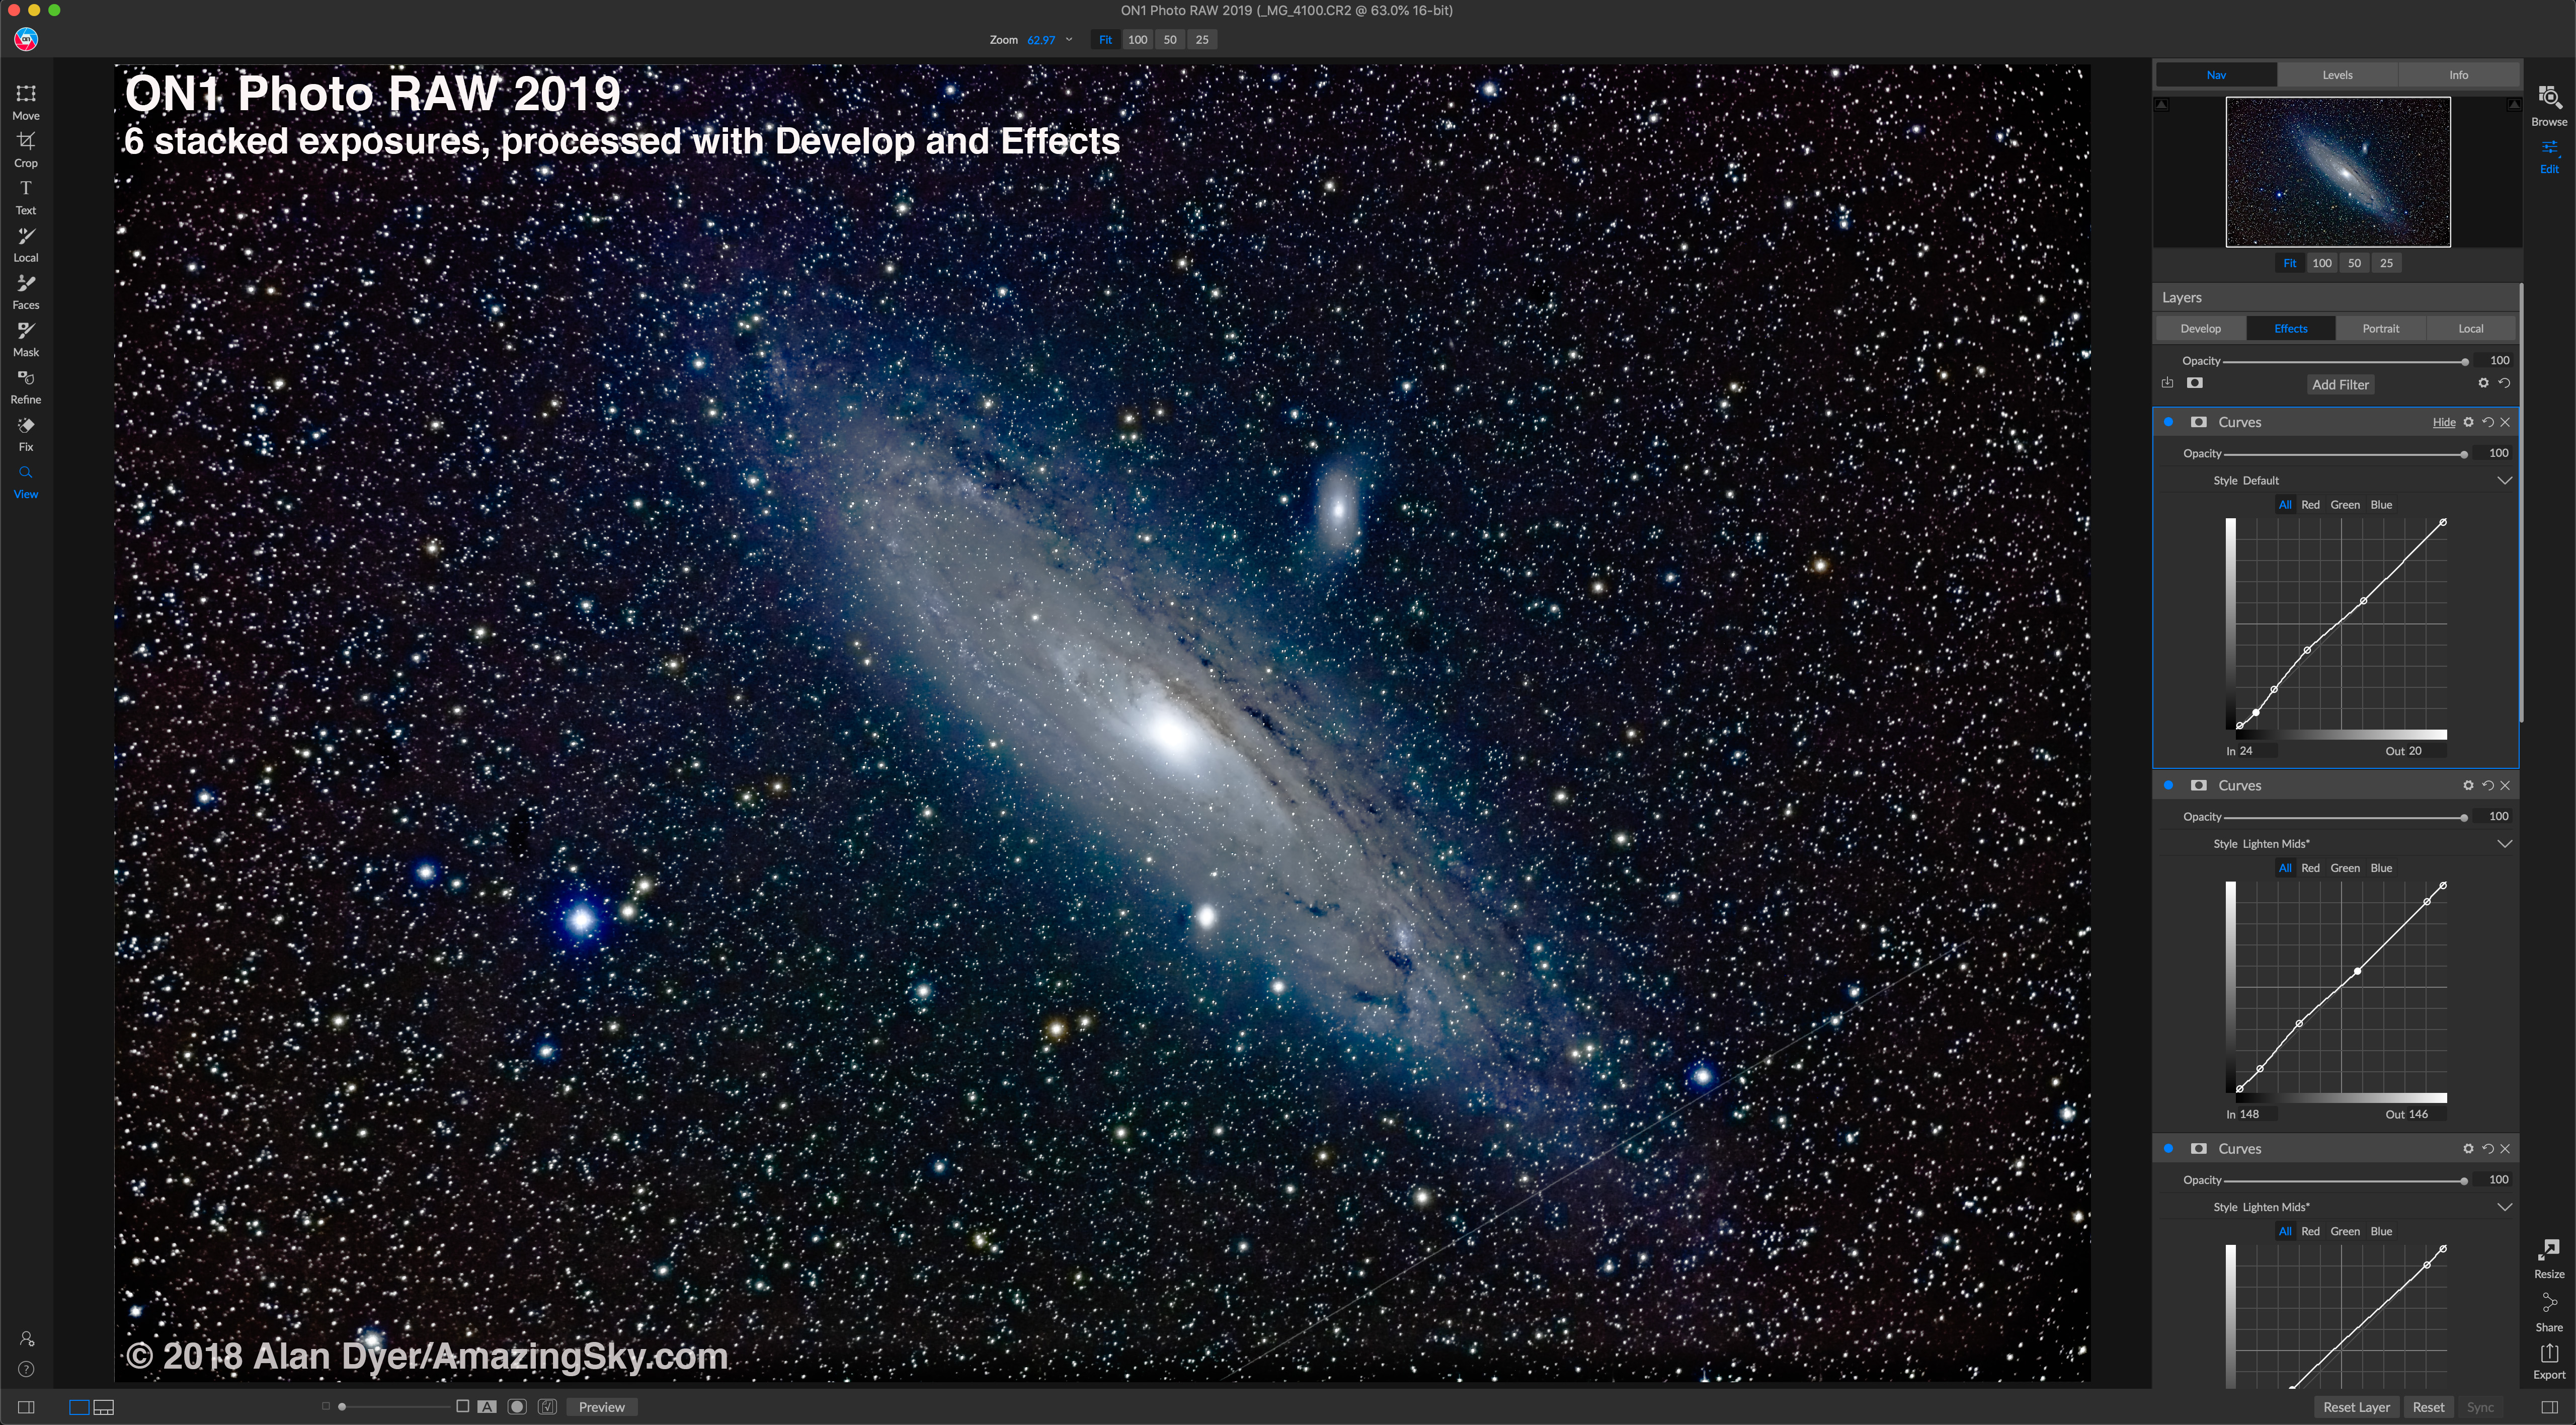
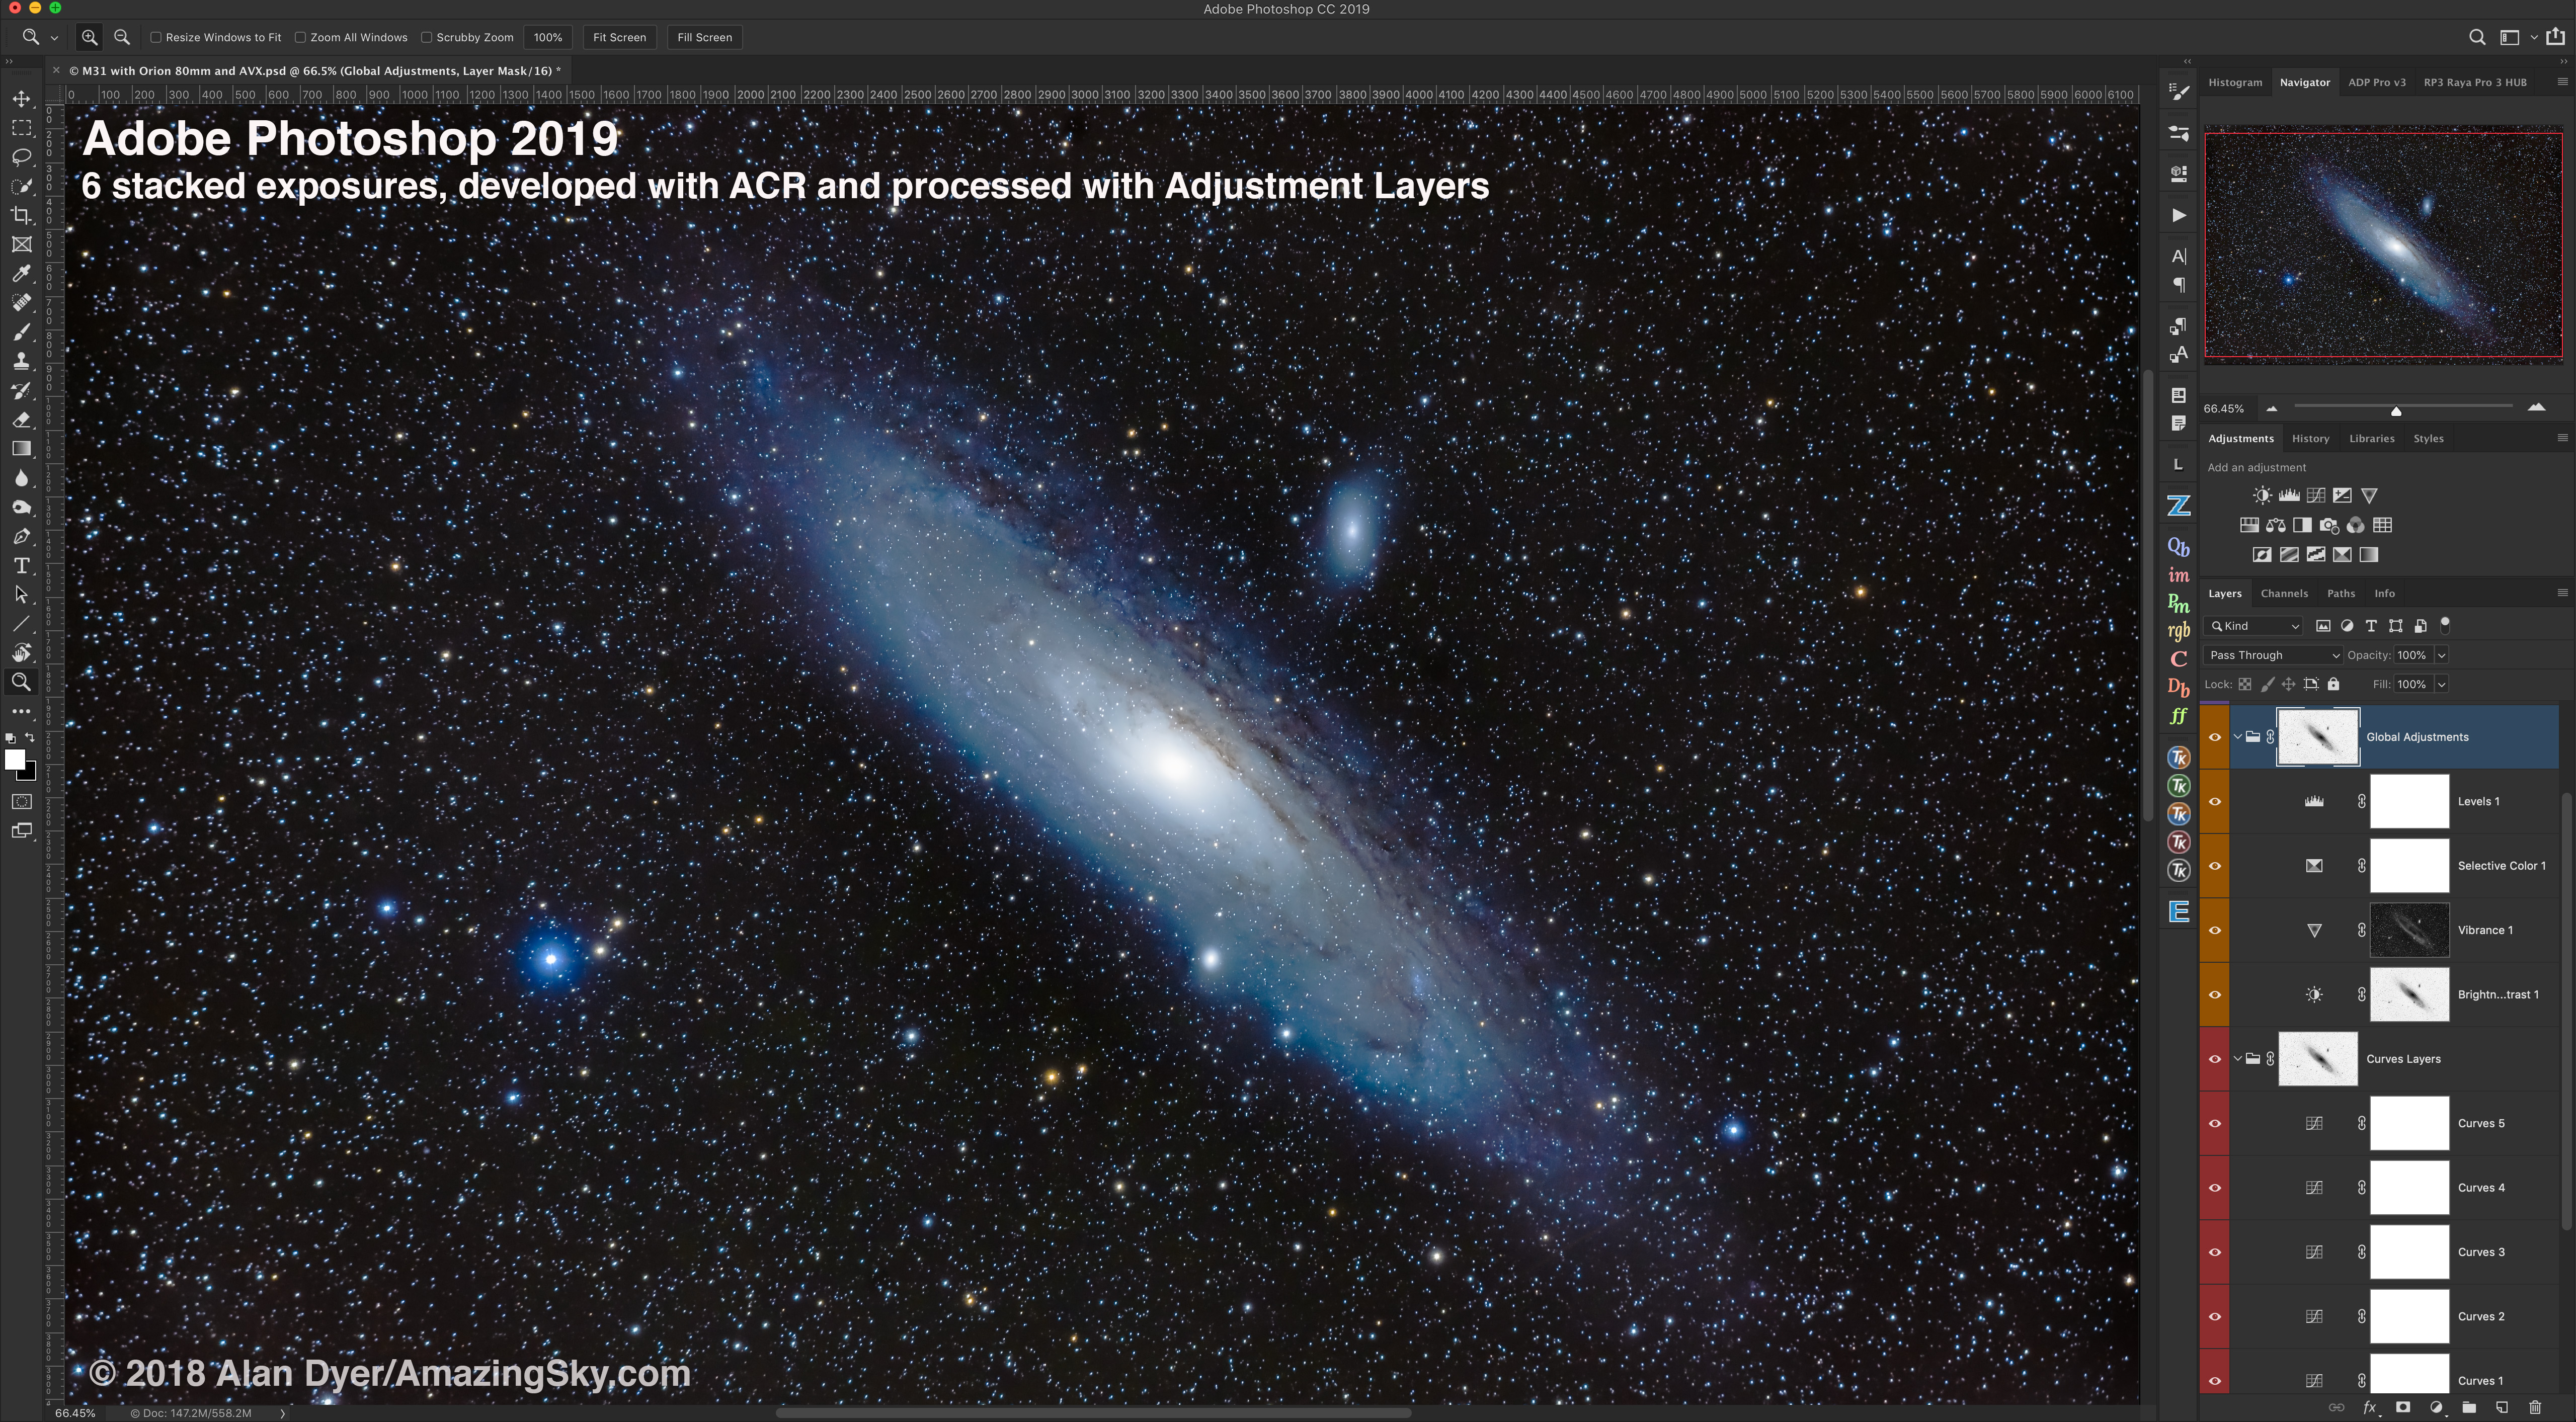
Similarly, taking a popular deep-sky subject, the Andromeda Galaxy, aka M31, and processing the same original images with ON1 and ACR/Photoshop resulted in what I think is a better-looking result with Photoshop.
Of course, it’s possible to change the look of such highly processed images with the application of various Curves and masked adjustment layers. And I’m more expert with Photoshop than with ON1.
But … as with the Cygnus Milky Way image, I just couldn’t get Andromeda looking as good in ON1. It always looked a little flat.
Dynamic Contrast did help snap up the galaxy’s dark lanes, but at the cost of “crunchy” stars, as I show next. A luminosity “star mask” might help protect the stars, but I think the background sky will inevitably suffer from the de-Bayering artifacts.
Star and Background Sky Image Quality

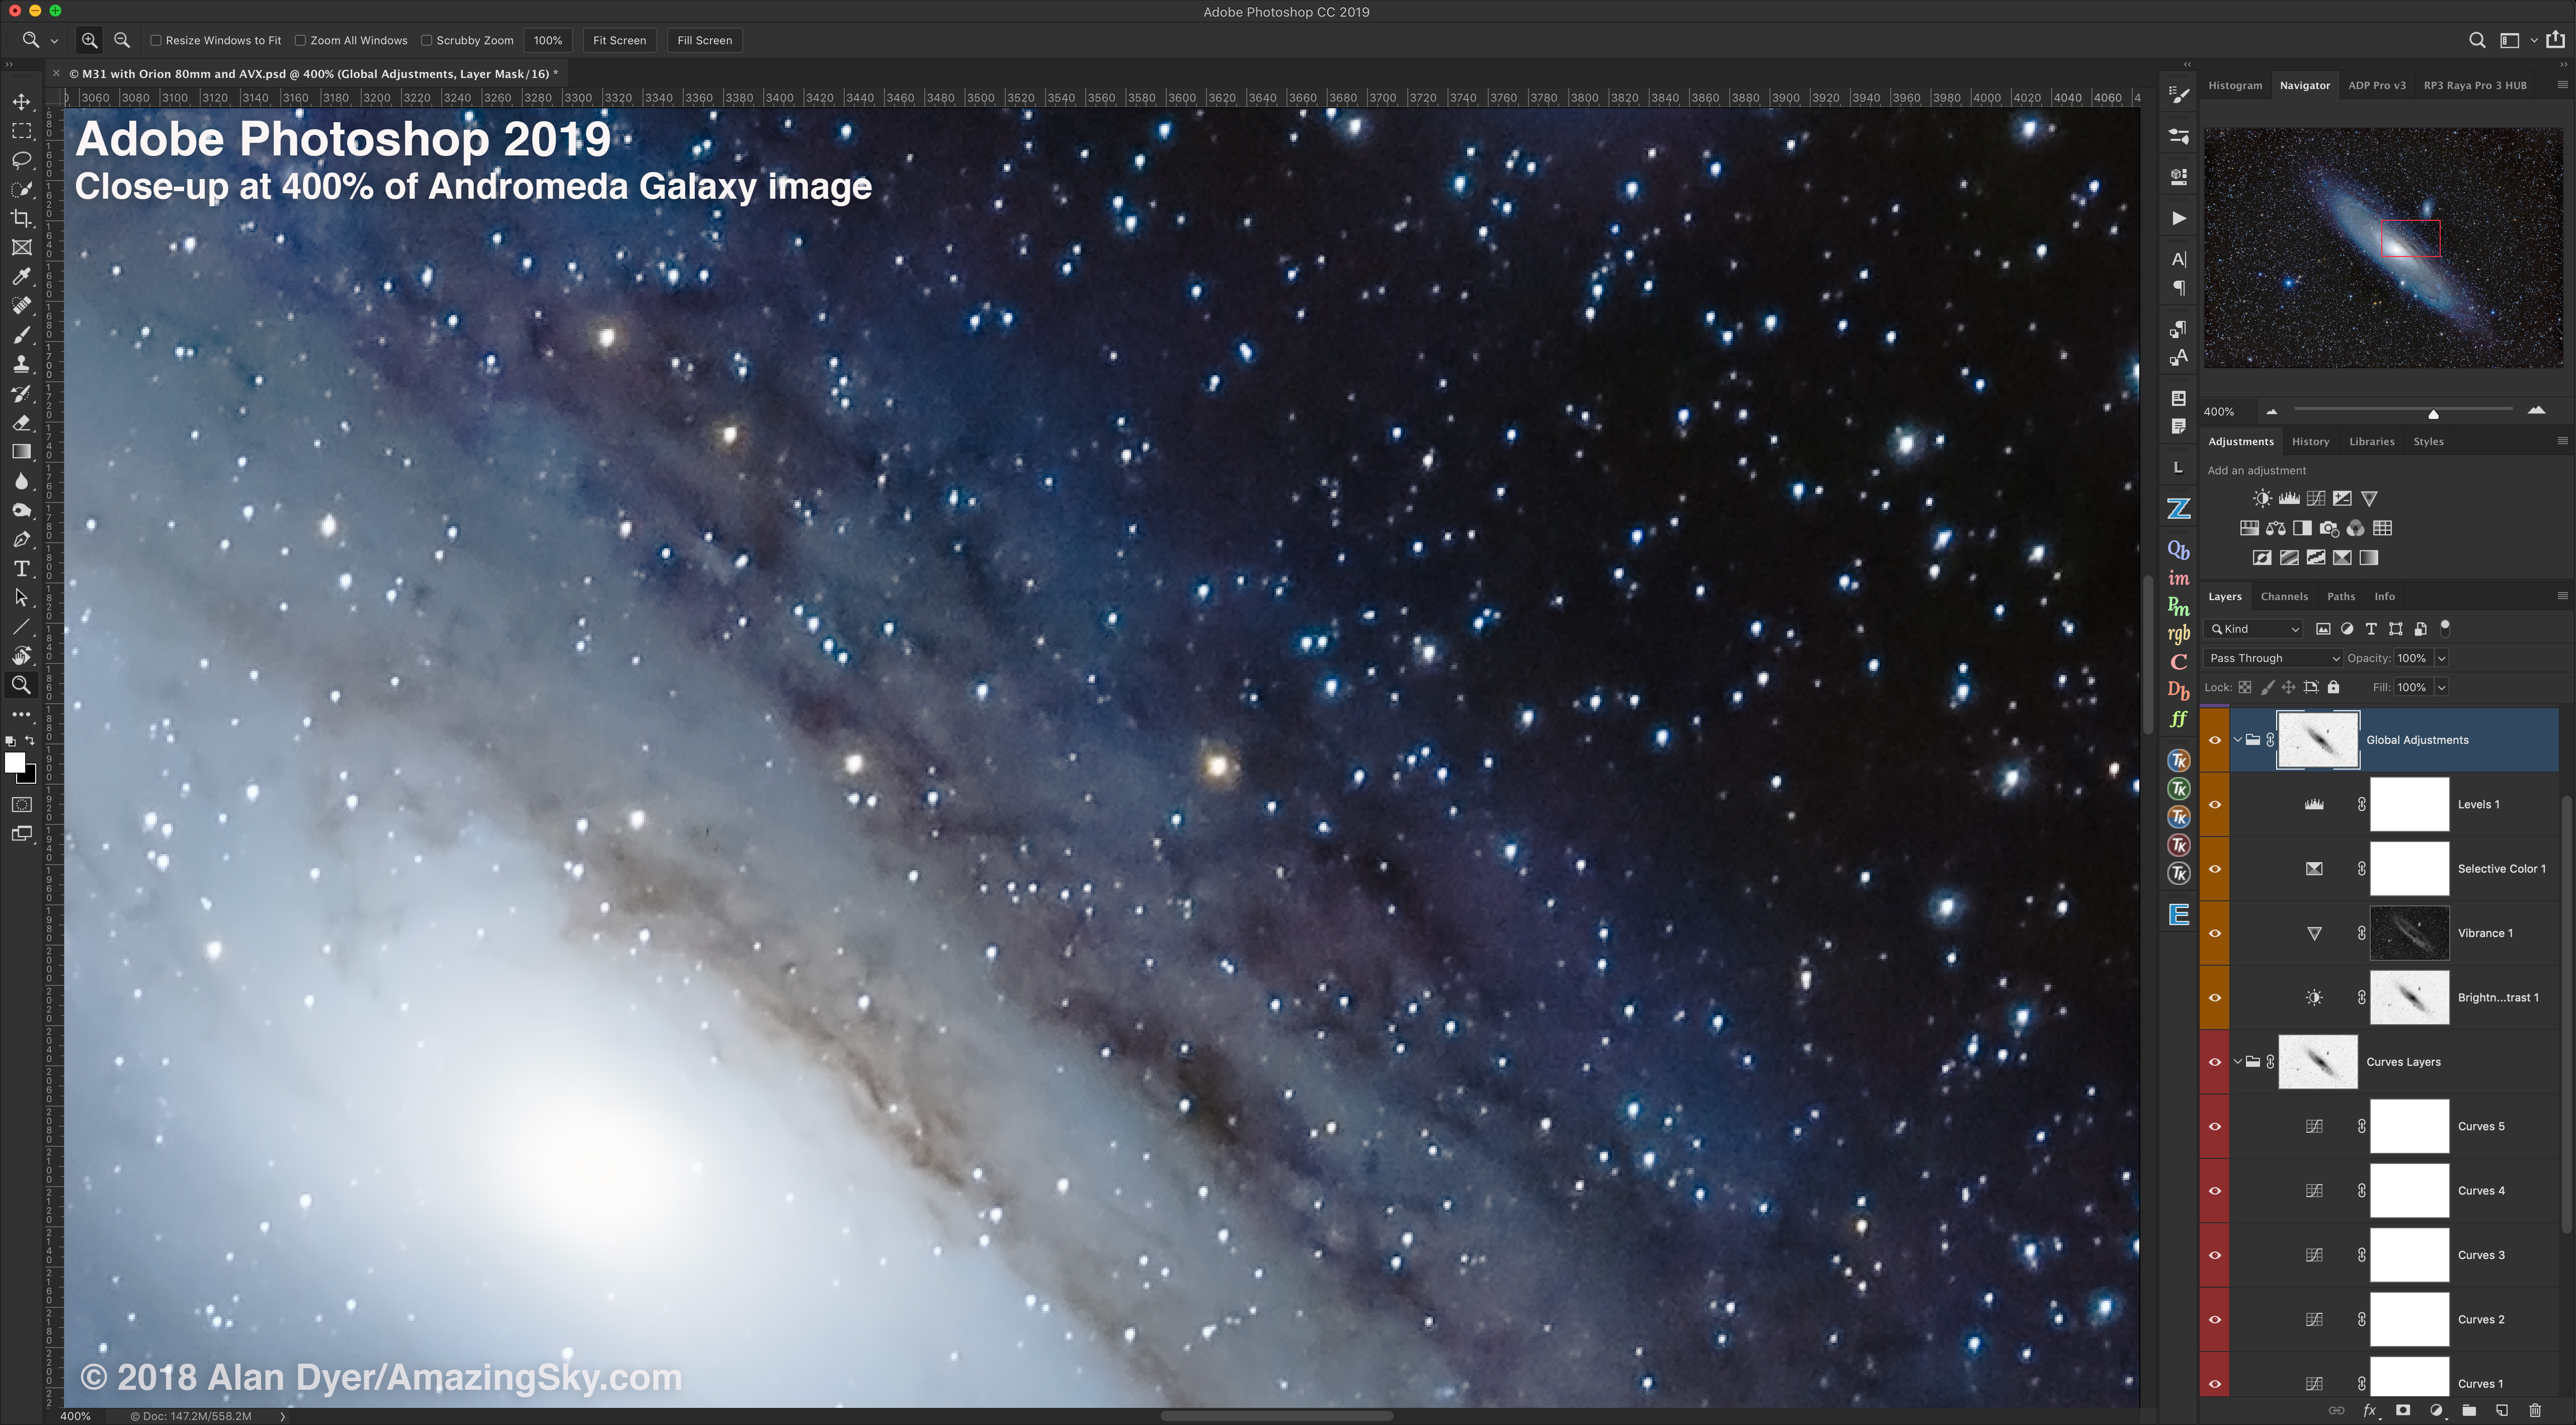
As I showed with the nightscape image, stars in ON1 end up looking too “crunchy,” with dark halos from over sharpening, and also with the blocky de-Bayering artifacts now showing up in the sky.
I feel it is not possible to avoid dark star haloes, as any application of contrast enhancements, so essential for these types of objects, brings them out, even if you back off sharpening at the raw development stage, or apply star masks.

ON1 is applying too much sharpening “under the hood.” That might “wow” casual daytime photographers into thinking ON1 is making their photos look better, but it is detrimental to deep-sky images. Star haloes are a sign of poor processing.
Noise and Hot Pixels
ON1’s noise reduction is quite good, and by itself does little harm to image details.
But turn on the Remove Hot Pixel button and stars start to be eaten. Faint stars fade out and brighter stars get distorted into double shapes or have holes in them.
Hot pixel removal is a nice option to have, but for these types of images it does too much harm to be useful. Use LENR or take dark frames, best practices in any case.
Image Alignment and Registration
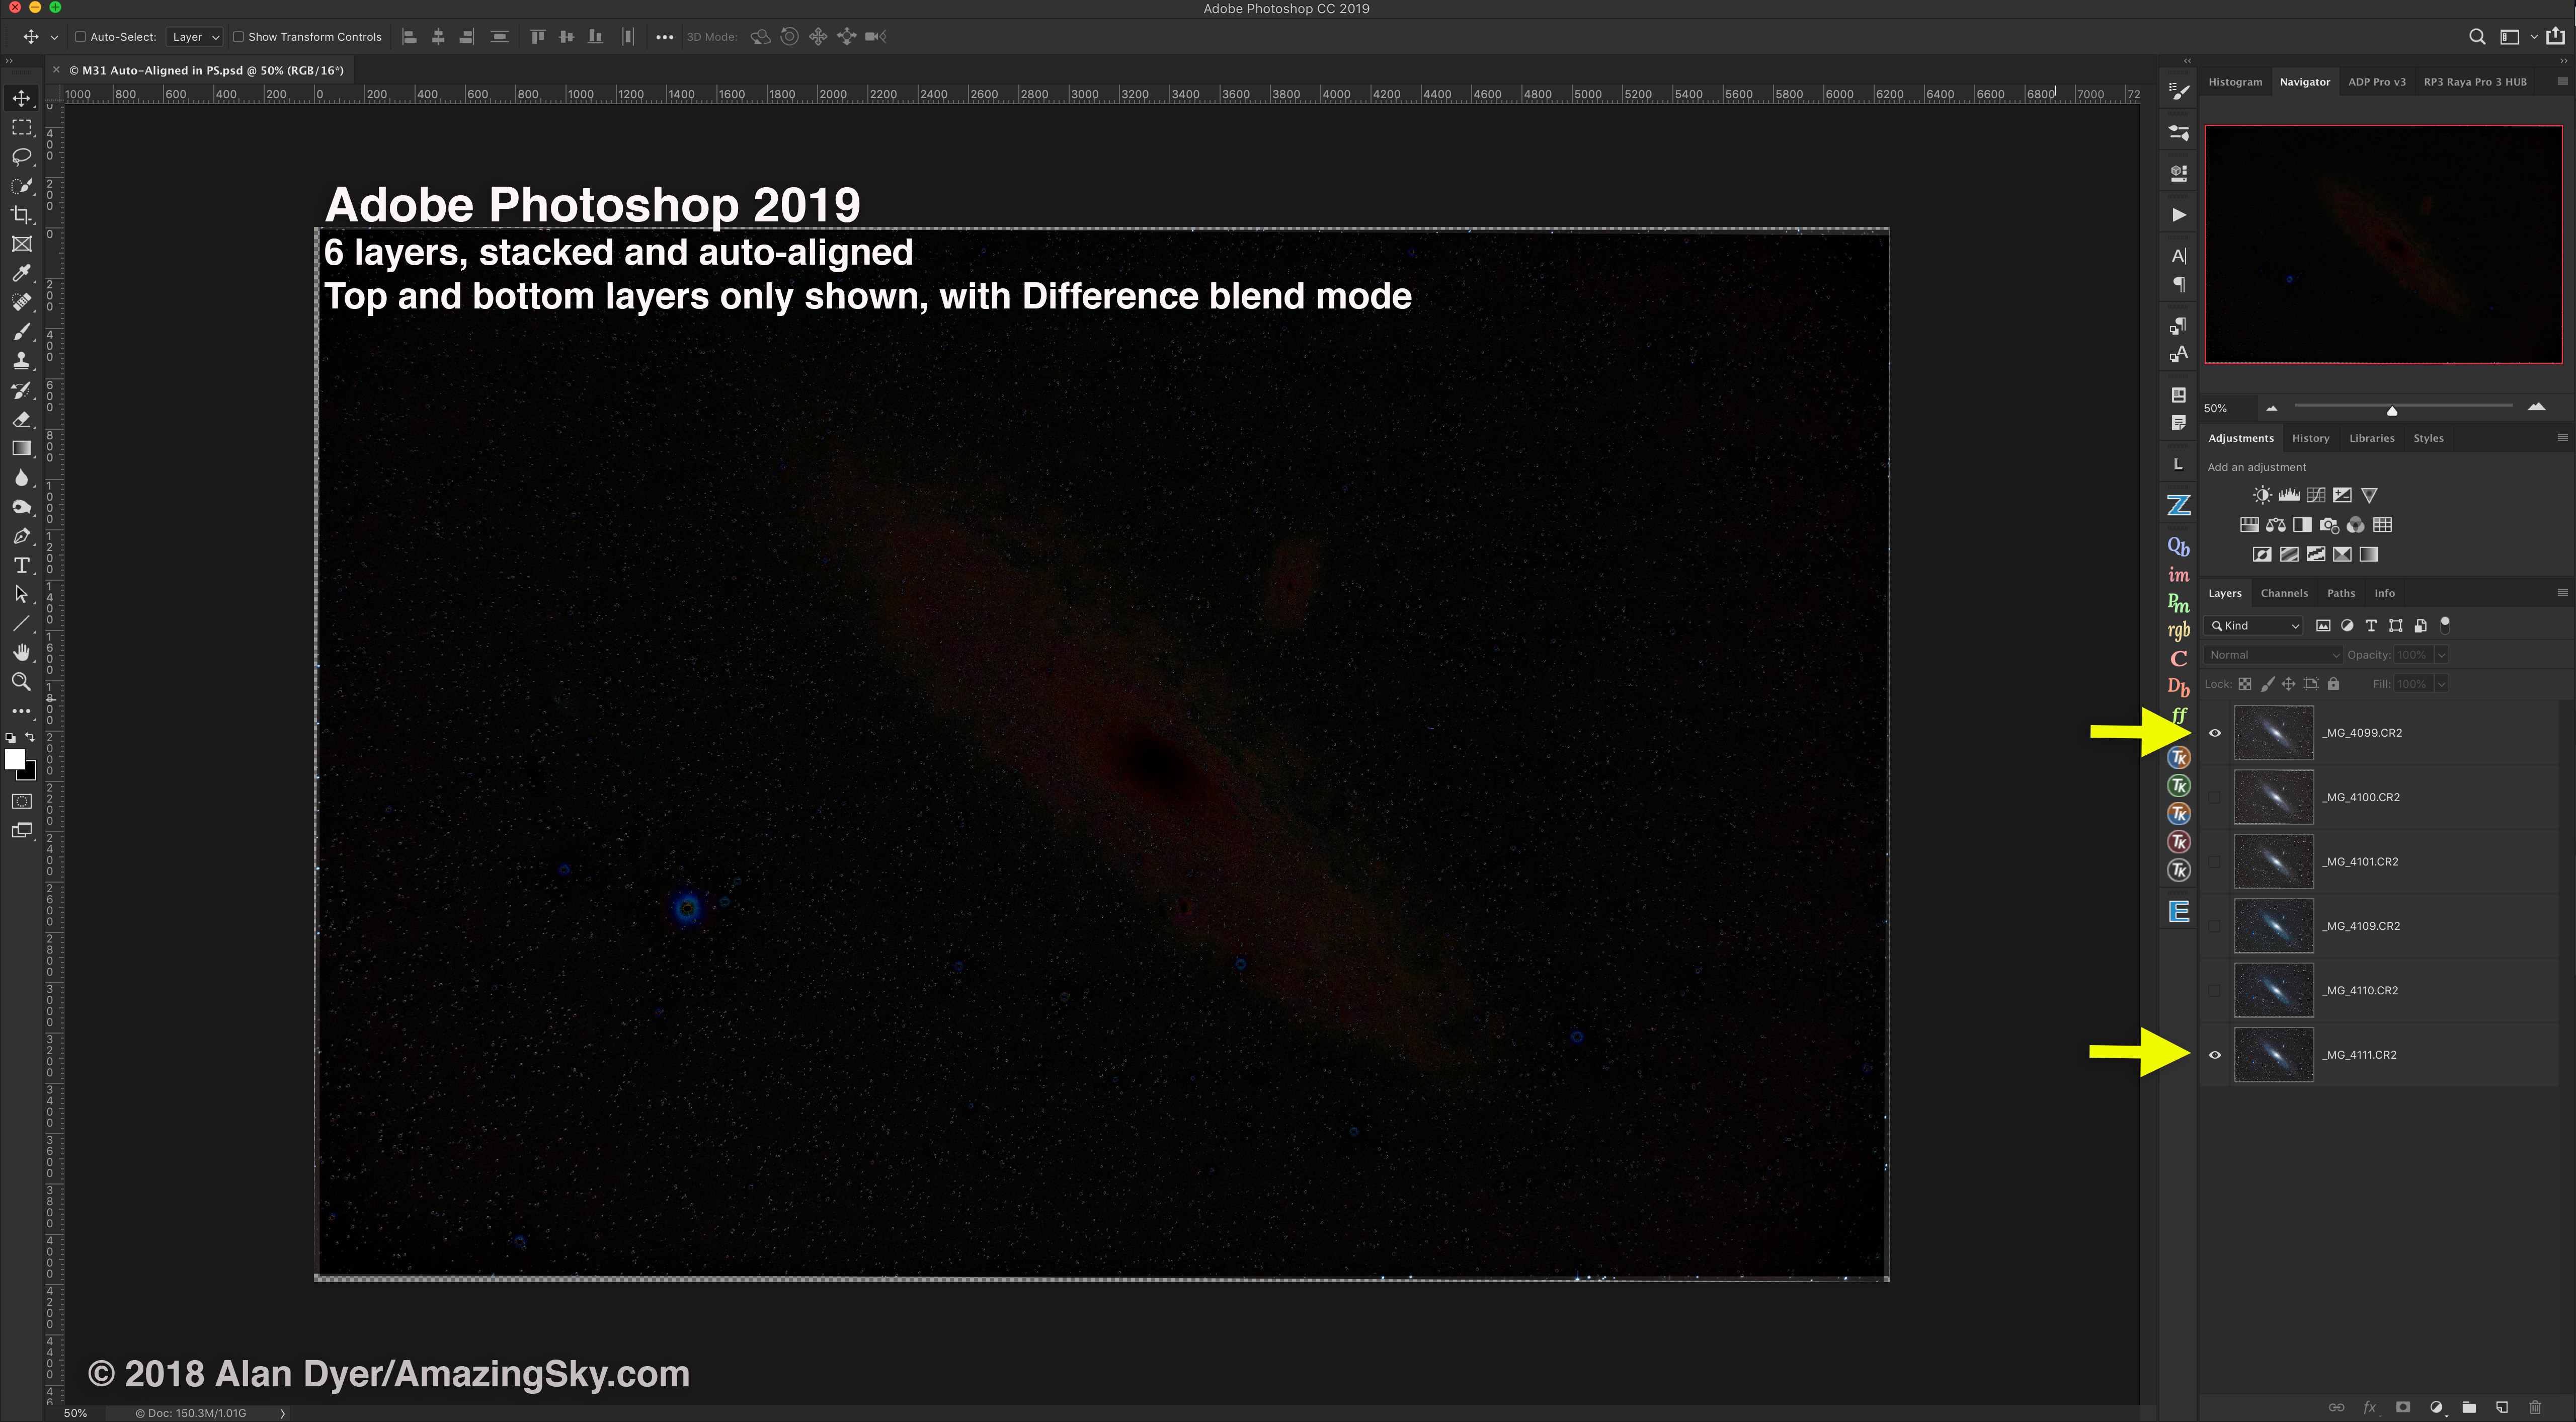
Before any processing of deep-sky images is possible, it is first necessary to stack and align them, to make up for slight shifts from image to image, usually due to the mount not being perfectly polar aligned. Such shifts can be both translational (left-right, up-down) and rotational (turning about the guide star).
New to ON1 2019 is an Auto-Align Layers function. It worked OK but not nearly as well as Photoshop’s routine. In my test images of M31, ON1 didn’t perform enough rotation.
Once stacked and aligned, and as I showed above, you then have to manually change the opacities of each layer to blend them for noise smoothing.
By comparison, Photoshop has a wonderful Statistics script (under File>Scripts) that will automatically stack, align, then mean or median average the images, and turn the result into a non-destructive smart object, all in one fell swoop. I use it all the time for deep-sky images. There’s no need for separate programs such as Deep-Sky Stacker.
In ON1, however, all that has to be done manually, step-by-step. ON1 does do the job, just not as well.
Wrap-Up

ON1 Photo RAW 2019 is a major improvement, primarily in providing a more seamless and less destructive workflow.
Think of it as Lightroom with Layers!
But it isn’t Photoshop.

True to ON1’s heritage as a special effect plug-in, it has some fine Effect filters, such as Dynamic Contrast above, ones I sometimes use from within Photoshop as plug-in smart filters.
Under Sharpen, ON1 does offer a High Pass option, a popular method for sharpening deep-sky objects.
Missing Filters and Adjustments
But for astrophoto use, ON1 is missing a lot of basic but essential filters for pixel-level touch-ups. Here’s a short list:
• Missing are Median, Dust & Scratches, Radial Blur, Shake Reduction, and Smart Sharpen, just to mention a handful of filters I find useful for astrophotography, among the dozens of others Photoshop has, but ON1 does not. But then again, neither does Lightroom, another example of how ON1 is more light Lightroom with layers and not Photoshop.
• While ON1 has many basic adjustments for color and contrast, its version of Photoshop’s Selective Color lacks Neutral or Black sliders, great for making fine changes to color balance in astrophotos.
• While there is a Curves panel, it has no equivalent to Photoshop’s “Targeted Adjustment Tool” for clicking on a region of an image to automatically add an inflection point at the right spot on the curve. This is immensely useful for deep-sky images.
• Also lacking is a basic Levels adjustment. I can live without it, but most astrophotographers would find this a deal-breaker.
• On the other hand, hard-core deep-sky photographers who do most of their processing in specialized programs such as PixInsight, using Photoshop or Lightroom only to perform final touch-ups, might find ON1 perfectly fine. Try it!
Saving and Exporting
ON1 saves its layered images as proprietary .onphoto files and does so automatically. There is no Save command, only a final Export command. As such it is possible to make changes you then decide you don’t like … but too late! The image has already been saved, writing over your earlier good version. Nor can you Save As … a file name of your choice. Annoying!
Opening a layered .onphoto file (even with ON1 itself already open) can take a minute or more for it to render and become editable.
Once you are happy with an image, you can Export the final .onphoto version as a layered .PSD file but the masks ON1 exports to the Photoshop layers may not match the ones you had back in ON1 for opacity. So the exported .PSD file doesn’t look like what you were working on. That’s a bug.
Only exporting a flattened TIFF file gets you a result that matches your ON1 file, but it is now flattened.
Bugs and Cost
I encountered a number of other bugs, ones bad enough to lock up ON1 now and then. I’ve even seen ON1’s own gurus encounter bugs with masking during their live tutorials. These will no doubt get fixed in 2019.x upgrades over the next few months.
But by late 2019 we will no doubt be offered ON1 Photo RAW 2020 for another $80 upgrade fee, over the original $100 to $120 purchase price. True, there’s no subscription, but ON1 still costs a modest annual fee, presuming you want the latest features.
Now, I have absolutely no problem with that, and ON1 2019 is a significant improvement.
However, I found that for astrophotography it still isn’t there yet as a complete replacement for Adobe.
But don’t take my word for it. Download the trial copy and test it for yourself.
— Alan, November 22, 2018 / © 2018 Alan Dyer/AmazingSky.com
