Amateur astronomers soon learn that spring is “galaxy season.” But so is autumn … if you know where to look.
Each season brings a different and rich set of targets to view through telescopes. Summer and winter skies are dominated by the Milky Way and its assortment of glowing nebulas and sparkling star clusters, objects not far away within our Galaxy’s spiral arms.
We live in a galaxy that is a flattened disk — though, as shown in this artwork based on data from the European Space Agency’s recently concluded Gaia mission, that disk is warped.
Image courtesy ESA
In summer and winter, as viewed from our location halfway from the centre to the edge of our Galaxy, we look into its disk, to see our Galaxy as the “Milky Way,” the misty band across the night sky.
But in spring we look straight out of the disk, into intergalactic space filled with other distant galaxies. In northern hemisphere spring we look “up” in this illustration, out of the disk toward the North Galactic Pole, and the rich collections of galaxies in Coma Berenices, Leo, and Virgo.
In southern hemisphere spring — and from the southern hemisphere — we look “down” in the diagram, toward the assortment of galaxies around the South Galactic Pole, in and around the lesser-known constellations of Eridanus, Fornax and Sculptor.
A SkySafari chart showing some of the targets on the tour, low in the south from Arizona’s latitude in autumn.
But, as I show above, that area of sky is accessible from sites in the northern hemisphere, when it is autumn. (The marker for SGP is the South Galactic Pole.) As you can see, the galaxy-filled constellations lie low in the southern sky. It takes travelling to a site as far south as possible to see them well.
That’s what I did in October 2024, to a favourite spot just north of the Mexican border near Portal, Arizona (latitude 32º N). I blogged about that trip earlier.
Here I provide a tour of some of the deep-sky delights I shot on that trip, during autumn “galaxy season,” the other galaxy hunting time. All these galaxies are bright, rivalling the better-known northern targets in the popular 18th-century Messier Catalogue. But French astronomer Charles Messier never observed from this far south to see them. And yet, some of these targets are large and bright enough to be visible in binoculars, ranking them as “showpiece” objects.
NOTE: You can tap or click on all images to bring them up full screen.
Galaxies Galore!
NGC 55 in Sculptor
This is a stack of 16 x 4 minute exposures with the Askar APO120 refractor at f/5.6 (with its 0.8x Reducer) and the Canon Ra at ISO 1000.
This bright (8th magnitude) edge-on galaxy is big, almost 1/2º across (as wide as a Full Moon diameter — the field here is 2º by 3º). NGC 55 lies on the border of the obscure southern constellations Sculptor and Phoenix.
The galaxy was discovered by James Dunlop from Australia in 1826. It is one of the brightest members of the Sculptor Group of galaxies near the South Galactic Pole, though some consider it a member of our own Local Group of neighbour galaxies. It has an asymmetrical shape and is crossed by dark dust lanes. It is classed as a barred spiral, though that shape is hard to discern; we’ll see better examples later in the tour.
NGC 247, the Dusty Spiral in Cetus
This is a stack of 16 x 4 minute exposures with the Askar APO120 refractor at f/5.6 with its 0.8x Reducer, and the Canon Ra at ISO 800.
This is the bright (9th magnitude) and moderately large spiral galaxy NGC 247 in southern Cetus, the Whale. It is known as the Dusty Spiral and is #62 in Sir Patrick Moore’s Caldwell Catalogue of notable non-Messier objects.
It is also a member of the Sculptor Group of nearby galaxies close to our own Local Group that surrounds the Milky Way. A group of tiny and faint 14th to 16th magnitude “PGC” galaxies (from the Principal Galaxies Catalogue) called Burbidge’s Chain lies just above NGC 247.
NGC 253, the Silver Coin, with NGC 288, a Pairing in Sculptor
This is a stack of 20 x 3-minute exposures with the APO120 refractor with its 0.8x Reducer for 560mm focal length and f/5.6, and the Canon Ra at ISO 1600. No filter was employed.
Here, sitting right next to the South Galactic Pole, we get a two-for-one field. This is the pairing of the bright and large edge-on spiral galaxy NGC 253 (upper right) with the large and loose globular star cluster NGC 288 (lower left). The latter is easily resolved into its constituent stars.
The two are just 1.75 degrees apart in Sculptor, but are actually 12 million light years apart in space, with NGC 288 belonging to our Milky Way, while NGC 253 is another galaxy altogether, one of the brightest in the sky (at magnitude 7) and a member of the Sculptor Group.
NGC 253 is also known as the Silver Coin Galaxy, and is Caldwell 65 on Sir Patrick Moore’s list. However, it was discovered by Caroline Herschel in 1783, from England! Her brother William discovered nearby NGC 288.
NGC 300, the Sculptor Pinwheel
This is a stack of 16 x 4 minute exposures with the APO120 refractor at f/5.6 with its 0.8x Reducer, and the Canon Ra at ISO 800.
This is the bright (8th magnitude) and moderately large (1/2º across) spiral galaxy NGC 300, aka the Sculptor Pinwheel. It’s the southern equivalent of the popular Messier 33 spiral in Triangulum. NGC 300 is also Caldwell 70.
It, too, was discovered in 1826 by James Dunlop. NGC 300 may be a member of the Sculptor Group. Or it might lie closer to us than the Sculptor Group, along with NGC 55, at “only” 6.5 million light years away.
NGC 1097, a Barred Spiral in Fornax
This is a stack of 10 x 6 minute exposures with the APO120 refractor at f/7, with the Canon Ra at ISO 1600.
We trek farther east into the next constellation over from Sculptor, to Fornax the Furnace, to find NGC 1097. This is the realm of bright (magnitude 9.5 in this case) barred spiral galaxies. This class of galaxy has arms emanating from a long bar at the core. This area of sky is replete with bright barred spirals, far more so than any area we find “up north.”
NGC 1097 is also classified as a Seyfert galaxy, a type with an active quasar-like nucleus, housing a massive black hole. NGC 1097 is also Caldwell 67. Just on its northern edge sits the little companion galaxy NGC 1097A.
NGC 1316 in Fornax, also with a Black Hole
This is a stack of 15 x 4 minute exposures with the APO120 refractor at f/5.6 with its 0.8x Reducer, with the Canon Ra at ISO 800.
This bright (magnitude 8.5) elliptical galaxy is also catalogued by radio astronomers as Fornax A, because NGC 1316 is also a “bright” source of radio waves, thought to be generated by a supermassive black hole at its core.
Elliptical galaxies are notorious for being cannibal galaxies, eating others nearby. Sure enough, the galaxy is surrounded by faint tidal streams of stars, just recorded here, the result of collisions and mergers with unfortunate companions that wandered too close by. NGC 1316 is about 75 million light years away, and belongs to the Fornax 1 Galaxy Cluster. Despite its uniqueness and brightness, it is not in the Caldwell Catalogue.
Just above it is the smaller elliptical NGC 1318. At top is the trio of: the edge-on spiral NGC 1326A and companion NGC 1326B, and the barred spiral NGC 1326 with an odd ring shape.
NGC 1365 and NGC 1399, at the Heart of the Fornax Cluster
This is a stack of just 10 x 6 minute exposures through the APO120 refractor at f/7 and the Canon Ra at ISO 1600.
This frames the main members of the populous Fornax Galaxy Cluster, second only perhaps to the northern sky’s Coma-Virgo Galaxy Cluster, and its Markarian’s Chain area, for having the most bright galaxies in one low-power telescope field. (The field here is 1.6º by 2.4º.) It is a “must see” sight for galaxy fans.
The two brightest Fornax cluster members are: – the giant elliptical galaxy NGC 1399 at upper left, paired with smaller NGC 1404, – and the barred spiral galaxy NGC 1365 at lower right, considered one of the best barred spirals in the sky. There’s nothing quite like it up north. Like NGC 1399, it is 58 million light years away.
The odd shaped galaxy at left is the irregular galaxy NGC 1427A, with NGC 1427 itself at the far left edge. The elongated spiral galaxy at top is NGC 1380. Numerous other NGC and tiny, faint PGC galaxies populate the field, down to magnitude 15 or so.
Bonus Nebulas!
While autumn’s galaxy season has lots to offer the galaxy hunter, there are some wonderful nebulas down south as well. In my sampling, all are “planetaries.”
NGC 246, the Skull Nebula in Cetus
This is a stack of 16 x 4 minute exposures with the Askar APO120 refractor at f/5.6 with its 0.8x Reducer, with the Canon Ra at ISO 1600.
This is the nebula NGC 246, aka the Skull Nebula, in Cetus. It’s an example of a planetary nebula, so-called because this type of object with their small blue-green disks reminded William Herschel of the planet Uranus that he discovered in 1781. NGC 246 was discovered by Herschel four years later in 1785.
NGC 246 has a mottled disk, giving it its fanciful name, and a 12th magnitude central star that has ejected the nebula as part of its end-of-life eruptions, the origin of all planetaries. They have nothing to do with planet formation; they are the products of star death.
NGC 246 lies about 1,600 light years away. Just above it is the small galaxy NGC 255.
NGC 1360, the Robin’s Egg Nebula in Fornax
This is a stack of 10 x 6 minute exposures with the Askar APO120 refractor at f/7 and with the Canon Ra at ISO 1600.
This, too, is a planetary nebula, but an odd one, in that it is a more uniform disk than is usual for planetaries, lacking the ring or bi-polar shape of most such objects. It was only recently classified as a planetary, one with an 11th magnitude central star responsible for expelling the nebula.
NGC 1360 is bright (at 9th magnitude), large, and blue-green, giving it the nickname the Robin’s Egg Nebula. The barred spiral galaxy (there are lot of them down here!) NGC 1398 is at lower left.
NGC 7293, the Helix Nebula in Aquarius
This is a blend of: a stack of 24 x 8 minute exposures with no filter, with a stack of 20 x 12 minute exposures with an IDAS NBX narrowband filter to isolate just the green Oxygen III and red Hydrogen alpha light. All through the APO120 at f/7, taken over 2 nights as the object was not well-placed long enough for all the images to be taken in one night. Shot using the Canon Ra, at ISO 3200 for the filtered frames and ISO 1600 for the unfiltered shots.
This is the large and bright (magnitude 7.6) planetary nebula catalogued as NGC 7293, but better known as the Helix Nebula, in Aquarius. But the internet has also dubbed in “The Eye of God.”
While this target lies farther north than most of the objects here, making it easy to see from northern latitudes, William Herschel working in England missed it. His telescopes were too powerful! It wasn’t discovered until 1824 (or thereabouts) by Karl Ludwig Harding in Germany. It is #63 in the Caldwell Catalogue.
NGC 7293 is thought to be one of the closest planetary nebulas to us, at only 650 light years away, thus its large size, nearly 1/4º across, half the size of the Moon’s disk. There’s an outer halo that is twice that size, but only the brightest portion of it is recorded here as a partial arc. It takes exposures of many hours, and more patience than I have, to pick up this nebula’s full extent.
The bright star at left is 5th magnitude star Upsilon Aquarii, which I composed to be in the frame and not on the edge if the Helix had been centered.
About the Images
As per the tech details in the captions, I shot all the images from southern Arizona during a wonderful marathon of astrophotography in October 2024, at the Quailway Cottage, a favorite spot of mine for an astronomy retreat.
I used an Askar APO120 refractor, at either its native f/7 for a focal length of 840mm, or with its 0.8x Reducer lens for a faster f/5.6 focal ratio and shorter 670mm focal length, yielding a wider field and shorter exposure times for each “sub-frame.” Most images have a similar “plate scale,” so the difference in object size is due to their actual size on the sky.
The camera was the astro-modified 30-megapixel Canon Ra. The mount was the venerable Astro-Physics AP400, which returned earlier in 2024 from its 20-year stay in Australia. I used the Lacerta MGEN3 stand-alone auto-guider, for app- and computer-free guiding which I prefer. The MGEN3 performs “dithering,” shifting the framing by a few pixels between each exposure, to aid elimination of thermal noise when stacking images.
While it looks impressive, the telescope is still not the best for small, detailed targets like the galaxies and planetaries here. They demand even more focal length (= bigger and heavier telescopes) than I prefer to shoot with.
Even so, I plan to take the same rig to New Mexico this year in May to shoot targets in the “other half of the sky,” during spring galaxy season.
After an absence of seven years it was great to be back under the fabulous sky of the Southern Hemisphere, home to the best deep-space splendours. Here’s my sky tour…
From 2000 to 2017, the year of my last previous trip Down Under, I had been travelling to the Southern Hemisphere, sometimes to Chile but most often to Australia, once a year or biennially. There’s just so much to see and photograph in the southern sky.
This is a panorama of the southernmost portion of the Milky Way, from the stars Alpha and Beta Centauri at far left, to Sirius, the brightest nighttime star, at far right. The second brightest star, Canopus, is at bottom. This is a panorama of 3 segments, each a stack of 10 to 20 sub-frames, each 4 minutes at ISO 800 with the Canon Ra and Canon RF28-70mm lens at f/2.
While the deep-south sky represents perhaps just 30 percent of the entire celestial sphere, it contains arguably the best of everything in the sky: the best nebulas, the best star clusters, the best galaxies, and certainly the best view of our own galaxy, the Milky Way.
No astronomical life is complete without a visit (or two or more!) to the lands south of the equator, ideally to a latitude of about 20° to 35° South. For the first time since 2017, I headed south this past March, in 2024. My belated blog takes you on a tour of the great southern sky.
NOTE: My blog is illustrated with lots of images, so it might take a while to load. Click or tap on an image to bring it up full screen. For the technically curious, I have included gear and exposure details in the captions.
Far Away in Australia
Yes, it’s long way to go — a 15-hour-flight from Canada. But Australia is my favourite destination down under. I can speak the language (sort of!), and have learned to drive on the left. Even after a seven year absence, my brain took only a few minutes to adjust once again to most of the car, and opposing traffic, being on the “wrong side” of me.
After a visit with the “relos” (Aussie for “relatives”) in Sydney and on the Central Coast of New South Wales, I loaded up all the telescope gear my folks had been kindly storing for me for two decades, and headed inland. Not really Outback. And not really “bush.”
My destination in March, as it usually has been on my many visits (this was my 12th time to Australia), was Coonabarabran in the Central West of NSW. It bills itself as the “Astronomy Capital of Australia.”
And rightly so, as nearby is the Siding Spring Observatory, Australia’s largest complex of optical telescopes (check the slide show above). I had a great tour again — thanks, Blake! — of the big 4-metre AAT that towers over the rest of the observatories on the mountain.
The Upside-Down Sky
A pano of Mirrabook Cottage, my astronomy retreat site.
My home for the first week in “Coona,” as the waning Moon got out of the way, was the Mirrabook Cottage off Timor Road, ideal as an astrophoto retreat. The view to the east and south (the view above) is partly obscured by gum trees, but not enough to prevent shooting targets around the South Celestial Pole, such as the Magellanic Clouds, as I show below.
The scope came with me this time, but the mount had been in Oz for 20 years.
The first order of the day upon arriving was to sort out my gear, to see if it was all working. My main Oz telescope, a legendary Astro-Physics Traveler refractor that I had stored in Australia since the early 2000s, came home with me in 2017, for use at the 2017, 2023, and 2024 solar eclipses in North America (the links take you to blogs for those eclipses) .
So this year I brought another little refractor with me, the diminutive Sharpstar 61mm EDPH III. Many of the images I present here I shot with the Sharpstar, on the veteran Astro-Physics AP400 mount I show above, which had lived in Australia for two decades. It came home with me this time, to use the very next month at the April total eclipse in Quebec. My blog with the final music video from that eclipse is here.
But I also brought a little star tracker, an MSM Nomad, which I reviewed here, just in case the old iOptron tracker I had in Australia, but hadn’t used since 2017, did not work. I needn’t have feared. It was the new Nomad that had issues, with the iOptron serving me well as a back-up for wide-angle Milky Way images.
This is a wide-angle view of the constellations of the northern hemisphere winter, but seen from the southern hemisphere looking north on an austral autumn night, March 3, 2024. Shot on the MSM Nomad tracker, for a blend of 4 x 2-minutes tracked at ISO 1600 for the sky and 2 x 2-minutes untracked at ISO 800 for the ground.
From Mirrabook looking north affords a fine view of a sky familiar to us northerners — if we stand on our heads! Orion and the stars of “winter” are there but upside-down for us, with the constellations that are overhead for us at home, now low in the north.
I shot all the images presented here during my two-week Oz astrophoto extravaganza. I had clear skies every night, bar for a couple that were welcome breaks!
This is a wide-angle view of the southern Milky Way, here from Carina and Crux at lower left up to Orion and Monoceros at upper right. On the MSM Nomad tracker, for a stack of 10 x 3-minute exposures at ISO 800 with the TTArtisan 11mm lens on the Canon Ra.
South of Orion, and overhead from Australia (as I show above), is the dimmer section of the Milky Way passing through constellations once part of the huge celestial ship Argo Navis, now broken into Puppis the Aft Deck, Vela the Sails, and Carina the Keel, the latter containing the second brightest star in the night sky, Canopus, second only to Sirius nearby in Canis Major.
Puppis and Vela
Though somewhat obscure and hard to pick out as distinctive patterns, Puppis and Vela are filled with deep-sky wonders.
The biggest is so vast it covers as much sky as a hand length, held at arm’s length. But it is totally invisible to the eye, even aided by optics.
This is a framing of the vast Gum Nebula in the southern Milky Way, that sprawls over the constellations of Vela and Puppis. This is a stack of 12 x 5 minutes at ISO 1600 and f/2 with the Astronomik 12nm H-alpha clip-in filter, blended onto the base unfiltered images from a stack of 14 x 3 minutes at f/2.8, all with the Canon RF28-70mm lens at 28mm on the red-sensitive Canon Ra camera, and on the MSM Nomad tracker.
This is the huge Gum Nebula, discovered in 1955 by Australian astronomer Colin Gum, working at the Mt. Stromlo Observatory near Canberra. It might be a star-forming nebula shaped by stellar winds, or it might be the exploded debris of a nearby supernova star.
Within the Gum Nebula in Vela is a smaller complex of arcs and fragments I show below. This definitely is a supernova remnant, one that exploded about 11,000 years ago some 900 light years away. But it, too, is large, making it a perfect target for the little refractor, and a telephoto lens, with both versions below.
This frames most of the intricate arcs and loops of the Vela Supernova Remnant (SNR). This is a stack of 8 x 10-minute exposures shot through an IDAS NBZ dual narrowband filter to bring out the nebulosity, blended with a stack of 12 x 5-minute exposures with no filter. All with the filter-modified Canon EOS R camera, on the Sharpstar 61 EDPH III refractor at f/4.4. This is the large Vela Supernova Remnant in a stack of 15 x 2-minute exposures with the Canon RF135mm lens at f/2 on the Canon Ra at ISO 1000. With a broadband filter.
The area is also home to rich fields of bright star clusters (two are below), many intertwined with wreaths of star-forming nebulosity. These rival or exceed the more famous northern targets of the Messier Catalogue compiled between 1774 and 1781 by Charles Messier. It took several more decades before astronomers from the north catalogued the sky to the south.
This is the bright, large and colourful naked-eye star cluster NGC 2516 in Carina, aka the Southern Beehive Cluster, near the bright star Avior (Epsilon Carinae) in Carina. This is a stack of 8 x 5 minute exposures with the Sharpstar 61mm refractor at f/4.4 and the Canon R at ISO 800.This frames a pair of contrasting and superb star clusters in Puppis: rich NGC 2477 on the left and sparse but bright NGC 2451 on the right, the latter centred on the orange star c Puppis. This is a stack of 8 x 5 minute exposures with the Sharpstar 61mm refractor at f/4.4 and the modified Canon R at ISO 800.
Carina and Crux
Continuing deeper down the Milky Way we come to its most southerly portion rich in nebulas and clusters that outclass anything up north. This is also the brightest part of the Milky Way after the Galactic Centre.
This is the showpiece nebula of the southern skies, the Carina Nebula. The bright and rich Football Cluster, aka the Black Arrow Cluster or Pincushion Cluster, is at upper left. With the Sharpstar refractor at f/4.4 and filter-modified Canon R at ISO 3200 for narrowband filtered shots and ISO 800 for unfiltered shots.
The Carina Nebula is larger than the more famous Orion Nebula farther north. In the eyepiece it is a glowing cloud painted in shades of grey and crossed by intersecting dark lanes of dust. Photographs reveal even more intricate details, and the magenta tints of glowing hydrogen.
At upper left is the “Football Cluster,” as Aussies call it, or the Black Arrow Cluster, aka NGC 3532. It is surely one of the finest open star clusters in the sky. John Herschel, who in the 19th century compiled the first thorough catalogue of southern objects, thought so. I agree!
This is the Southern Pleiades star cluster surrounding the naked eye star Theta Carinae. This is a stack of 8 x 5 minute exposures with the Sharpstar 61mm refractor at f/4.4 and the Canon R at ISO 800.
Below the Carina Nebula is a brighter and bluer star cluster known as the Southern Pleiades, or IC 2602. Like many of the targets I show here, it is visible to the unaided eye and is a fine sight in binoculars, which are all you need to enjoy most of the southern splendours.
This two-segment telephoto lens panorama extends from the colourful stars of Crux, the Southern Cross at left, to Carina at right. This is a panorama of two segments, each a stack of 12 x 2-minute exposures with the Canon RF135mm lens at f/2 on Canon Ra at ISO 800.
East of the constellation of Carina is the iconic and colourful Southern Cross, or Crux, a star pattern on the flags of Australia, New Zealand and several other austral nations.
This frames the dark Coal Sack nebula in Crux, the Southern Cross. This is a stack of 8 x 5 minute exposures with the Sharpstar 61mm refractor at f/4.4 and the filter-modified Canon R at ISO 800.
Next to Crux is the darkest patch in the Milky Way, called the Coal Sack. Looking like a dark hole to the eye, in photos it breaks up into streaky dust lanes surrounded by famous star clusters, like the Jewel Box above it. Like many southern clusters, the aptly named (by Herschel) Jewel Box contains a variety of colourful stars.
This is the region around the star Lambda Centauri, with the Running Chicken Nebula or IC 2948, at bottom, surrounding the star Lambda Centauri and the loose open star cluster IC 2944. This is a stack of 12 x 5 minute exposures with the Sharpstar 61mm at f/4.4 and filter-modified Canon EOS R camera at ISO 800.
Between Carina and Crux sits another wonderful field of clusters and nebulas, among them the more recently named Running Chicken Nebula. Can you see it? Above it is the Pearl Cluster, NGC 3766, also notable for its colourful member stars.
This frames the small constellation of Musca the Fly below the Southern Cross, with the dark nebula called the Dark Doodad, part of the Musca Dark Nebula Complex. This is a stack of 12 x 2 minute exposures with the Canon RF135mm lens at f/2 on the Canon Ra at ISO 800.
Below Crux is the little constellation of Musca the Fly (many southern constellations are named for rather mundane creatures and objects). One of Musca’s prime sights is the long finger of dusty darkness called the Dark Doodad — yes, that’s its official name!
The Magellanic Clouds
All the targets I’ve shown so far reside in our Milky Way. The next two objects, named for 16th century explorer Ferdinand Magellan, are extra-galactic.
This is the southern Milky Way in Carina, Crux and Centaurus arcing over Mirrabook Cottage. At right are the Large and Small Magellanic Clouds. This is looking south to the South Celestial Pole which is near centre here.
The Clouds are other galaxies beyond ours, but nearby. They are among the closest galaxies and are considered satellites of the Milky Way. Both are visible to the unaided eye, looking like detached bits of the Milky Way. For deep-sky aficionados, they are reason enough to visit the Southern Hemisphere!
This frames the entire Small Magellanic Cloud, a member of the Local Group of galaxies and a companion of our Milky Way Galaxy. The field is 7.5 by 5º. This is a blend of a stack of 8 x 10-minute exposures at ISO 3200 through an IDAS NBZ narrowband filter, and a stack of 12 x 5 minute unfiltered exposures at ISO 800, all with the Sharpstar 61mm refractor at f/4.4 and the filter-modified Canon R.
The Small Magellanic Cloud contains many star-forming nebulas that glow in hydrogen red and oxygen cyan. It is most famous for its spectacular neighbour, the great globular star cluster called 47 Tucanae, here at right. It is not actually part of the SMC — 47 Tuc is more than ten times closer, on the outskirts of our Galaxy.
As rich as the Small Cloud is, it pales in comparison to its bigger neighbour, the LMC. The Large Magellanic Cloud is almost a universe unto itself. Astronomers have devoted their careers to studying it.
This is the Large Magellanic Cloud, some 160,000 light years away. This is with the Sharpstar refractor in a stack of 12 x 10-minute exposures at ISO 3200 through an IDAS NBZ dual-band (OIII and H-a) filter that adds most of the nebulosity, blended with a stack of 20 x 5-minute exposures at ISO 800 with no filter for the main “natural light” background content.
The biggest attraction in the LMC, one visible to the eye, is the Tarantula Nebula, the mass of cyan at left here. Many of the LMC’s nebulas emit light primarily from oxygen, not hydrogen. But figuring out which object is which can be tough. The LMC is filled with so many nebulas and clusters — and nebulous clusters — that no two catalogues of its contents ever quite agree on the identity and labels of all of them.
Northern Fields
The Magellanic Clouds are in the deep south, close to the Celestial Pole. A trip south of the equator is needed to see them. But on my trips to Australia I often like to shoot “northern” fields that I can’t get well at home in Canada.
This frames the variety of bright nebulas and dark dust clouds in and around the Belt and Sword of Orion. It shows how the bright Orion Nebula is really just the visible tip of a vast complex of gas and dust in Orion. This is a stack of 14 x 2 minute exposures with the Canon RF135mm lens at f/2 and on the Canon Ra at ISO 800. The lens had an 82mm URTH Night broadband filter on it to enhance nebulas somewhat.
This is the Belt and Sword of Orion the Hunter surrounded by interstellar clouds. It’s low in my south from home, but high in the north down under. This is with a telephoto lens, not the telescope, captured under better and more comfortable skies than I have in winter in Canada.
This is the nebula-rich region of Monoceros the Unicorn, containing the bright Rosette Nebula, NGC 2237, below the fainter and larger complex of nebulosity, NGC 2264, which contains the small (on this scale) Cone Nebula. This is a stack of 16 x 2 minute exposures with the Canon RF135mm lens at f/2 and on the Canon Ra at ISO 800.
Nearby is another nebulous field but fainter, in Monoceros the Unicorn, containing the popular target, the Rosette Nebula, at bottom here. But there’s much more in the area that shows up only in long exposures under dark skies.
At top is the large Seagull Nebula, an area of mostly red hydrogen-alpha emission and is a region of star formation. At bottom is the small Thor’s Helmet, mostly emitting cyan oxygen III light. This is a blend of a stack of 12 x 10-minute exposures at ISO 3200 with the IDAS NBZ filter, and a stack of 12 x 5-minute exposures at ISO 800 with no filter. All with the Sharpstar 61mm refractor at f/4.4 and Canon EOS R camera.
A target I’ve often had difficulty shooting for one technical reason or another is the Seagull Nebula straddling the border between Monoceros and Canis Major. I got it this time, together with a contrasting blue-green nebula called Thor’s Helmet, at lower left. It’s the expelled outer layers of a hot but aging giant star called a Wolf-Rayet star.
The OzSky Star Party
After a successful week at Mirrabook, I packed up and moved down the road to the Warrumbungles Mountain Motel, home to the annual OzSky Star Safari I have now attended six times over the years. (I see as of this writing it is almost sold out for 2025!)
A colorful sunset over the telescope field at the OzSky star party, March 15, 2024, at the Warrumbungles Mountain Motel, near Coonabarabran, NSW, Australia.
Handheld with the RF28-70mm lens at 28mm on the Canon R.
Limited to about 30 people, OzSky (flip through the slide show above) caters to ardent amateur astronomers from overseas who want to revel in the southern sky, aided by the presence on site of a field of giant telescopes, delivered and set up by a great group of Australian astronomers, who show everyone how to run the computer-equipped scopes. And with tips on what to look at beyond the top “eye candy” targets I’m presenting here.
The views of the southern splendours through these 18- to 25-inch telescopes are well worth the price of admission!
Our group photo of the 2024 OzSky T-shirted attendees and hosts.
It is always a great week of stargazing and camaraderie. If you are thinking of “doing the southern sky,” I can think of no better way than by attending OzSky. While it is primarily geared to visual observers, a growing number of attendees have been lured into the “dark side” of astrophotography.
March and April, austral autumn, are good months to go anywhere down under, as you get views of the best of what the southern sky has to offer. The Milky Way is up all night, just as it is six months later in our northern autumn. That’s when I made my complementary Arizona pilgrimage this year, blogged about here.
The Dark Emu Rising
One of the great naked-eye sights at OzSky in its usual months of March or April is the Dark Emu rising after midnight.
This frames the Australian Aboriginal “Dark Emu” made of dark dust lanes in the Milky Way as it rises in the east. This is a blend of four tracked exposures for the sky and one untracked for the ground, all two minutes at ISO 1600 with the TTArtisan 11mm full-frame fish-eye lens on the Canon EOS R camera.
It is an Australian Aboriginal constellation made of lanes of obscuring interstellar dust, from the Coal Sack on down the Milky Way to past the Galactic Centre. It is obvious to the eye — a constellation made of darkness.
Sagittarius and Scorpius
Late at night in the austral autumn months, the centre of the Galaxy region in Sagittarius and Scorpius comes up, presenting such a wealth of fields and targets it is hard to know where to begin.
There’s no richer and more colourful area of the sky than this field encompassing the Galactic Center in Sagittarius, at left, and the constellation of Scorpius seen in full here at centre and at right. This is a stack of 6 x 2 minute exposures with the Canon RF 28-70mm lens at f/2 on the Canon Ra at ISO 800.
Yes, we can see this area from up north, but there’s nothing like seeing Scorpius crawling up the sky head first, and then shining from high overhead by dawn.
This is a mosaic of the tail of Scorpius — from the bright star cluster Messier 7 at upper left embedded in bright Milky Way starclouds, to the large star cluster NGC 6124 amid dusty dark lanes at lower right. This is a stitch of 3 segments: each a stack of 6 x 2 minute exposures with the Canon RF135mm at f/2 on the Canon Ra at ISO 800.
Fields like this in the Tail of Scorpius are below my northern horizon at home. And it would still be low from a southern U.S. site, where natural green or red airglow can spoil images. I’ve never had an issue with airglow in Australia. Oz skies are as dark and clean as I have ever experienced.
The Southern Milky Way
The grand finale of a night at OzSky, or anywhere in the southern hemisphere in autumn, is the celestial sight that I think ranks as one of the sky’s best, up there with a total solar eclipse.
This is an all-sky view of the centre of the Galaxy region in Sagittarius and Scorpius nearly overhead before dawn on an austral autumn morning in March 2024. The Milky Way stretches from Aquila at bottom left to Crux and Carina at upper right. This is a stack of 4 x 4 minute tracked exposures, at f/2.8 with the TTArtisan 11mm full-frame fish-eye lens on the filter-modified Canon EOS R at ISO 800.
That sight is the jaw-dropping pre-dawn panorama of our Galaxy stretched across the sky, with the bright core overhead and its spiral arms out to either side. It is obvious as a giant edge-on galaxy, with us far off-centre. The image above frames the entire Dark Emu.
One of my projects this year, for a moonless night with little likelihood of clouds coming through, was to work photographically along the Milky Way, down from Orion into Puppis and Vela, through Carina and Crux, and into Centaurus, then finishing with the galactic core area of Scorpius and Sagittarius.
This panorama takes in a 180° sweep of the Milky Way: from Sagittarius, Scorpius and the Galactic Centre at left, to Orion, Gemini and near the galactic anti-centre at right. This is a panorama of 11 segments, each a stack of 8 to 12 exposures, of 2 or 3 minutes each, with the Canon RF28-70mm lens at f/2.2 or f/2.8 on the Canon Ra at ISO 800.
The resulting 180º panorama, made of 11 segments shot at 32° South, was an all-night affair, interrupted by a nearby tree and the oncoming dawn. It complements one I shot six months later from 32° North in Arizona. That panorama is included in my Comet Chasing blog.
The Moon Returns
OzSky, as are all star parties, is timed for the dark of the Moon. By the end of the week, with everyone well and truly satiated by starlight and dark skies, the crescent Moon was beginning to appear in the west. (Yes, that’s a young waxing evening Moon, here near Jupiter on March 14, 2024.)
The waxing crescent Moon near Jupiter in the western twilight sky on an austral autumn evening. This is a blend of exposures to retain the detail around the bright Moon and corona glow: long (2.5s) for the sky and stars, and three shorter (0.6s, 0.3s and 1/6s) exposures for the Moon.
It was time to pack the telescopes into their trailers, and for everyone to head back home, whether that be in Australia or elsewhere in the world.
If You Go…
If you travel to the Southern Hemisphere, at the very least take binoculars and star charts, especially simple “beginner” charts, as you’ll be starting over again identifying a new set of patterns and stars.
For astrophotography, a star tracker is all you need, plus of course a camera and lenses. Focal lengths from fish-eye to telephoto can all be put to use. But many of the best fields are suitable for framing with no more than a 135mm lens, as I used for some of the images here.
But take good charts to identify the location of the South Celestial Pole in Octans the Octant. With no bright “South Star,” it can be tricky getting that field into your polar alignment sighting scope. Once aligned, I tend to leave my rig set up where it is, and not have to repeat the process each night. That’s why it’s nice to base yourself under dark skies at a cottage like Mirrabook, and not be on the road and at a different site every night.
The Sharpstar 61mm scope on the Star Adventurer GTi mount.
If you want to have a telescope with you, one of the current generation of small (50mm to 70mm) apo refractors is ideal, either to look through or shoot through. For imaging, a small equatorial mount is essential, but can be tough to pack with its tripod. And you need to power it. The little Sky-Watcher Star Adventurer GTi powered by its internal 8 AA batteries, but on a collapsible carbon fibre tripod, is a good choice.
For visual tours, the OzSky Star Safari will provide all the eyepiece time on big scopes you could ask for. It is imaging where you are on your own to come fully equipped and self-contained.
When will I be back? Perhaps not in 2025. But 2026 is a possibility, maybe a little later in austral autumn to get the Galactic Centre up sooner and higher before dawn. I’ve been to Australia in the winter months of June and July and it’s too cold! May perhaps.
My Oz observing site — with camera gear accompanied by a roo. Or a wallaby? Note the cover over my aligned tracker rig at right.
If you go once, you will be bitten (we hope not literally by one of Oz’s killer critters!) by the southern sky passion.
The only downside is that when I get home, often to poor weather, but even when skies are clear, I find that the home skies tend to lose their excitement and attraction. They just can’t compare to the great southern skies.
A run of exceptionally clear nights allowed me to capture scenes of stardust along the MilkyWay.
Colourful nebulas – clouds of glowing gas – are the most popular targets in the deep sky for astrophotographers. Most nebulas emit red light from hydrogen atoms. Some glow blue by reflecting the light of nearby hot stars.
But another class of nebulas emits or reflects almost no light, and appears dark, often as shapes silhouetted against the bright starry background. They are usually made of obscuring interstellar dust – typically grains of carbon soot emitted by aging or active stars – literally stardust.
In the olden days of film photography, these dark dust clouds always appeared black in our exposures. Or they never showed up at all.
But today’s digital cameras, with the aid of processing techniques, can capture the dust clouds, often not as black clouds, but as pale blue tendrils, or as brownish-yellow streamers faintly glowing with a warm light.
In October and November 2023, a series of unusually clear and mild nights allowed me to go after some of these dark and dusty targets, from my home in rural southern Alberta, Canada. I captured a selection of scenes off the beaten track along the Milky Way. Here’s my tour of stardust sights in the northern autumn and winter sky.
Cepheus the King
This is a portrait of most of the northern constellation of Cepheus the King. All the wide-field images were shot and processed to emphasize the rich collection of bright and dark nebulas in the constellation. North is always up. This is a stack of 40 x 2-minute exposures with the rare Samyang RF85mm f/1.4 lens stopped down to f/2.8, on the Canon EOS Ra camera at ISO 800. The lens was equipped with a 77mm Nisi Clear Night broadband filter. For all the wide-field images the camera was on the Star Adventurer 2i tracker for tracked but unguided exposures.
The wide-field image above frames most of the northern constellation of Cepheus. The southern section of Cepheus at the bottom of the frame lies in the Milky Way and is rich in bright red nebulas, notably the large, round IC 1396. It is a popular and easy target. But the northern upper reaches of Cepheus are where more challenging dusty nebulas reside. I’ve indicated the location of two fields shown in the close-ups below.
The Iris Nebula
This is the bright blue reflection nebula, NGC 7023, aka the Iris Nebula, in Cepheus. This is a stack of 25 x 8-minute exposures through the Askar APO120 refractor at f/7 with the 1X Flattener, and with the filter-modified Canon R camera at ISO 1600.
Located some 1300 light years away, this is a blue reflection nebula, as the dust is lit by the young blue star in its core. But surrounding the bright Iris Nebula are more extensive clouds of dust, dimly lit by reflected light and with varying densities and shades of grey and brown.
The Dark Shark and Wolf’s Cave Nebulas
This is a portrait of a field of dusty nebulas in northern Cepheus, in a stack of 30 x 6-minute exposures with the Astro-Tech AT90CFT refractor at f/4.8 and filter-modified Canon EOS R camera at ISO 800, though no filter was used when taking these frames.
This field in northern Cepheus is yellowed by reams of dust. A couple of blue reflection nebulas lie on the edges of streamers of brown dust. The object at top is called the Dark Shark, for its fanciful resemblance to a menacing shark, though one wearing a blue hat!
At the bottom of the frame is a long, snake-like dark brown nebula, Barnard 175, with the blue reflection nebula van den Bergh (vdB) 152 at its tip. This object has been dubbed the Wolf’s Cave Nebula, though that likeness is harder to discern. It is unclear where some of these nicknames come from, as many are recent appellations invented by astrophotographers. Some of the names have stuck, though few are “official.”
Perseus the Hero and Taurus the Bull
This is a portrait of the dust-filled region of sky from Perseus down to Taurus that includes the pink California Nebula (NGC 1499) at top down to the Pleiades star cluster (M45) at bottom. This is a stack of 48 x 2-minute exposures with the rare Samyang RF85mm f/1.4 lens stopped down to f/2.8, on the Canon EOS Ra camera at ISO 800. The lens was equipped with a 77mm Nisi Clear Night broadband filter.
The region of sky between Perseus and Taurus is rich in bright nebulas set amid large tendrils of dust in Taurus. The Pleiades star cluster lights up a portion of the dust clouds. And the pink California Nebula lies at the end of a large lane of dust.
The California Nebula
This is the California Nebula, aka NGC 1499, in Perseus near the star Menkib, or Xi Persei, at bottom. This is a stack of 12 x 6-minute exposures with the filter-modified Canon R (though no filter was used to take this image), at ISO 800, on the Askar APO120 refractor with its 0.8x Reducer/Flattener for f/5.6 and 670mm focal length.
The California Nebula (named for its resemblance to the shape of the state) lies in Perseus. It is a bright emission nebula glowing in the red and pink light of hydrogen atoms, perhaps excited by blue-white Xi Persei, aka Menkib, at bottom. But it sits amid wider clouds of dust, here recorded as white and yellow.
IC 348
This is the bright blue reflection nebula complex, IC 348, in Perseus, in a stack of 18 x 8-minute exposures through the Askar APO120 refractor at f/7 with the 1X Flattener, and with the filter-modified Canon R camera at ISO 1600.
This complex mix of reflection and dark nebulas surrounds Omicron Persei. In some sections the dust is so dense it blocks all light from more distant stars. Once thought to be holes in the heavens, the photos of pioneering astrophotographer Edward Emerson Barnard in the early 20th century proved that dark nebulas are nearby, and obscure what’s behind them.
IC 348’s distance of only 700 light years means there isn’t much between us and the surrounding dark clouds. Oddly, though a popular target, as best I can tell, no one has come up with a nickname for this field. What can you see in the dark shapes?
The Pleiades / Messier 45
This frames the famous Pleiades or Seven Sisters star cluster (aka Messier or M45) set amid a dusty starfield in Taurus. The field is about 4.7° by 3.2°. This is a stack of 30 x 6-minute exposures with the Astro-Tech AT90CFT refractor at f/4.8 (using its 0.8x Reducer) and the filter-modified Canon R camera at ISO 800.
There’s no more famous deep-sky object than the blue Pleiades, or Seven Sisters. They feature in the mythology of almost all cultures around the world. The young blue stars are surrounded by bright blue reflection nebulosity, most prominent below the lower star Merope, a bit of nebula catalogued separately as NGC 1435.
While the Pleiades light up the core of the dust clouds blue, the dust clouds extend much wider and permeate the entire constellation of Taurus. However, the outlying clouds are very faint as they have no nearby source of illumination. The arc of nebulosity at top is most obvious. It was found by Barnard and is catalogued as IC 353.
Taurus the Bull
This is a portrait of the dust-filled region of sky in Taurus that frames the Hyades star cluster (at bottom) with bright yellow Aldebaran, up to the blue Pleiades star cluster (M45) at top. This is a stack of 48 x 2-minute exposures with the Samyang RF85mm f/1.4 lens at f/2.8, on the Canon EOS Ra camera at ISO 800.
Overlapping the previous constellation field, this framing extends farther south, continuing past the Pleiades down into the main section of Taurus the Bull, with the luminous yellow star Aldebaran marking the Bull’s eye. It is surrounded by the stars of the V-shaped Hyades star cluster, legendary half-sisters to the Pleiades.
Notable in this framing are the large dark tendrils of the Taurus Molecular Clouds, dense streams of dust only about 430 light years away. They are on my shot list for close-ups on upcoming clear winter nights.
NGC 1555 and Area
This is a framing of dust clouds among the stars of the Hyades star cluster in Taurus. The field of view is 4.7° by 3.2°. This is a stack of 30 x 6-minute exposures with the Astro-Tech AT90CFT refractor at f/4.8 and the filter-modified Canon EOS R camera at ISO 800, though no filter was used in taking the images.
This complex field lies on the northern edge of the Hyades. At upper right is the odd nebula NGC 1555, discovered by John Russell Hind in 1852 and variable in brightness due to changes in its embedded source star T Tauri, a prototype of a class of young, newly formed stars. An adjacent object, NGC 1554, was catalogued by Otto Struve, but has faded from view; thus it is called Struve’s Lost Nebula.
At lower left is the emission nebula Sharpless 2-239 embedded in the dense and brownish dust cloud LDN (Lynds Dark Nebula) 1551. It is dark indeed, but not black. Like most dark nebulas it has some warm colour.
Orion the Hunter
This is a portrait of Orion the Hunter with exposures and processing to emphasize the complex and colourful array of bright and dark nebulas within its boundaries. This is a stack of 42 x 2-minute exposures with the Samyang RF85mm f/1.4 lens at f/2.8, on the Canon EOS Ra camera at ISO 800. The lens had a Nisi Clear Night broadband filter to help improve contrast.
The most photogenic constellation is surely Orion the Hunter. It is filled with a rich collection of nebulas, including the eponymous Orion Nebula, bright enough to be visible to the unaided eye in the Sword of Orion, and #42 in Charles Messier’s catalogue.
The largest feature (though one best seen only in photos) is the arc of Barnard’s Loop, a possible supernova remnant or stellar wind-blown bubble that encircles Orion. It is usually plotted on sky atlases as just an easternmost arc, though it extends down and below Orion, all the way over to blue Rigel at bottom right.
At top is the large circular emission nebula Sharpless 2-264, surrounding the head of Orion and the star Meissa and a loose open star cluster Collinder 69. The nebula has become known as the Angelfish Nebula. It sits above orange Betelgeuse (at left) and blue-white Bellatrix (at right), marking the shoulders of Orion.
As you can see, there’s a winter-full of targets to go after in Orion. However, in my tour, I focused on two areas of dust and reflection nebulas.
Messier 78 Area
This is the bright reflection nebula complex that includes Messier 78 (the largest blue-white nebula) and NGC 2071 above it. This is a stack of 30 x 4-minute exposures through the Astro-Tech AT90CFT refractor with its 0.8x Reducer for f/4.8, and with the filter-modified Canon R camera at ISO 1600. No filter was employed here.
This frames one of the other often-neglected nebulas in Orion, Messier 78, one of the objects catalogued by Charles Messier in the 1780s. His is the popular “hit list” of deep-sky targets for all amateur astronomers.
In this case, M78 is accompanied by another smaller reflection nebula, NGC 2071. They are set in a region of dark clouds of interstellar dust, and framed by the red-magenta arc of Barnard’s Loop, aka Sharpless 2-276. The small reflection nebula at upper left on the edge of another dark cloud is van den Bergh 62. The large faint star cluster left of centre on the edge of the Loop is NGC 2112.
The Witch Head Nebula
This is the reflection nebula called the Witch Head, but officially IC 2118 (also with the catalogue number NGC 1909), near the very bright star Rigel, at lower left in Orion. This is a stack of 29 x 6-minute exposures through the Astro-Tech AT90CFT refractor with its 0.8x Reducer for f/4.8, and with the filter-modified Canon R camera at ISO 800. No filter was employed here.
The hot, blue giant star at lower left is Rigel at the foot of Orion. It illuminates the dust cloud that forms the fanciful shape of the blue Witch Head Nebula, or IC 2118. The nebula is actually over the border in Eridanus the River. Some magenta emission nebulosity also populates the field in Orion.
Indeed, as the wide-field photo above attests, all of Orion is filled with some form of nebulosity, be it emission, reflection, or dark.
There’s much more to go after when exploring the nebulous and dusty realms of the Milky Way. The sky is filled with stardust. Indeed, we are made of it!
In a detailed technical blog I compare six AI-based noise reduction programs for the demands of astrophotography. Some can work wonders. Others can ruin your image.
Over the last two years we have seen a spate of specialized programs introduced for removing digital noise from photos. The new generation of programs use artificial intelligence (AI), aka machine learning, trained on thousands of images to better distinguish unwanted noise from desirable image content.
At least that’s the promise – and for noisy but normal daytime images they do work very well.
But in astrophotography our main subjects – stars – can look a lot like specks of pixel-level noise. How well can each program reduce noise without eliminating stars or wanted details, or introducing odd artifacts, making images worse.
To find out, I tested six of the new AI-based programs on real-world – or rather “real-sky” – astrophotos. Does one program stand out from the rest for astrophotography?
NOTE: All the images are full-resolution JPGs you can tap or click on to download for detailed inspection. But that does make the blog page slow to load initially. Patience!
TL;DR SUMMARY
The new AI-trained noise reduction programs can indeed eliminate noise better than older non-AI programs, while leaving fine details untouched or even sharpening them.
Of the group tested, the winner for use on just star-filled images is a specialized program for astrophotography, NoiseXTerminator from RC-Astro.
For nightscapes and other images, Topaz DeNoise AI performed well, better than it did in earlier versions that left lots of patchy artifacts, something AI programs can be prone to.
While ON1’s new NoNoise AI 2023 performed fine, it proved slightly worse in some cases than its earlier 2022 version. Its new sharpening routine needs work.
Other new programs, notably Topaz Photo AI and Luminar’s Noiseless AI, also need improvement before they are ready to be used for the rigours of astrophotography.
For reasons explained below, I would not recommend DxO’s PureRAW2. [See below for comments on the newer DxO PureRaw3, which suffers from the same issues.]
The three test images in Adobe Camera Raw showing the Basic settings applied.
METHODOLOGY
As described below, while some of the programs can be used as stand-alone applications, I tested them all as plug-ins for Photoshop, applying each as a smart filter applied to a developed raw file brought into Photoshop as a Camera Raw smart object.
Most of these programs state that better results might be obtainable by using the stand-alone app on original raw files. But for my personal workflow I prefer to develop the raw files with Adobe Camera Raw, then open those into Photoshop for stacking and layering, applying any further noise reduction or sharpening as non-destructive smart filters.
Many astrophotographers also choose to stack unedited original images with specialized stacking software, then apply further noise reduction and editing later in the workflow. So my workflow and test procedures reflect that.
However, the exception is DxO’s PureRAW2. It can work only on raw files as a stand-alone app, or as a plug-in from Adobe Lightroom. It does not work as a Photoshop plug-in. I tested PureRAW2 by dropping raw Canon .CR3 files onto the app, then exporting the results as raw DNG files, but with the same settings applied as with the other raw files. For the nightscape and wide-field images taken with lenses in DxO’s extensive database, I used PureRAW’s lens corrections, not Adobe’s.
As shown above, I chose three representative images:
A nightscape with star trails and a detailed foreground, at ISO 1600.
A wide-field deep-sky image at ISO 1600 with an 85mm lens, with very tiny stars.
A close-up deep-sky image taken with a telescope and at a high ISO of 3200, showing thermal noise hot pixels.
Each is a single image, not a stack of multiple images.
Before applying the noise reduction, the raw files received just basic color corrections and a contrast boost to emphasize noise all the more.
THE CONTENDERS
In the test results for the three images, I show the original raw image, plus a version with noise reduction and sharpening applied using Adobe Camera Raw’s own sliders, with luminance noise at 40, color noise at 25, and sharpening at 25.
I use this as a base comparison, as it has been the noise reduction I have long applied to images. However, ACR’s routine (also found in Adobe Lightroom) has not changed in years. It is good, but it is not AI.
[See below for an April 2023 update with a comparison of Adobe’s new AI Denoise with DxO DeepPrimeXD and Topaz PhotoAI.]
The new smart AI programs should improve upon this. But do they?
PLEASENOTE:
I have refrained from providing prices and explaining buying options, as frankly some can be complex!
For those details and for trial copies, go to the software’s website by clicking on the link in the header product names below.
All programs are available for Windows and MacOS. I tested the latter versions.
I have not provided tutorials on how to use the software; I have just reported on their results. For trouble-shooting their use, please consult the software company in question.
ON1’s main product is the Lightroom/Photoshop alternative program called ON1 Photo RAW, which is updated annually to major new versions. It has full cataloging options like Lightroom and image layering like Photoshop. Its Edit module contains the NoNoise AI routine. But NoNoise AI can be purchased as a stand-alone app that also installs as a plug-in for Lightroom and Photoshop. It’s what I tested here. The latest 2023 version of NoNoise AI added ON1’s new Tack Sharp AI sharpening routine.
Version tested: 17.0.1
Topaz DeNoise AI’s four-pane view to select the best AI model.
This program has proven very popular and has been adopted by many photographers – and astrophotographers – as an essential part of an editing workflow. It performs noise reduction only, offering a choice of five AI models. Auto modes can choose the models and settings for you based on the image content, but you can override those by adjusting the strength, sharpness, and recovery of original detail as desired.
A separate program, Topaz Sharpen AI, is specifically for image sharpening, but I did not test it here. Topaz Gigapixel AI is for image resizing.
Version tested: 3.7.0
Topaz Photo AI’s control interface for its three main functions: noise, sharpening and upscaling.
In 2022 Topaz introduced this new program which incorporates the trio of noise reduction, sharpening and image resizing in one package. Like DeNoise, Sharpen and Gigapixel, Photo AI works as a stand-alone app or as a plug-in for Lightroom and Photoshop. Photo AI’s Autopilot automatically detects and applies what it thinks the image needs. While it is possible to adjust settings, Photo AI offers much less control than DeNoise AI and Topaz’s other single-purpose programs.
As of this writing in November 2022 Photo AI is enjoying almost weekly updates, and seems to be where Topaz is focusing its development and marketing effort. [See below for a test of PhotoAI v1.3.1, current as of April 2023.]
Version tested: 1.0.9
Luminar Neo’s Edit interface with choices of many filters and effects, including Noiseless AI.
Unlike the other noise reduction programs tested here, Luminar Neo from the software company Skylum is a full-featured image editing program, with an emphasis on one-click AI effects. One of those is the new Noiseless AI, available as an extra-cost extension to the main Neo program, either as a one-time purchase or by annual subscription. Noiseless AI cannot be purchased on its own. However, Neo with most of its extensions does work as a plug-in for Lightroom and Photoshop.
Being new, Luminar Neo is also updated frequently, with more extensions coming in the next few months.
Version tested: 1.5.0
DxO PureRAW’s simple interface with few choices for Noise Reduction settings.
Like ON1, DxO makes a full-featured alternative to Adobe’s Lightroom for cataloging and raw developing called DxO PhotoLab, in version 6 as of late 2022. It contains DxO’s Prime and DeepPrime noise reduction routines. However, as with ON1, DxO has spun off just the noise reduction and lens correction parts of PhotoLab into a separate program, PureRAW2, which runs either as a stand-alone app or as a plug-in for Lightroom – but not Photoshop, as PureRAW works only on original raw files.
Unlike all the other programs, PureRAW2 offers essentially no options to adjust settings, just the option to apply, or not, lens corrections, and to choose the output format. For this testing I applied DeepPrime and exported out to DNG files. [See below for a test of DeepPrimeXD, now offered with PureRaw3.]
Version tested: 2.2
Noise Terminator’s controls allow adjusting strength and detail.
Unlike the other programs tested, NoiseXTerminator from astrophotographer Russell Croman is designed specifically for deep-sky astrophotography. It installs as a plug-in for Photoshop or Affinity Photo, but not Lightroom. It is also available under the same purchased licence as a “process” for PixInsight, an advanced program popular with astrophotographers, as it is designed just for editing deep-sky images.
I tested the Photoshop plug-in version of Noise XTerminator. It receives occasional updates to both the actual plug-in and separate updates to the AI module.
Version tested: 1.1.2, AI model 2
NIGHTSCAPE TEST
As with the other test images, the panels show a highly magnified section of the image, indicated in the inset. I shot the image of Lake Louise in Banff, Alberta with a Canon RF15-35mm lens on a 45-megapixel Canon R5 camera at ISO 1600.
The test results on a sample nightscape.
Adobe Camera Raw’s basic noise reduction did a good job, but like all general routines it does soften the image as a by-product of smoothing out high-ISO noise.
ON1 NoNoise 2023 retained landscape detail better than ACR but softened the star trails, despite me adding sharpening. It also produced a somewhat patchy noise smoothing in the sky. This was with Luminosity backed off to 75 from the auto setting (which always cranks up the level to 100 regardless of the image), and with the Tack Sharp routine set to 40 with Micro Contrast at 0. It left a uniform pixel-level mosaic effect in the shadow areas. Despite the new Tack Sharp option, the image was softer than with last year’s NoNoise 2022 version (not shown here as it is no longer available) which produced better shadow results.
Topaz DeNoise AI did a better job than NoNoise retaining the sharp ground detail while smoothing noise, always more obvious in the sky in such images. Even so, it also produced some patchiness, with some areas showing more noise than others. This was with the Standard model set to 40 for Noise and Sharpness, and Recover Details at 75. I show the other model variations below.
Topaz Photo AI did a poor job, producing lots of noisy artifacts in the sky and an over-sharpened foreground riddled with colorful speckling. It added noise. This was with the Normal setting and the default Autopilot settings.
Noiseless AI in Luminar Neo did a decent job smoothing noise while retaining, indeed sharpening ground detail without introducing ringing or colorful edge artifacts. The sky was left with some patchiness and uneven noise smoothing. This was with the suggested Middle setting (vs Low and High) and default levels for Noise, Detail and Sharpness. However, I do like Neo (and Skylum’s earlier Luminar AI) for adding other finishing effects to images such as Orton glows.
DxO PureRAW2 did smooth noise very well while enhancing sharpness quite a lot, almost too much, though it did not introduce obvious edge artifacts. Keep in mind it offers no chance to adjust settings, other than the mode – I used DeepPrime vs the normal Prime. Its main drawback is that in making the conversion back to a raw DNG image it altered the appearance of the image, in this case darkening the image slightly. It also made some faint star trails look wiggly!
Noise XTerminator really smoothed out the sky, and did so very uniformly without doing much harm to the star trails. However, it smoothed out ground detail unacceptably, not surprising given its specialized training on stars, not terrestrial content.
Conclusion: For this image, I’d say Topaz DeNoise AI did the best, though not perfect, job.
This was surprising, as tests I did with earlier versions of DeNoise AI showed it leaving many patchy artifacts and colored edges in places. Frankly, I was put off using it. However, Topaz has improved DeNoise AI a lot.
Why it works so well, when Topaz’s newer program Photo AI works so poorly is hard to understand. Surely they use the same AI code? Apparently not. Photo AI’s noise reduction is not the same as DeNoise AI.
Similarly, ON1’s NoNoise 2023 did a worse job than their older 2022 version. One can assume its performance will improve with updates. The issue seems to be with the new Tack Sharp addition.
NoiseXTerminator might be a good choice for reducing noise in just the sky of nightscape images. It is not suitable for foregrounds, though as of April 2023 its performance on landscapes has improved but is not ideal.
WIDE-FIELD IMAGE TEST
I shot this image of Andromeda and Triangulum with an 85mm Rokinon RF lens on the 45-megapixel Canon R5 on a star tracker. Stars are now points, with small ones easily mistaken for noise. Let’s see how the programs handle such an image, zooming into a tiny section showing the galaxy Messier 33.
The test results on a sample wide-field deep-sky image.
Adobe Camera Raw’s noise and sharpening routines do take care of the worst of the luminance and chrominance noise, but inevitably leave some graininess to the image. This is traditionally dealt with by stacking multiple sub-exposures.
ON1 NoNoise 2023 did a better job than ACR, smoothing the worst of the noise and uniformly, without leaving uneven patchiness. However, it did soften star images, almost like it was applying a 1- or 2-pixel gaussian blur, adding a slight hazy look to the image. And yet the faintest stars that appeared as just perceptible blurs in the original image were sharpened to one- or two-pixel points. This was with only NoNoise AI applied, and no Tack Sharp AI. And, as I show below, NoNoise’s default “High Detail” option introduced with the 2022 version and included in the 2023 edition absolutely destroys star fields. Avoid it.
ON1 NoNoise “High Detail” option ruins star fields, as shown at right. Use “Original” instead.
Topaz DeNoise AI did a better job than Camera Raw, though it wasn’t miles ahead. This was with the Standard setting. Its Low Light and Severe models were not as good, surprising as you might think one of those choices would be the best for such an image. It pays to inspect Topaz’s various models’ results. Standard didn’t erase stars; it actually sharpened the fainter ones, almost a little too much, making them look like specks of noise. Playing with Enhance Sharpness and Recover Detail didn’t make much difference to this behavior.
Topaz Photo AI again performed poorly. Its Normal mode left lots of noise and grainy artifacts. While its Strong mode shown here did smooth background noise better, it softened stars, wiping out the faint ones and leaving colored edges on the brighter ones.
Noiseless AI in Luminar Neo did smooth fine noise somewhat, better than Camera Raw, but still left a grainy background, though with the stars mostly untouched in size and color.
DxO PureRAW2did eliminate noise quite well, while leaving even the faintest stars intact, unlike with the deep-sky image below, which is odd. However, it added some dark halos to bright stars from over-sharpening. And, as with the nightscape example, PureRAW’s output DNG was darker than the raw that went in. I don’t want noise reduction programs altering the basic appearance of an image, even if that can be corrected later in the workflow.
Noise XTerminator performed superbly, as expected – after all, this is the subject matter it is trained to work on. It smoothed out random noise better than any of the other programs, while leaving even the faintest stars untouched, in fact sharpening them slightly. Details in the little galaxy were also unharmed.
Conclusion: The clear winner was NoiseXTerminator.
Topaz DeNoise was a respectable second place, performing better than it had done on such images in earlier versions. Even so, it did alter the appearance of faint stars which might not be desirable.
ON1 NoNoise 2023 also performed quite well, with its softening of brighter stars yet sharpening of fainter ones perhaps acceptable, even desirable for an effect.
TELESCOPIC DEEP-SKY TEST
I shot this image of the NGC 7822 complex of nebulosity with a SharpStar 61mm refractor, using the red-sensitive 30-megapixel Canon Ra and with a narrowband filter to isolate the red and green light of the nebulas.
Again, the test image is a single raw image developed only to re-balance the color and boost the contrast. No dark frames were applied, so the 8-minute exposure at ISO 3200 taken on a warm night shows thermal noise as single “hot pixel” white specks.
The test results on a sample deep-sky close-up.
Adobe Camera Raw did a good job smoothing the worst of the noise, suppressing the hot pixels but only by virtue of it softening all of the image slightly at the pixel level. However, it leaves most stars intact.
ON1 NoNoise 2023 also did a good job smoothing noise while also seeming to boost contrast and structure slightly. But as in the wide-field image, it did smooth out star images a little, though somewhat photogenically, while still emphasizing the faintest stars. This was with no sharpening applied and Luminosity at 60, down from the default 100 NoNoise applies without fail. One wonders if it really is analyzing images to produce optimum settings. With no Tack Sharp sharpening applied, the results on this image with NoNoise 2023 looked identical to NoNoise 2022.
Topaz DeNoise AI did another good job smoothing noise, while leaving most stars unaffected. However, the faintest stars and hot pixels were sharpened to be more visible tiny specks, perhaps too much, even with Sharpening at its lowest level of 1 in Standard mode. Low Light and Severe modes produced worse results, with lots of mottling and unevenness in the background. Unlike NoNoise, at least its Auto settings do vary from image to image, giving you some assurance it really is responding to the image content.
Topaz Photo AI again produced unusable results. Its Normal modes produced lots of mottled texture and haloed stars. Its Strong mode shown here did smooth noise better, but still left lots of uneven artifacts, like DeNoise AI did in its early days. It certainly seems like Photo AI is using old hand-me-down code from DeNoise AI.
Noiseless AI in Luminar Neo did smooth noise but unevenly, leaving lots of textured patches. Stars had grainy halos and the program increased contrast and saturation, adjustments usually best left for specific adjustment layers dedicated to the task.
DxO PureRAW2 did smooth noise very well, including wiping out the faintest specks from hot pixels, but it also wiped out the faintest stars, I think unacceptably and more than other programs like DeNoise AI. For this image it did leave basic brightness alone, likely because it could not apply lens corrections to an image taken with unknown optics. However, it added an odd pixel-level mosaic-like effect on the sky background, again unacceptable.
Noise XTerminator did a great job smoothing random noise without affecting any stars or the nebulosity. The Detail level of 20 I used actually emphasized the faintest stars, but also the hot pixel specks. NoiseXTerminator can’t be counted on to eliminate thermal noise; that demands the application of dark frames and/or using dithering routines to shift each sub-frame image by a few pixels when autoguiding the telescope mount. Even so, Noise XTerminator is so good users might not need to take and stack as many images.
Conclusion: Again, the winner was NoiseXTerminator.
Deep-sky photographers have praised “NoiseX” for its effectiveness, either when applied early on in a PixInsight workflow or, as I do in Photoshop, as a smart filter to the base stacked image underlying other adjustment layers.
Topaz DeNoise is also a good choice as it can work well on many other types of images. But again, play with its various models and settings. Pixel peep!
ON1 NoNoise 2023 did put in a respectable performance here, and it will no doubt improve – it had been out less than a month when I ran these tests.
Based on its odd behavior and results in all three test images I would not recommend DxO’s PureRAW2. Yes, it reduces noise quite well, but it can alter tone and color in the process, and add strange pixel-level mosaic artifacts.
COMPARING DxO and TOPAZ OPTIONS
DxO and Topaz DeNoise AI offer the most choices of AI models and strength of noise reduction. Here I compare:
Topaz DeNoise AI on the nightscape image using three of its models: Standard (which I used in the comparisons above), plus Low Light and Severe. These show how the other models didn’t do as good a job.
The set below also compares DeNoise AI to Topaz’s other program, Photo AI, to show how poor a job it is doing in its early form. Its Strong mode does smooth noise but over-sharpens and leaves edge artifacts. Yes, Photo AI is one-click easy to use, but produces bad results – at least on astrophotos.
Comparing DeNoise’s and Photo AI’s different model settings.
As of this writing DxO’s PureRAW2 offers the Prime and newer DeepPrime AI models – I used DeepPrime for my tests.
However, DxO’s more expensive and complete image processing program, PhotoLab 6, also offers the even newer DeepPrimeXD model, which promises to preserve or recover even more “Xtra Detail” over the DeepPrime model. As of this writing, the XD mode is not offered in PureRAW2. Perhaps that will wait for PureRAW3, no doubt a paid upgrade.
[UPDATE MARCH 2023: DxO has indeed brought out PureRaw3 as a paid upgrade that, as expected, offers the DeepPrimeXD. In testing the new version I found that, while it did not seem to alter an image’s exposure as PureRaw2 did, DeepPrime and DeepPrimeXD still unacceptably ruin starry skies, by either adding a fine-scale mosaic effect (DeepPrime) or weird wormy artifacts (DeepPrimeXD). Try it for yourself to see if you find the same.]
Comparing DxO’s various Prime model settings. DeepPrimeXD is only in PhotoLab 6.
The set above compares the three noise reduction models of DxO’s PhotoLab 6. DeepPrime does do a better job than Prime. DeepPrimeXD does indeed sharpen detail more, but in this example it is too sharp, showing artifacts, especially in the sky where it is adding structures and textures that are not real.
However, when used from within PhotoLab 6, the DeepPrime noise reduction becomes more usable. PhotoLab is then being used to perform all the raw image processing, so PureRAW’s alteration of color and tone is not a concern. Conversely, it can also output raw DNGs with only noise reduction and lens corrections applied, essentially performing the same tasks as PureRAW. If you have PhotoLab, you don’t need PureRAW.
APRIL 2023 UPDATE — TESTING ADOBE’S NEW AI Denoise
In April 2023 Adobe updated Lightroom Classic to v12.3 and the Camera Raw plug-in for Bridge and Photoshop to 15.3. The major new feature was a long-awaited AI noise reduction from Adobe called Denoise. It works only on raw files and generates a new raw DNG file to which all the raw develop settings, including AI masks, can be applied. But the DNG file is some four times larger than the original raw file from the camera.
Here’s a comparison of Camera Raw using the old noise reduction and the new AI option, with DxO’s DeepPrimeXD and Topaz’s PhotoAI, on an aurora image from April 23, 2023:
I used Topaz Photo AI as that’s the program Topaz is now putting all their development effort into, neglecting their other plug-ins such as DeNoise AI. I used DxO PhotoLab 6 with its DeepPrimeXD option to export a DNG with only noise reduction applied, for results identical to what is now offered with DxO’s separate PureRaw3 plug-in.
At 100% above, there’s very little obvious difference. They show up when pixel peeping.
400% blow-ups of the sky – Tap or click to download a full-res JPG
Above are 400% blow-ups of a section of the sky.
Compared to using Adobe’s old noise reduction sliders, their new AI Denoise did a far superior job at smoothing noise, and providing sharpening – almost too much, making even the smallest stars pop out more, perhaps a good thing. But there’s no control of that sharpening.
DxO’s DeepPrimeXD provides a similar, or perhaps more excessive level of AI sharpening. While it smooths noise, it introduces all manner of wormy AI artifacts. It is unacceptable.
Topaz PhotoAI’s noise reduction and sharpening, here both applied with their AutoPilot settings, smoothed noise, but created a patchy appearance. It also softened the stars, despite having sharpening turned on. It was the worst of the set.
400% blow-ups of a section of the ground y – Tap or click to download a full-res JPG
In a similar set of blow-ups of the ground, the old Adobe noise reduction did just that — it smoothed only some noise. The new AI Denoise not only smooths noise, it also applies AI-based sharpening, to the point of almost inventing detail. Here it looks believable, but in other tests I have seen it add content, such as structures in the aurora, that looked fake and out of place. Or just plain wrong!
DxO’s DeepPrimeXD’s main feature over the older DeepPrime is the “eXtra Detail” it finds. Here it produces a result similar to Adobe Denoise, though in some areas of this and other images, I find it is over-sharpening. As with Adobe, there is no option for backing off the sharpening. Other than using DeepPrime or Prime noise reduction.
Topaz PhotoAI didn’t do much to add sharpening. If anything, it made the image softer. While PhotoAI has improved with its weekly updates, it still falls far short of the competition, at least for astrophotos and nightscapes.
The bottom line — Adobe’s new AI Denoise can do a superb job on astrophotos, and will be particularly useful for high-ISO nightscapes, perhaps better than any of the competition. But watch what it does! It can invent details or create results that look artificial. Being able to adjust the sharpening would be helpful. Perhaps that will come in an update.
COMPARING AI TO OLDER NON-AI PROGRAMS
The new generation of AI-based programs have garnered all the attention, leaving older stalwart noise reduction programs looking a little forlorn and forgotten.
Here I compare Camera Raw and two of the best of the AI programs, Topaz DeNoise AI and NoiseXTerminator, with two of the most respected of the “old-school” non-AI programs:
Nik Dfine2’s control interface.
Dfine2, included with the Nik Collection of plug-ins sold by DxO (shown above), and
Reduce Noise v9 sold by Neat Image (shown below).
Neat Image’s Reduce Noise control interface – the simple panel.
I tested both by using them in their automatic modes, where they analyze a section or sections of the image and adjust the noise reduction accordingly, but then apply that setting uniformly across the entire image. However, both allow manual adjustments, with Neat Image’s Reduce Noise offering a bewildering array of technical adjustments.
How do these older programs stack up to the new AI generation? Here are comparisons using the same three test images.
Comparing results with Neat Image and Nik Dfine2 on the nightscape test image.
In the nightscape image, Nik Dfine2 and Neat Image’s Reduce Noise did well, producing uniform noise reduction with no patchiness. But the results weren’t significantly better than with Adobe Camera Raw’s built-in routine. Like ACR, both non-AI programs did smooth detail in the ground, compared to DeNoise AI which sharpened the mountain details.
Comparing results with Neat Image and Nik Dfine2 on the wide-field test image.
In the tracked wide-field image, the differences were harder to distinguish. None performed up to the standard of Noise XTerminator, with both Nik Dfine2 and Neat Image softening stars a little compared to DeNoise AI.
Comparing results with Neat Image and Nik Dfine2 on the deep-sky test image.
In the telescopic deep-sky image, all programs did well, though none matched NoiseXTerminator. None eliminated the hot pixels. But Nik Dfine2 and Neat Image did leave wanted details alone, and did not alter or eliminate desired content. However, they also did not eliminate noise as well as did Topaz DeNoise AI or NoiseXTerminator.
The AI technology does work!
YOUR RESULTS MAY VARY
I should add that the nature of AI means that the results will certainly vary from image to image.
In addition, with many of these programs offering multiple models and settings for strength and sharpening, results even from the same program can be quite different. In this testing I used either the program’s auto defaults or backed off those defaults where I thought the effect was too strong and detrimental to the image.
Software is also a constantly moving target. Updates will alter how these programs perform, we hope for the better. For example, two days after I published this test, ON1 updated NoNoise AI to v17.0.2 with minor fixes and improvements.
And do remember I’m testing on astrophotos, and pixel peeping to the extreme. Rave reviews claiming how well even the poor performers here work on “normal” images might well be valid.
This is all by way of saying, your mileage may vary!
So don’t take my word for it. Most programs (Luminar Neo is an exception) are available as free trial copies to test out on your astro-images and in your preferred workflow. Test for yourself. But do pixel peep. That’s where you’ll see the flaws.
WHAT ABOUT ADOBE?
As noted above, with v15.3 of Camera Raw and v12.3 of Lightroom Classic, Adobe finally introduced their contender into the AI noise reduction contest. And it is a very good entry at that.
But it works only on raw files early in the workflow, and it generates a new raw DNG file, one four times the size of the original. The suggestion is that this technology will expand so that the AI noise reduction can be applied later in the workflow to other file formats.
Indeed, in the last couple of years Adobe has introduced several amazing and powerful “Neural Filters” into Photoshop, which work wonders with one click.
Neural network Noise Reduction is coming to Photoshop. One day!
A neural filter for Noise Reduction is on Adobe’s Wait List for development, so perhaps we will see something in the next few months from Adobe, as a version of the AI noise reduction now offered in Lightroom and Camera Raw.
Until then we have lots of choices for third party programs that all improve with every update. I hope this review has helped you make a choice.
— Alan, November 15, 2022 / Revised April 27, 2023 / AmazingSky.com
In a format similar to my other popular camera tests, I put the 45-megapixel Canon R5 mirrorless camera through its paces for the demands of astrophotography.
In a sequel to my popular post from September 2021 where I reviewed the Canon R6 mirrorless camera, here is a similar test of its higher-megapixel companion, the Canon R5. Where the R6 has a modest 20-megapixel sensor with relatively large 6.6-micron pixels, the R5 is (at present) Canon’s highest megapixel camera, with 45 megapixels. Each pixel is only 4.4 microns across, providing higher resolution but risking more noise.
Is the higher noise noticeable? If so, does that make the R5 less than ideal for astrophotography? To find out, I tested an R5 purchased locally in Calgary from The Camera Store in May 2022.
NOTE: CLICK orTAP on any image to bring it up full screen for closer inspection. The blog contains a lot of high-res images, so they may take a while to all load. Patience! Thanks!
The Canon R5 uses a full-frame sensor offering 45 megapixels, producing images with 8192 x 5464 pixels, and making 8K video possible.
TL;DR Summary
The Canon R5 proved to be surprisingly low in noise, and has worked very well for nightscape, lunar and deep-sky photography (as shown below), where its high resolution does produce a noticeable improvement to image detail, with minimal penalty from higher noise. Its 8K video capability has a place in shooting the Moon, Sun and solar eclipses. It was not so well suited to shooting videos of auroras.
This is a stack of 12 x 5-minute exposures with a Sharpstar 94EDPH refractor at f/4.5 and the Canon R5 at ISO 800, taken as a test of the R5 for deep-sky imaging. No filters were employed. Close-ups of sub-frames from this shoot with the R5, and also with the R6 and Ra, are used throughout the review.
R5 Pros
The Canon R5 is superb for its:
High resolution with relatively low noise
ISO invariant sensor performance for good shadow recovery
Good live view display with ISO boost in Movie mode
8K video has its attraction for eclipse photography
Good top LCD information screen missing in the R6
No magenta edge “amp glow” that the R6 shows
Higher 6x and 15x magnifications for precise manual focusing
Good battery life
Pro-grade Type N3 remote port
R5 Cons
The Canon R5 is not so superb for its:
Noise in stills and movies is higher than in the R6
Propensity for thermal-noise hot pixels in shadows
Not so suitable for low-light video as the R6
Overheating in 8K video
Live View image is not as bright as in the R6’s Movie mode
High cost!
The flip-out screen of the R5 (and all recent Canon cameras) requires an L-bracket with a notch in the side (a Small Rig unit is shown here) to accommodate the tilting screen.
CHOOSING THE R5
Since late 2019 my main camera for all astrophotography has been the Canon Ra, a limited-edition version of the original R, Canon’s first full-frame mirrorless camera that started the R series. The Ra had a special infra-red cutoff filter in front of the sensor that passed a higher level of visible deep-red light, making it more suitable for deep-sky astrophotography than a standard DSLR or DSLM (mirrorless) camera. The Ra was discontinued after two years on the market, a lifetime similar to Canon’s previous astronomical “a” models, the 20Da and 60Da.
I purchased the Canon R6 in late 2021, primarily to use it as a low-light video camera for aurora photography, replacing the Sony a7III I had used for several years and reviewed here. Over the last year, I sold all my non-Canon cameras, as well as the Canon 6D MkII DSLR (reviewed here), to consolidate my camera gear to just Canon mirrorless cameras and lenses.
The R6 has proven to be an able successor to the Sony for me, with the R6’s modest megapixel count and larger pixels making it excellent for low-light video. But the higher resolution of the R5 was still attractive. So I have now added it to my Canon stable. Since doing so, I have put it through several of my standard tests to see how suitable it is for the demands of astrophotography, both stills and video.
Here are my extensive results, broken down by various performance criteria. I hope you will find my review useful in helping you make a purchase decision.
LIVE VIEW FRAMING
This compares the back-of-camera views of the R5 vs. the R6, with both set to their highest ISO in Movie mode for the brightest preview image.
First, why go mirrorless at all? For astrophotography, the big difference compared to even a high-end DSLR, is how much brighter the “Live View” image is when shooting at night. DSLM cameras are always in Live View – even the eye-level viewfinder presents a digital image supplied by the sensor.
And that image is brighter, often revealing more than what a DSLR’s optical viewfinder can show, a great advantage for framing nightscape scenes, and deep-sky fields at the telescope.
The R5 certainly presents a good live view image. However, it is not as bright nor as detailed as what the R6 can provide when placed in its Movie mode and with the ISO bumped up to the R6’s highest level of ISO 204,800, where the Milky Way shows up, live!
The R5 only goes as high as ISO 51,200, and so as I expected it does not provide as bright or detailed a preview at night as the R6 can. However, the R5 is better than the original R for live-view framing, and better than any Canon DSLR I’ve used.
LIVE VIEW FOCUSING
As with other Canon mirrorless cameras, the R5 offers a Focus Assist overlay (top) to aid manual focusing. It works on bright stars. It also has a 6x and 15x magnifications for even more precise focusing.
Like the R6, the R5 can autofocus accurately on bright stars and planets. By comparison, while the Ra can autofocus on distant bright lights, it fails on bright stars or planets.
Turning on Focus Peaking makes stars turn red, yellow or blue (your choice of colours) when they are in focus, as a reassuring confirmation.
Turning on Focus Guide provides the arrowed overlays shown above.
In manual focus, an additional Focus Aid overlay, also found in the R6, provides arrows that close up and turn green when in focus on a bright star or planet.
Or, as shown above, you can zoom in by 6x or 15x to focus by eye the old way by examining the star image. These are magnification levels higher than the 5x and 10x of the R6 and most other Canon cameras, and are a great aid to precise focusing, necessary to make full use of the R5’s high resolution, and the sharpness of Canon’s RF lenses. The 15x still falls short of the Ra’s 30x for ultra-precise focusing on stars, but it’s a welcome improvement nonetheless.
In all, while the R5 is not as good as the R6 for framing in low light, it is better for precise manual focusing using its higher 15x magnification.
NOISE PERFORMANCE — NIGHTSCAPES
The key camera characteristic for astrophoto use is noise. There is no point in having lots of resolution if, at the high ISOs we use for most astrophotography, the detail is lost in noise. But I was pleasantly surprised that proved not to be the case with the R5.
As I show below, noise is well controlled, making the R5 usable for nightscapes at ISOs up to 3200, if not 6400 when needed in a pinch.
This compares the noise on a dark nightscape at the typical ISOs used for such scenes. A level of noise reduction shown has been applied in Camera Raw.
With 45 megapixels, at the upper end of what cameras offer today, the R5 has individual pixels, or more correctly “photosites,” that are each 4.4 microns in size, the “pixel pitch.”
This is still larger than the 3.7-micron pixels in a typical 24-megapixel cropped-frame camera like the Canon R10, or the 3.2-micron pixels found in a 32-megapixel cropped-frame camera like the Canon R7. Both are likely to be noisier than the R5, though will provide even higher resolution, as well as greater magnification with any given lens or telescope.
By comparison, the 30-megapixel full-frame R (and Ra) has a pixel pitch of 5.4 microns, while the 20-megapixel R6’s pixel pitch is a generous 6.6 microns. Only the 12-megapixel Sony a7SIII has larger 8.5-micron pixels, making it the low-light video champ.
The bigger the photosites (i.e. the larger the pixel pitch), the more photons each photosite can collect in a given amount of time – and the more photons they can collect, period, before they overfill and clip highlights. More photons equals more signal, and therefore a better signal-to-noise ratio, while the greater “full-well depth” yields higher dynamic range.
However, each generation of camera improves the signal-to-noise ratio by suppressing noise via its sensor design and improved signal processing hardware and firmware. The R5 and R6 each use Canon’s latest DIGIC X processor.
This compares the R5 to the R6 and Ra cameras at the high ISOs of 3200 and 6400 often used for Milky Way nightscapes.
In nightscapes the R5 did show more noise at high ISOs, especially at ISO 6400, than the R6 and Ra, but the difference was not large, perhaps one stop at most, if that. What was noticeable was the presence in the R5 of more hot pixels from thermal noise, as described later.
This compares the R5 to the R6 and Ra cameras at the more moderate ISOs of 800 and 1600 used for brighter nightscapes.
At slower ISOs the R5 showed a similar level of noise as the R6 and Ra, but a finer-grained noise than the R6, in keeping with the R5’s smaller pixels. In this test set, the R5 did not exhibit noticeably more noise than the other two cameras. This was surprising.
NOTE: In these comparisons I have not resampled the R5 images down to the megapixel count of the R6 to equalize them, as that’s not what you would do if you bought an R5. Instead, I have magnified the R6 and Ra’s smaller images so we examine the same area of each camera’s images.
As with the R6, I also saw no “magic ISO” setting where the R5 performed better than at other settings. Noise increased in proportion to the ISO speed. The R5 proved perfectly usable up to ISO 3200, with ISO 6400 acceptable for stills when necessary. But I would not recommend the R5 for those who like to shoot Milky Way scenes at ISO 12,800.
For nightscapes, a good practice that would allow using lower ISO speeds would be to shoot the sky images with a star tracker, then take separate long untracked exposures for the ground.
NOTE: In my testing I look first and foremost at actual real-world results. For those interested in more technical tests and charts, I refer you to DxOMark’s report on the Canon R5.
NOISE PERFORMANCE — DEEP-SKY
This compares the R5 at the typical ISO settings used for deep-sky imaging, with no noise reduction applied to the raw files for this set. The inset shows the portion of the frame contained in the blow-ups.
Deep-sky imaging with a tracking mount is more demanding, due to its longer exposures of up to several minutes for each “sub-frame.”
On a series of deep-sky exposures through a telescope, above, the R5 again showed quite usable images up to ISO 1600 and 3200, with ISO 6400 a little too noisy in my opinion unless a lot of noise reduction was applied or many images were shot to stack later.
This compares the R5 to the R6 and Ra cameras at ISO 6400, higher than typically used for deep-sky imaging. No noise reduction was applied to the raw files.
As with the nightscape set, at high ISOs, such as at ISO 6400, the R5 did show more noise than the R6 and Ra, as well as more colour splotchiness in the dark sky, and lower contrast. The lower dynamic range of the R5’s smaller pixels is evident here.
Just as with nightscapes, the lesson with the R5 is to keep the ISO low if at all possible. That means longer exposures with good auto-guiding, but that’s a best practice with any camera.
This compares the R5 to the R6 and Ra cameras at the lower ISOs of 800 and 1600 best for deep-sky imaging, for better dynamic range. No noise reduction was applied to the raw files.
At lower ISOs that provide better dynamic range, shown above, the difference in noise levels between the three cameras was not that obvious. Each camera presented very similar images, with the R6 having a coarser noise than the Ra and R5.
In all, I was surprised the R5 performed as well as it did for deep-sky imaging. See my comments below about its resolution advantage.
ISO INVARIANCY
The flaw in many Canon DSLRs, one documented in my 2017 review of the 6D Mark II, was their poor dynamic range due to the lack of an ISO invariant sensor design.
Canon R-series mirrorless cameras have largely addressed this weakness. As with the R and R6, the sensor in the R5 appears to be nicely ISO invariant.
Where ISO invariancy shows itself to advantage is on nightscapes where the starlit foreground is often dark and underexposed. Bringing out detail in the shadows in raw files requires a lot of Shadow Recovery or increasing the Exposure slider. Images from an ISO invariant sensor can withstand the brightening “in post” far better, with minimal noise increase or degradations such as a loss of contrast, added banding, or horrible discolourations.
This shows the same scene with the R5 progressively underexposed by shooting at a lower ISO then boosted in exposure in Adobe Camera Raw.
As I do for such tests, I shot sets of images at the same shutter speed, one well-exposed at a high ISO, then several at successively lower ISOs to underexpose by 1 to 4 stops. I then brightened the underexposed images by increasing the Exposure in Camera Raw by the same 1 to 4 stops. In an ideal ISO invariant sensor, all the images should look the same.
The R5 performed well in images underexposed by up to 3 stops. Images underexposed by 4 stops started to fall apart with low contrast and a magenta cast. This was worse performance than the R6, which better withstood underexposure by as much as 4 stops, and fell apart at 5 stops of underexposure.
While it can withstand underexposure, the lesson with the R5 is to still expose nightscapes as well as possible, likely requiring a separate longer exposure for the dark ground. Expose to the right! Don’t depend on being able to save the image by brightening “in post.” But again, that’s a best practice with any camera.
THERMAL NOISE
Here I repeat some of the background information from my R6 review. But it bears repeating, as even skilled professional photographers often misunderstand the various forms of noise and how to mitigate them.
All cameras will exhibit thermal noise in long exposures, especially on warm nights. This form of heat-induced noise peppers the shadows with bright or “hot” pixels, often brightly coloured.
This is not the same as the shot and read noise that adds graininess to high-ISO images and that noise reduction software can smooth out later in post.
This shows a long-exposure nightscape scene both without and with Long Exposure Noise Reduction turned on. LENR eliminated most, though not all, of the hot pixels in the shadows.
I found the R5 was prone to many hot pixels in long nightscape exposures where they show up in dark, underexposed shadows. I did not find a prevalence of hot pixels in well-exposed deep-sky images.
LONG EXPOSURE NOISE REDUCTION
With all cameras a setting called Long Exposure Noise Reduction (LENR) eliminates this thermal noise by taking a “dark frame” and subtracting it in-camera to yield a raw file largely free of hot pixels, and other artifacts such as edge glows.
The LENR option on the R5 did eliminate most hot pixels, though sometimes still left, or added, a few (or they might be cosmic ray hits). LENR is needed more on warm nights, and with longer exposures at higher ISOs. So the extent of thermal noise in any camera can vary a lot from shoot to shoot, and season to season.
This compares a long exposure of nothing (with the lens cap on), both without LENR (left) and with LENR (right), to show the extent of just the thermal noise.
The comparison above shows just thermal noise in long exposures with and without LENR, to show its effectiveness. However, bear in mind in this demo the raw files have been boosted a lot in exposure and contrast (using DxO PhotoLab with the settings shown) to exaggerate the visibility of the noise.
Like the R6, when LENR is actively taking a dark frame, the R5’s rear screen indicates “Busy,” which is annoyingly bright at night, exactly when you would be employing LENR. To hide this display, the only option is to close the screen. Instead, the unobtrusive top LCD screen alone should be used to indicate a dark frame is in progress. It does with the Ra, though Busy also displays on its rear screen as well, which is unnecessary.
As with all mirrorless cameras, the R5 lacks the “dark frame buffer” present in Canon full frame DSLRs that allows several exposures to be taken in quick succession even with LENR on.
Long Exposure Noise Reduction is useful when the gap in time between exposures it produces is not critical.
With all Canon R cameras, turning on LENR forces the camera to take a dark frame after every light frame, doubling the time it takes to finish every exposure. That’s a price many photographers aren’t willing to pay, but on warm nights I find it can be essential, and a best practice, for the reward of cleaner images out of camera. I found it is certainly a good practice with the R5.
TIP: If you find hot pixels are becoming more obvious over time, try this trick: turn on the Clean Manually routine for 30 seconds to a minute. In some cameras this can remap the hot pixels so the camera can better eliminate them.
STAR QUALITY
Using LENR with the R5 did not introduce any oddities such as oddly-coloured, green or wiped-out stars. Even without LENR I saw no evidence of green stars, a flaw that plagues some Sony cameras at all times, or Nikons when using LENR.
This is a single developed raw frame from the stack of four minute exposures used to create the final image shown at the top. It shows sharp and nicely coloured stars, with no odd green stars.
Canons have always been known for their good star colours, and the R5 maintains the tradition. According to DPReview the R5 has a mild low-pass anti-alias filter in front of its sensor. Cameras which lack such a sensor filter do produce sharper images, but stars that occupy only one or two pixels might not de-Bayer properly into the correct colours. I did not find that an issue with the R5.
As in the R6, I also saw no evidence of “star-eating,” a flaw Nikons and Sonys have been accused of over the years, due to aggressive in-camera noise reduction even on raw files. Canons have largely escaped charges of star-eating.
RED SENSITIVITY
The R5 I bought was a stock “off-the-shelf” model. It is Canon’s now-discontinued EOS Ra that was “filter-modified” to record a greater level of the deep-red wavelength from red nebulas in the Milky Way. As I show below, compared to the Ra, the R5 did well, but could not record the depth of nebulosity the Ra can, to be expected for a stock camera.
However, bright nebulas will still be good targets for the R5. But if it’s faint nebulosity you are after, both in wide-field Milky Way images and telescopic close-ups, consider getting an R5 “spectrum modified” by a third-party supplier. Or modifying an EOS R.
This compares identically processed four-minute exposures at ISO 800 with the R5 vs. the red-sensitive Ra.
EDGE ARTIFACTS and EDGE GLOWS
DSLRs are prone to vignetting along the top and bottom of the frame from shadowing by the upraised mirror and mirror box. Not having a mirror, and a sensor not deeply recessed in the body, largely eliminates this edge vignetting in mirrorless cameras.
While the Ra shows a very slight vignetting along the bottom of the frame (visible in the example above), the R5 was clean and fully illuminated to the edges, as it should be.
I was also pleased to see the R5 did not exhibit any annoying “amp glows” — dim, often magenta glows at the edge of the frame in long exposures, created by heat emitted from sensor electronics adding infrared (IR) glows to the image.
I saw noticeable amp glows in the Canon R6 which could only be eliminated by taking LENR dark frames. It’s a flaw that has yet to be eliminated with firmware updates. Taking LENR darks is not required with the R5, except to reduce thermal hot pixels as noted above.
With a lack of IR amp glows, the R5 should work well when filter-modified to record either more visible Hydrogen-alpha red light, or deeper into the infrared spectrum.
Resolution — Nightscapes
Now we come to the very reason to get an R5, its high resolution. Is the difference visible in typical astrophotos? In a word, yes. If you look closely.
If people only see your photos on Facebook or Instagram, no one will ever see any improvement in your images! But if your photos are seen as large prints, or you are simply a stickler for detail, then you will be happy with the R5’s 45 megapixels. (Indeed, you might wish to wait for the rumoured even higher megapixel Canon 5S!)
This compares identically processed four-minute exposures at ISO 800 with the R5 vs. the red-sensitive Ra.
Nightscapes, and indeed all landscape photos by day or by night, is where you will see the benefit of more megapixels. Finer details in the foreground show up better. Images are less pixelated. In test images with all three cameras, the R5 did provide sharper images to be sure. But you do have to zoom in a lot to appreciate the improvement.
Resolution — lunar imaging
This compares blow-ups of images of the Moon taken through a 5-inch f/6 refractor (780mm focal length) with the R6 and R5.
The Moon through a telescope is another good test of resolution. The above comparison shows how the R5’s smaller 4.4-micron pixels do provide much sharper details and less pixelation than the R6.
Of course, one could shoot at an even longer focal length to increase the “plate scale” with the R6. But at that same longer focal length the R5 will still provide better resolution, up to the point where its pixels are sampling more than what the atmospheric seeing conditions permit to be resolved. For lunar and planetary imaging, smaller pixels are always preferred, as they allow you to reach the seeing limit with shorter and often faster optical systems.
Resolution — deep sky
This compares extreme blow-ups of images of the North America Nebula used for the other tests, shot with a 94mm f/4.5 refractor with the three cameras.
On starfields, the difference is not so marked. As I showed in my review of the R6, with “only” 20 megapixels the R6 can still provide detailed deep-sky images.
However, in comparing the three cameras above, with images taken at a focal length of 420mm, the R5 does provide sharper stars, with faint stars better recorded, and with less blockiness (i.e. “square stars”) on all the star images. At that focal length the plate scale with the R5 is 2.1 arc seconds per pixel. With the R6 it is 3.2 arc seconds per pixel.
This is dim green Comet PanSTARRS C/2017 K2, at top, passing above the star clusters IC 4756 at lower left and NGC 6633 at lower right on May 25-26, 2022. This is a stack of ten 5-minute exposures with a William Optics RedCat 51 at f/4.9 and the Canon R5 at ISO 800.
The R5 is a good choice for shooting open and globular star clusters, or any small targets such as planetary nebulas, especially with shorter focal length telescopes. Bright targets will allow using lower ISOs, mitigating any of the R5’s extra noise.
With an 800mm focal length telescope, the plate scale with the R5 will be 1.1 arc seconds per pixel, about the limit most seeing conditions will permit resolving. With even longer focal length telescopes, the R5’s small pixels would be oversampling the image, with little gain in resolution, at least for deep-sky subjects. Lunar and planetary imaging can benefit from plate scales of 0.5 arc seconds per pixel or smaller.
CAN YOU CreatE resolution?
This compares an original R6 image with the same image rescaled 200% in ON1 Resize AI and Topaz Gigapixel AI, and with those three compared to an original R5 image.
Now, one can argue that today’s AI-driven scaling programs such as ON1 Resize AI and Topaz Gigapixel AI can do a remarkable job up-sizing images while enhancing and sharpening details. Why buy a higher-megapixel camera when you can just sharpen images from a lower-resolution model?
While these AI programs can work wonders on regular images, I’ve found their machine-learning seems to know little about stars, and can often create unwanted artifacts.
In scaling up an R6 image by 200%, ON1 Resize AI 2022 made a mess of the stars and sky background. Topaz Gigapixel AI did a much better job, leaving few artifacts. But using it to double the R6 image in pixel count still produced an image that does not look as sharp as an original R5 image, despite the latter having fewer pixels than the upsized R6 image.
Yes, we are definitely pixel-peeping! But I think this shows that it is better to have the pixels to begin with in the camera, and to not depend on software to generate sharpness and detail.
VIDEO Resolution
The R5’s 45-megapixel sensor also makes possible its headline selling point when it was released in 2020: 8K movie recording, with movies sized 8192 x 4320 (DCI standard) or 7680 x 4320 (UHD standard) at 29.97 frames per second, almost IMAX quality.
Where the R6’s major selling point for me was its low-light video capability, the R5’s 8K video prowess was less important. Or so I thought. With testing, I can see it will have its place in astrophotography, especially solar eclipses.
The R5 offers the options of 8K and 4K movies each in either the wider DCI Digital Cinema standard (8K-D and 4K-D) or more common Ultra-High Definition standard (8K-U and 4K-U), as well as conventional 1080 HD.This shows the Moon shot with the same 460mm-focal length telescope, with full-width frame grabs from movies shot in 8K, 4K, and 4K Movie Crop modes.
Unlike the original Canon R and Rp, the R5 and R6 can shoot 4K movies sampled from the full width of their sensors, so there is no crop factor in the field of view recorded with any lens.
However, like the R6, the R5 also offers the option of a Movie Crop mode which samples a 4K movie from the central 4096 (4K-D) or 3840 (4K-U) pixels of the sensor. As I show above, this provides a “zoomed-in” image with no loss of resolution, useful when wide field of view is not so important as is zooming into small targets, such as for lunar and solar movies.
This compares close-ups of frame grabs of the Moon movies shown in full-frame above, as well as a frame from an R6 movie, to compare resolutions.
So what format produces the best resolution when shooting movies? As I show above, magnified frame grabs of the Moon demonstrate that shooting at 8K provides a much less pixelated and sharper result than either the 4K-Fine HQ (which creates a “High-Quality” 4K movie downsampled from 8K) or a standard 4K movie.
Shooting a 4K movie with the R6 also produced a similar result to the 4K movies from the R5. The slightly softer image in the R5’s 4K frame can, I think, be attributed more to atmospheric seeing.
Solar eclipse use
Shooting the highest resolution movies of the Moon will be of prime interest to astrophotographers when the Moon happens to be passing in front of the Sun!
That will happen along a narrow path that crosses North America on April 8, 2024. Capturing the rare total eclipse of the Sun in 8K video will be a goal of many. At the last total solar eclipse in North America, on August 21, 2017, I was able to shoot it in 4K by using a then state-of-the-art top-end Canon DSLR loaned to me by an IMAX movie production company!
And who knows, by 2024 we might have 100-megapixel cameras capable of shooting and recording the firehose of data from 12K video! But for now, even 8K can be a challenge.
This compares the R5 at 8K with it in the best quality 4K Fine HQ vs. the R5 and R6 in their 4K Movie Crop modes.
However, do you need to shoot 8K to get sharp Moon, Sun or eclipse movies? The above shows the 8K frame-grab compared to the R5’s best quality full-frame 4K Fine, and the R5’s and R6’s 4K Movie Crop mode that doesn’t resample or bin pixels from the larger sensor to create a 4K movie. The Cropped movies look only slightly softer than the R5 at 8K, with less pixelation than the 4K Fine HQ movie.
When shooting the Sun or Moon through a telescope or long telephoto lens, the wide field of a full-frame movie might not be required, even to take in the two- or three-degree-wide solar corona around the eclipsed Sun.
However, if a wide field for the maximum extent of the outer corona, combined with sharp resolution is the goal, then a camera like the Canon R5 capable of shooting 8K movies will be the ticket.
And 8K will be ideal for wide-angle movies of the passage of the Moon’s shadow during any eclipse, or for moderate fields showing the eclipsed Sun flanked by Jupiter and Venus on April 8, 2024.
Canon CLOG3
This shows the difference (using frame grabs from 4K movies) between shooting in Canon C-Log3 and shooting with normal “in-camera” colour grading. The exposures were the same.
Like the R6, the R5 offers the option of shooting movies in Canon’s C-Log3 profile, which records internally in 10-bit, preserving more dynamic range in movies, up to 12 stops. The resulting movie looks flat, but when “colour graded” later in post, the movie records much more dynamic range, as I show above. Without C-Log3, the bright sunlit lunar crescent is blown out, as will be the Sun’s inner corona.
The bright crescent Moon with dim Earthshine is a good practice-run stand-in for the eclipsed Sun with its wide range of brightness from the inner to the outer corona.
Sample Moon Movies
For the full comparison of the R5 and R6 in my test shoot of the crescent Moon, see this narrated demo movie on Vimeo for the 4K movies, shot in various modes, both full-frame and cropped, with C-Log3 on and off.
Keep in mind that video compression in the on-line version may make it hard to see the resolution difference between shooting modes.
A “private link” 10-minute video on Vimeo demonstrating 4K video clips with the R5 and R6.
For a movie of the 8K footage, though downsized to 4K for the Vimeo version (the full sized 8K file was 29 Gigs!), see this sample movie below on Vimeo.
A “private link” video on Vimeo demonstrating 8K video clips with the R5.
LOw-Light VIDEO
Like the R6, the R5 can shoot at a dragged shutter speed as slow as 1/8-second. That slow shutter, combined with a fast f/1.4 to f/2 lens, and ISOs as high as 51,200 are the keys to shooting movies of the night sky.
Especially auroras. Only when auroras get shadow-casting bright can we shoot at the normal 1/30-second shutter speed of movies and at lower ISOs.
This compares frame grabs of aurora movies shot the same night with the R5 at 8K and 4K with the Canon R6 at 4K, all at ISO 51,200.
I was able to shoot a decent aurora one night from home with both the R5 and R6, and with the same fast TTArtisan 21mm f/1.5 RF lens. The sky and aurora changed in brightness from the time I shot with the R6 first to the R5 later. But even so, the movies serve as a look at how the two cameras perform for real-time aurora movies.
Auroras are where we need to shoot full-frame, for the maximum field of view, and at high ISOs. The R5’s maximum ISO is 51,200, while the R6 goes up to 204,800, though it is largely unusable at that speed for actual shooting, just for previewing scenes.
As expected, the R6 was much less noisy than the R5, by about two stops. The R5 is barely usable at ISO 51,200, while the R6 works respectably well at that speed. If auroras get very bright, then slower ISOs can be used, making the R5 a possible camera for low-light use, but it would not be a first choice, unless 8K auroras are a must-have.
Sample aurora Movies
For a narrated movie comparing the R5 and R6 at 4K on the aurora, stepping both through a range of ISO speeds, see this movie at Vimeo.
A “private link” video on Vimeo demonstrating 4K aurora clips with the R5 and R6.
For a movie showing the same aurora shot with the R5 at 8K, see this movie. However, it has been down-sized to 4K for on-line viewing, so you’ll see little difference between it and the 4K footage. Shooting at 8K did not improve or smooth noise performance.
A “private link” video on Vimeo demonstrating 8K aurora clips with the R5.
BATTERY LIFE — Stills and video
Canon’s new LP-E6NH battery supports charging through the USB-C port and has a higher 2130mAh capacity than the 1800mAh LP-E6 batteries. However, the R5 is compatible with the older batteries.
Like the R6, the R5 comes with a new version of Canon’s standard LP-E6 battery, the LP-E6NH.
On mild nights, I found the R5 ran fine on one battery for the 3 to 4 hours needed to shoot a time-lapse sequence, or set of deep-sky images, with power to spare. Now, that was with the camera in “Airplane Mode,” which I always use regardless, to turn off the power-consuming WiFi and Bluetooth, which I never use on cameras.
As I noted with the R6, for demanding applications, especially in winter, the R5 can be powered by an outboard USB power bank that has Power Delivery or “PD” capability.
The exception for battery use is when shooting videos, especially 8K. That can drain a battery after an hour of recording, though it takes only 10 to 12 minutes of 8K footage to fill a 128 gigabyte card. While less than half that length will be needed to capture any upcoming total eclipse from diamond ring to diamond ring, the result is still a massive file.
OVERHEATING
More critically, the R5 is also infamous for overheating and shutting down when shooting 8K movies, after a time that depends on how hot the environment is. I found the R5 shot 8K or 4K Fine HQ for about 22 minutes at room temperature before the overheat warning first came on, then shut off recording two or three minutes later. Movie recording cannot continue until the R5 cools off sufficiently, which takes at least 10 to 15 minutes.
That deficiency might befoul unwary eclipse photographers in 2024. The answer for “no-worry” 8K video recording is the Canon R5C, the video-centric version of the R5, with a built-in cooling fan.
Features and usability
While certainly not designed with astrophotography in mind, the R5 has several hardware and firmware features that are astrophoto friendly.
The R5’s Canon-standard flip screen
Like all Canon cameras made in the last few years, the R5 has Canon’s standard articulated screen, which can be angled up for convenient viewing when on a telescope. It is also a full touch screen, with all important camera settings and menus adjustable on screen, good for use at night.
With 2.1 million dots, the R5’s rear screen has a higher resolution than the 1.62-million-dot screen of the R6, and much higher than the 1 million pixels of the Rp’s screen, but is the same resolution as in the R and Ra.
The R5’s top-mounted backlit LCD screen
The R5, like the original R, has a top backlit LCD screen for display of current camera settings, battery level and Bulb timer. The lack of a top screen was one of my criticisms of the R6.
Yes, the hardware Mode dial of the R6 and Rp does make it easier to switch shooting modes, such as quickly changing from Stills to Movie. However, for astrophotography the top screen provides useful information during long exposures, and is handy to check when the camera is on a telescope or tripod aimed up to the sky, without spoiling dark adaptation. I prefer to have one.
The R5’s front-mounted N3-style remote port
The R5’s remote shutter port, used for connecting external intervalometers or time-lapse motion controllers, is Canon’s professional-grade three-pronged N3 connector. It’s sturdier than the 2.5mm mini-phono plug used by the Rp, R and R6. It’s a plus for the R5.
As with all new cameras, the R5’s USB port is a USB-C type. A USB-C cable is included.
The R5’s back panel buttons and controls
Like the R6, the R5 has a dedicated magnification button on the back panel for zooming in when manually focusing or inspecting images. In the R and Ra, that button is only on the touch panel rear screen, where it has to be called up by paging to that screen, an inconvenience. While virtual buttons on a screen are easier to see and operate at night than physical buttons, I find a real Zoom button handy as it’s always there.
The R5’s twin cards, a CFexpress Type B and an SD UHS-II
To handle the high data rates of 8K video and also 4K video when set to the high frame rate option of 120 fps, one of the R5’s memory card slots requires a CFexpress Type B card, a very fast but more costly format.
As I had no card reader for this format, I had to download movies via a USB cable directly from the camera to my computer, using Canon’s EOS Utility software, as Adobe Downloader out of Adobe Bridge refused to do the job. Plan to buy a card reader.
Allocating memory card use
In the menus, you can choose to record video only to the CFexpress, and stills only to the SD card, or both stills and movies to each card for a backup, with the limitation that 8K and 4K 120fps won’t record to the SD card, even very fast ones.
FIRMWARE FEATURES
Setting the Interval Timer
Unlike the Canon R and Ra (which both annoyingly lack a built-in intervalometer), but like the R6, the R5 has an Interval Timer in its firmware. This can be used to set up a time-lapse sequence, but with exposures only up to the maximum of 30 seconds allowed by the camera’s shutter speed settings, true of most in-camera intervalometers. Even so, this is a useful function for simple time-lapses.
Setting the Bulb Timer
As with most recent Canon DSLRs and DSLMs, the R5 also includes a built-in Bulb Timer. This allows setting an exposure of any length (many minutes or hours) when the camera is in Bulb mode. However, it cannot be combined with the Interval Timer for multiple exposures; it is good only for single shots. Nevertheless, I find it useful for shooting long exposures for the ground component of nightscape scenes.
Custom button functions
While Canon cameras don’t have Custom Function buttons per se (unlike Sonys), the R5’s various buttons and dials can be custom programmed to functions other than their default assignments. I assign the * button to turning on and off the Focus Peaking display and, as shown, the AF Point button to a feature only available as a custom function, one that temporarily brightens the rear screen to full, good for quickly checking framing at night.
Assigning Audio Memos to the Rate button
A handy feature of the R5 is the ability to add an audio notation to images. You shoot the image, play it back, then use the Rate button (if so assigned) to record a voice memo of up to 30 seconds, handy for making notes in the field about an image or a shoot. The audio notes are saved as WAV files with the same file number as the image.
The infamous Release Shutter Without Lens command
Like other EOS R cameras, the R5 has this notorious “feature” that trips up every new user who attaches their Canon camera to a telescope or manual lens, only to find the shutter suddenly doesn’t work. The answer is to turn ON “Release Shutter w/o Lens” found buried under Custom Functions Menu 4. Problem solved!
OTHER FEATURES
I provide more details of other features and settings of the R5, many of which are common to the R6, in my review of the R6 here.
Multi-segment panoramas with the R5, like this aurora scene, yield superb resolution but can become massive in size, pressing the ability of software and hardware to process them.
CONCLUSION
No question, the Canon R5 is costly. Most buyers would need to have very good daytime uses to justify its purchase, with astrophotography a secondary purpose.
That said, other than low-light night sky videos, the R5 does work very well for all forms of astrophotography, providing a level of resolution that lesser cameras simply cannot.
Nevertheless, if it is just deep-sky imaging that is of interest, then you might be better served with a dedicated cooled-sensor CMOS camera, such as one of the popular ZWO models, and the various accessories that need to accompany such a camera.
But for me, when it came time to buy another premium camera, I still preferred to have a model that could be used easily, without computers, for many types of astro-images, particularly nightscapes, tracked wide-angle starfields, as well as telescopic images.
Since buying the R5, after first suspecting it would prove too noisy to be practical, it has in fact become my most used camera, at least for all images where the enhanced red sensitivity of the EOS Ra is not required. But for low-light night videos, the R6 is the winner.
However, to make use of the R5’s resolution, you do have to match it with sharp, high-quality lenses and telescope optics, and have the computing power to handle its large files, especially when stitching or stacking lots of them. The R5 can be just the start of a costly spending spree!
I had the chance to test out an early sample of Canon’s new EOS Ra camera designed for deep-sky photography.
Once every 7 years astrophotographers have reason to celebrate when Canon introduces one of their “a” cameras, astronomical variants optimized for deep-sky objects, notably red nebulas.
In 2005 Canon introduced the ground-breaking 8-megapixel 20Da, the first DLSR to feature Live View for focusing. Seven years later, in 2012, Canon released the 18-megapixel 60Da, a camera I still use and love.
Both cameras were cropped-frame DSLRs.
Now in 2019, seven years after the 60Da, we have the newly-released EOS Ra, the astrophoto version of the 30-megapixel EOS R released in late 2018. The EOS R is a full-frame mirrorless camera with a sensor similar to what’s in Canon’s 5D MkIV DSLR.
Here, I present a selection of sample images taken with the new EOS Ra.
The large emission nebula IC 1805 in Cassiopeia, aka the Heart Nebula. The round nebula at top right is NGC 896. The large loose star cluster at centre is Mel 15; the star cluster at left is NGC 1027. The small cluster below NGC 896 is Tombaugh 4. This is a stack of 8 x 6-minute exposures with the Canon EOS Ra mirrorless camera at ISO 1600 through the Astro-Physics Traveler apo refractor at f/6 with the Hotech field flattener. Stacked, aligned and processed in Photoshop.
Both versions of the EOS R have identical functions and menus.
The big difference is that the EOS Ra, as did Canon’s earlier “a” models, has a factory-installed filter in front of the sensor that transmits more of the deep red “hydrogen-alpha” wavelength emitted by glowing nebulas.
Normal cameras suppress much of this deep-red light as a by-product of their filters cutting out the infra-red light that digital sensors are very sensitive to, but that would not focus well.
The North America Nebula, NGC 7000, in Cygnus, taken with the new Canon EOS Ra factory-modified “astronomical” version of the Canon EOS R mirrorless camera. This is a stack of 4 x 6-minute exposures, with LENR on and at ISO 1600, through the Astro-Physics Traveler 105mm f/6 apo refractor with the Hutech field flattener.
I was sent an early sample of the EOS Ra, and earlier this autumn also had a sample of the stock EOS R.
Both were sent for testing so I could prepare a test report for Sky and Telescope magazine. The full test report will appear in an upcoming issue.
The large emission nebula IC 1396 in Cepheus with the orange “Garnet Star” at top, and the Elephant Trunk Nebula, van den Bergh 142, at bottom as a dark lane protruding into the emission nebula. This is a stack of 5 x 6-minute exposures with the Canon EOS Ra mirrorless camera at ISO 1600 through the Astro-Physics Traveler apo refractor at f/6 with the Hotech field flattener. Stacked, aligned and processed in Photoshop.
• How the Ra compares to previous “a” models and third-party filter-modified cameras
• How the Ra works for normal daylight photography
• Noise levels compared to other cameras
• Features unique to the EOS Ra, such as 30x Live View focusing
Messier 52 open cluster, at left, and the Bubble Nebula, NGC 7635 below and to the right of it, at centre, plus the small red nebula NGC 7538 at right. The open cluster at lower right is NGC 7510. All in Cassiopeia. This is a stack of 8 x 6-minute exposures at ISO 1600 with the Canon EOS Ra camera and Astro-Physics Traveler apo refractor at f/6 with the Hotech field flattener. No LENR dark frame subtraction employed as the temperature was -15° C.
UPDATE — November 25, 2019
As part of further testing I shot the Heart and Soul Nebulas in Cassiopeia through my little Borg 77mm f/4 astrograph with both the EOS Ra and my filter-modified 5D MkII (modified years ago by AstroHutech) to compare which pulled in more nebulosity. It looked like a draw.
Both images are single 8-minute exposures, taken minutes apart and developed identically in Adobe Camera Raw, but adjusted for colour balance to equally neutralize the sky background. The histograms look similar. Even so, the Ra looks a little redder overall. But keep in mind a sky or nebula can be made to appear any shade of red you like in processing.
The question is which camera shows more faint nebulosity?
The modified 5D MkII has always been my favourite camera for this type of astrophotography, picking up more nebulosity than other “a” models I’ve tested, including the Nikon D810a.
But in this case, I’d say the EOS Ra is performing as well as, if not better than the 5D MkII. How well any third-party modified camera you buy now performs will depend which, if any, filter the modifier installs in front of the sensor. So your mileage will vary.
For most of my other testing I shot through my much-prized Astro-Physics Traveler, a 105mm aperture f/6 apochromatic refractor on the Astro-Physics Mach1 mount.
To connect the EOS Ra (with its new RF lens mount) to my existing telescope-to-camera adapter and field flattener lens I used one of Canon’s EF-EOS R lens adapters.
The bottom line is that the EOS Ra works great!
It performs very well on H-alpha-rich nebulas and has very low noise. It will be well-suited to not only deep-sky photography but also to wide-field nightscape and time-lapse photography, perhaps as Canon’s best camera yet for those applications.
WHAT ABOUT THE PRICE?
The EOS Ra will sell for $2,500 US, a $700 premium over the cost of the stock EOS R. Some complain. Of course, if you don’t like it, you don’t have to buy it. This is not an upgrade being forced upon you.
As I look at it, it is all relative. When Nikon’s astronomy DSLR, the 36 Mp D810a, came out in 2015 it sold for $3,800 US, $1,300 more than the EOS Ra. It was, and remains a fine camera, if you can find one. It is discontinued.
A 36 Mp cooled and dedicated CMOS astro camera, the QHY367, with the same chip as the D810a, goes for $4,400, $1,900 more than the Ra. Yes, it will produce better images I’m sure than the EOS Ra, but deep-sky imaging is all it can do. At a cost, in dollars and ease of use.
And yes, buying a stock EOS R and having it modified by a third party costs less, and you’ll certainly get a good camera, for $300 to $400 less than an Ra. But …
• The EOS Ra has a factory adjusted white balance for ease of “normal” use — no need to buy correction filters. So there’s a $$ saving there, even if you can find clip-in correction filters for the EOS R — you can’t.
• And the Ra retains the sensor dust cleaning function. Camera modifier companies remove it or charge more to reinstall it.
• And the 30x live view magnification is very nice.
• The EOS Ra also carries a full factory warranty.
Do I wish the EOS Ra had some other key features? Sure. A mode to turn all menus red would be nice. As would an intervalometer built-in, one that works with the Bulb Timer to allow sequences of programmed multi-minute exposures. Both could be added in with a firmware update.
And providing a basic EF-EOS R lens adapter in the price would be a welcome plus, as one is essential to use the EOS Ra on a telescope.
That’s my take on it. I’ll be buying one. But then again I bought the 20Da, twice!, and the 60Da, and I hate to think what I paid for those much less capable cameras.
BONUS TEST — The RF 15-35mm L Lens
Canon is also releasing an impressive series of top-class RF lenses for their R mirrorless cameras. The image below is an example astrophoto with the new RF 15-35mm f/2.8 L zoom lens, an ideal combination of focal lengths and speed for nightscape shooting.
Orion and the winter stars rising on a late October night, with Sirius just clearing the horizon at centre bottom, Capella and the Pleiades are at top. M44 cluster is at far left. Taken with the Canon 15-35mm RF lens at 15mm and f/2.8 and the EOS Ra camera at ISO 800 as part of testing. A stack of 4 x 2-minute exposures on the Star Adventurer tracker.
Below is a further set of stacked and processed images with the RF 15-35mm L lens, taken in quick succession, at 15mm, 24mm, and 35mm focal lengths, all shot wide open at f/2.8. The EOS Ra was on the Star Adventurer tracker (as below) to follow the stars.
Click or tap on the images below to view a full-resolution version for closer inspection.
15mm — Northern autumn Milky Way with RF 15-35mm at f/2.8 and at 15mm focal length. Taken with the EOS Ra at ISO 800 for a stack of 4 x 2-minute exposures.
24mm — Northern autumn Milky Way with RF 15-35mm at f/2.8 and at 24mm focal length. Taken with the EOS Ra at ISO 800 for a stack of 2 x 2-minute exposures.
35mm — Northern autumn Milky Way with RF 15-35mm at f/2.8 and at 35mm focal length. Taken with the EOS Ra at ISO 800 for a stack of 2 x 2-minute exposures.
The RF 15-35mm lens performs extremely well at 15mm exhibiting very little off-axis aberrations at the corners.
Off-axis aberrations do increase at the longer focal lengths but are still very well controlled, and are much less than I’ve seen on my older zoom and prime lenses in this focal length range.
The RF 15-35mm is a great complement to the EOS Ra for wide-field Milky Way images.
I was impressed with the new EOS Ra. It performs superbly for astrophotography.
I present a tour of the deep-sky wonders of the winter sky.
While some might think the Milky Way is only a summer sight, the winter Milky Way is well worth a look!
In January and February we are looking outward from our location in the Milky Way, toward the Orion Spur, the minor spiral arm we live in. In it, and in the major Perseus Arm that lies beyond, lie hotbeds of star formation.
Courtesy European Southern Observatory
These star forming areas create a panorama of star clusters and glowing nebulas along the winter Milky Way and surrounding the constellation of Orion. The montage above shows the best of the deep-sky sights at this time or year.
(And yes, for southern hemisphere viewers I know this is your summer sky! But for us northerners, Orion is forever associated with frosty winter nights.)
The closeups below are all with a 200mm telephoto lens providing a field of view similar to that of binoculars. However, most of these nebulas are photographic targets only.
The Belt and Sword of Orion
This is a stack of 16 x 2- to 3-minute exposures with the filter-modified Canon 5D MkII at ISO 800 to 1250 and 200mm Canon L-Series lens at f/2.8. Taken with the Fornax Lightrack tracker as part of testing. Taken from home on January 8, 2019 during a clear couple of hours between passing haze and cloud.
This is the heart of the star formation activity, in the centre of Orion.
The bright Orion Nebula (or Messier 42 and 43) at bottom in Orion’s Sword is obvious in binoculars and glorious in a small telescope.
The Horsehead Nebula above centre and just below Orion’s Belt is famous but is a tough target to see through even a large telescope.
Barnard’s Loop at left is a wave of nebulosity being blown out of the Orion area by strong stellar winds. Any sighting of this object by eye is considered a feat of observing skill!
The Rosette Nebula and Area
The area of the Rosette Nebula (bottom) and Christmas Tree Cluster (top) in Monoceros with the Fornax Lightrack tracker and 200mm lens and filter modified Canon 5D MkII. This is a stack of 10 x 3 minute exposures at ISO 800.
The small cluster of hot young stars inside the Rosette Nebula is blowing a hole in the nebula giving it its Rosette name. Above is a loose star cluster called the Christmas Tree, surrounded by more faint nebulosity that includes the tiny Cone Nebula.
Gemini Clusters and Nebulas
This is a stack of 10 x 3-minute exposures with the filter-modified Canon 5D MkII at ISO 800 and 200mm Canon L-Series lens at f/2.8. Some light haze passing through in some exposures added the natural star glows. I left those in as part of the stack to add the glows. Taken with the Fornax Lightrack tracker as part of testing. Taken from home on a rare fine and mild winter night, January 4, 2019.
This field of clusters and nebulosity is above Orion in Gemini, with Messier 35 the main open star cluster here at top. Below M35 is the tiny star cluster NGC 2158. The nebulosity at left between Mu and Eta Geminorum is IC 443, a remnant of a supernova explosion, and is aka the Jellyfish Nebula. The nebula at bottom is IC 2174, just over the border in Orion and aka the Monkeyhead Nebula.
Auriga Clusters and Nebulas
This is a stack of 5 x 3-minute exposures with the filter-modified Canon 5D MkII at ISO 800 and 200mm Canon L-Series lens at f/2.8. Taken with the Fornax Lightrack tracker as part of testing. Diffraction spikes added with Astronomy Tools actions. Taken from home on January 4, 2019.
Above Gemini and Orion lies Auriga, with its rich field of clusters and nebulosity, with — from left to right — Messier 37, Messier 36, and Messier 38, as the main open star clusters here. Below M38 is NGC 1907. The nebulosity at right is IC 410 and IC 405, the Flaming Star Nebula.
In between them is the colourful asterism known as the Little Fish. Messier 38 is also known as the Starfish Cluster while Messier 36 is called the Pinwheel Cluster. The bright red nebula at top is Sharpless 2-235. The little nebulas at centre are NGC 1931 and IC 417.
The California Nebula
This is a stack of 5 x 3-minute exposures with the filter-modified Canon 5D MkII at ISO 800 and 200mm Canon L-Series lens at f/2.8. An additional exposure taken through the Kenko Softon A filter is layered in to add the star glows to bring out their colours. Taken with the Fornax Lightrack tracker. Taken from home on a rare fine and mild winter night, January 4, 2019.
Now we enter Perseus, more an autumn constellation but well up through most of the winter months. It contains the aptly named California Nebula, NGC 1499, at top left, with the bright star Zeta Persei. at bottom A small region of reflection nebulosity, IC 348, surrounds the star Atik, or Omicron Persei, at bottom right. The star just below NGC 1499 is Menkib, or Xi Persei, and is likely energizing the nebula.
The Pleiades, or Seven Sisters
The Pleiades with the Fornax Lightrack tracker and 200mm lens + Canon 5D MkII in a stack of 10 x 3 minute exposures at ISO 800.
Obvious to the eye and central to the sky lore of many cultures is the Pleiades, aka the Seven Sisters, in Taurus the bull. It is also called Messier 45.
This is a newly formed cluster of hundreds of stars, passing through a dusty region of the Milky Way, which adds the fuzzy glows around the stars — an example of a reflection nebula, glowing blue as it reflects the blue light of the young stars.
The Hyades
This is a stack of 5 x 2-minute exposures with the Canon 5D MkII at ISO 800 and 200mm Canon L-Series lens at f/2.8. An additional exposure taken through the Kenko Softon A filter is layered in to add the star glows to bring out their colours. Taken with the Fornax Lightrack tracker. Diffraction spikes added with Astronomy Tools actions for artistic effect.
Below the Pleiades in Taurus lies the larger Hyades star cluster. The V-shaped cluster stars are all moving together and lie about 150 light years away. Bright yellow Aldebaran, the eye of Taurus, is an intruder and lies at only half that distance, so is not a member of Hyades but is a more nearby star. The smaller, more distant star cluster NGC 1647 appears at left.
Seagull Nebula
This is a stack of 10 x 3 minute exposures at ISO 800 (with the filter-modified Canon 5D MkII and Canon 200mm lens at f/2.8). The rings of colour around Sirius are an artifact of the sensor filter, I think!
Low in my northern winter sky is the brightest star in the sky of any season, Sirius. Just above and to the east of Sirius lies the Seagull Nebula (at top left), also called IC 2177, on the Canis Major-Monoceros border. Like many of these nebulas. the Seagull is too faint to easily see even with a telescope, but shows up well in photographs.
Lambda Orionis Nebula
With the Fornax Lightrack tracker and 200mm lens and filter-modified Canon 5D MkII. A stack of 10 x 3 minute exposures at ISO 800 with the filter-modified Canon 5D MkII and Canon 200mm lens at f/2.8.
This is the head of Orion, with the red supergiant star Betelgeuse at bottom left and the blue giant star Bellatrix right at bottom right. The brightest star at top is Meissa or Lambda Orionis, and is surrounded by a large and very faint area of hydrogen nebulosity. The open cluster around Meissa is catalogued as Collinder 69.
While the winter Milky Way might not look as bright and spectacular as the summer Milky Way of Sagittarius and Scorpius, it does contains a wealth of wonders that are treats for the eye and telescope … and for the camera.
PS.: The techniques for taking and processing images like these form the content of our new Deep Sky with Your DSLR video course now being promoted on KickStarter until the end of February, and available for purchase once it is published later this spring.
Deep in the southern Milky Way lies one of the most spectacular regions of sky.
Located about as far south in the Milky Way as it gets you find this wonderful region in Carina and Centaurus.
The Carina Nebula (NGC 3372) at upper right is one of the finest nebulas in the sky for binoculars or any telescope.
At lower left is the Running Chicken Nebula (IC 2948) (aka the Lambda Centauri Nebula). By contrast, this nebula is mostly a photographic target, and is a challenge to see with a small telescope. But can you see the Chicken here?
The small red and magenta nebulas at centre are called NGC 3603 and NGC 3576.
The blue Southern Pleiades star cluster (IC 2602) is at bottom right.
The Pearl Cluster (NGC 3766) is above the Running Chicken at left. The cluster IC 2714 is to the right of the Chicken amid dark nebulas.
The Gem Cluster (NGC 3324) is above and right of the Carina Nebula but small and unresolved here.
The Football Cluster (NGC 3532) is top centre, though partly lost amid the rich starfield.
All told, this is one of the best areas in the sky for deep-sky wonders. But you must travel south to see it, to at least 20° North latitude.
This is a mosaic of three segments, taken with the camera in portrait orientation, stitched with Photoshop to make a square framing of the area. Each segment was a stack of 4 x 2-minute exposures at f/2.8 with the 200mm Canon L-series lens and filter-modified Canon 5D MkII at ISO 2500.
I shot this mosaic earlier in April from my observing site at Coonabarabran, Australia.
From southern latitudes the most amazing region of the sky shines overhead late on austral autumn nights.
There is no more spectacular part of the Milky Way than the regions around its galactic centre. Or at least in the direction of the galaxy’s core.
We can’t see the actual centre of the Galaxy, at least not with the cameras and telescopes at the disposal of amateur photographers such as myself.
It takes large observatory telescopes equipped with infrared cameras to see the stars orbiting the actual centre of the Milky Way. Doing so over many years reveals stars whipping around an invisible object with an estimated 4 million solar masses packed into the volume no larger than the solar system. It’s a black hole.
By comparison, looking in that direction with our eyes and everyday cameras, we see a mass of stars in glowing clouds intersected by lanes of dark interstellar dust.
The top image shows a wide view of the Milky Way toward the galactic centre, taking in most of Sagittarius and Scorpius and their incredible array of nebulas, star clusters and rivers of dark dust, all located in the dense spiral arms between us and the galactic core.
This is a mosaic of 6 segments, each segment being a stack of 4 x 3-minute exposures at f/2.8 with the 135mm Canon L-Series
Zooming into that scene reveals a panoramic close-up of the Milky Way around the galactic centre, from the Eagle Nebula in Serpens, at left, to the Cat’s Paw Nebula in Scorpius, at right.
This is the richest hunting ground for stargazers looking for deep-sky wonders. It’s all here, with field after field of telescopic and binocular sights in an area of sky just a few binocular fields wide.
The actual galactic core area is just right of the centre of the frame, above the bright Sagittarius StarCloud.
This is a stack of 5 x 5 minute exposures with the Borg 77mm f/4 astrograph and filter-modified Canon 5D MkII at ISO 1600, taken from Tibuc Cottage near Coonabarabran, NSW, Australia.
Zooming in again shows just that region of sky in an even closer view. The contrast between the bright star fields at left and the dark intervening dust at right is striking even in binoculars – perhaps especially in binoculars.
The visual impression is of looking into dark canyons of space plunging off bright plateaus of stars.
In fact, it is just the opposite. The dark areas are created by dust much closer to us, hiding more distant stars. It is where the stars are most abundant, in the dust-free starclouds, that we see farthest into the galaxy.
In the image above the galactic centre is at right, just above the small diffuse red nebula. In that direction, some 28,000 light years away, lurks the Milky Way’s monster black hole.
This is a stack of 5 x 6-minute tracked exposures with the 15mm fish-eye lens at f/4 and Canon 5D MKII at ISO 1600. The trees appear to be swirling around the South Celestial Pole at lower right above the Cottage.
To conclude my tour of the galactic centre, I back out all the way to see the entire sky and the Milky Way stretching from horizon to horizon, with the galactic centre nearly overhead in this view from 3 a.m. earlier this week.
Only from a latitude of about 30° South can you get this impressive view, what I consider one of the top “bucket-list” sights the sky has to offer.
The sky of December contains an amazing array of bright stars and deep-sky delights.
At this time of year we peer out toward the edge of our Galaxy, in the direction opposite to what we see in July and August. Even though we are looking away from the centre of our Galaxy, the Milky Way at this time of year contains a stunning collection of sights – for the naked eye, binoculars or a telescope.
I can’t list them all here, but most are in the lead image above! The image is a mosaic of the northern winter Milky Way, including the brilliant stars and constellations in and around Orion the Hunter.
The Milky Way extends from Perseus in the north at top, to Canis Major in the south at bottom. Throughout the scene are dark lanes and dust clouds, such as the Taurus Dark Clouds at upper right.
The Milky Way is dotted with numerous red “hydrogen-alpha” regions of emission nebulosity, such as the bright Rosette Nebula at lower left and the California Nebula at upper right. The curving arc of Barnard’s Loop surrounds the east side of Orion. Orion is below centre, with Sirius, the night sky’s brightest star, at lower left.
The constellation of Taurus is at upper right and Gemini at upper left. Auriga is at top and Perseus at upper right.
There’s an unusually bright area in Taurus just right of centre in the mosaic which I thought might be an image processing artifact. No. It’s the Gegenschein – a glow of sunlight reflected off comet dust directly opposite the Sun.
Two highlights of this sky that are great regions for binoculars are the Hyades cluster in Taurus ….
The Hyades open star cluster in Taurus with the bright star Aldebaran, not a part of the cluster iteslf. The smaller and more distant cluster NGC 1647 is at left. This is a telephoto lens image taking in a field similar to binoculars, and is a stack of 5 x 2.5-minute exposures with the 135mm lens at f/2 and Canon 5D MkII camera at ISO 800, plus two other exposures taken through the Kenko Softon filter to add the star glows. Taken from Quailway Cottage on Dec 7, 2015 using the iOptron Sky-Tracker.
…and the Belt and Sword of Orion.
The Hyades – the face of Taurus – is one of the nearest and therefore largest open star clusters.
Orion the Hunter, who battles Taurus in the sky, contains the famous Orion Nebula, here overexposed in order to bring out the much fainter nebulosity in the region.
The magenta and blue arcs in the image below are photographic targets, but the bright Orion Nebula in Orion’s Sword is easy in binoculars, shining below the trio of his Belt Stars.
A mosaic of the Sword and Belt region of Orion the Hunter, showing the diverse array of colourful nebulas in the area, including: curving Barnard’s Loop, the Horsehead Nebula below the left star of the Belt, Alnitak, and the Orion Nebula itself as the bright region in the Sword. Also in the field are numerous faint blue reflection nebulas. The reflection nebula M78 is at top embedded in a dark nebula, and the pinkish NGC 2024 or Flame Nebula is above Alnitak. The bright orange-red star at far right is W Orionis, a type M4 long-period variable star. This is a 4-panel mosaic with each panel made of 5 x 2.5-minute exposures with the 135mm Canon L-series telephoto wide open at f/2 and the filter-modified Canon 5D MkII at ISO 1250. The night was somewhat hazy which added natural glows on the stars. No filter was employed here. The camera was on the iOptron Sky-Tracker for tracking but no guiding. Shot from outside Quailway Cottage near Portal, Arizona, Dec 7, 2015. All stacking and stitching performed in Photoshop CC 2015. Stacking done with median combine stack mode to eliminate geosat trails through the fields.
For us in the northern hemisphere, Orion and company are winter sights. But for those down under, in the southern hemisphere, this is the summer sky. So pardon the northern chauvinism in the title!
Either way, on a dark, moonless night, get out and explore the sky around Orion.
TECHNICAL:
I shot the segments for the main mosaic at top on a very clear night on December 5, 2015 from the Quailway Cottage at Portal, Arizona. This is a mosaic of 8 segments, in two columns of 4 rows, with generous overlap. Each segment was made of 4 x 2.5-minute exposures stacked with mean combine stack mode to reduce noise, plus 2 x 2.5-minute exposures taken through the Kenko Softon filter layered in with Lighten belnd mode to add the star glows. Each segment was shot at f/2.8 with the original 35mm Canon L-series lens and the filter-modified (by Hutech) Canon 5D MkII at ISO 1600, riding on the iOptron Sky-Tracker. All stacking and stitching in Photoshop CC 2015. The soft diffusion filter helps bring out the star colors in this area of sky rich in brilliant giant stars.
Last night I shot into the autumn Milky Way at the Heart Nebula.
I’m currently just finishing off a month of testing the new Nikon D810a camera, a special high-end DSLR aimed specifically at astrophotographers.
I’ll post a more thorough set of test shots and comparisons in a future blog, but for now here are some shots from the last couple of nights.
Above is the setup I used to shoot the image below, shot in the act of taking the image below!
The Nikon is at the focus of my much-loved TMB 92mm refractor, riding on the Astro-Physics Mach One mount. The mount is being “auto-guided” by the wonderful “just-press-one-button” SG-4 auto-guider from Santa Barbara Instruments. The scope is working at a fast f/4.4 with the help of a field flattener/reducer from Borg/AstroHutech.
I shot a set of 15 five-minute exposures at ISO 1600 and stacked, aligned and averaged them (using mean stack mode) in Photoshop. I explain the process in my workshops, but there’s also a Ten Steps page at my websitewith my deep-sky workflow outlined.
The Heart Nebula, IC 1805, in Cassiopeia, with nebula NGC 896 at upper right and star cluster NGC 1027 at left of centre. This is a stack of 15 x 5-minute exposures with the Nikon D810a as part of testing, at ISO 1600, and with the TMB 92mm apo refractor at f/4.4 with the Borg 0.85x field flattener. Taken from home Nov 29, 2015.
The main advantage of Nikon’s special “a” version of the D810 is its extended red sensitivity for a capturing just such objects in the Milky Way, nebulas which shine primarily in the deep red “H-alpha” wavelength emitted by hydrogen.
It works very well! And the D810a’s 36 megapixels really do resolve better detail, something you appreciate in wide-angle shots like this one, below, of the autumn Milky Way.
It’s taken with the equally superb 14-24mm f/2.8 Nikkor zoom lens. Normally, you would never use a zoom lens for such a demanding subject as stars, but the 14-24mm is stunning, matching or beating the performance of many “prime” lenses.
The Milky Way from Perseus, at left, to Cygnus, at right, with Cassiopeia (the “W”) and Cepheus at centre. Dotted along the Milky Way are various red H-alpha regions of glowing hydrogen. The Andromeda Galaxy, M31, is at botton. The Double Cluster star cluster is left of centre. Deneb is the bright star at far right, while Mirfak, the brightest star in Perseus, is at far left. The Funnel Nebula, aka LeGentil 3, is the darkest dark nebula left of Deneb. This is a stack of 4 x 1-minute exposures at f/2.8 with the Nikkor 14-24mm lens wide open, and at 24mm, and with the Nikon D810a red-sensitive DSLR, at ISO 1600. Shot from home, with the camera on the iOptron Sky-Tracker.
The D810a’s extended red end helps reveal the nebulas along the Milky Way. The Heart Nebula, captured in the close-up at top, is just left of centre here, left of the “W” forming Cassiopeia.
The Nikon D810a is a superb camera, with low noise, high-resolution, and features of value to astrophotographers. Kudos to Nikon for serving our market!
The stars at night shine big and bright, deep in the heart of Texas.
Last week several hundred stargazers gathered under the dark skies of West Texas to revel in the wonders of the night sky. I was able to attend the annual Texas Star Party, a legendary event and a mecca for amateur astronomers held at the Prude Ranch near Fort Davis, Texas.
Some nights were plagued by clouds and thunderstorms. but here are some scenes from a clear night, with several hundred avid observers under the stars and Milky Way. Many stargazers used giant Dobsonian reflector telescopes to explore the faintest of deep-sky objects in and beyond the Milky Way.
A 360° panorama of the upper field of the Texas Star Party at the Prde Ranch near Fort Davis, TX, May 13, 2015, taken once the sky got astronomically dark. The panorama shows the field of telescopes and observers enjoying a night of deep-sky viewing and imaging. Venus is the bright object at right of centre and Jupiter is above it. The Zodiacal Light stretches up from the horizon and continues left across the sky in the Zodiacal Band to brighten in the east (left of centre) as the Gegeneschein. I shot this with a 14mm lens, oriented vertically, with each segment 60 seconds at f/2.8 and with the Canon 5D MkII at ISO 3200. The panorama is made of 8 segements at 45° spacings. The segments were stitched with PTGui software.
Observers at the Texas Star Party explore the wonders of the deep sky under the rising Milky Way, in May 2015. Sagittarius and Scorpius are in the background, with the centre of the Galaxy rising in the southeast. This is a single 30-second exposure at f/2 with the 24mm lens and Canon 5D MkII at ISO 4000.
Expert deep-sky observers Larry Mitchell and Barbara Wilson gaze skyward with Larry’s giant 36-inch Dobsonian telescope at the Texas Star Party, May 2015. This is a single 60-second exposure with the 14mm lens at f/2.8 and Canon 5D MkII at ISO 3200.
A deep-sky observer at the top of a tall ladder looking through a tall and large Dobsonian telescope, at the Texas Star Party, May 2015. Scorpius is rising in the background; Saturn is in the head of Scorpius as the bright star above centre. Anatares is just below Saturn. This is a single 30-second exposure at f/2.5 with the 24mm lens and Canon 5D MkII at ISO 6400.
Circumpolar star trails over the upper field of the Texas Star Party, May 13, 2015. I aimed the camera to look north over the field to capture the stars circling around Polaris in circumpolar trails over about 1 hour. Some cloud and haze obscured parts of the sky. Lights from cities to the north add the sky glow at right. The streaks at top are from the stars of the Big Dipper. This is a stack of 55 exposures, each 1 minute long, at f/2.8 with the 14mm lens and Canon 5D MkII at ISO 3200. The foreground comes from a single image in the series, masked and layered in Photoshop. The images were stacked using the Long Trails tapering effect with the Advanced Stacker Actions from Star Circle Academy.
I extend my thanks to the organizers for the great event, and for the opportunity to speak to the group as one of the featured evening speakers. It was great fun!
It’s a nova needle in a Milky Way haystack – an exploding star appears in Sagittarius.
On March 15 a very observant amateur astronomer in Australia spotted a star in Sagittarius that wasn’t there the night before. It was a nova, Latin for “new.”
But this was not a new star forming, but an old star in the process of dying.
This star is likely an ancient white dwarf drawing material off a close companion. When the in-falling material builds up on the surface of the white dwarf it ignites in a nuclear explosion, causing the star to brighten, in this case by hundreds of times.
At its peak last week, Nova Sagittarii was just bright enough to see naked eye. It is now below 5th magnitude and barely naked eye. In my long exposure photo it appears lost amid the blaze of stars in the Sagittarius Milky Way.
Still, this was the brightest nova visible from the northern hemisphere in many years. Indeed, we haven’t had a really bright naked-eye nova since the 1970s.
Considering all those stars, you’d think some would blow up for us to enjoy!
Tonight Comet Lovejoy paired with the Pleiades star cluster.
Sunday, January 18 was the night to catch the ever-photogenic Comet Lovejoy at its best and closest to the Seven Sisters, the Pleiades. Its long blue ion tail stretched back past the Pleiades.
I thought the tail would be passing right over the star cluster, but not so. At least not when I was shooting it at about 7:30 pm MST.
Still, the combination made a fine pairing of cosmic blue objects for the camera. The top image is with a 135mm telephoto.
This wide-angle image, with a 24mm lens, takes in many of the northern winter constellations, from Orion at bottom, to Auriga at top, with Taurus in the middle. Notice the dark tendrils of the Taurus Dark Clouds.
At right, beside the Pleiades, is the green and blue comet, with its tail reaching back past the Pleiades.
I shot both images from the dark skies of City of Rocks State Park, New Mexico, which has proven to be one of the finest places on the planet for watching Lovejoy!
As a special New Year’s gift I have prepared a free Calendar of celestial events for 2015.
I have lots of photos and I maintain a personal calendar to remind me of the year’s astronomical events. So why not combine them into a pictorial sky calendar anyone can use!
So I’ve prepared a free2015 Sky Calendar as a PDF you can download.
The sky events listed are for North America. While most will be visible around the world the timing may be off for other locations. Many thanks for visiting and following my blog this past year. I wish everyone a happy and celestial 2015.
Comet Lovejoy passes near the globular cluster M79 in this image from Saturday, December 27.
Here is the comet that is making the news, as it comes into view in northern skies, now sporting a decent tail of gas streaming away from its cyan-coloured head.
Comet Lovejoy (C/2014 Q2) is proving to be a fine photogenic comet and an easy target for binoculars. Visually it still looks like a large fuzzy star, though I could spy a sign of a faint tail on Saturday night, at least through binoculars.
This weekend it passed the small, faint globular cluster Messier 79, seen here at upper right. It was very close to M79 Sunday night, but alas, clouds blew in, obscuring the view from here in New Mexico.
The Moon is now in the sky with the comet, leaving no dark sky time to see the comet after moonset. That will be the case for another two weeks or so. But by mid January the Moon will be gone and the comet will be much higher in the sky, moving up through Taurus.
From a dark site, it may be easily visible to the naked eye at that time, a surprising bonus for the winter, as this comet was never expected to get this bright.
Thank you, Terry Lovejoy, for finding your comets in Australia and sending them our way!
A cosmic Christmas wreath glows in the sky, adorned by a celestial garnet.
This nebula, known as IC 1396, shines in the constellation of Cepheus the king, now high overhead on early winter evenings in the northern hemisphere. It’s a bubble of gas blown by new stars amid the interstellar wreath.
At top, shining like a Christmas light on the wreath, is an orange star. This is Mu Cephei, also known as the Garnet Star. It’s a red supergiant, roughly 1,500 times bigger than our Sun. If it replaced our Sun at the centre of our solar system it would engulf all the planets out to and including Jupiter.
Be happy Mu sits 1,000 light years away!
Happy holidays! And happy solstice. Winter arrives in the northern hemisphere at 6:03 p.m. EST on Sunday, December 21. That’s the shortest day and longest night of the year, for all those north of the equator.
A bubble of glowing gas blows away from an ancient dying star, next to a cluster of new stars in Gemini.
This image, from a week ago, captures contrasting stages in the life of a star.
At left is a crescent-shaped bubble of gas called IC 443, or the Jellyfish Nebula, billowing away from the site of an ancient supernova explosion, when a giant star ended its life in a blast thousands of years ago. Estimates put its age as between 3,000 and 30,000 years.
At upper right is the bright open star cluster, Messier 35, a gathering of hundreds of comparatively new stars at the beginning of their lives. M35 lies 2,800 light years away, close enough that its stars are nicely resolved in my photo and in any small telescope. M35 is one of the showpieces of the winter northern sky.
Just below M35 you can see a fuzzy glow. It’s another star cluster, NGC 2158. However, its great distance of 11,000 light years makes it appear as a small, partially-resolved glow, a nice contrast in clusters near and far.
This image focuses on IC 443, sitting between the stars Eta (right) and Mu Geminorum. The field is filled with other faint nebulosity, all part of the cycle of star birth and death.
“Many a night I saw the Pleiads, rising thro’ the mellow shade,
Glitter like a swarm of fireflies tangled in a silver braid.”
– Alfred, Lord Tennyson
These are the famous Seven Sisters, the Pleiades, caught two nights ago in New Mexico skies. This bright star cluster stands out easily to the unaided eye in the winter sky, shining in the shoulder of Taurus.
What the eye does not see is the “silver braid” – the dim dust that surrounds the Pleiades. The stars light the dust, causing it to shine blue near the stars. Farther out, the dust is much dimmer and glows with pale tints of cyan and red.
The dust clouds were once thought to be what was leftover from the formation of the stars, now estimated to have occurred about 100 million years ago. However, current theory suggests that the natal dust of the Pleiads would have long since dispersed.
Instead, the silvery braids of dust that surround the Seven Sisters are just nearby dust clouds in Taurus that the stars are passing through, and illuminating with their hot blue light.
The Pleiades, as familiar as they are – they have been mentioned in ancient texts and myths dating back thousand of years – remain a source of scientific controversy. Astronomers argue over their distance, with different methods providing different results. But the best recent measurement puts them 440 light years away.
Technical notes: This is a stack of 10 x 12 minute exposures at ISO 400 with the Canon 5D MkII camera and 92mm TMB refractor at f/4.4. I shot the images November 16 from near Silver City, New Mexico.
Here are both the heart and the soul of Cassiopeia the Queen.
Two days ago I posted an image of the Soul Nebula. Now, here is the matching Heart Nebula, in a mosaic of the glorious region of the Milky Way called the Heart and Soul Nebulas located in the constellation of Cassiopeia.
They are otherwise respectively called IC 1805 and IC 1848. Amid the swirls of nebulosity are numerous clusters of stars, such as NGC 1027 just above centre. The separate patch of nebulosity at upper right is NGC 896.
I shot the frames for this 3-segment mosaic over two nights, with one segment taken from the frames that made up the previous post. Plus I shot two others to span the region of the Milky Way that is about seven degrees long, a binocular field.
Each of the 3 segments is a stack of 12 frames, with each frame a 6-minute exposure. I used the filter-modified Canon 5D MkII and shot through the TMB 92mm apo refractor at f/4.4. All processing was in Photoshop, including the mosaic assembly.
In all, it’s the best image I’ve taken of this much-shot area of the sky. It really brings out the diversity in star colours, and sky colours, from the dusty orange-brown region at left, to the inky dark dustless region at far right.
The Soul Nebula glows from within the constellation of Cassiopeia the Queen.
I shot this image last night, capturing an object prosaically known as IC 1848, but more popularly called the Soul Nebula.
It is often depicted framed with a companion nebula just “off camera” here to the right, called the Heart Nebula. Thus they are the Heart and Soul. Both shine on the eastern side of Cassiopeia the Queen.
Here I’m framing just the Soul, taking in some of the faint nebulosity to the left of the main nebula, including a tiny object called IC 289, a star-like planetary nebula at upper left.
I like this image for its variety of subtle colours, not only the reds and magentas in the bright nebula, but also in the dark sky around it from dim dust adding faint yellows, browns and even a touch of green.
The Soul Nebula lies 6,500 light years away in the Perseus Arm, the next spiral arm out from ours in the Milky Way. On northern autumn nights this region of the sky and Milky Way lies high overhead.
For the technically minded:
The image is a stack of 20 six-minute exposures, taken with a filter-modified Canon 5D Mark II at ISO 800. I was shooting through one of my favourite telescopes for deep-sky photography, the TMB (Thomas M. Back-designed) 92mm apo refractor, working at a fast f/4.4 using a Borg 0.85x field flattener and focal reducer.
I used one of Noel Carboni’s “Astronomy Tools” Photoshop actions to add the “diffraction spikes” on the stars. They are artificial (refractors don’t produce spikes on stars) but they add a photogenic touch to a rich starfield.
I shot this from the backyard of my New Mexico winter home.
We gaze into the interstellar depths of the Milky Way through uncountable stars.
In this telescopic scene we look toward the Scutum Starcloud, and next spiral arm in from ours as we gaze toward the core of the Galaxy.
The field is packed with stars, seemingly crowded together in interstellar space. In fact, light years of empty space separate the stars, even in crowded regions of the Milky Way like this.
Two dense clusters of stars stand out like islands in the sea of stars. At lower right is Messier 26, an open cluster made of a few dozen stars. Our young Sun probably belonged to a similar family of stars billions of years ago. M26 lies 5,200 light years away.
At upper left is a condensed spot of light, made of hundreds of thousands of density packed stars in the globular cluster known only as NGC 6712. Though much larger and denser than M26, NGC 6712 appears as a tiny spot because of its remoteness – 23,000 light years away, a good part of the distance toward the centre of the Galaxy.
Look carefully (and it may not be visible on screen) and you might see a small green smudge to the left of NGC 6712. That’s a “planetary nebula” called IC 1295. It’s the blown off atmosphere of an aging Sun-like star. It’s what our Sun will become billions of years from now.
At top is a vivid orange-red star, S Scuti, a giant pulsating star nearing the end of its life.
Mars shines near the globular star cluster Messier 22 in Sagittarius.
This week Mars has been passing near one of the brightest globular star clusters, M22. I caught the pair tonight, November 8, as they sank into the southwestern sky.
The two form a contrasting pair, with red Mars now 260 million kilometres away, far enough that its light takes 13 minutes to reach Earth. However, blue M22 lies so far away, toward the galactic core, that its light take 10,000 years to reach Earth.
Mars appeared closer to M22 earlier this week but tonight was the first night with a narrow window of dark sky between twilight and moonrise, allowing me to shoot the pair.
I shot the image through a telescope with a short focal length of 400mm, taking in a field of about 5 by 3 degrees, the field of high-power binoculars. The image is a stack of eight 2-minute exposures at f/4.5 with the TMB 92mm refractor and Canon 6D at ISO 800.
The head of Scorpius is laced with colourful nebulas, both bright and dark.
This is an image from two nights ago, from the dark skies of southeast Arizona. It takes in the head of Scorpius, from yellow Antares at lower left as the heart of the Scorpion, to the blue stars at right that mark his head.
The remarkable feature of this region of sky is its colour. No where else in the sky do we see (or I should say, does the camera see) such a spectrum of colourful nebulas. Dark brown lanes run down from the constellation Ophiuchus at left. They meet up with a yellow patch of nebulosity caused by dust reflecting the yellow-orange light of the giant star Antares.
Hot blue stars light up other dusty patches, while the magenta nebulas are created by gas emitting light, not just reflecting light from nearby stars.
A close-up of the region, shot in Australia last month, appears in my blog post from April 17, Stars Scenes in Scorpius. The image above, shot with a 135mm telephoto lens, takes in an area of sky that typical binoculars would frame.
But the eye sees only a hint of the detail, and none of the colour, hidden in the heart of Scorpius.
There’s no more spectacular region of the sky than the Milky Way toward the centre of the Galaxy.
What a perfect night it was last night. After moonset between 2 and 3:30 a.m. I shot a series of images around the centre of the Galaxy area and stitched them into a big mosaic of the Milky Way.
The scene takes in the Milky Way from the Eagle and Swan nebulas at top left, down to the Messier 6 and 7 open clusters in Scorpius at bottom. Standing out is the large pink Lagoon Nebula left of centre and the huge region of dark dusty nebulosity popularly called the Dark Horse at right of centre. It’s made of smaller dark nebulas such as the Pipe Nebula and tiny Snake Nebula.
At upper left is the bright Small Sagittarius Starcloud, aka Messier 24, flanked by the open clusters M23 and M25. There are a dozen or more Messier objects in this region of sky.
The actual centre of the Milky Way is obscured by dark dust but lies in the direction just below the centre of the frame, amid one of the bright star clouds that mark this amazing region of sky.
I shot the images for this mosaic from a site near Portal, Arizona, using a 135mm telephoto lens and filter-modified Canon 5D Mark II riding on an iOptron SkyTracker to follow the stars. The mosaic is made of 6 panels, each a stack of five 3-minute exposures. They were all stacked and stitched in Photoshop CC. The full version is 8000 by 9000 pixels and is packed with detail.
I think the result is one of the best astrophotos I’ve taken! It sure helps to have Arizona skies!
The southern Milky Way is populated by the sky’s best clusters of stars.
Here are three of the southern sky’s best star clusters, in portraits I took earlier this month from Australia.
At top, my main image takes in a great contrasting pair of star clusters. Both lie in the constellation of Puppis, once part of the ship Argo Navis.
At left is the stunningly rich NGC 2477, so packed with stars it almost ranks as a globular cluster, not one of the sparser open clusters. At least that’s the impression it gives in the eyepiece. But instead of containing hundreds of thousands of stars, as do globulars, NGC 2477 “only” has 300 stellar members. They are just very tightly packed in one of the richest open star clusters in the sky. If it had been farther north NGC 2477 would certainly rate as one of the top 100 sky sights, and carry some memorable name after a fanciful resemblance to who knows what! Instead, it carries but a catalog number.
Next to it, at right, is NGC 2451, more typical of open clusters. It has a central bright star, this one naked eye, surrounded by 40 or so lesser stars of contrasting colour and brightness. The two clusters make a great side-by-side comparison in any low-power telescope.
Much farther along the southern Milky Way is this rich open cluster (above), NGC 6067, in Norma, itself embedded in one of the richest star clouds of the southern Milky Way, the Norma Star Cloud. Here you are gazing for 6800 light years toward the cluster which shines suspended against the background of the even more distant inner arms of our spiral galaxy.
So NGC 6067 looks a little like an island of blue stars amid the dust-reddened background of more distant stars in the Milky Way — an island in a sea of stars.
The two brightest stars in the night sky shine in the southern sky.
Here are Sirius (at right) and Canopus (at bottom left), the brightest and second brightest stars in the night sky, together near the southern Milky Way.
My image also captures the huge loops of the Gum Nebula, thought to be the remains of a supernova that blew up a million years ago. It’s utterly invisible to the naked eye, but Sirius and Canopus stand out as brilliant stars even from light polluted sites.
Sirius can be seen from northern latitudes but Canopus is below the horizon for any location north of 37° North or so. I shot this image from Australia where these stars pass overhead.
Sirius is a hot blue-white star 8.6 light years away. Canopus appears slightly dimmer but only because it lies much farther away, at some 310 light years. In reality it is a supergiant yellow-white star that shines with a luminosity 15,000 times that of our Sun.
This image takes in Canopus at bottom right, next to the Large Magellanic Cloud, and with the southern Milky Way sweeping across the top, with the Carina Nebula and its attendant star clusters at top left and parts of the Gum Nebula at right.
Here are a few cocktail party facts about Canopus:
• In 480,000 years its motion around the Galaxy will bring Canopus close enough to Earth that it will become the brightest star in our night sky, outranking Sirius.
• The origin of its name is a mystery. One idea is that the star is named for the pilot of the ship that took Menelaus to Troy on the quest to re-capture Helen.
• Canopus, the star, was used in ancient times as a key navigation star for those sailing to southern seas, as it would have risen above the southern horizon from latitudes below 35° North back around 2000 BCE.
• Today, Canopus is charted as the brightest star in the constellation of Carina the Keel, part of the ancient constellation of Argo Navis, named for the ship sailed by Jason and the Argonauts.
This is what’s left of a star that exploded in ancient times.
This is the Vela Supernova Remnant, an object in the southern sky in the constellation of Vela the Sail. The wispy tendrils of magenta and cyan are all that’s left of the outer layers of giant star that exploded about 12,000 years ago.
Cluttering the field at left are amorphous patches of star-forming nebulosity that are part of the much larger Gum Nebula complex.
The supernova was only about 800 light years away so it would have been a brilliant sight in the sky to neolithic observers, far outshining any other stars. But no record exists of anyone seeing it.
The star didn’t destroy itself completely – its core collapsed to form a pulsar, an ultra-dense ball of neutrons, in this case spinning about 11 times a second. The pulsar is in this field but it’s much too faint to show up in visible light.
I shot this earlier this month from Australia where Vela sails directly overhead. The field is about 6° by 4°, the amount of sky framed by high power binoculars. The brighter parts of the Vela Remnant can be picked out in large amateur telescopes – I’ve seen bits of it in my 10-inch telescope – but this is certainly a challenging object to see, even with aided eyes.
Scorpius, one of the most photogenic of constellations, contains a wealth of amazing sky sights.
My trip to the land down under is coming to an end but I’m still working through the dozens of deep-sky images I was able to take under the southern stars. The wide-field scene above takes in all of Scorpius, shot with the constellation sitting directly overhead in the pre-dawn hours of an austral autumn. You can trace the scorpion’s winding shape down from his head and claws at top, to his curving stinger tail at bottom.
Off the stinger of the scorpion shine two naked-eye star clusters, Messier 6 and 7 (the close-up photo above). M6 is the Butterfly Cluster, seen here sitting in a dark region of the Milky Way at upper right. Its companion, M7, a.k.a. Ptolemy’s Cluster at left of the frame, is lost amid the bright star fields that mark the direction of the galactic core.
In the curving tail of the scorpion lie two patches of nebulosity. At upper left is NGC 6357, but the triple-lobed NGC 6334 at bottom right is also known as the Cat’s Paw Nebula.
Further up the tail of the scorpion sits this fabulous region of space that is a stunning sight in binoculars. NGC 6231 is the blue star cluster at bottom, which garnered the name The False Comet Cluster back in early 1986 when many people mistook its fuzzy naked eye glow for Comet Halley then passing through the area. The camera reveals the region filled with glowing hydrogen gas.
But the standout region of Scorpius lies at its heart. Here, the yellow-orange star Antares lights up a dusty nebula surrounding it, reflecting its yellow glow. At top, another dusty nebula surrounds the star Rho Ophiuchi, reflecting its blue light. Glowing hydrogen gas adds its characteristic magenta tints. This is one of the most colourful regions of the Milky Way.
I shot these images with 50mm normal and 300mm telephoto lenses two weeks ago during the OzSky Star Safari near Coonabarabran, NSW, Australia. For all I used a filter-modified (by Hutech) Canon 5D Mark II camera.
The Milky Way of the southern hemisphere contains some astonishing deep-sky sights.
The lead image above shows the section of the Milky Way that extends farthest south, and so is visible only from tropical latitudes in the north and, of course, from the southern hemisphere. I shot these images this past week in Australia.
The wide-angle image above takes in the southern Milky Way from Vela, at right, to Centaurus, at left. In the middle is the Southern Cross (left of centre), the Carina Nebula complex and surrounding clusters, and the False Cross at right of frame. The close-ups below zoom into selected regions of this area of the Milky Way. All are spectacular sights in binoculars or any telescope.
This image frames the left side of Crux, the Southern Cross. The bright stars are Becrux (top) and Acrux (bottom). Just below Becrux is the compact and brilliant Jewel Box cluster, aka NGC 4755. Below it are the dark clouds of the Coal Sack, which in photos breaks up into discrete segments and patches.
This region is a favourite of mine for images and for visual scanning in any telescope. The large nebula is the Lambda Centauri complex, also labelled the Running Chicken Nebula. Can you see its outline? Above it is the beautiful Pearl Cluster, aka NGC 3766.
This is the standout object in the deep south – the Carina Nebula complex. I’ve shot this many times before but this is my best take on it. At upper left is the Football Cluster, NGC 3532, while at upper right is the Gem Cluster, NGC 3293.
Seeing this area in person is worth the trip to the southern hemisphere. There are now many photographers up north who have shot marvellous images of Carina but using robotic telescopes. They have never actually seen the object for themselves. They print the images upside down or sideways, a sign of their detachment from the real sky.
You have to stand under the southern stars to really appreciate the magnificence of the Milky Way. All else is just data taking.
A series of closer images zooms us into the Milky Way looking toward the centre of our Galaxy
Here are some images I took this past week at the OzSky Star Safari near Coonabarabran, Australia. The lead image above is a wide-angle lens image of all of Scorpius (above and to the right) and Sagittarius (below and to the left) straddling the Milky Way and its bright glowing core. The direction of the galactic centre is just left of centre of the image. We can’t see the actual centre of the Milky Way with our eyes and normal cameras because there are just too many stars and obscuring dust lanes in between us and the core.
The dust forms marvellous patterns across the glowing Milky Way — see the Dark Horse prancing at left? Long tendrils of dust reach from the feet of the Horse to the bright yellow star at top, Antares, the heart of Scorpius.
This image with a longer lens zooms in closer to the bright Sagittarius Starcloud around the heart of the Galaxy. All along it you can see red and pink nebulas, from the Cat’s Paw at upper right to the Eagle Nebula at lower left. The larger pink object at centre is the Lagoon Nebula.
The next image zooms into the area at the centre of the above shot, just right of the Lagoon.
This is the star-packed Sagittarius Starcloud. Everything you see is stars. Millions of stars.
I took this shot with a 300mm telephoto — a small telescope actually, the gear shown below. It’s what I was using most of this past week to shoot the Australian southern sky.
This is some of my Oz gear, the equipment (except for the camera and autoguider on top) that stays in Australia for use every year or two. The mount is an Astro-Physics 400 and the scope is the Borg 77mm f/4 astrograph. I used it for the close-up photo.
The gear all worked great this time. I’ll have more photos to post shortly as my connection allows. Tonight, I am at the Parkes Radio Observatory where the internet connection is as good as it gets!
The centre of our Galaxy rises above the gum trees of Australia.
This was the scene at 3 a.m. this week at our OzSky star party, as the stars of Scorpius and Sagittarius rise into the eastern sky, a magnificent view of the bright core of the Milky Way rising into view.
The image shows the intricate lacework of dark dust that lines the Milky Way – the stardust of which we are made. The bright star at upper left is Antares, the heart of the Scorpion.
This is one of the views you travel to the southern hemisphere to see. It is an unforgettable sight, one of the best the sky has to offer.
One of our nearest galactic neighbours contains an astonishing collection of nebulas and star clusters.
This is the money shot — top of my list for targets on this trip to Australia. This is the Large Magellanic Cloud, a satellite galaxy of our Milky Way. At “just” 160,000 light years away, the LMC is in our galactic backyard. Being so close, even the small 77mm telescope I used to take this image resolves numerous nebulas, star clusters, and a mass of individual stars. The image actually looks “noisy” from being filled with so many stars.
I’ve oriented and framed the Cloud to take in most of its main structure and objects. One can spend many nights just visually exploring all that the LMC contains. It alone is worth the trip to the southern hemisphere.
At left is the massive Tarantula Nebula, a.k.a. NGC 2070. At upper right is the LMC’s second best nebula, the often overlooked NGC 1763, also known as the LMC Lagoon. In between are many other magenta and cyan tinted nebulas.
I’ve shot this object several times but this is my best shot so far I think, and my first with this optical system in several years.
I used a Borg 77mm aperture “astrograph,” a little refractor telescope optimized for imaging. It is essentially a 330mm f/4 telephoto lens, but one that is tack sharp across the entire field, far outperforming any camera telephoto lens.
This shot is a stack of six 10-minute exposures at ISO 800 with the filter-modified Canon 5D MkII camera. The autoguider worked perfectly. And yet, I shot this in clear breaks between bands of clouds moving though last night. The night was humid but when the sky was clear it was very clear.
Next target when skies permit: the Vela Supernova Remnant.
The Carina Nebula glows among the colourful southern stars.
I’ve shot this field many times over the years in visits to the southern hemisphere but never with a result quite like this. Last night the sky was hazy with high cloud but I shot anyway. The result is a “dreamy” rendition of the Carina Nebula and its surrounding clusters of stars. At upper left is the Football Cluster, NGC 3532, while at upper right is the Gem Cluster, NGC 3293.
As with my previous post, the haze brings out the star colours, filling the field with pastel shades. It is one of the finest fields in the sky, worth the trip down under.
Alas, skies have clouded up tonight with only a few bright stars and Mars shining through. And the forecast is for rain for the next few days. So I may get lots of writing done at my Aussie retreat.
As a technical note: I shot this with the little 77mm Borg Astrograph, essentially a 300mm f/4 telephoto lens that is tack sharp across a full frame camera, like the Canon 5D MkII I used here. It was riding on my Astro-Physics 400 mount and guided flawlessly with the Santa Barbara SG4 auto-guider. The image is a stack of four 8-minute exposures. All the gear, much of it stored here in Australia between my visits, is working perfectly.
The stars of the Pleiades sit amid a dusty sky in Taurus.
These are the famous Seven Sisters of Greek legend, known as the Pleiades. They are the daughters of Atlas and Pleione, who are also represented by stars in the cluster. Many cultures around the world tell stories about these stars, but in Greek tradition their appearance signalled the summer sailing season in the Mediterranean. The Pleiades first appear at sunset in the eastern evening sky in autumn and put in their last appearance in the western sky in spring.
One story has it they were placed in the sky to recognize their devotion to their father Atlas and his unending labour in holding up the heavens. They are the half-sisters of the Hyades, another nearby cluster of stars in Taurus. Other stories describe the Pleiades as the Seven Doves that carried ambrosia to the infant Zeus.
A seldom-used name now for this cluster is the Atlantides, from the plural form of Atlas, their father. Thus, these sisters gave their name to the Atlantic Ocean, a vast and uncharted sea until the 16th century. The term “atlas,” first used by Mercator for a book of maps, comes not from the Pleiades’ father but from a real-life king in Morocco who supposedly made one of the first celestial globes.
I shot this portrait of the Sisters a few nights ago, stacking a set of five 15-minute exposures with the TMB 92mm refractor and Canon 5D MkII at ISO 800. I processed the image to bring out the faint clouds of dust that pervade the area.
The Pleiades are passing through dust clouds in Taurus and lighting them up. The stars are embedded in dust, lit blue by the light of the hot stars. But even farther out you can see wisps of dust faintly illuminated by the light of the Pleiades.
The stars are thought to be about 100 million years old, quite young as stars go. They formed together in a massive nebula that has long since dissipated, and will travel together for another few hundred million years until the sister stars go their own way around the Galaxy. The stellar family that gave rise to so many legends around the world will be scattered to the stars.
A star cluster and nebulas highlight a glorious starfield in Cassiopeia.
I shot this three nights ago on a very clear autumn evening. The telescope field takes in the star cluster Messier 52 at upper left, a cluster of 200 stars about 5000 light years away. It is one of the best objects of its class for viewing in small telescopes. Charles Messier found it in 1774 as part of his quest to catalog objects that might be mistaken for comets.
The brightest area of nebulosity below M52 is the Bubble Nebula, aka NGC 7635, found in 1787 by William Herschel. It’s an area of star formation marked by a central bubble of gas (just visible on the scale of my photo) being blown by the winds from a hot central star. The Bubble can be seen in amateur telescopes but is a tough target to spot.
Above the Bubble is a small bright nebula, NGC 7538.
Below the Bubble lies a larger claw-like nebula known only as Sharpless 2-157, an object that shows up only in photos.
In all, it’s a complex and beautiful field, set in the constellation of Cassiopeia the Queen.
A footnote for the technically minded: This is a stack of 5 x 15 minute exposures with a filter-modified Canon 5D MkII at ISO 800 shooting through a TMB 92mm apo refractor at f/4.8, mounted on an Astro-Physics Mach 1 mount guided by a Santa Barbara SG-4 autoguider.
This is what’s left of a star that exploded thousands of years ago.
I shoot this object every year or two, so this is my 2013 take on the Veil Nebula. For last year’s see Star Death Site, a post from September 2012.
The Veil Nebula is a supernova remnant. The lacework arcs are what’s left of a massive star that blew itself to bits in historic times. This object, one of the showpieces of the summer sky for telescope users, is now high overhead at nightfall, off the east wing of Cygnus the swan.
I shot this a couple of nights ago using a 92mm-aperture refractor that provides a wide field of view to easily frame the 3-degree-wide extent of the nebula. The image is a stack of five 15-minute exposures with a filter-modified (i.e. red sensitive) Canon 5D MkII camera at ISO 800. Stacking the images helps reduce noise.
The colours in this object make it particularly photogenic, with a contrast of magenta and cyan. At right, a sharp-edged area of obscuring interstellar dust tints the sky brown and dims the stars.
A cocoon of glowing gas sits at the tip of a dark cloud of interstellar dust.
It’s been months since I’ve shot more “traditional” astrophotos, meaning images of deep-sky objects through telescopes. But the last couple of nights have been excellent, and well-timed to the dark of the Moon.
This is the Cocoon Nebula in Cygnus, aka IC 5146. It is a cloud of gas about 4,000 light years away where new stars are forming. They are lighting up the gas to glow with incandescent pink colours.
The Cocoon sits at the end of snake-like dark nebula known as Barnard 168 which, in the eyepiece of a telescope, is usually more obvious than the subtle bright nebula. Photos like mine here, with long exposures and boosted contrast and colours, make nebulas look much brighter and more colourful than they can ever appear to the eye.
For the technically curious, I shot this with a 92mm diameter apochromatic refractor, the TMB 92, and a Borg 0.85x flattener/reducer, a combination that gives a fast f-ratio of f/4.8 with a very flat wide field. I also used my now-vintage filter-modified Canon 5D MkII at ISO 800. This is a stack of five 12-minute exposures, registered and median-combined in Photoshop to smooth out noise. All processing was with Adobe Camera Raw and Photoshop CC. The telescope was on an Astro-Physics Mach 1 mount, flawlessly autoguided with an SBIG SG-4 autoguider.
The stars of Andromeda the Princess highlight the autumn sky.
Here’s an image from last night, October 4, that frames all of the constellation of Andromeda, now high in the northern autumn sky. A trio of coloured stars arcs across the centre of the image, forming the main pattern in Andromeda. In Greek legend she was the daughter of Queen Cassiopeia and was rescued by Perseus from the devouring jaws of Cetus the Sea Monster.
Above the centre star lies the constellation’s most famous feature, the Andromeda Galaxy, shining at us from 2.5 million light years away. It is the most distant object easily visible to the unaided eye.
An equal distance below the centre star of Andromeda you can see another smaller fuzzy spot. That’s the Pinwheel or Triangulum Galaxy, a dwarf spiral 2.8 million light years away, but also a member of the Local Group of galaxies that contains our Milky Way and Andromeda as its two main members.
At left, just below centre, is a large open cluster of stars, NGC 752, easily visible to the naked eye.
For this shot, as I do for most constellation portraits, I used Photoshop to layer in a shot taken through a diffusion filter (the Kenko Softon A) on top of a stack of shots taken without the filter. This allows me to add the enhanced glows around stars to bring out their colours, and to do so in a controlled fashion by varying the opacity of the filtered view. Shooting on a night with high haze or cirrus clouds has the same end effect but that’s hardly a reliable way to take constellation images. Combining filtered and unfiltered views works great, and gives the “look” made popular years ago by Japanese astrophotographer Akira Fuji.
The centre of Cygnus is laced with an intricate complex of glowing gas clouds.
This is another shot from earlier this week, under ideal skies, in a view looking straight up into Cygnus the Swan. This is a telephoto lens shot of the amazing array of nebulas in central Cygnus, around the bright star Deneb.
At left is the North America and Pelican Nebulas. At right is the Gamma Cygni complex and the little Crescent Nebula at lower right.
Here we’re looking down our local Cygnus-Orion arm of the Milky Way into a region of star formation rich in glowing hydrogen gas and dark interstellar dust. These clouds lie about 1500 to 3000 light years away. Dotting the field are hot blue stars newly formed from the raw ingredients making stars in Cygnus.
At top, the clouds have a lacework appearance, like sections of bubbles. Perhaps these are being blown across space by the high-velocity winds streaming from the young stars.
A galaxy 80 million light years away floats in the blackness of space near a star in the Big Dipper.
This is Messier 109, a bright spiral galaxy in Ursa Major, and within an eyepiece and camera field of the bright naked eye star Gamma Ursa Majoris. That’s the “bottom left” star in the bowl of the Big Dipper, so this is an easy galaxy to find with a telescope in the current spring sky.
Technically, this galaxy is classed as a barred spiral because of the way its spiral arms emerge from an elongated bar at the core of the galaxy. It is the brightest member of the Ursa Major Cluster of some 80 galaxies.
Springtime is galaxy time, no matter what hemisphere you live in. But for us in the northern half of the planet that means April and May. When we look up at this time of year into the evening sky we are looking out of the plane of our Milky Way galaxy and seeing into the depths of intergalactic space, populated by thousands of other galaxies. Most of the bright ones, like M109, are 20 to 100 million light years away. At its distance of 80 million light years, M109 lies a million times farther away from us than Gamma Ursa Majoris, a nearby blue star “just” 80 light years away and in our Galaxy.
I shot this last weekend though my 5-inch refractor with the Canon 60Da camera. Even with the telescope’s 800mm focal length it isn’t enough to really do justice to the intricate detail in galaxies like this. But the view does set the galaxy into its context, floating in the blackness of space.
Tonight, April 1, we enjoyed the rare conjunction of a comet with a galaxy.
This is Comet PANSTARRS below the Andromeda Galaxy, a.k.a. M31. The two objects were less than a binocular field apart – 4 degrees – on the sky. But in real space they were separated by millions of light years. The comet was 192 million kilometres from Earth tonight and receding. But that’s a stone’s throw compared to the 2.5 million light year distance of the Andromeda Galaxy. Light was taking a mere 10 minutes to get to us from the comet, but the light from Andromeda was 2.5 million years old.
And yet, the two objects looked similar in brightness and shape to the binocular-aided eye.
I caught the two just above the horizon as they were dipping into haze and trees. The circumstances didn’t make for a technically great photo but with PANSTARRS we’ve all had to shoot despite the conditions and hope for the best.
With worsening weather prospects for the next week I suspect this will be my last look at PANSTARRS for a while.
From a dark site the glow of Zodiacal Light rivals the Milky Way in brightness.
This was the scene every night last week in the evening sky from our New Mexico observing site. The vertical glow of Zodiacal Light was a source of natural light pollution brightening the western sky. I’ve never see it more obvious in the west and this was the perfect season to see it. In March from the northern hemisphere the ecliptic – the plane of the solar system – is angled high into the western sky, almost vertical from the latitude of southern New Mexico.
The Zodiacal Light lies not in our atmosphere but comes from interplanetary space, and follows the ecliptic. What we were seeing was a glow of sunlight being reflected off fine dust particles orbiting the Sun in the inner solar system, likely spread by passing comets like PANSTARRS. I blogged about the Zodiacal Light last month, in photo taken from home in southern Alberta. You can also read about it at the excellent Atmospheric Optics website.
You don’t need to be in the desert to see it, but you do need dark skies. And no Moon in the sky.
At last week’s dark of the Moon period, Jupiter sat at the apex of the Zodiacal Light, just above the Pleiades star cluster. Near the top, right of centre, you can also see a short satellite trail, likely from a flaring Iridium satellite.
In the land of enchantment, the winter Milky Way sets over our adobe house.
I’m in New Mexico, enjoying wonderfully clear skies. In the early evening the winter Milky Way runs north and south then turns to set over in the west, as it’s doing here, over the main house at the Painted Pony Resort near Rodeo, in southwest New Mexico.
Jupiter and the stars of Taurus are at upper right, and Orion is just right of centre. Above the house shine Sirius and the stars of Canis Major and Puppis. The area of red in the Milky Way just above the house is the massive Gum Nebula in Vela, an area of sky hidden from us in Canada.
For this image I combined a stack of five 5-minute tracked exposures taken with the Canon 5D MkII at ISO 800 and 14mm Samyang lens wide open at f/2.8. The ground details are from two of the exposures.
This was a fabulous night with more to come this week.
The Starfish and the Flaming Star combine to create a rich star field in the Charioteer.
I shot this last week, using a favourite small refractor that takes in a generous field of view for a telescope. In this case, it frames the star cluster at left called the Starfish Cluster, or better known as Messier 38. At right the large number 7-shaped patch of nebulosity is the Flaming Star Nebula, known by its catalog number as IC 405. At bottom, the nameless companion nebulas are IC 417 at left and IC 410 at bottom centre.
Of note is the colourful grouping of six stars at right called the Little Fish. It’s not a proper star cluster but an asterism, a chance alignment of stars that happens to look like something imaginative. David Ratledge presents a nice list and photo gallery of similar whimsical asterisms at his Deep-Sky.co.uk website.
The entire field is a rich hunting ground for the eyepiece or camera. You can find it these nights, in winter from the northern hemisphere, straight overhead in the evening, in the middle of Auriga the Charioteer.
For this portrait I shot and stacked eight 7-minute exposures at ISO 800 using a filter-modified Canon 6D on my TMB 92mm apo refractor at f/4.8.
What a hardy bunch we are in Canada, braving winter weather to see Orion and company.
A well-bundled group of sky fans partakes in an impromptu tour of Orion and his famous nebula.
I shot this scene last night, February 9, at the first of a series of monthly stargazing nights at the local university research observatory, the Rothney Astrophysical Observatory. About 120 people and volunteers gathered to take in the sights of the winter sky, as best they could as transient clouds permitted. Inside, speakers presented talks themed to the Chinese New Year, which is governed by the timing of the New Moon each year. As this was a New Moon night, people were able to stargaze under reasonably dark skies to see deep-sky sights such as the Orion Nebula.
Want to know where it is? An astronomy club member points it out rather handily with one of the best tools astronomers have for public outreach, a bright green laser pointer. Controversial and dangerous in the wrong hands, when used responsibly these laser pointers are wonderful for conducting sky tours.
As a side note, this is a 3-second exposure with a new Canon 6D camera at ISO 8000, yet the photo shows very little noise. In just 3 seconds, the Milky Way is beginning to show up! I could have gone to previously unthinkable speeds of ISO 12000+ and still had a presentable shot. This will be a superb camera for nightscapes and available light shots.
Everyone knows the Belt of Orion, but only the camera reveals the wealth of colours that surround it.
I shot this Friday night, February 8, under very clear sky conditions.
While I used a telescope, it had a short enough focal length, about 480mm, that the field took in all three stars in the Belt: from left to right, Alnitak, Alnilam, and Mintaka. All are hot blue stars embedded in colourful clouds. The most famous is the Horsehead Nebula, running down from Alnitak at left. Above the star is the salmon-coloured Flame Nebula. All manner of bits of blue and cyan nebulas dot the field, their colour coming from the blue starlight the dust reflects.
Dimmer dust clouds more removed from nearby stars glow with browns and yellows. At left, a large swath of sky is obscured by gas and dust simmering in dull red. The entire field is peppered with young blue stars.
It is certainly one of the most vibrant regions of sky, though only long exposures and image processing bring out the colours.
This is another test shot with a new Canon 6D that has had its sensor filter modified to transmit more of the deep red light of these types of nebulas. The camera works very well indeed!
This one image frames examples of both the beginning and end points of a star’s life.
I shot this last night, February 6, 2013, capturing a field in the constellation of Gemini the twins. At upper right is the showpiece star cluster known as Messier 35. It’s a collection of fairly young stars still hanging around together after forming from a cloud of interstellar gas tens of millions of years ago. M35 lies about 2,800 light years from Earth, on the other side of the spiral arm we live in. Just below M35 you can see another smaller and denser cluster. That’s NGC 2158, about five times farther away from us, thus its smaller apparent size. Both are objects that represent the early stages of a star’s life.
At lower left is an object known as the Jellyfish Nebula, for obvious reasons. The official name is IC 443. It’s the expanding remains of a star that blew up as a supernova anywhere from 3,000 to 30,000 years ago. What’s left of the star’s core can still be detected as a spinning neutron star. You need a radio telescope to see that object, but the blasted remains of the star’s outer layers can be seen through a large backyard telescope as a shell of gas. It is expanding into the space between stars – the interstellar medium – ploughing into other gas clouds. The shockwave from its collision with other nebulas may trigger those clouds to collapse and form clusters of new stars. And so it goes in the Galaxy.
For this portrait of stellar lifestyles, I used a 92mm apochromatic refractor and a new Canon 6D camera, one that has had its sensor filter modified to accept a greater range of deep red light emitted by hydrogen nebulas. The image is actually a stack of 12 exposures with an accumulated exposure time of 80 minutes.
After the 7 stars of the Big Dipper and the 3 stars of Orion’s Belt, these 5 stars are likely the most well-known in the northern sky.
These are the 5 bright stars of Cassiopeia the queen, better known simply as “the W” in the sky. Her five stars come in a range of colours, from blue giant Segin at upper left to yellow giant Shedar at lower right.
Scattered around Cassiopeia you can also spot at least one bright red nebula, the “Pacman Nebula,” plus a faint patch of purple nebulosity just above central Navi, the middle star of the W also known as Gamma Cassiopeiae. A few wisps of fainter reddish nebulosity and lanes of dark dust wind around the queen’s celestial throne. The left side of the W – the back of the throne – is also home to several clumps of stars, nice open clusters suitable for binoculars or any telescope.
I shot this portrait of the Queen on Wednesday night, February 6, on a cool and frosty winter night in my backyard. For the set of 8 images that went into this stack I used a new tracking device, the iOptron SkyTracker. It’s a nifty little battery-powered tracker, compact but very solid. And it tracks very well. For this portrait I used a 135mm telephoto lens, and most, though not all, shots were very well tracked with pinpoint stars. A few frames showed a bit of trailing, not unusual for small portable tracking mounts. At $400 the little iOptron SkyTracker is a great accessory for anyone wanting to shoot constellations and the Milky Way with wide-angle to telephoto lenses.
In this image I’ve tried to render the Milky Way in a view that simulates what you see with your unaided eyes.
The result is a celestial portrait in subtle shades of black and white.
This is a photo mosaic, but processed contrary to the usual methods – eliminating colour rather than enhancing it, and reducing contrast rather than boosting it. The result is a view that I think quite nicely matches what your eyes see, though certainly from a dark site. And in this case, you would need to be in the southern hemisphere to see this sweep of the Milky Way, from Aquila at left, to the Southern Cross at right, with the bright star clouds around the centre of the Galaxy in Sagittarius and Scorpius in the middle.
I’ve removed colours except for the muted colours of stars. And I’ve tried to render the stars with an intensity and dynamic range that the eye sees but that is often lost in long exposures.
The dark lanes of dust seen here really do look like this under dark skies. The nearby Coal Sack next to the Southern Cross does look a little darker than the rest of the sky. This view also captures another effect you can see in the real sky – the brighter sky below the Milky Way plane beneath Sagittarius and Aquila – there are more stars there, which make the background sky brighter than above the Milky Way plane (along the top of the photo) where the sky is permeated by dark obscuring dust.
This scene also frames the “dark Emu” – the shape drawn in the dark lanes that looks like a flightless emu in the sky. It’s an important “constellation” in Aboriginal mythology in Australia. The emu’s head is the Coal Sack at far right, her neck the long dark lane curving up through Centaurus and Lupus, and her tail the dark lanes at left in Ophiuchus, Scutum and Aquila.
I shot the original images for this panoramic mosaic in Chile in May 2011. You can see the full colour version in my “Milky Way Mosaic” post from 2011. The colours are wonderful. But there’s something enthralling about “capturing” the view more as your eyes – and mind – remember it.
He’s certainly the sky’s most photogenic mythological figure. Here’s my full-length portrait of Orion the hunter, captured from Alberta.
I’ve shot him many times before but this was a new combination of gear: the Canon 60Da camera and the Sigma 50mm lens, nicely framing the hunter in portrait format. This version of Orion isn’t as deep as the one I took last month from Australia. But skies were darker there, and I used my filter-modified Canon 5D MkII for his Oz portrait, a camera which picks up more faint red nebulosity than does the 60Da, Canon’s own specialized DSLR camera for astronomy. The 60Da does do a very good job though, much better than would a normal DSLR.
For this shot, as I do for many constellation images, I layered in exposures taken through a soft-focus filter, the Kenko Softon, to enlarge and “fuzzify” the stars! It really helps bring out their colours, contrasting cool, orange Betelgeuse with the hot blue-white stars in the rest of Orion.
I shot this January 4 on a fine clear winter night, the classic hunting ground for Orion.
Yes, it’s cold out there, but a clear evening away from city lights this week – or this winter – will reward you with the sight of a rising star-filled sky.
This is the winter sky of the northern hemisphere, rising above a snowy prairie landscape, in a shot I took Sunday night, January 6, 2013. The sky is populated by a ream of bright stars and constellations, anchored by Orion, just below centre. You can see his three Belt stars pointing down to Sirius, just peering above the horizon in the glow of a distant town. Orion’s Belt points up to Aldebaran, the V-shaped Hyades star cluster, and bright Jupiter (the brightest object in the scene, above centre), all in Taurus. Above Jupiter is the Pleiades star cluster.
The Milky Way runs down the sky from Auriga to Canis Major. This week, January 6 to 13, is a good week to see the winter Milky Way, as it’s New Moon and the sky is dark.
In this scene the camera was looking southeast about 9 p.m. Sirius has just risen. By midnight the Dog Star shines due south. I used a 15mm wide-angle lens to take in the entire sweep of the winter sky from horizon to zenith. This is a stack of four 4-minute exposures, though the landscape is from just one of the frames, to minimize the blurring caused by the camera tracking the sky. Some clouds moving in add the streaks on either side of the frame. It was a wonderful sky, while it lasted!
And I’m pleased to note that this is my 250th blog post since beginning AmazingSky.net two years ago in early 2011. I hope you have enjoyed the sky tours.
Look up on a clear night this season (winter for us in the northern hemisphere) and you’ll see a bright object shining in Taurus the bull. That’s Jupiter.
This year Jupiter sits in a photogenic region of the sky, directly above the stars of the Hyades star cluster and yellow Aldebaran, the brightest star in Taurus. Above and to the west (right) of Jupiter is the blue Pleiades star cluster.
Over the course of January 2013 you’ll be able to see Jupiter move a little further west each night (to the right in this photo) away from Aldebaran and toward the Pleiades. Jupiter will stop its retrograde motion on January 30. After that it treks eastward to again pass above the Hyades and Aldebaran (returning to where it is now) in early March.
Jupiter’s proximity to Aldebaran and the Hyades makes it easy to follow its retrograde loop over the next few weeks. It’s an easy phenomenon to watch, but explaining it took society hundreds of years and the ultimate in paradigm shifts in thinking, from the self-important arrogance that Earth – and we – were the centre of the universe, to the Sun-centered view of space, with Earth demoted to being just one planet orbiting our star.
I took this image Friday night, January 4, from home as my first astrophoto upon returning to Canada from Australia. It’s a combination of two sets of images: one taken “straight & unfiltered” and one taken through a soft-focus filter to add the glows around the stars and central, brilliant Jupiter. I then blended the filtered images onto the normal images in Photoshop with the Lighten blend mode.
As we end 2012 and start a new year, I wish everyone a very happy 2013 and leave you with this view of a very amazing sky.
This is a 360° panorama of the Milky Way over Timor Cottage on a very clear night in mid-December in New South Wales, Australia. May all your skies be as wonderful and as inspiring as this in the coming year.
Indeed, we have some potentially remarkable sights to look forward to, with the prospects of two bright comets in 2013: Comet PANSTARRS in March and Comet ISON in November and December.
Let’s hope for more amazing skies in 2013. Keep looking up!
In the third instalment in my trilogy of Canis Major zooms, I present this close-up of another neat nebula in the Great Hunting Dog, called Thor’s Helmet.
You can tell just by the colour that this is a different type of nebula than the typical red hydrogen gas clouds, such as the Seagull Nebula of my previous post. Yes, this is glowing gas but this nebula originates from a different source than most. Rather than being a site where stars form this is a nebula surrounding an aging star, a massive superhot star that is shedding shells of gas in an effort to lose weight – or mass as we should say.
Intense winds from the star blow the gas into bubbles, and cause it to fluoresce in shades of cyan. The central star is one of a rare stellar type called a Wolf-Rayet star, named for the pair of French astronomers who discovered this class of star in the 19th century. WR stars are likely candidates to explode as supernovas.
This particular Wolf-Rayet nebula, catalogued as NGC 2359, has a complex set of intersecting bubbles that, through the eyepiece, do take on the appearance of a Viking helmet with protruding horns, like you see in the Bugs Bunny cartoon operas! It’s a neat object to look at with as big a telescope as you can muster. And, as you can see, it’s rather photogenic as well, embedded in a rich field with faint star cluster companions.
The catalog number for this object is IC 2177, but the bright round nebula at right (the head of the Seagull?) is object #1 in the catalog of Australian astronomer Colin Gum. It’s also object #2327 in the familiar NGC listing that all stargazers use.
Some of this nebulosity is just visible through a small telescope, especially with the aid of a nebula filter than accentuates the emission lines – the colours – emitted by these kinds of glowing gas clouds.
This is certainly a photogenic field, with a nice mix of pinks, blues, purples and deep reds.
I used my 4-inch (105mm aperture) f/5.8 apo refractor to shoot this target, so the field is fairly narrow, framing what a telescope would show at very low power.
(FYI – The image info listed at left, automatically picked off the image’s EXIF data by the WordPress blog software, fails to record the focal length of the optics properly, as I didn’t use a standard camera lens but a telescope the camera doesn’t know about.)
I’ve been after a good shot of this object for some years, but haven’t been successful until this past observing run in Australia, in December 2012. While I can see and shoot the Seagull Nebula from home in Alberta, it’s always very low in my home sky. From Australia the challenge was framing the field with the Seagull overhead at the zenith. Just looking through the camera aimed straight up took some ground grovelling effort. Plus avoiding having the telescope hit the tripod as it tracked the object over the hour or so worth of exposures – typically 4 to 5 that I then stack to reduce noise.
My last post featured a wide view of Canis Major. Here, we zoom in closer to one of the most interesting regions in that constellation, filled with nebulas and clusters.
The prominent red arc is the Seagull Nebula, aka IC 2177. Above and to the right of the Seagull is a clump of stars called Messier 50, which lies over the border in the constellation of Monoceros the Unicorn.
At the lower left edge of the frame sits a pair of dissimilar star clusters, Messier 46 (the left one) and Messier 47 (the right one). M46 is a dense rich cluster of stars while M47 is brighter but looser and more scattered.
Several other non-Messier clusters punctuate the field. This is a great area of sky to explore with binoculars.
Just below centre you might see a small green-blue patch. That’s the nebula called Thor’s Helmet, or NGC 2359, a fine telescopic object.
If you get a clear night this season when the Moon is out of the way and you can head to a dark sky, Canis Major, the Hunting Dog, is a great hunting ground for deep-sky fans.
As the data at left shows, I shot this with a 135mm telephoto lens, giving a field of view similar to what binoculars would show.
Shining in the southern sky these nights are the stars of Canis Major, the big hunting dog of Orion the Hunter. Among them is the famous Dog Star, Sirius, the brightest star in the night sky.
Can you see a dog outlined in stars? Sirius marks his head – or it is sometimes depicted as a jewel in his collar. His hind legs and tail are at the bottom of the frame.
I shot this earlier this month from Australia, where Sirius and Canis Major stand high overhead. From northern latitudes you can see these stars due south low in the sky about midnight. Sirius is hard to miss, often sparkling through many colours as our atmosphere distorts its light. But as the photo shows, it is really a hot blue-white star. While it is intrinsically a bright star, much of its brilliance in our sky comes from its proximity, only 9 light years away from us.
For this portrait of the celestial canine I used a 50mm “normal” lens. The atmosphere provided some natural haze this night, to add the glows around the stars accentuating their colours.
This area of sky also contains several nebulas, notably the red arc of the Seagull Nebula to the left of Sirius. Below Sirius you can also see the star cluster Messier 41, a good target for binoculars.
Toward the left edge of the frame you can see a pair of star clusters, Messier 46 and Messier 47, two other excellent binocular objects in the Milky Way, which runs down the frame to the left of Canis Major. The dog is just climbing out of the Milky Way after a swim in this river of stars.
The current night sky contains another seasonal sight, a cluster of stars called the Christmas Tree Cluster. Turn the image upside down and you might see it!
The bright star lies at the base of the Christmas tree and at the bottom of a tall triangle of blue and yellow stars that outlines – or decorates – the tree. At the top of the tree sits the dark Cone Nebula. The Tree also encompasses a bright blue dusty nebula reflecting the light of nearby stars and swirls of pink glowing hydrogen. At right sits a rich cluster of stars dimmed yellow by intervening dust. At bottom (south) in this photo you can also see a small V-shaped object. That’s Hubble’s Variable Nebula, a dust cloud studied by Edwin Hubble, one that varies in intensity with fluctuations in the main star embedded at its tip.
This rich area of sky lies above (north of) the subject of my previous post, the Rosette Nebula in the constellation of Monoceros the Unicorn. Very little of this is visible to the eye. The magic of photography is how it coaxes detail out of the sky that the eye alone cannot see.
This is the Rosette Nebula, a celestial wreath 5,000 light years in the northern winter sky.
It is one of the most photogenic of nebulas, but is barely visible to even an aided eye as a ghostly grey arc of light around the central star cluster. Winds from the group of hot stars at the centre of the Rosette are blowing a hole in the cloud, creating the wreath-like shape of the Rosette.
While I shot this earlier this month from Australia, the Rosette lies far enough north in the constellation of Monoceros that northerners can see this cosmic wreath on any dark and clear winter night. It makes a beautiful decoration in our holiday sky.
Swirls of pink, red and blue nebulas surround the Belt and Sword of Orion the Hunter.
For this closeup of Orion I used a 135mm telephoto lens under dark Australian skies to grab long exposures to reveal not only the bright Orion Nebula at bottom in Orion’s Sword, but also the Horsehead Nebula (below the left star of Orion’s Belt), Barnard’s Loop (at left) and the mass of red nebulosity between the Loop and the Belt & Sword. At right is a faint blue nebula reflecting the light of the hot blue stars in the area.
This is a gorgeous area of sky for the camera, but only the brightest nebulas, the tip of the cosmic iceberg, are visible to the eye even with the aid of a telescope.
The constellation Orion is a hotbed of star formation, from masses of colourful clouds.
I shot this portrait of Orion the Hunter a few nights ago in Australia where Orion stands upside down compared to our view from up north. But I’ve turned around the photo here to put him right side up with head at the top and feet at the bottom.
The three stars in a row in the middle are his famous Belt stars. Below shines the nebulas that outline his Sword, among them the Orion Nebula, the subject of an earlier post last week.
The giant arc is Barnard’s Loop, a bubble blown in space by the winds from hot new stars. The bubble around Orion’s head at top is a similar interstellar bubble. Most stars here are blue-white and hot, but the distinctively orange star is the red giant Betelgeuse, a good candidate for a supernova explosion.
Orion stands high in the sky at midnight these nights, summer here in Australia, but winter at home in Canada.
Amid a maze of glowing nebulas sits a tracery of magenta and cyan that was once a star.
This image takes in the Vela Supernova Remnant. You can see it as the lacework of gas in the centre of the field. Oddly enough, it sits in the middle of the vast Gum Nebula, the subject of my previous post, an object also thought to be a supernova remnant but one much older and closer. The Vela Supernova Remnant here likely comes from a supergiant star that exploded about 10,000 years ago. It, too, would have been quite a sight to the earliest of civilizations.
The field in the southern constellation of Vela also contains many other classic red and pink nebulas, but ones that are forming new stars, not the remains of dead ones. Most carry designations from astronomer Colin Gum’s catalog from the 1950s and have no numbers from the more familiar NGC or IC catalogs amateur stargazers refer to in their scanning of the skies. Yet, these Gum nebulas show up easily in photos.
I used a 135mm telephoto lens to take this image and it encompasses a field similar to what binoculars would frame. Except, it takes long exposure photos to show these nebulas. I looked last night at the Vela SNR with my 25cm reflector telescope and could just barely see the main arc of nebulosity as a grey ghost in the eyepiece. And that was under perfect dark Australian sky conditions.
The southern sky contains what must be the largest nebula in our sky, a giant bubble spanning a wide swath of the Milky Way.
This is the object known as the Gum Nebula. You can see it in my previous post, in the ultrawide view of the southern sky. Here I’m framing it with a normal 50mm lens that covers about 50° of sky. The Gum Nebula is completely invisible to the eye and shows up only on photos. It wasn’t even discovered until the 1950s, by Australian astronomer Colin Gum. It is #12 in his catalog of southern sky nebulas. I’ve always thought this was an example of an interstellar bubble, blown by intense winds from hot blue stars, of which there are many in this part of the Milky Way in Vela and Puppis. At left are the four stars of the False Cross in Carina and Vela.
But some sources claim this is a supernova remnant, the blasted remains of a star that blew up 1 to 2 million years ago. It is big because it is close by, just 450 to 1500 light years away depending on what side if the remnant you measure. If that’s the case, the star that exploded would have been quite a shadow-casting sight in our prehistoric sky, assuming it was that close to us when it blew up and was in the night sky at the time.
Either way, it is a great target for amateur photographers, and now with digital cameras it is easy to record. This night, some haze moving through added the photogenic glows around all the stars to bring out their colours.
This horizon-to-horizon image takes in a broad sweep of the southern Milky Way from Orion to the Southern Cross.
At upper left shines bright Jupiter in Taurus and the stars of Orion, upside down. To the right of Orion is Sirius in Canis Major, the brightest star in the night sky. To the right of Sirius above the Milky Way is Canopus, the second brightest star in the night sky and one we don’t see from up north. The two satellite galaxy Magellanic Clouds are at upper right. Below them is the bright Milky Way through Carina and Crux, the Southern Cross. Alpha and Beta Centauri are just above the dark trees at right. This is the entire Milky Way you see on an early austral summer night from down under.
What stands out is the huge red bubble of gas called the Gum Nebula in Vela and Carina. It is strictly a photographic object but shows up well on red-sensitive digital cameras.
I shot this with a filter-modified Canon 5D Mark II camera and a 15mm wide-angle lens on a mount tracking the stars. It is a stack of four 6-minute exposures, shot from Australia a few nights ago under nearly perfect sky conditions.
My Australian nights are proving to be frequently and thankfully clear enough that I’ve got the luxury of shooting some familiar “home sky” objects. This is the famous Orion Nebula in the Sword of Orion, about 1500 light years away.
I’ve shot this nebula many times from the northern hemisphere but my Australian skies are darker than at home, and the nights a lot warmer than when this object is up in our winter sky.
The Orion Nebula is a complex consisting of Messier 42, the main nebula, M43, a small nebula attached to the north (above) and the bluish Running Man Nebula (can you see his dark figure?) at top that is officially catalogued as NGC 1973-5-7. Together, these make up the largest region of star formation in our corner of the Milky Way. It’s easy to see with the unaided eye on a dark night.
To shoot this, I blended three different exposures, short (4 x 1 minute), medium (4 x 5 minutes) and long (4 x 15 minutes), to preserve all the details from the intensely bright core our to the faint tendrils extending into deep space. I stacked the 4 frames taken at each of the exposure times, then blended those stacks using masks in Photoshop CS6 (and its wonderful and editable Refine Mask function) to mask out the overexposed area of the longer exposure and let the shorter exposure content shine through. The result is that the core still shows the little cluster of stars, the Trapezium, and the characteristic green tint of the core. But I applied lots of Curves to bring out the fainter bits and swirls in the periphery.
I shot this through my Astro-Physics Traveler 105mm refractor at f/5.8 using the filter-modified Canon 5D MkII camera, at ISO 400. This turned out to be certainly my best shot of Orion yet in my library.
The Carina Nebula ranks as one of the most spectacular sights in the southern sky.
I shot this last night under perfect conditions. I’ve shot this nebula many times before but had to have a go at it again – I think this version is the best yet of many I’ve taken over the years of coming to the southern hemisphere to shoot the sky. I shot this through my 4-inch apo refractor with a filter-modified Canon 5D MkII camera. It’s a stack of five 12-minute exposures at ISO 400.
This massive nebula is the site of loads of star formation, and home to one massive young star, Eta Carinae, that is a prime candidate for a supernova explosion sometime soon. That will certainly stir things up in Carina. This object sits over 6,000 light years away in the next spiral arm in from ours, the Carina-Sagittarius Arm of the Milky Way.
Through the telescope it fills the field with intricate shades of grey — the colours show up only in photos – with one bright yellow star at the centre, Eta Carinae itself shrouded in the golden-hued nebula it cast off during its last explosive outburst in the 1840s.
Like the Large Magellanic Cloud, this is one object worth the trip to southern skies just to see for yourself.
This is one of the most spectacular areas of the southern sky, around the lair of the Tarantula Nebula.
I shot this close up of the Large Magellanic Cloud last night, December 10, 2012 to frame the most interesting part of the LMC, the massive Tarantula Nebula. This star-forming region is much larger than any in our Milky Way, yet exists in a small dwarf galaxy that is a satellite of our Milky Way. But tidal forces from our Milky Way are torturing the Magellanic Clouds and stirring up massive amounts of star formation. If the Tarantula were as close to us as is the Orion Nebula some 1500 light years from us, the Tarantula would cover 30° of sky and cast shadows at night. Good thing perhaps that the wicked Tarantula is 160,000 light years away.
I shot this with my 105mm apo refractor. It’s a stack of 5 x 12 minute guided exposures, using the filter-modified Canon 5D MkII camera.
This is a wonderful region of sky to explore with any telescope. I had a great look at it through my 10-inch Dobsonian reflector last night. Well worth the trip to the southern hemisphere to see!
This is the southern hemisphere sky in a 360° panorama.
From left to right in the sky, you can see:
– in the South: the two Magellanic Clouds, satellite galaxies of the Milky Way
– in the West: the diagonal glow of Zodiacal Light
– in the North: Orion, Jupiter and the Pleiades above the outline of Timor Rock
– in the East: the southern Milky Way just rising
I shot this last night in the early evening, Sunday, December 9, from my observing site in Australia, Timor Cottage at Coonabarabran, NSW. It’s a panorama of 8 images, each a 1 minute untracked exposure with the 10-22mm lens at 10mm. I’m amazed at how well the sections join together, considering the stars are moving from one frame to the next and about 16 minutes separates the beginning and end frames.
If this was the only unique object in the southern sky that we couldn’t see from up North, then it would still be worth travelling south of the equator to see the southern sky.
This is the Large Magellanic Cloud, a satellite galaxy to our Milky Way. Being “just” 160,000 light years away (as opposed to millions of light years for most galaxies) this object is large (it fills the field of binoculars) and is rich in detail. Just look at all the pinkish nebulas dotting its ragged structure. The biggest is near the bottom, the massive Tarantula Nebula. Through a telescope there is so much to see in this object it takes careful comparisons with charts and atlases over several nights just to figure out what all the nebulas and clusters are in the eyepiece. It is a deep-sky observer’s dream object. While several professional astronomers have made their careers studying just the Magellanic Clouds.
Once classed as an irregular, ragged galaxy, the “LMC” is now thought of as a barred spiral. I think this photo suggests the two spiral arms coming off the top and bottom of the central elongated bar.
I shot this last night, under a perfect night of viewing in Coonabarabran, Australia, using a 135mm telephoto lens. The field is similar to what you see in binoculars though the long exposure (this is a stack of ten 5-minute tracked exposures) brings out more detail than the eye can see. Compare this wide view with a higher magnification shot I took two years ago from the same location. Both are good but I like this wider view better as it sets this big object into the celestial frame of the surrounding night sky.
Here’s what heaven on Earth looks like to an amateur astronomer.
It’s a cottage all to myself under some of the darkest skies on Earth, and in the southern hemisphere where all the best stuff is in the sky. This is Timor Cottage near Coonabarabran, NSW, Australia, the self-proclaimed Astronomy Capital of Australia. Near Coona sits Siding Spring Observatory, home to Australia’s largest collection of optical research telescopes. I’m staying nearby, at this cottage under the stars doing my own southern sky explorations.
I was here in December 2010 but had to contend with torrential rains and floods two years ago. As you can see, the weather is much better in 2012!
This is a one minute exposure looking south, toward the most prominent objects in the southern evening sky at this time of year: the two Magellanic Clouds. They look like detached parts of the Milky Way but are separate dwarf galaxies orbiting our Galaxy and in the process of being ripped apart by our Galaxy’s tidal forces.
The red light at left is my other camera taking a shot of the Clouds through a telescope, the subject of my next blog.
It’s a perfect night when the only clouds in the sky are the Magellanic Clouds!
Sitting on the border of Queen Cassiopeia and King Cepheus is this royal cloak of pinks and reds.
Too faint to see even in a small telescope, the main cloud of nebulosity is called NGC 7822, with a companion cloud below known as Cederblad 214. Rather cold names for a stunning region of space.
I love the colours in this field. The camera I use is modified to bring out the reds of glowing hydrogen but also nicely picks up blues and purples, which mix to provide subtle shades of pink and magenta. There are even yellows and greens from dust clouds.
Yes, I’ve certainly punched up the colour and contrast quite a bit from what came out of the camera, but I tried to retain a “natural” colour balance, not skewing the palette too far to the deeply saturated monotone red I see in some images of nebulas.
I shot this Saturday night, October 6, from my backyard on a fine autumn night for stargazing and star shooting. It’s a stack of eight 12-minute exposures, “median” combined to eliminate the satellite trails that crossed several frames.
Some 3 billion years from now we are going to collide with this galaxy.
This is the famous Andromeda Galaxy, now 2.5 million light years from us but getting closer by the day! Andromeda, a.k.a. Messier 31, is the most distant object readily visible to the naked eye. It now shines high overhead for us in the northern hemisphere.
I asked Siri, my iPad assistant, how many stars are in the Andromeda Galaxy, and she said one trillion. She’s right. Recent estimates put Andromeda’s stellar population at 3 or 4 times that of our own Milky Way Galaxy. It’s also bigger. Measuring from the outermost extremities of the disk gives a diameter of over 200,000 light years, twice the size of our home galaxy.
I took this shot last week. It’s stack of five 15-minute exposures with a new Lunt 80mm refractor. The long exposures bring out the faint halo of stars extending beyond the main bright disk, the part you see in a telescope. You can also see Andromeda’s two close companion galaxies: M32, looking like a fuzzy star below the core; and M110, the elliptical galaxy above the core and connected to the main galaxy by a bridge of faint stars.
In contrast to last Saturday’s post, Star Death Site, this is a place where stars are born.
This magenta cloud is where dozens of new stars are forming. One centre of star formation is the finger at right jutting into the hollowed out core of the nebula. Ultra-violet radiation from nearby hot stars is eroding away this dark finger of dust and gas, causing its rim to glow. This is a feature similar to the famous “Pillars of Creation” depicting in Hubble Space Telescope views of another nebula, the Eagle Nebula. However, this giant wreath of hydrogen 3000 light years away has no name, just the catalog number IC 1396. It’s in Cepheus, high in the northern autumn sky.
An added attraction of the scene is the orange star at top, Herschel’s Garnet Star, a.k.a. mu Cephei. This red supergiant is one of the largest stars known. If it replaced our Sun the Garnet Star would engulf all the planets out to Jupiter. Including its profuse radiation emitted in the infrared, the Garnet Star outshines the Sun by 350,000 times. It is squandering its energy so quickly this supergiant is destined to explode as a supernova, perhaps leaving behind a remnant like the Veil Nebula I described in that earlier blog from a few days ago.
These deep space wonders are all part of the great cycle of stardust that fuels the Galaxy.
This is the graveyard of where a star died at the dawn of civilization.
The Veil Nebula, made of several fragments, is the remains of a star that exploded as a supernova some 5000 to 8000 years ago. With a telescope you can see this deep sky wonder high overhead these nights, in Cygnus the swan. A decent sized telescope, say 15 to 25cm diameter, can show a lot of the detail recorded here, but only in black-and-white. It takes a photo to pick up the magentas, from glowing hydrogen, and cyans, from oxygen being excited into shining by the shockwave created as the expanding cloud ploughs into the surrounding interstellar gas.
The whole complex is called the Veil Nebula but the segment at right passing through the star 52 Cygni is called the Witch’s Broom Nebula.
I shot this from home a couple of nights ago during a continuing run of typically fine fall weather, which usually brings the best nights of the year for astronomy. For this shot I used a new Lunt 80mm apochromatic refractor on loan for testing. It works very well! This is a stack of five 15-minute exposures.
This is what half a million stars look like when packed into one big ball.
This is the globular star cluster called Messier 22, in Sagittarius. It’s the biggest and best such object visible from Canadian latitudes, though it always sits low in our summer sky. M22 is one of 150 or so such spherical clusters of stars that orbit our Milky Way. This one sits 10,000 light years away from us, toward the centre of the Galaxy. Those half million stars are packed into a sphere 100 light years across. In our sky it appears as big as the Full Moon, though not as bright of course. But just imagine the sky if you can view it from the centre of M22. The heavens would be ablaze with stars.
I shot this with the 130mm refractor at f/6. It’s a stack of just three 4-minute exposures with the Canon 7D. Though M22 was low above the southern horizon from the Cypress Hills where I shot this, the final image turned out pretty well.
This is the prime celestial real estate above us now on northern summer nights.
This wide-angle shot takes in the Milky Way from Cygnus at right to Perseus at left, an area populated by lots of nebulas, both bright and dark. A couple of previous posts (The Subtle Shades of Cepheus and The Dark Clouds of Cygnus) featured close-up views of sections of this sky, the areas at centre in this wider context image in northern Cygnus and southern Cepheus.
At bottom is the elliptical glow of the Andromeda Galaxy, another “milky way” beyond ours.
I boosted the contrast and colour more than I normally do for astrophotos, to punch out the nebulas and the subtle dark lanes of dust that permeate this part of the Milky Way. I shot this last weekend from the star party in Cypress Hills, Saskatchewan. With three clear nights it was a productive weekend!
The Milky Way in Cepheus presents a palette of colours revealed in long exposures.
This binocular-sized field contains the large magenta nebula IC 1396, a site of star formation. On its northern (upper) edge shines the orange star Mu Cephei, otherwise known as Herschel’s Garnet Star, for its very red appearance in the eyepiece. It is a bloated red supergiant, one of the largest stars known. A few other stars in the field are younger blue giants. Faint wisps of red hydrogen fill the field (the faint crescent at right is Sharpless 129, left of centre is Sharpless 132, at top left is NGC 7380). Diagonally along the Milky Way lie dark, yellow-tinted dust clouds. The darkest patch at centre is the Barnard 169/170/171 complex. These contrast with the dust-free blue starfields of the Milky Way at left.
This is a stack of five 5-minute exposures with the 135mm telephoto and Canon 5D MkII camera, which has been filter modified to record the faint red nebulas better than a stock camera.
Stare into the starfields of Cygnus and ponder what lies undiscovered in our part of the Milky Way.
You are looking down the spiral arm we live in, into clouds of stars seemingly packed together. Every one of those specks is a sun like ours. With planets? Very likely, as we now know.
Amid the stars float glowing red clouds of hydrogen gas. The North America Nebula shines at lower right.
Snaking northward from the “arctic” region of the bright nebula is a river of dust that broadens into a delta of dark nebulosity. Once thought to be holes in the sky allowing us to see deeper into space, we know now that these dark nebulas are really foreground dust clouds filled with the soot of dying stars, carbon dust that absorbs starlight and obscures the more distant parts of the Milky Way.
This dust cloud is called Le Gentil 3, named for the 18th century French astronomer who first noted its position in the sky. Le Gentil’s dust cloud is one of the easiest features of the summer Milky Way to see. Look north of Deneb, the bright star at the right of the image, and with the unaided eye on a dark moonless night you’ll see what looks like a dark hole in the Milky Way. That’s Le Gentil 3.
I use this dust cloud as a measure of sky brightness. On a truly dark night, Le Gentil 3 looks darker than any other area of sky, even relatively starless regions off the Milky Way. Most of the sky brightness we see from a dark site is really starlight. But Le Gentil’s proximity and opaqueness makes it appear darker than the more distant starlit sky background.
This image covers about the width of a binocular field. I shot it from the Cypress Hills in Saskatchewan this past weekend, using the Canon 5D MkII at ISO 1600 and Canon 135mm telephoto lens at f/2.8. It’s a stack of 10 five-minute exposures.
This is a binocular-sized gulp of sky in the northern summer Milky Way. Countless stars form a bright patch in the Milky Way called the Scutum Starcloud, named for the odd little constellation of Scutum the Shield that contains it.
Visible to the naked eye, this star cloud is a rich area for binoculars or a small telescope. One favourite object of stargazers lies embedded in the star cloud and can be seen here as a bright clump of stars at left of centre. That’s the Wild Duck Cluster, or Messier 11, a dense and populous cluster of stars within the already star-packed Scutum Starcloud. Look in this direction into the Milky Way and you are looking toward the next spiral arm in from ours, some 6,000 light years away.
The immensity of stars in just this small area of sky is hard to fathom. That’s why it’s called deep space!
Shining overhead on northern summer nights right now is the blue supergiant star Deneb, in Cygnus. Nearby glow the magenta clouds of the North America Nebula.
This image shot with a telephoto lens takes in roughly the same field of view as a pair of binoculars. But being a long time exposure it reveals much more of the faint nebula than even the aided eye can see. However, even binoculars will show a greyish cloud near Deneb in roughly the shape of North America. It is actually a continent of stars and hydrogen gas, glowing with hydrogen’s characteristic magenta colour, a mix of deep red and blue emission lines. The gas may be electrified into glowing by the searing radiation from the star Deneb, some 1400 light years away from Earth.
I shot this on a July night, with some haze passing by during some of the exposures. The haze added the photogenic glows around the stars.
Look up on a dark summer night in the northern hemisphere and you see a river of stars flowing across the sky.
This is the Milky Way, a glowing mass of millions of distant stars populating the spiral arms of the Galaxy we live in. Lining the arms are lanes of dark interstellar dust, seen here splitting the Milky Way in two from the bright red North America Nebula at top, down to the core of the Galaxy in Sagittarius on the horizon. The dust is the soot created in stars and blown into space to form a new generation stars and planets.
This ultra-wide-angle scene takes in almost the entire summer Milky Way from the southern horizon to beyond the zenith overhead at top. I shot this a couple of nights ago from my rural backyard on a particularly transparent and dark night. It was heaven on Earth.
OK, it’s just a dot. But that dot is a massive star ending its life in a titanic supernova explosion.
Unlike all the other stars in this picture, which are close by in the foreground of our own Milky Way Galaxy, that one star indicated is 38 million light years away. It lies in another galaxy altogether, in the outer spiral arm of the galaxy M95. Discovered on March 16, Supernova SN 2012aw is now shining with the light of a hundred million suns as it blasts most of its starstuff into space.
It is these types of stellar explosions that seed the universe with the elements heavier than lead.
I took this shot Monday, April 9 through my 5-inch refractor, an instrument not ideally suited for shooting small objects like galaxies. But its wider field here does take in not just M95 but also its companion in space, the spiral M96 at left. Both are barred spiral galaxies in Leo, on the list of targets compiled by Charles Messier in the late 18th century and favourites of backyard astronomers. It’s rare to get a supernova as bright as this (anyone with a modest telescope can see it) letting off in a well-known “top 100” galaxy like M95.
Take a look on the next clear night, and contemplate the cosmic forces at work to make visible a single star across a gulf of 38 million light years.
Auriga the Charioteer rides high across the northern winter sky these nights. This is a wide-field image I took last week of the constellation that now shines overhead from northern latitudes.
My image takes in all of Auriga, the pentagon-shaped charioteer of Roman mythology, as well as the feet of Gemini the twins, spanning a wide area of the winter Milky Way. Sprinkled along this bit of Milky Way you can see a few clusters of stars. They include four of the best open star clusters in the catalogue of Charles Messier: M35 in Gemini at bottom, and M36, M37 and M38 in Auriga at centre, all wonderful targets for a small telescope. Some of these targets lie in the next spiral arm out from the one we live in.
The star colours show up nicely here, with the brightest star at top appearing a little off white. That’s Capella, 42 light years away and classified as a type G “yellow” star not unlike our own Sun in temperature but much larger – a giant star. Indeed, it is really two yellow-giant stars in close orbit around each other. It’s interesting that Capella doesn’t really show up as yellow. Just like our Sun does to our eyes, Capella appears white because it still emits such a broad range of colours that even though its peak energy does fall in the yellow part of the spectrum, all the other colours remain strong enough that the star looks white to our eyes. Remember, our eyes evolved under the light of a type G star to see all the colours of the spectrum from red to blue.
Only the cool red giant stars take on a yellow or orange hue to our eyes, and to the camera. You can see a few in this image, as well as hot blue stars. The pinky red bits are nebulas in the Milky Way – clouds of hydrogen gas emitting deep red light.
When we look in this direction in the Milky Way we are looking out toward the edge of our Galaxy, exactly opposite the galactic centre.
While I took this shot three weeks ago, I’ve only just got around to processing it. This is a nebula-filled region of the northern winter sky in the constellation of Monoceros, the unicorn.
The highlight is the rose-like Rosette Nebula at bottom, an interstellar flower of glowing hydrogen where new stars are forming. Above it, at centre, is a mass of pink, blue and deep red nebulosity that forms the Monoceros Complex. All lie in our local corner of the Milky Way, in a spiral arm fragment called the Orion Spur, a hotbed of star formation.
This field, shot with a 135mm telephoto lens, sits to the left of Orion and spans about a hand width at arm’s length. It would take a couple of binocular fields to contain it. Next on my astrophoto agenda – shooting some close ups of selected bits of Monoceros, shots that have eluded me till now.
Who says the dark night sky isn’t colourful? Of course, to the naked eye it mostly is, with the darkness punctuated only with a few red, yellow and blues stars. But expose a camera for long enough and all kinds of colour begins to appear.
This region is above us now, in the Northern Hemisphere evening sky for mid-winter. It’s the boundary area between Taurus and Perseus. Below are the vivid blues of the hot young Pleiades star cluster in Taurus. At top, just squeezing into the frame, is the shocking pink of the California Nebula, a glowing cloud of hydrogen gas in Perseus.
But between are the subtle hues of faint nebulosity weaving all through the Perseus-Taurus border zone. Below are faint cyans and blues from dust clouds reflecting the light of the Pleiades stars. In the middle are the yellow-browns of dark dust clouds hardly emitting light at all, but snaking across the frame to end in a complex of pink and blue straddling the border collectively known as IC 348 and IC 1333. At top, the glowing hydrogen gas of the California emits a mix of red and blue wavelengths, creating the hot pink tones, but fading to a deeper red to the left as the nebula thins out to the east. Throughout, hot blue stars pepper the sky and help illuminate the dust and gas clouds which will likely form more hot stars in the eons to come.
I took this shot last Wednesday night, on one of the few clear, haze-free nights of late. This is a “piggybacked shot,” with the Canon 5D MkII camera going along for the ride on one of my tracking mounts. This final shot is a stack of five 6-minute exposures, highly processed to bring out the faint clouds barely brighter than the sky itself. The camera was equipped with a 135mm telephoto lens, giving a field of view a couple of binocular fields wide. Hold out your hand and your outstretched palm would nicely cover this area of sky. But only the camera reveals what is actually there.
Spiral galaxies are icons of deep space. This one is a classic. This is the Triangulum Galaxy, named for its home constellation. Amateur astronomers also know it as M33, the 33rd entry in Charles Messier’s catalog of deep sky objects compiled in the 1780s. To Messier, object #33 was another fuzzy spot he and others might confuse for comets, the objects astronomers of the day were really after.
It wasn’t until 1850 that the Earl of Rosse, observing with his monster Leviathan of Parsonstown, a 72-inch reflector telescope, managed to see M33 as something more than a nebulous glow. He saw what the photo clearly shows — spiral arms swirling around a central core. However, in those days, such “spiral nebulae” were thought to be whirlpools of gas where stars and solar systems were forming.
It wasn’t until the 1920s, with the work of Edwin Hubble, that objects like M33 were proven to be other galaxies like our Milky Way, each composed of billions of stars.
We now know the Triangulum Galaxy lies about 3 million light years away, and is about half the size of our Milky Way. That makes it the third largest member of our Local Group of galaxies, after our own Milky Way and the famous Andromeda Galaxy.
For this shot of M33, taken September 25, I stacked 6 images, each a 12-minute exposure at ISO 800 and f/6, shot with my Astro-Physics 130mm refractor and Canon 7D camera. Visible along the galaxy’s spiral arms you can see some of the reddish and cyan-coloured nebulas that are sites of active star formation in M33.
It’s taken me a few months to get around to the task, but at last! — my mosaic of the Milky Way I shot in Chile back in May.
The panorama is made up of 6 frames, stitched and blended together, extending from Crux, the Southern Cross (at right) to Aquila the eagle (at left) — a sweep of the Milky Way from Acrux to Altair! The mosaic is centred on the core of the Galaxy in Sagittarius and Scorpius.
Panoramas like this allow you to step back a distance and take in the big picture:
— You can see the large-scale structure of the dust clouds and the odd diagonal sweep of many of the clouds cutting across the plane of the Galaxy. I’ve never heard an explanation of why the dust lanes seem to have that structure and direction. I also see a 3D effect, with the nearby dust clouds hanging in front of and obscuring the bright starclouds of the distant inner spirals arms of our Galaxy.
— Also apparent are the extensive dust clouds at left extending from Ophiuchus (at top) down into Aquila, well below the plane of the Galaxy. Most wide-angle shots of the Milky Way I see tend to process out the subtle brown clouds that extend far off the Galactic plane. And they are brown, not black.
— And what really stands out is the band of bright blue stars from Scorpius (at top centre) to the right above the Milky Way through Lupus, Centaurus then down into Crux. This is a section of Gould’s Belt, a ring of hot blue stars around the sky that runs at an angle of about 20° to the Milky Way. This ring of hot, nearby stars surrounds us in our spiral arm and is thought to be only about 65 million years old, likely caused by some disturbance in our spiral arm which set off a wave of star formation close to us.
— And … as my Australian friends will point out, you can see the entire Dark Emu, made of the dust lanes from the Coal Sack in Crux at right (his head and beak), through the curving lanes in Centaurus (his neck), then sweeping up and over the centre of the Galaxy (his body) then down into Scutum and Aquila (his two feet and his tail).
I took this panorama from the Atacama Lodge in north central Chile, using the Canon 5D MkII and Canon 35mm lens. Each of the 6 segments that went into this pan was itself a stack of 4 x 6 minute exposures, plus a fifth exposure through a soft-focus filter, all at f/4 and ISO 800. The camera was on a Kenko SkyMemo tracking platform. I assembled the pan with Photoshop CS5’s Photomerge command. This is actually only half of the full panorama mosaic, which extends for another 5 segments to the right along the Milky Way to Orion, taking in the entire southern portion of the Milky Way. But this is the best bit!
This was the scene Monday night and into Tuesday morning, August 1/2, as a relatively new comet to our skies passed a bright globular cluster known as M15 in Pegasus. The comet is Comet Garradd, or more formally C/2009 P1. Here it glows with the characteristic cyan tint of many comets and sports a stubby fan-shaped tail.
As comets move across the sky they often appear near prominent deep-sky objects for a night or two before moving on. Comet Garradd has a number of such encounters coming up: with the globular cluster M71 on August 26, and then near the neat Coathanger cluster September 1 through 3.
Comet Garradd can be spotted now from a dark site in big astronomy binoculars and is a fine sight in a telescope. However, it is well below the threshold of naked-eye brightness and is expected to remain so as it moves high across the summer sky from east to west and then into the western evening sky in late autumn. It is certainly well-placed for viewing, but only comet aficionados are likely to pay much attention to it. Plus astrophotographers taking advantage of photo ops like this one.
Look straight up on a summer night in the northern hemisphere and you are looking into this region of sky. This is the centre — the heart — of Cygnus the swan, marked here by the bright star called Sadr, or Gamma Cygni.
While the star is easily visible to the unaided eye, the glowing clouds of gas surrounding it are not. Only long exposure images reveal the amazing swirls of nebulosity in the middle of Cygnus.
The main cloud at left, split by a dark lane of dust, is catalogued as IC 1318. The little crescent-shaped nebula at right is NGC 6888, or more appropriately, the Crescent Nebula. It formed when a hot giant star blew off its outer layers, to add to the general melee of hydrogen and other elements. But note the little blue reflection nebulas at top left. Oddly out of place!
New stars are forming in this region, located about 1500 light years away down the Cygnus arm that we live in, in the Milky Way Galaxy.
This field can be framed nicely by binoculars or a low-power telescope, but only the brightest bits of this nebulosity will show up in the eyepiece as grey ghosts, and then only with the aid of a specialized nebula filter.
I took this shot on Saturday night, July 30, 2011 with the Borg 77mm f/4 astrograph lens and Canon 5D MkII camera. Other stats are similar to the previous blog post. It’s certainly my best shot of this area of sky.
Though they are truly “nebulous,” these clouds of interstellar gas carry fanciful names — our human attempt to make sense of the vast chaotic forms that pervade deep space.
Above is the Eagle Nebula, a.k.a. Messier 16. Below lies the Swan Nebula, a.k.a. Messier 17. Through a telescope to the eye these nebulas do take on the imagined shape of interstellar birds flying along the Milky Way. But long exposure images like this bring out far more than the eye can see. The entire field, here about the width of what high-power binoculars take in, is filled with swirls of hydrogen gas, glowing in its characteristic red colour.
The Eagle Nebula lies in the constellation of Serpens the serpent, while the Swan Nebula lies just over the border in Sagittarius the archer.
I took this shot Saturday night, July 30, 2011, on one the few perfect nights of observing we get here in Canada — the night was warm, dry, with little wind and no mosquitoes. I could venture out with just a sweater on for a bit of warmth. A far cry from the parkas and down-filled boots normally needed.
This field is a first for me from Canada. I’ve shot it from Australia and Chile, where these objects lie overhead, never from home in Alberta at a latitude of 51° North. But the night was so transparent, the field was worth going after, despite it being low on the southern horizon and at its best for no more than an hour after it got dark.
To shoot the field, I used the wonderful little Borg 77mm f/4 astrographic refractor, effectively a 300mm telephoto lens but far sharper and flatter than most telephotos made for sports and wildlife. The camera was the Canon 5D MkII, a filter-modified version that has a special filter for passing more of the deep red colour of hydrogen. But the real difference here was the use of a filter at the focus of the telescope that further isolated the red wavelengths and blocked other colours that might have otherwise fogged the image, especially from a field so low on the horizon. It worked great, though does tend to render the whole field on the red side.
Here we peer into the heart of Scorpius, to a place where the sky is painted with pastel hues unlike anywhere else in the heavens.
The yellow star at bottom is Antares, the cool supergiant star that marks the heart of the Scorpion. To the right is Messier 4, a globular cluster of thousands of stars. Wrapping the entire field are shrouds of dust, reflecting the yellow light of Antares and the blue light of hotter stars above, such as Rho Ophiuchi at top right. Glowing hydrogen gas clouds add the magenta hues.
The remarkable feature of this field are the dark fingers, clouds of dark interstellar stardust glowing with a dim yellowy-brown hue. In places the clouds become more opaque and intense, blocking any light from background stars. Those clouds must be close by in our galactic spiral arm because few stars lie between us and their dark masses. Estimates put them about 400 light years away.
The entire region is a busy factory of star making, one of the closest to our Sun. Chances are our solar system formed in a similar star factory 5 billion years ago, one that has long since dissolved away and dispersed around the Galaxy.
Like the previous shot, this is a Canon 7D/135mm telephoto image in a stack of six 2-minute exposures, taken from Chile in early May. I find it remarkable that with digital cameras just 2-minute exposures not only bring out the dark nebulas, but actually show them with colour and tonality. In the old days, film shots 20 minutes long only ever showed them as a mass of underexposed and featureless black.
Off the tail of Scorpius lies one of the great starry regions of the Milky Way. From southern Canada the Scorpion’s Tail barely clears our horizon at this time of year, on June nights. But from farther south, Scorpius crawls high into the sky — and the sky actually gets dark at solstice, so stargazers can see the starclouds of Scorpius in all their glory.
At right, the blue stars mark the “stinger” at the end of the Scorpion’s tail. The brightest one, called Shaula, or Lambda Scorpii, is a hot blue giant star some 10,000 times more luminous than our own modest Sun. It is also a triple star, with another luminous blue star orbiting it, plus a third odd mystery star thought to be either a neutron star or perhaps a young proto-object still in the process of forming a proper “main-sequence” normal star.
To the left lie two prominent clusters of stars: at top the Butterfly Cluster (a.k.a. Messier 6), a bright group of stars sitting amid a dark bay of dust. Below it, almost lost in the stars, is Ptolemy’s Cluster (a.k.a. Messier 7), that is an obvious sight to the unaided eye – so obvious the Greek astronomer Ptolemy catalogued it in 130 AD. Several other star clusters pepper the field.
This telephoto lens shot frames the field as binoculars would show it. I took this from Chile in early May, using the Canon 7D and 135mm lens, for a stack of six 2-minute exposures at f/2.8 and ISO 1250.
In this part of the sky the Milky Way takes on a surprising palette of hues. And it’s all due to dust.
The centrepiece of this shot is a bright star cloud in Sagittarius called, well, the Sagittarius Star Cloud! But not the Large one. This is the Small Sagittarius Star Cloud, a.k.a. Messier 24, a mass of stars with a single black eye. The dark spot, called Barnard 92, is a dense and opaque cloud of dust. Stardust — clouds of carbon soot blown out by aging stars — weaves all through this scene, creating the dark canyons winding through the stars. Obscuring dust also dims much of the background stars and discolours most of this part of the Milky Way a yellowish brown. It’s the same effect that dims the setting Sun a deep orange or red, as its light shines through haze and dust in the sky.
But here, the Star Cloud looks bluish and “cleaner.” That part of the Milky Way has less dust in front of it. And yet it is much farther away than the yellow dusty starfields around it. When we look toward the Small Sagittarius Star Cloud we are looking through a dust-free window, allowing us to see unencumbered right past our Galaxy’s nearby Sagittarius-Carina spiral arm to glimpse a dense part of the more distant Norma Arm, an inner spiral arm of our Milky Way Galaxy about 12,000 to 16,000 light years away.
To the lower right of M24 is M23, a rich cluster of stars 2,000 light years away, nearby by galactic standards, and so sits suspended in front of the fainter star background. The pinkish nebula at top is Messier 17, the Swan Nebula.
I took this shot May 2 from Chile, using the Canon 7D and 135 lens, for a stack of six 2-minute exposures.
Down in the south sit many austral equivalents to namesake northern sky objects: the Southern Cross, the Southern Beehive, the Southern Pinwheel. This is the “Southern Pleiades,” a match to the famous Pleiades star cluster prominent in our northern hemisphere sky. Since our Pleiades also carries the moniker the “Seven Sisters,” I suppose that makes this object the “Seven Sisters of the South.”
The field here again duplicates what binoculars would show, and this is a lovely object for binos. Its resemblance to the northern Pleiades comes from this star cluster’s bright but scattered appearance, and the blue colour of its sorority of stars. Like its northern counterpart, the Southern Pleiades is a cluster of hot young stars which shine furiously blue in their energetic youth. This group is perhaps no more than 50 million years old, and like the northern Sisters, shines quite close by, just 480 light years away, putting it a stone’s throw away down our own galactic spiral arm.
Officially catalogued as IC 2602, and also dubbed the Theta Carinae Cluster, this clutch of blue stars shines just below the Carina Nebula (you can see both together in my earlier blog The Best Nebula in the Sky). A couple of other fainter star clusters also populate the field.
I took this shot with the Canon 7D and 135mm telephoto lens and stacked five 2-minute exposures. Stacking helps smooth out background noise, though in a wide field shot like this, the sheer number of stars tends to overwhelm any camera noise.
This image looks toward the inner spiral arm of our Milky Way called the Norma Arm, where stars bunch together to form the rich Norma Starcloud, a prominent patch in the southern Milky Way. What you see here is all stars, lots and lots of stars.
Seemingly embedded in the sea of stars is an island of brighter stars called the Norma star cluster, or more prosaically NGC 6067. It’s about 6800 light years away, much closer to us than the more distant stars behind it. It is literally floating in front of the background sea of stars.
As with the previous image, this is a wide field shot, taken with the 135mm telephoto, to frame the field much as it would appear in binoculars. This shot is a stack of six 2-minute unguided exposures at ISO 1250 with the Canon 7D riding on the little Kenko tracking platform. It’s one of a couple of dozen fields I shot the first night of shooting on Chile in May.
It’s been a month since my last post, a month with no new astrophotos from home. But I’ve got a backlog of RAW files to work through from the Chile trip a month ago. Here’s a new image from that shooting expedition. It’s of an area of the southern sky that lends itself to every focal length and framing variation — you can’t go wrong with the Carina Nebula!
This wonderful nebula in the deep-south Milky Way rewards any astrophotographer. For this shot I used a 135mm telephoto (Canon’s wonderful f/2 L-series lens) and the Canon 7D camera. The 7D is what I call a “stock” camera, used just as it comes off the dealer shelf. The 7D does a superb job capturing the red nebulosity and its faint outlying bits and pieces. It tends to record these clouds of glowing hydrogen as magenta in tone. By comparison, my other Canon camera is a “filter-modified” 5D MkII. You can see a shot of this same area of sky taken with the 5D MkII a few blogs back under The Best Nebula in the Sky, posted May 6. The 5D MkII’s modification (which replaces the filter in front of the sensor with a new astro-friendly one) allows it to record deep-red wavelengths and picks up more faint nebulosity, registering it more as red in tone. But both images look good and presentable.
This field is rich in objects — not only the main sprawling nebula but nearby star clusters and patches of dark dust clouds. It is one of the finest fields in the sky for binoculars, and this shot approximates the field of view of typical binos. I like to shoot a lot of objects with telephoto lenses — while the main subject is not frame-filling and in your face, it does match (at least in field of view) what you can see in binos, useful for illustrations and observing articles. Of course, the camera picks up more stuff and colours even your bino-aided eyes can’t see.
This shot is a stack of five 2-minute exposures at f/2.8 with the 135mm telephoto, on the Canon 7D at ISO 1250. I used the little Kenko Sky Memo tracking platform for this, letting it track without any added guiding. It’s tracking was spot on, with nary any star trailing as it followed the target for 20 minutes or so.
What a great field this is to explore with binoculars. The image here takes in about the same area of sky as most binoculars and look what it contains! Arguably, the best nebula in the sky: the Carina Nebula, and the best open star cluster: the Football Cluster (aka NGC 3532) to the left of the main nebula. And then there’s the Southern Pleiades star cluster, IC 2602, below the nebula, and lots more besides.
This one field is reason enough to travel to the southern hemisphere for stargazing.
I shot this last night, May 6, 2011, using a 135mm telephoto lens at the modified Canon 5D MkII camera. The filter modification allows the camera to pick up a lot more of the faint wispy bits of glowing nebulosity. This is a stack of four 3-minute exposures, with two of the exposures shot through some thin cloud (the first we saw all week!), adding the subtle but photogenic glows around the stars.
This shot took getting up early (rather than staying up all night) to shoot the sky at 5 a.m. The main subject here is a subtle tower of light rising up vertically from the eastern horizon. That’s the Zodiacal Light, best seen from low latitudes.
The glow is from sunlight reflected off dust particles deposited in the inner solar system by passing comets. While it looks like dawn twilight coming on, the light actually comes from out in space and heralds the brightening of the sky by true twilight.
After a week of gazing in the evening sky, a number of us observers took the opportunity this morning to snooze through part of the night and get up prior to dawn to see a new set of objects. At that time of night, and at this time of year, the centre of the Milky Way sits straight overhead, and shows up here in an ultrawide shot from horizon to zenith.
I shot this with the 15mm lens at f/2.8 and the Canon 5D MkII at ISO 800. It’s a stack of two 3-minute exposures.
This is a star cluster in Scorpius called NGC 6124 – it doesn’t have a name, to the best of my knowledge. But a good one might be the “Dark River Cluster.”
I’ve shot lots of stuff along the Milky Way on my various trips to the southern hemisphere, but this field was a pleasant new surprise. While I had photographed this star cluster before, previous portraits had been extreme closeups. I had not shot it with a wide field like this.
The field here takes in about the same area of sky as binoculars. One of my projects on this current trip to Chile has been to shoot binocular fields like this. And it’s a good one. The cluster is a little off the beaten track in Scorpius and tends to be ignored. But its position entangled with lanes of dark nebulosity makes it a wonderful contrast of stars and darkness.
The dark lanes are obscuring dust in the foreground, hiding the light of distant stars in the Milky Way. The cluster itself is about 18,000 light years away, quite a distance for a star cluster, and putting it a good portion of the way toward the centre of the Galaxy.
For this shot I used the Canon 7D camera and 135mm telephoto, for a stack of six 2-minute exposures at ISO 800 and f/2.8.

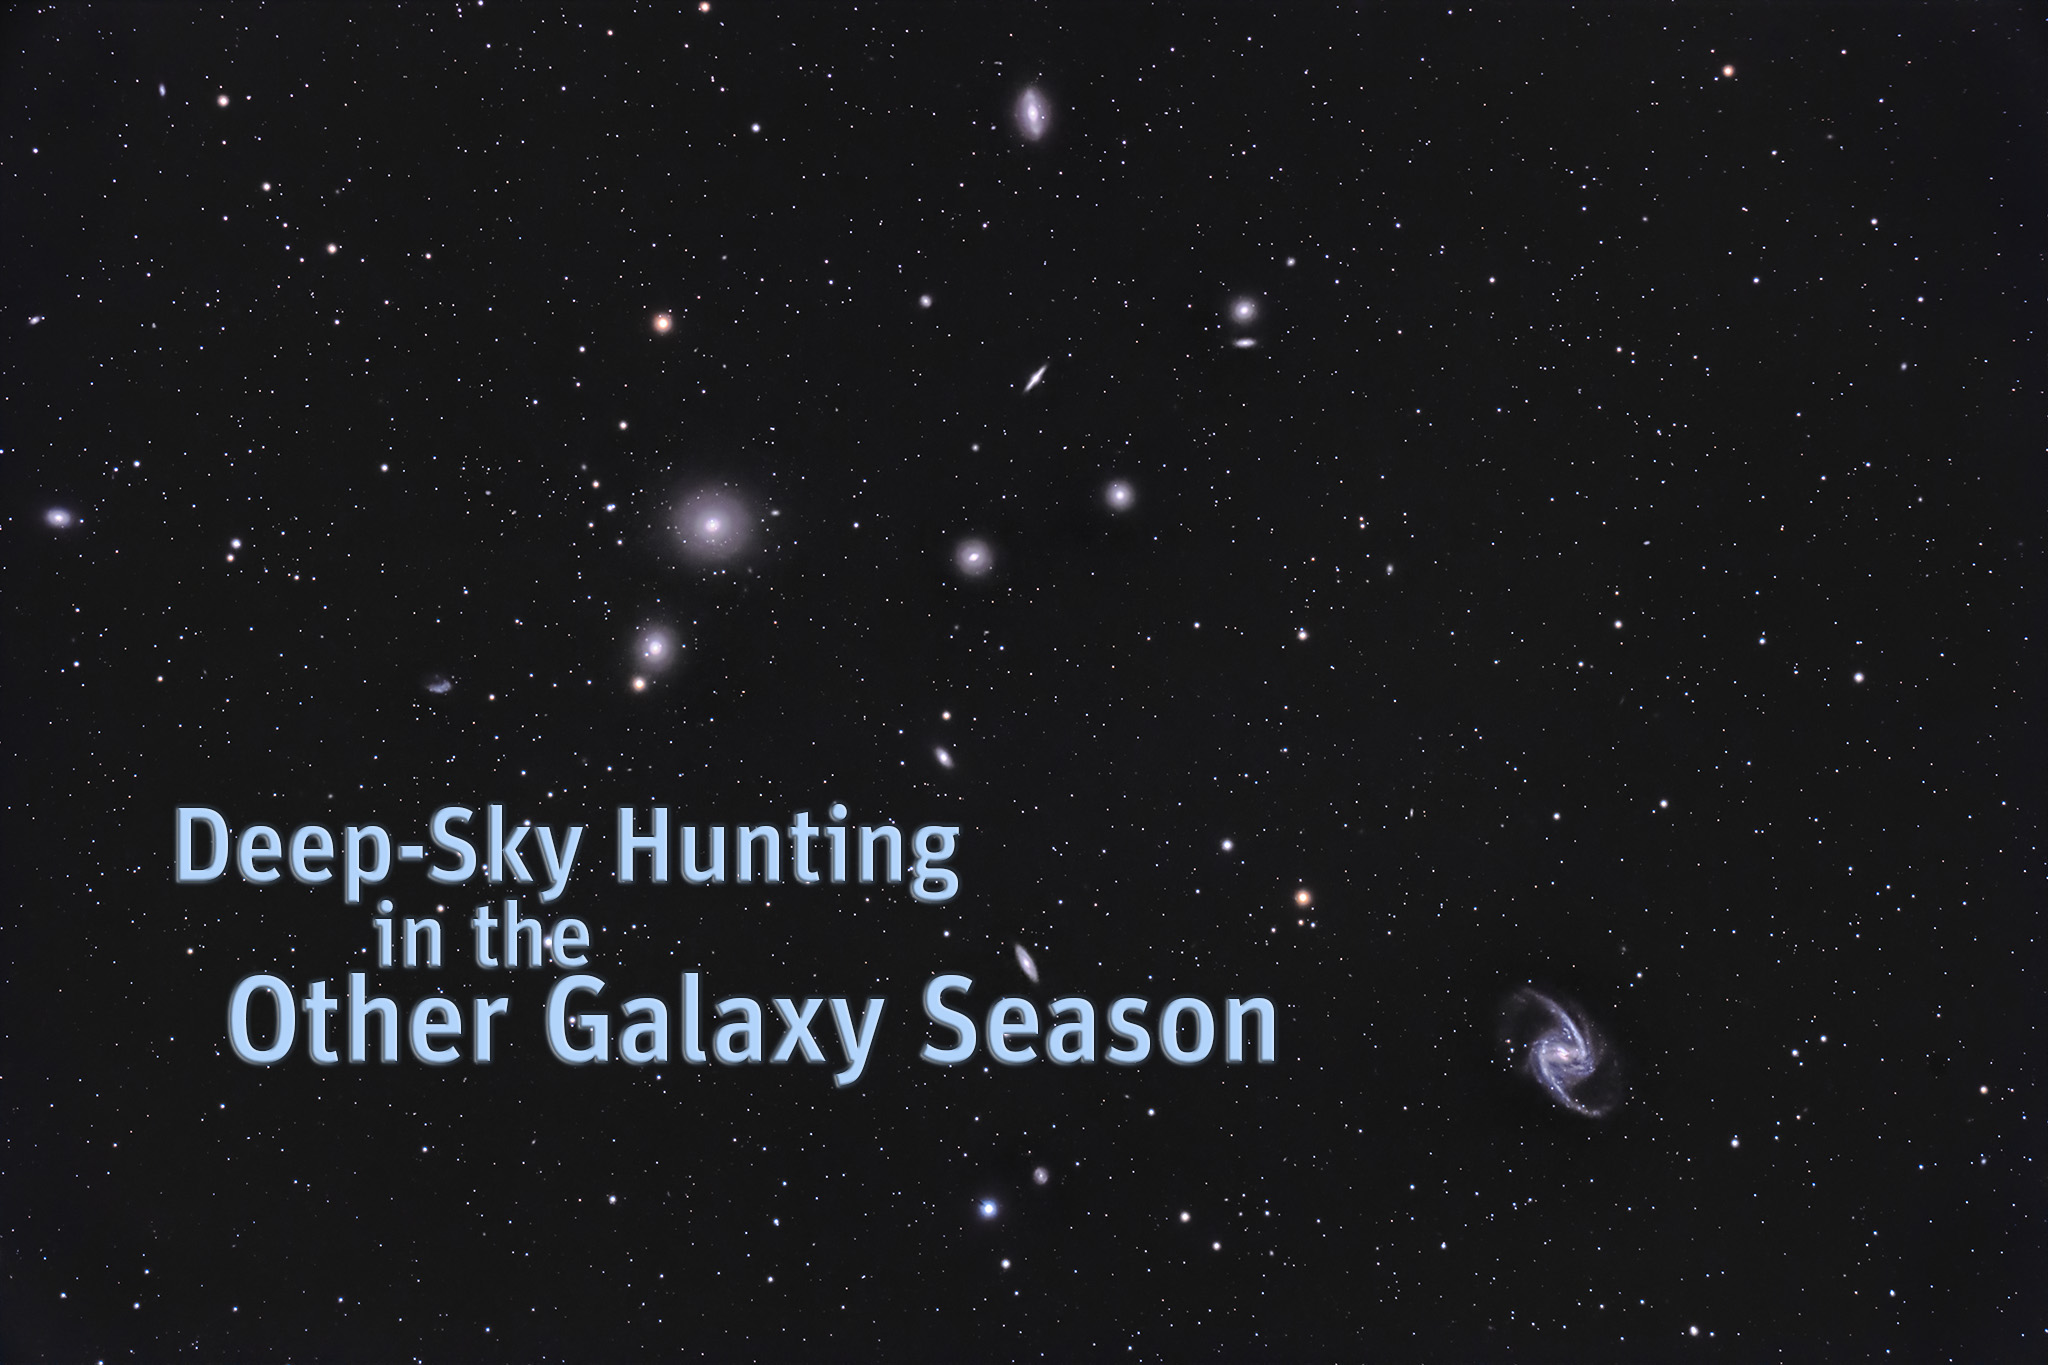
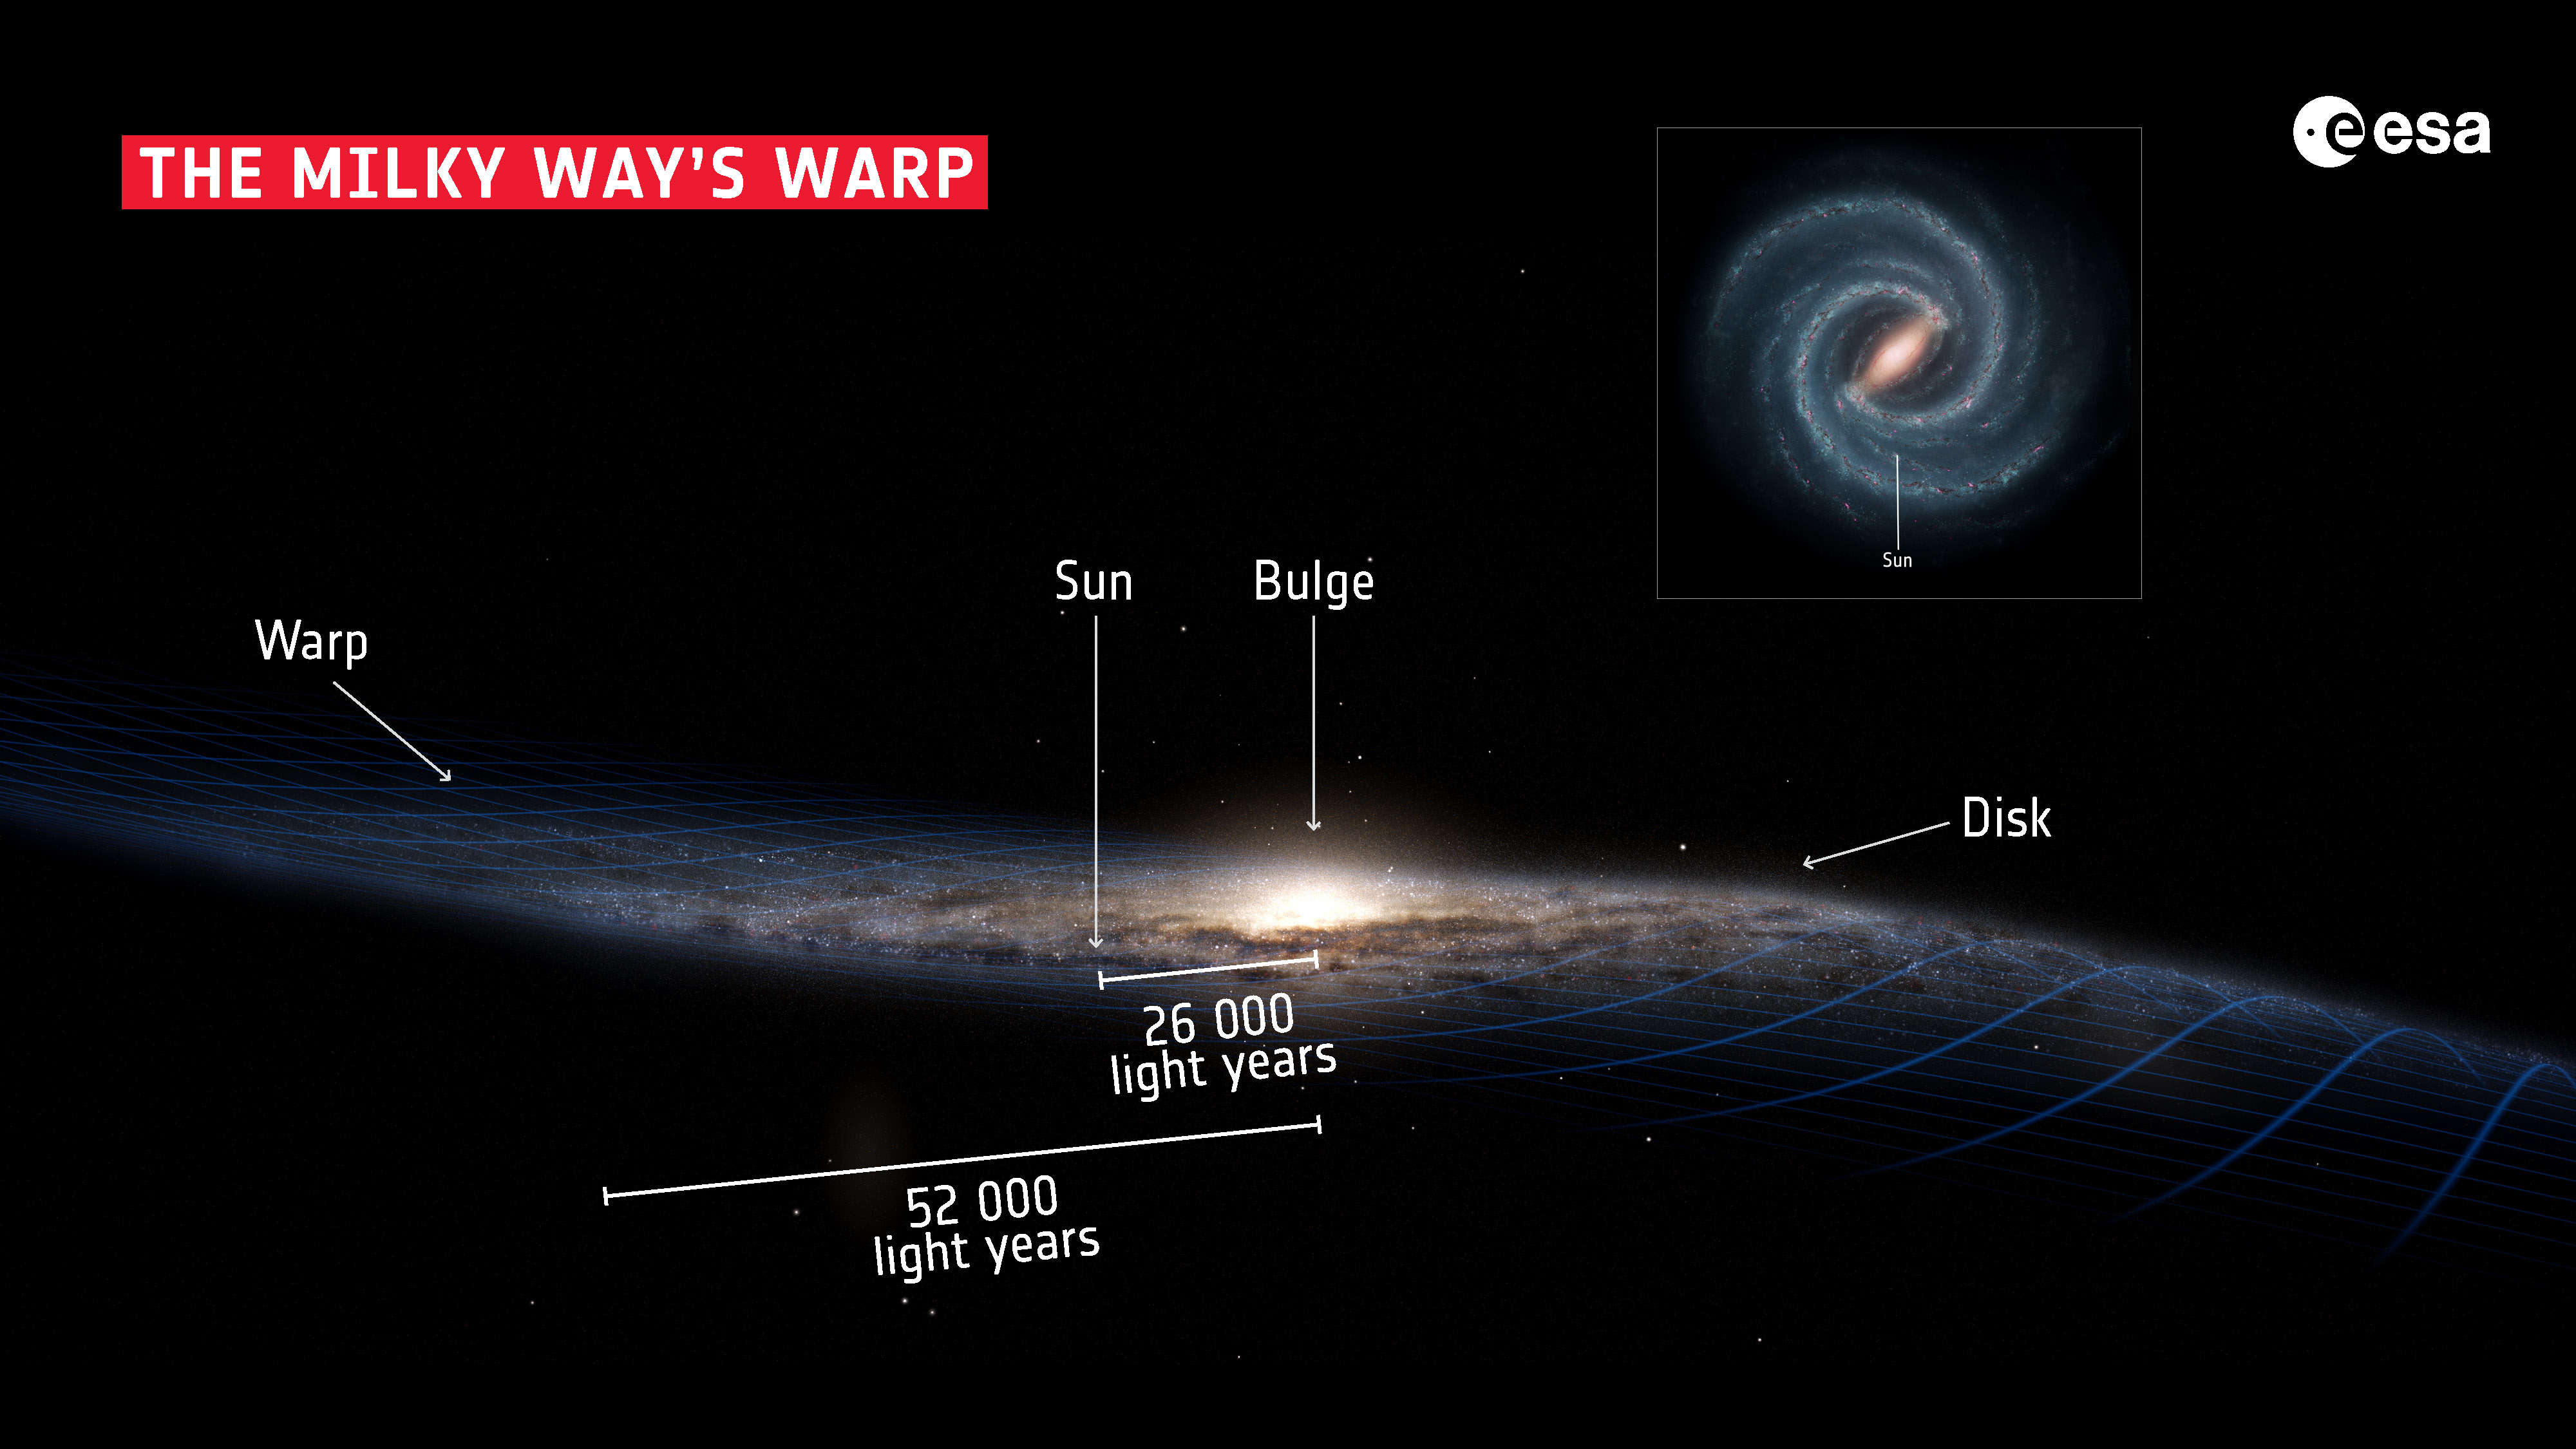
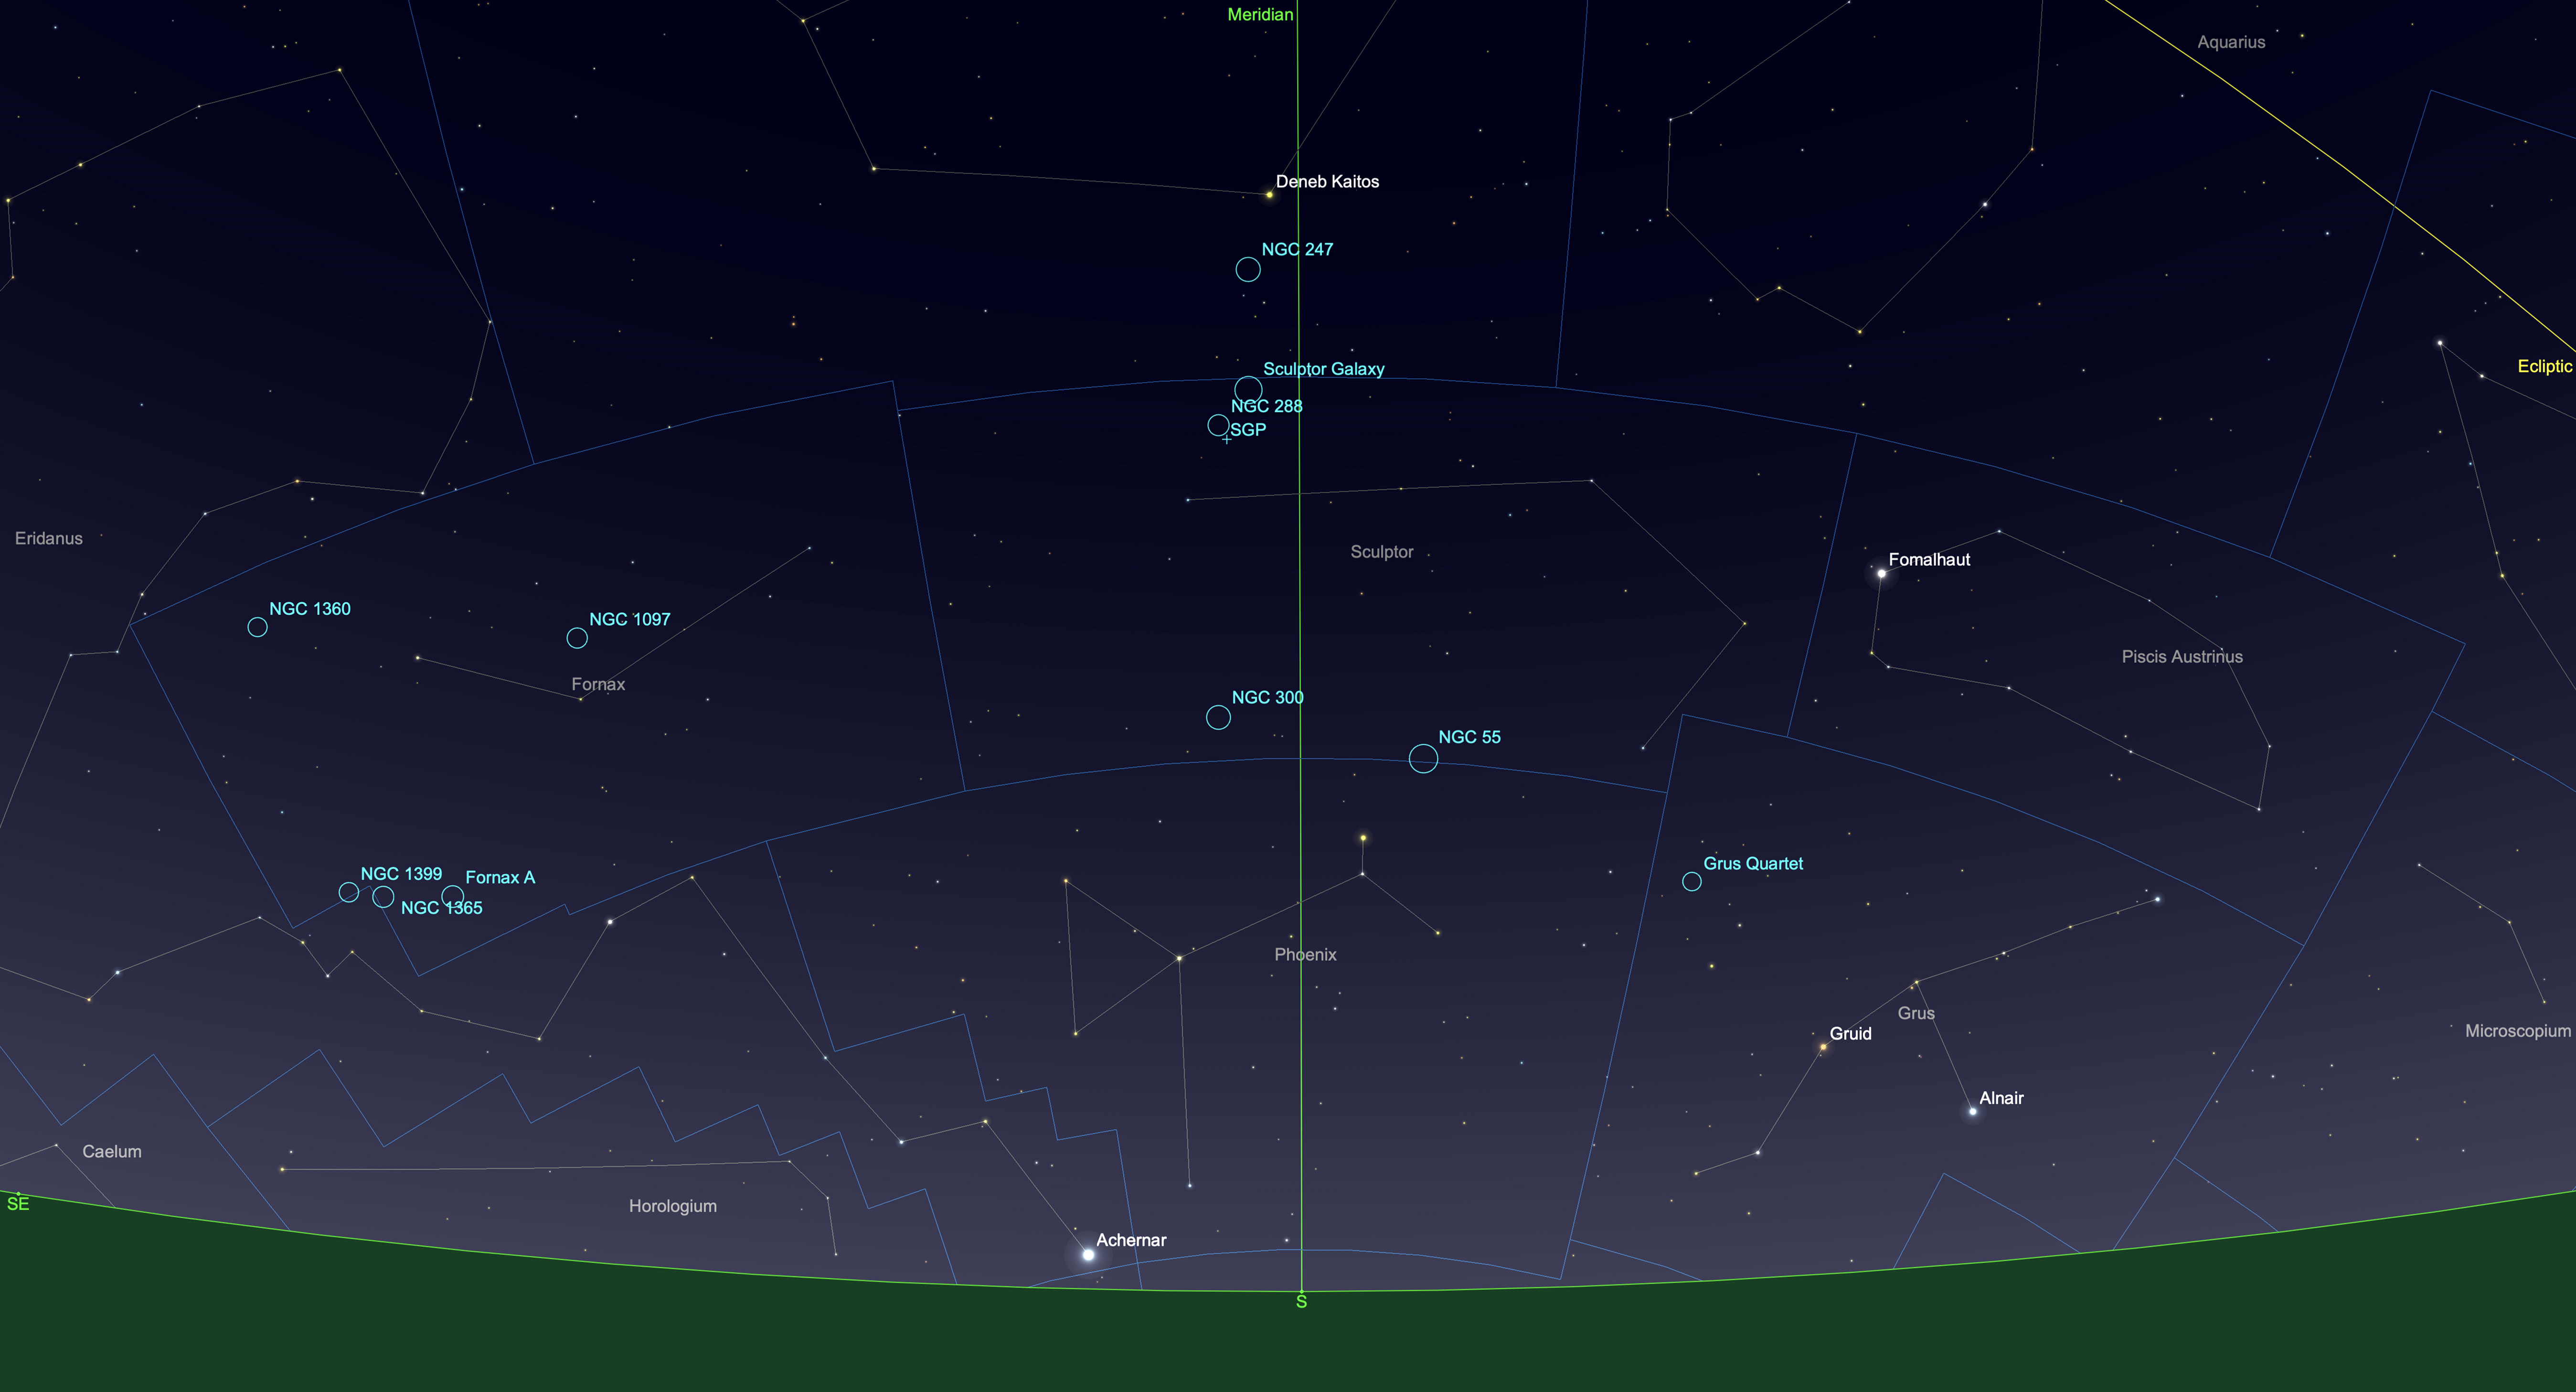
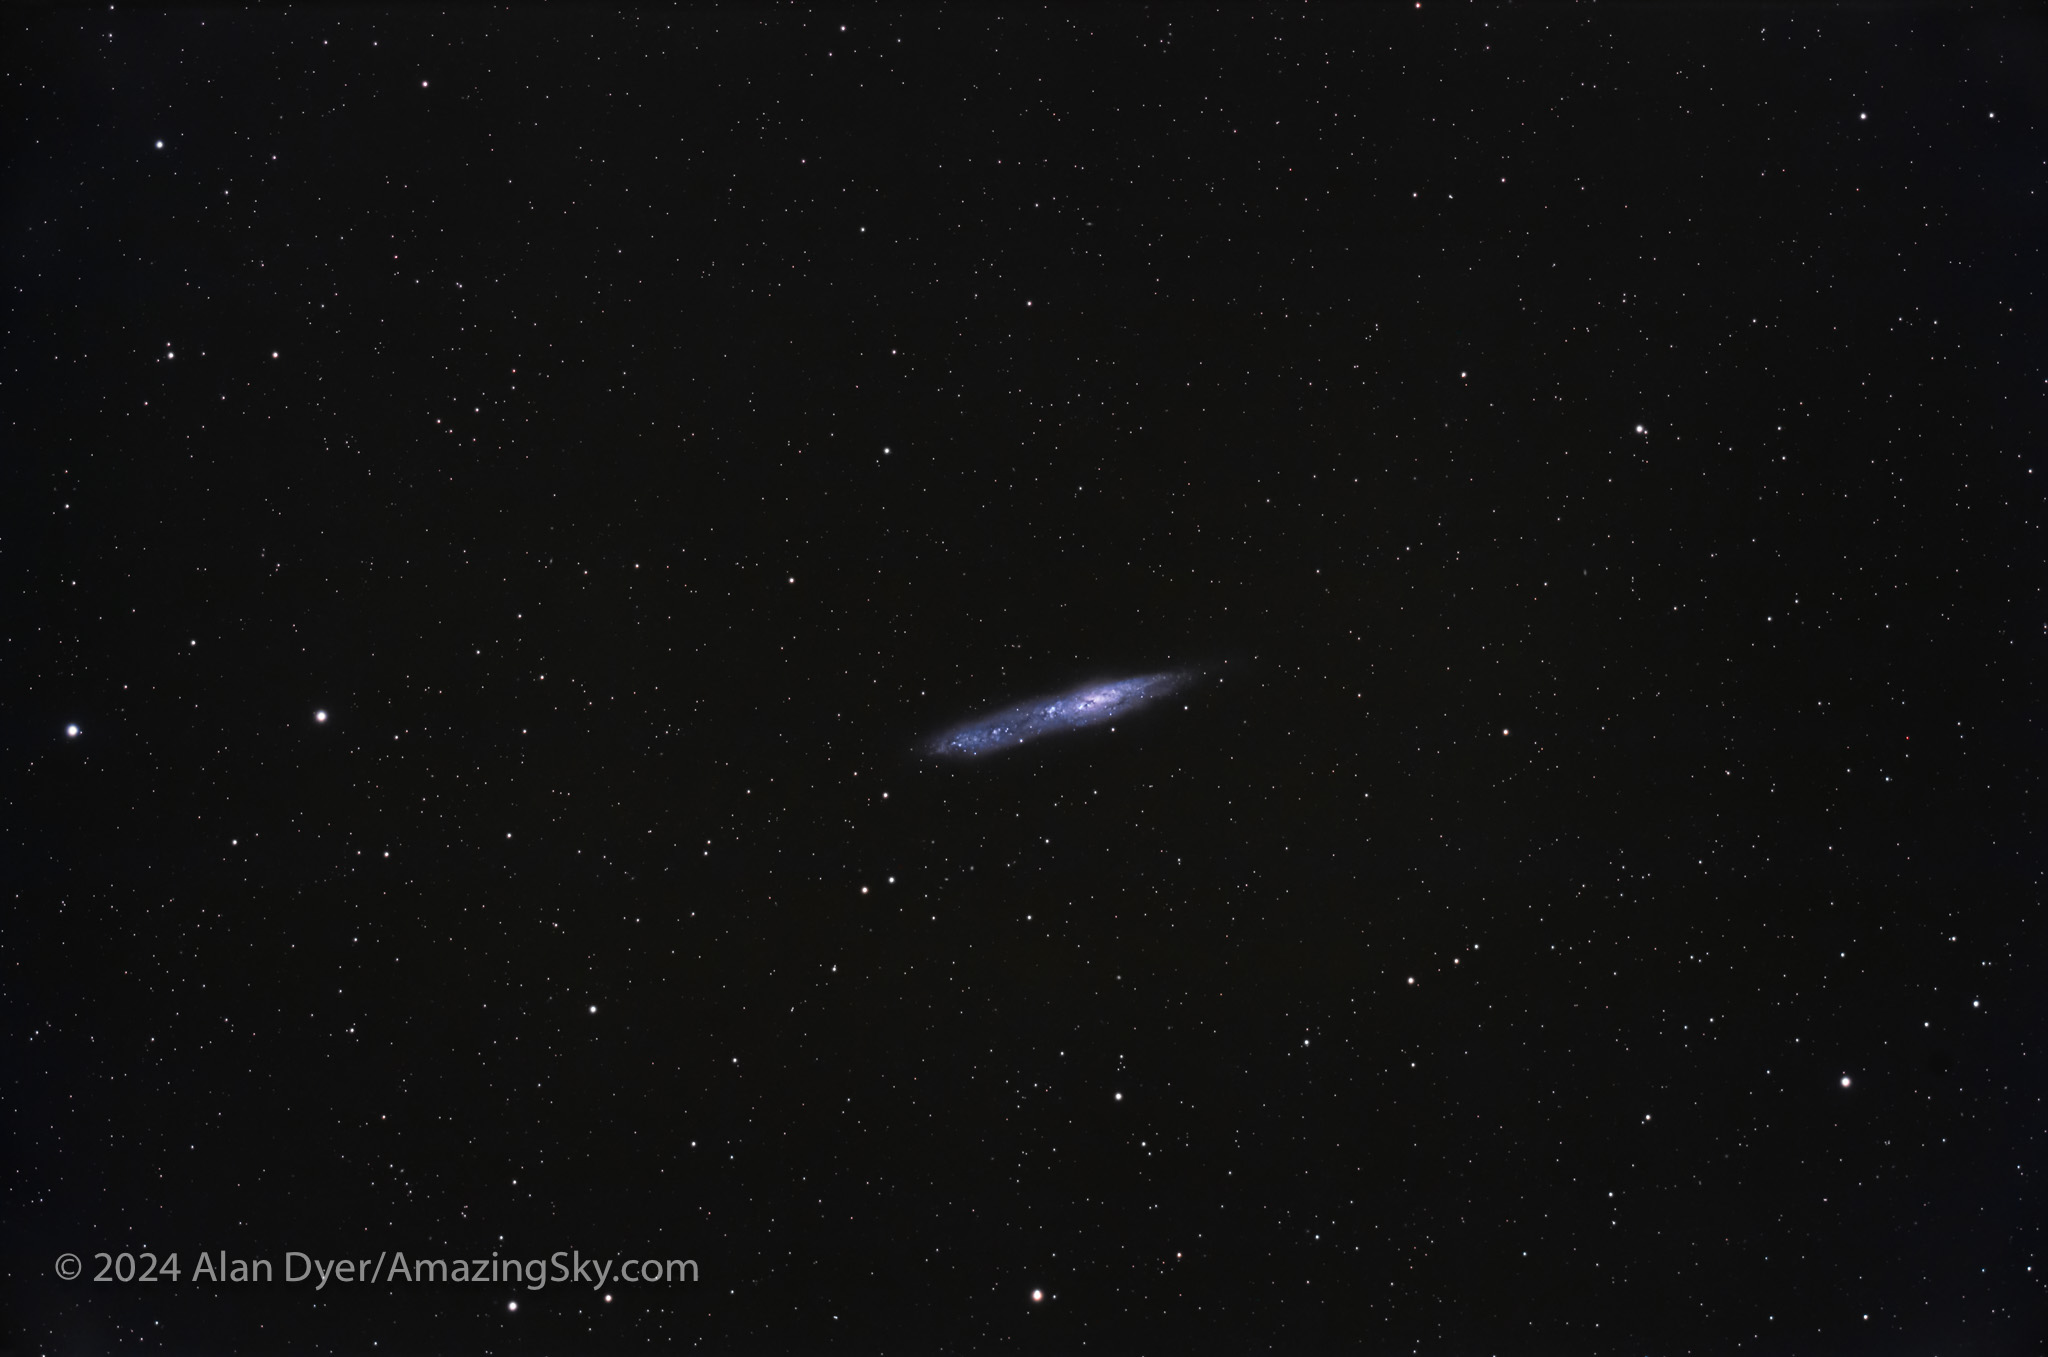

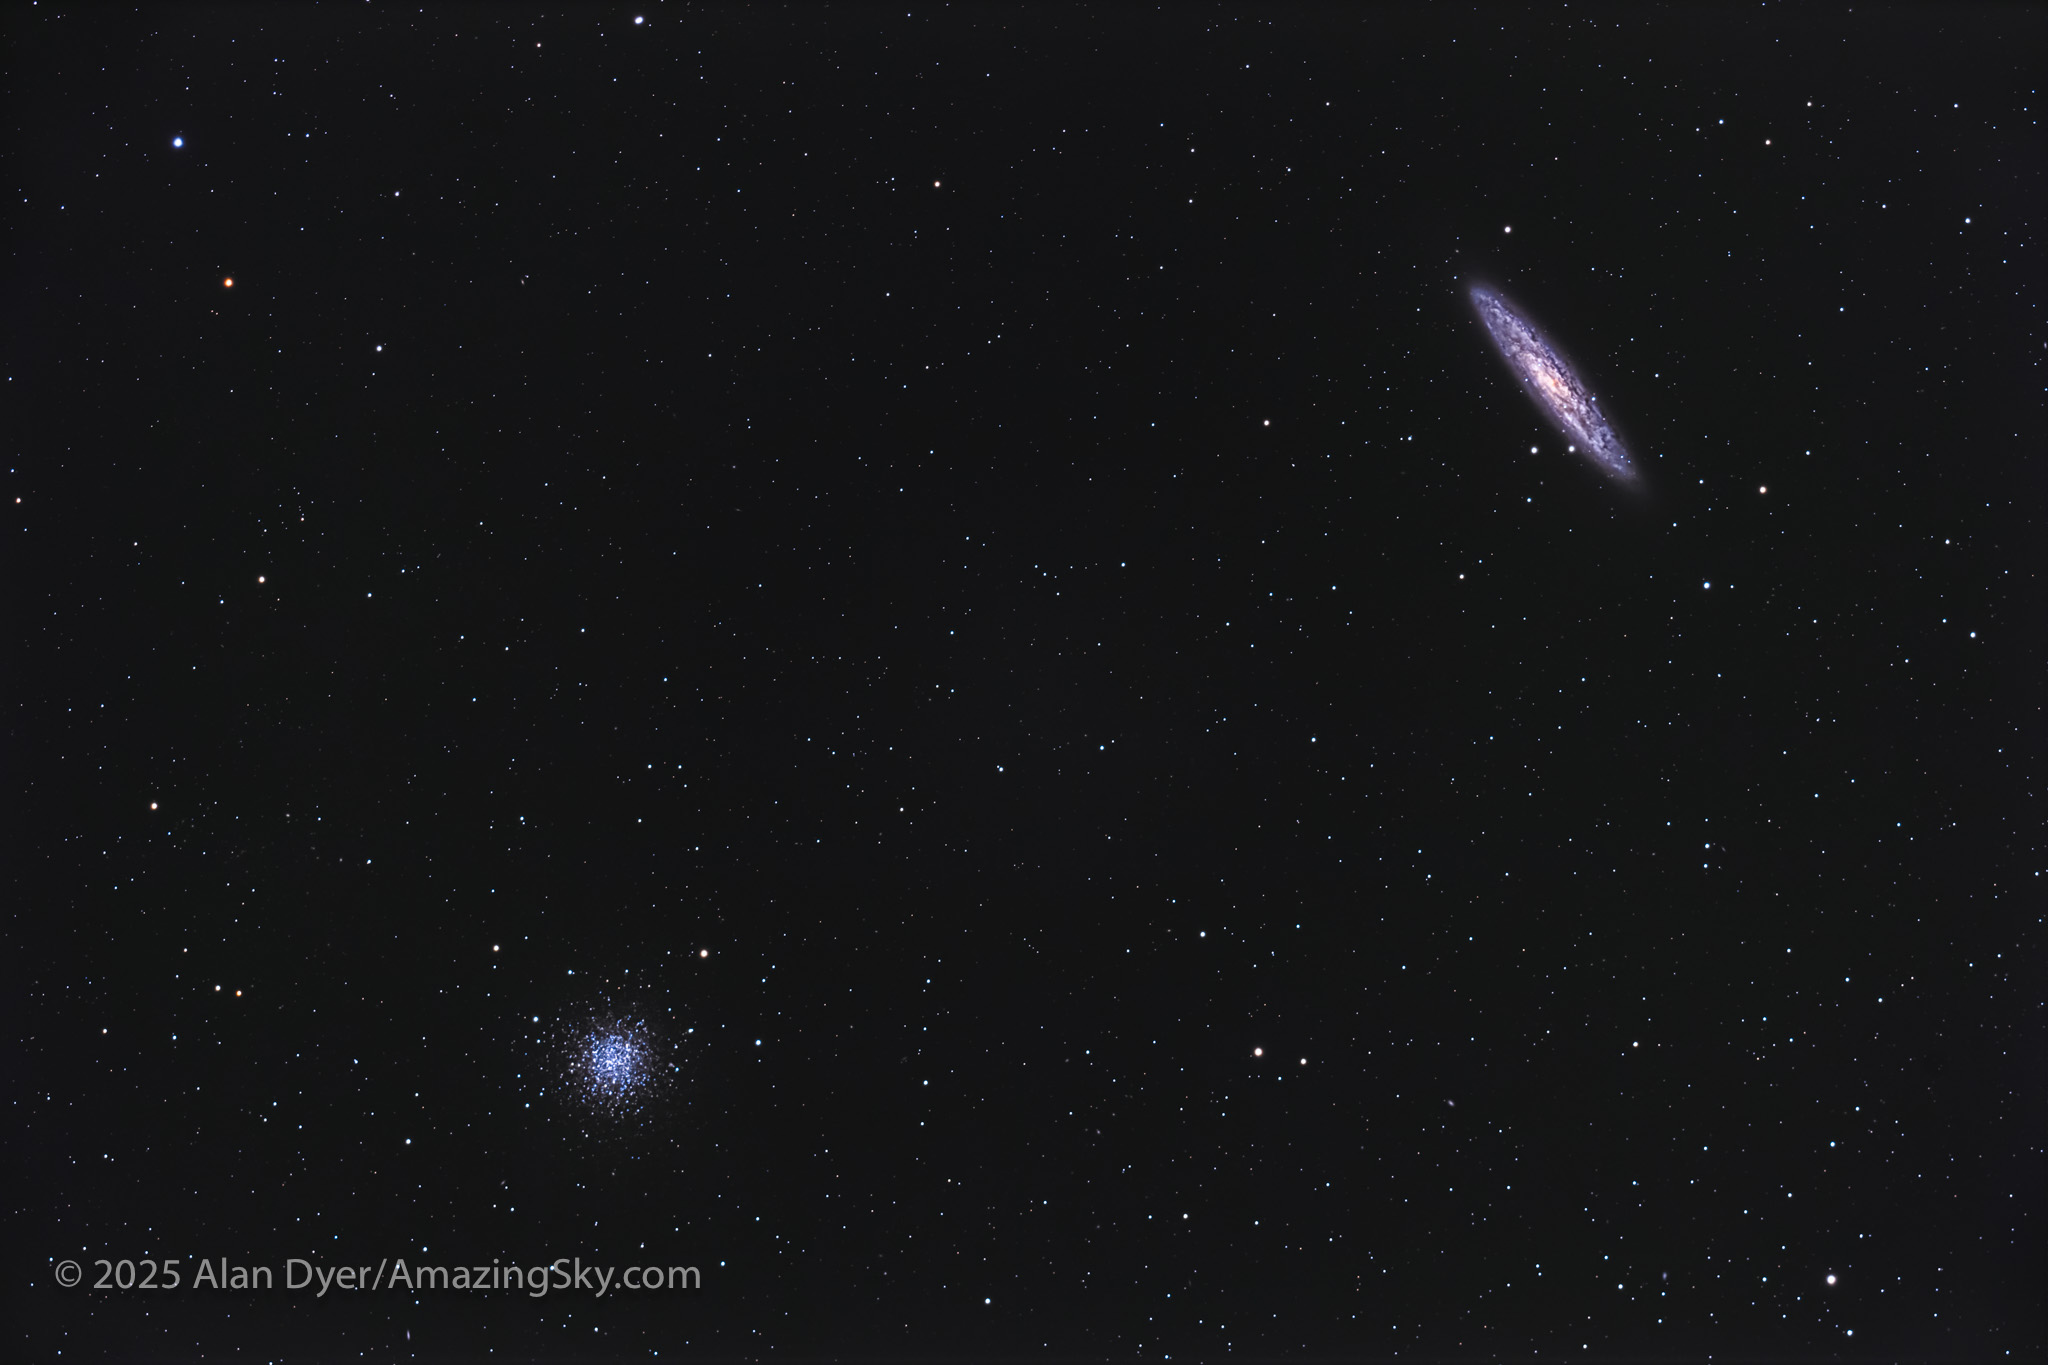

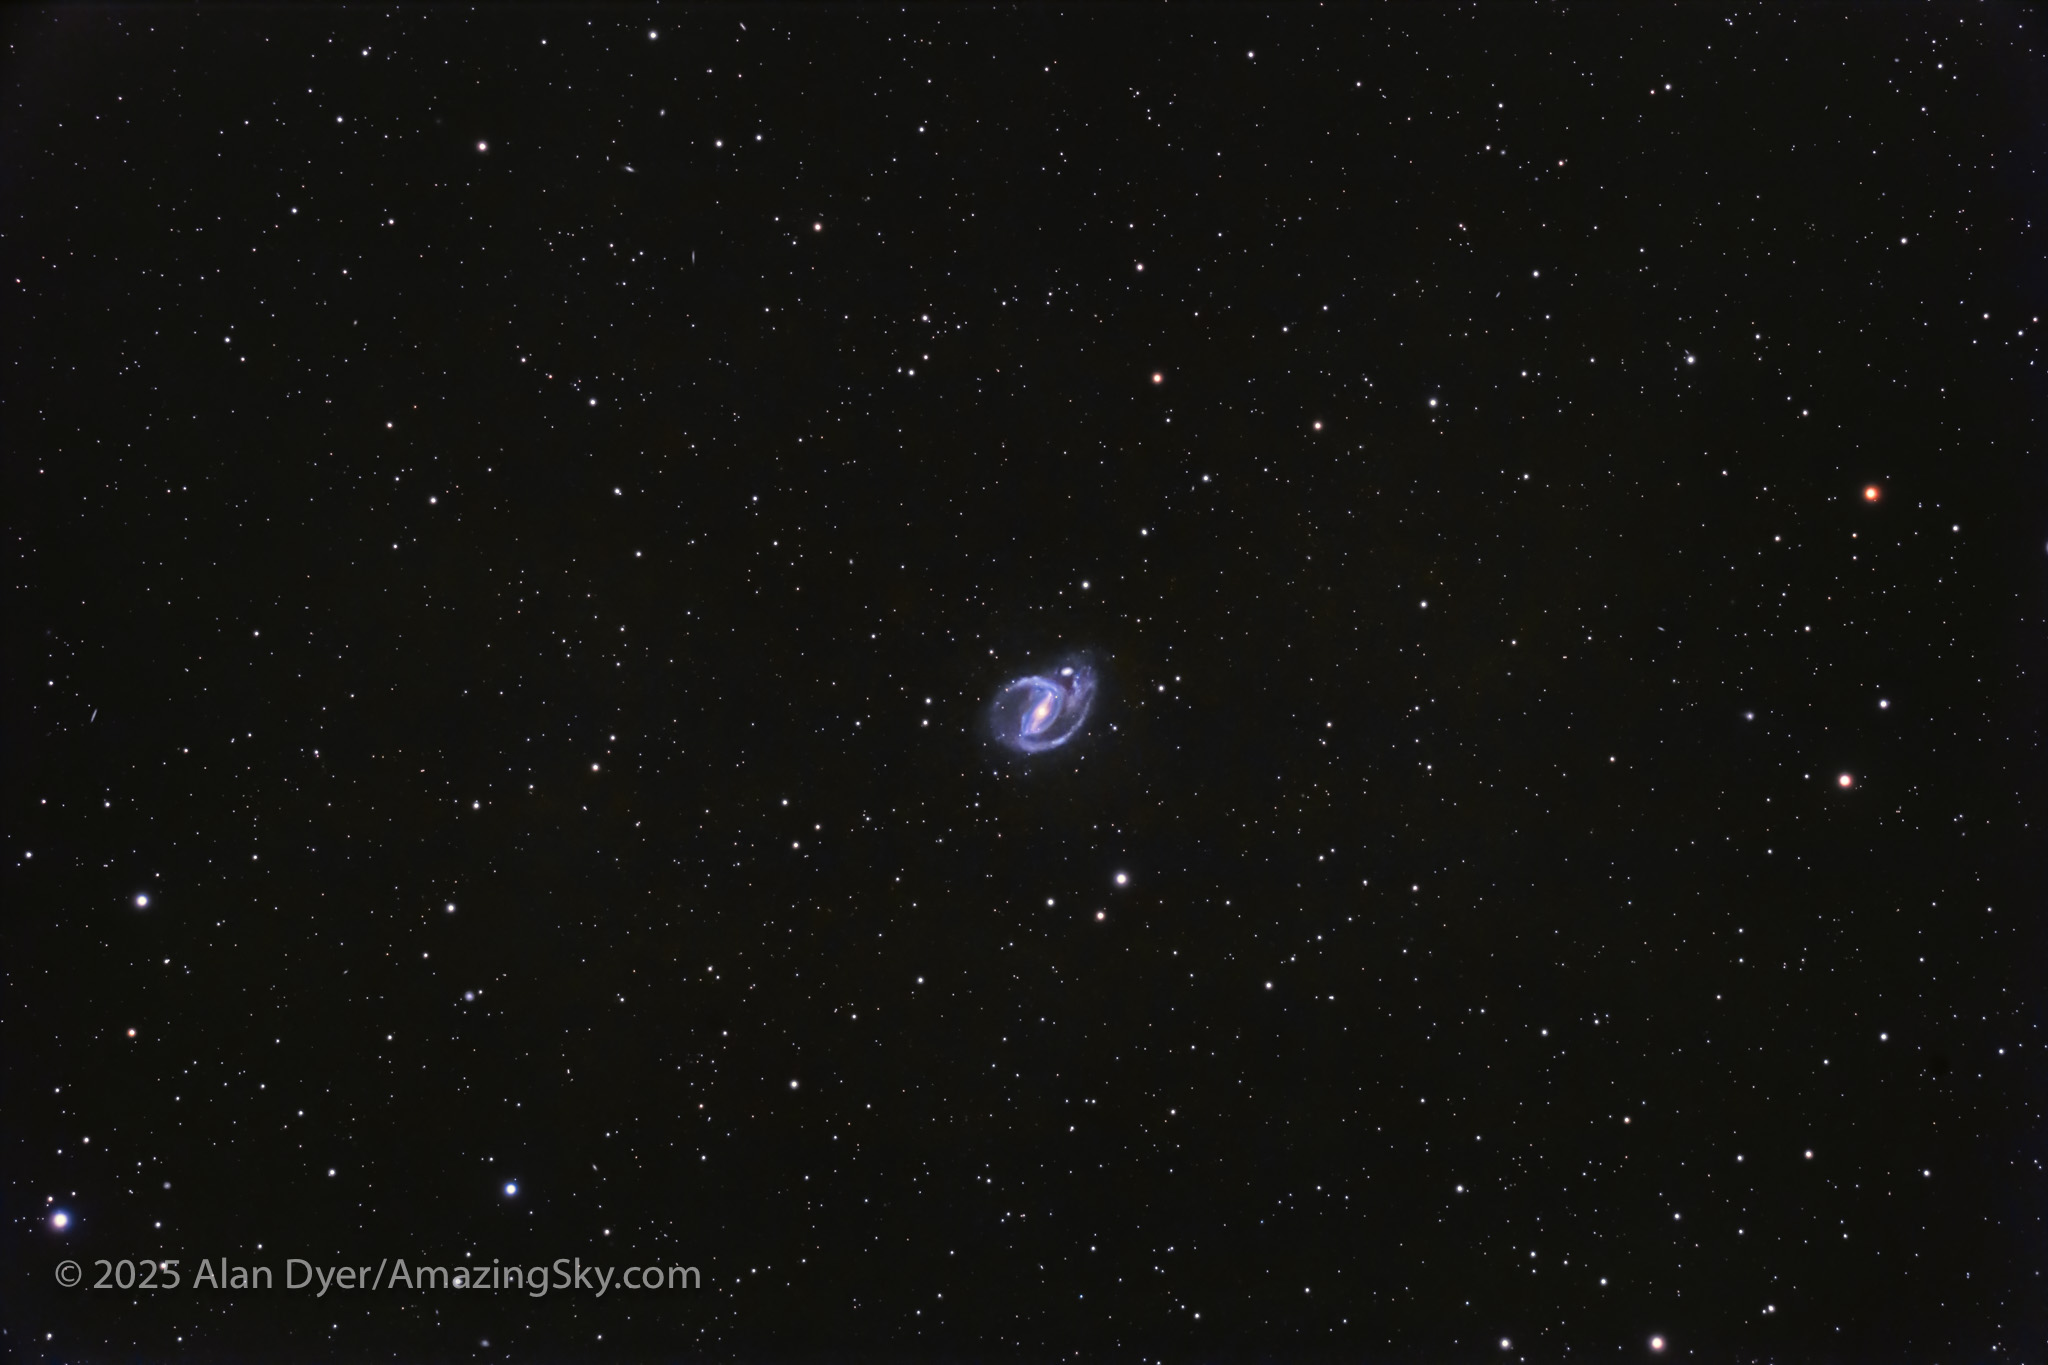
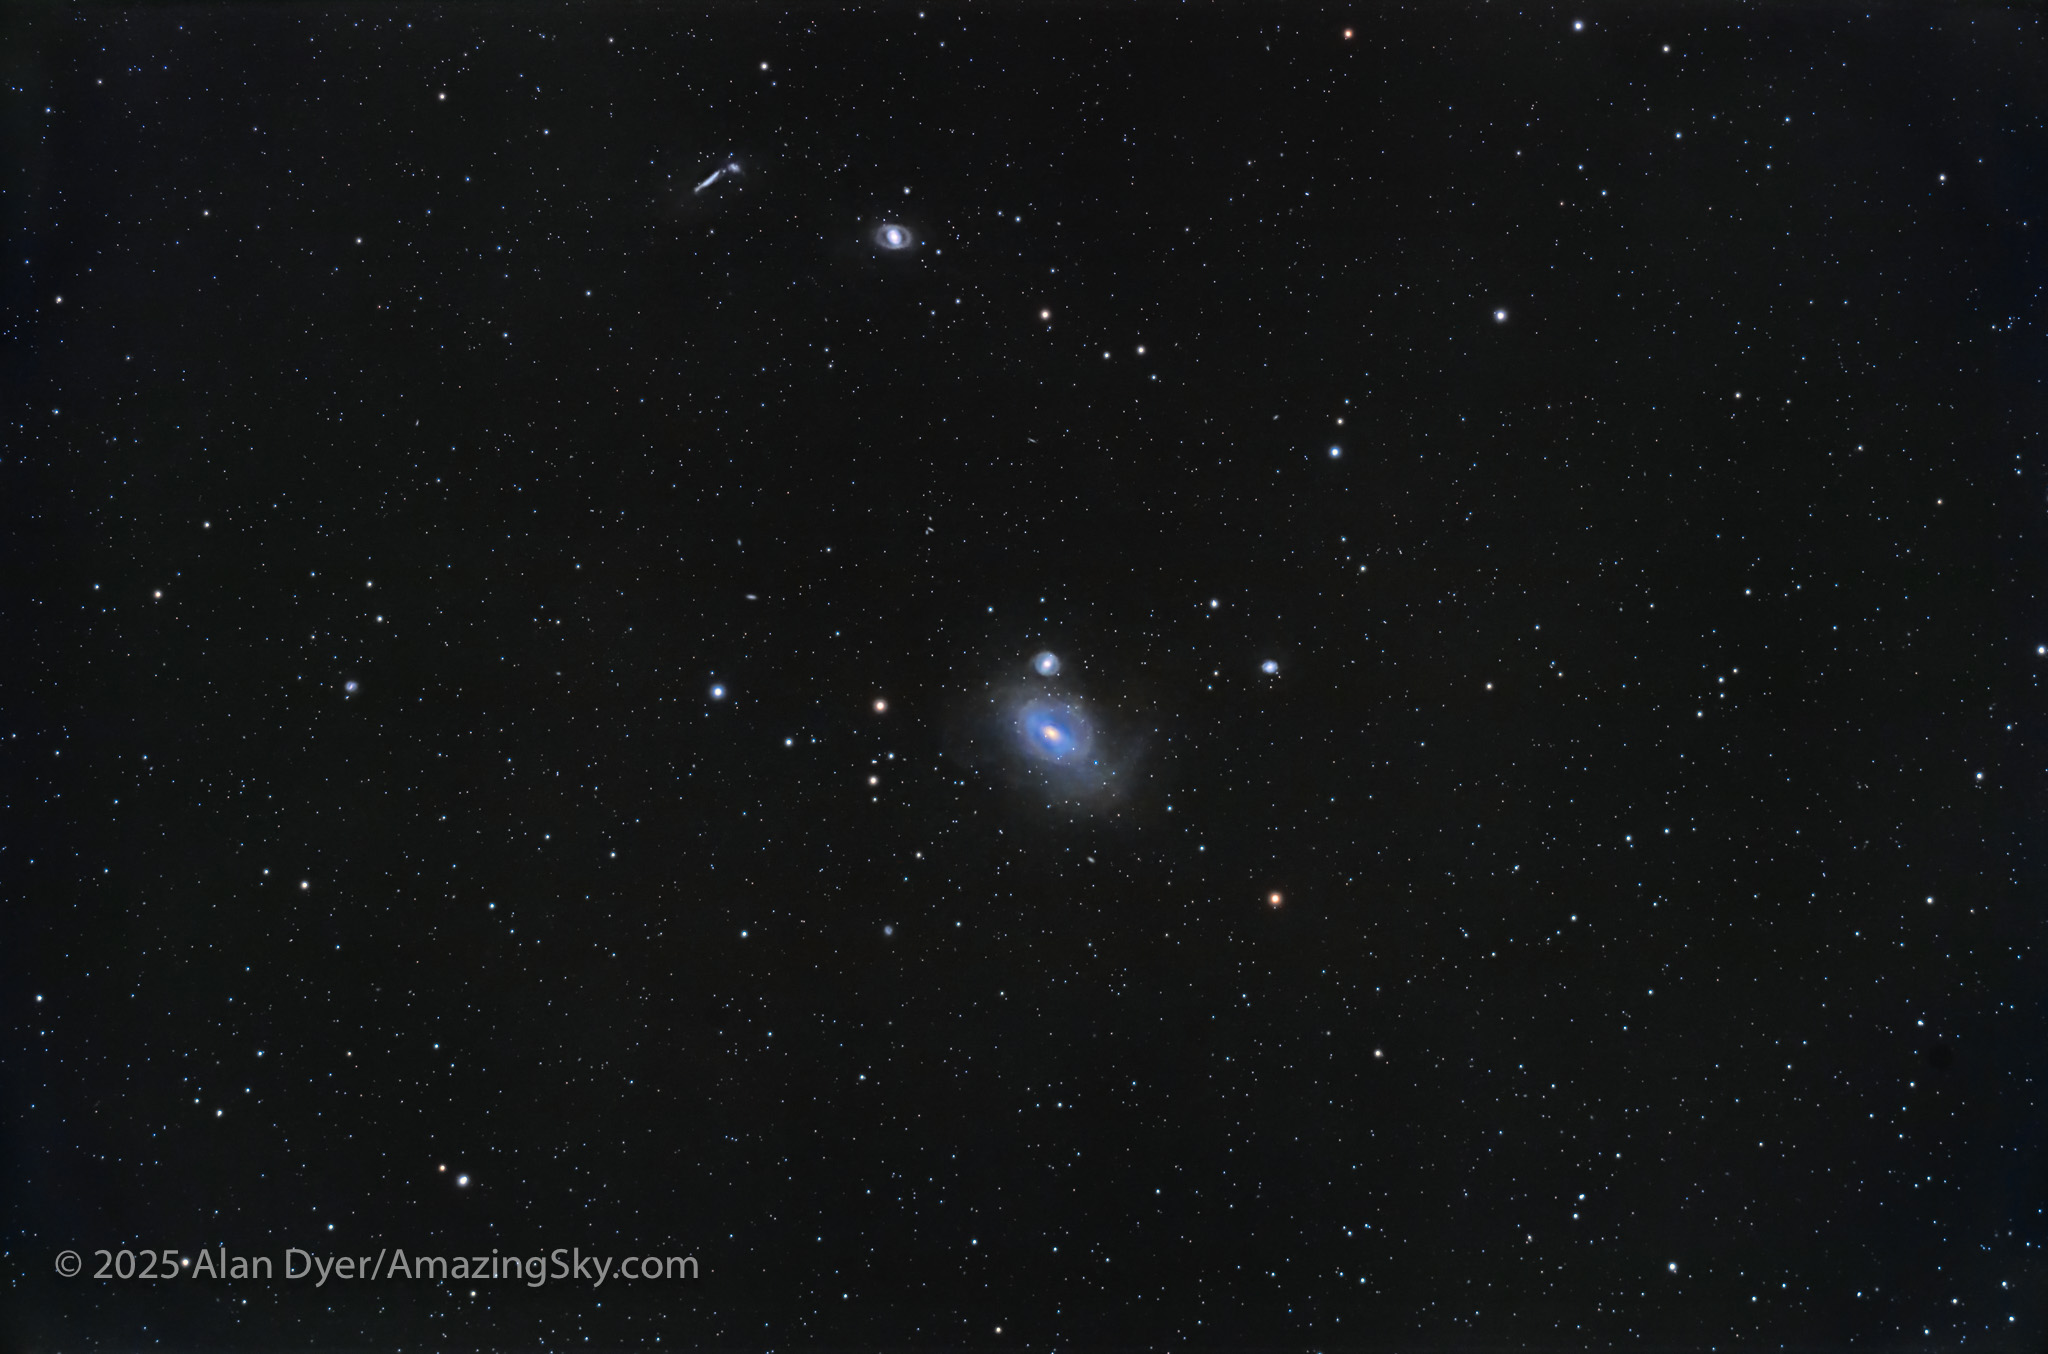
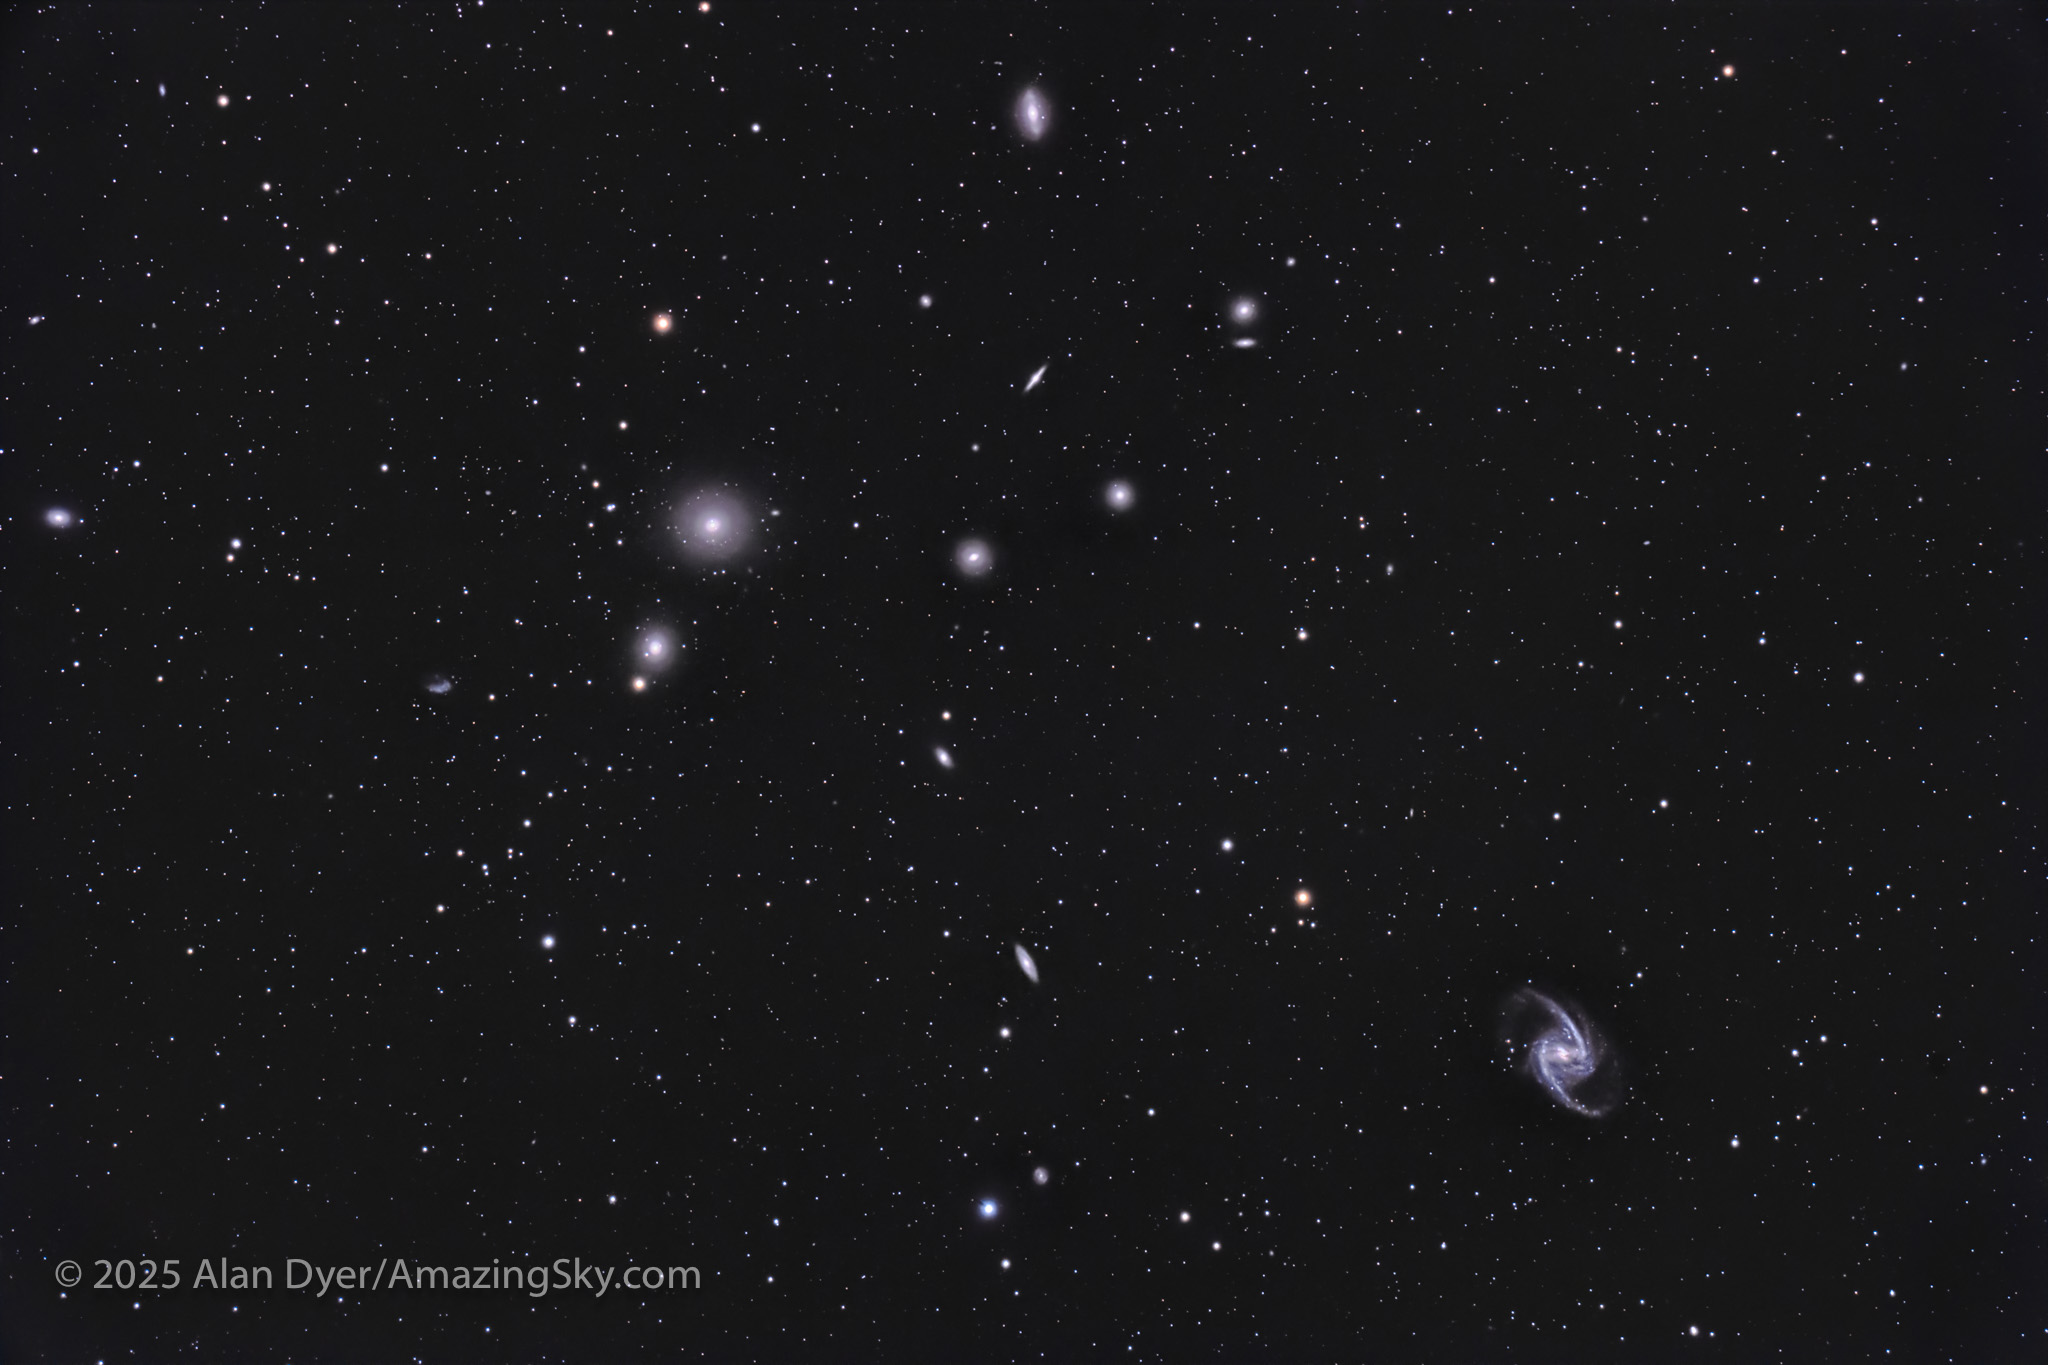
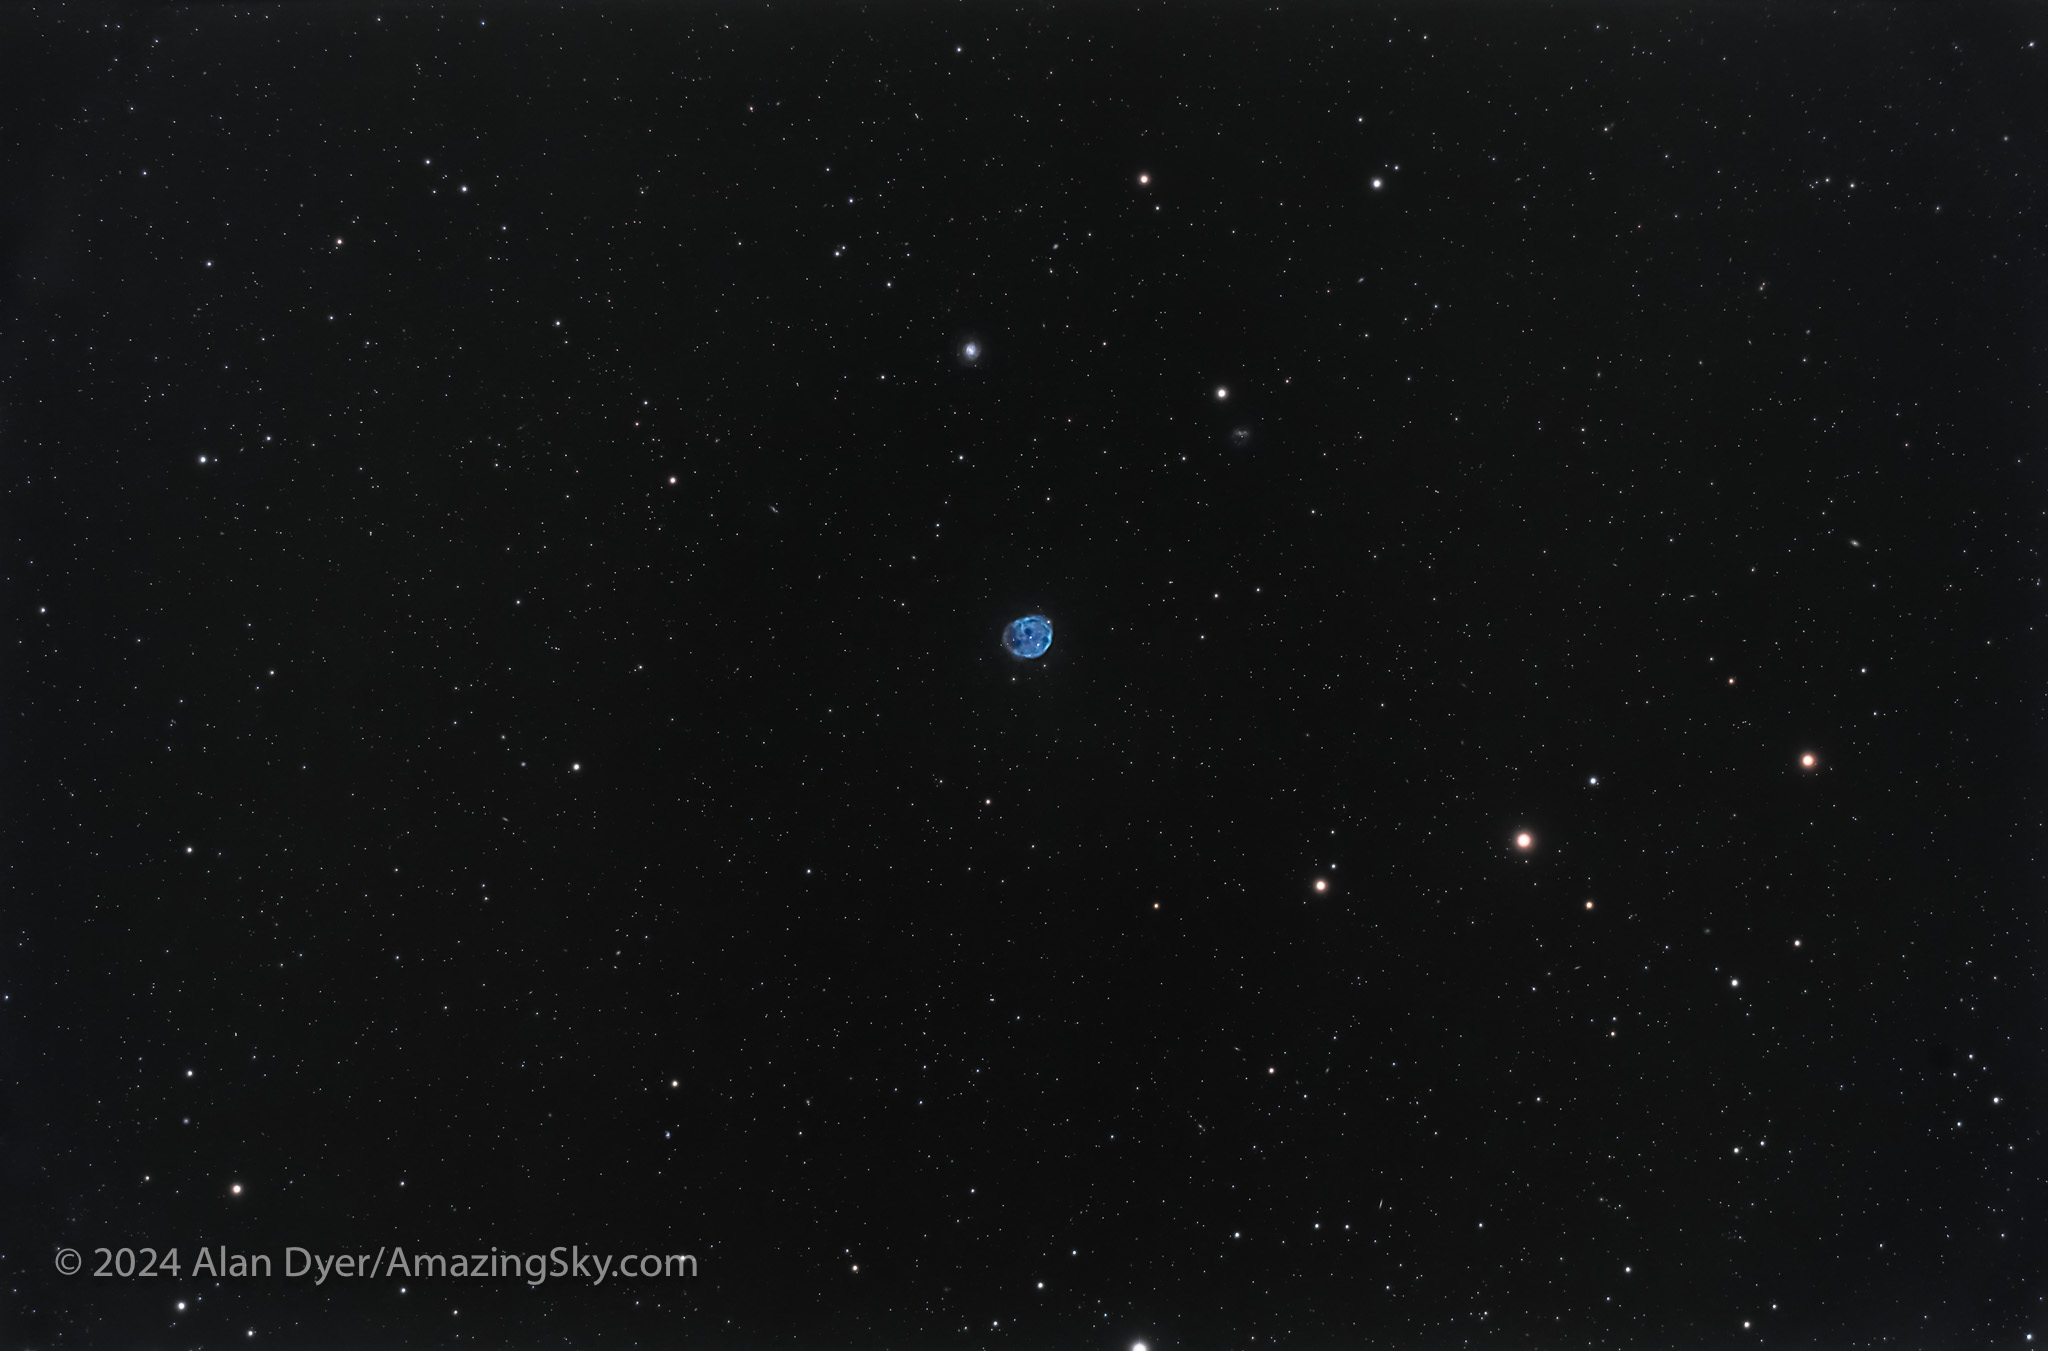
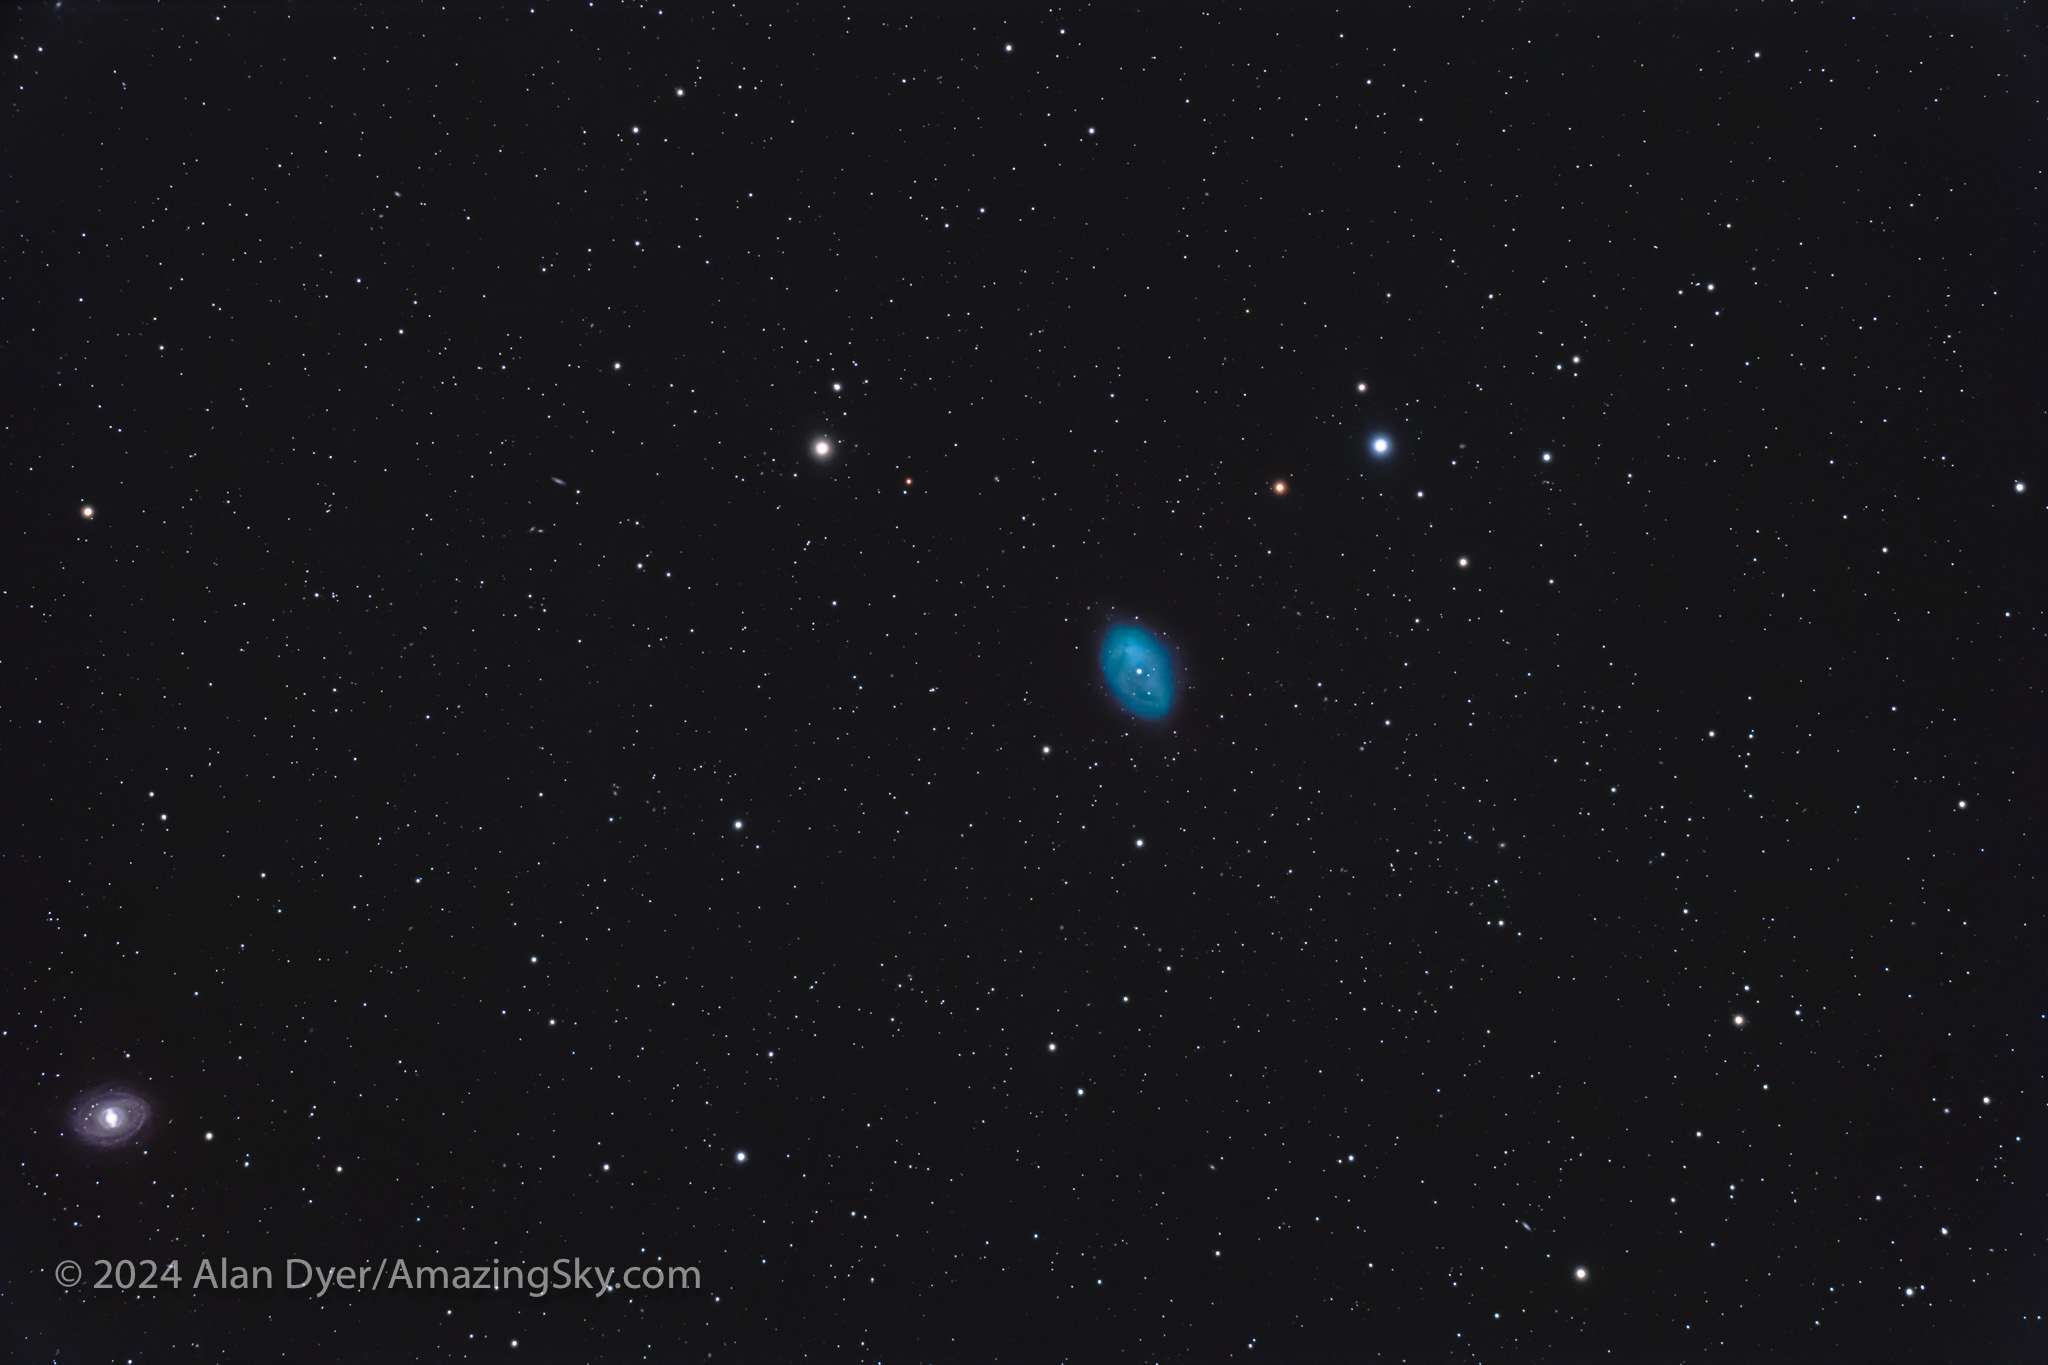


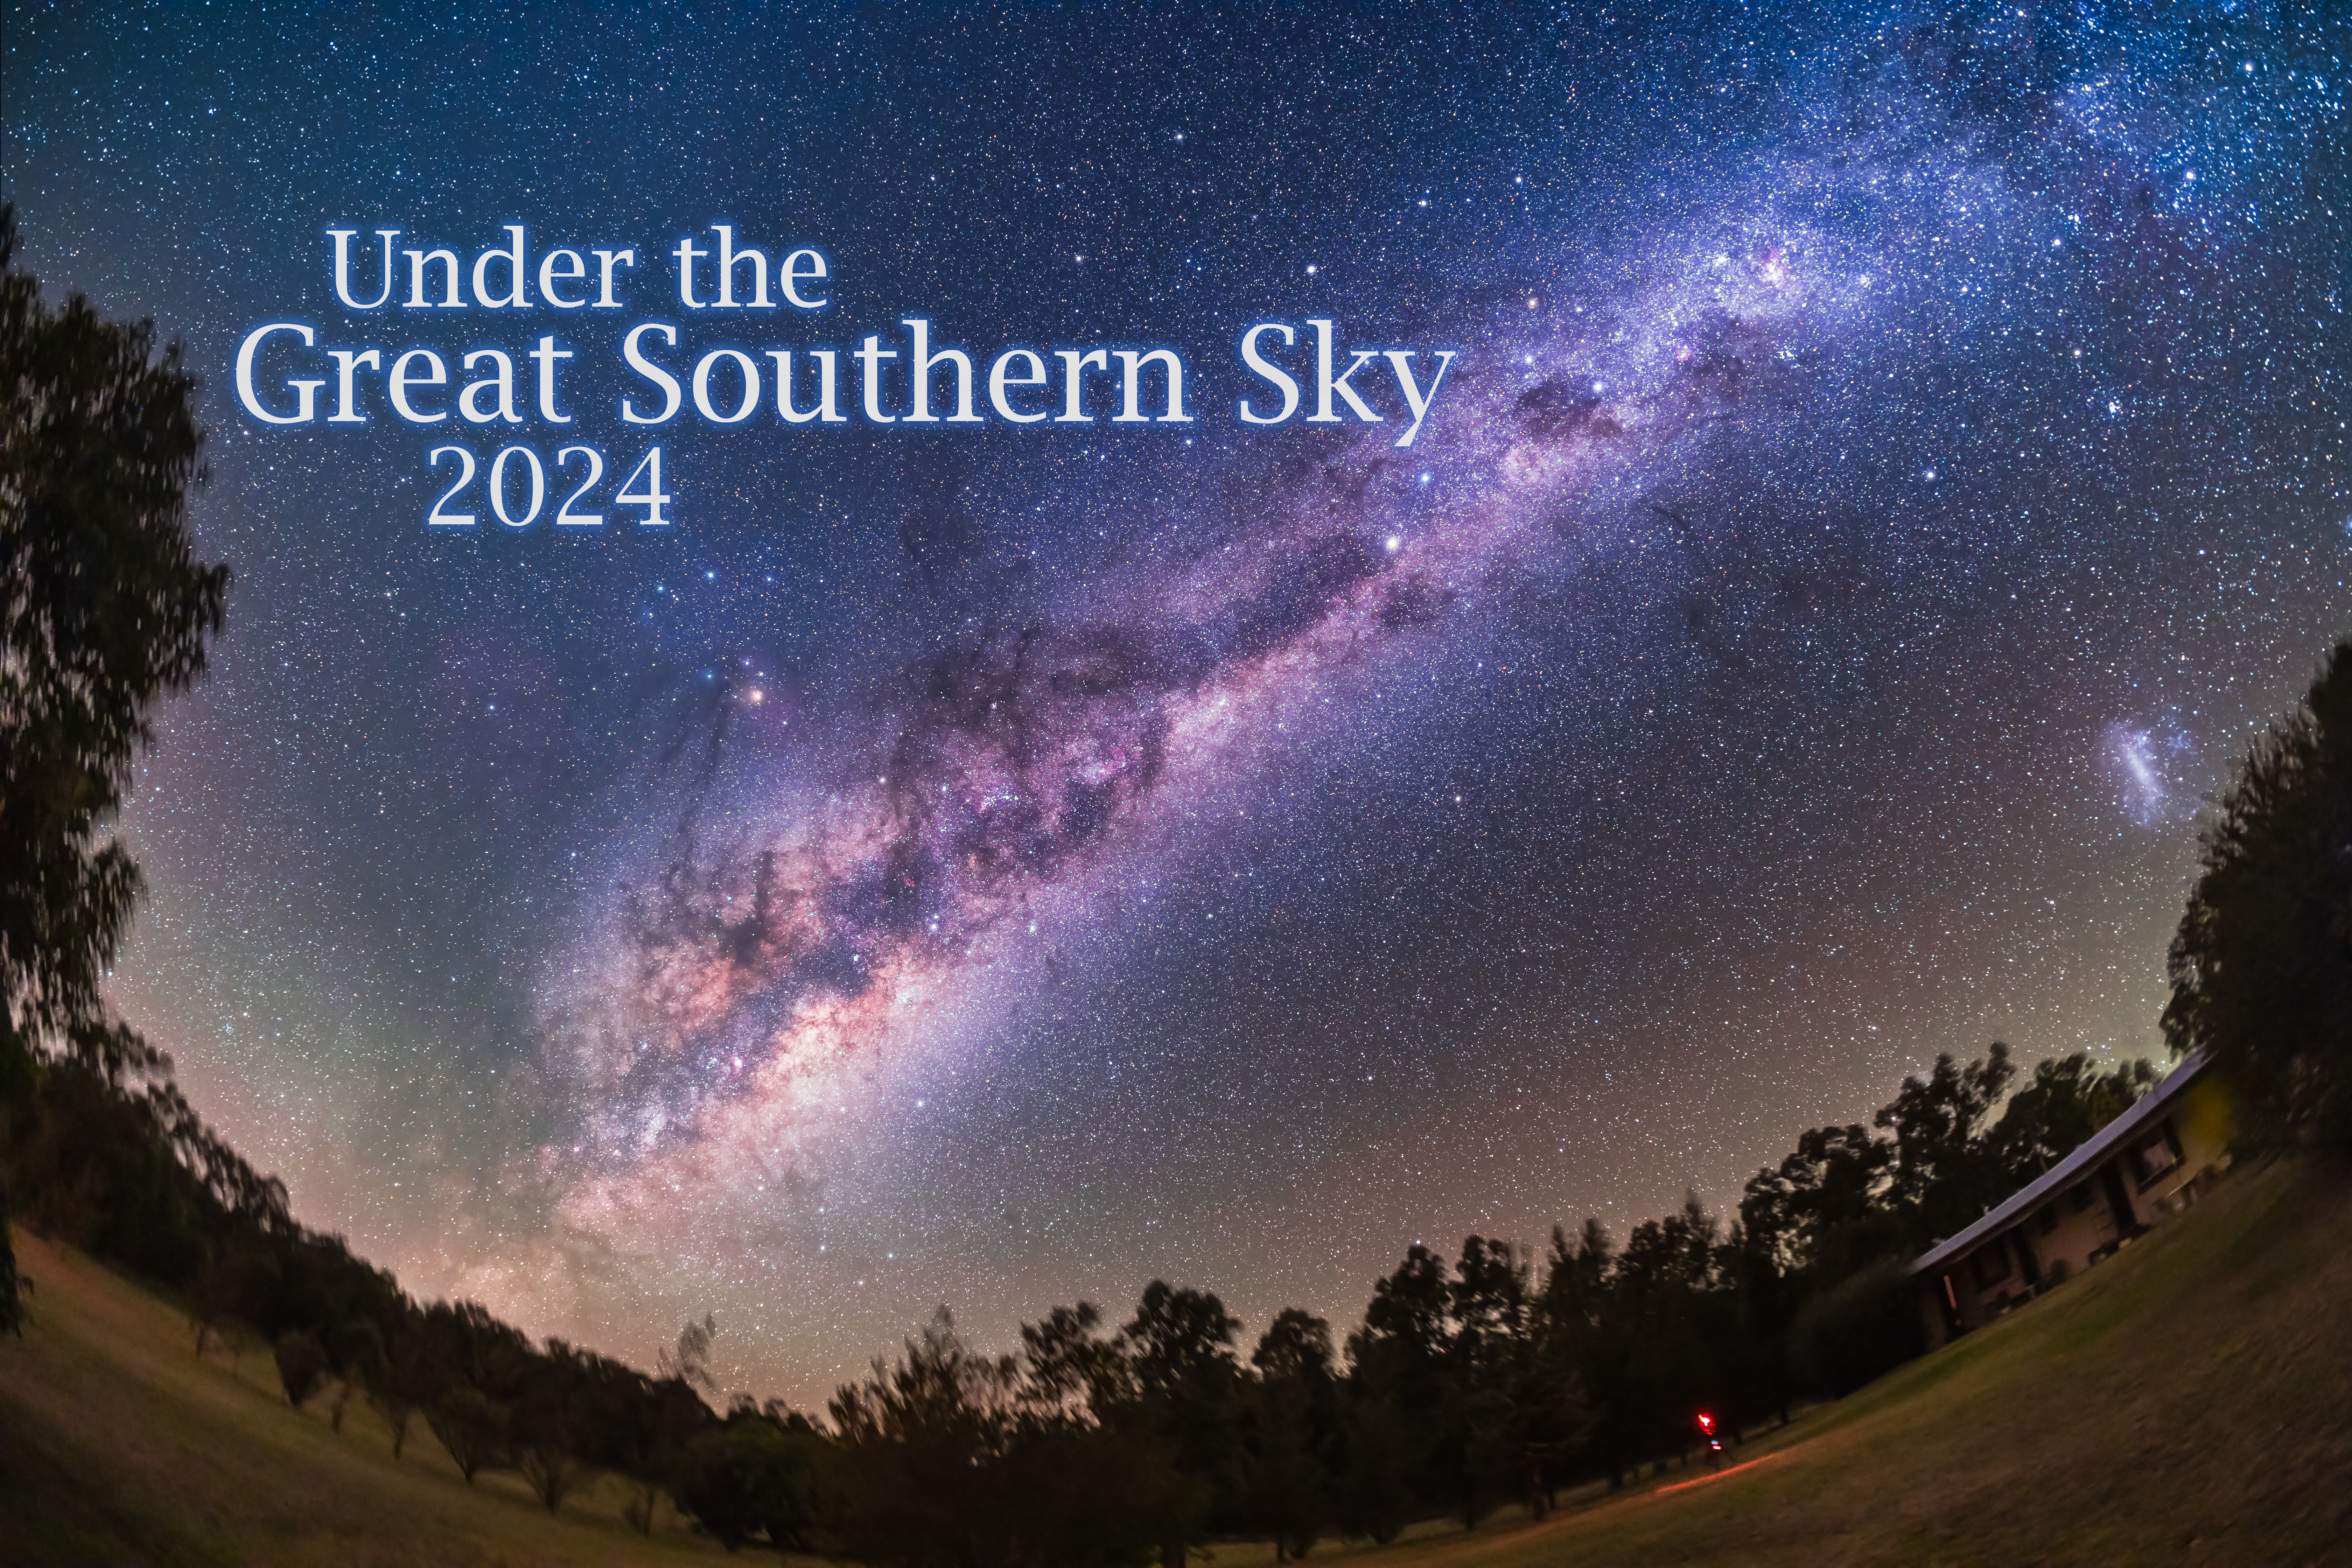
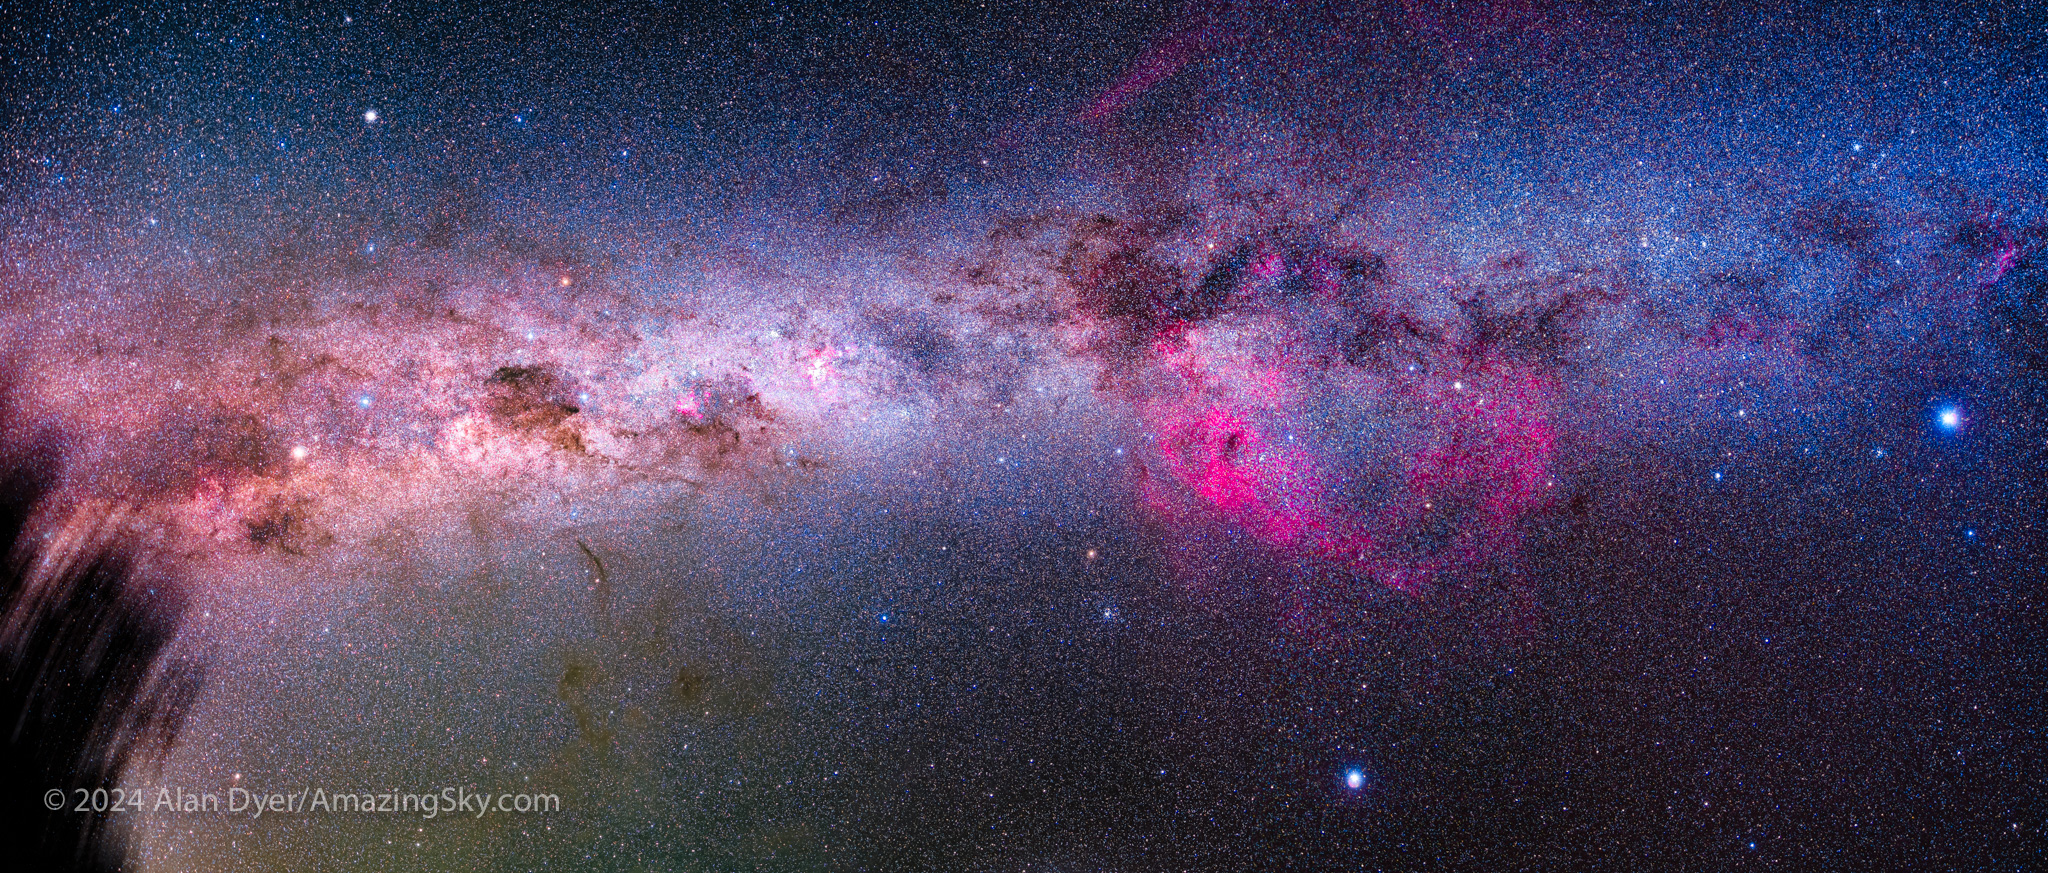

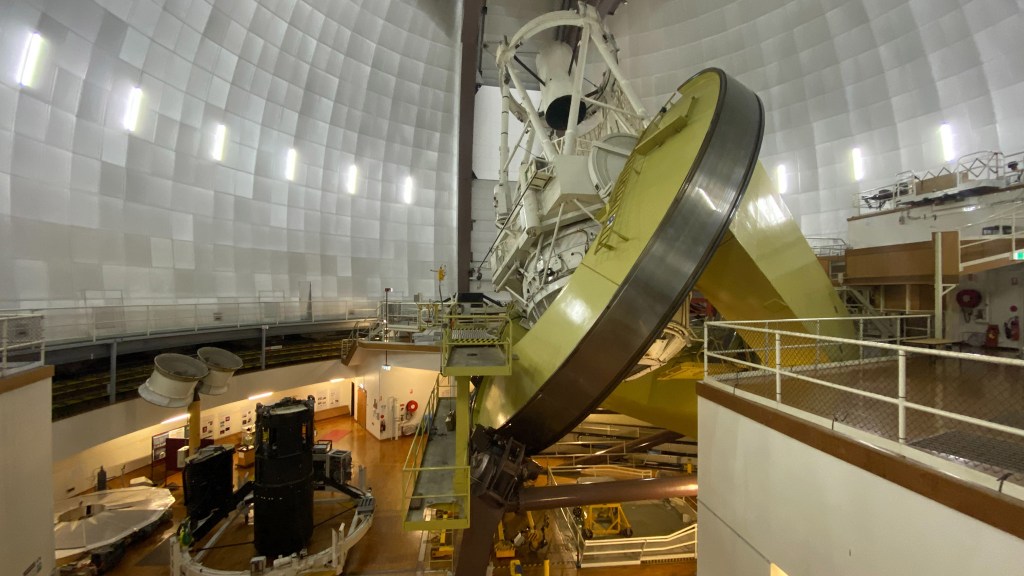
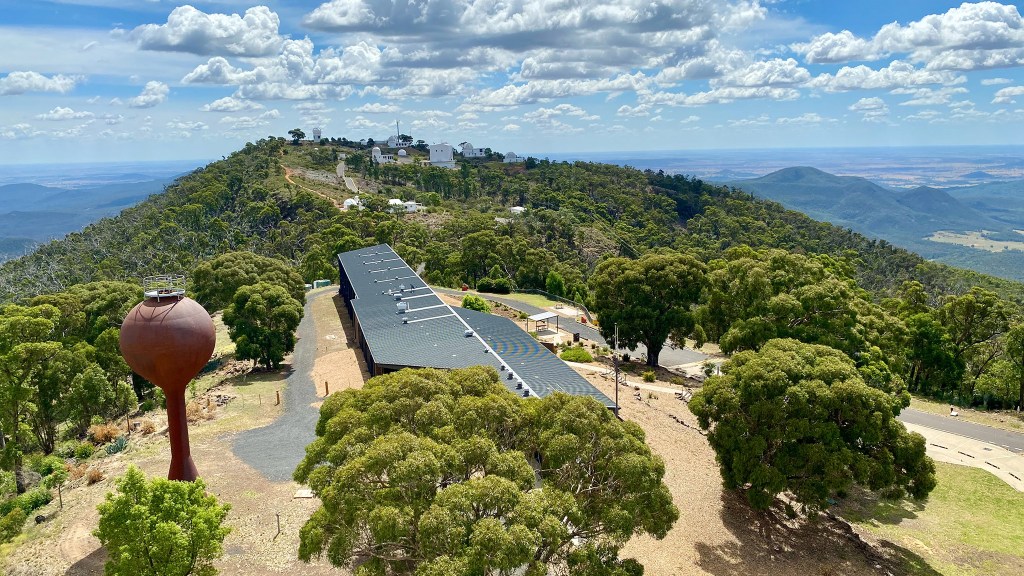
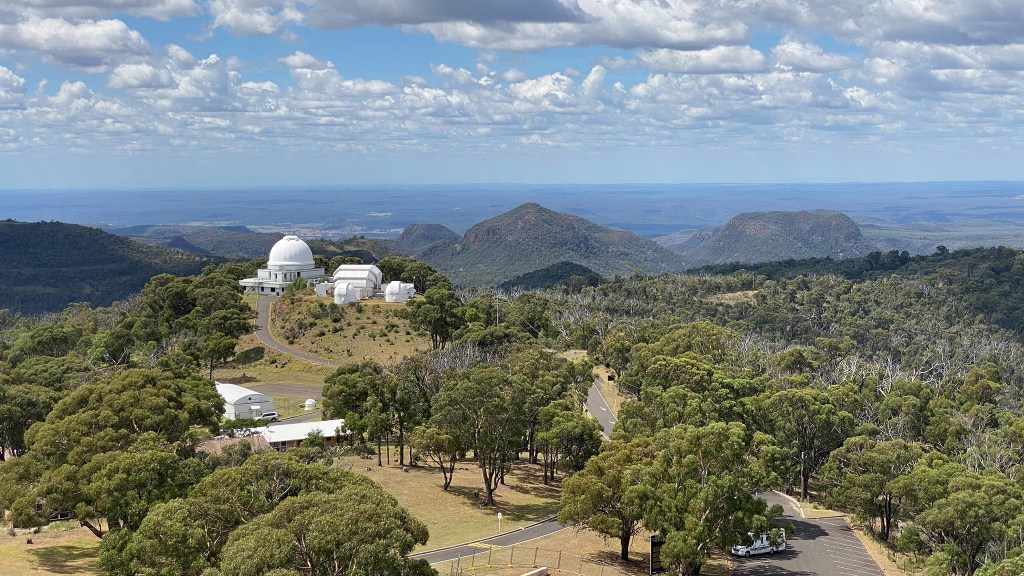
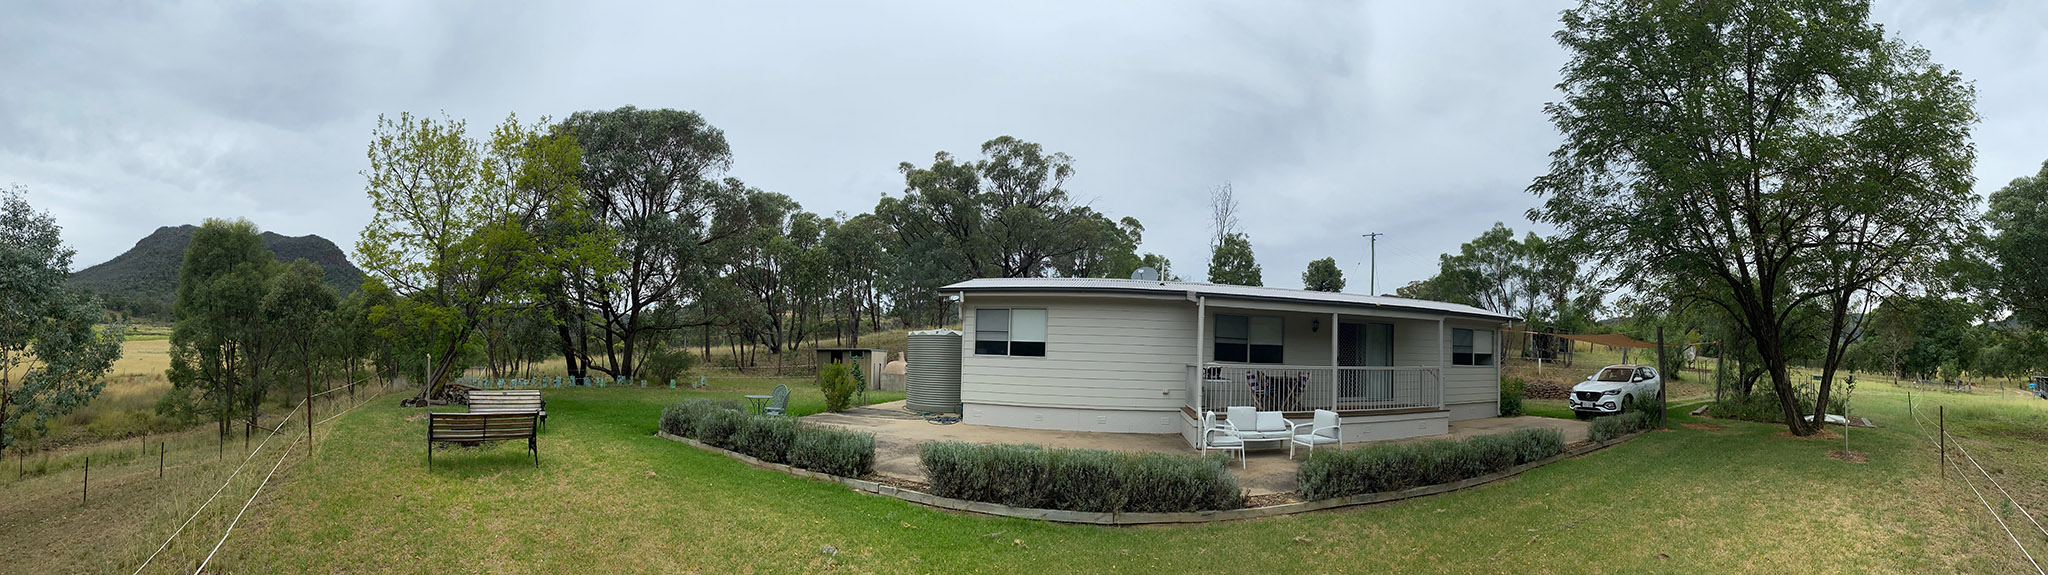
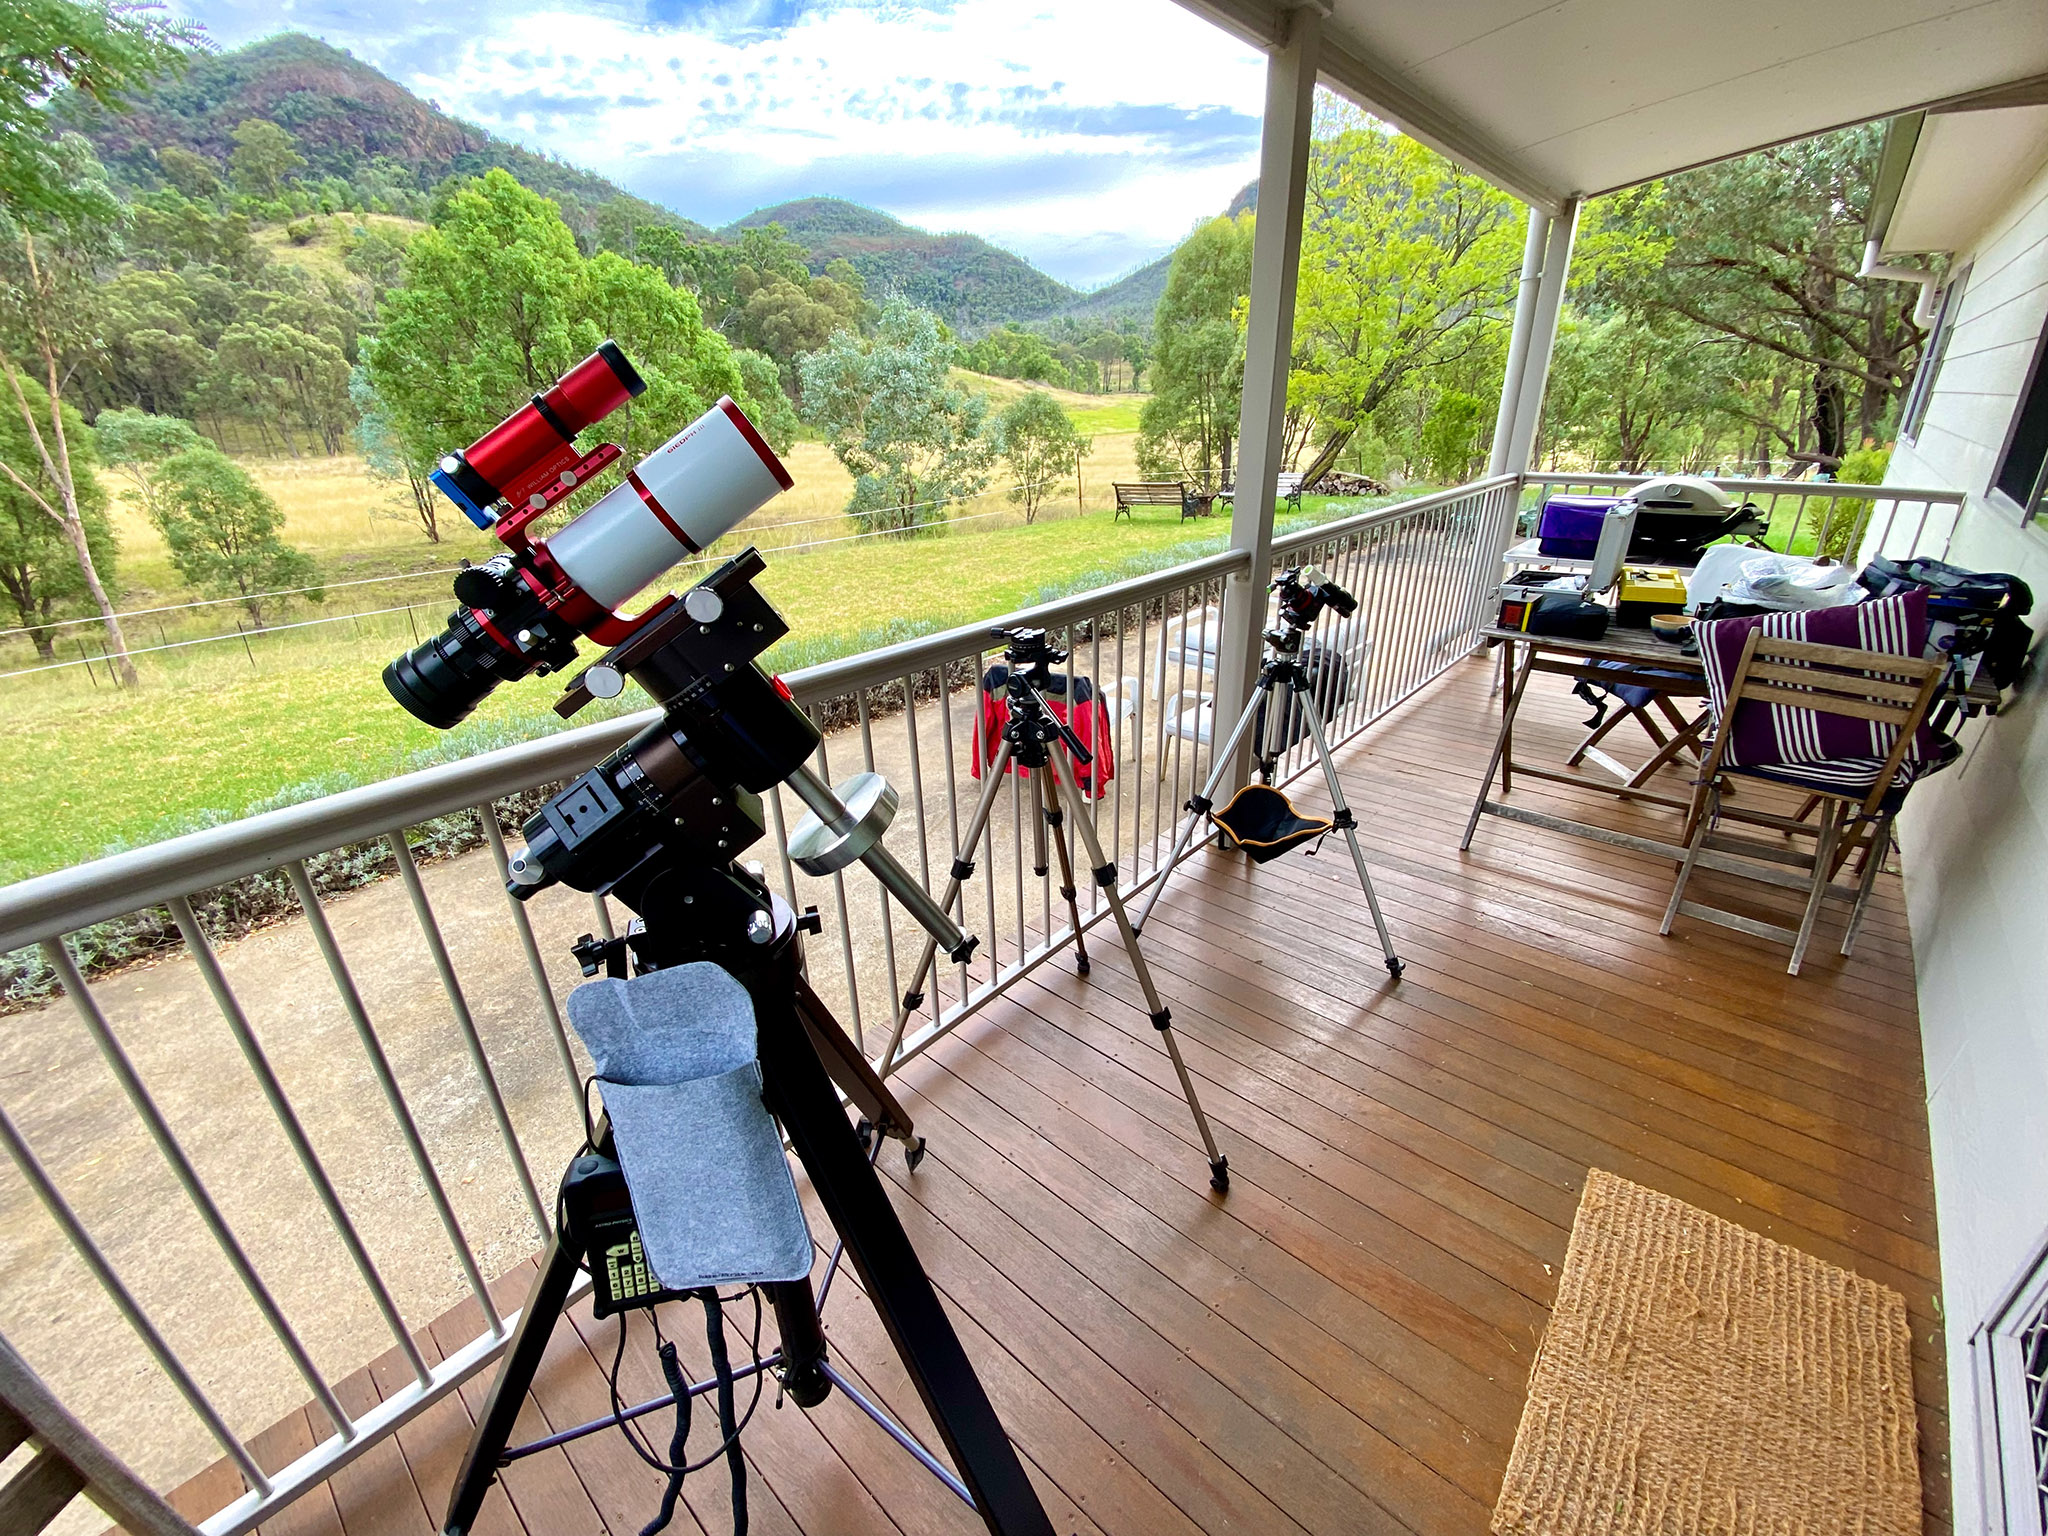
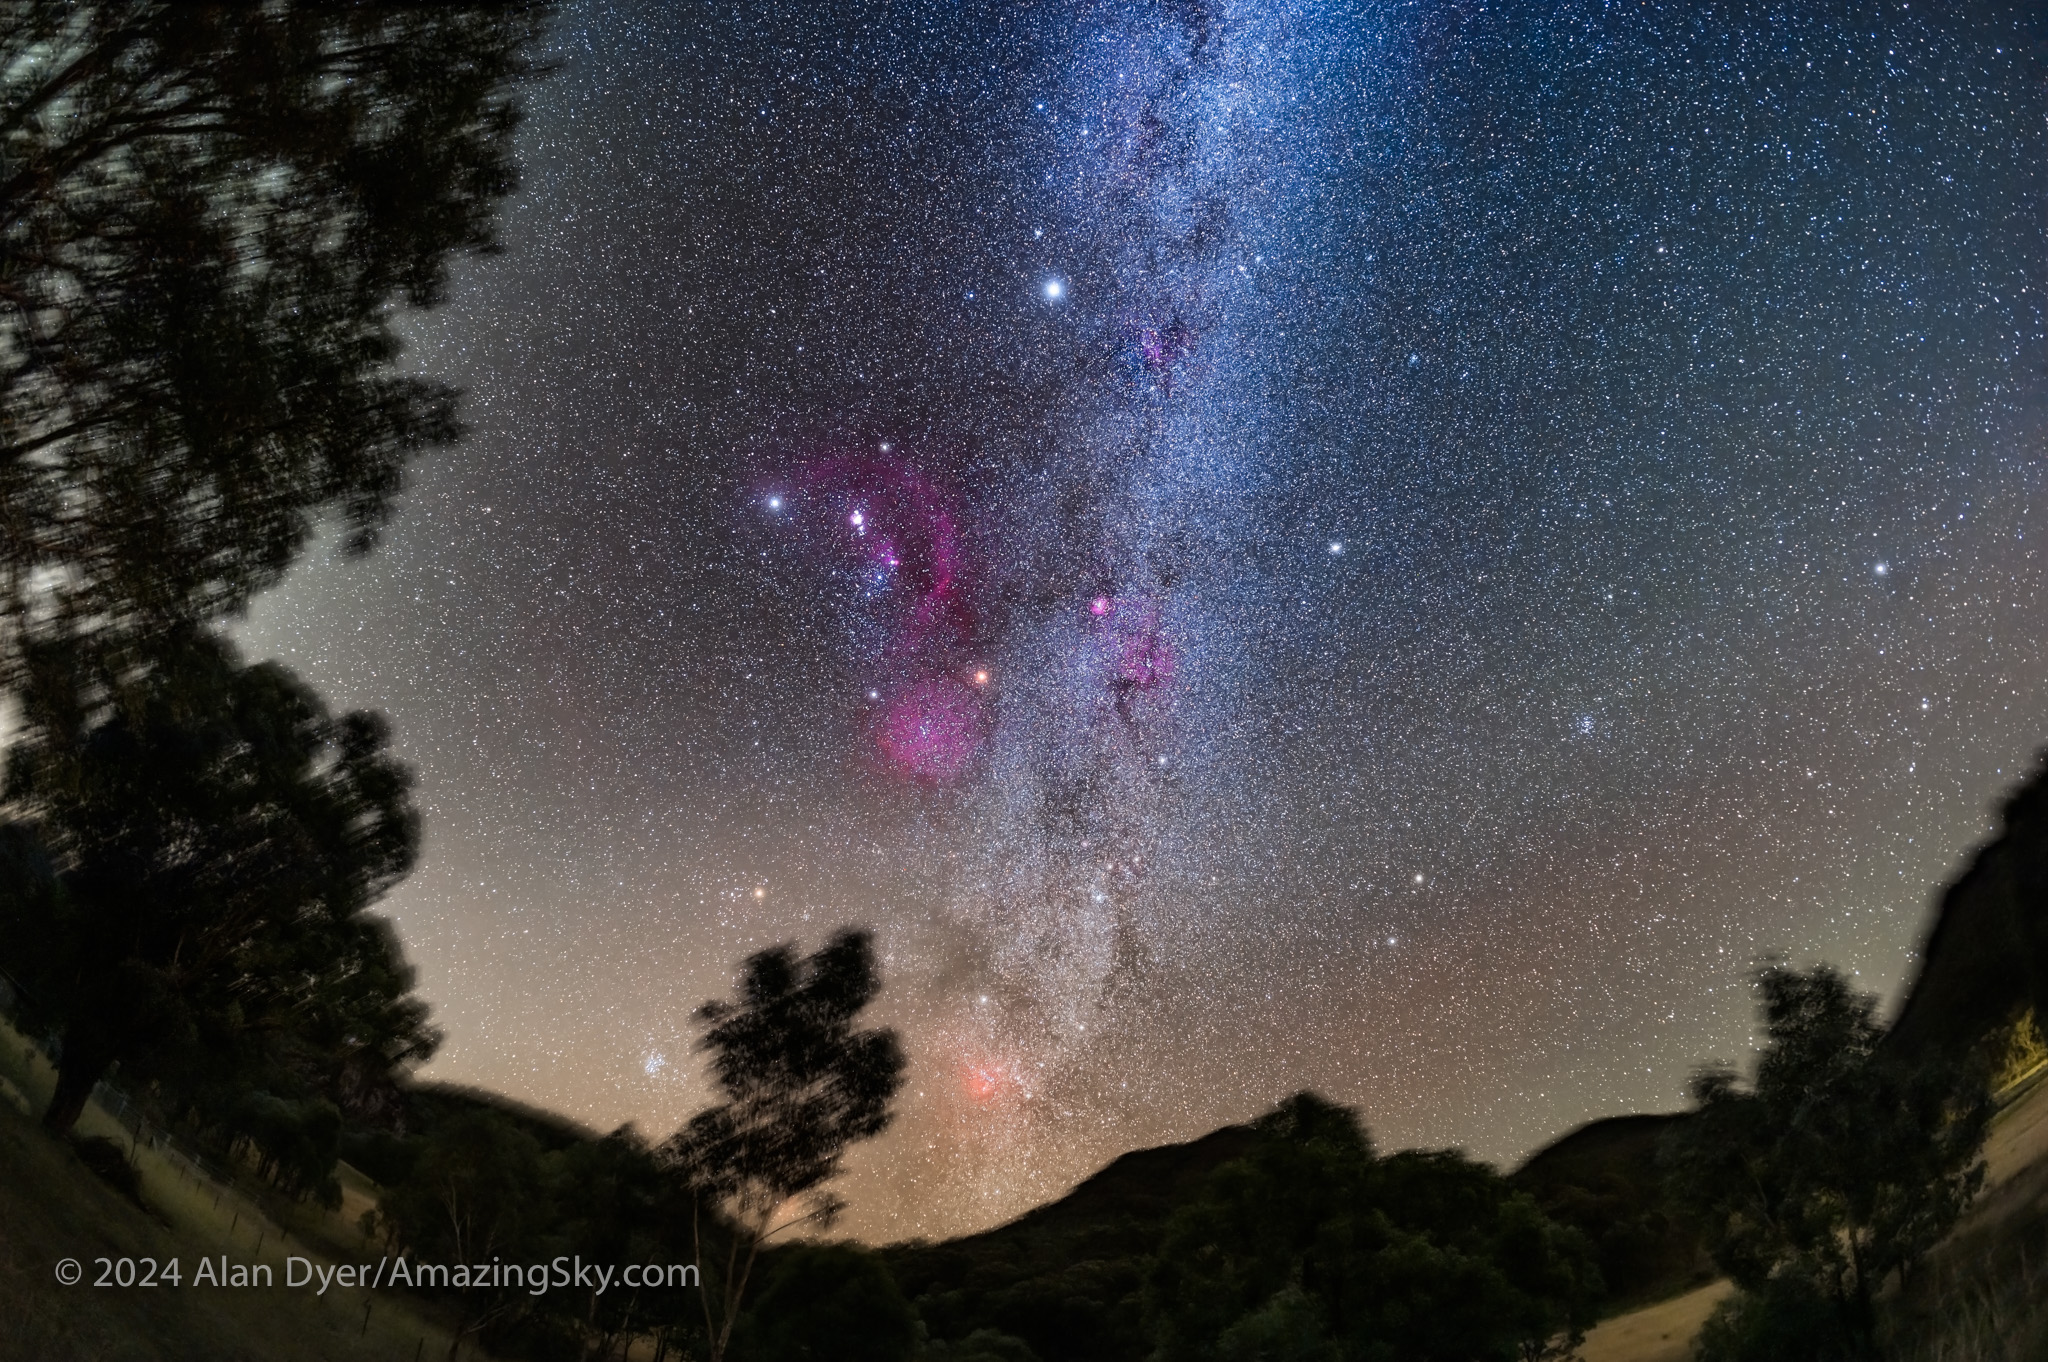

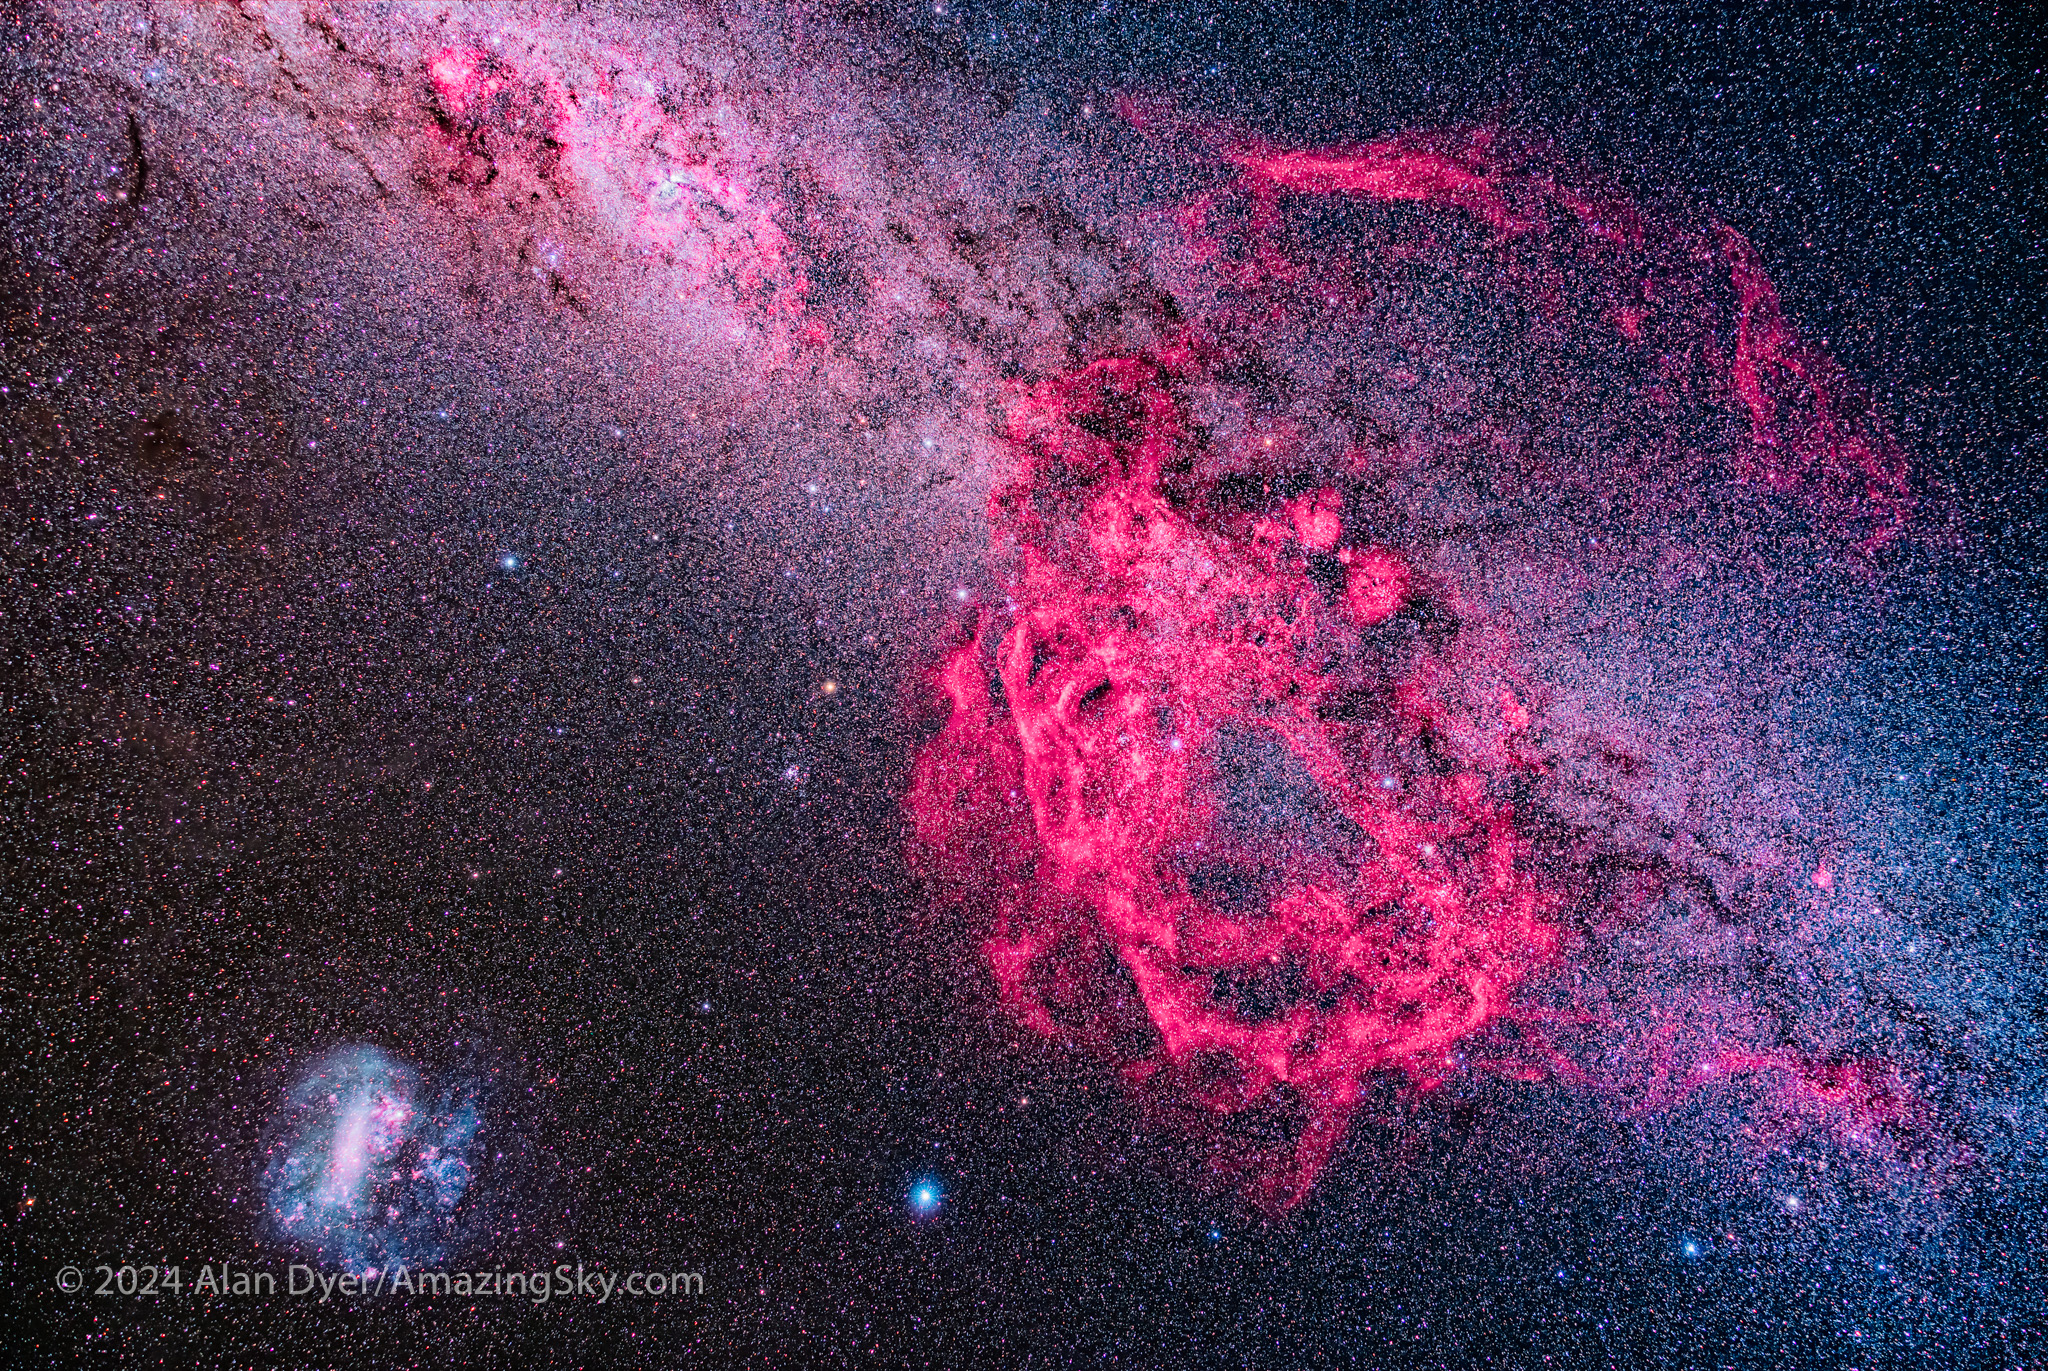
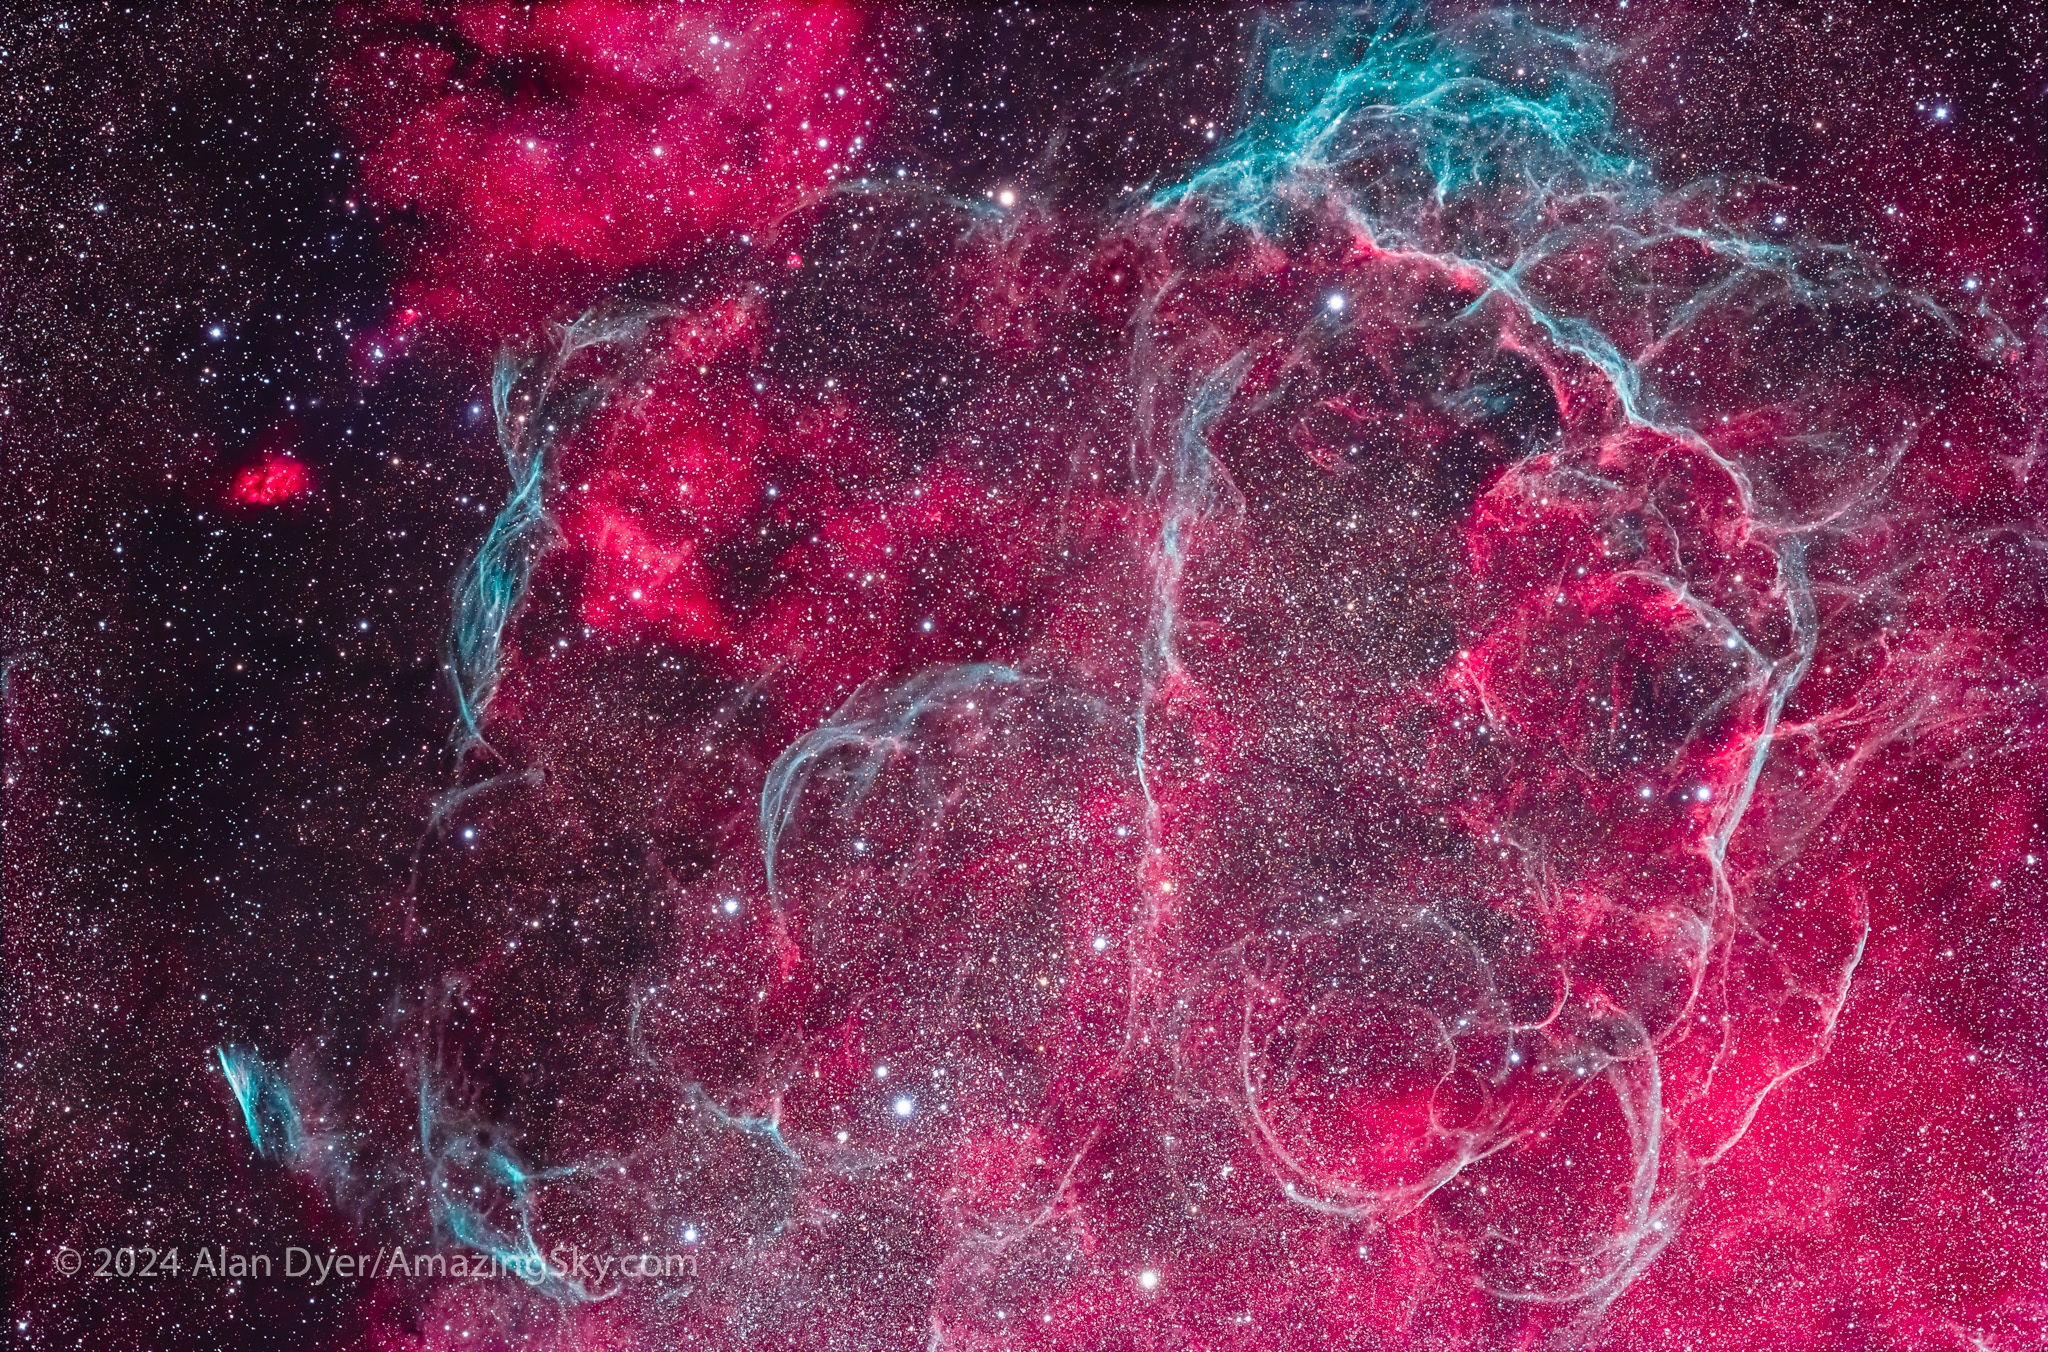

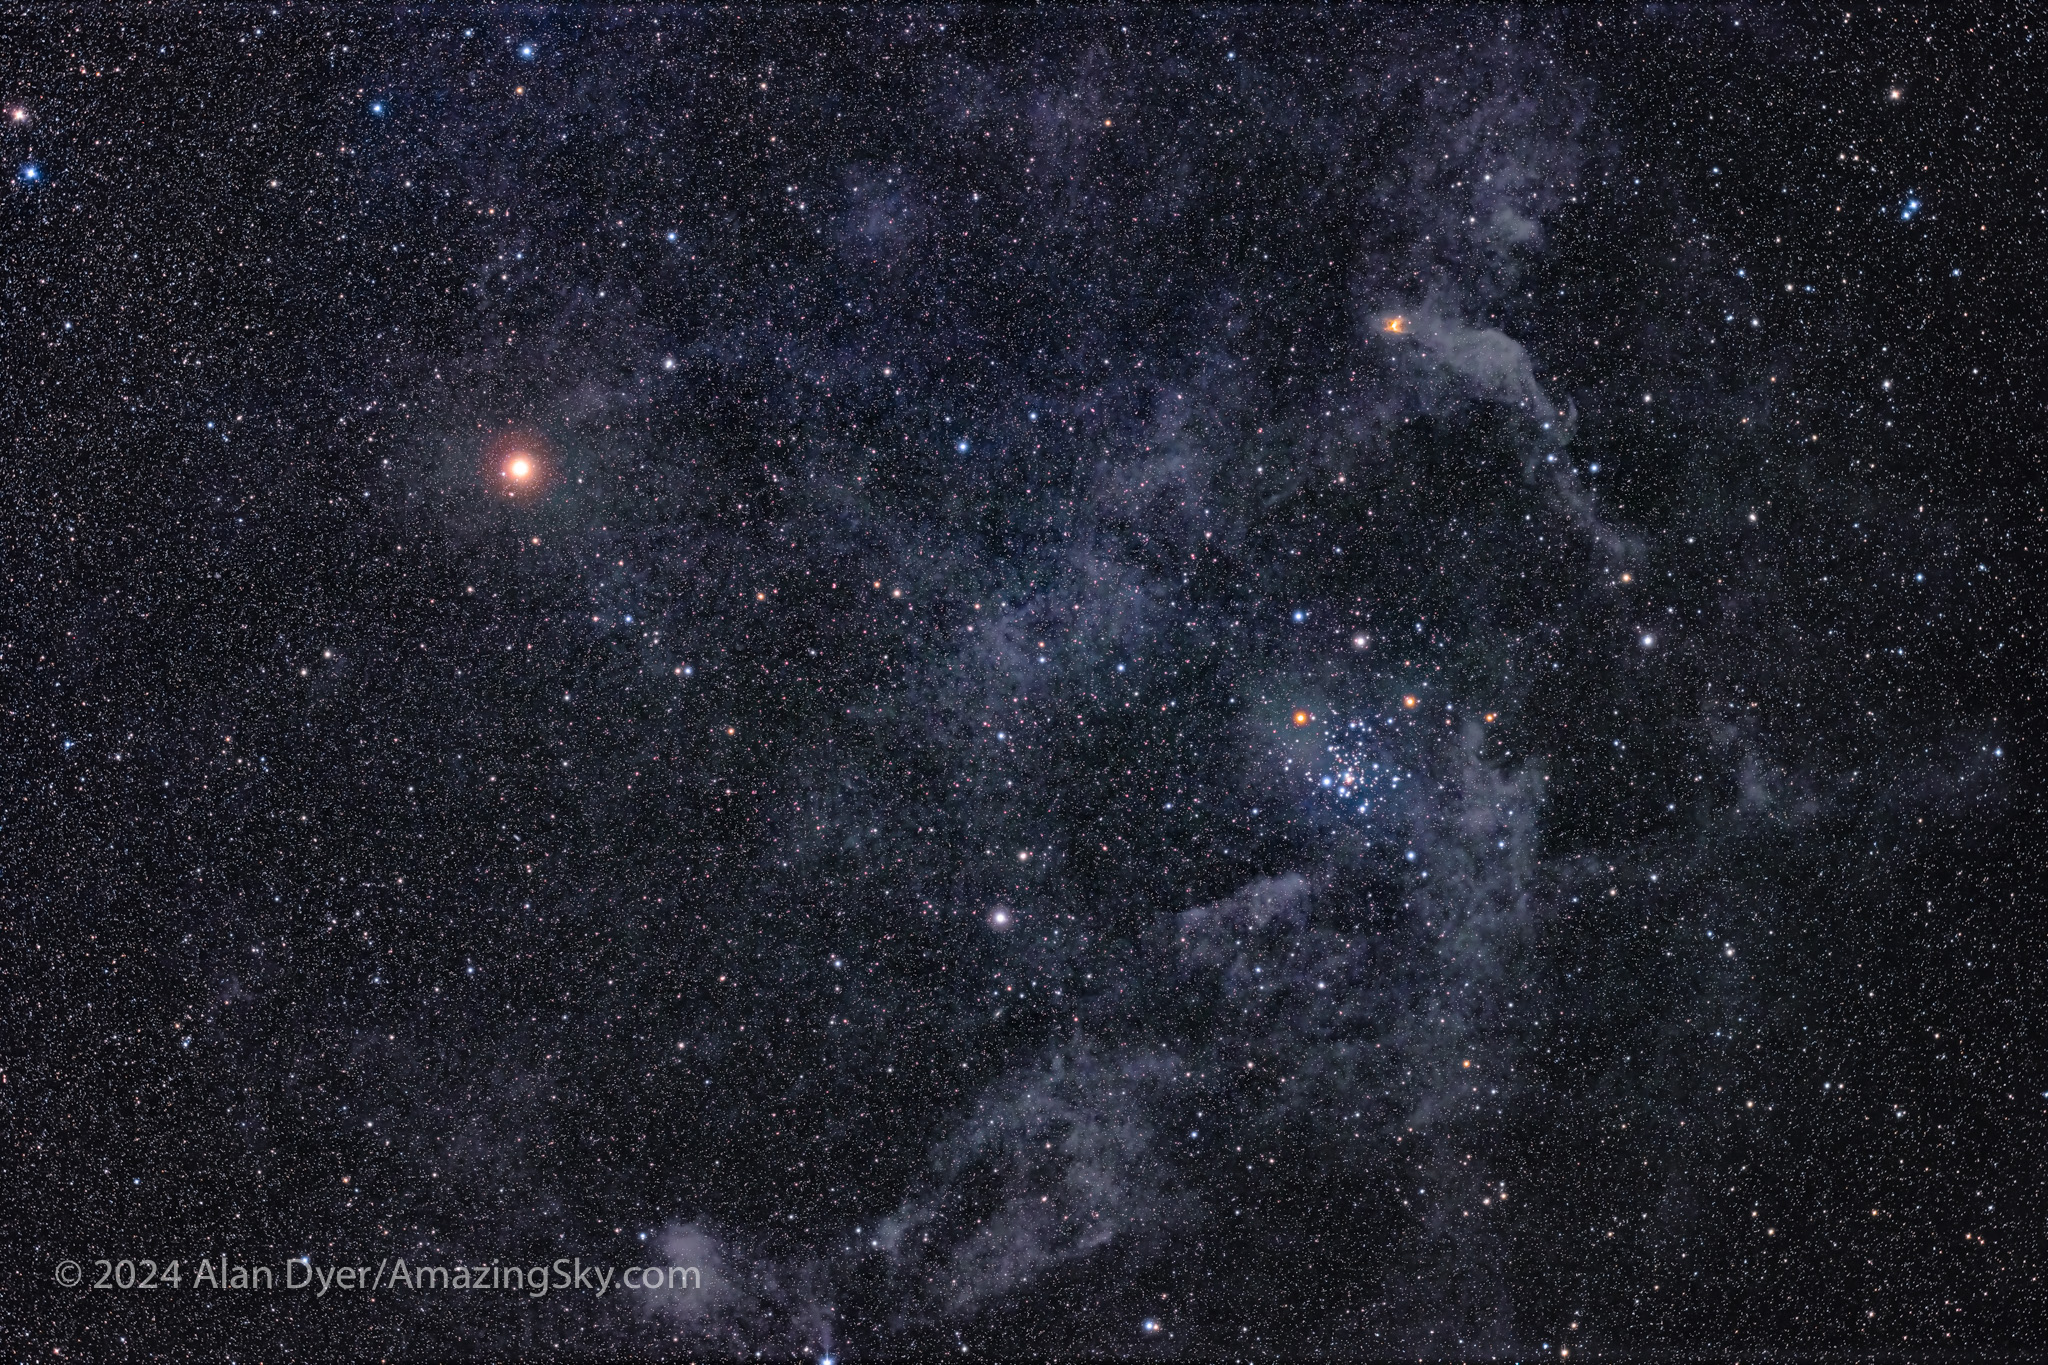

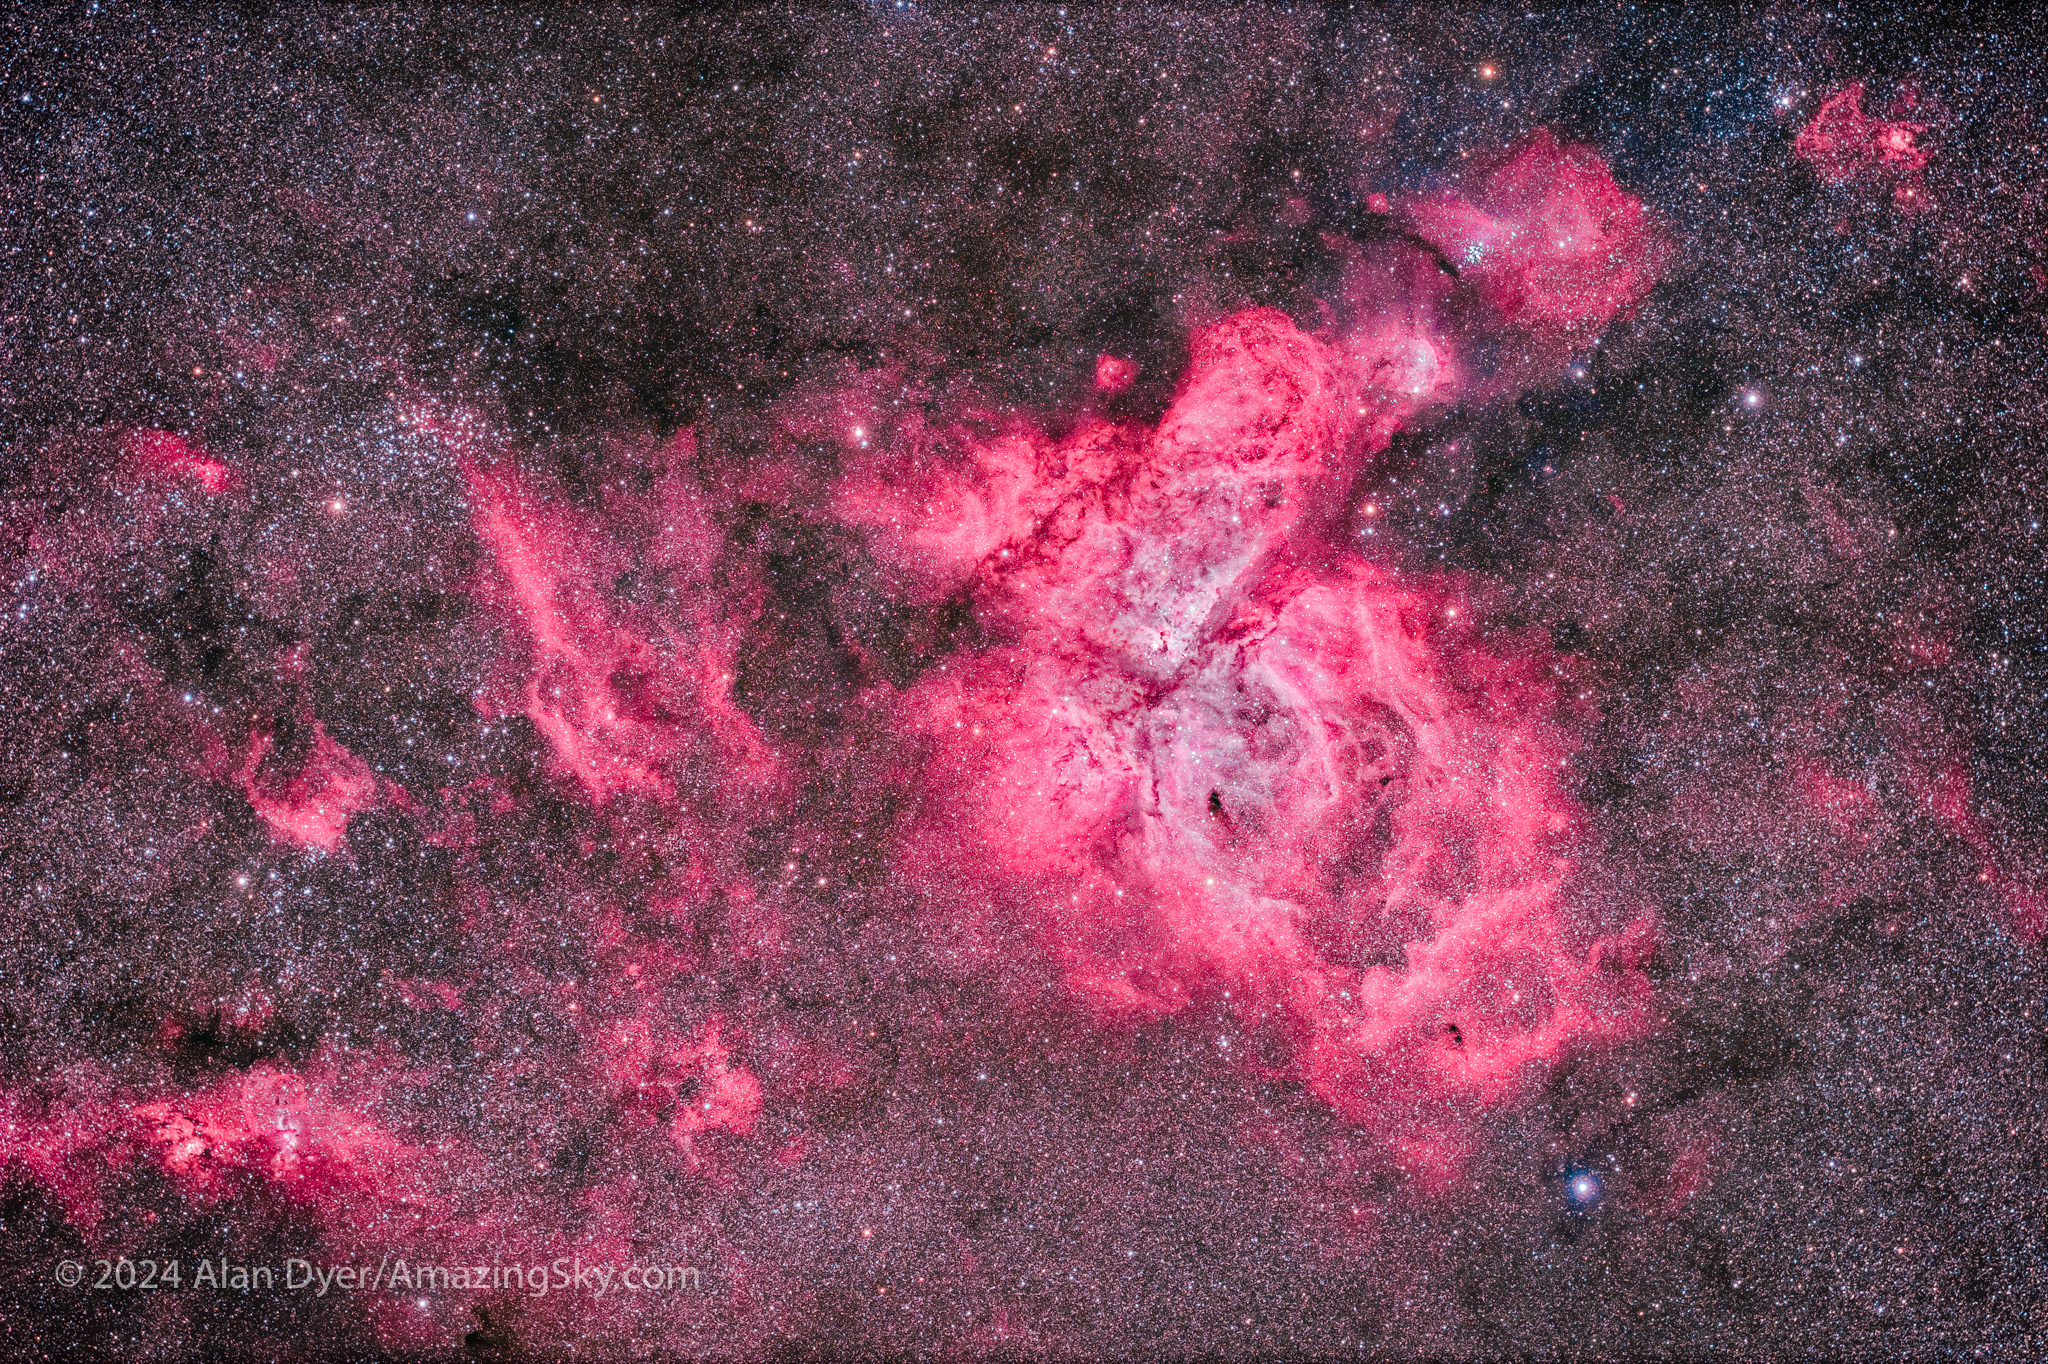
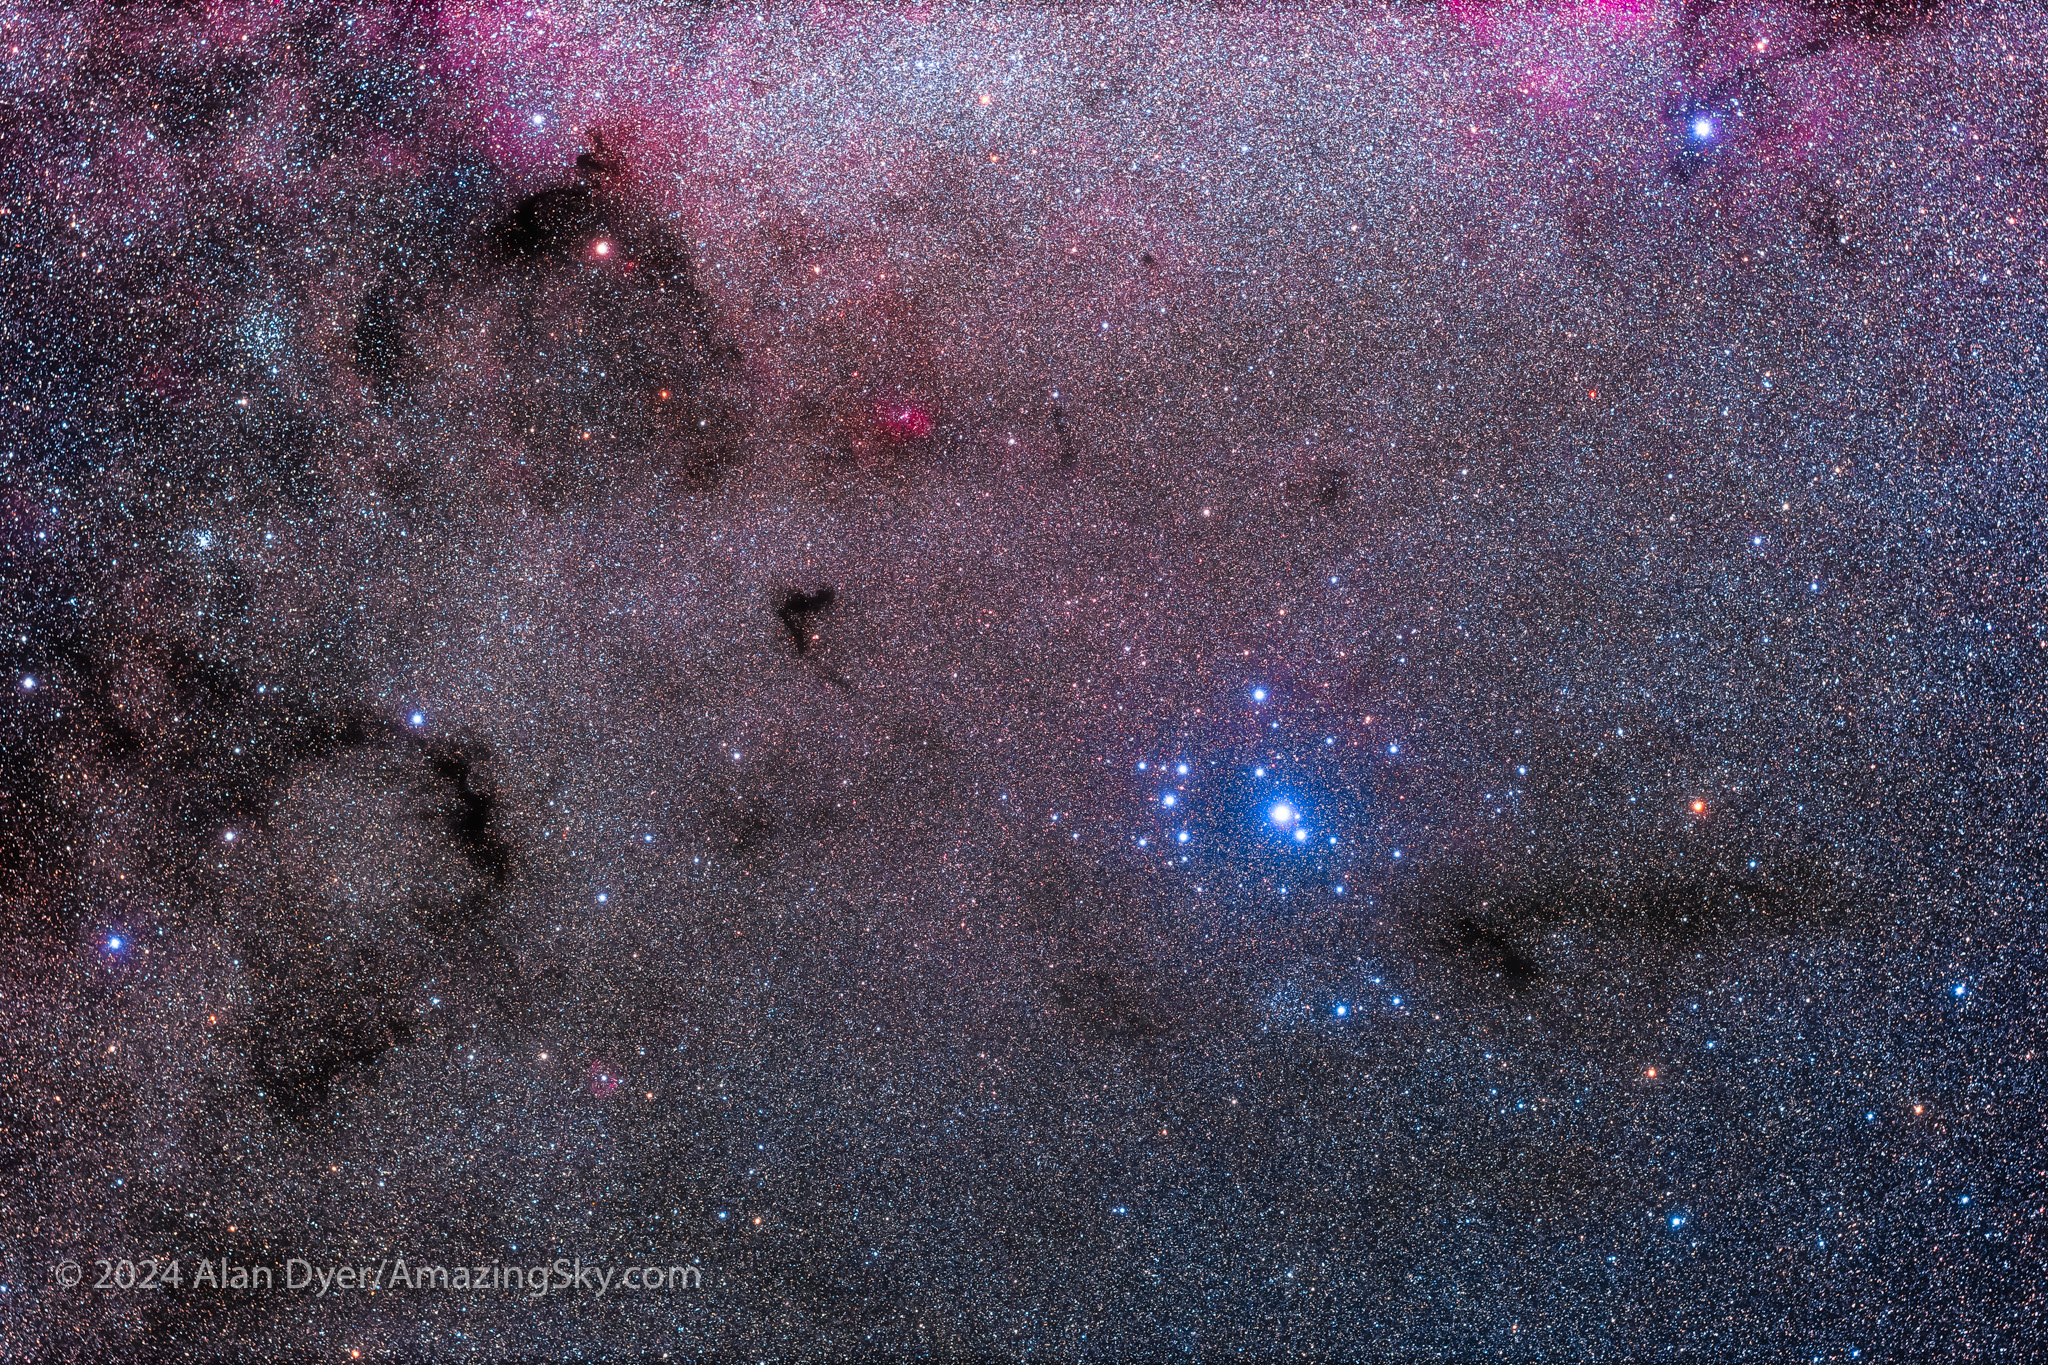
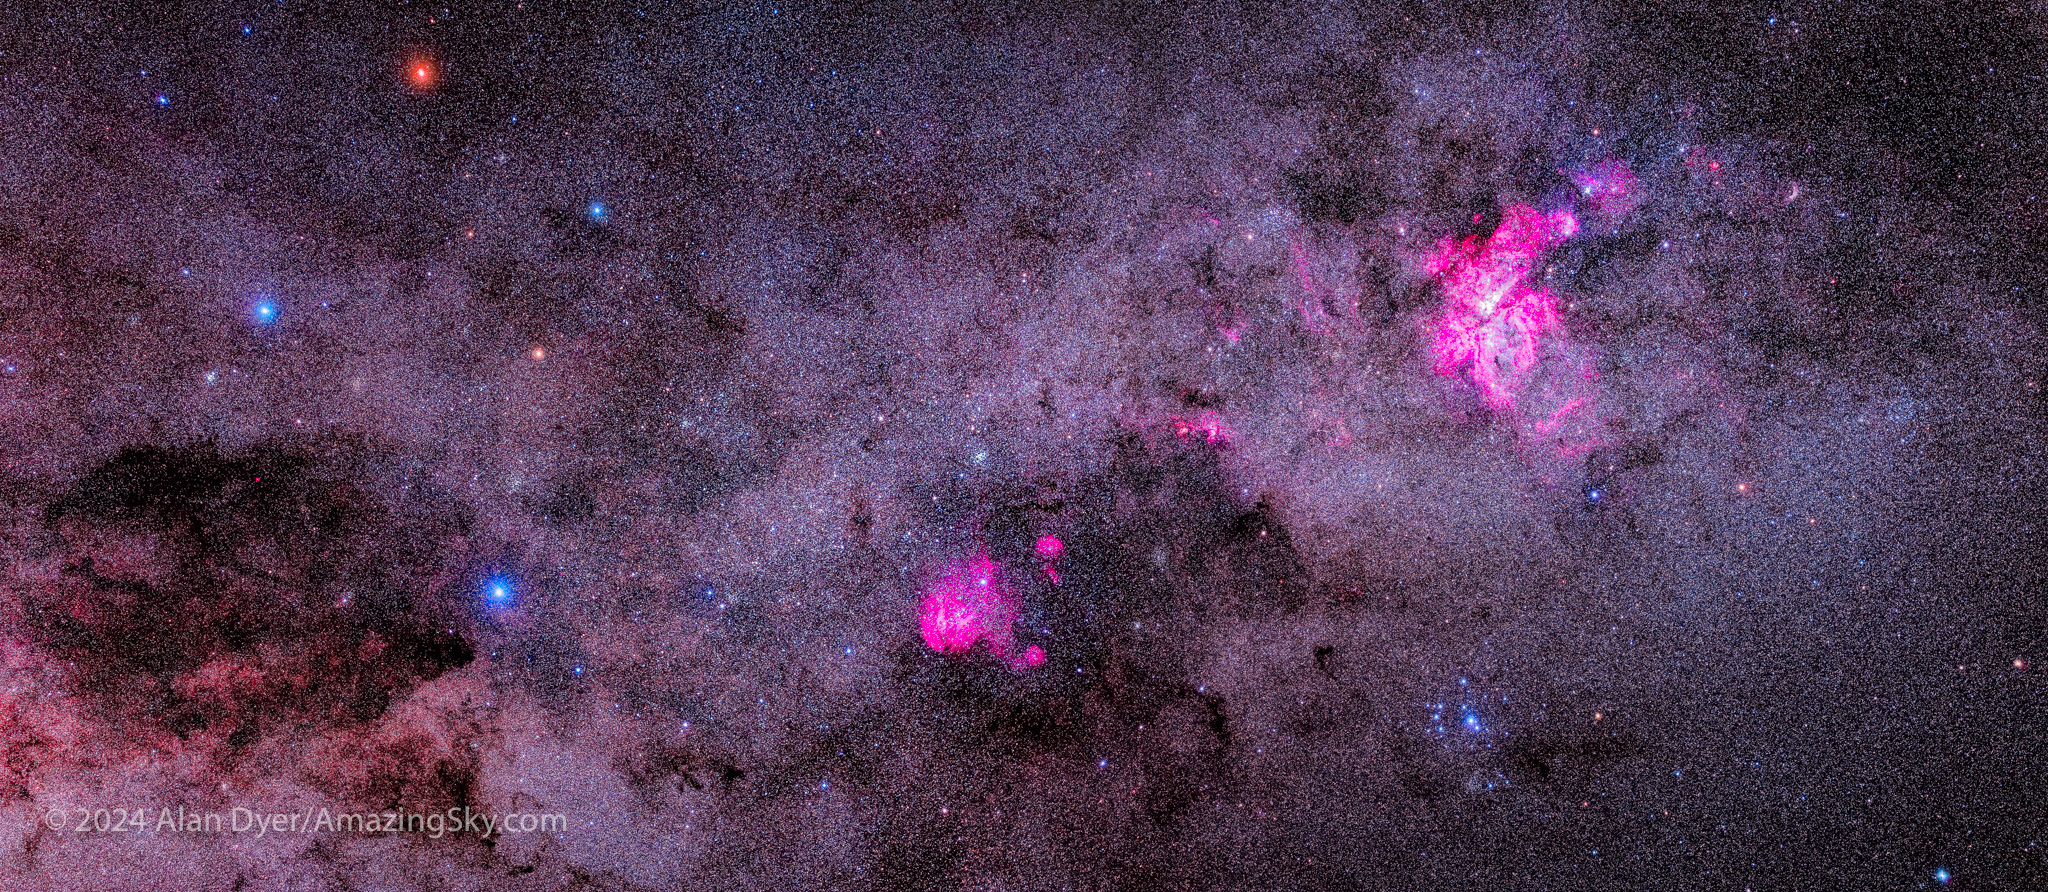
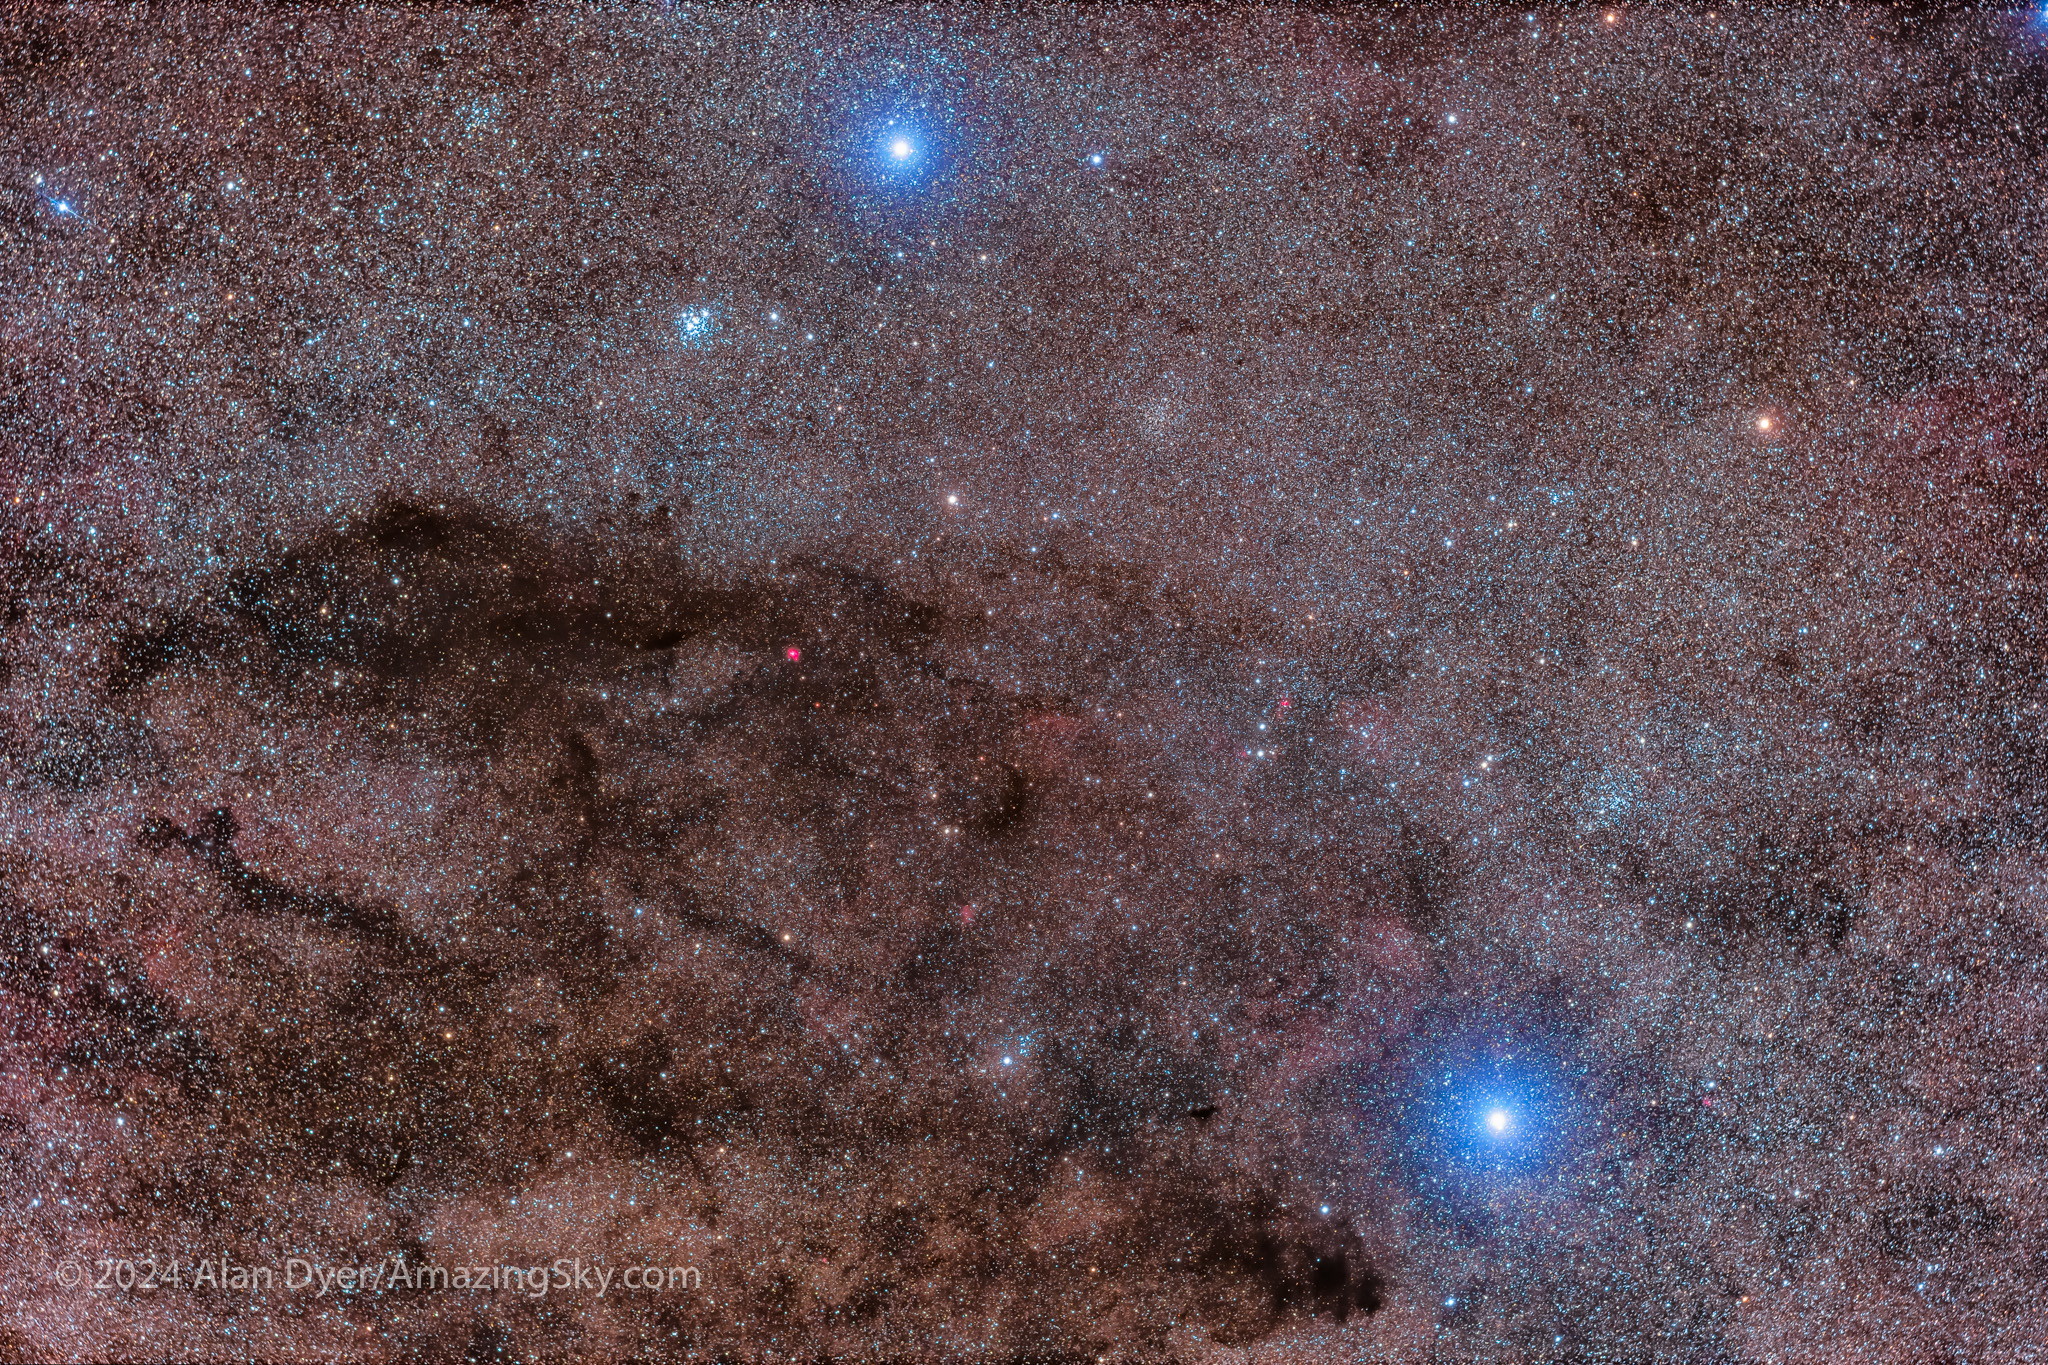
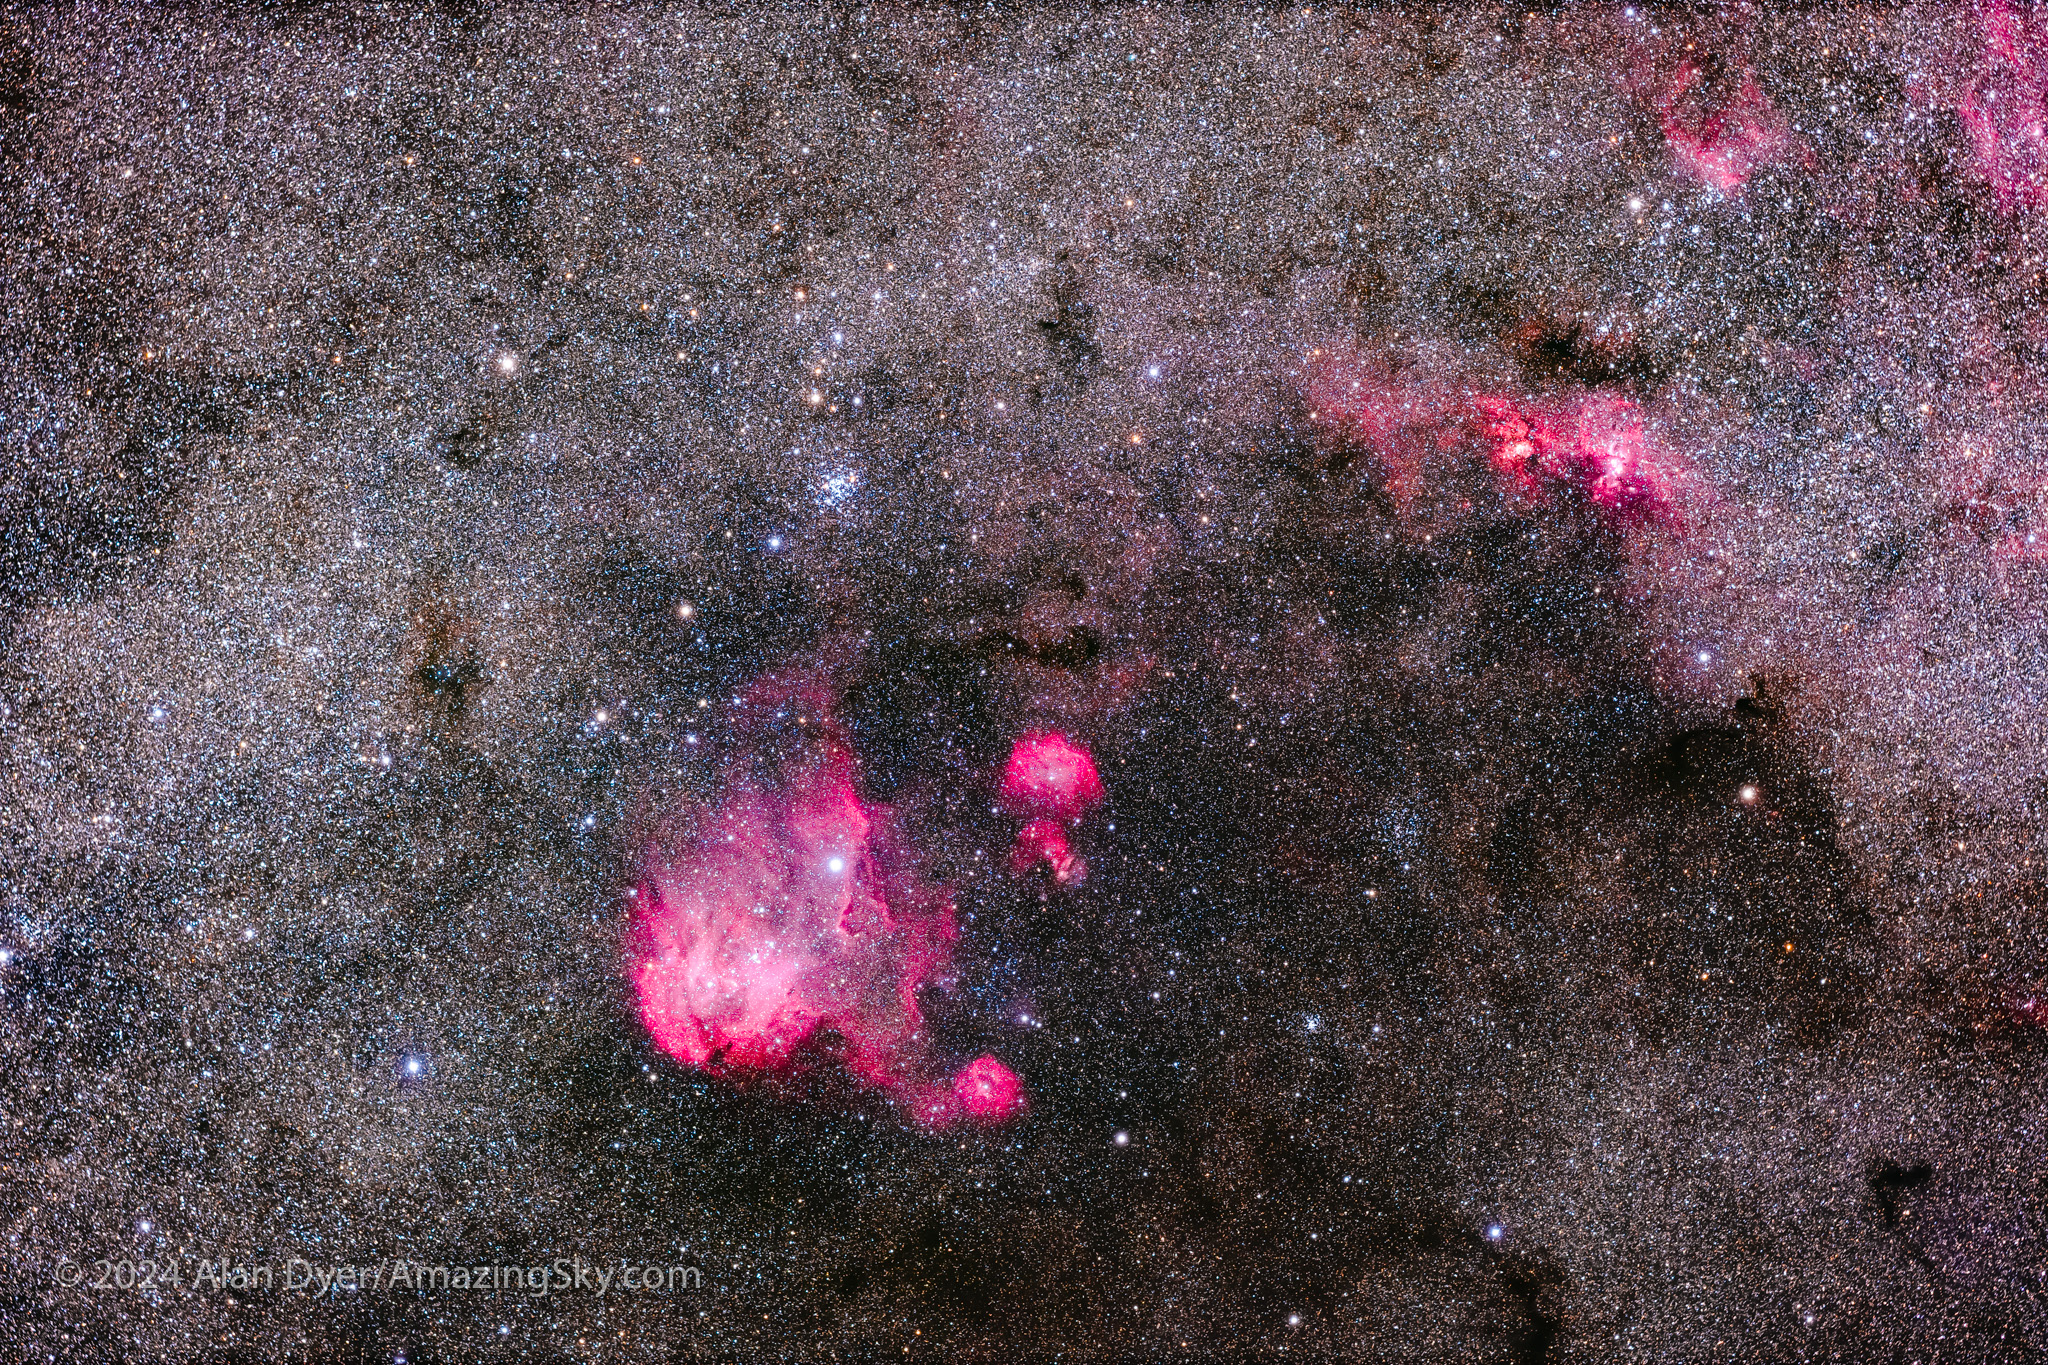
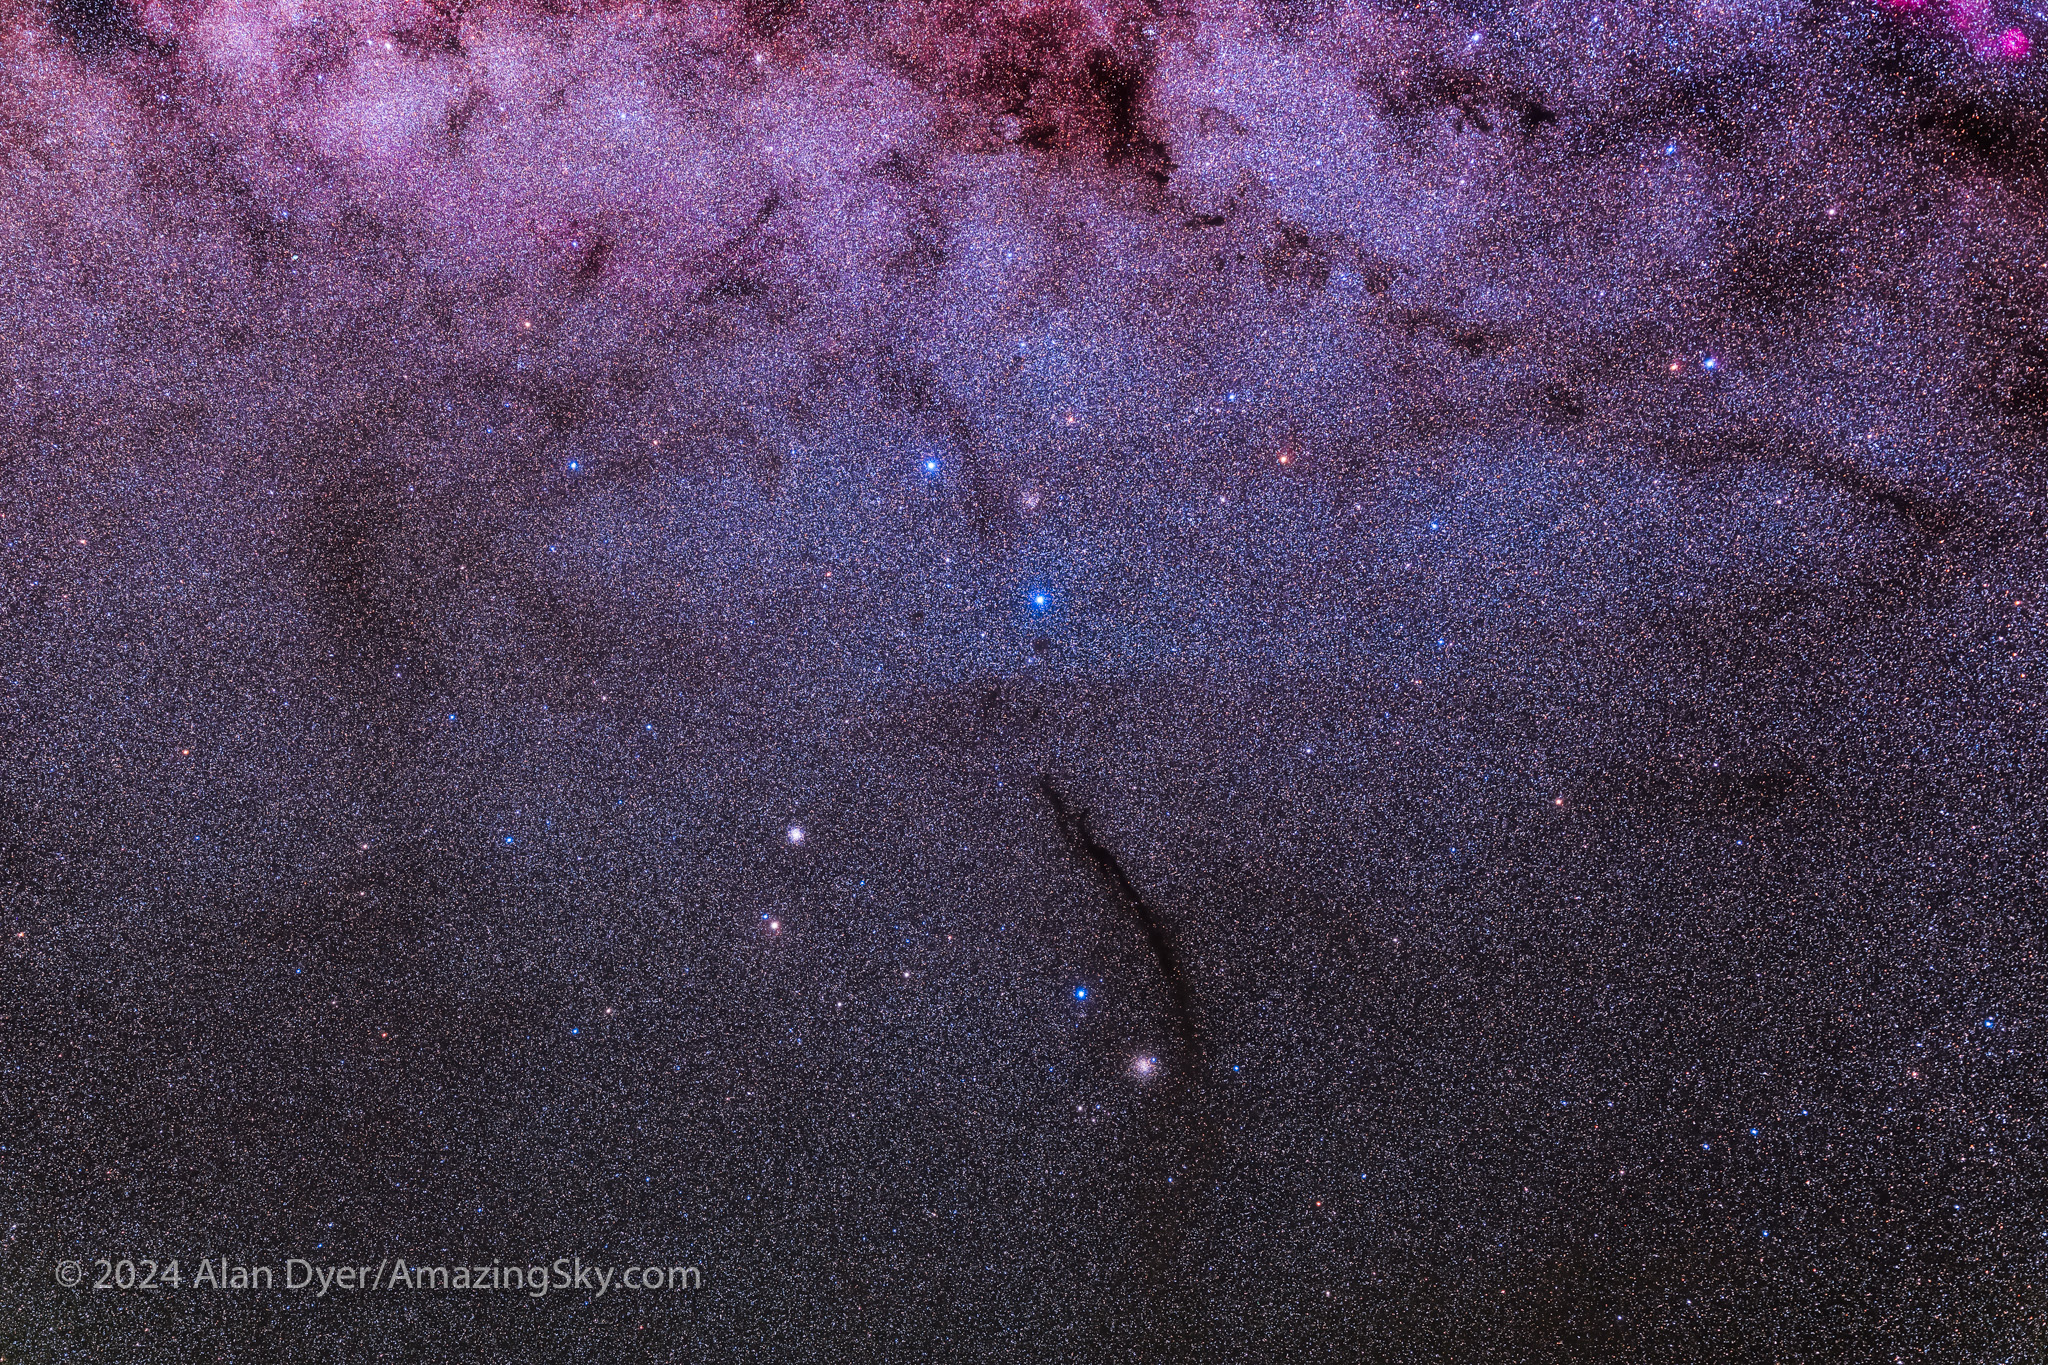
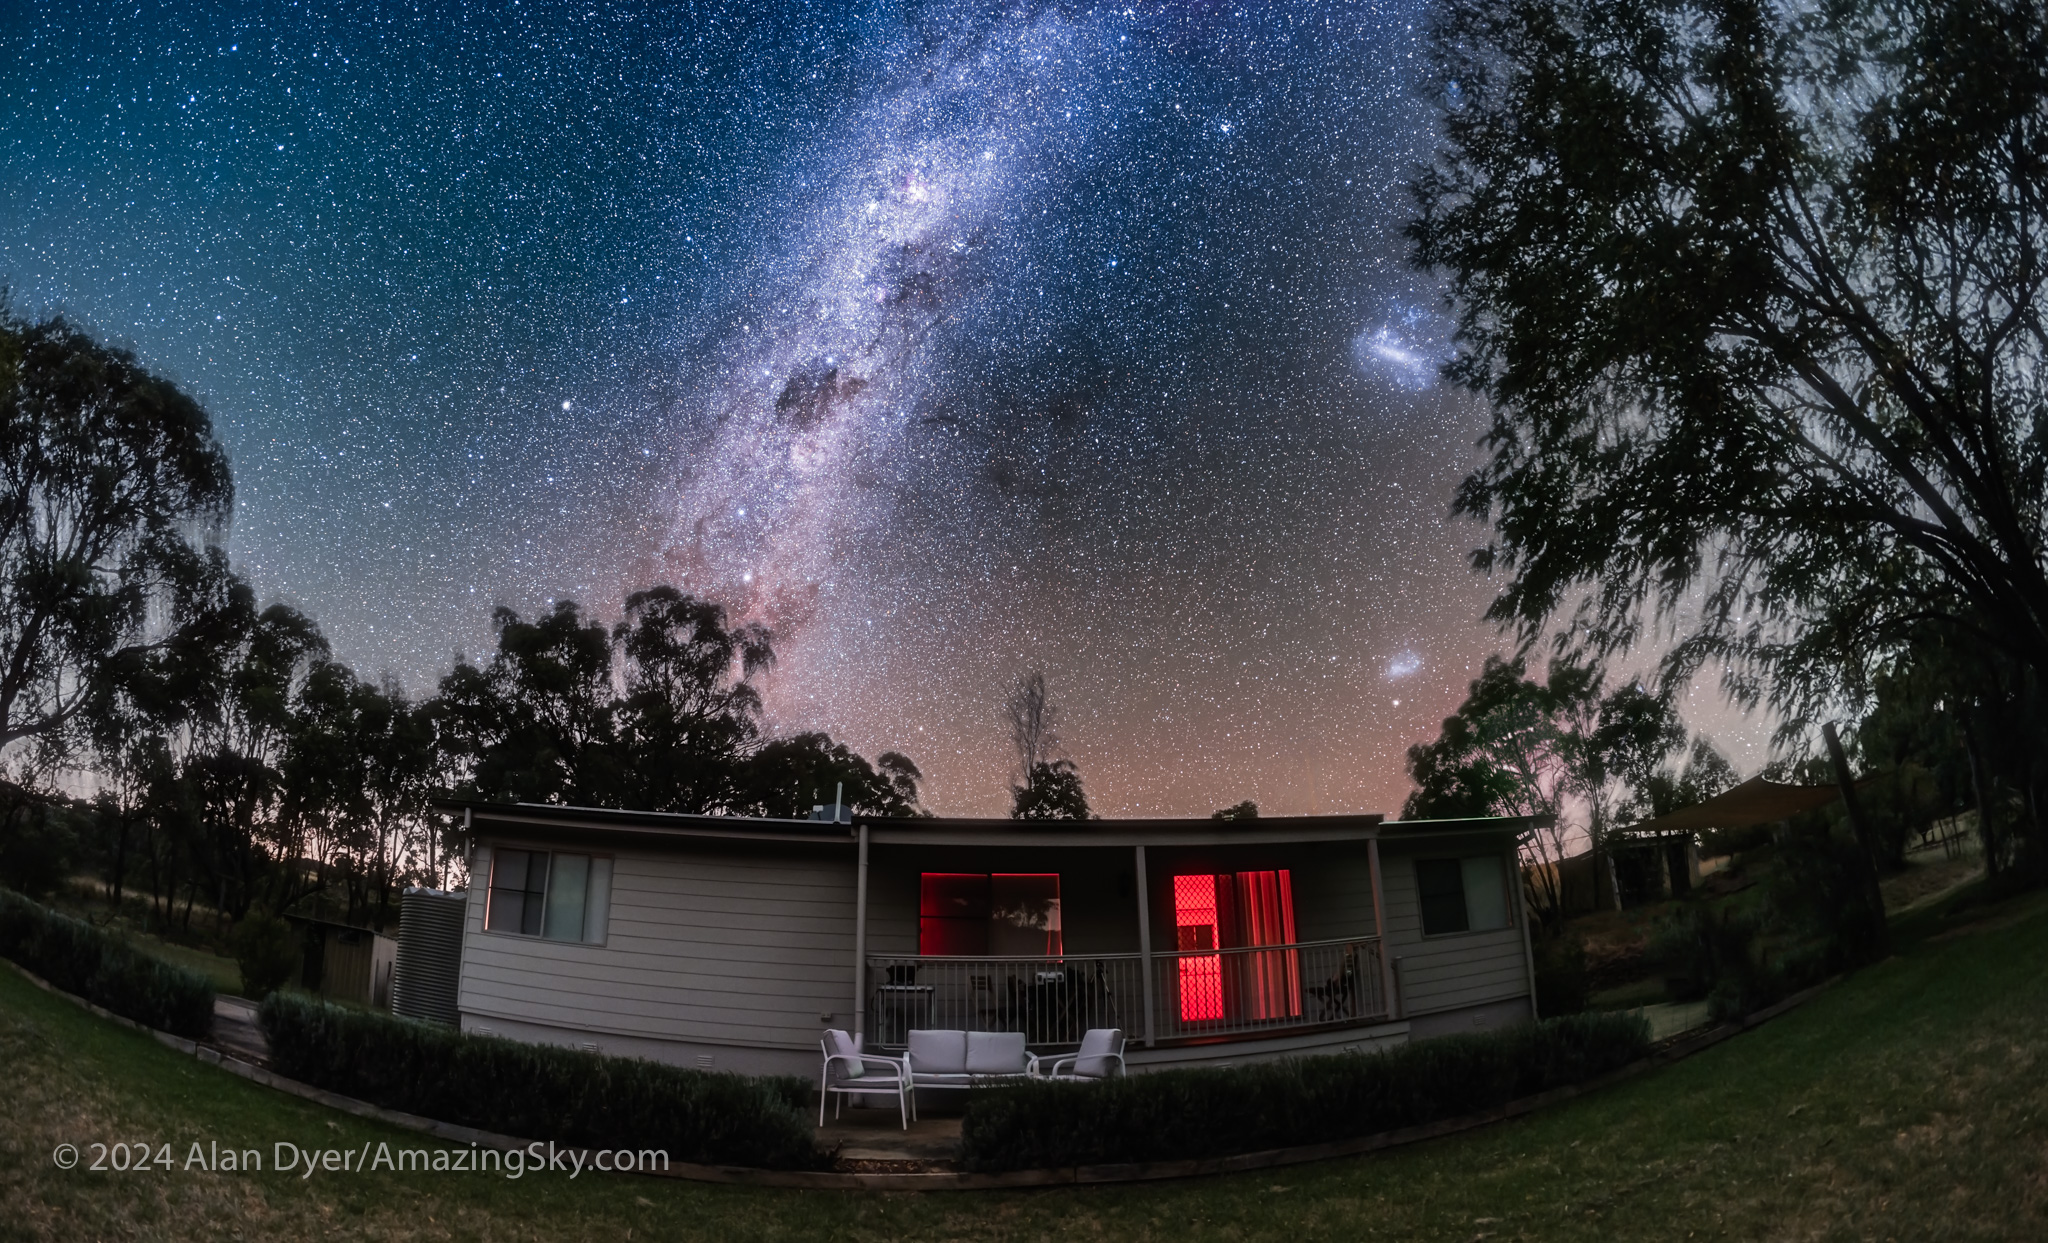
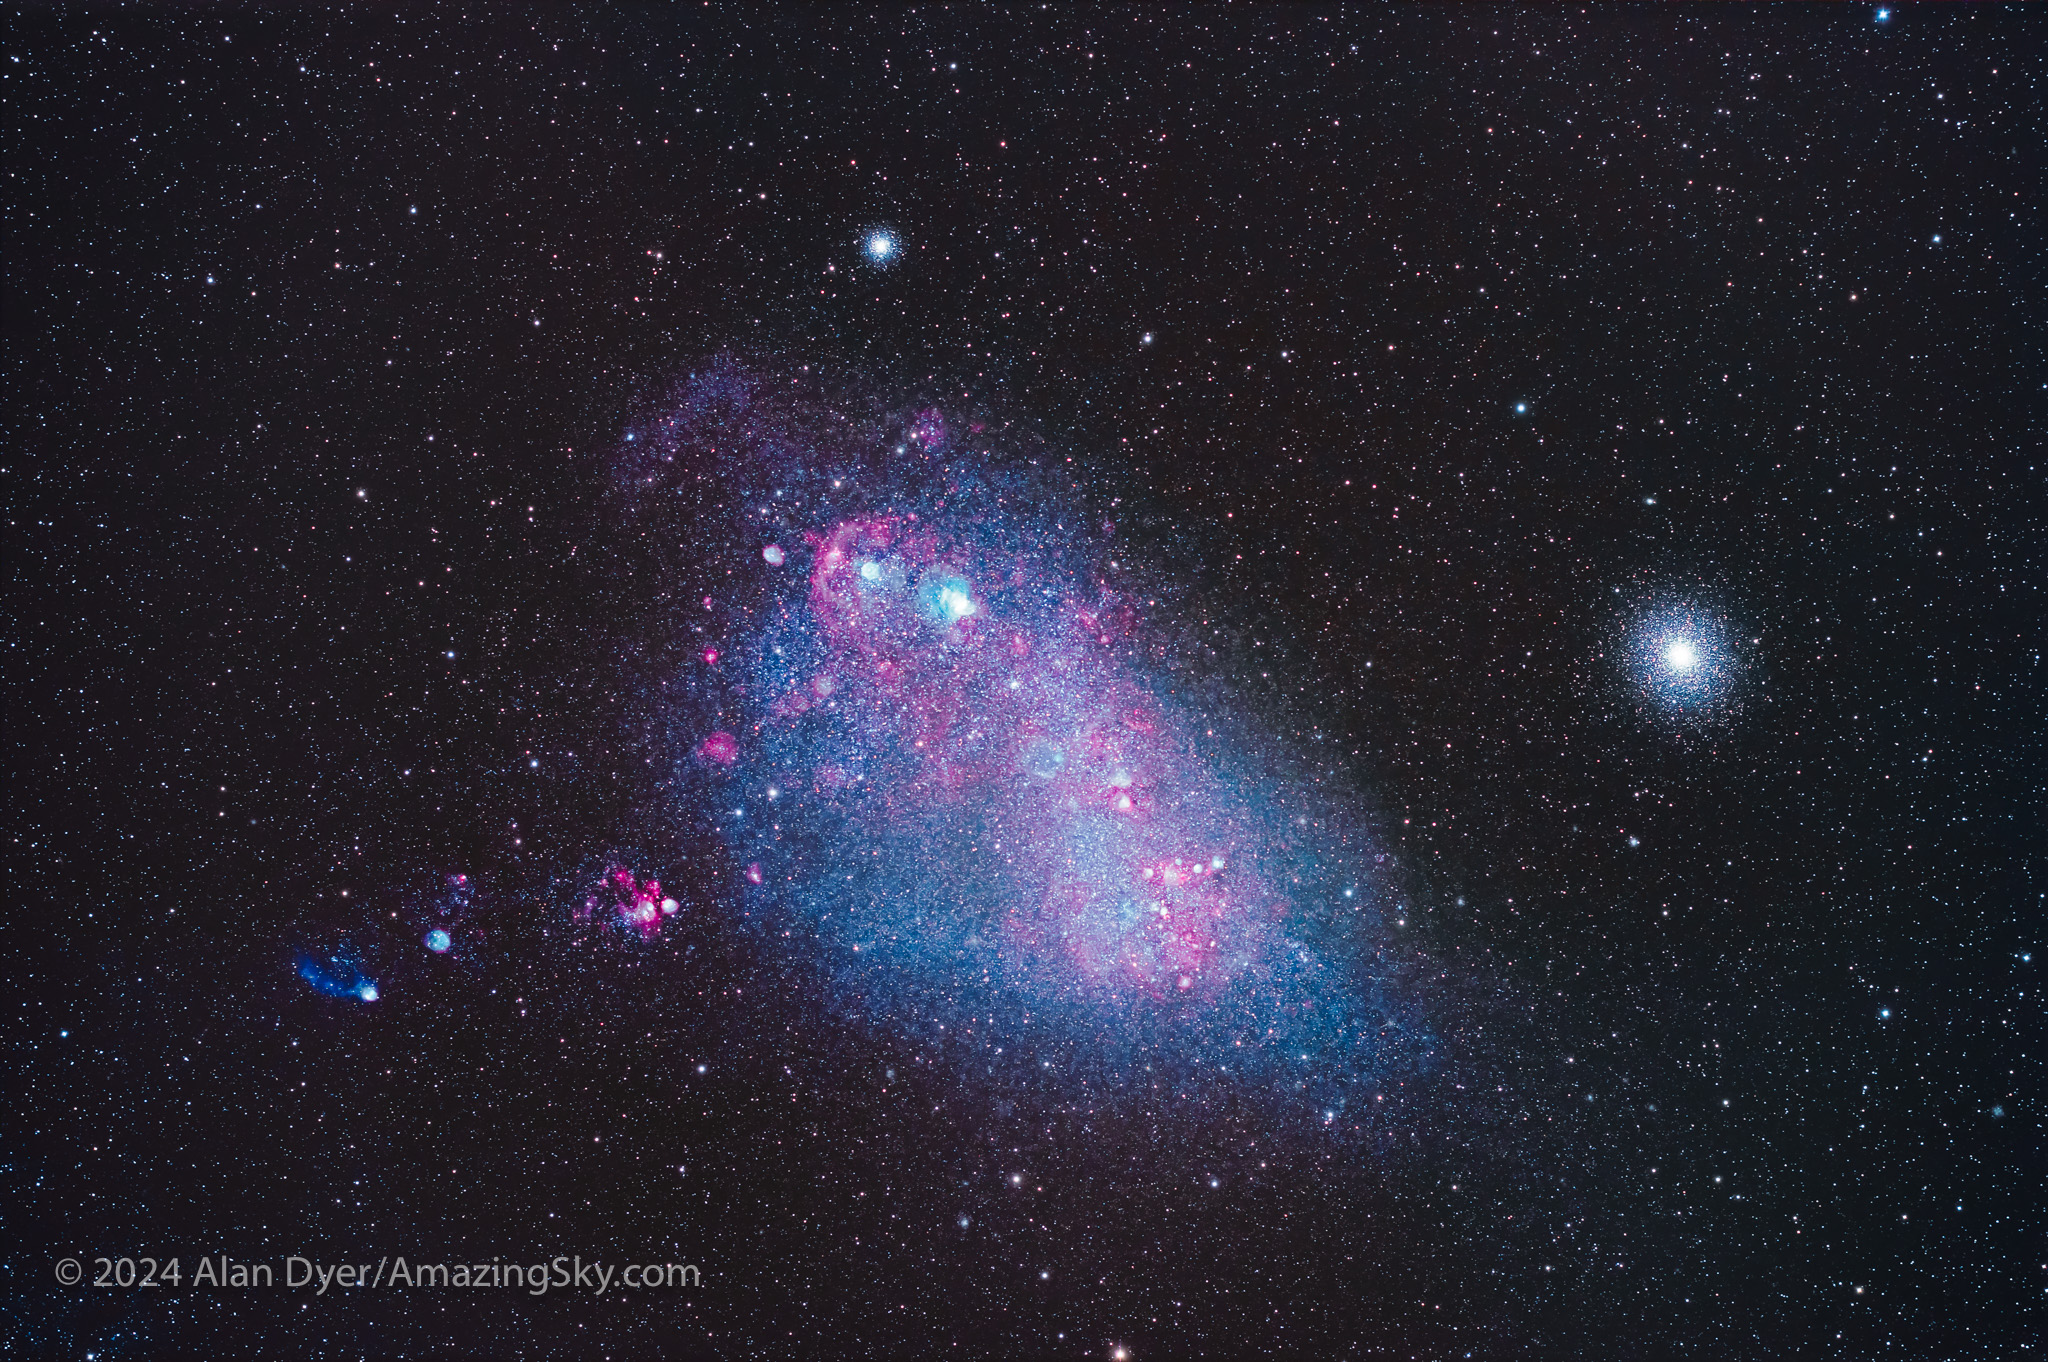
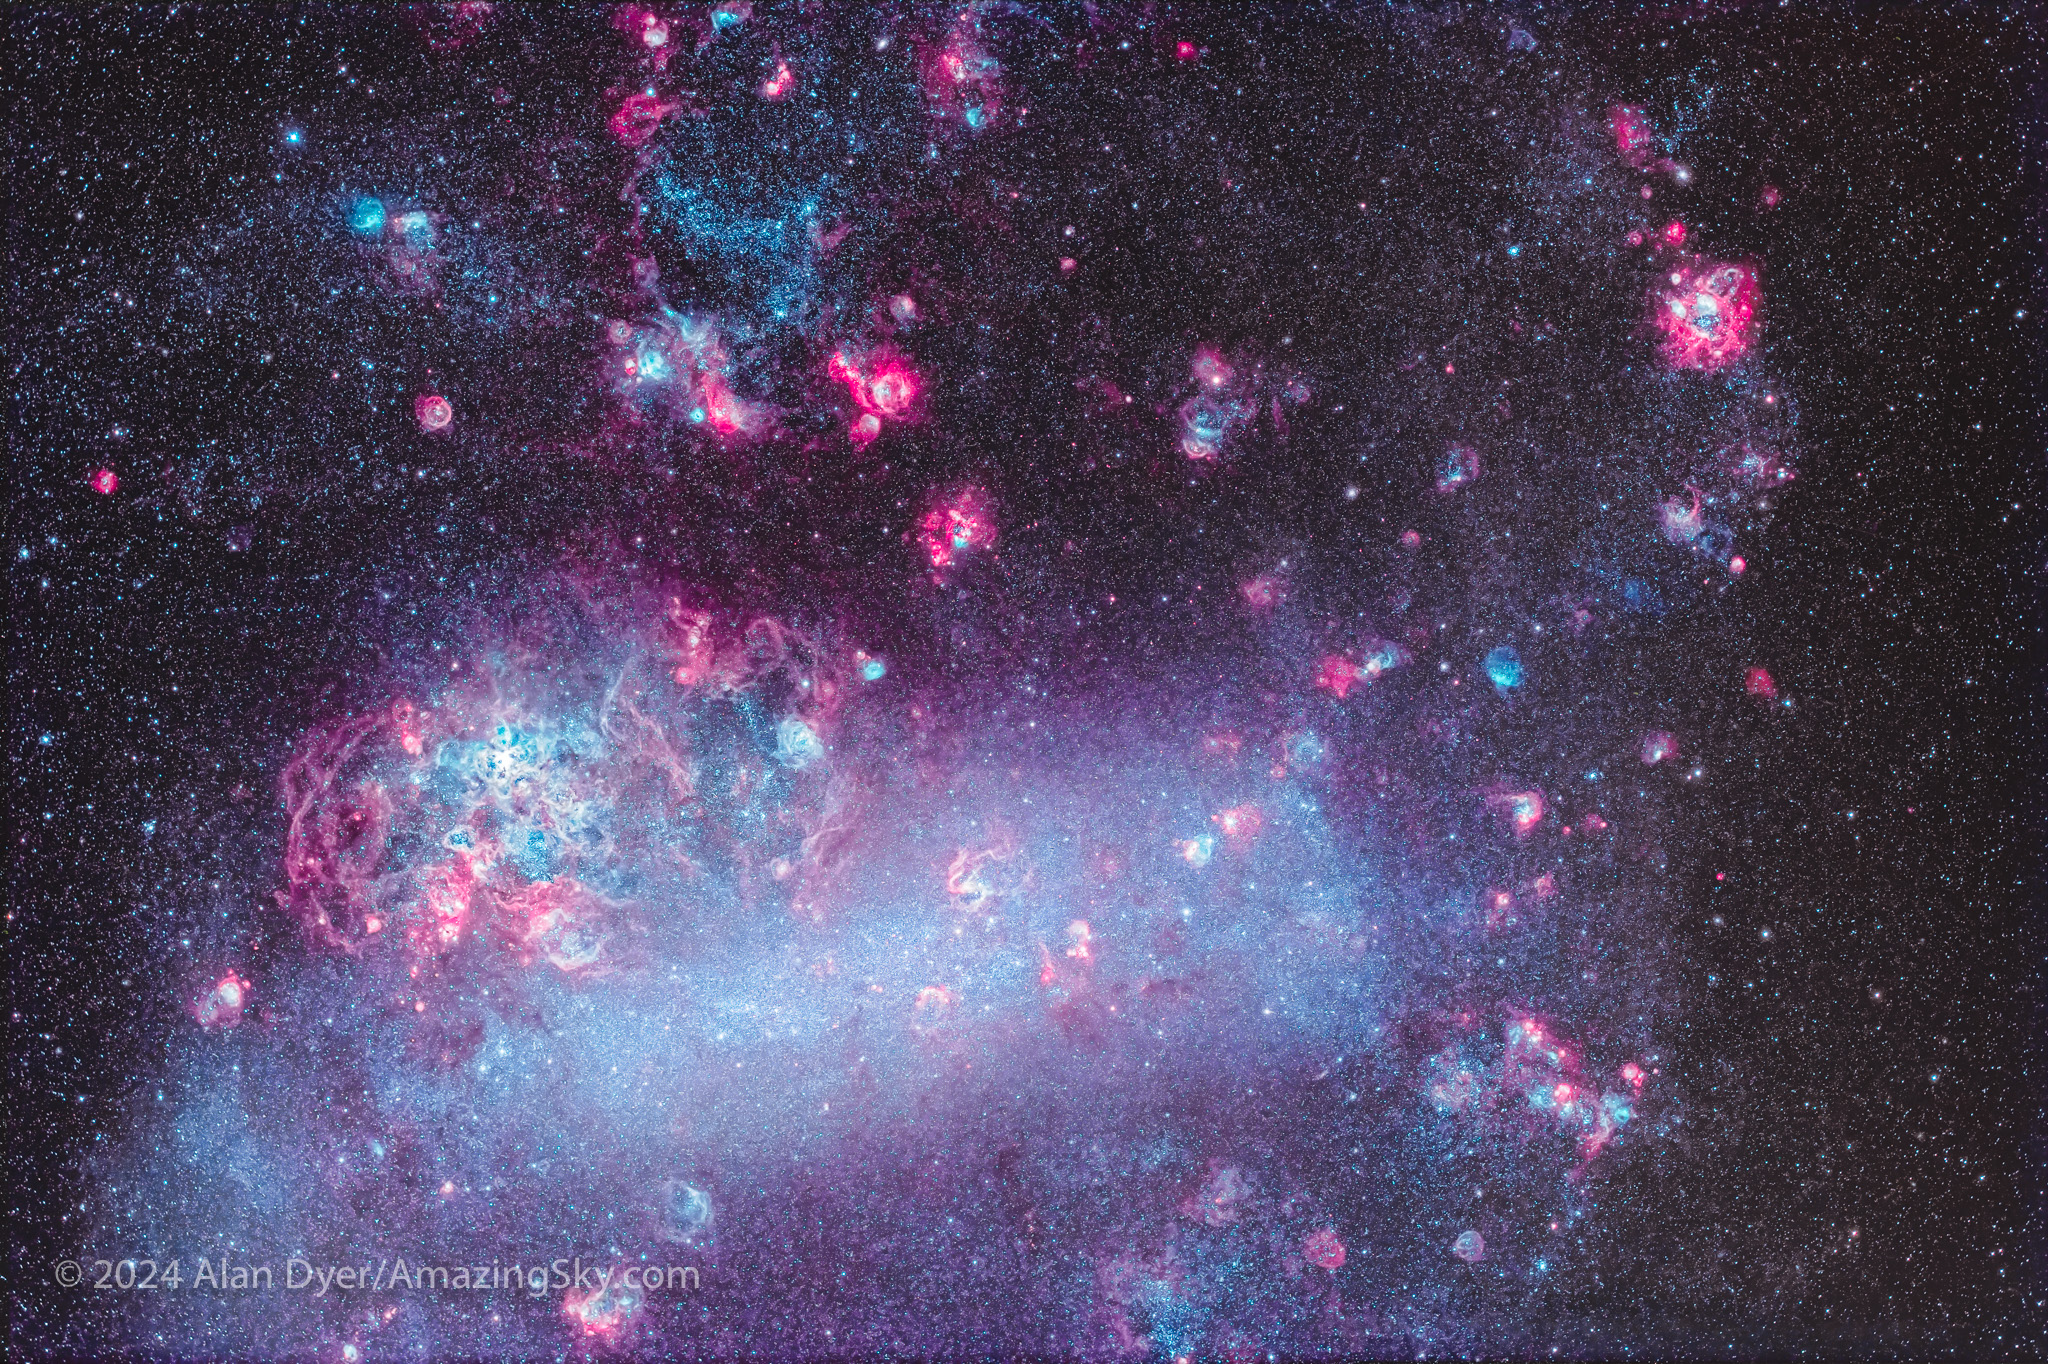
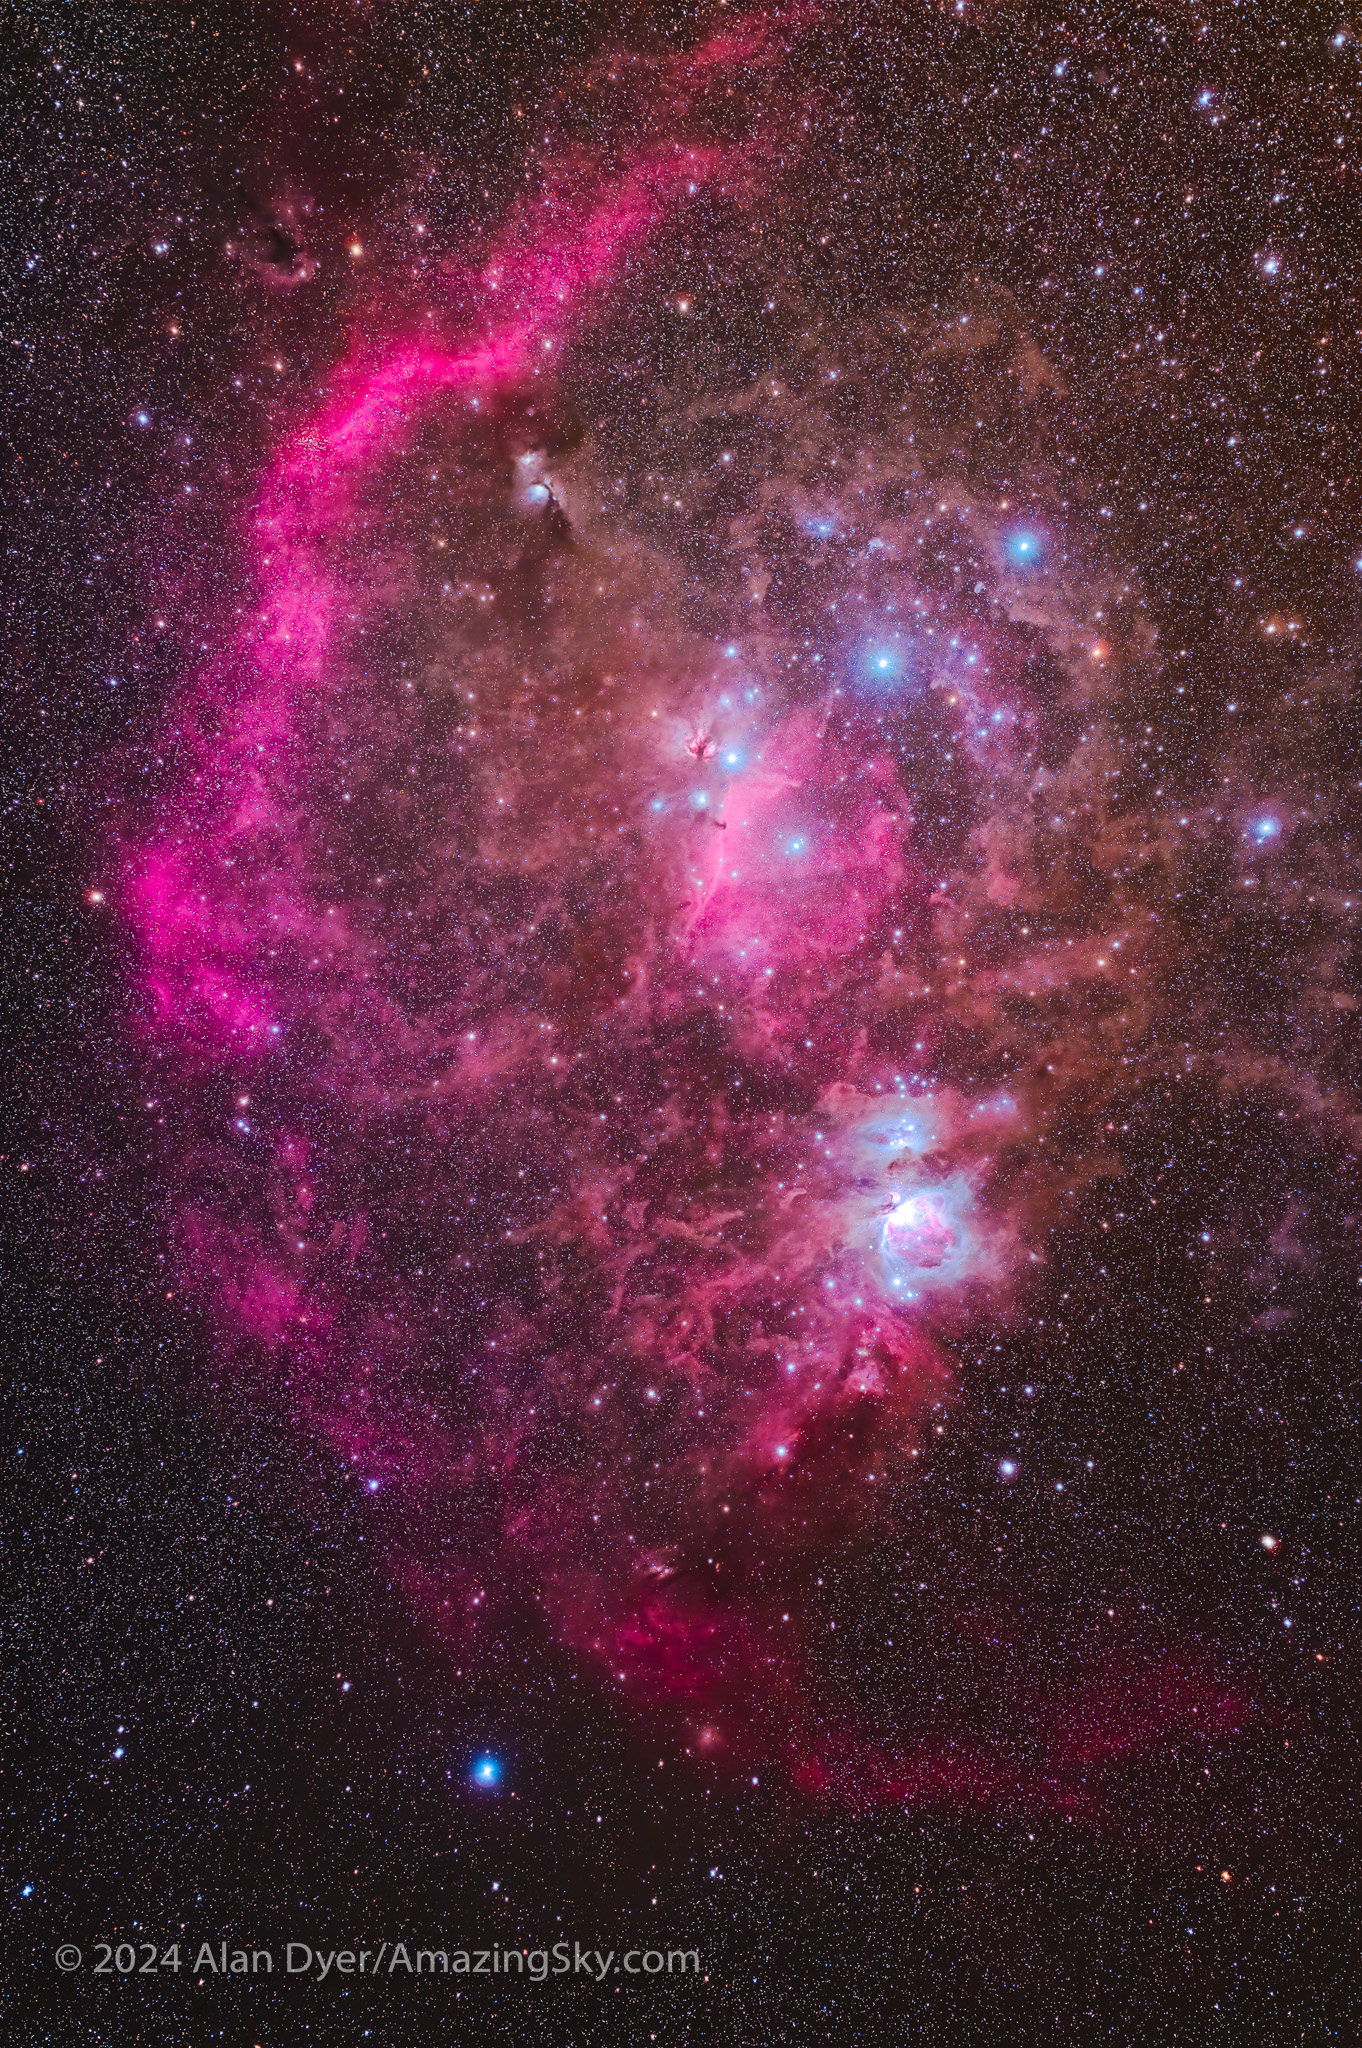
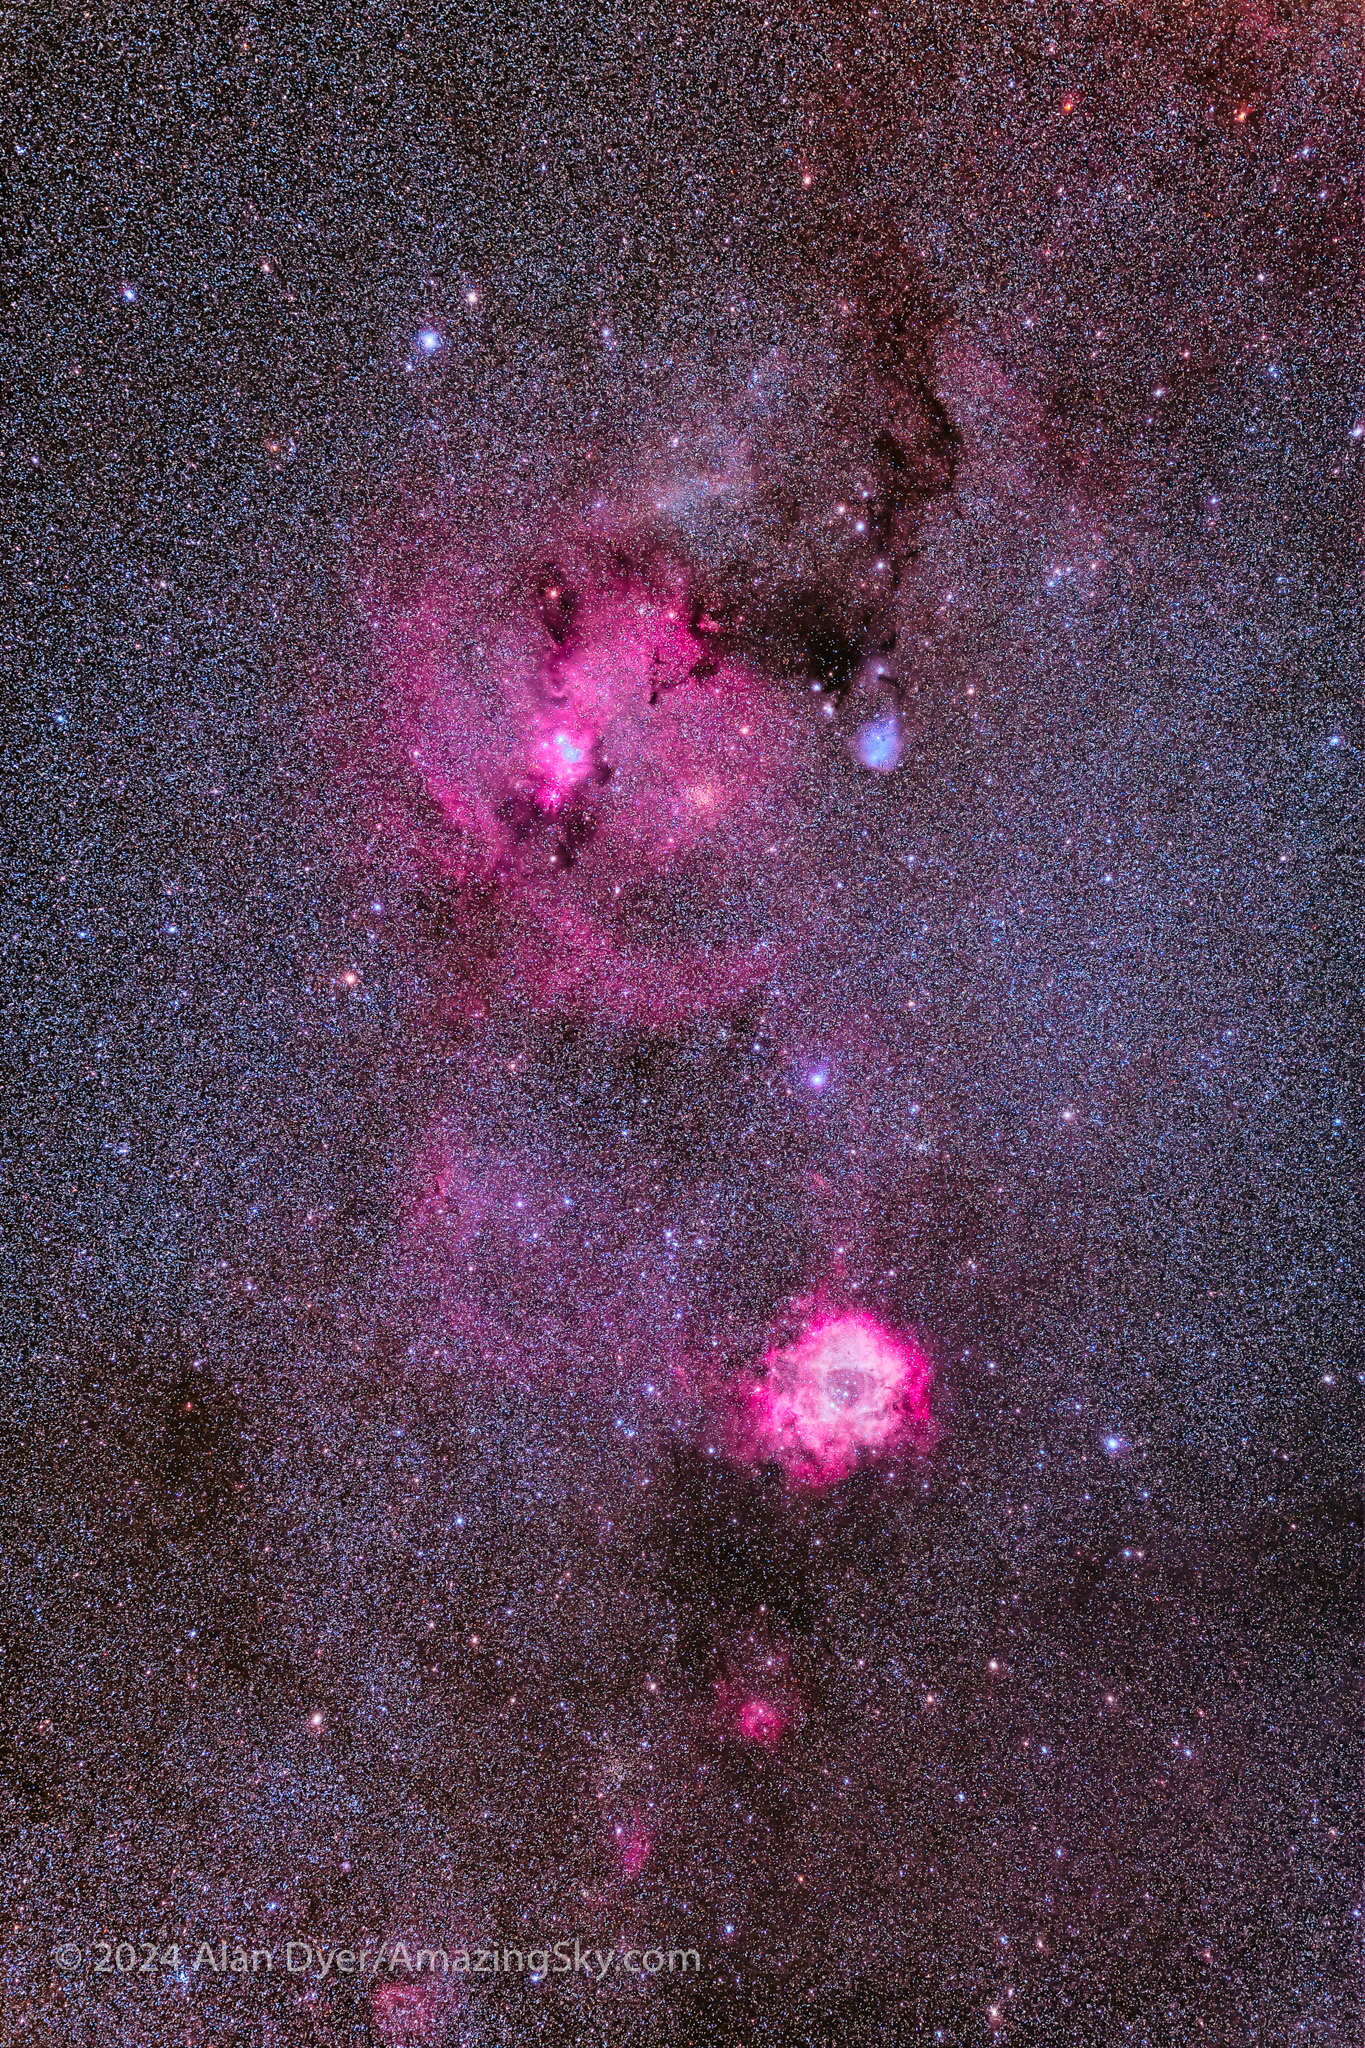
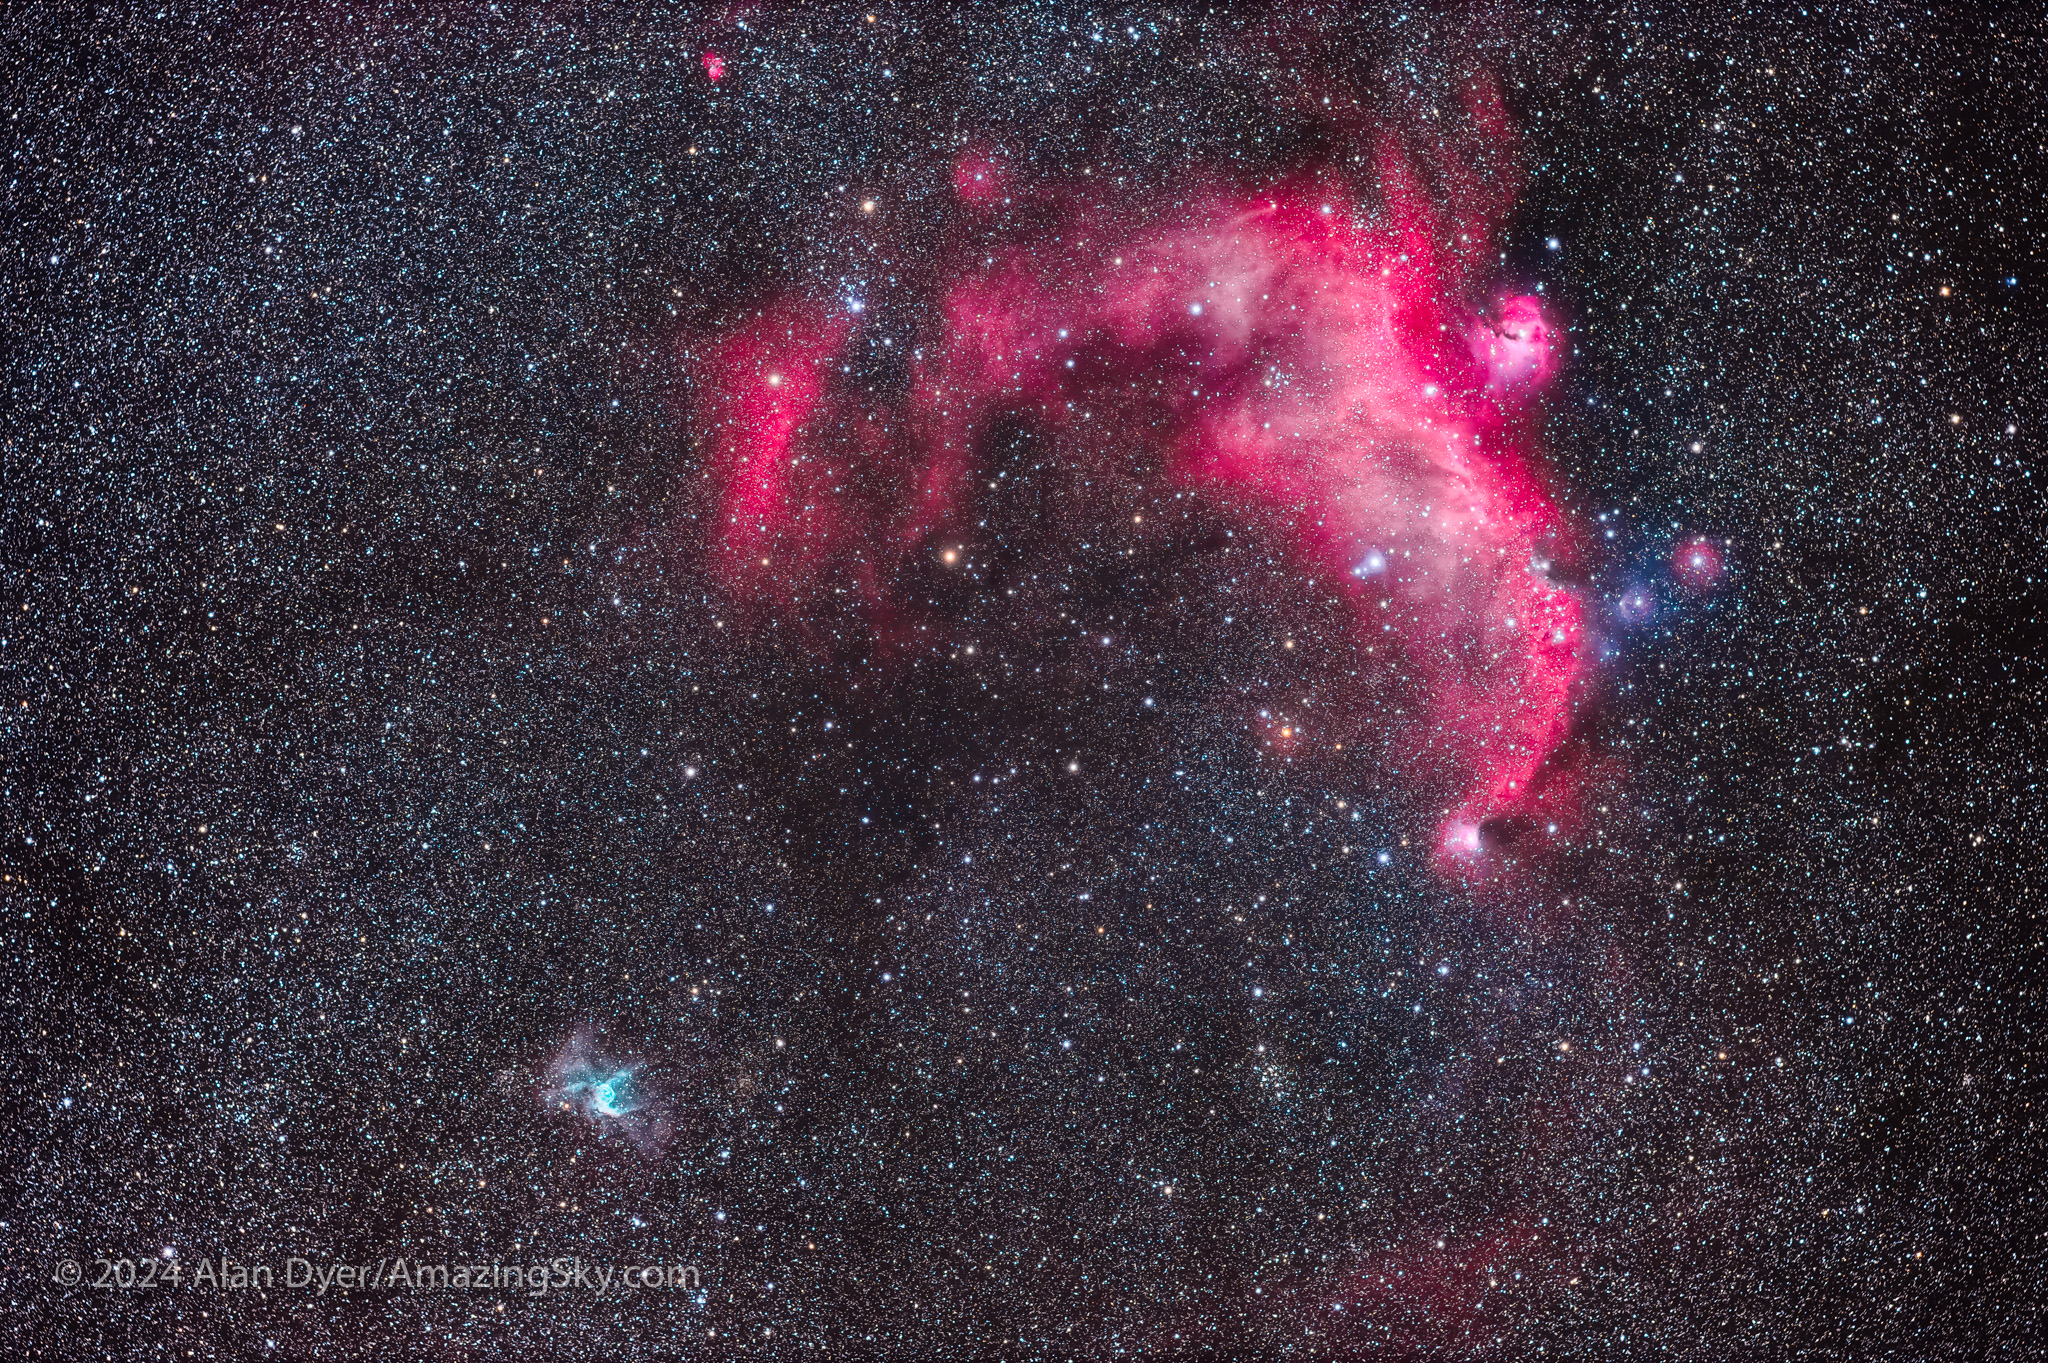

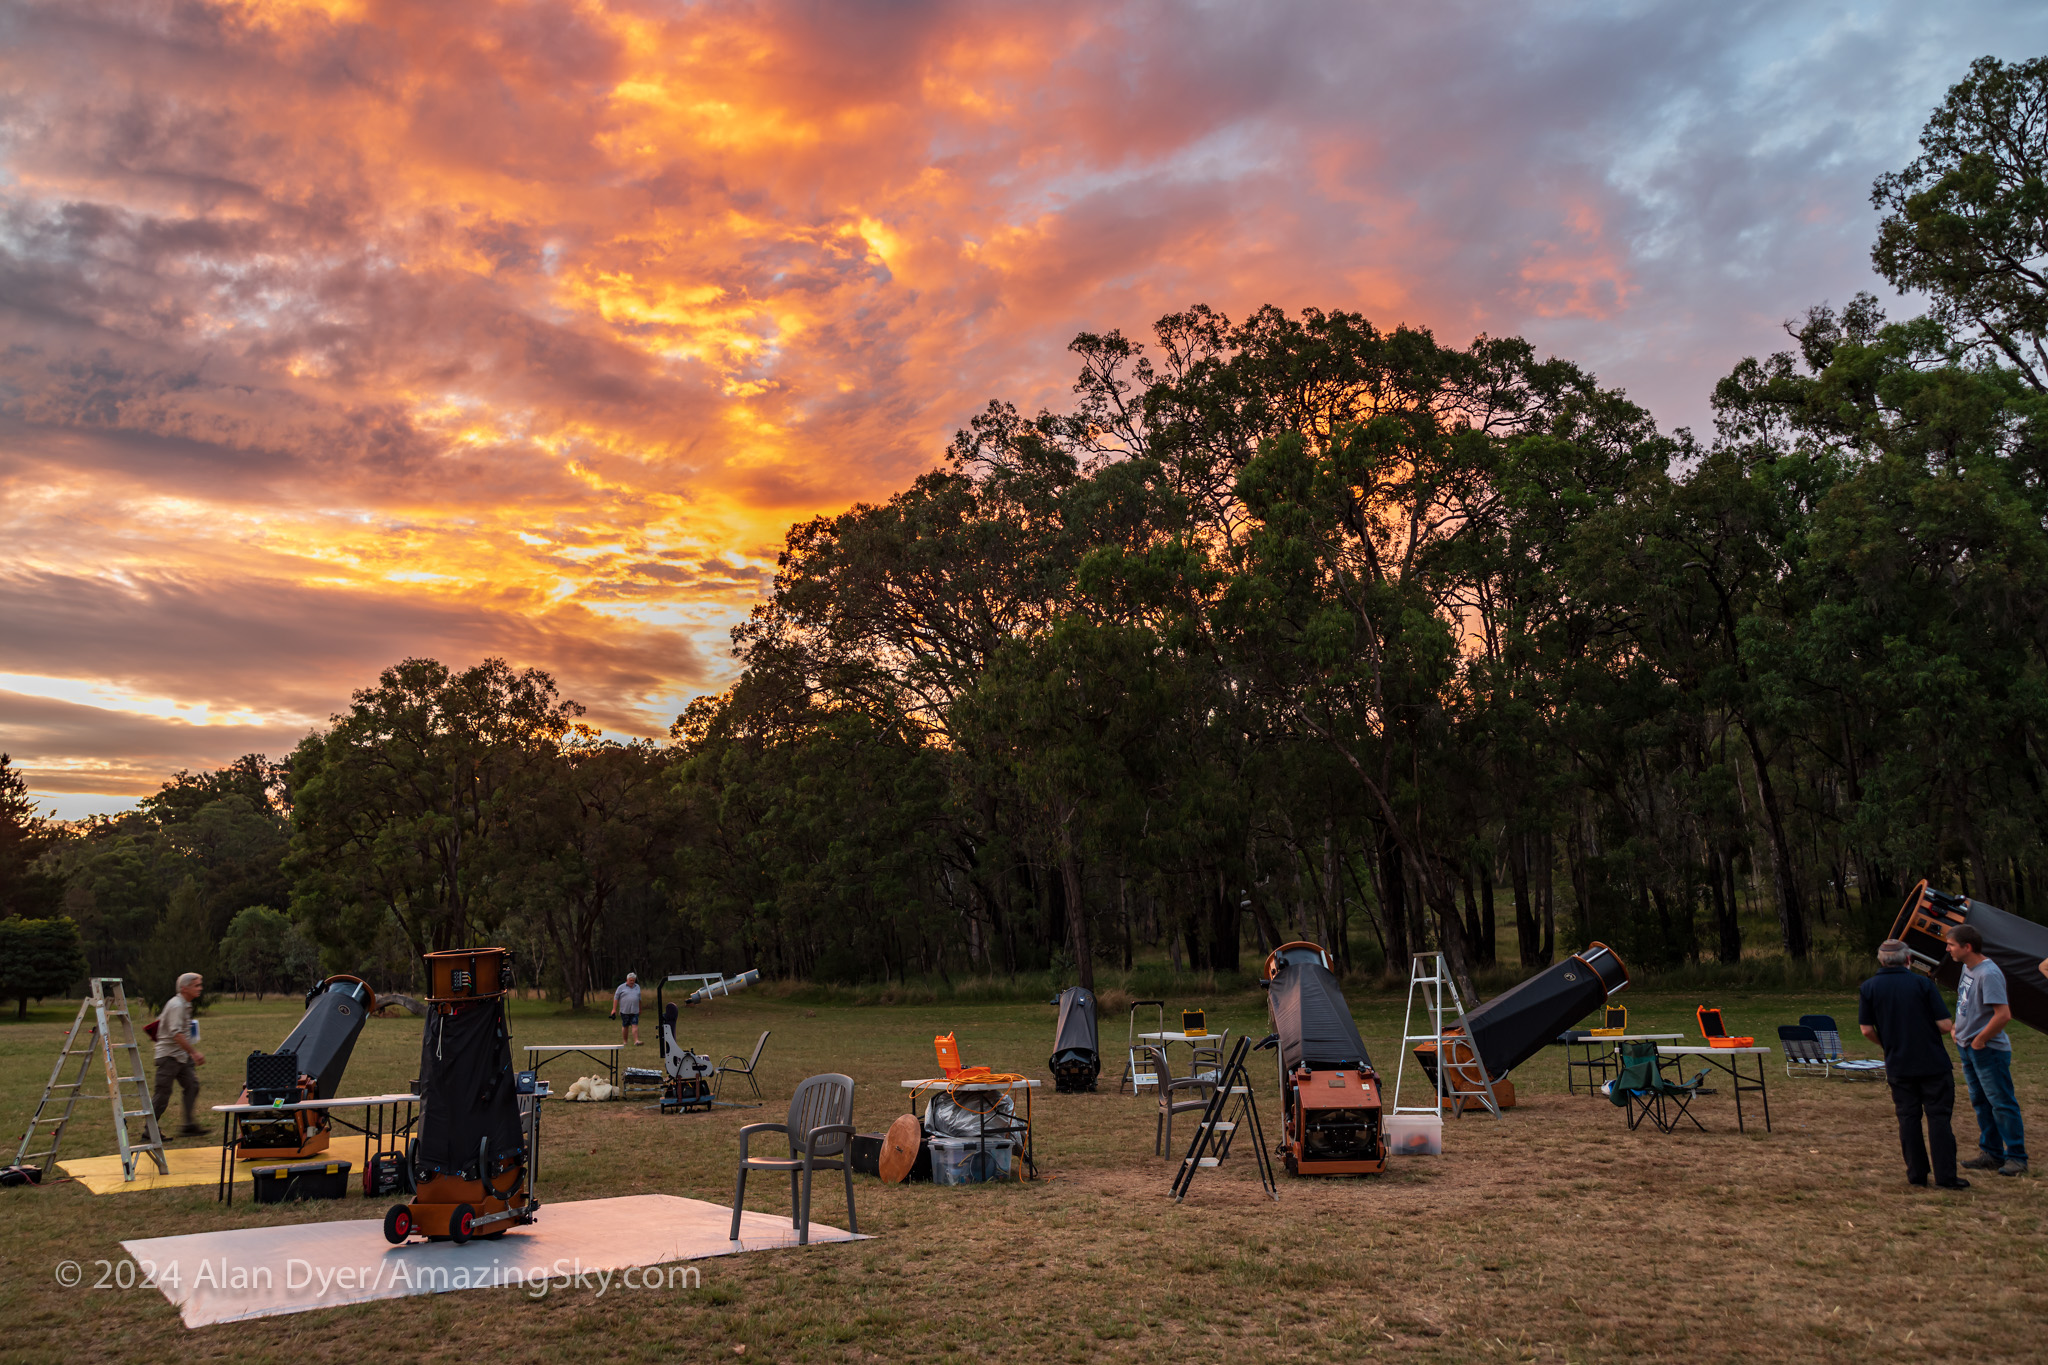
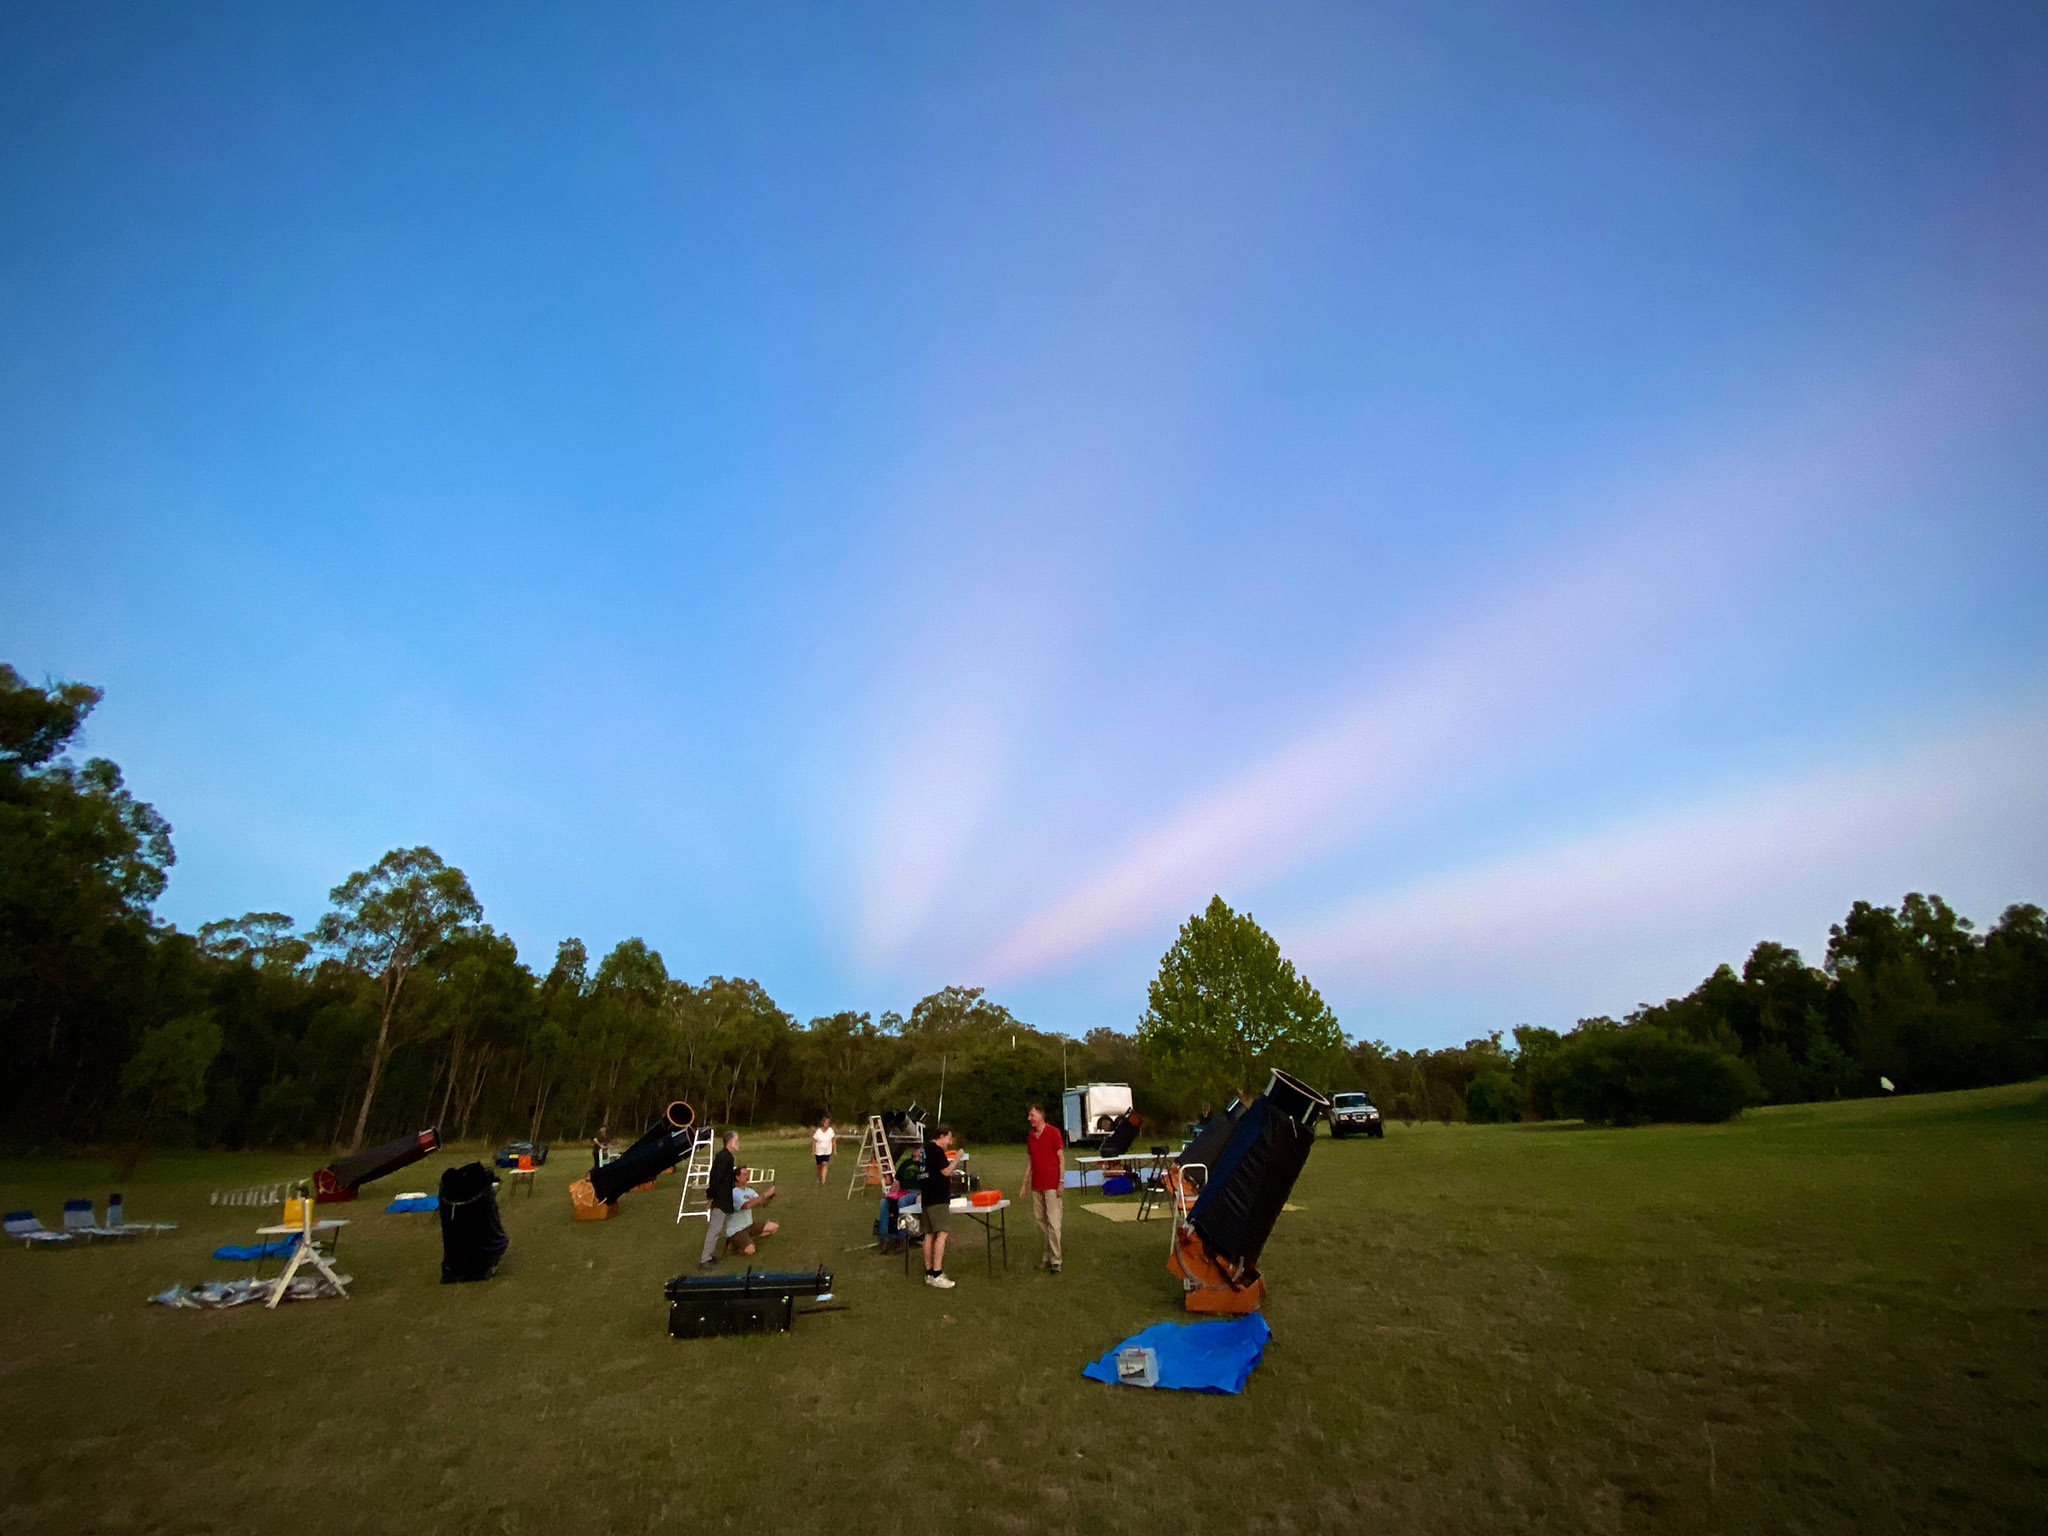

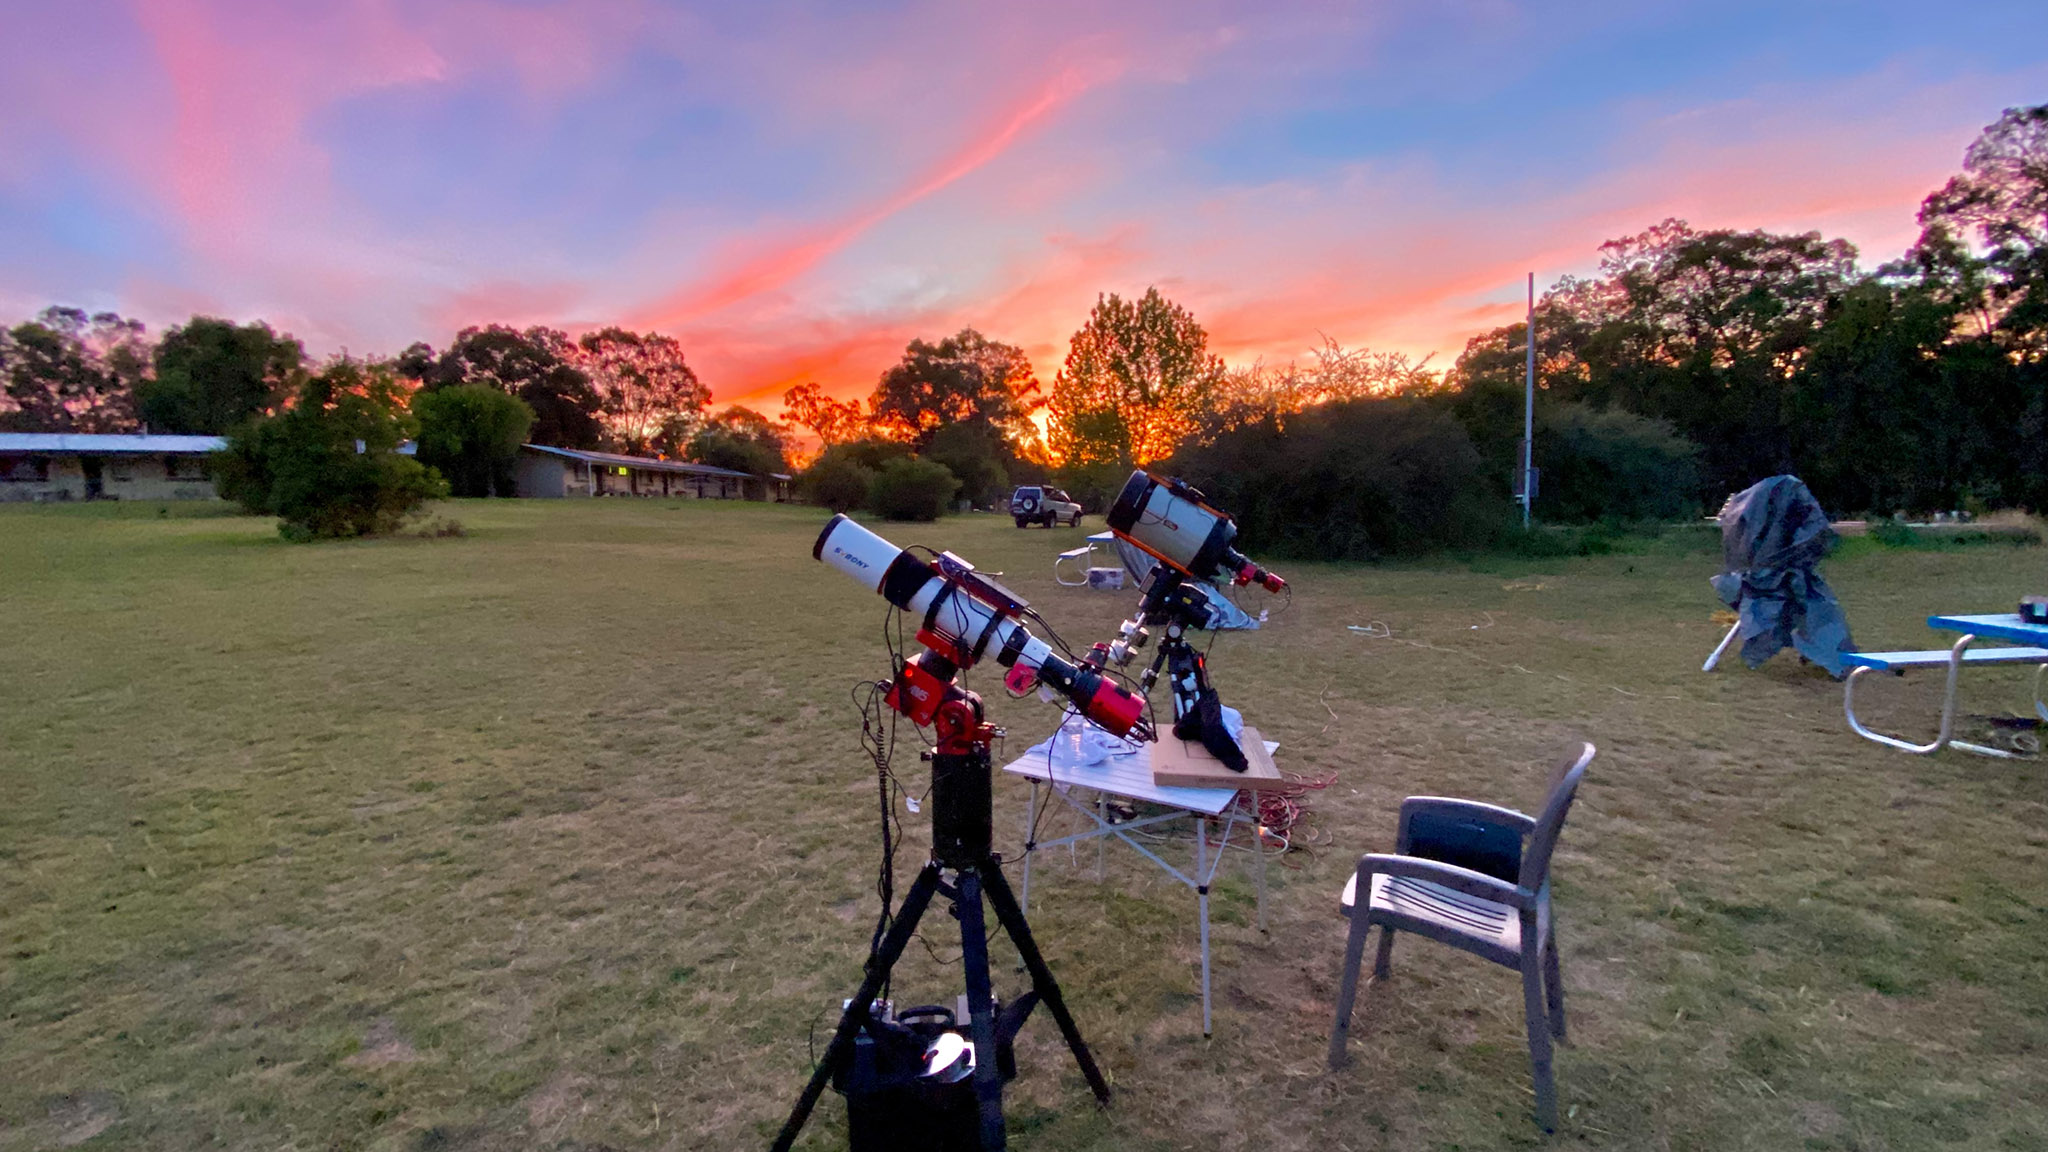
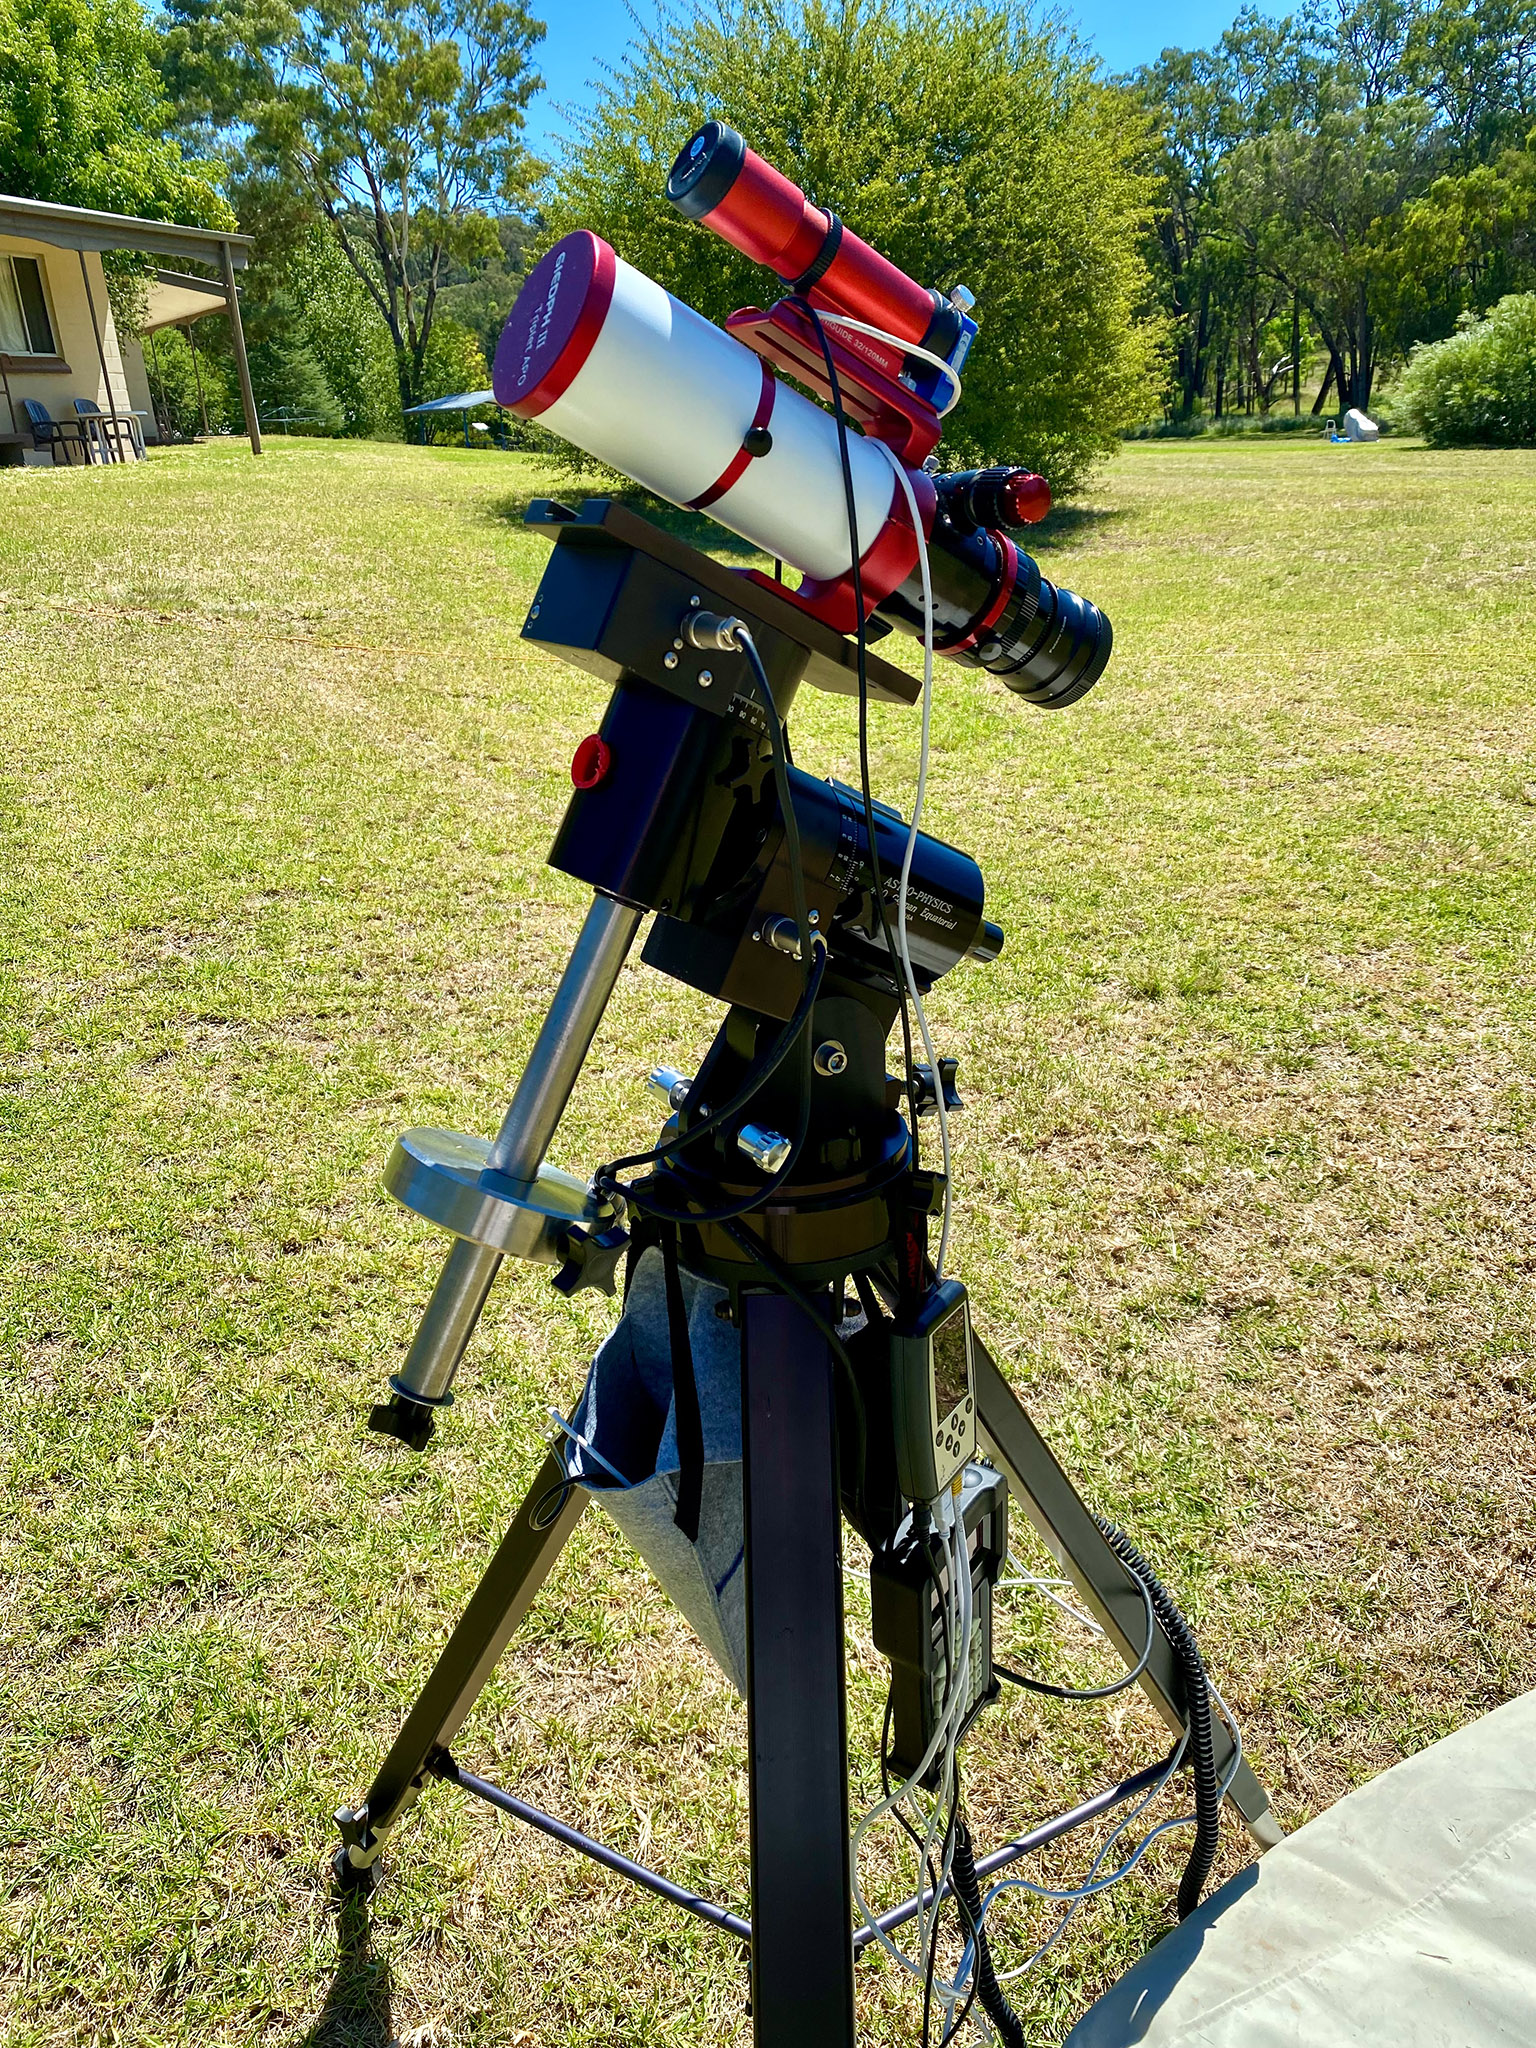
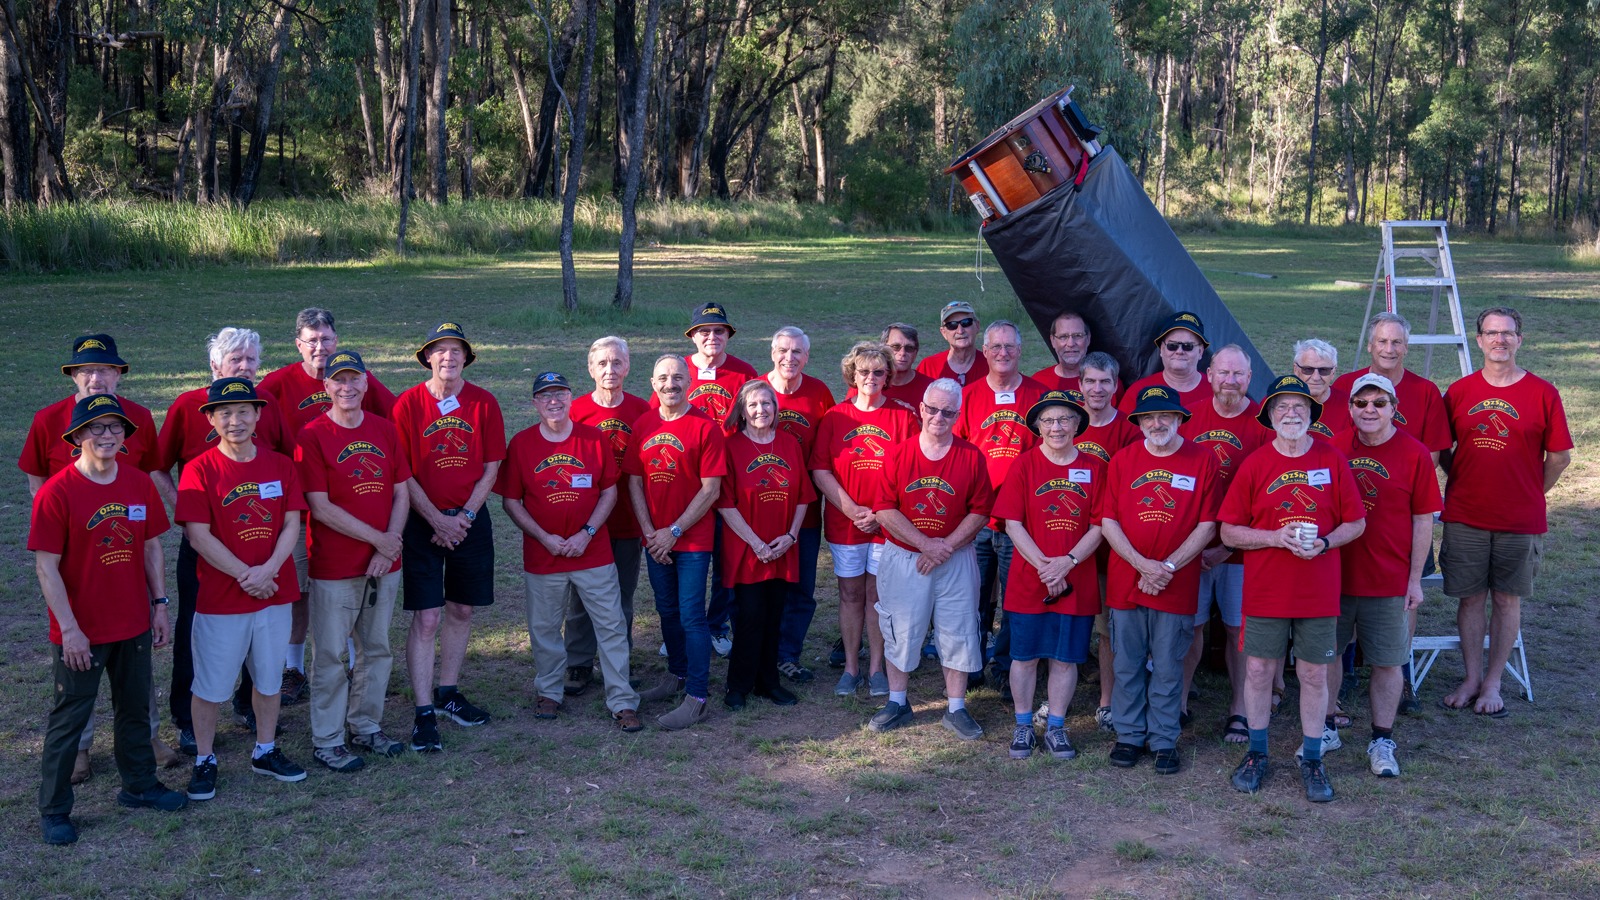

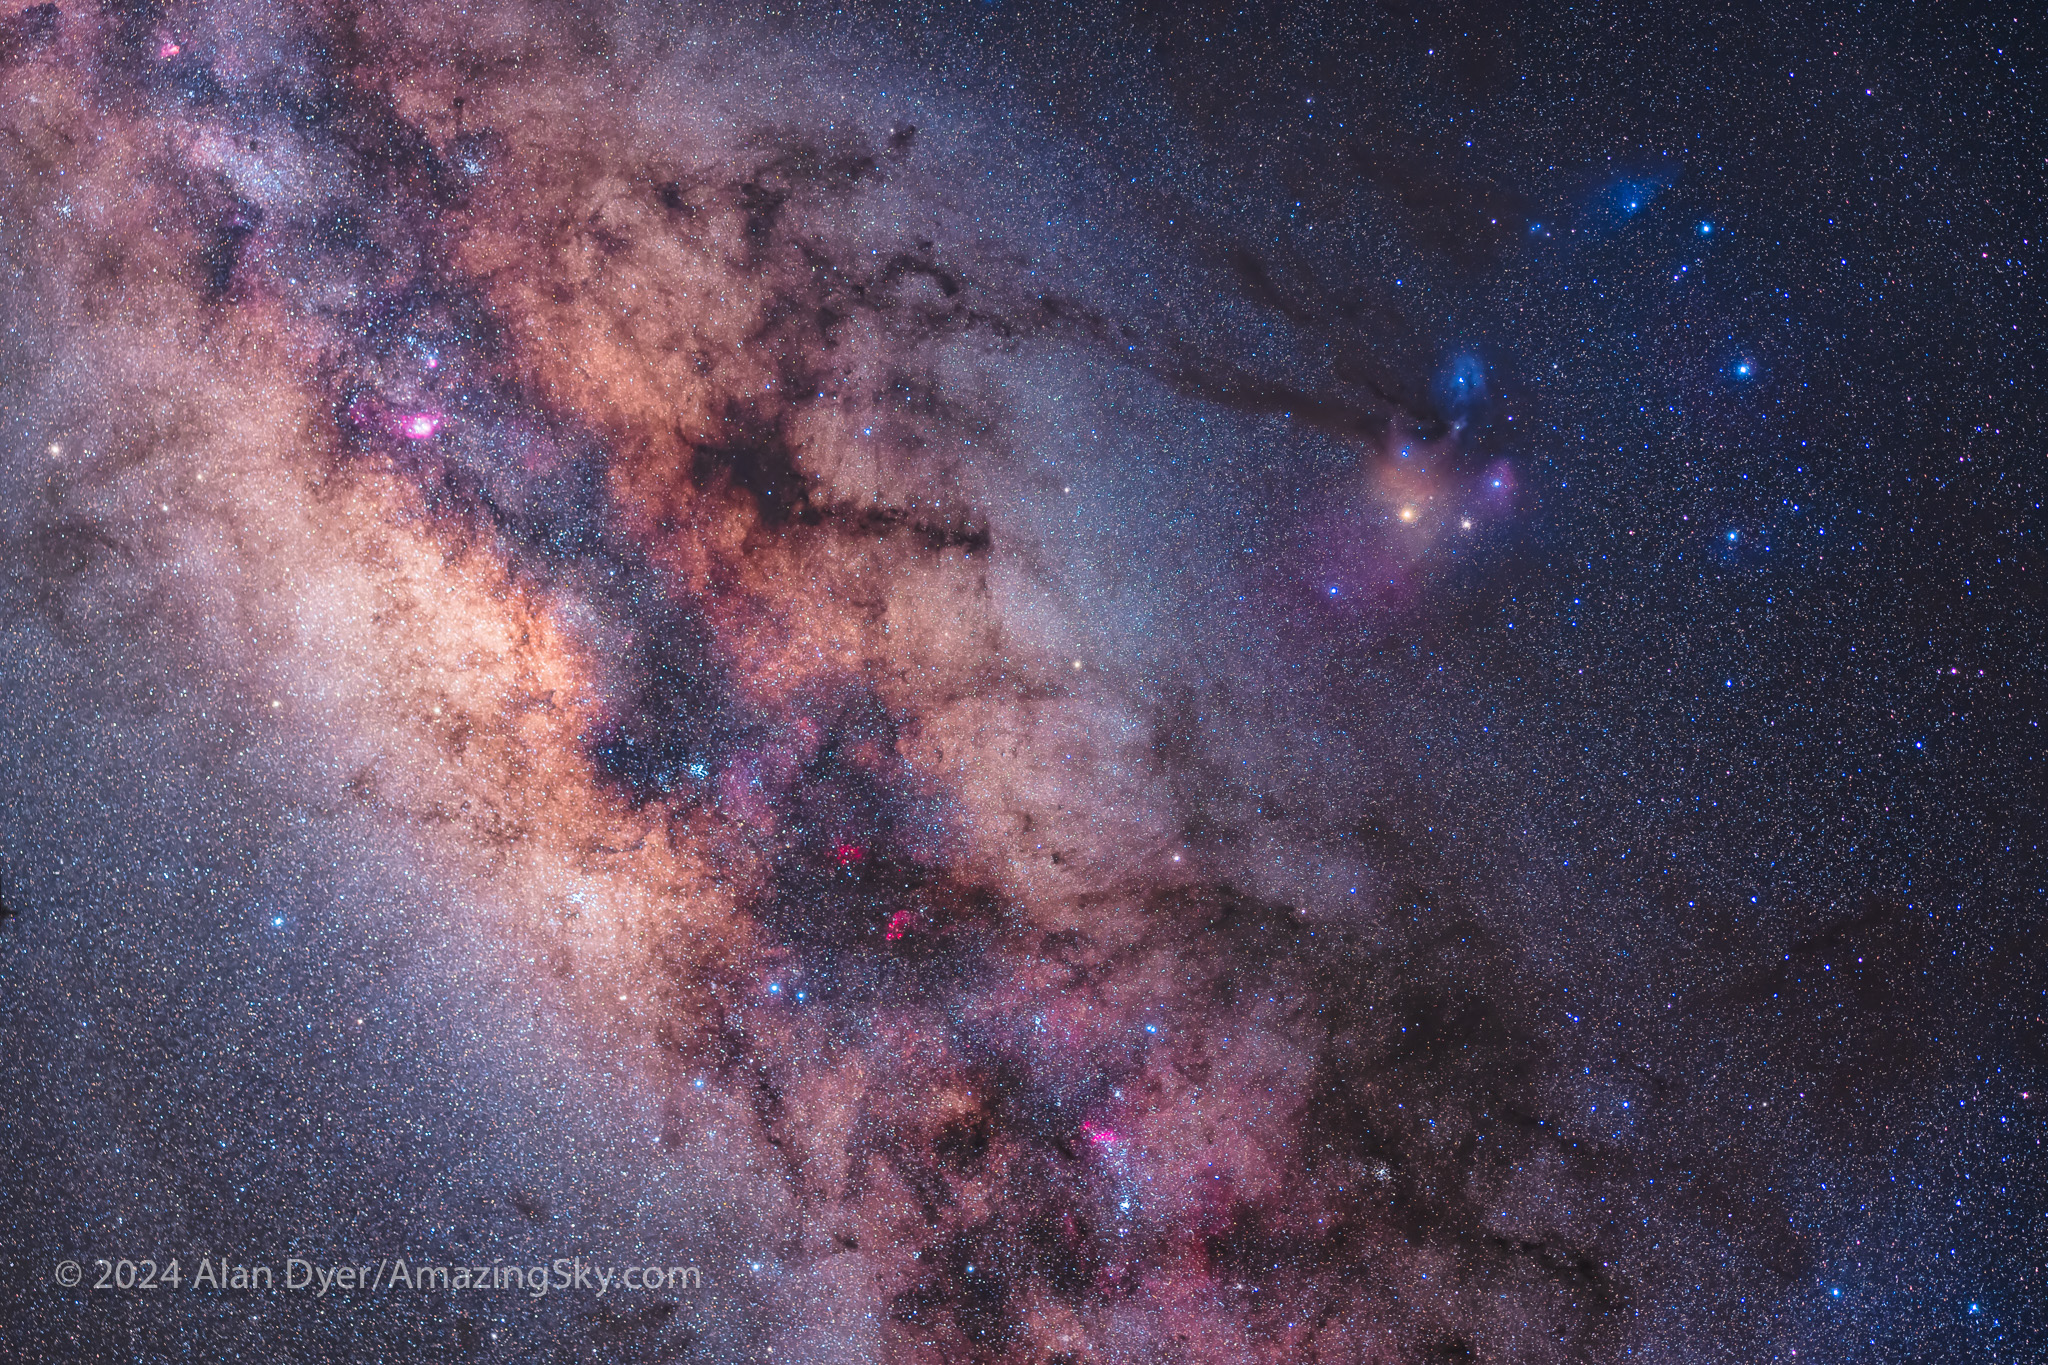
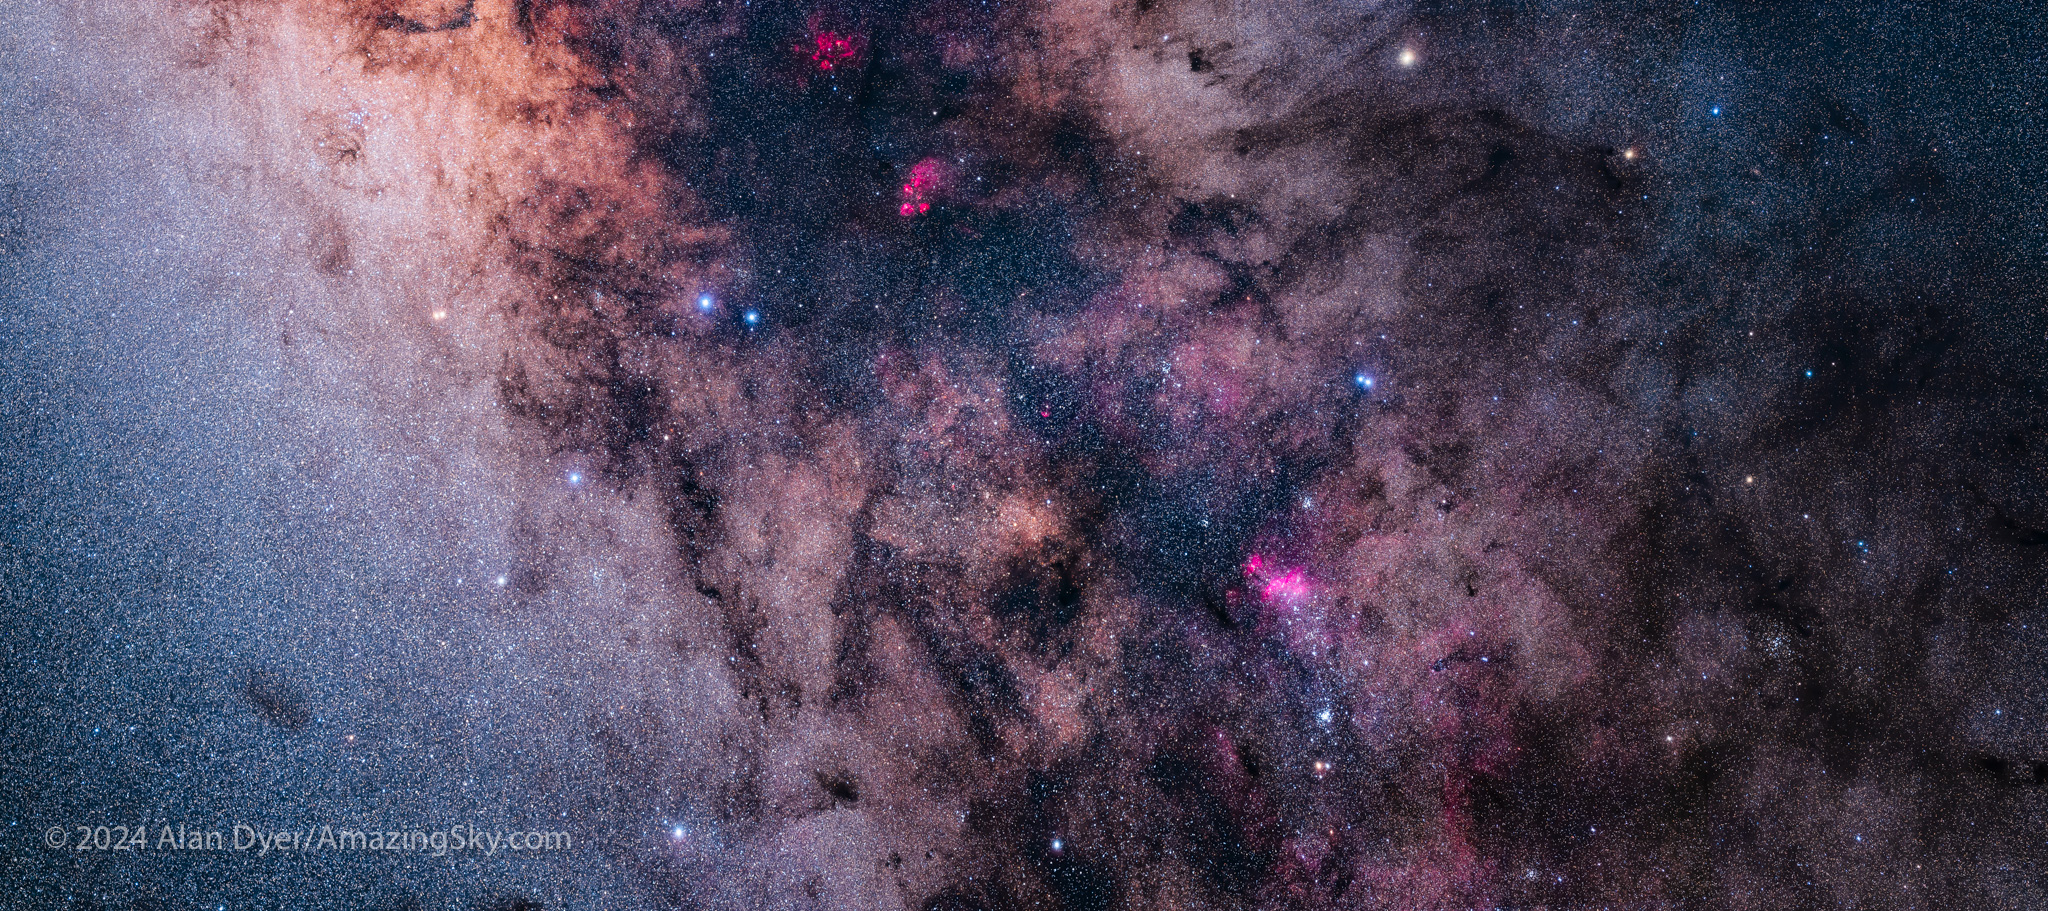
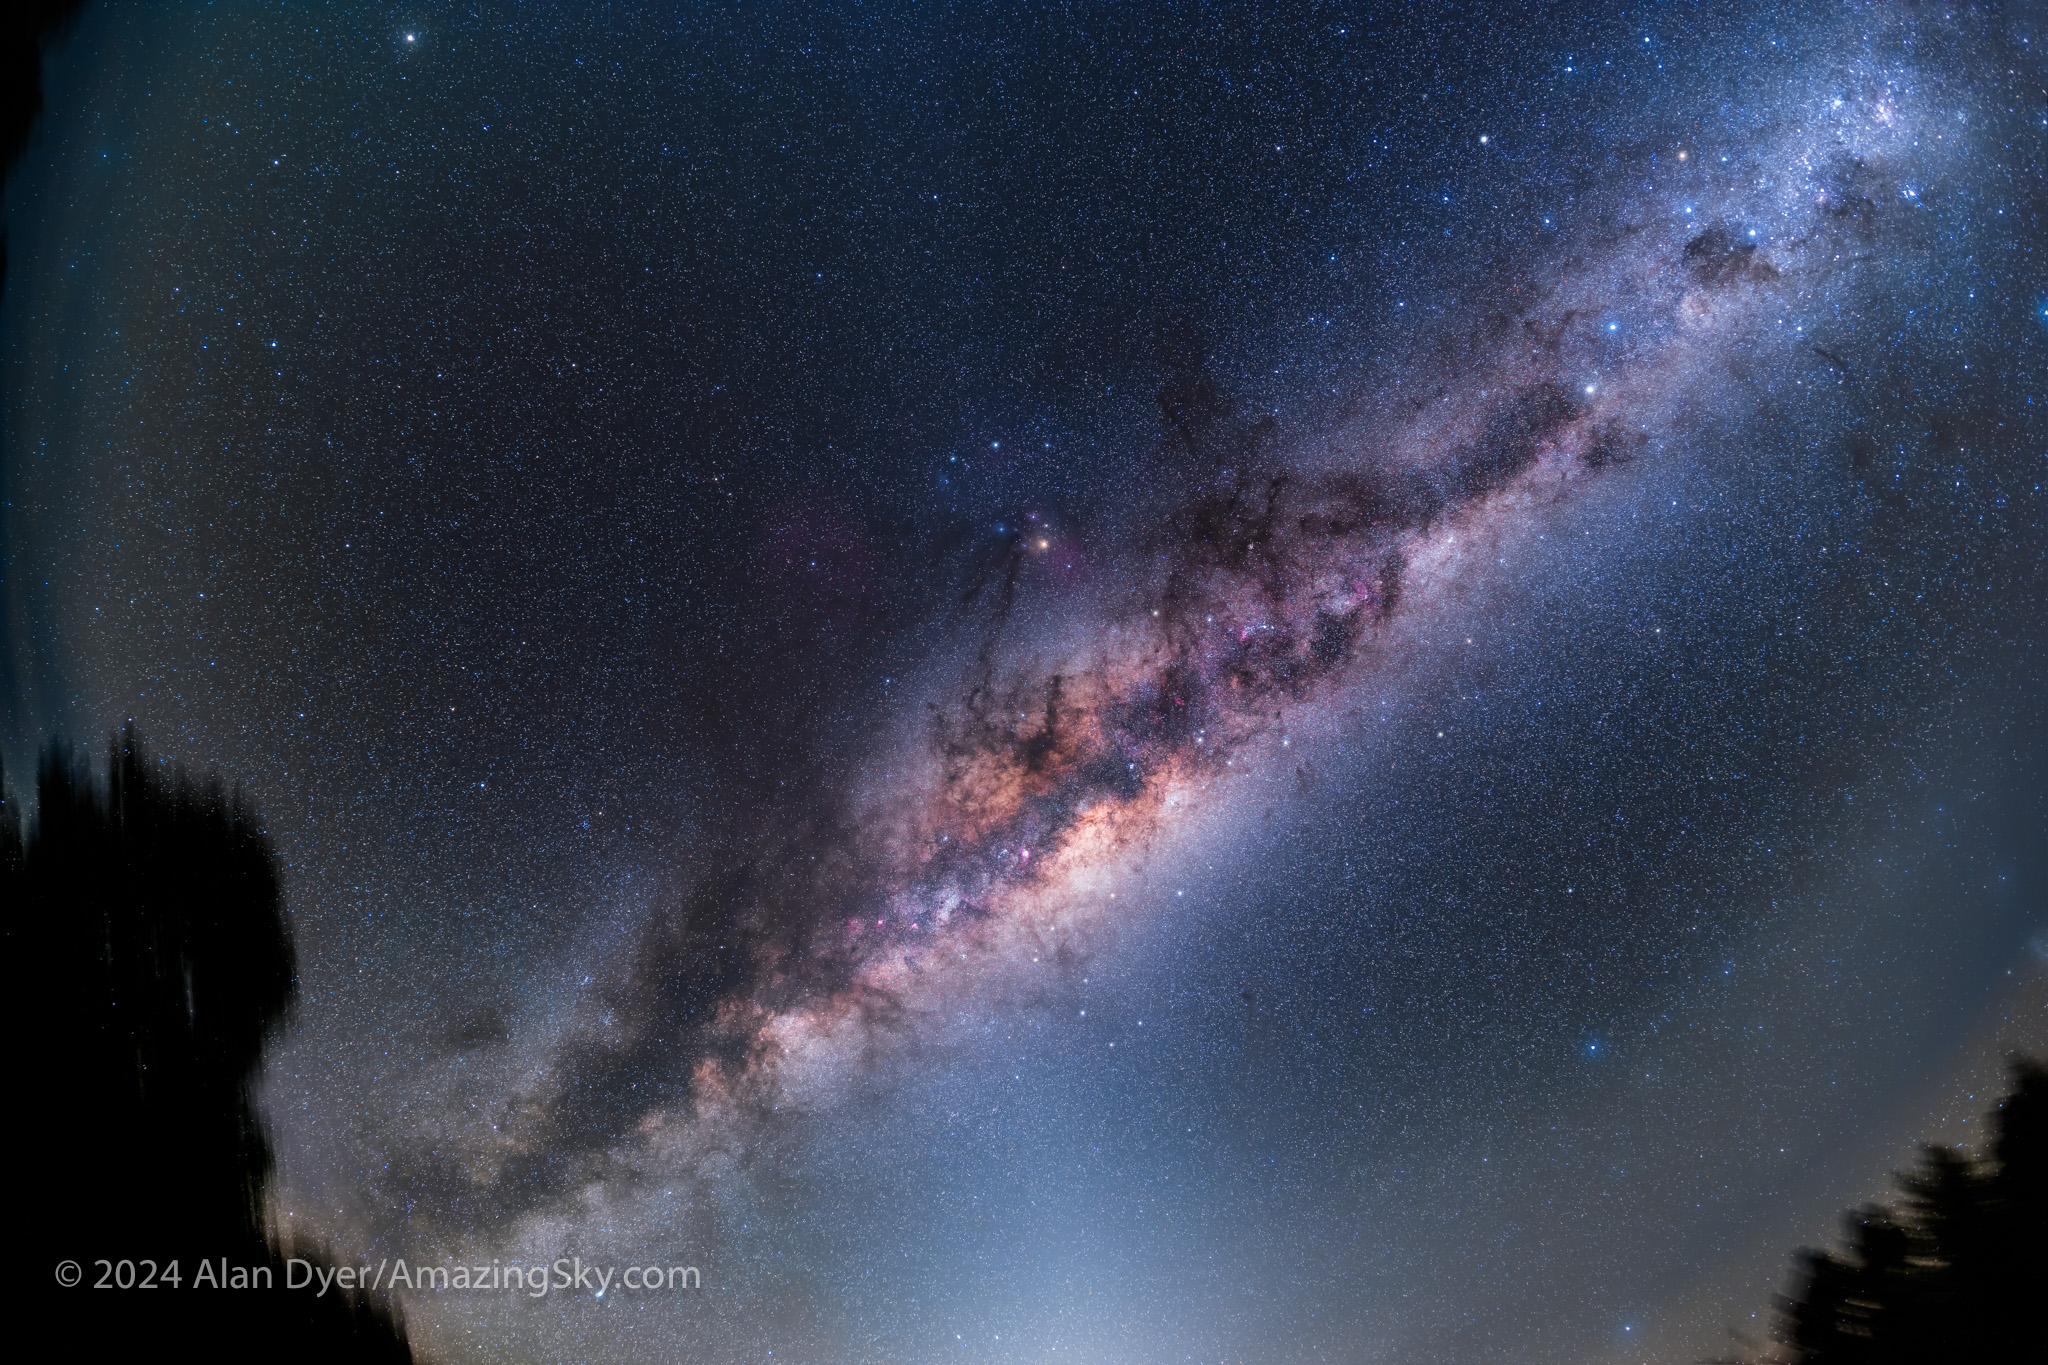
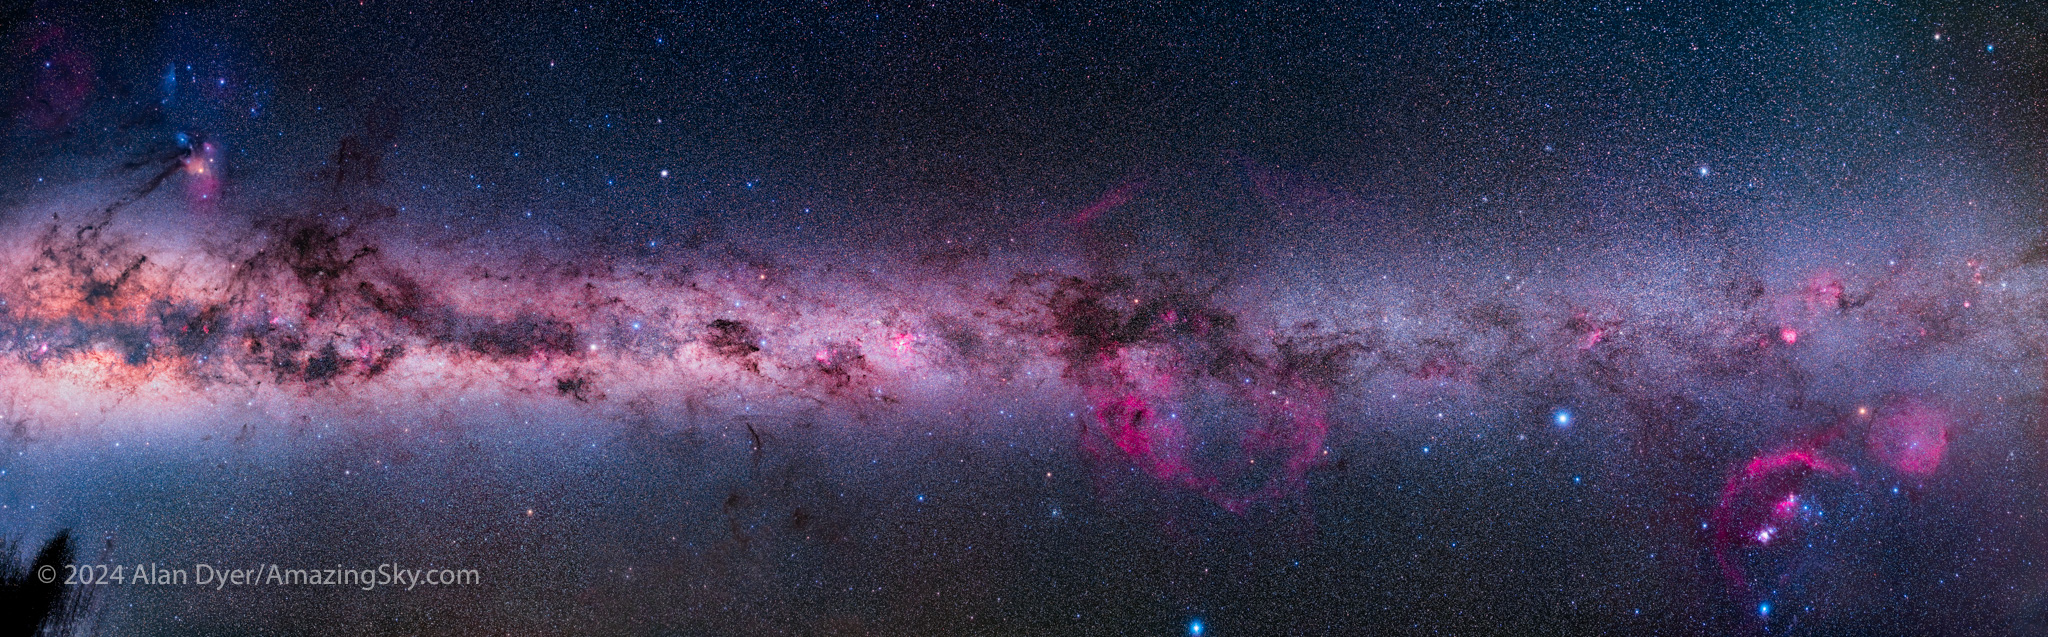

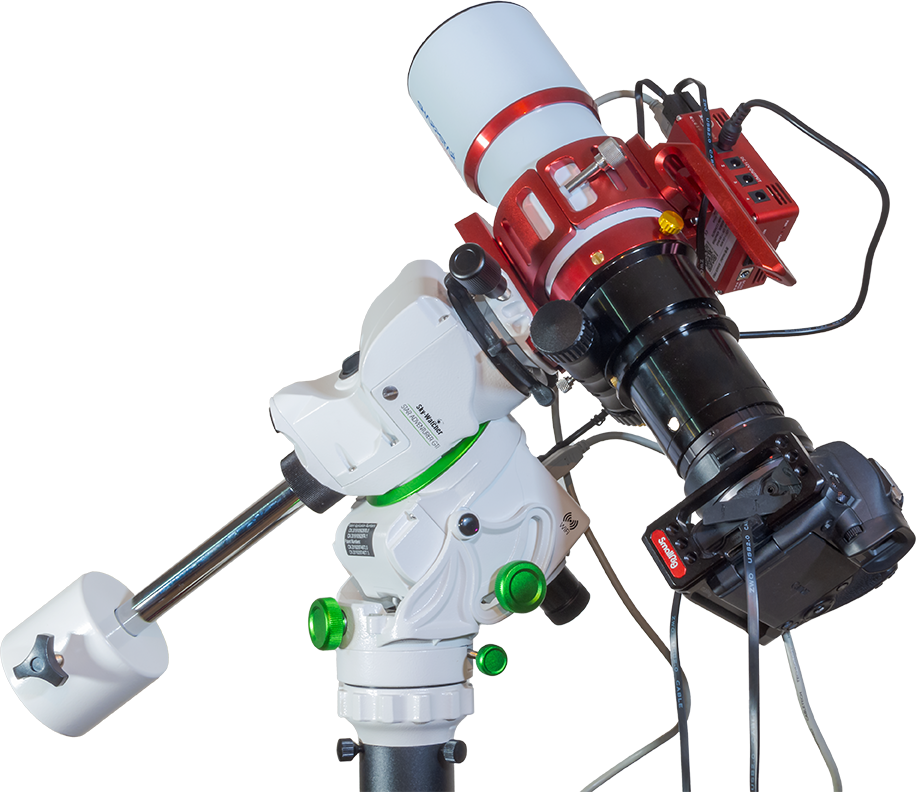
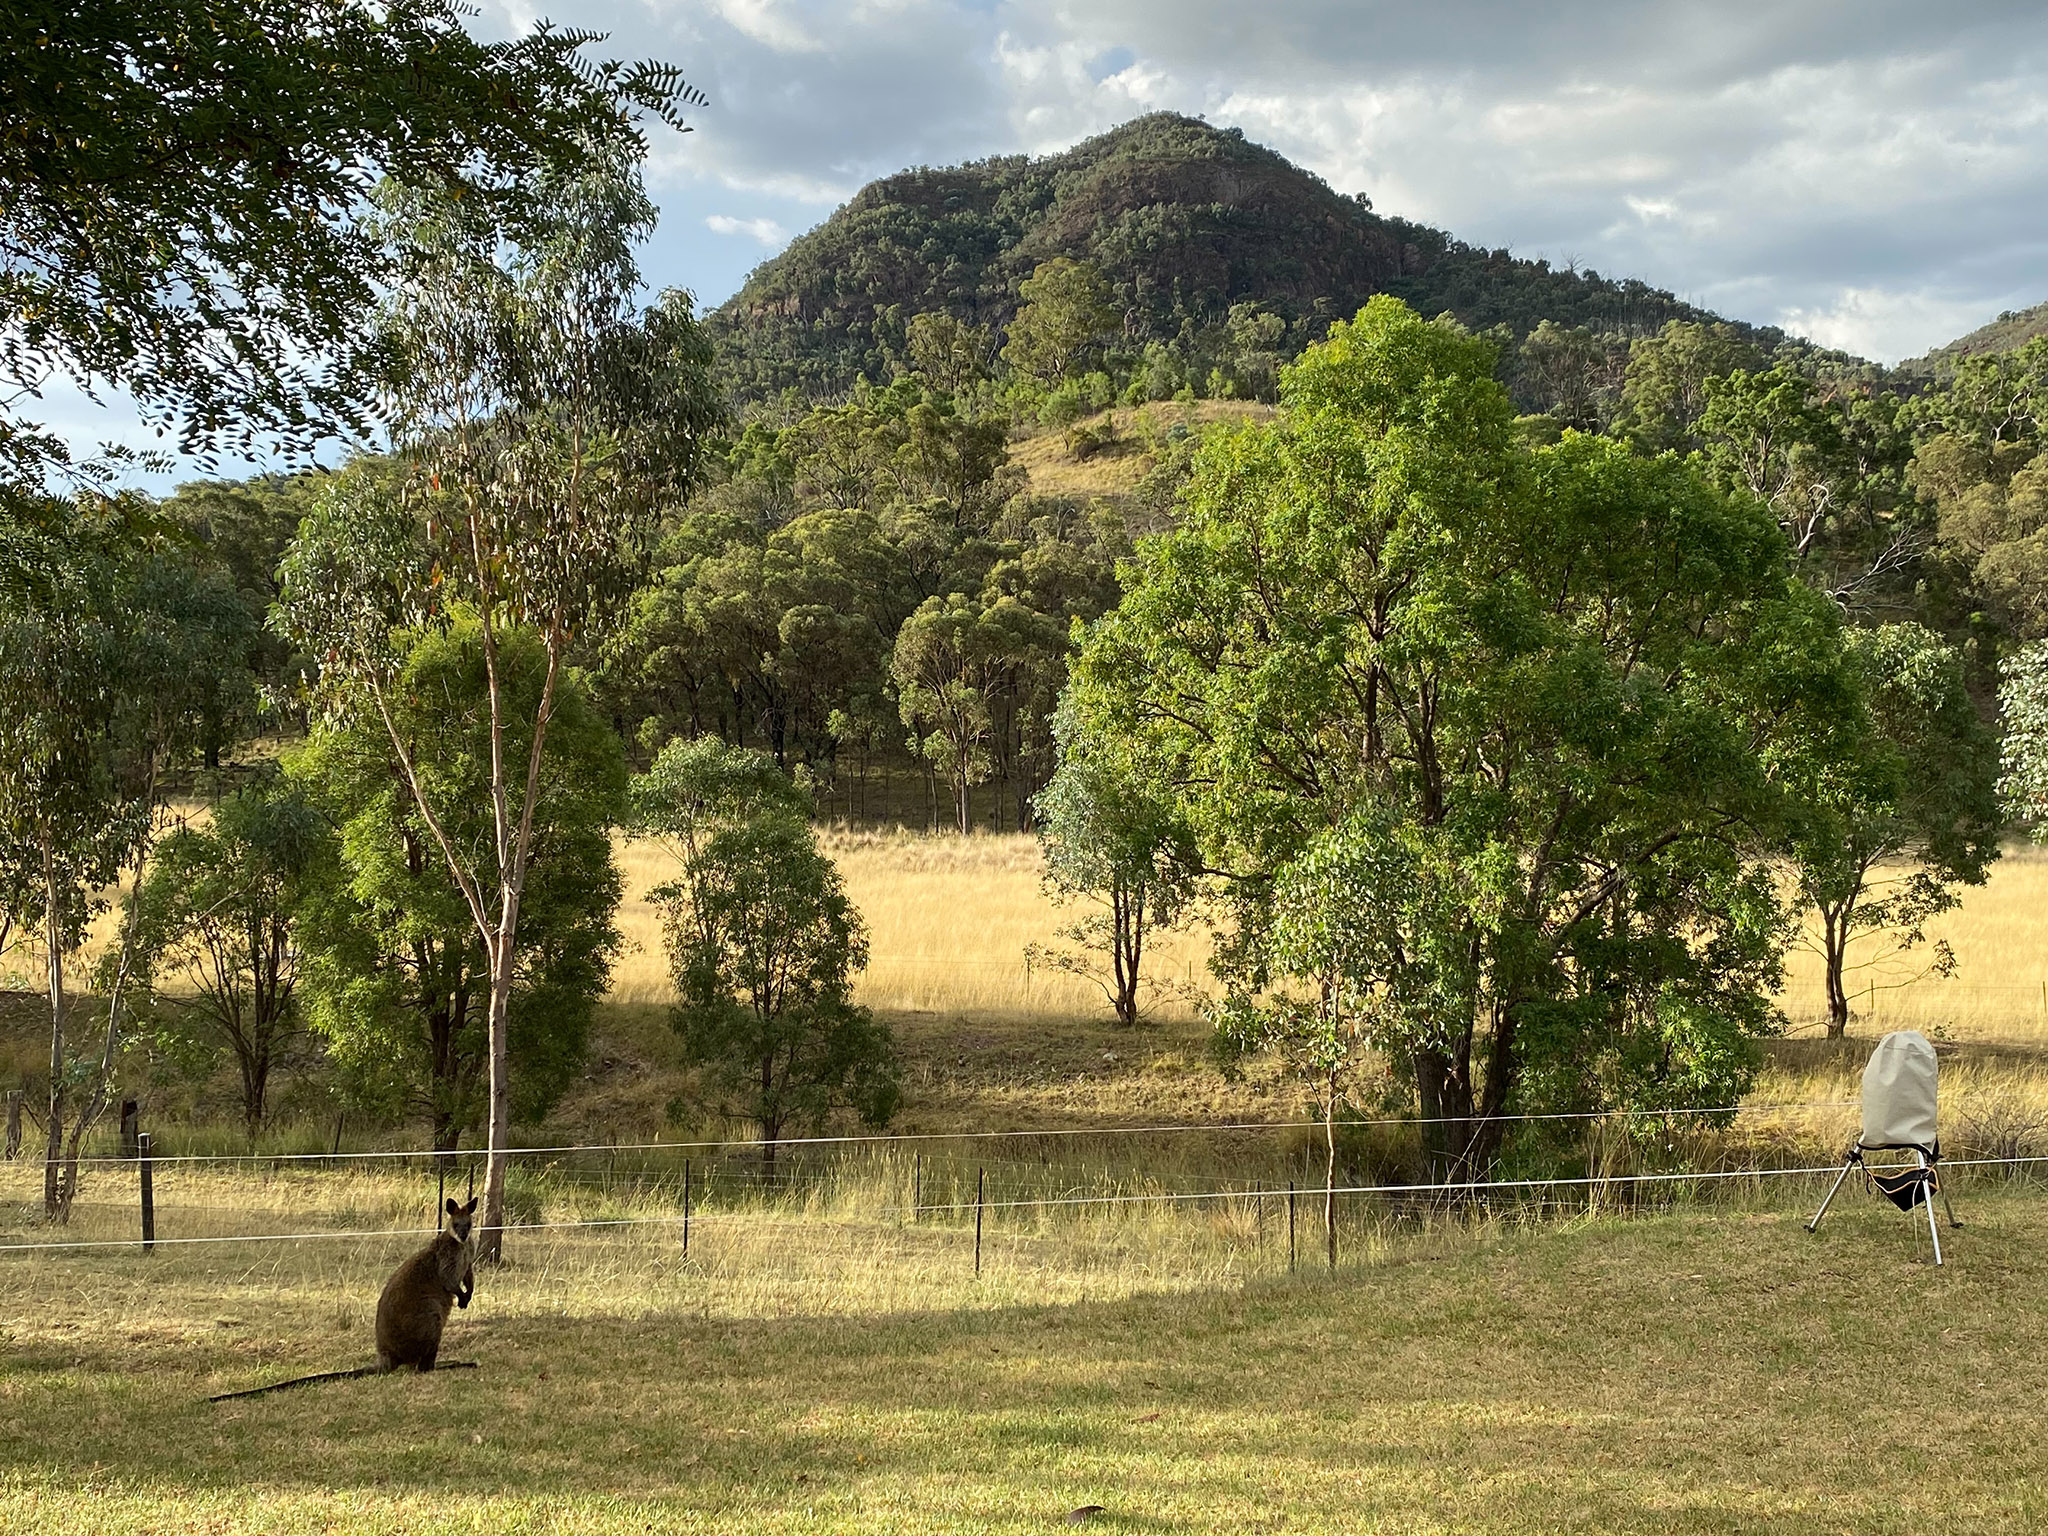

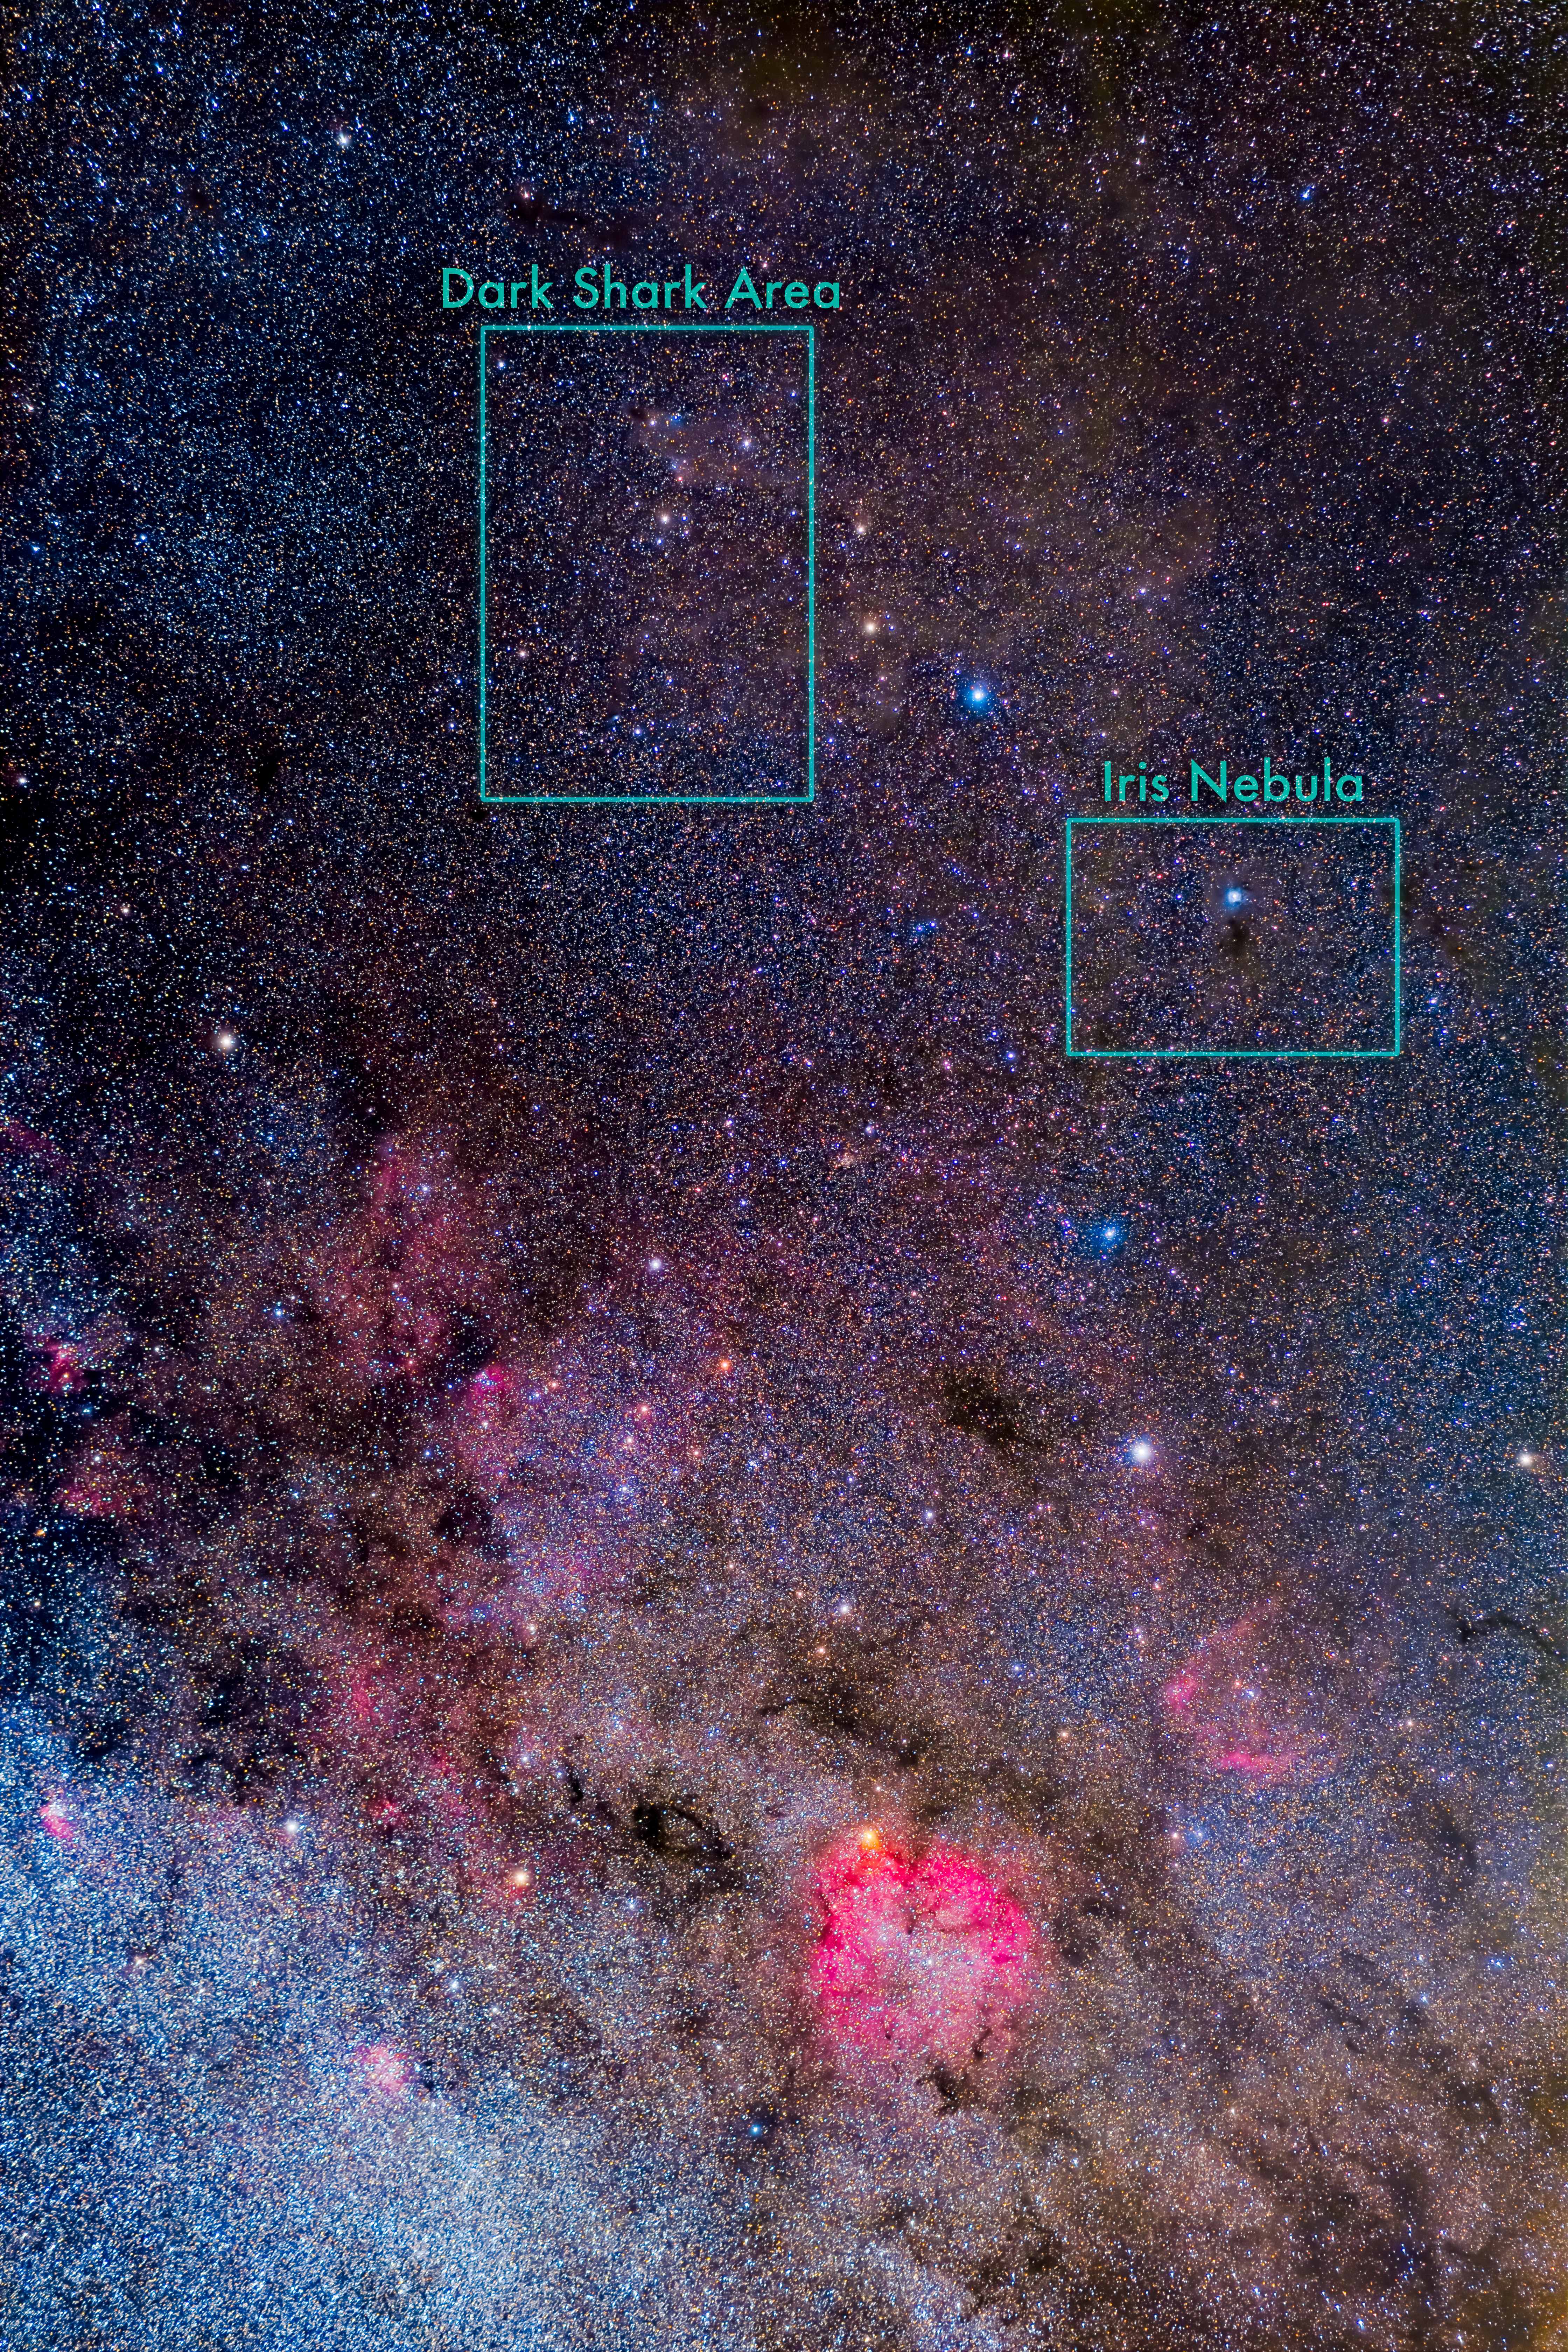
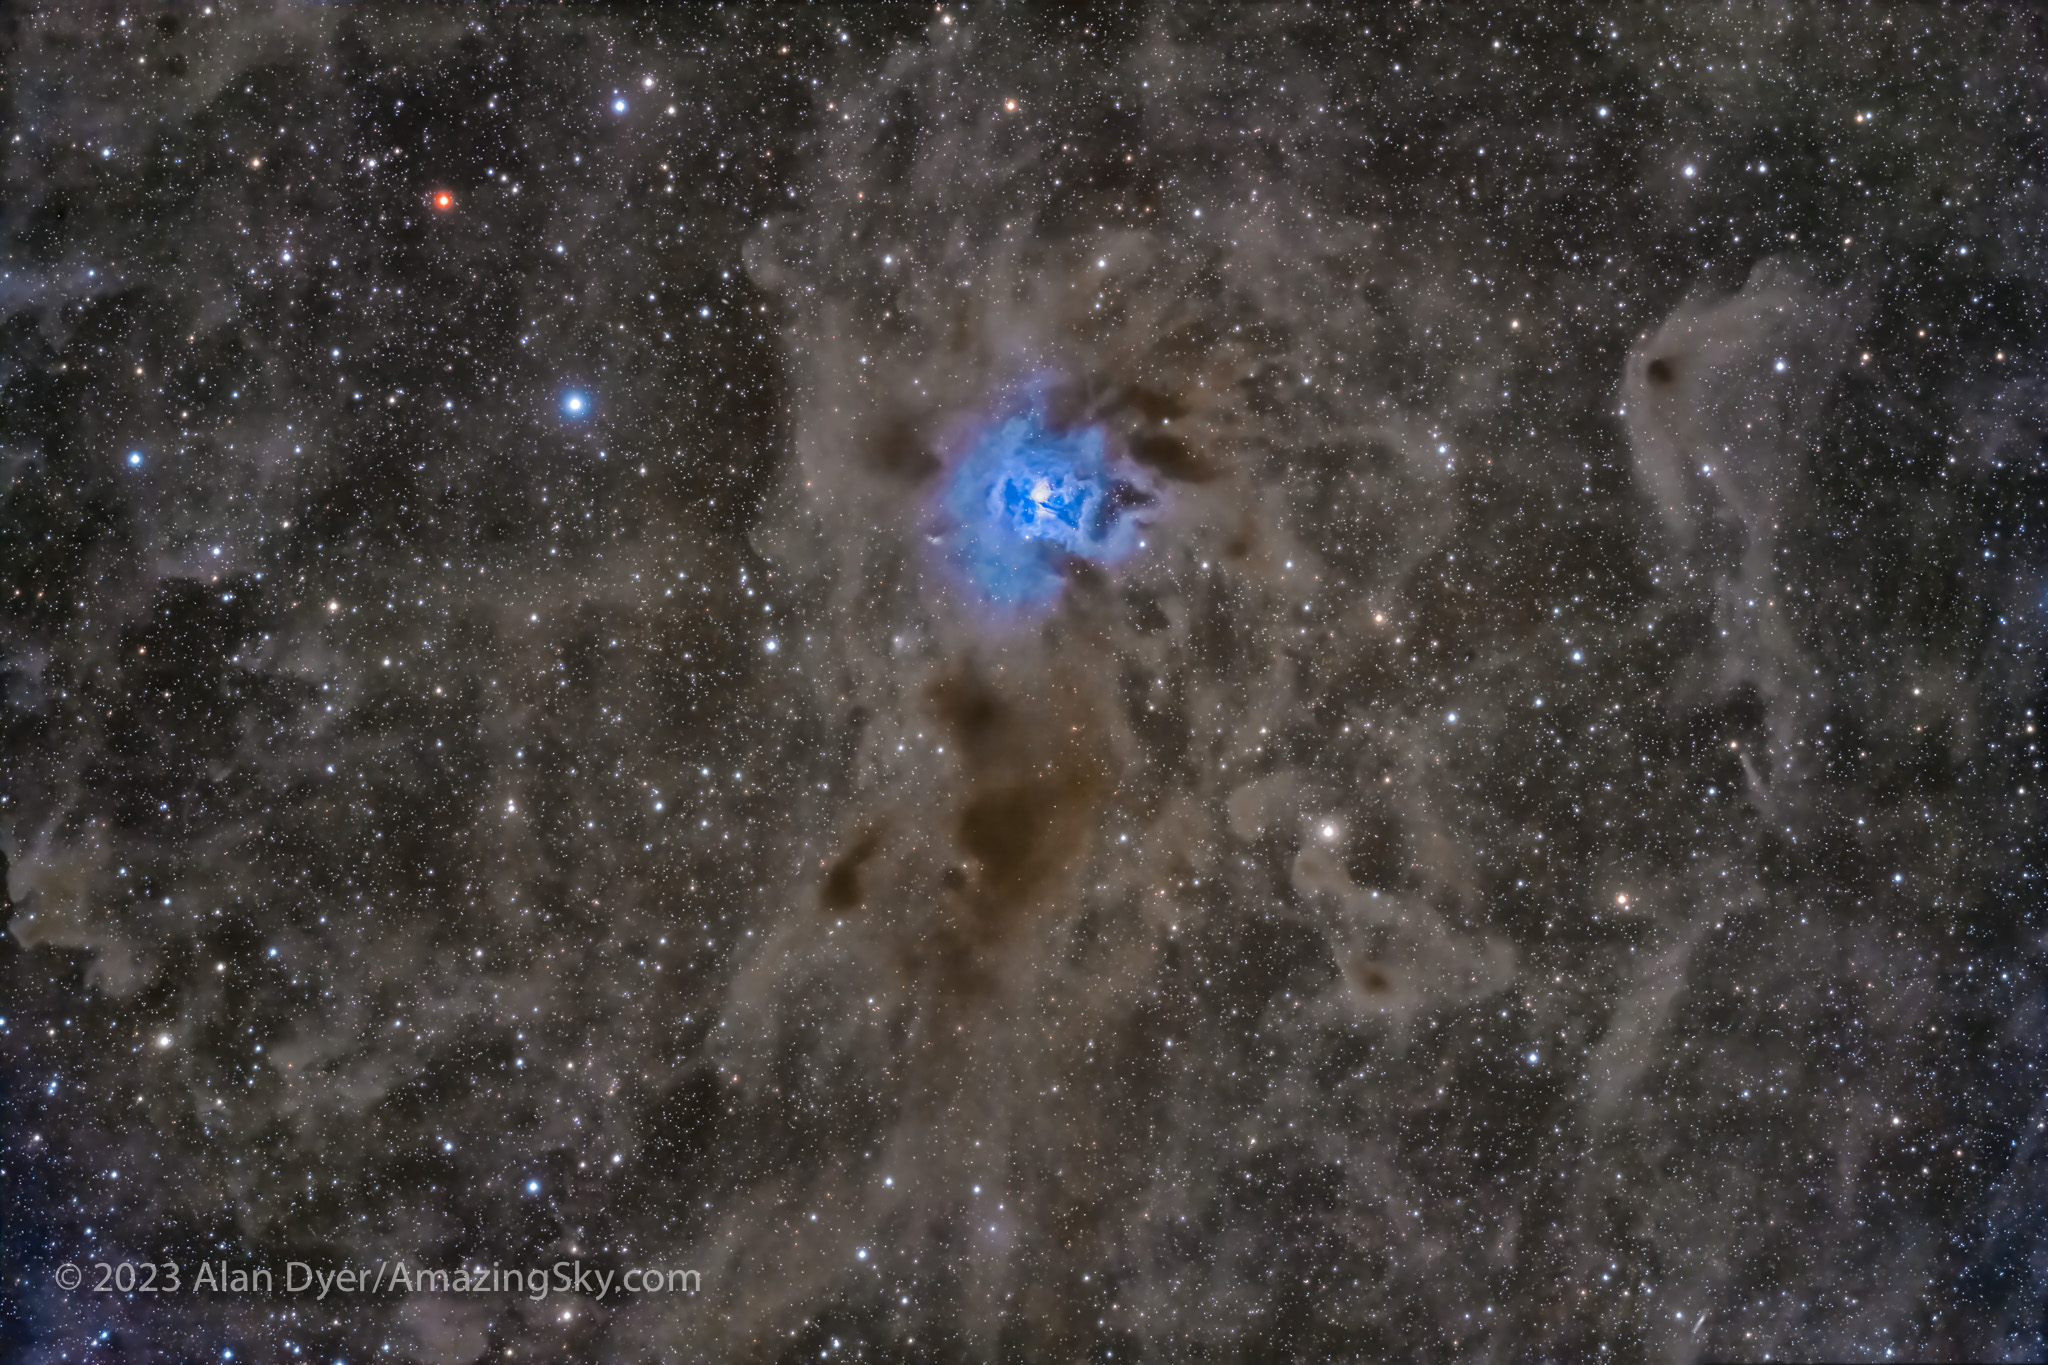

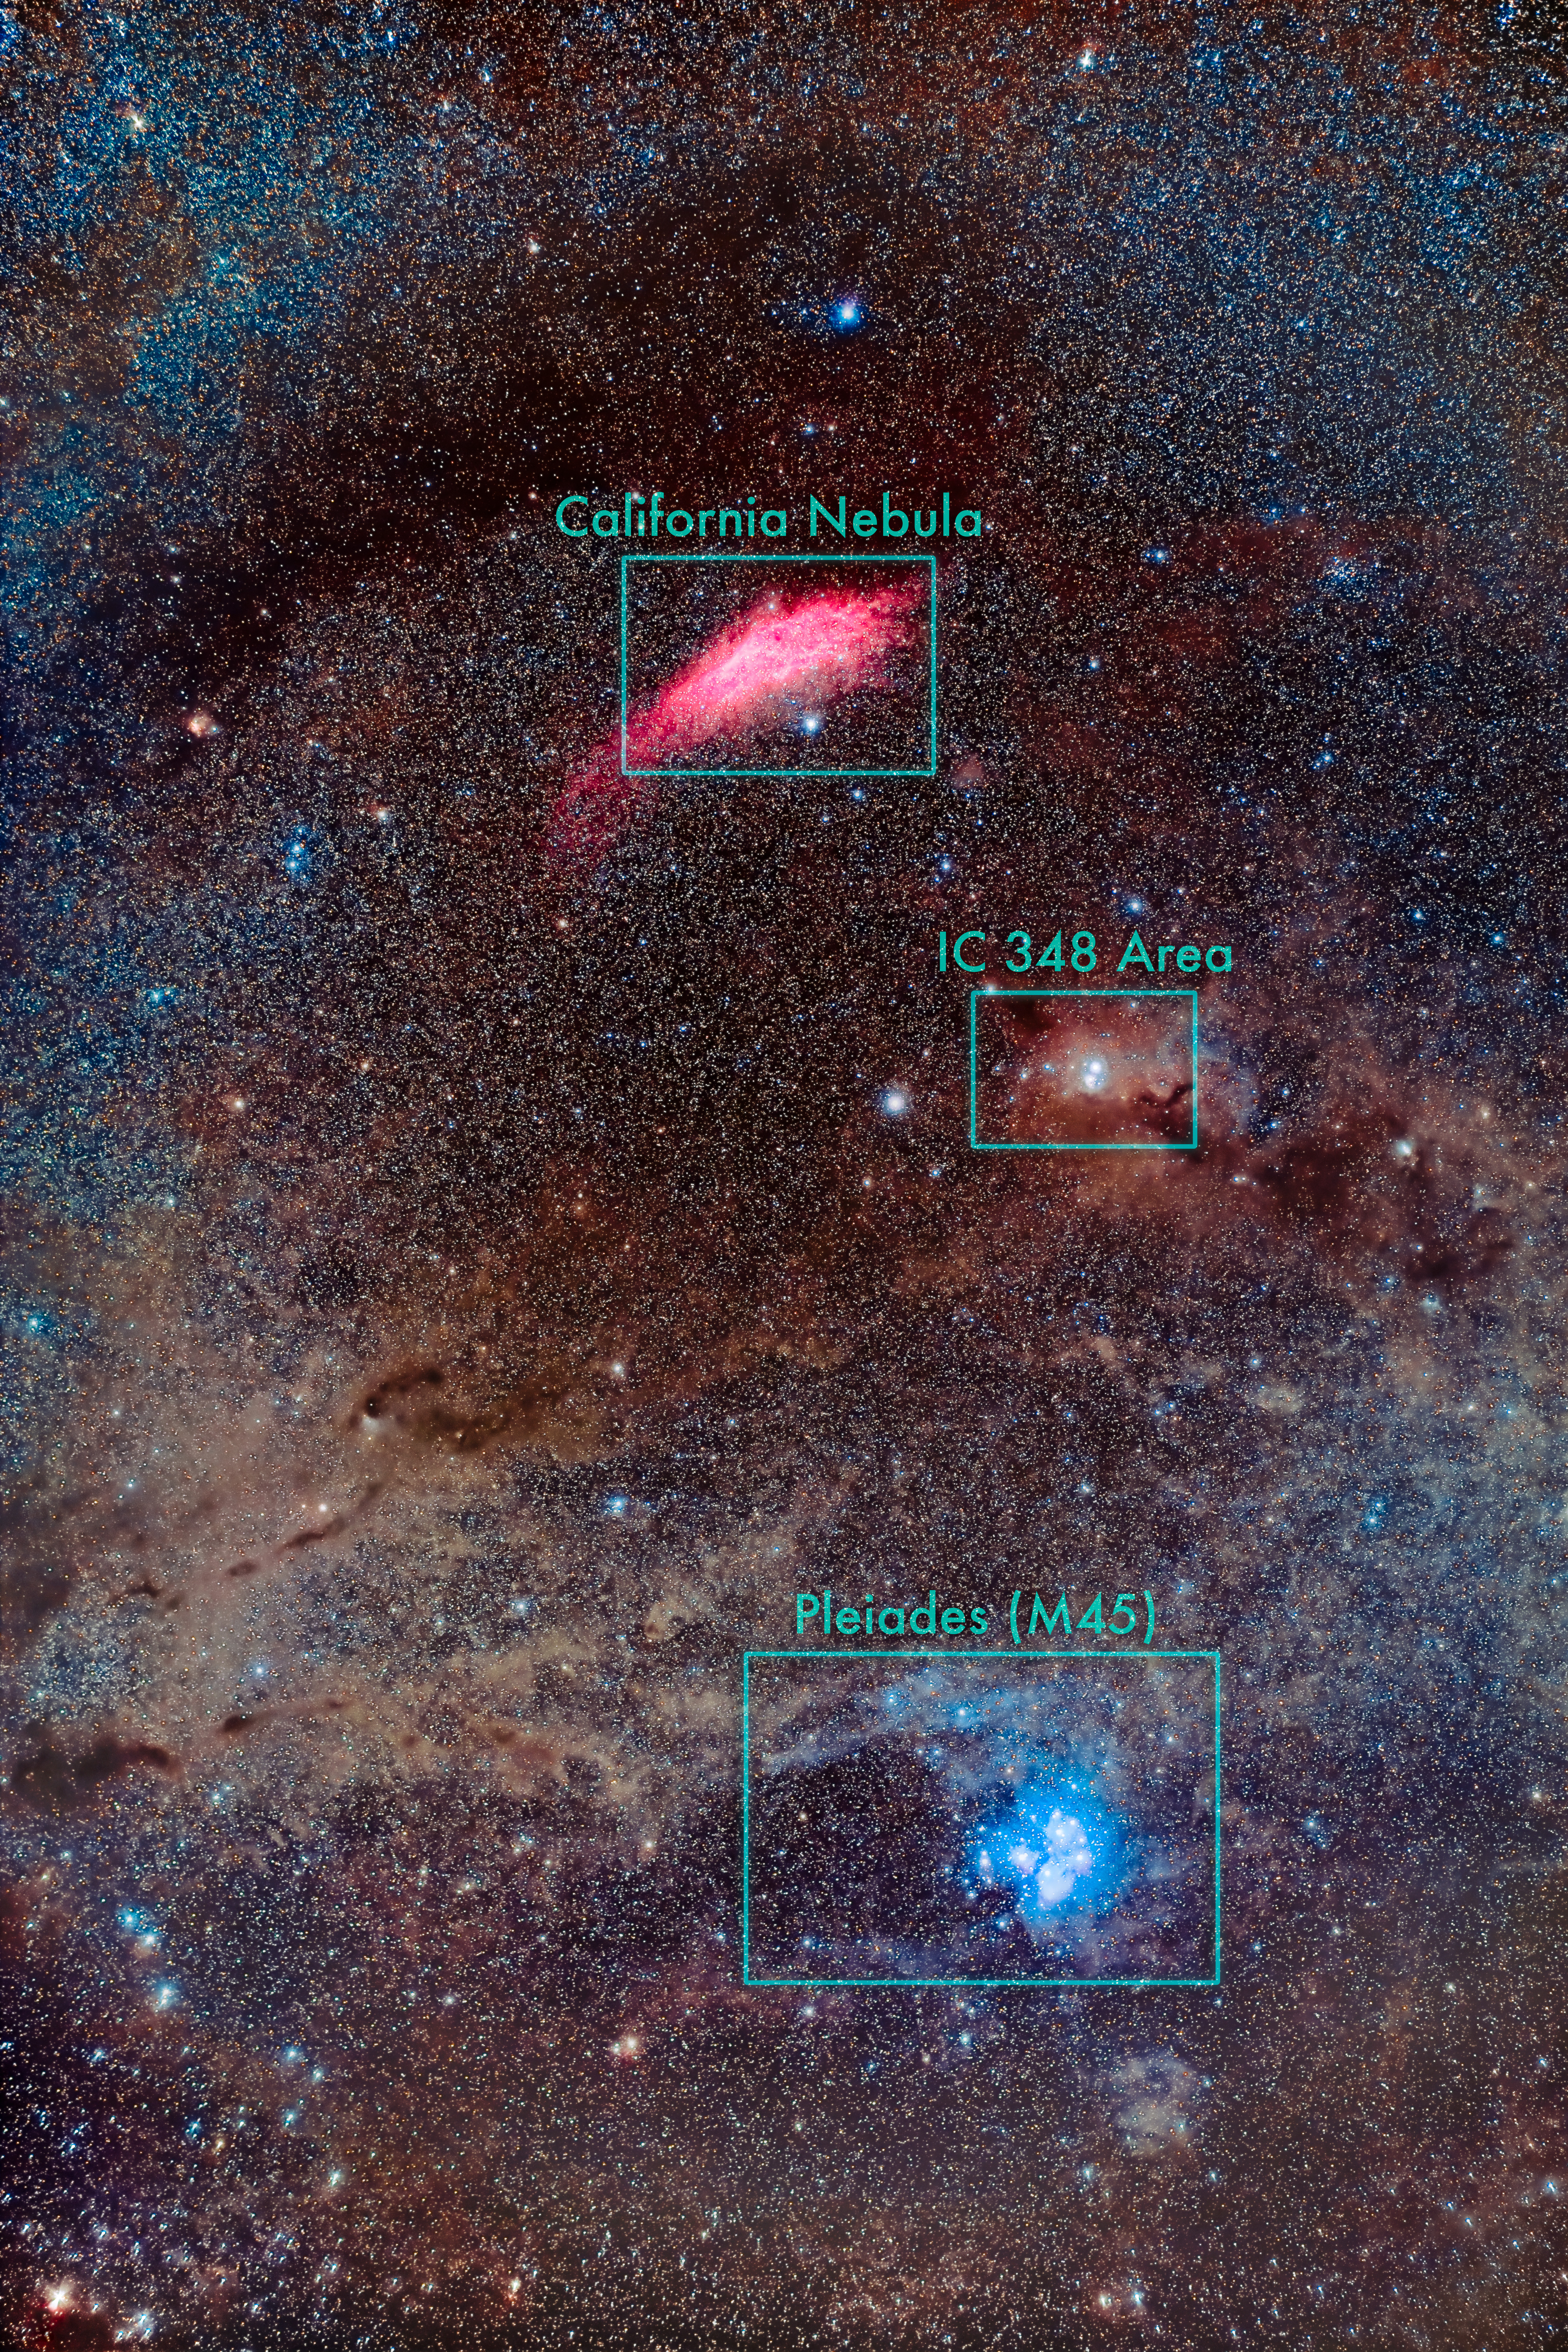
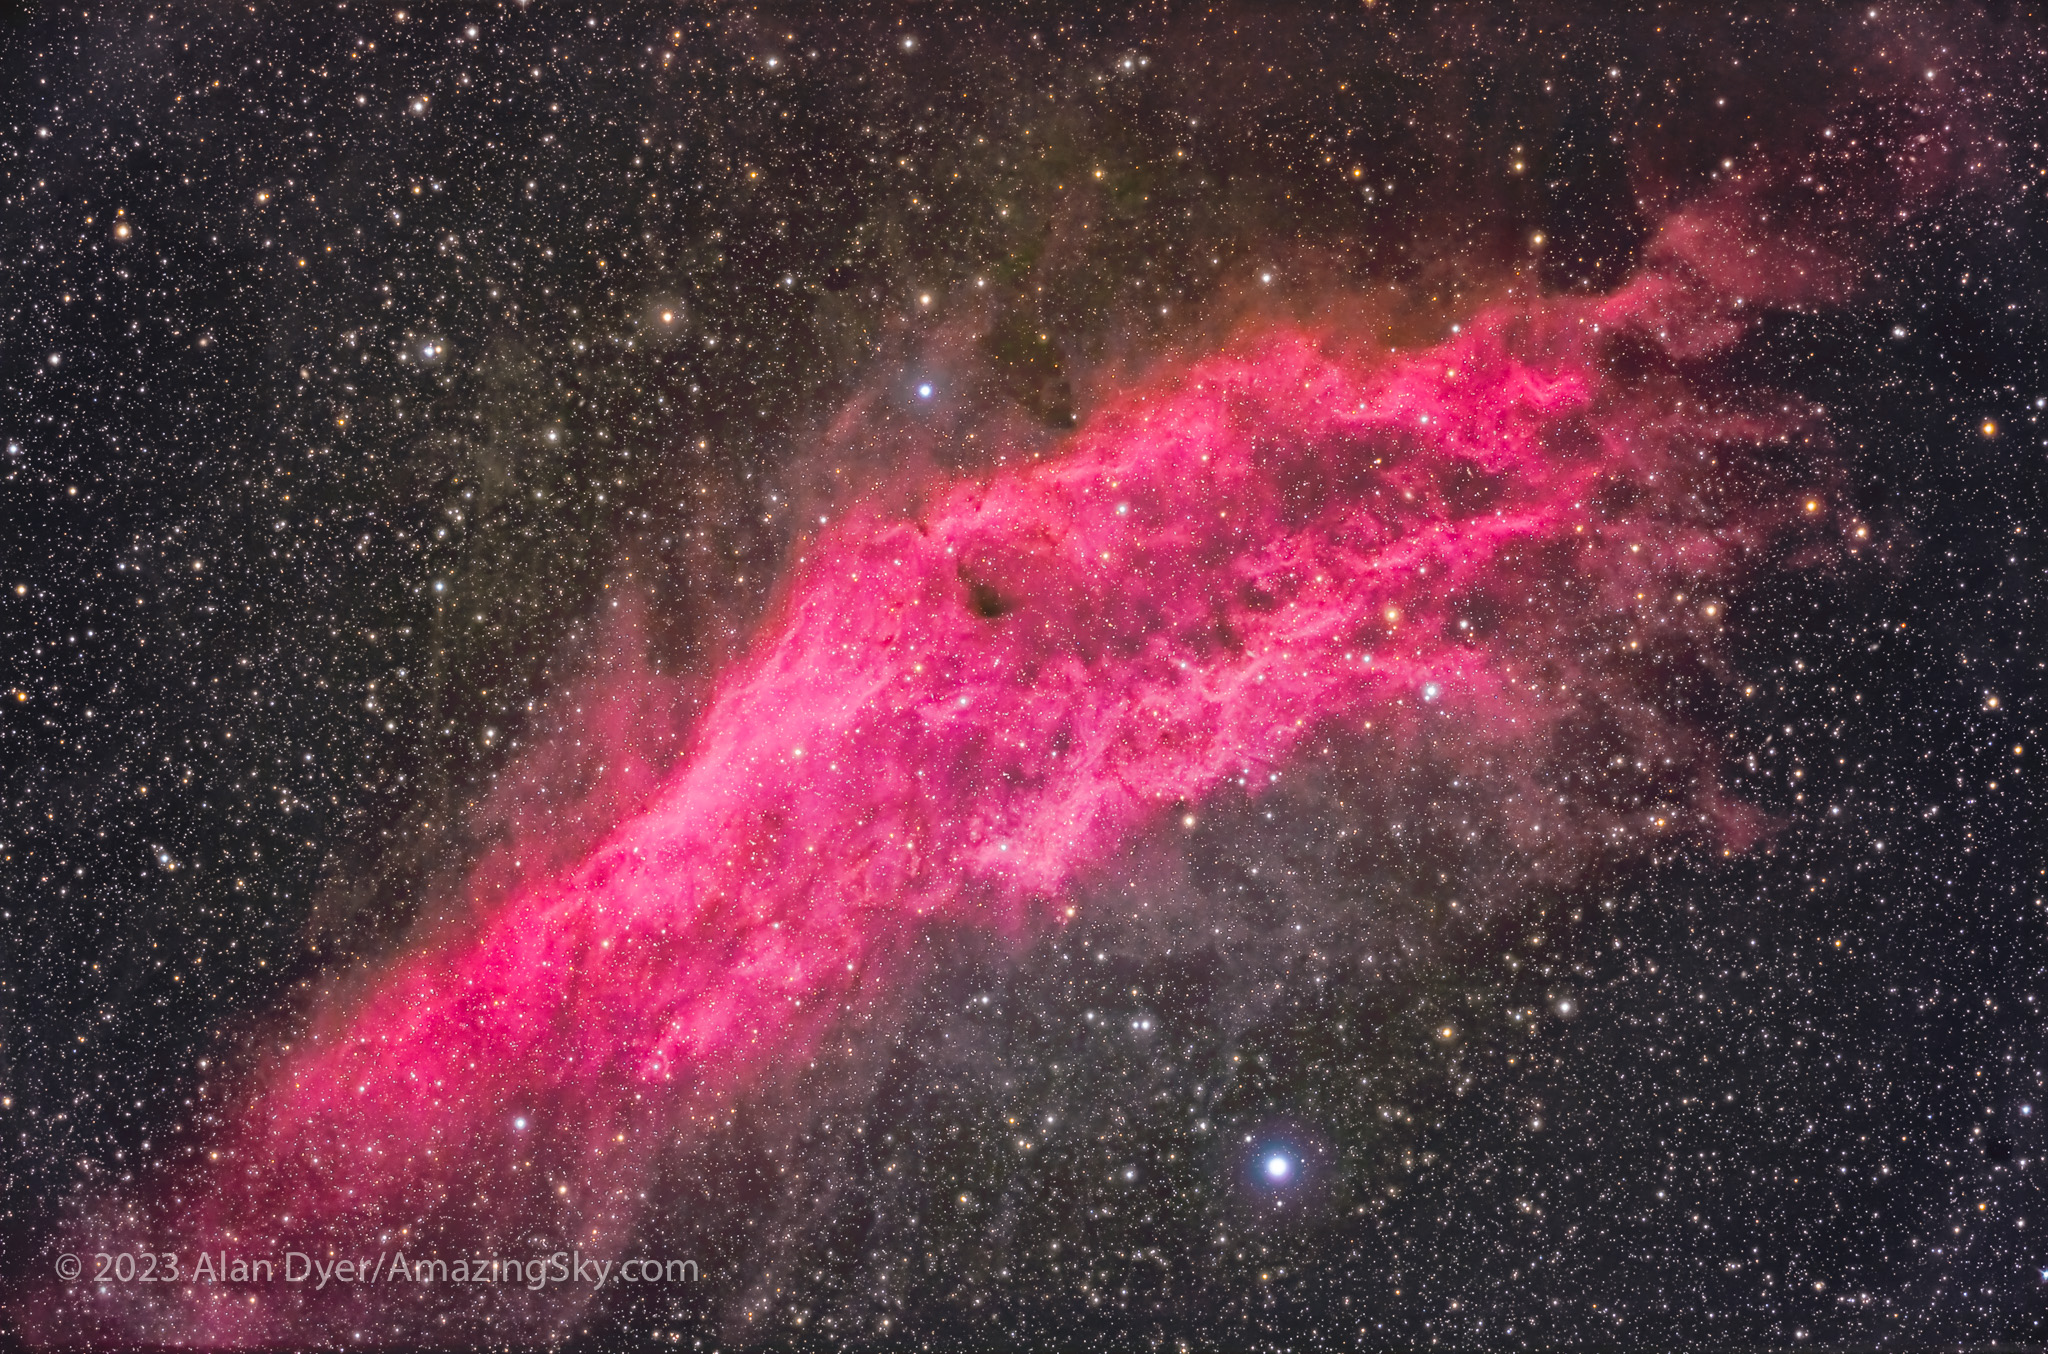
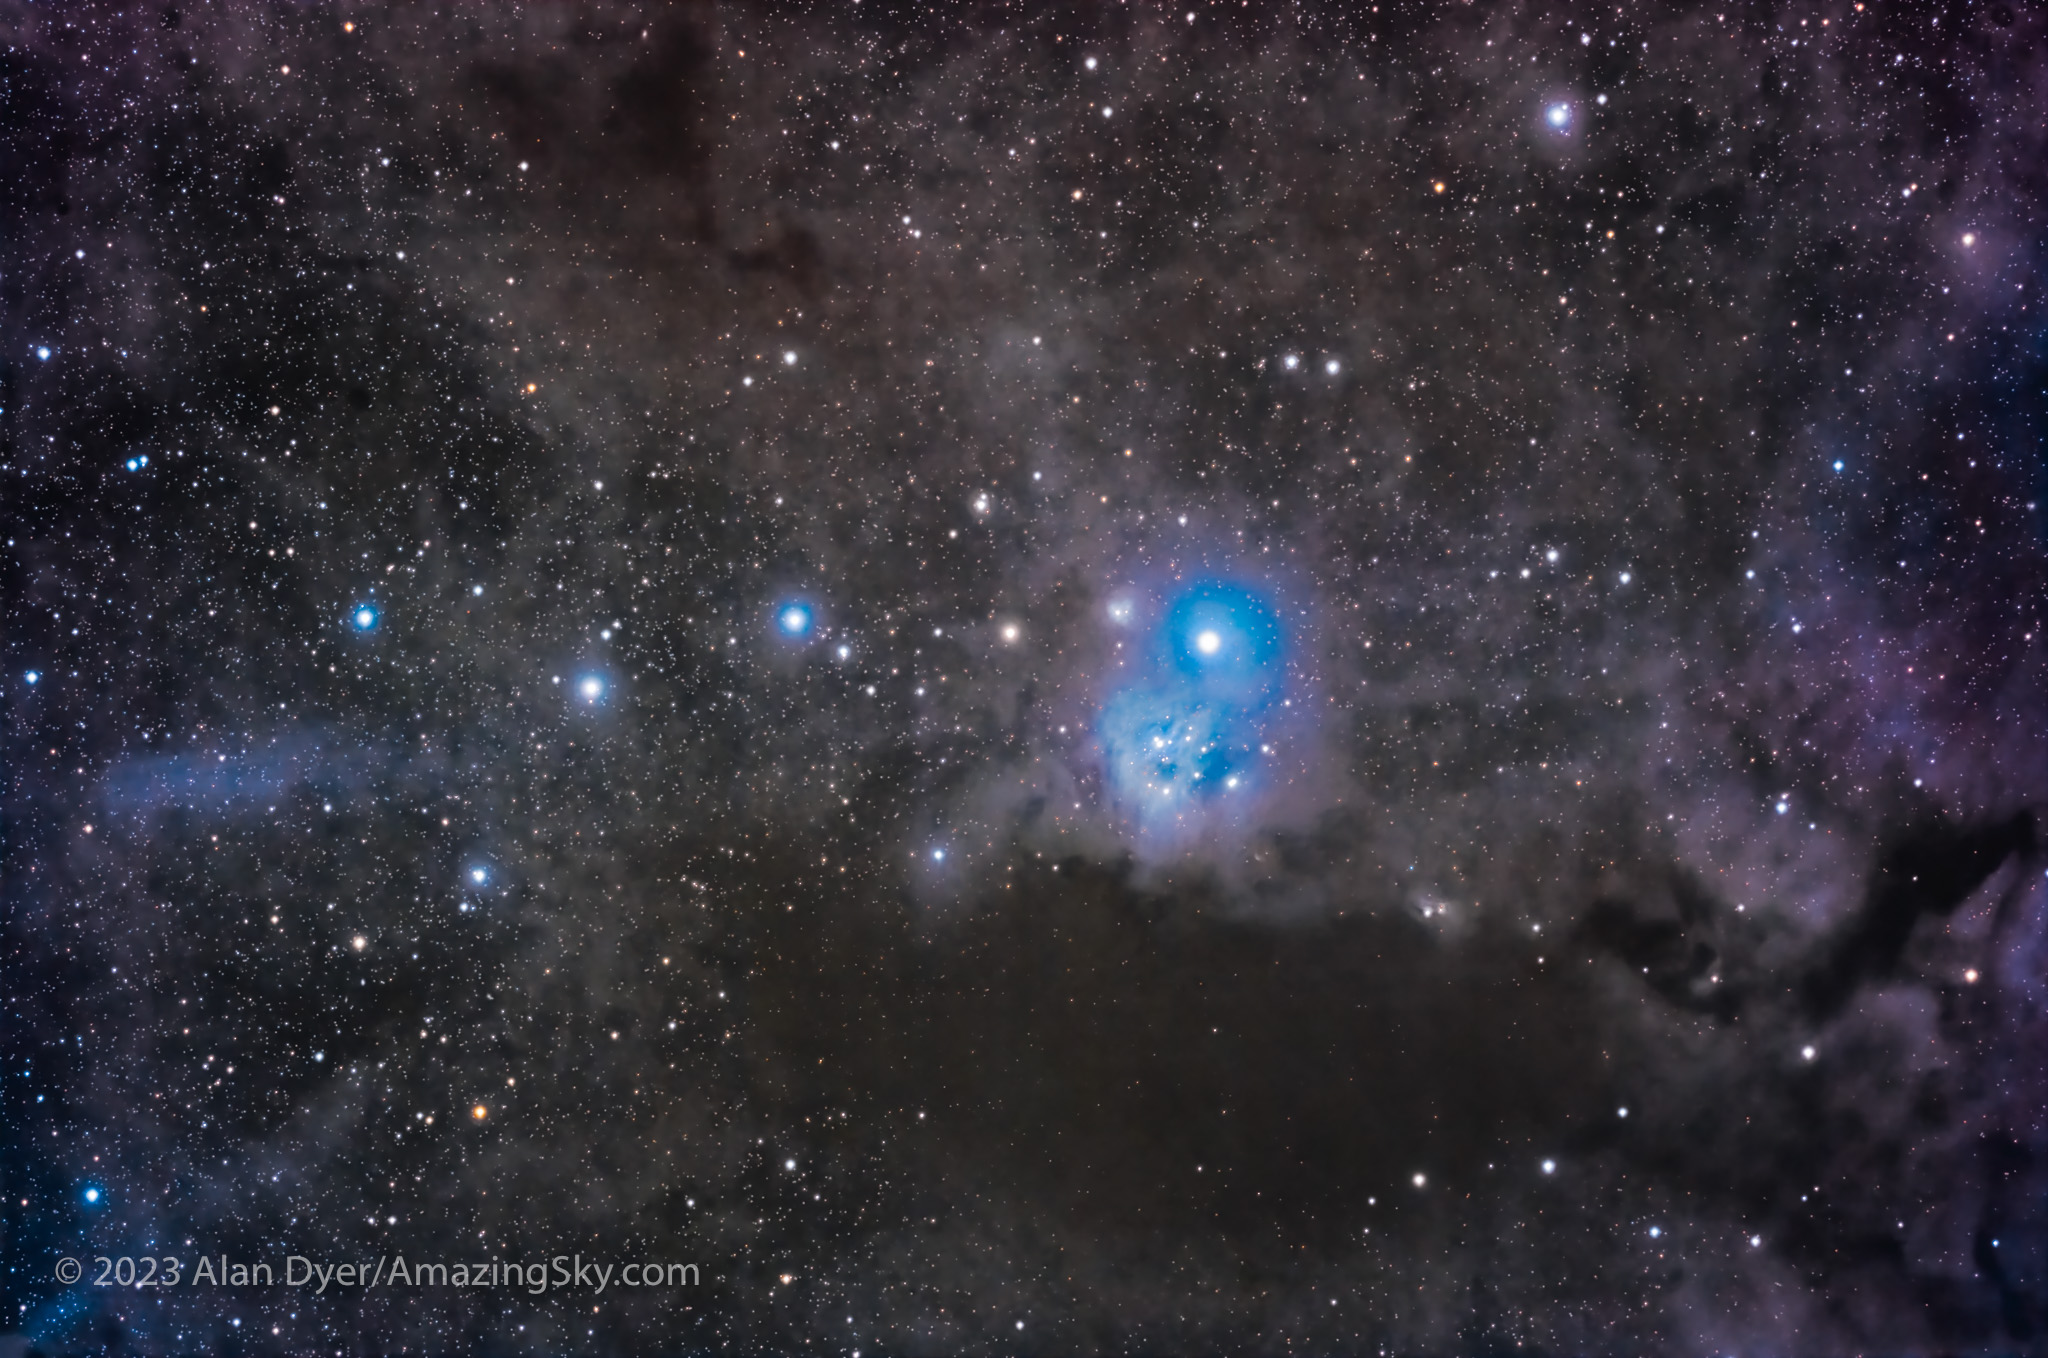
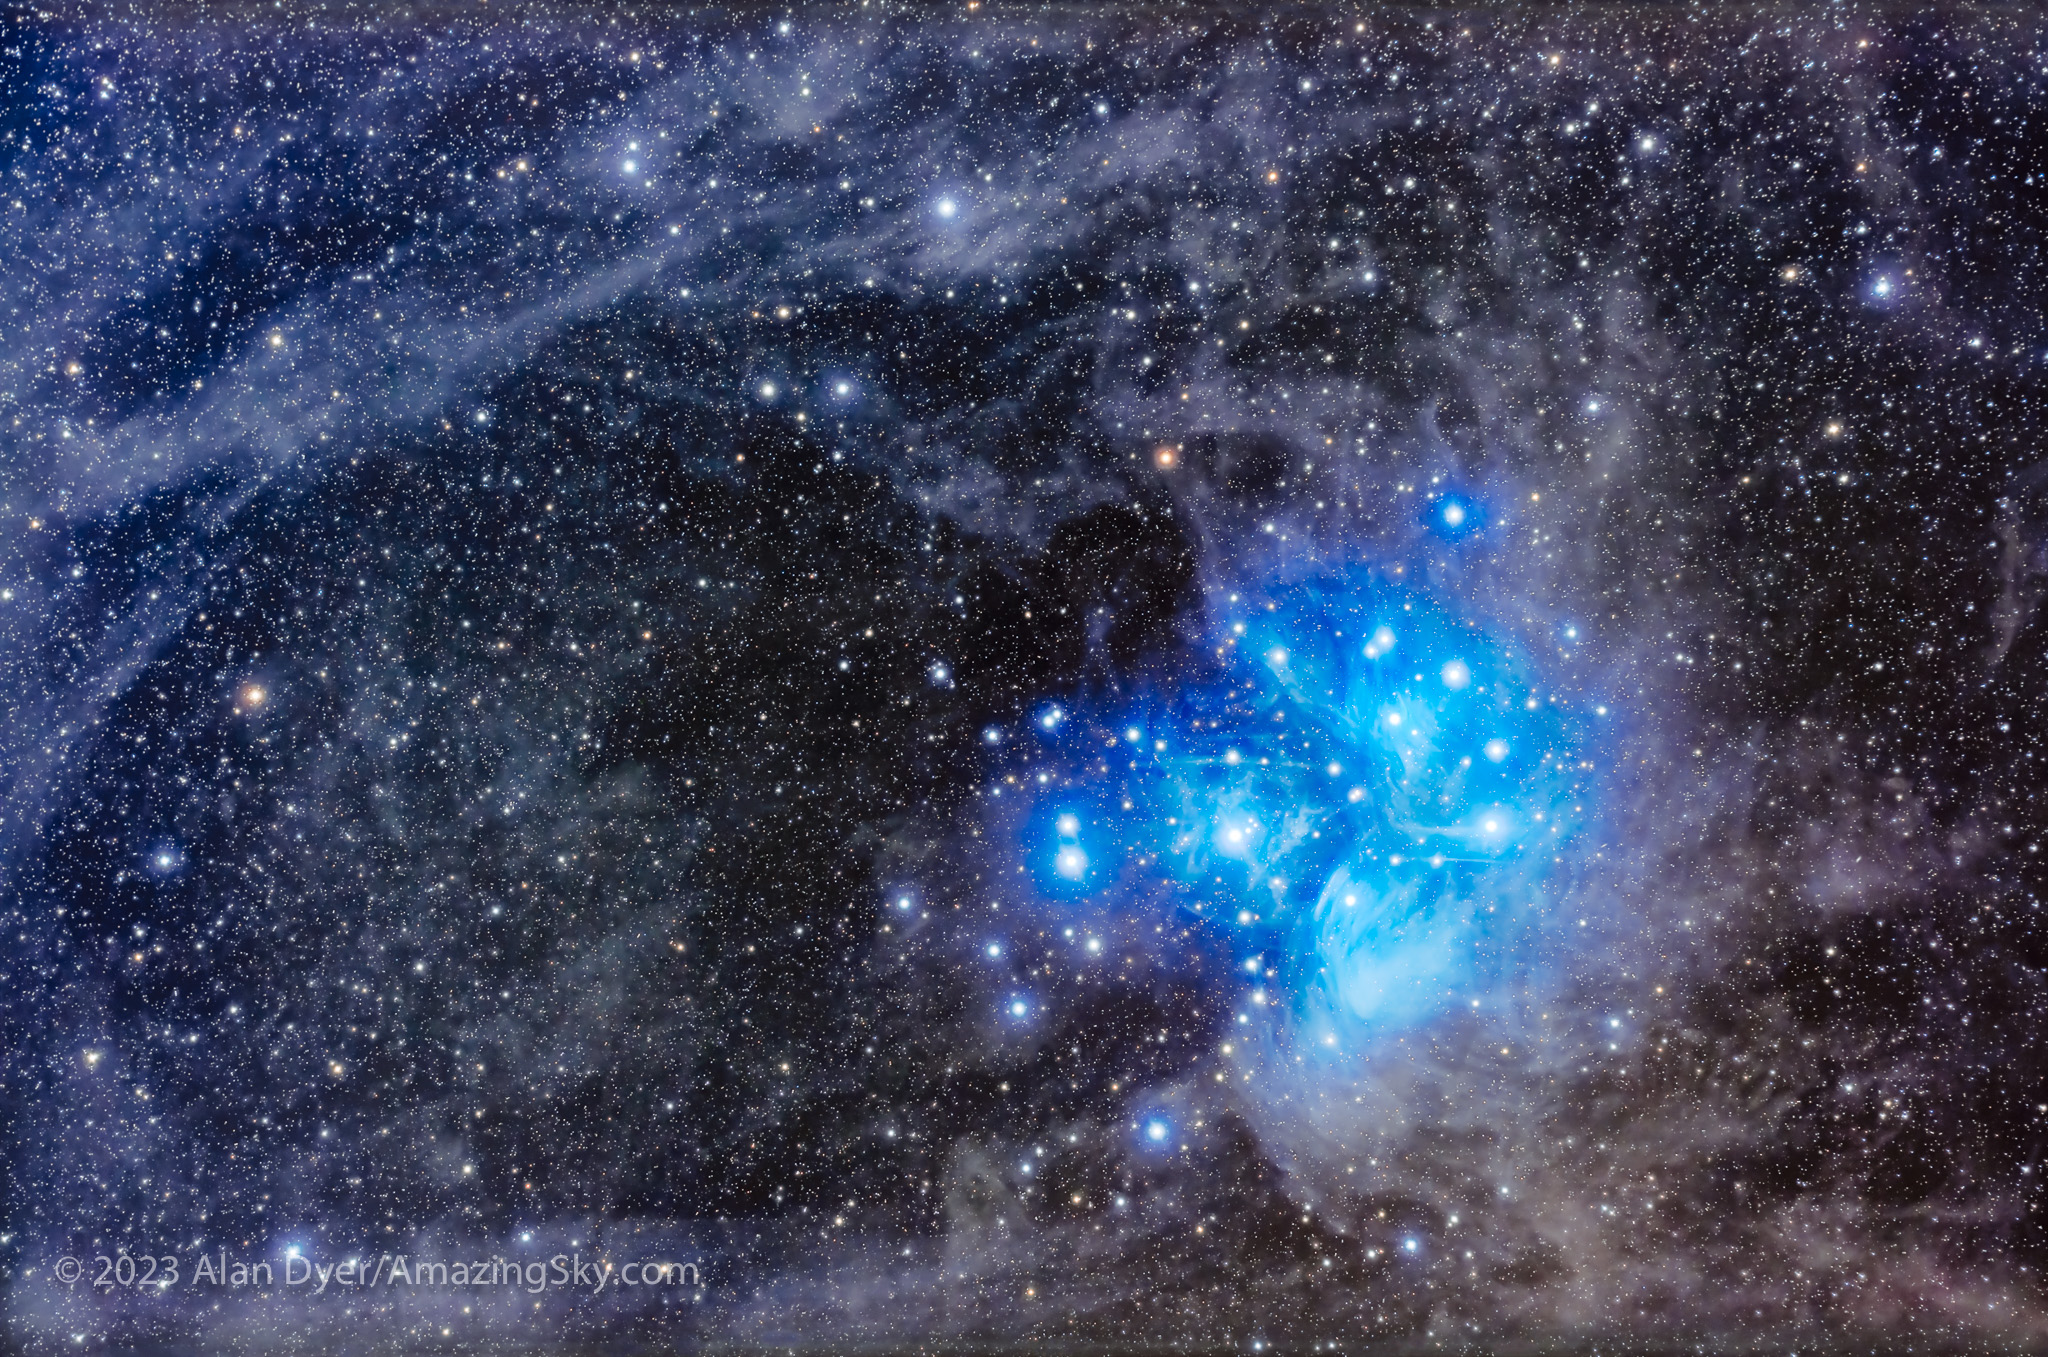

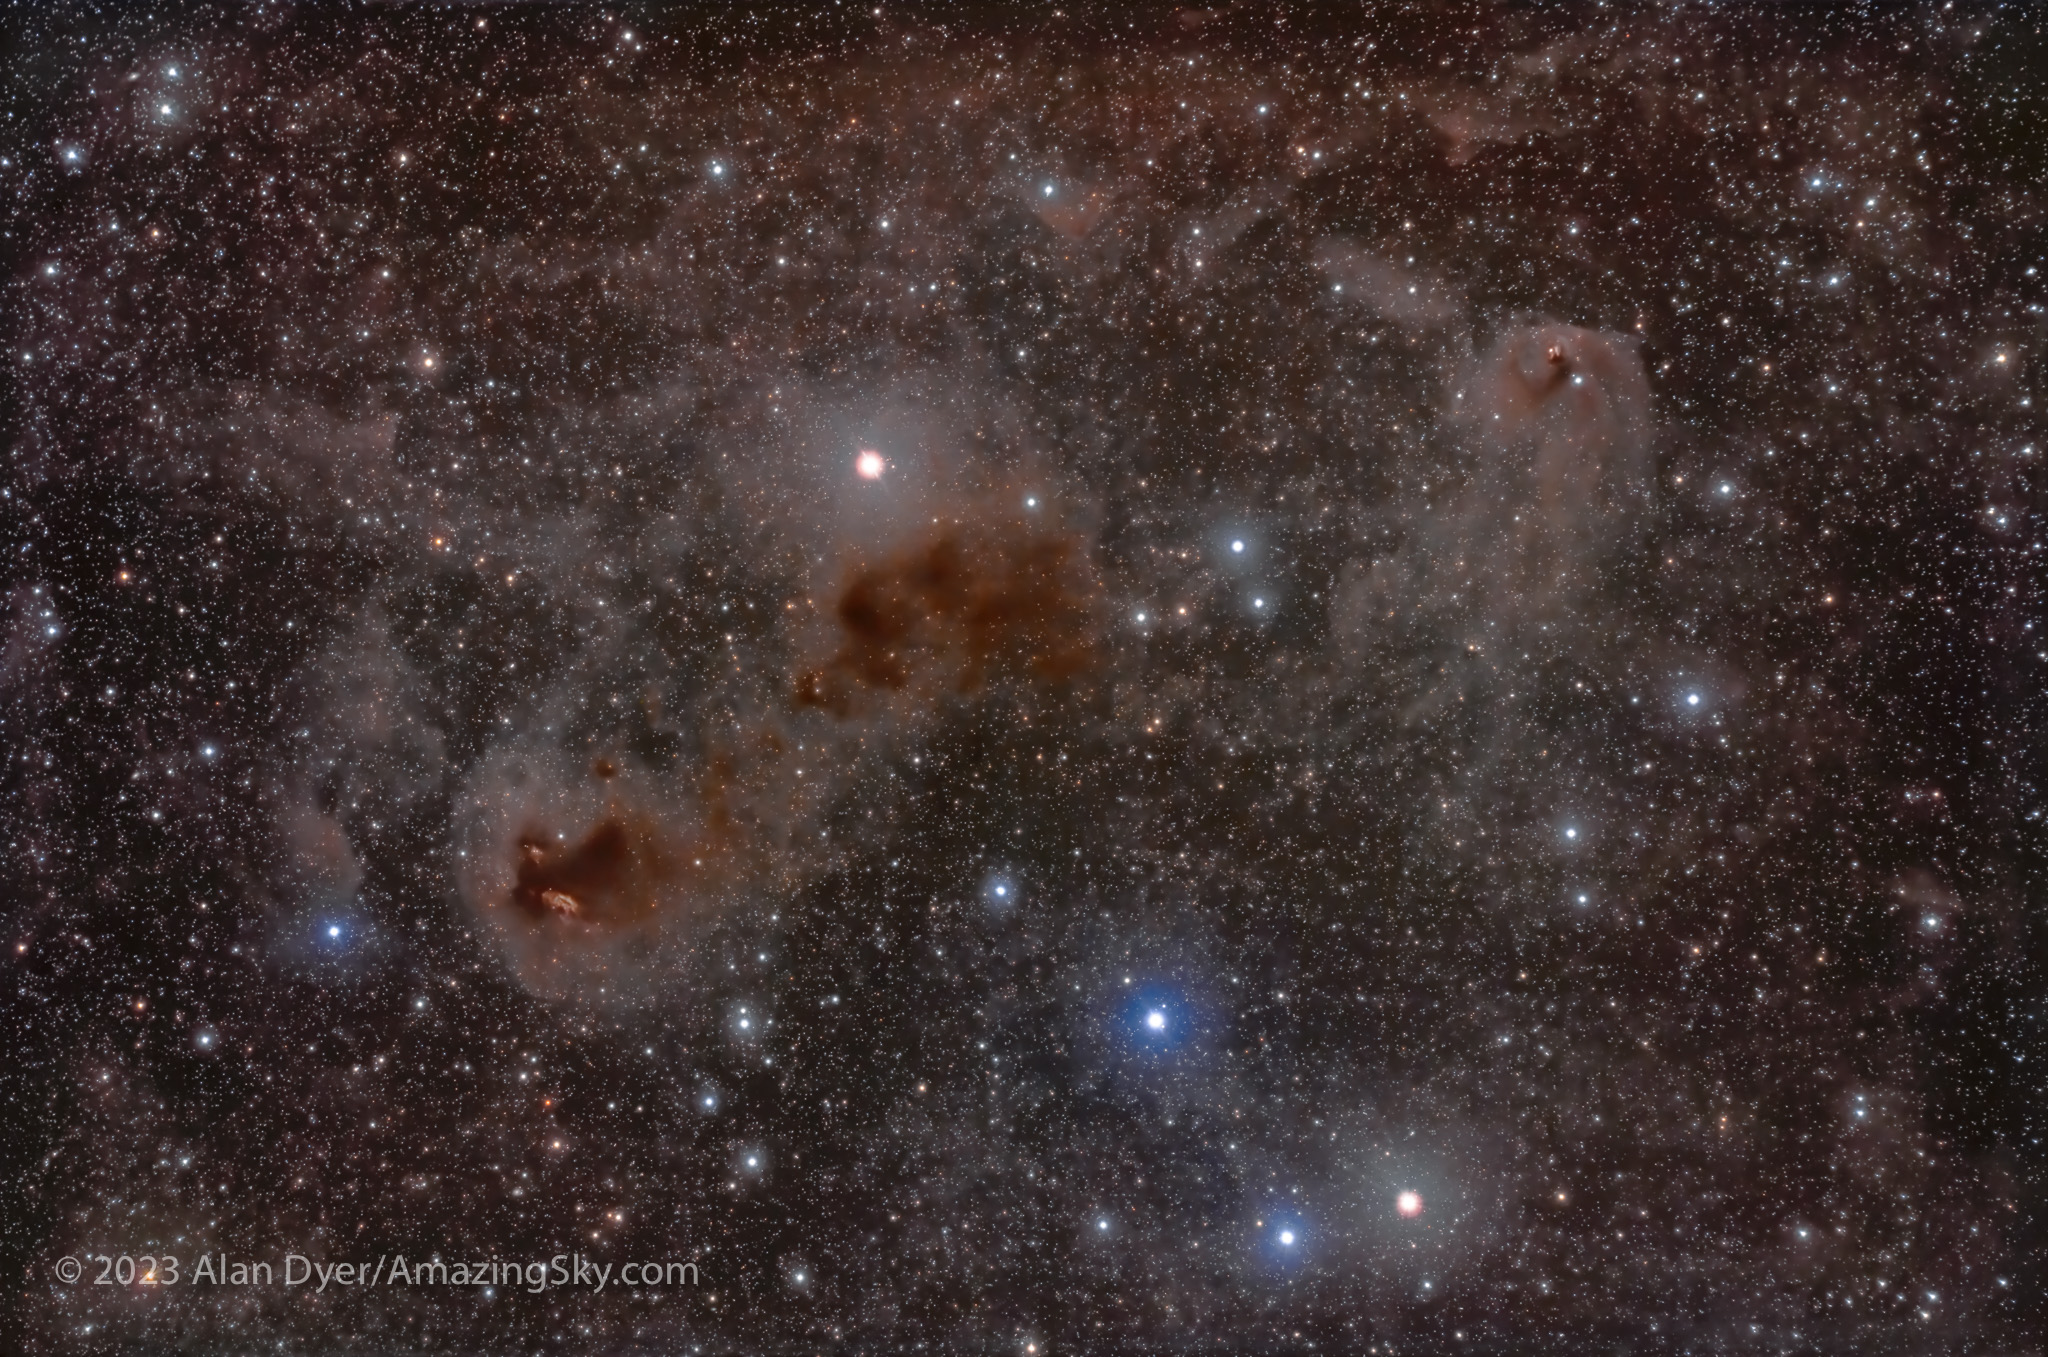


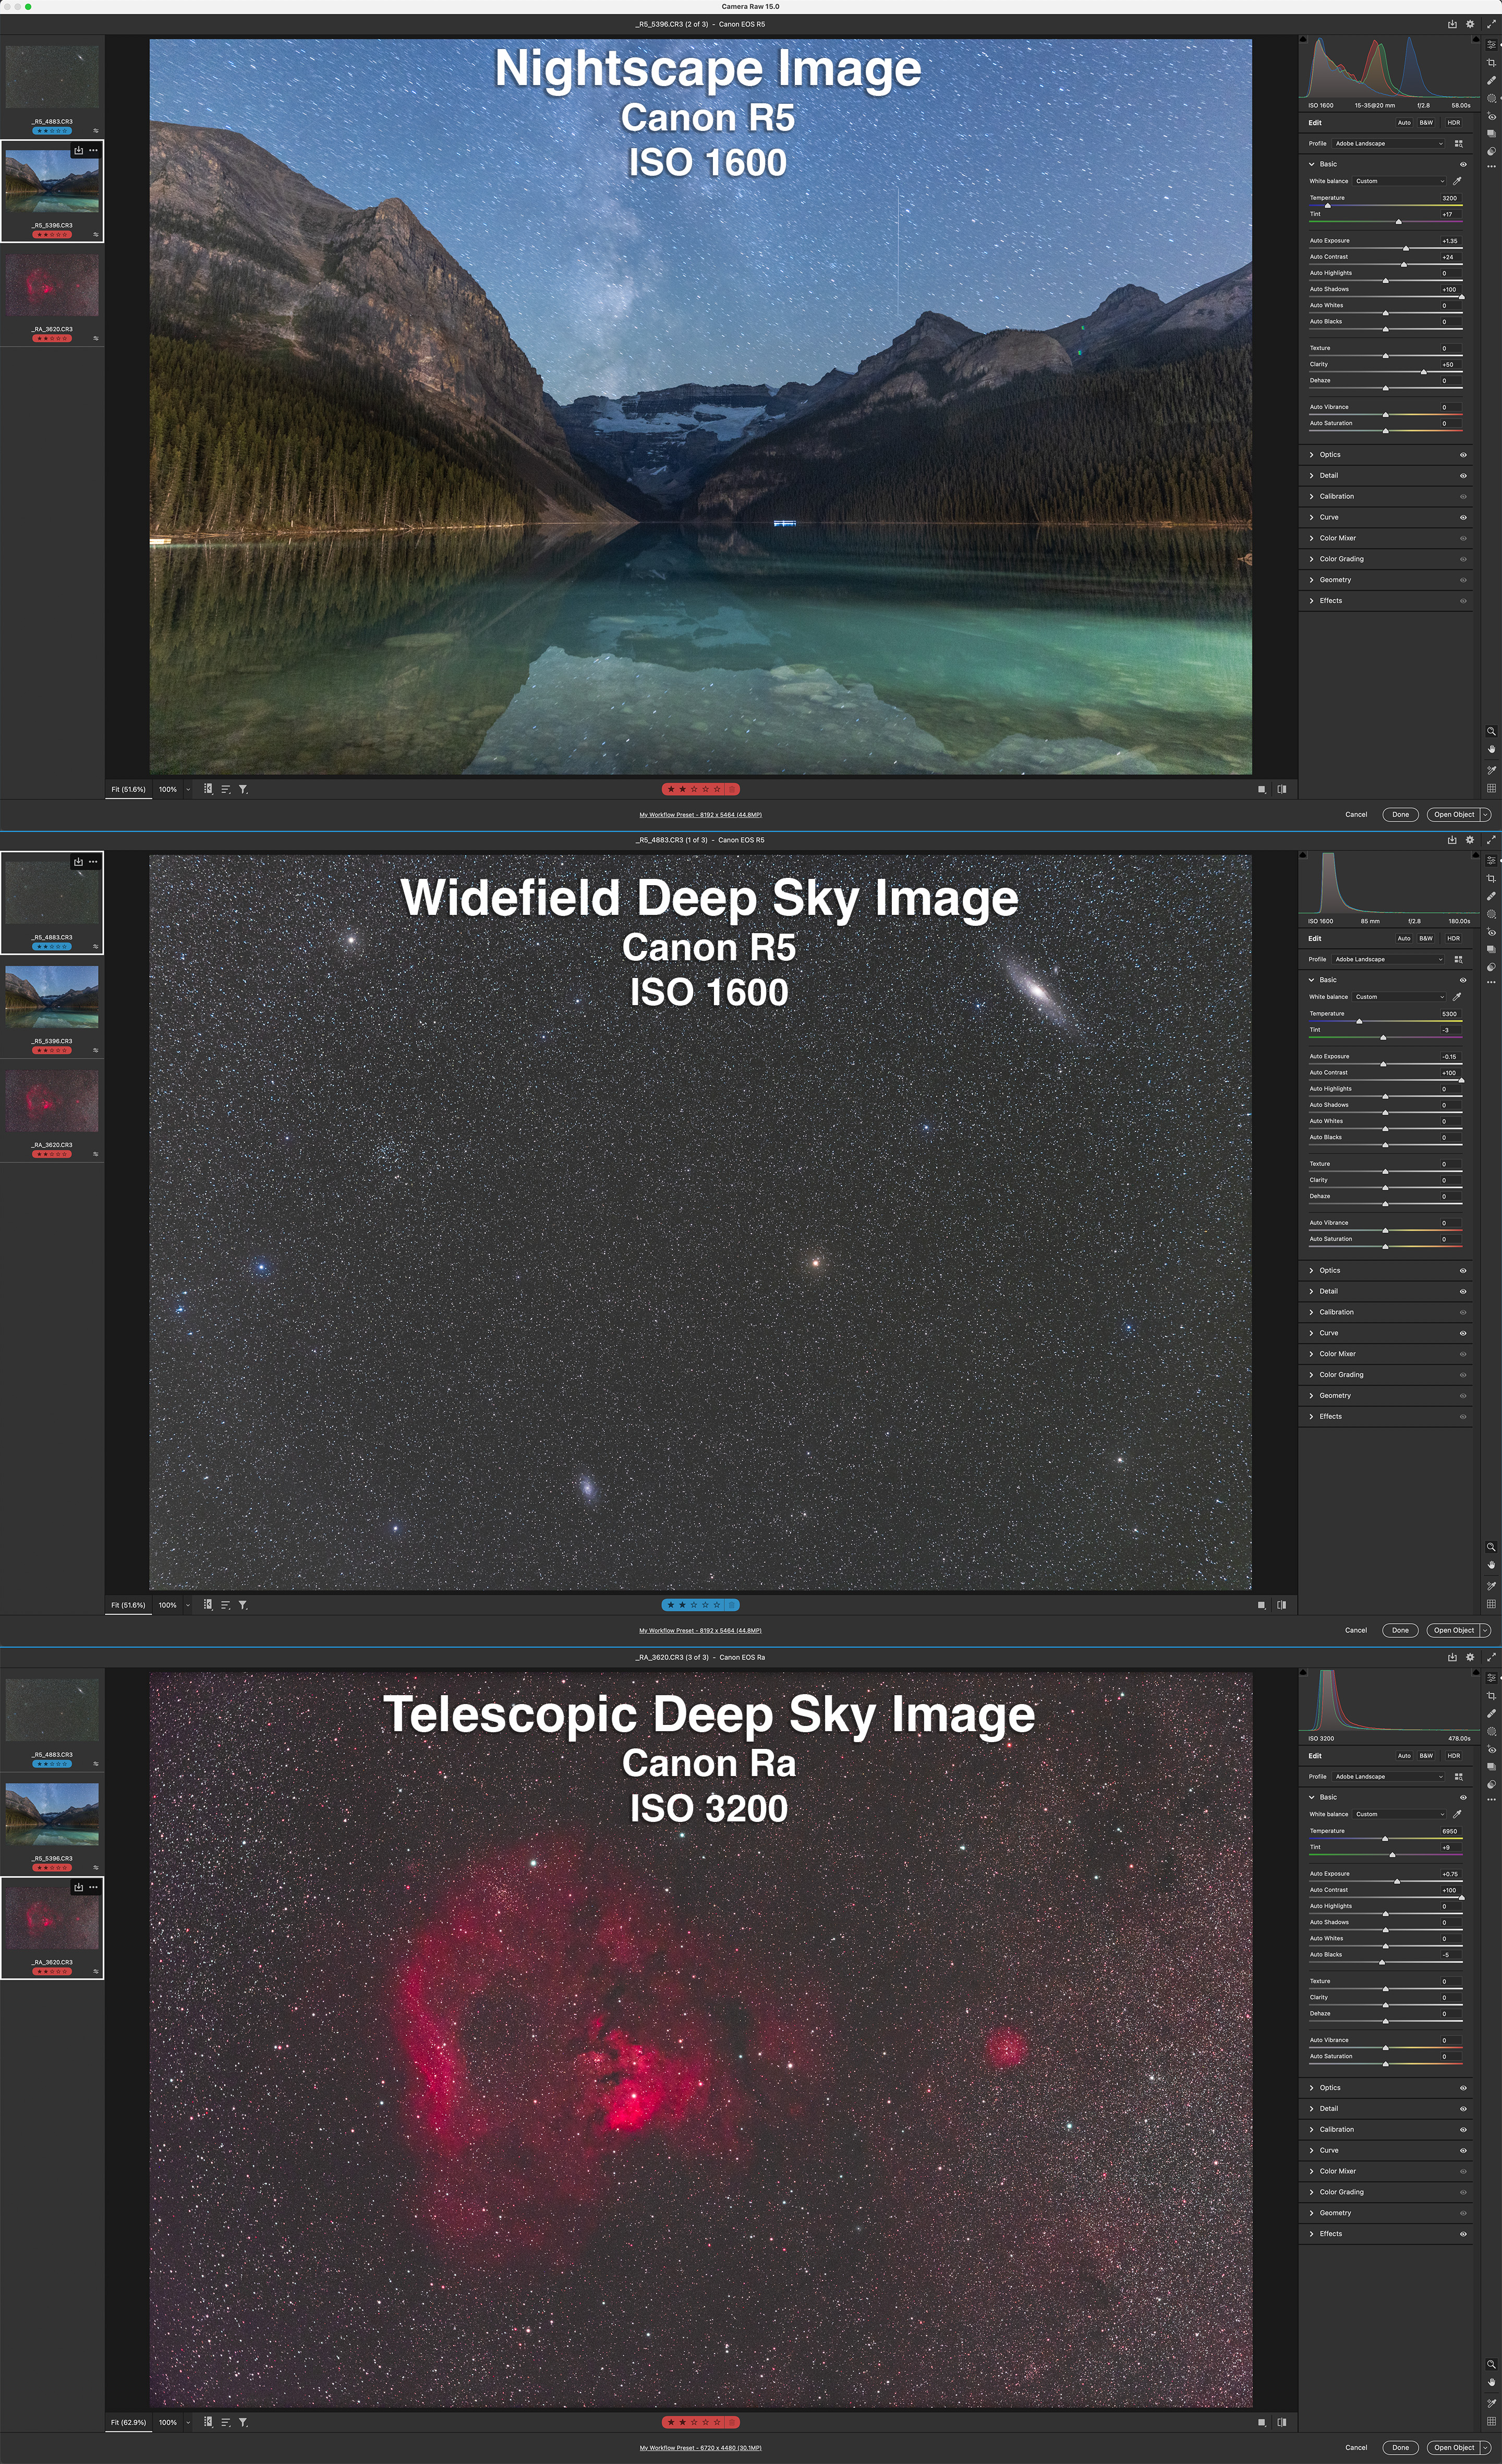

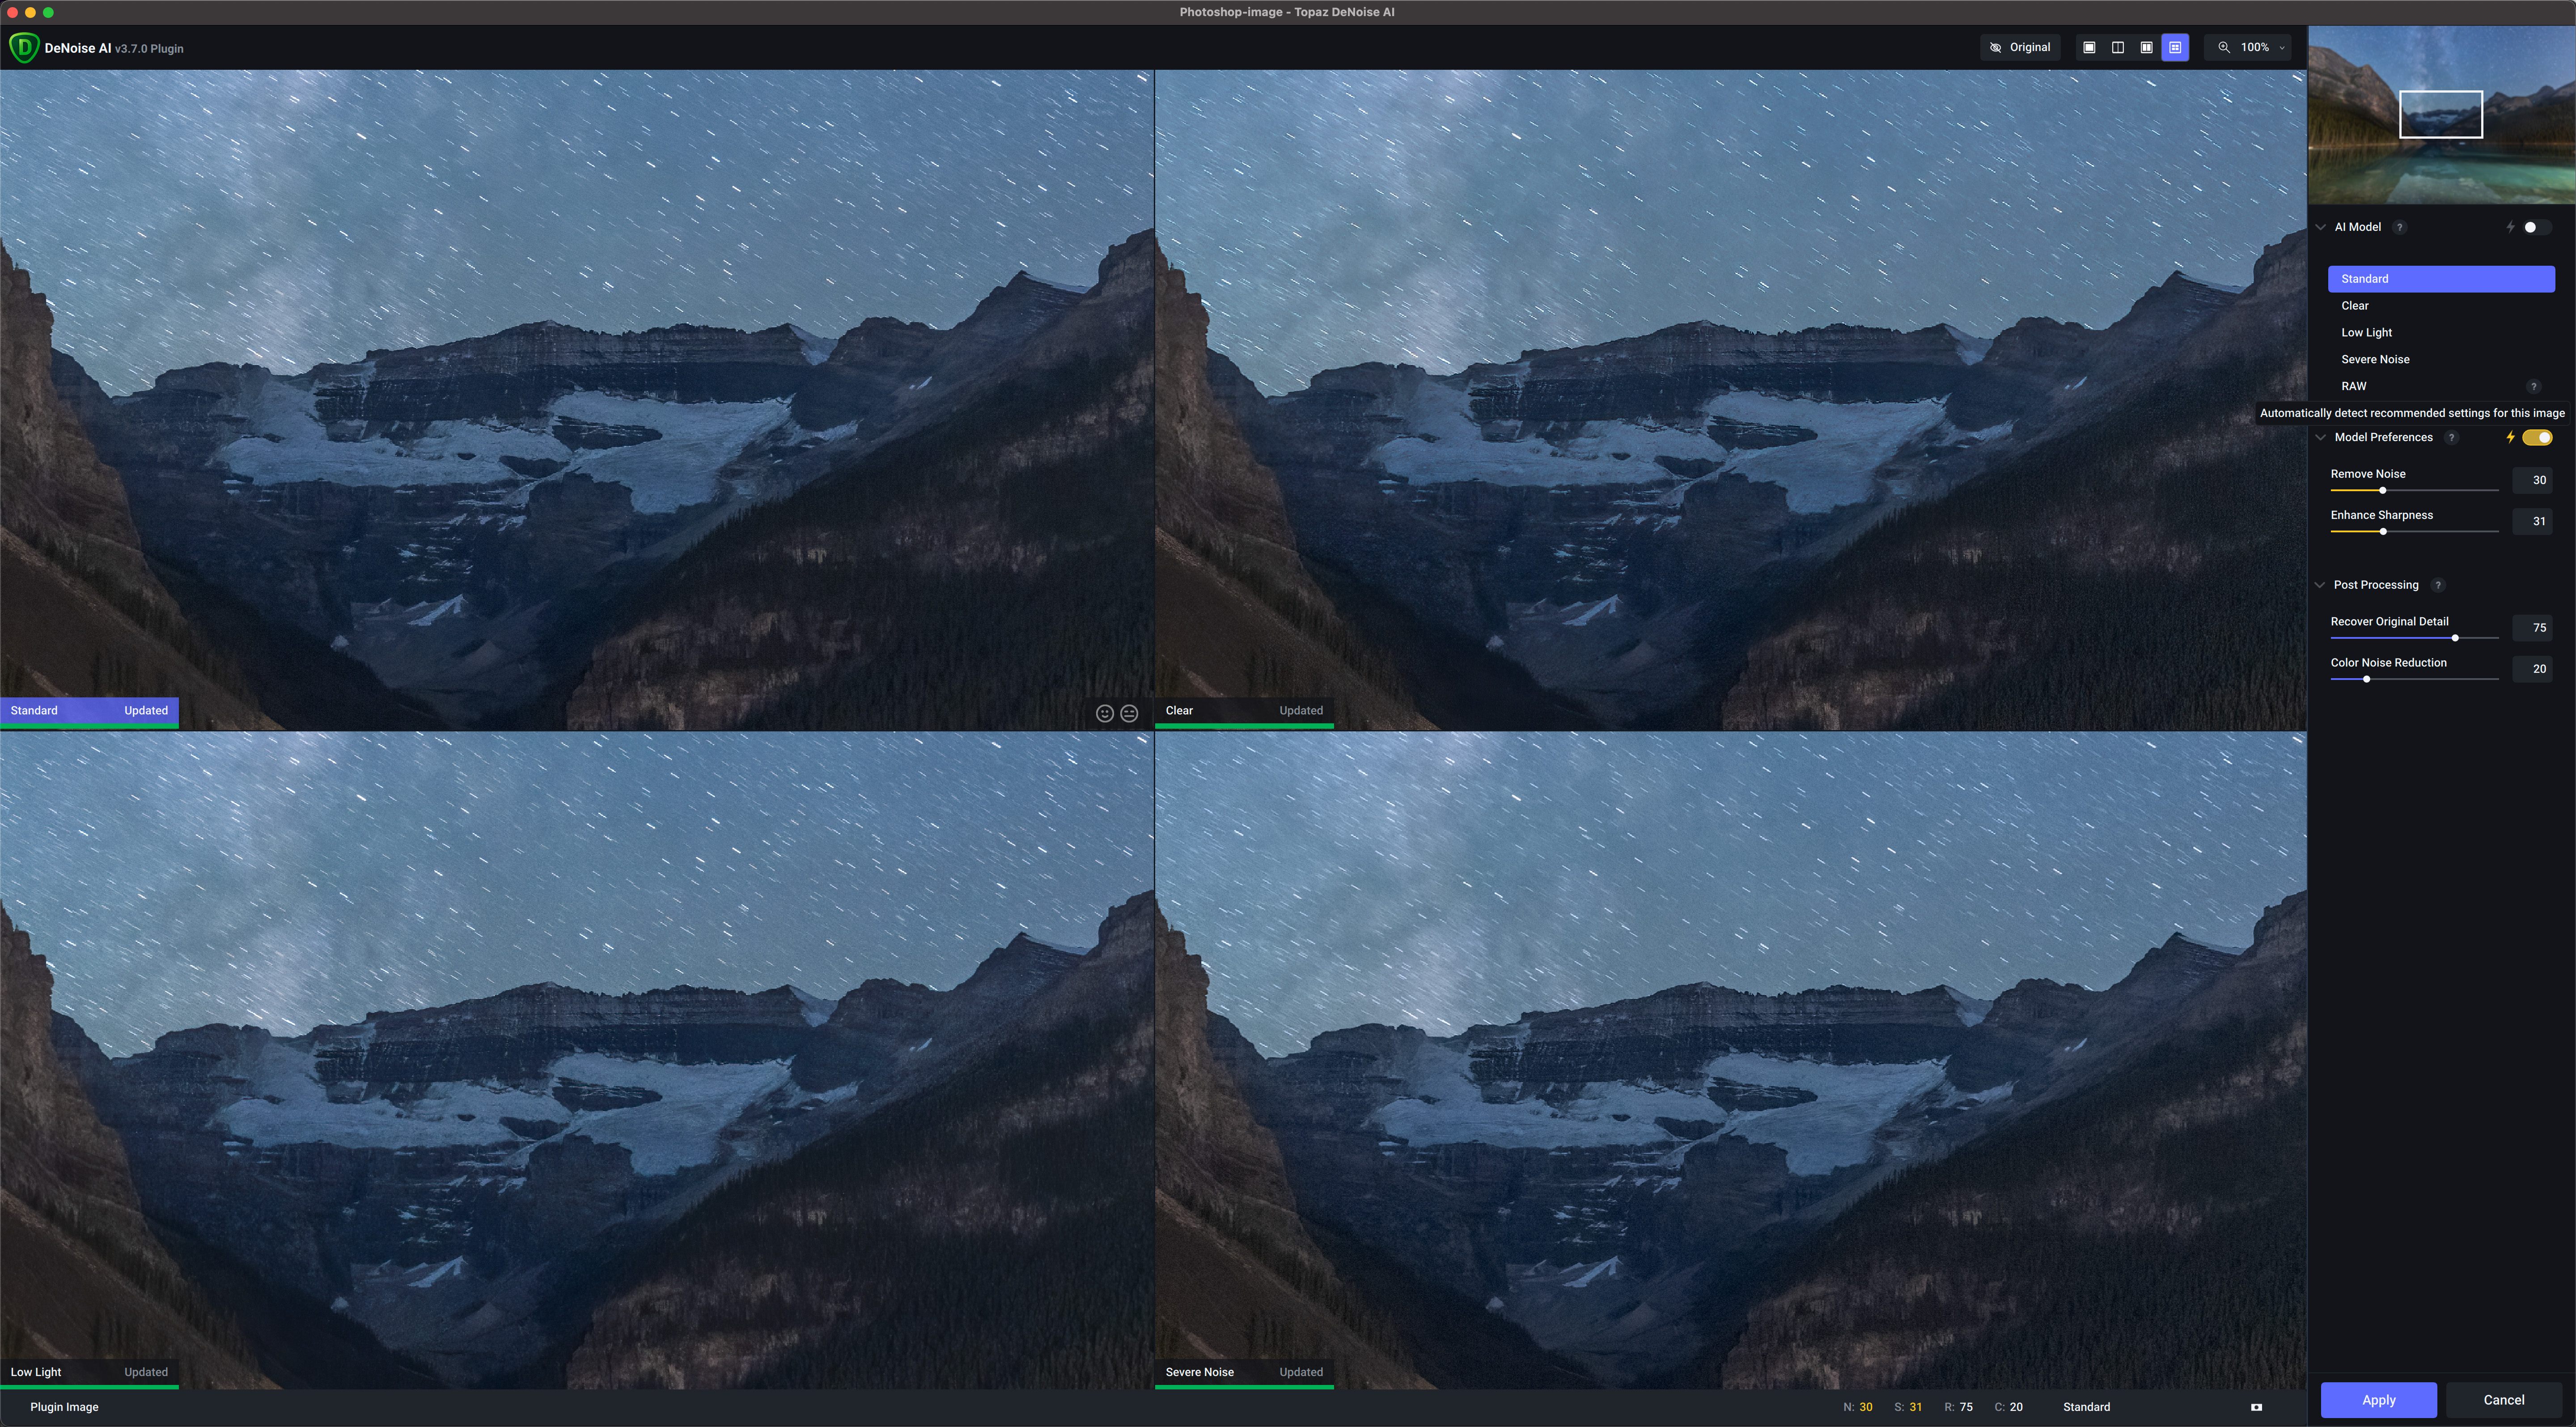
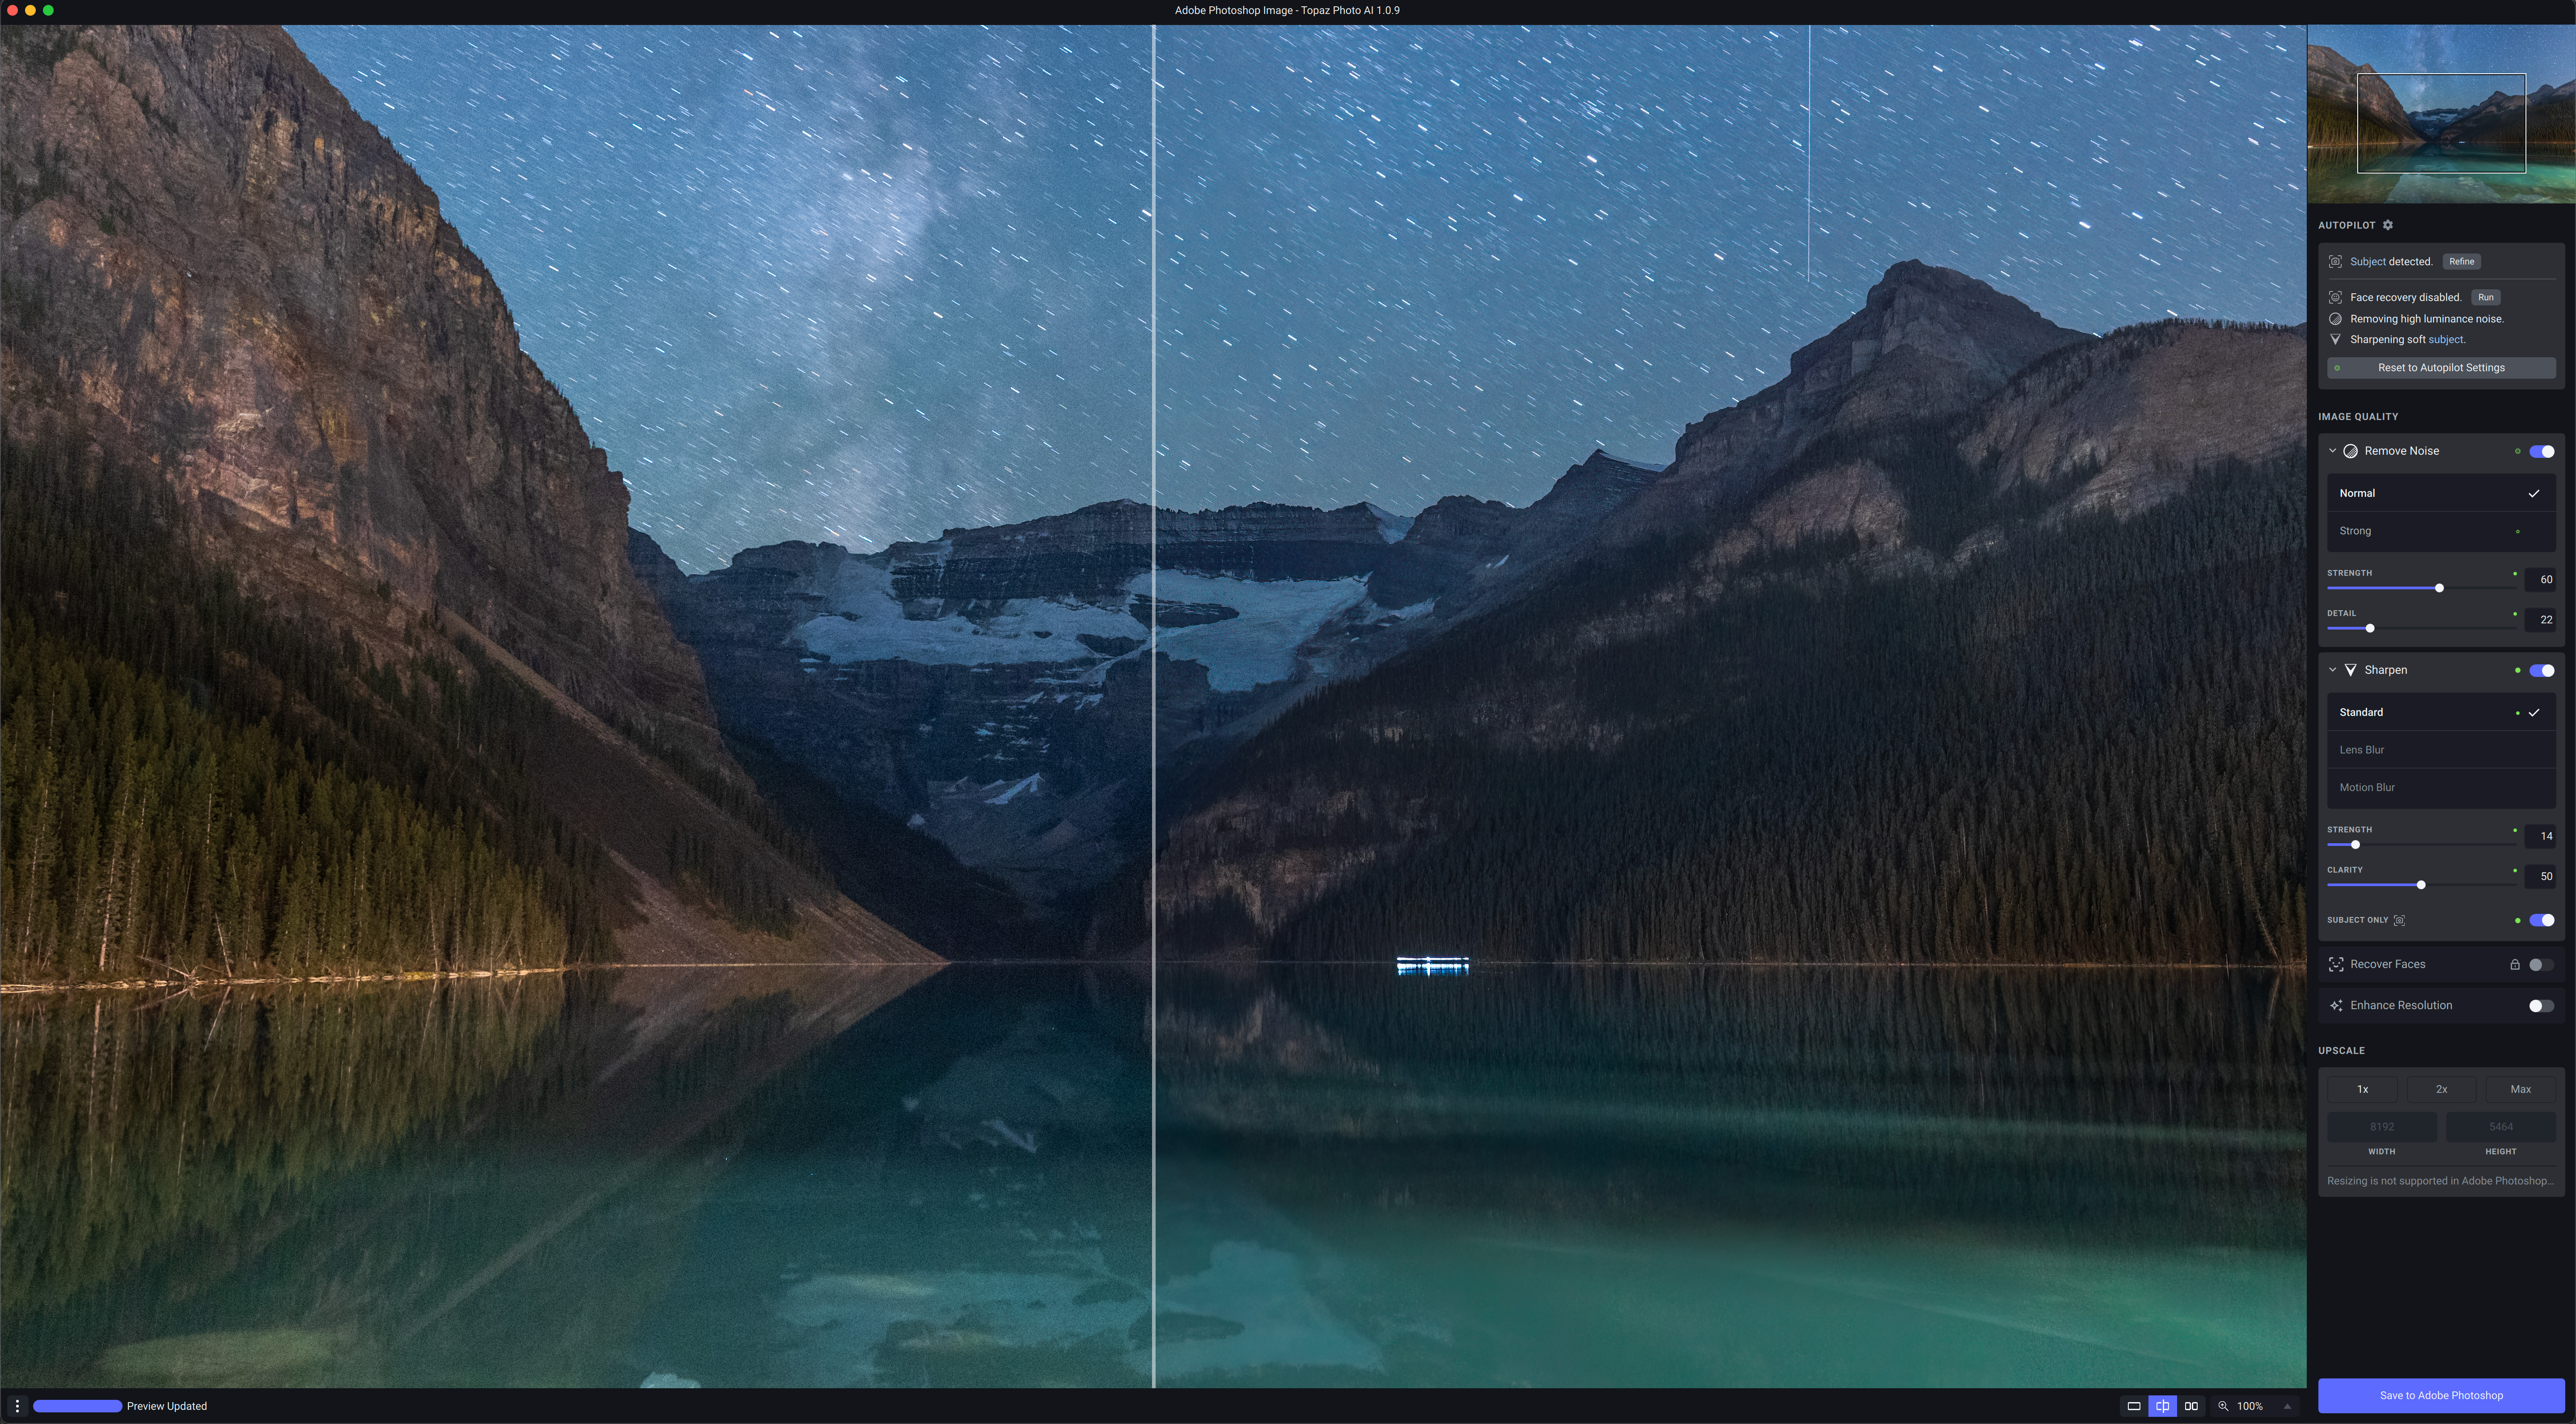
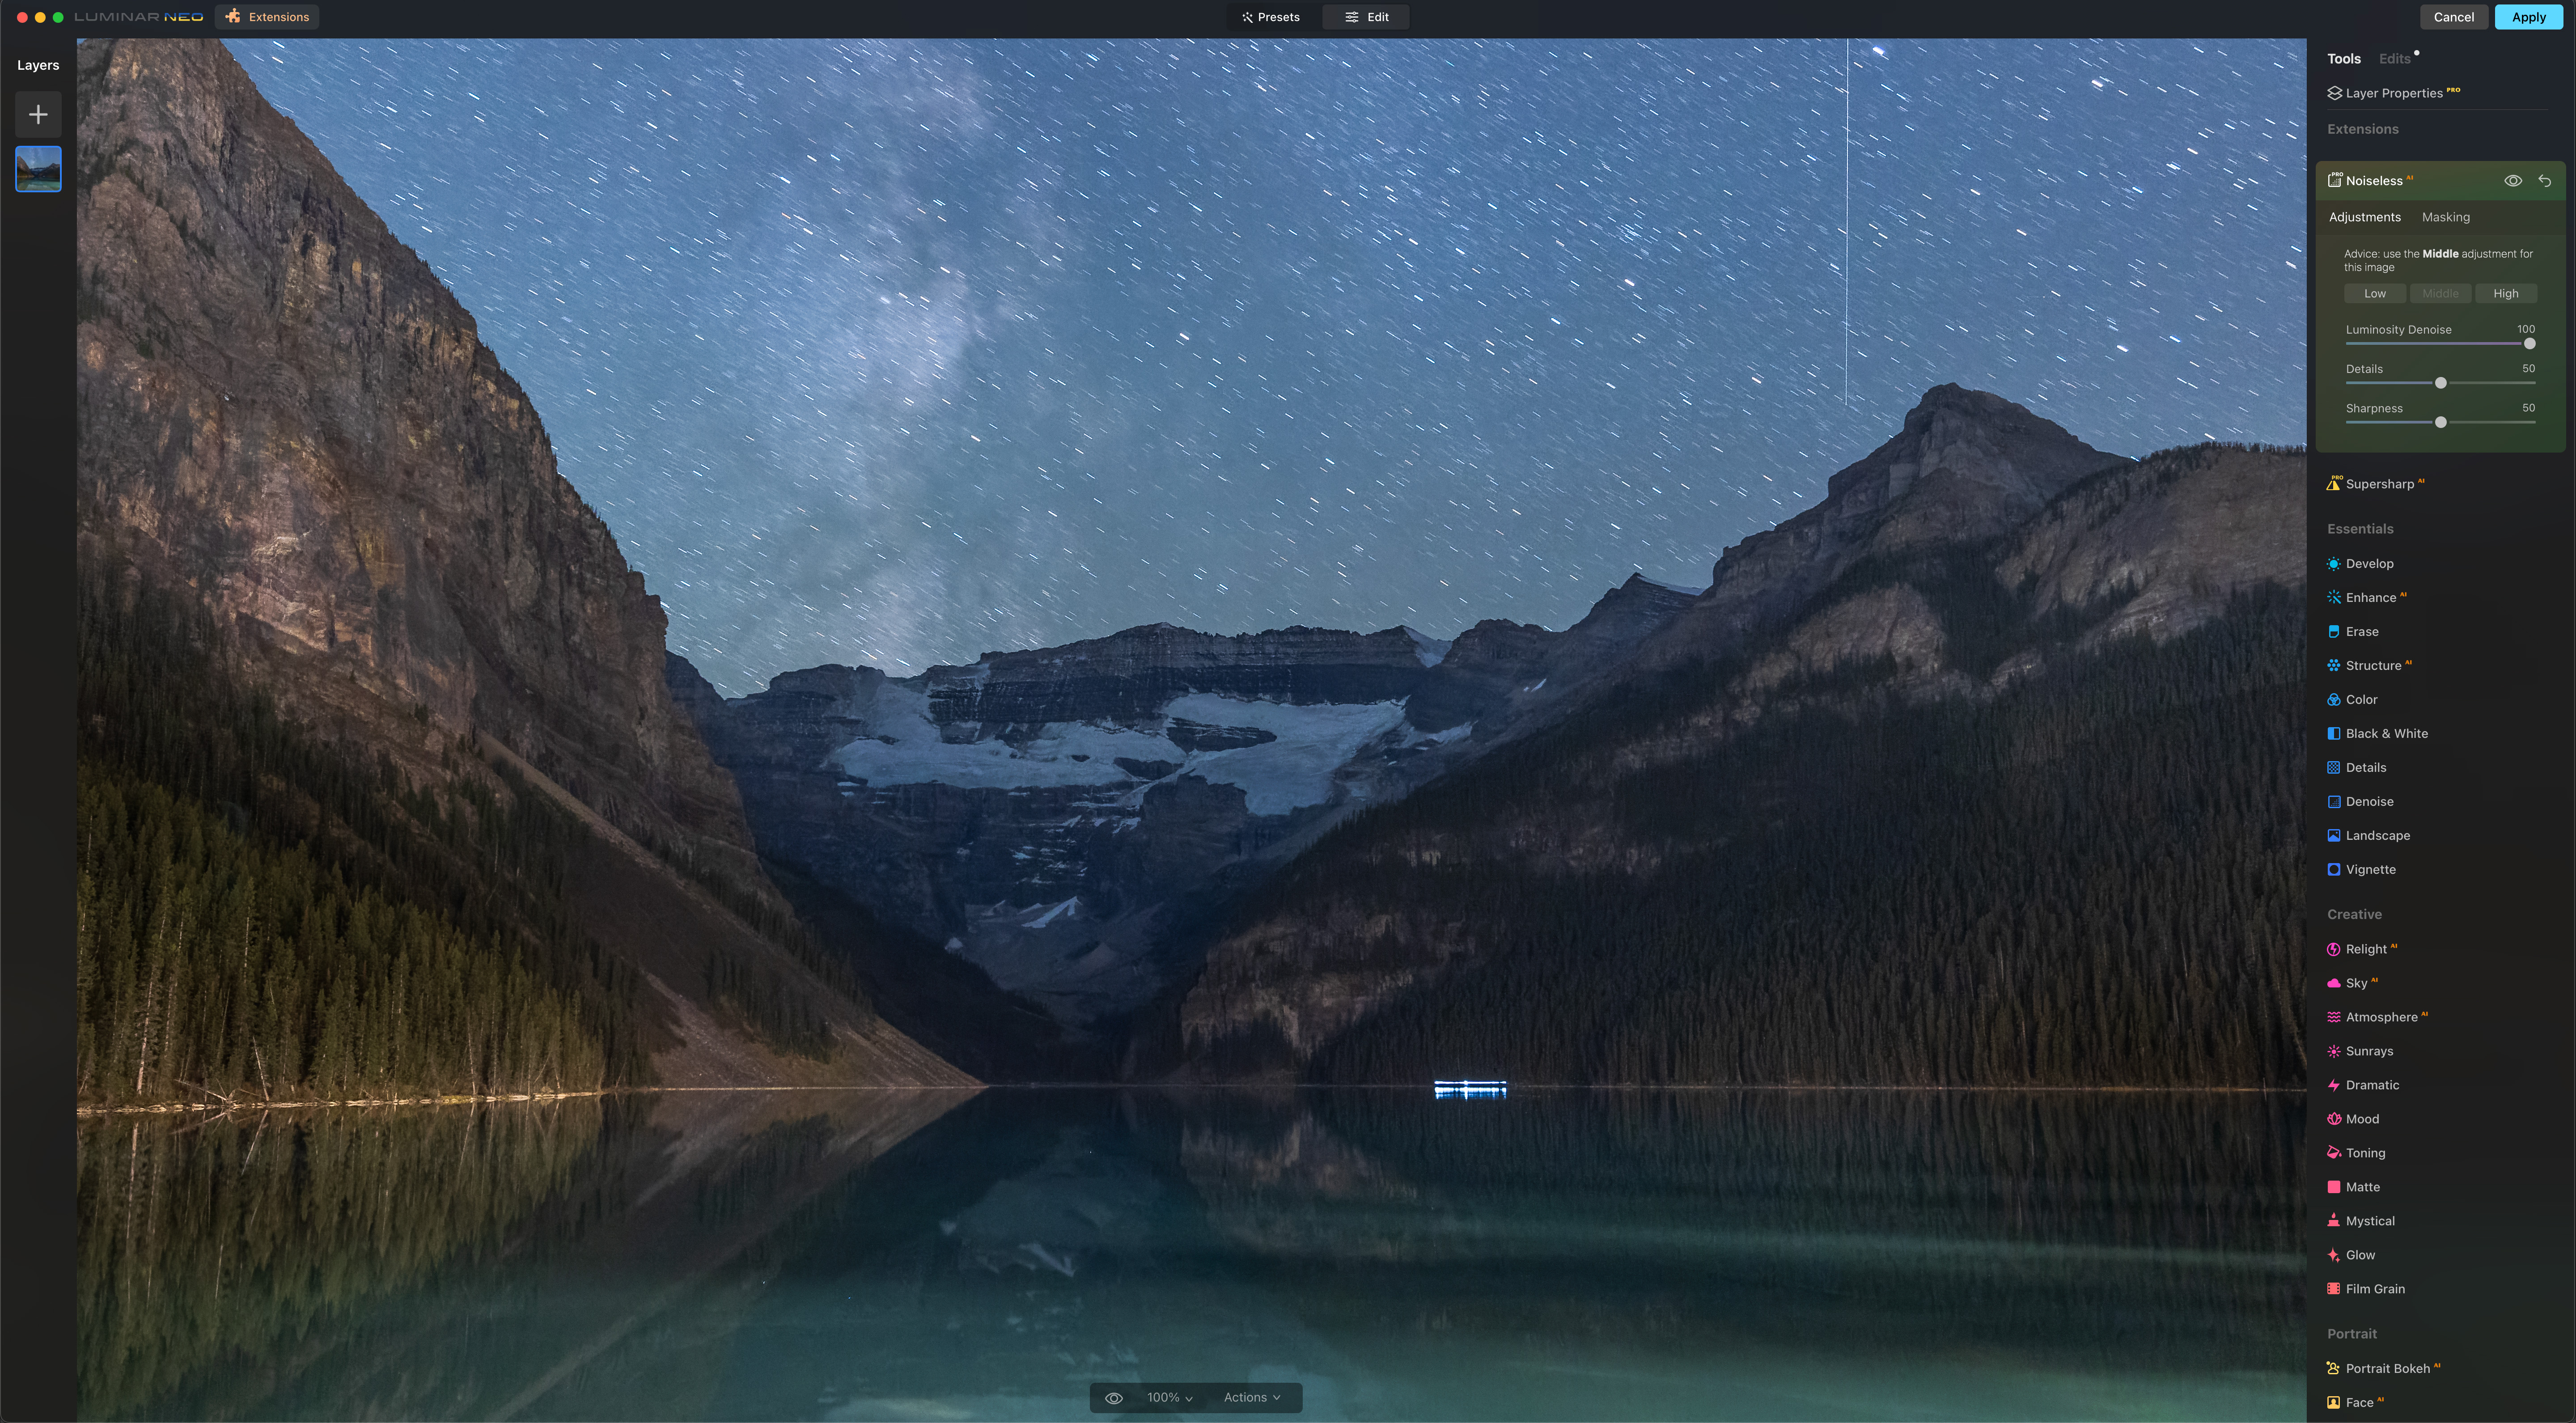
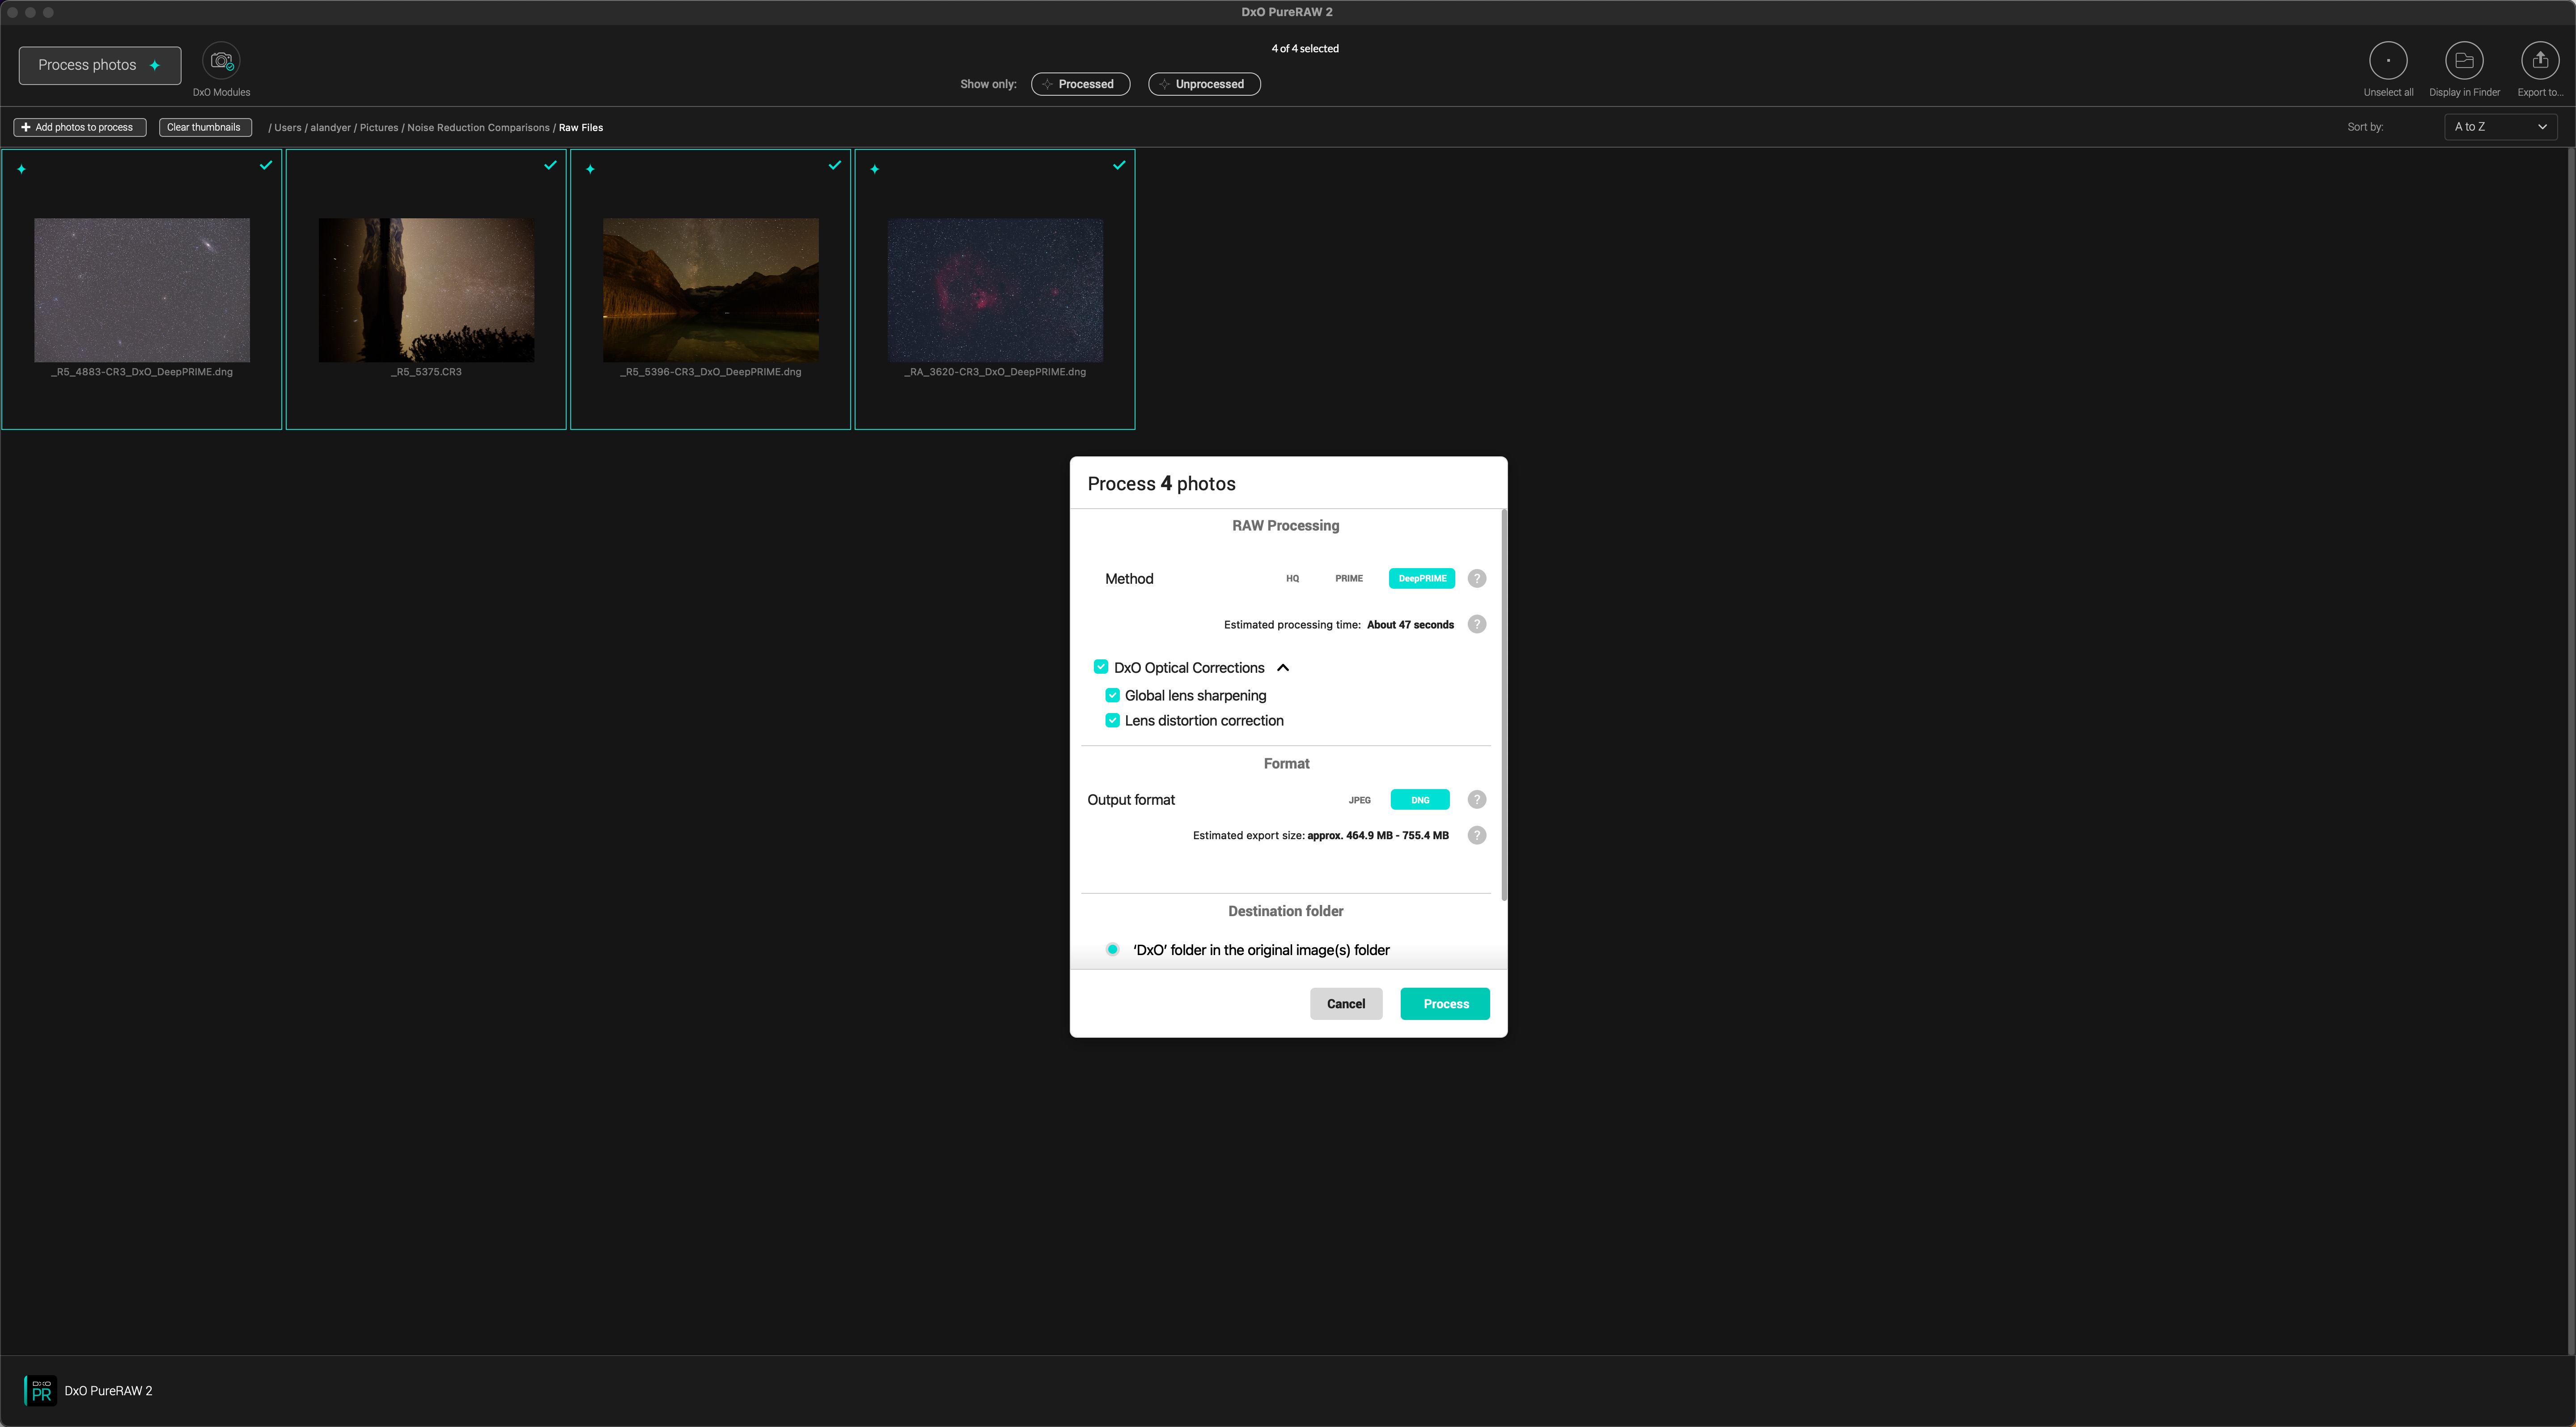


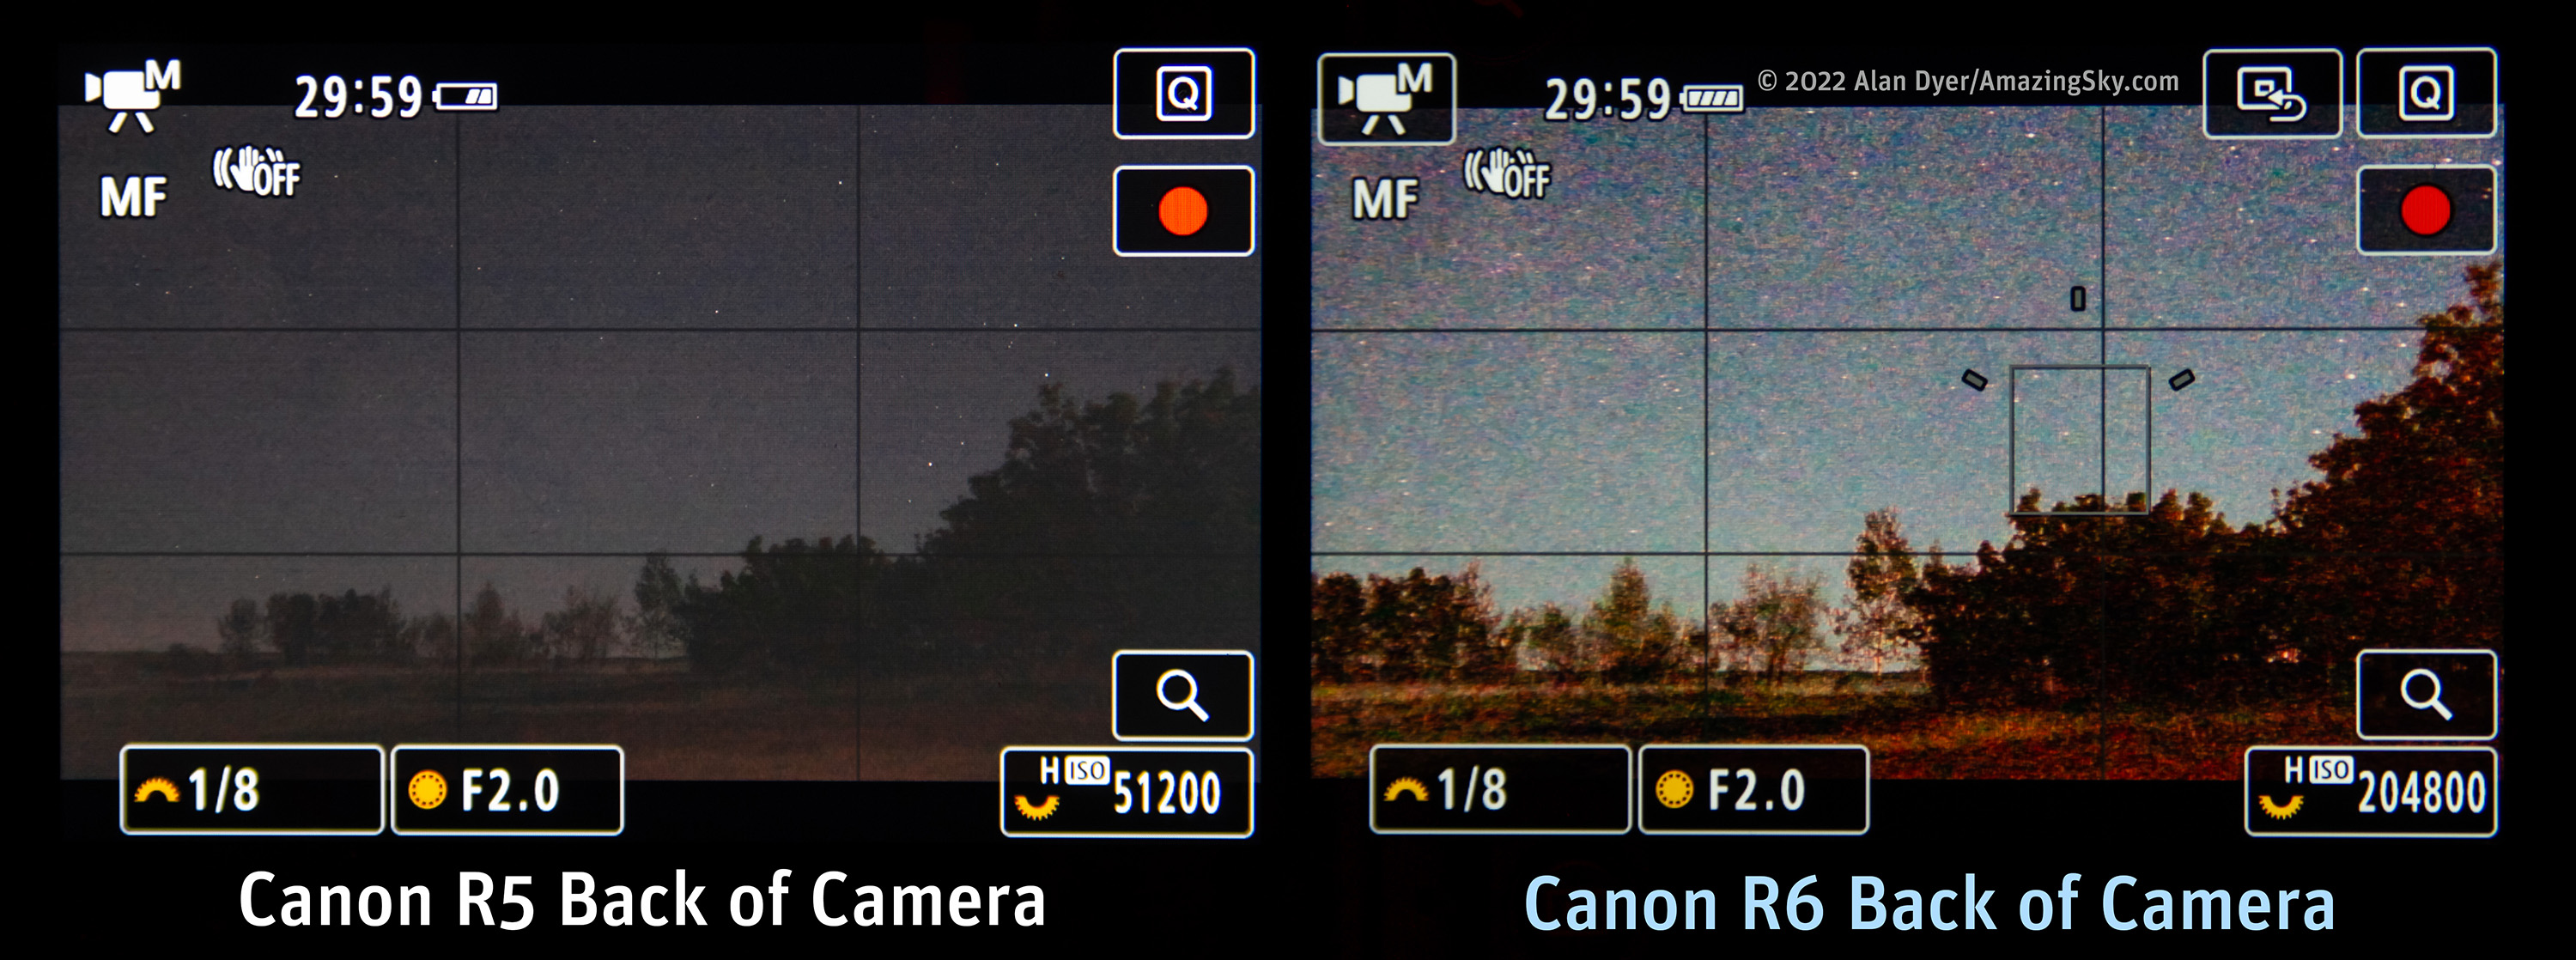
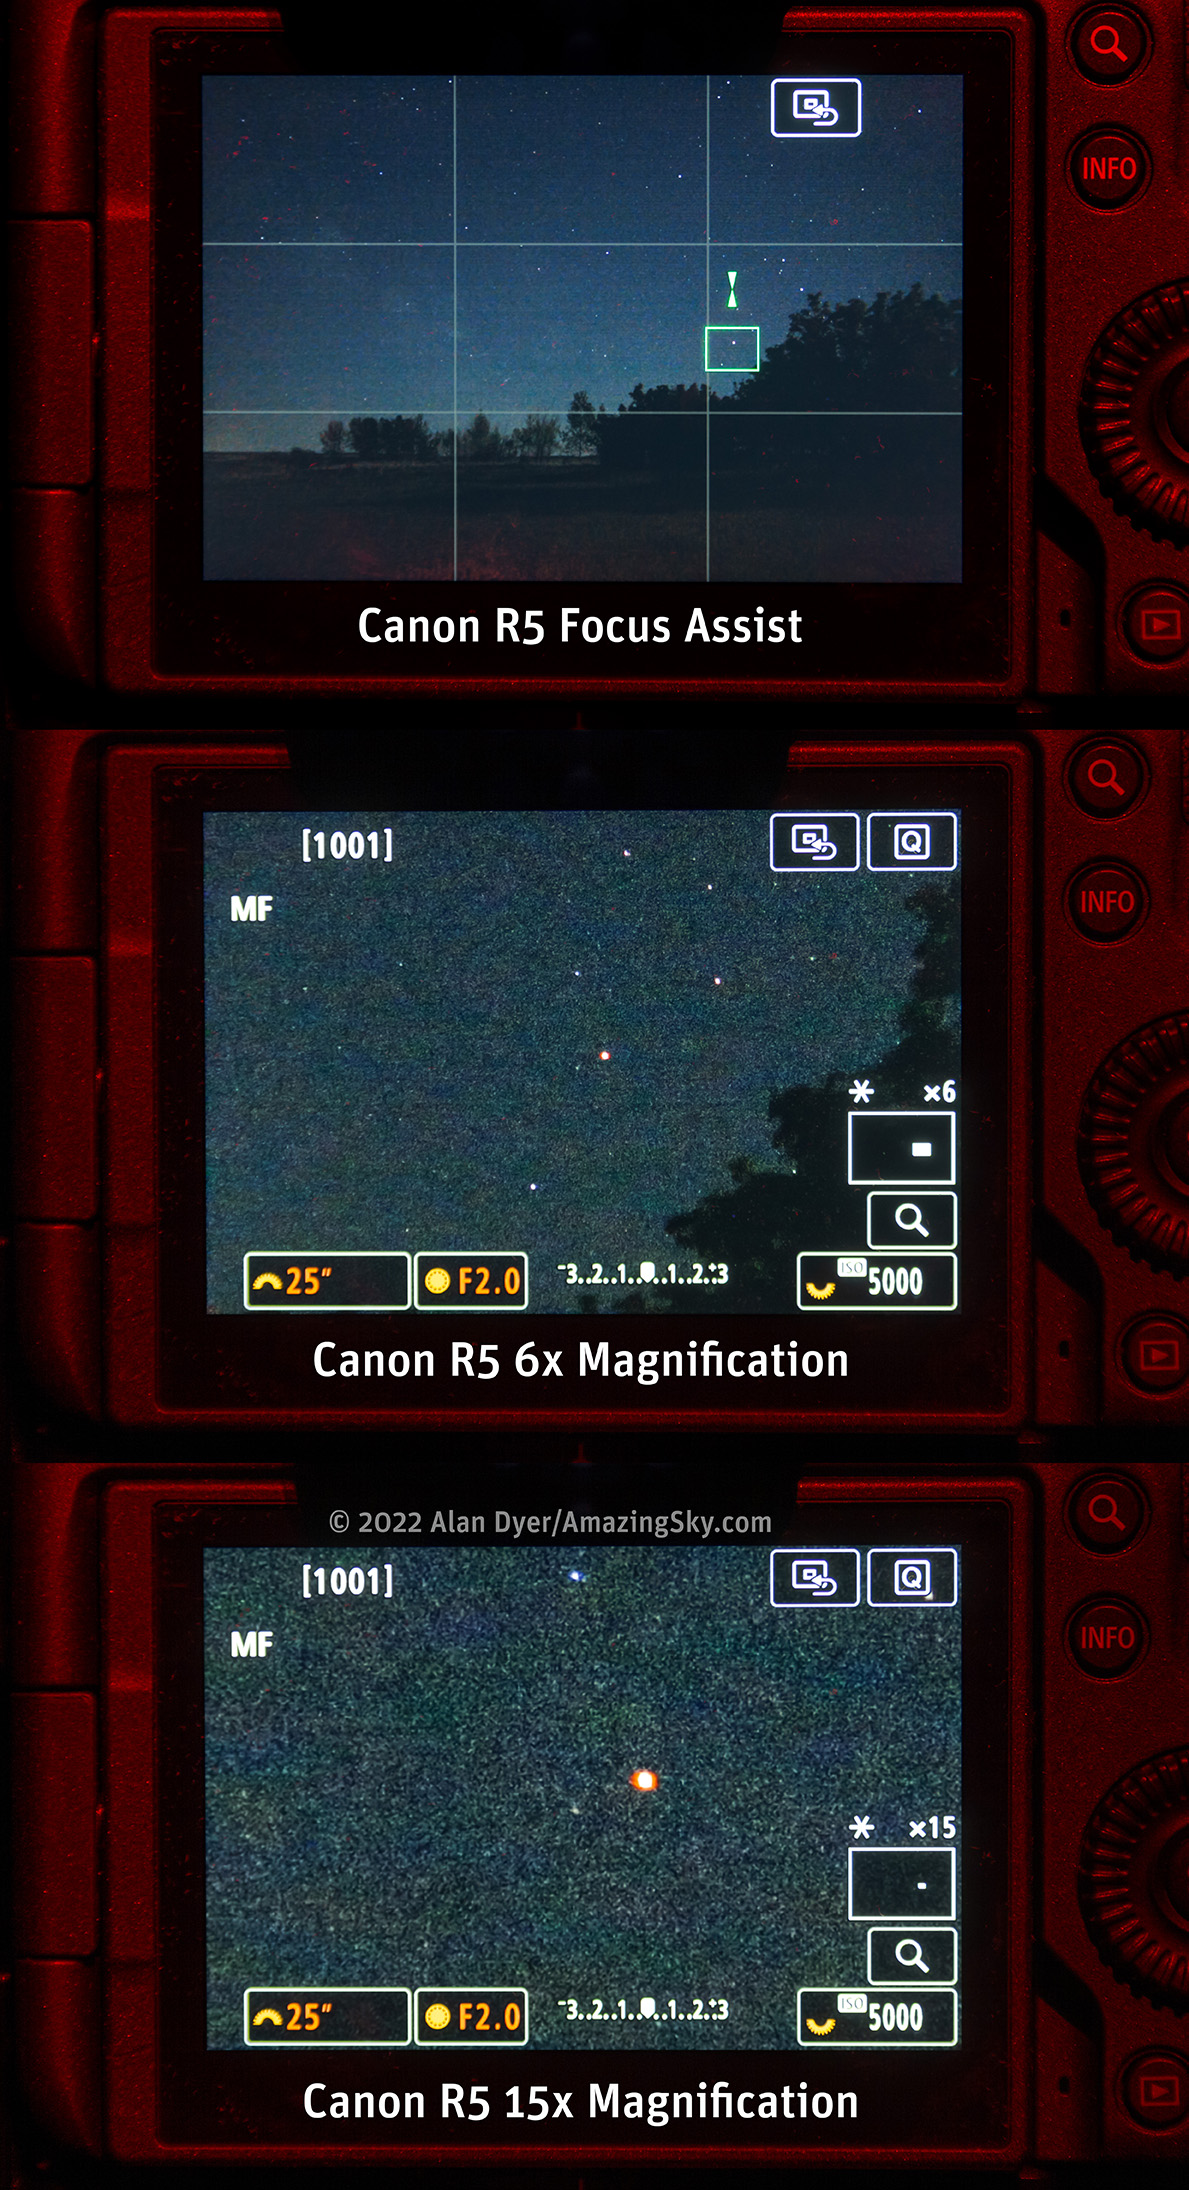

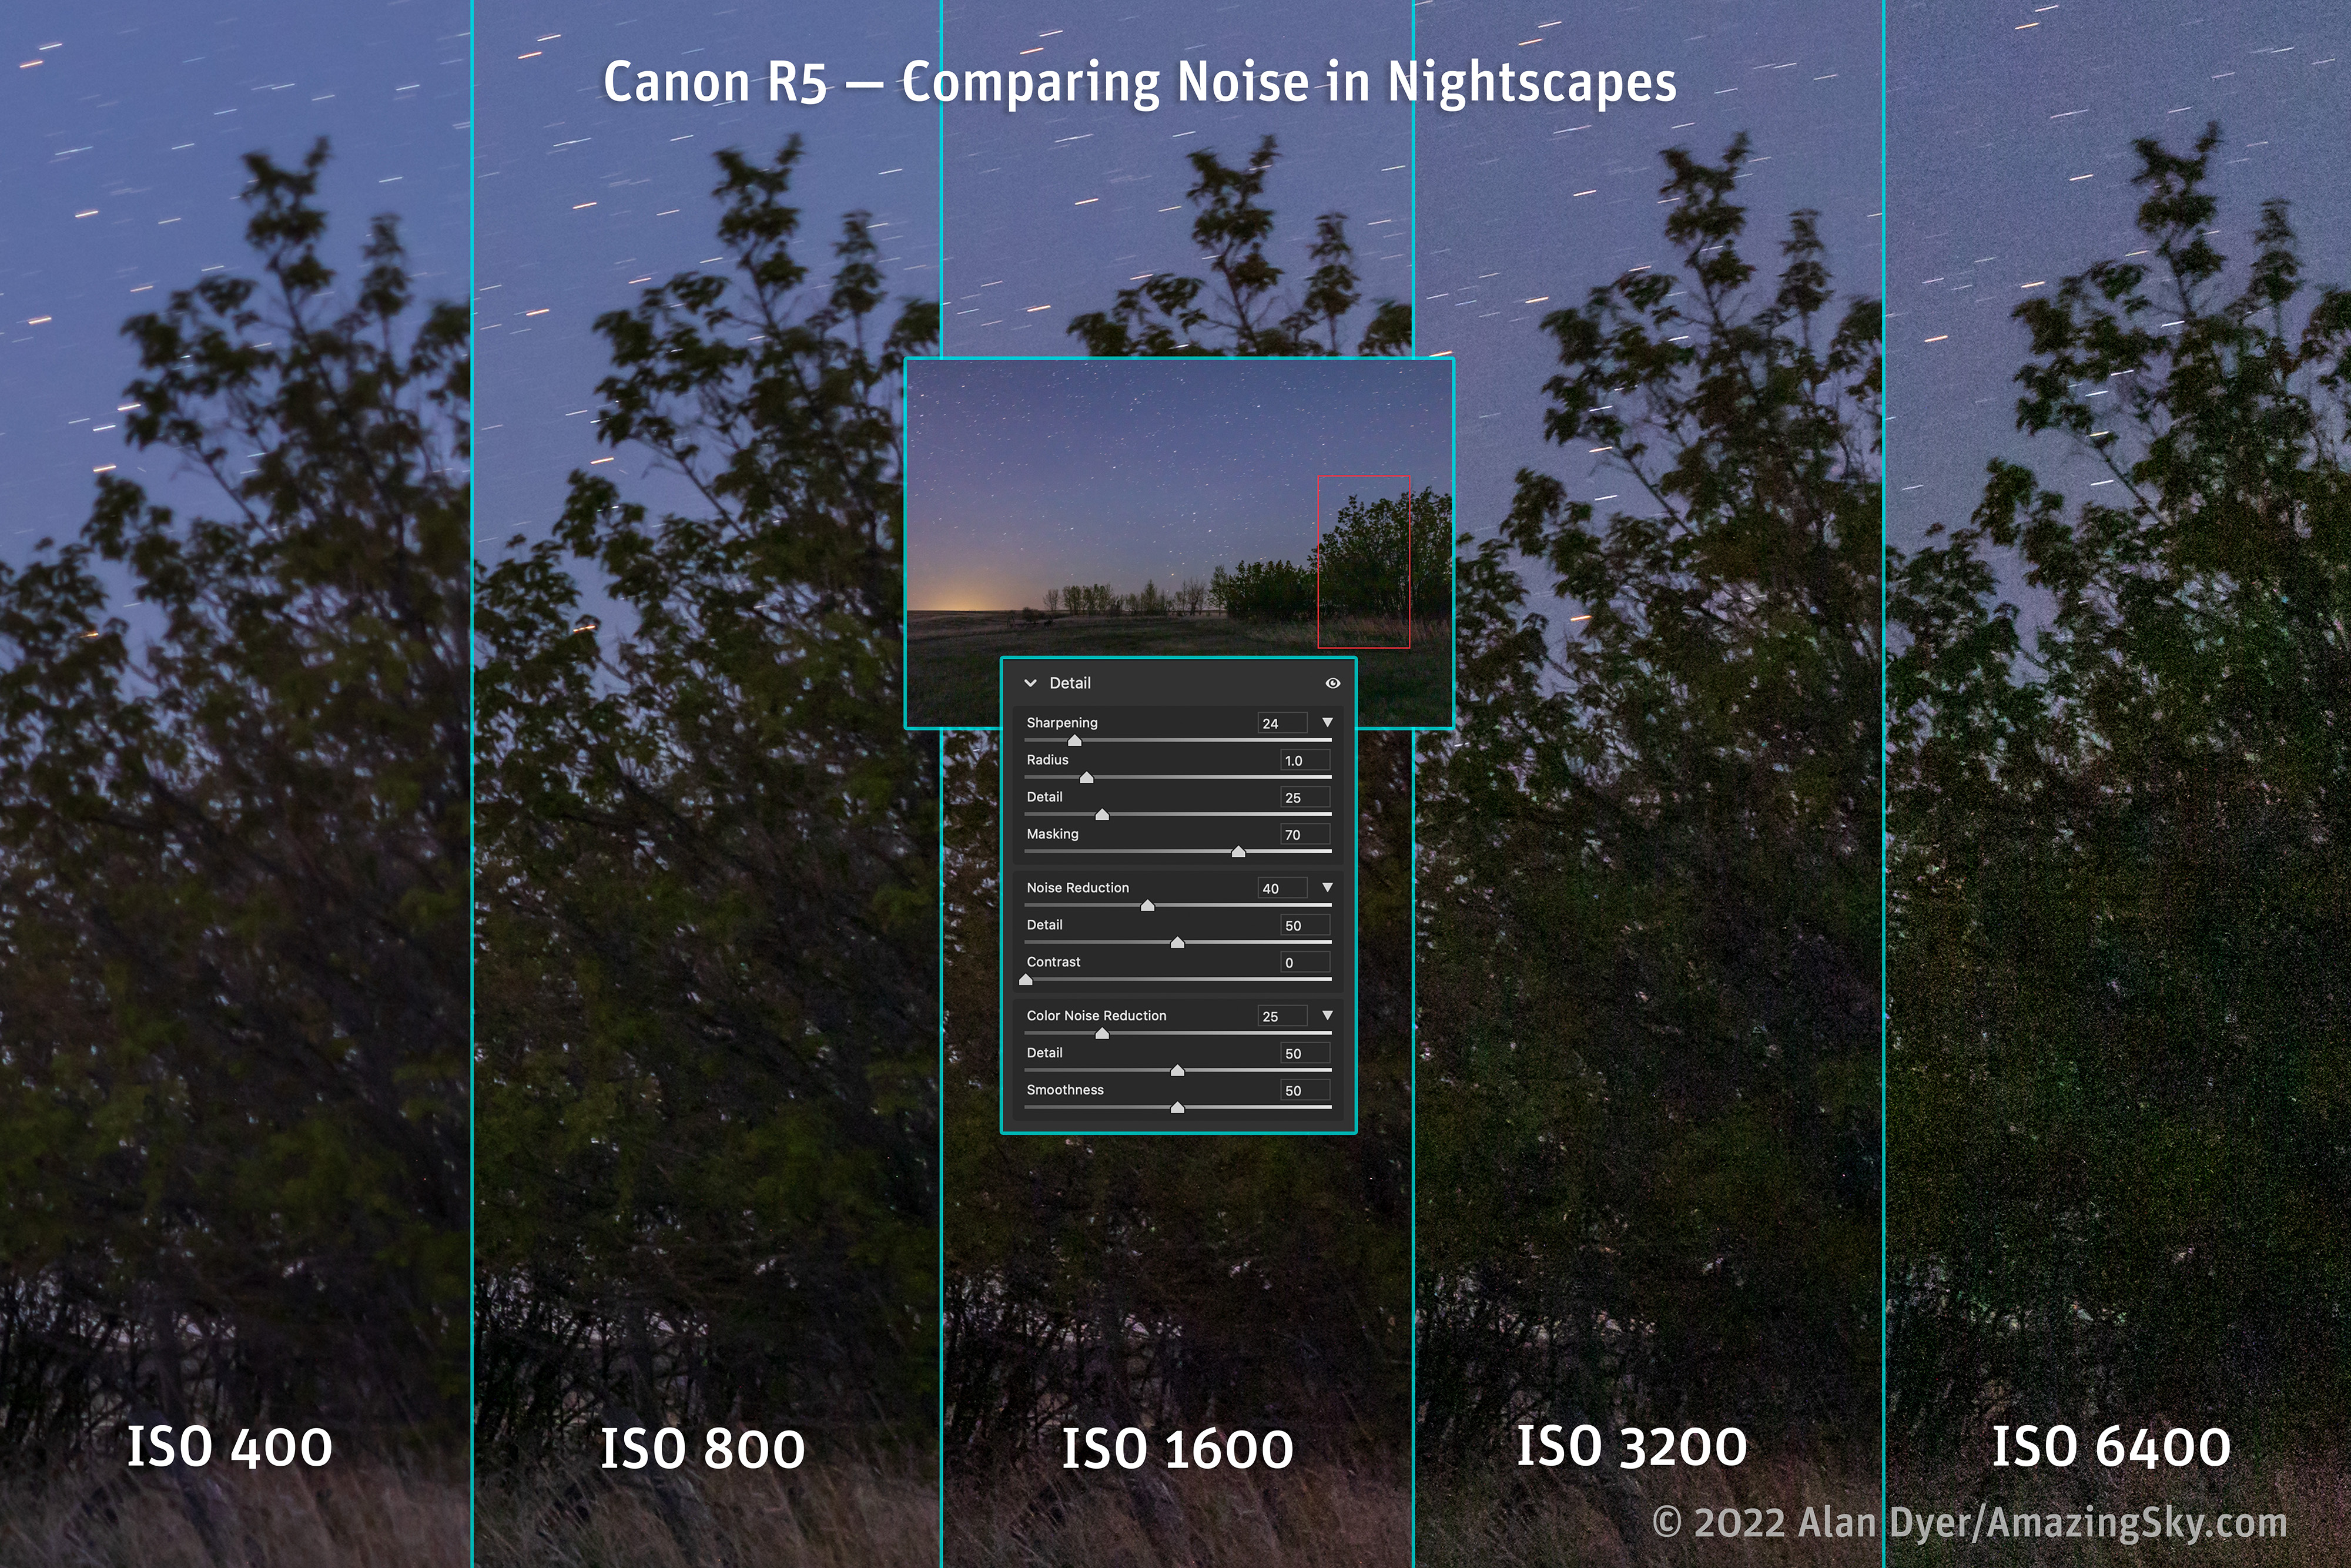

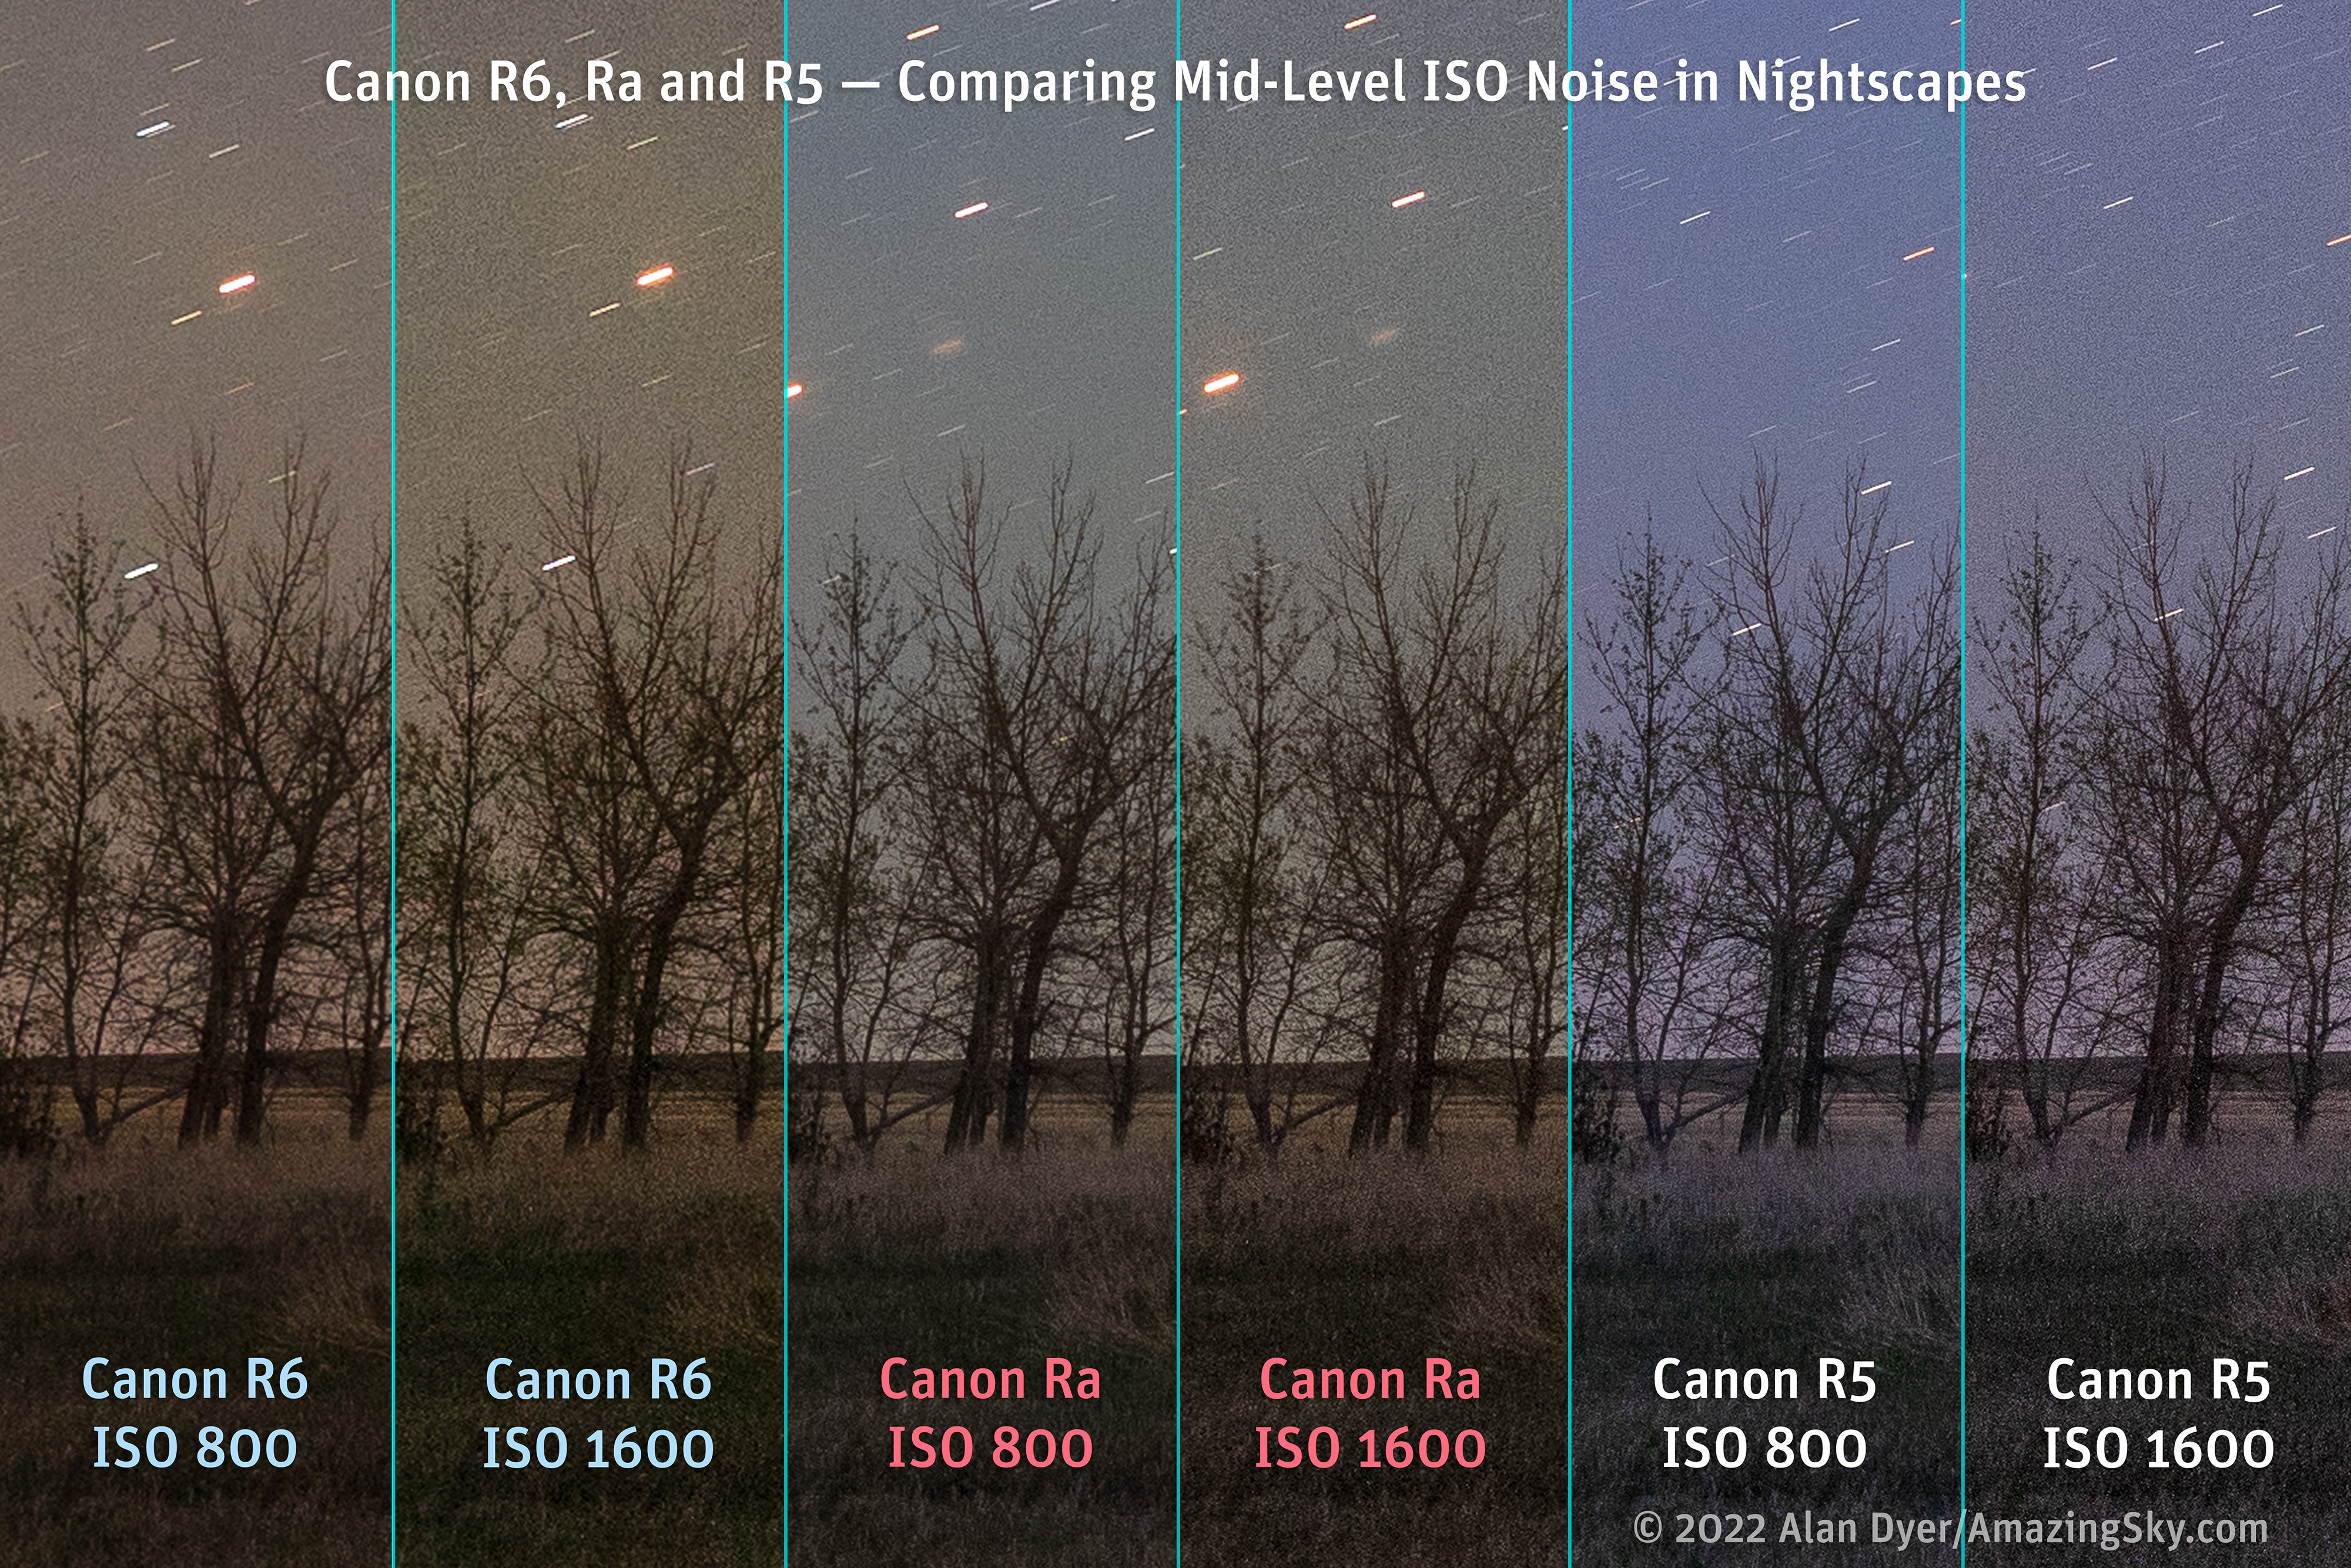
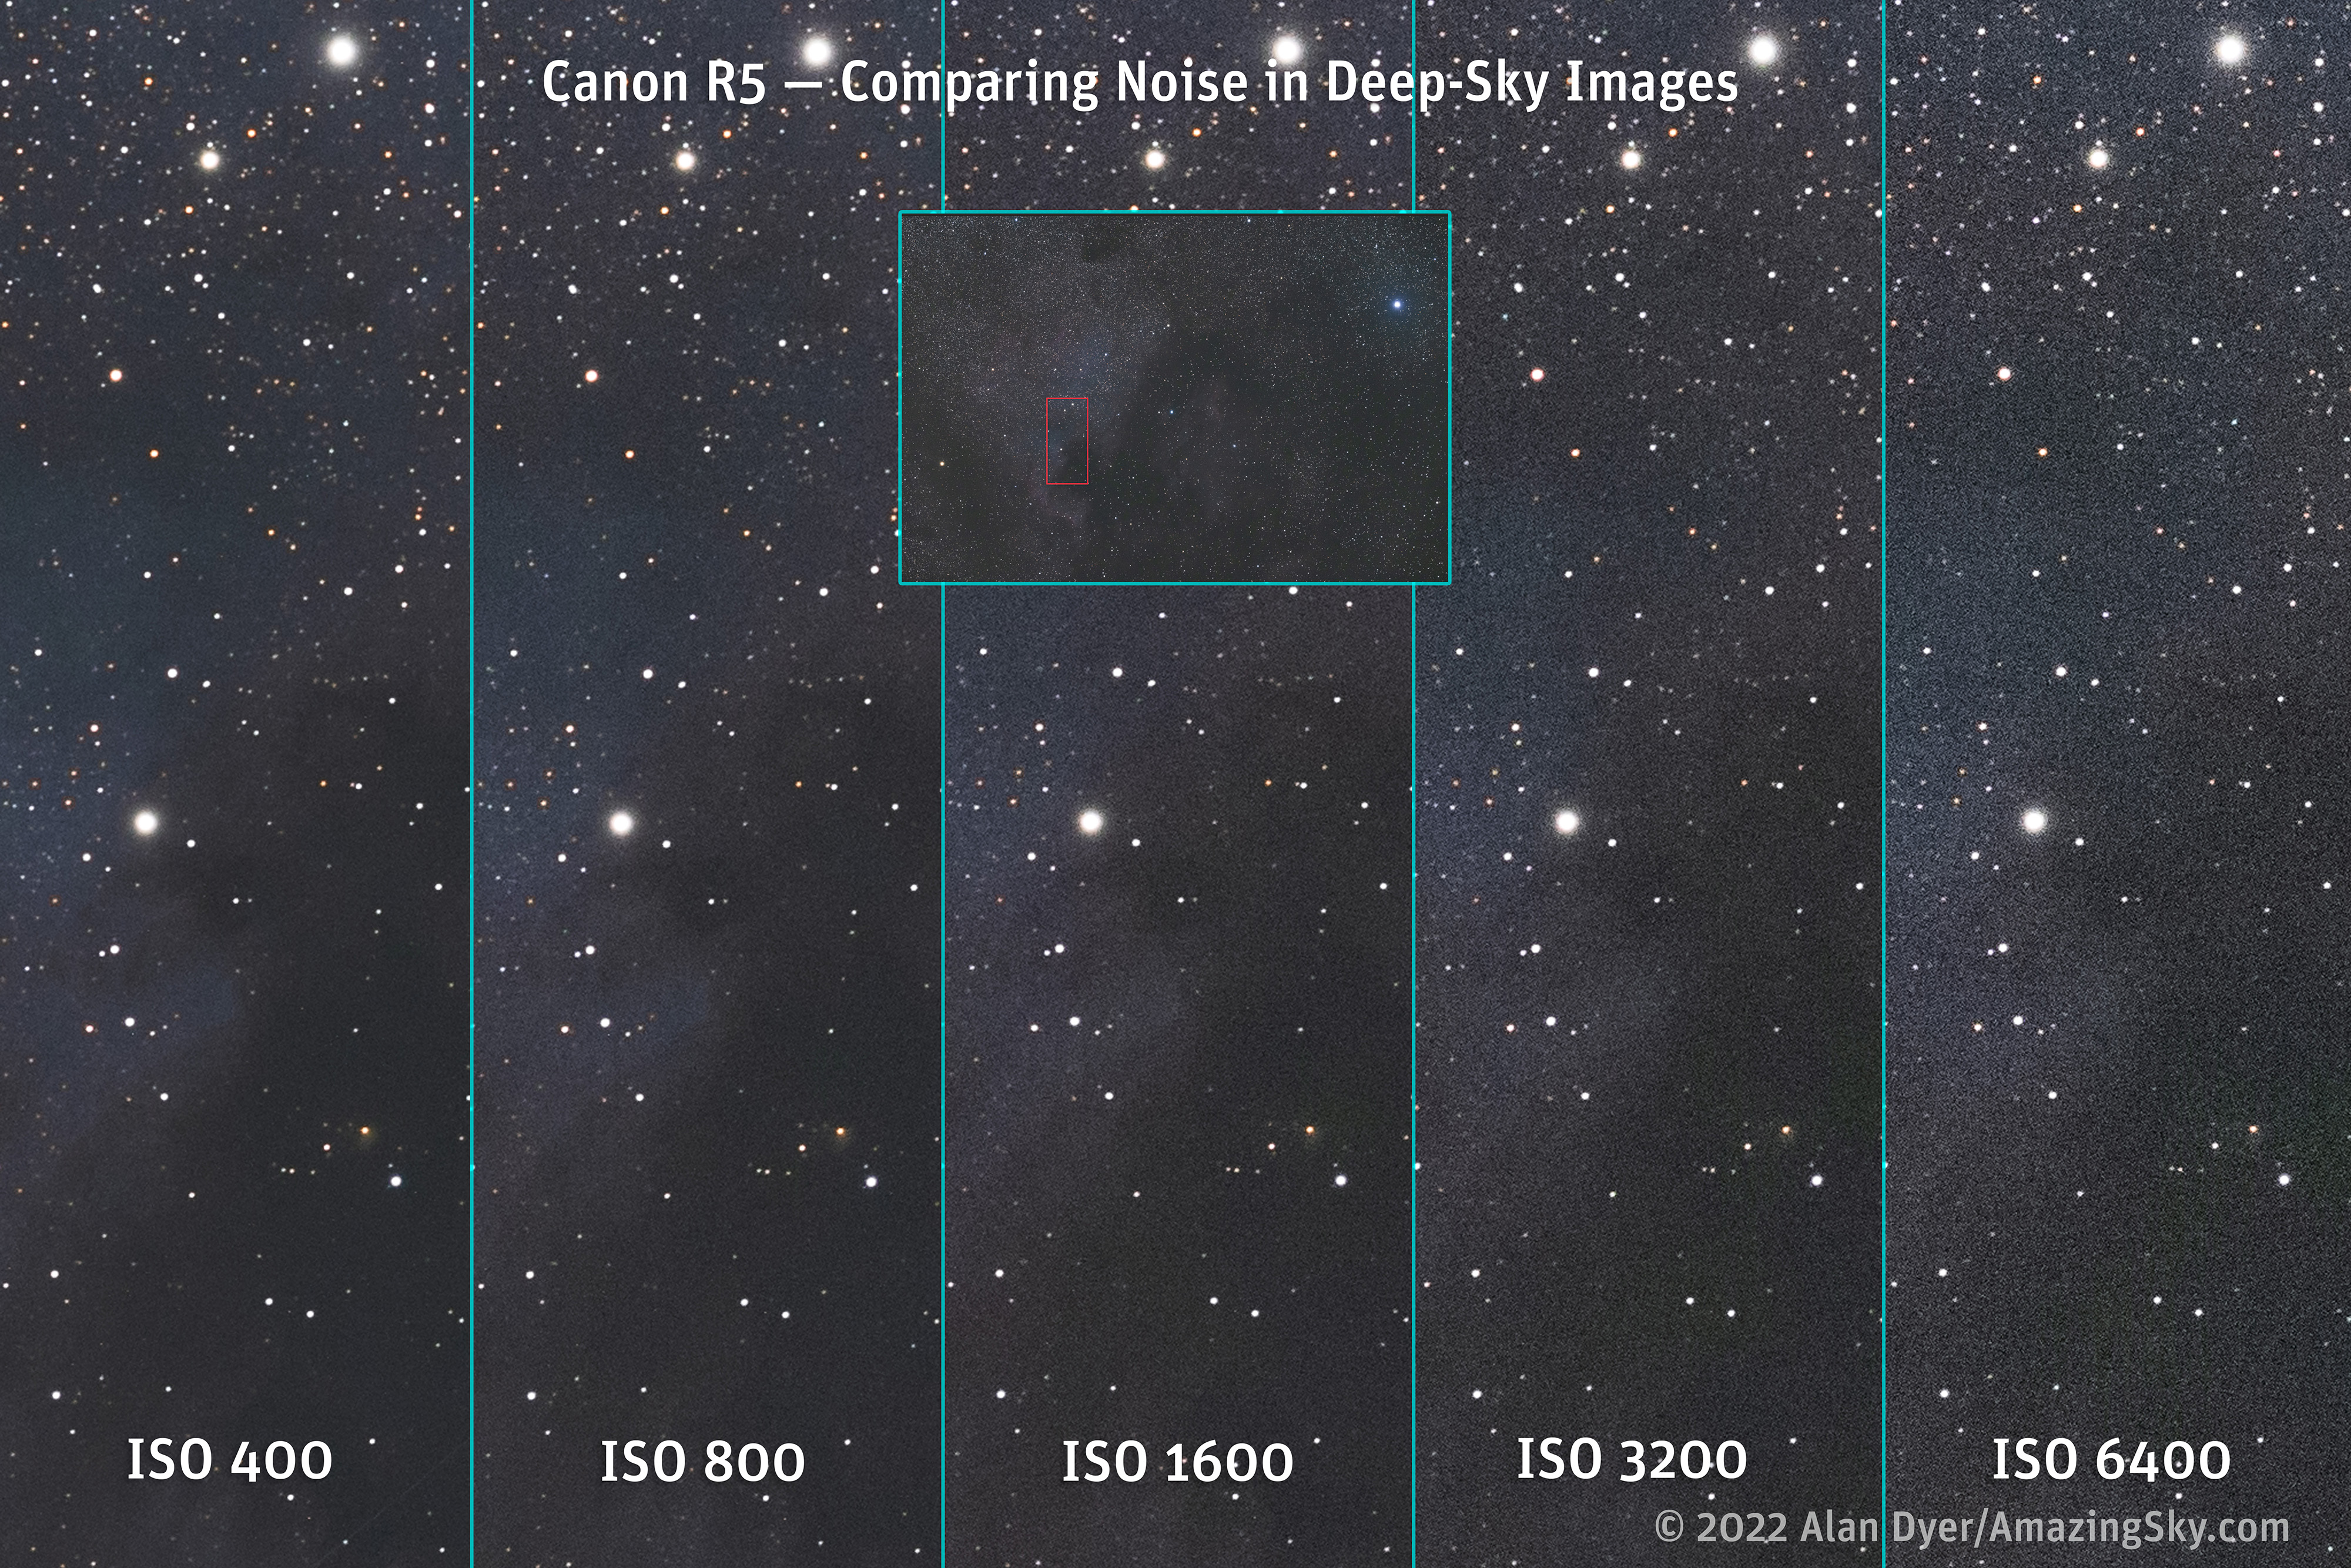


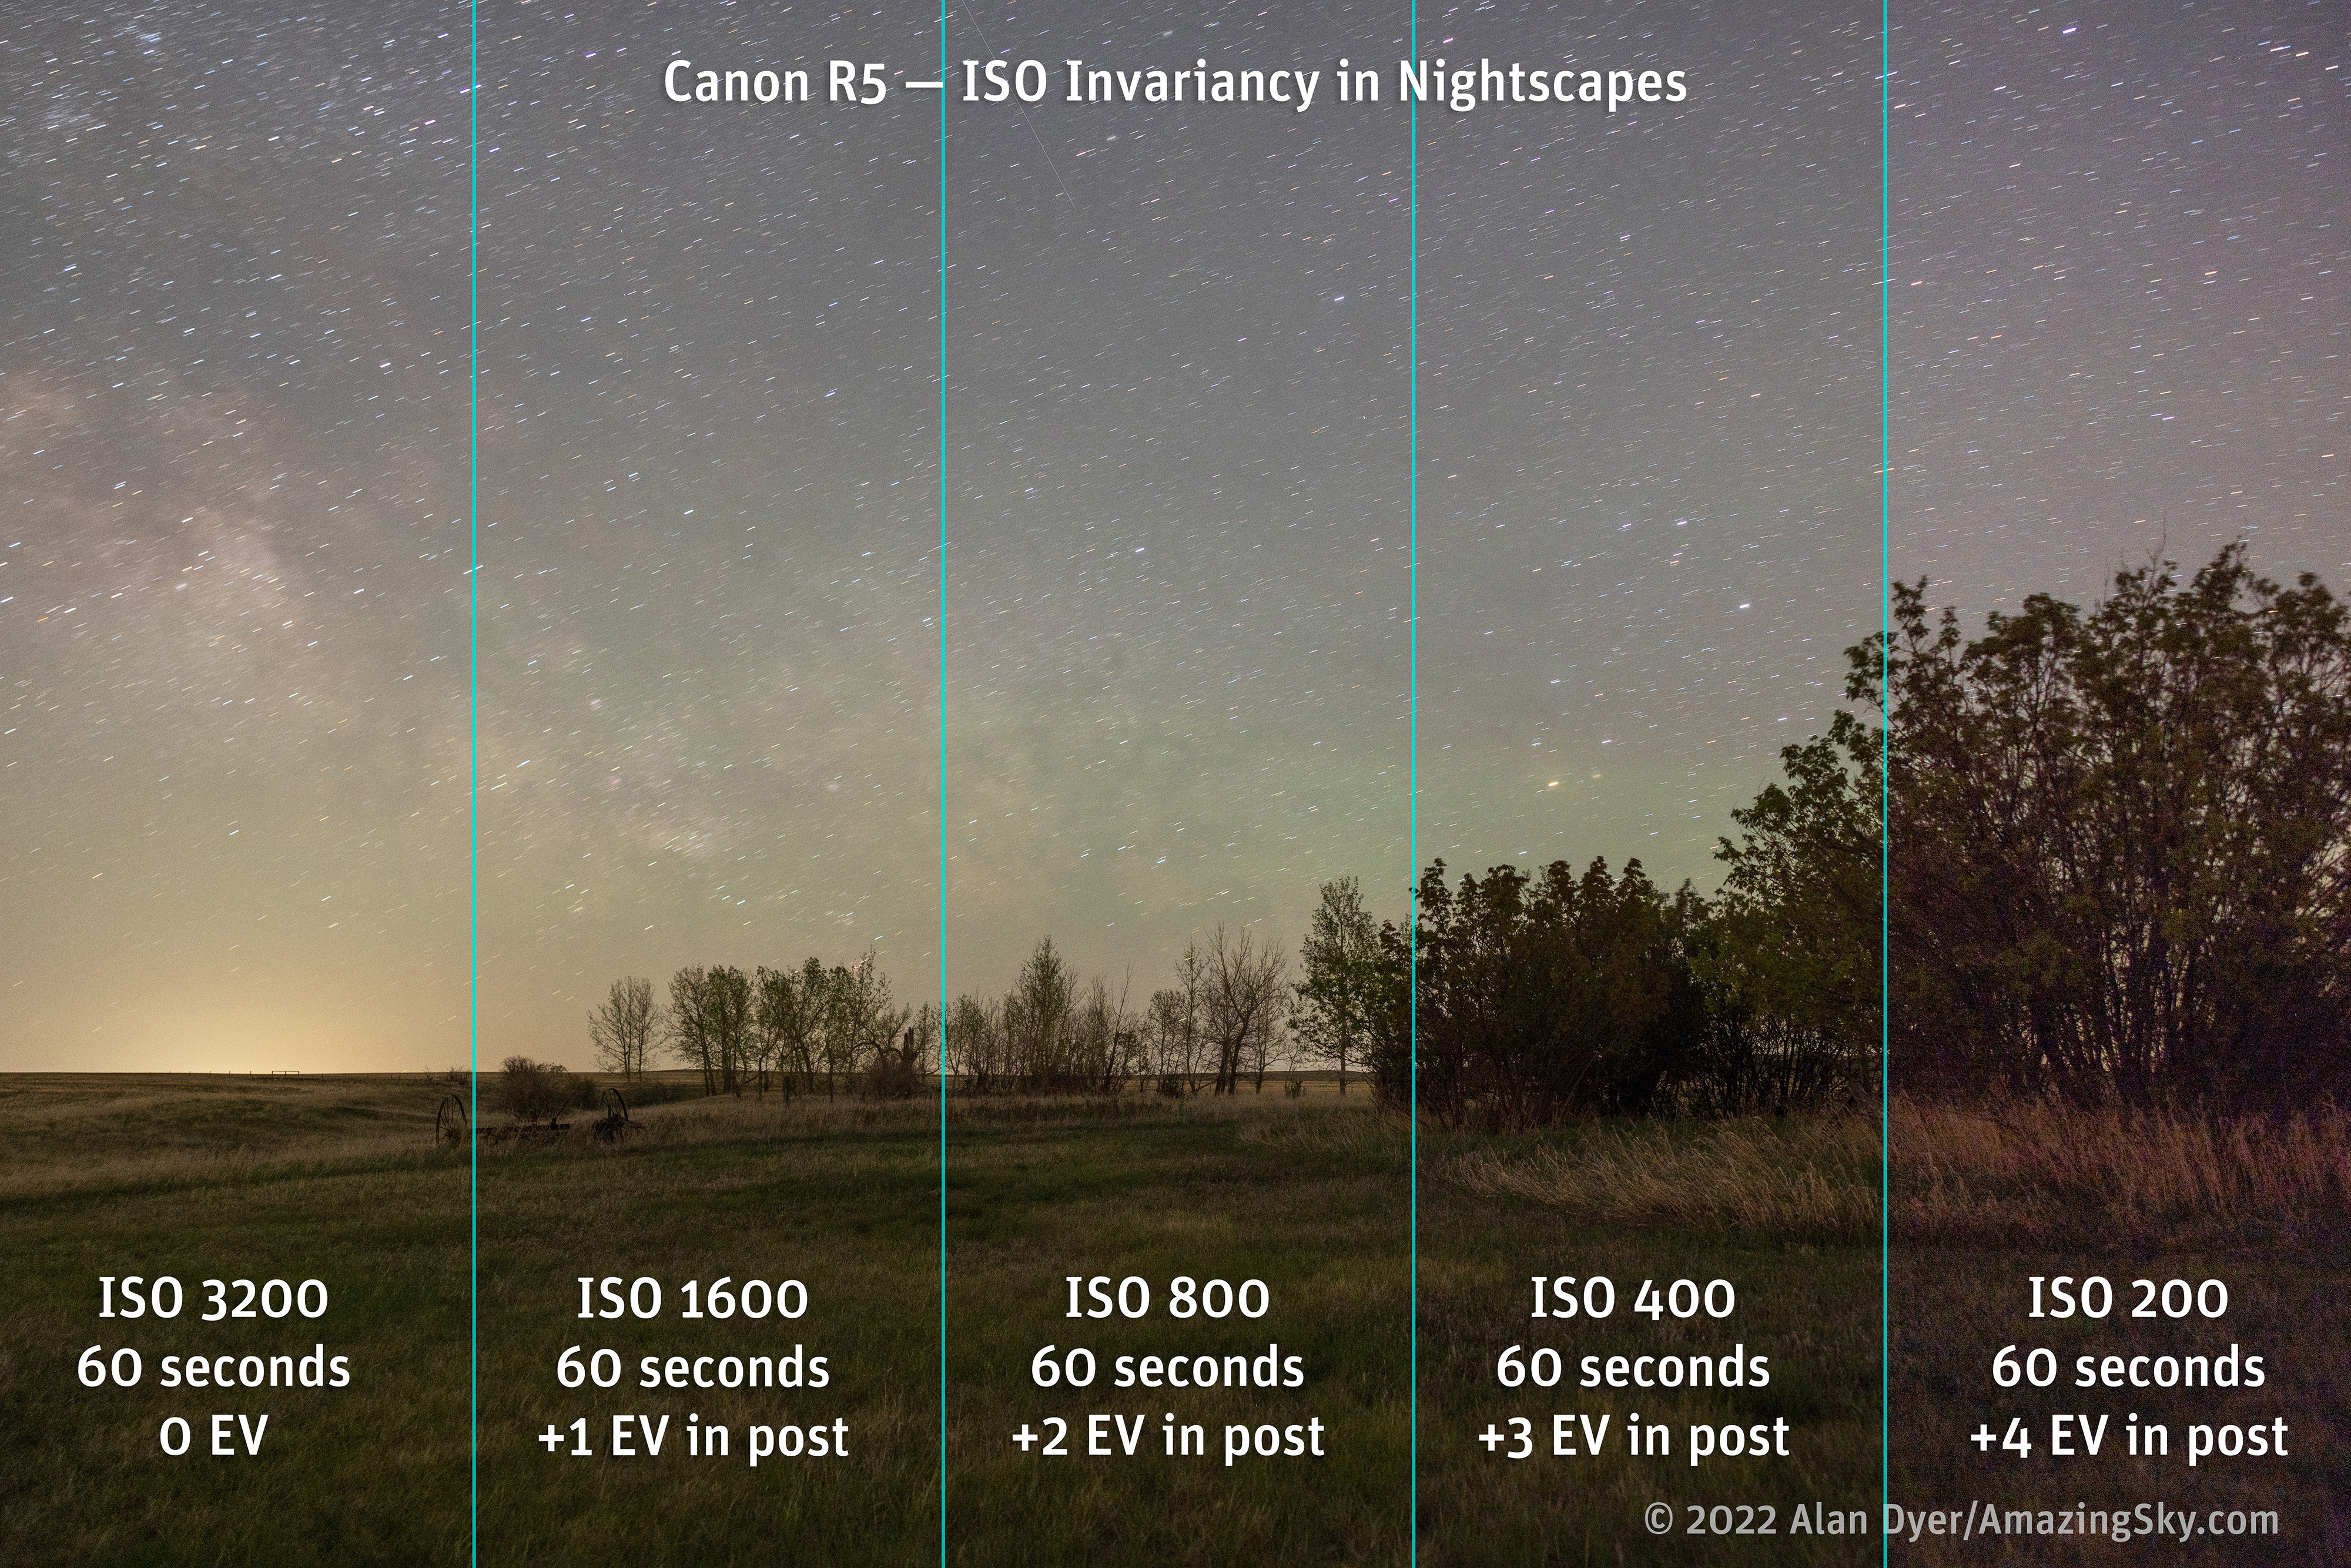

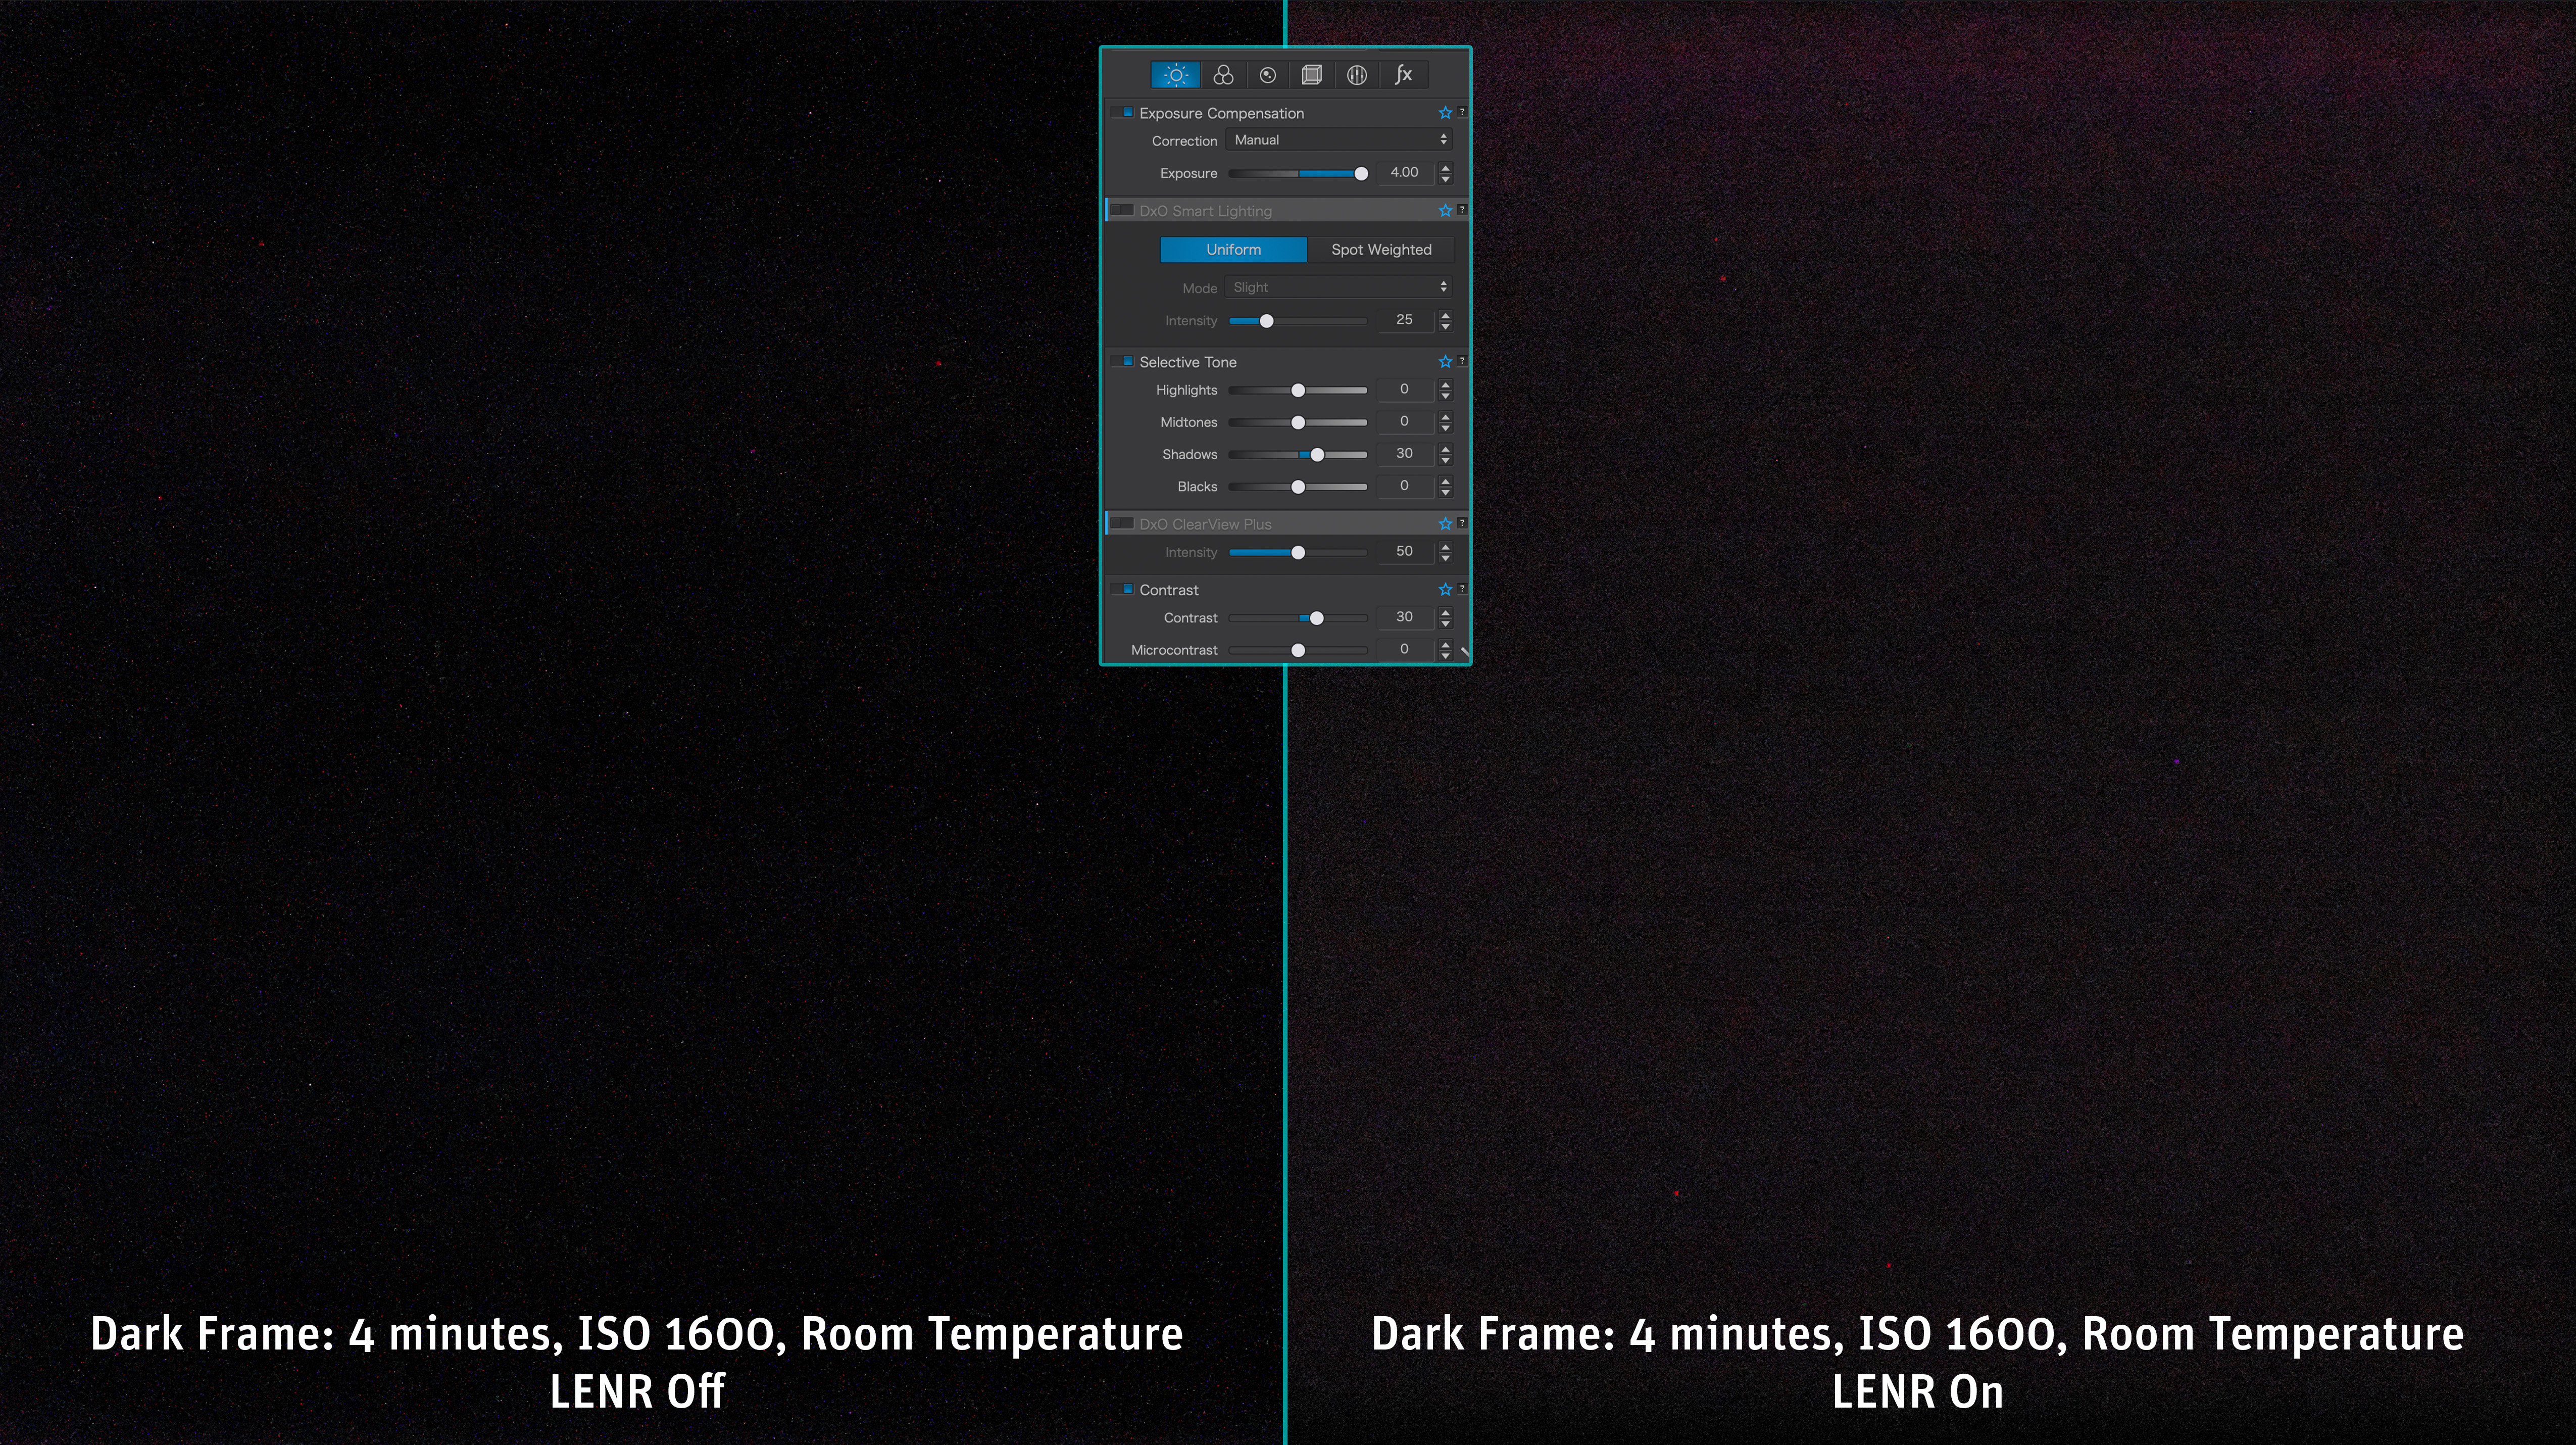
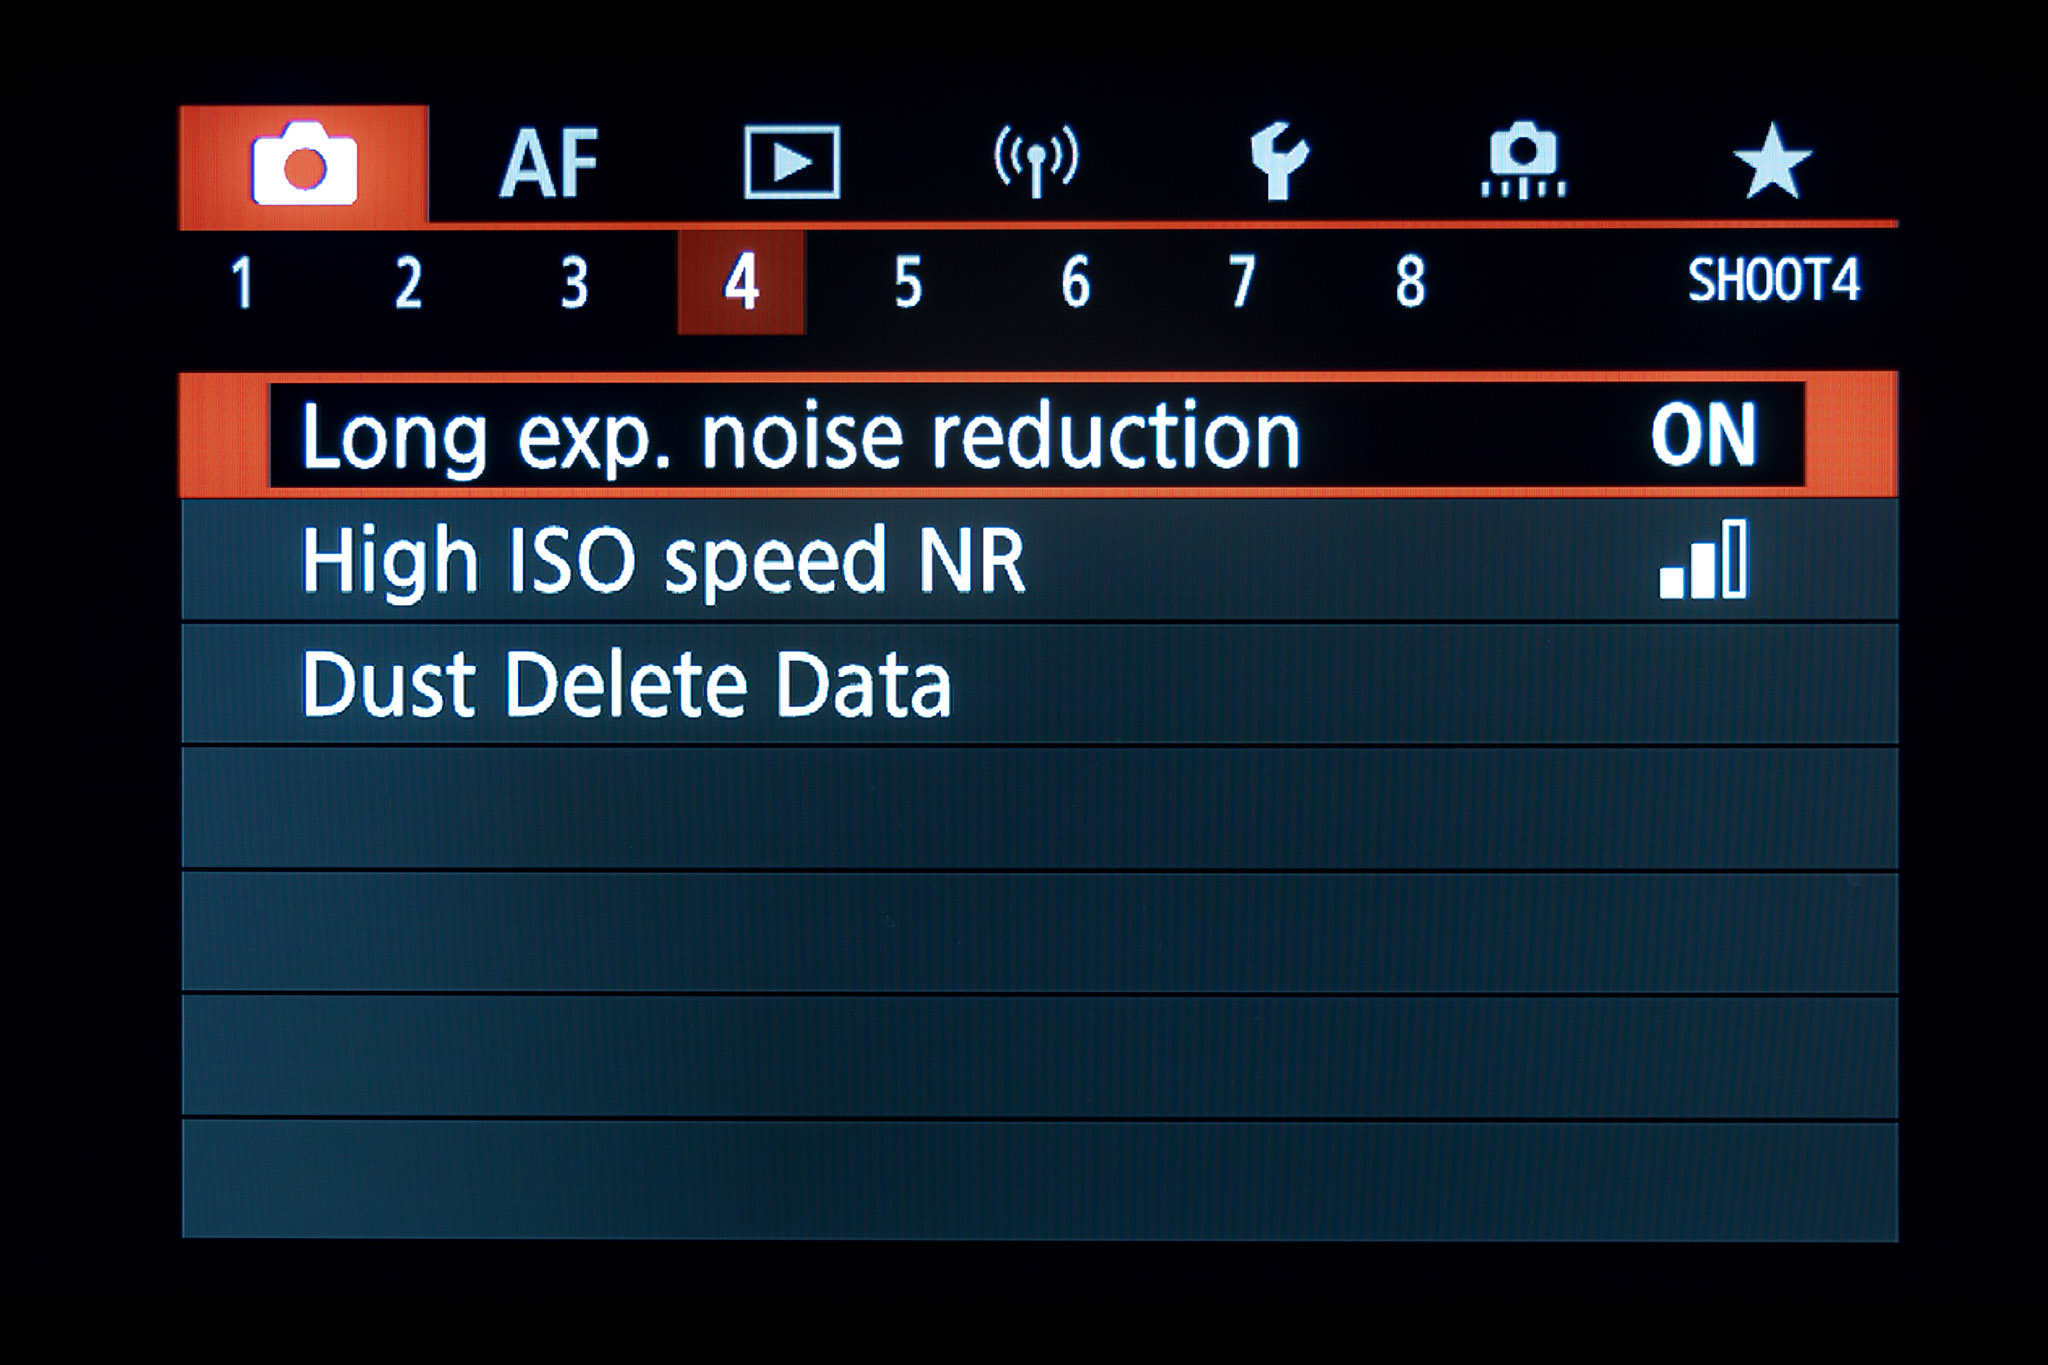

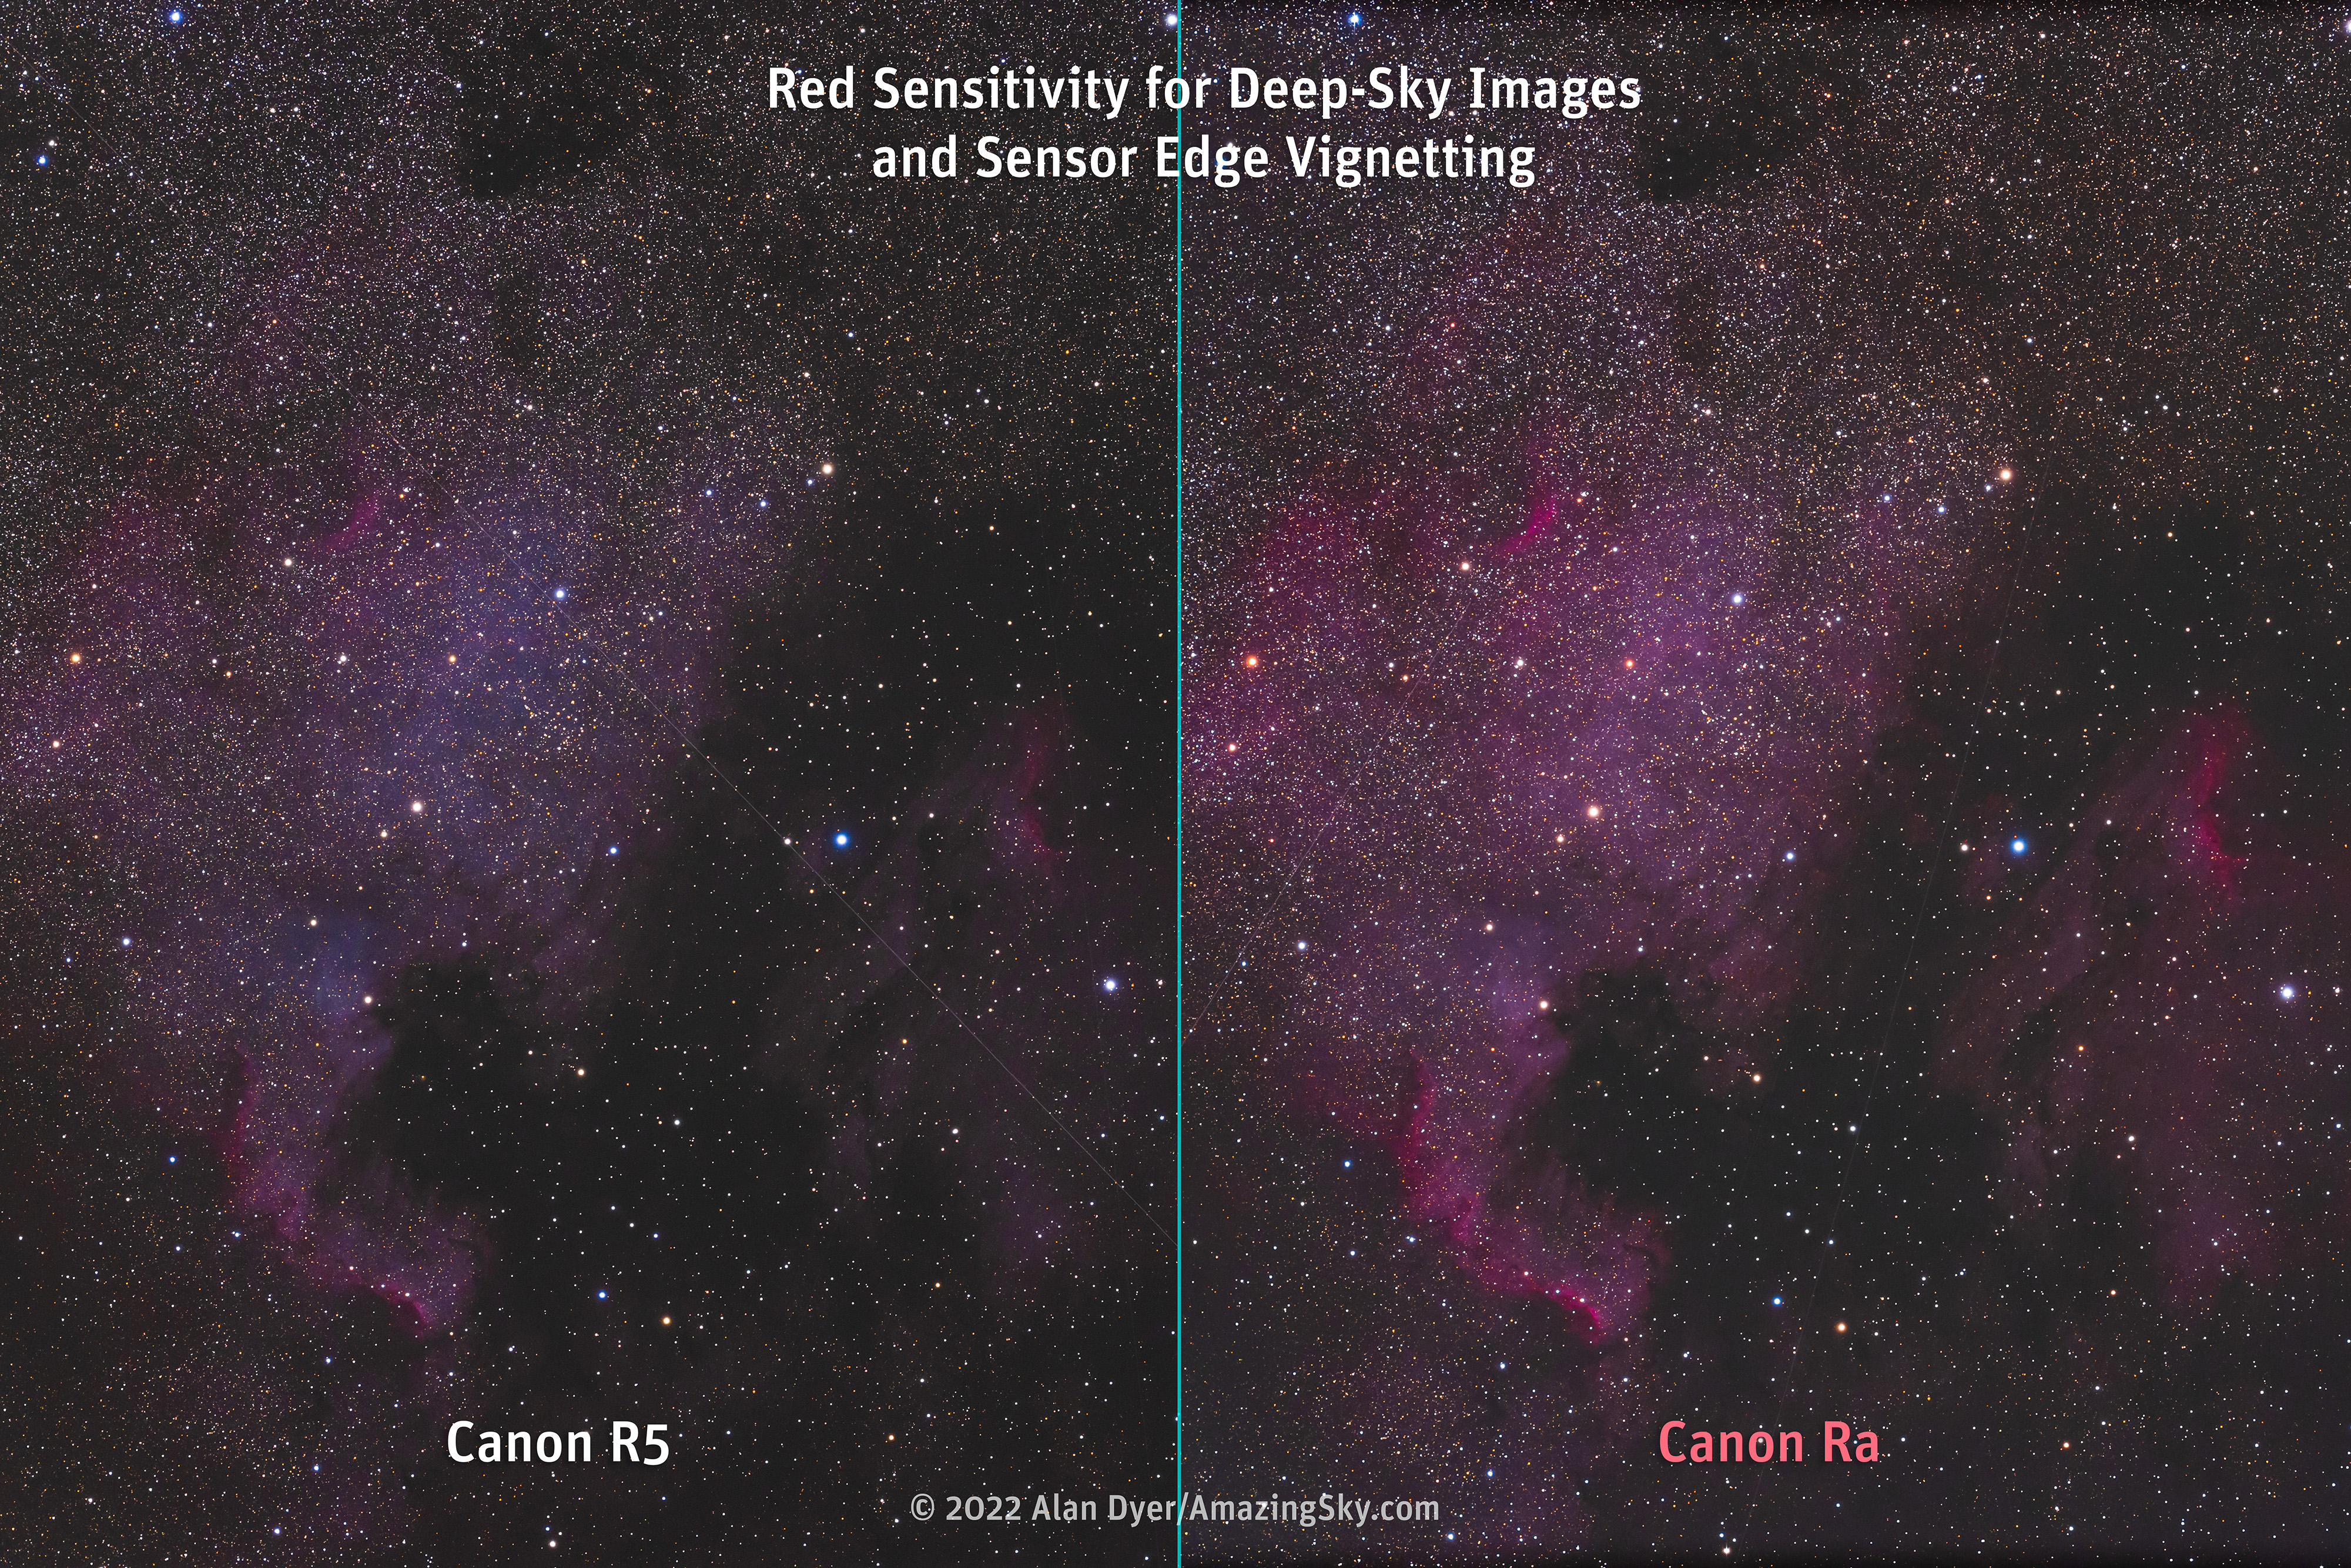
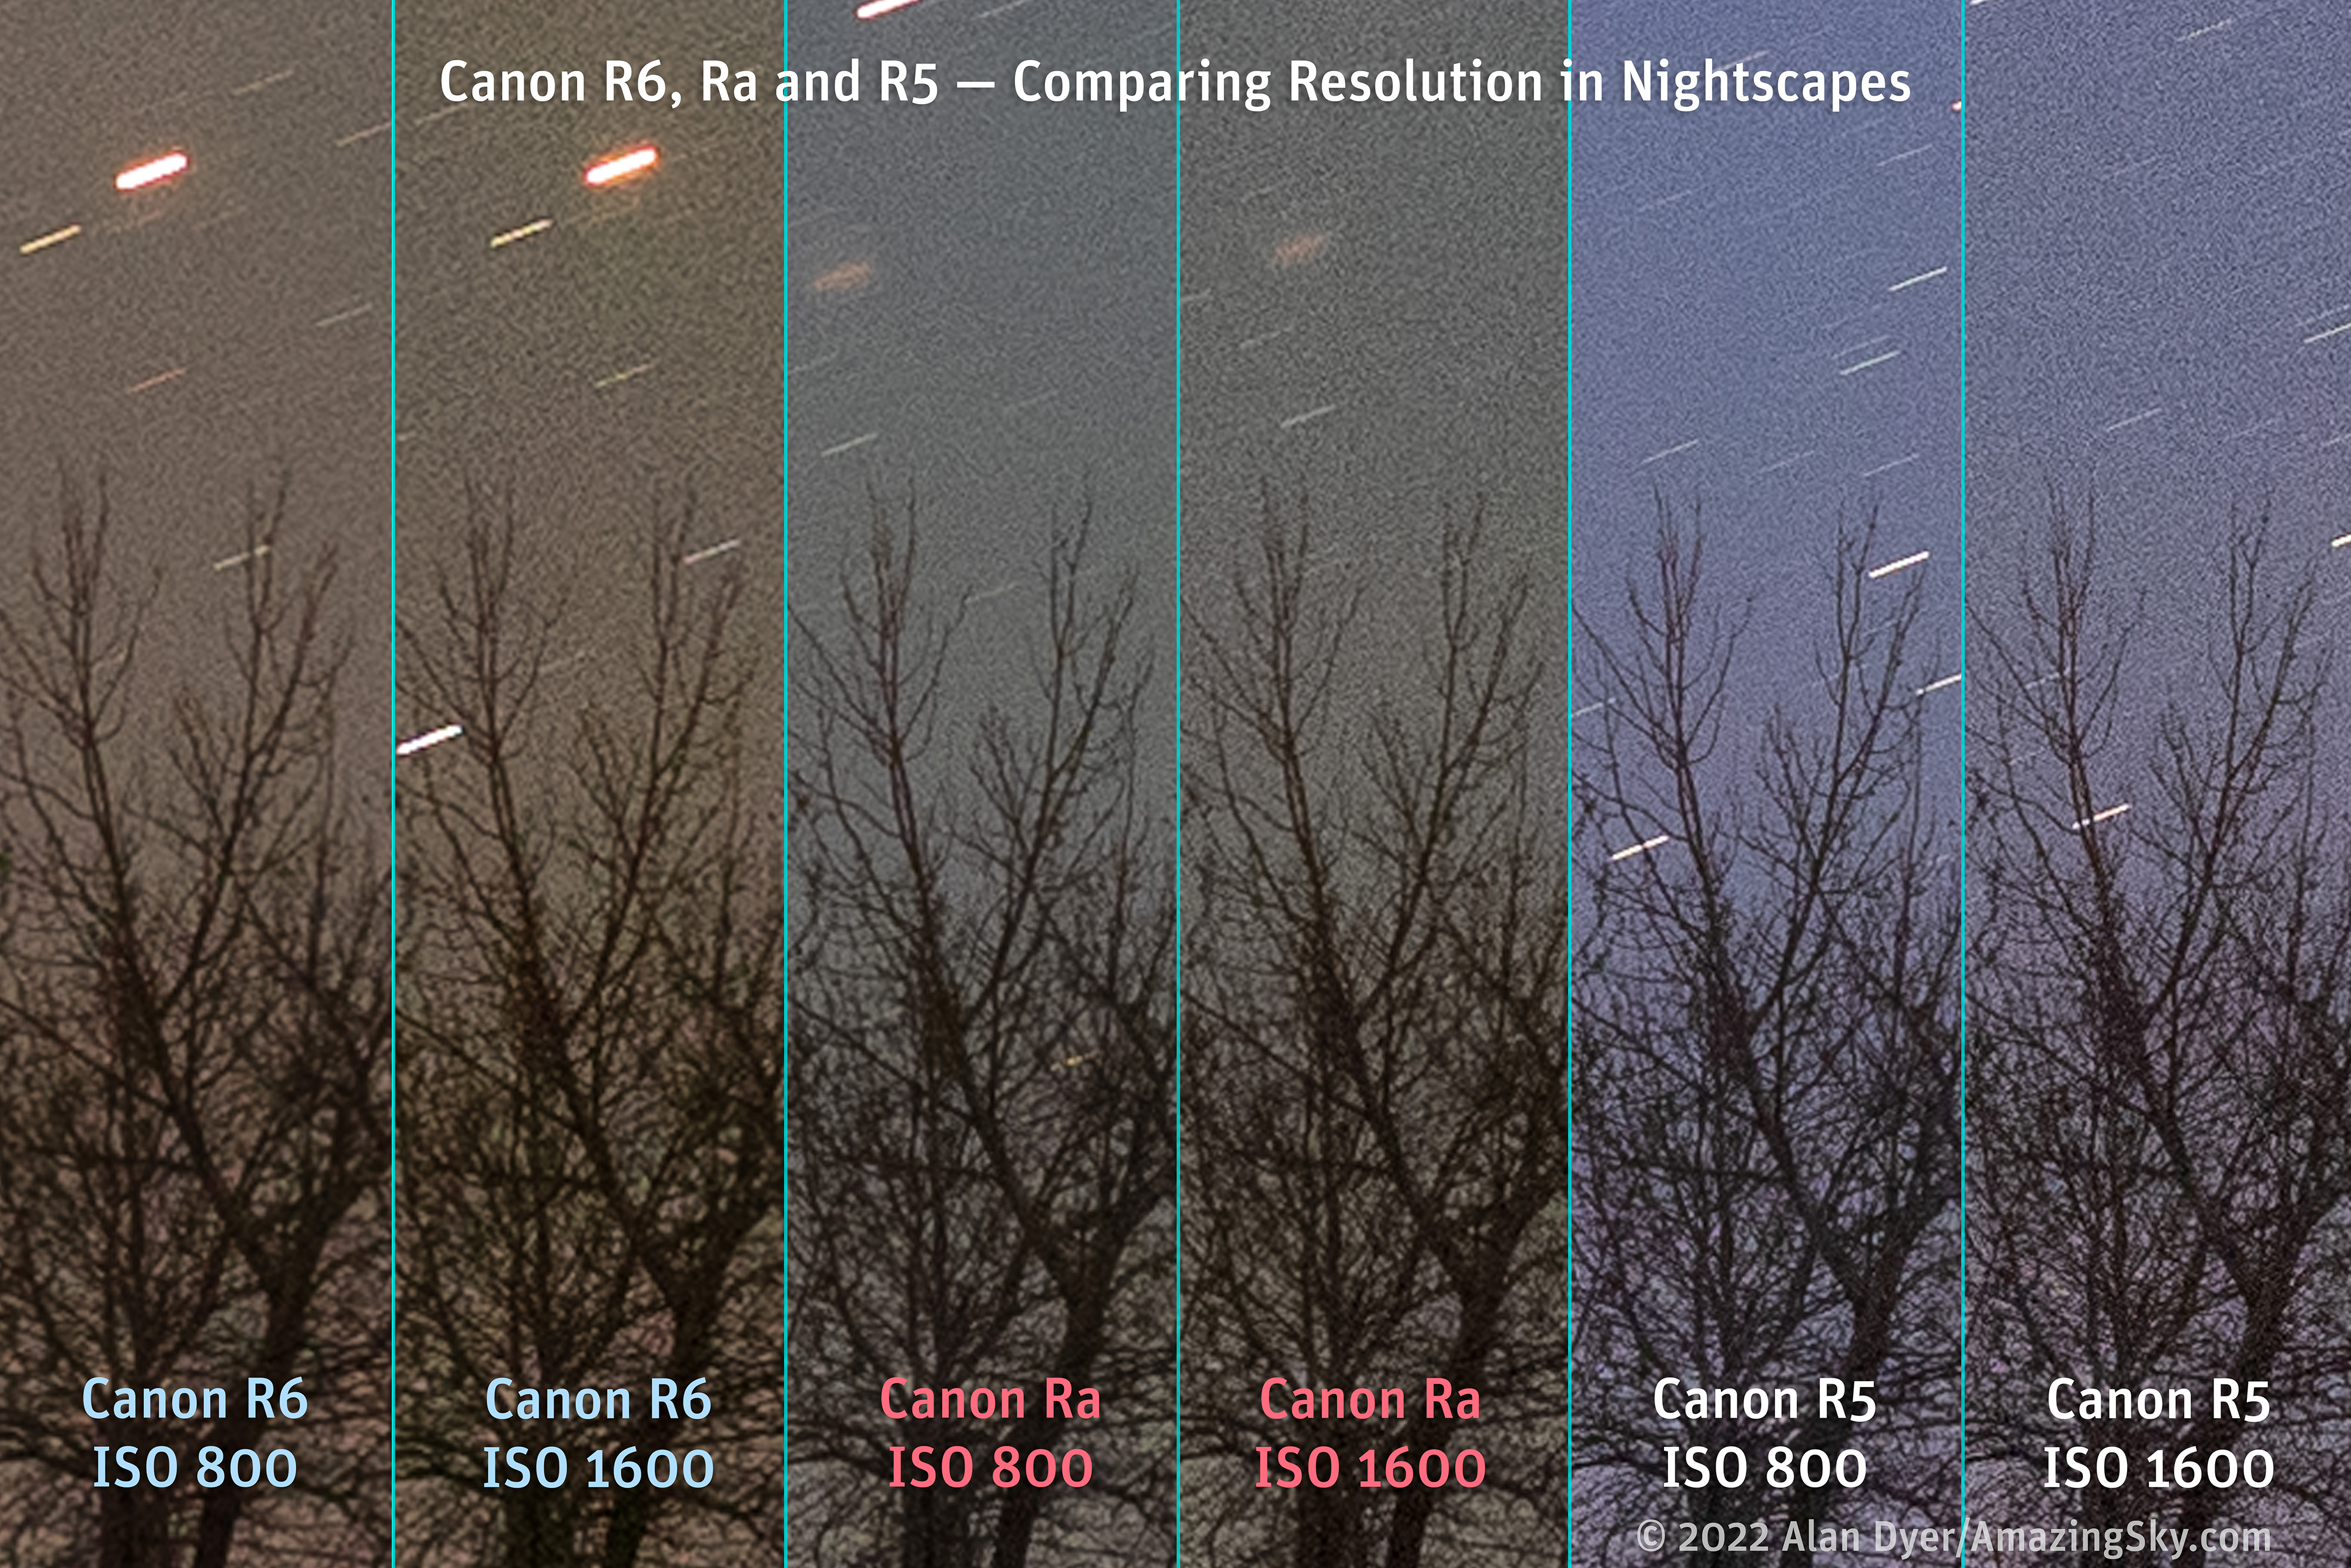


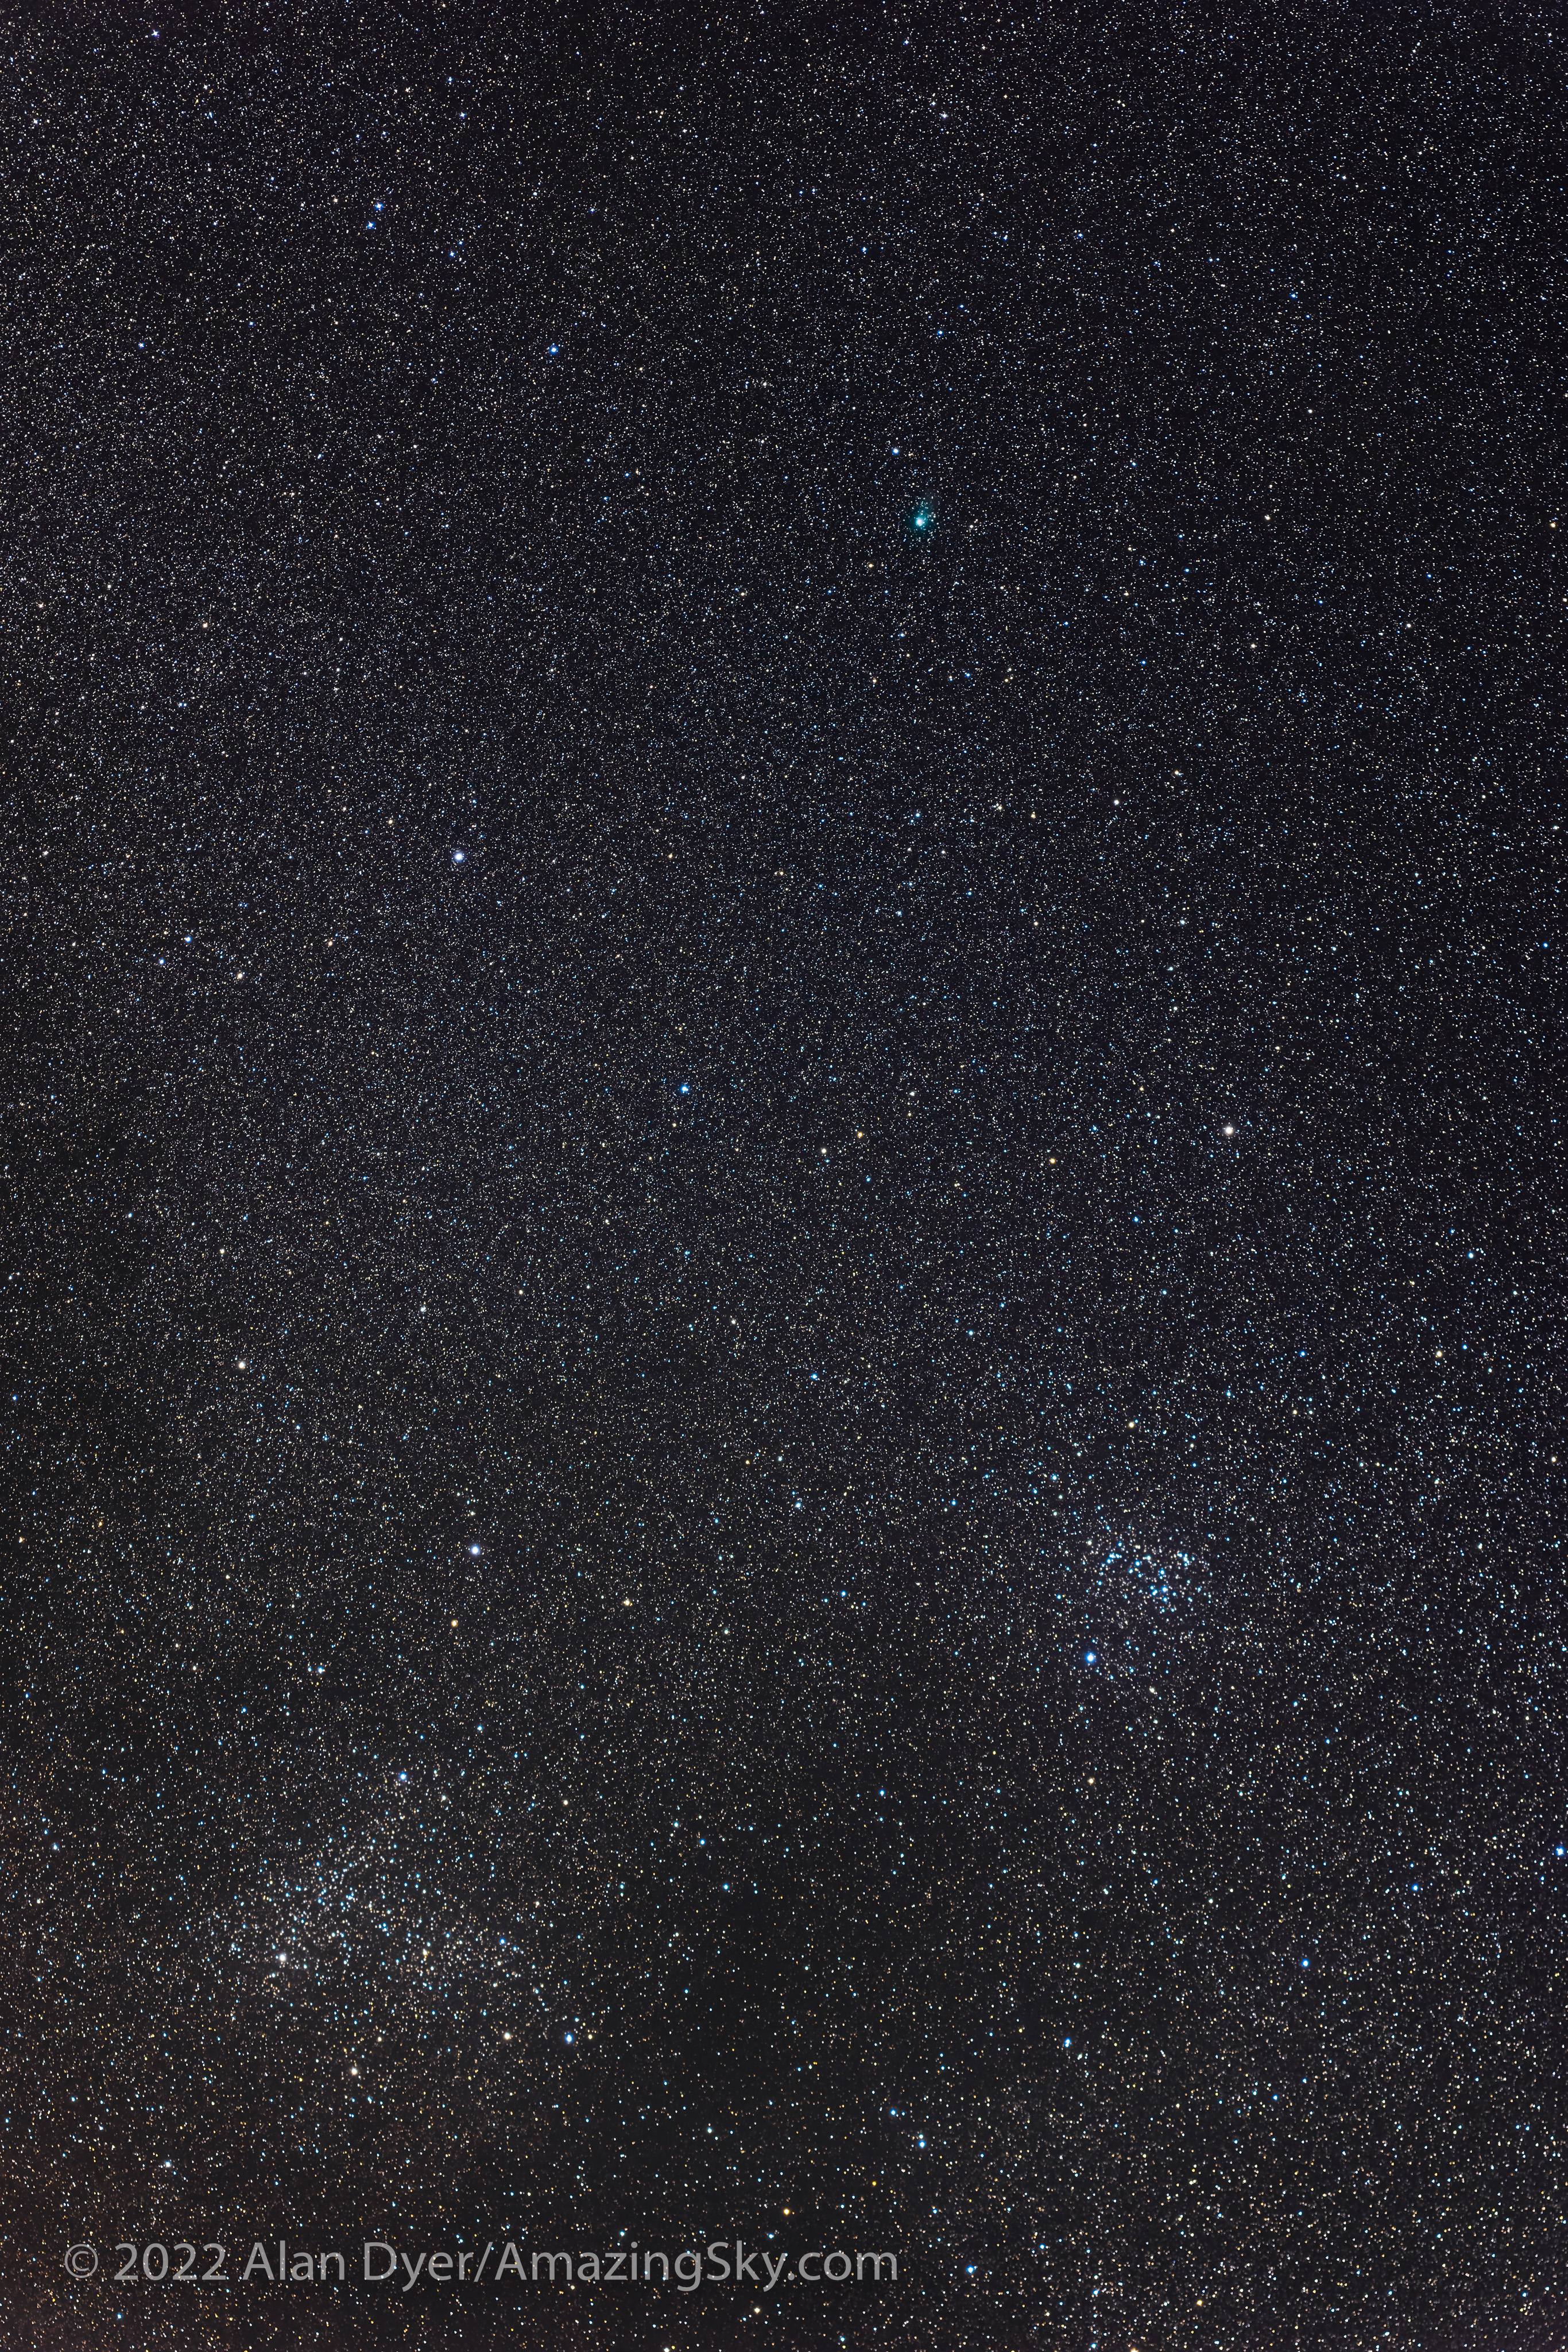


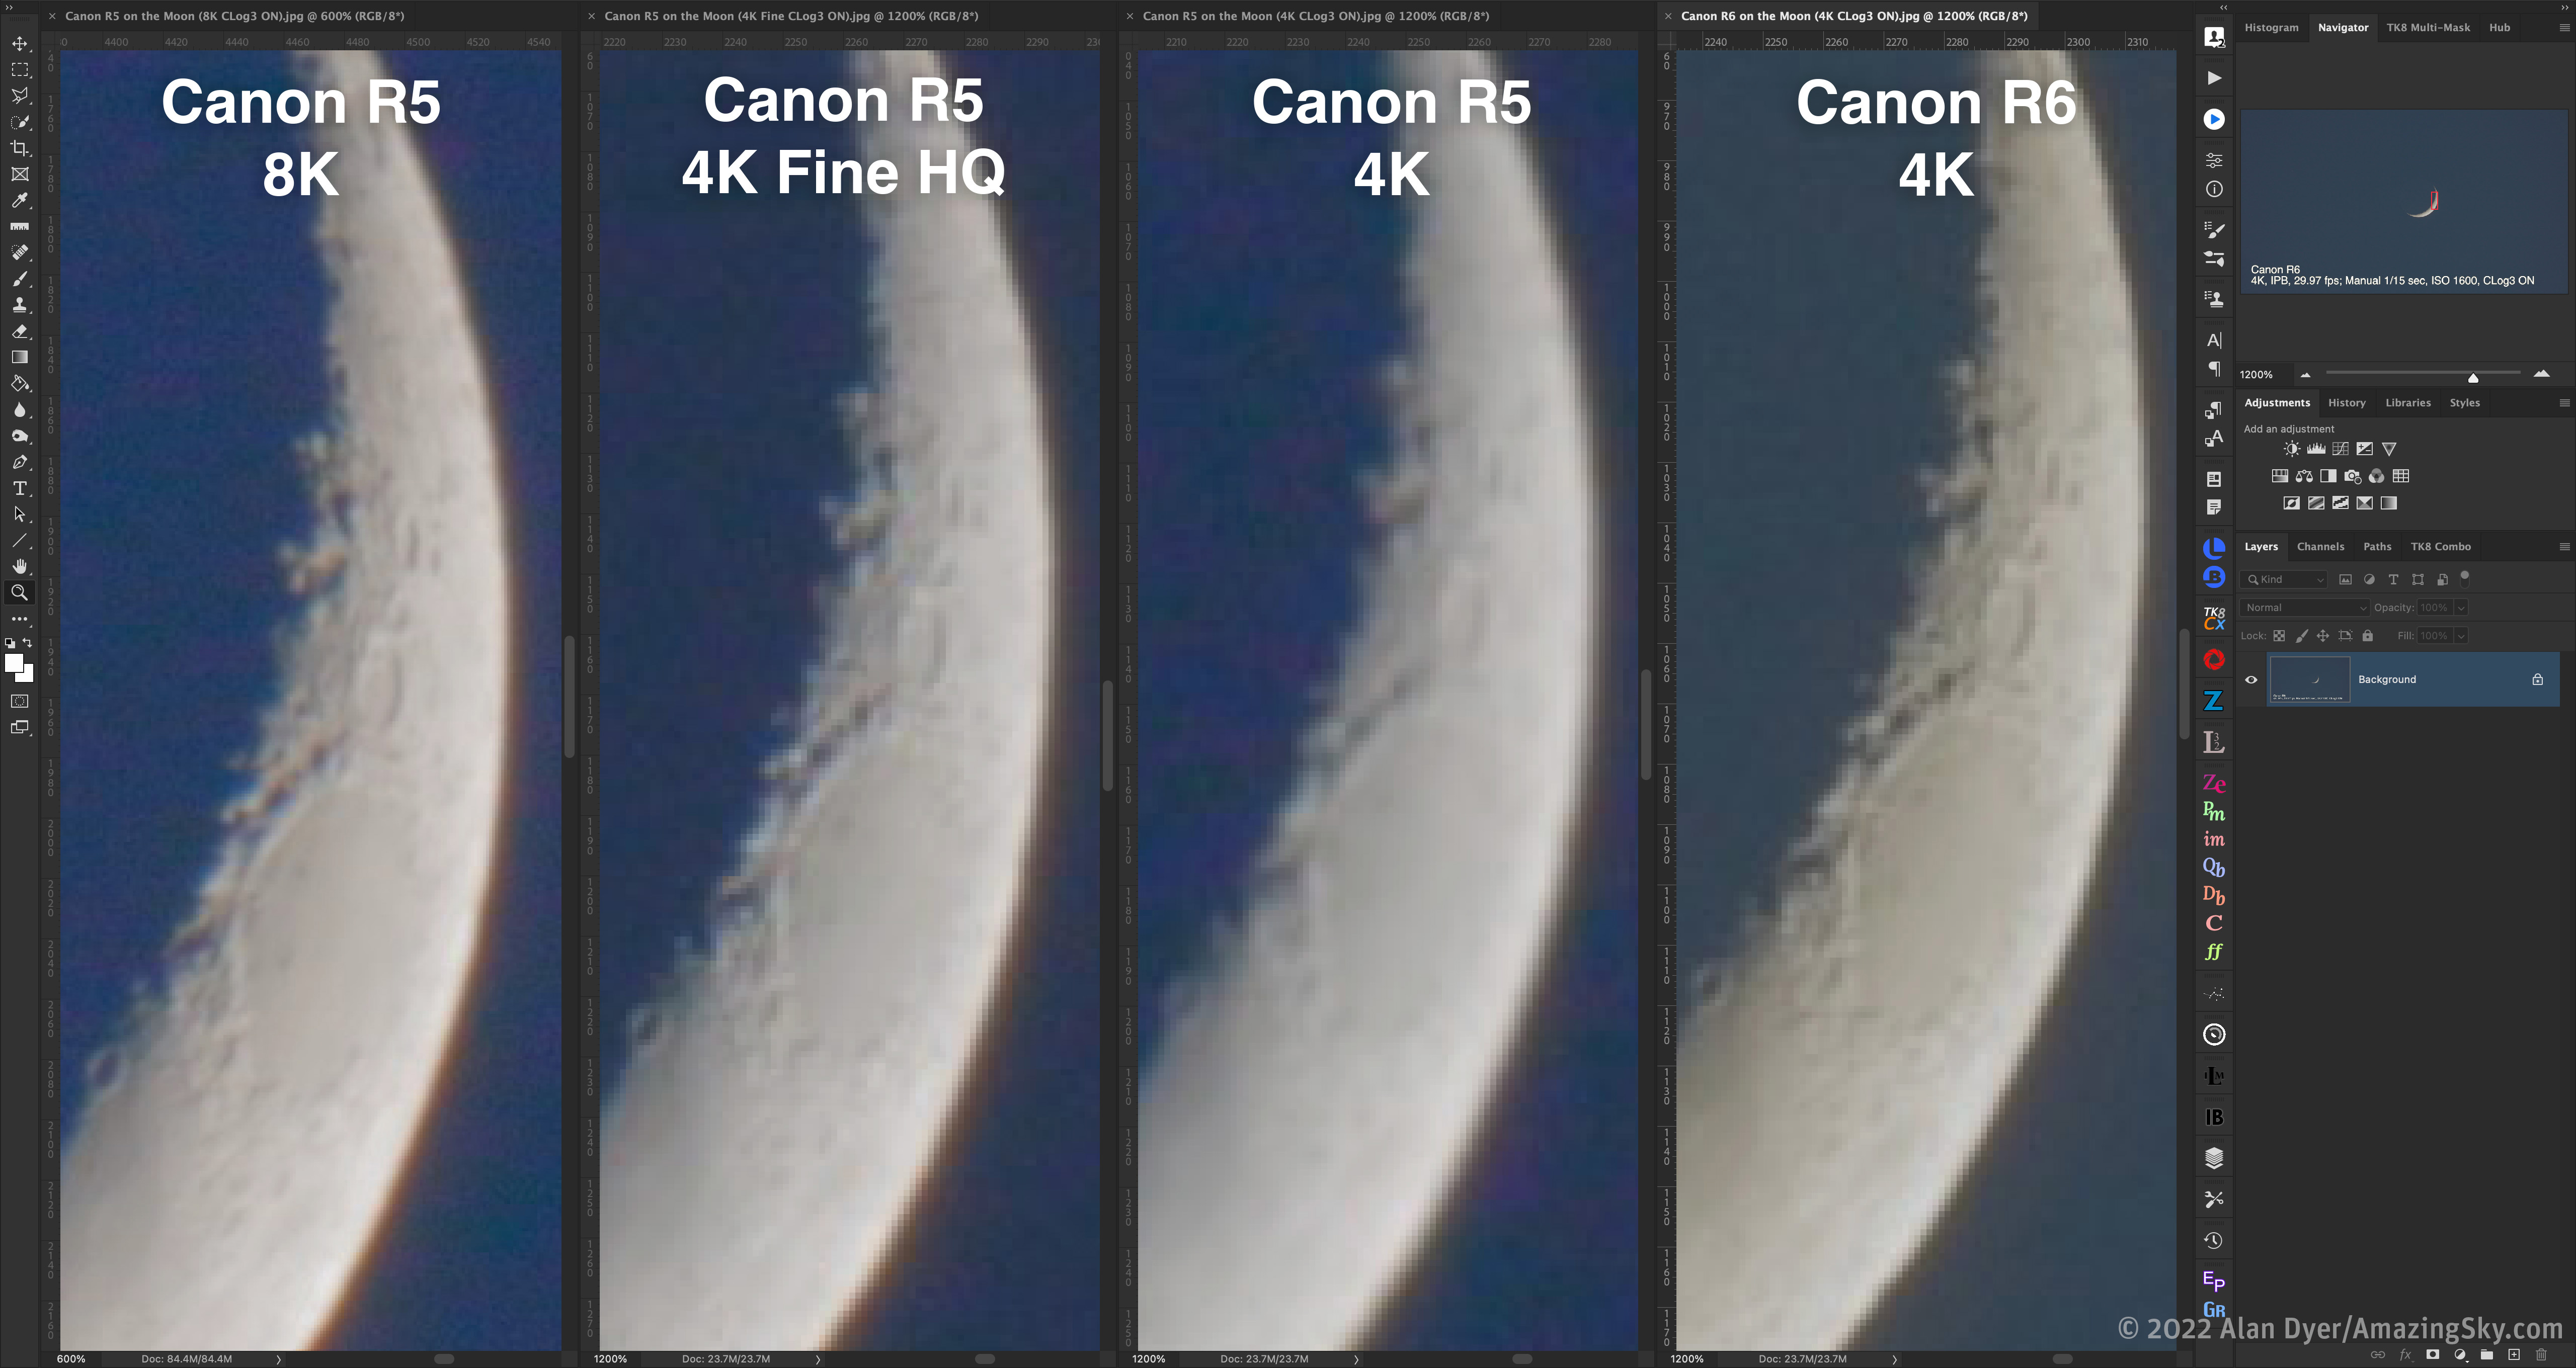

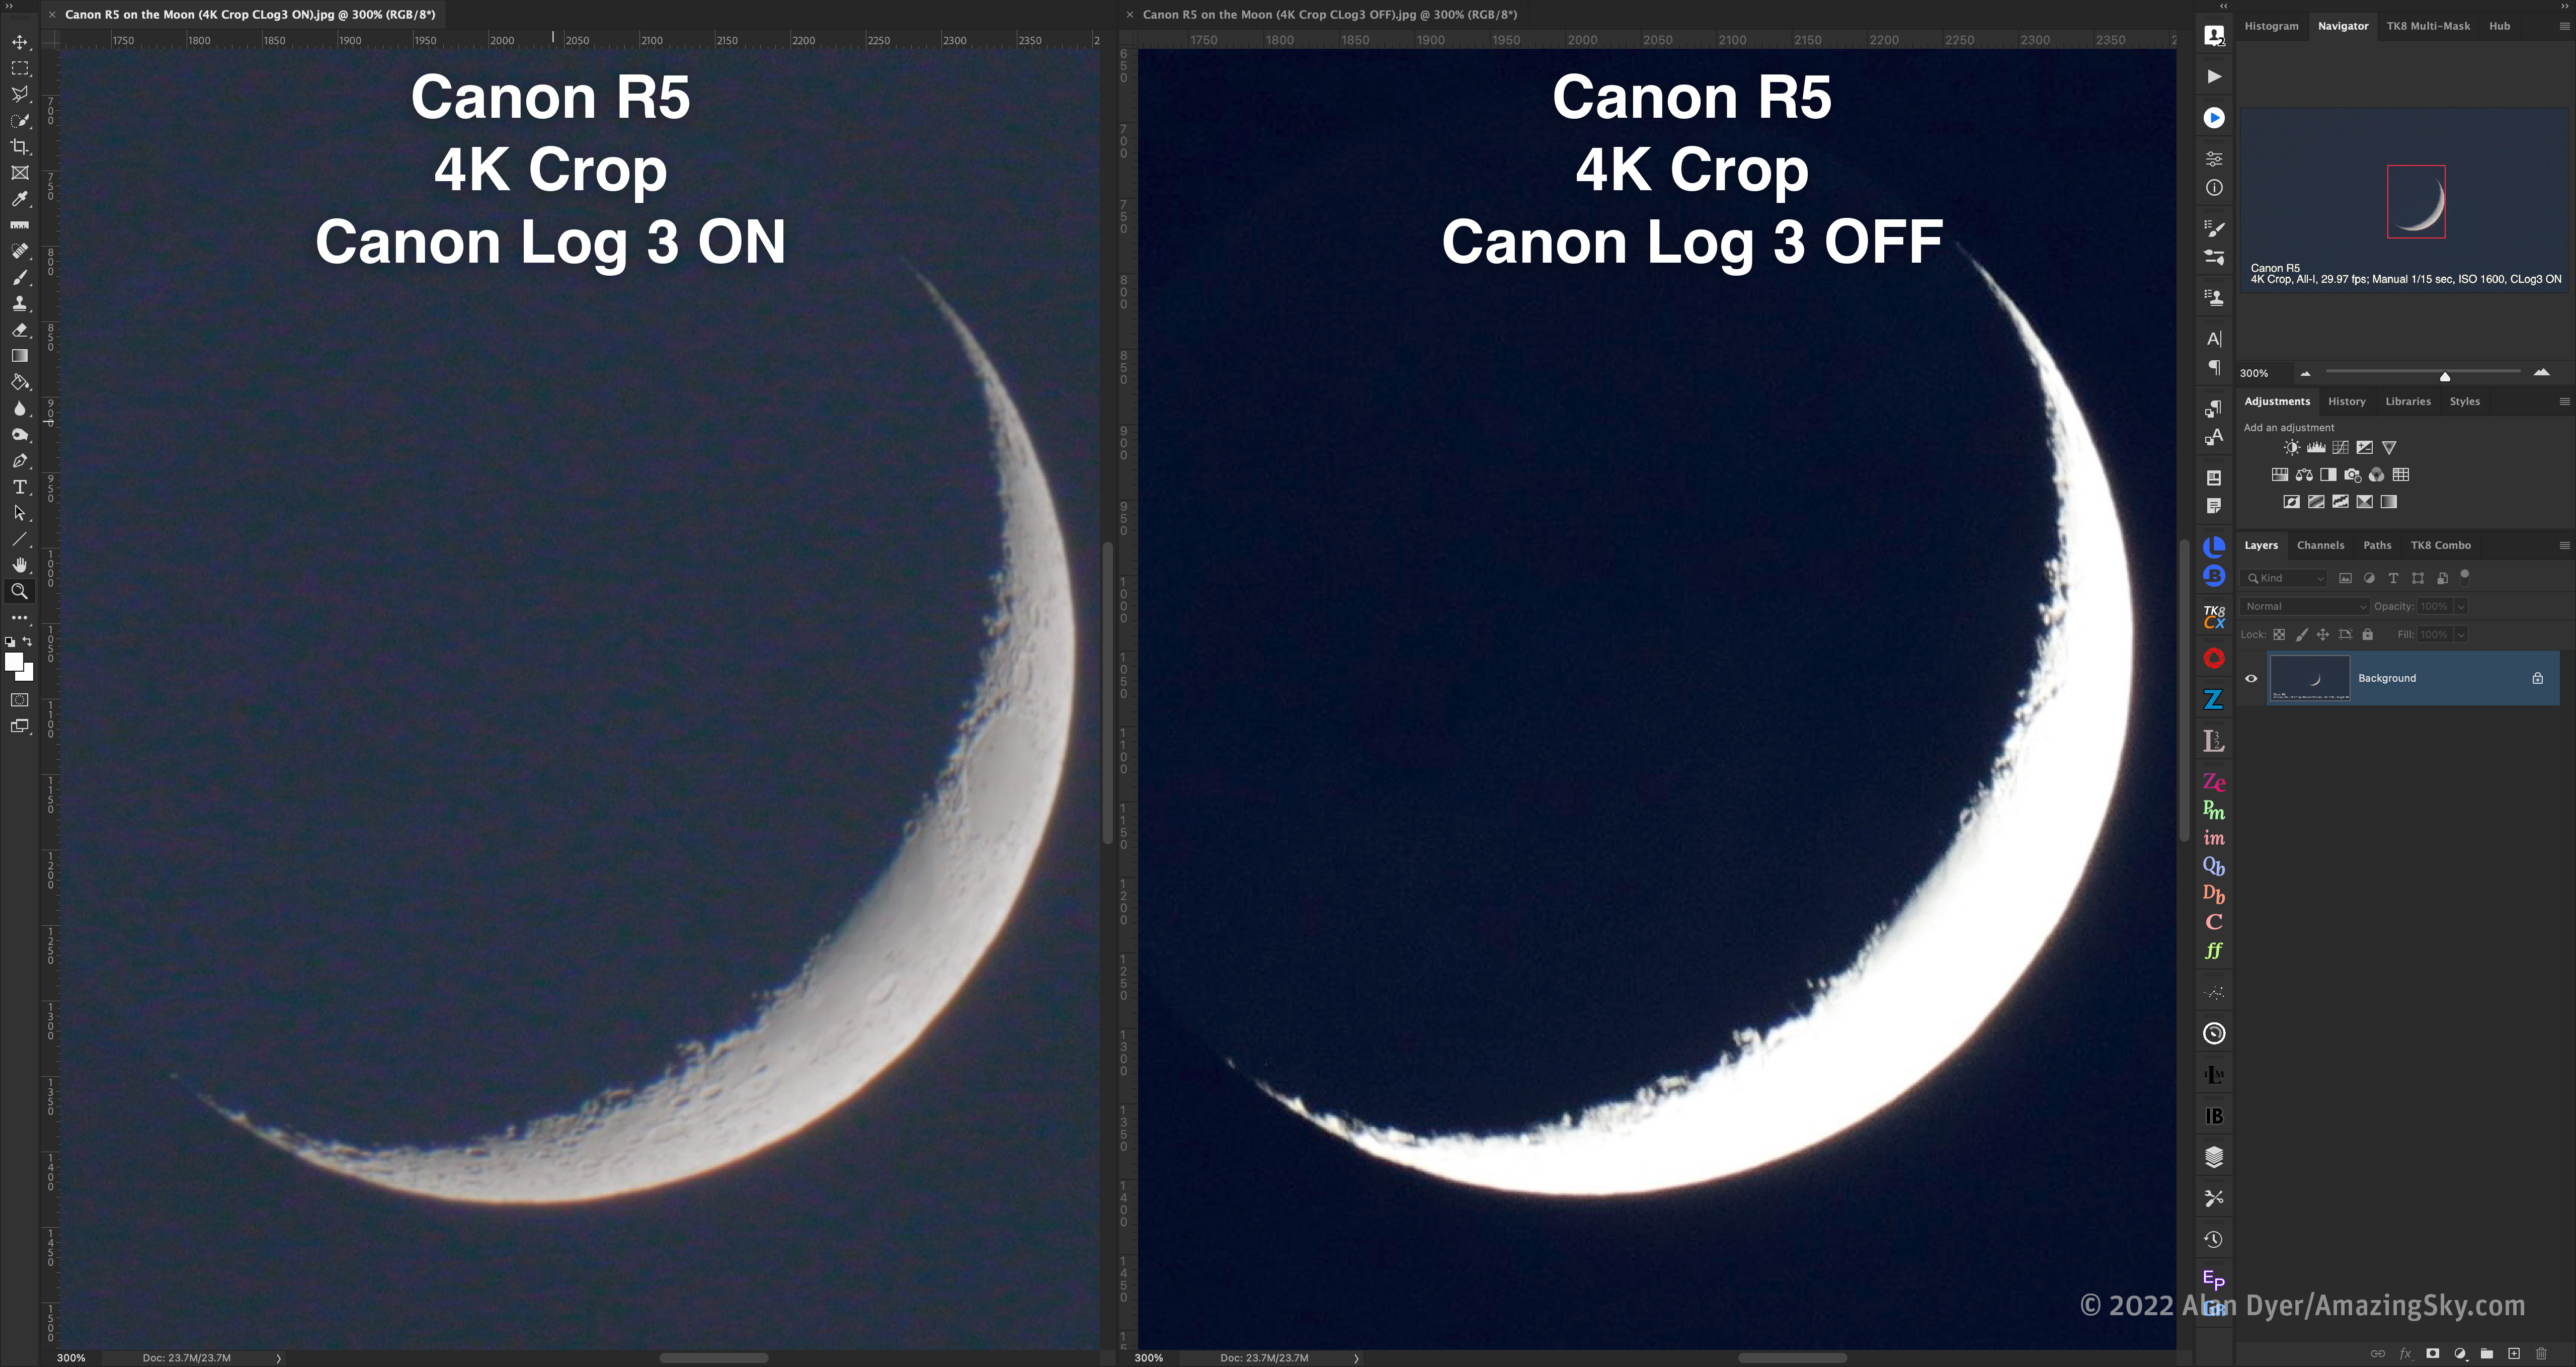
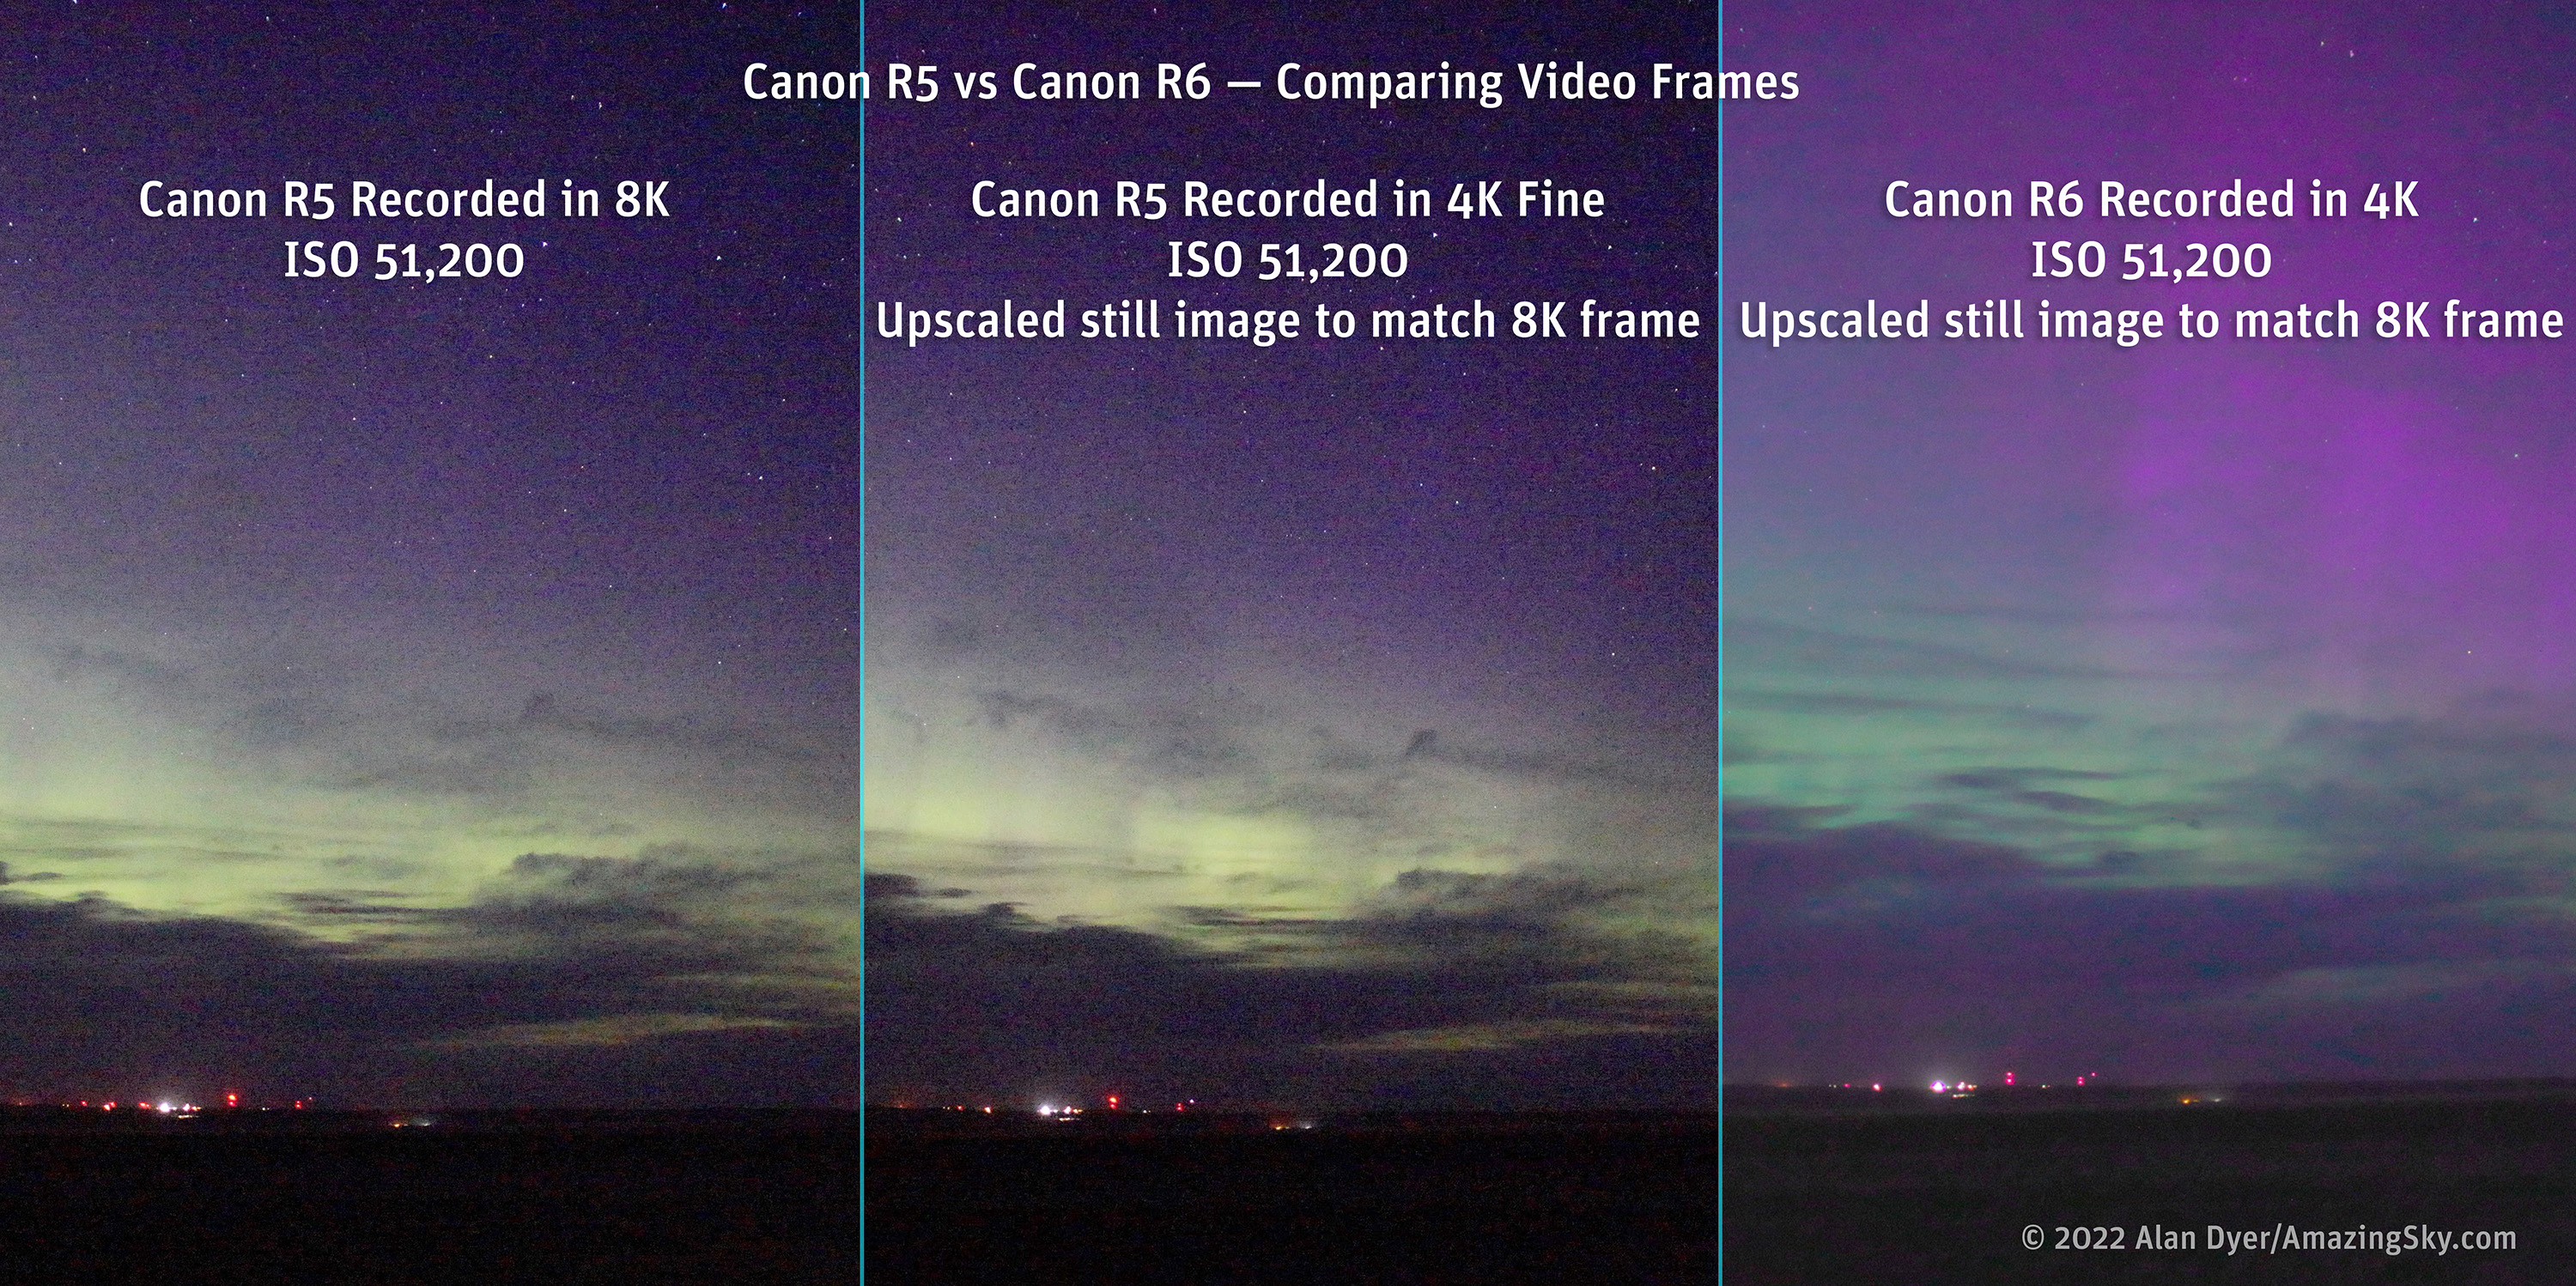
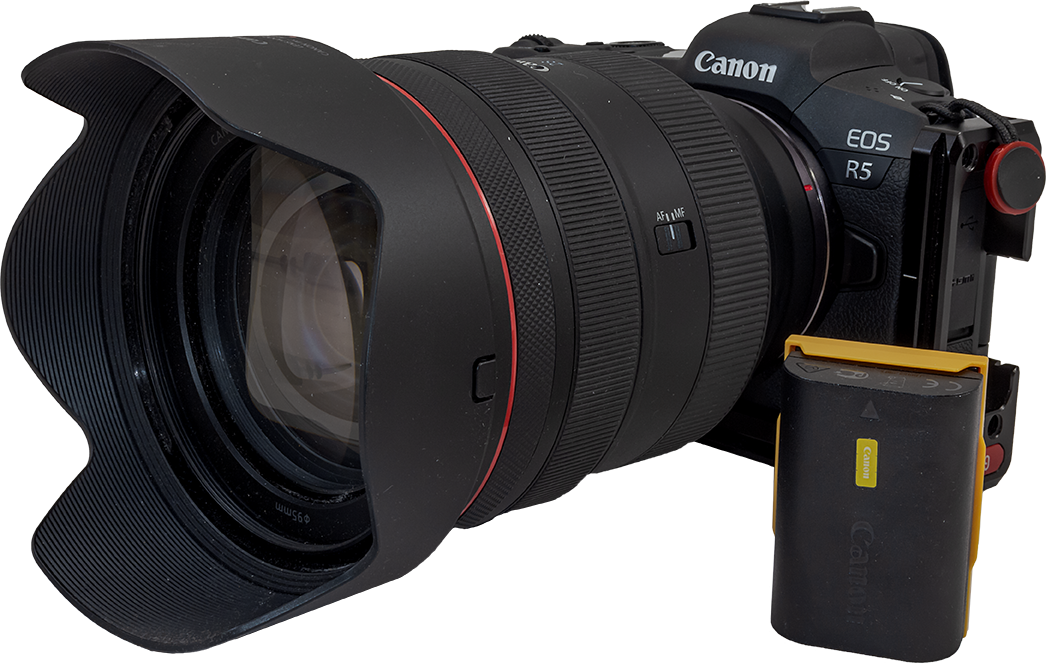
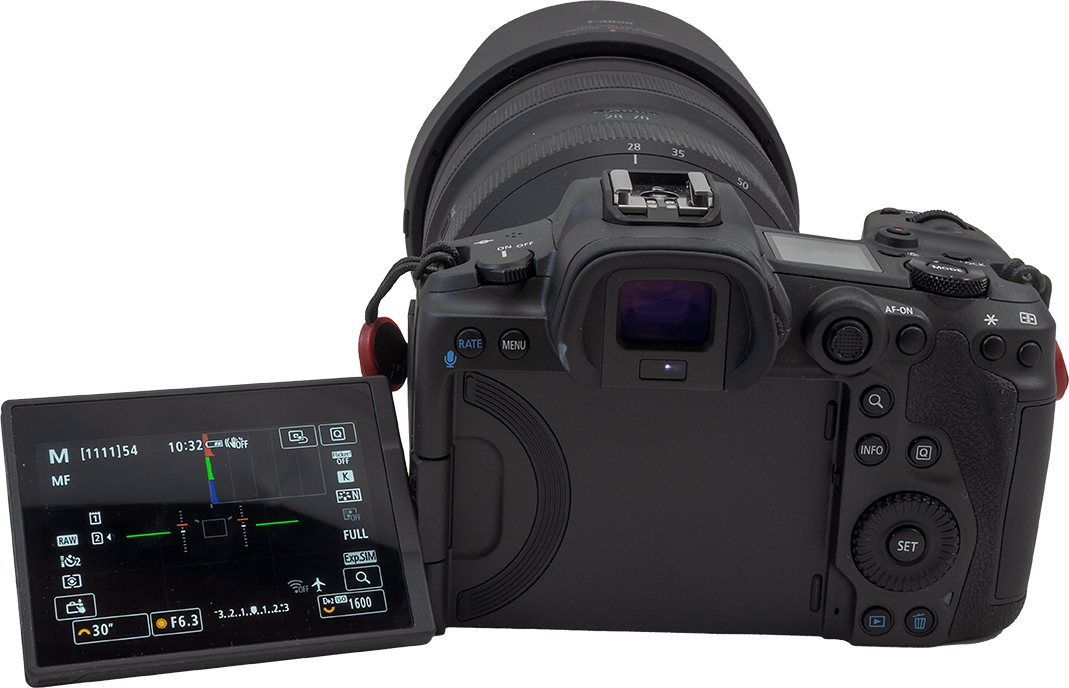


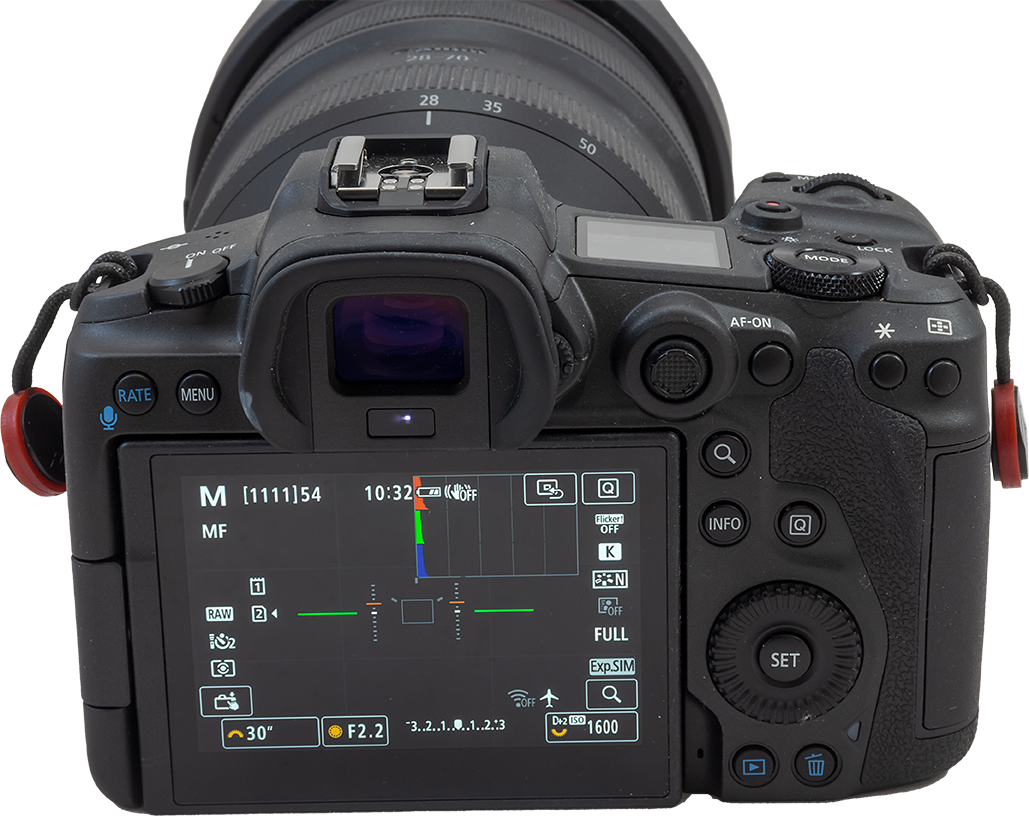
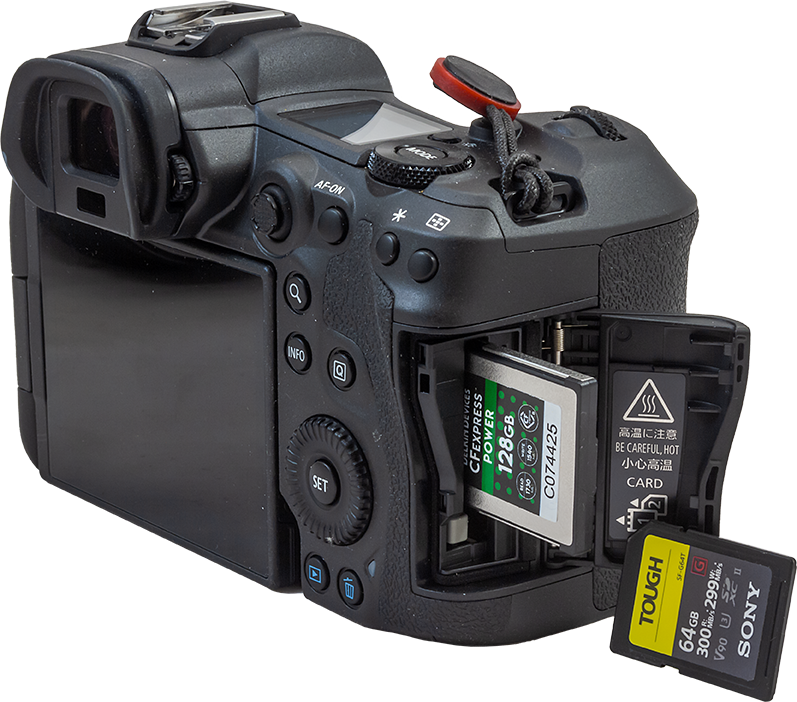

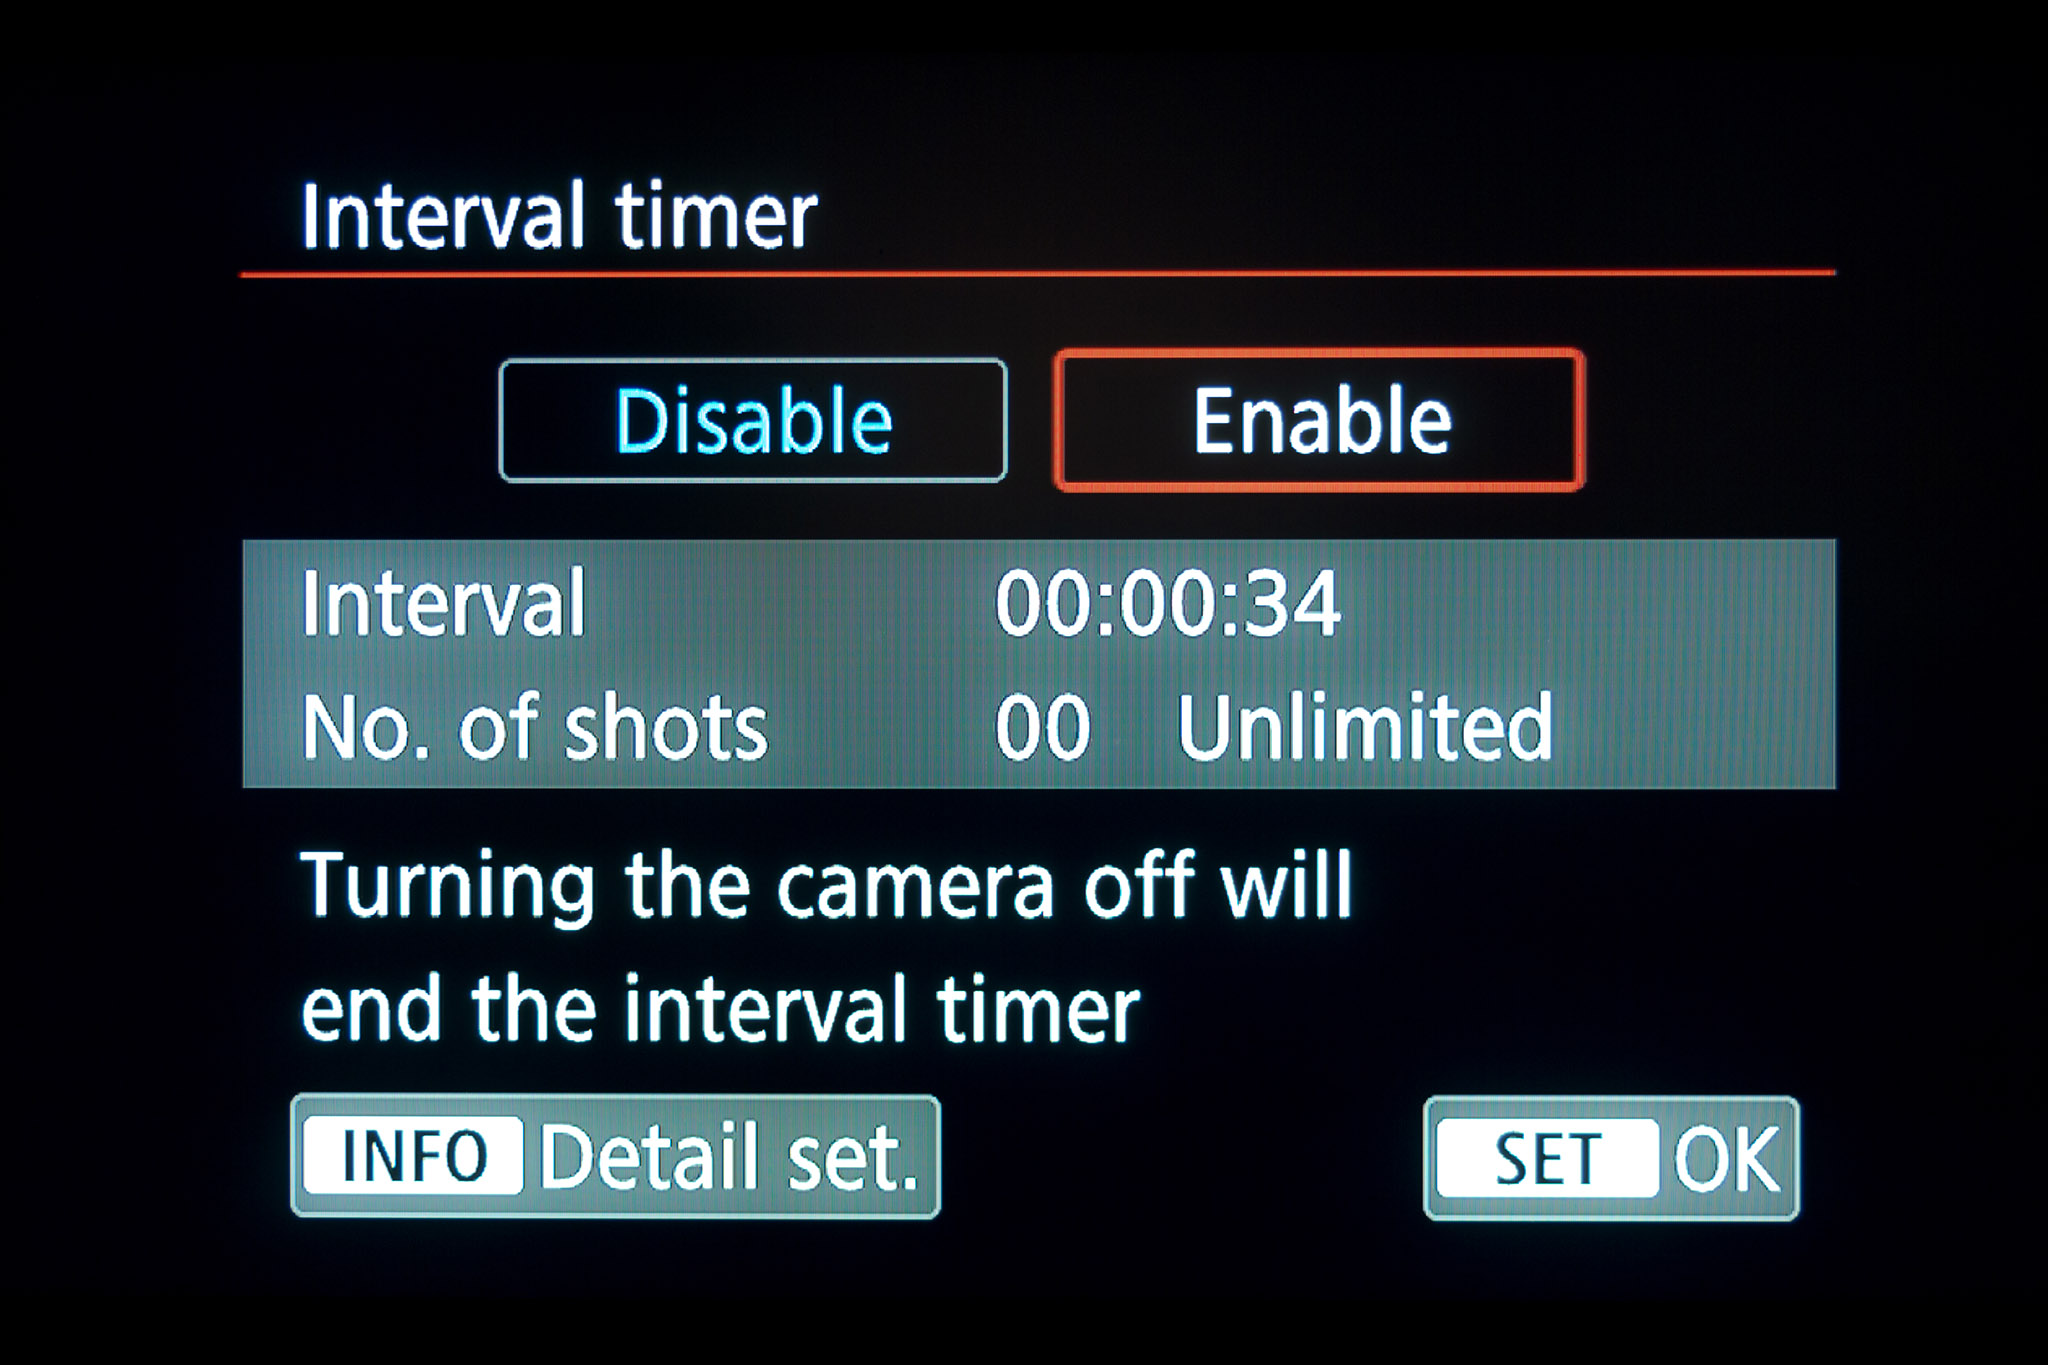
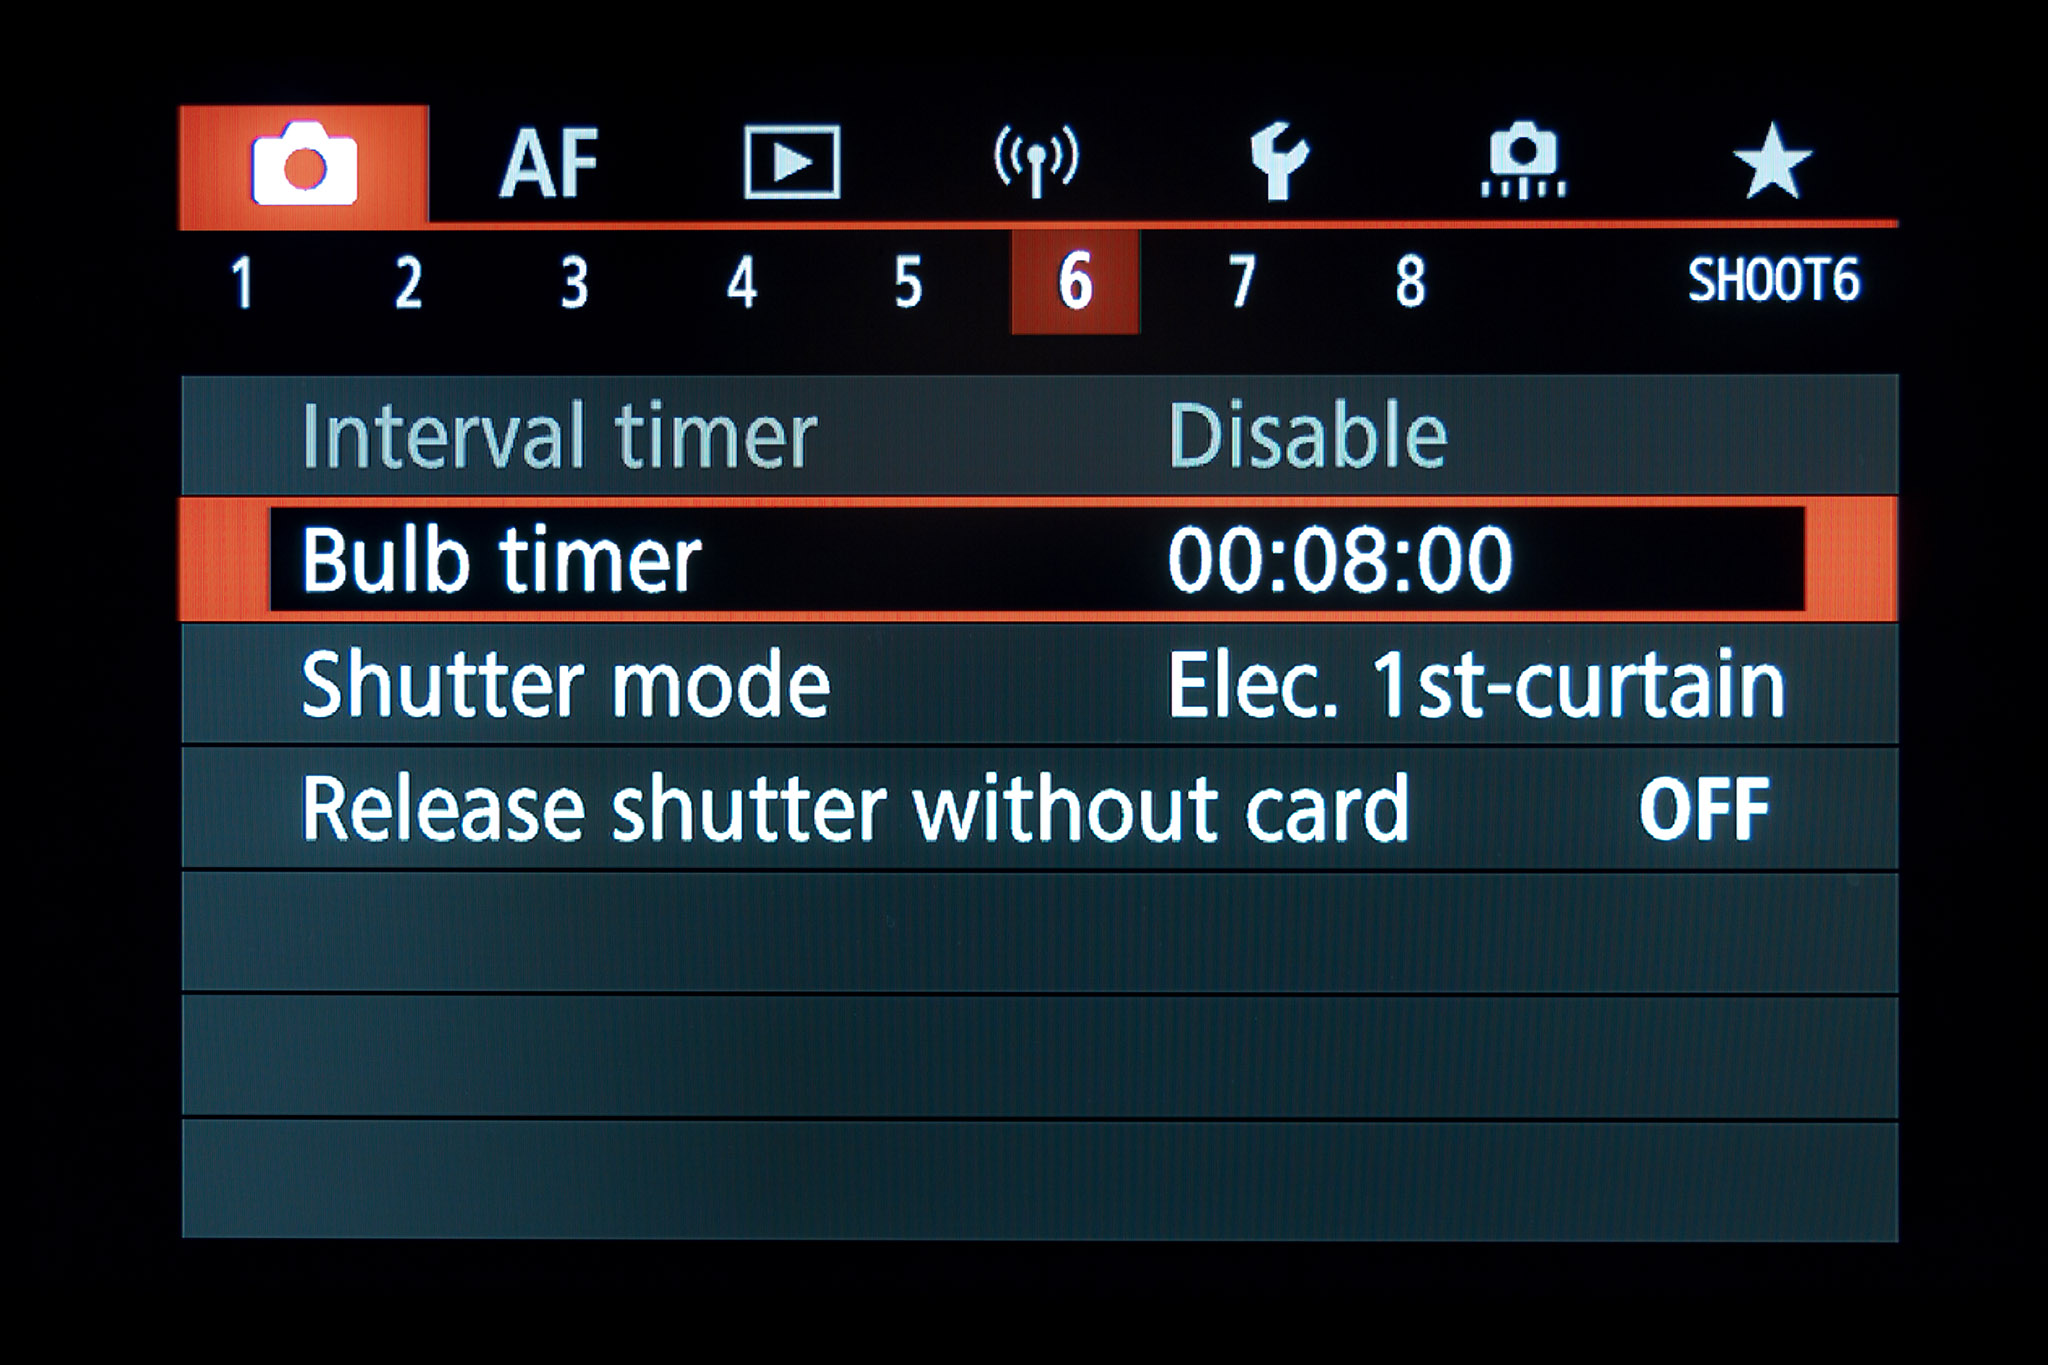
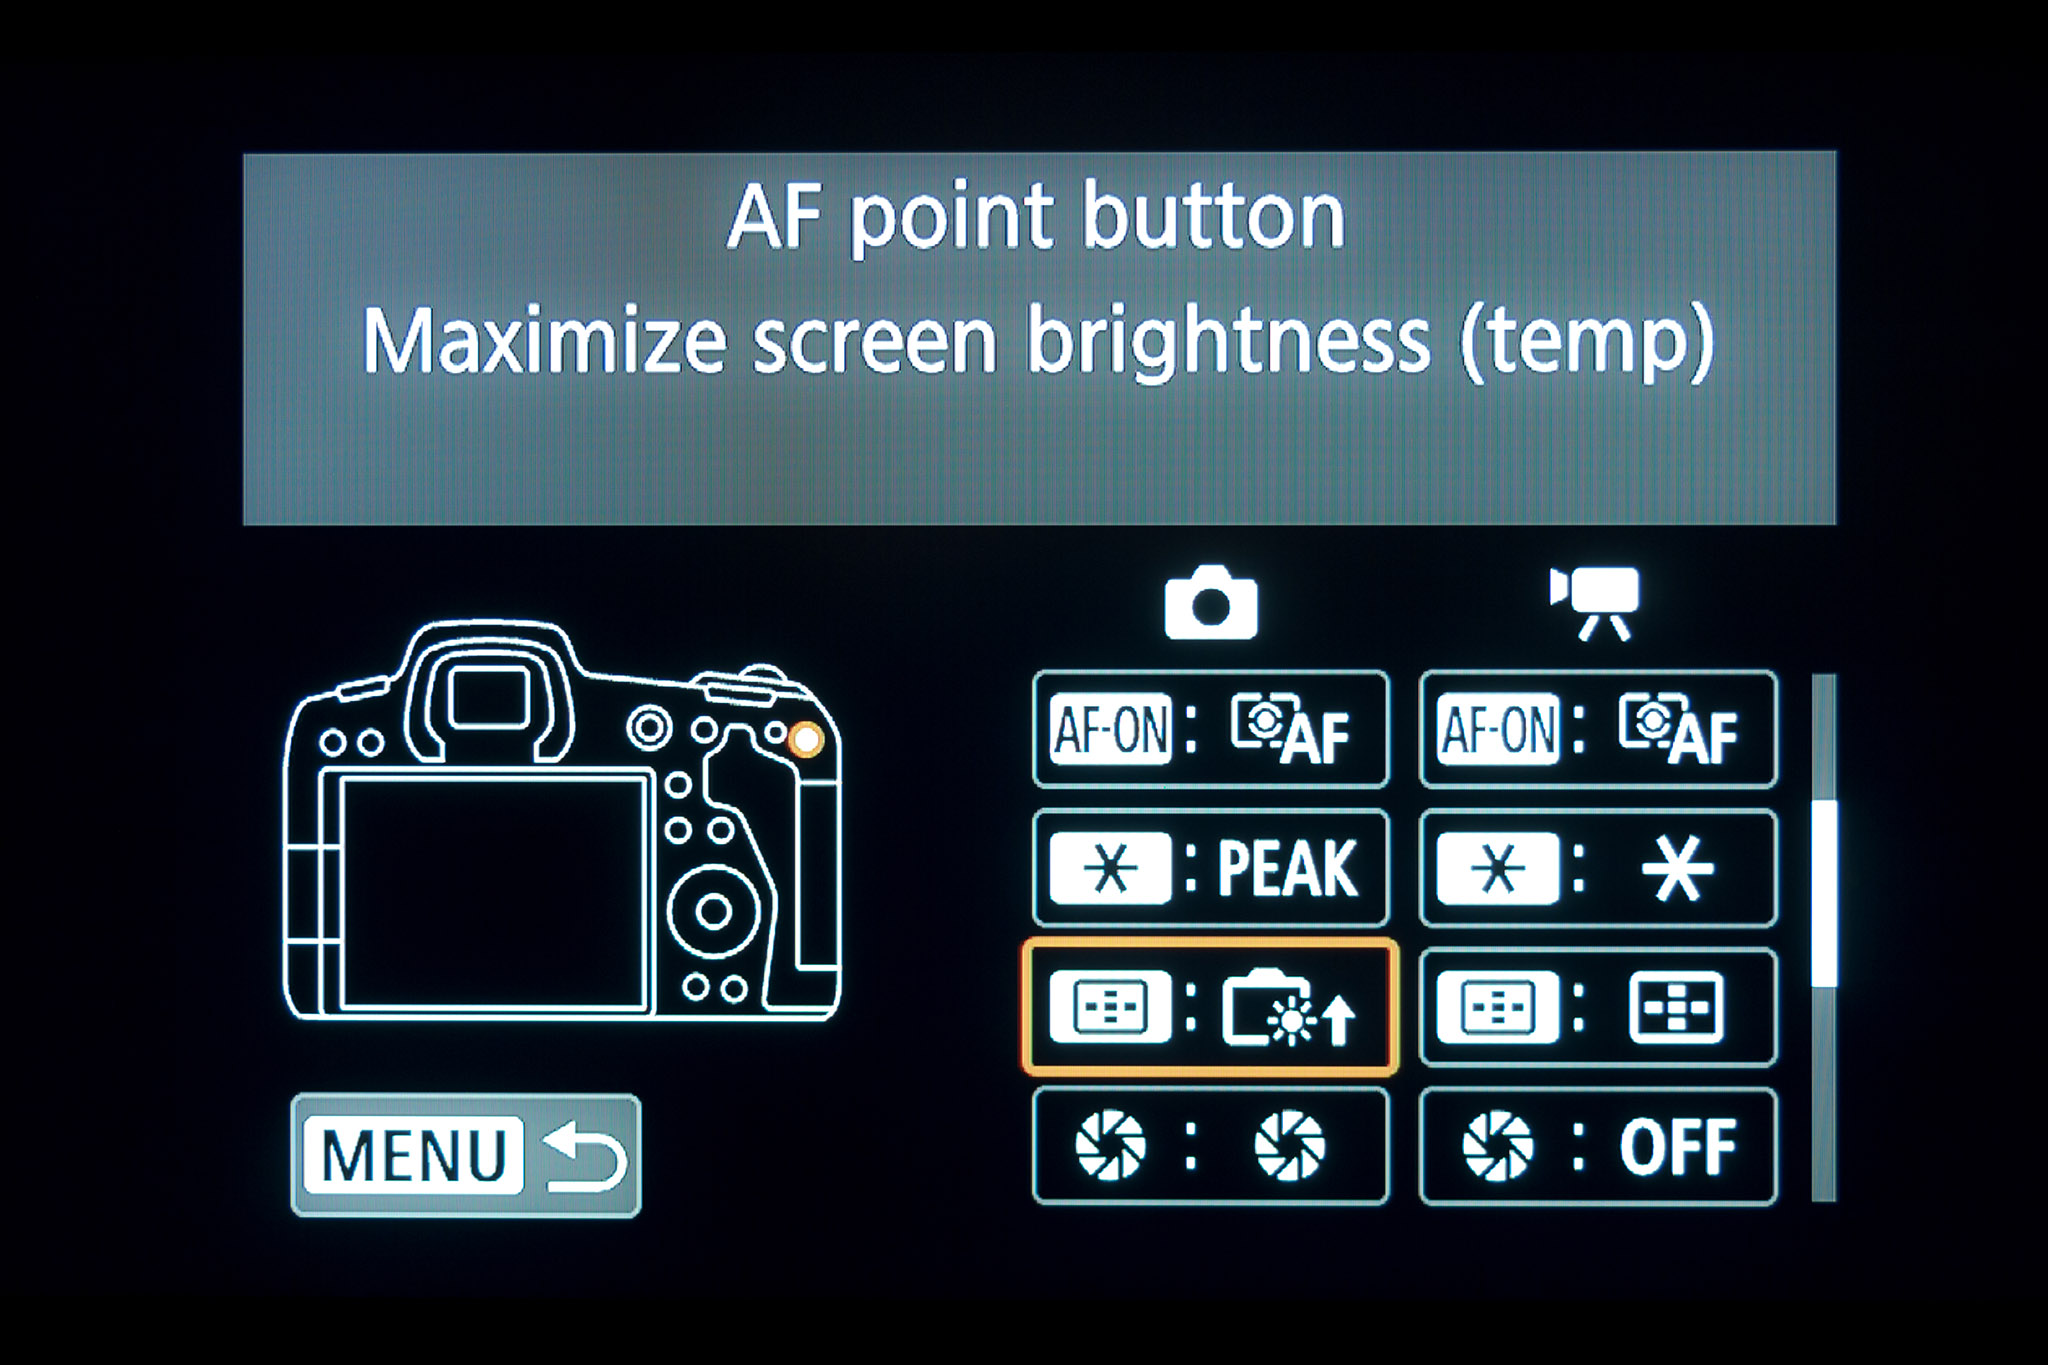


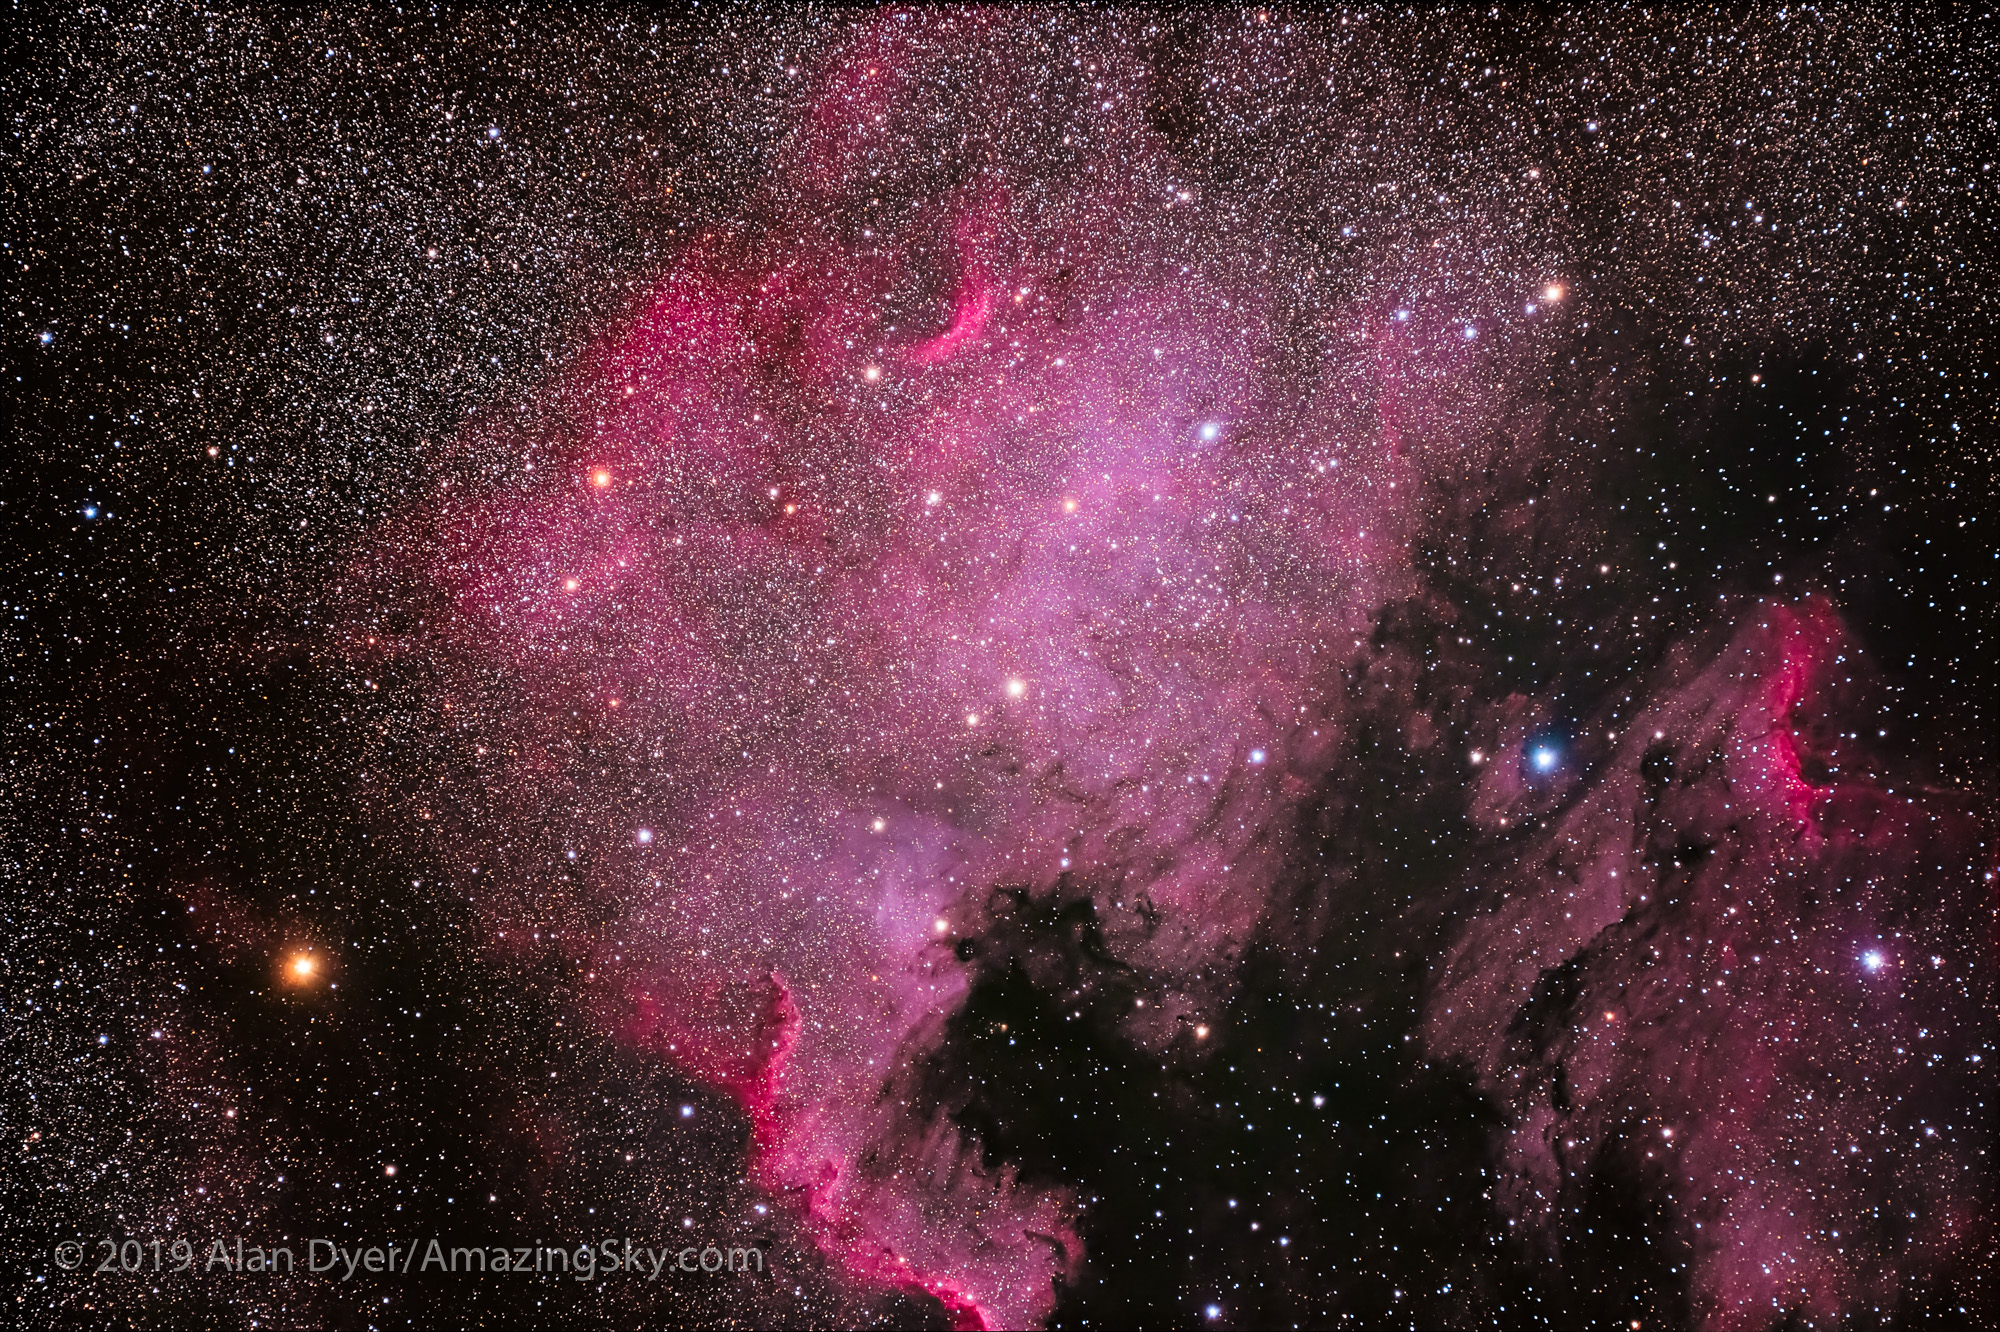


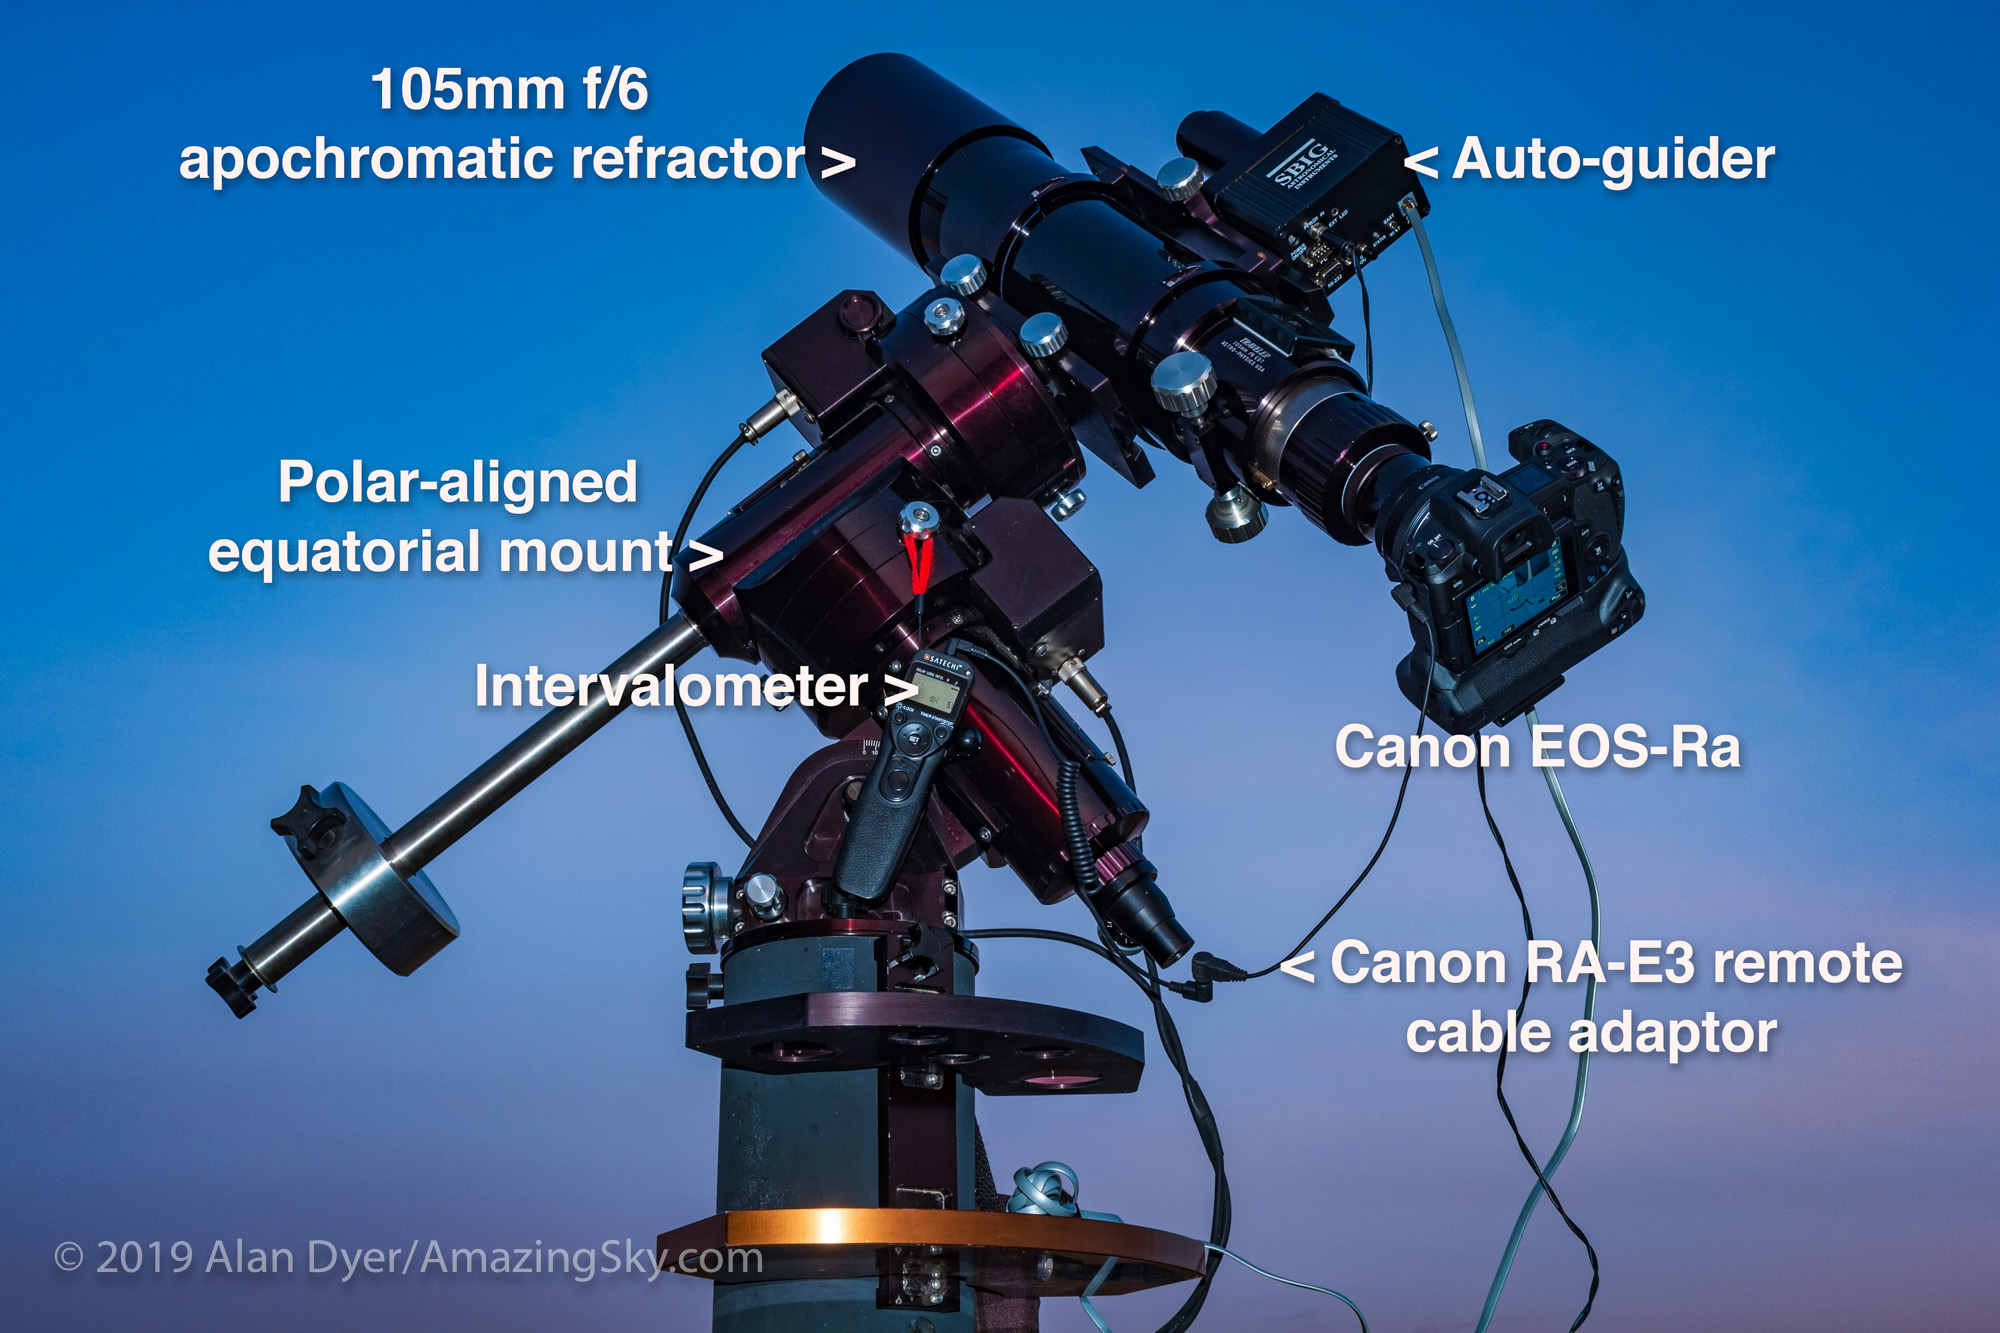

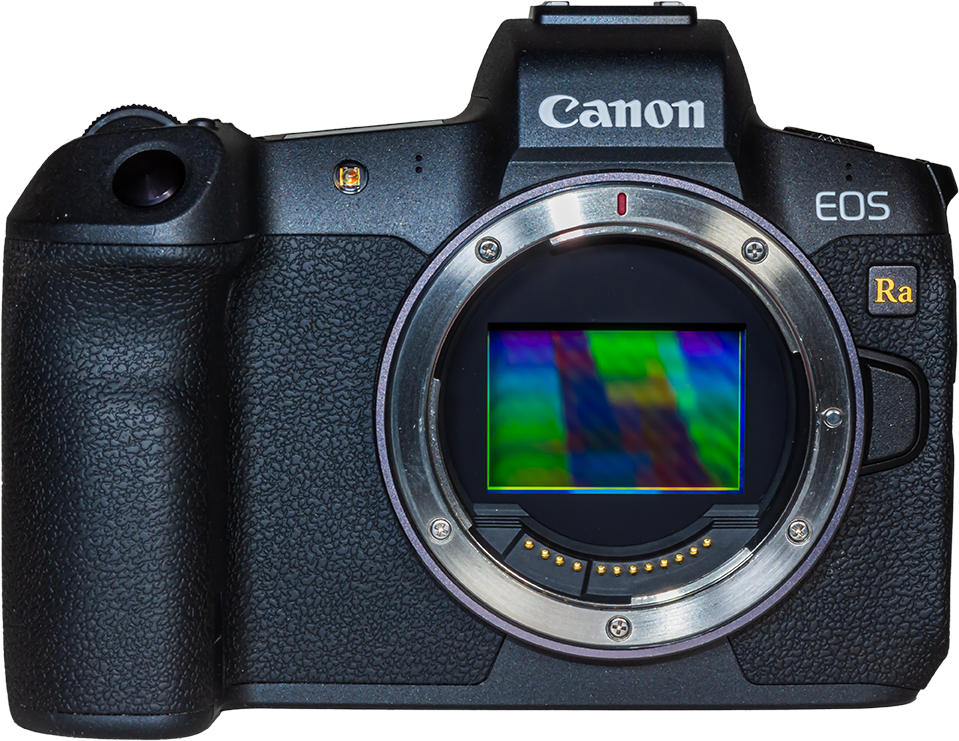
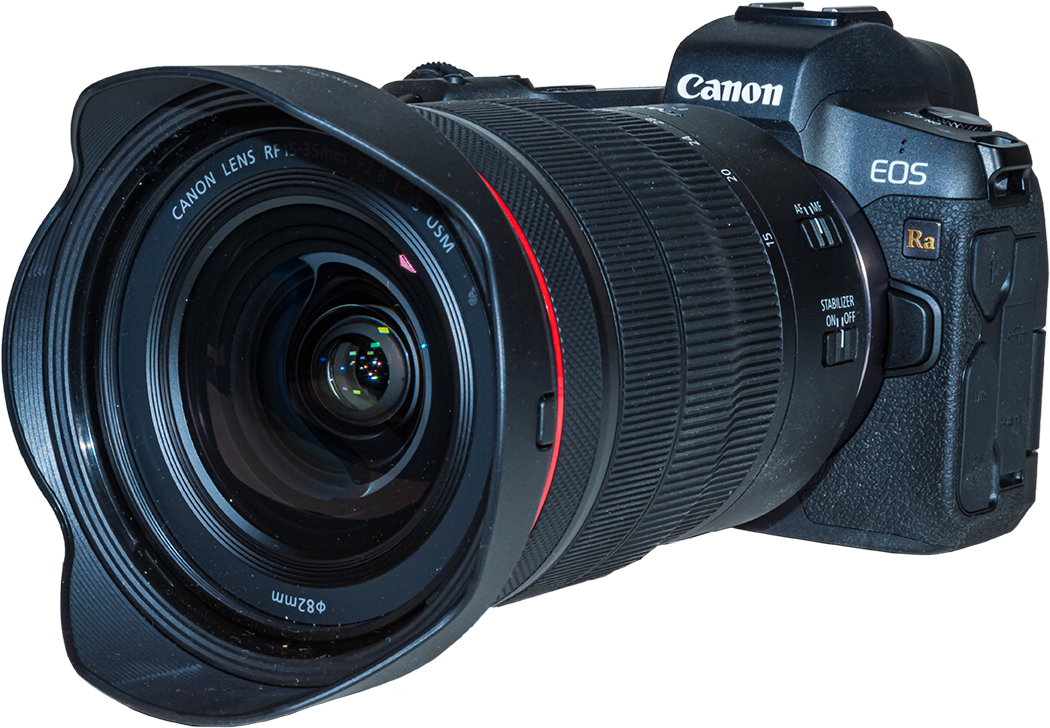
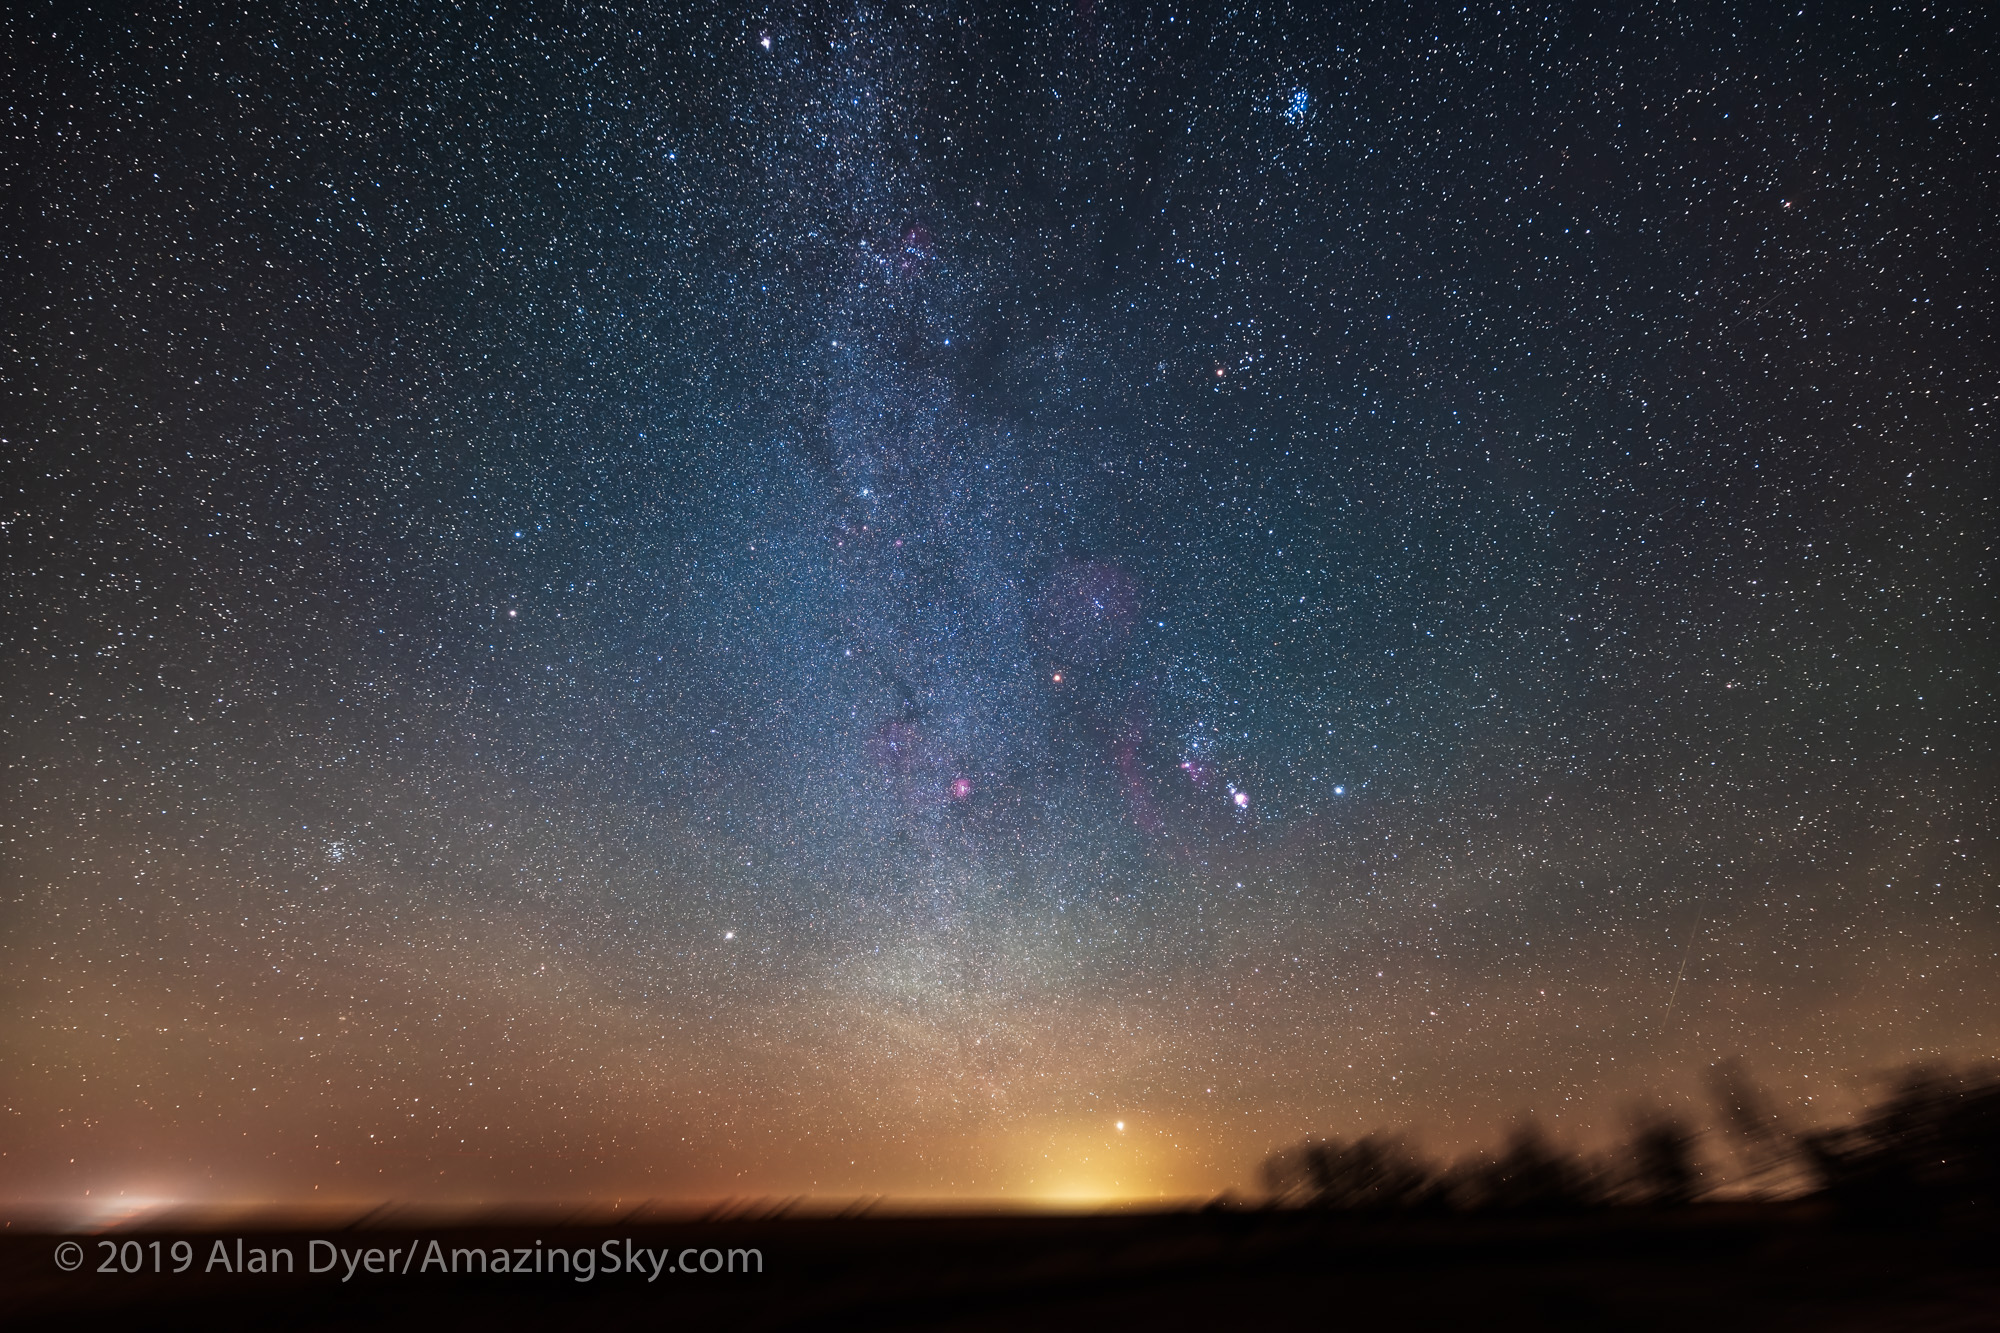
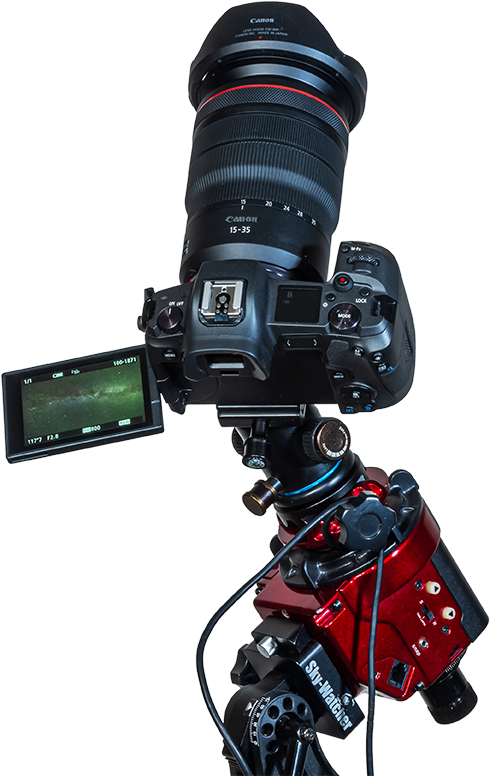
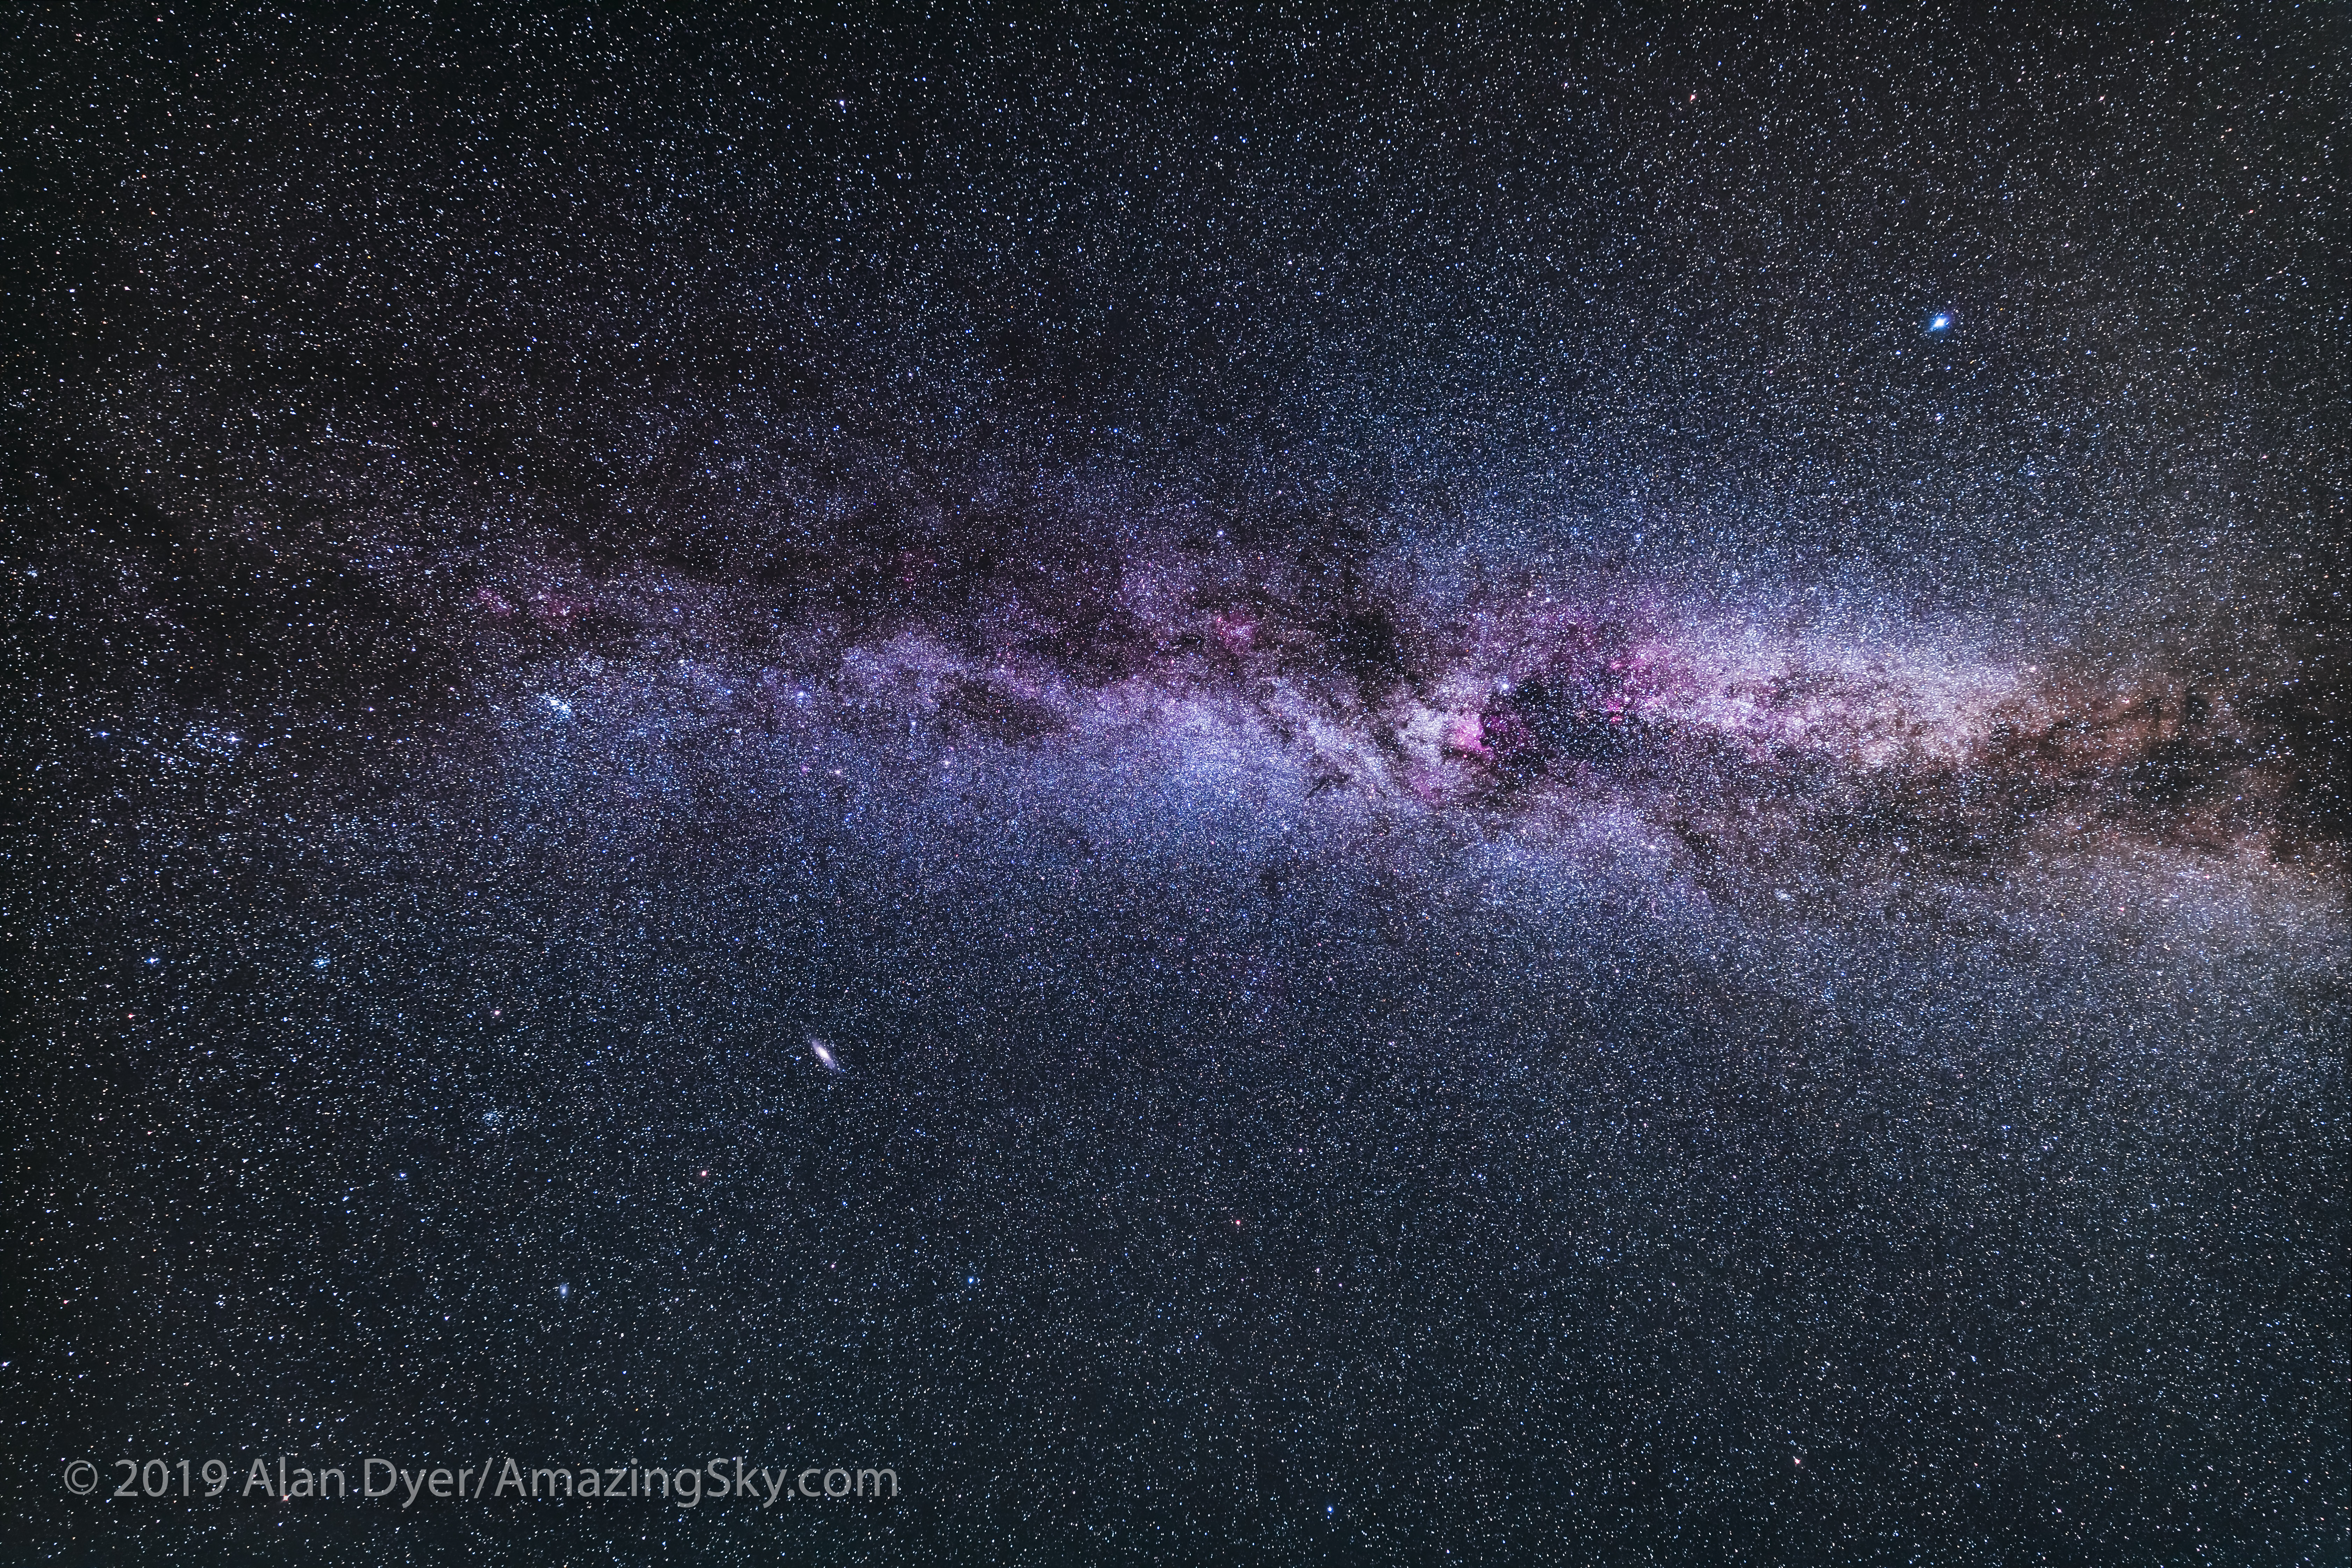


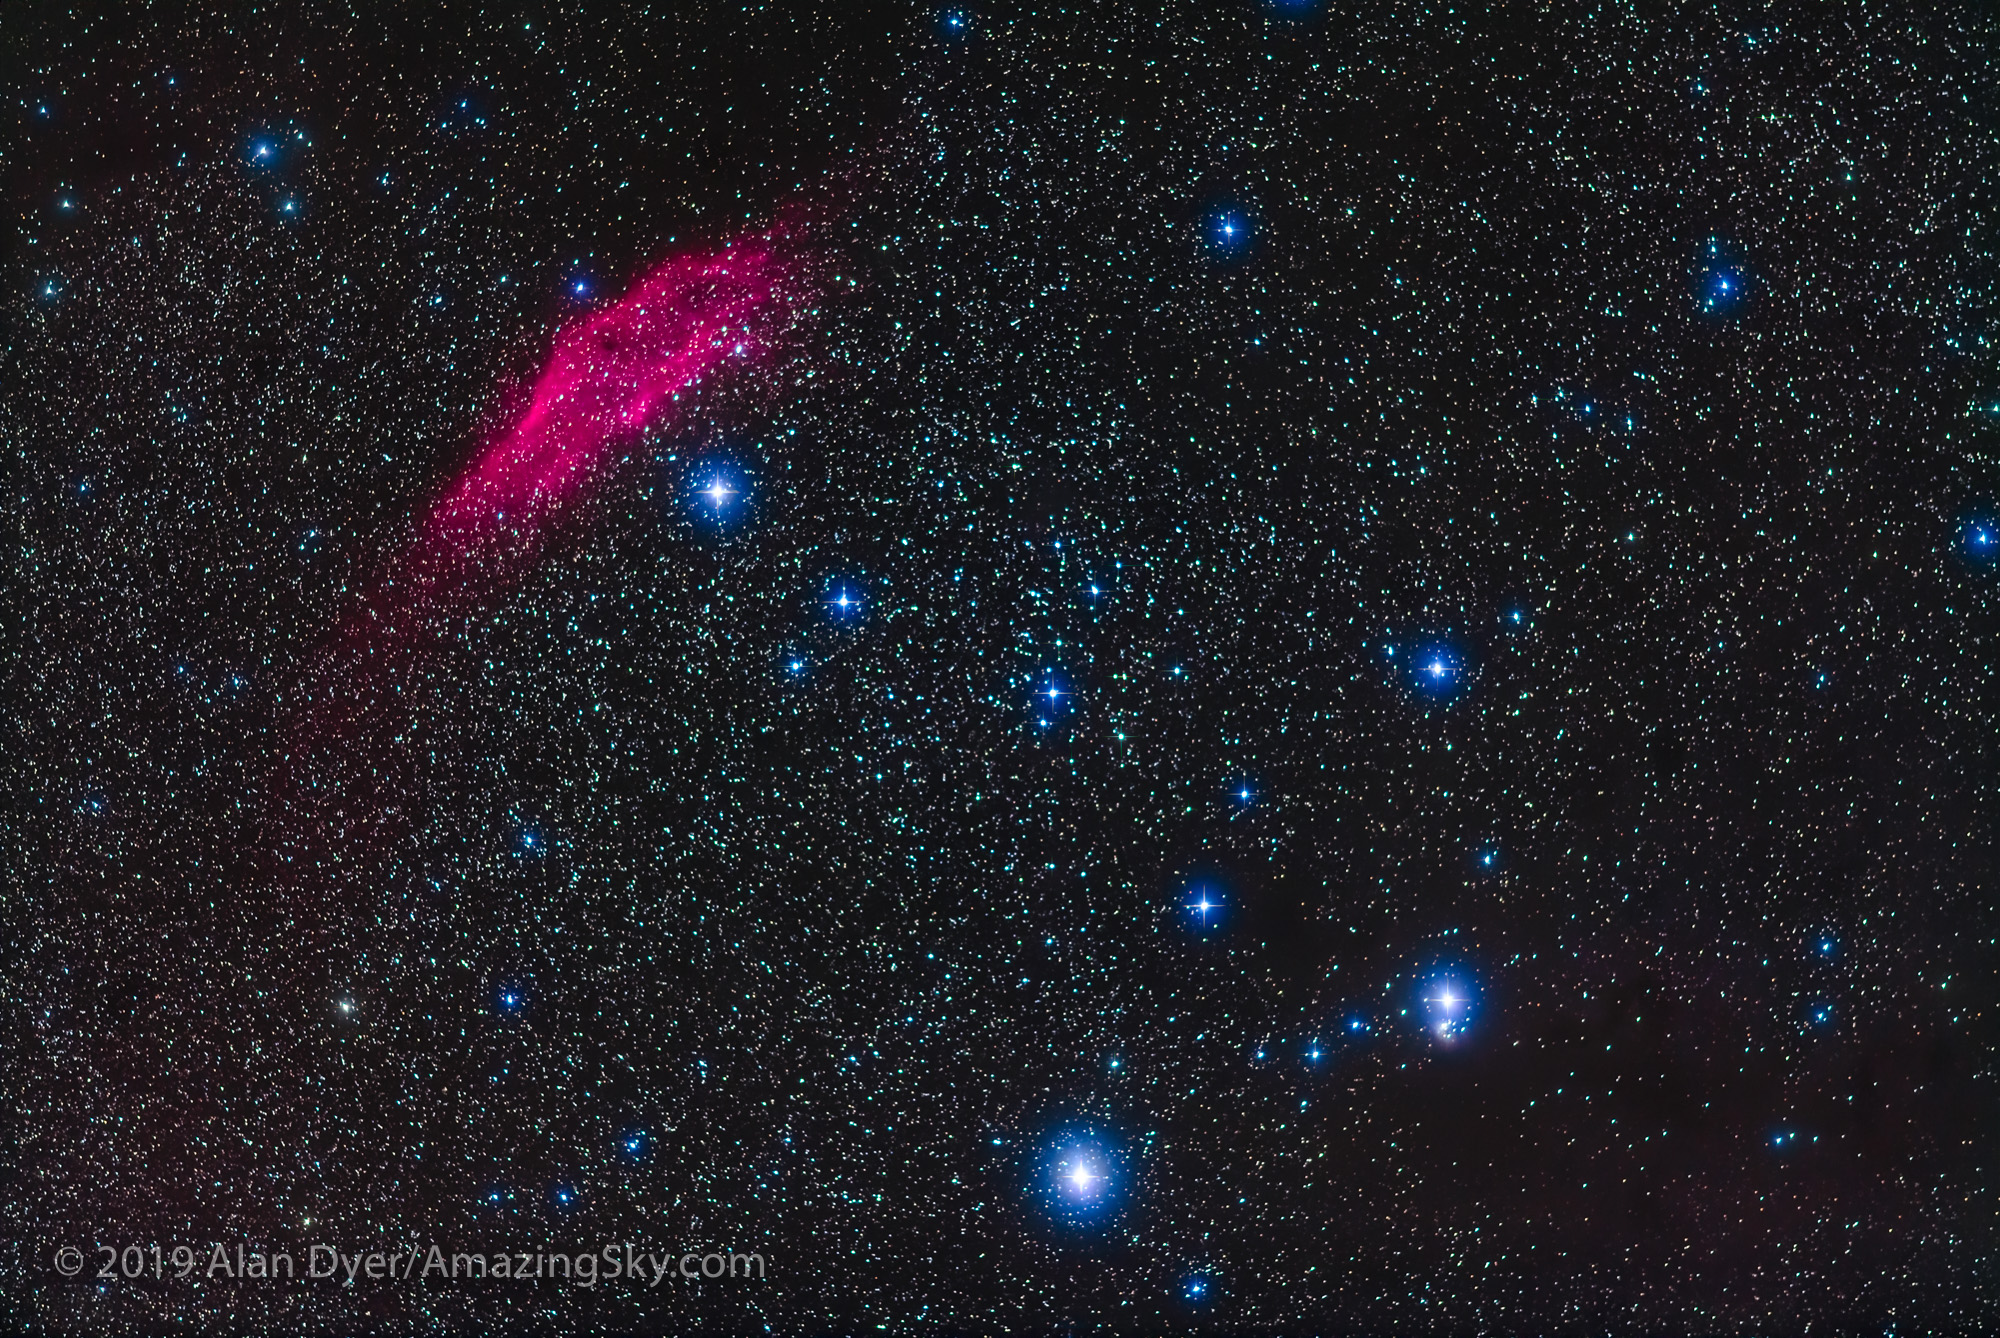


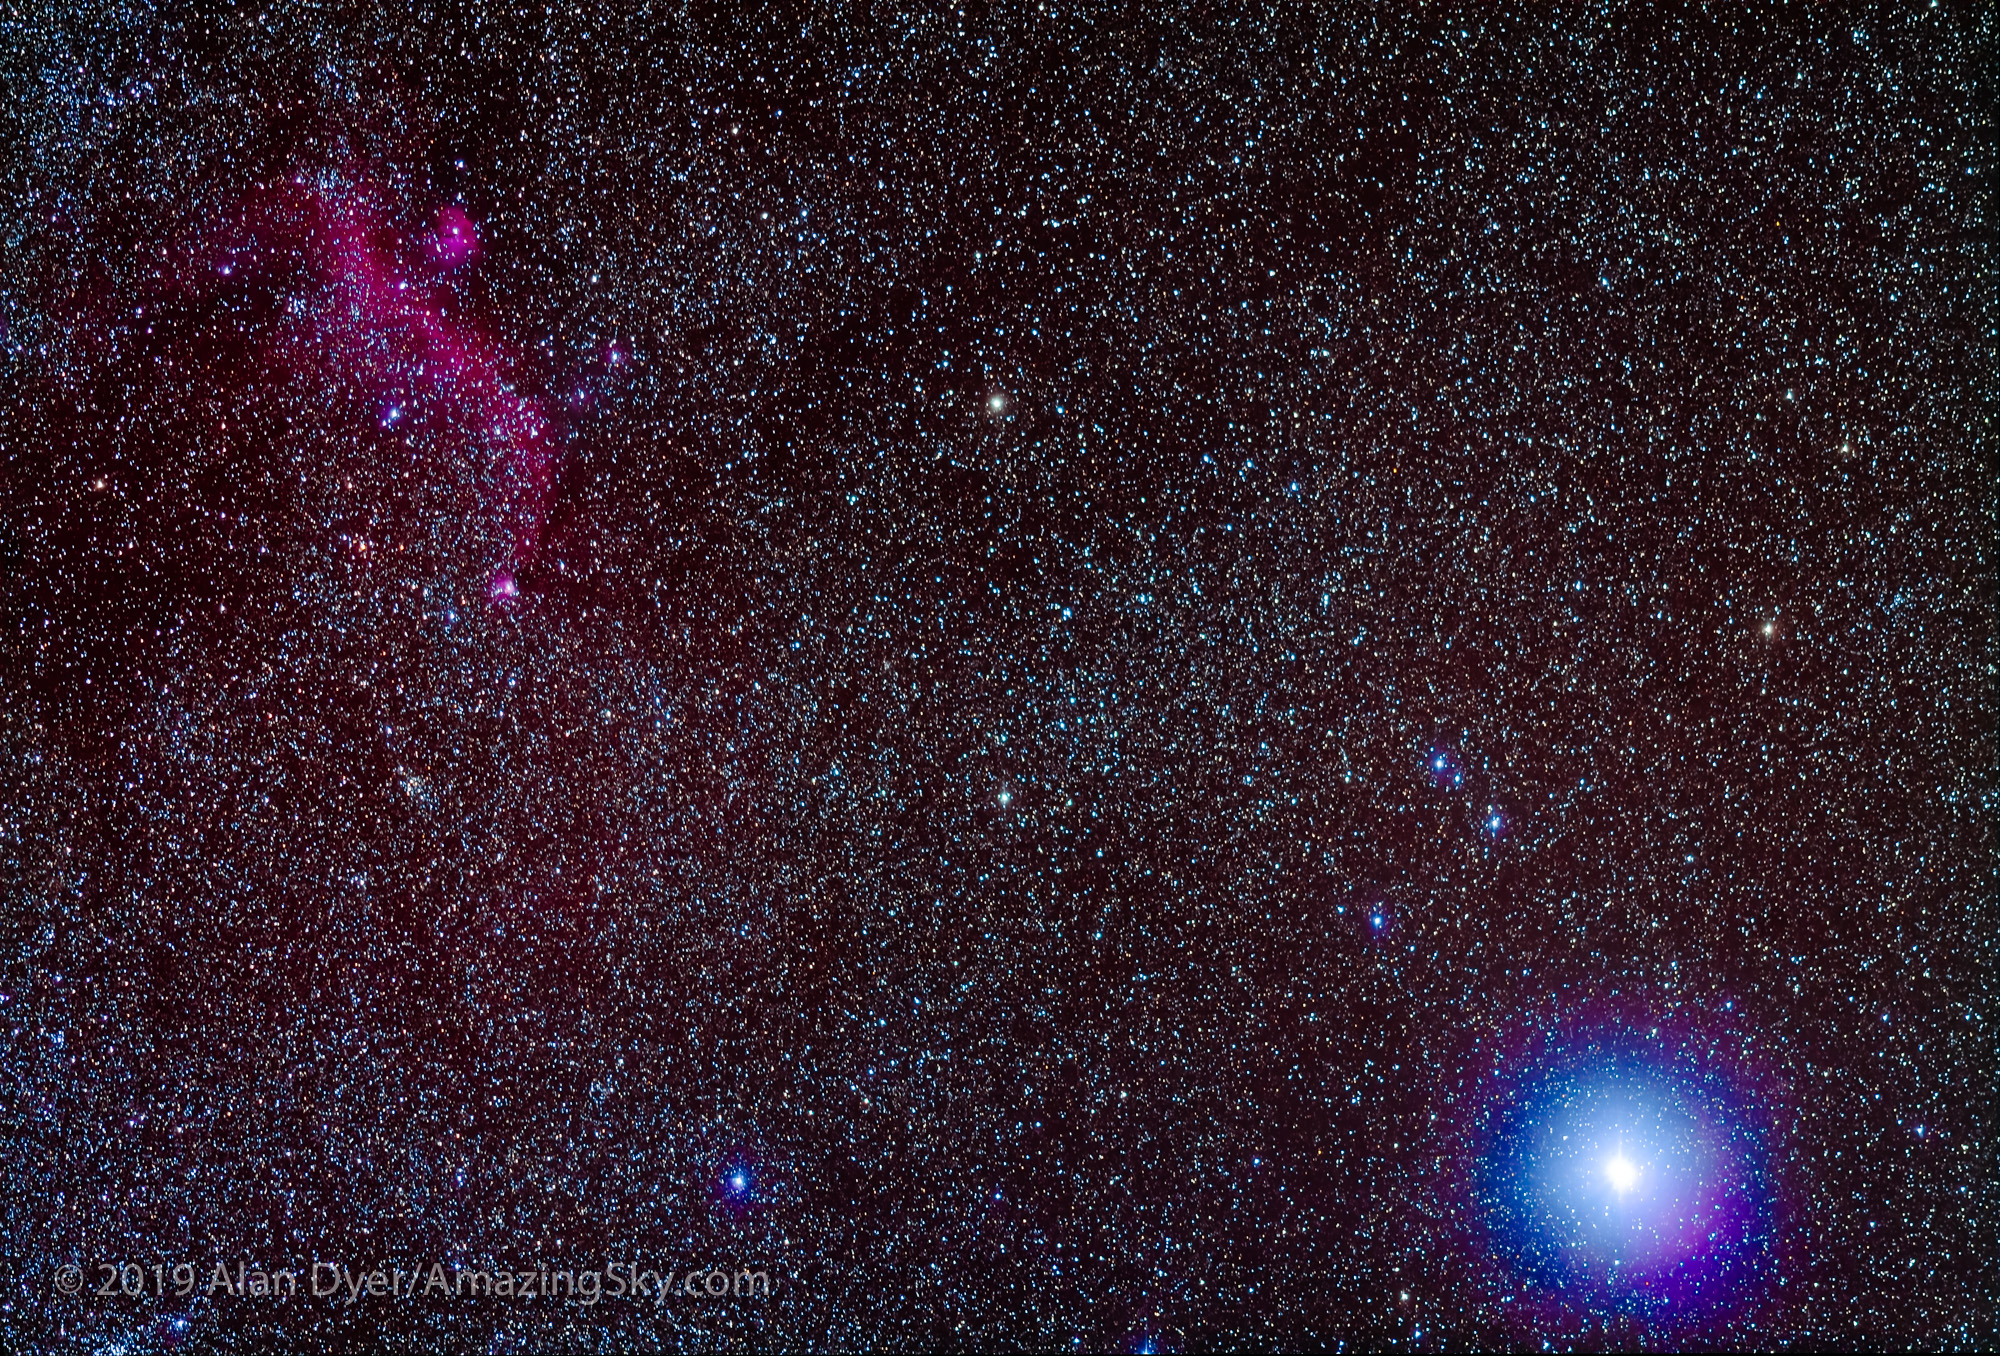
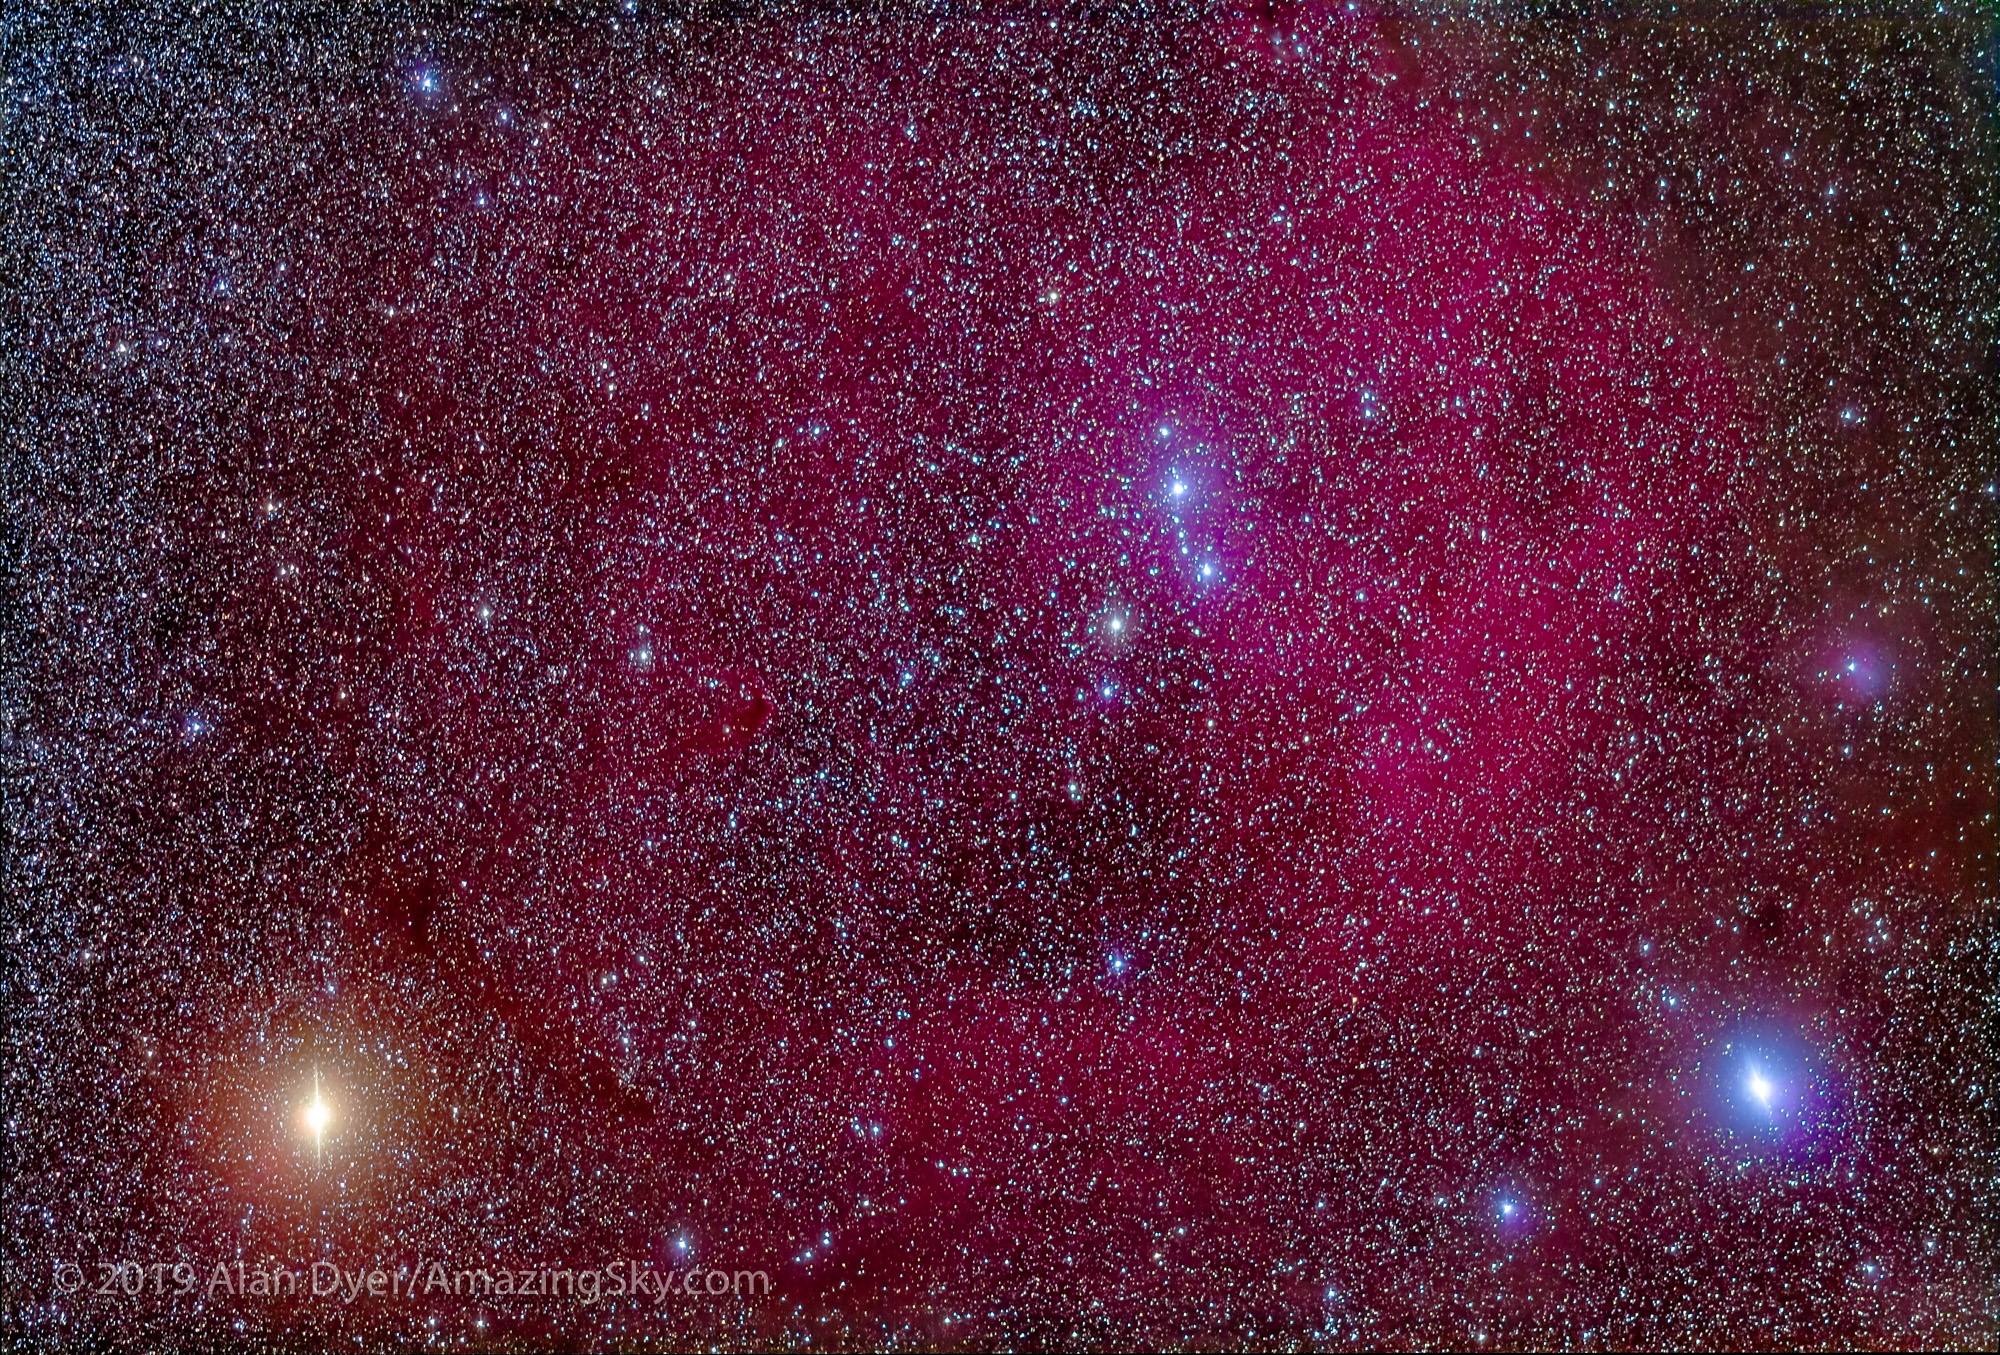
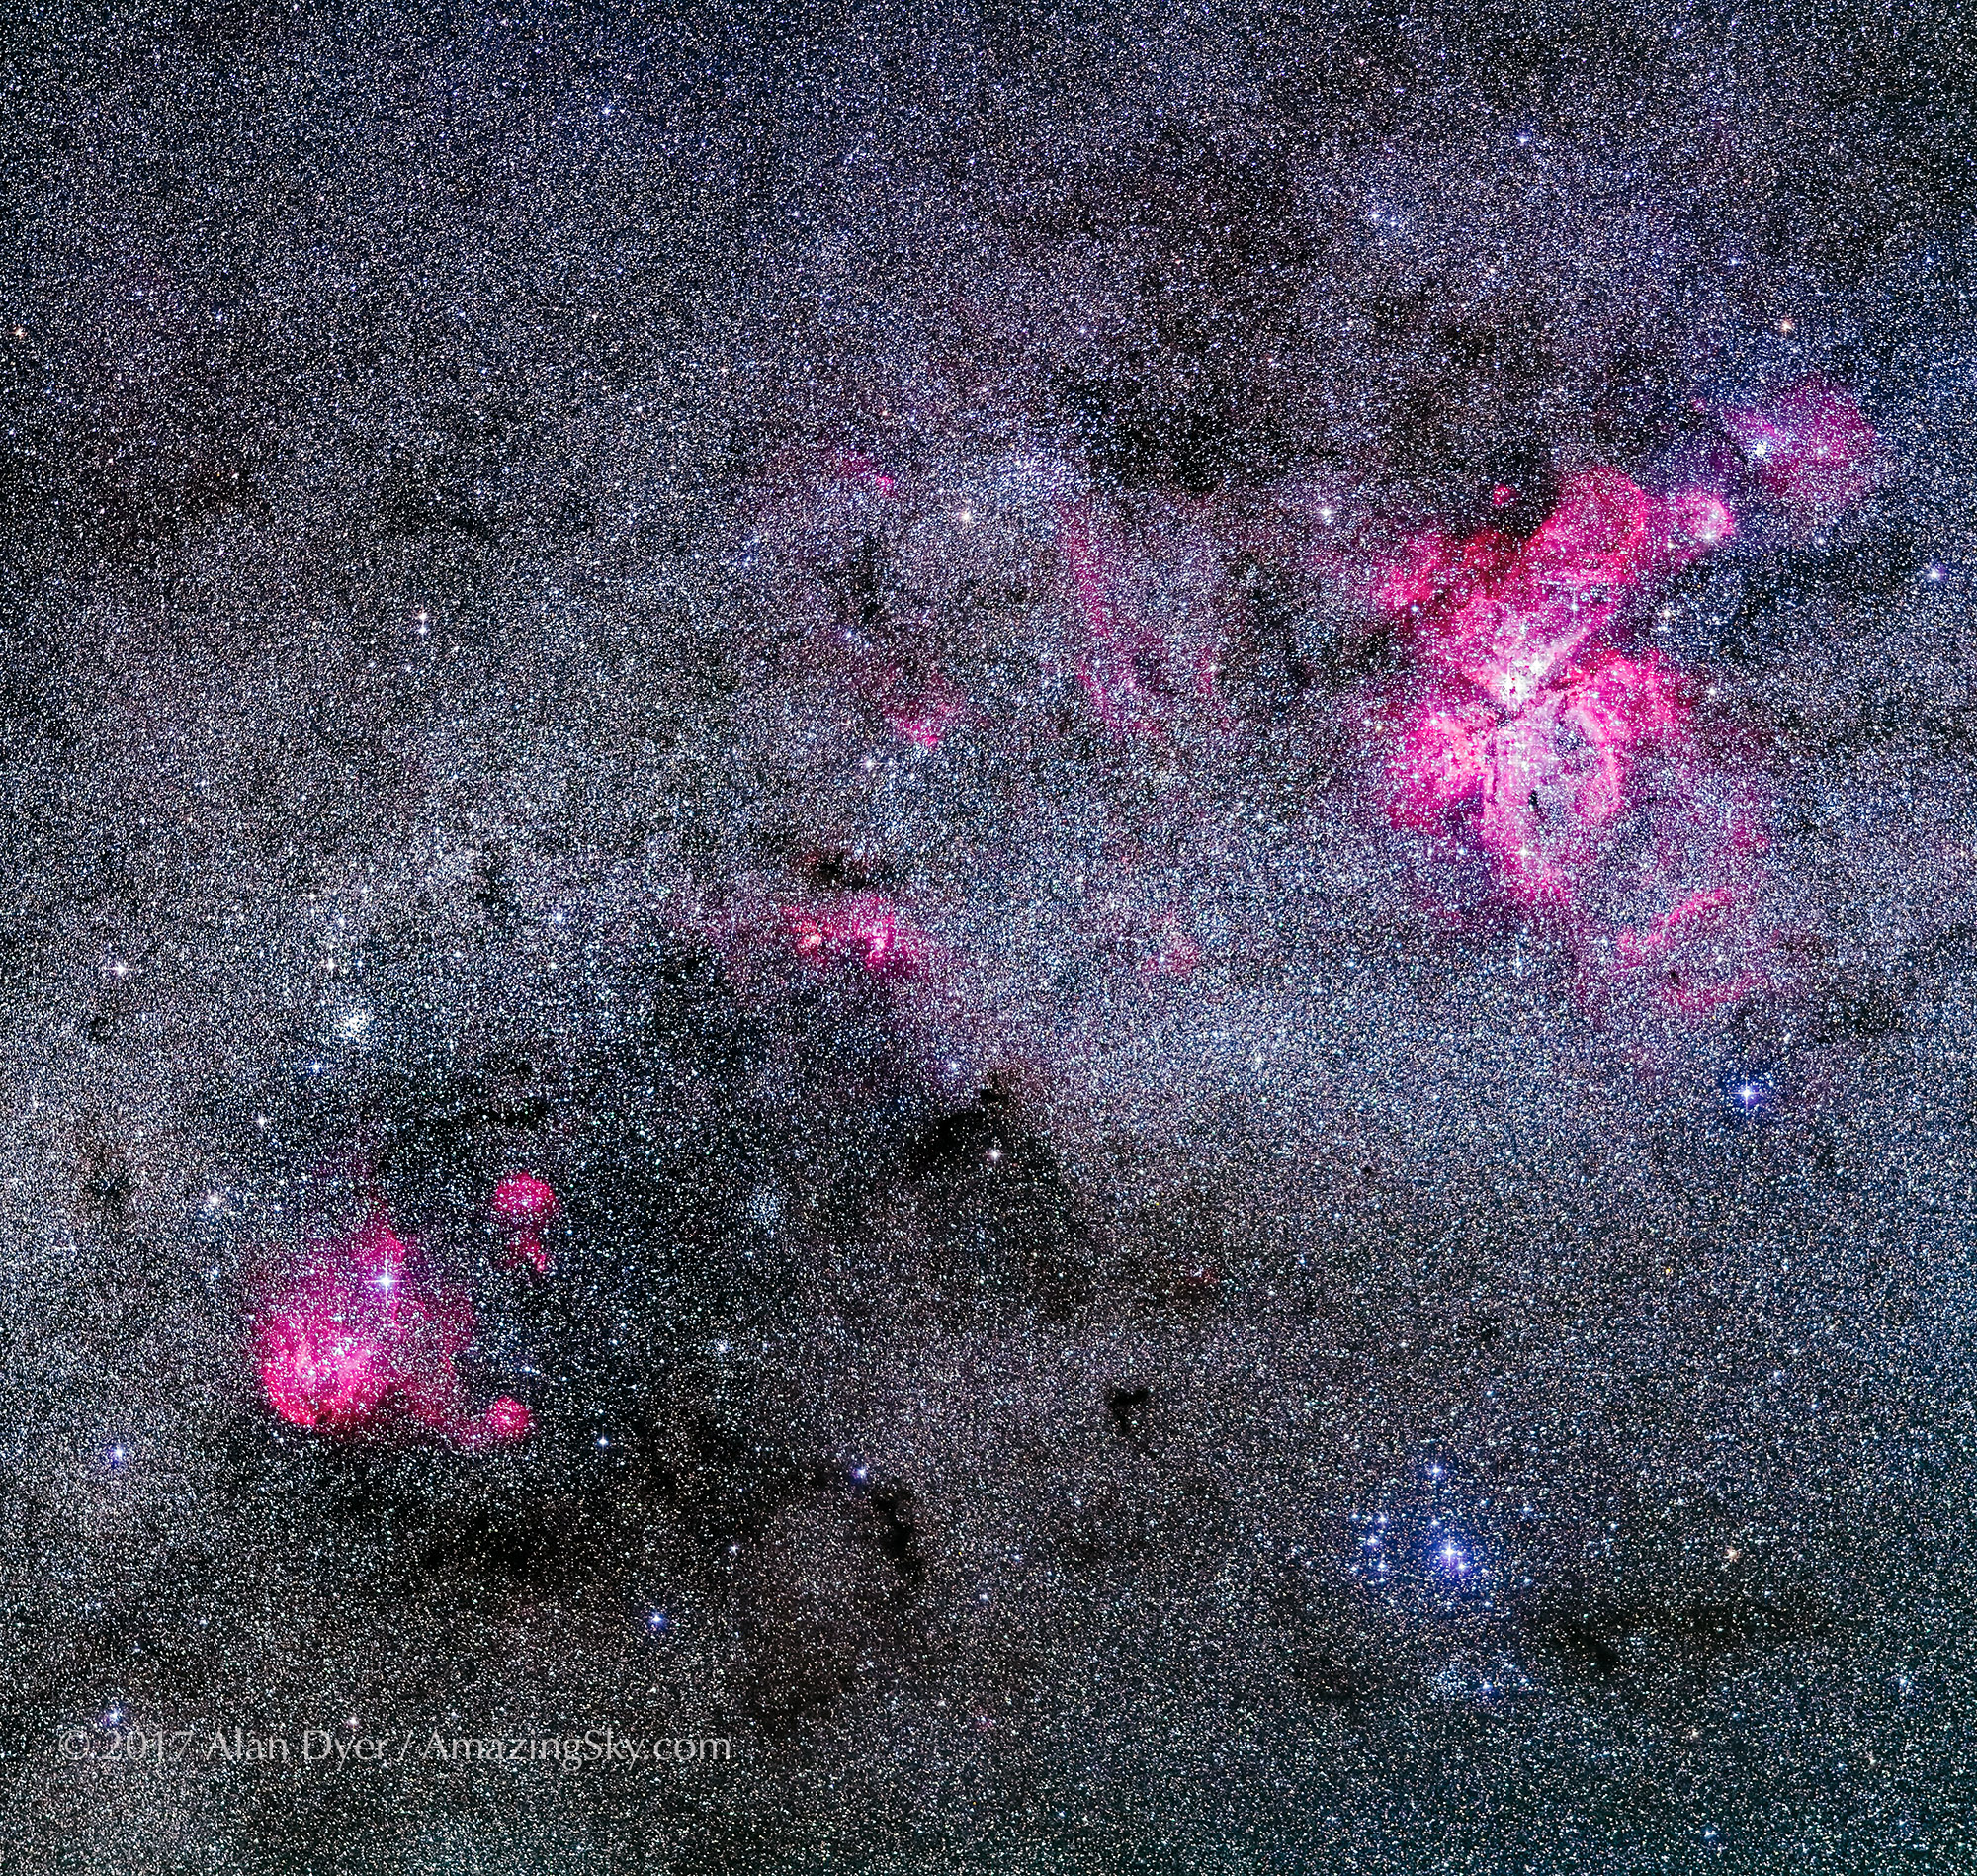

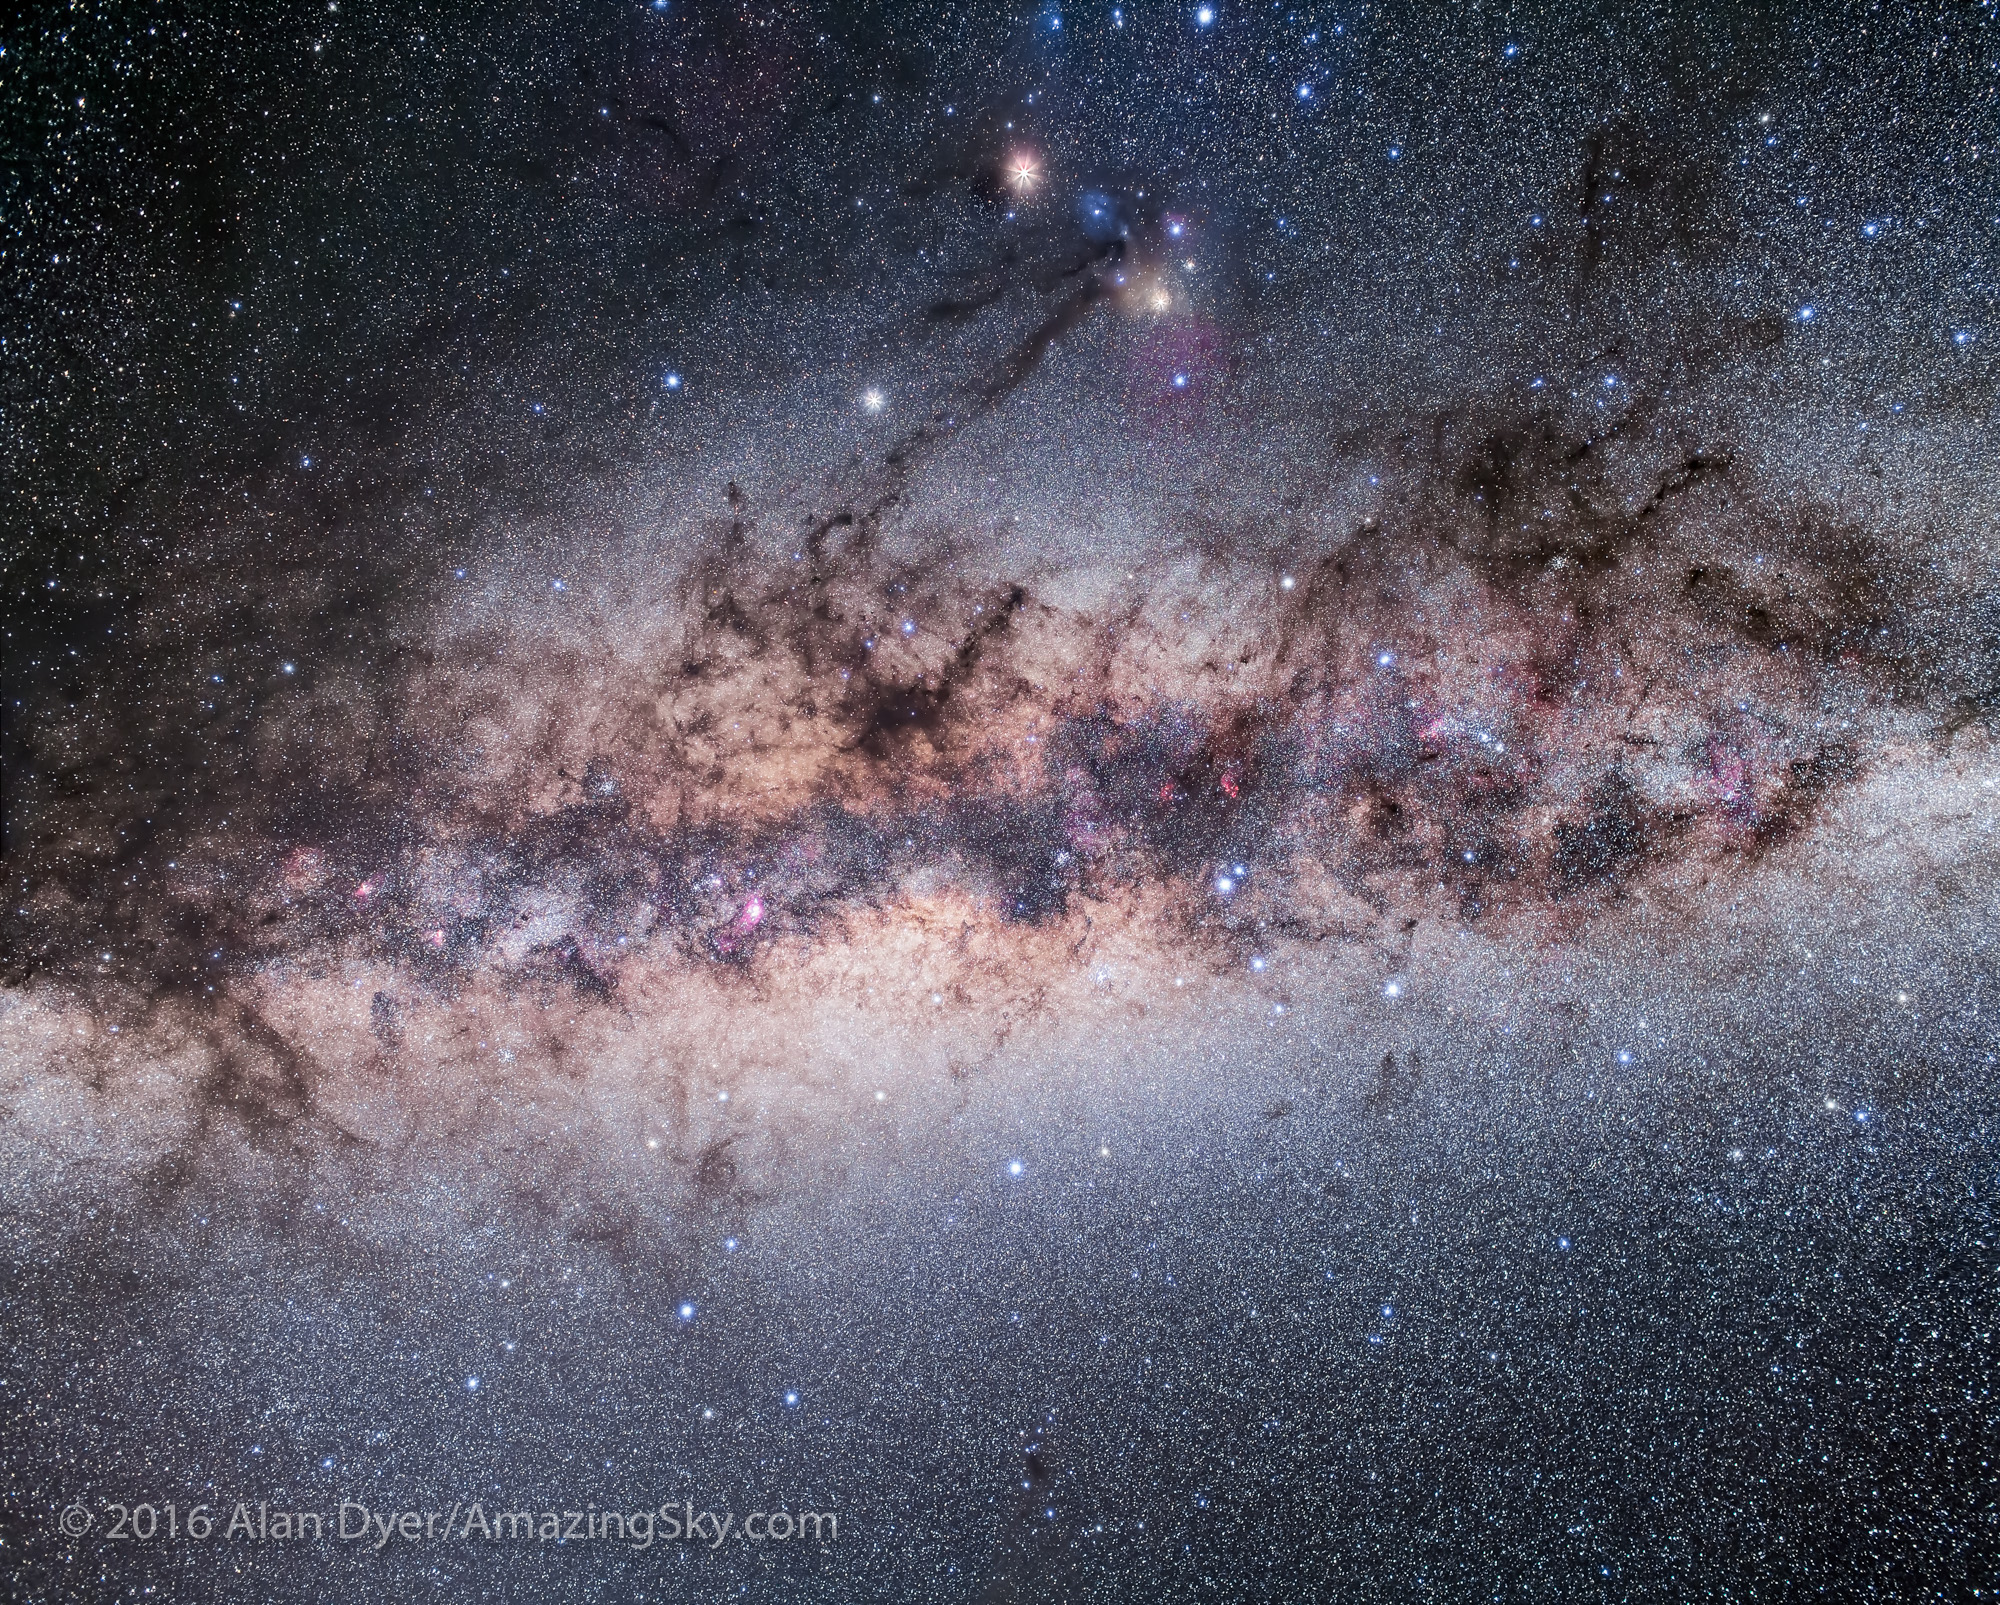
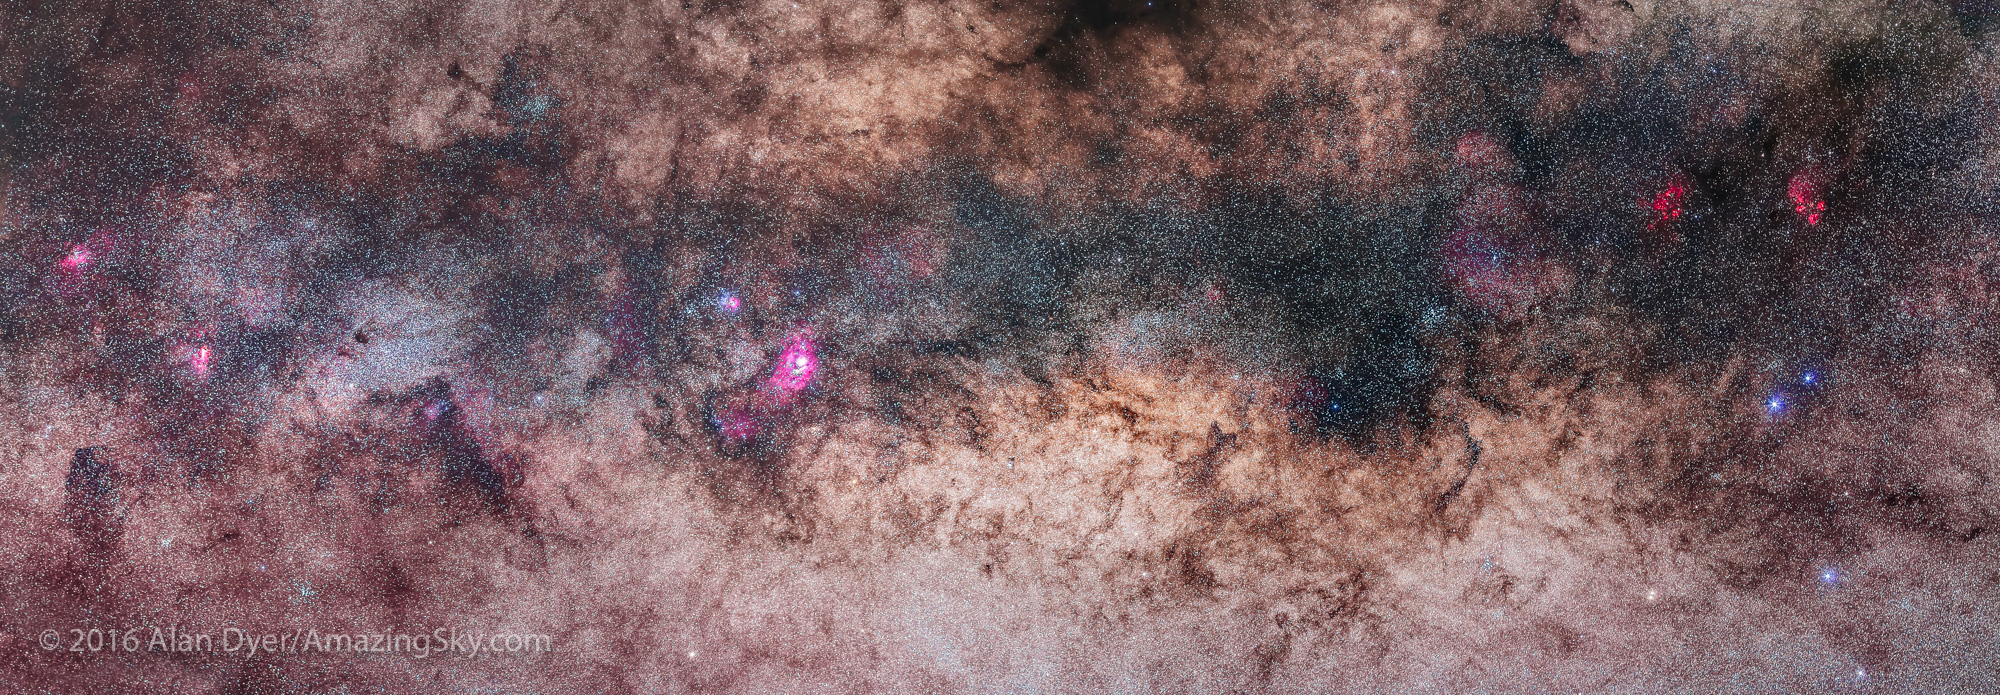
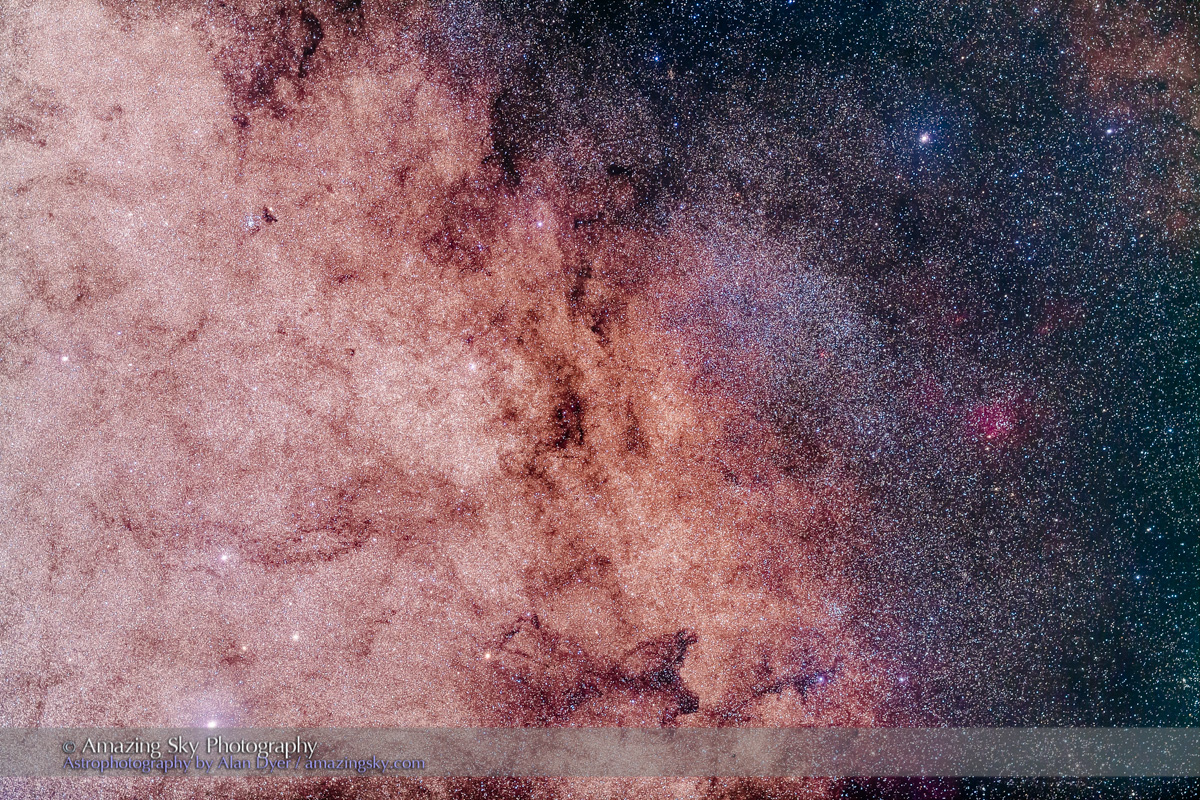

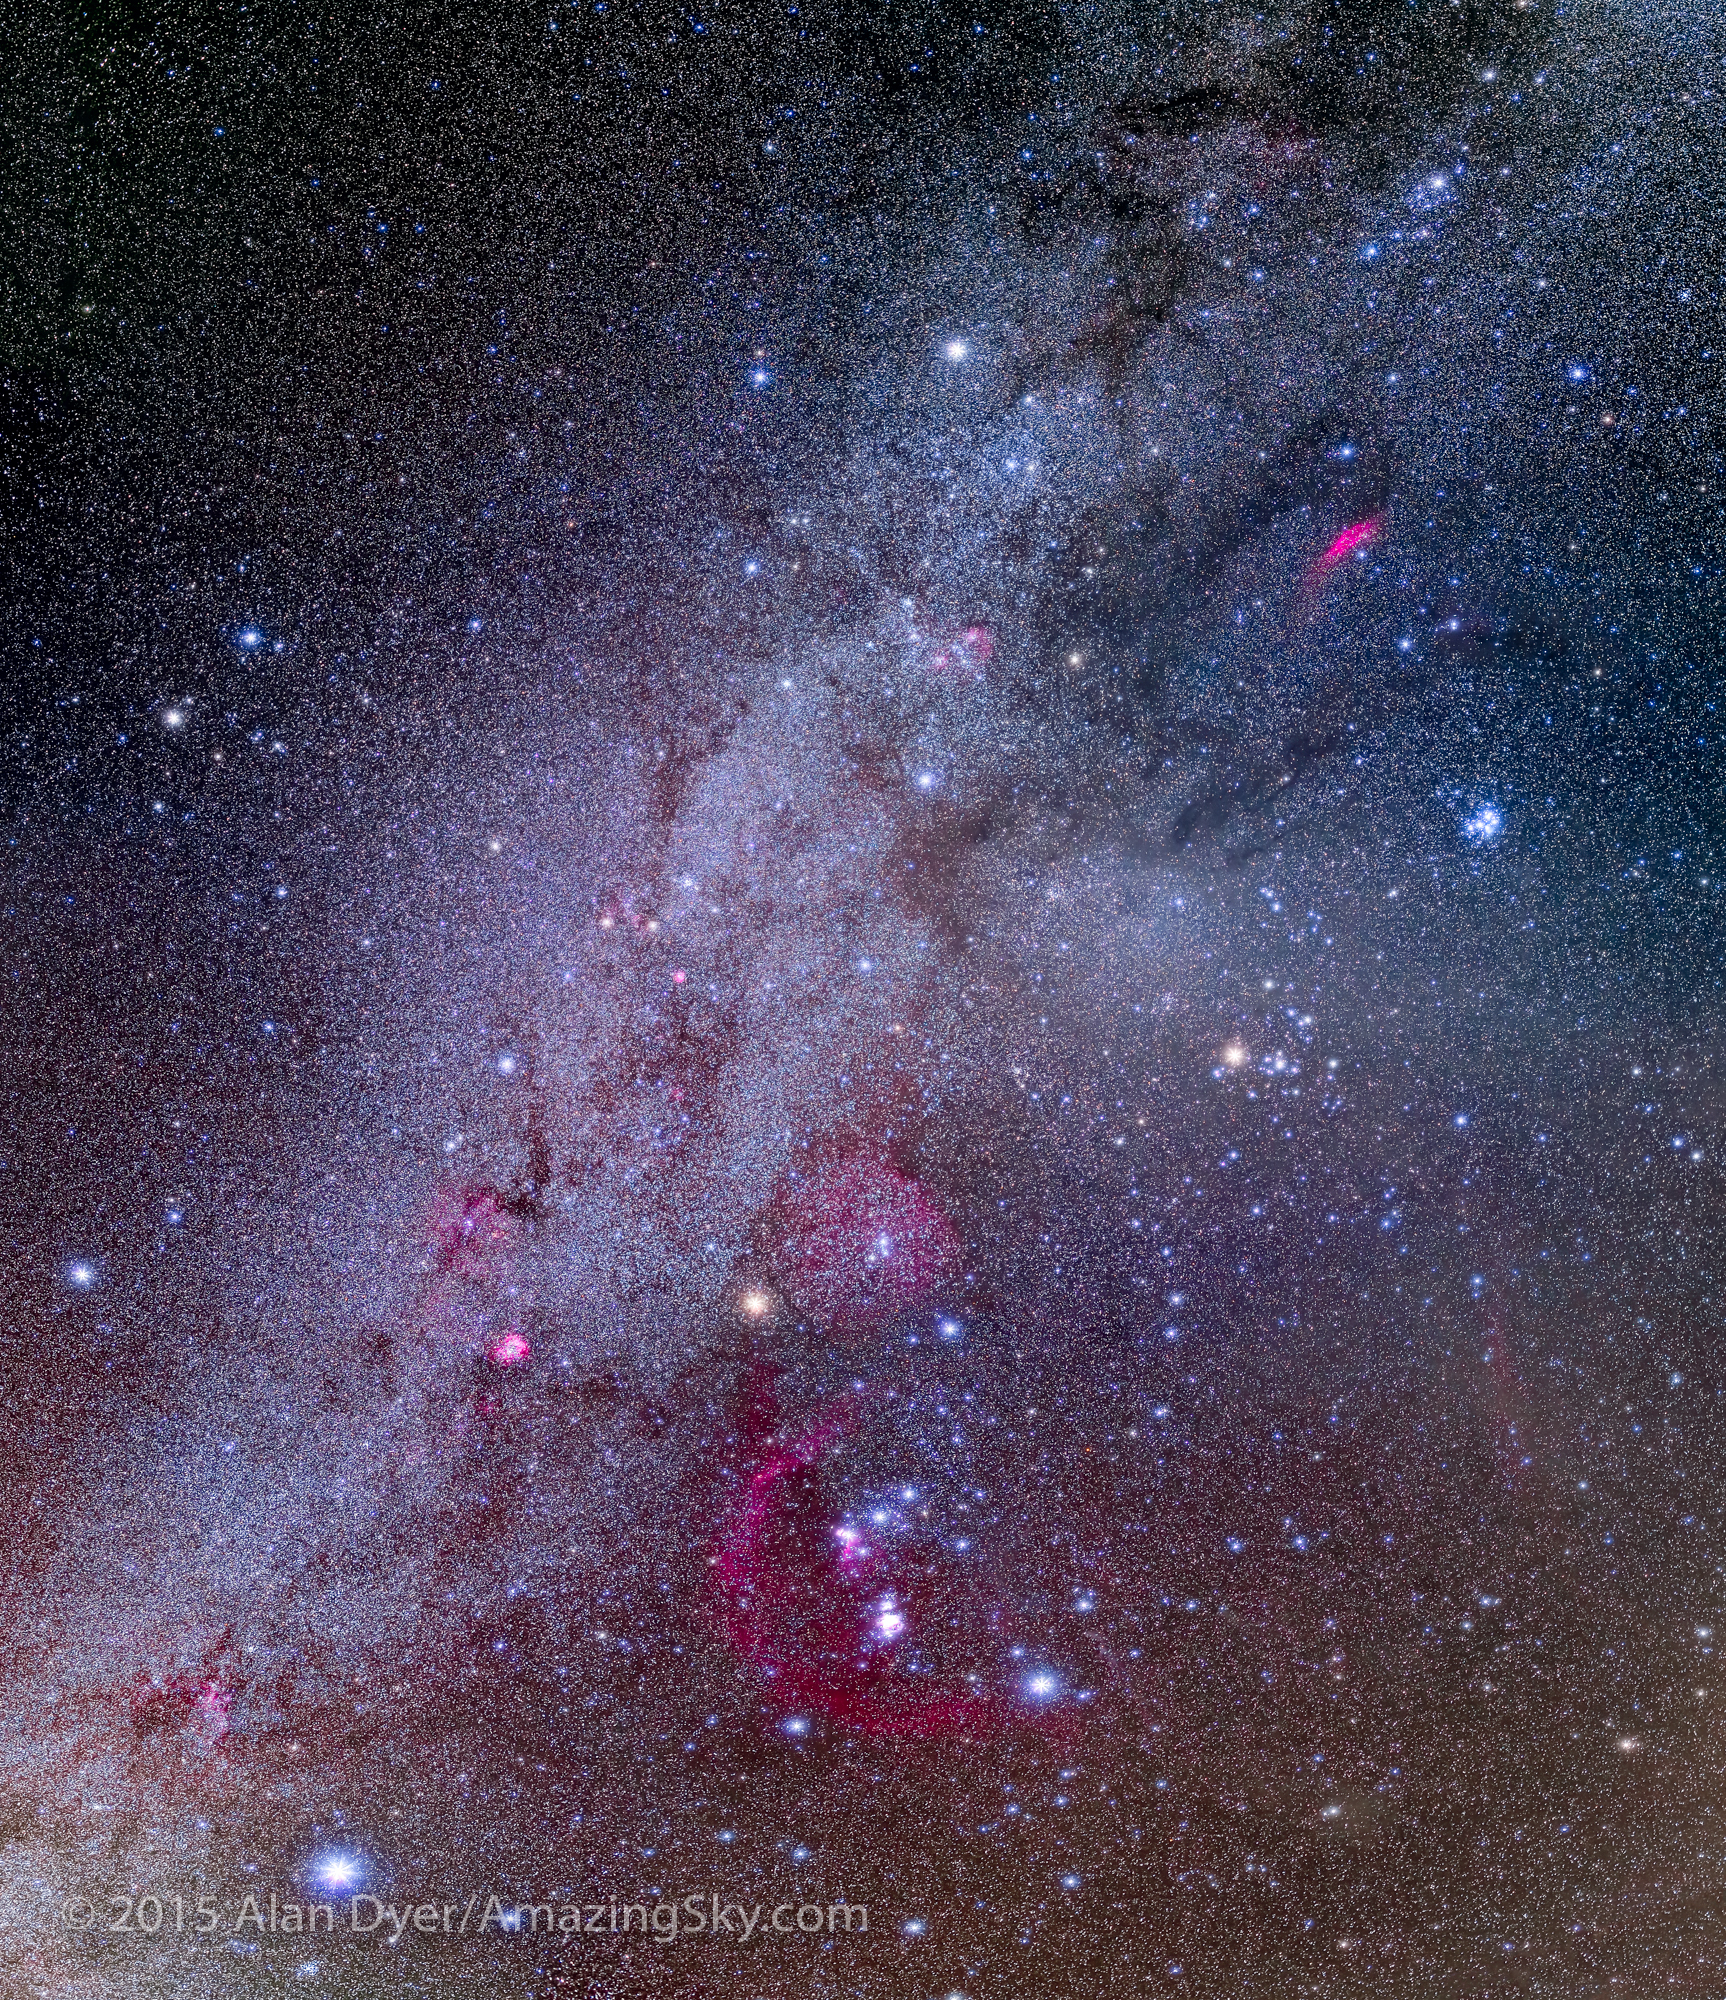

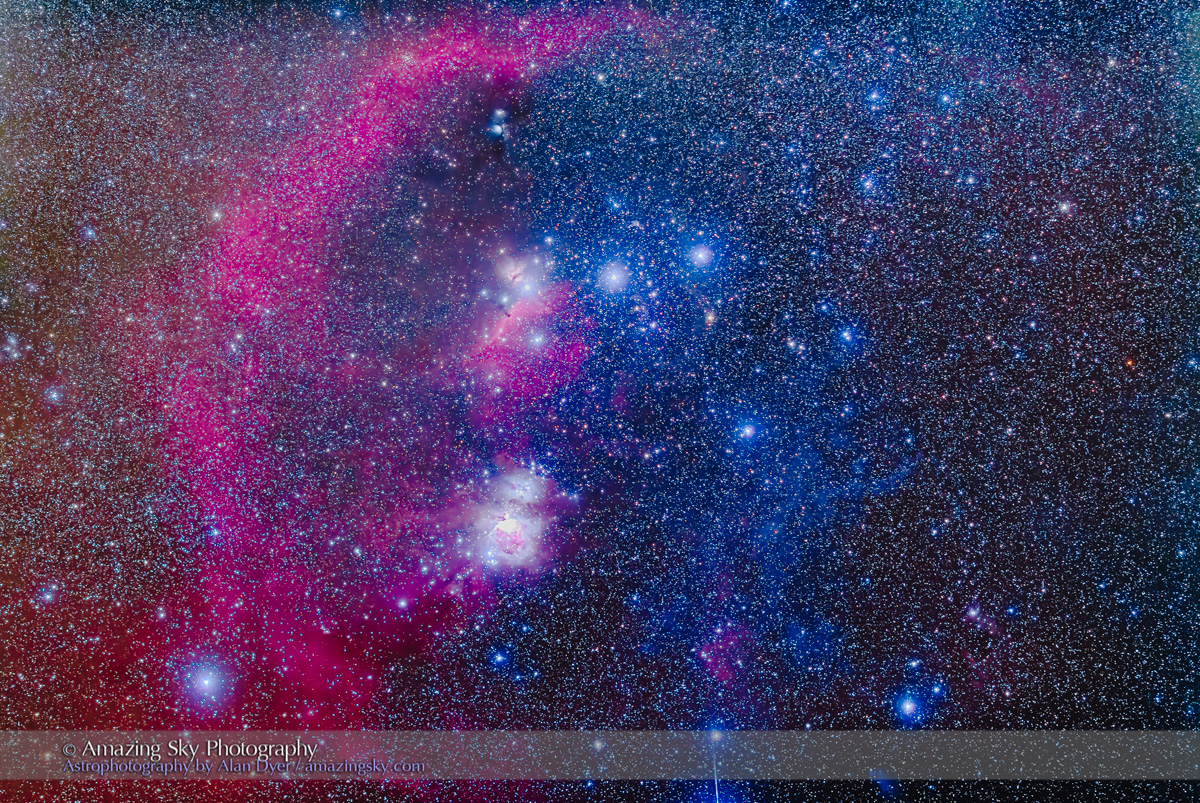
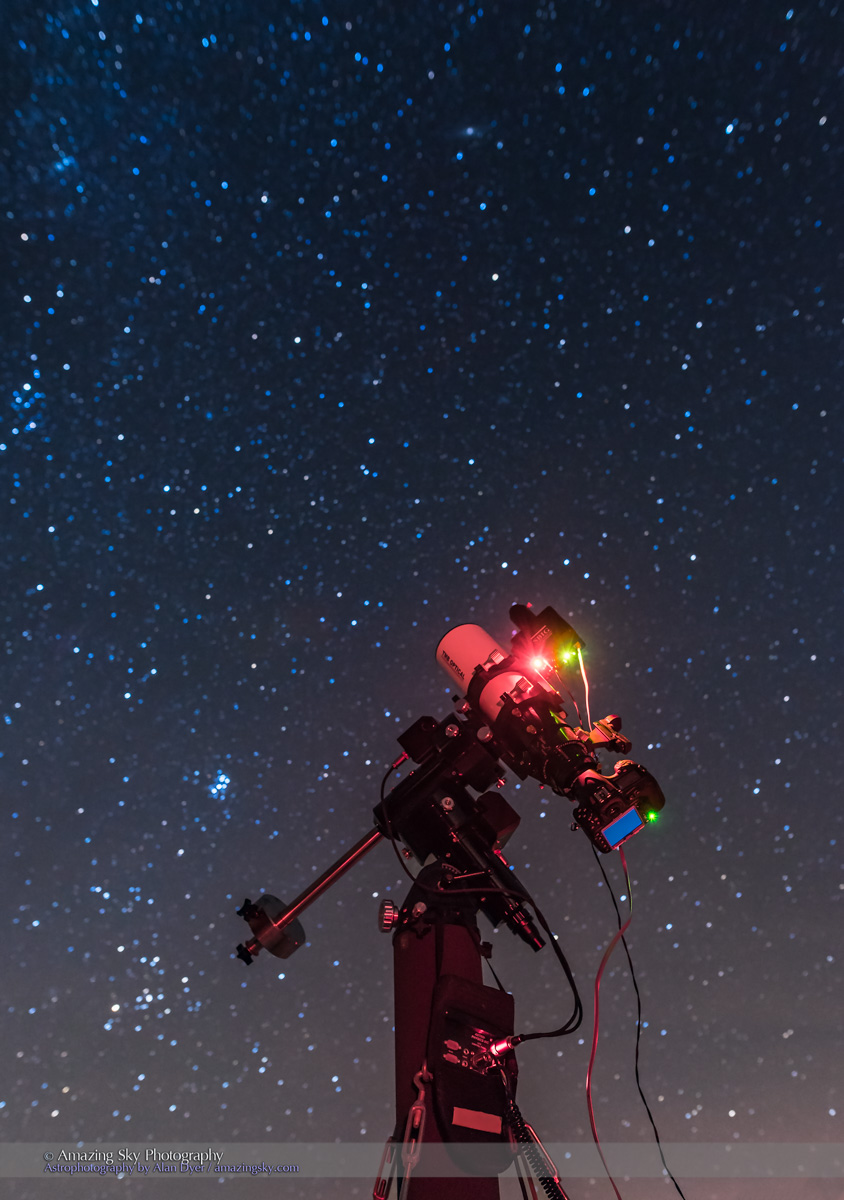

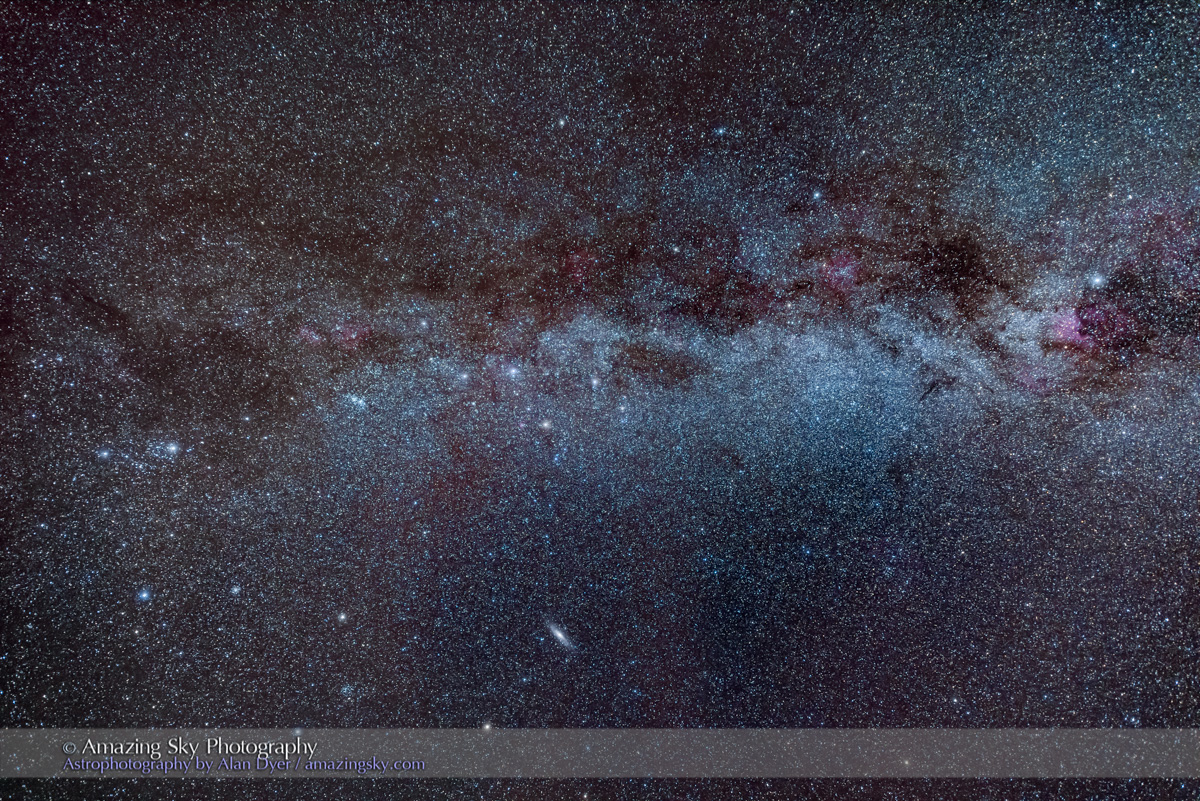

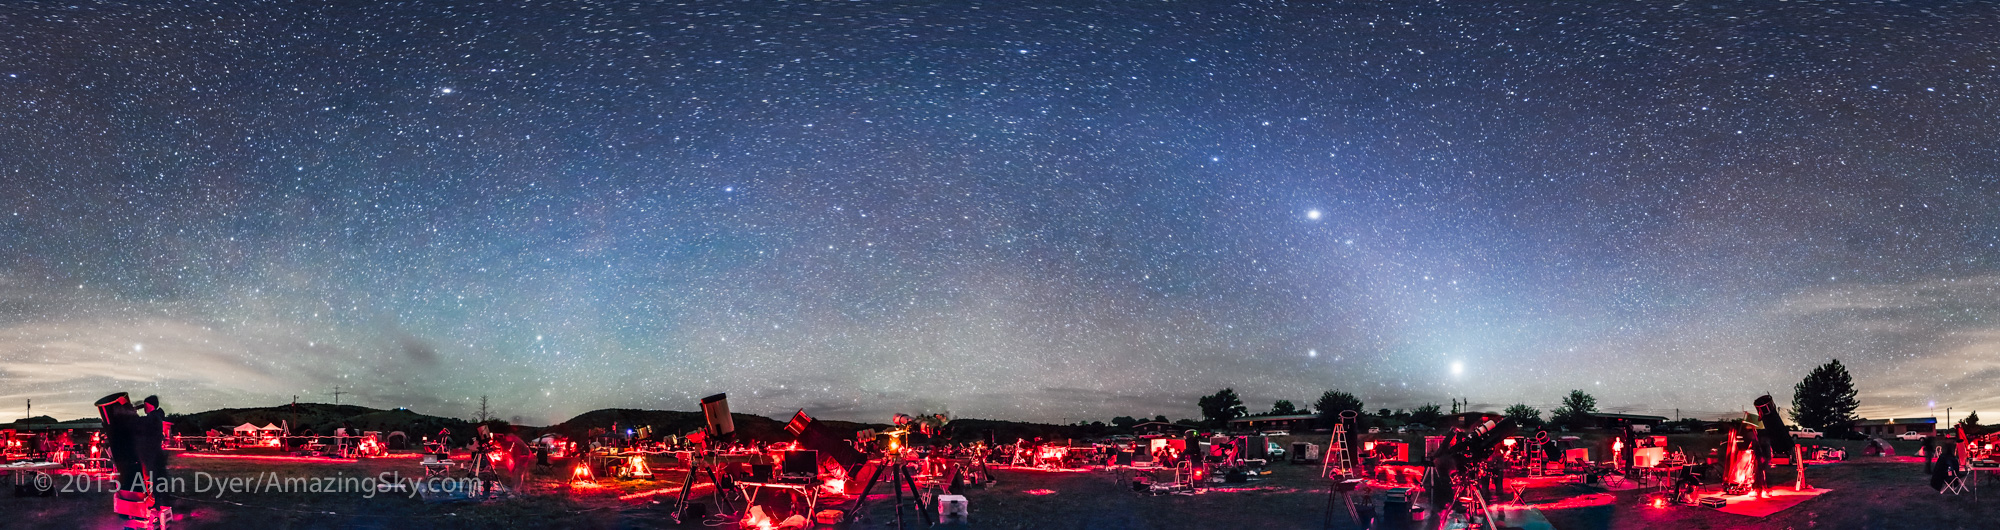

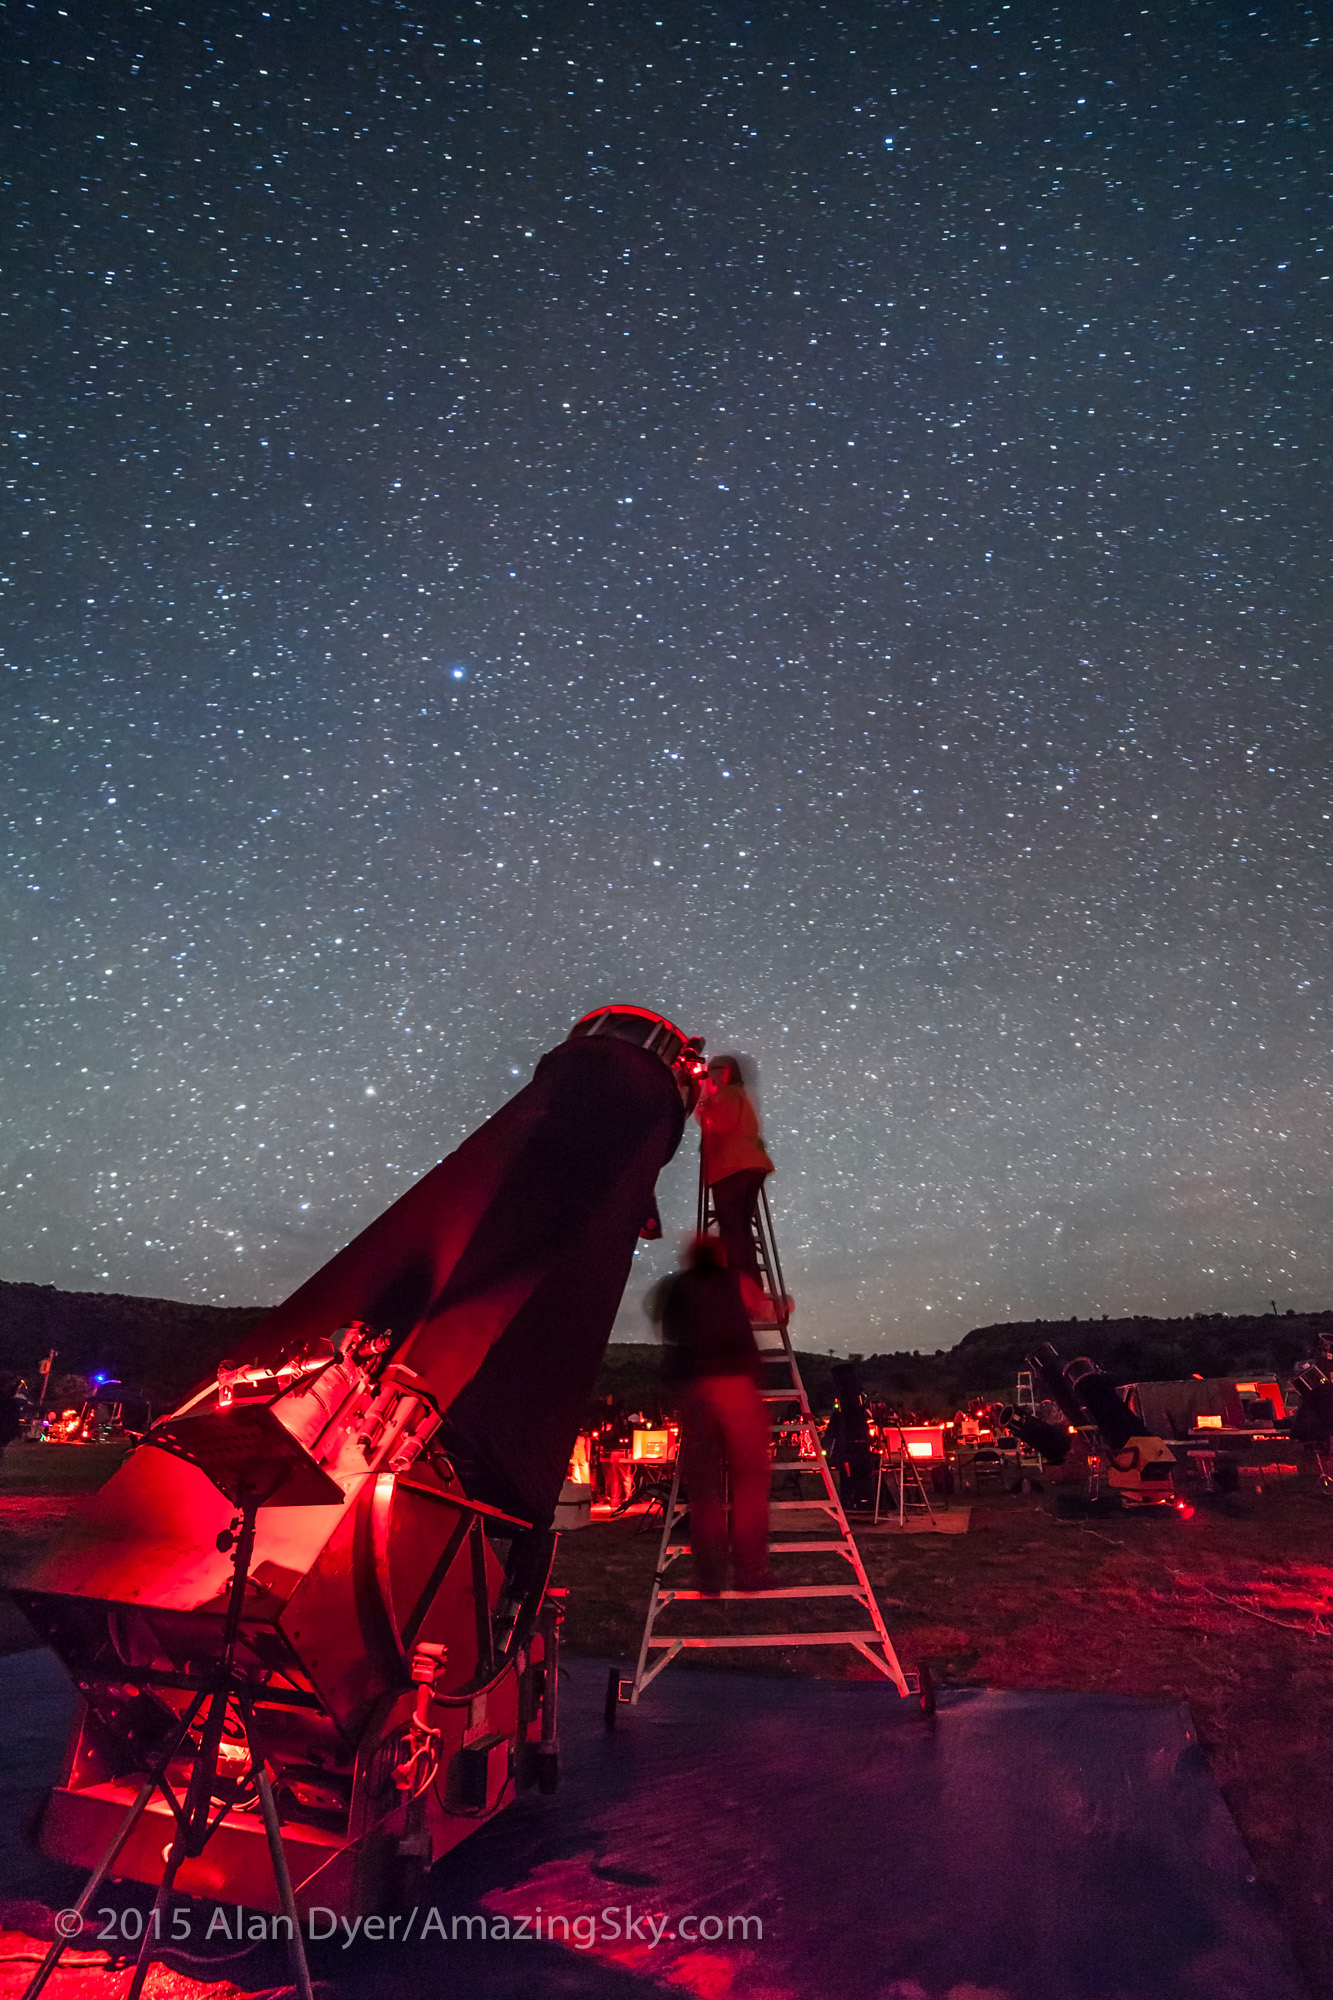
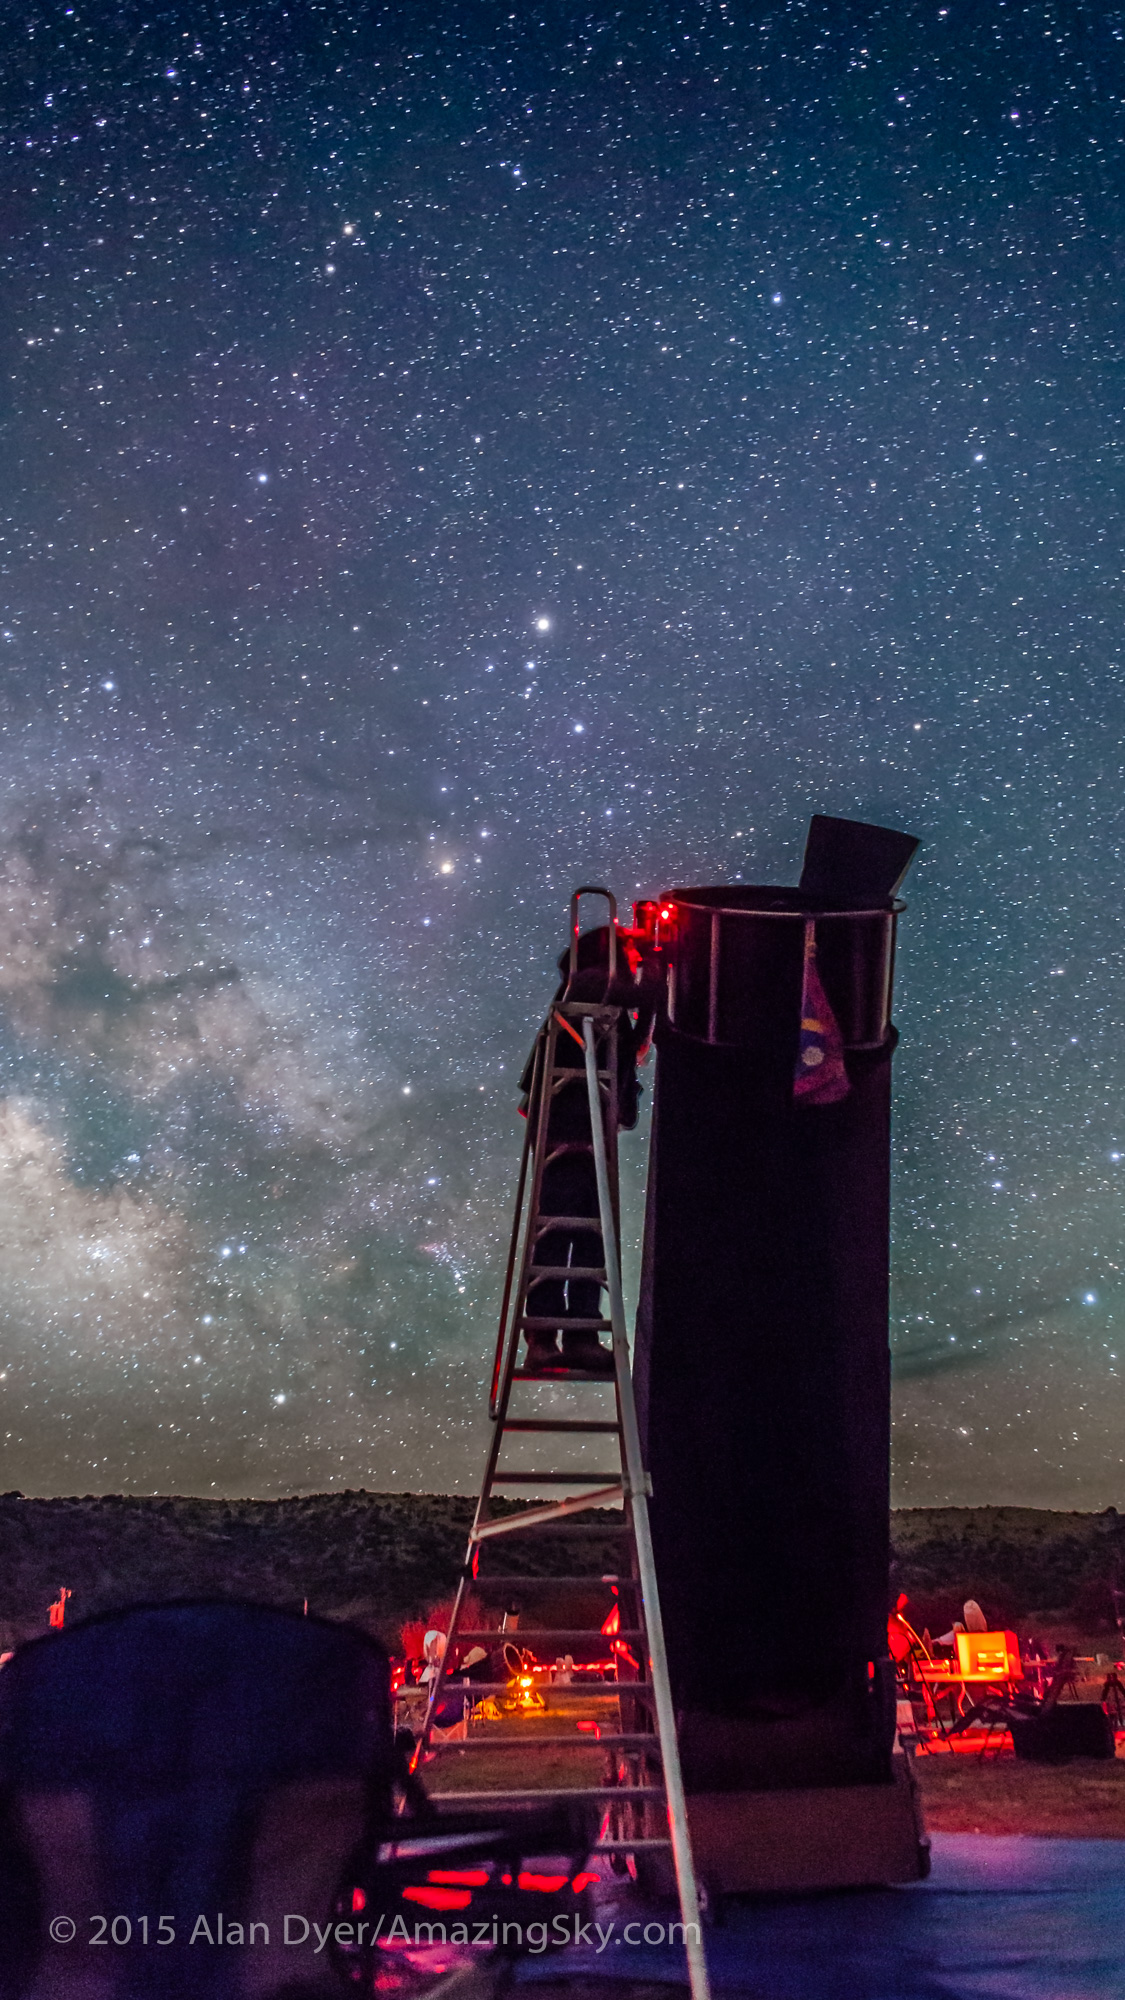
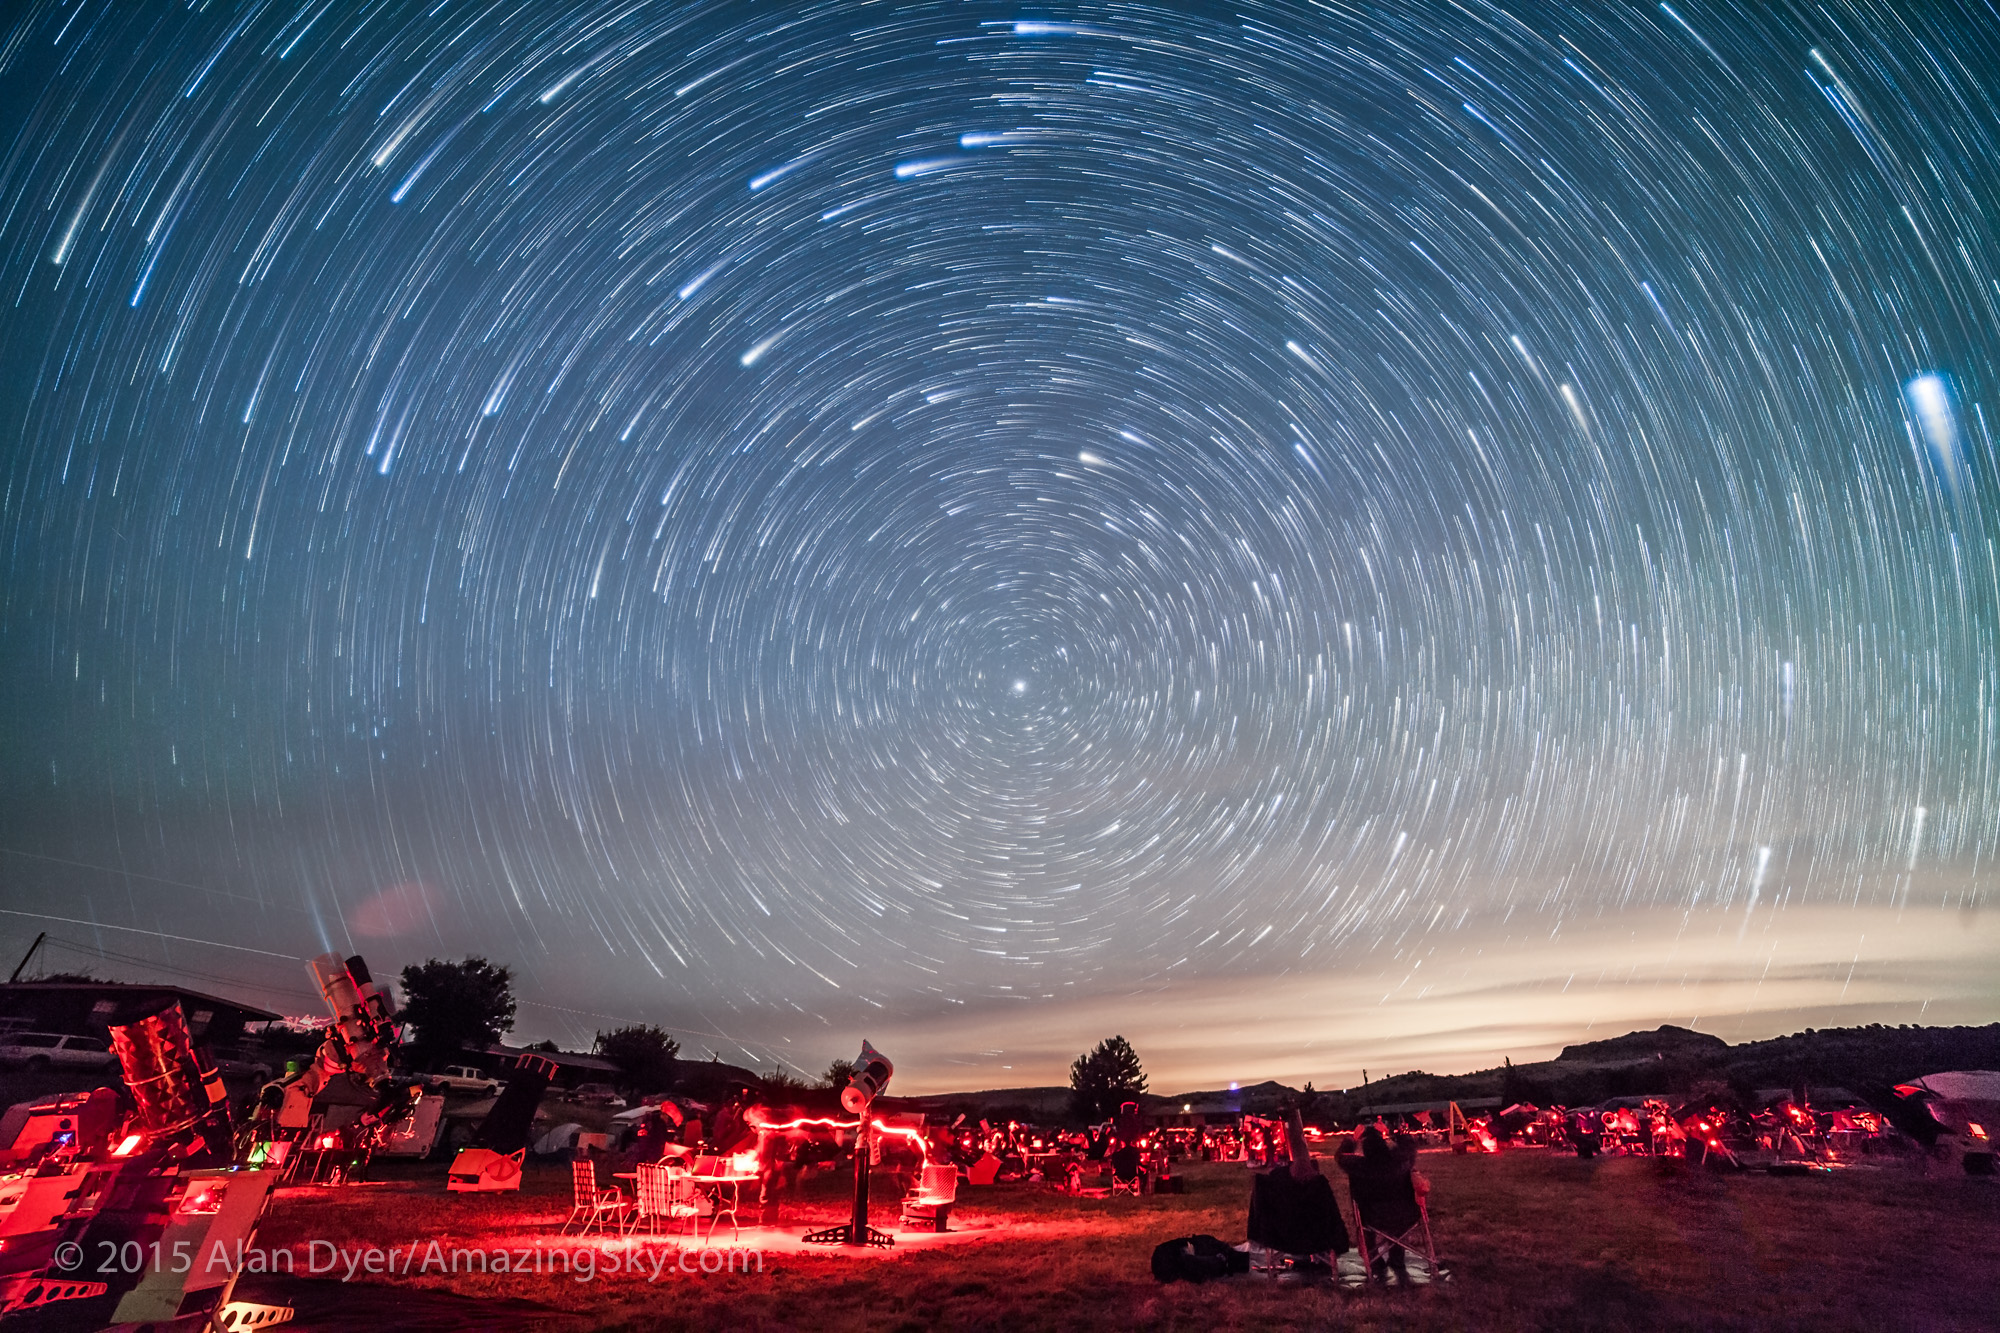
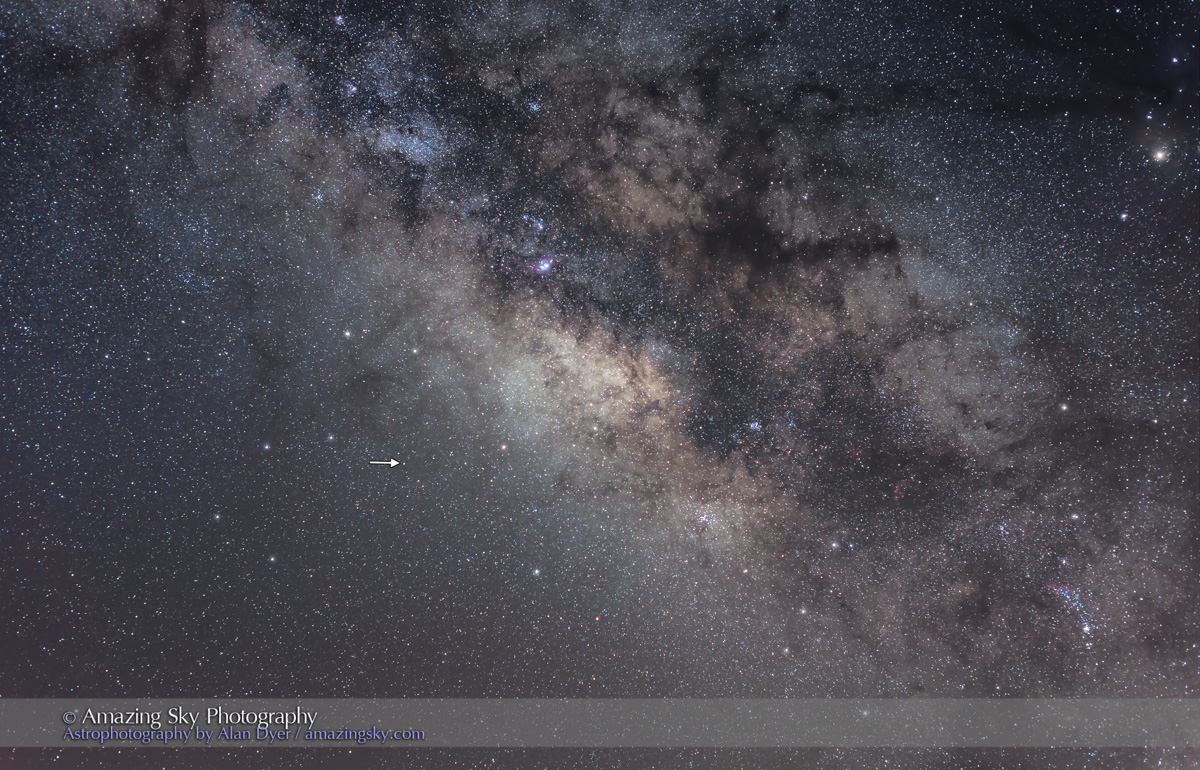

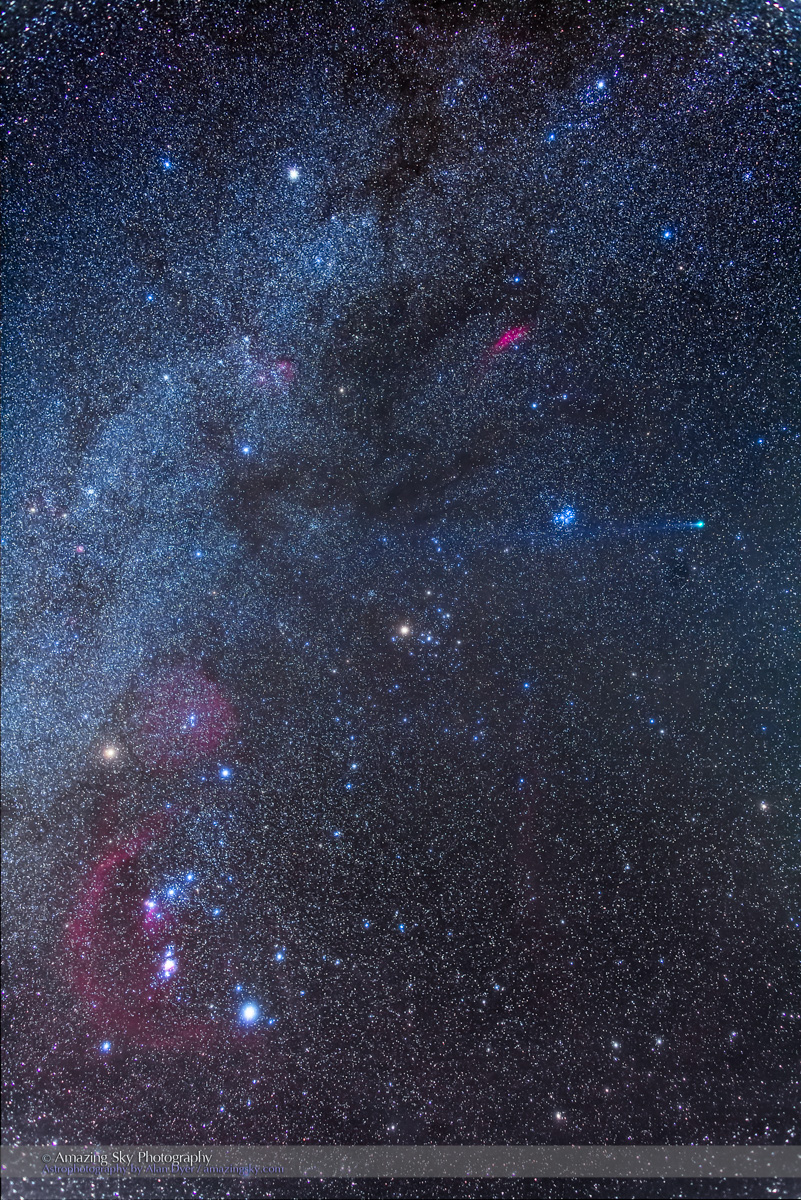


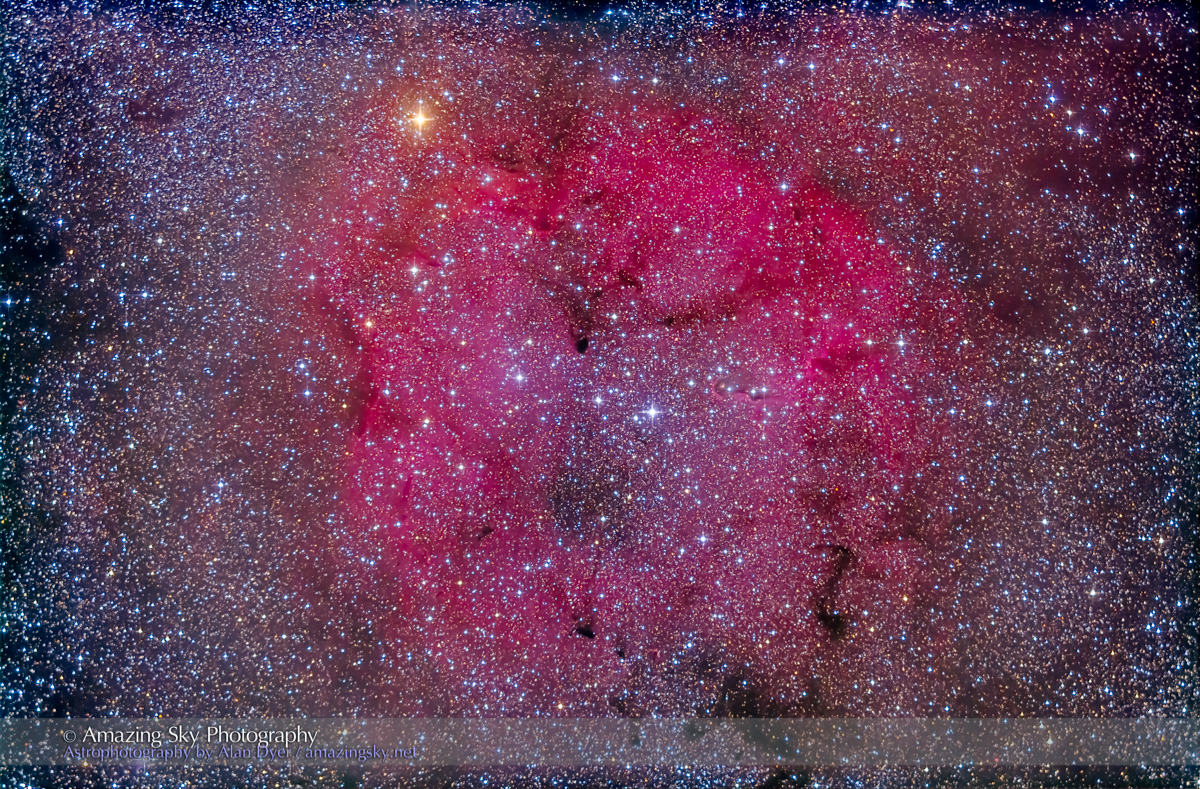
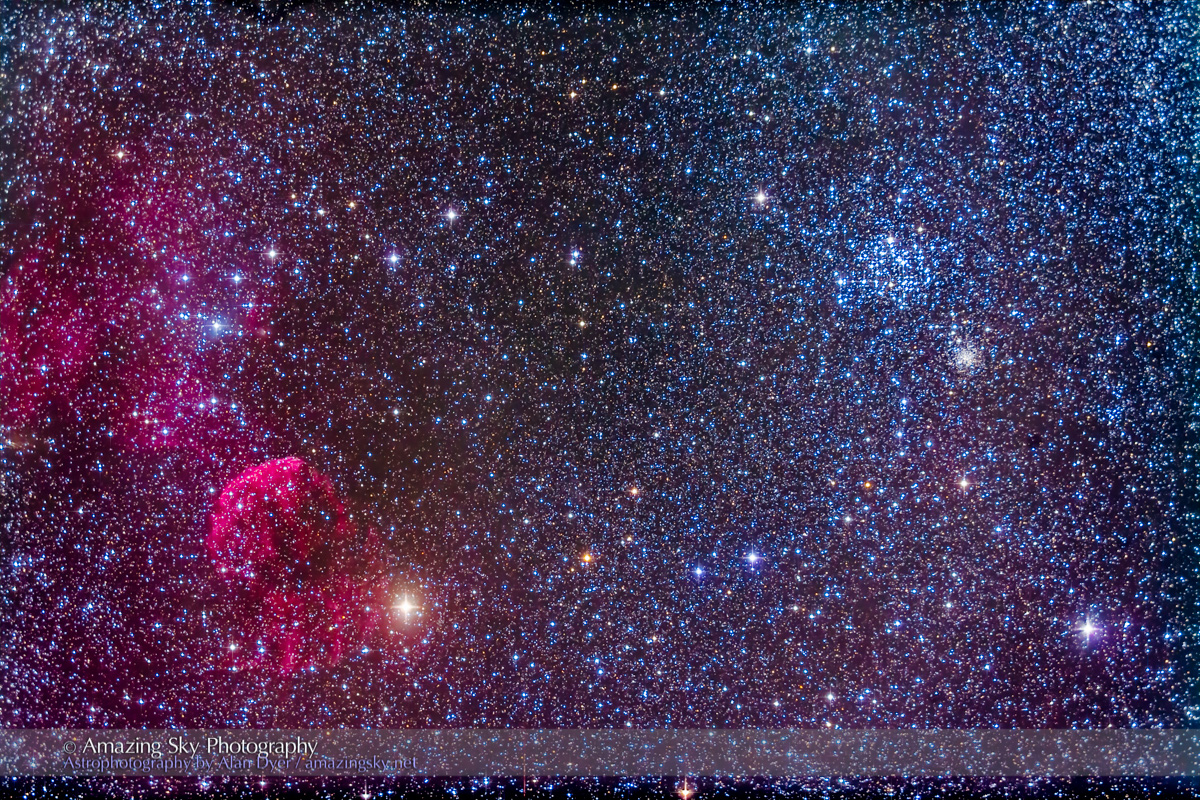
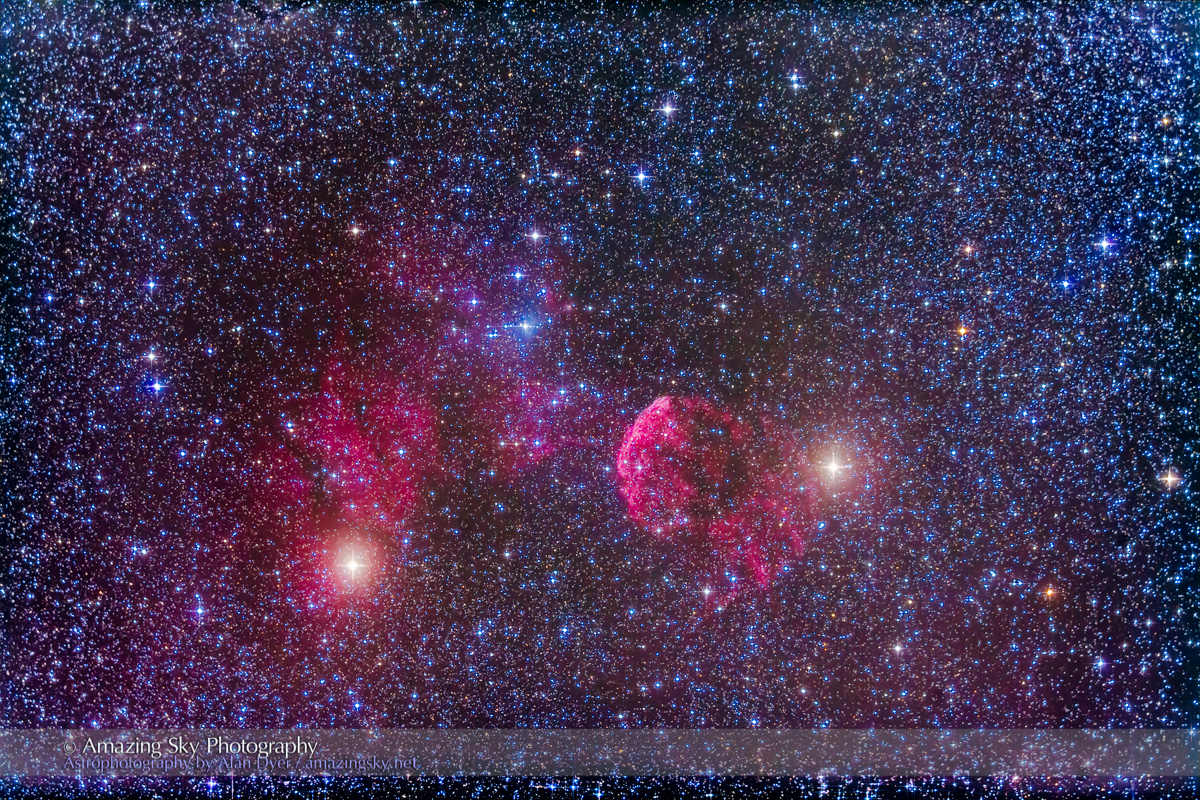


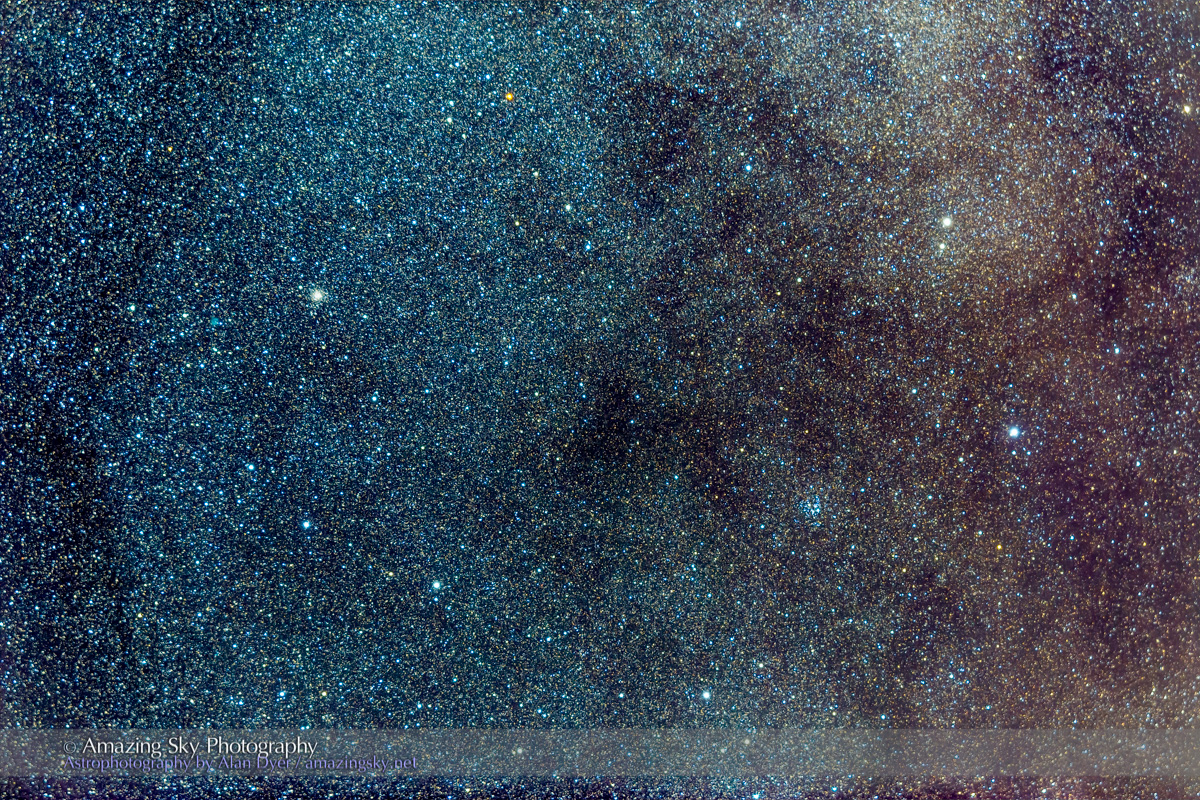

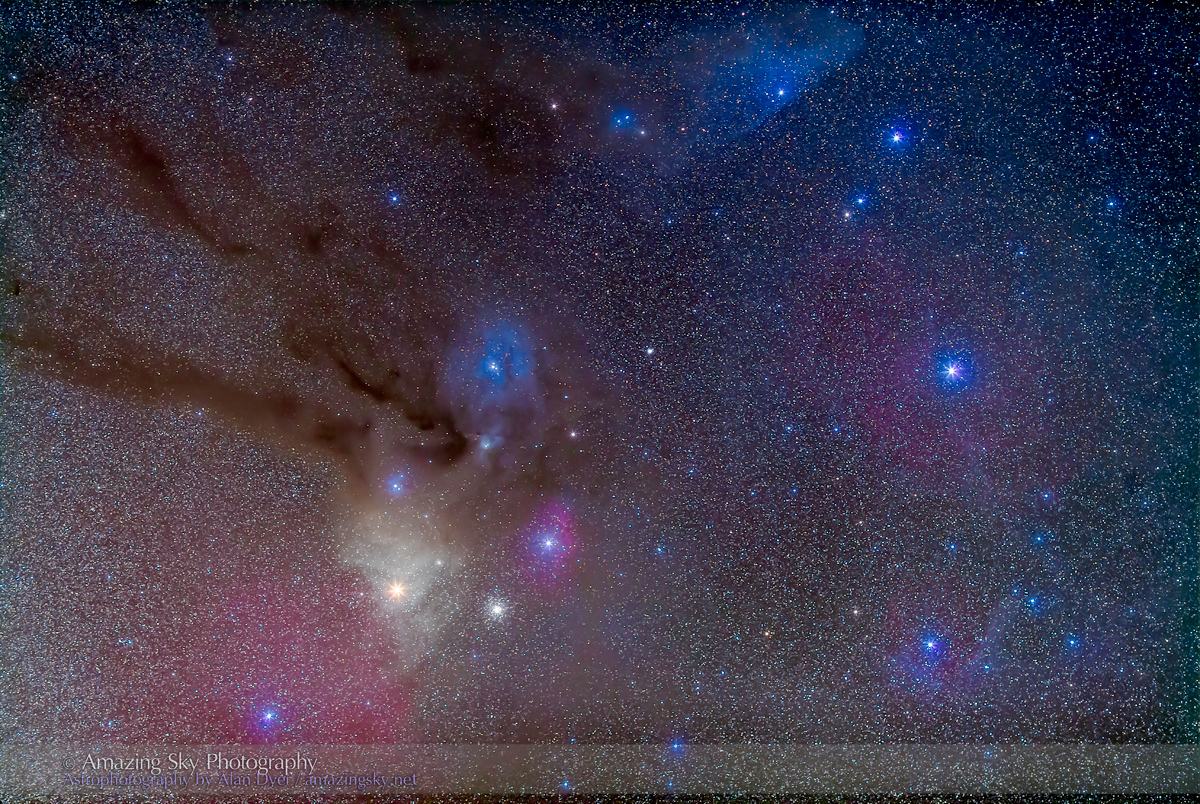
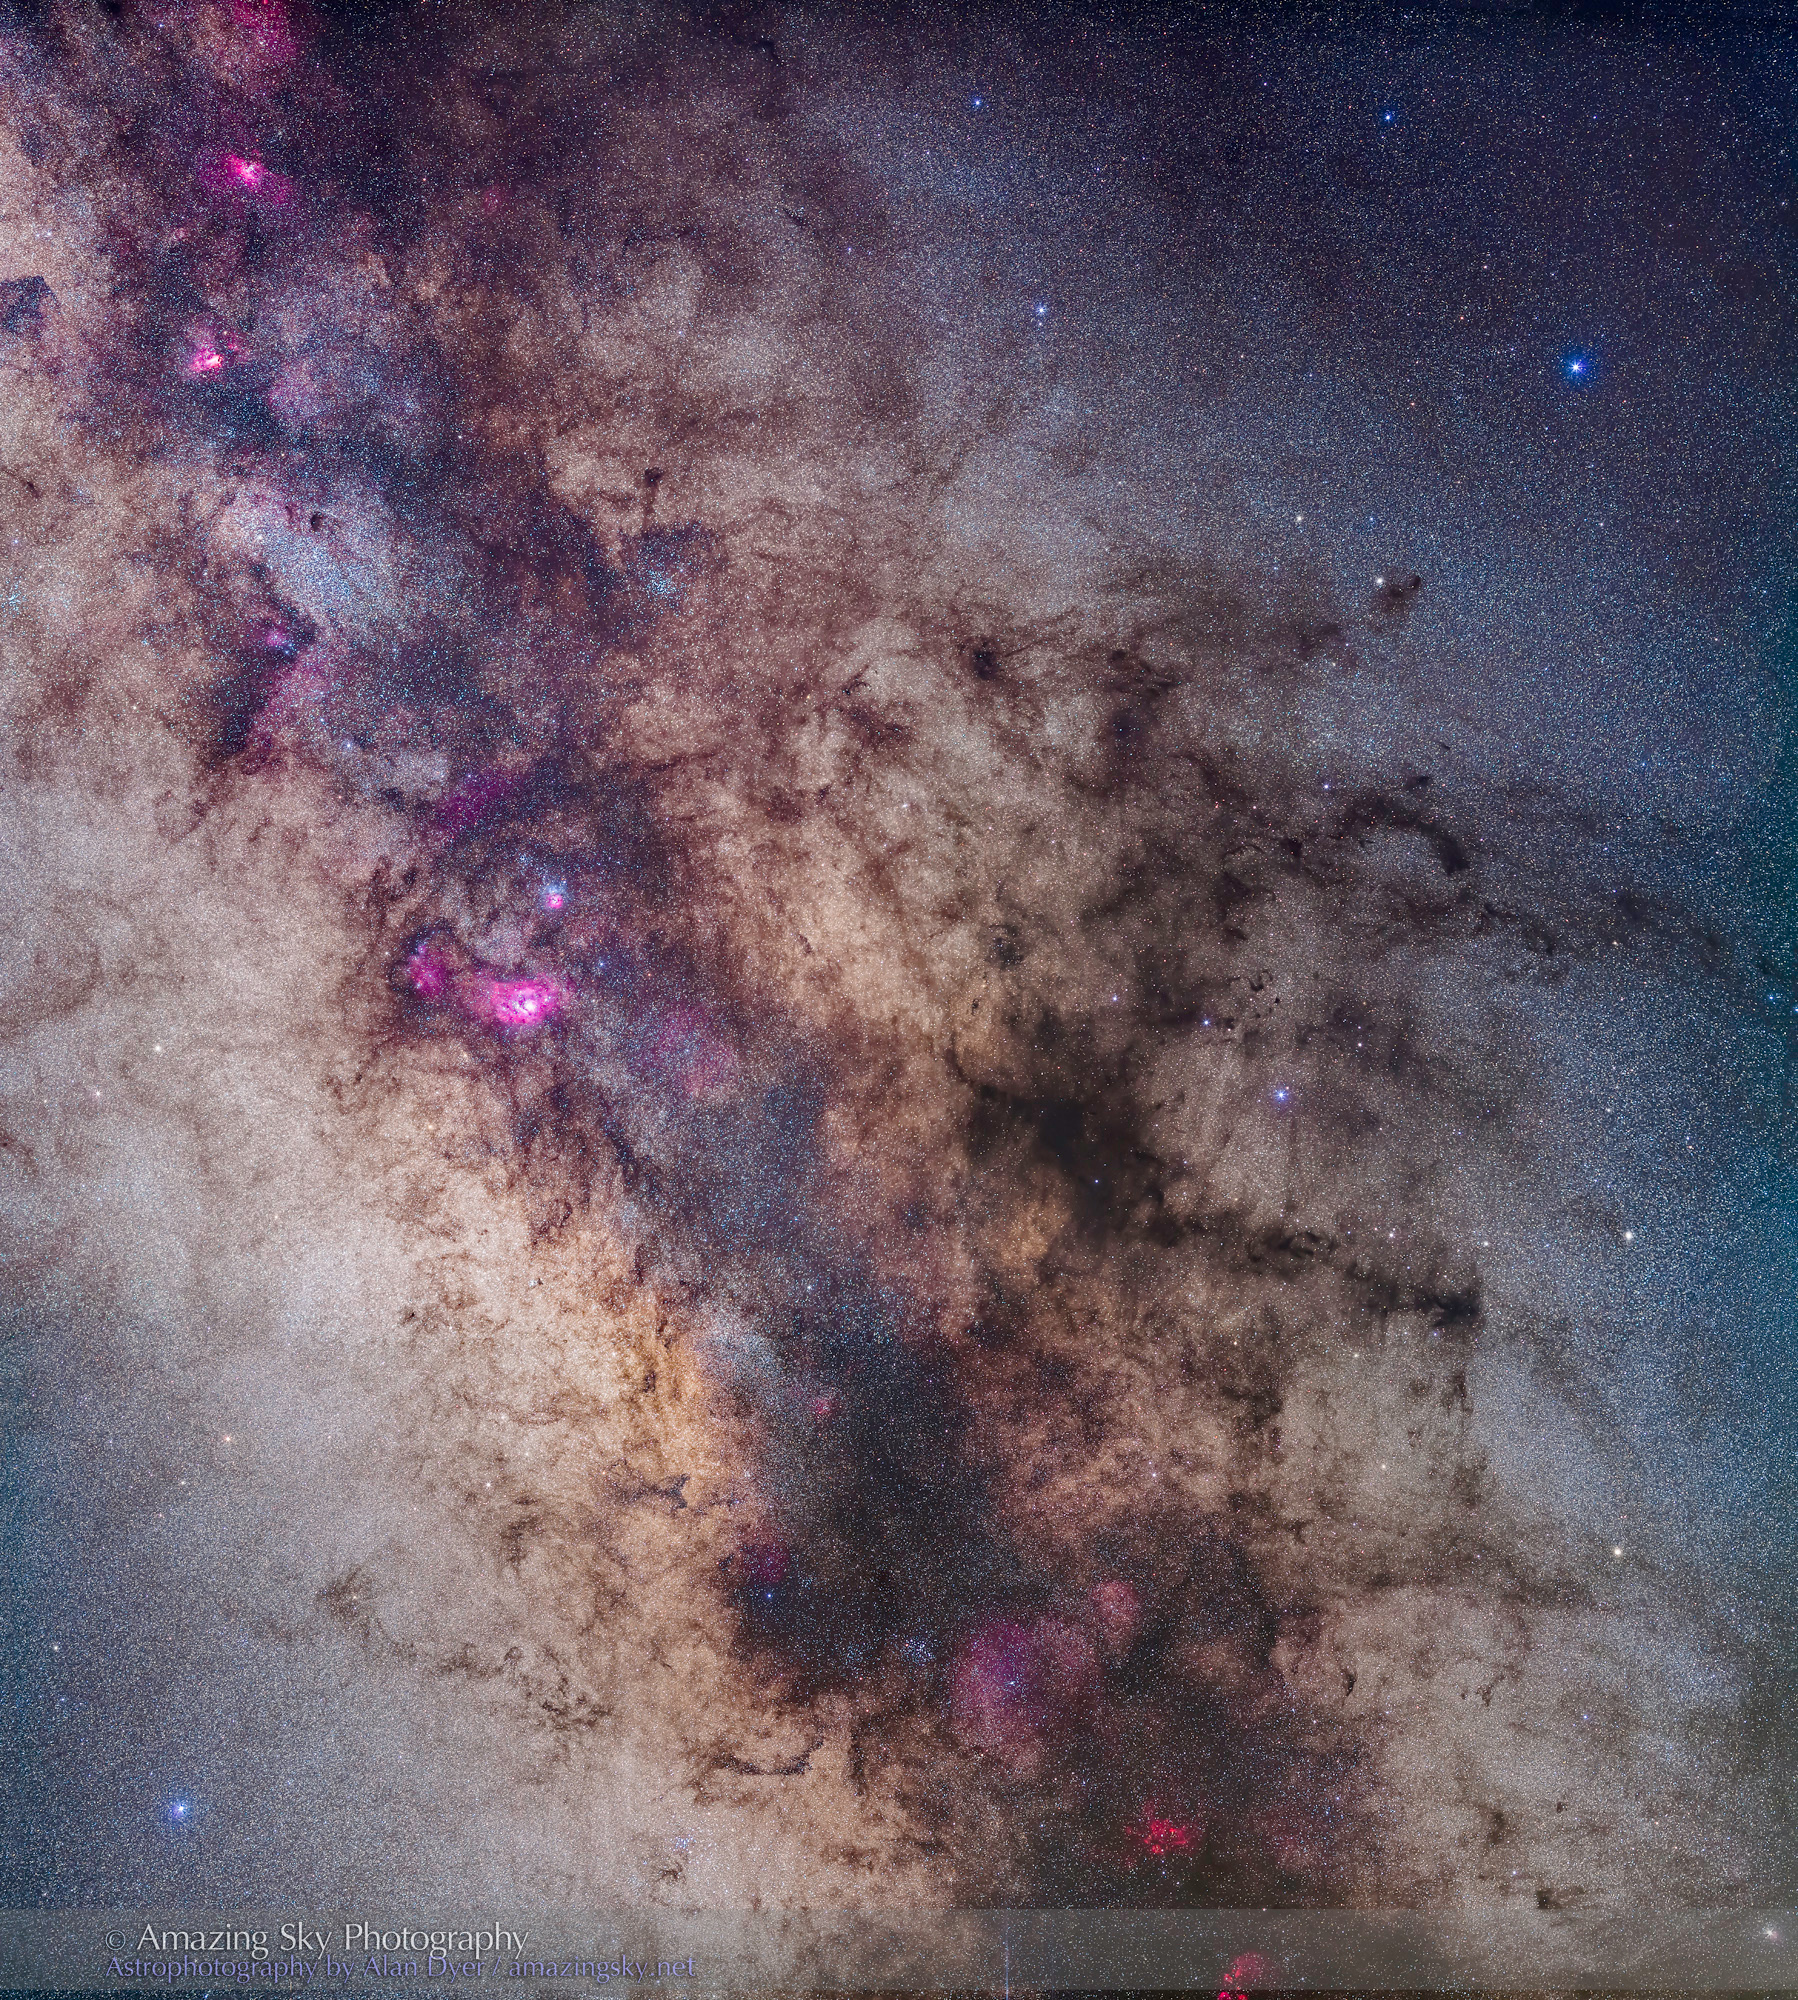
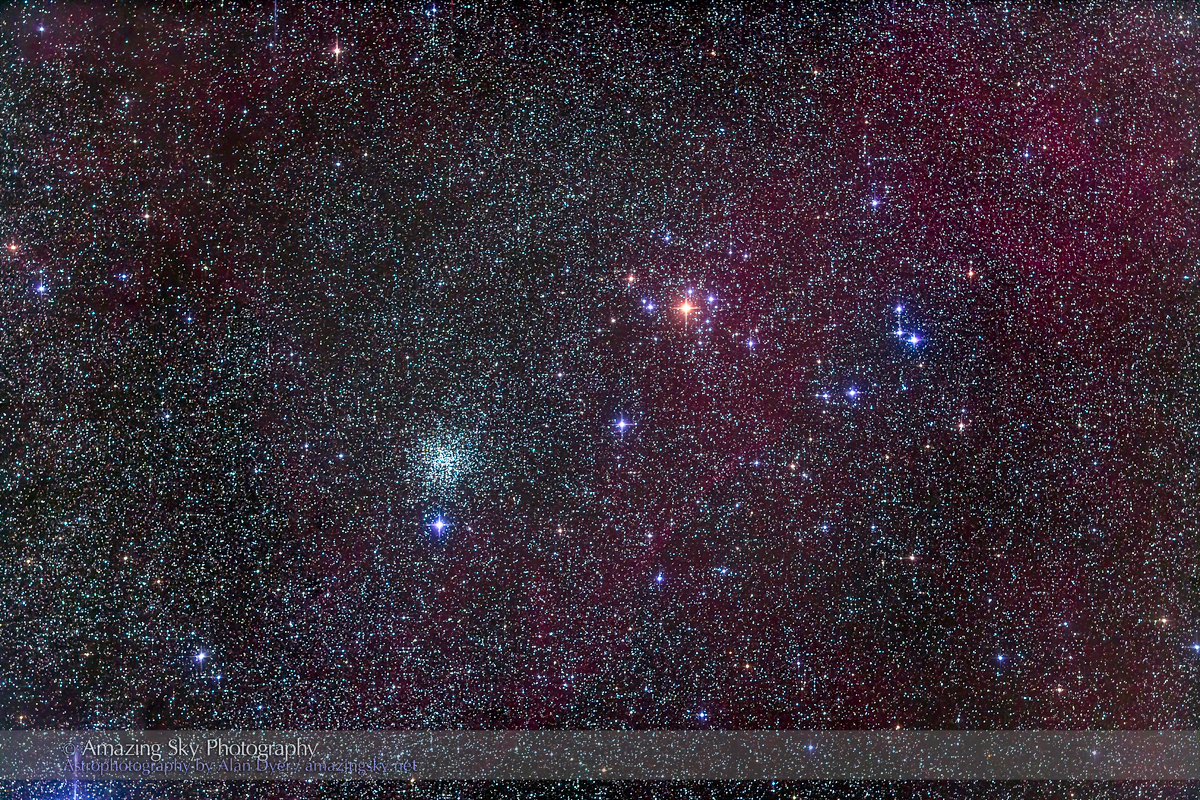
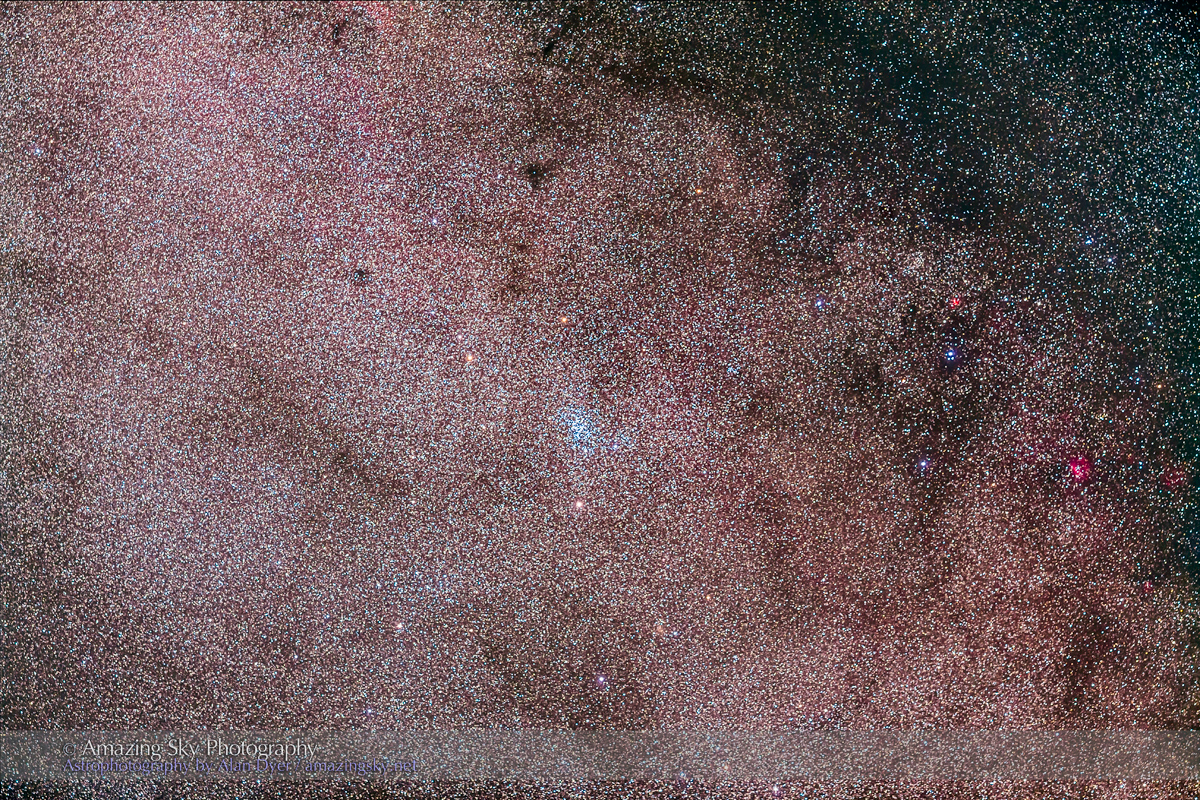
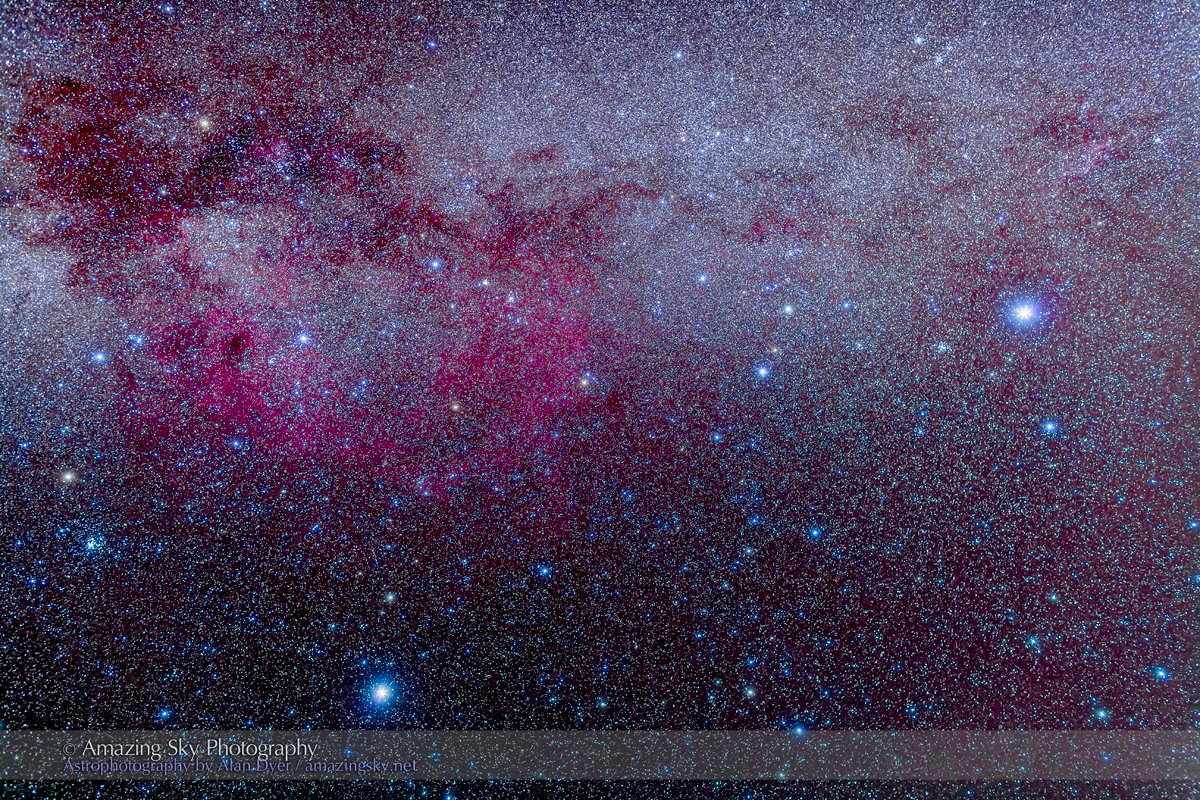

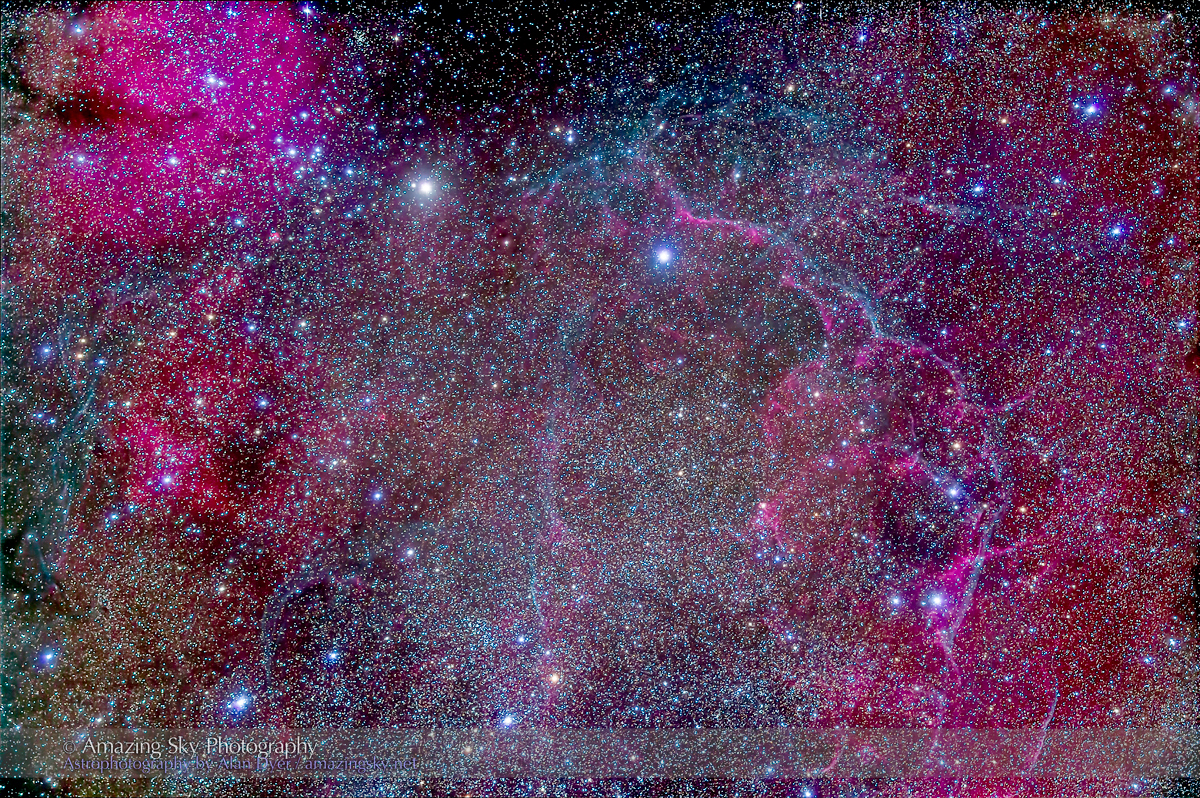

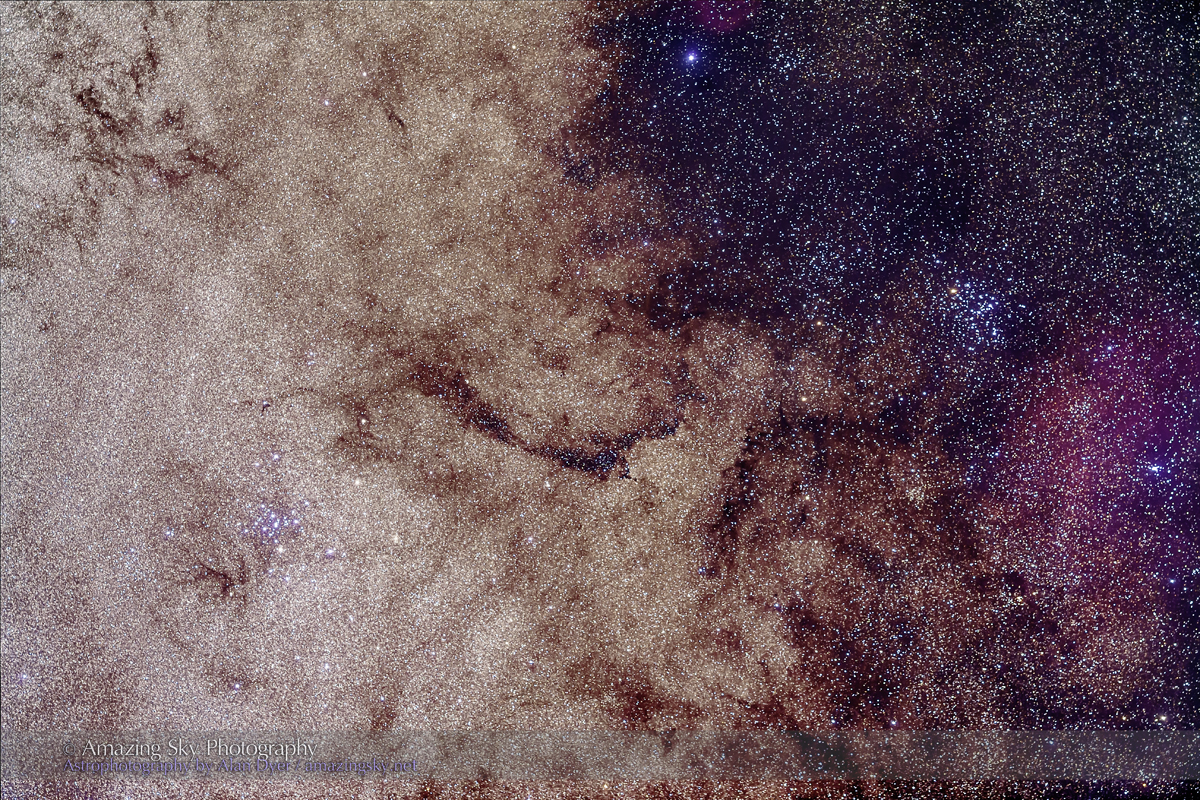
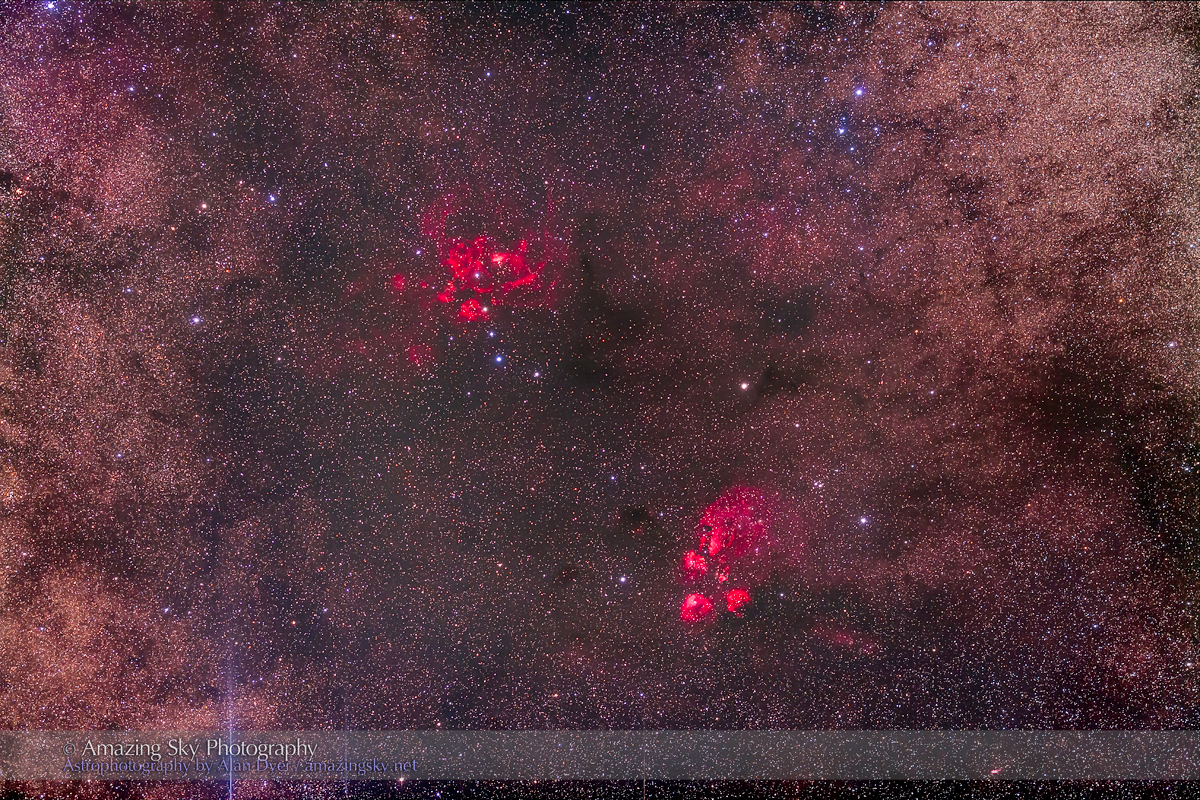
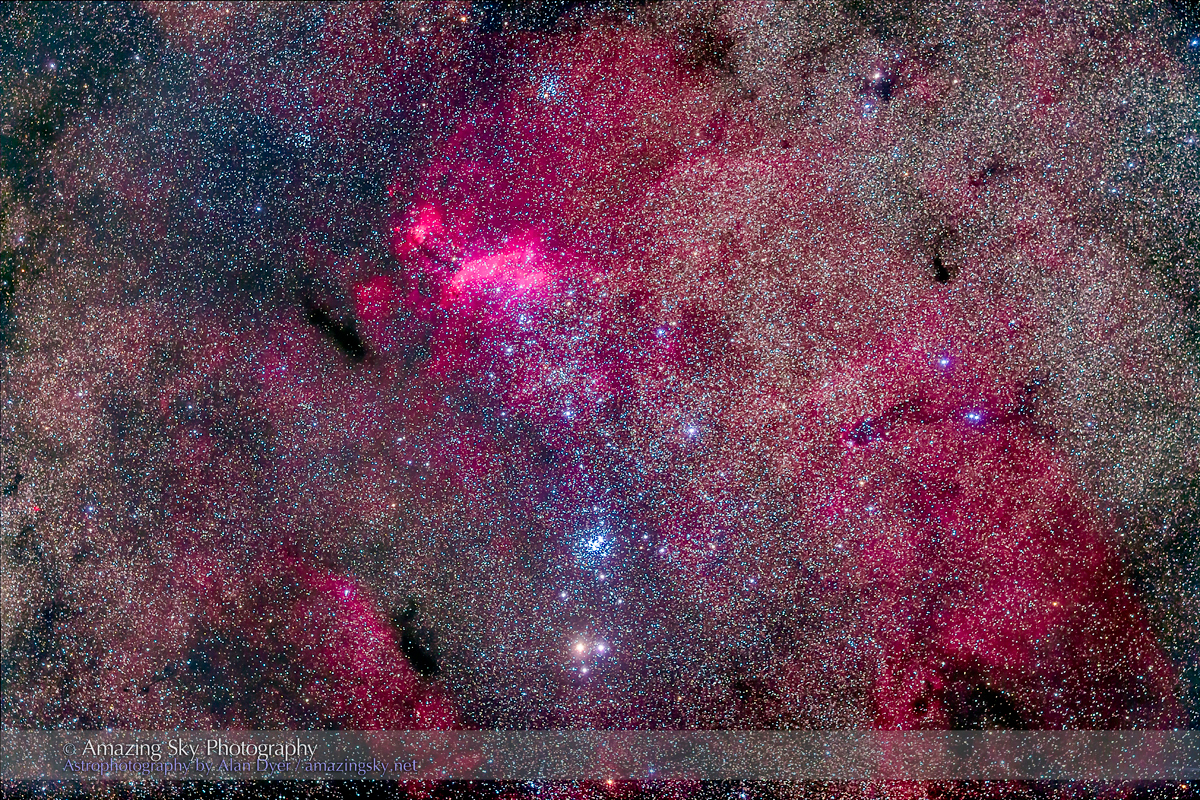
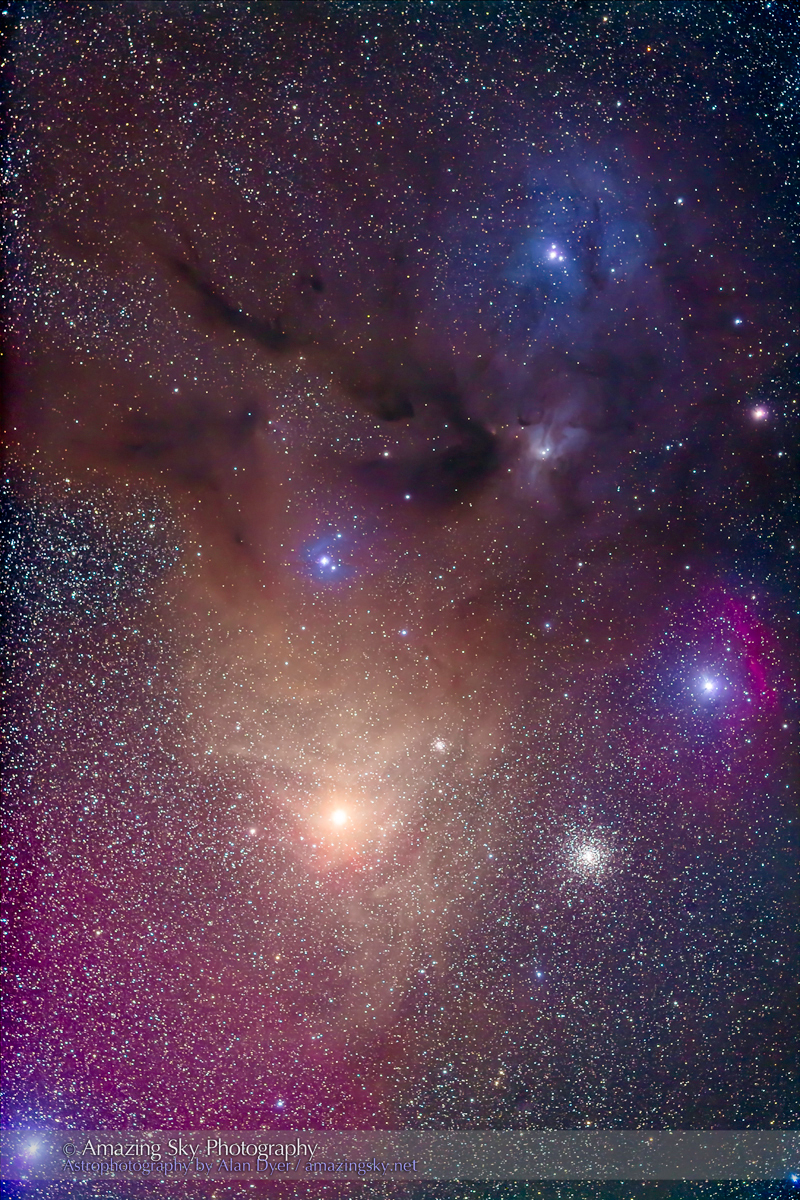
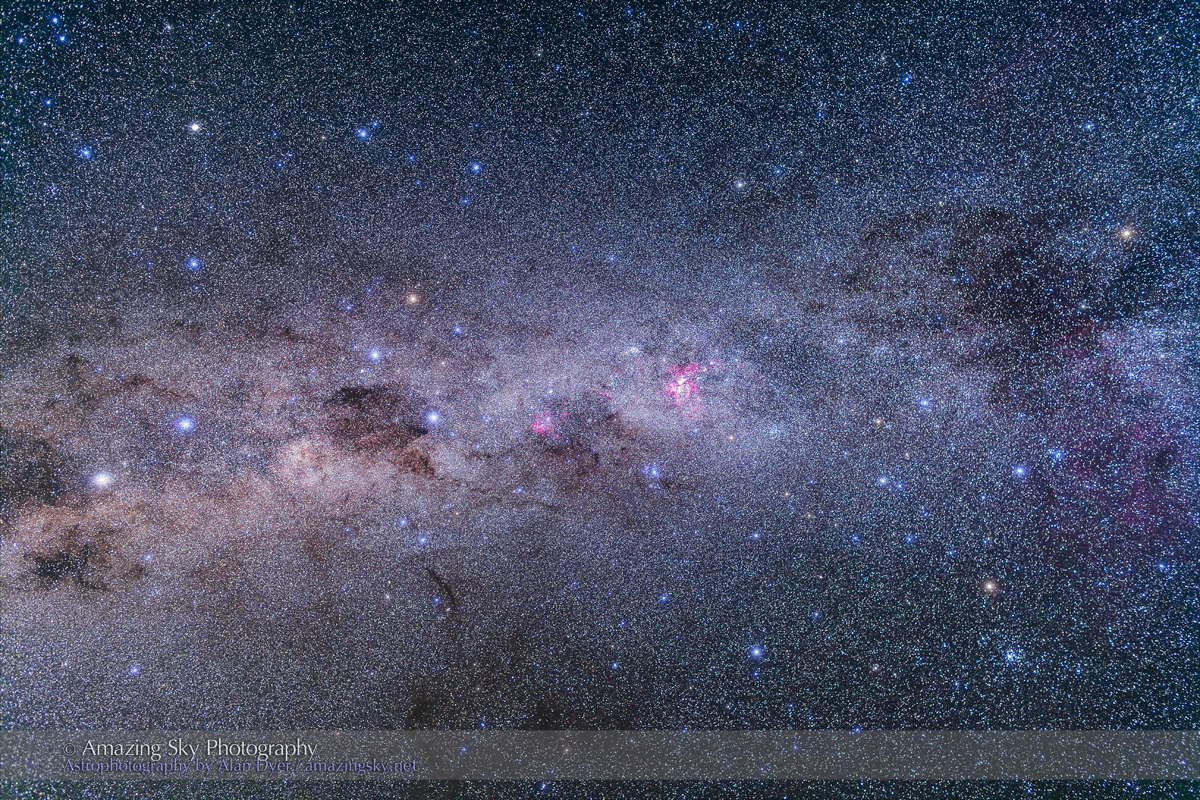
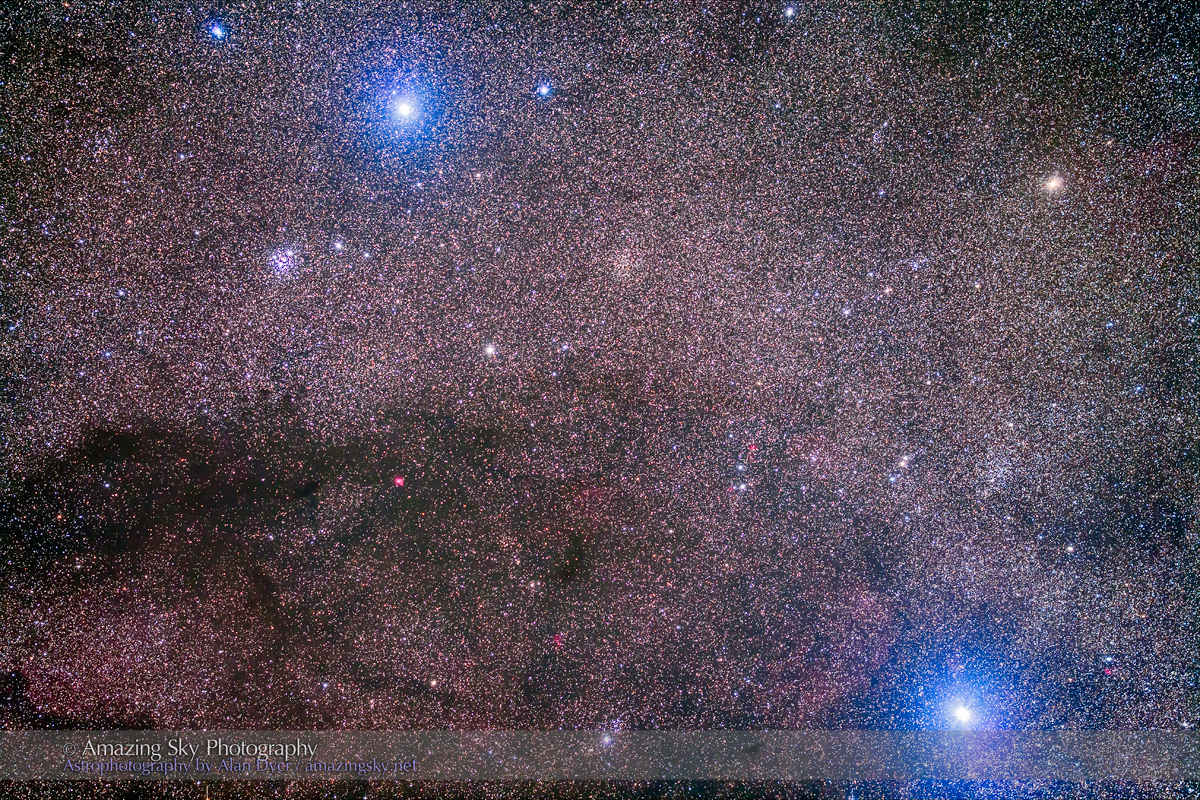

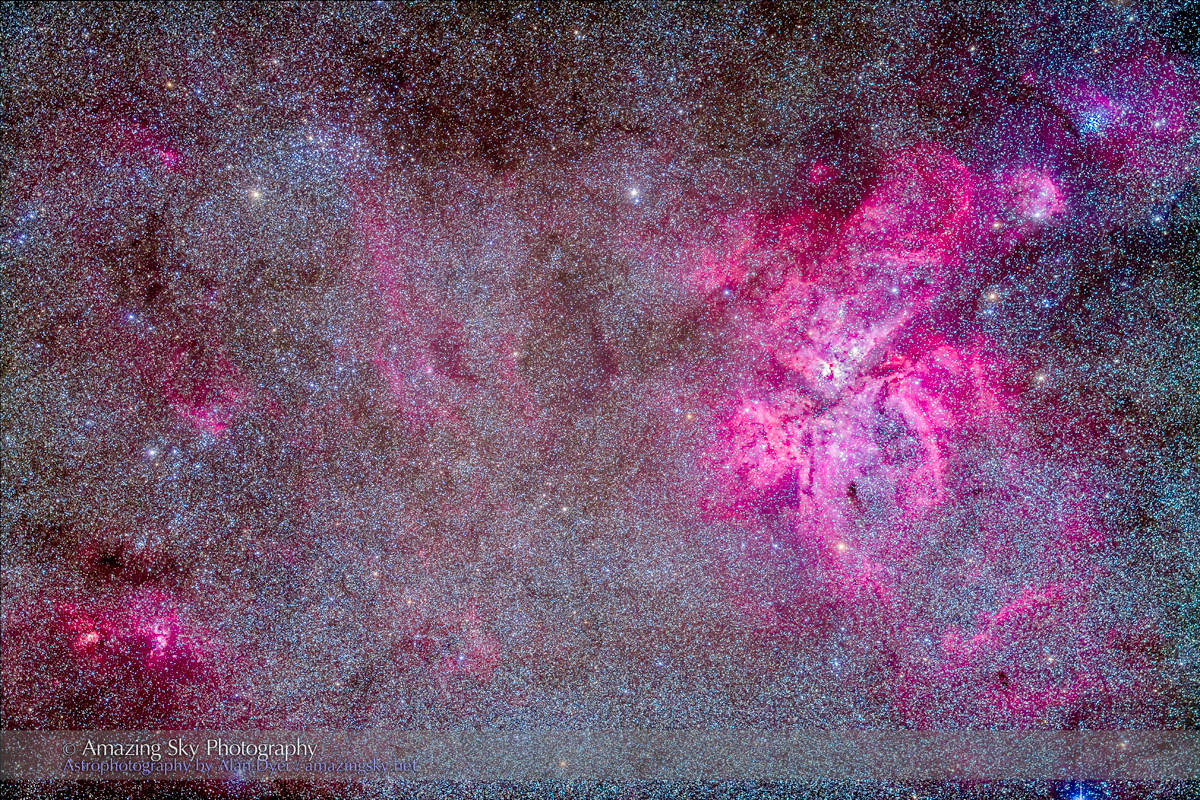


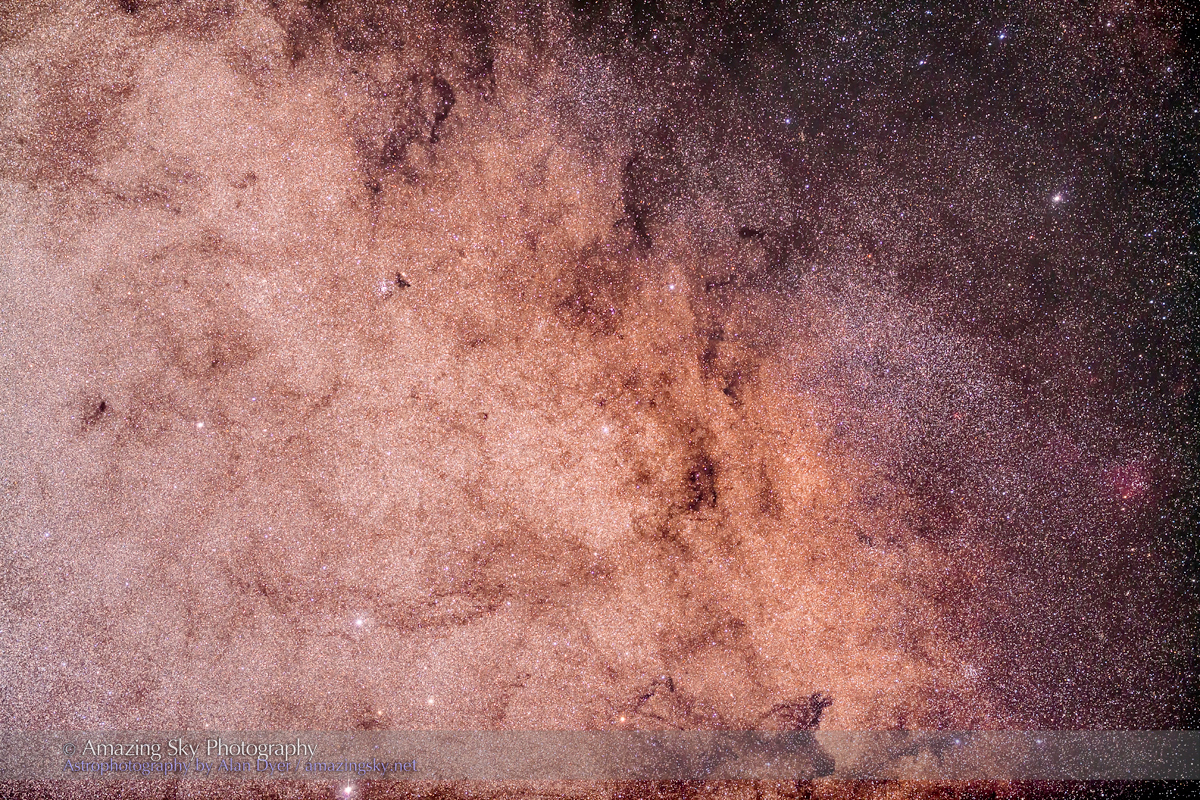
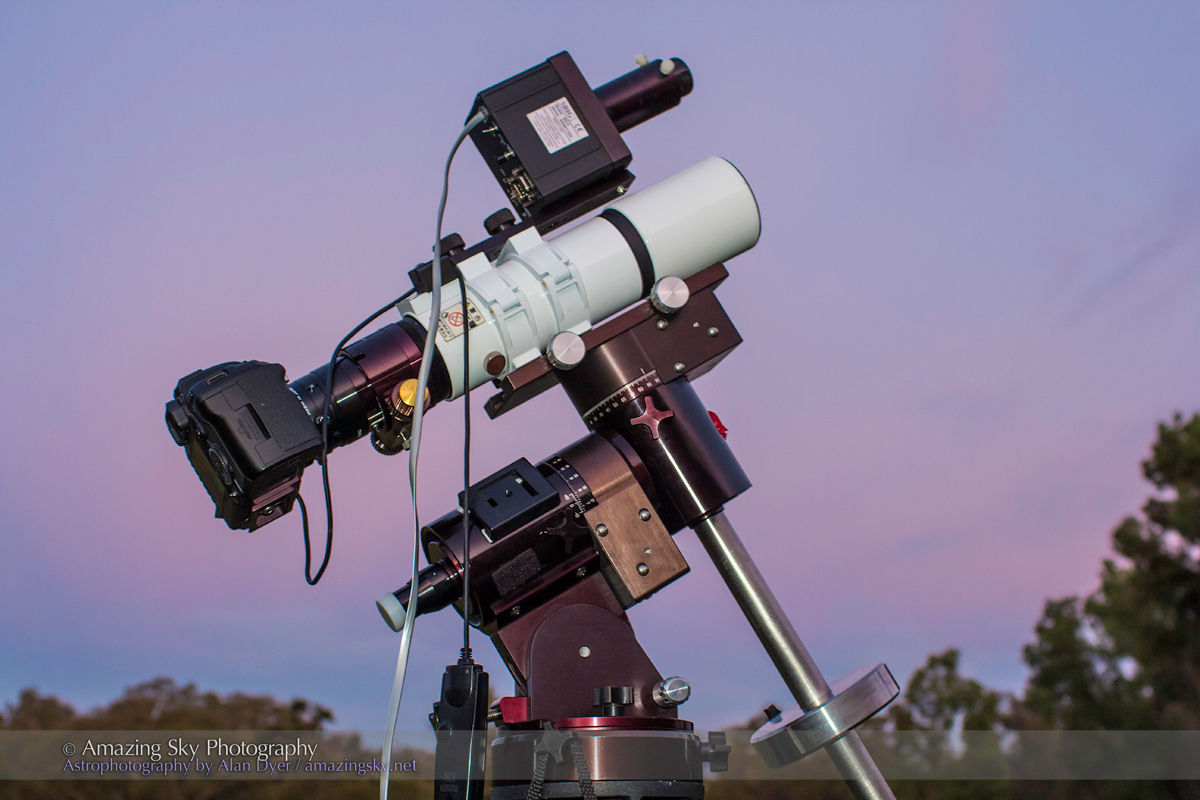
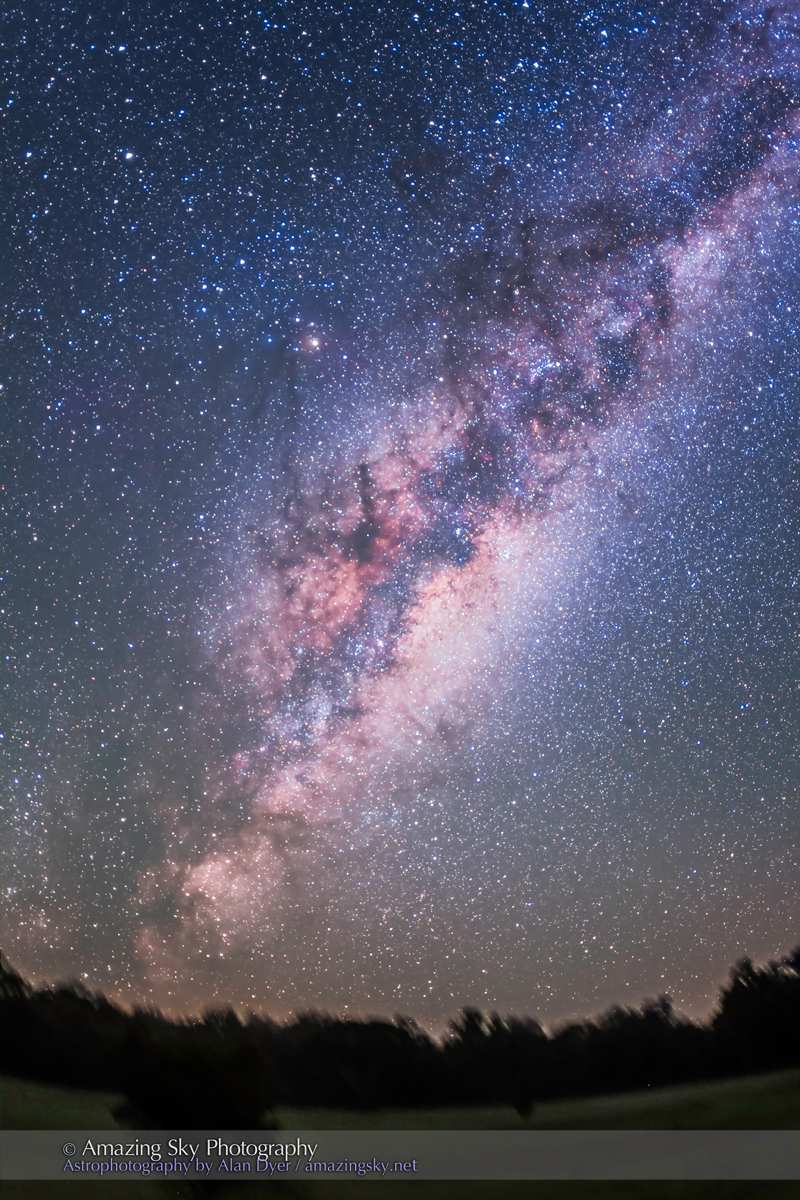
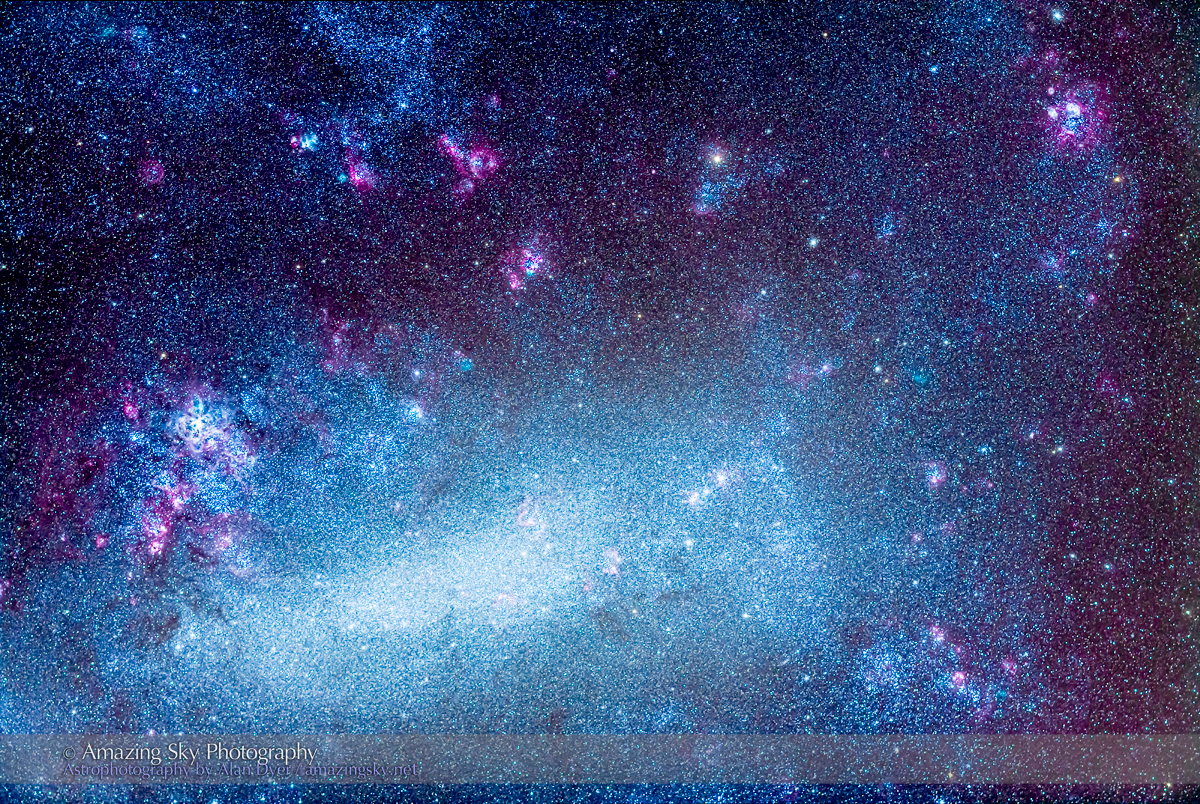

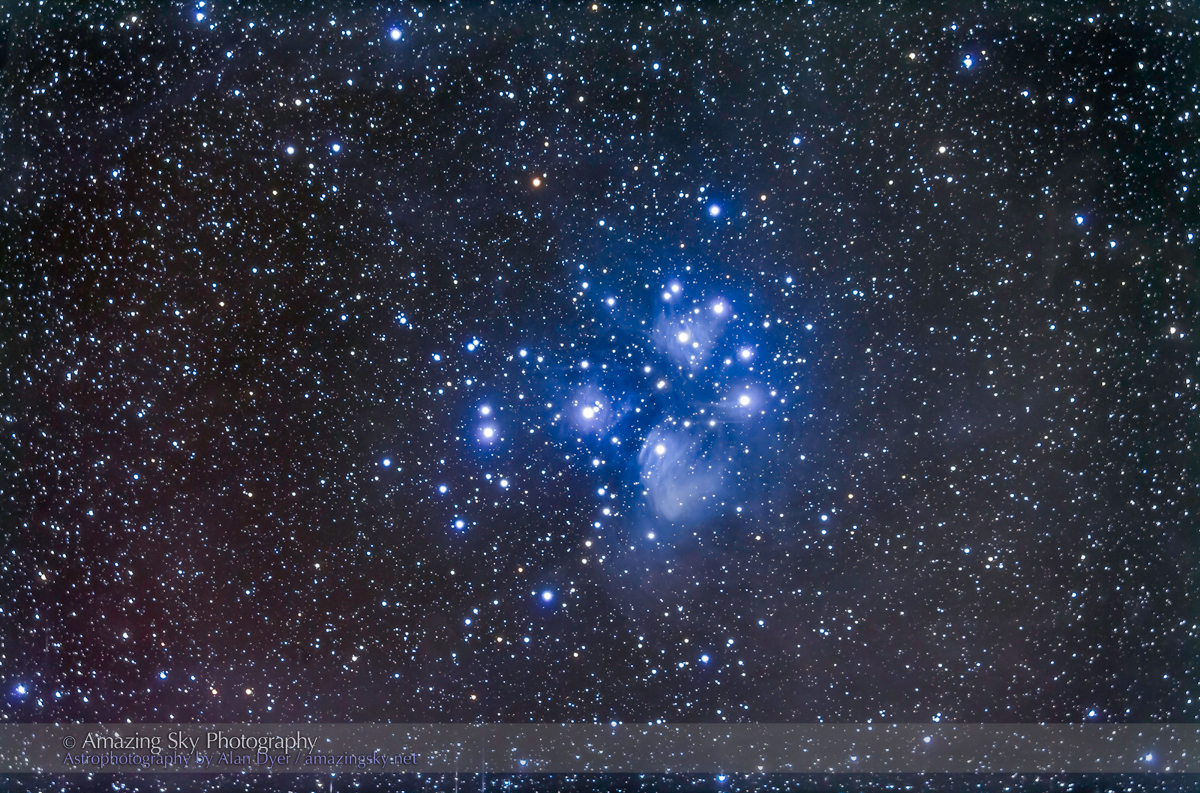
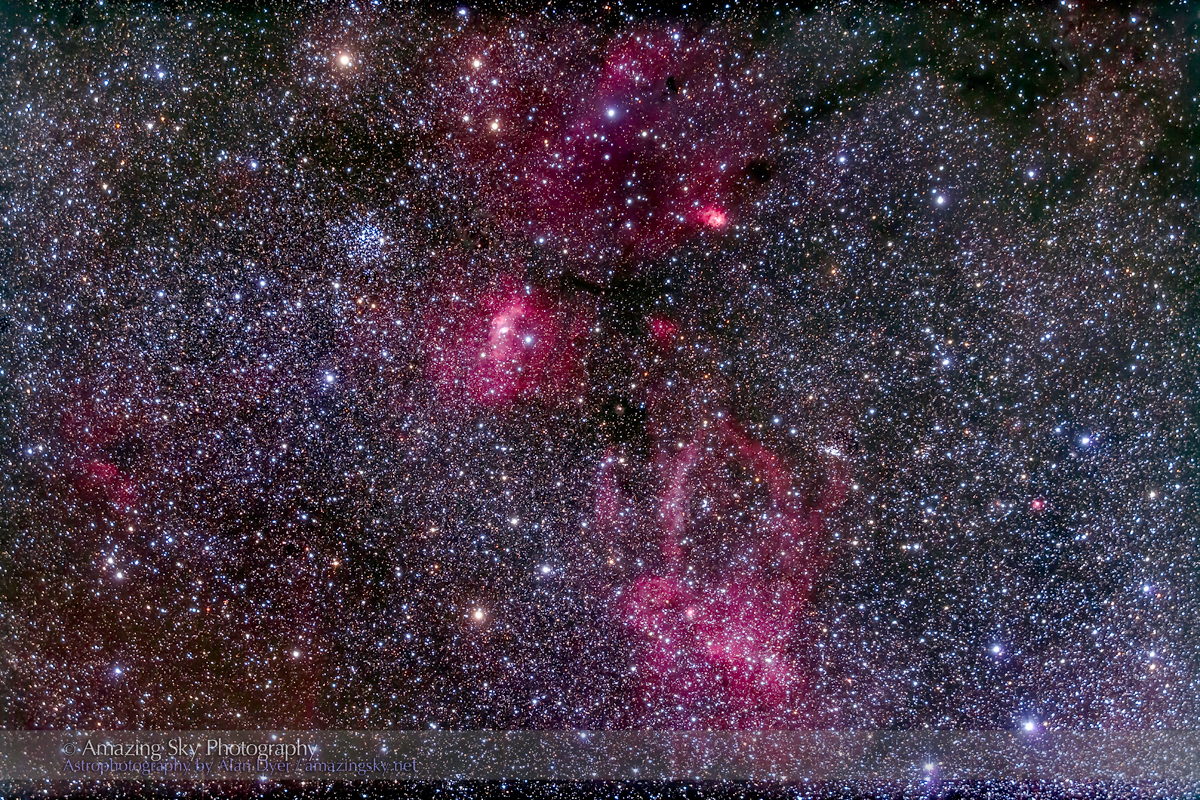


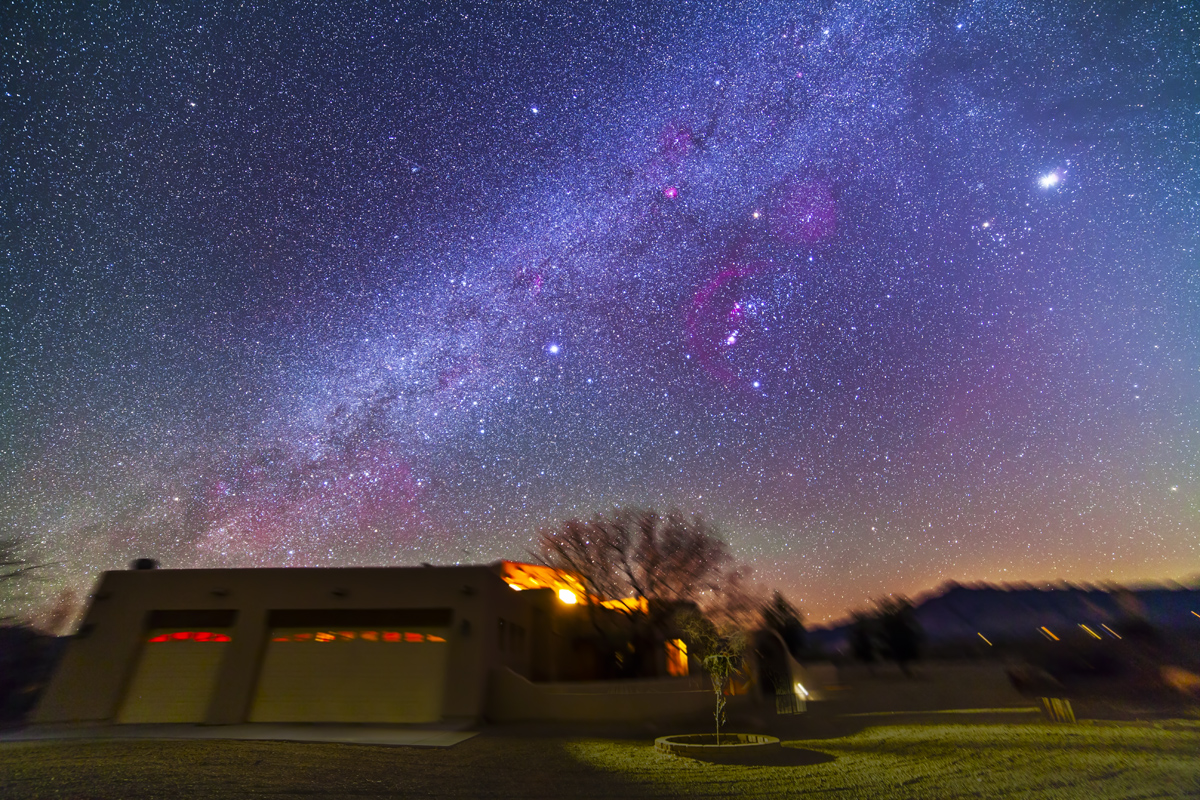

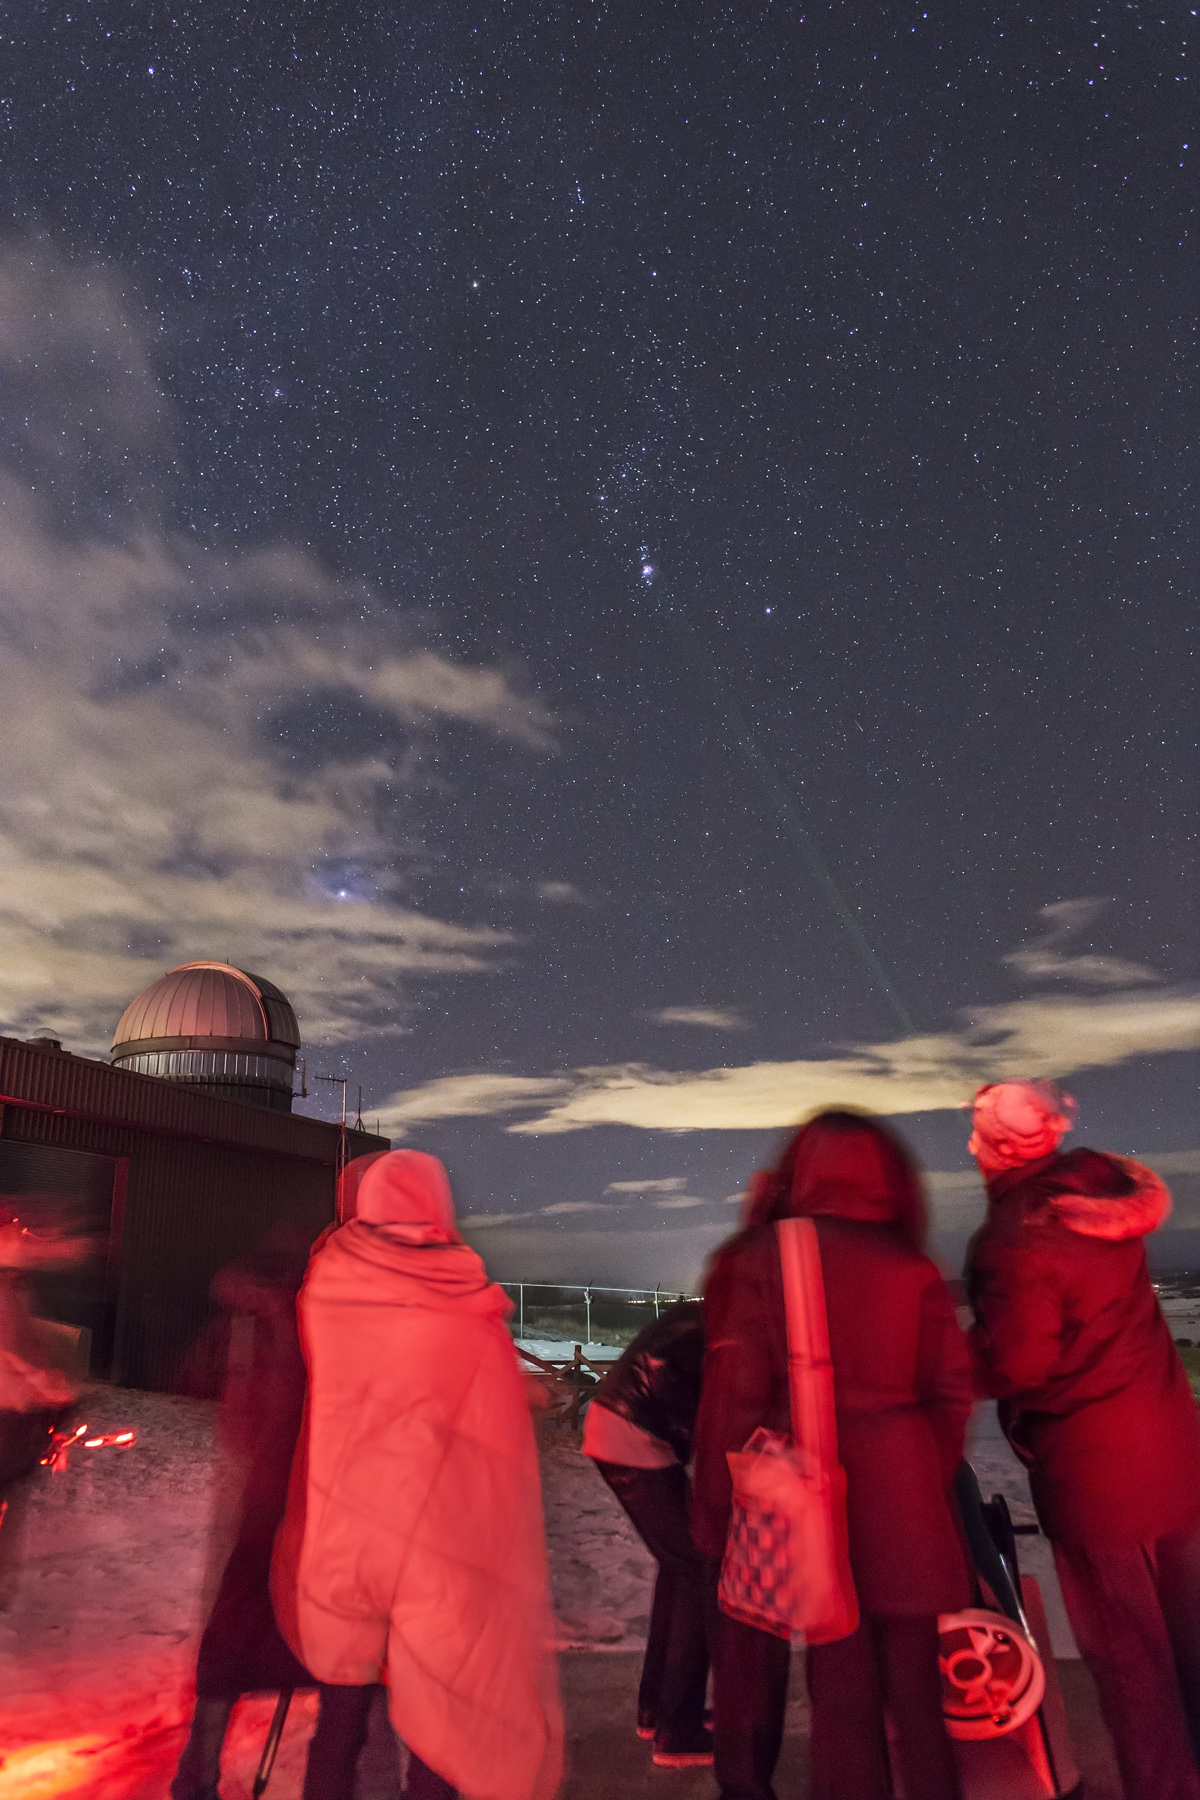


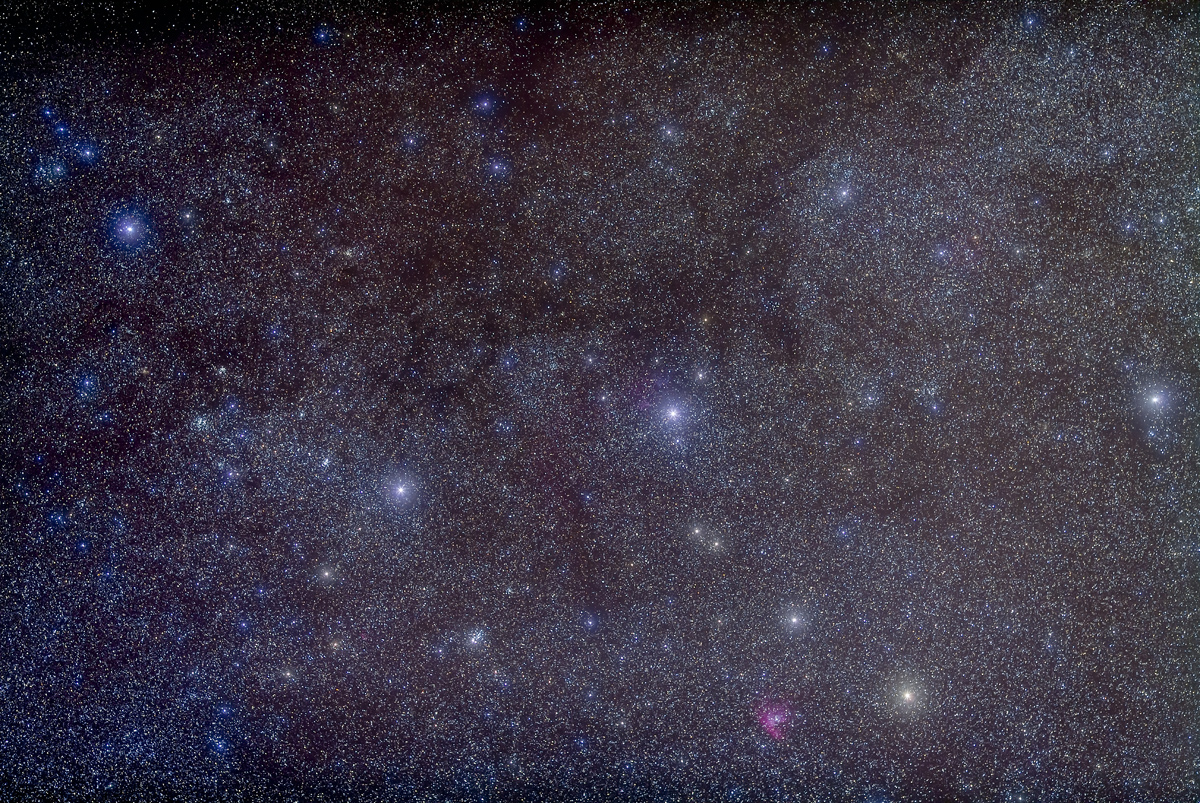


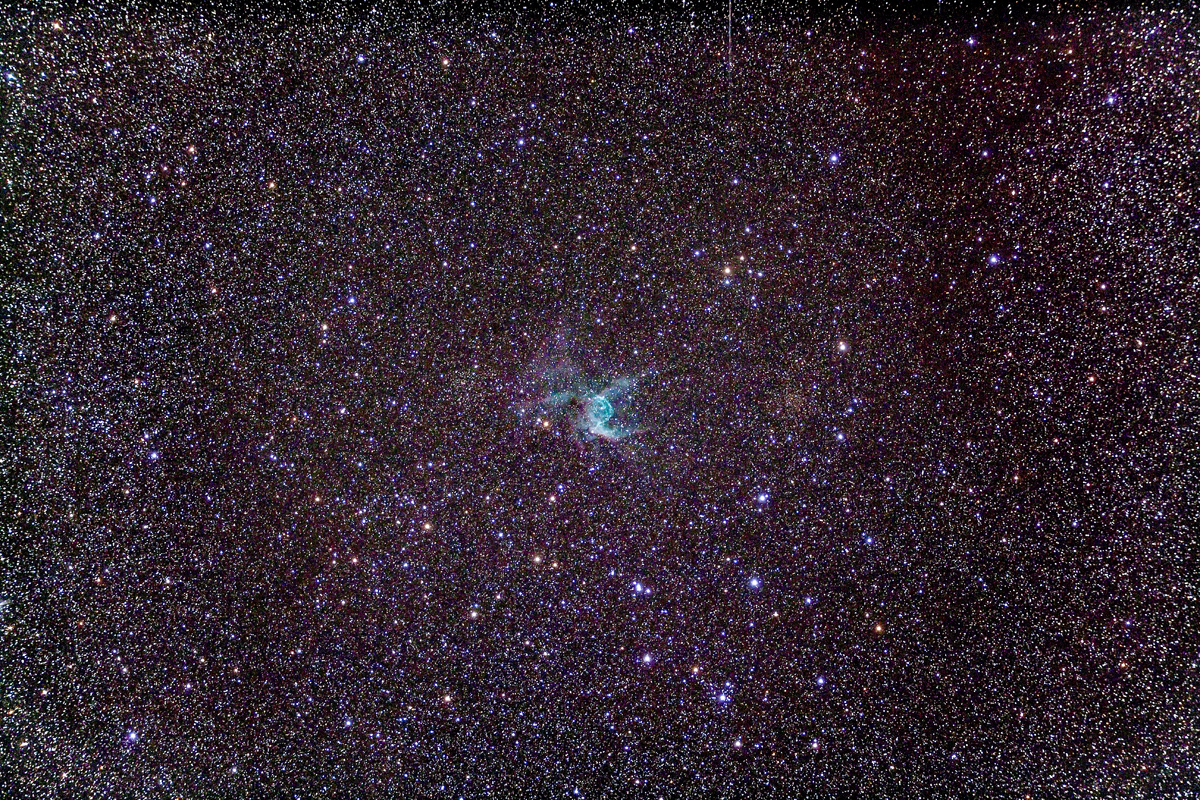

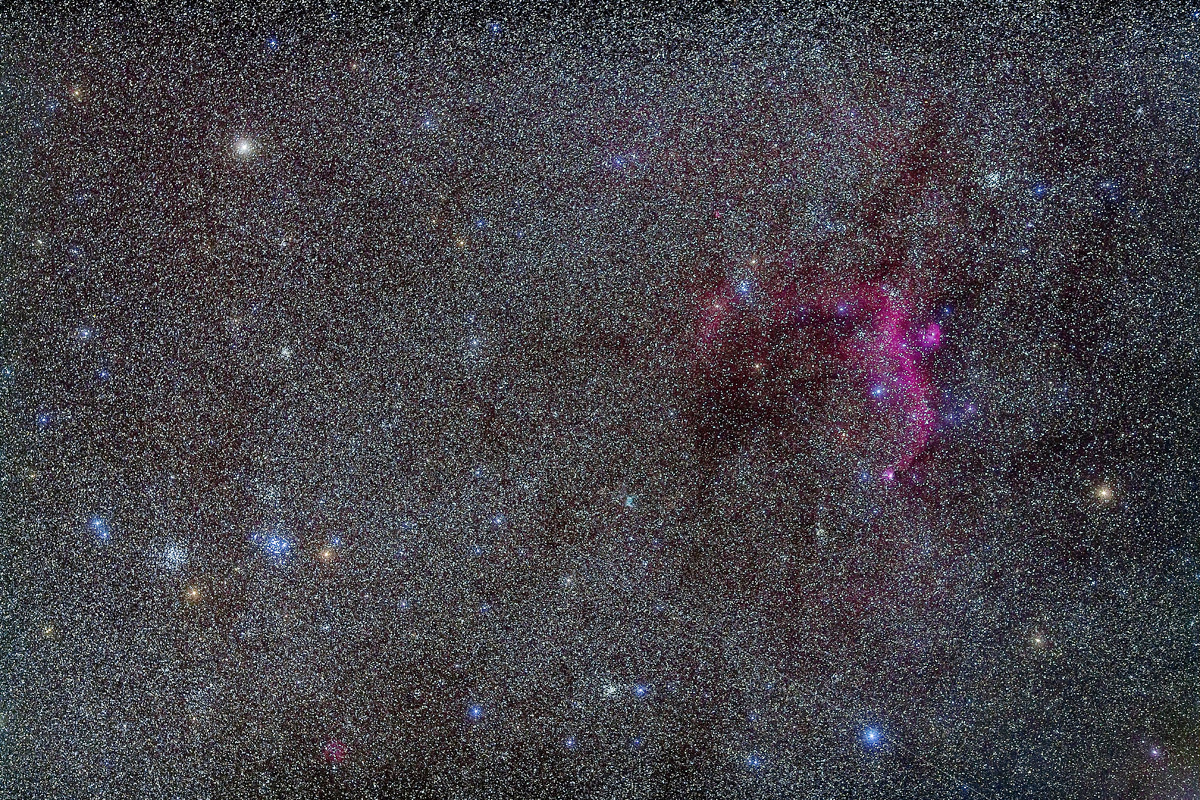


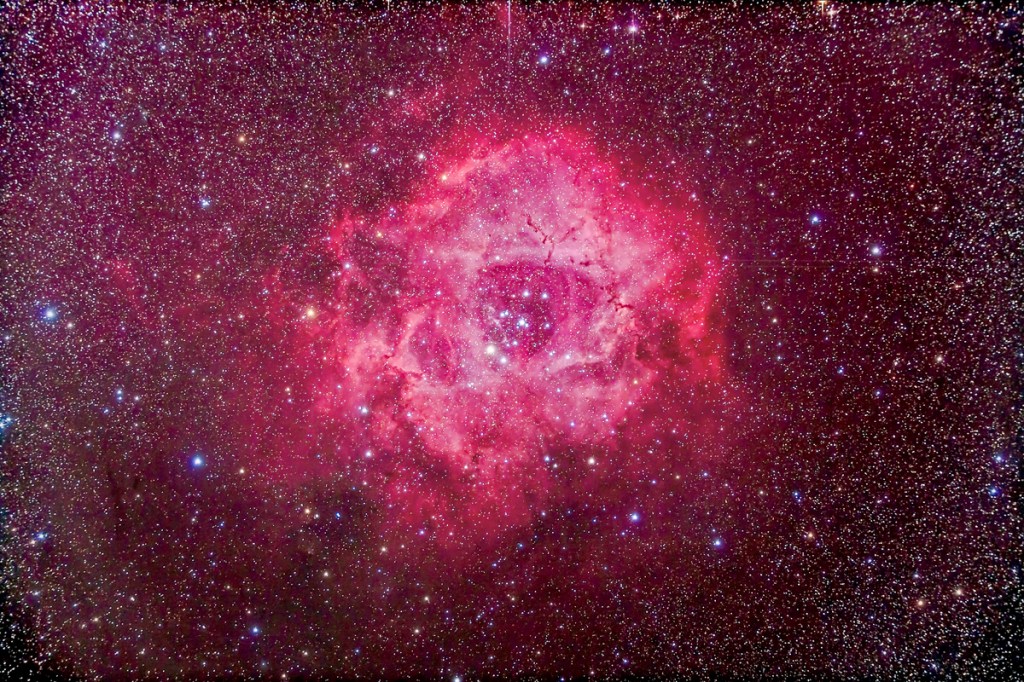

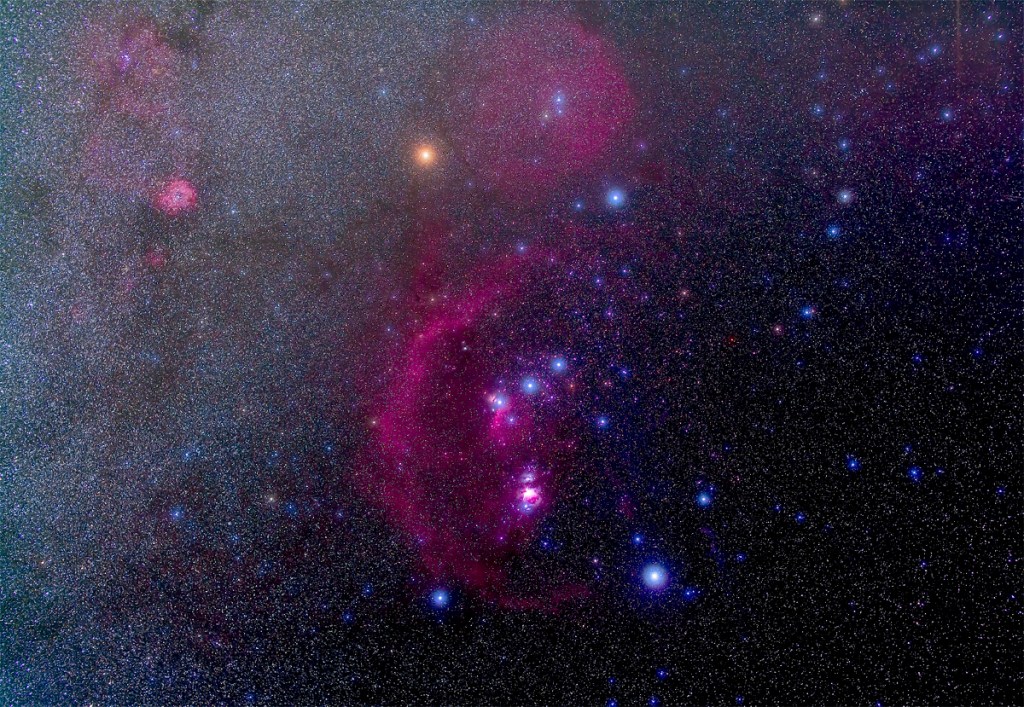


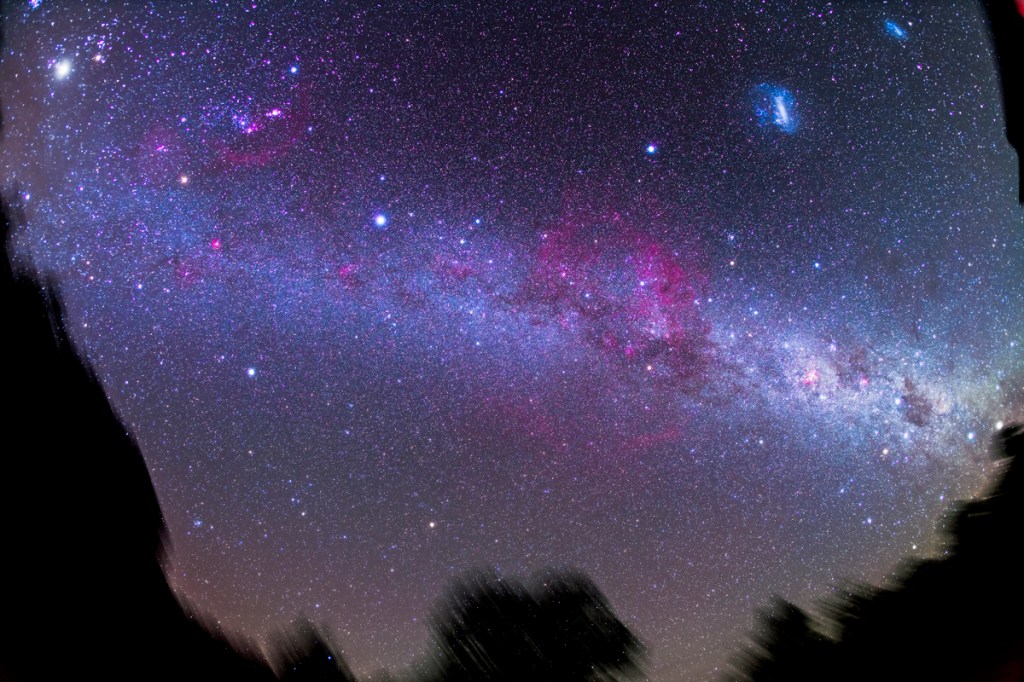


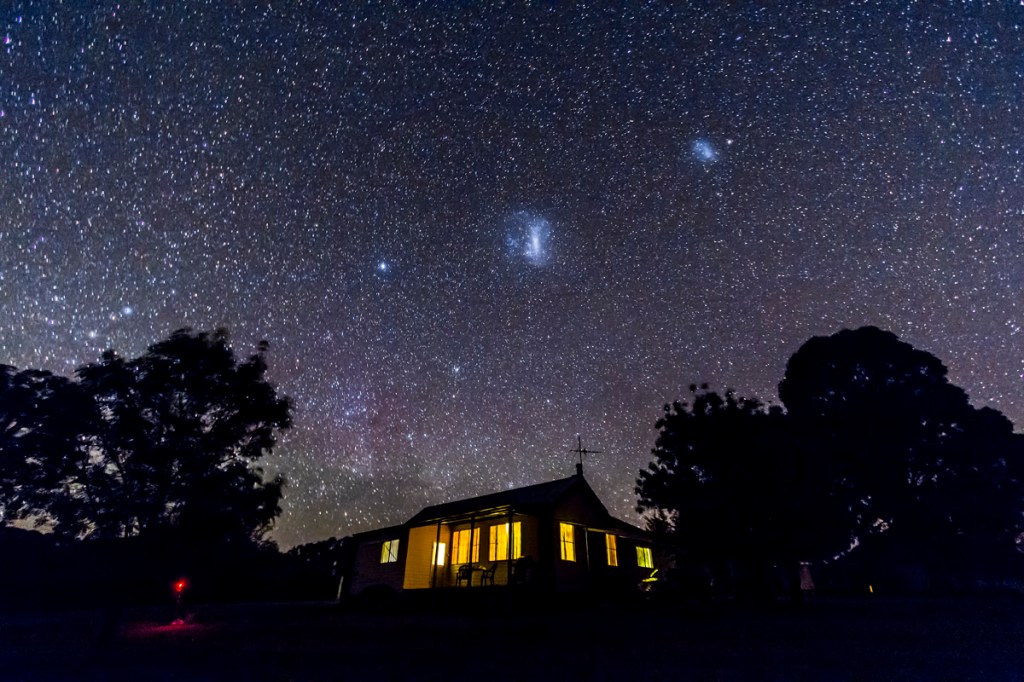

")


")

")


 & M15")
 and Crescent Nebula (NGC 6888)")


")


")


