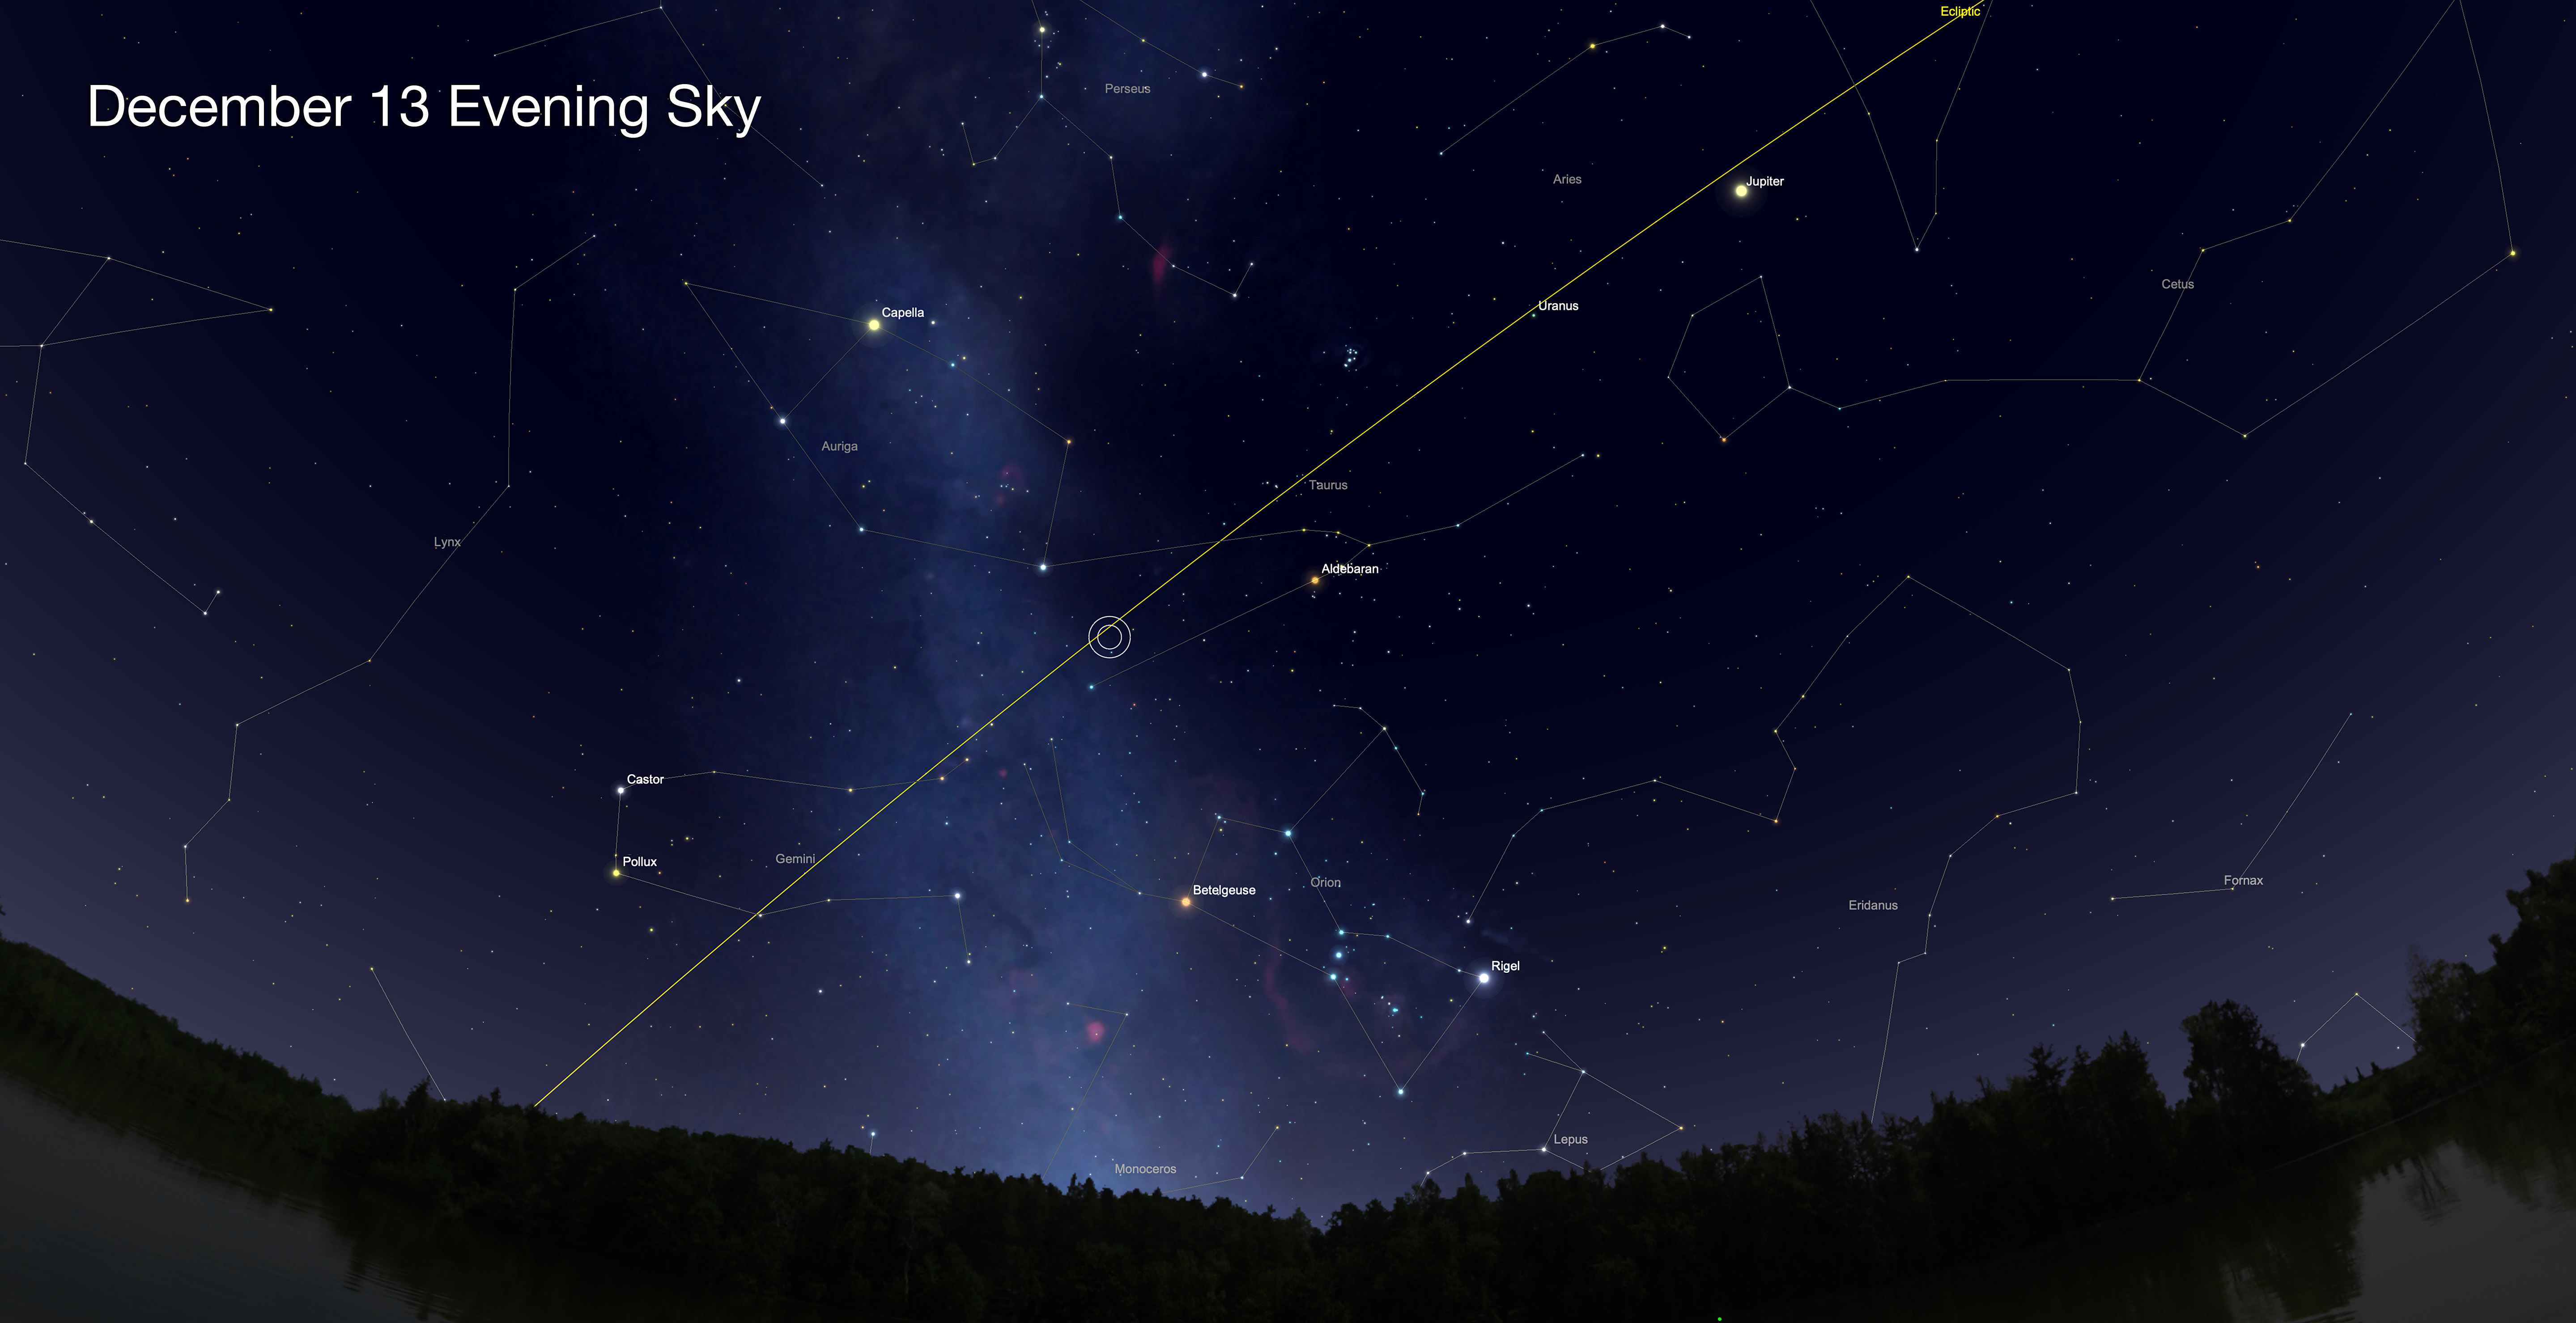
A run of exceptionally clear nights allowed me to capture scenes of stardust along the MilkyWay.
Colourful nebulas – clouds of glowing gas – are the most popular targets in the deep sky for astrophotographers. Most nebulas emit red light from hydrogen atoms. Some glow blue by reflecting the light of nearby hot stars.
But another class of nebulas emits or reflects almost no light, and appears dark, often as shapes silhouetted against the bright starry background. They are usually made of obscuring interstellar dust – typically grains of carbon soot emitted by aging or active stars – literally stardust.
In the olden days of film photography, these dark dust clouds always appeared black in our exposures. Or they never showed up at all.
But today’s digital cameras, with the aid of processing techniques, can capture the dust clouds, often not as black clouds, but as pale blue tendrils, or as brownish-yellow streamers faintly glowing with a warm light.
In October and November 2023, a series of unusually clear and mild nights allowed me to go after some of these dark and dusty targets, from my home in rural southern Alberta, Canada. I captured a selection of scenes off the beaten track along the Milky Way. Here’s my tour of stardust sights in the northern autumn and winter sky.
Cepheus the King
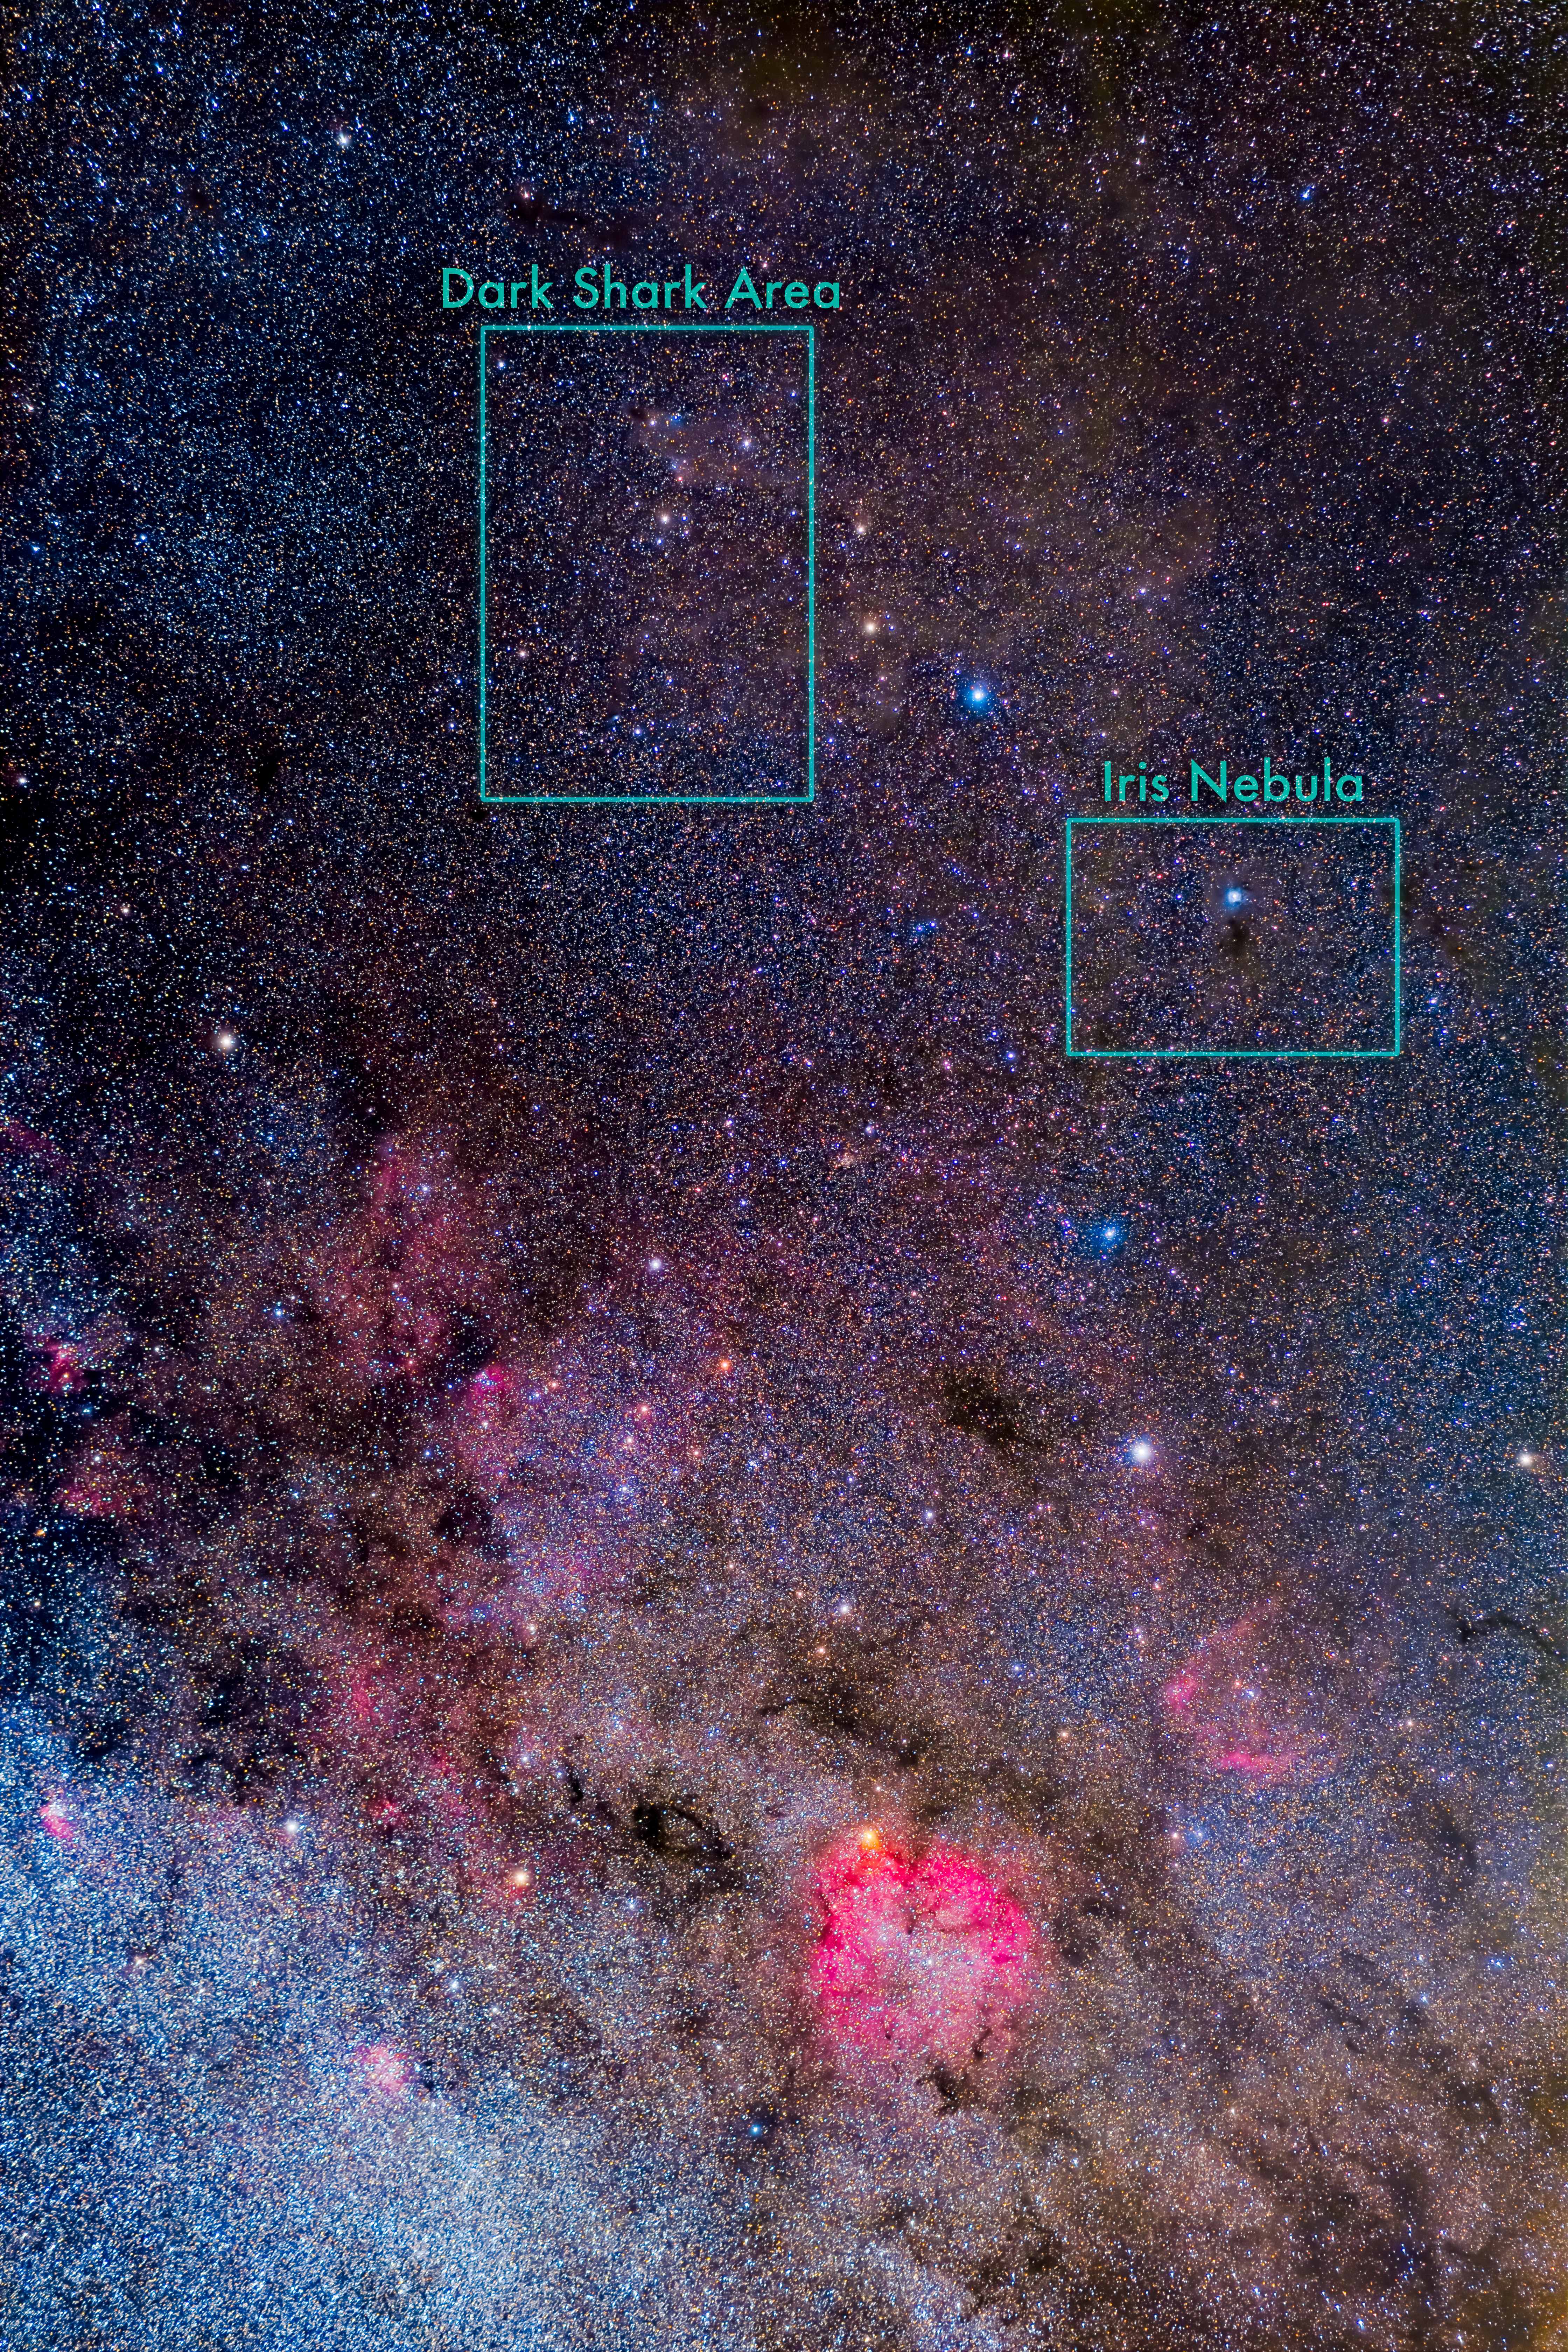
This is a portrait of most of the northern constellation of Cepheus the King. All the wide-field images were shot and processed to emphasize the rich collection of bright and dark nebulas in the constellation. North is always up. This is a stack of 40 x 2-minute exposures with the rare Samyang RF85mm f/1.4 lens stopped down to f/2.8, on the Canon EOS Ra camera at ISO 800. The lens was equipped with a 77mm Nisi Clear Night broadband filter. For all the wide-field images the camera was on the Star Adventurer 2i tracker for tracked but unguided exposures.
The wide-field image above frames most of the northern constellation of Cepheus. The southern section of Cepheus at the bottom of the frame lies in the Milky Way and is rich in bright red nebulas, notably the large, round IC 1396. It is a popular and easy target. But the northern upper reaches of Cepheus are where more challenging dusty nebulas reside. I’ve indicated the location of two fields shown in the close-ups below.
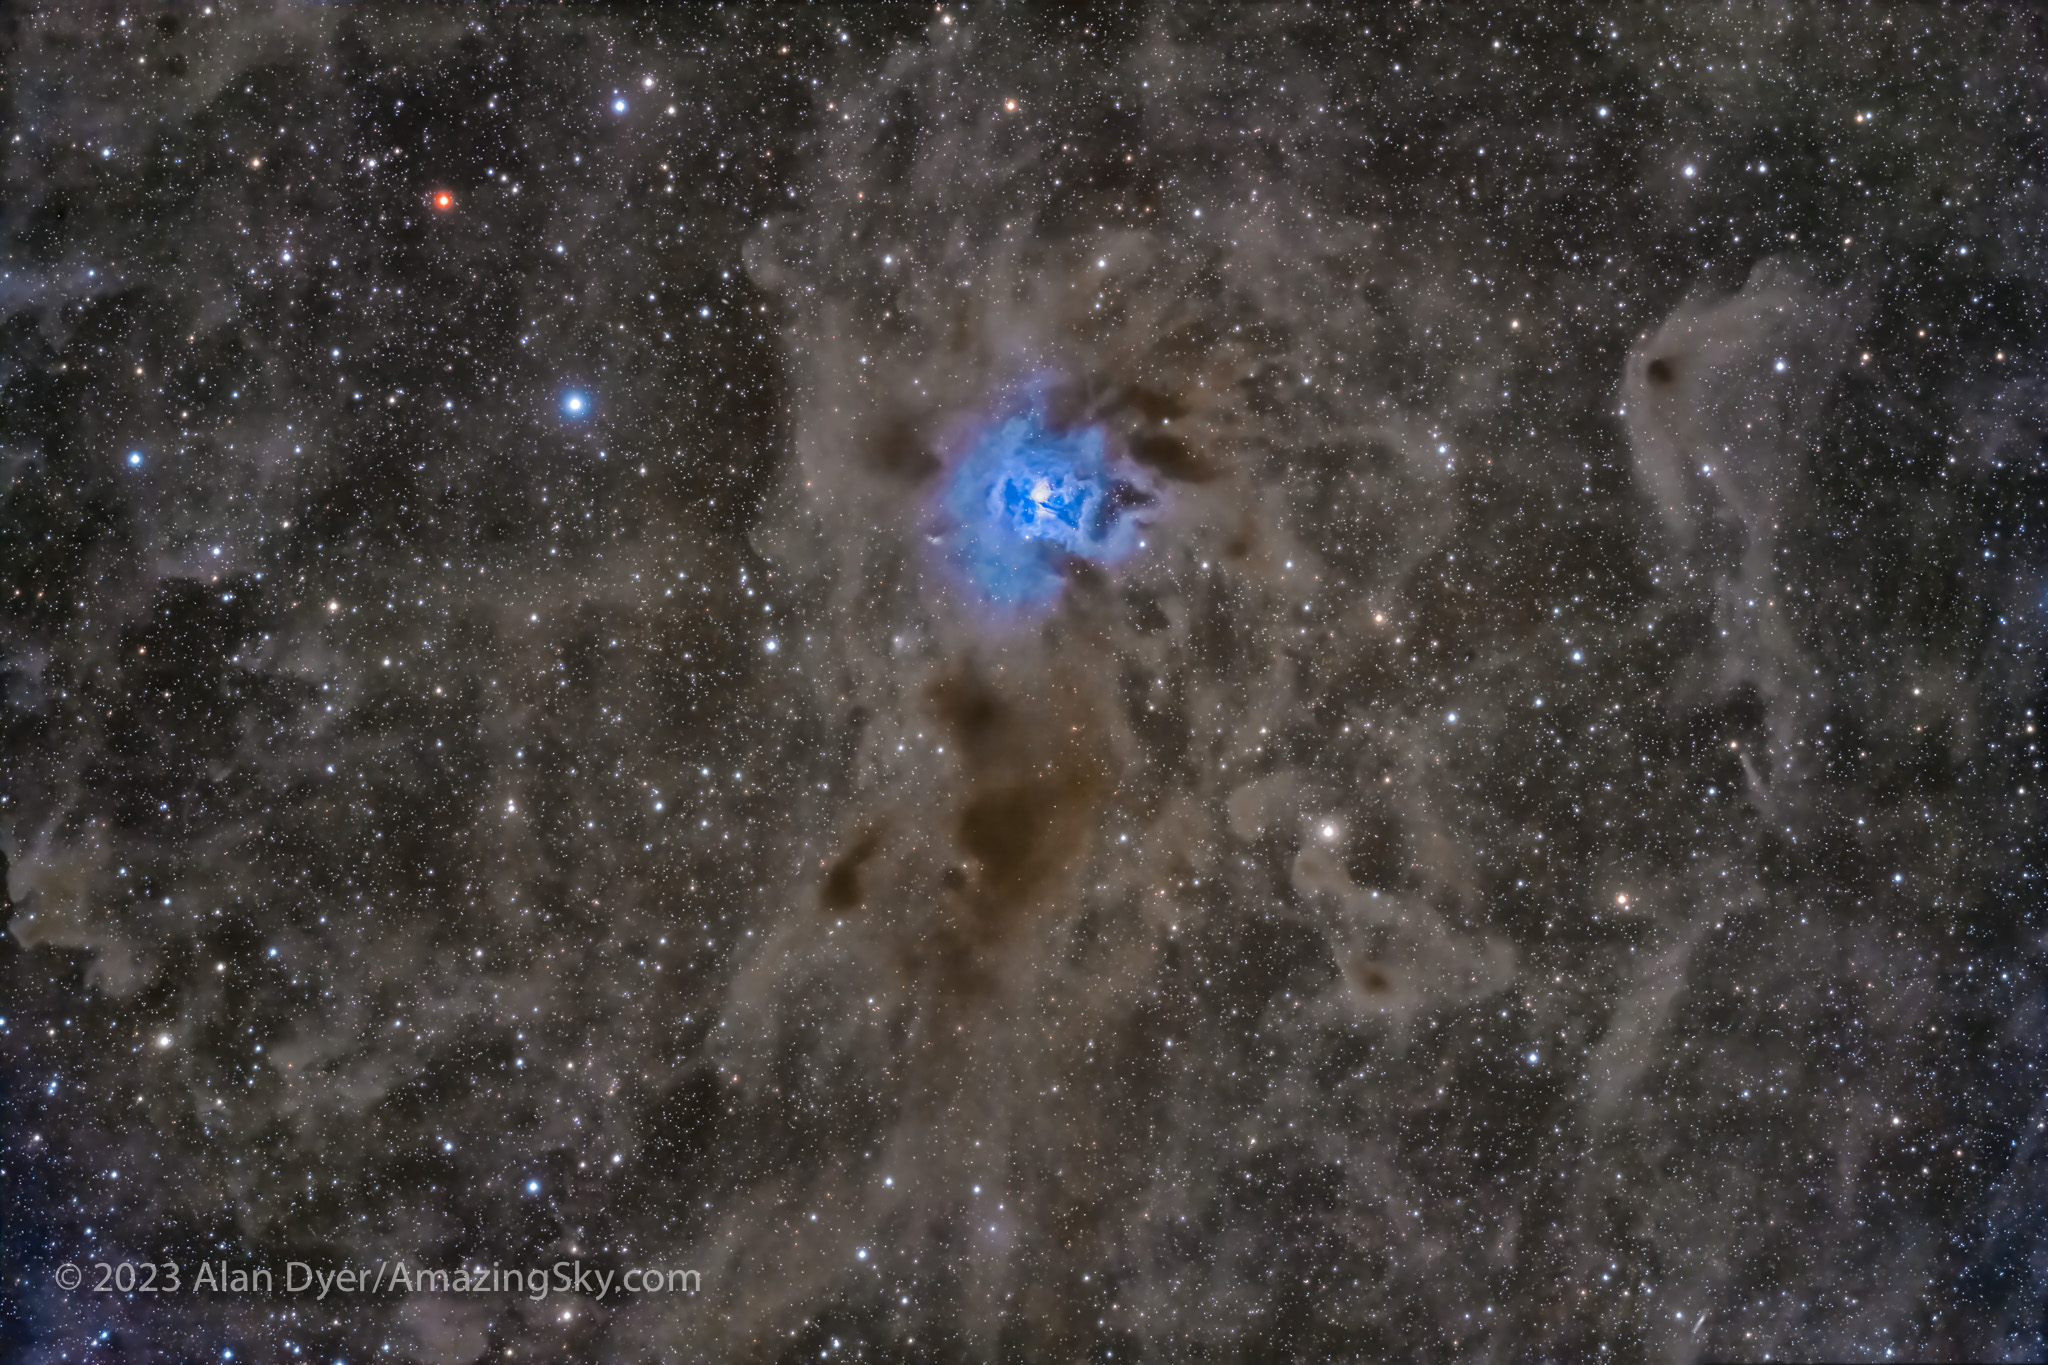
The Iris Nebula
This is the bright blue reflection nebula, NGC 7023, aka the Iris Nebula, in Cepheus. This is a stack of 25 x 8-minute exposures through the Askar APO120 refractor at f/7 with the 1X Flattener, and with the filter-modified Canon R camera at ISO 1600.
Located some 1300 light years away, this is a blue reflection nebula, as the dust is lit by the young blue star in its core. But surrounding the bright Iris Nebula are more extensive clouds of dust, dimly lit by reflected light and with varying densities and shades of grey and brown.
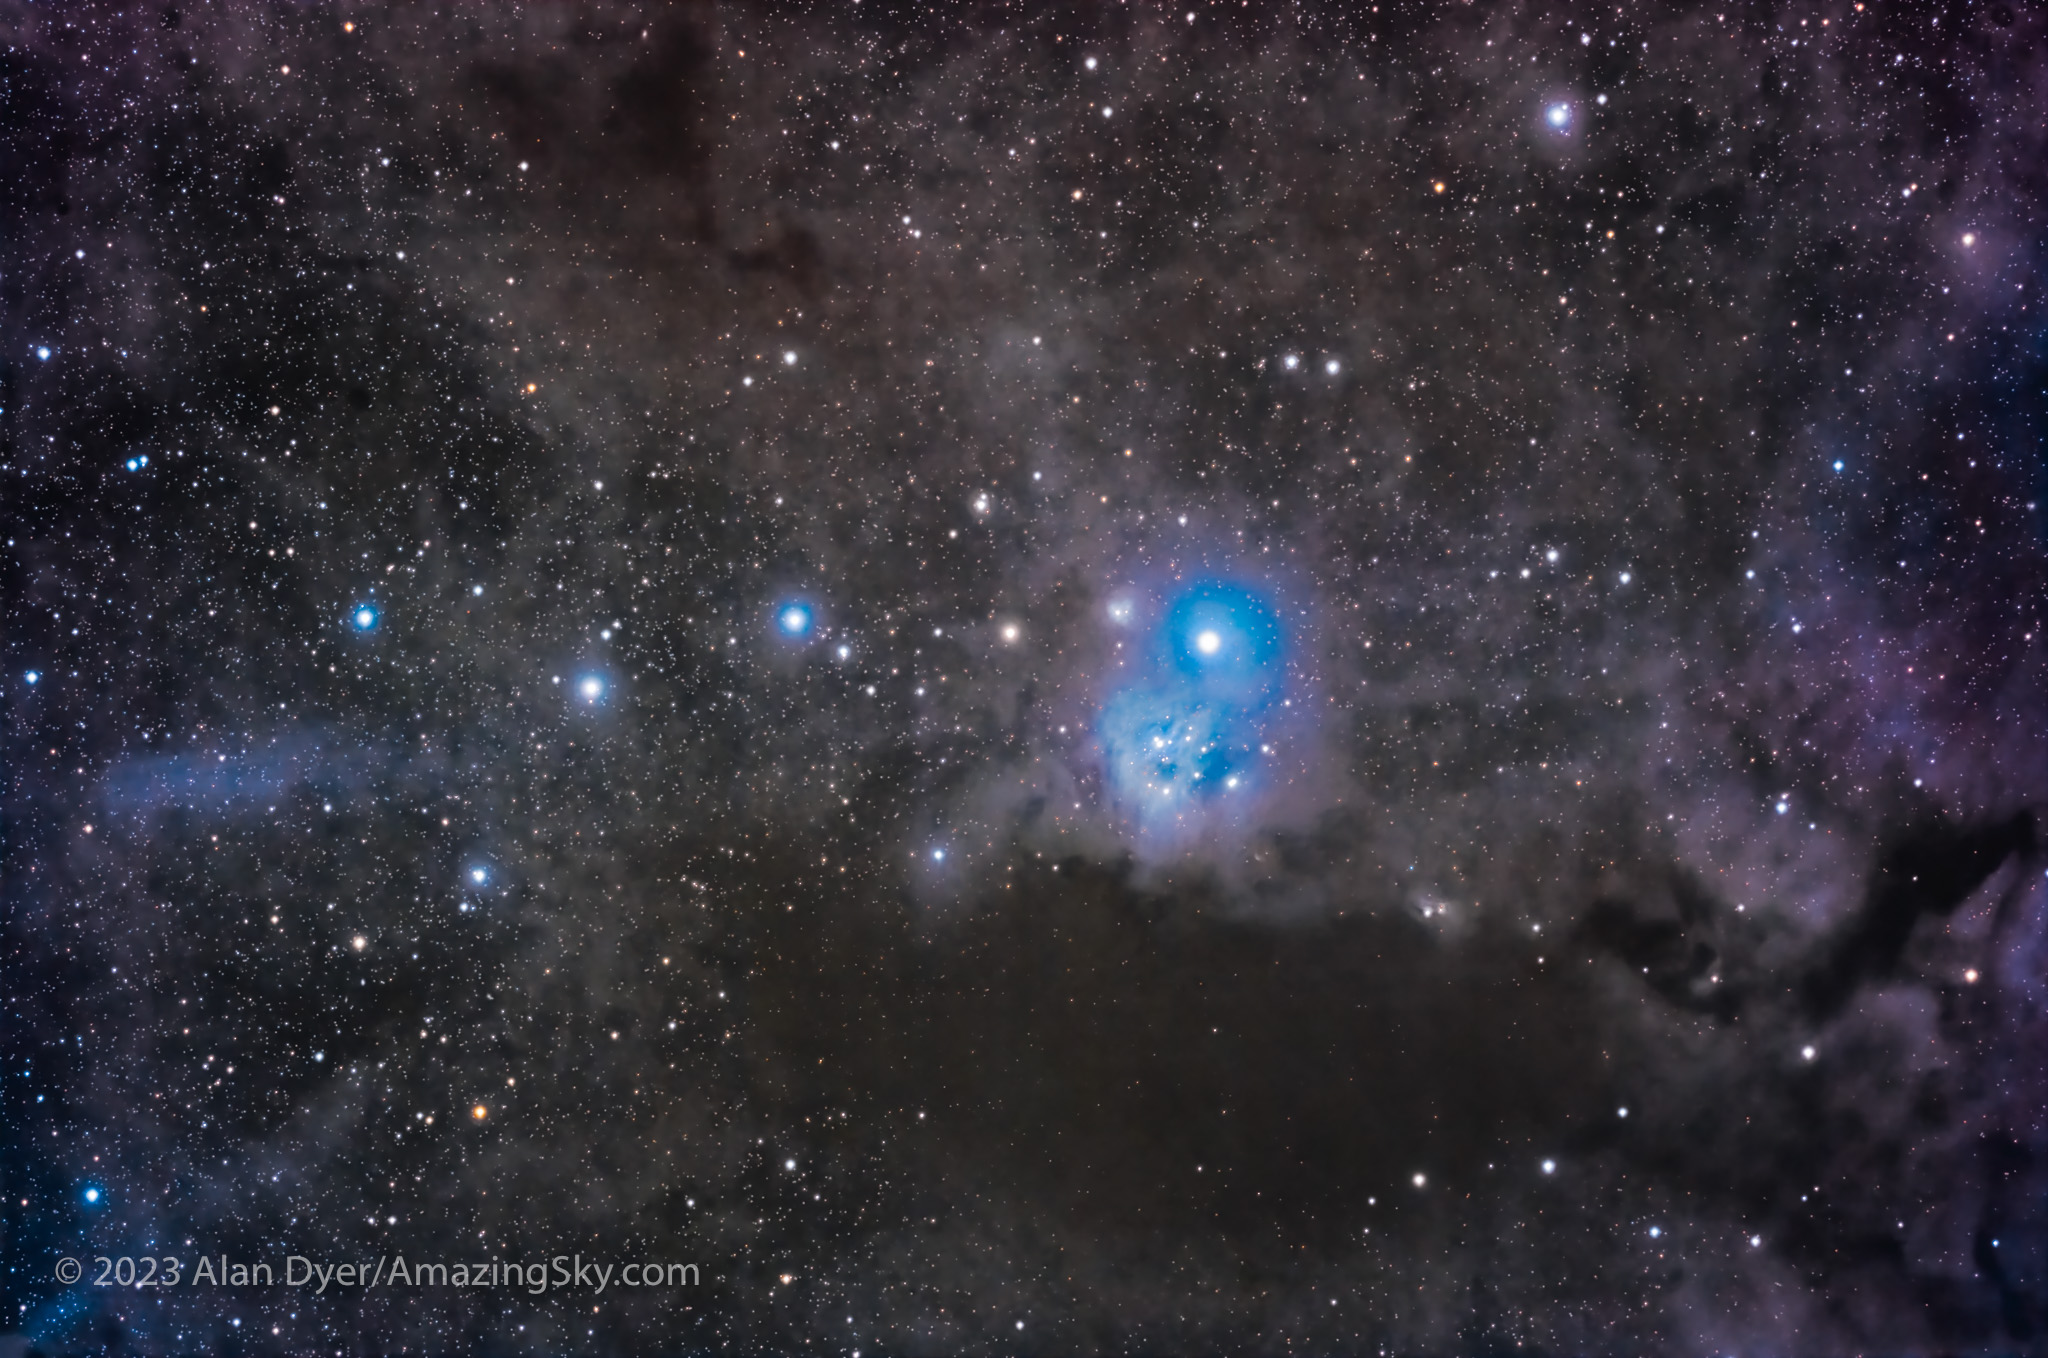
The Dark Shark and Wolf’s Cave Nebulas
This is a portrait of a field of dusty nebulas in northern Cepheus, in a stack of 30 x 6-minute exposures with the Astro-Tech AT90CFT refractor at f/4.8 and filter-modified Canon EOS R camera at ISO 800, though no filter was used when taking these frames.
This field in northern Cepheus is yellowed by reams of dust. A couple of blue reflection nebulas lie on the edges of streamers of brown dust. The object at top is called the Dark Shark, for its fanciful resemblance to a menacing shark, though one wearing a blue hat!
At the bottom of the frame is a long, snake-like dark brown nebula, Barnard 175, with the blue reflection nebula van den Bergh (vdB) 152 at its tip. This object has been dubbed the Wolf’s Cave Nebula, though that likeness is harder to discern. It is unclear where some of these nicknames come from, as many are recent appellations invented by astrophotographers. Some of the names have stuck, though few are “official.”
Perseus the Hero and Taurus the Bull
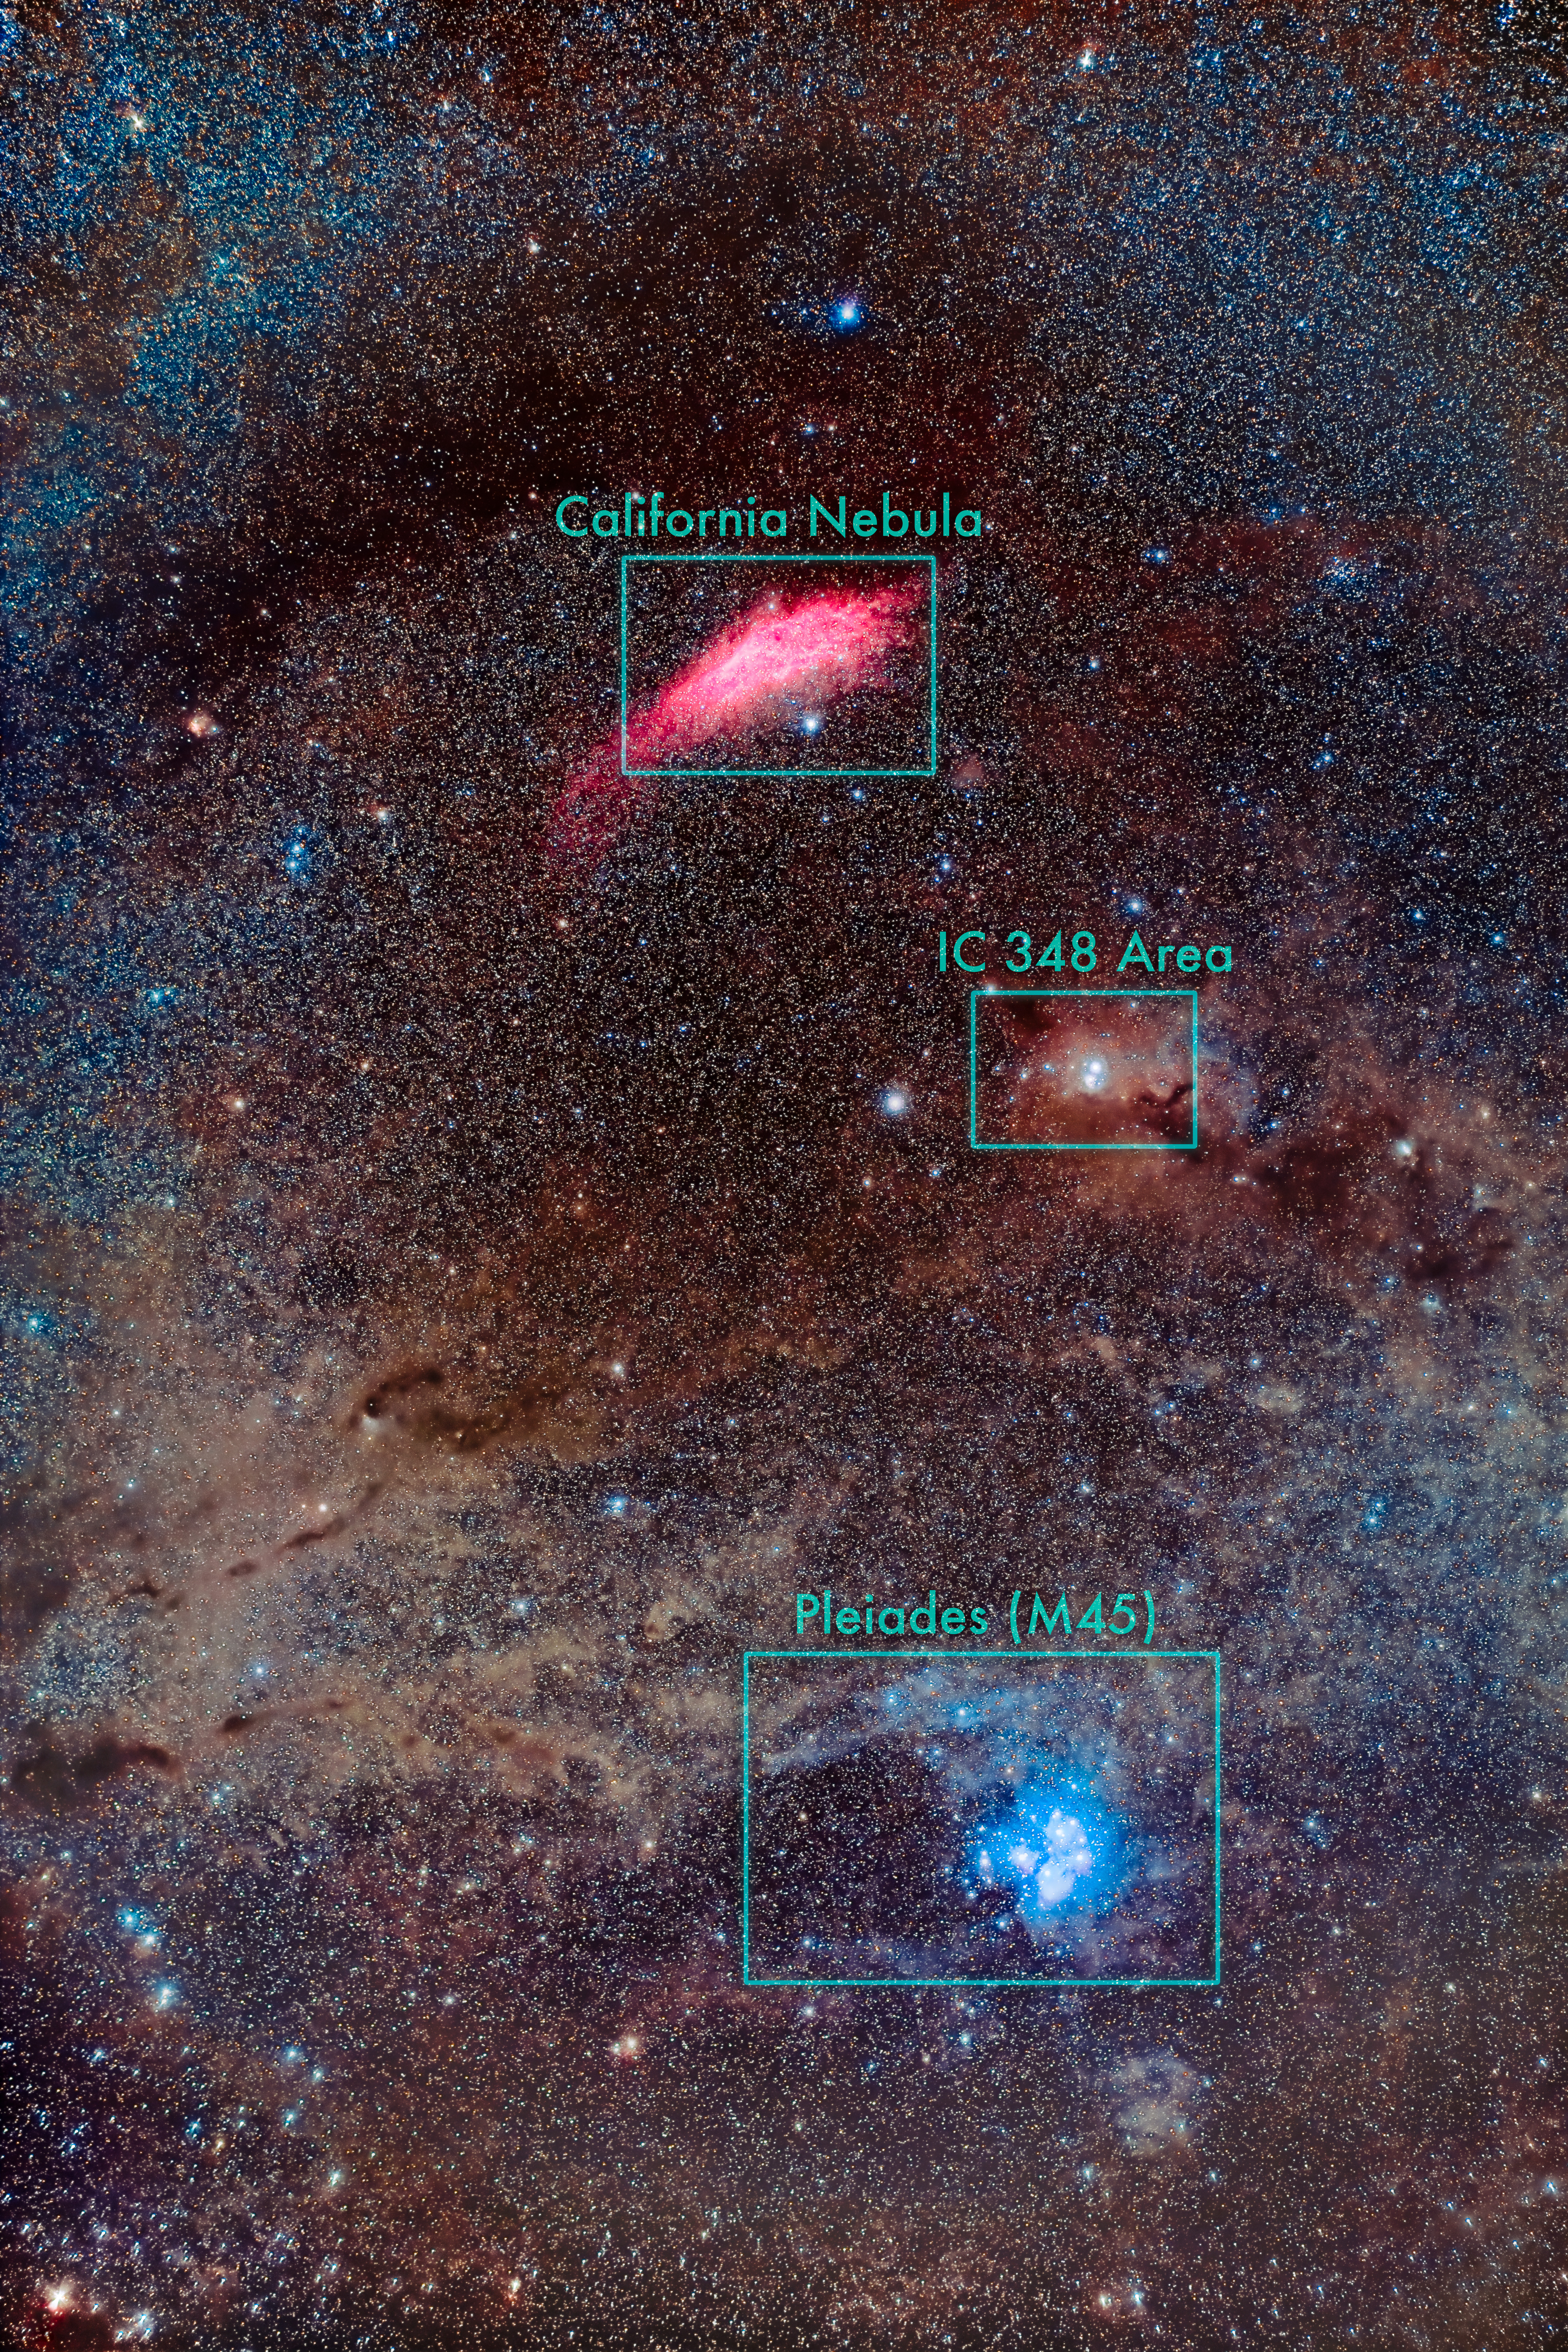
This is a portrait of the dust-filled region of sky from Perseus down to Taurus that includes the pink California Nebula (NGC 1499) at top down to the Pleiades star cluster (M45) at bottom. This is a stack of 48 x 2-minute exposures with the rare Samyang RF85mm f/1.4 lens stopped down to f/2.8, on the Canon EOS Ra camera at ISO 800. The lens was equipped with a 77mm Nisi Clear Night broadband filter.
The region of sky between Perseus and Taurus is rich in bright nebulas set amid large tendrils of dust in Taurus. The Pleiades star cluster lights up a portion of the dust clouds. And the pink California Nebula lies at the end of a large lane of dust.
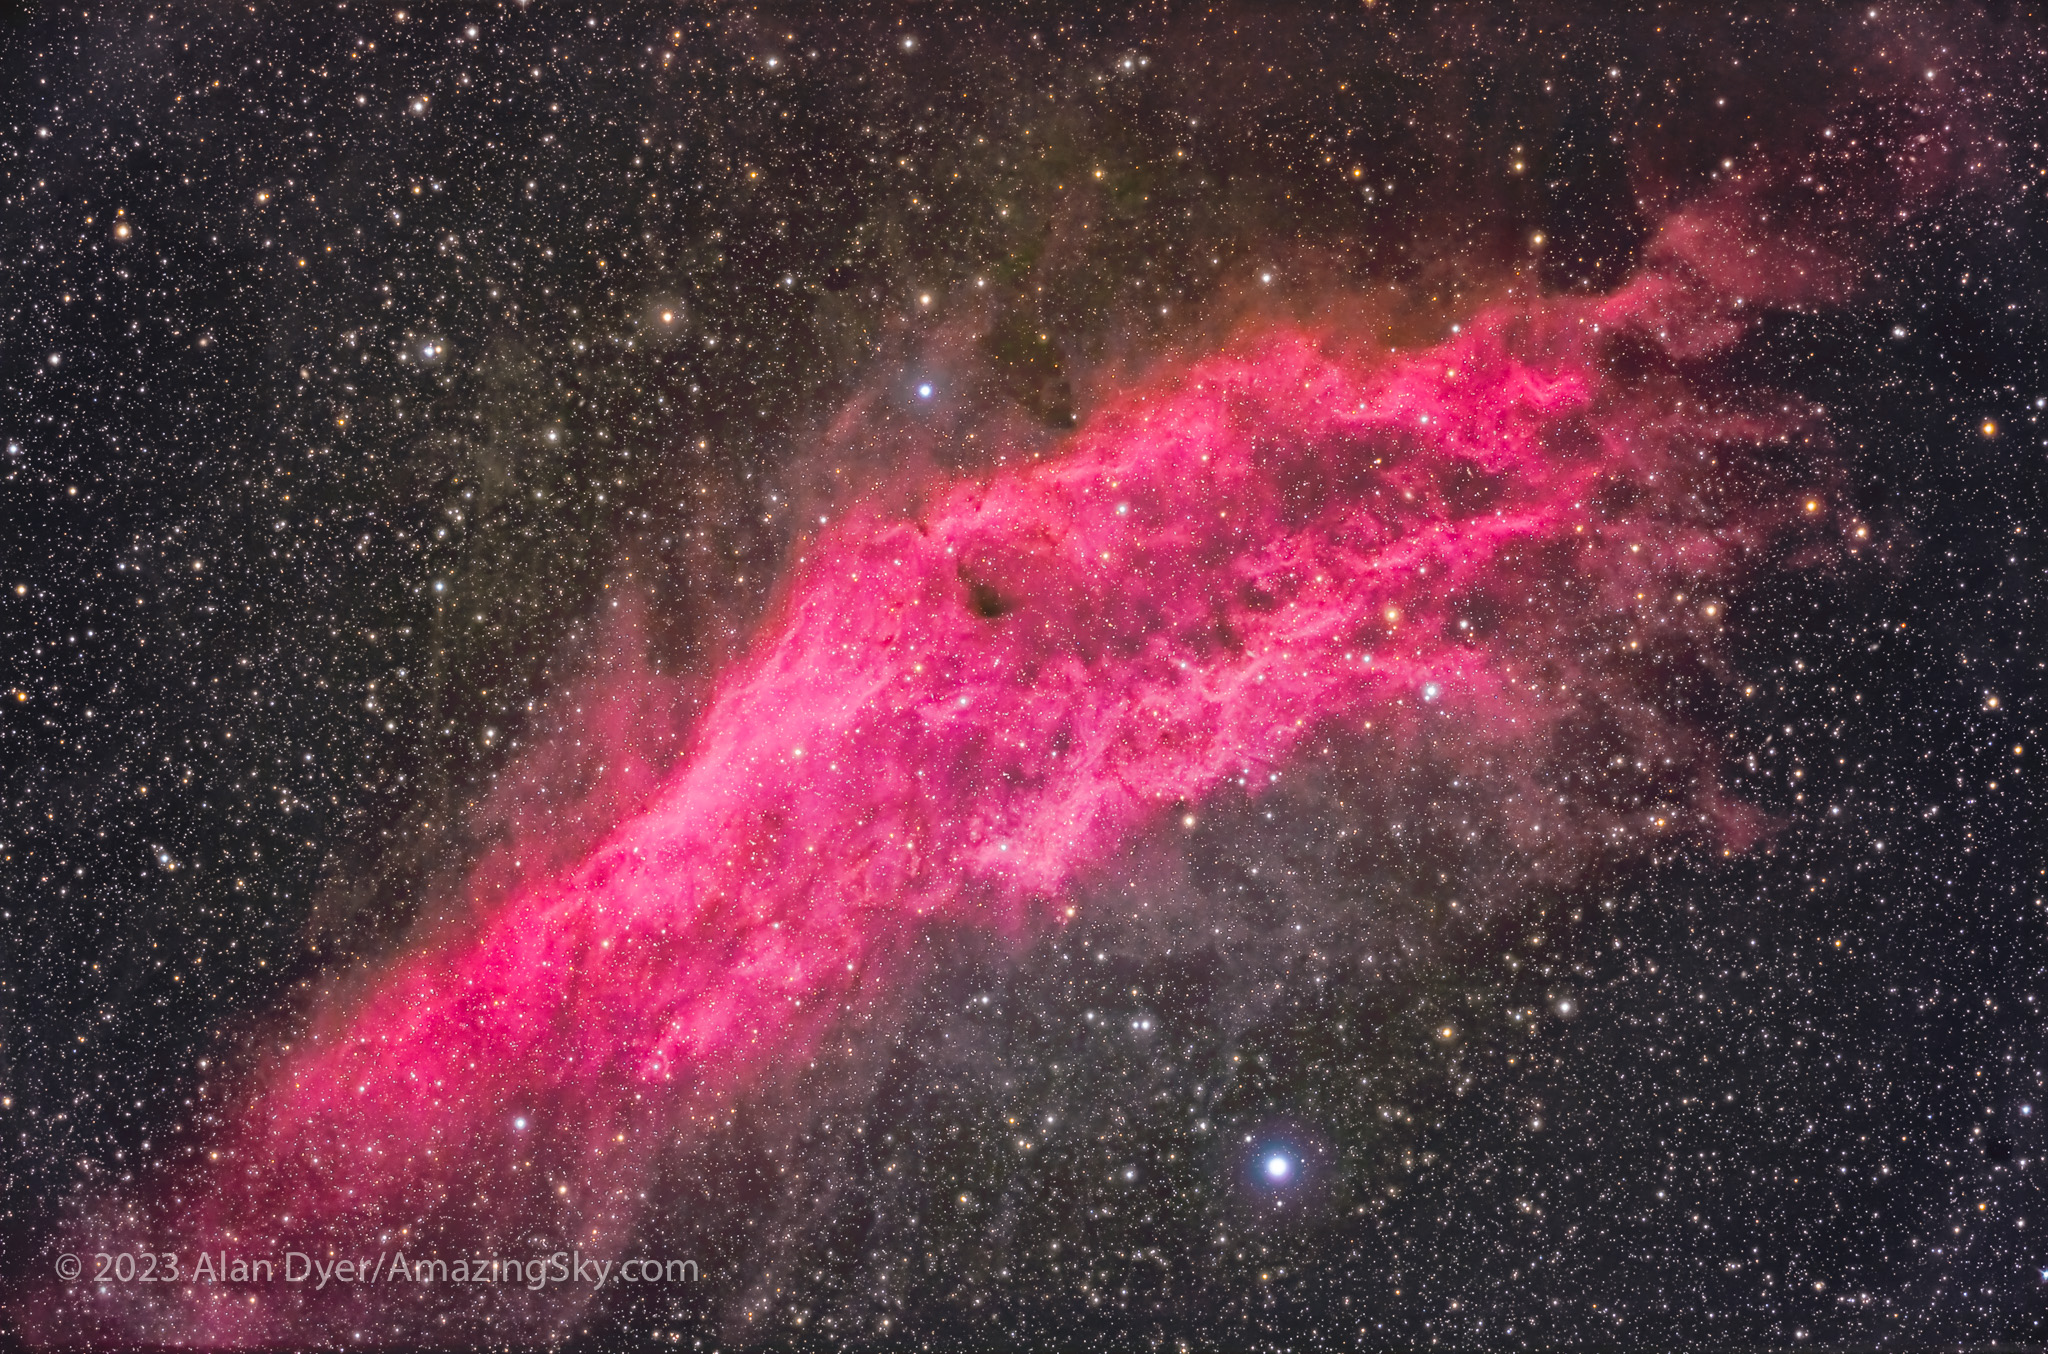
The California Nebula
This is the California Nebula, aka NGC 1499, in Perseus near the star Menkib, or Xi Persei, at bottom. This is a stack of 12 x 6-minute exposures with the filter-modified Canon R (though no filter was used to take this image), at ISO 800, on the Askar APO120 refractor with its 0.8x Reducer/Flattener for f/5.6 and 670mm focal length.
The California Nebula (named for its resemblance to the shape of the state) lies in Perseus. It is a bright emission nebula glowing in the red and pink light of hydrogen atoms, perhaps excited by blue-white Xi Persei, aka Menkib, at bottom. But it sits amid wider clouds of dust, here recorded as white and yellow.
IC 348
This is the bright blue reflection nebula complex, IC 348, in Perseus, in a stack of 18 x 8-minute exposures through the Askar APO120 refractor at f/7 with the 1X Flattener, and with the filter-modified Canon R camera at ISO 1600.
This complex mix of reflection and dark nebulas surrounds Omicron Persei. In some sections the dust is so dense it blocks all light from more distant stars. Once thought to be holes in the heavens, the photos of pioneering astrophotographer Edward Emerson Barnard in the early 20th century proved that dark nebulas are nearby, and obscure what’s behind them.
IC 348’s distance of only 700 light years means there isn’t much between us and the surrounding dark clouds. Oddly, though a popular target, as best I can tell, no one has come up with a nickname for this field. What can you see in the dark shapes?
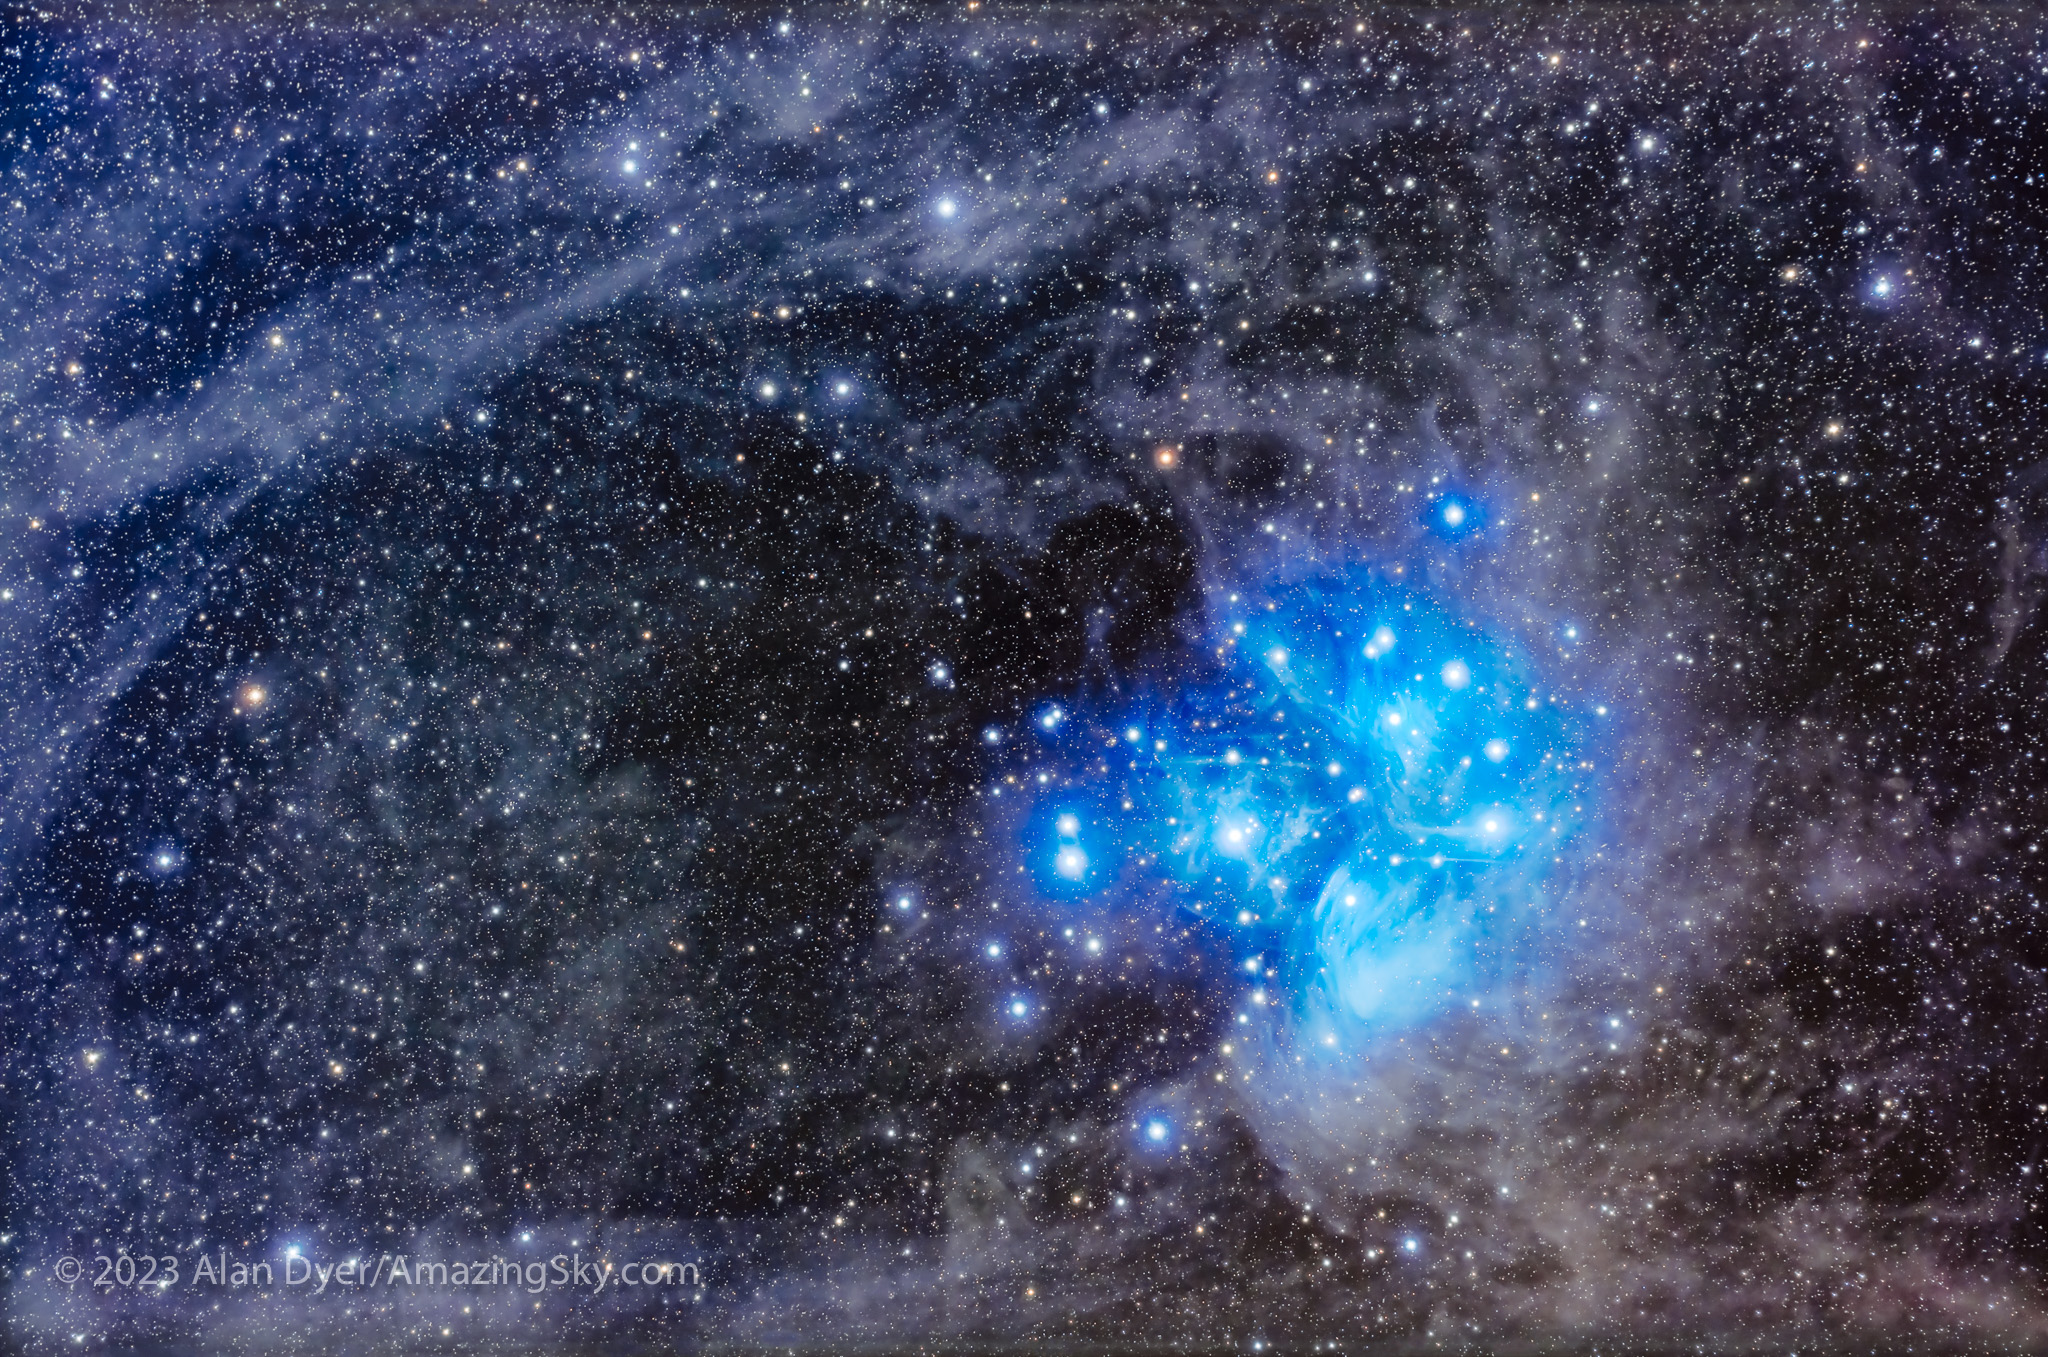
The Pleiades / Messier 45
This frames the famous Pleiades or Seven Sisters star cluster (aka Messier or M45) set amid a dusty starfield in Taurus. The field is about 4.7° by 3.2°. This is a stack of 30 x 6-minute exposures with the Astro-Tech AT90CFT refractor at f/4.8 (using its 0.8x Reducer) and the filter-modified Canon R camera at ISO 800.
There’s no more famous deep-sky object than the blue Pleiades, or Seven Sisters. They feature in the mythology of almost all cultures around the world. The young blue stars are surrounded by bright blue reflection nebulosity, most prominent below the lower star Merope, a bit of nebula catalogued separately as NGC 1435.
While the Pleiades light up the core of the dust clouds blue, the dust clouds extend much wider and permeate the entire constellation of Taurus. However, the outlying clouds are very faint as they have no nearby source of illumination. The arc of nebulosity at top is most obvious. It was found by Barnard and is catalogued as IC 353.
Taurus the Bull
This is a portrait of the dust-filled region of sky in Taurus that frames the Hyades star cluster (at bottom) with bright yellow Aldebaran, up to the blue Pleiades star cluster (M45) at top. This is a stack of 48 x 2-minute exposures with the Samyang RF85mm f/1.4 lens at f/2.8, on the Canon EOS Ra camera at ISO 800.
Overlapping the previous constellation field, this framing extends farther south, continuing past the Pleiades down into the main section of Taurus the Bull, with the luminous yellow star Aldebaran marking the Bull’s eye. It is surrounded by the stars of the V-shaped Hyades star cluster, legendary half-sisters to the Pleiades.
Notable in this framing are the large dark tendrils of the Taurus Molecular Clouds, dense streams of dust only about 430 light years away. They are on my shot list for close-ups on upcoming clear winter nights.
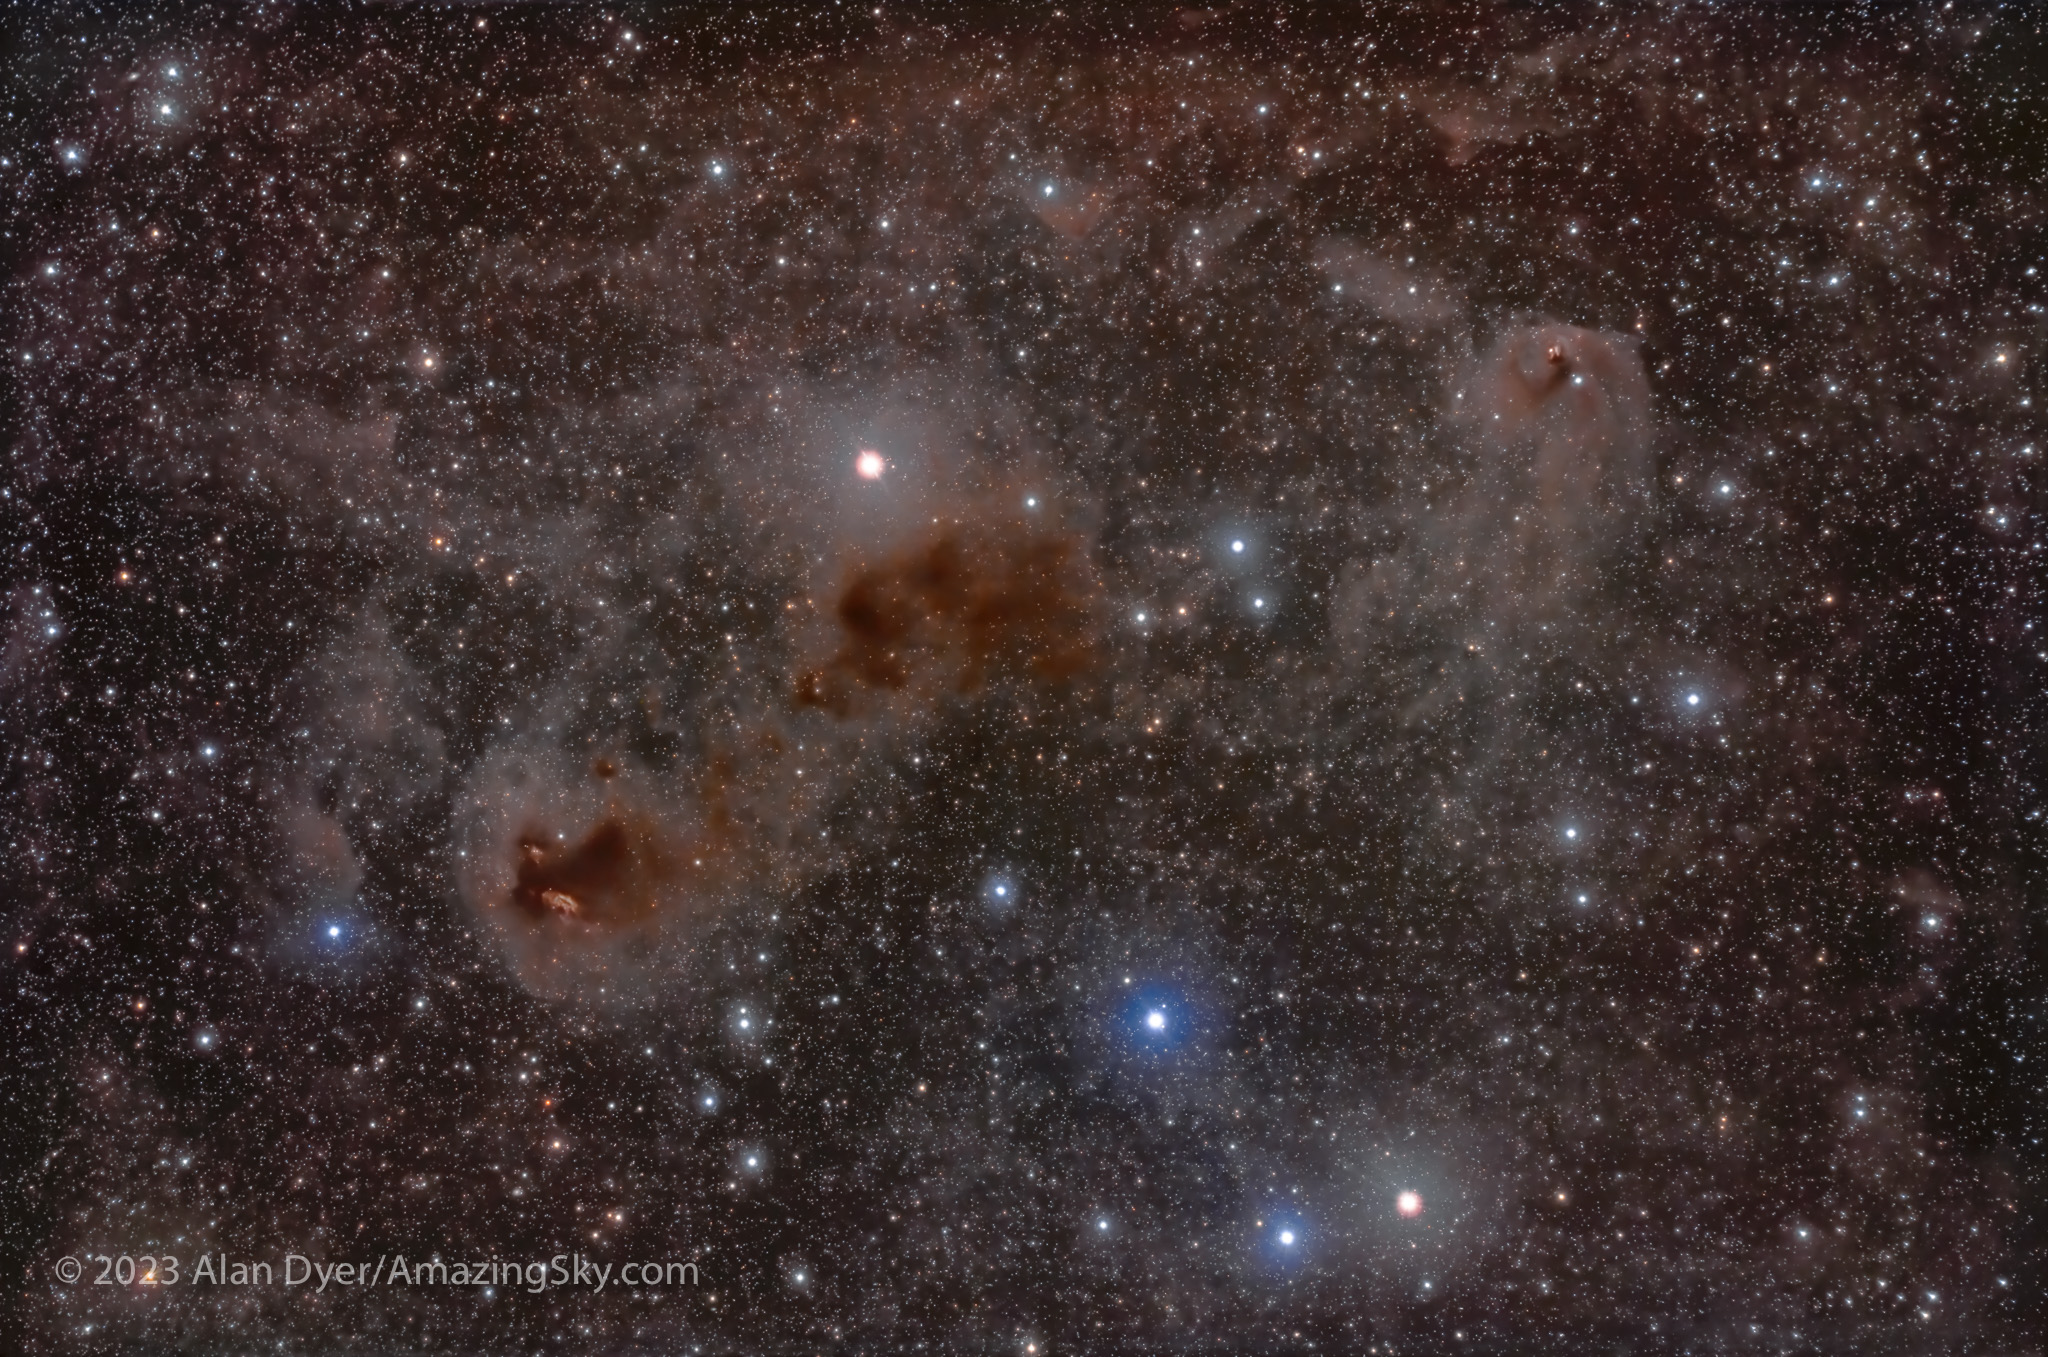
NGC 1555 and Area
This is a framing of dust clouds among the stars of the Hyades star cluster in Taurus. The field of view is 4.7° by 3.2°. This is a stack of 30 x 6-minute exposures with the Astro-Tech AT90CFT refractor at f/4.8 and the filter-modified Canon EOS R camera at ISO 800, though no filter was used in taking the images.
This complex field lies on the northern edge of the Hyades. At upper right is the odd nebula NGC 1555, discovered by John Russell Hind in 1852 and variable in brightness due to changes in its embedded source star T Tauri, a prototype of a class of young, newly formed stars. An adjacent object, NGC 1554, was catalogued by Otto Struve, but has faded from view; thus it is called Struve’s Lost Nebula.
At lower left is the emission nebula Sharpless 2-239 embedded in the dense and brownish dust cloud LDN (Lynds Dark Nebula) 1551. It is dark indeed, but not black. Like most dark nebulas it has some warm colour.
Orion the Hunter
This is a portrait of Orion the Hunter with exposures and processing to emphasize the complex and colourful array of bright and dark nebulas within its boundaries. This is a stack of 42 x 2-minute exposures with the Samyang RF85mm f/1.4 lens at f/2.8, on the Canon EOS Ra camera at ISO 800. The lens had a Nisi Clear Night broadband filter to help improve contrast.
The most photogenic constellation is surely Orion the Hunter. It is filled with a rich collection of nebulas, including the eponymous Orion Nebula, bright enough to be visible to the unaided eye in the Sword of Orion, and #42 in Charles Messier’s catalogue.
The largest feature (though one best seen only in photos) is the arc of Barnard’s Loop, a possible supernova remnant or stellar wind-blown bubble that encircles Orion. It is usually plotted on sky atlases as just an easternmost arc, though it extends down and below Orion, all the way over to blue Rigel at bottom right.
At top is the large circular emission nebula Sharpless 2-264, surrounding the head of Orion and the star Meissa and a loose open star cluster Collinder 69. The nebula has become known as the Angelfish Nebula. It sits above orange Betelgeuse (at left) and blue-white Bellatrix (at right), marking the shoulders of Orion.
As you can see, there’s a winter-full of targets to go after in Orion. However, in my tour, I focused on two areas of dust and reflection nebulas.
Messier 78 Area
This is the bright reflection nebula complex that includes Messier 78 (the largest blue-white nebula) and NGC 2071 above it. This is a stack of 30 x 4-minute exposures through the Astro-Tech AT90CFT refractor with its 0.8x Reducer for f/4.8, and with the filter-modified Canon R camera at ISO 1600. No filter was employed here.
This frames one of the other often-neglected nebulas in Orion, Messier 78, one of the objects catalogued by Charles Messier in the 1780s. His is the popular “hit list” of deep-sky targets for all amateur astronomers.
In this case, M78 is accompanied by another smaller reflection nebula, NGC 2071. They are set in a region of dark clouds of interstellar dust, and framed by the red-magenta arc of Barnard’s Loop, aka Sharpless 2-276. The small reflection nebula at upper left on the edge of another dark cloud is van den Bergh 62. The large faint star cluster left of centre on the edge of the Loop is NGC 2112.
The Witch Head Nebula
This is the reflection nebula called the Witch Head, but officially IC 2118 (also with the catalogue number NGC 1909), near the very bright star Rigel, at lower left in Orion. This is a stack of 29 x 6-minute exposures through the Astro-Tech AT90CFT refractor with its 0.8x Reducer for f/4.8, and with the filter-modified Canon R camera at ISO 800. No filter was employed here.
The hot, blue giant star at lower left is Rigel at the foot of Orion. It illuminates the dust cloud that forms the fanciful shape of the blue Witch Head Nebula, or IC 2118. The nebula is actually over the border in Eridanus the River. Some magenta emission nebulosity also populates the field in Orion.
Indeed, as the wide-field photo above attests, all of Orion is filled with some form of nebulosity, be it emission, reflection, or dark.
There’s much more to go after when exploring the nebulous and dusty realms of the Milky Way. The sky is filled with stardust. Indeed, we are made of it!
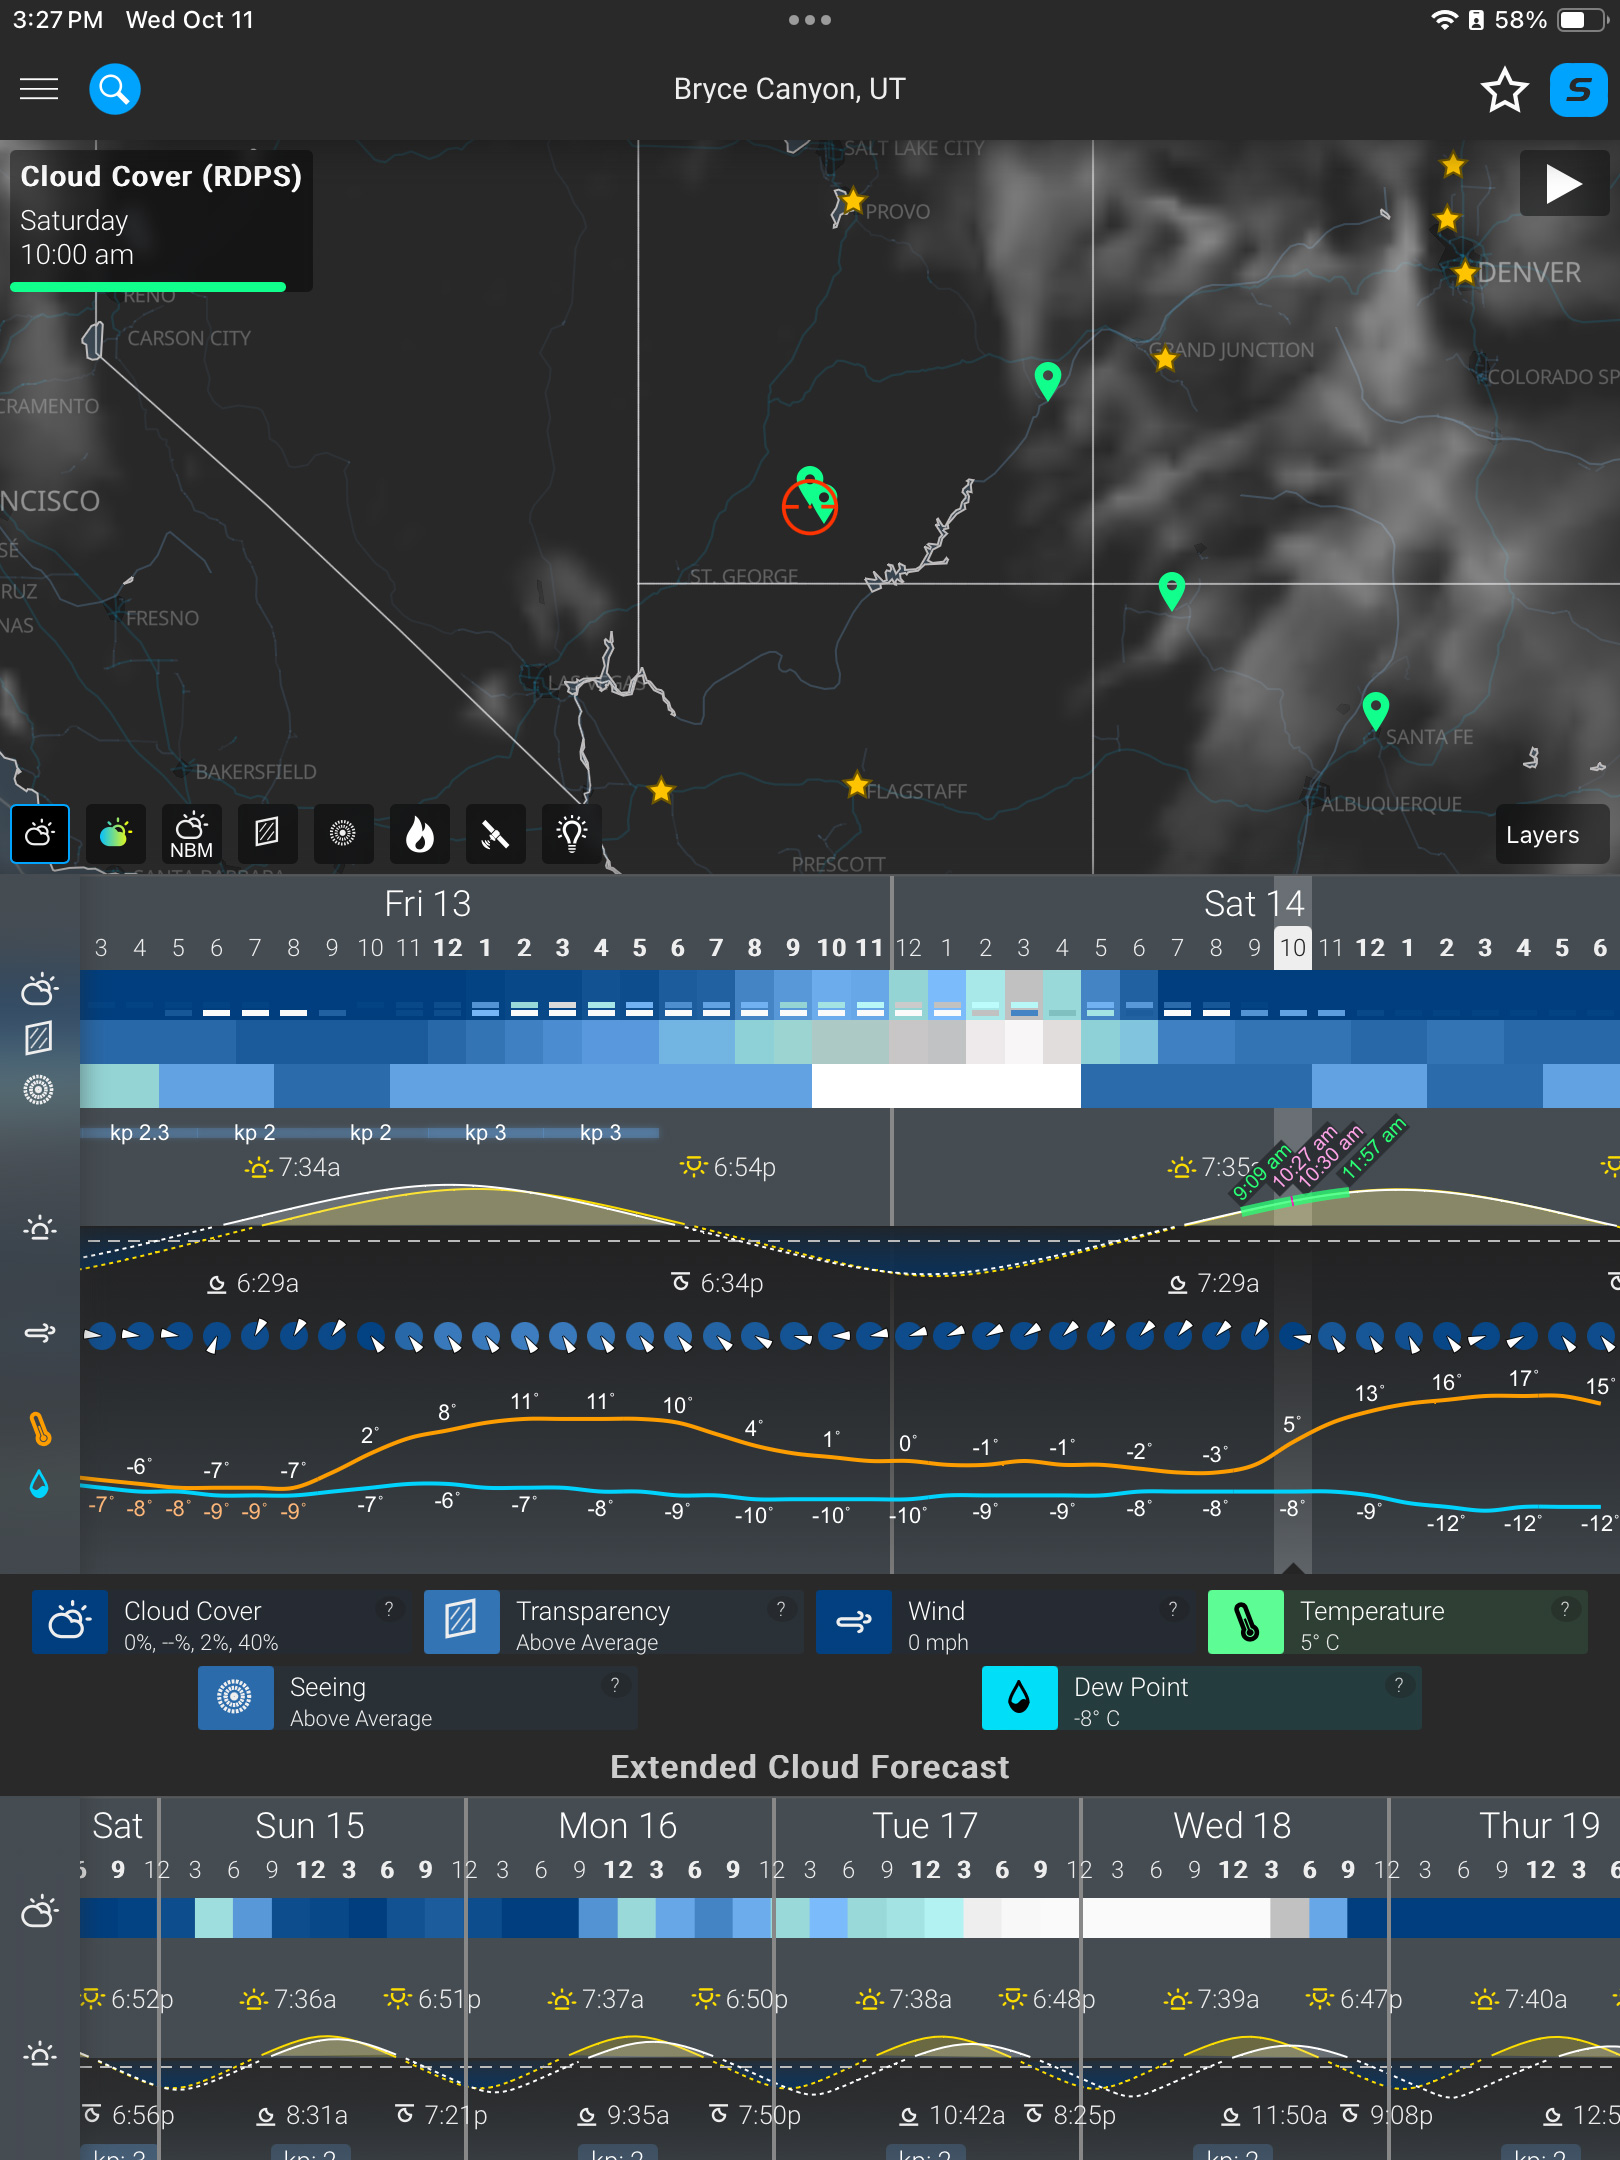
Like all eclipses, seeing the October 14 annular eclipse of the Sun was not a certainty. As good luck and planning would have it, the sky and location could not have been better!
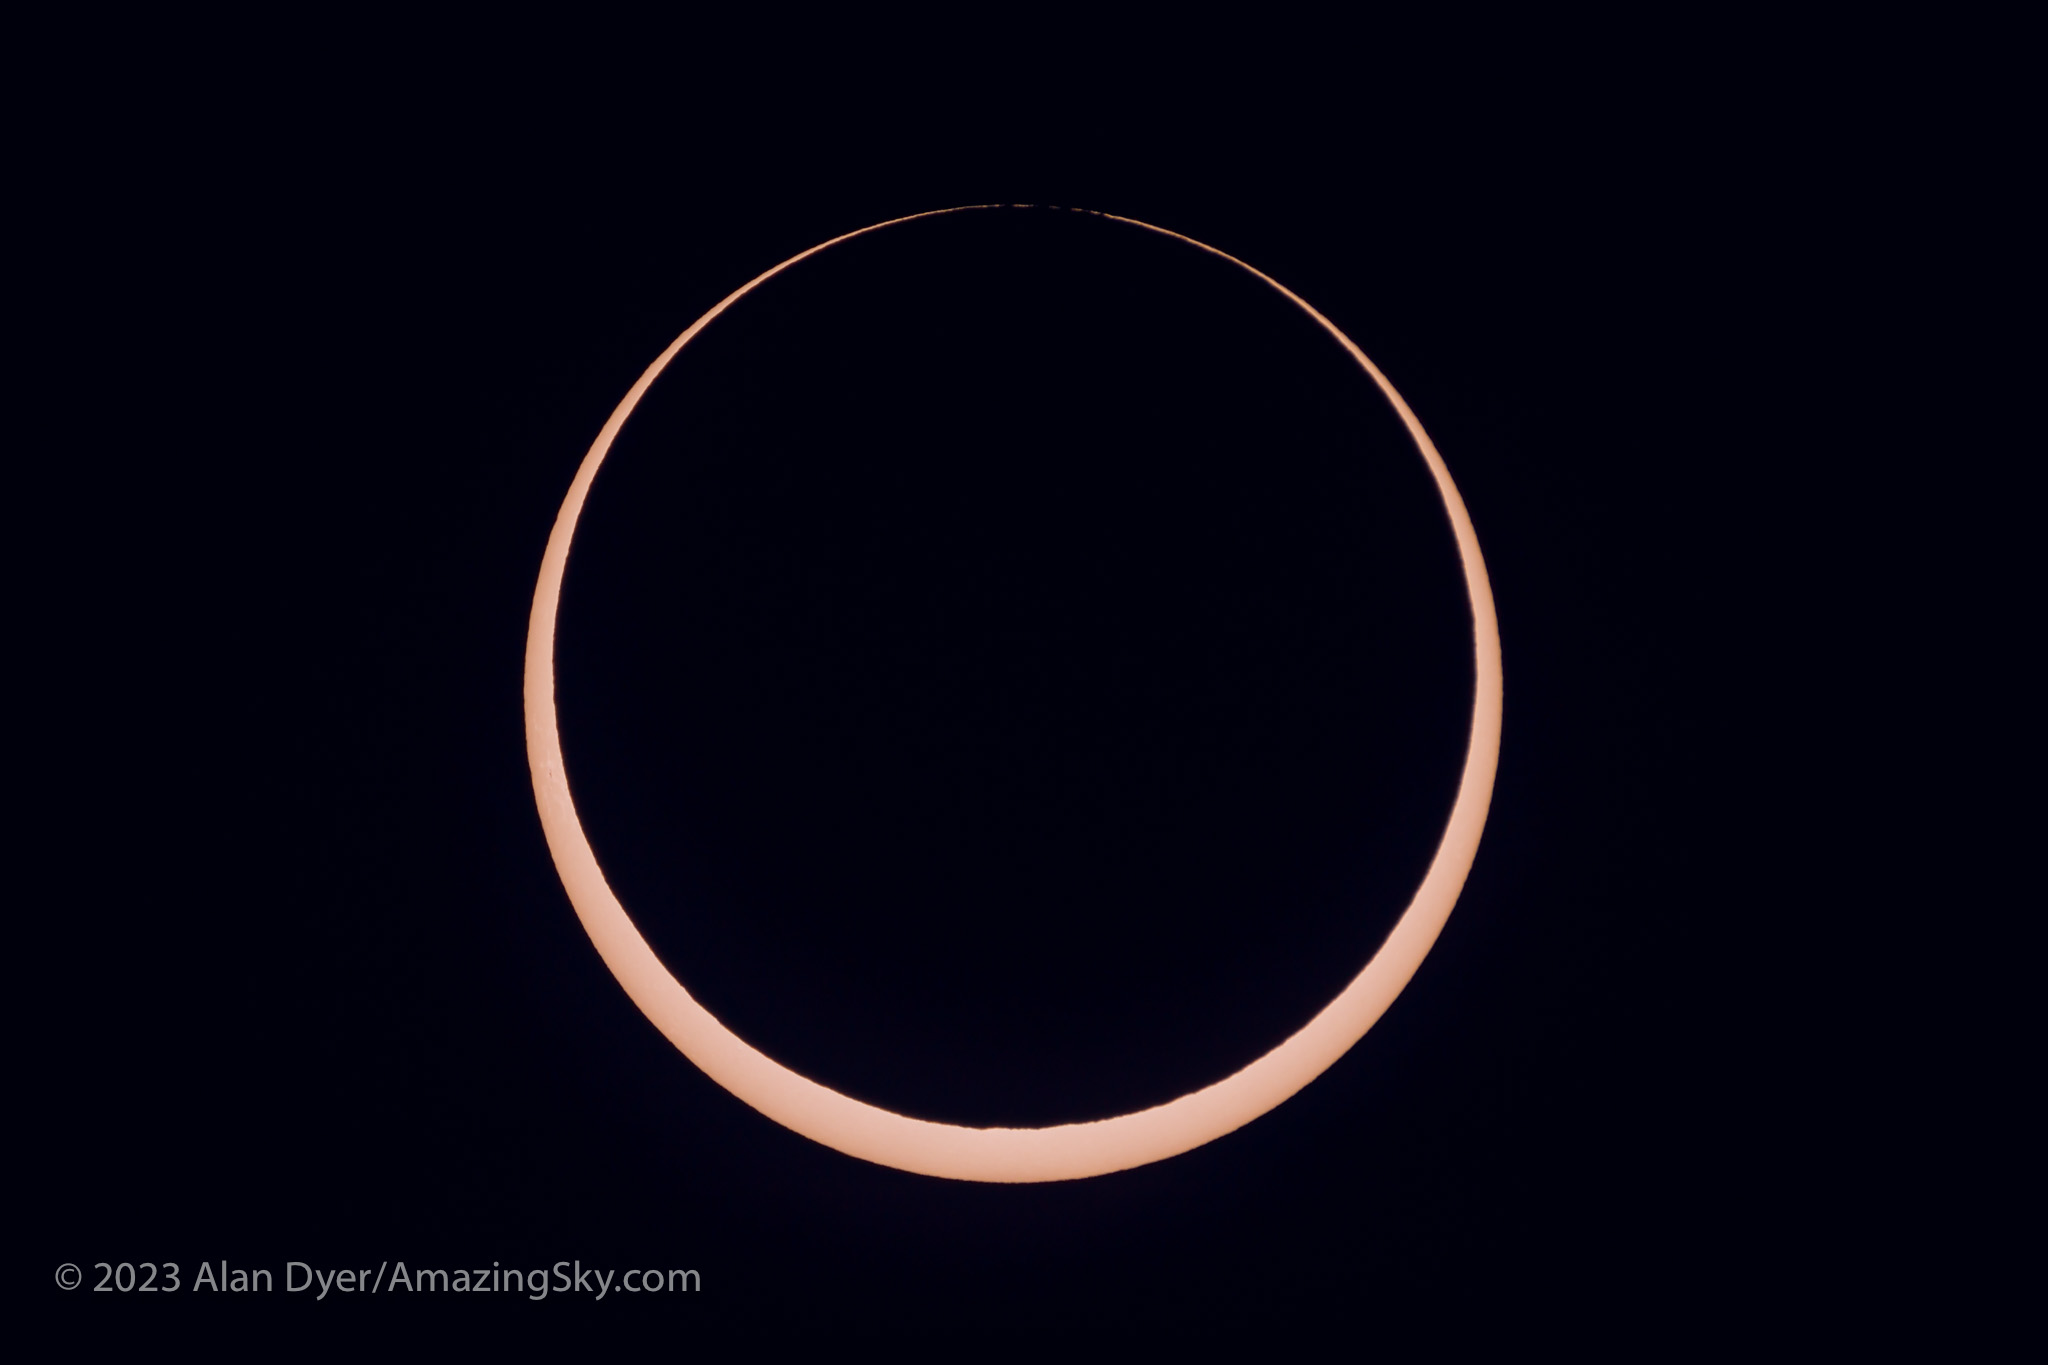
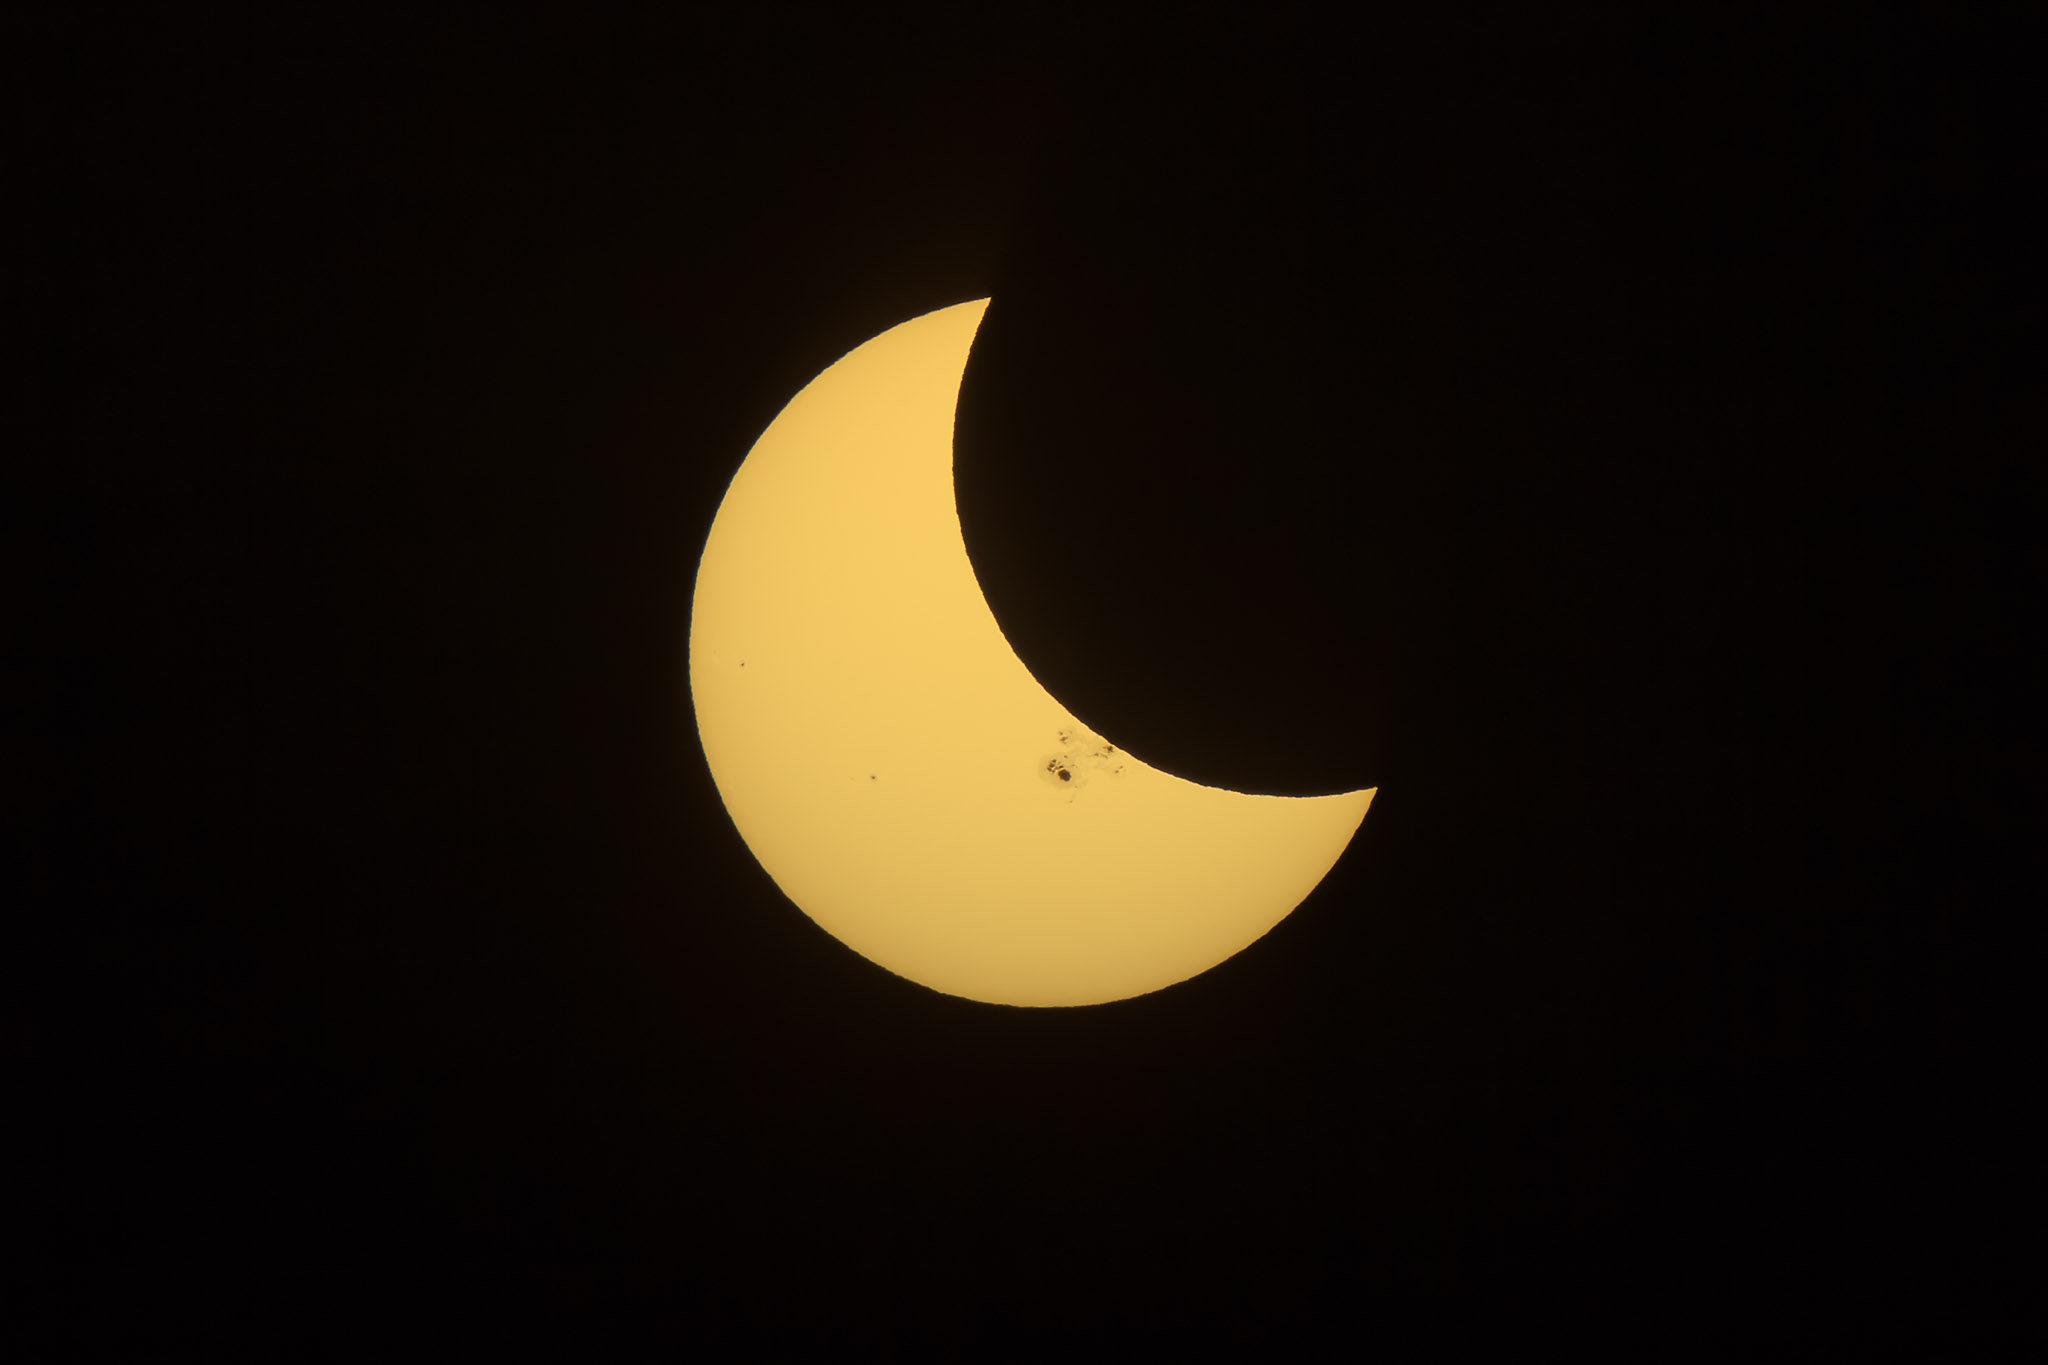
Annular eclipses of the Sun don’t present the spectacle of a total eclipse. Because the Moon is near its farthest point from Earth, its disk is not large enough to completely cover the Sun. At mid-eclipse, as I show below, a ring of sunlight (dubbed a “ring of fire”) remains, still too bright to view without a solar filter.
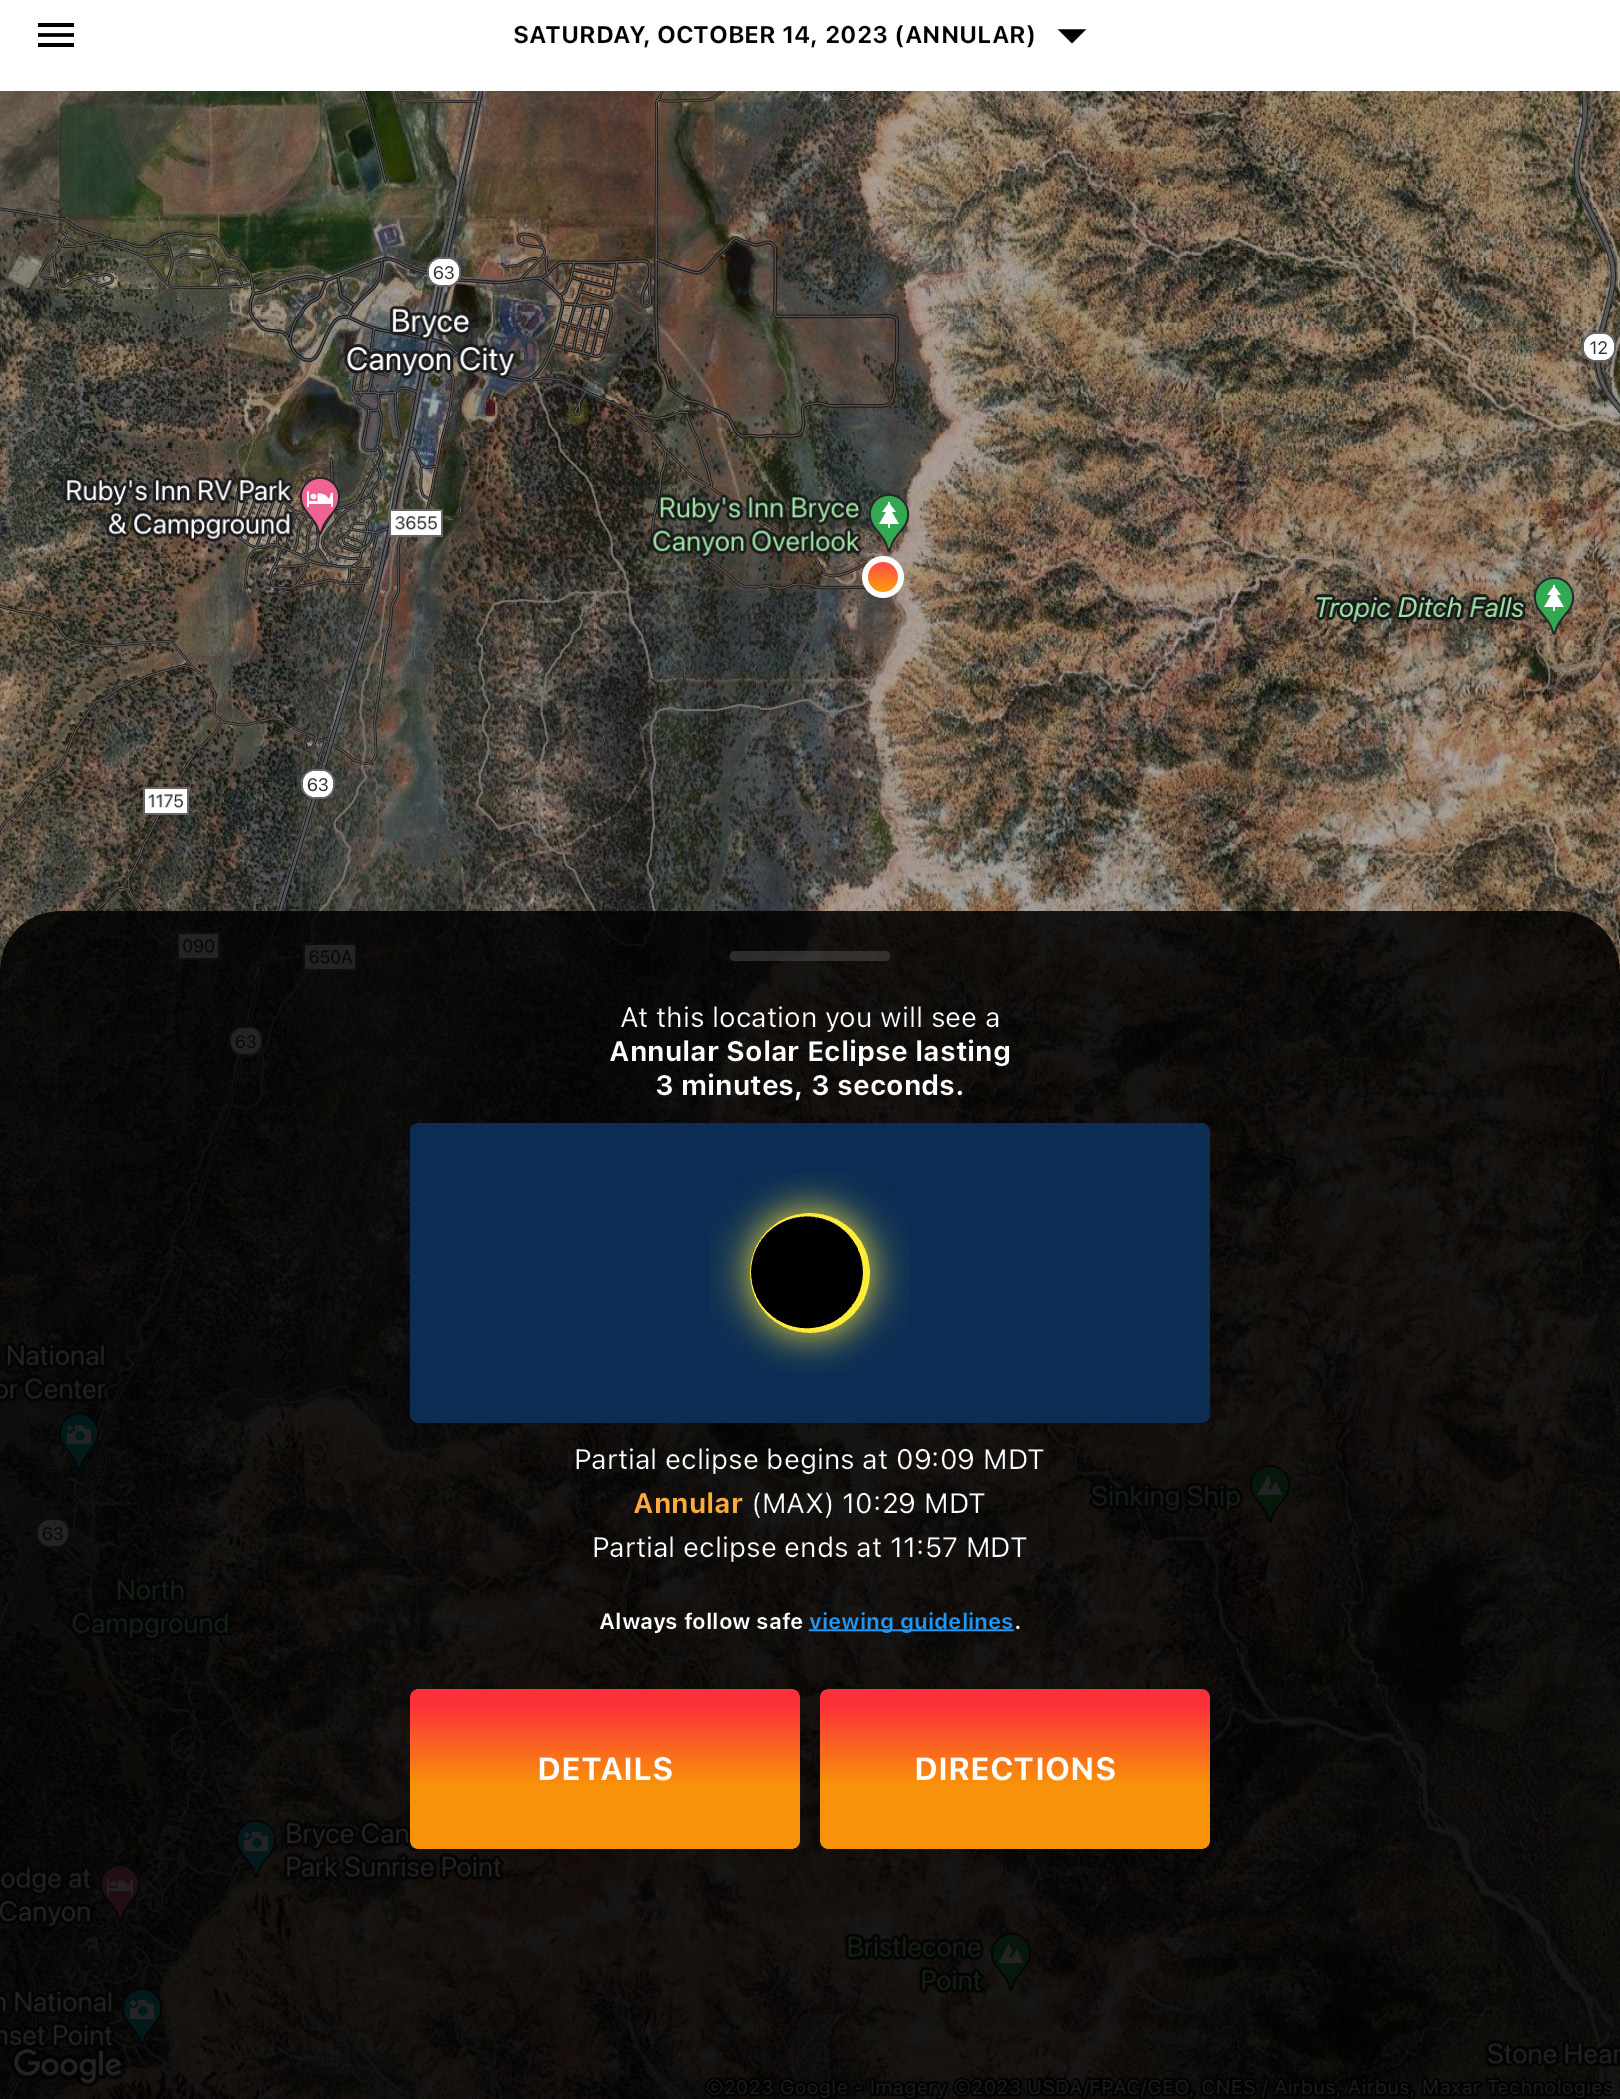
The October 14, 2023 annular solar eclipse, in a single image captured at mid-eclipse, at 10:29 am MDT at the Ruby’s Inn Overlook on the rim of Bryce Canyon, Utah, a site well south of the centreline, with 3m03s of annularity.
While lacking the jaw-dropping beauty of a total, annular eclipses are rare and unique enough that every ardent skywatcher should make a point of seeing one.
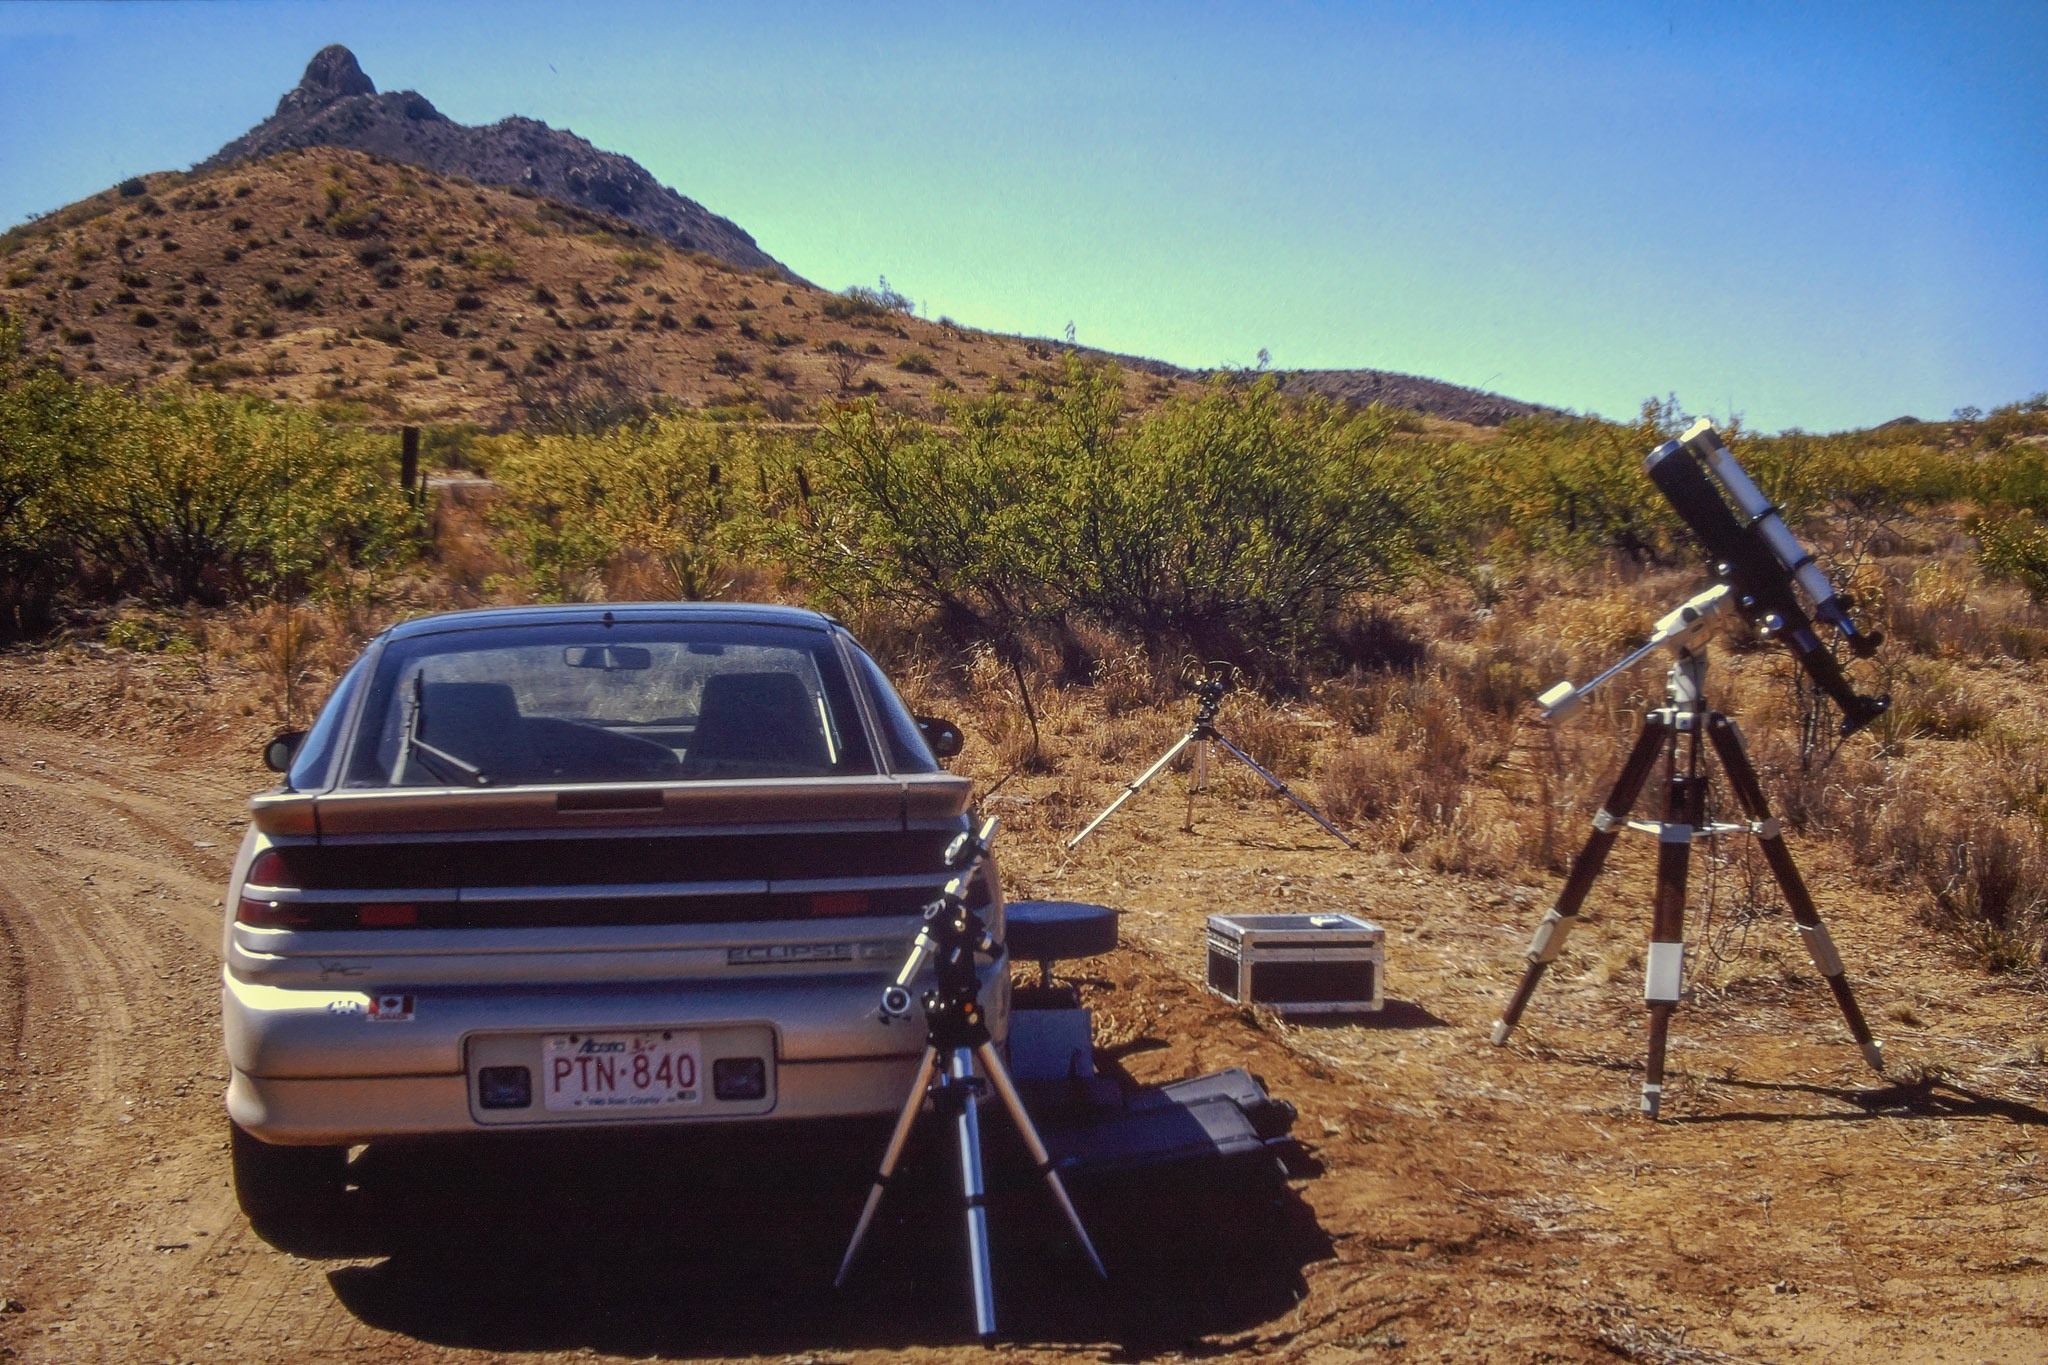
Prior to October 14, I had seen only one, on May 10, 1994, from southeast Arizona, an event I captured on film of course back then.
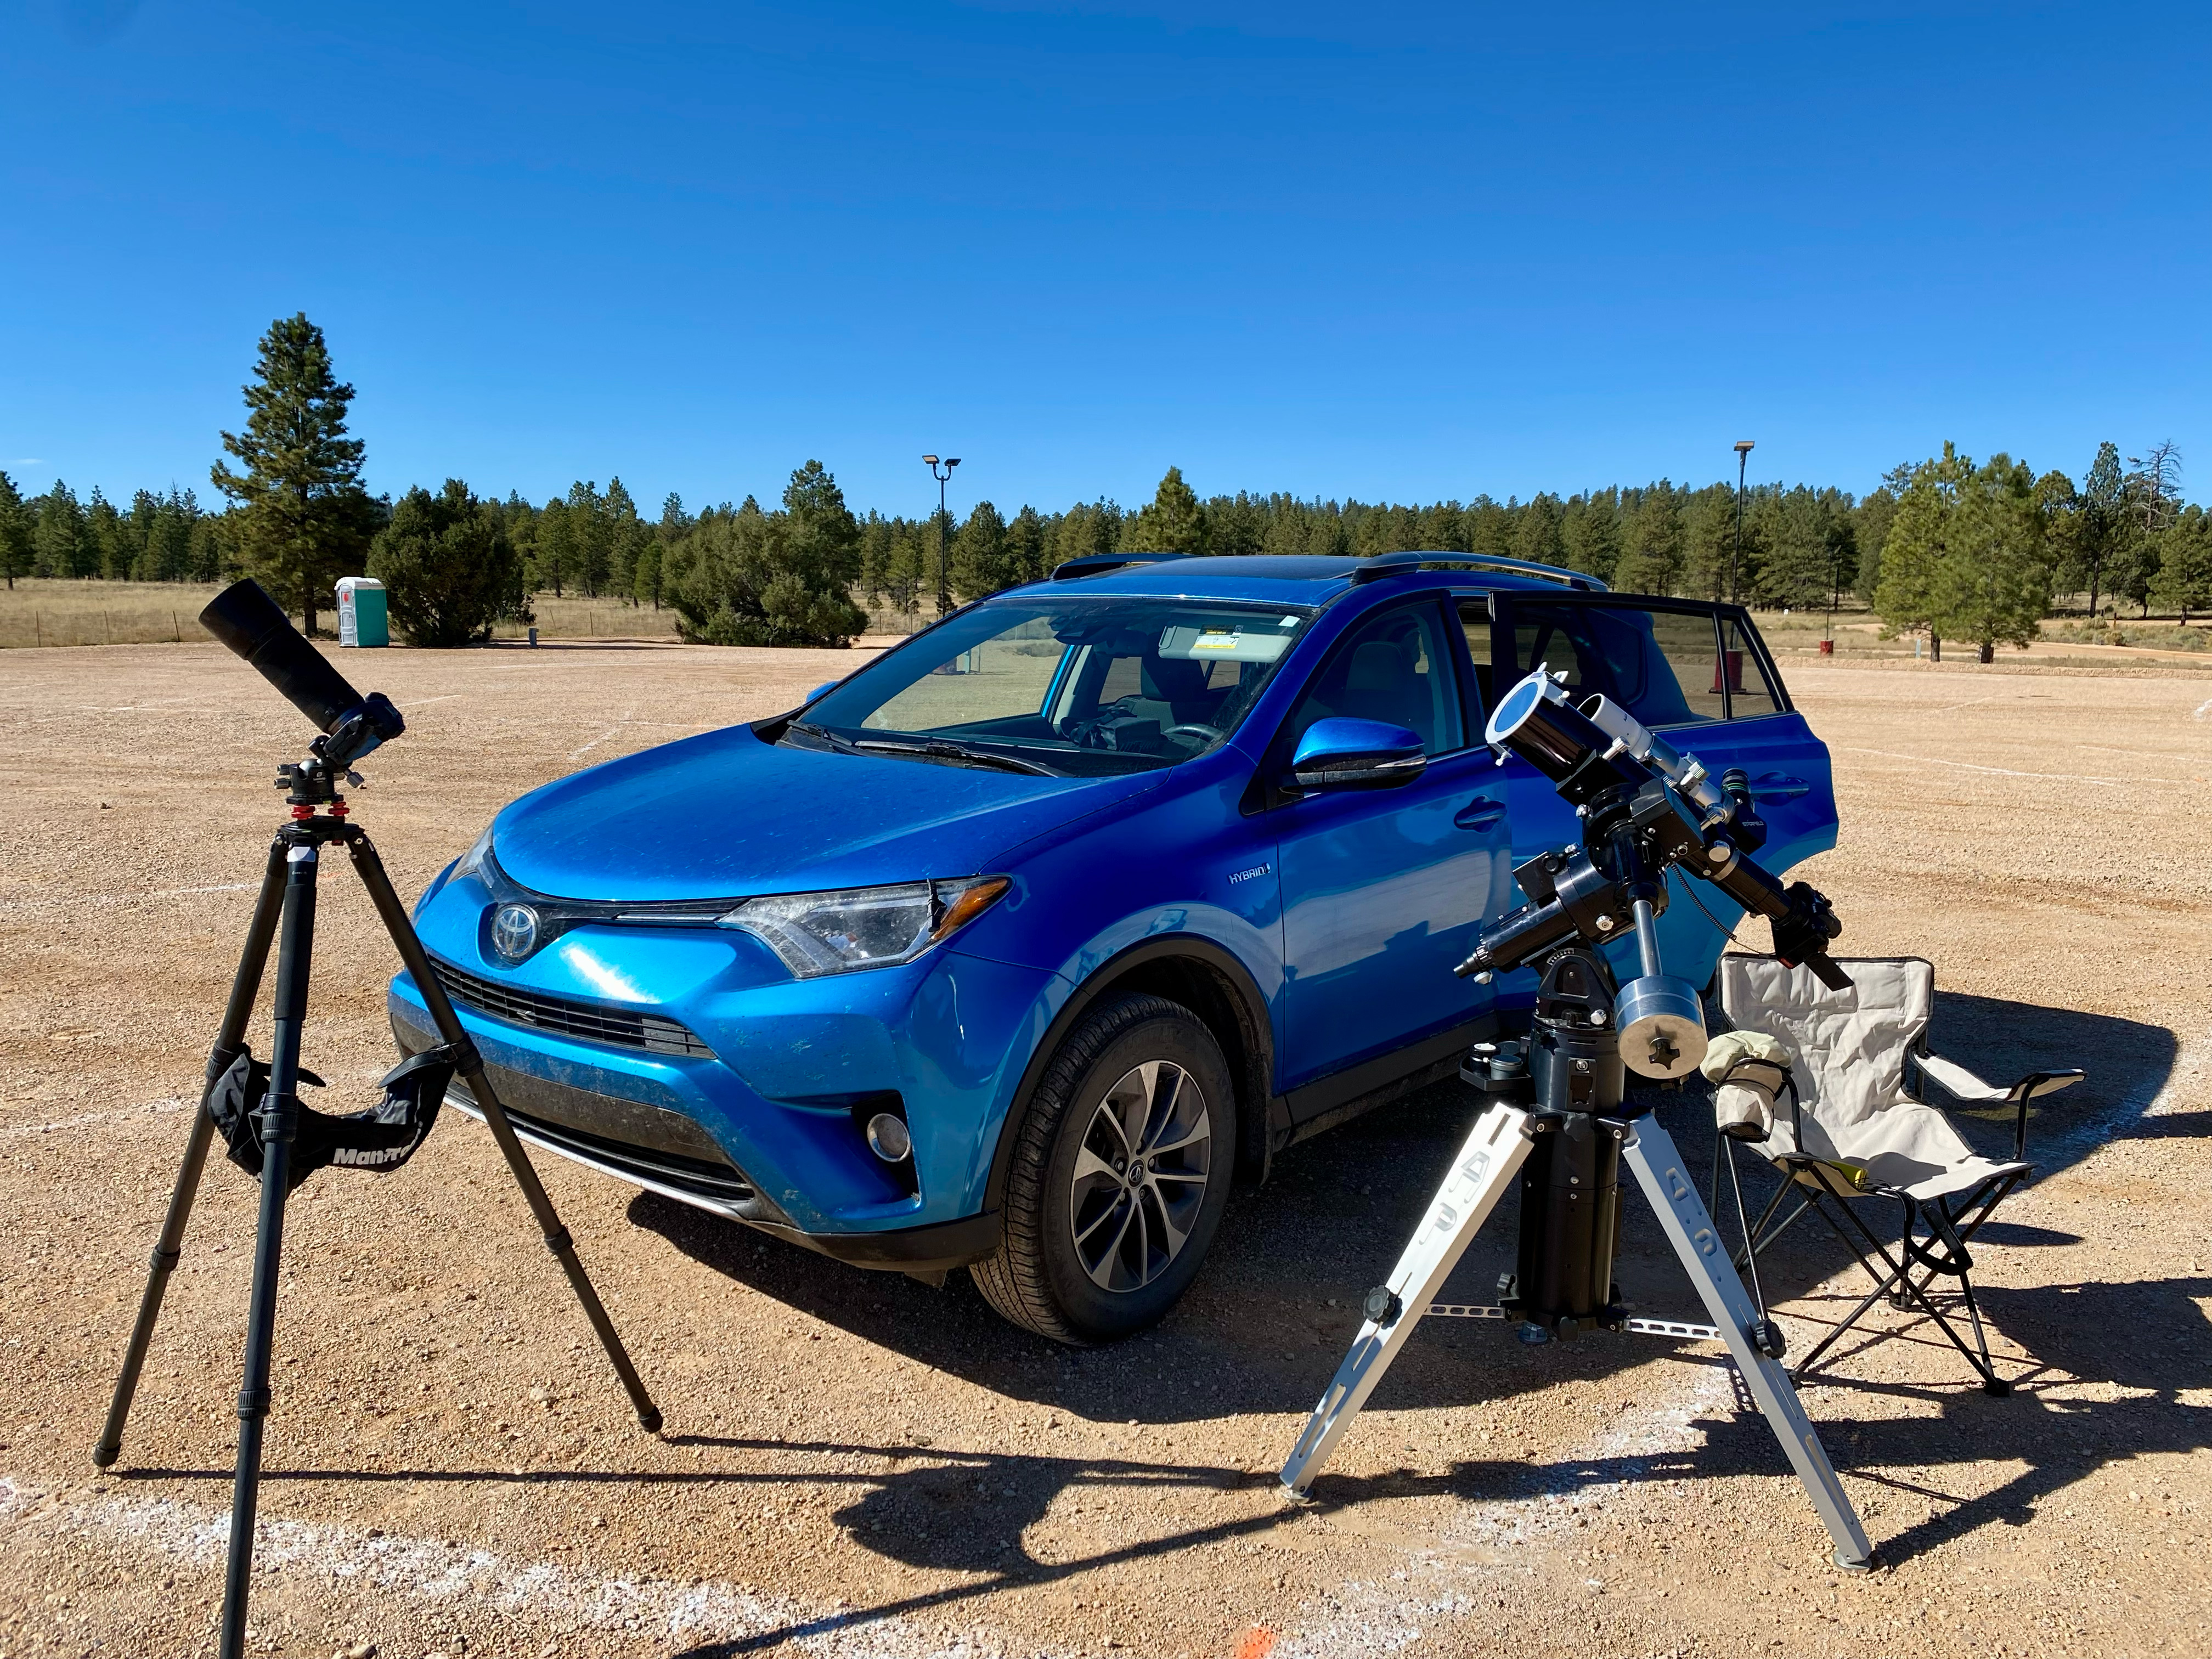
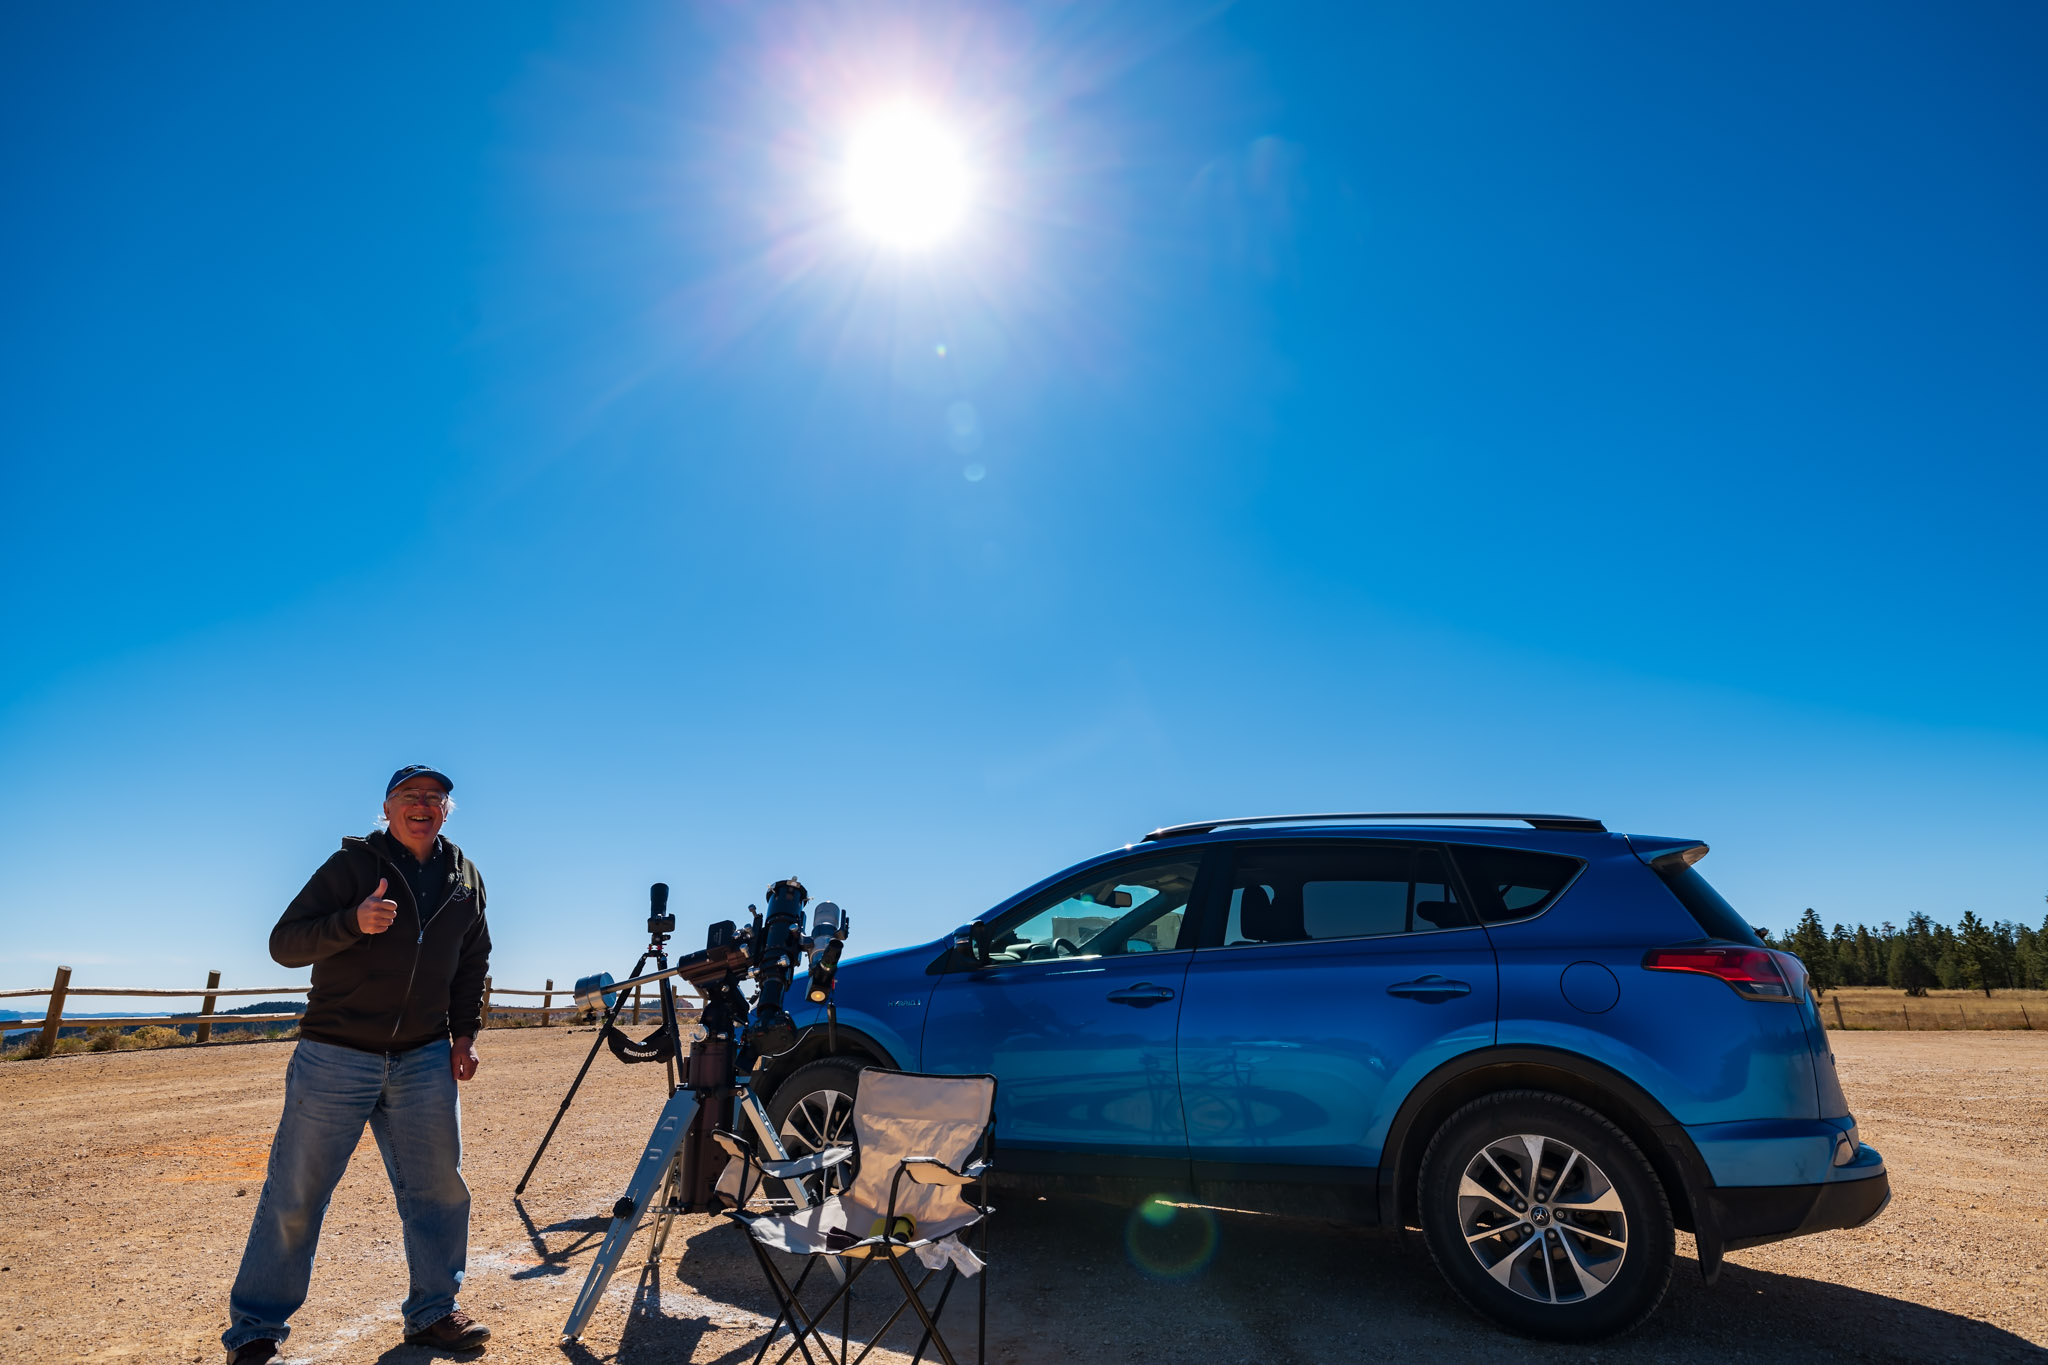
My 1994 annular eclipse setup in ArizonaMy 2023 annular eclipse setup in Utah
A sunset annular on June 10, 2002 that I traveled to Puerto Vallarta, Mexico to see was mostly clouded out. The annular of May 20, 2012 traced a similar path across the U.S. Southwest as the 2023 eclipse. But work commitments at the science centre in Calgary kept me home for that one. A sunrise annular on June 10, 2021 in Northwestern Ontario was essentially out of reach due to COVID travel restrictions.
With no other annular eclipses within easy reach in North America until 2039 and 2046, this was my next, and perhaps last, opportunity to see one, unless I chose to travel the world.
Eclipse site and pathSite close upEclipse details at my final site
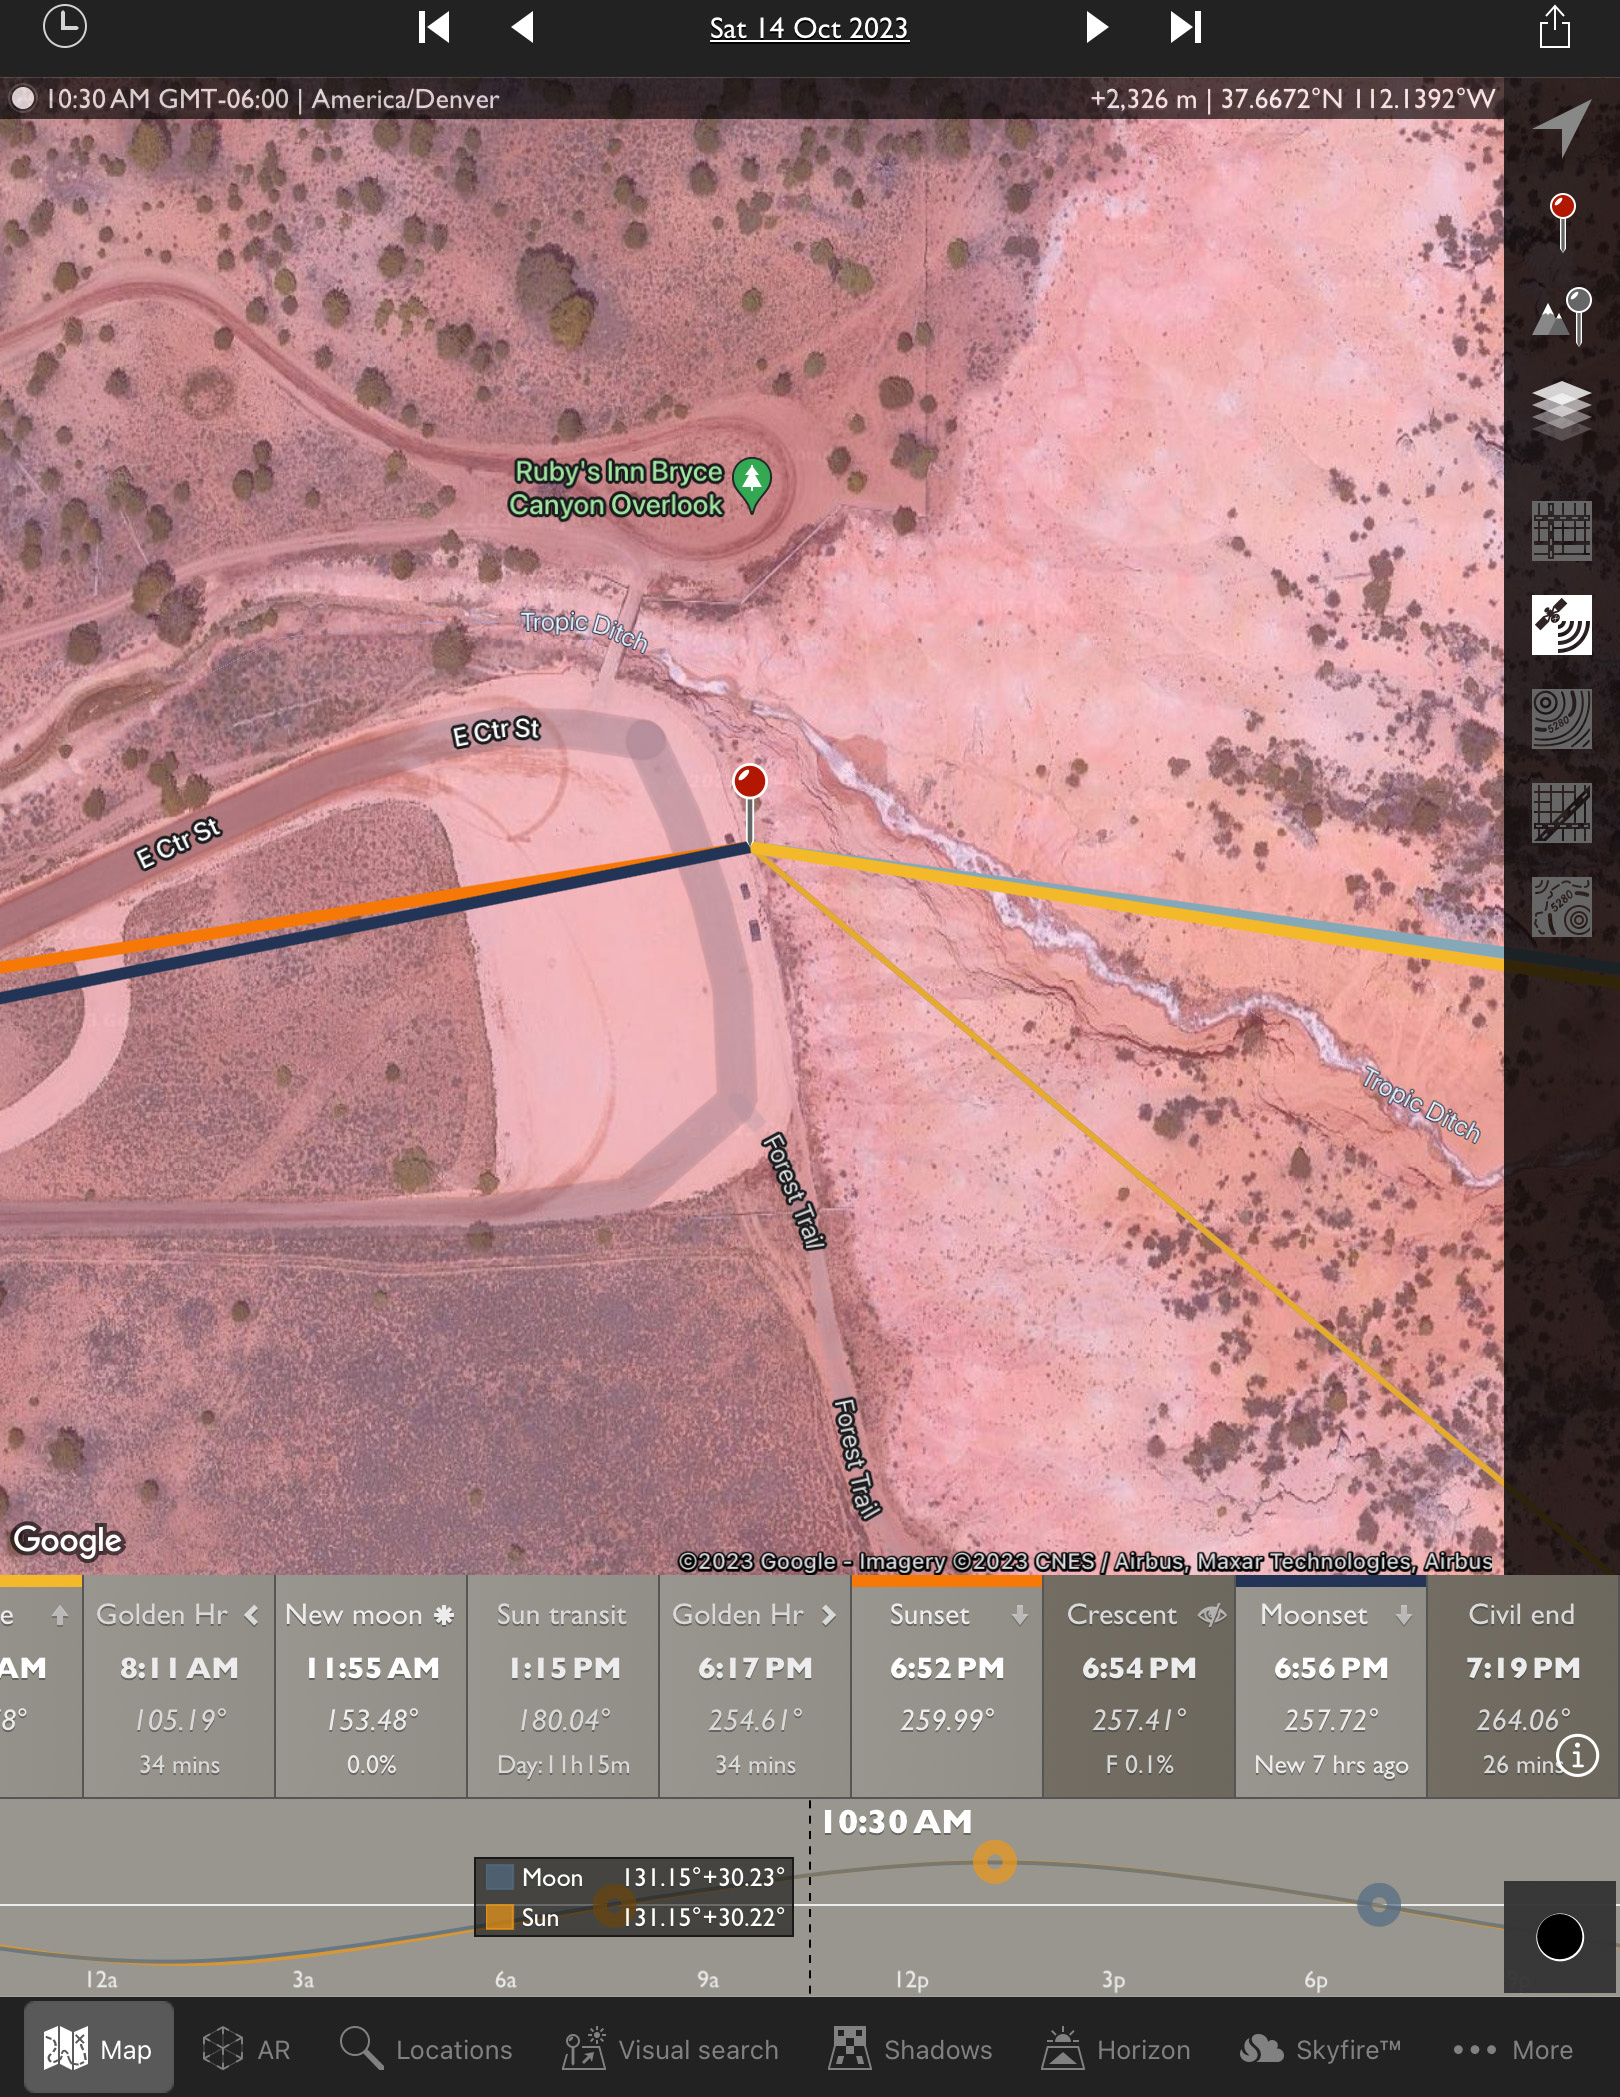
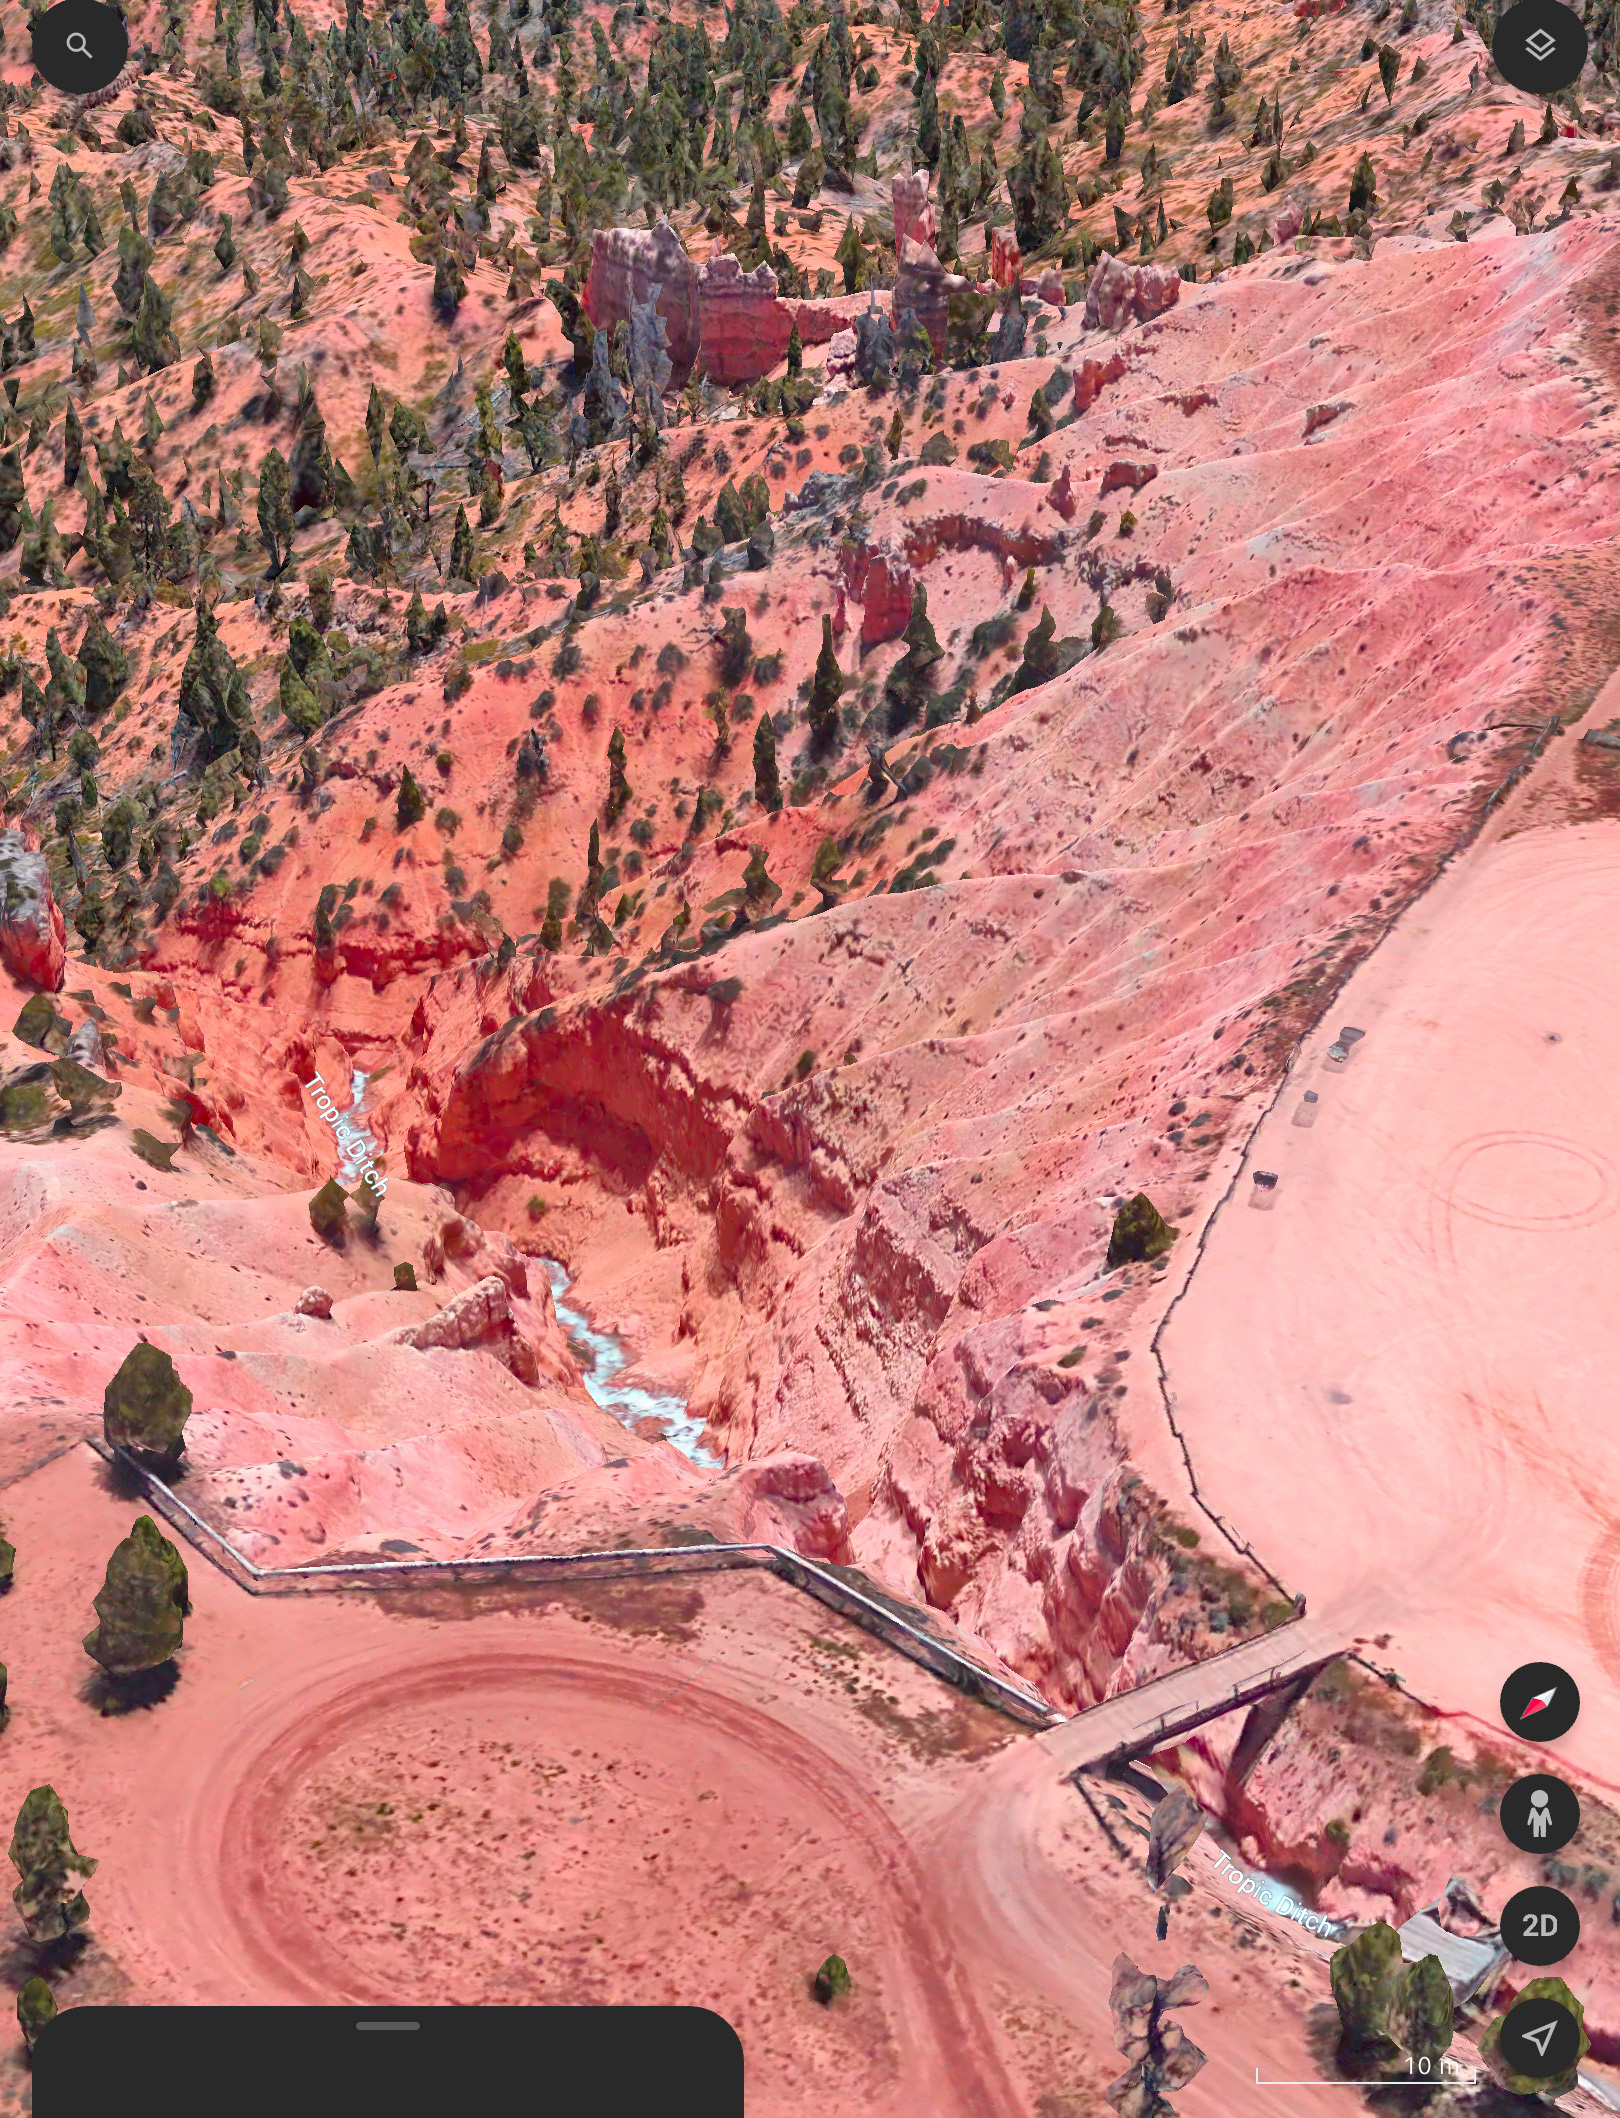
I had planned for several months to watch the annular eclipse from southern Utah, ideally from Bryce Canyon National Park, shown above. (Clicking on the images brings them up full screen.) I booked accommodations in January 2023, finding even then that popular hotels in the area were already sold out.
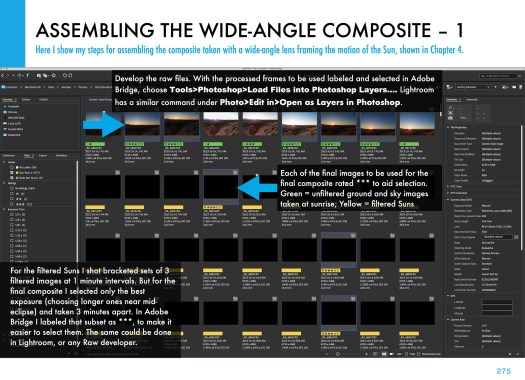
The final spot for the wide-angle composite shown below. The camera had to be next to that very fence post to frame the scene well.
The attraction was the landscape below the morning Sun, for a planned composite image of the eclipse over the hoodoos of Bryce. However, I had learned weeks earlier that traffic was going to be restricted to just park shuttle buses on eclipse day. Should Plan A not work out then Plan B was Kodachrome Basin, a state park nearby, which a park employee assured me would be open to cars well before sunrise on eclipse day.
Seen on I-15 past Salt Lake City. Eclipse ahead!
So I made my plans to drive south, taking with me a carload of telescope and camera gear, an array I would never be able to take to an overseas eclipse. The centrepiece was my venerable Astro-Physics Traveler 105mm (4-inch) refractor, a telescope created for the 1991 total eclipse in Mexico. Since I bought mine in 1992 I’ve used it for five central solar eclipses, including now two annulars. It’s in the 1994 and 2023 site images above.
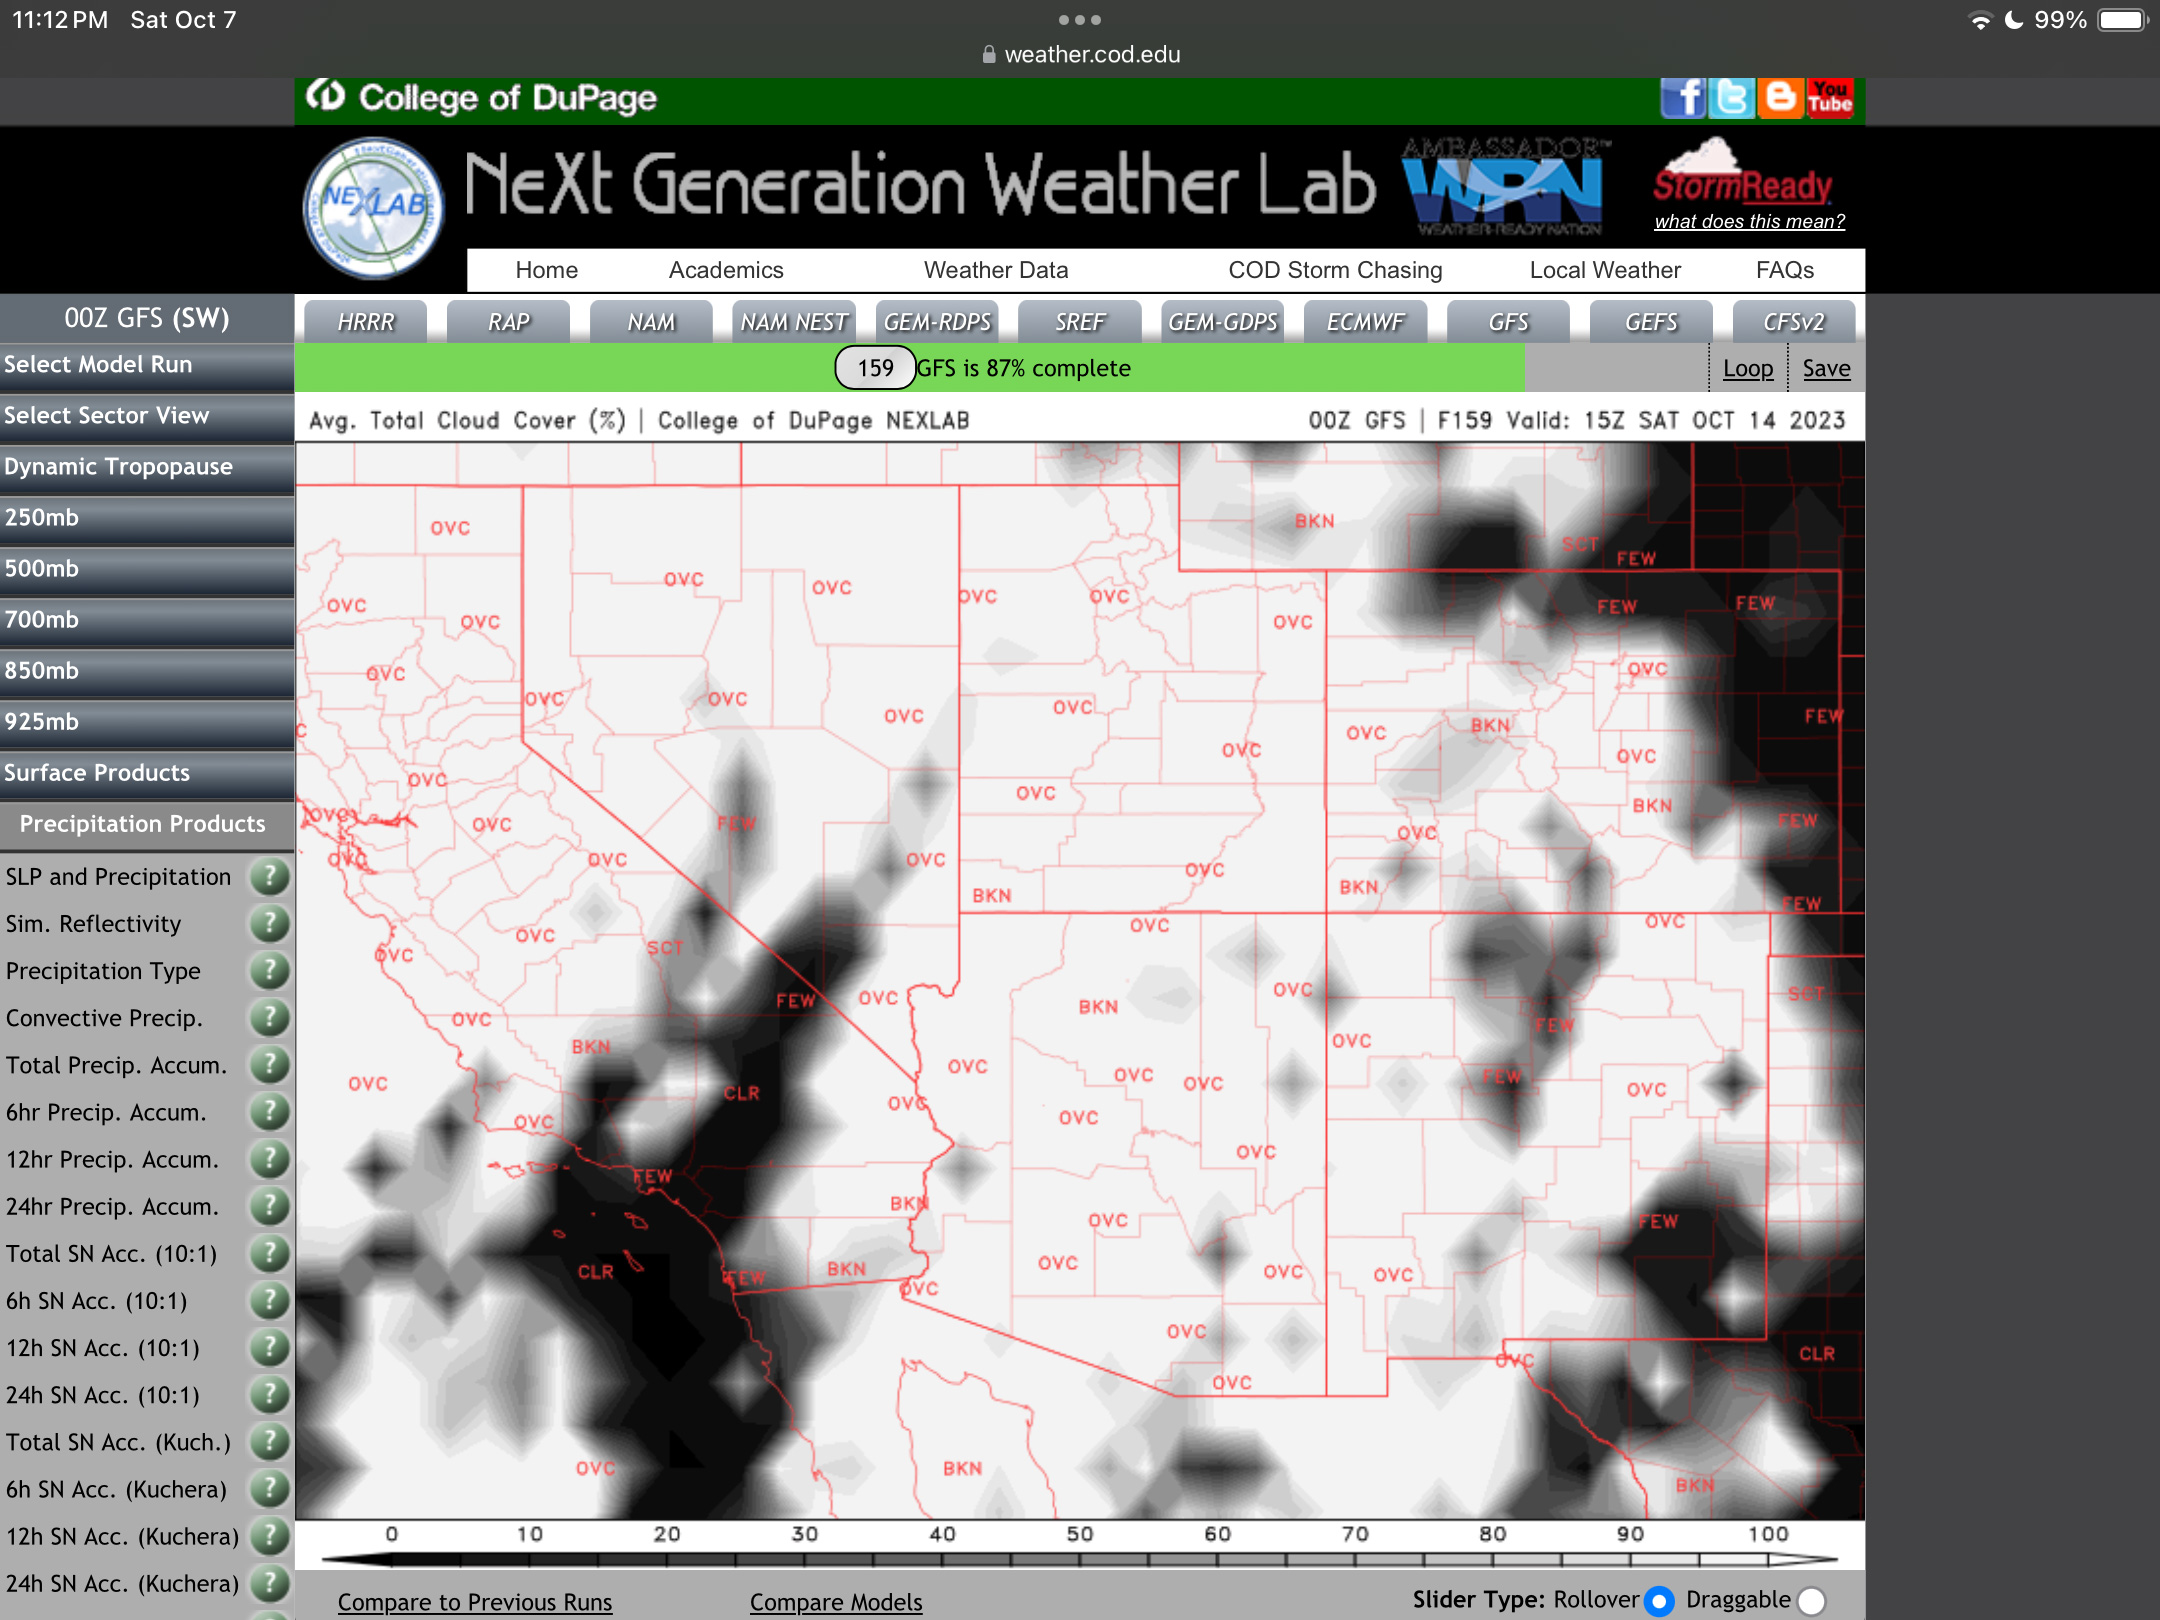
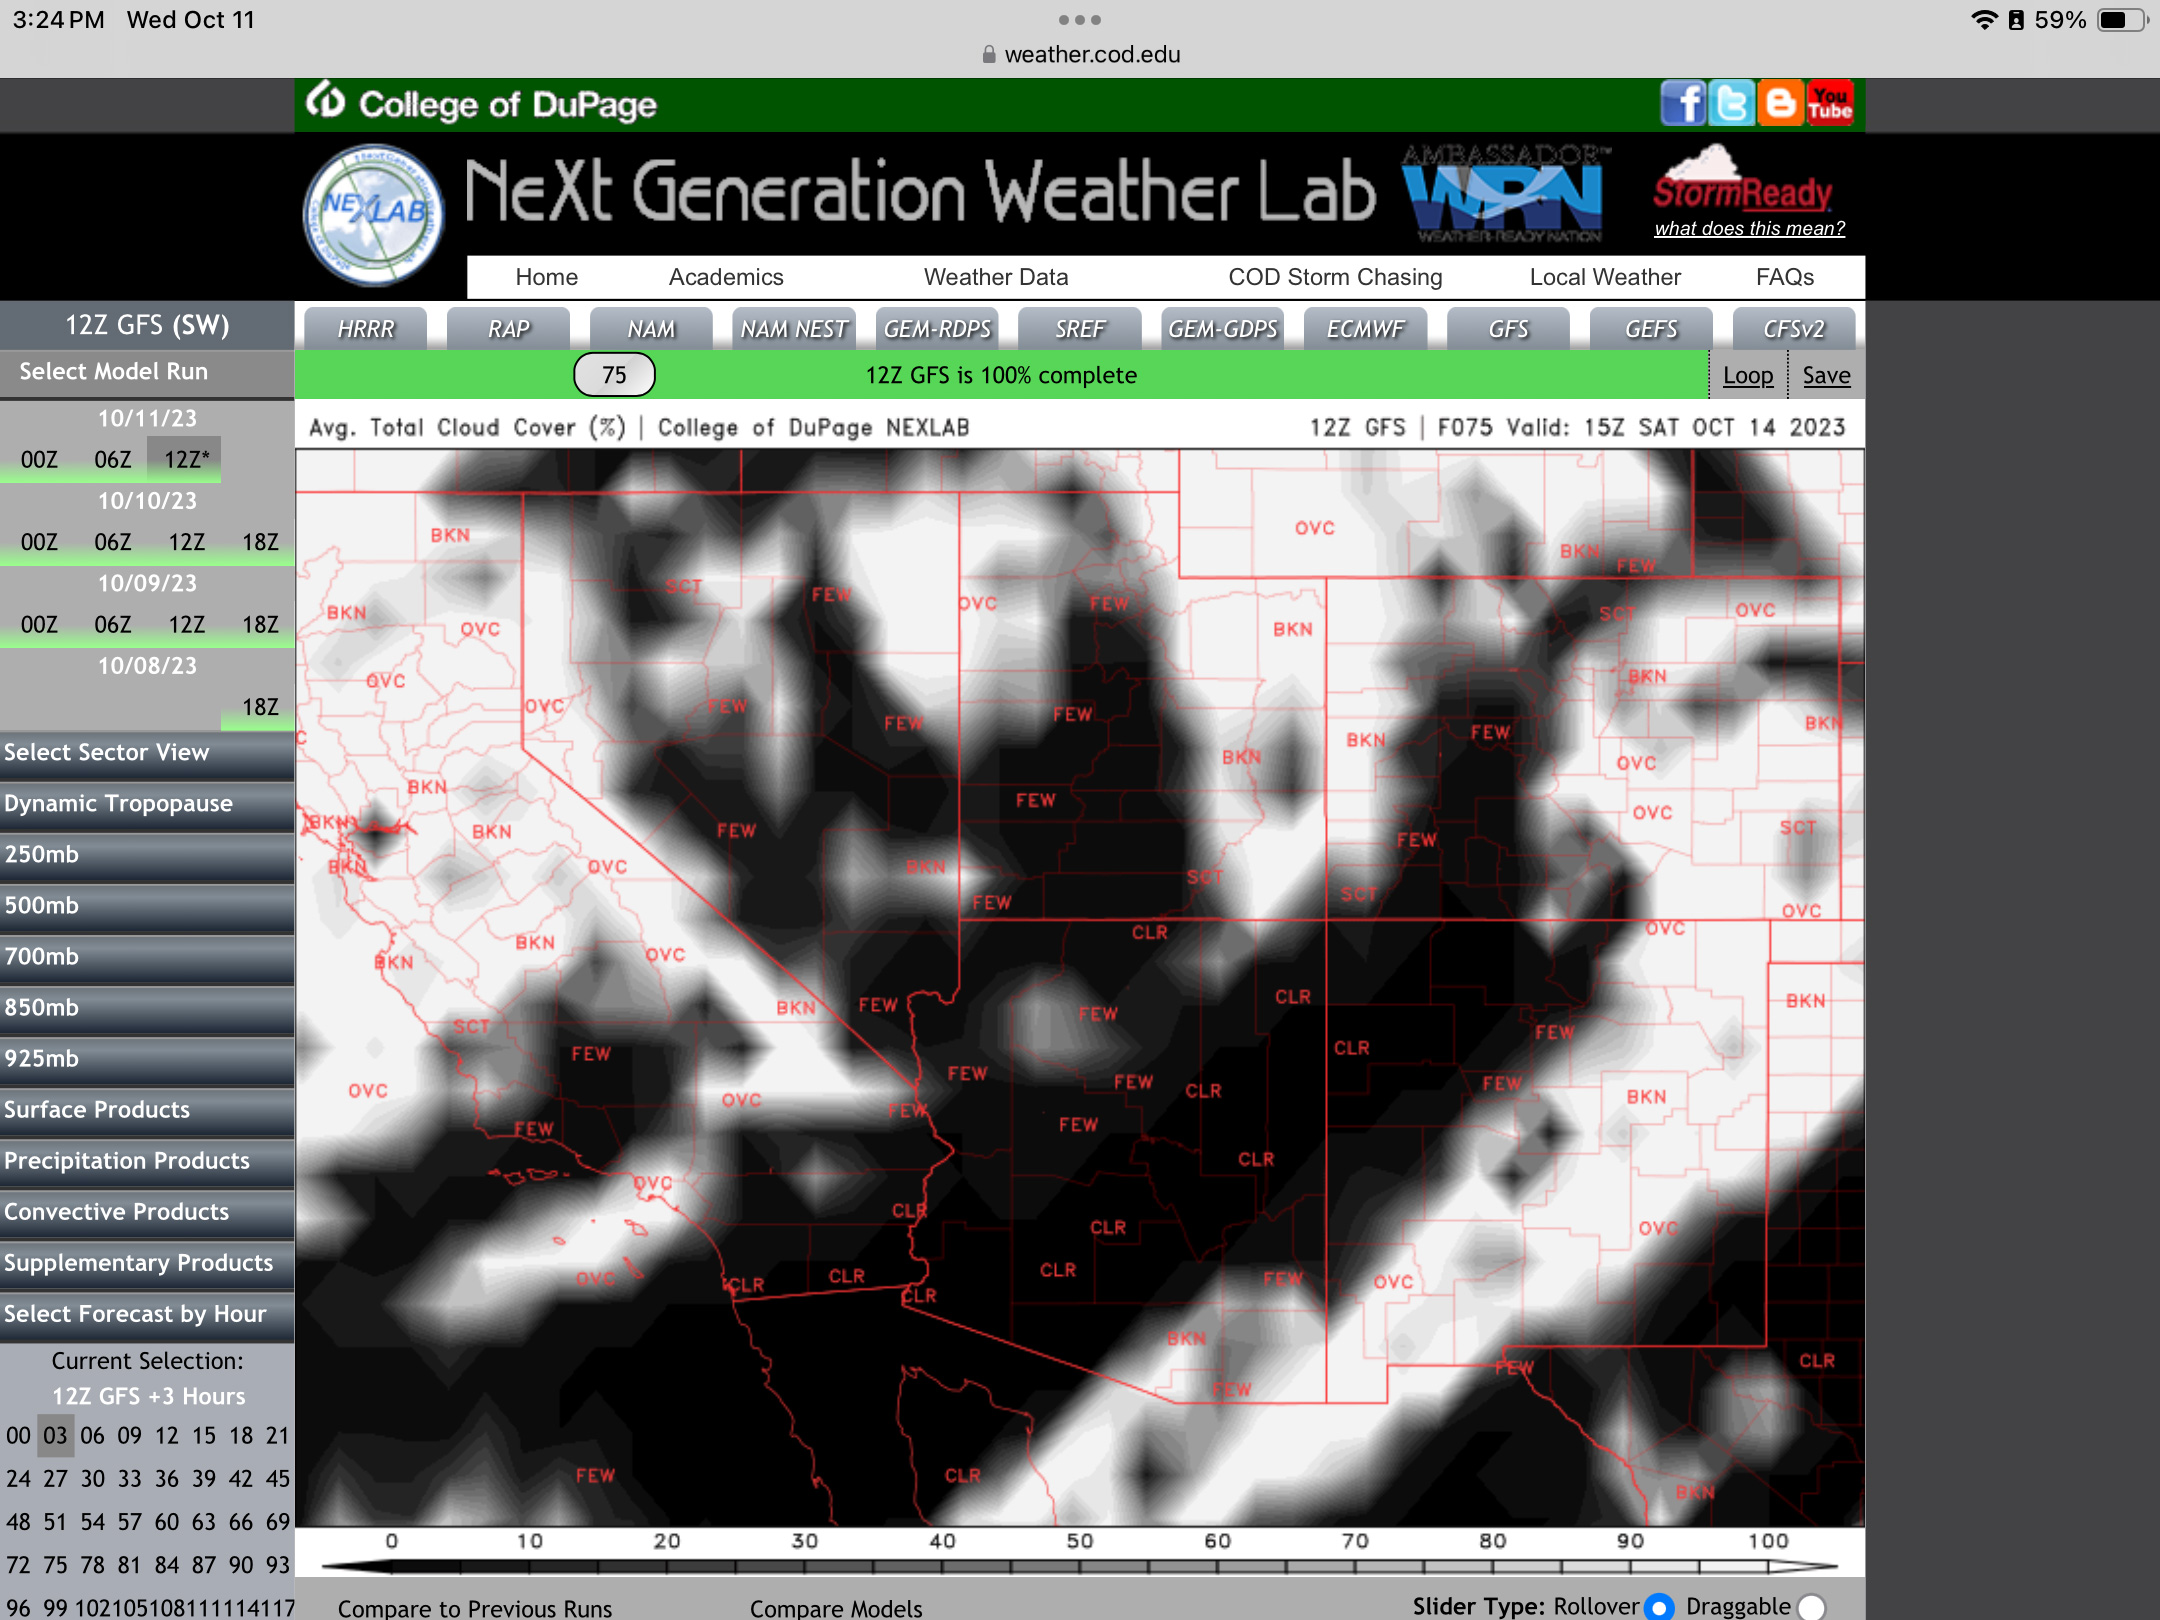
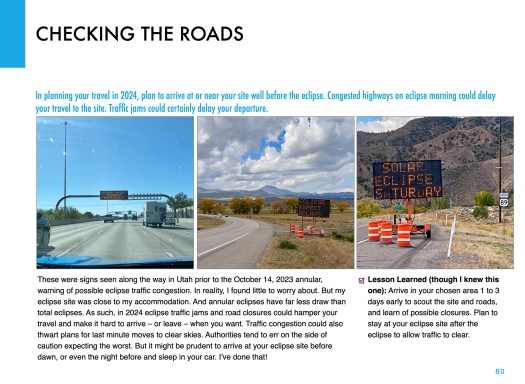
A week before the eclipse (as above at left), the weather prospects for the entire southwest looked poor. It was to be clouds everywhere. I even considered Plan S – Stay Home! And watch the 60% partial eclipse from Alberta where skies were to be clear.
But undaunted, six days before the eclipse, I headed south on Interstate 15, checking the weather each day, and seeking out Plan C sites in New Mexico or Texas south of the projected mass of clouds. I checked where accommodation could be had at the last minute.
At my stop in Richfield, Utah, four days before the eclipse, I had a crossroads turning point: either continue south to Bryce down US-89 (above), or head east on I-70, then south into New Mexico or Texas, with enough time to get there if needed.
But by now the weather prospects were turning around. By three days out, and with the forecasts now much more reliable, it looked like southern Utah would be in the clear. I continued with my original plan to Bryce. But where exactly?
TPE site overview with anglesTPE 3D showing Sun pathGoogle Earth 3D
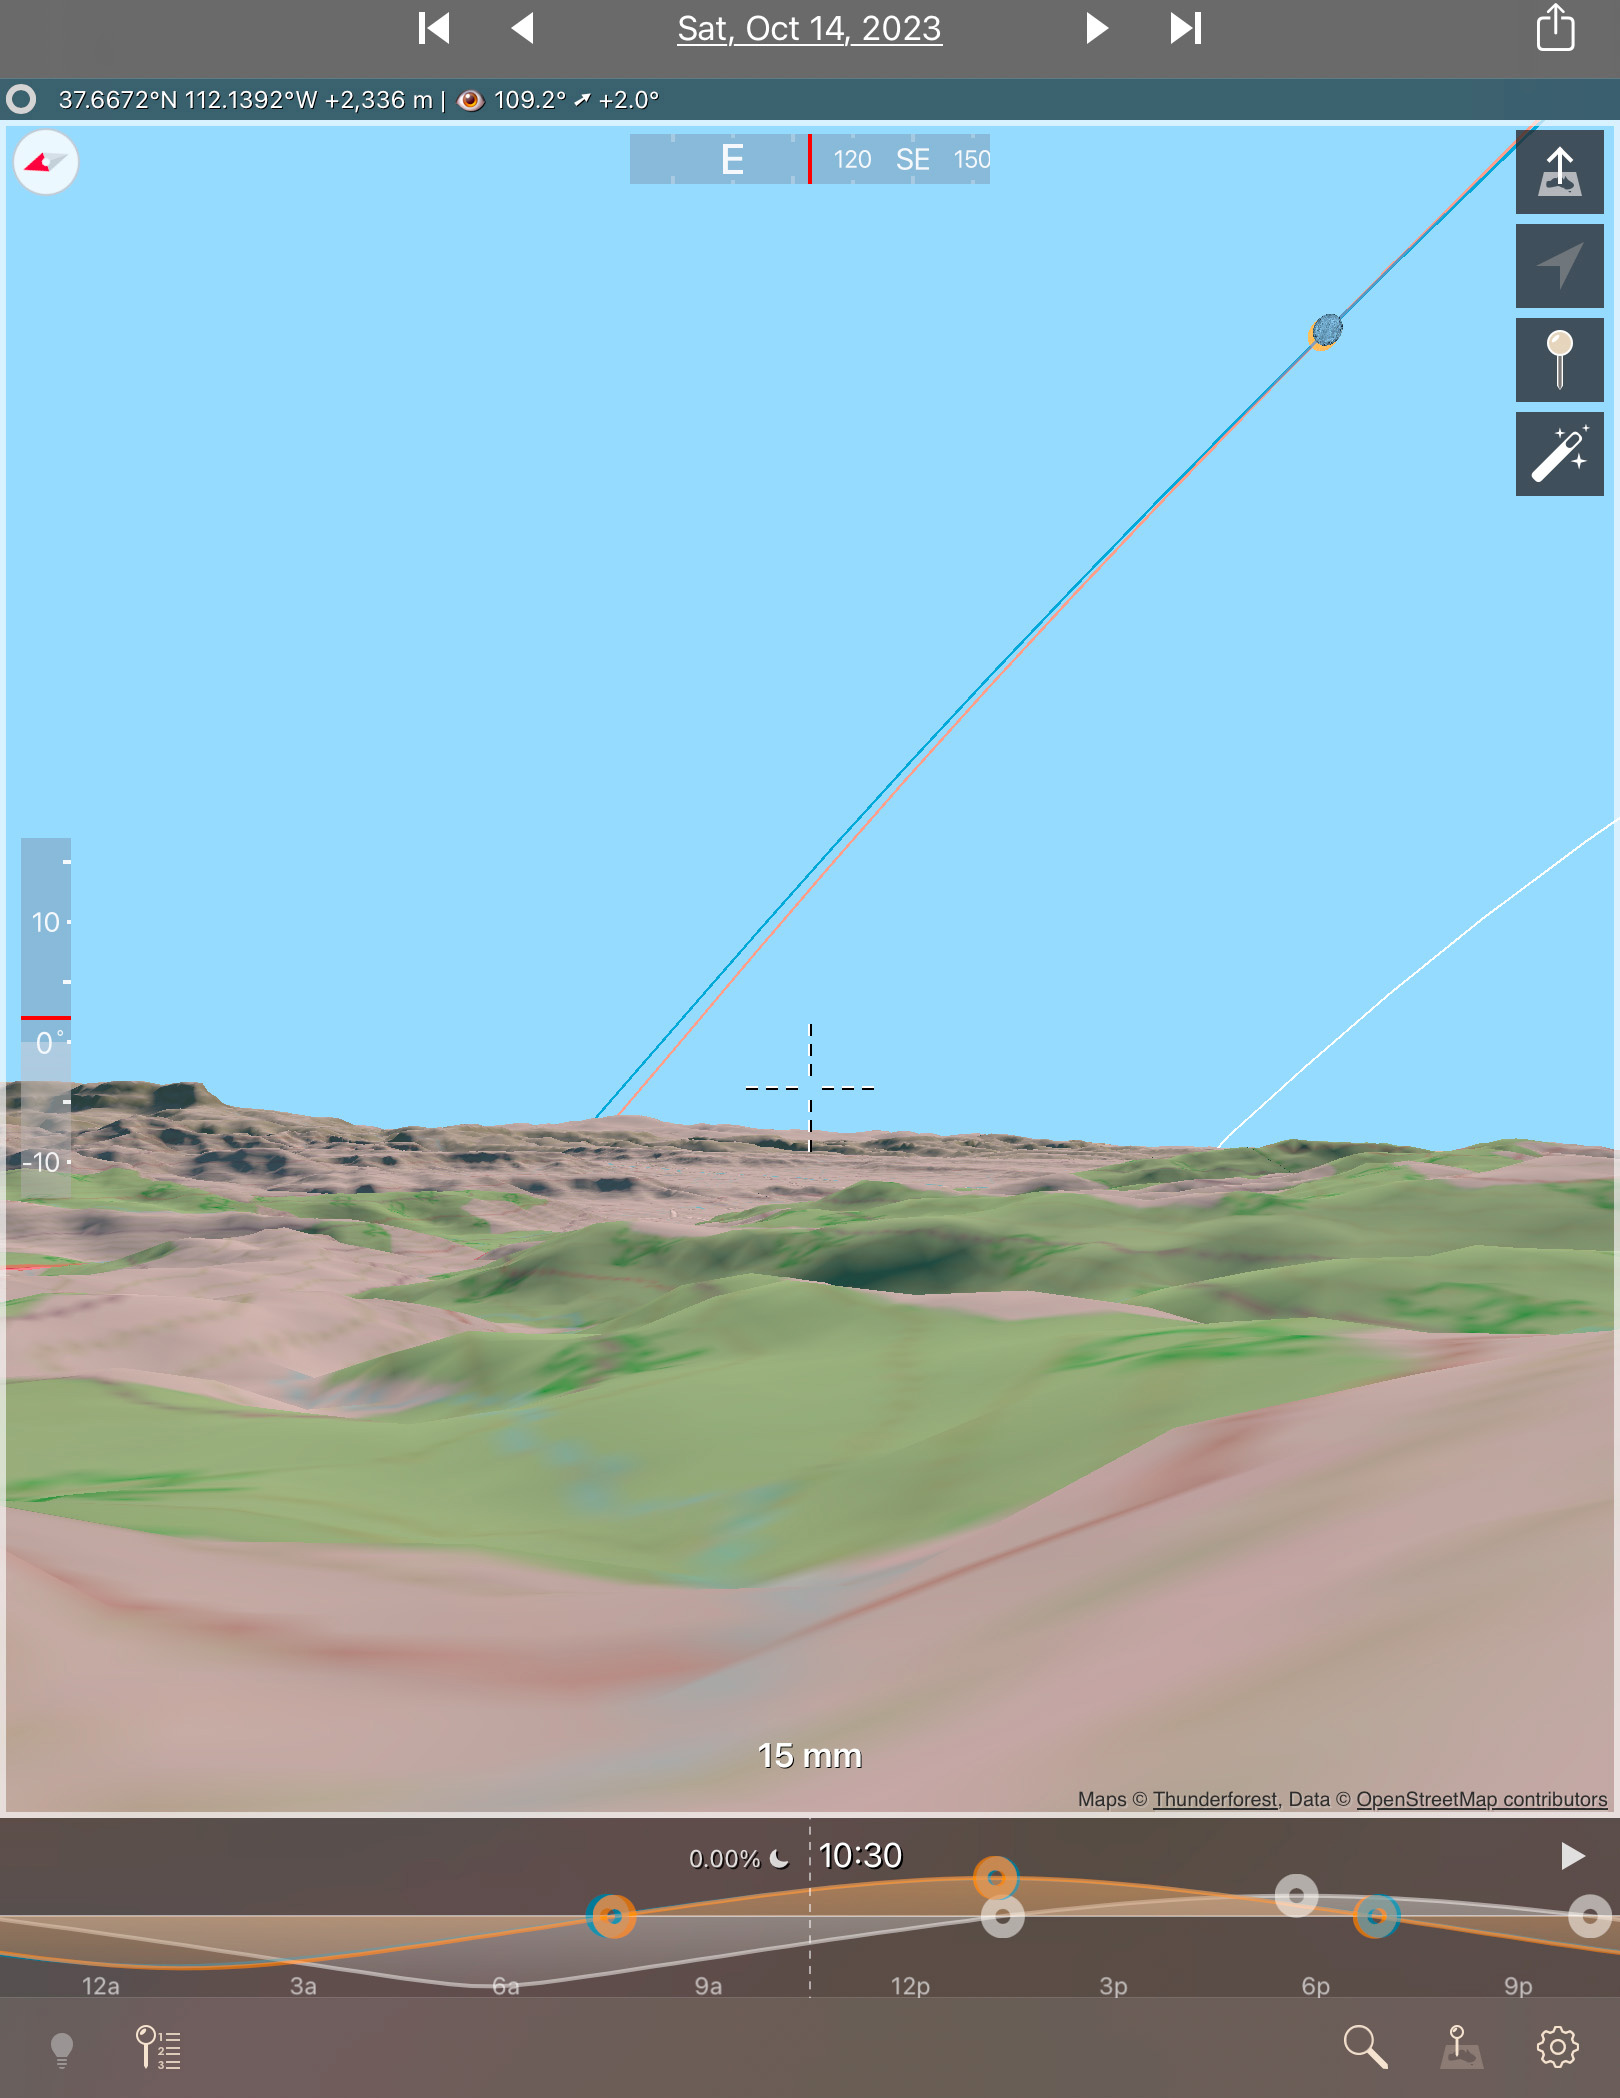
I had looked at possible sites on Google Earth and with the Sun-angle planning apps I use (such as The Photographer’s Ephemeris, or TPE) and found one just outside the Park that I hoped would be accessible to drive into.
Upon arriving in the area three days early, the first priority was to inspect the site in person. It looked perfect! Almost too good to be true!
A panorama of the Ruby’s Inn site with the eclipse in progress. My wide-angle camera is at left by that fencepost.
The site, known as the Ruby’s Inn Overlook, provided a great view toward the eclipse with a stunning landscape below, including a river! (Well, it was actually an irrigation channel called the Tropic Ditch.) And I could park right next to my wide-angle landscape camera, to keep an eye on it over the five hours of shooting, while setting up the scope gear next to my car.
I stayed at the Bryce View Lodge on eclipse eve, a hotel just a few hundred metres from the site. So no long pre-dawn drive on eclipse morn. However, the gated site was not going to be open until 7 a.m. on eclipse day. And admission was $20 per car, a cash donation to the Bryce Canyon City school sports teams. Fine!
As it turned out, by the time I got on site and setup the priority wide-angle camera for the base-image sunrise shots at 7:30 a.m., the sky was too bright to polar align the telescope mount on Polaris, for accurate tracking of the Sun across the sky.
It turned out that was the least of my concerns.
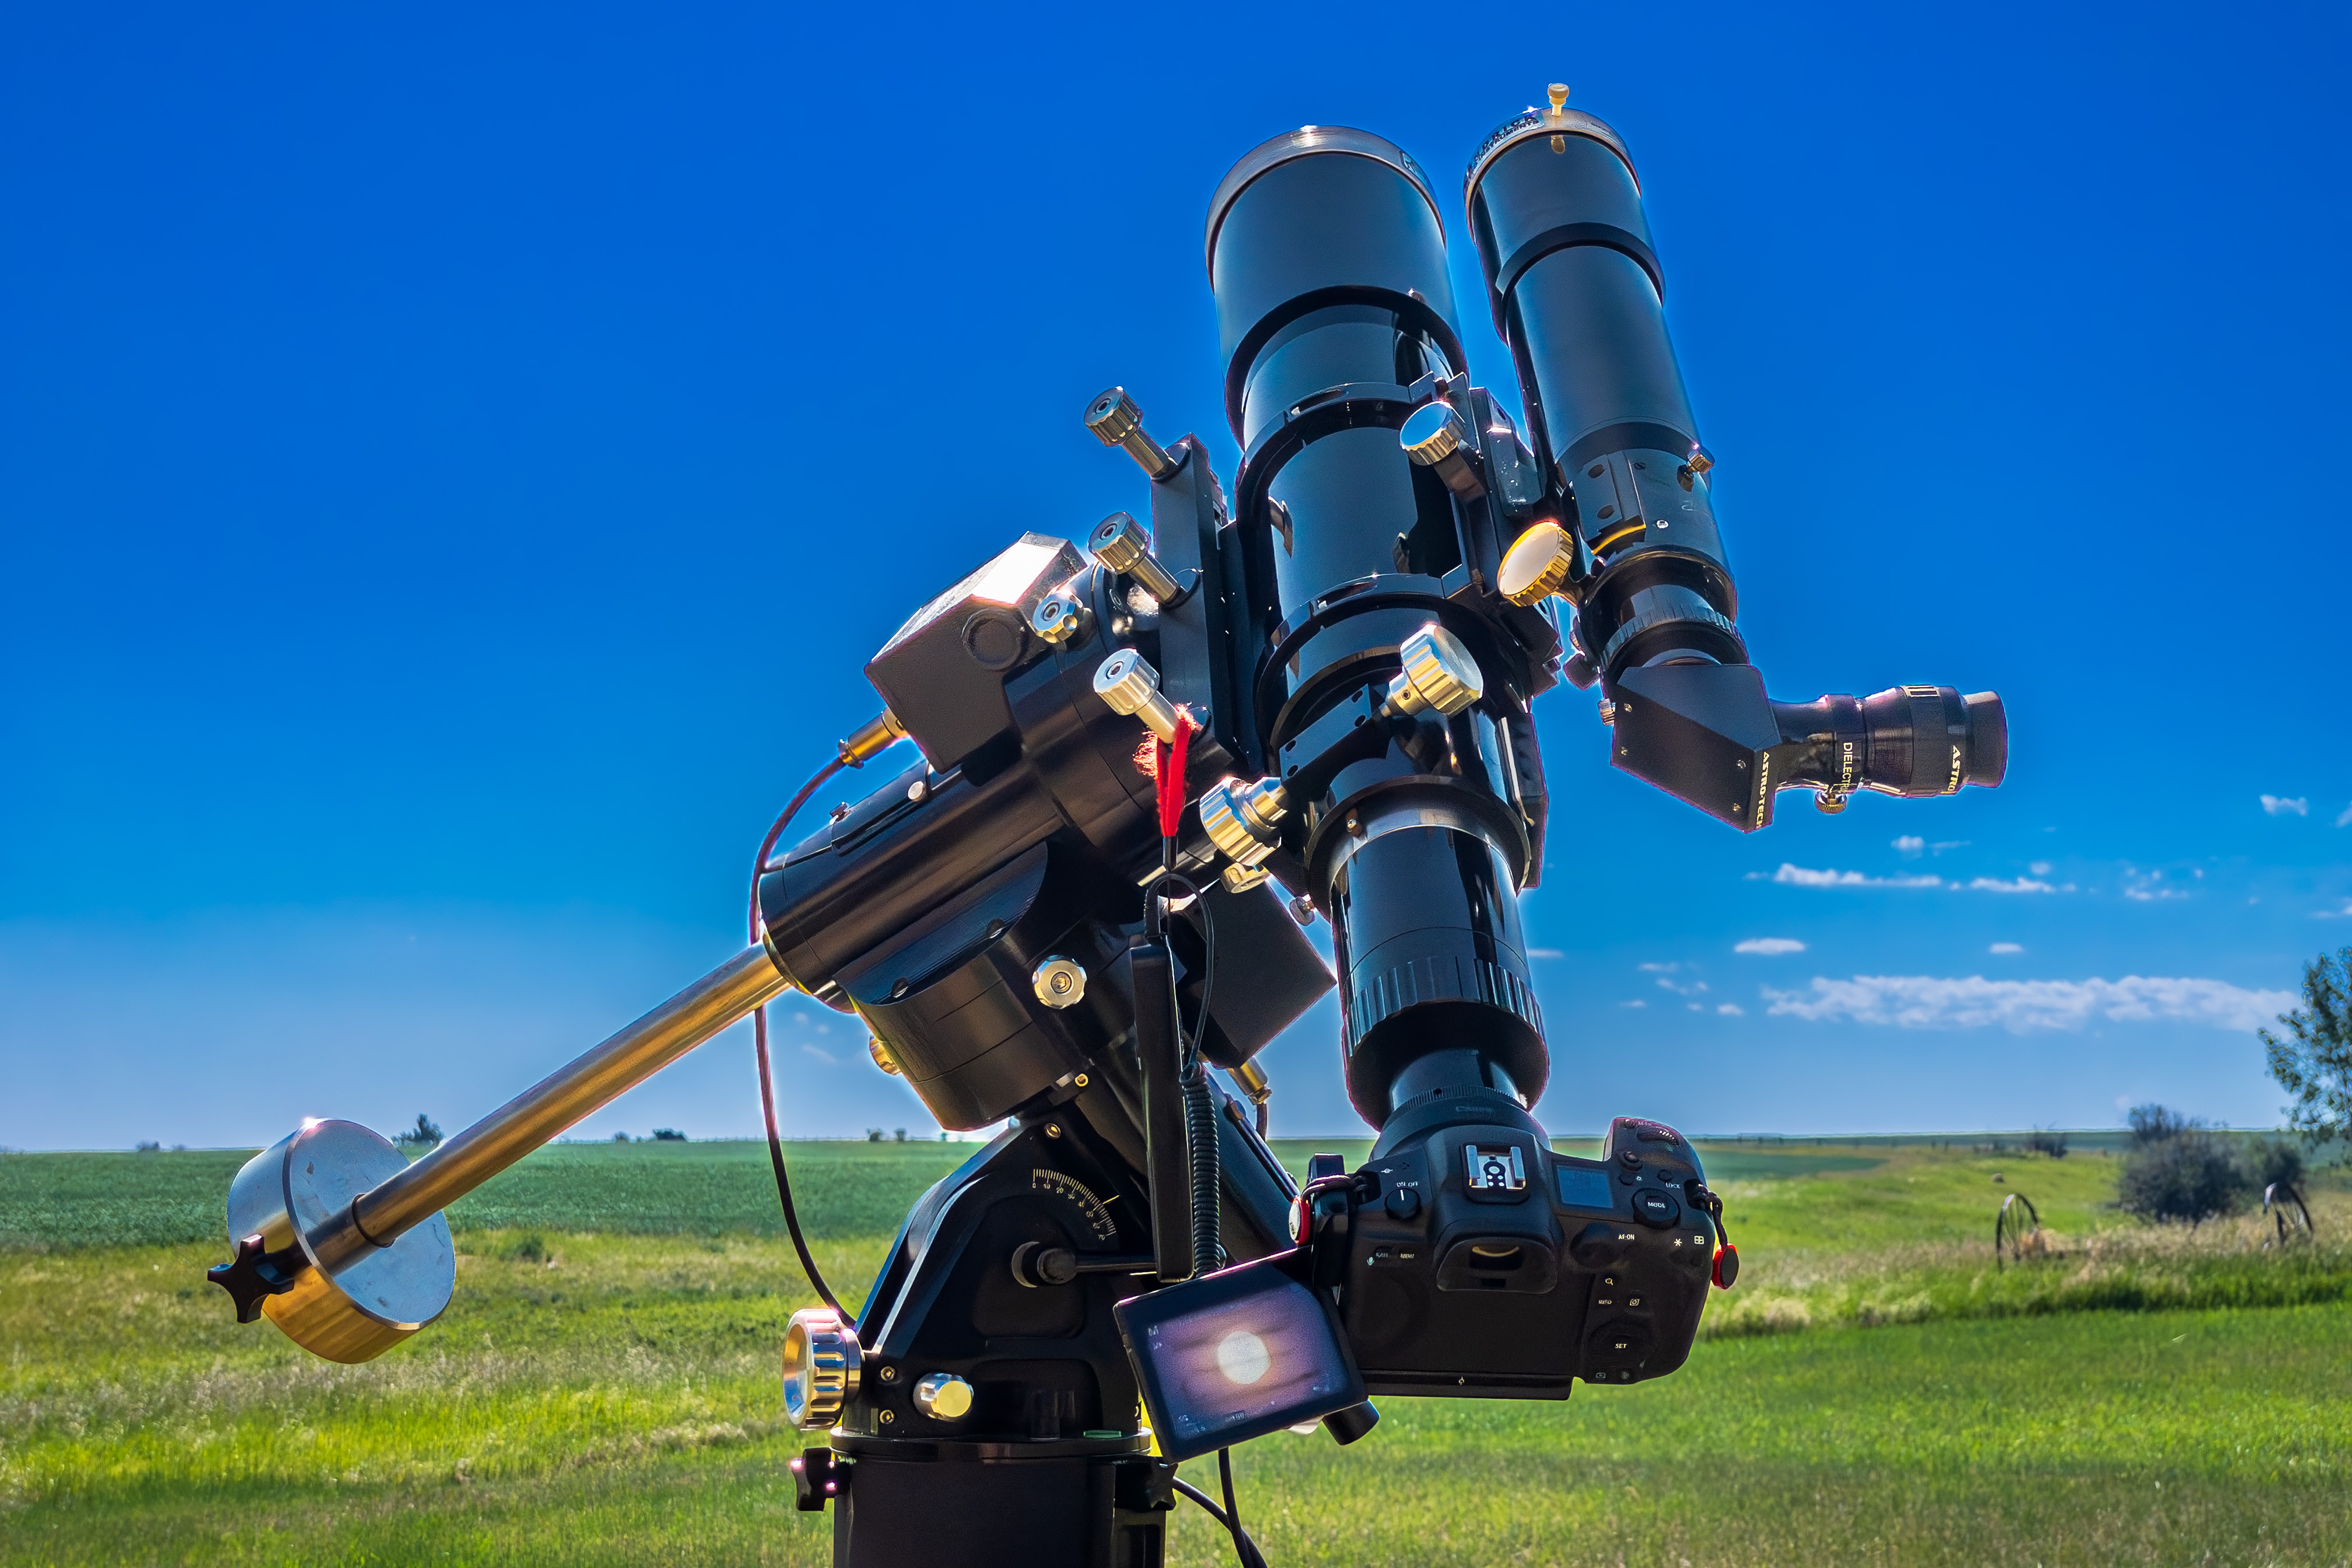
My three eclipse cameras: the wide-angle, the one on the 105mm refractor telescope (with a smaller 60mm scope on top for visual views with a Herschel Solar Wedge), and one with a 100-400mm lens on the tripod.
As I unpacked the carload of scope gear at 8 a.m. I realized I had forgotten a crucial cable to connect the mount to the drive electronics. So the mount was not going to be able to track anyway!
So much for my plans for a time-lapse through the scope. I had to manually centre the Sun every minute or so. I took lots of photos, but gave up on any effort to take them at a regular cadence. But I had enough images for the singles and composites shown here.
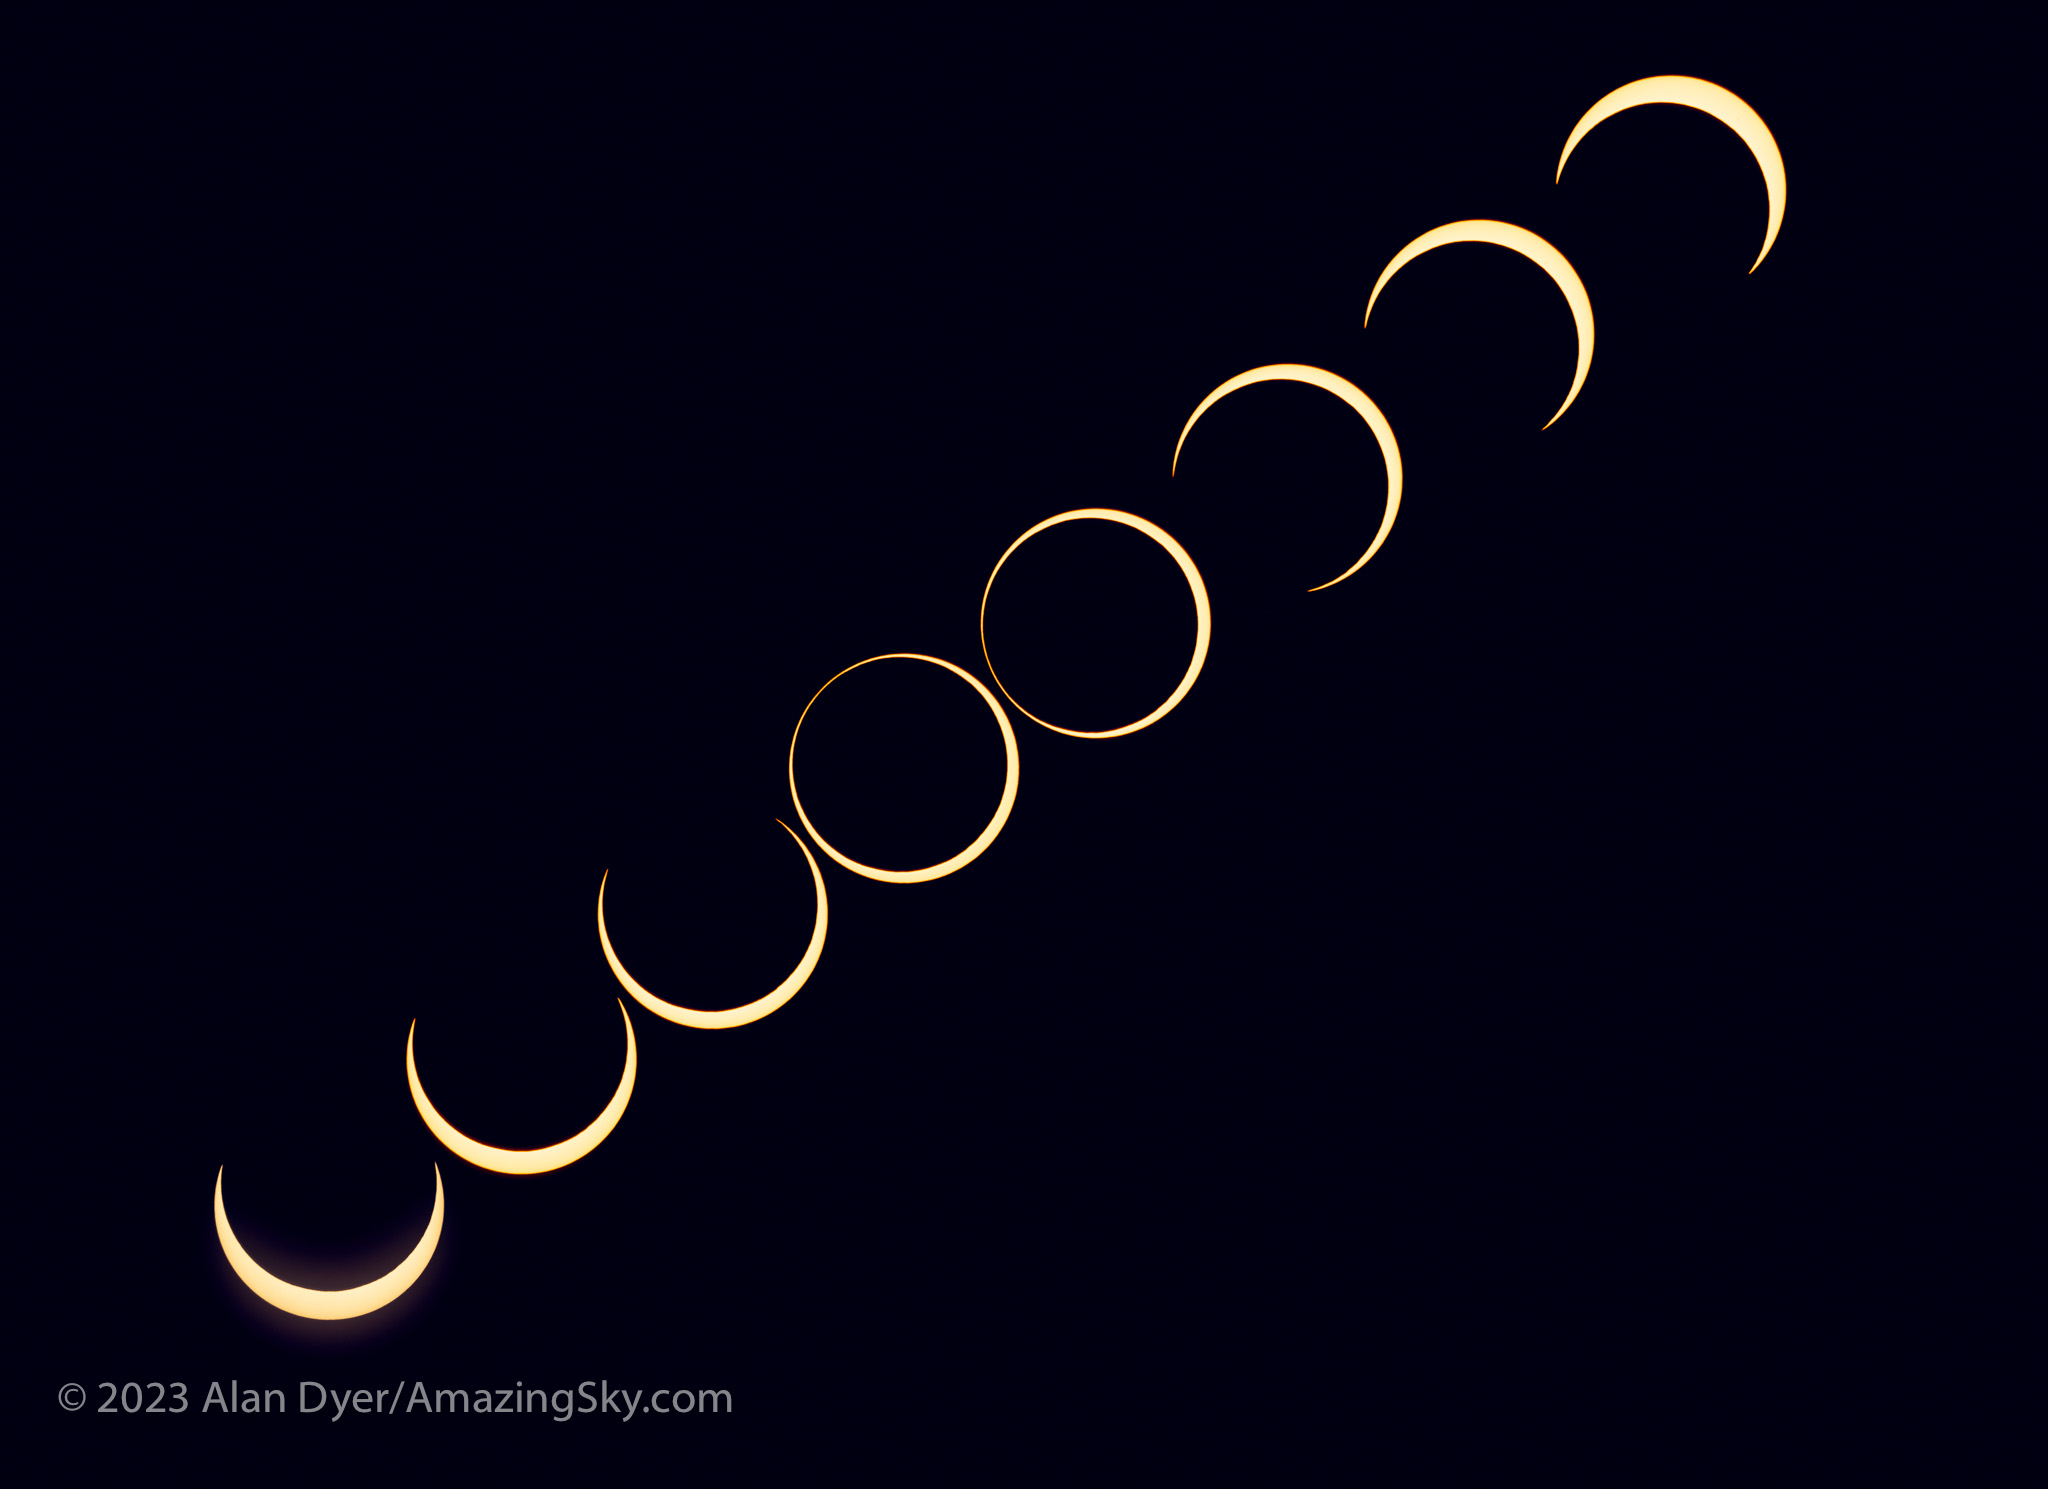
This is a composite of the October 14, 2023 annular solar eclipse with a sequence of six images showing the Moon advancing across a sunspot, the largest one visible on the Sun that day. The images are placed for a photogenic spacing, with time running forward from lower left to upper right, to reflect the Sun’s motion up across the morning sky.
Of course, once I got home the first thing I did was look downstairs in my scope room. Sure enough there was the cable, mixed up with the similar electronics from another mount I have from the same company, as I had been testing both prior to the eclipse. So much for my checklists! They’re only good if they list every critical bit, and if you use them.
So that was one big user error.
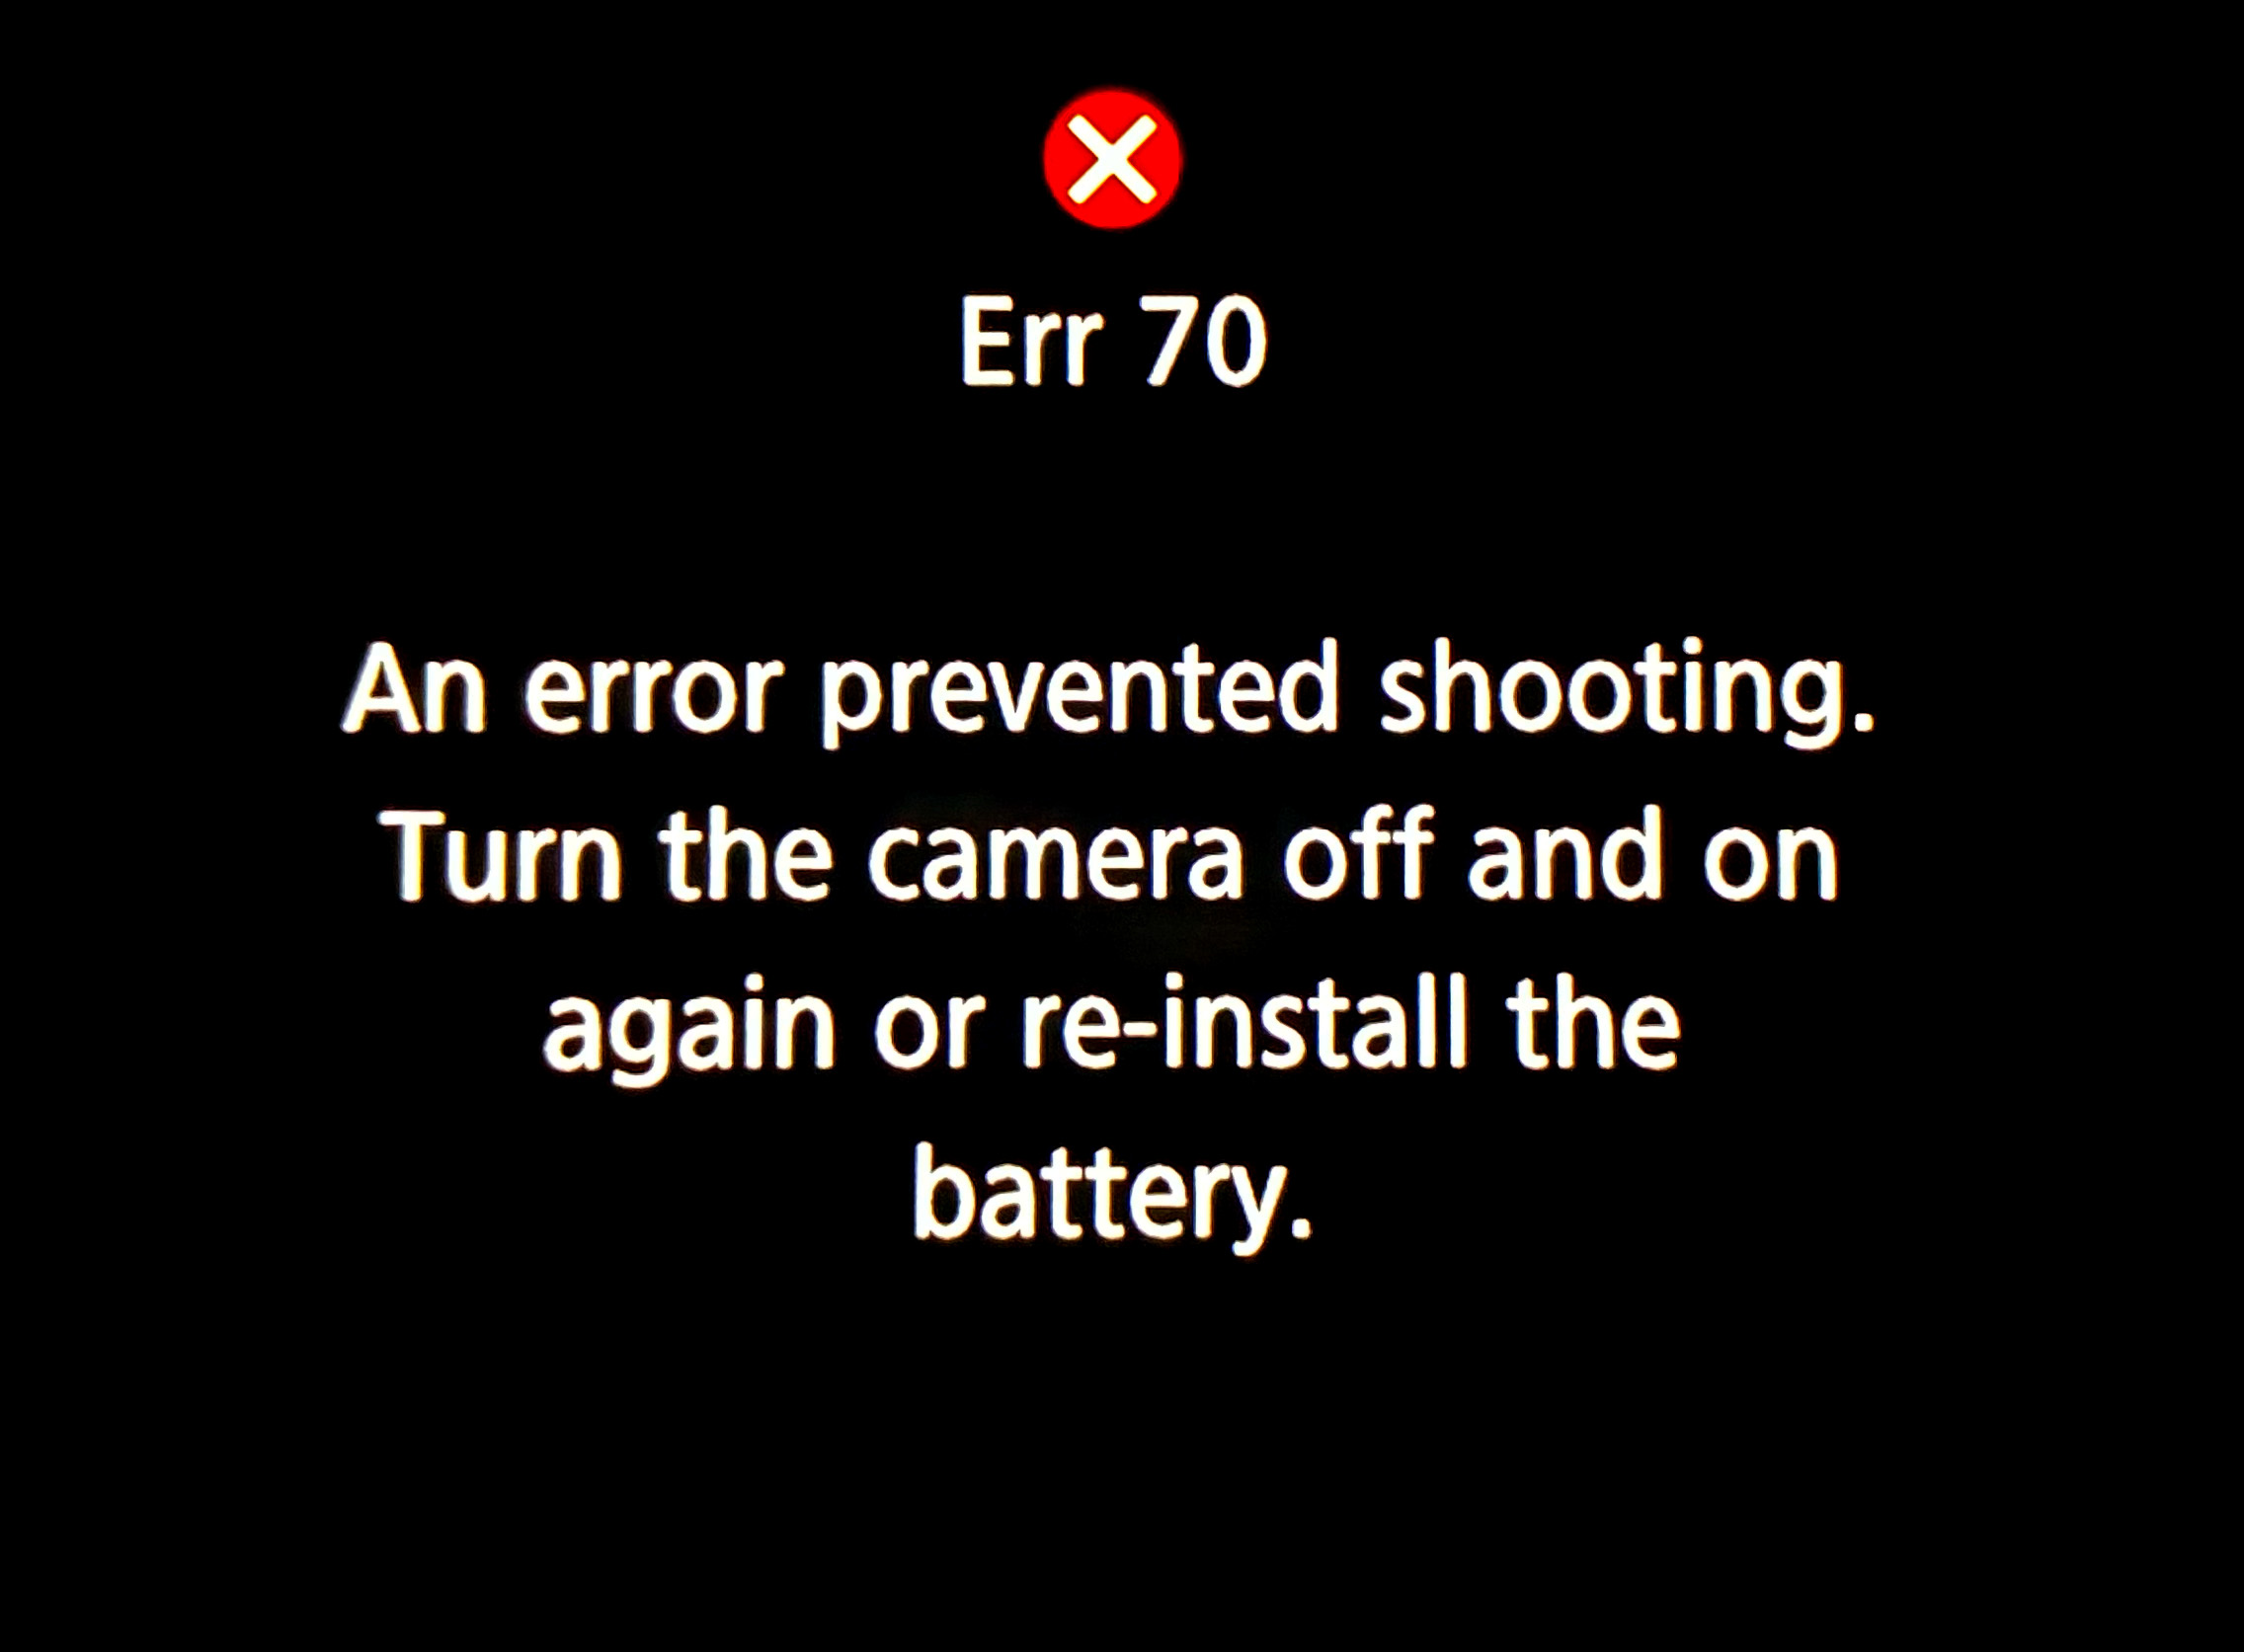
You don’t want to see this at an eclipse!
The other was a camera error, in fact Error70! I had set my main telescope camera to take rapid bursts of images (at up to 20 frames per second) at the crucial second and third contacts when annularity began and ended. With the Moon’s rough limb tangent to the inside edge of the Sun, you see beads of light rapidly form and disappear at the contacts.
This is a composite of the October 14, 2023 annular solar eclipse at second contact. It illustrates the irregular edge of the Moon breaking up the rim of sunlight as the dark disk of the Moon became tangent to the inner edge of the Sun at second contact at the start of annularity. 15 exposures taken over 20 seconds at second contact are combined with a single exposure taken about 1.5 minutes later at mid-annularity.
The camera worked great at second contact, shooting 344 frames over 20 seconds. A composite of 15 of those frames is above, layered to exaggerate the rough lunar limb and its mountain peaks. A time-lapse from those frames is below.
A time-lapse of second contact from 344 frames over ~20 seconds.
And it appeared to be working at third contact three minutes later. Until I looked down and saw the dreaded error message. In checking the camera later, none of the third contact images had recorded to either memory card.
It is a known but intermittent bug in Canon firmware that can happen when the camera is not connected to a Canon lens (it was on a telescope it cannot communicate with). I saw the error once in testing. And I had a hard time reproducing it to take the screen shot above once I got home. But if something can go wrong …!
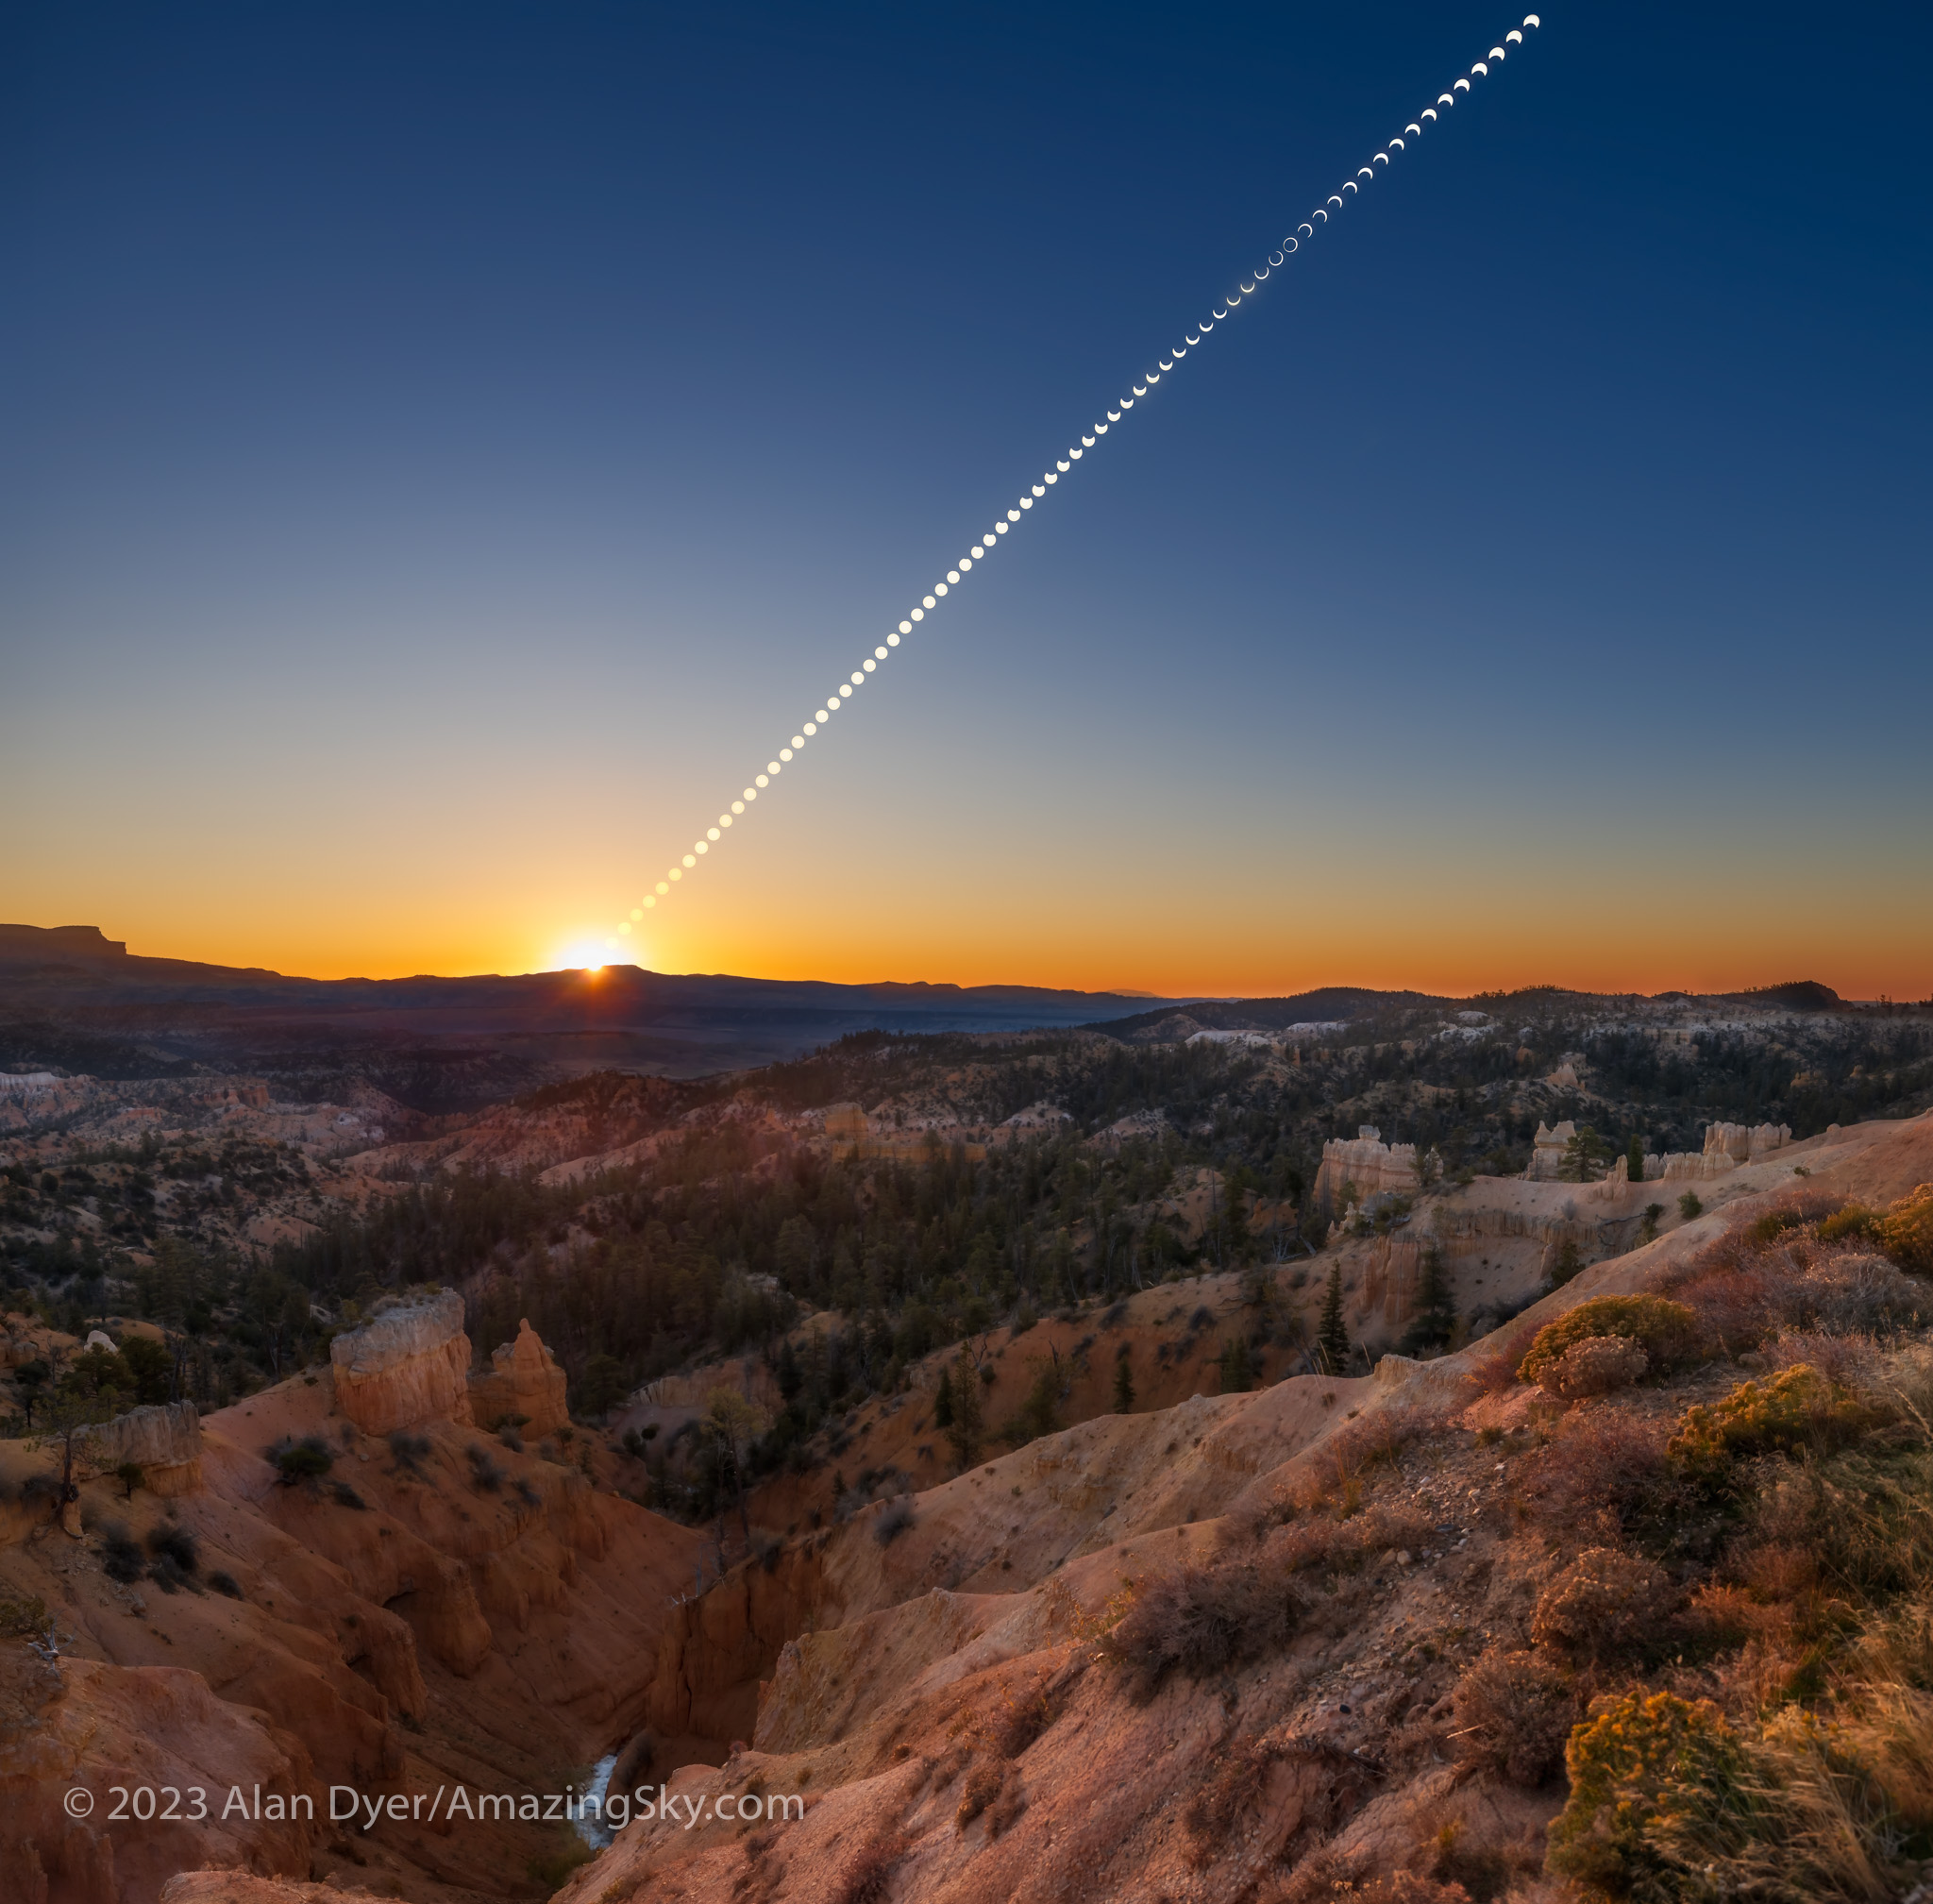
This is a portrait of the October 14, 2023 annular eclipse of the Sun, captured in a sequence of images taken from the rim of Bryce Canyon, Utah, from sunrise until nearly the end of the eclipse before noon local time. This is a composite blend of unfiltered exposures taken at sunrise for the landscape lit by the rising Sun, and for the dawn sky. Onto the base panorama of the ground and sky I layered in 66 filtered images of the Sun, as it rose into the morning sky, and with the Moon moving across its disk over nearly 3 hours, reaching mid-eclipse at about 10:29 local MDT at upper right. It then appears as a ring, or annulus of light for one frame.
Despite the errors both human and machine, I count eclipse day as successful, considering a week earlier prospects had looked so poor. As it was, apart from some thin but inconsequential cloud that drifted through before mid-eclipse, the sky was perfect.
As was the site. I enabled me to get the main shot I was after, the wide-angle composite, above. It’s a winner! And it accurately depicts the size of the Sun and its motion across the sky, albeit set into a twilight sky taken at sunrise.
As it had been 29 years since my last annular, I wasn’t sure what to expect. But the darkening of the sky and eerie level of sunlight, despite a blazing Sun in the day sky, were impressive. The morning just looked strange! It was a taste of the total to come.
Venus at its widest angle west of the Sun was easy to spot in the deep blue sky. I regret not thinking to shoot even a phone camera image of that sight.
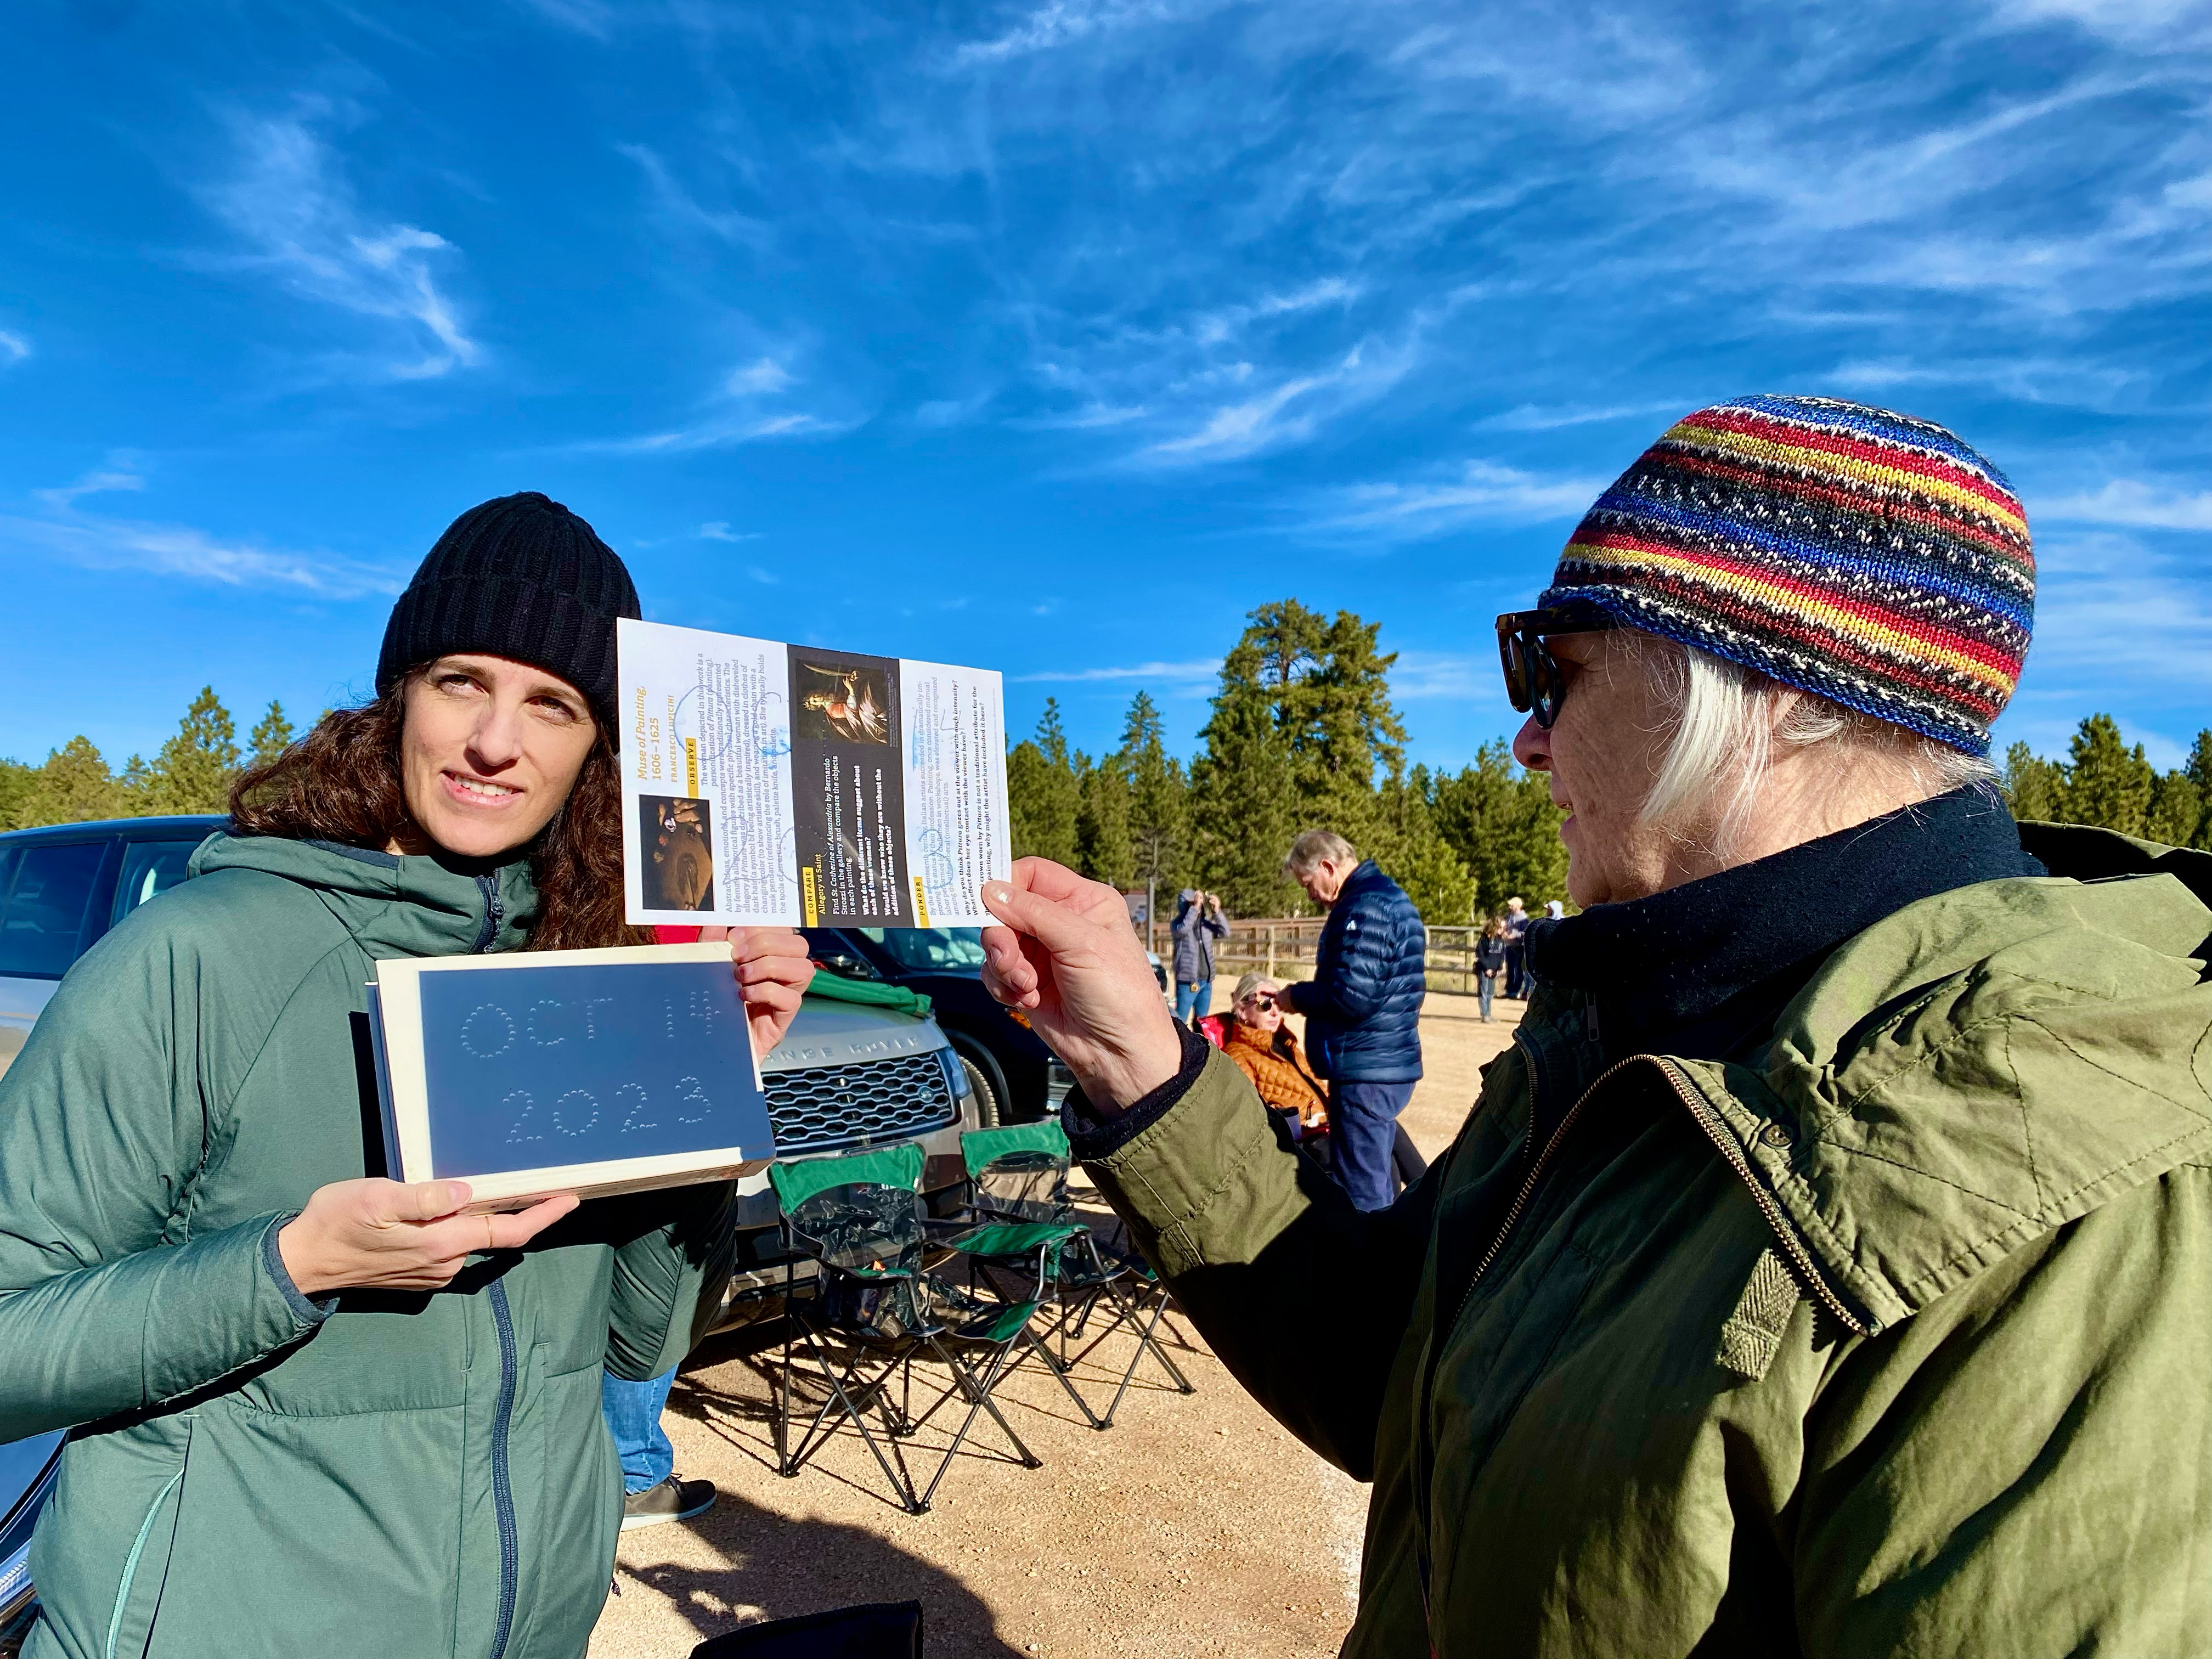
Projecting the solar crescents with a made-on-the-spot pinhole projection sign.
I had pleasant chats with other folks at the site, and enjoyed showing them telescopic views though the smaller visual scope I had piggybacked on the main scope, one that was just for looking through. Plus folks shot phone pix of my camera screen.
The October 14, 2023 annular solar eclipse, in a single image captured at second contact with the Moon tangent to the inside limb of the Sun, at 10:27 am MDT at the site I used.
But at the critical contacts, I was glued to that visual scope for the amazing sight of the horns of the crescent Sun rapidly wrapping around the Moon at second contact, then unwrapping at third contact.
The October 14, 2023 annular solar eclipse, in a series of images captured at second contact with the Moon tangent to the inside limb of the Sun, at 10:27 am MDT at the site I used. The 7 frames here were selected from a set of 344 shot in high-speed continuous mode at 20 frames per second.
The breakup of the rim of sunlight into beads of light along the cratered and mountainous edge of the Moon was also impressive. I was not at the optimum site for seeing those beads, as the landscape dictated my choice of location. But those that I saw at each of the internal contacts were a fine bonus to a memorable morning.
This is a composite that records the sequence around mid-eclipse of the October 14, 2023 annular eclipse of the Sun. This is a blend of 8 exposures each taken 2.25 minutes apart, about the minimum time to keep the disks separate and avoid them overlapping.
A third camera shooting a sequence with an untracked 400mm telephoto lens worked well. I used a subset of its images to create a still-image composite (above) and the full set for a time-lapse (below), with the position and motion of the Sun authentic, produced by the natural east-to-west motion of the sky. But against that you see the Moon’s orbital motion moving its dark disk down across the disk of the Sun.
A time-lapse from 300 frames taken at 4-second intervals with the sky’s motion carrying the Sun across the frame.
As soon as annularity ended, everyone else started to pack up and leave. For them the show was over. Understandably. On many total eclipse tours I’ve been on we’ve been on the road back to the hotel after totality and the requisite happy group shot.
Eclipse success! The trophy shot after everyone else had left.
But at this eclipse my shooting plan dictated that I stick it out. By the end of the eclipse I was the last one standing, alone to enjoy last contact and then lunch, killing time for any road congestion to diminish, as I had to head to another motel for the post-eclipse night, in nearby Panguitch.
I had a celebratory dinner and Moab-brewed beer that night at Cowboy’s, the best restaurant in Panguitch, sporting my Annular 2023 eclipse hat!
But the next day I started the drive north again, for the three-day trek back up I-15 to the border, then home.
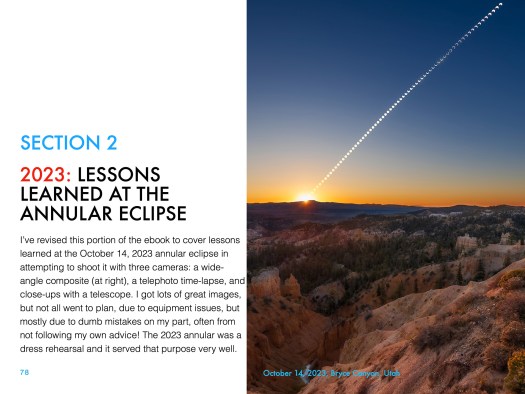
Priority one upon getting home was to finish processing images, and to include them in a revised version of my ebook How to Photograph the Solar Eclipses. It is linked to above and here on the title. Images of some sample pages from the revised edition are in the slide show below.
Post-annular, the book’s title remains the same, but I revised the pages in Chapter 4 on planning for the 2023 eclipse with pages on “lessons learned!” And there were several!
I expanded Chapter 11 on processing to include tutorials on assembling annular eclipse composites, now that I actually have some!
Such as the composite of first- to last-contact telescopic close-ups below.
This is a composite of the various stages of the entire October 14, 2023 annular solar eclipse, from start (lower left) to end (upper right), with mid-eclipse at centre. So time runs forward from left to right, with the Suns positioned to reflect the approximate motion of the Sun in the morning sky when this eclipse occured at my site, with it rising higher through the progress of the eclipse. North is up in this image.
The new version of my ebook is 20 pages larger than the pre-annular edition.
An email has gone out from eJunkie to all buyers of the earlier-edition PDF to alert them to the new version, and with a download link. Apple Books readers should get a notice when they open the book on their Mac or iPad in the Books app that a new version is available.
I suspect that will be the last revision of my ebook before the big event – the total eclipse of the Sun on April 8, 2024.
Here’s wishing us all clear skies for that one! That eclipse will indeed require a drive to Texas. This time I’ll remember that damned cable!
With the October 14, 2023 annular eclipse of the Sun only weeks or days away, it’s time to test your equipment, to ensure success on eclipse day.
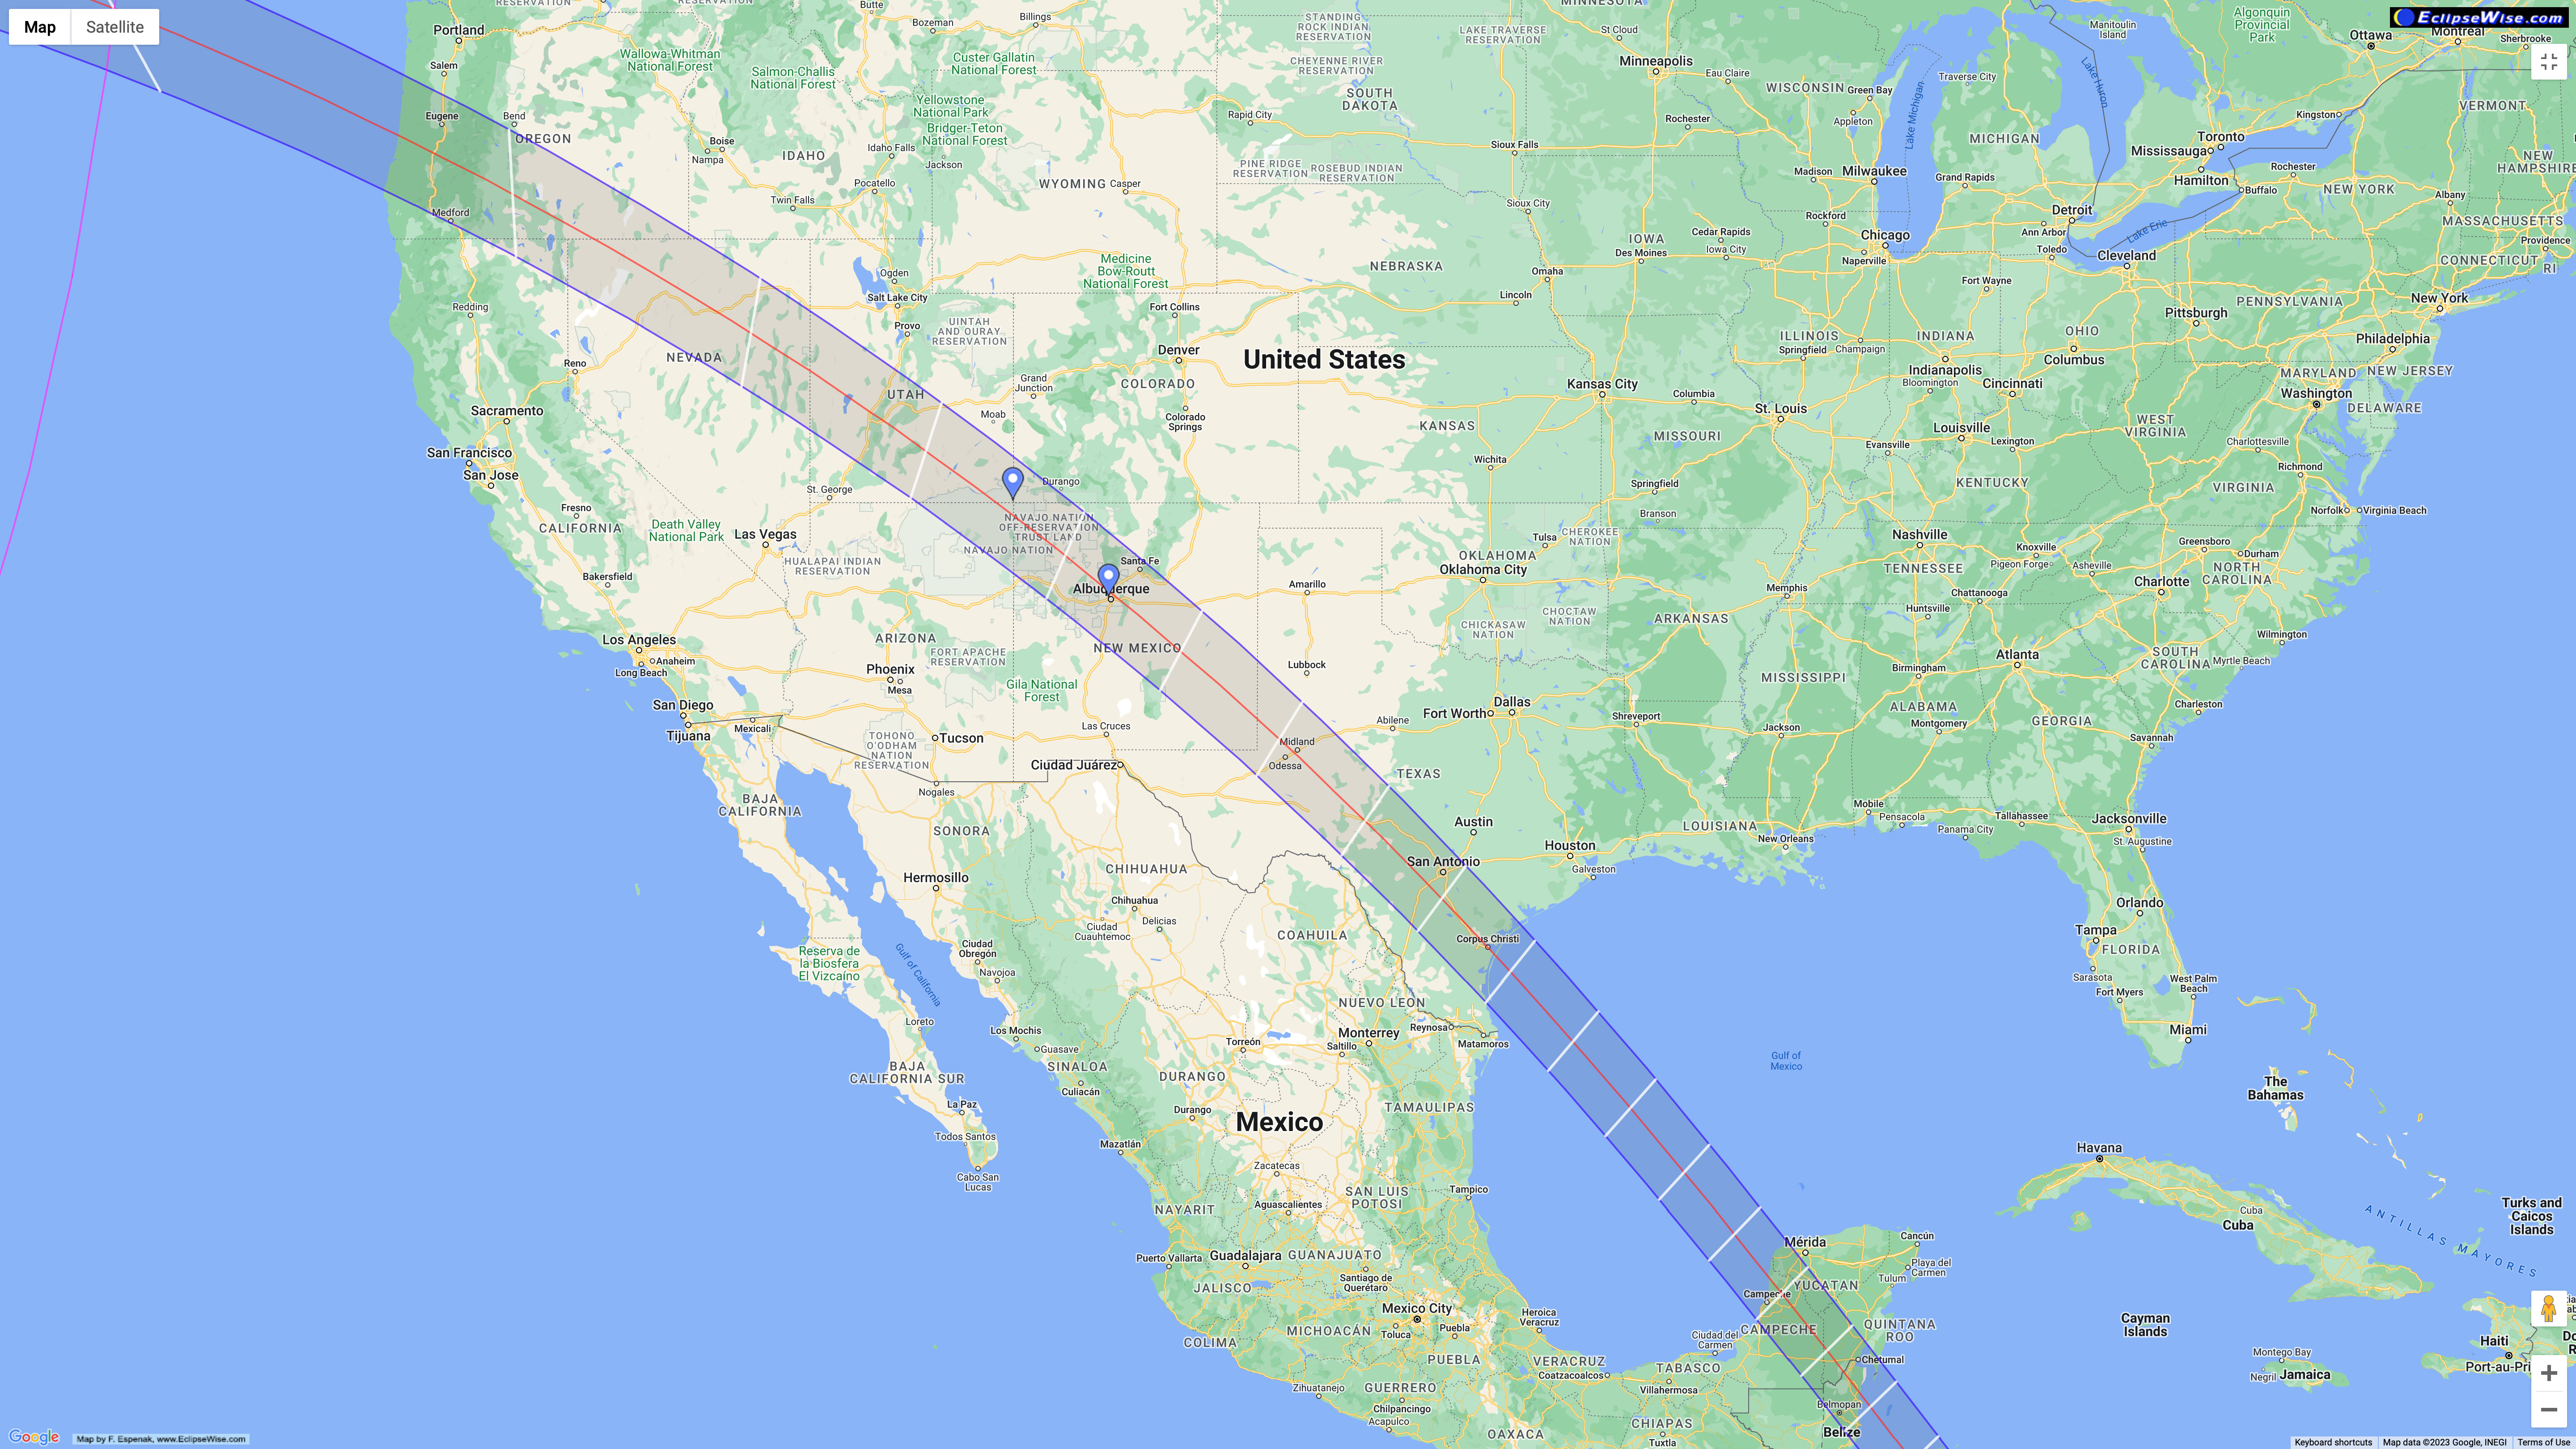
On October 14 everyone in North America, Central America, and much of South America can see an eclipse of the Sun, as shown in the map below, courtesy GreatAmericanEclipse.com. The closer you are to the “path of annularity” drawn in yellow here, the more of the Sun you see covered by the Moon.
Eclipse map showing area of visibility of the October 14 eclipse courtesy GreatAmericanEclipse.com
However, for the best experience, plan to be in the central path of the Moon’s shadow. In North America, as shown in the map below, that path crosses the western states, passing over the scenic landscapes of the American southwest.
Courtesy GreatAmericanEclipse.com
Those in the main path will see an annular eclipse – the Moon will travel across the center of the Sun’s disk, but won’t be large enough to completely cover the Sun. The result, as shown below, is that the Sun will be reduced to a thin ring or “annulus” of light at mid-eclipse, but only for a few minutes.
The May 10, 1994 annular eclipse of the Sun, with a trio of eclipse rigs.
To view or photograph the annular eclipse well, you need to use a long telephoto lens or a telescope. A focal length of 400mm or longer is required to make the Sun’s and Moon’s disks large enough to show detail well.
As I show above, the lens or telescope can be on a solid tripod, or on an untracked alt-azimuth telescope mount, or on a mount that can track the sky, such as the equatorial mount on the right above. All will work fine, as exposures will always be short, just a fraction of a second.
I go into the many options for photographing the eclipse in my ebook, linked to at right. It contains thorough tutorials on how to shoot the eclipses in 2023 and 2024. In this blog I’m focusing on extolling the need to practice now, with whatever gear you own and intend to use for the eclipse.
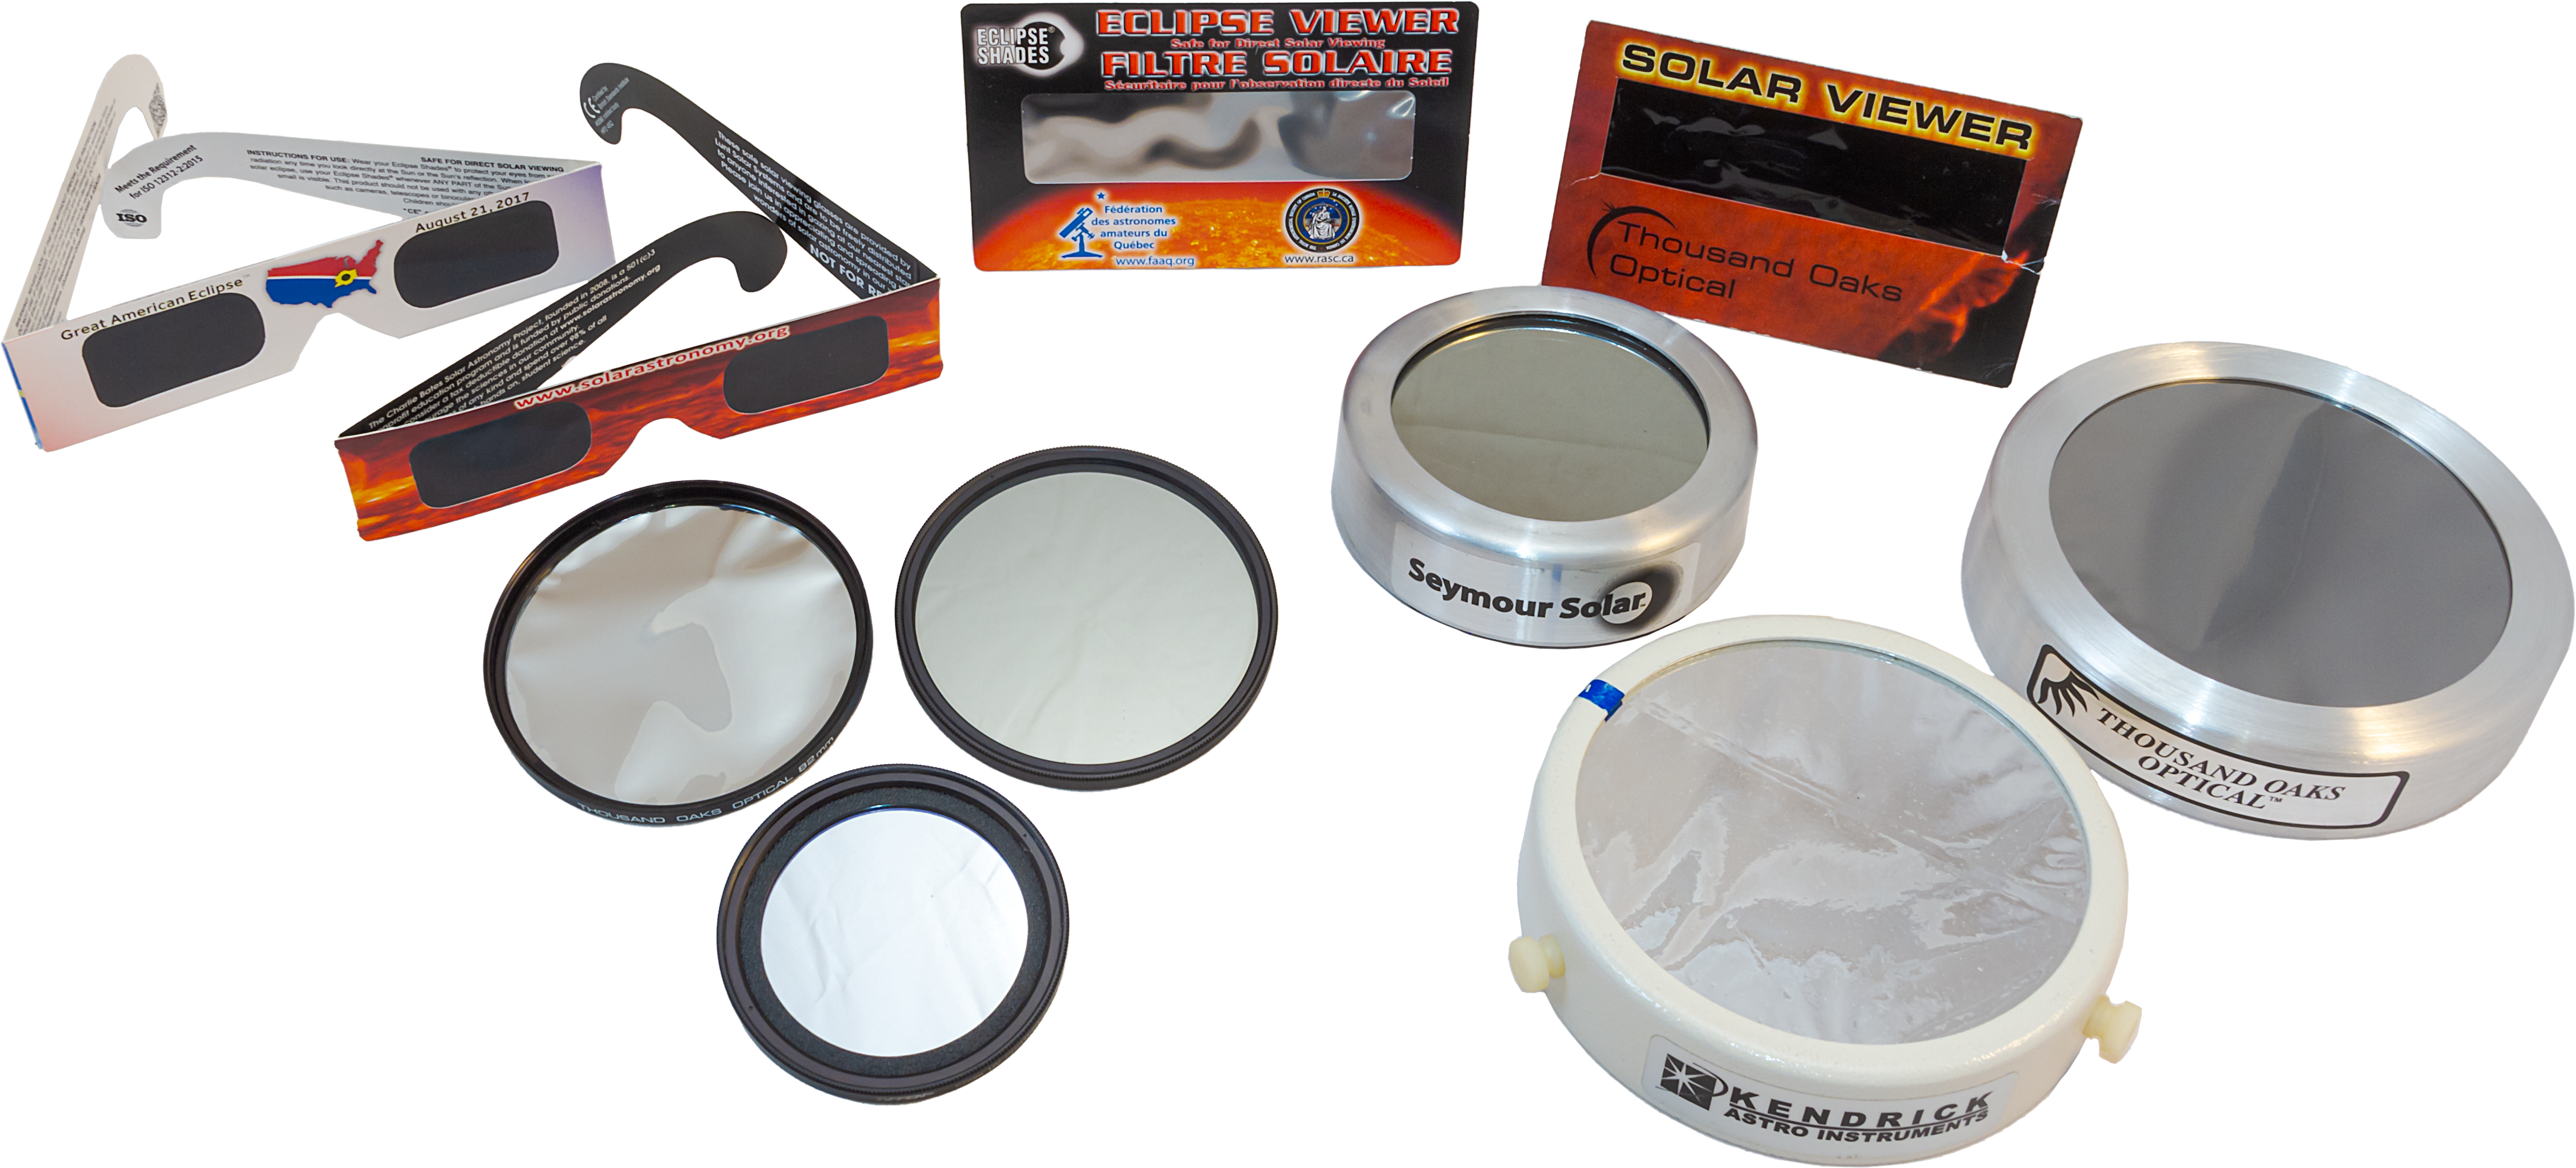
An array of solar filers, for unaided eyes, lenses and telescopes
No matter what optics you plan to use, they must be equipped with a safe solar filter mounted over the front of the optics. For the October 14 eclipse, even from sites in the path of annularity, a filter must be used at all times. It will never be safe to look at or shoot the Sun without a filter.
And it must be a filter dense enough and designed for the purpose of aiming at the Sun. Do not use stacked neutral density filters or other jury-rigged arrangements, as other filters can transmit ultraviolet or infrared light that can still damage eyes and cameras.
The eyeglass or handheld style of solar filters are good for unaided eye views, and most are made by American Paper Optics or Rainbow Symphony. A list of recommended filter suppliers is available at the American Astronomical Society’s eclipse website at https://eclipse.aas.org/eye-safety. In addition, many astronomy clubs, planetariums and science centers will offer safe eyeglass-style filters they purchased in bulk from one of the suppliers above.
However, for photography through a lens or telescope you need a filter that either screws onto the lens or clamps over the telescope, as I show below.
Comparing different types of telescope filters – the Baader Mylar worked best in this test.
In my testing, I’ve found that the aluminized Mylar® (or polyethylene) type of filter – one that looks like a silvery sheet – provides the best sharpness and contrast, despite the wrinkles. The most popular type is made by Baader Planetarium, and sold by them or by other dealers and resellers.
While metal-coated glass filters also work very well, in recent years they have become hard to find, with past suppliers of glass filters switching to black polymer plastic material. While safe and good for naked-eye views, I’ve found the image through black polymer filters can be soft and surrounded by lots of light scatter when used for photography at long focal lengths.
TESTING, TESTING!
An eclipse rig under test, with dual scopes for shooting and looking
Once properly equipped, test your setup as soon as possible on the Sun. In the rig above I have piggybacked a smaller telescope onto the larger telescope, both with filters, the latter to shoot through while I look through the smaller scope, good for watching the few minutes of annularity.
The key things to test for are:
Finding the Sun (not as easy as you might think!)
Focusing on the Sun (also critical and can be tough – focus on the edge or on sunspots)
Checking for any focus shift over a couple of hours time
Determining the correct exposures with your filter
Checking for any vibration that can blur the image
Operating your camera to change settings, without vibration
Checking to see how long batteries will last
Seeing how much the Sun moves across the frame during a few minutes time
Following the Sun or keeping it centered
Making a checklist of the gear you need on eclipse day, plus any backups such as a spare battery, and tools for last-minute fixes or adjustments.
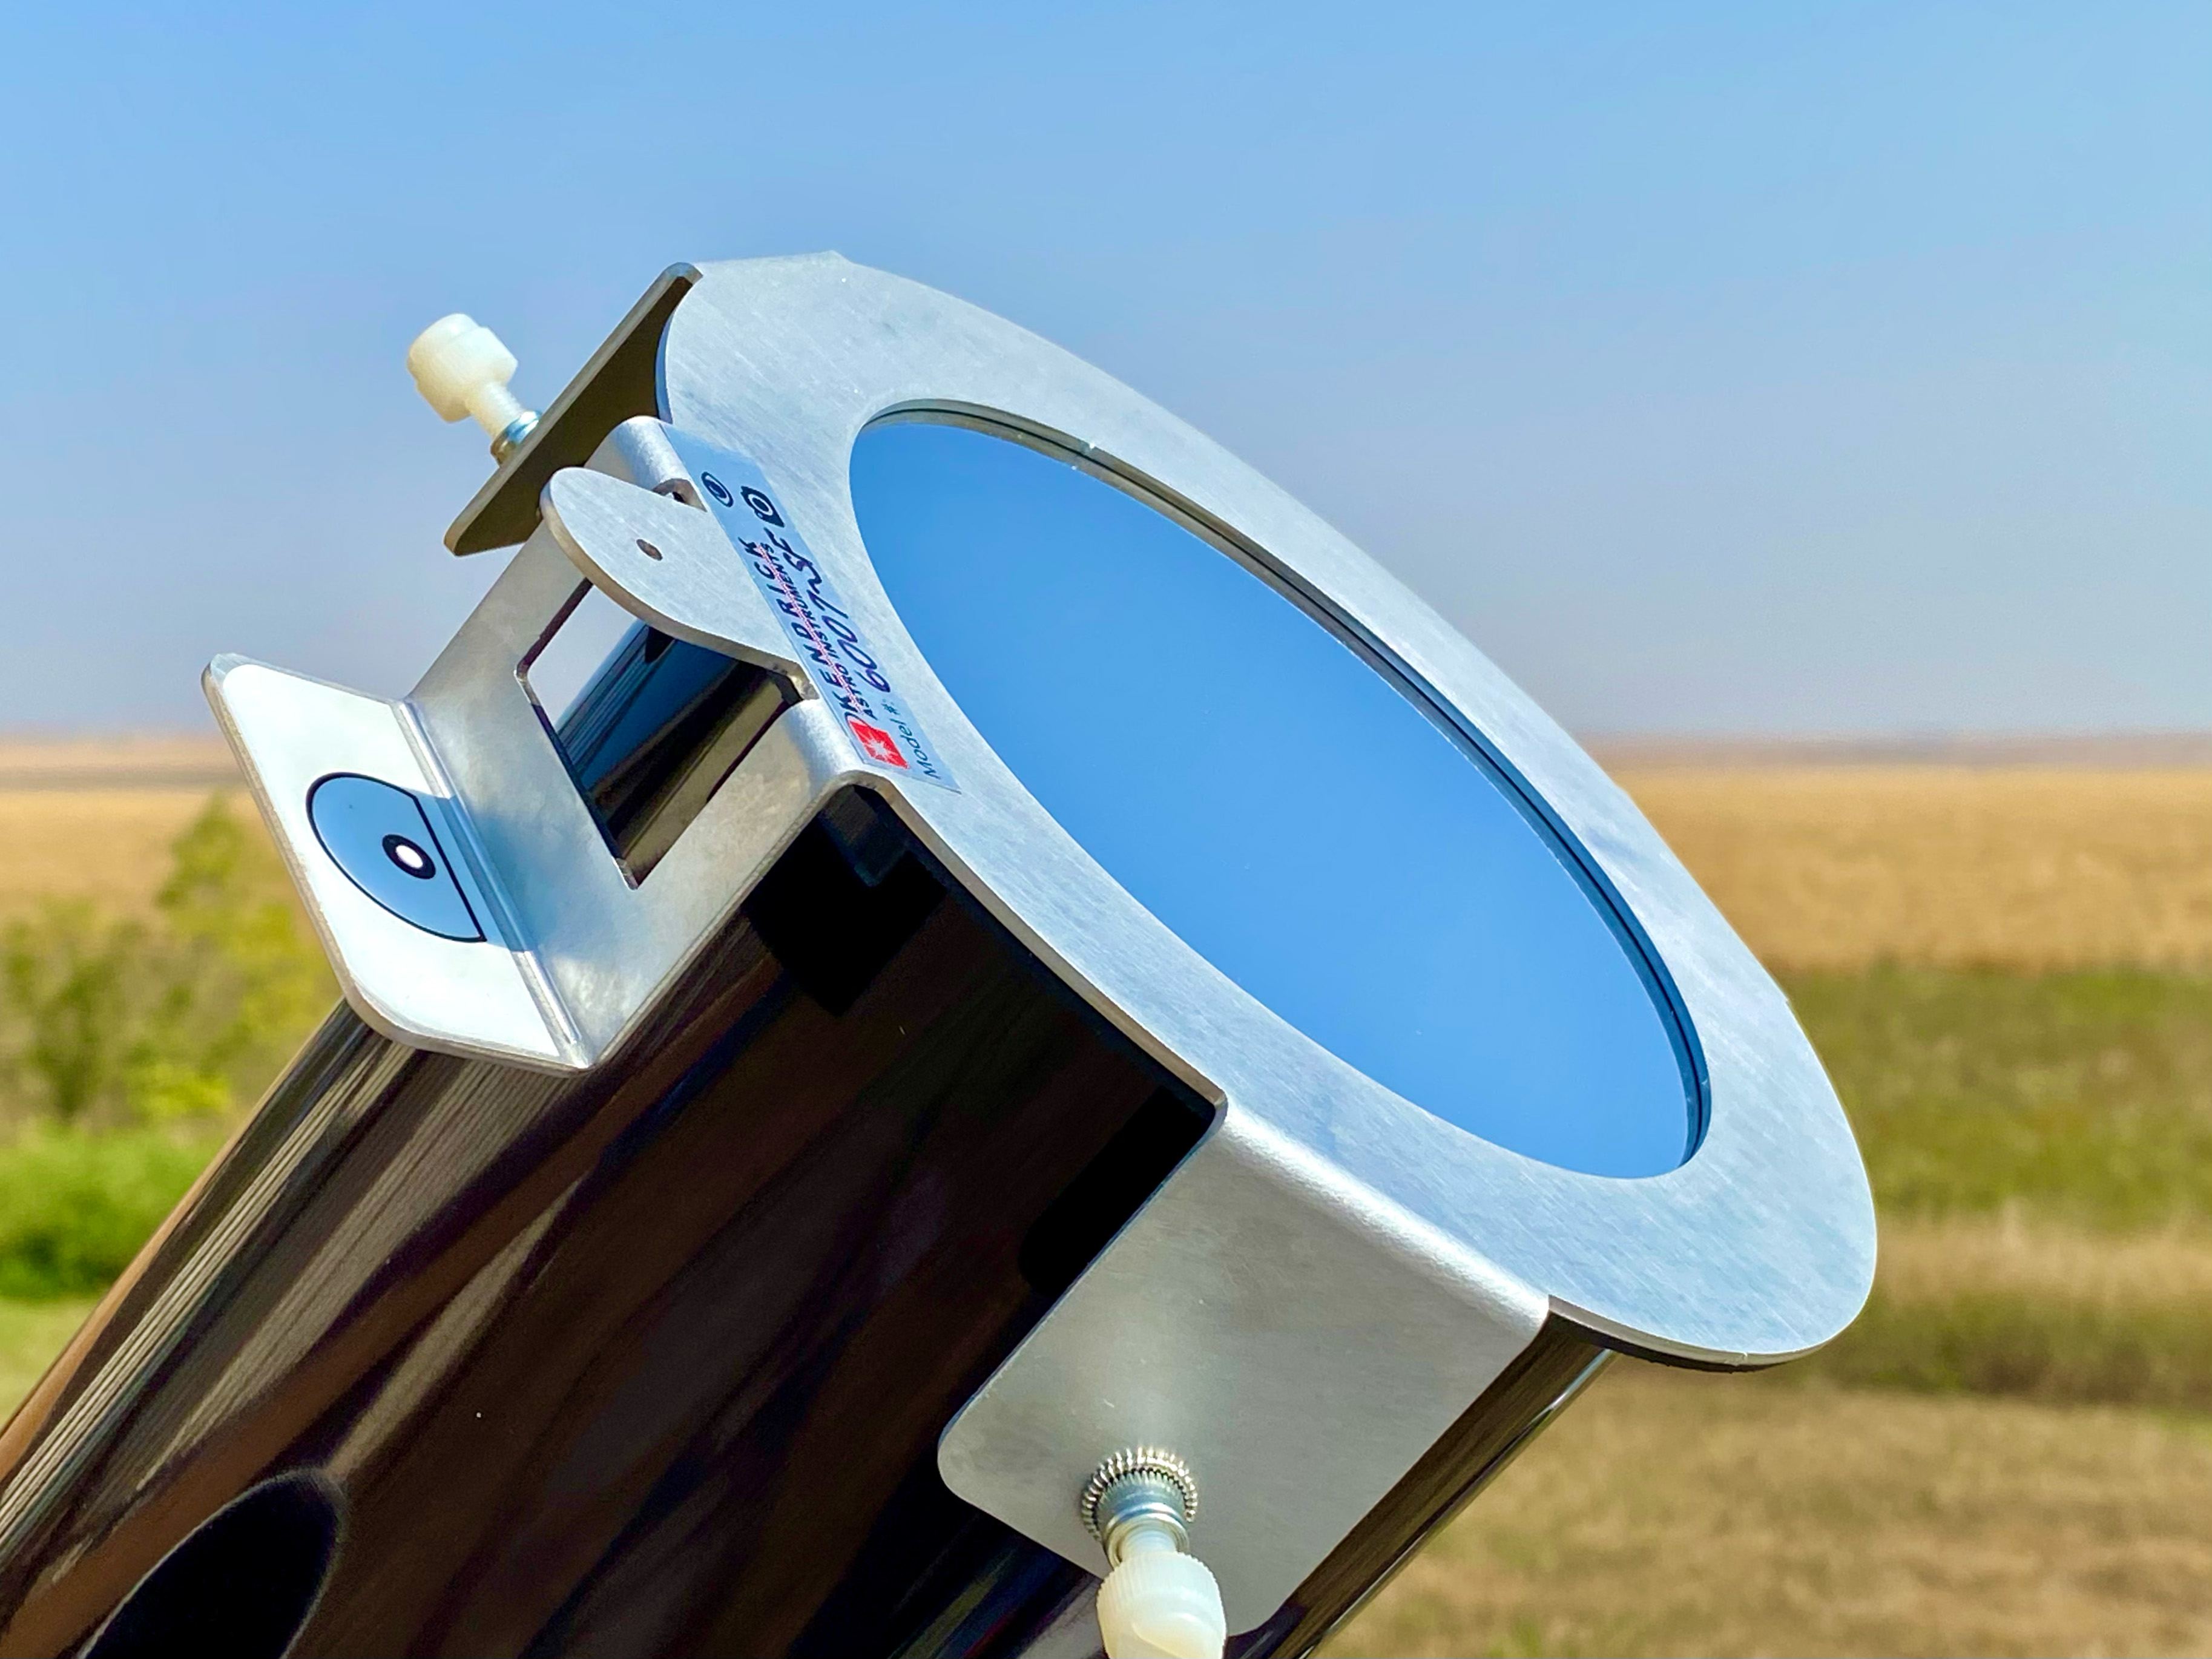
The filters from Kendrick Astro Instruments have a handy Sun finder attachment.
You want to test how solid your setup is when aimed up. Your super-telephoto lens and tripod that work great for birds and wildlife might not be as well-suited as you thought when aimed high at the Sun. Best to find out now about any shortcomings in your gear.
A series of images with an 80mm refractor and Kendrick Mylar filter shows a range from under to over-exposed.
Run through a set of exposures to see what produces the best result with your optics and filter. Even with the October 14 eclipse underway, the Sun will be a similar brightness as it is on any normal day.
At best, on eclipse day you might wish to shoot a bracketed set of exposures throughout the eclipse, perhaps a frame taken at your pre-determined “best” exposure, and two others: at one stop and two stops overexposed, to account for the slightly dimmer solar disk when it is mostly covered by the Moon in a deep partial or annular phase.
Alter exposures by changing shutter speeds, not aperture or ISO. Keep the ISO speed low, and the aperture either wide open or at some middle setting such as f/5.6 for the sharpest images.
But also check what exposures might be needed when shooting the Sun through thin clouds. Any cloud or haze will require longer exposures. And you might need to change shutter speeds quickly if the Sun goes into and out of clouds. Practice that – without introducing vibration from handling the camera.
Leave the rig for a couple of hours to test how the focus might shift, as it is certain to do, as the temperature changes through the morning or afternoon. Practice touching up the focus. People fuss over the “best” exposure, when it is poor focus that is the common spoiler of eclipse photos.
You can find more tips for practicing for eclipse close-ups at a blog I wrote for AstronomyByNight.ca.
WIDE-FIELD OPTIONS
May 10, 1994 annular eclipse in a series of multiple exposures every 10 minutes.
An alternative way to shoot the eclipse is with a wide-angle lens, but also equipped with a solar filter, as shown above. Frame the scene to include the expected path of the Sun, determined by using planetarium software such as SkySafari or Stellarium (my ebook also has charts). Take images every minute or so, then layer those onto an unfiltered image of the sky and foreground taken either before the Sun enters the frame or after it leaves it.
A test set for a composite image.
Practice that method now, to shoot images for a test composition as I show above. It layers filtered images taken at 5-minute intervals onto an unfiltered background sky image taken after the Sun left the frame.
However, composite images can be complex to plan and execute.
The partial solar eclipse of October 23, 2014 as seen from Jasper, Alberta, at a public event in Centennial Park as part of the annual Dark Sky Festival. This is a single-exposure image showing the scene near mid-eclipse with telescopes from volunteers from the Royal Astronomical Society of Canada, and the mostly clear skies above with the crescent Sun visible through the handheld polymer solar filter.
A simpler method for grabbing a souvenir eclipse photo is to simply hold a handheld solar filter in front of the lens to dim the Sun but leave the rest of the scene visible.
Again, you can practice that now to see what exposure might be best. For this type of shot I find black polymer filters best as they are less reflective than the Mylar type.
That method, or using a long lens or telescope will work well on eclipse day no matter where you are, either in the path or elsewhere enjoying the partial eclipse, as in the example image below, also from October 23, 2014, shot with my small scope at lower left in the image above.
The partial eclipse of the Sun, October 23, 2014, as seen from Jasper, Alberta, shot under clear skies through a Mylar filter, on the front of a 66mm f/6 apo refractor.
No matter the method and gear you use, success on eclipse day will require practicing beforehand to learn what can go wrong, and what works best for the setup you plan to use. Never assume something will work!
Clear skies on October 14! The annular eclipse that day will serve as a great dress rehearsal for the big eclipse to come – the total eclipse of the Sun on April 8, 2024. That’s the event you really want to get right!
My latest ebook describes in detail the many techniques we can use to capture great still images and movies of the 2023 and 2024 eclipses of the Sun.
In the next few months we have two major eclipses of the Sun visible from North America.
On October 14, 2023 the Moon will cross the disk of the Sun creating a partial eclipse. But from along a narrow path in the western U.S. the Moon’s disk will be centered on the Sun’s disk but not be large enough to completely cover it. For a few minutes, viewers will see an “annular” eclipse, as above, as what remains of the Sun forms a brilliant ring of light around the dark disk of the Moon.
Six lunar months later, the Moon again crosses the Sun but is now large enough to completely cover the Sun’s bright disk. The result is the most spectacular celestial sight, a total eclipse of the Sun, on April 8, 2024. The last such total solar eclipse (TSE) in North America was on August 21, 2017, shown above. After 2024, the next TSE in southern North America will not be until August 23, 2044. (There’s a TSE in northern Alaska on March 30, 2033.)
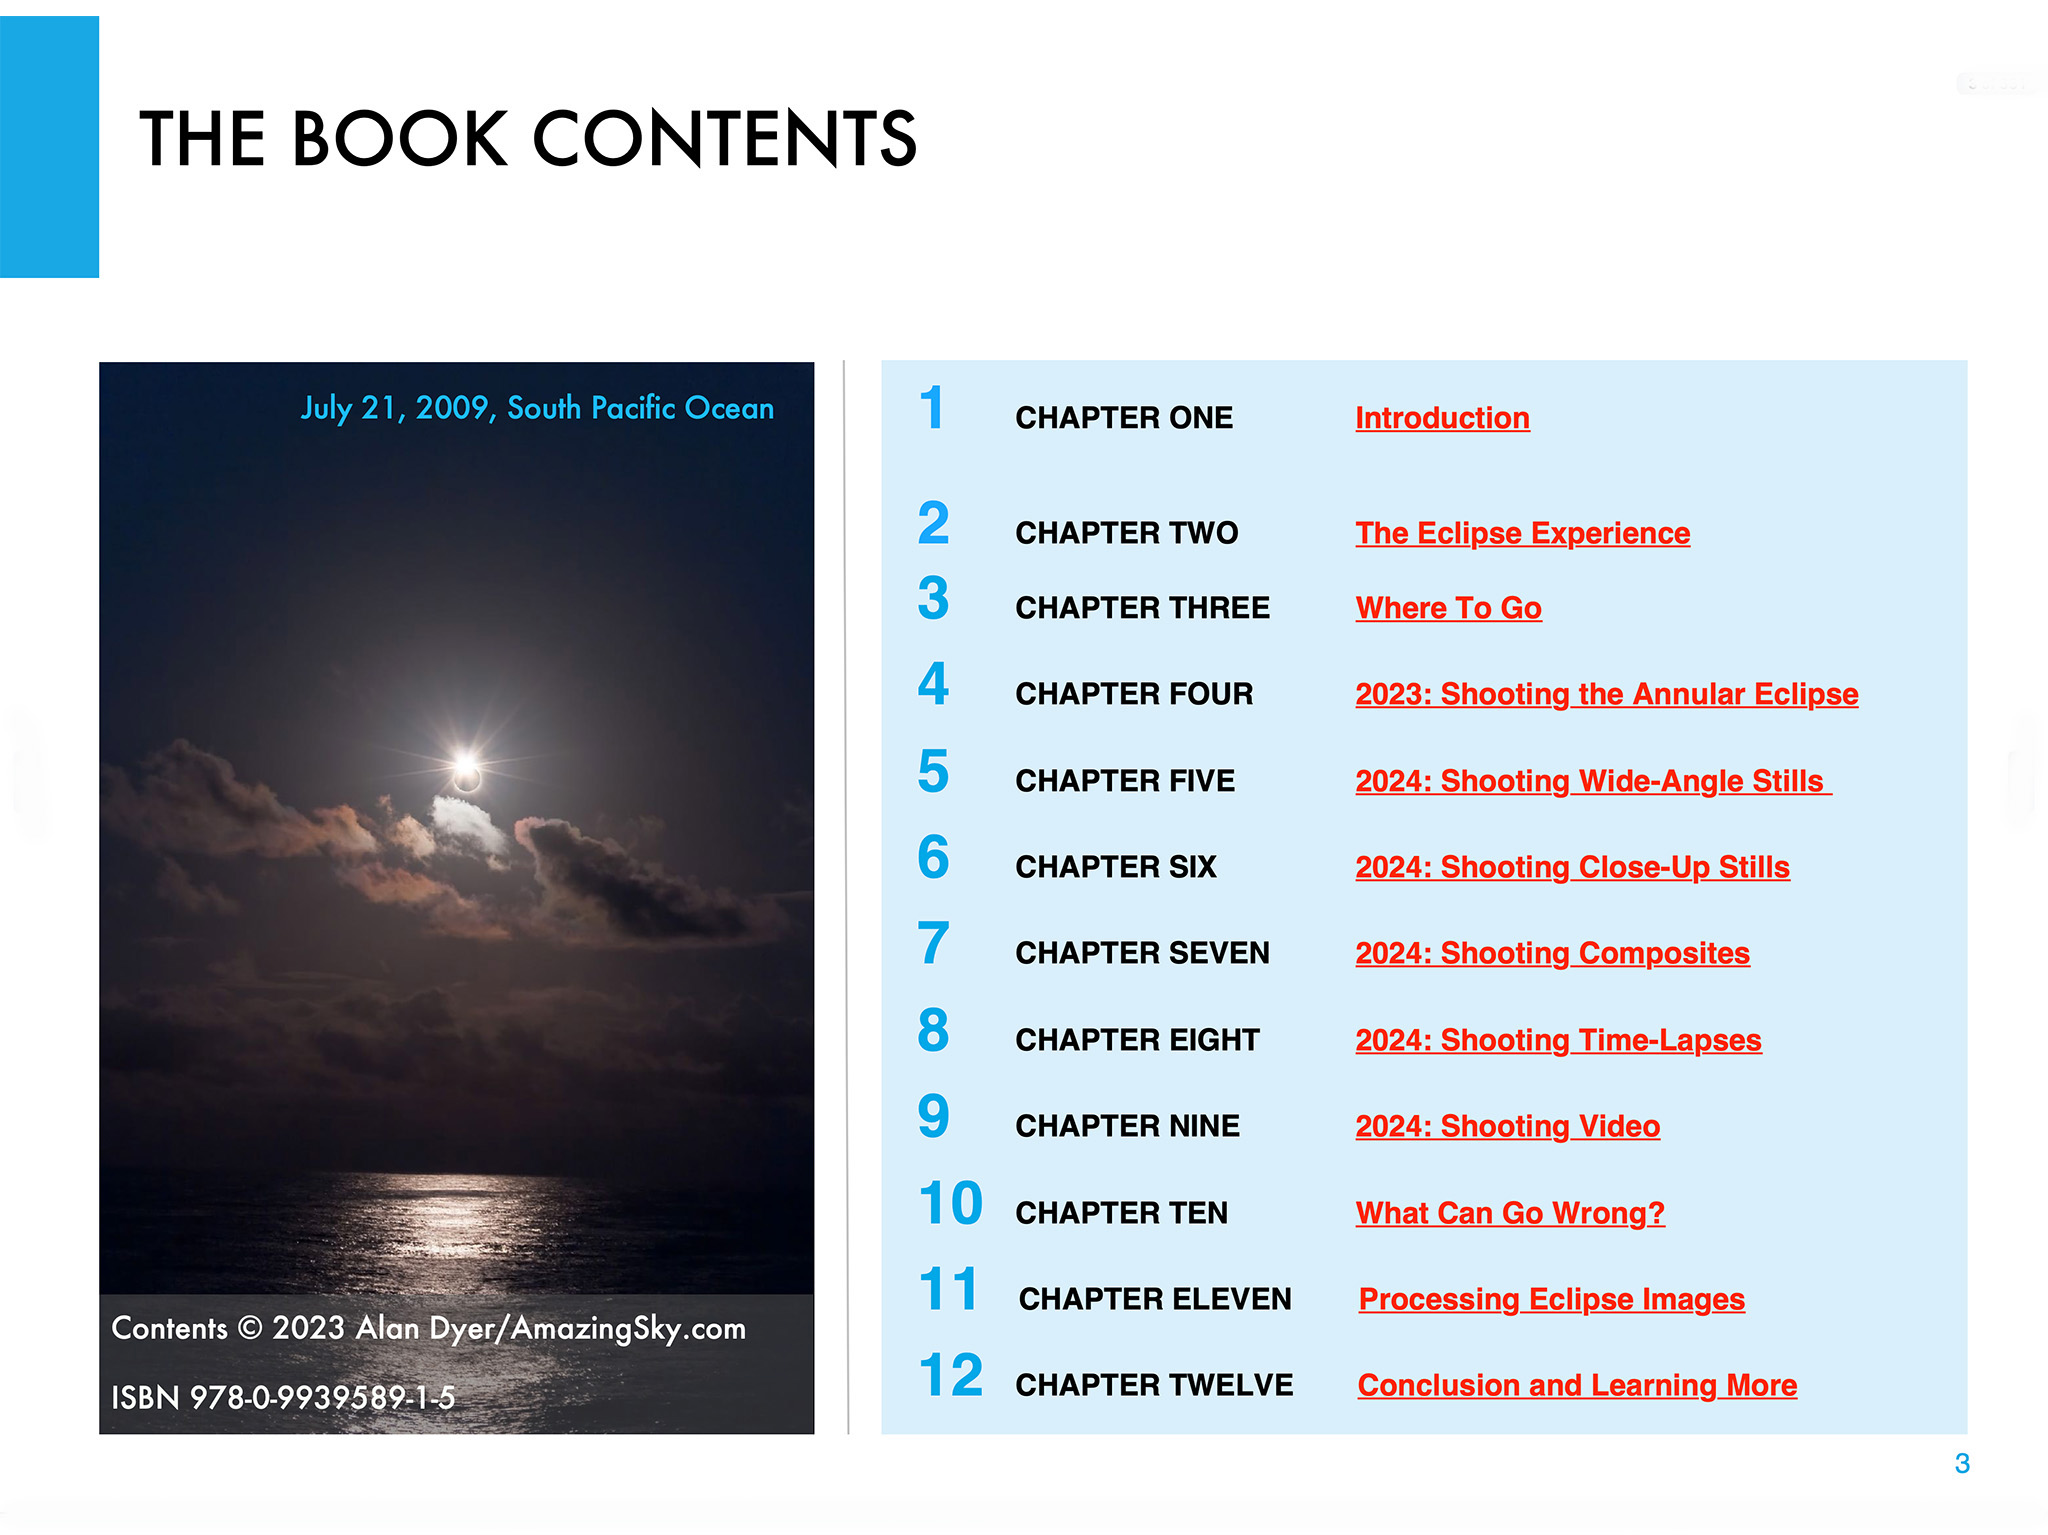
In 2017 I prepared an ebook about how to shoot that year’s total eclipse. This year I revised and expanded the book extensively to cover both the 2023 annular and 2024 total eclipses. The new 350-page ebook explains how to frame the eclipses depending on where you are along the paths. New information covers the advances in camera gear, with more details added on shooting video. Revised tutorials cover new software and processing techniques.
Above is the ebook’s Contents page, so you can see what topics it covers, over an extensive 350 pages. I provide not only advice on lots of techniques and gear, but also suggestions for what not to do, and what can go wrong!
The Fundamentals
I discuss the filters needed, comparing the various types available, and when to use them, and when to remove them. (A filter is always needed for the annular eclipse, but failing to remove the filter is a common failing at a total eclipse!)
For the 2023 annular eclipse I explain how to shoot close-ups, but also another type of image, the multiple exposure composite. Framing, timing and exposing correctly are crucial.
I do the same for the 2024 total eclipse, as a wide-angle shot of the eclipsed Sun over a landscape is one of the easiest ways to capture the event. It’s possible to set up a camera to take the images automatically, leaving you free to enjoy the view of the event without fussing with gear. I explain how best to do that.
For both eclipses, many people will want to shoot close-ups with telephoto lenses or telescopes. It takes more work and more can go wrong, but I show what’s required for equipment and exposures, and explain how to avoid the common flaws of fuzzy focus and trailed images.
But good exposure is also essential. However, for a total eclipse close-up, no one exposure is best. It takes a range of exposures to record the wide dynamic range of phenomena during totality. That demands work at the camera.
Setting Cameras
I show how we can use a camera’s auto-bracketing function to help automate the process of taking a set of exposures, from short exposures for the prominences, to long for the faint outer corona.
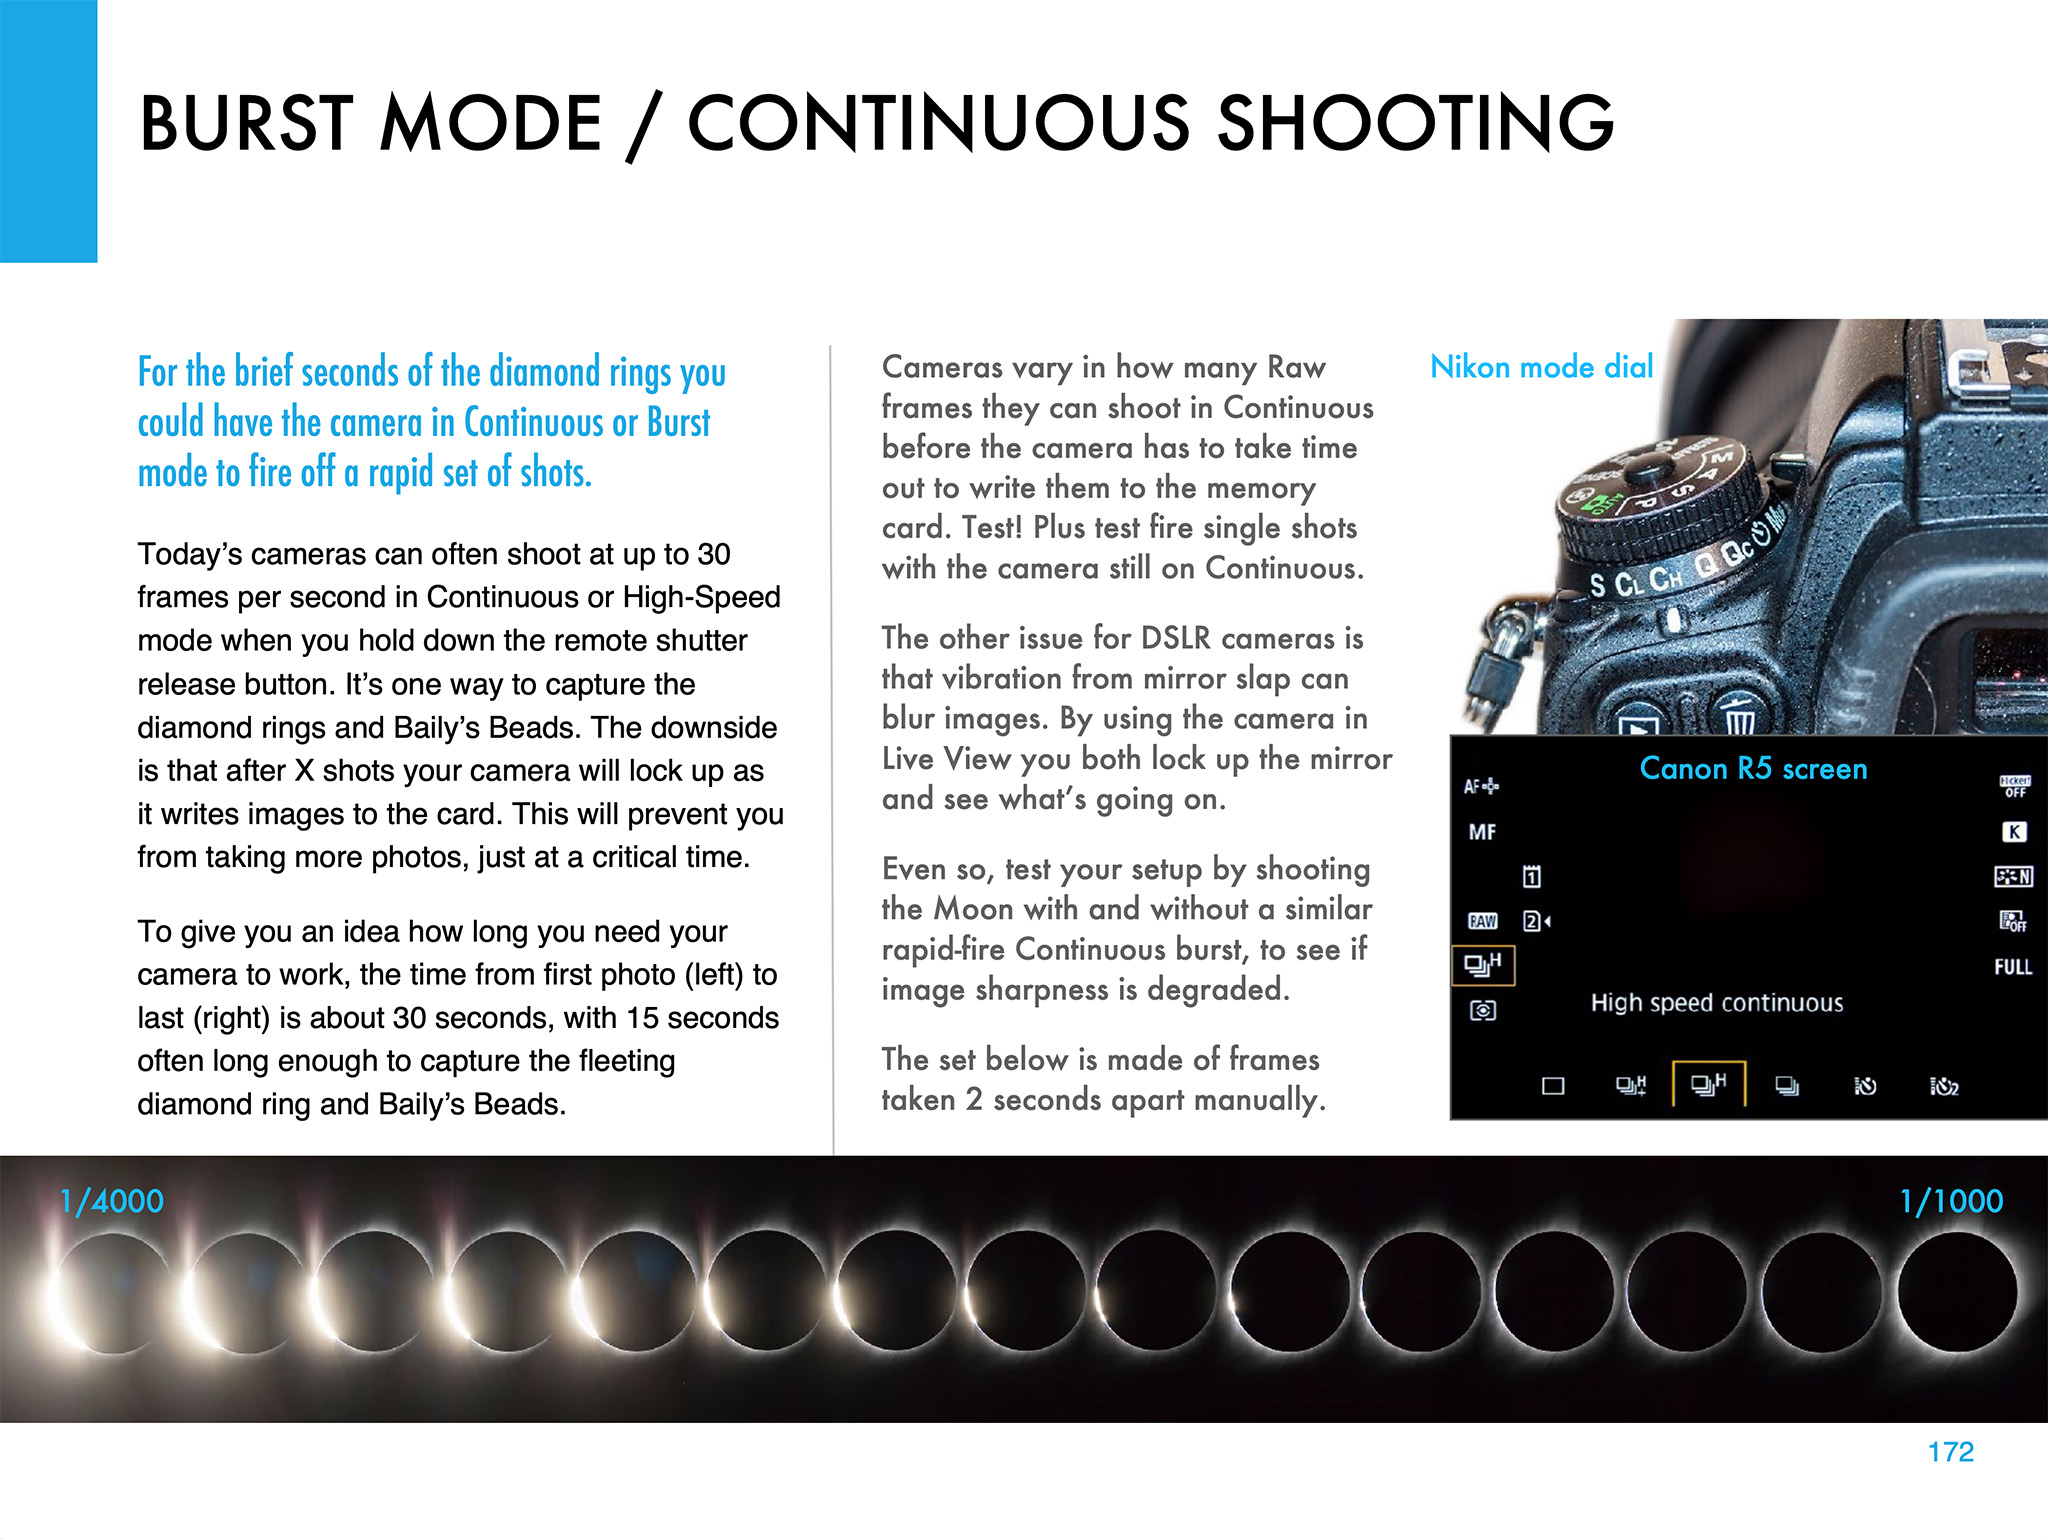
Another option is using a continuous burst mode to capture the fleeting moments of the diamond rings at the start and end of totality in 2024. But this can also be useful for capturing the “reverse Baily’s beads” that appear briefly as the Moon reaches the inner contact points at the start and end of the annular phase of the 2023 eclipse.
Using a tracking mount can help with shooting a set of images during totality. I describe the options for choosing the right mount and telescope, and how to set it up for accurate tracking. I discuss the advantages — and pitfalls — of using a tracking mount.
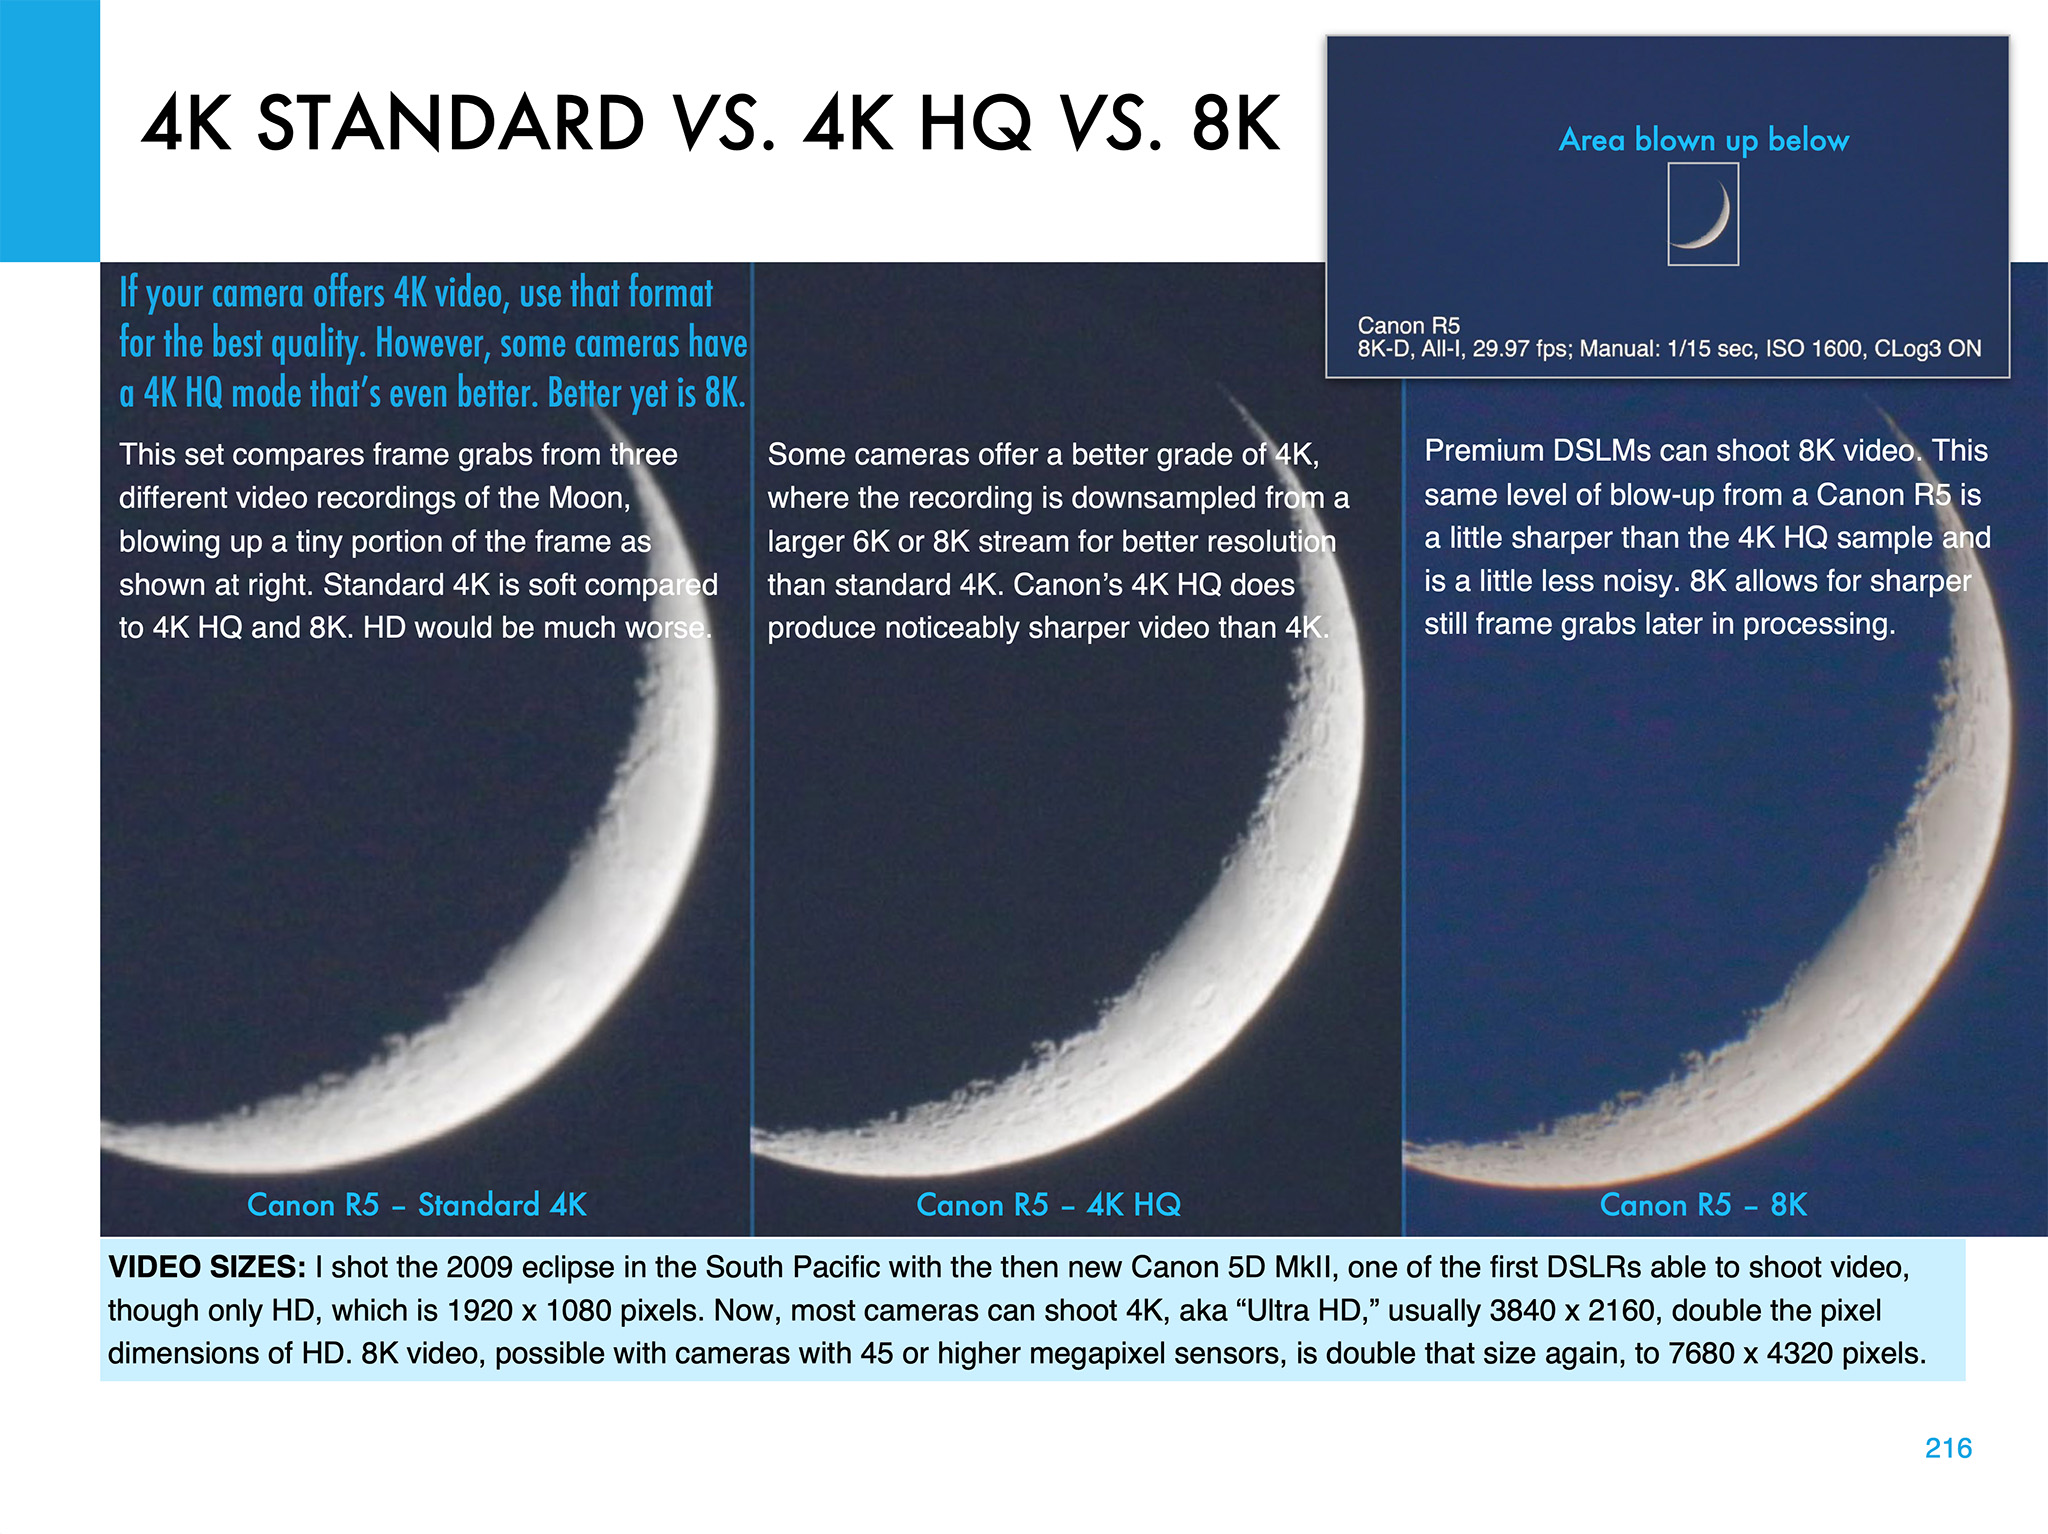
Shooting Video
Video is now an important feature of many cameras. But the choices of formats and settings can be daunting! 4K, 8K, 4K HQ — what to use? I illustrate the differences, using the best practice target, the crescent Moon.
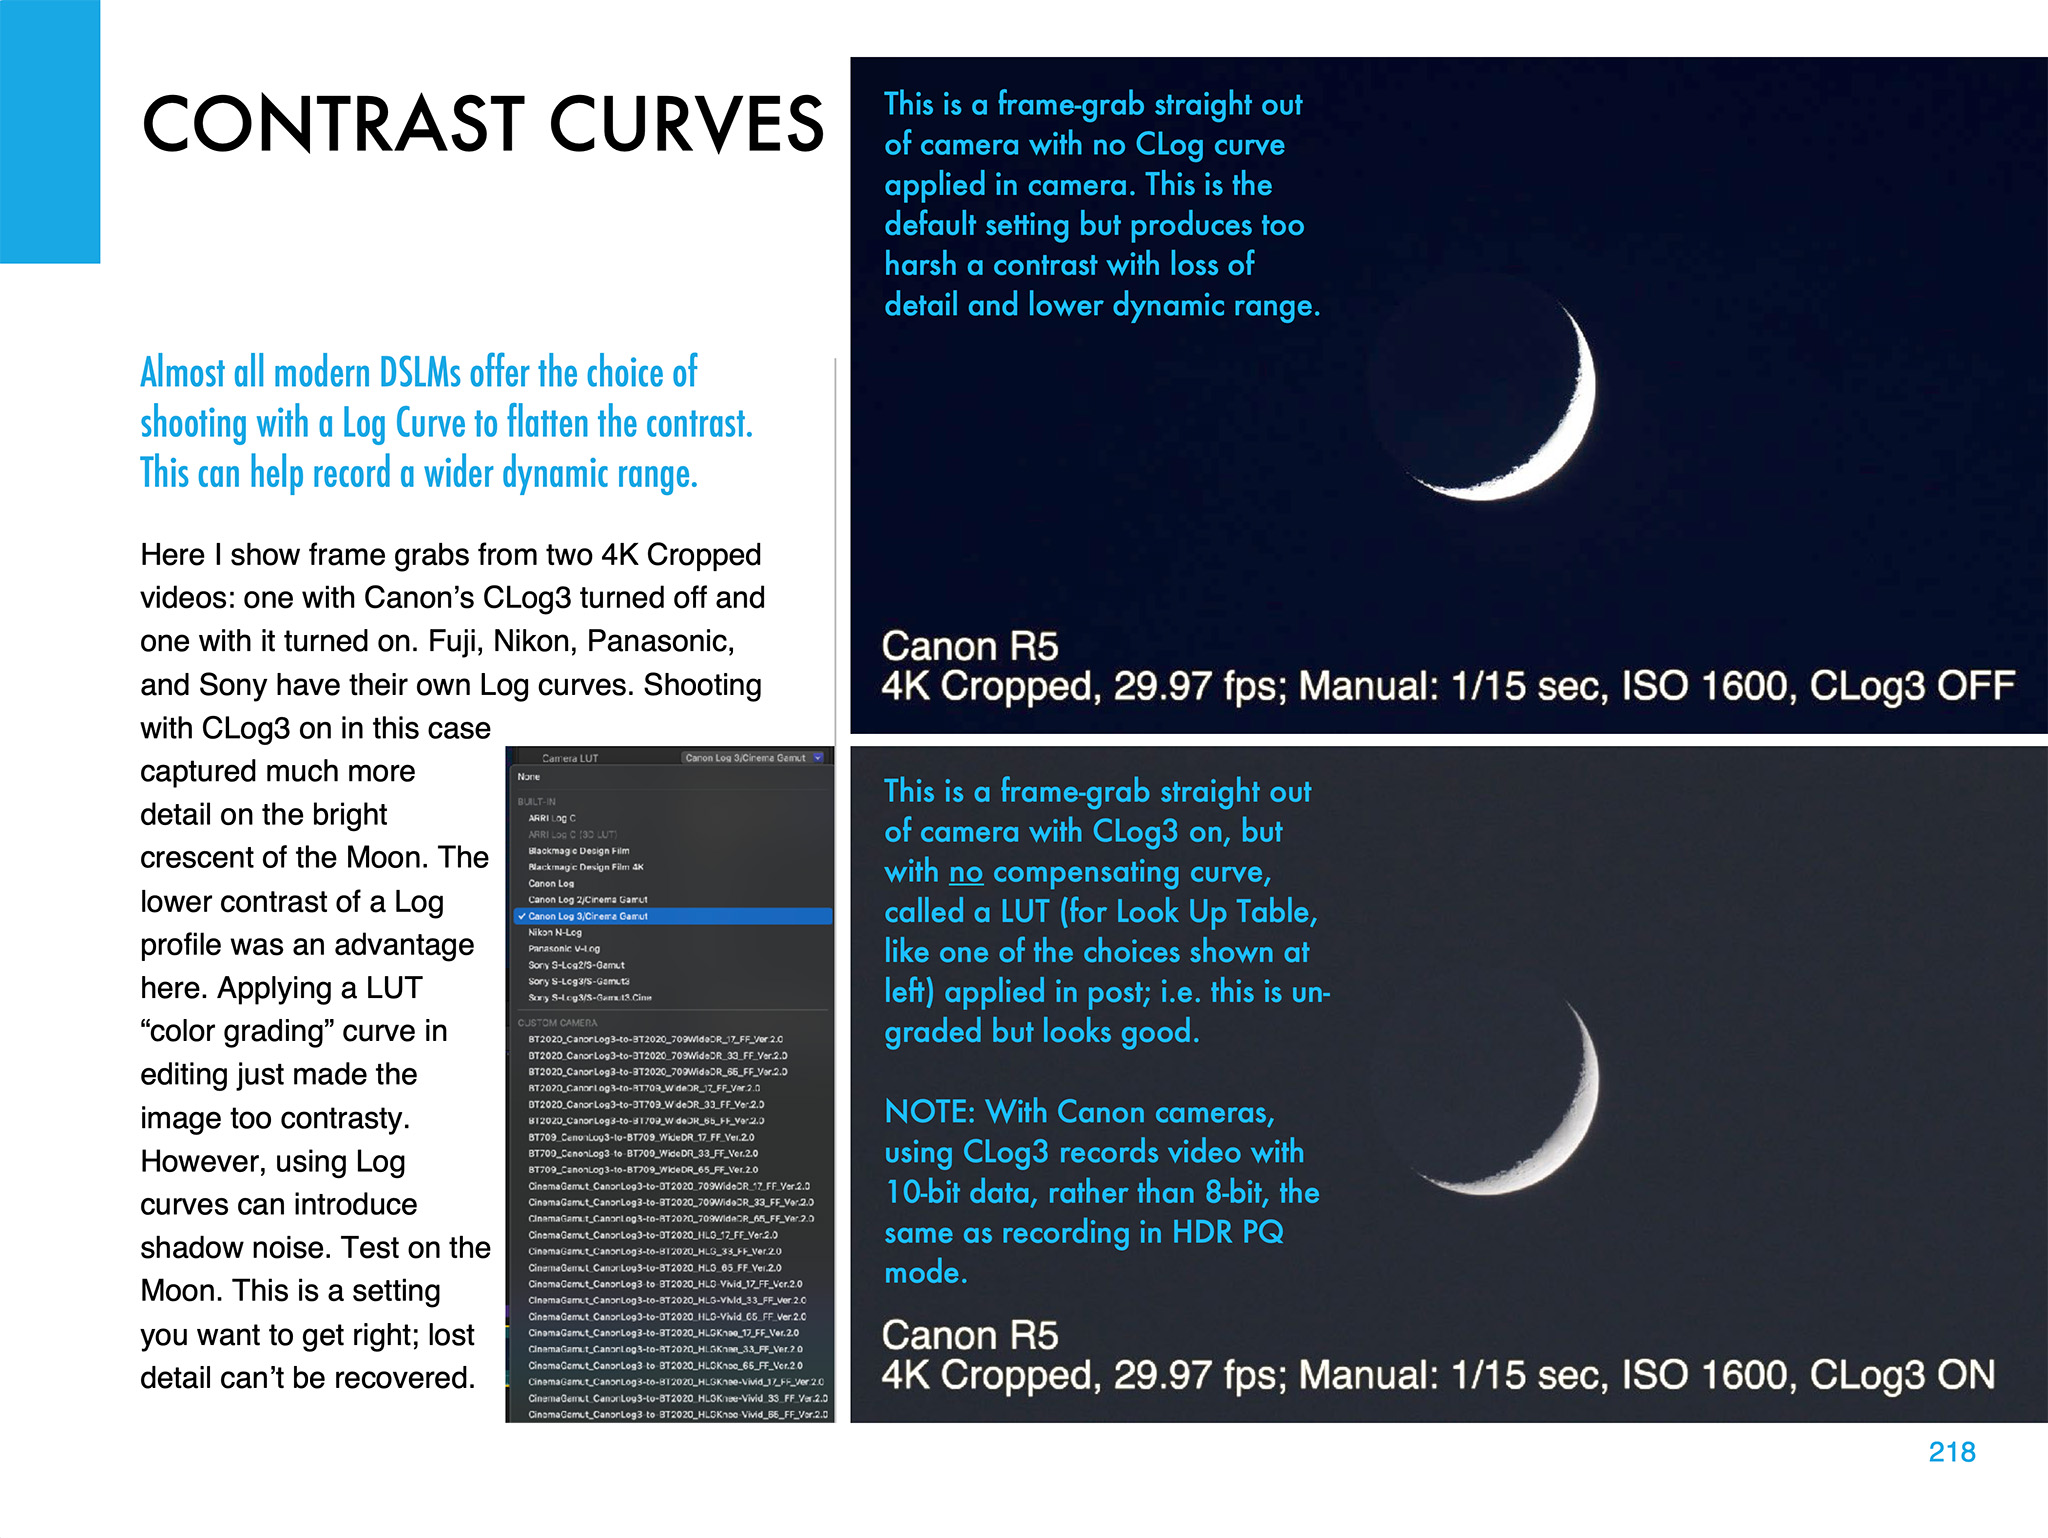
Choosing the right contrast curve for your video — such as CLog3 here — can also make a big difference to the final video quality. It’s important to get that right. You have only one chance!
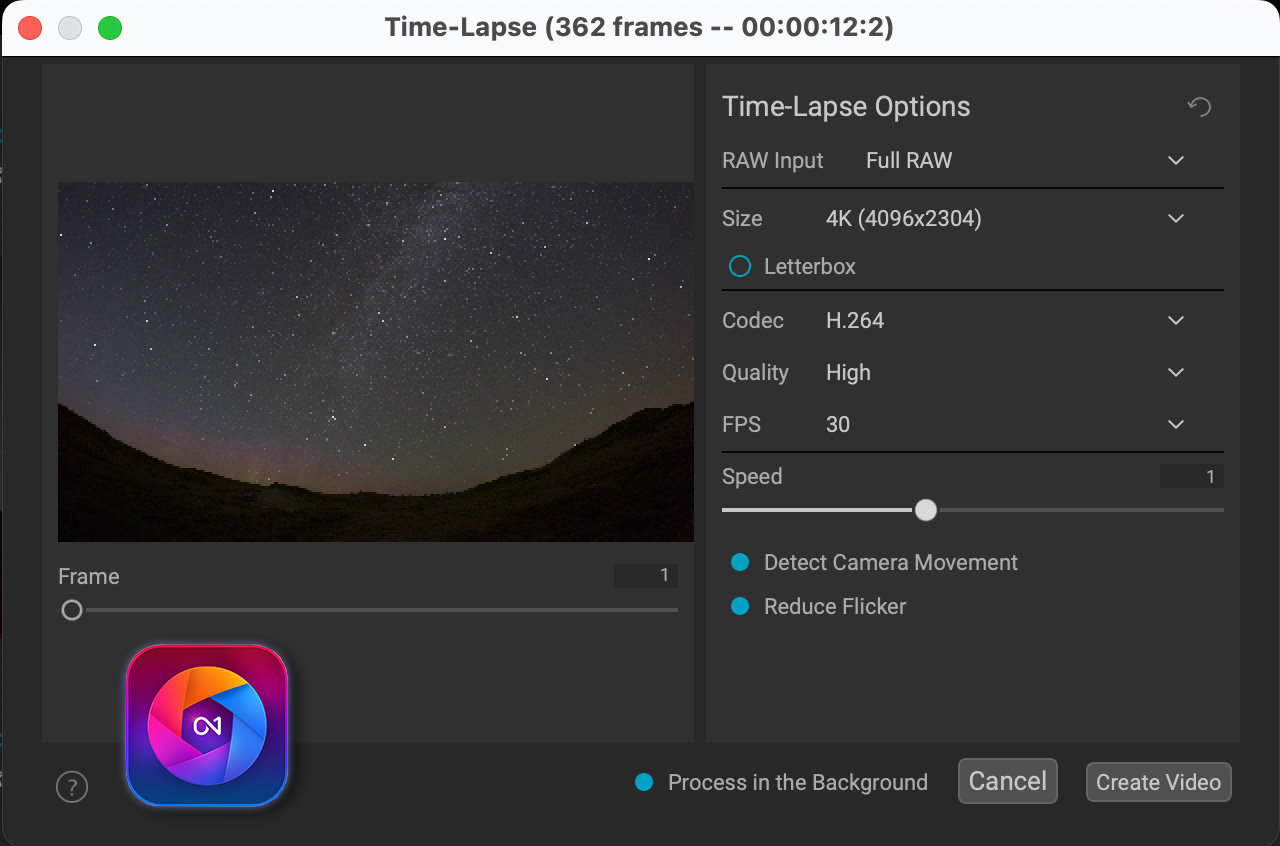
I also devote a chapter to shooting time-lapses, with wide-angle lenses and telescopes.
Image Processing
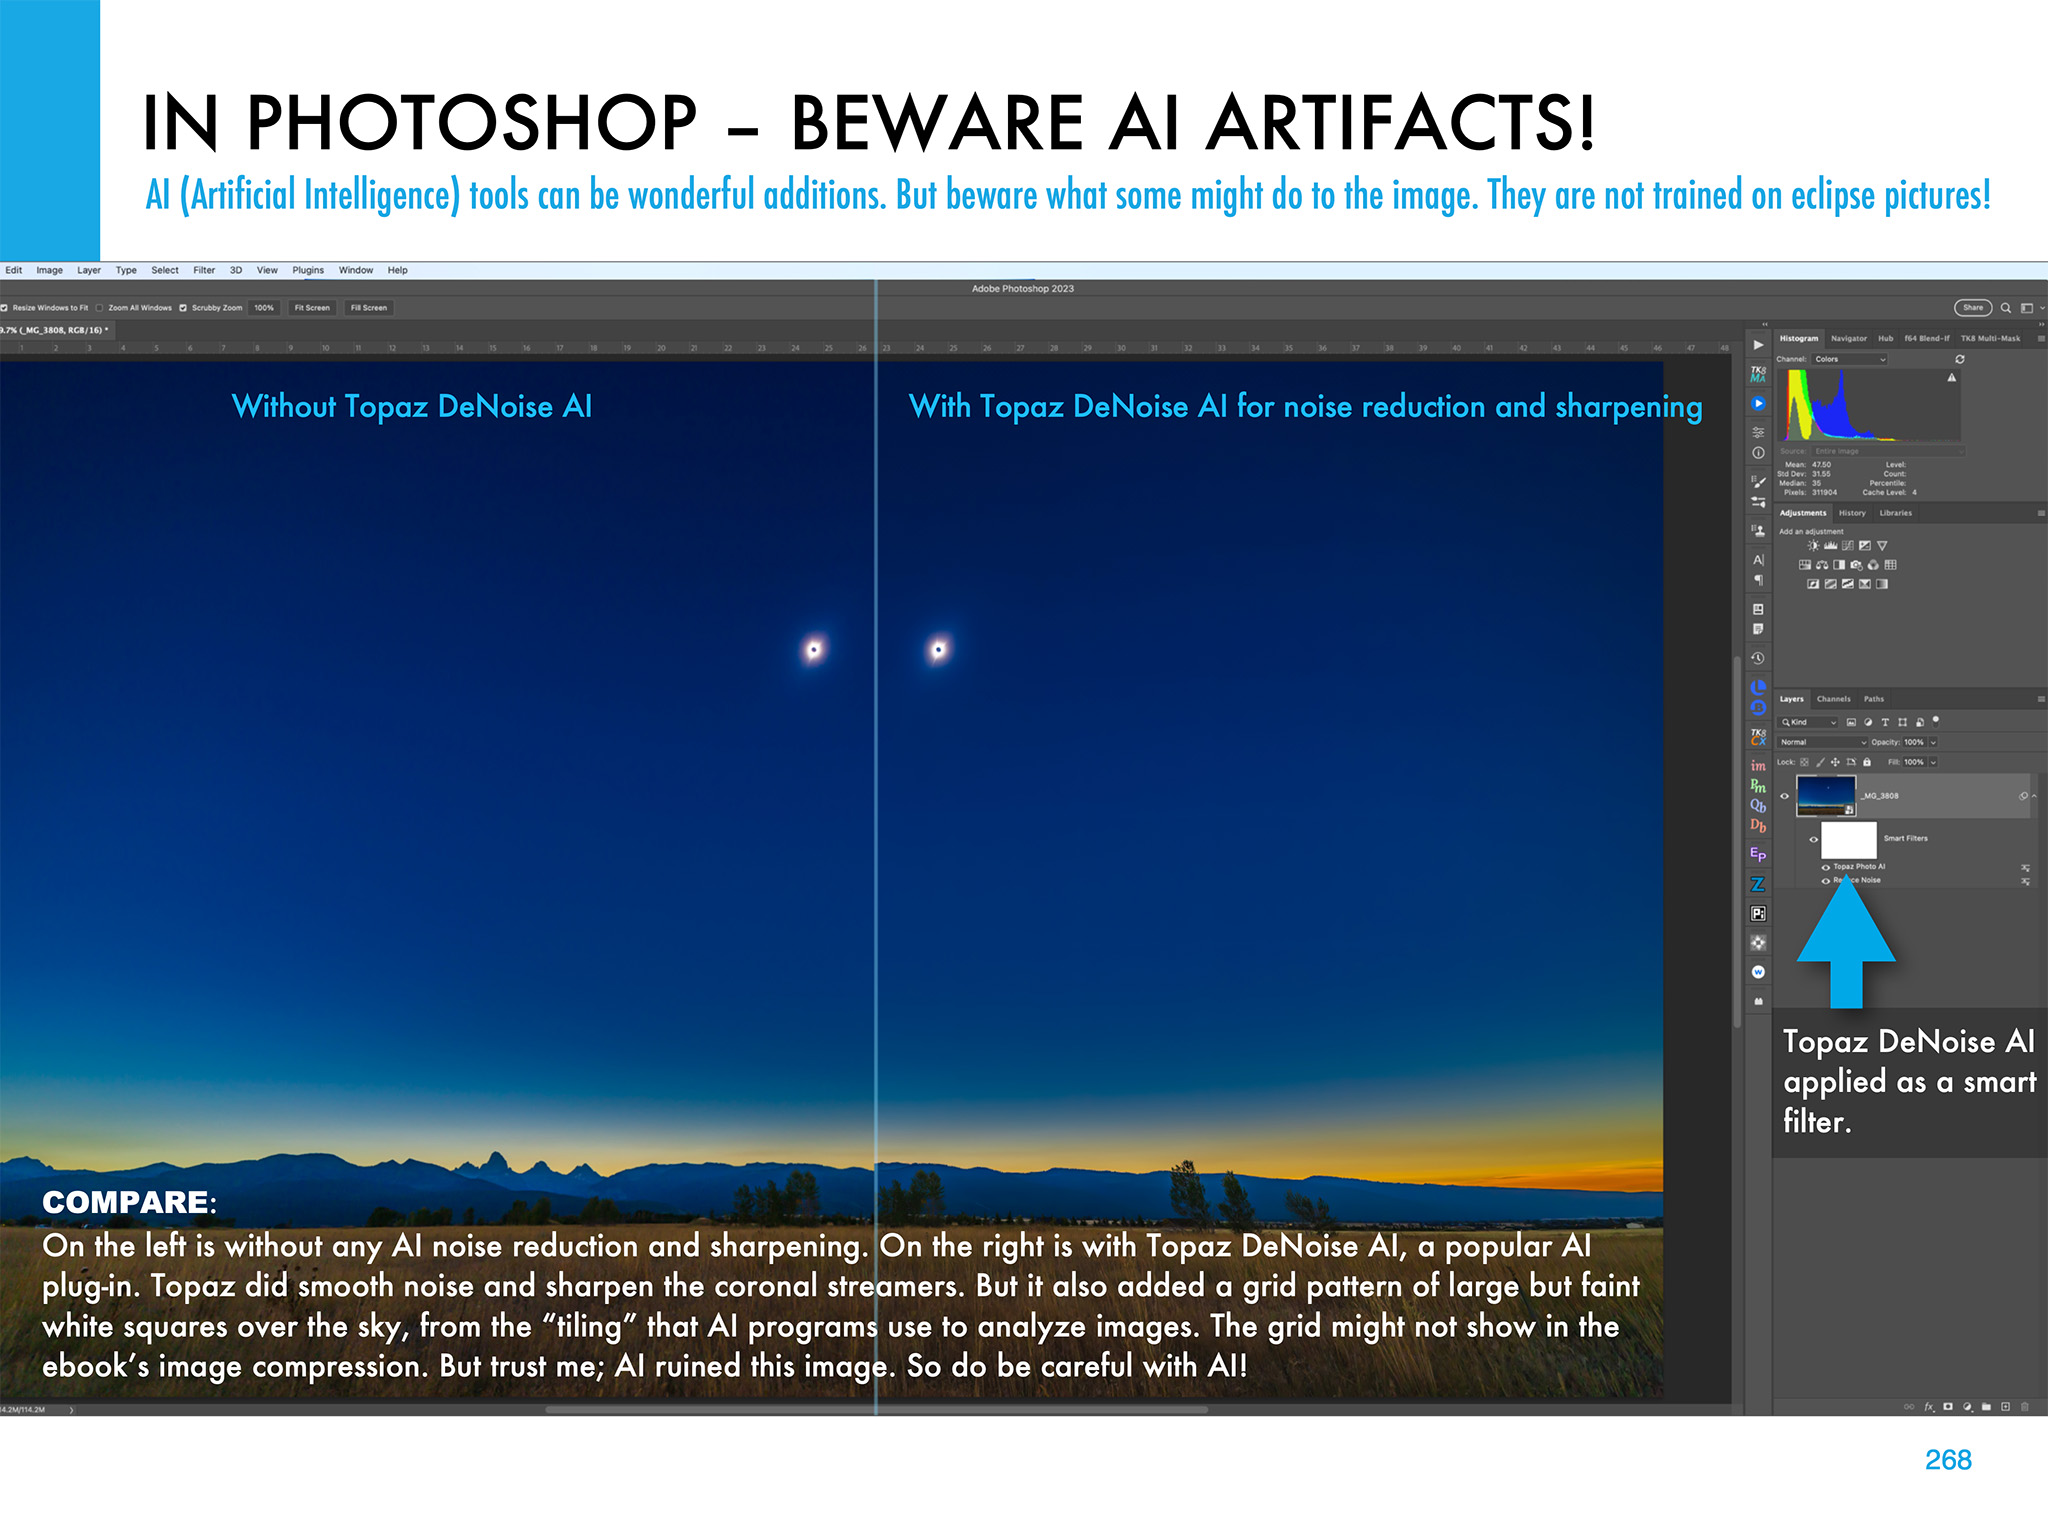
Chapter 11 is the biggest, with 68 pages of tutorials on how to process eclipse images, using the latest software. I show the benefit new AI tools can provide, but also the oddities they can impart to eclipse images.
I illustrate how to use HDR software (comparing sample results from several popular programs) to blend multiple exposures for greater dynamic range.
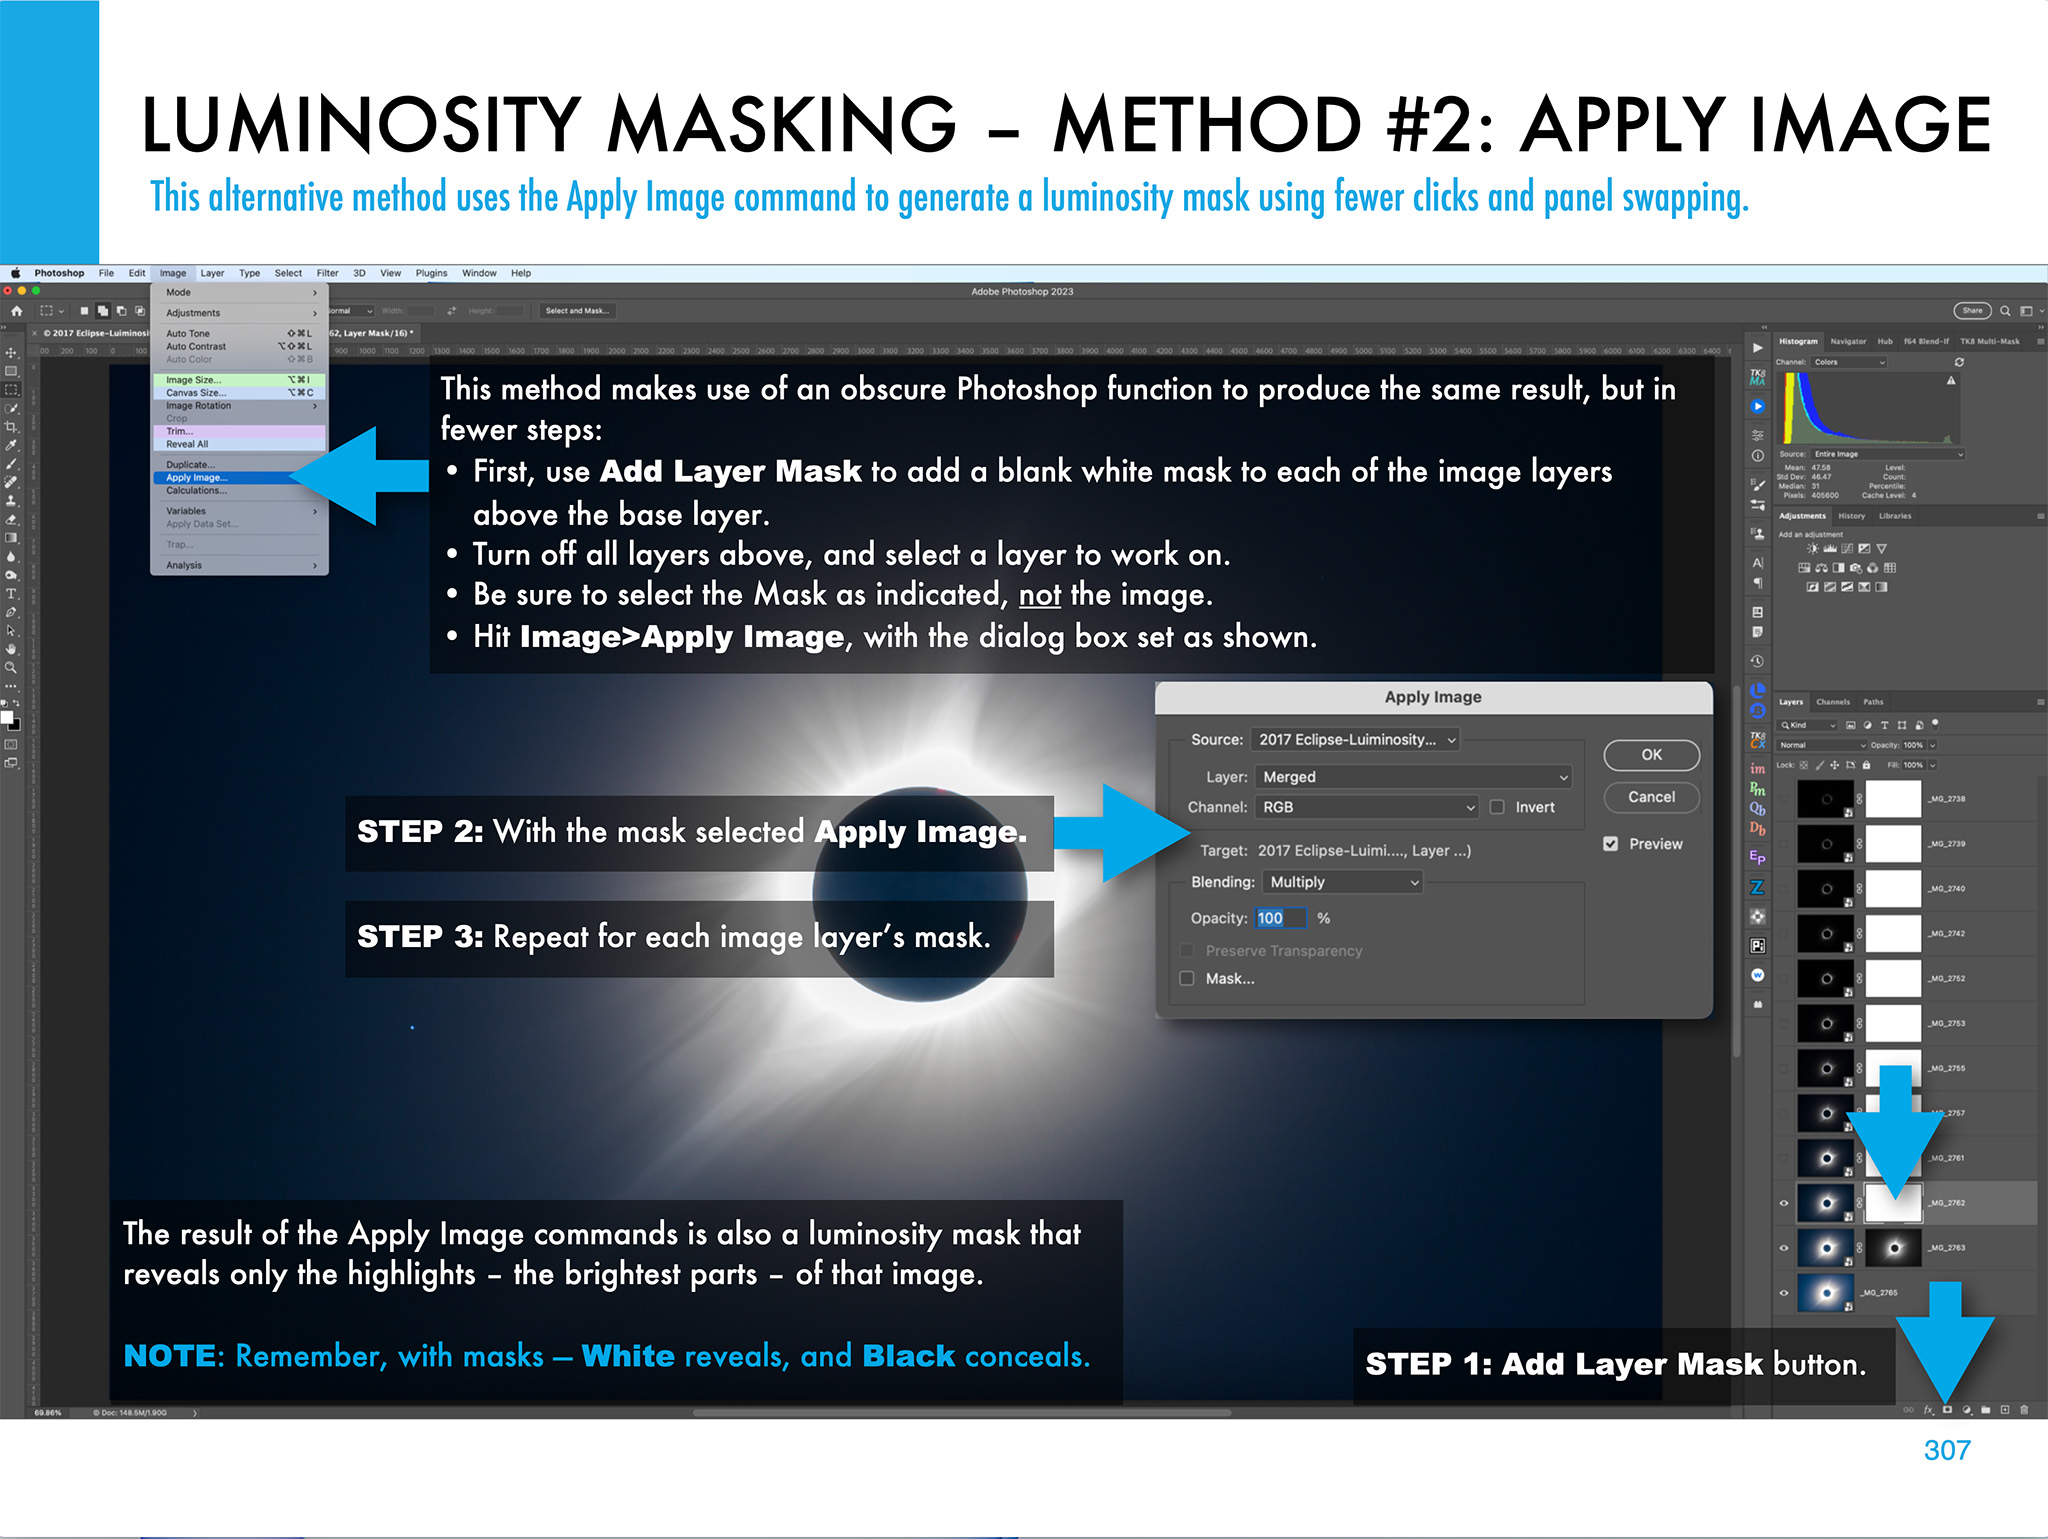
I illustrate other methods of stacking and blending exposure sets, such as luminosity masks and stack modes. Examples are all with Adobe products, but the methods are applicable to other layer-based programs such as Affinity Photo.
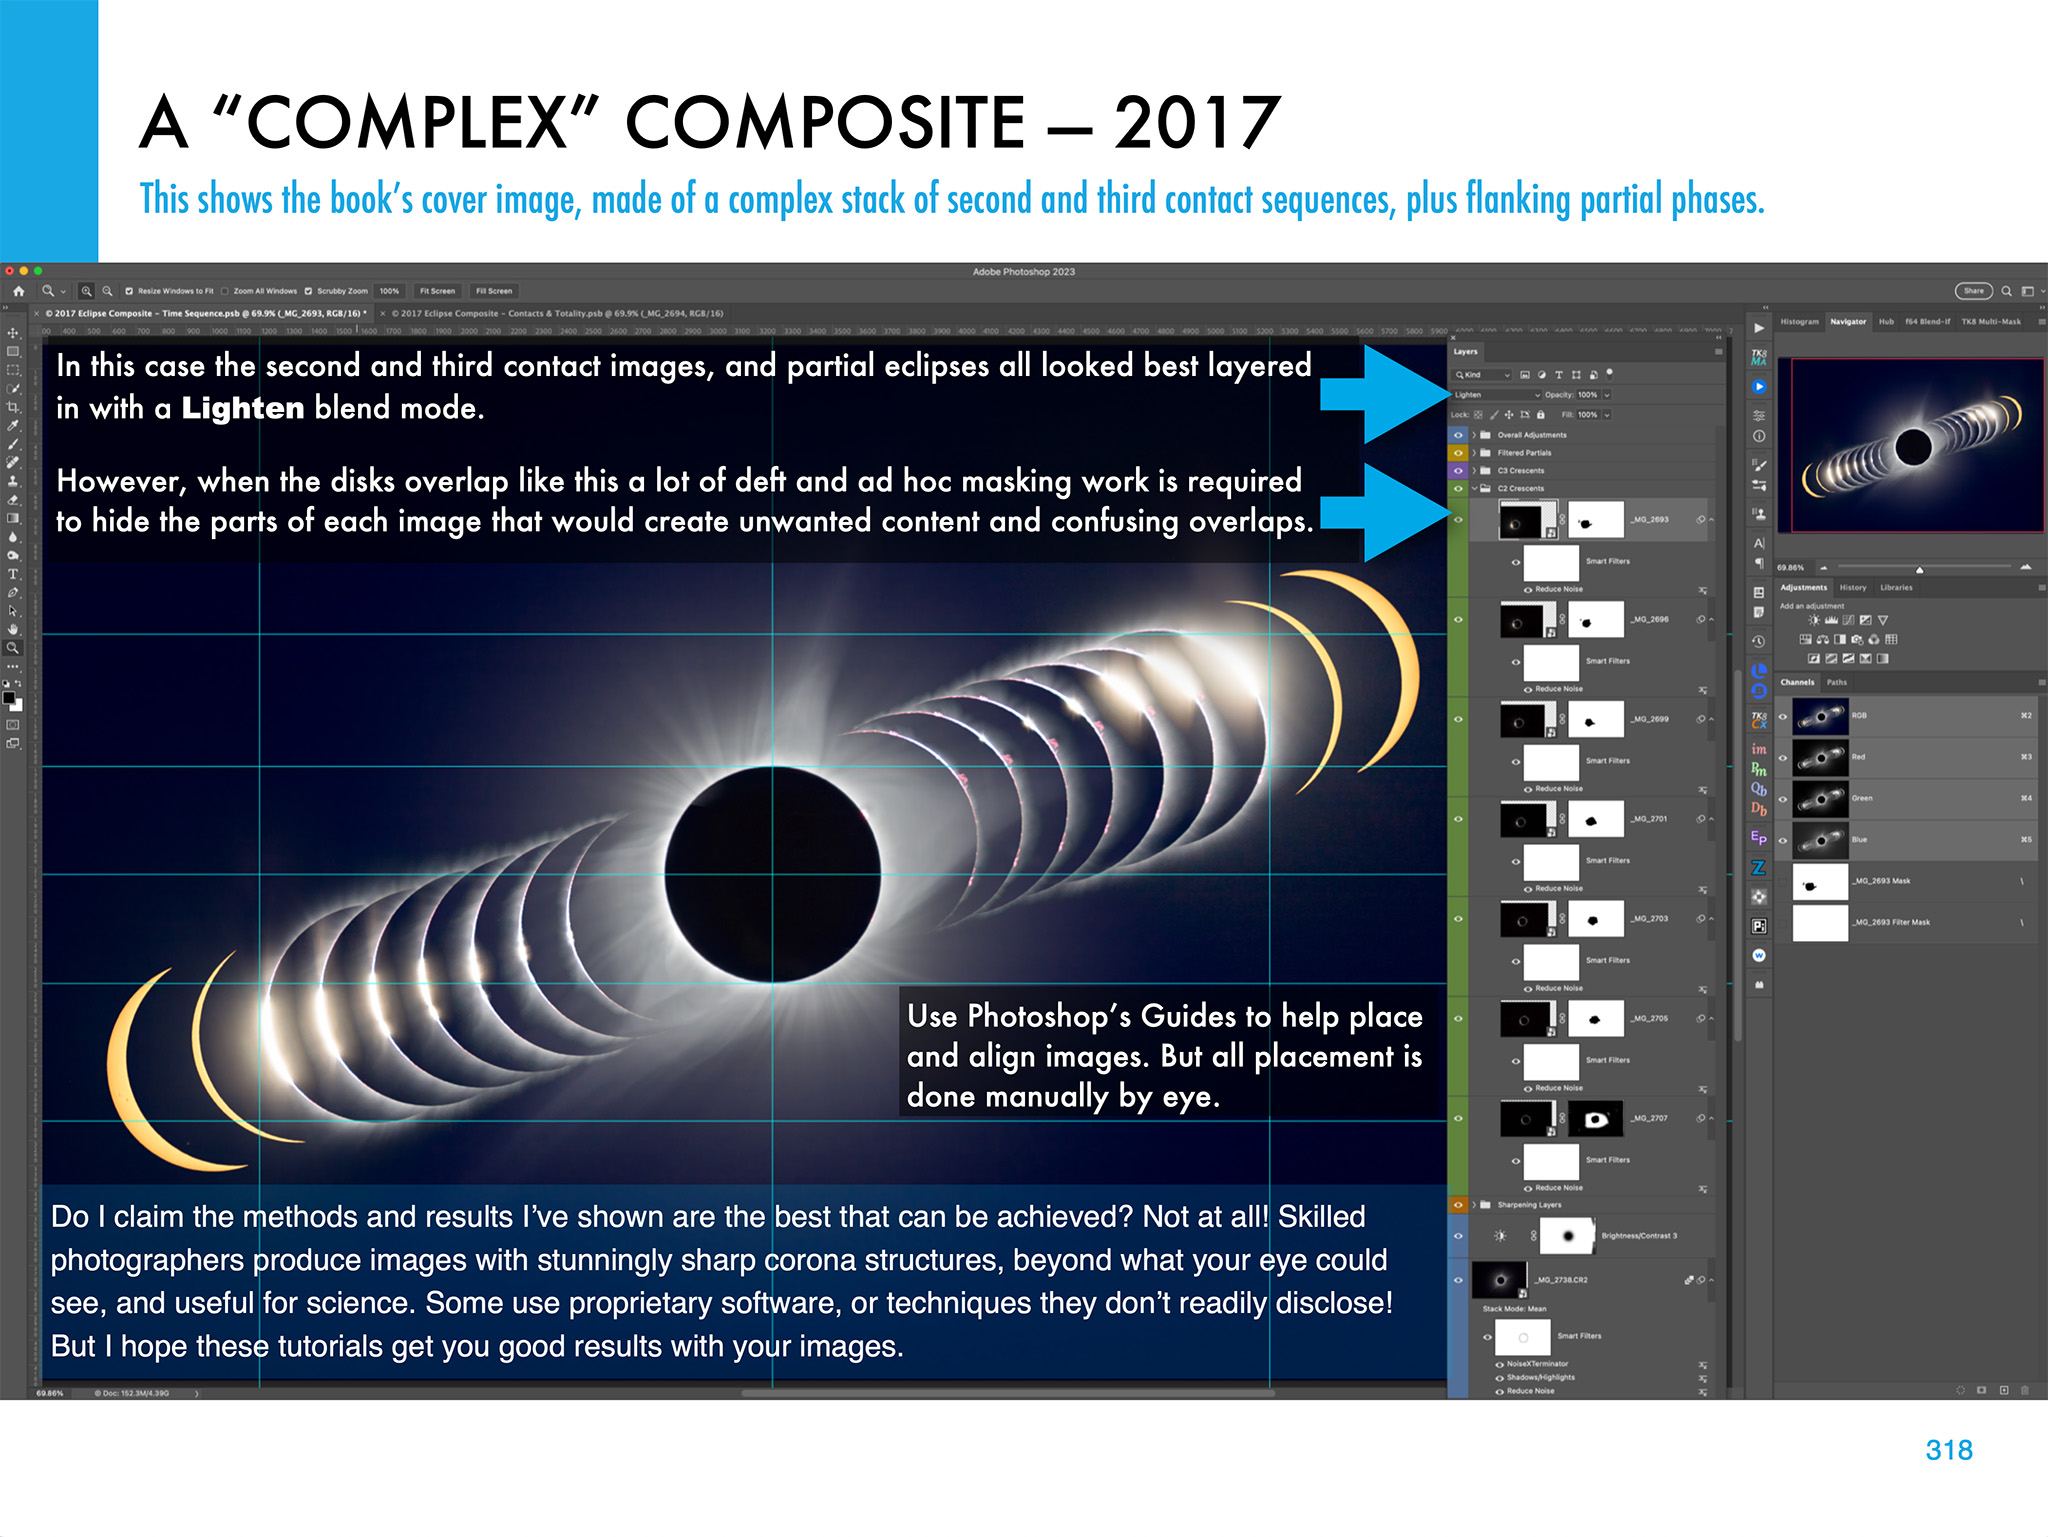
The processing chapter ends with illustrations on how to create layered composites from images taken at multiple stages of an eclipse.
What Can Go Wrong?
The ebook ends with advice for the ambitious (!) on how best to use several cameras to capture different aspects of the eclipse. And I includes lots of tips and checklists to ensure all goes well on eclipse day — or what to do for Plan B if all does not go well!
The ebook is available for Apple Books (for Macs and iPads) and as a PDF for all devices. Links to buy and more details on ebook content are at my website at www.amazingsky.com/EclipseBook.
I’ll be posting more eclipse “tips and techniques” blogs in the coming months, so be sure to subscribe.
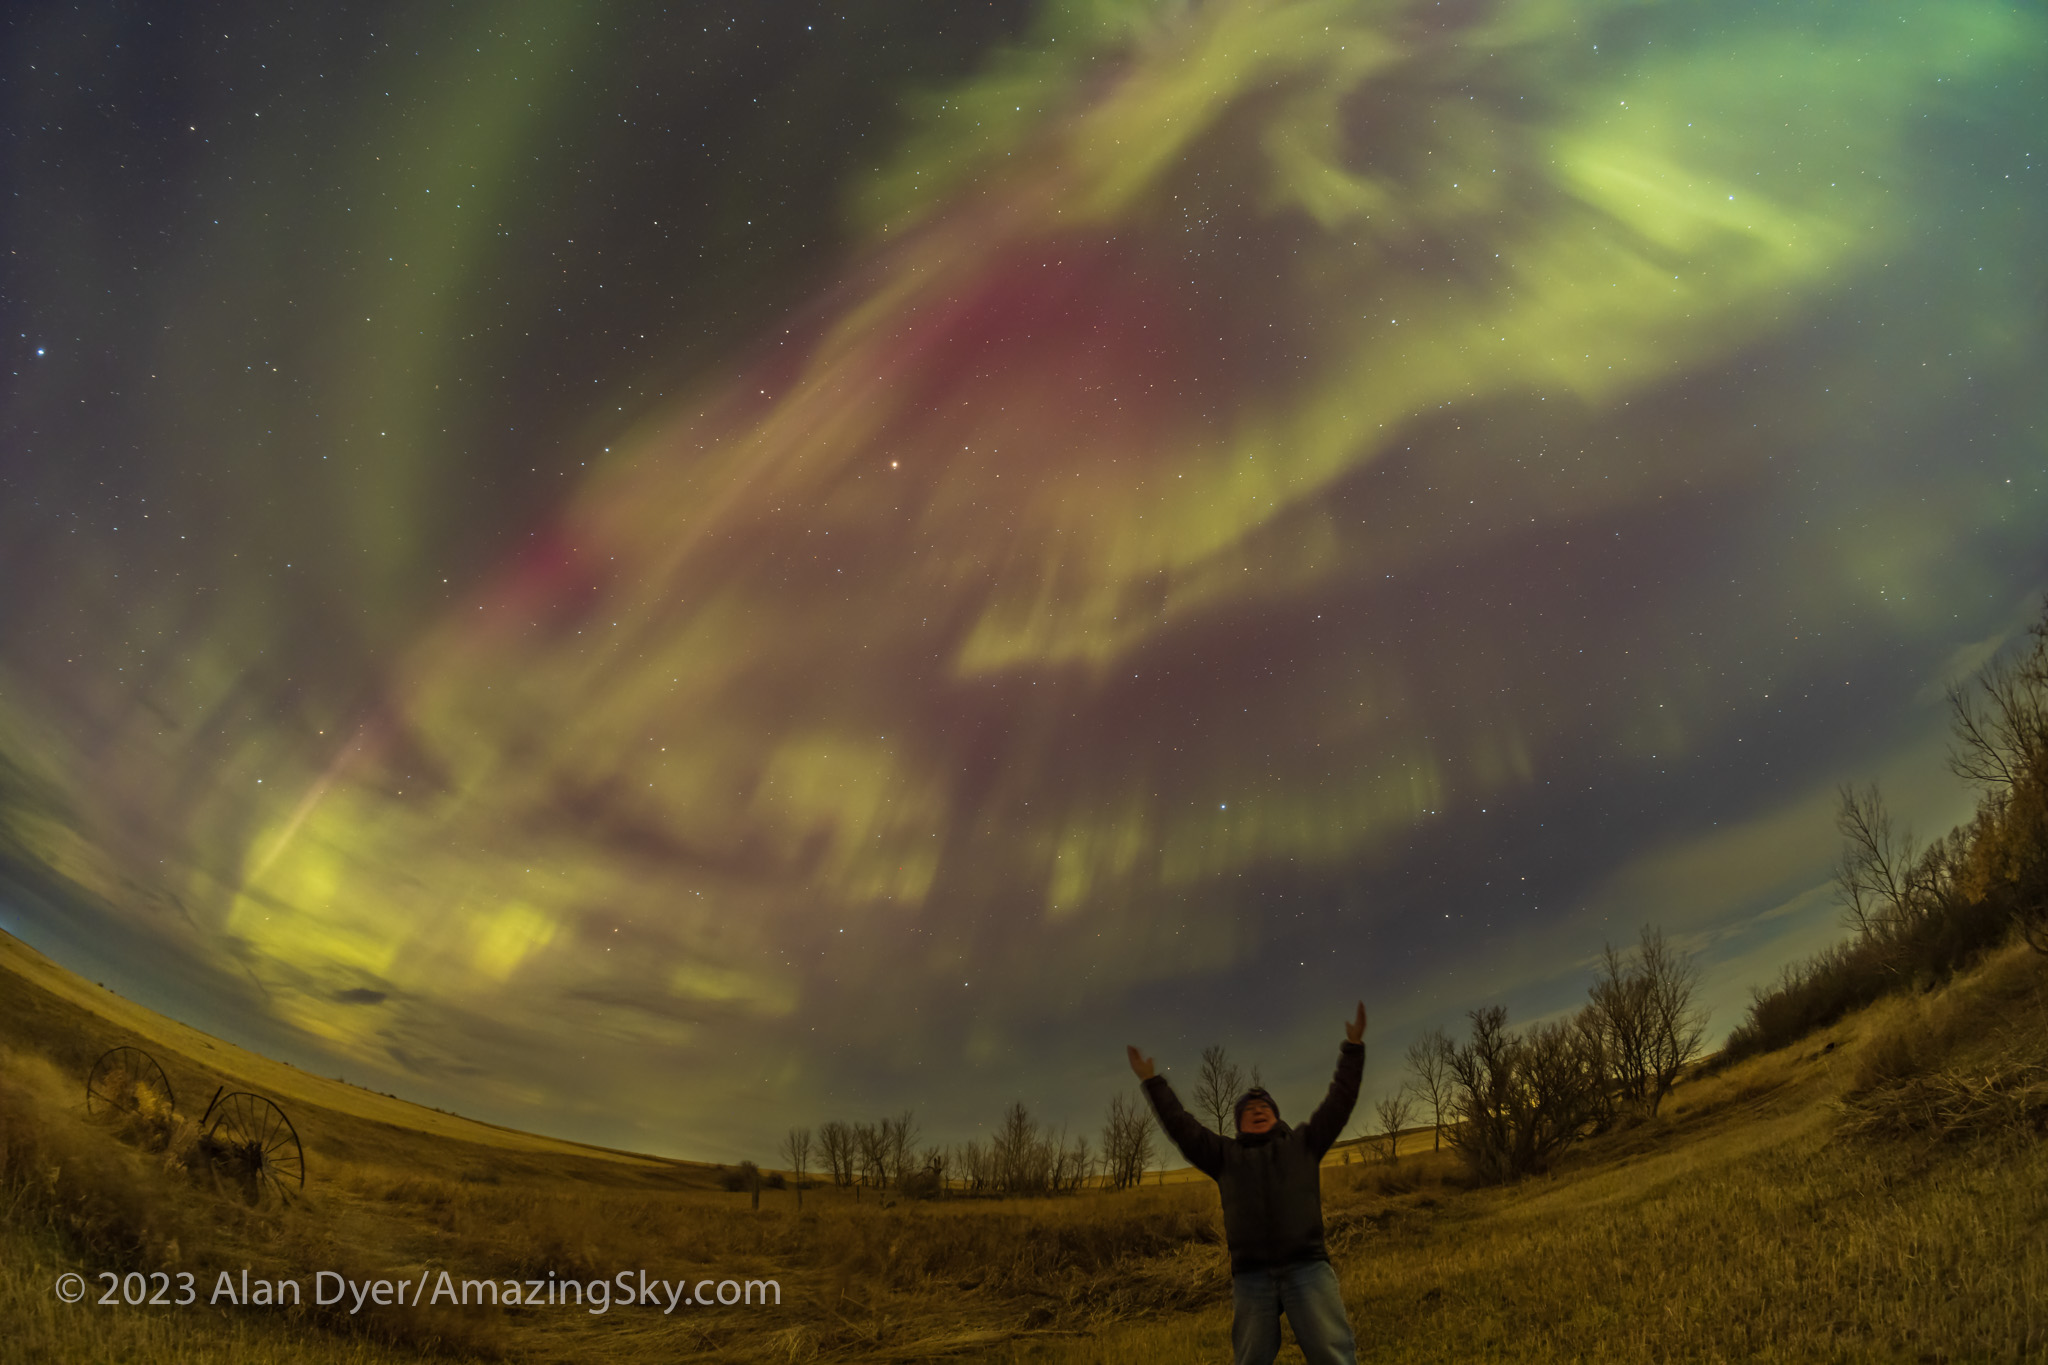
On April 23, 2023 the sky erupted with a massive solar storm, bringing the aurora to millions of people around the word.
On April 23 warnings went out alerting aurora watchers that a solar storm was imminent. And as the sky darkened that night locations all across the Northern and Southern Hemispheres were treated to a great sky show.
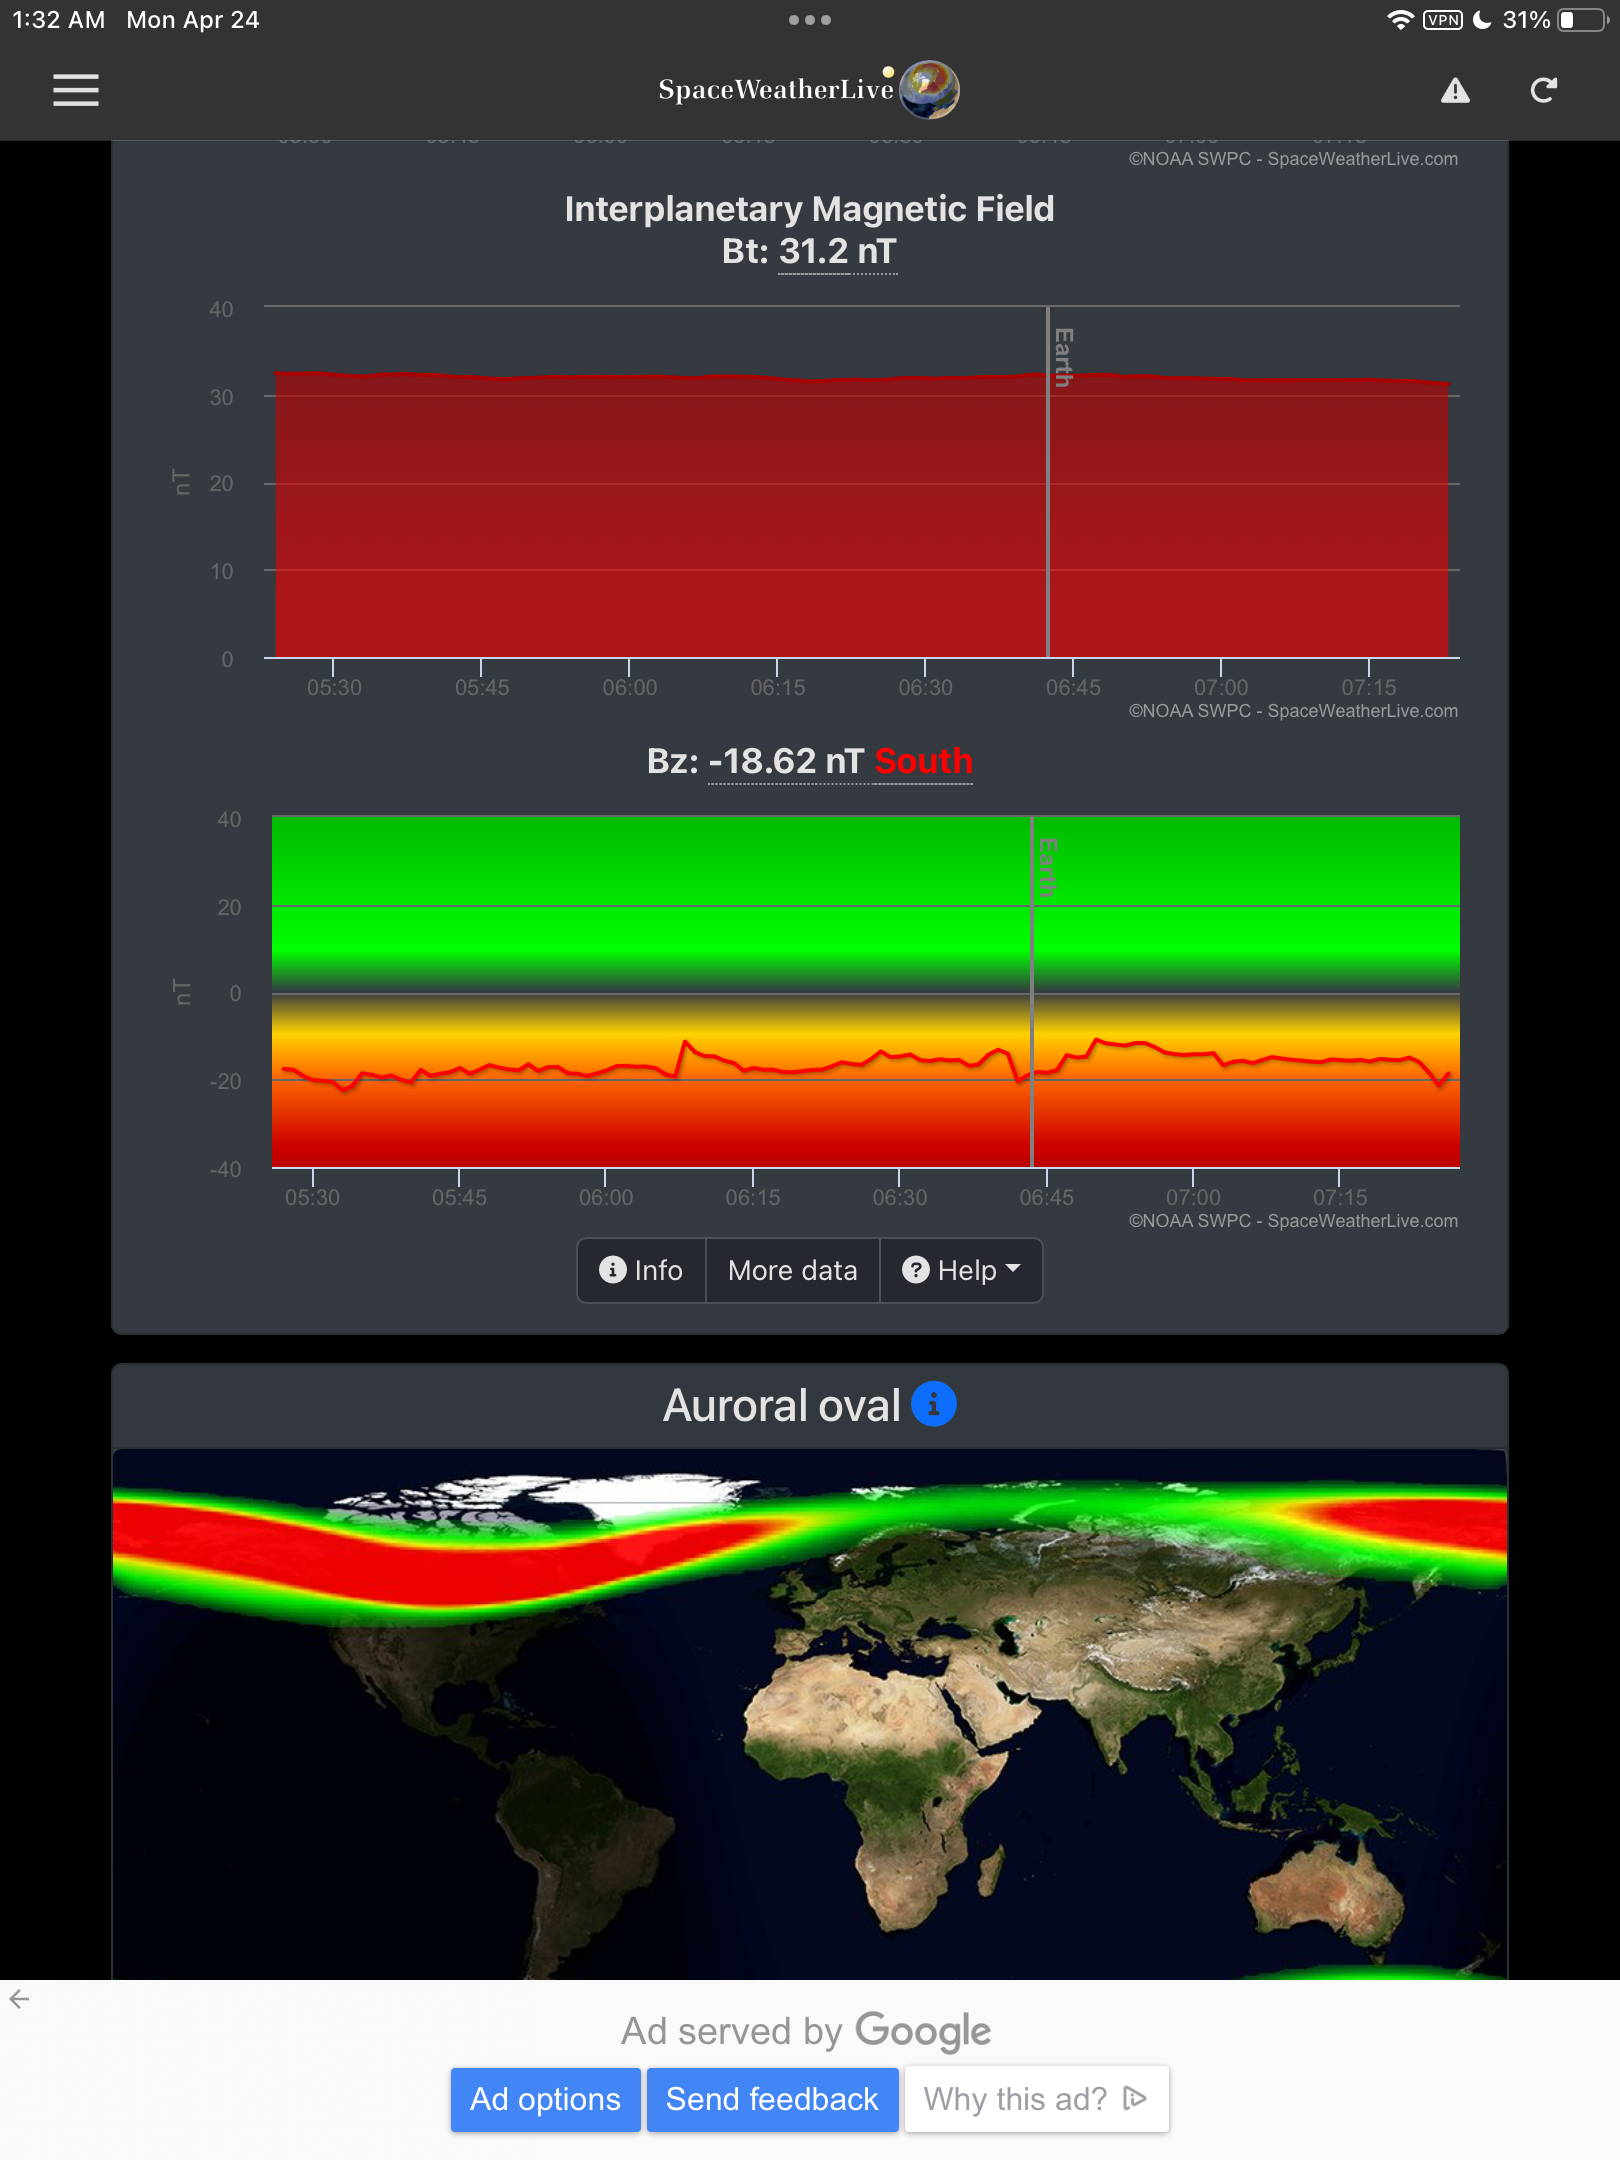
This is what we want to see in our aurora apps! Code Red and a vast auroral oval.
When we see this on our phone apps, we know we’ll get a great show. This was the auroral oval, lit up red, as the display was underway at my location in Alberta, Canada.
All indicators were great!
The strength of the interplanetary field (Bt) was high and the direction of the field (Bz) was well south, all welcome indicators of a superb show.
Sure enough, as it got dark that night, and from my location after the clouds cleared, an aurora was underway covering much of the sky.
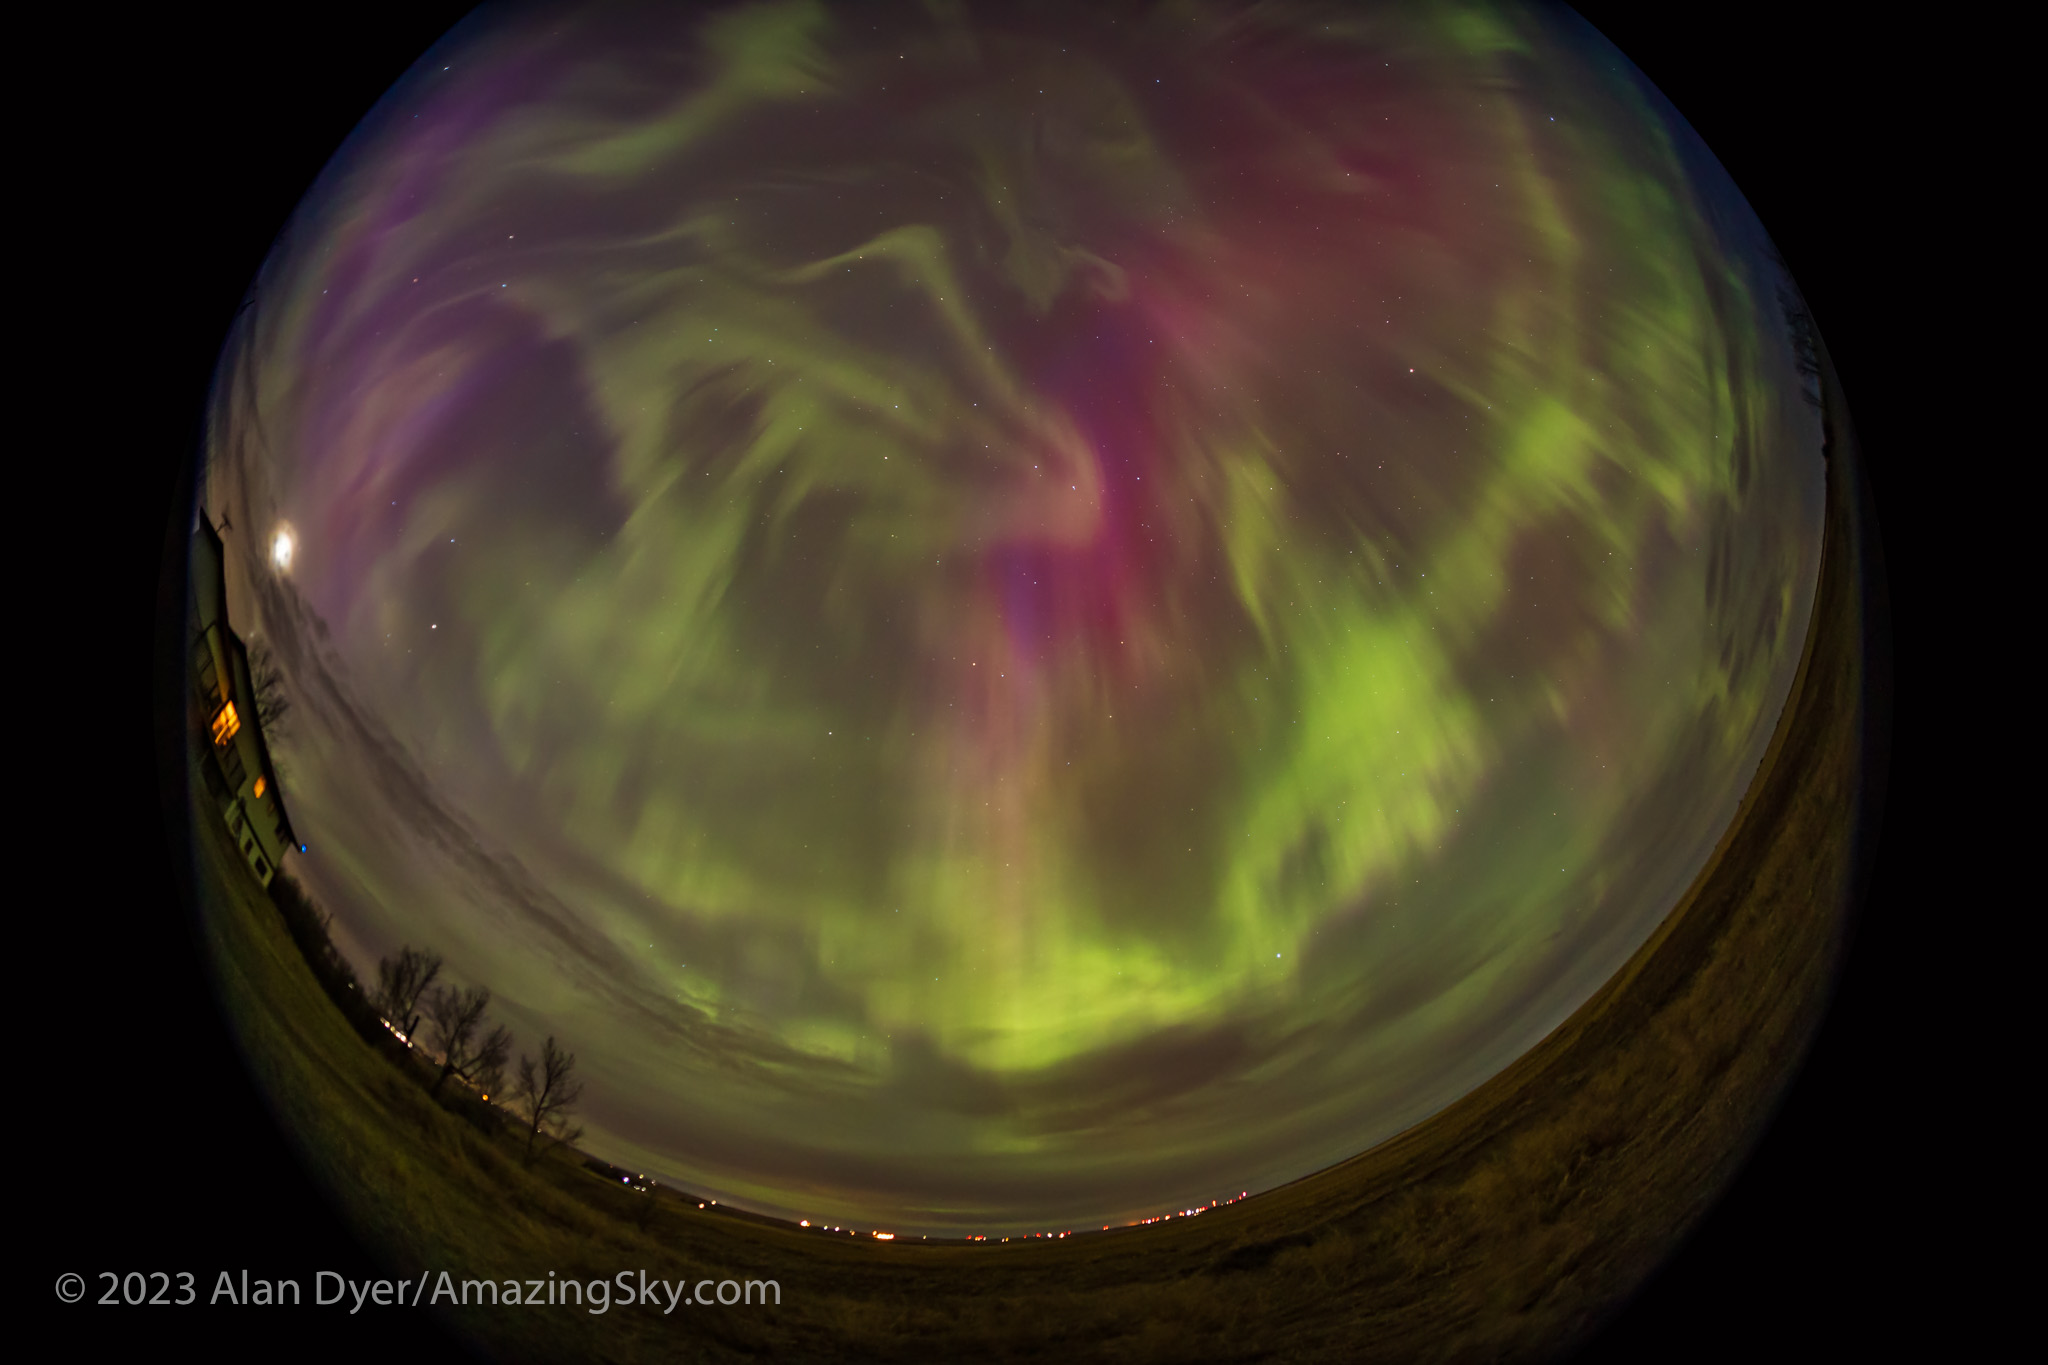
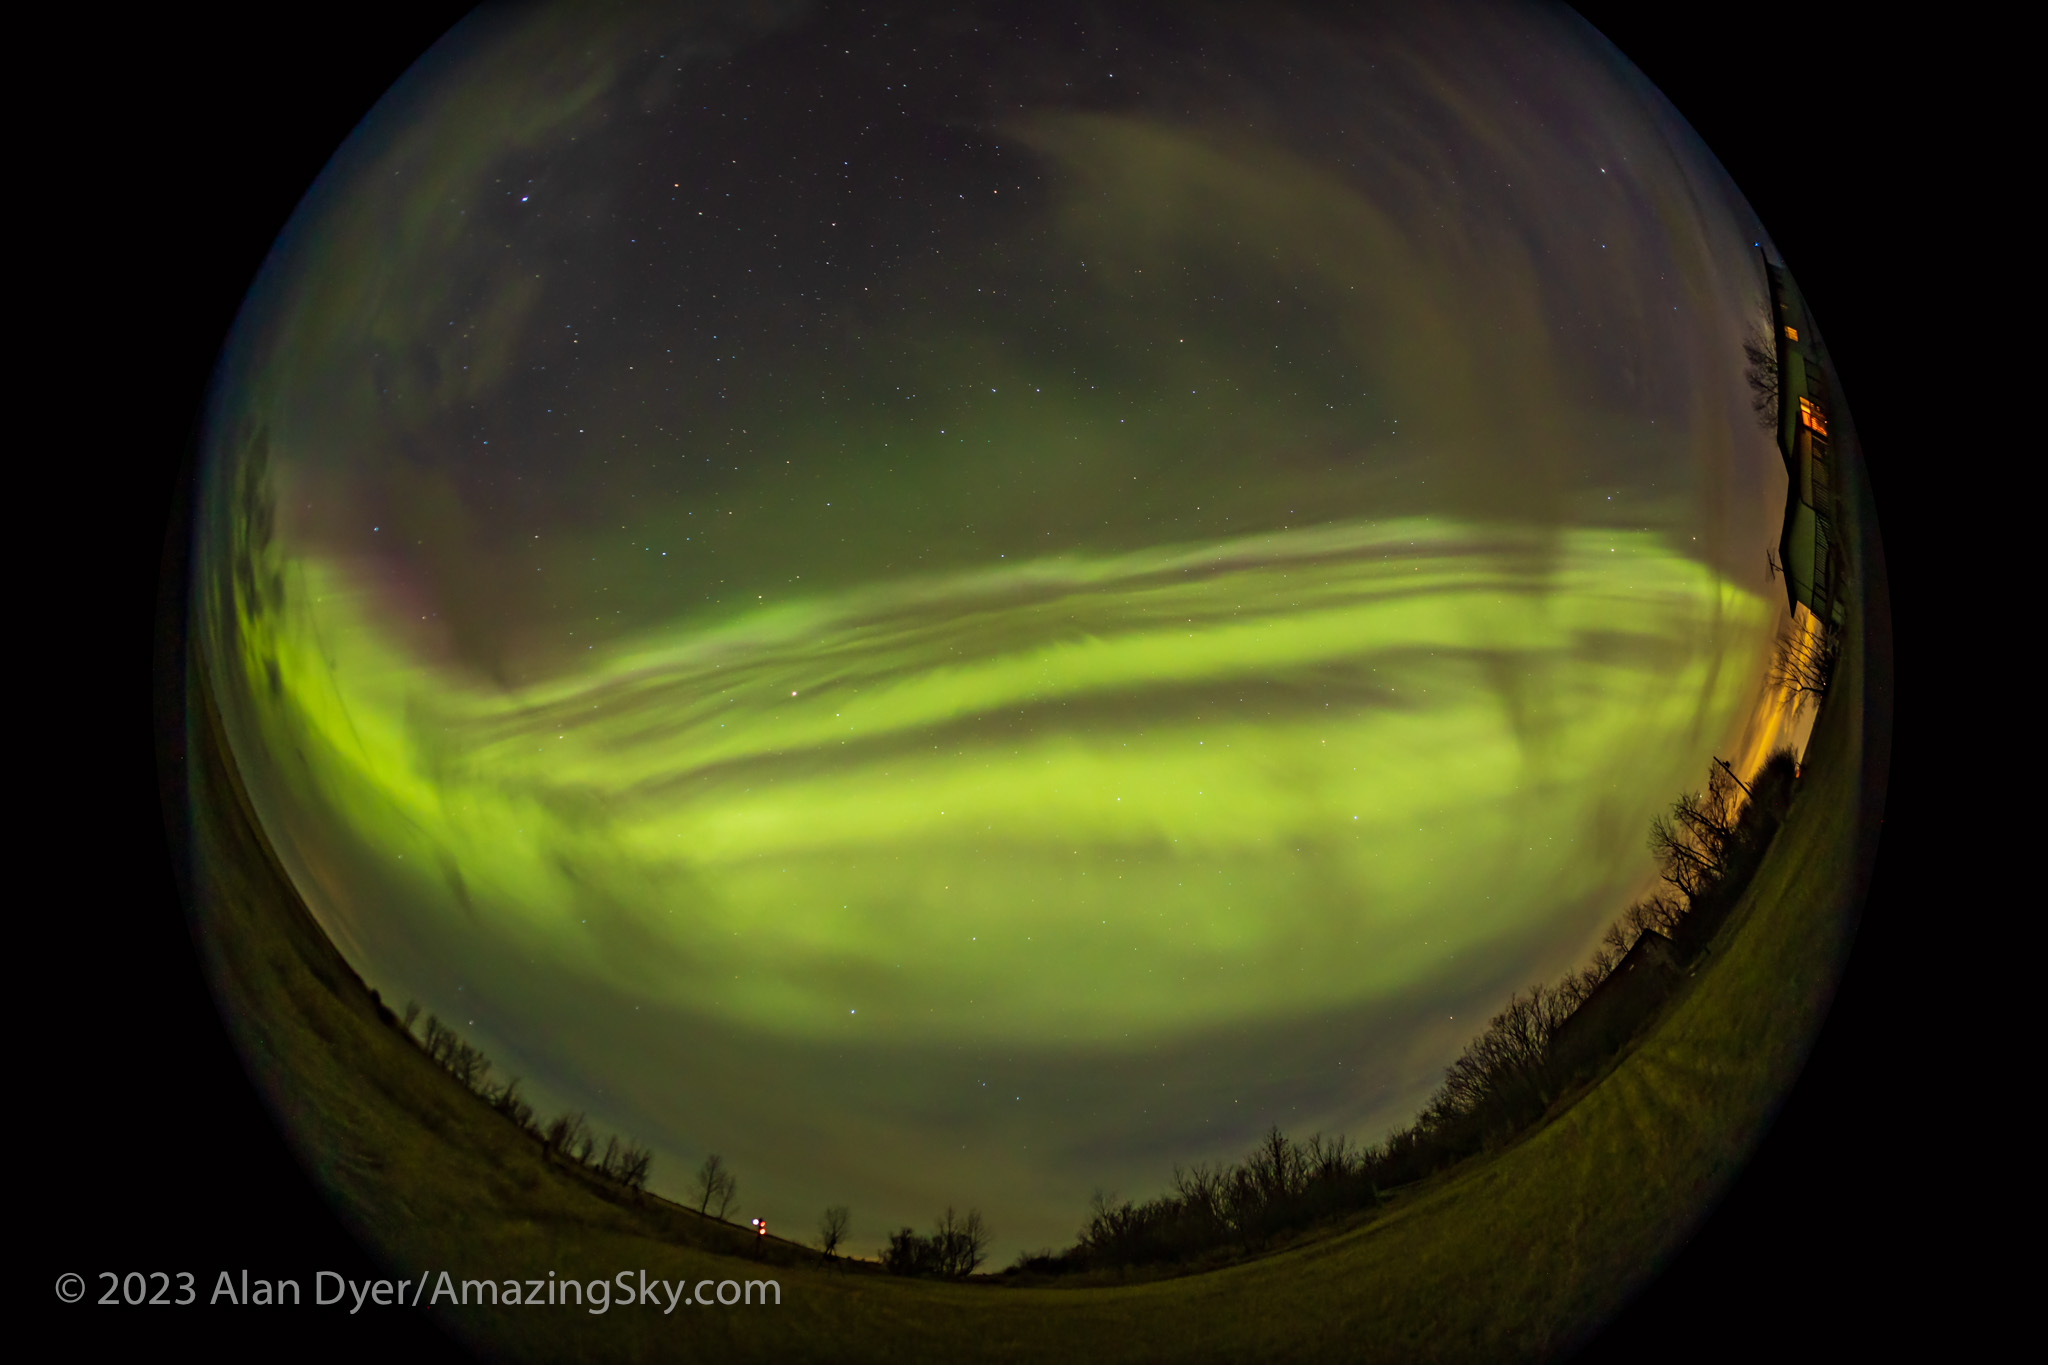
A fish-eye 360° view of the Great April Aurora of April 23, 2023, from home in southern Alberta, Canada. The Kp level reached 7 to 8 this day. The Big Dipper is above centre. This is looking north.
A single 5-second exposure with the TTArtisan 7.5mm circular fish-eye lens at f/2 and Canon R6 at ISO 3200.
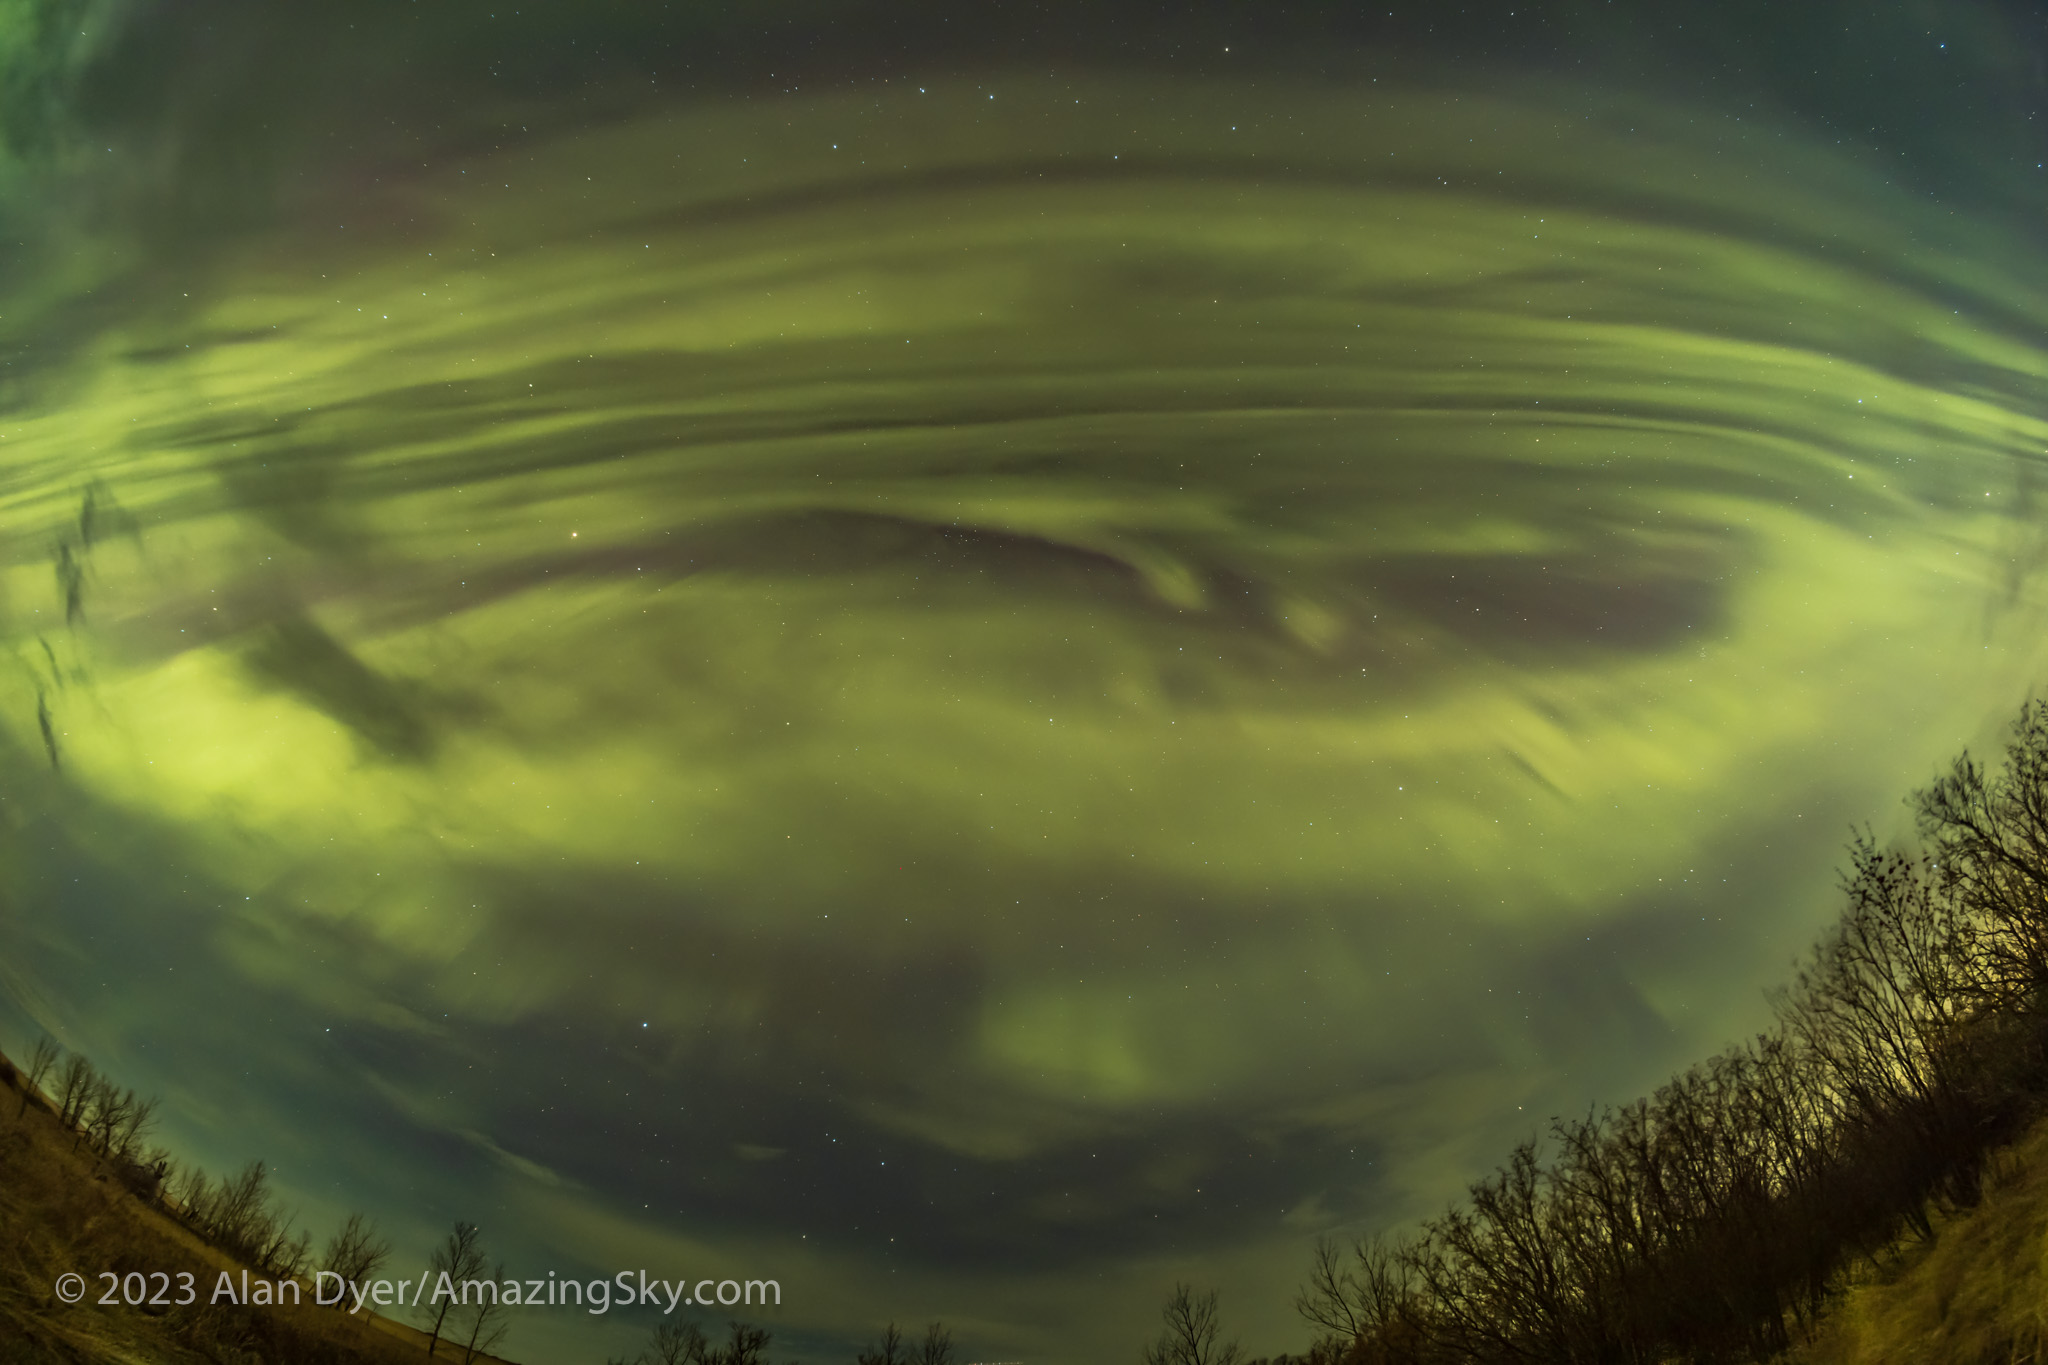
The aurora moved south to occupy just the southern half of the sky, but with incredible ribbons crossing from east to west, rippling and pulsating off and on. Seeing patches of aurora pulse off and on and flaming up to the zenith is not uncommon toward the end of a substorm outburst. But this was the first time I can recall seeing pulsating ribbons.
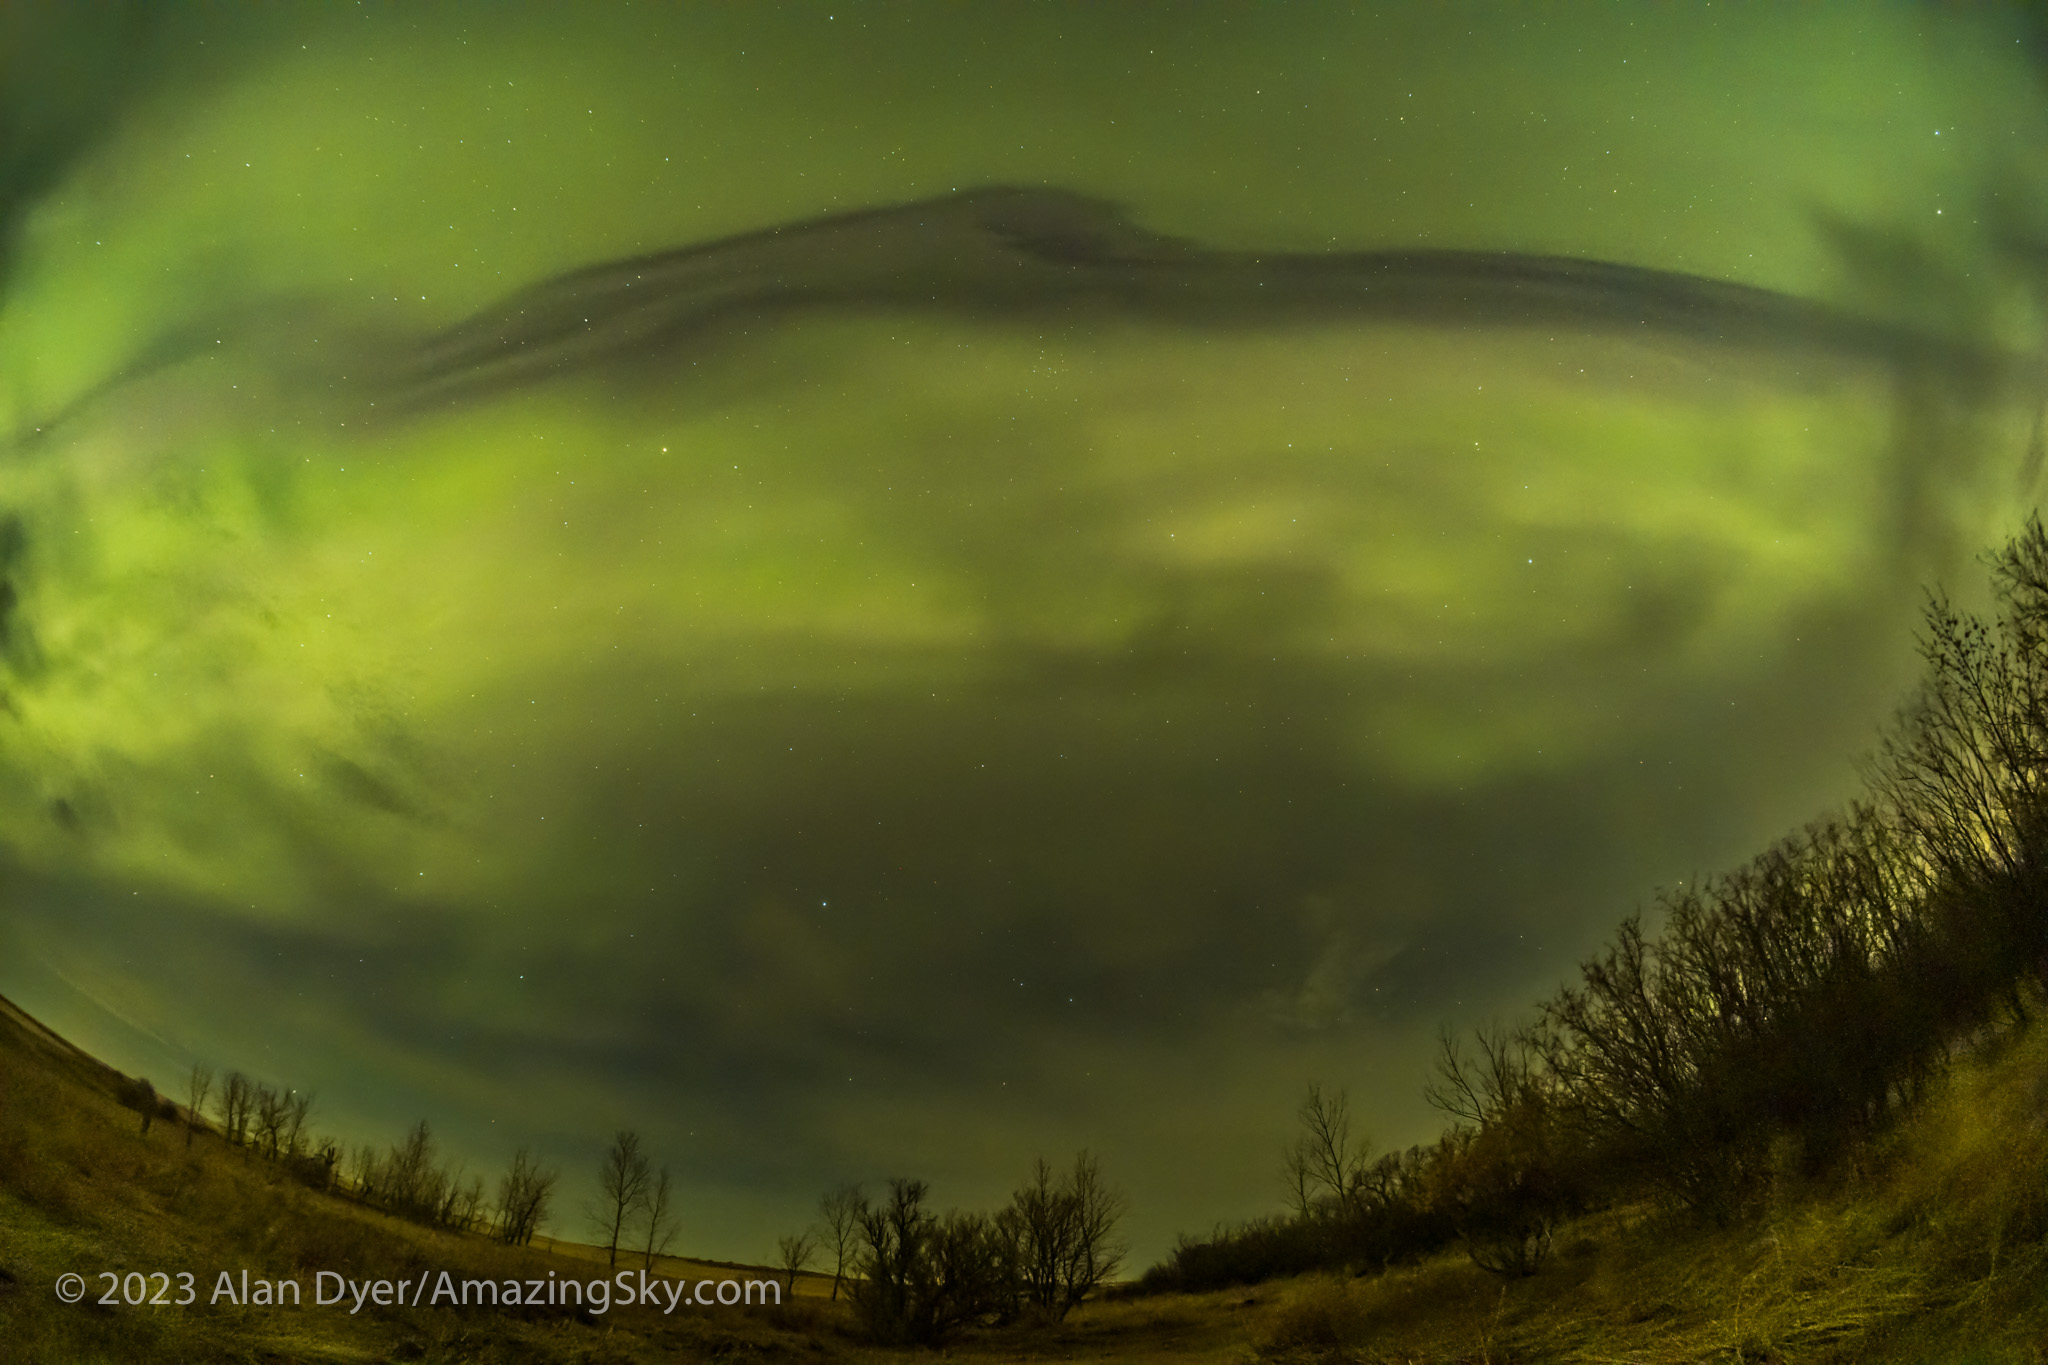
At times, there was a dark ribbon across the sky, as the aurora formed a gap in its curtains, looking like a “dark aurora.”
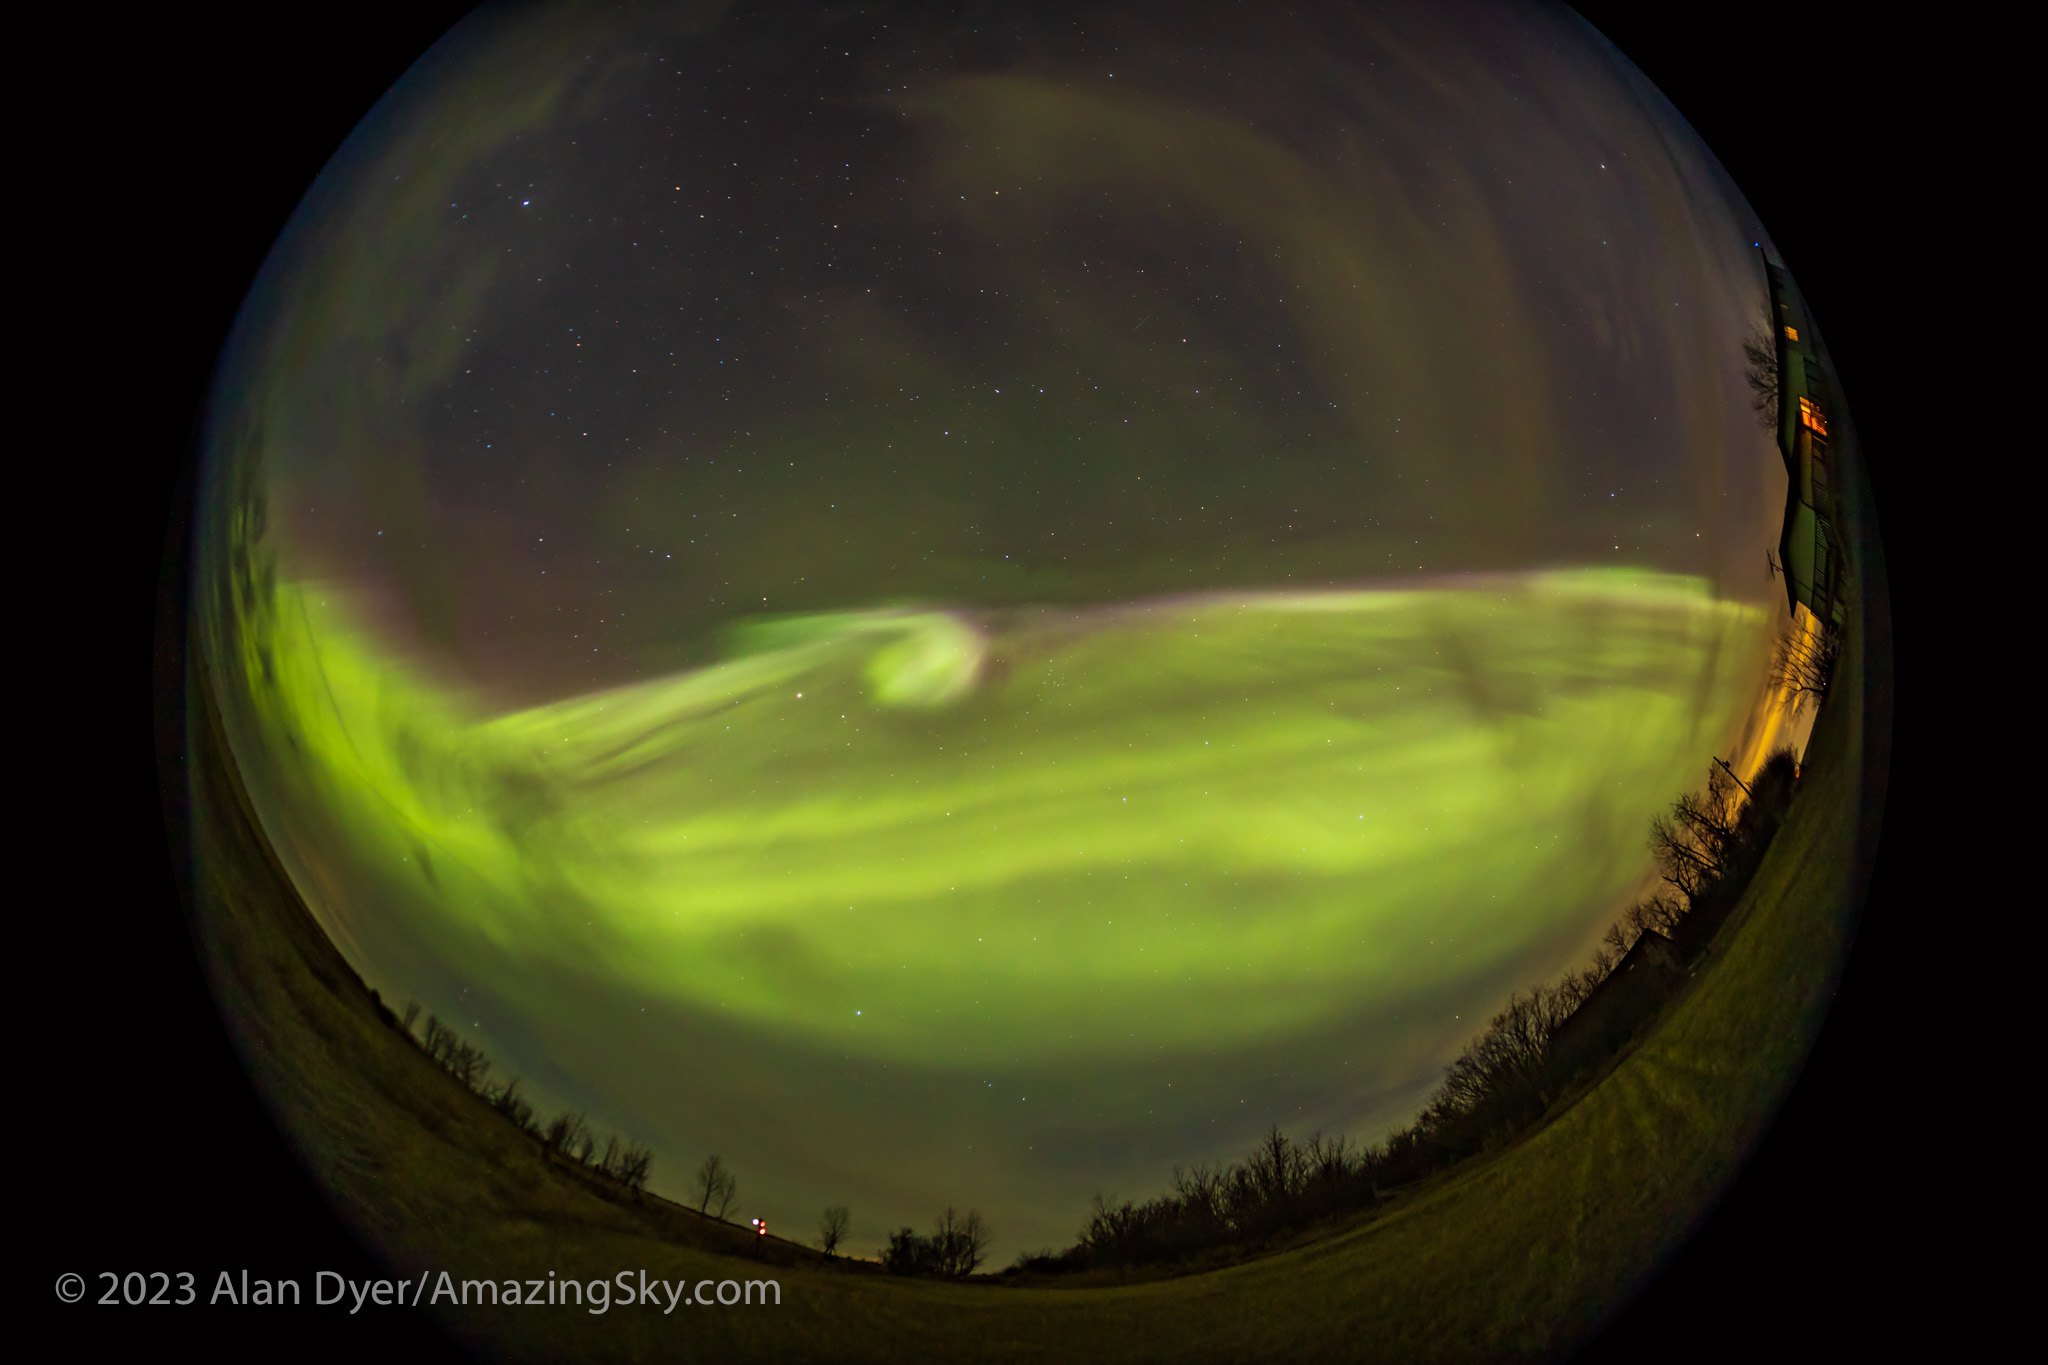
A fish-eye 360° view of the Great April Aurora of April 23, 2023, from home in southern Alberta, Canada. The Kp level reached 7 to 8 this day. The Big Dipper is above centre. This is looking south.
A single 5-second exposure with the TTArtisan 7.5mm circular fish-eye lens at f/2 and Canon R6 at ISO 1600.A fish-eye 360° view of the Great April Aurora of April 23, 2023, from home in southern Alberta, Canada. The Kp level reached 7 to 8 this day. The Big Dipper is above centre. This is looking south.
A single 5-second exposure with the TTArtisan 7.5mm circular fish-eye lens at f/2 and Canon R6 at ISO 1600.A view of the great April aurora show of April 23, 2023, looking up to the zenith near the top, with a set of finely-structured parallel ribbons of aurora crossing the sky from east (left) to west (right). This is looking south. The Big Dipper is at top. Taken from home in southern Alberta, Canada.
This is a single 10-second exposure with the Canon Ra at ISO 1600 and 11mm TTArtisan full-frame fish-eye lens at f/2.8.A view of the great April aurora show of April 23, 2023, looking to the south, with diffuse curtains across the sky forming a dark gap at the zenith. Taken from home in southern Alberta, Canada.
This is a single 1.6-second exposure with the Canon Ra at ISO 5000 and 11mm TTArtisan full-frame fish-eye lens at f/2.8.
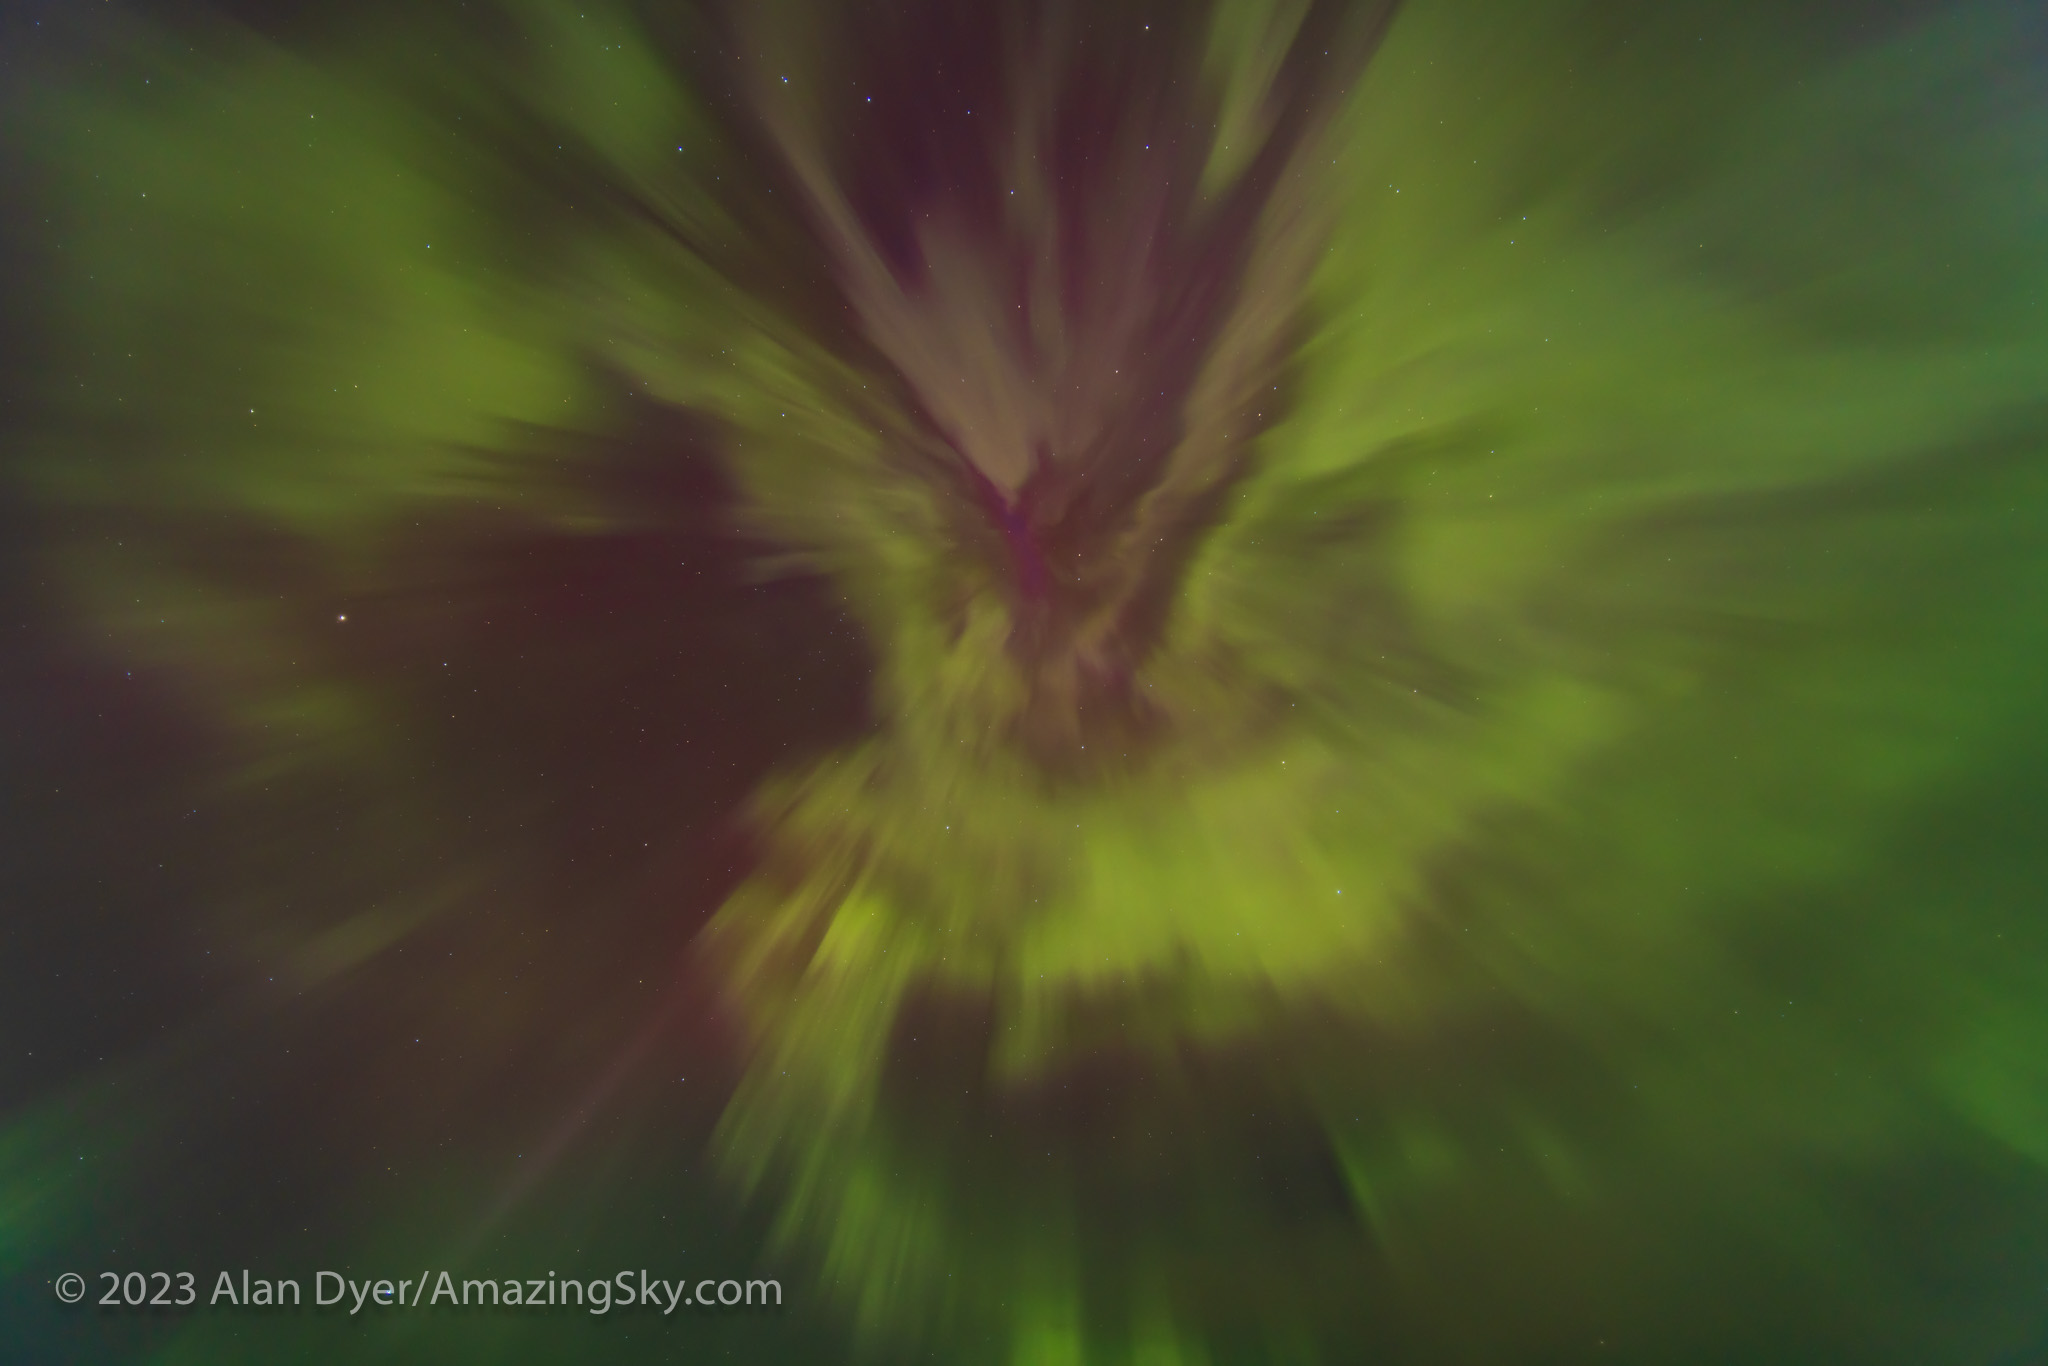
The view looking straight up is always the most jaw-dropping when an aurora fills the sky. Rays and curtains converge at the magnetic zenith to form a “corona.”
The aurora of April 23, 2023, looking straight up to the zenith to capture the converging curtains in a coronal display. The Big Dipper is at top.
A single 3.2-second exposure with the Canon R5 at ISO 800 and Laowa 15mm lens at f/2.
I shot with three cameras, taking stills, time-lapses, and real-time movies. I edited them together here in a music video. Enlarge to full screen to view it. I hope you enjoy it!
A 3-minute video of the April 23, 2023 aurora show from Alberta.An aurora selfie with the great all-sky Kp6 to 8 level aurora of April 23, 2023. This is looking south toward Arcturus and Spica. The Coma Berenices cluster is at top near the convergence point for the auroral curtains.
Shot from home with the Canon Ra and 11mm TTArtisan full-frame fish-eye lens at f/2.8.
With the Sun ramping up in activity, we should get more great shows of Northern – and Southern! – Lights around the world in the next few years,
May 10, 1994 Annular Eclipse taken from a site east of Douglas, Arizona showing “reverse” Bailey’s Beads —lunar mountains just touching Sun’s limb 4-inch f/6 apo refractor at f/15 with Barlow lens Ektachrome 100 slide film.
Here’s my preview of some of the best celestial events for 2023. Mine is certainly not an exhaustive list. I’ve picked just one event per month, and I’ve focused on events best for unaided eyes or binoculars, and visible from North America. (So the solar eclipse of April 20 visible from Australia and the South Pacific, and the two minor lunar eclipses this year don’t make the cut!)
Click or tap on any of the illustrations to bring up a full-screen view with more detail and readable labels!
JANUARY
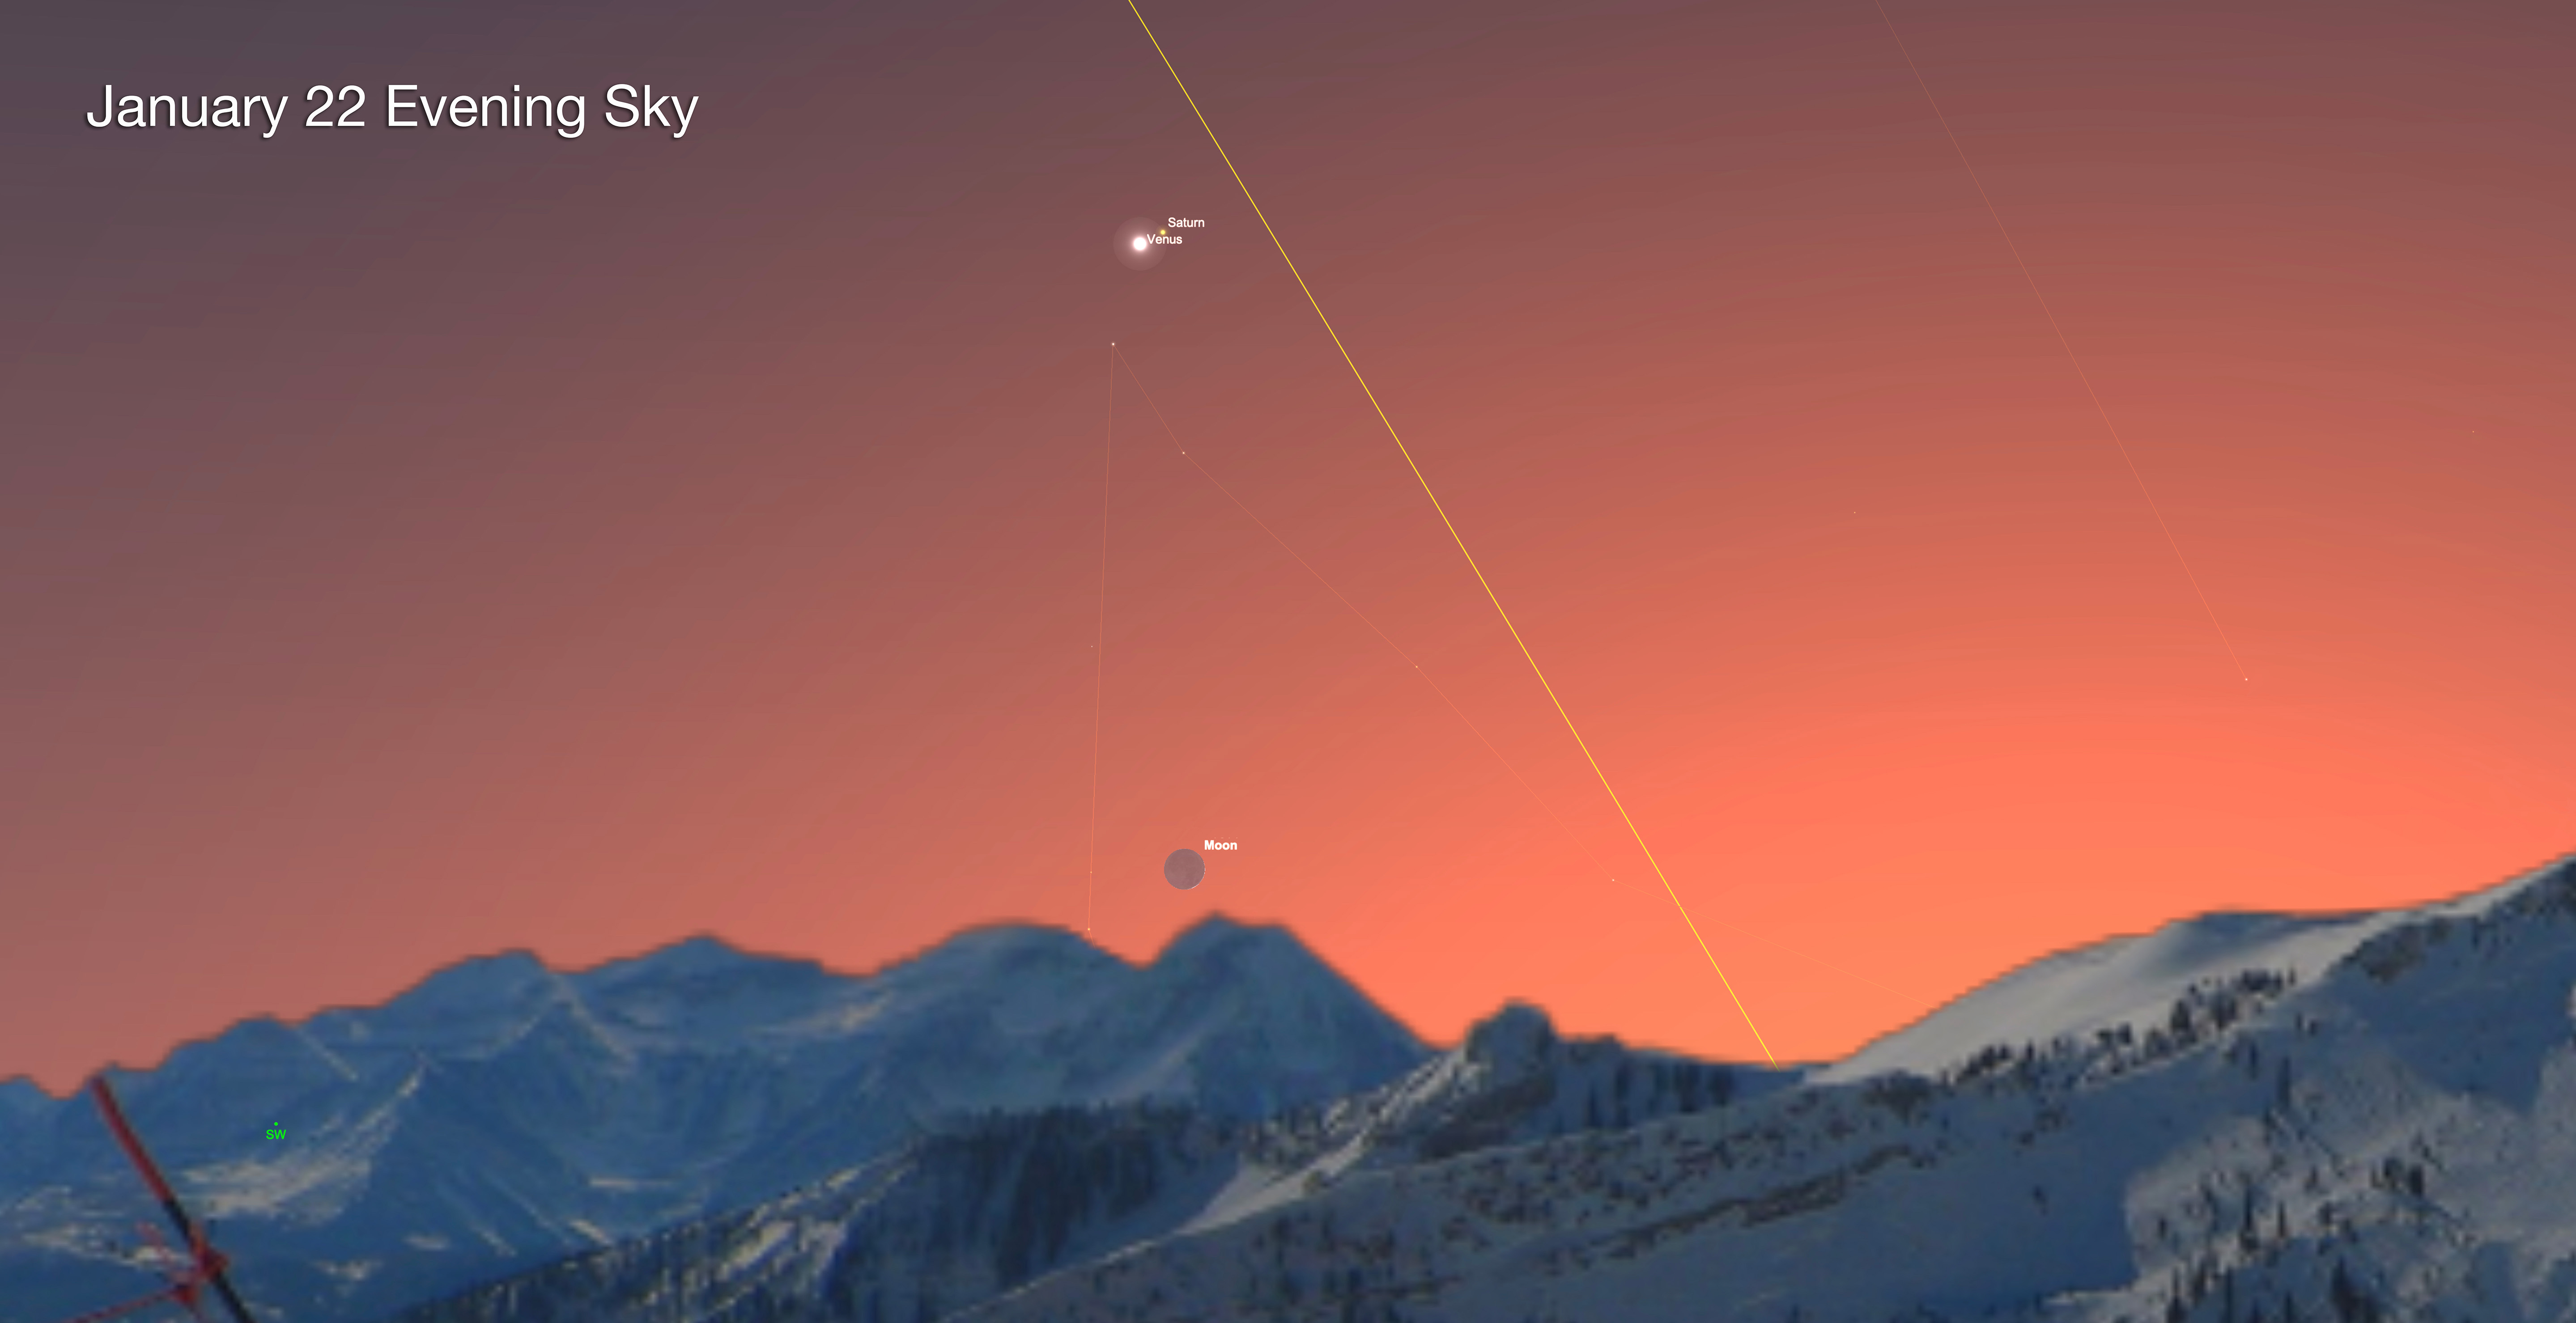
As 2023 opens, Venus is beginning its climb into the evening sky, while Saturn is sinking into the sunset. The two planets pass each other on Sunday, January 22, when they appear just one-third of a degree apart in the twilight. Use binoculars to pick out dimmer Saturn. And look for the thin day-old crescent Moon just over a binocular field below the planet pair.
FEBRUARY
A month later, on Wednesday, February 22, Venus has now ascended higher, preparing to meet up with descending Jupiter. But before they meet, the crescent Moon, with its dark side lit by faint Earthshine, joins the planets in a particularly close conjunction with Jupiter. They will appear about 1° (two Moon diameters) apart, with Venus about a binocular field below.
MARCH
Here’s a date to circle on your calendar. On Wednesday, March 1 the sky’s two brightest planets, Venus and Jupiter, pass within half a degree of each other, in arguably the year’s best conjunction. They’ll be close enough to frame nicely at medium power in a telescope, though the featureless gibbous disk of Venus will appear small, about the third the size of Jupiter’s banded globe. But Venus is by far the brighter of the two worlds.
APRIL
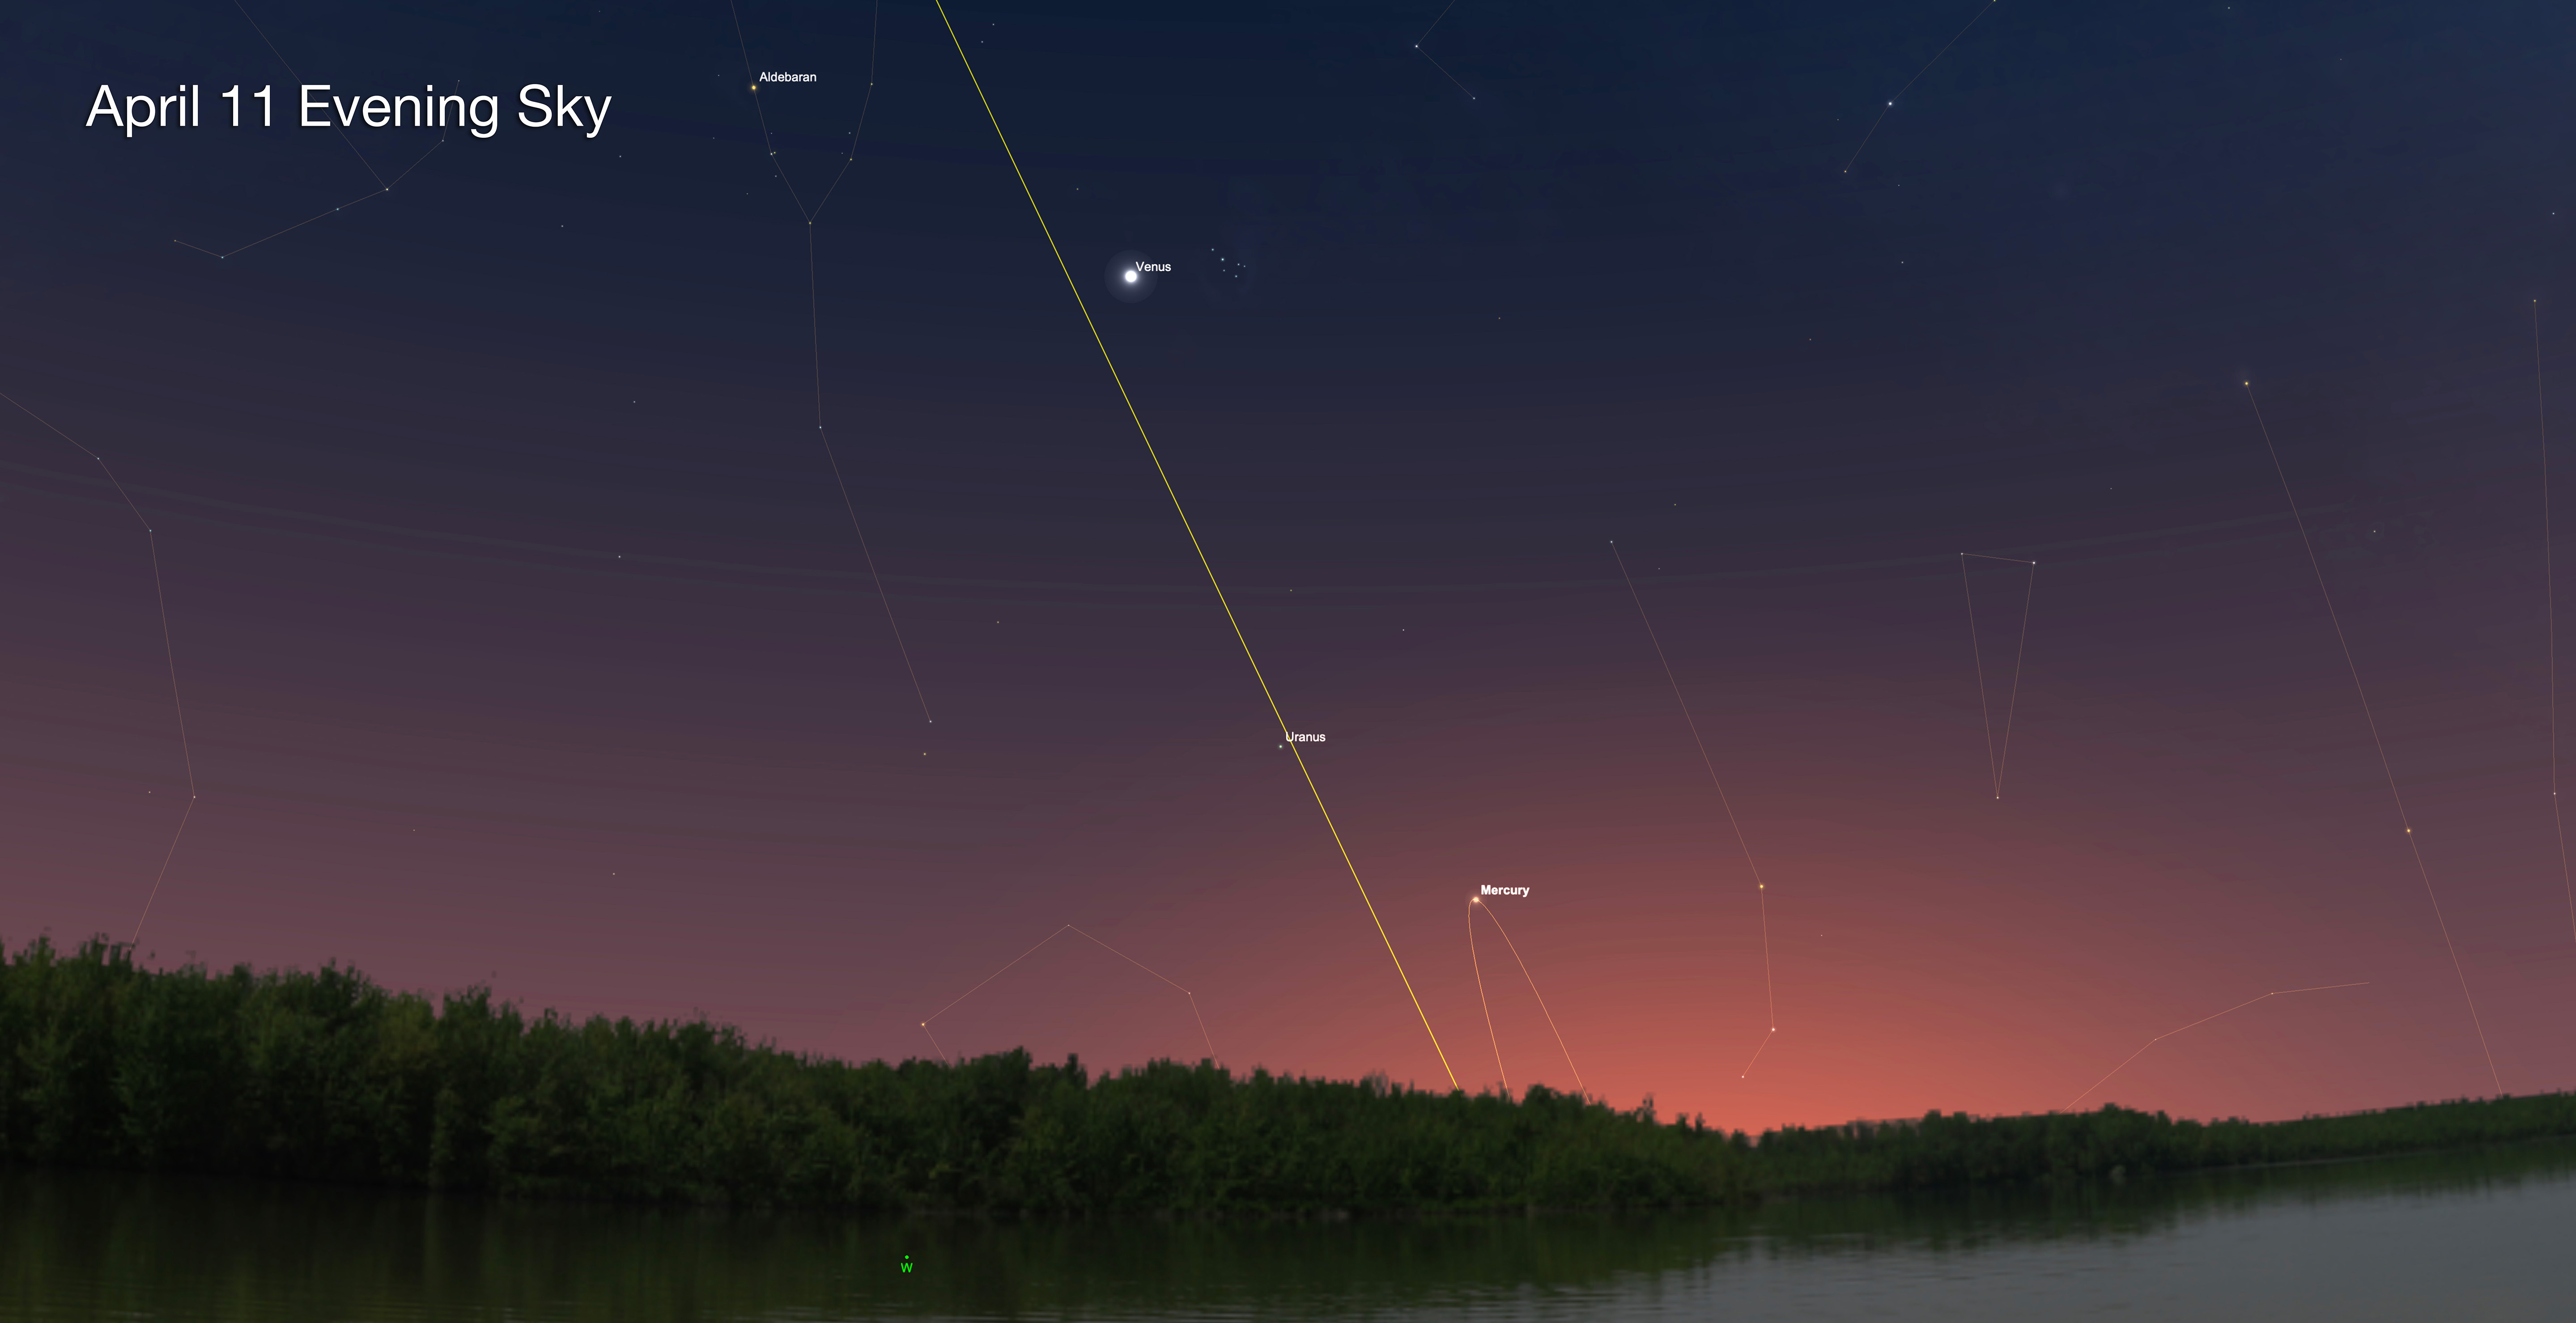
If you want to check Mercury off your sighting list this year, this is a good week to do it. On April 11 Mercury reaches its greatest angle away from the Sun in the evening sky, and for northern hemisphere viewers, is angled at its highest in the western sky. Even so, look just a binocular field above the horizon. While you’re at it, look higher for the fine sight of Venus near the Pleiades star cluster.
MAY
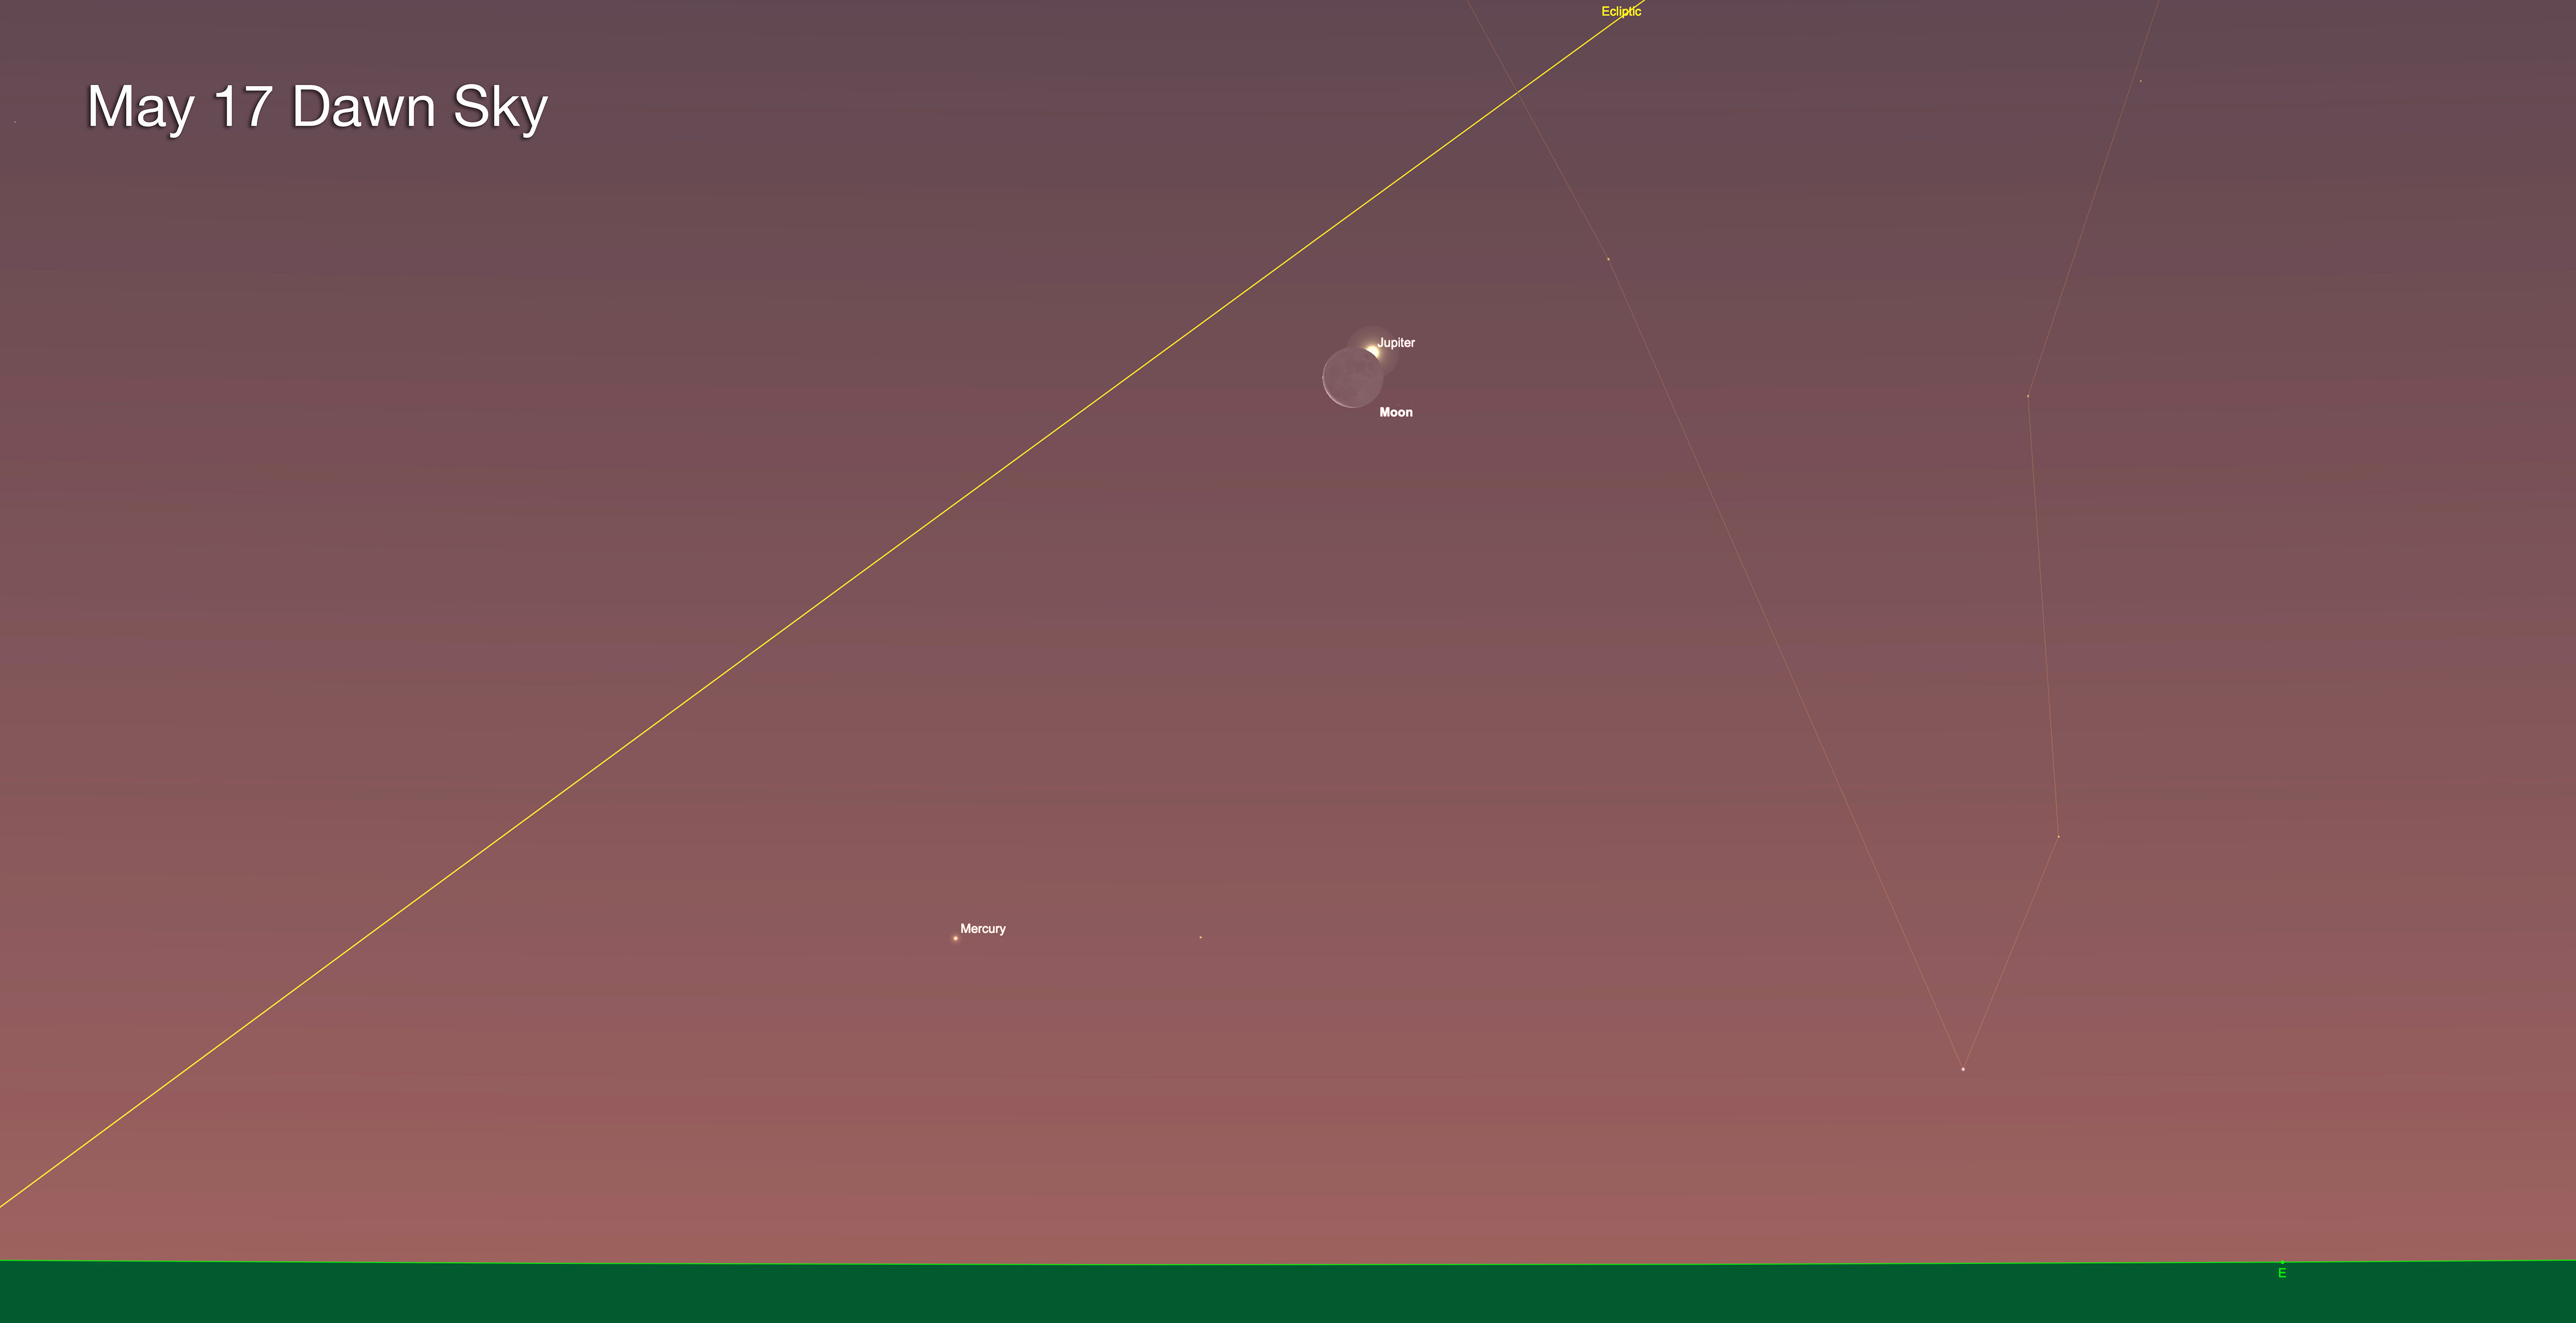
Wednesday, May 17 brings a chance to see the crescent Moon pass in front of Jupiter. But it will be a tricky event to catch. While most of North America and parts of Northern Europe can see the occultation, it occurs in the daytime sky with the Moon only 25° west of the Sun. However, locations along the West Coast of North America can see either the start or end of the occultation in a bright pre-dawn sky. Vancouver, Canada sees Jupiter disappear before sunrise, while Los Angeles – the view shown above – sees Jupiter reappear just before sunrise. Other locations will see a close conjunction of the Moon and Jupiter low in the dawn sky.
JUNE
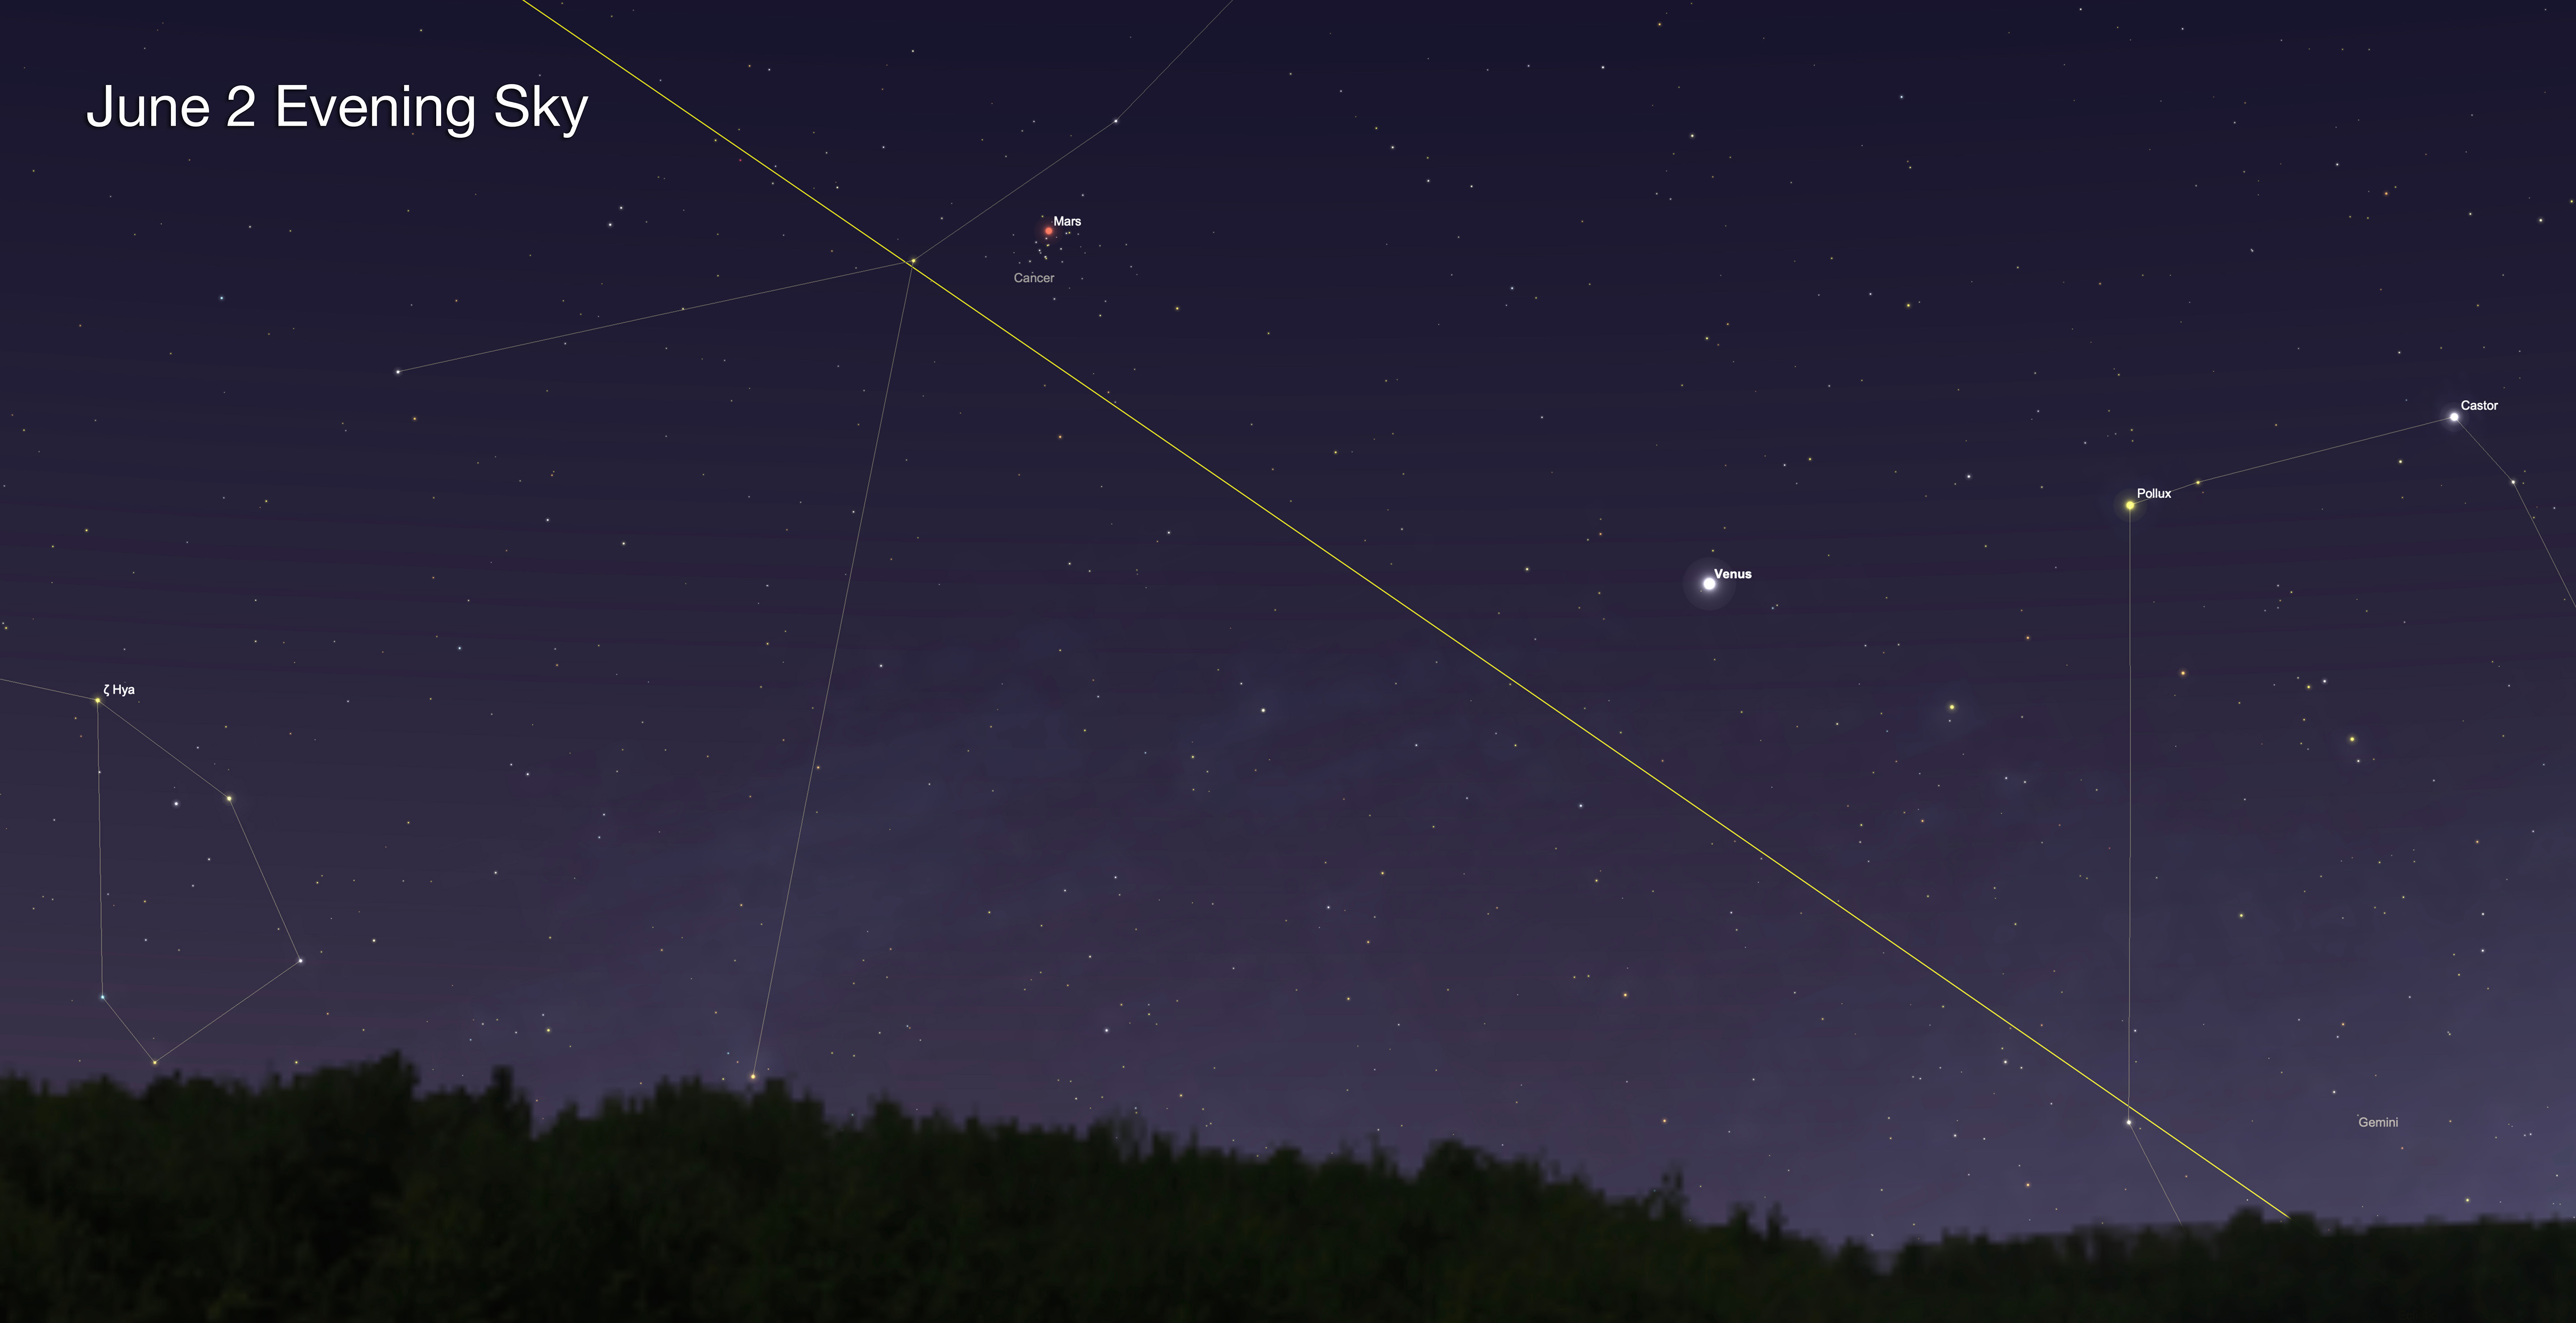
As June opens we have Venus still shining brightly in the evening below much dimmer Mars, now far from the Earth and tiny in a telescope. But it’ll be worth a look this night even in binoculars as the red planet passes in front of the Beehive star cluster, also known as Messier 44. If you miss June 2, Mars will be close to the Beehive the night before and after.
JULY
Venus has been bright all spring, but on July 7 it officially peaks at its maximum brilliance, reaching a blazing magnitude of -4.7. It reached its greatest angle from the Sun a month earlier on June 4 and is now dropping closer to the Sun each evening. But you still can’t miss it. What you might miss is dim Mars above, now close to the star Regulus in Leo. Mars passes 3/4 of a degree above Regulus on July 9 and 10. You’ll need binoculars to pick out the pairing.
AUGUST
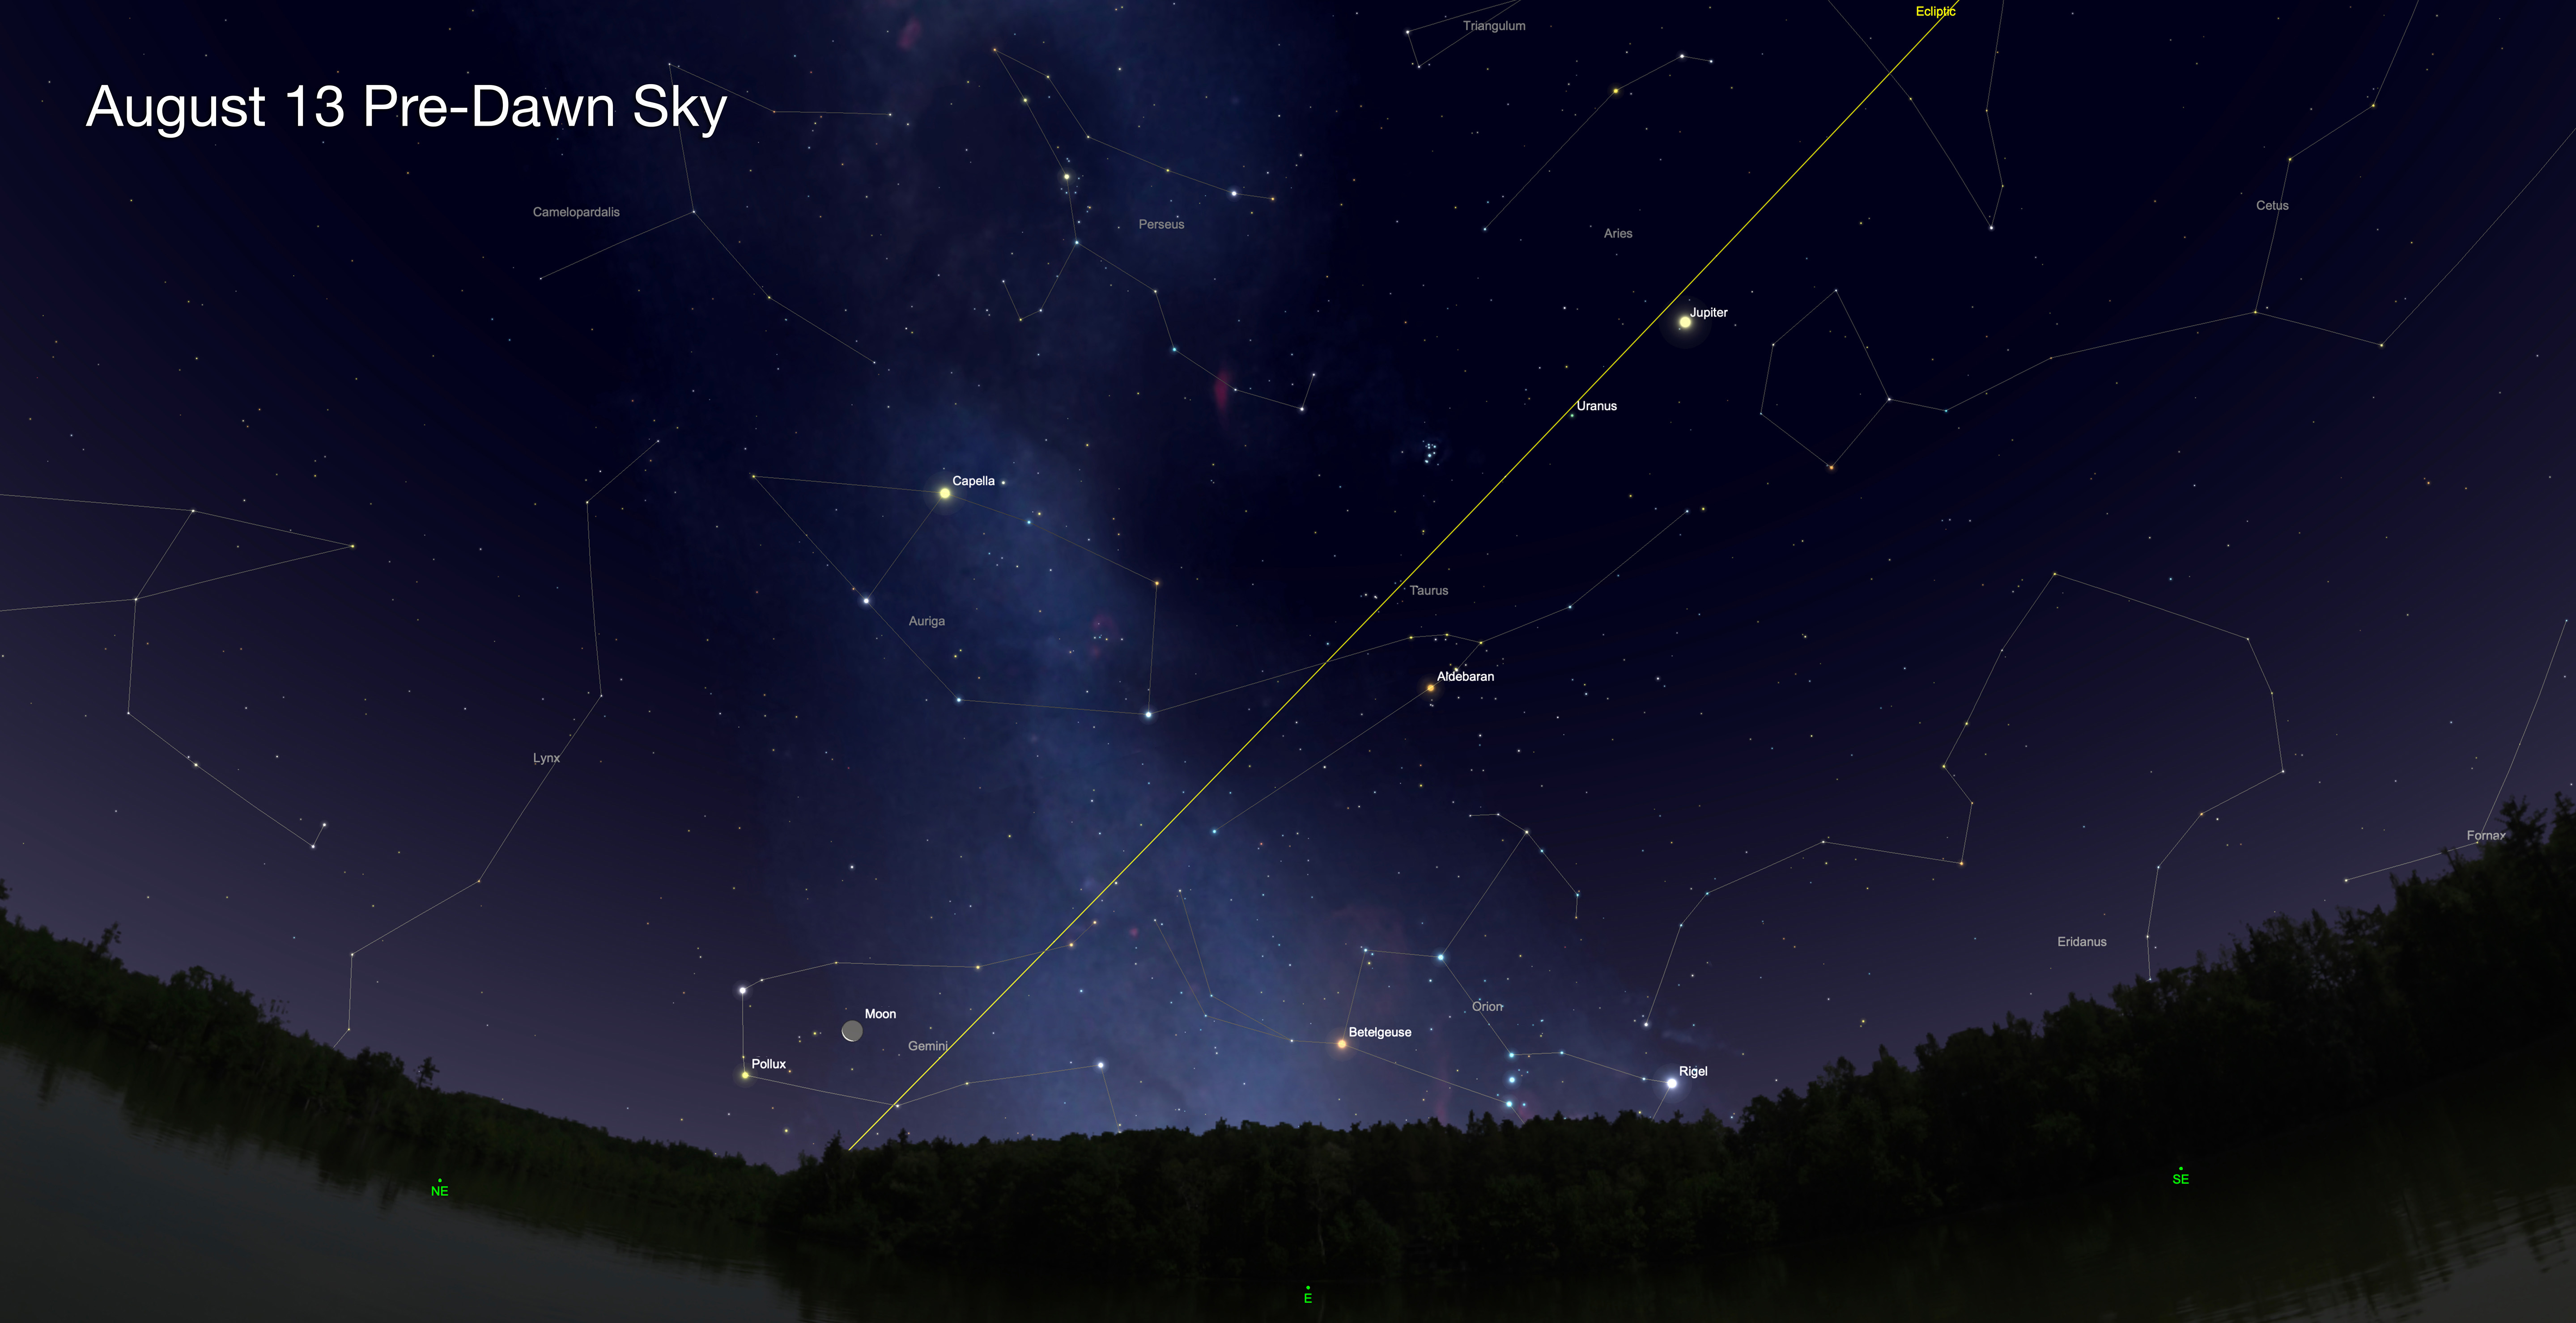
Everyone looks forward to the annual summer stargazing highlight – watching the Perseid meteor shower. This is a good year, with the peak hour of the shower falling in the middle of the night of August 12/13 for North America. That’s a Saturday night! But most importantly, the waning Moon doesn’t rise until the wee hours, as shown here, so its light won’t wash out the meteors. Plan to be at a dark site for an all-night meteor watch.
SEPTEMBER
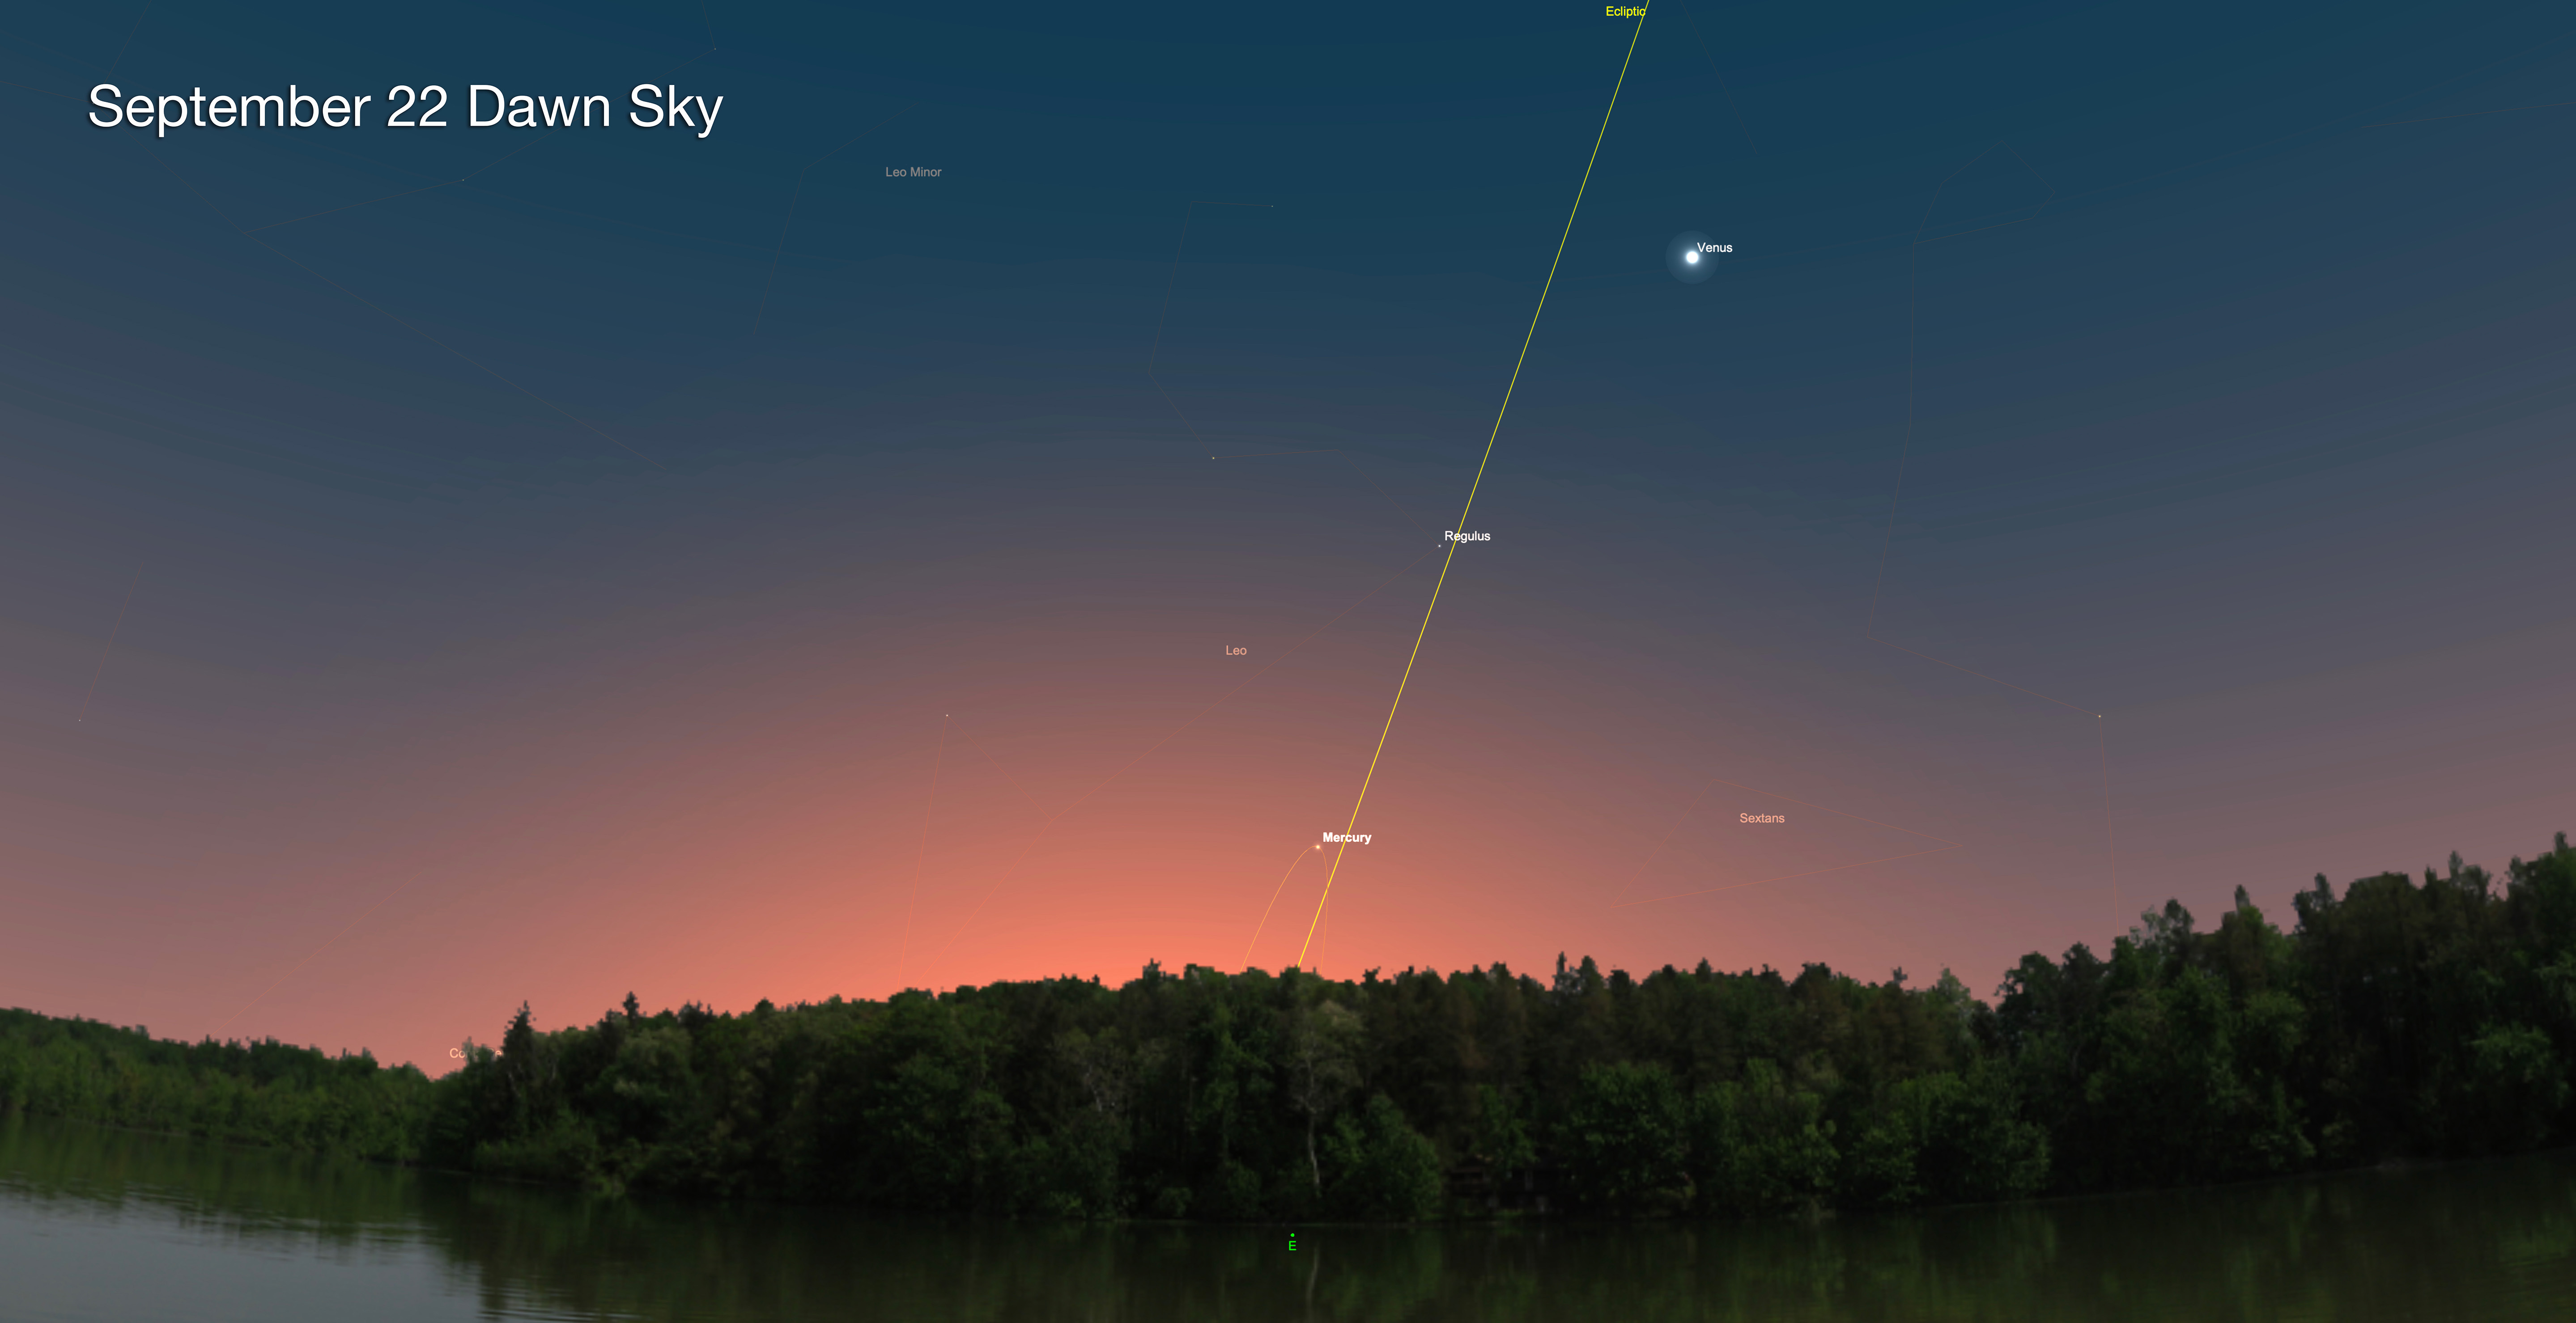
By September Venus has made the transition into the morning sky and shines at its greatest dawn-sky brilliance on September 19. It will then be joined by Mercury, with the inner planet reaching its greatest angle away from the Sun on September 22 shown here. This is the best morning appearance of Mercury for Northern Hemisphere observers. The view this morning bookends the view five months earlier on April 11. If you are away from urban light pollution, also look for the faint glow of Zodiacal Light in the pre-dawn sky before Mercury rises.
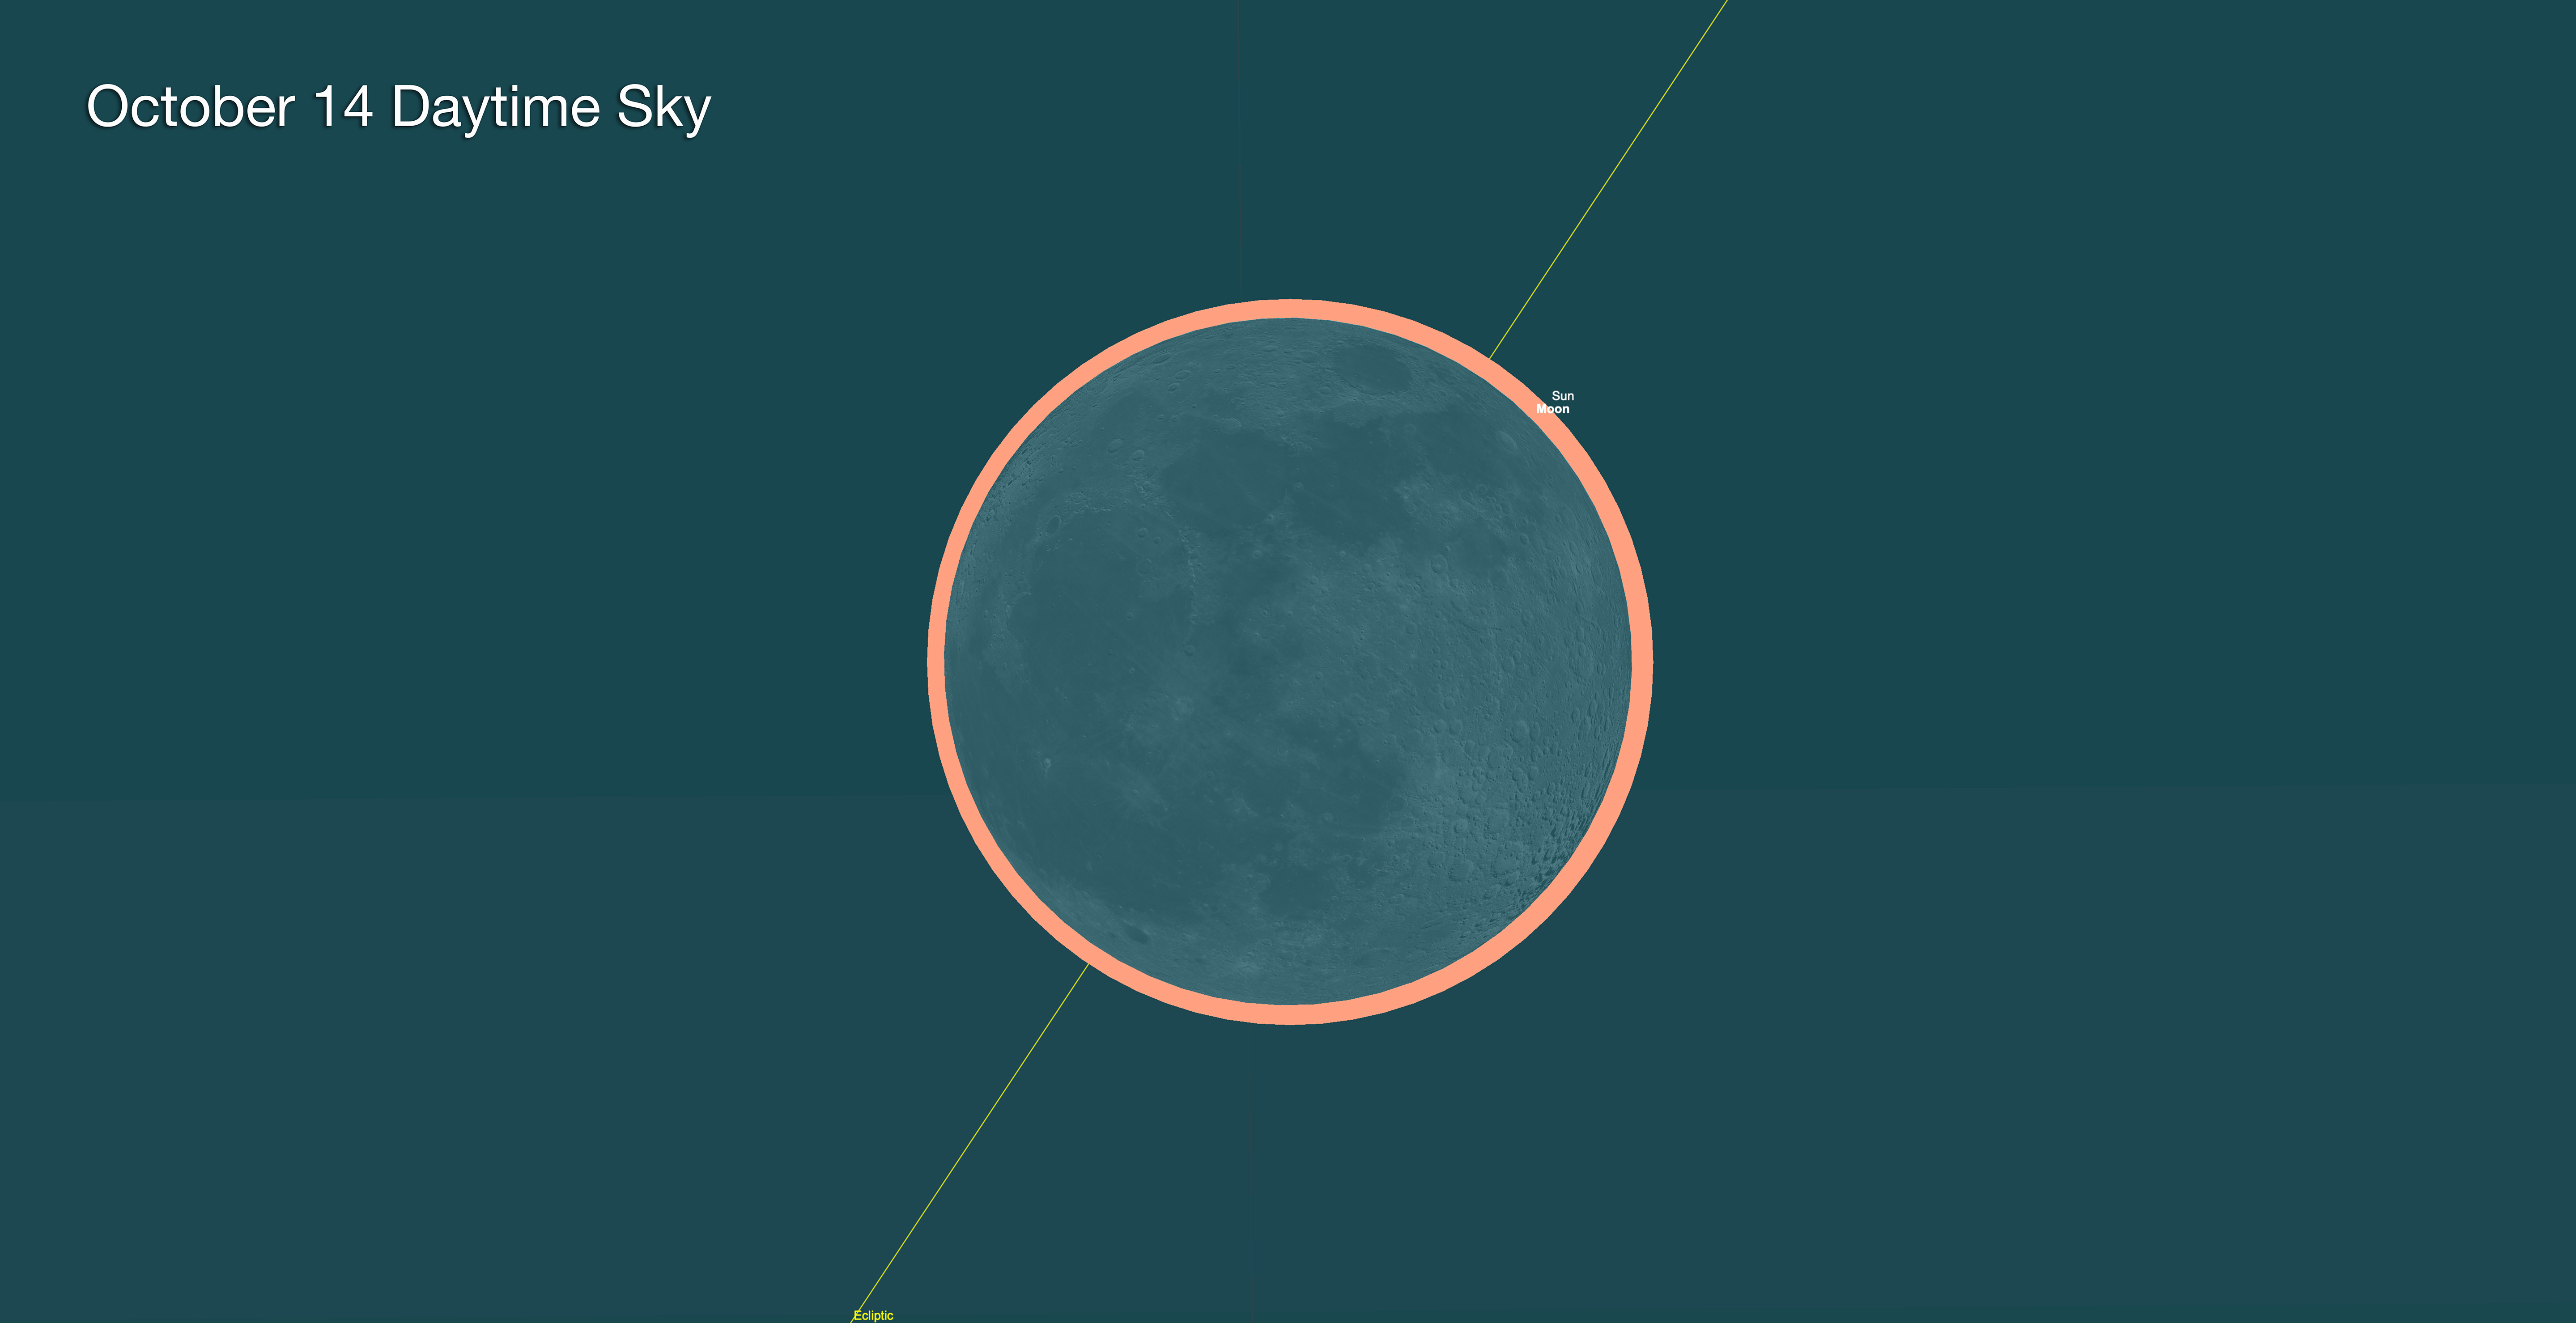
OCTOBER
October is solar eclipse month! On Saturday, October 14 the shadow of the Moon passes across all of North America and most of South America. Everyone on those two continents sees a partial eclipse of the Sun. But those along a narrow path sweeping across the western U.S. and down into Mexico, Central America and across northern South America can see a rare “ring of fire” eclipse as the Moon’s dark disk eclipses the Sun, but isn’t quite large enough to totally cover it. This is an “annular” eclipse. The view above is from Albuquerque, New Mexico, one of the largest U.S. cities in the path of annularity, second only to San Antonio, Texas.
This is the path of annularity across the western U.S. To see the Moon pass centrally across the Sun (the “ring of fire”) you have to be somewhere in that grey path. Outside the path you will see only a partial eclipse of the Sun. For detailed and zoomable eclipse path maps like the one above, please visit EclipseWise.com.
NOVEMBER
Close conjunctions between the crescent Moon and Venus are always notable. Get up early on Thursday, November 9 to see the 26-day-old Moon shining only a degree below Venus. Venus reached its greatest angle away from the Sun on October 23. It is now descending back toward the Sun, but remains high in the morning sky in early November.
DECEMBER
Though it usually puts on a better show than the summer Perseids, the Geminid meteor shower is not as popular because it’s cold! But this is also a good year for the Geminids as it peaks only two days after New Moon. The best night might be Thursday, December 14, but a good number of meteors should be zipping across the sky the night before on December 13, shown here. Start watching at nightfall and go as long as you can in the chill of a December night.
To download my free Amazing Sky 2023 Calendar in PDF format, go to my website at https://www.amazingsky.com/Books The PDF file can be printed out at home or taken to an office supply shop to be printed and bound.
Good luck in your stargazing and clear skies for 2023!
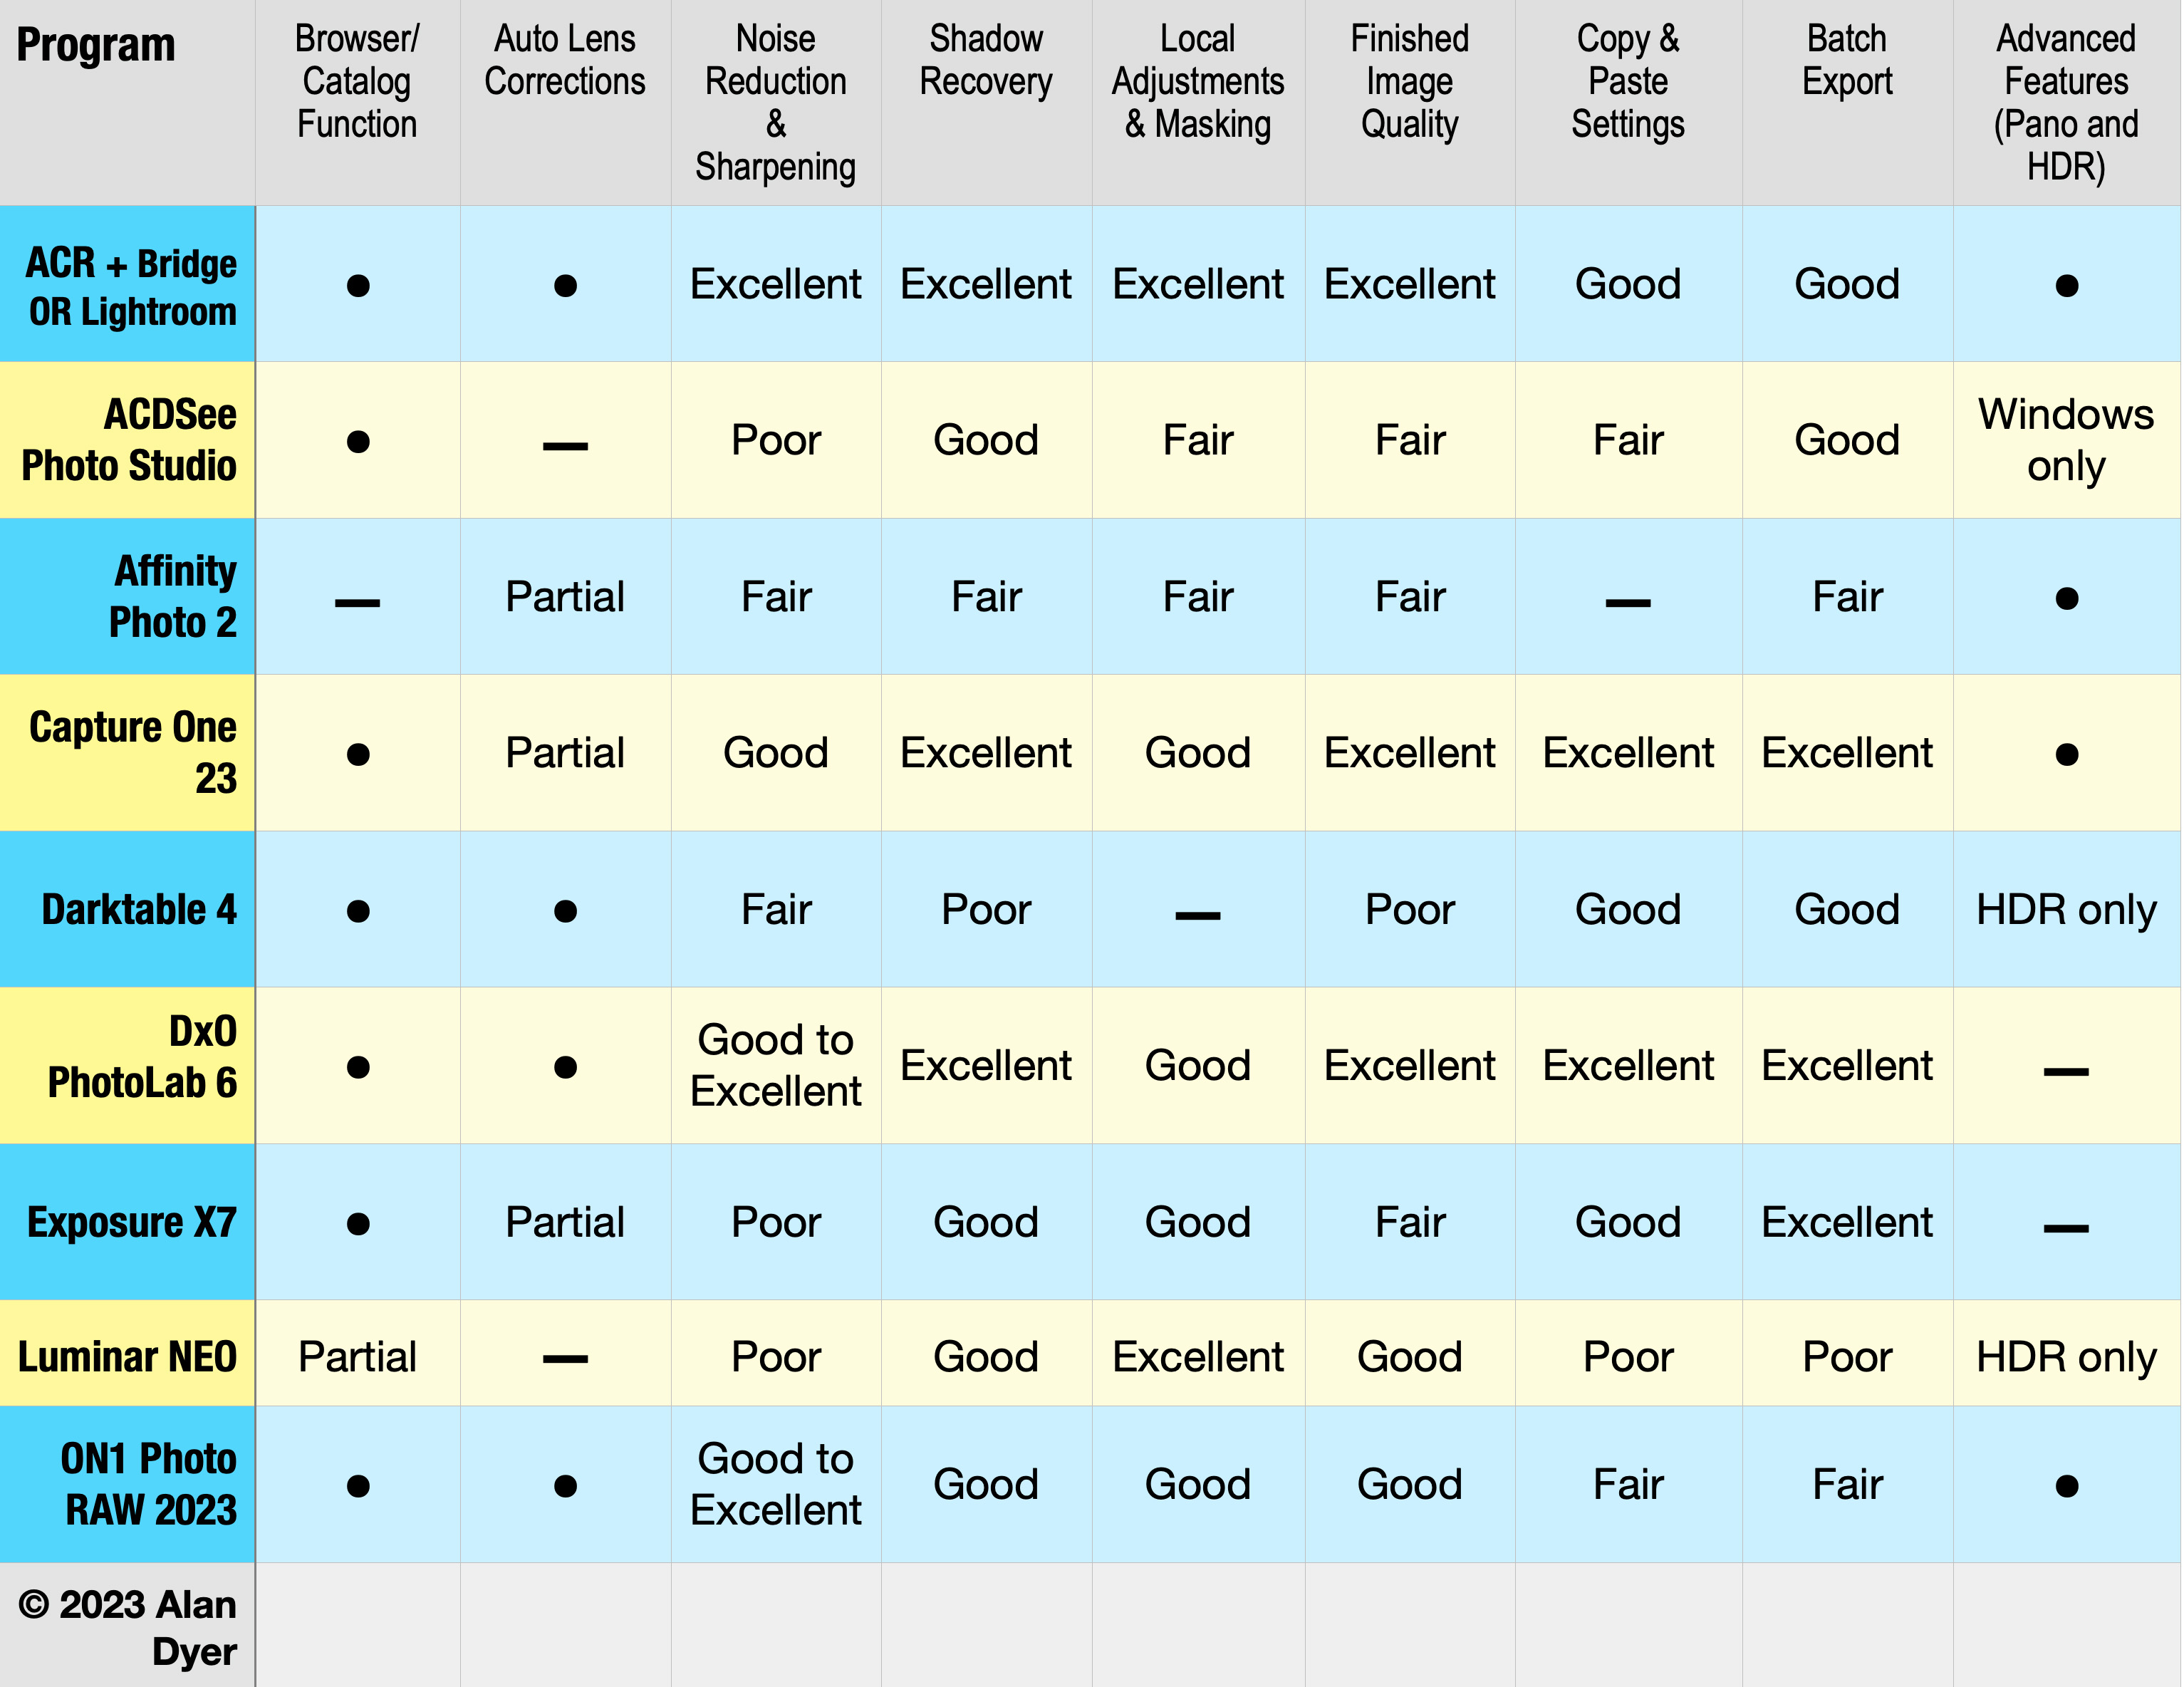
I test nine programs for processing raw files for the demands of nightscape astrophotography.
Warning! This is a long and technical blog, but for those interested in picking the best software, I think you’ll find it the most comprehensive test of programs for processing nightscapes. The review is illustrated with 50 high-resolution, downloadable images which will take a while to load. Patience!
As a background, in December 2017 I tested ten contenders vying to be alternatives to Adobe’s suite of software. You can find that earlier survey here on my blog. But 2017 was ages ago in the lifetime of software. How well do the latest versions of those programs compare now for astrophotography? And what new software choices do we have as we head into 2023?
To find out, I compared eight programs, pitting them against what I still consider the standard for image quality when developing raw files, Adobe Camera Raw (the Develop module in Adobe Lightroom is essentially identical). I tested them primarily on sample nightscape images described below.
I tested only programs that are offered for both MacOS and Windows, with identical or nearly identical features for both platforms. However, I tested the MacOS versions.
In addition to Adobe Camera Raw (represented by the Adobe Bridge icon), I tested, in alphabetical order, and from left to right in the icons above:
ACDSee Photo Studio
Affinity Photo 2 (from Serif)
Capture One 23
Darktable 4
DxO PhotoLab 6
Exposure X7
Luminar Neo (from SkyLum)
ON1 Photo RAW 2023
I tested all the programs strictly for the purpose of processing, or “developing” raw files, using nightscape images as the tests. I also looked at features for preparing and exporting a large batch of images to assemble into time-lapse movies, though the actual movie creation usually requires specialized software.
NOTE: I did not test the programs with telescope images of nebulas or galaxies. The reason — most deep-sky astrophotographers never use a raw developer anyway. Instead, the orthodox workflow is to stack and align undeveloped raw files with specialized “calibration” software such as DeepSkyStacker or PixInsight that outputs 16-bit or 32-bit TIFFs, bypassing any chance to work with the raw files.
TL;DR Conclusions
Here’s a summary of my recommendations, with the evidence for my conclusions presented at length (!) in the sections that follow:
What’s Best for Still Image Nightscapes?
Adobe Camera Raw (or its equivalent in Adobe Lightroom) still produces superb results, lacking only the latest in AI noise reduction, sharpening and special effects. Though, as I’ve discovered, AI processing can ruin astrophotos if not applied carefully.
The Adobe alternatives that provided the best raw image quality in my test nightscapes were Capture One and DxO PhotoLab.
ACDSee Photo Studio, Exposure X7,and Luminar Neo produced good results, but all had flaws.
ON1 Photo RAW had its flaws as well, but can serve as a single-program replacement for both Lightroom and Photoshop.
Affinity Photo works well as a Photoshop replacement, and at a low one-time cost. But it is a poor choice for developing raw images.
If you are adamant about avoiding subscription software, then a combination of DxO PhotoLab and Affinity Photo can work well, providing great image quality, and serving to replace both Lightroom and Photoshop.
I cannot recommend Darktable, despite its zero price. I struggled to use its complex and overly technical interface, only to get poor results. It also kept crashing, despite me using the new ARM version on my M1 MacBook Pro. It was worth what I paid for it.
At the end of my blog, I explain the reasons why I did not include other programs in the test, to answer the inevitable “But what about …!?” questions.
What’s Best for Basic Time-Lapses?
For simple time-lapse processing, where the same settings can be applied to all the images in a sequence, all the programs except Affinity Photo, can copy and paste settings from one key image to all the others in a set, then export them out as JPGs for movie assembly.
However, for the best image quality and speed, I feel the best choices are:
Adobe, either Lightroom or the combination of Camera Raw/Bridge
Capture One 23
DxO PhotoLab 6
While ON1 Photo RAW can assemble movies directly from developed raw files, I found Capture One or DxO PhotoLab can do a better job processing the raw files. And ON1’s time-lapse function is limited, so in my opinion it is not a major selling point of ON1 for any serious time-lapse work.
Luminar Neo was so slow at Copy & Paste and Batch Export it was essentially unusable.
What’s Best for Advanced Time-Lapses?
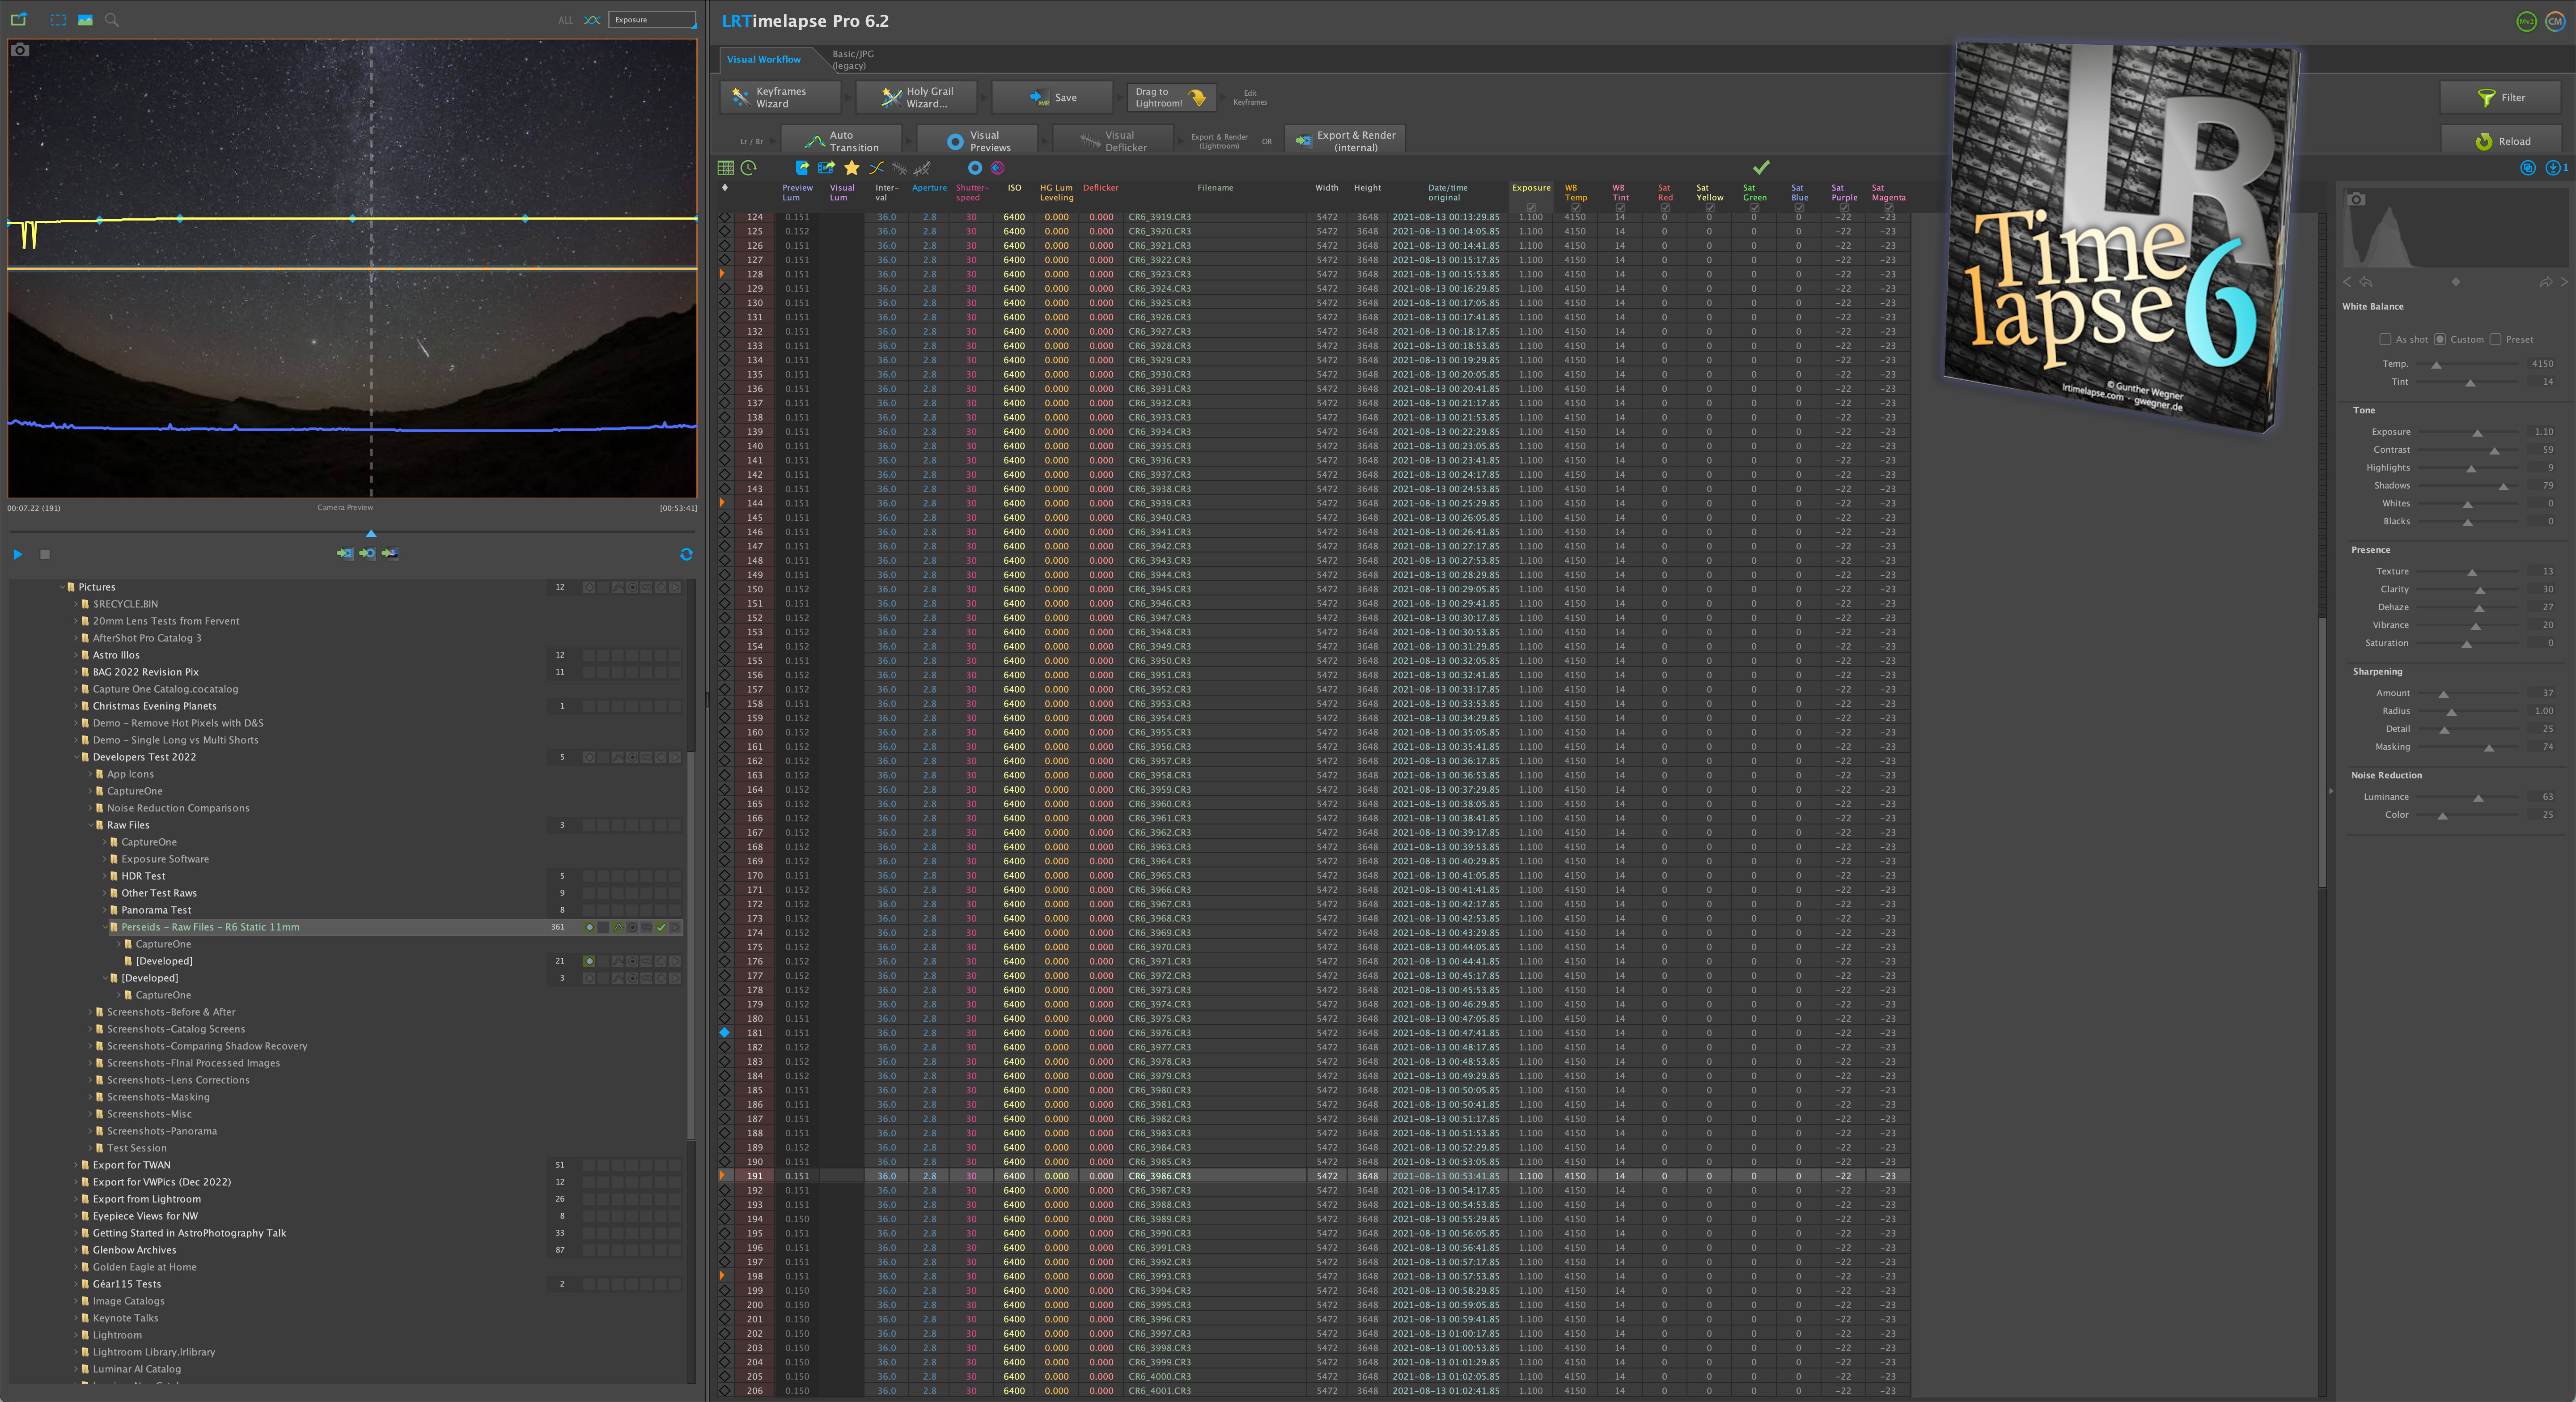
None of the non-Adobe programs will work with the third-party software LRTimelapse (www.lrtimelapse.com). It is an essential tool for advanced time-lapse processing.
While ON1 offers time-lapse movie assembly, it cannot do what LRTimelapse does — gradually shift processing settings over a sequence based on keyframes to accommodate changing lighting, and to micro-adjust exposure levels based on actual image brightness to smooth out the bane of time-lapse shooters — image flickering.
LRTimelapse works only with Lightroom or ACR/Bridge. If serious and professional time-lapse shooting is your goal, none of the Adobe contenders will do the job. Period. Subscribe to Adobe software. And buy LRTimelapse.
Avoiding Adobe?
My testing demonstrated to me that for nightscape photography, Adobe software remains a prime choice, for its image quality and ease of use. However, the reasons to go with any program other than Adobe are:
For equal or even better image quality, or for features not offered by Adobe.
But mostly to avoid Adobe’s subscription model of monthly or annual payments.
Capture One pricing as of early 2023, in Canadian funds.
All the non-Adobe alternatives can be purchased as a “perpetual license” for a one-time fee, though often with significant annual upgrade costs for each year’s major new release. However, you needn’t purchase the upgrade; your old version will continue to run. Below, I provide purchase prices in U.S. funds, but most companies have frequent sales and discount offers.
While all of Adobe’s competitors will proclaim one-time pricing, several also offer their software via annual subscriptions, with additional perks and bonuses, such as file syncing to mobile apps, or better long-term or package pricing, to entice you to subscribe.
Keep in mind that whatever program you use, its catalog and/or sidecar files where your raw image settings are stored will always be proprietary to that program. ON1 and Affinity also each save files in their own proprietary format. Switch to any other software in the future and your edits will likely not be readable by that new software.
Raw Editing vs. Layer-Based Editing
As I mentioned, I tested all the programs strictly for their ability to process, or “develop,” raw image files for nightscapes. (Raw files are likened to being digital negatives that we “develop.”)
For some nightscape still images, raw developing might be all that’s needed, especially as software companies add more advanced “AI” (artificial intelligence) technology to their raw developers for precise selection, masking, and special effects.
In the case of time-lapse sequences made of hundreds of raw frames, raw developing is the only processing that is practical. What we need for time-lapses is to:
Develop a single key raw file to look great, then …
Copy all its settings to the hundreds of other raw files in the time-lapse set, then …
Export that folder of raw images to “intermediate JPGs” for assembly into a movie, usually with a specialized assembly program.
The programs that offer layer-based editing: Adobe Photoshop, ON1 Photo RAW, and Serif Affinity Photo
However, for most still-image astrophotography, including nightscapes, we often stack and/or blend multiple images to create the final scene, for several reasons:
To stack multiple images with a Mean or Median stack mode to smooth noise.
To layer dozens of images with a Lighten blend mode to create star trails.
To layer and blend images via masking to combine the different exposures often needed to record the ground and sky each at their best.
Or often as not, a combination of all of the above!
All those methods require a layer-based program. Adobe Photoshop is the most popular choice.
Of the programs tested here, only two also offer the ability to layer multiple images for stacks, blends and composites. They are:
Affinity Photo 2
ON1 Photo RAW 2023
I did not test these two programs to compare their image layering and masking abilities vs. Photoshop, as important as those functions might be.
Fans of Skylum’s Luminar Neo will point out that it also supports image layers. In theory. In the version I tested (v1.6.2) bugs made it impossible to load files into layers properly — the layer stack became confused and failed to display the stack’s contents. I could not tell what it was stacking! Skylum is notorious for its buggy releases.
Those determined not to use Adobe software should be aware that, apart from Affinity Photo and ON1 Photo RAW, all the other programs tested here are not replacements for Adobe Photoshop, nor are they advertised as such. They are just raw developers, and so can serve only to replace Adobe Lightroom or Adobe Camera Raw/Adobe Bridge.
The Challenge
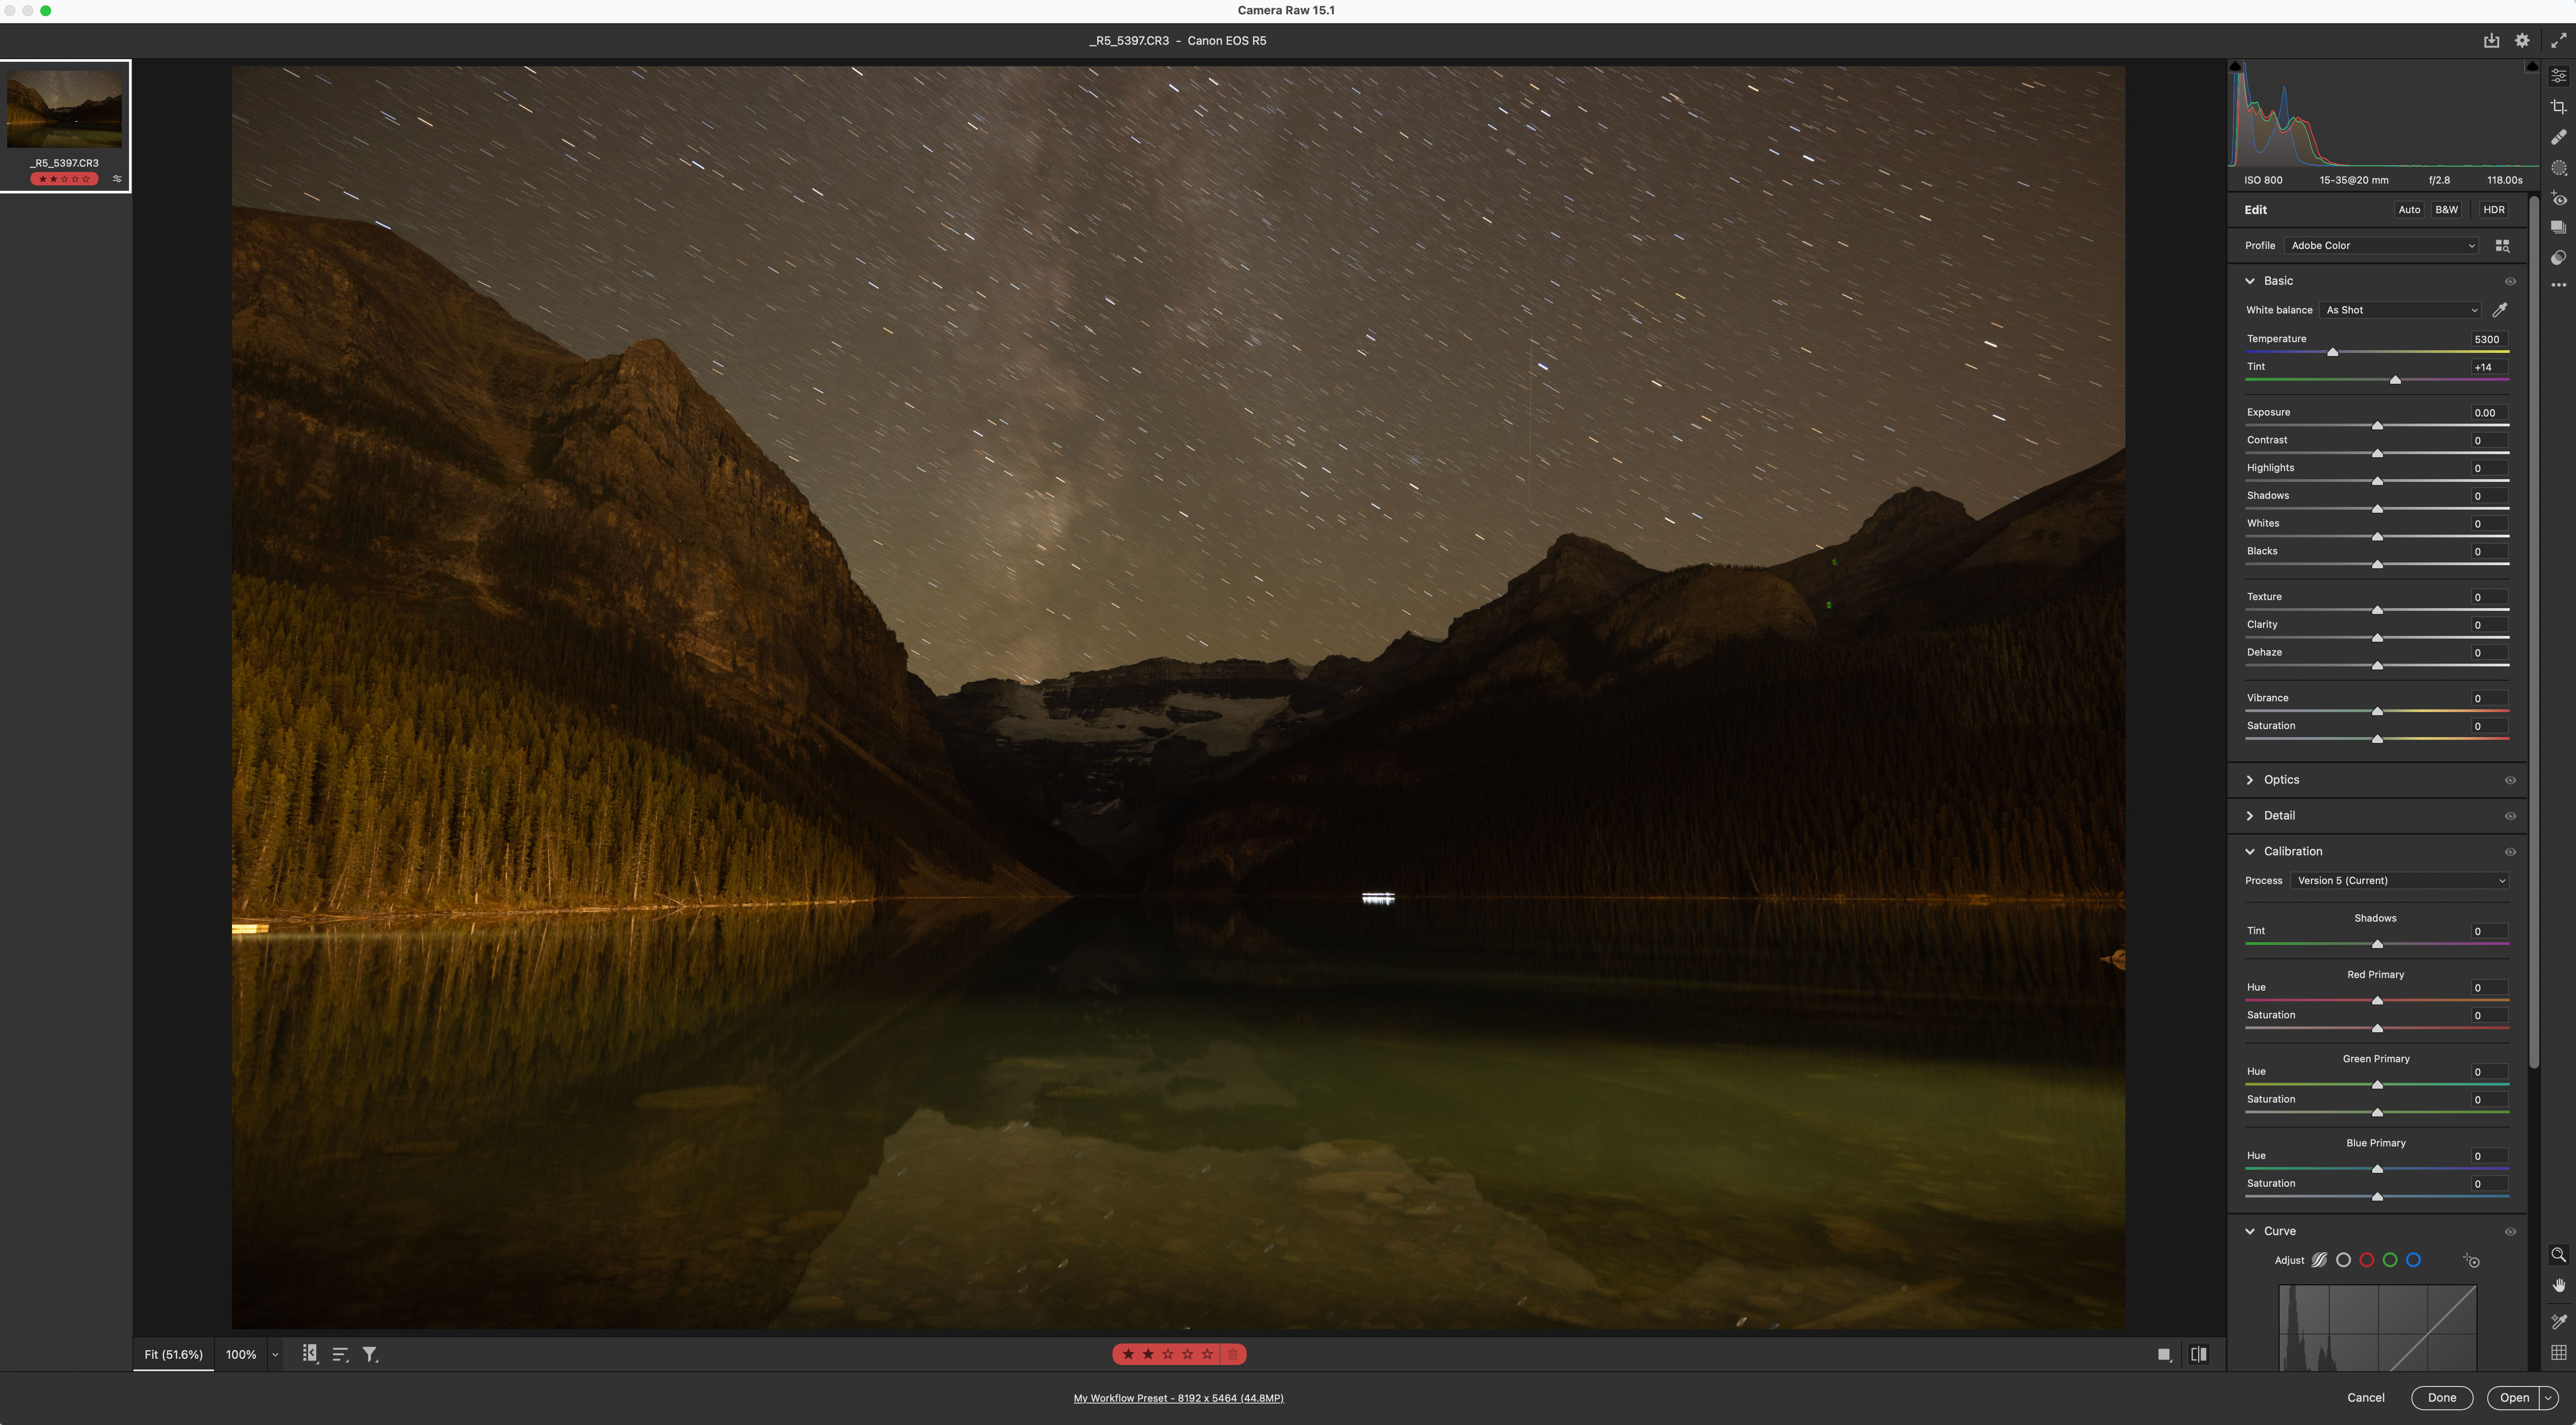
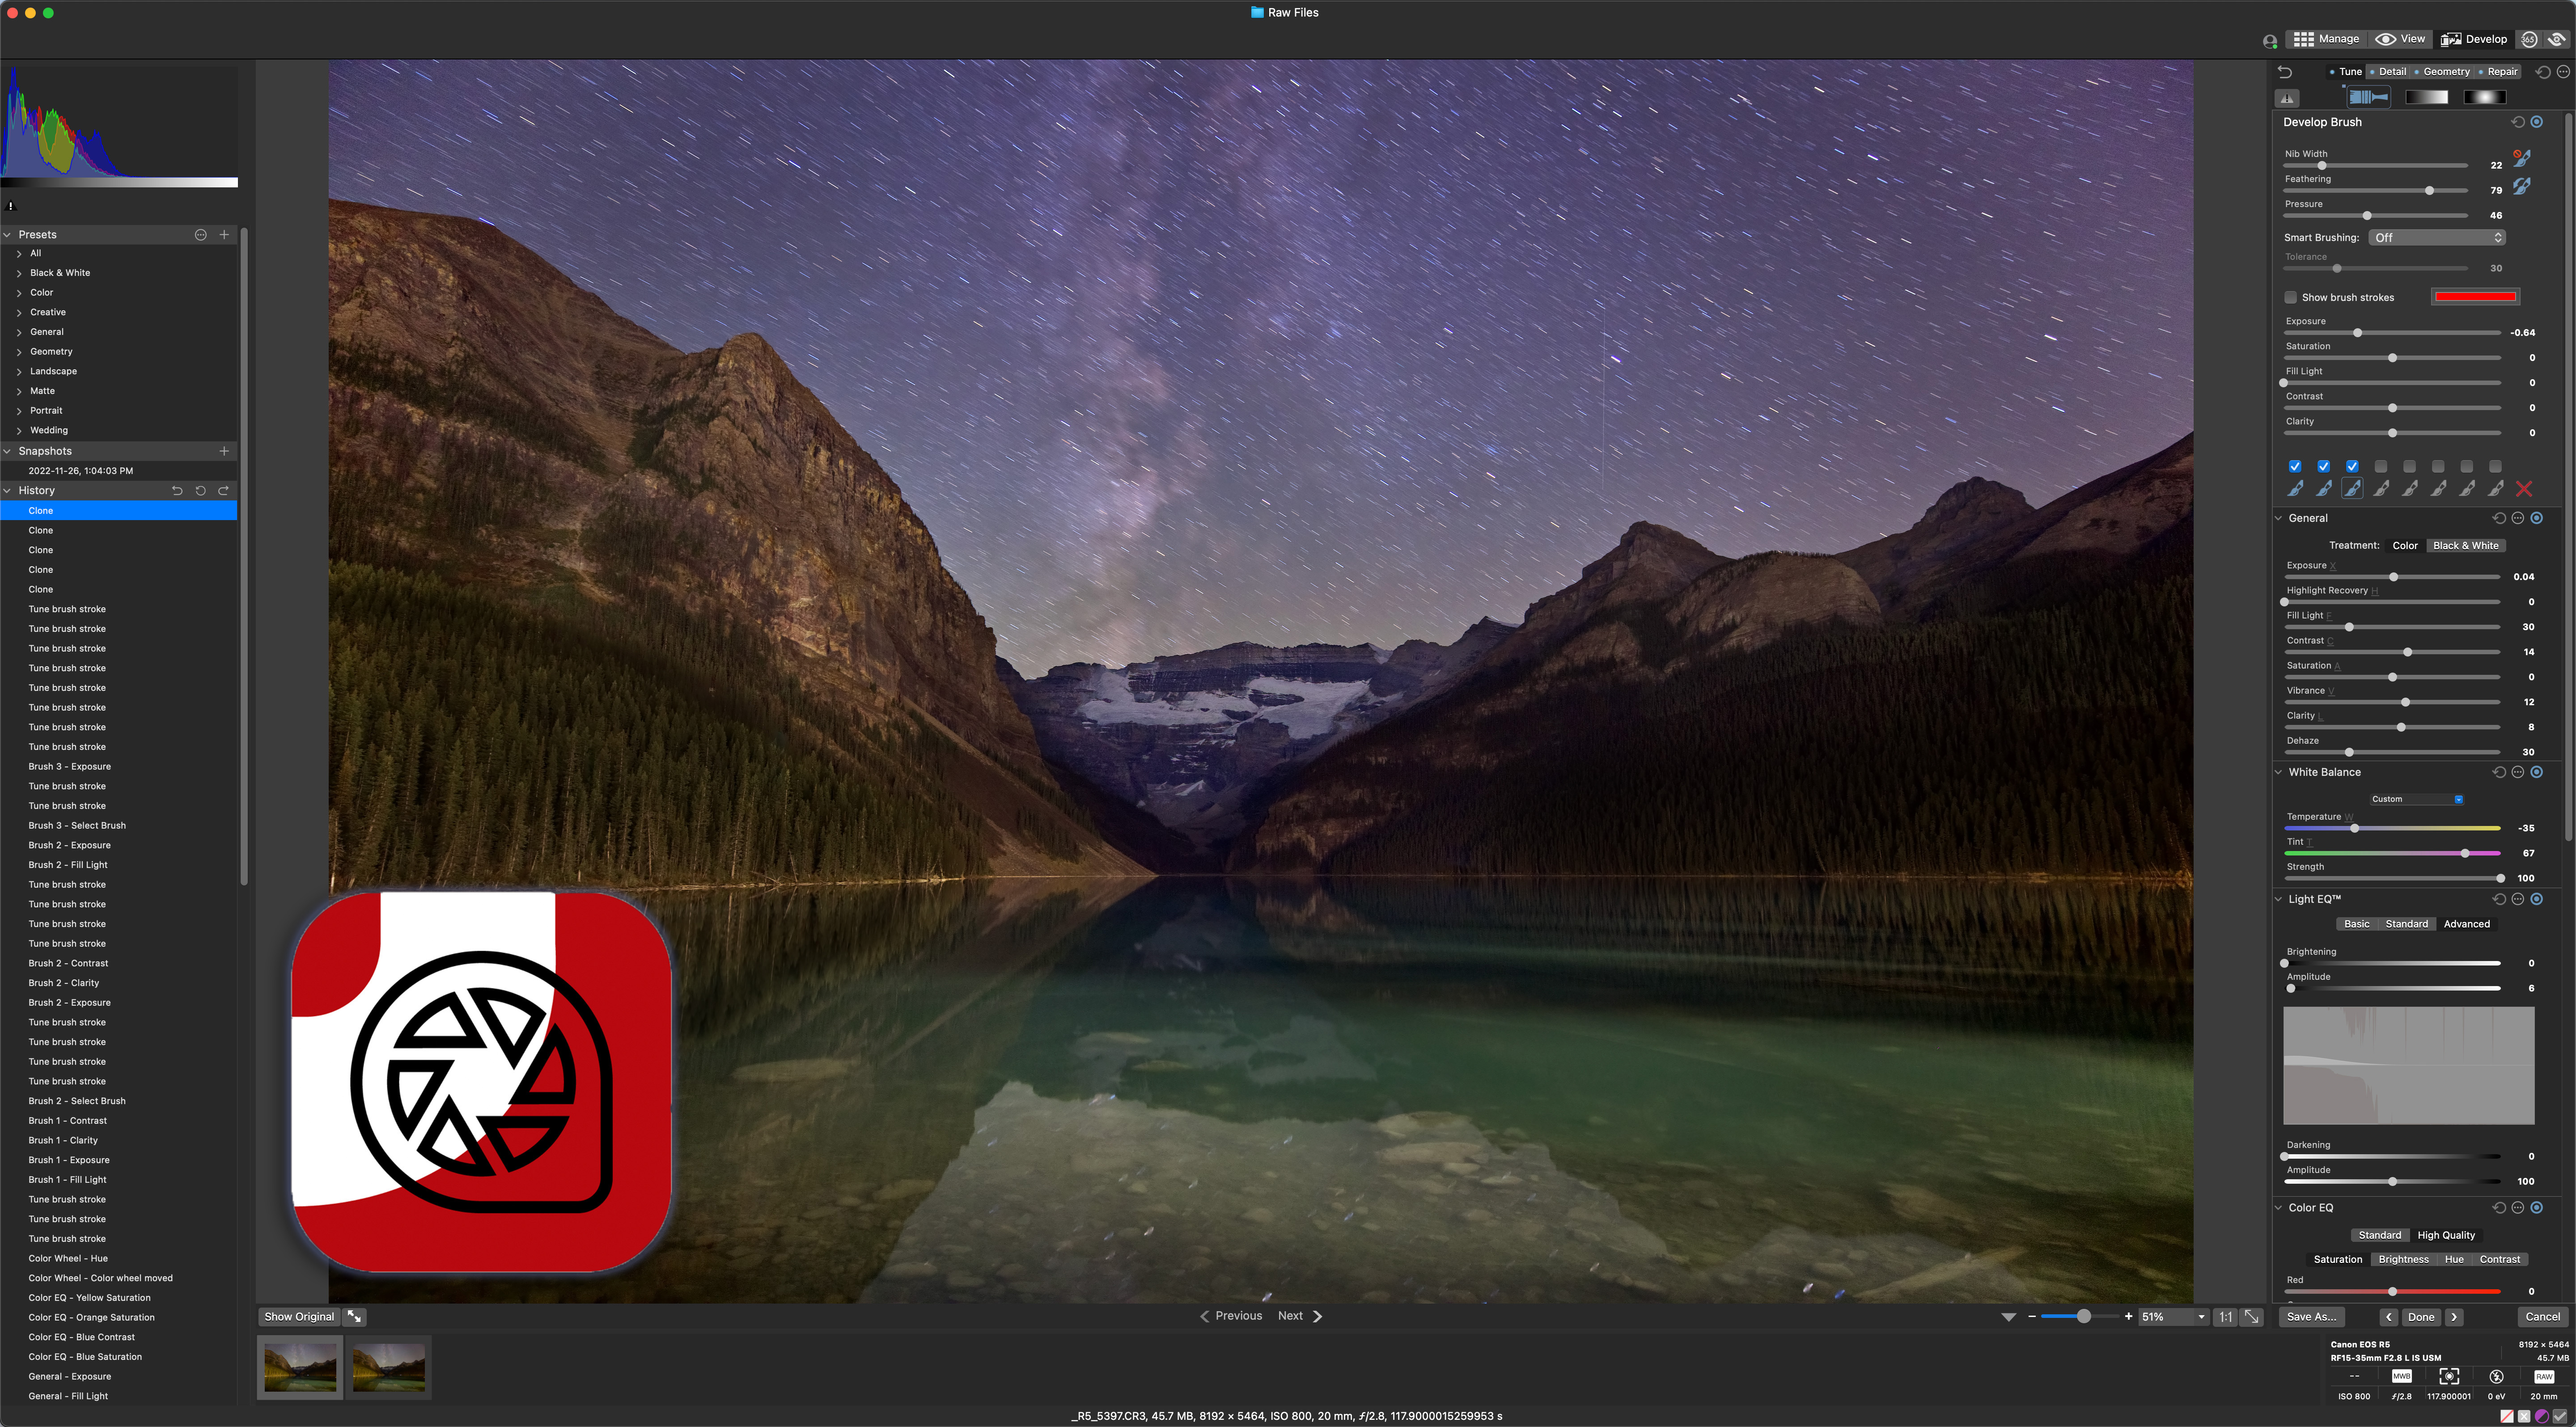
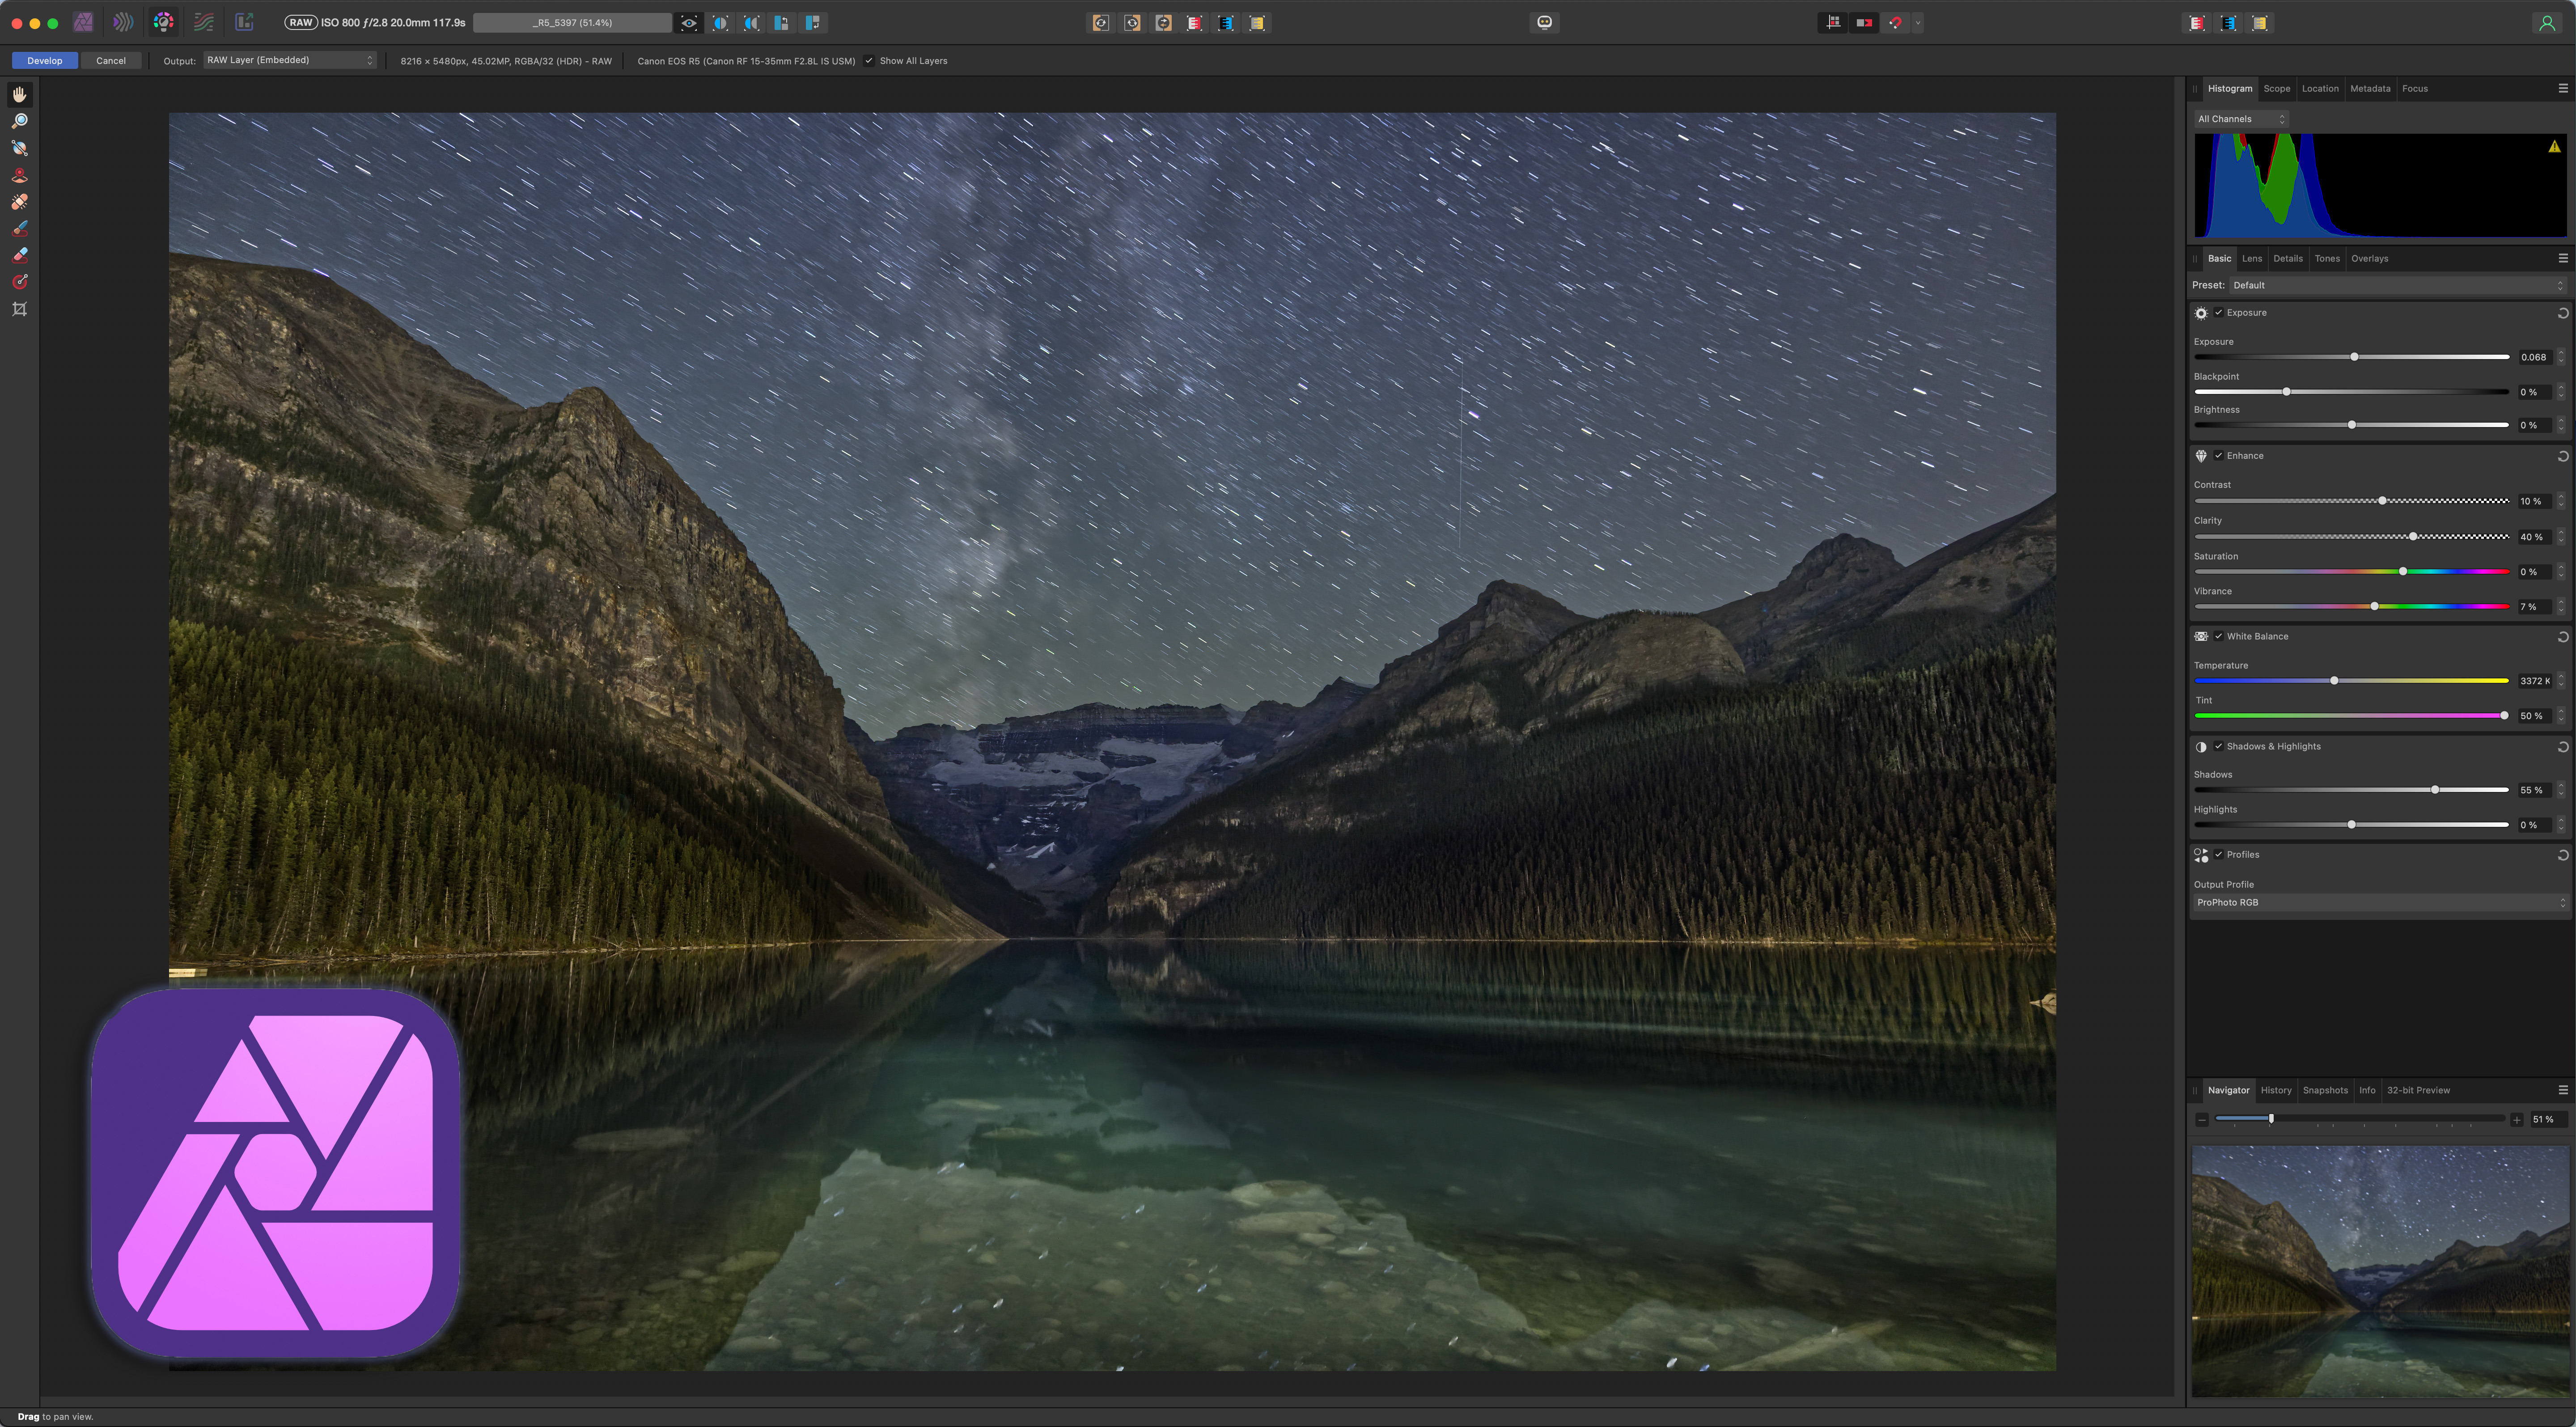
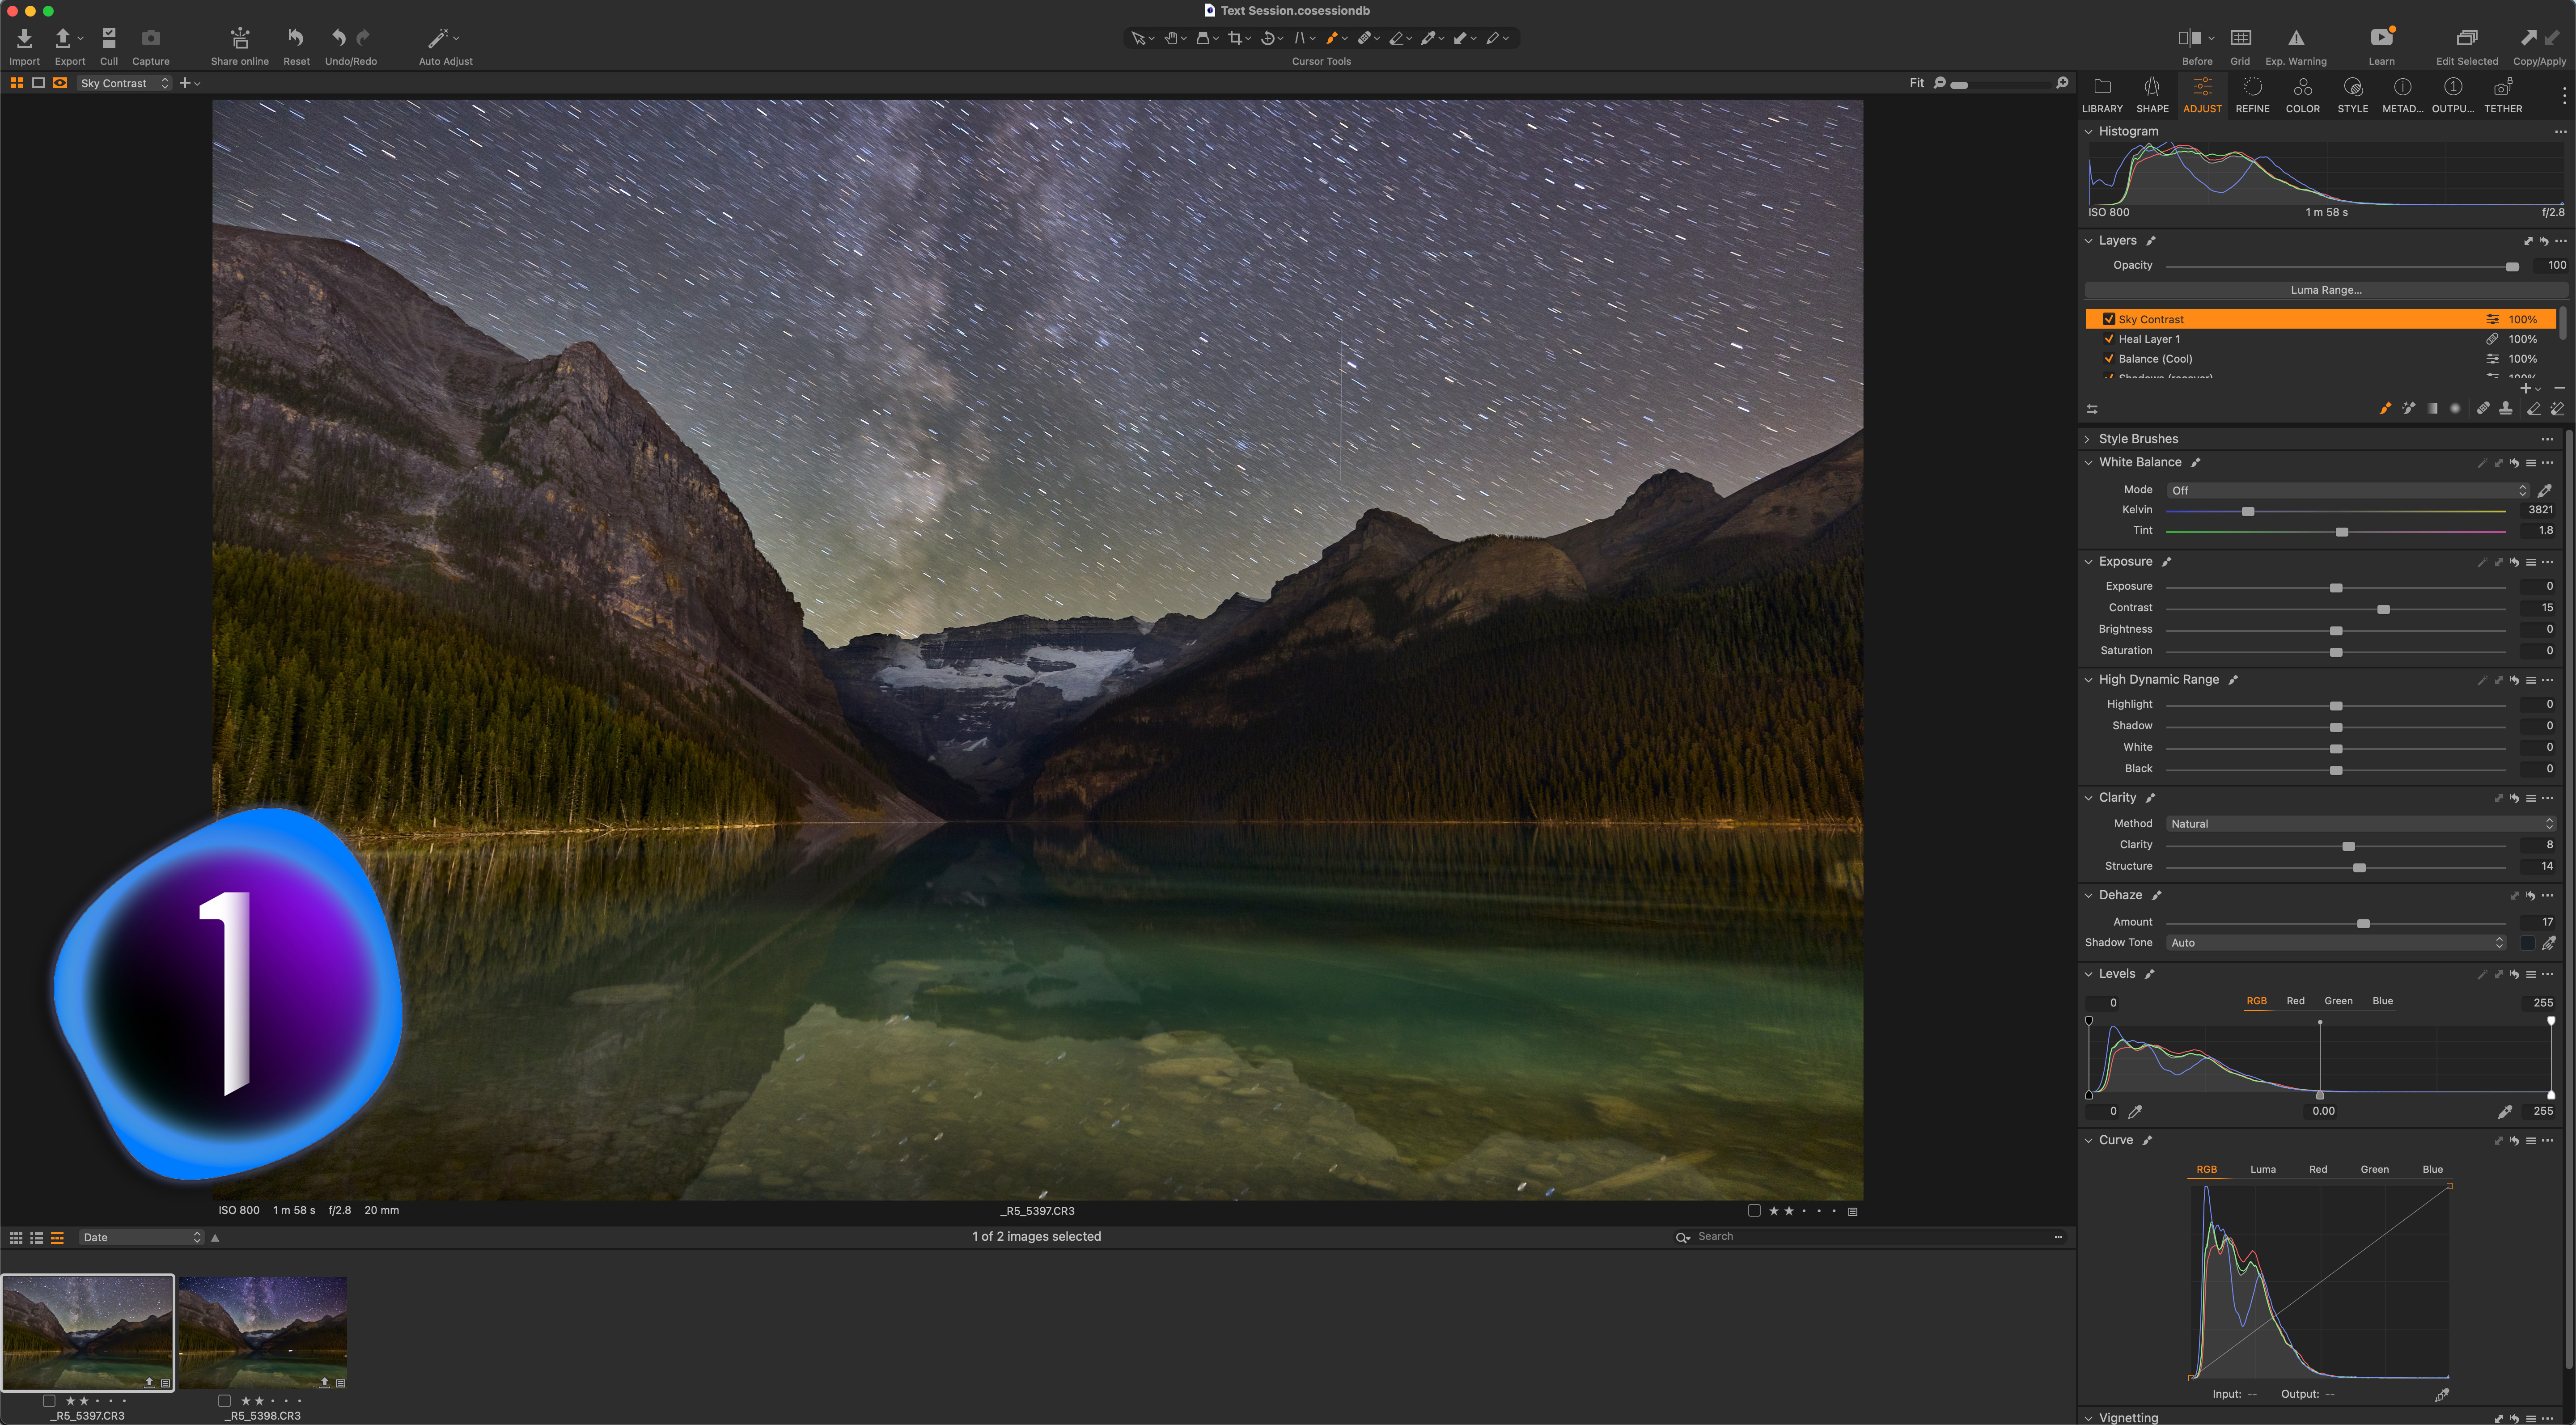
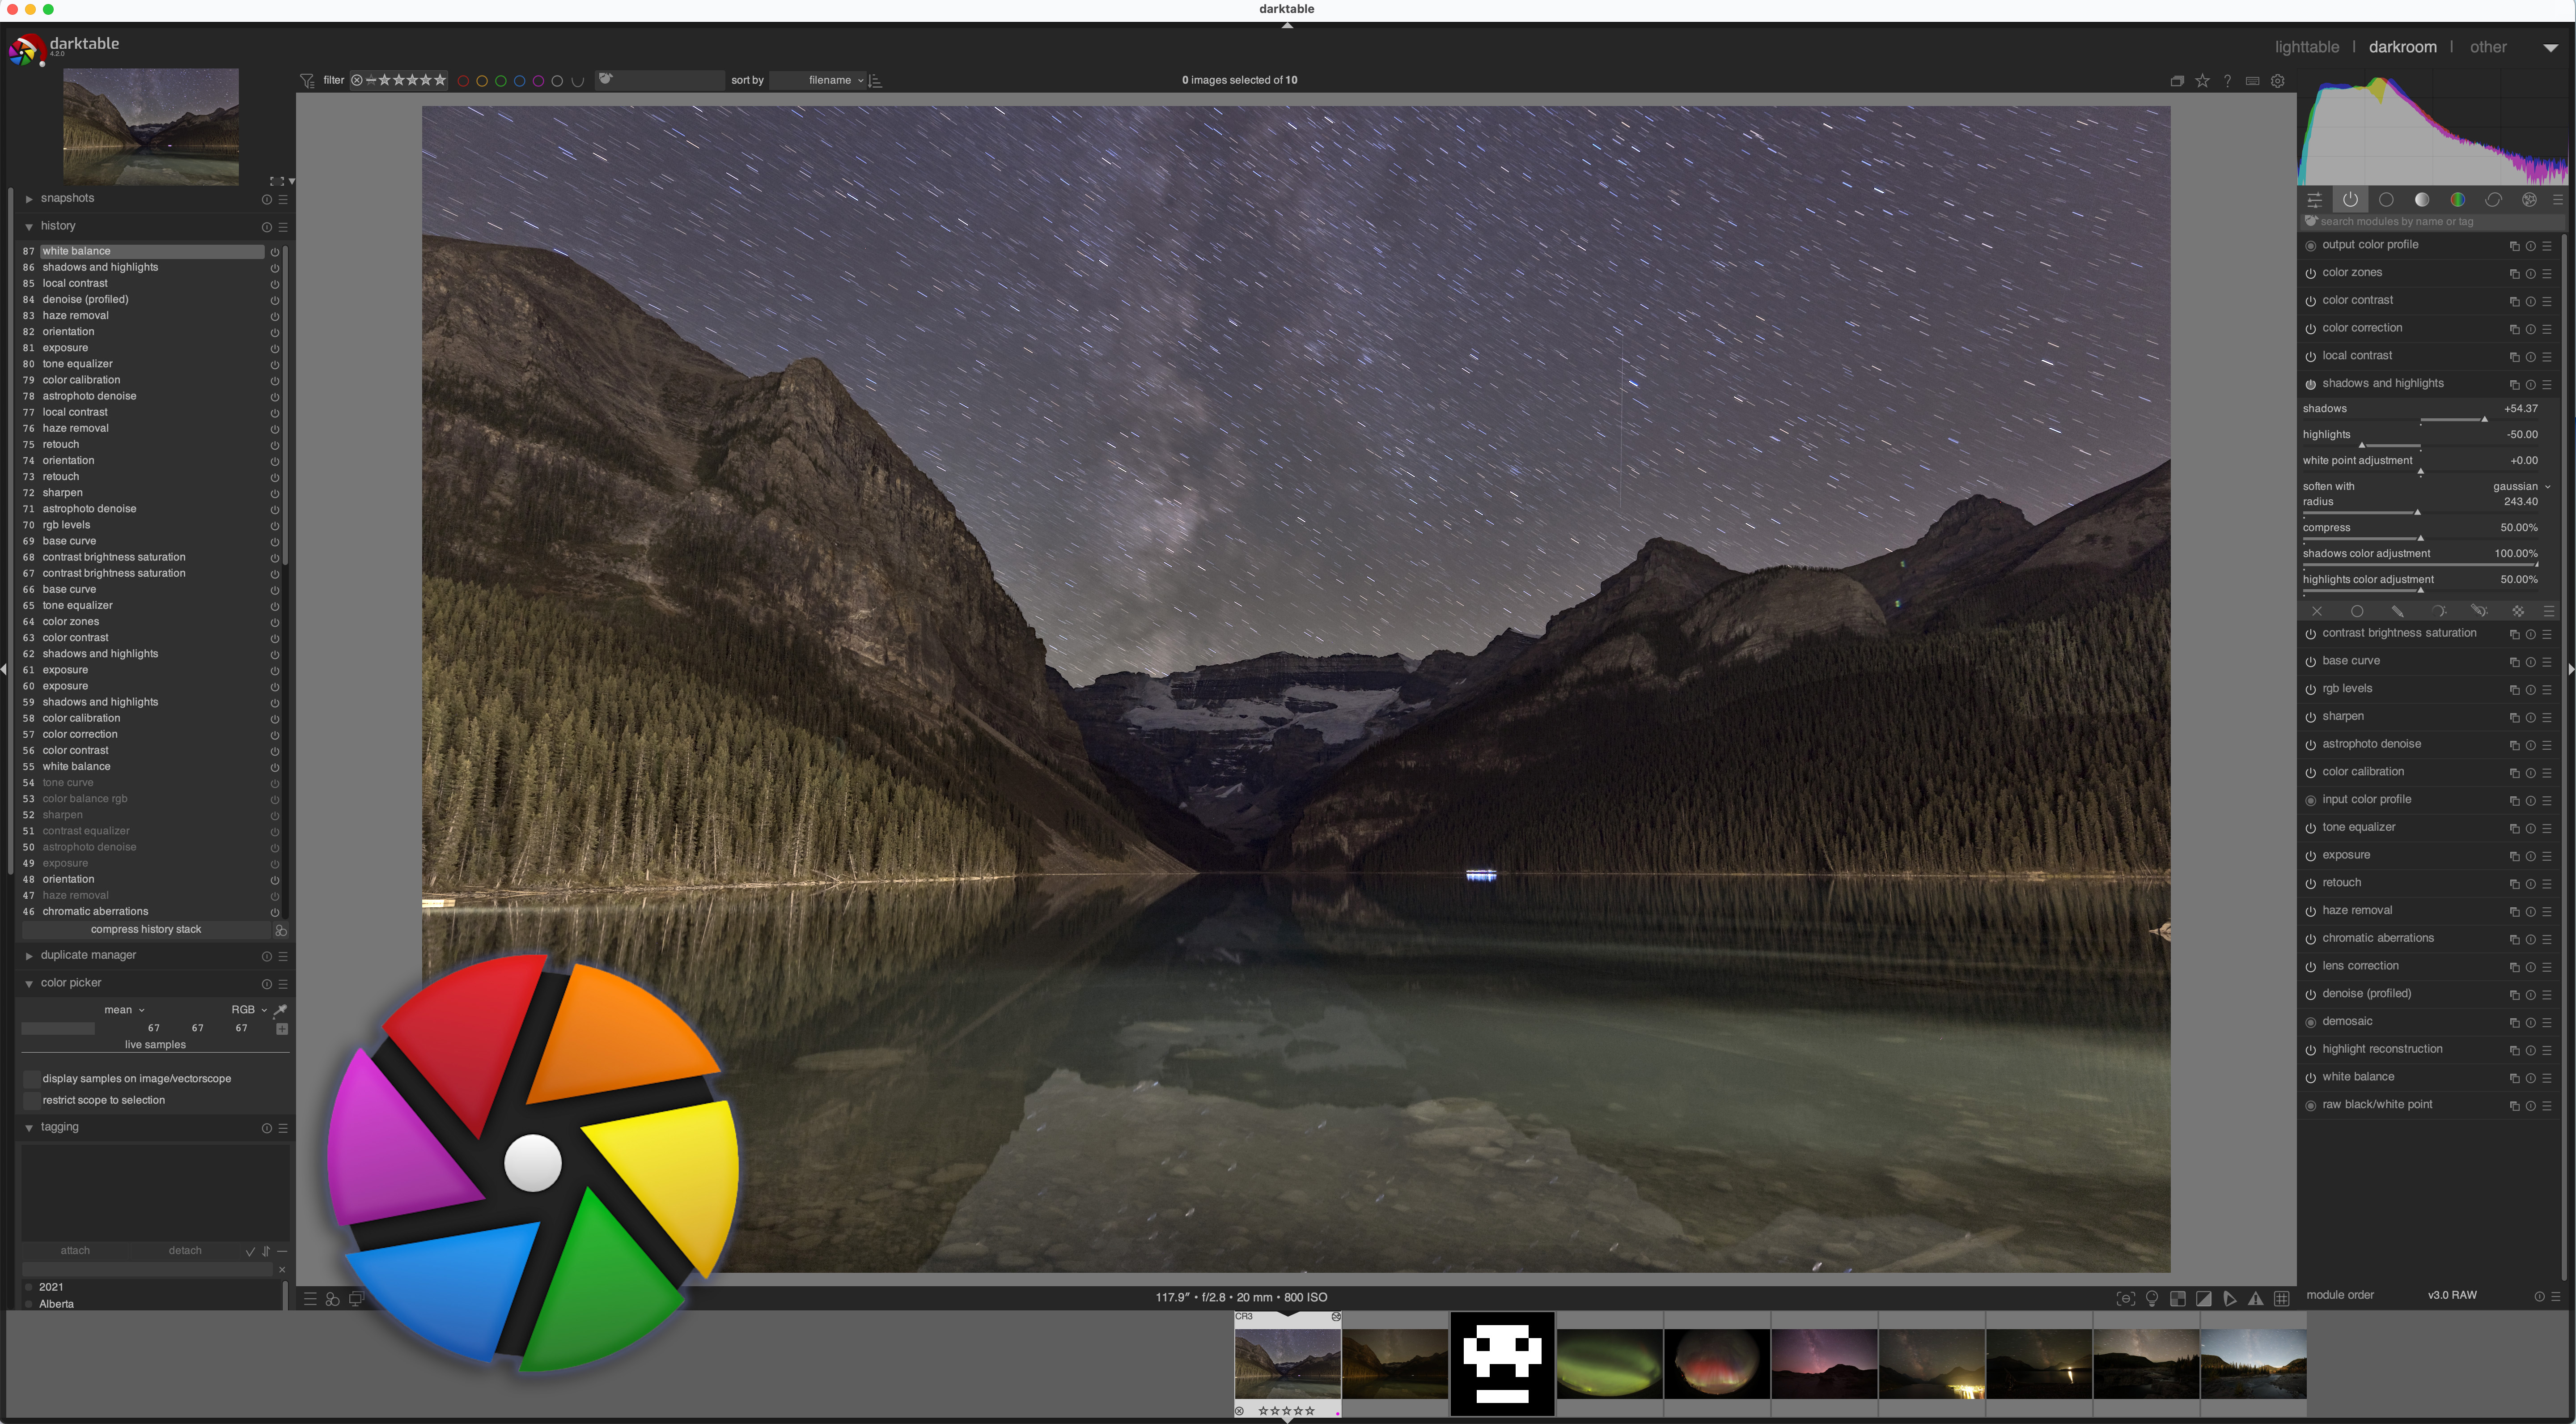
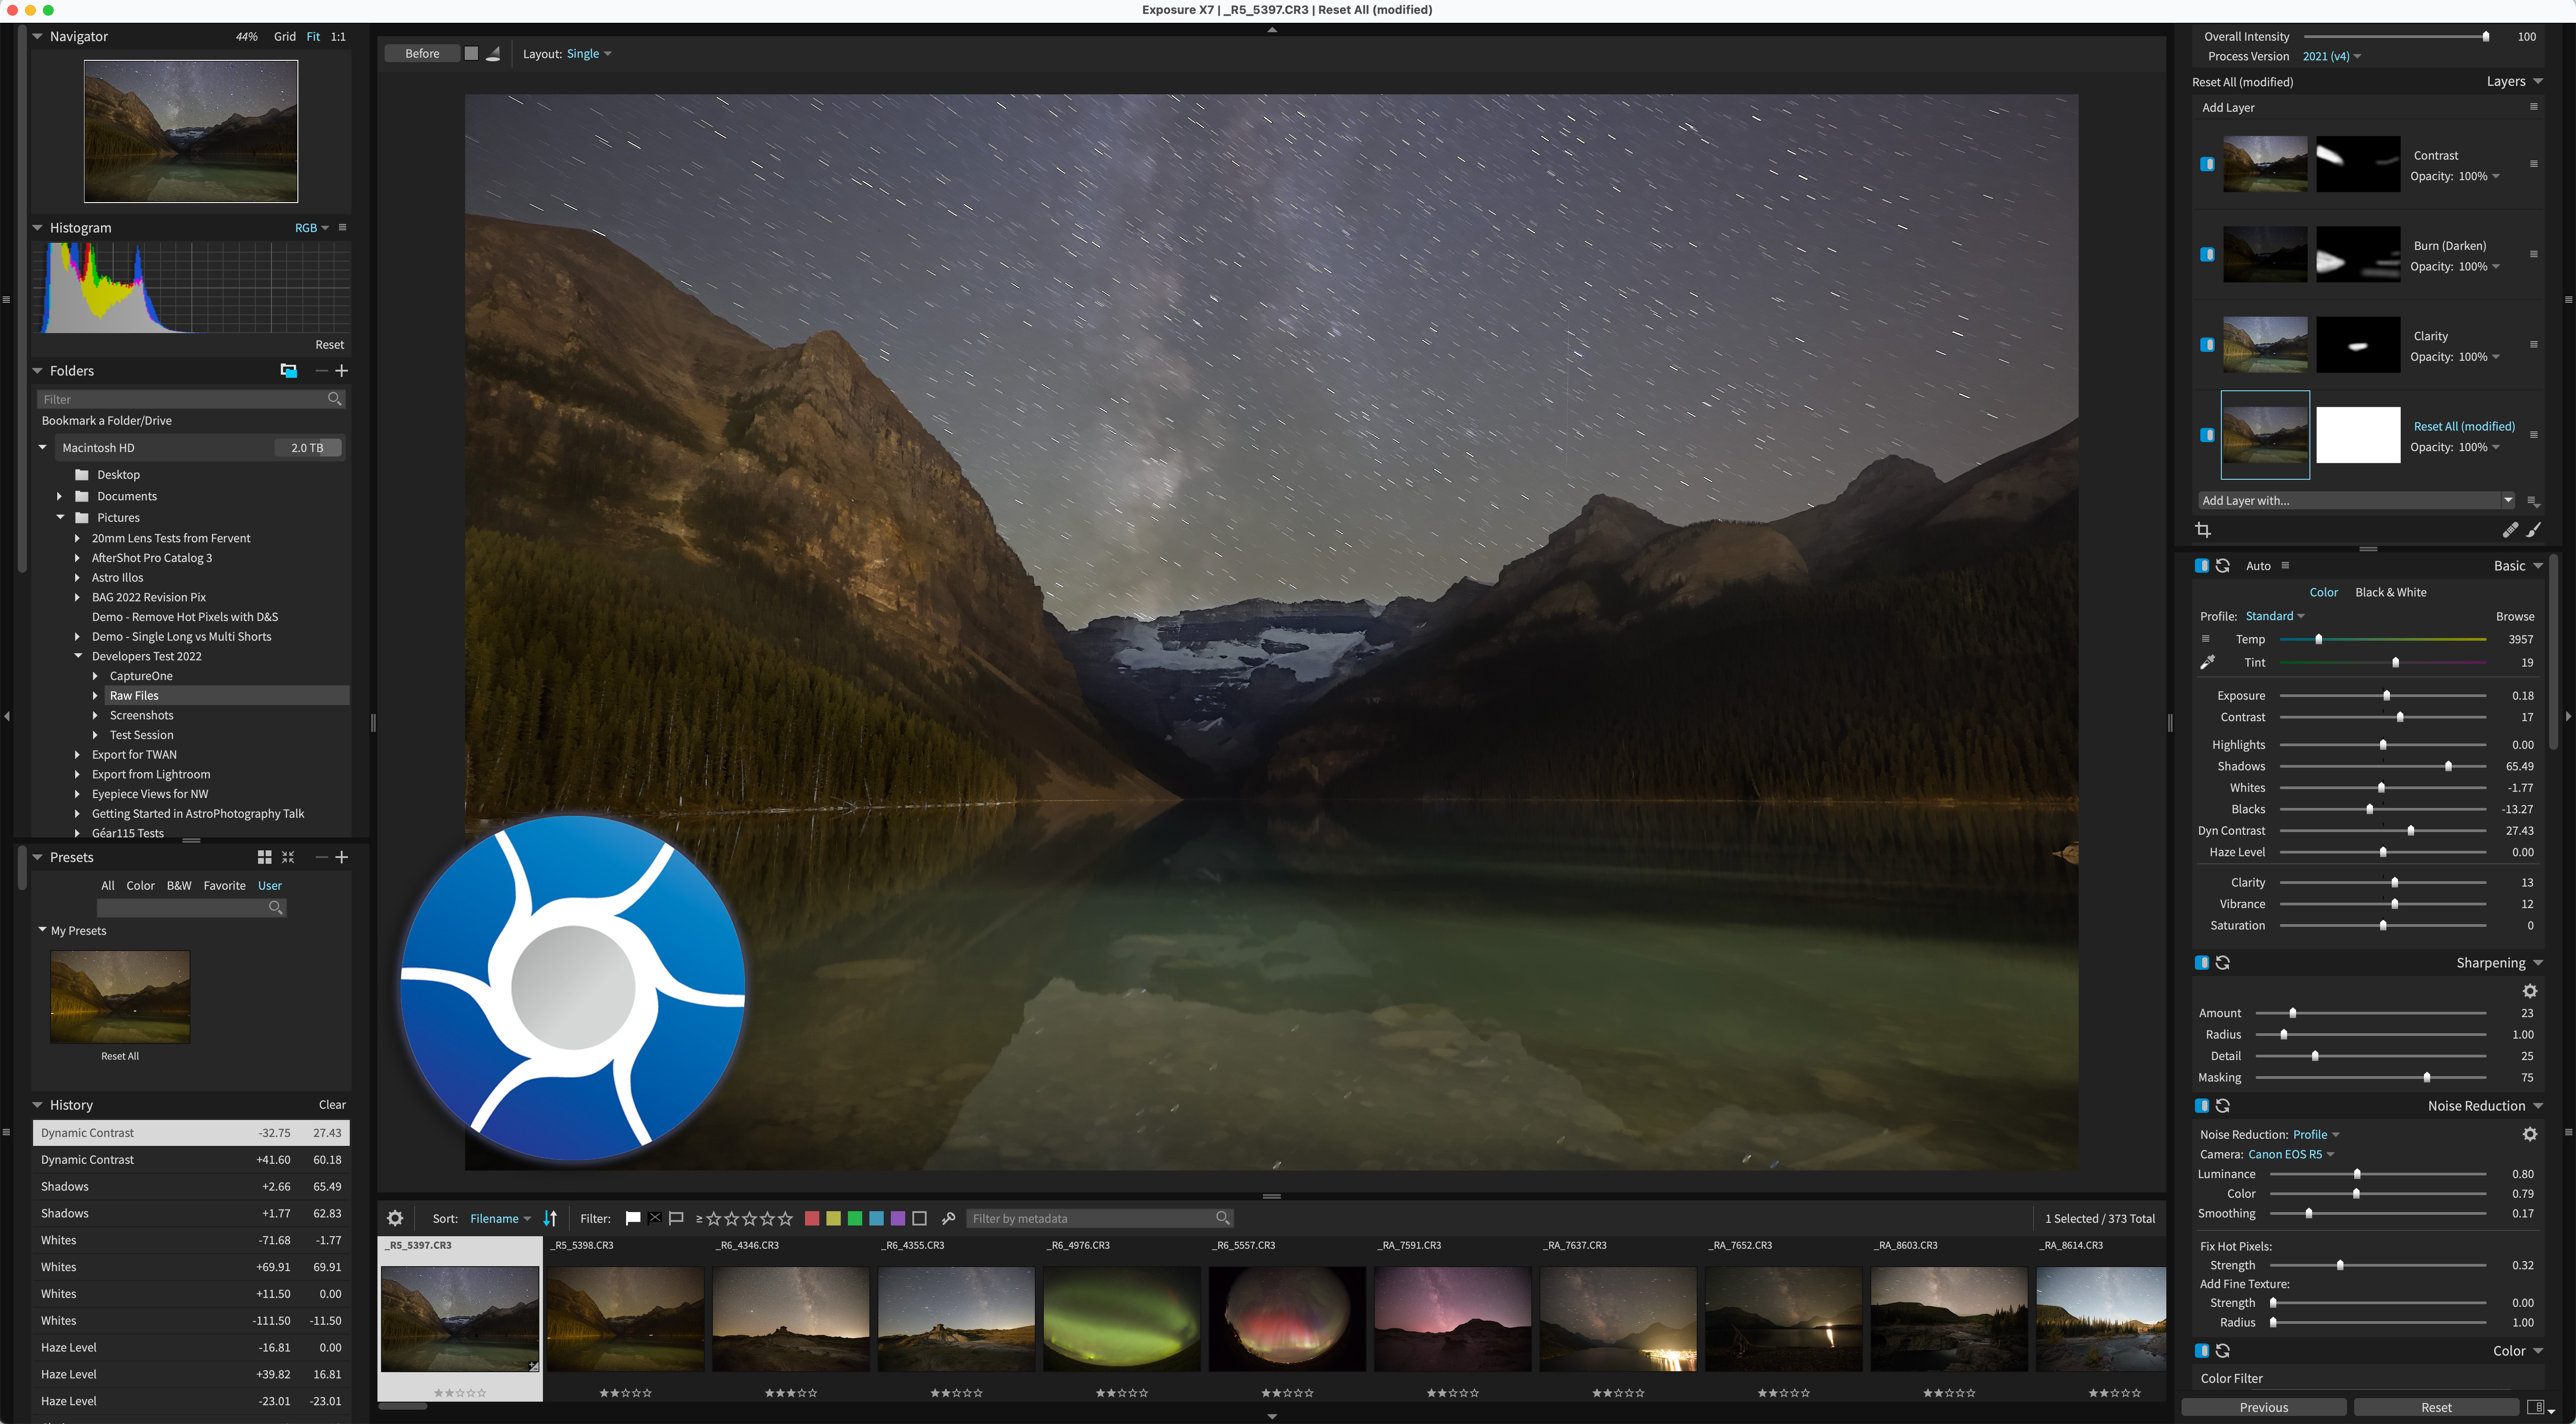
This is the main image I threw at all nine programs, a single 2-minute exposure taken at Lake Louise, Alberta in October 2022. The lens was the Canon RF15-35mm at f/2.8 on a Canon R5 camera at ISO 800.
The original raw image
Above is the raw image as it came out of camera, with the default Adobe Color camera profile applied, but no other adjustments. The length of exposure on a static tripod meant the stars trailed. The image has:
A sky that needs color correcting and contrast enhancement.
Dark shadows in the foreground and distance that need recovery.
Bright foreground areas that need suppressing, where lights from the Chateau Lake Louise hotel illuminate the mountainsides and water.
Lens flares and lights from night hikers that need retouching out.
It is an iconic scene, but when shot at night, it’s a challenging one to process.
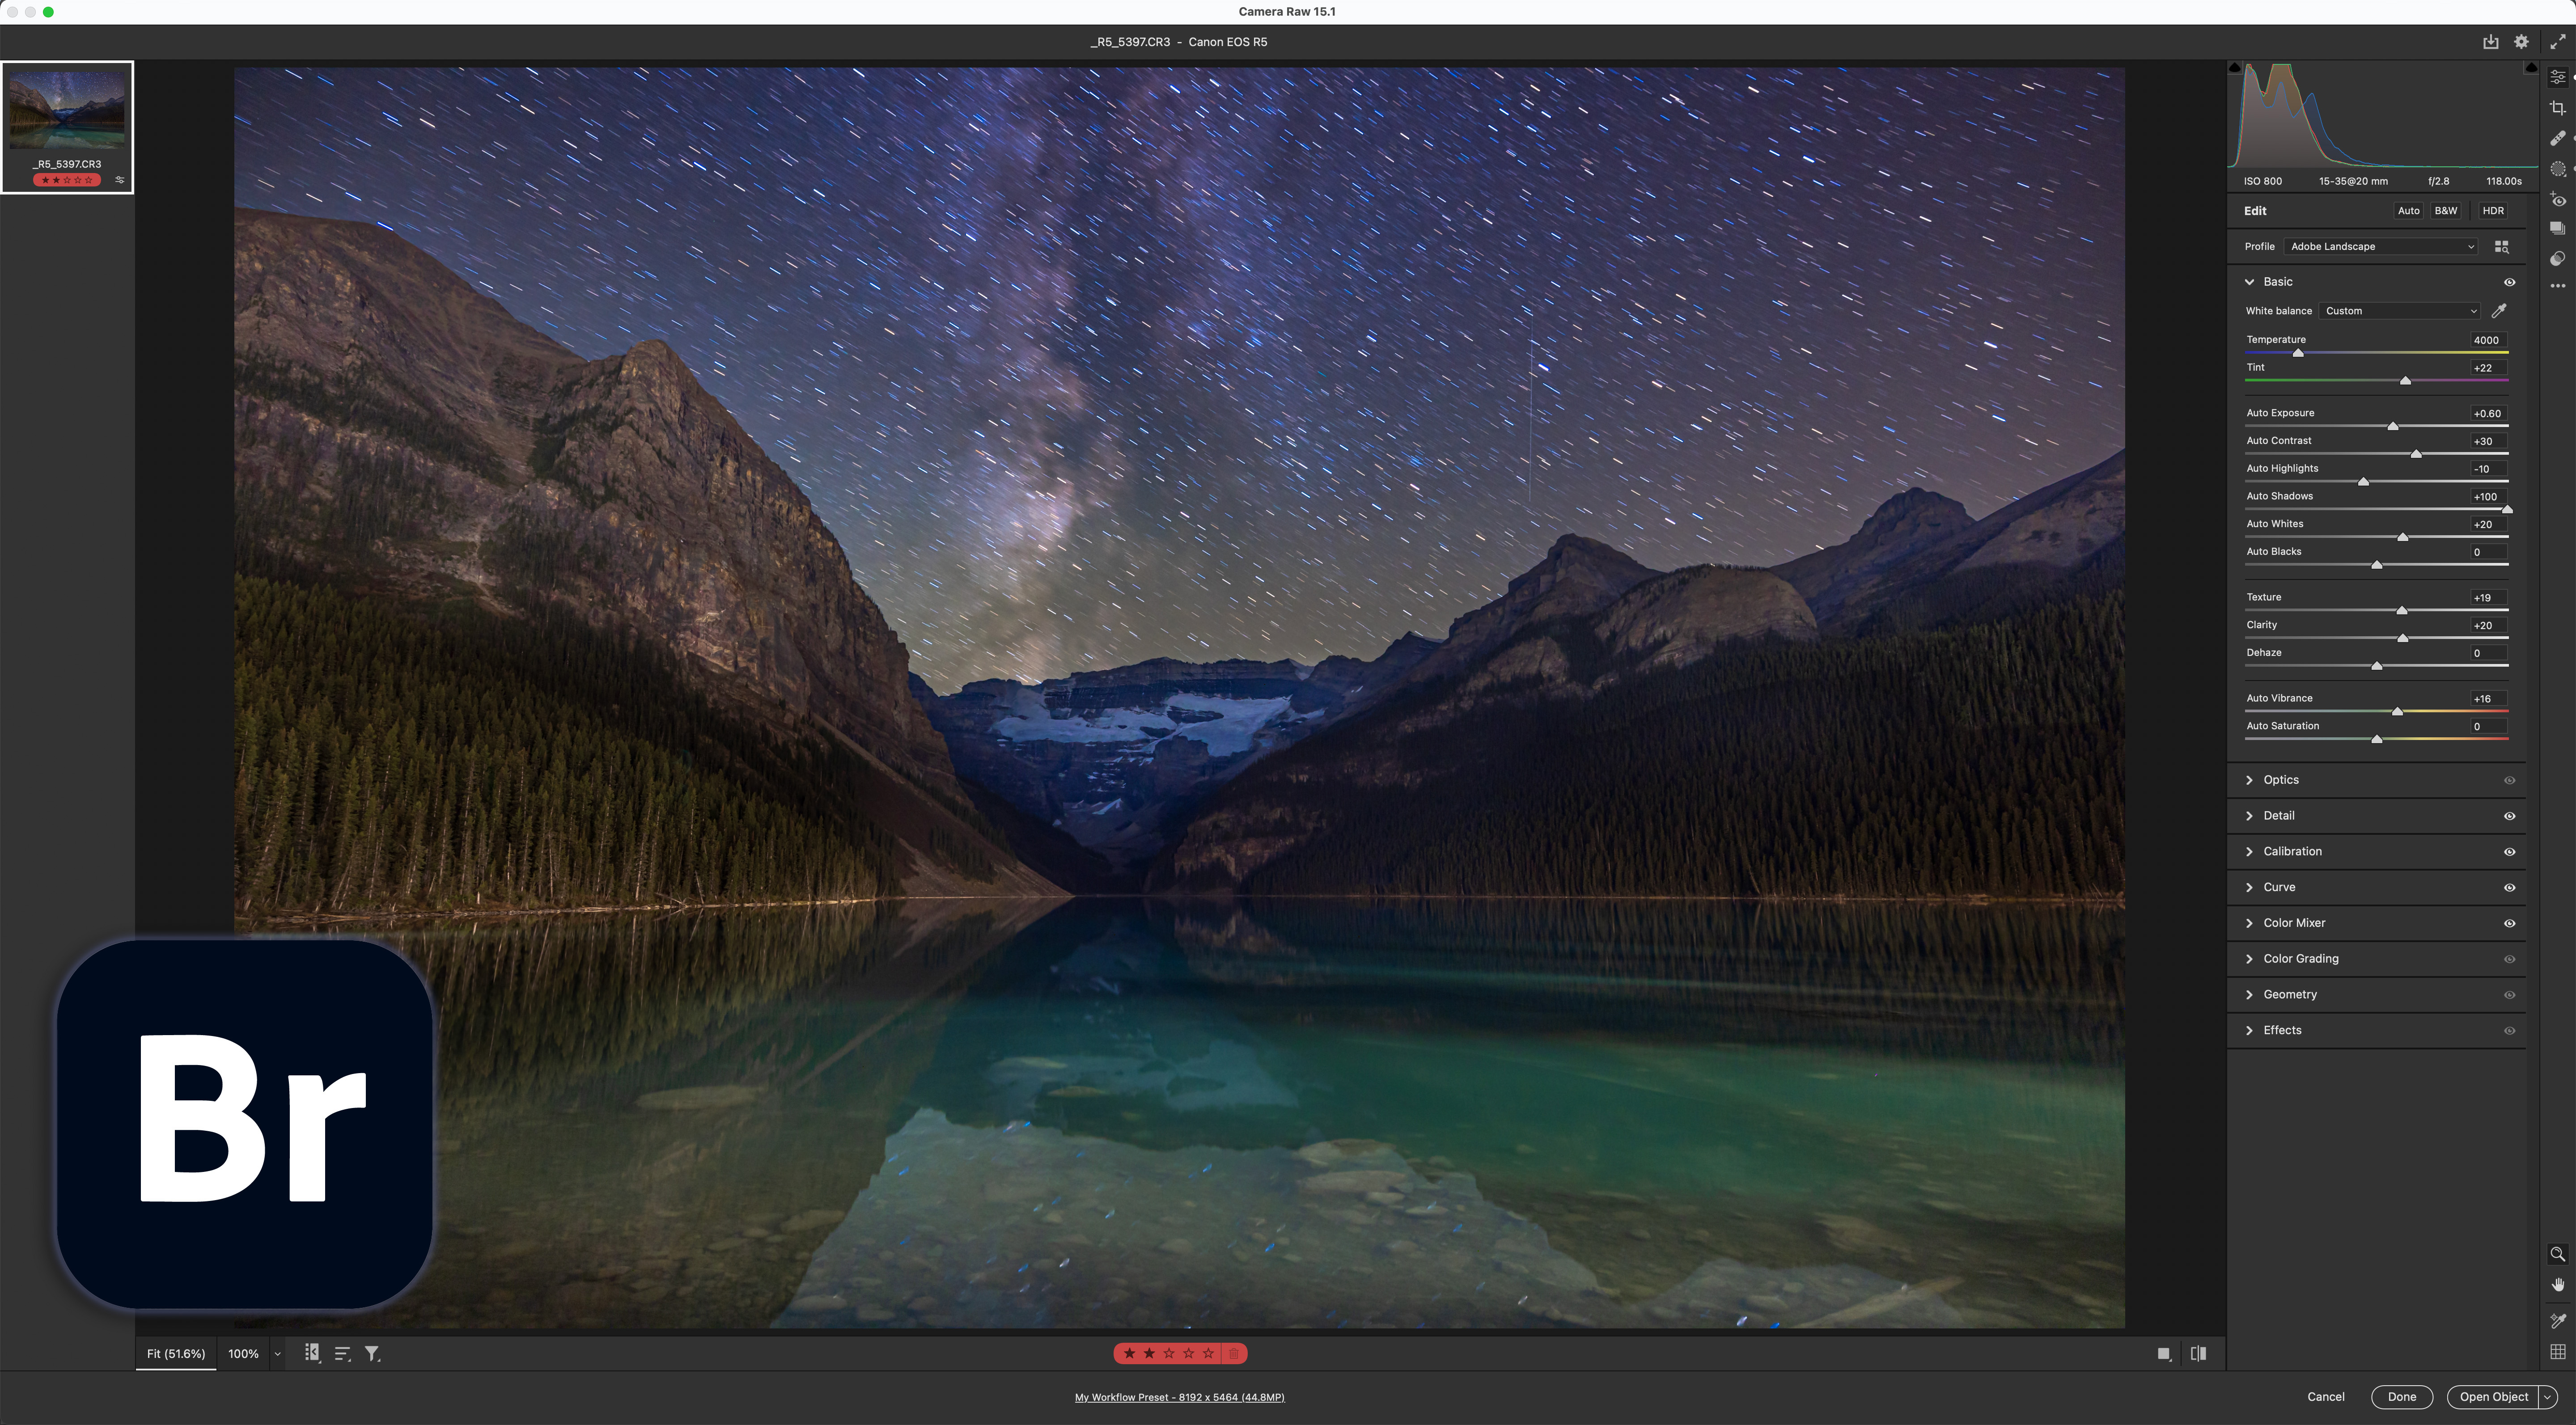
The untracked image developed in Adobe Camera Raw
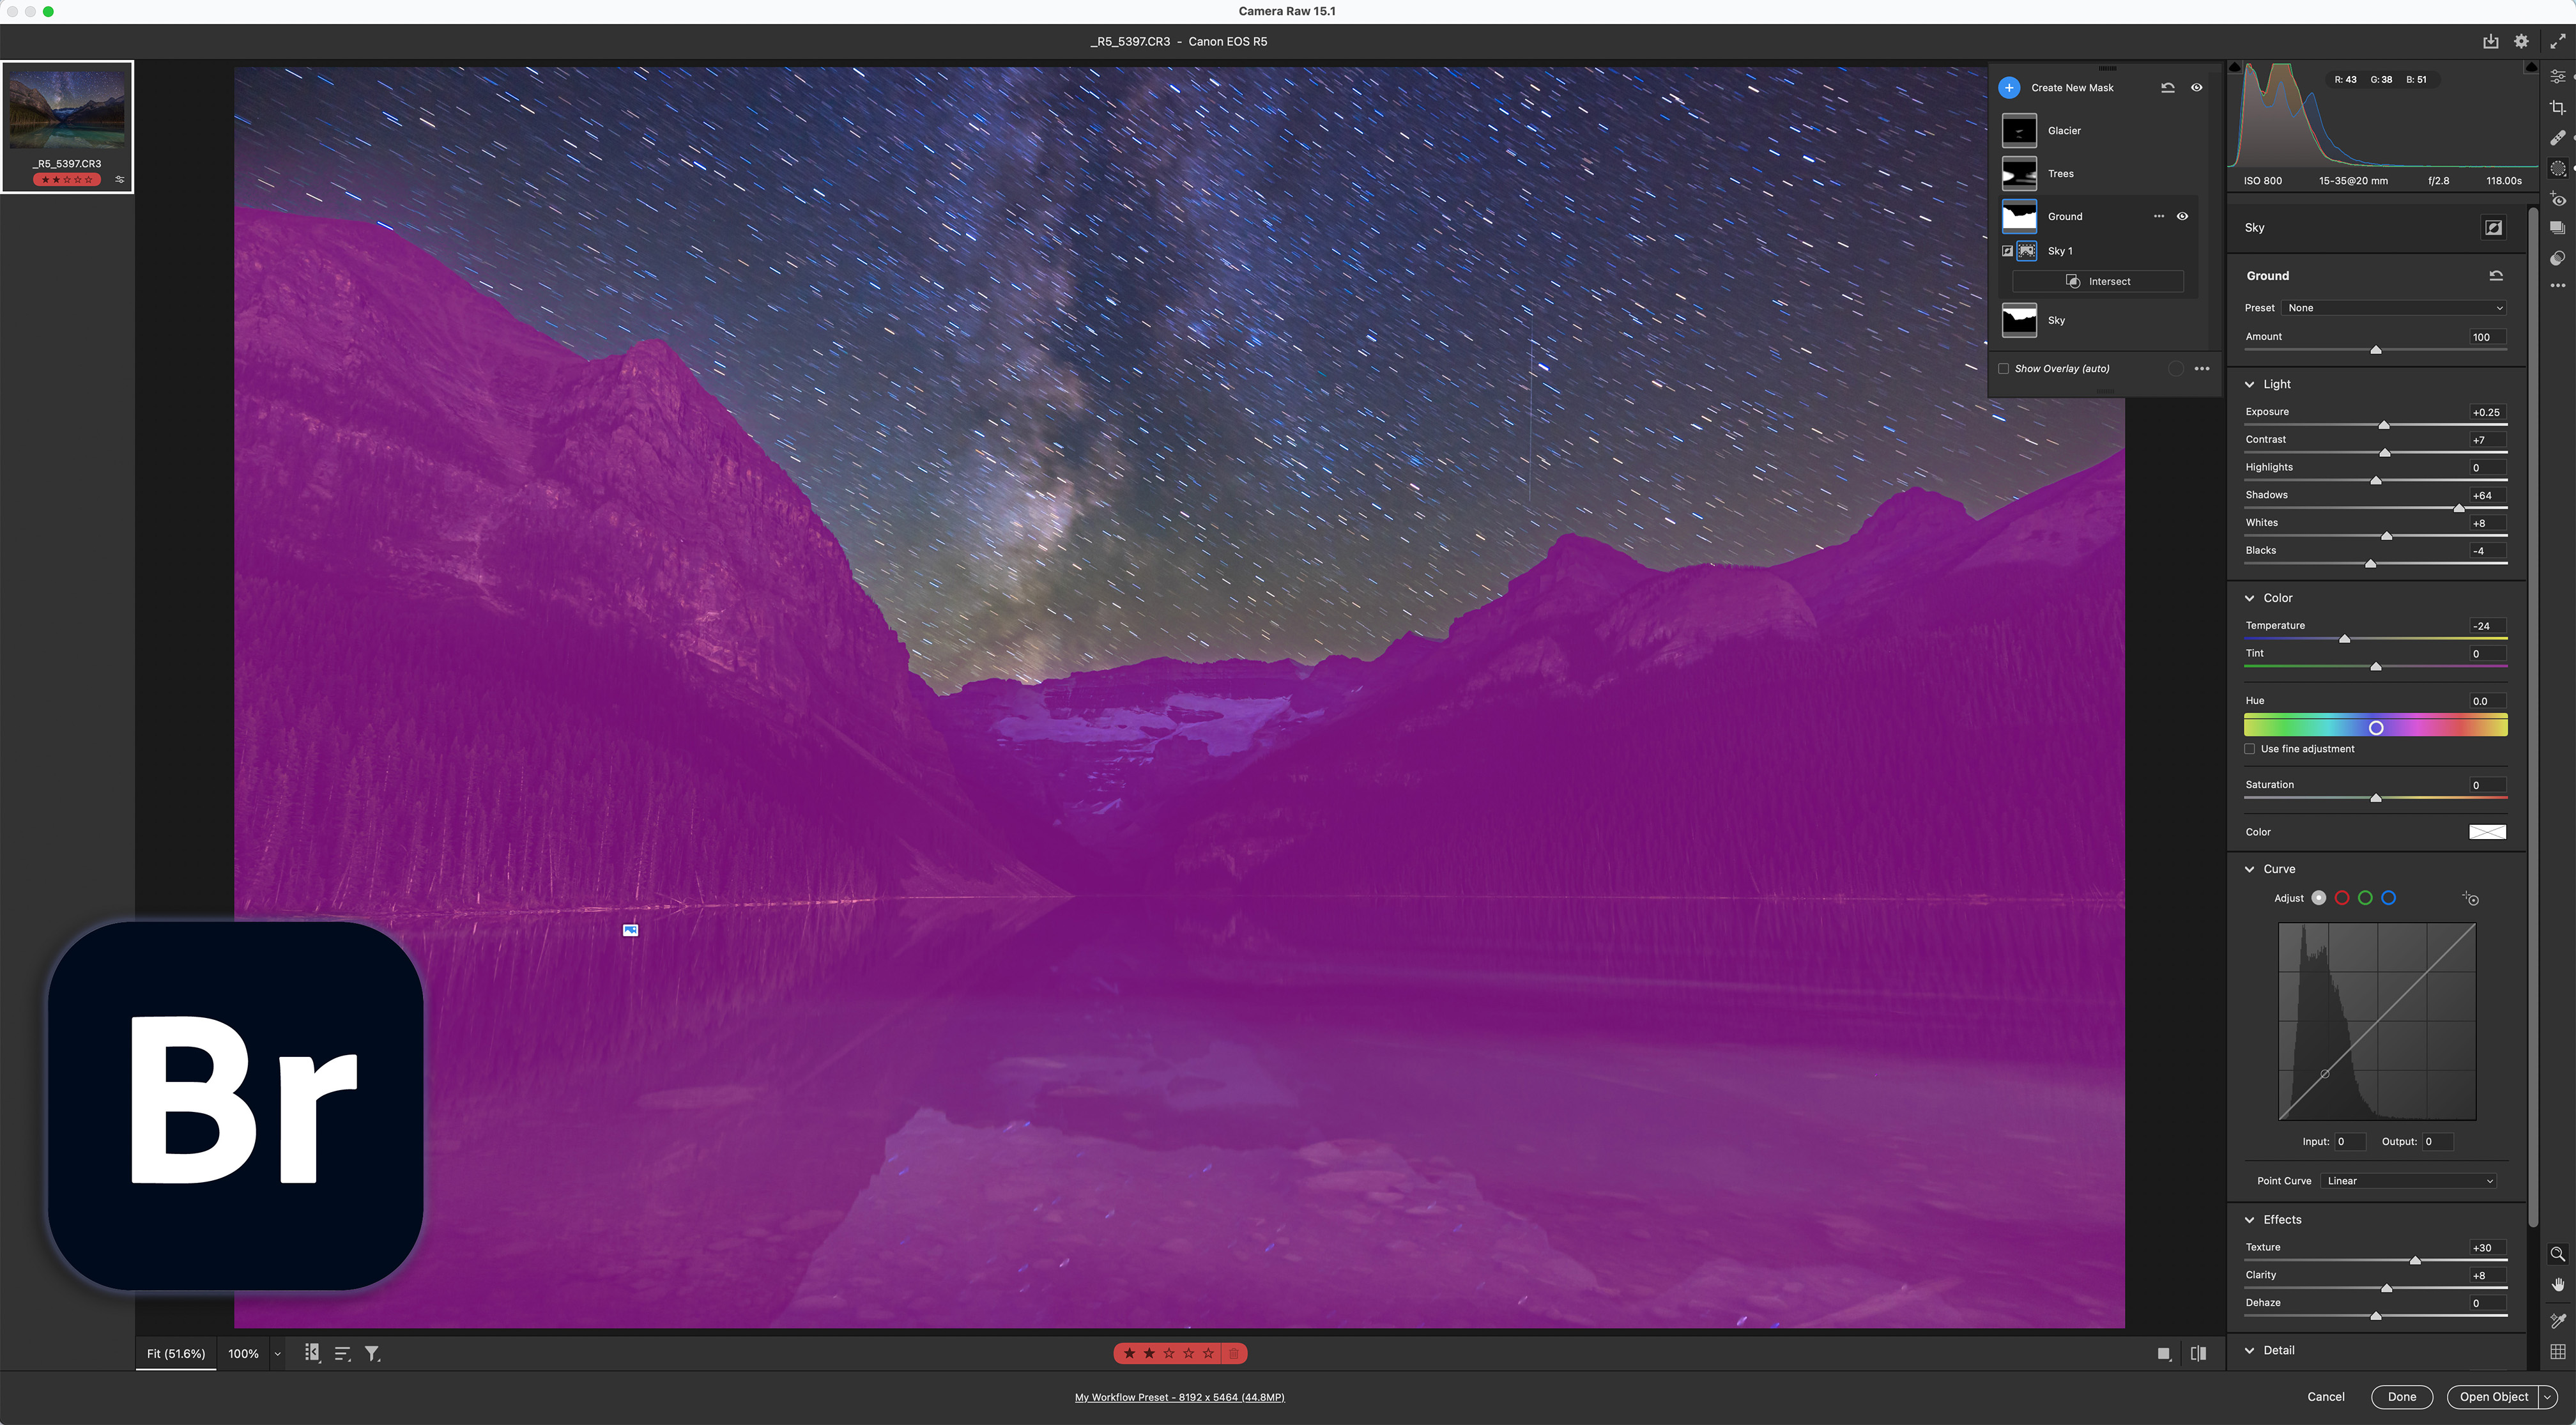
Above is the image after development in Adobe Camera Raw (ACR), using sliders under its Basic, Optics, Detail, Curve, Color Mixer, and Calibration tabs, and applying the Adobe Landscape camera profile. Plus I added retouching, and local adjustments with ACR’s masks to affect just the sky and parts of the ground individually. This is the result I think looks best, and is the look I tried to get all other programs to match or beat. You might prefer a different look or style.
The developed tracked image
In addition, I tried all programs on another two-minute exposure of the scene (shown above) but taken on a star tracker to produce untrailed, pinpoint stars, but a blurred ground. It served to test how well each program’s noise reduction and sharpening dealt with stars.
The final layered and blended image in Adobe Photoshop
I shot that tracked version to blend with the untracked version to produce the very final image above, created from the Camera Raw edits. That blending of sky and ground images (with each component a stack of several images) was done in Photoshop. However, Affinity Photo or ON1 Photo RAW could have done the required layering and masking. I show a version done with Affinity at the end of the blog.
The Competitors
In a statement I read some time ago, DxO stated that Adobe products enjoy a 90% share of the image processing market, leaving all the competitors to battle over the remaining 10%. I’m not sure how accurate that is today, especially as many photographers will use more than one program.
However, I think it is fair to say Adobe’s offerings are the programs all competitors are out to beat.
NOTE: Click/tap on any of the images to bring them up full screen as high-res JPGs so you can inspect them more closely.
The Established Standard
Adobe Camera Raw (included with Photoshop, Adobe Bridge and Lightroom)
Cost: $10 a month, or $120 a year by subscription for 20 Gb of cloud storage (all prices in U.S. $)
Adobe Camera Raw (ACR) is the raw development utility that comes with Photoshop and Adobe Bridge, Adobe’s image browsing application. Camera Raw is equivalent to the Develop module in Lightroom, Adobe’s cataloguing and asset management software. Camera Raw and Lightroom have identical processing functions and can produce identical results, but I tested ACR. I use it in conjunction with Adobe Bridge as an image browser. Bridge can then send multiple developed images into Photoshop as layers for stacking. All programs are included in Adobe’s Photo subscription plan.
The Contenders (in Alphabetical Order)
Here are the eight programs I tested, comparing them to Adobe Camera Raw. All but Skylum’s Luminar Neo offer free trial copies.
ACDSee Photo Studio
Cost: $100 to $150, depending on version. $50 on up for annual major upgrades. By subscription from $70 a year.
I tested Photo Studio for Mac v9. Windows users have a choice of Photo Studio Professional or Photo Studio Ultimate. All three versions offer a suite of raw development tools, in addition to cataloging functions. However, the Ultimate version (Windows only) also offers layer-based editing, making it similar to Photoshop. ACDSee assured me that Photo Studio for Mac resembles the Windows Professional version, at least for basic raw editing and image management. However, Photo Studio Professional for Windows also has HDR and Panorama merging, which the Mac version does not.
Affinity Photo 2
Cost: $70. Upgrades are free except for rare whole-number updates (in seven years there’s been only one of those!). No subscription plan is offered.
Apart from the free Darktable, this is the lowest-cost raw developer on offer here. But Affinity’s strength is as a layer-based editor to compete with Photoshop. As such, Affinity Photo has some impressive features, such as the unique ability to calibrate and align deep-sky images, its stack modes (great for star trails and noise smoothing) which only Photoshop also has, and its non-destructive adjustment layers, filters and masks. Affinity Photo is the most Photoshop-like of all the programs here. However, it alone of the group lacks any image browser or cataloging function, so this is not a Lightroom replacement.
Capture One 23 Pro
Cost: $299. 33% off (about $200) for annual major upgrades. By subscription for $180 a year.
Capture One started life as a program for tethered capture shooting in fashion studios. It has evolved into a very powerful raw developer and image management program. While Capture One advertises that it now offers “layers,” these are only for applying local adjustments to masked areas of a single underlying image. While they work well, you cannot layer different images. So Capture One cannot be used like Photoshop, to stack and composite images. It is a Lightroom replacement only, but a very good one. However, it is the most costly to buy, upgrade each year, or subscribe to, which appears to be the sales model Capture One is moving toward, following Adobe.
In contrast to Capture One, you cannot argue with Darktable’s price! For a free, open-source program, Darktable is surprisingly full-featured, while being fairly well supported and updated. As with most free cross-platform programs, Darktable uses an unconventional and complex user interface lacking any menus. It has two main modules: Lighttable for browsing images, and Darkroom for editing images. Map, Slideshow, Print and Tethering modules clearly signal this program is intended to be a free version of Lightroom. The price you pay, however, is in learning to use its complex interface.
DxO PhotoLab 6 ELITE
Cost: $219. $99 for annual major upgrades. No subscription plan is offered.
DxO PhotoLab is similar to Capture One in being a very complete and feature-rich raw developer with good image management functions and a well-designed interface. While it has an image browser for culling, keywording and rating images, PhotoLab does not create a catalog as such, so this isn’t a full Lightroom replacement. But it is a superb raw developer, with very good image quality and noise reduction. While PhotoLab is also available in a $140 ESSENTIAL edition, it lacks the DeepPrime noise reduction and ClearView Plus haze reduction, both useful features for astrophotos.
Exposure X7
Cost: $129. $89 for annual major upgrades. No subscription plan is offered.
Formerly known as Alien Skin Exposure, from the makers of the once-popular utilities Blow Up and Eye Candy, Exposure X7 is a surprisingly powerful raw editor (considering you might not have heard of it!), with all the expected adjustment options, plus a few unique ones such as Bokeh for purposely blurring backgrounds. It enjoys annual major updates, so is kept up to date, though is a little behind the times in lacking any AI-based effects or masking, or even automatic edge detection. Like Capture One, Exposure offers adjustment layers for ease of applying local edits.
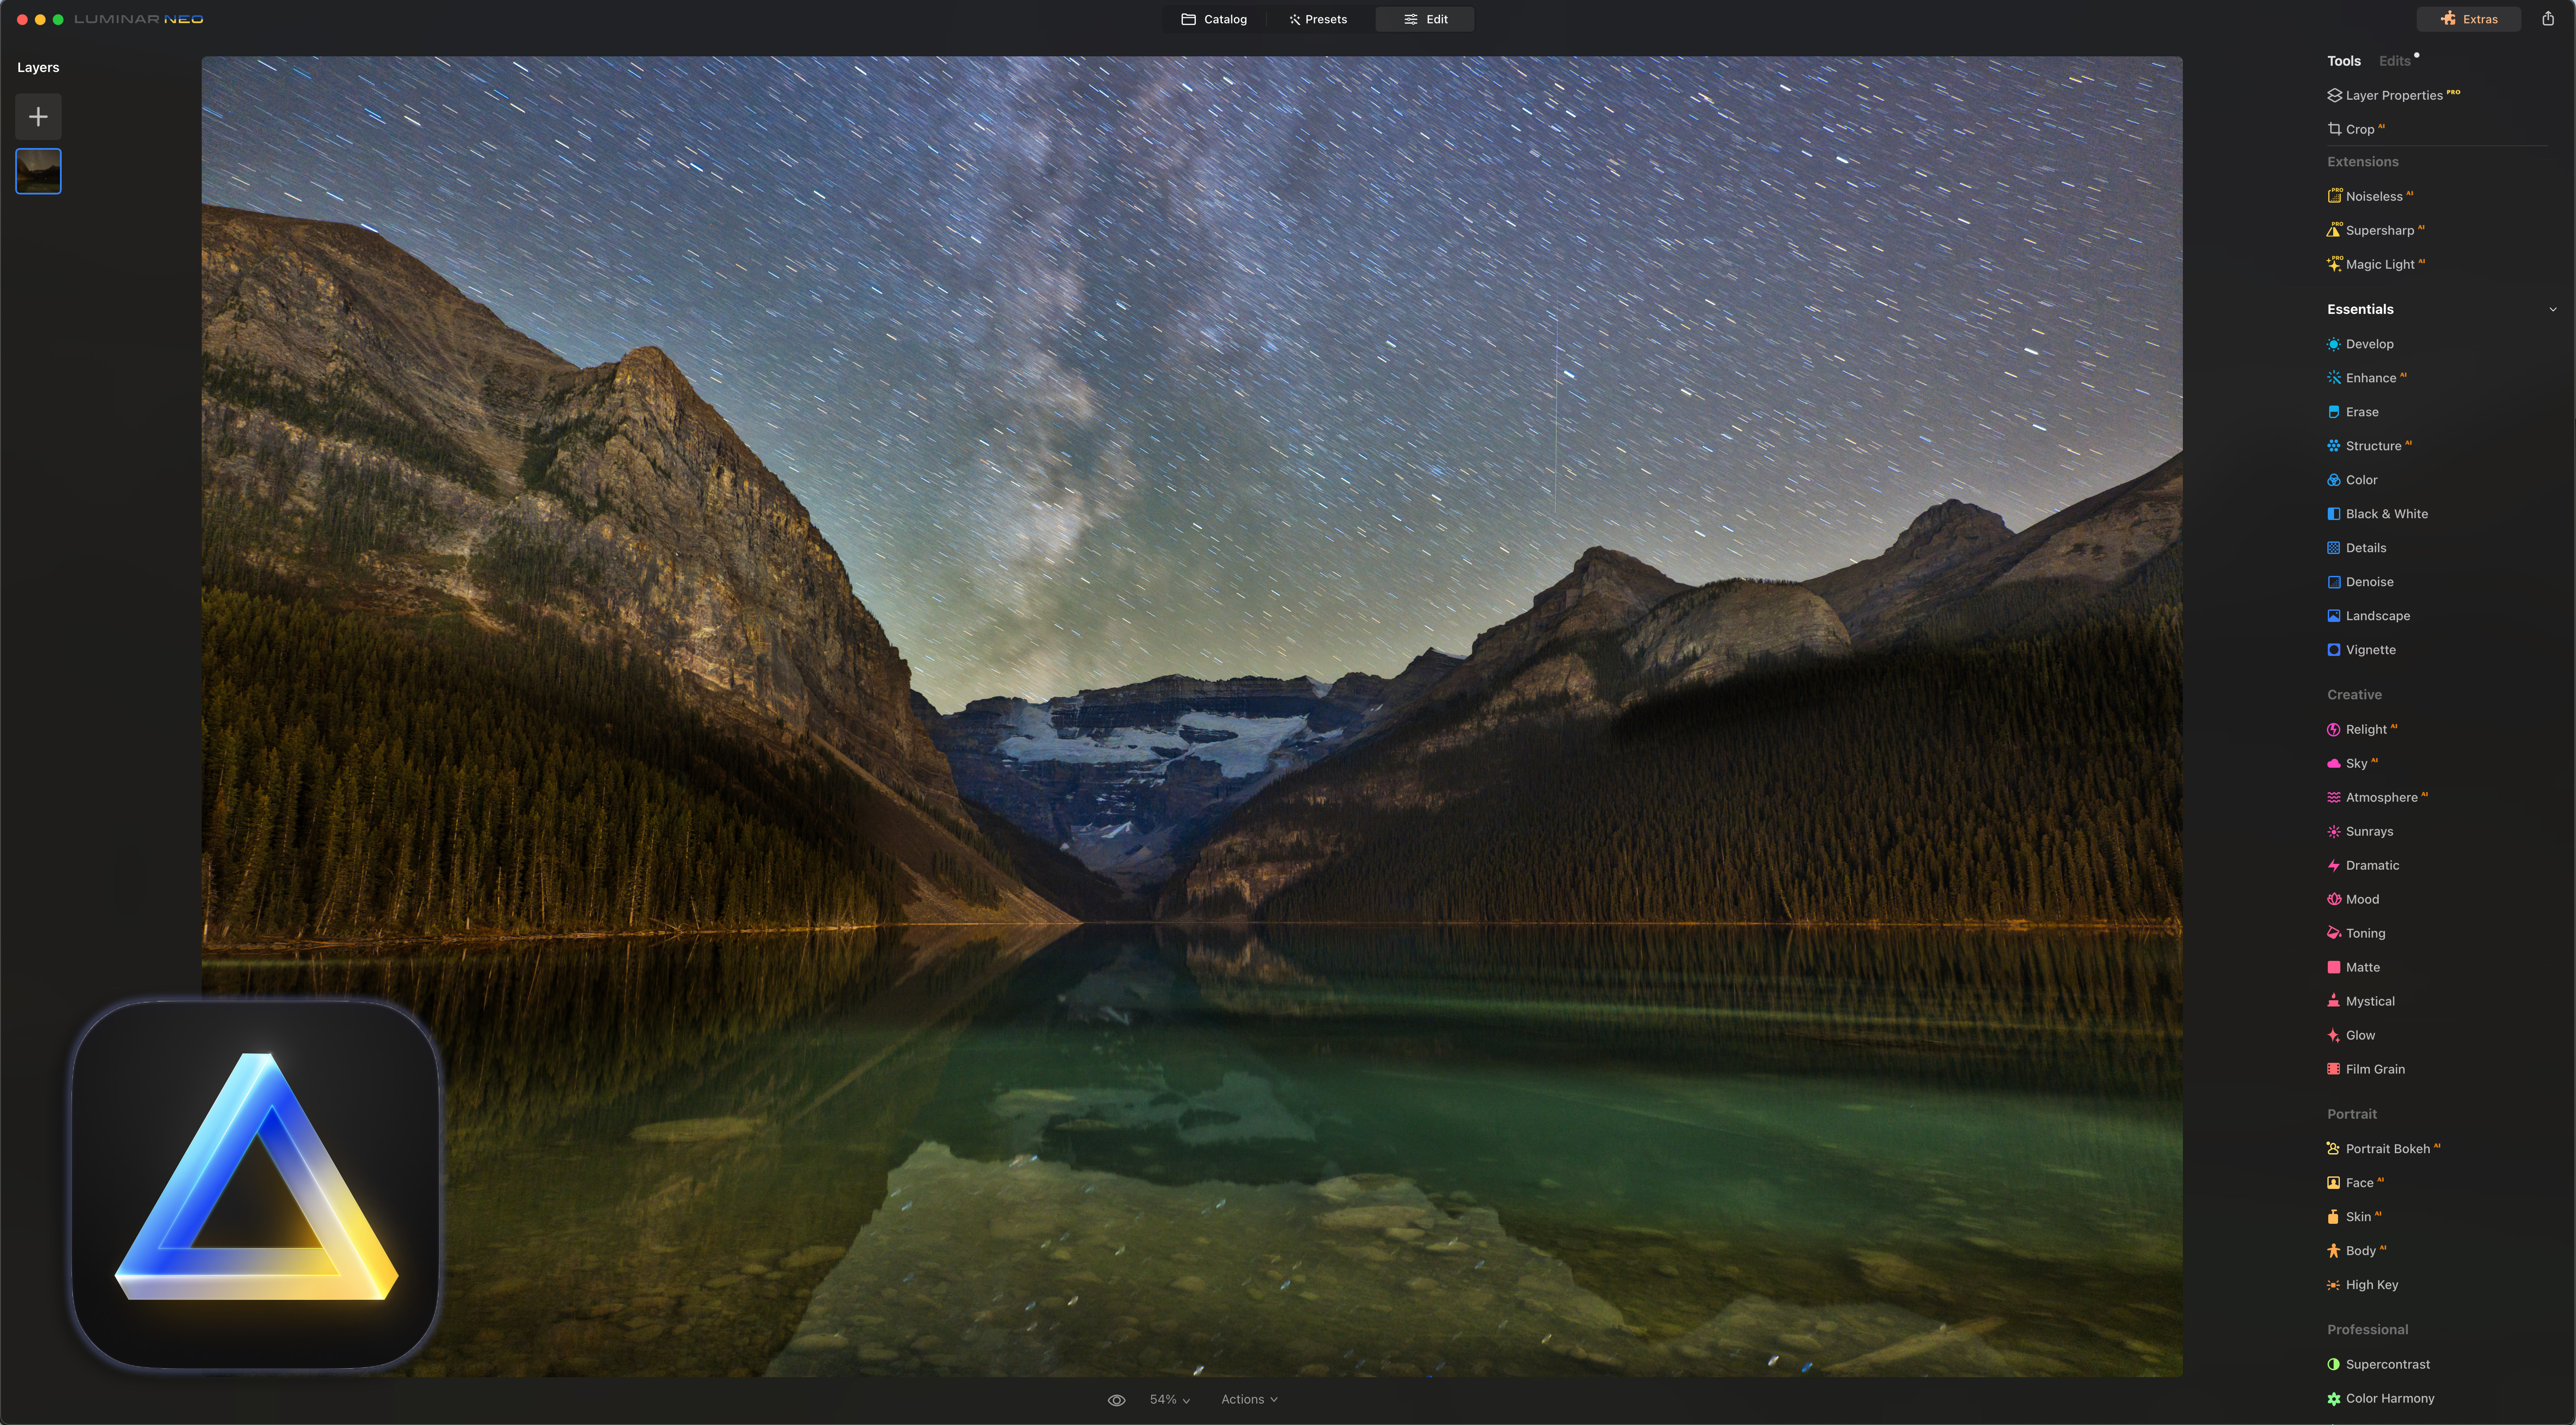
Luminar Neo
Cost: $149. $39 to $59 for individual Extensions. $179 for Extensions pack. By subscription for $149 a year which includes Neo and all Extensions. Frequent discounts and changing bundles make the pricing confusing and unpredictable.
By contrast to Exposure X7, Luminar Neo from Skylum is all about AI. Indeed, its predecessor was called Luminar AI. Introduced in 2022, Neo supplanted Luminar AI, whose image catalog could not be read by Neo, much to the consternation of users. Luminar AI is now gone. All of Skylum’s effort now goes into Neo. It offers the expected raw editing adjustments, along with many powerful one-click AI effects and tools, some offered as extra-cost extensions in a controversial à la carte sales philosophy. Neo’s cataloging ability is basic and unsuitable for image management.
ON1 Photo RAW 2023
Cost: $99. $60 for annual major upgrades. $70 for individual plug-ins, each with paid annual updates. By subscription for $90 a year which includes all plug-ins and updates.
Of all the contenders tested, this is the only program that can truly replace both Lightroom and Photoshop, in that ON1 Photo RAW has cataloging, raw developing, and image layering and masking abilities. In recent years ON1 has introduced AI functions for selection, noise reduction, and sharpening. Some of these are also available as individual plug-ins for Lightroom and Photoshop at an additional cost. While the main program and plug-ins can be purchased as perpetual licences, the total cost makes an annual subscription the cheapest way to get and maintain the full ON1 suite. Like Capture One, they are moving customers to be subscribers.
Feature Focus
I have assumed a workflow that starts with raw image files, not JPGs, for high-quality results. And I have assumed the goal of making that raw image look as good as possible at the raw stage, an important step in the workflow, as it is the only time we have access to the full dynamic range of the 14-bit raw data that comes from the camera.
I judged each program based on several features I consider key to great nightscapes and time-lapses:
Browser/Cataloging Functions —Because we often deal with lots of images from an astrophoto shoot, the program should allow us to sort, rate, and cull images before proceeding with developing the best of the set for later stacking, and to easily compare the results.
Lens Corrections —Does the program apply automatic lens corrections for distortion and vignetting? How extensive is its lens database? Or are manual adjustments required?
Noise Reduction —We shoot at high ISOs, so good noise reduction is essential for removing digital noise without sacrificing details such as pixel-level stars, or adding AI artifacts.
Shadow Recovery —While good highlight recovery can be important (and a prime reason for shooting and processing raw images), in nightscapes good shadow recovery is even more crucial. The starlit ground is dark, but rich in detail. We want to recover that shadow detail, without affecting other tonal ranges or introducing noise.
Local Adjustments and Masking —Good masking tools allow us to do more at the raw stage while we have access to the full range of image data. But how precise can the masks be? How easy is it to apply different settings to the ground and sky, the most common need for local adjustments with nightscapes.
Overall Finished Image Quality —Tools such as Dehaze and Clarity can work wonders at boosting contrast in the sky. Good color adjustments from HSL sliders can help fine-tune the overall color balance. How good did the final image look? — an admittedly subjective judgement.
Copy & Paste Settings —A program should not only develop one image well, but also then be able to transfer all of that key image’s settings to several other images taken for noise stacking, or to what could be hundreds of images shot for a time-lapse movie or star trail scene.
Batch Export —For stacking images for star trails, or for creating panoramas in advanced stitching programs such as PTGui, or when assembling time-lapse movies, the program should allow a “batch export” of selected images to TIFFs or JPGs for use elsewhere.
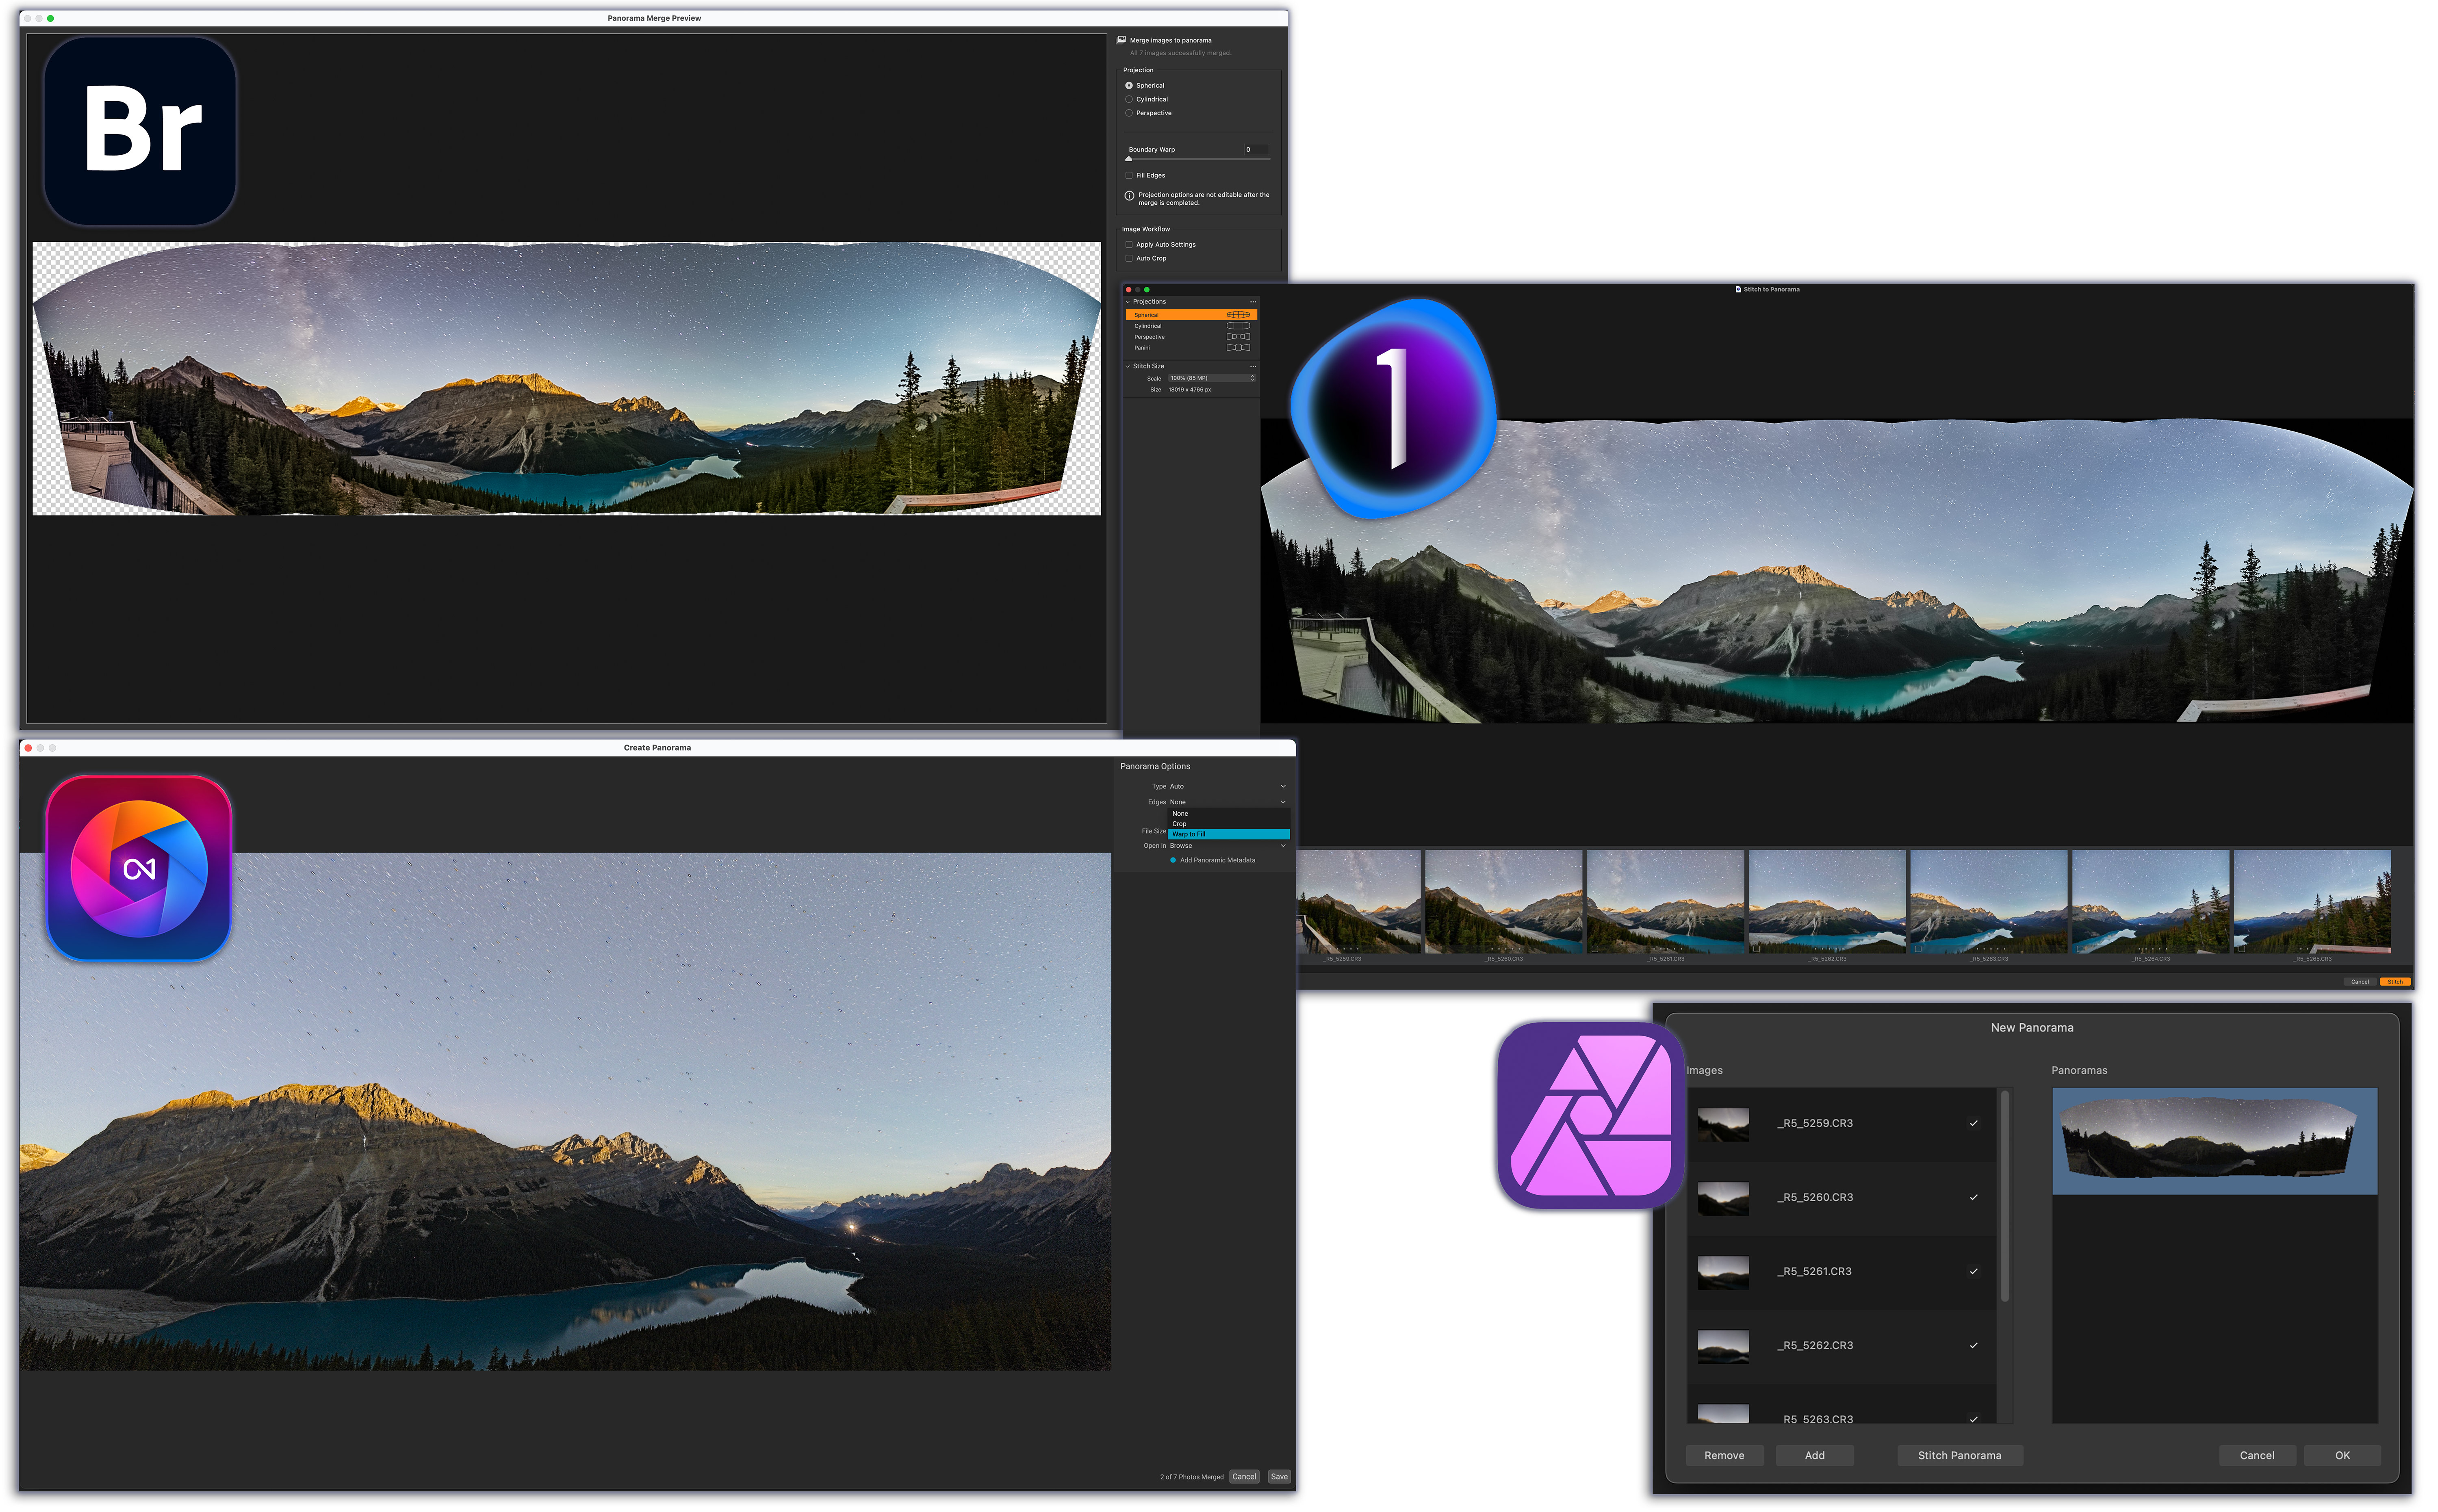
Advanced Features —Does the program support panorama stitching and HDR (High Dynamic Range) merging of selected developed raw files? If so, what type of file does it create?
Summary Comparison Table
• = Feature is present; ticks the boxes!
— = Feature is missing
Partial = Feature only partially implemented (e.g. Only has distortion correction but not vignetting correction, or has limited cataloging functions)
I judged other features on an admittedly subjective scale of Poor, Fair, Good, or Excellent, based on my overall impressions of the reliability, options offered, quality, and/or speed of operation.
Feature-by-Feature Details — 1. Browsing and Cataloging
Here, feature by feature, are what I feel are the differences among the programs, comparing them using the key factors I listed above.
All programs, but one, offer a Browse or Library module presenting thumbnails of all the images in a folder or on a drive. (For Adobe Camera Raw that module is Adobe Bridge, included with the Creative Cloud Photo subscription.) From the Browse/Library module you can sort, rate and cull images.
The Catalog screens from six of the programs tested
Luminar Neo’s Catalog function (as of early 2023) allows only flagging images as favorites. It is very crude.
The other programs have more full-featured image management, allowing star rating, color label rating, pick/reject flags, keywording, grouping into collections or projects, and searching.
Capture One and ON1 Photo RAW provide the option of importing images into formal catalogs, just as Adobe Lightroom requires. However, unlike Lightroom, both programs can also work with images just by pointing them to a folder, without any formal import process. Capture One calls this a “session.” Adobe Bridge works that way — it doesn’t produce a catalog.
While not having to import images first is convenient, having a formal catalog allows managing a library even when the original images are off-line on a disconnected hard drive, or for syncing to a mobile app. If that’s important, then consider Capture One, ON1 Photo RAW, or Adobe Lightroom. They each have mobile apps.
Adobe Lightroom (but not Bridge) is also able to connect directly to what it calls “Publish Services” — Flickr, PhotoShelter, and SmugMug for example, using plug-ins offered by those services. I use that feature almost daily. ACDSee offers that feature only in its Windows versions of Photo Studio. As best I could tell, all other programs lacked anything equivalent.
SerifAffinity Photo is the lone exception lacking any form of image browser or asset management. It’s hard to fathom why in late 2022, with their major update to Version 2 of their software suite, Serif did not introduce a digital asset management program to link their otherwise excellent Photo, Designer and Publisher programs. This is a serious limitation of Serif’s Affinity creative suite, which is clearly aimed at competing one-on-one with Adobe Photoshop, Illustrator and InDesign, yet Serif has no equivalent of Adobe Bridge for asset management.
WINNERS: Capture One and ON1 Photo RAW, for the most flexibility in informal browsing vs. formal cataloguing. Adobe Lightroom for its Publish Services.
LOSER: Affinity Photo for lacking any image management or catalog.
Feature-by-Feature Details — 2. Lens Corrections
The wide-angle lenses we typically use in nightscape and time-lapse imaging suffer from vignetting and lens distortions. Ideally, software should automatically detect the camera and lens used and apply accurate corrections based on its equipment database.
The Lens Corrections panels from all nine programs.
Of the nine programs tested, only four — Adobe Camera Raw, Darktable, DxO PhotoLab, and ON1 Photo Raw — automatically applied both distortion and vignetting corrections for the Canon RF15-35mm lens I used for the test images. DxO is particularly good at applying corrections, drawing upon the company’s vast repository of camera and lens data. If your local copy of PhotoLab is missing a camera-lens combination, what it calls a “module,” DxO allows you to download it or request it.
Capture One and Exposure X7 both detected the lens used and applied distortion correction, but did nothing to adjust vignetting. I had to apply vignetting correction, a more important adjustment, manually by eye.
ACDSee and Luminar have no Auto Lens Corrections at all; distortion and vignetting both have to be dialed in manually.
Affinity Photo lacked any automatic correction data for the Canon RF15-35mm lens in question, despite the lens being introduced in 2019. I selected the similar Canon EF16-35mm lens instead, as I show above circled in blue. Affinity gets marks off for having an outdated and incomplete lens database.
WINNERS: Adobe, Darktable, DxO PhotoLab, and ON1 Photo RAW, for full Auto Lens Corrections.
LOSERS: ACDSee and Luminar, for lacking Auto Lens Corrections.
Feature-by-Feature Details — 3. Noise Reduction and Sharpening
Absolutely essential to astrophotography is effective noise reduction, of both grainy “luminance” noise, as well as colorful speckles and splotches from “chrominance” noise. Programs should smooth noise without eliminating stars, removing star colors, or adding odd structures and artifacts.
Conversely, programs should offer a controllable level of sharpening, without introducing dark halos around stars, a sure sign of over-zealous sharpening.
Closeups of the tracked image comparing noise reduction and star image quality in all 9 programs. Tap or click to download a high-res version for closer inspection to see the pixel-level differences.
I tested noise reduction using the tracked version of my test images, as the pinpoint stars from the 45-megapixel Canon R5 will reveal any star elimination or discoloration.
Adobe Camera Raw’s aging noise reduction routine stood up very well against the new AI competitors. It smoothed noise acceptably, while retaining star colors and Milky Way structures. But turn it up too high, as might be needed for very high ISO shots, and it begins to blur or wipe out stars. AI noise reduction promises to solve this.
AI-Based Noise Reduction:
DxO PhotoLab’s Prime and DeepPrime AI-based options can also do a good job. But … I find DeepPrime (shown above) and the newer DeepPrimeXD (shown below) can introduce wormy looking artifacts to starfields. The older Prime method might be a better choice. However, the annoyance with DxO PhotoLab is that it is not possible to preview any of its Prime noise reduction results full-screen, only in a tiny preview window, making the best settings a bit of a guess, requiring exporting the image to see the actual results.
ON1 Photo RAW’s NoNoise AI can also do a good job, but has to be backed off a lot from the automatic settings its AI technology applies. Even so, I found it still left large-scale color blotches, a pixel-level mosaic pattern, and worst of all, dark halos around stars, despite me applying no sharpening at all to the image. ON1 continues to over-sharpen under the hood. I criticized it for star halos in my 2017 survey — the 2023 version behaves better, but still leaves stars looking ugly.
The other AI program, Luminar Neo with its Noiseless AI extension (an extra-cost option) did a poor job, adding strange artifacts to the background sky and colored halos around stars.
Comparing DxO’s three Prime noise reduction options on the untracked image. DeepPrimeXD is sharper!Comparing DxO’s three Prime noise reduction methods on the tracked image. DeepPrimeXD is riddled with artifacts.
So beware of AI. As I show above with DxO, because they are not trained on starfields, AI routines can introduce unwanted effects and false structures. What works wonders on high-ISO wildlife or wedding shots can ruin astrophotos.
For a more complete test of AI programs, such as Topaz DeNoise AI and Noise XTerminator, made specifically for noise reduction, see my review from November 2022, Testing Noise Reduction Programs for Astrophotography.
Non AI-Based Noise Reduction:
Capture One smoothed noise very well, but tended to bloat stars and soften fine detail with its Single Pixel control turned up even to one pixel, as here.
Affinity Photo nicely smoothed noise, but also removed star colors, yet added colored rims to some stars, perhaps from poor de-Bayering. Serif Lab’s raw engine still has its flaws.
ACDSee Photo Studio also added loads of unacceptable halos to stars, and could not reduce noise well without smoothing details.
Darktable has very good noise reduction, including a panel specifically for Astrophoto Denoise. Great! Pity its routines seemed to wipe out star colors and fine structures in the Milky Way.
Exposure X7 smoothed noise well, but also wiped out details and structures, and its sharpening adds dark halos to stars.
That said, it might be possible to eke out better results from all these programs with more careful settings. Backing off sharpening or noise reduction can avoid some of the unwanted side effects I saw, but leave more noise.
Adobe Camera Raw does eliminate most random hot or dead pixels “under the hood.” However, I wish it had an adjustable filter for removing any that still remain (usually from thermal noise) and that can plague the shadows of nightscapes. Single-pixel filters are offered by Capture One, Darktable, DxO, and Exposure X7. Though turning them up too high can ruin image detail.
WINNERS: Adobe and DxO PhotoLab (if the latter is used cautiously)
LOSERS: ACDSee, Affinity, Darktable, Exposure X7, and Luminar Neo for unacceptable loss of detail and star colors, while adding in false structures (Neo)
Feature-by-Feature Details — 4. Shadow Recovery
While all programs have exposure and contrast adjustments, the key to making a Milky Way nightscape look good is being able to boost the shadows in the dark starlit ground, while preventing the sky or other areas of the image from becoming overly bright or washed out.
Comparing Shadow Recovery in two programs (Camera Raw – top – and DxO PhotoLab – middle) that worked quite well, with Darktable (bottom) that did not.
In the three examples above I have applied only white balance and exposure correction, then “lifted” the Shadows. I added some contrast adjustment to Darktable, to help improve it, and Smart Lighting to the DxO image, which was needed here.
Here are my findings, roughly in order of decreasing image quality, but with Adobe first as the one to match or beat.
Adobe Camera Raw has a very good Shadows slider that truly affects just the dark tonal areas and with a slight touch (turning it up to 100 doesn’t wipe out the image). Some other programs’ Shadows adjustments are too aggressive, affect too wide a range of tones, or just add a grey wash over the image, requiring further tweaks to restore contrast.
Capture One did an excellent job on Shadow recovery under its High Dynamic Range set of sliders. The dark landscape brightened without becoming flat or grey. This is a primary contributor to its excellent image quality.
DxO PhotoLab’s Shadows slider affects a wider tonal range than ACR or Capture One, also brightening mid-tones, though it has a Midtones slider to separately adjust those. On its own, the Shadows slider didn’t work as well as in ACR or Capture One. But DxO’s superb feature is its “Smart Lighting,” which can work wonders on a scene with one click. Another unique adjustment is “ClearView Plus,” a form of Dehaze which can snap up contrast, often too aggressively, but it can be backed off in intensity. Those two adjustments alone might be reason enough to use PhotoLab.
ON1 Photo RAW’s Shadows slider affected too wide a range of tonal values, brightening the entire scene and making it look flat. This can be overcome with some tweaks to the Contrast, Blacks and Midtones sliders. It takes more work to make a scene look good.
ACDSee’s Fill Light and Shadows sliders were also much too broad. But its unique LightEQ panel has options for “Standard” and “Advanced” settings which each provide an equalizer interface for making more selective tonal adjustments. It worked well, though the image looked too harsh and contrasty, despite me adding no contrast adjustments, the opposite flaw of other programs.
Luminar Neo’s Shadows slider under its DevelopRAW panel was also broad, washing out contrast, requiring a liberal application of its SuperContrast slider to return the image to a better look. But the final result looked fine.
Exposure X7’s Shadows slider also lowered overall contrast, requiring boosting Contrast and Blacks to return the image to a pleasing tonal balance.
Affinity Photo’s Shadows slider did a far better job in its new v2 (released in late 2022) than in the original Affinity Photo, which was frankly awful. Even so, I found Affinity Photo 2 still tended to produce flat results, hard to compensate for from within the Develop Persona, as its options are so limited.
Darktable’s Shadows slider (which has several sub-sliders) produced a flat result. Despite the numerous variations of other contrast and level adjustments scattered over various panels, I could not get a pleasing result. It will take a true Darktable fan and expert to exact a good image from its bewildering options, if it’s even possible.
WINNERS: Capture One and DxO PhotoLab, plus Adobe still works well
LOSERS: Affinity Photo and Darktable
Feature-by-Feature Details — 5. Local Adjustments and Masking
This is the area where programs have made major improvements in the five years since my last survey of raw developers. Thus I devote a major section to the feature.
With accurate and easy masking it is now easier to apply adjustments to just selected areas of a raw image. We can finish off a raw file to perhaps be publication ready, without having to use a layer-based program like Photoshop to perform those same types of local adjustments. Adobe Camera RAW, Luminar Neo, and ON1 Photo Raw are leaders in this type of advanced AI masking. But other programs have good non-AI methods of masking – and making – local adjustments.
Adobe Camera Raw (and Adobe Lightroom) now has far better masking than in older versions that used the awkward method of applying multiple “pins.” Masks now occupy separate layers, and AI masks can be created in one-click for the sky (and ground by inverting the Sky mask) and for key subjects in the image. Other non-AI masks can be created with brushes (with an Auto Mask option for edge detection) and gradient overlays, and with the option of luminance and color range masks. The AI-created Sky masks proved the most accurate compared to other programs’ AI selections, though they can intrude into the ground at times. But the sky masks do include the stars. In all, Camera Raw (or Lightroom) has the most powerful masking tools of the group, though they can be tricky to master.
ACDSee Photo Studio allows up to eight different brushed-on mask areas, each with its own adjustments, in addition to gradient masks. There is no edge detection as such, though the brushes can be limited to selecting areas of similar brightness and color. The “Magic” brush option didn’t help in selecting just the sky and stars. Local adjustments are possible to only Exposure, Saturation, Fill Light, Contrast, and Clarity. So no local color adjustments are possible. In all, local adjustments are limited.
Affinity Photo has, in its Develop Persona, what it calls Overlays, where for each Overlay, or layer, you can brush on separate sets of adjustments using all the sliders in the Develop Persona. Oddly, there is no option for decreasing the opacity of a brush, only its size and feathering. While there is an Edge Aware option, it did a poor job on the test image detecting the boundary between land and sky, despite the edge being sharply defined. So local adjustments require a lot of manual brushing and erasing to get an accurate mask. The red mask Overlay, useful at times, has to be turned on and off manually. Other programs (ACR and Capture One) have the option of the colored overlay appearing automatically just when you are brushing.
Capture One offers adjustment layers for each mask required. The only “smart” brush is the Magic Brush which affects areas across the entire image with similar luminosity. There isn’t any edge detection option as such, so creating masks for the sky and ground is still largely a manual process requiring careful brushing. Separate layers can be added for healing and retouching. While Capture One’s local adjustments can work well, they require a lot more manual work than do programs equipped with AI-driven selection tools.
DxO PhotoLab allows multiple local adjustments, with the option of an Auto Mask brush that nicely detects edges, though the mask overlay itself (as shown above on the sky) doesn’t accurately show the area being affected. Strange. Masks can also be added with what are called Control Points to affect just areas of similar luminance within a wide circle, often requiring multiple Control Points to create an adjustment across a large region. Masks can also be created with adjustable brushes. Each masked area is then adjusted using a set of equalizer-like mini-controls, rather than in the main panels. In all, it’s a quirky interface, but it can work quite well once you get used to it.
Exposure X7 offers adjustment layers with options to add a gradient, or to draw or brush on an area to make a selection. There is no edge detection, only a color range mask option, so creating a sky or ground mask can require lots of hand painting. I found the preview sluggish, making it a bit of a trial-and-error exercise to make fine adjustments. However, the full range of tone and color adjustments can be applied to any local mask, a plus compared to ACDSee for example.
Luminar was first out with AI masks to automatically select the sky, and various landscape elements it detects. In all it does a good job, making it easy to add local adjustments. There are also gradient tools and normal brushes, but oddly, considering the amount of AI Luminar relies on, there is no edge detection (at least, as of early 2023). So brushing to create a mask requires a lot of finicky painting and erasing to refine the mask edge. The strong point is that masks can be added to any of Luminar’s many filters and adjustment panels, allowing for lots of options for tweaking the appearance of selected areas, such as adding special effects like glows to the sky or landscape. However, most of those filters and effects are added to the image after it is developed, and not to the original raw file.
ON1’s AI Sky mask does not include the stars.
ON1 Photo RAW has always offered good local adjustments, with each occupying its own layer. Photo RAW 2023 added its new “Super Select” AI tools to compete with Adobe. But they are problematic. The select Sky AI masking fails to include stars, leaving a sky mask filled with black holes, requiring lots of hand painting to eliminate. You might as well have created the mask by hand to begin with. Plus in the test image, selecting “Mountain” to create a ground mask just locked up the program, requiring a Force Quit to exit it. However, ON1’s conventional masks and adjustments work well, with a wide choice of brush options. The Perfect Brush detects areas of similar color, not edges per se.
WINNERS: Adobe and Luminar for accurate AI masks
LOSER: Darktable— it has no Local Adjustments at all
I provide each of the finished images for the untracked star trail example below, under Program-by-Program Results. But here’s a summary, in what I admit is a subjective call. One program would excel in one area, but be deficient in another. But who produced the best looking end result?
Overall, I think Capture One came closest to matching or exceeding Adobe Camera Raw for image quality. Its main drawback is the difficulty in creating precise local adjustment masks.
DxO PhotoLab also produced a fine result, but still looking a little flat compared to ACR and Capture One. But it does have good AI noise reduction.
In the middle of the ranking are the group of ACDSee Photo Studio, Exposure X7, and ON1 Photo RAW. Their results look acceptable, but closer examination reveals the flaws such as haloed stars and loss of fine detail. So they rank from Fair to Good, depending on how much you pixel peep!
Luminar Neo did a good job, though achieving those results required going beyond what its DevelopRAW panel can do, to apply Neo’s other filters and effects. So in Neo’s case, I did more to the image than what was possible with just raw edits. But with Luminar, the distinction between raw developer and layer-based editor is fuzzy indeed. It operates quite differently than other programs tested here, perhaps refreshingly so.
For example, with the more conventionally structured workflow of Affinity Photo, I could have exacted better results from it had I taken the developed raw image into its Photo Persona to apply more adjustments farther down the workflow. The same might be said of ON1 Photo RAW.
But the point of this review was to test how well programs could do just at the raw-image stage. Due to the unique way it operates, I’ll admit Luminar Neo did get the advantage in this raw developer test. Though it failed on several key points.
WINNERS: Adobe and Capture One, with DxO a respectable second
Getting one image looking great is just the first step. Even when shooting nightscape stills we often take several images to stack later.
As such, we want to be able to process just one image, then copy and paste its settings to all the others in one fell swoop. And then we need to be able to inspect those images in thumbnails to be sure they all look good, as some might need individual tweaking.
While it’s a useful feature for images destined for a still-image composite, Copy & Paste Settings is an absolutely essential feature for processing a set for a time-lapse movie or a star trail stack.
The Copy and Paste Settings panels from the 8 programs that offer this feature.
I tested the programs on the set of 360 time-lapse frames of the Perseid meteor shower used next for the Batch Export test.
Adobe Bridge makes it easy to copy and paste Camera Raw settings to identically process all the files in a folder. Lightroom has a similar function. Adobe also has adaptive masks, where a sky mask created for one image will adapt to all others, even if the framing or composition changes, as it would in a motion-control time-lapse sequence or panorama set. Applying settings to several hundred images is fairly quick, though Bridge can be slow at rendering the resulting thumbnails.
ON1 Photo RAW can also copy and paste AI masks adaptively, so a Sky mask created for one image will adapt to match another image, even if the framing is different. However, applying all the settings to a large number of images and rendering the new previews proved achingly slow. And it’s a pity it doesn’t create a better sky mask to begin with.
Capture One has a single Copy and Apply Adjustments command where you develop one image, select it plus all the other undeveloped images in the set to sync settings from the processed image to all the others. But the adjustment layers and their masks copy identically; there is no adaptive masking because there are no AI-generated masks. However, applying new settings to hundreds of images and rendering their thumbnails is very fast, better than other programs.
DxO PhotoLab’s Control Point masks and local adjustments also copy identically. Copying adjustments from one image to the rest in the set of 360 test images was also very fast.
ACDSee Photo Studio and Exposure X7 also allow copying and pasting all or selected settings, including local adjustment masks. ACDSee was slow, but Exposure X7 was quite quick to apply settings to a large batch of images, such as the 360 test images.
Darktable’s function is under the History Stack panel where you can copy and paste all or selected settings, but all are global — there are no local adjustments or masks.
Luminar Neo allows only copying and pasting of all settings, not a selected set. When testing it on the set of 360 time-lapse frames, Neo proved unworkably slow, taking as much as an hour to apply settings and render the resulting thumbnails in its Catalog view, during which time my M1 MacBook Pro warned the application was running out of memory, taking up 110 Gb! I had to Force Quit it.
Affinity Photo is capable of editing only one image at a time. There is no easy or obvious way to copy the Develop Persona settings from one raw image, open another, then paste in those settings. You can only save Presets for each Develop Persona panel, making transferring settings from one image to even just one other image a tedious process.
Affinity Photo with several raw images stacked and identically processed with the method below.
Affinity Workaround
But … there is a non-obvious and unintuitive method in Affinity which works for stacking and processing a few raw files for a blend:
Process one raw image and then click Develop so it moves into the Photo Persona, as a “RAW Layer (Embedded),” a new feature in Affinity Photo 2.
Find the other raw image files (they won’t have any settings applied) and simply drag them onto the Photo Persona screen.
Use the Move tool to align the resulting new layers with the original image.
Select all the image layers (but only the first will have any settings applied) and hit the Develop Persona button.
Then hit the Develop button — this will apply the settings from the first image to all the others in the layer stack. It’s the best Affinity can do for a “copy and paste” function.
Change the blend mode or add masks to each layer to create a composite or star trail stack.
Each layer can be re-opened in the Develop Persona if needed to adjust its settings.
It’s all a bit of a kludge, but it does work.
WINNERS: Capture One for blazing speed; Adobe and ON1 for adaptive masks
LOSER: Affinity Photo, for lacking this feature entirely, except for a method that is not at all obvious and limited in its use.
Feature-by-Feature Details — 8. Batch Export
Once you develop a folder of raw images with “Copy & Paste,” you now have to export them with all those settings “baked into” the exported files.
This step creates an intermediate set of TIFFs or JPGs to either assemble into a movie with programs such as TimeLapse DeFlicker, or to stack into a star trail composite using software such as StarStaX.
The Batch Export panels from all 9 programs.
To test the Batch Export function, I used each program to export the same set of 360 developed raw files taken with a 20-megapixel Canon R6, shot for a meteor shower time-lapse, exporting them into full-resolution, low-compression JPGs.
While all programs can do the task, some are much better than others.
Adobe Bridge has a configurable Export panel (though it can be buggy at times), as does Lightroom. Its speed is good, but is beaten by several of the competitors.
Even Affinity Photo can do a batch export, done through its “New Batch Job” function. As with its other image selection operations, Affinity depends on your operating system’s Open dialog box to pick images. Exporting worked well, though without being able to develop a batch of raw files, I’m not sure why you would have cause to use this batch function to export them. I had to test it with undeveloped raws. Oddly, Affinity’s exported JPGs (at 5496 x 3664 pixels) were slightly larger than the size of the original raws (which were 5472 x 3648 pixels). No other program did this.
Most programs allow saving combinations of Export settings as frequently used presets. An exception is Exposure X7 where separate presets have to be saved and loaded for each option in its Export panel, awkward. And Luminar Neo’s batch export is basic, with no option for saving Export presets at all.
In the export of the 360 test images, each program took:
Adobe Bridge 15 minutes (after 3 attempts to get it to actually work!)
ACDSee Photo Studio 33 minutes
Affinity Photo 2 32 minutes
Capture One 23 6 minutes
Darktable 4 16 minutes
DxO PhotoLab 6 8 minutes
Exposure X7 5 minutes 30 seconds
Luminar Neo 8.5 hours (!)
ON1 Photo RAW 2023 1.4 hours
This was on my M1 Max MacBook Pro. Your mileage will vary! The clear winners in the export race were Exposure X7, Capture One, and DxO. ON1 was way behind the pack. Luminar was impossibly slow. It is not a program for working with lots of images.
ON1’s Time-Lapse Function
Unique among these programs, ON1 Photo RAW provides a Time-Lapse function that allows directly exporting developed raw files to a final movie, without the need to export an intermediate JPG set. That sounds like a great time saver. Only Adobe After Effects can do the same.
However … ON1’s options are limited: up to a maximum DCI 4K size, in H264 or Apple ProRes codecs, and with a choice of just three frame rates: 24, 25, or 30 frames per second. A dedicated assembly program such as TimeLapse DeFlicker can do a much better job, and faster, with more options such as frame blending, and up to 8K movie sizes.
And oddly, ON1’s Time-Lapse panel provides no option for where to save the movie or what to name it — it defaults to saving the movie to the original folder with the images, and with the name of one of the images. I had to search for it to locate it.
WINNERS: Exposure X7 and Capture One for sheer speed
LOSER: Luminar Neo for being unusably slow
Feature-by-Feature Details — 9. Advanced Features
Here I’ve noted what programs offer what features, but I tested only the panorama stitching function. For a panorama test I used a set of seven images shot with the Canon R5 and RF15-35mm lens at Peyto Lake, Banff.
The Panorama options from 4 programs. ON1 (lower left) failed to stitch 2 of the 7 segments).
Adobe Camera Raw (and Lightroom) offers HDR Merge and Panorama stitching plus, uniquely, the ability to merge multi-exposure HDR panoramas. But it has no Focus Stack option (that’s in Photoshop). For panoramas, ACR offers a choice of projection geometries, and the very excellent Boundary Warp function for filling in blank areas, as well as content-aware Fill Edges. The result is a raw DNG file.
Capture One has HDR Merge and Panorama stitching, but no Focus Stack option. Like ACR, Capture One’s panorama mode offers a choice of projection geometries and results in a raw DNG file for further editing at the raw level. It worked well on the test set, though lacks anything equivalent to ACR’s content-aware Fill Edges and Boundary Warp options.
ON1 Photo RAW offers HDR Merge, Focus Stack, and Panorama stitching of raw files. Using the same seven images that ACR and Capture One succeeded with, ON1 failed to stitch two of the segments, leaving a partial pano. It does offer a limited choice of projection methods and, like ACR, has the option to warp the image to fill blank areas. It creates a raw DNG file.
Affinity Photo also offers HDR Merge, Focus Stack, and Panorama stitching, all from raw files. However, the panorama function is quite basic, with no options for projection geometry or content-aware fill. But it did a good job blending all segments of the test set seamlessly. The result is a raw file that can be further processed in the Develop Persona.
ACDSee Photo Studio for Mac lacks any HDR, Focus Stack, or Panorama stitching. Those functions are available in the Windows versions (Pro and Ultimate), but I did not test them.
Luminar Neo offers HDR Merge and Focus Stack through two extra-cost extensions. As of this writing it does not offer Panorama stitching, but more extensions (yet to be identified!) will be released in 2023.
Darktable offers just HDR Merge, but no Focus Stack or Panorama functions.
DxO PhotoLab 6 lacks any HDR, Focus Stack or Panorama functions. Ditto for Exposure X7. Those are serious deficiencies, as we have a need for all those functions when processing nightscapes. You would have to develop the raw files in DxO or Exposure, then export TIFFs to merge or stitch them using another program such as Affinity Photo.
WINNERS: Adobe and Capture One
LOSER: DxO for missing key functions expected in a premium “Adobe killer”
Program-by-Program Summary
I could end the review here, but I feel it’s important to present the evidence, in the form of the final images, as best I could process them with each of the programs. I rate their overall image quality and performance on a subjective scale of Poor / Fair / Good / Excellent, with additional remarks about the Pros and Cons of each program, as I see them.
Adobe Camera Raw (also applies to Adobe Lightroom)
IMAGE QUALITY: Excellent
PROS: ACR has excellent selective shadow recovery and good noise reduction which, while not up to the level of new AI methods, doesn’t introduce any weird AI artifacts. Its panels and sliders are fairly easy to use, with a clean user interface. Its new AI masking and local adjustments are superb, though take some practice to master.
CONS: It is available only by monthly or annual subscription, and lacks the more advanced AI noise reduction, sharpening, and one-click special effects of some competitors. Using the Adobe suite requires moving between different Adobe programs to perform all functions. Adobe Bridge, a central program in my workflow, tends to be neglected by Adobe, and suffers from bugs and deficiencies that go uncorrected.
ACDSee Photo Studio (for Mac)
IMAGE QUALITY: Fair
PROS: Photo Studio in its various versions offers good image management functions, making it suitable as a non-subscription Lightroom alternative. It offers an advanced array of tonal and color adjustments in an easy-to-use interface.
CONS: It produced badly haloed stars and had poor noise reduction. Its local adjustments are limited and lag behind the competition with no AI functions. It has no panorama stitching or HDR merging functions in the Mac version — the Windows versions get much more love and attention from ACDSee.
Affinity Photo 2
IMAGE QUALITY: Fair (for its Develop Persona) / Good to Excellent (as a Photoshop replacement)
PROS: Affinity Photo is certainly the best alternative to Photoshop for anyone looking to avoid Adobe. It is an excellent layer-based program (far better than GIMP) with unique features for astrophotographers such as stacking and gradient removal. With v2, it is now possible to transfer a raw file from the Develop Persona to the Photo Persona non-destructively, allowing re-opening the raw file for re-editing, similar to Adobe’s Camera Raw Smart Objects.
CONS: Affinity Photo’s Develop Persona for raw files is basic, with limited adjustments and producing average results at best. Transferring settings from one raw file to others is difficult, if not impossible. Affinity Photo is designed for editing single images only.
Capture One 23
IMAGE QUALITY: Excellent
PROS: Capture One has excellent shadow recovery and color adjustment controls. Local adjustments are easy to add and edit, though lack edge detection and AI selection. It has excellent cataloging functions, and overall superb image quality. It’s a good Lightroom alternative.
CONS: It’s costly to purchase, and more expensive than Adobe’s Creative Cloud to subscribe to. It can easily soften stars if not careful. It lacks AI masking, and overall the program tends to lag behind competitors by a few years for advanced features — Capture One added panorama stitching only a couple of versions back. I found the program also tended to litter my drive with Capture One folders.
Darktable
IMAGE QUALITY: Poor
PROS: It’s free! And it offers many adjustments and intricate options not found elsewhere that the technically minded will enjoy experimenting with.
CONS: Darktable’s community of developers has added a bewildering array of panels in a confusing interface, making Darktable not for beginners nor the feint of heart. I struggled with it, all for poor results. Just finding the Export function was a challenge. Darktable is a program designed by programmers for use by other programmers who love to play with image data, and who care little for a user interface friendly to “the rest of us!”
DxO PhotoLab 6
IMAGE QUALITY: Excellent
PROS: Along with Capture One, I found DxO PhotoLab capable of producing a good-looking image, the equal of or perhaps better than Camera Raw, partly because of DxO’s ClearView and Smart Lighting options. It has lots of downloadable camera and lens modules for automatic lens corrections. Its noise reduction was excellent, though its DeepPrime and DeepPrimeXD options can add AI artifacts.
CONS: There are no adjustment layers or masks as such. Local adjustments are done through DxO’s quirky Control Point interface which isn’t as visually intuitive nor as precise as masks and layers. As of PhotoLab 6, DxO has yet to offer panorama or HDR merging, lagging far behind the competition.
Exposure X7
IMAGE QUALITY: Fair
PROS: Exposure has a full set of tonal and color adjustments, and essential image management functions. It has good local adjustment layers, though with no AI or smart brushes to automatically detect edges. It produced acceptable final results, though still looking a little flat.
CONS: Exposure lacks any panorama stitching or HDR merging functions. Its noise reduction can wipe out stars and image details, and its sharpening adds dark halos to stars. It often crashed during my testing, by simply quitting unexpectedly. Annoying.
Luminar Neo
IMAGE QUALITY: Good to Excellent
PROS: Luminar has a clean, fresh interface with many powerful AI-driven functions and effects unique to Luminar and that are easy to apply. The final result looks fine. Its AI masks work quite well. Neo also works as a plug-in for Photoshop or Lightroom.
CONS: Luminar is expensive to purchase outright with all the Extensions, with a subscription the most economical method of acquiring, and maintaining, the full package. Its Noiseless AI didn’t handle starfields well. Neo lacks a useable cataloging function, and the version tested had numerous serious bugs. It is best for editing just single images.
ON1 Photo RAW 2023
IMAGE QUALITY: Good
PROS: ON1 Photo RAW is the only program of the set that can: catalog images, develop raw files, and then layer and stack images, performing all that Lightroom and Photoshop can do. It can serve as a one-program solution, and has excellent Effects and NoNoise AI, also available as plug-ins for Adobe software. It offers layer-based editing as well.
CONS: ON1 consistently produces dark halos around stars from over-sharpening in its raw engine. These cannot be eliminated. Its AI selection routines are flawed. Its AI noise reduction can leave artifacts if applied too aggressively, which is the default setting. Opening images from the Browse module as layers in the Edit module can be slow. It offers no stack modes (present in Photoshop and Affinity) for easy noise smoothing or star trail stacking, and the alternative — changing layer Blend modes — has to be done one at a time for each layer, a tedious process for a large image stack.
Why Didn’t I Test …?
… [Insert your favorite program here!] No doubt it’s one you consider badly neglected by all the world’s photographers!
But … as I stated at the outset, I tested only programs offered for both MacOS and Windows. I tested the MacOS versions — and for nightscapes, which are more demanding than normal daytime scenes.
Icons for the programs not tested. How many can you identify? Hint: They are in alphabetical order.
I did not test:
Adobe Photoshop Elements —Effectively Photoshop “Lite,” Elements is available for $99 as a one-time purchase with a perpetual license, for both MacOS and Windows. Optional annual updates cost about $80. While it offers image and adjustment layers, and can open .PSD files, Elements cannot do much with 16-bit images, and has limited functions for developing raw files, in its version of Camera Raw “Lite.” And its Lightroom-like Organizer module does not not have any Copy & Paste Settings or batch export functions, making it unsuitable for batch editing or time-lapse production.
Like Apple’s Photos and other free photo apps, I don’t consider Elements to be a serious option for nightscape and time-lapse work. A Creative Cloud Photo subscription doesn’t cost much more per year, yet gets you far, far more in Adobe’s professional-level software.
Corel PaintShop — As with ACDSee’s product suite, Corel’s PaintShop is available in Pro and Pro Ultimate versions, both updated for 2023, and each with extensive raw and layer-based editing features. But they are only for Windows. If you are a PC user, PaintShop is certainly worth testing out. Their neglected MacOS program (also available for Windows and Linux) is the raw developer AfterShot Pro 3 (currently at v3.7.0.446). It is labeled as being from 2017, and last received a minor bug fix update in January 2021. I included it in my 2017 survey, but could not this year as it refused to recognize the CR3 raw files from my Canon R5 and R6 cameras.
Darkroom and Acorn are two Mac-only apps wth just basic features. There are no doubt numerous other similar Windows-only apps that I am not familiar with.
GIMP — Being free, it has its loyal fans. But it is not a raw developer, so it is not tested here. It is favorite of some astrophotographers as a no-cost substitute for Adobe Photoshop or Affinity Photo. It’s available for MacOS and Windows.
Iridient Developer — Its anachronistic, text-only website looks like it comes from 1995, giving the impression that this raw developer should be free, open-source software. It isn’t; it costs $99. It is a basic raw developer but only for MacOS. It is updated frequently, and a trial copy is available.
Pixelmator Pro — While it is a very capable and well-supported program with some excellent features, it too is available only for MacOS. Like Affinity Photo, it seems to be primarily for editing individual raw images, and lacks any image management functions, notably Copy & Paste Settings.
PixInsight — This specialized astrophoto program is designed for deep-sky image processing and bringing out the most subtle structures in faint nebulas and galaxies. For those it works wonders. But it is not suitable for nightscapes. Examples I’ve seen from PI fans who have used it for nightscapes, including images I’ve sent them for their expert processing, have not impressed me.
RawTherapee — As of early January 2023 when I completed my testing, the latest version of this free open-source program, v5.9, was available only for Windows and Linux. The MacOS version was still back at v5.8 from February 2020, a version that was unable to open the Canon CR3 raw files I was using in my tests. While the CR3 format has been out for several years, RawTherapee was still not supporting it, a hazard of open-source software dependent on the priorities of volunteer programmers who mostly use Windows. Like Darktable, RawTherapee is an incredibly complex program to use, with programmers adding every possible panel, slider and checkbox they could think of. [UPDATE MARCH 2023: RawTherapee 5.9 for MacOS is now available and opens Canon .CR3 files. Mac users might certainly want to try it. And Windows users, too!]
Topaz Studio — While Topaz Labs has been busy introducing some fine AI specialty programs, such as DeNoise AI, their main photo editor, Topaz Studio, has been neglected for years and, as of late 2022, was not even listed as a product for sale. It’s gone.
What About? — To prevent the number of programs tested from growing even larger, I did not include a few other little-known and seldom-used programs such as Cyberlink PhotoDirector and Picktorial, though I’m sure they have their fans.
I also did not test any camera manufacturer programs, such as Canon’s Digital Photo Professional, Nikon’s CaptureNX, or Sony’s ImagingEdge. They will open raw images only from their own cameras. Few photographers use them unless forced to, perhaps to open new raw files not yet supported by Adobe, DxO, et al, or to access files created by special camera functions such as Pixel Shift or Raw Burst Mode.
Recommendations
Having used Adobe software for decades, I’m used to its workings and the look it provides images. I’ve yet to see any of the competitors produce results so much better that they warrant me switching programs. At best, the competitors produce results as good as Adobe, at least for nightscape astrophotos, though with some offering unique and attractive features.
For example, the AI noise reduction routines in DxO PhotoLab and ON1 Photo RAW can outperform Adobe Camera Raw and Lightroom. Adobe needs to update its raw editing software with more advanced noise reduction and sharpening. Even so, the AI routines in the competitors are prone to creating odd artifacts, so have to be applied carefully to astrophotos.
A possible workflow: DxO PhotoLab or Capture One into Affinity Photo
As I recommended in 2017, for those who refuse to use Adobe — or any software by subscription — a possible combination for the best astrophoto image quality might be DxO PhotoLab 6 for raw developing and basic time-lapse processing, paired with Affinity Photo 2 for stacking and compositing still images, from finished TIFF files exported out of DxO then opened and layered with Affinity.
An example of images developed in Capture One and then layered and masked in Affinity Photo.
The pairing of Capture One with Affinity could work just as well, though is more costly. And anyone who hates software by subscription in principle might want to avoid Capture One as they are pushing customers toward buying only by subscription, as is ON1.
For a single-program solution, I’d recommend ON1 Photo RAW more highly, if only it produced better star image quality. Its raw engine continues to over-sharpen, and its AI masking functions are flawed, though will likely improve. I routinely use ON1’s Effects plug-in from Photoshop, as it has some excellent “finishing-touch” filters such as Dynamic Contrast. I find ON1’s NoNoise AI plug-in also very useful.
The same applies to Luminar Neo. While I can’t see using it as a principle processing program, it works very well as a Photoshop plug-in for adding special effects, some with its powerful and innovative AI routines.
Finally — Download Trials and Test!
But don’t take my word for all of this. Please test for yourself!
With the exception of Luminar Neo, all the programs I tested (and others I didn’t, but you might be interested in) are available as free trial copies. Try them out on your images and workflow. You might find you like one program much better than any of the others or what you are using now.
Often, having more than one program is useful, if only for use as a plug-in from within Lightroom or Photoshop. Some plug-ins made for Photoshop also work from within Affinity Photo, though it is hit-and-miss what plug-ins will actually work. (In my testing, plug-ins from DxO/Nik Collection, Exposure X7, ON1, RC-Astro, and Topaz all work; ones from Skylum/Luminar install but fail to run.)
LRTimelapse working on the meteor shower time-lapse frames.
While I was impressed with Capture One and DxO PhotoLab, for me the need to use the program LRTimelapse (shown above) for processing about 80 percent of all the time-lapse sequences I shoot means the question is settled. LRTimelapse works only with Adobe software, and the combination works great and improves wth every update of LRTimelapse.
Even for still images, the ease of working within Adobe’s ecosystem to sort, develop, layer, stack, and catalog images makes me reluctant to migrate to a mix of programs from different companies, especially when the cost of upgrading many of those programs is not much less than, or even more costly, than an Adobe Photo plan subscription.
However … if it’s just a good raw developer you are after for astro work, without paying for a subscription, try Capture One 2023 or DxO PhotoLab 6. Try Affinity Photo if you want a good Photoshop replacement.