Testing Low-Cost Fish-Eye Lenses for Astrophotography


We have a bevy of new and very affordable fish-eye lenses to choose from. They can work great for astrophotography. But which one is best? 

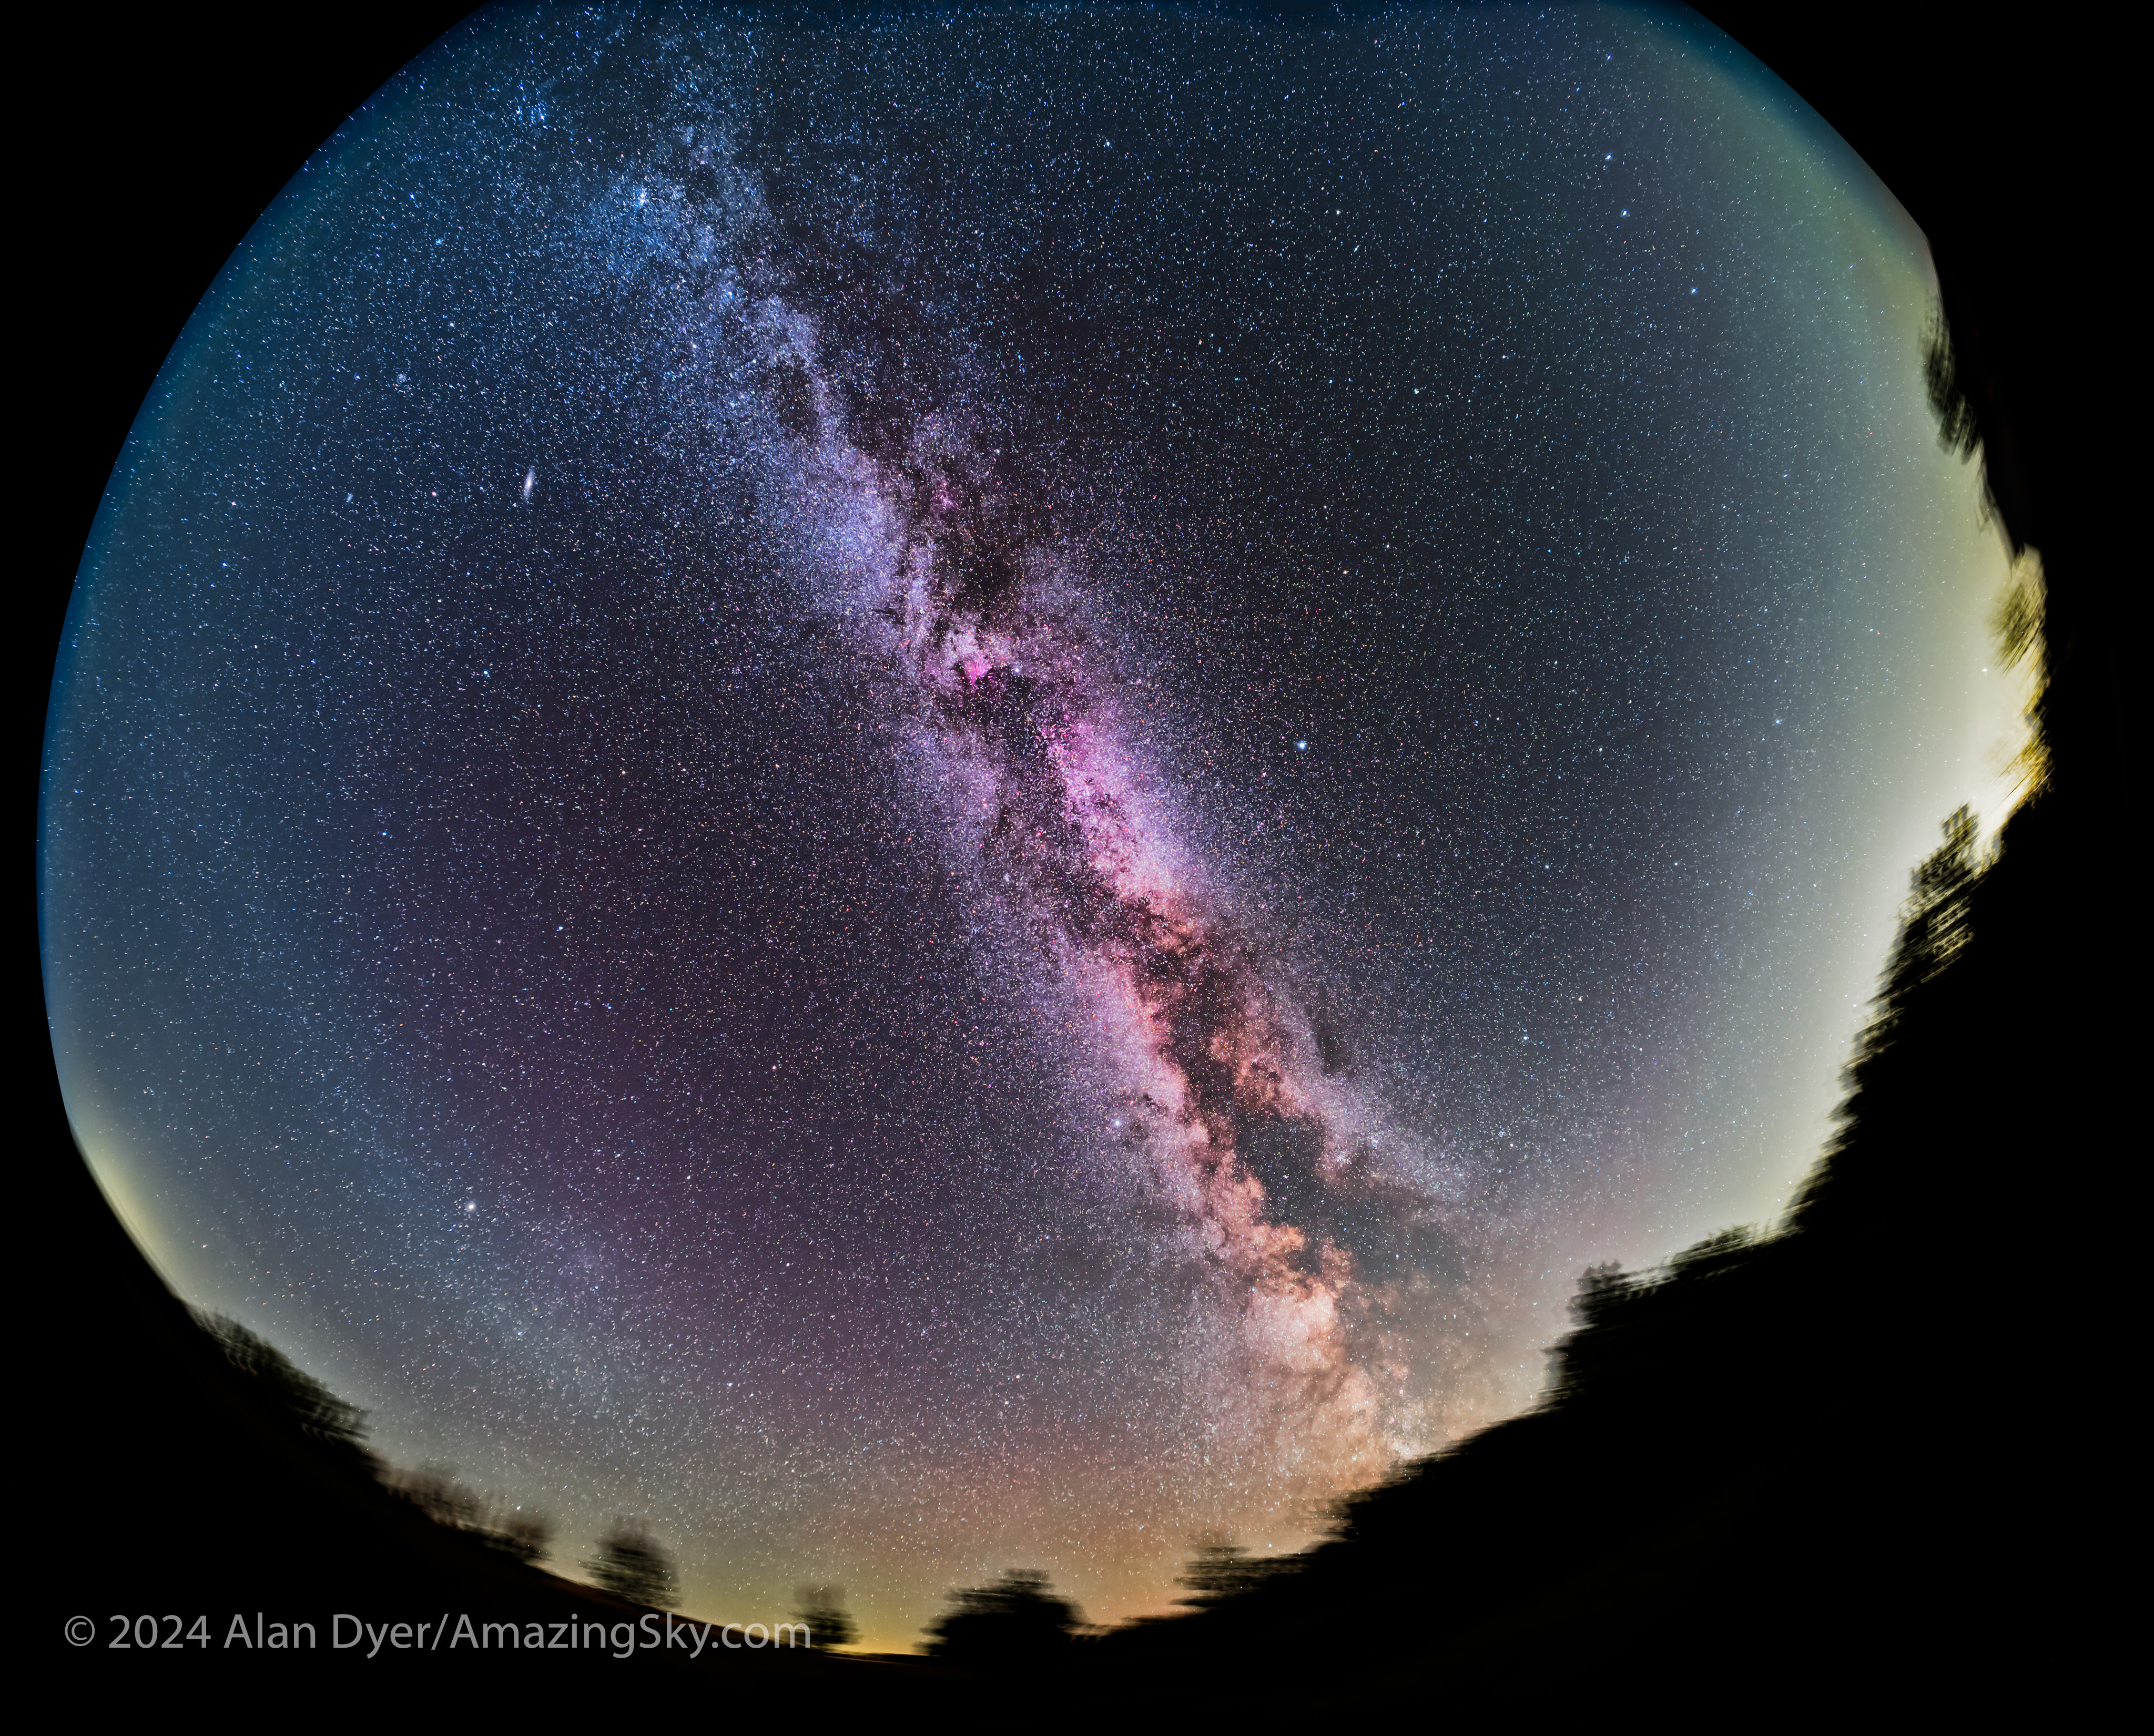
Chinese lens makers are showering the market with affordable lenses, and for the most part theyโ€™re of quite good quality. Among them are fish-eyes, very special-purpose lenses. One of those purposes is astrophotography โ€” shooting wide swaths of the night sky, if not the entire sky, in one frame. Thatโ€™s ideal for capturing sky-filling auroras, or the sweep of the Milky Way.ย 

Here I test five low-cost fish-eyes on the night sky: 
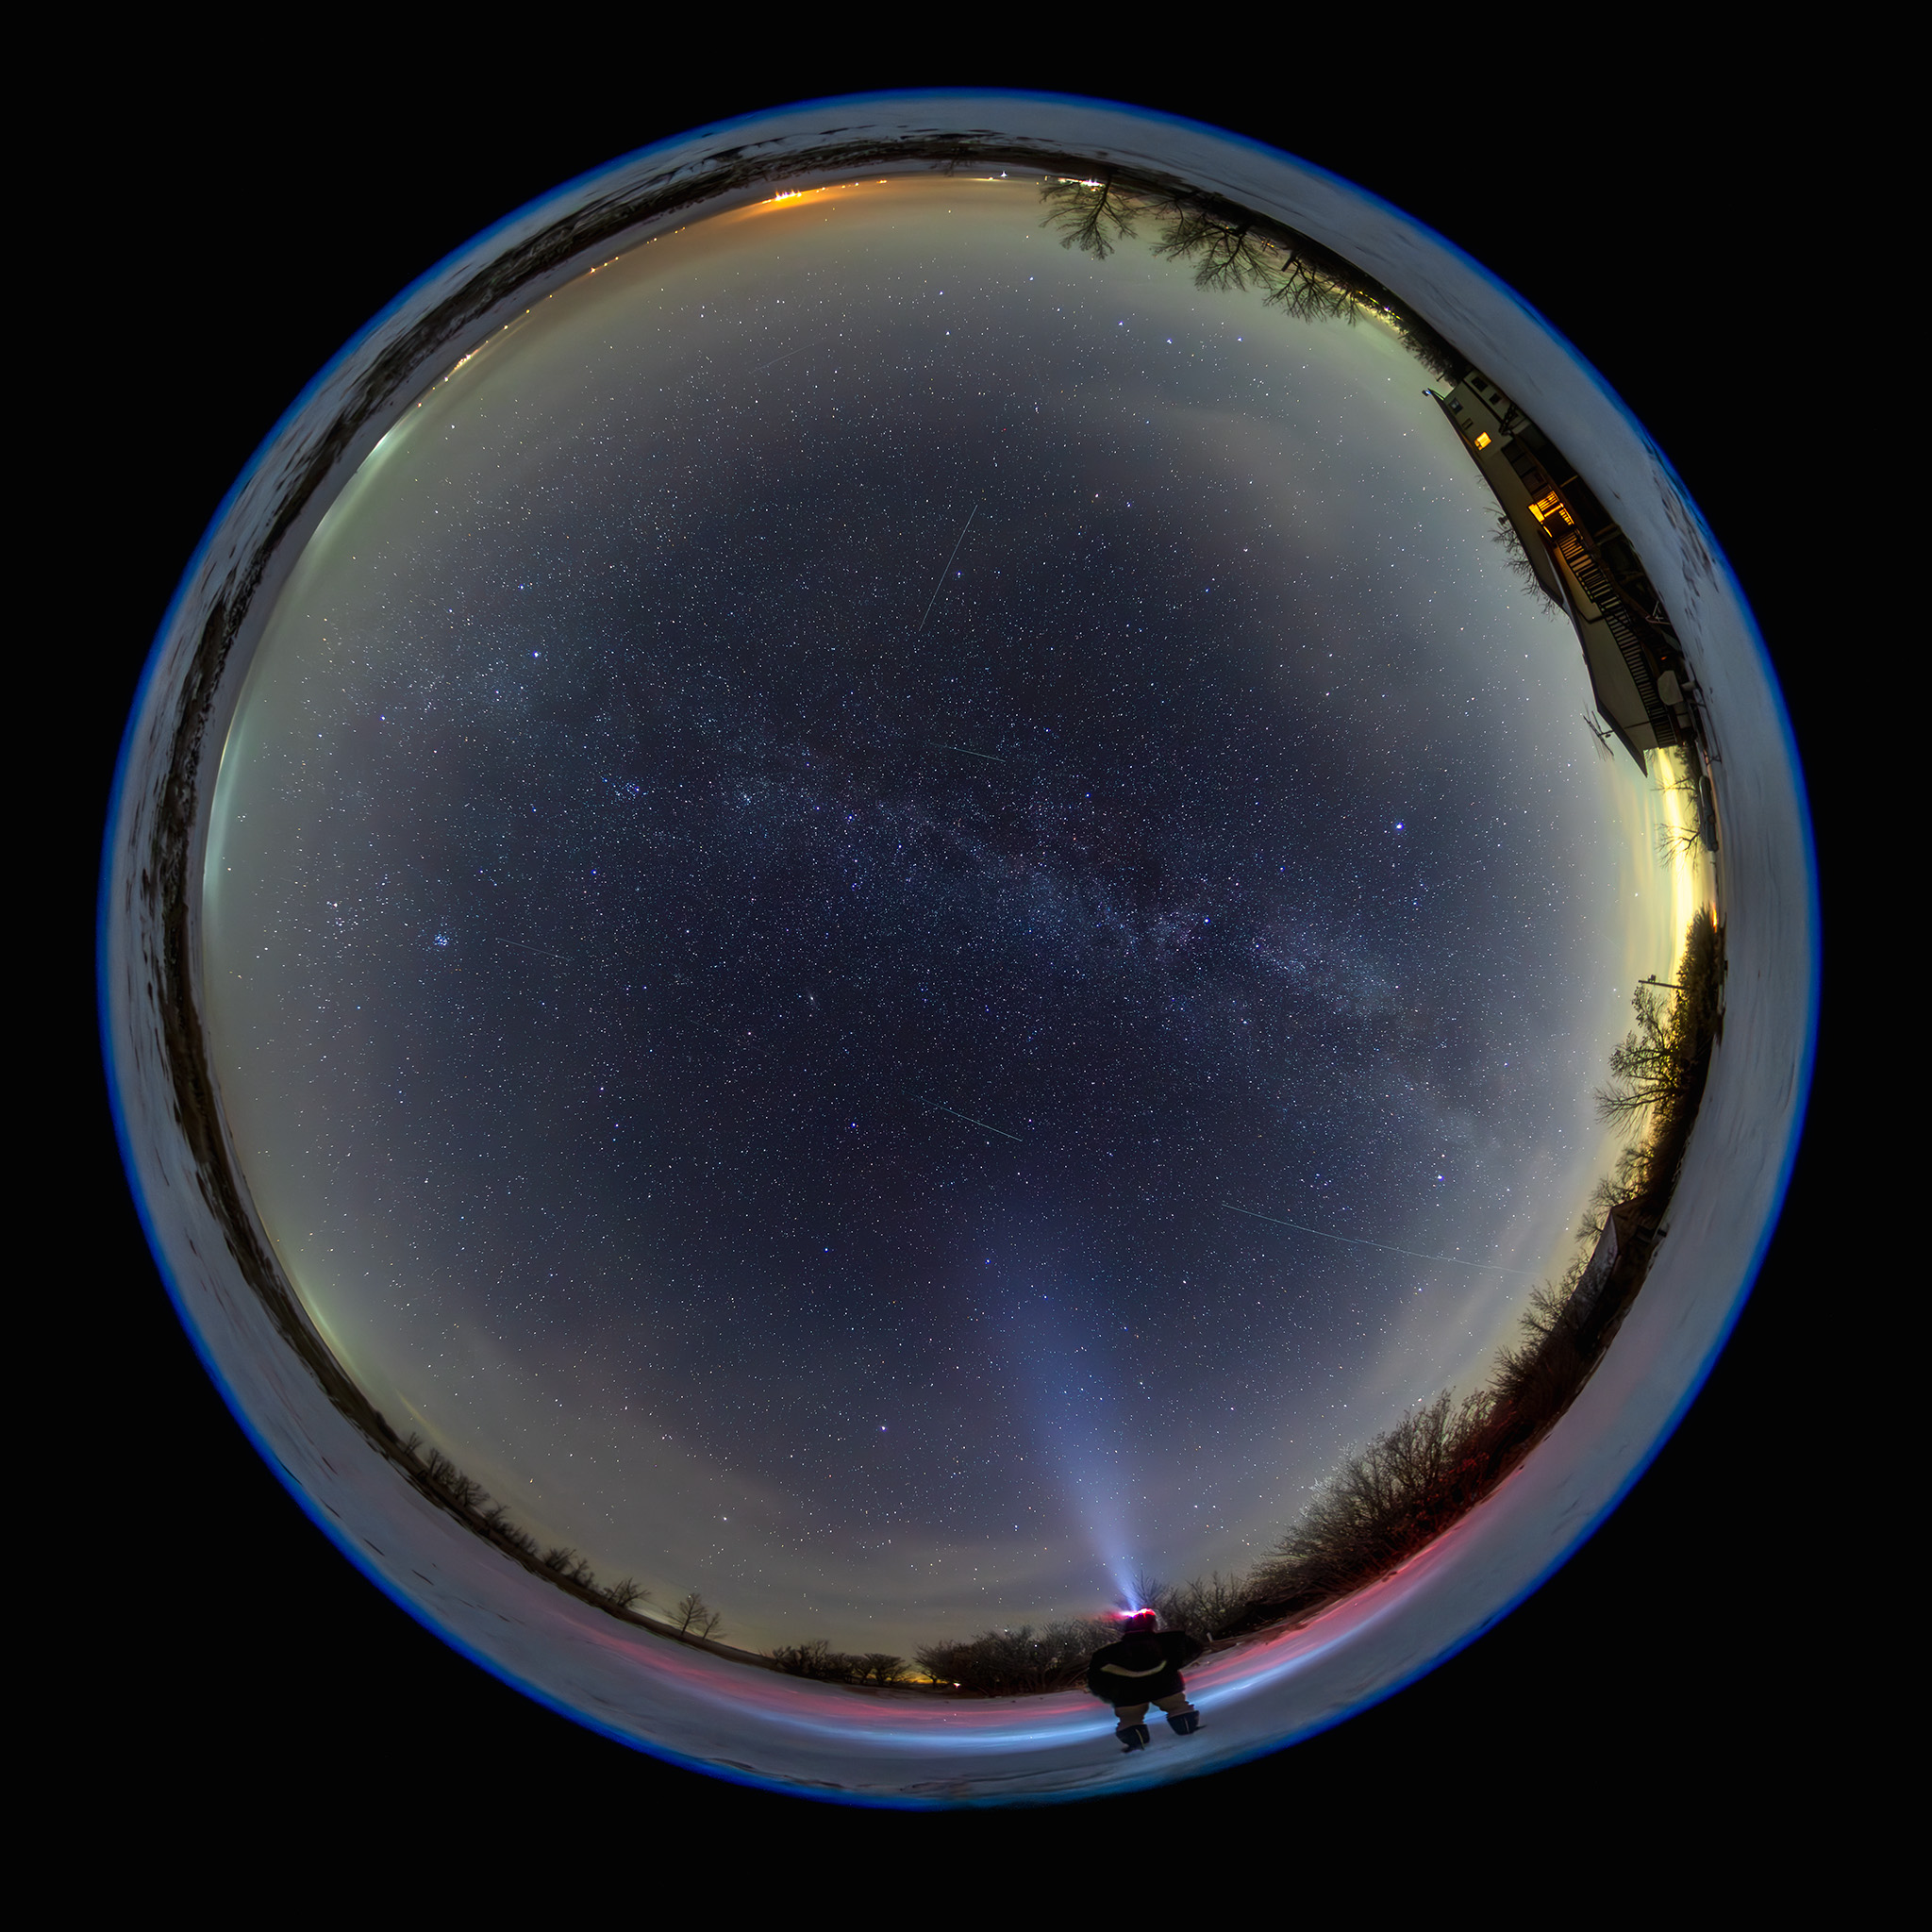
โ€“ Two circular format lenses that project a round image taking in a full 360ยฐ by 180ยบ within the rectangular frame, plus โ€ฆ

โ€“ Three lenses that fill the rectangular frame corner to corner (i.e. they are โ€œfull-frameโ€ or โ€œdiagonalโ€ fish-eyes) with a field that is about 180ยบ wide across the frame diagonal. They present curved horizons; they are not โ€œzero-distortionโ€ ultra-wide lenses. 

All five lenses work well on full-frame (36mm x 24mm sensor) cameras. All have fast f/2.8 or f/2 optics, making them suitable for astrophotography. Slower f/4 and f/5.6 fish-eyes are not.

I tested them all under a dark starry sky, checking for horizon-to-horizon sharpness and edge artifacts, and on a moonlit night looking for lens flares. 

NOTE: My blog features many high-resolution images that may take a while to load. 

However, you can CLICK or TAP on a test image to bring it up full screen for closer inspection, and save it as a JPG download.ย 

All images are ยฉ 2026 by Alan Dyer/AmazingSky.com. Use without permission is prohibited.

TL;DR SUMMARY

All five lenses work surprisingly well for such low-cost optics. And all are well made, with smooth, well-dampened manual focusing. None are โ€œplastic-fantasticโ€ junk. 

For a full-frame fish-eye the 7Artisans 10mm stands out for astro use, for its optical quality and good features such as the glow-in-the-dark markings, and an excellent storage case. It will be the best lens here for Milky Way images where star sharpness counts most.ย 

For a circular fish-eye, the 6mm AstrHori and the 7.5mm TTArtisan each have unique features: an amazing field of view for the 6mm, and fast speed for the 7.5mm. Both would be superb for capturing all-sky aurora shows, perhaps for planetarium projection. 

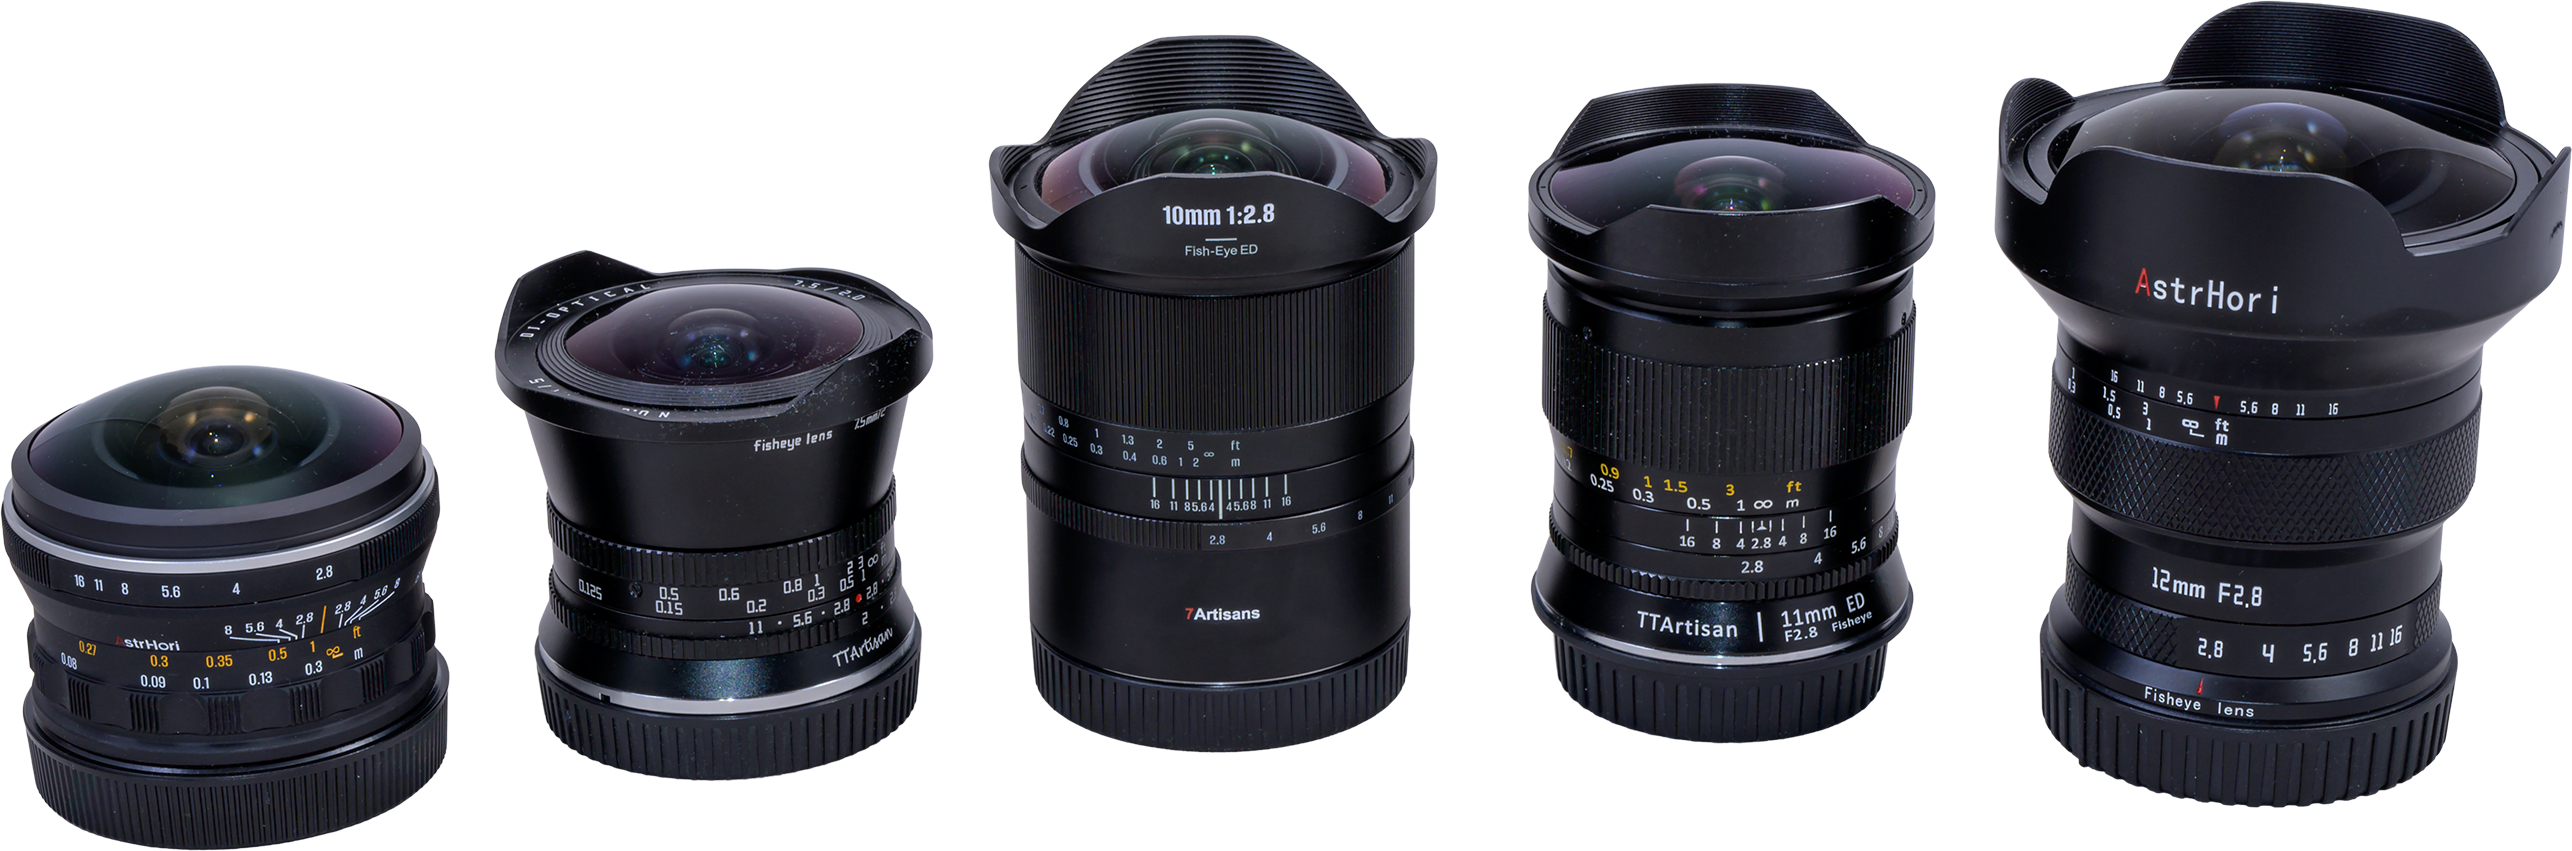
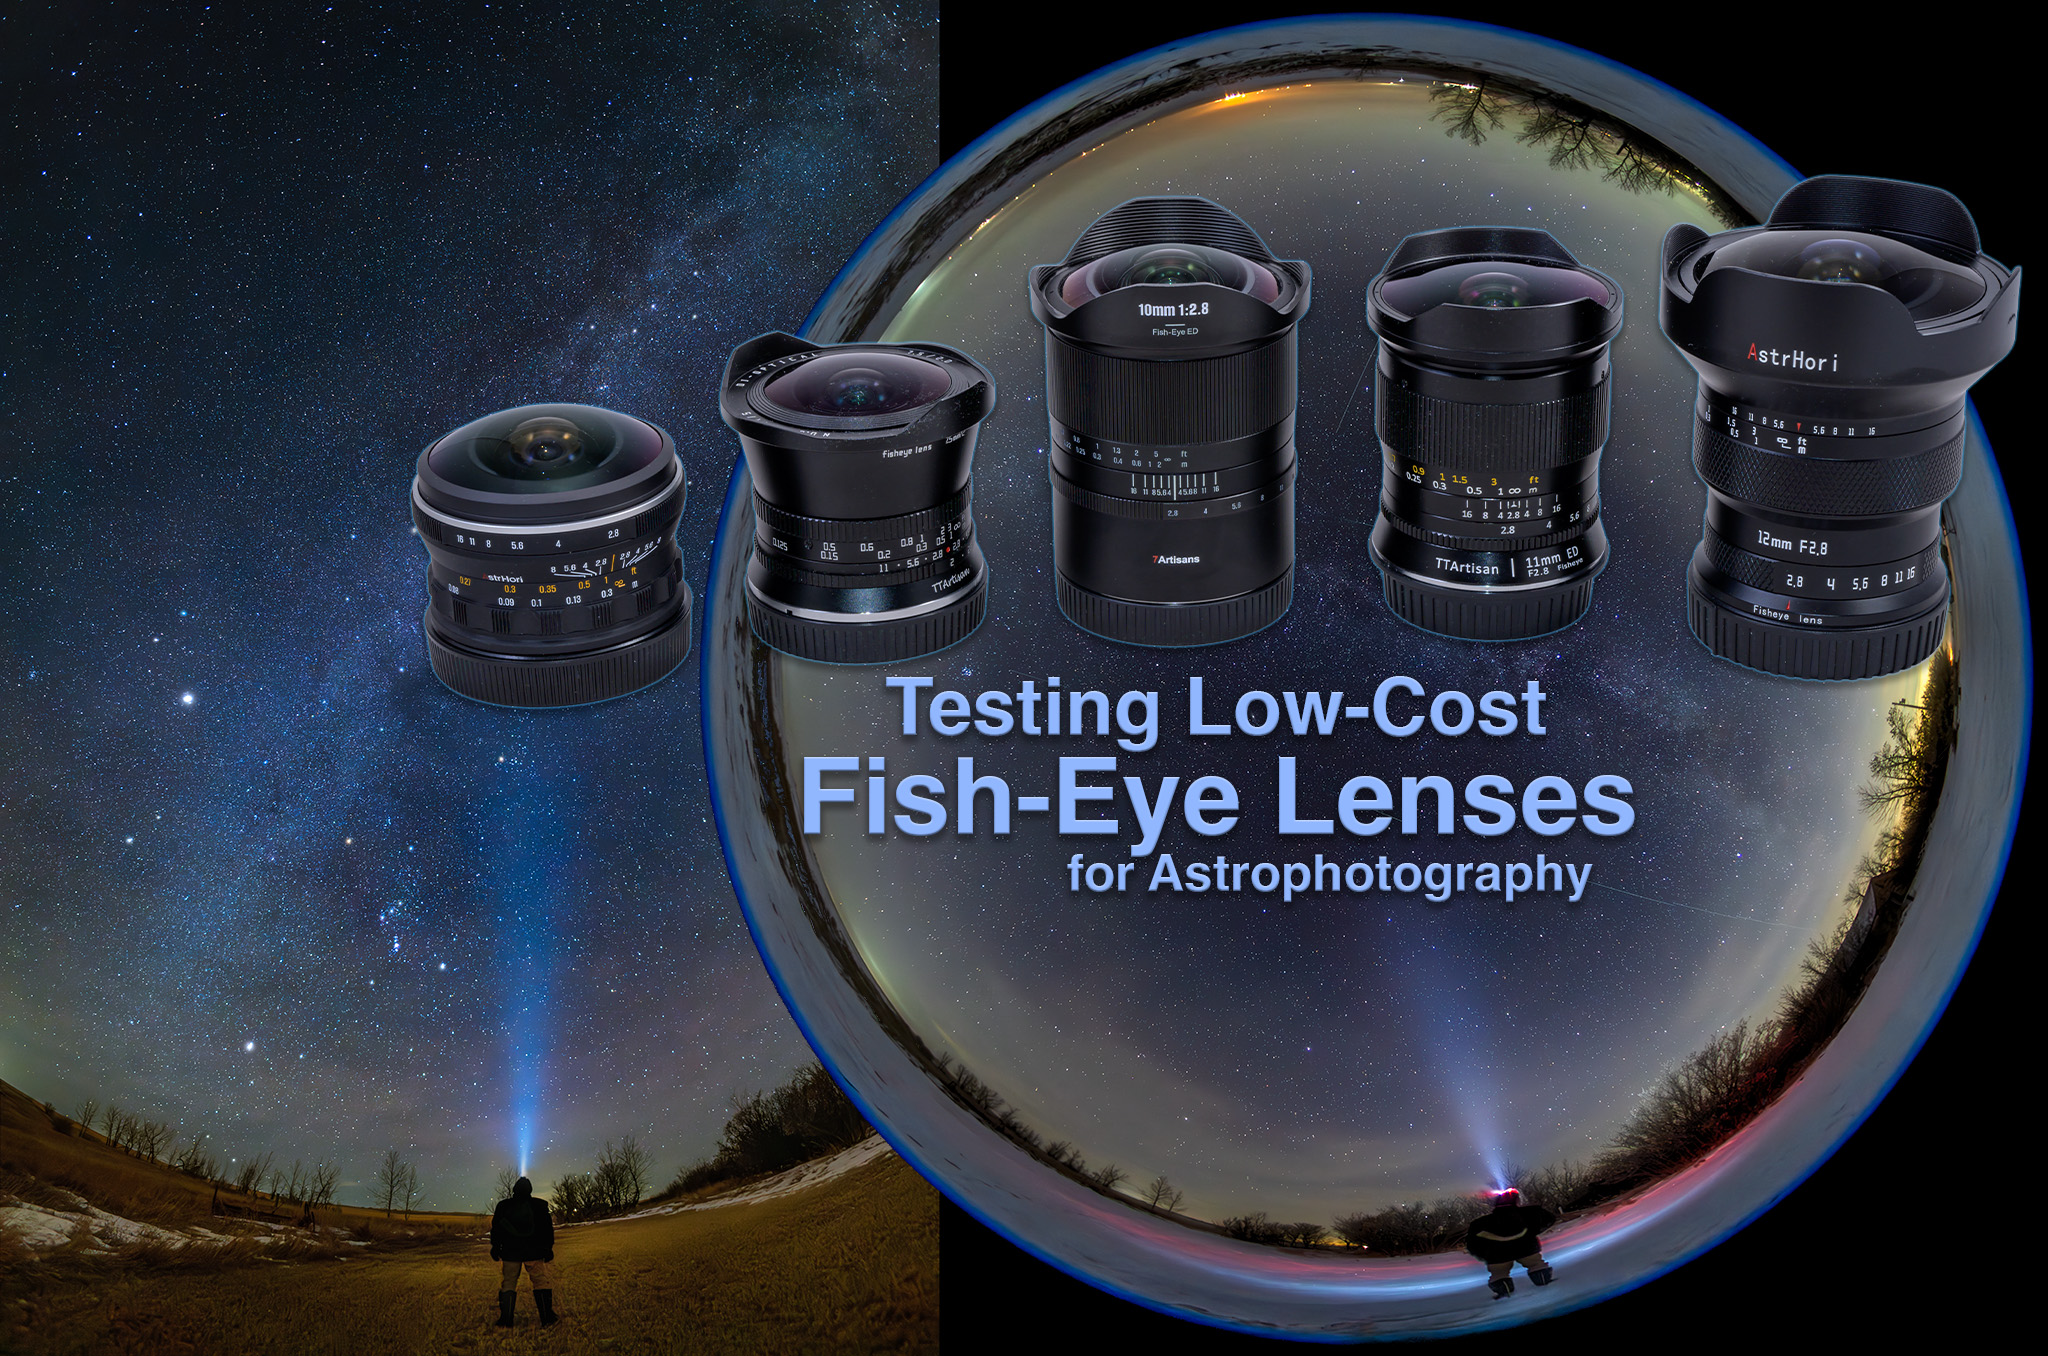
The five fish-eyes, to compare their relative sizes

THE LENSES

Here are the five lenses under test, in order of increasing focal length, shown above from L to R to compare their sizes โ€”

โ€” 6mm f/2.8 AstrHori circular fish-eye โ€“ with an advertised 220ยบ field of view

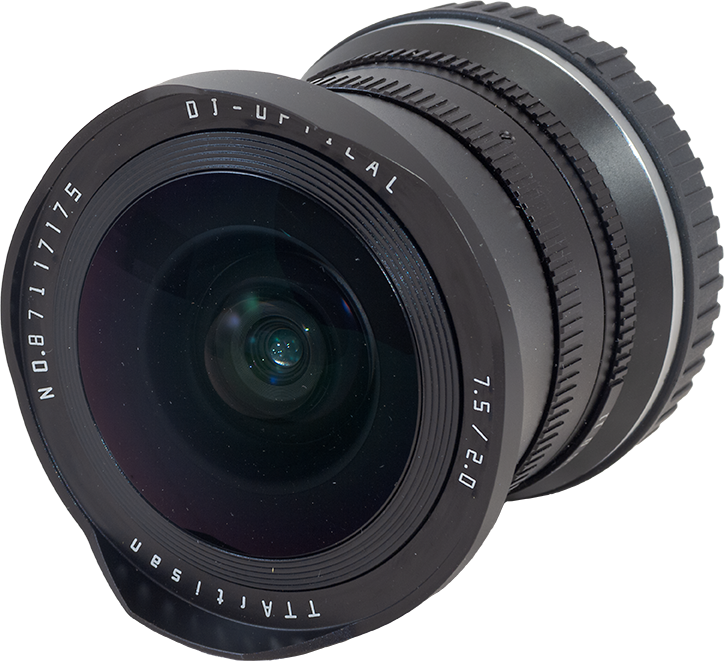
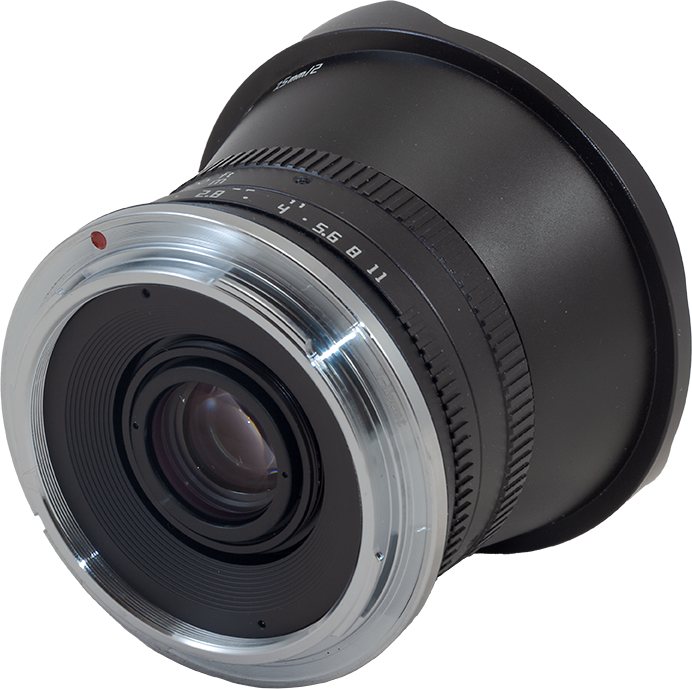
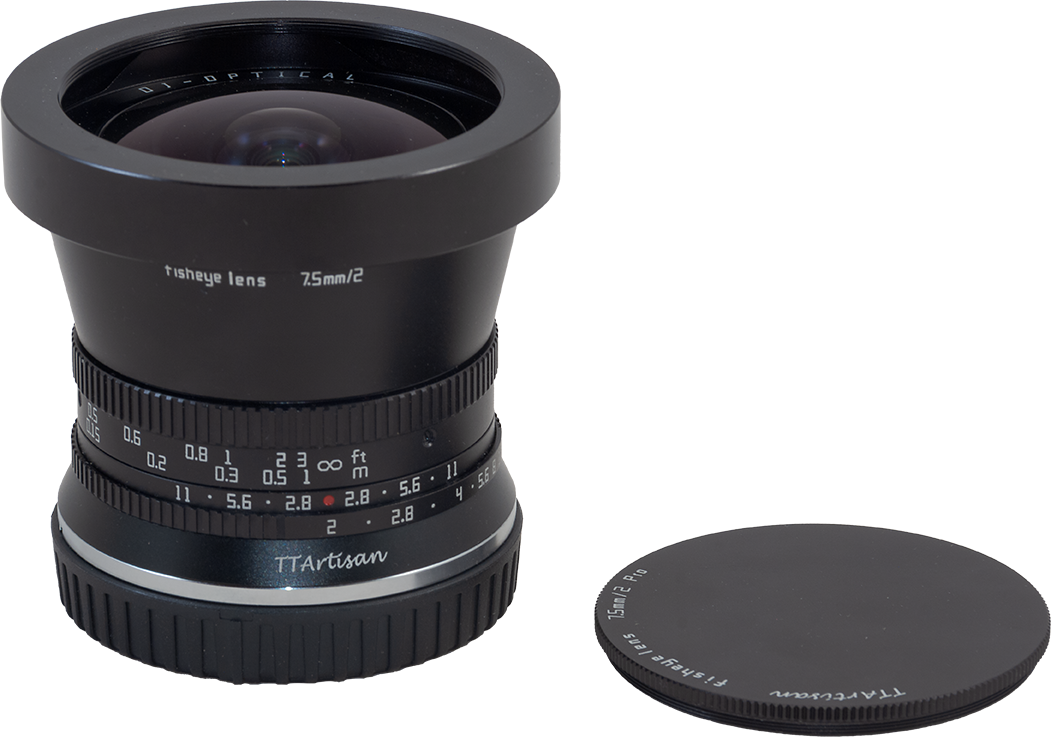
โ€” 7.5mm f/2 TTArtisan circular fish-eye โ€“ 180ยบ field of view (advertised)

โ€” 10mm f/2.8 7Artisans full-frame fish-eye โ€“ 185ยบ diagonal field of view (advertised)

โ€” 11mm f/2.8 TTArtisan full-frame fish-eye โ€“ 180ยบ diagonal field of view (advertised)

โ€” 12mm f/2.8 AstrHori full-frame fish-eye โ€“ 185ยบ diagonal field of view (advertised)

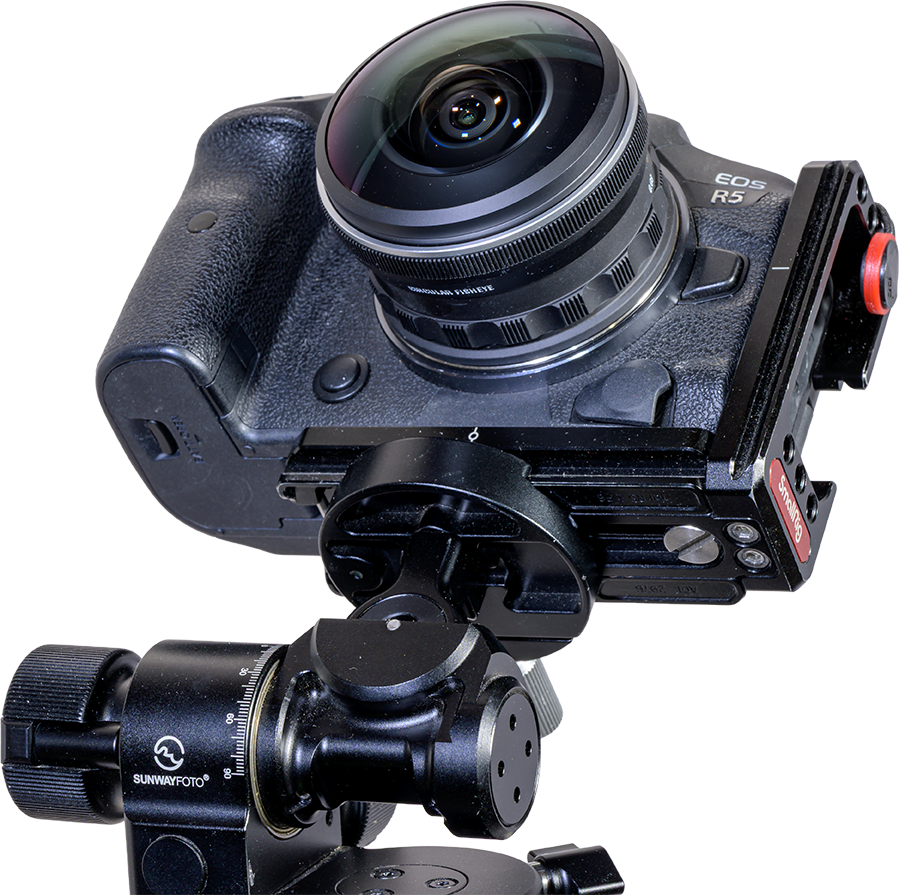
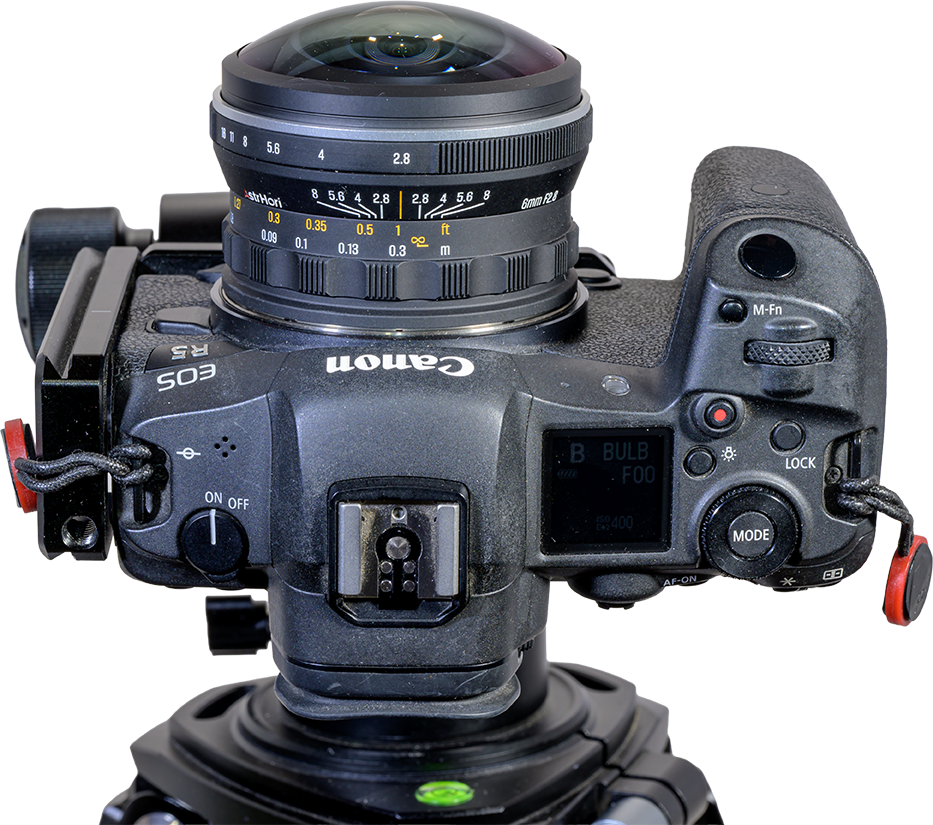
The 6mm, 11mm and 12mm lenses I tested on a 45 megapixel Canon R5.

The 7.5mm and 10mm lenses I tested on a 45 megapixel Nikon Z8. 

However, all the lenses are available for a wide range of camera brands, as I list below. All are manual-focus only, with no electrical connections to the camera body. So there is no restriction from Canon in offering them in RF-mount versions. But when using them on any camera, no EXIF metadata is recorded for lens brand, focal length or aperture. 

With the exception of the TTArtisan 11mm (which has versions for older Canon EF and Nikon F mounts), the lenses are for mirrorless cameras only โ€” they will not fit on DSLR camera bodies. By virtue of their design, none of the lenses accept filters, either front- or rear-mounted. None feature a rear weather sealing gasket. 

But the key factor is that none sell for more than $300; some cost less than $200. At that price, why not have one? Or two? 
WHY DIDNโ€™T YOU TESTโ€ฆ?

First, I am not a test lab; I bought these lenses for personal use and out of curiosity. I selected low-cost lenses made for full-frame mirrorless cameras, what I shoot with; indeed, the short flange distance of mirrorless cameras is what makes these lens designs possible.ย 

I did not test fish-eyes made just for APS-C or Micro4/3rds cameras, for example from the Chinese brands Meike (their 3.5mm and 7.5mm) and Brightin Star (their 7.5mm).

However, despite it being made for full-frame cameras, I chose not to buy and include the new Brightin Star 11mm f/2.8 Mark II ($270), a decision based on expert lens reviewer Christopher Frostโ€™s test here on his YouTube channel. The lensโ€™s edge performance, important for astro work, was shown as poor, even when stopped down. I saved my money.ย 

Nor did I test the new Laowa/Venus Optics 8-15mm f/2.8 zoom fish-eye, which offers a circular-format and full-frame fish-eye in one lens. It might perform well but is $700 US, so not a low-cost option โ€“ but you do get two lenses for the price of one. Ditto on the new Canon RF7-14mm f/2.8-f/3.5 L fish-eye โ€“ it is $1,900 US but has autofocus. 

The AstrHori 6mm

TESTING NOTES:

โ€” For my aberration tests I shot all the lenses on the same moonless night, with them aimed straight up to take in as much sky as possible to put stars across the frame. The cameras were on a star tracker (not shown) to eliminate star trails that can mask or mimic aberrations.ย 

โ€”In all cases where I show examples shot at different apertures, both images were shot for equal exposure value (by doubling the ISO for the smaller aperture shot), and then processed identically. So any brightness difference you see is from the lens performance, not my exposure or processing.

โ€” I did not apply any lens corrections or brighten the edges to compensate for vignetting. However, none of the lenses (especially the diagonal fish-eyes) suffer from much vignetting. 

โ€” For my lens flare tests I shot all the lenses on the same moonlit night with a waxing Moon in the southwest which I placed off-centre to prompt internal reflections. The cameras were also on a tracker. 

โ€” I bought most of these lenses directly from the manufacturers from their on-line stores in China. Delivery in all cases was quick by mail, fulfilled from a North American distribution point. While I had no issues, because product quality for bargain lenses can vary, consider buying from a source where you can easily return the lens for a replacement or a refund.

I will state at the outset that none of these lenses offer pinpoint stars to the edges of their image circles, certainly not at their maximum apertures. You canโ€™t expect aberration-free performance at these prices. 

If you wish optical perfection in a fish-eye lens then look at the Sigma 15mm f/1.4 DG DN, for $2,200 US. (See Nico Carverโ€™s test of that lens here on his Nebula Photos YouTube channel.)

Here are the test details, with the five fish-eyes presented in order of increasing focal length.ย 


The AstrHori 6mm f/2.8 Circular Fish-Eye
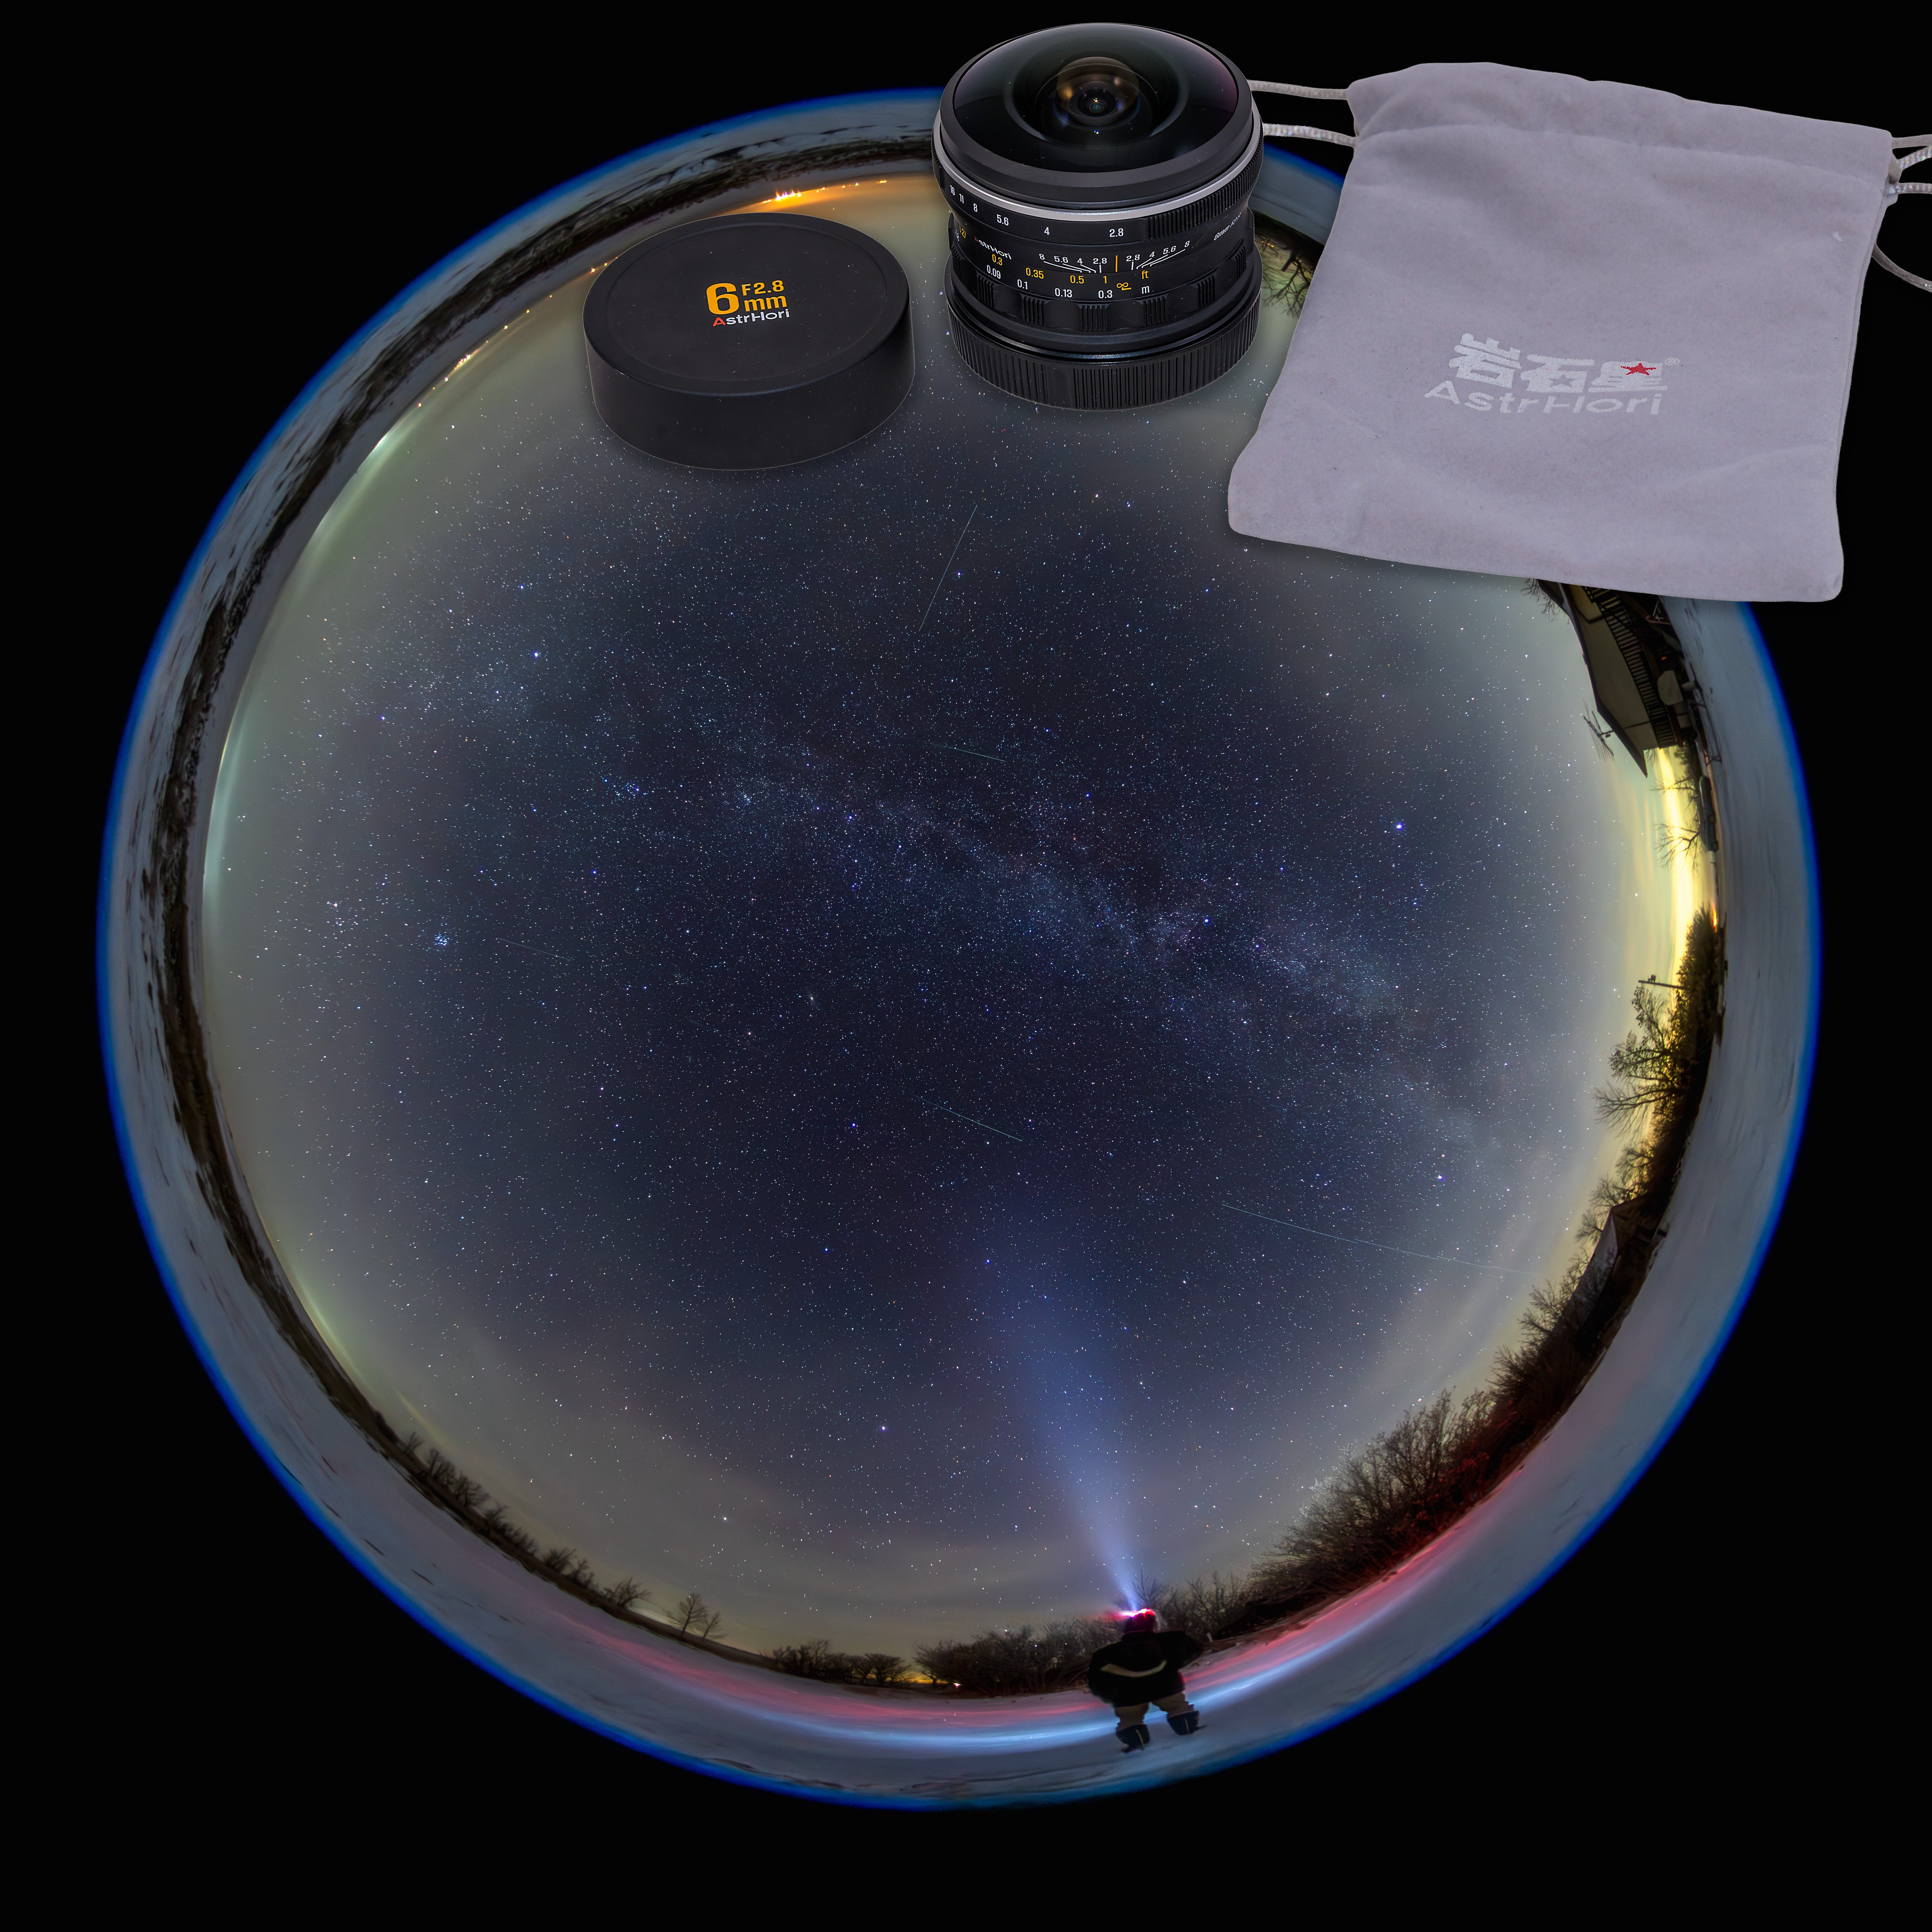
Available for Sony E, Panasonic L, Canon RF, Nikon Z Lens Mounts

$300 US. 

The unique selling point of this lens is that it has an amazing 220ยบ field of view across its image circle. It can actually see behind itself! To stay out of the frame, duck!

When aimed straight up it will include not only the entire sky down to the horizon, but also the ground well below the horizon, good for putting the sky in context to the landscape below. Doing so with any other lens requires shooting a multi-segment panorama. While panos have the benefit of higher resolution, the 6mm lens allows for all-sky time-lapses and movies. ย 

Previously, to get such a field of view with such a speed (f/2.8) you had to pay more than $100,000 (!!!) for a rare sample of the massive 6mm f/2.8 Nikkor lens made in limited quantities in the early 1980s. By contrast, the 6mm from AstrHori (it is not AstroHori!) is downright tiny. And cheap!

The lens has a knurled manual focus ring that turns smoothly, and a ribbed aperture ring with firm clicks at each f-stop. Infinity focus, with the stars sharpest, proved to be slightly shy of the centre of the infinity mark, so the lens requires careful manual focusing. The lens can focus past infinity.

The press-on metal lens cap is boldly marked with the lens identity. Like all AstrHori lenses, the 6mm comes with a thick soft cloth pouch. 

The short length of the lens makes it difficult to wrap an anti-dew heater coil around it, certainly not without risk of shifting the focus or aperture. Thatโ€™s a consideration, as aimed straight up its lens is bound to attract dew or frost over long shoots. 

IMAGE QUALITY

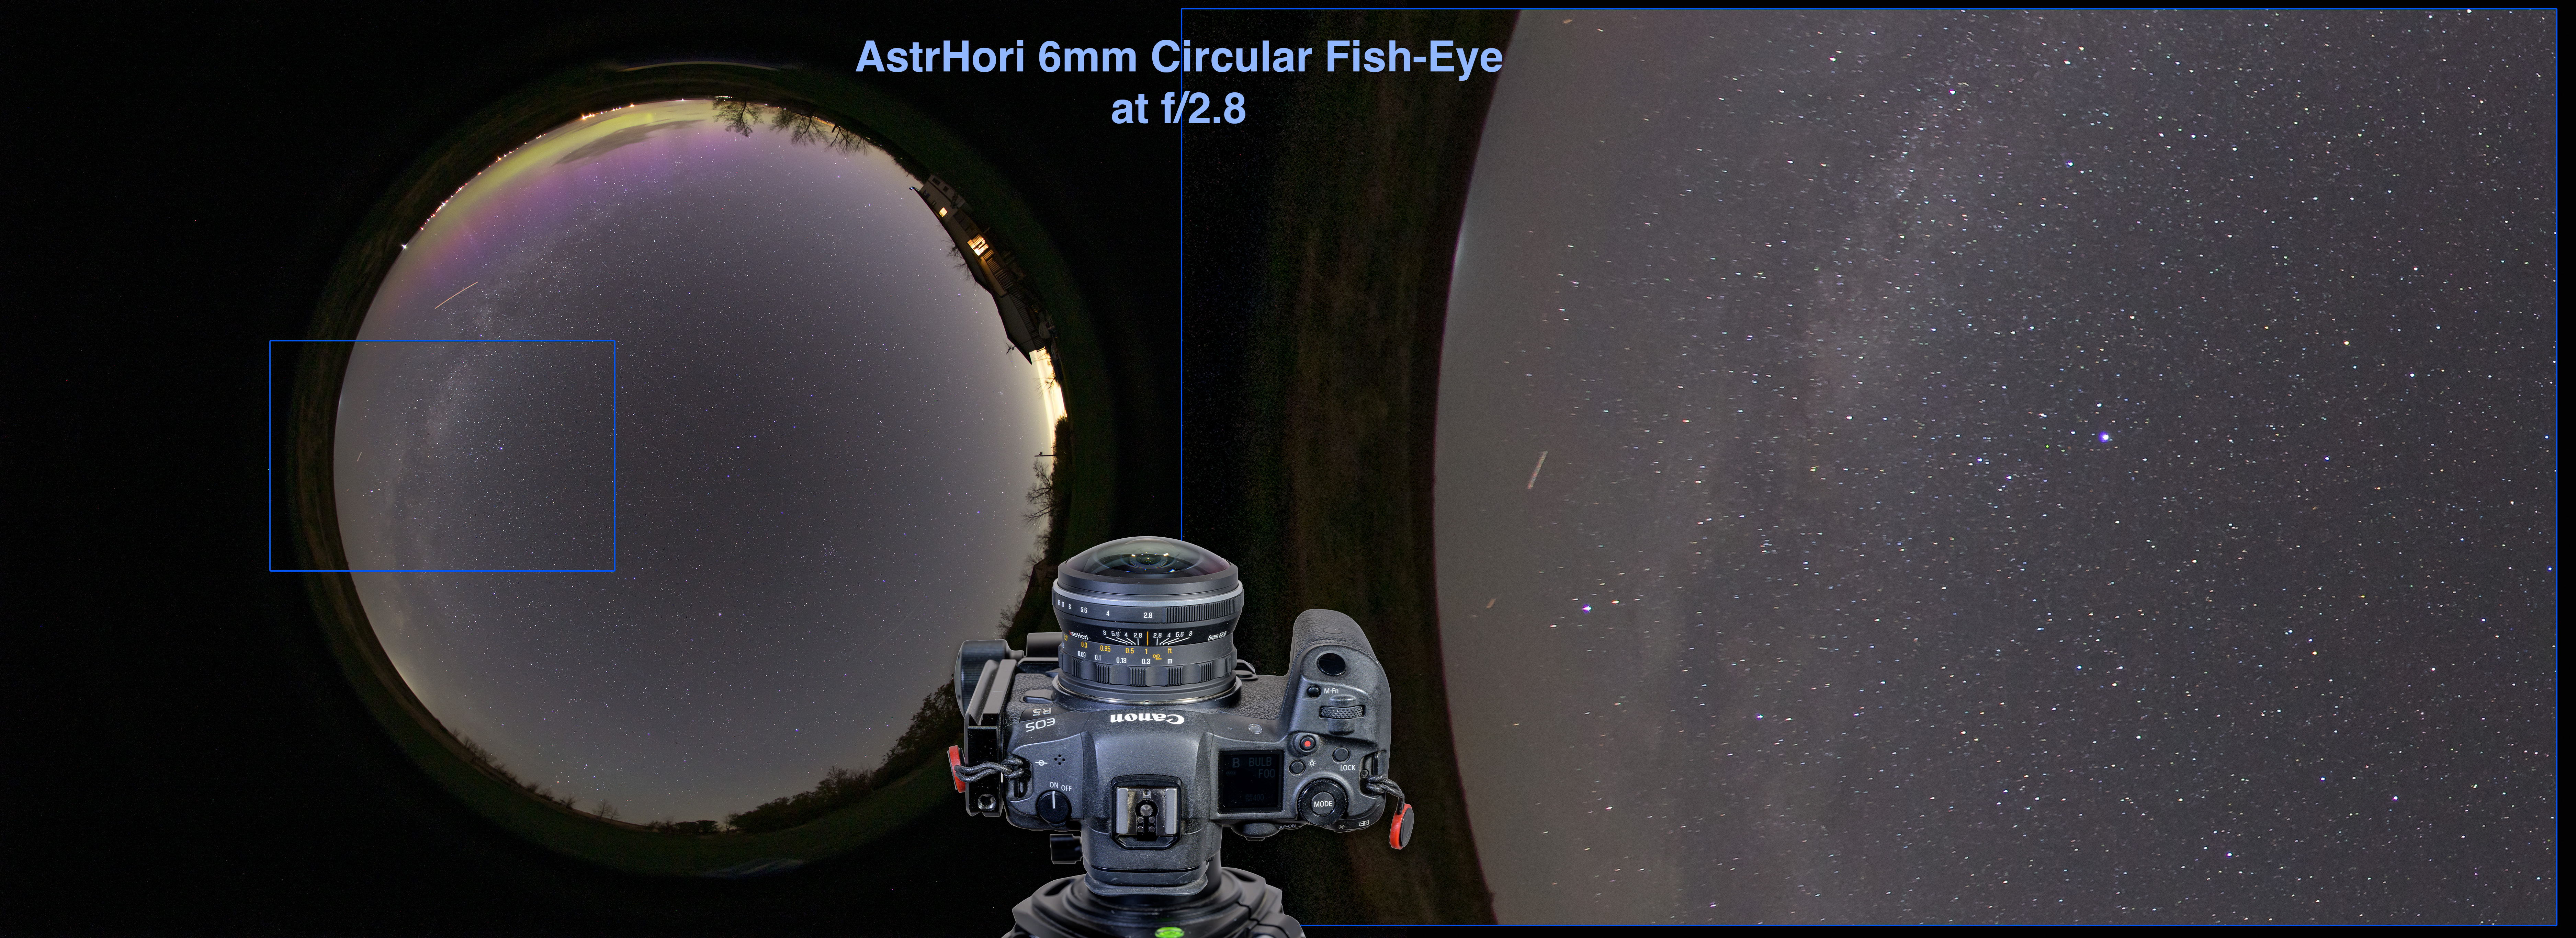
The 6mm AstrHori doesnโ€™t quite fill the frame across the sensorโ€™s short dimension (24mm). Instead, the lensโ€™s image circle is about 21mm across. The edge of the image circle is soft but clean โ€“ it is not rimmed by odd colours or internal reflections.ย 

6mm AstrHori at f/2.8 โ€“ In all test images the image on the right is a blow-up of the blue-framed area at left.

Stars in the centre are tack sharp at f/2.8, with some longitudinal chromatic aberration (LoCA) adding small blue halos. The LoCA is gone at f/4. Stars toward the edges show an increasing amount of elongation from astigmatism, and exhibit colour streaks from lateral chromatic aberration (LaCA). Both diminish at f/4 but are still present. 
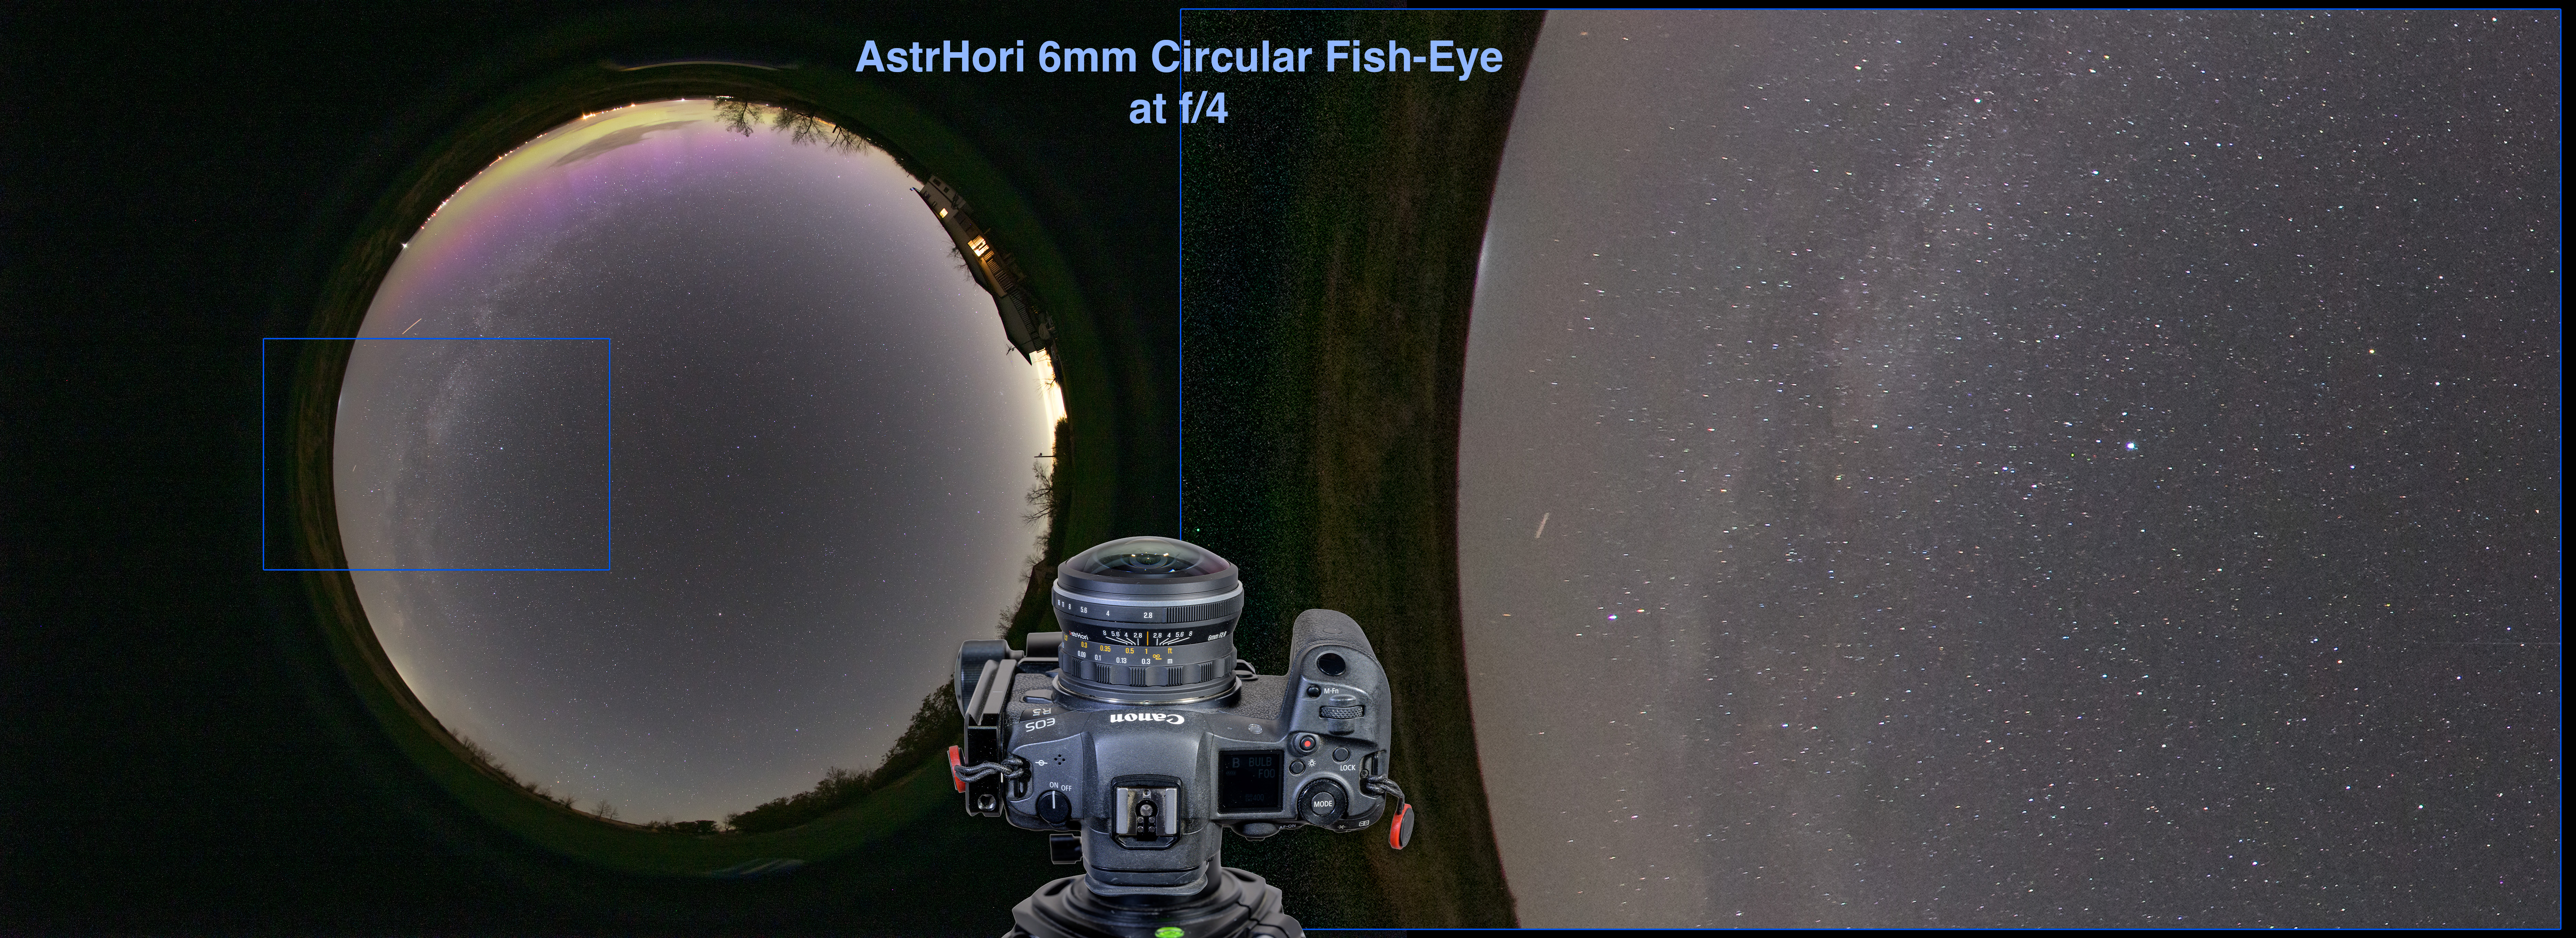
6mm AstrHori at f/4 โ€“ Note the brighter edge and ground compared to f/2.8

By comparison, Sigmaโ€™s old 8mm f/3.5 circular fish-eye, now long discontinued but that I used for many years on my Canon DSLRs, had smaller but still noticeable levels of astigmatism and lateral chromatic aberration at the edges, even when stopped down to f/4 or f/4.5. So the $300 AstrHori is not far below the classic but much more costly Sigma 8mm for edge sharpness.

The main benefit to stopping down the AstrHori 6mm is the reduced vignetting that brightens the field overall, but especially the horizon around the edges. So if the horizon content is important, stop the lens down. Otherwise, this lens works well at f/2.8.

LENS FLARES

A 30-second exposure at f/2.8 with the Moon in the frame (if itโ€™s in the sky itโ€™ll be in the frame with this lens!) showed only a small lens flare (arrowed) opposite the Moon. It tightened up at f/4 (not shown) but was still present. In all, this is a good performance. 
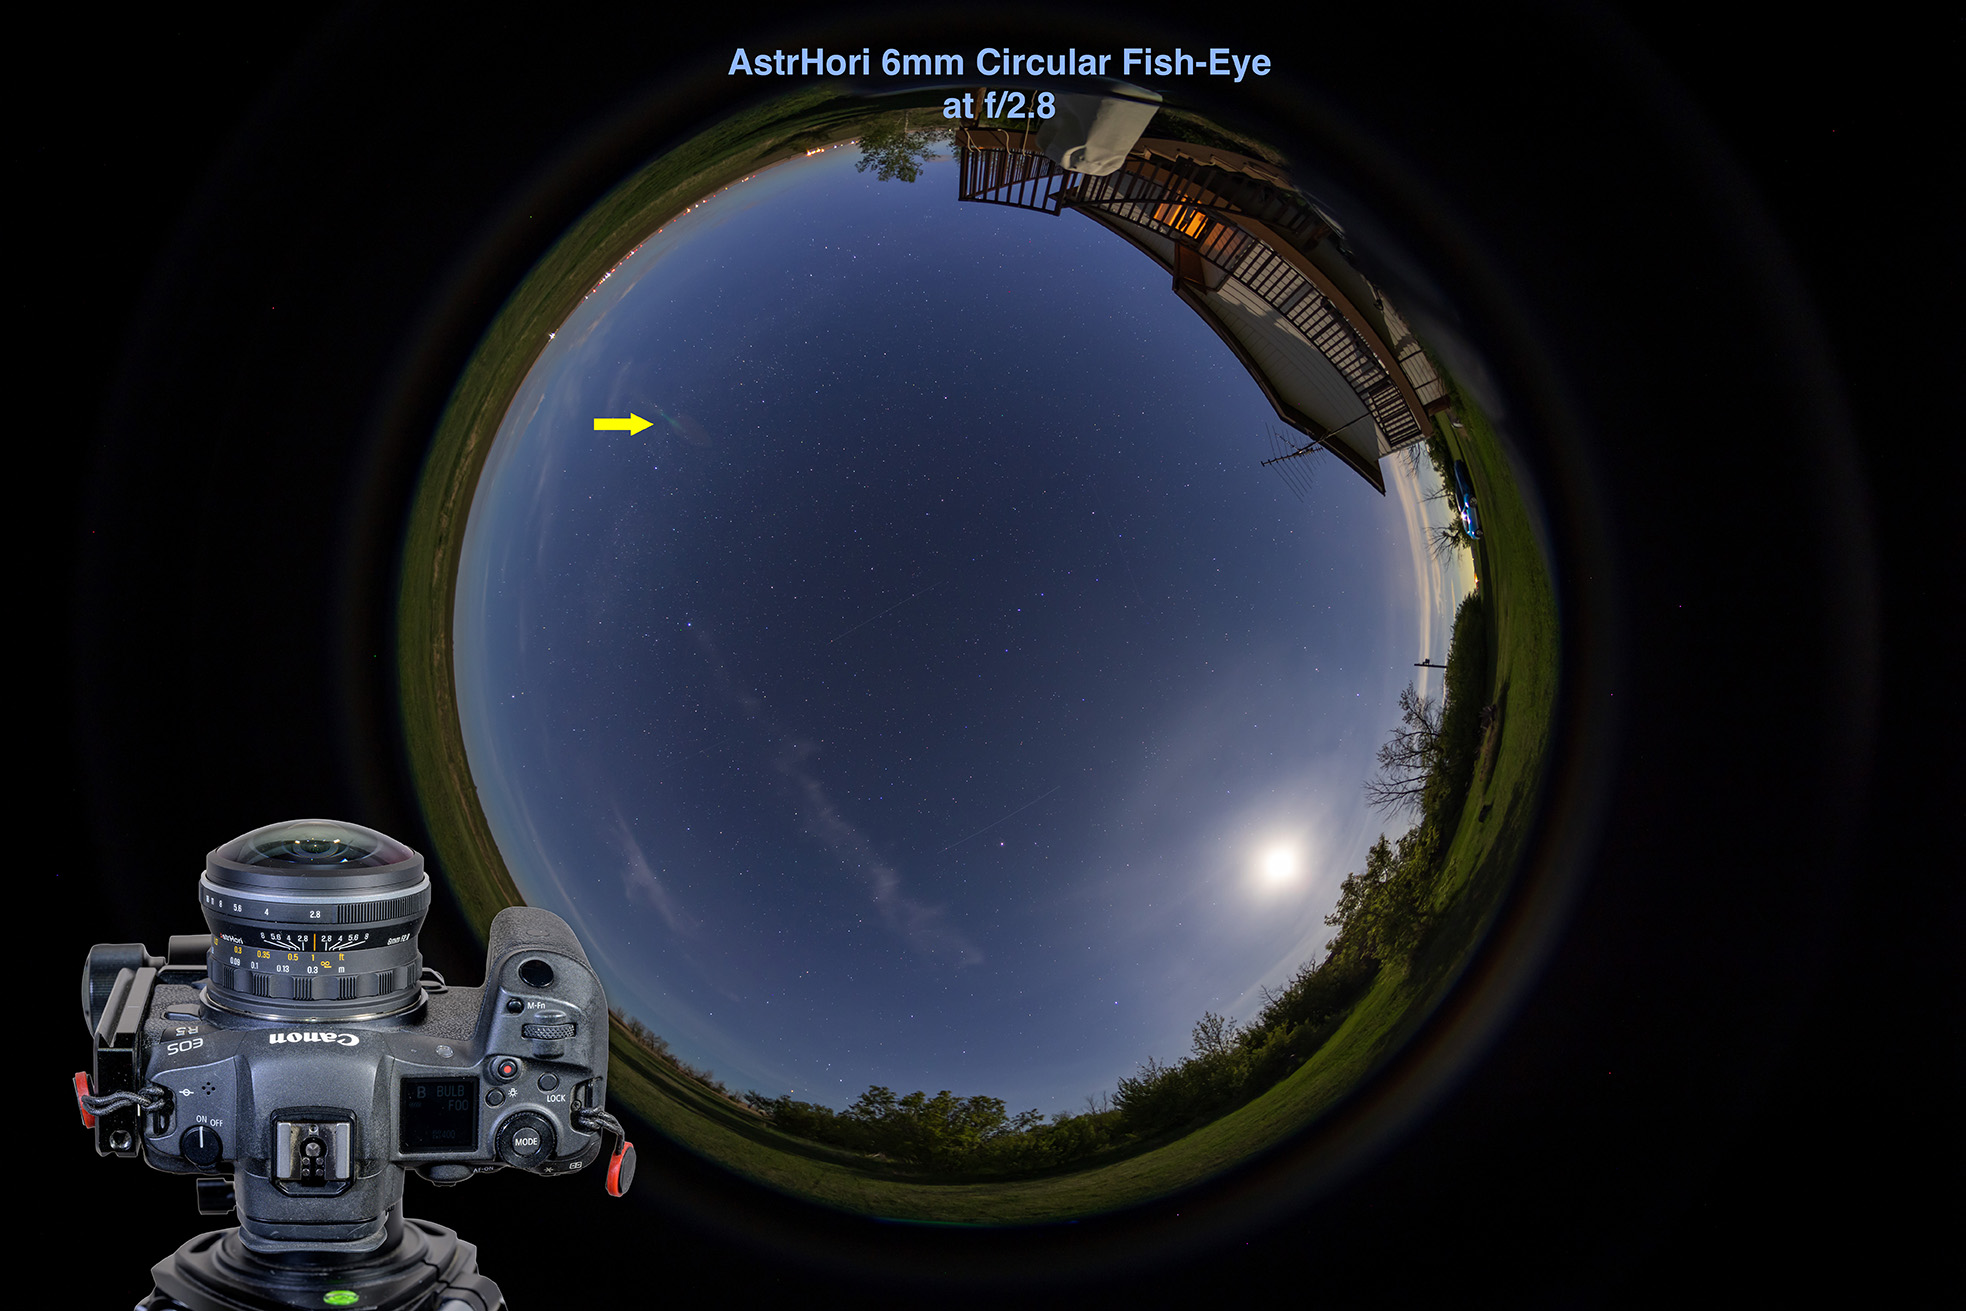
Faint lens flare is arrowed.

But for all-sky time-lapses with the Moon up, expect to see a lens flare moving opposite the Moon. The same might be true of all-sky images of a total solar eclipse. The eclipse of August 2, 2027 with the Sun at the zenith from Egypt would be a great use-case for this lens!


The TTArtisan 7.5mm f/2 Circular Fish-Eye
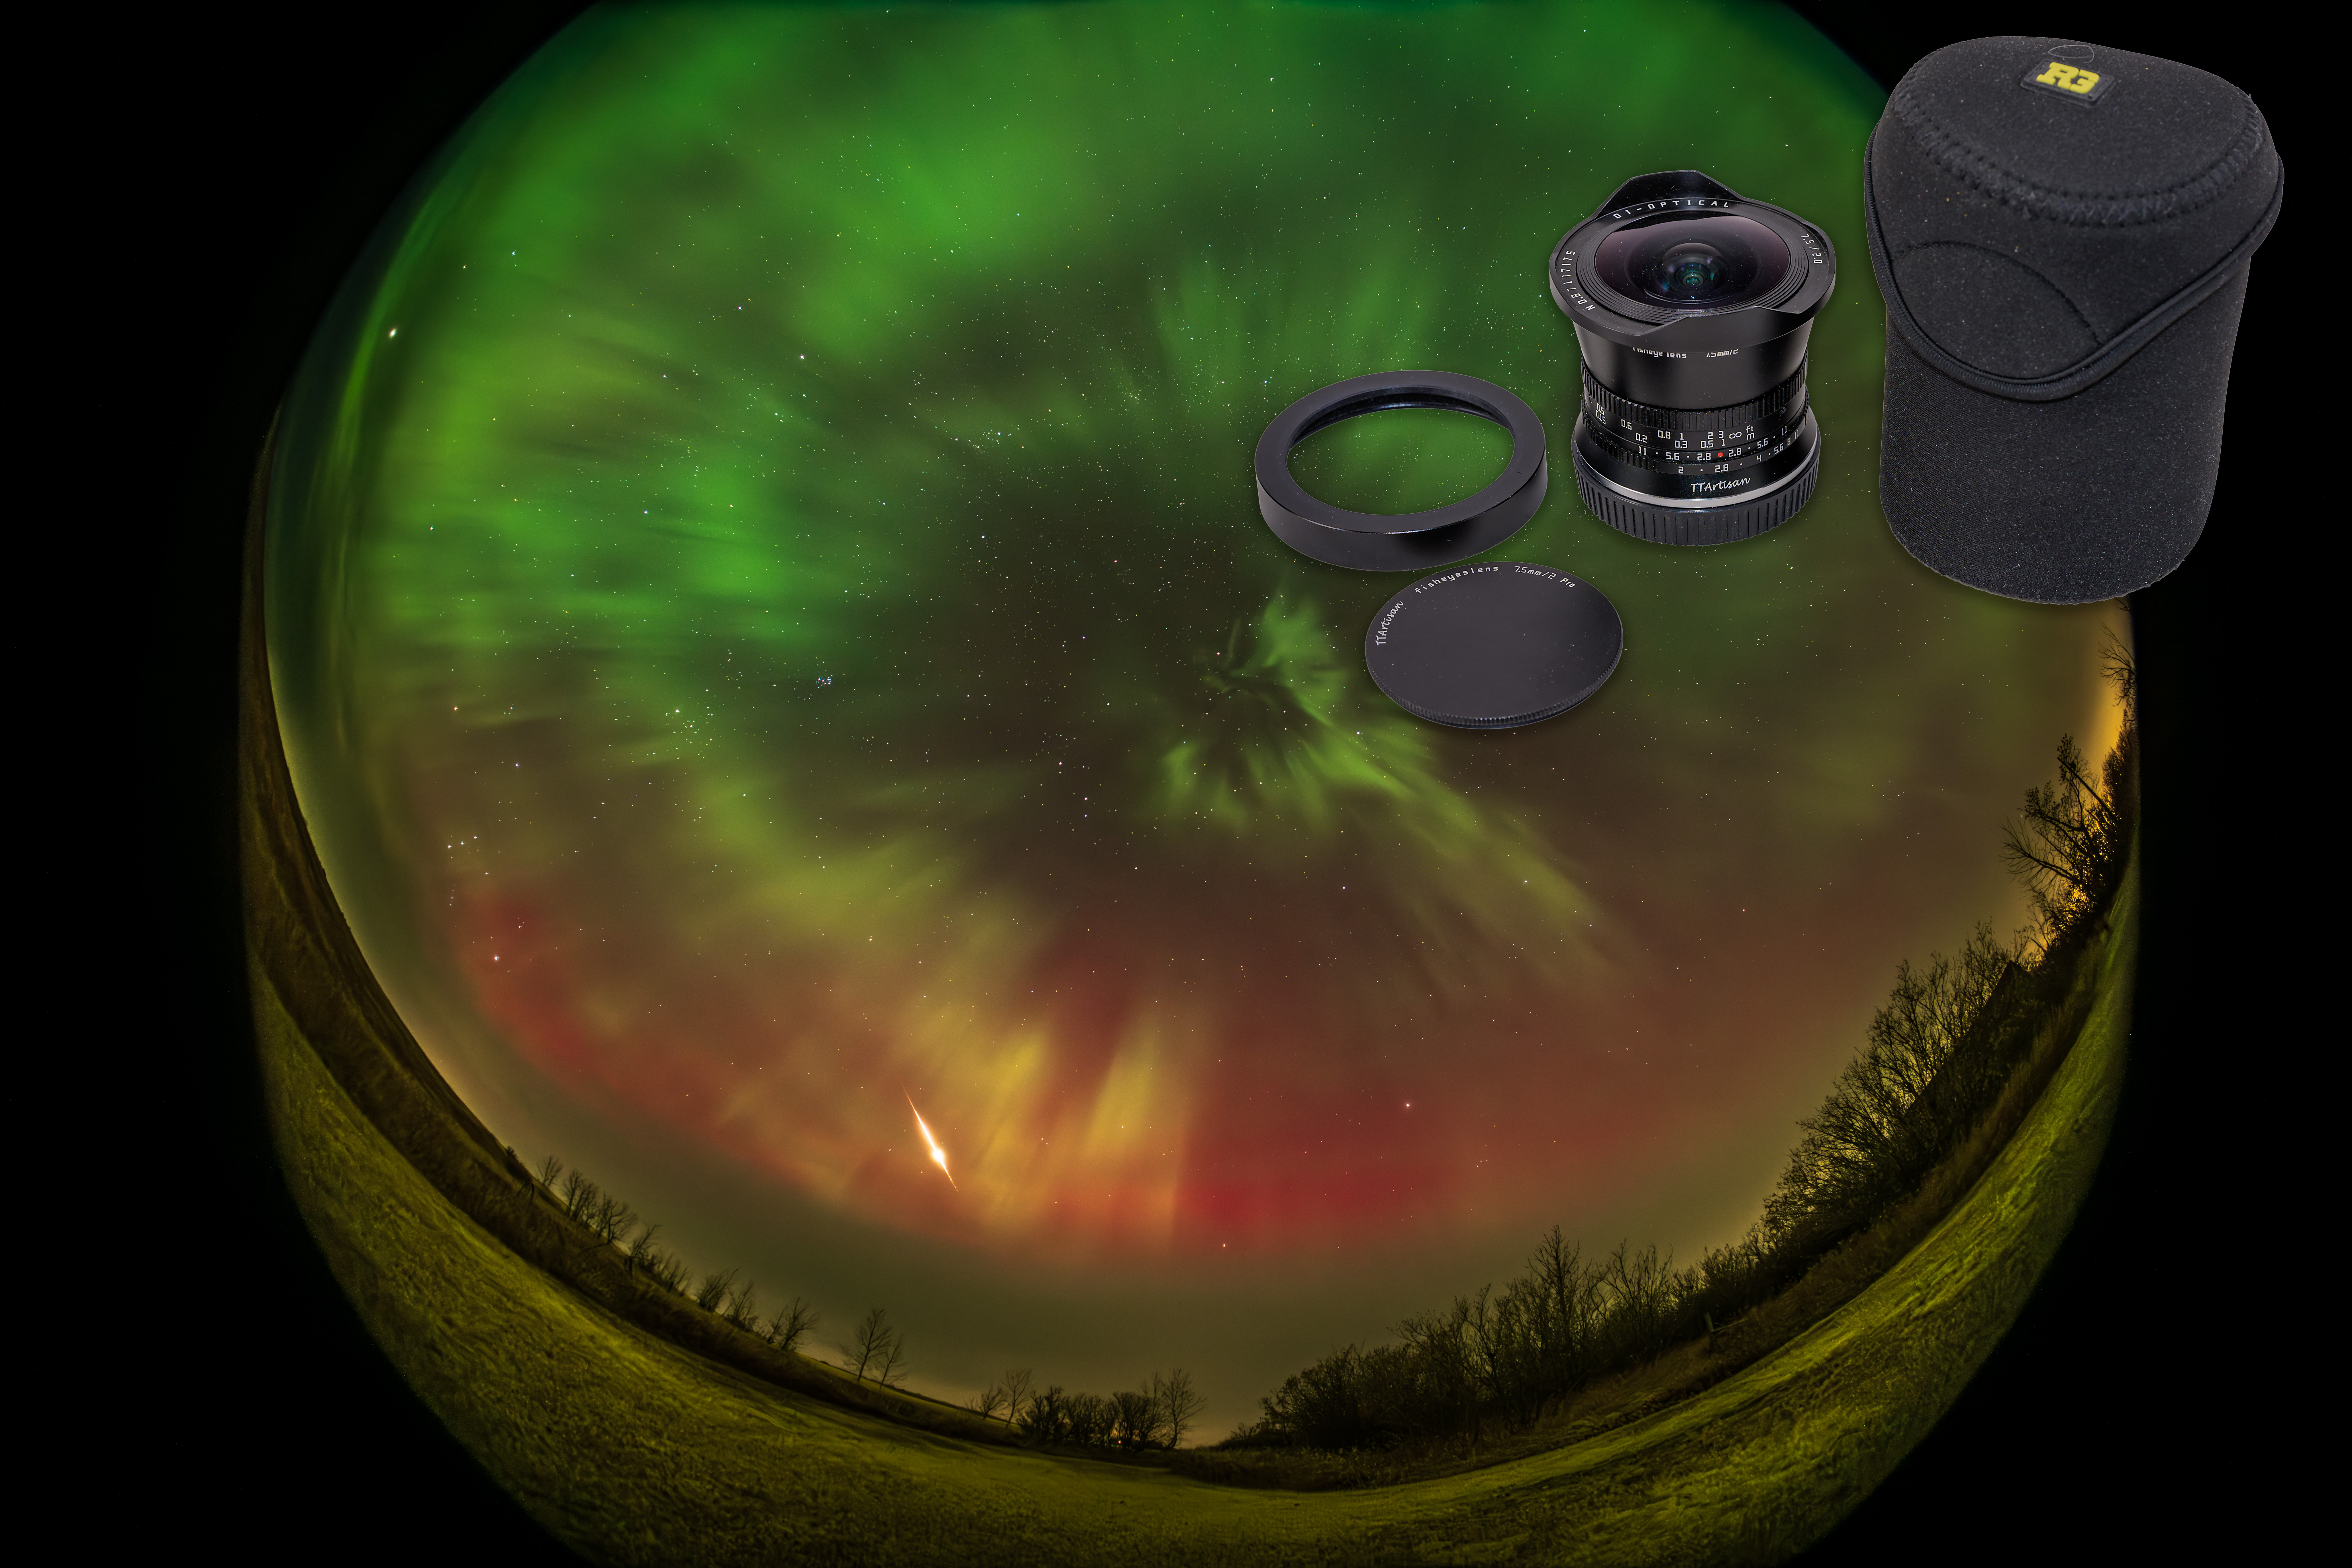
Available for Sony E, Leica L, Canon RF, Fuji X, Nikon Z Lens Mounts

$140 US. 

Link to TTArtisan web page for 7.5mm

The unique selling point of this lens is its speed โ€“ f/2! All the others are f/2.8. However, technically this is a lens made for APS-C sensor cameras, where it would serve as a full-frame fish-eye. But it works as a near-circular-format fish-eye on full-frame cameras, though with the image truncated at the top and bottom, as I show. You donโ€™t get a full circle. But you do get a much wider field than with the full-frame fish-eyes that follow.

The 7.5mm does not come with a case or pouch, unlike lenses from TTArtisanโ€™s competitors. (The case I show above is one I bought extra for this lens.) The lens has a metal front cap with a thread-on central disk, as shown above. With the disk removed, the remaining ring acts as an iris that mechanically vignettes the image to a 24mm-wide circle, but with much less than 180ยฐ horizon-to-horizon coverage. Iโ€™ve never used this lens that way; I prefer to record as much of the image as the lens projects, then mask down the image later if needed.ย 

I like this lens so much I bought it twice โ€“ for Canon RF and for Nikon Z. The Nikon copy I test here has better optics with less tilt (or โ€œdecenteringโ€) in the lens elements. The Canon copy is notably soft on the left side. I asked TTArtisan about this, hoping to get a replacement for my Canon RF unit, but their rep said thatโ€™s within their acceptable level of performance. Thatโ€™s the drawback of low-cost lenses like these; expect unit-to-unit variations. 

The best focus, with the stars sharpest, proved to be well short of the infinity mark, requiring manual focusing. But I suspect that, too, will vary from unit to unit, likely true of most of these lenses. 

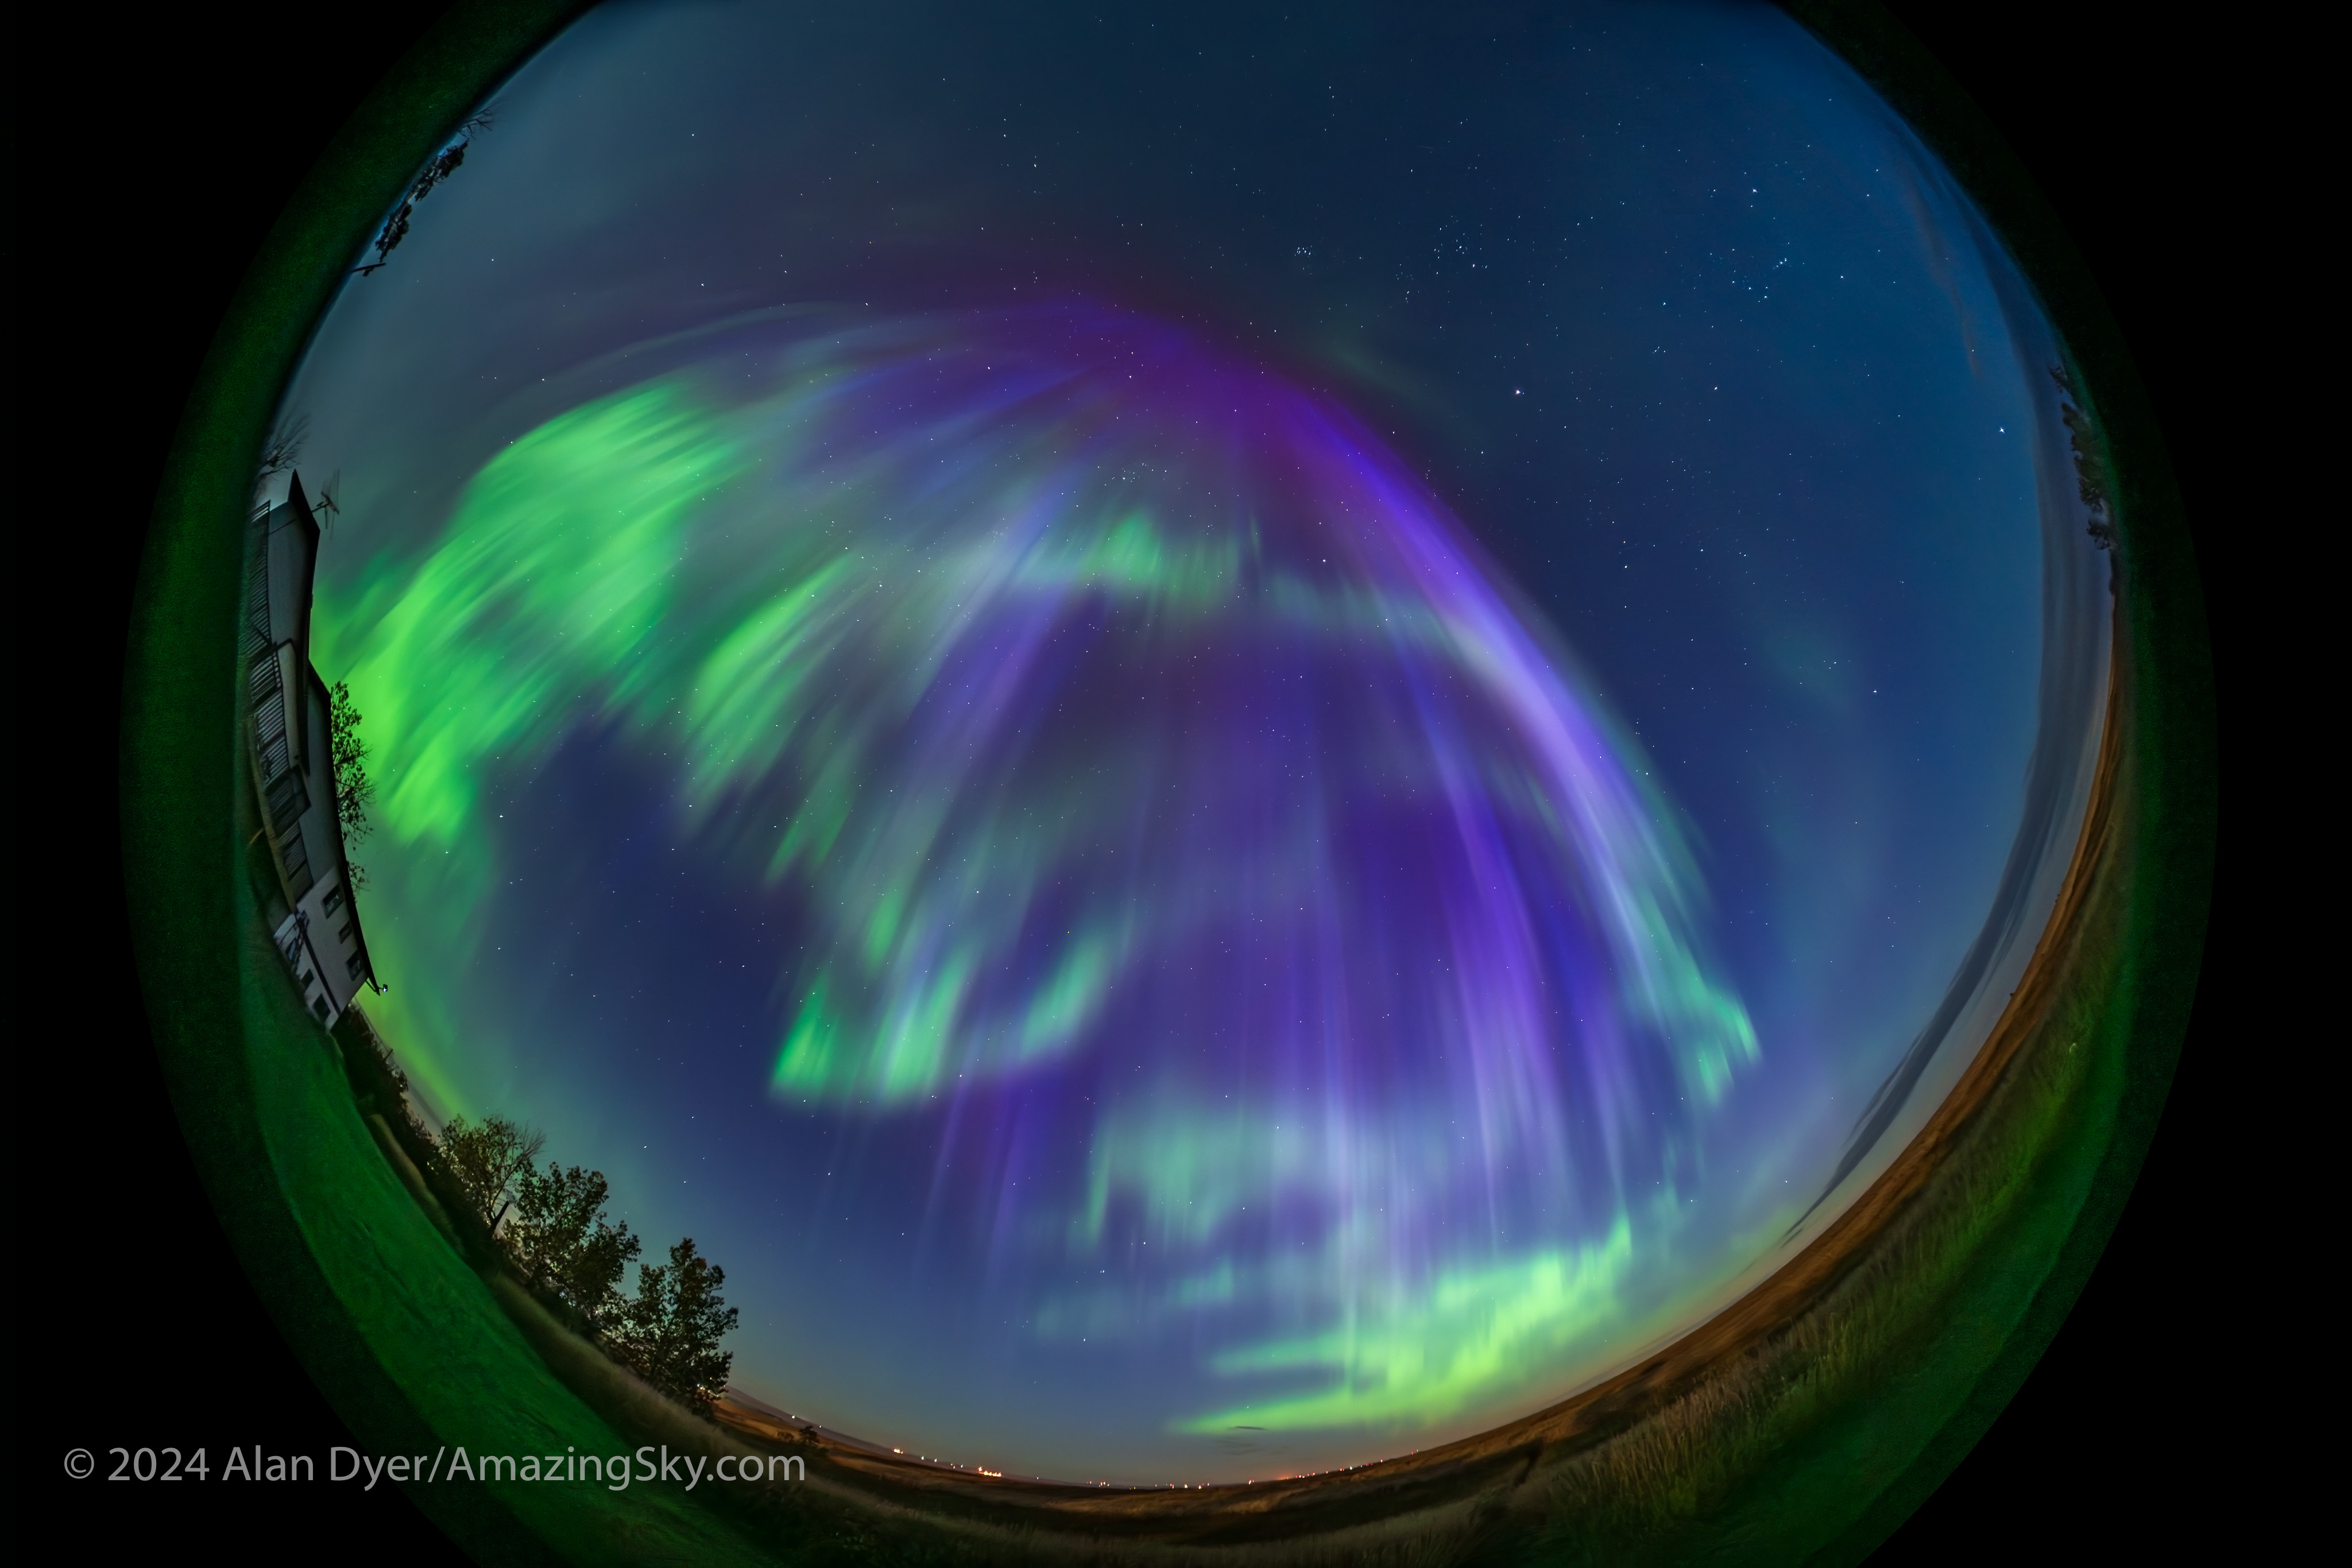
With its f/2 speed, the 7.5mm is great for rapid-fire time-lapses of fast-moving auroras, or even real-time 4K or 8K aurora movies where fast lens speed is essential, to keep the ISO lower for less noise. 

IMAGE QUALITYย 

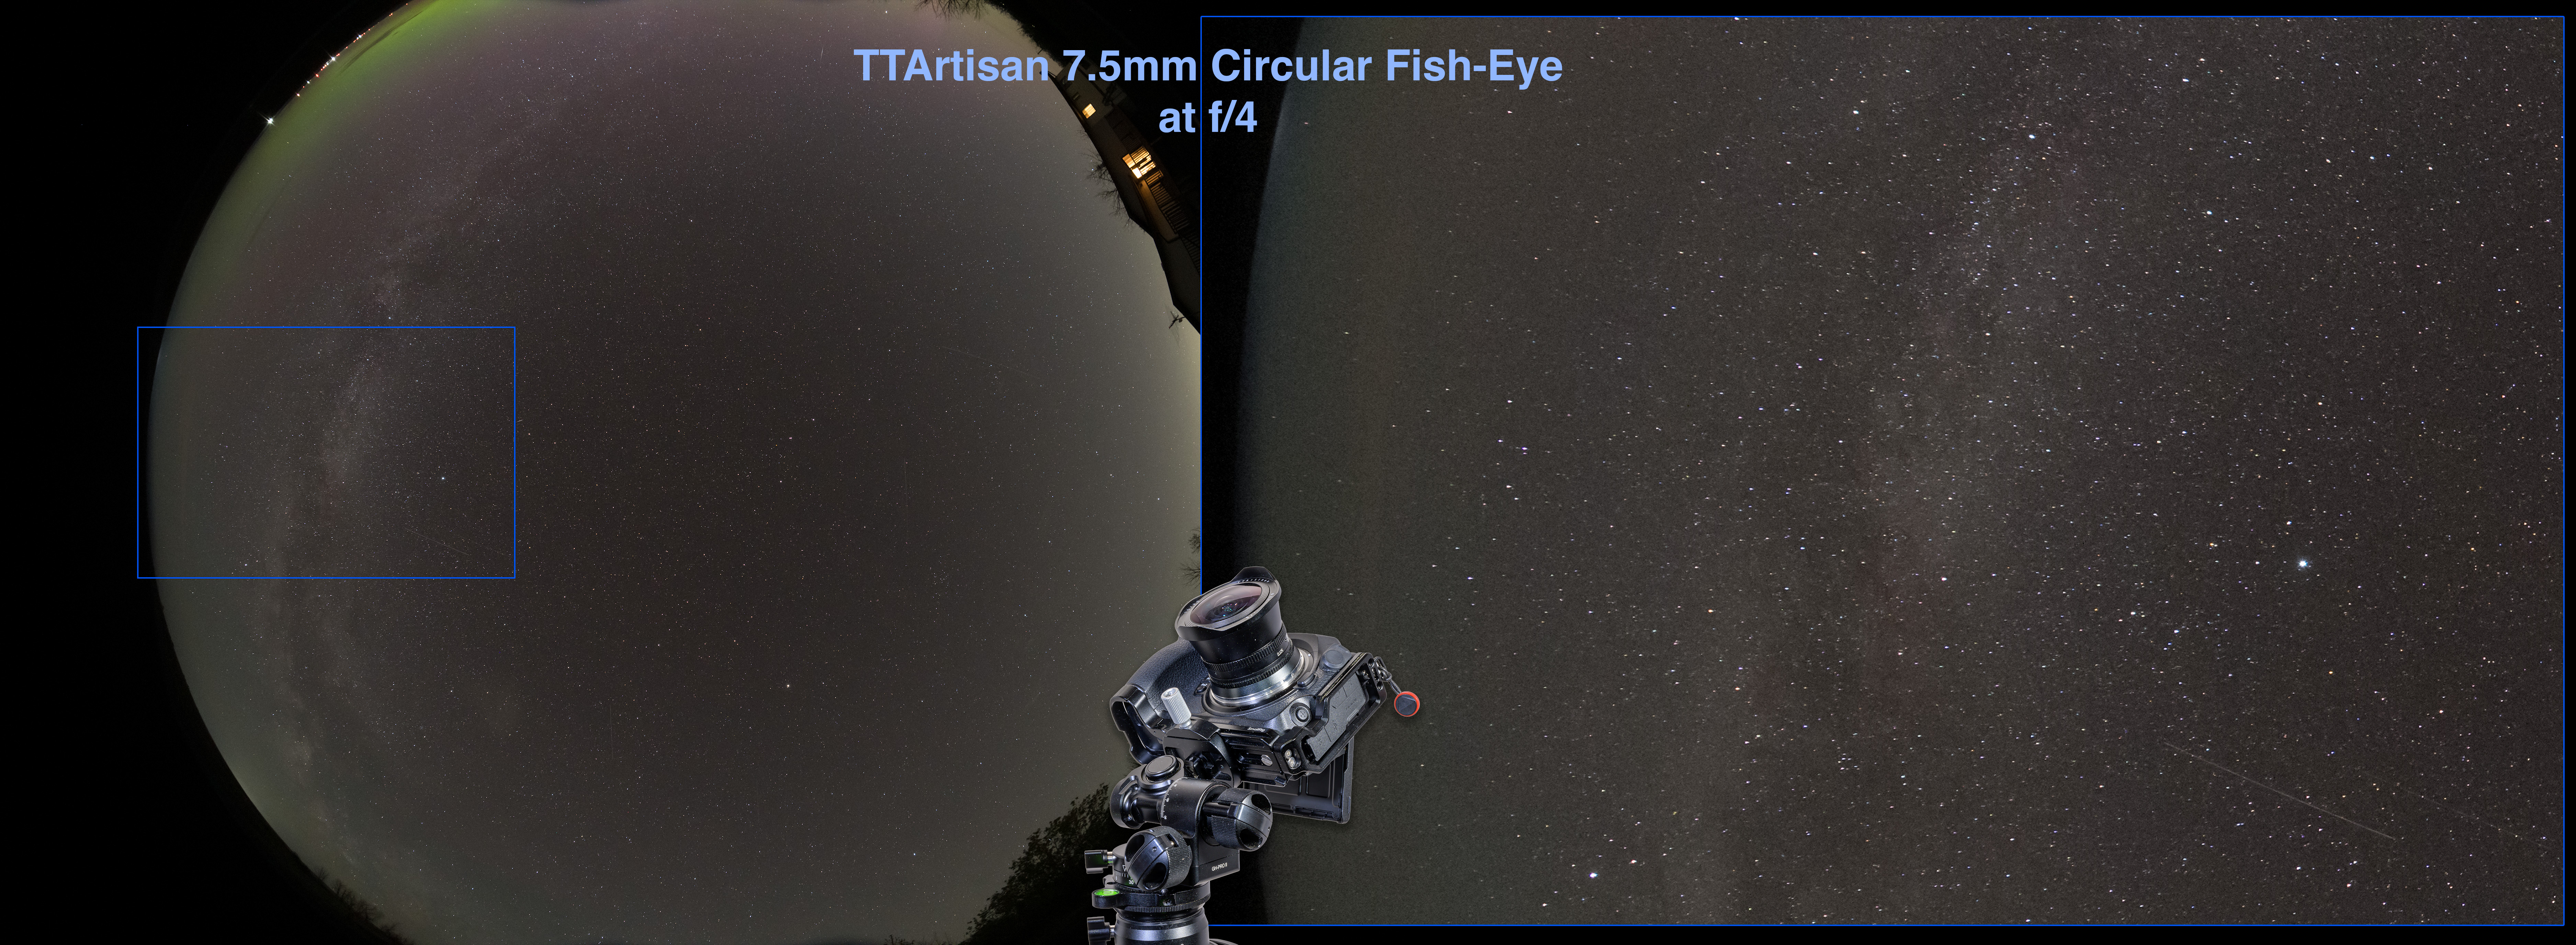
The image circle is fairly cleanly defined, but does show two small dark shadows protruding into both the top and bottom of the frame from some mechanical vignetting. A dark blue glow also rims the periphery of the image circle. Keep in mind, on the APS-C cameras the lens is designed for you wouldnโ€™t see the outer part of the image circle.
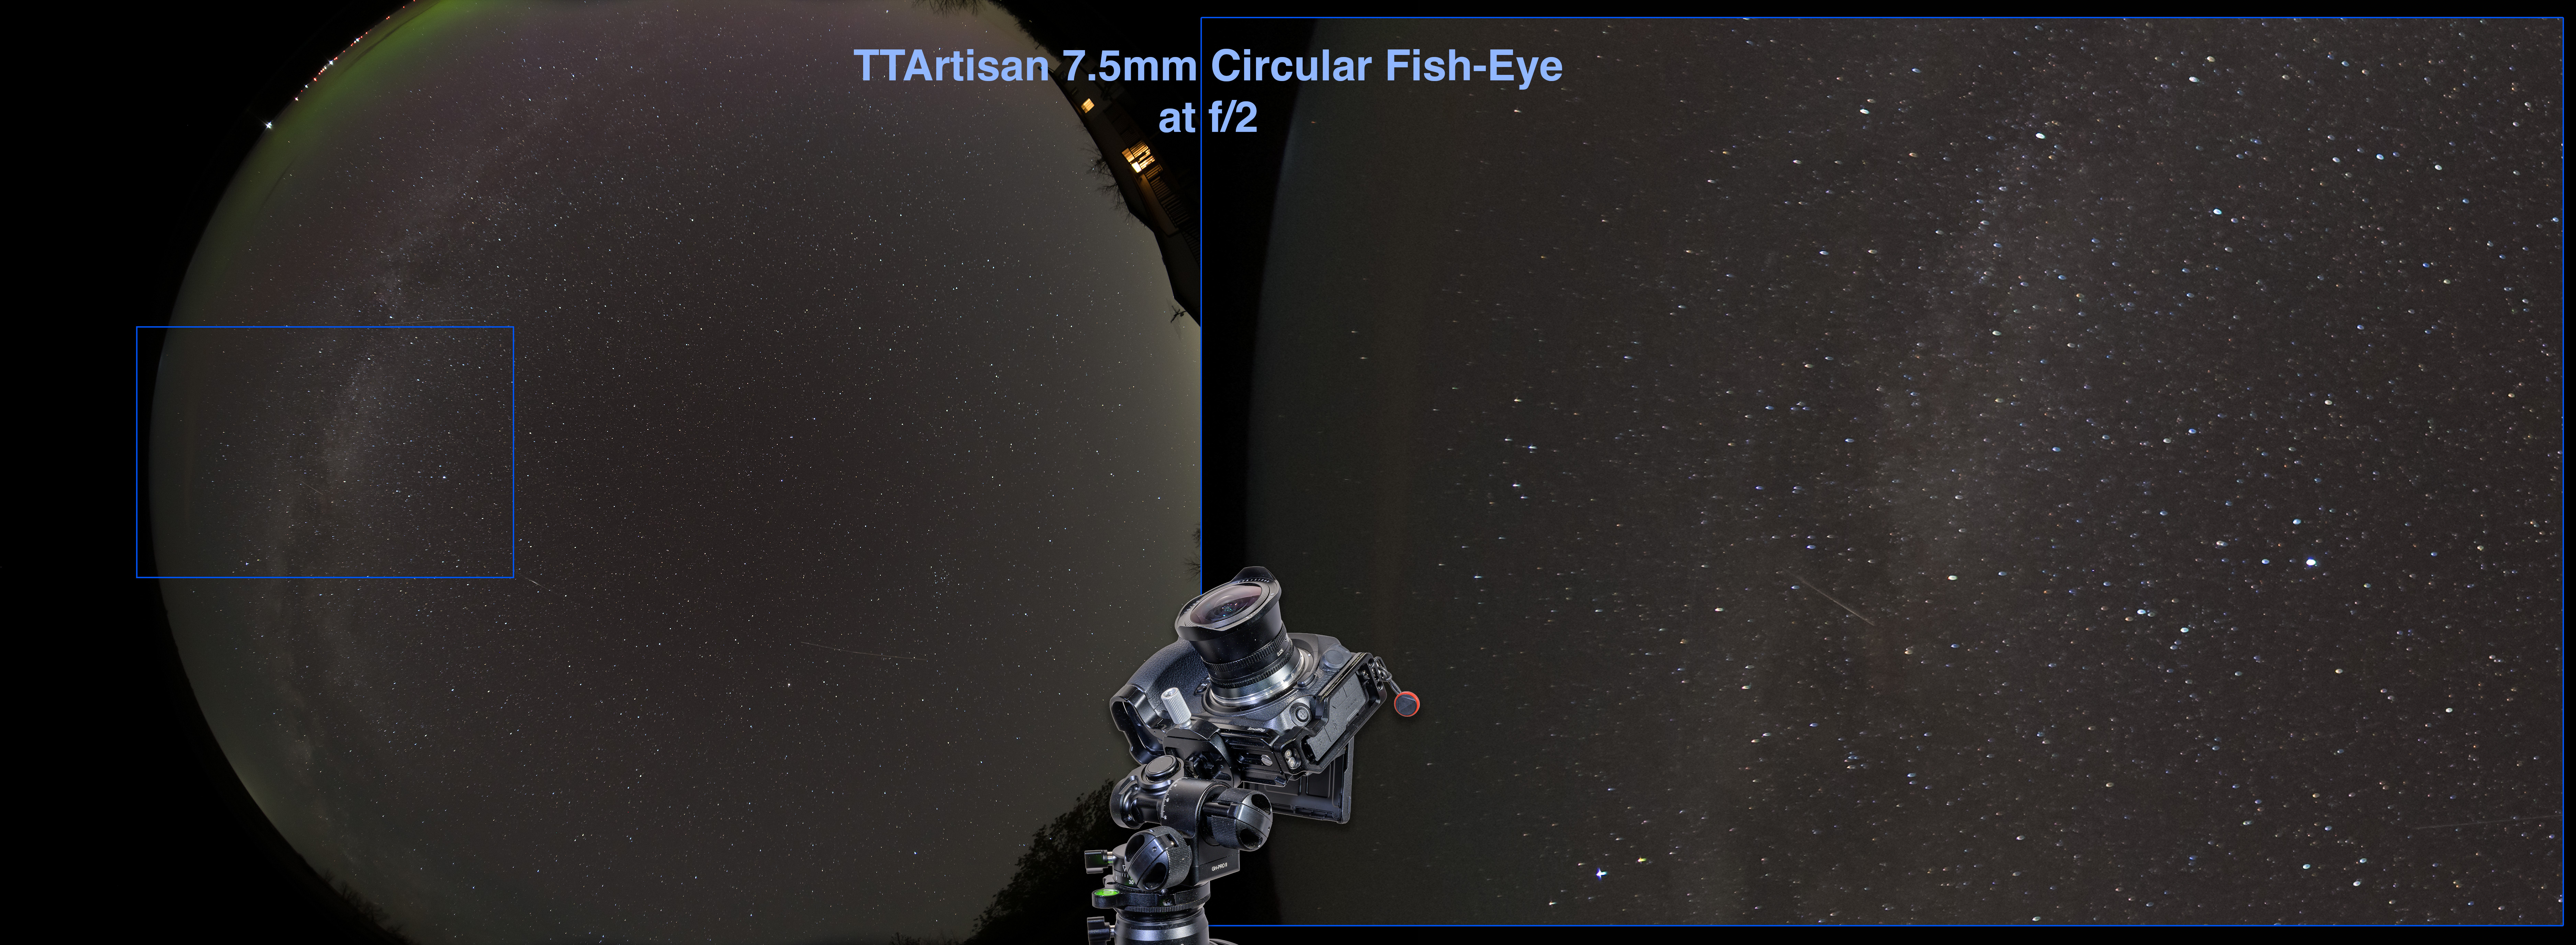
7.5mm TTArtisan at f/2

At f/2 stars are quite sharp at the centre, but begin to soften and elongate from what looks like coma as well as astigmatism in the outer third of the image circle.
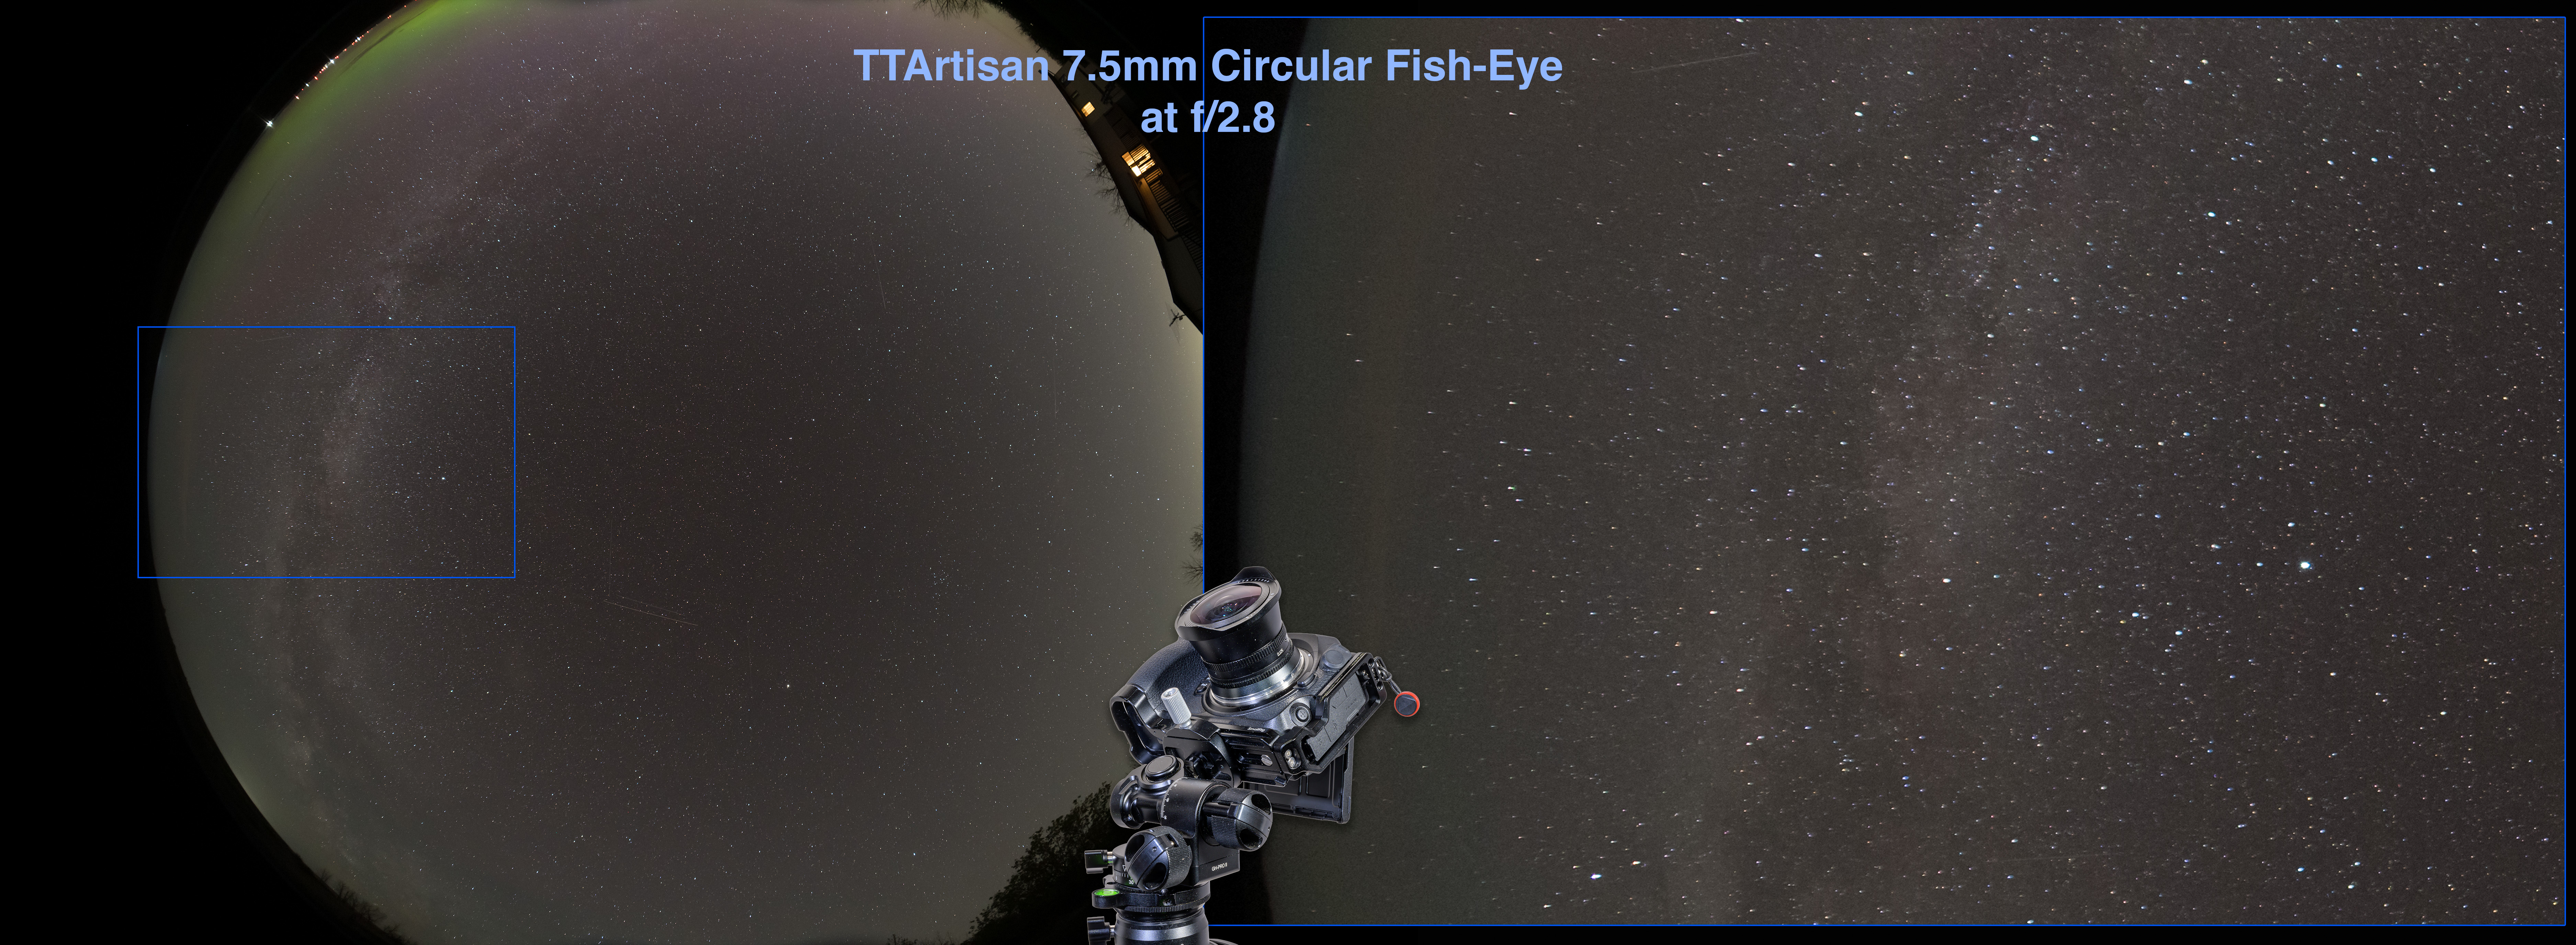
7.5mm TTArtisan at f/2.8

Star sharpness improves at f/2.8, and more at f/4, by which point stars now look very sharp almost to the edge of the image circle.ย 

7.5mm TTArtisan at f/4

As the examples show, the image also brightens and becomes more evenly illuminated as you stop down. In all, shooting at f/2.8 will work best for most astrophoto situations. Shoot at f/2 if you need the extra speed for rapid time-lapses or movies. Shoot at f/4 if star sharpness is paramount, such as for projection in a digital planetarium dome.ย 

LENS FLARES

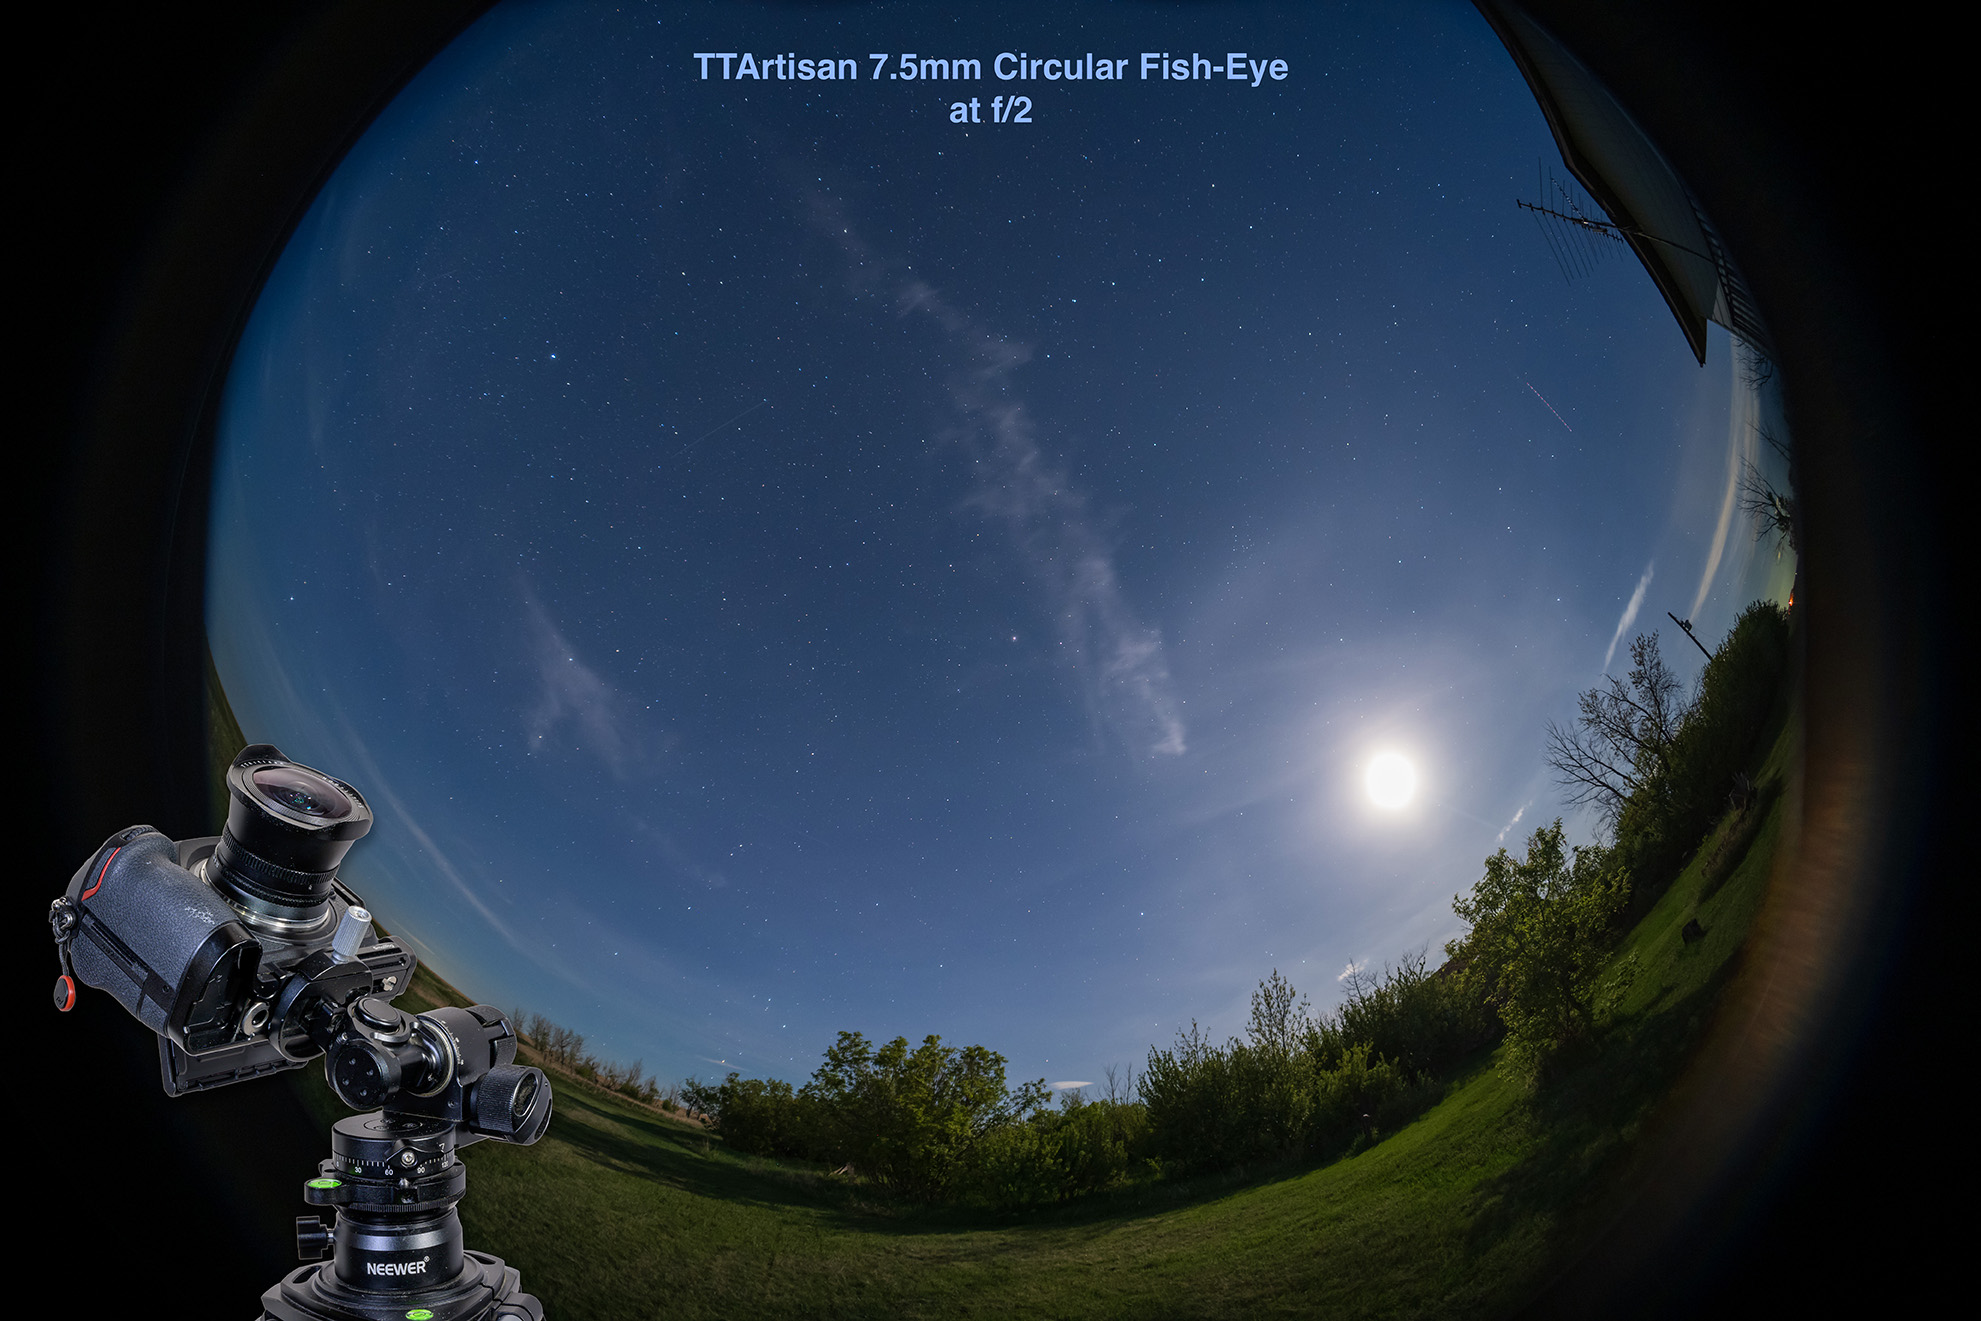
7.5mm TTArtisan at f/2

The TTArtisan 7.5mm proved surprisingly immune to lens flares. I didnโ€™t see any in the sky itself. What you do get is a flare around the periphery from an internal reflection off bright lights, like the Moon here. This might need masking out in the final images. 


The 7Artisans 10mm f/2.8 Mark II Full-Frame Fish-Eye
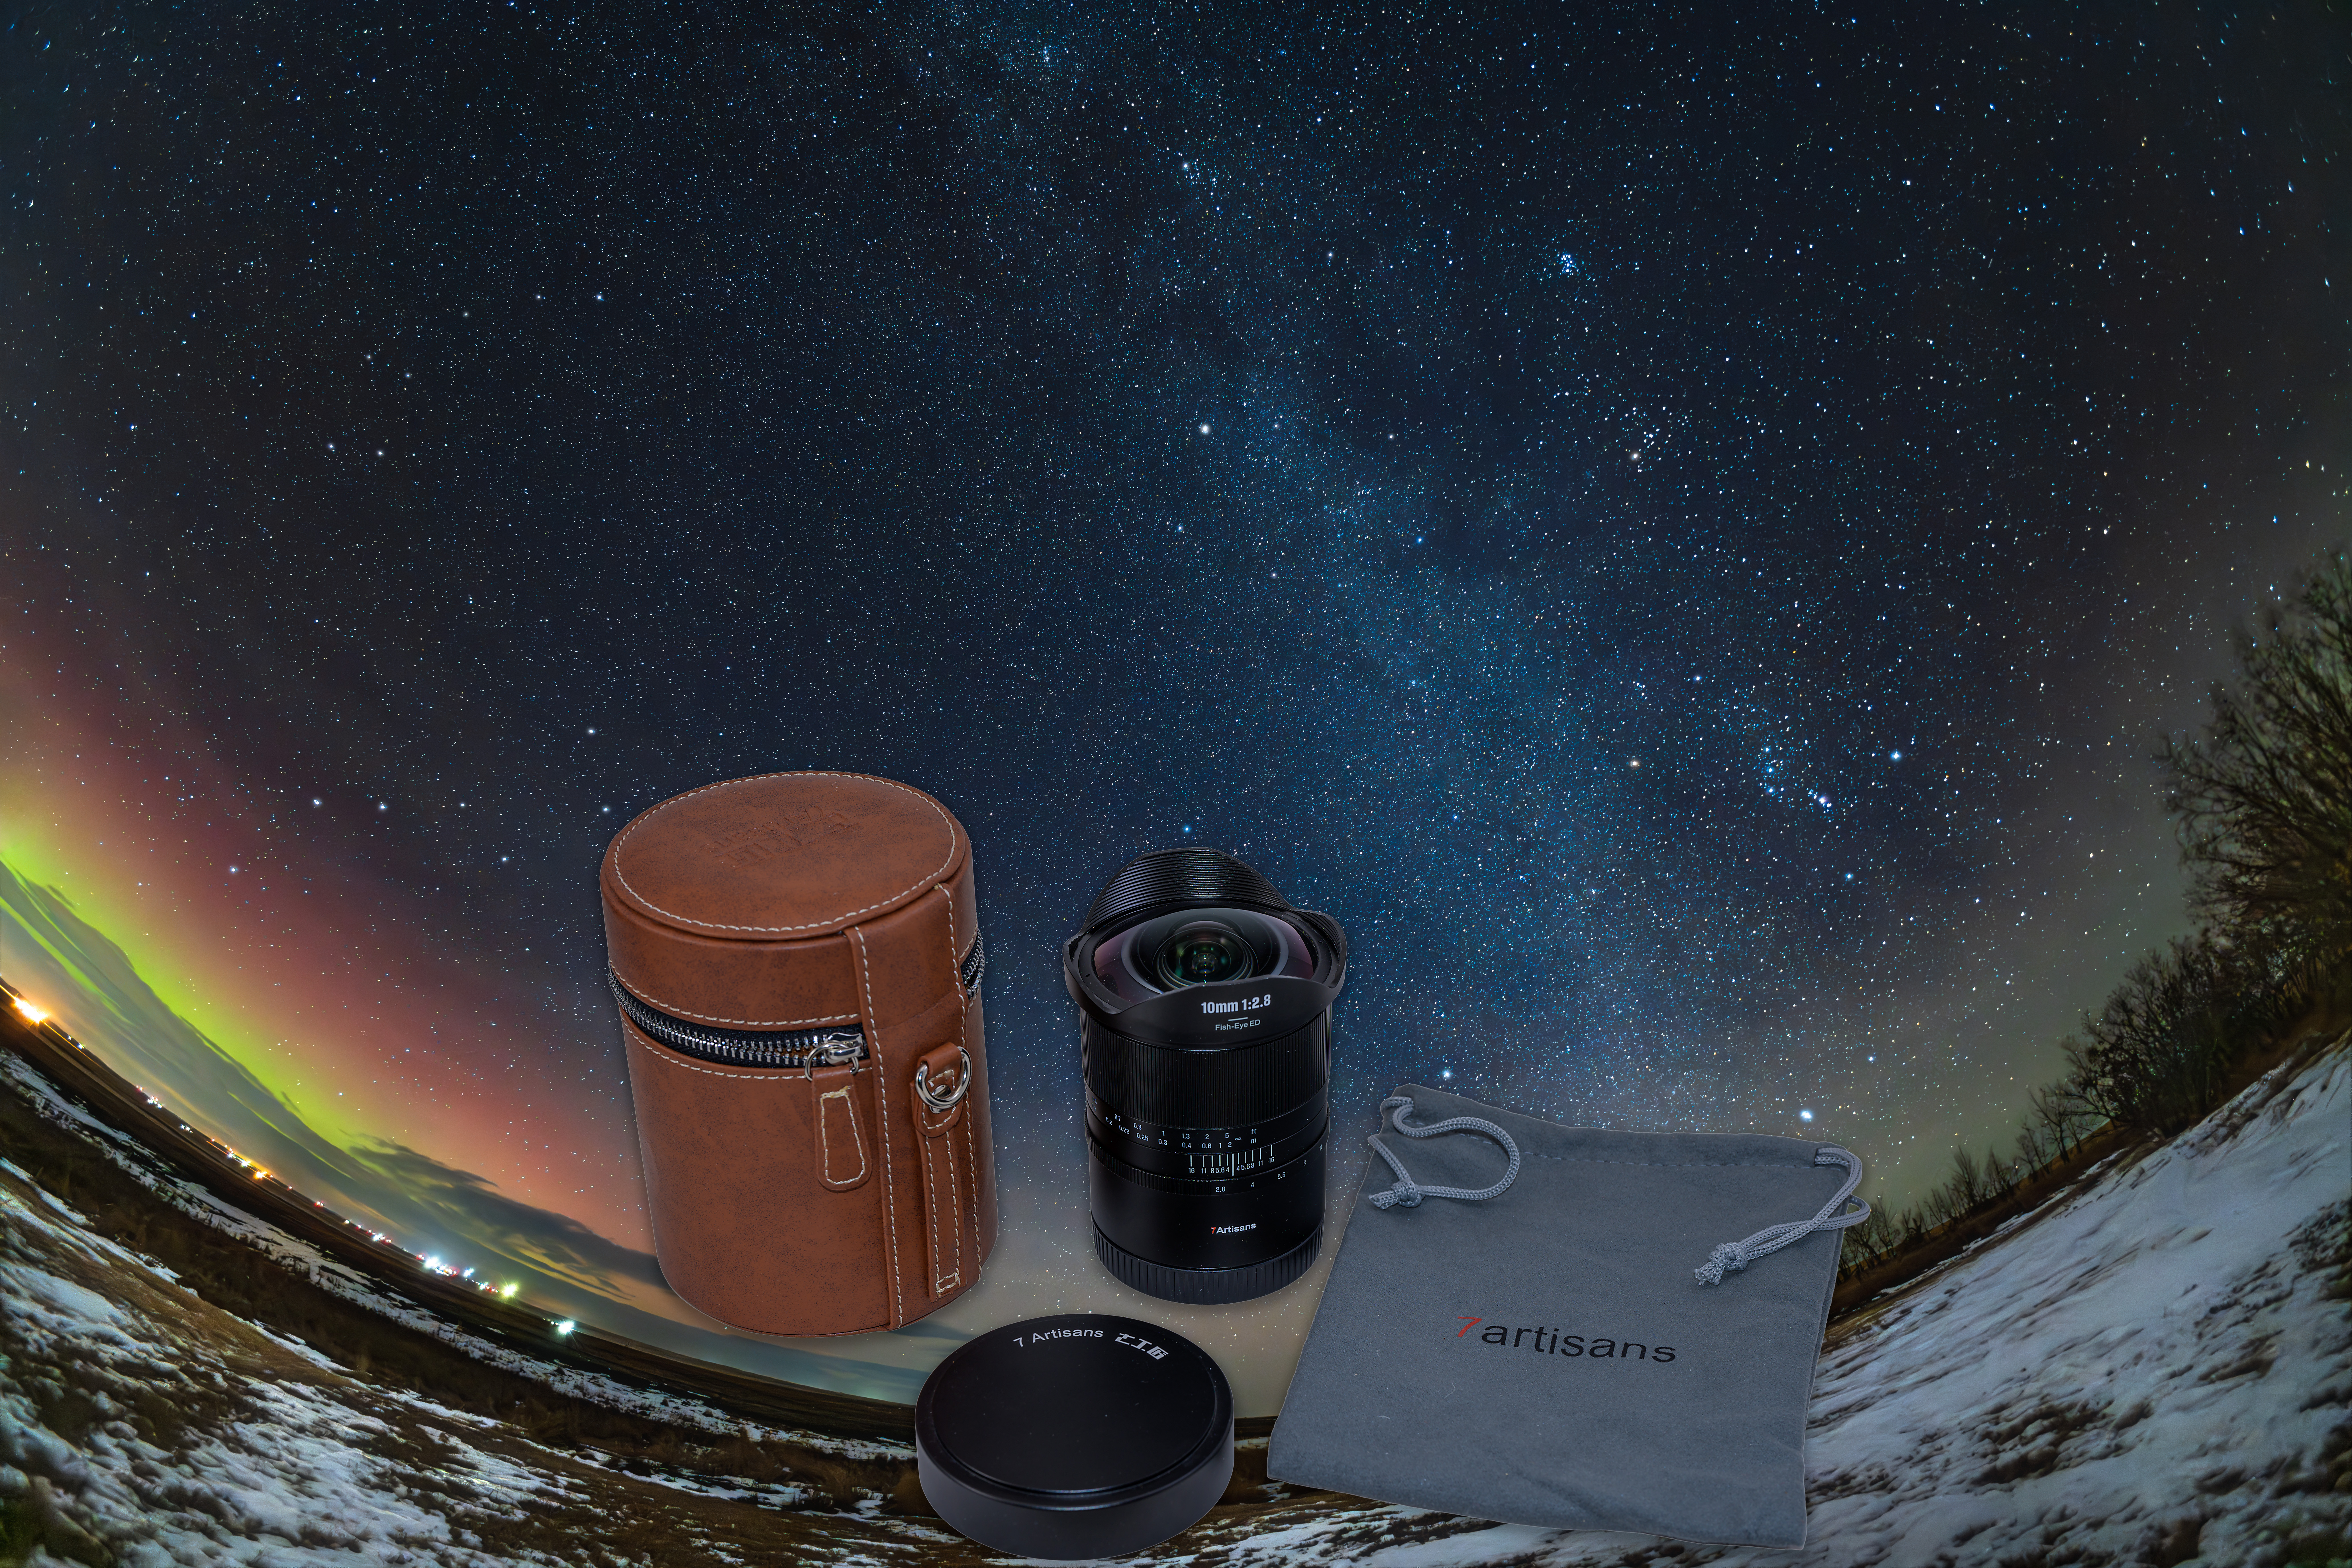
Available for Sony E, Leica L, Canon RF, Nikon Z Lens Mounts

$280 US. 

This is the first, and so far only, lens I have used from the China-based company 7Artisans. I am impressed with it. The 10mm came with both a cloth lens pouch and a hard-sided zippered lens case, both shown above. Very nice! Nikon should take note and be so generous with their premium S-line lenses. 

The lens is solid, with all-metal construction and a metal press-on lens cap. The rear cap is plastic, true of all the lenses. The focus movement is smooth with a good level of resistance or dampening. Infinity focus, with the stars sharpest, proved to be left of the infinity mark. The lens focuses past infinity, so careful manual focusing is needed. The aperture ring is click-less, preferred for video use, but a bit of a nuisance for photography. 
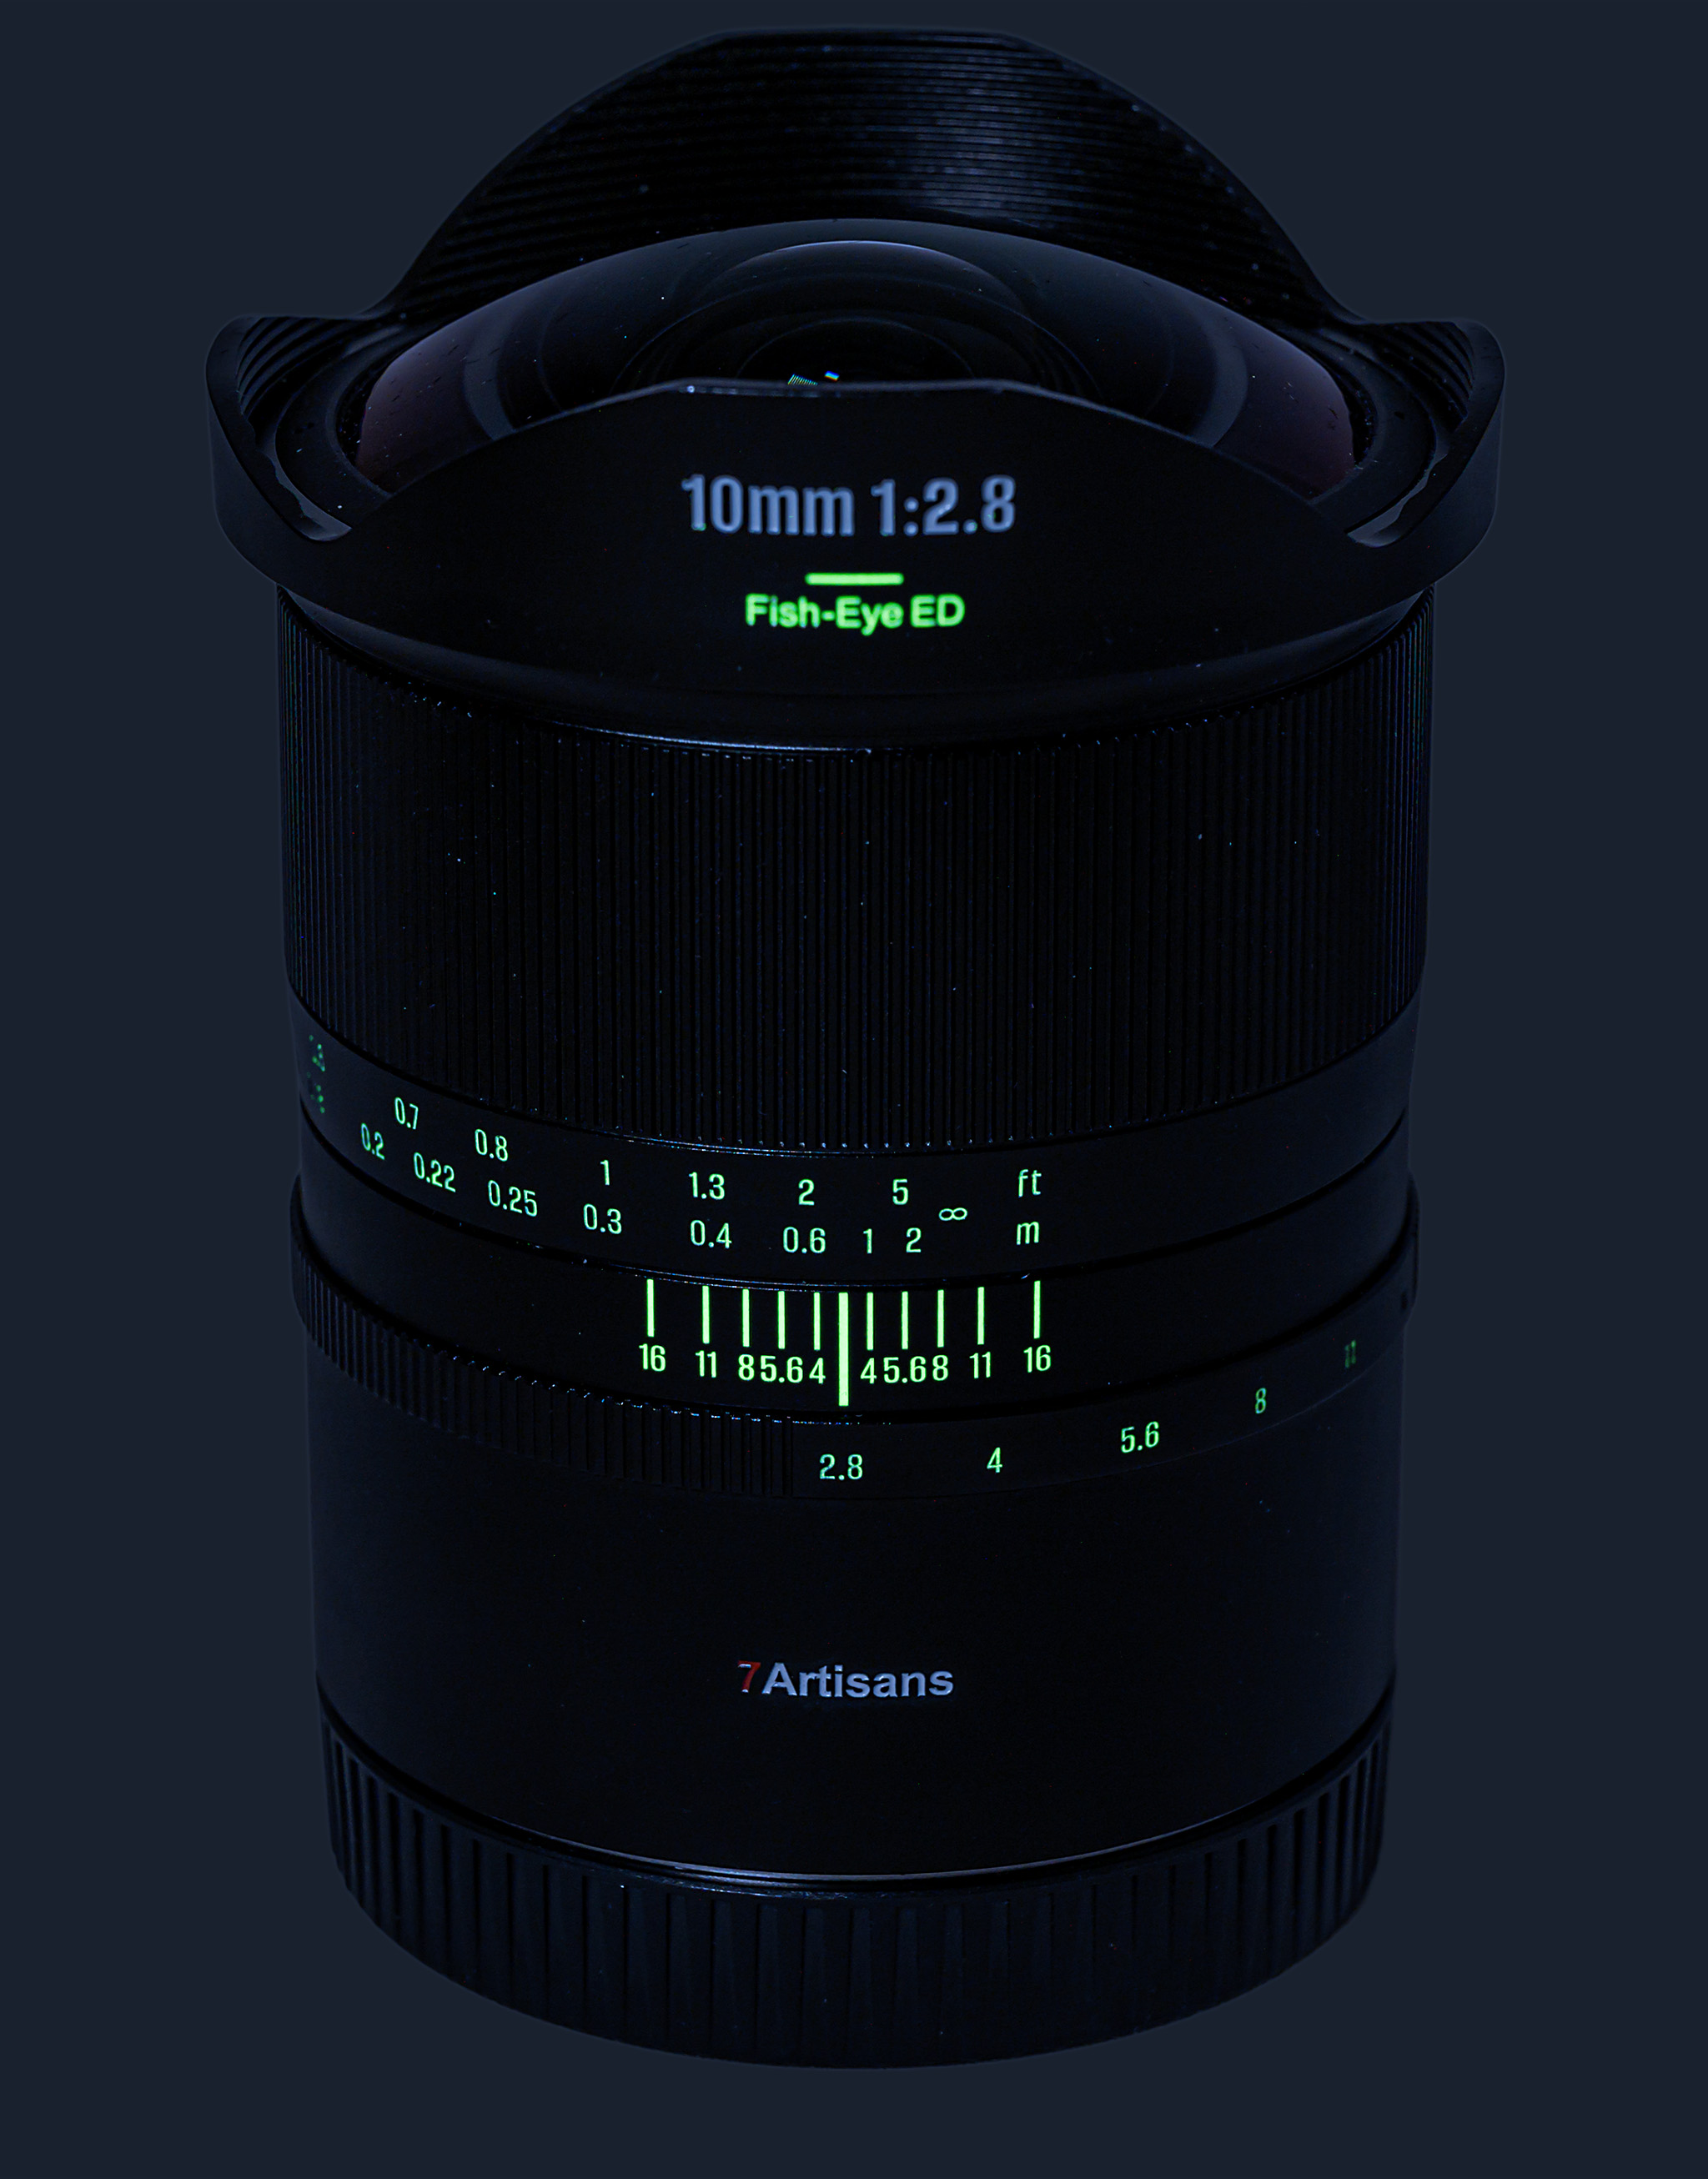
The fluorescent lens markings

An added bonus, clearly showing this lens has been designed for night use in mind, is that the focus and depth of field markings are fluorescent. Hit the lens with white light and they will glow in the dark for a while, as above. Nice!ย 

I tested the new Manual Focus Mark II model, advertised as having โ€œenhanced performanceโ€ over the original lens โ€“ with two of the 11 lens elements being ED glass, versus the original modelโ€™s single ED element. I never used the original 10mm, so I canโ€™t comment on how the Mark II version has improved. And donโ€™t confuse this new MkII 10mm with another 10mm f/2.8 AF lens 7Artisans also sells. That 10mm has auto-focus but is only for APS-C cameras. 

IMAGE QUALITY ย 

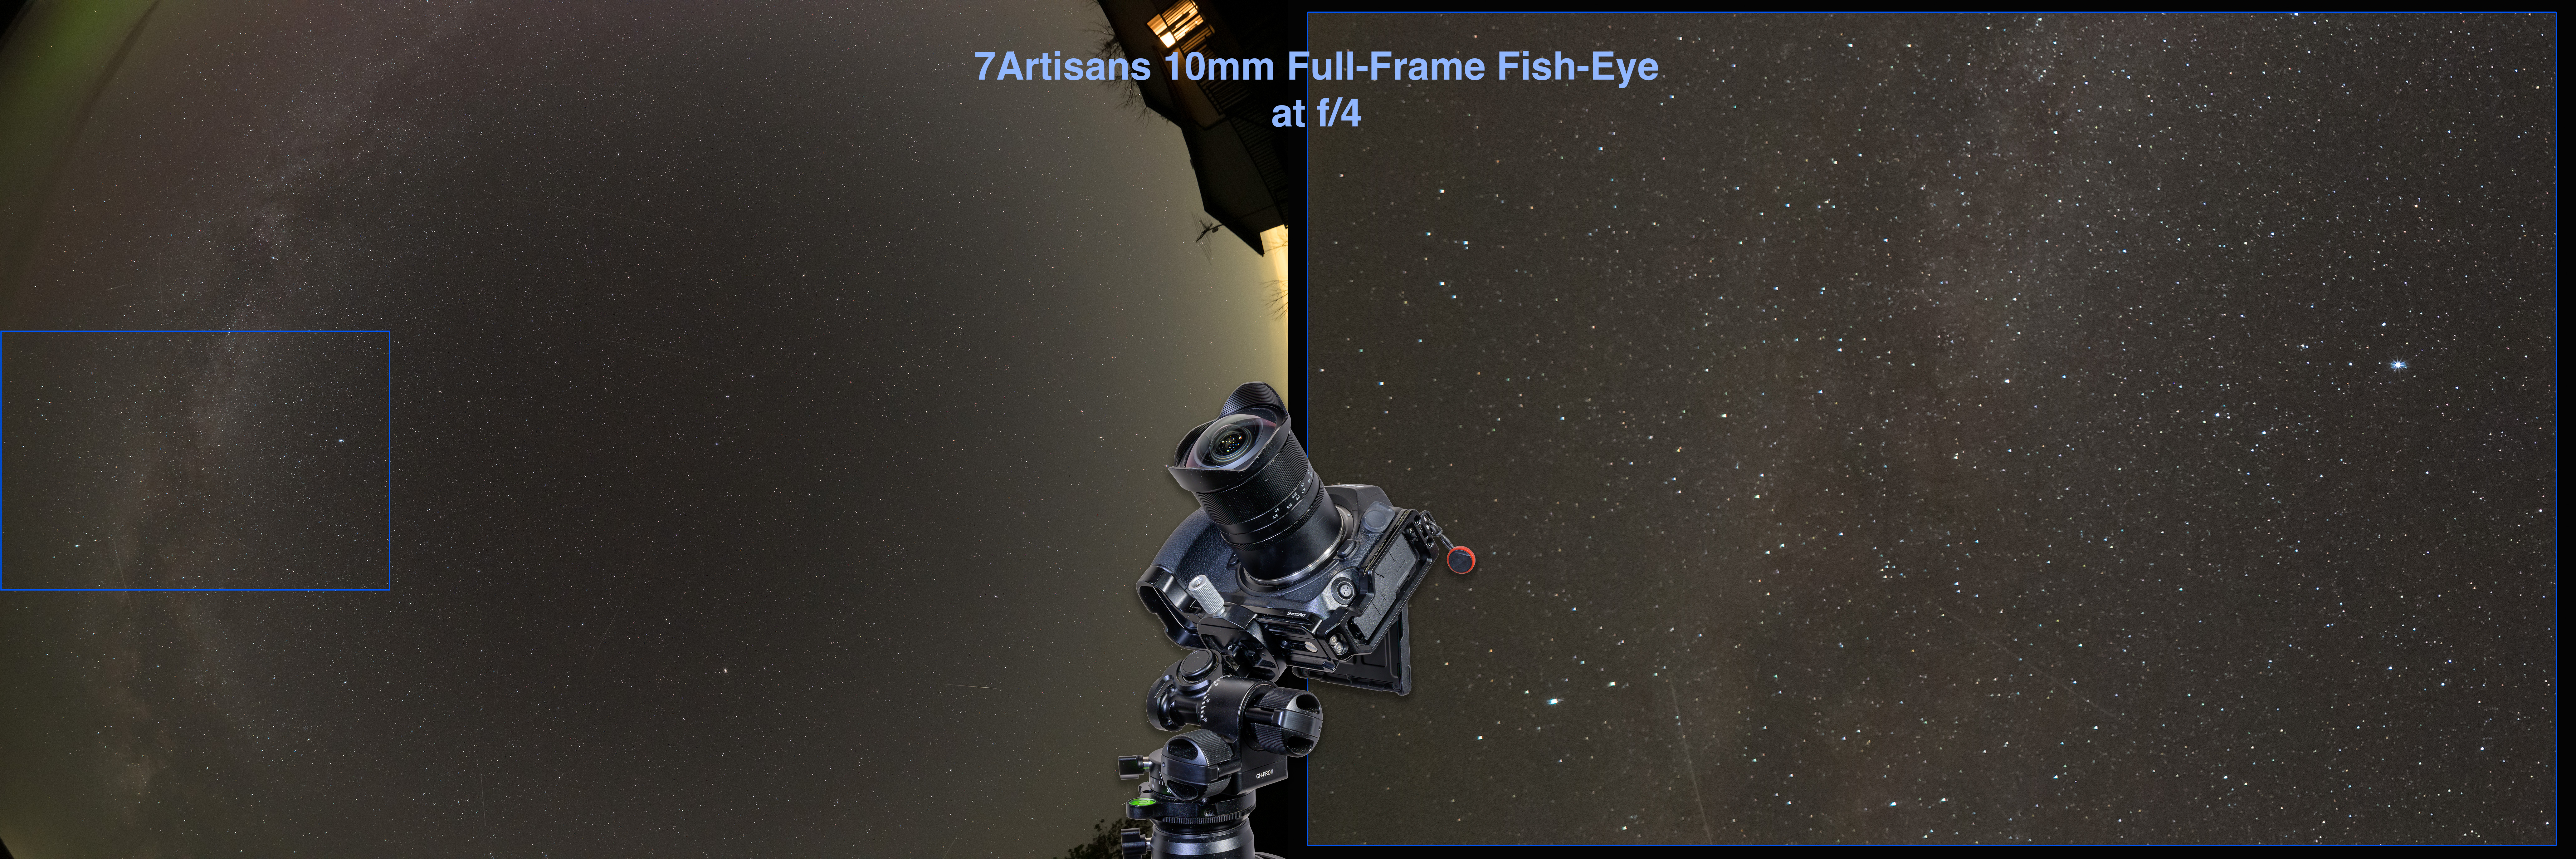
I aimed all the full-frame fish-eyes straight up to the zenith, to put stars in all corners. However, I am zooming in on the edge of the long dimension in these samples. Click or tap on an image to download a high-resolution JPG for closer inspection of all parts of an image. 
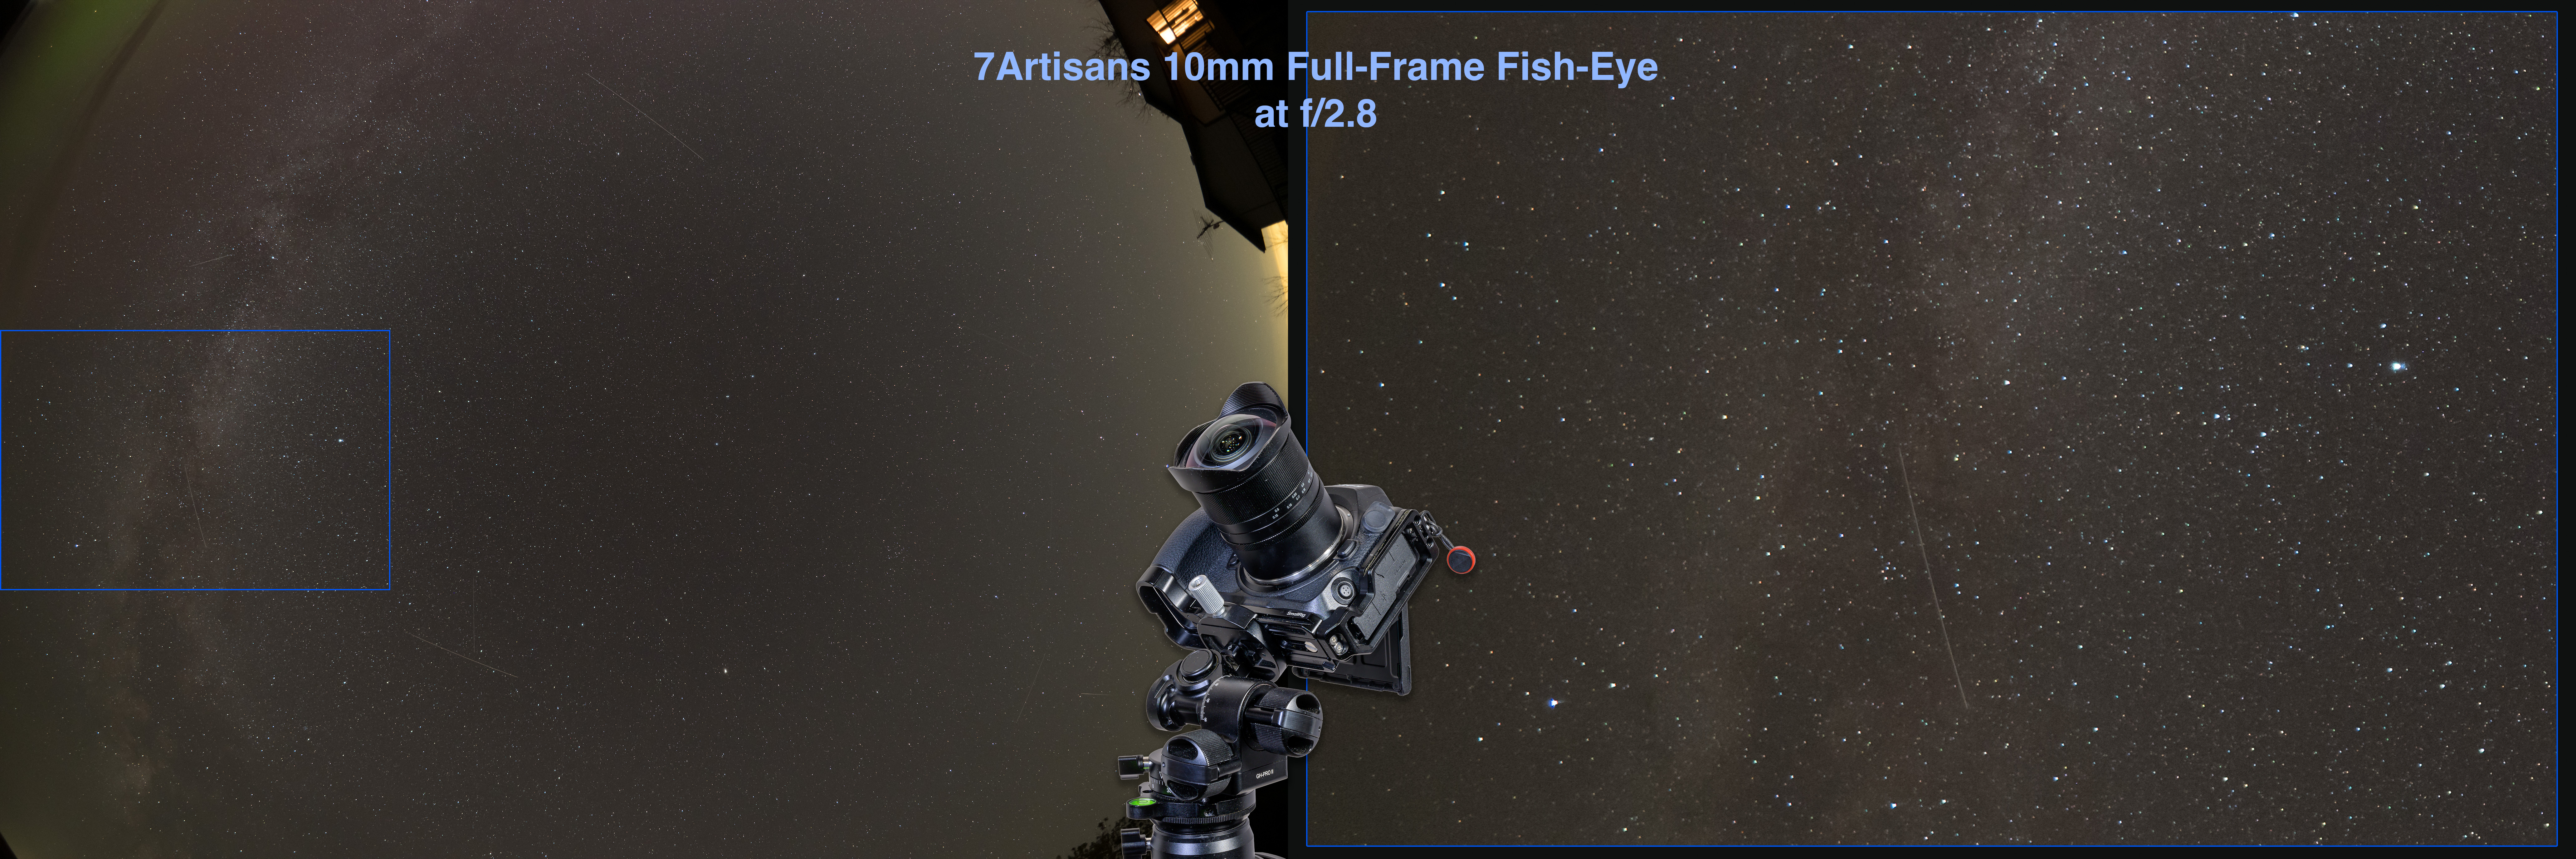
10mm 7Artisans at f/2.8

The 7Artisans 10mm proved very sharp at the centre and toward the edges of the frame, showing only a small level of astigmatism and lateral colour at the edges at f/2.8. Bright stars at the very corners did show โ€œwingsโ€ from astigmatism.

10mm 7Artisans at f/4

Stars tightened up at f/4, but still had some astigmatism at the pixel-peeping level. The 10mm also had the widest field of view of the three full-frame fish-eyes, by a slight margin.ย 

The image edges brightened with the lens at f/4, as expected from the reduced vignetting all wide-angle lenses show when stopped down. But unless you are very fussy about star shapes, the 7Artisans 10mm will work very well when shot wide-open at f/2.8.

LENS FLARES
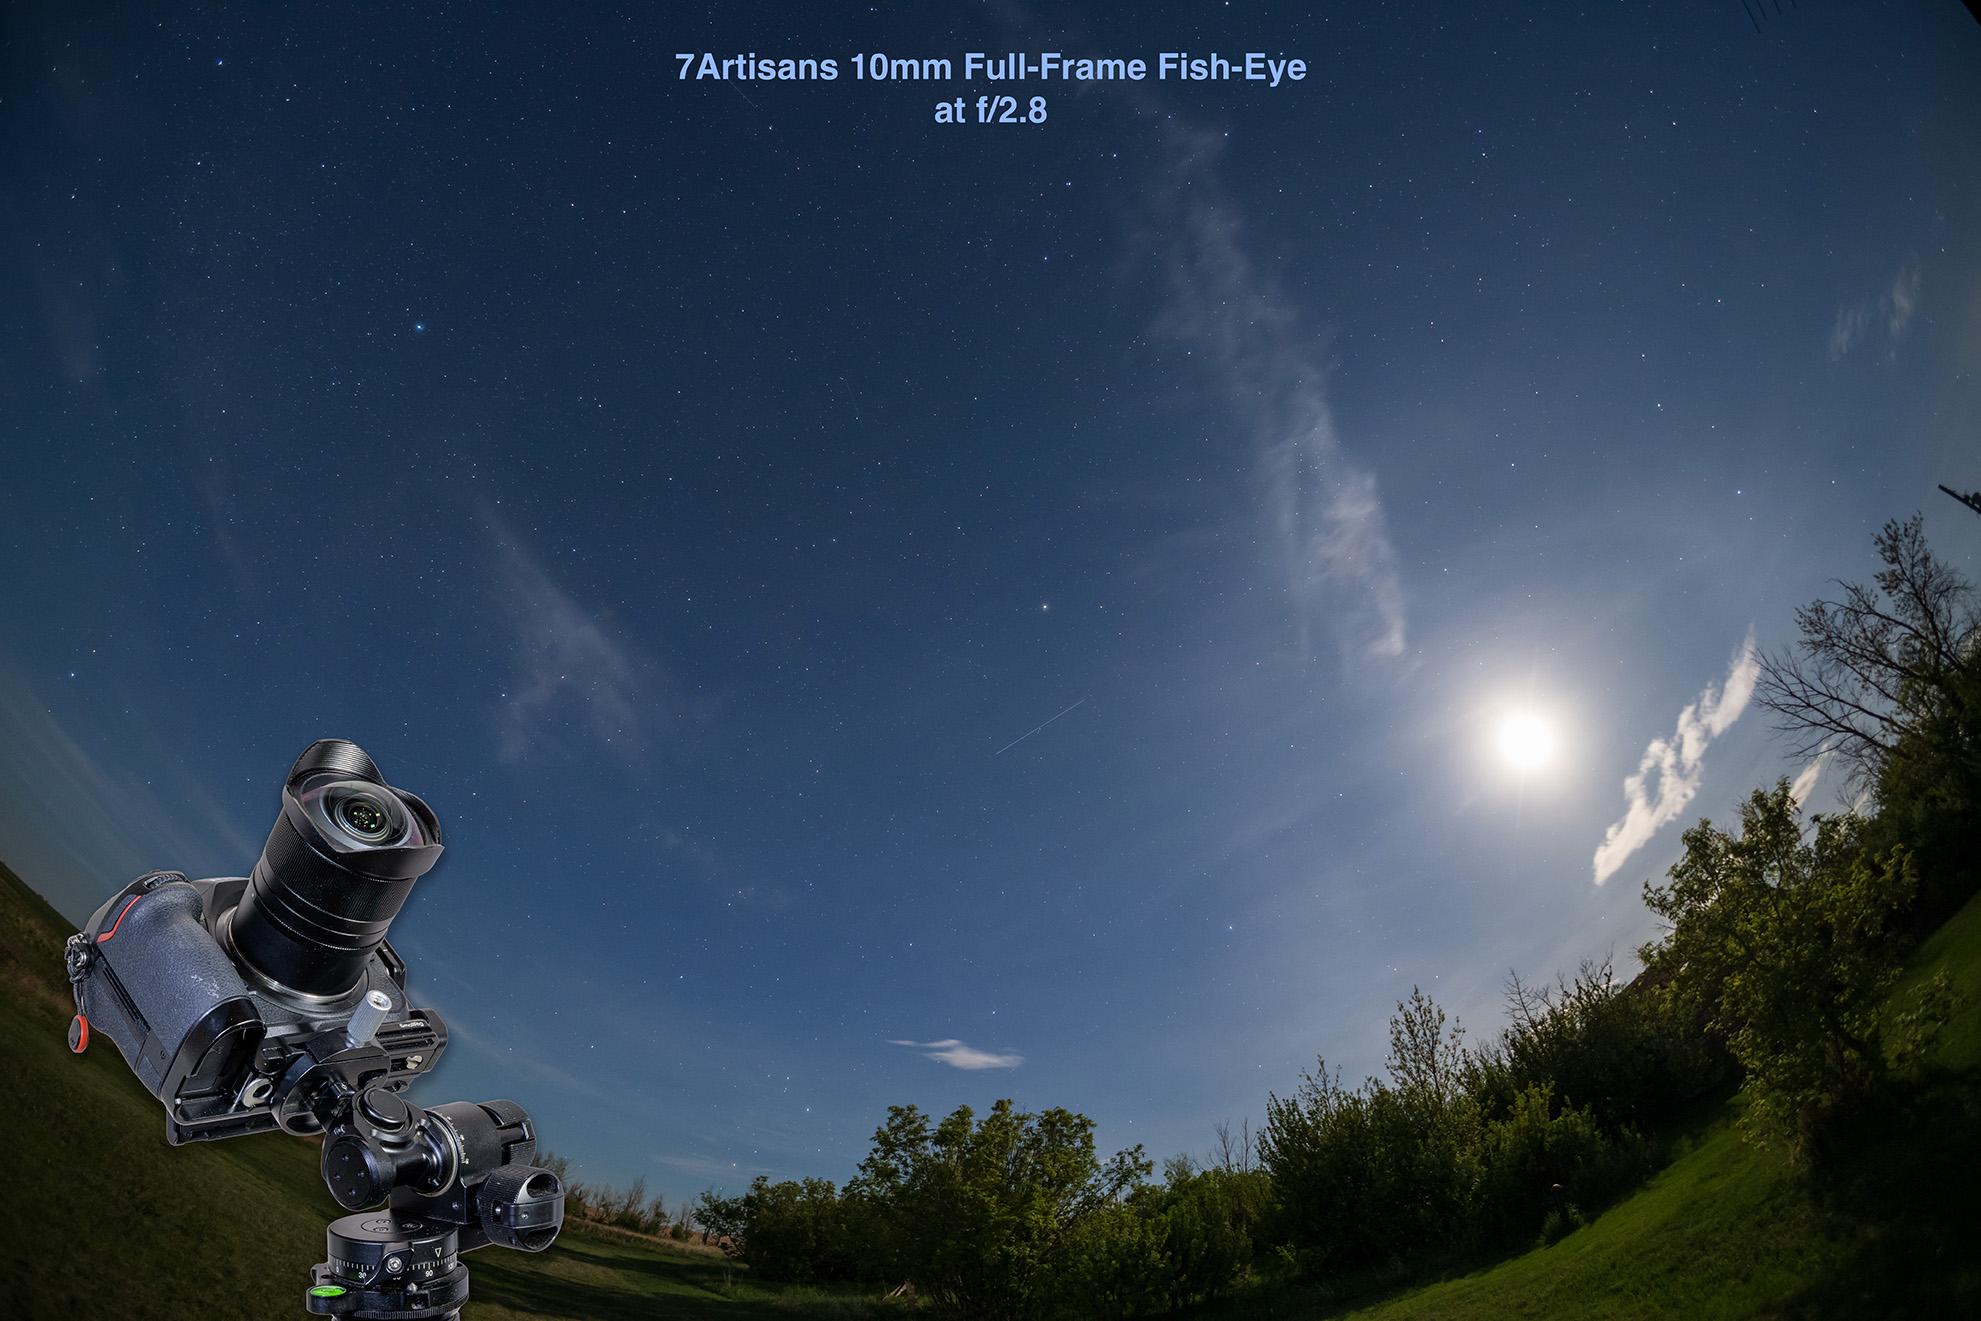
10mm 7Artisans at f/2.8

I didnโ€™t see any noticeable flares in my moonlight test shots, quite remarkable! What slight halo you can see around the Moon, here shot at f/2.8, is in the sky, from the thin clouds this night.


The TTArtisan 11mm f/2.8 Full-Frame Fish-Eye
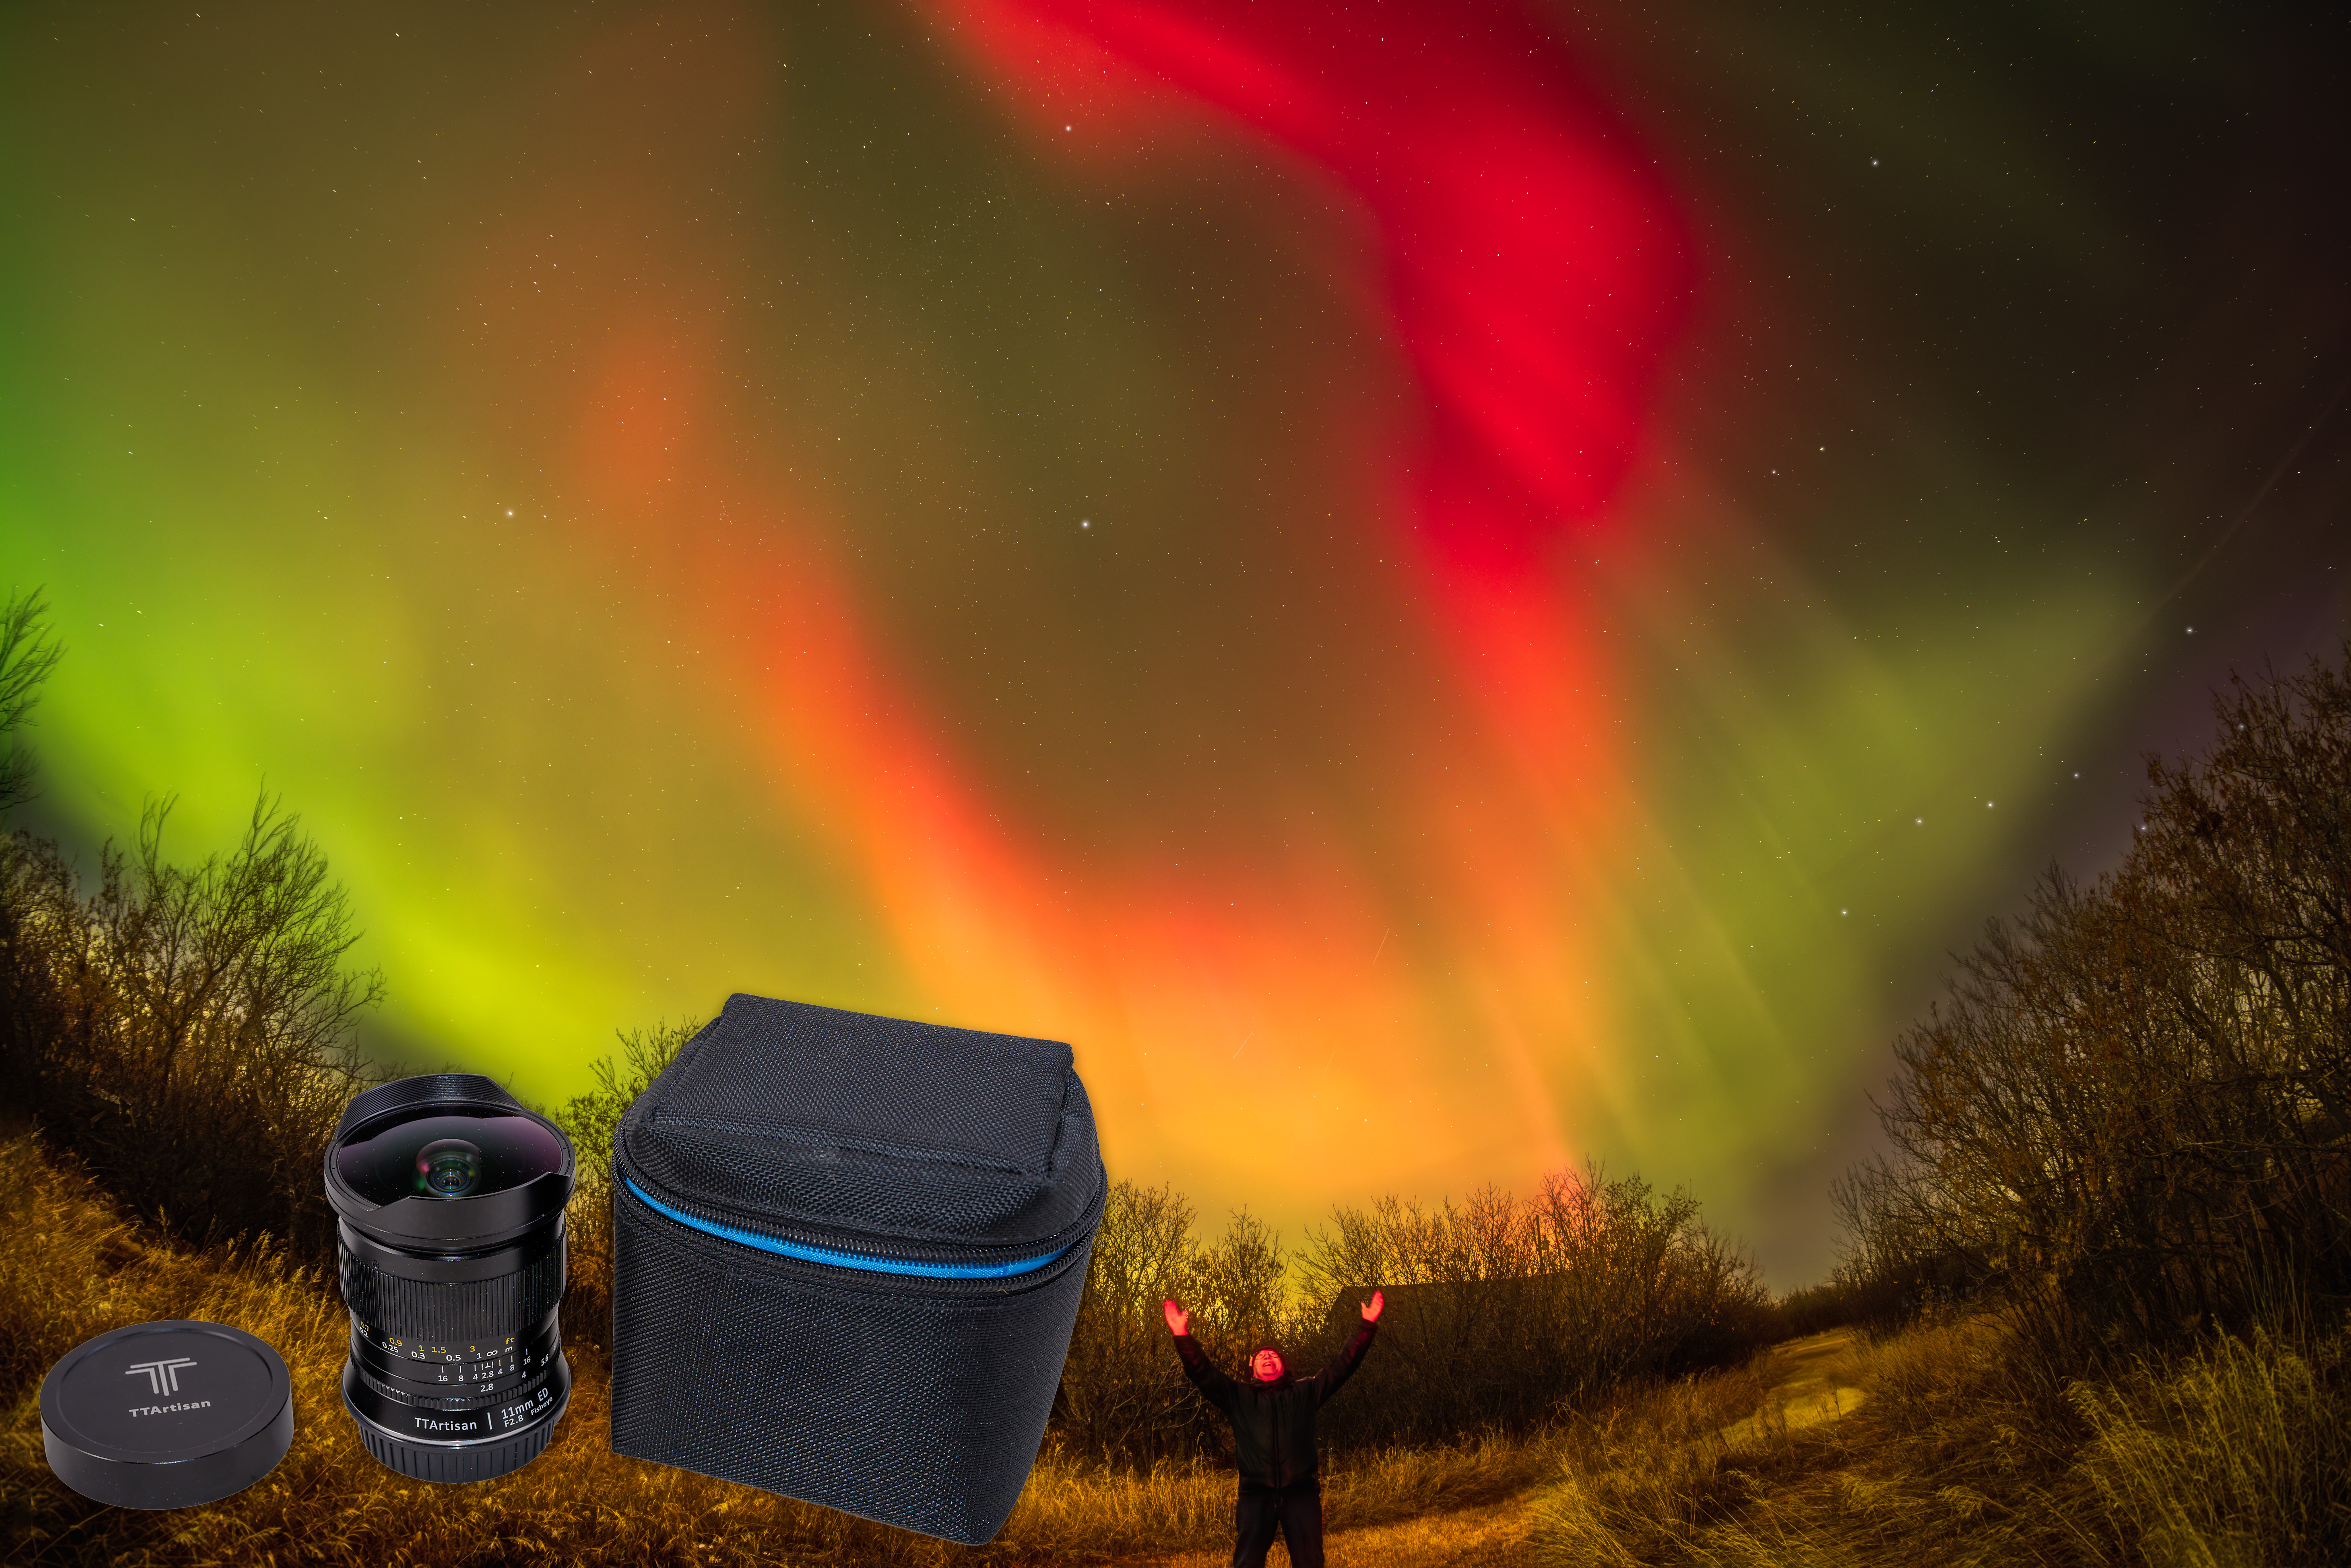
Available for Sony E, Leica L, Panasonic/Olympus M43, Canon RF, Fuji X, Nikon Z Lens Mounts plus for Nikon F and Canon EF DSLR cameras in a different model. 

$235 US. 

https://www.ttartisan.com/?full-frame-lenses/62.html

Iโ€™ve owned this lens for several years during which time it has served me well for many aurora shows. As best I can tell the lens sold today is the same as the one I bought some 5 years ago. Like the 7.5mm, the 11mm does not come with a case or pouch, a shortcoming of TTArtisan lenses. The case I show above is an extra one I had on hand that works well for this lens.

Note, this is the one lens of the group that is available for DSLR cameras โ€“ for Canon EF and Nikon F โ€“ย though in a different optical design than the lens I tested.ย 

The lens is compact, solid and dense, with all-metal construction, including the front lens cap. The focus turns smoothly with just the right amount of dampening. Infinity focus, with the stars sharpest, proved to be actually at the infinity mark with the focus at the extreme end. The lens does not focus past infinity, making it the easiest lens of the group to focus in the field. The aperture ring is click-less, again not ideal for photography. 

IMAGE QUALITYย 

The 11mm TTArtisanโ€™s test images proved to be about 1/2-stop darker than images with the 10mm 7Artisans and 12mm AstrHori, when all were shot at the same camera settings. 

The 11mm also had the narrowest field of the three diagonal fish-eyes, even compared to the 12mm AstrHori, though the difference was slight. 
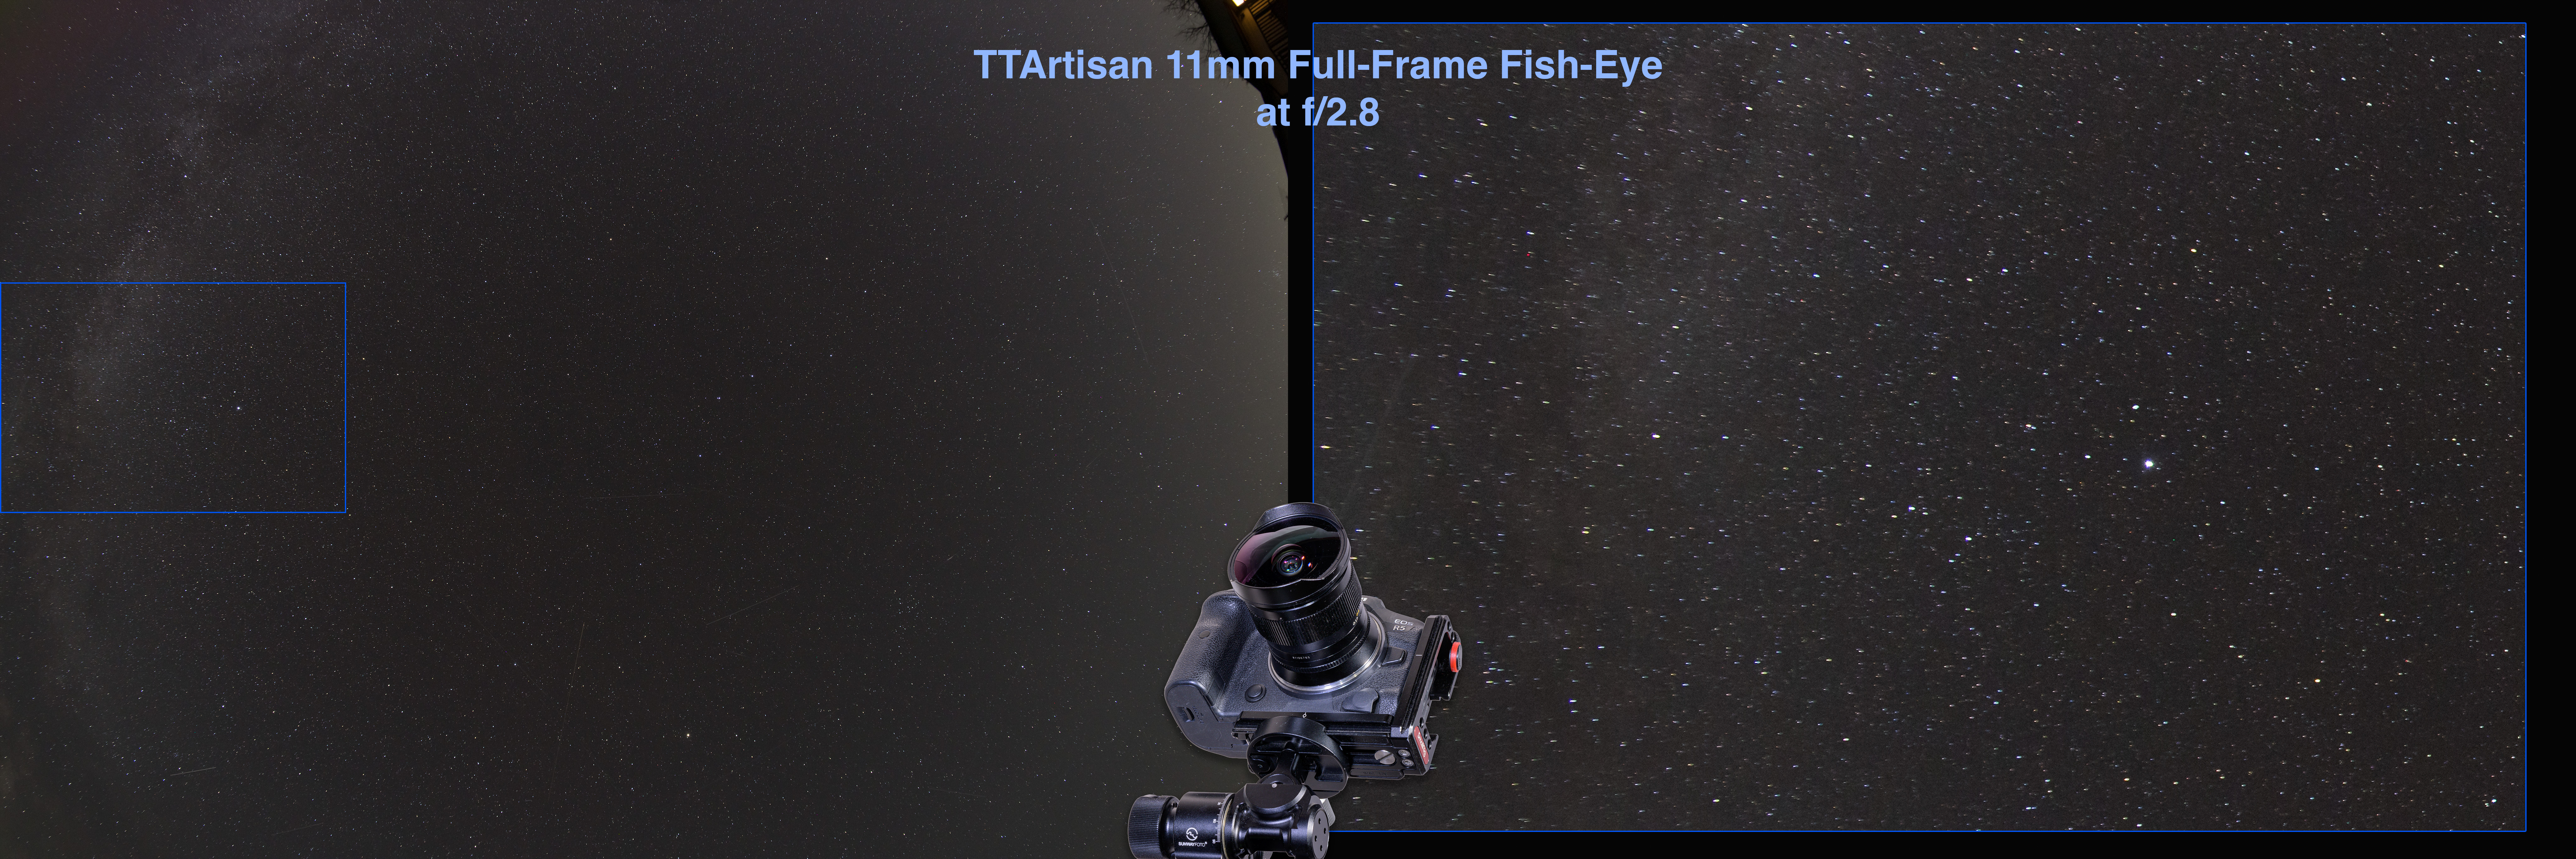
11mm TTArtisan at f/2.8

Stars were sharp in the centre of the frame with minimal LoCA. Astigmatism increasingly elongated the stars into streaks toward the edges of the frame at f/2.8, though with minimal lateral colour. Stars tightened up at f/4 but still showed more aberration than did the 10mm 7Artisans. 
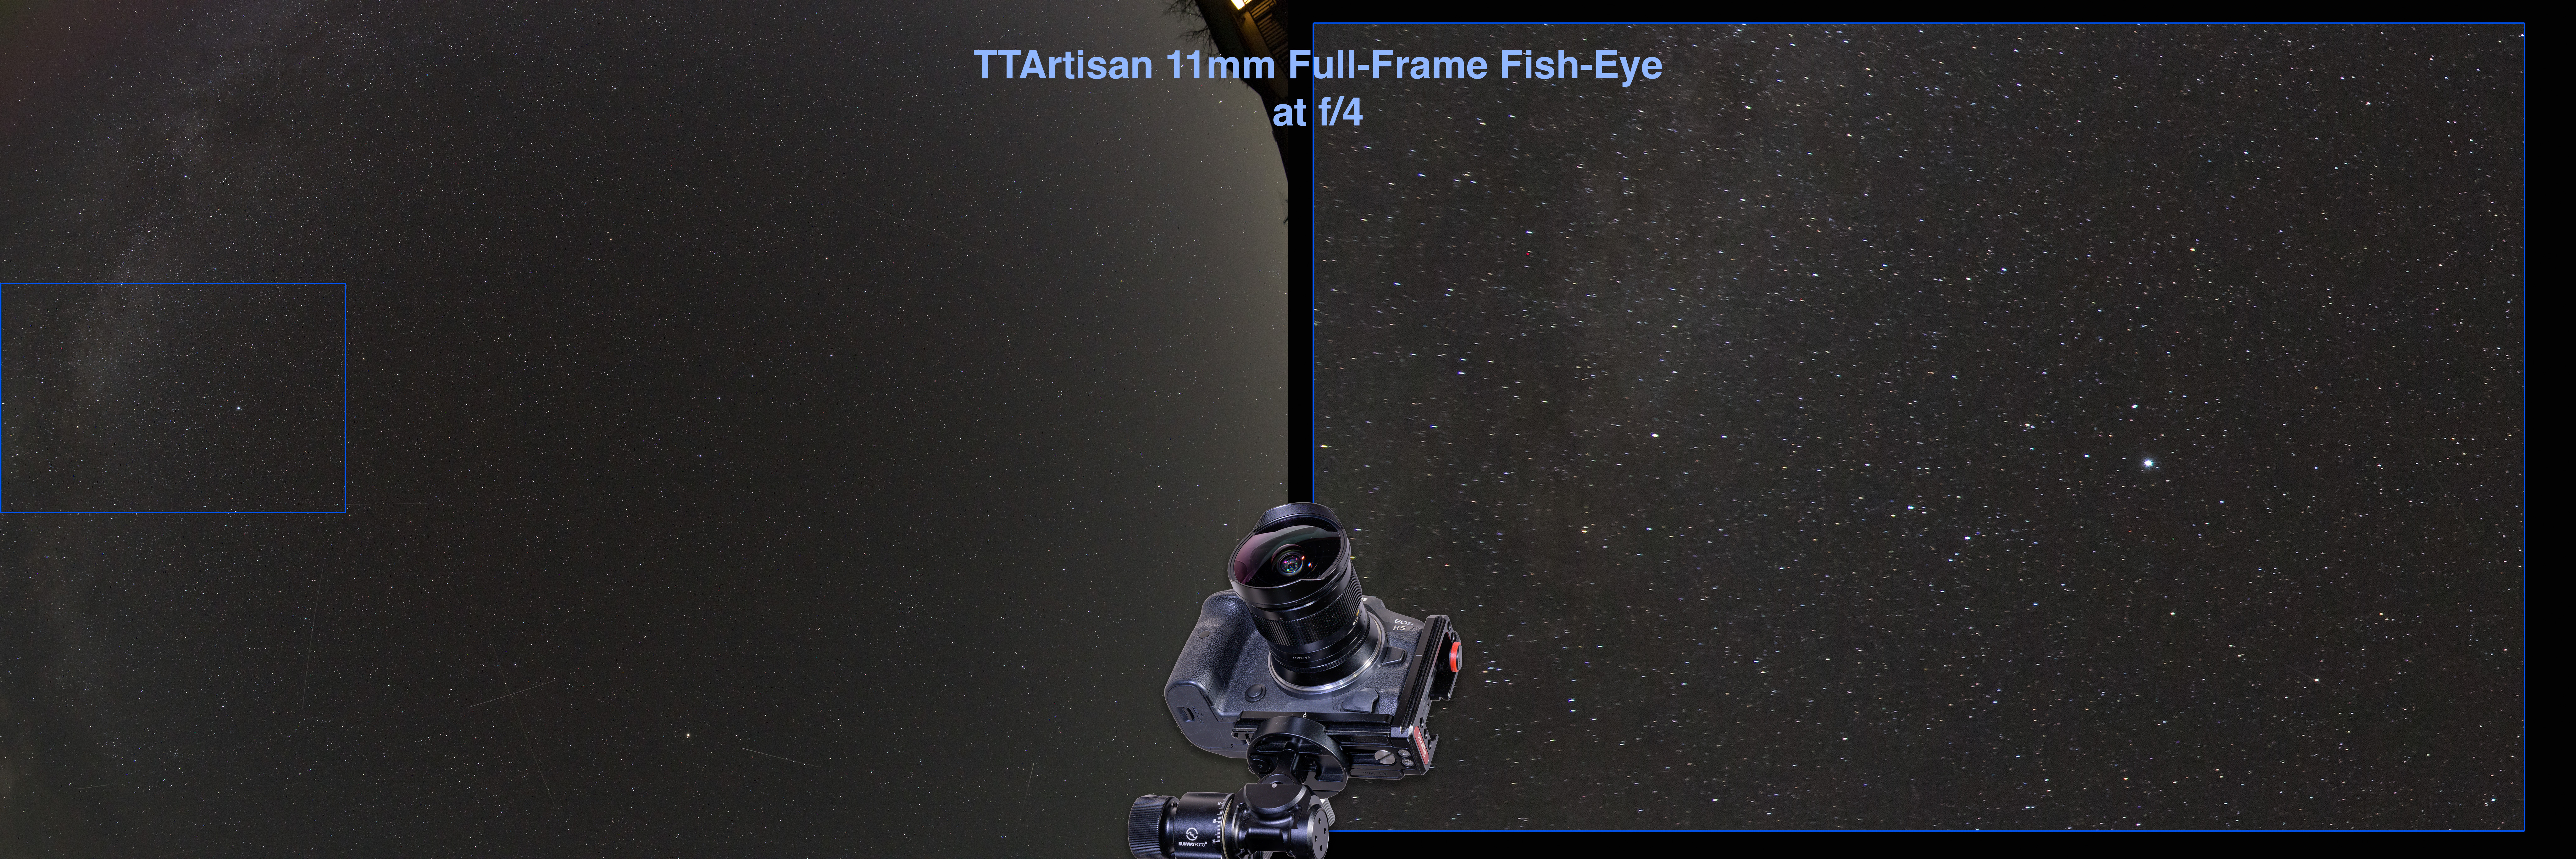
11mm TTArtisan at f/4

Stopping down brightened the frame edges. But overall, this lens can work well at f/2.8, which is how Iโ€™ve used it for most shooting, mostly of auroras. If Milky Way nightscapes are your priority, look at the 7Artisans 10mm. 

LENS FLARES
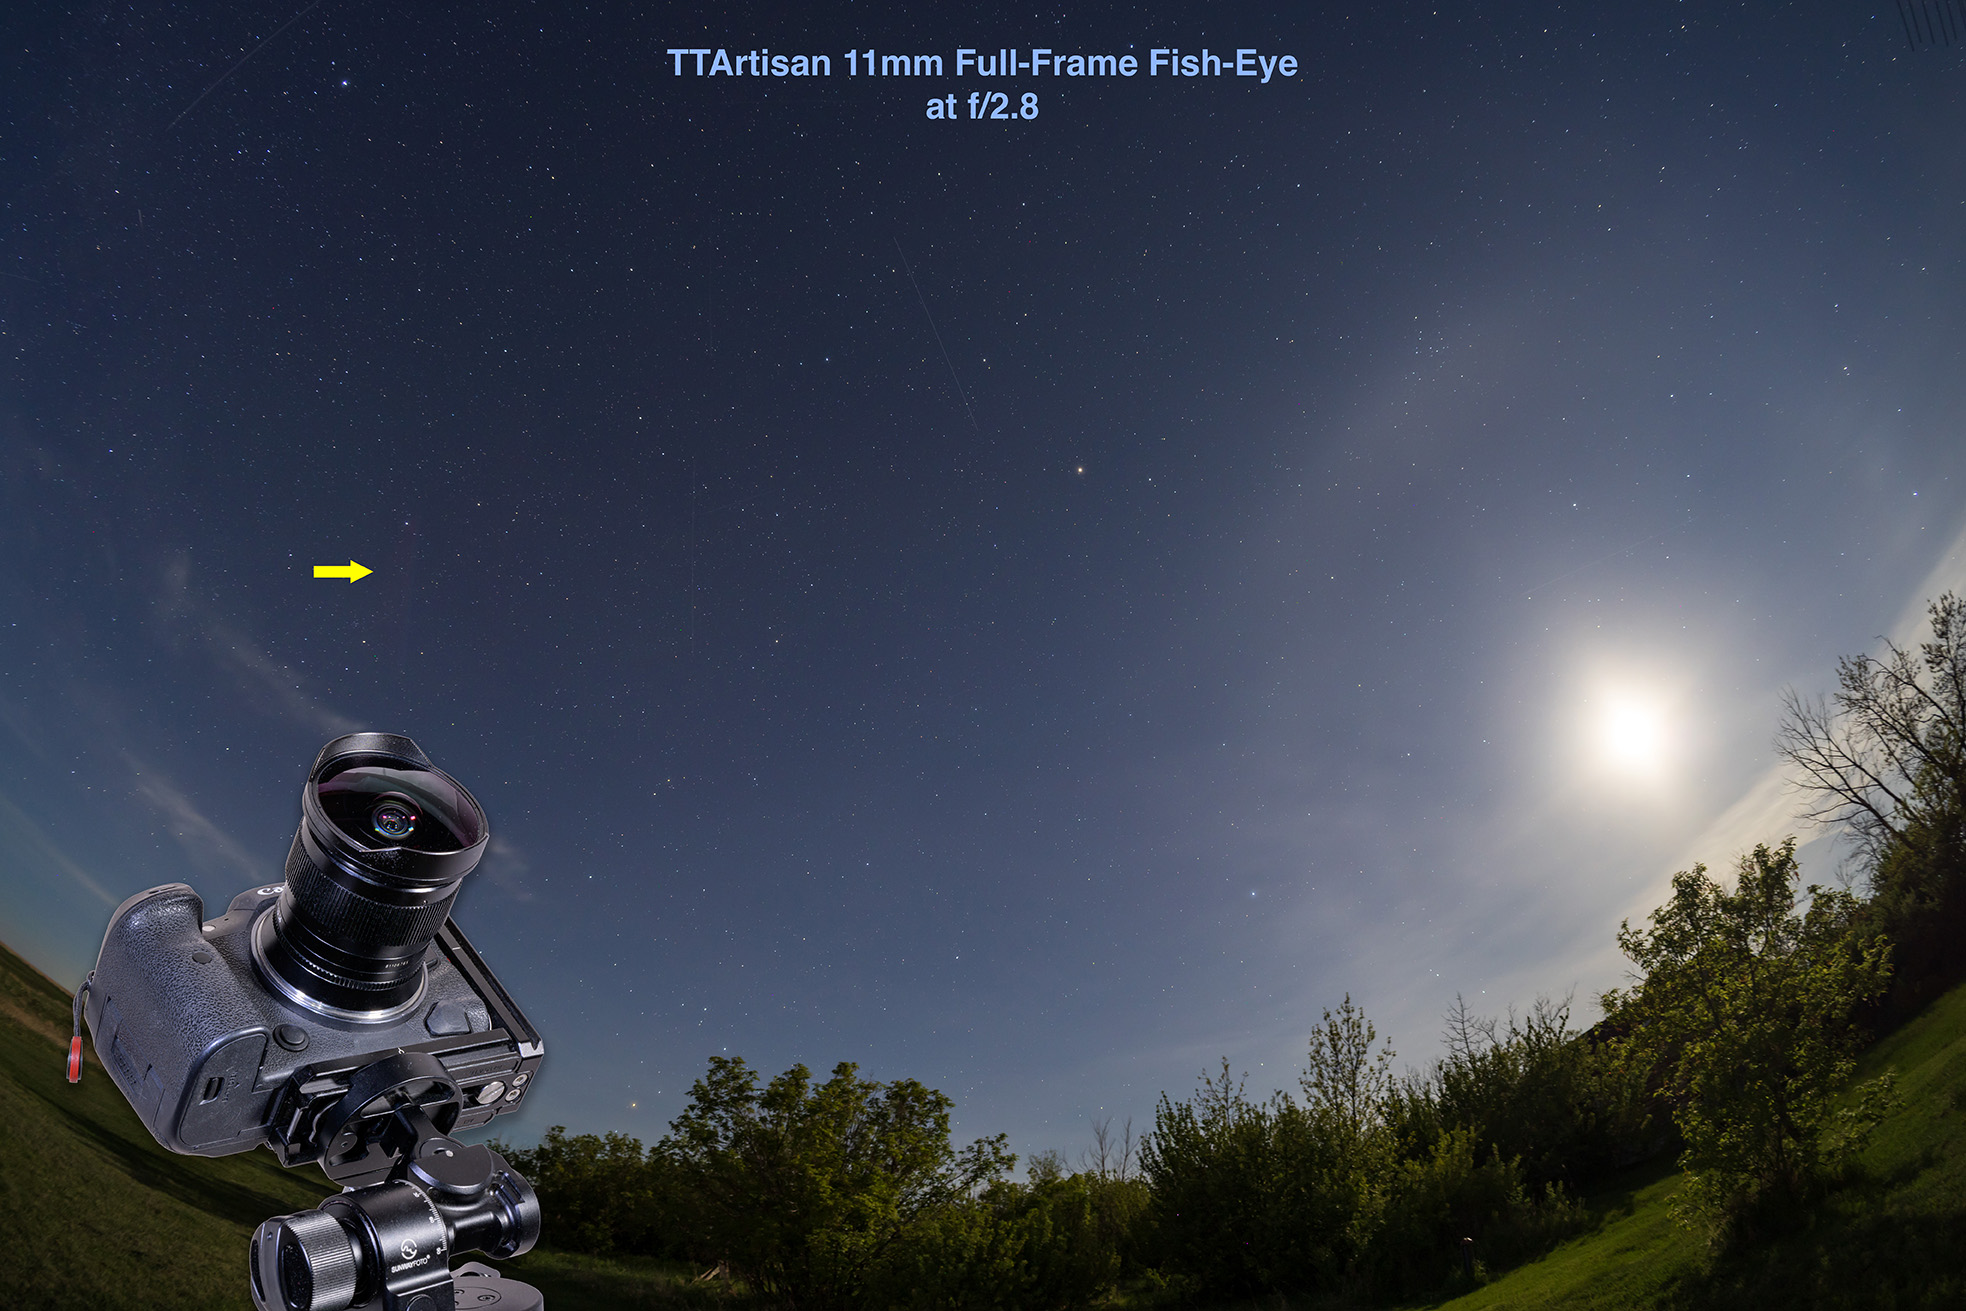
11mm TTArtisan at f/2.8 โ€“ a small lens flare is arrowed.

The TTArtisan 11mm was fairly immune to lens flares, showing only a slight coloured flare (arrowed) opposite the Moon in my test images. So its coatings must be performing fairly well, despite the overall lower level of light transmission of this older lens.ย 


The Astrhori 12mm f/2.8 Full-Frame Fish-Eye
Available for Sony E, Leica L, Canon RF, Nikon Z Lens Mounts

$260 US. 

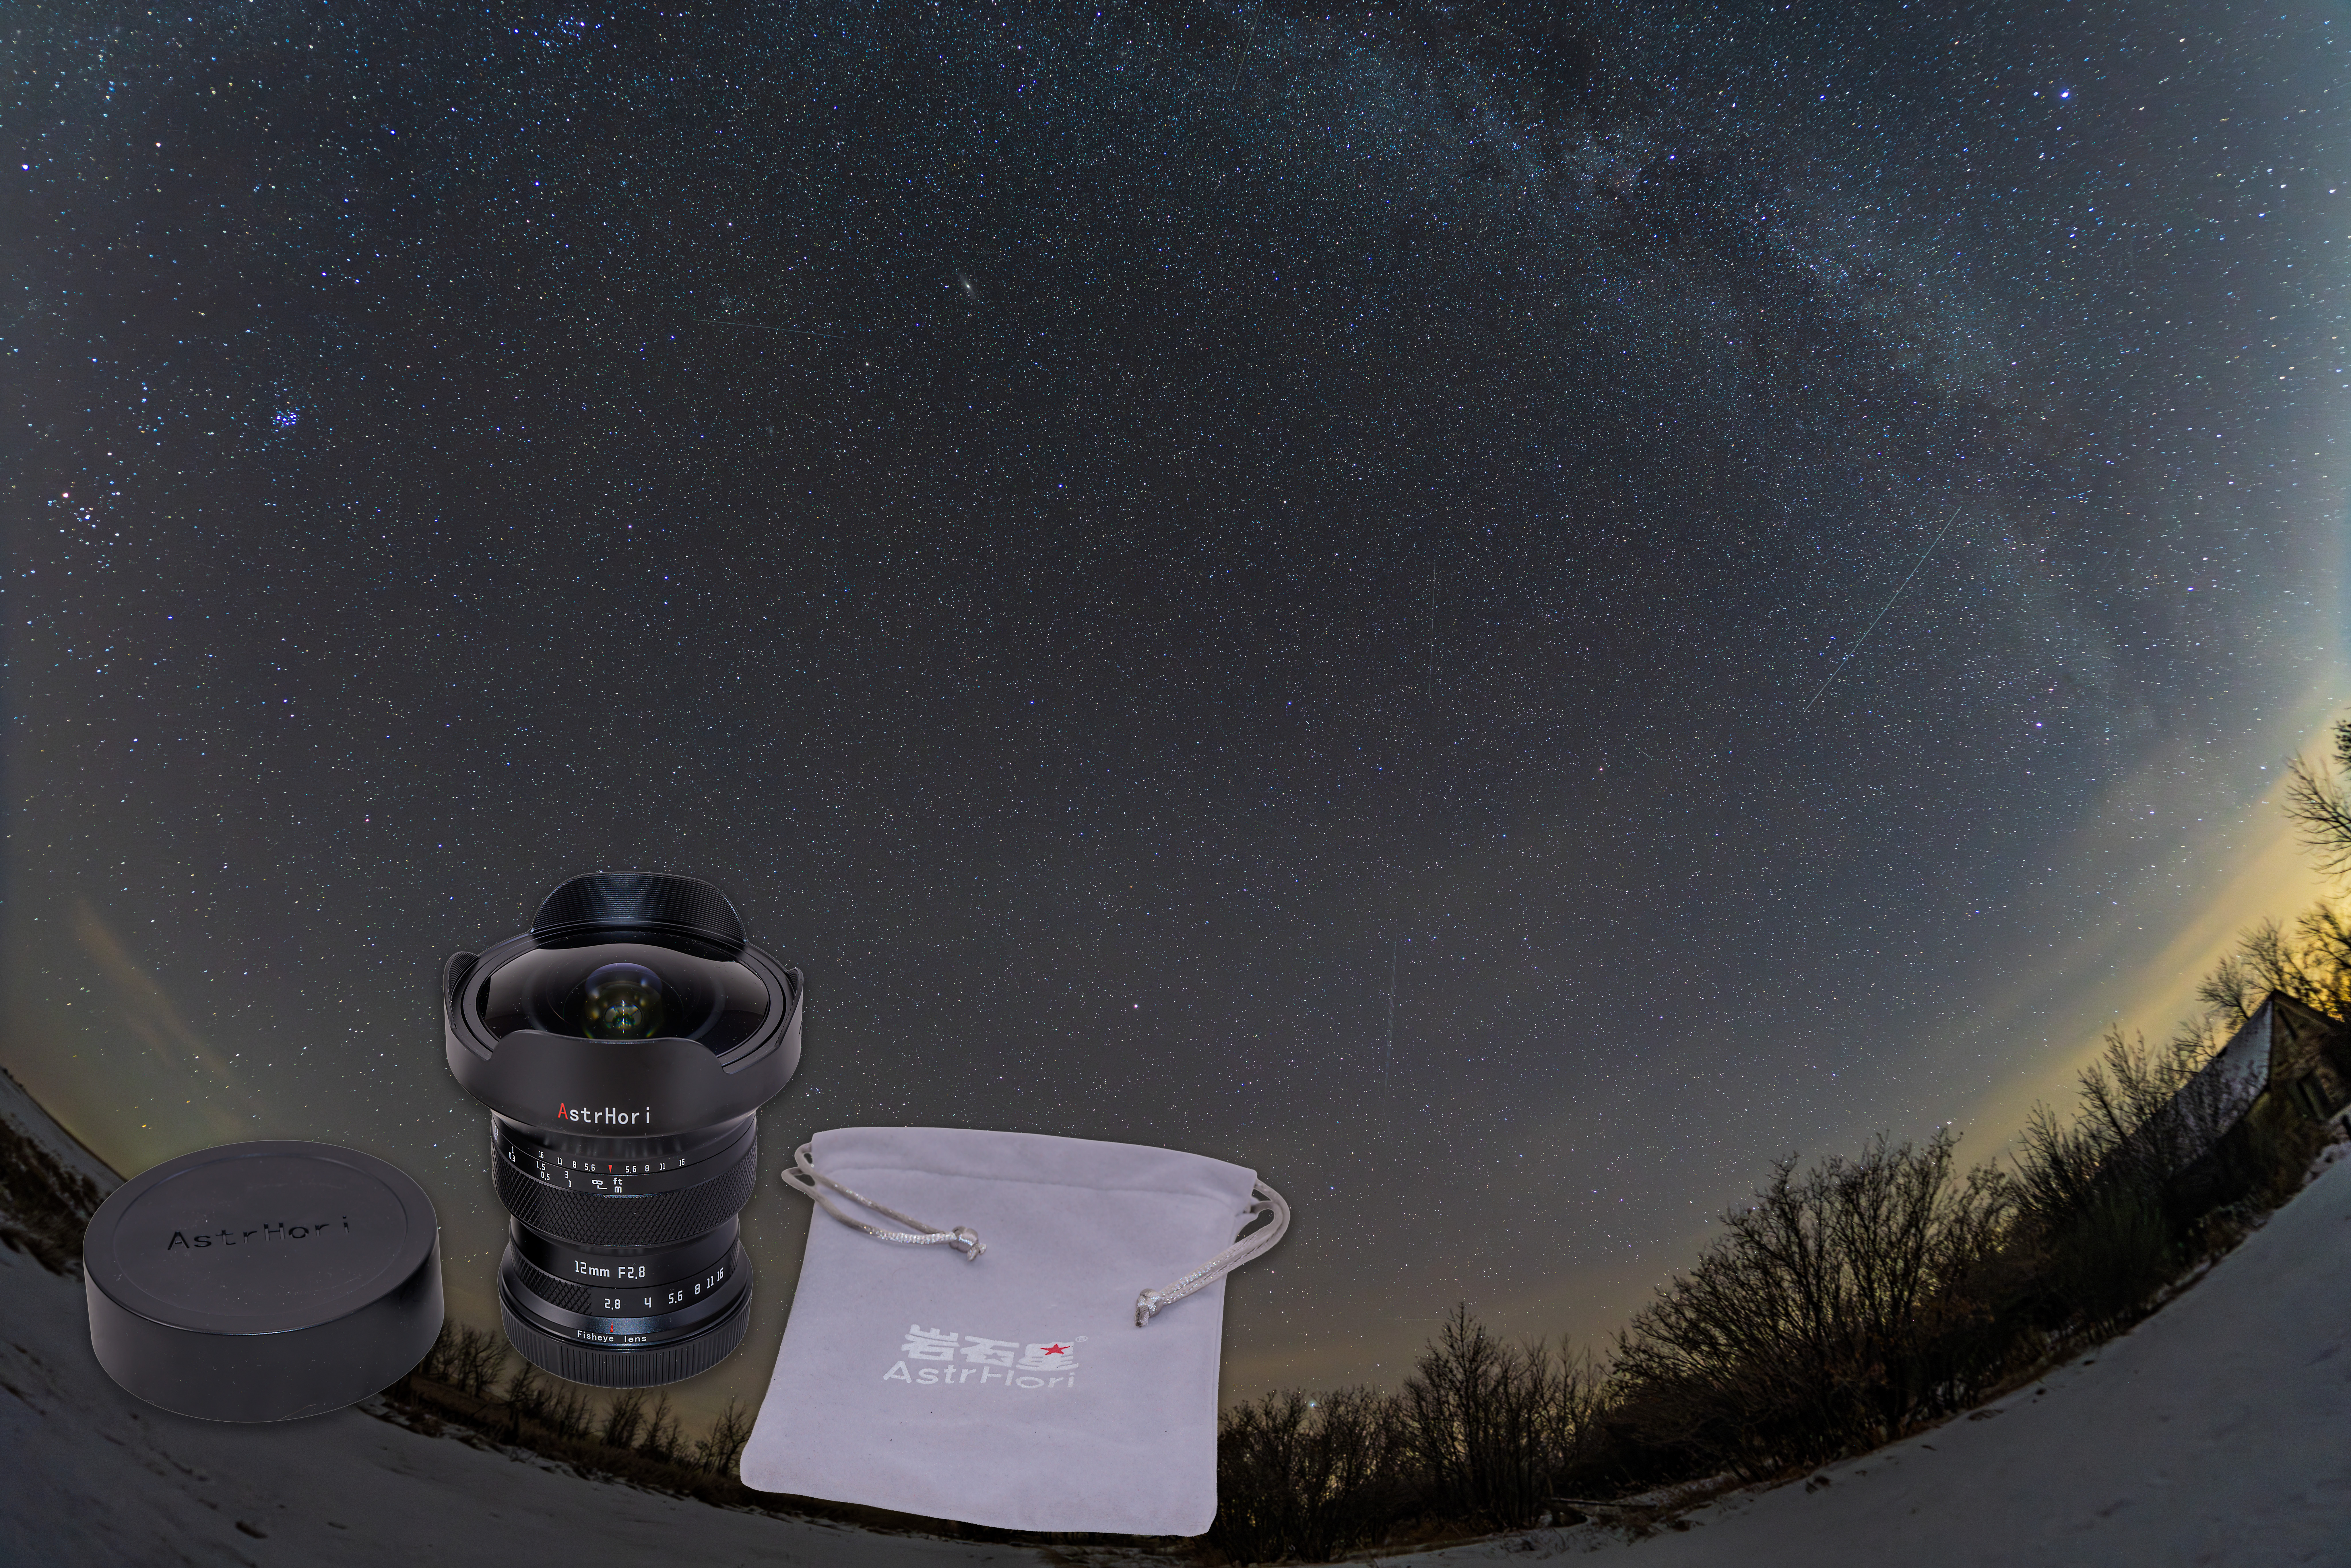
AstrHori offers a 12mm as their diagonal fish-eye for full-frame cameras. It is solidly made, but larger than the others with a bulbous front lens element. It is also the heaviest lens of the group, weighing 830 grams with lens caps, compared to 700 grams for the 7Artisans 10mm, and 550 grams for the much smaller TTArtisan 11mm.

ย While the 12mm came with AstrHoriโ€™s standard lens pouch it is far too small for this lens. What were they thinking? The lens has a smoothly-turning manual focus ring and, similar to the others, with a good level of dampening. Infinity focus with the stars sharpest was shy of the infinity mark, between 1 metre and infinity. The lens focused past infinity, so careful manual focusing is required, true of all the lenses except the TTArtisan 11mm.ย 

The aperture ring has firm click stops at 1/2-stop intervals from f/2.8 to f/8, and one each for f/11 and f/16. This is the only lens of the group with a plastic front cap, but it is deep and presses on very securely. The aperture values have large white figures making them easy to read in the dark. 

IMAGE QUALITYย 

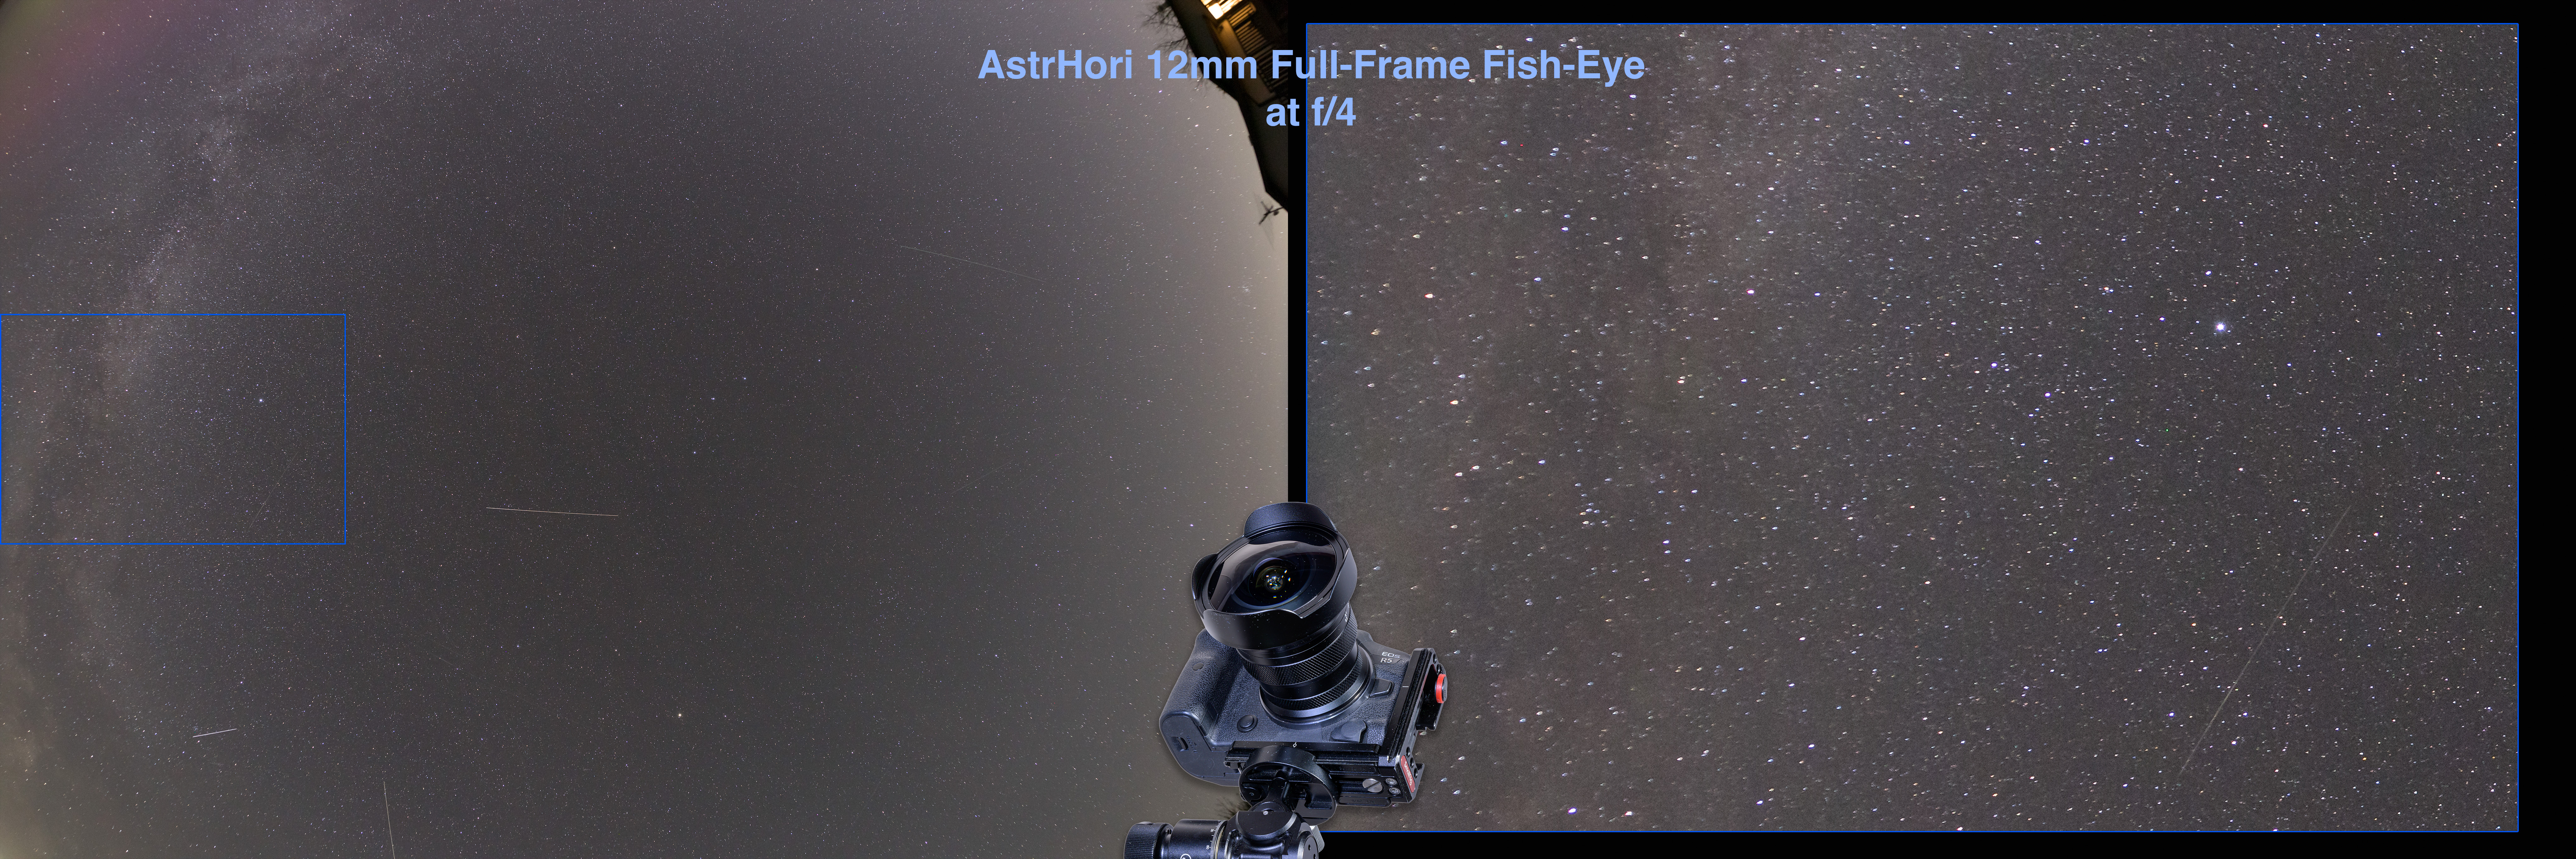
Stars are sharp in the centre with only slight LoCA-induced blue halos at f/2.8 that disappear at f/4. Stars begin to soften and elongate from astigmatism at the outermost edges of the field at f/2.8.
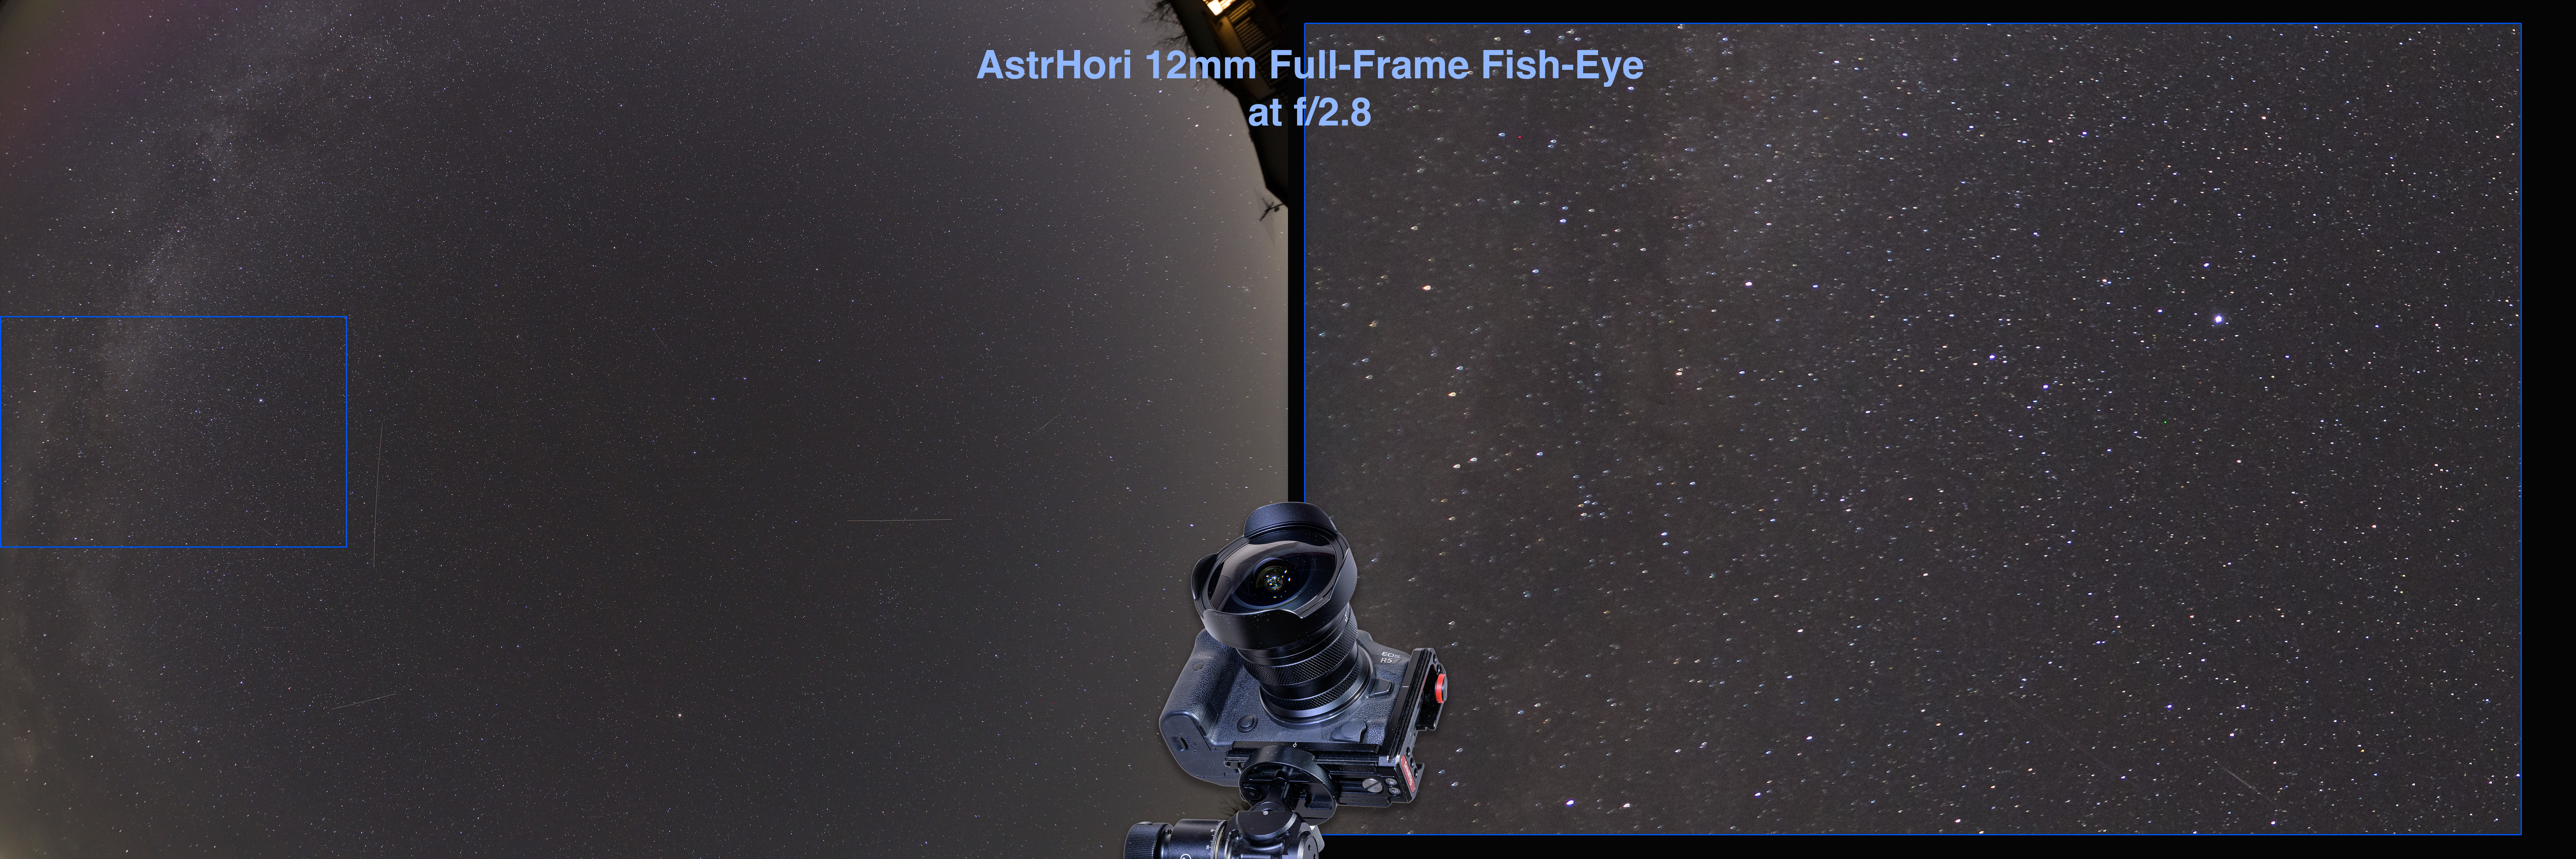
12mm AstrHori at f/2.8

They tighten somewhat at f/4 but not by much compared to f/2.8. The entire field, not just the field edges, brightens at f/4 from the more uniform illumination.ย 

12mm AstrHori at f/4 โ€“ Note the brighter field at f/4.

Of the three full-frame fish-eyes Iโ€™d rank the 12mm as #2 for across-the-field star sharpness, behind the 10mm 7Artisans but ahead of the 11mm TTArtisan. 

LENS FLARES

I donโ€™t need to add an arrow to point out the lens flares here! Wow! They are extreme. 
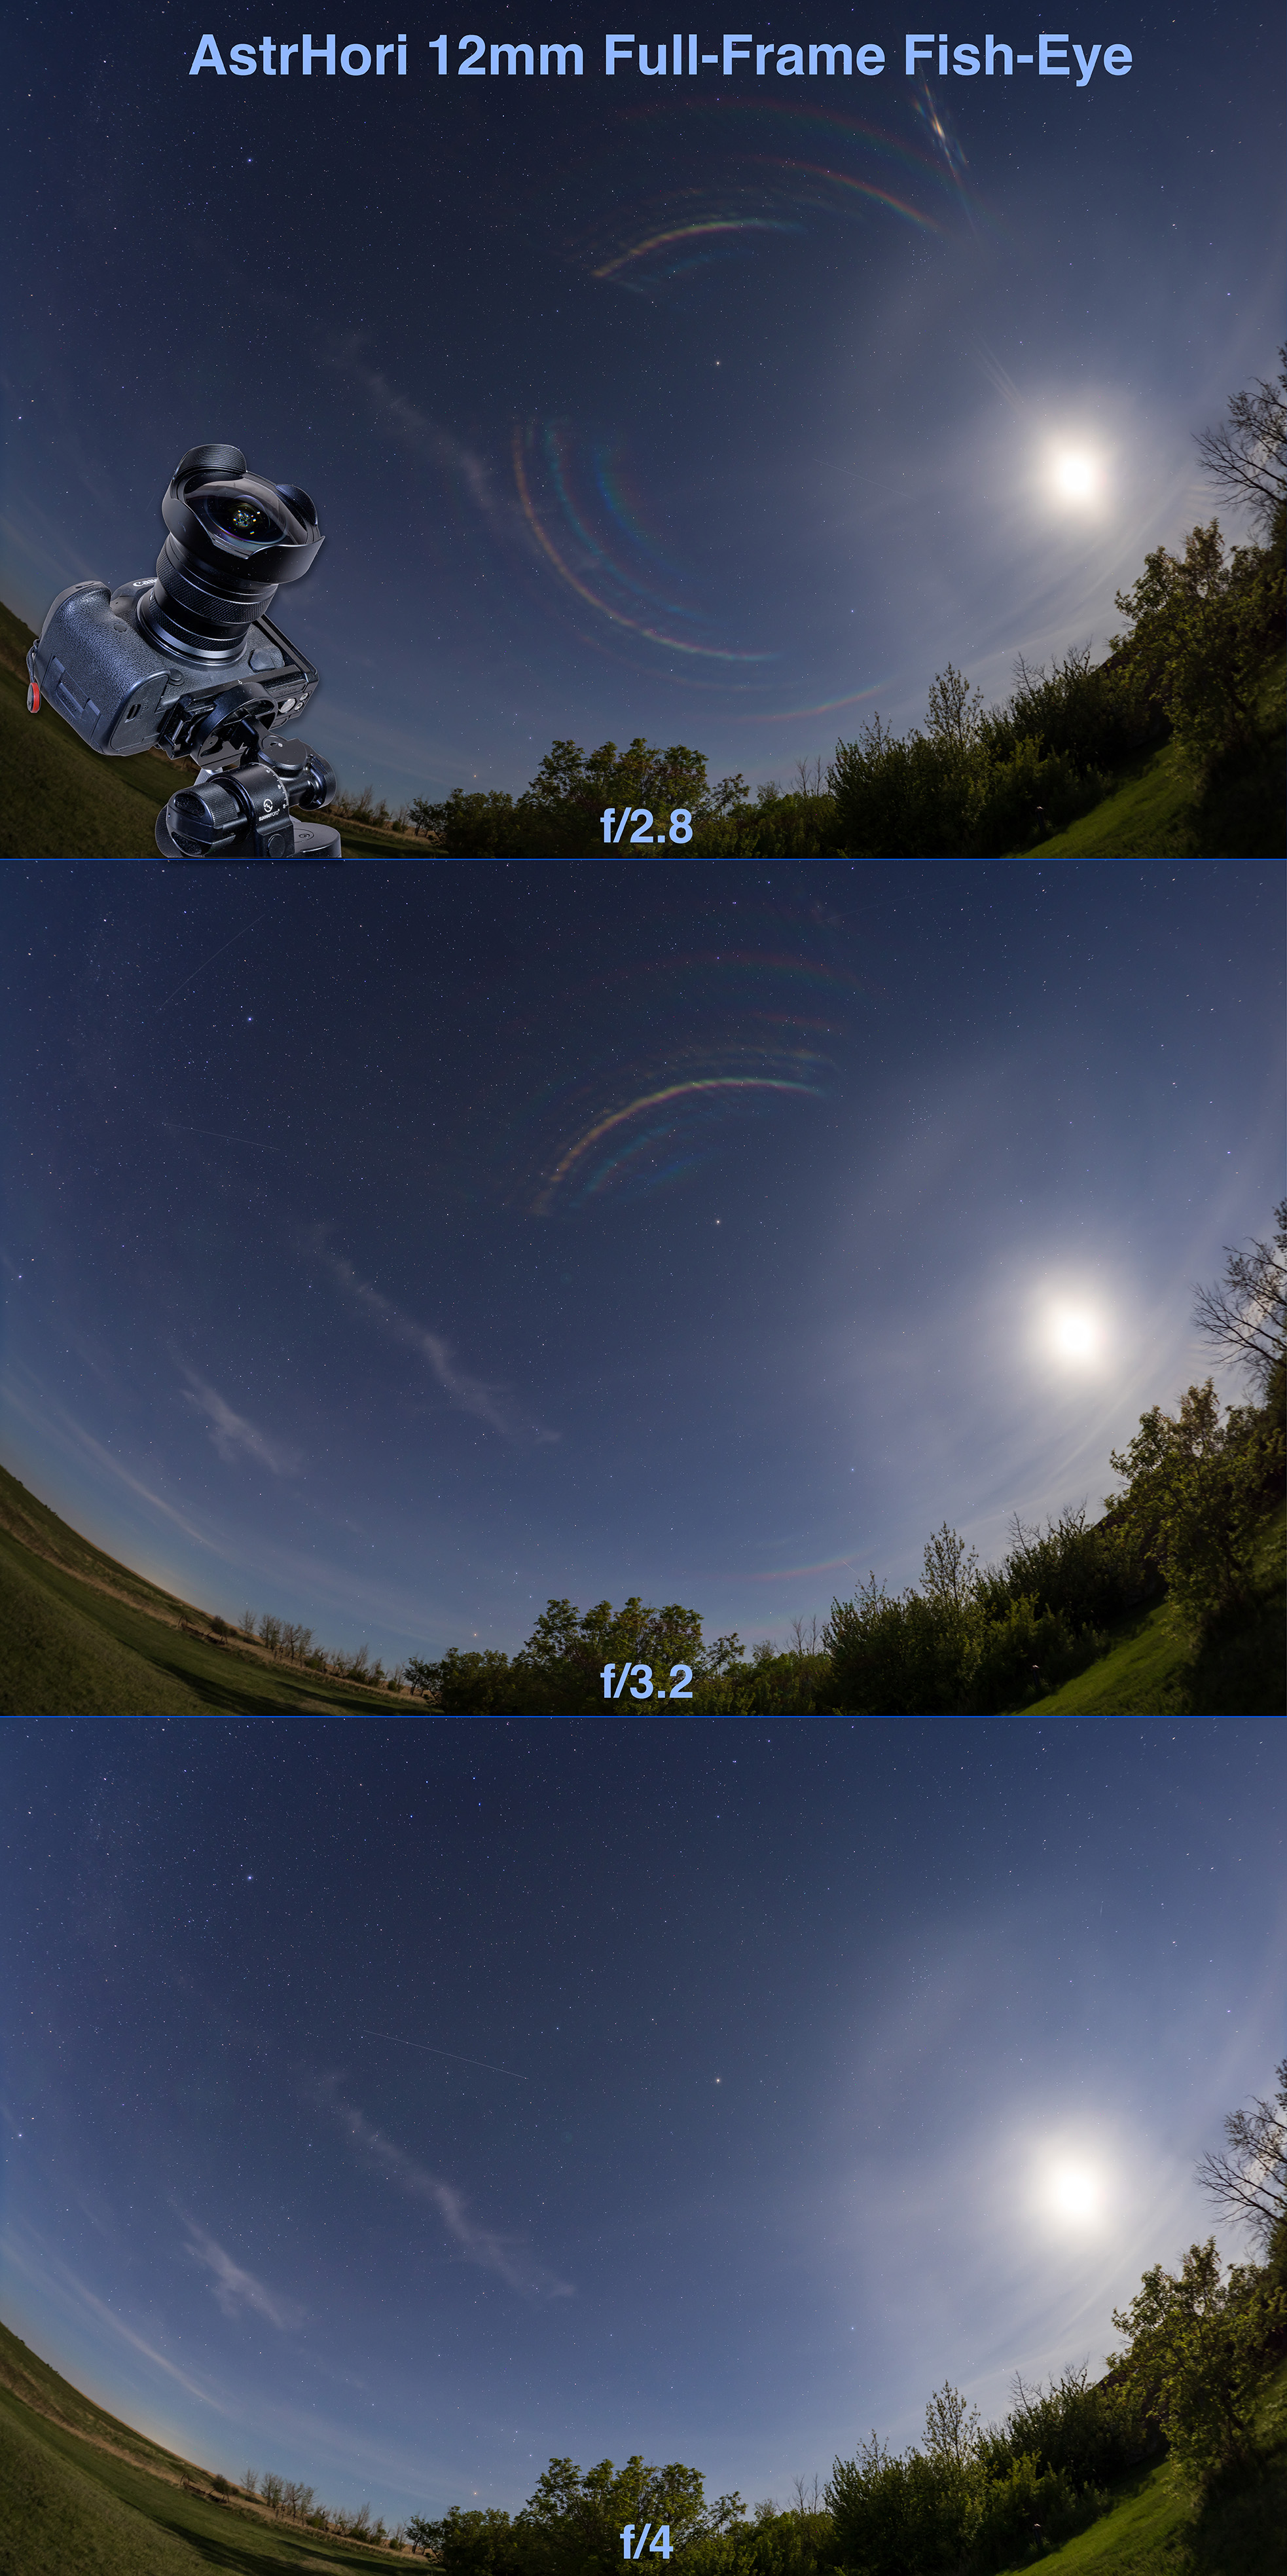
12mm AstrHori lens flare at three f/ratios – Gone at f/4 โ€“ The white ring around the Moon is a natural ice halo.

Wide open at f/2.8 the lens shows rainbows of internal lens reflections, with an odd split appearance. Stopping down to the click stop halfway between f/2.8 and f/4 (about f/3.2) eliminates half the reflections. Stopping down to f/4 gets rid of all of them. Very odd. 

Either the lenses are not properly edge blackened, or the lens hood is inducing reflections in the bulbous front element, or there is some shiny component inside adding the reflections. 
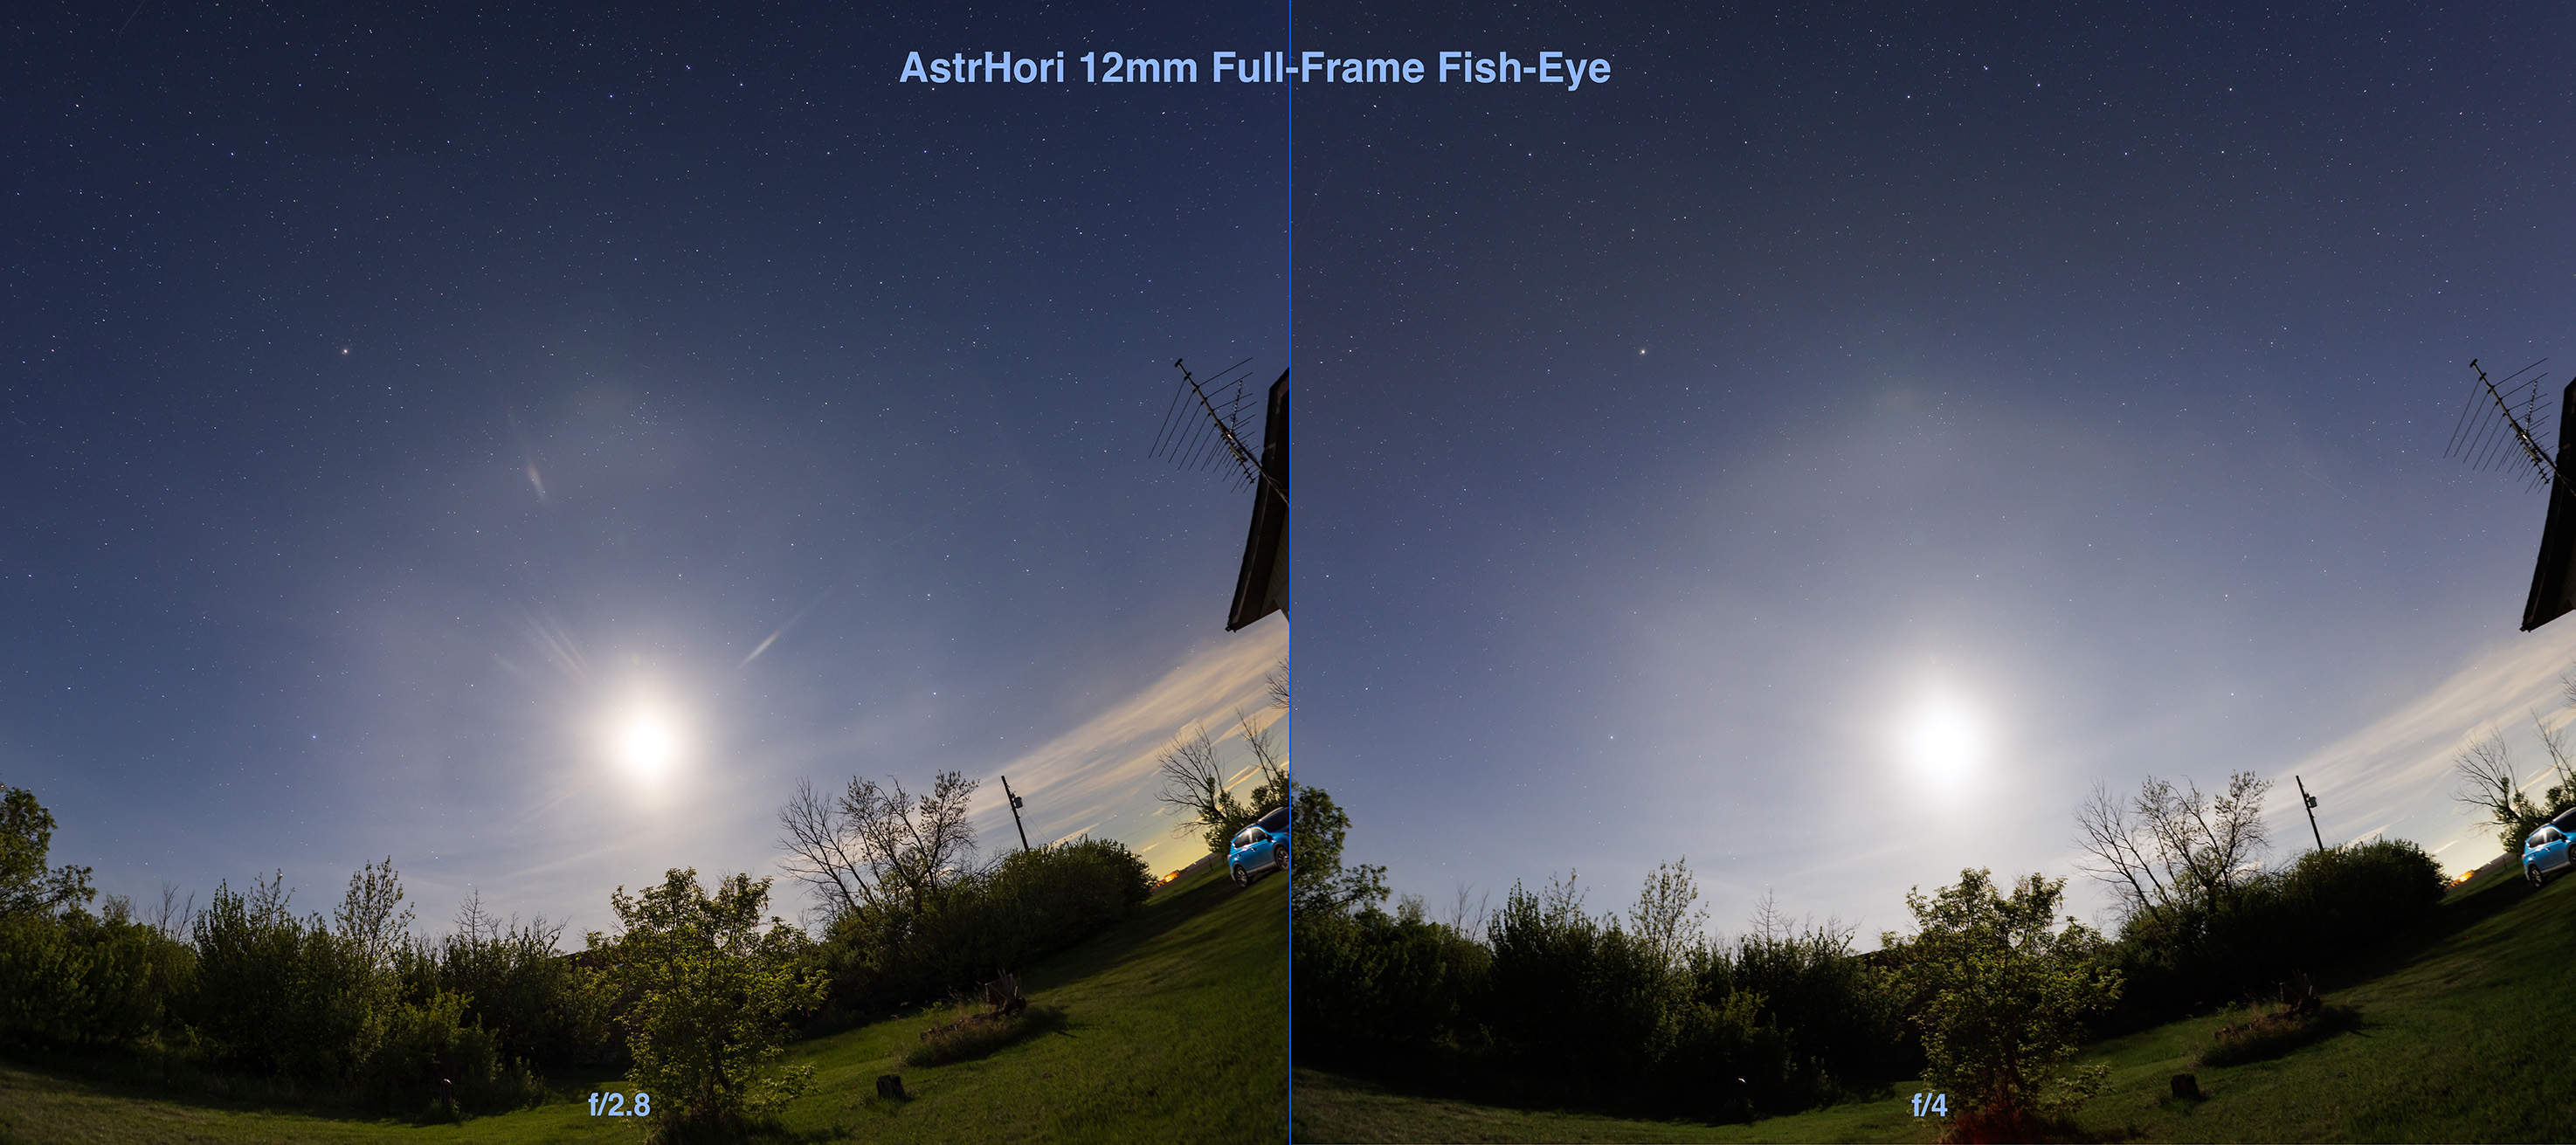
12mm AstrHori at f/2.8 and at f/4, with Moon below centre.

The flares get larger as the light source (the Moon here) moves to the edge of the frame. With the Moon closer to the centre (as shown above), the coloured rings disappear but there are still radial streaks pointing away from the Moon. They disappear at f/4.

I never noticed these flares on dark sky shots of the stars and aurora. But this is not a lens you can shoot the sky with if the Moon or Sun are in it, at least not at f/2.8. If you shoot an eclipse sky time-lapse with this lens, you must stop it down. 

This is a serious flaw AstrHori needs to fix in a Mark II version of this lens. 


Recommendations

I think every astrophotographer should have a fish-eye lens in their kit, especially true of aurora chasers. The low cost of these new Chinese lenses makes it easy to add one, for the few special nights itโ€™ll be used.ย 

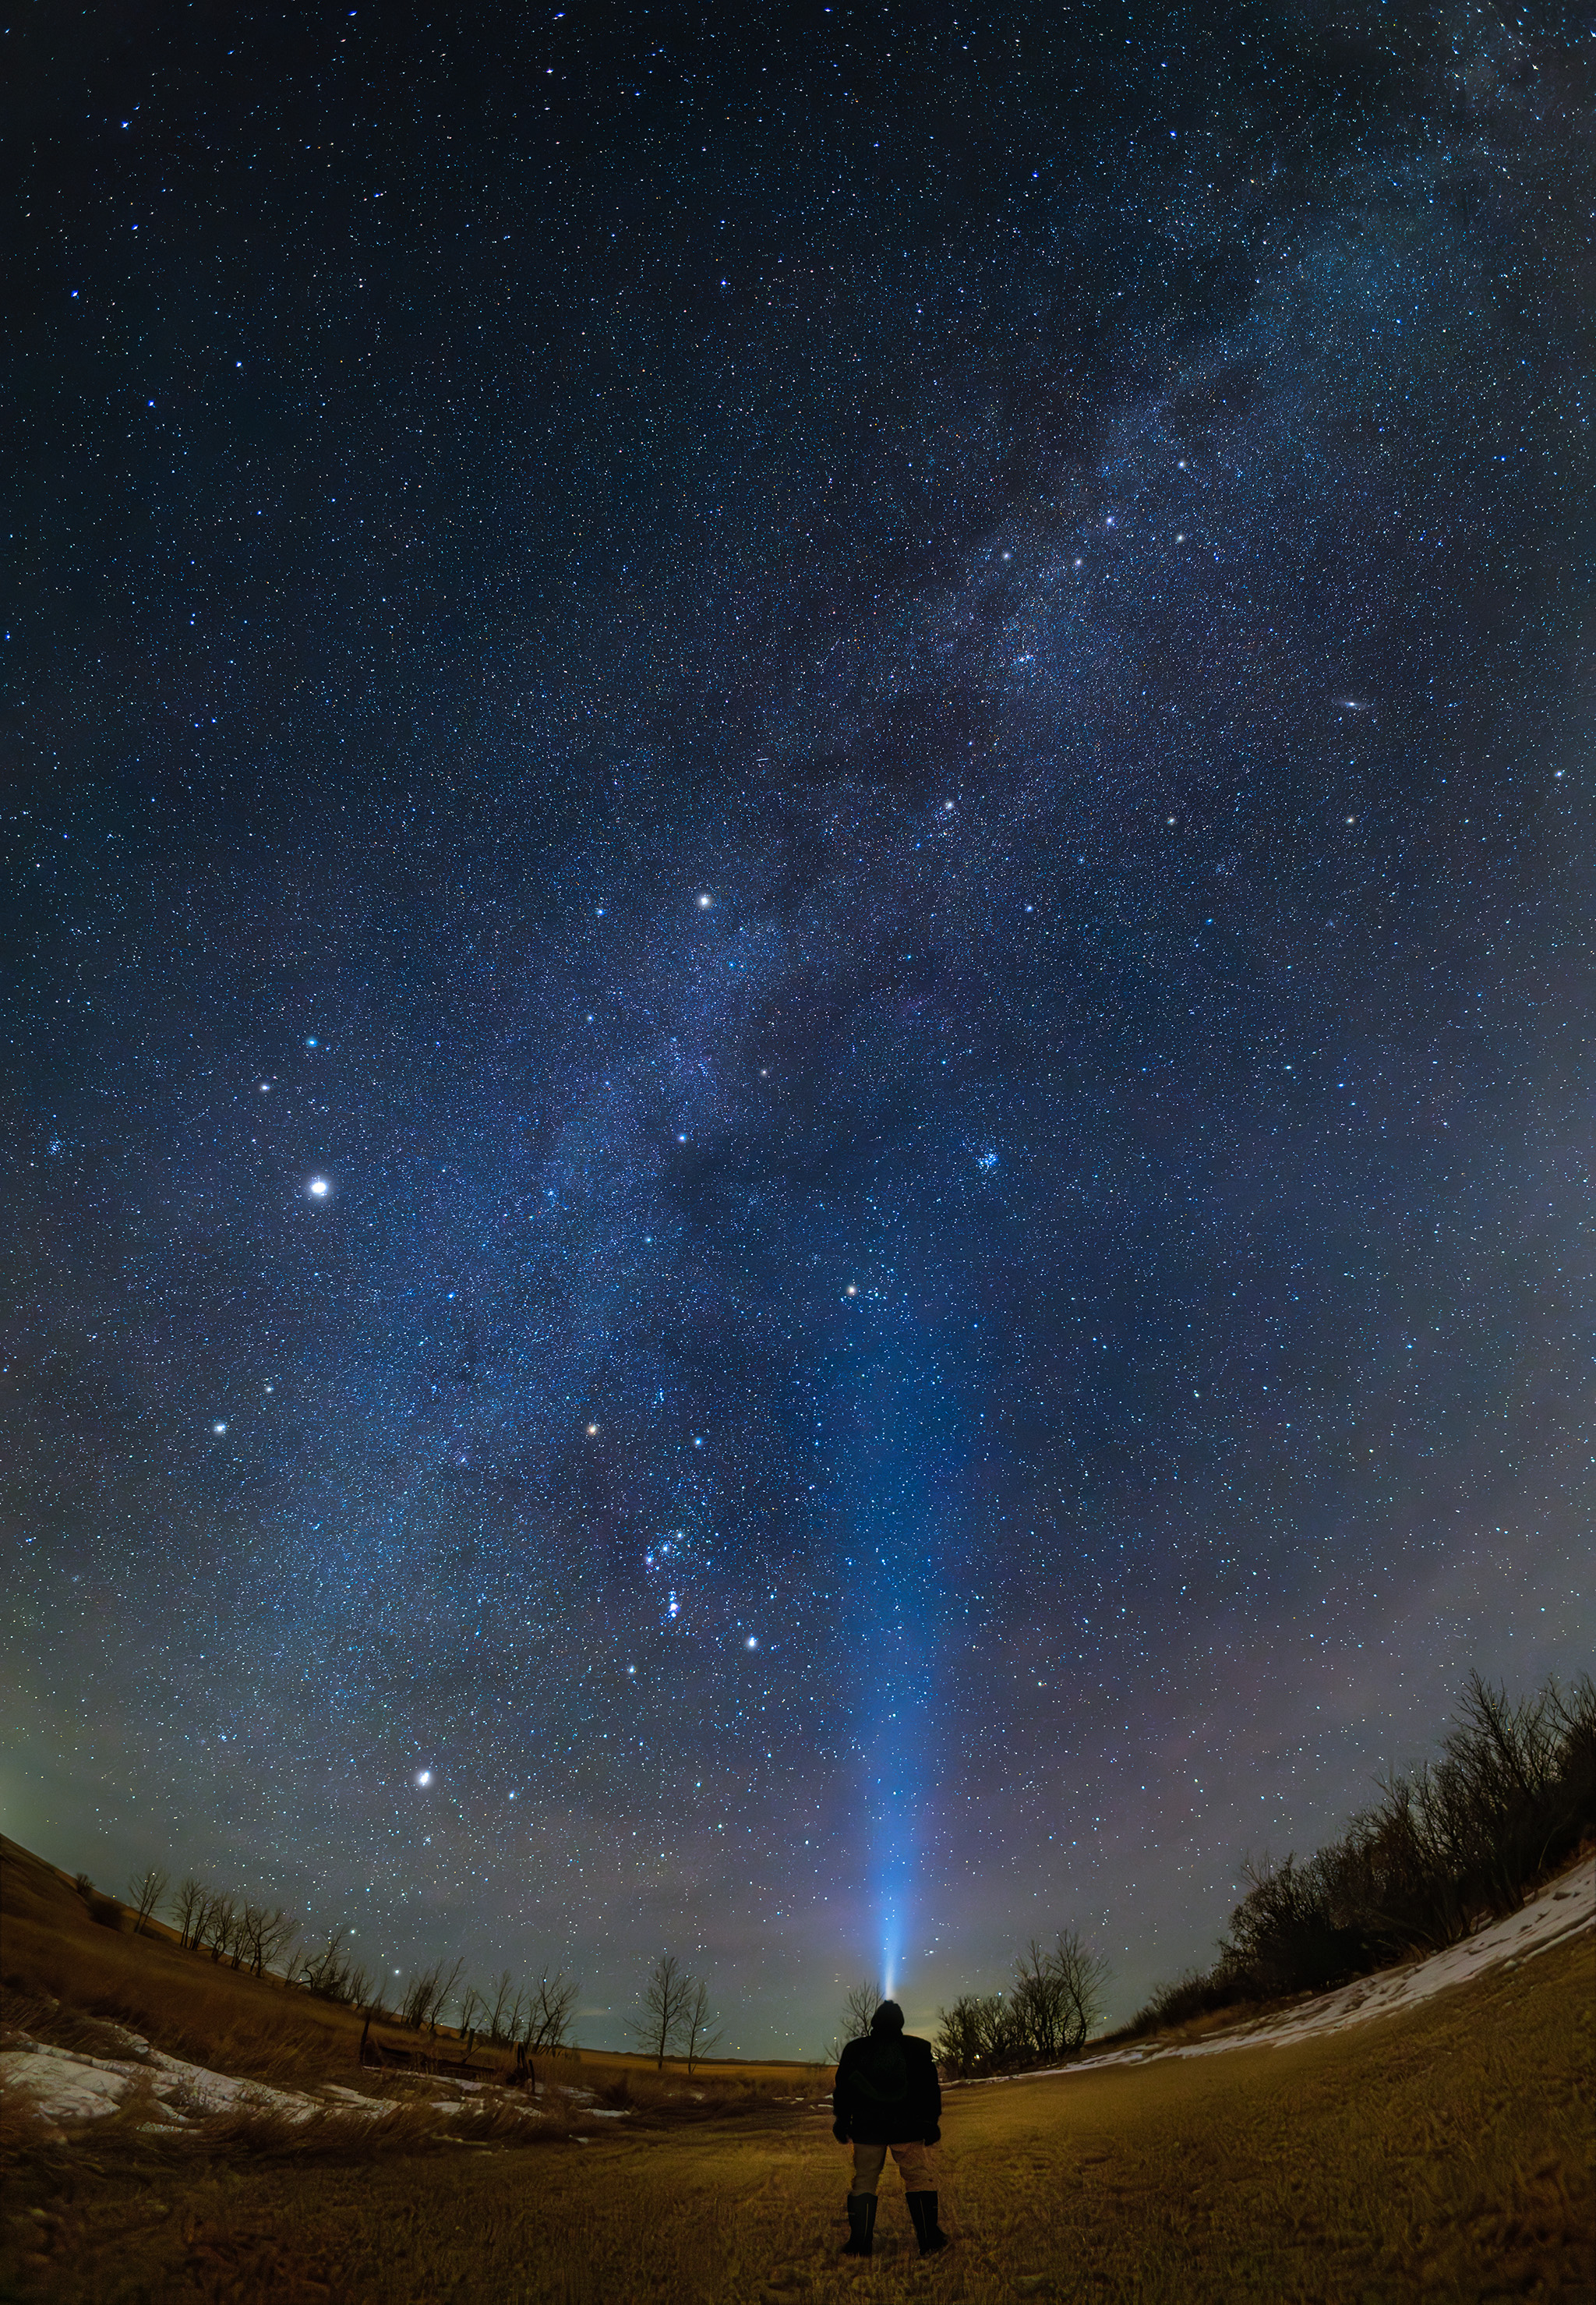
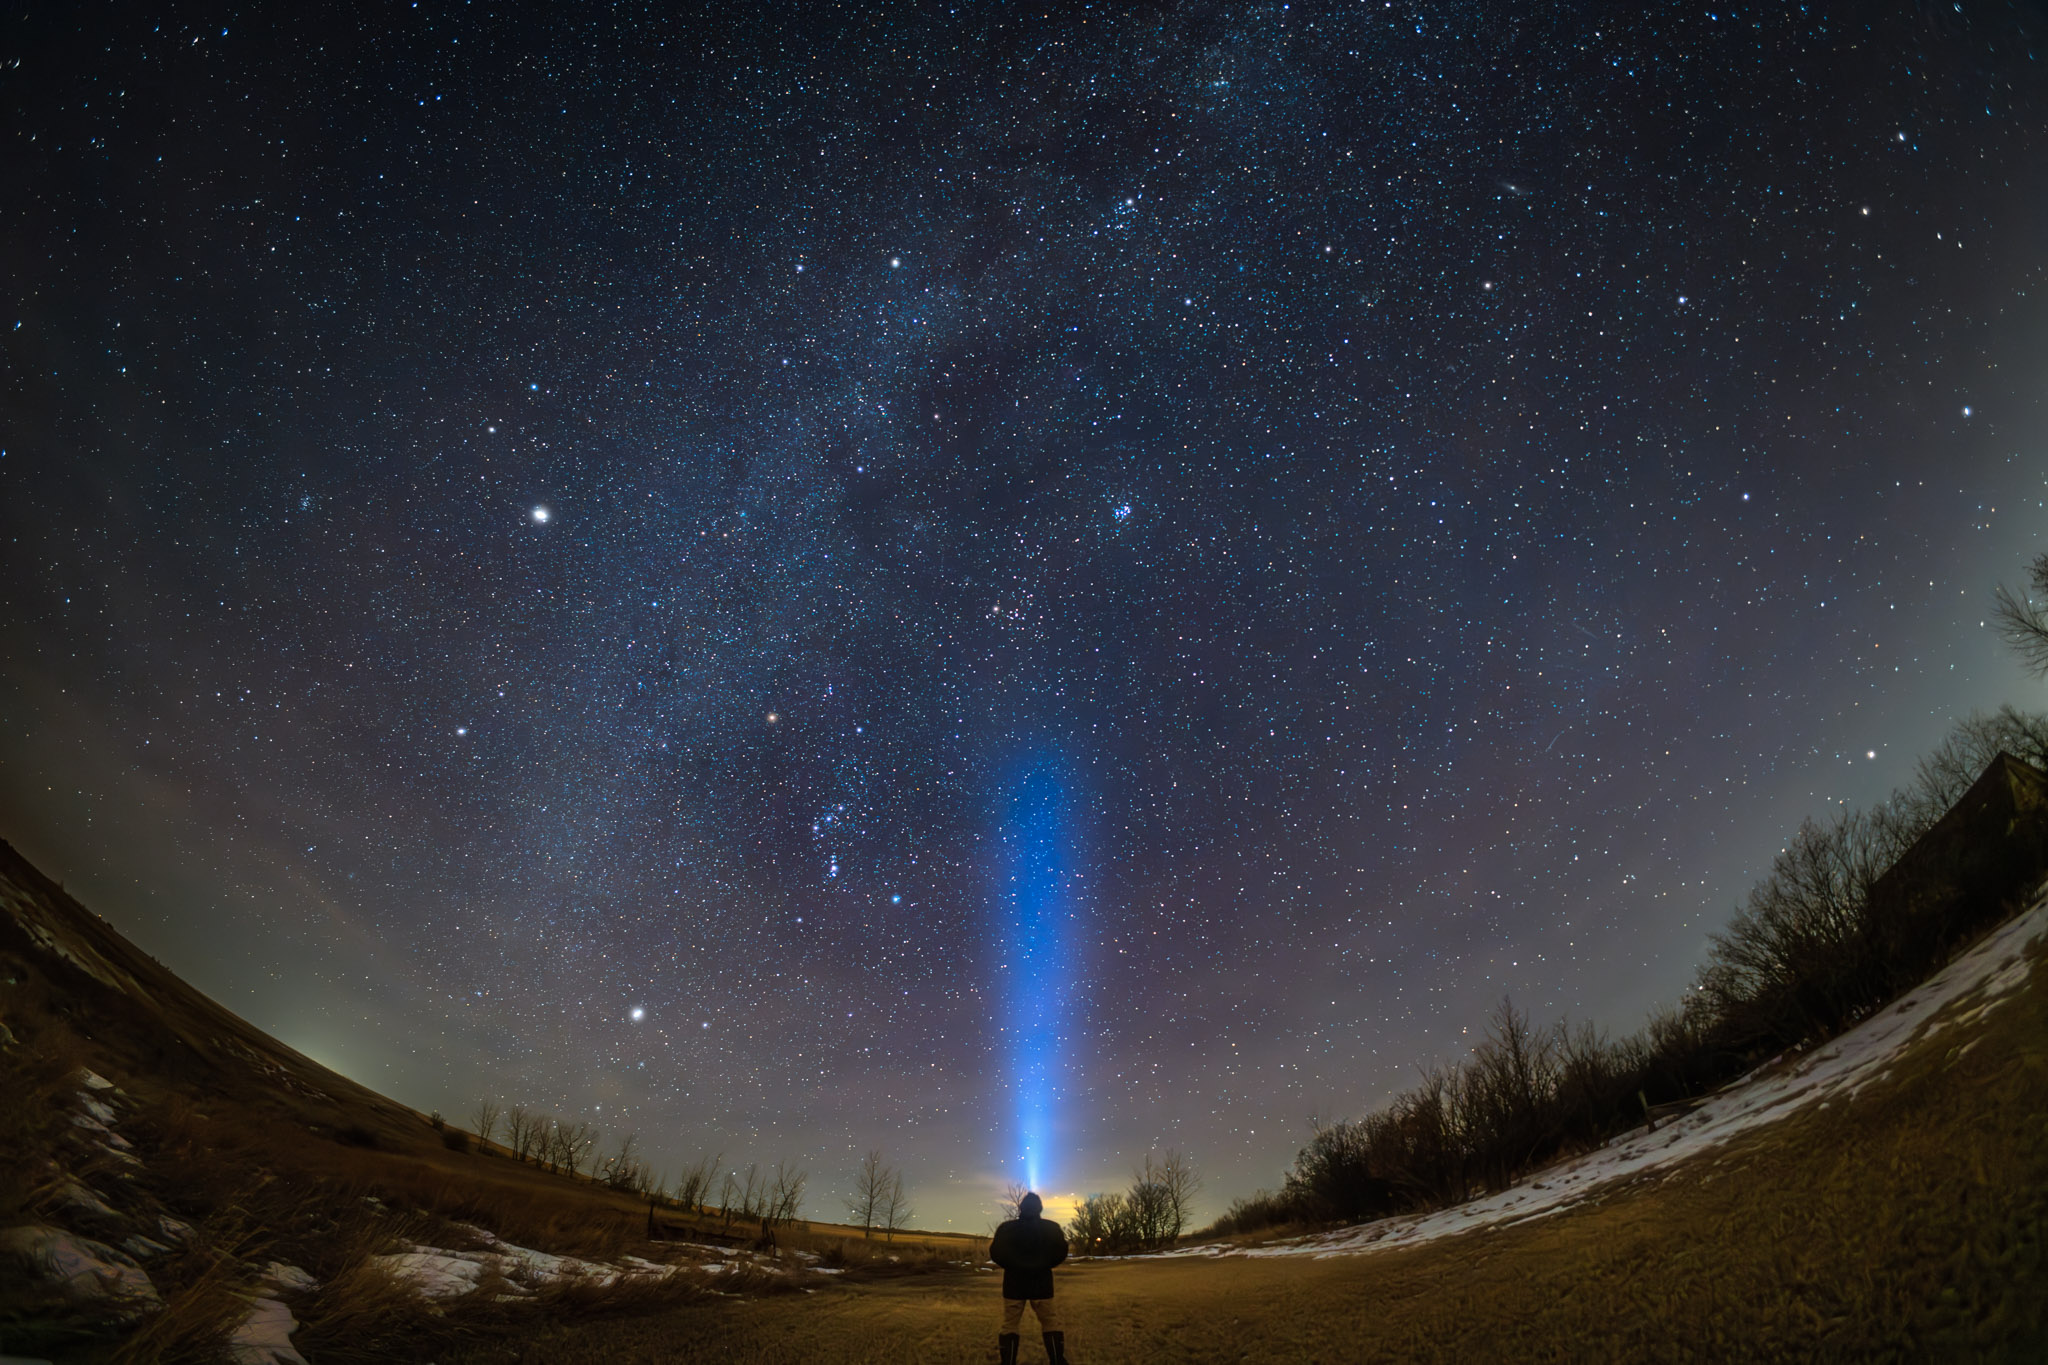
A blend of three exposures โ€“ two for the ground and me without the light on, and one for the sky with the headlamp on. Untracked, with the 7Artisans MkII 10mm lens wide-open at f/2.8 on the Nikon Z8 at ISO 3200 for 15 seconds each.

A full-frame fish-eye is the first choice I would recommend. But do note they produce a curved horizon, as above. If thatโ€™s not to your liking, buy an ultra-wide rectilinear lens. But none have as a wide a field as a fish-eye, and rectilinears will distort objects much more by stretching them at the corners.ย 

Of the three full-frame fish-eyes I tested I liked the 10mm 7Artisans the best. It offered the best optical quality, nice fittings wth its glow-in-the-dark markings, an excellent accessory case, and it was compact. 

The 12mm AstrHori was bright and relatively sharp, but much larger than the others so is not a lens you can tuck away in a bag in case you might need it. And its wild lens flares made it unsuitable for use wth the Sun or Moon in the frame, at least when shot wide open. 

The 11mm TTArtisan was compact but darker than the others, showing its older coatings perhaps, and lower light transmission. Again, mine was an older unit. 
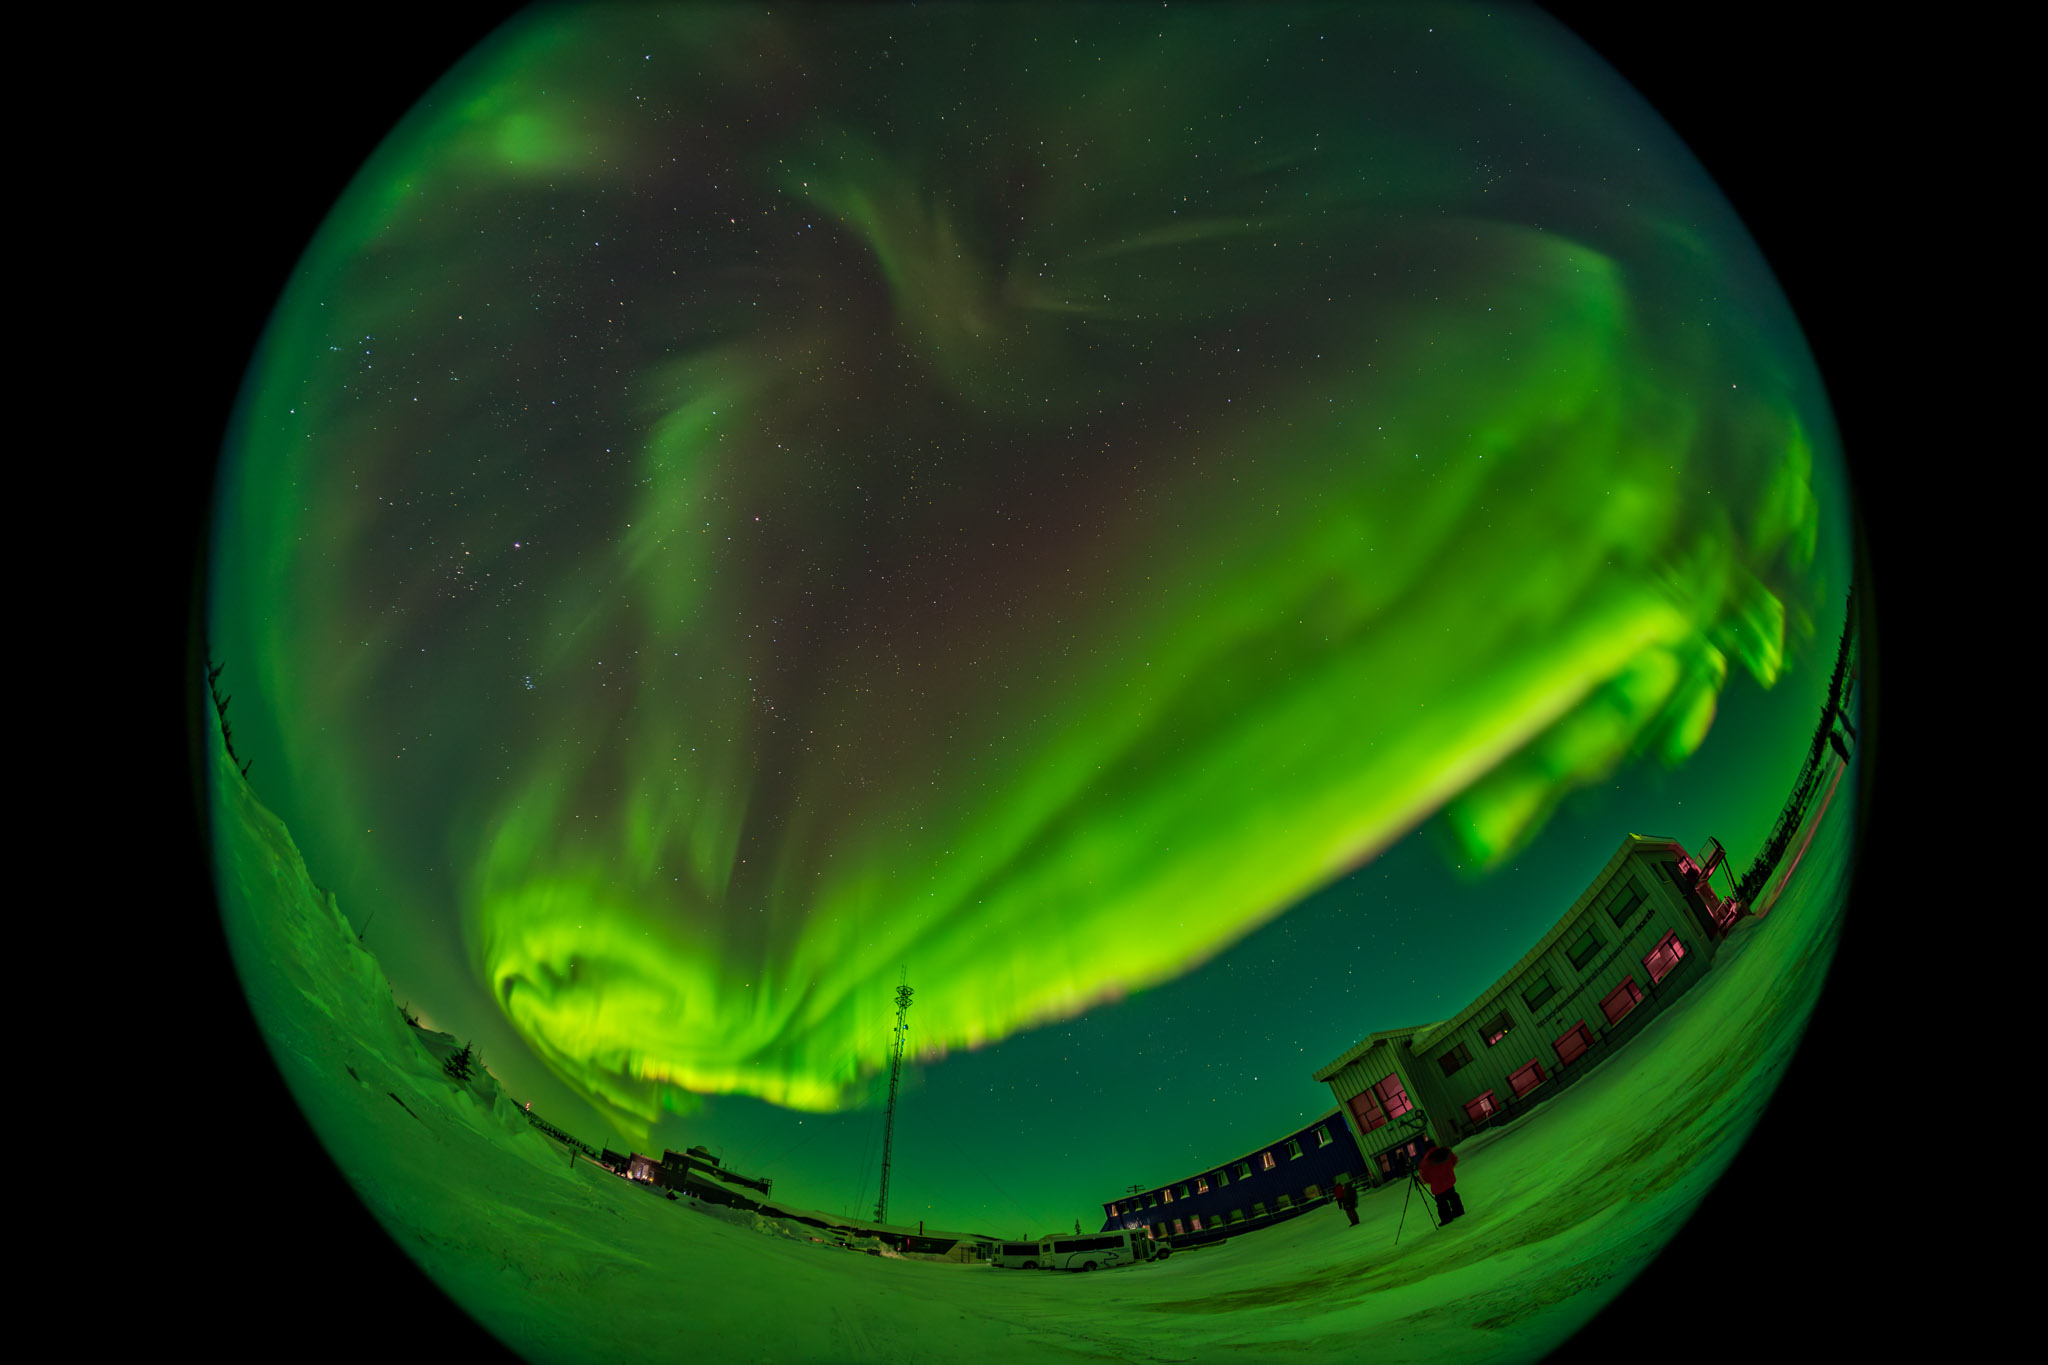
A single 2.5-second exposure with the TTArtisan 7.5mm fish-eye lens at f/2 on the Nikon Z6III at ISO 1600. From the Churchill Northern Studies Centre, Manitoba.

The f/2 speed of the 7.5mm TTArtisan is great if you intend to take time-lapses or movies of the aurora. It would be good for sequences shot for tilt-dome planetariums. 

Otherwise, the unique 220ยบ 6mm AstrHori is perfect for capturing all the sky and ground below on one frame. It would be good for shooting stills or time-lapses of auroras or sky motion for planetarium projection, especially in non-tilt-dome (flat-floor) theatres. 

I hope this test has helped you make a choice. We have some fine lenses to pick from now, and at appealing prices, compared to the DSLR days when there were few fish-eyes on offer, all costly.

โ€” Alan, May 27, 2026 / ยฉ 2026 Alan Dyer / AmazingSky.com  
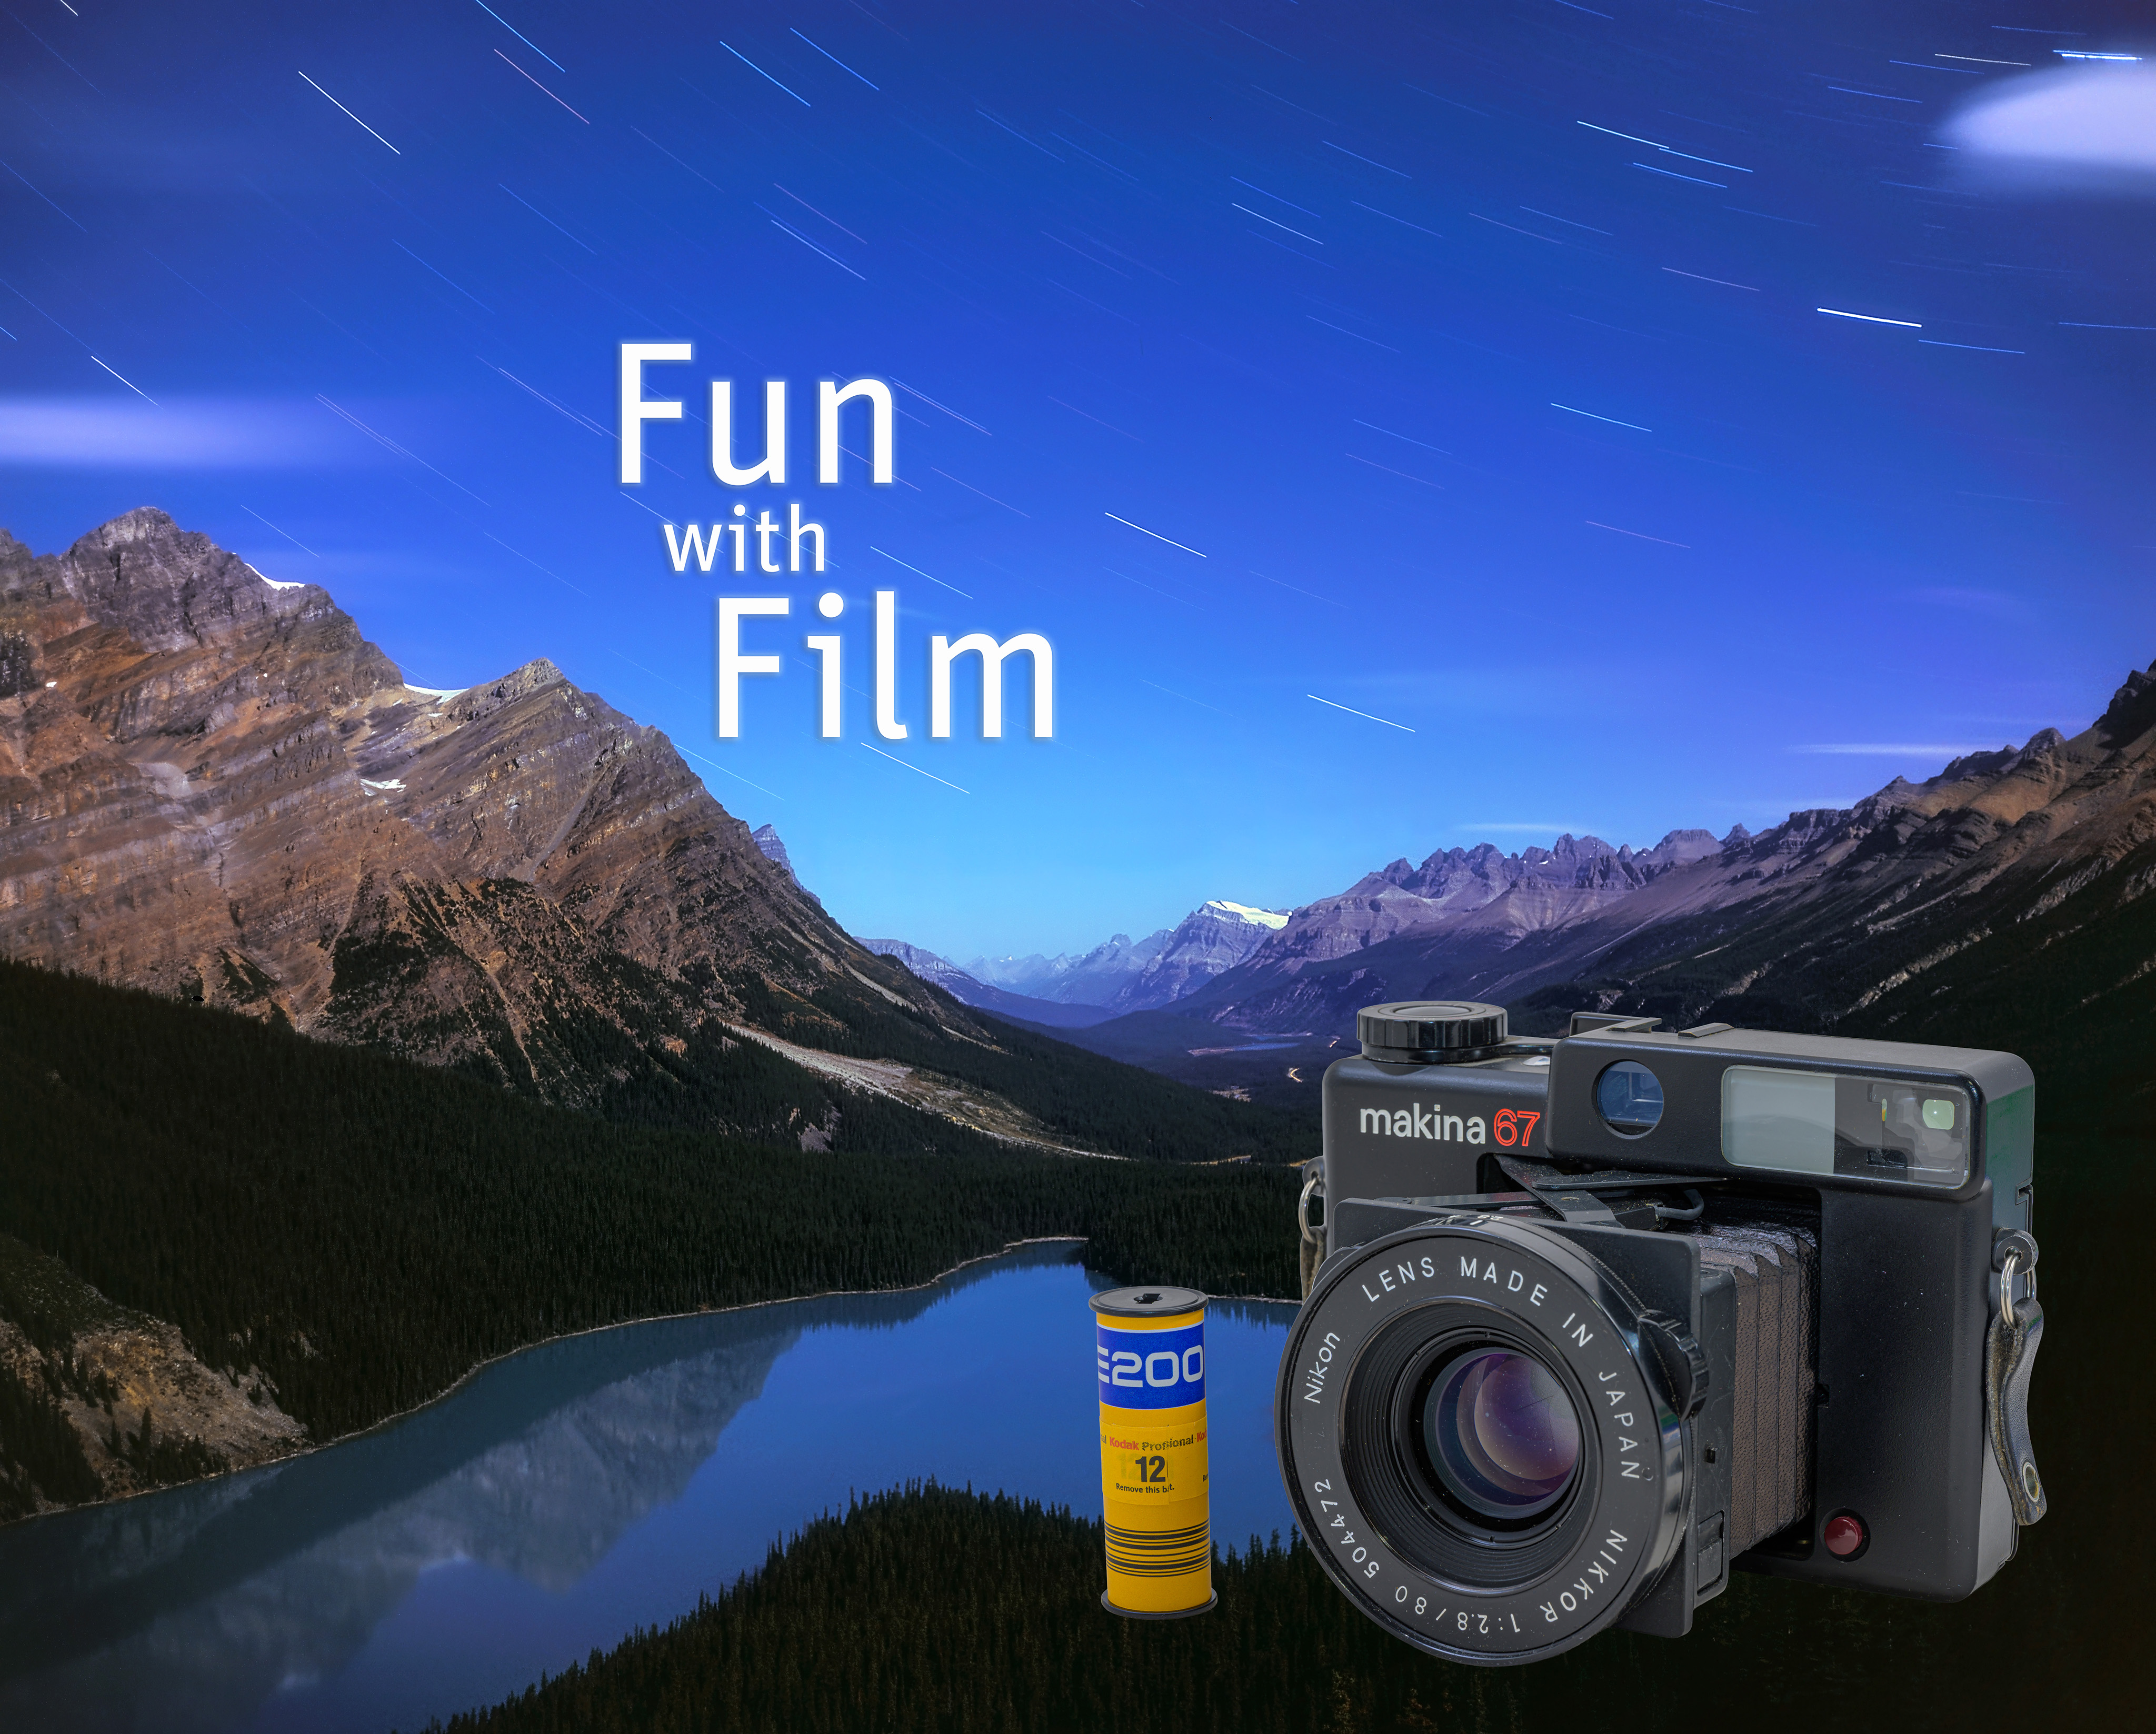
Fun with Film!


I take a nostalgic look back at what could be done in nightscape photography with the “analogue” technology of film โ€“ and in medium-format.

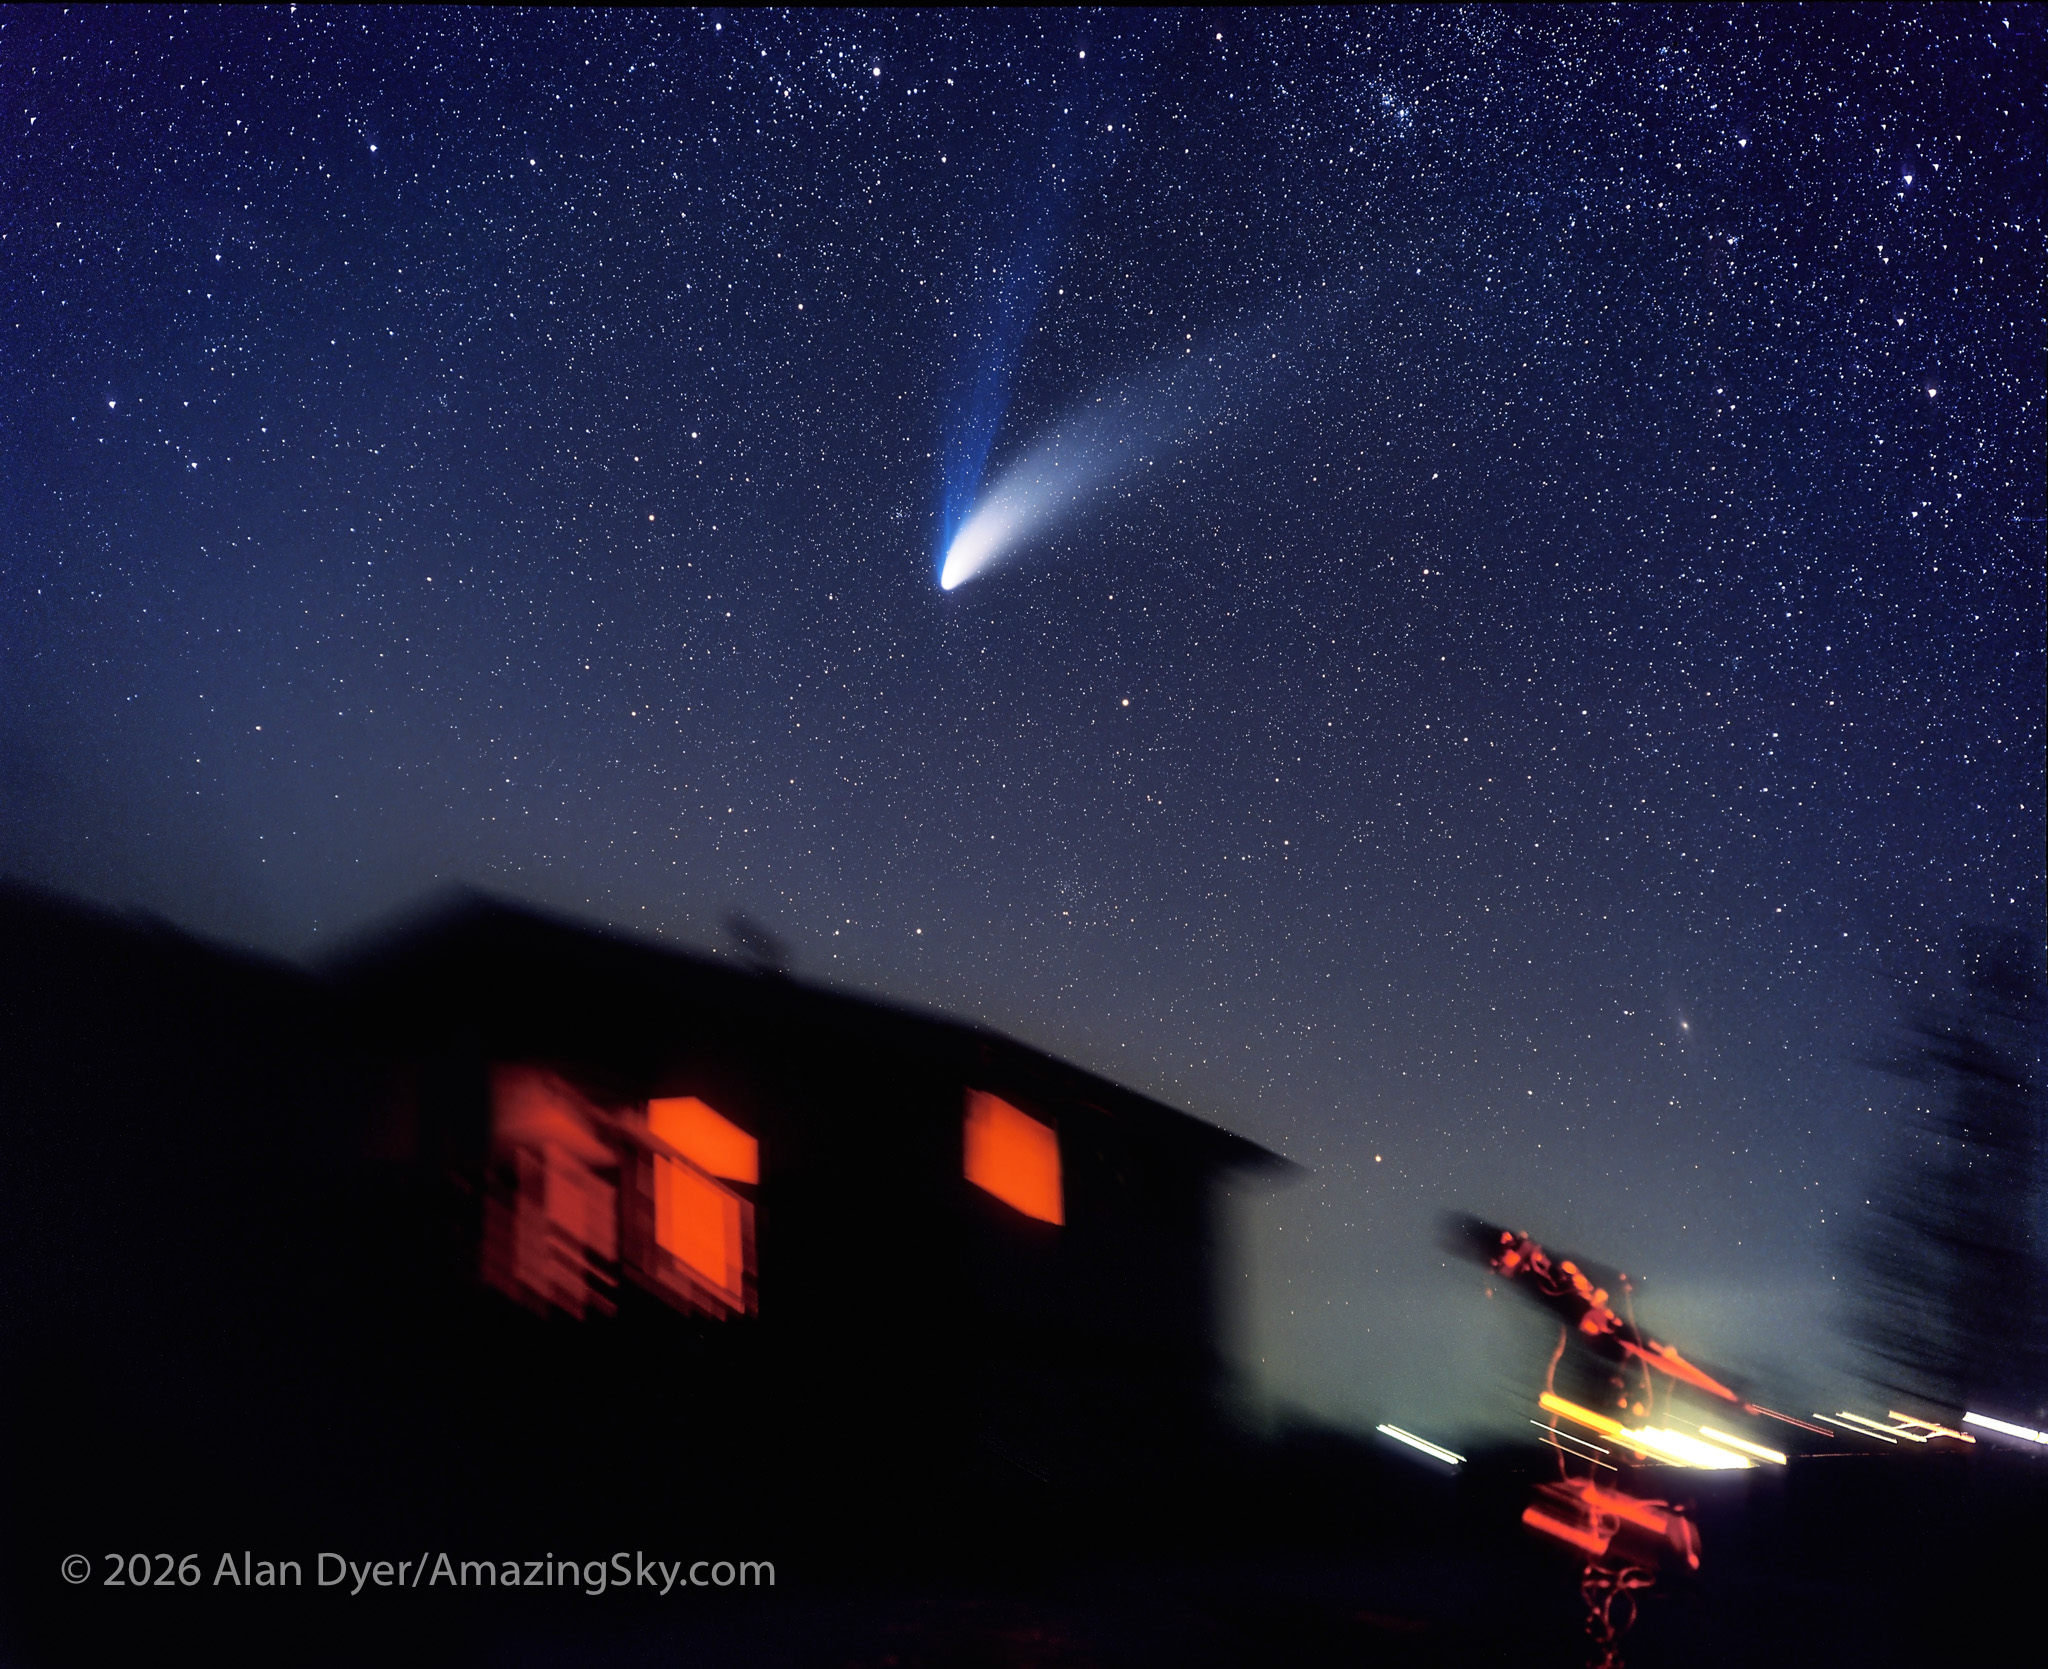
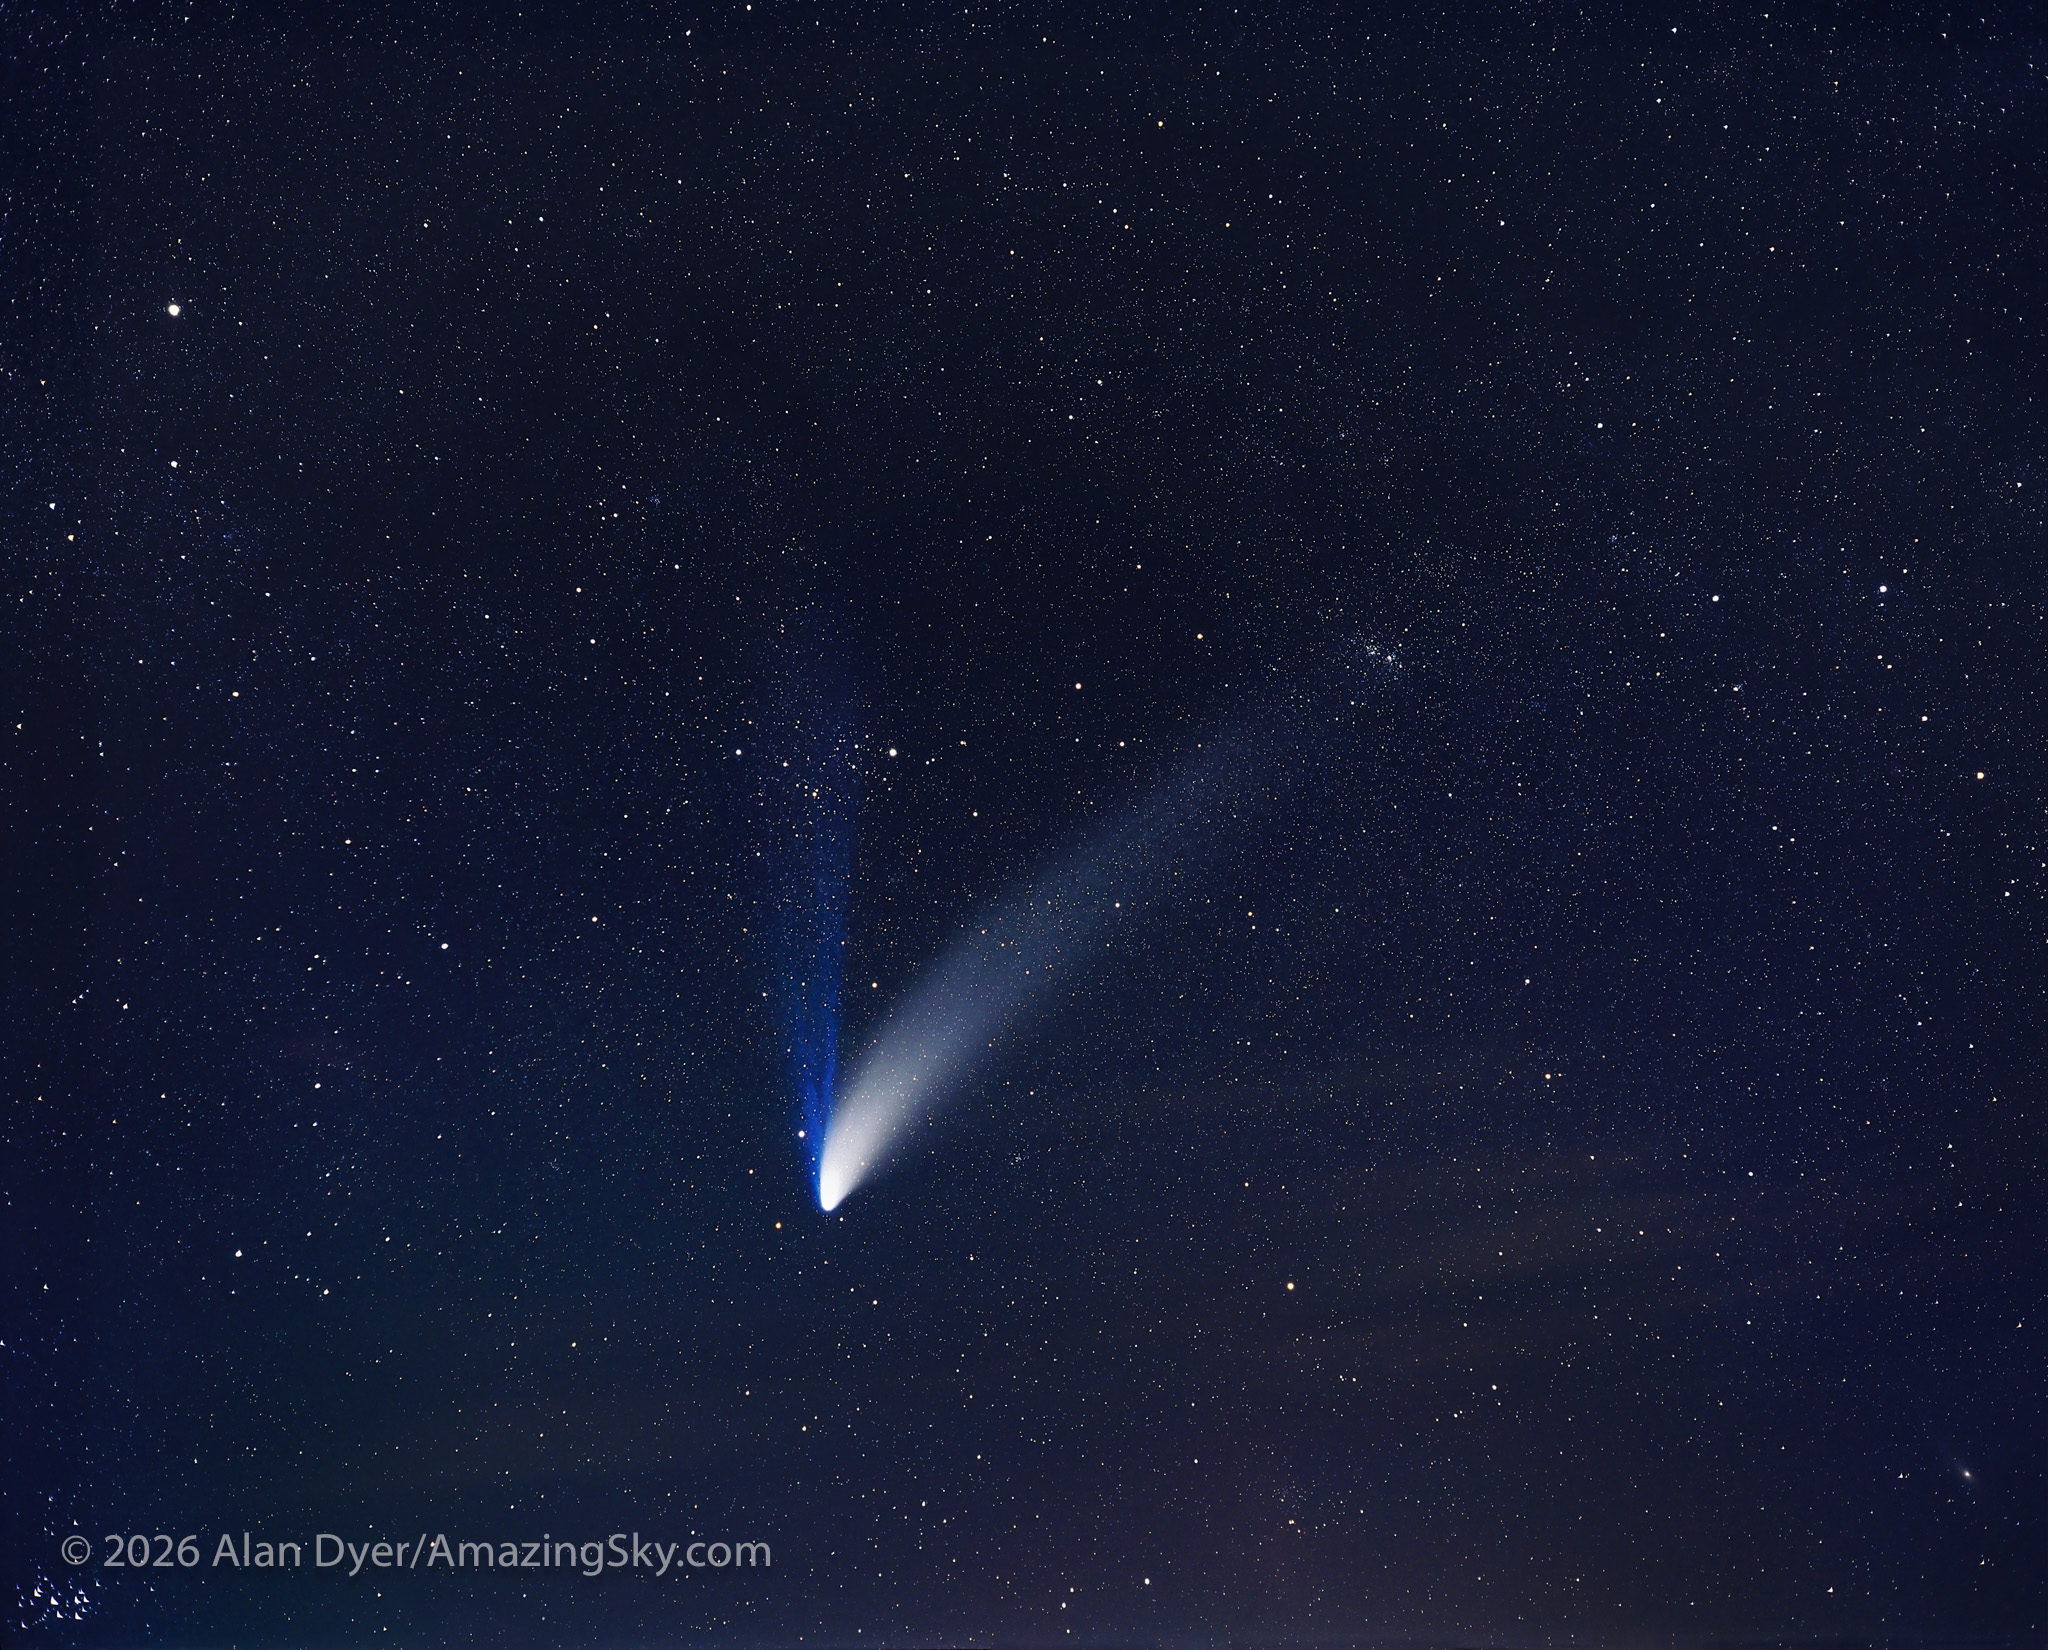
Ah! Those were the good old days โ€“ย and nights โ€“ย shooting with film. The occasion of the 30th anniversary of the great Comet Hyakutake in March 1996 prompted me to revisit my old film shots of that comet, and of Comet Hale-Bopp a year later in April 1997, as below.

Comet Hale-Bopp (C/1995 O1) on April 5, 1997. With the Plaubel Makina 67 camera with its 80mm Nikkor lens at f/4, with Fujichrome 400 slide film, 120-format. About a 10 minute tracked exposure.

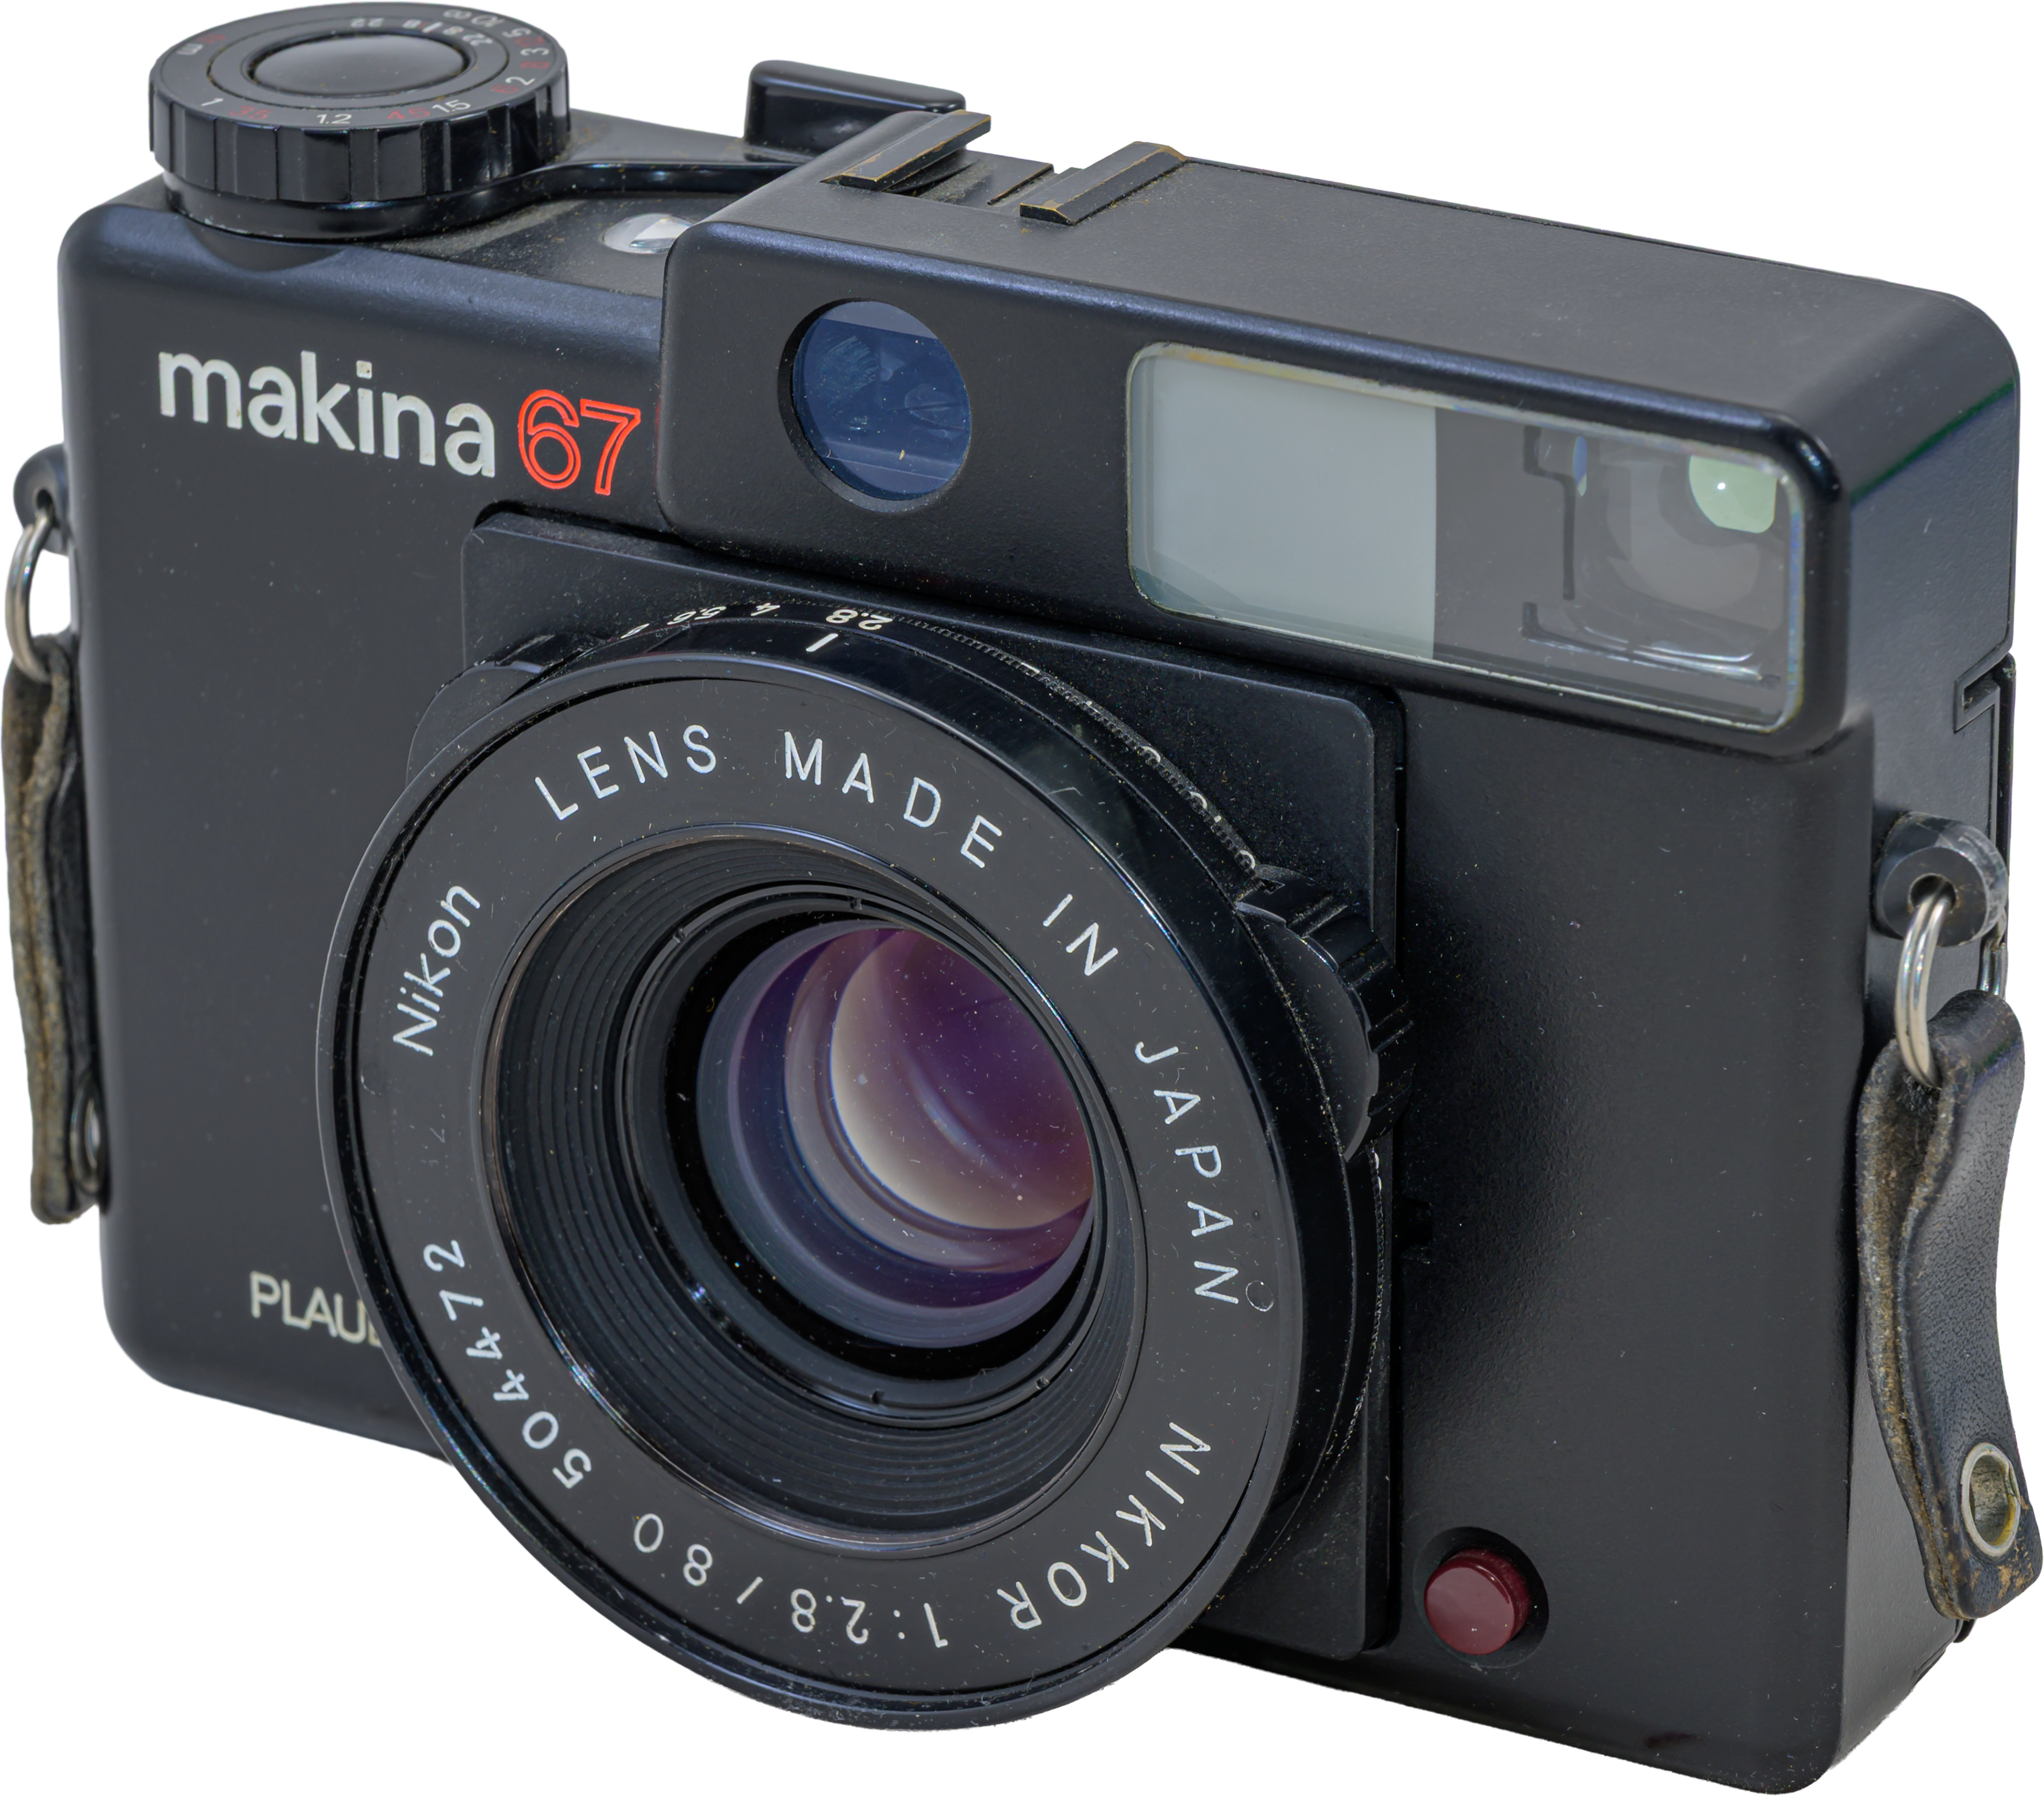
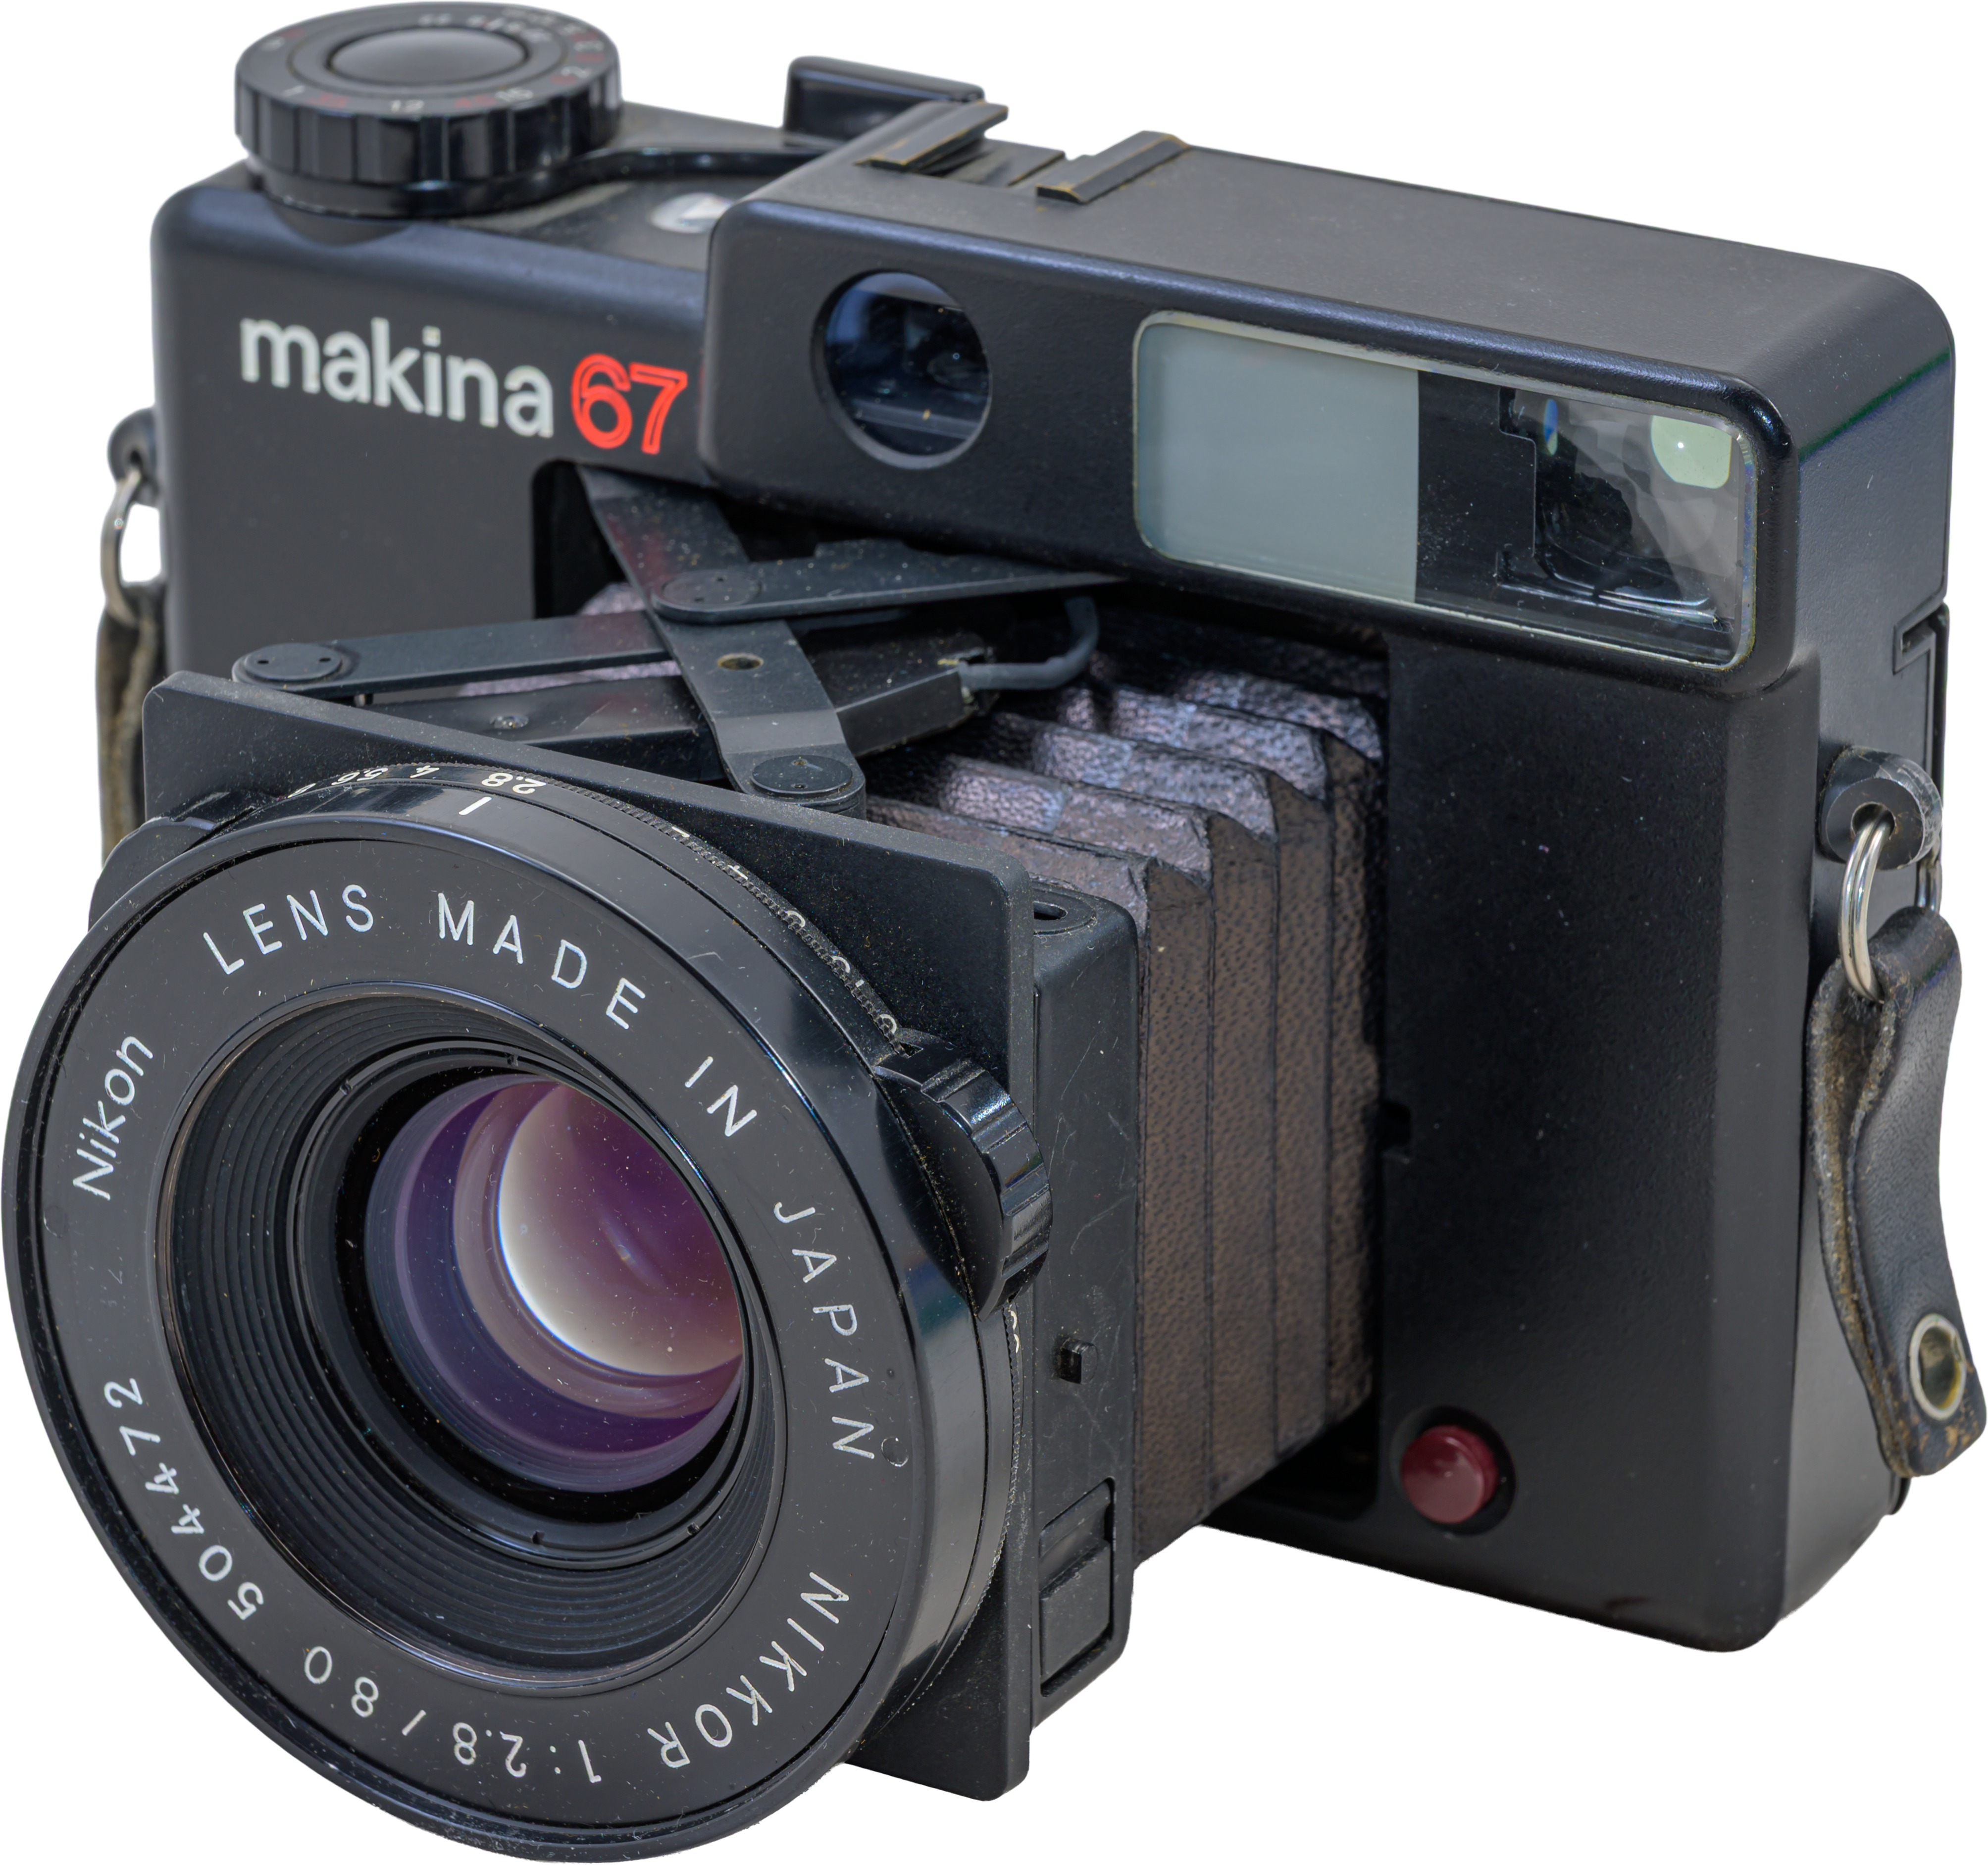
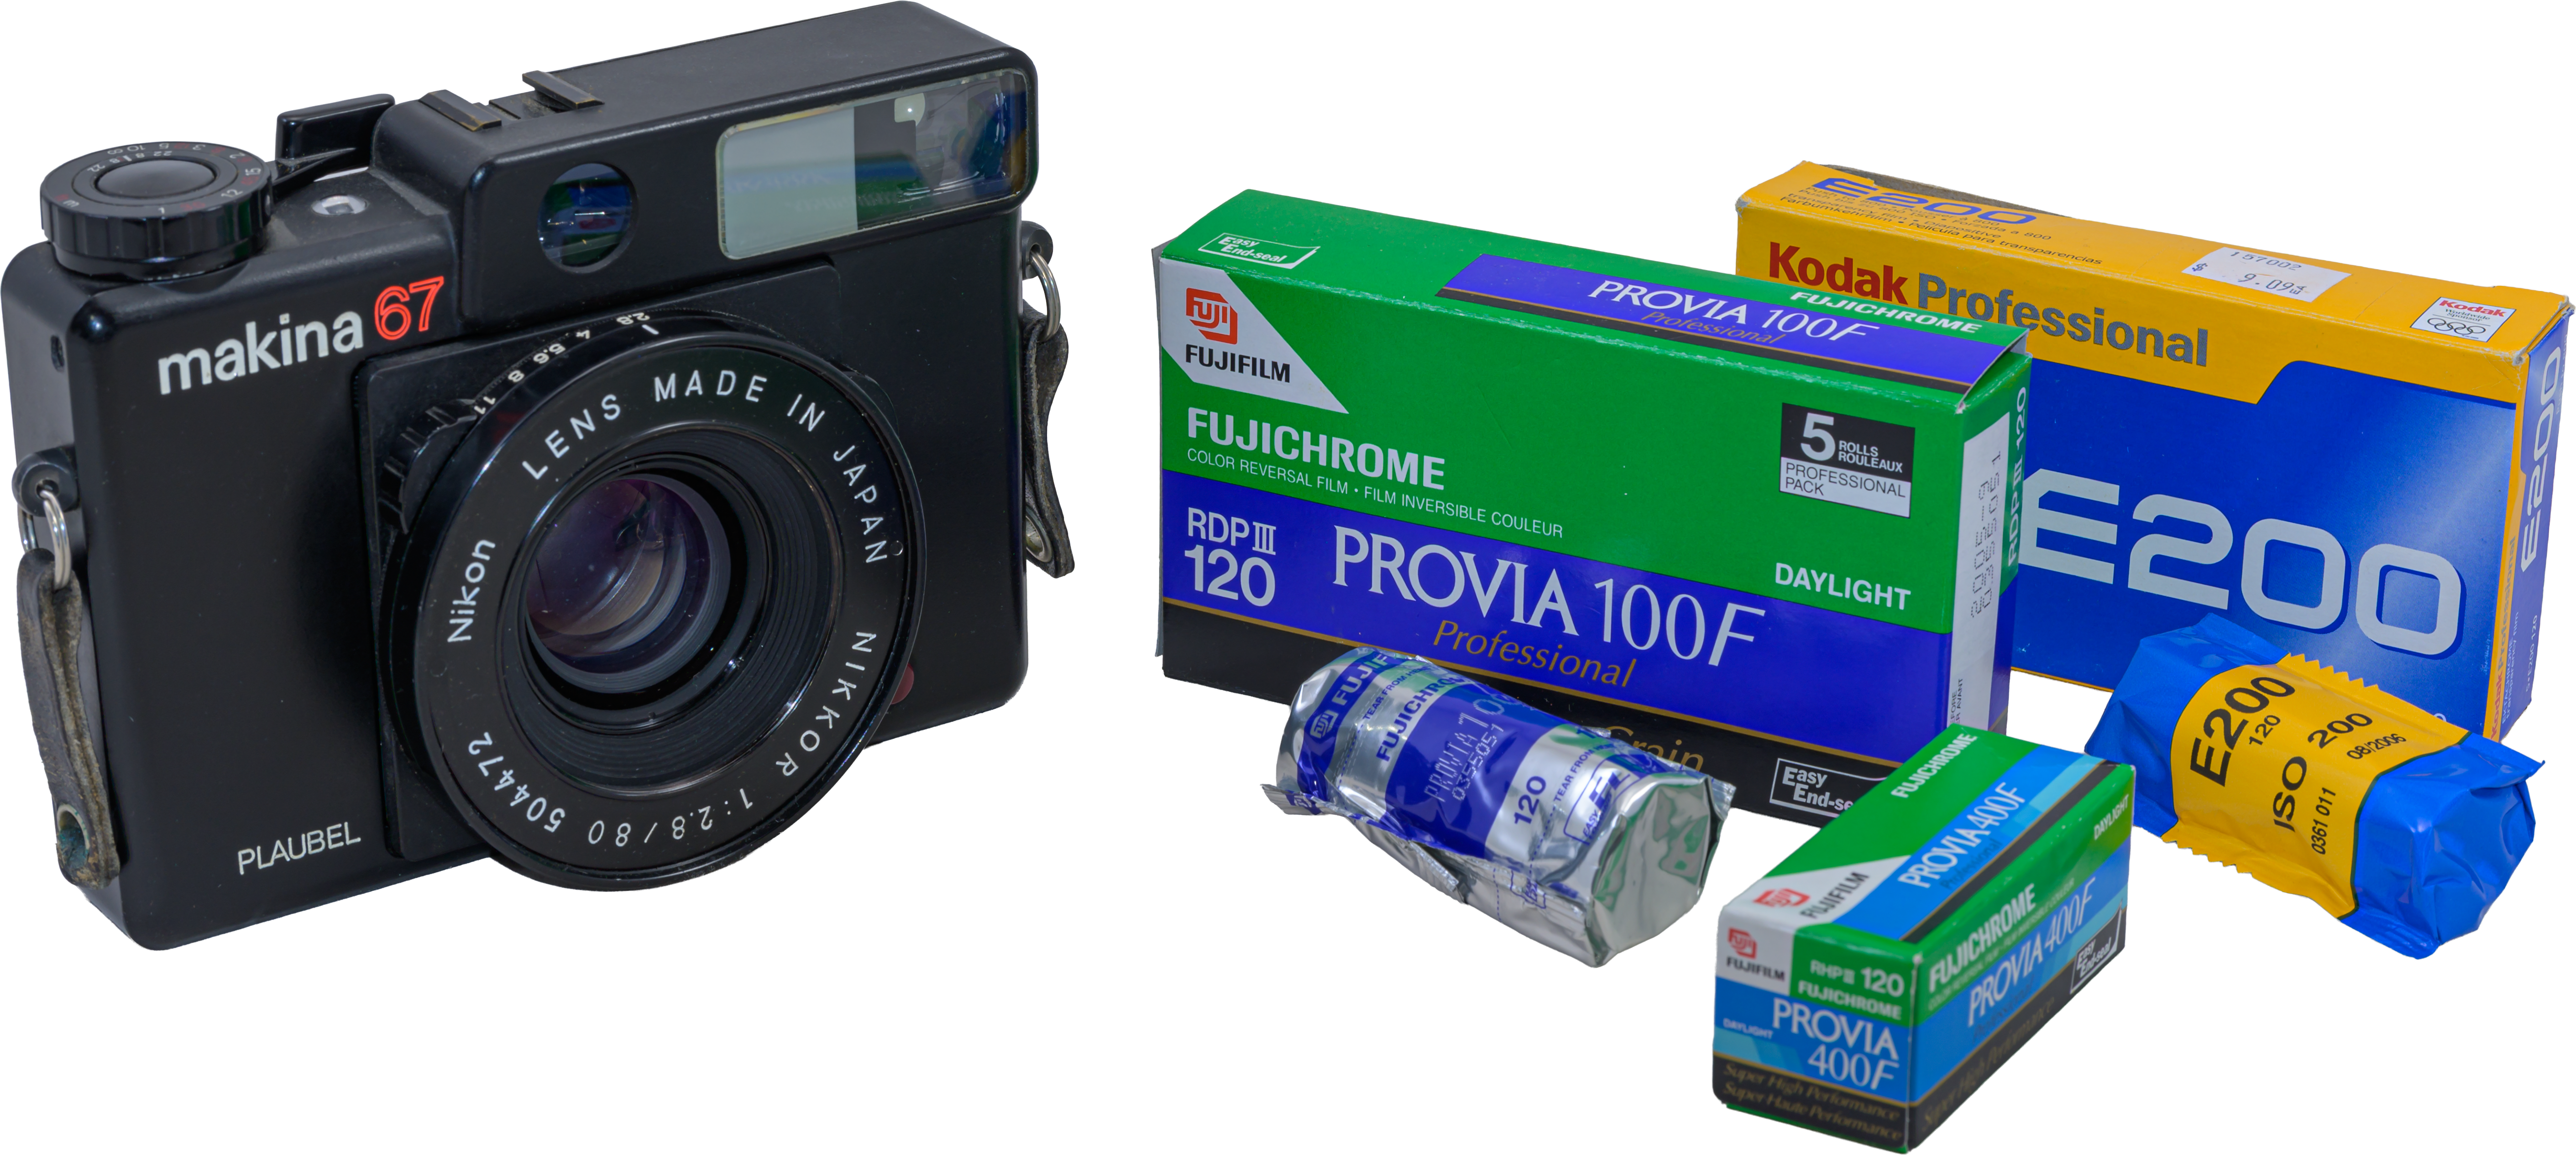
In this case, all the photos I present here (with one exception) I shot with the rather rare, and as it turns out collectible medium-format camera, the Plaubel Makina 67. It used 120- or 220-format film which, for this camera, yielded images 60mm by 70mm in size, larger than today’s “medium-format” digital camera sensors. I scanned all the negatives or positive slides with a Nikon 8000 film scanner.

The made-in-Japan Plaubel Makina was unusual for being a rangefinder, not a reflex camera โ€“ you framed and focused through a separate optical viewfinder, not through the taking lens. For all my images I simply set the focus to infinity, and there was never an issue with parallax when composing a nightscape scene.

But the lens was fixed, and was a Nikkor 80mm f/2.8 made by Nikon. That’s the equivalent of a 40mm normal/slightly wide-angle lens on a full-frame sensor today (or on 35mm film). The lens was on a bellows that could collapse back to make a compact, almost pocketable camera. Thus today, with the resurgence in popularity of film, the Makina is still sought after, not just by collectors to put on a shelf, but by those wanting to put it to use in the field.

I bought it in 1994. I just sold it, for about what I paid for it 32 years earlier, though not taking into account inflation. I had not shot with it in 20 years. Apart from the light meter, which I rarely used, it still worked.

Moonlit Nightscapes

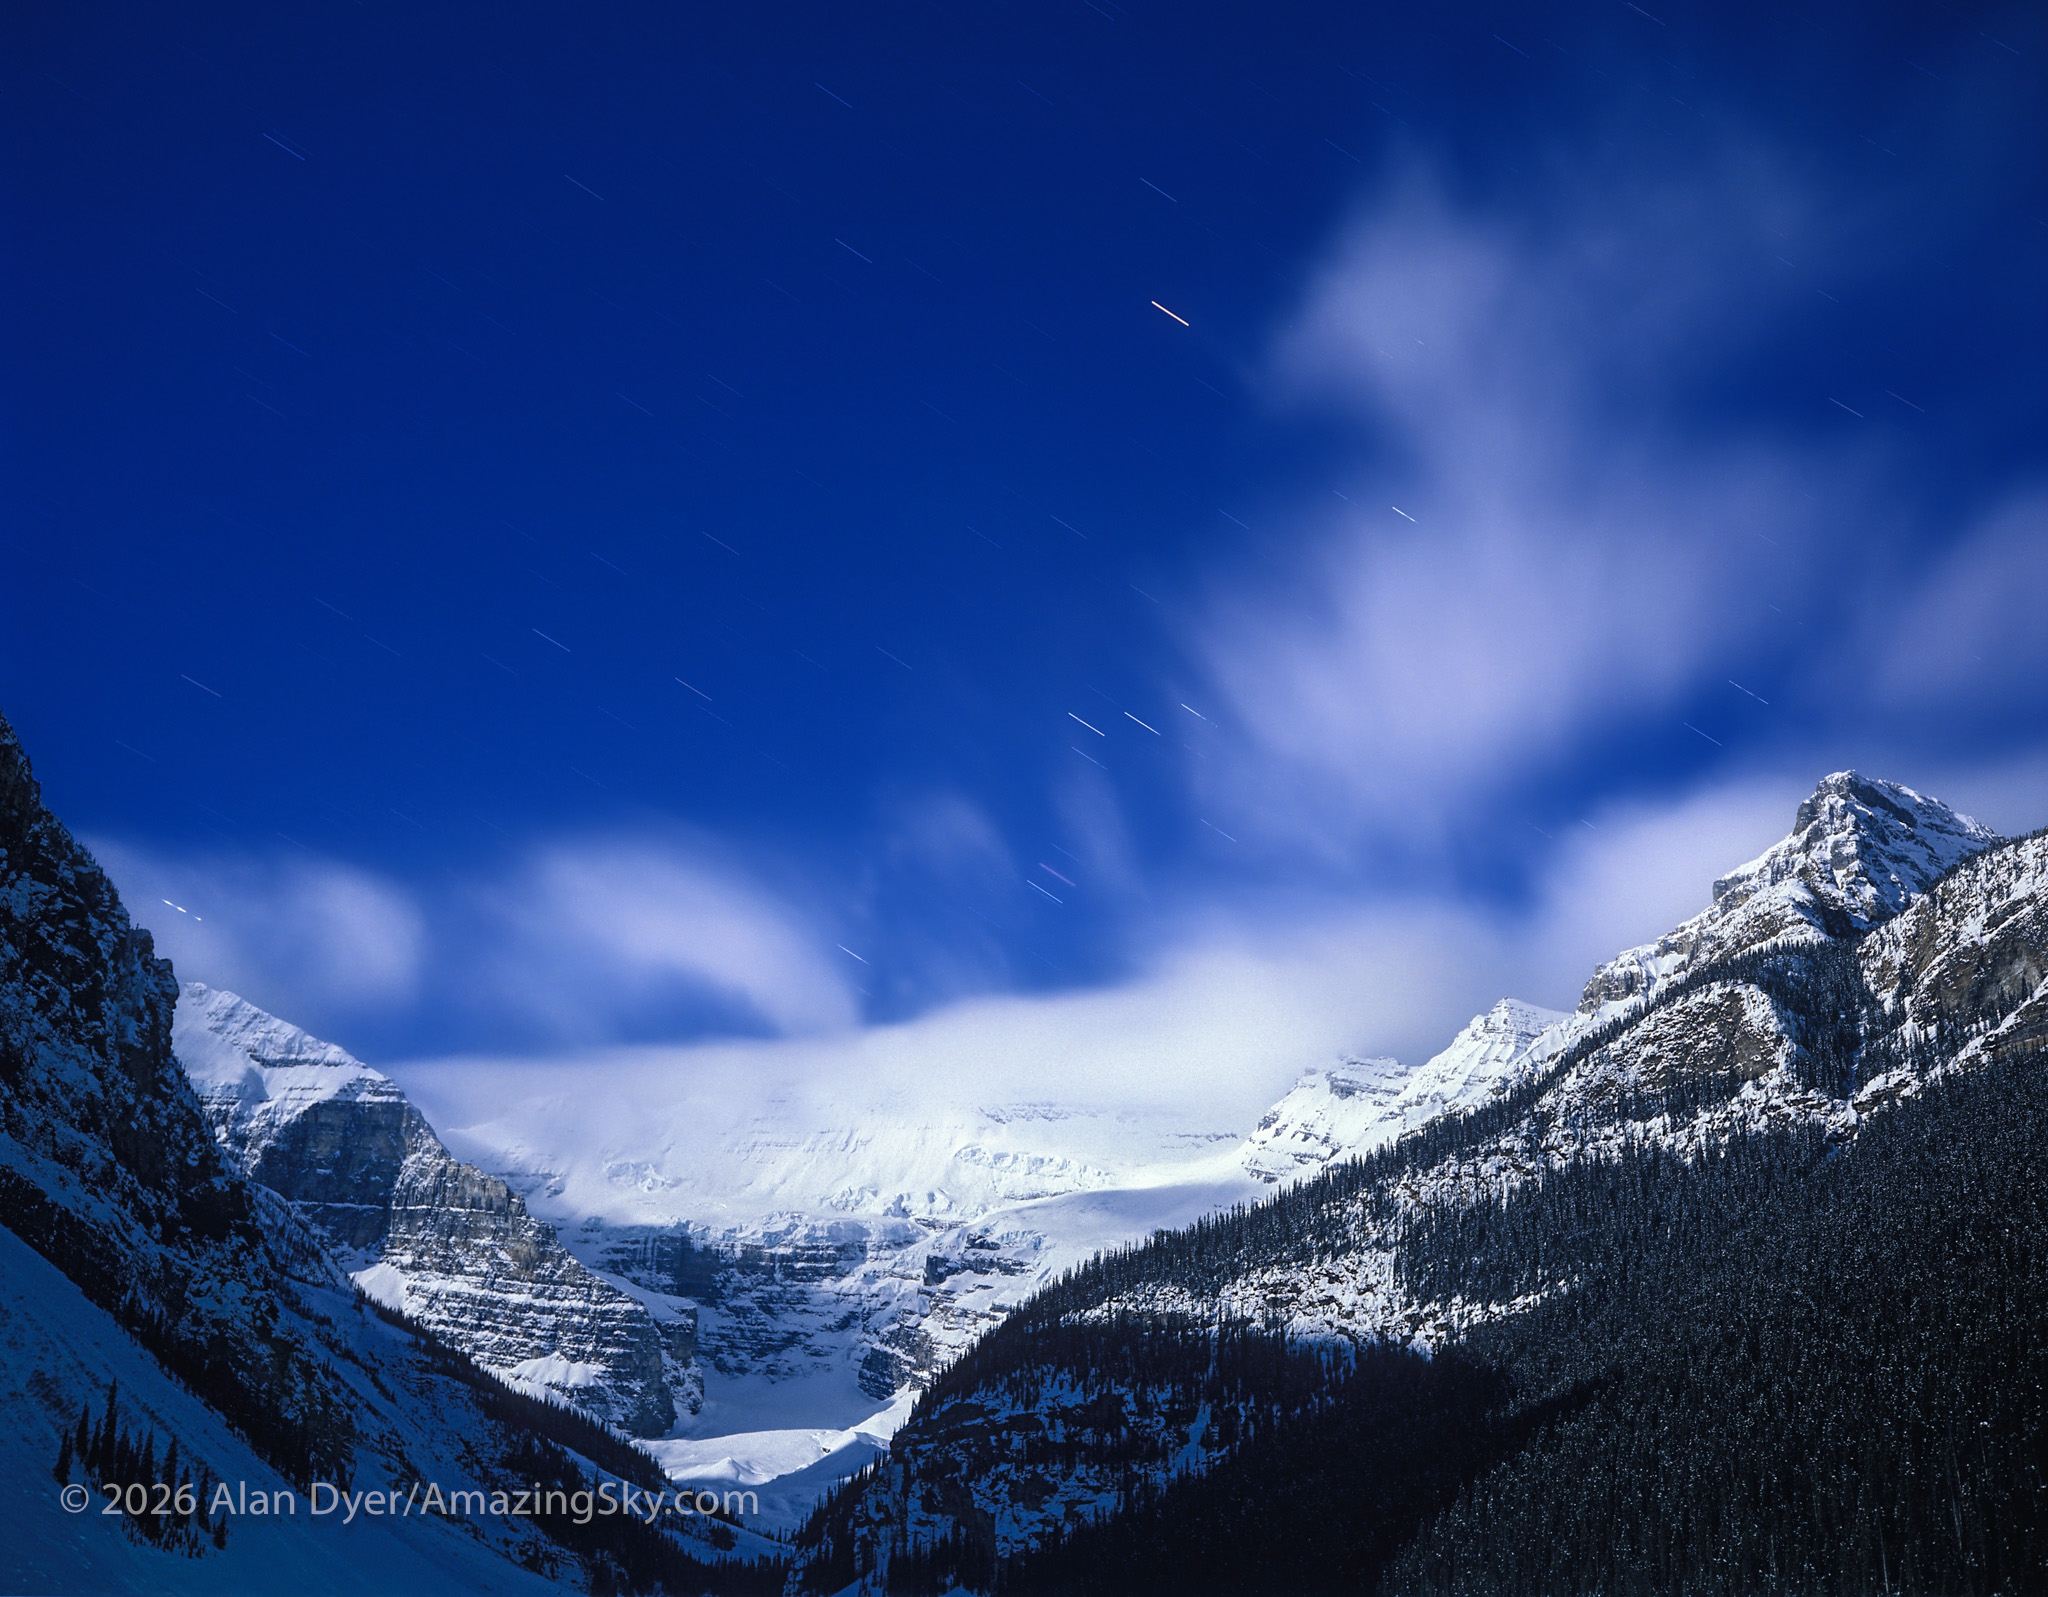
Orion setting in star trails over Lake Louise and Mt Victoria and Victoria Glacier in Banff National Park, Alberta.. Moonlight provides the illumination. Taken in March 1996 with the Plaubel Makina 67 camera with 120-format Fujichrome 100 slide film, 80mm lens at f/5.6, for 15 minutes.
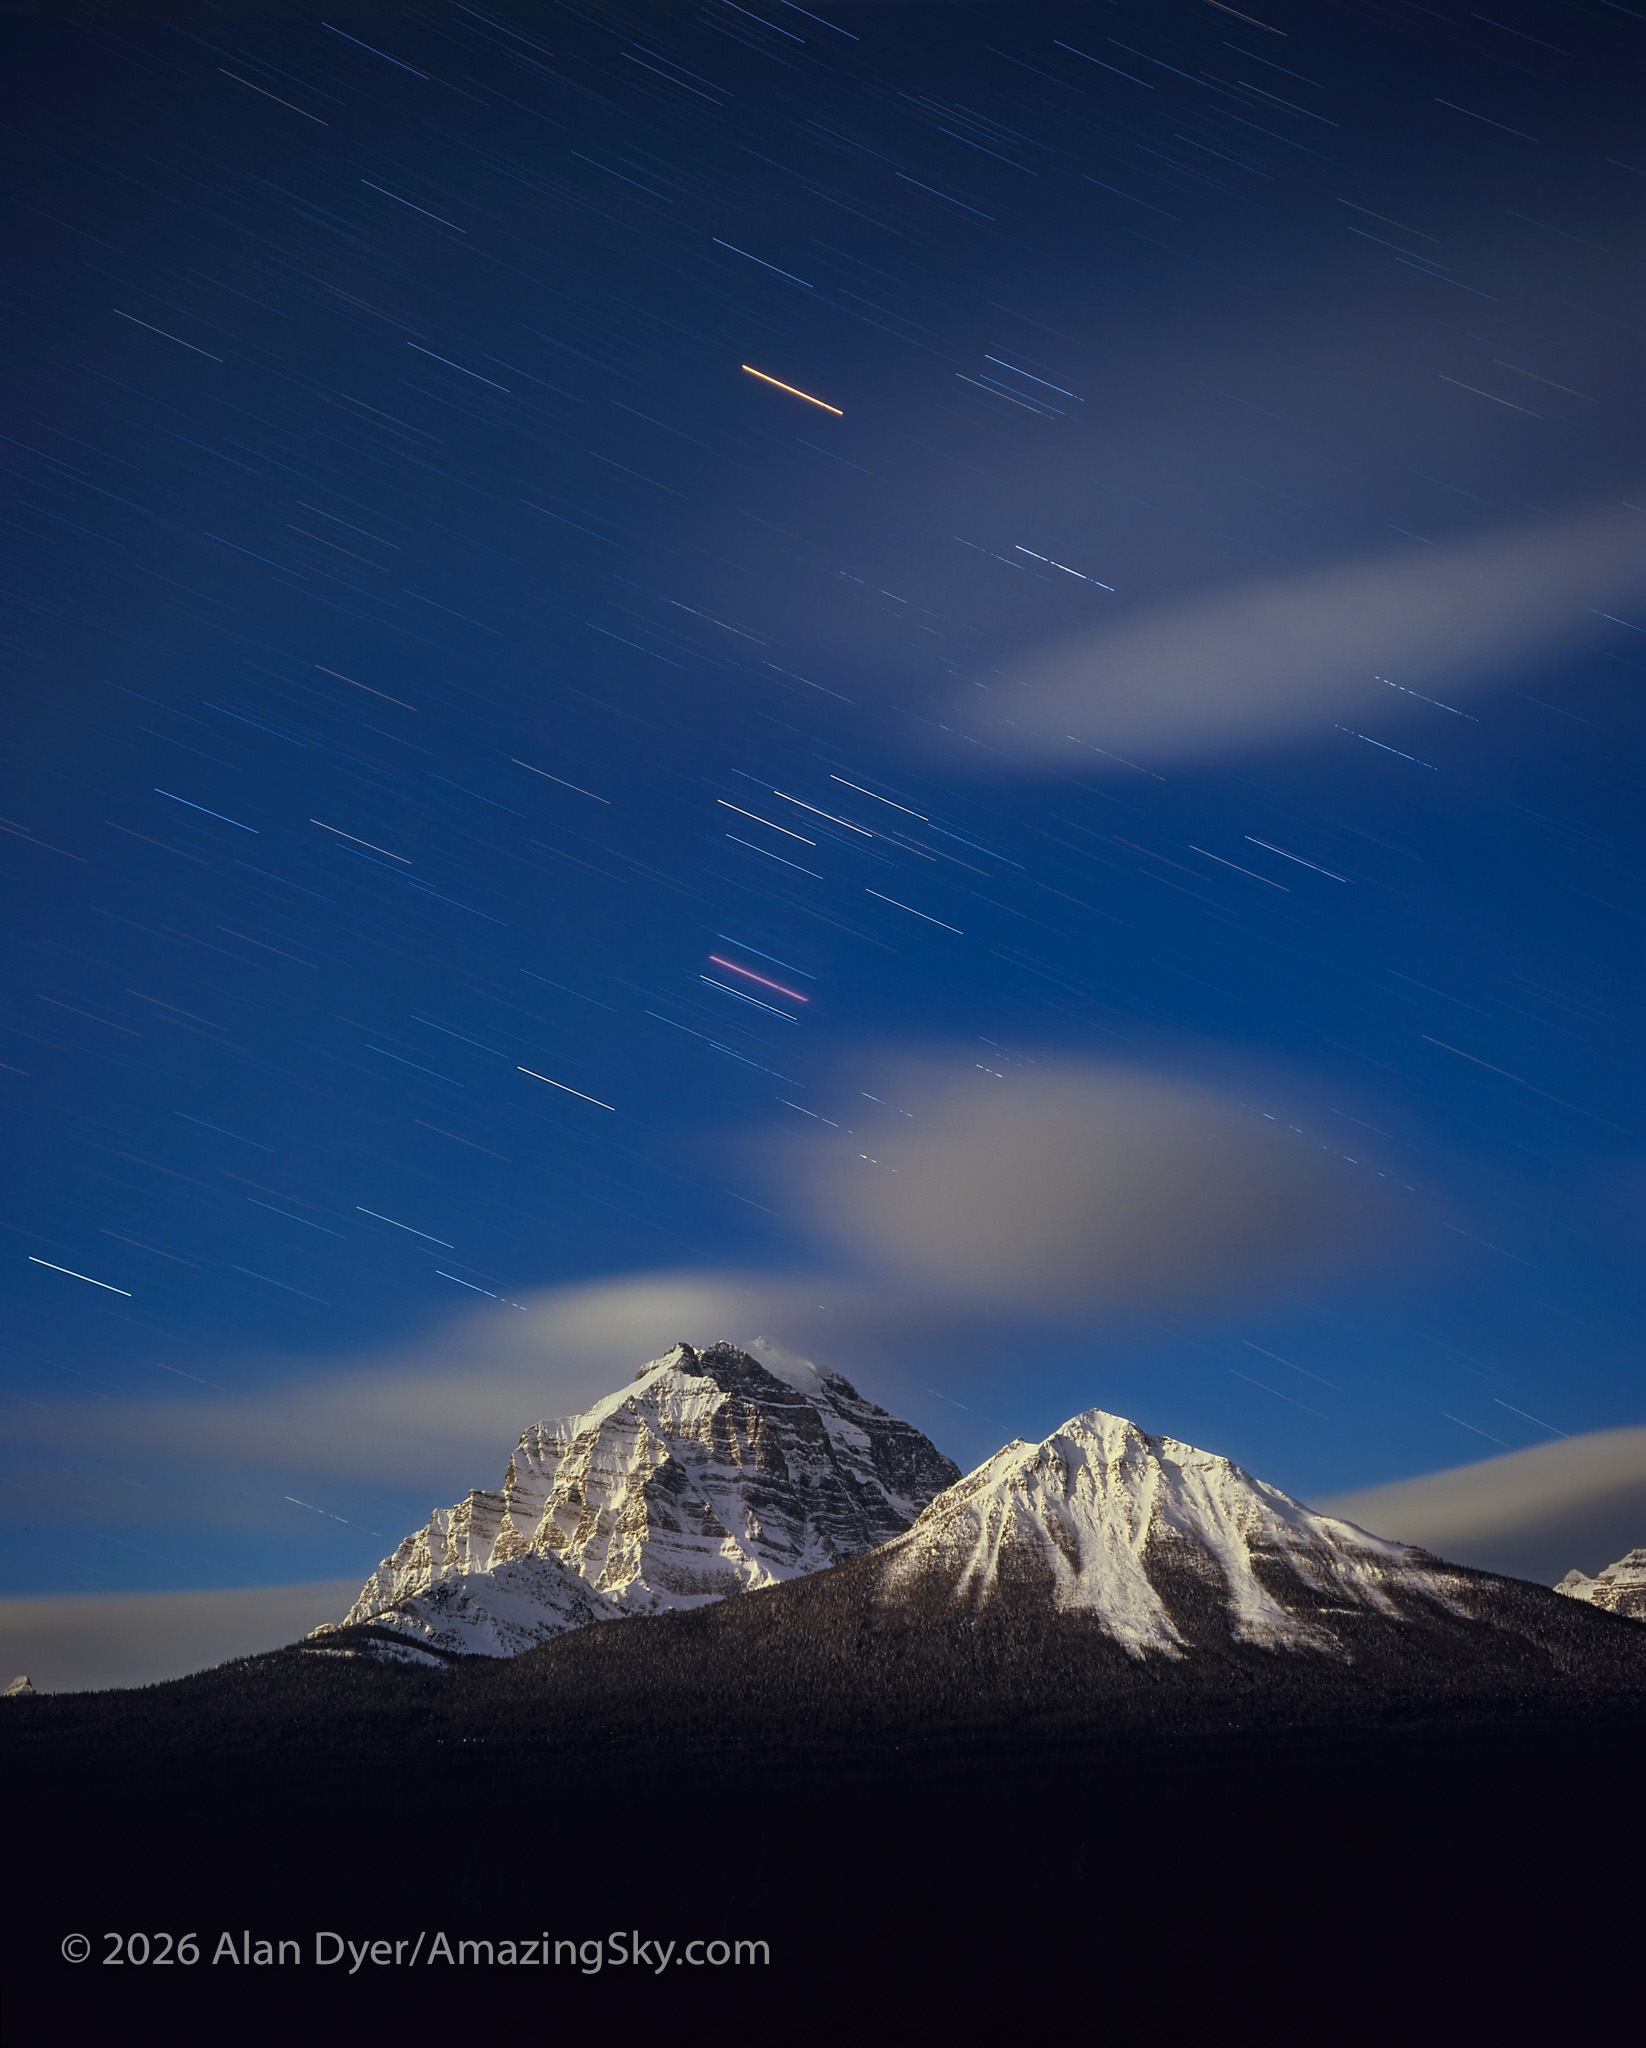
The stars of Orion setting over Mt. Temple near Lake Louise in Banff National Park, Alberta. Taken in full moonlight, from the Bow Valley Parkway in March 1995. With the Plaubel Makina 67 camera, Fujichrome Velvia 50 slide film, 80mm lens at f/5.6, and about a 25 minute single exposure.

What could you shoot with medium format film โ€“ or any film โ€“ for nightscapes? The prime subjects were scenes lit by bright moonlight. While you could shoot short exposures to keep stars as pinpoints, that required quite fast film, with ASA/ISO 400 or 800 generally the fastest on the market. And fast film was very grainy, in part spoiling the very sharpness you were after by shooting with medium format.

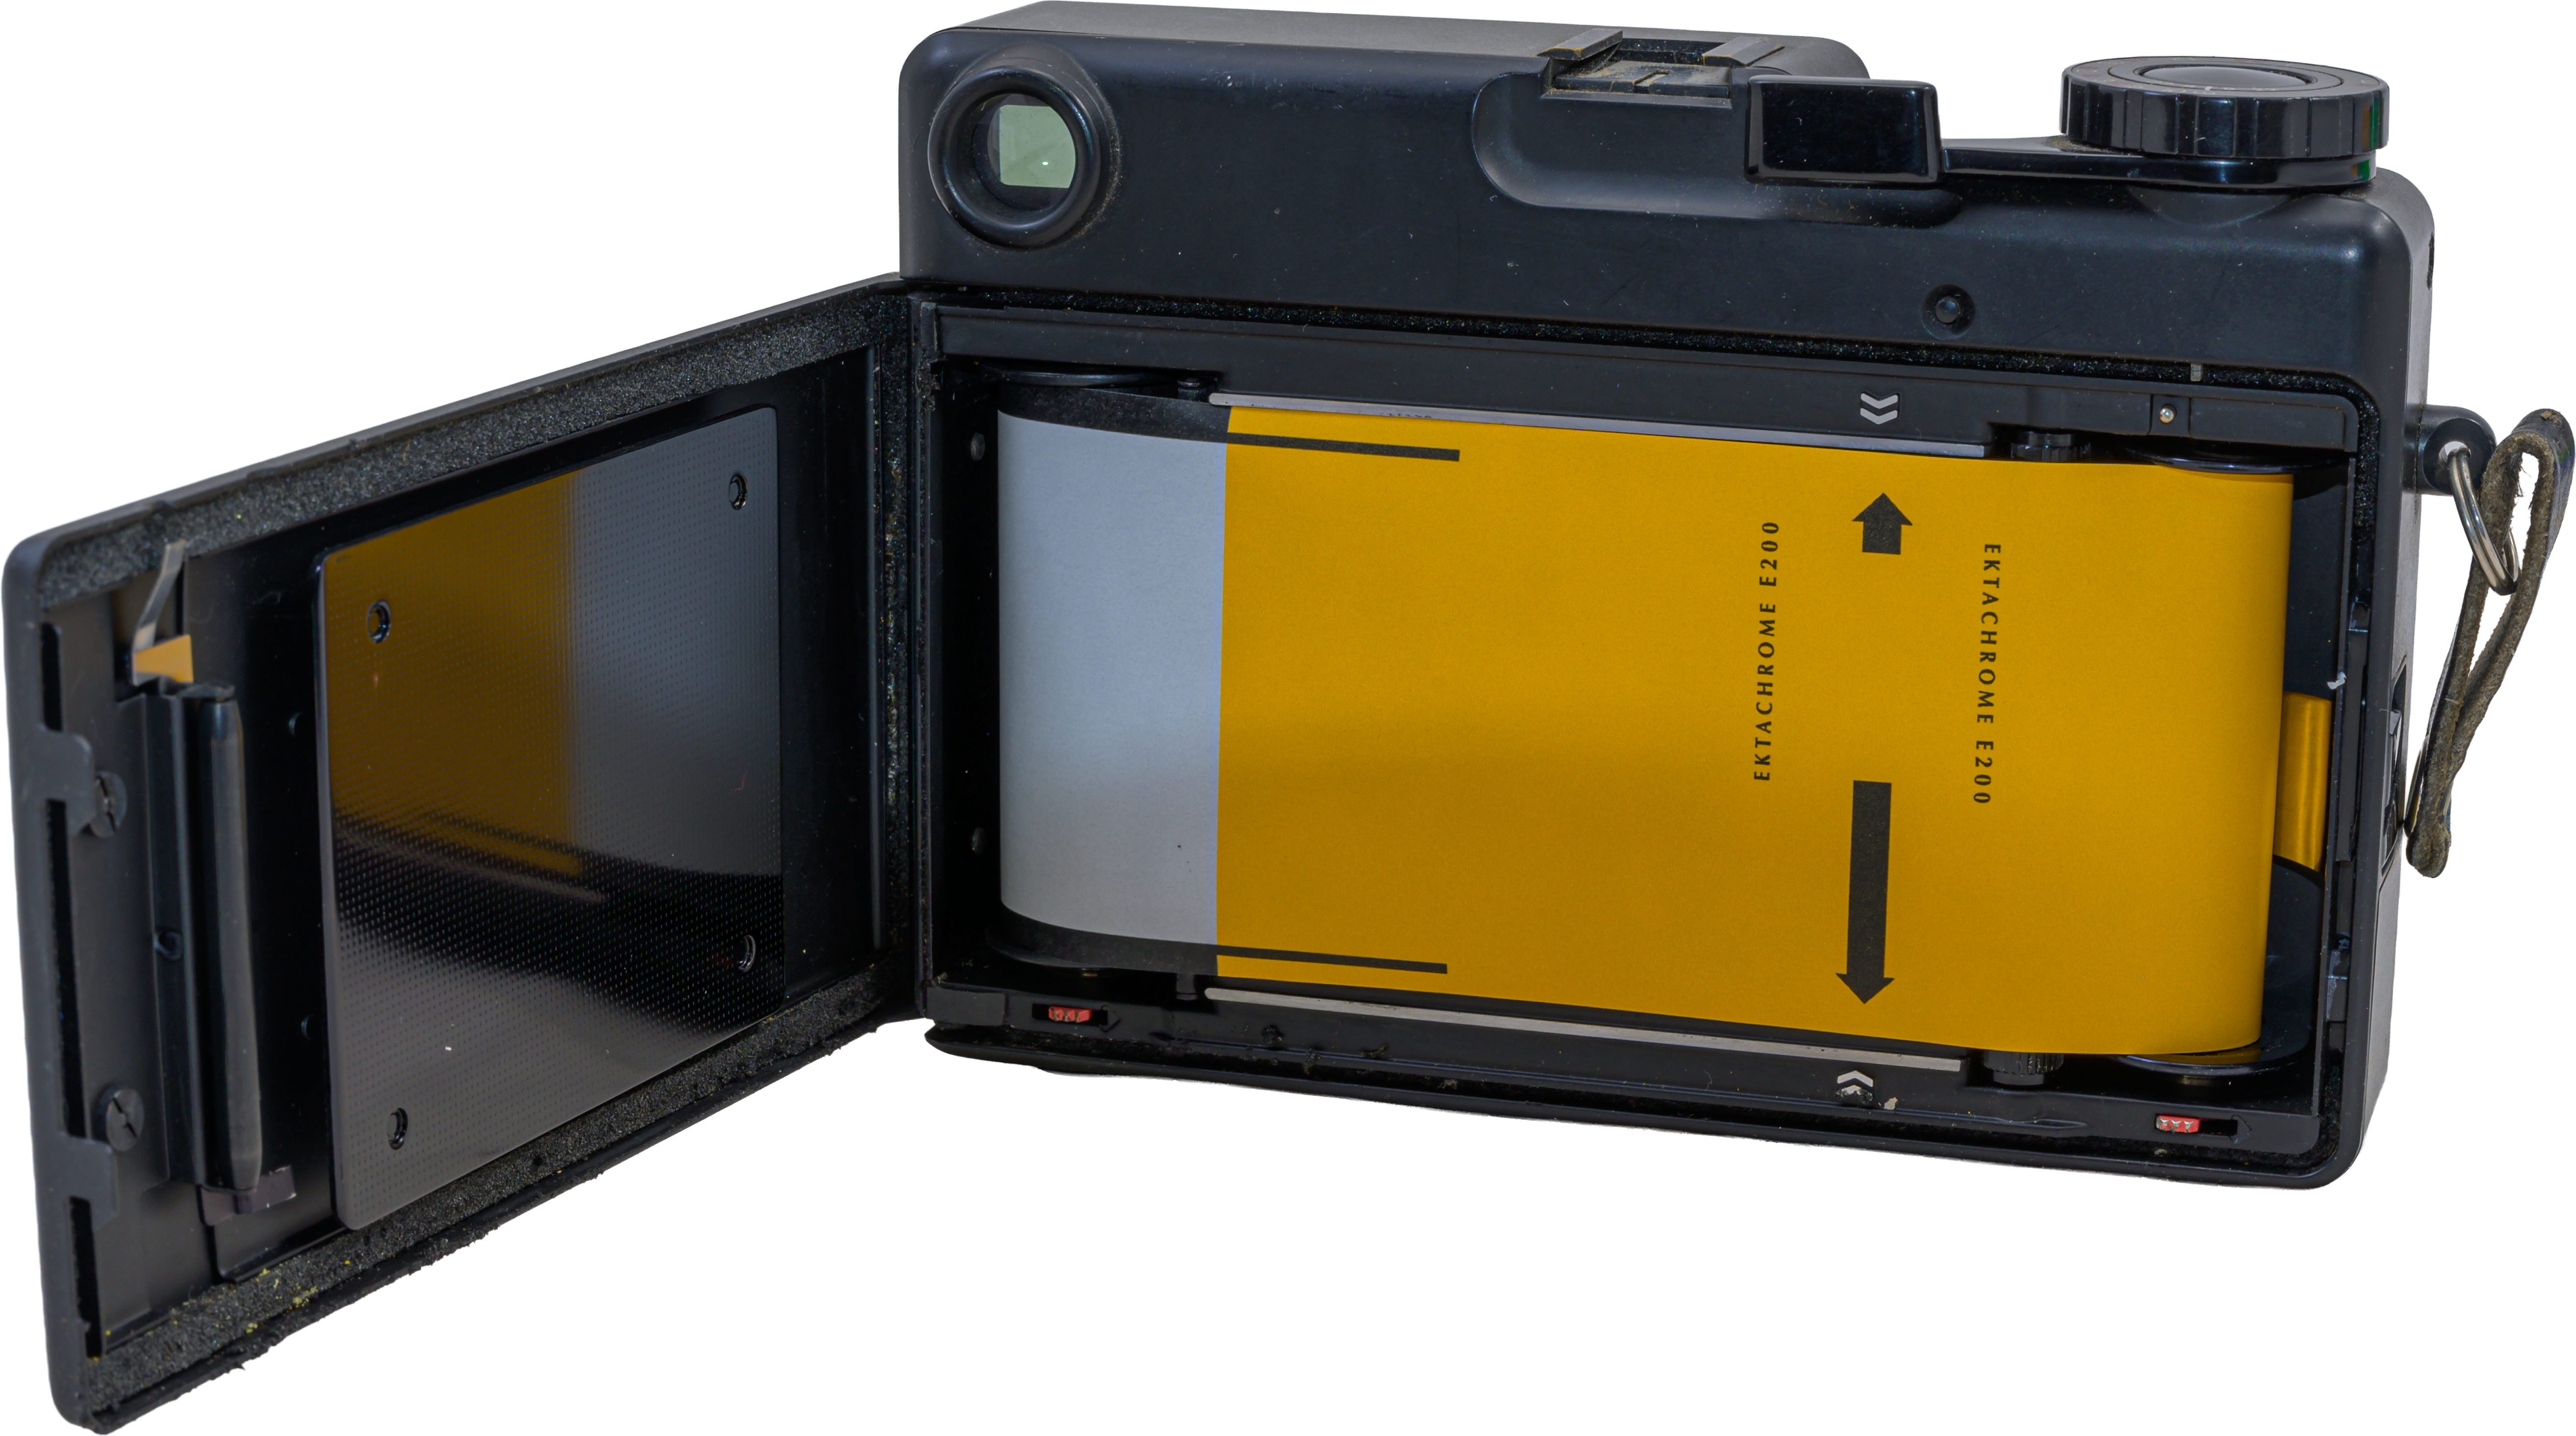
So my choice was to usually shoot with slower ASA or ISO 50 to 200 film, such as Fuji Velvia 50, Provia 100 F, or Kodak Ektachrome E200. The latter was a prime choice for any tracked deep-sky images as it was quite red sensitive to pick up red nebulas along the Milky Way. But I didn’t do much of that with the Makina, reserving those shots for a Pentax 67 camera I bought later with its interchangeable lenses.

Star Trails

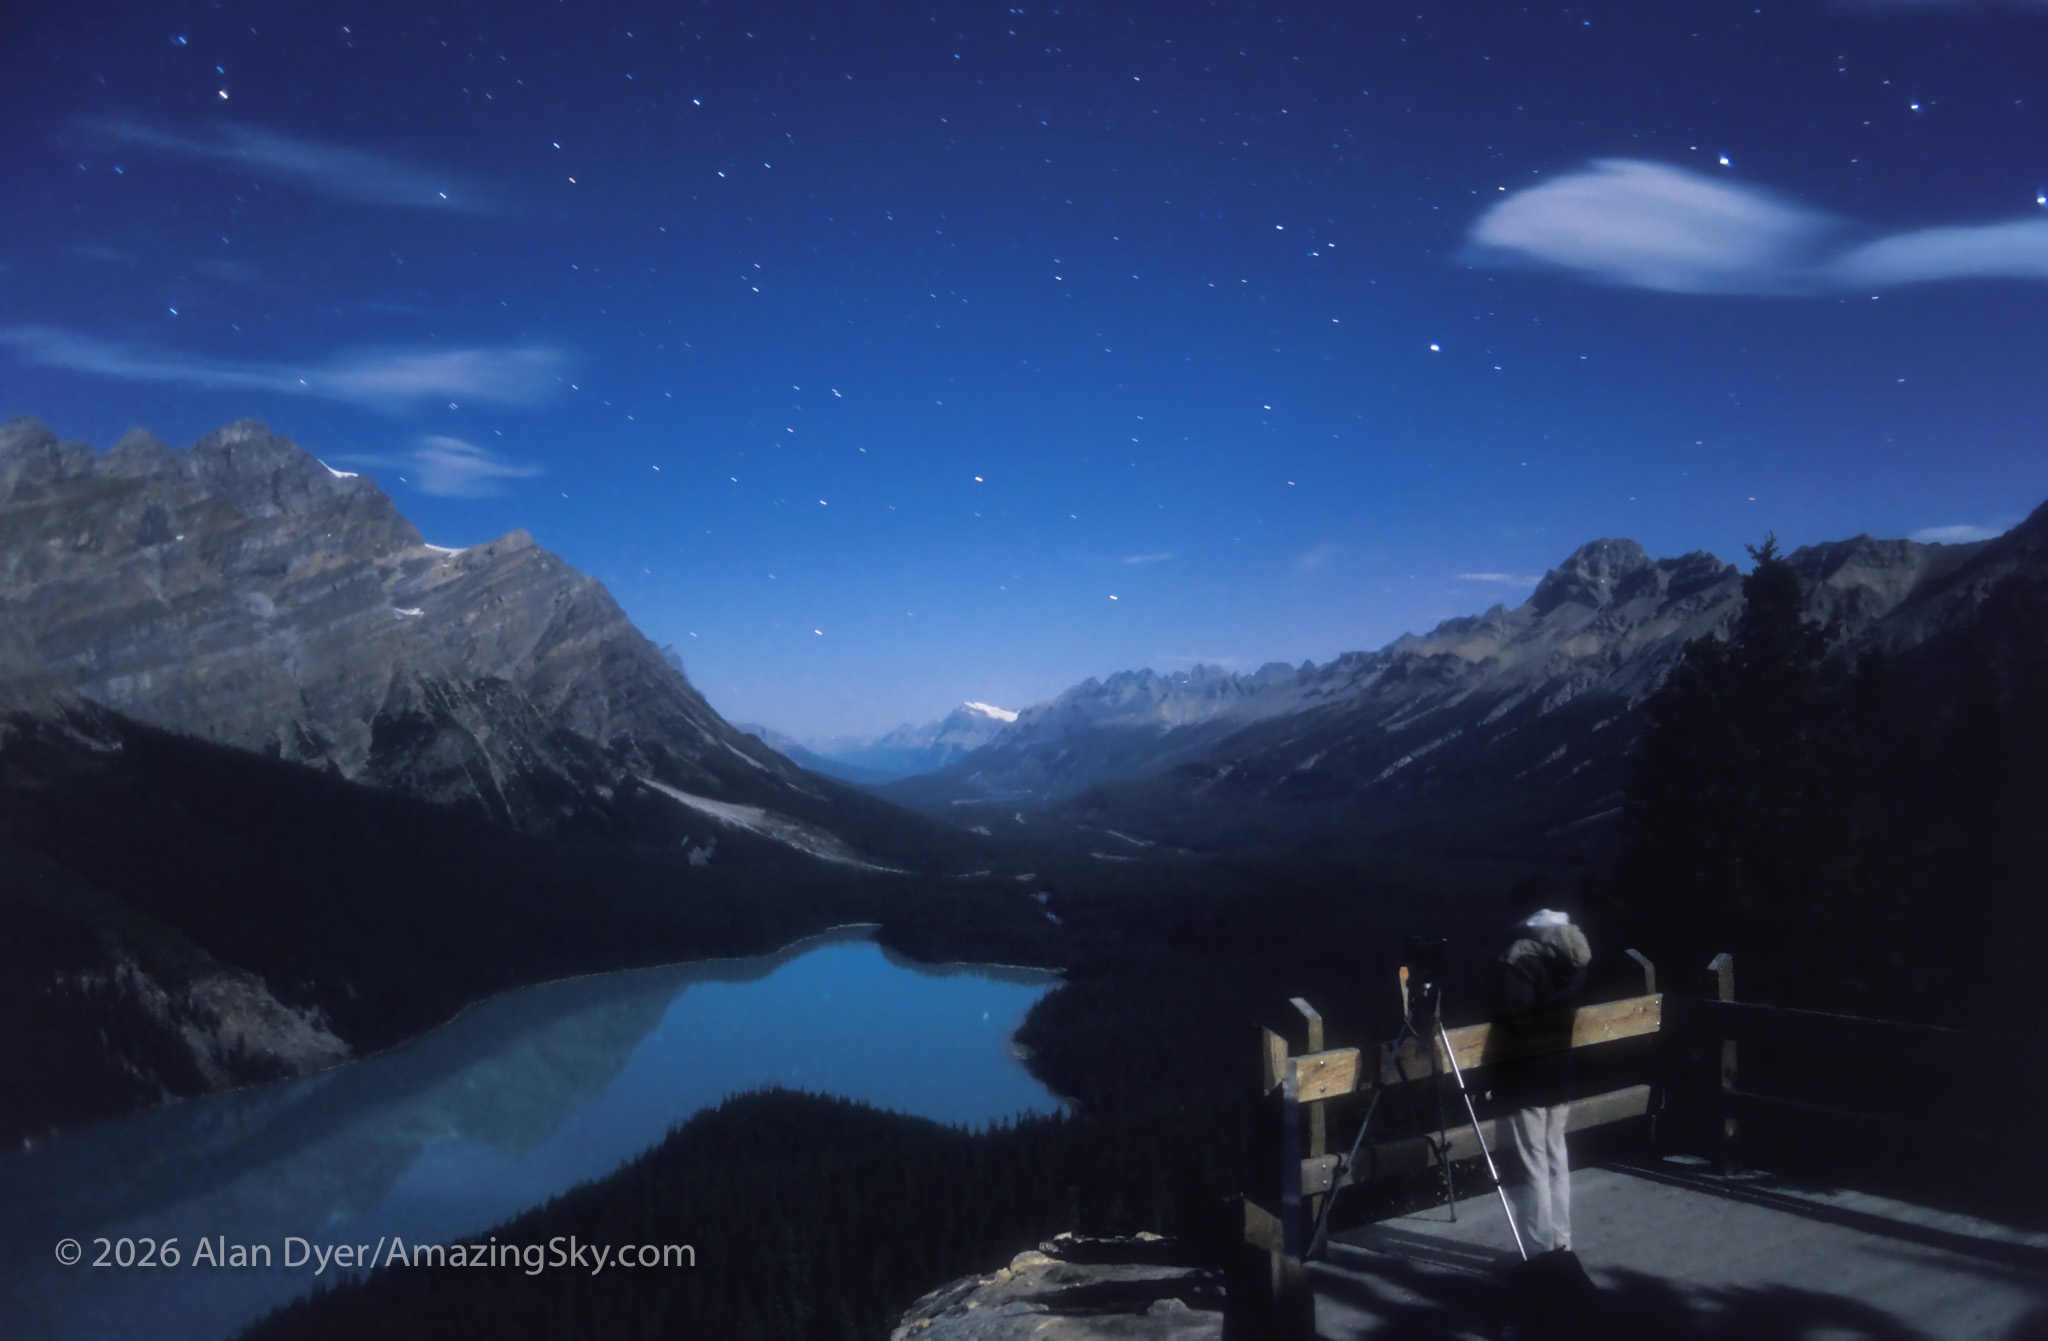
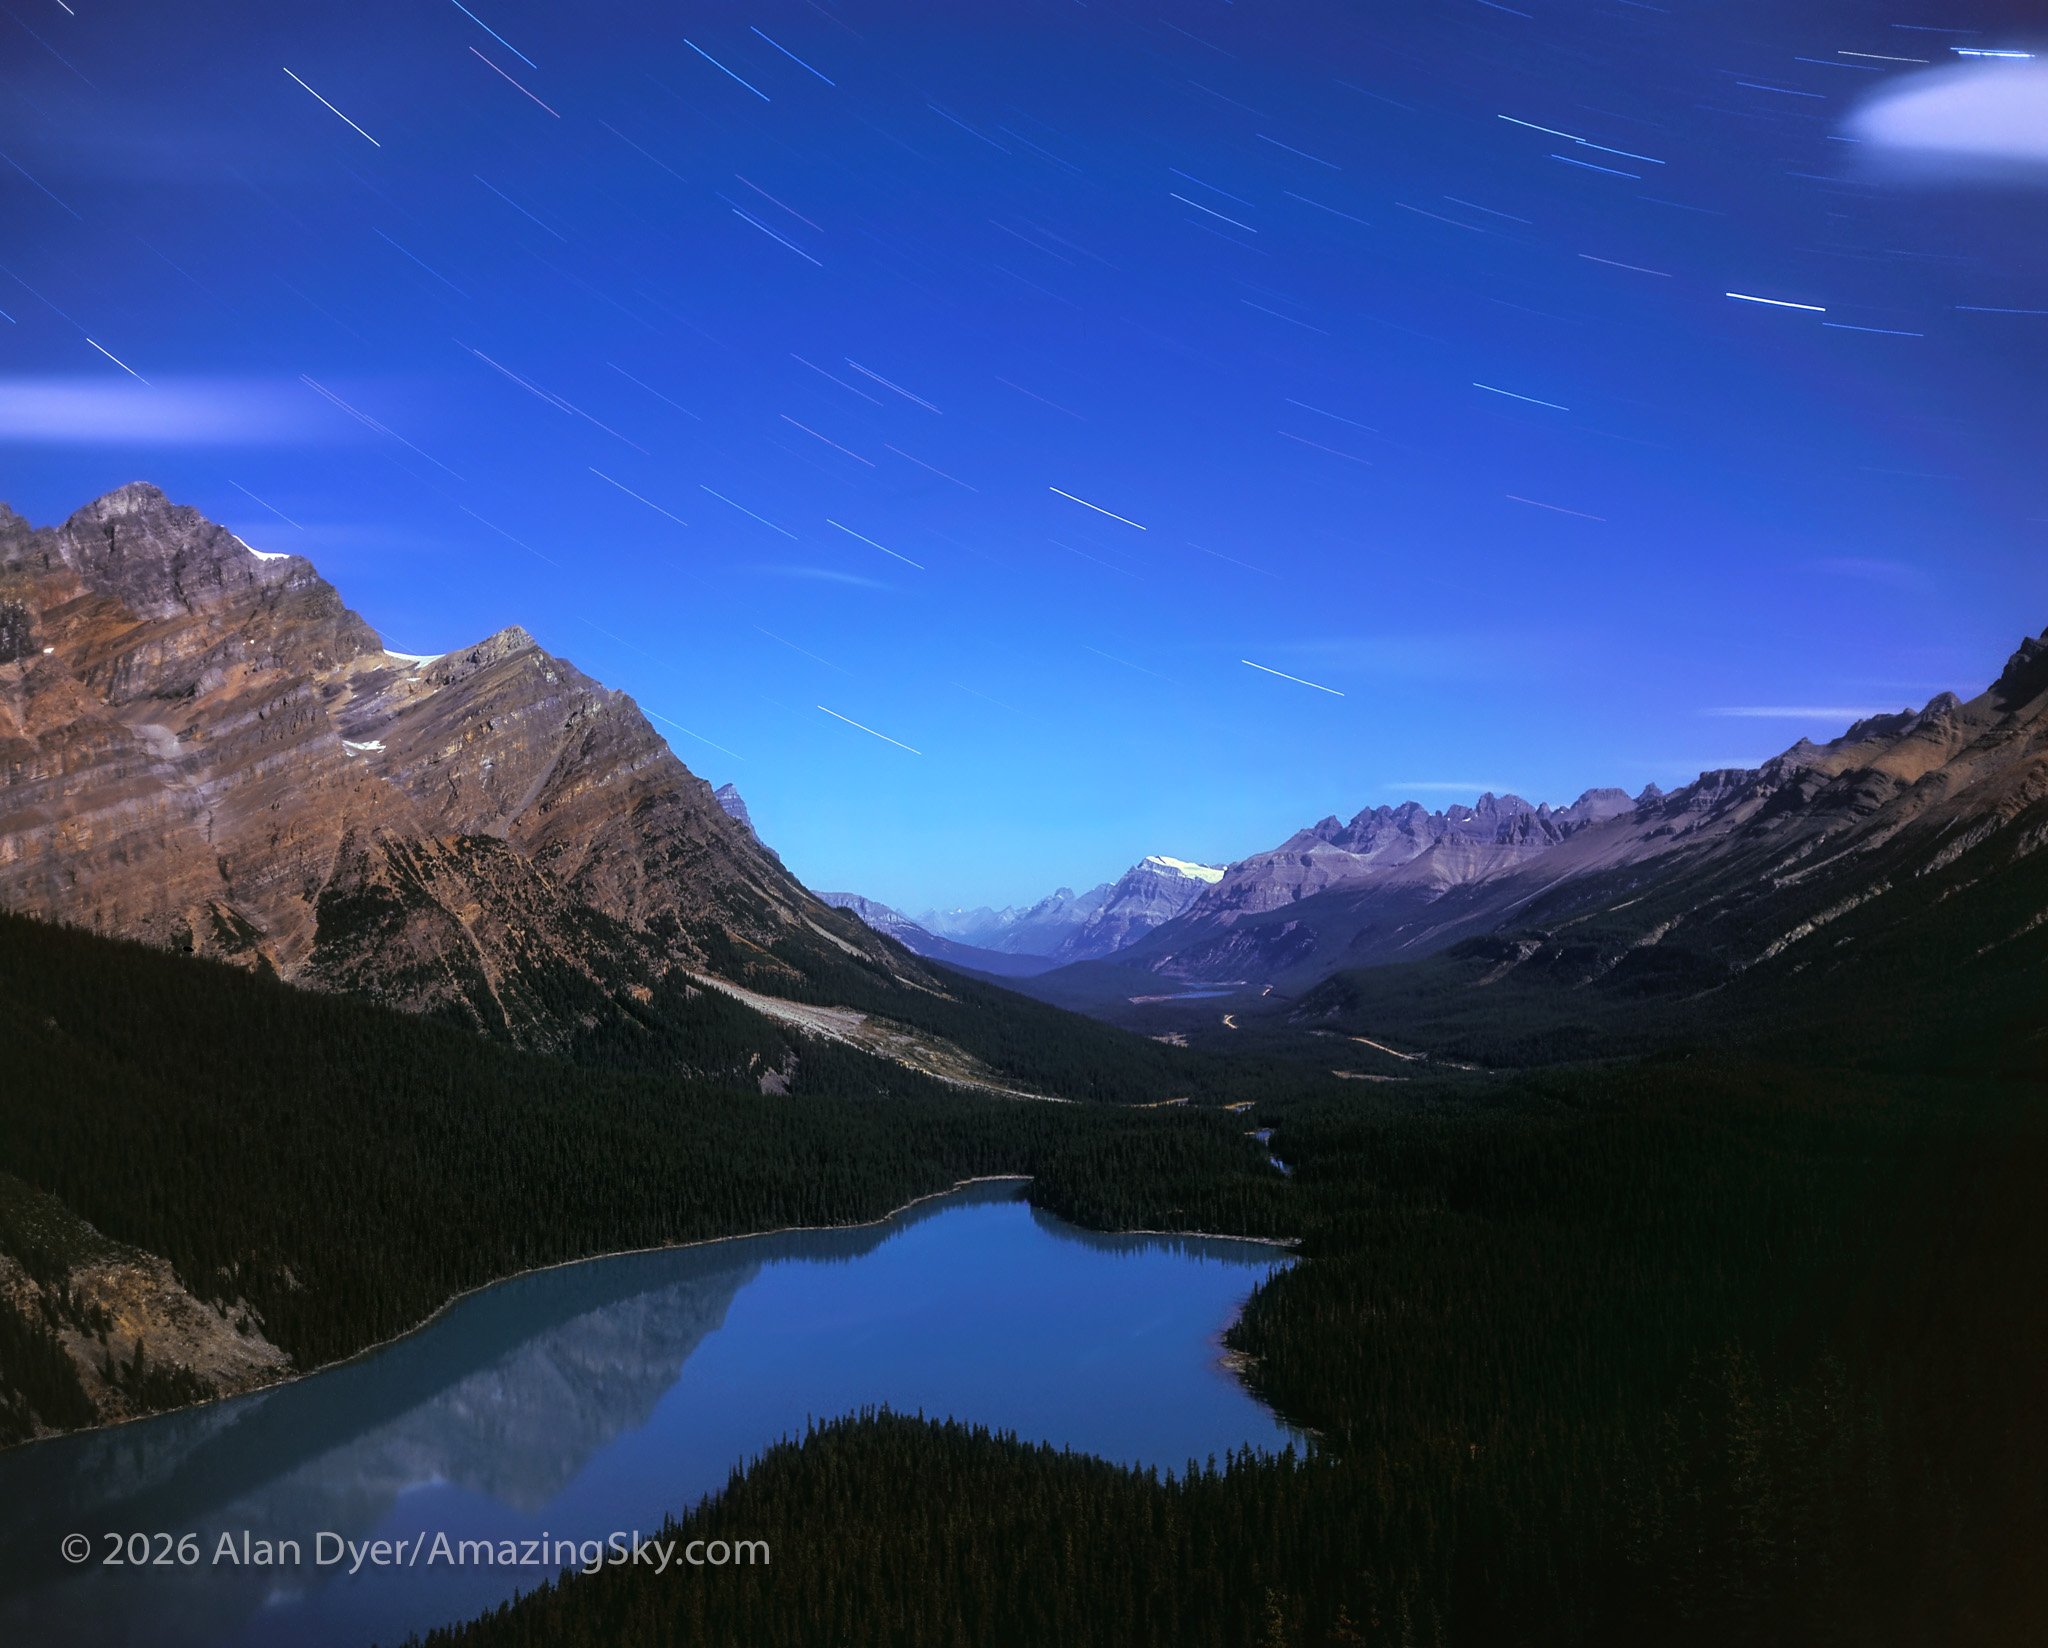
Star trails looking north over Peyto Lake in Banff National Park, Alberta, with full moonlight providing the illumination. Taken with the Plaubel Makina 67 camera on Fujichrome Velvia 50 slide film with 80mm lens. Exposure about 20 minutes at f/5.6.
Me shooting a moonlight nightscape at Peyto Lake, Banff National Park, Alberta. On 35mm film with a Nikon F2 and a 28mm lens at f/2.8, about a 60 second exposure, on Ektachrome 400 slide film.

So instead I generally sought out sites in the scenic Canadian Rockies to shoot long exposures by moonlight, as I am doing above at Peyto Lake, to create star trail nightscapes. Exposures were typically 15 to 30 minutes but on slow film. That’s one single exposure on one piece of film. Stacking short exposures? Not in the good old days!

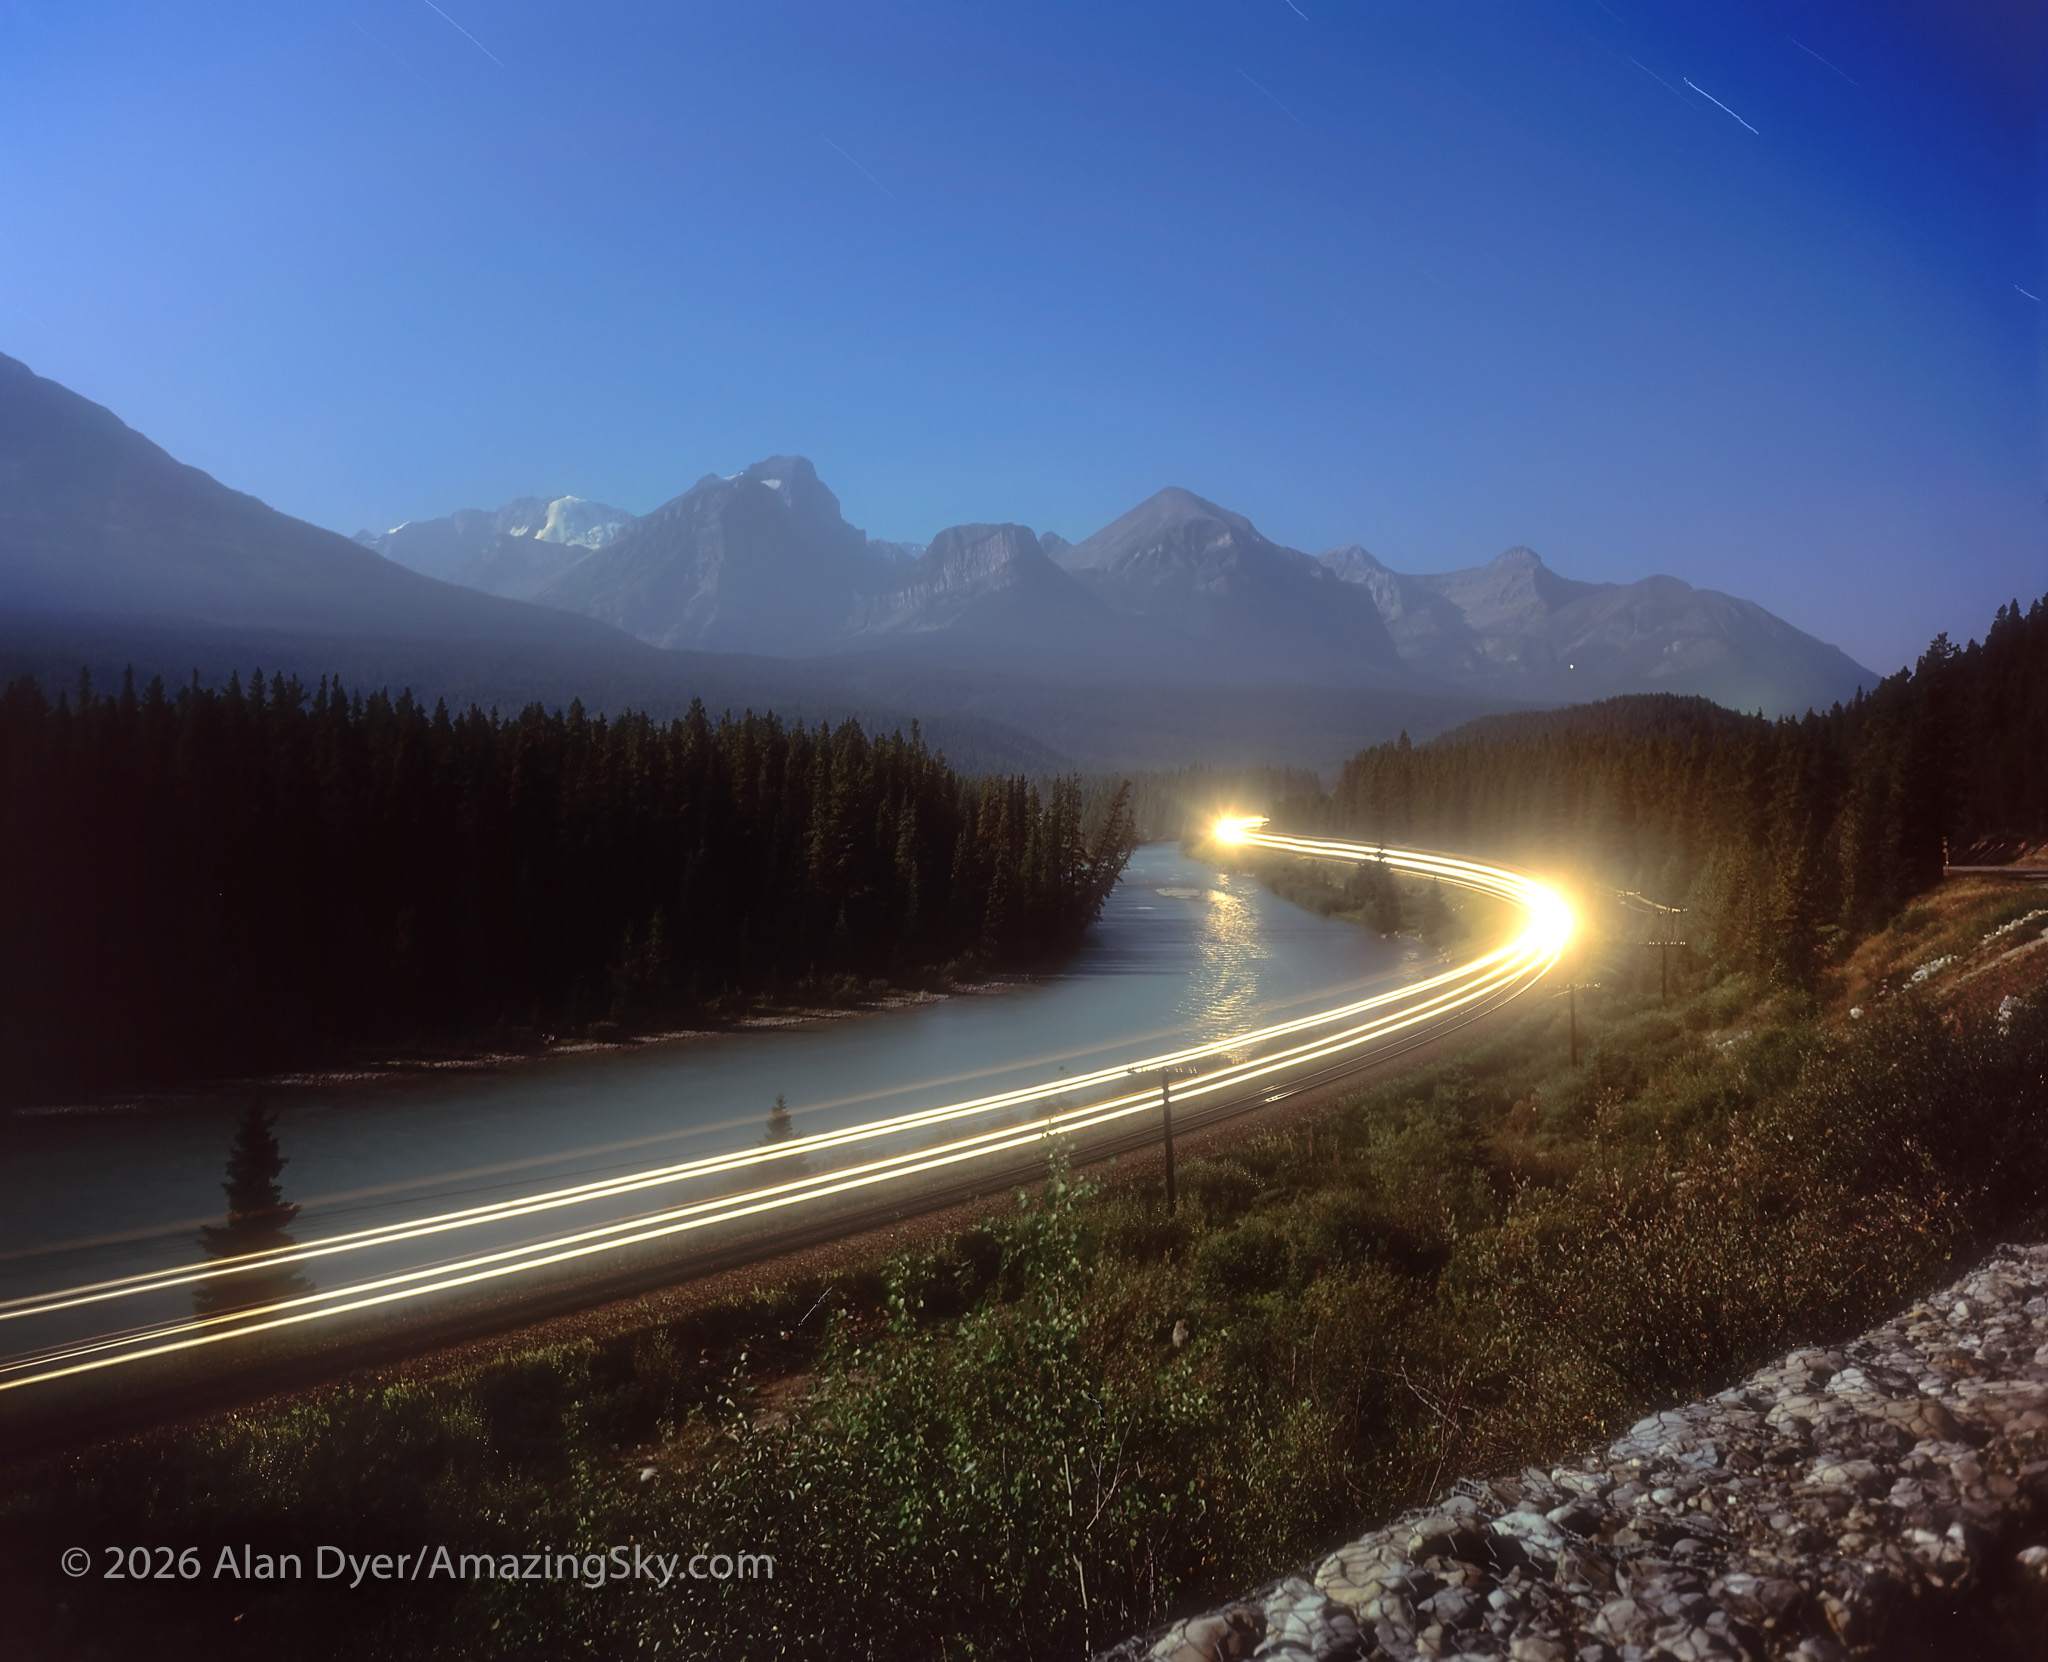
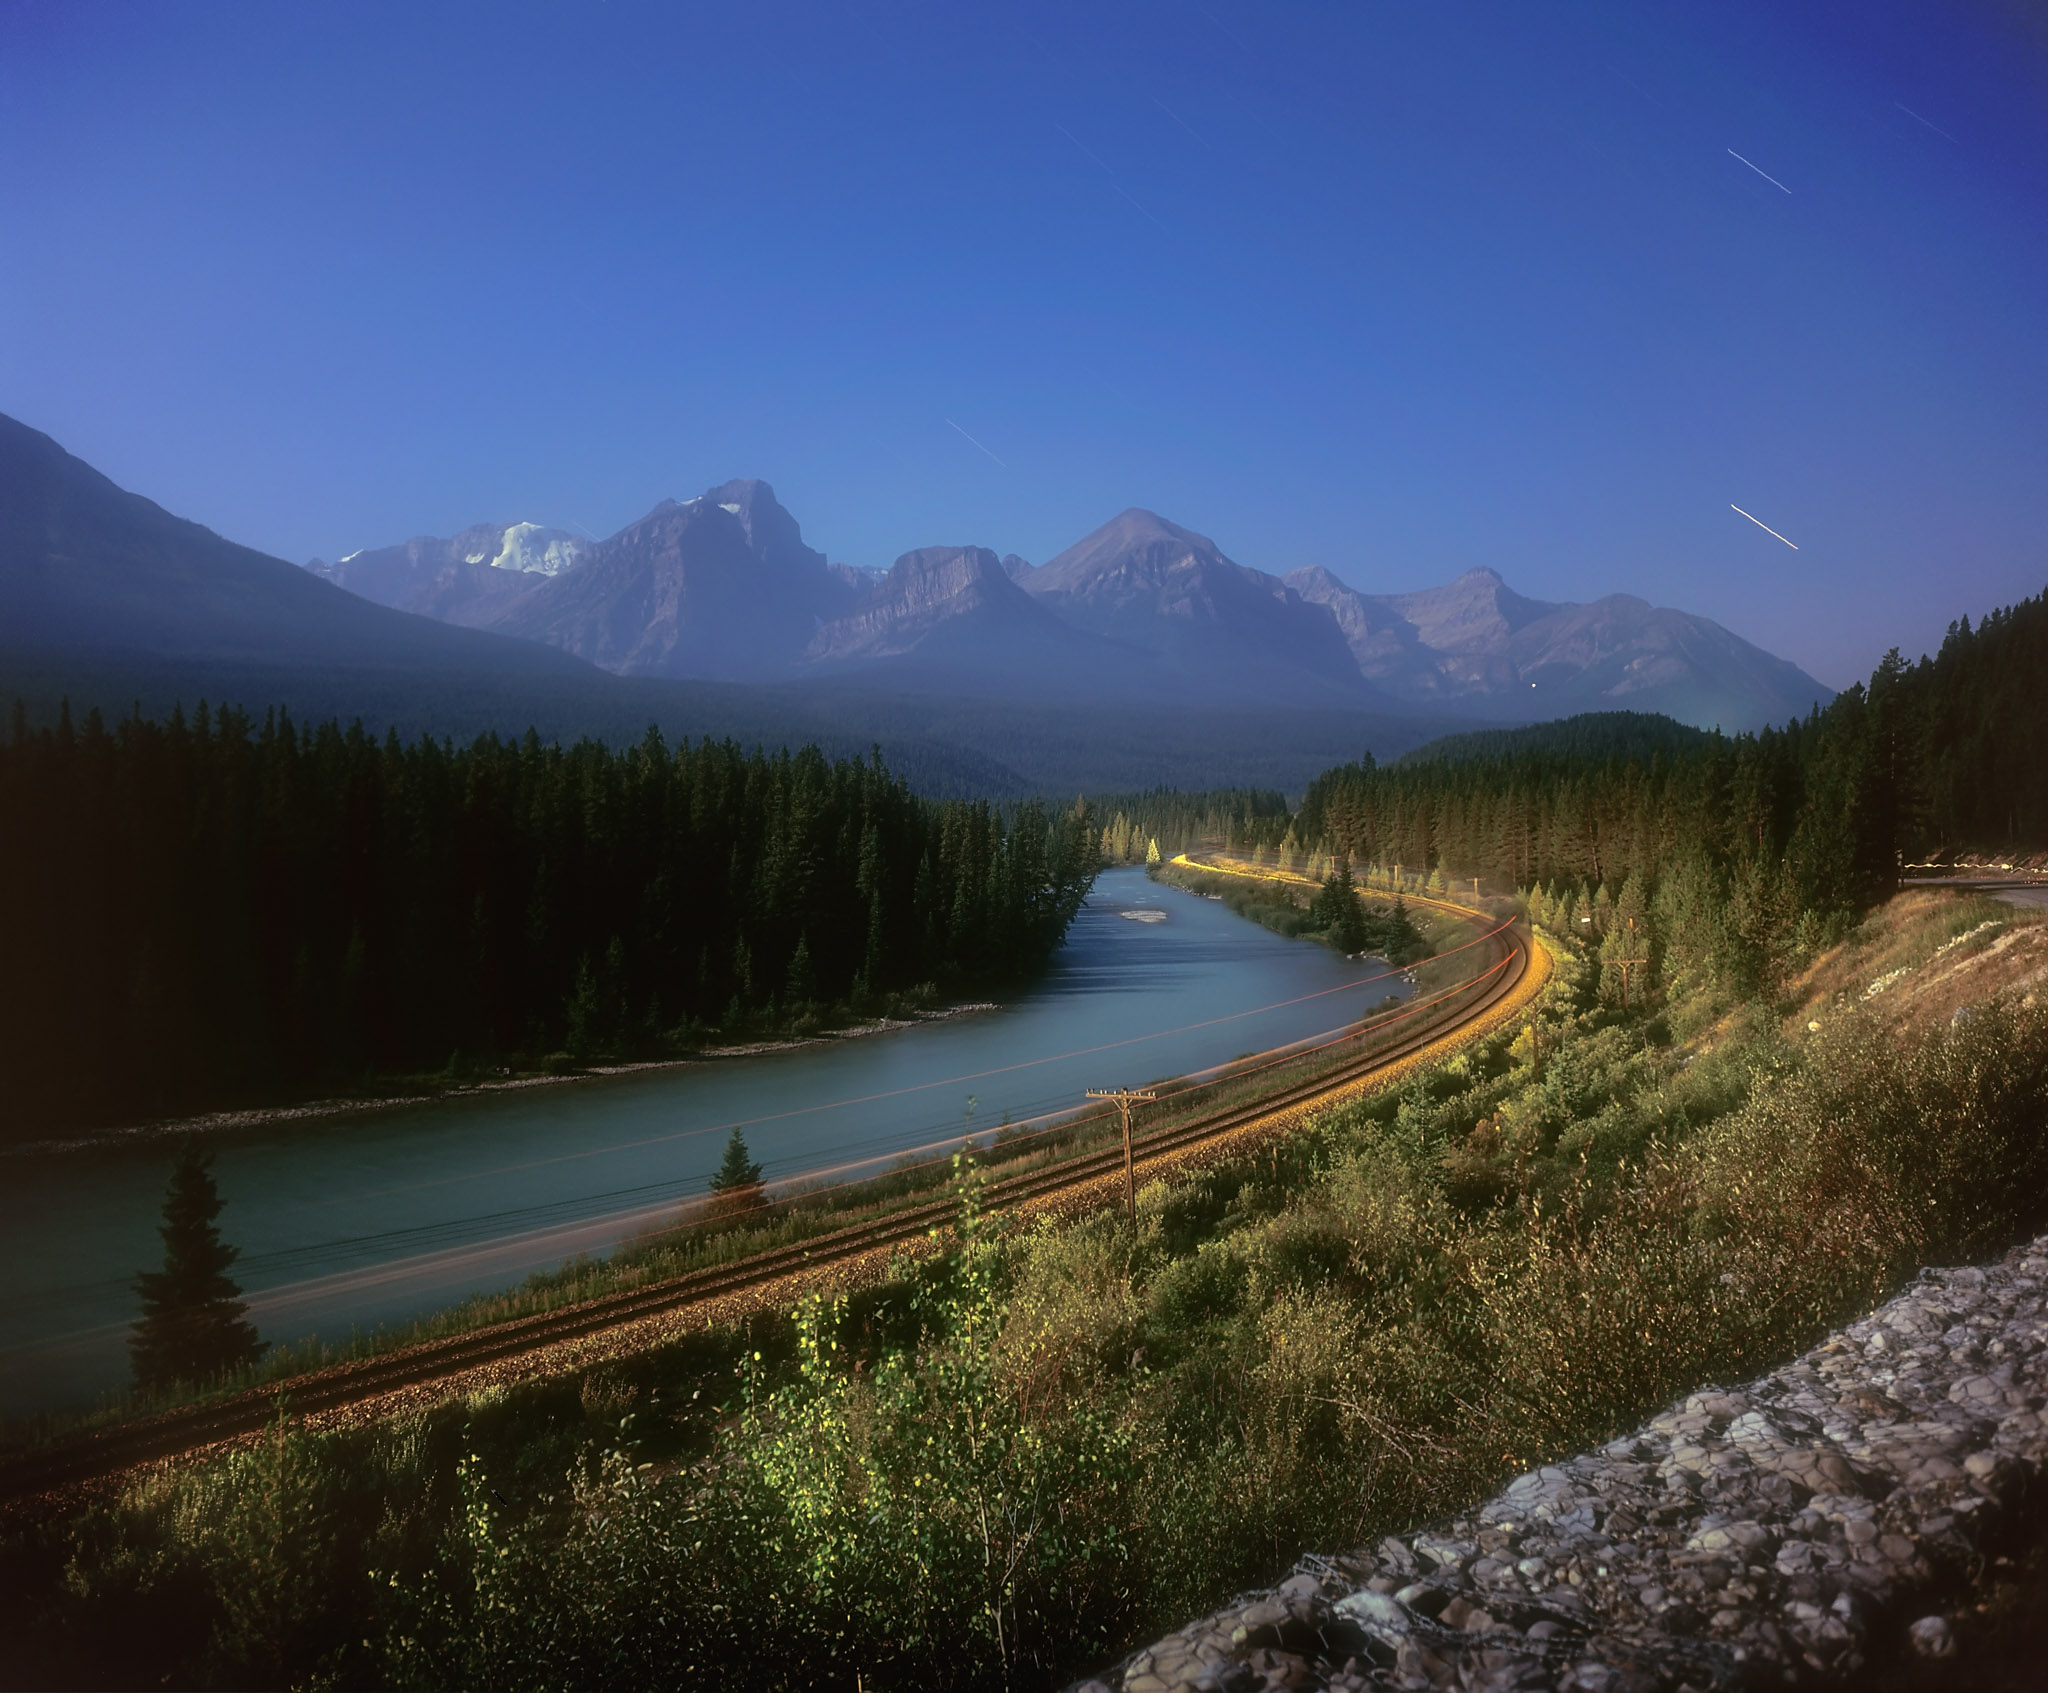
Exposures were strictly from experience. I carried a printed table of exposures with me, with exposure times for what worked at different Moon phases and altitudes, and with various films. Even so, you never knew if you got it right until days later. Of course, you could “bracket,” and shoot for various lengths of time. But in some cases, as below, you had limited time, or one chance, to get the shot.

Again, those are single shots “got right” in the camera, not blends or composites created later at the computer.

While you could take star trails on dark moonless nights, the foreground would simply be a dark silhouette. It would have no detail, and “lifting the shadows” in processing yielded nothing! Film is inherently “non-linear” โ€“ recording twice as many photons does not necessarily yield an image twice as bright.

Indeed, below a certain threshold of incoming photons, such as with landscapes lit only by starlight, film did nothing. The few photons coming in were never enough to excite the silver halide molecules in the emulsion into reacting.

And a property called “reciprocity failure” meant films lost what sensitivity they had over a long exposure time. Exposing longer didn’t necessarily produce a brighter image, and might even result in a discoloured image as the three colour-sensitive layers in the emulsion suffered different levels of reciprocity failure. So long-exposure images might turn green.

Comet Hale-Bopp (C/1995 O1) taken on April 8, 1997 from southern Alberta. With the Plaubel Makina 67, piggybacked on a tracking mount, with Fujichrome 400 slide film, and about a 10 minute exposure at f/4.

But bright subjects worked well, such as of what is still the brightest comet we’ve seen in recent decades, above. But what could we have recorded if we’d had digital sensors!

In-Camera Composites

This is Orion rising due east from latitude of +51ยฐ N โ€“ in a blend of an untracked star trail image and a tracked exposure, shot on film and double exposed in-camera. Taken in November 1997.

Before digital processing, you had to be creative at the camera. The star trail image above is a double exposure on Fujichrome 100 film:

  • an untracked exposure for just over an hour as Orion rose into position with lens stopped down to f/8,
  • then the lens covered for two minutes. With the drive then turned on, I opened the lens to f/2.8 and exposed for about another 10 minutes with the equatorial drive tracking to add deeper pinpoint stars.

But the image has soft focus at the centre due to another annoying property of film โ€“ it could buckle in the camera as it absorbed moisture, despite a pressure plate pressing it down over the film gate. So you could expose for a long time only to have the image spoiled by film warping.

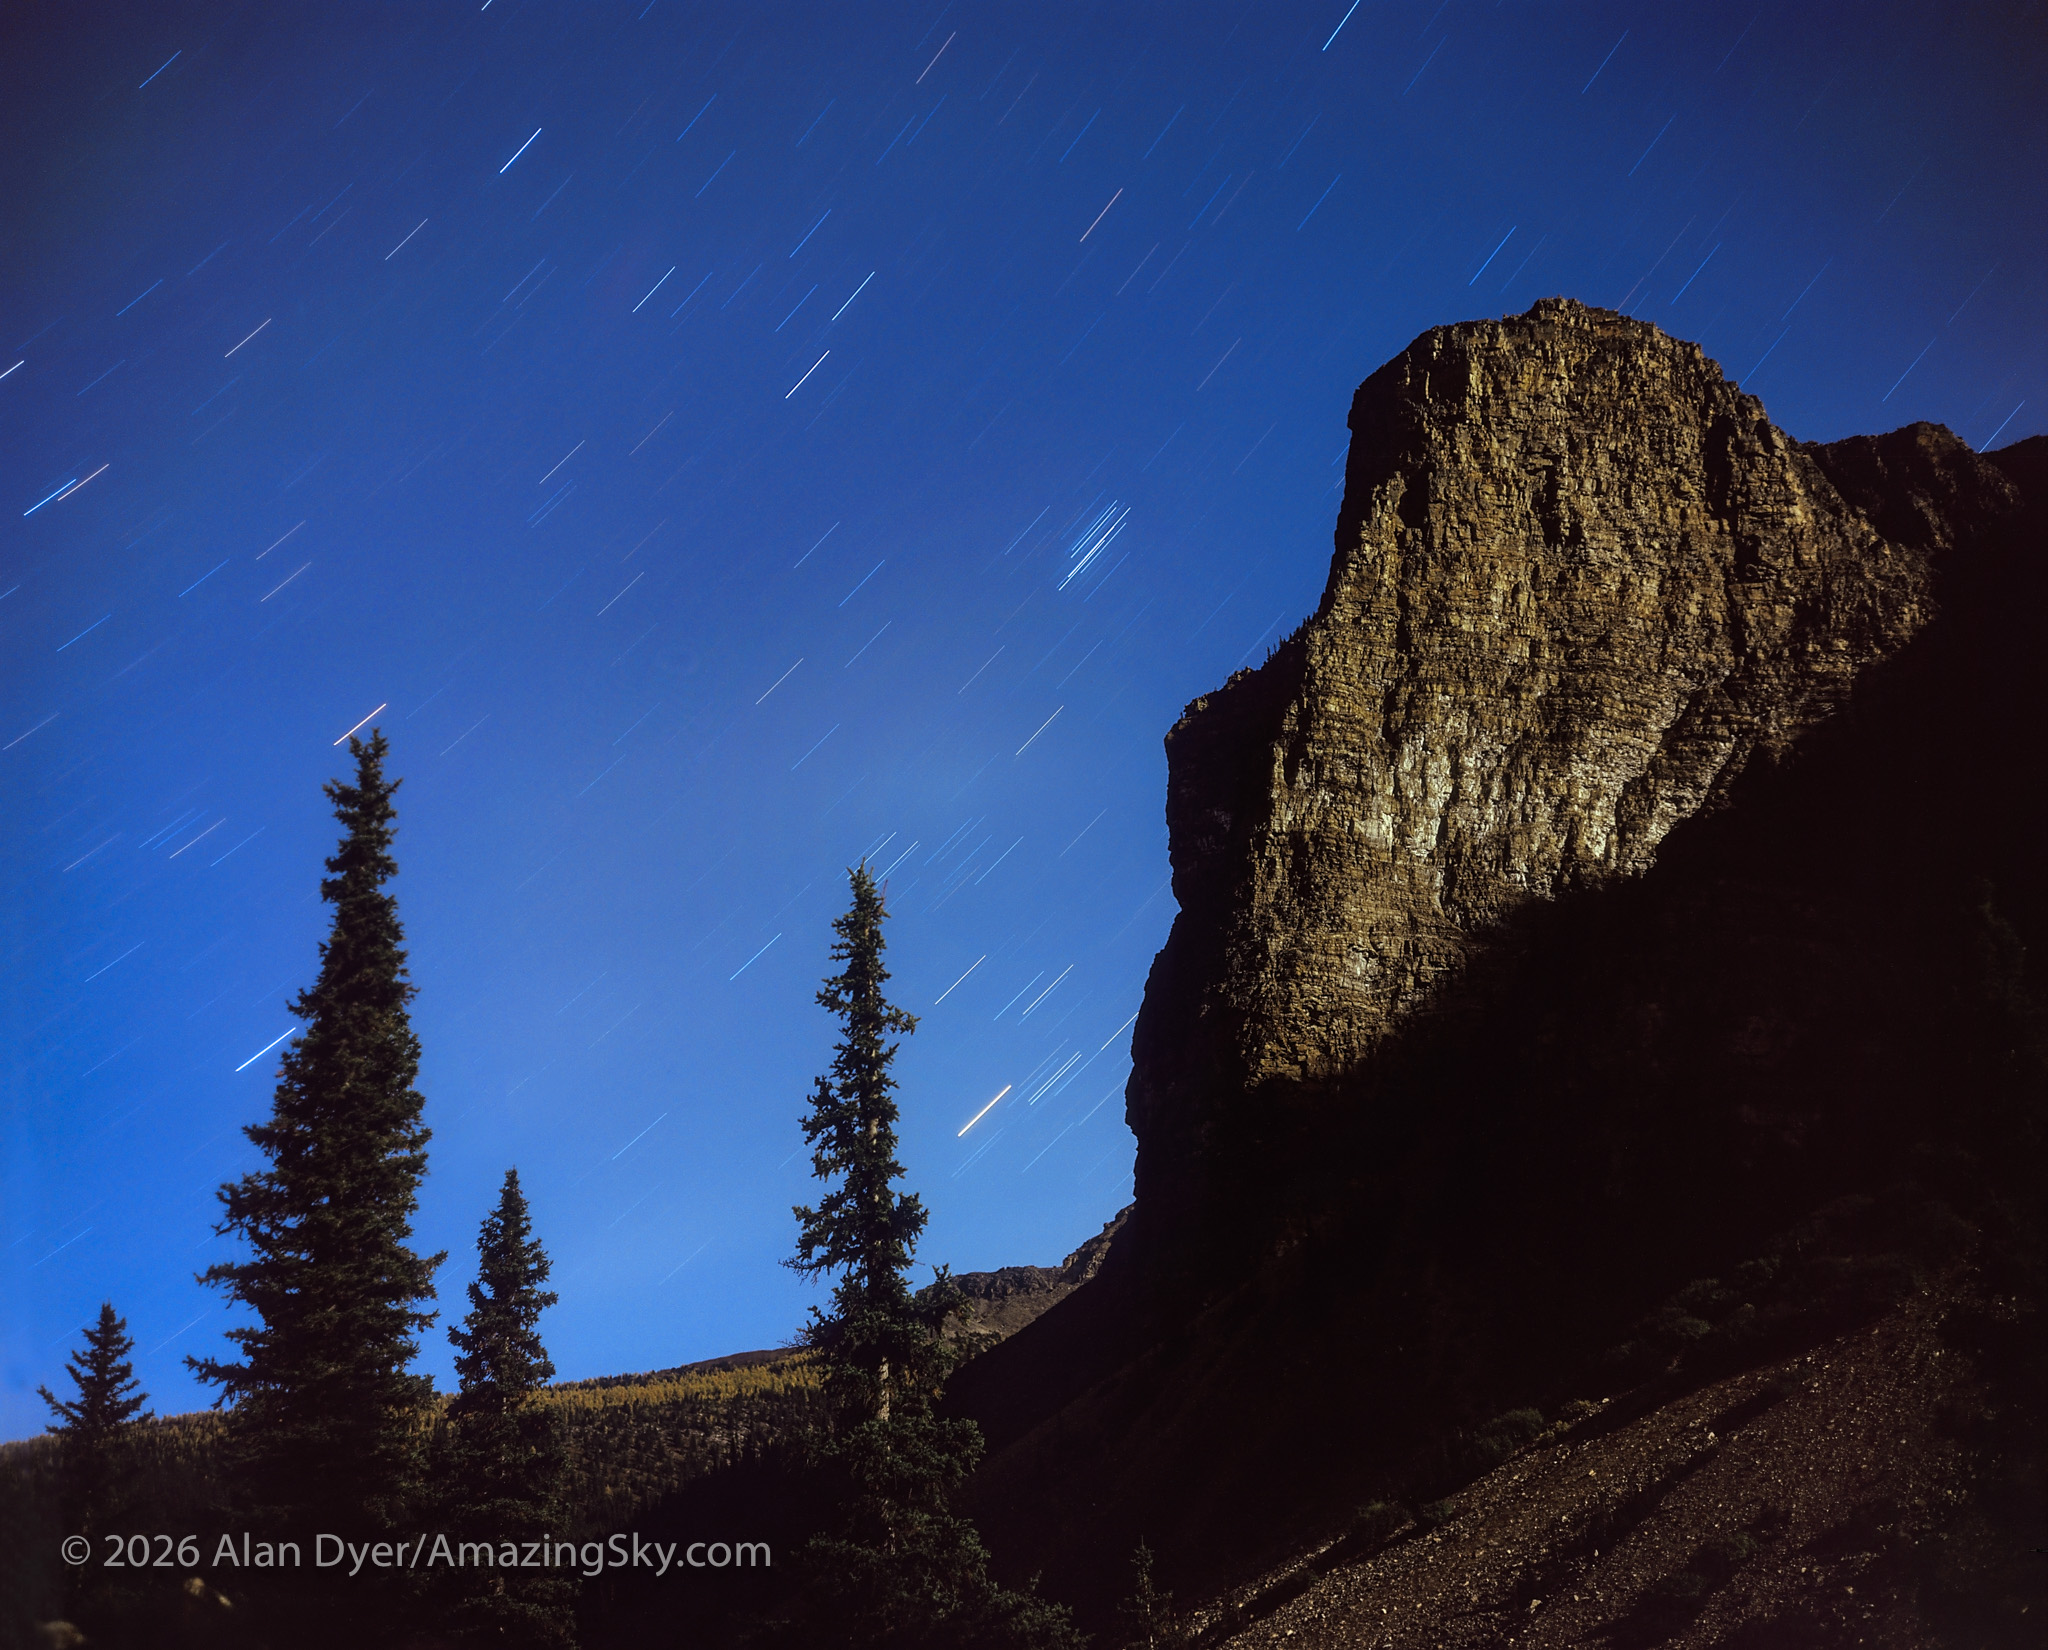
The stars of Taurus rising behind the Tower of Babel at Moraine Lake, Banff. In full moonlight with Plaubel Makina 67 camera, with the 80mm lens at f/5.6 and on Fujichrome Velvia 50 slide film for about 16 minutes.

So shooting on moonlit nights and keeping exposures under 30 minutes usually worked well. But as above and below, even under moonlight, the areas in shadow remained dark and blocked up, with no hope of recovering detail.

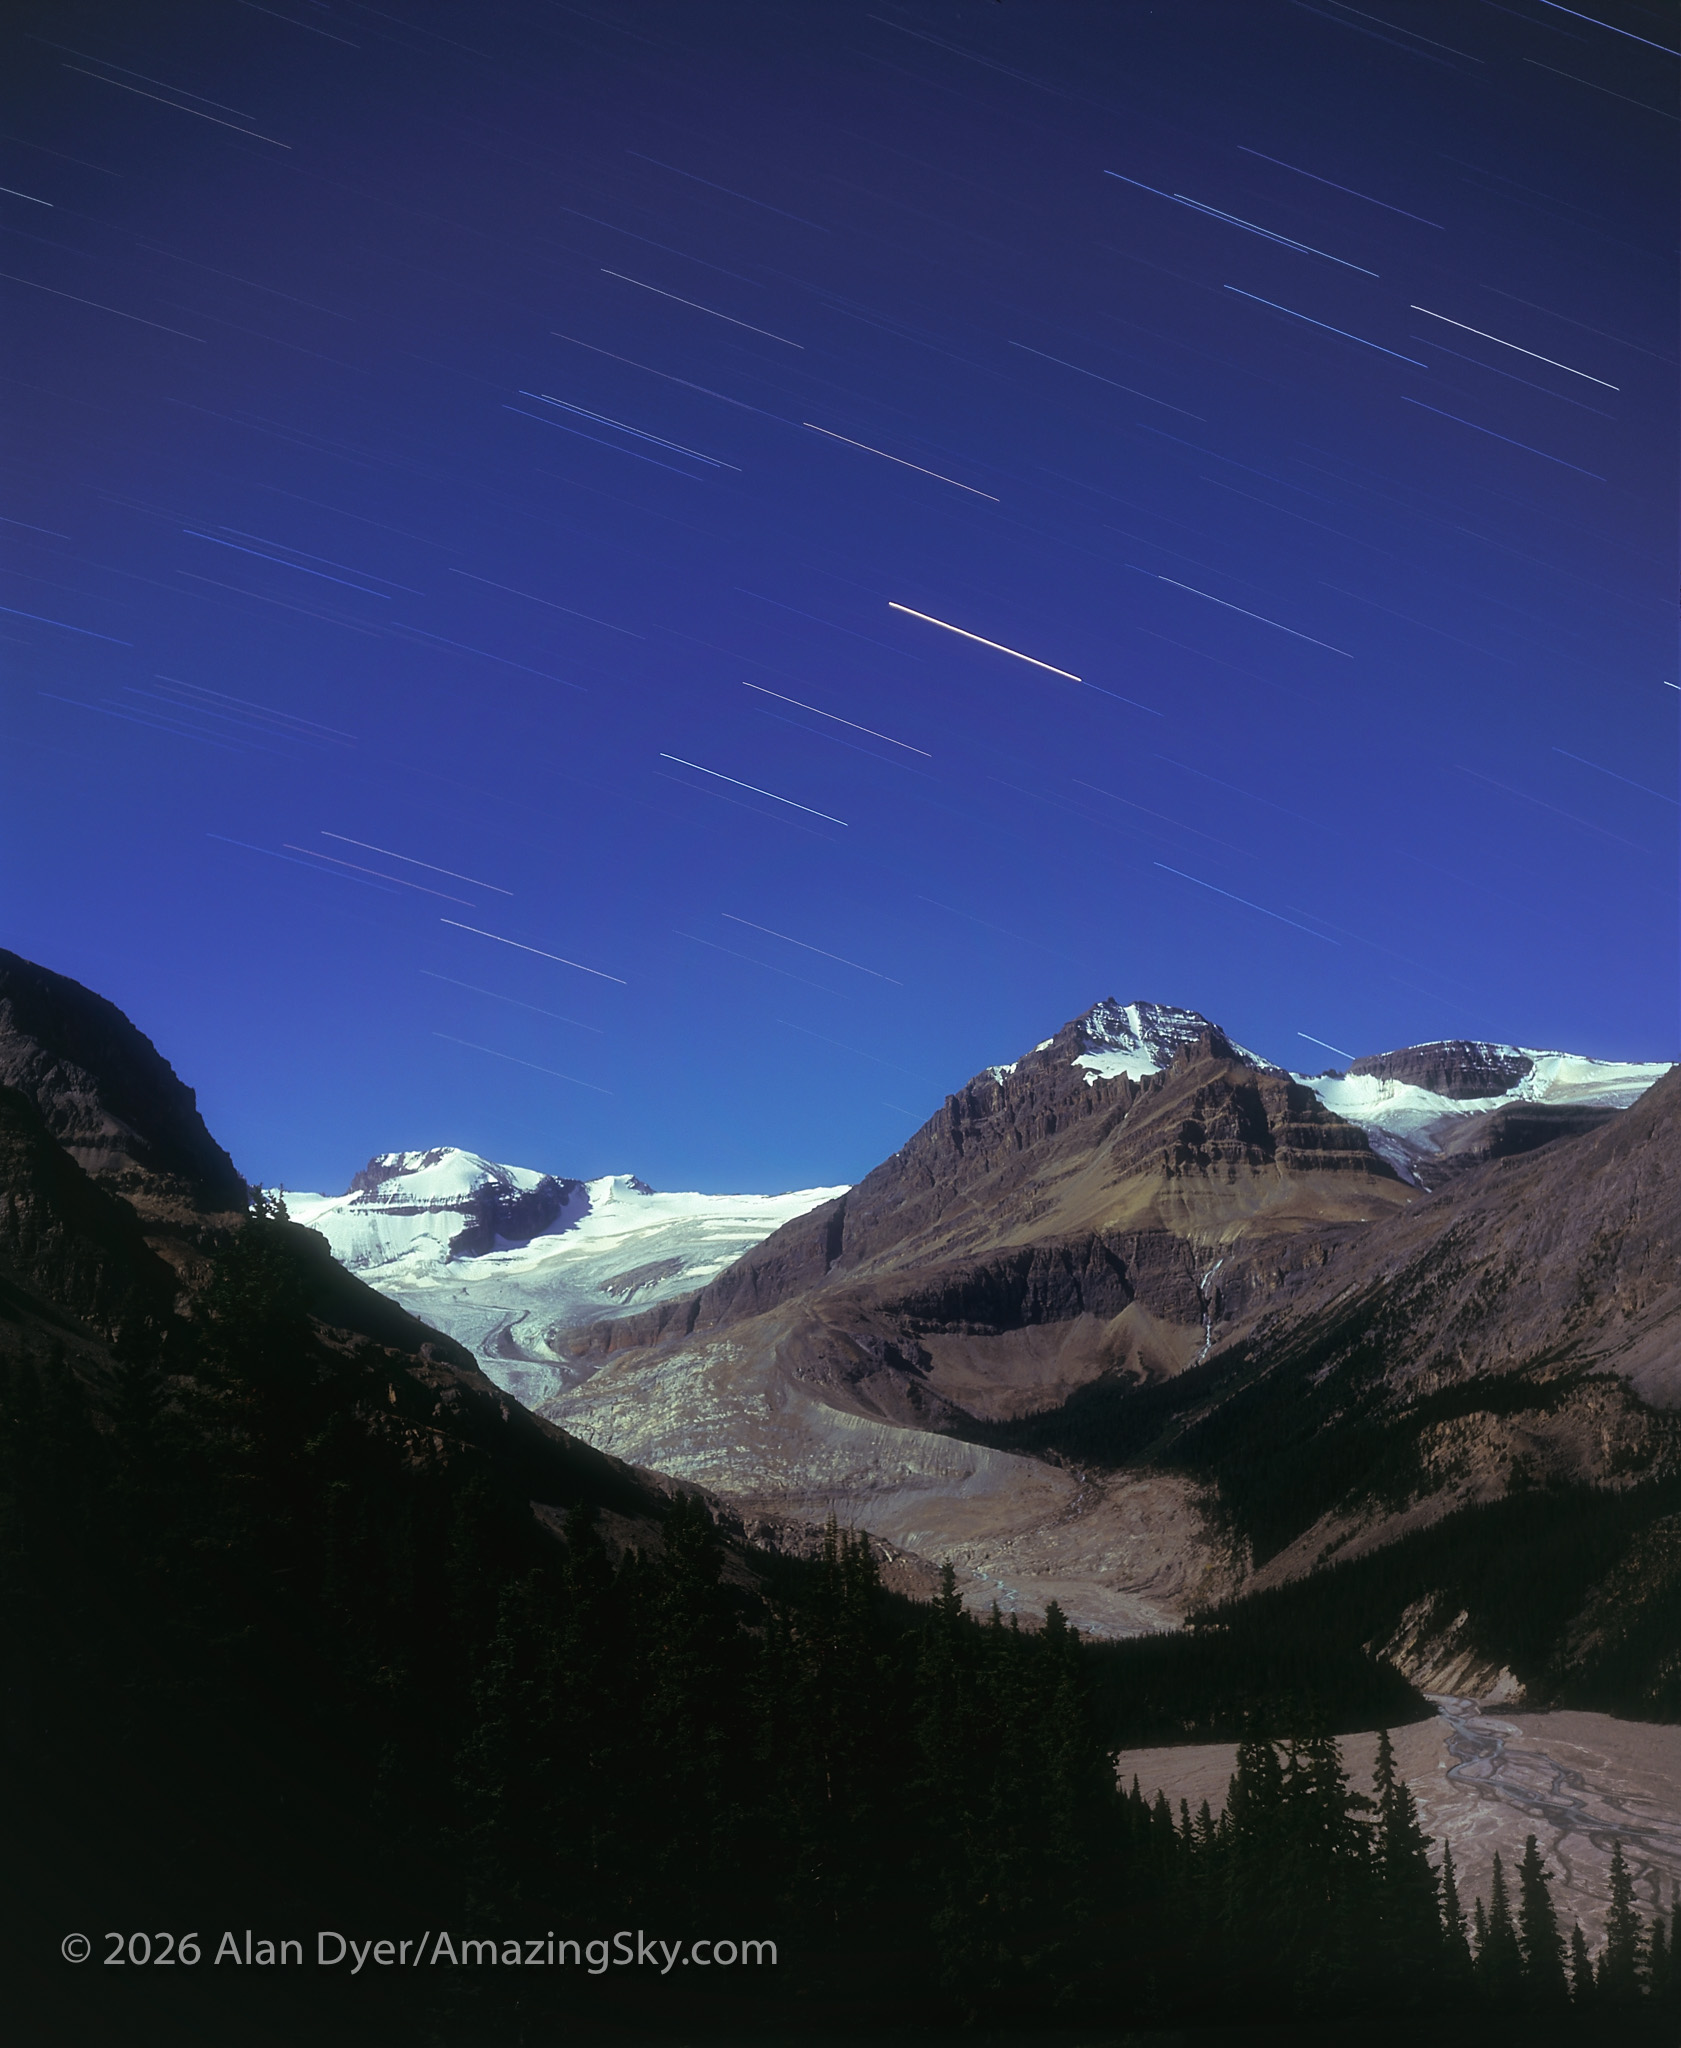
Summer star trails setting over Peyto Glacier taken from Peyto Lake viewpoint in Banff National Park on the Icefiields Parkway. Taken in full moonlight in summer 1997 with the Plaubel Makina 67 camera, with its 80mm lens at f/5.6 and Fujichrome Velvia 50 slide film and a single exposure of about 25 minutes.

Shooting the Milky Way on a moonless night? Forget it! The iconic nightscape image most common today of a detailed Milky Way above a starlit landscape rich in details was, and is, impossible with film. Nightscape photography as we know it really became feasible only with the advent of digital SLR cameras.

Indeed, my first nightscapes in 2004 with my first digital SLR, the Canon 300D โ€“ images which showed a detailed foreground with only starlight providing the illumination โ€“ย ended what had been my decade-long love-affair with medium-format film, and film in general.

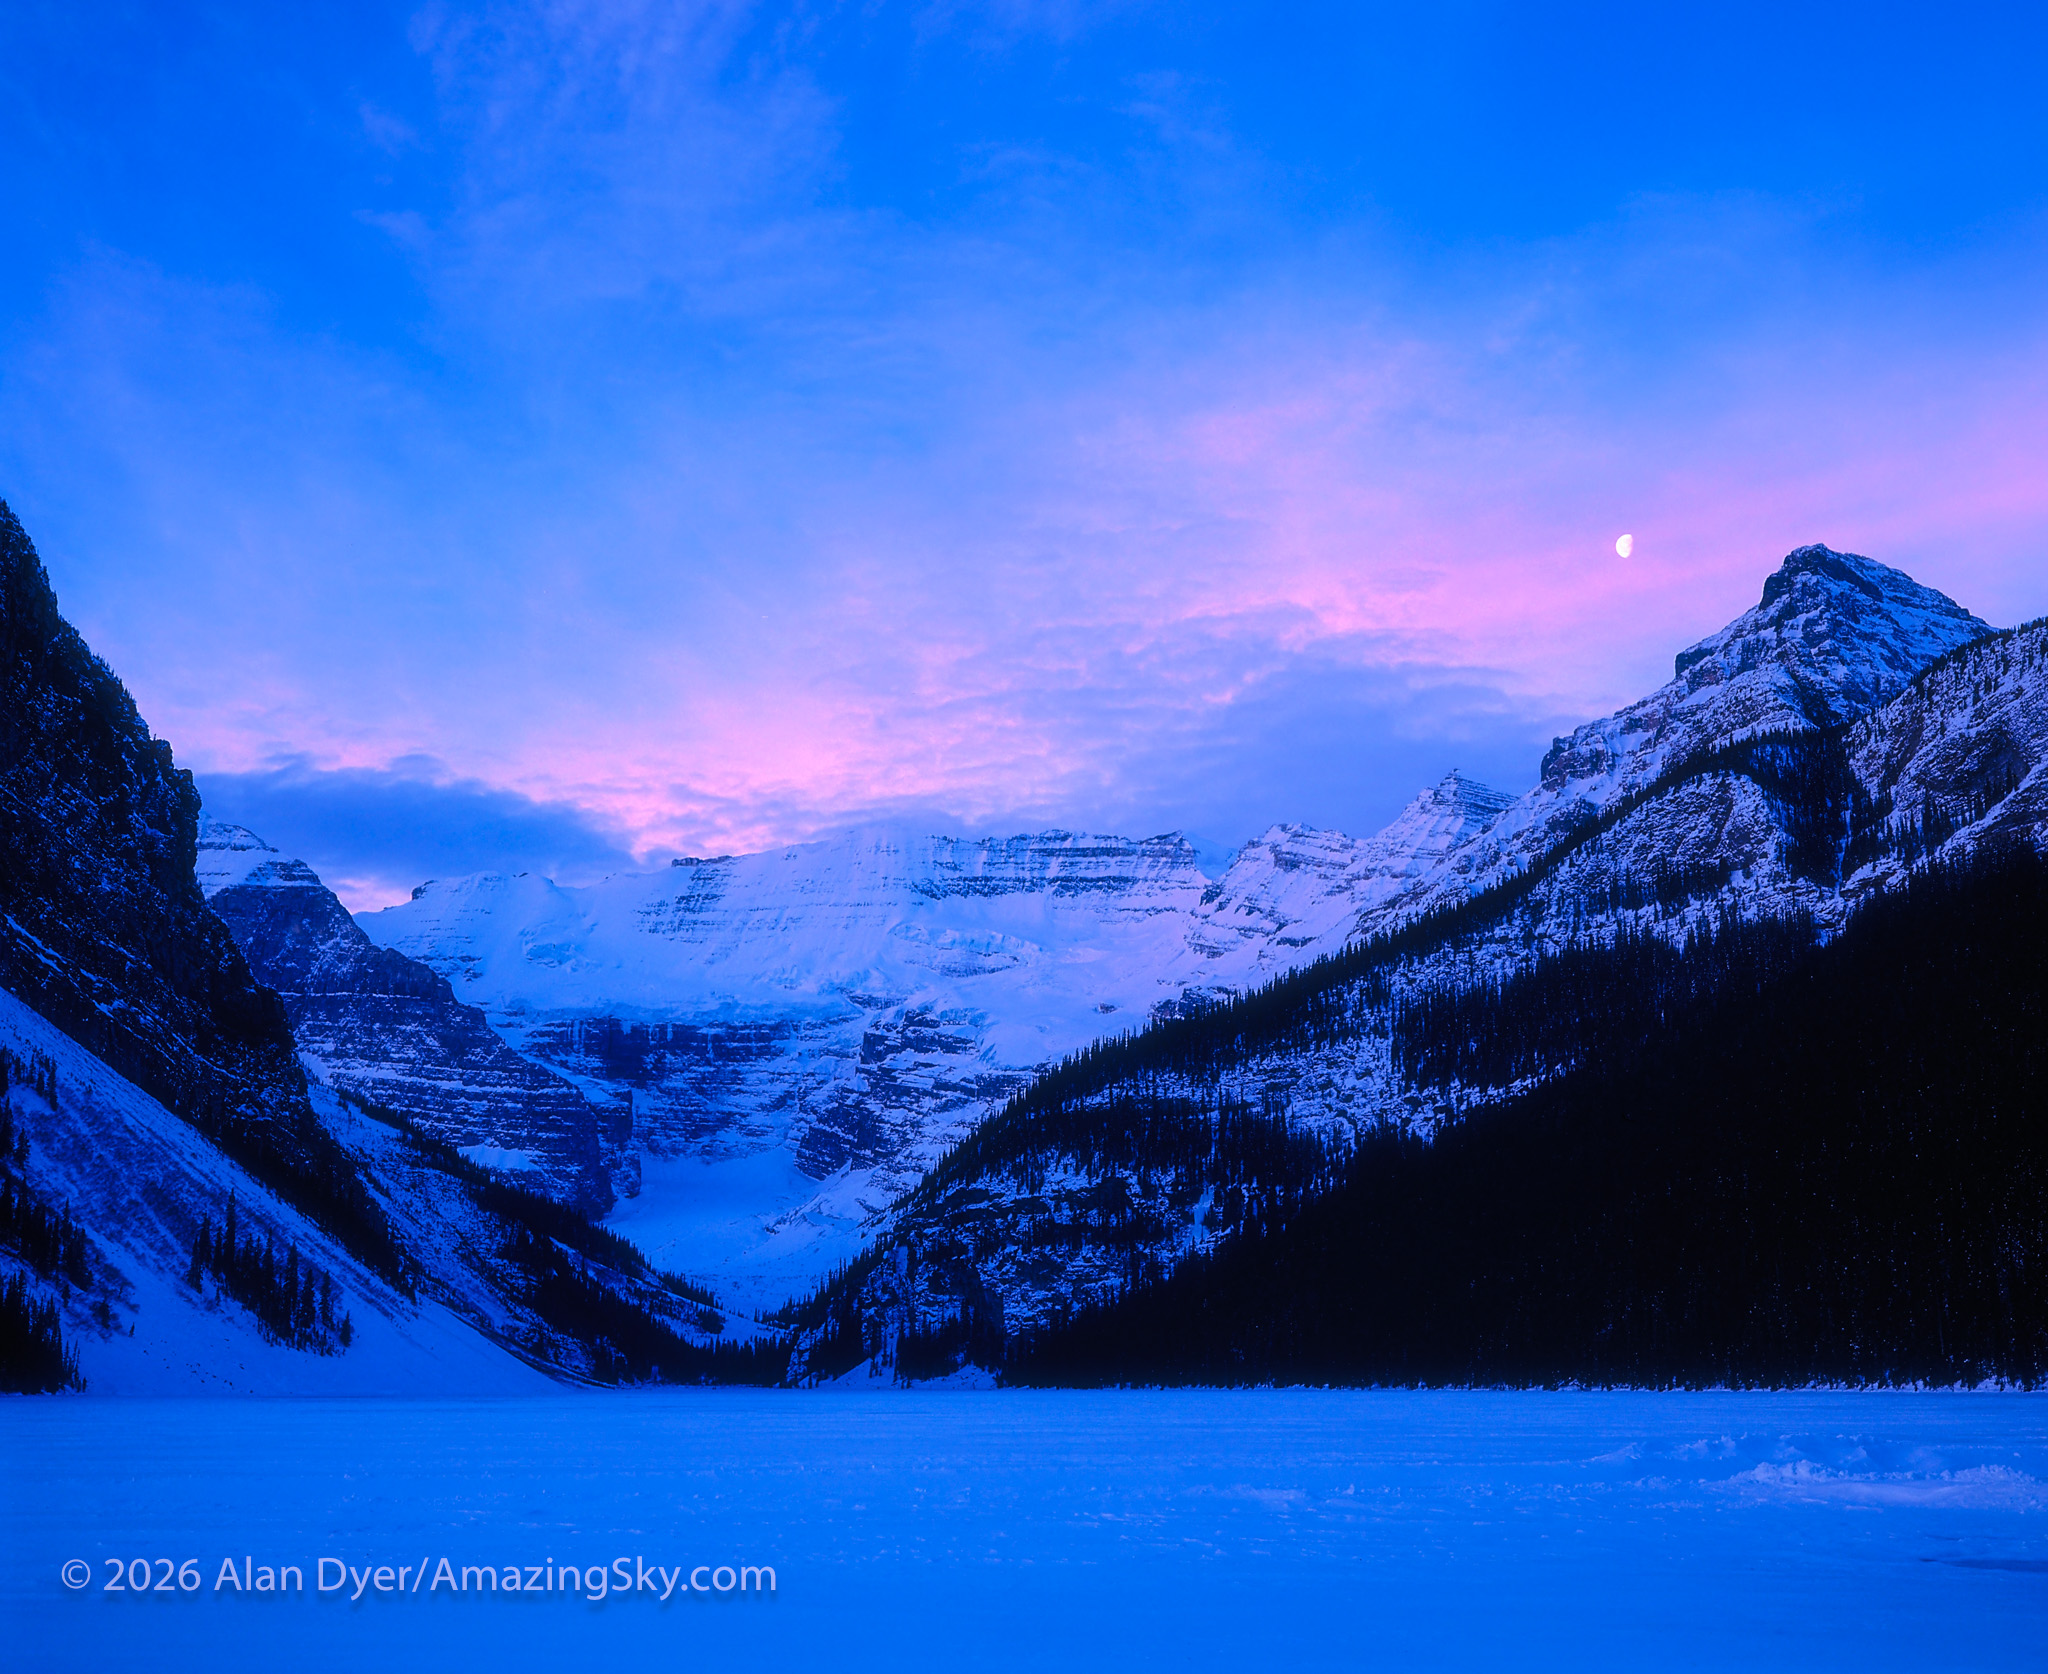
Waning gibbous Moon in the pre-dawn winter sky over Lake Louise. Taken December 1996 with the Plaubel Makina 67 camera on Ektachrome 100 slide film. Exposure metered.

In dusting off the Makina I was tempted to put a roll in it for old time’s sake and shoot some astro with it. Tempted for a few seconds, then I came to my senses. The younger generation are welcome to discover the challenge of shooting film. I’ve been there, done that, and I’m not going back! The drawbacks are just too much for the results.

But a new generation of photographers are welcome to have their fun with film.

โ€“ Alan, April 2026 / amazingsky.com

Testing Wide-Angle Lenses on Nikon Z for Astrophotography


I test a trio of wide-angle, auto-focus lenses for astrophotography, all for Nikon Z mount: the Nikkor 20mm f/1.8 S, the Viltrox 16mm f/1.8, and the Laowa 10mm f/2.8 Zero D.

As a bonus, I also test a fourth lens: the TTArtisan manual-focus 7.5mm f/2 fish-eye.

While the selection of lenses for Nikon Z mirrorless cameras is not as diverse as it is for Sony E-mount, Nikon shooters have more brands of lenses to pick from than do users of Canon R mirrorless cameras. For nightscapes and Milky Way photography we want fast, wide-angle lenses, usually in the 14mm to 24mm range. 

Canon, Nikon, and Sony all have excellent zoom lenses that cover the range. I use Canonโ€™s RF 15-35mm L lens a lot, and reviewed it here on my blog from 2022.

But all these wide-angle zooms are f/2.8. While thatโ€™s a good speed for most astro work, having an even faster lens can be valuable. An aperture of f/2 or faster allows for:

โ€” Shorter exposures for untrailed stars when shooting just on a tripod with no tracker.

โ€” Capturing fainter and more numerous meteors during a shower.

โ€” Rapid-cadence time-lapses of auroras, freezing the motions of curtains.

โ€” Real-time movies of auroras and satellite passages at lower, less noisy ISO settings. 

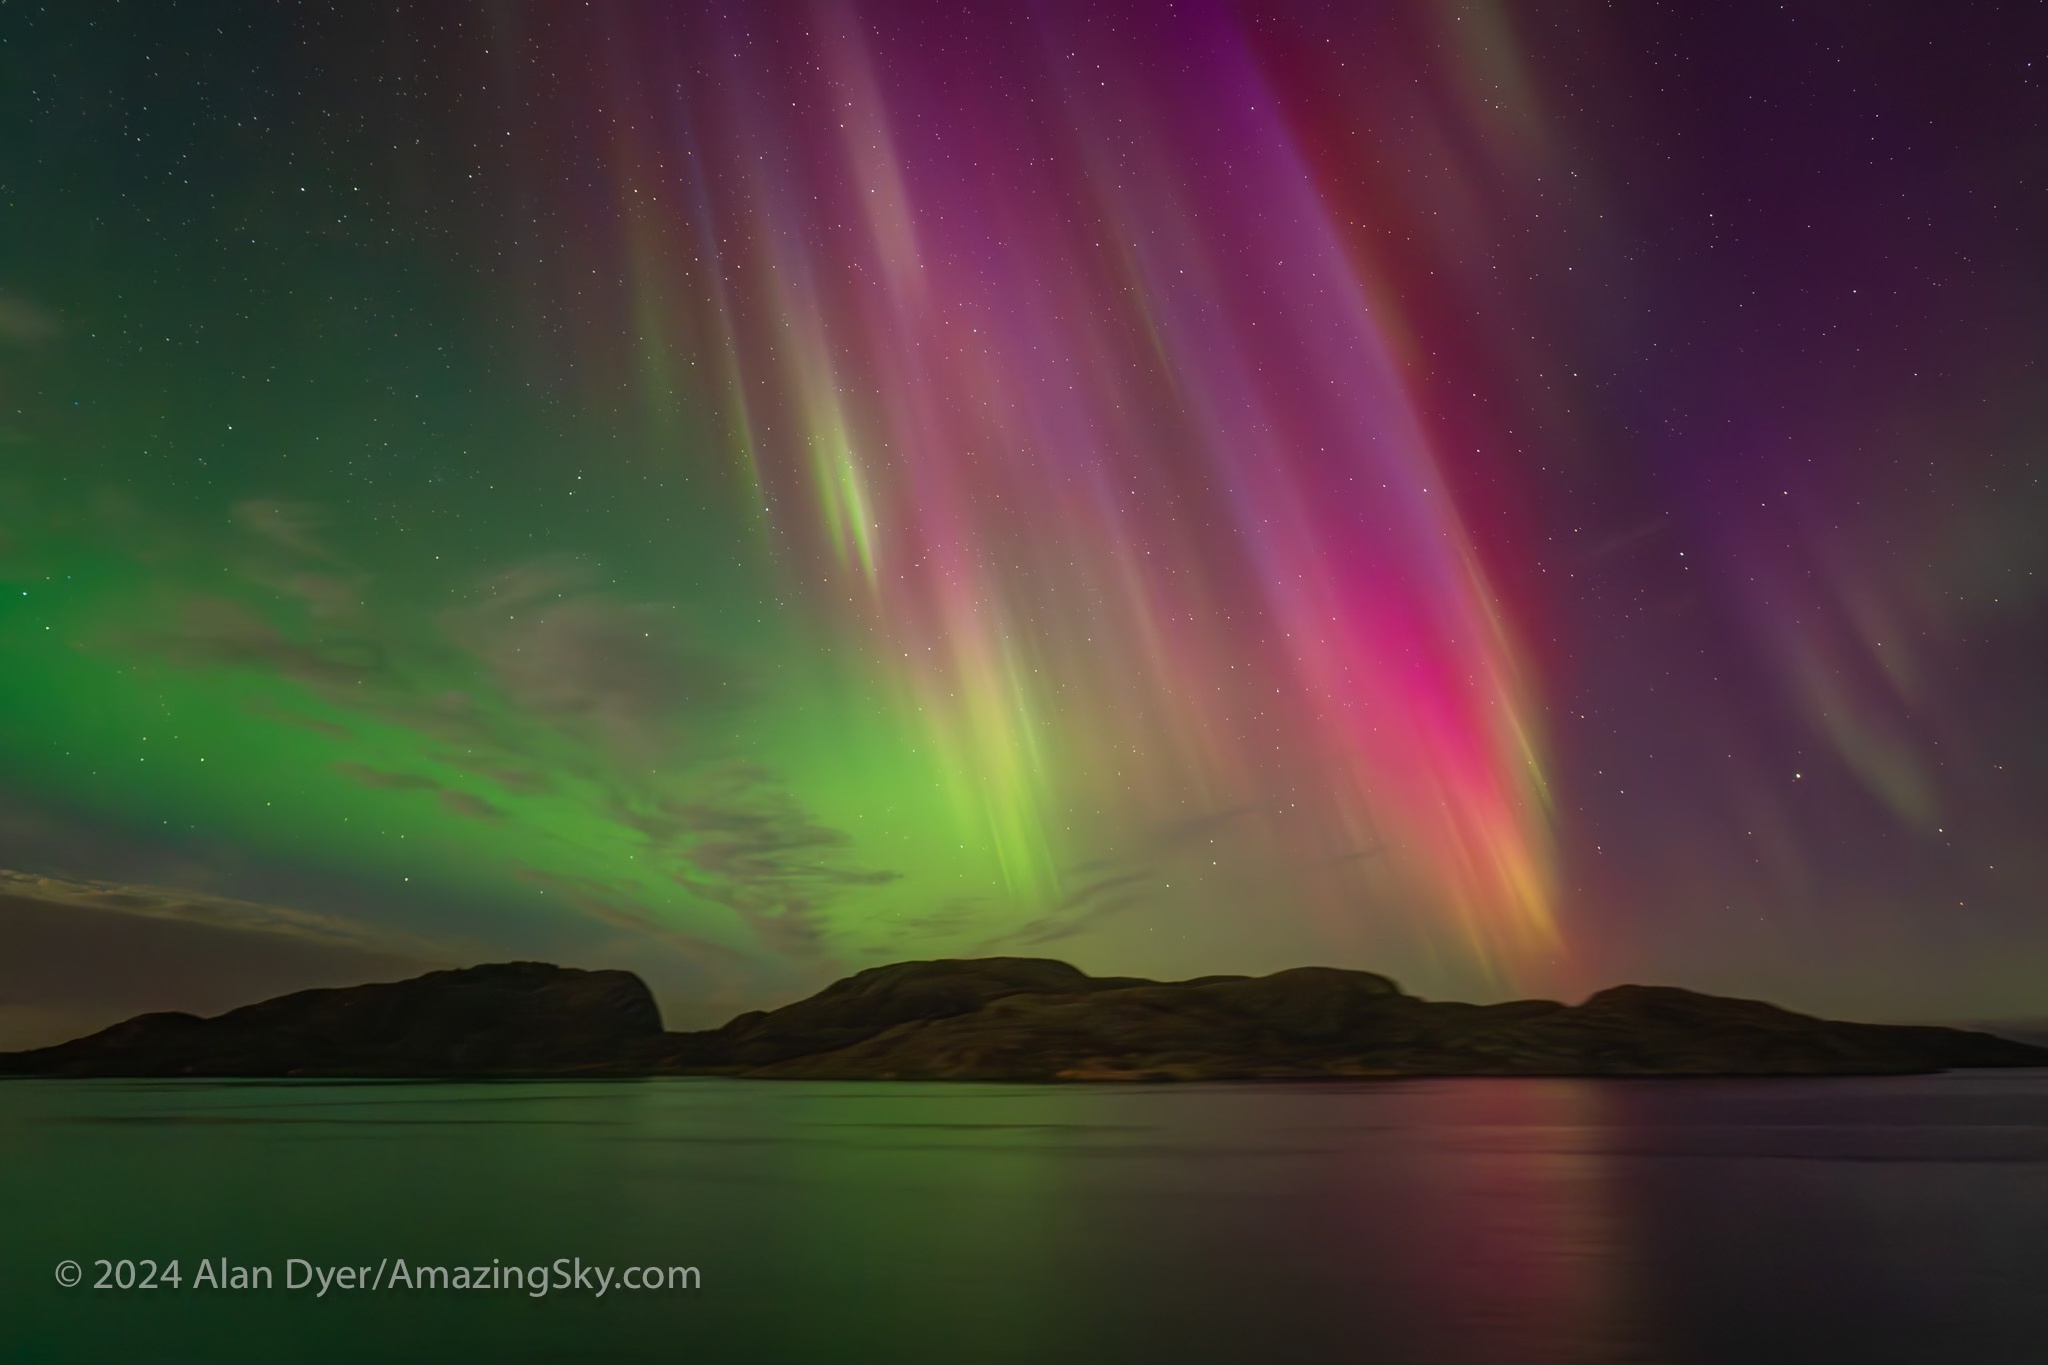
The Nikkor 20mm at f/1.8 allowed a short 1.3-second exposure for capturing the aurora from a ship off the coast of Norway, to minimize ship motion trailing the stars.

Also, stopping those faster lenses down to f/2.8 can sometimes yield better image quality than shooting with a native f/2.8 lens wide open. 

Canon and Sony each have fast f/2 zooms that cover the range from 28mm to 70mm. While those focal lengths can be useful, both lenses are expensive and heavy. And they are still not wide enough for many astro subjects. For fast lenses with even shorter focal lengths we need to turn to โ€œprimeโ€ lenses, ones with fixed focal lengths. 

As of this writing Canon has few fast, wide primes for their RF lens mount (their new 24mm f/1.4 VCM is a costly choice designed primarily for video use). A few third-party lens makers offer fast (f/2 or faster) primes for Canon full-frame cameras, always as manual focus lenses. For example, Laowa has a 15mm f/2, and TTArtisan has a 21mm f/1.5. 

Yes, Sigma now offers auto-focus 16mm and 23mm f/1.4 primes, and Samyang has a new 12mm f/2, but they are only for Canon RF-S cropped-frame cameras. Canon has yet to allow other companies to produce auto-focus lenses for their full-frame cameras. 

Nikon has been restrictive as well. Sigma’s much-lauded Art series that includes the 14mm rectilinear (i.e. the horizon remains straight) and 15mm fish-eye (with a curved horizon), both f/1.4 and aimed at astrophotographers, are not offered for Nikon or Canon, only for Sony E-mount and Panasonic/Leica L-mount cameras. 

However, while Sigma lenses are missing, there is a wider choice of third-party lenses for Nikon Z-mount compared to Canon RF, plus Nikon itself makes a very fine 20mm prime in their premium S-series. 

Thatโ€™s what I test here โ€” three wide-angle rectilinear primes for Nikon Z: A 20mm Nikkor, and two third-party primes: one from Viltrox, their 16mm; and one from Laowa, their new 10mm.

As a bonus, I add in a test of a fast fish-eye lens, from TTArtisan, their 7.5mm f/2. 

Prices are from B&H Photo, but will vary with sales and special promotions.


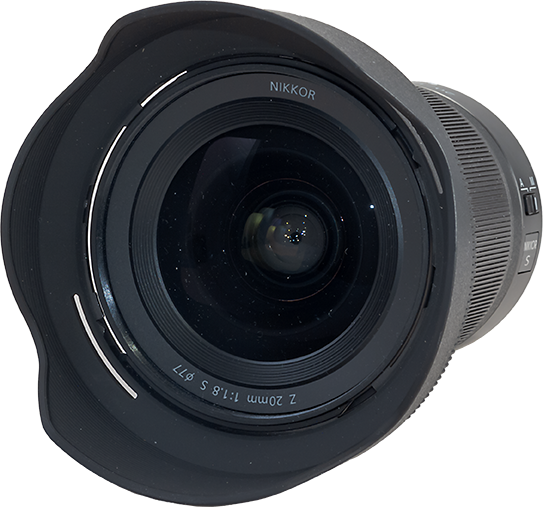
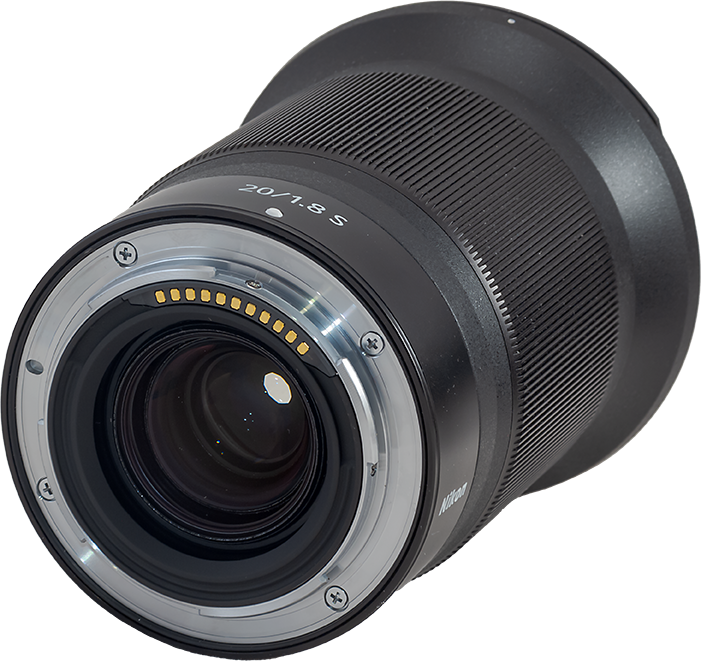
The Nikkor 20mm S-Line Lens ($1,050)

I shot the northern summer Milky Way (below) with the three rectilinear wide-angle lenses (meaning these are not fish-eyes) with the camera on a star tracker, to prevent star trailing. The tracker was the Move-Shoot-Move Nomad, reviewed here on my blog.

The Nikon Z6III and 20mm Nikkor on the MSM Nomad tracker.

I shot with Nikon’s new Z6III, a 24-megapixel full-frame camera I reviewed in the December 2024 issue of Sky & Telescope magazine. It offers a number of excellent features for nightscape photography. Most notably, auto-focus lenses zip to the infinity focus point automatically when the camera is turned on, something I wish Canon cameras would do. 

The Nikkor 20mm has a field of view along the long dimension of 84ยฐ.

The Nikkor 20mm is the widest prime lens in Nikonโ€™s premium S-Line series. It offers what I consider to be an ideal focal length for most nightscape and wide-field Milky Way images. 

While a 14mm lens is often thought of as the default nightscape lens, a 20mm presents less distortion (objects leaning in or stretched out at the corners) and a more natural perspective. Plus the lens can be made faster (in this case f/1.8), smaller, and not cost as much as an ultra-fast 14mm like the Sigma f/1.4 Art lens. 

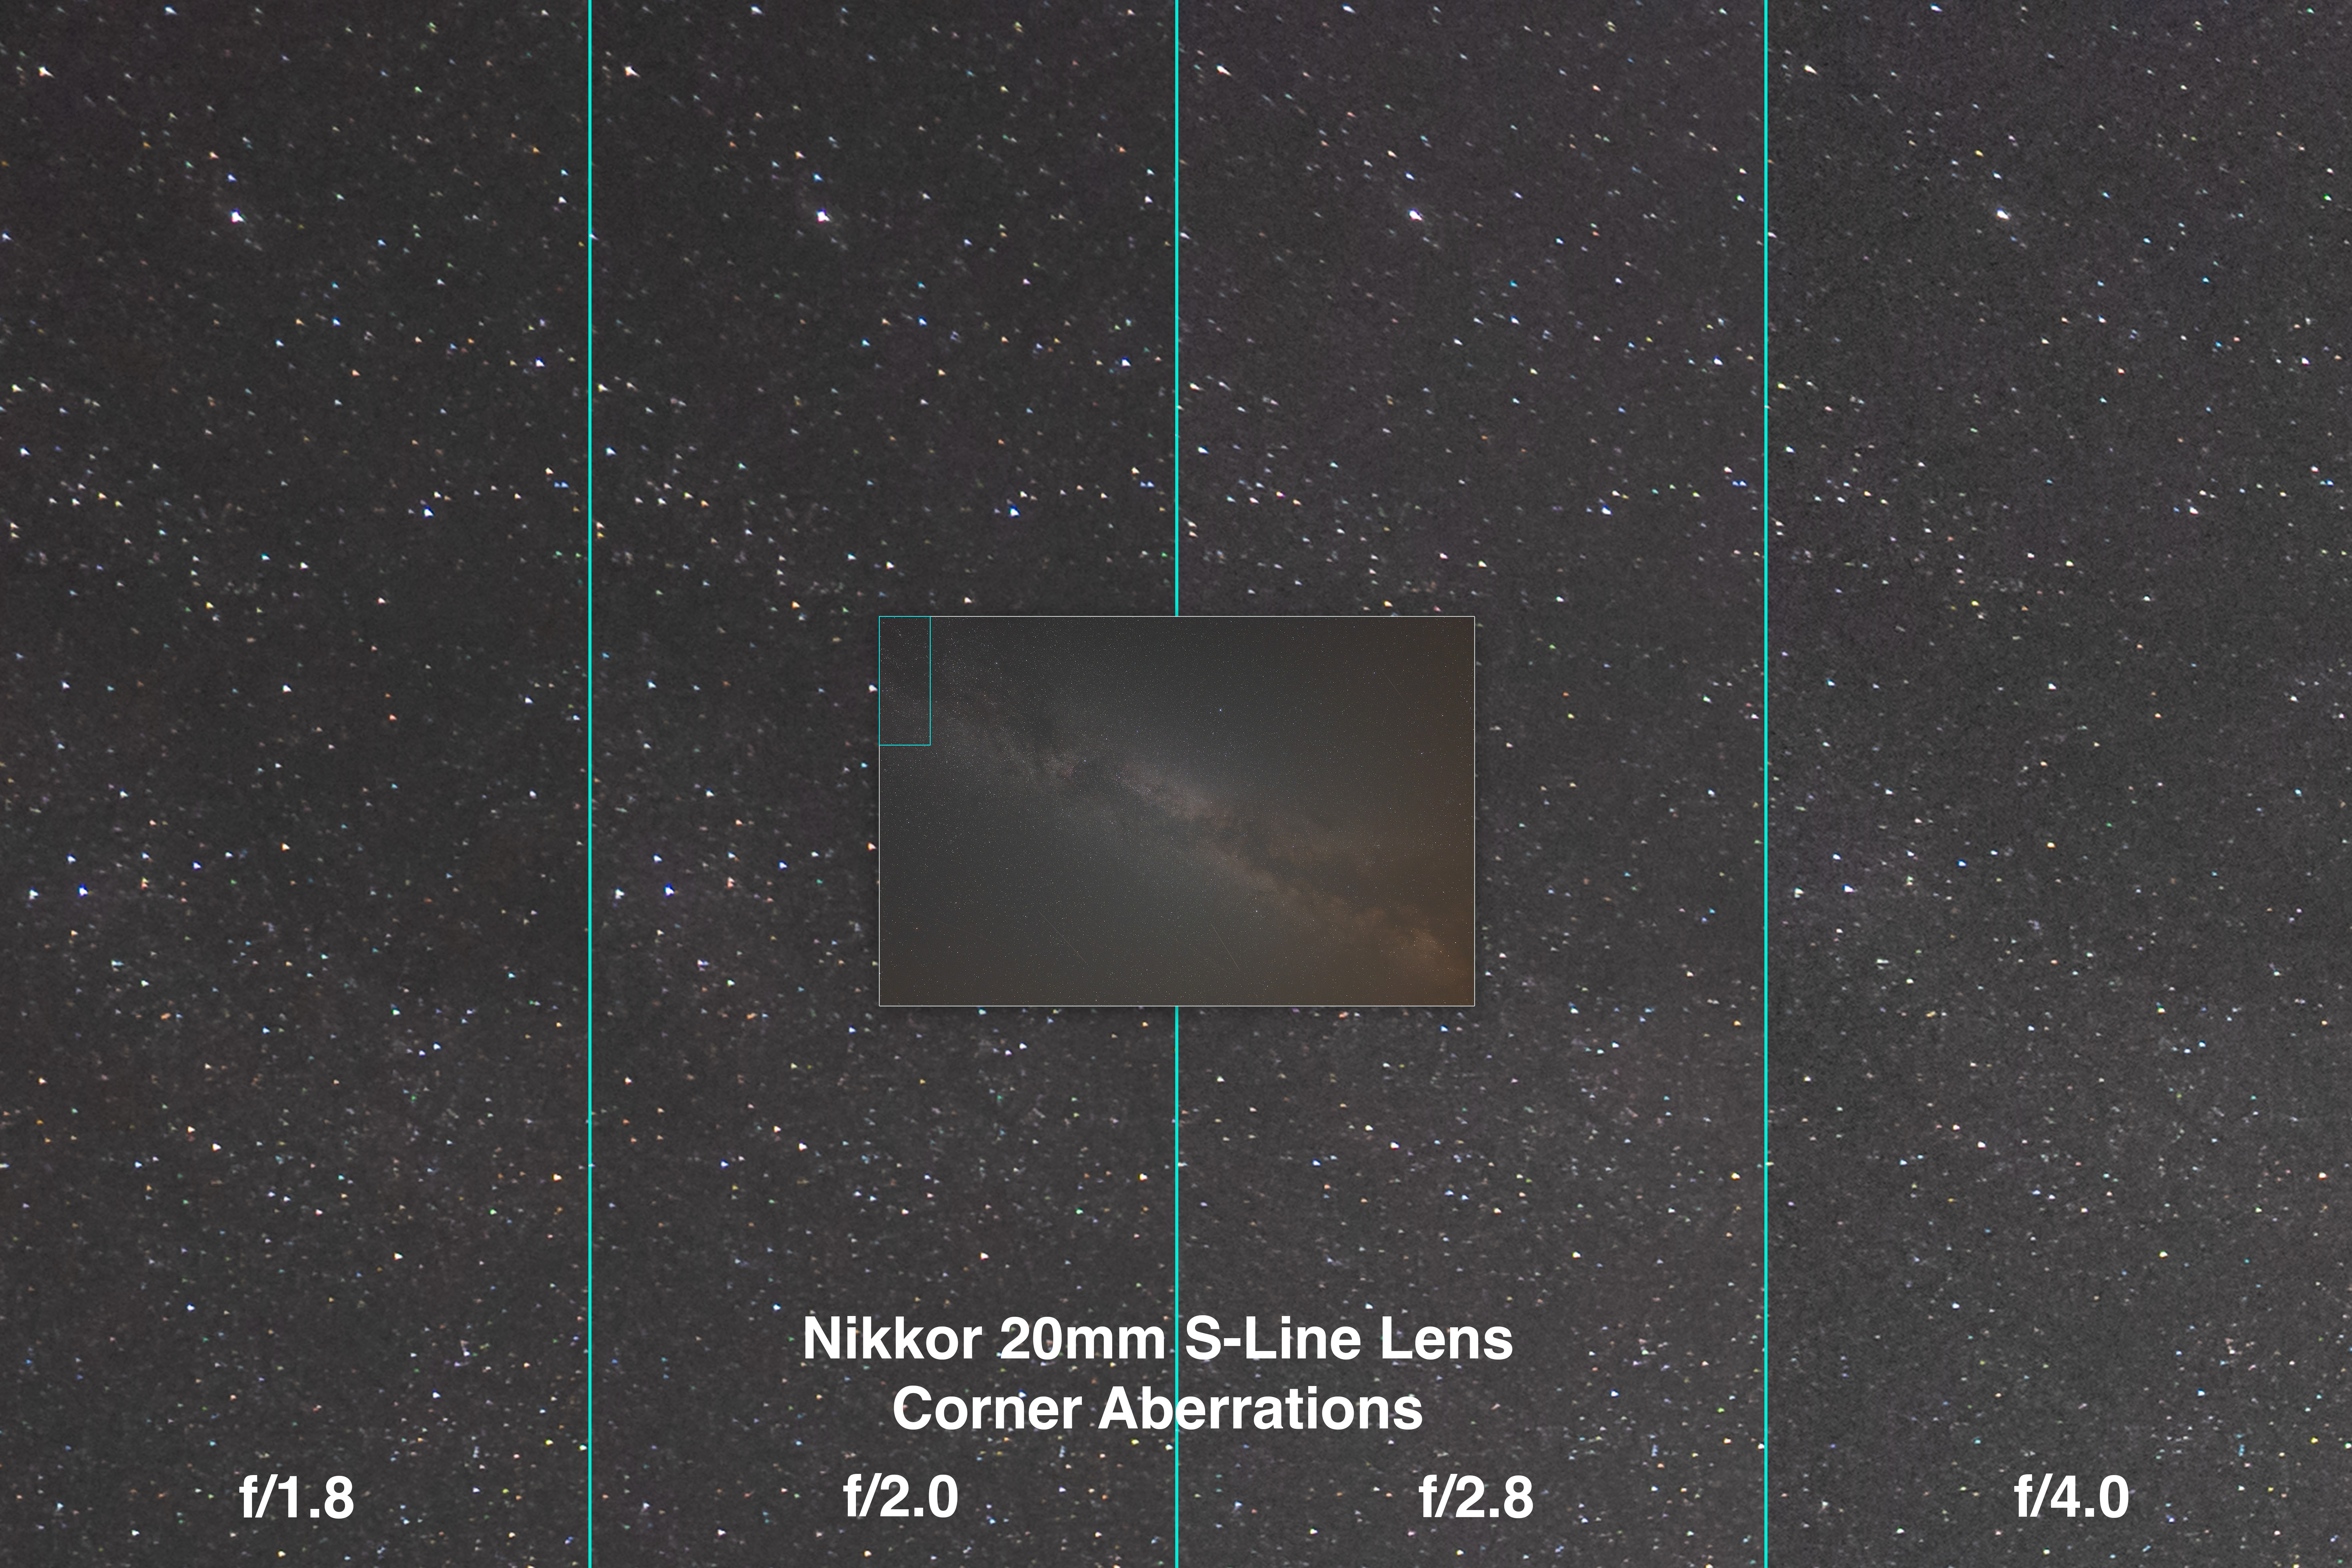
Nikkor 20mm Corner Aberrations

The four panels show the upper left corner, in the area outlined in the inset that shows the full frame.

Sharp stars right to the corners is the ideal for all forms of astro images. We donโ€™t want stars to turn into winged seagulls or coloured streaks. They should remain as pinpoint as possible. 

The Nikkor 20mm shows very little aberrations across the frame. Stars are elongated by tangential astigmatism and discoloured by lateral chromatic aberration only slightly and only at the extreme corners. 

Stopping down the lens decreased the aberrations, but some residual astigmatism remained, even at f/4. However, the corner aberrations are low enough, and so restricted to the very corners, that this is a lens you can certainly use wide open at f/1.8, or perhaps at f/2, without any penalty of image sharpness. 

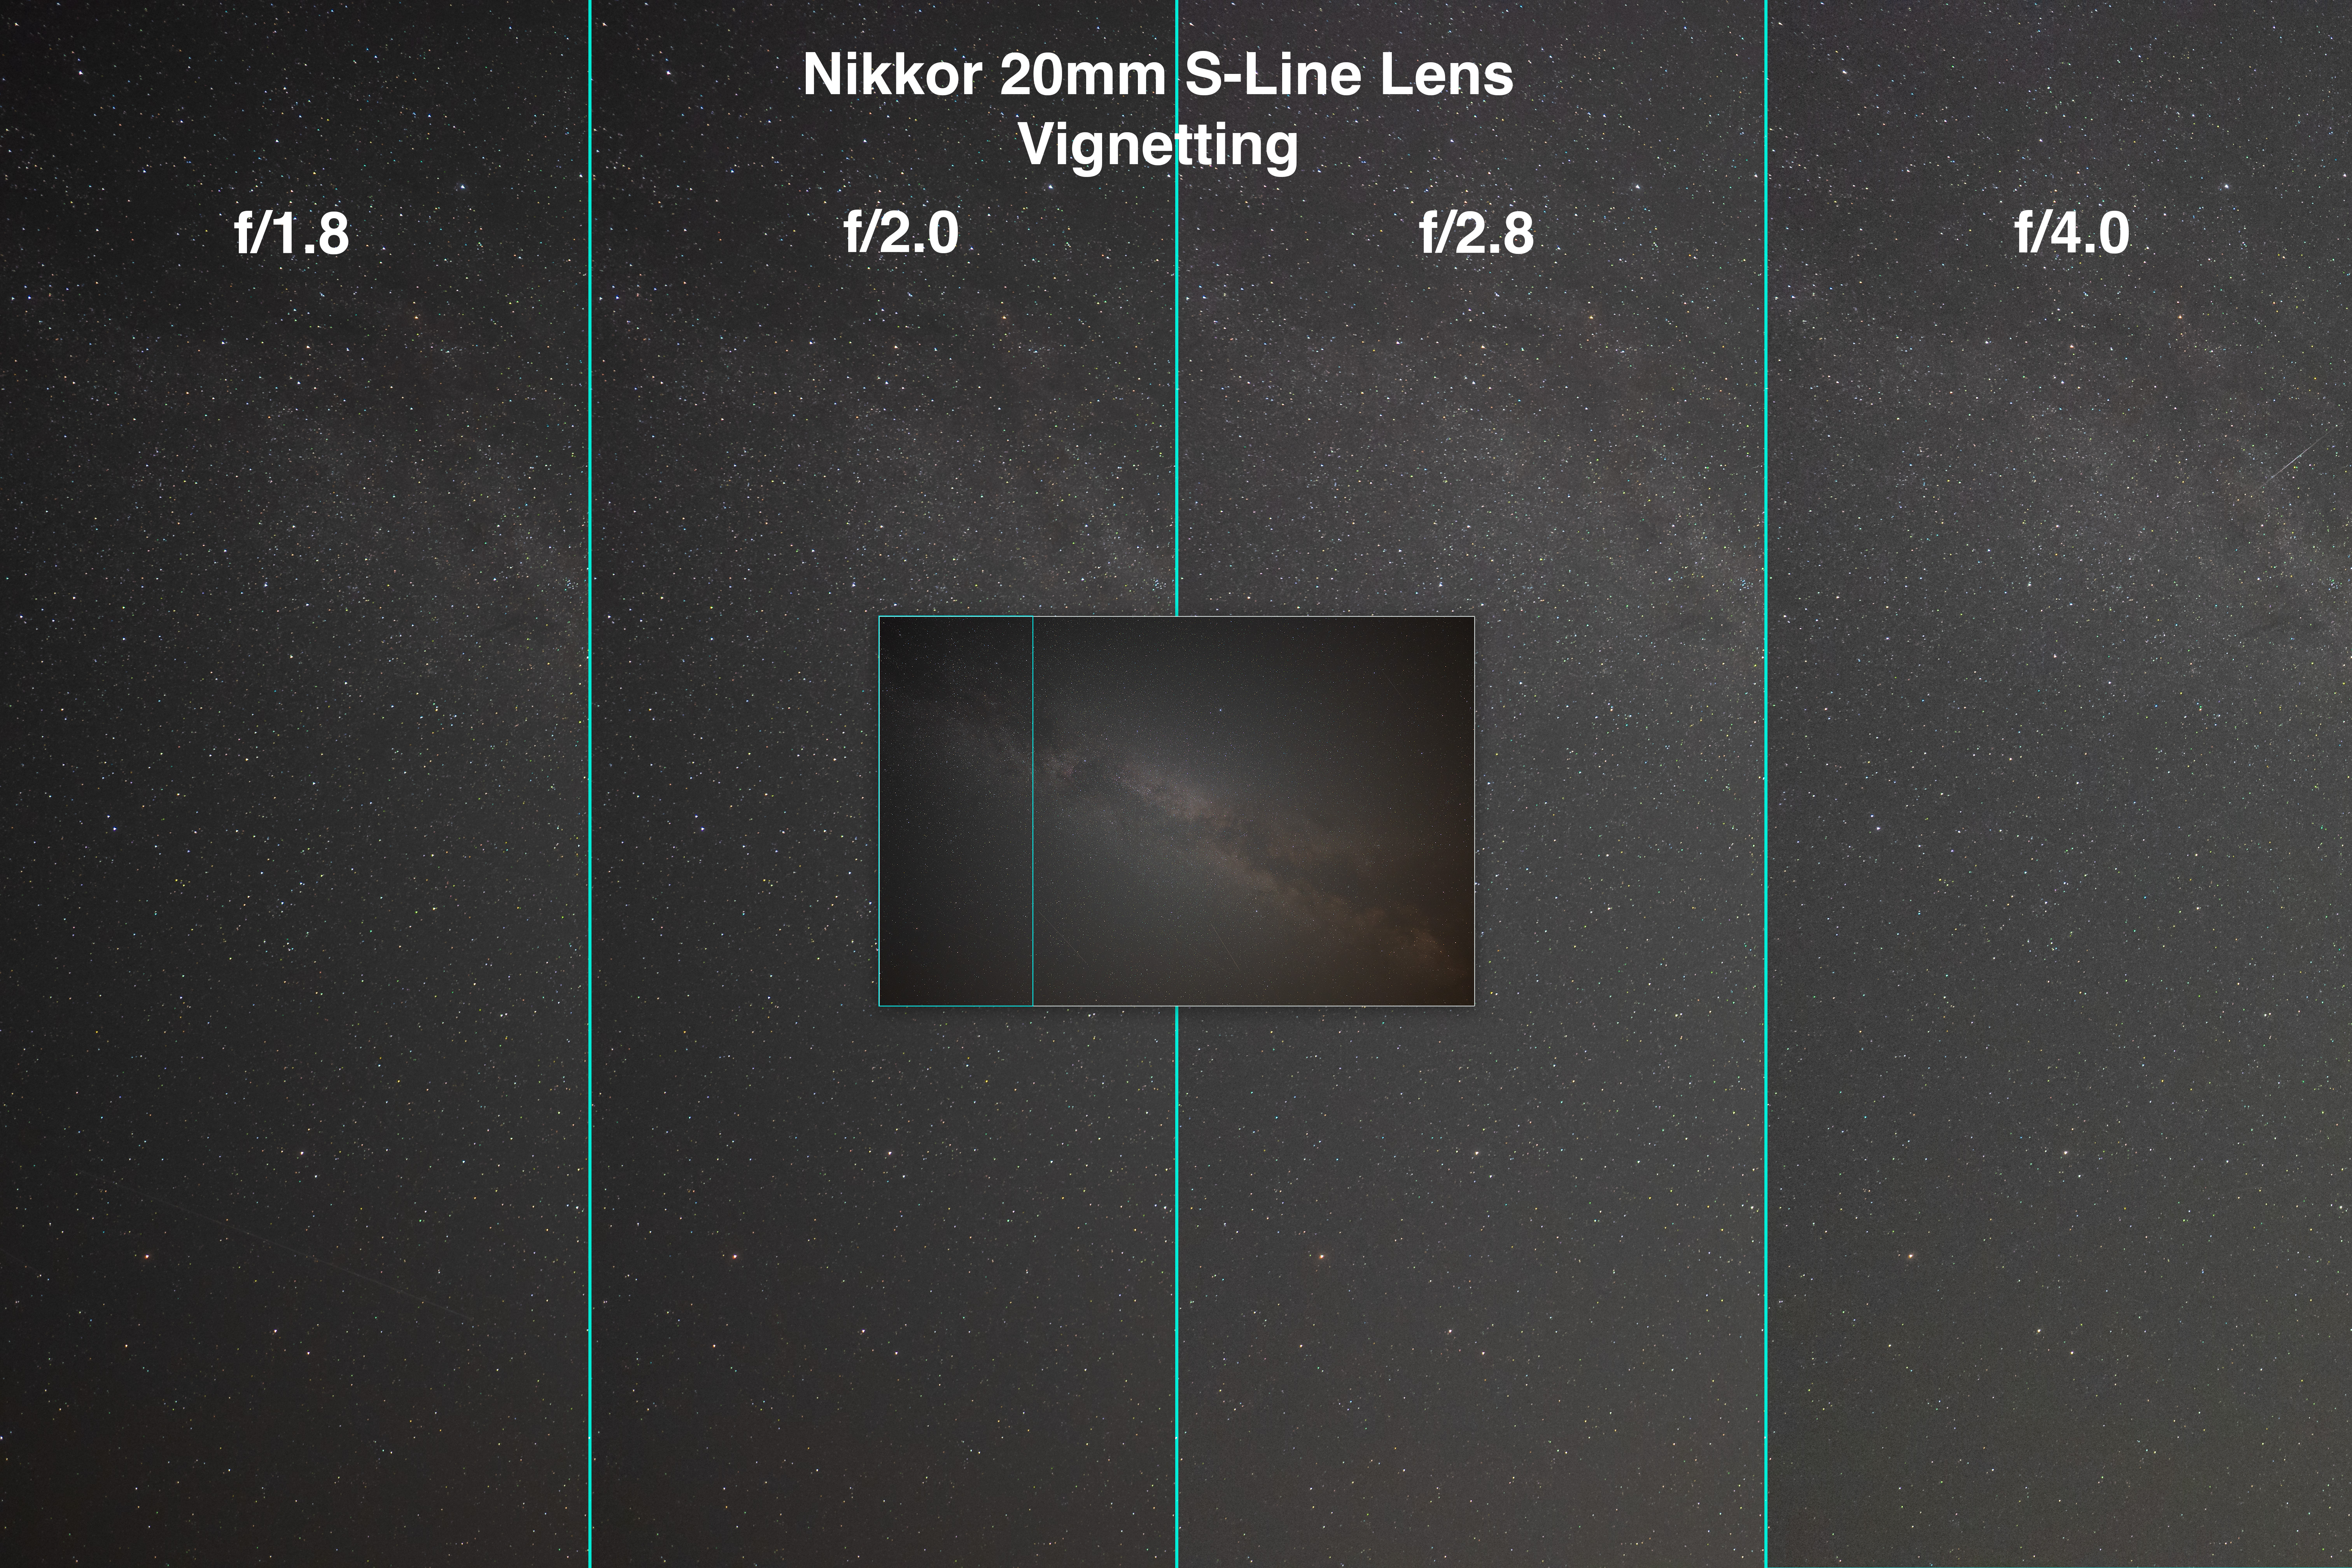
Nikkor 20mm Vignetting

The four panels show the left side, as outlined in the inset. The inset is the f/1.8 sample.

Ideally, we also want images to be as fully-illuminated across the frame as possible. Light fall-off, or vignetting, creates dark corners with less signal reaching the sensor. Less signal gives rise to more noise, noticeable when brightening the corners in processing. That can reveal unsightly noise, banding, and discolouration in nightscapes, especially in the ground, often the darkest part of a scene, not the starry sky. 

The 20mm shows a fair degree of edge and corner darkening when wide open at f/1.8. Stopping the lens down to f/2 improves the field illumination notably. And by f/2.8 the field is fairly uniformly lit. There is little need to go as slow as f/4. 

In all, the Nikkor 20mm S is a superb lens ideal for nightscapes and Milky Way images.


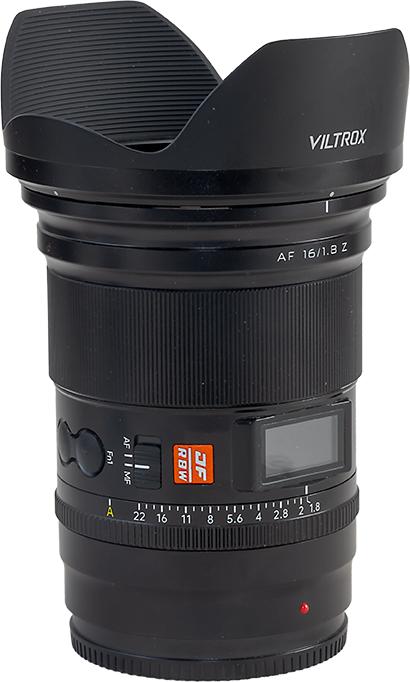
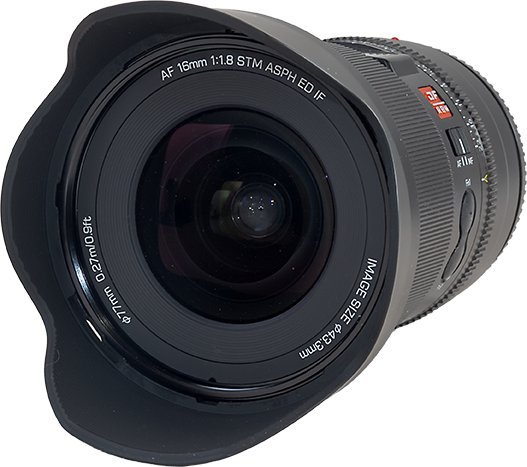
The Viltrox AF 16mm STM ASPH ED IF ($580)

The new company Viltrox has been making a name for themselves recently with the introduction of a number of top-quality pro-grade lenses to compete with the best from any brand, and at much more affordable prices. 

The horizontal field of view of the Viltrox 16mm is 100ยฐ.

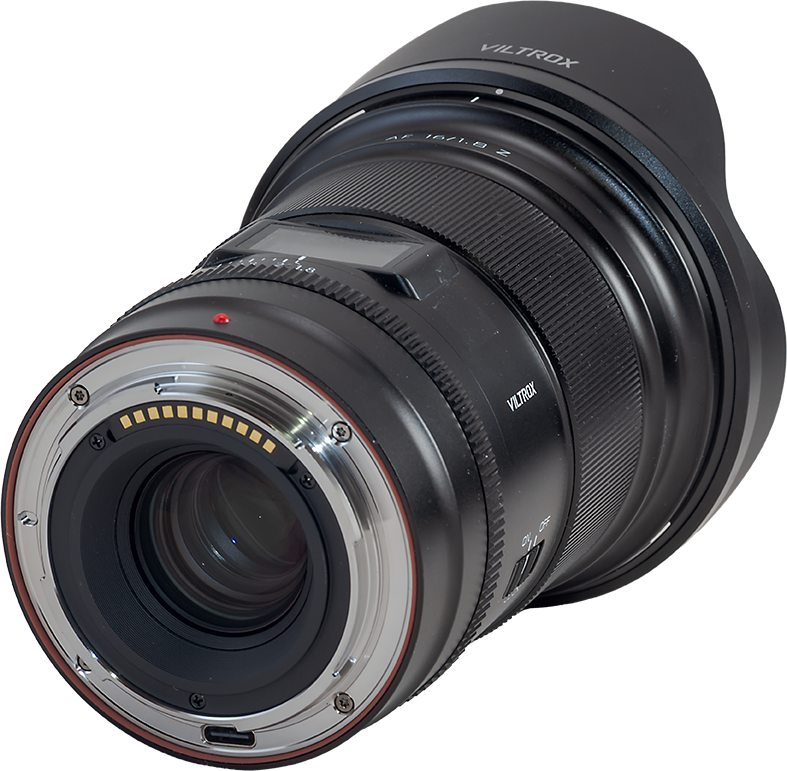
Their 16mm is an auto-focus lens that, on the Nikon, can actually auto-focus on stars, as can the Nikkor 20mm. However, it, too, will zip to infinity focus when powered up. Plus two function buttons can be programmed to rack between two preset focus distances, one of which can be infinity. 

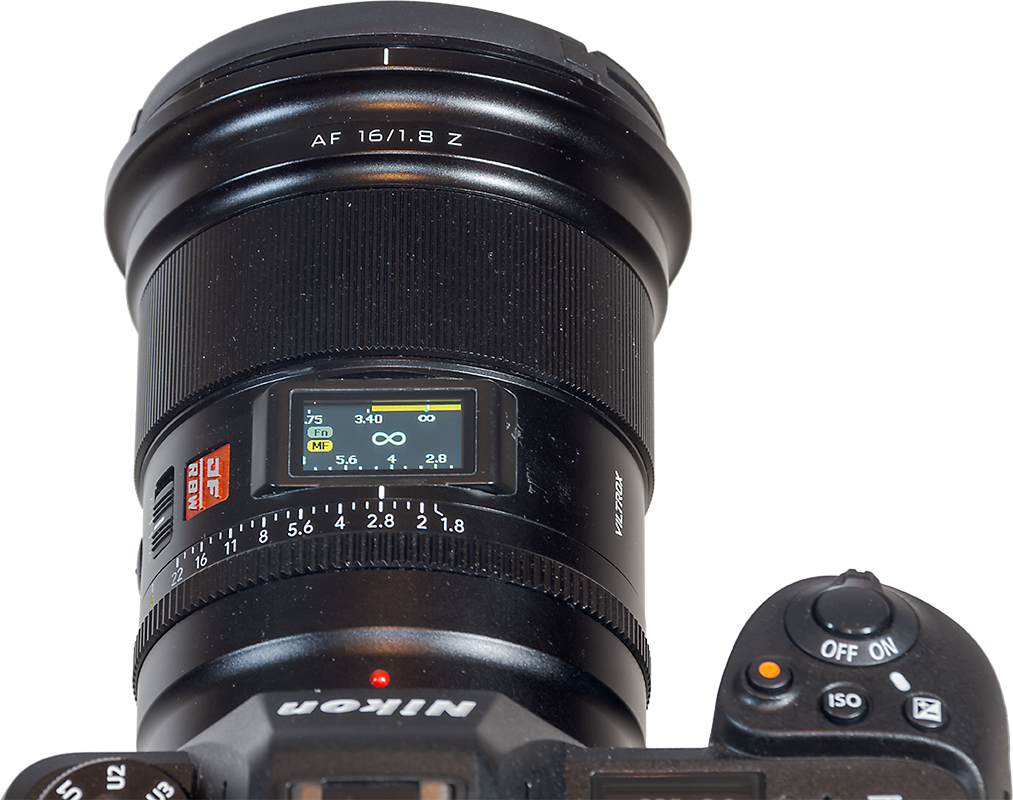
A manual aperture ring (above left) has 1/3rd-stop detents, or it can be set to A for controlling the aperture in the camera. 

A colour OLED display (above right) shows the focus distance and aperture, a nice way to confirm your settings at night. The display is too bright on the darkest nights; I cover it with red gel. 

An option to turn it red using the Viltrox app would be welcome.ย  Or to turn it off! ….

With Viltrox lens fully engaged and display ON

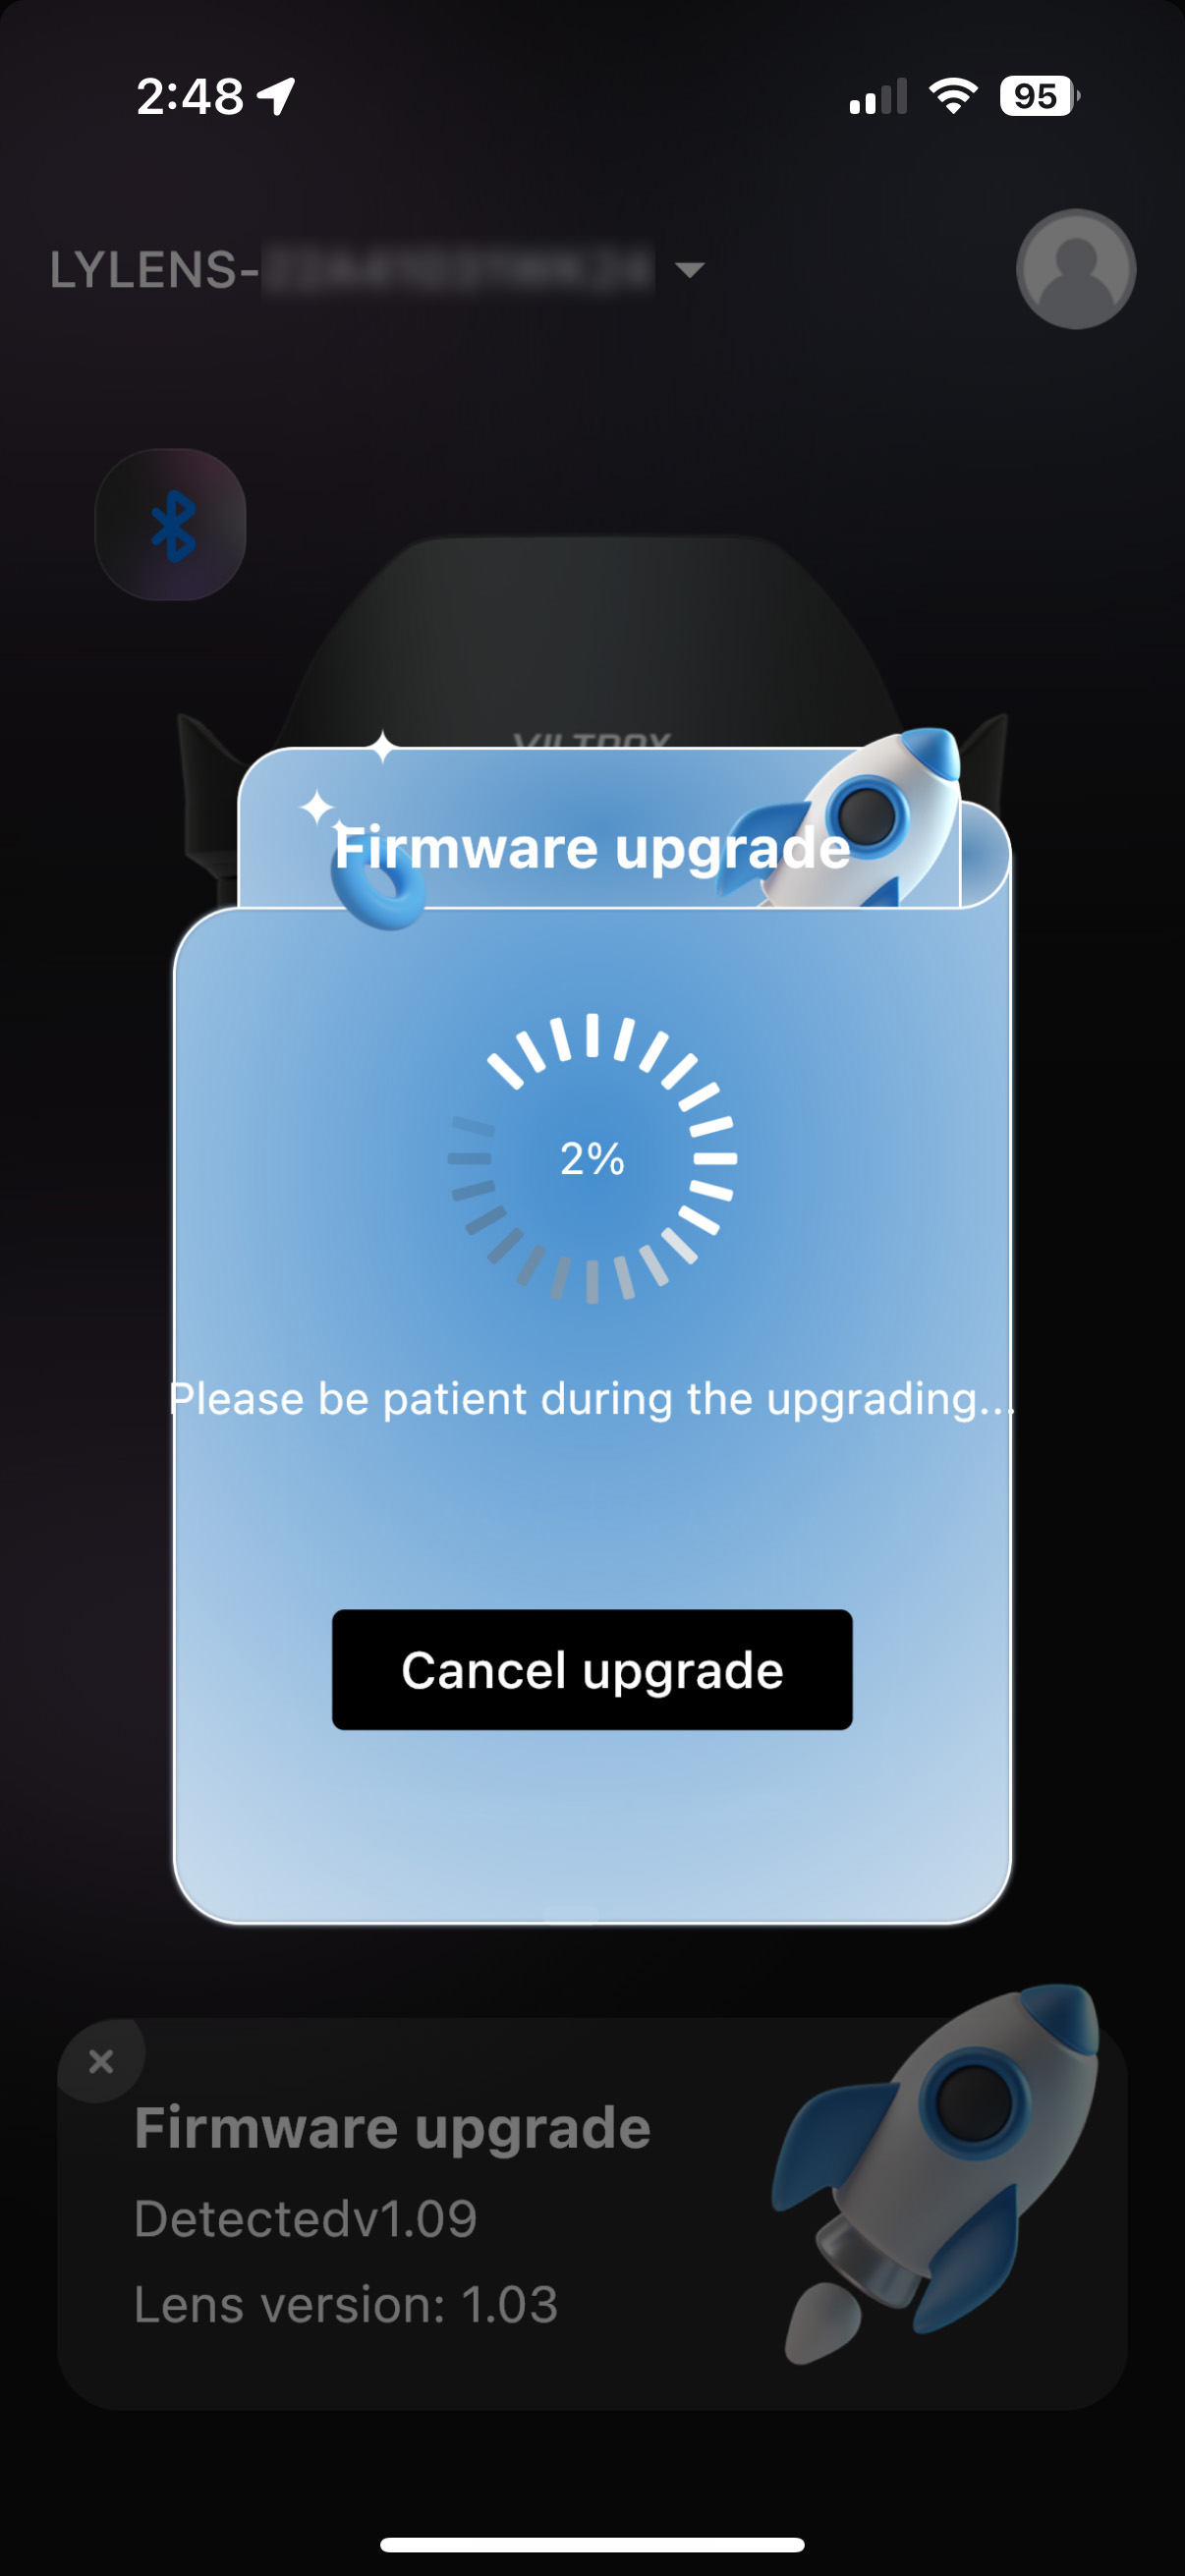
Uniquely, this and other Viltrox lenses have Bluetooth built in, for direct connection to a mobile device for firmware updates and lens settings, shown above. However, I found the app buggy; it would connect to the lens, but then refuse to allow settings to be changed, claiming the lens was not connected. Or the app would freeze, disconcerting during a firmware update. Luckily, that did not brick the lens. 

Viltrox 16mm Corner Aberrations

The four panels show the small corner area outlined in the centre inset that shows the entire image.

At the extreme corners, the Viltrox shows some softness (perhaps from field curvature), but only minimal astigmatism and lateral chromatic aberration when wide open at f/1.8, and slightly sharper corners at f/2. At f/2.8 corner performance is nearly perfect, and certainly is at f/4. 

This is a level of aberration correction even the most premium of lenses have a hard time matching.

Viltrox 16mm Vignetting

The panels show the left side outlined in the centre inset, which shows the f/1.8 image.

As is often the case with wider lenses, the Viltrox does show a great deal of vignetting at f/1.8, more so than the Nikkor 20mm. While this can be corrected in processing it will raise noise levels. 

Stopping down to just f/2 helps, but the field becomes more uniform only at f/2.8, the sweet spot for this lens for the best all-round performance. But it offers the speed of f/1.8 when needed, such as for auroras. 

If you prefer a wider field than a 20mm provides, the Viltrox 16mm (also available for Sony) is a great choice that wonโ€™t break the bank. Until Canon changes their third-party lens policy, Canon owners are out of luck getting this excellent lens. 


The Venus Optics/Laowa 10mm Zero-D FF ($800) 

The lens maker Venus Optics (aka Laowa) is known for its innovative and often unusual lens designs. 

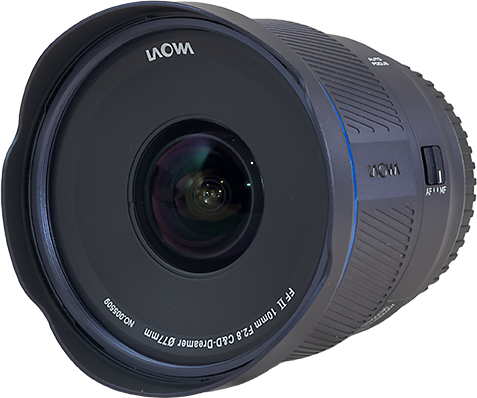
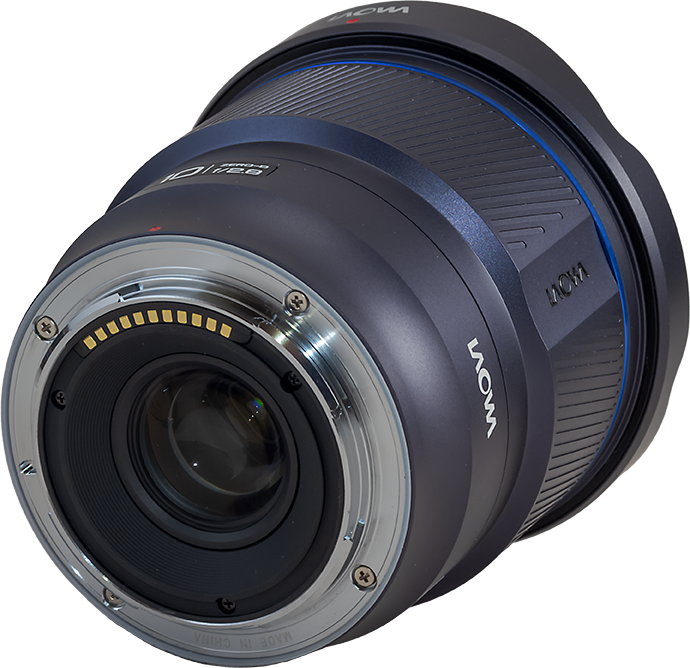
Introduced in 2024, their new 10mm offers the widest field available in a rectilinear (not fish-eye) lens for full-frame cameras. The โ€œZero-Dโ€ label is for the lensโ€™s lack of pincushion or barrel distortion. Horizons remain straight no matter where they fall on the frame. However, objects at the corners become elongated a lot.

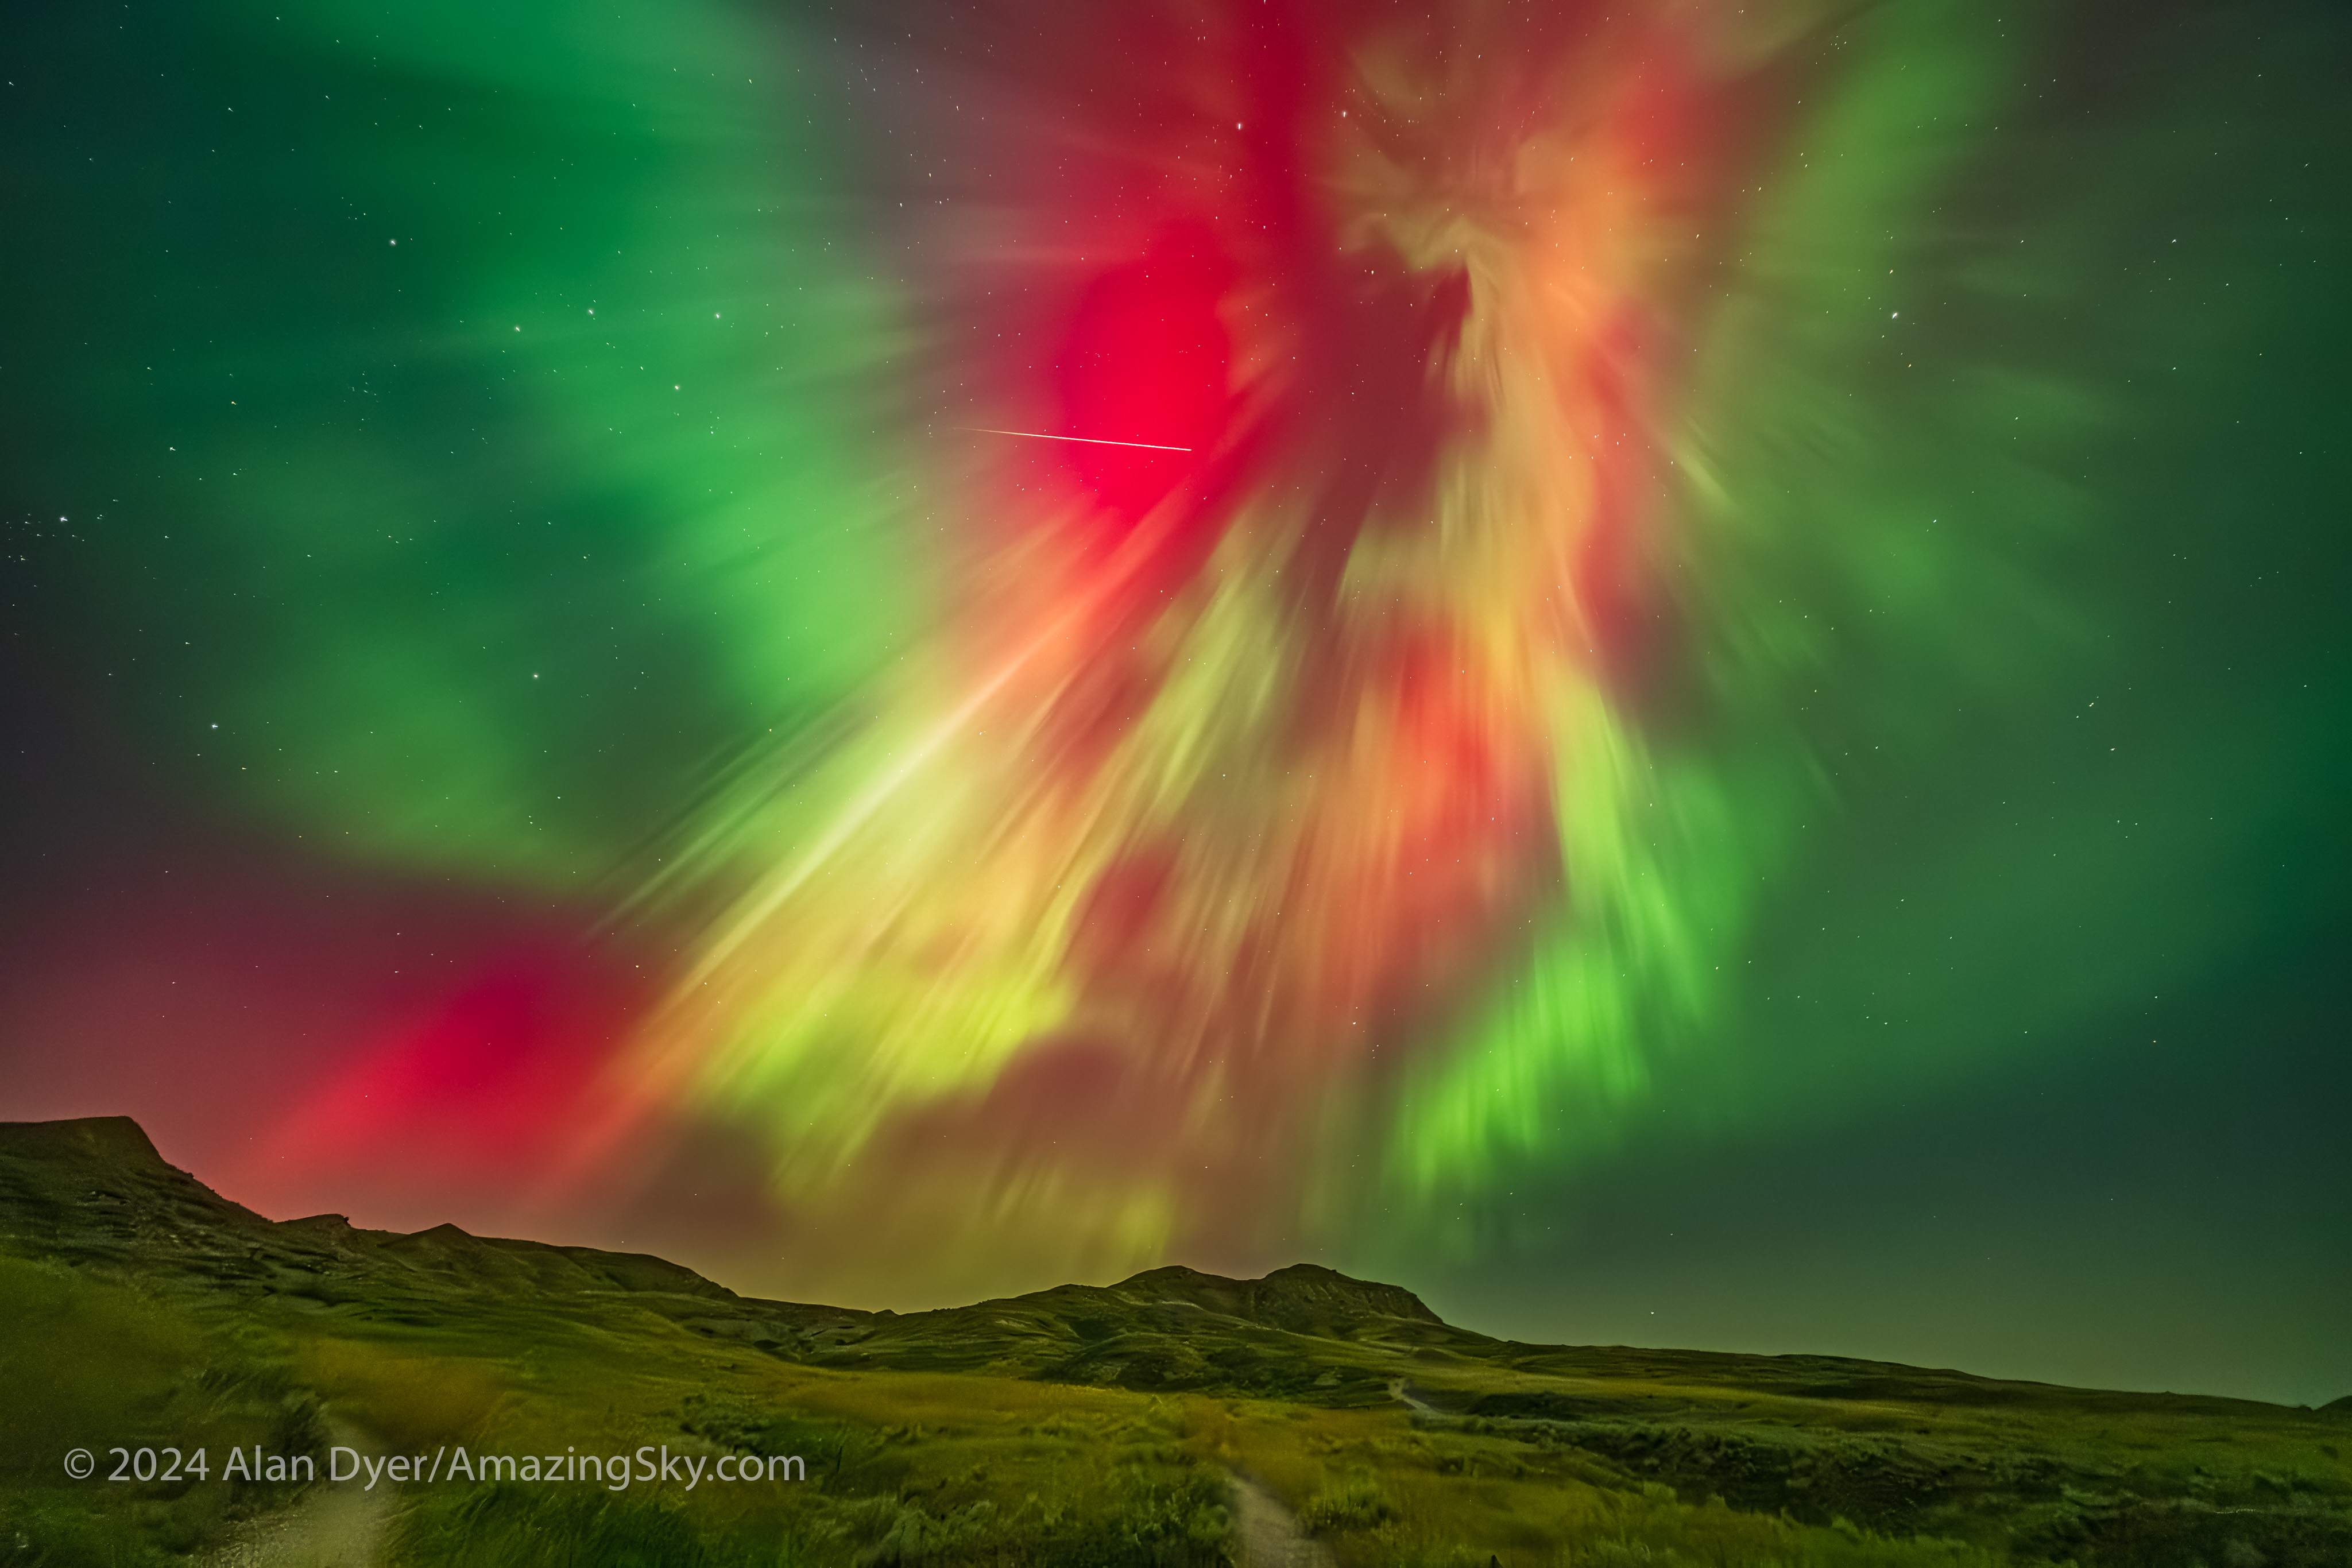
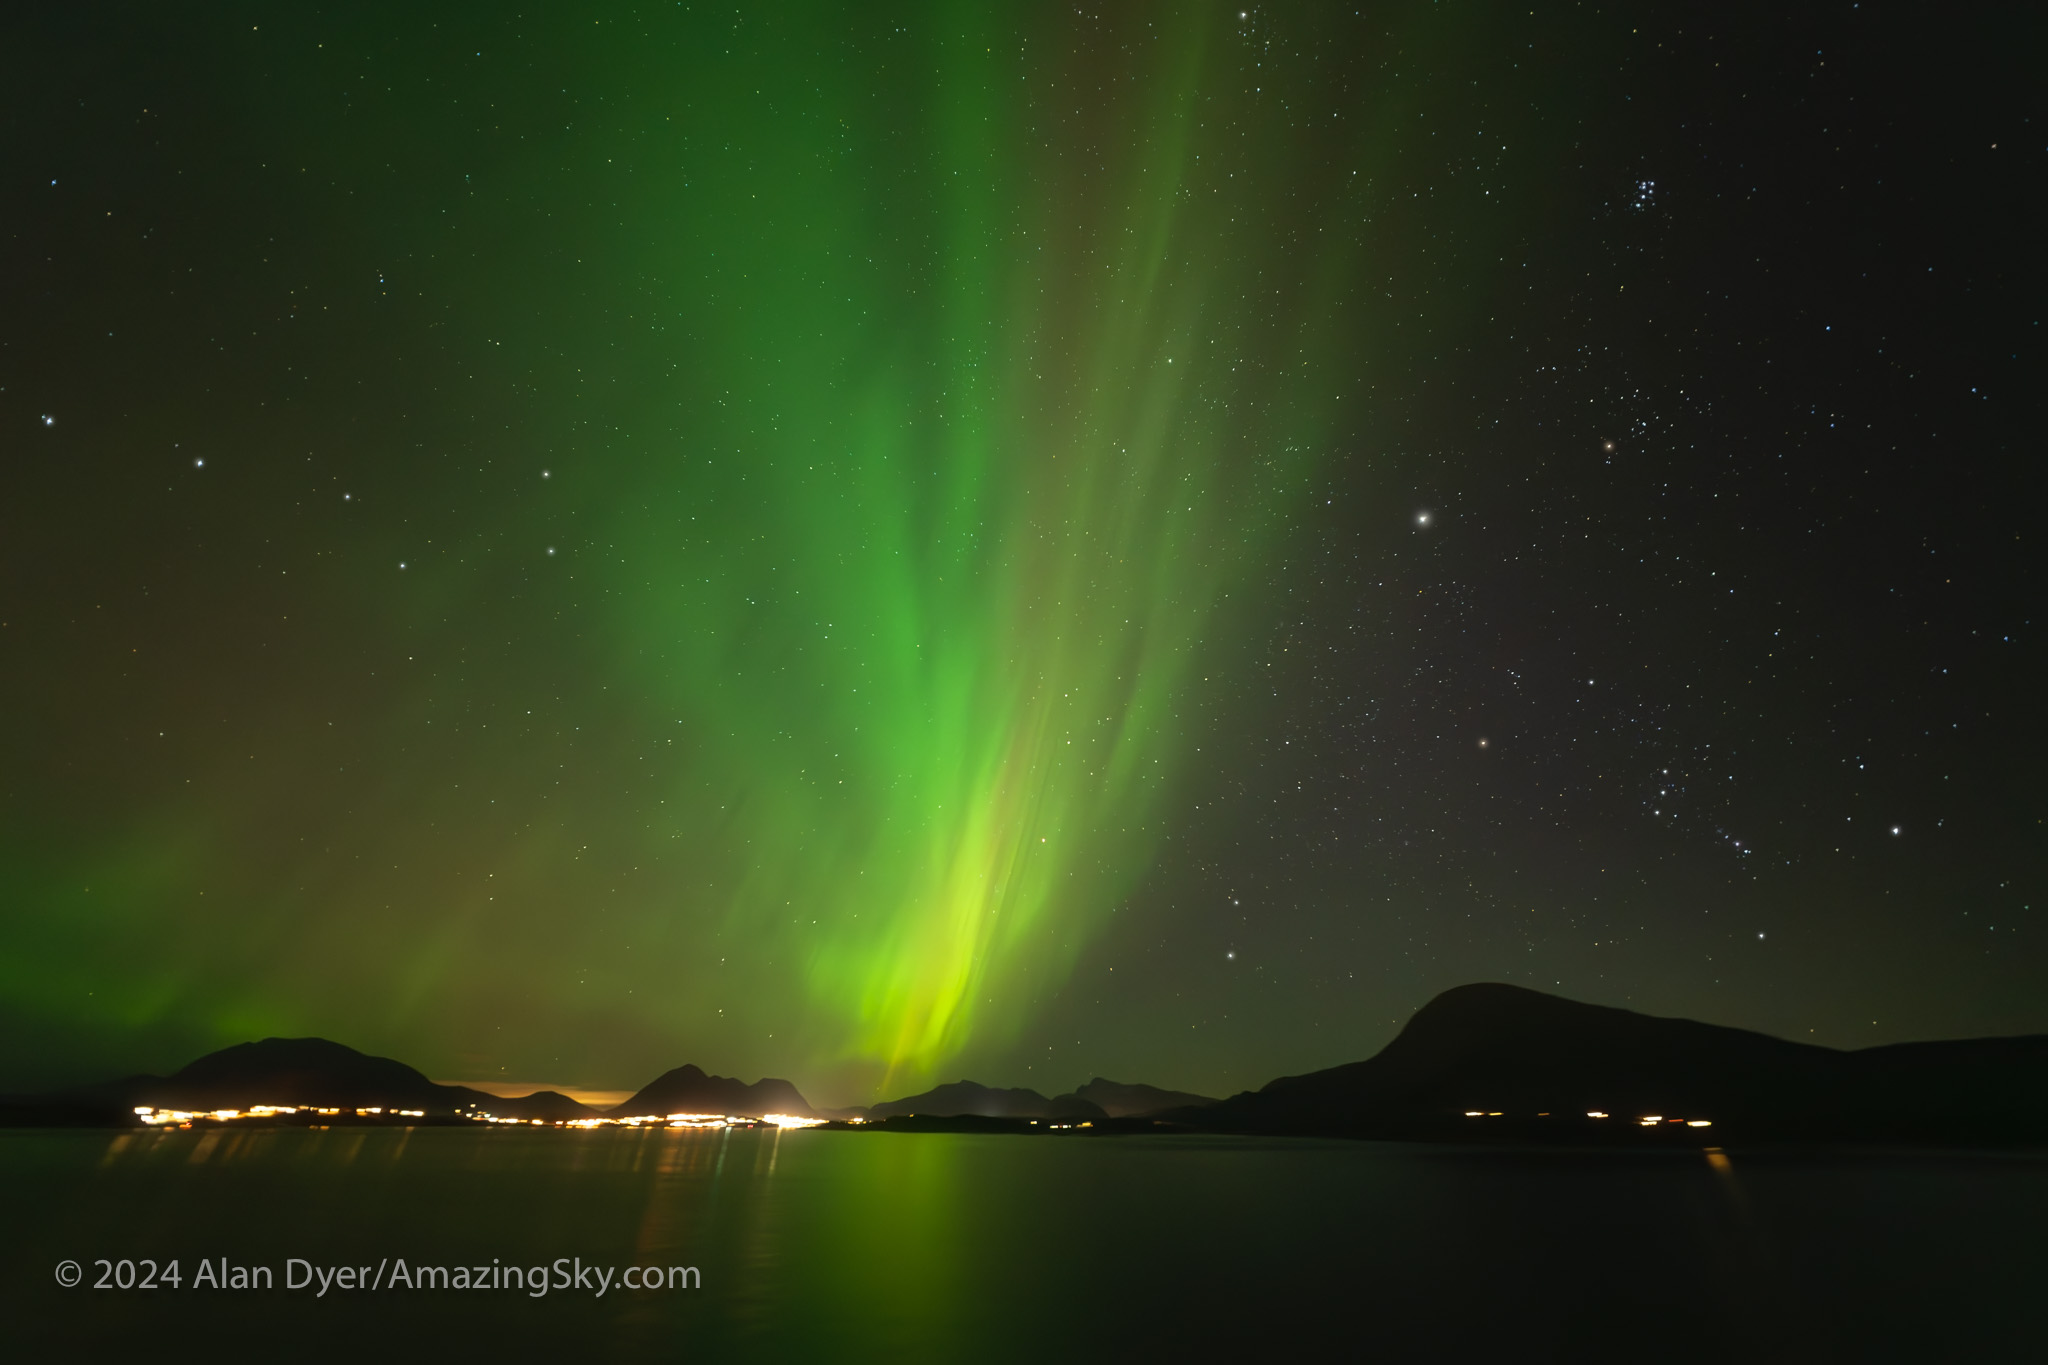
The Northern Lights in a superb display on August 11-12, 2024, at Grasslands National Park, Saskatchewan. This is with the Laowa 10mm wide open at f/2.8 on the Nikon Z6III at ISO 6400.

Even so, thereโ€™s a lot to be said for having a field that extends for 130ยฐ across the long dimension of a full-frame sensor. Thatโ€™s more than enough to go from well below the horizon to past the zenith when the camera is in portrait orientation. Even in landscape orientation (as above) the lens covers nearly a 90ยฐ field across the short dimension, enough to go almost from horizon to zenith. 

The f/2.8 speed is slower than the other lenses on test here, but is still faster than most ultra-wide lenses. Remarkably, it accepts common 77mm filters, the same as the Nikkor 20mm and Viltrox 16mm. 

The 10mm is available as an auto-focus lens for Sony E and Nikon Z, and in manual focus versions for Canon RF and Panasonic L, oddly all at the same price. 

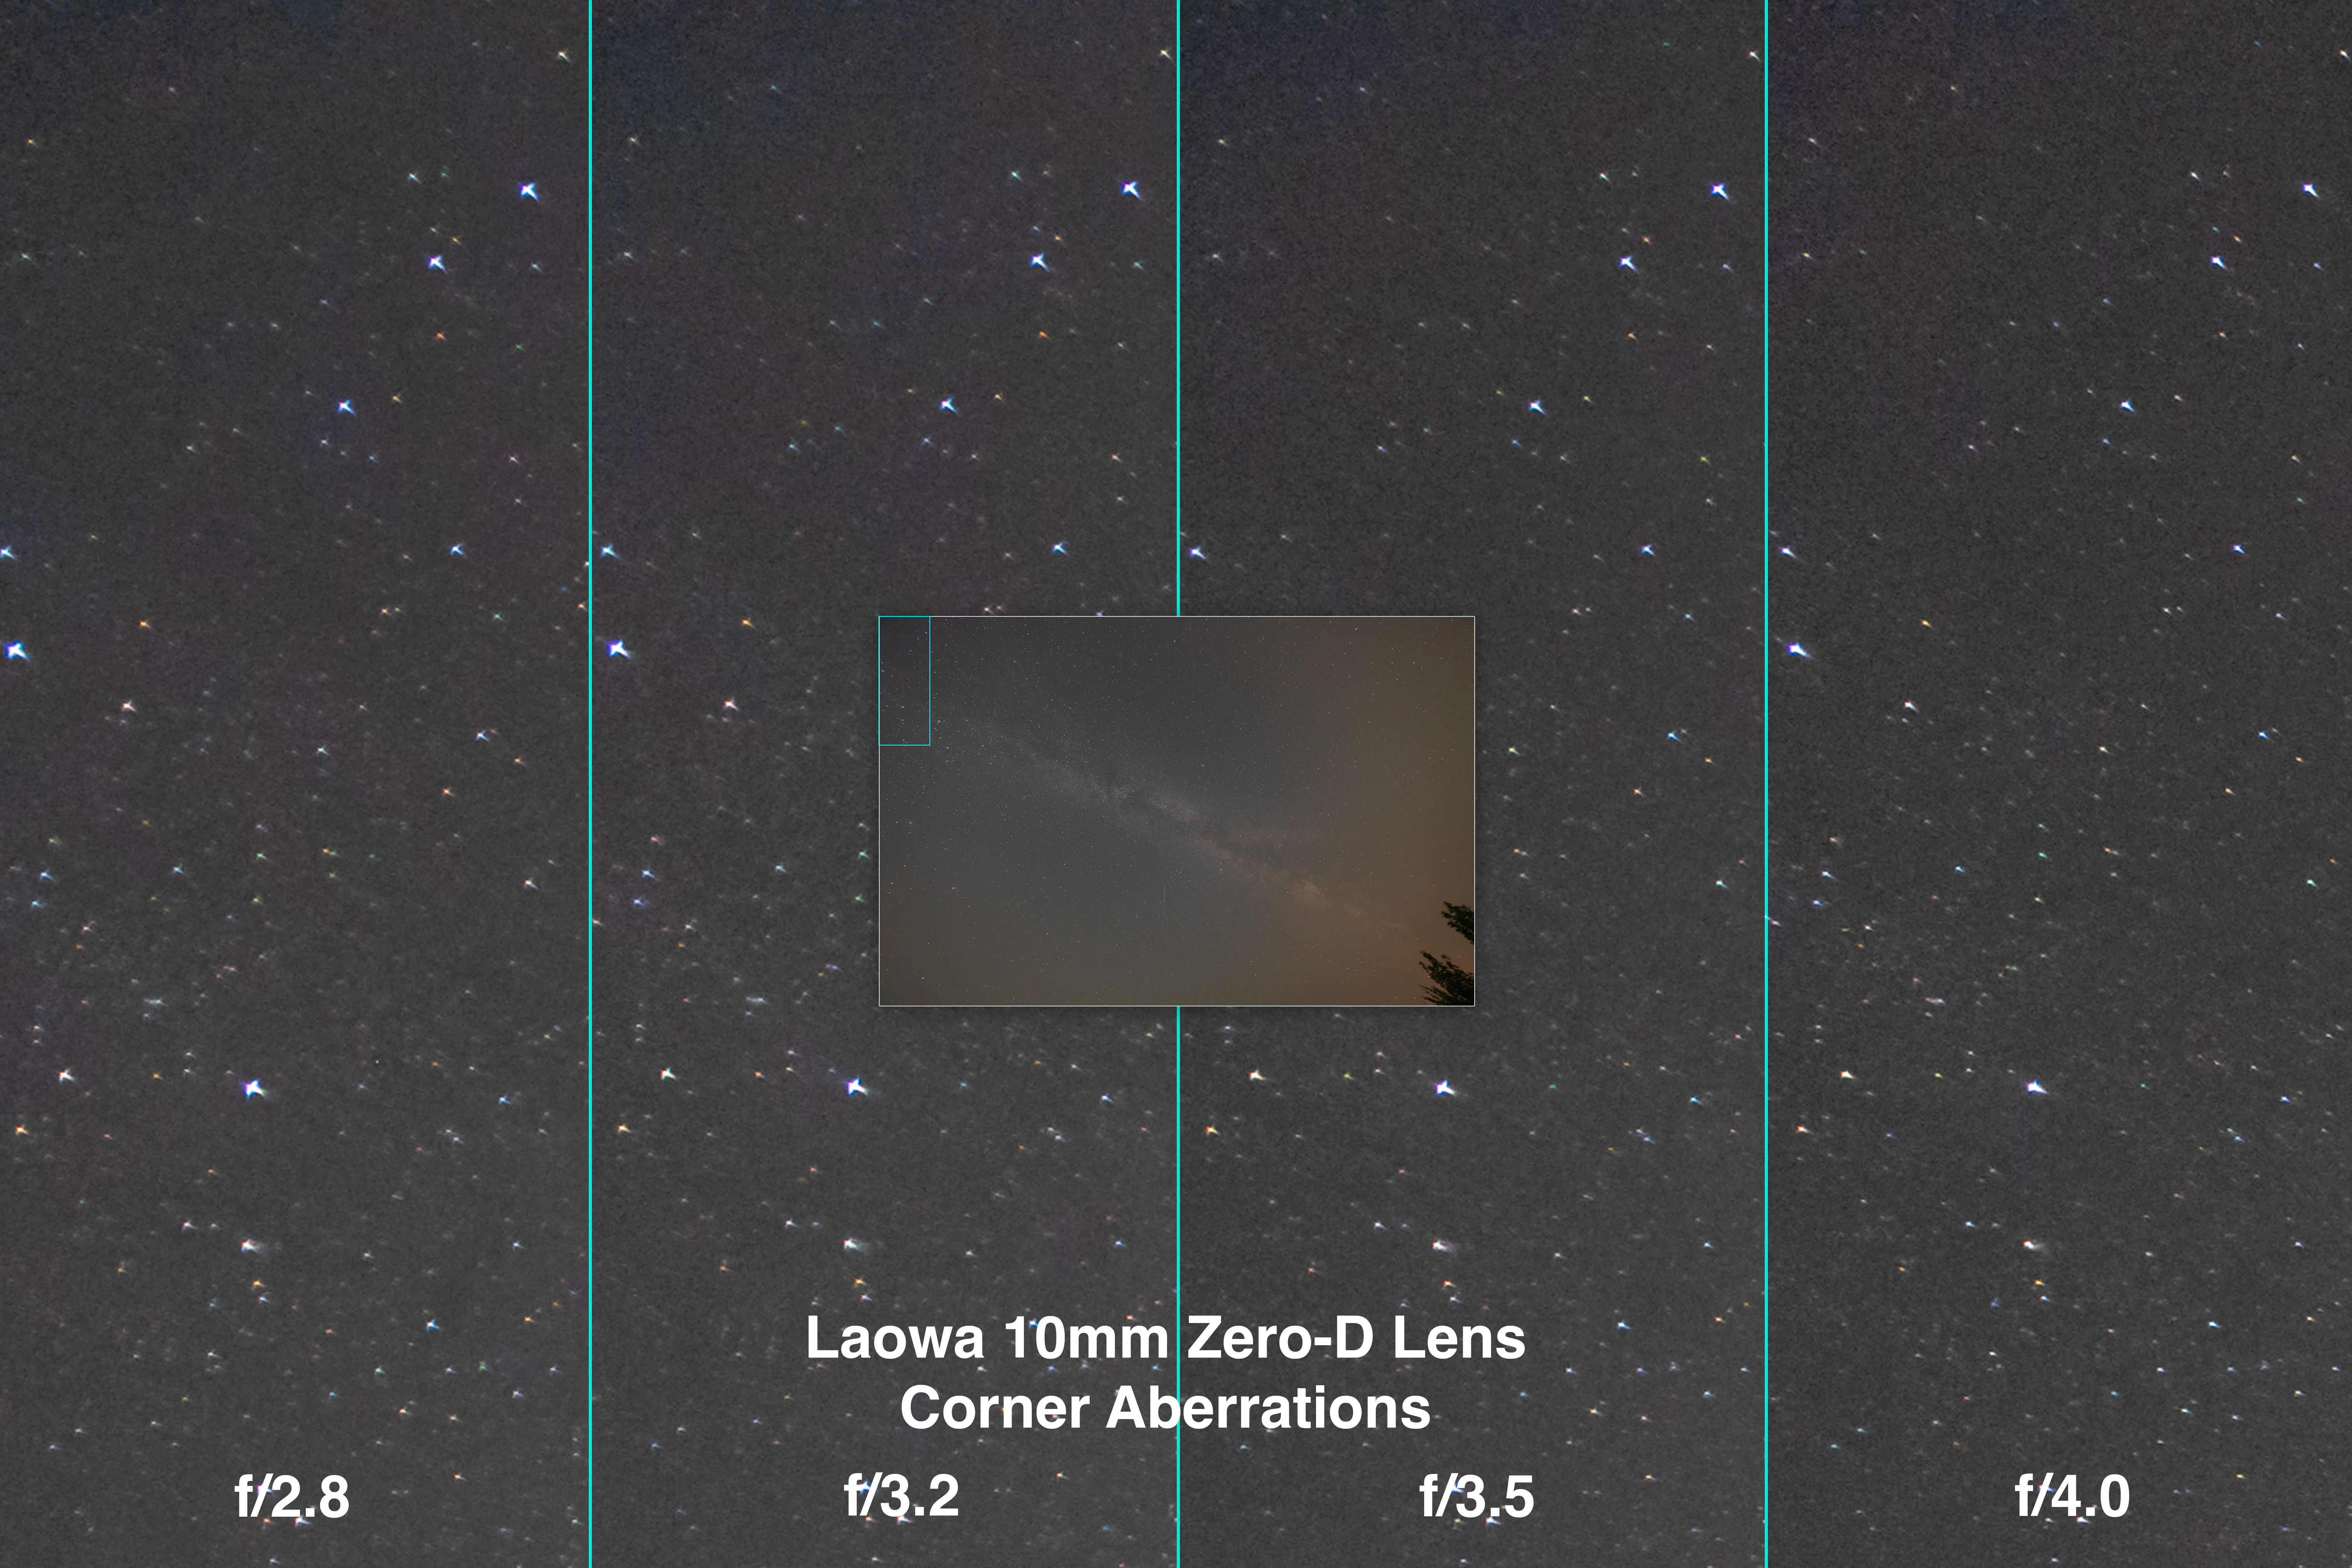
Laowa 10mm Corner Aberrations 

The four panels show the corner area outlined in the inset, at four apertures between f/2.8 and f/4.

Corner aberrations are much worse than in the 20mm and 16mm lenses, showing a fair degree of tangential  and sagittal astigmatism, elongating stars radially and adding wings to them, respectively. The aberrations are larger and reach deeper into the frame than in the Nikkor and Viltrox lenses. 

Thereโ€™s also some lateral chromatic aberration adding blue and purple fringes to the stars at the corners. Stopping down to f/4 improves, but doesnโ€™t eliminate, the aberrations. 

Laowa 10mm Vignetting

The four panels show the left side, as outlined in the inset, which shows the f/2.8 image.

Edge and corner darkening were also worse than in the other lenses and required about a +50 setting to correct in Adobe Camera Raw, far less than the maximum of +100. So itโ€™s still quite acceptable and correctable. 

However, while stopping the lens down to f/4 improves vignetting, it does not eliminate it, still requiring a +40 correction. Vignetting will be a factor to deal with in all astrophotos with this ultra-wide lens. 

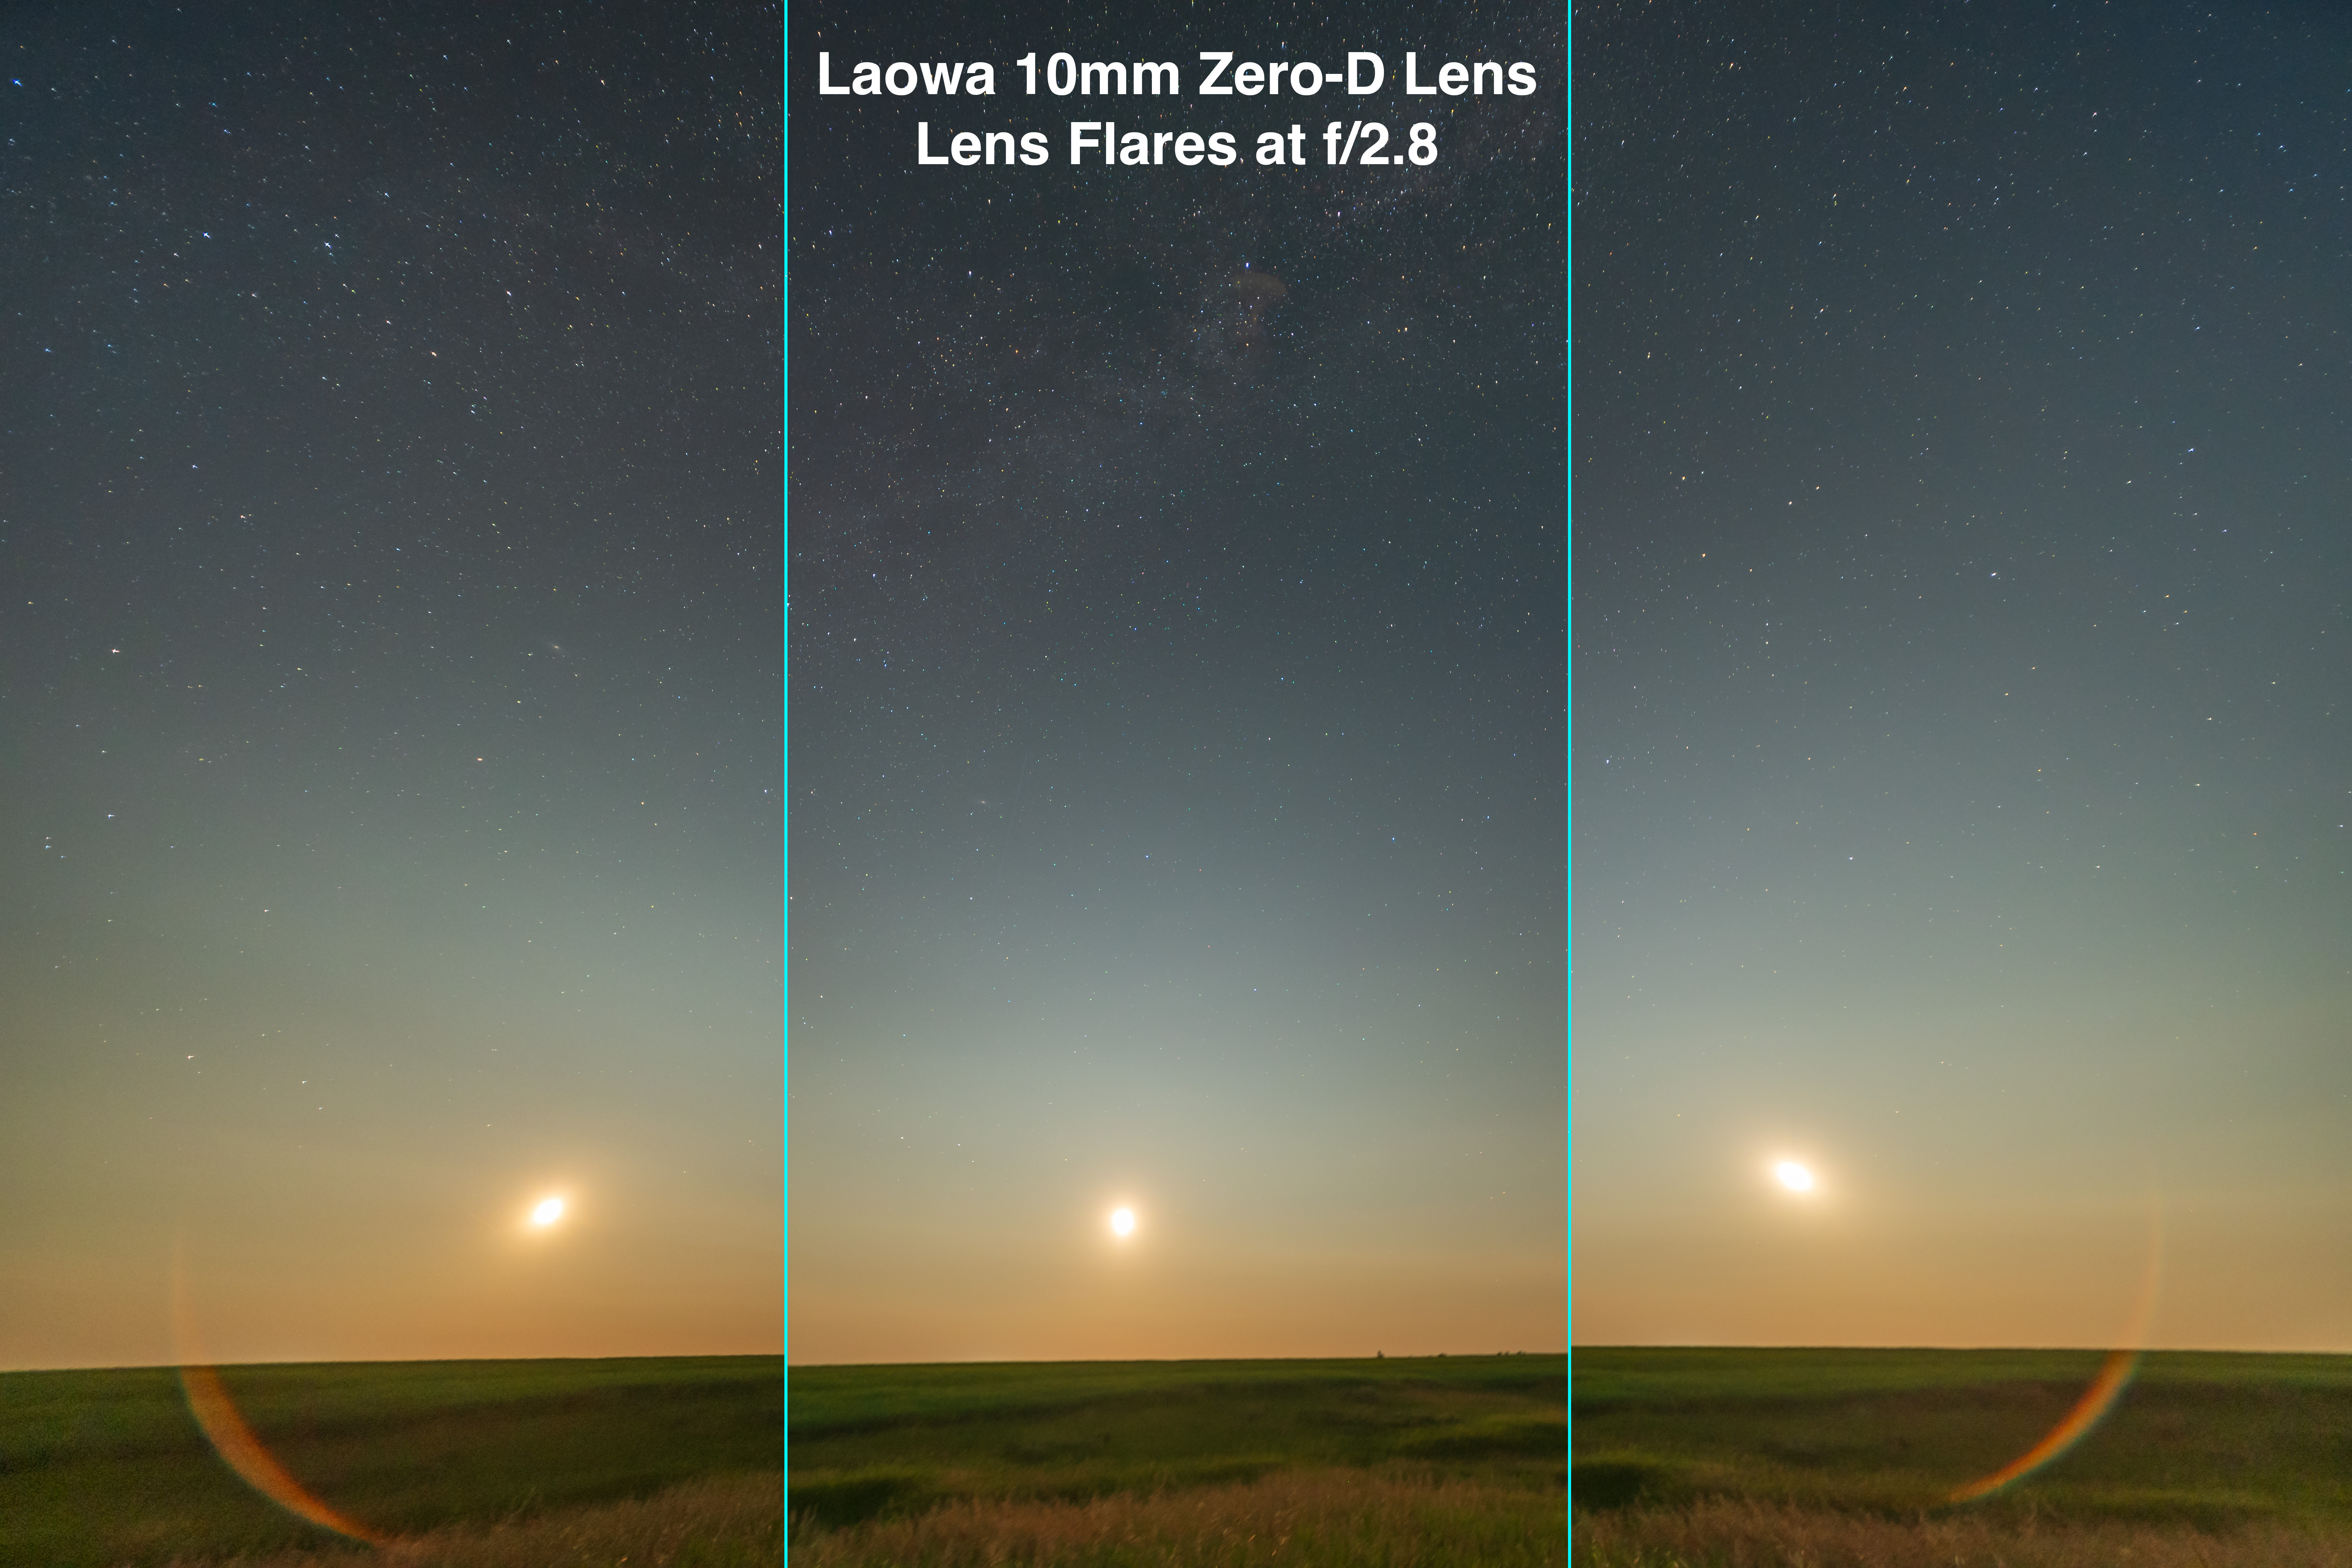
Laowa 10mm Lens Flares

Three panels showing the Moon framed in the left corner (L), centred (C), and in the right corner (R).

With such a wide lens, the Moon or other bright light sources are bound to be within the frame. The Laowa exhibits a prominent internal lens flare when bright objects are in the corners, but just in the corners. Objects near the edge but centered are fine. 

Showing the effect of decreasing aperture on the lens flare and bright light source.

Stopping down the lens adds diffraction spikes (or โ€œsunstarsโ€) to bright lights, but doesnโ€™t eliminate the circular internal reflection. None of this is a serious issue for most images, but it is something to be mindful of when framing nightscapes. 

With the Laowa 10mm lens at f/2.8 on the Nikon Z6III at ISO 3200. Note the Big Dipper at left and Orion at right.

In Milky Way and starfield images, constellations in the corners can distort into unnatural shapes that look odd, as I show above. While the lens can take in a great swath of sky, its distortion and corner aberrations make it less than desirable for tracked Milky shots. 

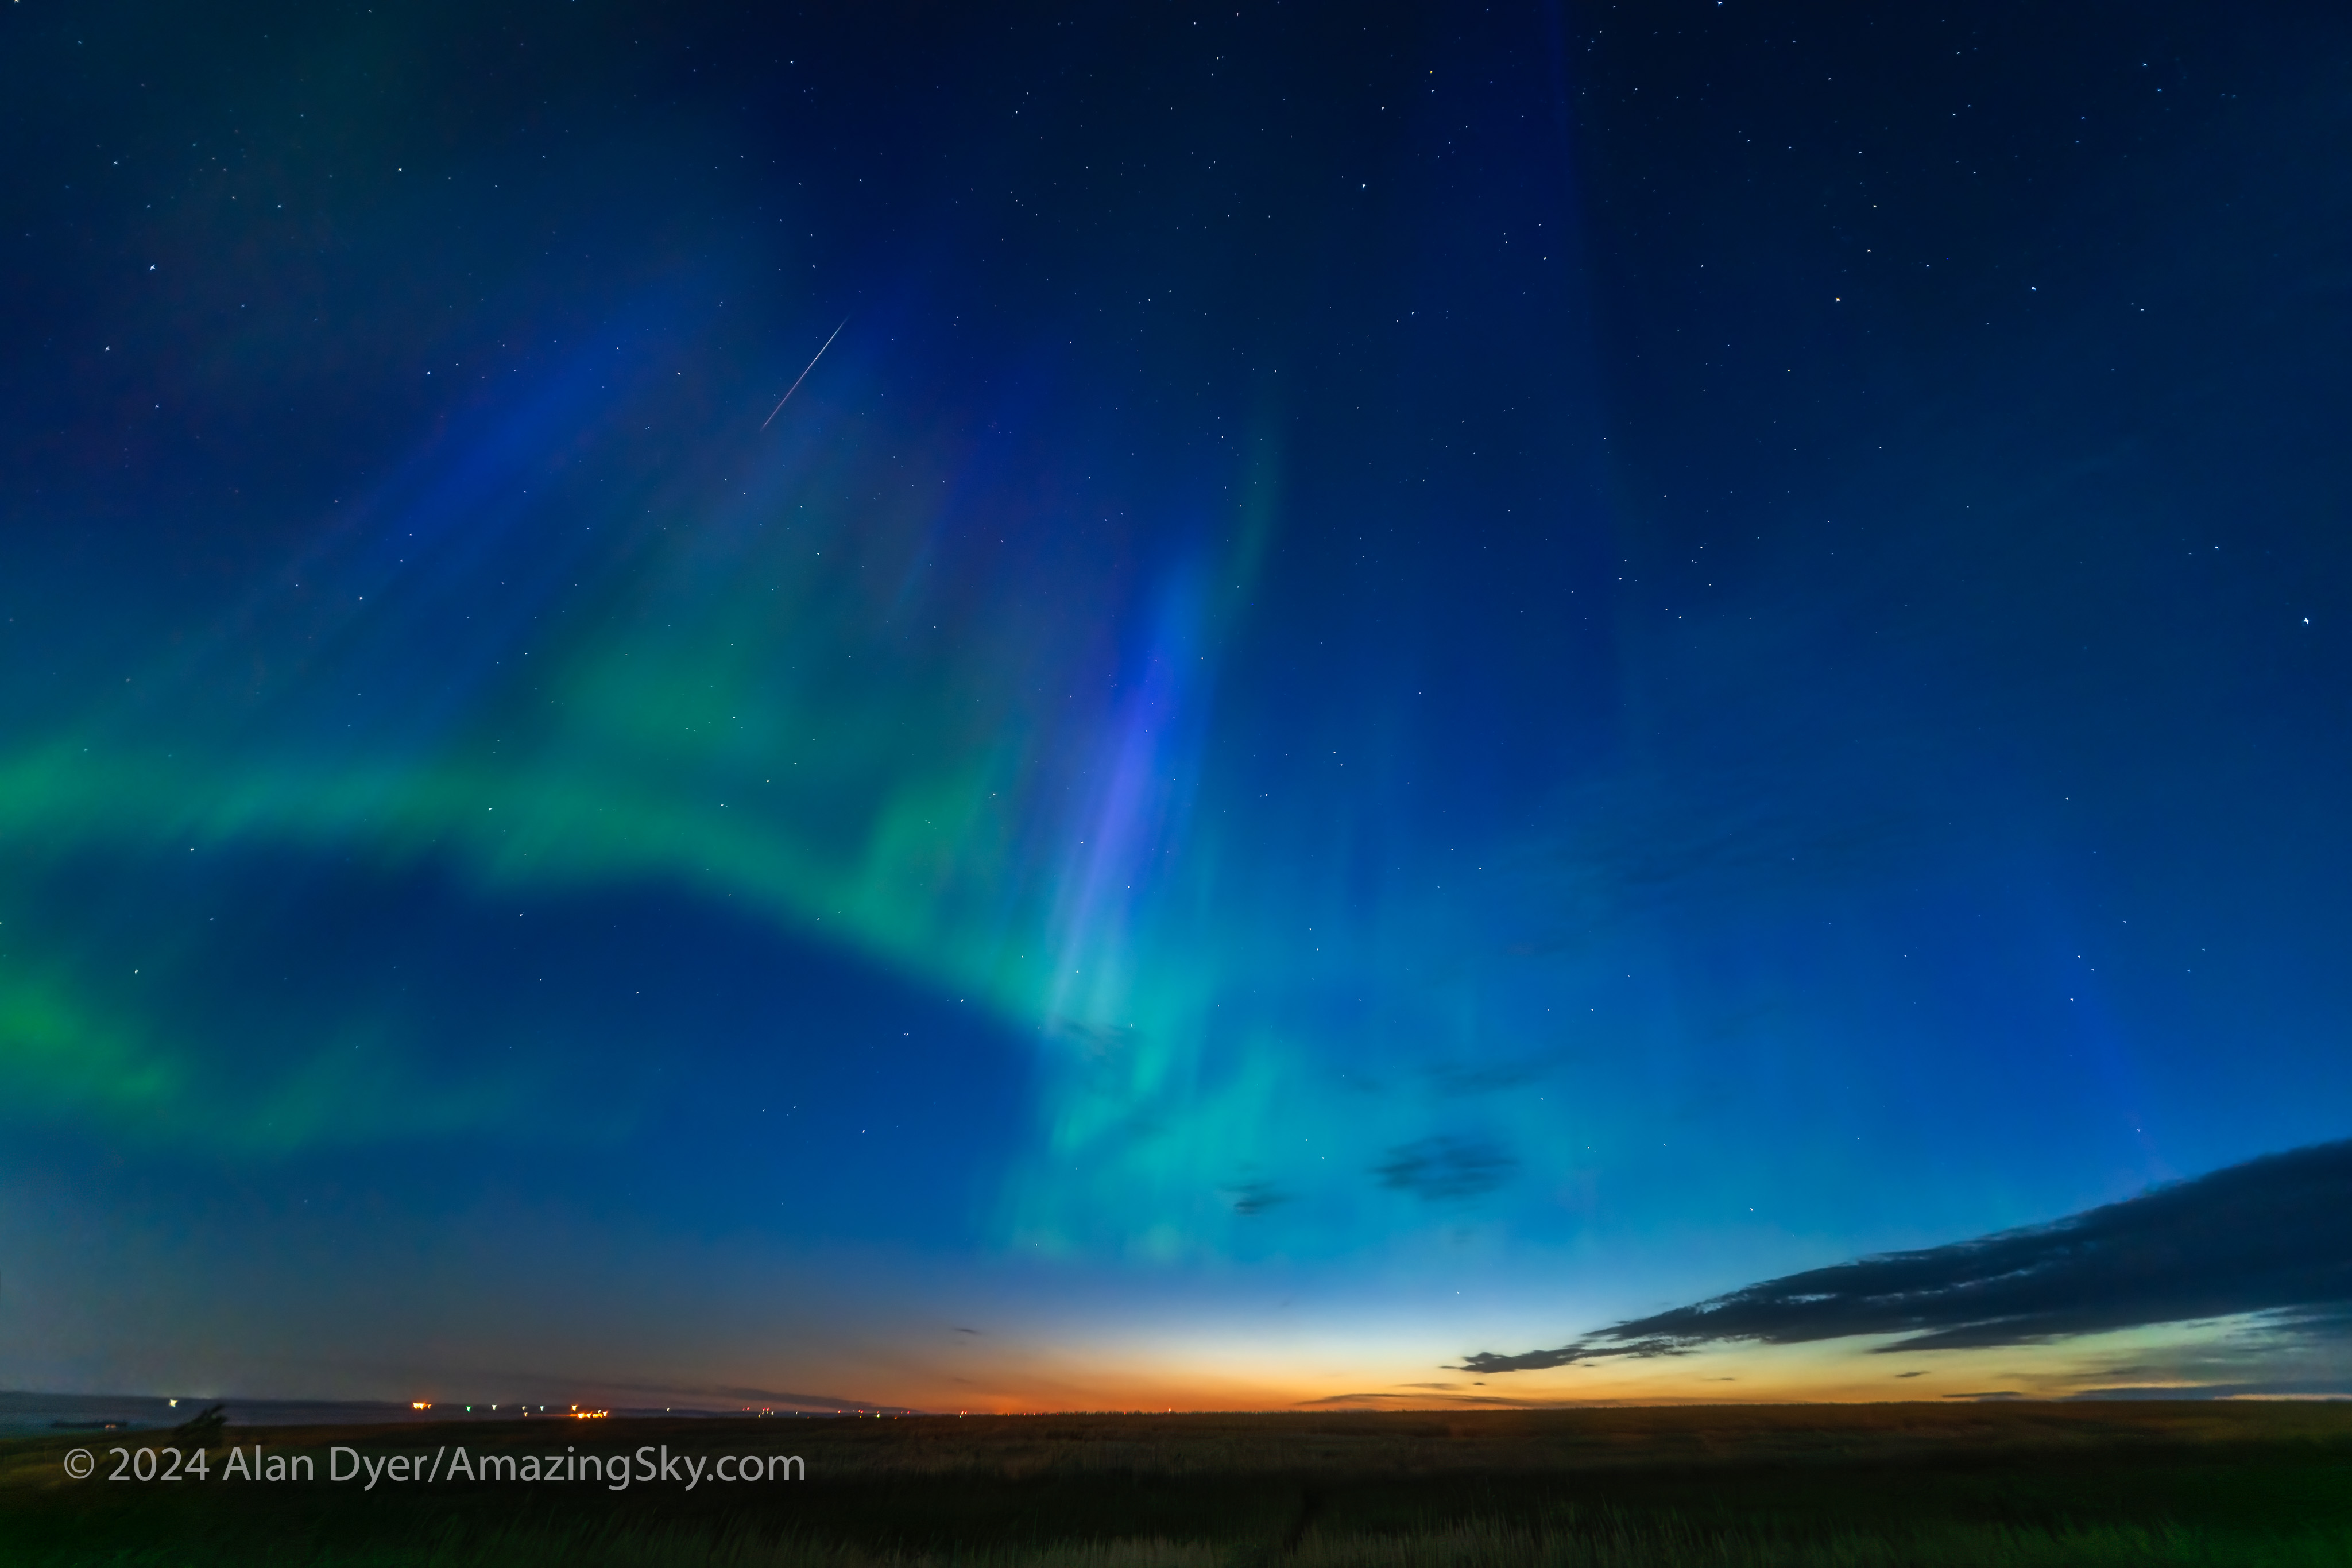
An aurora in the dawn twilight on September 17, 2024. A 4-second exposure with the Laowa 10mm at f/2.8.

Where the Laowa 10mm really proves its worth is for auroras, as above, which can require as wide a field as you can muster. Note the flat horizon.

For ultra-wide nightscapes in a single image (not a panorama) with a natural looking (not curved) horizon, and for meteor showers, the Laowa is just the ticket. 


BONUS TEST: The TTArtisan 7.5mm f/2 Fish-Eye ($140)

Technically, this lens is designed to be used on cropped-frame (or APS-sensor) cameras where it fills the frame with a curving horizon. But it works on a full-frame camera where it projects a circular image slightly larger in diameter than the short dimension of the frame, so not a complete circle as with a true circular fish-eye like the old Sigma 8mm f/3.5. 

An aurora in the dawn twilight on September 17, 2024 in a 2-second exposure with the TTArtisan 7.5mm fish-eye lens at f/2 on the Nikon Z6III at ISO 800.

For all-sky auroras, this is ideal, where the TTArtisanโ€™s fast f/2 speed is unprecedented in a fish-eye lens. That makes rapid-cadence time-lapses possible, as well as real-time movies. An example is here on my YouTube channel.

A stack of 4 x 4-minute exposures with the TTArtisan 7.5mm f/2 fish-eye lens stopped down to f/2.8 on the Nikon Z6III at ISO 1600, on the MSM Nomad tracker.

Or you can just capture the Milky Way from horizon to horizon, as above. For the latter, having stars sharp across the circular field is still desirable. 

I have this lens for Canon RF as well, but that unit shows a noticeable softening of the left edge with defocused stars, likely from lens de-centering. I was told by TTArtisan that was a normal unit-to-unit variation and not a defect warranting replacement. Annoying! 

I hesitated to buy one for my Nikon. But this is such a unique lens, and so affordable, I took the chance. The Nikon Z-mount version proved much better. 

TTArtisan 7.5mm Edge Performance 

There is no corner performance or vignetting to test here. 

TTArtisan 7.5mm lens at f/2, showing the left side area shown in the blowups below.

Instead, Iโ€™m inspecting the same side on the Nikon Z version that caused a problem on my Canon version. 

Comparing f/2 and f/2.8 edge aberrations.

The Nikon version looks fine, with stars sharp along the edge even at f/2, showing just a low level of astigmatism, to be expected in such a fast, wide lens. Stars tighten up a bit more at f/2.8. Most critically, the field was flat and in focus across the frame. There was no evidence of lens de-centering or optical defects. 

The edges do show some discolouration and a soft edge to the image area. I also see two odd dark protrusions at the top of the frame. Looking through the lens, thereโ€™s nothing obvious intruding into the light path. 

Keep in mind when used on a full-frame camera youโ€™re seeing more of the projected image than was intended in the design. 

The 7.5mm lens comes with a metal lens cap with a threaded centre disk. Remove it to create an aperture that vignettes the image to a smaller but complete circle.

The TTArtisan 7.5mm is a specialty lens to be sure. But at its low price it isnโ€™t a big outlay to include in your lens arsenal, for unique all-sky images, of auroras, satellite passages, sky colours, and the Milky Way. And it is terrific for time-lapses and movies of the whole sky. It is a no-frills manual lens available for most camera mounts.


Recommendations

The Viltrox 16mm, Laowa 10mm and TTArtisan 7.5mm are all available for Sony E-mount. The Laowa and TTArtisan are available for Canon RF, but the Viltrox 16mm is not, as it is an auto-focus, full-frame lens, the class of lenses Canon has yet to allow on their RF mounts, much to the disdain of all concerned but Canon management it seems. 

Viltrox 16mm โ€” For nightscape use, the Viltrox 16mm might be the single best choice, as being the most versatile and affordable of the trio of wide-angle lenses. Its focal length is a good balance between the usual 14mm and what I think is a more useful 20mm. 

Nikkor 20mm โ€” I like the Nikkor 20mm for its lower level of vignetting, slightly tighter framing, and very sharp stars. I think a 20mm is an ideal focal length for many nightscapes and Milky Way scenes. But it is the most expensive lens tested here. 

Laowa 10mm โ€” While nearly as costly as the Nikkor 20mm, the Laowa 10mm is much more specialized and, I think, not as useful as the others for general nightscape and Milky Way shooting. But it is superb for auroras, if you are in a place where they are common, as they are here in Alberta. Otherwise, I think youโ€™d find the 10mm a costly lens that might not see a lot of use for astrophotography. Its real fortรฉ is architecture and real-estate interiors. 

TTArtisan 7.5mm โ€” Ditto on its limited use. But it is so affordable itโ€™s easy to justify even if it doesnโ€™t get a lot of use. The astro images, time-lapses, and movies it can produce are unique and impossible to create any other way. Be sure to buy it from a source where you can return it easily if you find your sample defective. 

Reason To Go Mirrorless

The quality of these and other premium lenses from Nikon, and also from Canon, Sony and third-party makers like Sigma and Viltrox, is one of the major benefits of migrating to mirrorless cameras. DSLRs, and the lenses made for them, are now effectively dead as new gear choices. 

Yes, mirrorless cameras can be better in many aspects of their operation than DSLRs. But it is the lenses made for mirrorless that show the greatest improvement over their DSLR equivalents, many of which date back to the forgiving film days. 

โ€” Alan, December 6, 2024 (amazingsky.com

How To Photograph the Solar Eclipses


My latest ebook describes in detail the many techniques we can use to capture great still images and movies of the 2023 and 2024 eclipses of the Sun.

In the next few months we have two major eclipses of the Sun visible from North America.

On October 14, 2023 the Moon will cross the disk of the Sun creating a partial eclipse. But from along a narrow path in the western U.S. the Moon’s disk will be centered on the Sun’s disk but not be large enough to completely cover it. For a few minutes, viewers will see an “annular” eclipse, as above, as what remains of the Sun forms a brilliant ring of light around the dark disk of the Moon.

Six lunar months later, the Moon again crosses the Sun but is now large enough to completely cover the Sun’s bright disk. The result is the most spectacular celestial sight, a total eclipse of the Sun, on April 8, 2024. The last such total solar eclipse (TSE) in North America was on August 21, 2017, shown above. After 2024, the next TSE in southern North America will not be until August 23, 2044. (There’s a TSE in northern Alaska on March 30, 2033.)

In 2017 I prepared an ebook about how to shoot that year’s total eclipse. This year I revised and expanded the book extensively to cover both the 2023 annular and 2024 total eclipses. The new 350-page ebook explains how to frame the eclipses depending on where you are along the paths. New information covers the advances in camera gear, with more details added on shooting video. Revised tutorials cover new software and processing techniques.

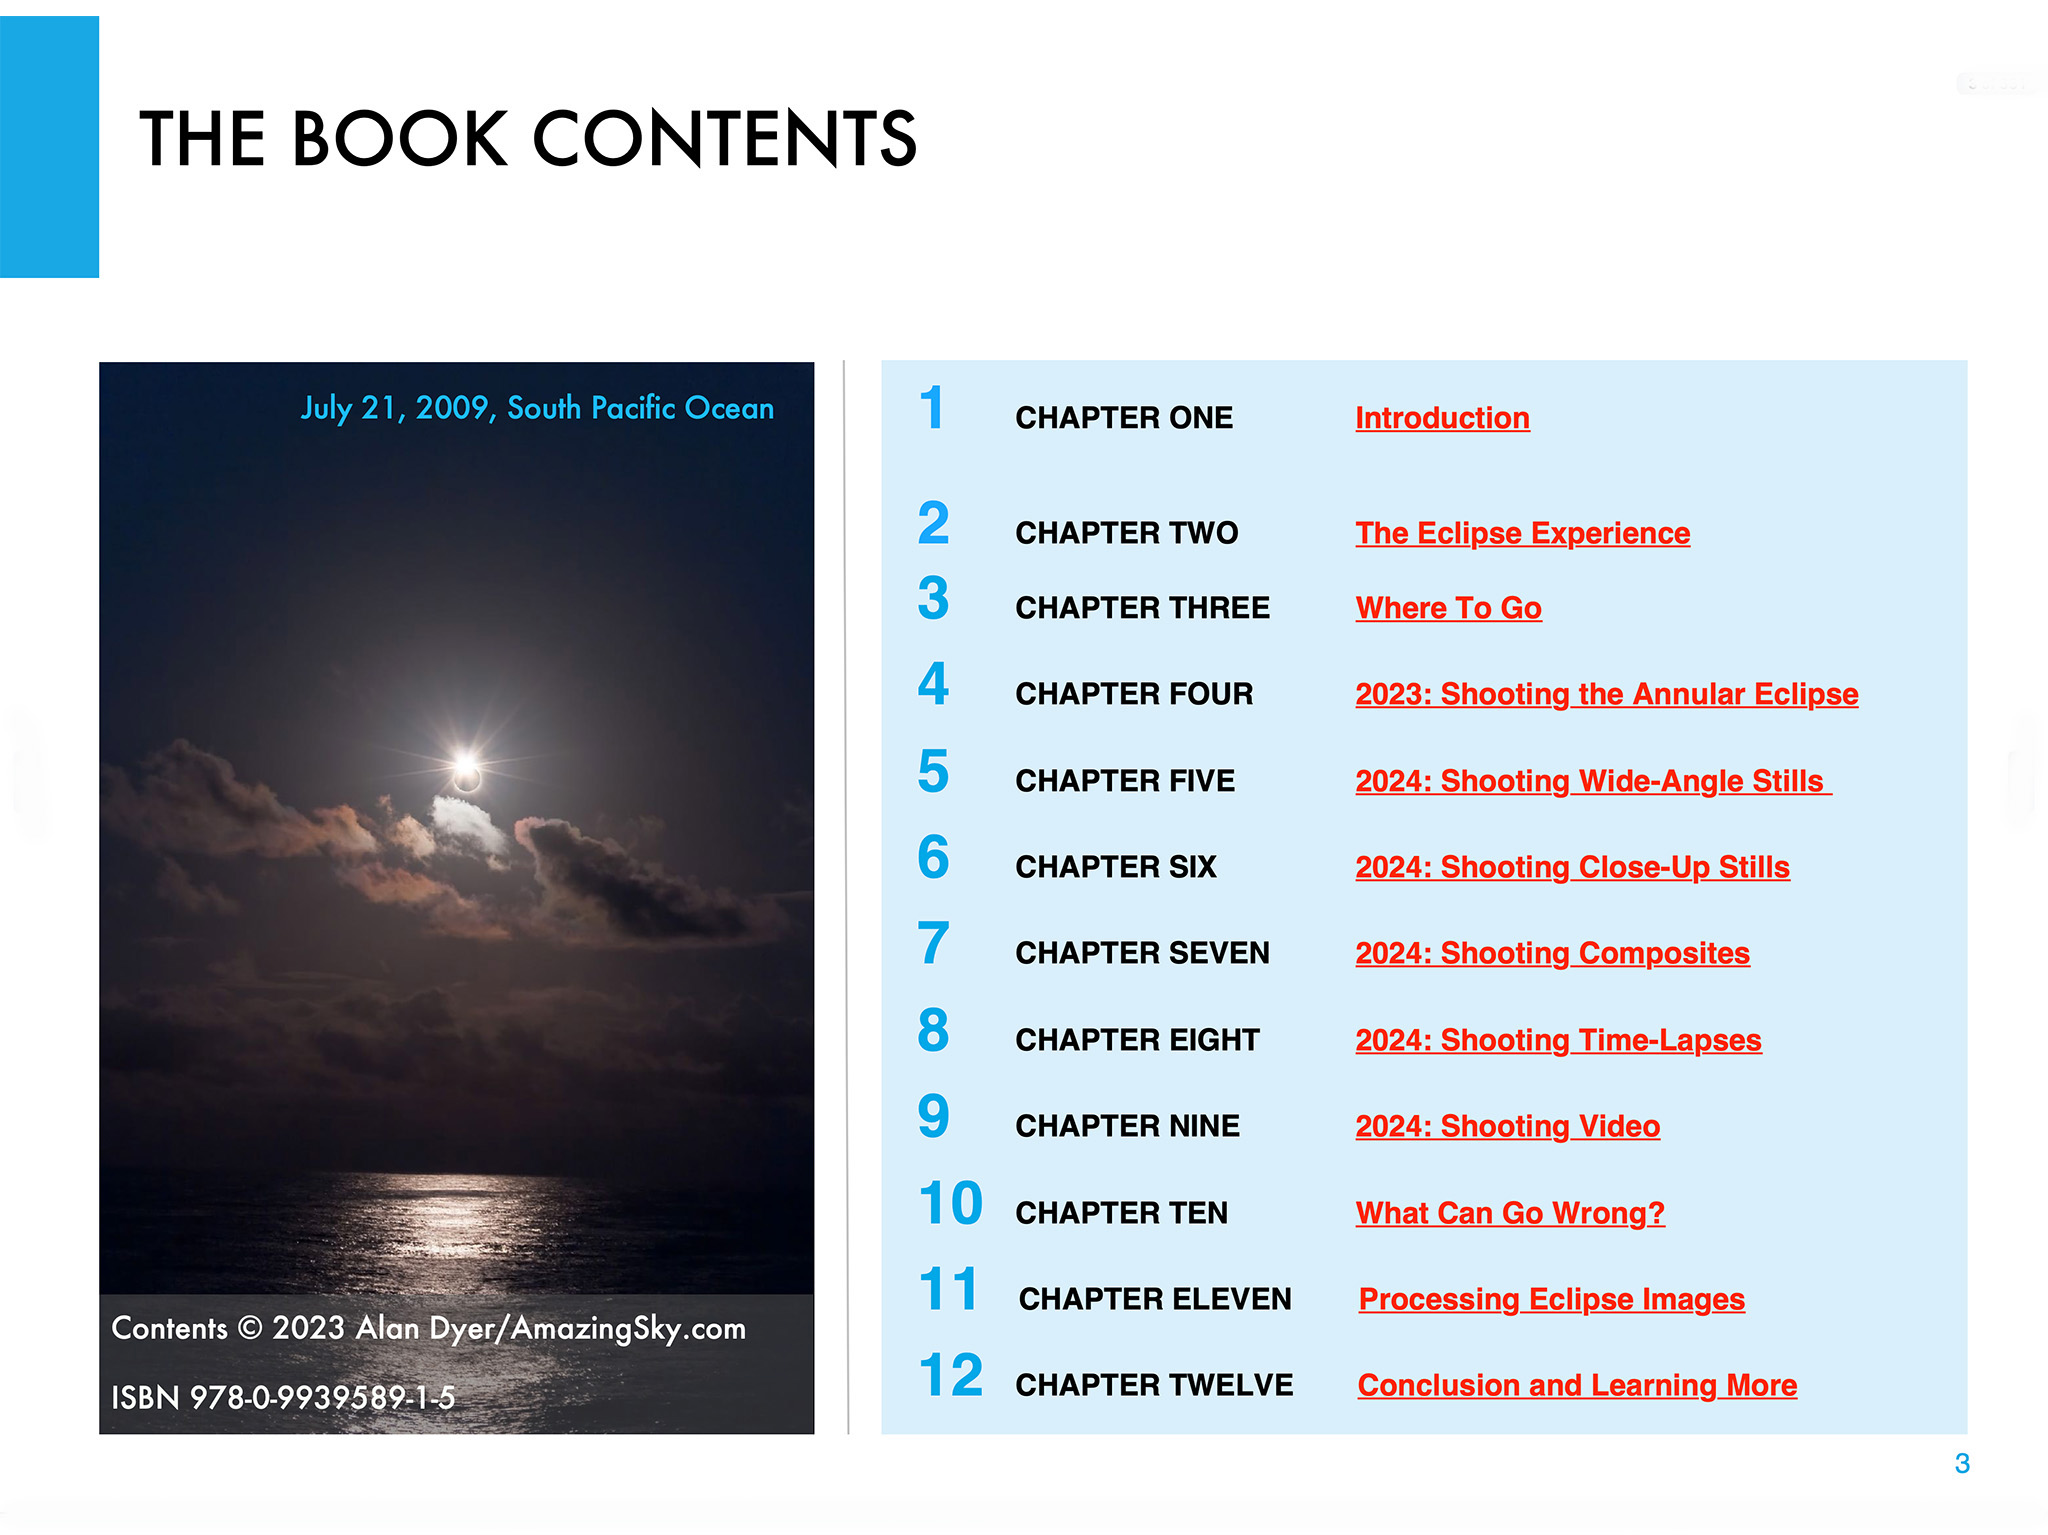
Above is the ebook’s Contents page, so you can see what topics it covers, over an extensive 350 pages. I provide not only advice on lots of techniques and gear, but also suggestions for what not to do, and what can go wrong!


The Fundamentals

I discuss the filters needed, comparing the various types available, and when to use them, and when to remove them. (A filter is always needed for the annular eclipse, but failing to remove the filter is a common failing at a total eclipse!)

For the 2023 annular eclipse I explain how to shoot close-ups, but also another type of image, the multiple exposure composite. Framing, timing and exposing correctly are crucial.

I do the same for the 2024 total eclipse, as a wide-angle shot of the eclipsed Sun over a landscape is one of the easiest ways to capture the event. It’s possible to set up a camera to take the images automatically, leaving you free to enjoy the view of the event without fussing with gear. I explain how best to do that.

For both eclipses, many people will want to shoot close-ups with telephoto lenses or telescopes. It takes more work and more can go wrong, but I show what’s required for equipment and exposures, and explain how to avoid the common flaws of fuzzy focus and trailed images.

But good exposure is also essential. However, for a total eclipse close-up, no one exposure is best. It takes a range of exposures to record the wide dynamic range of phenomena during totality. That demands work at the camera.


Setting Cameras

I show how we can use a camera’s auto-bracketing function to help automate the process of taking a set of exposures, from short exposures for the prominences, to long for the faint outer corona.

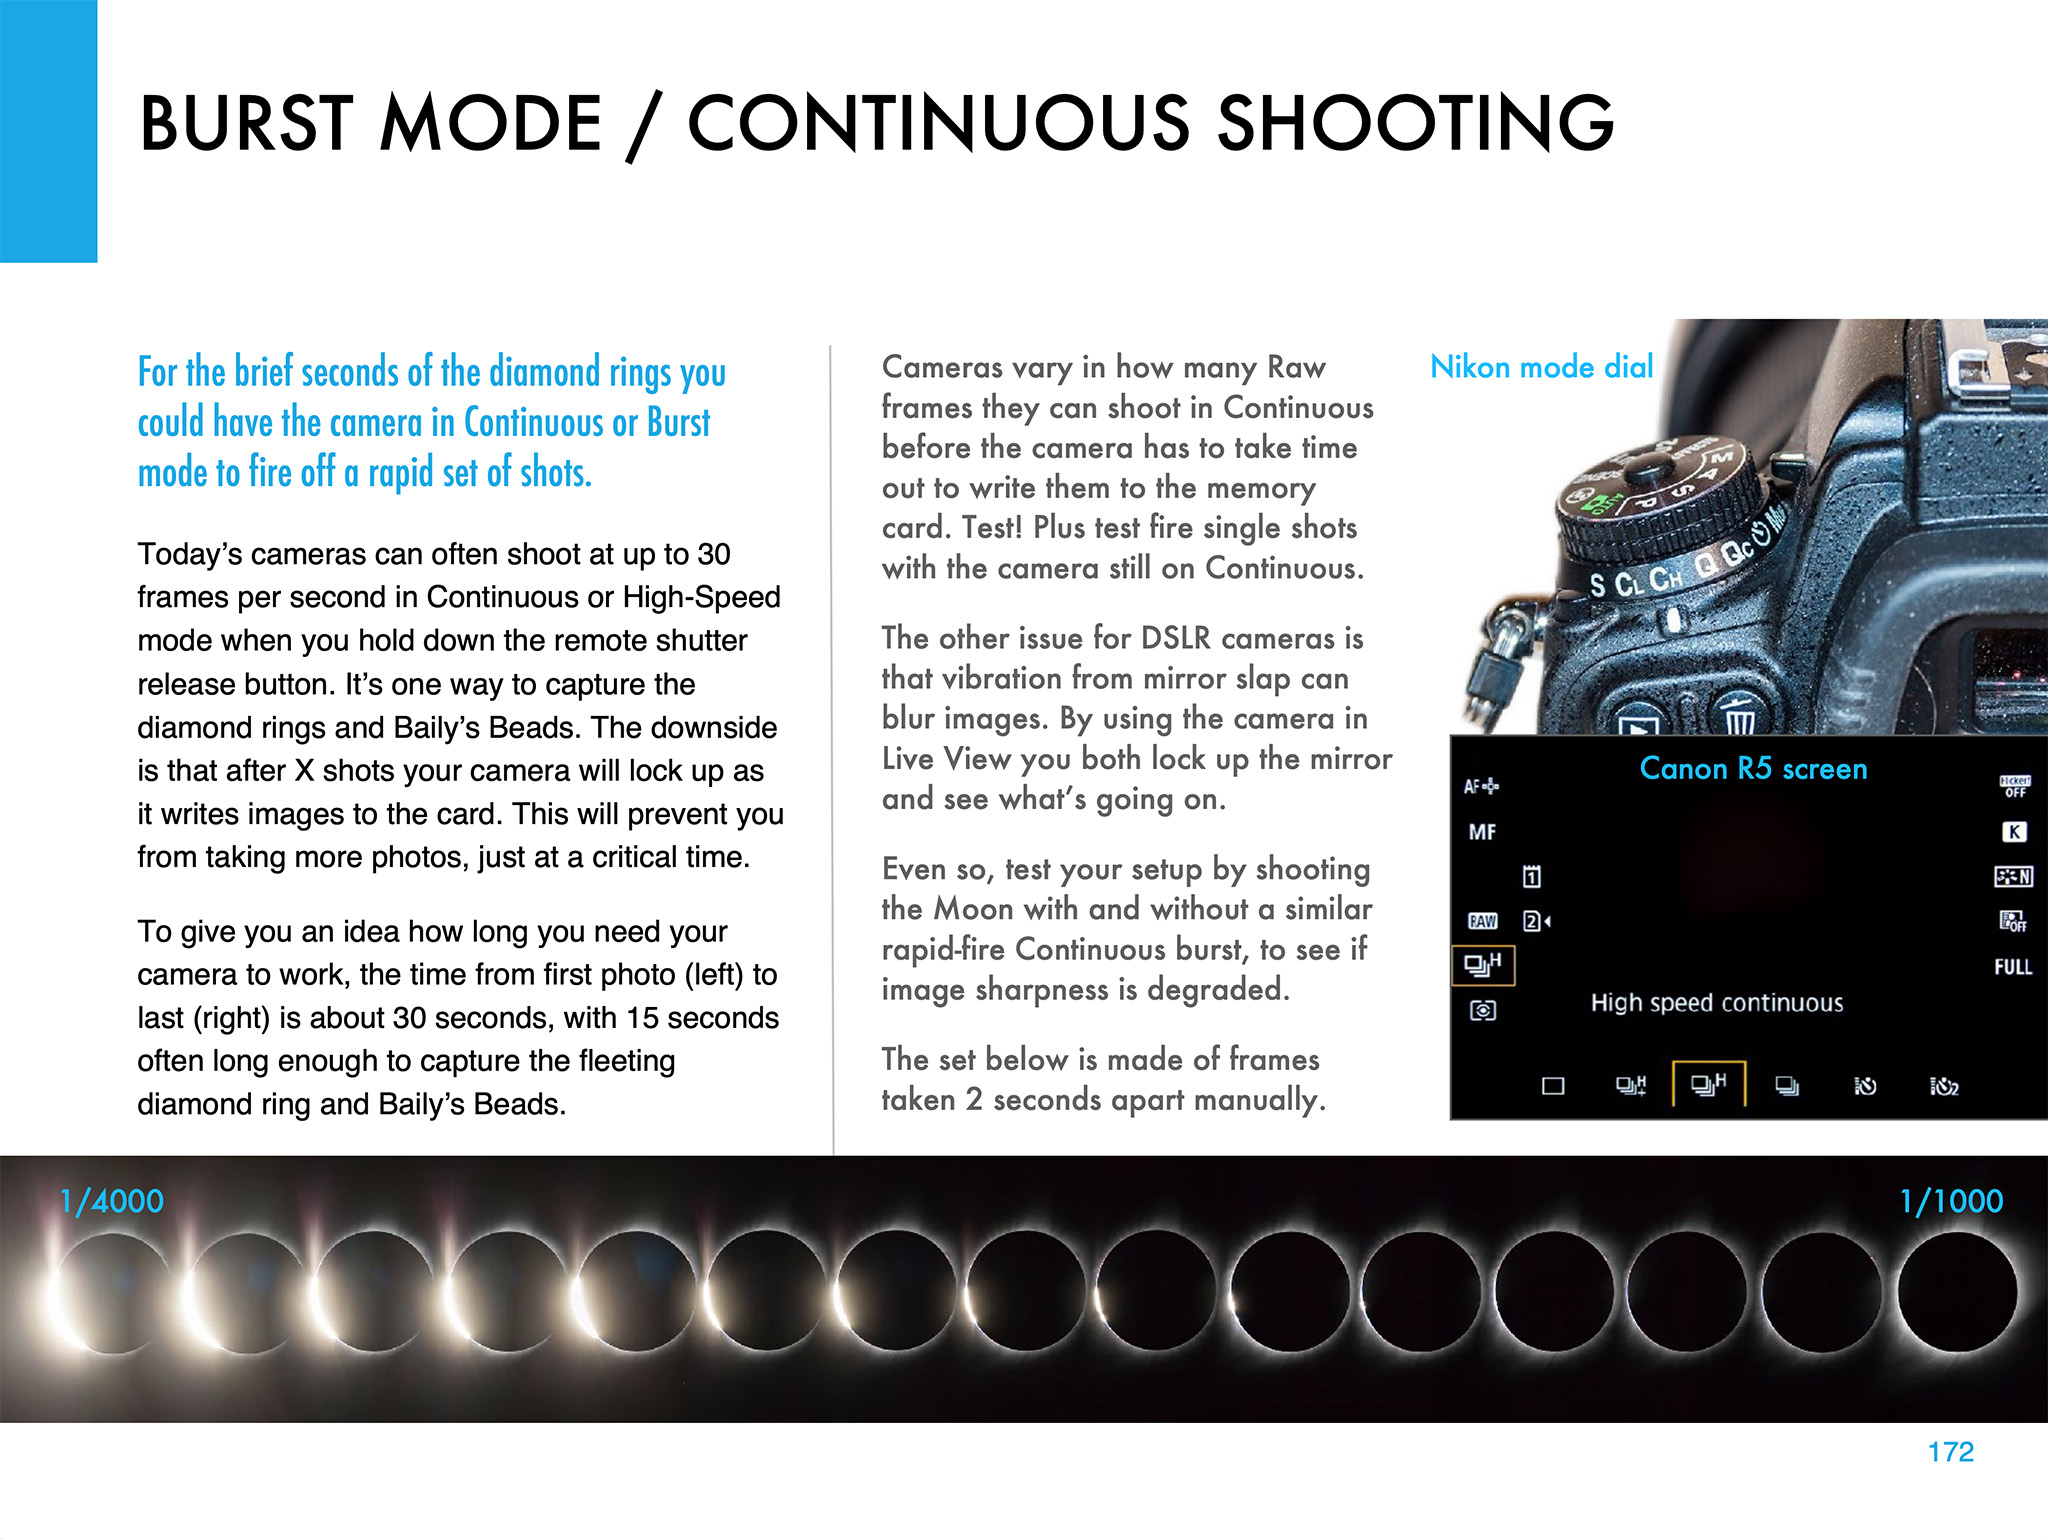
Another option is using a continuous burst mode to capture the fleeting moments of the diamond rings at the start and end of totality in 2024. But this can also be useful for capturing the “reverse Baily’s beads” that appear briefly as the Moon reaches the inner contact points at the start and end of the annular phase of the 2023 eclipse.

Using a tracking mount can help with shooting a set of images during totality. I describe the options for choosing the right mount and telescope, and how to set it up for accurate tracking. I discuss the advantages โ€” and pitfalls โ€”ย of using a tracking mount.


Shooting Video

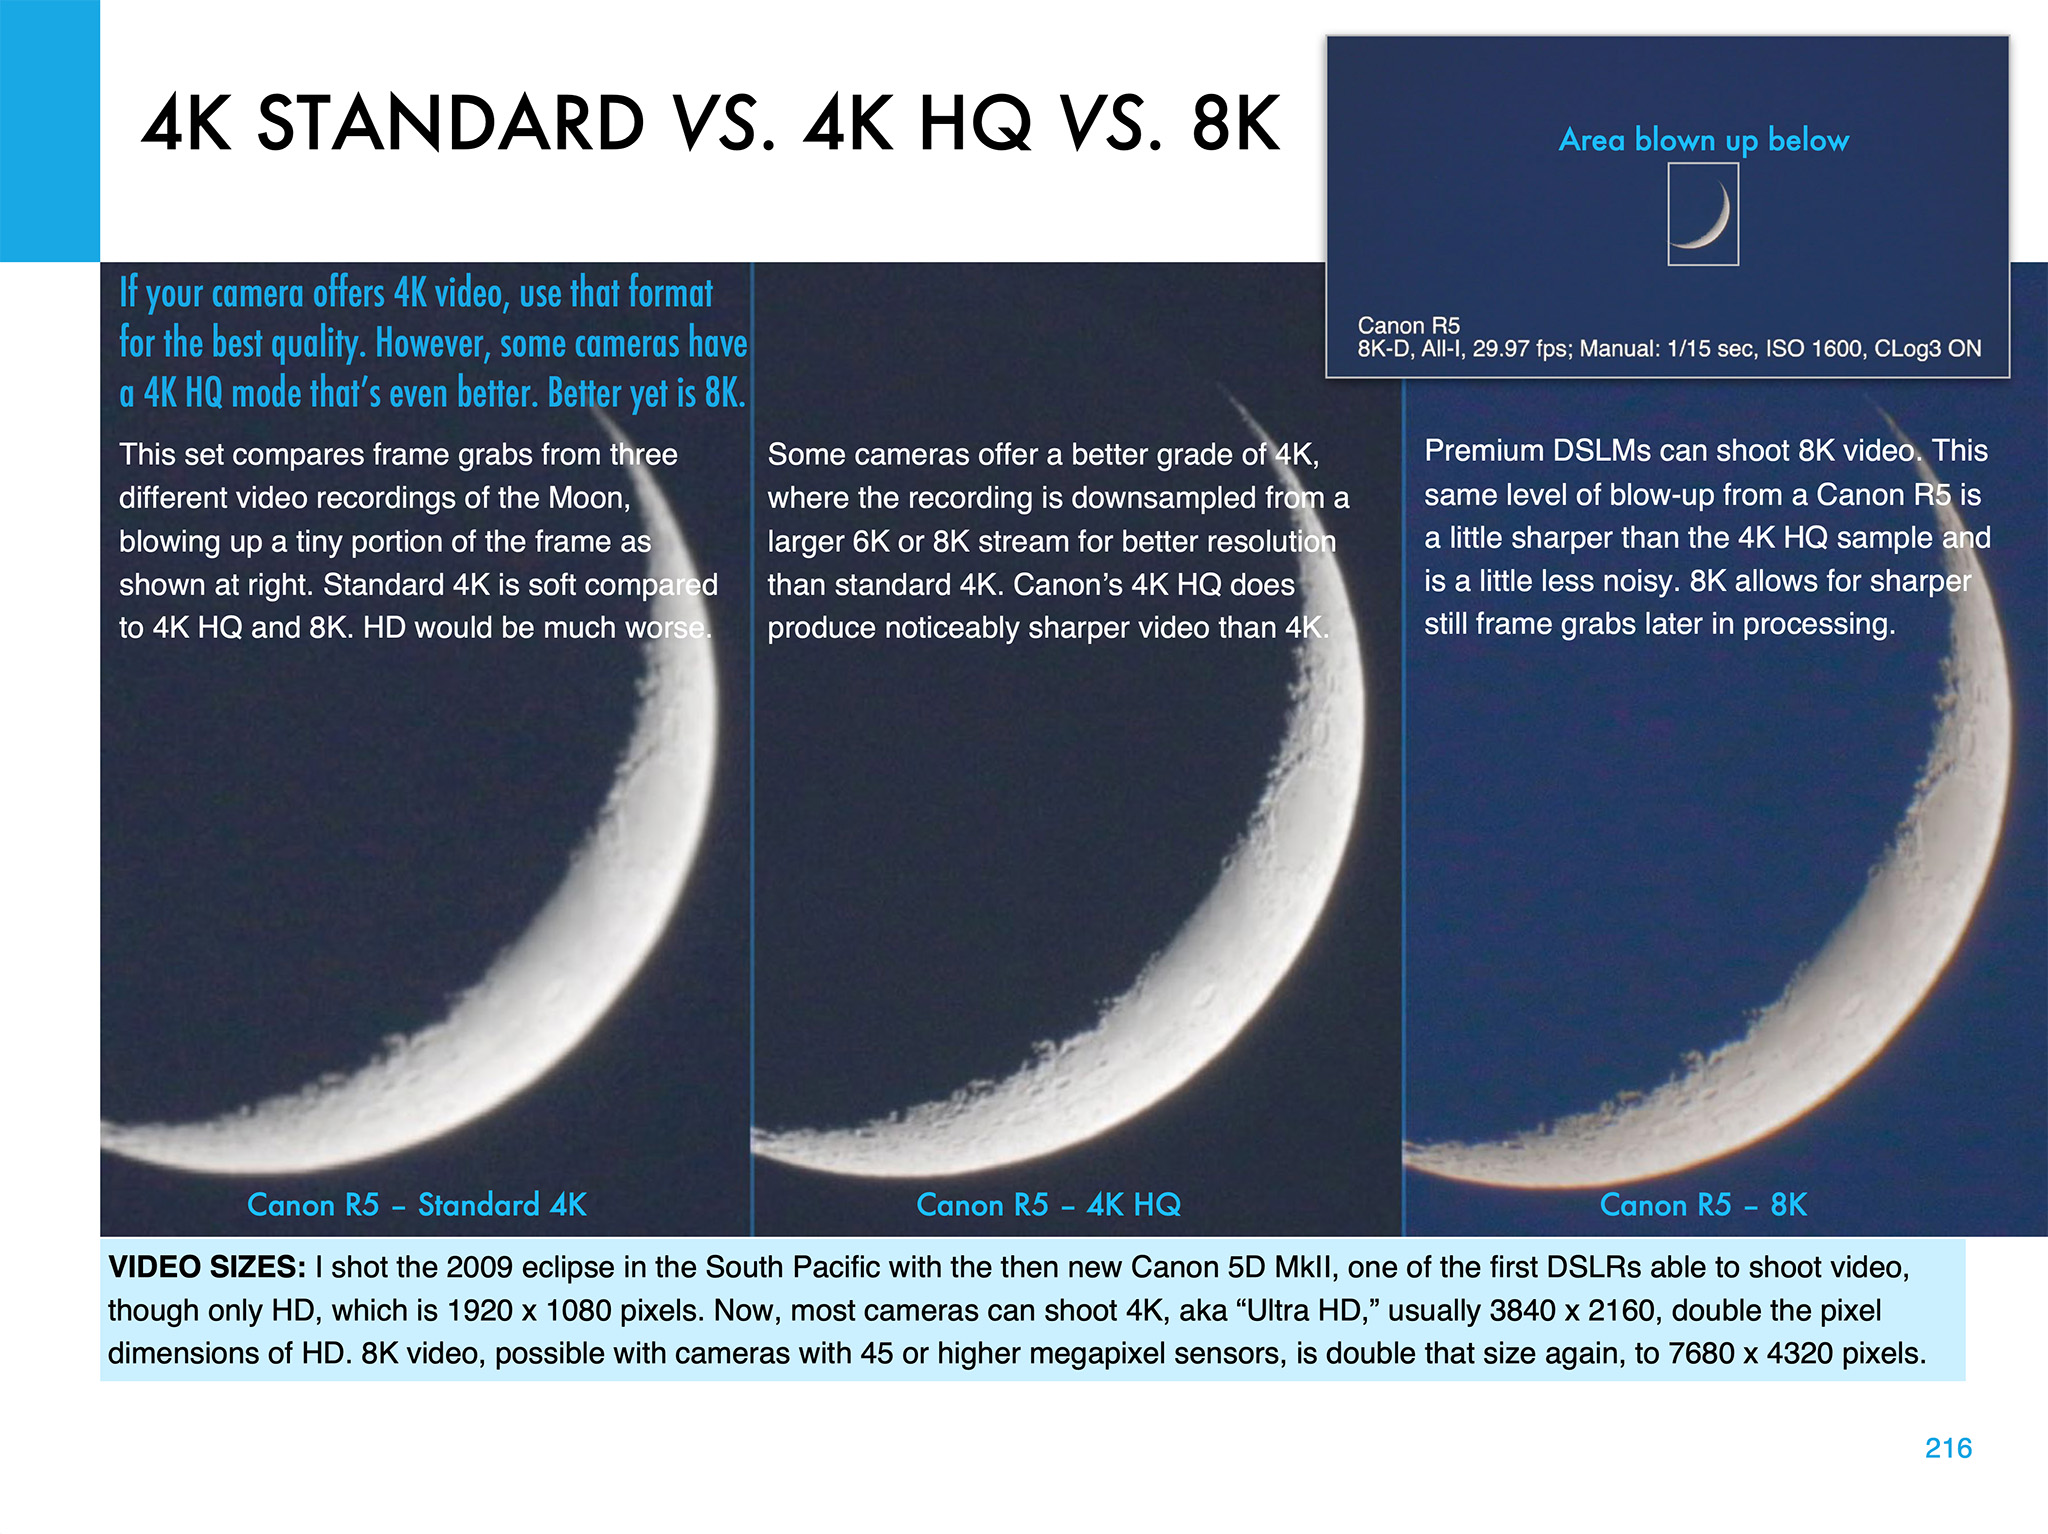
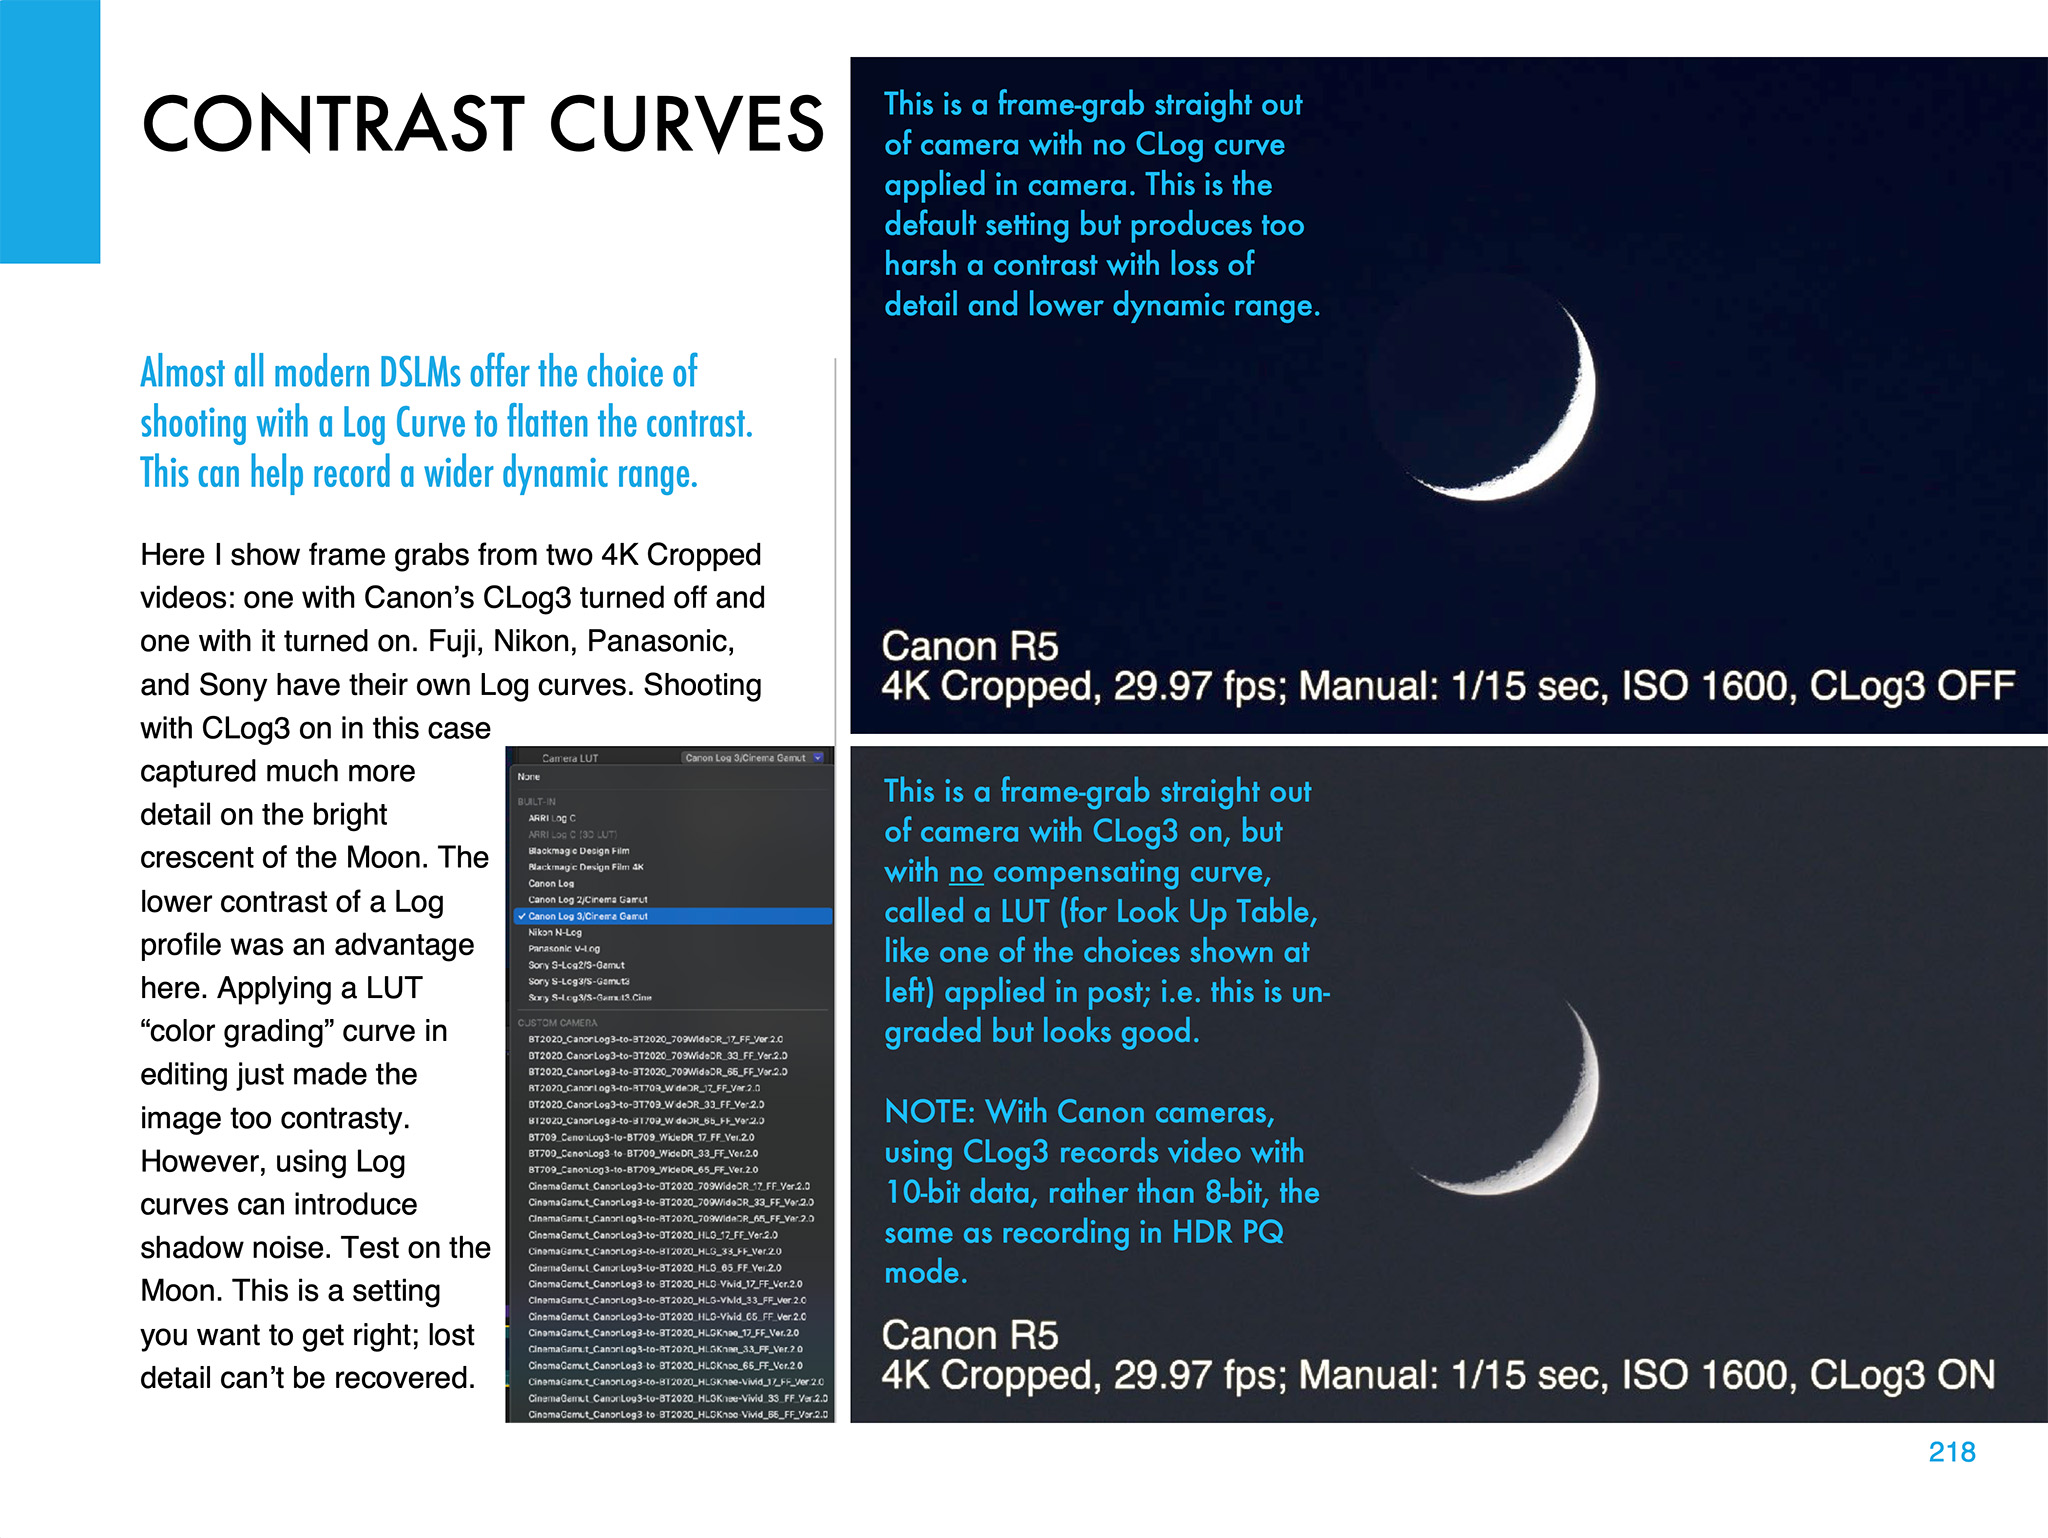
Video is now an important feature of many cameras. But the choices of formats and settings can be daunting! 4K, 8K, 4K HQ โ€” what to use? I illustrate the differences, using the best practice target, the crescent Moon.

Choosing the right contrast curve for your video โ€” such as CLog3 here โ€” can also make a big difference to the final video quality. It’s important to get that right. You have only one chance!

I also devote a chapter to shooting time-lapses, with wide-angle lenses and telescopes.


Image Processing

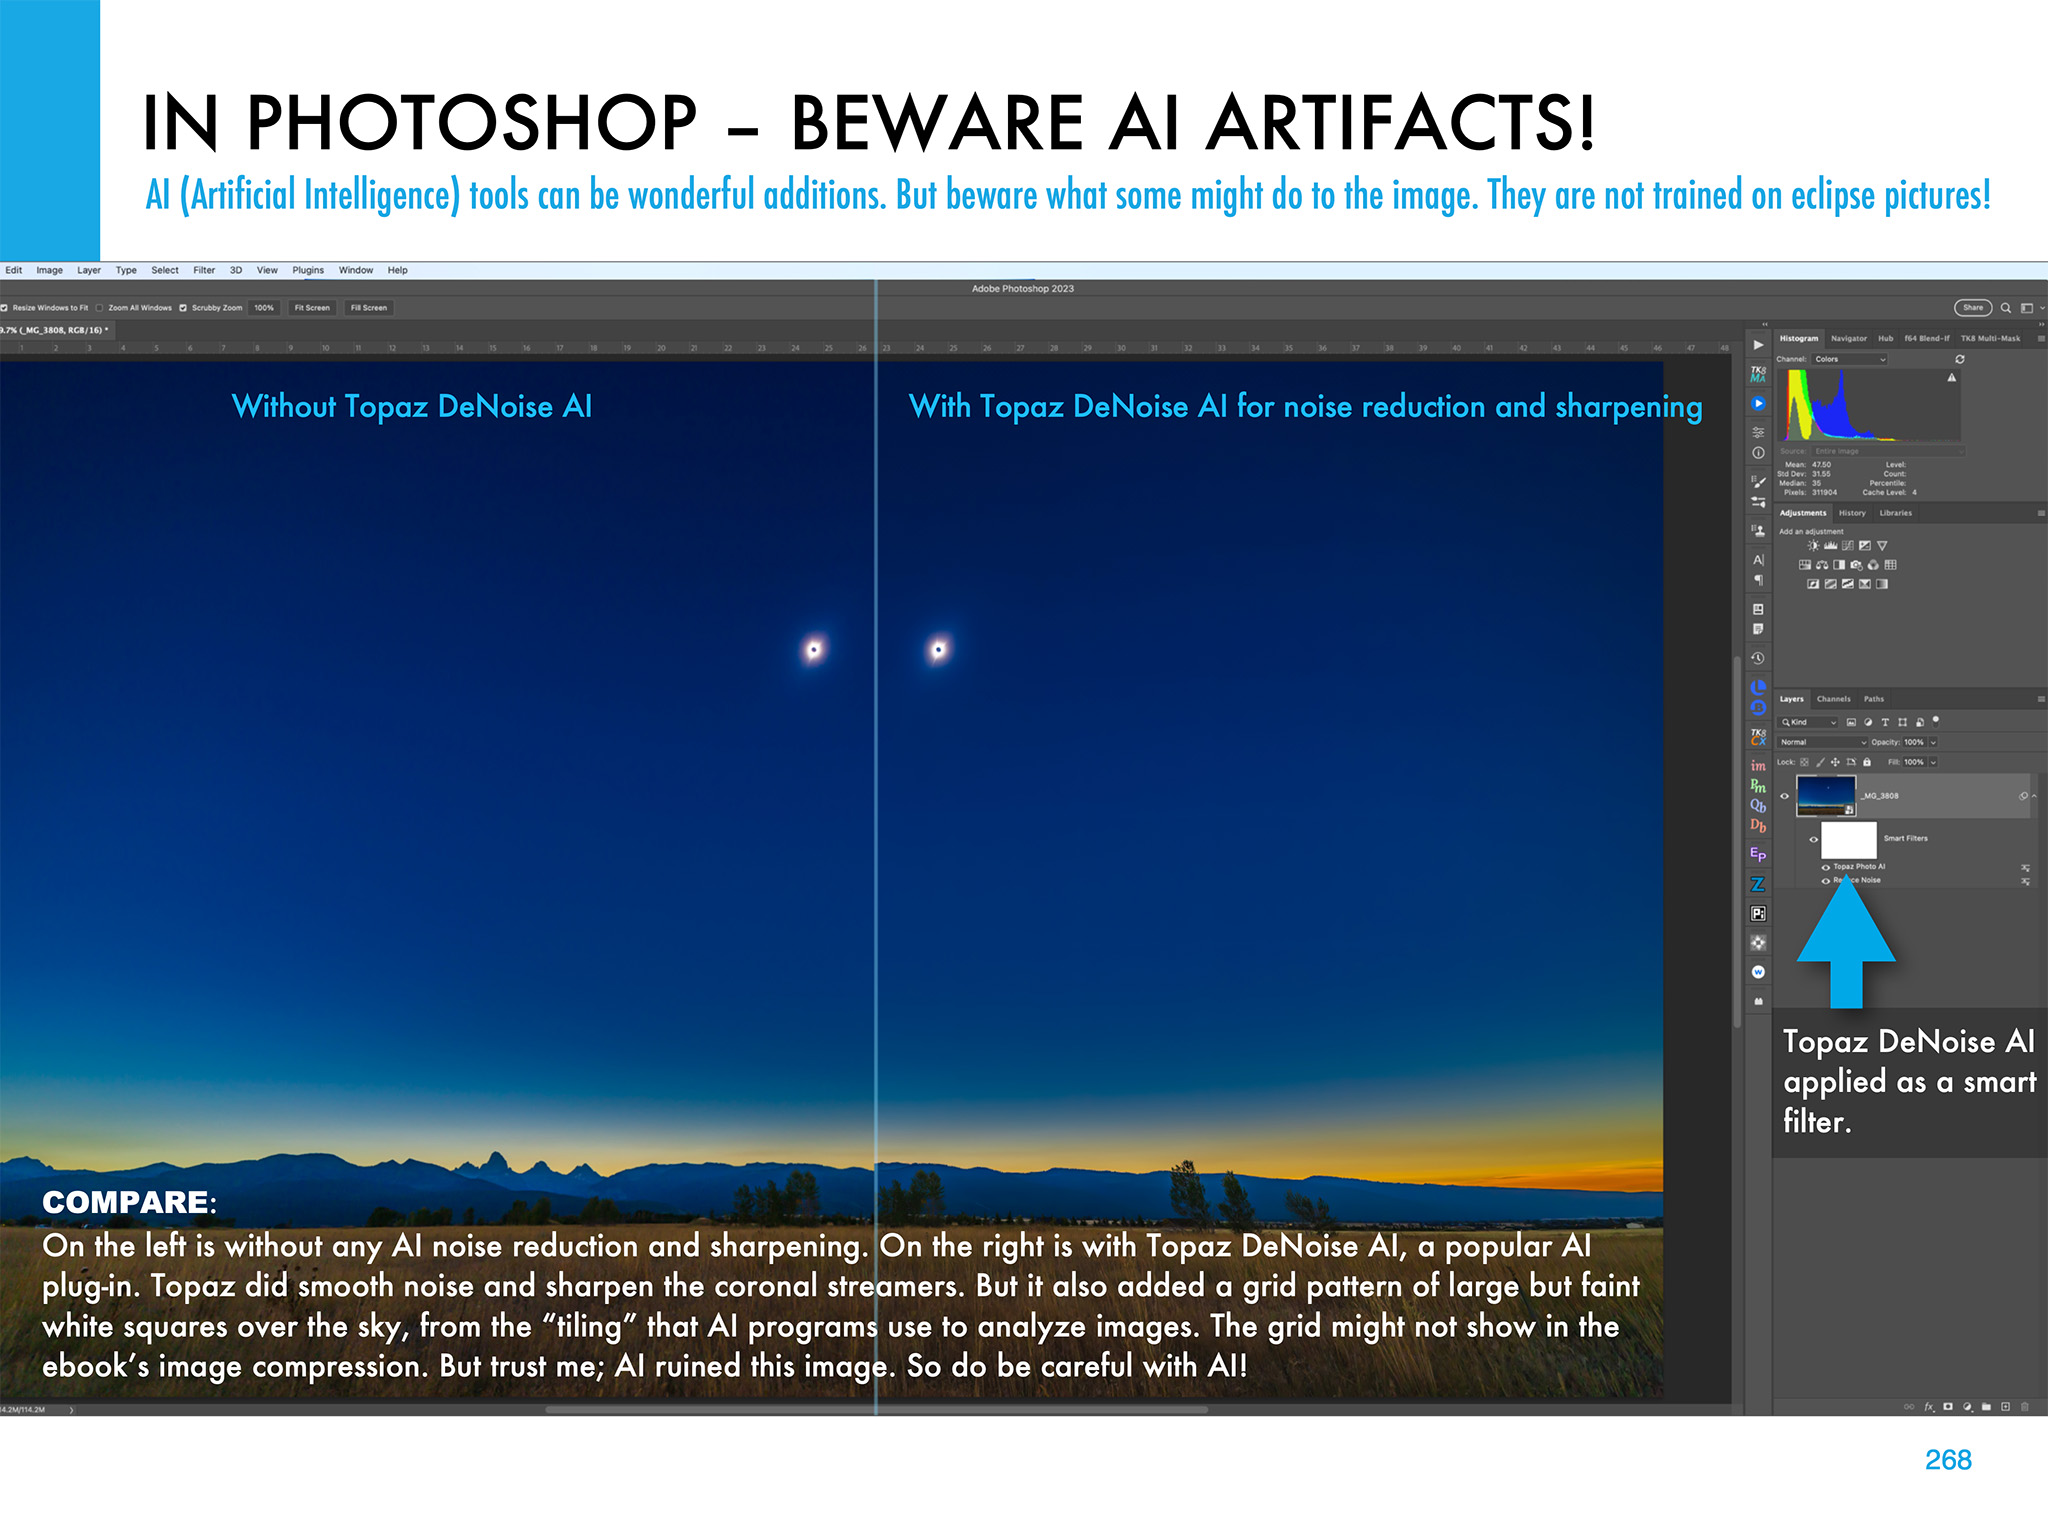
Chapter 11 is the biggest, with 68 pages of tutorials on how to process eclipse images, using the latest software. I show the benefit new AI tools can provide, but also the oddities they can impart to eclipse images.

I illustrate how to use HDR software (comparing sample results from several popular programs) to blend multiple exposures for greater dynamic range.

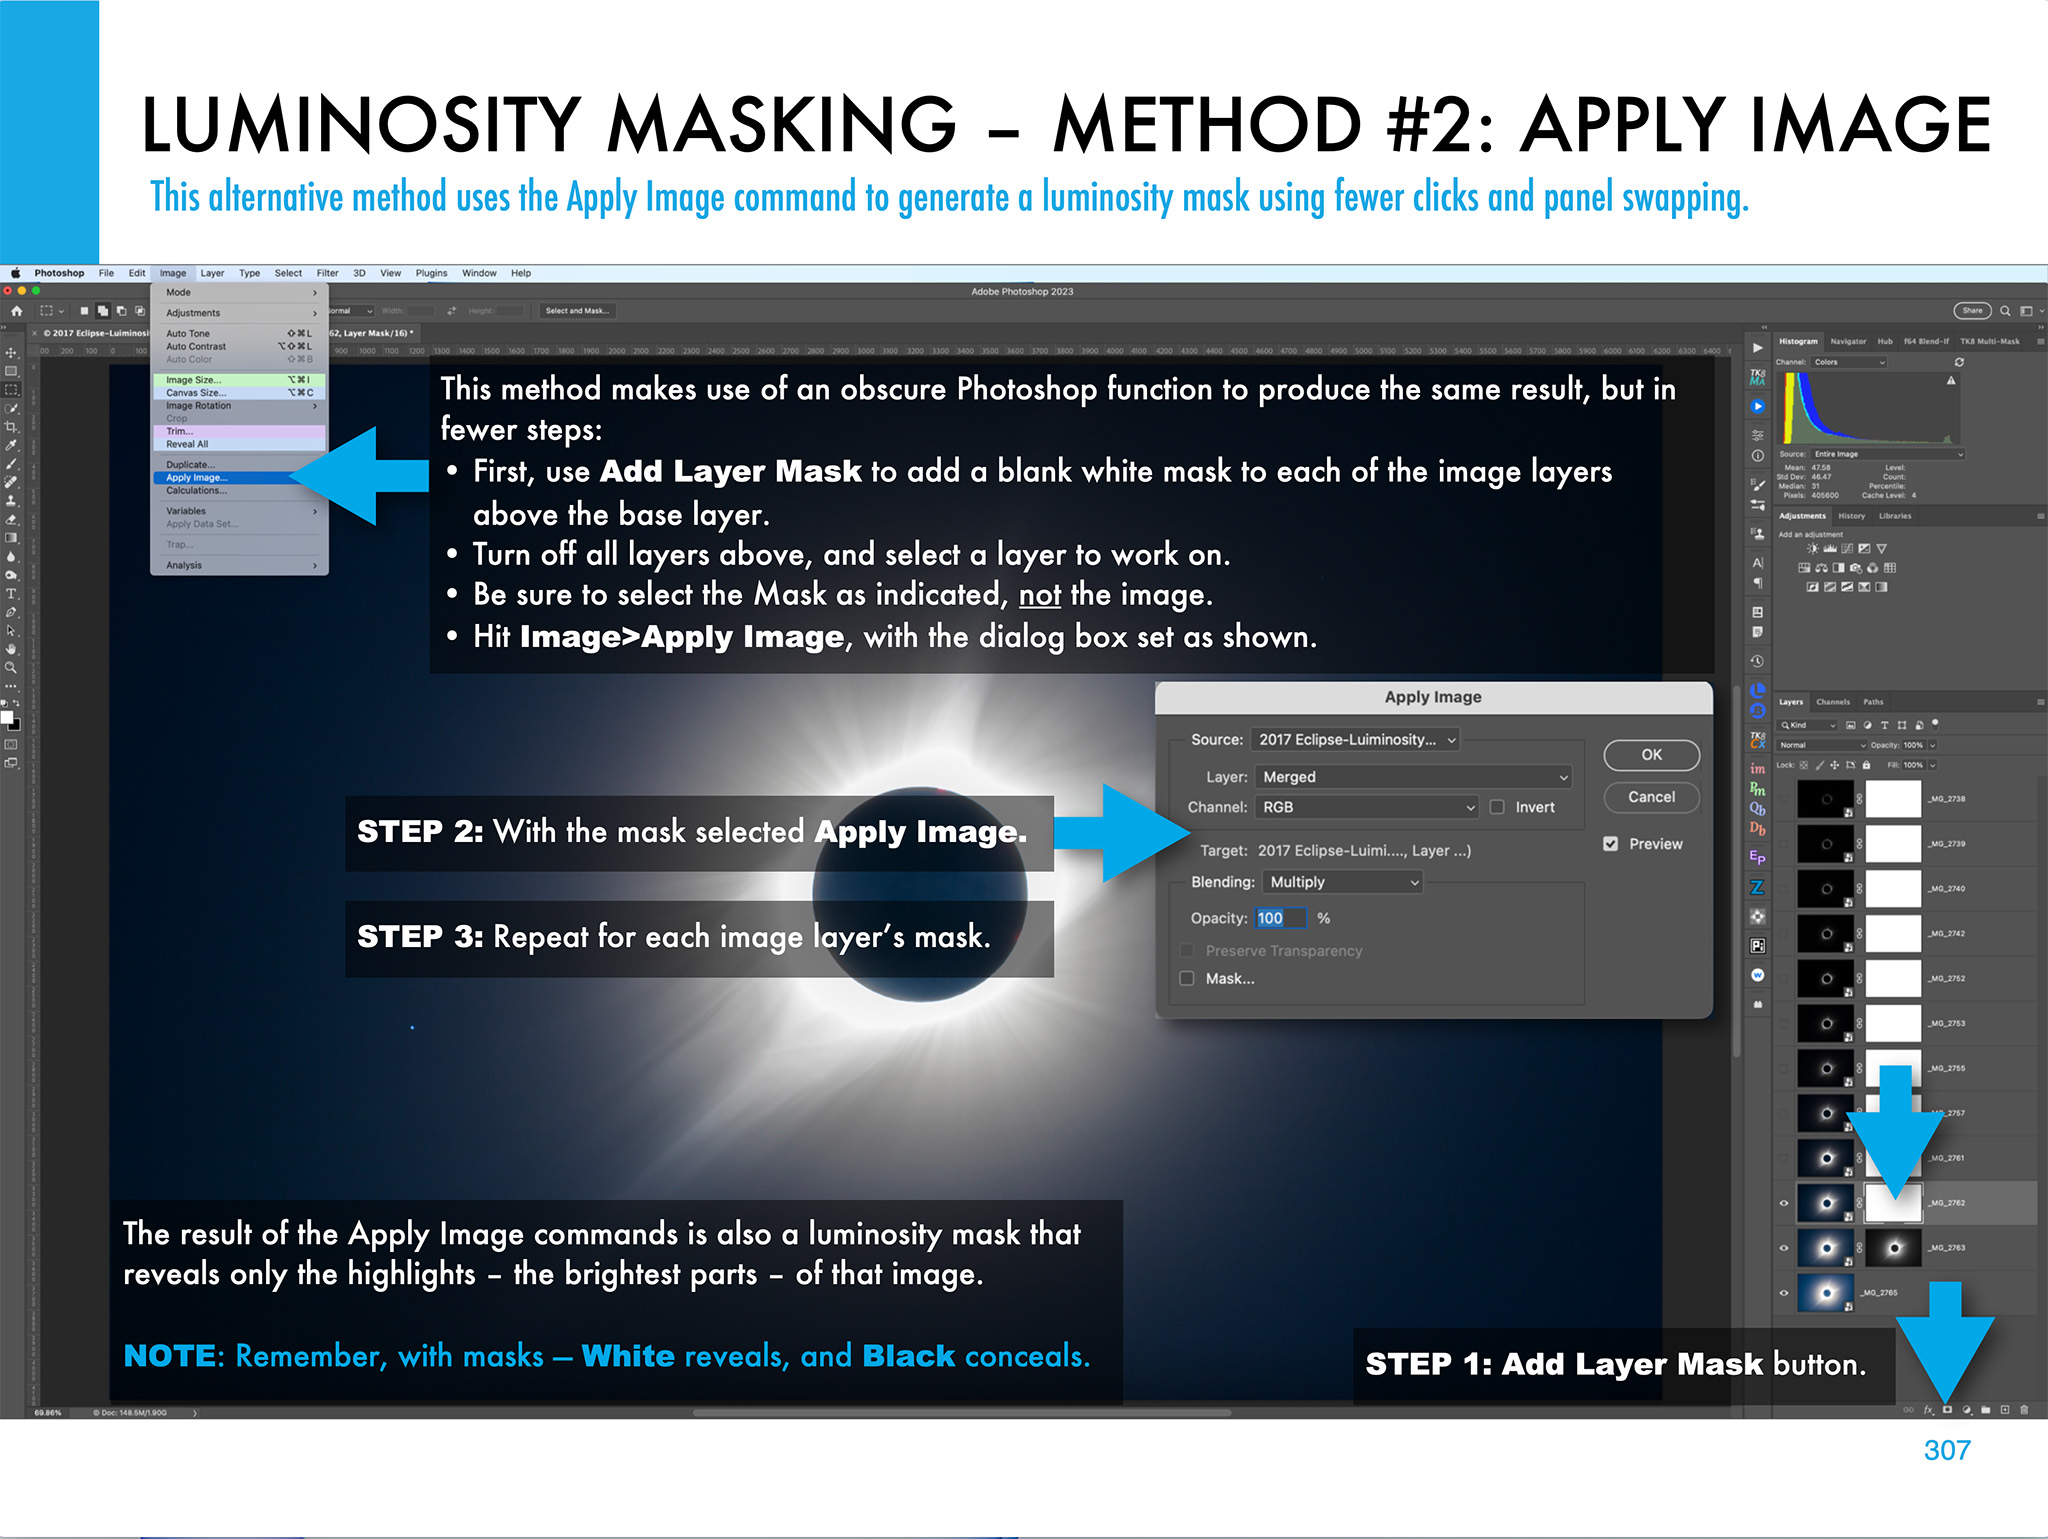
I illustrate other methods of stacking and blending exposure sets, such as luminosity masks and stack modes. Examples are all with Adobe products, but the methods are applicable to other layer-based programs such as Affinity Photo.

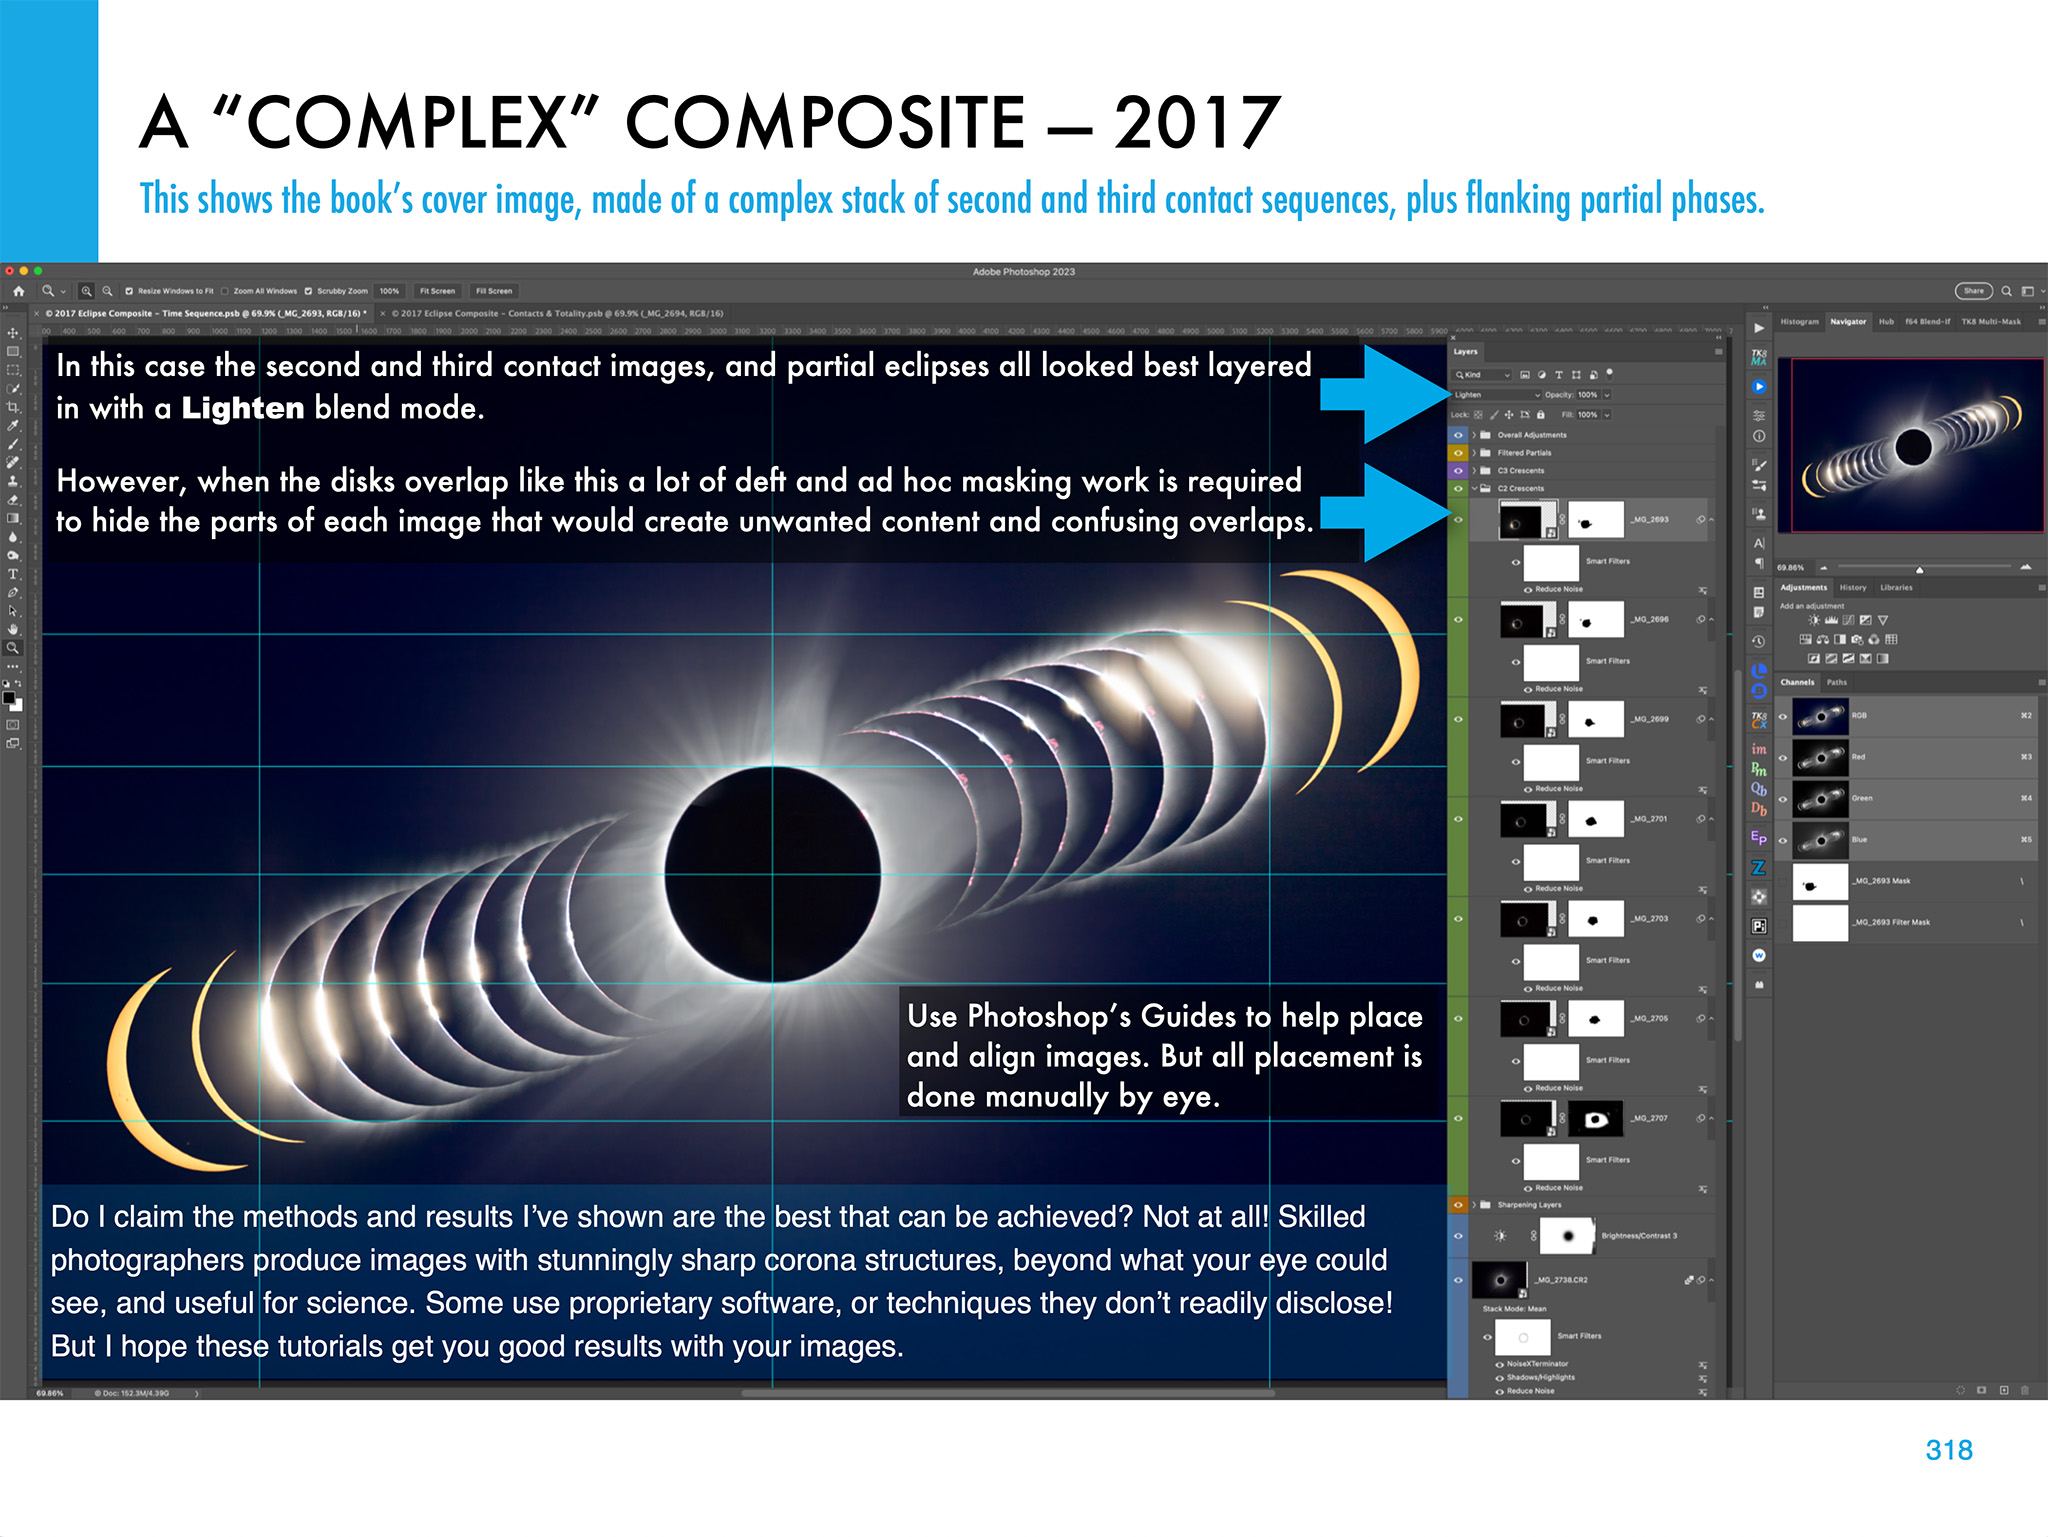
The processing chapter ends with illustrations on how to create layered composites from images taken at multiple stages of an eclipse.


What Can Go Wrong?

The ebook ends with advice for the ambitious (!) on how best to use several cameras to capture different aspects of the eclipse. And I includes lots of tips and checklists to ensure all goes well on eclipse day โ€” or what to do for Plan B if all does not go well!

The ebook is available for Apple Books (for Macs and iPads) and as a PDF for all devices. Links to buy and more details on ebook content are at my website at www.amazingsky.com/EclipseBook.

I’ll be posting more eclipse “tips and techniques” blogs in the coming months, so be sure to subscribe.

Thanks and clear skies!

โ€” Alan, June 2023

How to Photograph the Lunar Eclipse


On the night of November 18/19 eclipse fans across North America can enjoy the sight of the Moon turning deep red. Hereโ€™s how to capture the scene.

Seeing and shooting this eclipse will demand staying up late or getting up very early. Thatโ€™s the price to pay for an eclipse everyone on the continent can see.

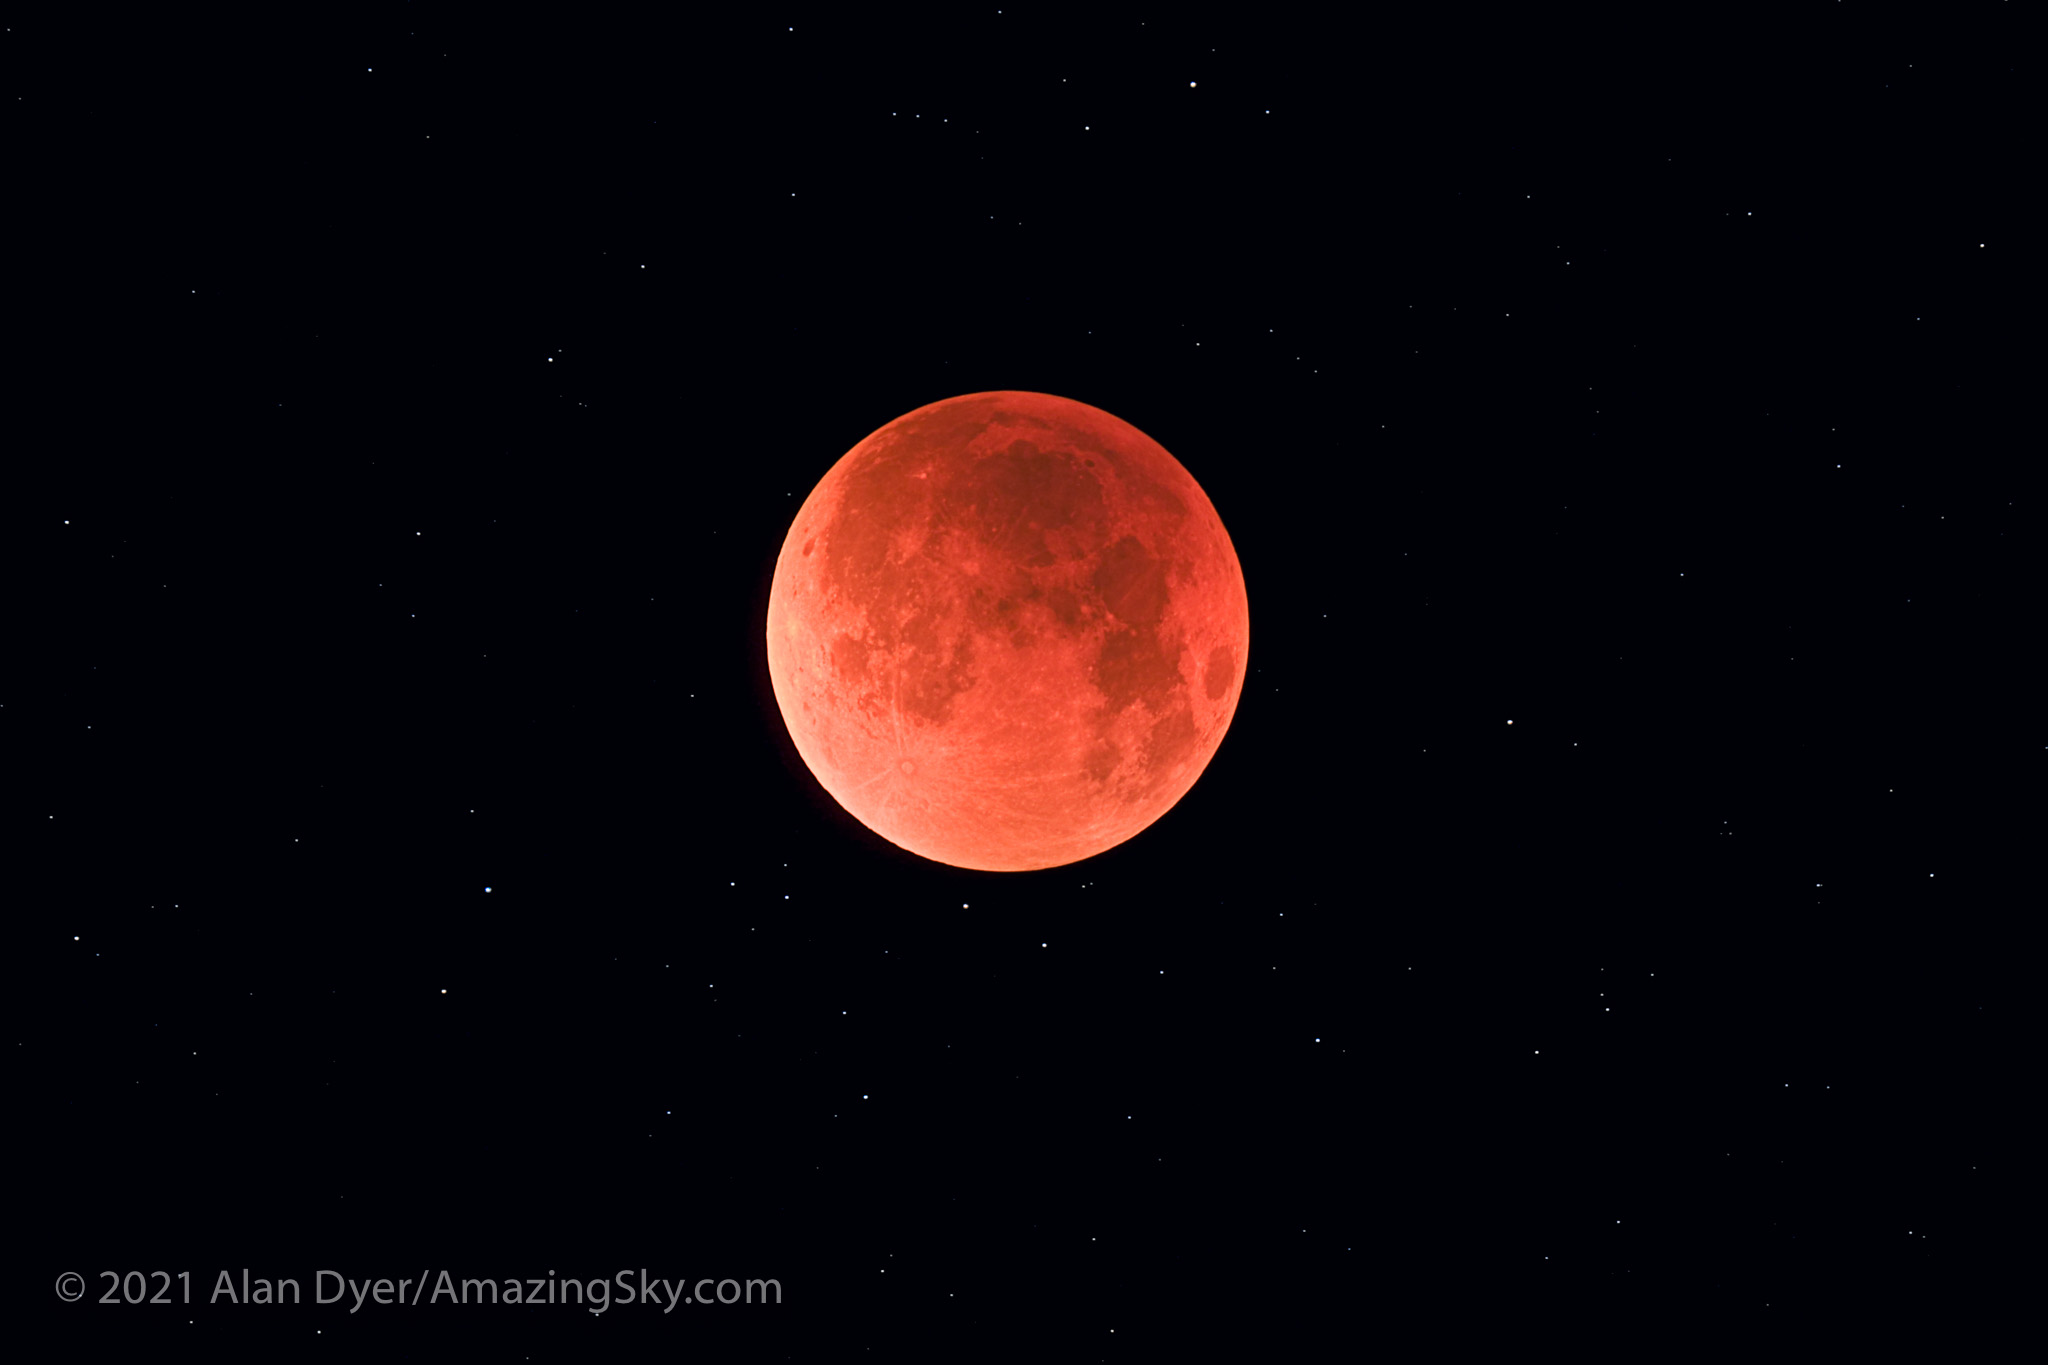
Also, this is not a total eclipse of the Moon. But itโ€™s the next best thing, a 97% partial eclipse โ€“ almost total! So the main attraction โ€” a red Moon โ€” will still be front and centre.

CLICK ON AN IMAGE to bring it up full screen for closer inspection.

NOT QUITE TOTAL

At mid-eclipse 97% of the disk of the Full Moon will be within Earthโ€™s dark umbral shadow, and should appear a bright red colour to the eye and even more so to the camera. A sliver of the southern edge of the Moon will remain outside the umbra and will appear bright white, like a southern polar cap on the Moon. 

While some references will say the eclipse begins at 1:01 am EST, thatโ€™s when the Moon first enters the outer lighter penumbral shadow. Nothing unusual can be seen at that point, as the darkening of the Moonโ€™s disk by the penumbra is so slight, you wonโ€™t notice any difference over the normally bright Full Moon. 

The extent of the umbra and penumbra at the October 2004 total lunar eclipse.

It isnโ€™t until the Moon begins to enter the umbra that you can see a dark bite being taken out of the edge of the Moon. 

WHAT TO SEE

At mid-eclipse the Full Moon will look deep red or perhaps bright orange โ€” the colours can vary from eclipse to eclipse, depending on the clarity of the Earthโ€™s atmosphere through which the sunlight is passing to light the Moon. The red is the colour of all the sunsets and sunrises going on around the Earth during the eclipse.

The total lunar eclipse of August 2007. At the November 18 eclipse the bottom edge of the Moon, as it did here, will be bright, but brighter than it appears here.

The unique aspect of this eclipse is that for the 15 to 30 minutes around mid-eclipse we might see some unusual colour gradations at the edge of the umbral shadow, from sunlight passing through Earthโ€™s upper atmosphere and ozone layer. This can tint the shadow edge blue or even green. 

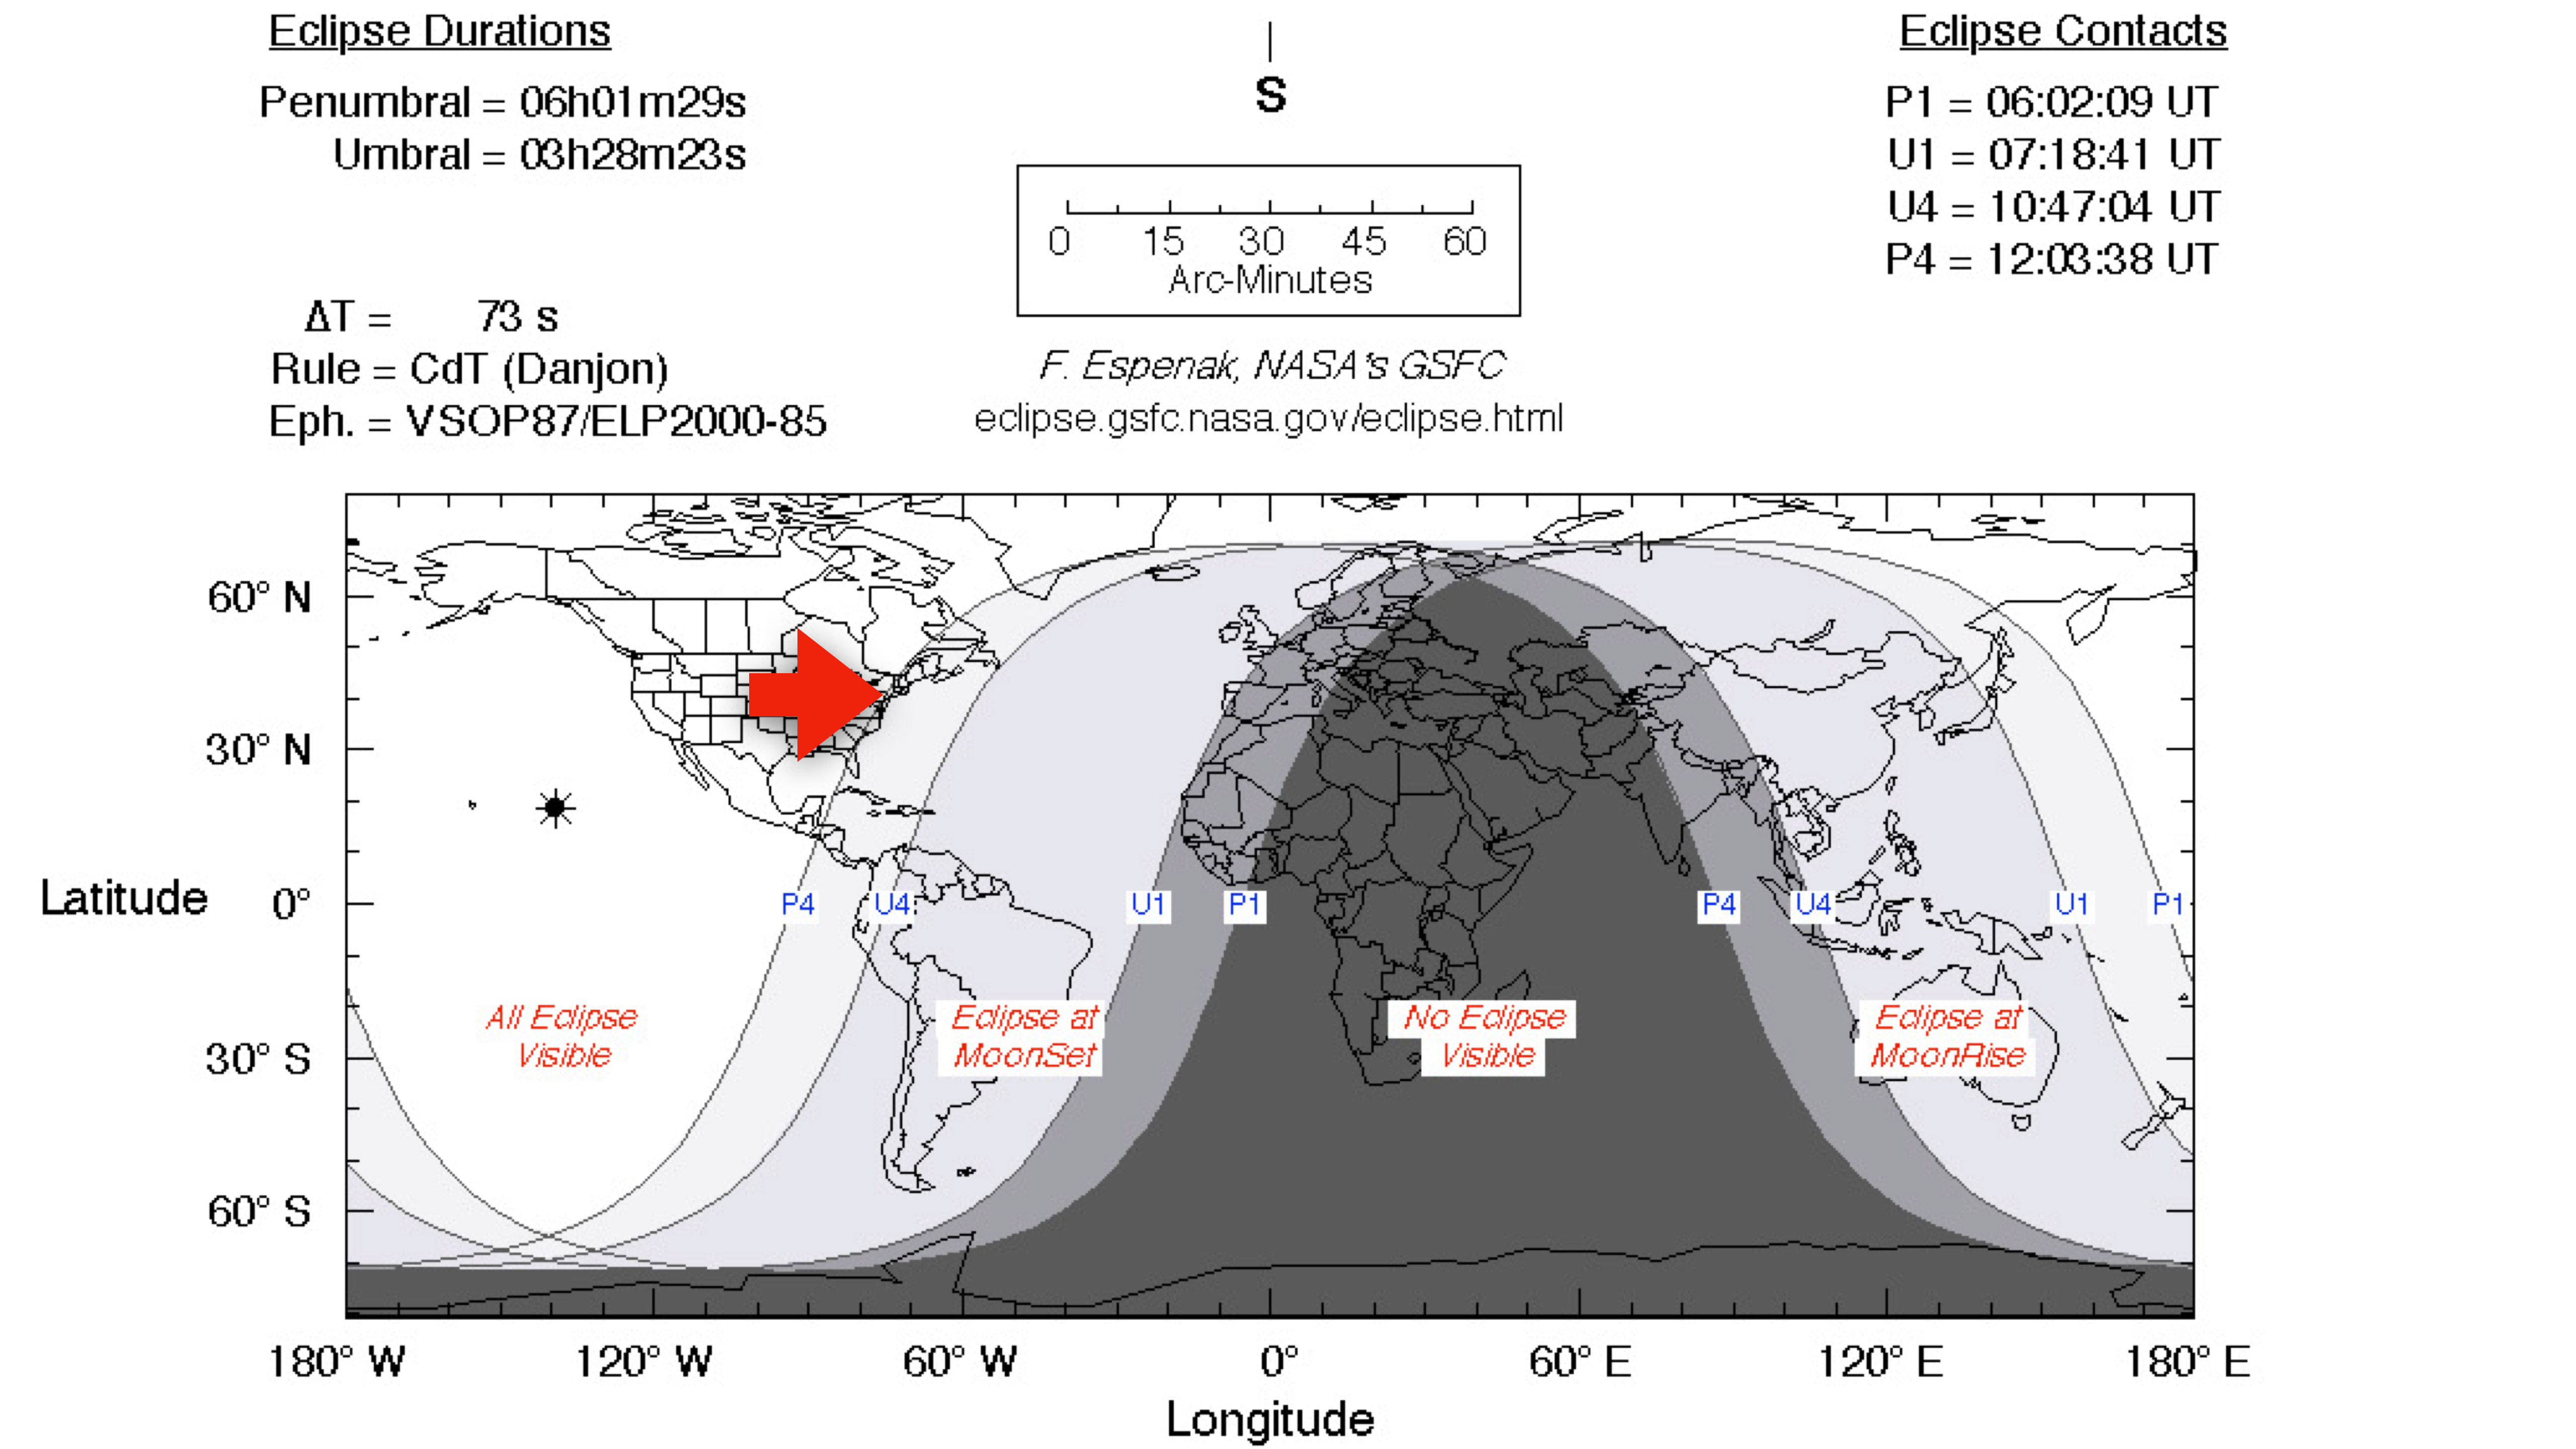
Eclipse chart courtesy Fred Espenak / EclipseWise.com

WHERE CAN THE ECLIPSE BE SEEN?

The last lunar eclipse six months ago on the morning of May 26, 2021 (see my blog here) was visible during its total phase only from western North America, and then only just. However, this eclipse can be seen from coast to coast. 

Only from the very easternmost points in North America does the Moon set with the eclipse in progress, but during the inconsequential penumbral phase. All of the umbral phase is visible from the Eastern Seaboard, though the last stages will be in progress with the Moon low in the west in the pre-dawn hours. But that positioning can make for photogenic sight. 

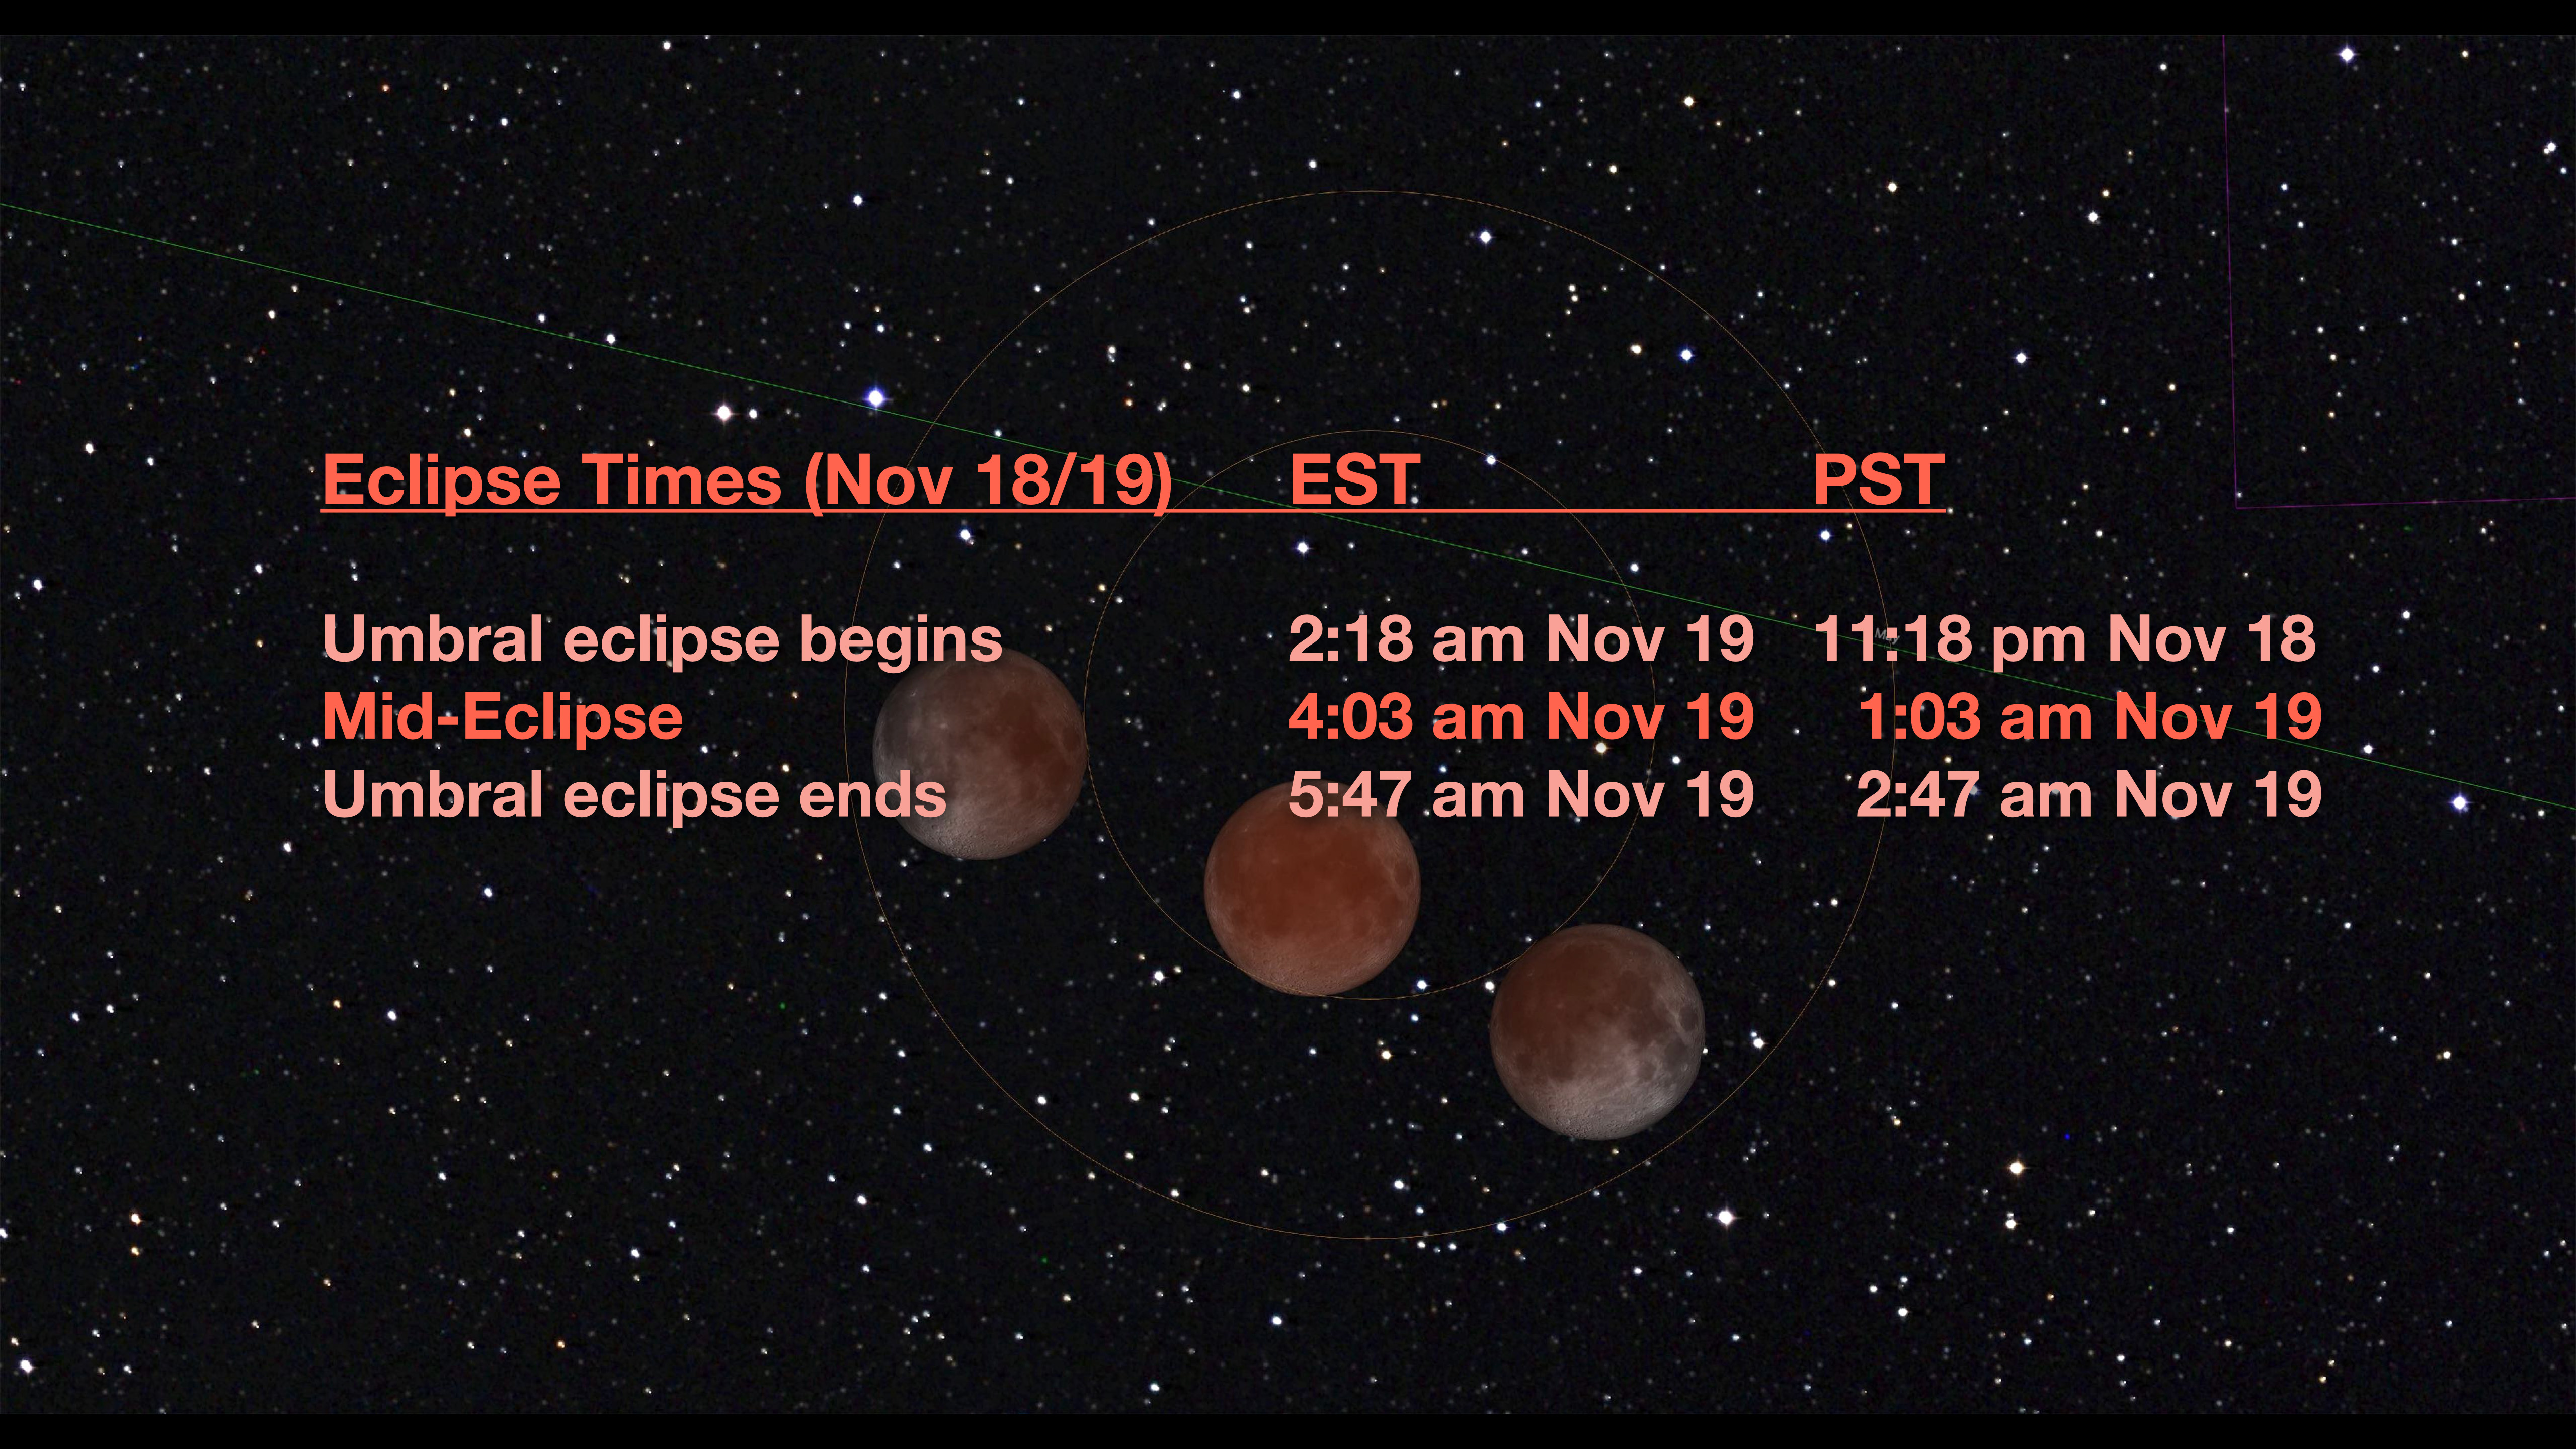
The start, middle and end times of the umbral eclipse for Eastern and Pacific time zones. The background image is a simulation of the path of the November 18/19, 2021 eclipse when the Moon travels through the southern part of the umbra.

WHEN IS THE ECLIPSE?

The show really begins when the Moon begins to enter the umbra at 2:18 am EST (1:18 am CST, 12:18 am MST, 11:18 pm PST). 

But note, these times are for the night of November 18/19. If you go out on the evening of November 19 expecting to see the eclipse, youโ€™ll be sadly disappointed as you will have missed it. Itโ€™s the night before! 

The eclipse effectively ends at 5:47 am EST (4:47 am CST, 3:47 am MST, 2:47 am PST) when the Moon leaves the umbra. That makes the eclipse 3 1/2 hours long, though the most photogenic part will be for the 15 to 30 minutes centred on mid-eclipse at 4:03 am EST (3:03 am CST, 2:03 am MST, 1:03 am PST). 

The sky at mid-eclipse from my home on Alberta, Canada (51ยฐ N)

WHERE WILL THE MOON BE?

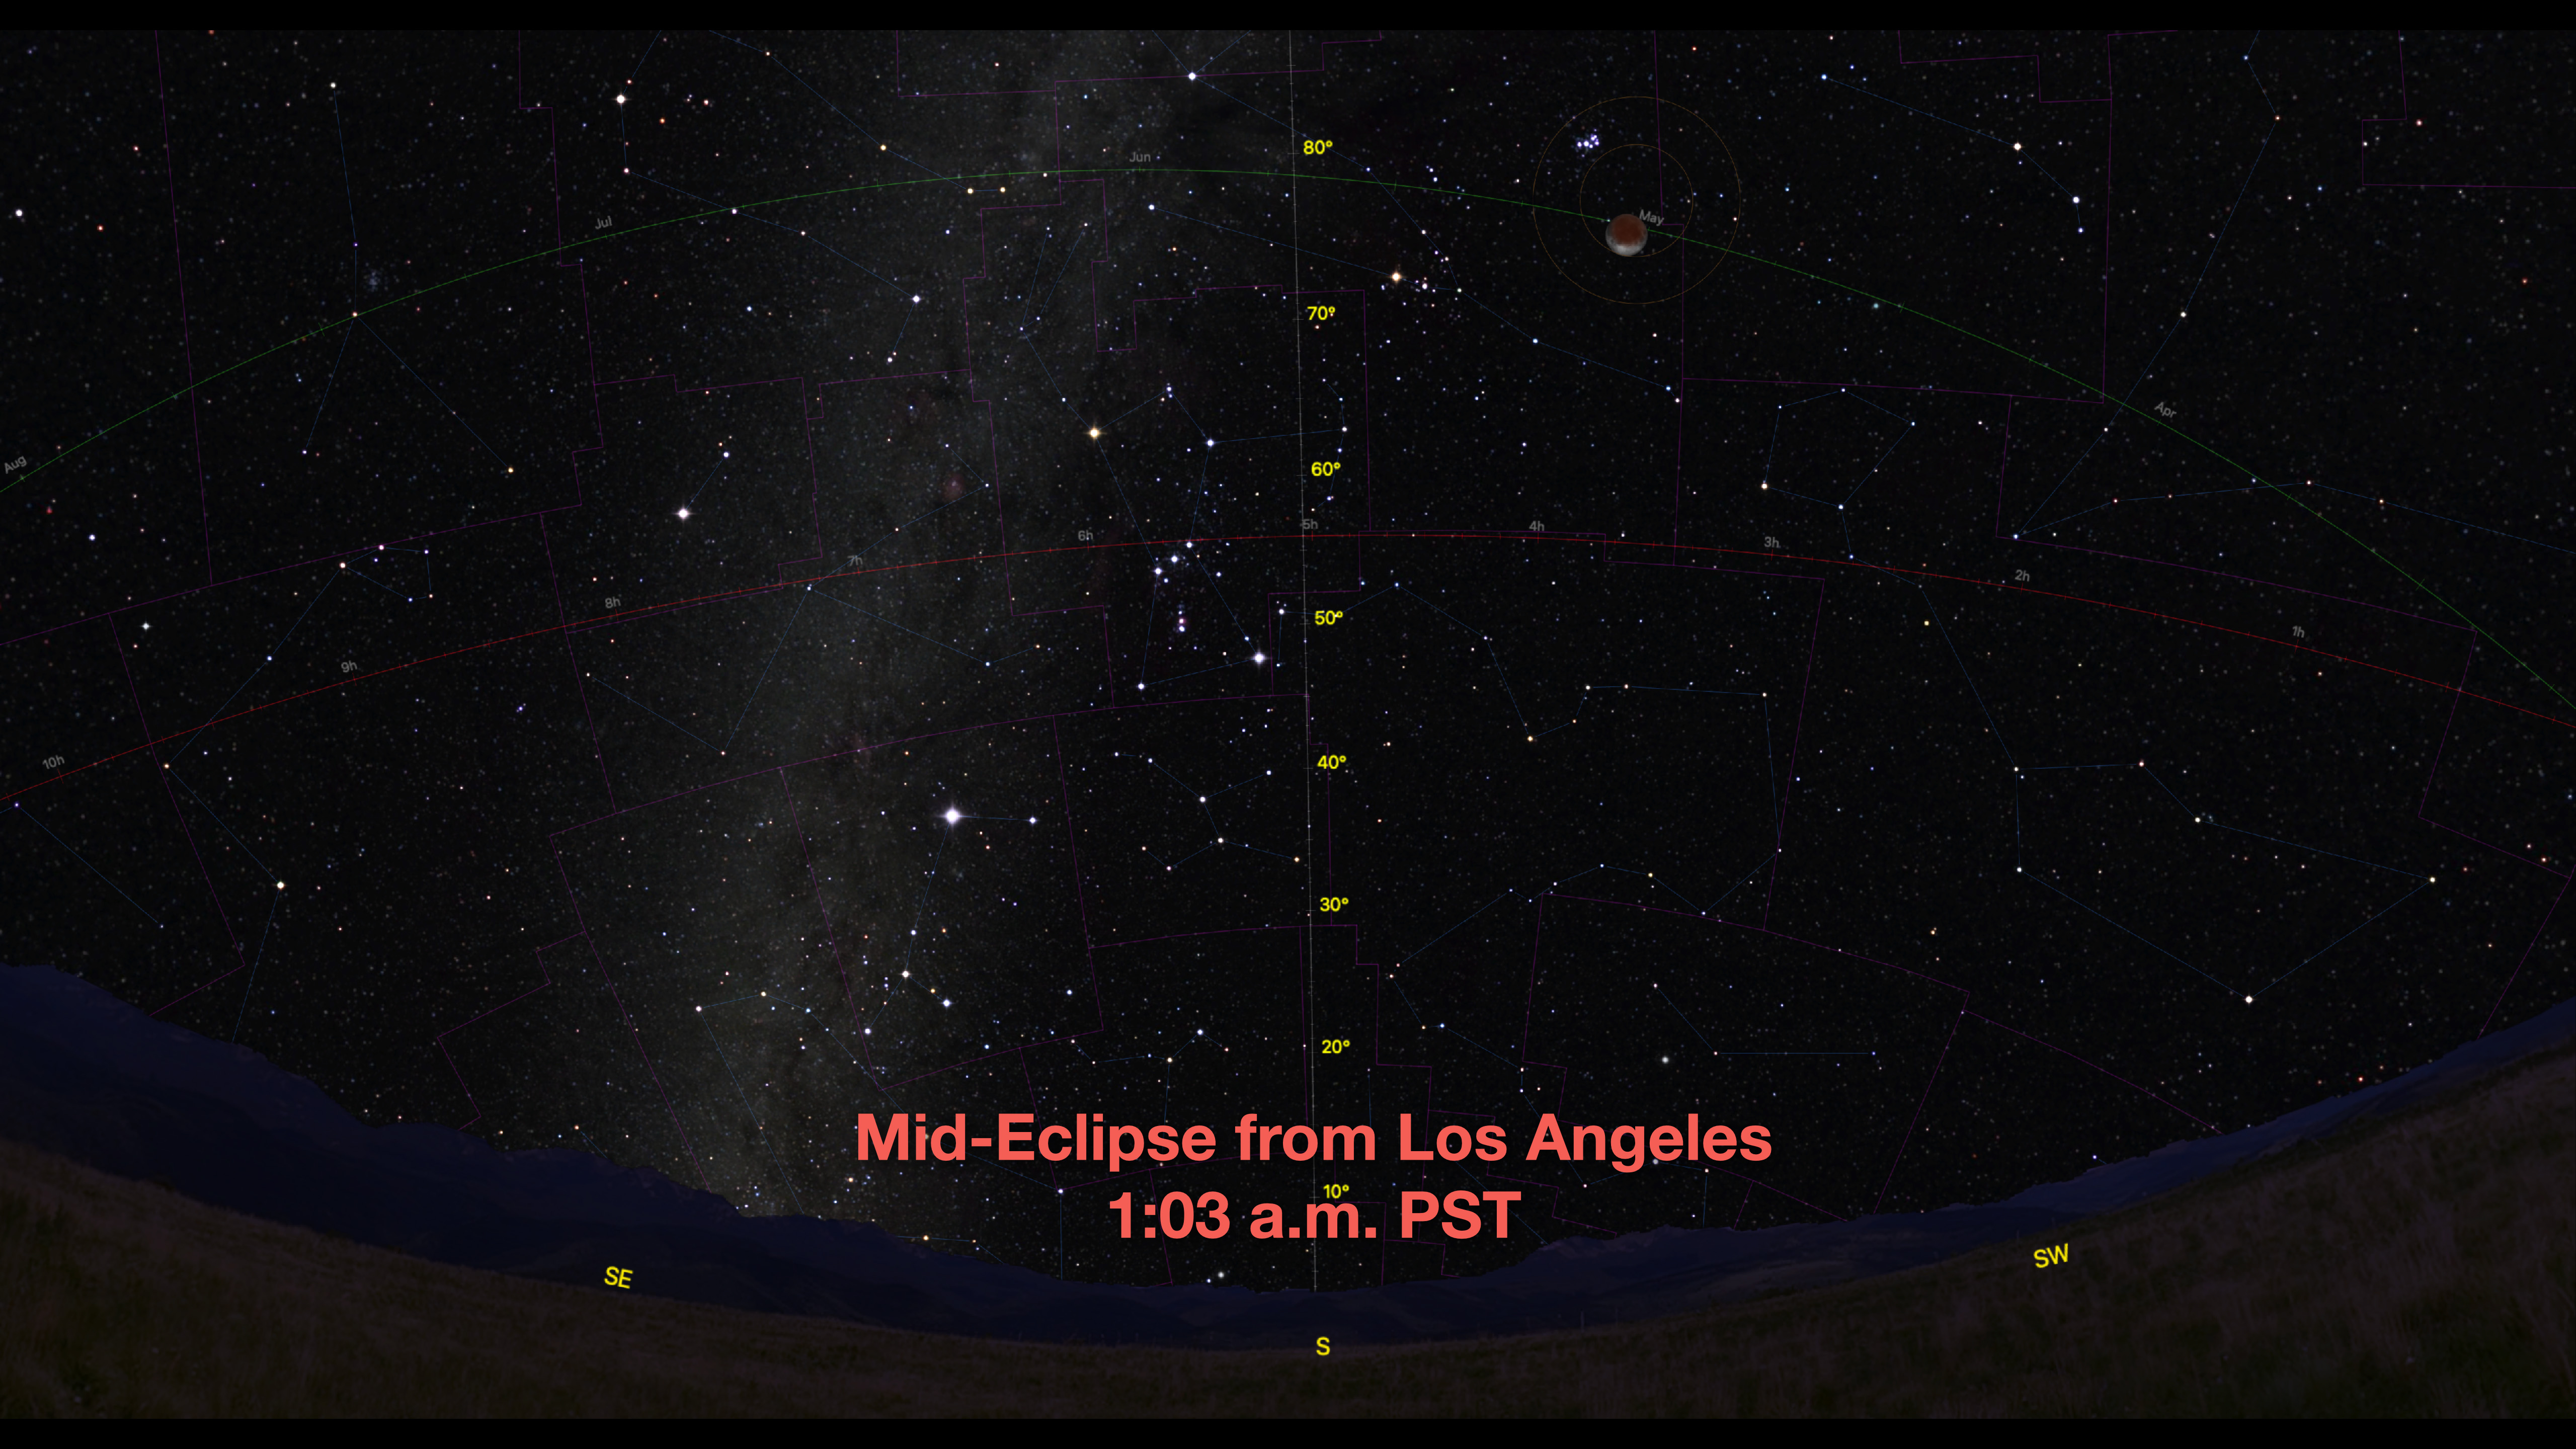
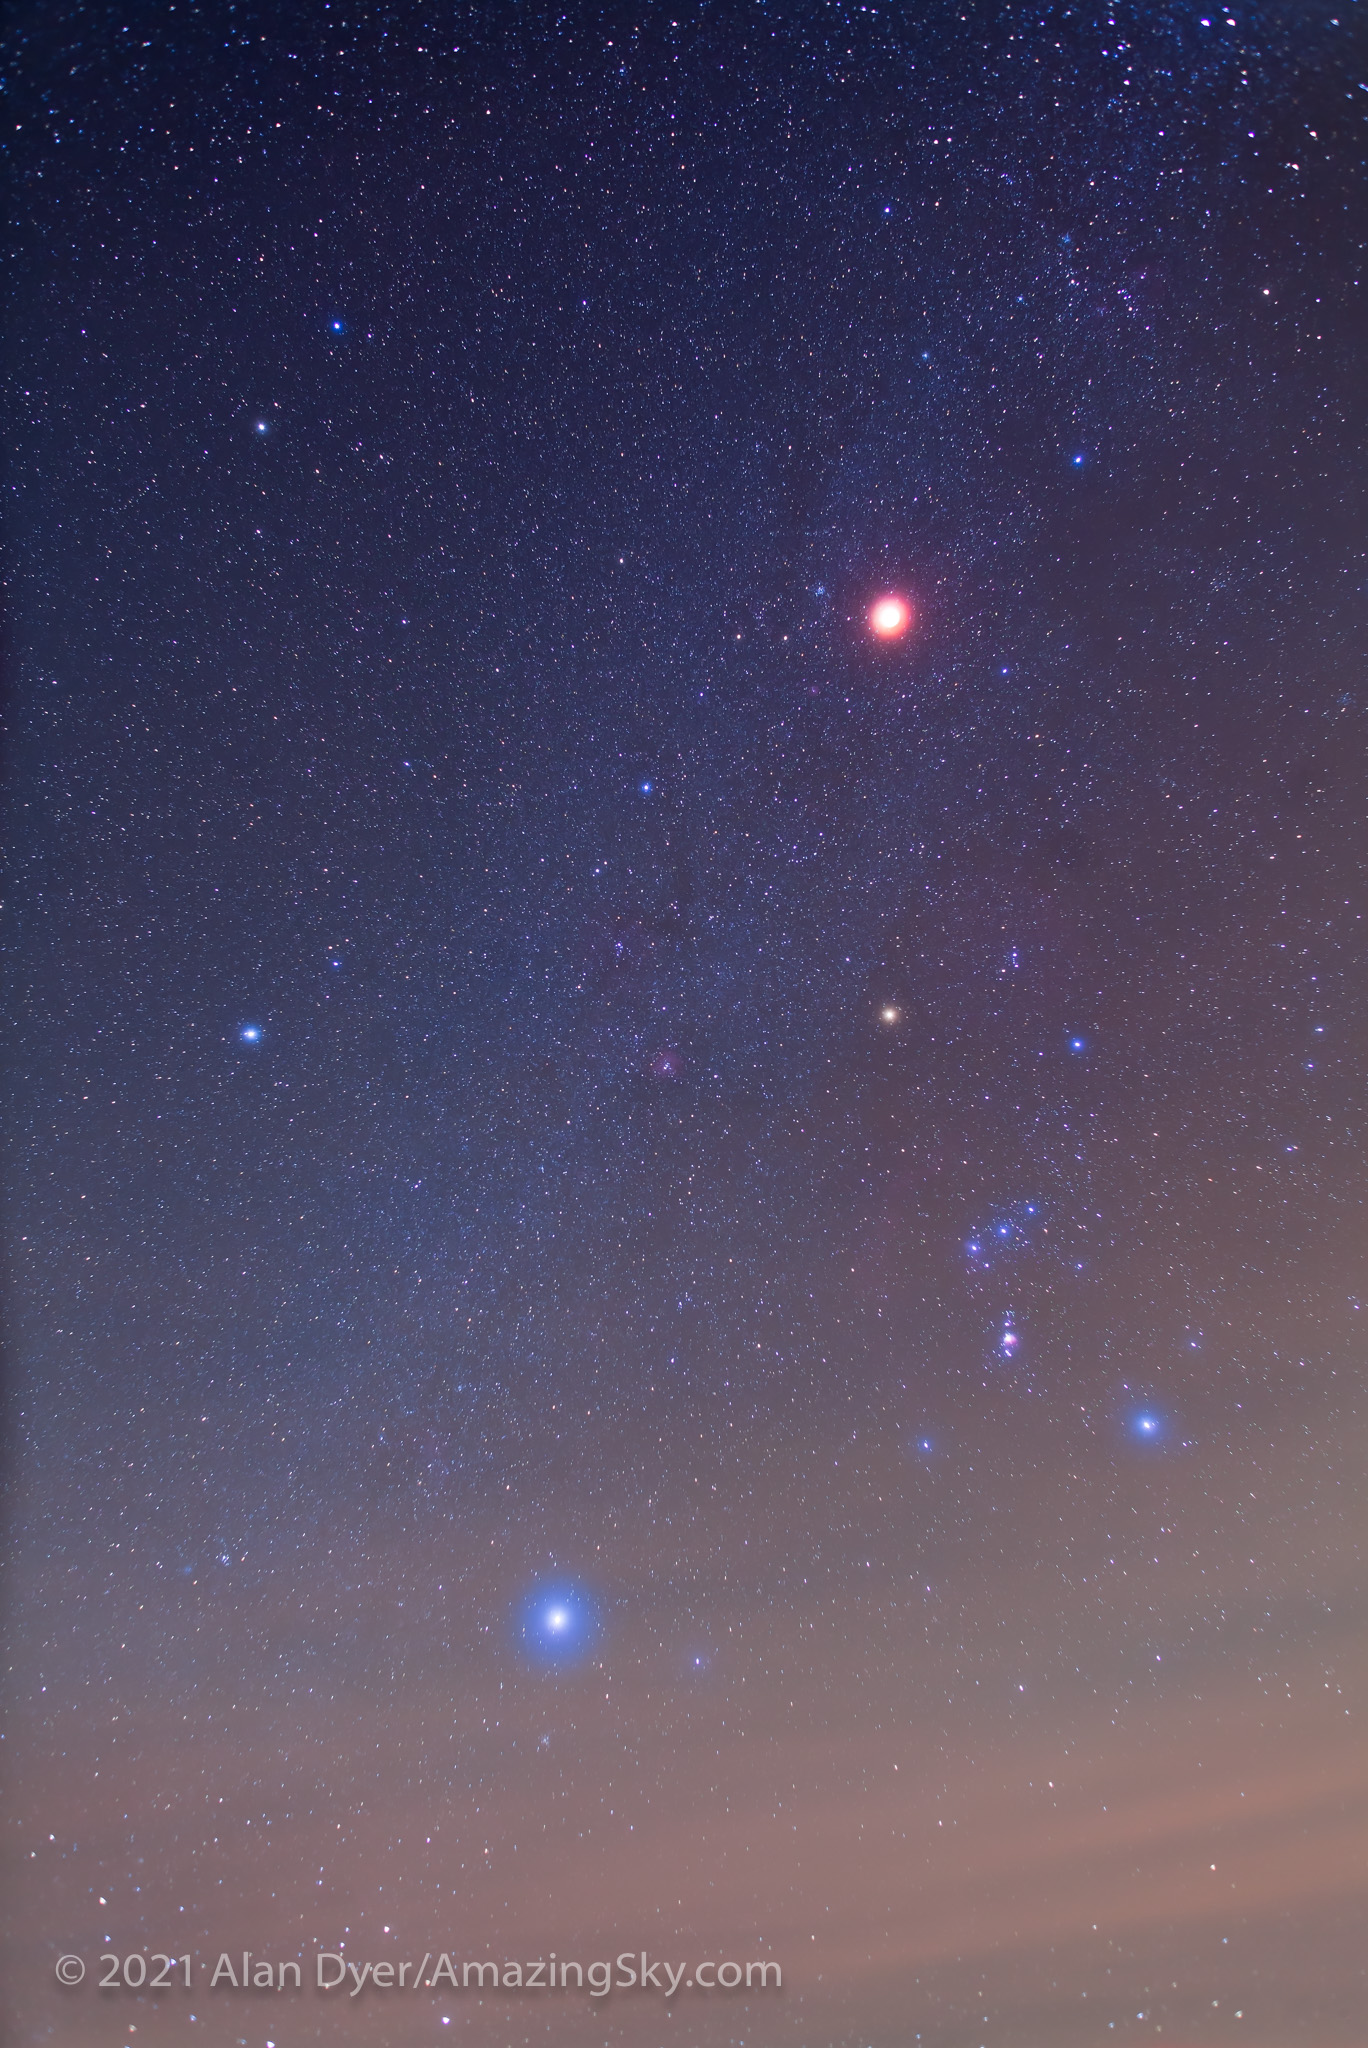
The post-midnight timing places the Moon at mid-eclipse high in the south to southwest for most of North America, just west (right) of the winter Milky Way and below the distinctive Pleiades star cluster. 

The view from the West Coast.

The high altitude of the Moon (some 60ยบ to 70ยบ above the horizon) puts it well above haze and murk low in the sky, but makes it a challenge to capture in a frame that includes the landscape below for an eclipse nightscape. 

ASTRONOMY 101: The high altitude of the Moon is a function of both the eclipse timing in the middle of the night and its place on the ecliptic. The Full Moon is always 180ยฐ away from the Sun. So it sits where the Sun was six months earlier, in this case back in May, when the high Sun was bringing us warmer and longer days. Winter lunar eclipses are always high; summer lunar eclipses are always low, the opposite of what the Sun does. 

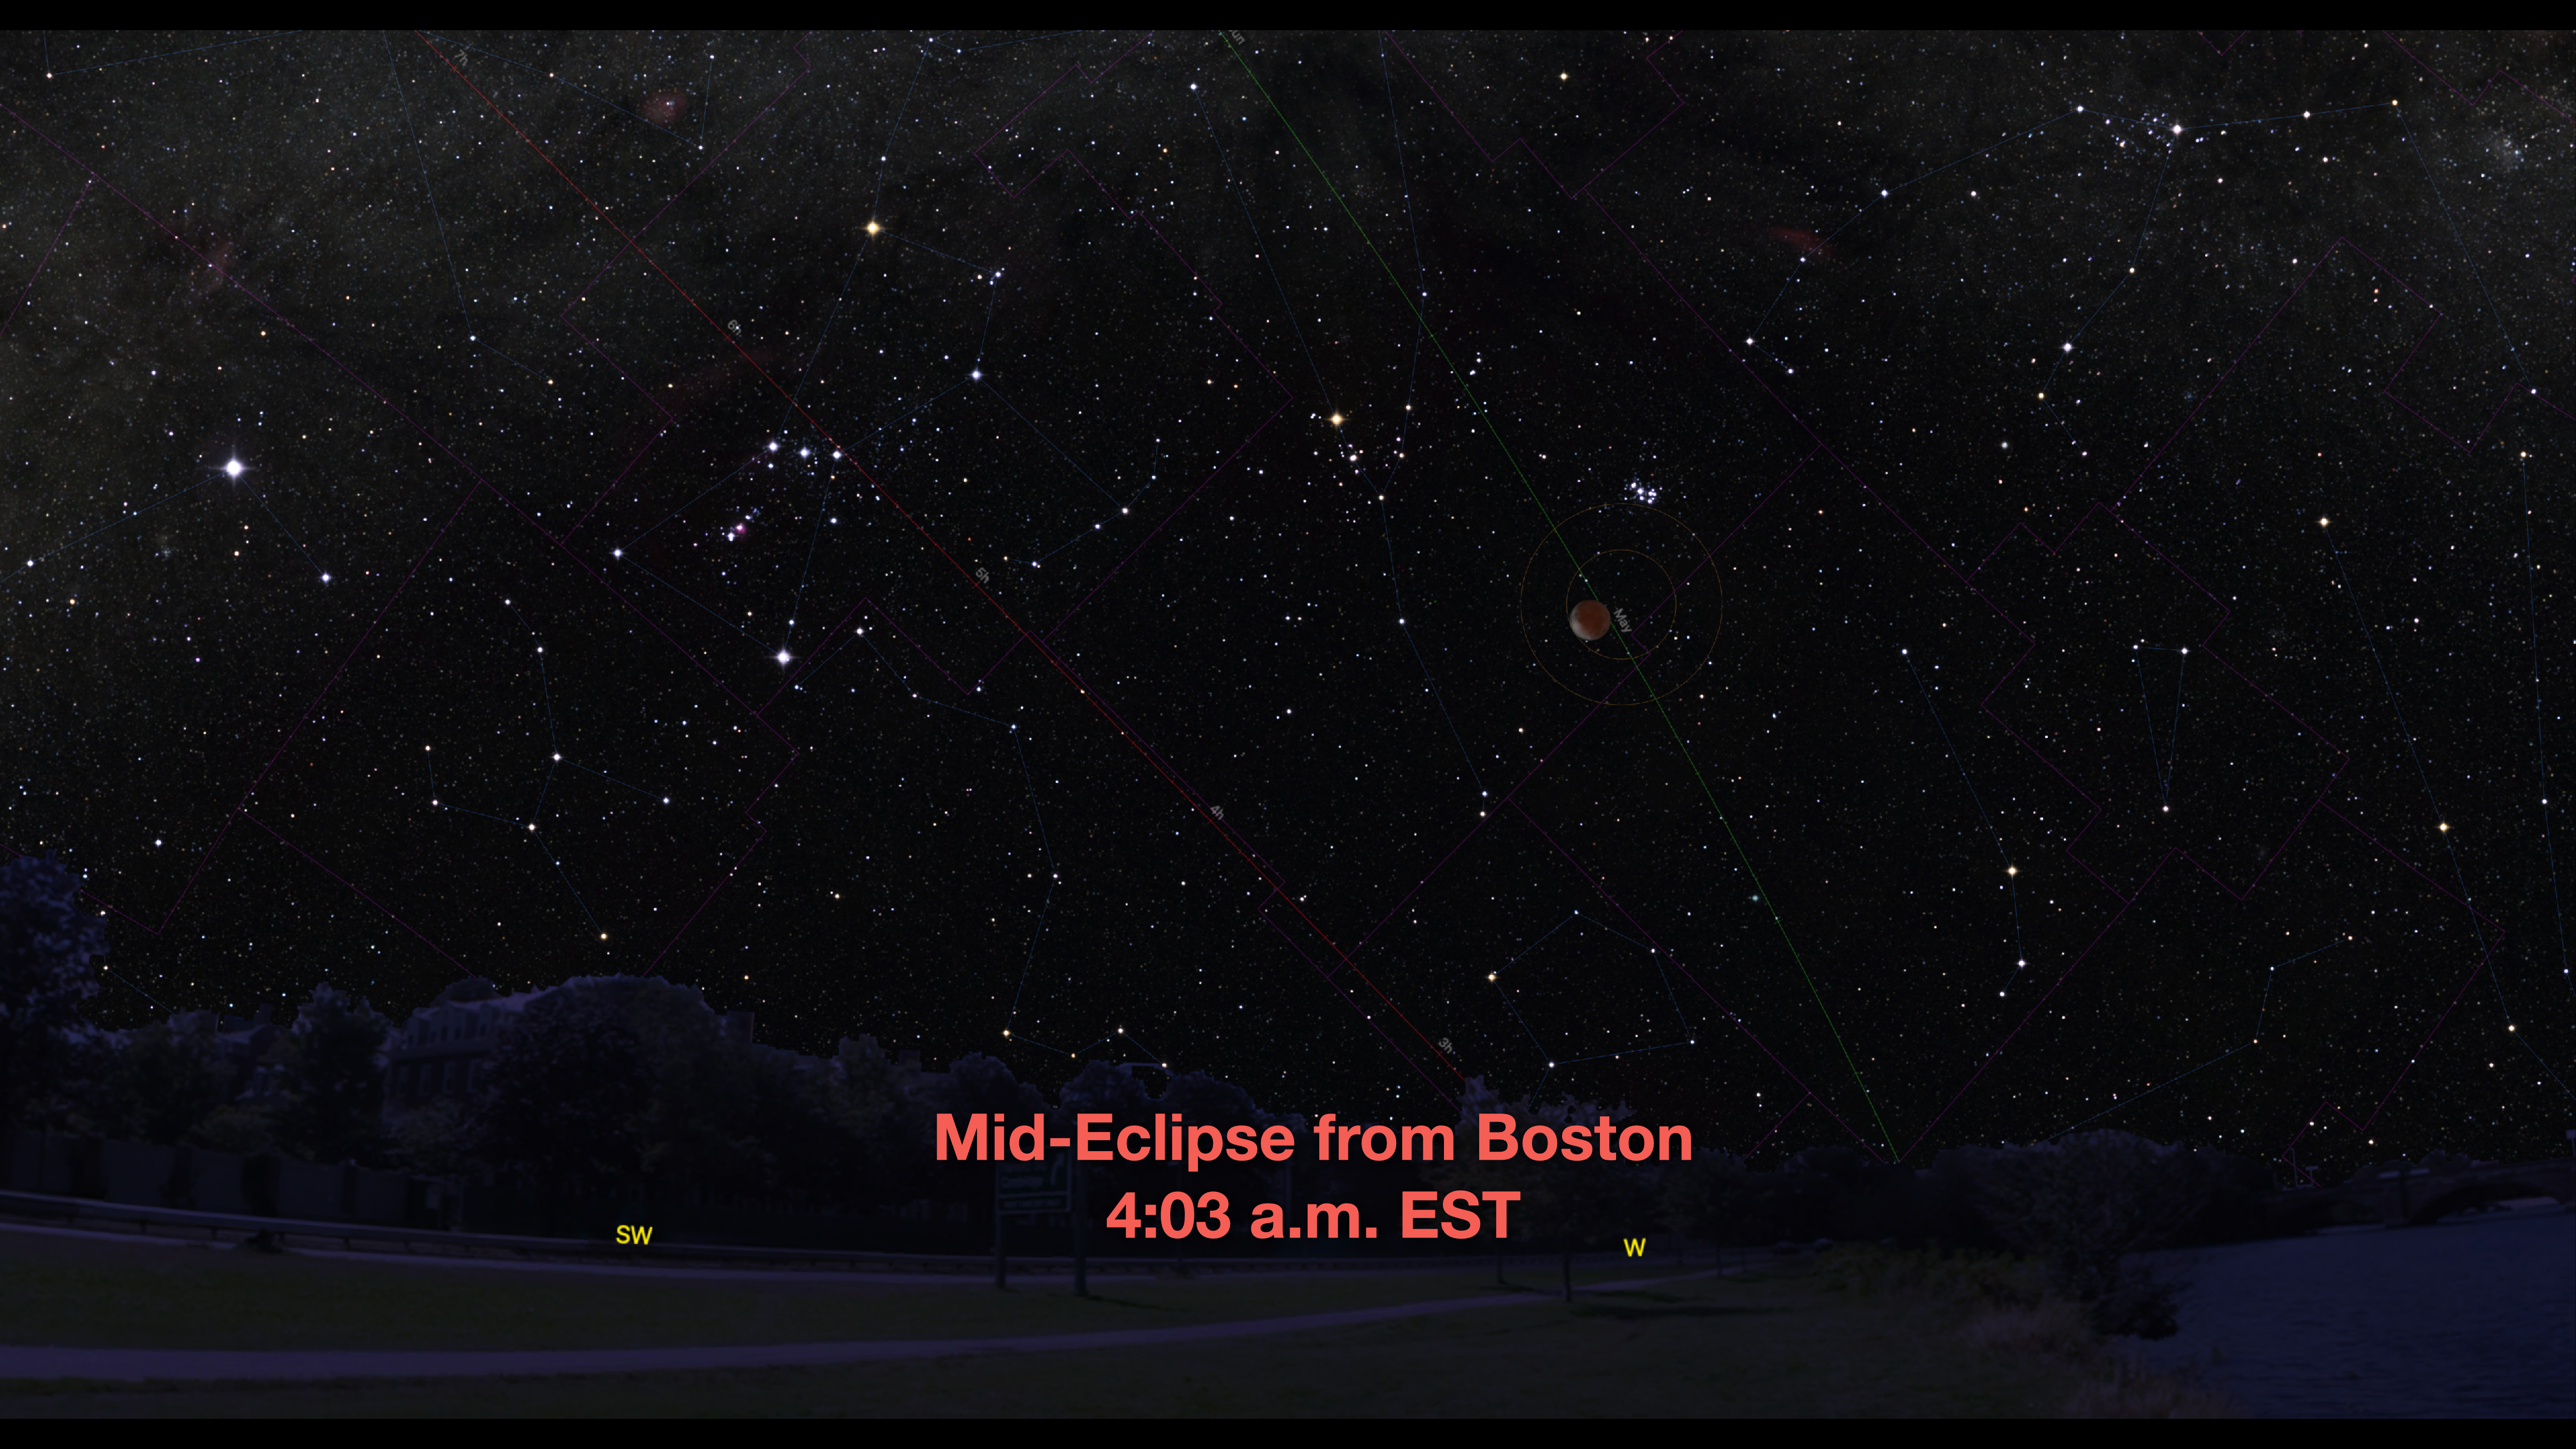
The view from the East Coast.

From eastern North America the Moon appears lower in the west at mid-eclipse, making it easier to frame above a landscape. For example from Boston the Moon is 30ยบ up, lending itself to nightscape scenes. 

However, the sky will still be dark. To make use of the darkness to capture scenes which include the Milky Way, I suggest making the effort to travel away from urban light pollution to a dark sky site. That applies to all locations. Yes, that means a very long night!

PHOTO OPTIONS 1 โ€” CAMERA ON A FIXED TRIPOD

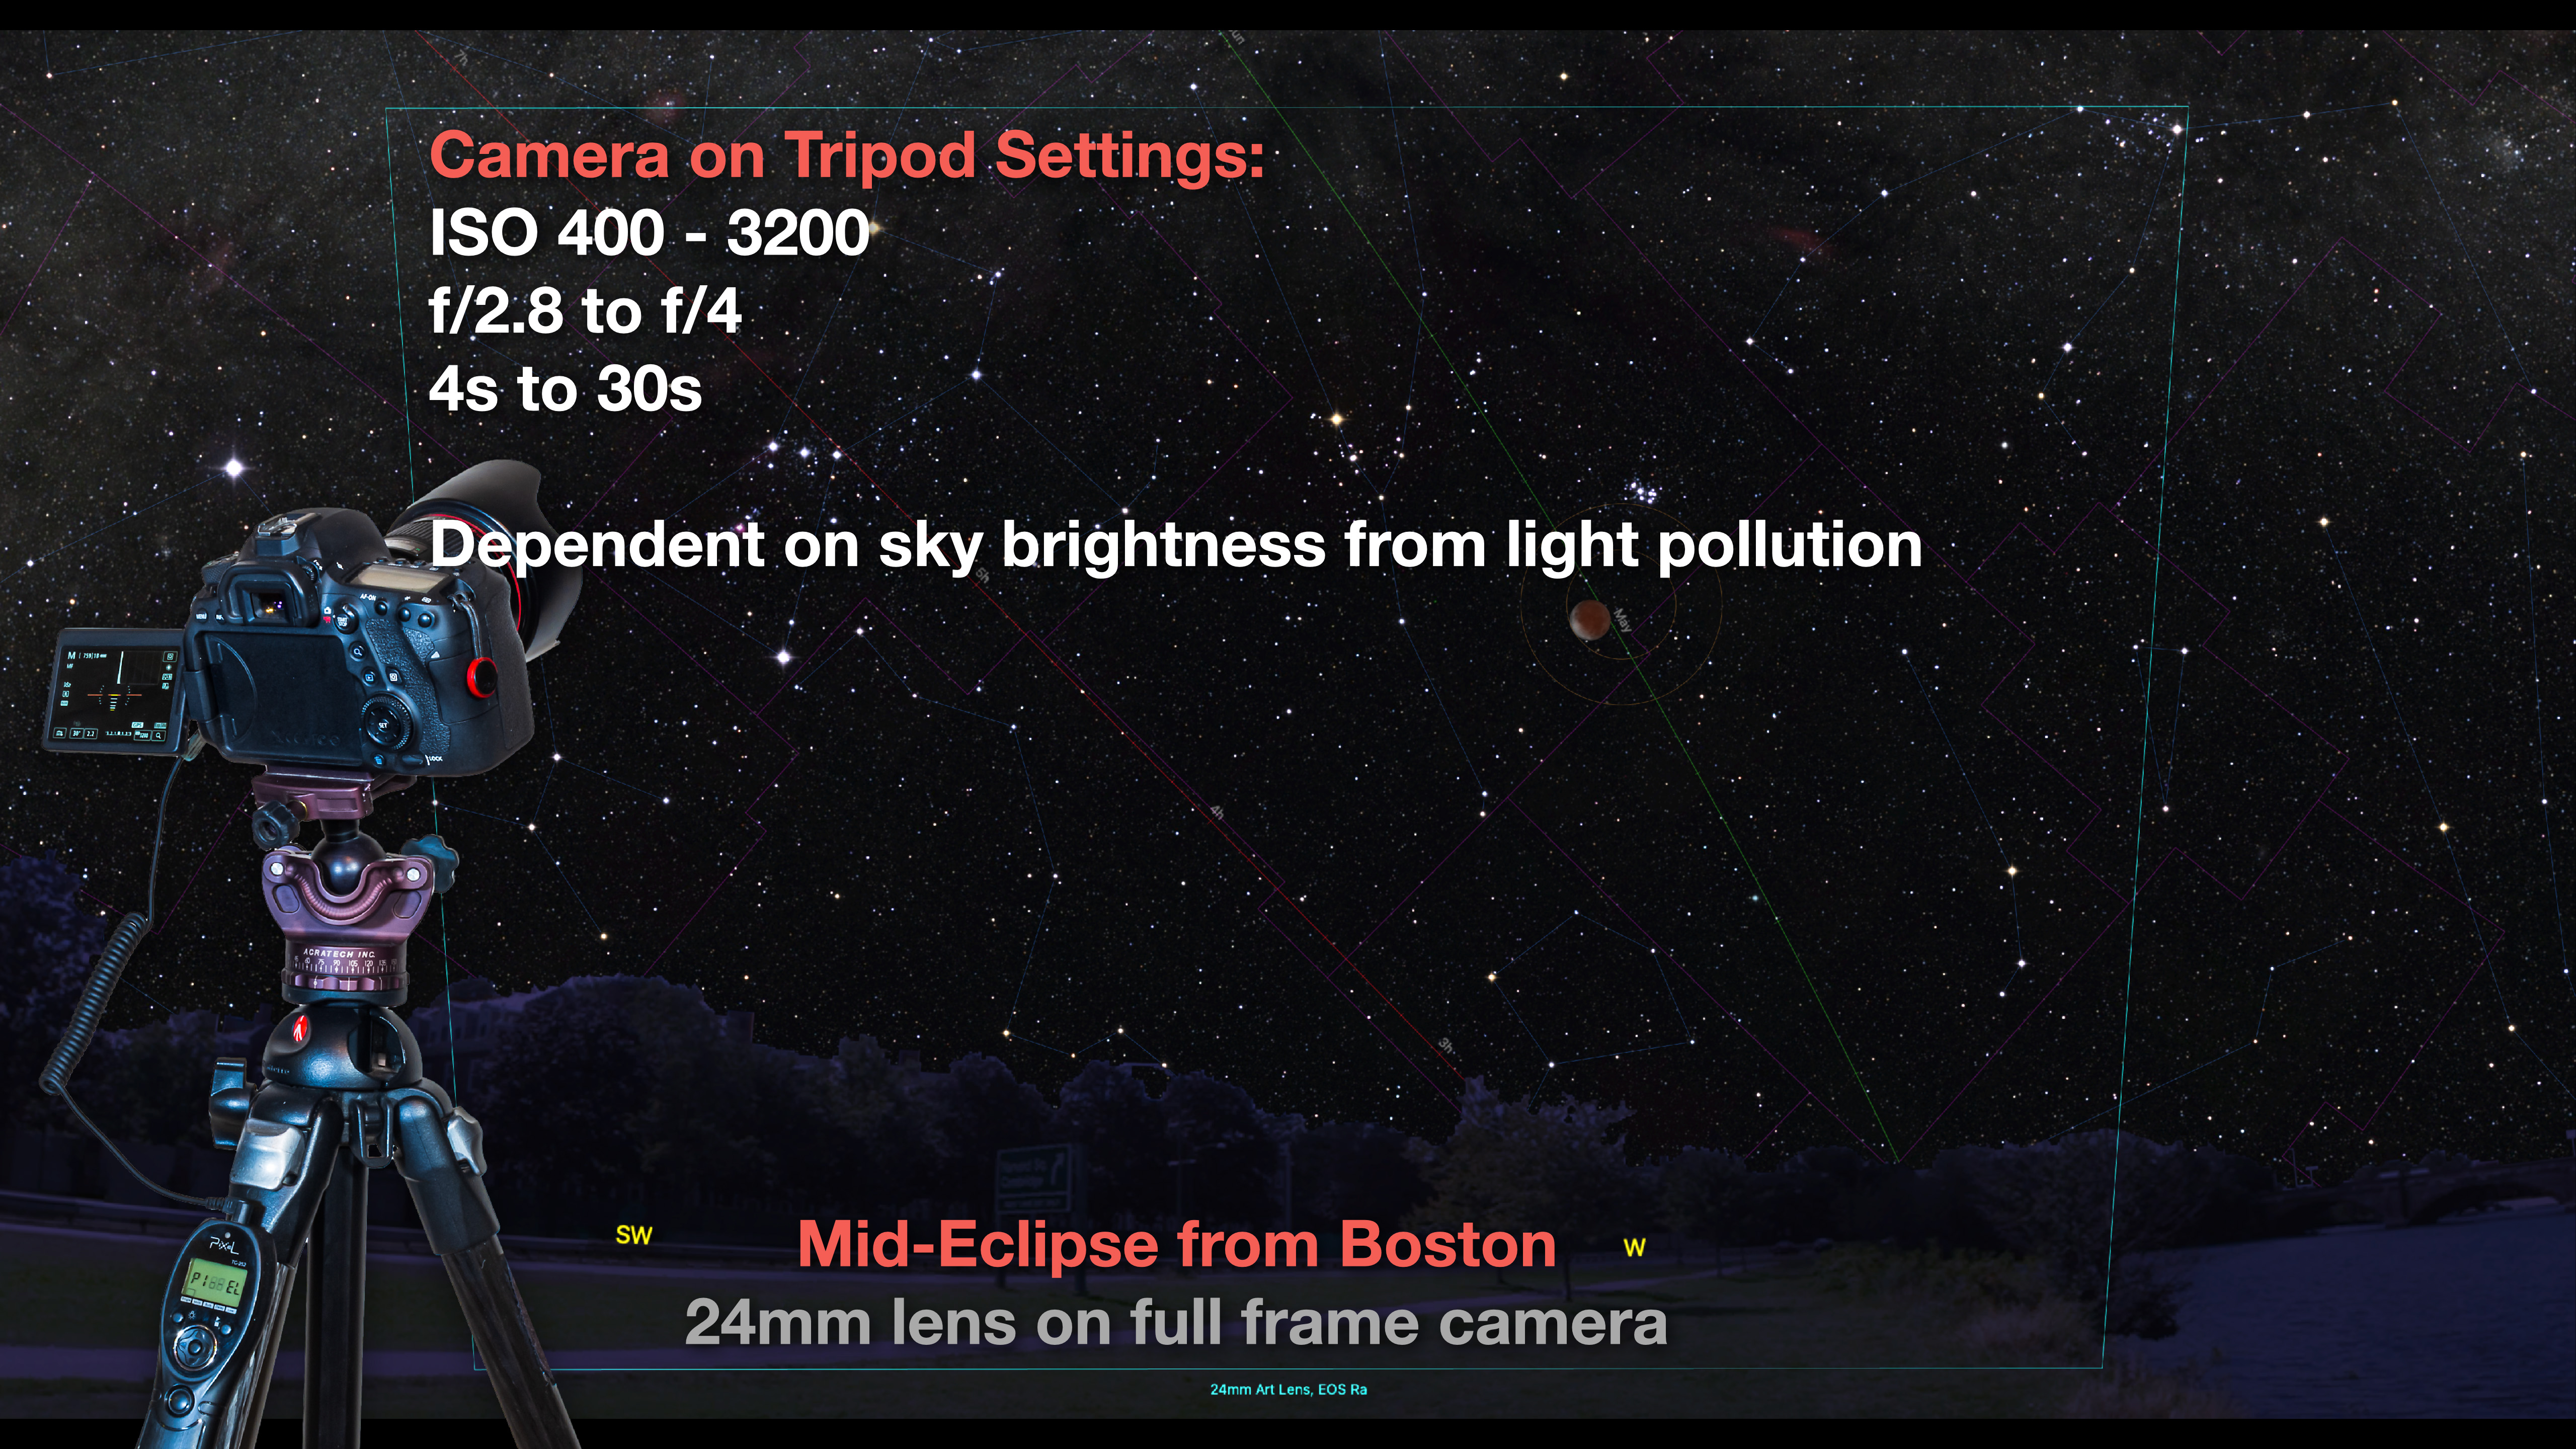
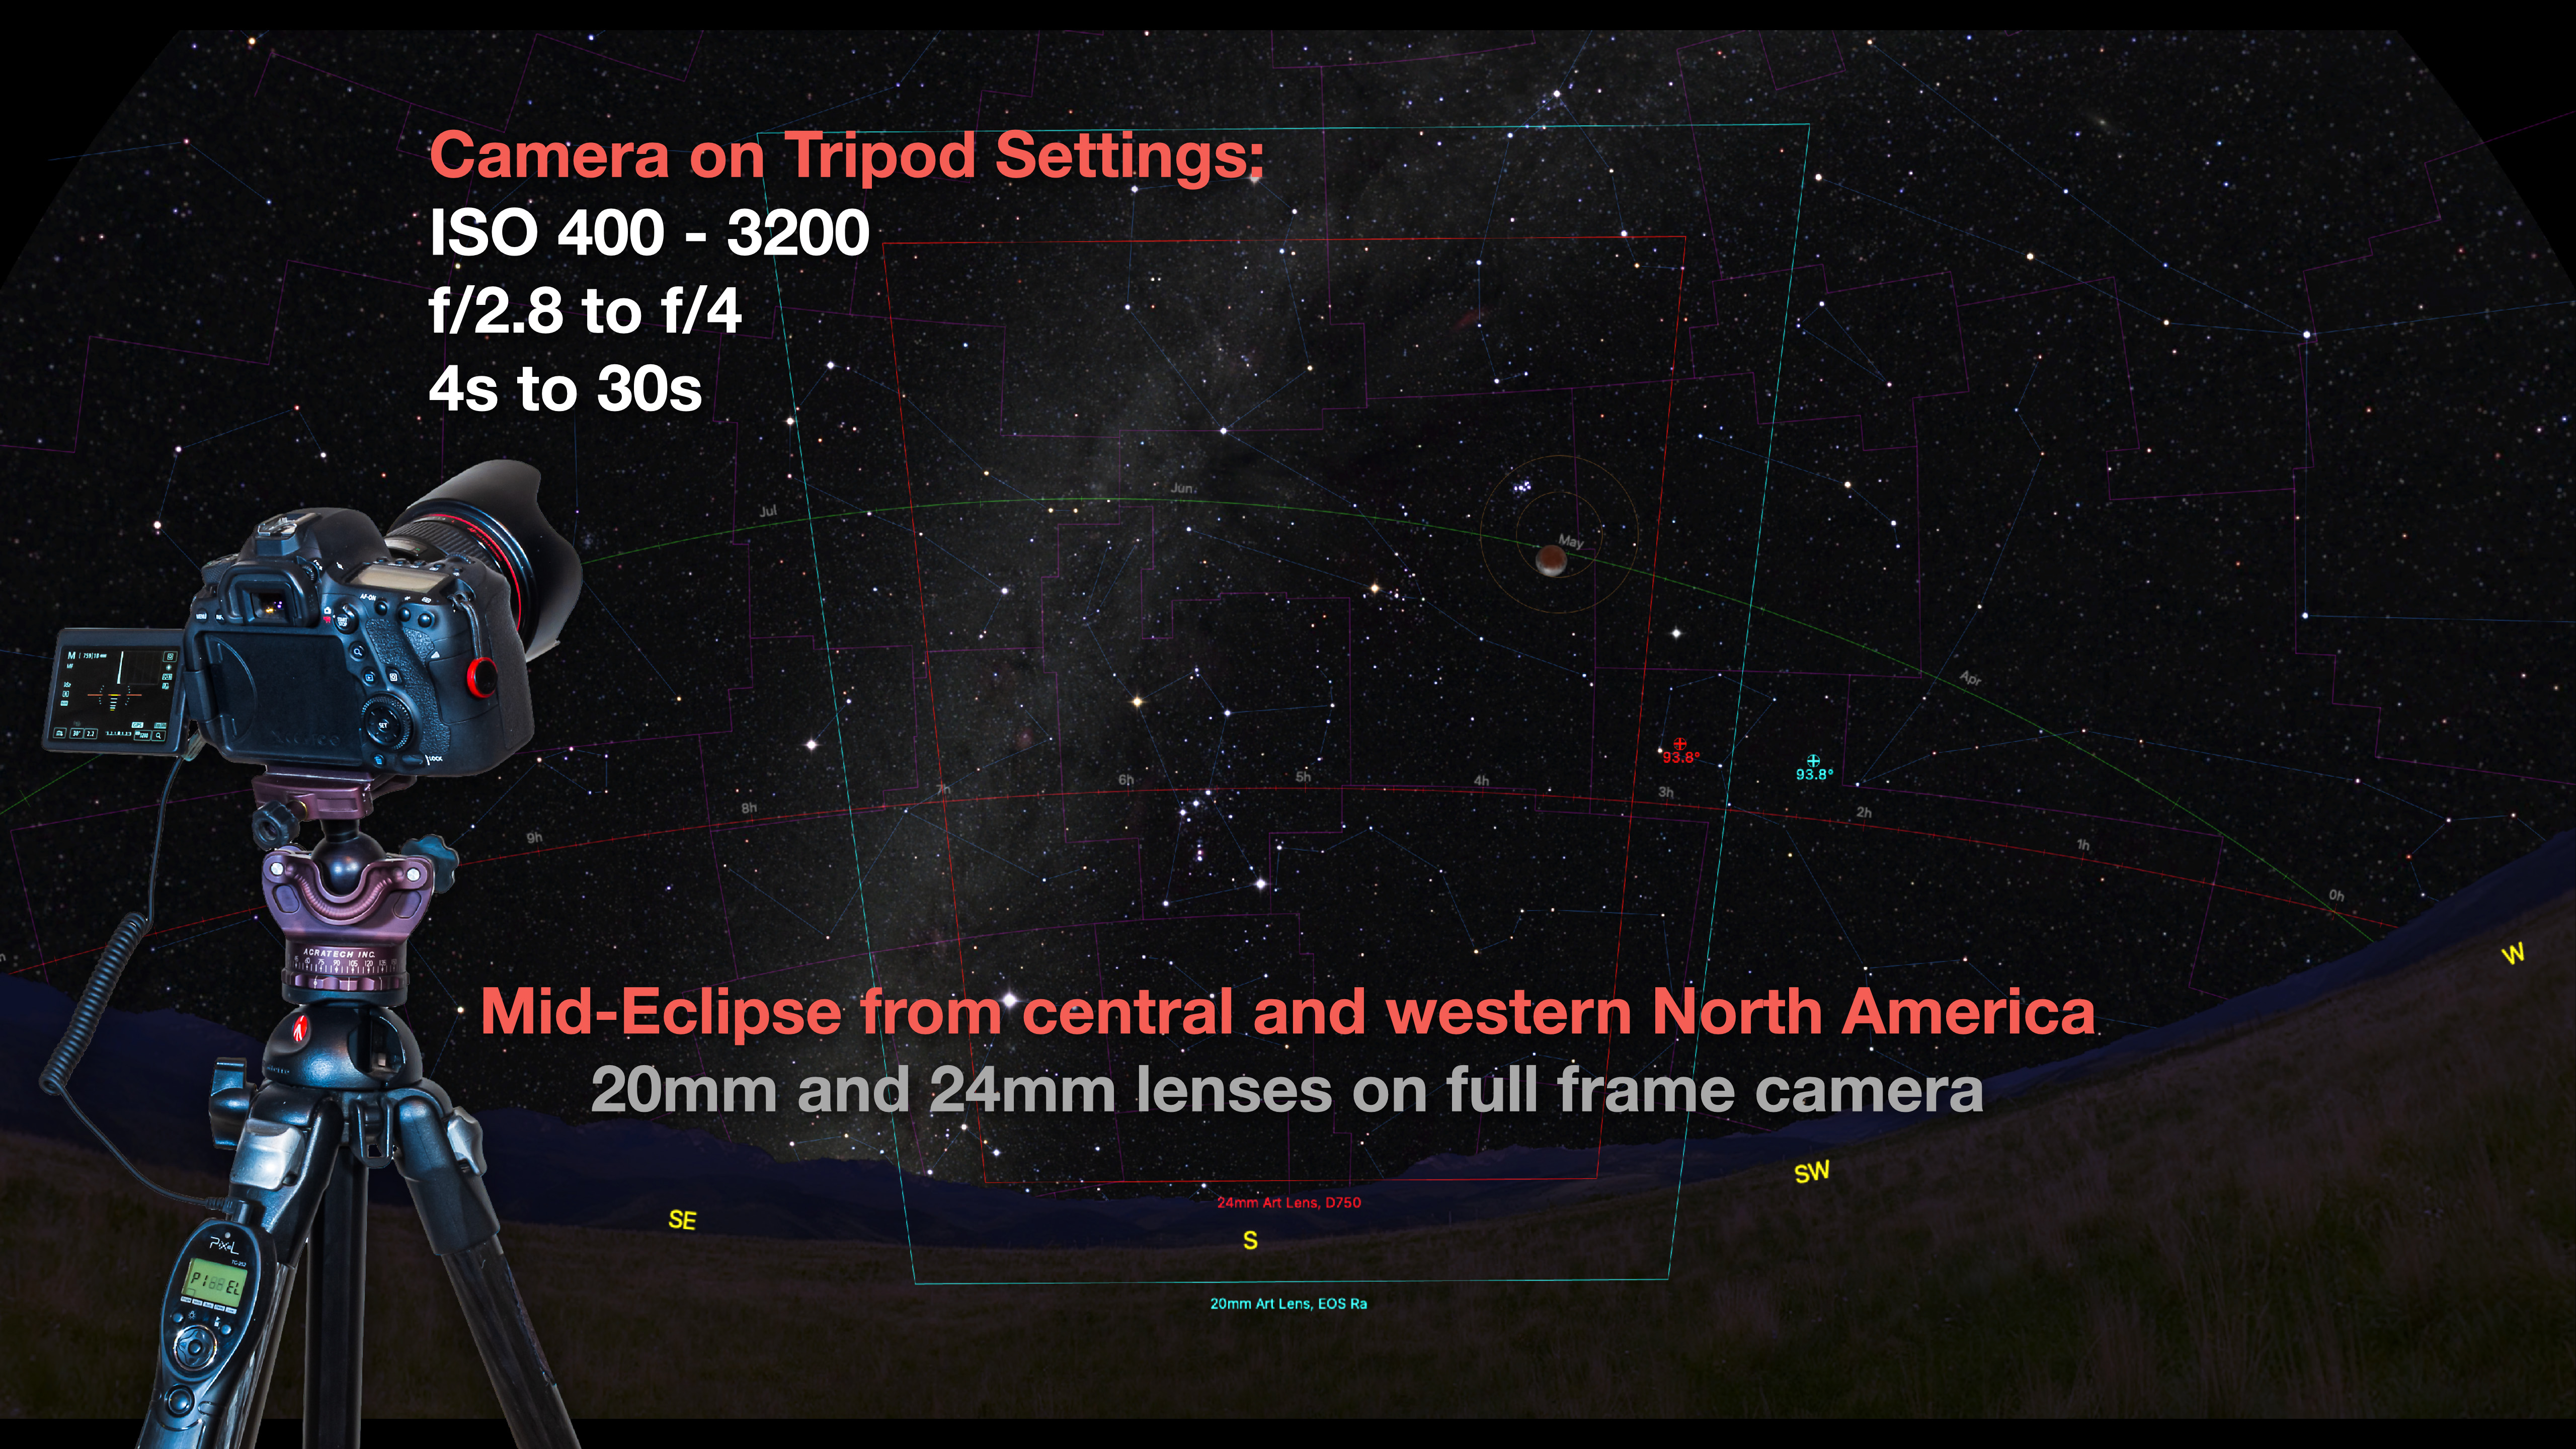
With just a camera on a tripod, if you are on the East Coast (I show Boston here) it will be possible to frame the eclipsed Moon above a landscape with a 24mm lens (assuming a full frame camera; a cropped frame camera will require a 16mm lens). 

Framing the scene from the East Coast.

What exposure will be best will depend on the level of local light pollution at your site. But from a dark site, 30 seconds at ISO 1600 and f/2.8 should work well. But without tracking, you will see some star trailing at 30 seconds. Also try shorter exposures at a higher ISO. 

Thereโ€™s lots of time, so take lots of shots. Include some short shots of just the Moon to blend in later, as the exposures best for picking up the Milky Way will still overexpose the Moon, even when it is darkest at mid-eclipse. 

Framing the scene from the West.

From western North America, including the landscape below will require wide lenses and a vertical format, with the Moon appearing quite small. But from a photogenic site, it might be worth the effort. 

Total eclipse of the Moon, December 20/21, 2010, taken from home with 15mm lens at f/3.2 and Canon 5D MkII at ISO 1600 for 1 minute single exposure, toward the end of totality.
Total eclipse of the Moon, December 20/21, 2010, taken from home with Canon 5D MKII and 24mm lens at f2.8 for stack of 4 x 2 minutes at ISO 800. Taken during totality..

However, as my images above from the December 2010 eclipse show, if thereโ€™s any haze, the Moon could turn into a reddish blob. 

You might be tempted to shoot with a long telephoto lens, but unless the camera is on a tracker, as below, the result will likely be a blurry mess. The sky moves enough during the long (over 1 second) exposures needed to pick up the reddened portion of the Moon that the image will smear when shot with long focal lengths. The solution is to use a sky tracker.

PHOTO OPTIONS 2 โ€” CAMERA ON A TRACKER

Placing the camera on a motorized tracker that has been polar aligned to follow the motion of the stars opens up many more possibilities. 

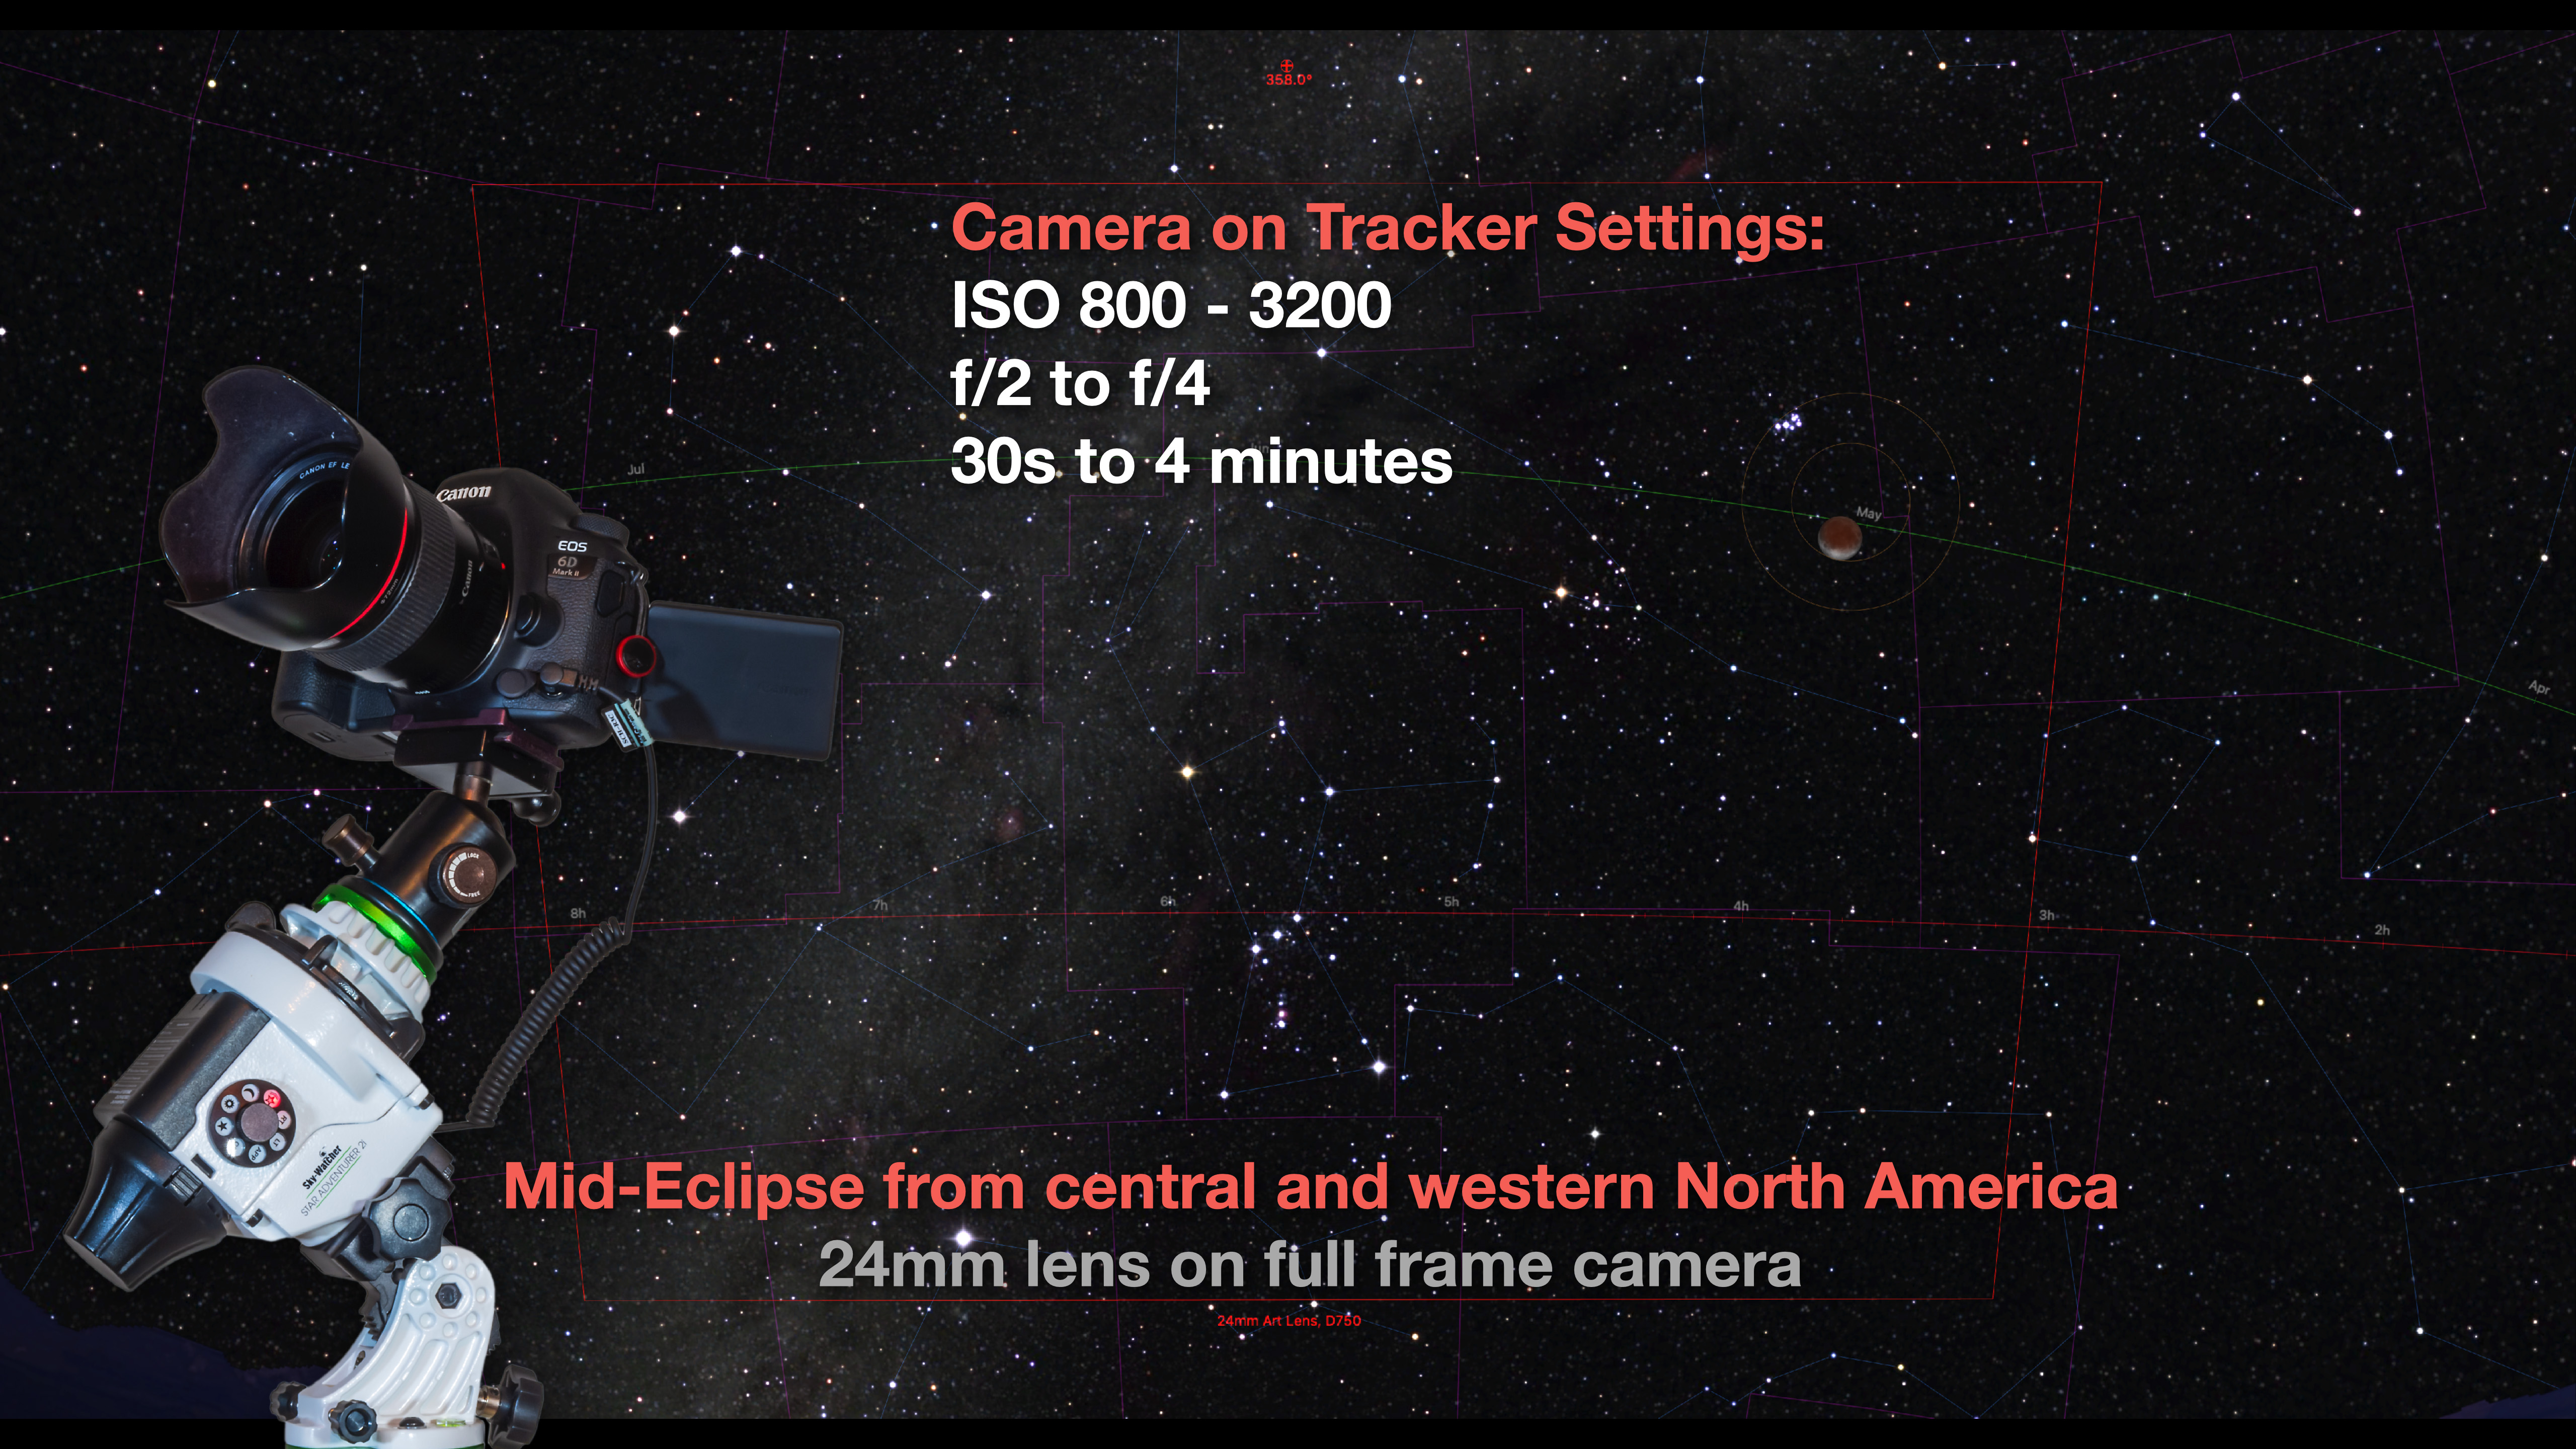
Camera on a Star Adventurer tracker showing the field of a 24mm lens.

From a dark site, make use of the Moonโ€™s position near the Milky Way to frame it and Orion and his fellow winter constellations. A 24mm lens will do the job nicely, in exposures up to 2 to 4 minutes long. But take short ones for just the Moon to layer in later. 

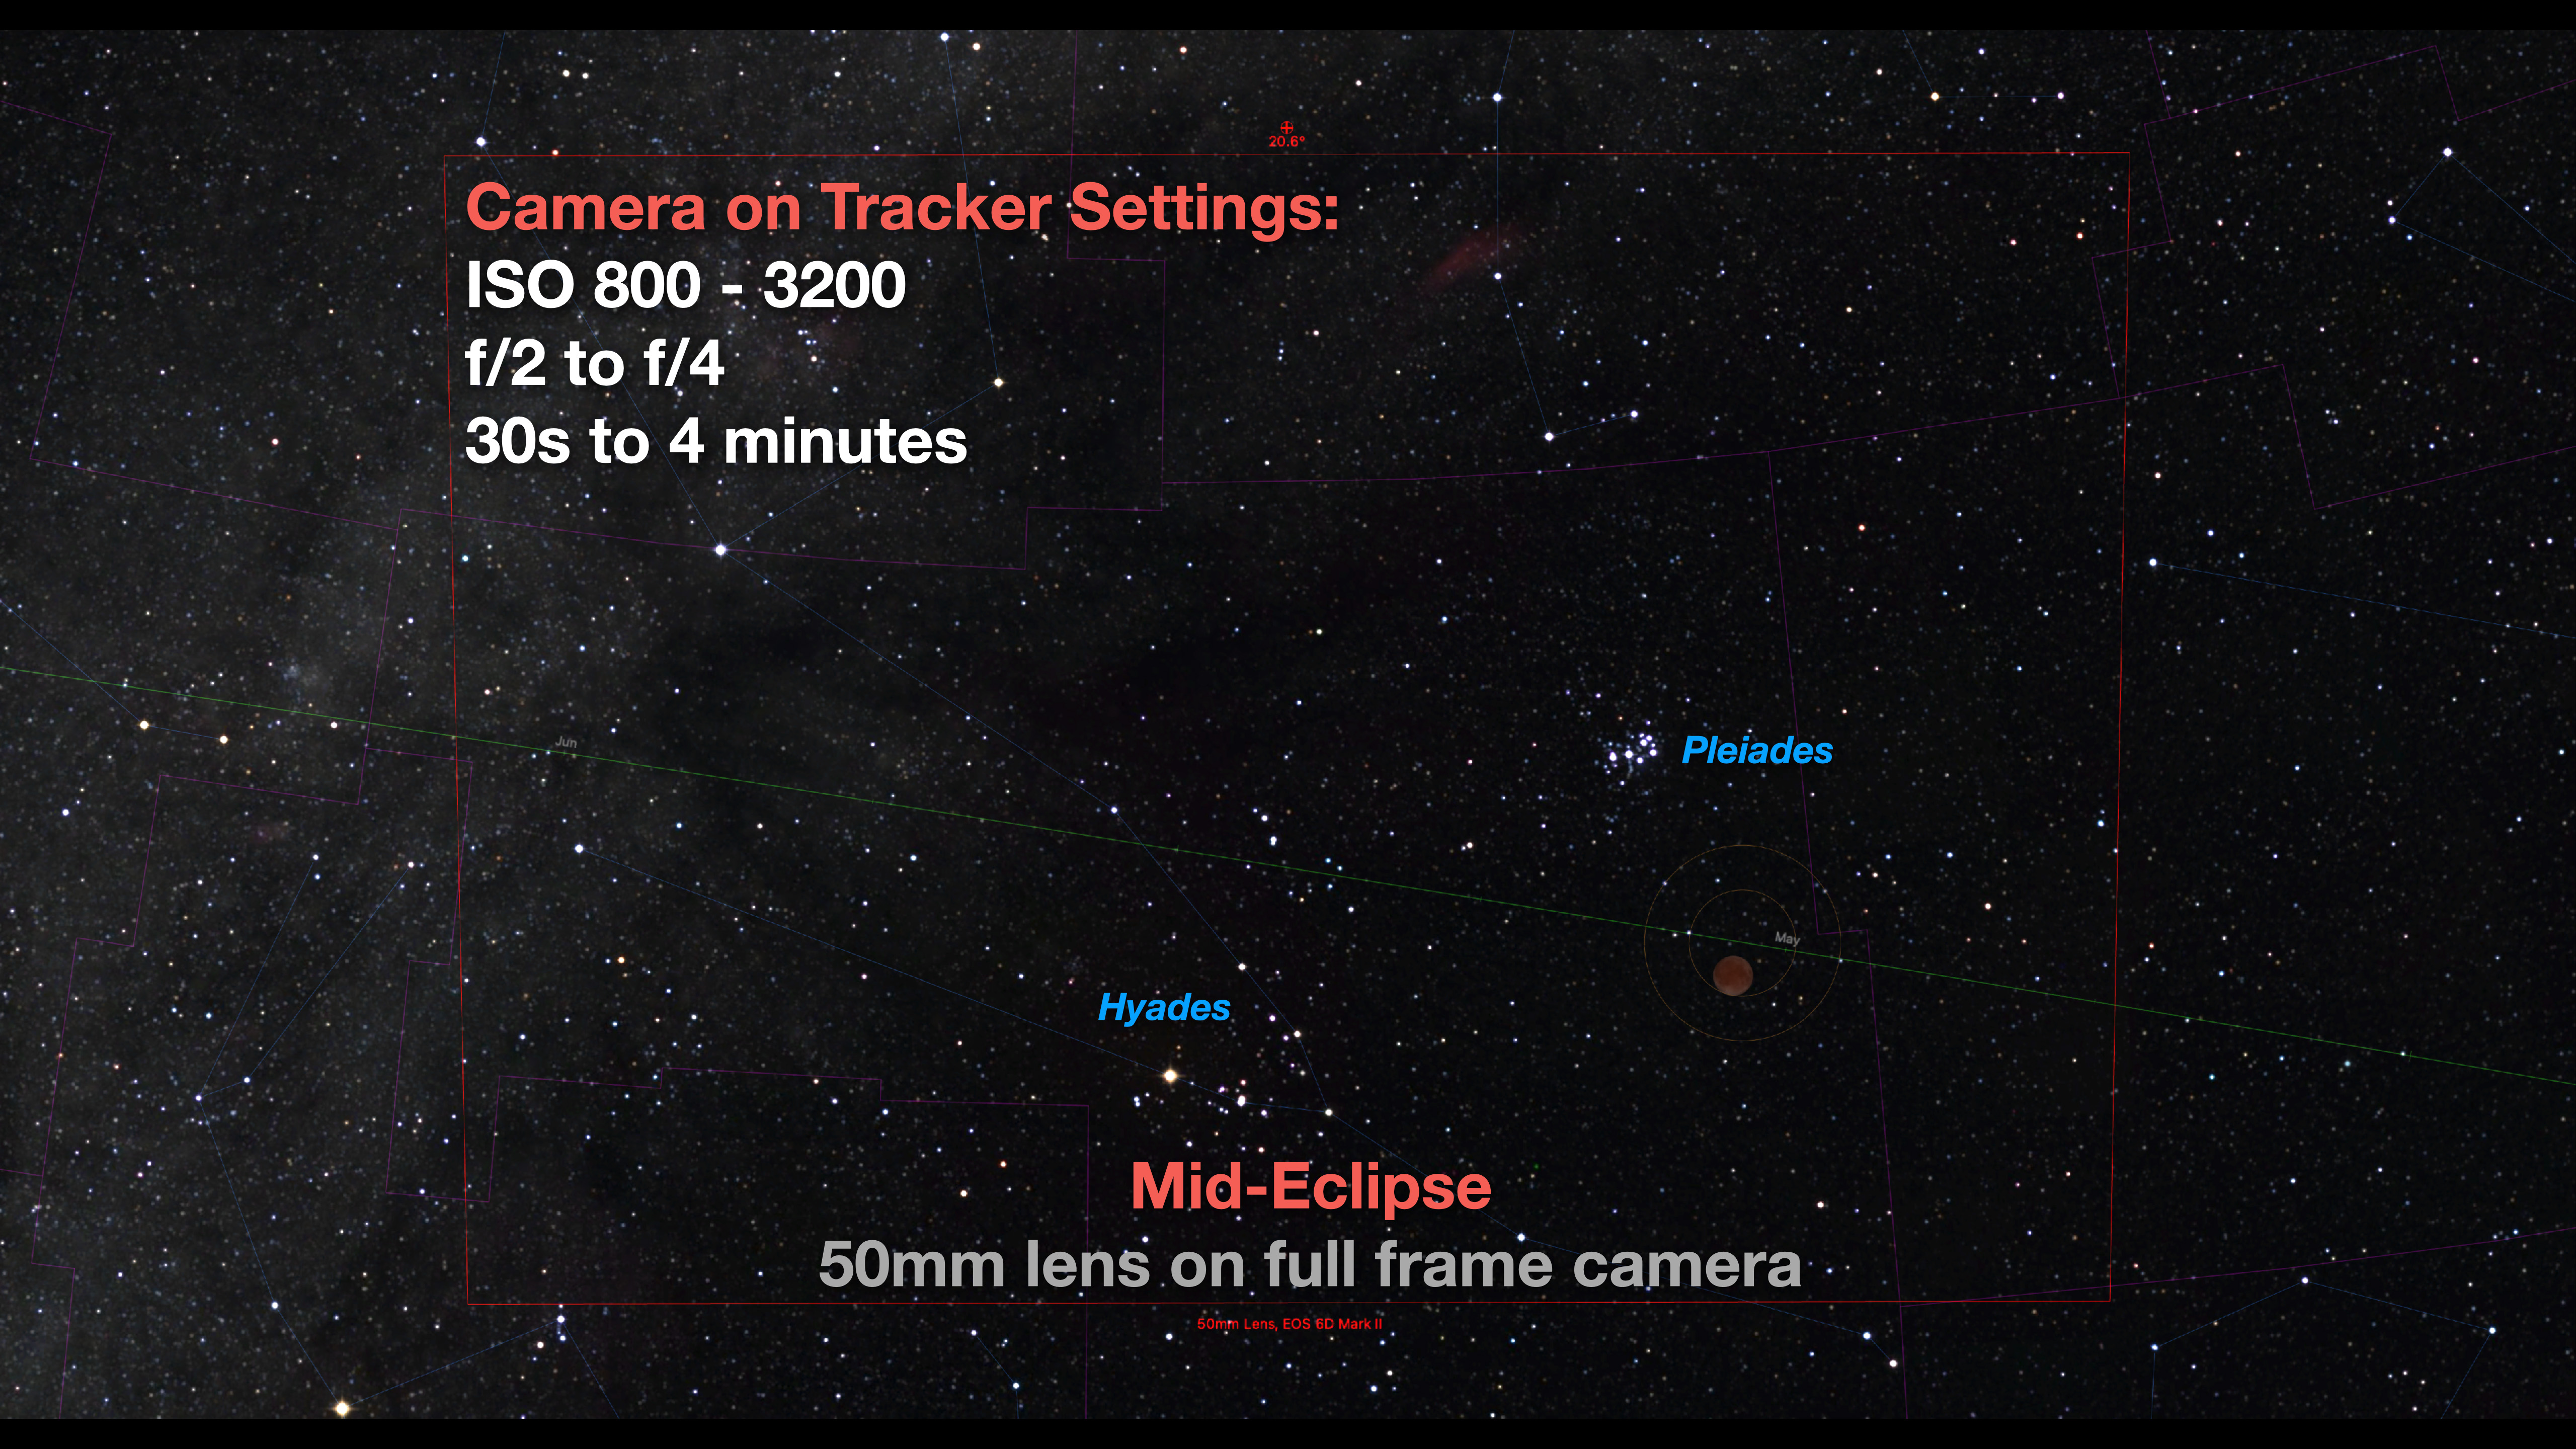
Showing the field of a 50mm lens.

A 50mm lens (again assuming a full frame camera) frames the Moon with the Pleiades and Hyades star clusters in Taurus. 

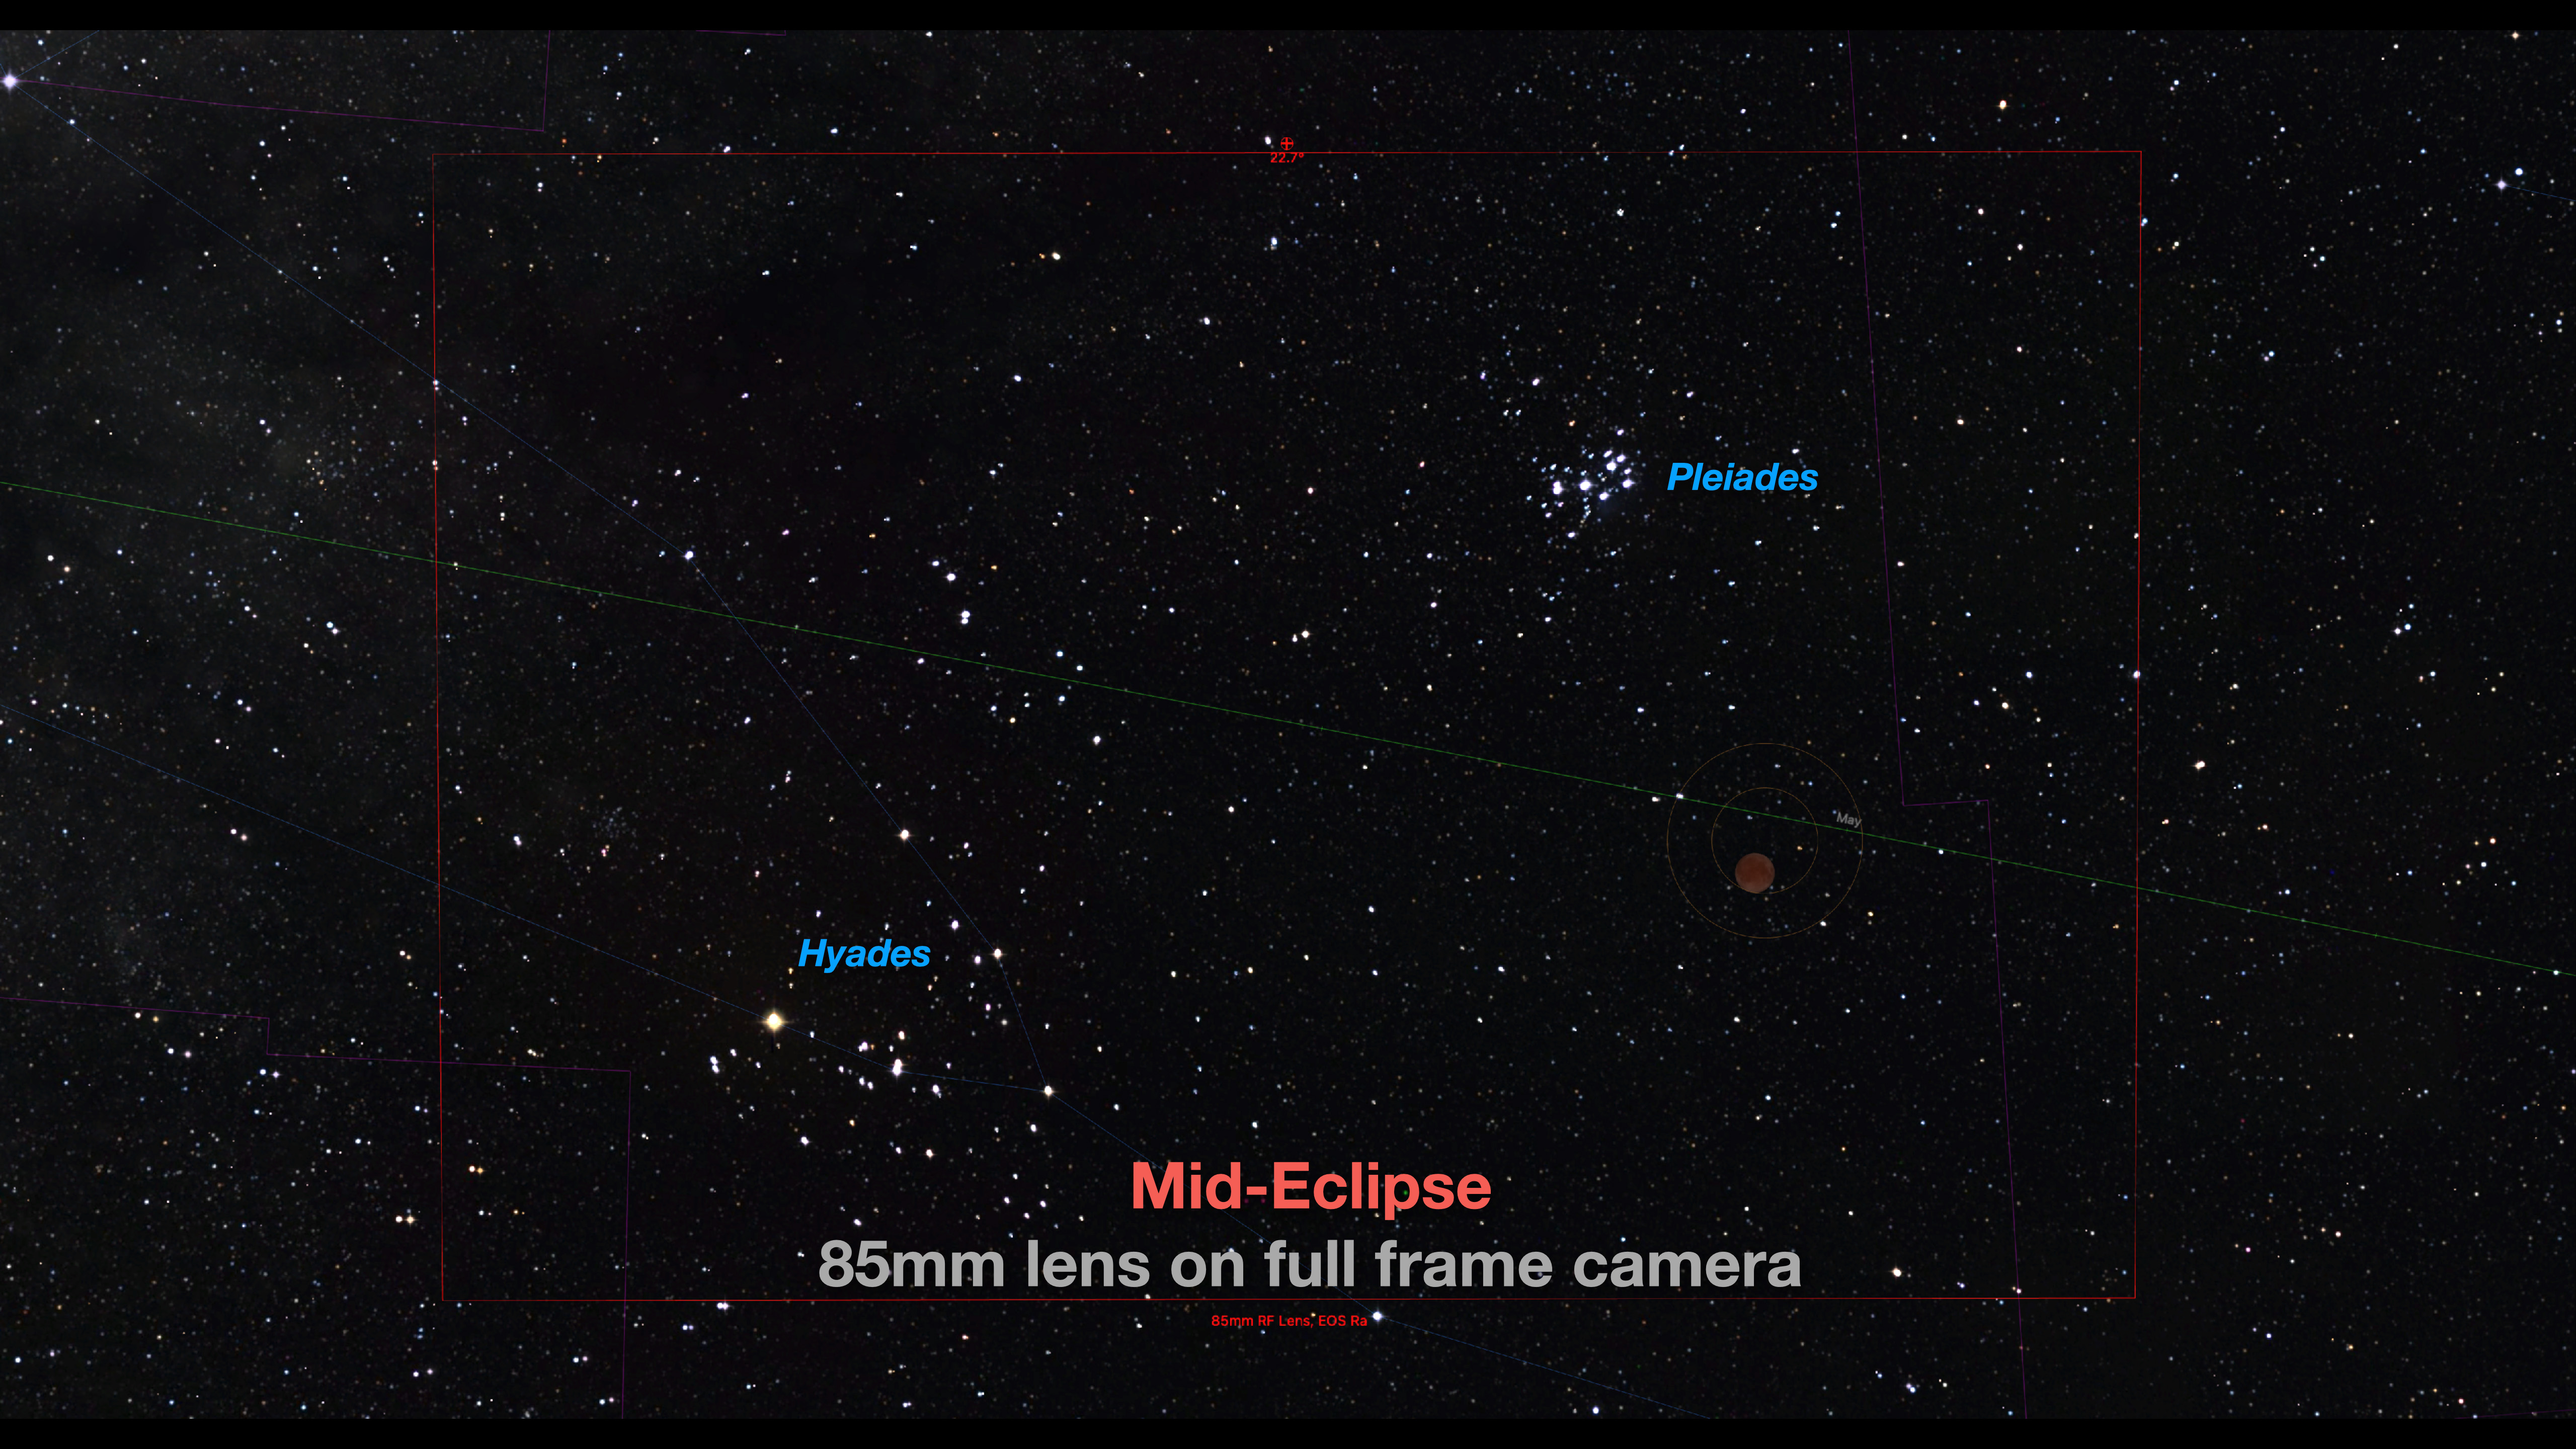
Showing the field of an 85mm lens,

Switching to an 85mm lens frames the clusters more tightly and makes the Moonโ€™s disk a little larger. For me, this is the best shot to go for at this eclipse, as it tells the story of the eclipse and its unique position near the two star clusters. 

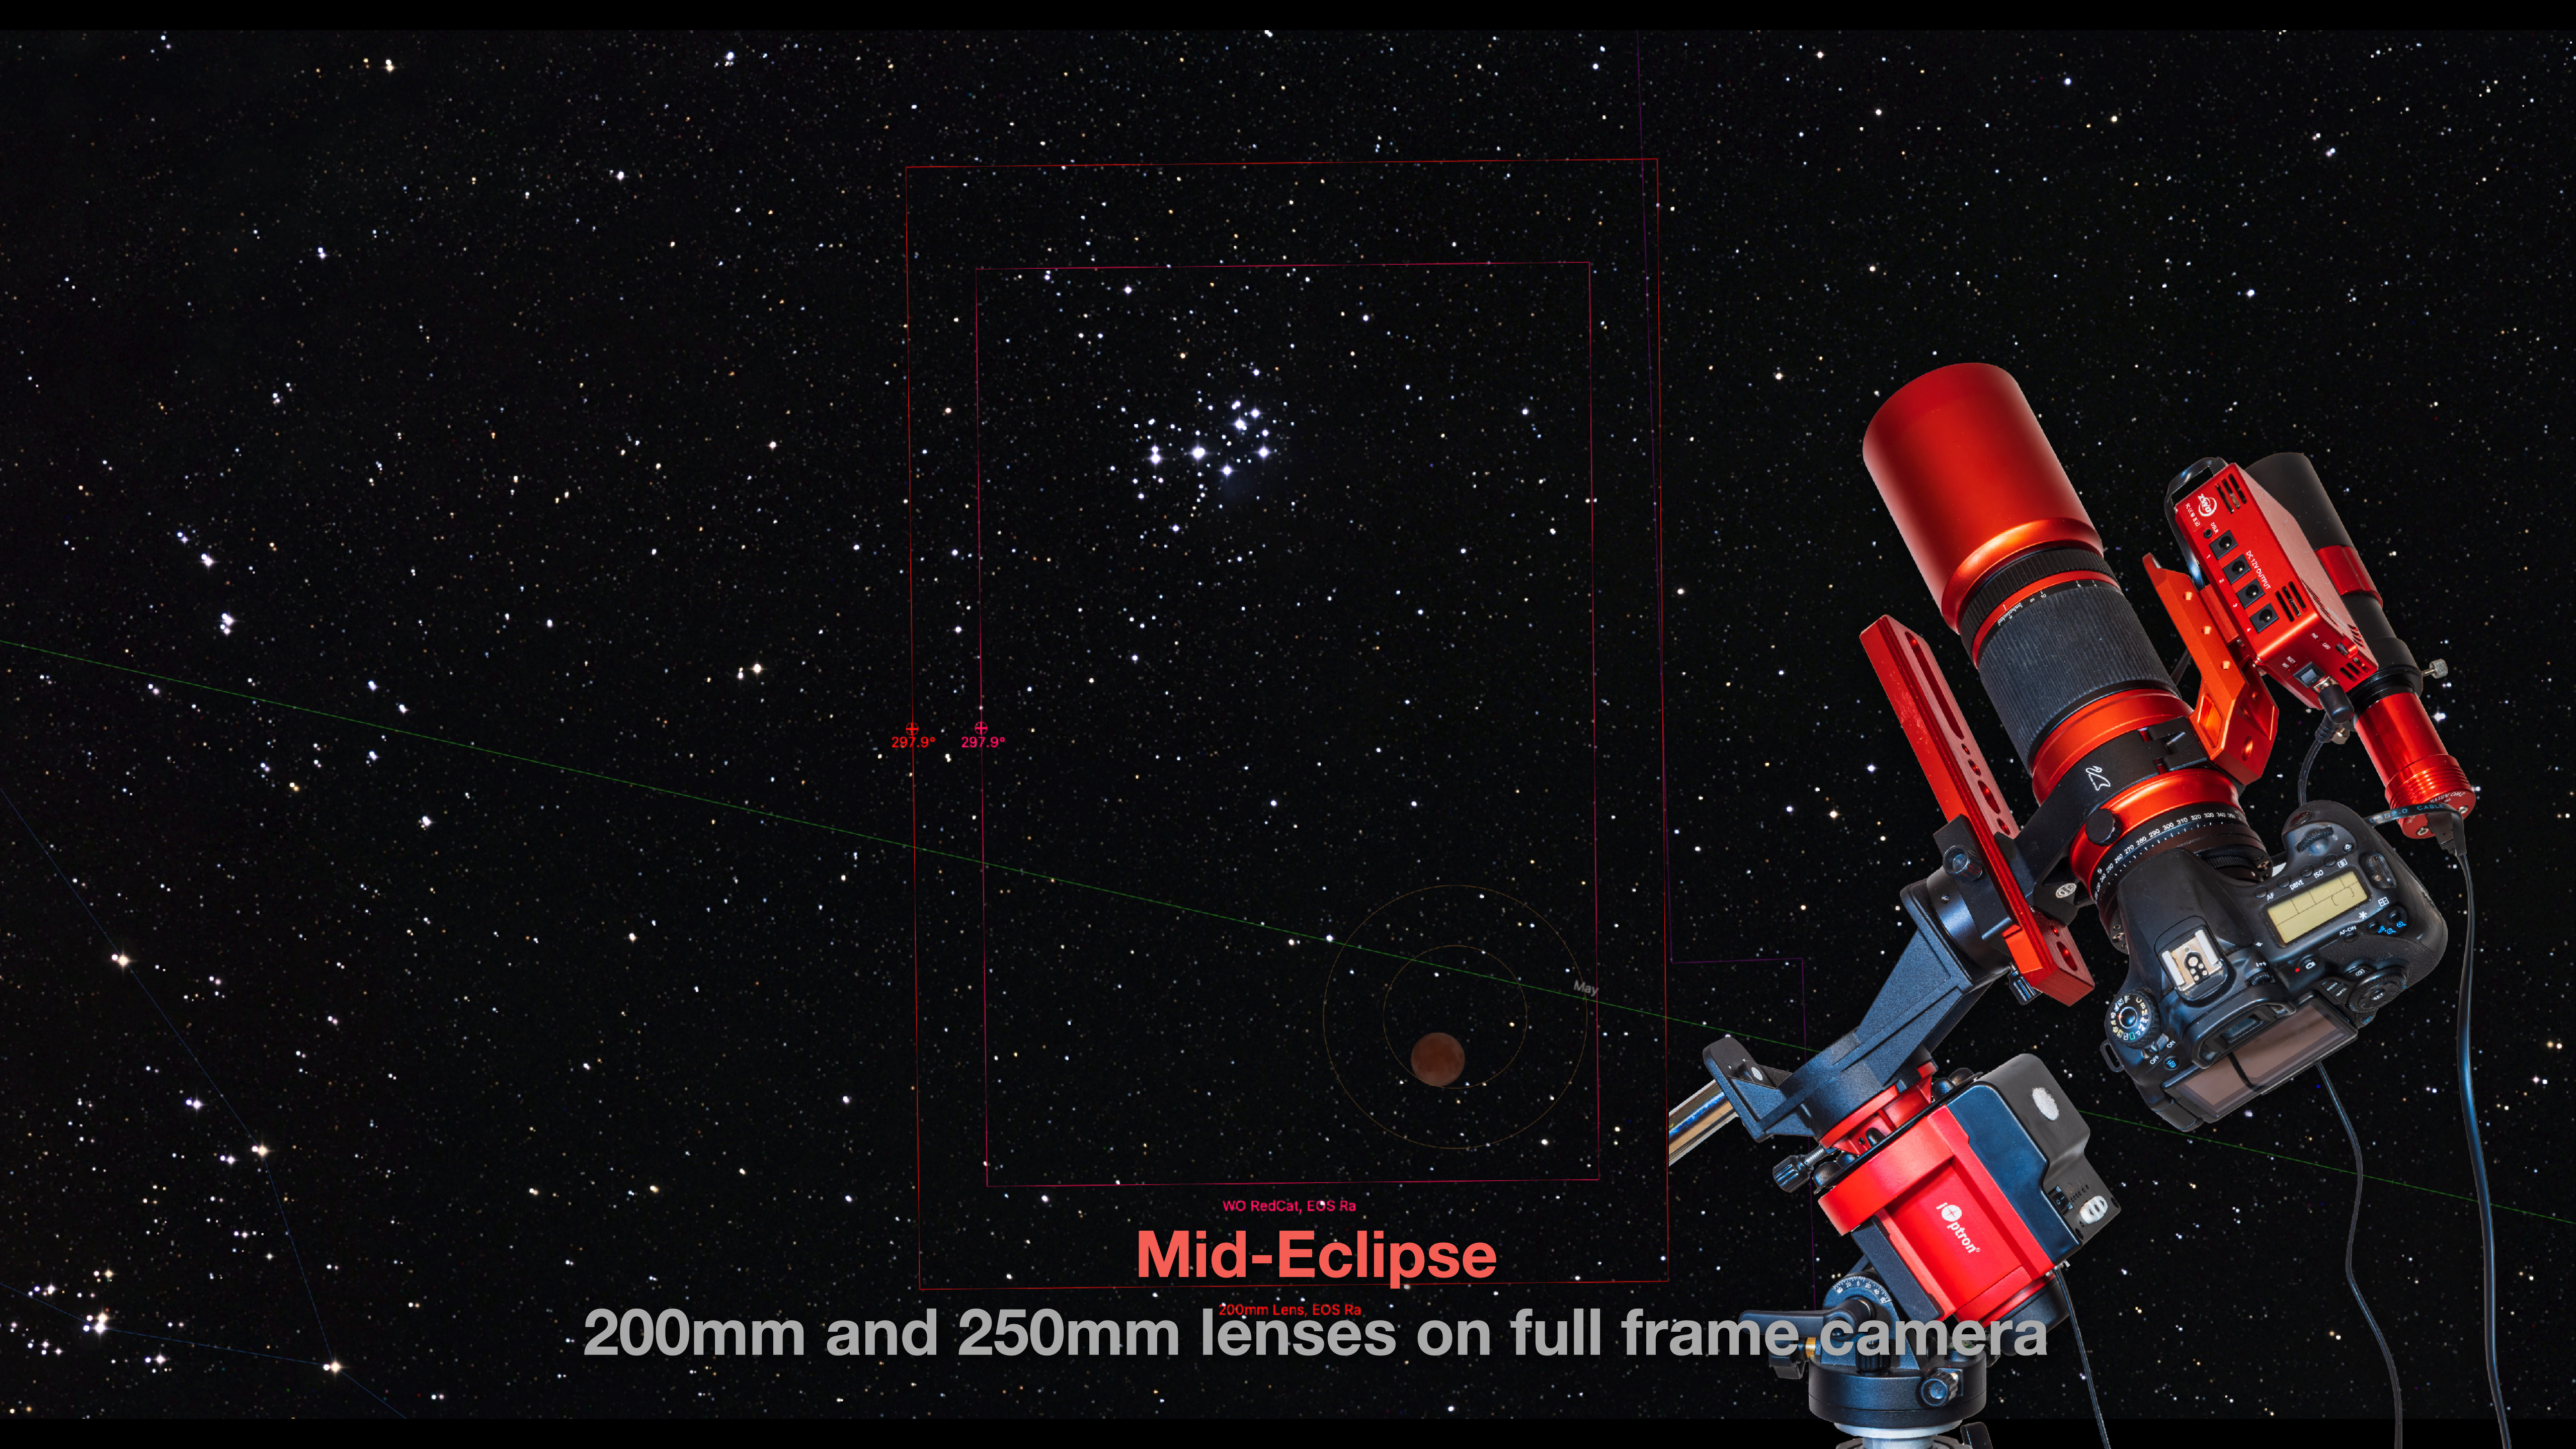
Showing the field of 200mm and 250mm lenses.

But going with a longer lens allows framing the red eclipsed Moon below the blue Pleiades cluster, a fine colour contrast. A 200mm lens will do the job nicely (or a 135mm on a cropped frame camera). 

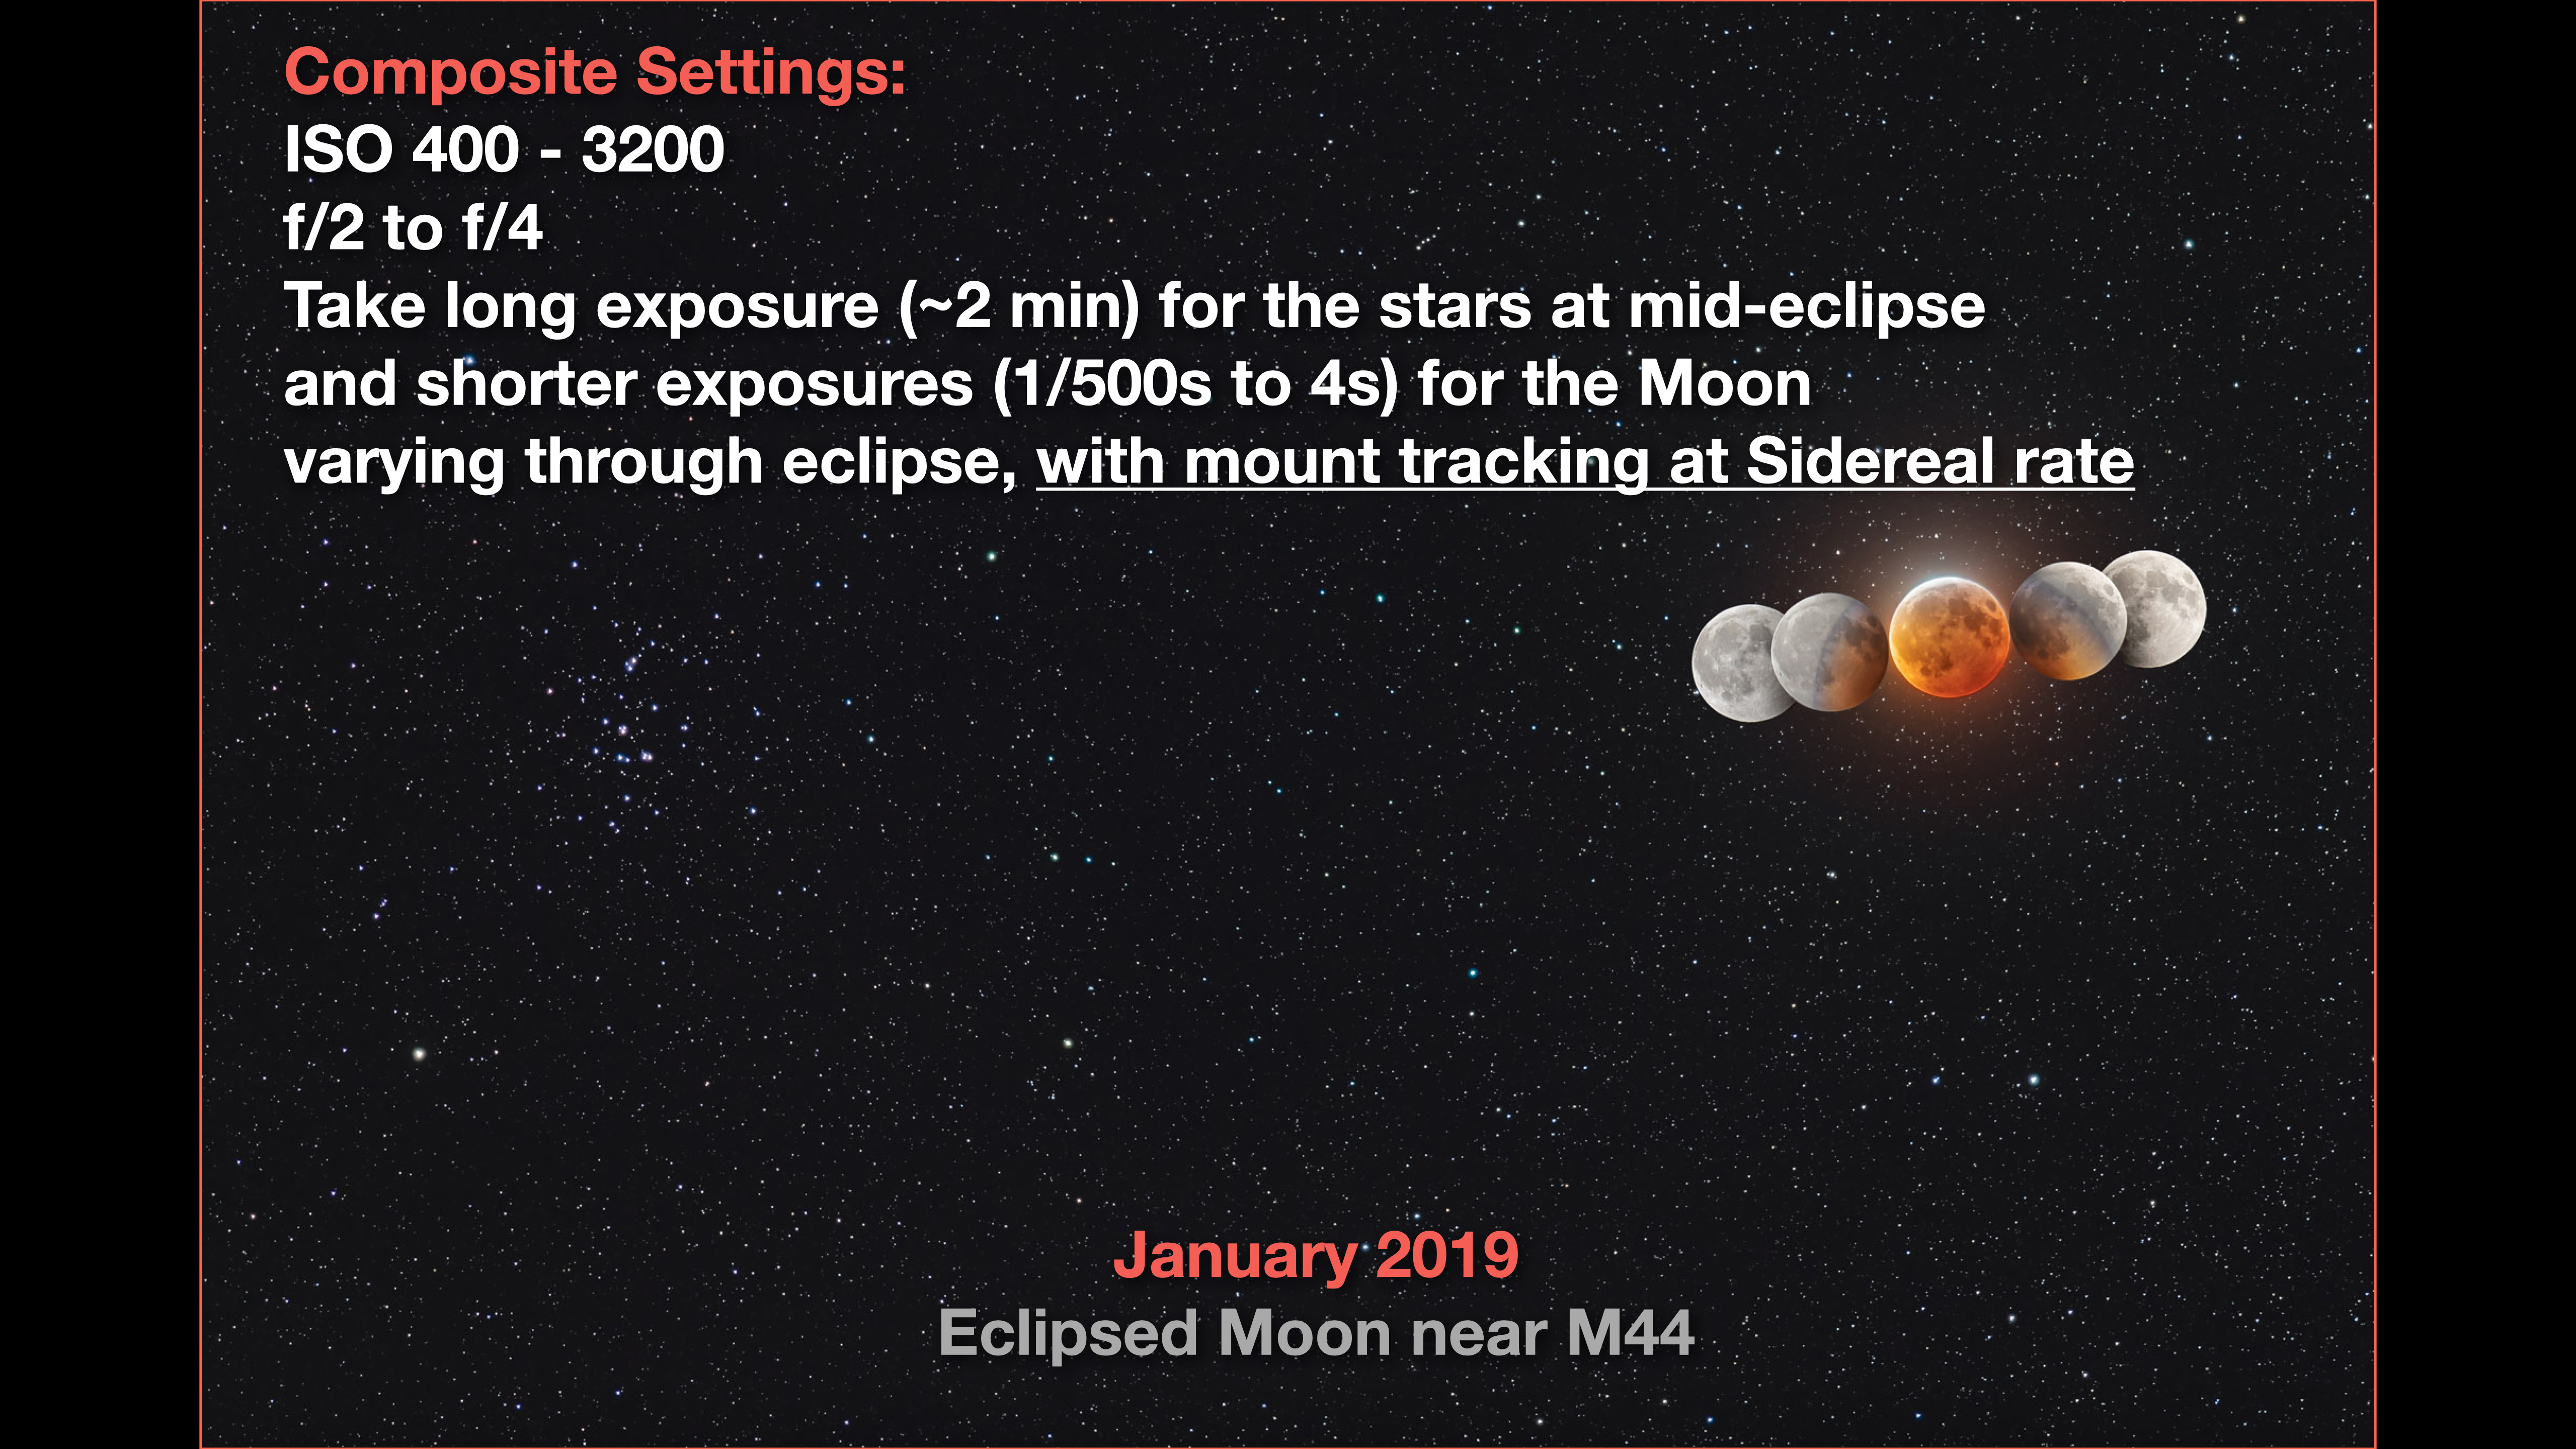
Or, as I show here, the popular William Optics RedCat with its 250mm focal length will also work well. But such a lens must be on a polar-aligned tracker to get sharp shots. Use the Sidereal rate drive speed to ensure the sharpest stars over the 1 to 4 minutes needed to record lots of stars. 

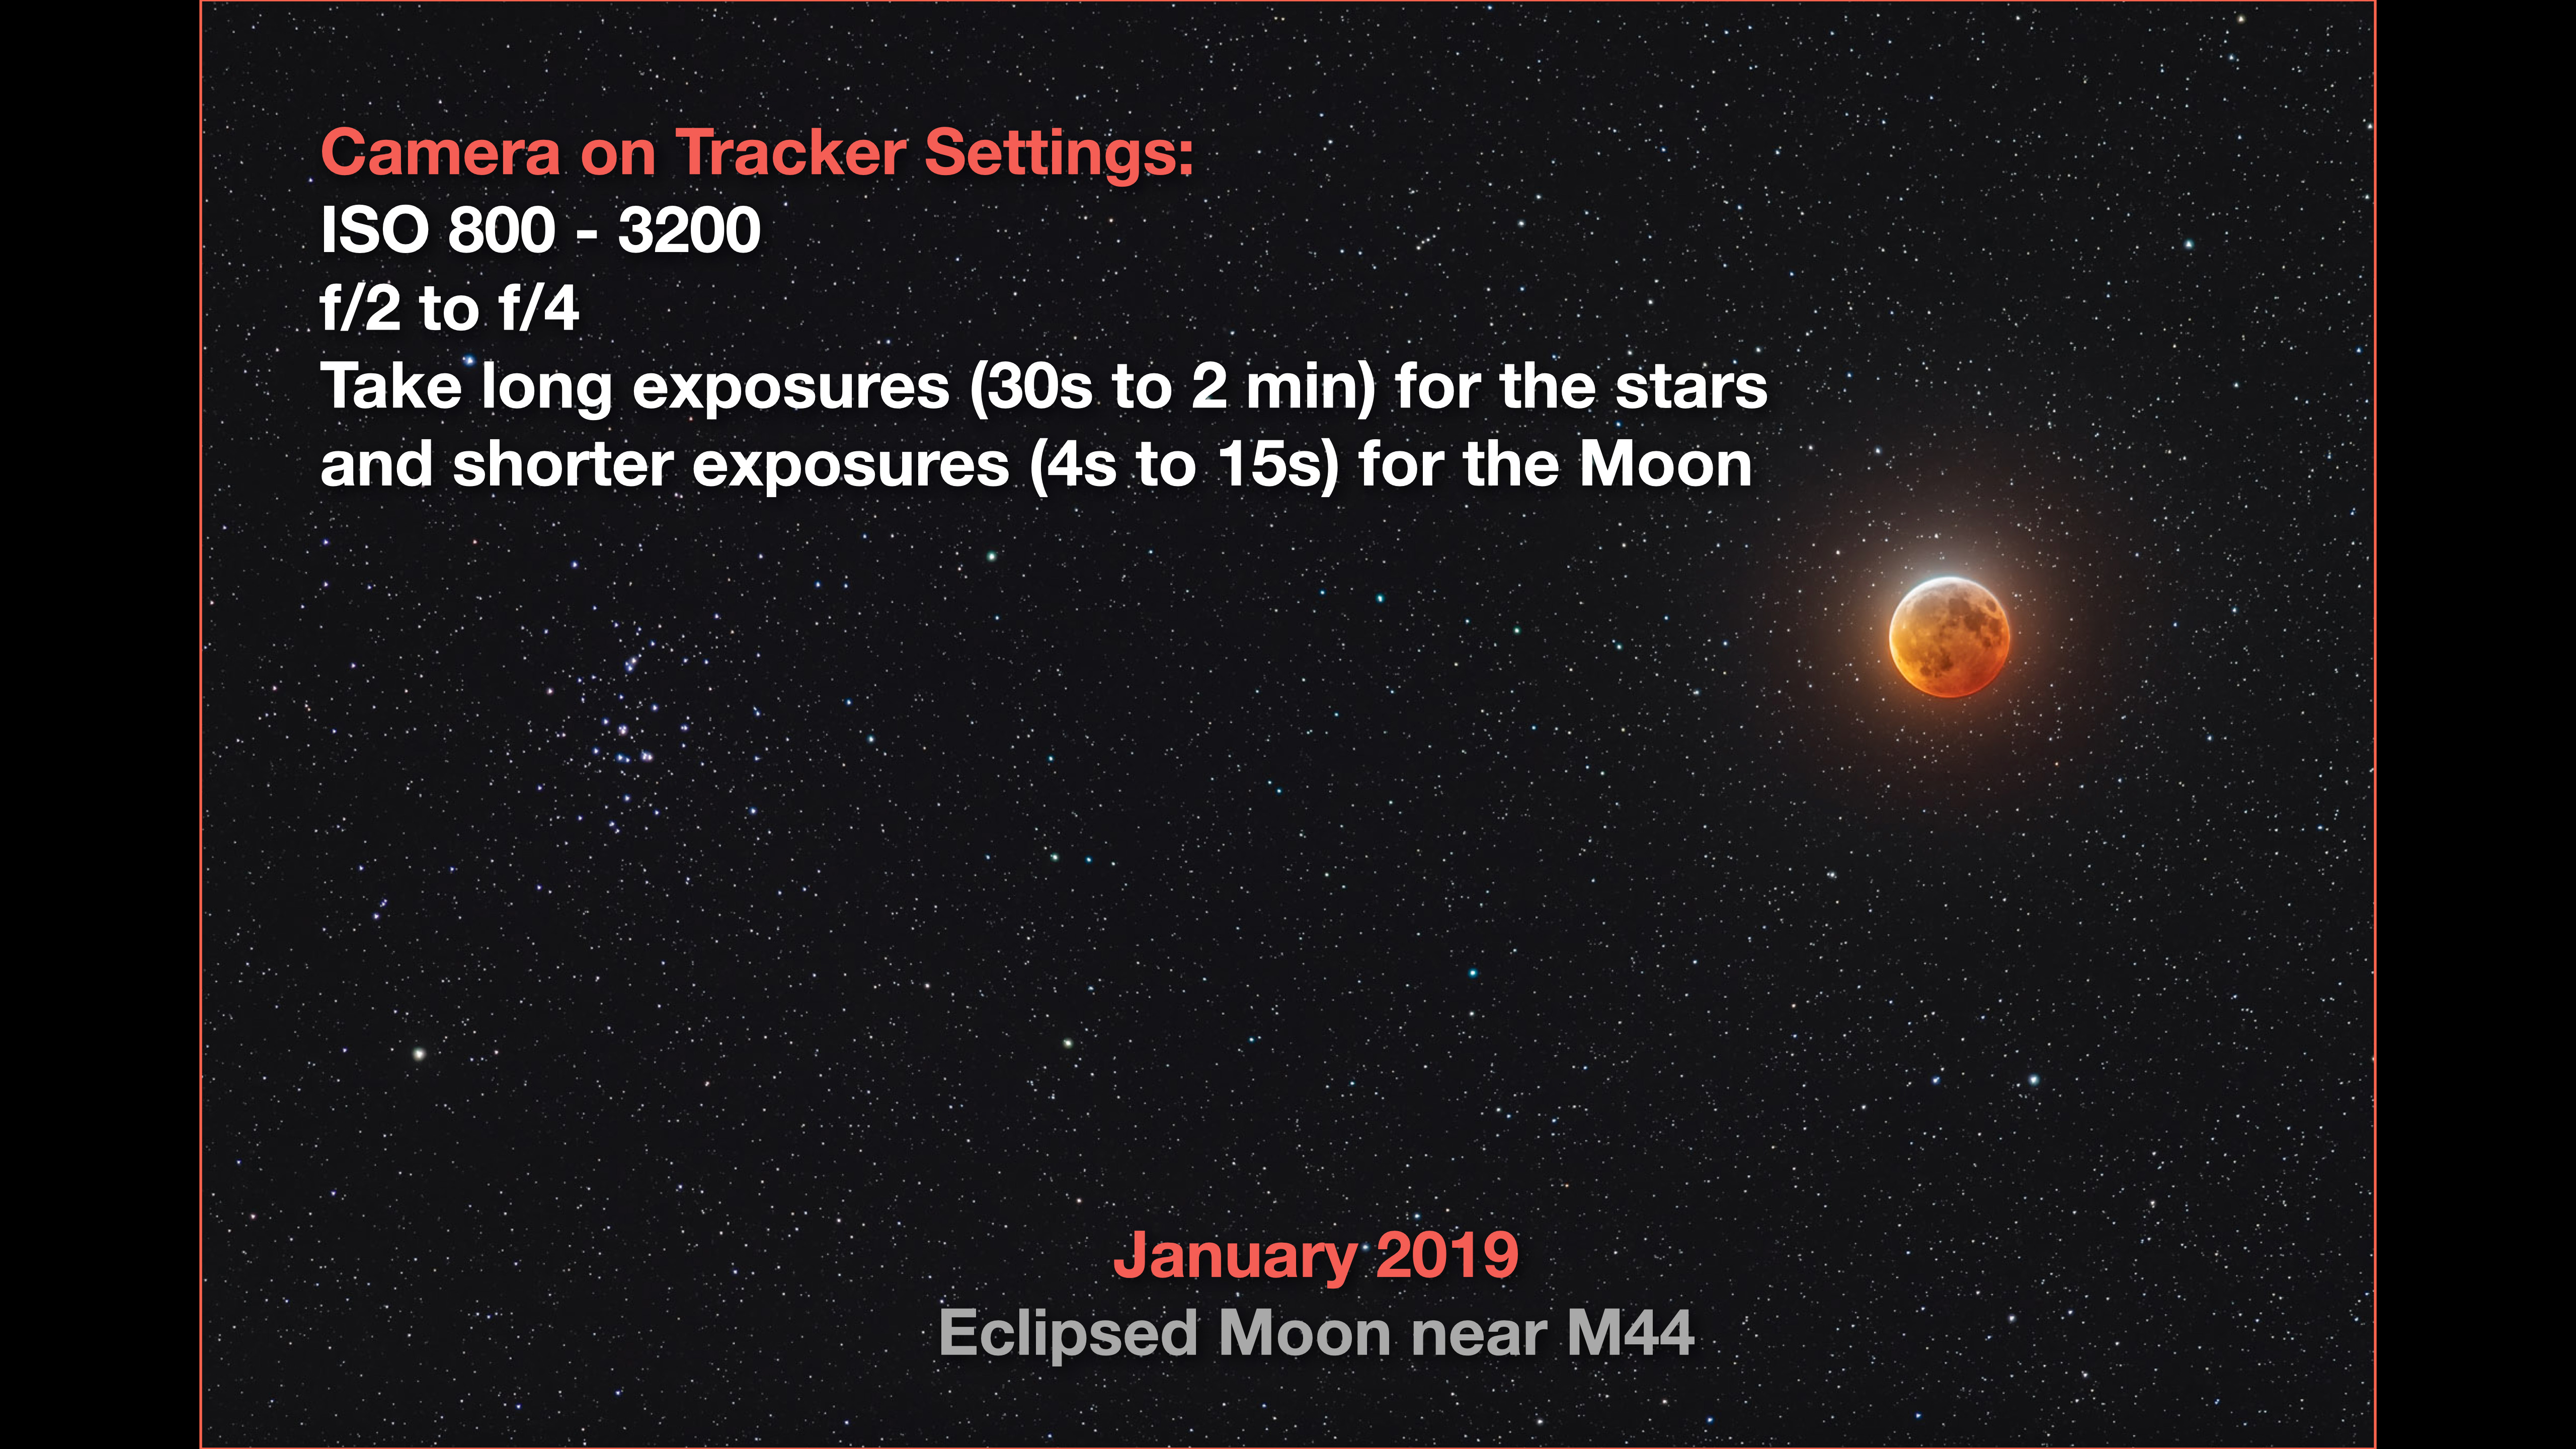
Typical settings for tracker images, with an image of the January 2019 eclipse.

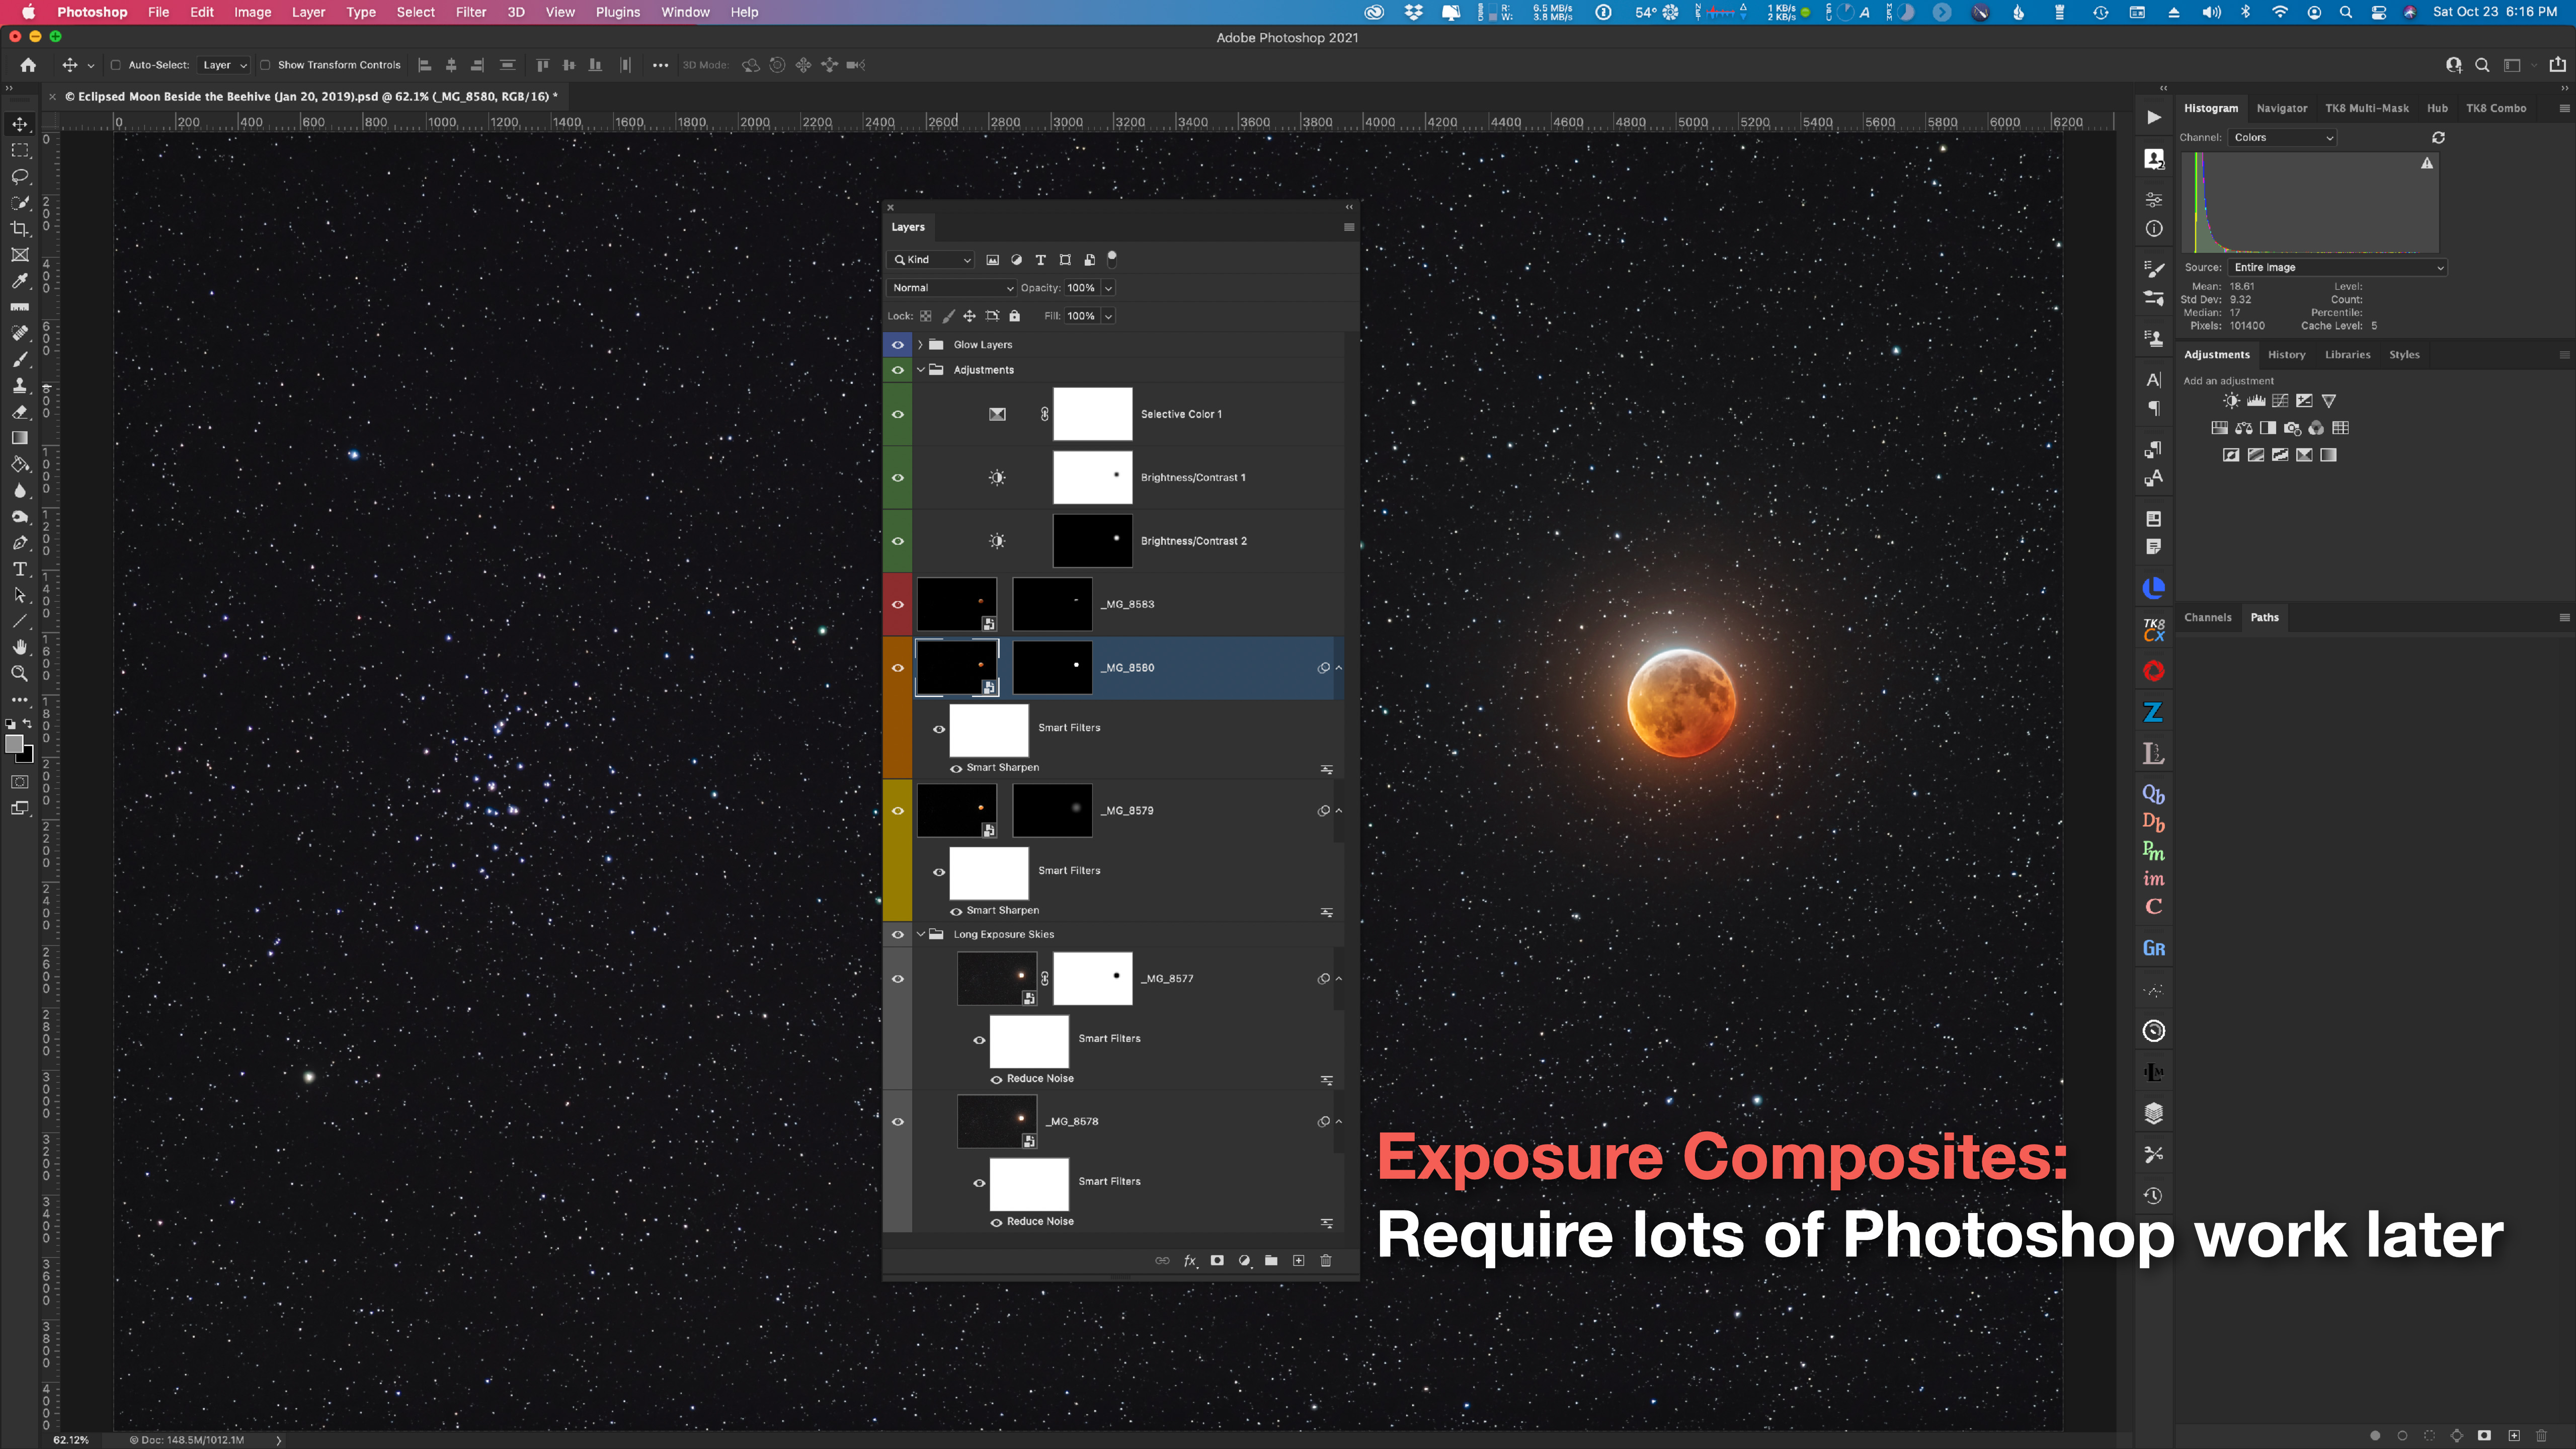
Take lots of exposures over a range of settings โ€” long to bring out the deep sky detail and shorter to preserve detail in the reddened lunar disk. These can be layered and blended later in Photoshop, or in the layer-based image editing program of your choice, such as Affinity Photo or ON1 Photo RAW. 

PHOTO OPTIONS 3 โ€” THROUGH A TELESCOPE

While I think the tracked wide-field options are some of the best for this eclipse, many photographers will want frame-filling close-ups of the red Moon. While a telescope will do the job, unless it has motors to track the sky, your options are limited.

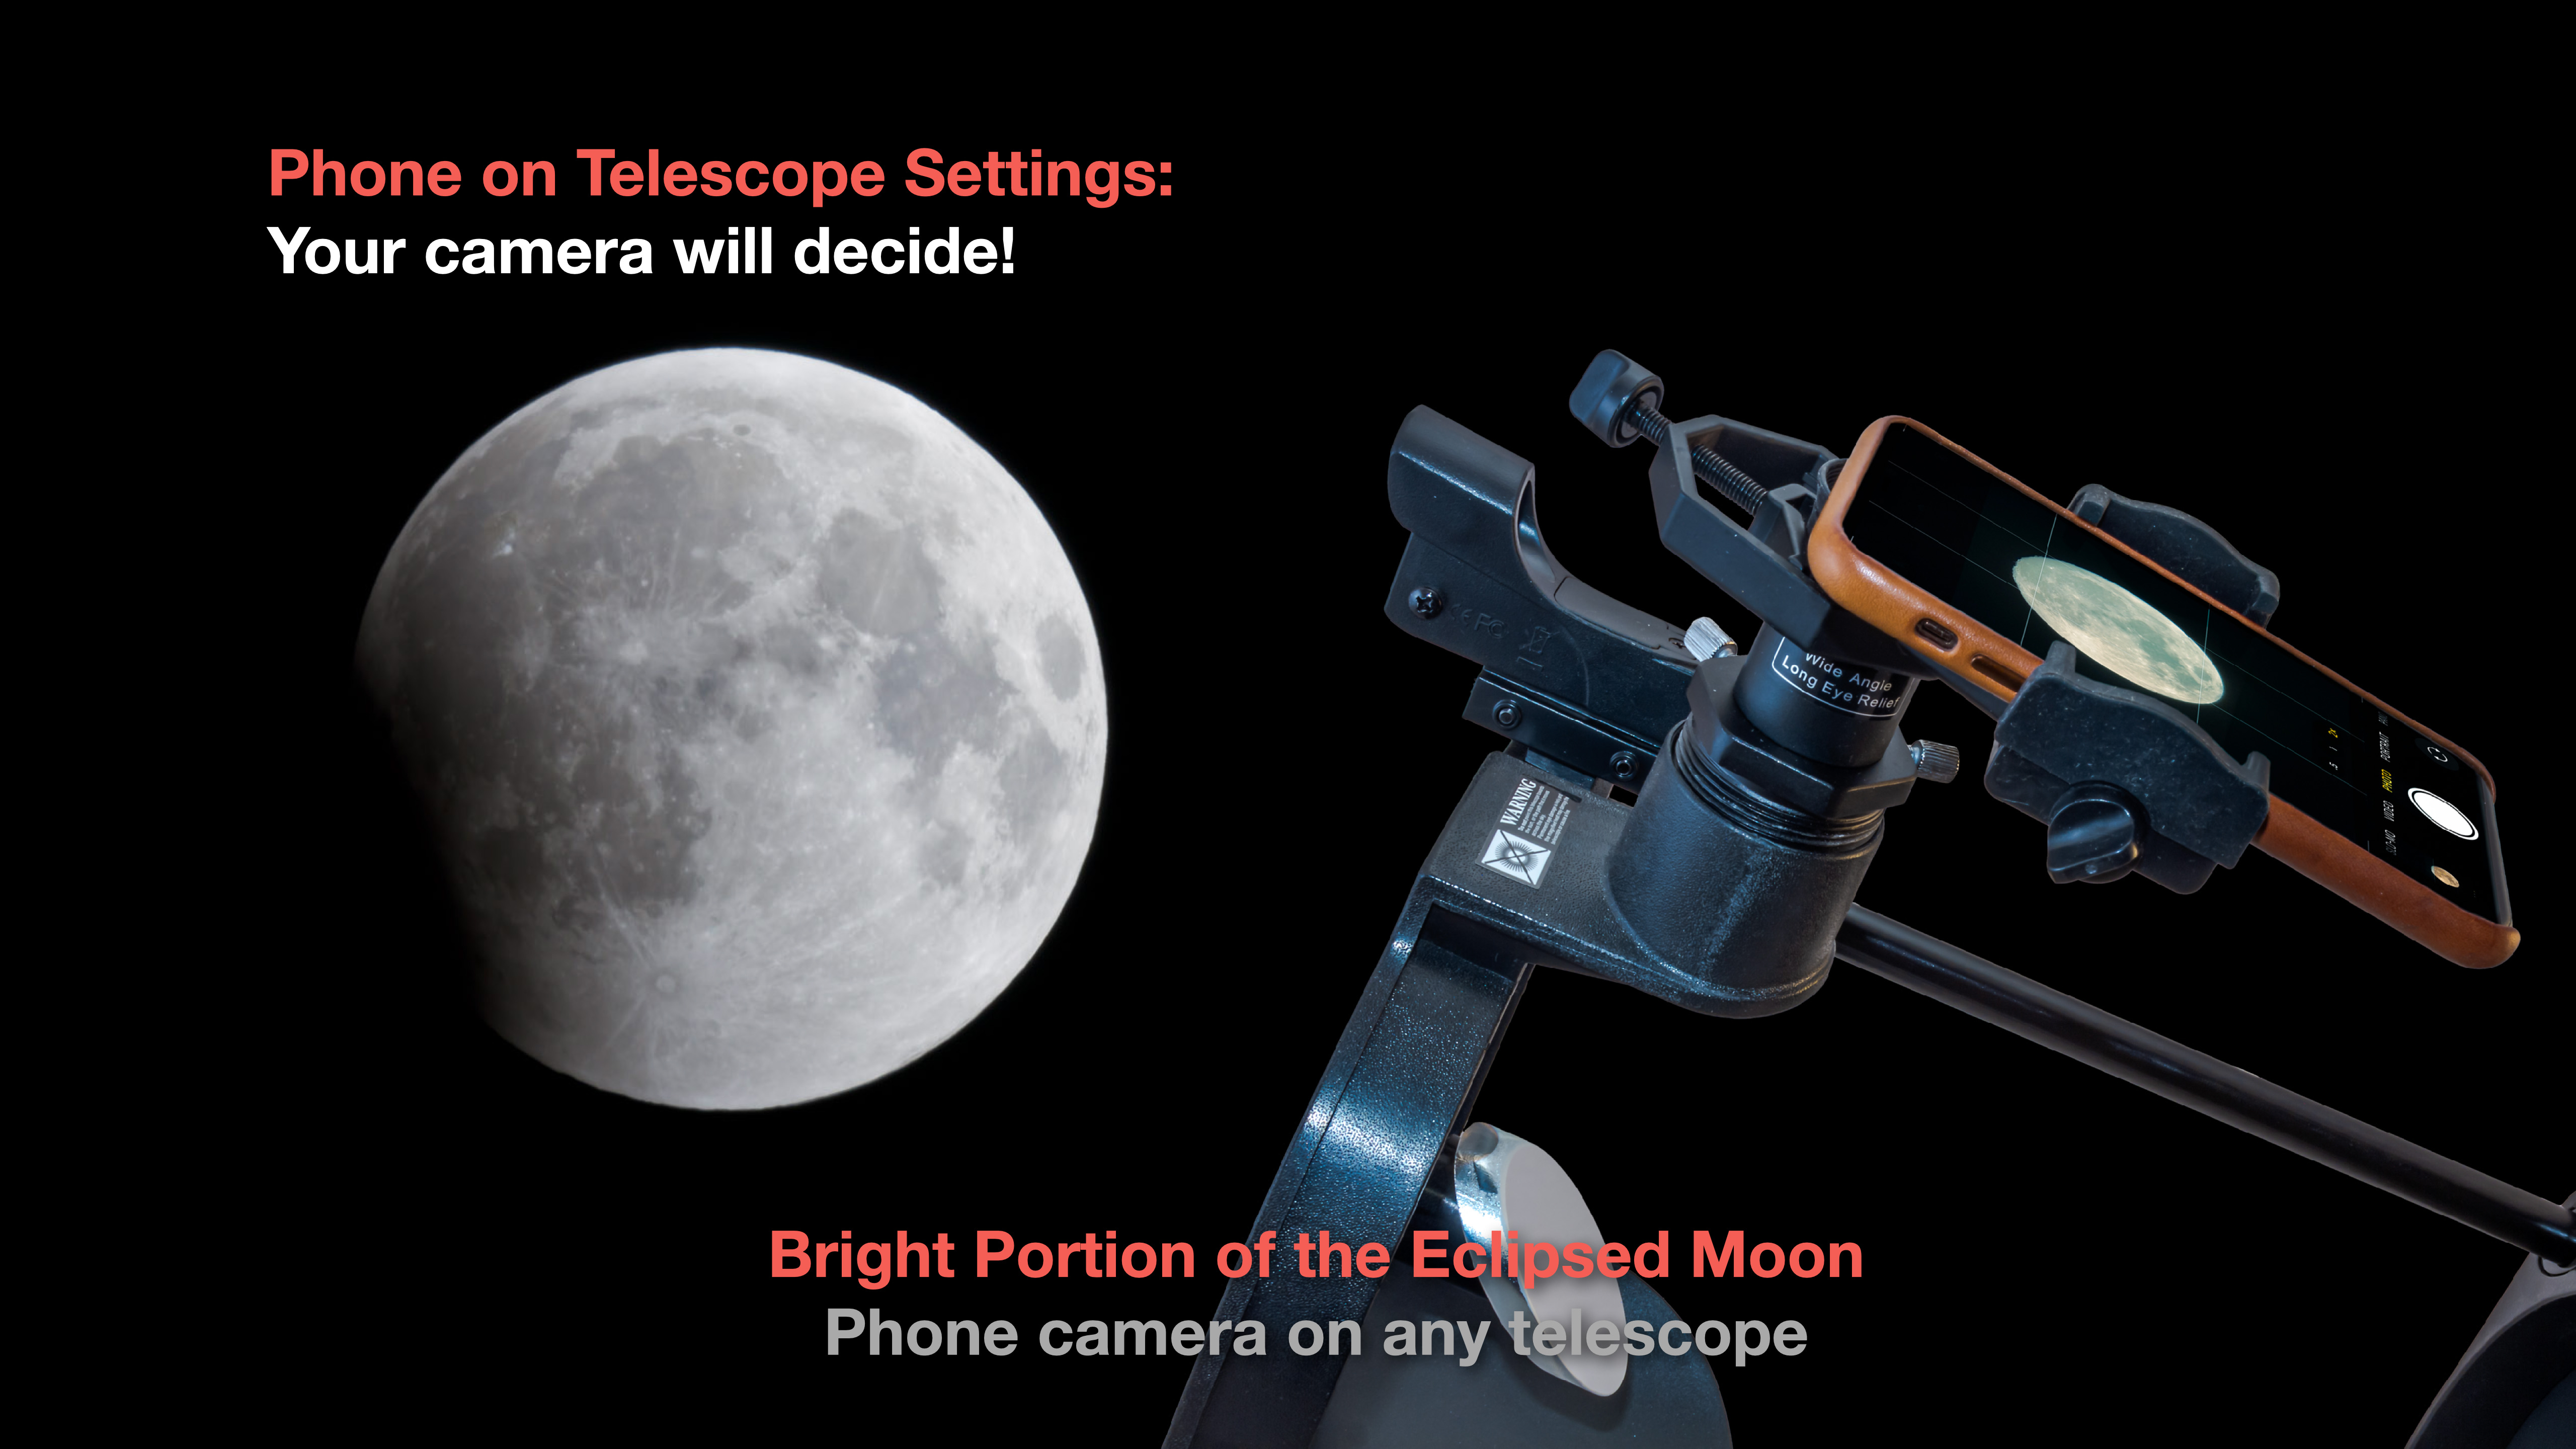
Phone on a simple Dobsonian reflector.

A phone clamped to the eyepiece of a telescope can capture the shrinking bright part of the eclipsed Moon as the Moon enters more deeply into the umbra. Exposures for the bright part of the Moon are short enough a motor drive on the telescope is not essential. 

But if you havenโ€™t shot the Moon with this gear before, eclipse night is not the time to learn. Practice on the Moon before the eclipse. 

DSLR on a beginner refractor telescope showing the adapter.

For shooting with a DSLR camera through a telescope youโ€™ll need a special camera adapter nosepiece and T-ring for your camera. Again, if you donโ€™t have the gear and the experience doing this, I would suggest not making the attempt at two in the morning on eclipse night! 

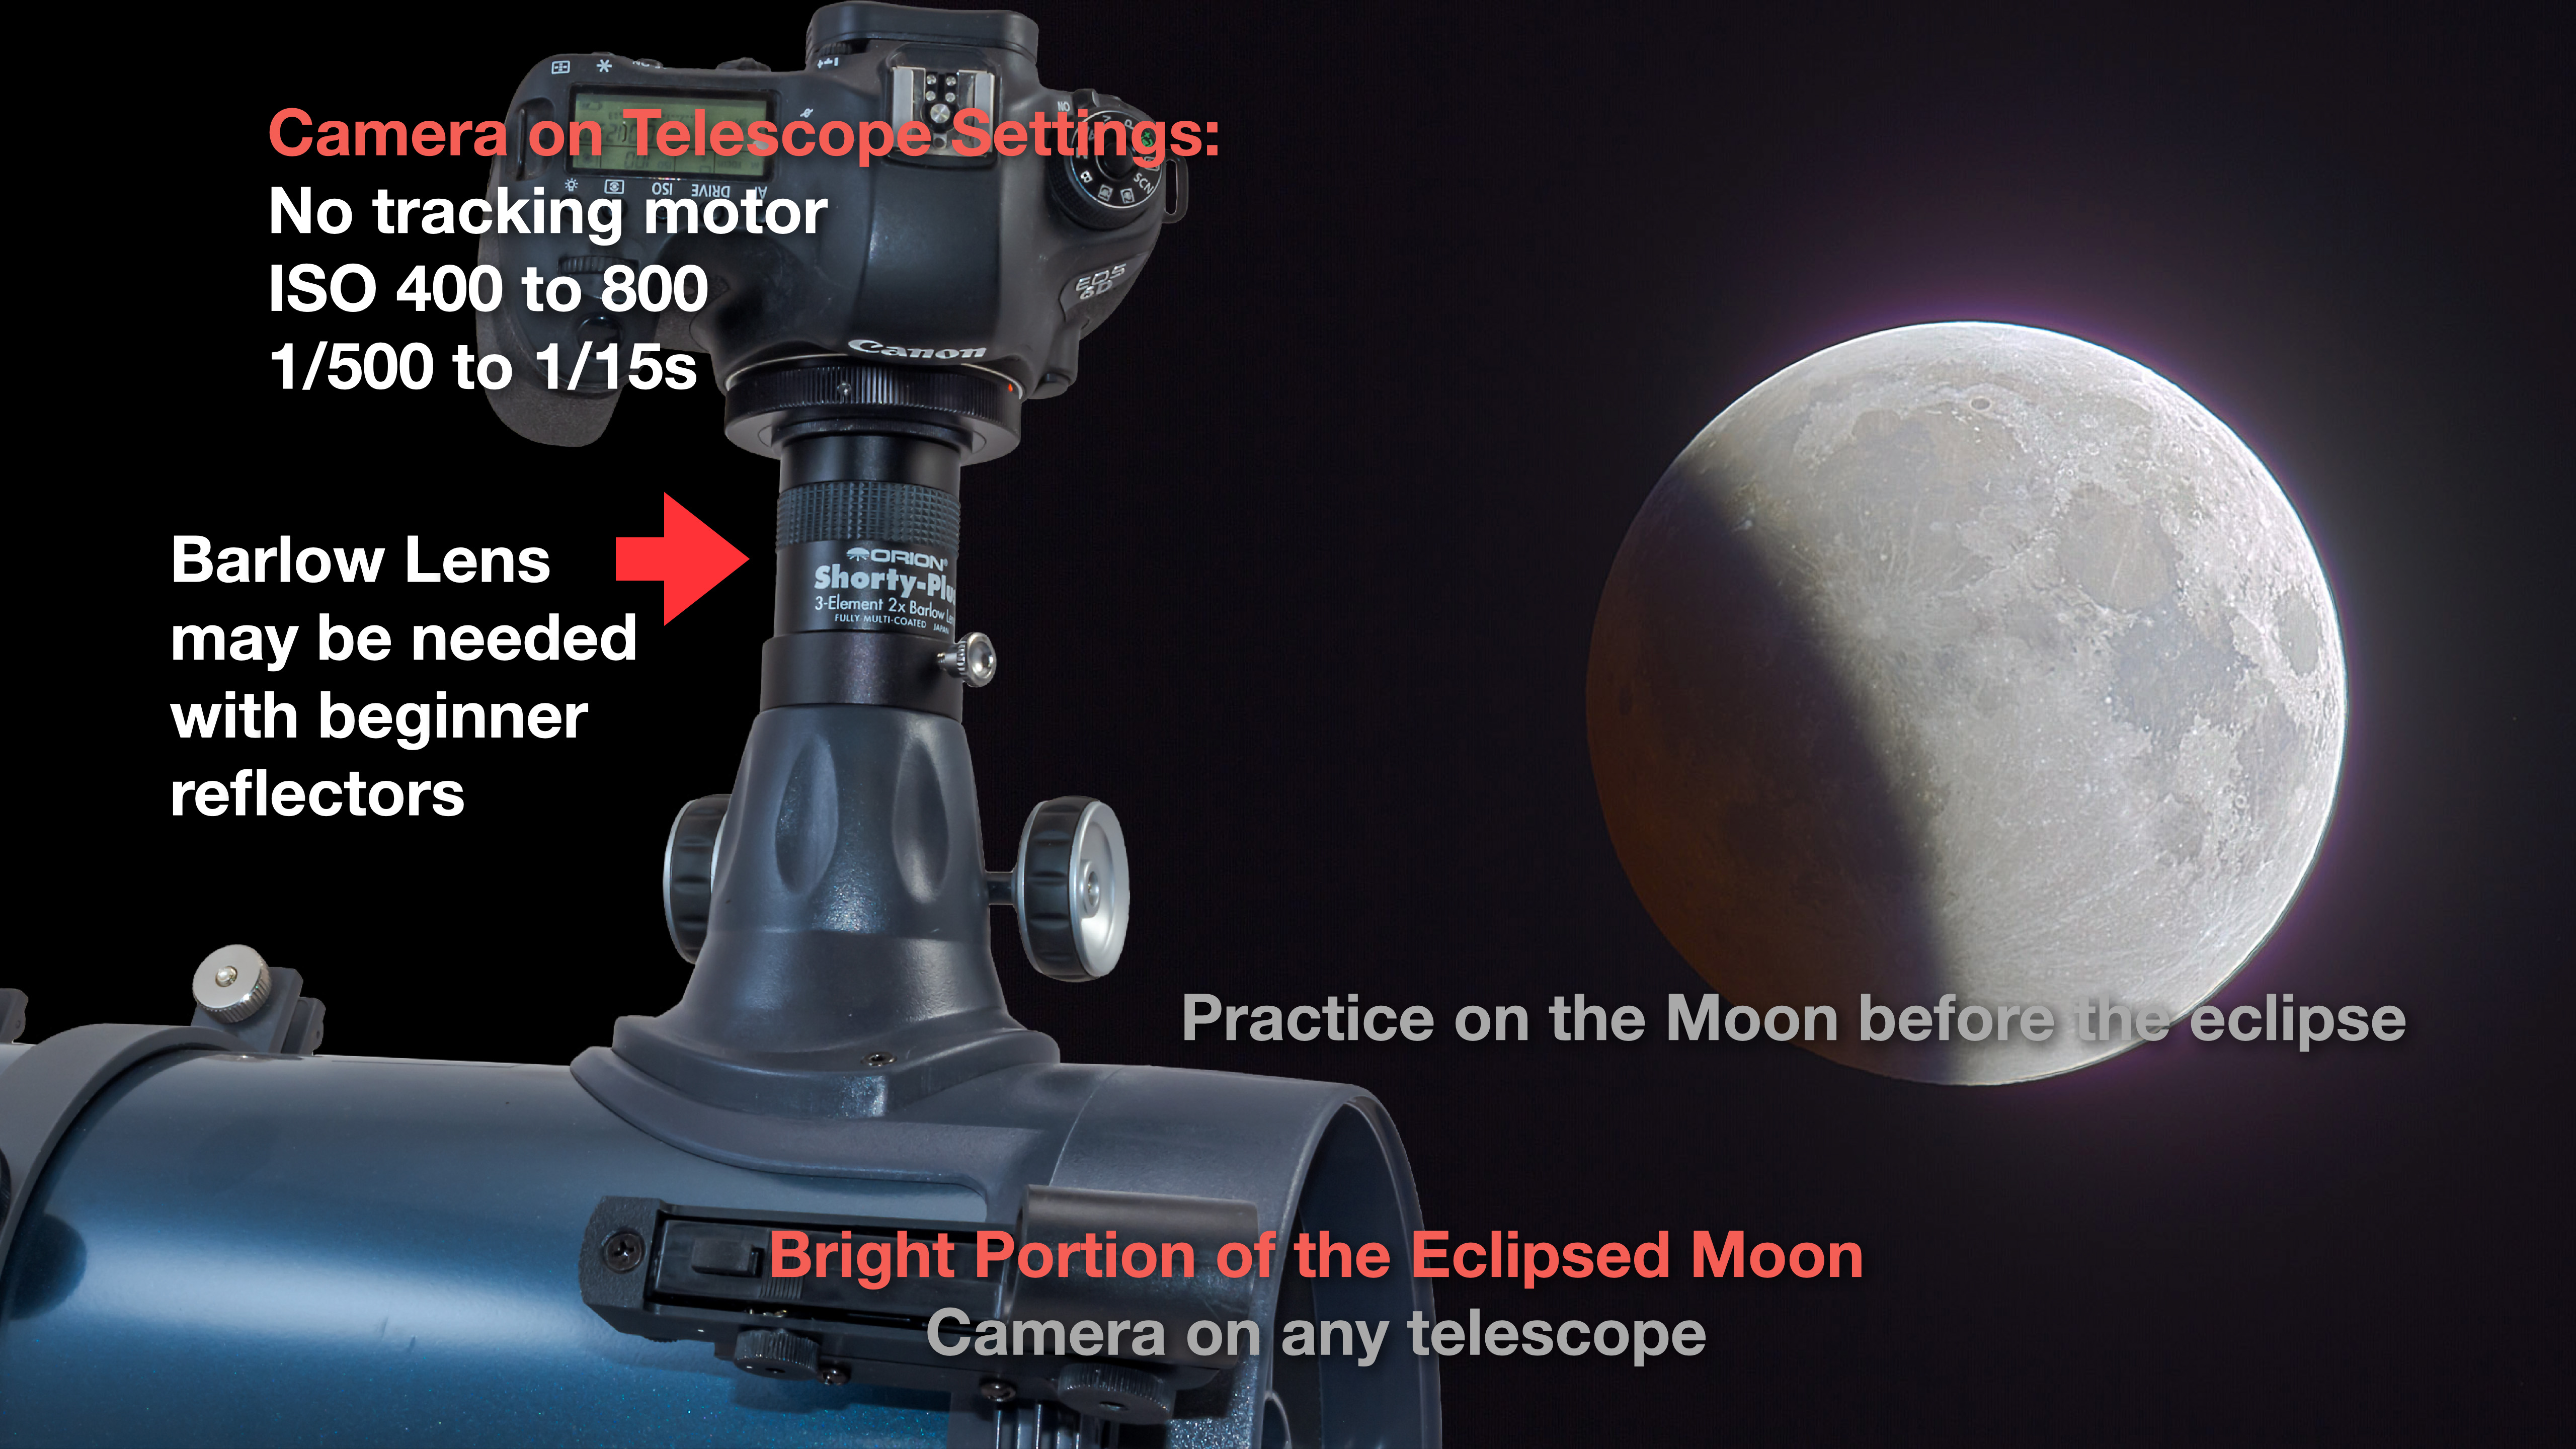
DSLR on a beginner reflector with an often necessary Barlow lens.

For example, owners of typical beginner reflectors are often surprised to find their cameras wonโ€™t even reach focus on their telescope. Many are simply not designed for photography. Adding a Barlow lens is required for the camera to reach focus, though without a drive, exposures will be limited to short (under 1/15s) shots of the bright part of the Moon.

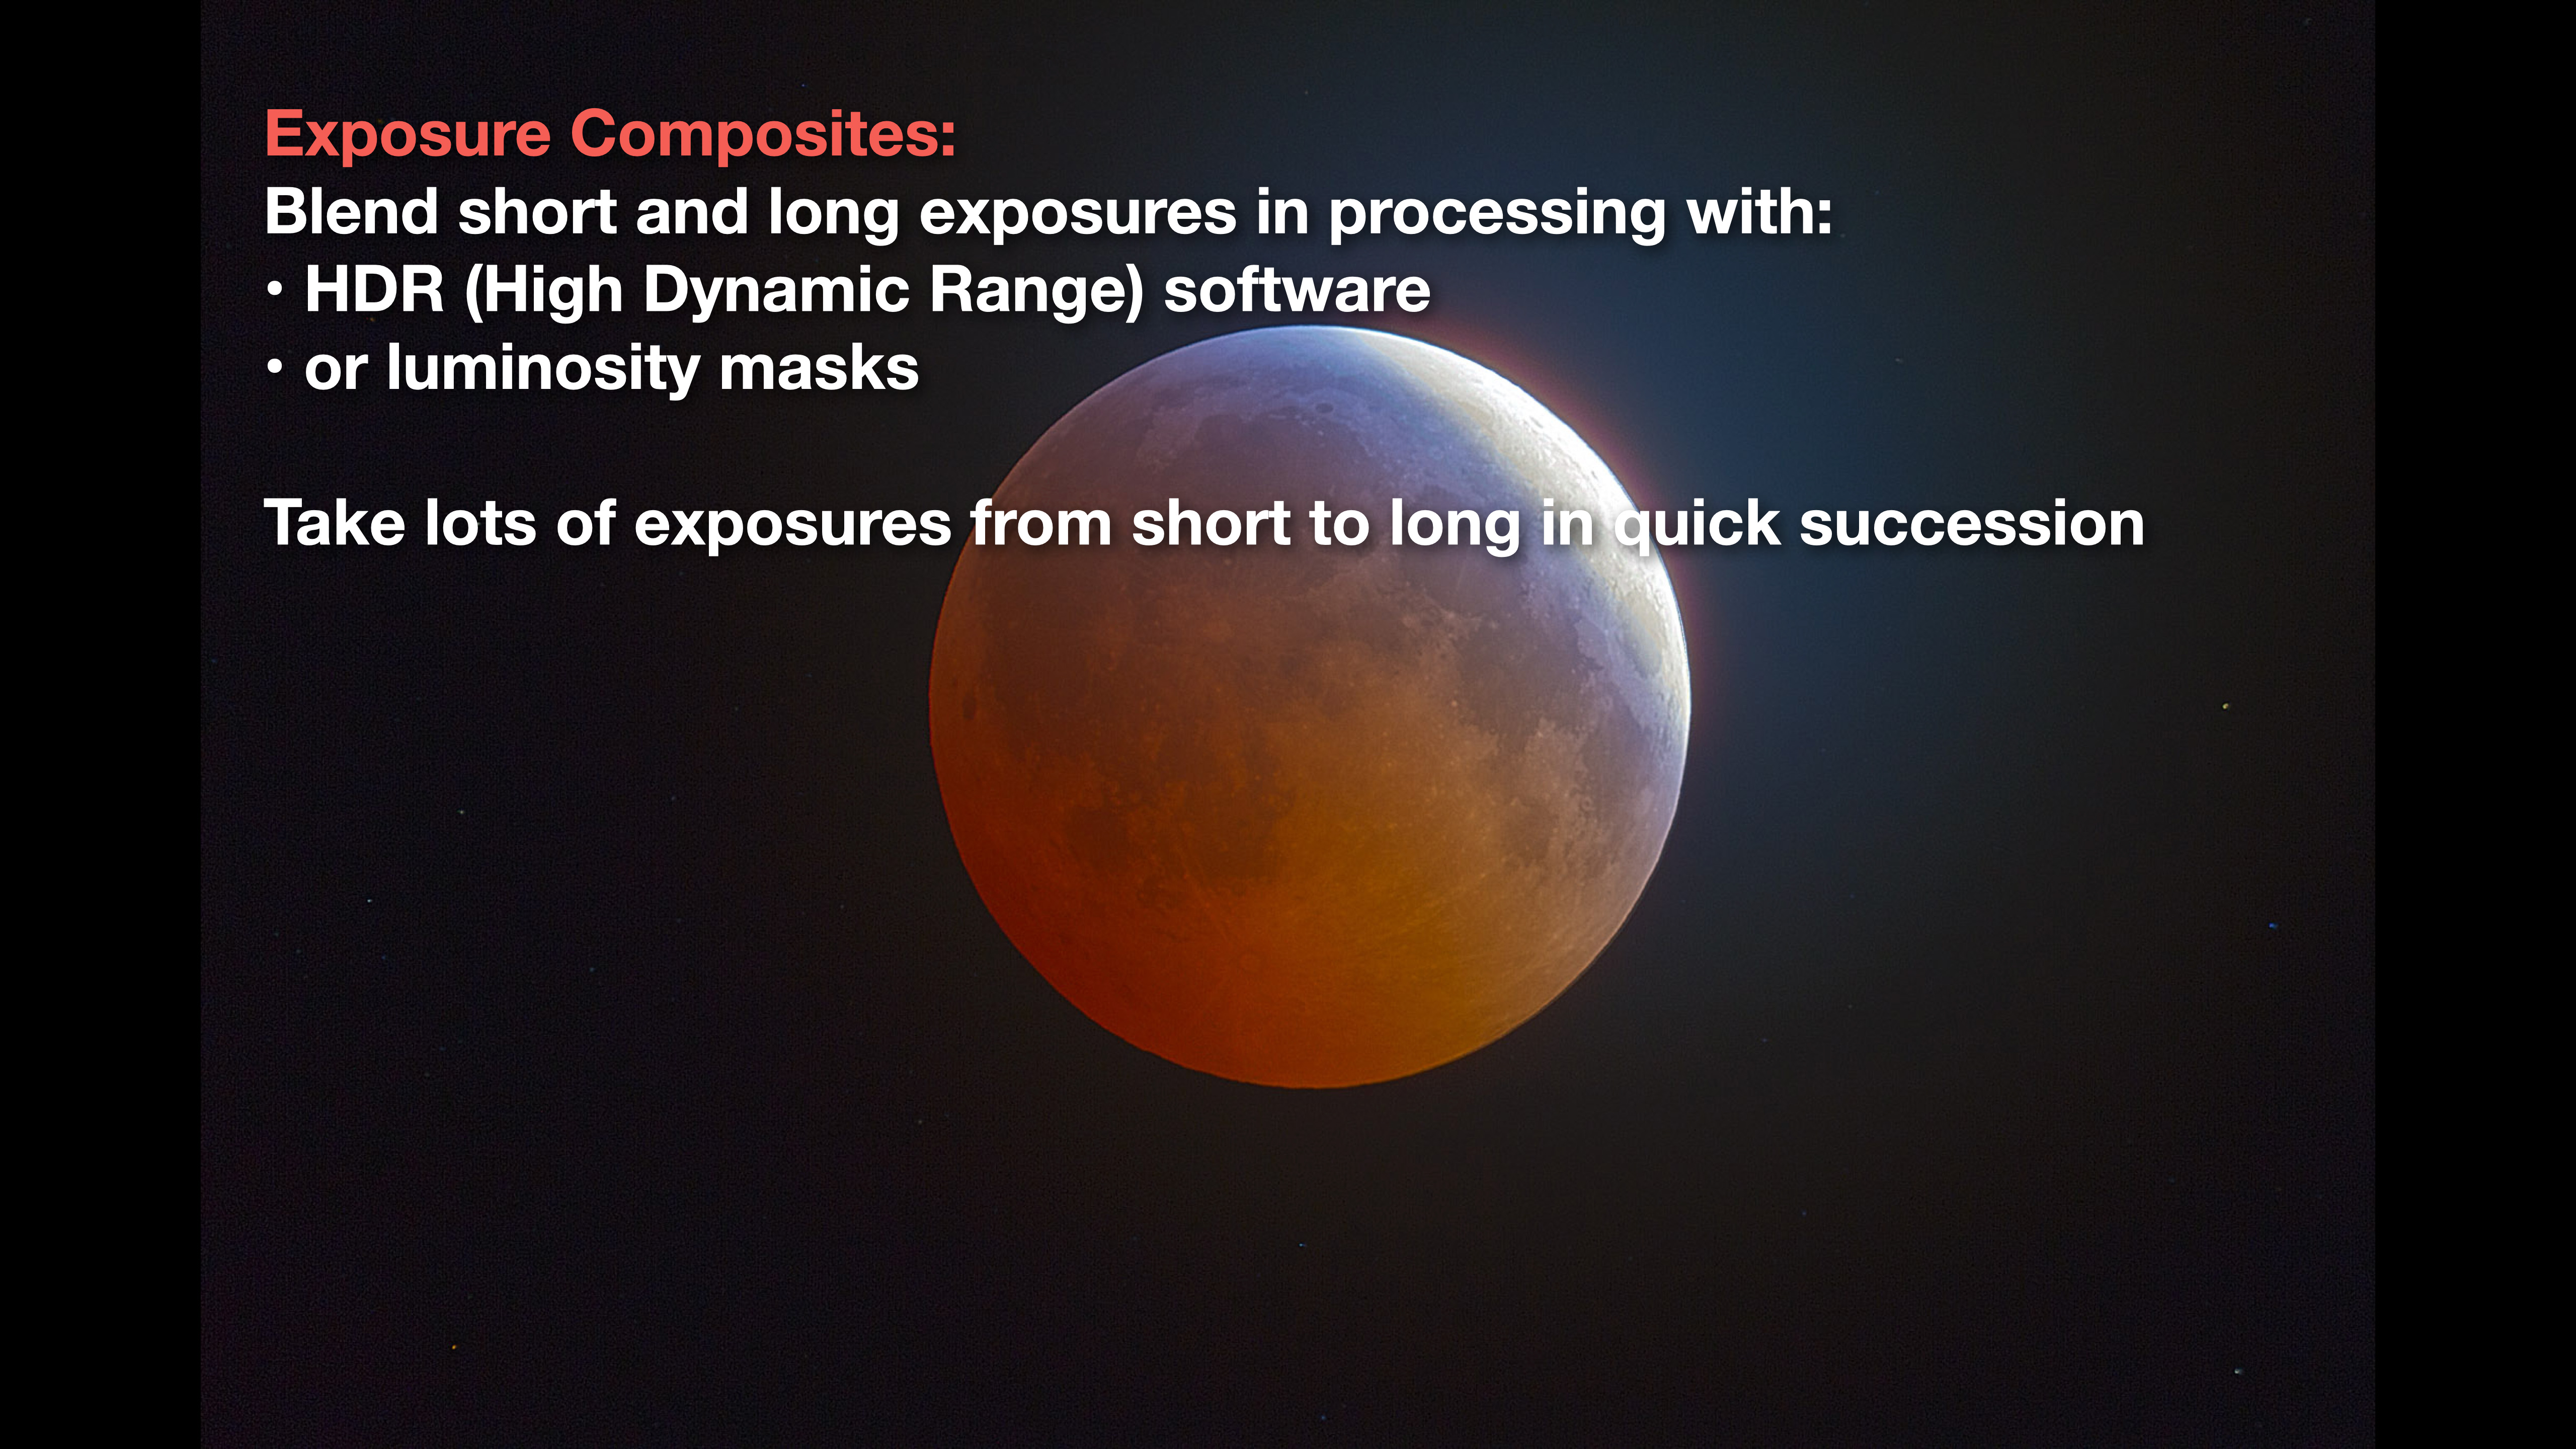
An exposure composite of short and long exposures.

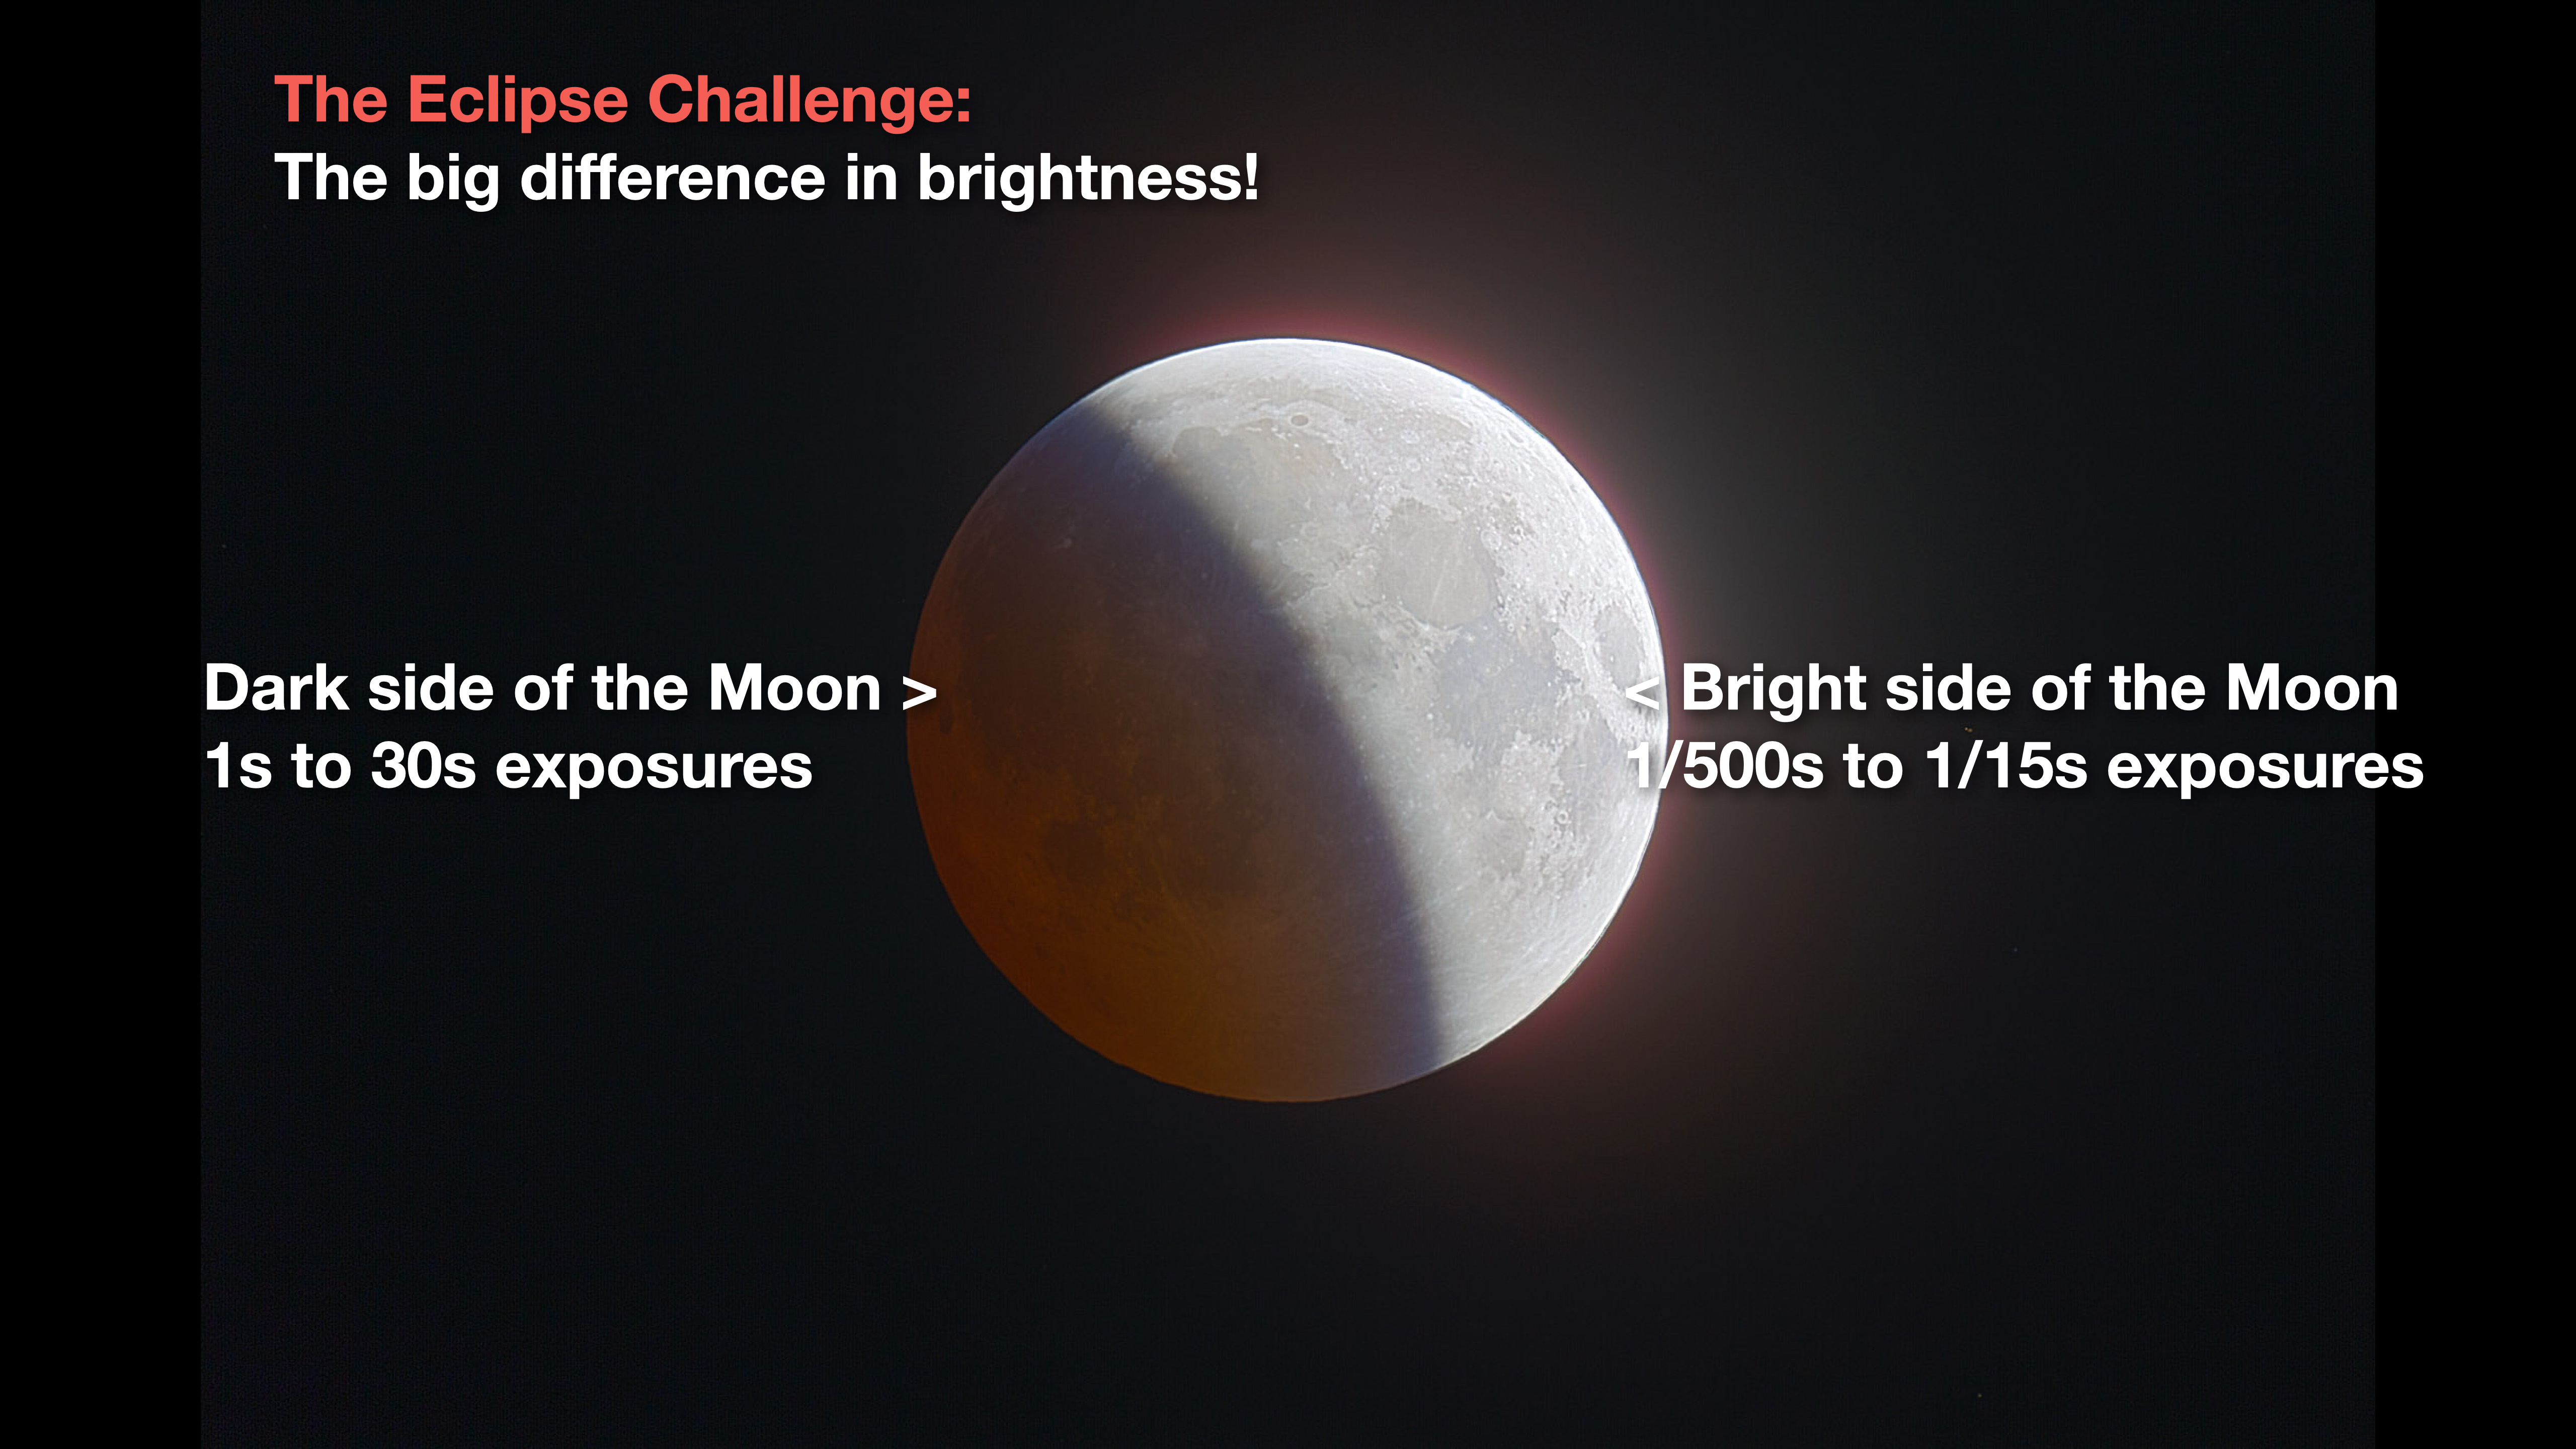
The challenge with this and all lunar eclipses is that the Moon presents a huge range of brightness. Short snapshots can capture the bright part of the Moon not in the umbra, but the dark umbral-shaded portion requires much longer exposures, usually over one second. 

Your eye can see the whole scene (as depicted above) but the camera cannot, not in one exposure. This example is a โ€œhigh dynamic rangeโ€ blend of several exposures. 

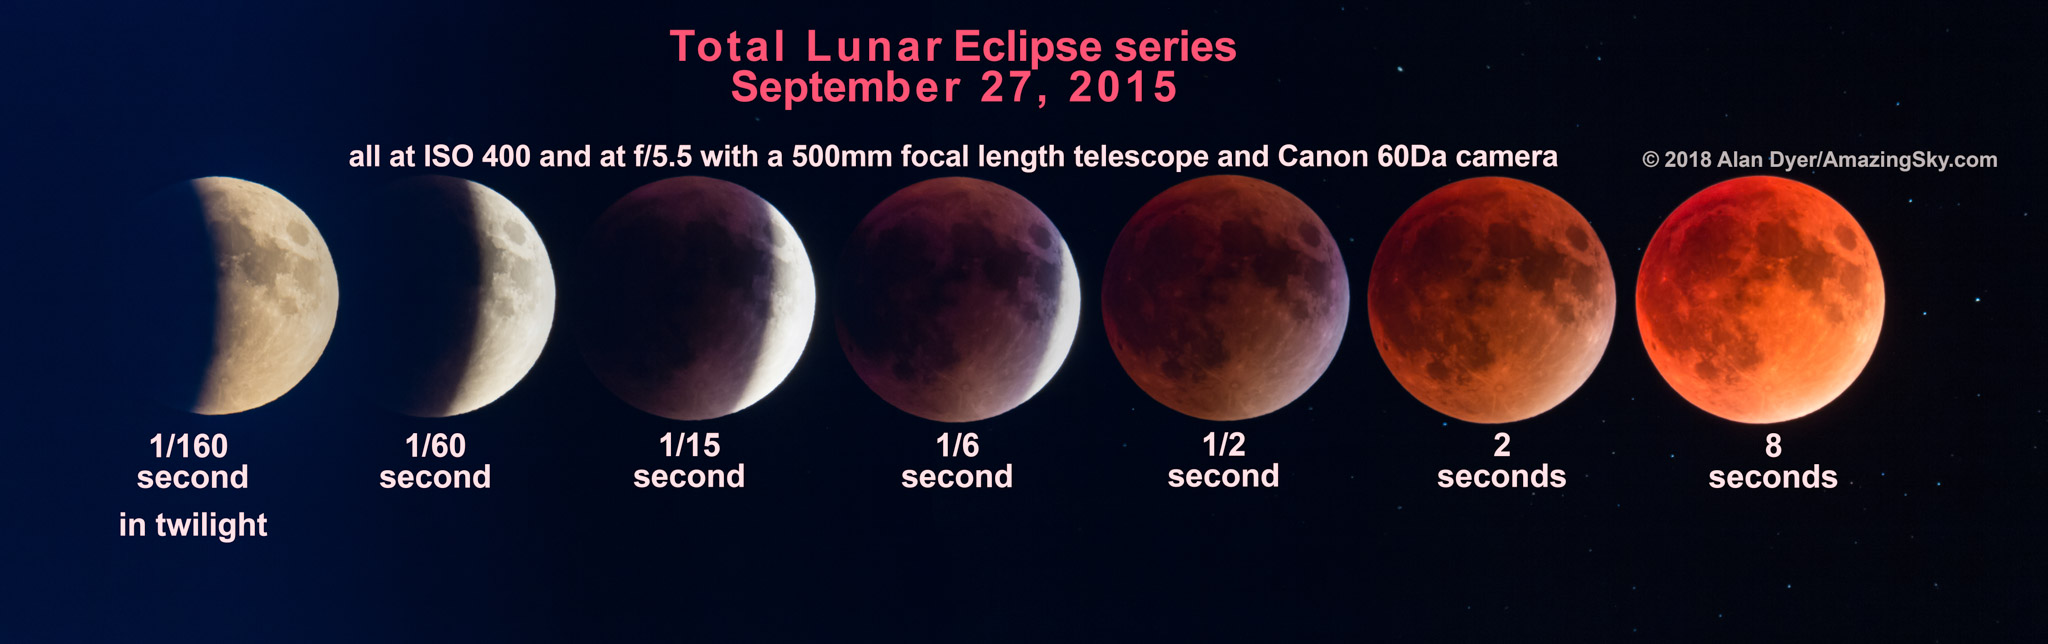
A series of the September 27, 2015 total lunar eclipse to demonstrate an exposure sequence from partial to total phase.

Plus as the eclipse progresses, longer and longer exposures are needed to capture the sequence as the Moon is engulfed by more of the umbra. 

After mid-eclipse, the exposures must get progressively shorter again in reverse order. So attempting to capture an entire sequence requires a lot of exposure adjustments. 

TIP: Bracket a lot! Take lots of frames at each burst of images shot every minute, or however often you wish to capture the progress of the eclipse for a final set. Unlike total solar eclipses, lunar eclipses provide lots of time to take lots of images. 

PHOTO OPTIONS 4 โ€” THROUGH A TRACKING TELESCOPE

If you want close-ups of the eclipsed red Moon, you will need to use a mount equipped with a tracking motor, such as an equatorial mount shown here. But for use with telephoto lenses and short telescopes, a polar-aligned sky tracker, as above, will work. 

A small apo refractor on an equatorial mount with typical settings for mid-eclipse.

Exposures can now be several seconds long, and at a lower ISO speed for less noise, allowing the Moon to be captured in sharp detail and with great colour. Long exposures will even pick up stars near the Moon. 

However, when shooting close-ups, use the Lunar drive rate (if your mount offers that choice) to follow the Moon itself, as it has a motion of its own against the background stars. Itโ€™s that orbital motion that takes it from west to east (right to left) through the Earthโ€™s shadow. 

The fields of view and size of the Moon’s disk with typical telescope focal lengths.

Filling the camera frame with the Moon requires a surprising amount of focal length. The Moon appears big to our eyes, but is only 1/2ยบ across. 

Even with 800mm of focal length, the Moon fills only a third of a full frame camera field. Using a cropped frame camera has the advantage of tightening the field of view, but it still takes 1200mm to 1500mm of focal length to fill the frame. 

But I wouldnโ€™t worry about doing so, as longer focal lengths typically also come with slower f-ratios, requiring longer exposure times or higher ISOs, both of which can blur detail. 

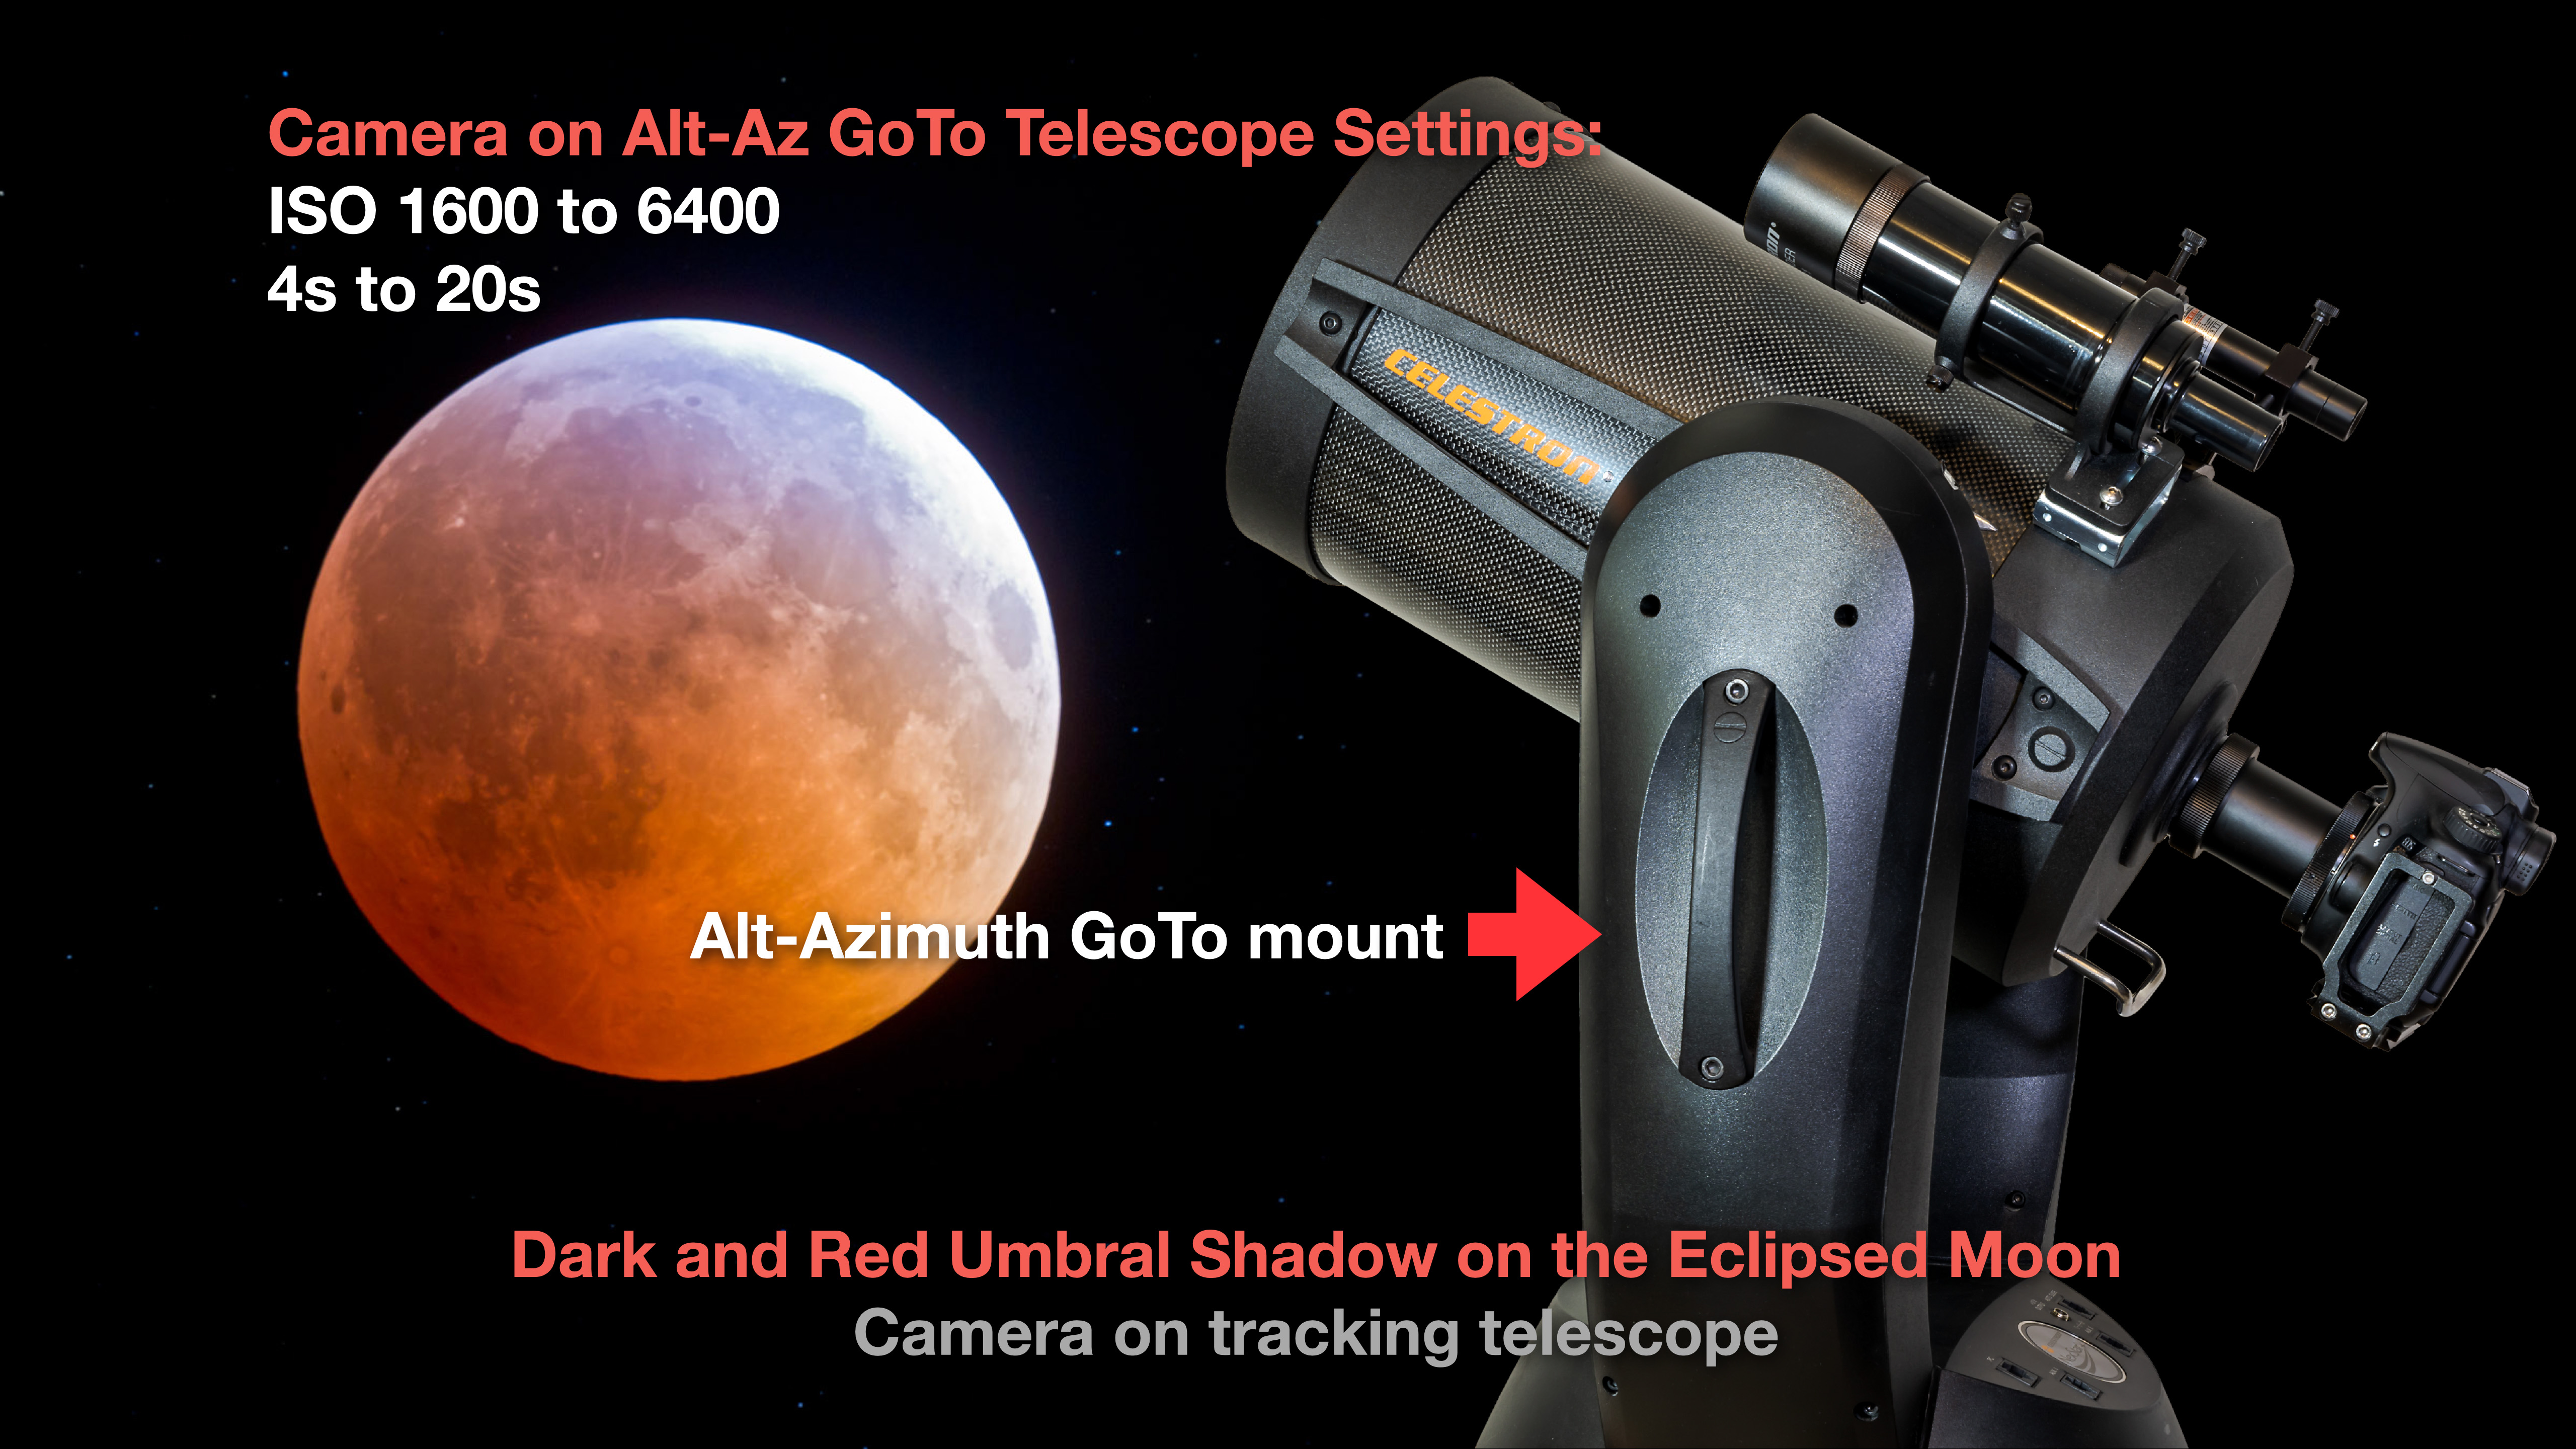
A camera on an alt-azimuth GoTo Schmidt-Cassegrain.

For close-ups, a polar-aligned equatorial mount is best. But if your telescope is a GoTo telescope on an alt-azimuth mount (such as a Schmidt-Cassegrain shown here), you should be able to get good shots.

The field of view will slowly rotate during the eclipse, making it more difficult to later accurately assemble a series of shots documenting the entire sequence. 

But any one shot should be fine, though it might be best to keep exposures shorter by using a higher ISO speed. As always, take lots of shots at different settings. 

You wonโ€™t be able to tell which is sharpest until you inspect them later at the computer.

TIP: People worry about exposures, but the flaw that ruins many eclipse shots is poor focus. Use Live View to focus carefully on the sharp edge of the bright part of the Moon. Or better yet, focus on a bright star nearby. Zoom up to 10x to make it easier to see when the star is in sharpest focus. It can be a good idea to refocus through the night as the changing temperature can shift the focus point of long lenses and telescopes. That might take moving the scope over to a bright star, which wonโ€™t be possible if you need to preserve the framing for a composite. 

PHOTO OPTIONS 5 โ€” HDR COMPOSITES

Using an equatorial mount tracking at the lunar rate keeps the Moon stationary. This opens up the possibility of taking a series of shots over the wide range of exposures needed to capture the Moon from bright to dark, to assemble later in processing. Take 5 to 7 shots in quick succession. 

An HDR composite from the December 2010 eclipse.

High dynamic range software can blend the images, or use luminosity masks created by extension panels for Photoshop such as Lumenzia, TK8 or Raya Pro. Either technique can create a final image that looks like what your eye saw. The key is making sure all the images are aligned. HDR software likely won’t align them for you very well.

The January 2019 eclipse layered and blended in Photoshop.

Blending multiple exposures will also be needed to properly capture the eclipsed Moon below the Pleiades, similar to what I show here (and below) from the January 2019 eclipse when the Moon appeared near the Beehive star cluster. 

PHOTO OPTIONS 6 โ€” ECLIPSE TRACK COMPOSITES

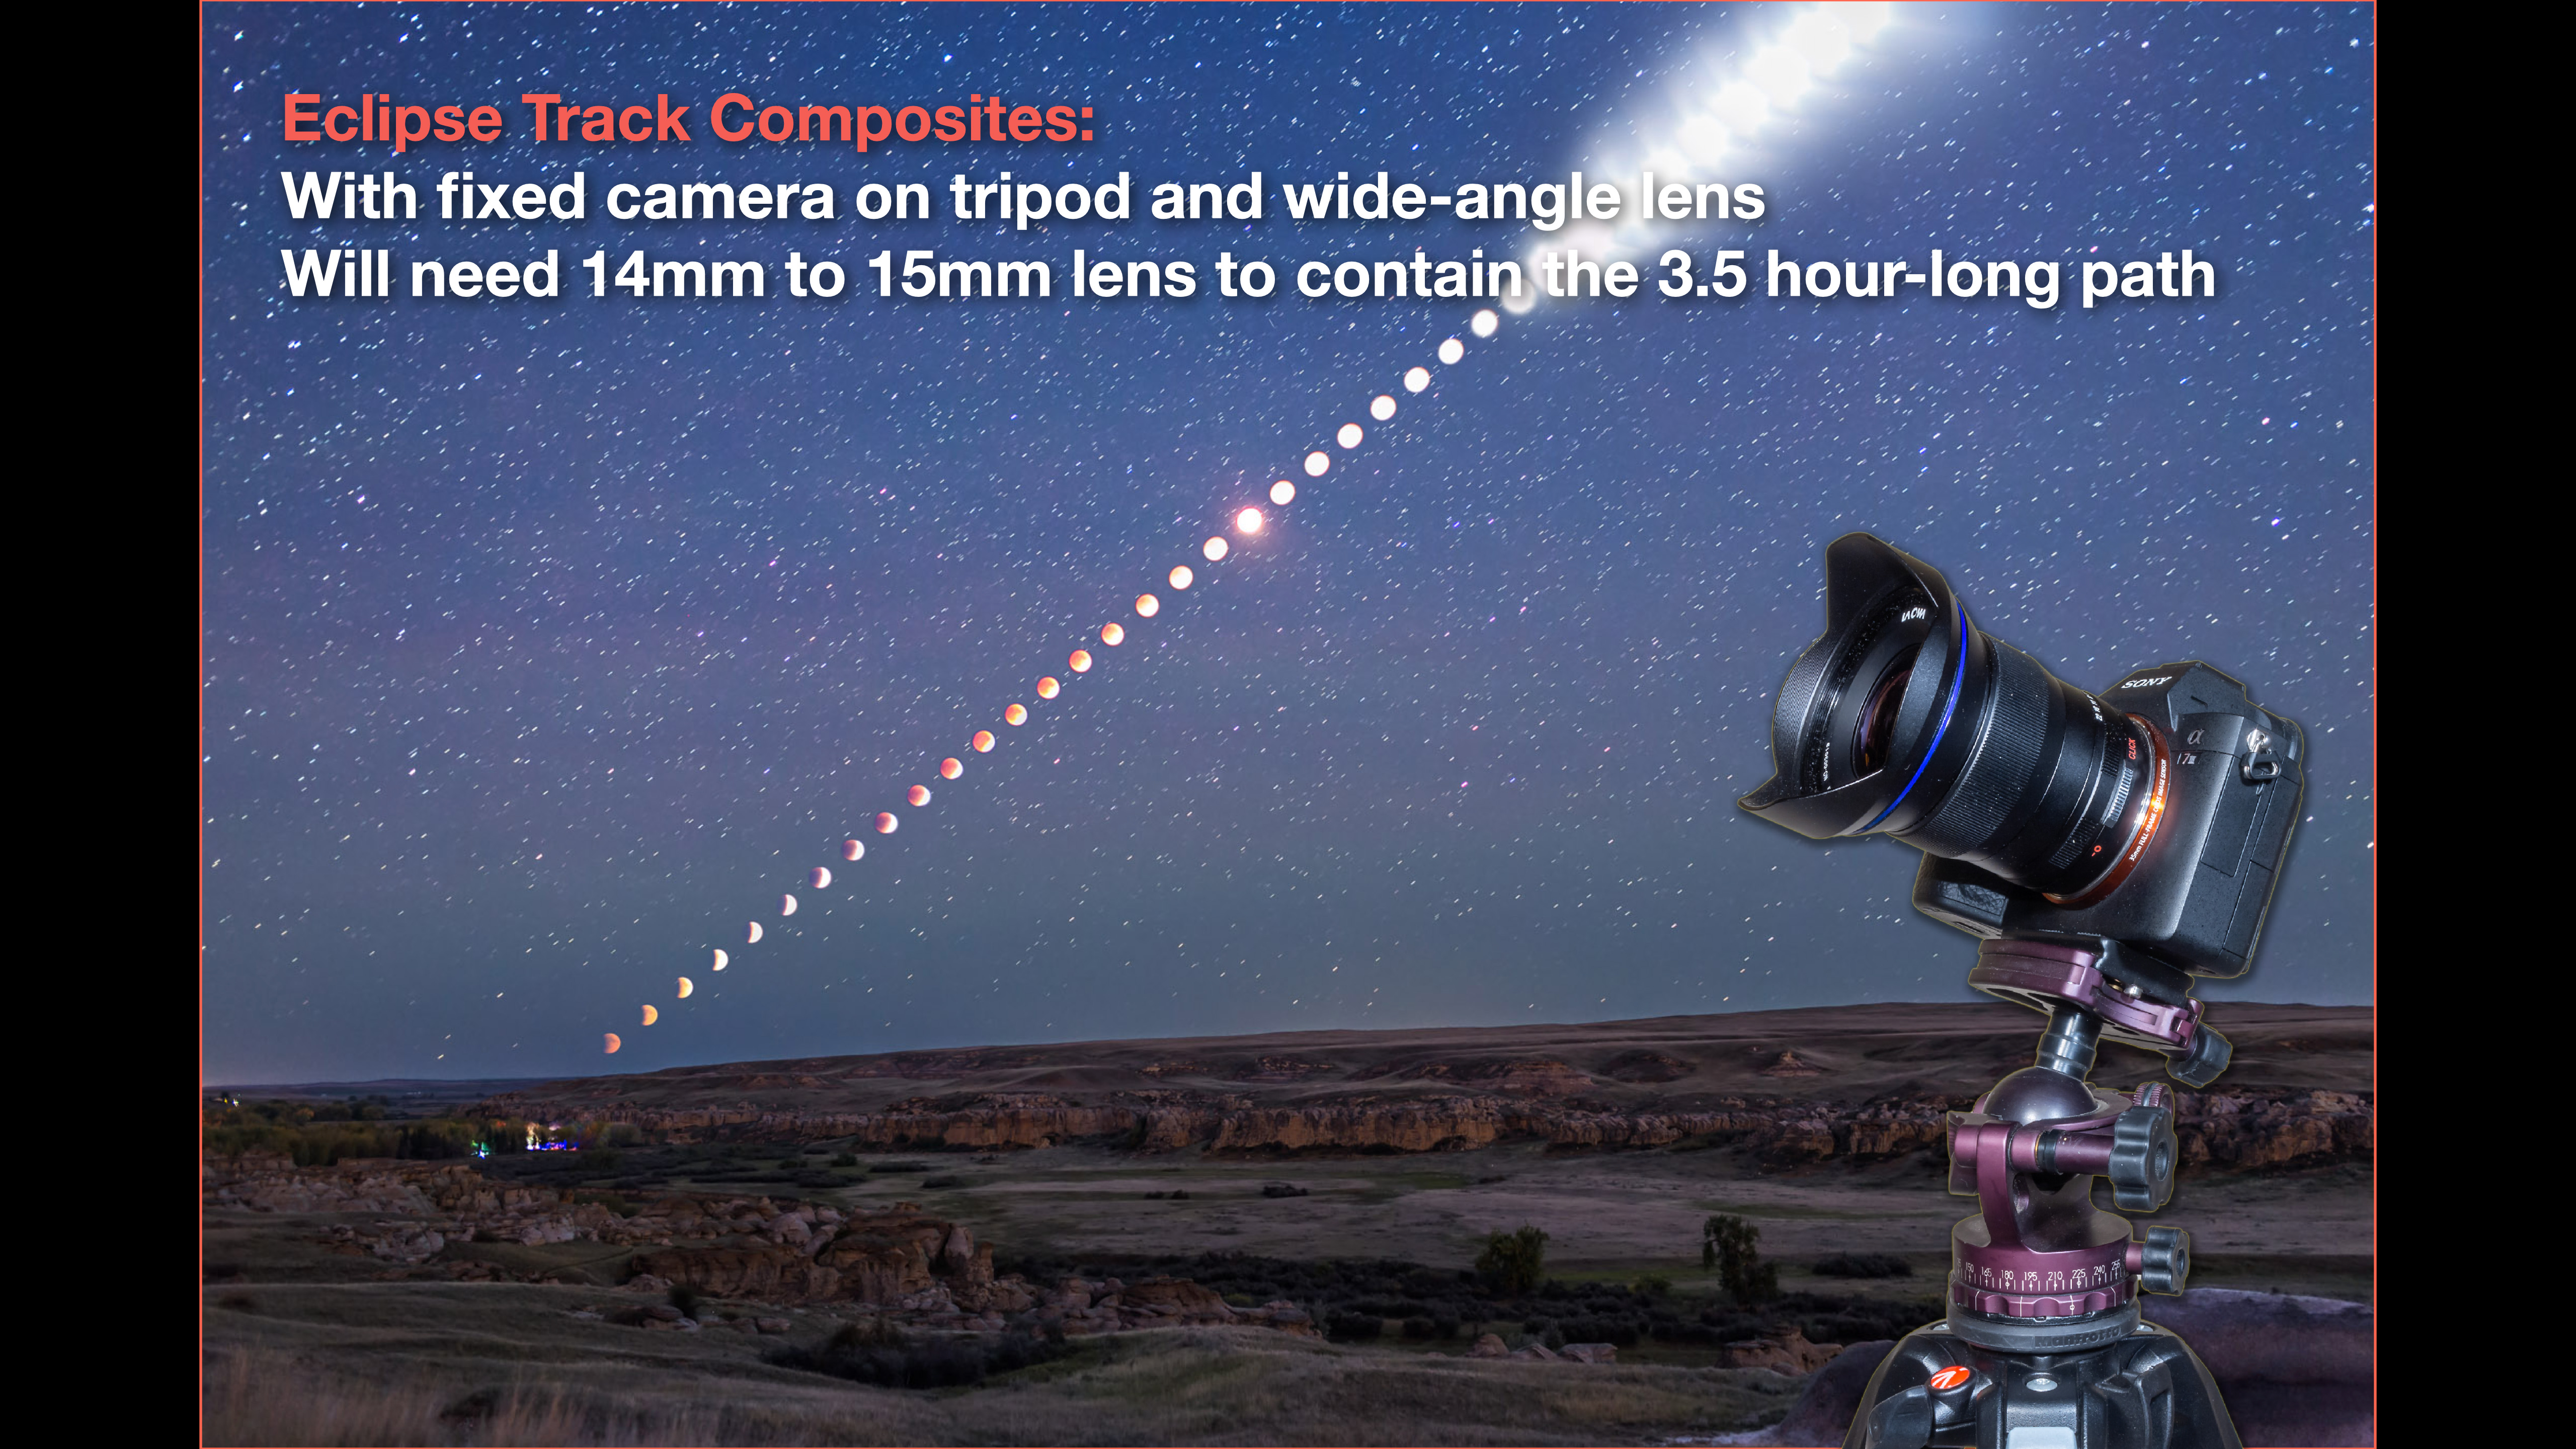
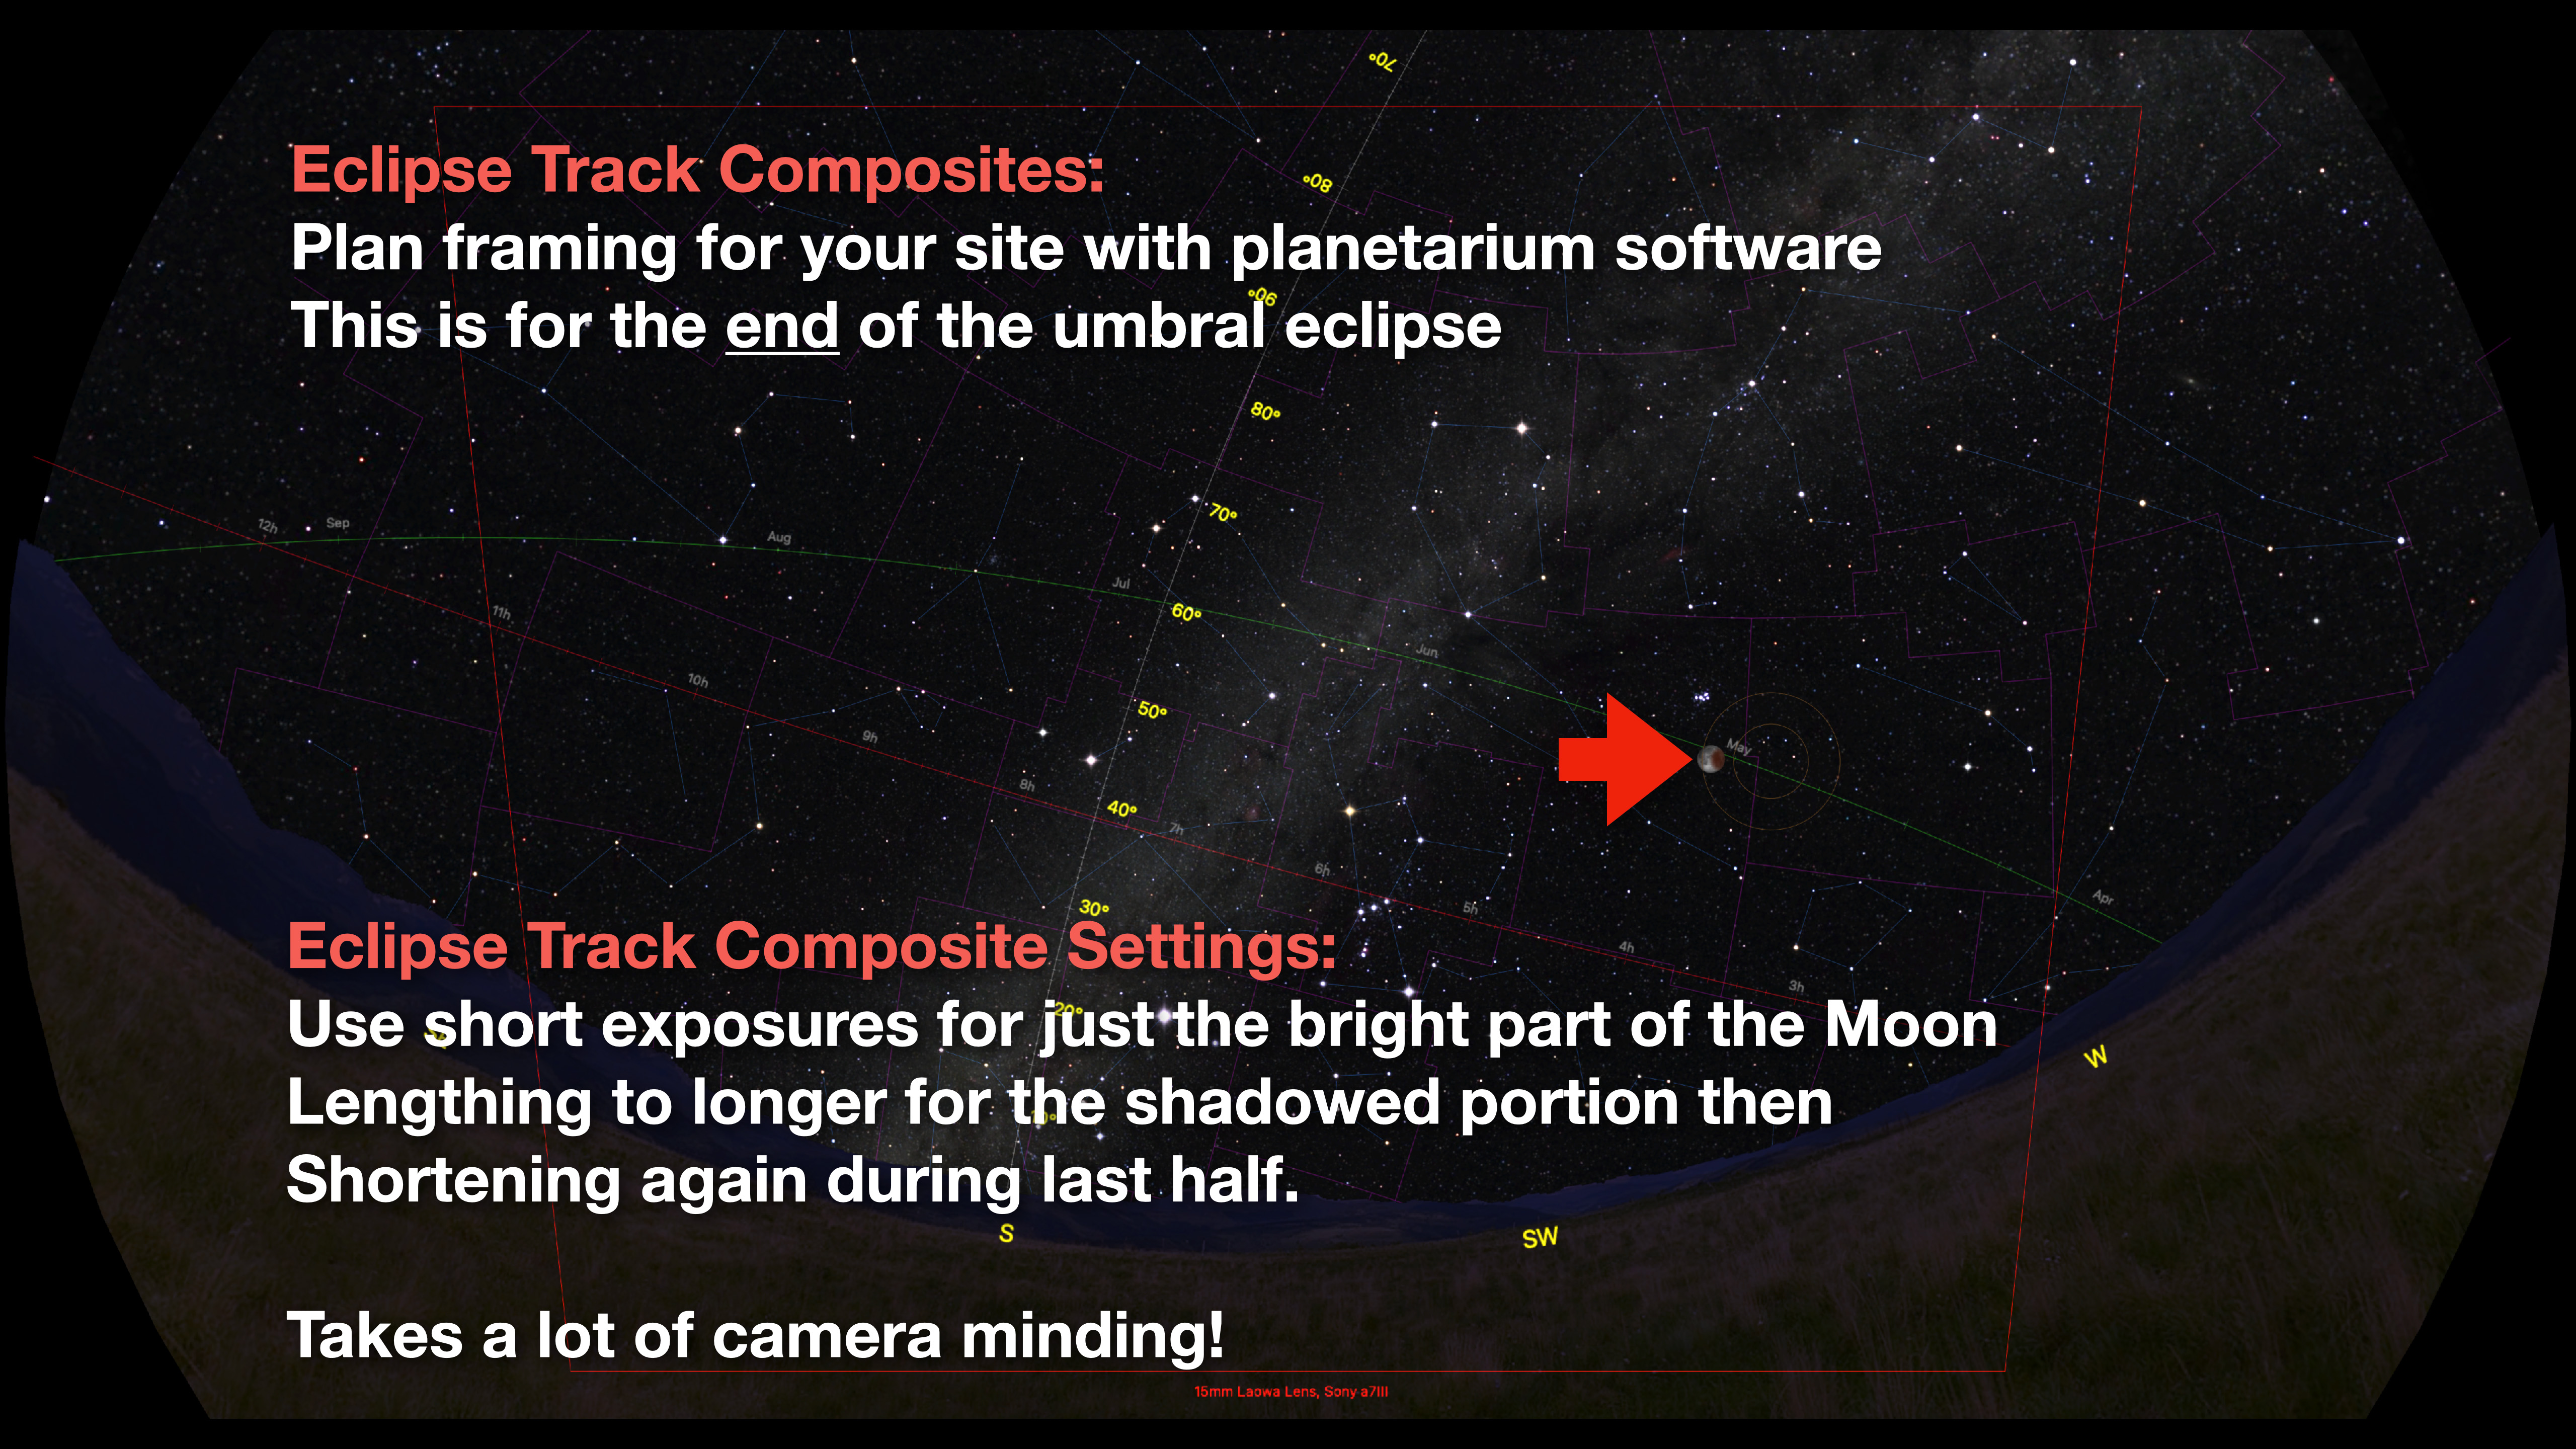
Another popular form of eclipse image (though also one rife for laughably inaccurate fakes) is capturing the entire path of the Moon across the sky over the duration of the eclipse from start to end. 

The track of the September 2015 eclipse, accurately assembled to correct scale.

It can be done with a fixed camera on a tripod but requires a wide (14mm to 20mm) and properly framed lens, to capture the sequence as it actually appeared to proper scale, and not created by just pasting over-sized moons onto a sky to โ€œsimulateโ€ the scene, usually badly. By the end of the day on November 19 the internet will be filled with such ugly fakes. 

You could set the camera at one exposure setting (one best for when the Moon and sky are darkest at mid-eclipse) and let the camera run, shooting frames every 5 seconds or so. The result might work well as a time-lapse sequence, showing the bright sky darkening, then brightening again. 

But chances are the frames taken at the start and end when the sky is lit by full moonlight will be blown out. It will still take some manual camera adjustments through the eclipse. 

For a still-image composite, you should instead expose properly for the Moonโ€™s disk at all times, a setting that will change every few minutes, then take a long exposure at mid-eclipse to pick up the stars and Milky Way. The short Moon shots are then blended into the base-layer sky image later in processing. 

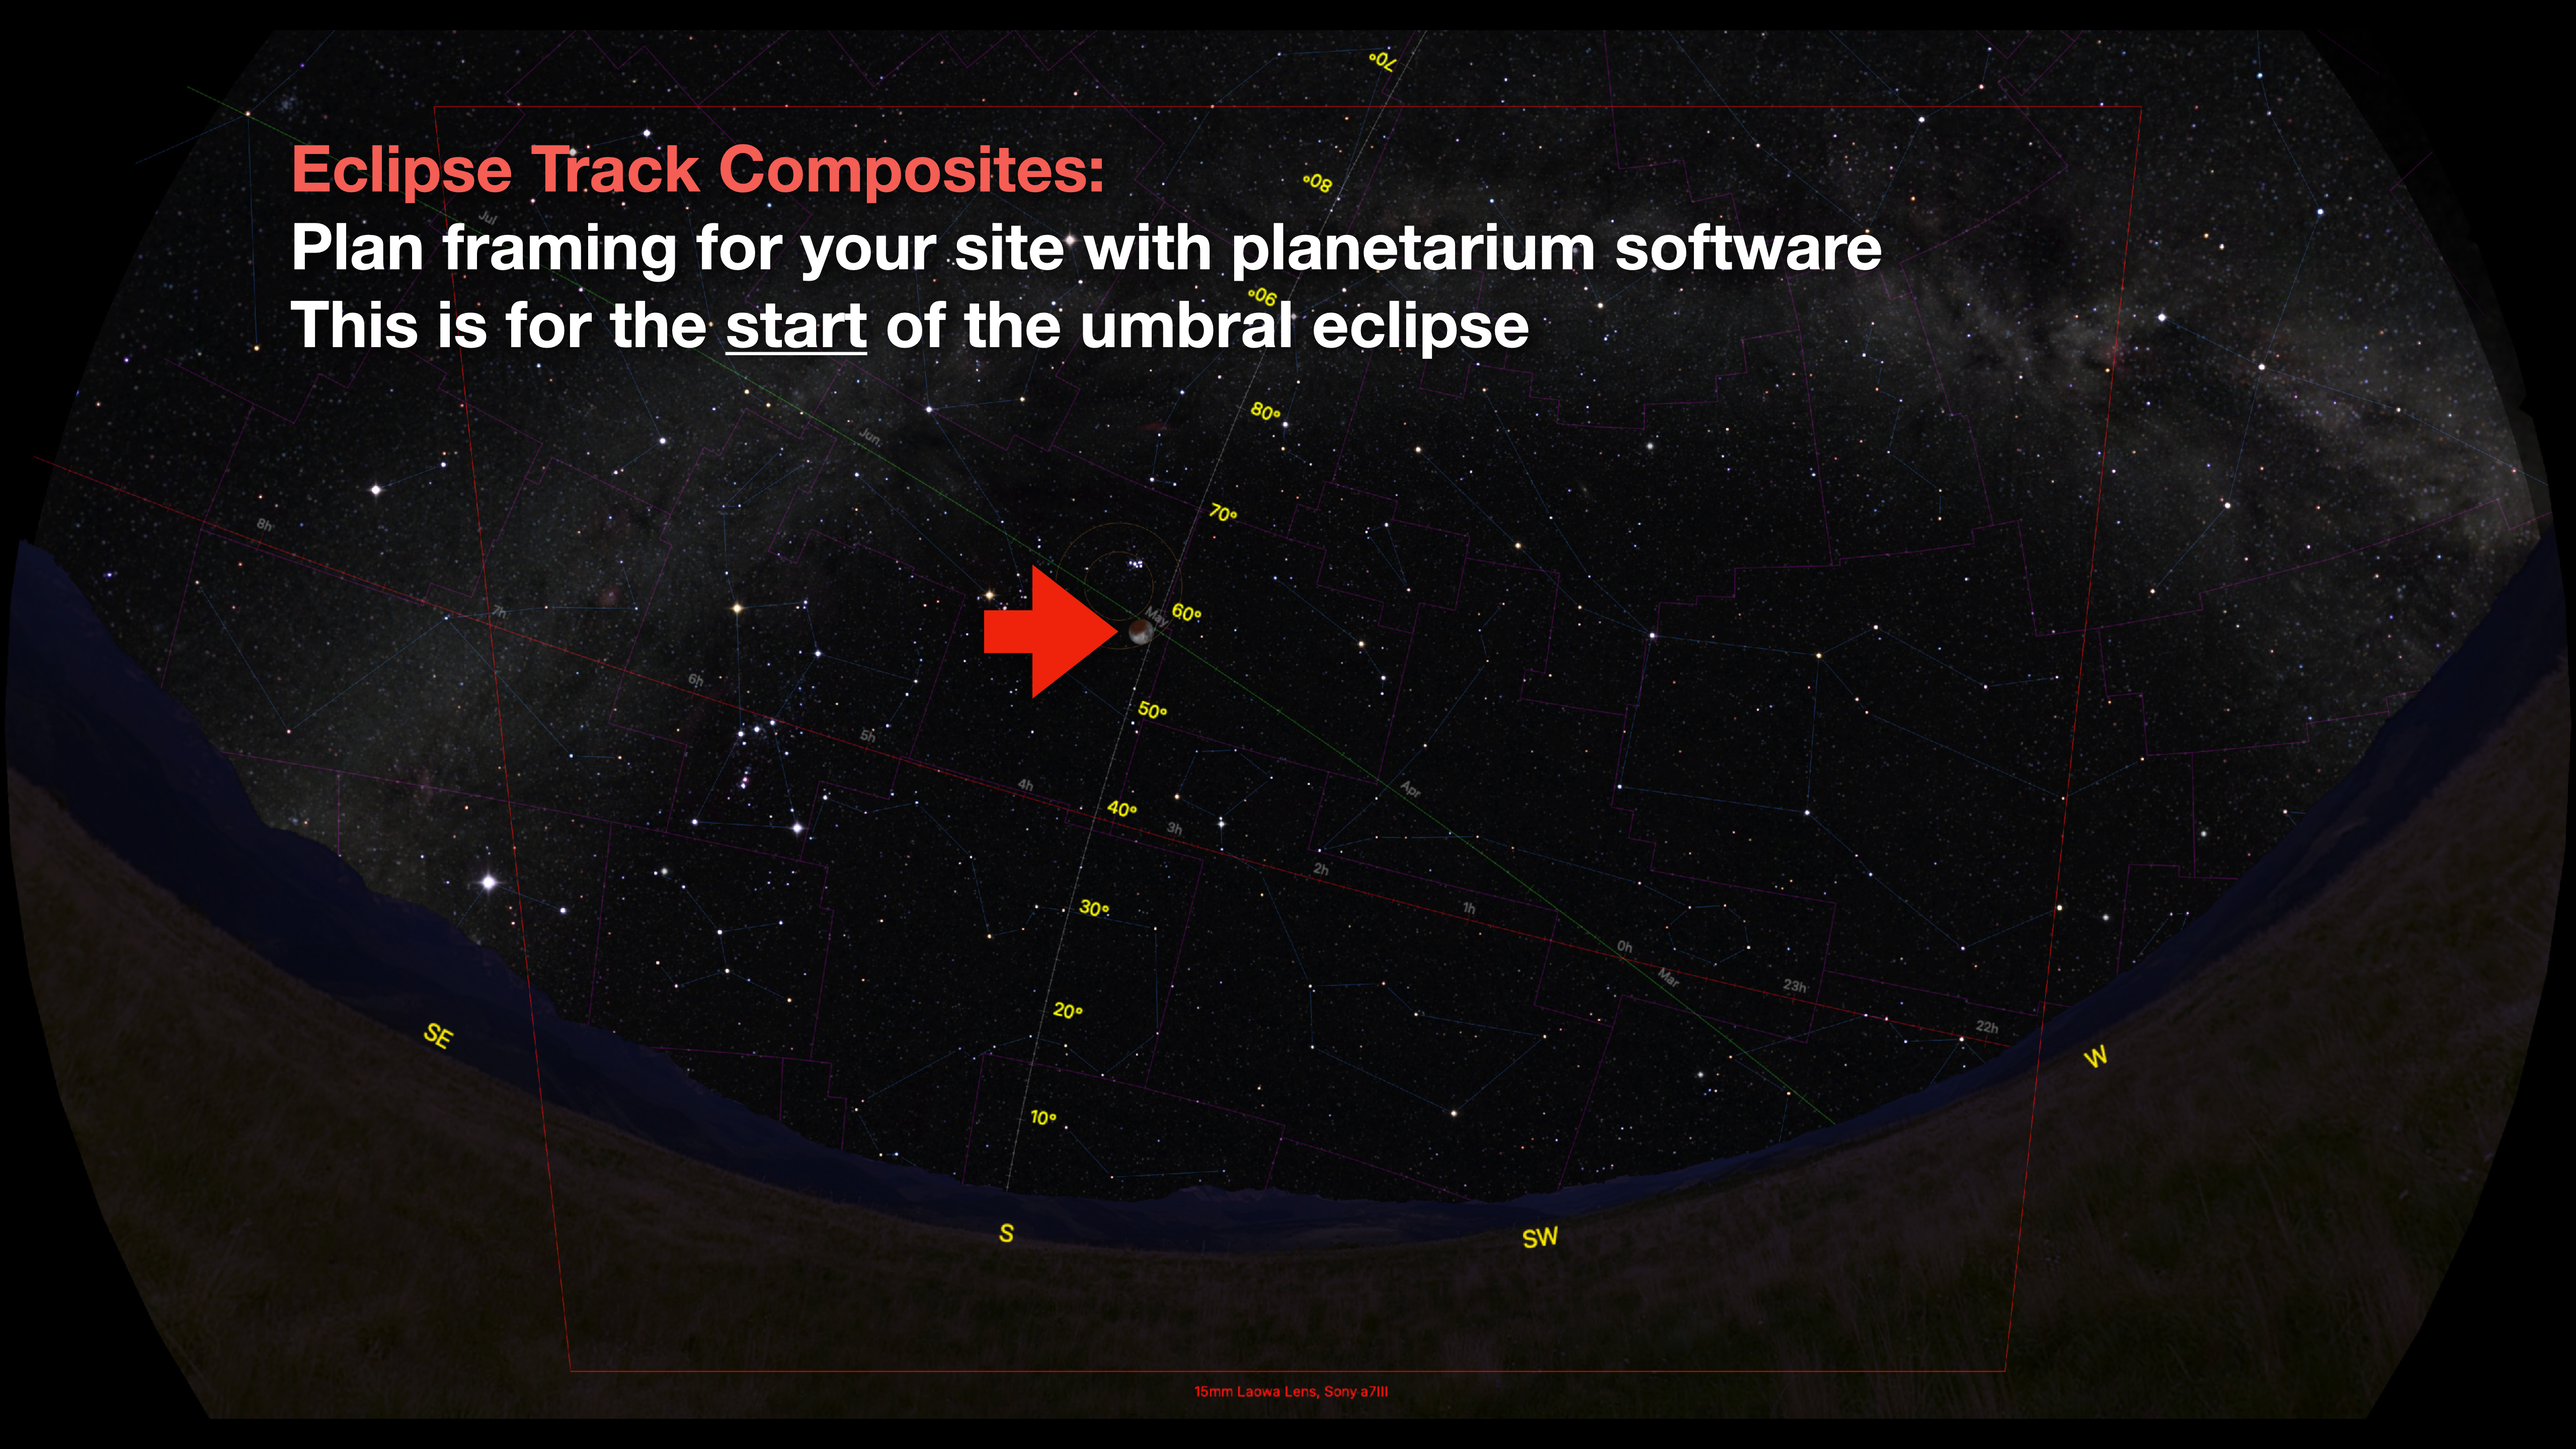
Framing the eclipse path for the start of the sequence.
Framing the path so the Moon ends up at a desired location on the frame.

If the camera has been well-framed and was not moved over the 3.5 hours of the eclipse, the result is an accurate and authentic record of the Moonโ€™s path and passage into the shadow, and not a faked atrocity! 

But creating a real image requires a lot of work at the camera, and at the computer. 

TIP: Shooting for composites is not work I would recommend attempting while also running other cameras. Focus on one type of image and get it right, rather than trying to do too many and doing them all poorly. 

PHOTO OPTION 7 โ€” ECLIPSE SHADOW COMPOSITE

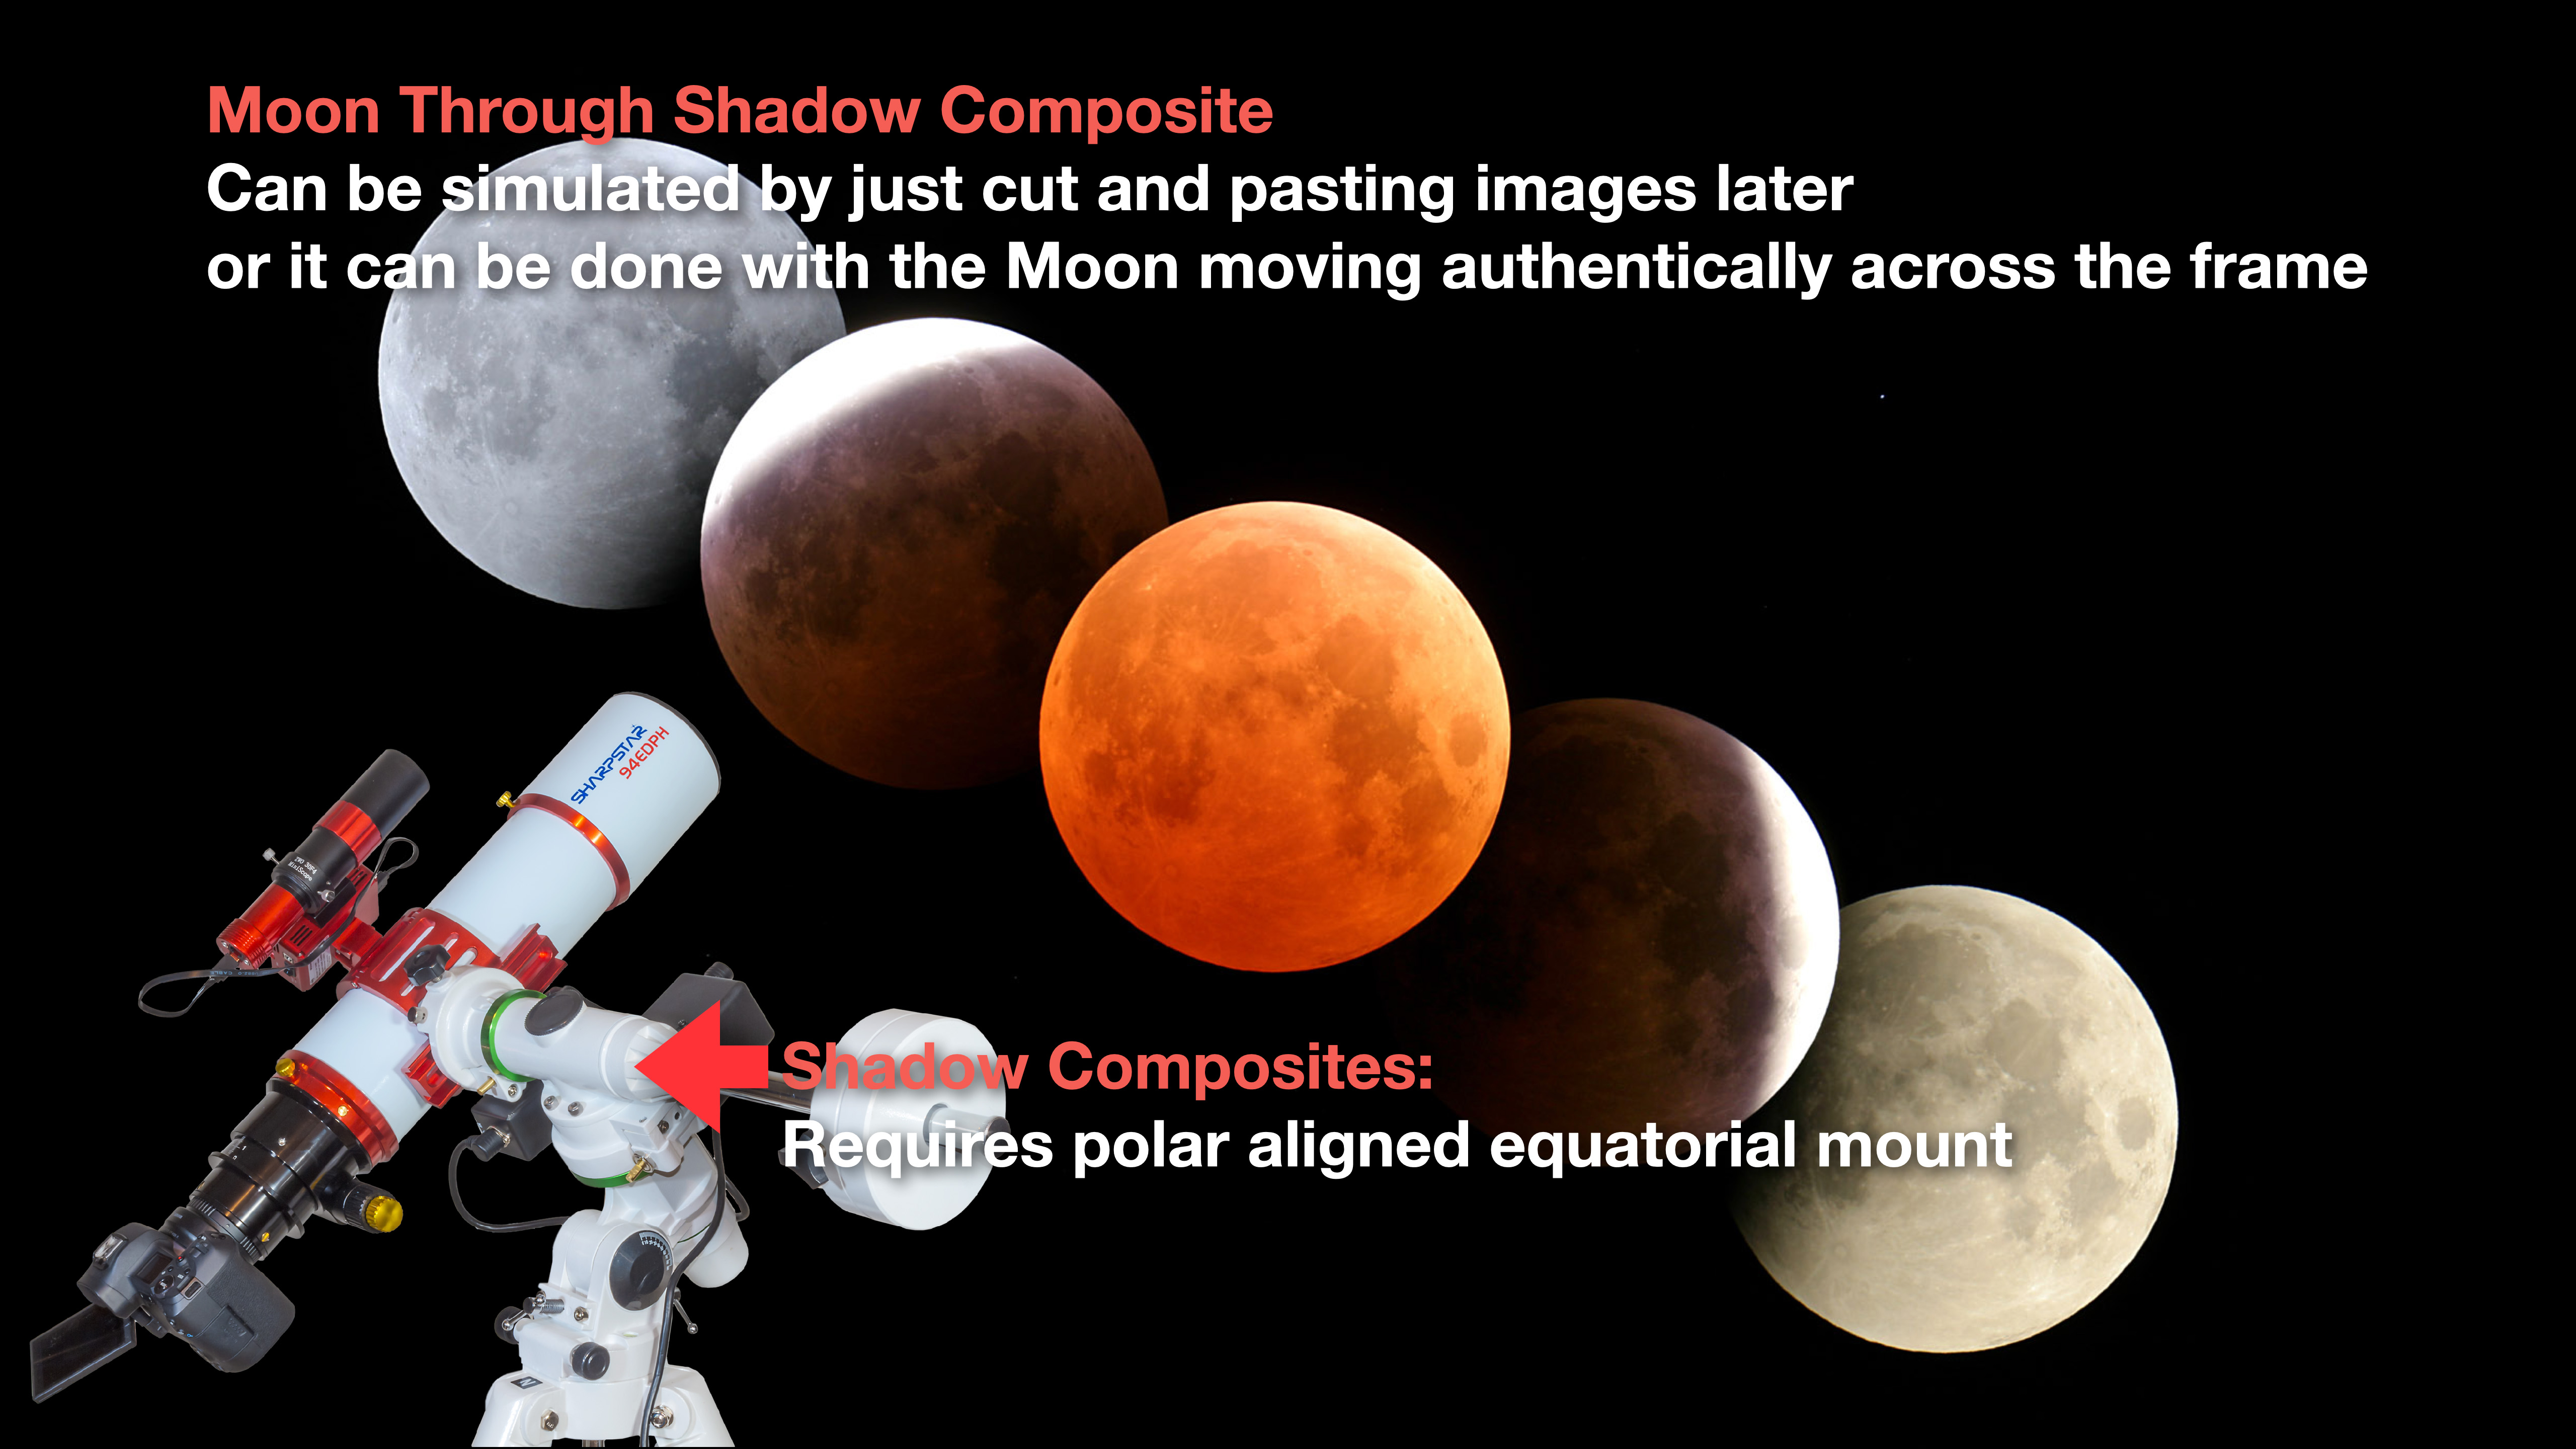
One of the most striking types of lunar eclipse images is a close-up composite showing the Moon passing through the Earthโ€™s umbral shadow, with the arc of the shadow edge on the Moon defining the extent of the shadow, which is about three times larger than the Moon.

Such a composite can be re-created later by placing individual exposures accurately on a wider canvas, using screen shots from planetarium software as a template guide. 

A composite of the Moon moving through the umbra.

But to create an image that is more accurate, it is possible to do it โ€œin camera.โ€ Unlike in the film days, we donโ€™t have to do it with multiple exposures onto one piece of film. 

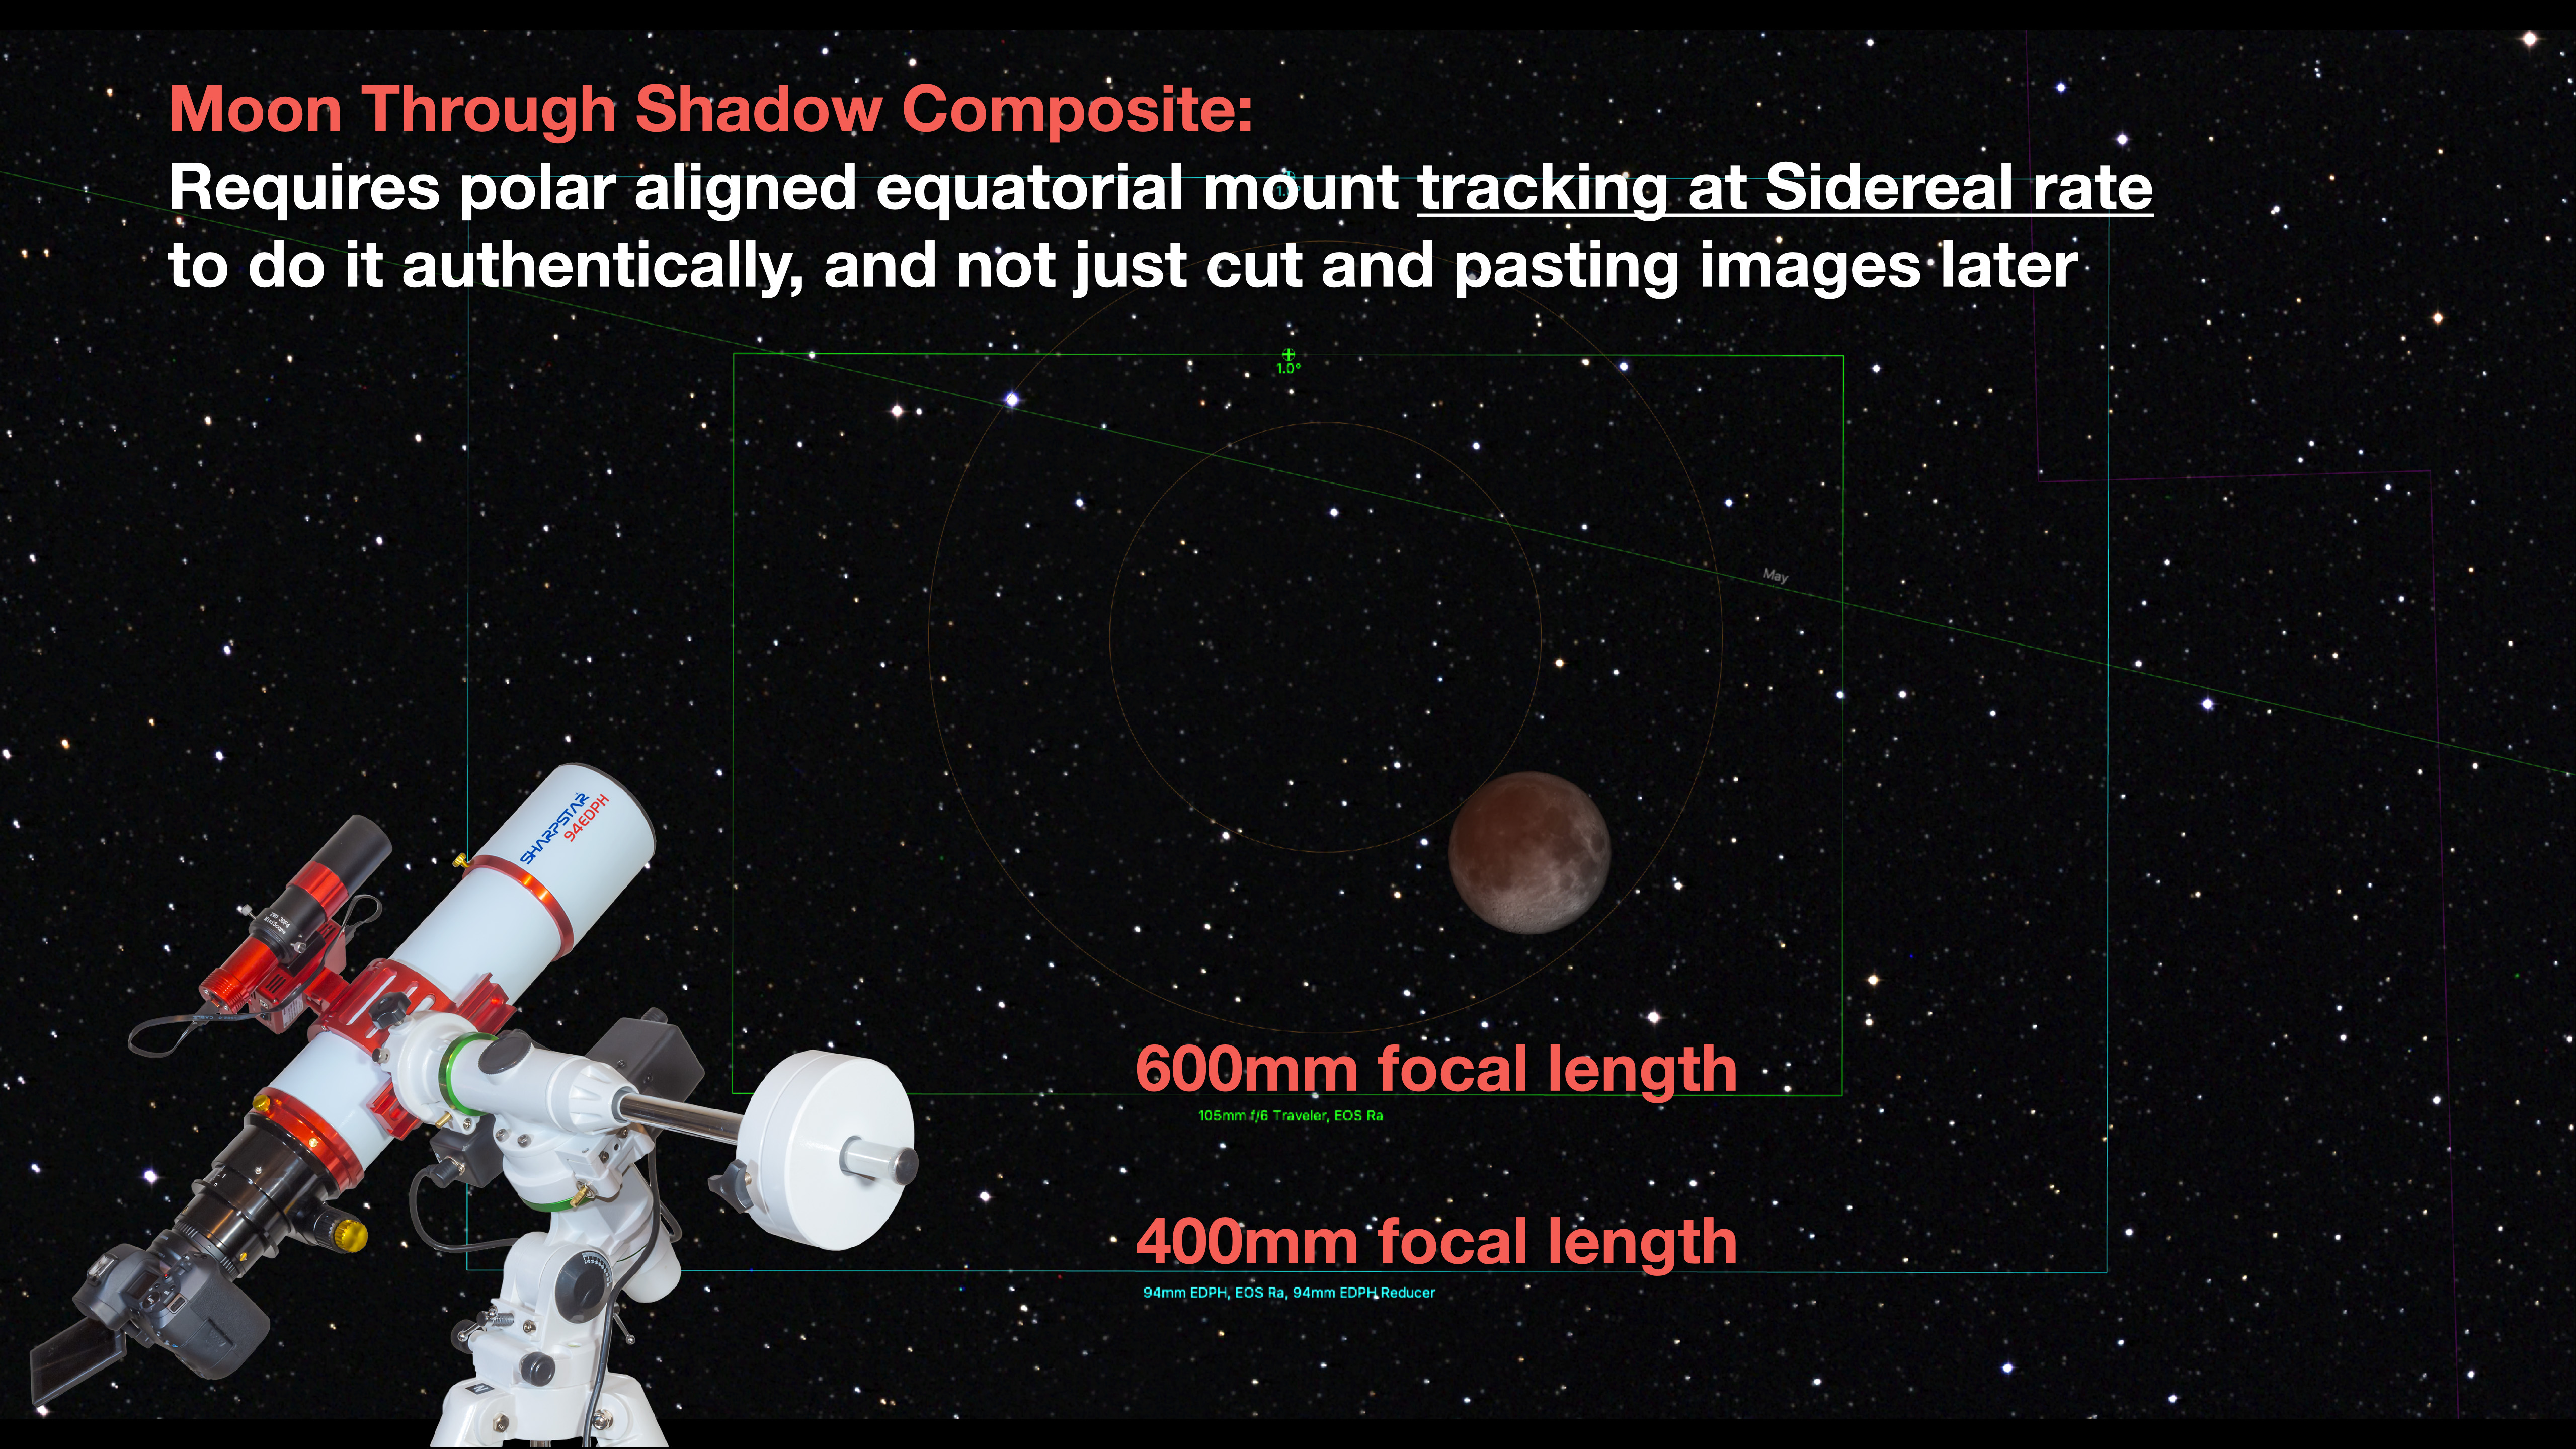
We take lots of separate frames with a telescope or lens wide enough to contain the entire path of the Moon through the umbra. A polar-aligned equatorial mount tracking at the sidereal rate is essential. That way the scope follows the stars, not the Moon, and so the Moon travels across the frame from right to left. 

Framing for a shadow composite.

Start such a sequence with the Moon at lower right if you are framing just the path through the shadow. Use planetarium software (I used Starry Nightโ„ข to create the star charts for this blog) to plan the framing for your camera, lens and site, so the Moon ends up in the middle of the frame at mid-eclipse. This is not a technique for the faint of heart!  

A shadow-defining composite from January 2019, with the Moon near the Beehive cluster.

An interesting variation would be using a 200mm to 250mm lens to frame the Moonโ€™s shadow passage below the Pleiades, to create an image as above. That will be unique. Again, an accurately aligned tracker turning at the sidereal rate will be essential.

Acquiring the frames for any composite takes constantly adjusting the exposure during the length of eclipse, which can try your patience and gear during the wee hours of the morning. 

Iโ€™ll be happy just to get a good set of images at mid-eclipse to make a single composite of the red Moon below the Pleiades. 

TIP: It could be cold and lenses can frost over. A battery-powered heater coil on the optics might be essential. And spare warm batteries.

The 4-day-old waxing crescent Moon on April 8, 2019 in a blend of 7 exposures from 1/30 second to 2 seconds, blended with luminosity masks in Photoshop.

PRACTICE!

To test your equipment and your skills at focusing, you can use the waning crescent Moon in the dawn hours on the mornings of October 29 to November 2 or, after New Moon on November 4, the waxing crescent Moon on the evenings of November 6 to 10. While the crescent Moon isnโ€™t as bright as the Full Moon, it will be a good stand in for the bright part of the eclipsed Moon when it is deep in the umbra.ย 

Even better, the dark part of the crescent Moon lit by Earthshine is a good stand-in for the part of the Moon in the umbra. Like the eclipsed Moon, the crescent Moonโ€™s bright and dark parts canโ€™t be captured in one exposure. So itโ€™s a good test for the range of exposures youโ€™ll need for the eclipse, for practising changing settings on your camera, and for checking your tracking system.  

The crescent Moon is also useful to test your manual focusing, though the sharp detail along the terminator (the line dividing the bright crescent from the earthlit dark part of the Moon) is much easier to focus on than the flat, low contrast Full Moon.

A selfie of me looking up at the total eclipse of the Moon on January 20, 2019, using binoculars to enjoy the view.

DONโ€™T FORGET TO LOOK!

Amid all the effort needed to shoot this or any eclipse, lunar or solar, donโ€™t forget to just look at it. No photo can ever quite capture the glowing nature of the eclipsed Moon set against the stars. 

A selfie of the successful eclipse chaser bagging his trophy, the total lunar eclipse of January 20, 2019.

I wish you clear skies and good luck with your lunar eclipse photography. If you miss it, we have two more visible from North America next year, both total eclipses, on May 15/16 and November 8, 2022. 

โ€” Alan, www.amazingsky.com 

How to Photograph Comet NEOWISE


Comet over Hoodoos at Dinosaur Park in Twilight (July 14, 2020)A bright comet is a once-a-decade opportunity to capture some unique nightscapes. Here are my suggested tips and FAQs for getting your souvenir shot.ย 

My guide to capturing Comet NEOWISE assumes youโ€™ve done little, if any, nightscape photography up to now. Even for those who have some experience shooting landscape scenes by night, the comet does pose new challenges โ€” for one, it moves from night to night and requires good planning to get it over a scenic landmark.ย 

So here are my tips and techniques, in answers to the most frequently asked questions I get and that I see on social media posts.

Comet over Hoodoos at Dinosaur Park (July 14, 2020)
Comet NEOWISE (C/2020 F3) over the eroded hoodoo formations at Dinosaur Provincial Park, Alberta, July 14-15, 2020. A faint aurora is at right. The foreground is lit by starlight only; there was no light painting employed here. This is a stack of 12 exposures for the ground to smooth noise, blended with a single untracked exposure of the sky, all at 20 seconds at f/2.8 and ISO 1600, all with the 35mm Canon lens and Canon 6D MkII camera.


How Long Will the Comet be Visible?

The comet is not going to suddenly whoosh away or disappear. It is in our northern hemisphere sky and fairly well placed for shooting and watching all summer.

But โ€ฆ it is now getting fainter each night so the best time to shoot it is now! Or as soon as clouds allow on your next clear night.ย 

As of this writing on July 18 it is still bright enough to be easily visible to the unaided eye from a dark site. How long this will be the case is unknown.ย 

But after July 23 and its closest approach to Earth the comet will be receding from us and that alone will cause it to dim. Later this summer it will require binoculars to see, but might still be a good photogenic target, but smaller and dimmer than it was in mid-July.ย 

Comet Path
This chart shows the position of Comet NEOWISE at nightly intervals through the rest of the summer. However, the rest of July are the prime nights left for catching the comet at its best. Click or tap on the image to download a full-res copy.


When is the Best Time to Shoot?

The comet has moved far enough west that it is now primarily an evening object. So look as soon as it gets dark each night.ย 

Until later in July it is still far enough north to be โ€œcircumpolarโ€ for northern latitudes (above 50ยฐ N) and so visible all night and into the dawn.ย 

But eventually the comet will be setting into the northwest even as seen from northern latitudes and only visible in the evening sky. Indeed, by the end of July the comet will have moved far enough south that observers in the southern hemisphere anxious to see the comet will get their first looks.ย 

Comet NEOWISE over Red Deer River
Comet NEOWISE (C/2020 F3) over the Red Deer River from Orkney Viewpoint north of Drumheller, Alberta, on the morning of July 11, 2020. The sky is brightening with dawn twilight and a small display of noctilucent clouds is on the horizon at right. This is a two-segment vertical panorama with the 35mm Canon lens at f/2.8 and Canon 6D MkII at ISO 200 for 13 seconds each. Stitched with Adobe Camera Raw.


Where Do I Look?ย 

In July look northwest below the Big Dipper. By August the comet is low in the west below the bright star Arcturus. By then it will be moving much less from night to night. The chart above shows the comet at nightly intervals; you can see how its nightly motion slows as it recedes from us and from the Sun.ย 

Selfie Observing Comet NEOWISE (July 15, 2020)
A selfie observing Comet NEOWISE (C/2020 F3) with binoculars on the dark moonless night of July 14/15, 2020 from Dinosaur Provincial Park, Alberta. A faint aurora colours the sky green and magenta. The faint blue ion tail of the comet is visible in addition to its brighter dust tail. The ground is illuminated by starlight and aurora light only. This is a blend of 6 exposures stacked for the ground (except me) to smooth noise, and one exposure for the sky and me, all 13 seconds at f/2.5 with the 35mm lens and Canon 6D MkII at ISO 6400. Topaz DeNoise AI applied.


What Exposures Do I Use?

There is no single best setting. It depends on โ€ฆ

โ€” How bright the sky is from your location (urban vs a rural site).

โ€” Whether the Moon is up โ€” it will be after July 23 or so when the Moon returns to the western sky as a waxing crescent.

โ€” The phase of the Moon โ€” in late July it will be waxing to Full on August 3 when the sky will be very bright and the comet faint enough it might lost in the bright sky.

However, here are guidelines:

โ€” ISO 400 to 1600

โ€” Aperture f/2 to f/4

โ€” Shutter speed of 4 to 30 seconds

Unless you are shooting in a very bright sky, your automatic exposure settings are likely not going to work.

As with almost all nightscape photography you will need to set your camera on Manual (M) and dial in those settings for ISO, Aperture and Shutter Speed manually. Just how is something you need to consult your cameraโ€™s instruction manual for, as some point-and-shoot snapshot cameras are simply not designed to be used manually.

Panorama of Comet NEOWISE Over Prince of Wales Hotel (July 14, 2
A once-in-a-lifetime scene โ€” A panorama of the dawn sky at 4 am on July 14, 2020 from Waterton Lakes National Park, Alberta, Canada with Comet NEOWISE (C/2020 F3) over the iconic Prince of Wales Hotel. Noctilucent clouds glow below the comet in the dawn twilight. Venus is rising right of centre paired with Aldebaran and the Hyades star cluster, while the Pleiades cluster shine above. The waning quarter Moon shines above the Vimy Peak at far right. The Big Dipper is partly visible above the mountain at far left. Capella and the stars of Auriga are at centre. This is an 8-segment panorama with the 35mm Canon lens at f/2.5 for 15 seconds each at ISO 100 with the Canon 6D MkII and stitched with Adobe Camera Raw.

Exposure Considerationsย 

As a rule you want to โ€ฆ

โ€” Keep the ISO as low as possible for the lowest noise. The higher the ISO the worse the noise. But โ€ฆ do raise the ISO high enough to get a well-exposed image. Better to shoot at ISO 3200 and expose well, than at ISO 800 and end up with a dark, underexposed image.

โ€” Shoot at a wide aperture, such as f/2 or f/2.8. The wider the aperture (smaller the f-number) the shorter the exposure can be and/or lower the ISO can be. But โ€ฆ lens aberrations might spoil the sharpness of the image.ย 

โ€” Keep exposures short enough that the stars wonโ€™t trail too much during the exposure due to Earthโ€™s rotation. The โ€œ500 Ruleโ€ of thumb says exposures should be no longer than 500 / Focal length of your lens.ย 

So for a 50mm lens exposures should be no longer than 500/50 = 10s seconds. Youโ€™ll still see some trailing but not enough to spoil the image. And going a bit longer in exposure time can make it possible to use a slower and less noisy ISO speed or simply having a better exposed shot.ย 

Histogram
The histogram as shown in Adobe Camera Raw. Cameras also display the image’s histogram in the Live View preview and in playback of recorded images. Keep the histogram from slamming to the left.

โ€” Avoid underexposing. If you can, call up the โ€œhistogramโ€โ€” the graph of exposure values โ€” on the resulting image in playback on your camera. The histogram should look fairly well distributed from left to right and not all bunched up at the left.ย 

Comet NEOWISE Over Dinosaur Park (July 15, 2020)
This is Comet NEOWISE (C/2020 F3) over the badlands and formations of Dinosaur Provincial Park, Alberta, on the night of July 14-15, 202. This is a blend of 6 exposures for the ground stacked to smooth noise, with a single exposure for the sky, with the 35mm Canon lens and Canon 6D MkII. The ground exposures are 1- and 2-minutes at ISO 1600 and f/2.8, while the single untracked sky exposure was 20 seconds at ISO 3200 and f/2.5.

My Nightscapes and Time-Lapses ebook shown above provides extensive instruction on the best camera settings for exposure and noise reduction.

Location Considerations

When and where you are will also affect your exposure combination.ย 

If you are at a site with lots of lights such as overlooking a city skyline, exposures will need to be shorter than at a dark site.ย 

And nights with a bright Moon will require shorter exposures than moonless nights.

Take test shots and see what looks good! Inspect the histogram. This isnโ€™t like shooting with film when we had no idea if we got the shot until it was too late!ย 


Whatย Lens Do I Use?

Comet over Canola Field (July 15, 2020)
With a 35mm lens. Comet NEOWISE (C/2020 F3) over a ripening canola field near home in southern Alberta, on the night of July 15-16, 2020. This is a blend of a stack of six 2-minute exposures at ISO 3200 and f/5.6 to smooth noise, provide depth of field, and bring out the colours of the canola, blended with a single short 15-second exposure of the sky at f/2.8 and ISO 1600, all with the 35mm lens and Canon 6D MkII camera.

Comet over Canola Field Close-Up (July 15, 2020)
With a 50mm lens. Comet NEOWISE (C/2020 F3) over a ripening canola field near home in southern Alberta, on the night of July 15-16, 2020. This is a blend of a stack of three 2-minute exposures at ISO 1600 and f/5 to smooth noise, provide depth of field, and bring out the colours of the canola, blended with a single short 15-second exposure of the sky at f/2.8 and ISO 3200, all with the 50mm Sigma lens and Canon 6D MkII camera.

Any lens can produce a fine shot. Choose the lens to frame the scene well.ย 

Using a longer lens (105mm to 200mm) does make the comet larger, but โ€ฆ might make it more difficult to also frame it above a landscape. A good choice is likely a 24mm to 85mm lens.

A fast lens is best, to keep exposure times below the 500 Rule threshold and ISO speeds lower. Slow f/5.6 kit zooms can be used but do pose challenges for getting well exposed and untrailed shots.ย 

Shooting with shorter focal lengths can help keep the aperture wider and faster. Long focal lengths arenโ€™t needed, especially for images of the comet over a landscape. Avoid the temptation to use that monster 400mm or 600mm telephoto wildlife lens. Unless it is on a tracker (see below) it will produce a trailed mess. It is best to shoot with no more than a 135mm telephoto, the faster the better, IF you want a close-up.

Planetarium programs that I recommend below offer โ€œfield of viewโ€ indicators so you can preview how much of the horizon and sky your camera and lens combination will show.ย 

StarryNightFOV
StarryNightโ„ข and other programs offer “Field of View” indicator frames that can show how the scene will frame with (in this example) lenses from 24mm to 135mm.


Can I Use My [insert camera here] Camera?

Yes. Whatever you have, try it.ย 

However, the best cameras for any nightscape photography are DSLRs and Mirrorless cameras, either full-frame or cropped frame. They have the lowest noise and are easiest to set manually.ย 

In my experience in teaching workshops I find that the insidious menus of automatic โ€œpoint-and-shootโ€ pocket cameras make it very difficult to find the manual settings. And some have such noisy sensors they do not allow longer exposures and/or higher ISO speeds. But try their Night or Fireworks scene modes.ย 

It doesnโ€™t hurt to try, but if you donโ€™t get the shot, donโ€™t fuss. Just enjoy the view with your eyes and binoculars.ย 

But โ€ฆ if you have an iPhone11 or recent Android phone (I have neither!) their โ€œNight sceneโ€ modes are superb and use clever in-camera image stacking and processing routines to yield surprisingly good images. Give them a try โ€” keep the camera steady and shoot.ย 

Comet NEOWISE with NLCs Above Prairie Lake (July 10-11, 2020)
This is Comet NEOWISE (C/2020 F3) over Deadhorse Lake near Hussar in southern Alberta, taken just after midnight on July 10-11, 2020 during its evening appearance. The comet shines just above low noctilucent clouds. This is a blend of nine exposures for the ground stacked to smooth noise and the water, with a single exposure for the sky, all 4 seconds with the 135mm Canon lens at f/2 and Canon 6D MkII at ISO 1600.


What No One Asks: How Do I Focus?

Everyone fusses about โ€œthe bestโ€ exposure.ย 

What no one thinks of is how they will focus at night. What ruins images is often not bad exposure (a lot of exposure sins can be fixed in processing) but poor focus (which cannot be fixed later).

On bright scenes it is possible your cameraโ€™s Autofocus system will โ€œseeโ€ enough in the scene to work and focus the lens. Great.

On dark scenes it will not. You must manually focus. Do that using your cameraโ€™s โ€œLive Viewโ€ function (all DSLRs and Mirrorless cameras have it โ€” but check your user manual as on DSLRs it might need to be activated in the menus if you have never used it).ย 

Canon 6D Live View Wide
The Live View screen of a Canon DSLR. Look in your manual for tips on how to boost the Live screen image brightness with the Exposure Simulation option.

Canon 6D Live View Zoom5x
Magnify the image 5x, 10x or more with the Zoom box centred on a star to focus the star to a pinpoint.

Aim at a bright star or distant light and magnify the image 5x or 10x (with the + button) to inspect the star or light. Put the lens on MF (not AF) and focus the lens manually to make the star as pinpoint as possible. Do not touch the lens afterwards.ย 

Practice on a cloudy night on distant lights.

All shooting must be done with a camera on a good tripod. As such, turn OFF any image stabilization (IS), whether it be on the lens or in the camera. IS can ruin shots taken on a tripod.ย 


What Few Ask: How Do I Plan a Shoot?ย 

Good photos rarely happen by accident. They require planning. Thatโ€™s part of the challenge and satisfaction of getting the once-in-a-lifetime shot.ย 

To get the shot of the comet over some striking scene below, you have to figure out:

โ€” First, where the comet will be in the sky,ย 

โ€” Then, where you need to be to look toward that location.ย 

โ€” And of course, you need to be where the sky will be clear!

Stellarium Web
The free web version of Stellarium shows the comet, as do the paid mobile apps.

  1. Planning Where the Comet Will Beย 

Popular planning software such as PhotoPills and The Photographerโ€™s Ephemeris can help immensely, but wonโ€™t have the comet itself included in their displays, just the position of the Sun, Moon and Milky Way.

For previewing the cometโ€™s position in the sky, I use the planetarium programs Starry Night (desktop) or SkySafari (mobile app). Both include comet positions.ย 

The program Stellarium (stellarium.org) is free for desktop while the mobile Stellarium Plus apps (iOS and Android) have a small fee. There is also a free web-based version at https://stellarium-web.orgย  Be sure to allow it to access your location.ย 

Set the programs to the night in question to see where the comet will be in relation to the stars and patterns such as the Big Dipper. Note the cometโ€™s altitude in degrees and azimuth (how far along the horizon it will be). For example, an azimuth of 320ยฐ puts it in the northwest (270ยฐ is due west; 0ยฐ or 360ยฐ is due north, 315ยฐ is directly northwest).ย 

Comet NEOWISE and NLCs over Prince of Wales Hotel (July 14, 2020
Comet NEOWISE (C/2020 F3) with a small display of noctilucent clouds over Emerald Bay and the iconic Prince of Wales Hotel at Waterton Lakes National Park, Alberta, at dawn on July 14, 2020. This is a blend of a stack of four exposures for the ground and water to smooth noise, blended with a single short exposure for the sky, all 20 seconds at f/2.5 and ISO 400. All with the 35mm Canon lens and Canon 6D MkII camera.

  1. Planning Whereย Youย Need To Be

I use The Photographerโ€™s Ephemeris mobile app (https://www.photoephemeris.com) โ€” there is a free web version available. Many like PhotoPills (https://www.photopills.com).

With either you can dial in the time and date and see lines pointing toward where the Sun would be, but below the horizon. Scrub through time to move that line to the same azimuth angle as where the comet will be and then see if the comet is sitting in the right direction.ย 

TPE
The screen from The Photographer’s Ephemeris app showing the planning map for the image above, with the faint yellow line indicating the line toward the comet’s azimuth.

Move your location to place the line toward the comet over what you want to include in the scene.

TPE 3D
The simulation of the real scene above, of the comet over the Prince of Wales Hotel, using TPE 3D app. The simulation matches the real scene very well!

I like The Photographerโ€™s Ephemeris as it links to the companion app TPE3D that can show the stars over the actual topographic landscape. It wonโ€™t show the comet, but if you know where it is in the sky you can see if if will clear mountains, for example.

Astrospheric
The Astrospheric app prediction of skies for me for the night I prepared this blog. Not great! But clear skies could be found to to east with a fresh hours drive.

  1. Planning for the Weatherย 

All is for nought if the sky is cloudy.ย 

For planning astro shoots I like the app Astrospheric (https://www.astrospheric.com). It is free for mobile and there is a web-based version. It uses Environment Canada predictions of cloud cover for North America. Use it to plan where to be for clear skies first, then figure out the best scenic site that will be under those clear skies.ย 

For sites outside North America, try ClearOutside (https://clearoutside.com)ย 


Advanced Techniquesย 

Be happy to get a well-composed and exposed single shot.ย 

But โ€ฆ if you wish to try some more advanced techniques for later processing, here are suggestions.

Comet NEOWISE and Aurora Panorama (July 13, 2020)
A panorama of the sky just before midnight on July 13, 2020 from Waterton Lakes National Park, Alberta, Canada with Comet NEOWISE (C/2020 F3) over the front range of the Rocky Mountains and an arc of aurora across the north. This is a 6-segment panorama with the 35mm Canon lens at f/2.2 for 25 seconds each at ISO 800 with the Canon 6D MkII and stitched with Adobe Camera Raw.

1. Panoramas

On several nights Iโ€™ve found a panorama captures the scene better, including the comet in context with the wide horizon, sweep of the twilight arch or, as weโ€™ve had in western Canada, some Northern Lights.

Take several identical exposures, moving the camera 10 to 15 degrees between images. Editing programs such as Lightroom, Adobe Camera Raw, ON1 Photo RAW and Affinity Photo have panorama stitching routines built in.ย 

My Nightscapes and Time-Lapses ebook shown above provides tutorials for shooting and processing nightscape panoramas.ย 

Comet NEOWISE over Red Deer River Panorama (July 11, 2020)
What a magical scene this was! This is Comet NEOWISE (C/2020 F3) over the sweep of the Red Deer River and Badlands from Orkney Viewpoint north of Drumheller, Alberta, on the morning of July 11, 2020. Light from the waning gibbous Moon provides the illumination, plus twilight. This nicely shows the arch of the twilight colours. This is a 6-segment panorama with the 50mm Sigma lens at f/2.8 and Canon 6D MkII at ISO 400 for 13 seconds each. Stitched with Adobe Camera Raw. Topaz DeNoise AI and Sharpen AI applied.

2. Exposure Blendingย 

If you have a situation where the sky is bright but the ground is dark, or vice versa, and one exposure cannot record both well, then shoot two exposures, each best suited to recording the sky and ground individually.ย 

For example, on moonless nights Iโ€™ve been shooting 2- to 5-minute long exposures for the ground and with the lens stopped down to f/5.6 or f/8 for better depth of field to be sure the foreground was in focus.ย 

For a video tutorial on how to do the layering and masking in programs such as Photoshop, see my How to Shoot Moonlit Nightscapes video at https://vimeo.com/theamazingsky/moonlighttutorial.ย 

Comet NEOWISE over Horseshoe Canyon (July 11, 2020)
This is Comet NEOWISE (C/2020 F3) over the Horseshoe Canyon formation near Drumheller, Alberta on the night of July 10-11, 2020, taken about 2 a.m. MDT with the comet just past lower culmination with it circumpolar at this time. Warm light from the rising waning gibbous Moon provides the illumination. This is a blend of six 1- and 2-minute exposures for the ground at ISO 800 and 400 stacked to smooth noise, with a single 30-second exposure at ISO 1600 for the sky, all with the 35mm Canon lens at f/2.8 and Canon 6D MkII.

3. Exposure Stackingย 

To reduce noise, it is also possible to shoot multiple exposures to stack later in processing to smooth noise. This is most useful in scenes with dark foregrounds where noise is most obvious, and where I will stack 4 to 8 images.ย 

Just how to do this is beyond the scope of this blog. I also give step-by-step tutorials for the process in my Nightscapes and Time-Lapses ebook shown above. It be done in Photoshop, or in specialized programs such as StarryLandscapeStacker (for MacOS) or Sequator (Windows).ย 

But shoot the images now, and learn later how to use them.ย 

Comet NEOWISE Close-Up (July 15, 2020)
A close-up of Comet NEOWISE (C/2020 F3) on the night of July 14/15, 2020 with a 135mm telephoto lens. This is a stack of nine 1-minute exposures with the 135mm Canon lens wide-open at f/2 and Canon EOS Ra camera at ISO 800. The camera was on the iOptron SkyGuider Pro tracker tracking the stars not the comet. Stacked and aligned in Photoshop.

4. Tracking the Skyย 

If it is close-ups of the comet you want, then you will need to use a 135mm to 300mm telephoto lens (especially later in the summer when the comet is farther away and smaller).ย 

But with such lenses any exposure over a few seconds will result in lots of trailing.ย 

iOptron SkyGuider Pro
The iOptron SkyGuider Pro and 135mm lens used to take the close-up shot of the comet above.

The solution is a tracking device such as the Sky-Watcher Star Adventurer or iOptron SkyGuider. These need to be set up so their rotation axis aims at the North Celestial Pole near Polaris. The camera can then follow the stars for the required exposures of up to a minute or more needed to record the comet and its tails well.ย 

Star Adventurer Polar Axis Angle
This is the Sky-Watcher Star Adventurer. All trackers have a polar axis that needs to be aligned to the Celestial Pole, near Polaris.

Just how to use a tracker is again beyond the scope of this blog. But if you have one, it will work very well for comet shots with telephoto lenses. However, trackers are not essential for wide-angle shots, especially once the Moon begins to light the sky.

But later in the summer when the comet is fainter and smaller, a tracked and stacked set of telephoto lens images will likely be the best way to capture the comet.

Clear skies and happy comet hunting!

โ€” Alan, July 18, 2020 /Revised July 23 / AmazingSky.comย 


Testing the Canon 6D Mark II for Nightscapes


Canon 6DMkII vs 6D Front

In a technical blog I compare the new Canon 6D Mark II camera with its predecessor, the Canon 6D, with the focus on performance for nightscape astrophotography.

No pretty pictures in this blog Iโ€™m afraid! This is a blog for gear geeks.

The long-awaited Canon 6D Mark II camera is out, replacing the original 6D after that cameraโ€™s popular 5-year reign as a prime choice among astrophotographers for all kinds of sky images, including nightscapes and time-lapses.

As all new cameras do, the 6D Mark II is currently fetching a full list price of $2000 U.S. Eventually it will sell for less. The original 6D, introduced in 2012 at that same list price, might still be available from many outlets, but for less, likely below $1500 US.

Shown on the left, above, the 6D Mark II is similar in size and weight to the original 6D.

However, the new Mark II offers 6240 x 4160 pixels for 26 megapixels, a bump up in resolution over the 5472 x 3648 20-megapixel 6D. The pixel pitch of the Mark II sensor is 5.7 microns vs. 6.6 microns for the 6D. 

One difference is that the port for a remote release is now on the front, but using the same solid 3-pin N3 connector as the 6D and other full-frame Canons. That makes it compatible with all external controllers for time-lapse shooting.

TESTING FOR THE NIGHT

My interest is in a cameraโ€™s performance for long-exposure astrophotography, with images taken at high ISO settings. I have no interest in auto-focus performance (we shoot at night with focus set manually), nor how well a camera works for high-speed sports shooting.

To test the Mark II against the original 6D I took test shots at the same time of a high-contrast moonlit scene in the backyard, using a range of ISO speeds typical of nightscape scenes.

The comparisons show close-ups of a scene shown in full in the smaller inset screen.

COMPARING NOISE

The key characteristic of interest for night work is noise. How well does the camera suppress the noise inherent in digital images when the signal is boosted to the high ISO settings we typically use?

6D MkII Noise at 5 ISOs 6D Mark II noise at 5 ISO speeds

This set shows the 6D MkII at five ISOs, from ISO 1600 all the way up to the seldom-used ISO 25,600, all shot in Raw, not JPG. In all cases, no noise reduction was applied in later processing, so the results do look worse than what processed images would.

Click or tap on all images to expand each image to full screen for closer inspection. 

6D Noise at 5 ISOs 6D noise at 5 ISO speeds

This set shows the same range of ISOs with the original 6D. All were taken at the same aperture, f/2.8, with a 35mm lens. Exposures were halved for each successive bump up in ISO speed, to ensure equally exposed images.

Comparing the sets, the 6D MkII shows a much greater tendency to exhibit a magenta cast in the shadows at very high ISOs, plus a lower contrast in the shadows at increasing ISOs, and slightly more luminance noise than the 6D. 

How much more noise the 6D MkII exhibits is demonstrated here.

6D MkII Noise at ISO 3200 6D MkII noise at ISO 3200 compared to 6D

To me, visually, the MkII presents about 1/2 stop, or EV, worse noise than the 6D. 

In this example, the MkII exhibits a noise level at ISO 3200 (a common nightscape setting) similar to what the 6D does if set between ISO 4000 and 5000 โ€“ about 1/2 stop worse noise.

Frankly, this is surprising. 

Yes, the MkII has a higher pixel count and therefore smaller pixels (5.7 microns in this case) that are always more prone to noise. But in the past, advances to the in-camera signal processing has prevented noise from becoming worse, despite increasing pixel count, or has even produced an improvement in noise.

For example, the 2012-vintage 6D is better for noise than Canonโ€™s earlier 2008-era 5D MkII model by about half a stop, or EV.

After five years of camera development I would have expected a similar improvement in the 6D MkII. After all, the 6D MkII has Canonโ€™s latest DIGIC 7 processor, vs. the older 6Dโ€™s DIGIC 5+.

Instead, not only is there no noise improvement, the performance is worse. 

That said, noise performance in the 6D MkII is still very good, and better than youโ€™ll get with todayโ€™s 24 megapixel cropped-frame cameras with their even smaller 4 micron pixels. But the full frame 6D MkII doesn’t offer quite as much an improvement over cropped-frame cameras as does the five-year-old 6D.

ISO INVARIANCY

In the previous sets all the images were well-exposed, as best they could be for such a contrasty scene captured with a single exposure.

What happens when Raw images are underexposed, then boosted later in exposure value in processing? 

This is not an academic question, as thatโ€™s often the reality for nightscape images where the foreground remains dark. Bringing out detail in the shadows later requires a lot of Shadow Recovery or increasing the Exposure. How well will the image withstand that work on the shadows?

To test this, I shot a set of images at the same shutter speed, but at successively slower ISOs, from a well-exposed ISO 3200, to a severely underexposed ISO 100. I then boosted the Exposure setting later in Raw processing by an amount that compensated for the level of underexposure in the camera, from a setting of 0 EV at ISO 3200, to a +5 EV boost for the dark ISO 100 shots.

This tests for a cameraโ€™s โ€œISO Invariancy.โ€ If a camera has a sensor and signal processing design that is ISO invariant, a boosted underexposed image at a slow ISO should look similar to a normally exposed image at a high ISO.

Youโ€™re just doing later in processing what a camera does on its own in-camera when bumping up the ISO.

But cameras that use ISO โ€œvariantโ€ designs suffer from increased noise and artifacts when severely underexposed images are boosted later in Raw processing.

The Canon 6D and 6D MkII are such cameras.

6D MkII ISO Variancy 6D Mark II ISO Invariancy

This set above shows the results from the 6D Mark II. Boosting underexposed shadows reveals a lot of noise and a severe magenta cast.

These are all processed with Adobe Camera Raw, identical to the development engine in Adobe Lightroom.

6D ISO Variancy 6D ISO Invariancy

This set above shows the results from the 6D. The older camera, which was never great for its lack of ISO Invariancy performance, is still much better than the new Mark II. 

Underexposed shadows show less noise and discolouration in the 6D. For a comparison of the Canon 6D with the ISO Invariant Nikon D750, see my earlier Nikon vs. Canon blog from 2015. The Nikon performs much better than the 6D.

Effectively, this is the lack of dynamic range that others are reporting when testing the 6D MkII on more normal daytime images. It really rears its ugly head in nightscapes.

The lesson here is that the Mark II needs to be properly exposed as much as possible.

Donโ€™t depend on being able to extract details later from the shadows. The adage “Expose to the Right,” which I explain at length in my Nightscapes eBook, applies in spades to the 6D MkII. 

DARK FRAME BUFFER

All the above images were taken with Long Exposure Noise Reduction (LENR) off. This is the function that, when turned on, forces the camera to take and internally subtract a dark frame โ€“ an image of just the noise โ€“ reducing thermal noise and discolouration in the shadows.

A unique feature of Canon full-frame cameras is that when LENR is on you can take several exposures in quick succession before the dark frame kicks in and locks up the camera. This is extremely useful for deep-sky shooting.

The single dark frame then gets applied to the buffered “light frames.”

The 6D Mark II, when in either Raw or in Raw+JPG can take 3 shots in succession. This is a downgrade from the 6D which can take 4 shots when in Raw+JPG. Pity.

ADOBE CAMERA RAW vs. DIGITAL PHOTO PROFESSIONAL

My next thought was that Adobe Camera Raw, while it was reading the Mark II files fine, might not have been de-Bayering or developing them properly. So I developed the same image with both Raw developers, Adobe’s and Canon’s latest version of their own Digital Photo Professional (DPP).

ACR vs DPP-withNR ACR vs. DPP

Here I did apply a modest and approximately similar level of noise reduction to both images:

In ACR: Color at 25, Luminosity at 40, with Sharpness at 25

In DPP: Chrominance at 8, Luminosity at 8, with Sharpness at 2

Yes, DPP did do a better job at eliminating the ugly magenta cast, but did a much worse job at reducing overall noise. DPP shows a lot of blockiness, detail loss, and artifacts left by the noise reduction.

Adobe Camera Raw and/or Lightroom remain among the best of many Raw developers.

IMAGE AVERAGING

A new feature the 6D Mark II offers is the ability to shoot and stack images in-camera. It can either “Add” the exposure values, or, most usefully, “Average” them, as shown here.

Multiple Exposure Menu 6D Mark II Multiple Exposure screen

Other newer Canon DSLRs also offer this feature, notably the 7D MkII, the 5D MkIV, the 5Ds, and even the entry-level 80D. So the 6D MkII is not unique. But the feature was not on the 6D.

Hereโ€™s the benefit.

6D MkII Averaging 6D Mark II Averaging results

The left image is a single exposure; the middle is an average stack of 4 exposures stacked in camera; the right image an average stack of 9 exposures, the maximum allowed.

Noise smooths out a lot, with less noise the more images you stack. The result is a single Raw file, not a JPG. Excellent! 

While this kind of stacking can be done later in processing in Photoshop, or in any layer-based program, many people might find this in-camera function handy.

Except, as you can see, the sky will exhibit star trails, and not as well defined as you would get from stacking them with a “Lighten” blend mode, as all star trail stacking routines use.

So this averaging method is NOT the way to do star trails. The Mark II does not offer the Brighten mode some other new Canons have that does allow for in-camera star trail stacking. Again, a pity in a camera many will choose for astrophotography.

Nevertheless, the Average mode is a handy way to create foreground landscapes with less noise, which then have to be composited later with a sky image or images.

OTHER FEATURES

On the left, below, the Mark II has a nearly identical layout of buttons and controls to the 6D on the right. So owners of the older model will feel right at home with the Mark II. Thatโ€™s handy, as we astrophotographers work in the dark by feel!

Canon 6DMkII vs 6D Rear 6D Mark II (left) and 6D rear views

Of course the big new feature, a first for Canon in a full-frame camera, is the Mark IIโ€™s fully articulated screen. It flips out, tilts, and even flips around to face forward. This is super-great for all astrophotography, especially when conducted by aging photographers with aching backs!

And the screen, as with the entry-level cropped-frame Canons, is a touch screen. For someone who hasnโ€™t used one before โ€“ me! โ€“ thatโ€™ll take some getting used to, if only in just remembering to use it.

And it remains to be seen how well it will work in the cold. But itโ€™s great to have.

INTERVAL TIMER

Like other late-model Canon DSLRs, the 6D MkII has a built-in intervalometer. It works fine but is useable only on exposures with internally set shutter speeds up to 30 seconds.

Interval Timer Menu 6D Mark II Interval Timer screen

However, setting the Interval so it fires the shutter with a minimal gap of 1 second between shots (our usual requirement for night time-lapses) is tricky: You have to set the interval to a value not 1 second, but 2 to 3 seconds longer than the shutter speed. i.e. an exposure of 30 seconds requires an interval of 33 seconds, as shown above. Anything less and the camera misses exposures.

Why? Well, when set to 30 seconds the camera actually takes a 32-second exposure. Surprise!

Other cameras I’ve used and tested with internal intervalometers (Nikon and Pentax) behave the same way. Itโ€™s confusing, but once you are used to it, the intervalometer works fine.

Except โ€ฆ the manual suggests the only way to turn it off and stop a sequence is to turn off the camera. Thatโ€™s crude. A reader pointed out that it is also possible to stop a time-lapse sequence by hitting the Live View Start/Stop button. However, that trick doesn’t work on sequences programmed with only a second between frames, as described above. So stopping a night time-lapse is inelegant to say the least. With Nikons you can hold down the OK button to stop a sequence, with the option then of restarting it if desired. 

Also, the internal Intervalometer cannot be used for exposures longer than 30 seconds. Again, that’s the case with all in-camera intervalometers in other models and brands.

BULB TIMER

As with many other new Canons, the Mark II has a Bulb Timer function.

Bulb Timer Menu 6D Mark II Bulb Timer screen

When on Bulb you can program in exposure times of any length. Thatโ€™s a nice feature that, again, might mean an external intervalometer is not needed for many situations.

PLAYBACK SCREEN

A new feature I like is the greatly expanded information when reviewing an image.

Playback Menu-LENR Status 6D Mark II Playback screen

One of the several screens you can scroll to shows whether you have shot that image with Long Exposure Noise Reduction on or not.

Excellent! I have long wanted to see that information recorded in the metadata. Digital Photo Professional also displays that status, but not Adobe Camera Raw/Lightroom.

CONCLUSION

While this has been a long report, this is an important camera for us astrophotographers.

I wish the news were better, but the 6D Mark II is somewhat of a disappointment for its image quality. It isnโ€™t bad. Itโ€™s just that it isn’t any better than than the older 6D, and in some aspects is worse.

Eclipse Rig The 6D Mark II as part of the rig for shooting the total solar eclipse. The articulated screen will be very nice!

Canon has clearly made certain compromise decisions in their sensor design. Perhaps adding in the Dual-Pixel Autofocus for rapid focusing in Movie Mode has compromised the signal-to-noise ratio. Thatโ€™s something only Canon can explain.

But the bottom-line recommendations I can offer are:

  • If you are a Canon user looking to upgrade to your first full-frame camera, the 6D Mark II will provide a noticeable and welcome improvement in noise and performance over a cropped-frame model. But an old 6D, bought new while they last in stock, or bought used, will be much cheaper and offer slightly less noise. But the Mark IIโ€™s flip-out screen is very nice!


  • If you are a current 6D owner, upgrading to a Mark II will not get you better image quality, apart from the slightly better resolution. Noise is actually worse. But it does get you the flip-out screen. I do like that!


  • If you are not wedded to Canon, but want a full-frame camera for the benefits of its lower noise, I would recommend the Nikon D750. I have one and love it. I have coupled it with the Sigma Art series lenses. I have not used any of the Sony a7-series Mirrorless cameras, so cannot comment on their performance, but they are popular to be sure.


You can find a thorough review of the Mark IIโ€™s performance for normal photography at DPReview at https://www.dpreview.com/reviews/canon-eos-6d-mark-ii-review

However, I hope this review aimed specifically at nightscape shooters will be of value. I have yet to test the 6D Mark II for very long-exposure tracked deep-sky images.

โ€” Alan, August 9, 2017 / ยฉ 2017 Alan Dyer / AmazingSky.com  
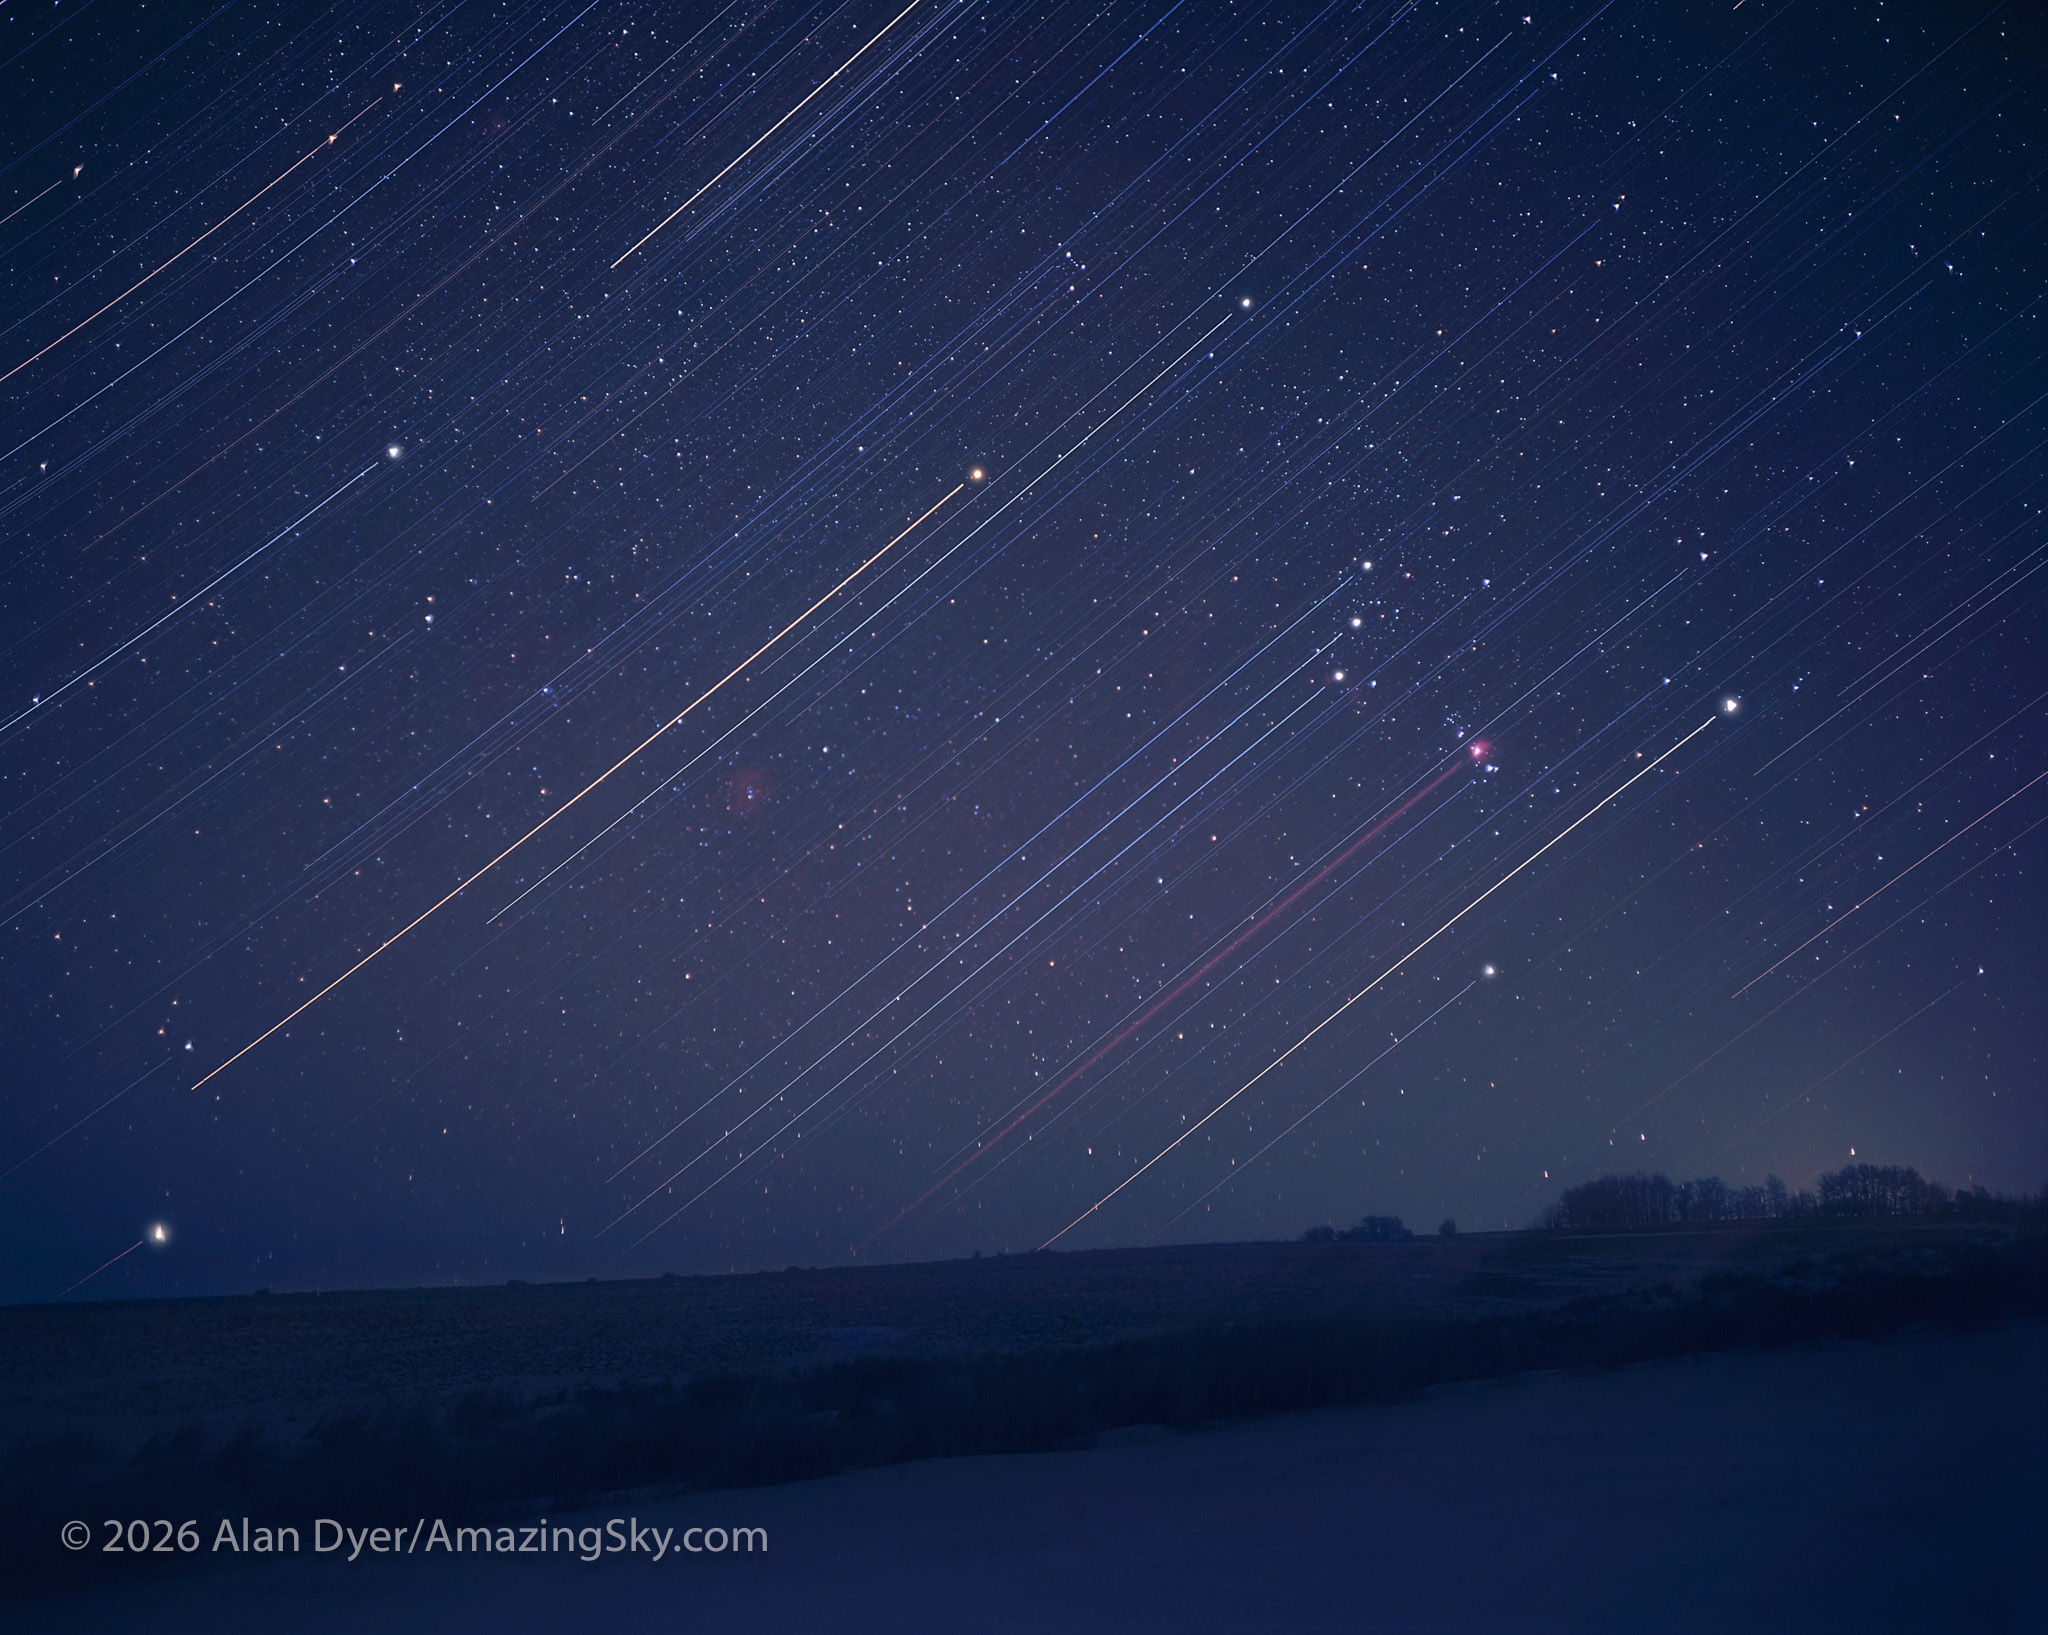
 

10 Tips for Terrific Time-Lapses


eMotimo at Dino Park #1

Here are my top tips for shootingย terrificย still-image nightscapes … and time-lapse movies of the night sky.ย 

Canon 6D

1. Go for pixel size, not pixel count

When choosing a camera for night sky scenes, the most important characteristic is not number of megapixels. Just the opposite.

The best cameras are usually models with more modest megapixel counts. Each of their individual pixels is larger and so collects more photons in a given exposure time, yielding higher a signal-to-noise ratio โ€“ or lower noise, critical for night shooting.

Cameras with pixels (the โ€œpixel pitchโ€) 6 to 8 microns across are best. Many high-megapixel cameras have tiny 4-micron pixels.

Large-pixel cameras are often the full-frame models, such as the Canon 5D MkIII and 6D, the Nikon D610, D750, and Df, and the Sony a7s and a7S II.

Many โ€œcropped-frameโ€ cameras are now 18- to 24-megapixel models with smaller, noise-prone pixels. They can certainly be used, but will requireย more care in exposing well at lower ISOs, and in processing to smooth out noise without blurring detail.

Manual Settings

2. Learn to fly on manual

While DSLRs and Compact System Cameras have amazing automatic functions we use none of them at night.

Instead, we use the camera on Manual or Bulb, dialling in shutter speed, aperture and ISO speed manually. We also have to focus manually, using Live View mode to focus on a bright star or distant light.

Learn the tradeoffs involved: Increasing ISO sensitivity of the sensor keeps exposure times down but increases noise. Opening up the lens aperture to f/2 or f/1.4 also keeps exposures short but introduces image-blurring aberrations, especially at the frame corners.

To prevent stars from trailing due to the skyโ€™s motion adhere to the โ€œ500 Rule:โ€ the maximum exposure time is roughly 500 divided by the focal length of your lens.

Histogram-Correct

3. Expose to the rightย 

At night, always give the sensor plenty of signal.

Use whatever combination of shutter speed, aperture and ISO will provide a well-exposed image. The image โ€œhistogram,โ€ the graph of number of pixels at each brightness level shown above, should never be slammed to the left.

It should be a well-distributed โ€œmountain rangeโ€ of pixels, extending well to the right. If the 500 Rule restricts your shutter speed, and your desire for sharp images across the frame demands you shoot at f/2.8 or even slower, then donโ€™t be afraid to bump up the ISO speed to whatever it takes to produce a good histogram and a well-exposed image.

Noise will look far worse if you underexpose, then try to boost the image brightness later in processing. Expose to the right!

File Format #2 7D

4. Shoot Raw!

Shoot Raw. Period.

When comparing Raw and compressed JPG versions of the same image, you can be fooled into thinking the JPGs look better (i.e. smoother) because of the noise reduction the camera has applied to the JPG that is beyond your control. However, that smoothing has also wiped out fine detail, like stars.

By shooting Raw you get to control whatever level of noise reduction and sharpening the image needs later in processing.

JPGs are also 8-bit images with a limited tonal range โ€“ย or palette โ€“ย in which to record the subtle gradations of brightness and colour present in our images.

Imported Raw files are 16-bit, with a much wider tonal scale and colour palette. Thatโ€™s critical for all astrophotos when, even with a well-exposed image, many tonal values are down in the dark end of the range. Processing Raw images makes it possible to extract detail in the shadows and highlights.

Even when shooting a time-lapse sequence, shoot Raw.

LENR

5. Take dark frames (sometimes!)

LENR reduces noise.

Itโ€™s a topic of some debate, but in my experience it is always better to turn on the cameraโ€™s Long Exposure Noise Reduction (LENR) function when shooting individual nightscape images. Doing so forces the camera to take a โ€œdark frame,โ€ an exposure of equal length but with the shutter closed.

It records just the noise, which the camera then subtracts from the image. Yes, it takes twice as long to acquire an image, but the image is cleaner, with fewer noisy pixels.

This is especially true when shooting on hot summer nights (the warmer the sensor the higher the noise). That said, you cannot use LENR when shooting frames for star trail composites or time-lapse movies.

For those, the interval between images should be no more than 1 to 5 seconds. Using LENR would introduce unsightly gaps in the trails or jumps in the star motion in time-lapses.

As an alternative, it is possible to take separate dark frames at the end of the night by simply covering the lens and taking exposures of the same duration and at the same ISO as your “light frames.”

Some stacking software, such as StarStax and the Advanced Stacker Actions have places to put these dark frames, to subtract them from the stack later in processing.

811eBU4sBkL._SL1500_

6. Use fast lenses

A fast lens is your best accessory.

While the โ€œkit zoomโ€ lenses that come with many DSLRs are great for shooting bright twilight or Full Moon scenes, they will prove too slow for dark starlit scenes with the Milky Way.

In addition to exposing to the right and shooting Raw, the secret to great nightscapes is to shoot with fast lenses, usually โ€œprimeโ€ lenses with fixed focal lengths. They are usually faster and have better image quality than zooms.

Your most-used lens for nightscape and time-lapse shooting is likely to be a 14mm to 24mm f/2 to f/2.8 lens.

Fortunately, because we donโ€™t need (and indeed canโ€™t use) autofocus we can live happily with low-cost manual lenses, such as the models made in Korea and sold under brands such as Rokinon, Samyang and Bower. They work very well.

The quarter Moon reflected in the waters of Reesor Lake, Alberta in Cypress Hills Interprovincial Park. Taken on July 5, 2014. This is with the 14mm Rokinon lens and Canon 6D at ISO800. This is a high dynamic range stack of6 exposures from 1/15 to 0.6 seconds taken just before using the camera to take a motion control time-lapse. The Moon was in conjunction with Mars (right of Moon) and Spica (left of Moon) but in the bright twilight they are not showing up here.

7. Get to know the Moon & Milky Way

For many nightscape and time-lapse shoots, the Moon is your light source for illuminating the landscape.

When the Moon is absent, the Milky Way is often your main sky subject.

Knowing where the Moon will be in the sky at its various phases, and when it will rise (in its waning phases after Full Moon) or set (in its waxing phases before Full) helps you a plan a shoot, so youโ€™ll know whether a landscape will be well lit.

Astronomy apps for desktop computers and mobile devices are essential planning aids. A good one specifically for photographers is The Photographer’s Ephemeris.

Knowing in what season and time of night the Milky Way will be visible is essential if you want to capture it. Donโ€™t try for Milky Way shots in spring โ€“ it isn’t up!

Me with cameras shooting time-lapses at Crawling Lake reservoir, Alberta, June 30/July 1, 2013. Perpetual twilight of summer solstice shines to the north and very weak noctilucent clouds.

8. Keep it simple to start

Don’t be seduced by the fancy gear.ย 

Time-lapse imaging has blossomed into a field replete with incredible gear for moving a camera incrementally during a shoot, and for automating a shoot as day turns to night.

I explain how to use all the fancy gear in my ebook, linked to below, however … Great time-lapses, and certainly still-frame nightscapes, can be taken with no more than a DSLR camera with a good fast lens and mounted on a sturdy tripod. Invest in the lens and donโ€™t scrimp on the tripod.

Another essential for shooting multi-frame star trails and time-lapses is a hardware intervalometer ($50 to $150).

TC-80N3 Masked

9. Learn the intricacies of intervals

For time-lapses, an intervalometer is essential.

Mastering exposure and focus in still images is essential for great time-lapse movies because they are simply made of hundreds of well-exposed still frames.

But move to time-lapses and you have additional factors to consider: how many frames to shoot and how often to shoot them. A good rule of thumb is to shoot 200ย to 300 frames per sequence, shot with an interval of no more than 1 to 5 seconds between exposures, at least for starry night sequences.

However, most intervalometers (the Canon TC-80N3 is an exception) define their โ€œIntervalโ€ setting to mean the time from when the shutter opens to when it opens again. In that case, you set the Interval to be a value 1 to 5 seconds longer than the exposure time you are using. That’s also true of theย intervalometer function Nikon builds into their internal camera firmware.

Test first!

The summer Milky Way with a meteor streaking at centre as a bonus. An aurora to the north off frame is lighting the foreground with a green glow. Haze and forest fire smoke obscure the horizon. I shot this at the Battle Scene viewpoint at Writing-on-Stone Provincial Park, in southern Alberta. Sagittarius and the galactic centre is on the horizon at left of centre. Capricornus is amid the haze at left of centre. On the horizon are the Sweetgrass Hills in Montana. The Milk River winds below amid the sandstone formations that are home to historic First Nations petroglyphs.  This is a single 30-second exposure with the Nikon D750 at ISO 3200 and Sigma 24mm Art lens at f/2, taken as part of a time-lapse sequence.

10. Go to beautiful places

While the gear can be simple, great shots demandย anย investment in time.

By all means practice at home and at nearby sites that are quick to get to. Try out gear and techniques at Full Moon when exposures are short (the Full Moon is bright!) and you can see what you are doing.

But beautiful images of landscapes lit by moonlight or starlight require you to travel to beautiful locations.

When you are on site, take the time to frame the scene well, just as you would during the day. Darkness is no excuse for poor composition!

While shooting nightscapes and time-lapses can be done with a minimal investment in hardware and software, it does require an investment in time โ€“ time to travel and spend nights shooting at wonderful places under the stars.

Enjoy the night!

I cover all these topics, and much more, in detail in my ebook How to Photograph & Process Nightscapes and Time-Lapses. Click the link below to learn more.

โ€” Alan, September 16, 2015 / ยฉ 2015 Alan Dyer / www.AmazingSky.com
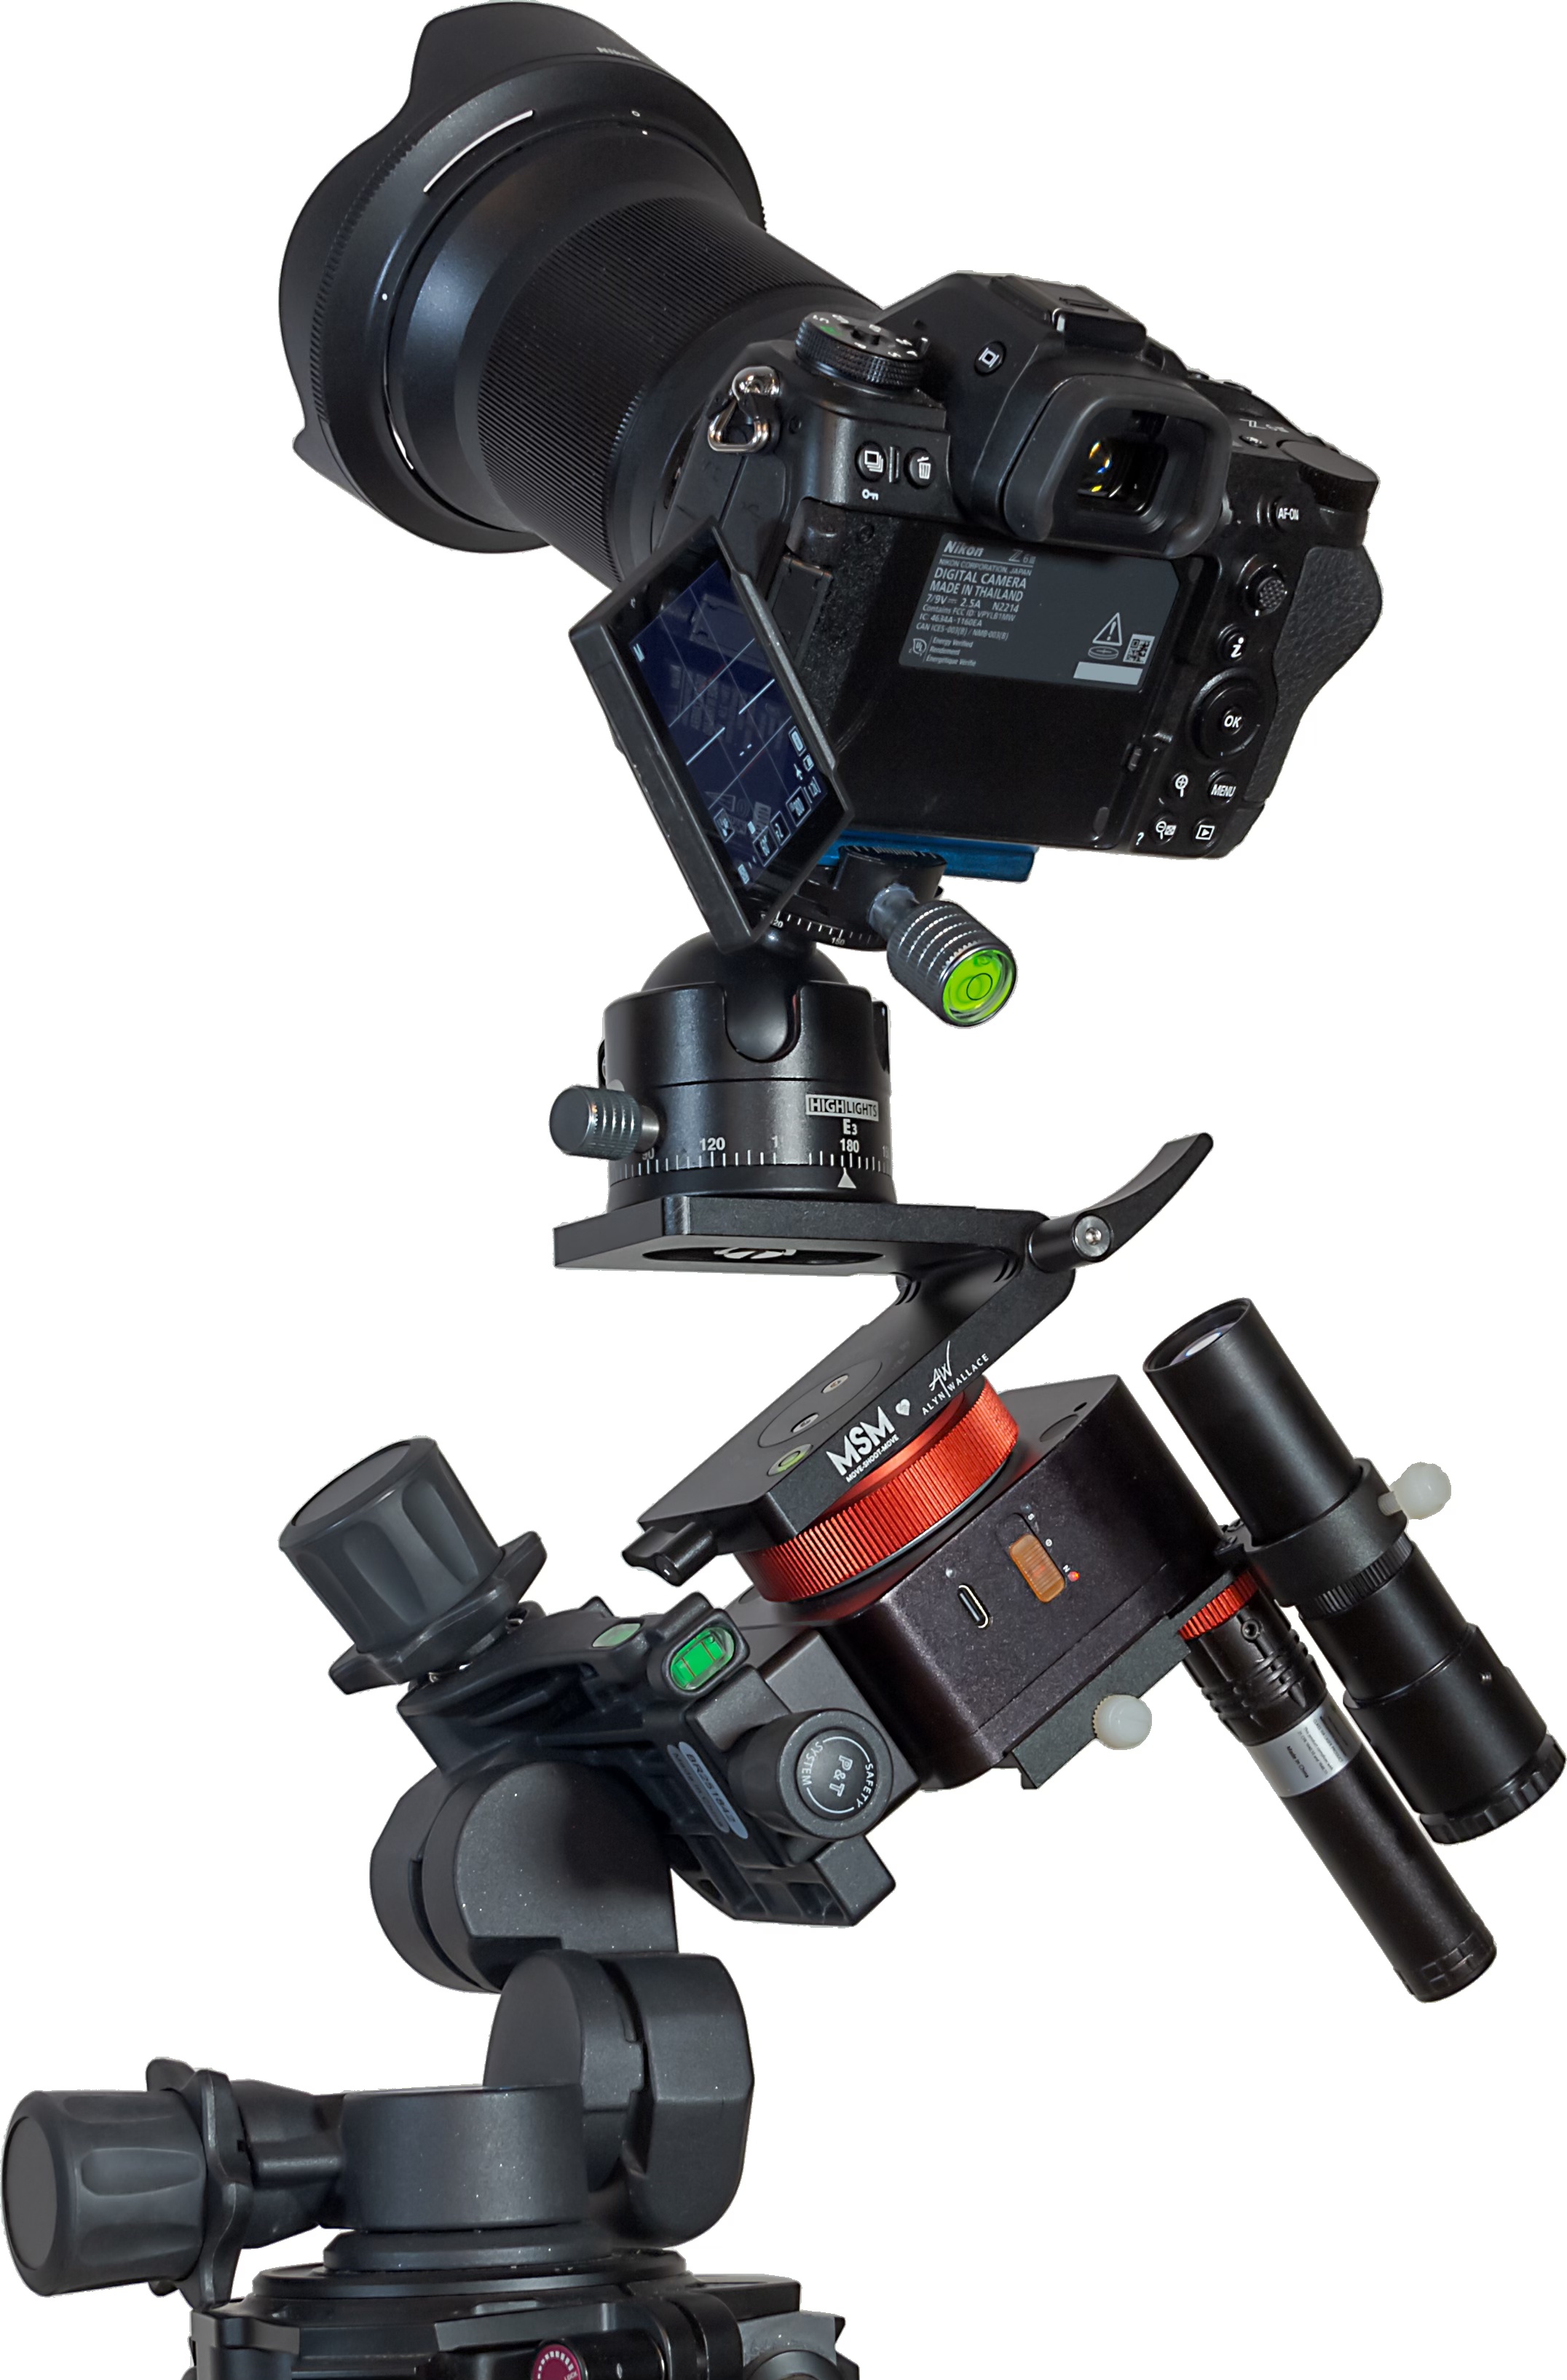
Canon vs. Nikon for Astrophotography


Canon and Nikon Cameras

I’ve been an avowed Canon DSLR user for a decade. I may be ready to switch!

[NOTE: This review dates from 2015. Tests done today with current models would certainly differ. Canon’s EOS R mirrorless series, for example, offer much better ISO Invariancy performance but lack the “dark frame buffer” advantage of Canon DSLRs. And indeed, I have used the Nikon D750 a lot since 2015. But I did not give up my Canons!]

Here, in a technical blog, I present my tests of two leading contenders for the best DSLR camera for nightscape and astronomical photography: the Canon 6D vs. the Nikon D750. Which is better?

To answer, I subjected both to side-by-sideย outdoor tests, using exposures you’ll actually use in the field for typical nightscapes and for deep-sky images.

Both cameras are stock, off-the-shelf models. They haveย notย had their filters modified for astronomy use.ย Both are 20- to 24-megapixel, full-frame cameras, roughly competitive in price ($1,900 to $2,300).

For images shot through lenses, I used the Canon L-Series 24mm on the Canon 6D, and the Sigma 24mm Art lens on the Nikon D750.

The bottom line:ย Both are great cameras, with the Nikon D750 having the edge for nightscape work, and the Canon 6D the edge for deep-sky exposures.

NOTE: Click on the test images for higher-resolution versions for closer inspection. All images and text ยฉ 2015 Alan Dyer and may not be reproduced without my permission.


TEST #1 โ€” Noise

The 24.3-megapixel Nikon D750 has 5.9-micron pixels, while the 20.2-megapixel Canon 6D has slightly larger 6.5-micron pixels which, in theory, should lead to lower noise for the Canon. How do they compare in practice?

The scene used to test for noise (here with the Nikon images) showing the development settings applied to both the Nikon and Canon sets. NO noise reduction (colour or lunminance) was applied to any of the images, but Exposure, Shadows, Contrast and Clarity were boosted, and Highlights reduced.

I shot aย moonlit nightscape scene (above) at five ISO settings, from 800 to 12800, at increasingly shorter exposures to yield identically exposed frames. I processed each frame as shown above, with boosts to shadows, clarity, and contrast typical for nightscapes. However, I applied no noise reduction (either luminance or color) in processing. Nor did I take and apply dark frames.

Noise - Canon

Noise - Nikon

The blowups of aย small section of the frame (outlined in the box in the upperย right of the Photoshop screen) show very similar levels of luminance noise. The Canon shows slightly more color noise, in particular more magenta pixels in the shadows at high ISOs. Its larger pixels didn’t provide the expected noise benefit.


TEST #2 โ€” Resolution

Much has been written about the merits of Canonย vs. Nikon re: the most rigorous of tests, resolving stars down at the pixel level.

I shot the images below of the Andromeda Galaxy the same night through a 92mm aperture apo refractor. They have had minimal but equal levels of processing applied. At this level of inspection the cameras look identical.

M31 (Canon 6D)

M31 (Nikon D750)

But what if we zoom in?

For many years Nikon DSLRs had a reputation for not being a suitable for stellar photography because of a built-in noise smoothing that affected even Raw files, eliminating tiny stars along with noise. Raw files weren’t raw. Owners worked around this by turning on Long Exposure Noise Reduction, then when LENR kicked in after an exposure, they would manually turn off the camera power.

This so-called “Mode 3” operation yielded a raw frame without the noise smoothing applied. Clearly, this clumsy workaround made it impossible to automate the acquisition of raw image sequences with Nikons.

Are Nikons still handicapped? In examining deep-sky images at the pixel-peeping level (below), I saw absolutely no difference in resolution or the ability to record tiny and faint stars. With its 4-megapixel advantage the Nikon should resolve finer details and smaller stars, but in practice I saw little difference.

Closeup of telescope view of Andromeda Galaxy with Canon 6D 4 minute exposure at ISO 800 No noise reduction applied in processing
Closeup of telescope view of Andromeda Galaxy with Canon 6D
4 minute exposure at ISO 800
No noise reduction applied in processing

Closeup of telescope view of Andromeda Galaxy with Nikon D750 4 minute exposure at ISO 800 No noise reduction applied in processing
Closeup of telescope view of Andromeda Galaxy with Nikon D750
4 minute exposure at ISO 800
No noise reduction applied in processing

On the other hand I saw no evidence for Nikon’s “star eater” reputation. I think it is time to lay this bugbear of Nikons to rest. The Nikon D750 proved to beย just as sharp as the Canon 6D.

Note that in the closeups above, the red area marks a highlight (the galaxy core) that is overexposed and clipped. Nikon DSLRs also have a reputation for having sensors with a larger dynamic range than Canon, allowing better recording of highlights before clipping sets in.

However, in practice I saw very little difference in dynamic range between the two cameras. Both clipped at the same points and to the same degree.


TEST #3 โ€” Mirror Box Shadowing

An issue little known outside of astrophotography is that a DSLR’s deeply-inset sensor can be shadowed by the upraised mirror and sides of the mirror box. Less light falls on the edges of the sensor.

The vignetting effect is noticeable only when we boost the contrast to the high degree demanded by deep-sky images, and when shooting through fast telescope systems.

Here I show the vignetting of the Canon and Nikon when shooting through my 92mm refractor at f/4.5.

The circular corner vignetting visible in the images below is from the field flattener/reducer I employed on the telescope. It can be compensated for by using Lens Correction in Adobe Camera Raw, or eliminated by taking flat fields.

Demonstrating the level of vignetting and mirror-box shadowing with the Canon 6D on a TMB 92mm apo refractor with a 0,85x field flattener/reducer lens
Demonstrating the level of vignetting and mirror-box shadowing with the Canon 6D on a TMB 92mm apo refractor with a 0.85x field flattener/reducer lens

Demonstrating the level of vignetting and mirror-box shadowing with the Nikon D750 on a TMB 92mm apo refractor with a 0,85x field flattener/reducer lens
Demonstrating the level of vignetting and mirror-box shadowing with the Nikon D750 on a TMB 92mm apo refractor with a 0.85x field flattener/reducer lens

The dark edge at the bottom of the frame is from shadowing by the upraised mirror. It can be eliminated only by taking flat fields, or reduced by using masked brightness adjustments in processing.

Both cameras showed similar levels of vignetting, with the Canon perhaps having the slight edge.


TEST #4 โ€” ISO Invariancy

So far the Nikon D750 and Canon 6D are coming up fairly equal in performance. But not here. This is where the Nikon outperformsย the Canon by quite a wide margin.

Sony sensors (used in Sony cameras and also used by Nikon) have a reputation for being “ISO Invariant.”

What does that mean?

A typical Milky Way nightscape with the Nikon D750 and Sigma 24mm Art lens. With no Moon, shot at very high ISO of 6400 and wide aperture of f/1.4 to show image quality under these demanding shooting circumstances. Lens correction and basic development setttings applied.
A typical Milky Way nightscape with the Nikon D750 and Sigma 24mm Art lens.
With no Moon, shot at very high ISO of 6400 and wide aperture of f/1.4 to show image quality under these demanding shooting circumstances.
Lens correction and basic development setttings applied.

A typical Milky Way nightscape with the Canon 6D and Canon 24mm L lens (original model). With no Moon, shot at very high ISO of 6400 and wide aperture of f/1.4 to show image quality under these demanding shooting circumstances. Lens correction and basic development setttings applied.
A typical Milky Way nightscape with the Canon 6D and Canon 24mm L lens (original model).
With no Moon, shot at very high ISO of 6400 and wide aperture of f/1.4 to show image quality under these demanding shooting circumstances.
Lens correction and basic development setttings applied.

In the examples above, the correct exposure for the starlit scene was 15 seconds at f/1.4 at ISO 6400. See how the two cameras rendered the scene? Very similar, albeit with the Canon showing more noise and discoloration in the dark frame corners.

What if we shoot at the same 15 seconds at f/1.4 … but at ISO 3200, 1600, 800, and 400? These are now 1-, 2-, 3-, and 4-stops underexposed, respectively.

Then we boost the Exposure setting of the underexposed Raw files later in processing, by 1, 2, 3 or 4 f-stops. What do we see?

Nikon D750 - Comparing ISO Invariancy from ISO 6400 to 400 (Nightscape)
Nikon D750 – Comparing ISO Invariancy from ISO 6400 to 400 (Nightscape)

With the Nikon (above) we see images that look nearly identical for noise to what we got with the properly exposed ISO 6400 original. It really didn’t matter what ISO speed the image was shot at โ€“ย we can turn it into any ISO we want later with little penalty.

Canon 6D - Comparing ISO Invariancy from ISO 6400 to 400 (Nightscape)
Canon 6D – Comparing ISO Invariancy from ISO 6400 to 400 (Nightscape)

With the Canon (above) we get images with grossly worse noise in the shadows and with ugly magenta discoloration. Canons cannot be underexposed. You must use as high an ISO as needed for the correct exposure.

This “ISO Invariant” advantage of Nikon over Canon is especially noticeable in nightscapes scenes lit only by starlight, as above. The Canon turns ugly purple at -3EV underexposure, and loses all detail and contrast at -4EV underexposure.

For nightscape imaging this is an important consideration. We are limited in exposure time and aperture, and so are often working at the ragged edge of exposure. Dark areas of a scene are often underexposed and prone to noise. With the Nikon D750 these areas may still look noisy, but not much more so than they would be at that ISO speed.

With the Canon 6D, underexpose the shadows and you pay the price of increased noise and discoloration when you try to recover details in the shadows.

ย For more technical information on the topic of ISO invariancy, see DPReview.com and many of their recent reviews of DSLRs, such as this page about the Canon 5Ds/r models.ย 
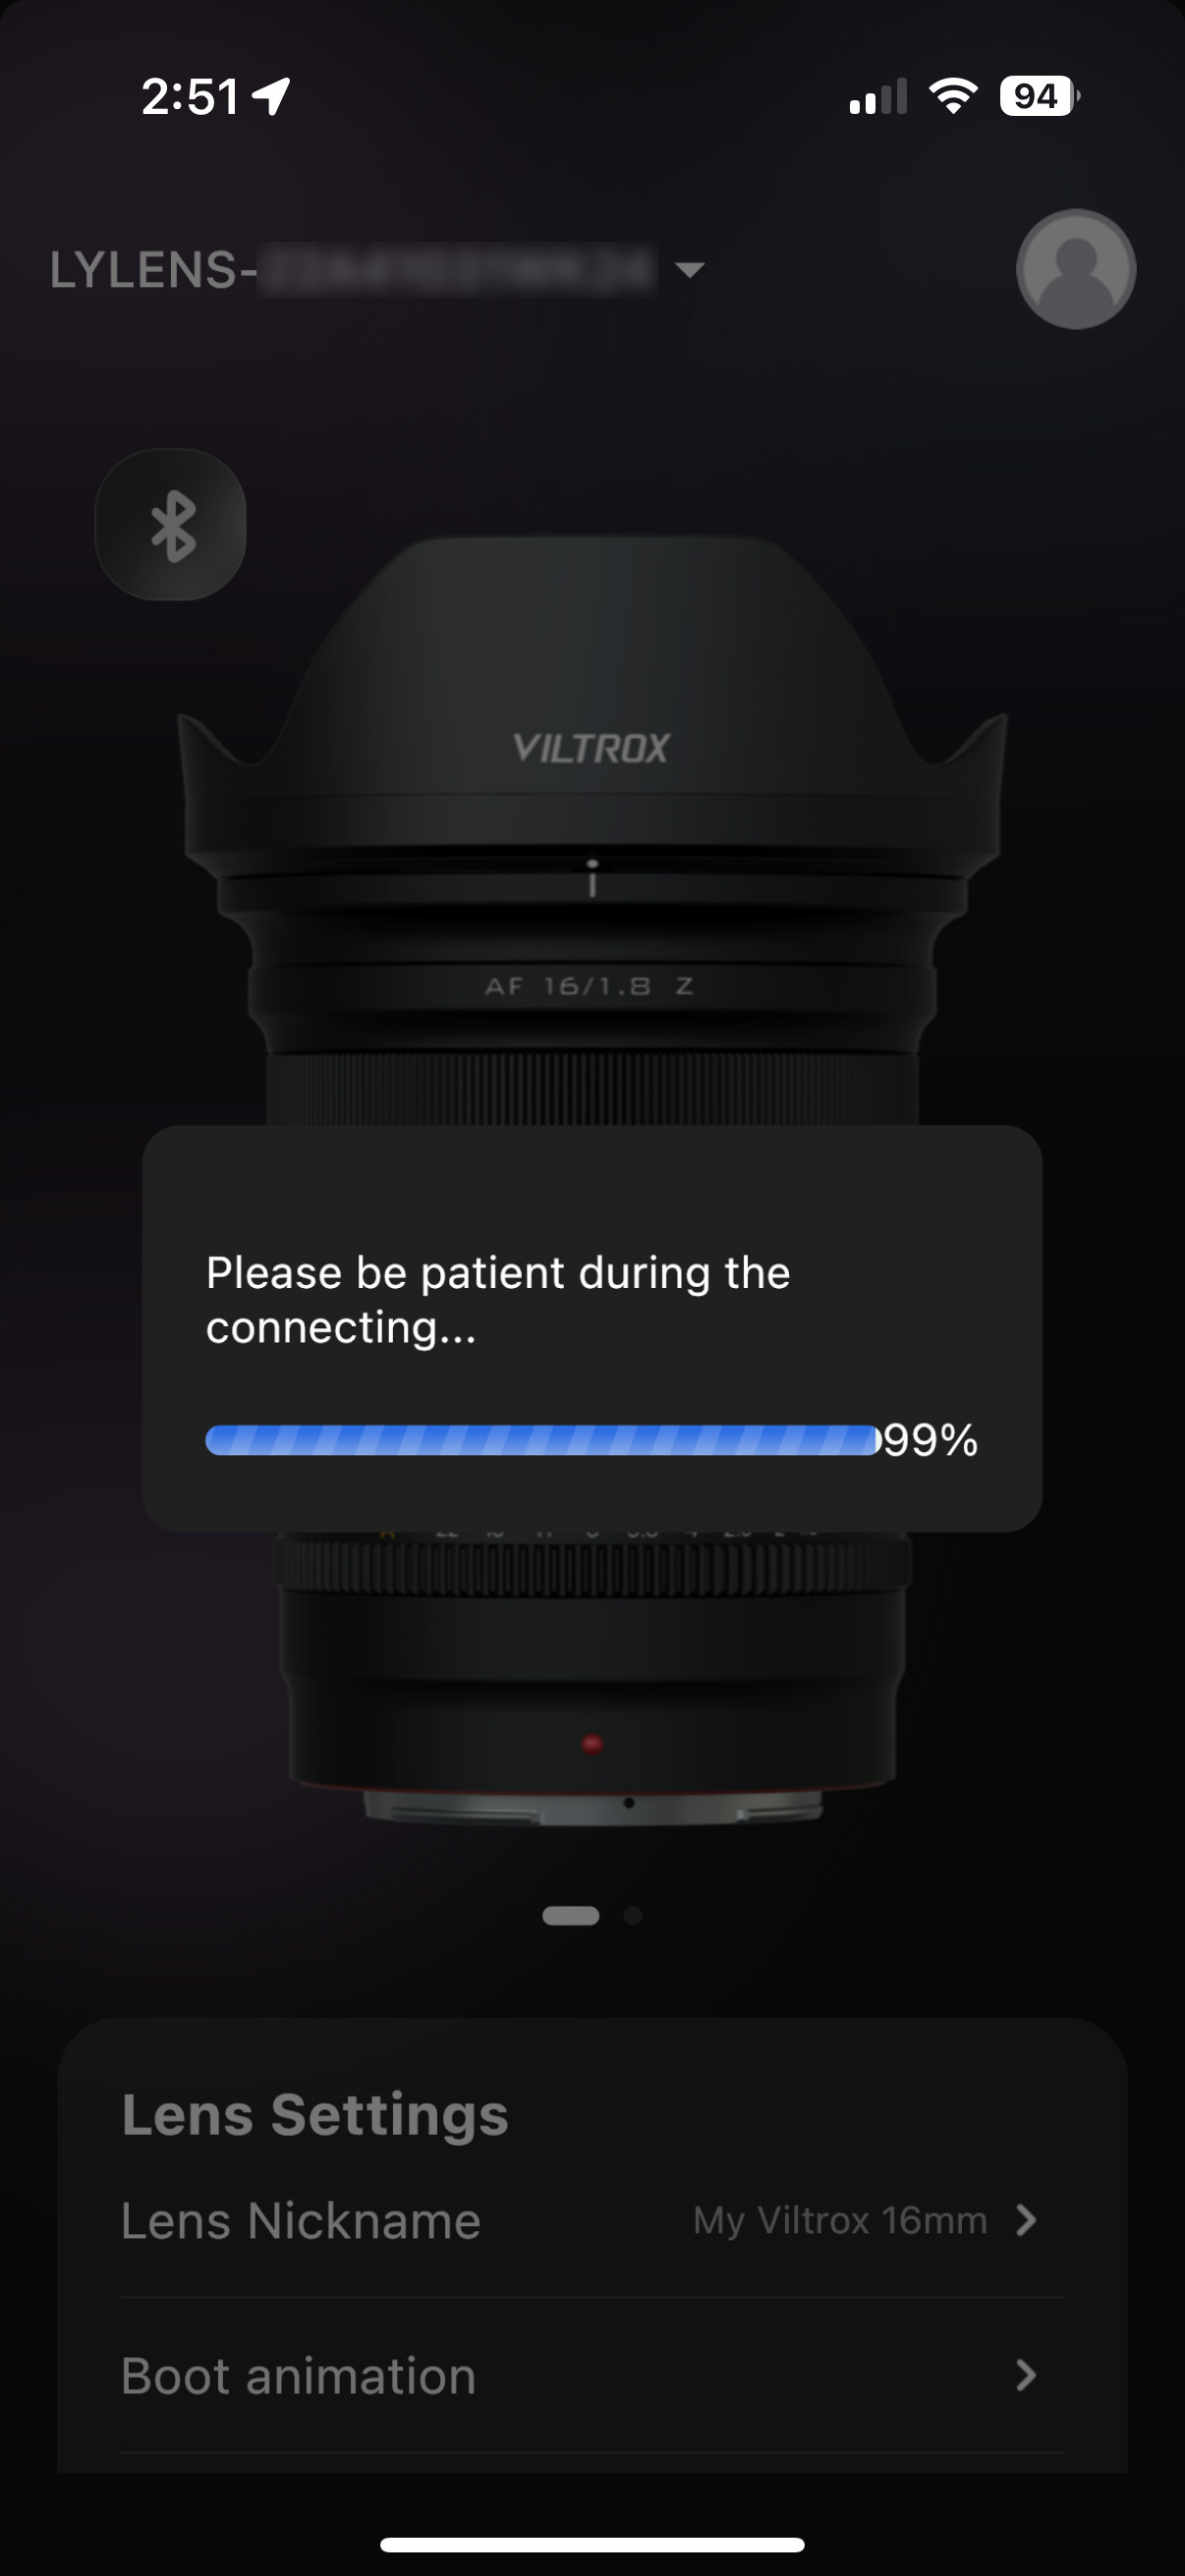
Apparently, the difference comes from where the manufacturer places the analog-to-digital circuitry: on the sensor (ISO invariant) or outboard on a separate circuit (ISO variant), and thus where in the signal path the amplification occurs when we boost ISO speed.


TEST #6 โ€” Features

One could go on endlessly about features, but here I compare the two cameras on just a few key operating features very important to astrophotographers.

Nikon Intervalometer Start

Intervalometer:

The Canon 6D has none, though newer Canons do. The Nikon D750, as do many Nikons, has a built-in intervalometer (shown above), even with a deflickering “Exposure Smoothing” option. However, exposure time is limited to the camera’s maximum of 30 seconds. Any longer requires an outboard intervalometer, as with the Canon.

If you use your camera with any motion control time-lapse unit, then it becomes the intervalometer, negating any capability built into the camera. But it’s nice to have.

Small Advantage: Nikon


Interval Length:

REVISED JUNE 2020:

When taking time-lapse or star trail images with the Canon I can set an interval as short as 1 second between frames, for a minimum of gaps or jumps in the stars. With the Nikon, controlled internally by its built-in intervalometer, a 1-second interval is possible but only if you set the interval to 33 seconds for a 30-second shutter speed.

That’s true of Canon and Sony built-in intervalometers as well, because on all cameras setting the exposure to 30 seconds really gives you a 32-second exposure. A little known fact! So the interval between shutter firings has to be set to 33 seconds. It’s tricky.

Advantage: None to either


Nikon D750 with Radian

Tiltable LCD Screen:

The Canon 6D has none. The Nikon D750 has a very useful tilt-out screen as shown above. This is hugely convenient for all forms of astrophotography. Only cropped-frame Canons have tilt-out screens. This feature might add weight, but it’s worth it!

Big Advantage: Nikon


Dark Frame Buffer:

The Nikon has none. With Long Exposure Noise Reduction ON, the Canon 6D allows up to four exposures to be shot in quick succession before the dark frame kicks in and locks up the camera. (Put the camera into Raw+JPG.)

[JUNE 2020: With the Canon 6D MkII the buffer allows three frames to be taken in quick succession.]

This is very useful for deep-sky imaging, for acquiring a set of images for stacking that have each had a dark frame subtracted in-camera, with a minimum of “down-time” at the camera.

Big Advantage: Canon


Live View Screen Brightness:

As pointed out to me by colleague Christoph Malin, with the Nikon you cannot dim the screen when in Live View mode and with Exposure Simulation ON. So it can be too bright at night. With the Canon you can dim the Live View screen โ€” the LCD Brightness control affects the screen both during Live View as well as duringย playback of images.

Small Advantage: Canon


Canon with GBTimelapse

Software Compatibility:

Canon EOS cameras are well supported by advanced software, such as GBTimelapse (above) that controls only Canons, not Nikons, in complex time-lapse sequences, and Nebulosity, popular among deep-sky imagers for DSLR control.

Small Advantage: Canon


Myย take-away conclusions:ย 

โ€ข Nikon DSLRs now are just as good for astrophotography as Canons, though that wasn’t always the case โ€“ย early models did suffer from more noise and image artifacts than their Canon counterparts.
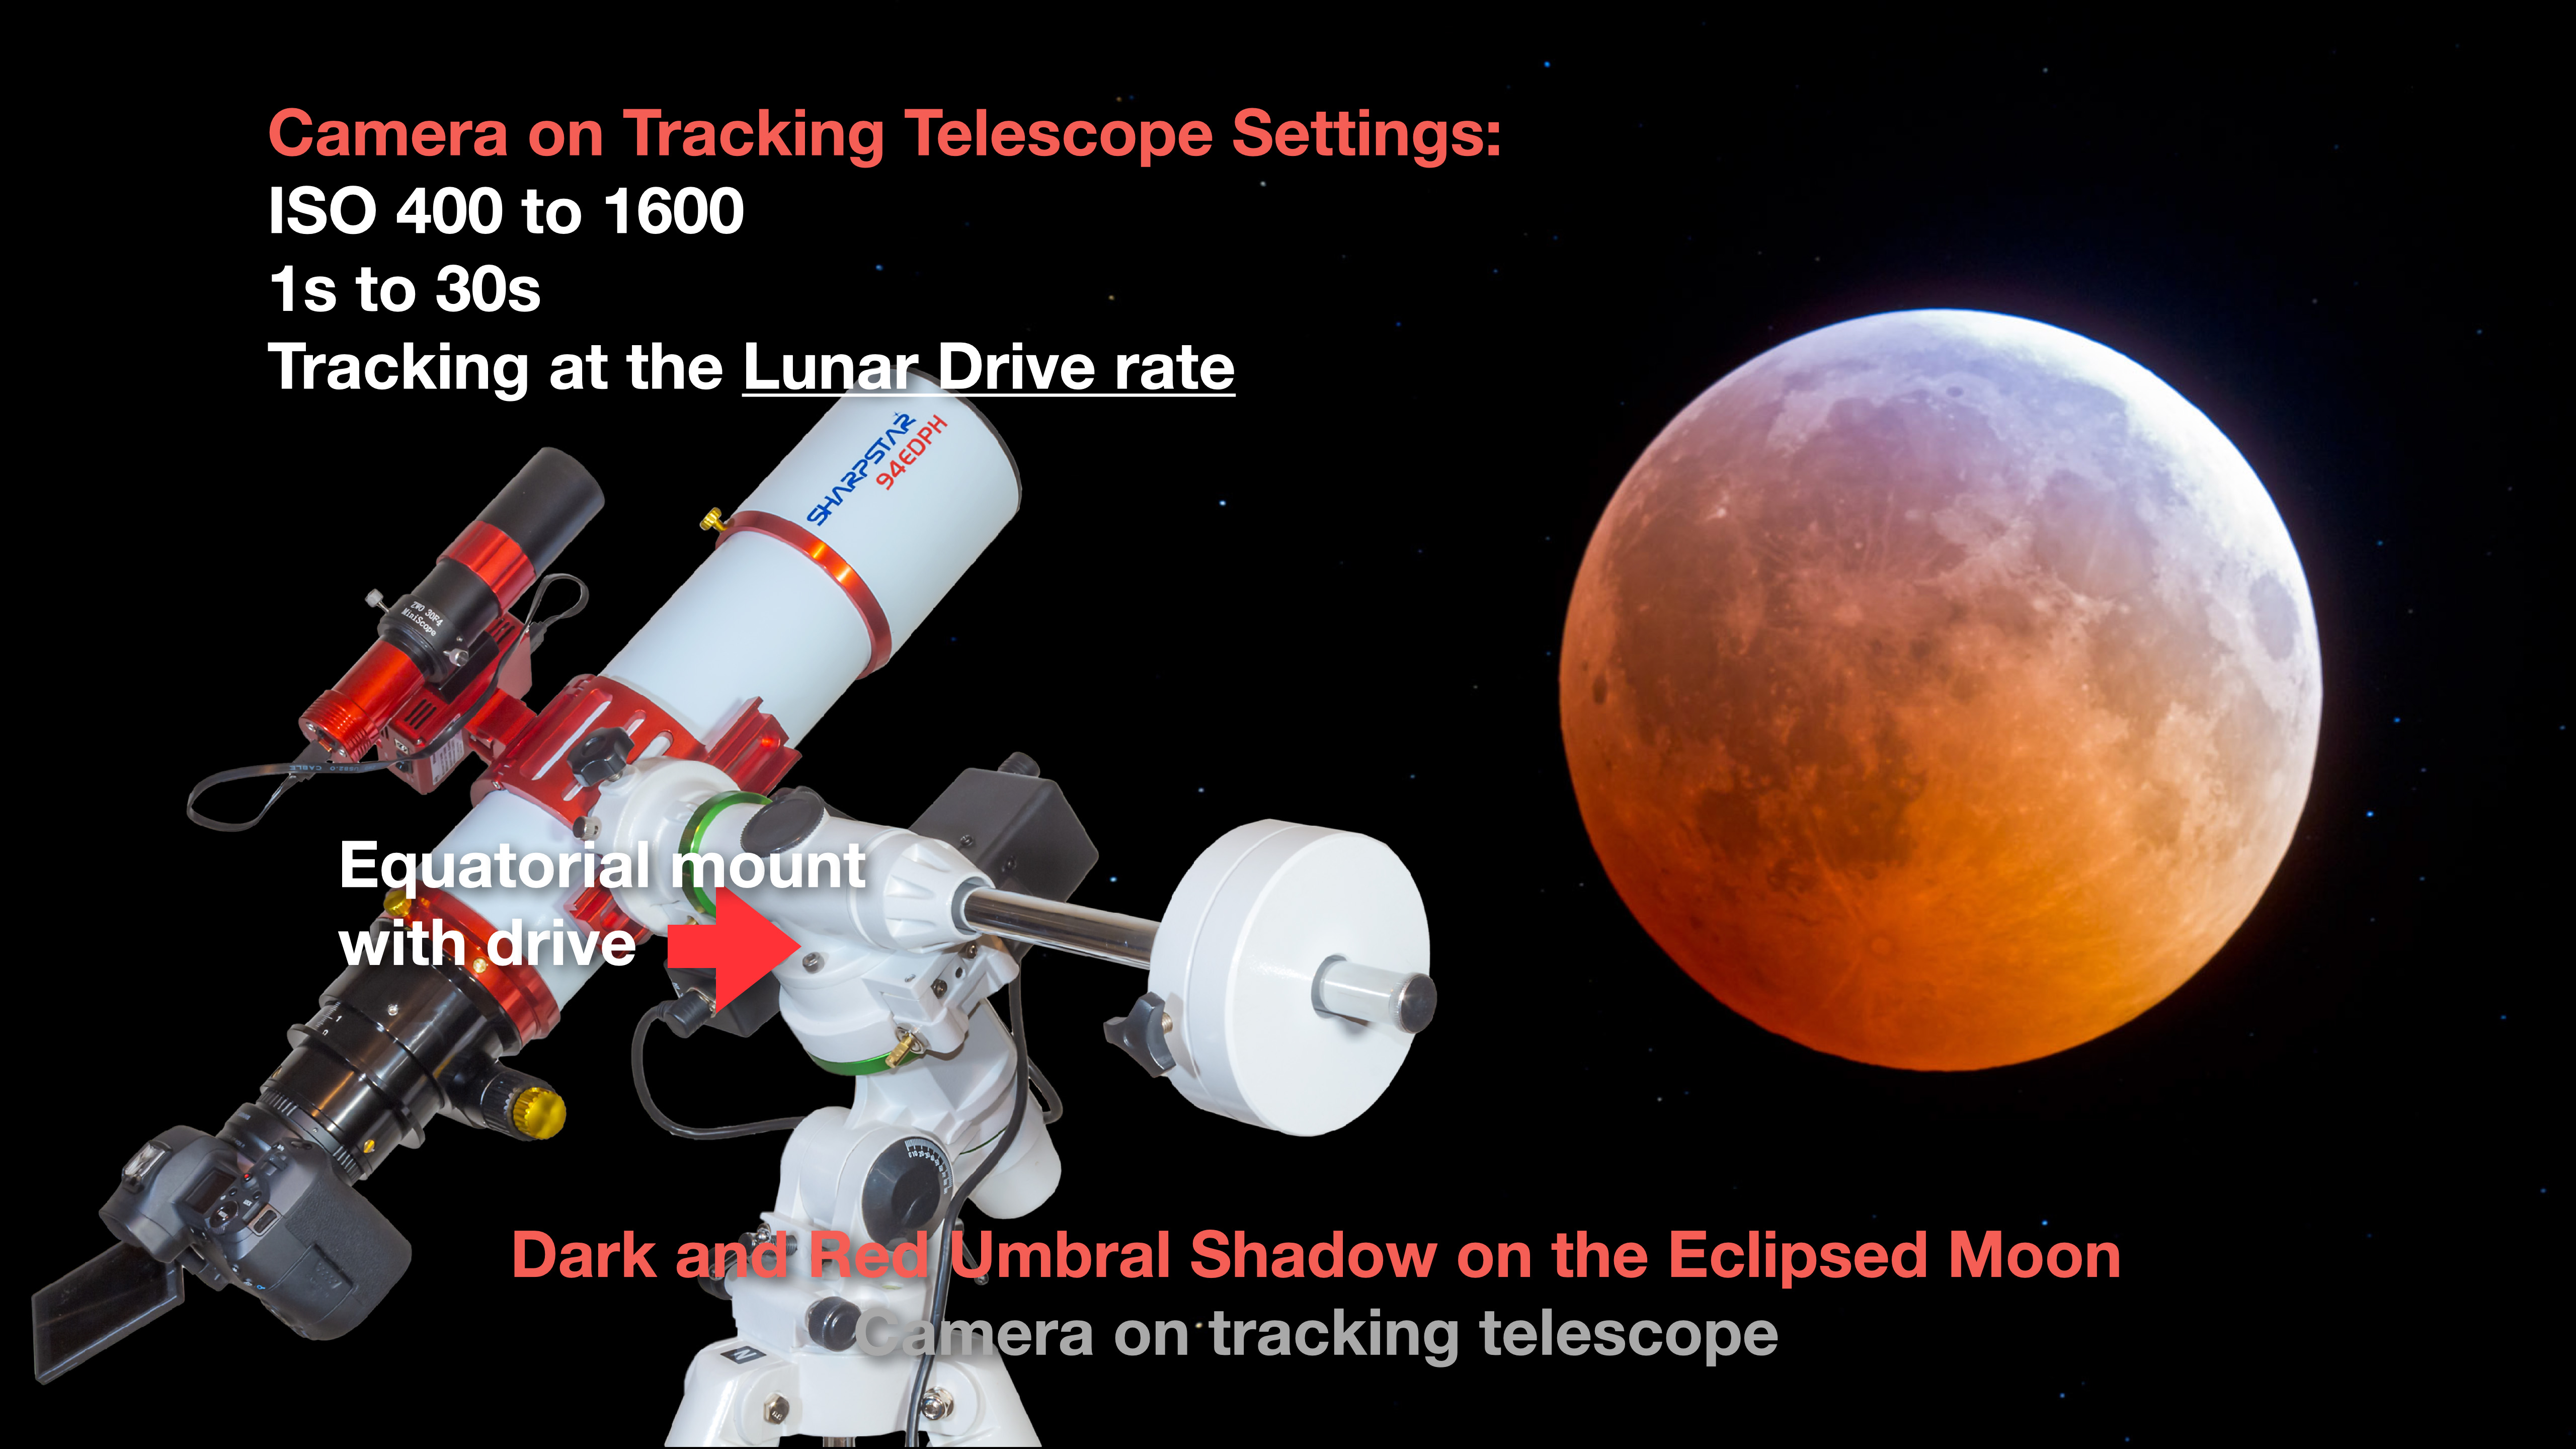
โ€ข Canon DSLRs, due to their sensor design, are more prone to exhibiting noise and image artifacts when images are greatly underexposed then boosted later in processing. Just don’t underexpose them – good advice for any camera.
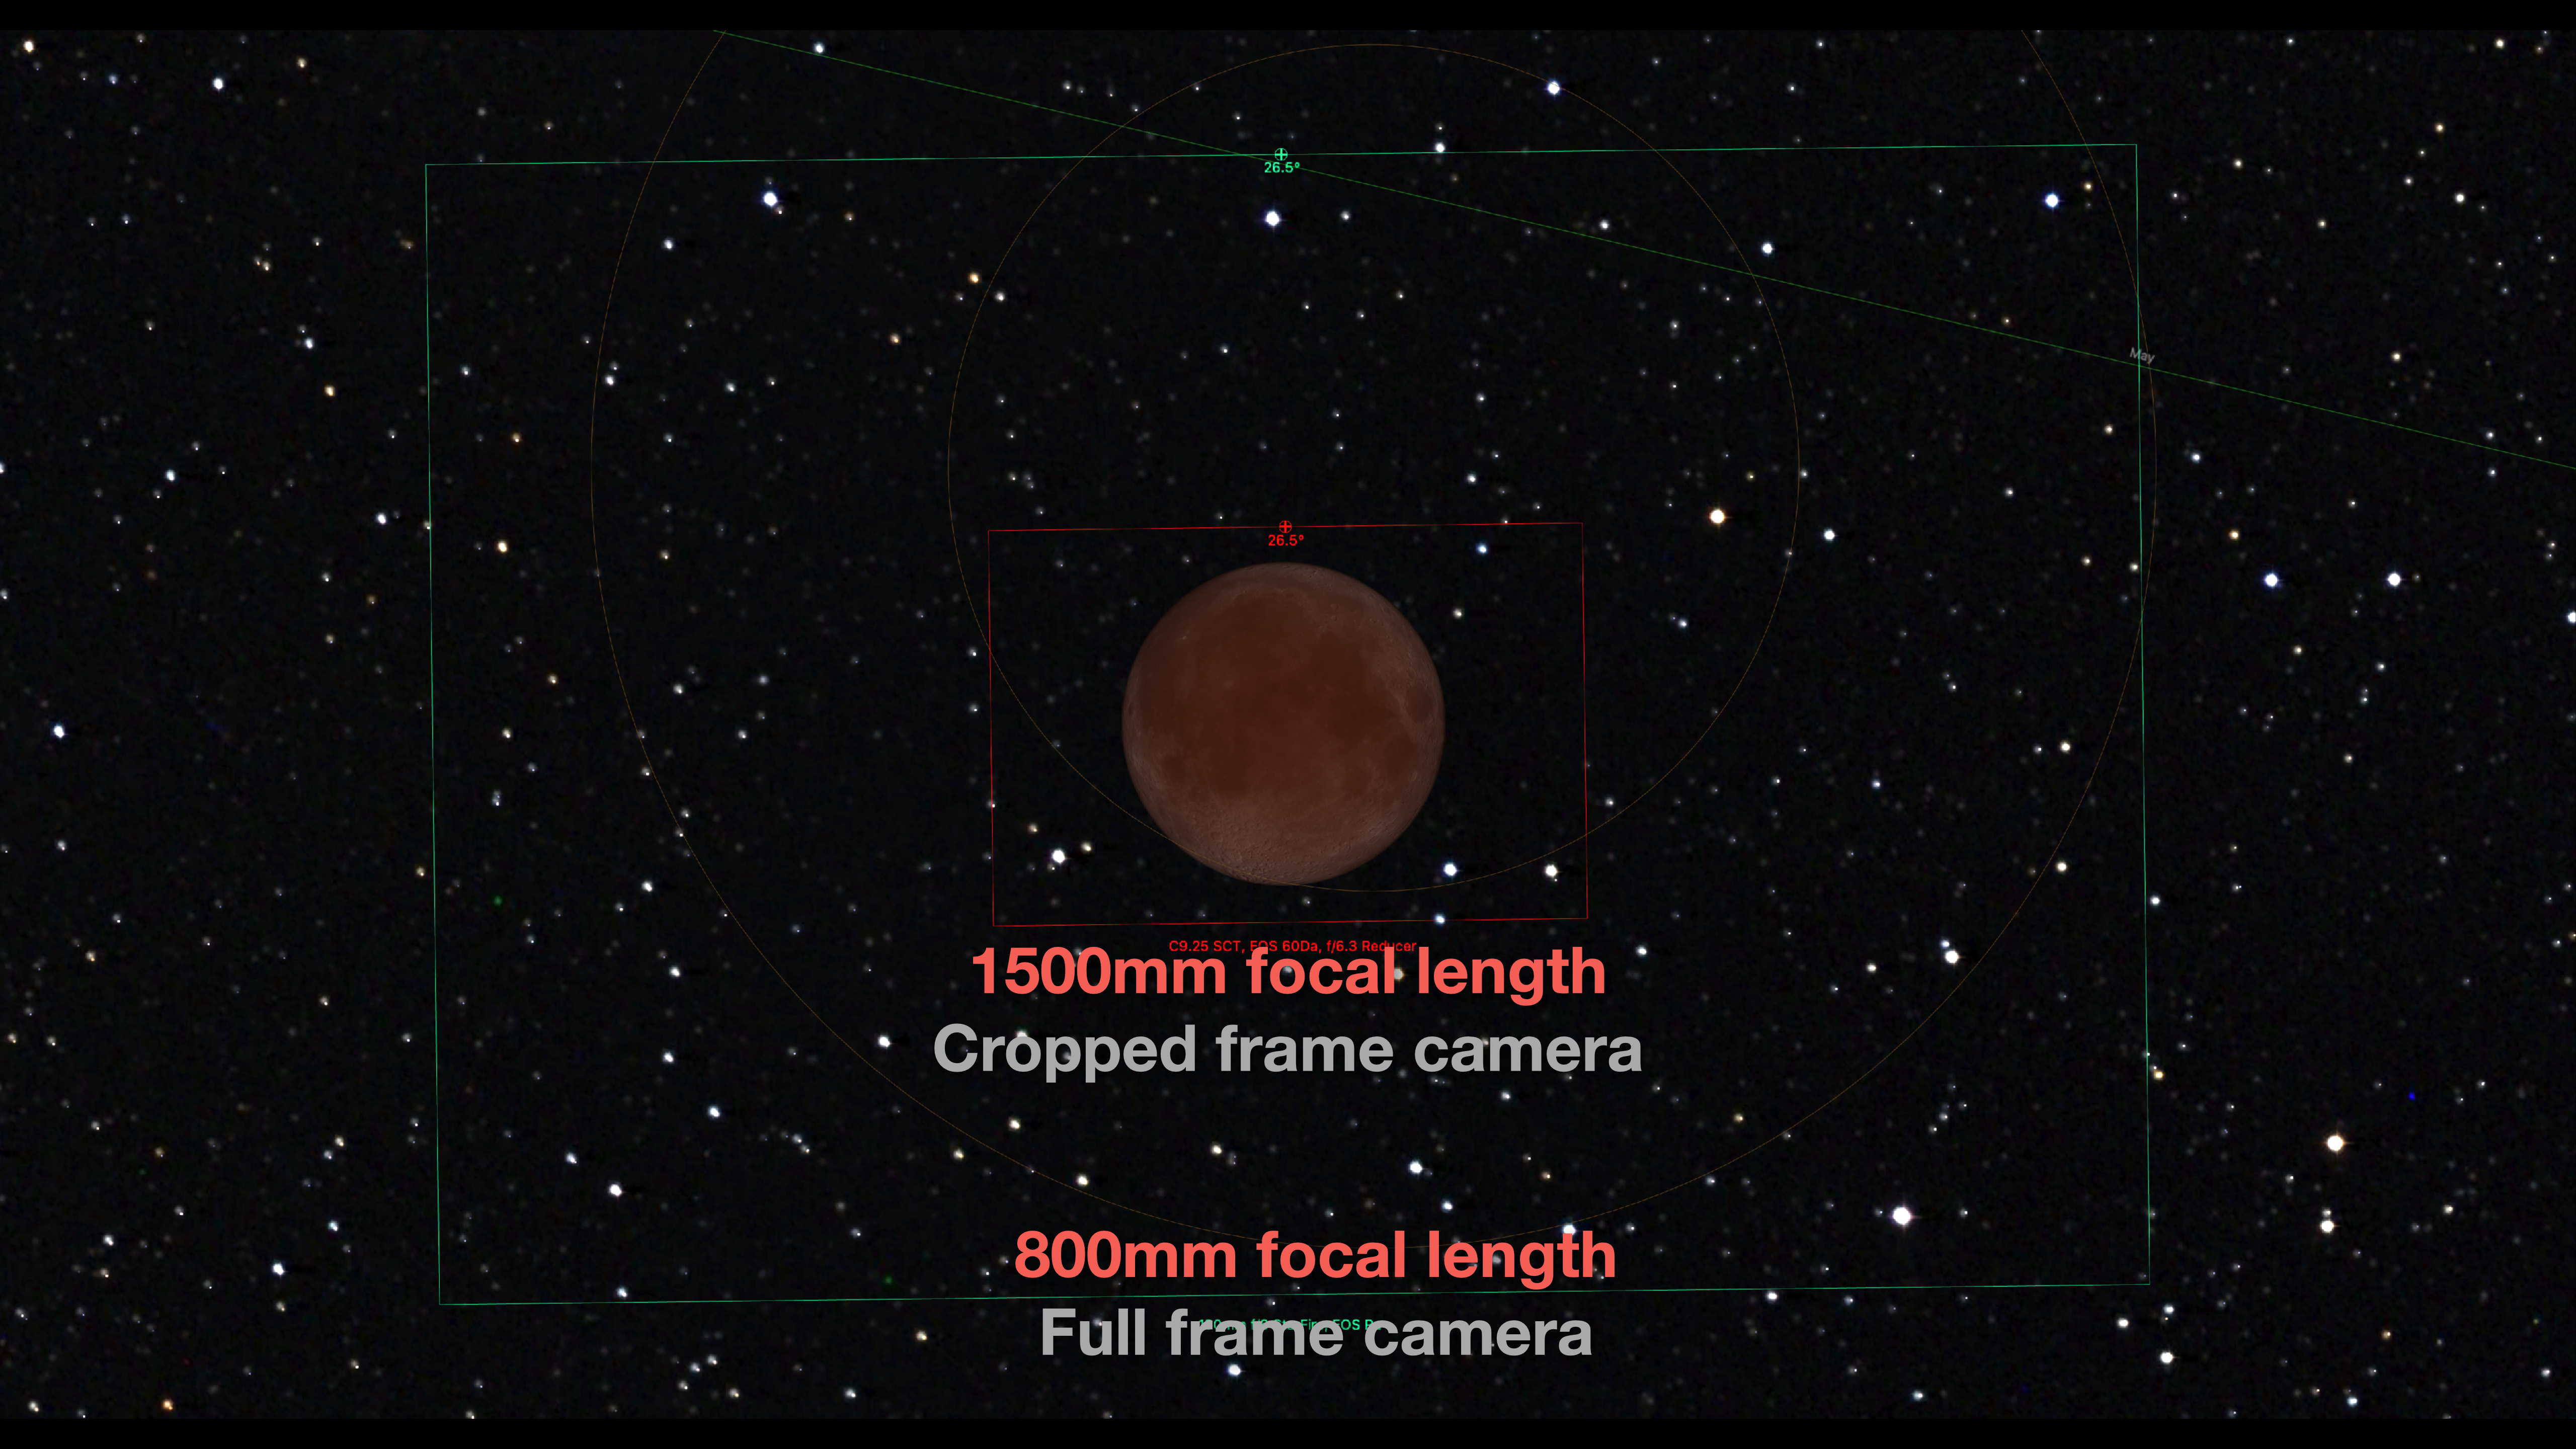

All images and text are ยฉ 2015 Alan Dyer.

โ€“ Alan, August 27, 2015 & Revised June 25, 2020 / ยฉ 2015 Alan Dyer / www.amazingsky.com