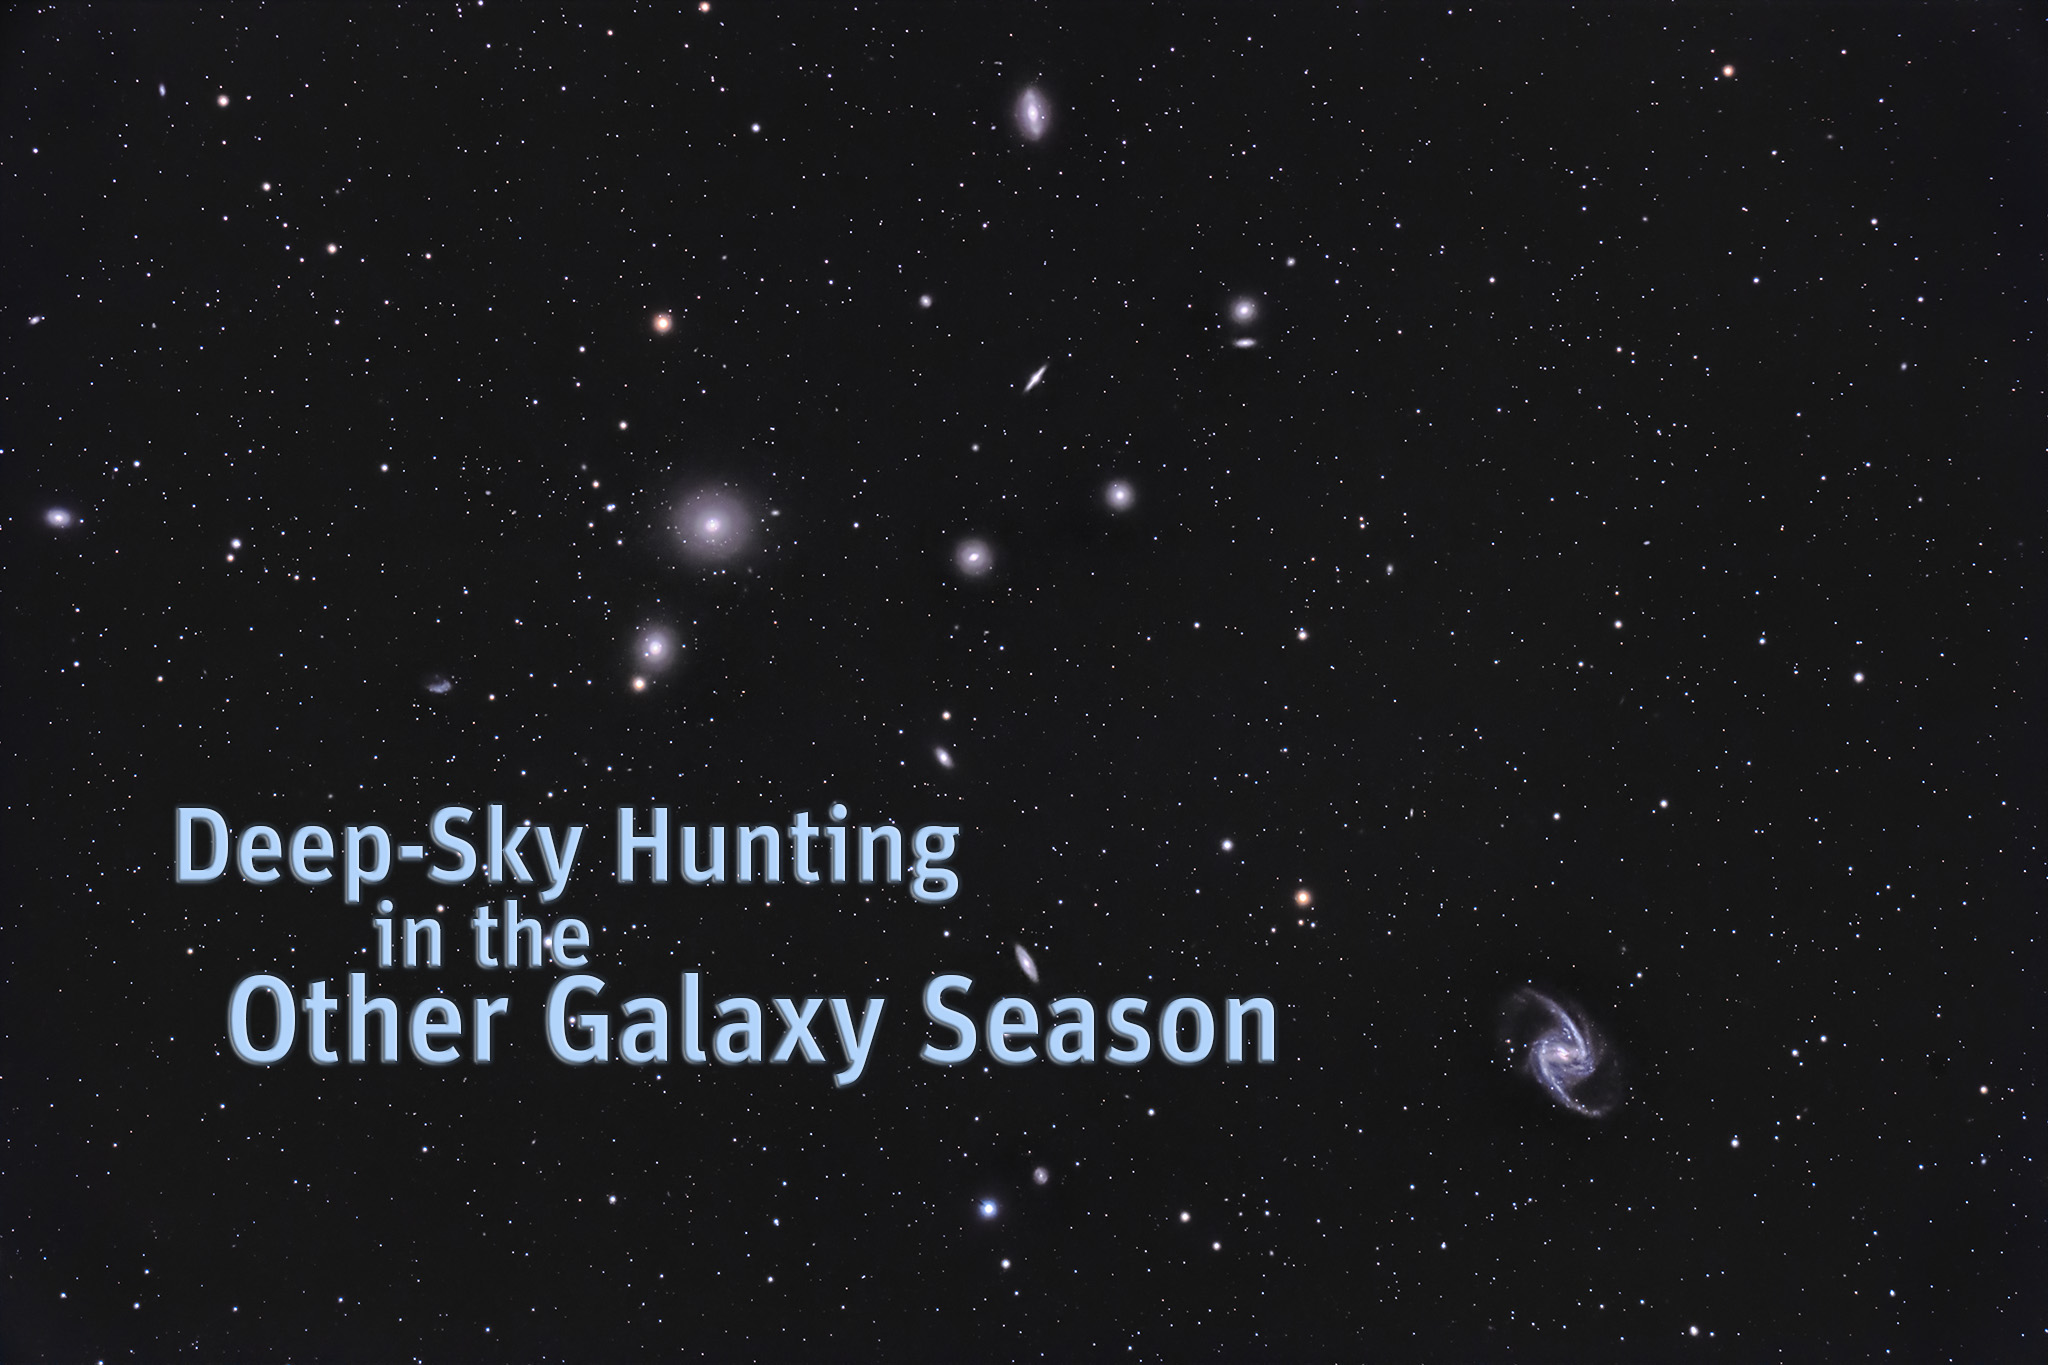
Amateur astronomers soon learn that spring is “galaxy season.” But so is autumn … if you know where to look.
Each season brings a different and rich set of targets to view through telescopes. Summer and winter skies are dominated by the Milky Way and its assortment of glowing nebulas and sparkling star clusters, objects not far away within our Galaxy’s spiral arms.
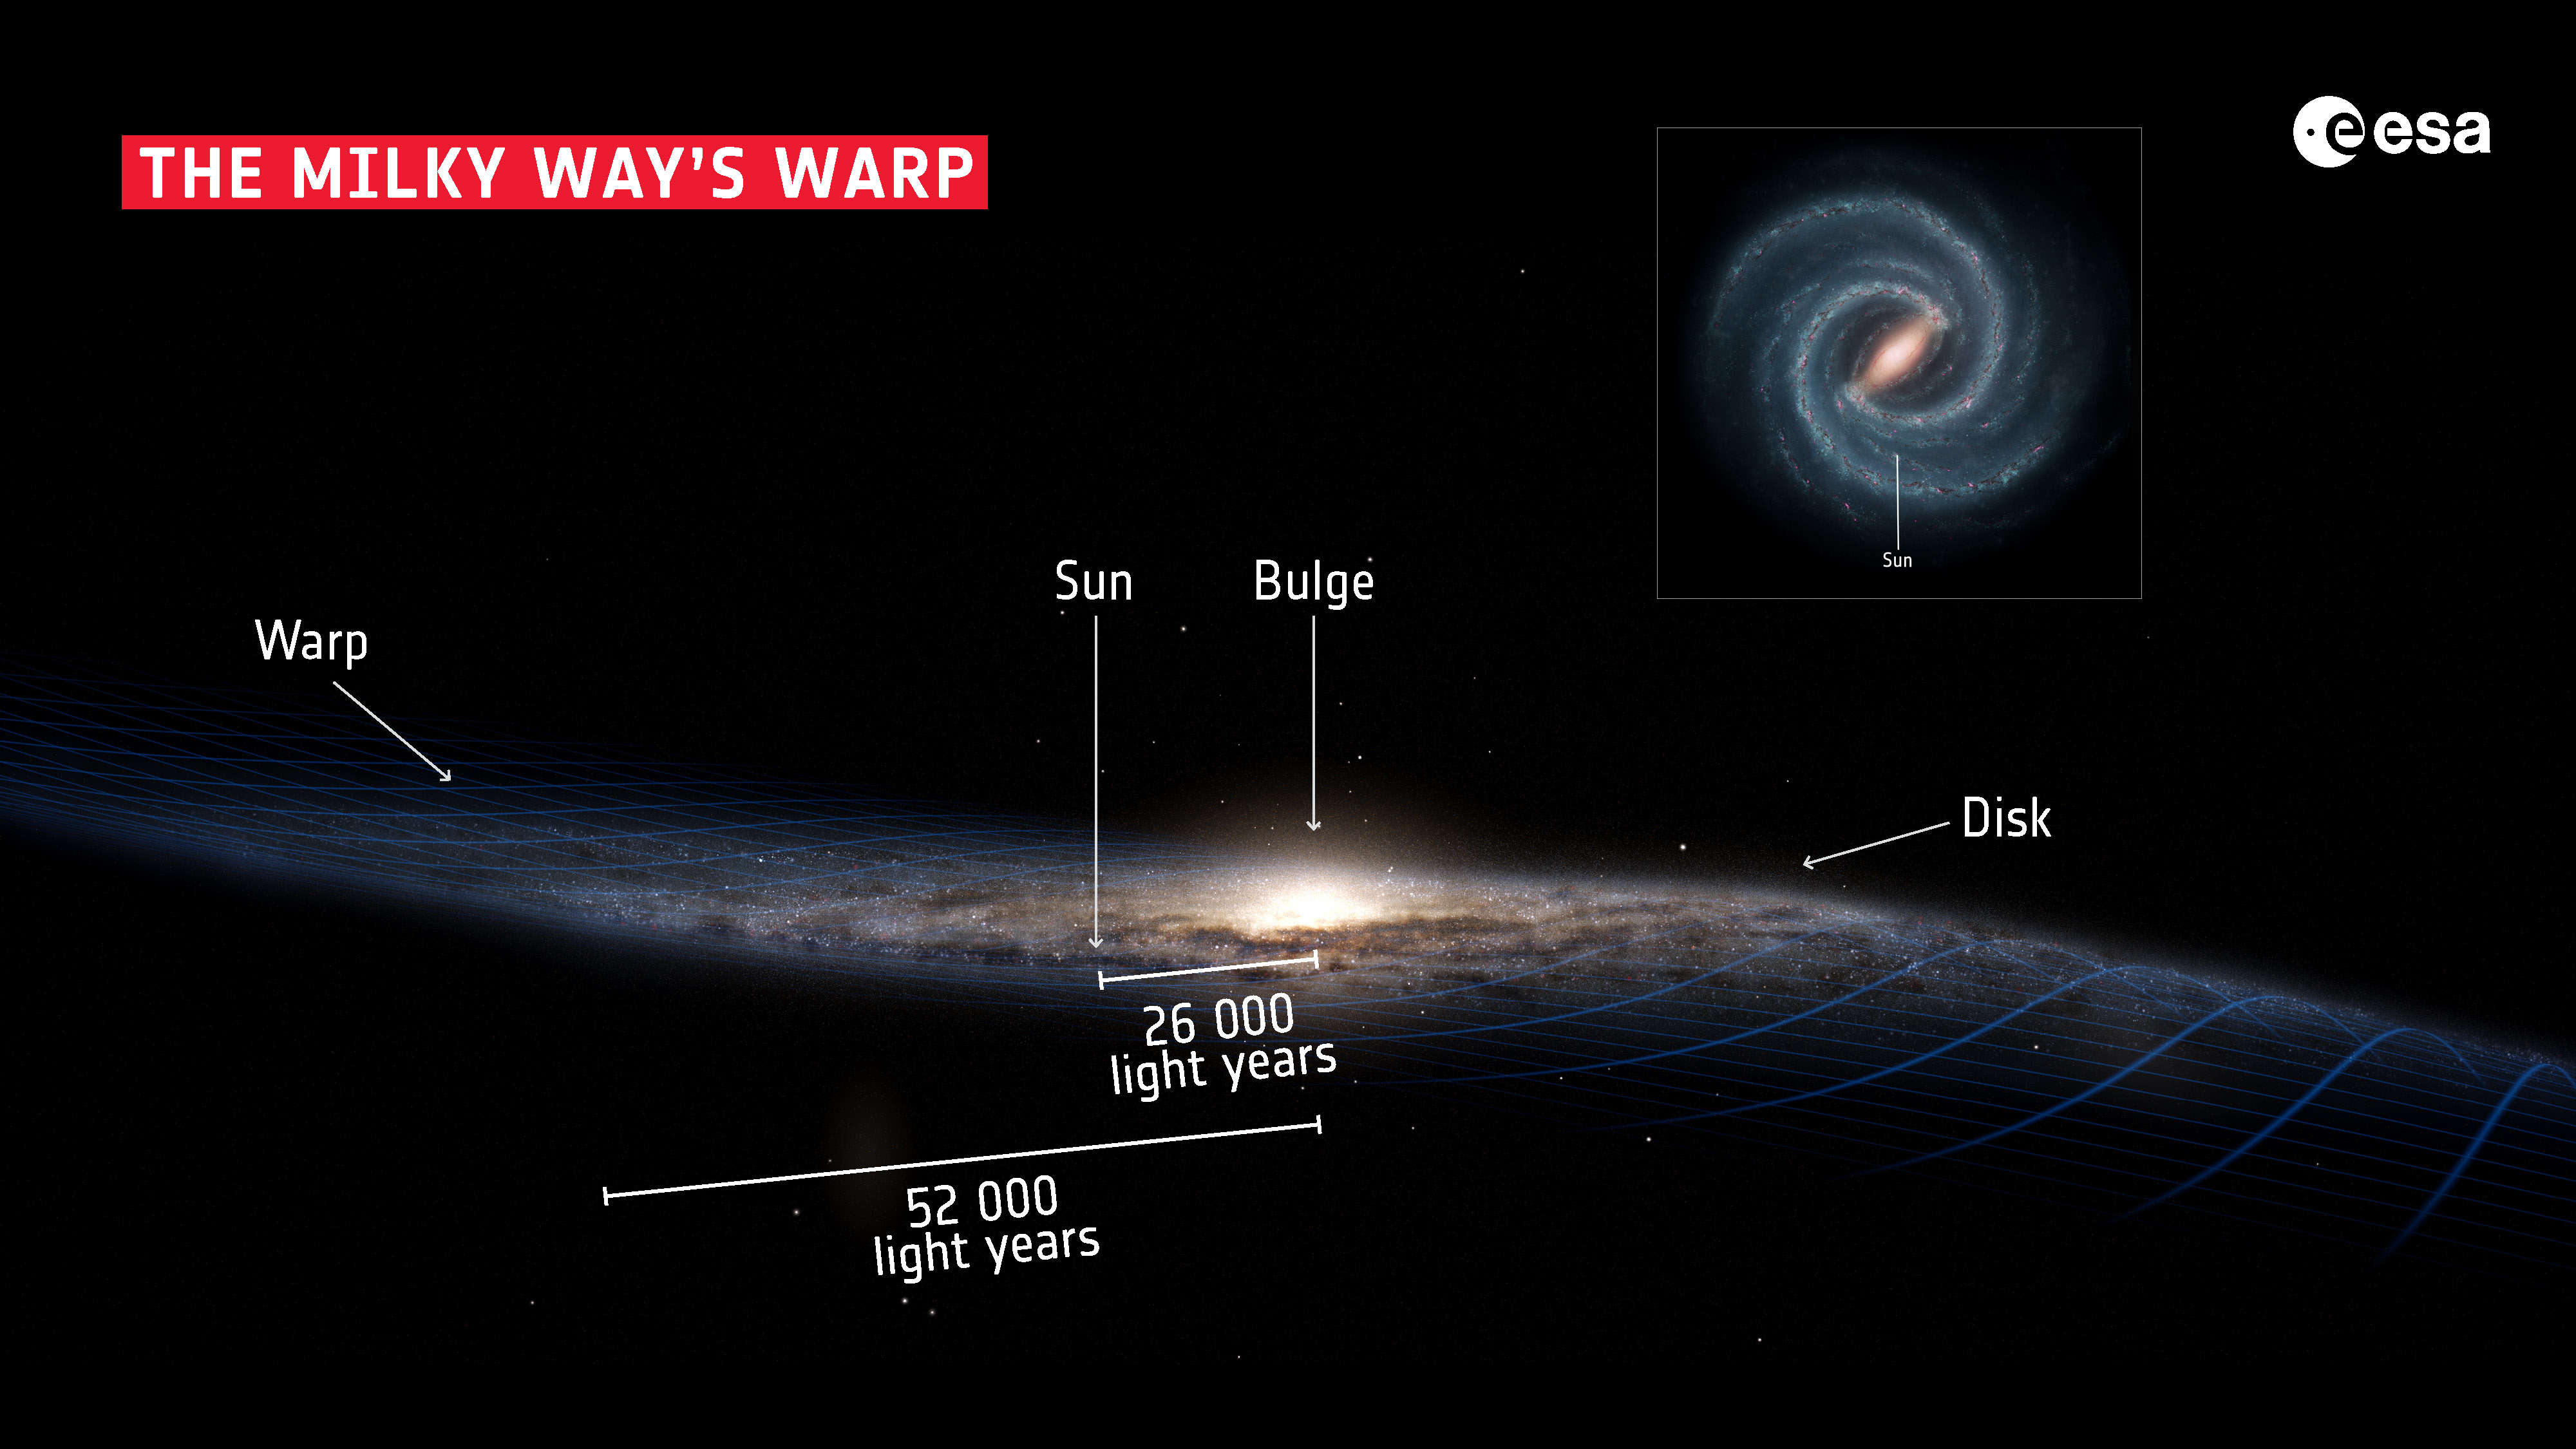
We live in a galaxy that is a flattened disk — though, as shown in this artwork based on data from the European Space Agency’s recently concluded Gaia mission, that disk is warped.
Image courtesy ESA
In summer and winter, as viewed from our location halfway from the centre to the edge of our Galaxy, we look into its disk, to see our Galaxy as the “Milky Way,” the misty band across the night sky.
But in spring we look straight out of the disk, into intergalactic space filled with other distant galaxies. In northern hemisphere spring we look “up” in this illustration, out of the disk toward the North Galactic Pole, and the rich collections of galaxies in Coma Berenices, Leo, and Virgo.
In southern hemisphere spring — and from the southern hemisphere — we look “down” in the diagram, toward the assortment of galaxies around the South Galactic Pole, in and around the lesser-known constellations of Eridanus, Fornax and Sculptor.
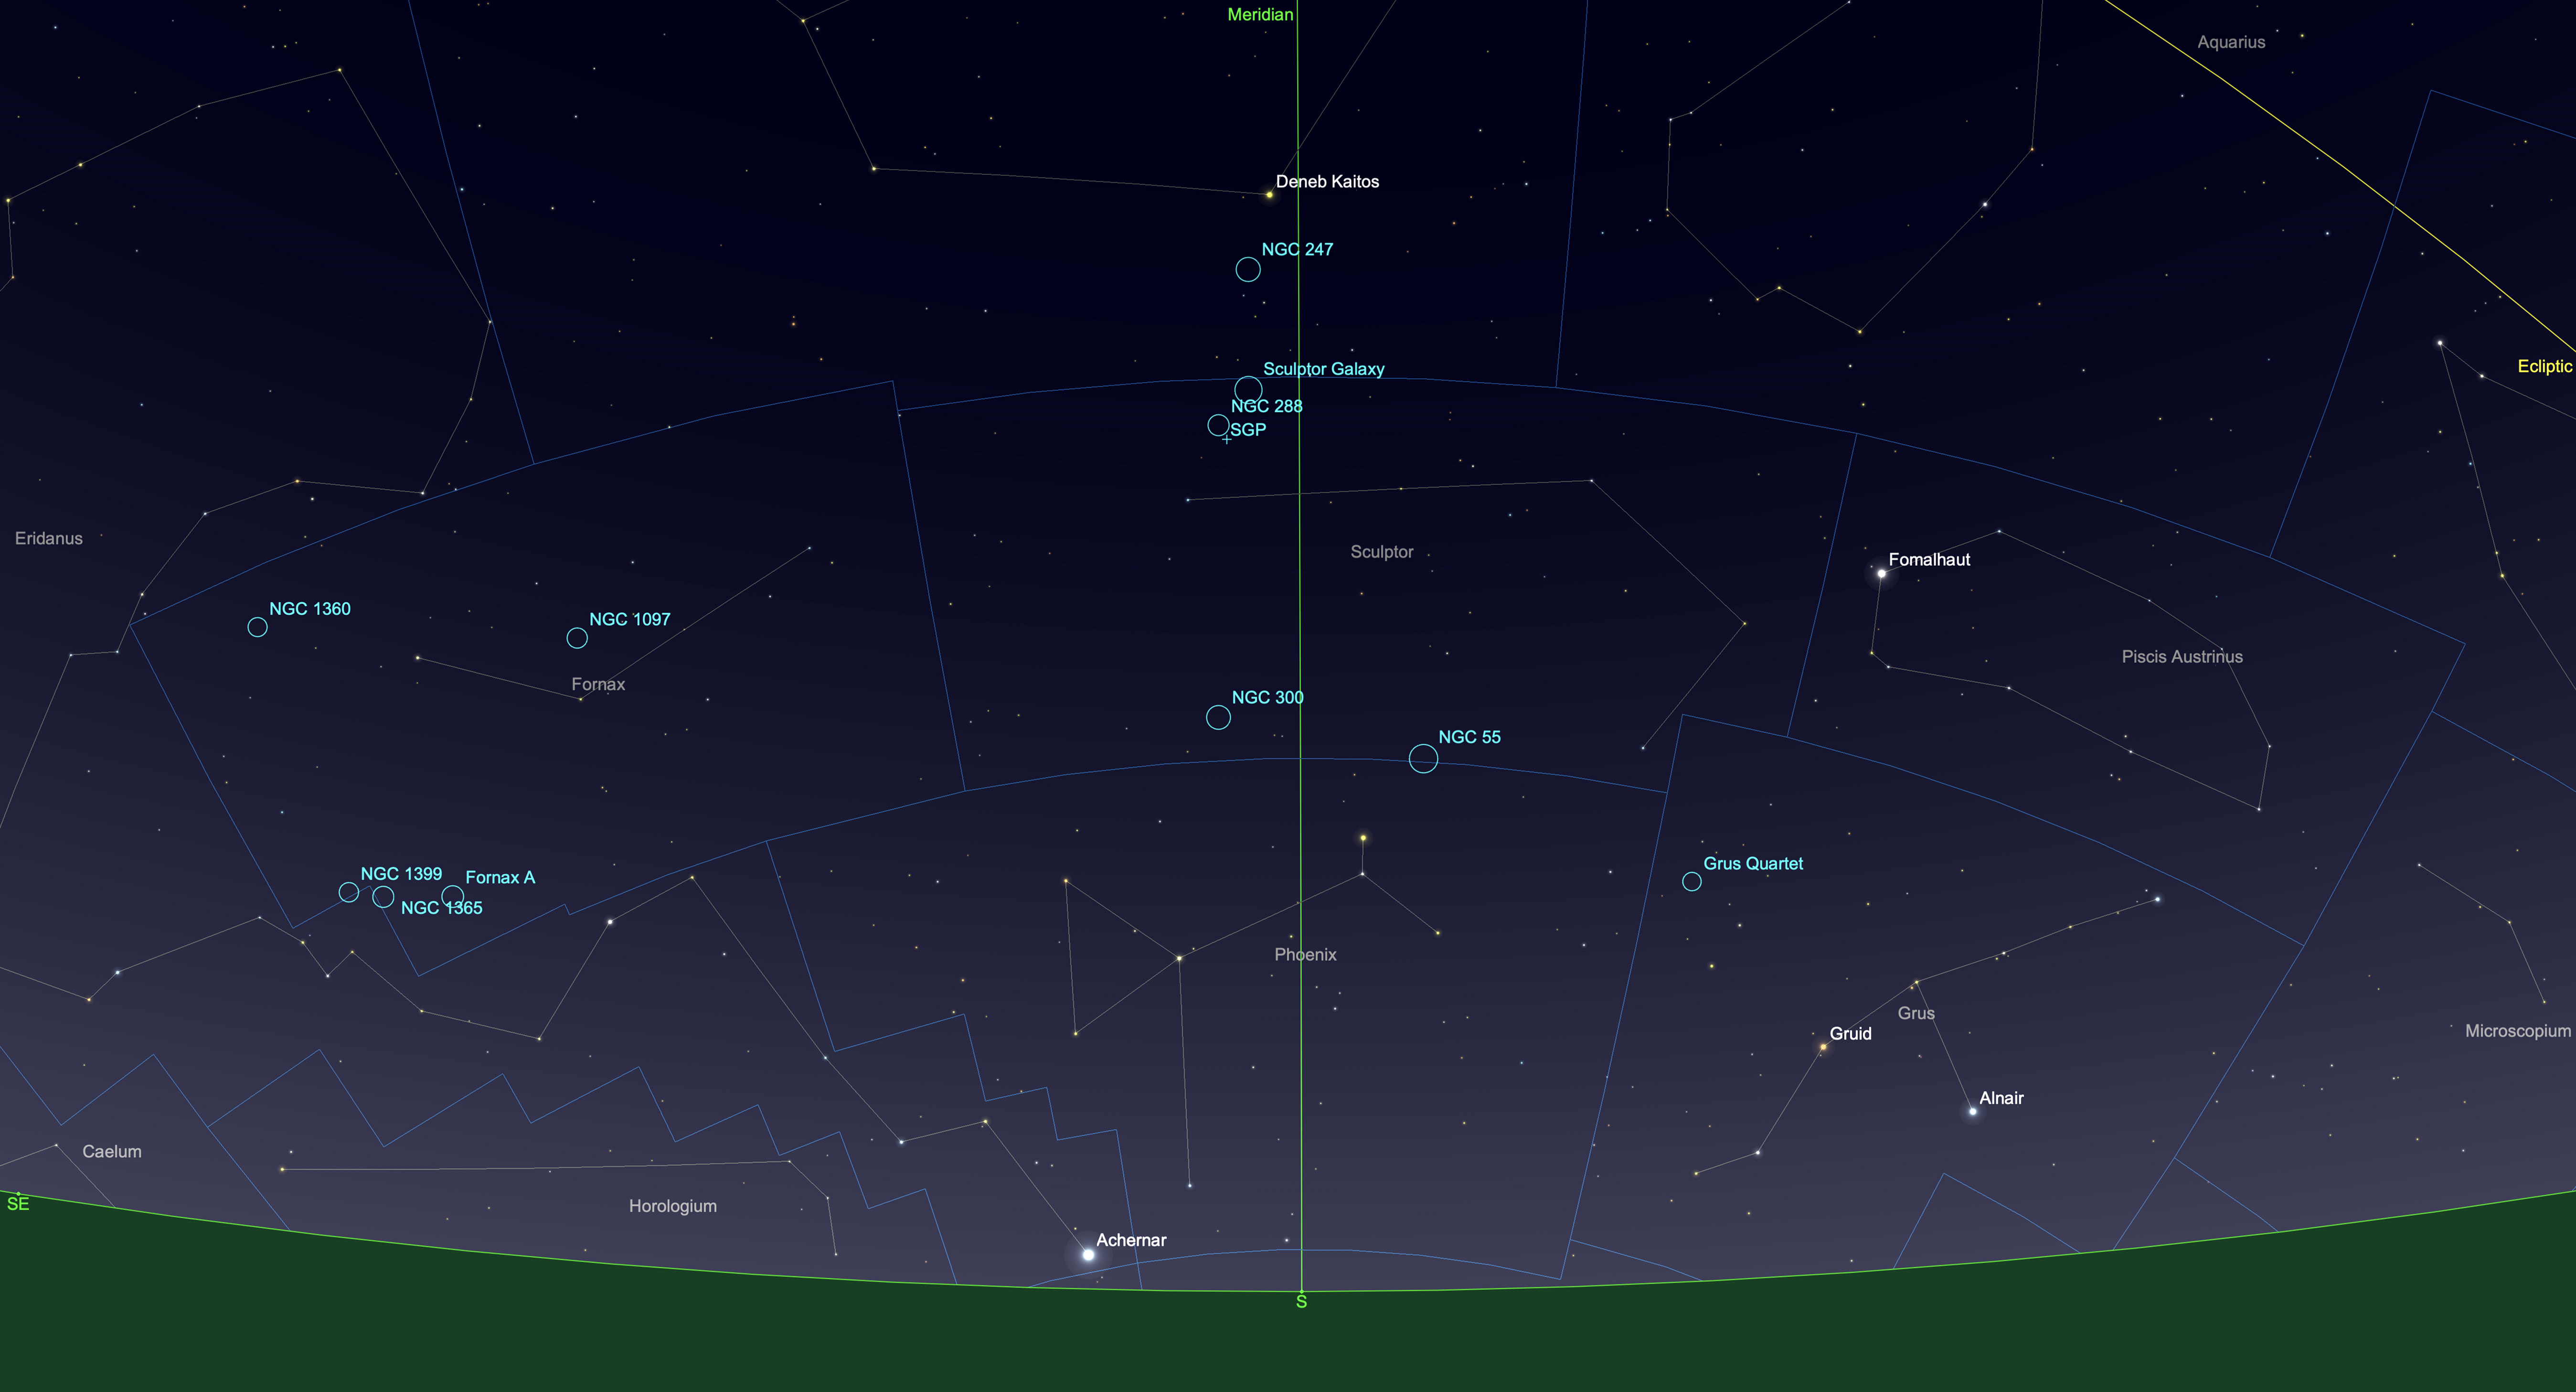
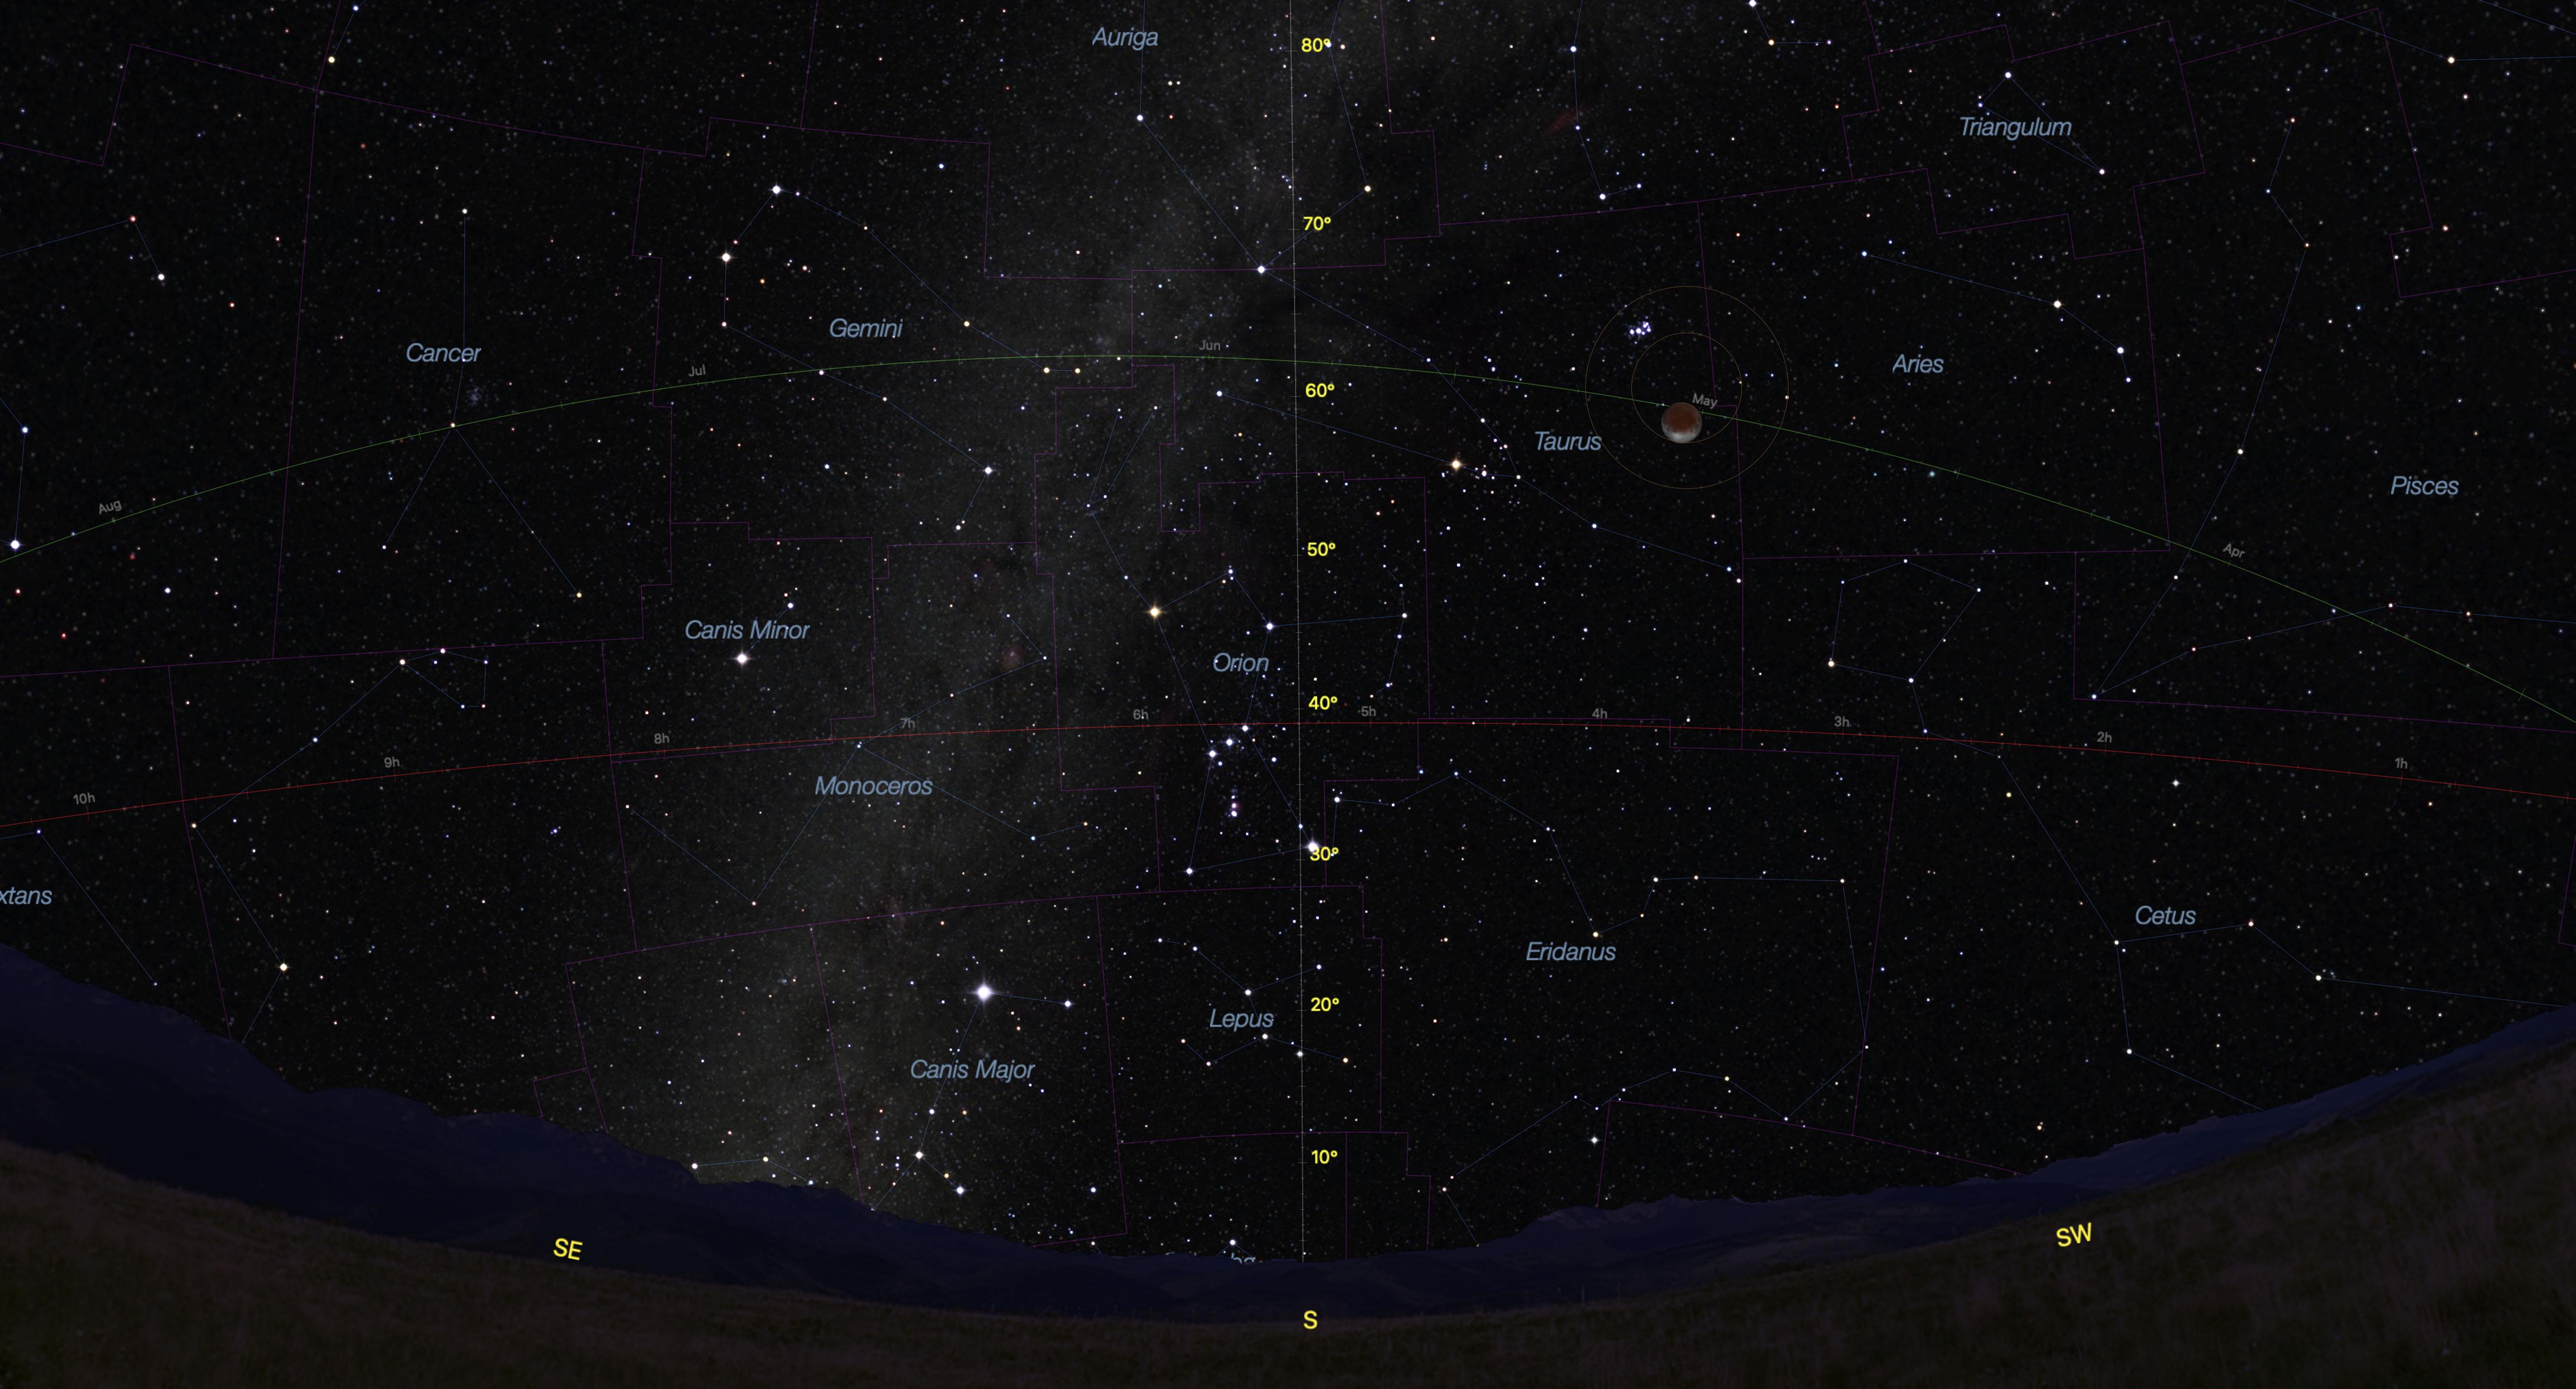
A SkySafari chart showing some of the targets on the tour, low in the south from Arizona’s latitude in autumn.
But, as I show above, that area of sky is accessible from sites in the northern hemisphere, when it is autumn. (The marker for SGP is the South Galactic Pole.) As you can see, the galaxy-filled constellations lie low in the southern sky. It takes travelling to a site as far south as possible to see them well.
That’s what I did in October 2024, to a favourite spot just north of the Mexican border near Portal, Arizona (latitude 32º N). I blogged about that trip earlier.
Here I provide a tour of some of the deep-sky delights I shot on that trip, during autumn “galaxy season,” the other galaxy hunting time. All these galaxies are bright, rivalling the better-known northern targets in the popular 18th-century Messier Catalogue. But French astronomer Charles Messier never observed from this far south to see them. And yet, some of these targets are large and bright enough to be visible in binoculars, ranking them as “showpiece” objects.
NOTE: You can tap or click on all images to bring them up full screen.
Galaxies Galore!
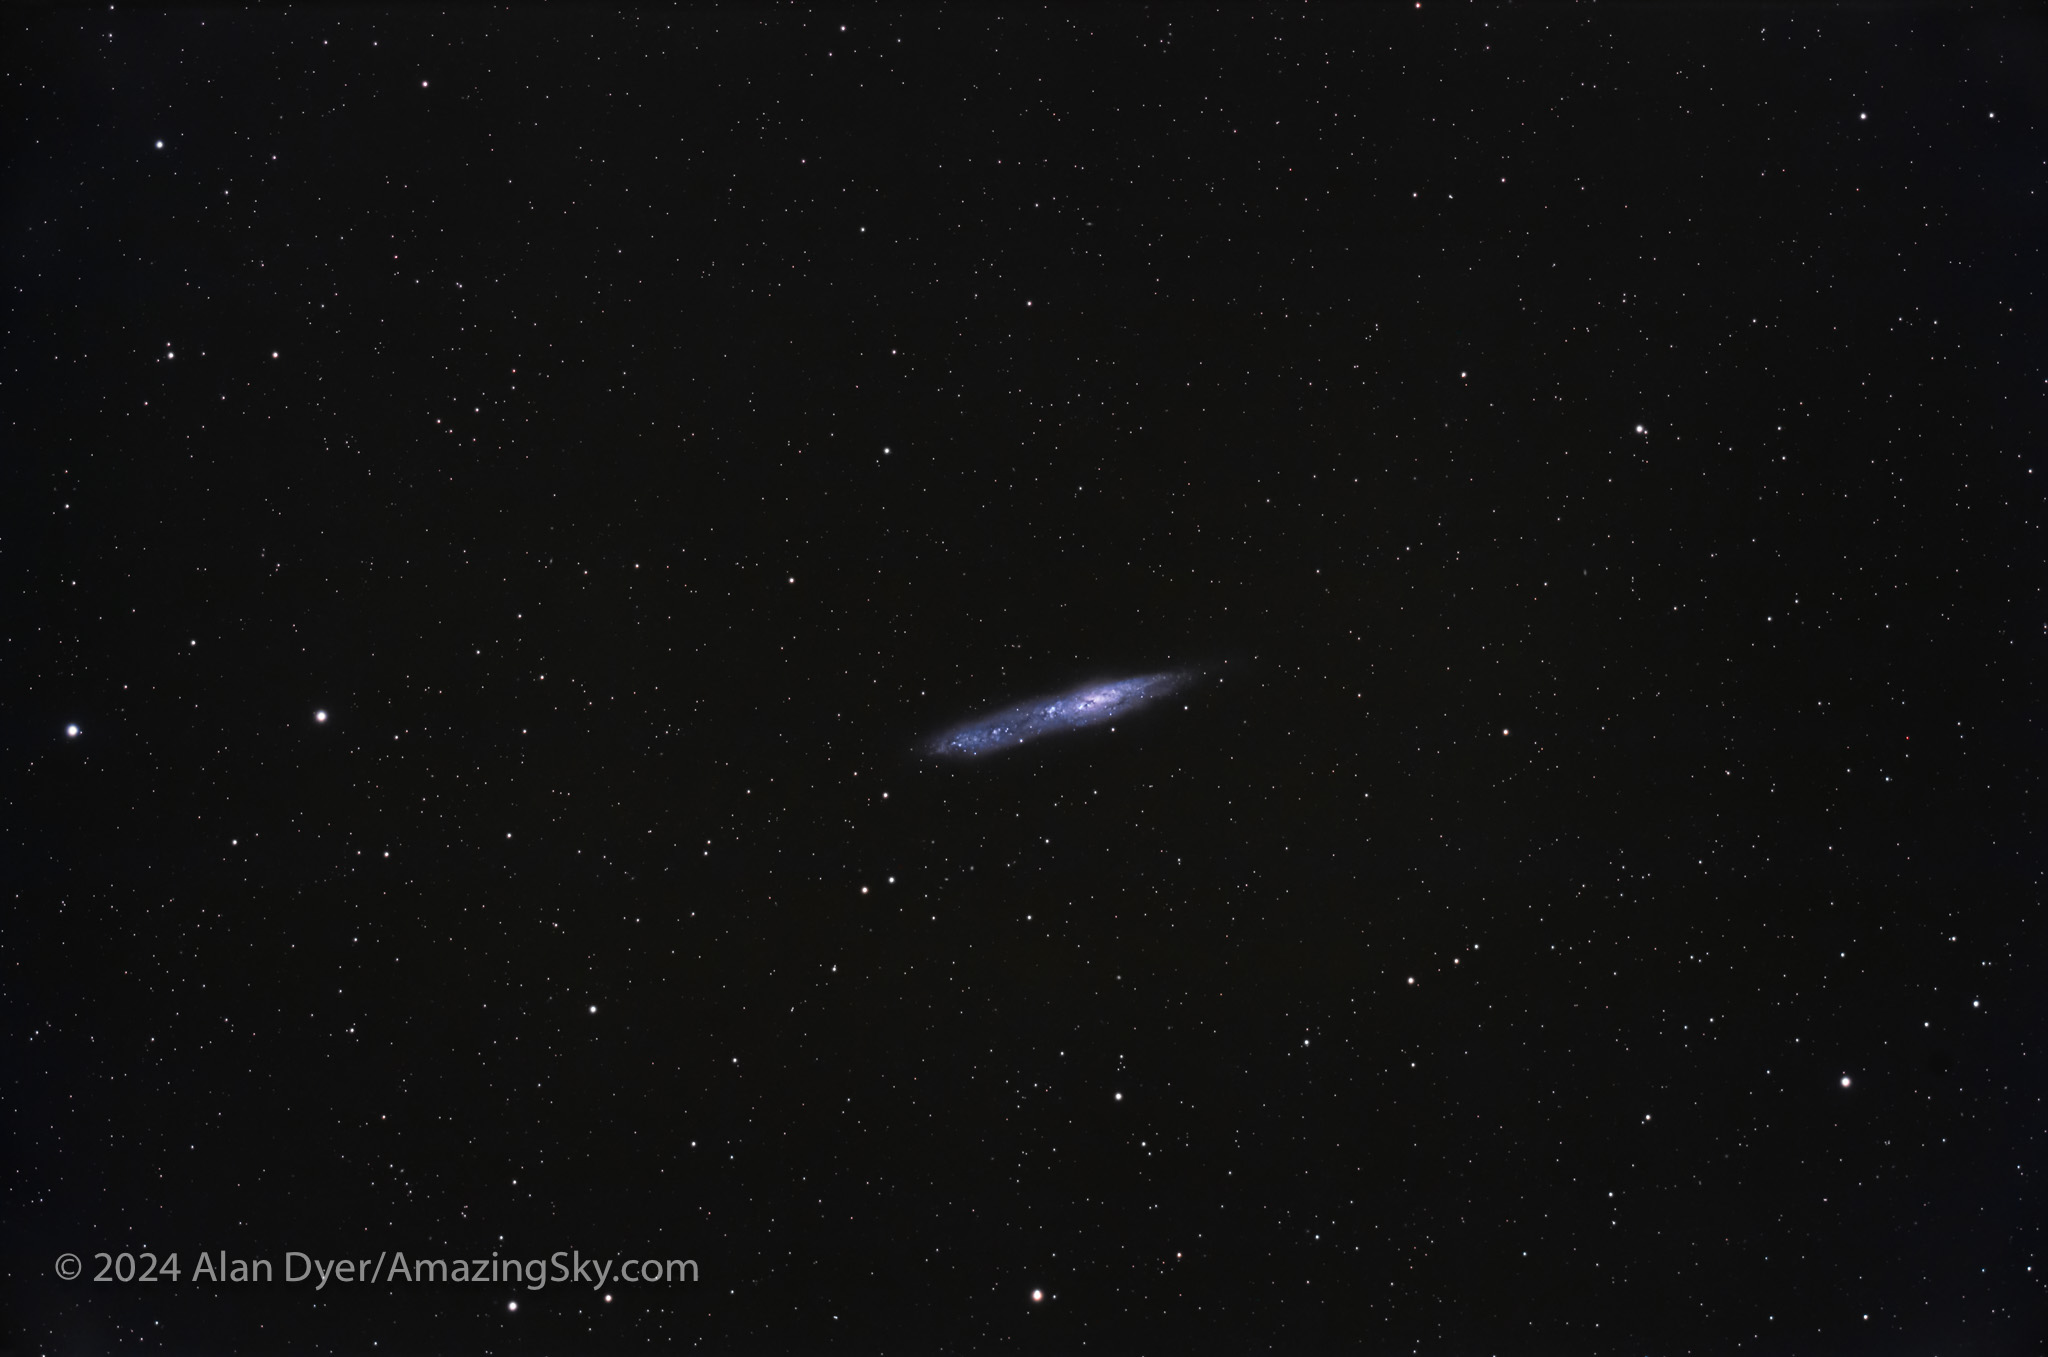
NGC 55 in Sculptor
This is a stack of 16 x 4 minute exposures with the Askar APO120 refractor at f/5.6 (with its 0.8x Reducer) and the Canon Ra at ISO 1000.
This bright (8th magnitude) edge-on galaxy is big, almost 1/2º across (as wide as a Full Moon diameter — the field here is 2º by 3º). NGC 55 lies on the border of the obscure southern constellations Sculptor and Phoenix.
The galaxy was discovered by James Dunlop from Australia in 1826. It is one of the brightest members of the Sculptor Group of galaxies near the South Galactic Pole, though some consider it a member of our own Local Group of neighbour galaxies. It has an asymmetrical shape and is crossed by dark dust lanes. It is classed as a barred spiral, though that shape is hard to discern; we’ll see better examples later in the tour.
NGC 247, the Dusty Spiral in Cetus
This is a stack of 16 x 4 minute exposures with the Askar APO120 refractor at f/5.6 with its 0.8x Reducer, and the Canon Ra at ISO 800.
This is the bright (9th magnitude) and moderately large spiral galaxy NGC 247 in southern Cetus, the Whale. It is known as the Dusty Spiral and is #62 in Sir Patrick Moore’s Caldwell Catalogue of notable non-Messier objects.
It is also a member of the Sculptor Group of nearby galaxies close to our own Local Group that surrounds the Milky Way. A group of tiny and faint 14th to 16th magnitude “PGC” galaxies (from the Principal Galaxies Catalogue) called Burbidge’s Chain lies just above NGC 247.
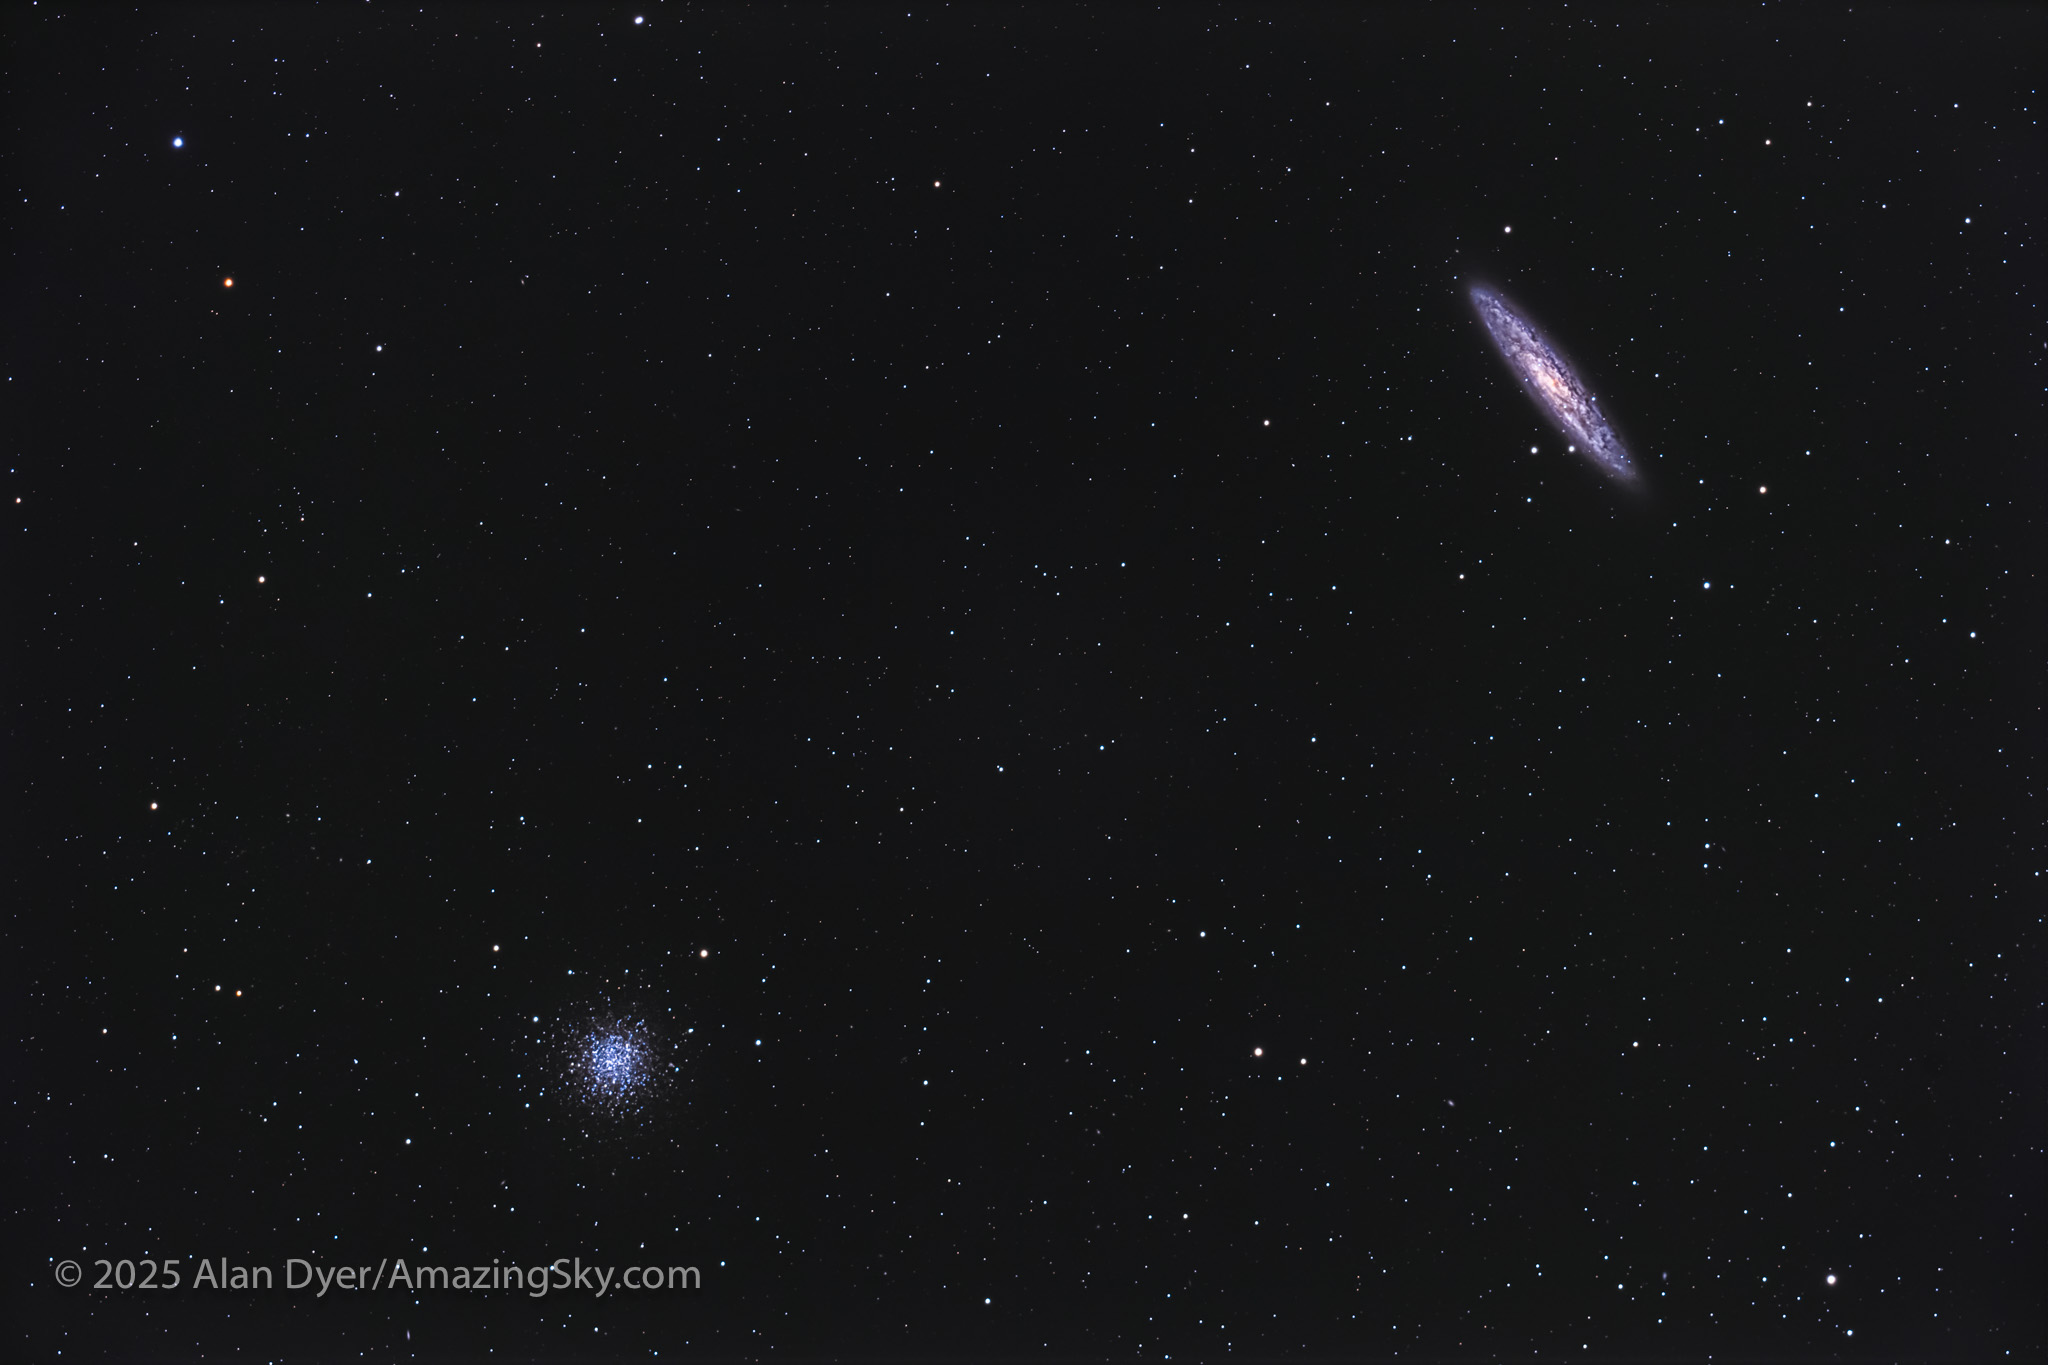
NGC 253, the Silver Coin, with NGC 288, a Pairing in Sculptor
This is a stack of 20 x 3-minute exposures with the APO120 refractor with its 0.8x Reducer for 560mm focal length and f/5.6, and the Canon Ra at ISO 1600. No filter was employed.
Here, sitting right next to the South Galactic Pole, we get a two-for-one field. This is the pairing of the bright and large edge-on spiral galaxy NGC 253 (upper right) with the large and loose globular star cluster NGC 288 (lower left). The latter is easily resolved into its constituent stars.
The two are just 1.75 degrees apart in Sculptor, but are actually 12 million light years apart in space, with NGC 288 belonging to our Milky Way, while NGC 253 is another galaxy altogether, one of the brightest in the sky (at magnitude 7) and a member of the Sculptor Group.
NGC 253 is also known as the Silver Coin Galaxy, and is Caldwell 65 on Sir Patrick Moore’s list. However, it was discovered by Caroline Herschel in 1783, from England! Her brother William discovered nearby NGC 288.
NGC 300, the Sculptor Pinwheel
This is a stack of 16 x 4 minute exposures with the APO120 refractor at f/5.6 with its 0.8x Reducer, and the Canon Ra at ISO 800.
This is the bright (8th magnitude) and moderately large (1/2º across) spiral galaxy NGC 300, aka the Sculptor Pinwheel. It’s the southern equivalent of the popular Messier 33 spiral in Triangulum. NGC 300 is also Caldwell 70.
It, too, was discovered in 1826 by James Dunlop. NGC 300 may be a member of the Sculptor Group. Or it might lie closer to us than the Sculptor Group, along with NGC 55, at “only” 6.5 million light years away.
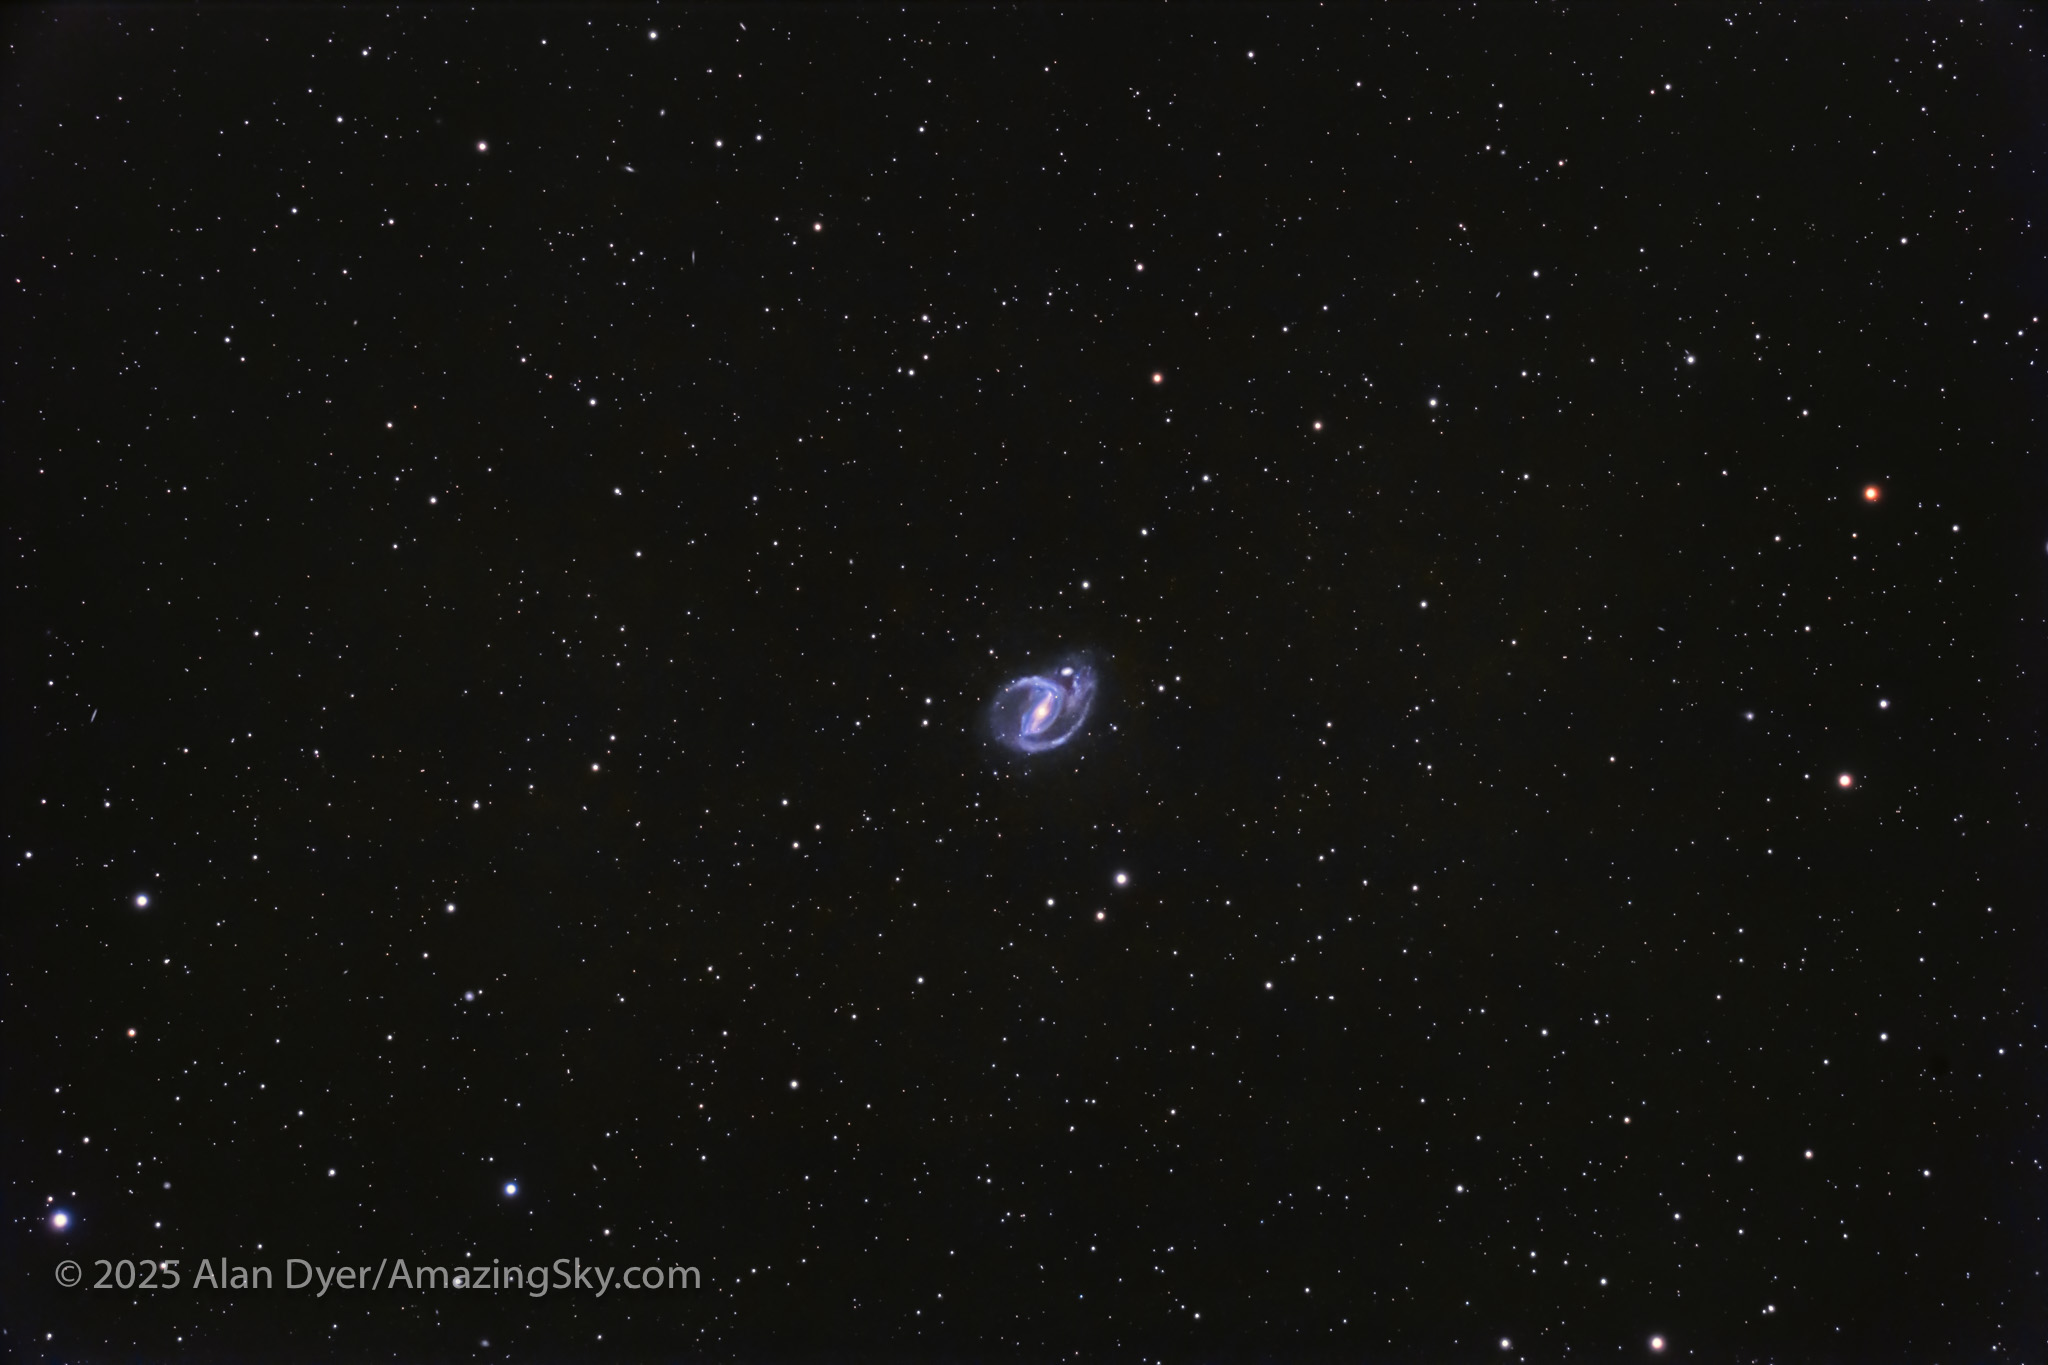
NGC 1097, a Barred Spiral in Fornax
This is a stack of 10 x 6 minute exposures with the APO120 refractor at f/7, with the Canon Ra at ISO 1600.
We trek farther east into the next constellation over from Sculptor, to Fornax the Furnace, to find NGC 1097. This is the realm of bright (magnitude 9.5 in this case) barred spiral galaxies. This class of galaxy has arms emanating from a long bar at the core. This area of sky is replete with bright barred spirals, far more so than any area we find “up north.”
NGC 1097 is also classified as a Seyfert galaxy, a type with an active quasar-like nucleus, housing a massive black hole. NGC 1097 is also Caldwell 67. Just on its northern edge sits the little companion galaxy NGC 1097A.
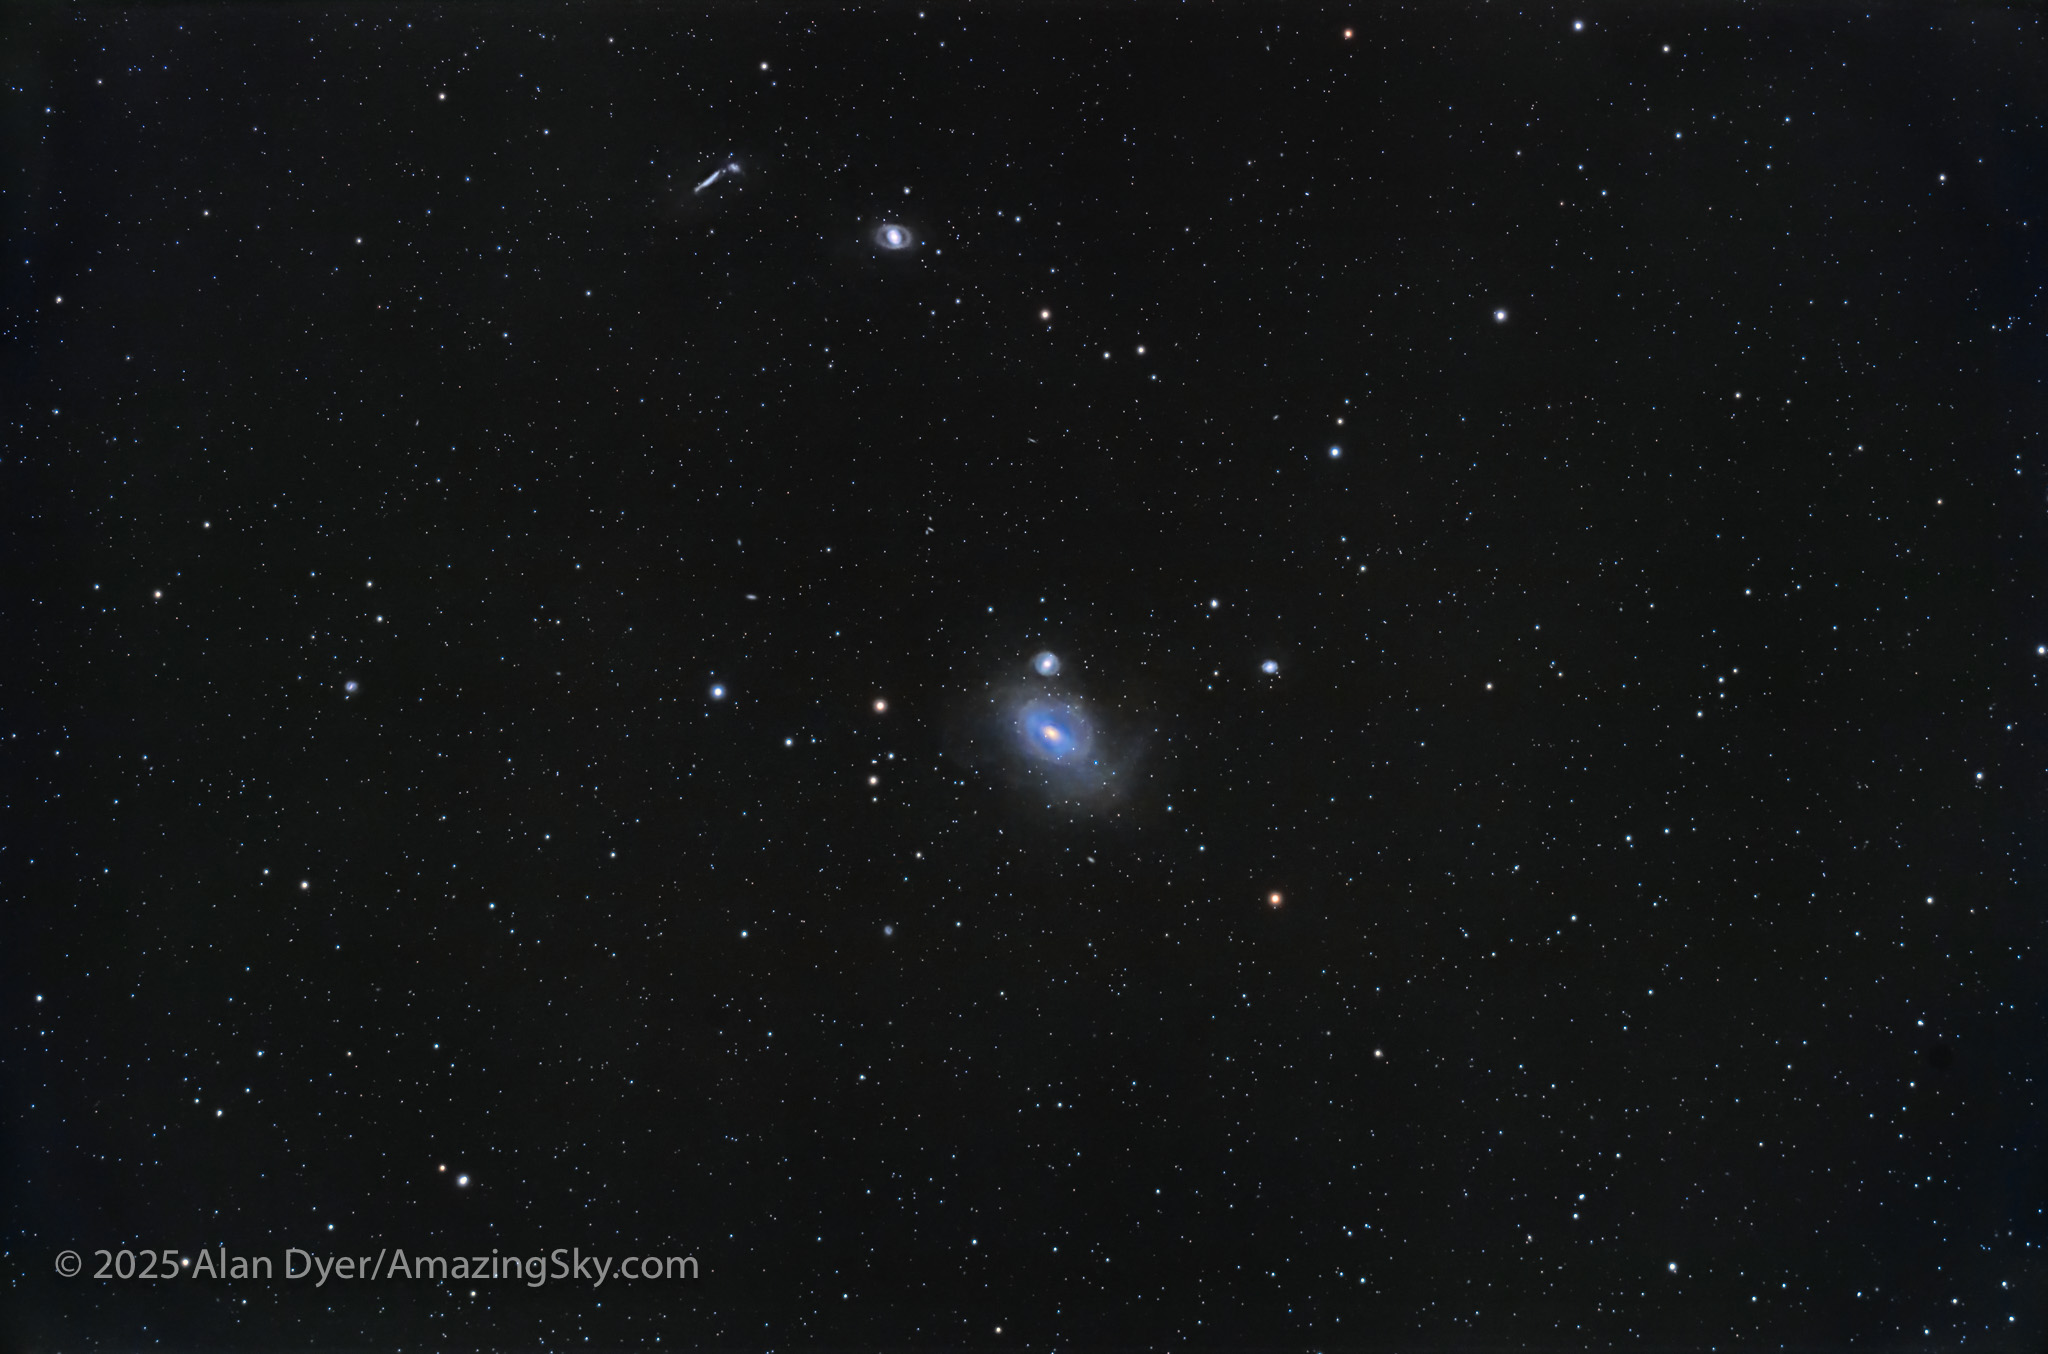
NGC 1316 in Fornax, also with a Black Hole
This is a stack of 15 x 4 minute exposures with the APO120 refractor at f/5.6 with its 0.8x Reducer, with the Canon Ra at ISO 800.
This bright (magnitude 8.5) elliptical galaxy is also catalogued by radio astronomers as Fornax A, because NGC 1316 is also a “bright” source of radio waves, thought to be generated by a supermassive black hole at its core.
Elliptical galaxies are notorious for being cannibal galaxies, eating others nearby. Sure enough, the galaxy is surrounded by faint tidal streams of stars, just recorded here, the result of collisions and mergers with unfortunate companions that wandered too close by. NGC 1316 is about 75 million light years away, and belongs to the Fornax 1 Galaxy Cluster. Despite its uniqueness and brightness, it is not in the Caldwell Catalogue.
Just above it is the smaller elliptical NGC 1318. At top is the trio of: the edge-on spiral NGC 1326A and companion NGC 1326B, and the barred spiral NGC 1326 with an odd ring shape.
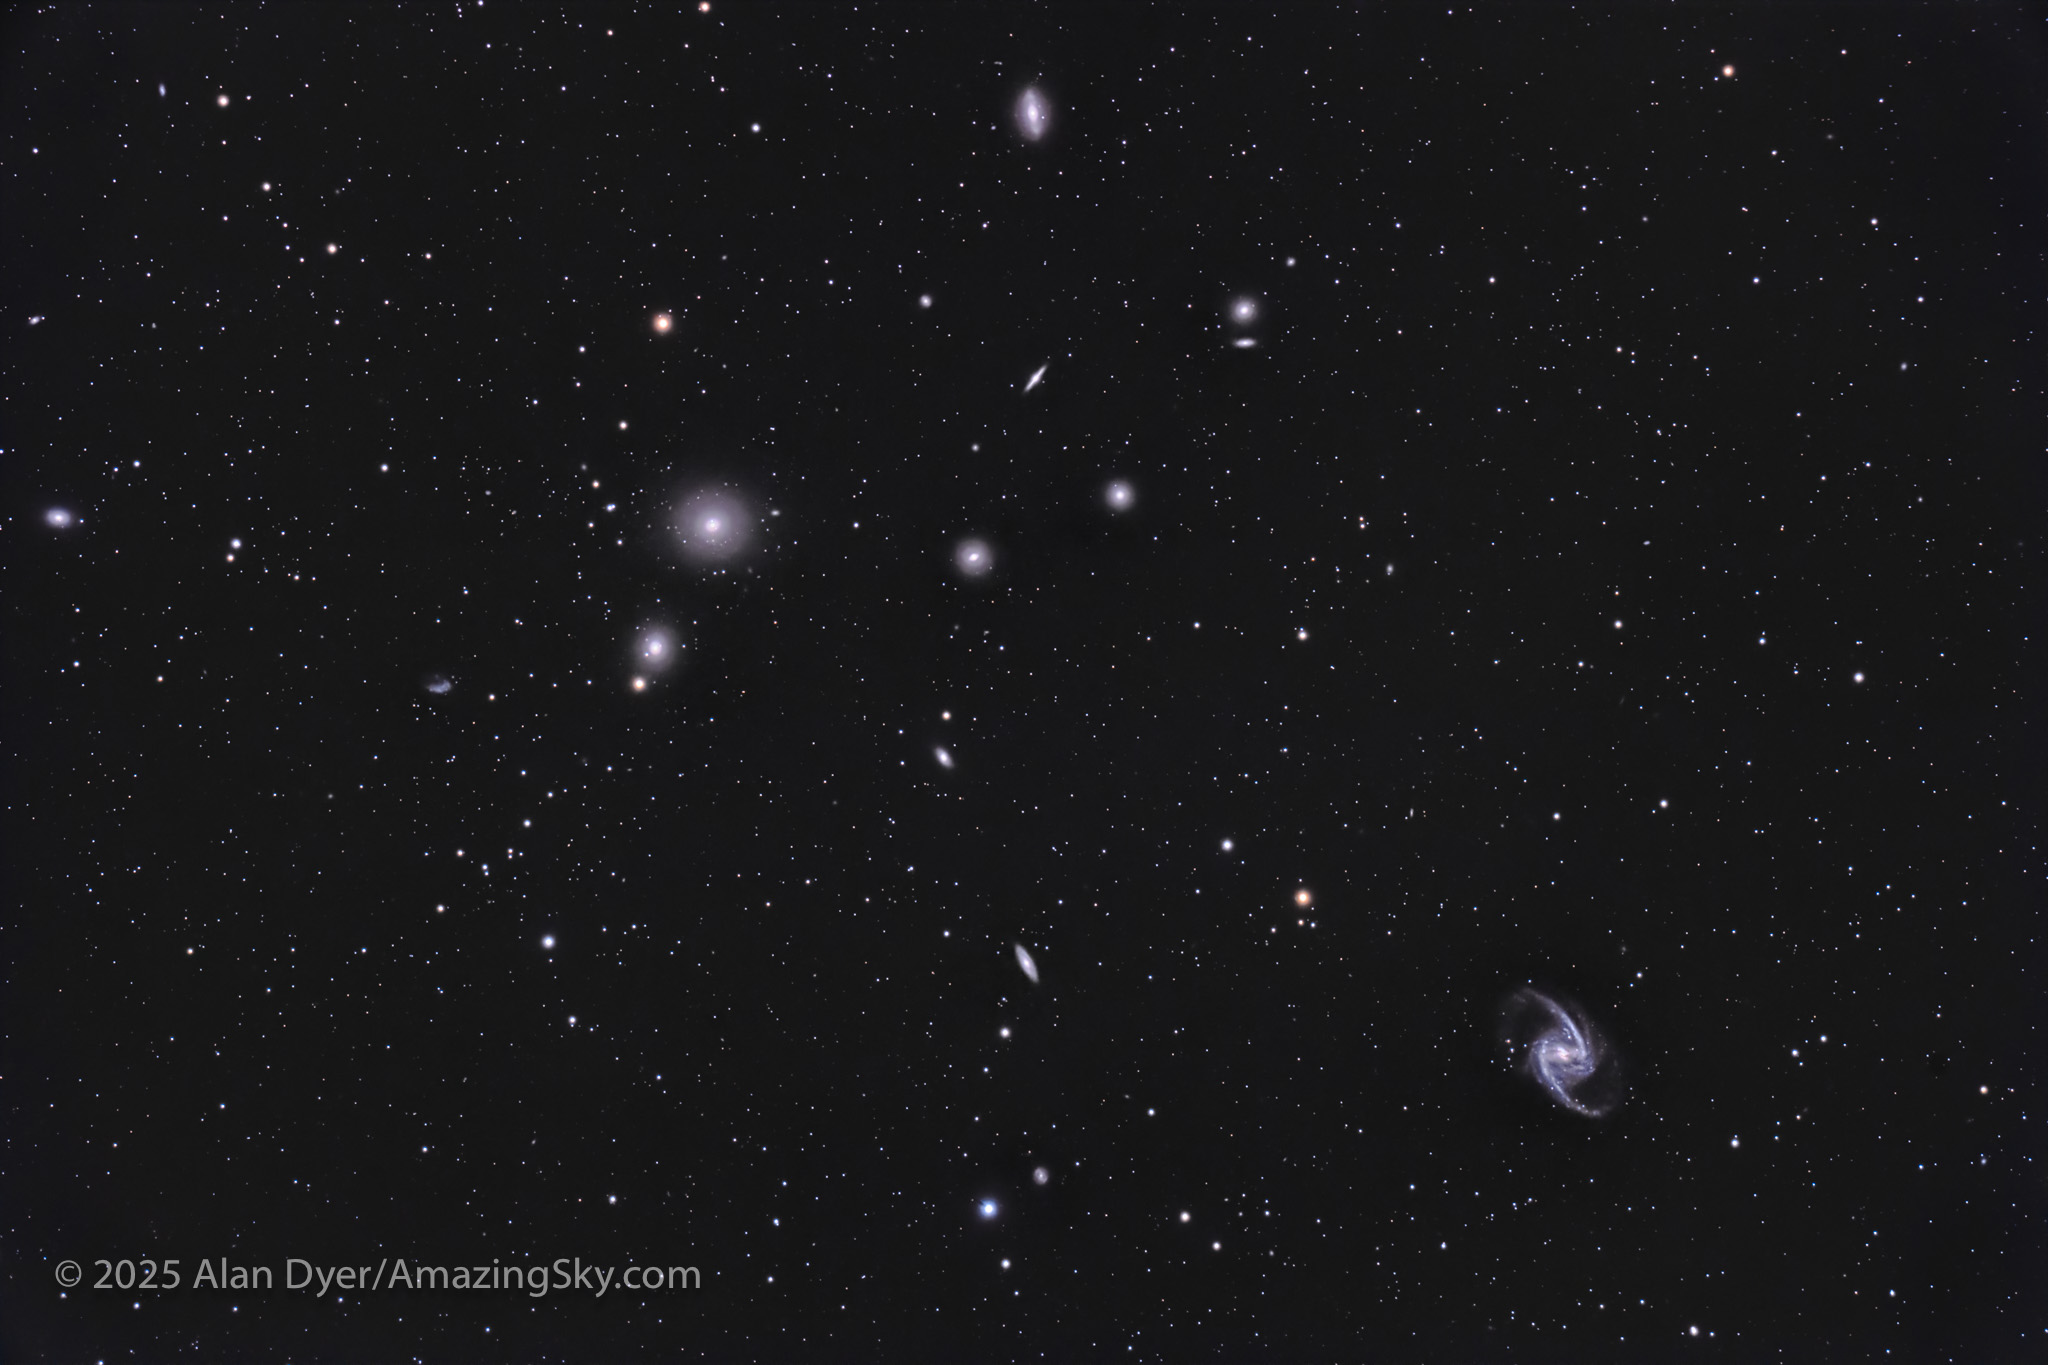
NGC 1365 and NGC 1399, at the Heart of the Fornax Cluster
This is a stack of just 10 x 6 minute exposures through the APO120 refractor at f/7 and the Canon Ra at ISO 1600.
This frames the main members of the populous Fornax Galaxy Cluster, second only perhaps to the northern sky’s Coma-Virgo Galaxy Cluster, and its Markarian’s Chain area, for having the most bright galaxies in one low-power telescope field. (The field here is 1.6º by 2.4º.) It is a “must see” sight for galaxy fans.
The two brightest Fornax cluster members are: – the giant elliptical galaxy NGC 1399 at upper left, paired with smaller NGC 1404, – and the barred spiral galaxy NGC 1365 at lower right, considered one of the best barred spirals in the sky. There’s nothing quite like it up north. Like NGC 1399, it is 58 million light years away.
The odd shaped galaxy at left is the irregular galaxy NGC 1427A, with NGC 1427 itself at the far left edge. The elongated spiral galaxy at top is NGC 1380. Numerous other NGC and tiny, faint PGC galaxies populate the field, down to magnitude 15 or so.
Bonus Nebulas!
While autumn’s galaxy season has lots to offer the galaxy hunter, there are some wonderful nebulas down south as well. In my sampling, all are “planetaries.”
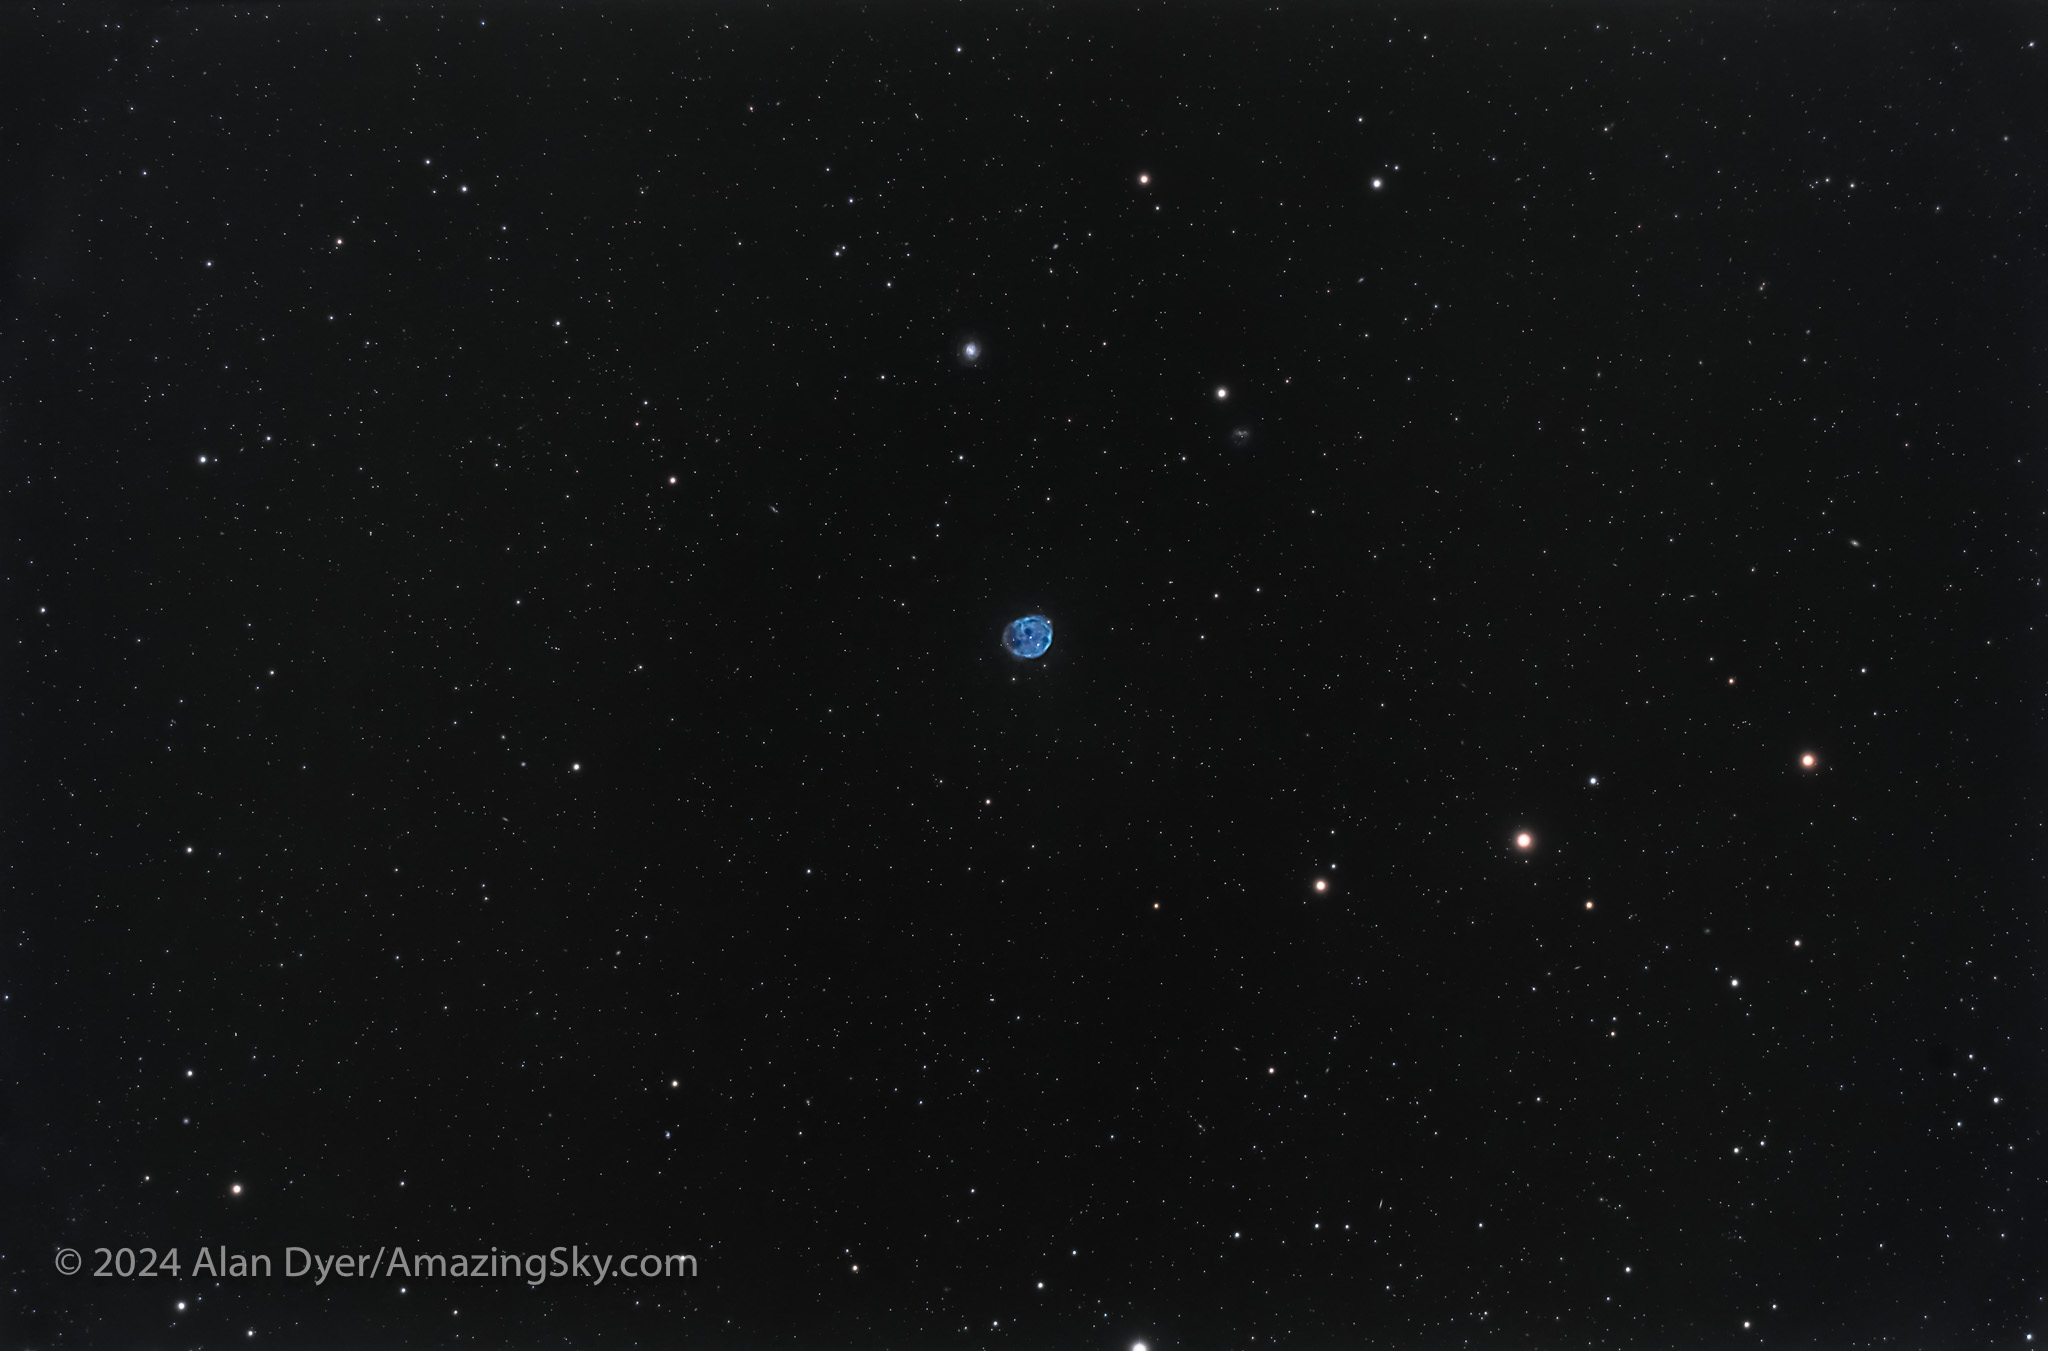
NGC 246, the Skull Nebula in Cetus
This is a stack of 16 x 4 minute exposures with the Askar APO120 refractor at f/5.6 with its 0.8x Reducer, with the Canon Ra at ISO 1600.
This is the nebula NGC 246, aka the Skull Nebula, in Cetus. It’s an example of a planetary nebula, so-called because this type of object with their small blue-green disks reminded William Herschel of the planet Uranus that he discovered in 1781. NGC 246 was discovered by Herschel four years later in 1785.
NGC 246 has a mottled disk, giving it its fanciful name, and a 12th magnitude central star that has ejected the nebula as part of its end-of-life eruptions, the origin of all planetaries. They have nothing to do with planet formation; they are the products of star death.
NGC 246 lies about 1,600 light years away. Just above it is the small galaxy NGC 255.
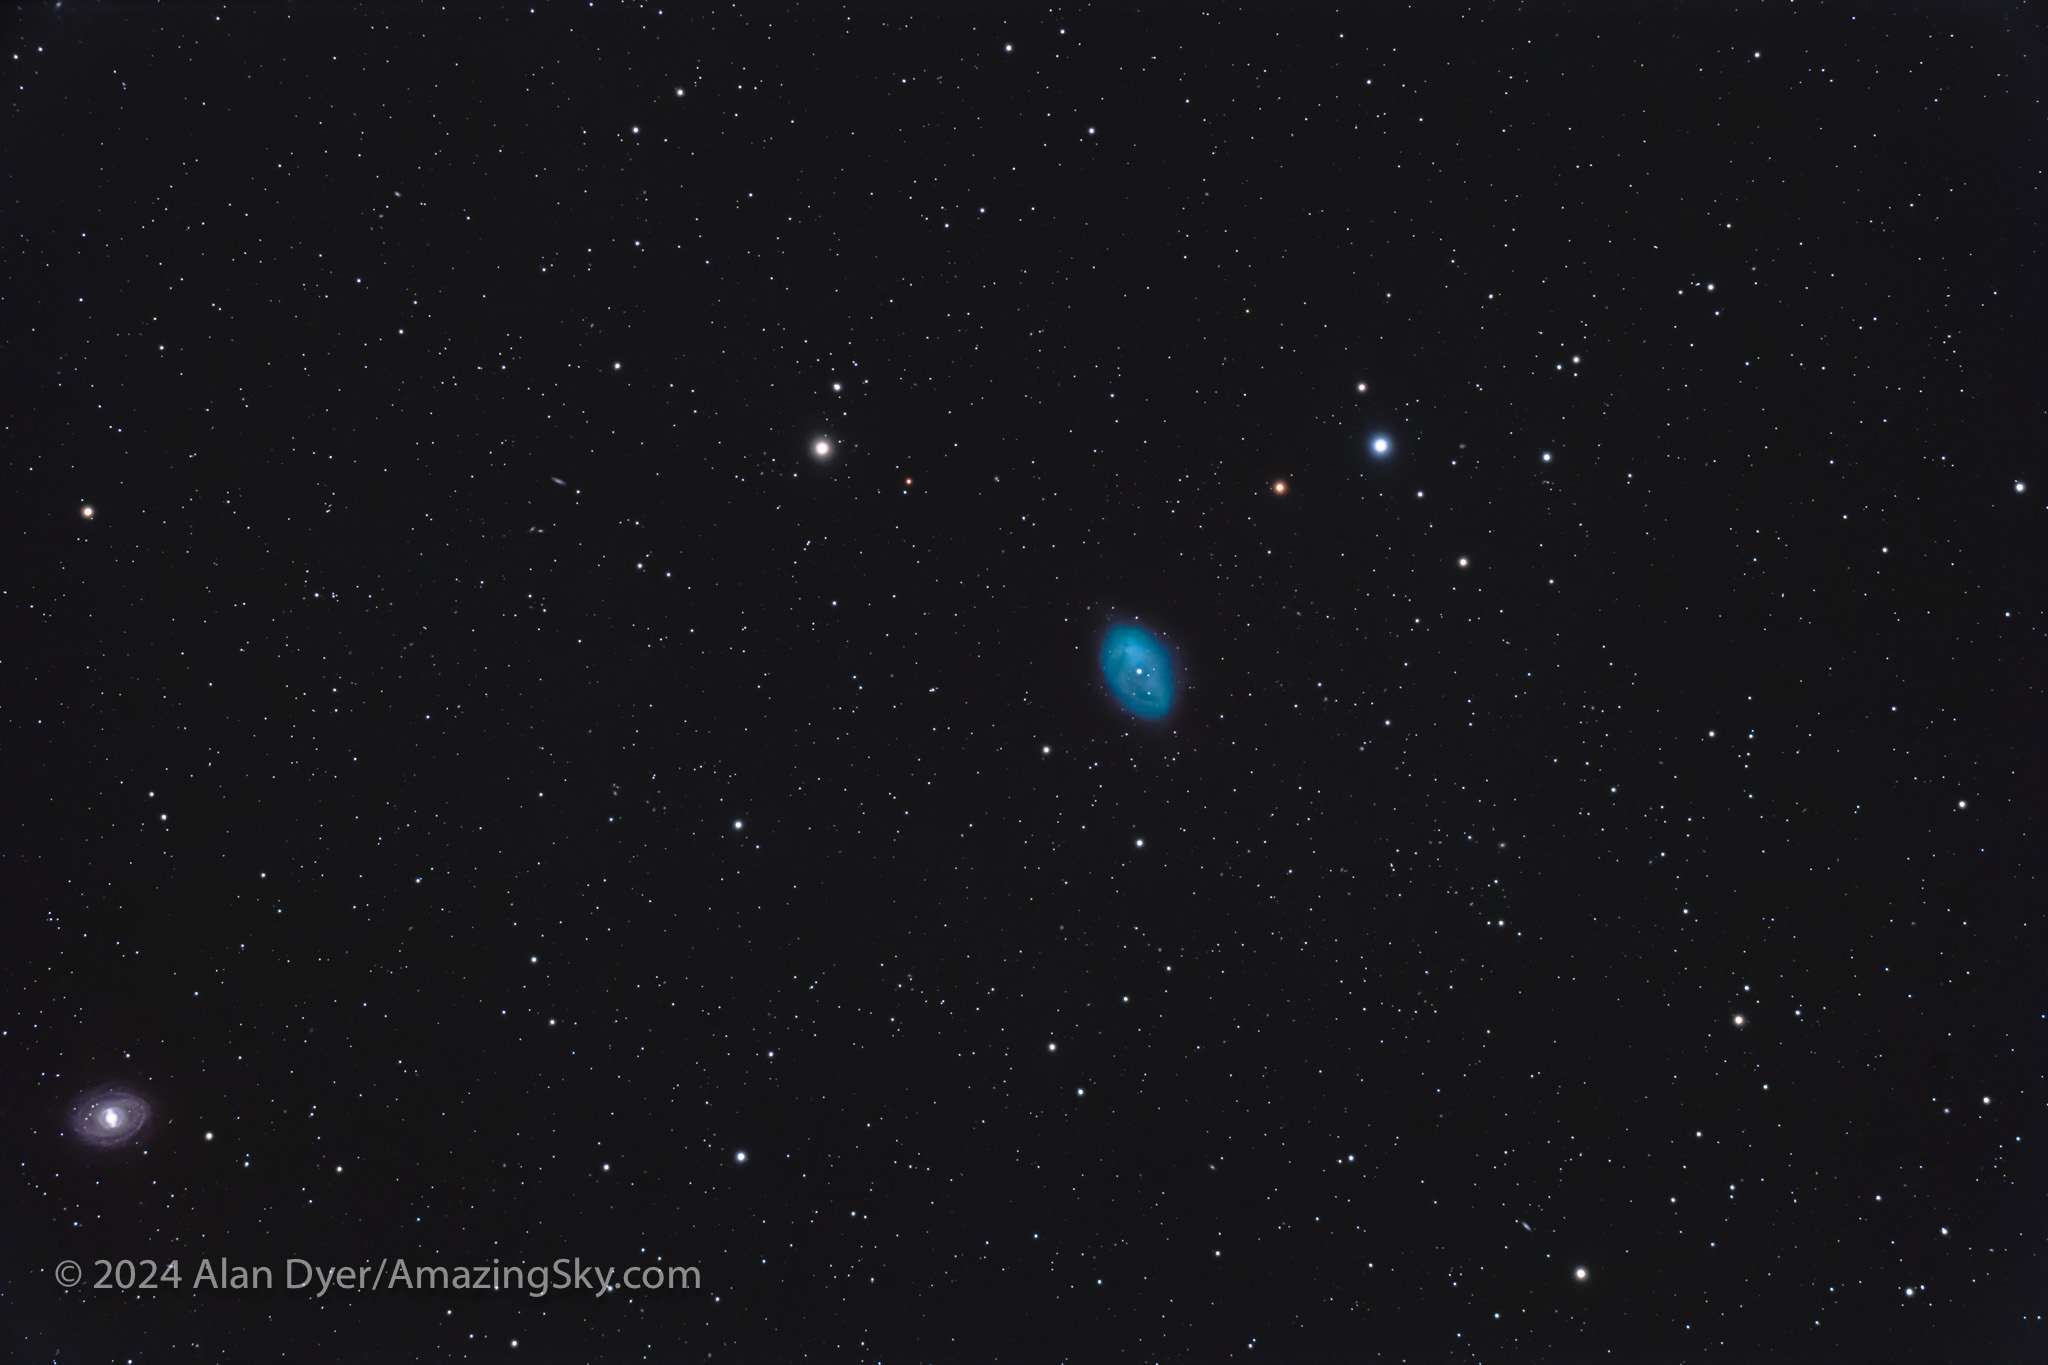
NGC 1360, the Robin’s Egg Nebula in Fornax
This is a stack of 10 x 6 minute exposures with the Askar APO120 refractor at f/7 and with the Canon Ra at ISO 1600.
This, too, is a planetary nebula, but an odd one, in that it is a more uniform disk than is usual for planetaries, lacking the ring or bi-polar shape of most such objects. It was only recently classified as a planetary, one with an 11th magnitude central star responsible for expelling the nebula.
NGC 1360 is bright (at 9th magnitude), large, and blue-green, giving it the nickname the Robin’s Egg Nebula. The barred spiral galaxy (there are lot of them down here!) NGC 1398 is at lower left.
NGC 7293, the Helix Nebula in Aquarius
This is a blend of: a stack of 24 x 8 minute exposures with no filter, with a stack of 20 x 12 minute exposures with an IDAS NBX narrowband filter to isolate just the green Oxygen III and red Hydrogen alpha light. All through the APO120 at f/7, taken over 2 nights as the object was not well-placed long enough for all the images to be taken in one night. Shot using the Canon Ra, at ISO 3200 for the filtered frames and ISO 1600 for the unfiltered shots.
This is the large and bright (magnitude 7.6) planetary nebula catalogued as NGC 7293, but better known as the Helix Nebula, in Aquarius. But the internet has also dubbed in “The Eye of God.”
While this target lies farther north than most of the objects here, making it easy to see from northern latitudes, William Herschel working in England missed it. His telescopes were too powerful! It wasn’t discovered until 1824 (or thereabouts) by Karl Ludwig Harding in Germany. It is #63 in the Caldwell Catalogue.
NGC 7293 is thought to be one of the closest planetary nebulas to us, at only 650 light years away, thus its large size, nearly 1/4º across, half the size of the Moon’s disk. There’s an outer halo that is twice that size, but only the brightest portion of it is recorded here as a partial arc. It takes exposures of many hours, and more patience than I have, to pick up this nebula’s full extent.
The bright star at left is 5th magnitude star Upsilon Aquarii, which I composed to be in the frame and not on the edge if the Helix had been centered.
About the Images
As per the tech details in the captions, I shot all the images from southern Arizona during a wonderful marathon of astrophotography in October 2024, at the Quailway Cottage, a favorite spot of mine for an astronomy retreat.
I used an Askar APO120 refractor, at either its native f/7 for a focal length of 840mm, or with its 0.8x Reducer lens for a faster f/5.6 focal ratio and shorter 670mm focal length, yielding a wider field and shorter exposure times for each “sub-frame.” Most images have a similar “plate scale,” so the difference in object size is due to their actual size on the sky.
The camera was the astro-modified 30-megapixel Canon Ra. The mount was the venerable Astro-Physics AP400, which returned earlier in 2024 from its 20-year stay in Australia. I used the Lacerta MGEN3 stand-alone auto-guider, for app- and computer-free guiding which I prefer. The MGEN3 performs “dithering,” shifting the framing by a few pixels between each exposure, to aid elimination of thermal noise when stacking images.
While it looks impressive, the telescope is still not the best for small, detailed targets like the galaxies and planetaries here. They demand even more focal length (= bigger and heavier telescopes) than I prefer to shoot with.
Even so, I plan to take the same rig to New Mexico this year in May to shoot targets in the “other half of the sky,” during spring galaxy season.
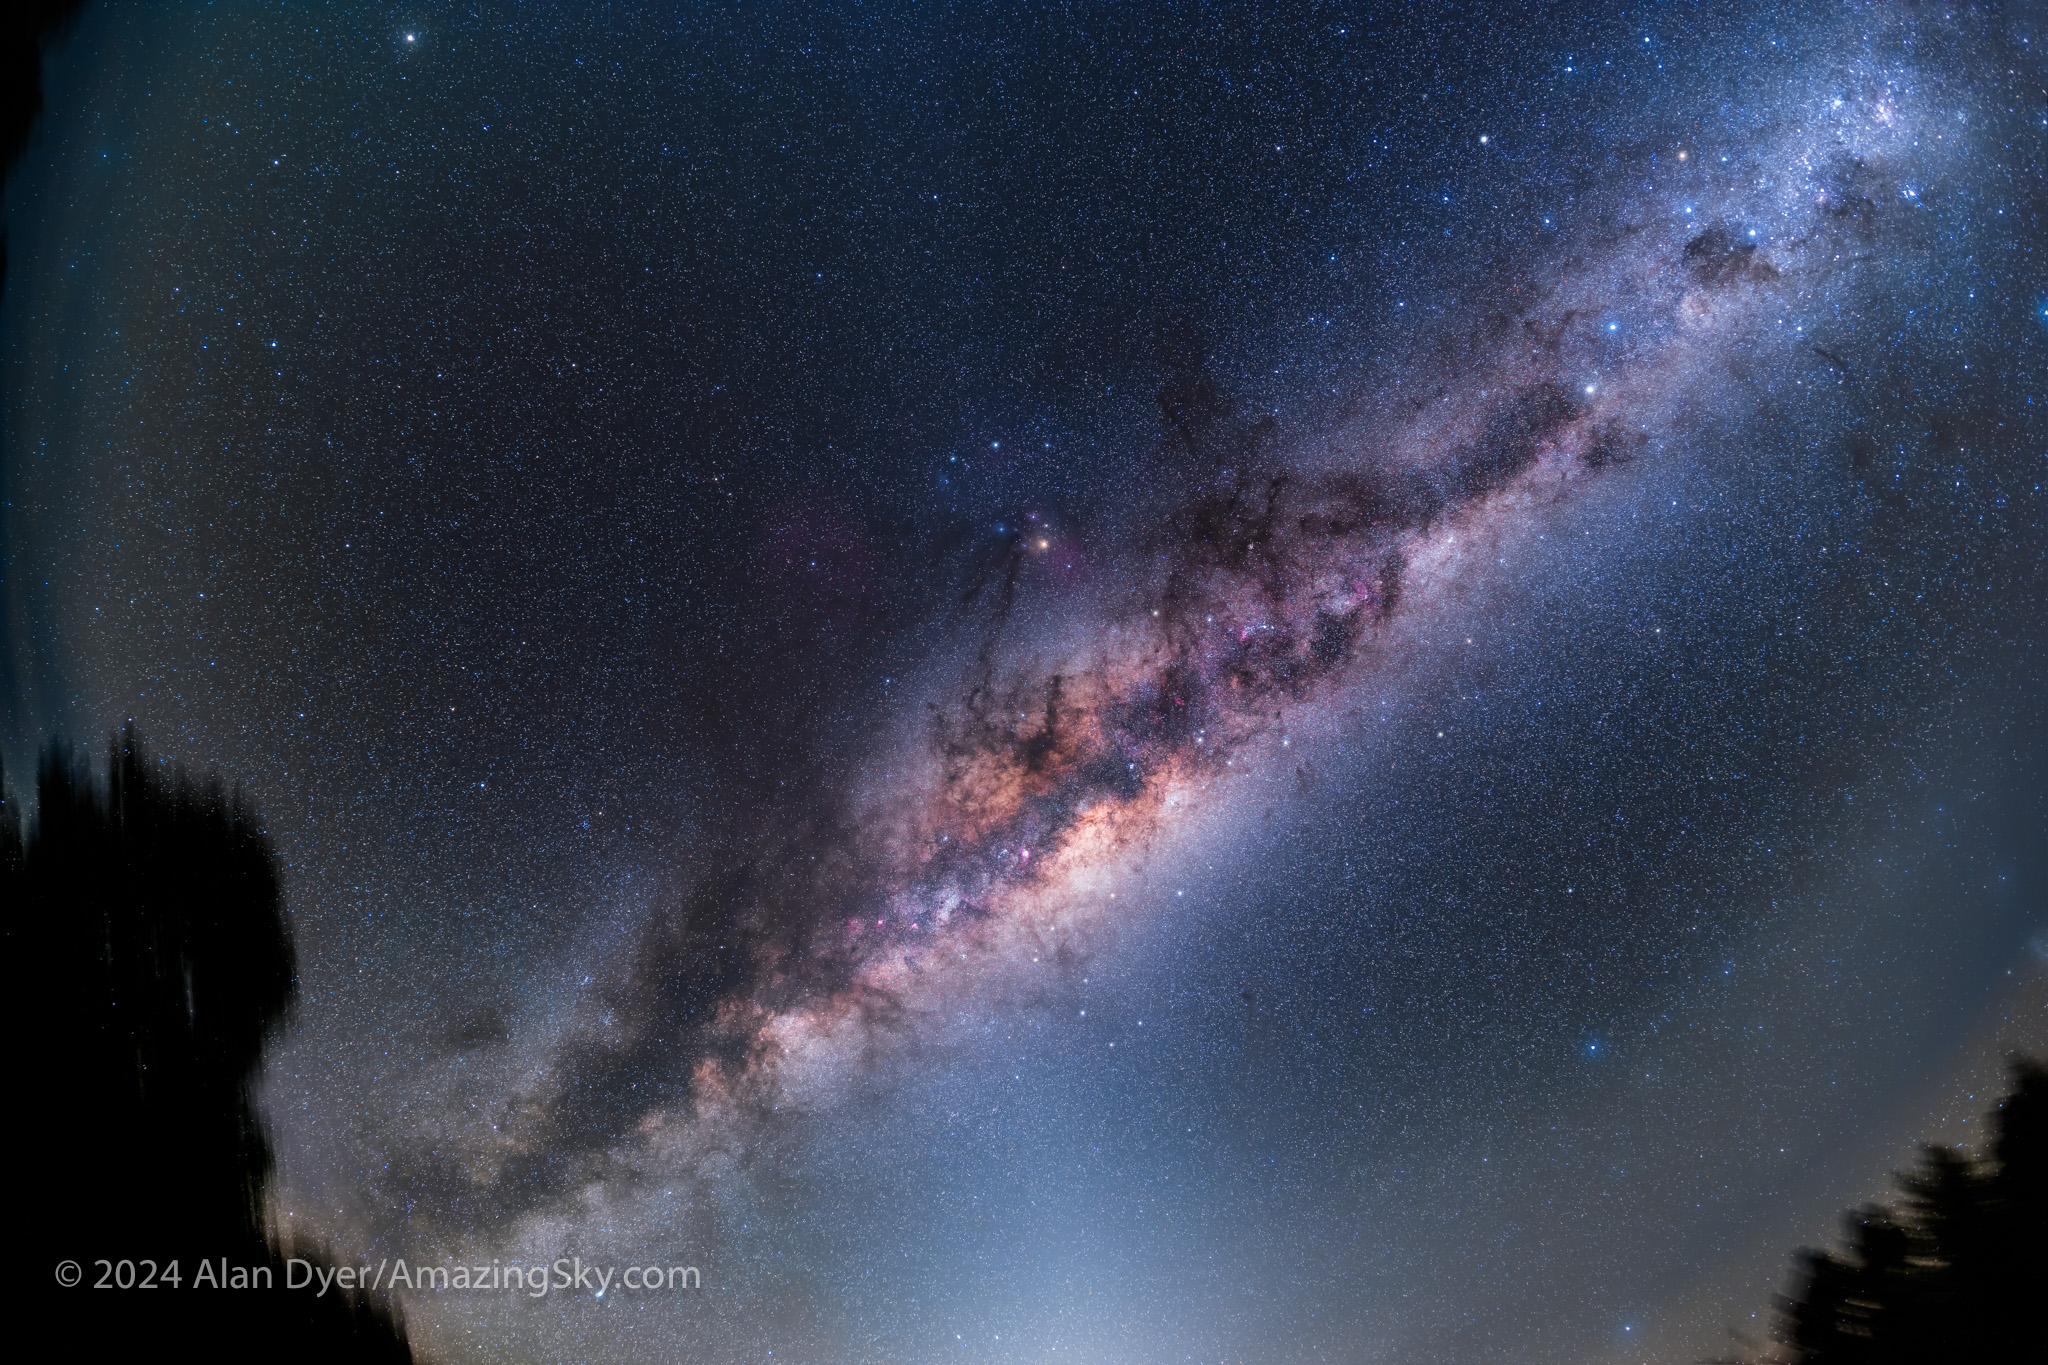
After an absence of seven years it was great to be back under the fabulous sky of the Southern Hemisphere, home to the best deep-space splendours. Here’s my sky tour…
From 2000 to 2017, the year of my last previous trip Down Under, I had been travelling to the Southern Hemisphere, sometimes to Chile but most often to Australia, once a year or biennially. There’s just so much to see and photograph in the southern sky.
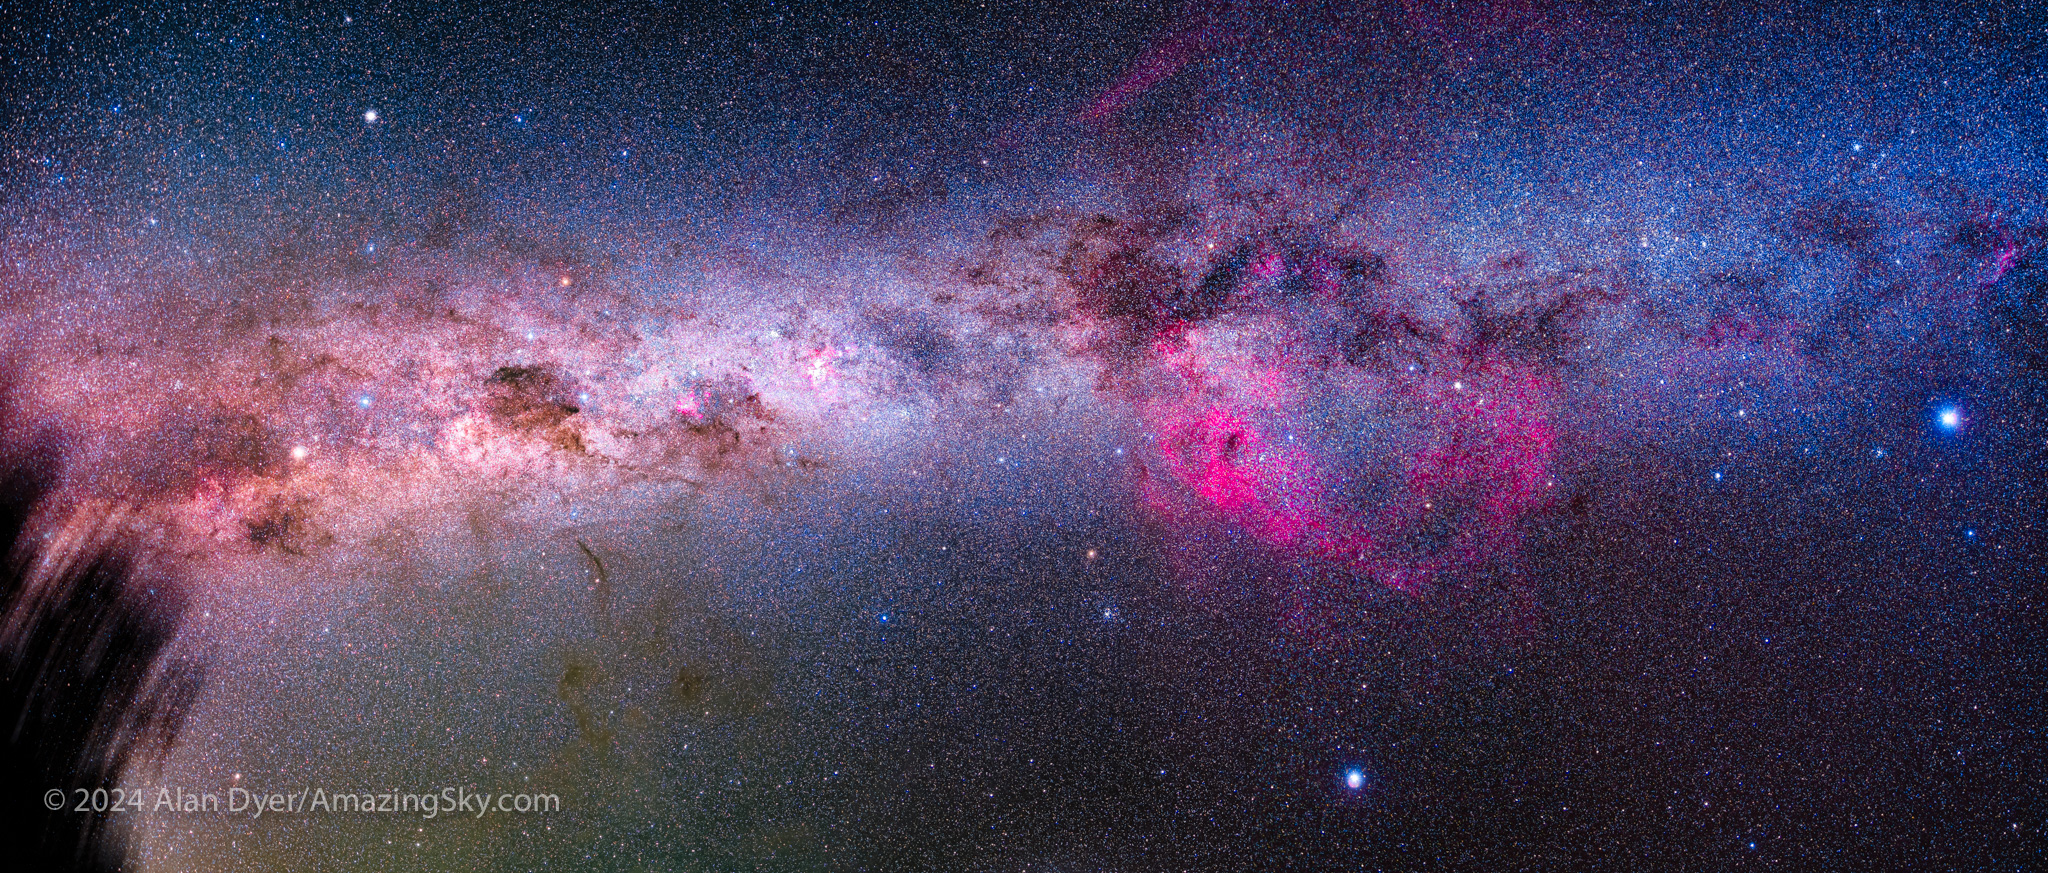
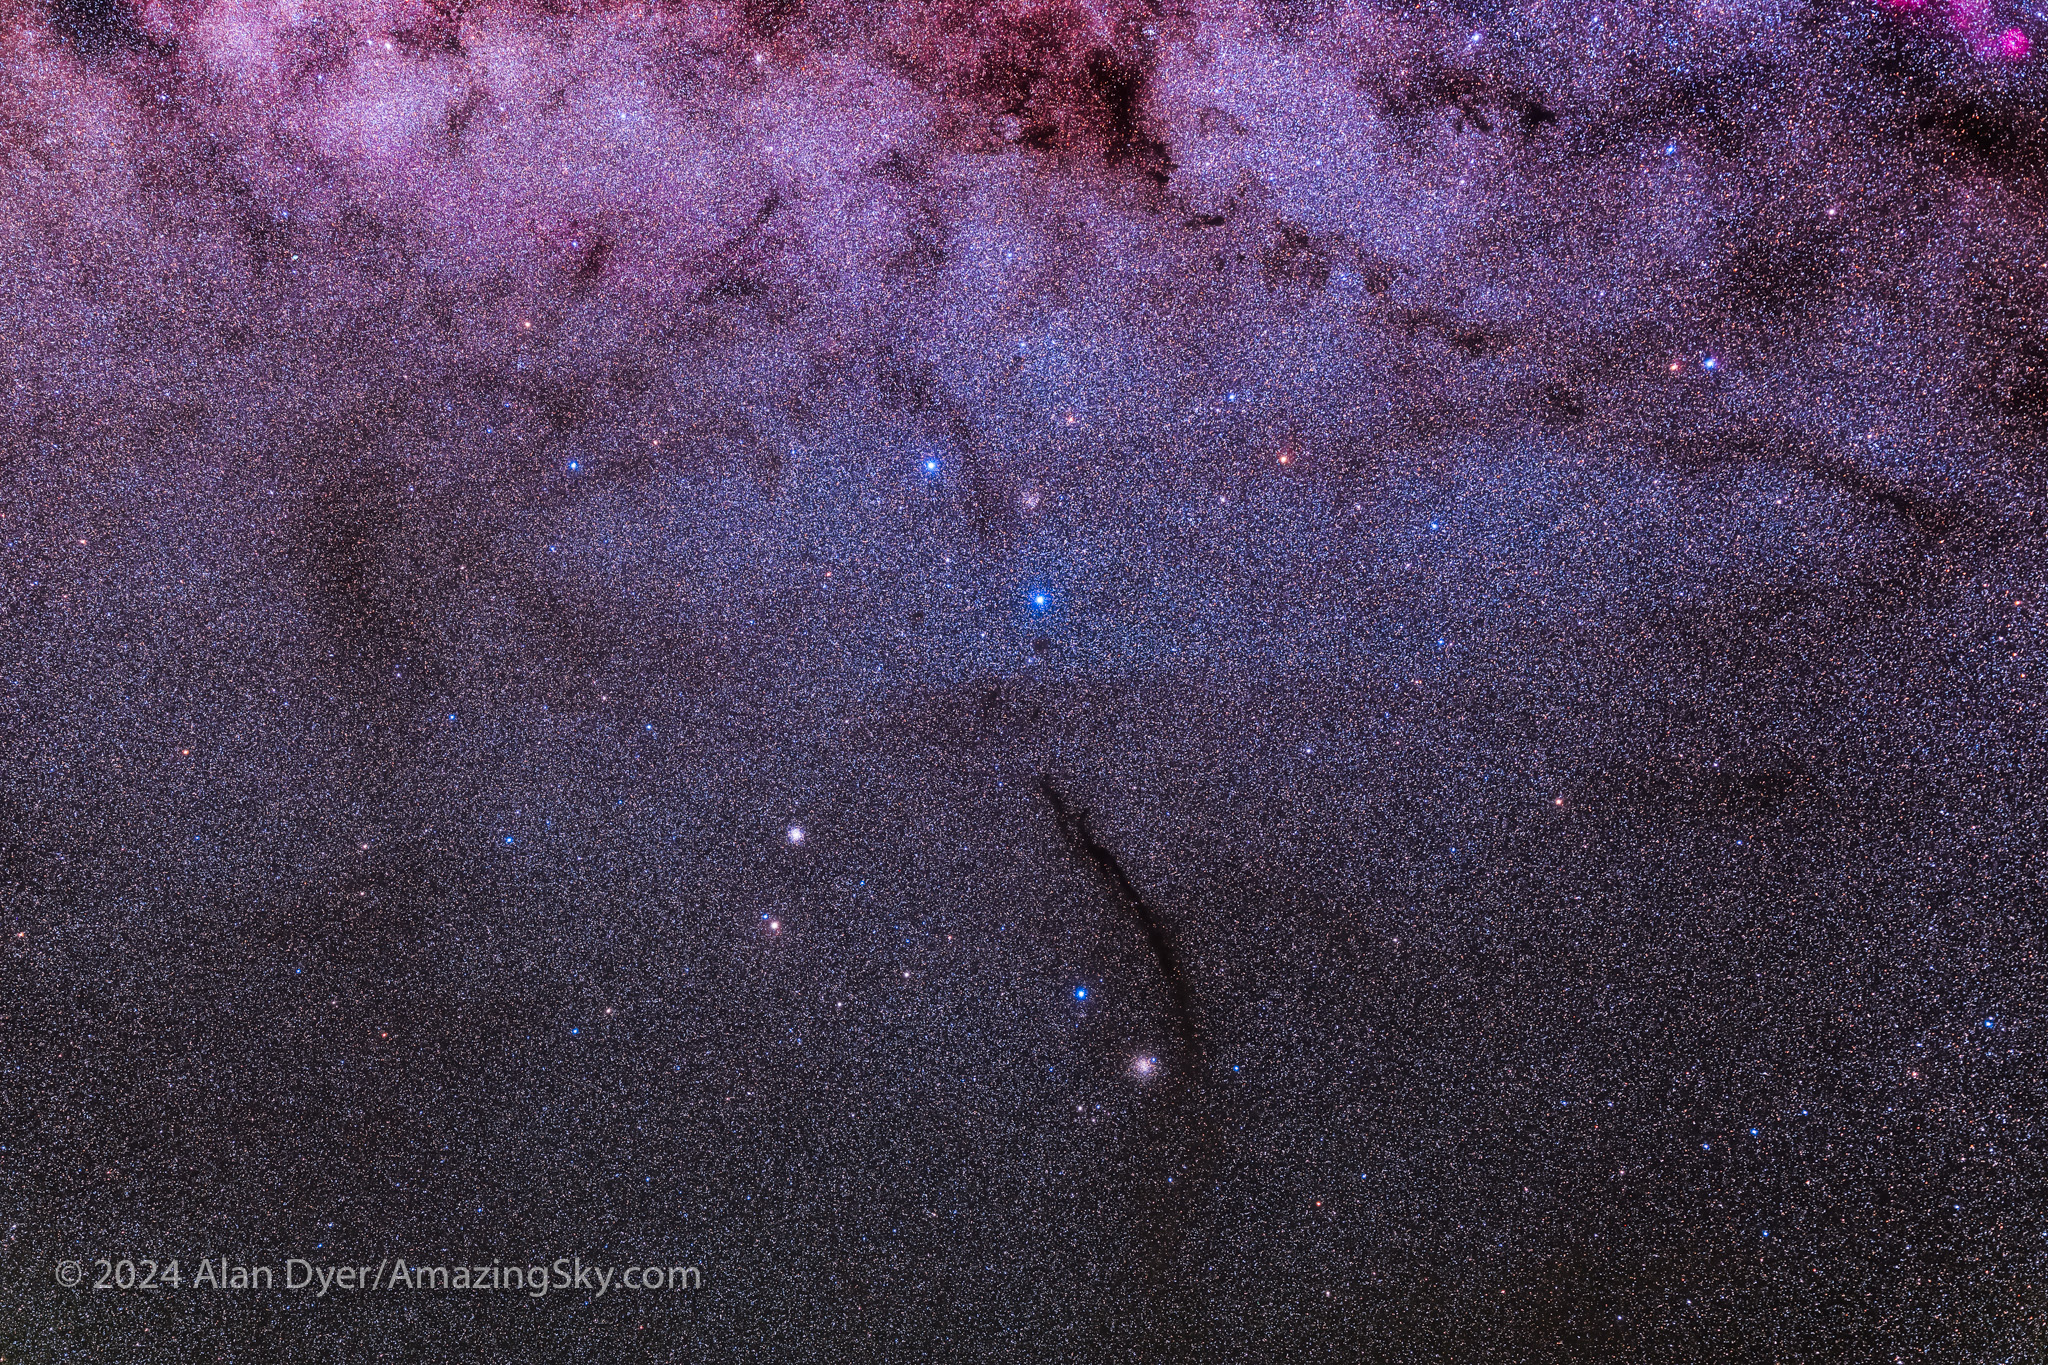
This is a panorama of the southernmost portion of the Milky Way, from the stars Alpha and Beta Centauri at far left, to Sirius, the brightest nighttime star, at far right. The second brightest star, Canopus, is at bottom. This is a panorama of 3 segments, each a stack of 10 to 20 sub-frames, each 4 minutes at ISO 800 with the Canon Ra and Canon RF28-70mm lens at f/2.
While the deep-south sky represents perhaps just 30 percent of the entire celestial sphere, it contains arguably the best of everything in the sky: the best nebulas, the best star clusters, the best galaxies, and certainly the best view of our own galaxy, the Milky Way.
No astronomical life is complete without a visit (or two or more!) to the lands south of the equator, ideally to a latitude of about 20° to 35° South. For the first time since 2017, I headed south this past March, in 2024. My belated blog takes you on a tour of the great southern sky.
NOTE: My blog is illustrated with lots of images, so it might take a while to load. Click or tap on an image to bring it up full screen. For the technically curious, I have included gear and exposure details in the captions.
Far Away in Australia
Yes, it’s long way to go — a 15-hour-flight from Canada. But Australia is my favourite destination down under. I can speak the language (sort of!), and have learned to drive on the left. Even after a seven year absence, my brain took only a few minutes to adjust once again to most of the car, and opposing traffic, being on the “wrong side” of me.
After a visit with the “relos” (Aussie for “relatives”) in Sydney and on the Central Coast of New South Wales, I loaded up all the telescope gear my folks had been kindly storing for me for two decades, and headed inland. Not really Outback. And not really “bush.”
My destination in March, as it usually has been on my many visits (this was my 12th time to Australia), was Coonabarabran in the Central West of NSW. It bills itself as the “Astronomy Capital of Australia.”
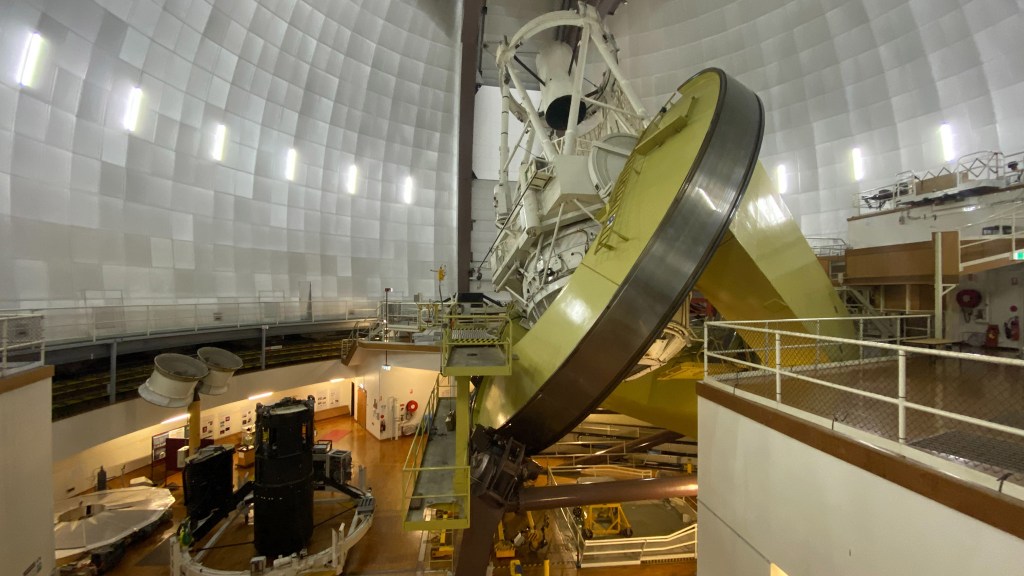
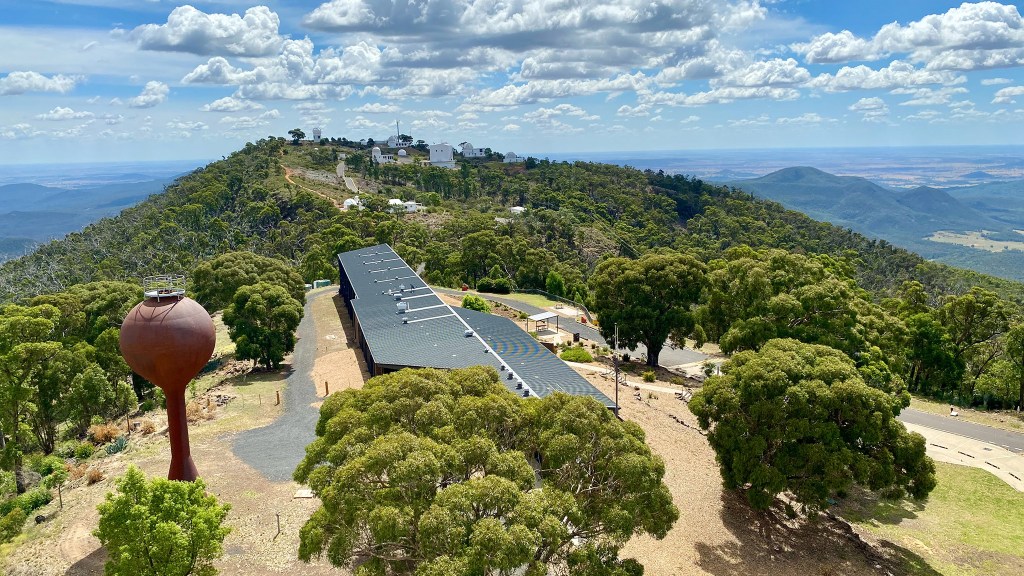
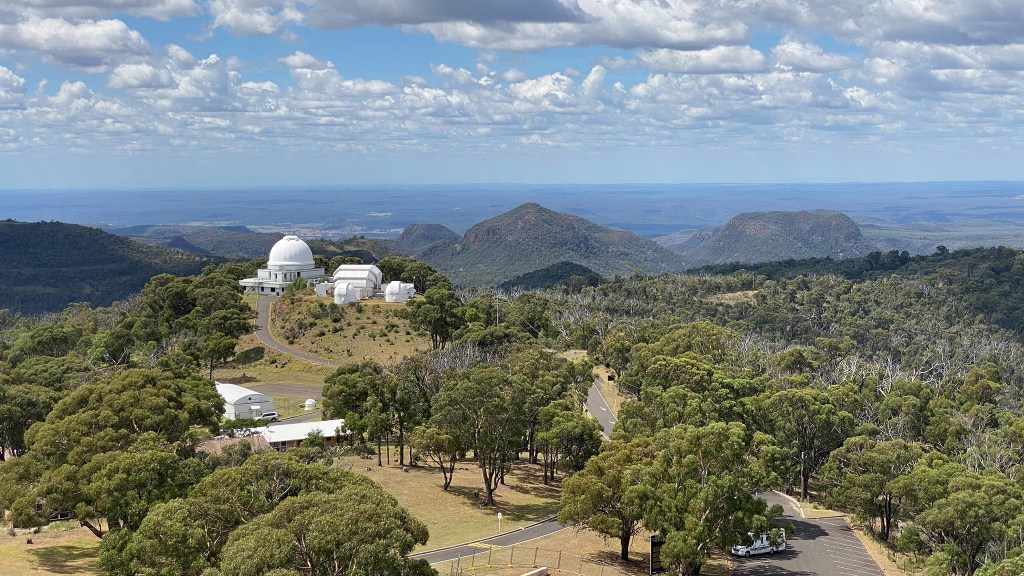
And rightly so, as nearby is the Siding Spring Observatory, Australia’s largest complex of optical telescopes (check the slide show above). I had a great tour again — thanks, Blake! — of the big 4-metre AAT that towers over the rest of the observatories on the mountain.
The Upside-Down Sky
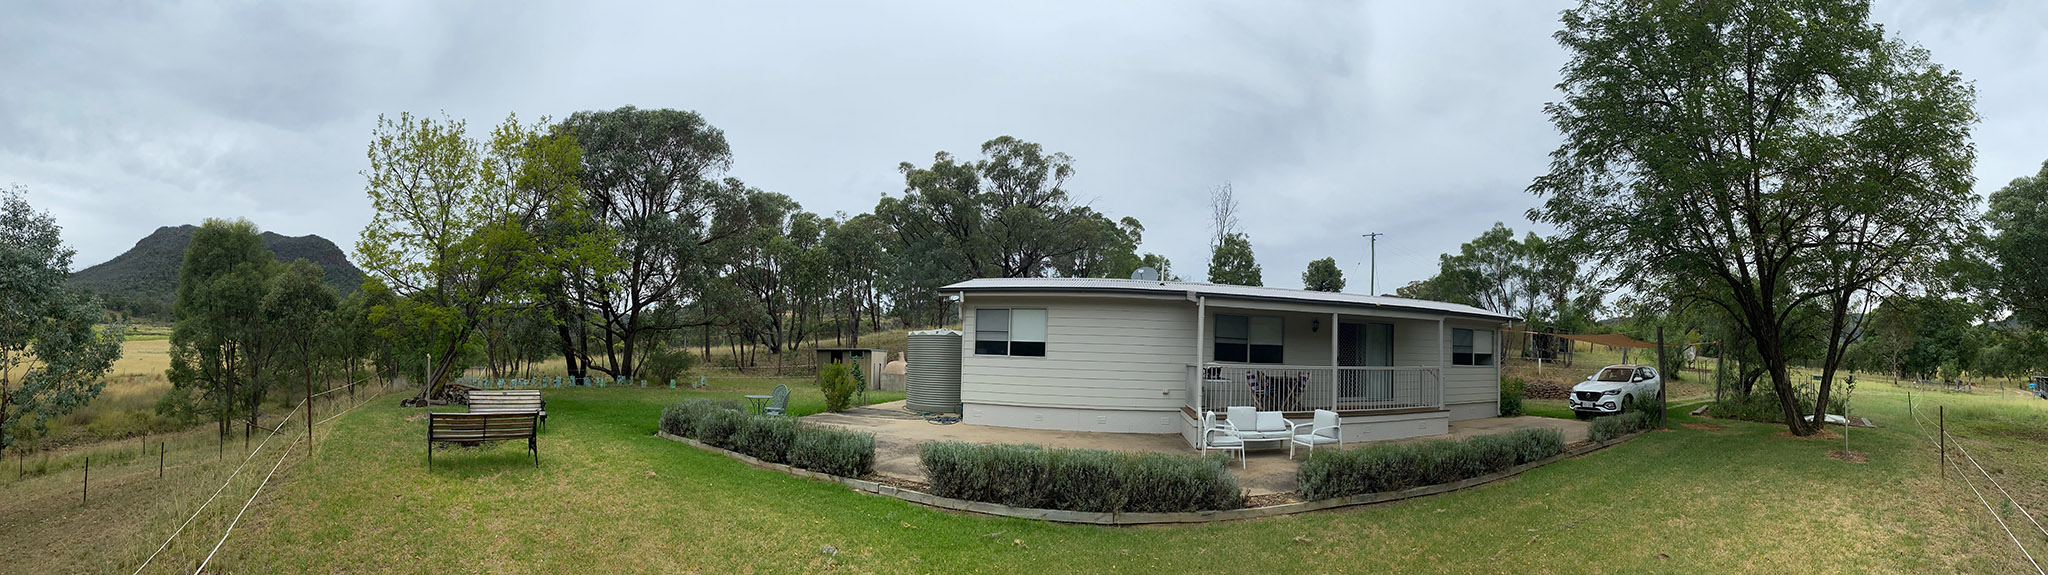
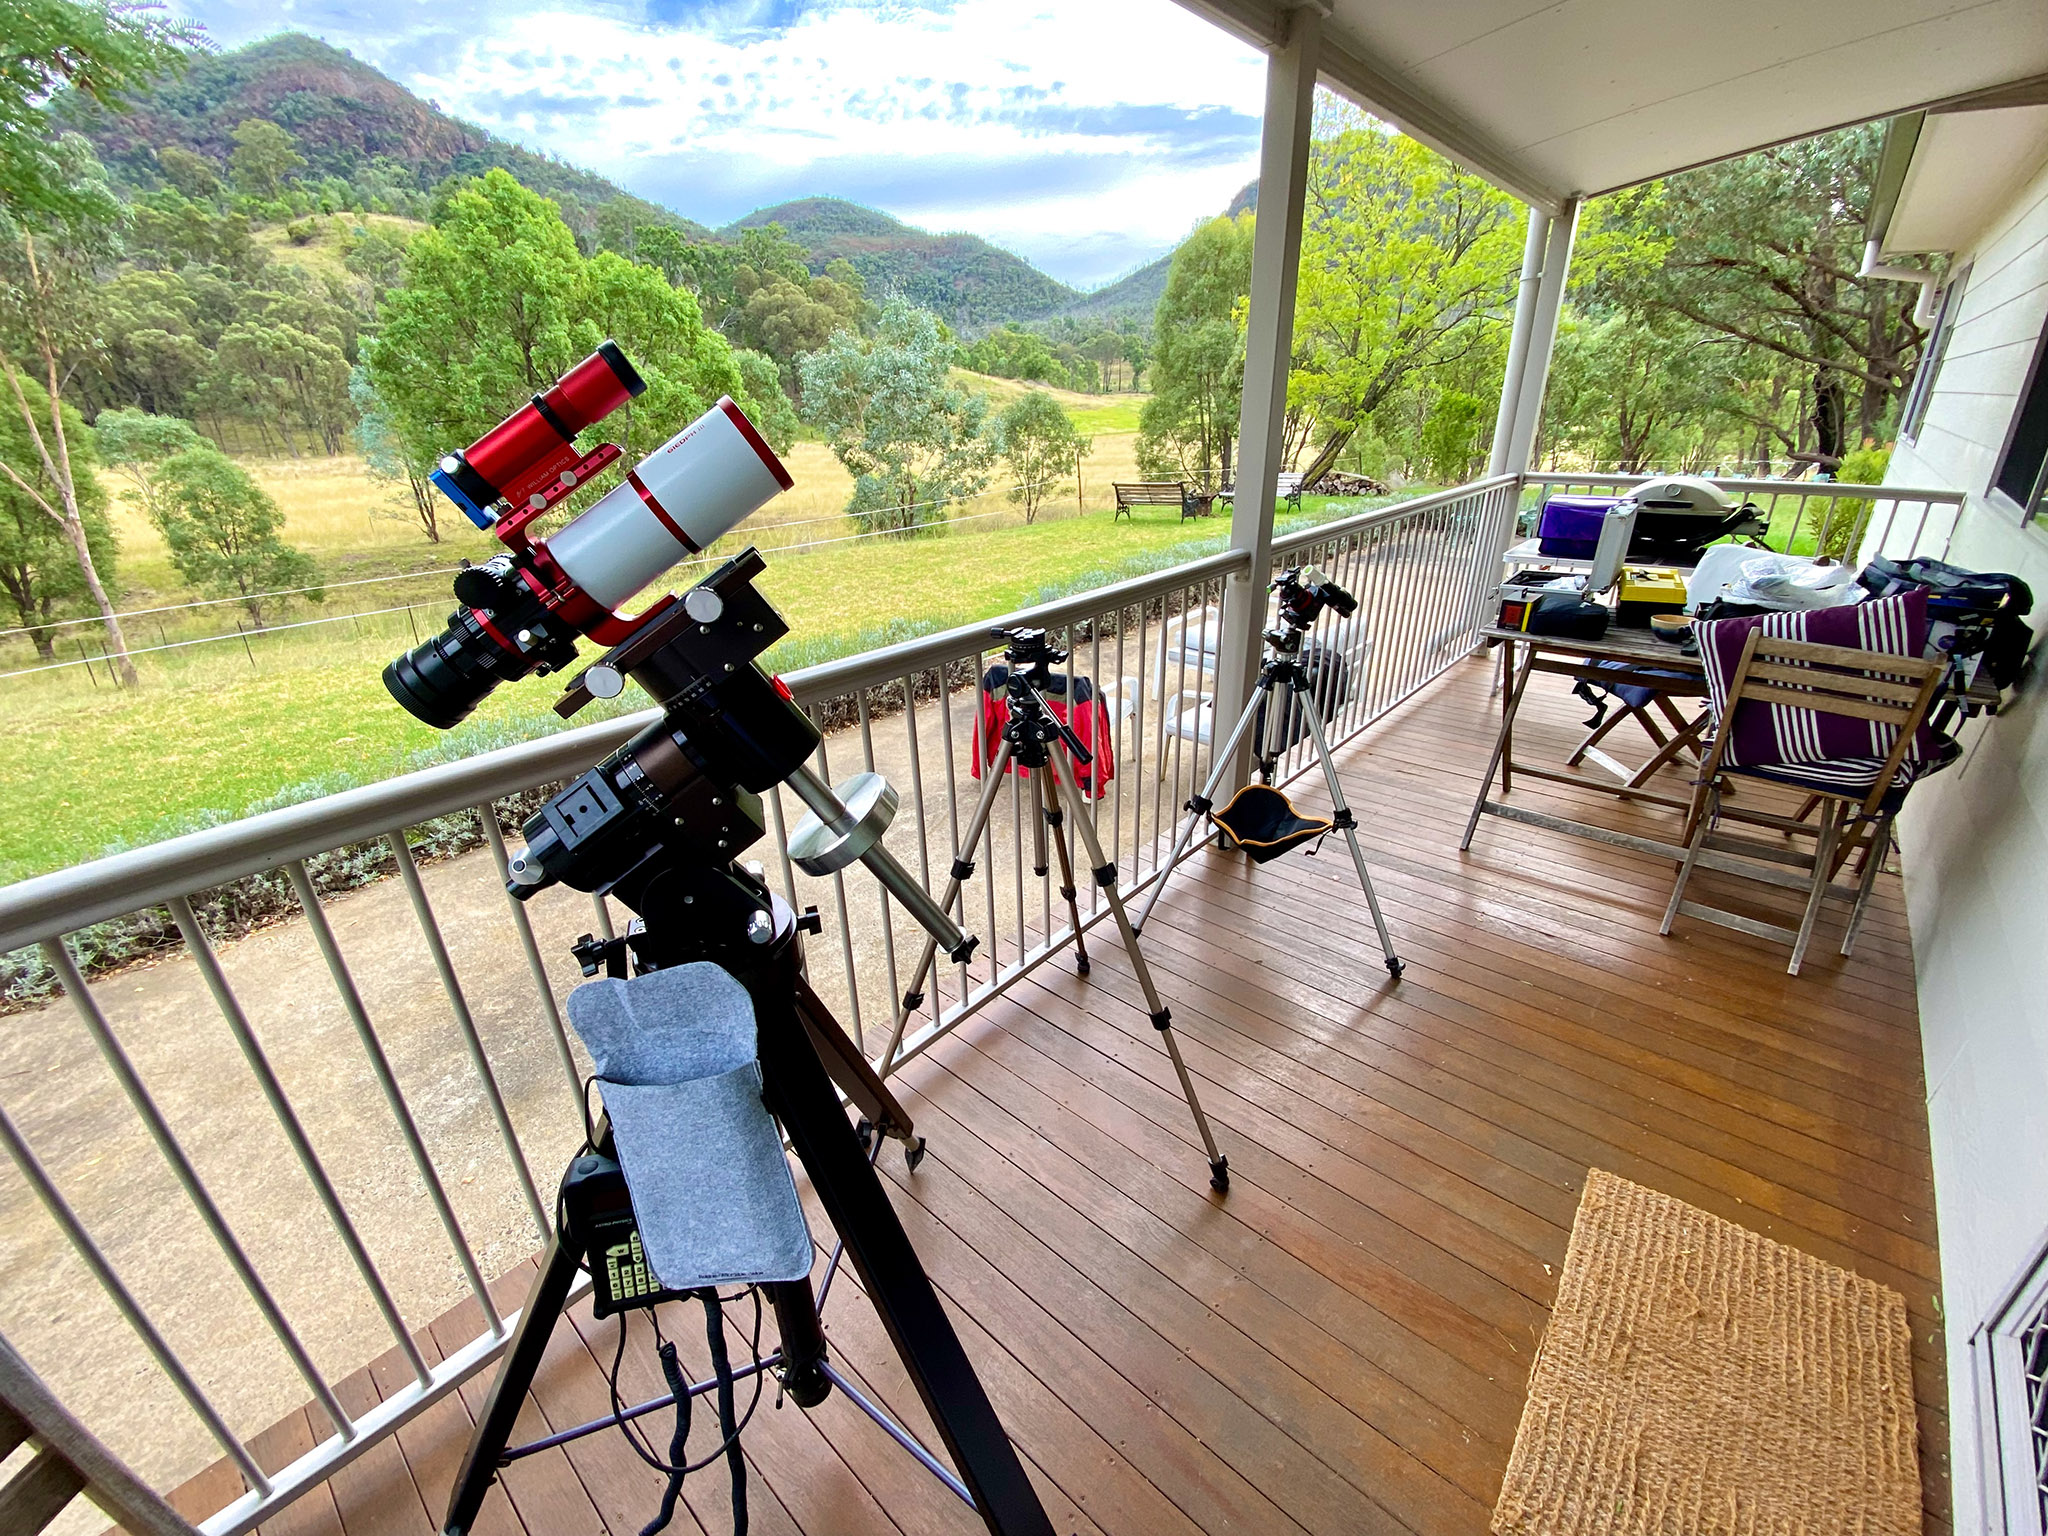
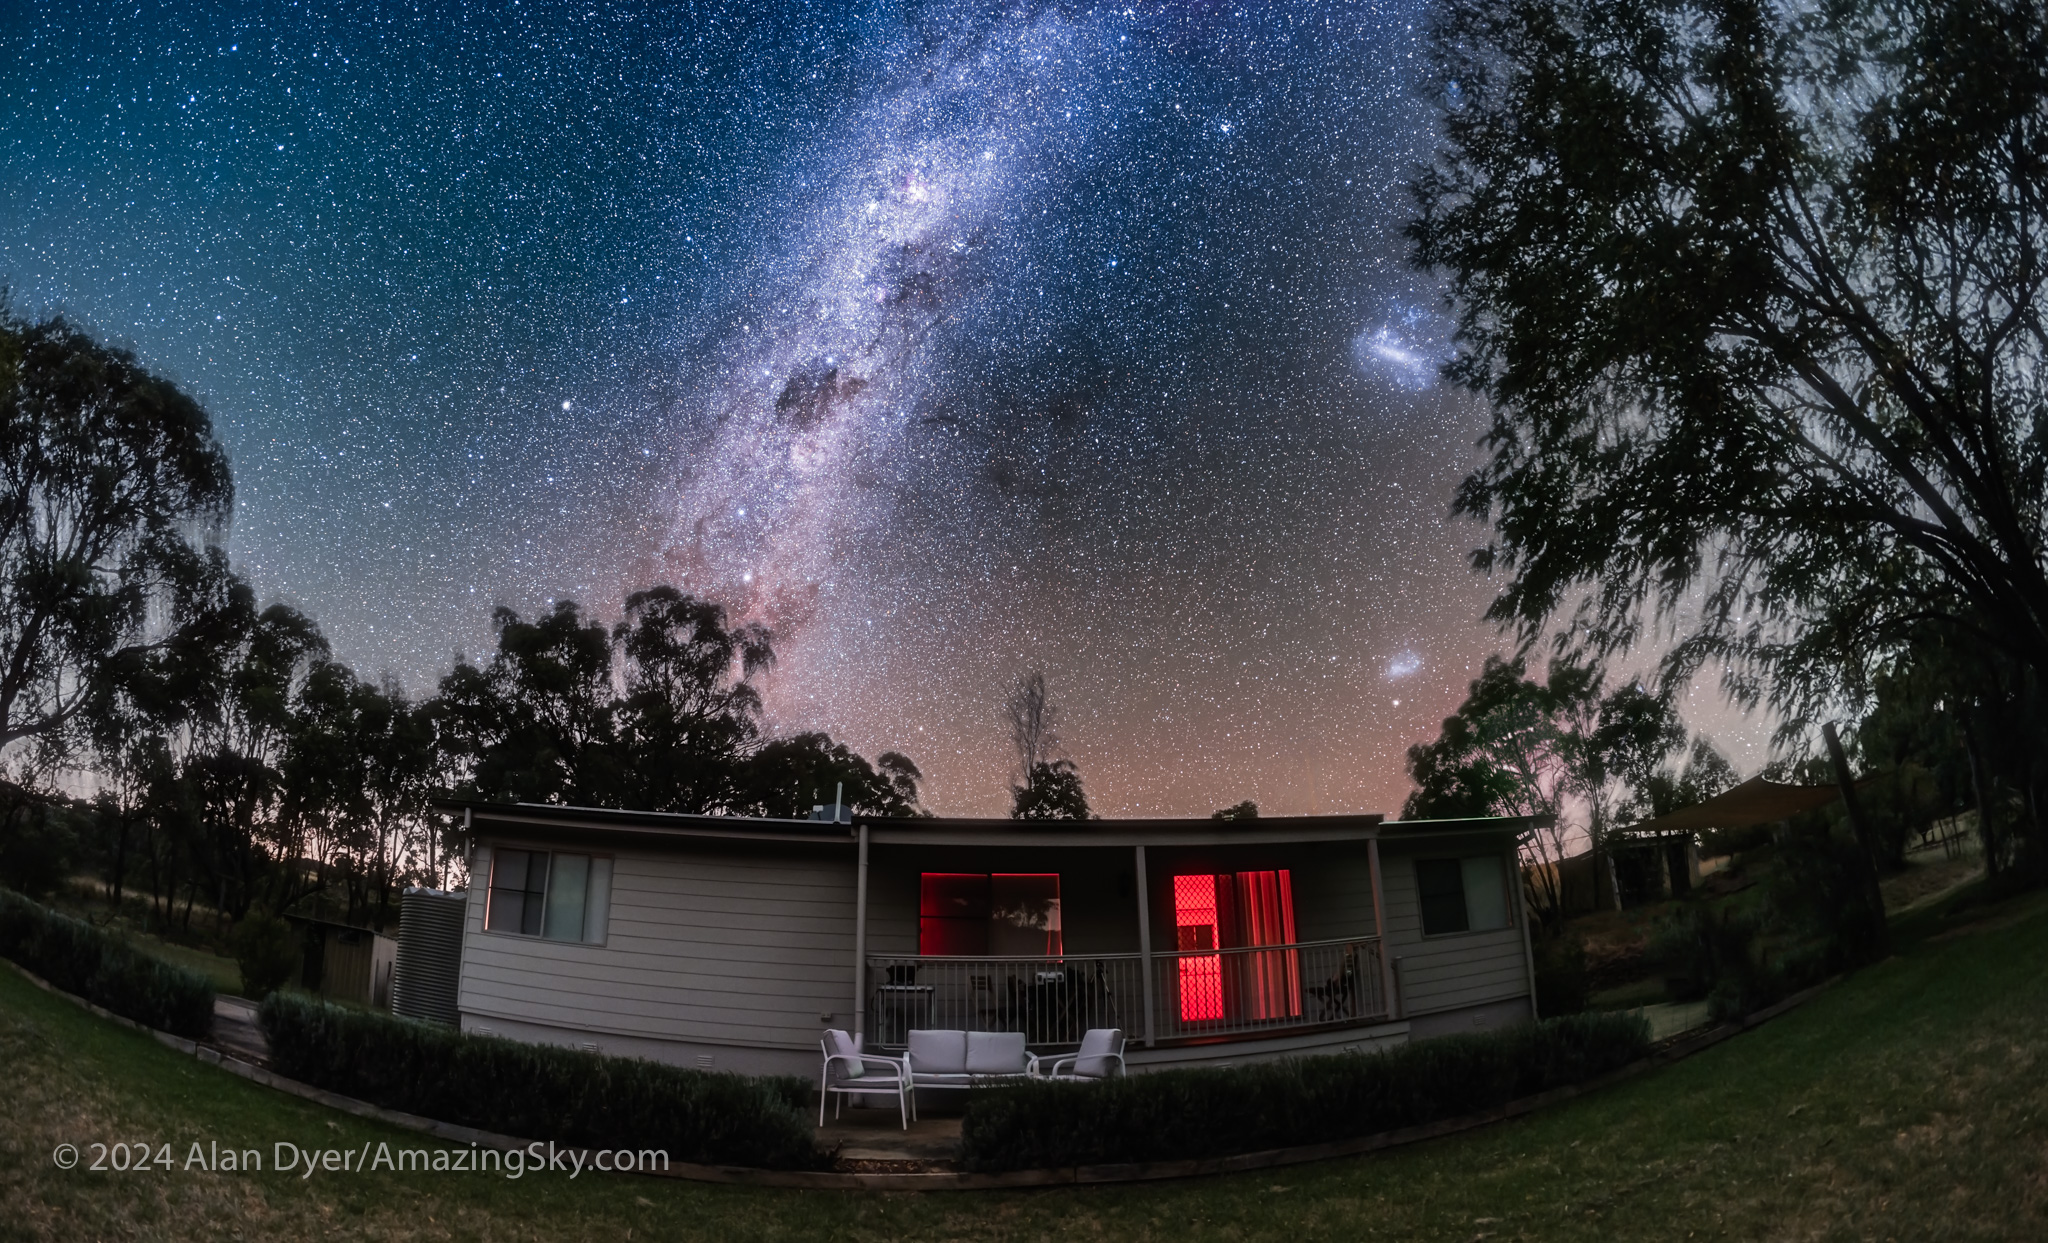
A pano of Mirrabook Cottage, my astronomy retreat site.
My home for the first week in “Coona,” as the waning Moon got out of the way, was the Mirrabook Cottage off Timor Road, ideal as an astrophoto retreat. The view to the east and south (the view above) is partly obscured by gum trees, but not enough to prevent shooting targets around the South Celestial Pole, such as the Magellanic Clouds, as I show below.
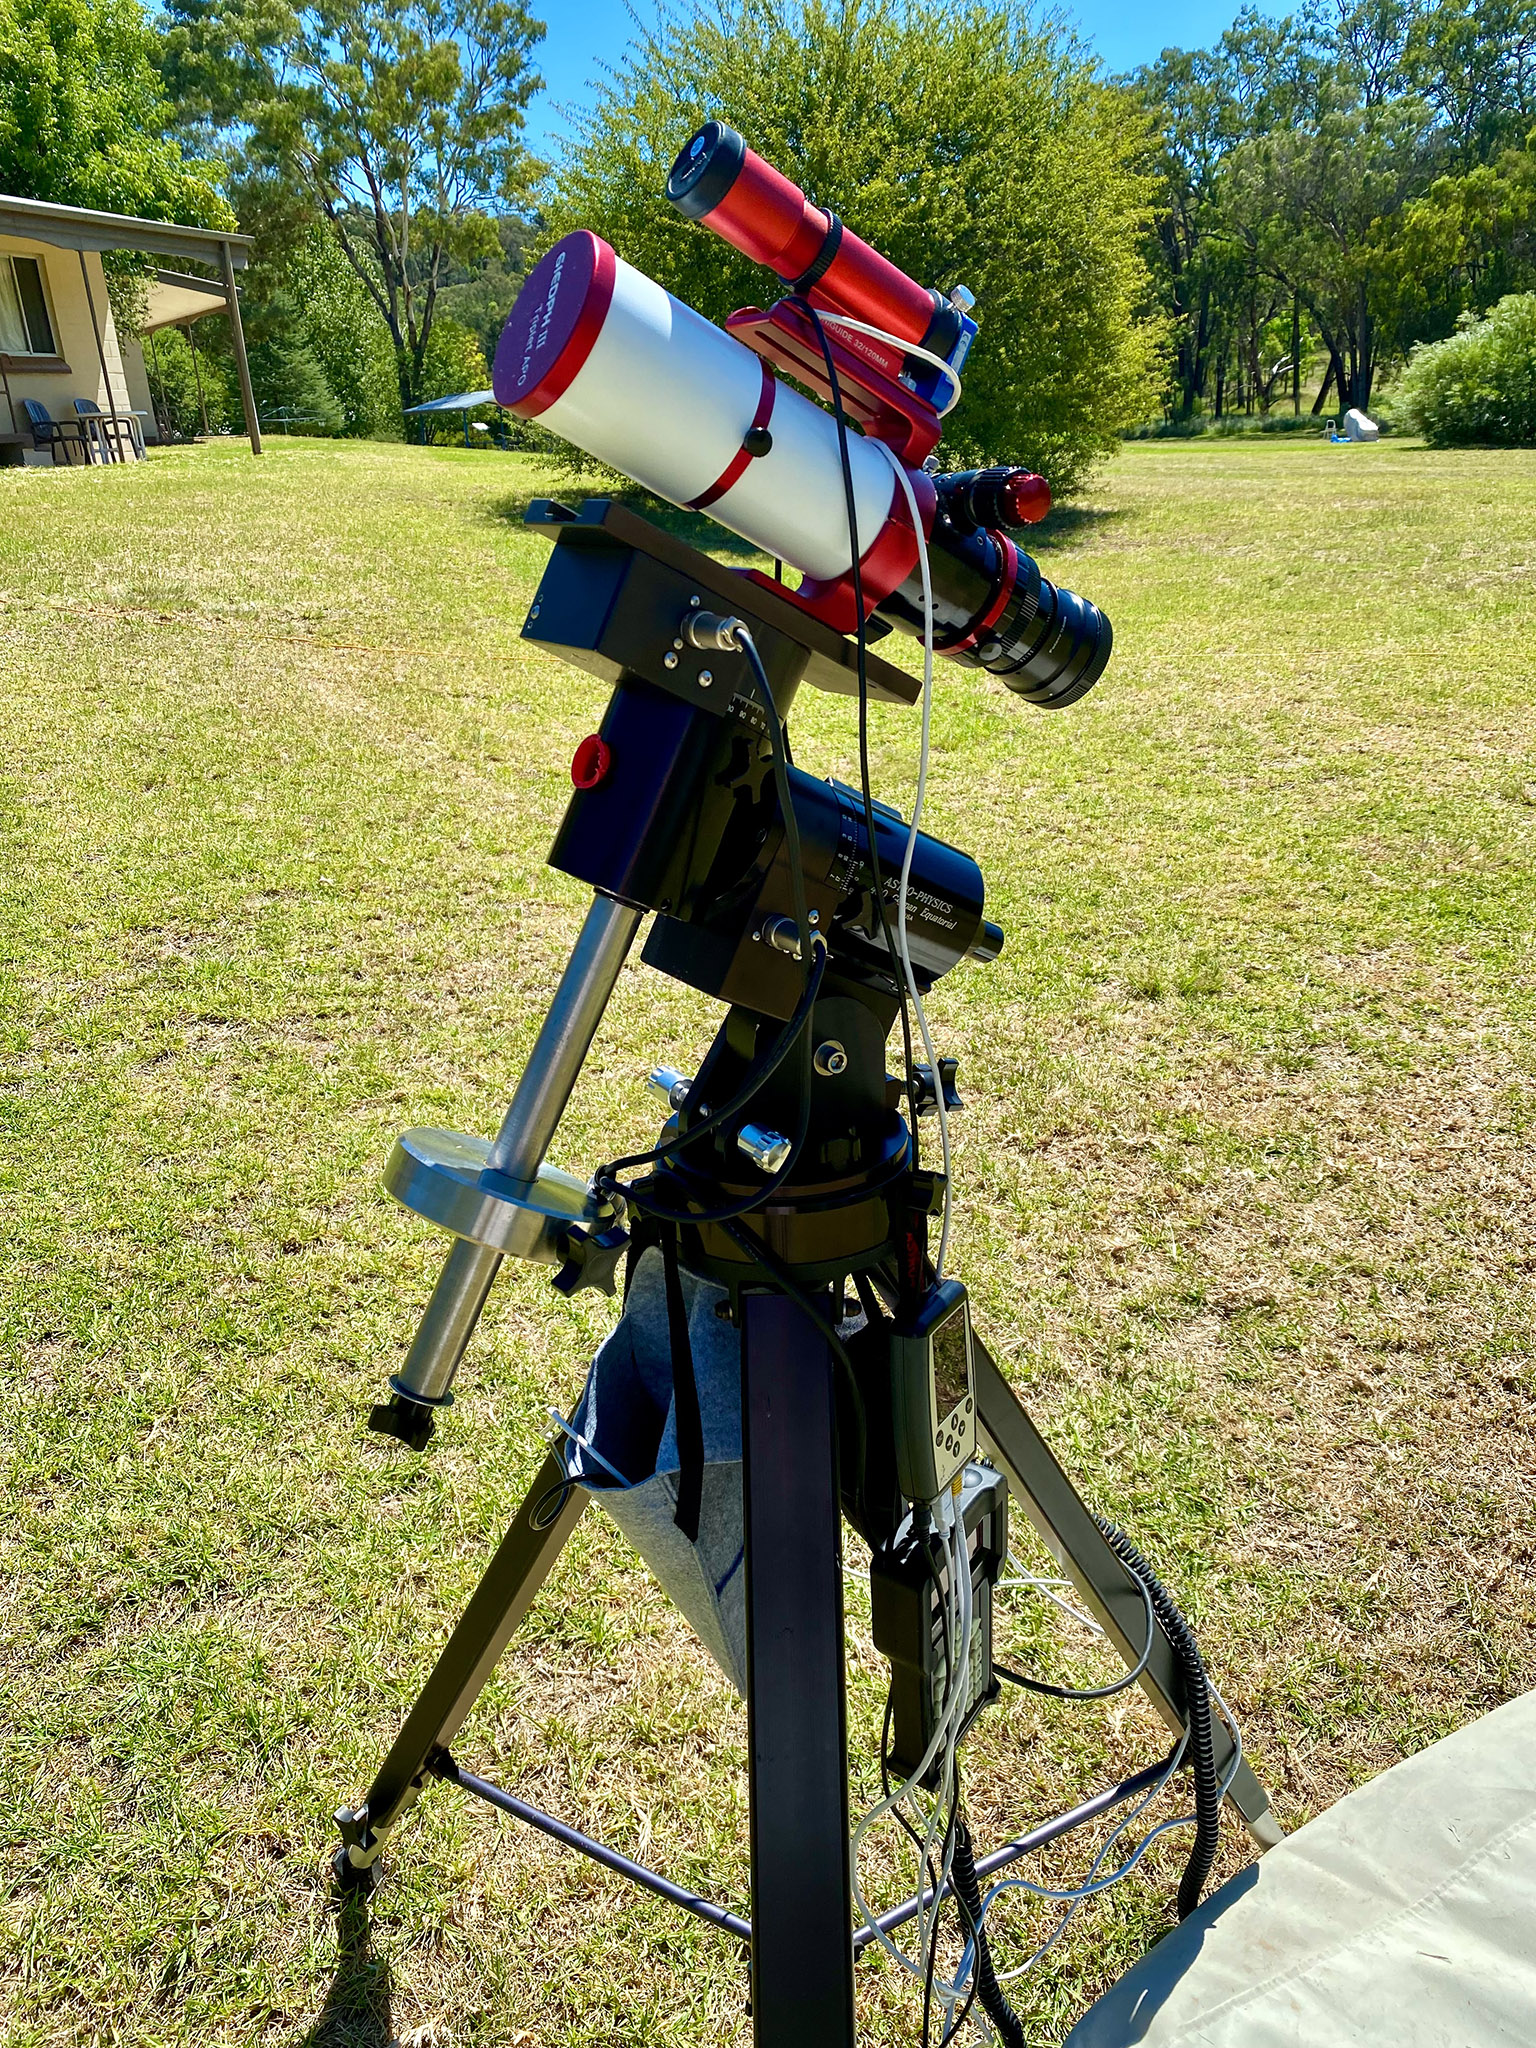
The scope came with me this time, but the mount had been in Oz for 20 years.
The first order of the day upon arriving was to sort out my gear, to see if it was all working. My main Oz telescope, a legendary Astro-Physics Traveler refractor that I had stored in Australia since the early 2000s, came home with me in 2017, for use at the 2017, 2023, and 2024 solar eclipses in North America (the links take you to blogs for those eclipses) .
So this year I brought another little refractor with me, the diminutive Sharpstar 61mm EDPH III. Many of the images I present here I shot with the Sharpstar, on the veteran Astro-Physics AP400 mount I show above, which had lived in Australia for two decades. It came home with me this time, to use the very next month at the April total eclipse in Quebec. My blog with the final music video from that eclipse is here.
But I also brought a little star tracker, an MSM Nomad, which I reviewed here, just in case the old iOptron tracker I had in Australia, but hadn’t used since 2017, did not work. I needn’t have feared. It was the new Nomad that had issues, with the iOptron serving me well as a back-up for wide-angle Milky Way images.
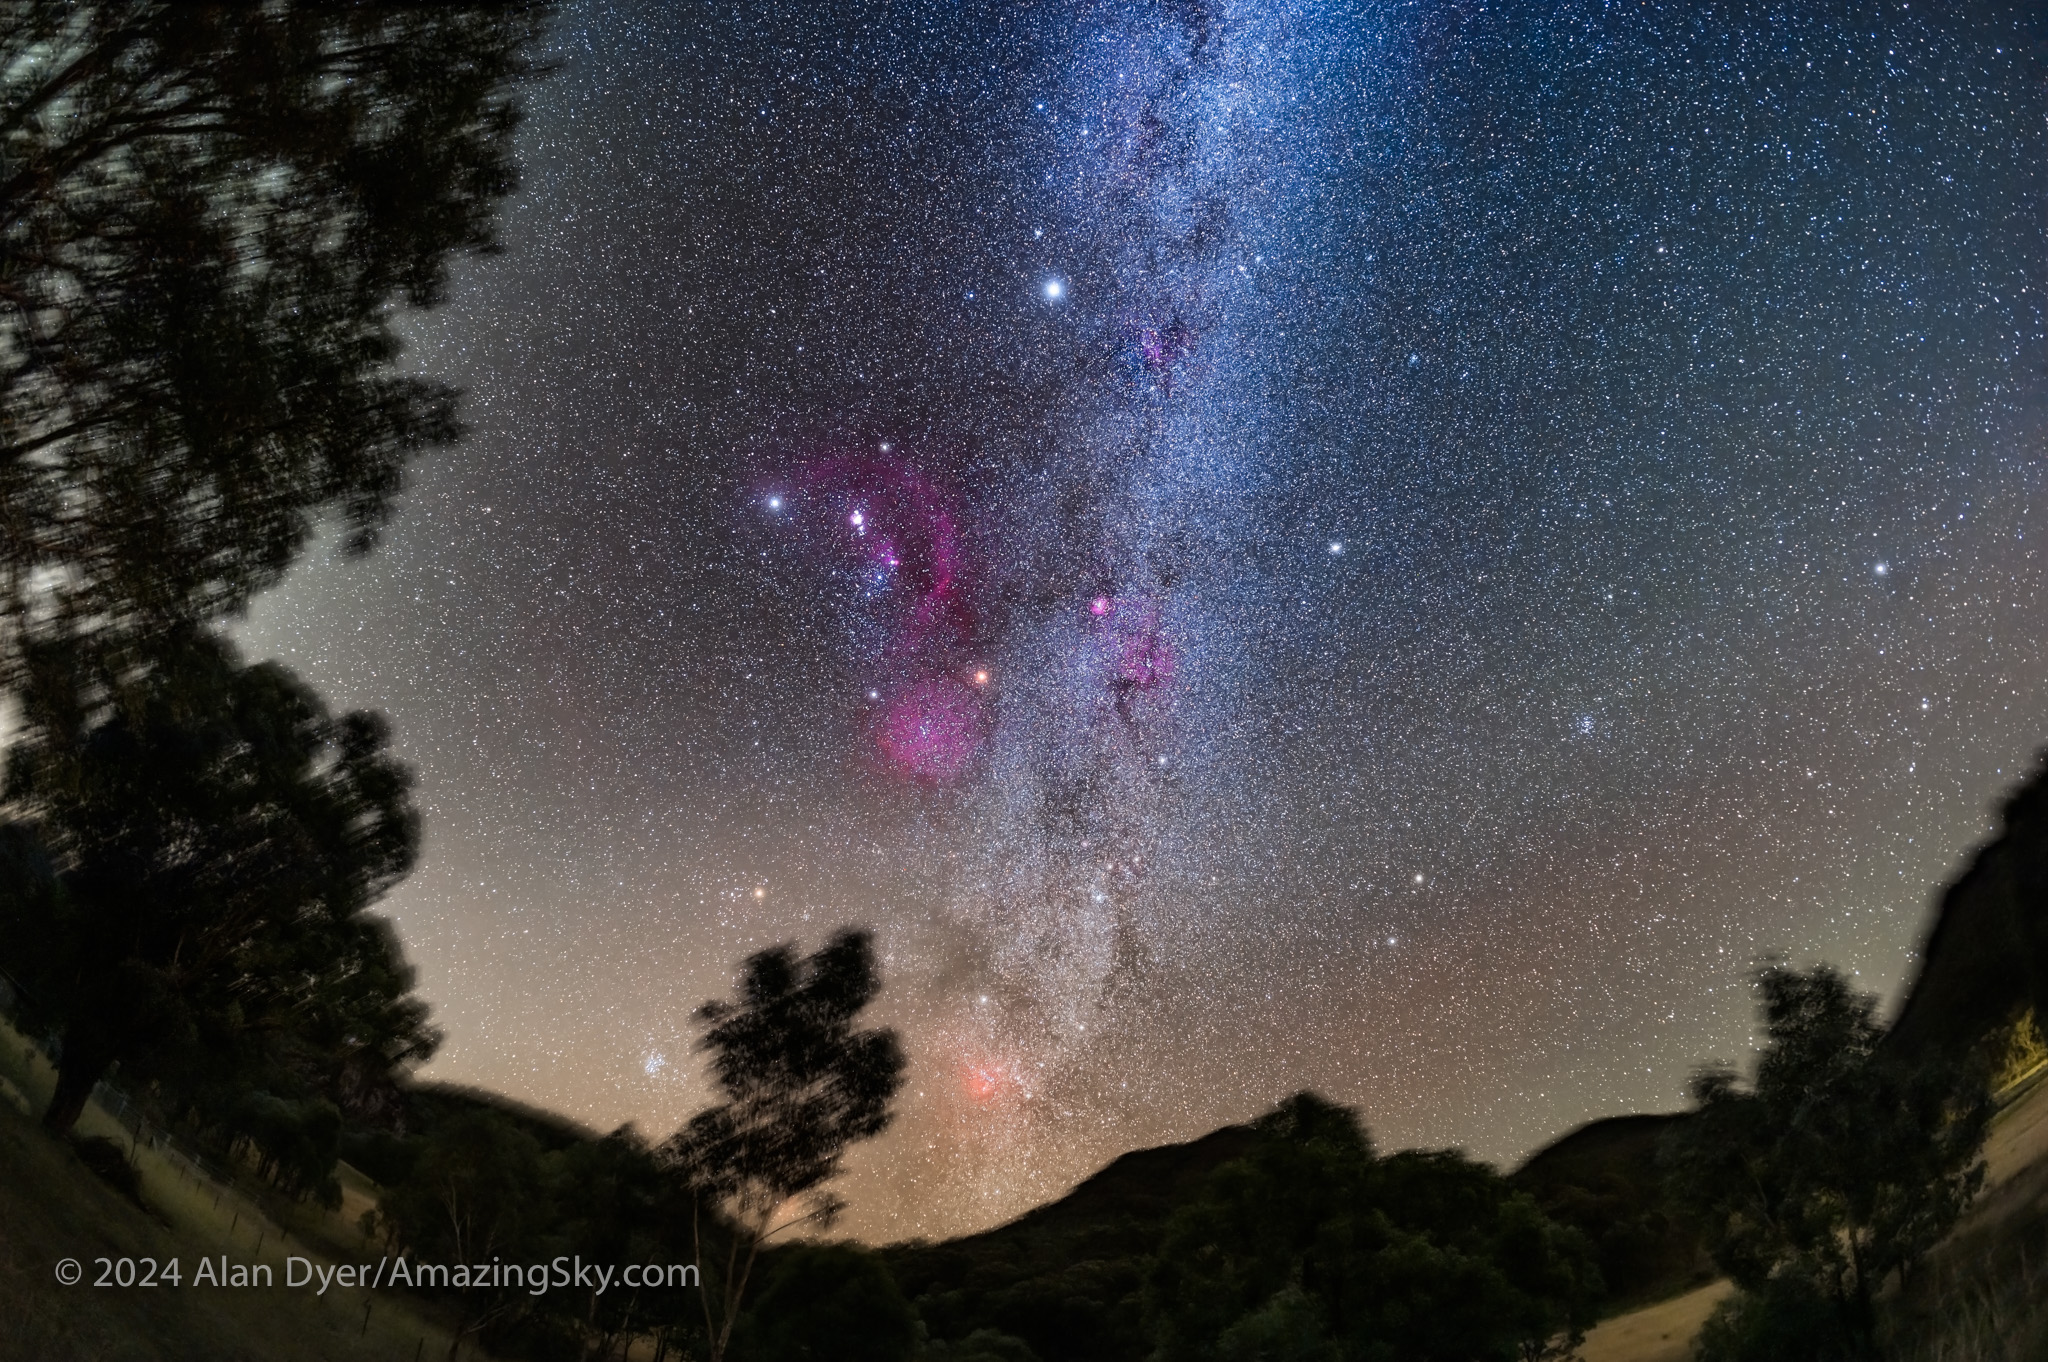
This is a wide-angle view of the constellations of the northern hemisphere winter, but seen from the southern hemisphere looking north on an austral autumn night, March 3, 2024. Shot on the MSM Nomad tracker, for a blend of 4 x 2-minutes tracked at ISO 1600 for the sky and 2 x 2-minutes untracked at ISO 800 for the ground.
From Mirrabook looking north affords a fine view of a sky familiar to us northerners — if we stand on our heads! Orion and the stars of “winter” are there but upside-down for us, with the constellations that are overhead for us at home, now low in the north.
I shot all the images presented here during my two-week Oz astrophoto extravaganza. I had clear skies every night, bar for a couple that were welcome breaks!
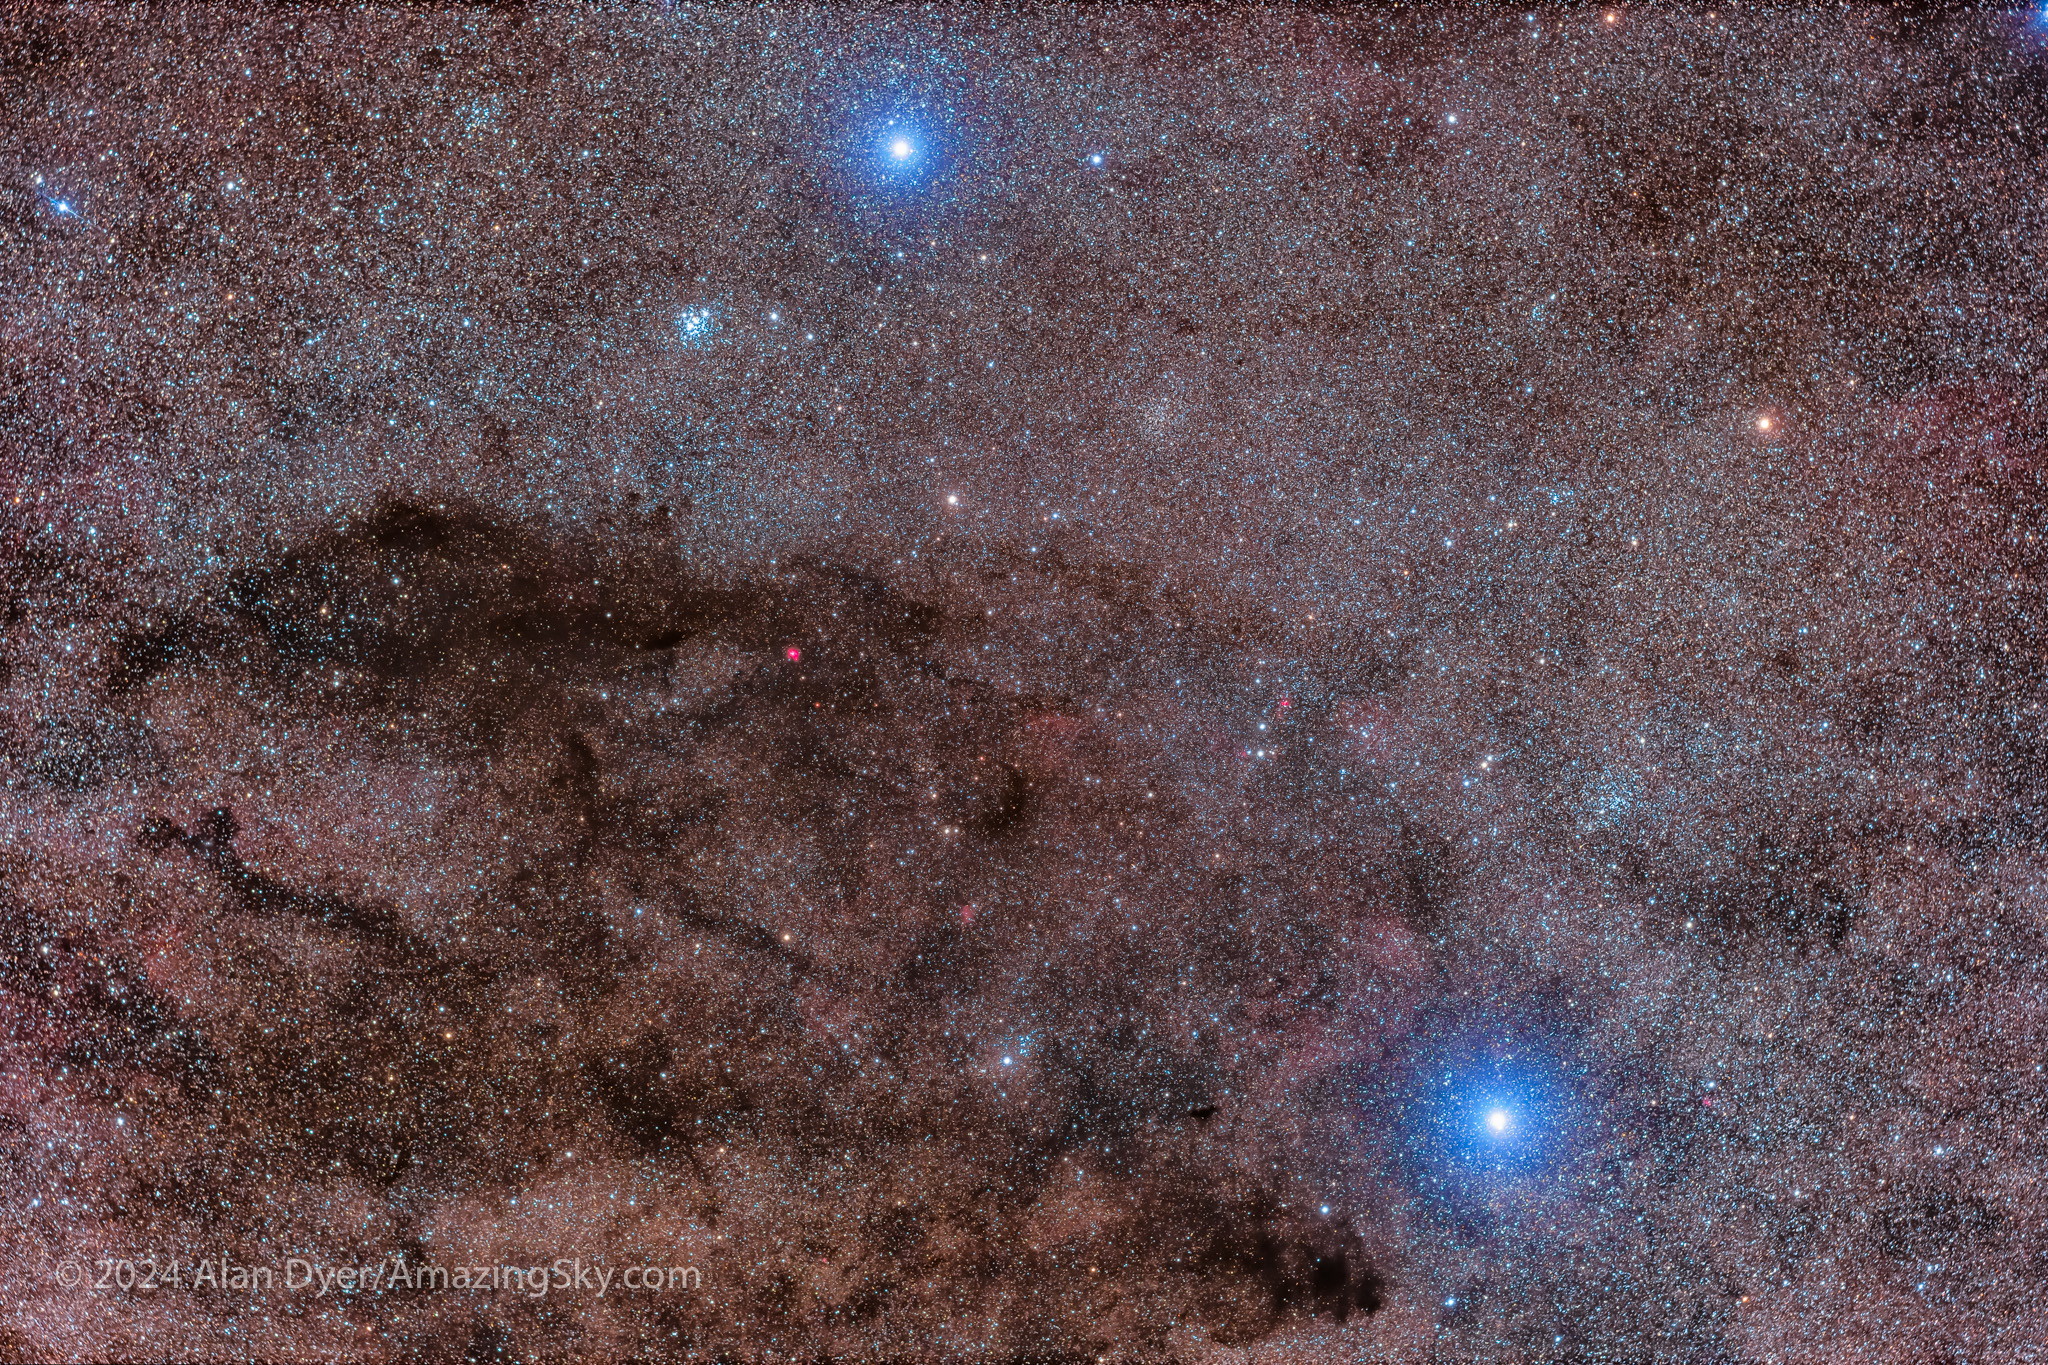
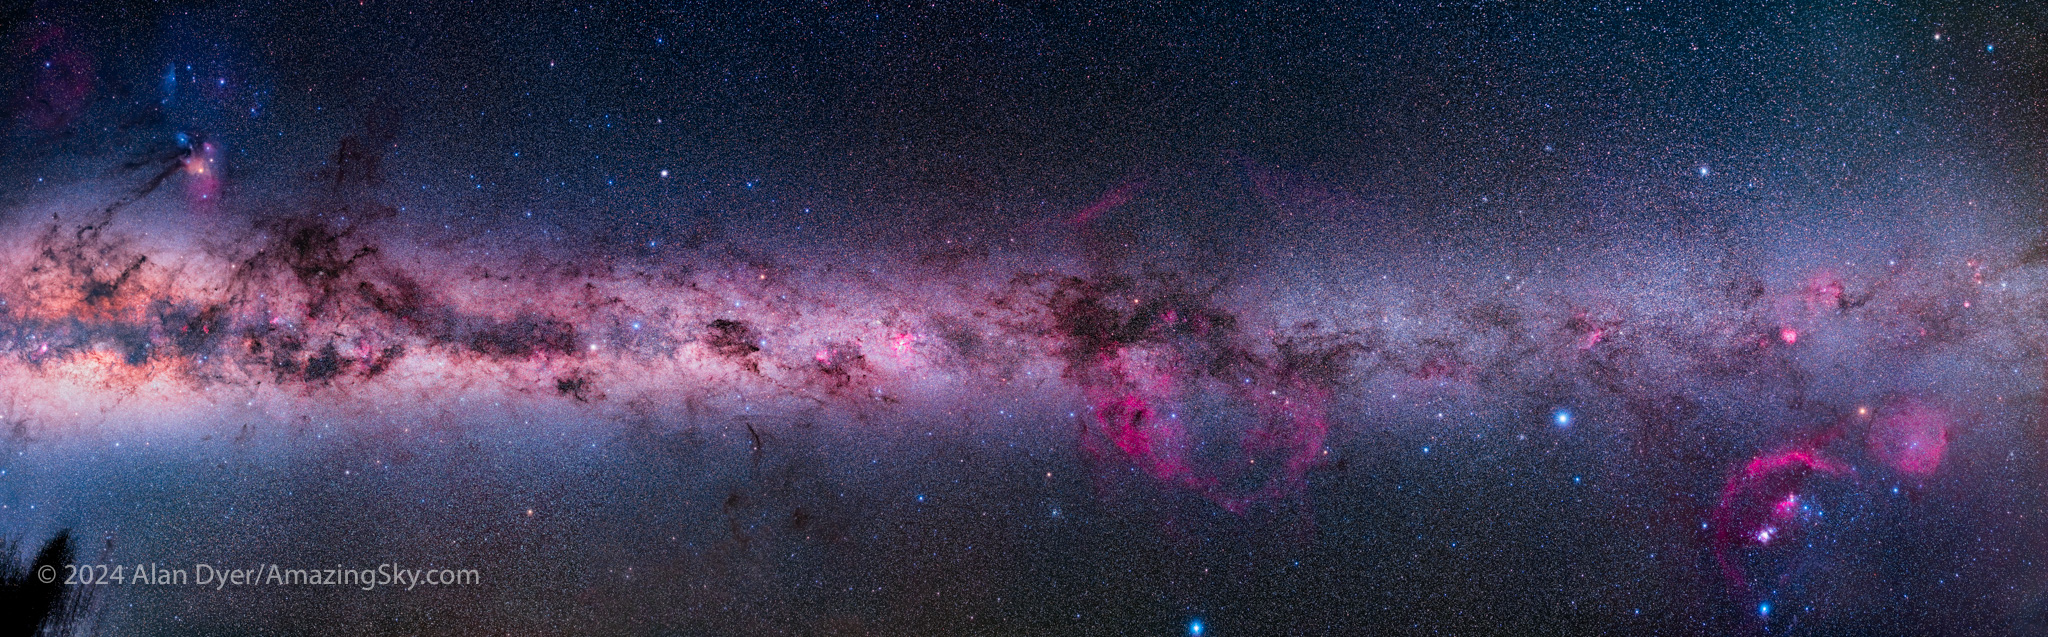
This is a wide-angle view of the southern Milky Way, here from Carina and Crux at lower left up to Orion and Monoceros at upper right. On the MSM Nomad tracker, for a stack of 10 x 3-minute exposures at ISO 800 with the TTArtisan 11mm lens on the Canon Ra.
South of Orion, and overhead from Australia (as I show above), is the dimmer section of the Milky Way passing through constellations once part of the huge celestial ship Argo Navis, now broken into Puppis the Aft Deck, Vela the Sails, and Carina the Keel, the latter containing the second brightest star in the night sky, Canopus, second only to Sirius nearby in Canis Major.
Puppis and Vela
Though somewhat obscure and hard to pick out as distinctive patterns, Puppis and Vela are filled with deep-sky wonders.
The biggest is so vast it covers as much sky as a hand length, held at arm’s length. But it is totally invisible to the eye, even aided by optics.
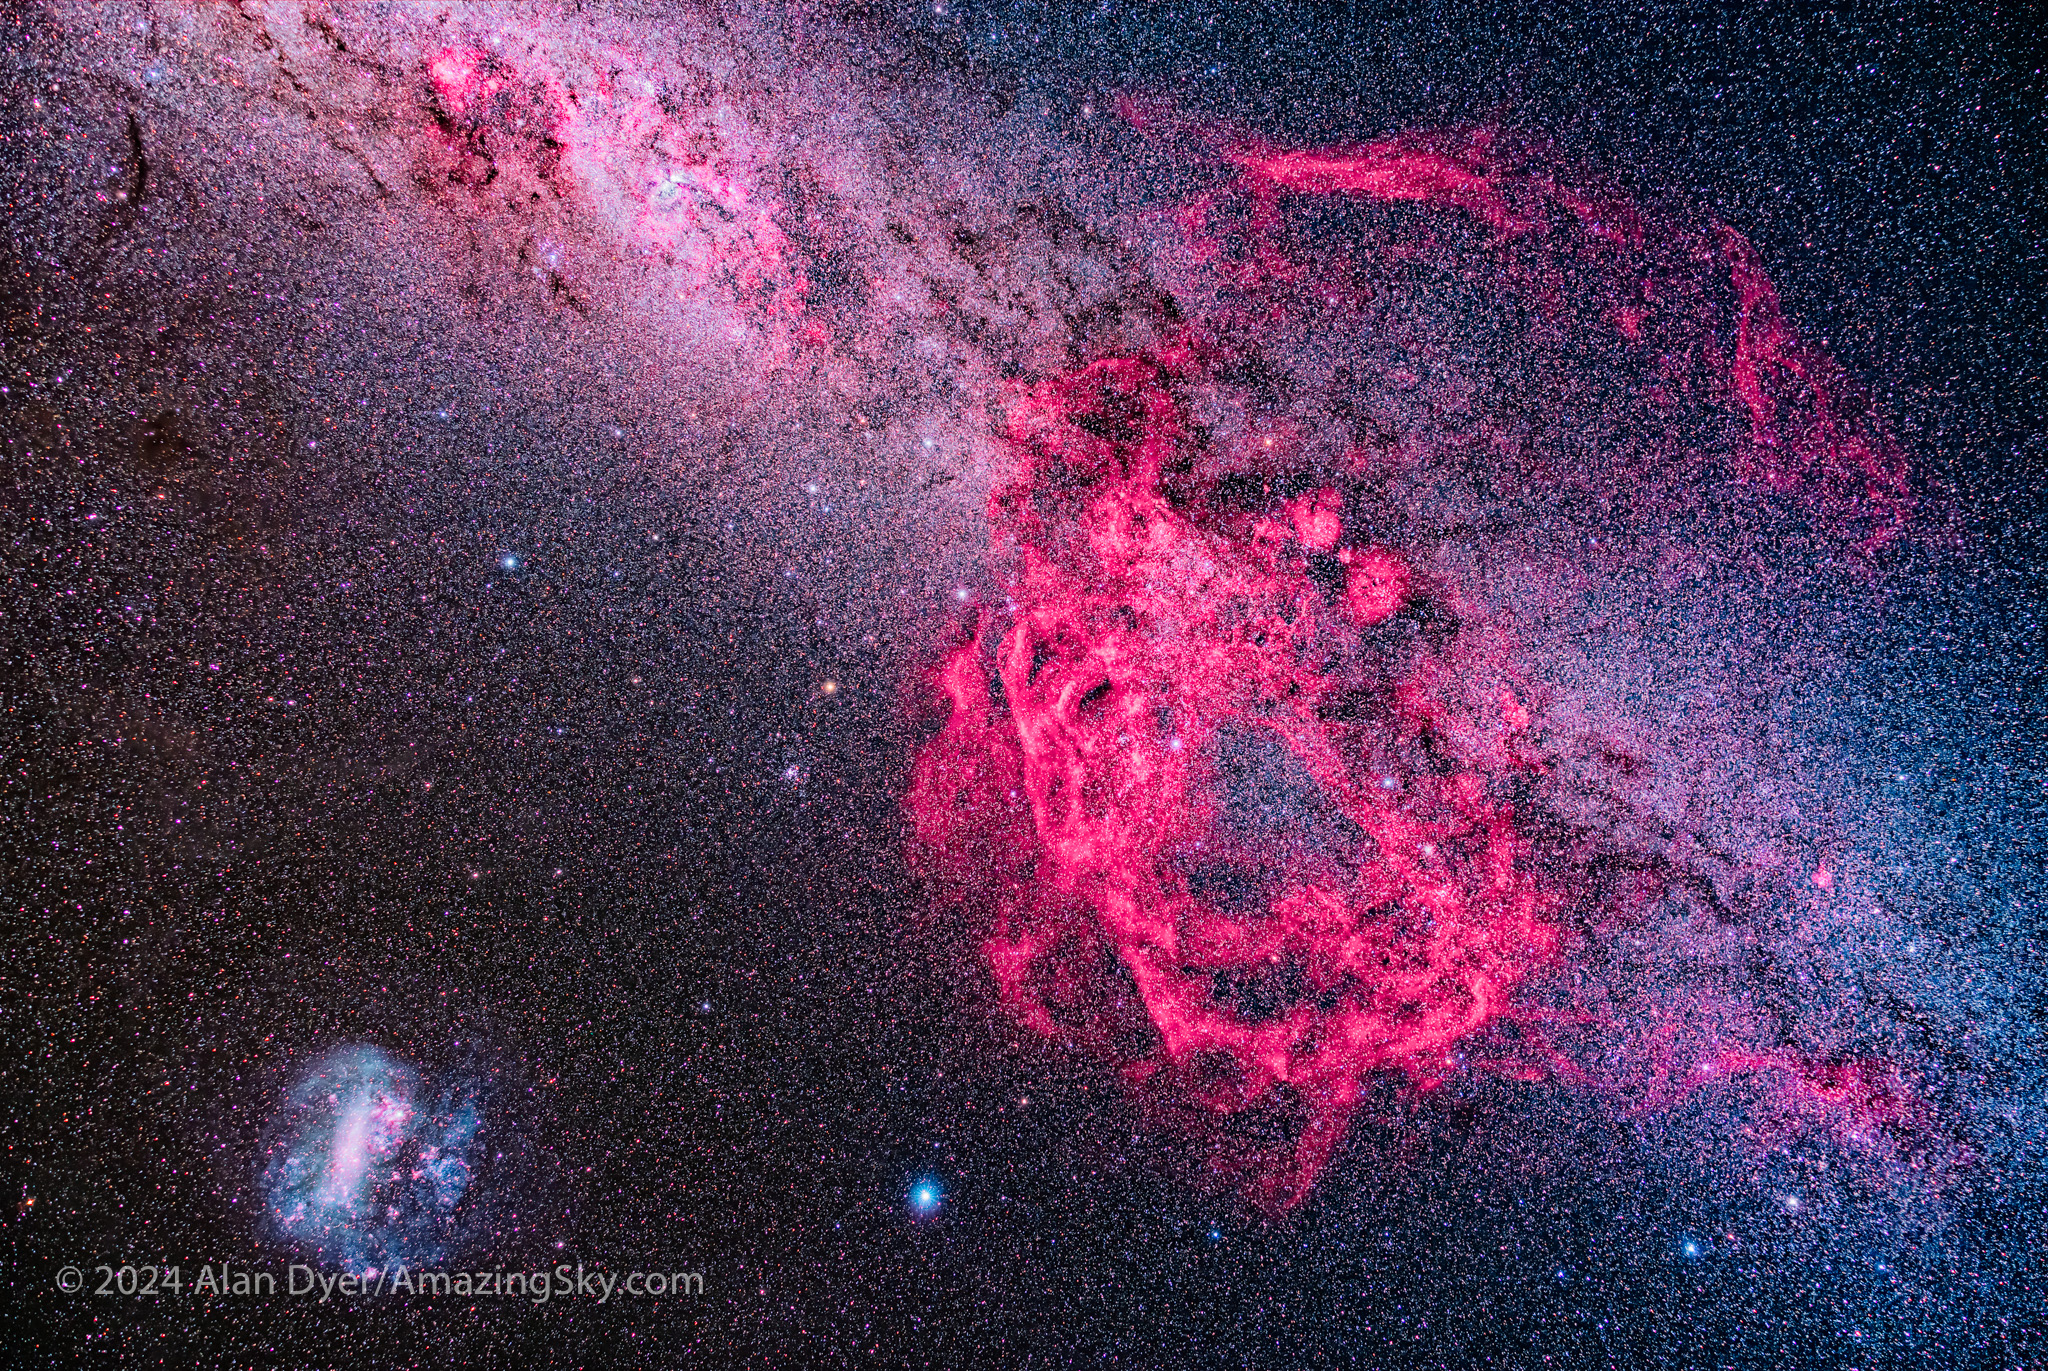
This is a framing of the vast Gum Nebula in the southern Milky Way, that sprawls over the constellations of Vela and Puppis. This is a stack of 12 x 5 minutes at ISO 1600 and f/2 with the Astronomik 12nm H-alpha clip-in filter, blended onto the base unfiltered images from a stack of 14 x 3 minutes at f/2.8, all with the Canon RF28-70mm lens at 28mm on the red-sensitive Canon Ra camera, and on the MSM Nomad tracker.
This is the huge Gum Nebula, discovered in 1955 by Australian astronomer Colin Gum, working at the Mt. Stromlo Observatory near Canberra. It might be a star-forming nebula shaped by stellar winds, or it might be the exploded debris of a nearby supernova star.
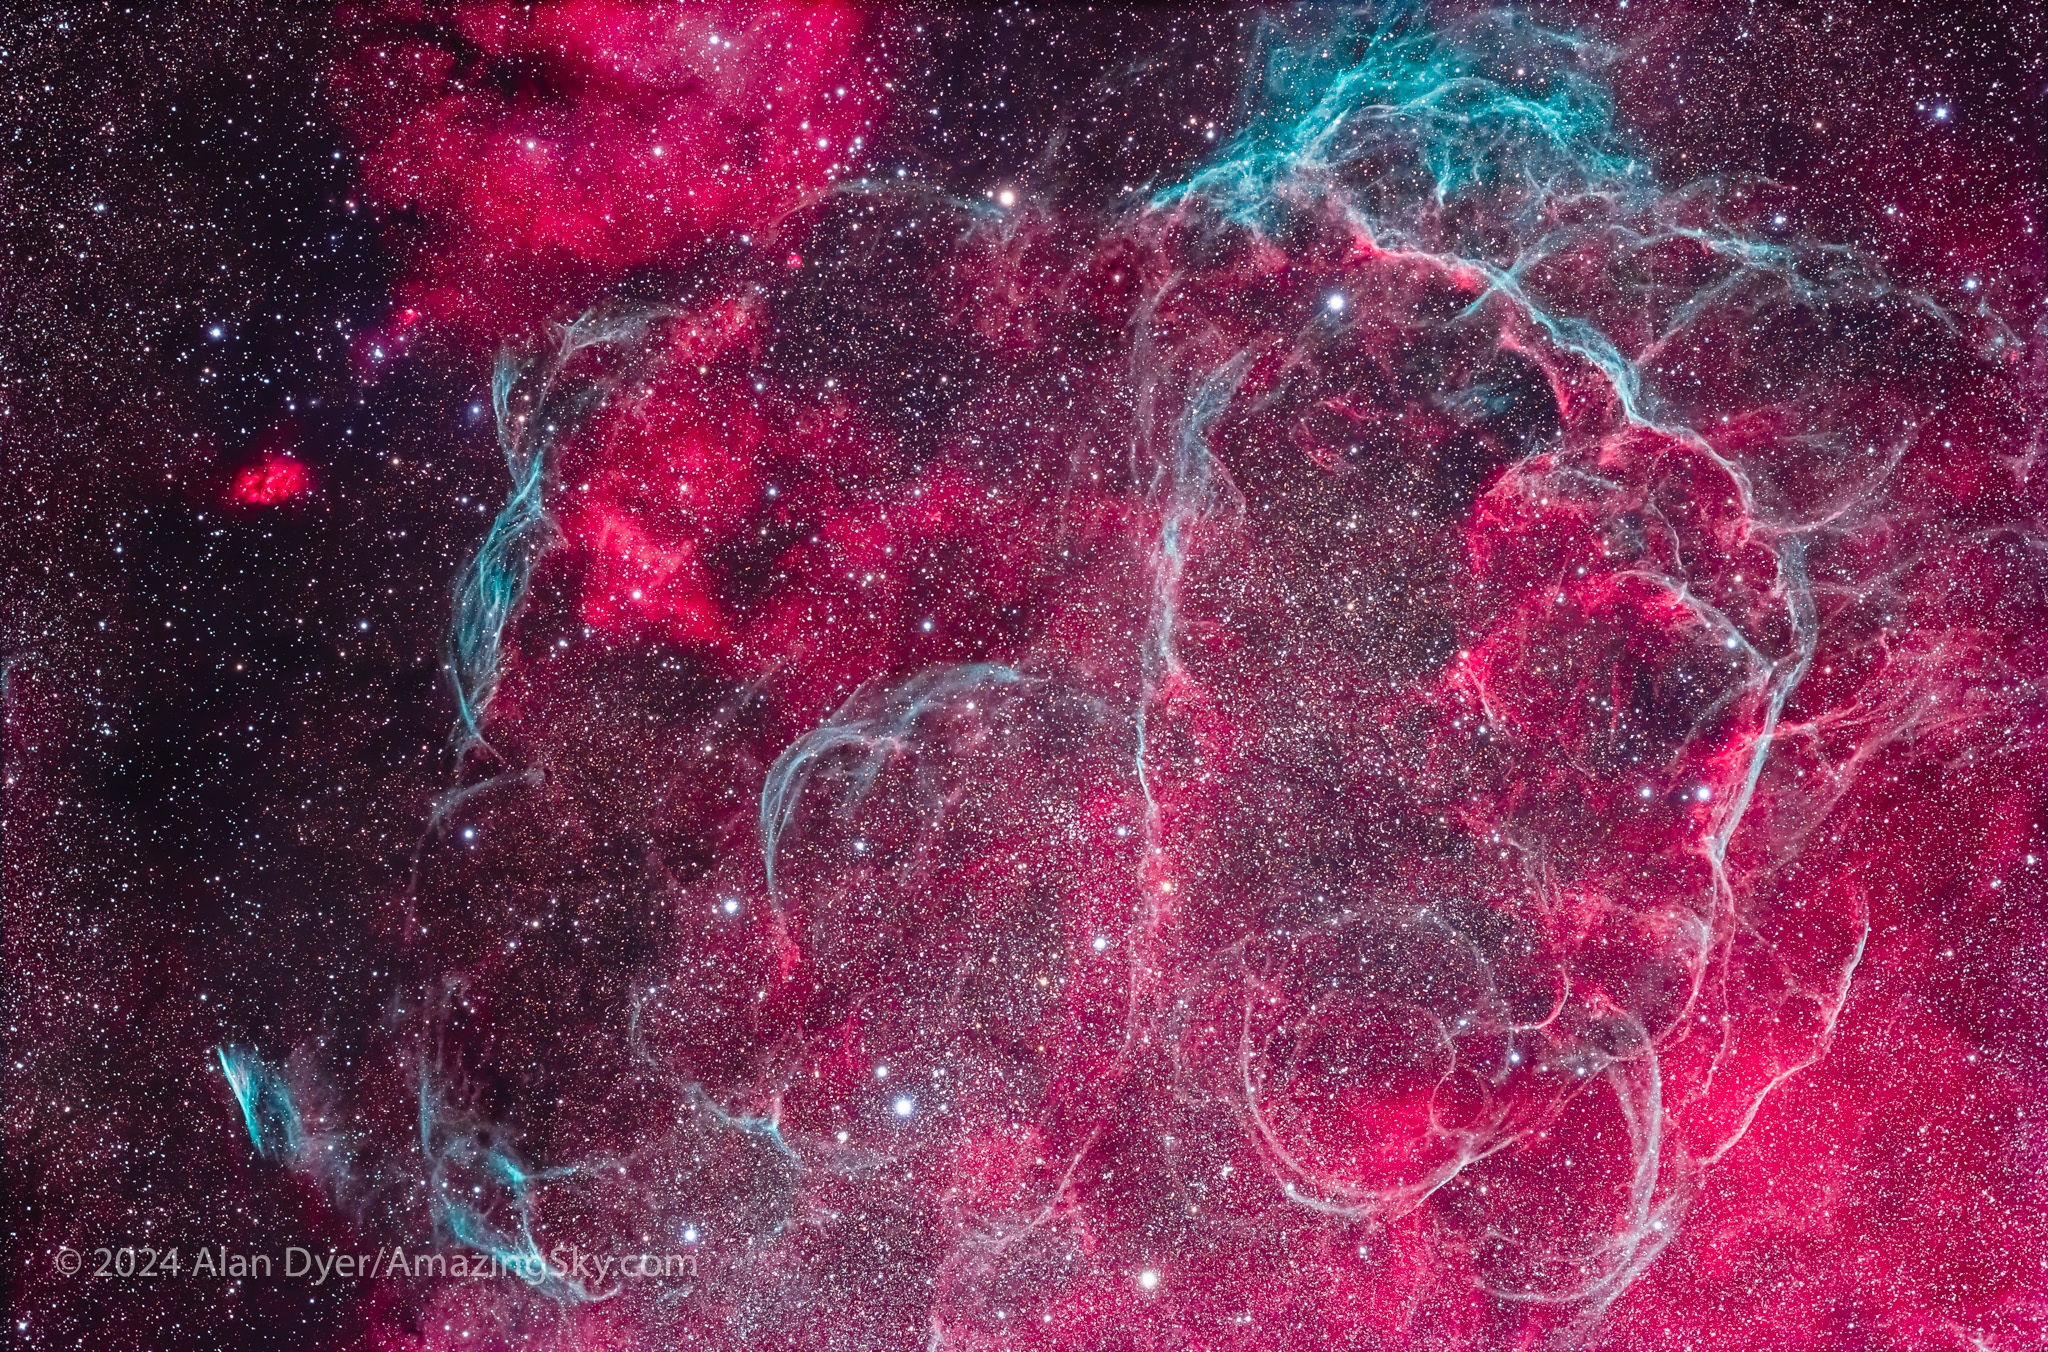
Within the Gum Nebula in Vela is a smaller complex of arcs and fragments I show below. This definitely is a supernova remnant, one that exploded about 11,000 years ago some 900 light years away. But it, too, is large, making it a perfect target for the little refractor, and a telephoto lens, with both versions below.
This frames most of the intricate arcs and loops of the Vela Supernova Remnant (SNR). This is a stack of 8 x 10-minute exposures shot through an IDAS NBZ dual narrowband filter to bring out the nebulosity, blended with a stack of 12 x 5-minute exposures with no filter. All with the filter-modified Canon EOS R camera, on the Sharpstar 61 EDPH III refractor at f/4.4. This is the large Vela Supernova Remnant in a stack of 15 x 2-minute exposures with the Canon RF135mm lens at f/2 on the Canon Ra at ISO 1000. With a broadband filter.
The area is also home to rich fields of bright star clusters (two are below), many intertwined with wreaths of star-forming nebulosity. These rival or exceed the more famous northern targets of the Messier Catalogue compiled between 1774 and 1781 by Charles Messier. It took several more decades before astronomers from the north catalogued the sky to the south.
This is the bright, large and colourful naked-eye star cluster NGC 2516 in Carina, aka the Southern Beehive Cluster, near the bright star Avior (Epsilon Carinae) in Carina. This is a stack of 8 x 5 minute exposures with the Sharpstar 61mm refractor at f/4.4 and the Canon R at ISO 800.This frames a pair of contrasting and superb star clusters in Puppis: rich NGC 2477 on the left and sparse but bright NGC 2451 on the right, the latter centred on the orange star c Puppis. This is a stack of 8 x 5 minute exposures with the Sharpstar 61mm refractor at f/4.4 and the modified Canon R at ISO 800.
Carina and Crux
Continuing deeper down the Milky Way we come to its most southerly portion rich in nebulas and clusters that outclass anything up north. This is also the brightest part of the Milky Way after the Galactic Centre.
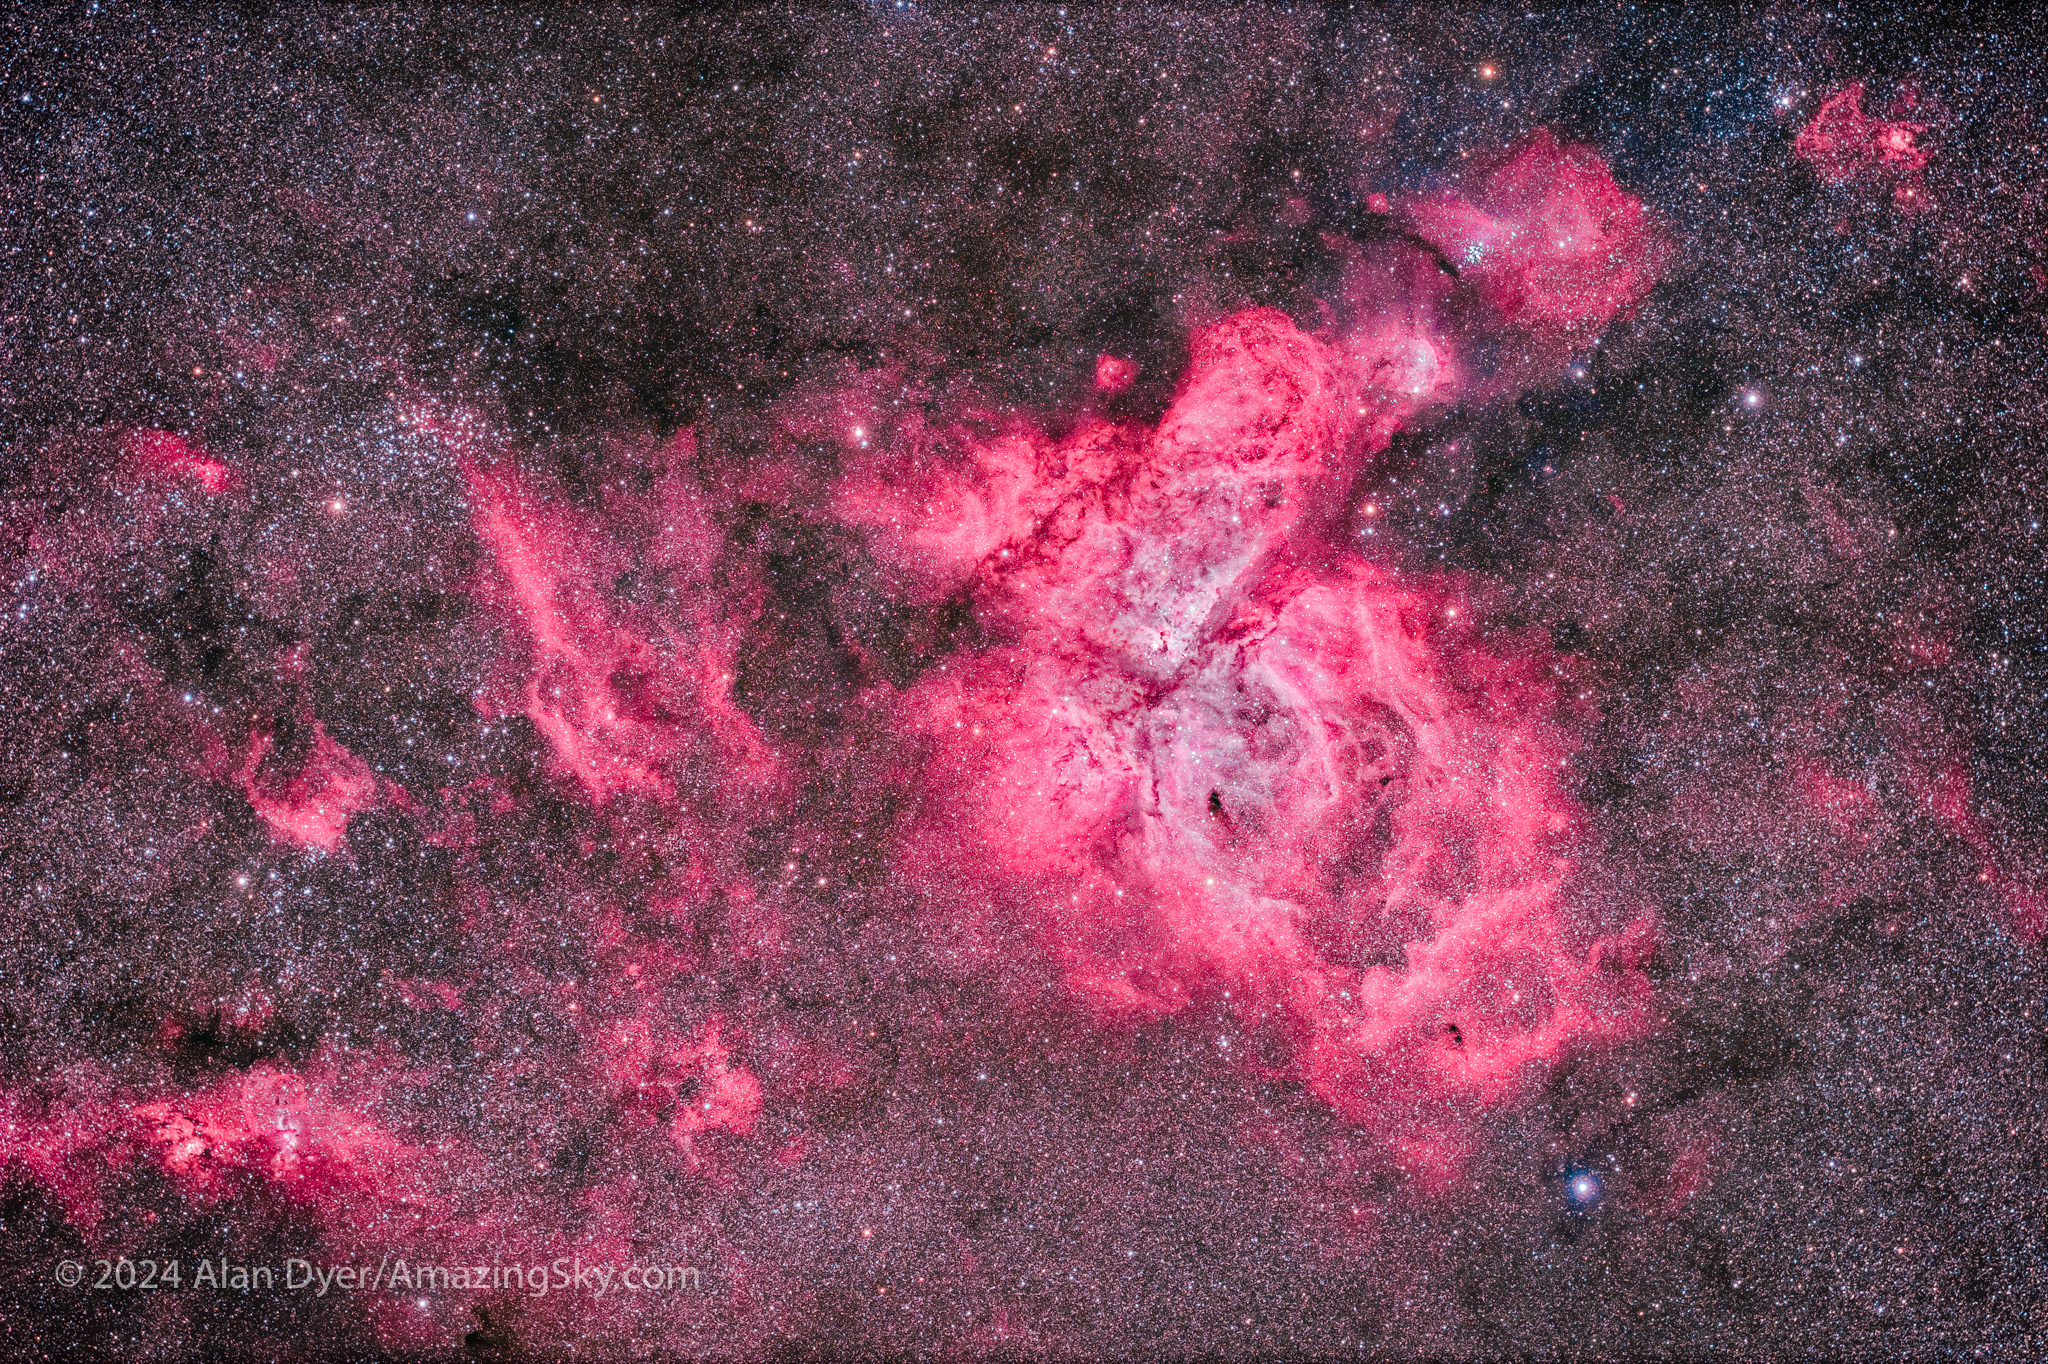
This is the showpiece nebula of the southern skies, the Carina Nebula. The bright and rich Football Cluster, aka the Black Arrow Cluster or Pincushion Cluster, is at upper left. With the Sharpstar refractor at f/4.4 and filter-modified Canon R at ISO 3200 for narrowband filtered shots and ISO 800 for unfiltered shots.
The Carina Nebula is larger than the more famous Orion Nebula farther north. In the eyepiece it is a glowing cloud painted in shades of grey and crossed by intersecting dark lanes of dust. Photographs reveal even more intricate details, and the magenta tints of glowing hydrogen.
At upper left is the “Football Cluster,” as Aussies call it, or the Black Arrow Cluster, aka NGC 3532. It is surely one of the finest open star clusters in the sky. John Herschel, who in the 19th century compiled the first thorough catalogue of southern objects, thought so. I agree!
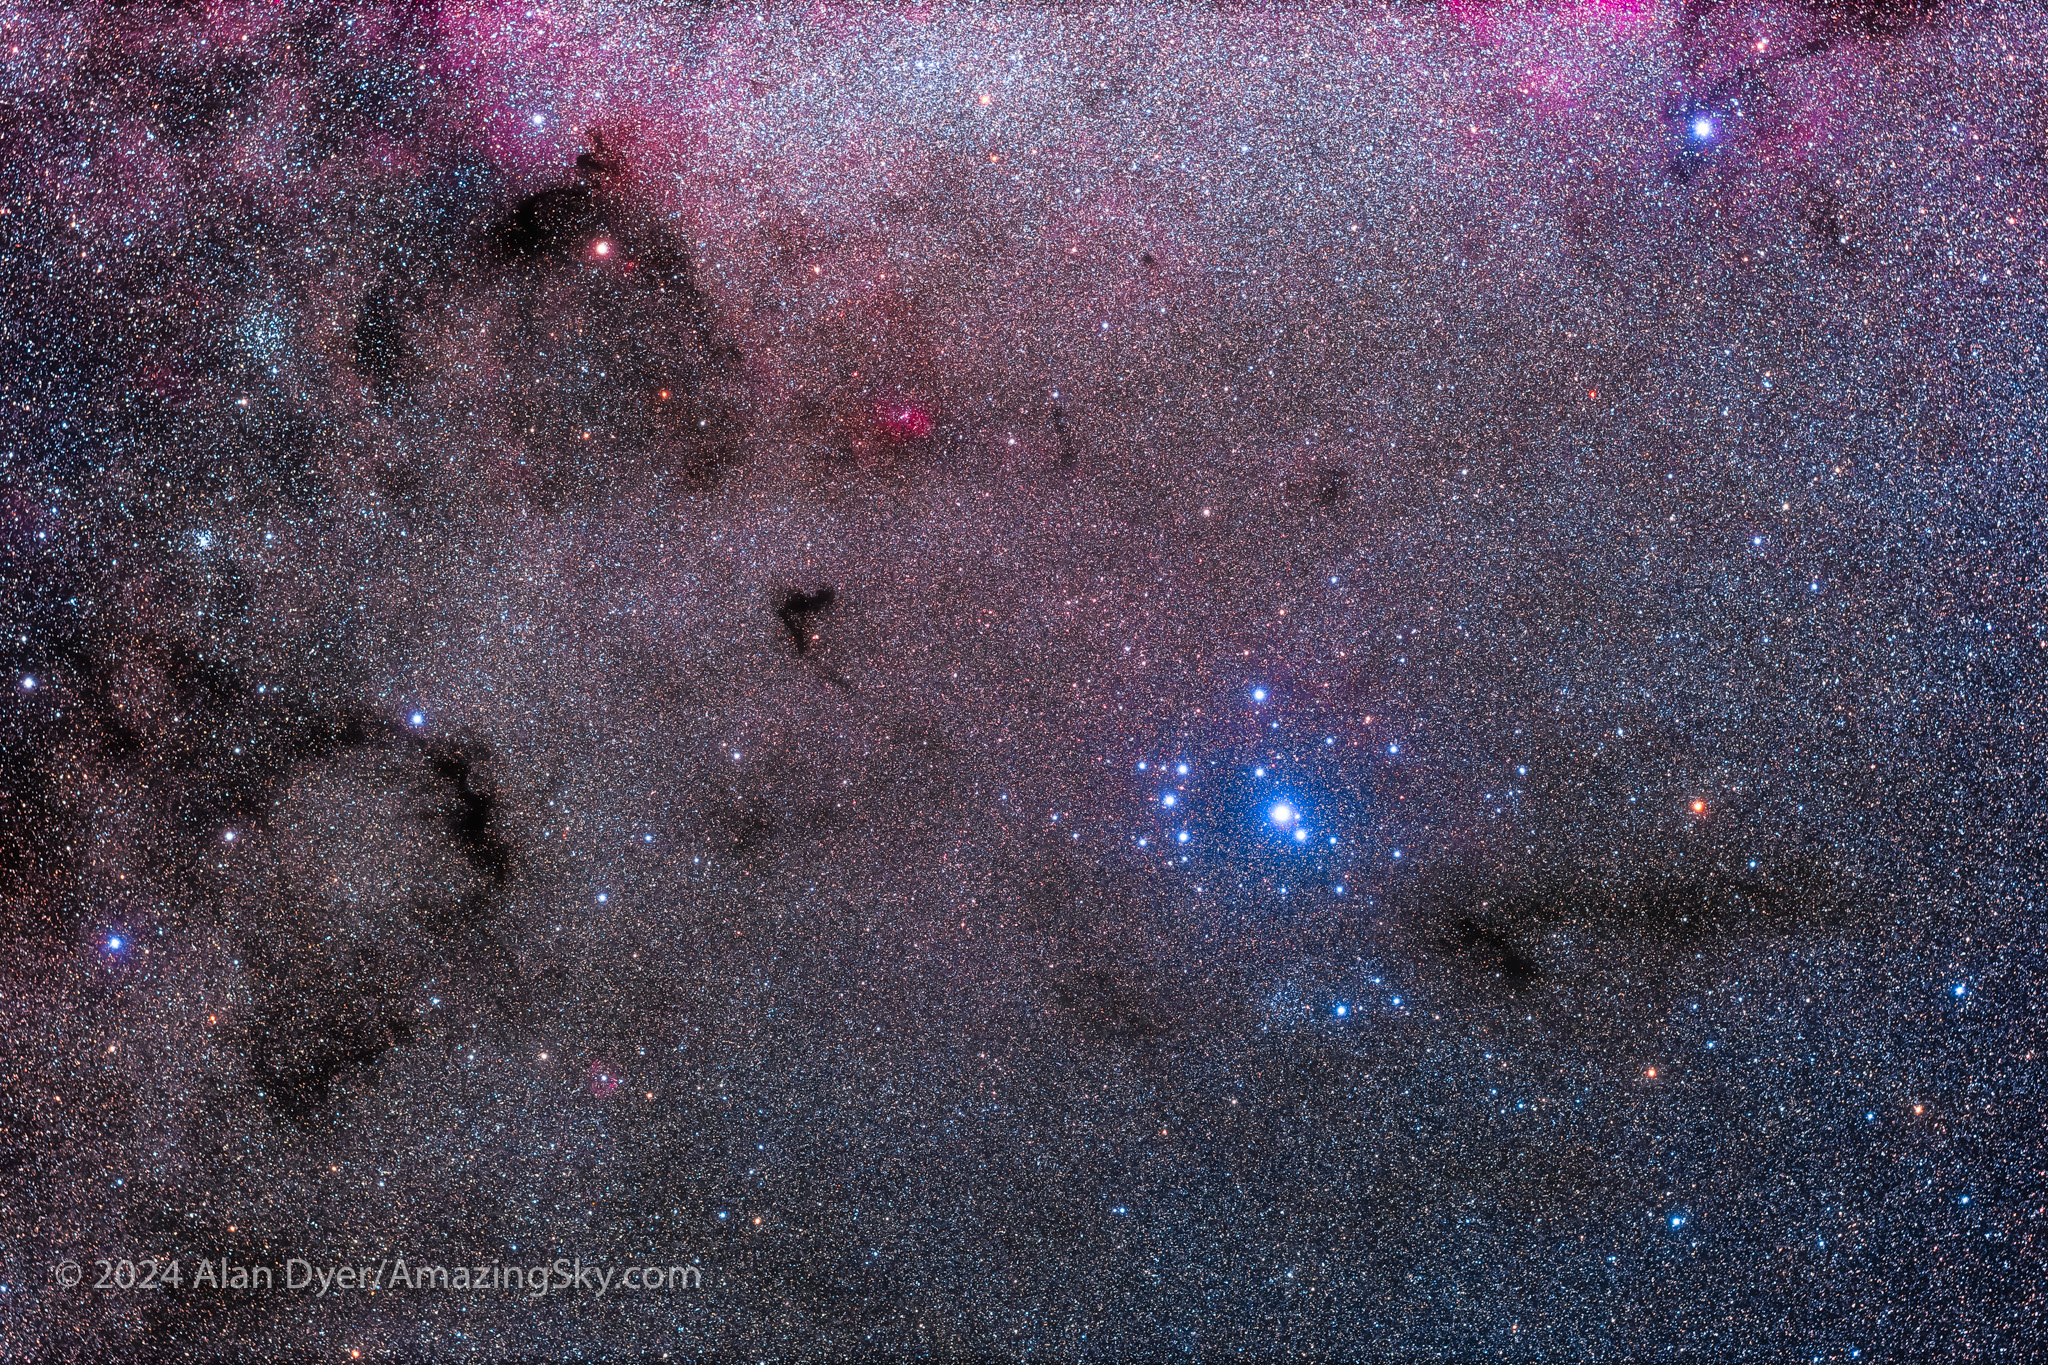
This is the Southern Pleiades star cluster surrounding the naked eye star Theta Carinae. This is a stack of 8 x 5 minute exposures with the Sharpstar 61mm refractor at f/4.4 and the Canon R at ISO 800.
Below the Carina Nebula is a brighter and bluer star cluster known as the Southern Pleiades, or IC 2602. Like many of the targets I show here, it is visible to the unaided eye and is a fine sight in binoculars, which are all you need to enjoy most of the southern splendours.
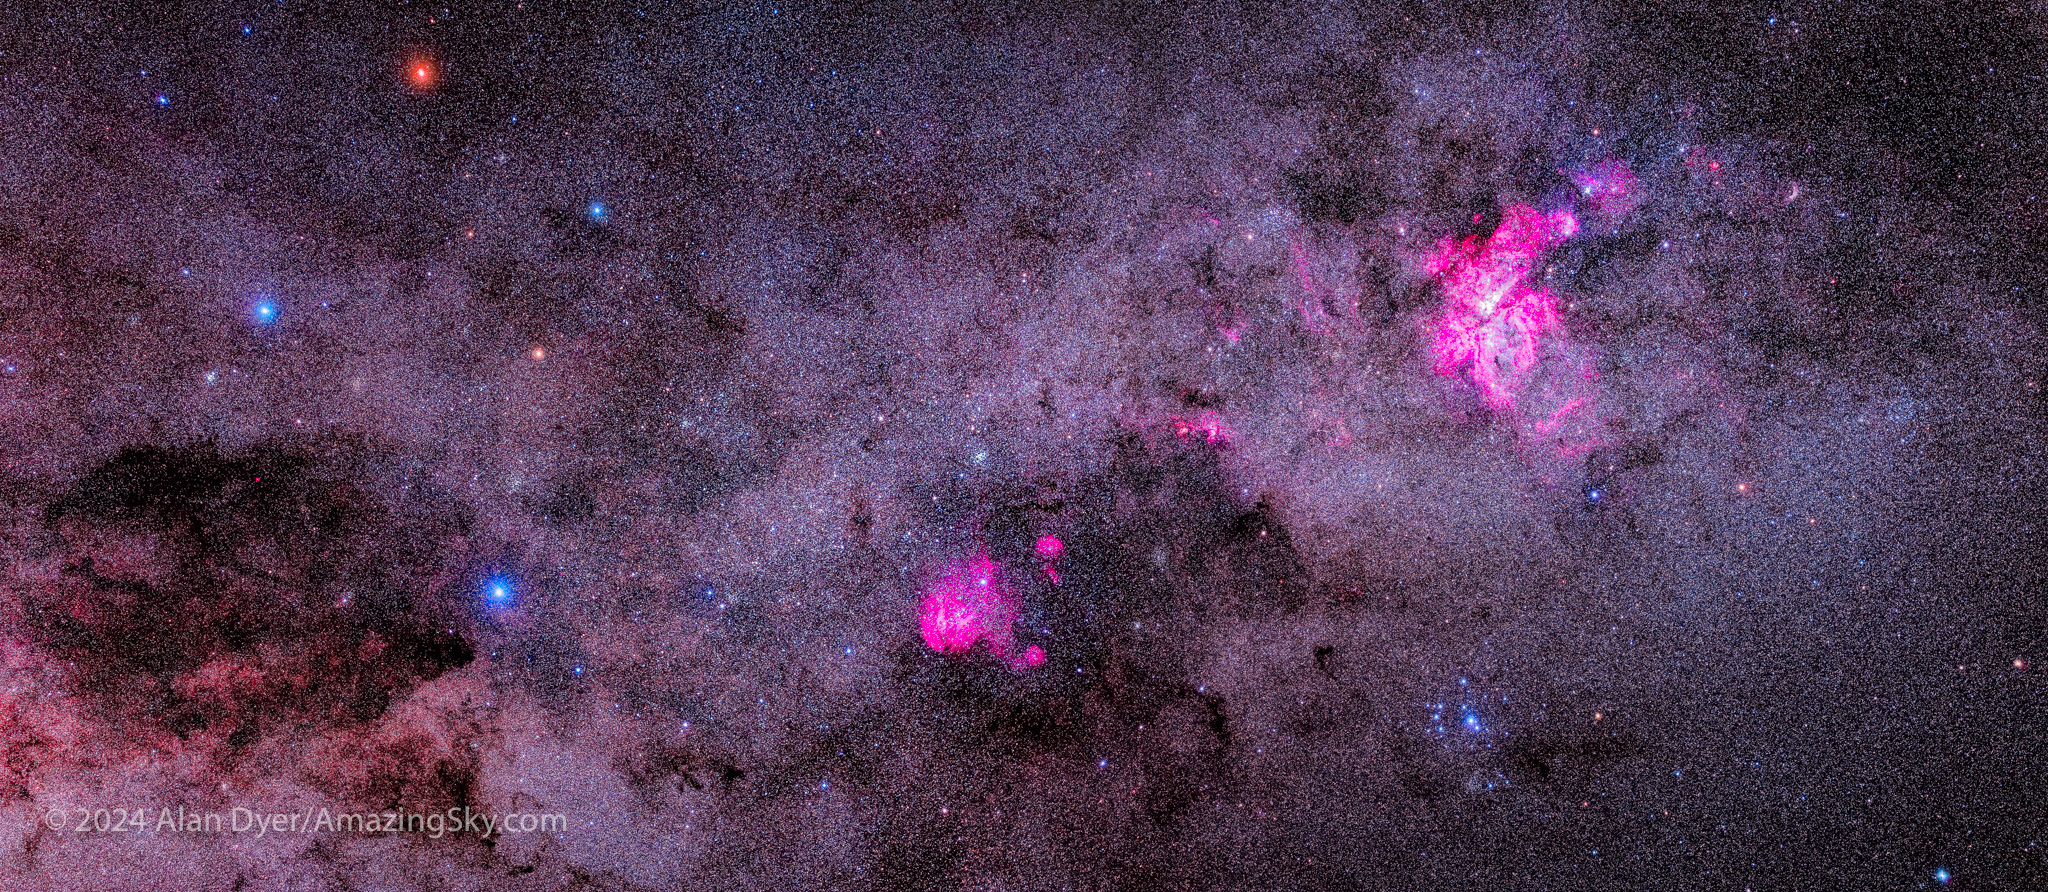
This two-segment telephoto lens panorama extends from the colourful stars of Crux, the Southern Cross at left, to Carina at right. This is a panorama of two segments, each a stack of 12 x 2-minute exposures with the Canon RF135mm lens at f/2 on Canon Ra at ISO 800.
East of the constellation of Carina is the iconic and colourful Southern Cross, or Crux, a star pattern on the flags of Australia, New Zealand and several other austral nations.
This frames the dark Coal Sack nebula in Crux, the Southern Cross. This is a stack of 8 x 5 minute exposures with the Sharpstar 61mm refractor at f/4.4 and the filter-modified Canon R at ISO 800.
Next to Crux is the darkest patch in the Milky Way, called the Coal Sack. Looking like a dark hole to the eye, in photos it breaks up into streaky dust lanes surrounded by famous star clusters, like the Jewel Box above it. Like many southern clusters, the aptly named (by Herschel) Jewel Box contains a variety of colourful stars.
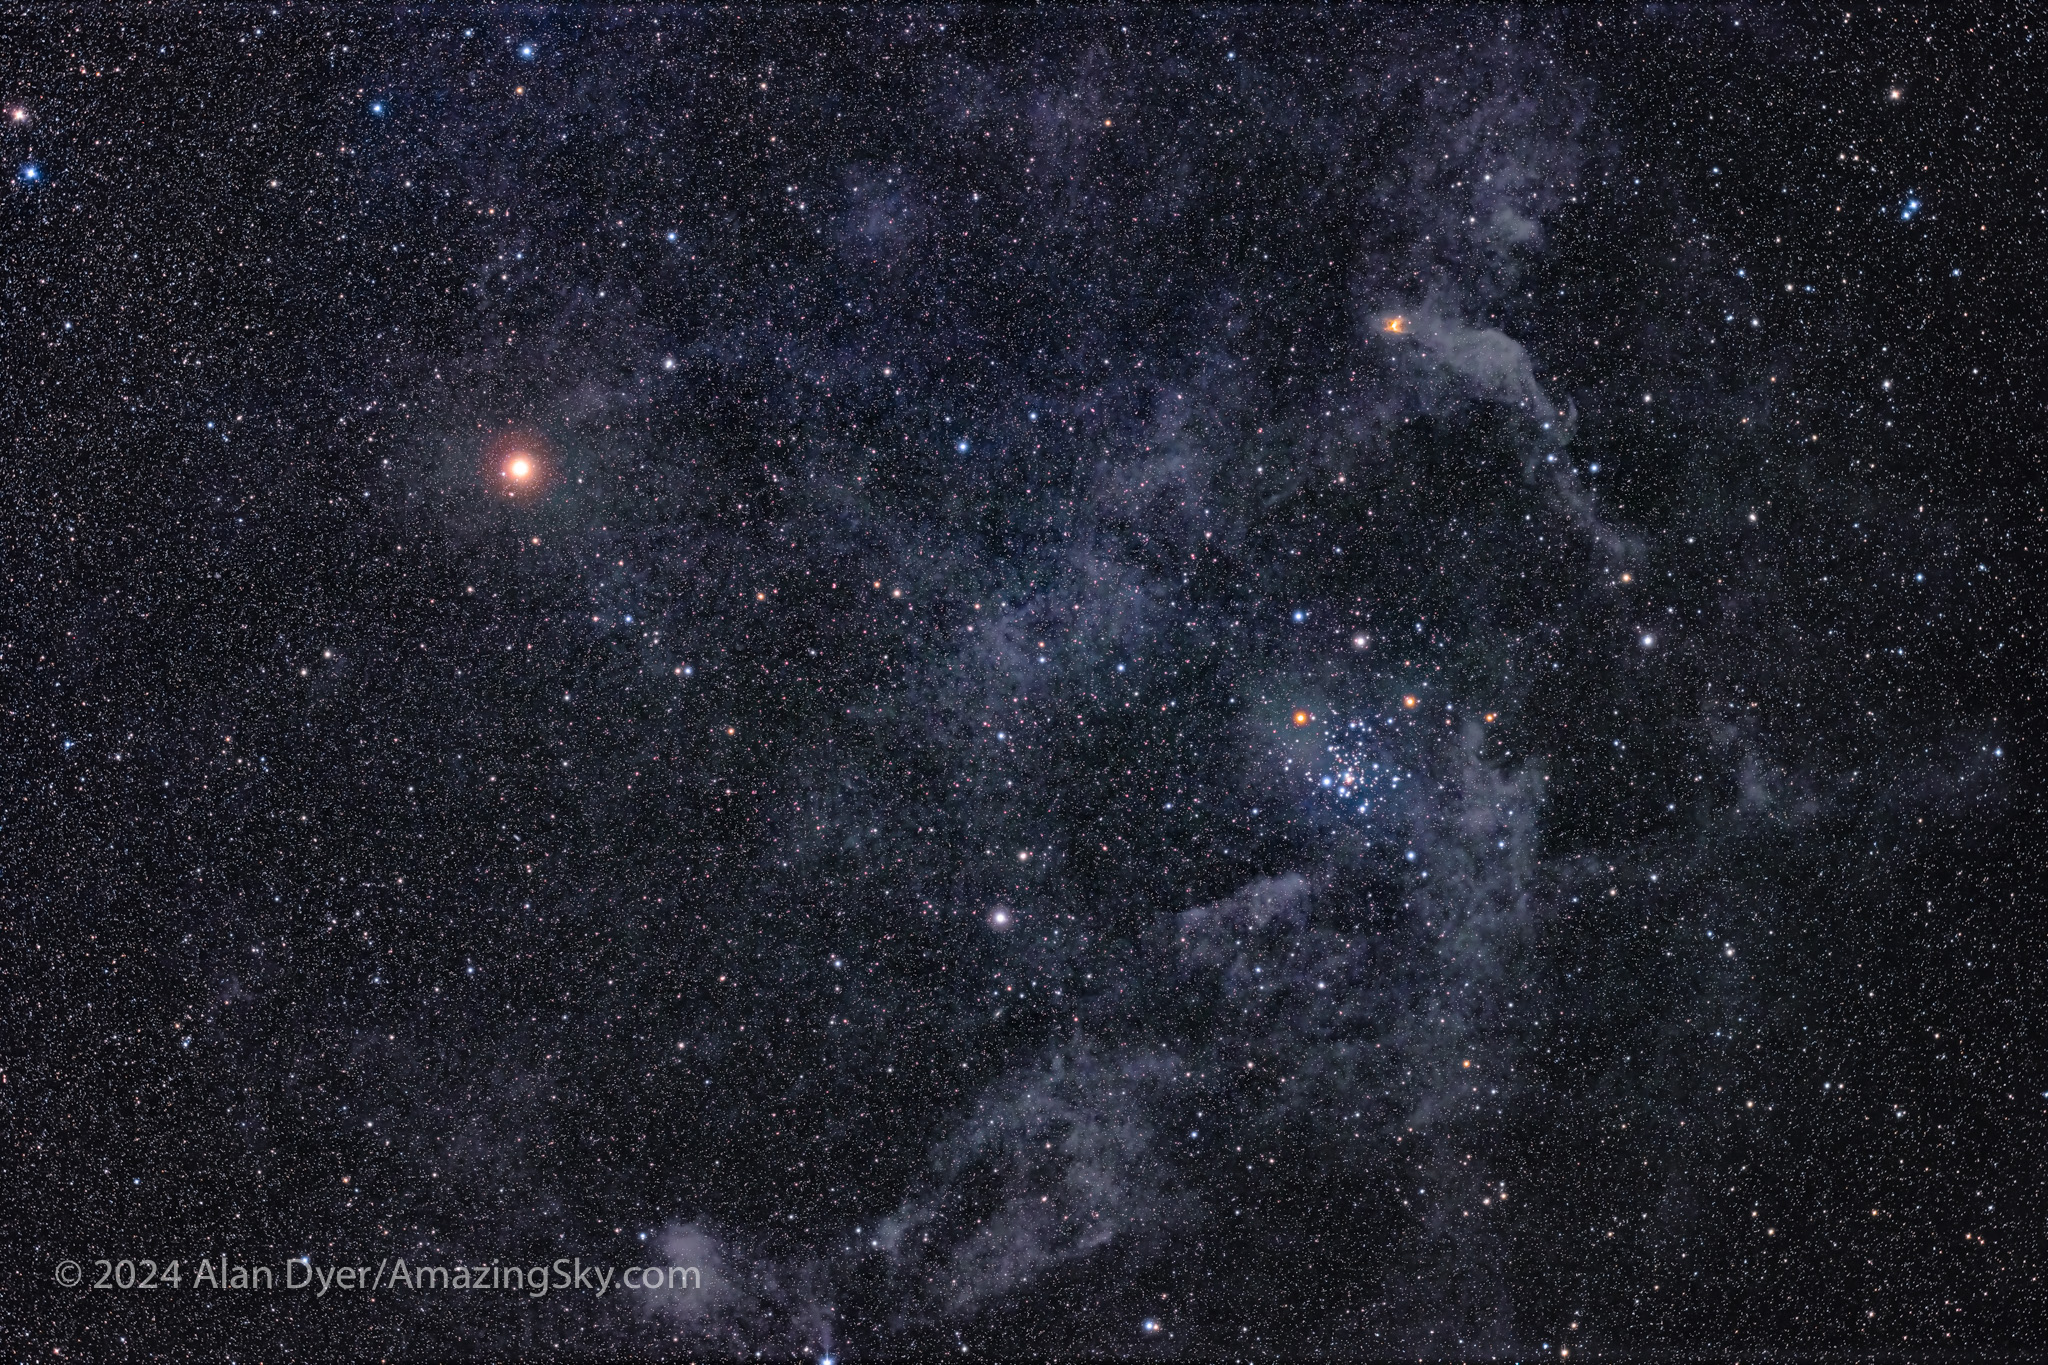
This is the region around the star Lambda Centauri, with the Running Chicken Nebula or IC 2948, at bottom, surrounding the star Lambda Centauri and the loose open star cluster IC 2944. This is a stack of 12 x 5 minute exposures with the Sharpstar 61mm at f/4.4 and filter-modified Canon EOS R camera at ISO 800.
Between Carina and Crux sits another wonderful field of clusters and nebulas, among them the more recently named Running Chicken Nebula. Can you see it? Above it is the Pearl Cluster, NGC 3766, also notable for its colourful member stars.
This frames the small constellation of Musca the Fly below the Southern Cross, with the dark nebula called the Dark Doodad, part of the Musca Dark Nebula Complex. This is a stack of 12 x 2 minute exposures with the Canon RF135mm lens at f/2 on the Canon Ra at ISO 800.
Below Crux is the little constellation of Musca the Fly (many southern constellations are named for rather mundane creatures and objects). One of Musca’s prime sights is the long finger of dusty darkness called the Dark Doodad — yes, that’s its official name!
The Magellanic Clouds
All the targets I’ve shown so far reside in our Milky Way. The next two objects, named for 16th century explorer Ferdinand Magellan, are extra-galactic.
This is the southern Milky Way in Carina, Crux and Centaurus arcing over Mirrabook Cottage. At right are the Large and Small Magellanic Clouds. This is looking south to the South Celestial Pole which is near centre here.
The Clouds are other galaxies beyond ours, but nearby. They are among the closest galaxies and are considered satellites of the Milky Way. Both are visible to the unaided eye, looking like detached bits of the Milky Way. For deep-sky aficionados, they are reason enough to visit the Southern Hemisphere!
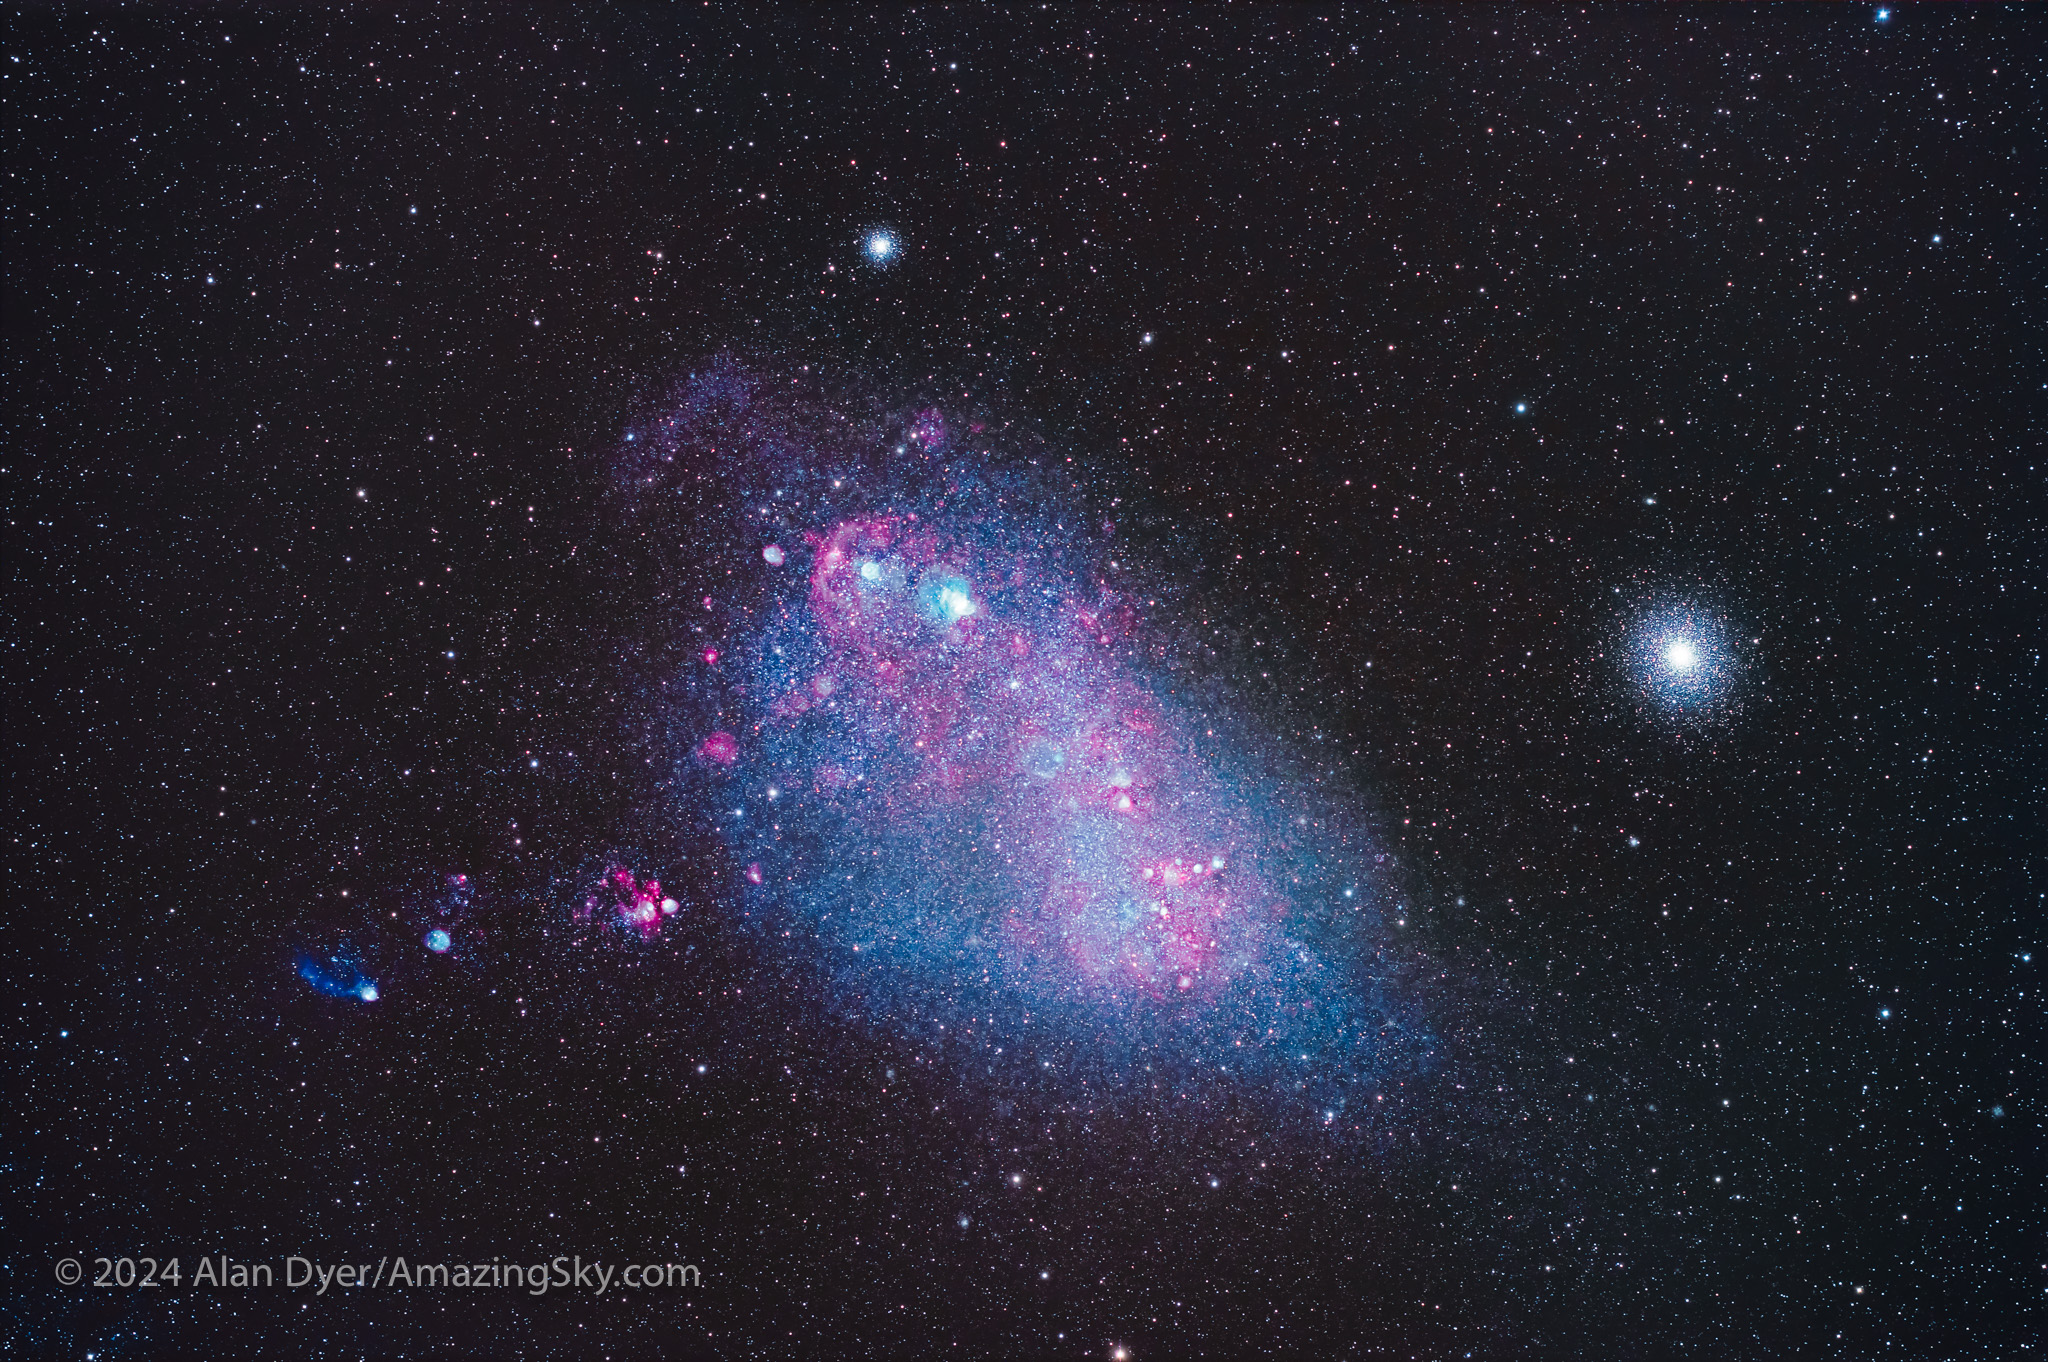
This frames the entire Small Magellanic Cloud, a member of the Local Group of galaxies and a companion of our Milky Way Galaxy. The field is 7.5 by 5º. This is a blend of a stack of 8 x 10-minute exposures at ISO 3200 through an IDAS NBZ narrowband filter, and a stack of 12 x 5 minute unfiltered exposures at ISO 800, all with the Sharpstar 61mm refractor at f/4.4 and the filter-modified Canon R.
The Small Magellanic Cloud contains many star-forming nebulas that glow in hydrogen red and oxygen cyan. It is most famous for its spectacular neighbour, the great globular star cluster called 47 Tucanae, here at right. It is not actually part of the SMC — 47 Tuc is more than ten times closer, on the outskirts of our Galaxy.
As rich as the Small Cloud is, it pales in comparison to its bigger neighbour, the LMC. The Large Magellanic Cloud is almost a universe unto itself. Astronomers have devoted their careers to studying it.
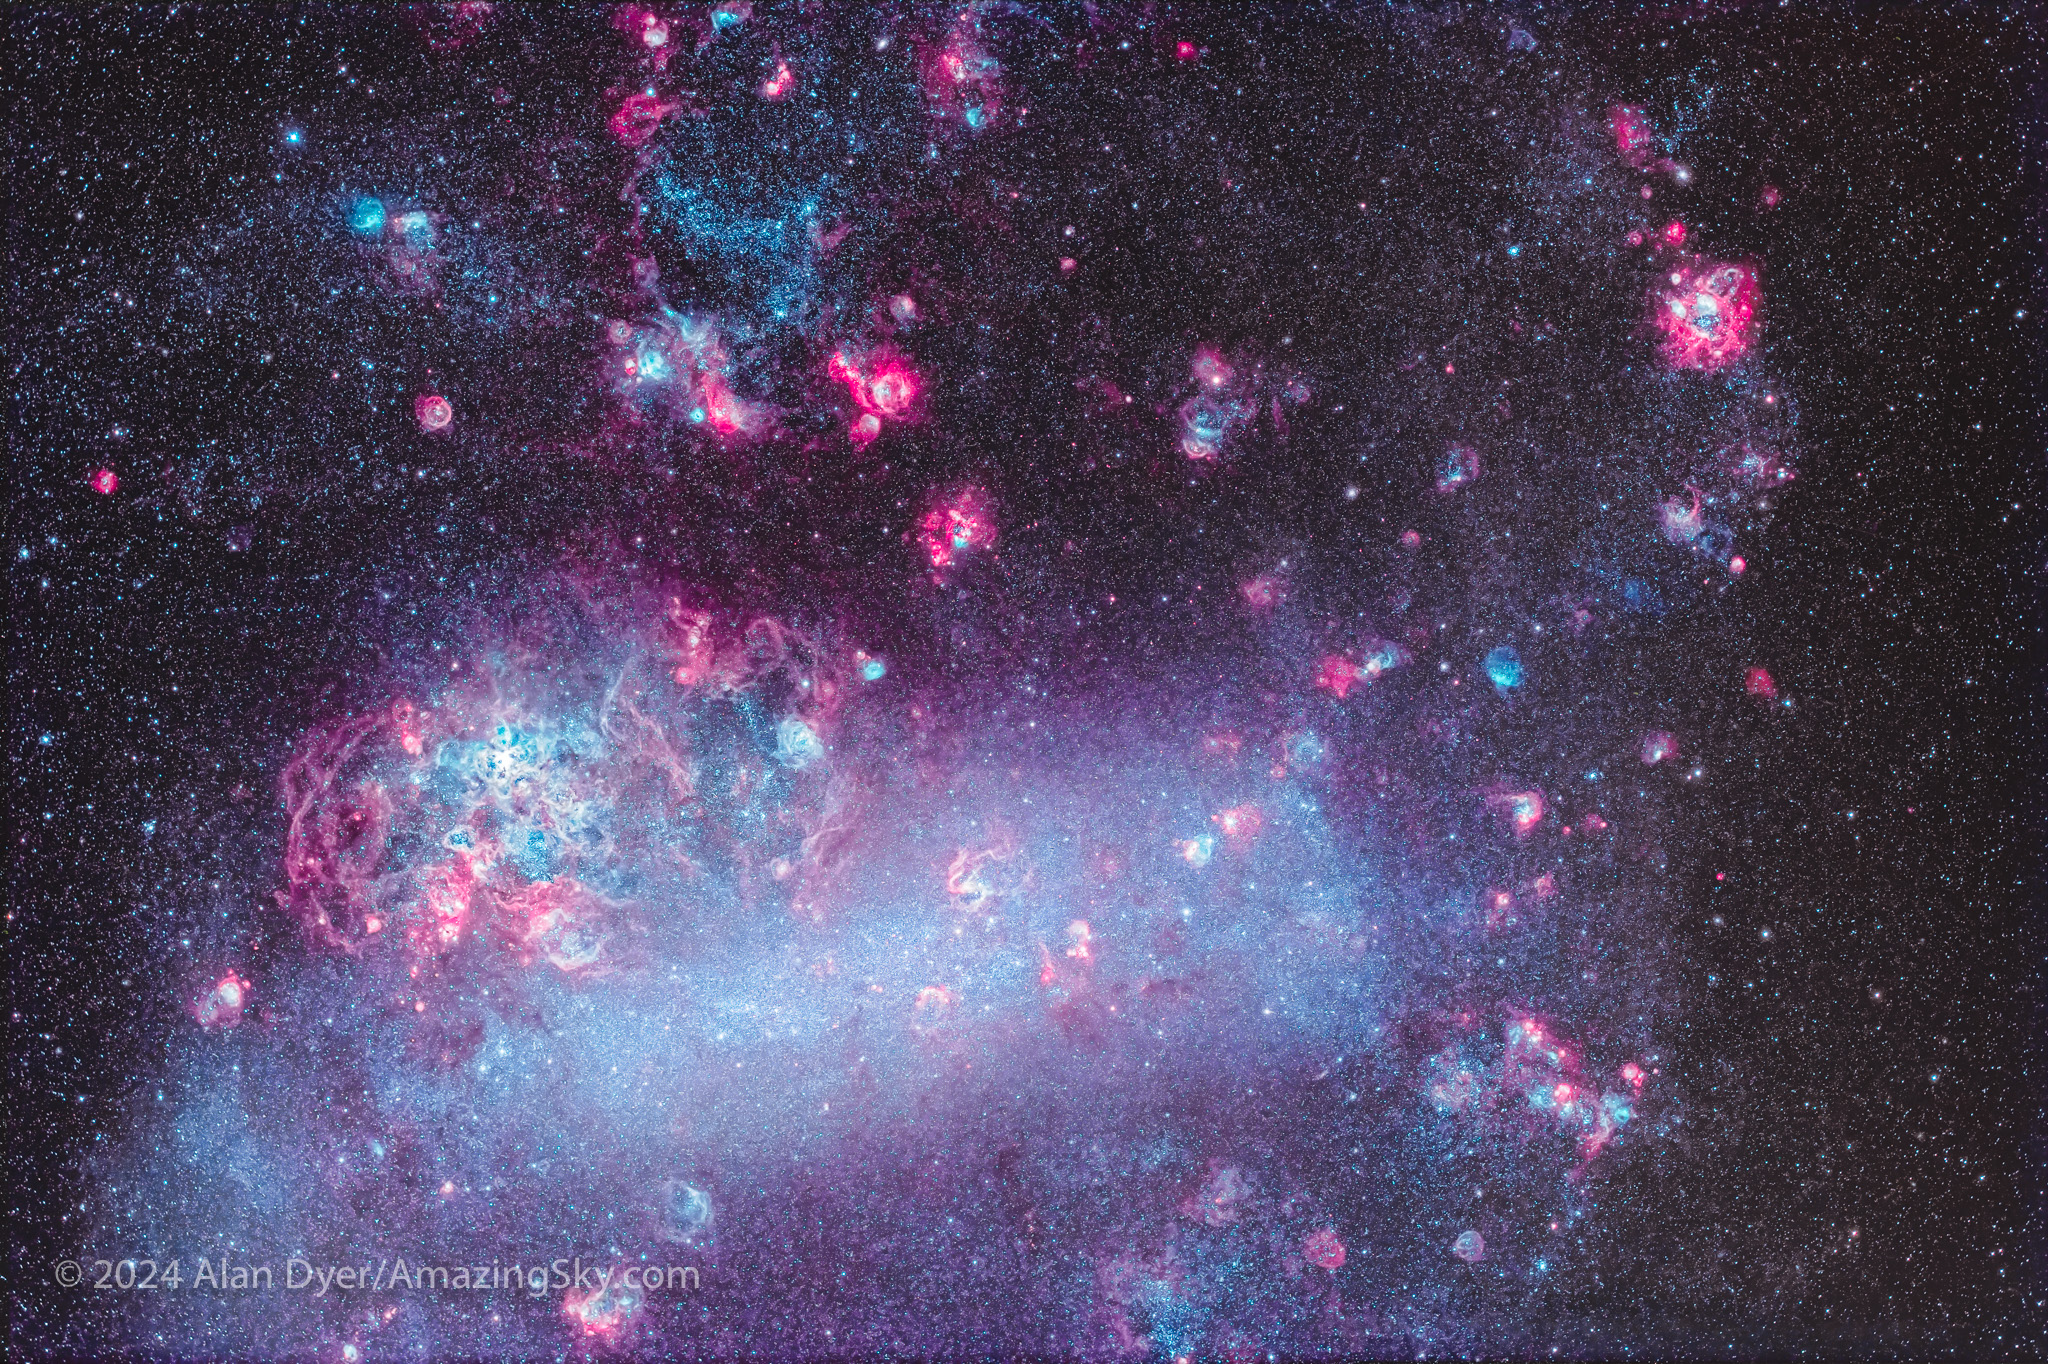
This is the Large Magellanic Cloud, some 160,000 light years away. This is with the Sharpstar refractor in a stack of 12 x 10-minute exposures at ISO 3200 through an IDAS NBZ dual-band (OIII and H-a) filter that adds most of the nebulosity, blended with a stack of 20 x 5-minute exposures at ISO 800 with no filter for the main “natural light” background content.
The biggest attraction in the LMC, one visible to the eye, is the Tarantula Nebula, the mass of cyan at left here. Many of the LMC’s nebulas emit light primarily from oxygen, not hydrogen. But figuring out which object is which can be tough. The LMC is filled with so many nebulas and clusters — and nebulous clusters — that no two catalogues of its contents ever quite agree on the identity and labels of all of them.
Northern Fields
The Magellanic Clouds are in the deep south, close to the Celestial Pole. A trip south of the equator is needed to see them. But on my trips to Australia I often like to shoot “northern” fields that I can’t get well at home in Canada.
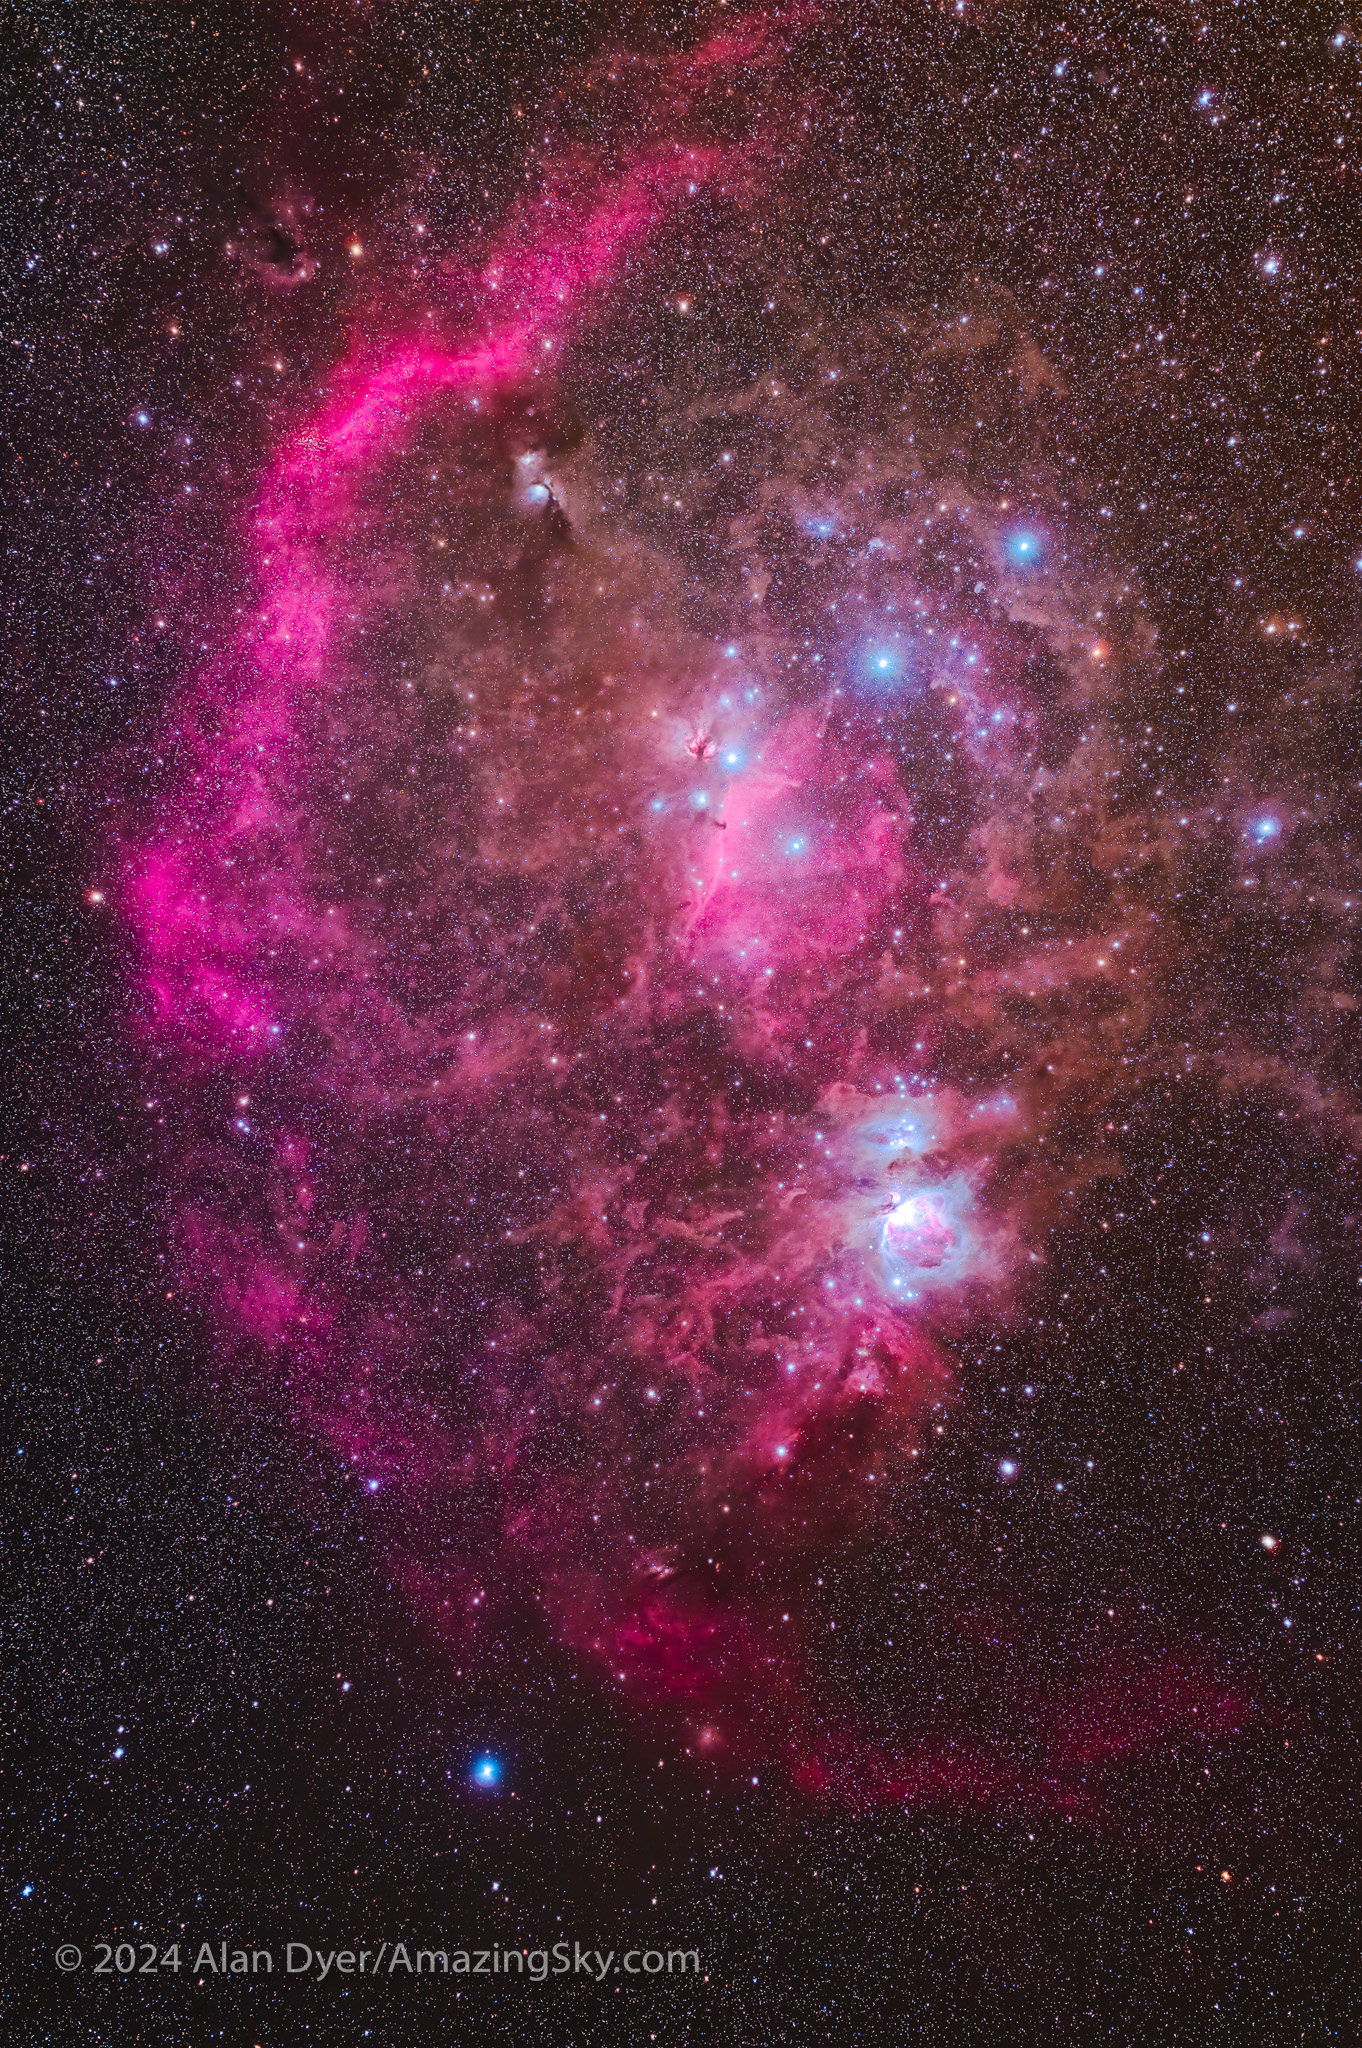
This frames the variety of bright nebulas and dark dust clouds in and around the Belt and Sword of Orion. It shows how the bright Orion Nebula is really just the visible tip of a vast complex of gas and dust in Orion. This is a stack of 14 x 2 minute exposures with the Canon RF135mm lens at f/2 and on the Canon Ra at ISO 800. The lens had an 82mm URTH Night broadband filter on it to enhance nebulas somewhat.
This is the Belt and Sword of Orion the Hunter surrounded by interstellar clouds. It’s low in my south from home, but high in the north down under. This is with a telephoto lens, not the telescope, captured under better and more comfortable skies than I have in winter in Canada.
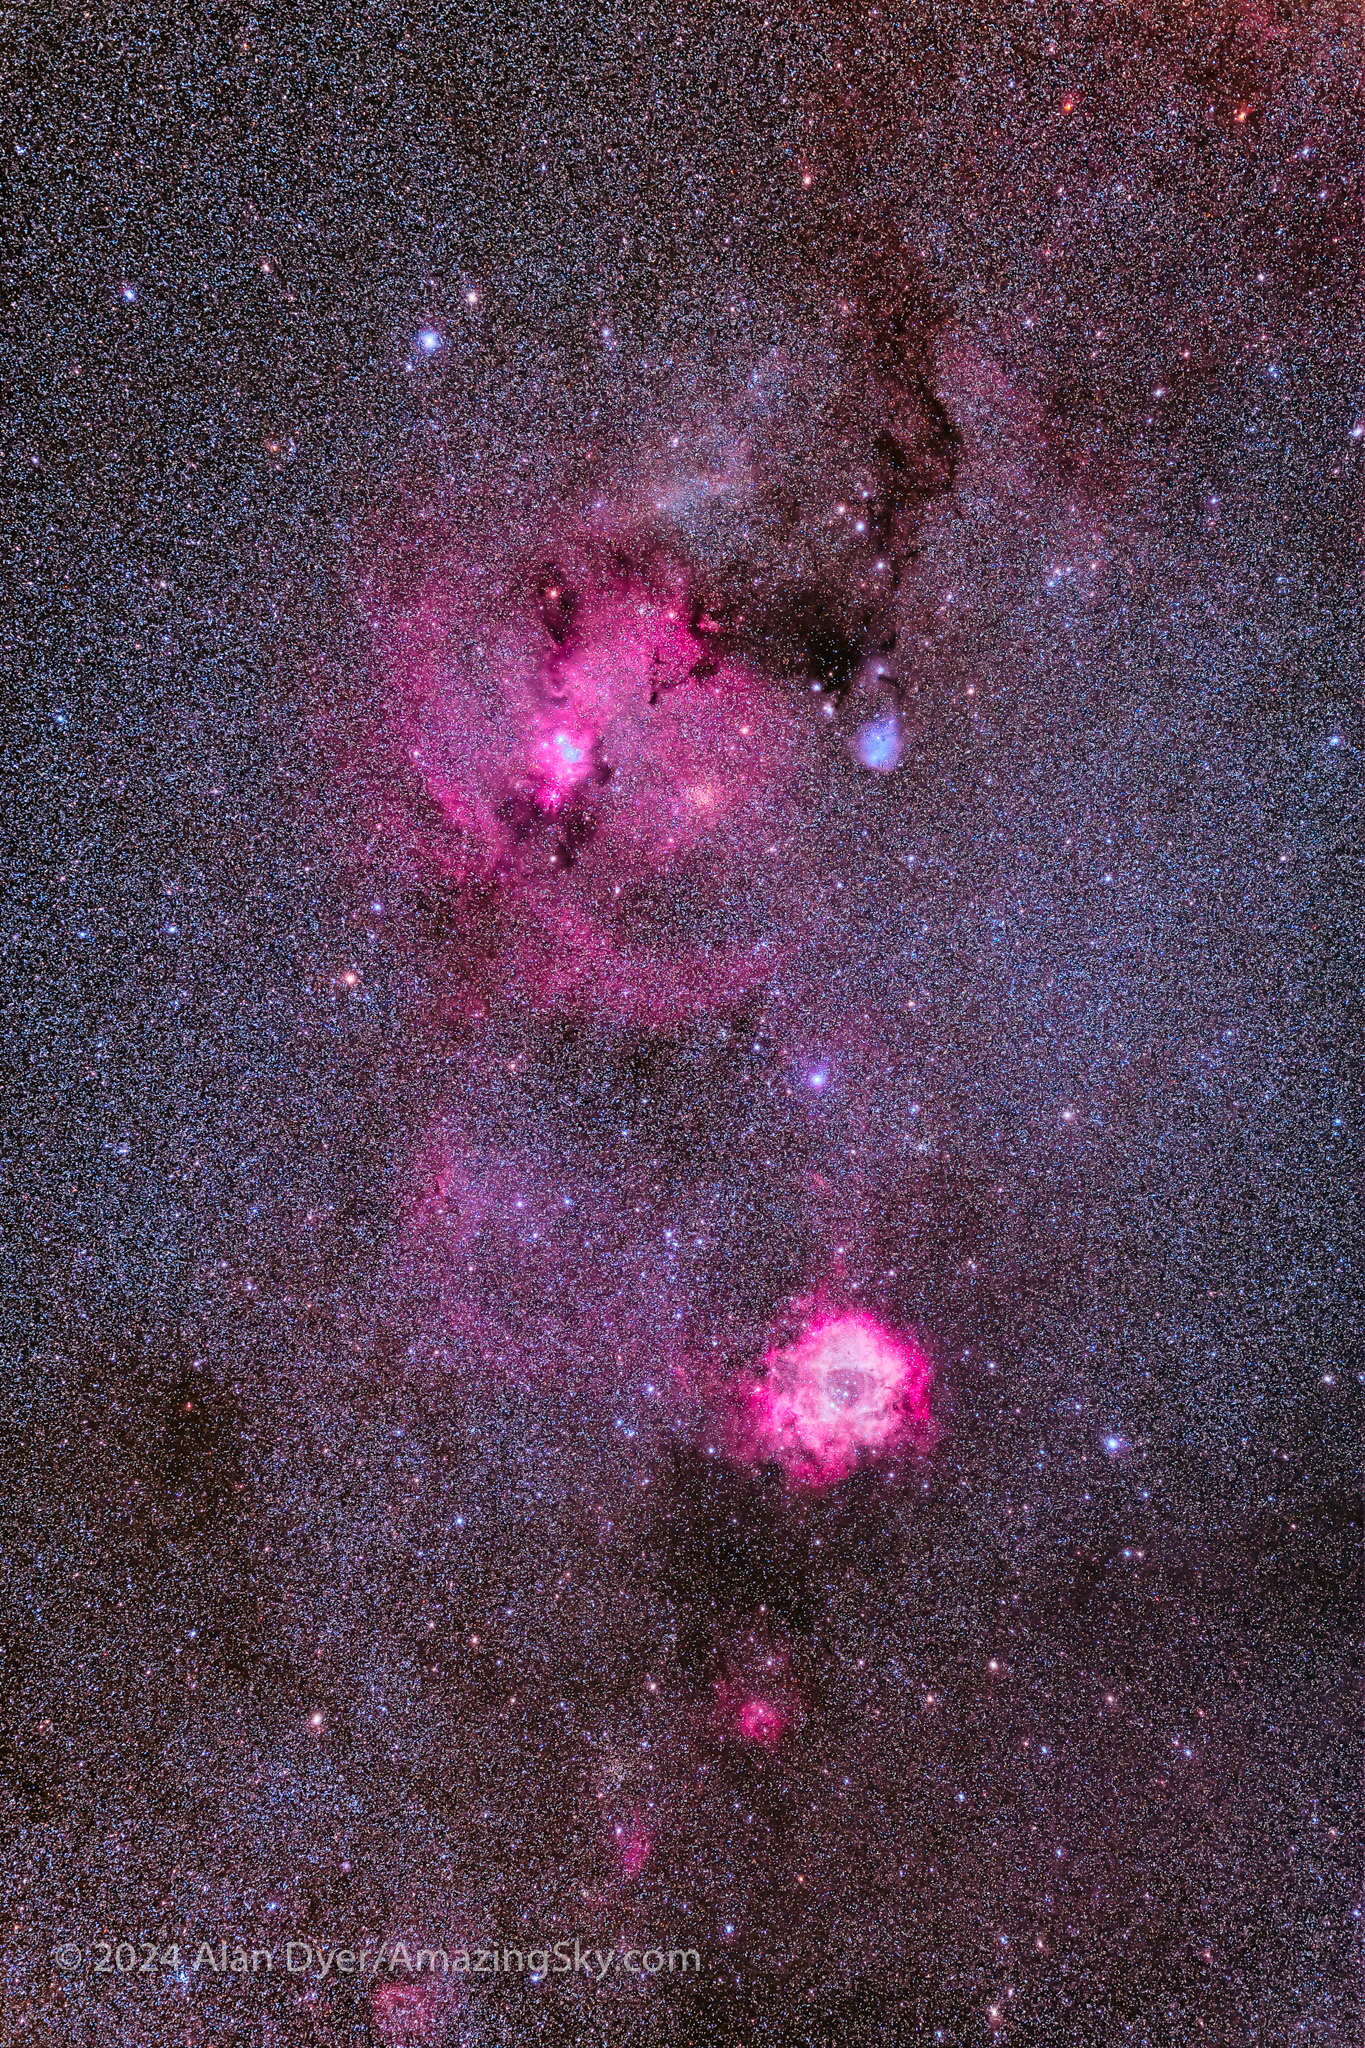
This is the nebula-rich region of Monoceros the Unicorn, containing the bright Rosette Nebula, NGC 2237, below the fainter and larger complex of nebulosity, NGC 2264, which contains the small (on this scale) Cone Nebula. This is a stack of 16 x 2 minute exposures with the Canon RF135mm lens at f/2 and on the Canon Ra at ISO 800.
Nearby is another nebulous field but fainter, in Monoceros the Unicorn, containing the popular target, the Rosette Nebula, at bottom here. But there’s much more in the area that shows up only in long exposures under dark skies.
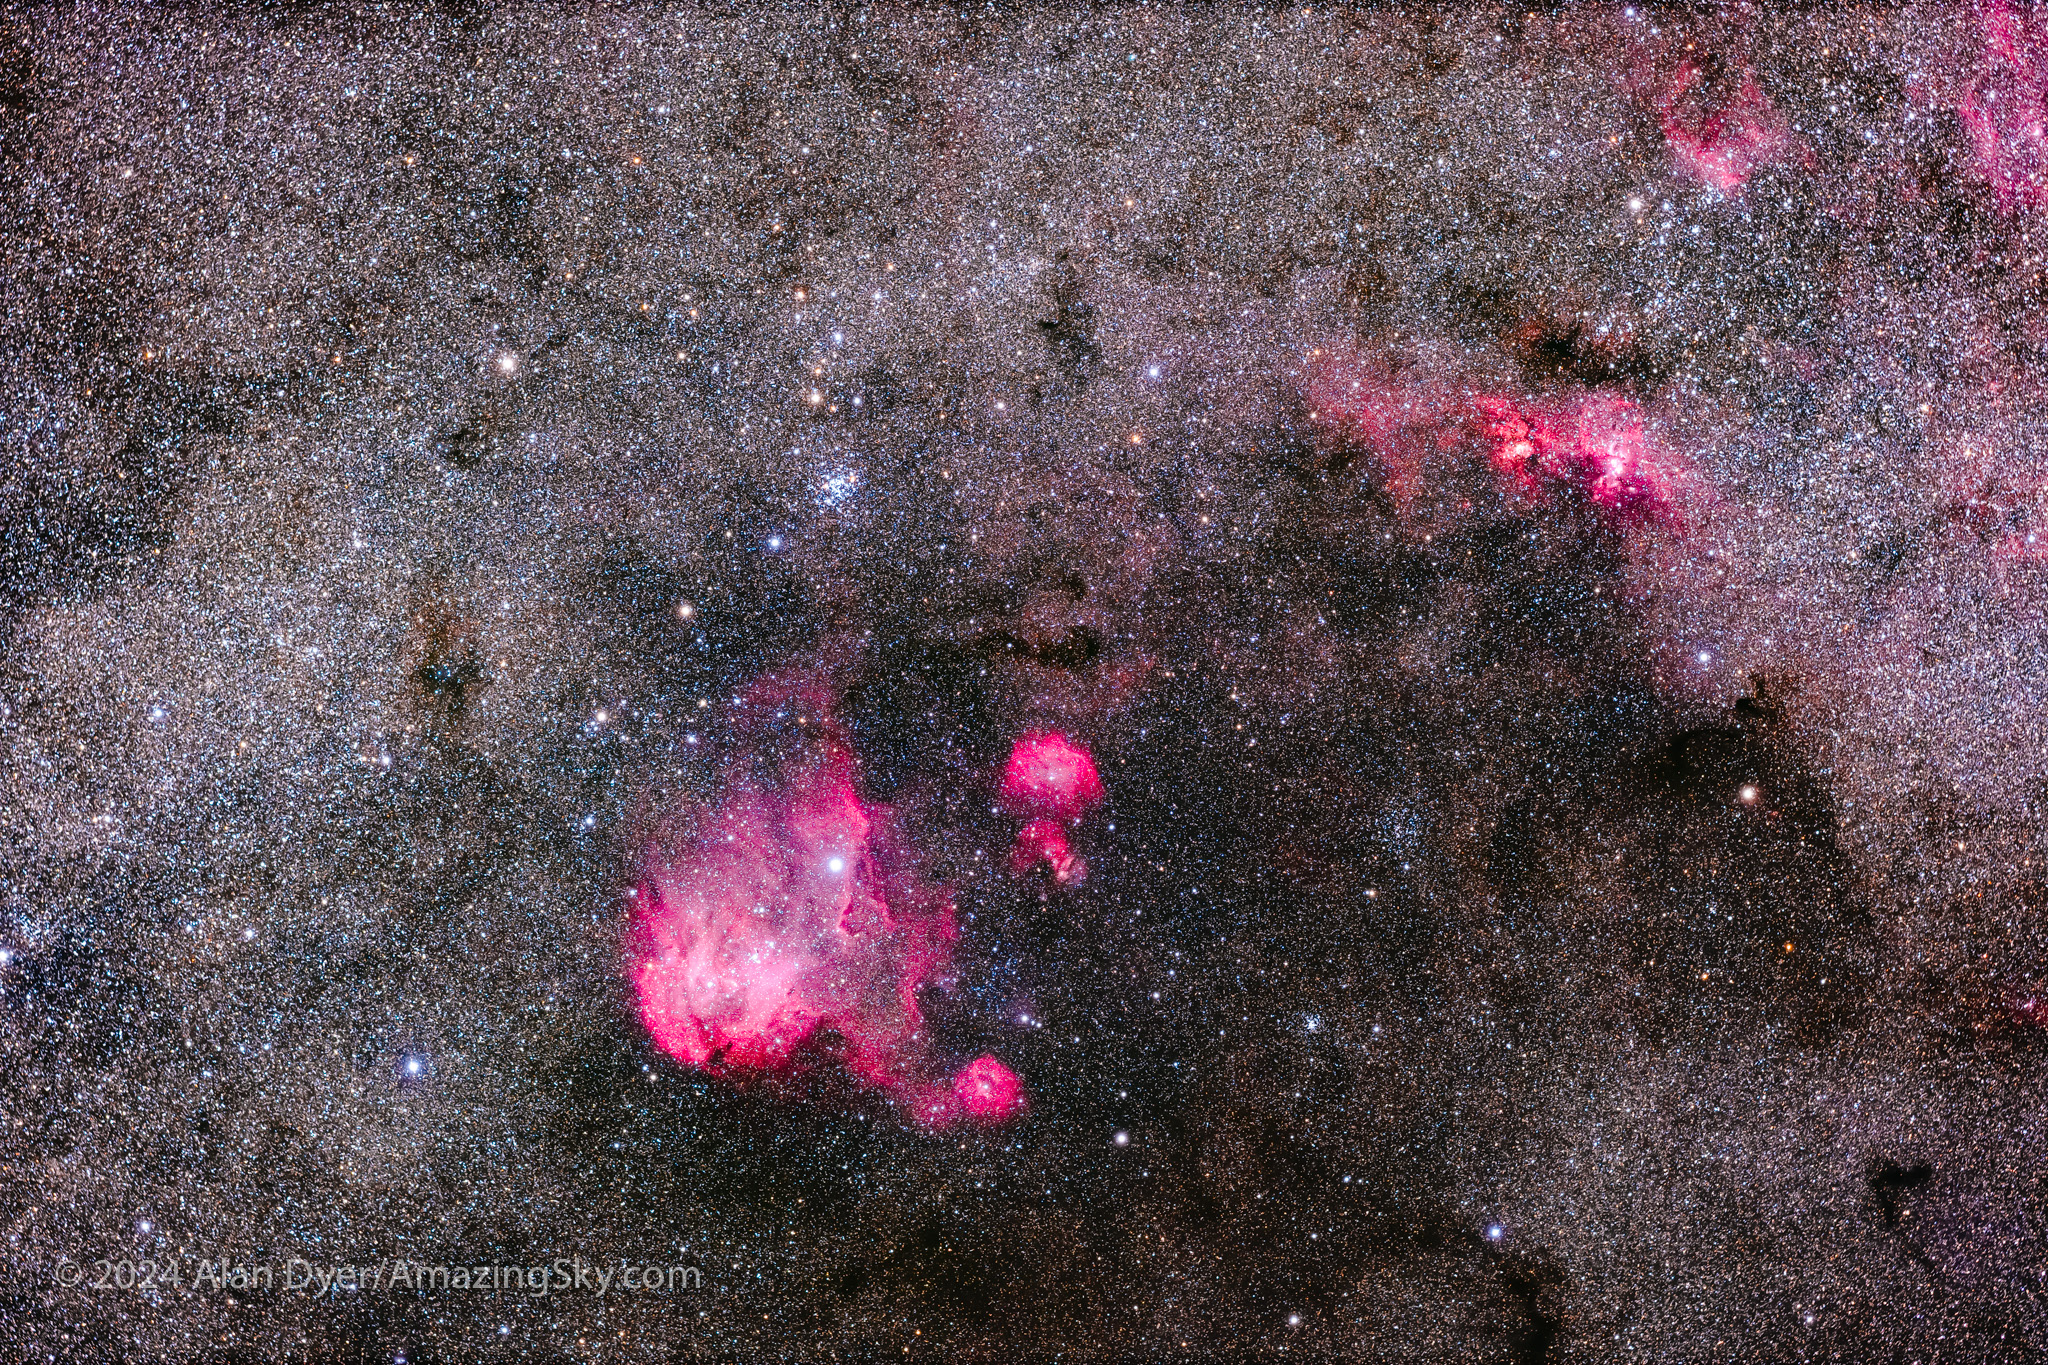
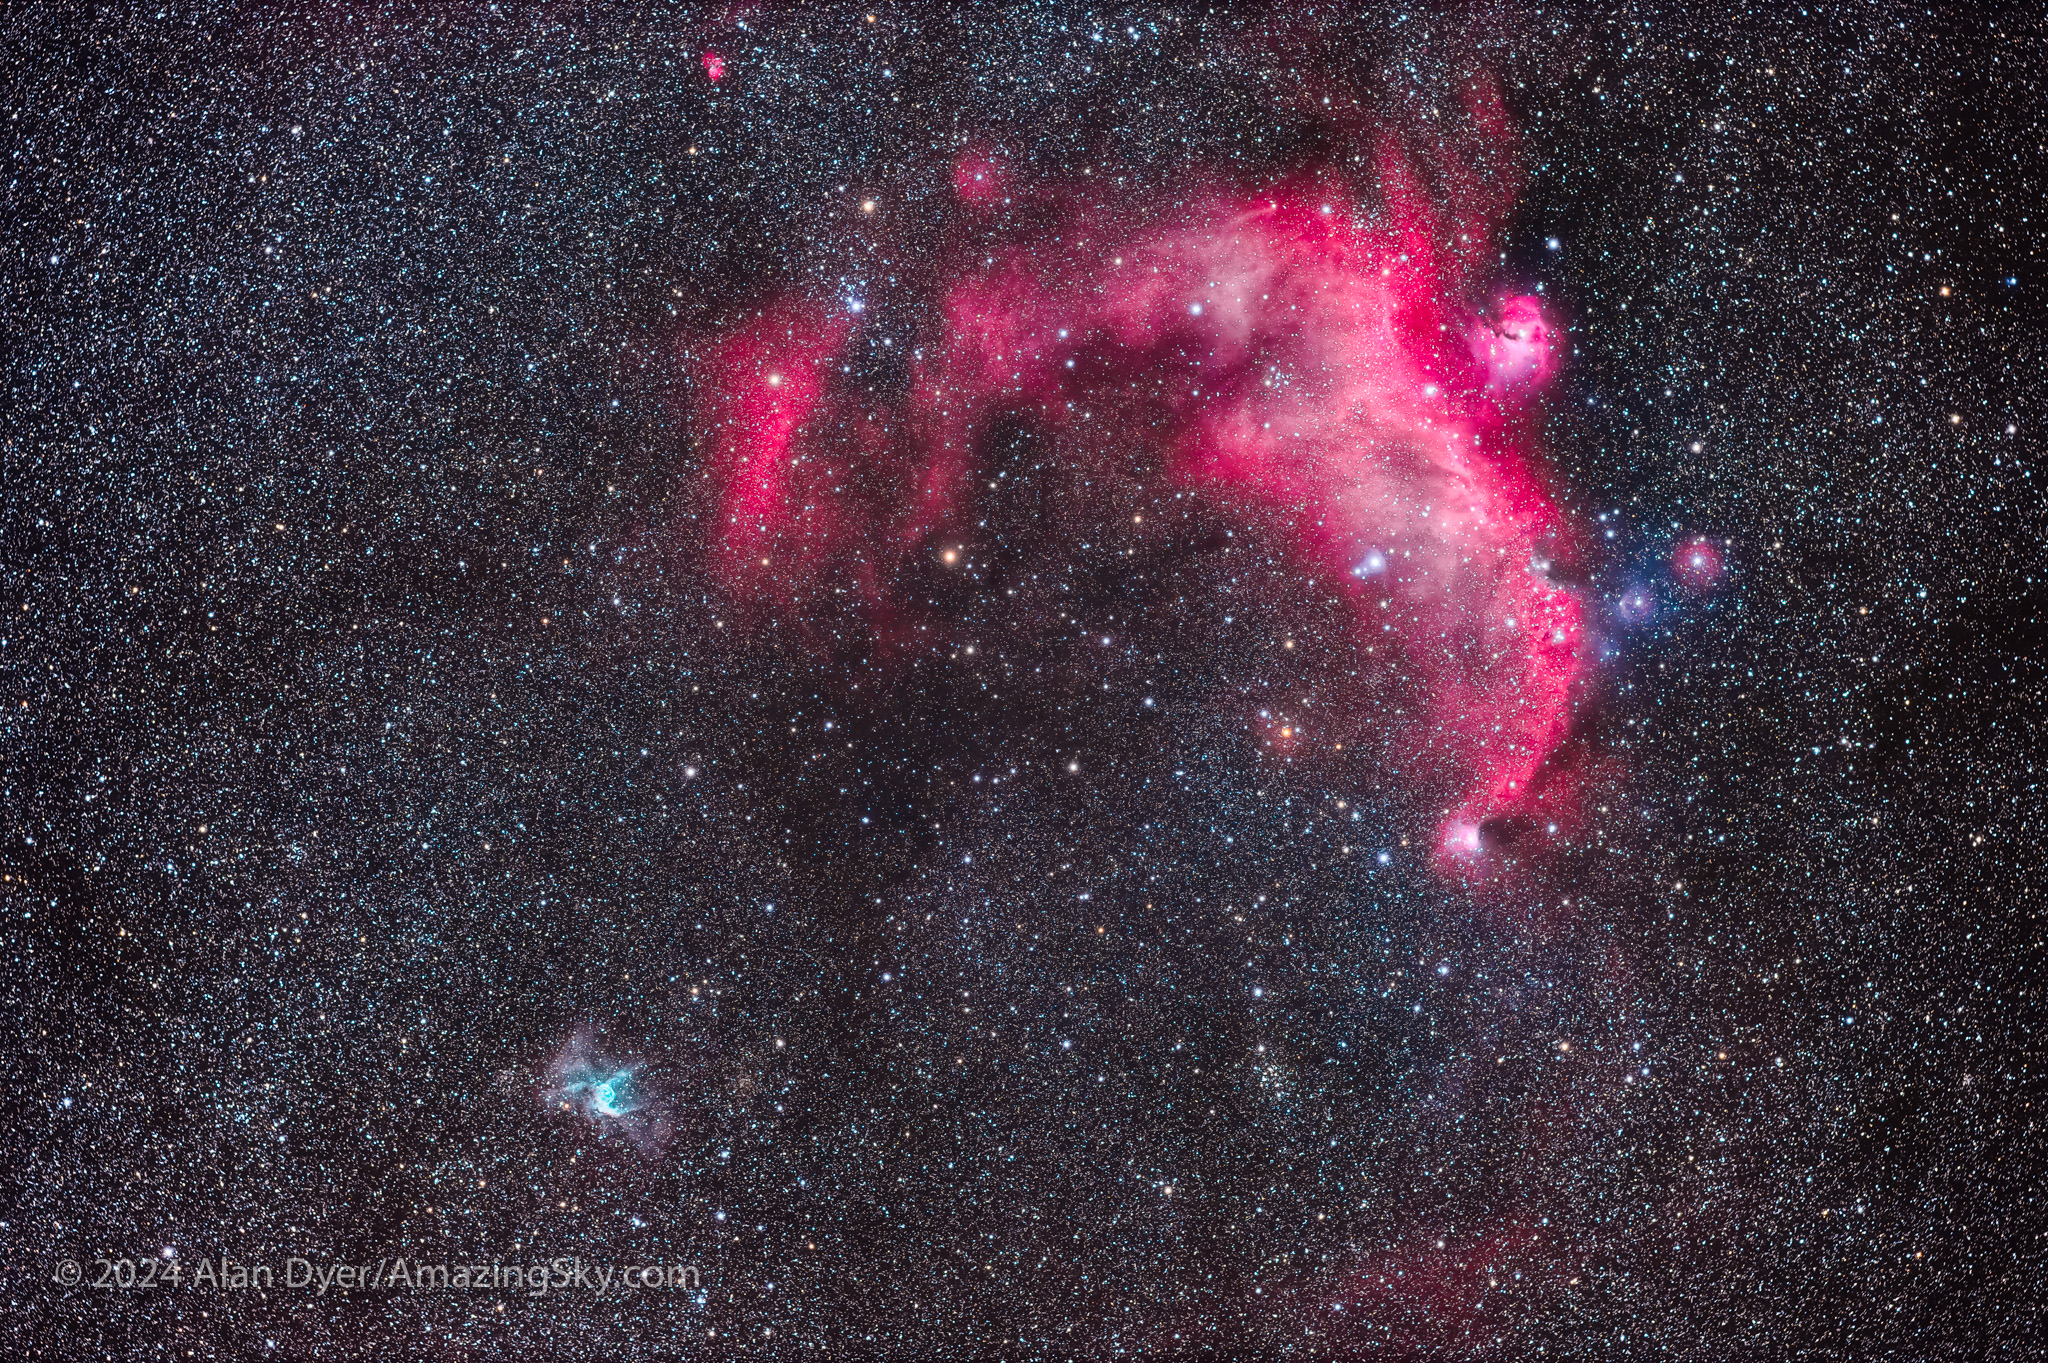
At top is the large Seagull Nebula, an area of mostly red hydrogen-alpha emission and is a region of star formation. At bottom is the small Thor’s Helmet, mostly emitting cyan oxygen III light. This is a blend of a stack of 12 x 10-minute exposures at ISO 3200 with the IDAS NBZ filter, and a stack of 12 x 5-minute exposures at ISO 800 with no filter. All with the Sharpstar 61mm refractor at f/4.4 and Canon EOS R camera.
A target I’ve often had difficulty shooting for one technical reason or another is the Seagull Nebula straddling the border between Monoceros and Canis Major. I got it this time, together with a contrasting blue-green nebula called Thor’s Helmet, at lower left. It’s the expelled outer layers of a hot but aging giant star called a Wolf-Rayet star.
The OzSky Star Party
After a successful week at Mirrabook, I packed up and moved down the road to the Warrumbungles Mountain Motel, home to the annual OzSky Star Safari I have now attended six times over the years. (I see as of this writing it is almost sold out for 2025!)
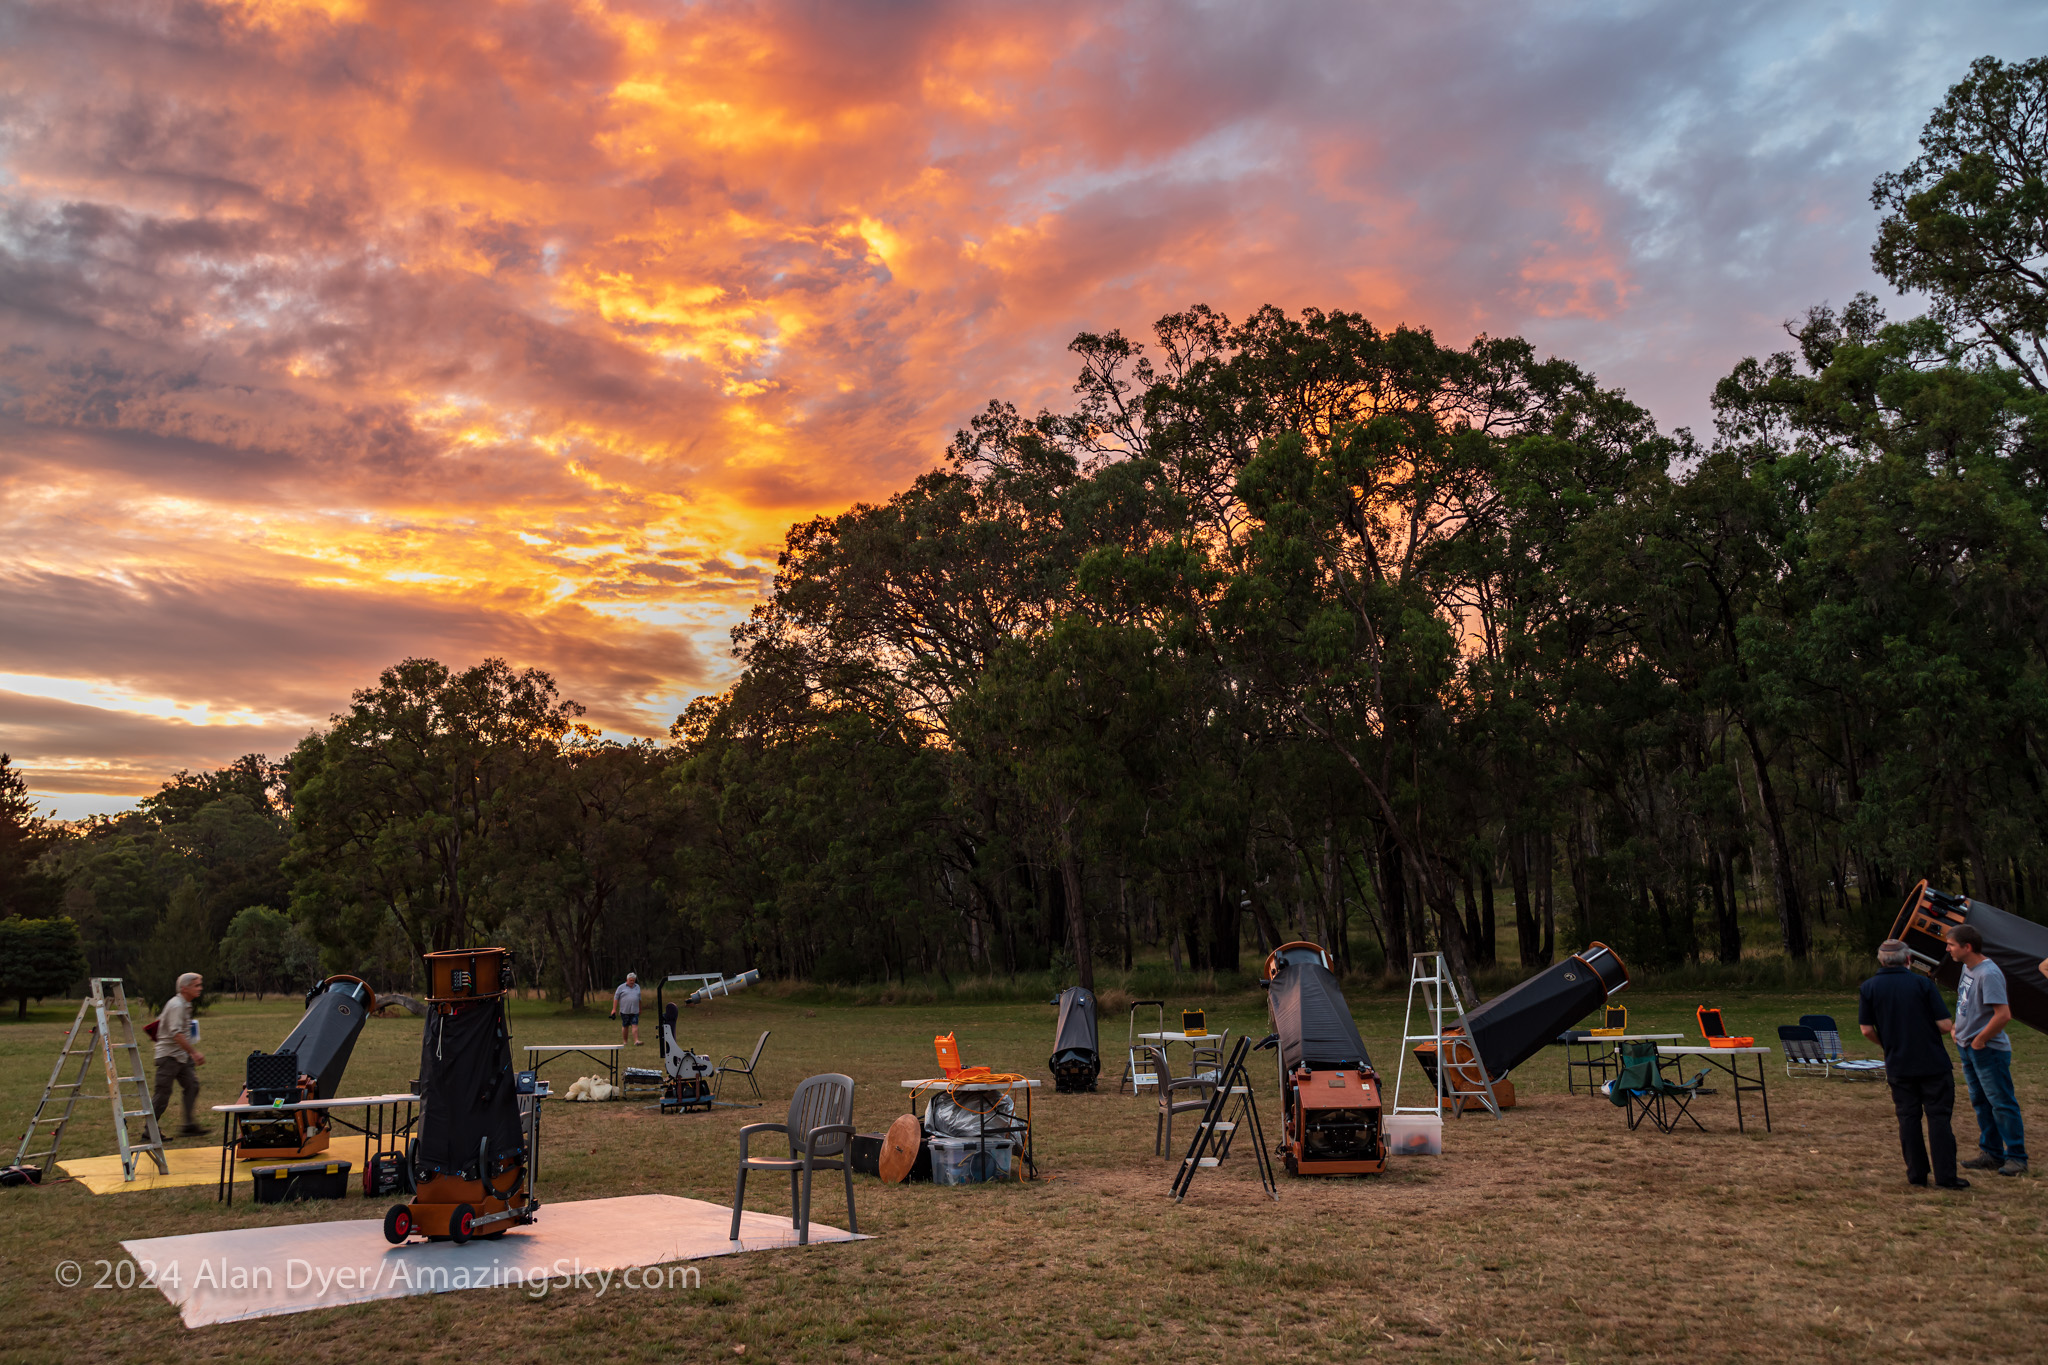
A colorful sunset over the telescope field at the OzSky star party, March 15, 2024, at the Warrumbungles Mountain Motel, near Coonabarabran, NSW, Australia.
Handheld with the RF28-70mm lens at 28mm on the Canon R.
Limited to about 30 people, OzSky (flip through the slide show above) caters to ardent amateur astronomers from overseas who want to revel in the southern sky, aided by the presence on site of a field of giant telescopes, delivered and set up by a great group of Australian astronomers, who show everyone how to run the computer-equipped scopes. And with tips on what to look at beyond the top “eye candy” targets I’m presenting here.
The views of the southern splendours through these 18- to 25-inch telescopes are well worth the price of admission!
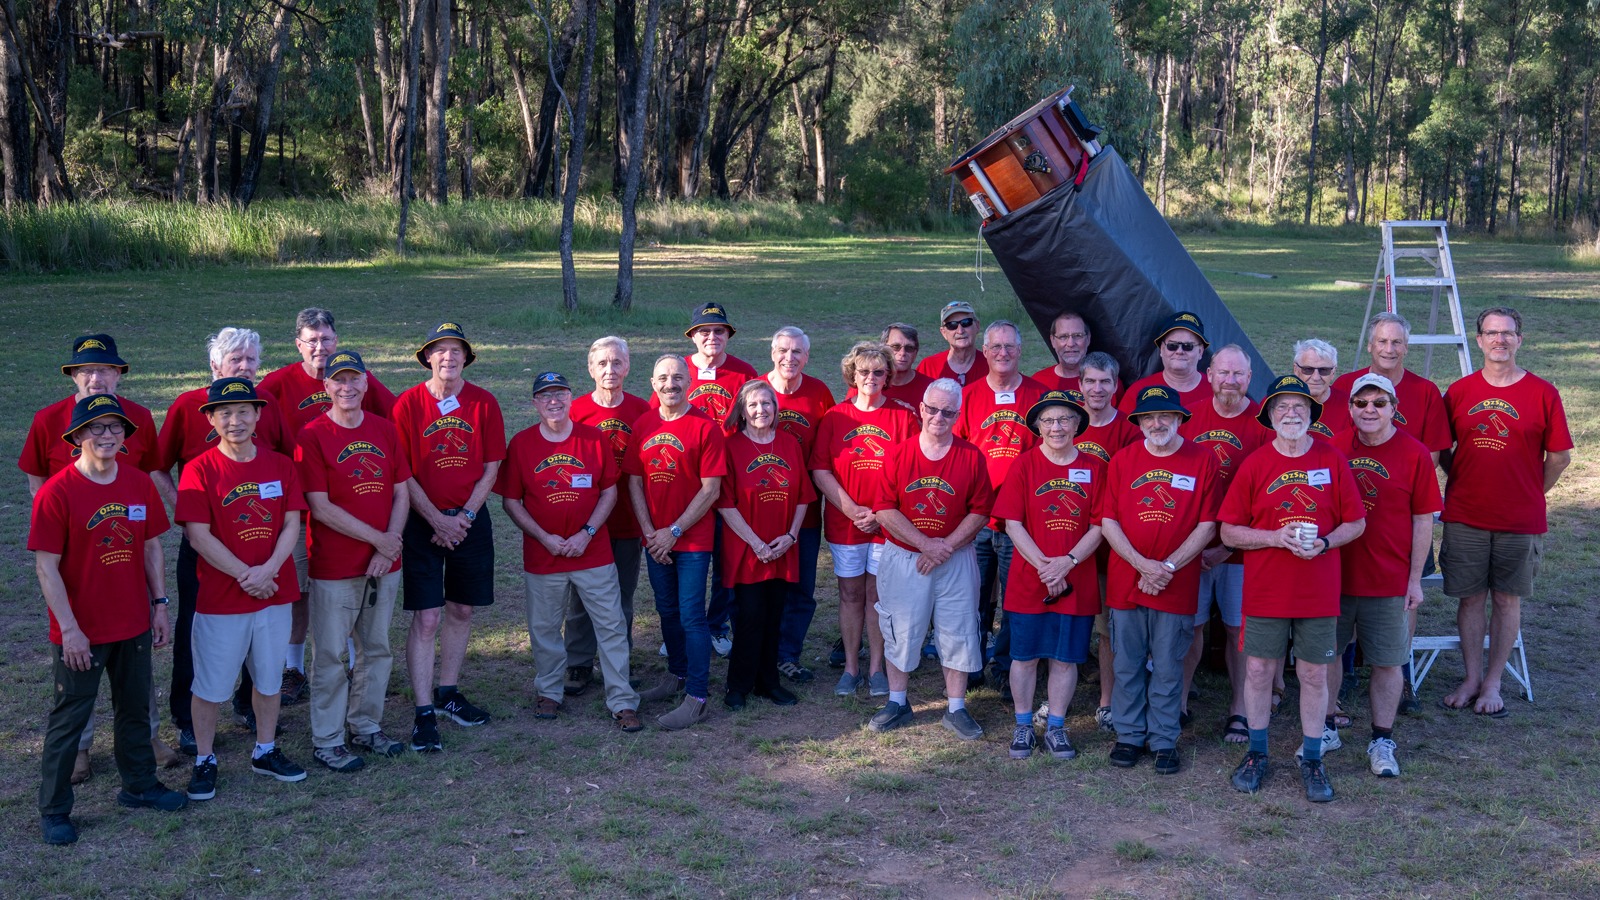
Our group photo of the 2024 OzSky T-shirted attendees and hosts.
It is always a great week of stargazing and camaraderie. If you are thinking of “doing the southern sky,” I can think of no better way than by attending OzSky. While it is primarily geared to visual observers, a growing number of attendees have been lured into the “dark side” of astrophotography.
March and April, austral autumn, are good months to go anywhere down under, as you get views of the best of what the southern sky has to offer. The Milky Way is up all night, just as it is six months later in our northern autumn. That’s when I made my complementary Arizona pilgrimage this year, blogged about here.
The Dark Emu Rising
One of the great naked-eye sights at OzSky in its usual months of March or April is the Dark Emu rising after midnight.
This frames the Australian Aboriginal “Dark Emu” made of dark dust lanes in the Milky Way as it rises in the east. This is a blend of four tracked exposures for the sky and one untracked for the ground, all two minutes at ISO 1600 with the TTArtisan 11mm full-frame fish-eye lens on the Canon EOS R camera.
It is an Australian Aboriginal constellation made of lanes of obscuring interstellar dust, from the Coal Sack on down the Milky Way to past the Galactic Centre. It is obvious to the eye — a constellation made of darkness.
Sagittarius and Scorpius
Late at night in the austral autumn months, the centre of the Galaxy region in Sagittarius and Scorpius comes up, presenting such a wealth of fields and targets it is hard to know where to begin.
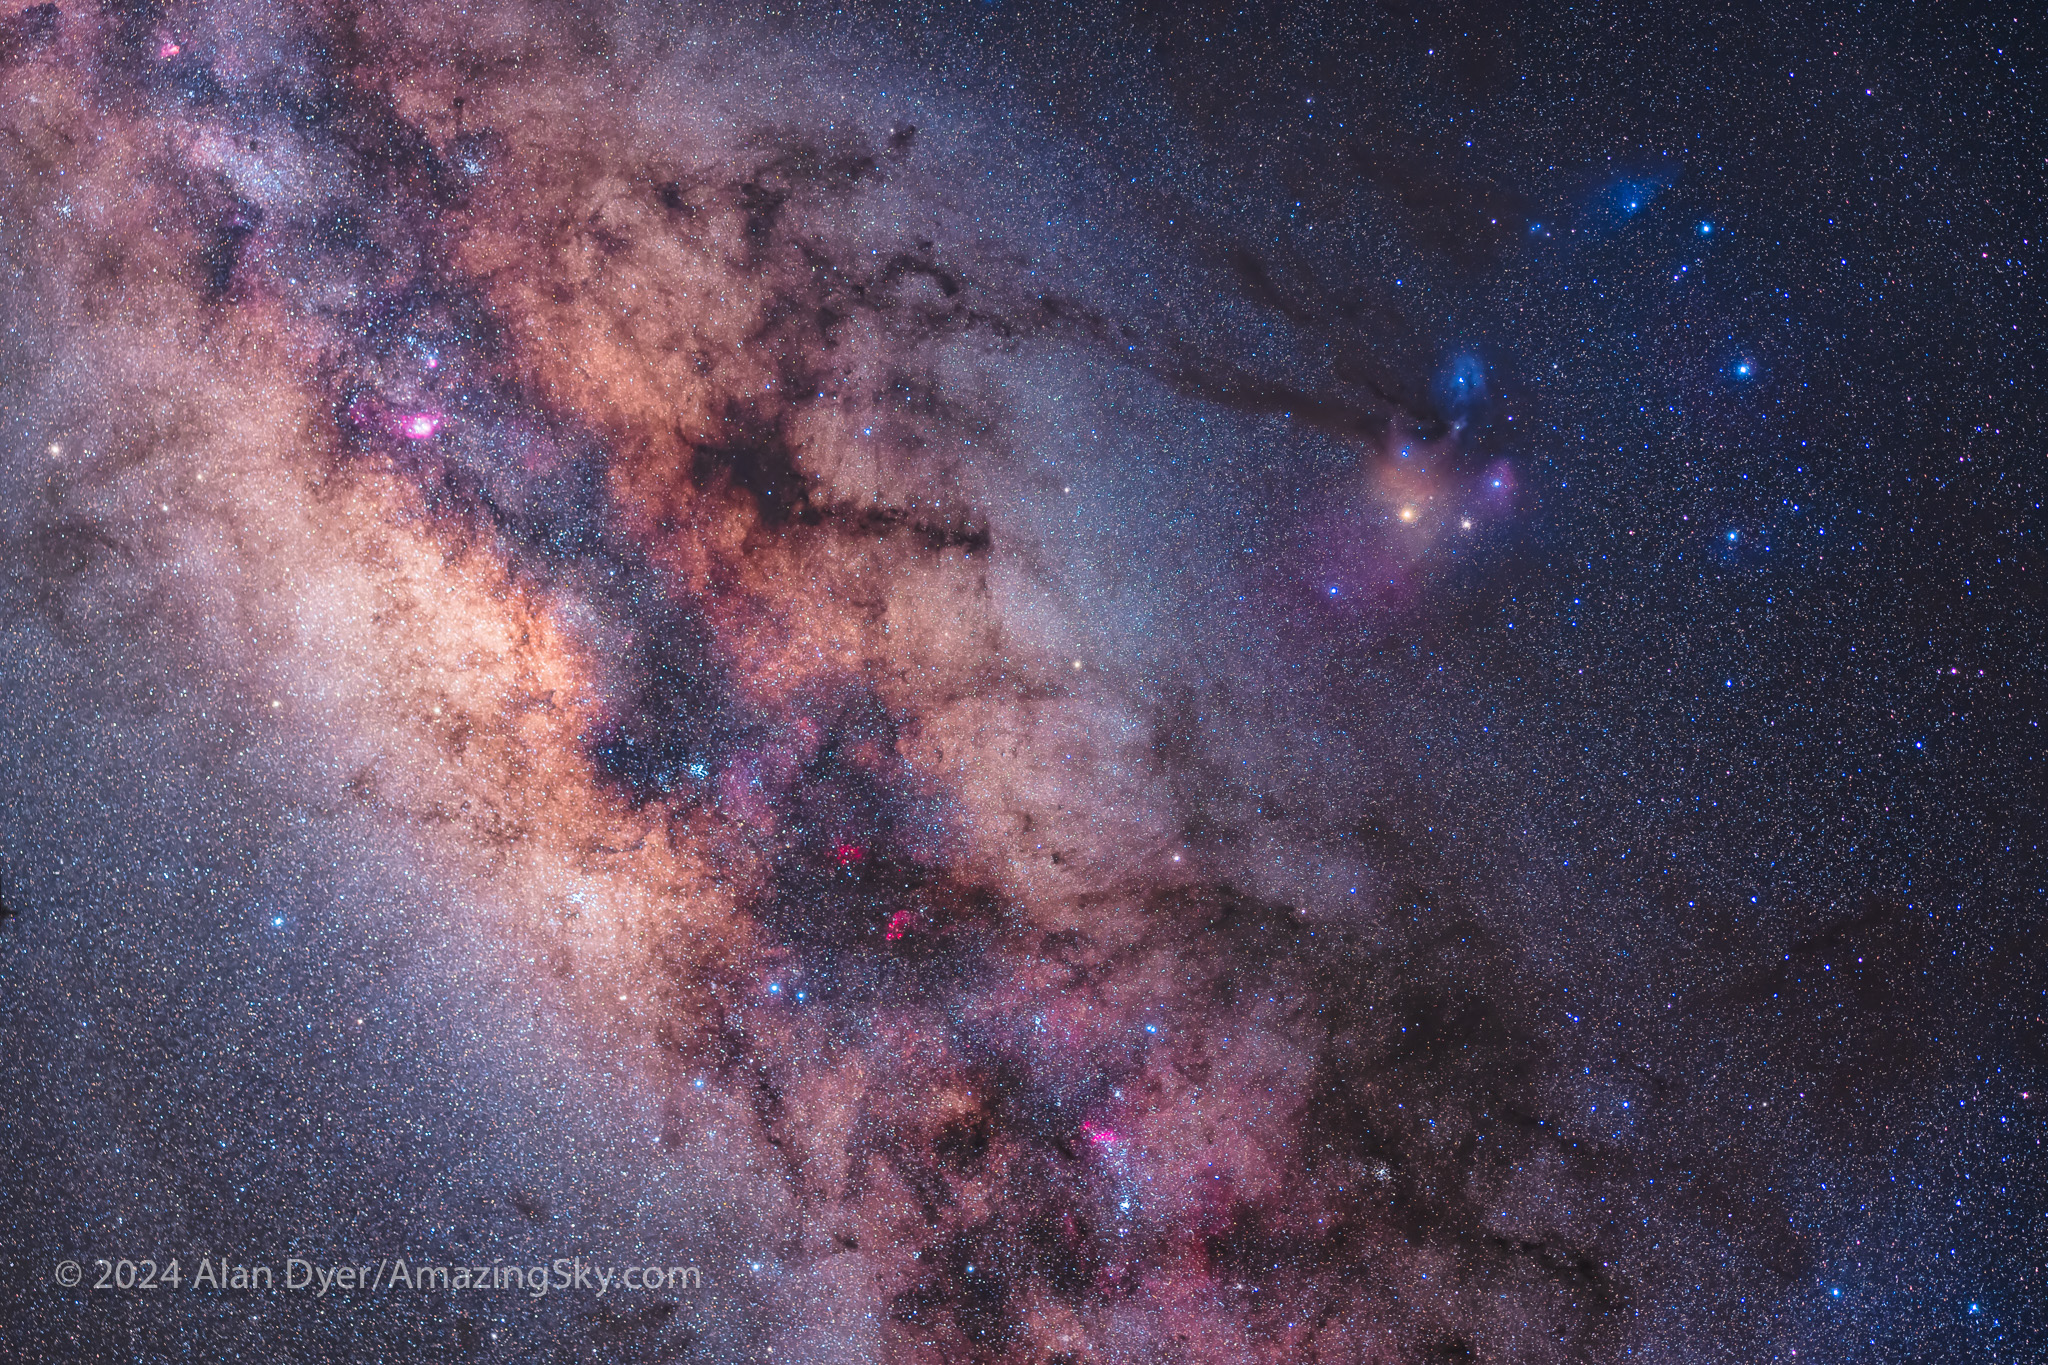
There’s no richer and more colourful area of the sky than this field encompassing the Galactic Center in Sagittarius, at left, and the constellation of Scorpius seen in full here at centre and at right. This is a stack of 6 x 2 minute exposures with the Canon RF 28-70mm lens at f/2 on the Canon Ra at ISO 800.
Yes, we can see this area from up north, but there’s nothing like seeing Scorpius crawling up the sky head first, and then shining from high overhead by dawn.
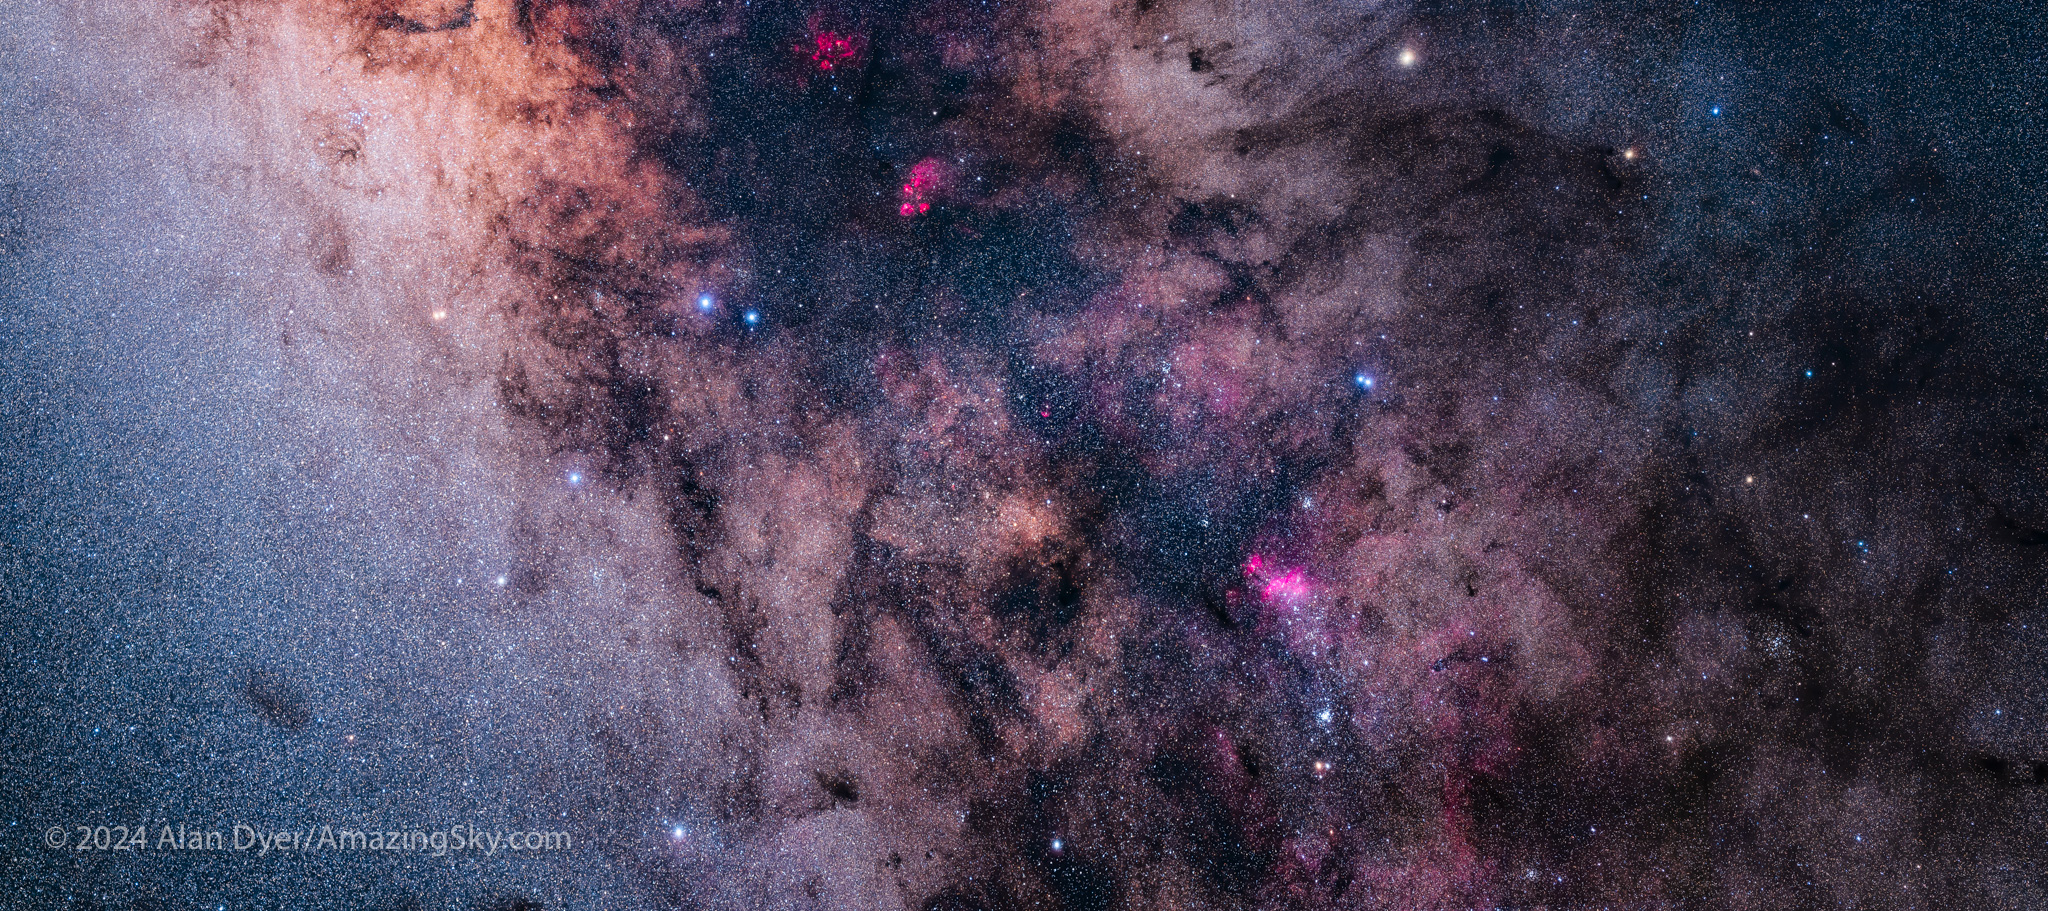
This is a mosaic of the tail of Scorpius — from the bright star cluster Messier 7 at upper left embedded in bright Milky Way starclouds, to the large star cluster NGC 6124 amid dusty dark lanes at lower right. This is a stitch of 3 segments: each a stack of 6 x 2 minute exposures with the Canon RF135mm at f/2 on the Canon Ra at ISO 800.
Fields like this in the Tail of Scorpius are below my northern horizon at home. And it would still be low from a southern U.S. site, where natural green or red airglow can spoil images. I’ve never had an issue with airglow in Australia. Oz skies are as dark and clean as I have ever experienced.
The Southern Milky Way
The grand finale of a night at OzSky, or anywhere in the southern hemisphere in autumn, is the celestial sight that I think ranks as one of the sky’s best, up there with a total solar eclipse.
This is an all-sky view of the centre of the Galaxy region in Sagittarius and Scorpius nearly overhead before dawn on an austral autumn morning in March 2024. The Milky Way stretches from Aquila at bottom left to Crux and Carina at upper right. This is a stack of 4 x 4 minute tracked exposures, at f/2.8 with the TTArtisan 11mm full-frame fish-eye lens on the filter-modified Canon EOS R at ISO 800.
That sight is the jaw-dropping pre-dawn panorama of our Galaxy stretched across the sky, with the bright core overhead and its spiral arms out to either side. It is obvious as a giant edge-on galaxy, with us far off-centre. The image above frames the entire Dark Emu.
One of my projects this year, for a moonless night with little likelihood of clouds coming through, was to work photographically along the Milky Way, down from Orion into Puppis and Vela, through Carina and Crux, and into Centaurus, then finishing with the galactic core area of Scorpius and Sagittarius.
This panorama takes in a 180° sweep of the Milky Way: from Sagittarius, Scorpius and the Galactic Centre at left, to Orion, Gemini and near the galactic anti-centre at right. This is a panorama of 11 segments, each a stack of 8 to 12 exposures, of 2 or 3 minutes each, with the Canon RF28-70mm lens at f/2.2 or f/2.8 on the Canon Ra at ISO 800.
The resulting 180º panorama, made of 11 segments shot at 32° South, was an all-night affair, interrupted by a nearby tree and the oncoming dawn. It complements one I shot six months later from 32° North in Arizona. That panorama is included in my Comet Chasing blog.
The Moon Returns
OzSky, as are all star parties, is timed for the dark of the Moon. By the end of the week, with everyone well and truly satiated by starlight and dark skies, the crescent Moon was beginning to appear in the west. (Yes, that’s a young waxing evening Moon, here near Jupiter on March 14, 2024.)
The waxing crescent Moon near Jupiter in the western twilight sky on an austral autumn evening. This is a blend of exposures to retain the detail around the bright Moon and corona glow: long (2.5s) for the sky and stars, and three shorter (0.6s, 0.3s and 1/6s) exposures for the Moon.
It was time to pack the telescopes into their trailers, and for everyone to head back home, whether that be in Australia or elsewhere in the world.
If You Go…
If you travel to the Southern Hemisphere, at the very least take binoculars and star charts, especially simple “beginner” charts, as you’ll be starting over again identifying a new set of patterns and stars.
For astrophotography, a star tracker is all you need, plus of course a camera and lenses. Focal lengths from fish-eye to telephoto can all be put to use. But many of the best fields are suitable for framing with no more than a 135mm lens, as I used for some of the images here.
But take good charts to identify the location of the South Celestial Pole in Octans the Octant. With no bright “South Star,” it can be tricky getting that field into your polar alignment sighting scope. Once aligned, I tend to leave my rig set up where it is, and not have to repeat the process each night. That’s why it’s nice to base yourself under dark skies at a cottage like Mirrabook, and not be on the road and at a different site every night.
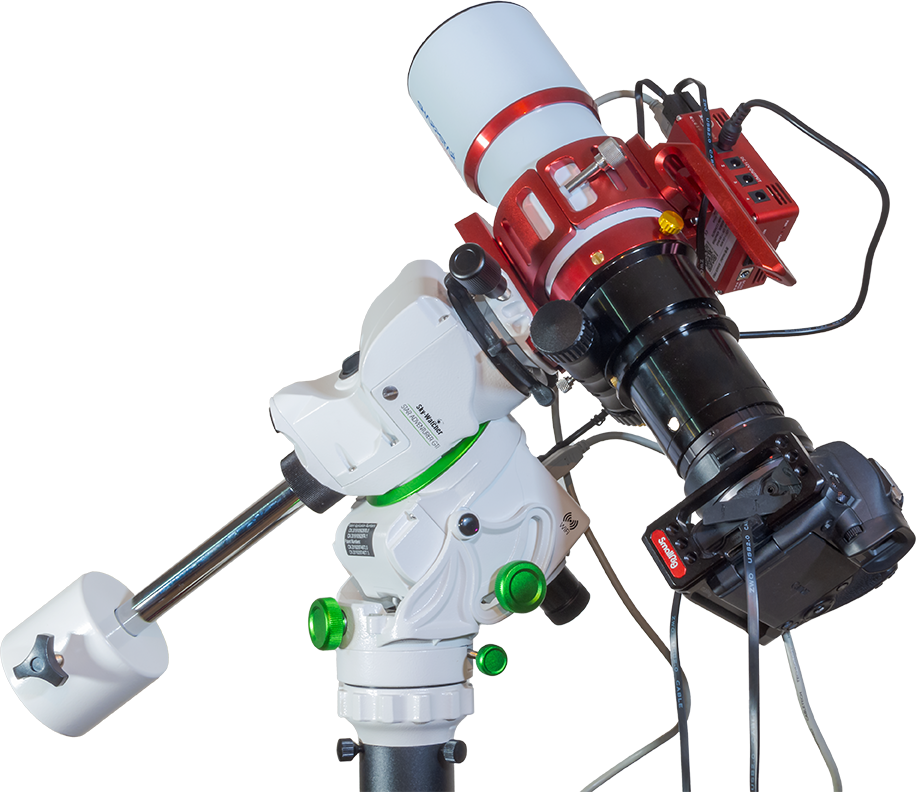
The Sharpstar 61mm scope on the Star Adventurer GTi mount.
If you want to have a telescope with you, one of the current generation of small (50mm to 70mm) apo refractors is ideal, either to look through or shoot through. For imaging, a small equatorial mount is essential, but can be tough to pack with its tripod. And you need to power it. The little Sky-Watcher Star Adventurer GTi powered by its internal 8 AA batteries, but on a collapsible carbon fibre tripod, is a good choice.
For visual tours, the OzSky Star Safari will provide all the eyepiece time on big scopes you could ask for. It is imaging where you are on your own to come fully equipped and self-contained.
When will I be back? Perhaps not in 2025. But 2026 is a possibility, maybe a little later in austral autumn to get the Galactic Centre up sooner and higher before dawn. I’ve been to Australia in the winter months of June and July and it’s too cold! May perhaps.
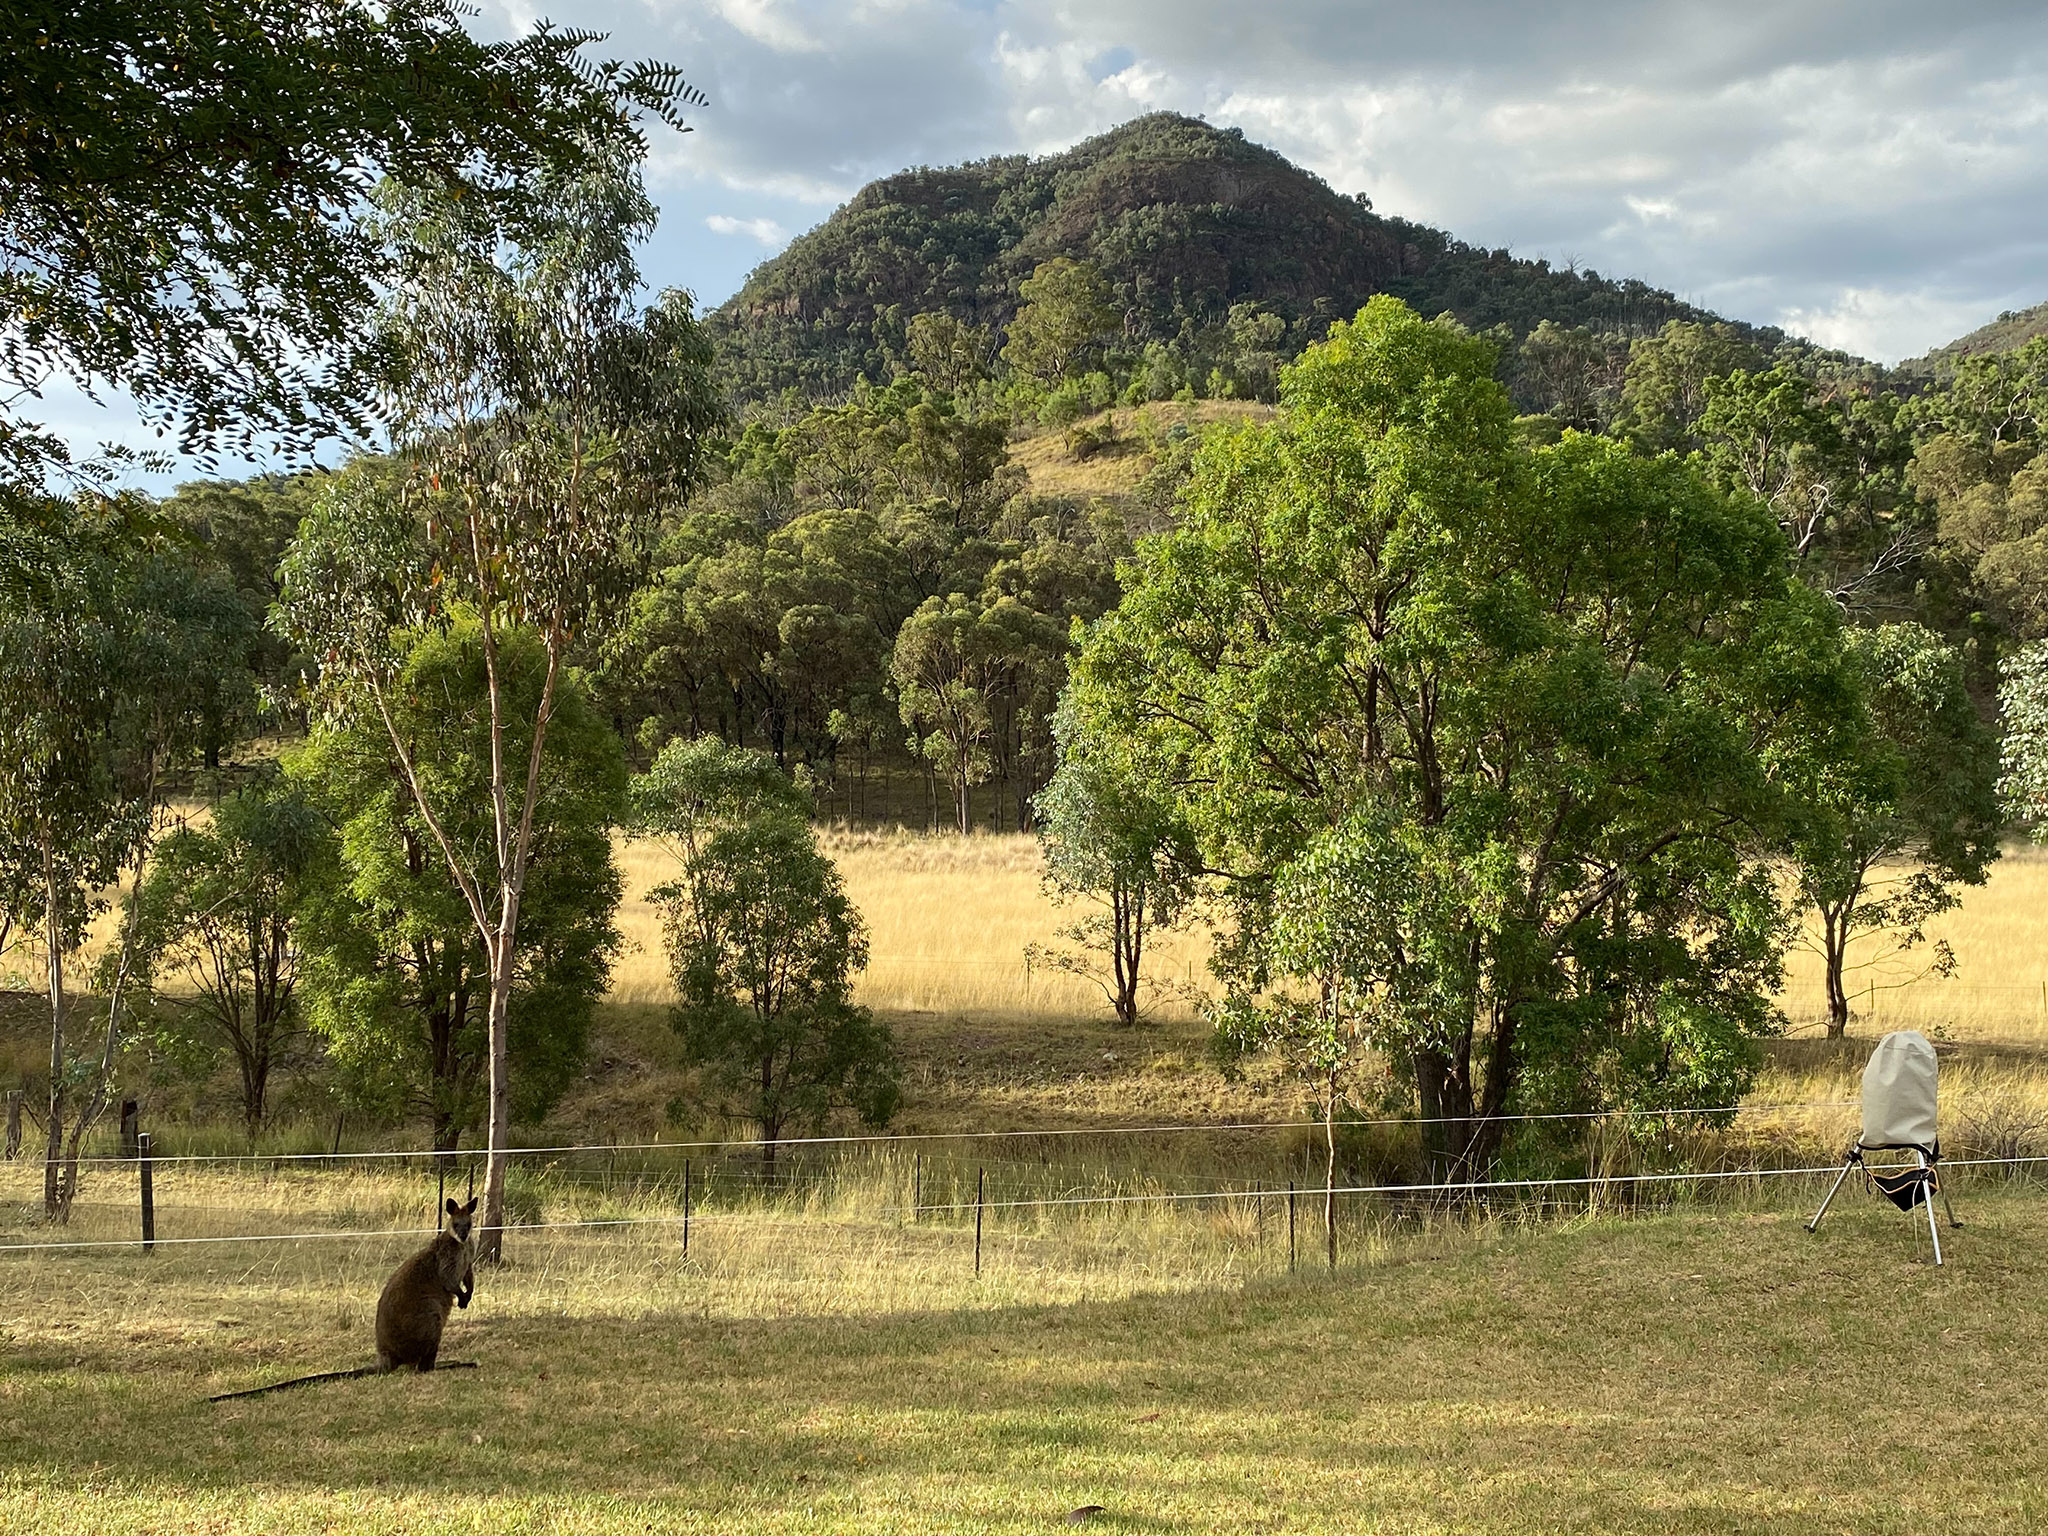
My Oz observing site — with camera gear accompanied by a roo. Or a wallaby? Note the cover over my aligned tracker rig at right.
If you go once, you will be bitten (we hope not literally by one of Oz’s killer critters!) by the southern sky passion.
The only downside is that when I get home, often to poor weather, but even when skies are clear, I find that the home skies tend to lose their excitement and attraction. They just can’t compare to the great southern skies.
In a format similar to my other popular camera tests, I put the 45-megapixel Canon R5 mirrorless camera through its paces for the demands of astrophotography.
In a sequel to my popular post from September 2021 where I reviewed the Canon R6 mirrorless camera, here is a similar test of its higher-megapixel companion, the Canon R5. Where the R6 has a modest 20-megapixel sensor with relatively large 6.6-micron pixels, the R5 is (at present) Canon’s highest megapixel camera, with 45 megapixels. Each pixel is only 4.4 microns across, providing higher resolution but risking more noise.
Is the higher noise noticeable? If so, does that make the R5 less than ideal for astrophotography? To find out, I tested an R5 purchased locally in Calgary from The Camera Store in May 2022.
NOTE: CLICK orTAP on any image to bring it up full screen for closer inspection. The blog contains a lot of high-res images, so they may take a while to all load. Patience! Thanks!
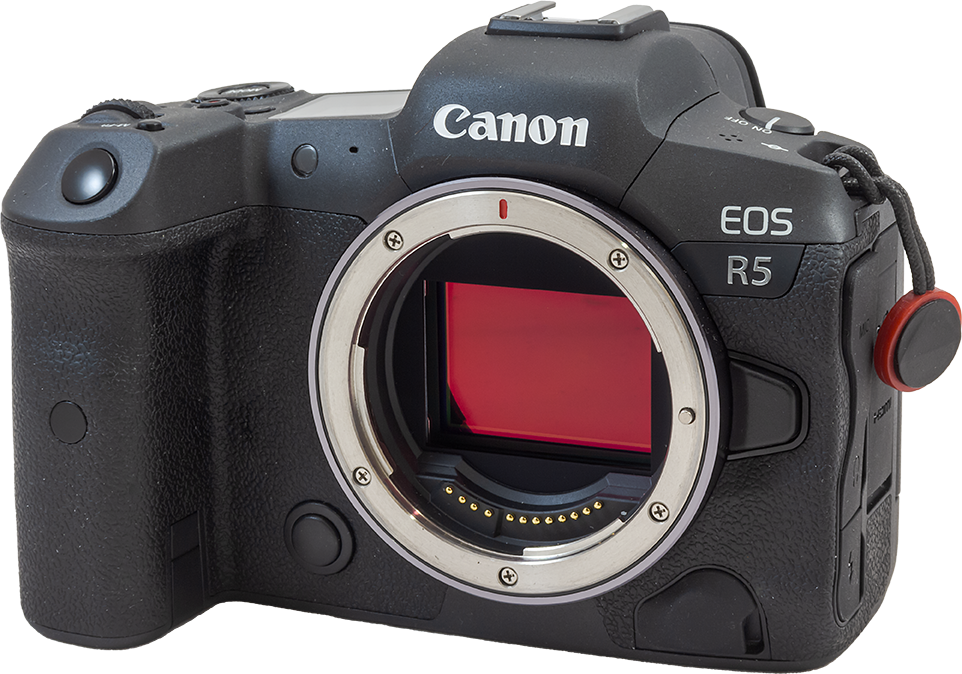
The Canon R5 uses a full-frame sensor offering 45 megapixels, producing images with 8192 x 5464 pixels, and making 8K video possible.
TL;DR Summary
The Canon R5 proved to be surprisingly low in noise, and has worked very well for nightscape, lunar and deep-sky photography (as shown below), where its high resolution does produce a noticeable improvement to image detail, with minimal penalty from higher noise. Its 8K video capability has a place in shooting the Moon, Sun and solar eclipses. It was not so well suited to shooting videos of auroras.
This is a stack of 12 x 5-minute exposures with a Sharpstar 94EDPH refractor at f/4.5 and the Canon R5 at ISO 800, taken as a test of the R5 for deep-sky imaging. No filters were employed. Close-ups of sub-frames from this shoot with the R5, and also with the R6 and Ra, are used throughout the review.
R5 Pros
The Canon R5 is superb for its:
High resolution with relatively low noise
ISO invariant sensor performance for good shadow recovery
Good live view display with ISO boost in Movie mode
8K video has its attraction for eclipse photography
Good top LCD information screen missing in the R6
No magenta edge “amp glow” that the R6 shows
Higher 6x and 15x magnifications for precise manual focusing
Good battery life
Pro-grade Type N3 remote port
R5 Cons
The Canon R5 is not so superb for its:
Noise in stills and movies is higher than in the R6
Propensity for thermal-noise hot pixels in shadows
Not so suitable for low-light video as the R6
Overheating in 8K video
Live View image is not as bright as in the R6’s Movie mode
High cost!
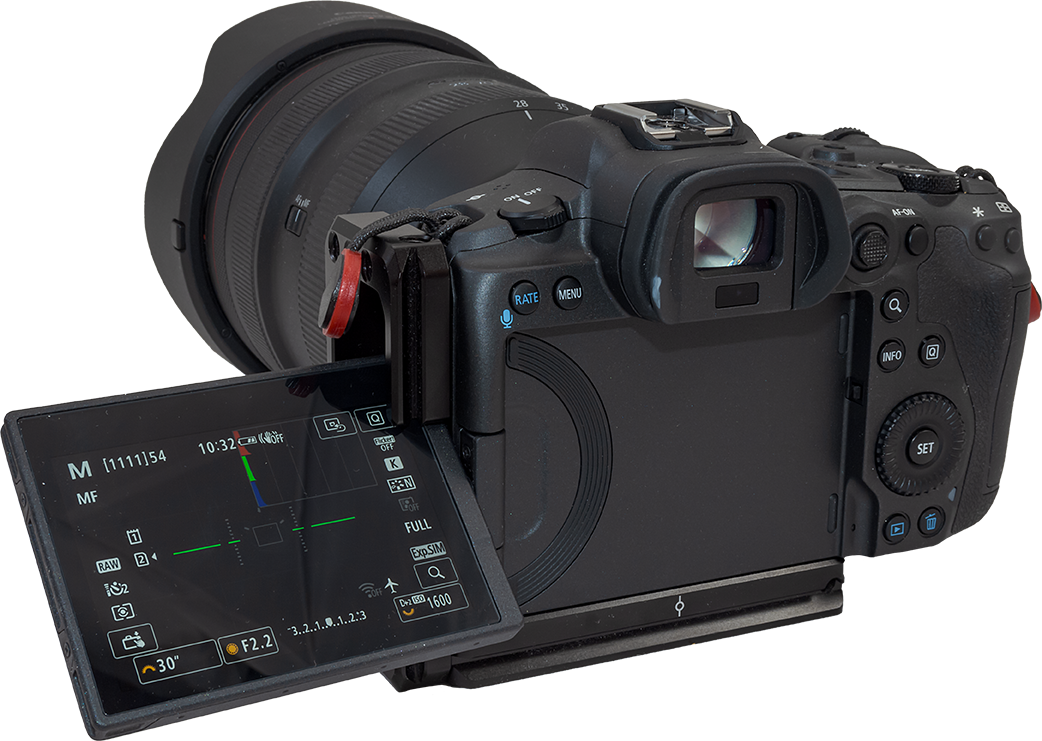
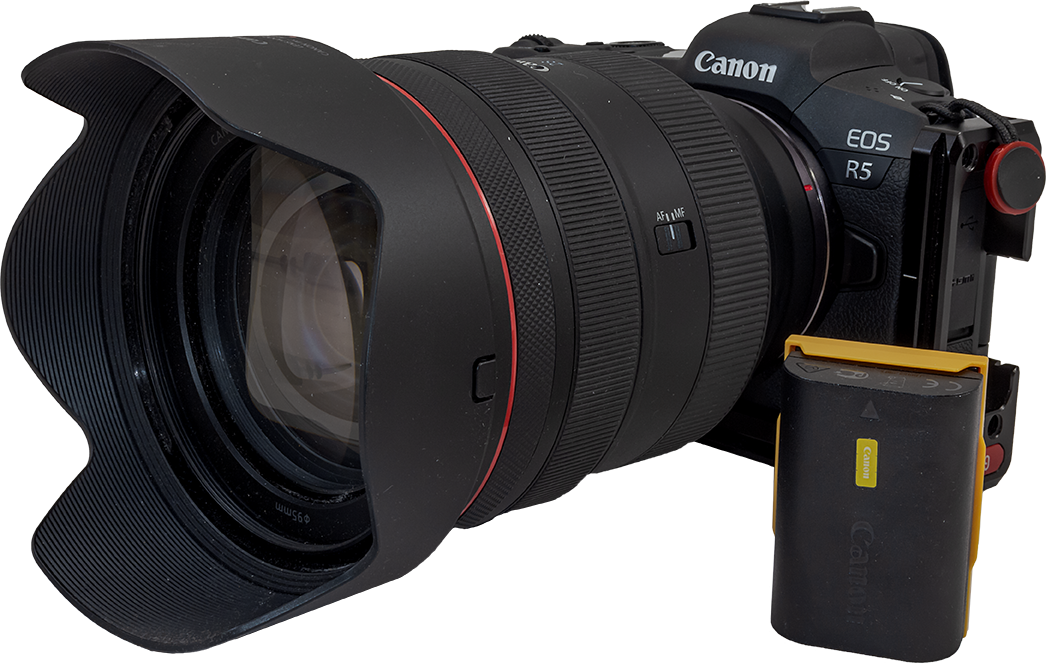
The flip-out screen of the R5 (and all recent Canon cameras) requires an L-bracket with a notch in the side (a Small Rig unit is shown here) to accommodate the tilting screen.
CHOOSING THE R5
Since late 2019 my main camera for all astrophotography has been the Canon Ra, a limited-edition version of the original R, Canon’s first full-frame mirrorless camera that started the R series. The Ra had a special infra-red cutoff filter in front of the sensor that passed a higher level of visible deep-red light, making it more suitable for deep-sky astrophotography than a standard DSLR or DSLM (mirrorless) camera. The Ra was discontinued after two years on the market, a lifetime similar to Canon’s previous astronomical “a” models, the 20Da and 60Da.
I purchased the Canon R6 in late 2021, primarily to use it as a low-light video camera for aurora photography, replacing the Sony a7III I had used for several years and reviewed here. Over the last year, I sold all my non-Canon cameras, as well as the Canon 6D MkII DSLR (reviewed here), to consolidate my camera gear to just Canon mirrorless cameras and lenses.
The R6 has proven to be an able successor to the Sony for me, with the R6’s modest megapixel count and larger pixels making it excellent for low-light video. But the higher resolution of the R5 was still attractive. So I have now added it to my Canon stable. Since doing so, I have put it through several of my standard tests to see how suitable it is for the demands of astrophotography, both stills and video.
Here are my extensive results, broken down by various performance criteria. I hope you will find my review useful in helping you make a purchase decision.
LIVE VIEW FRAMING
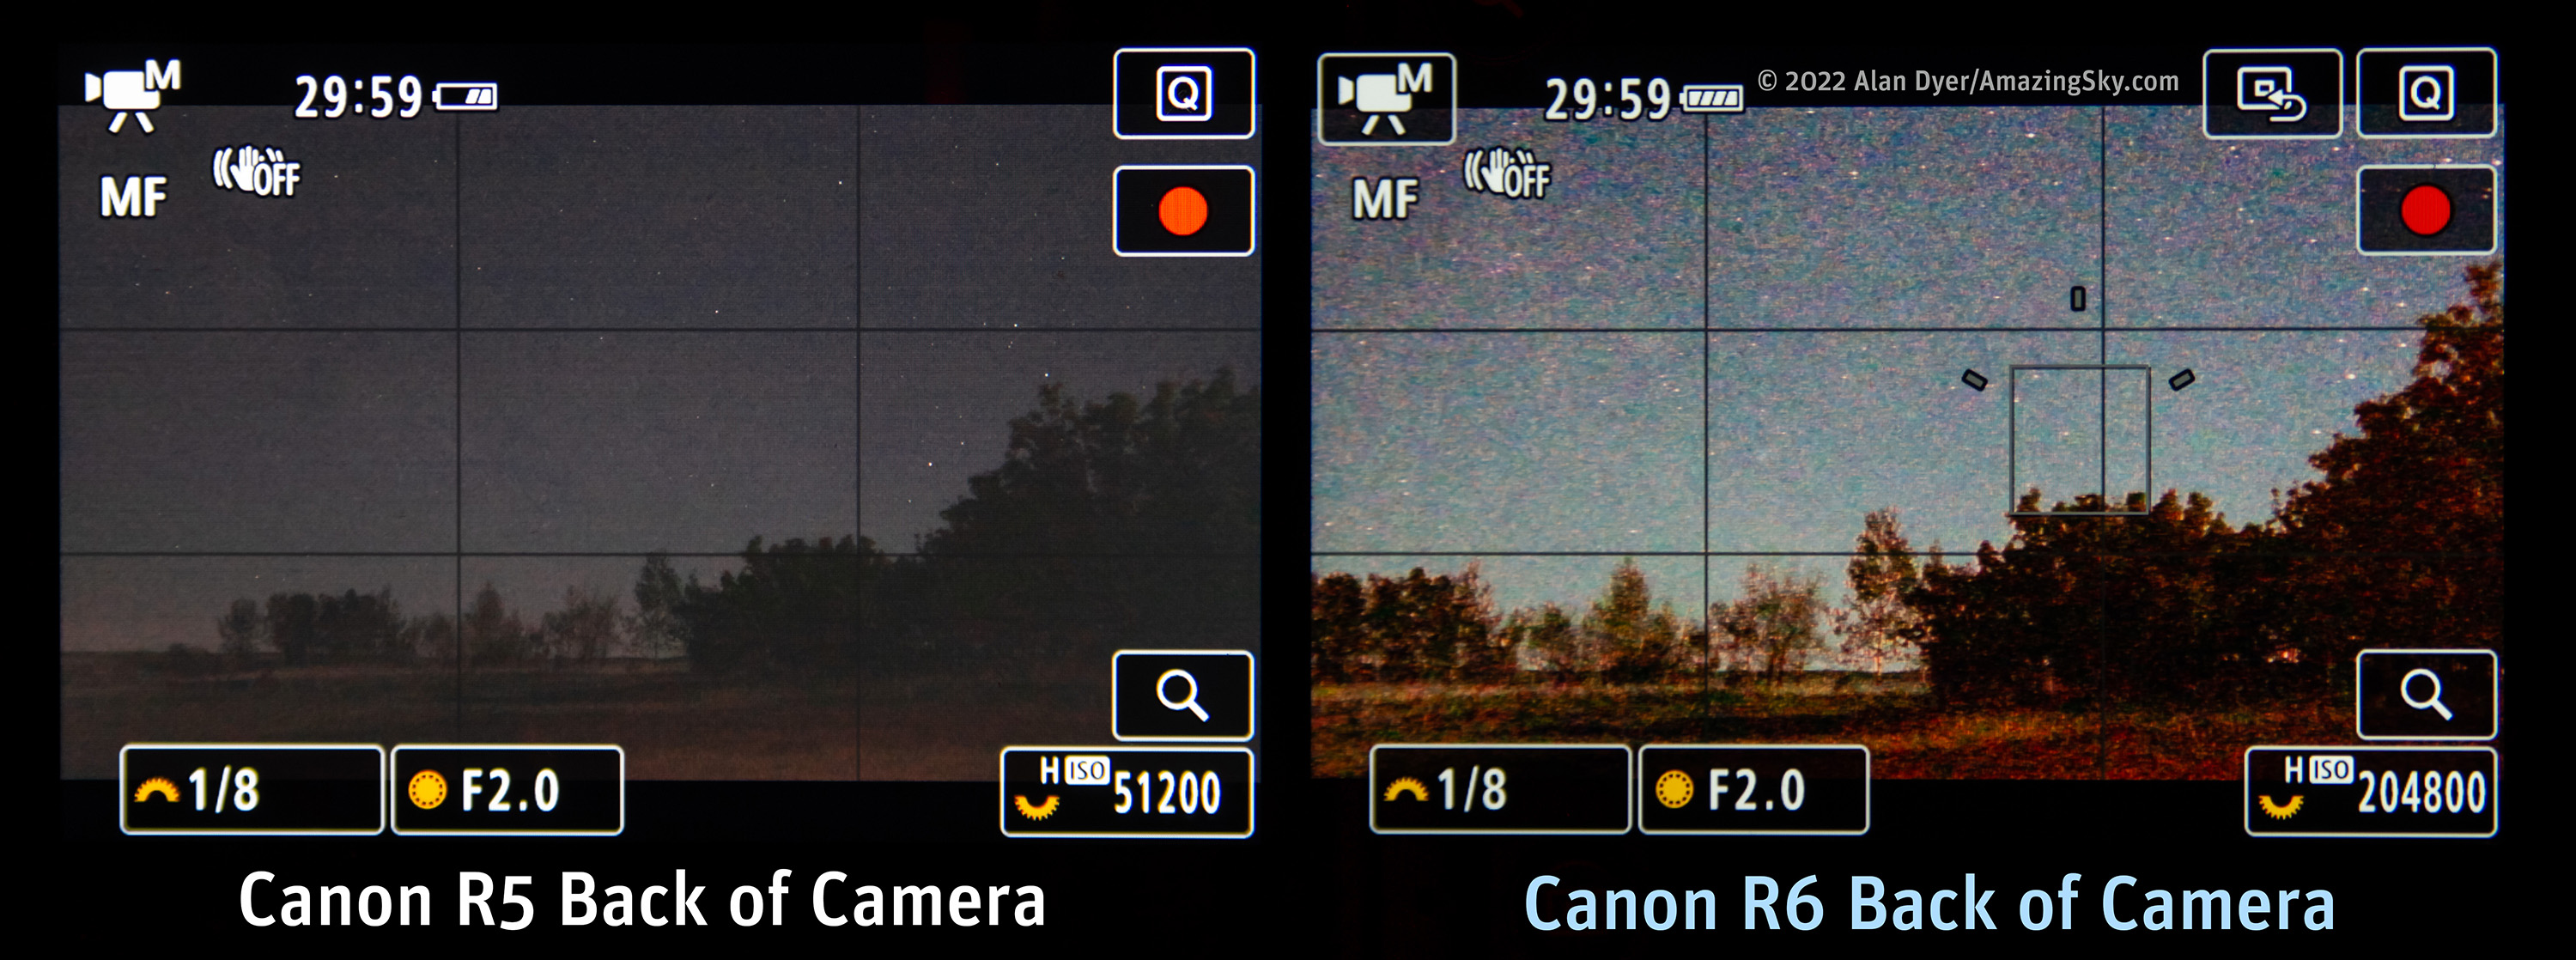
This compares the back-of-camera views of the R5 vs. the R6, with both set to their highest ISO in Movie mode for the brightest preview image.
First, why go mirrorless at all? For astrophotography, the big difference compared to even a high-end DSLR, is how much brighter the “Live View” image is when shooting at night. DSLM cameras are always in Live View – even the eye-level viewfinder presents a digital image supplied by the sensor.
And that image is brighter, often revealing more than what a DSLR’s optical viewfinder can show, a great advantage for framing nightscape scenes, and deep-sky fields at the telescope.
The R5 certainly presents a good live view image. However, it is not as bright nor as detailed as what the R6 can provide when placed in its Movie mode and with the ISO bumped up to the R6’s highest level of ISO 204,800, where the Milky Way shows up, live!
The R5 only goes as high as ISO 51,200, and so as I expected it does not provide as bright or detailed a preview at night as the R6 can. However, the R5 is better than the original R for live-view framing, and better than any Canon DSLR I’ve used.
LIVE VIEW FOCUSING
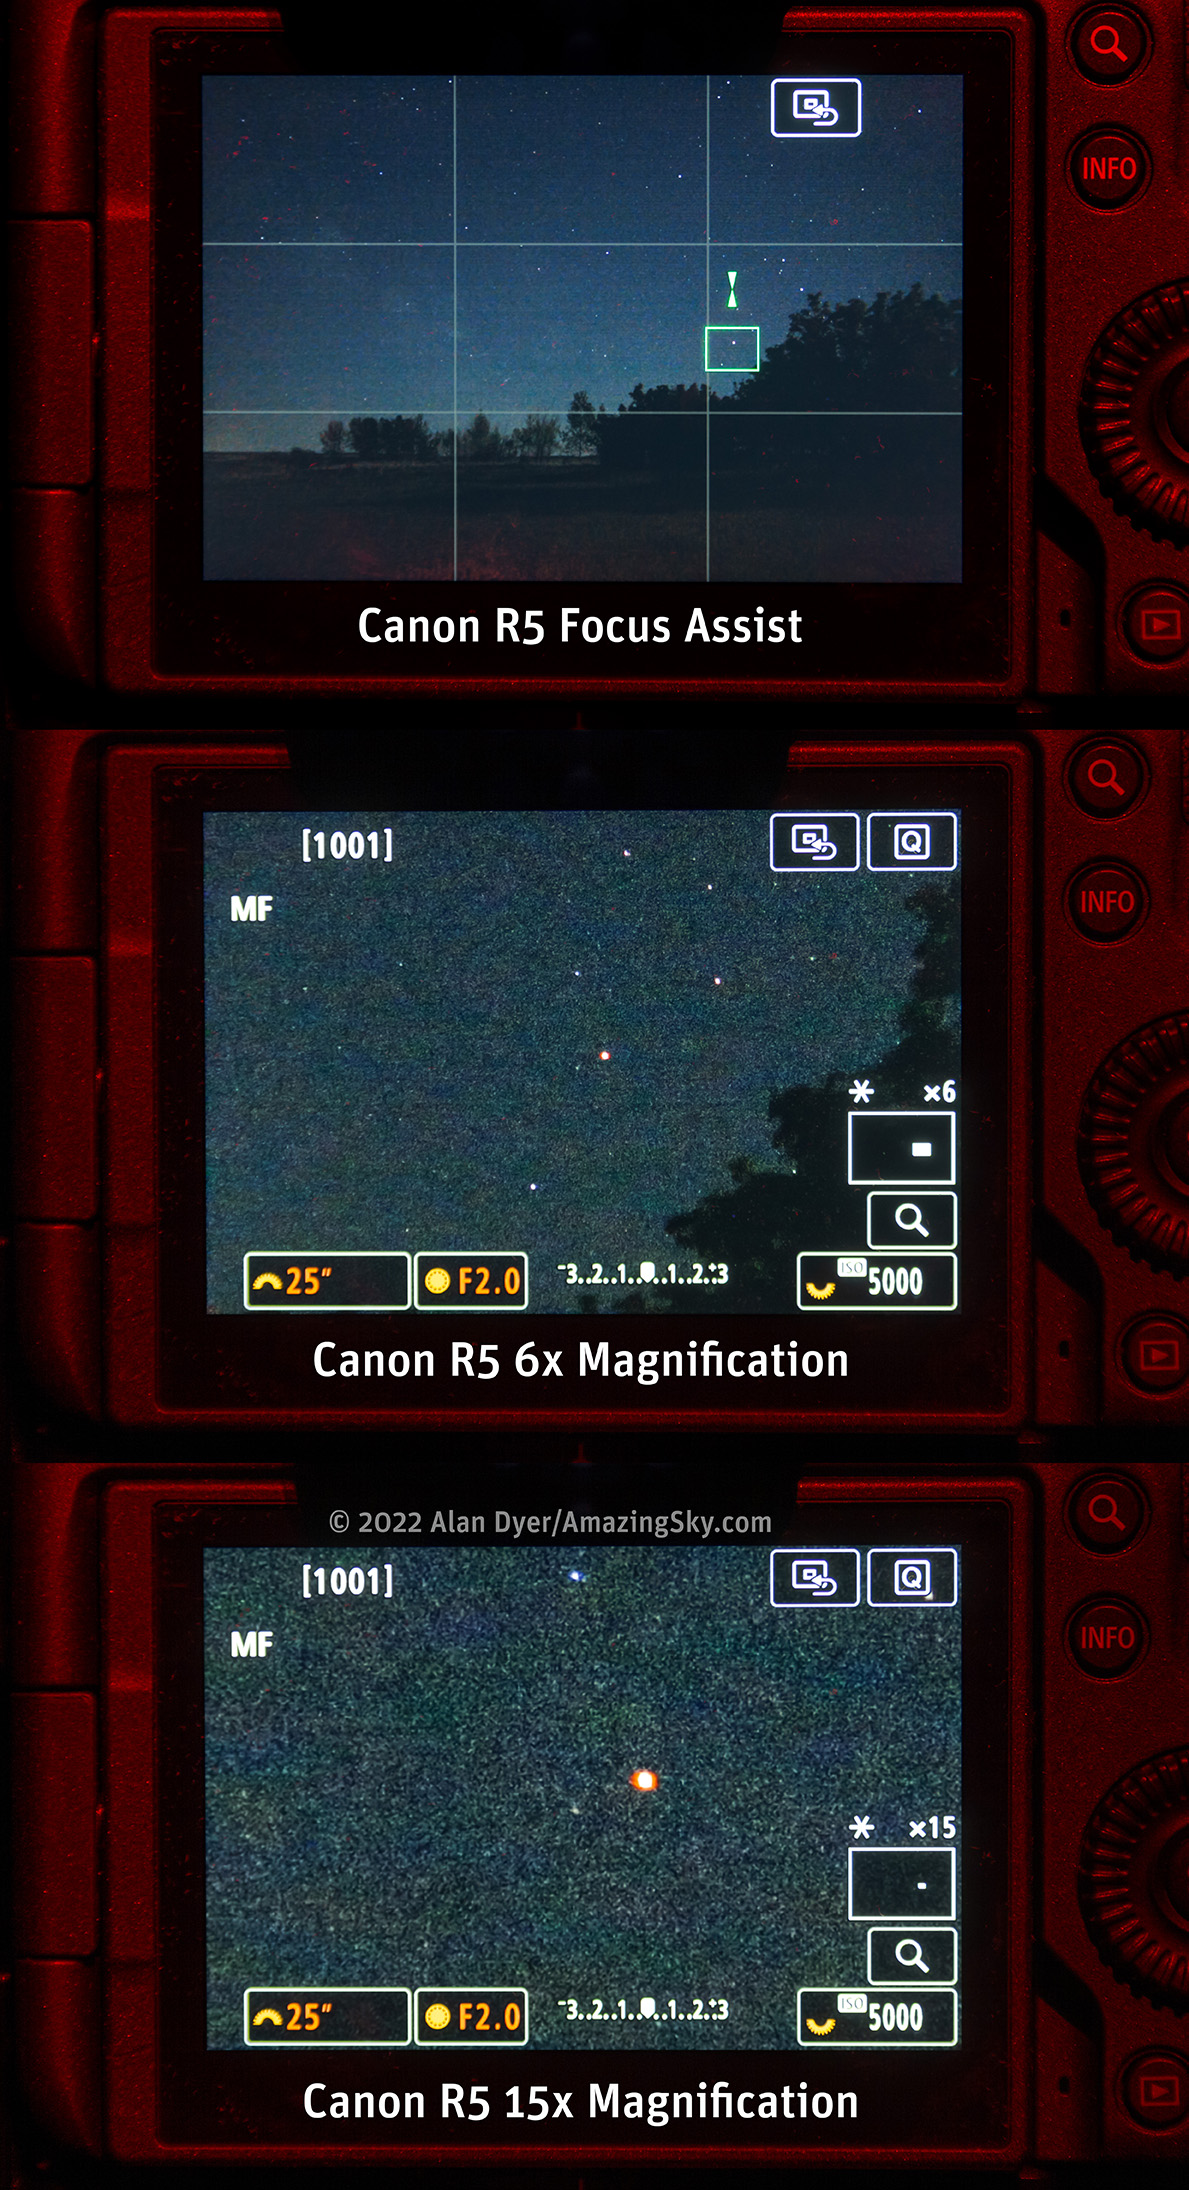
As with other Canon mirrorless cameras, the R5 offers a Focus Assist overlay (top) to aid manual focusing. It works on bright stars. It also has a 6x and 15x magnifications for even more precise focusing.
Like the R6, the R5 can autofocus accurately on bright stars and planets. By comparison, while the Ra can autofocus on distant bright lights, it fails on bright stars or planets.
Turning on Focus Peaking makes stars turn red, yellow or blue (your choice of colours) when they are in focus, as a reassuring confirmation.
Turning on Focus Guide provides the arrowed overlays shown above.
In manual focus, an additional Focus Aid overlay, also found in the R6, provides arrows that close up and turn green when in focus on a bright star or planet.
Or, as shown above, you can zoom in by 6x or 15x to focus by eye the old way by examining the star image. These are magnification levels higher than the 5x and 10x of the R6 and most other Canon cameras, and are a great aid to precise focusing, necessary to make full use of the R5’s high resolution, and the sharpness of Canon’s RF lenses. The 15x still falls short of the Ra’s 30x for ultra-precise focusing on stars, but it’s a welcome improvement nonetheless.
In all, while the R5 is not as good as the R6 for framing in low light, it is better for precise manual focusing using its higher 15x magnification.
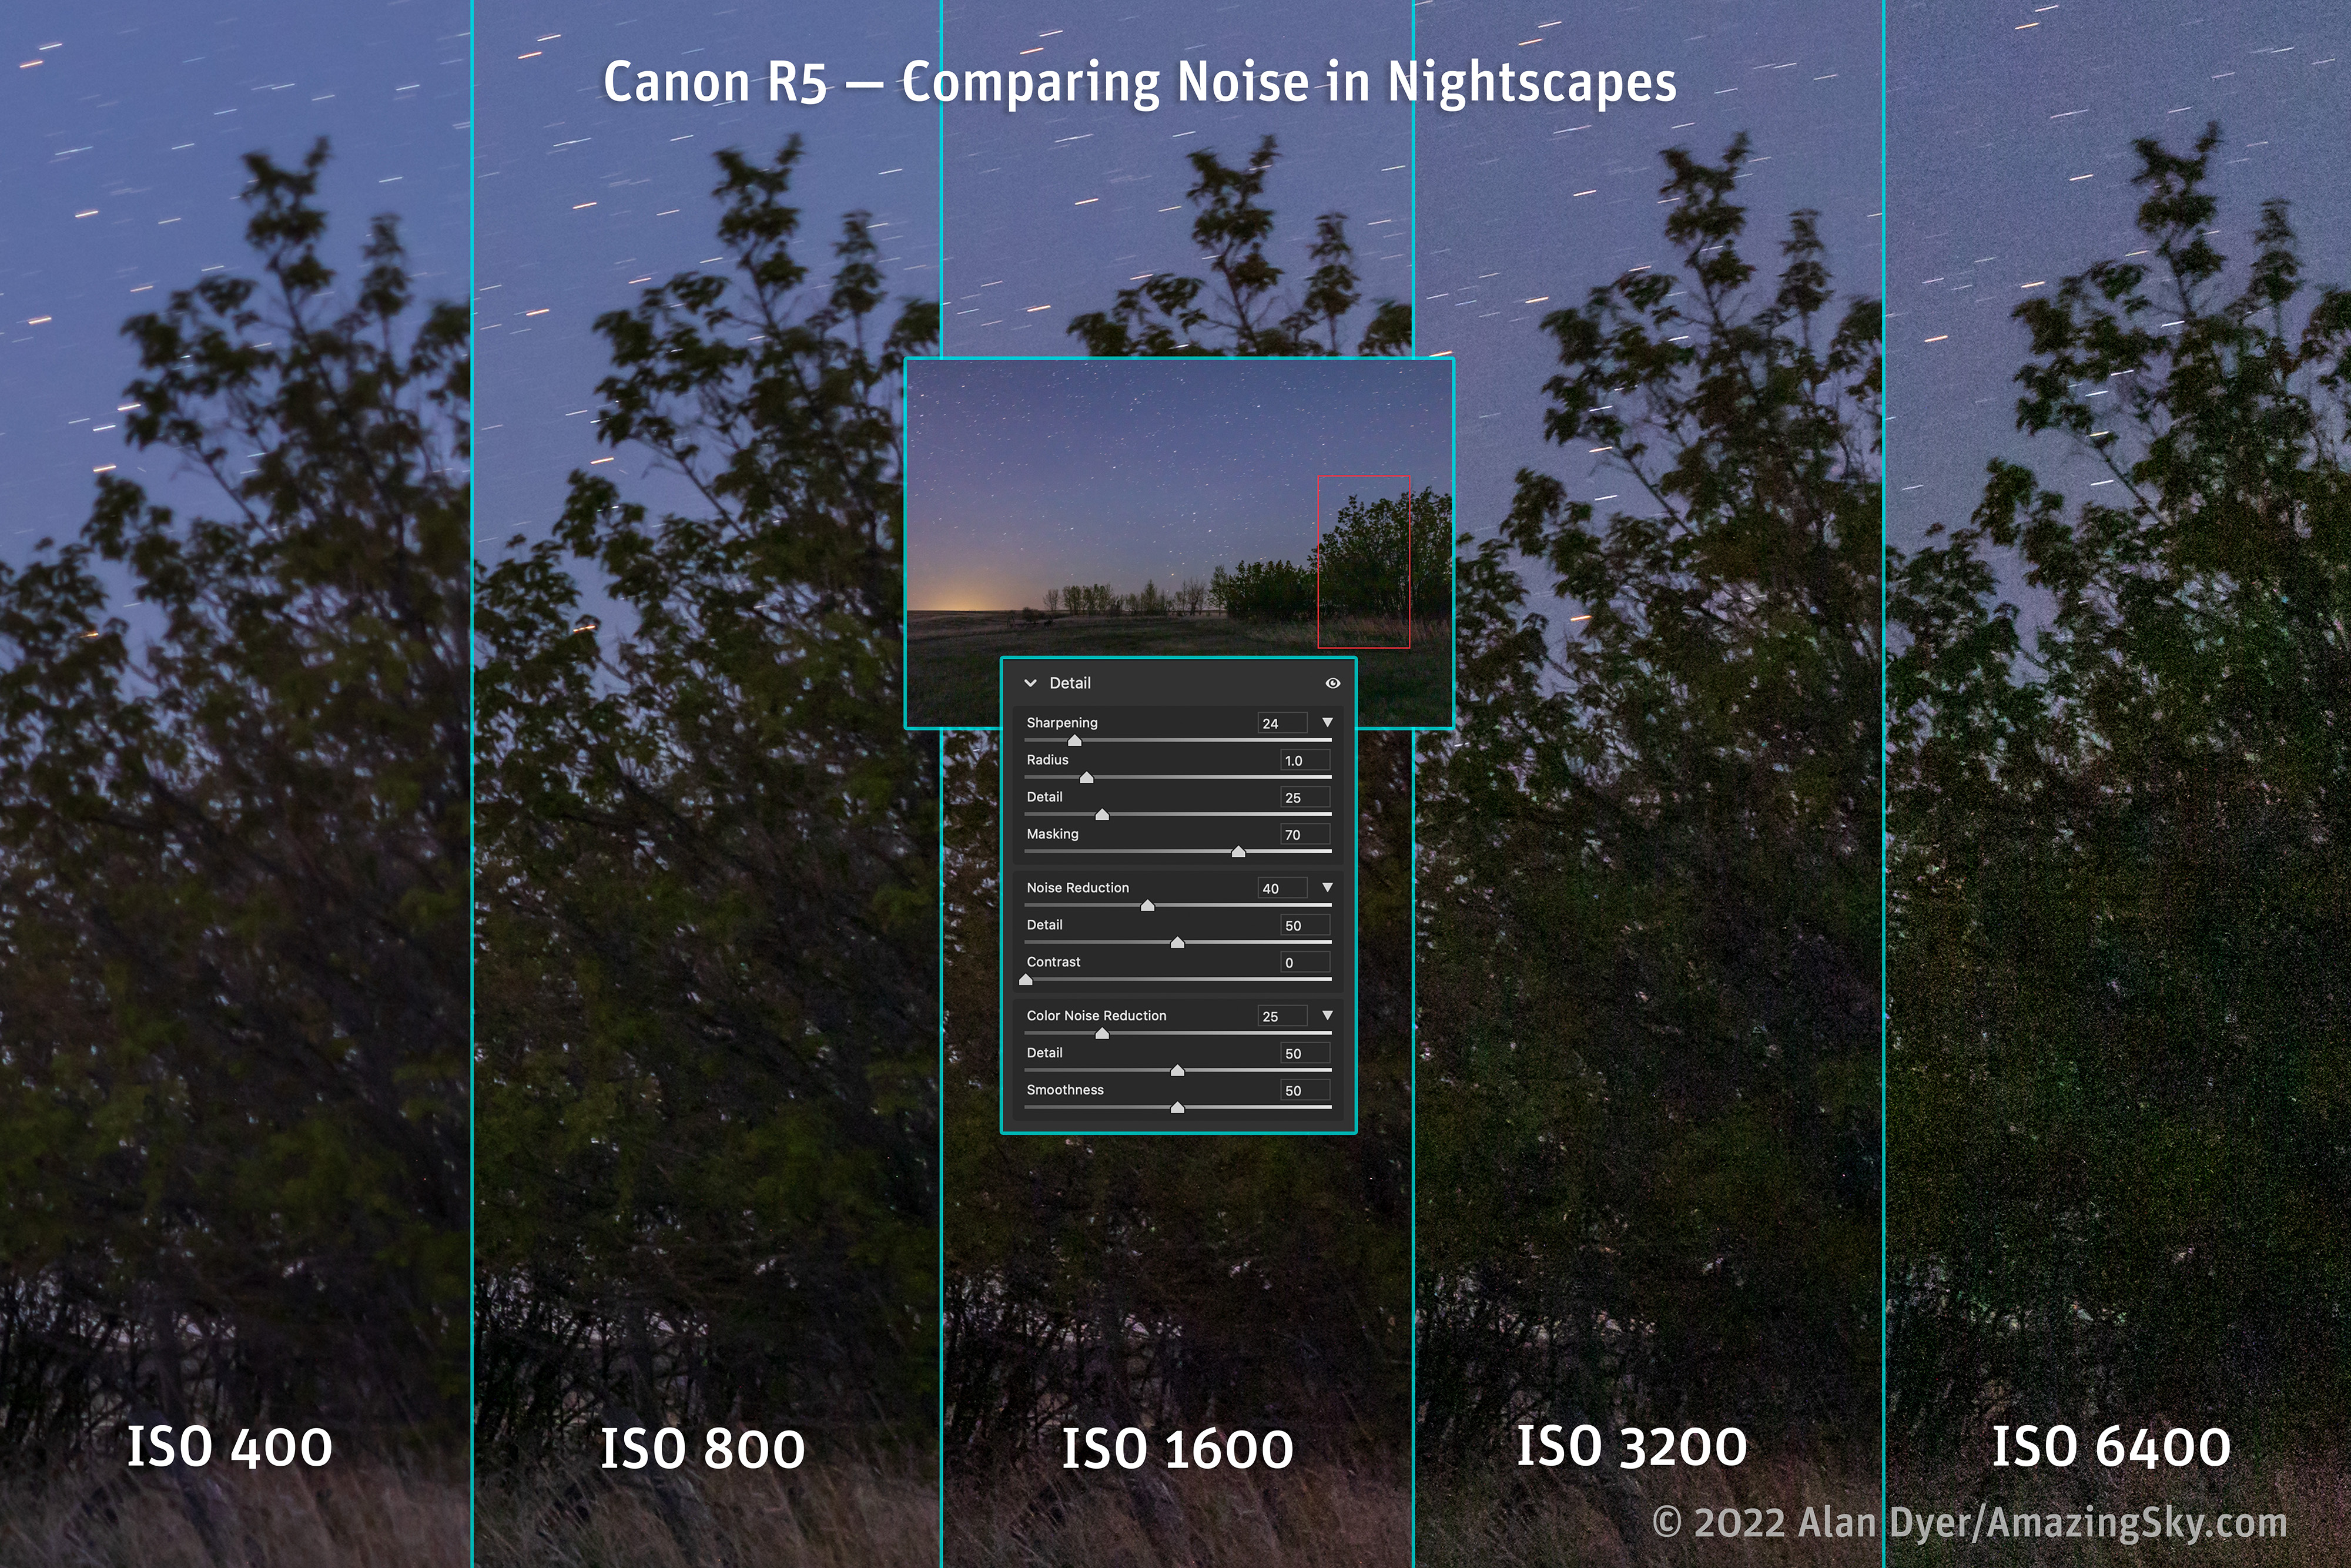
NOISE PERFORMANCE — NIGHTSCAPES
The key camera characteristic for astrophoto use is noise. There is no point in having lots of resolution if, at the high ISOs we use for most astrophotography, the detail is lost in noise. But I was pleasantly surprised that proved not to be the case with the R5.
As I show below, noise is well controlled, making the R5 usable for nightscapes at ISOs up to 3200, if not 6400 when needed in a pinch.
This compares the noise on a dark nightscape at the typical ISOs used for such scenes. A level of noise reduction shown has been applied in Camera Raw.
With 45 megapixels, at the upper end of what cameras offer today, the R5 has individual pixels, or more correctly “photosites,” that are each 4.4 microns in size, the “pixel pitch.”
This is still larger than the 3.7-micron pixels in a typical 24-megapixel cropped-frame camera like the Canon R10, or the 3.2-micron pixels found in a 32-megapixel cropped-frame camera like the Canon R7. Both are likely to be noisier than the R5, though will provide even higher resolution, as well as greater magnification with any given lens or telescope.
By comparison, the 30-megapixel full-frame R (and Ra) has a pixel pitch of 5.4 microns, while the 20-megapixel R6’s pixel pitch is a generous 6.6 microns. Only the 12-megapixel Sony a7SIII has larger 8.5-micron pixels, making it the low-light video champ.
The bigger the photosites (i.e. the larger the pixel pitch), the more photons each photosite can collect in a given amount of time – and the more photons they can collect, period, before they overfill and clip highlights. More photons equals more signal, and therefore a better signal-to-noise ratio, while the greater “full-well depth” yields higher dynamic range.
However, each generation of camera improves the signal-to-noise ratio by suppressing noise via its sensor design and improved signal processing hardware and firmware. The R5 and R6 each use Canon’s latest DIGIC X processor.
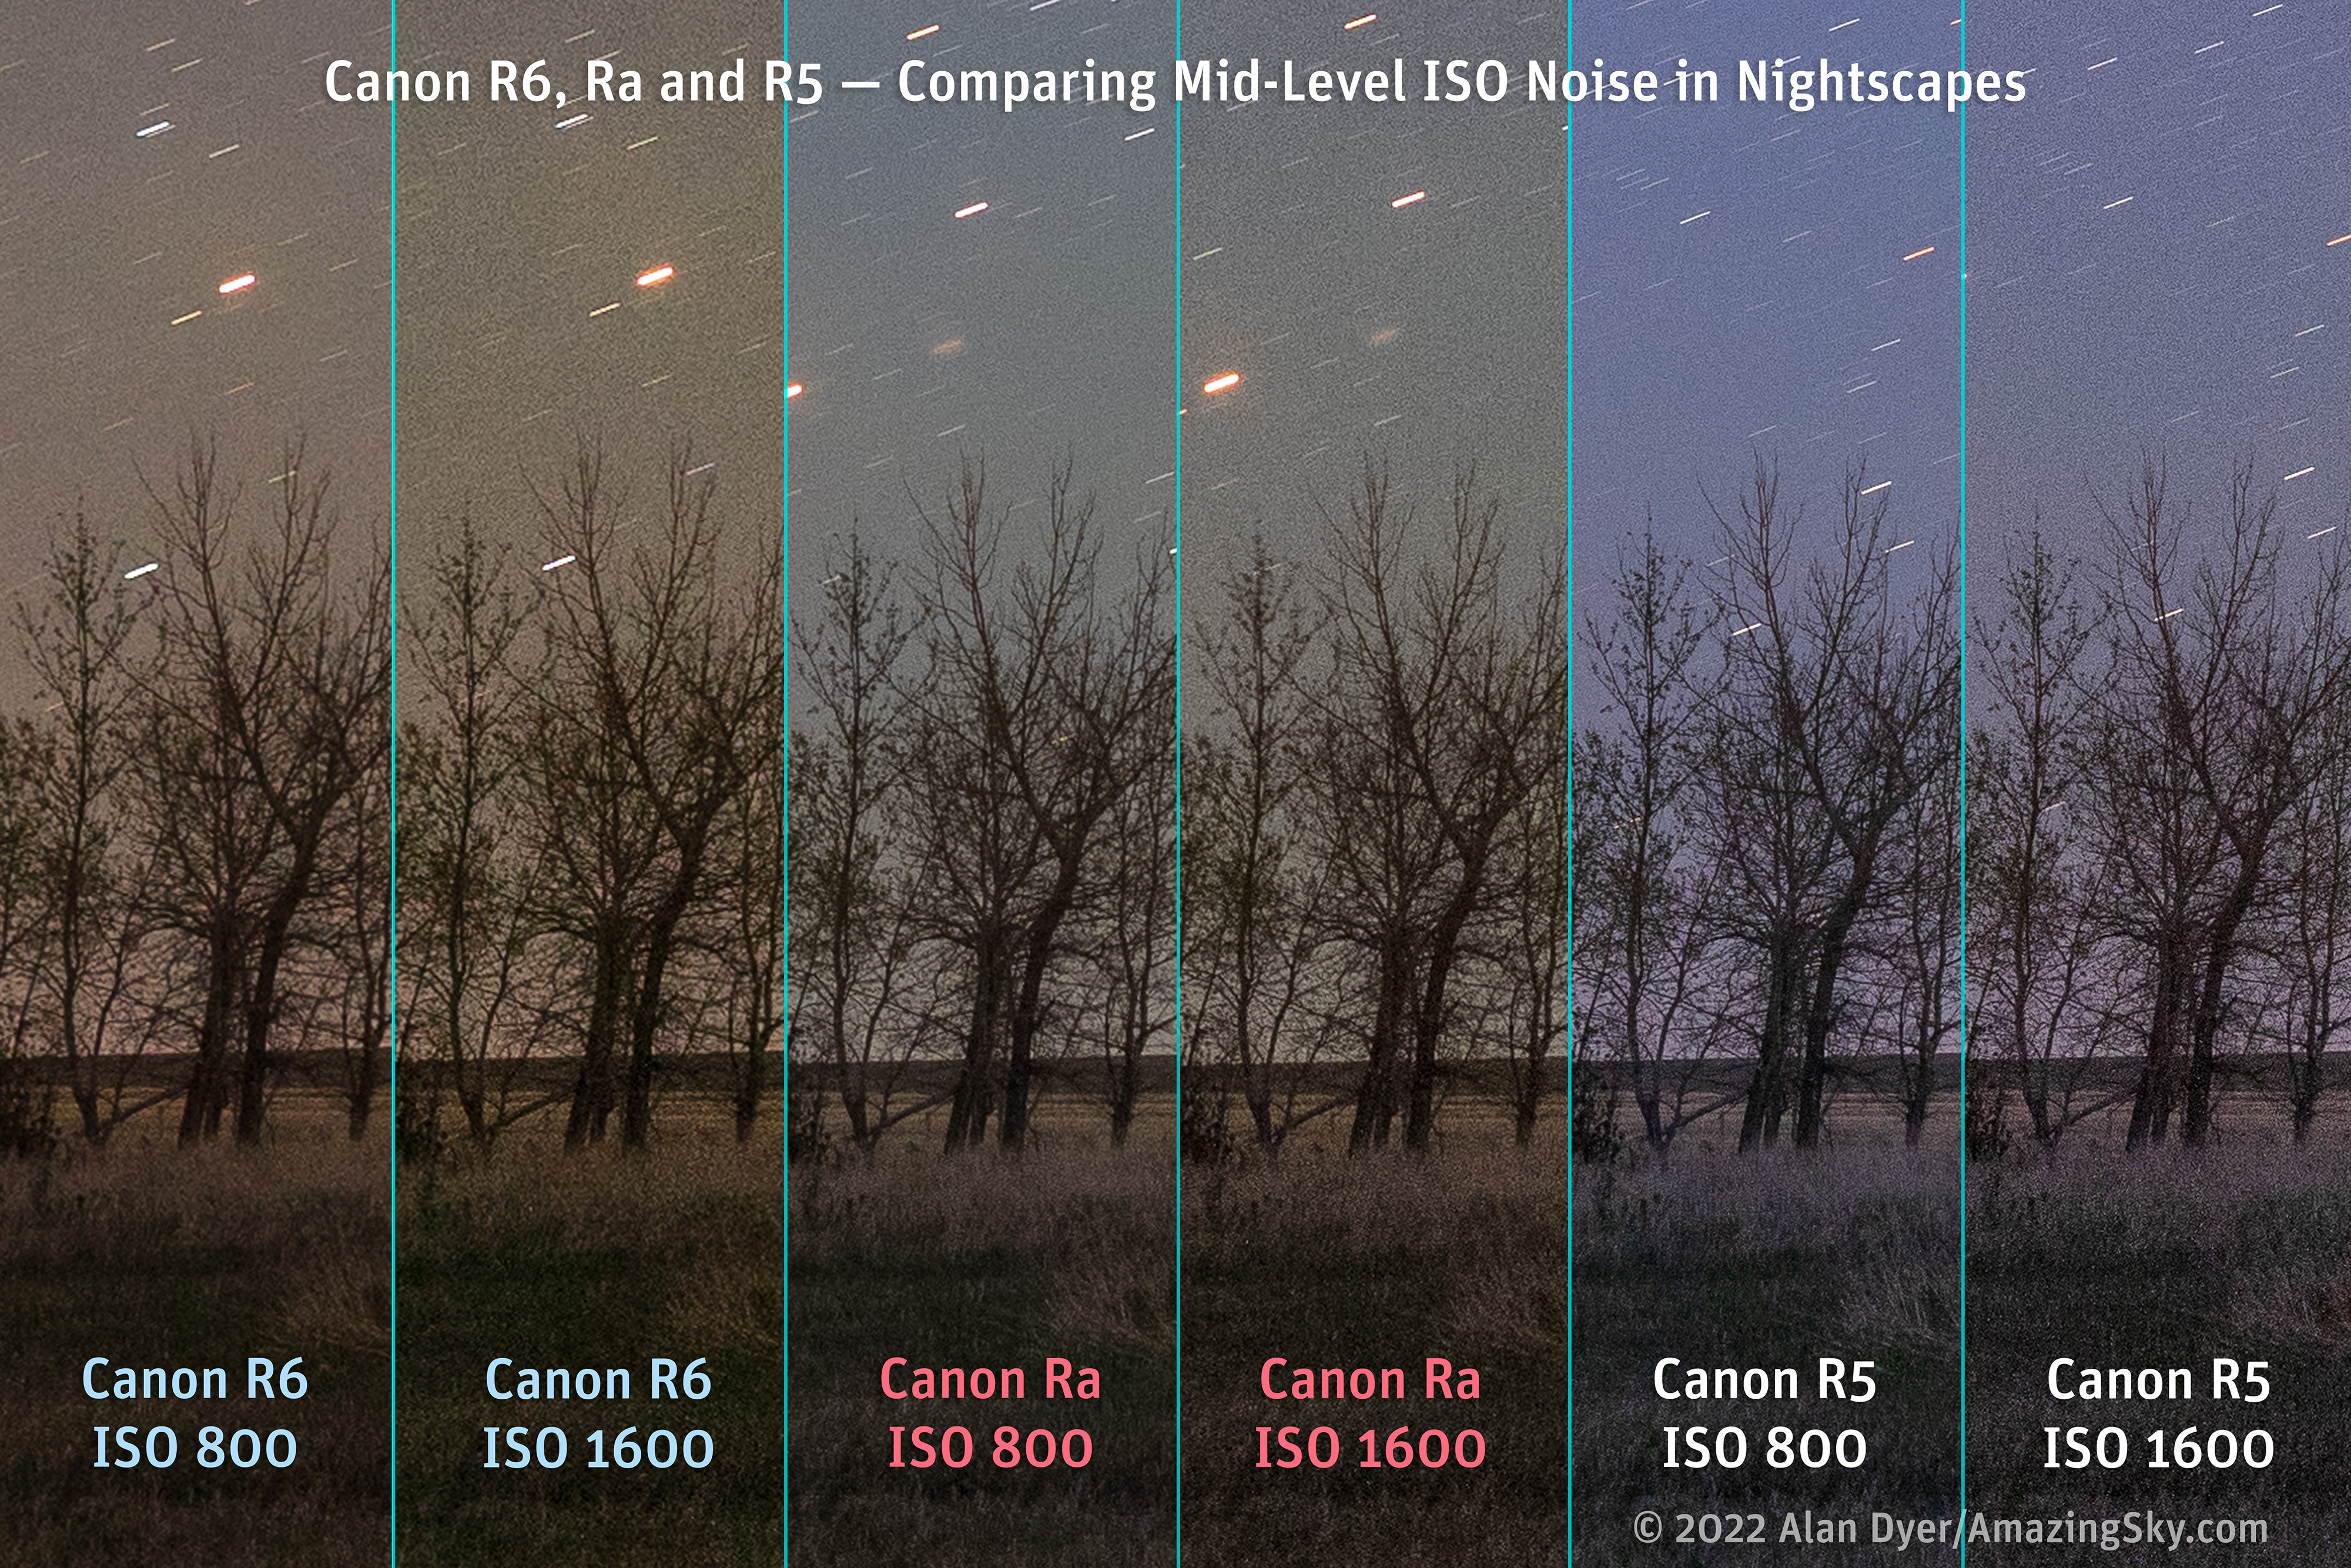
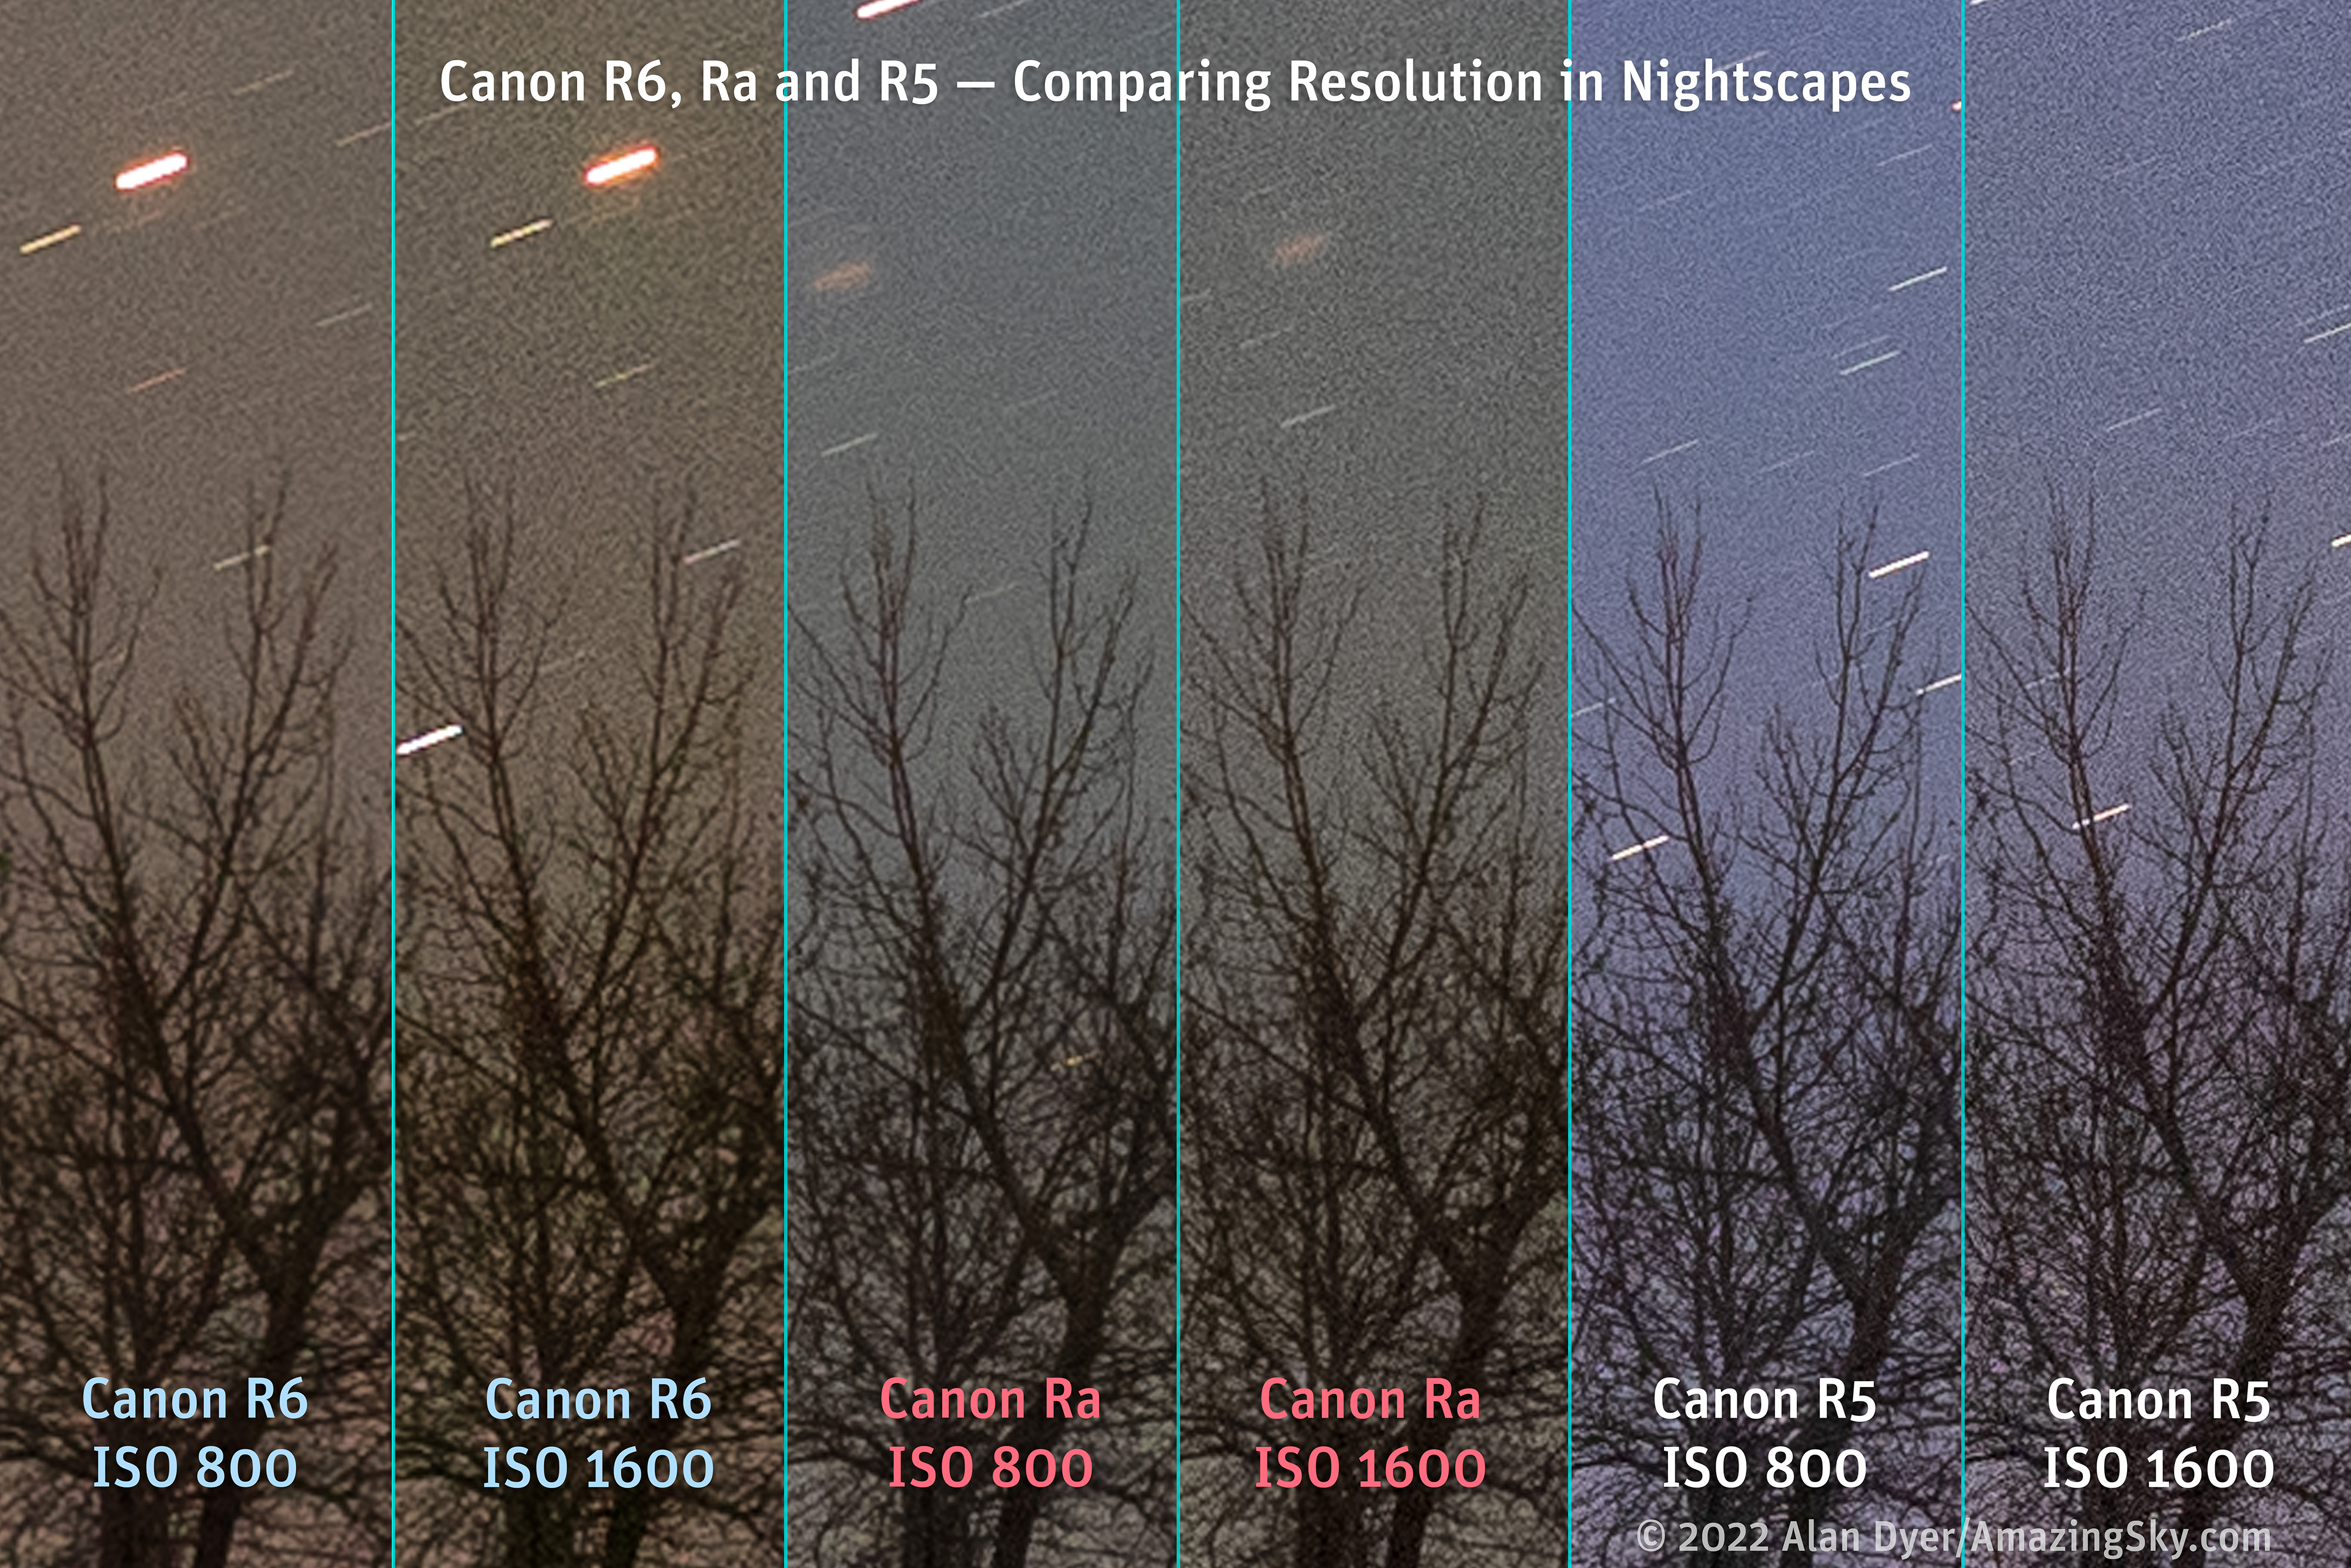
This compares the R5 to the R6 and Ra cameras at the high ISOs of 3200 and 6400 often used for Milky Way nightscapes.
In nightscapes the R5 did show more noise at high ISOs, especially at ISO 6400, than the R6 and Ra, but the difference was not large, perhaps one stop at most, if that. What was noticeable was the presence in the R5 of more hot pixels from thermal noise, as described later.
This compares the R5 to the R6 and Ra cameras at the more moderate ISOs of 800 and 1600 used for brighter nightscapes.
At slower ISOs the R5 showed a similar level of noise as the R6 and Ra, but a finer-grained noise than the R6, in keeping with the R5’s smaller pixels. In this test set, the R5 did not exhibit noticeably more noise than the other two cameras. This was surprising.
NOTE: In these comparisons I have not resampled the R5 images down to the megapixel count of the R6 to equalize them, as that’s not what you would do if you bought an R5. Instead, I have magnified the R6 and Ra’s smaller images so we examine the same area of each camera’s images.
As with the R6, I also saw no “magic ISO” setting where the R5 performed better than at other settings. Noise increased in proportion to the ISO speed. The R5 proved perfectly usable up to ISO 3200, with ISO 6400 acceptable for stills when necessary. But I would not recommend the R5 for those who like to shoot Milky Way scenes at ISO 12,800.
For nightscapes, a good practice that would allow using lower ISO speeds would be to shoot the sky images with a star tracker, then take separate long untracked exposures for the ground.
NOTE: In my testing I look first and foremost at actual real-world results. For those interested in more technical tests and charts, I refer you to DxOMark’s report on the Canon R5.
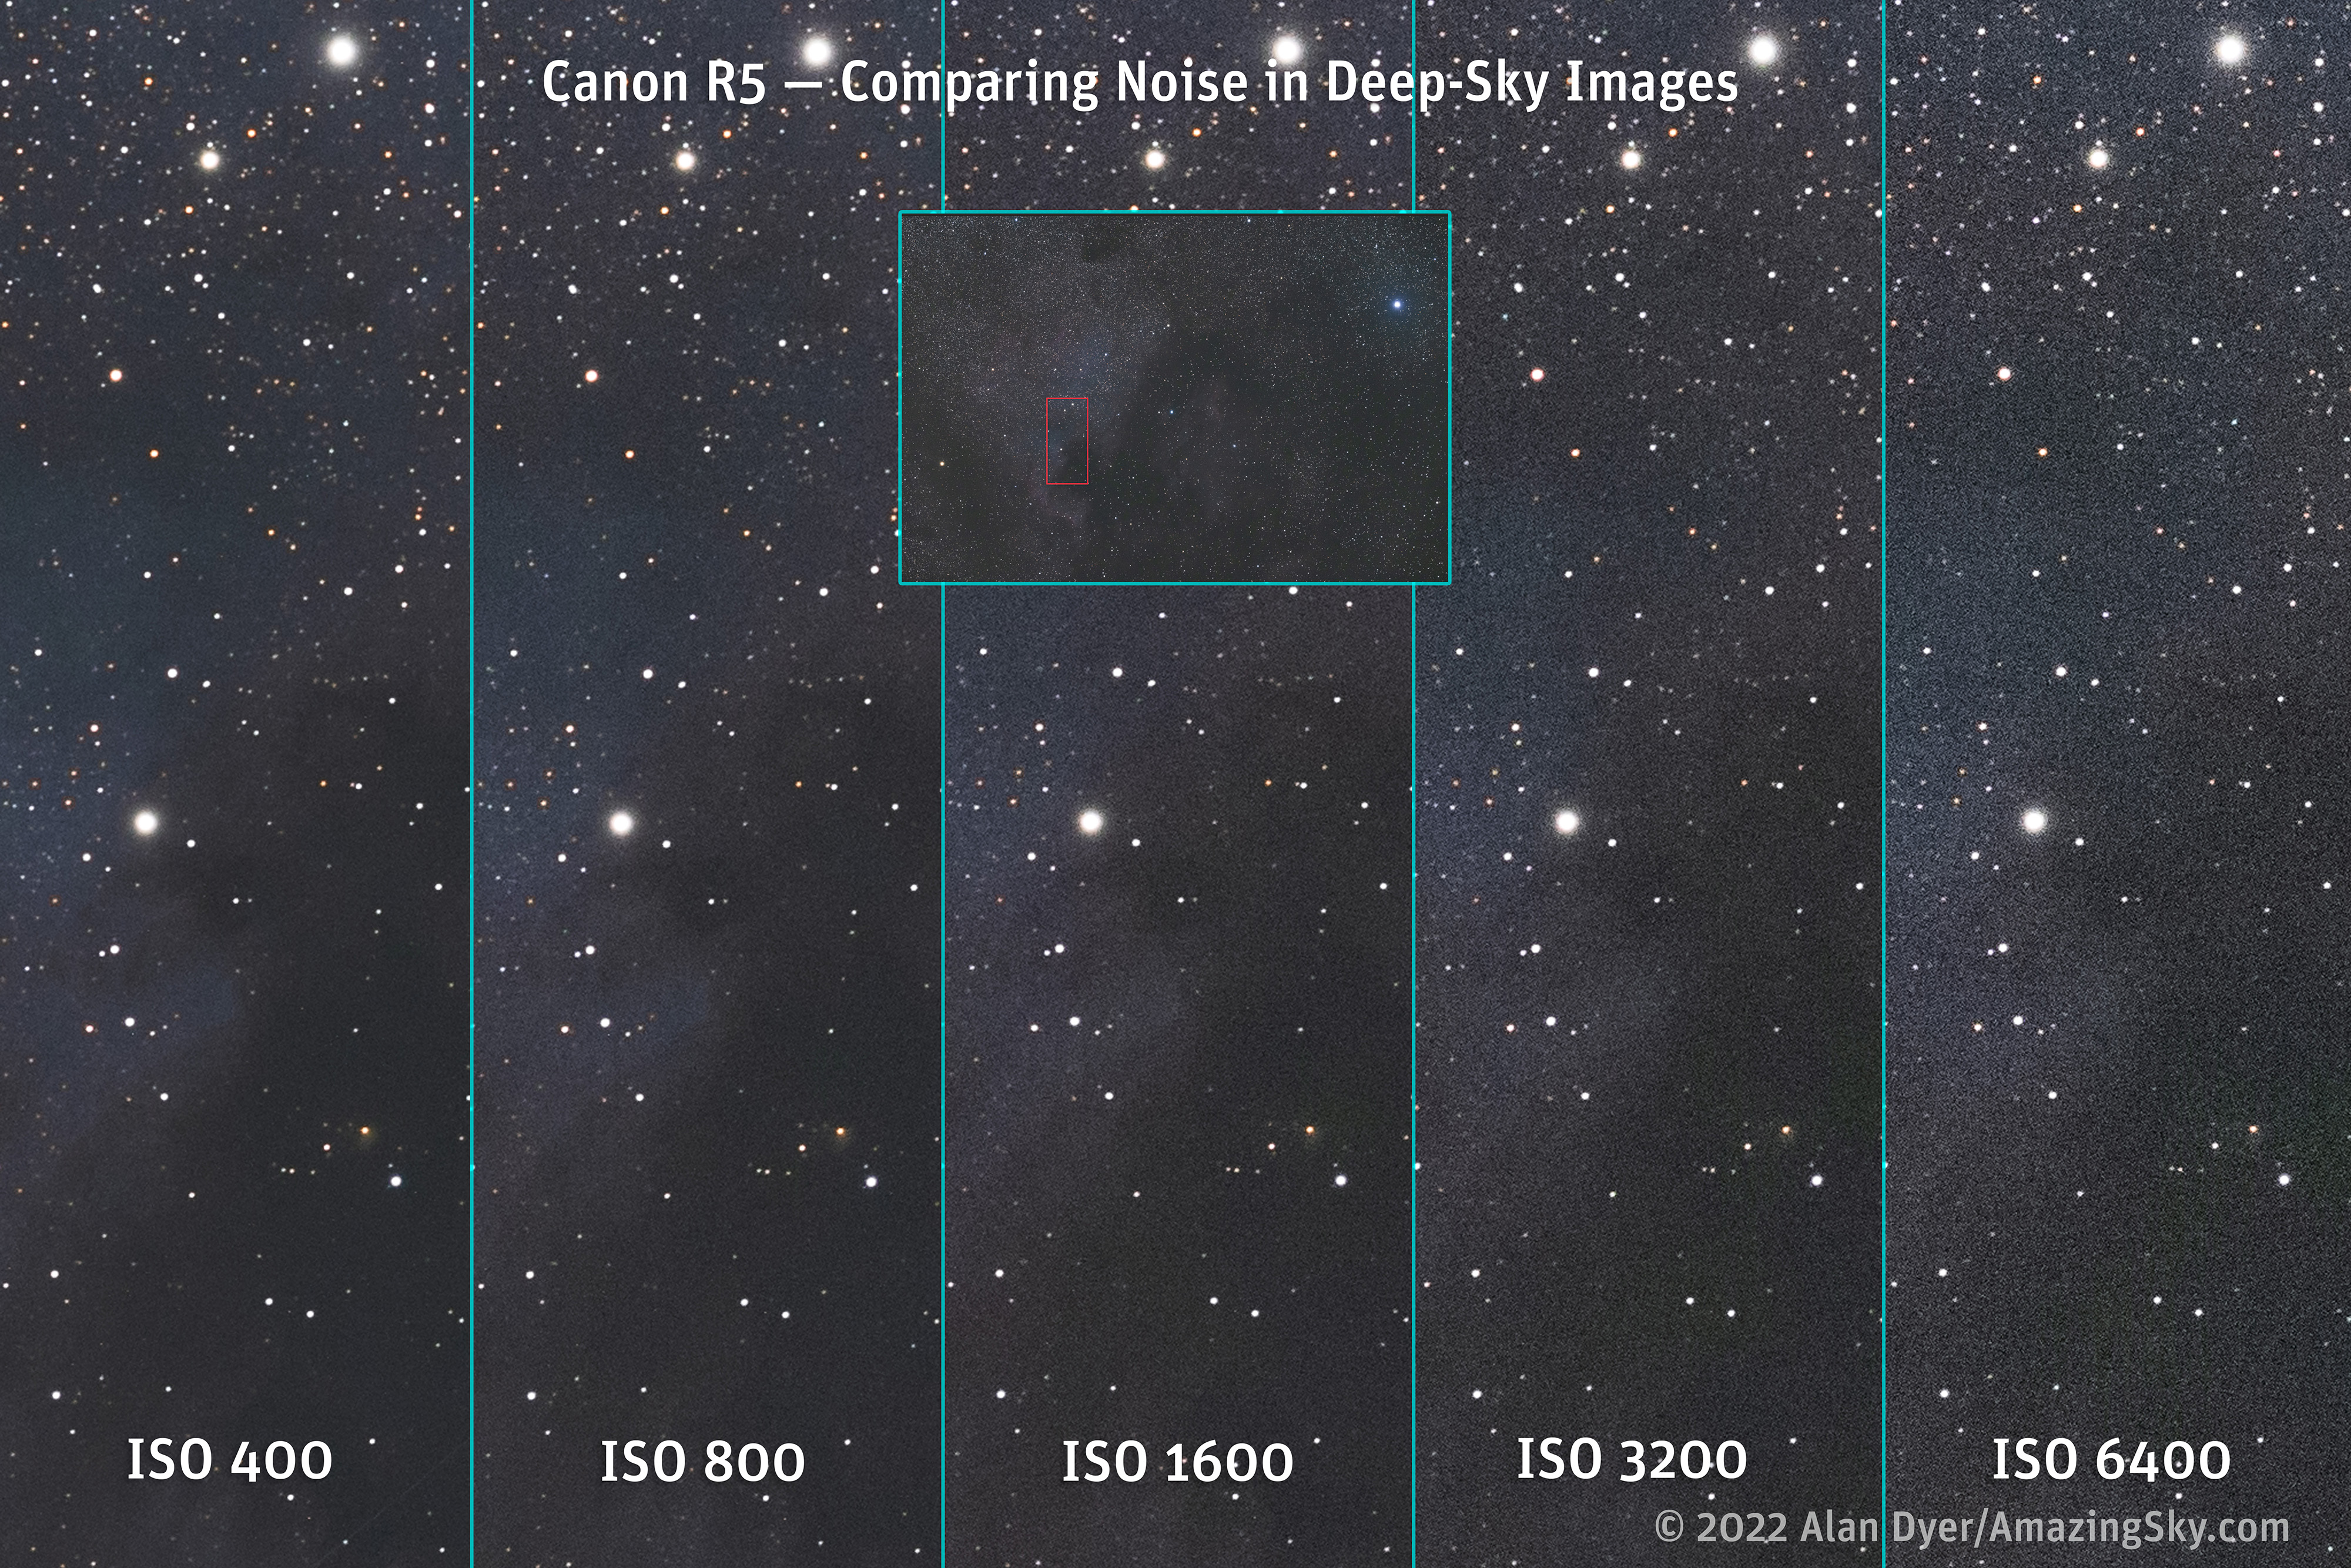
NOISE PERFORMANCE — DEEP-SKY
This compares the R5 at the typical ISO settings used for deep-sky imaging, with no noise reduction applied to the raw files for this set. The inset shows the portion of the frame contained in the blow-ups.
Deep-sky imaging with a tracking mount is more demanding, due to its longer exposures of up to several minutes for each “sub-frame.”
On a series of deep-sky exposures through a telescope, above, the R5 again showed quite usable images up to ISO 1600 and 3200, with ISO 6400 a little too noisy in my opinion unless a lot of noise reduction was applied or many images were shot to stack later.
This compares the R5 to the R6 and Ra cameras at ISO 6400, higher than typically used for deep-sky imaging. No noise reduction was applied to the raw files.
As with the nightscape set, at high ISOs, such as at ISO 6400, the R5 did show more noise than the R6 and Ra, as well as more colour splotchiness in the dark sky, and lower contrast. The lower dynamic range of the R5’s smaller pixels is evident here.
Just as with nightscapes, the lesson with the R5 is to keep the ISO low if at all possible. That means longer exposures with good auto-guiding, but that’s a best practice with any camera.
This compares the R5 to the R6 and Ra cameras at the lower ISOs of 800 and 1600 best for deep-sky imaging, for better dynamic range. No noise reduction was applied to the raw files.
At lower ISOs that provide better dynamic range, shown above, the difference in noise levels between the three cameras was not that obvious. Each camera presented very similar images, with the R6 having a coarser noise than the Ra and R5.
In all, I was surprised the R5 performed as well as it did for deep-sky imaging. See my comments below about its resolution advantage.
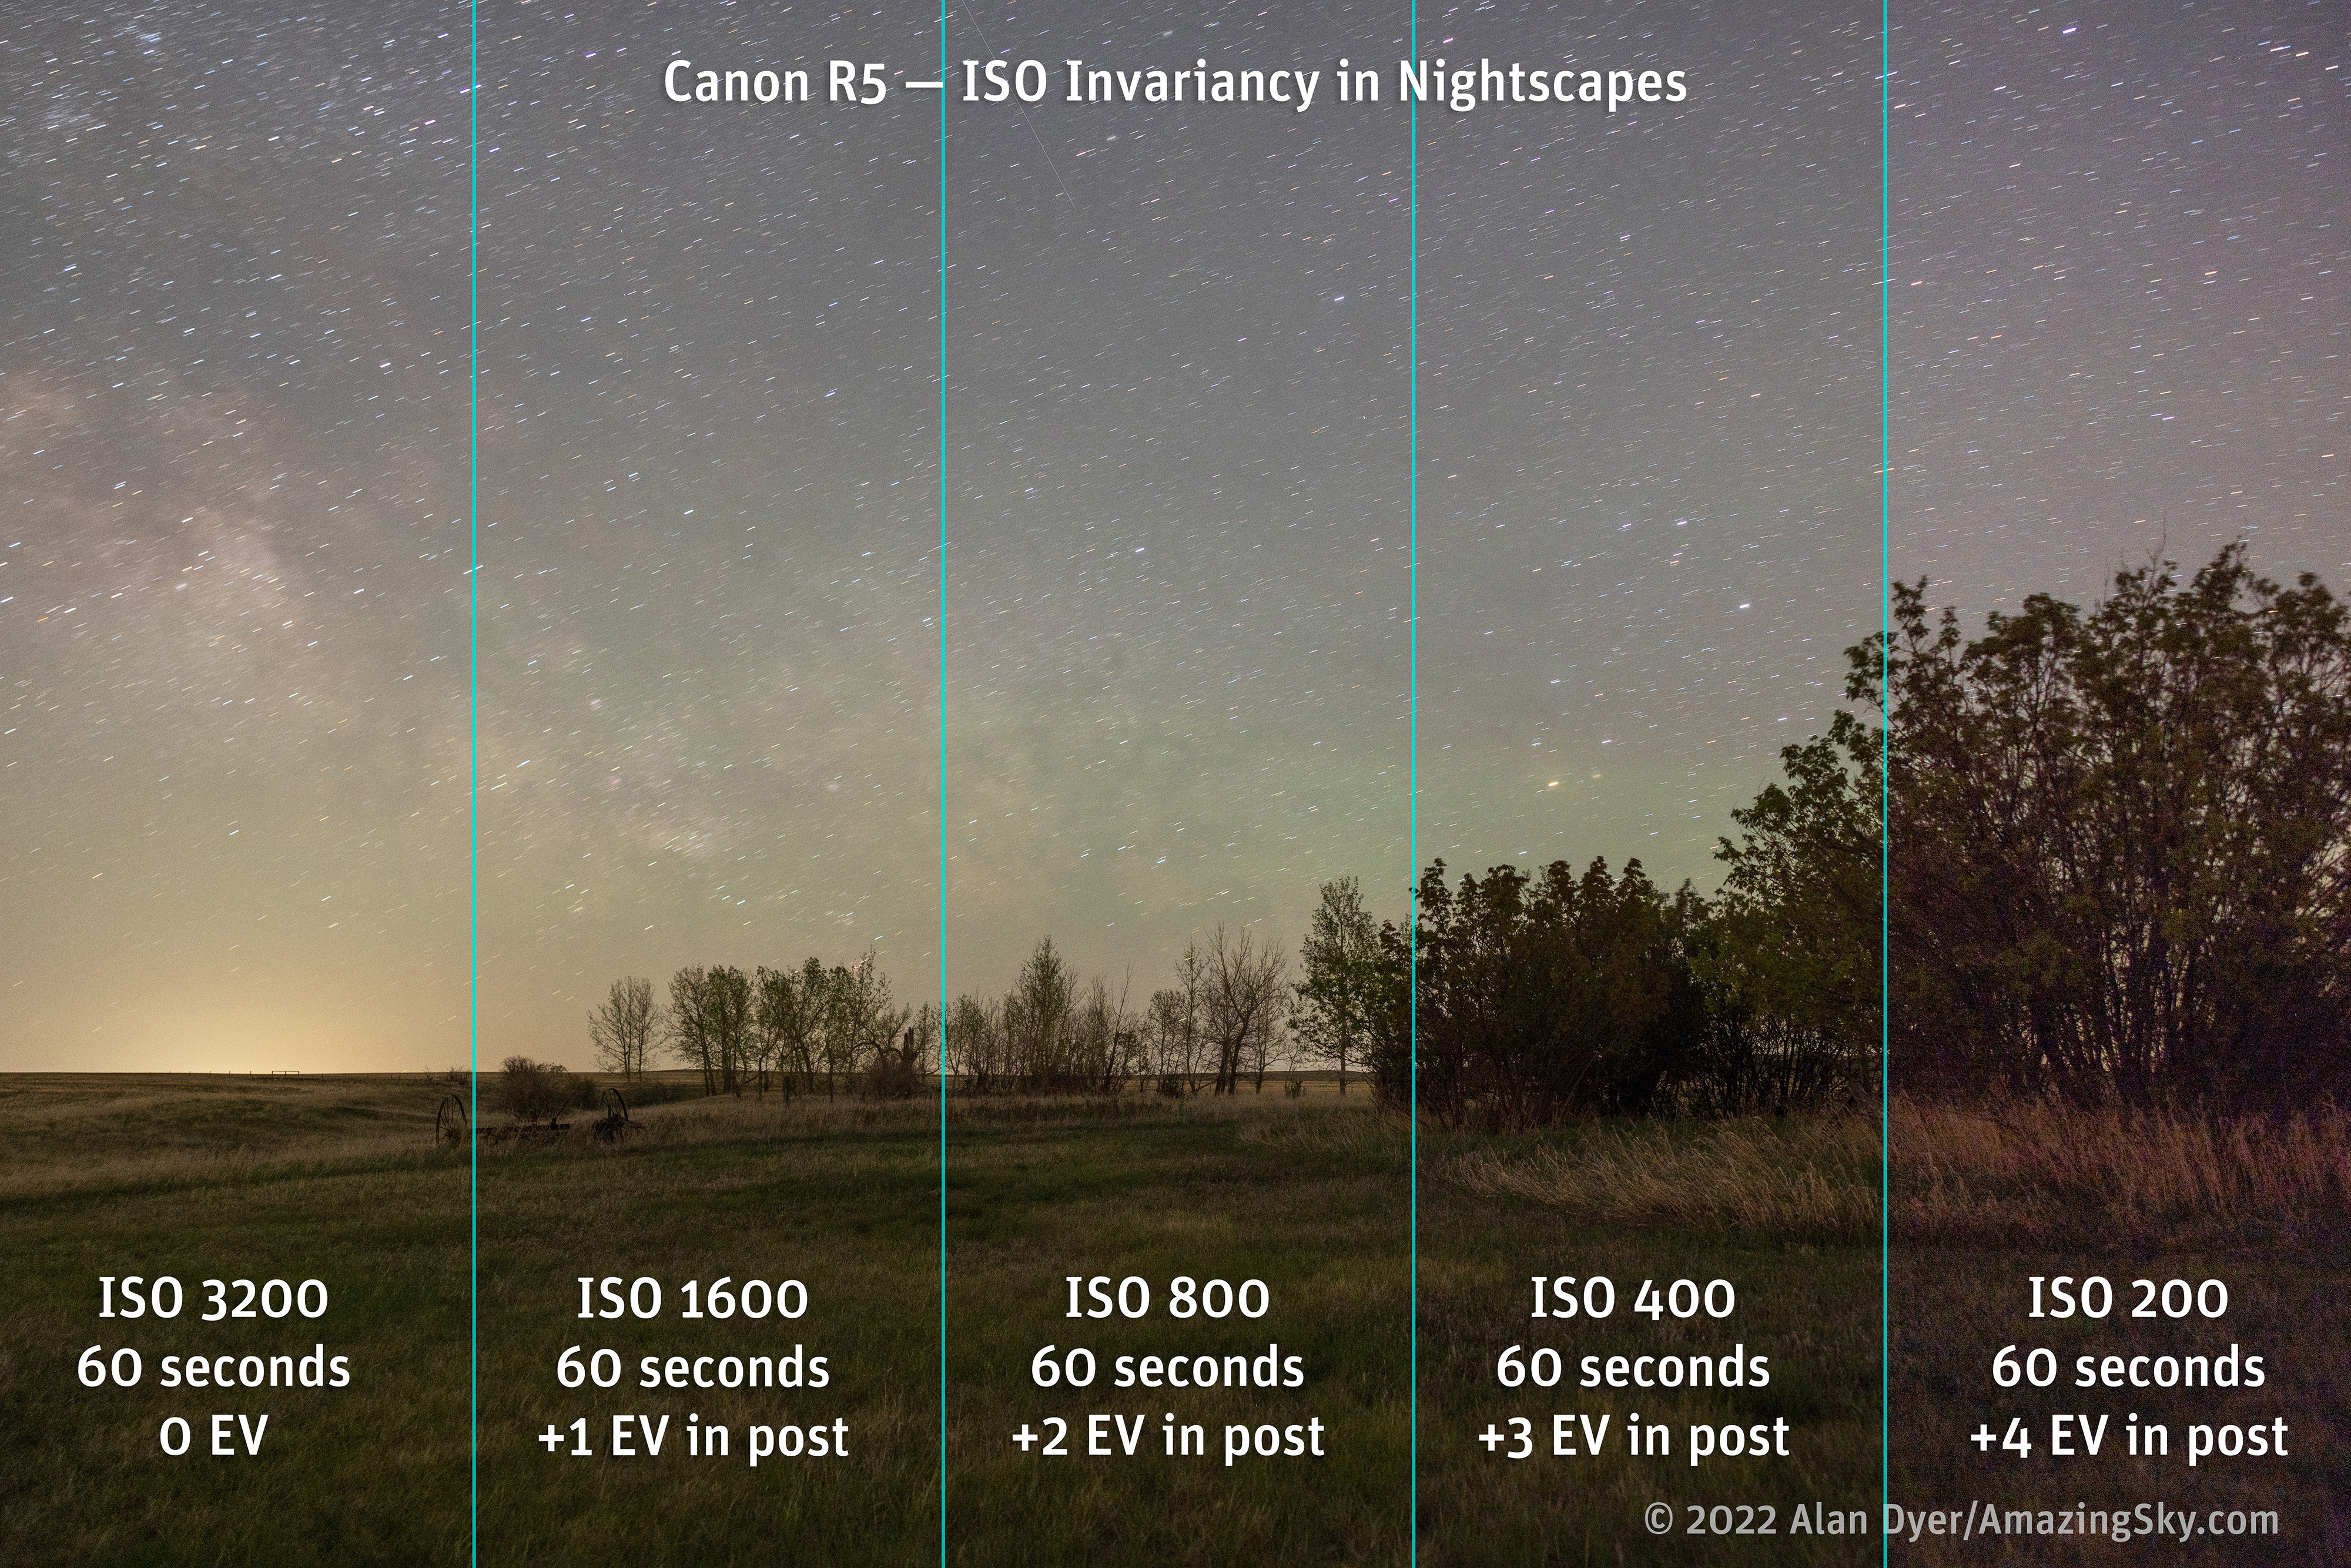
ISO INVARIANCY
The flaw in many Canon DSLRs, one documented in my 2017 review of the 6D Mark II, was their poor dynamic range due to the lack of an ISO invariant sensor design.
Canon R-series mirrorless cameras have largely addressed this weakness. As with the R and R6, the sensor in the R5 appears to be nicely ISO invariant.
Where ISO invariancy shows itself to advantage is on nightscapes where the starlit foreground is often dark and underexposed. Bringing out detail in the shadows in raw files requires a lot of Shadow Recovery or increasing the Exposure slider. Images from an ISO invariant sensor can withstand the brightening “in post” far better, with minimal noise increase or degradations such as a loss of contrast, added banding, or horrible discolourations.
This shows the same scene with the R5 progressively underexposed by shooting at a lower ISO then boosted in exposure in Adobe Camera Raw.
As I do for such tests, I shot sets of images at the same shutter speed, one well-exposed at a high ISO, then several at successively lower ISOs to underexpose by 1 to 4 stops. I then brightened the underexposed images by increasing the Exposure in Camera Raw by the same 1 to 4 stops. In an ideal ISO invariant sensor, all the images should look the same.
The R5 performed well in images underexposed by up to 3 stops. Images underexposed by 4 stops started to fall apart with low contrast and a magenta cast. This was worse performance than the R6, which better withstood underexposure by as much as 4 stops, and fell apart at 5 stops of underexposure.
While it can withstand underexposure, the lesson with the R5 is to still expose nightscapes as well as possible, likely requiring a separate longer exposure for the dark ground. Expose to the right! Don’t depend on being able to save the image by brightening “in post.” But again, that’s a best practice with any camera.
THERMAL NOISE
Here I repeat some of the background information from my R6 review. But it bears repeating, as even skilled professional photographers often misunderstand the various forms of noise and how to mitigate them.
All cameras will exhibit thermal noise in long exposures, especially on warm nights. This form of heat-induced noise peppers the shadows with bright or “hot” pixels, often brightly coloured.
This is not the same as the shot and read noise that adds graininess to high-ISO images and that noise reduction software can smooth out later in post.
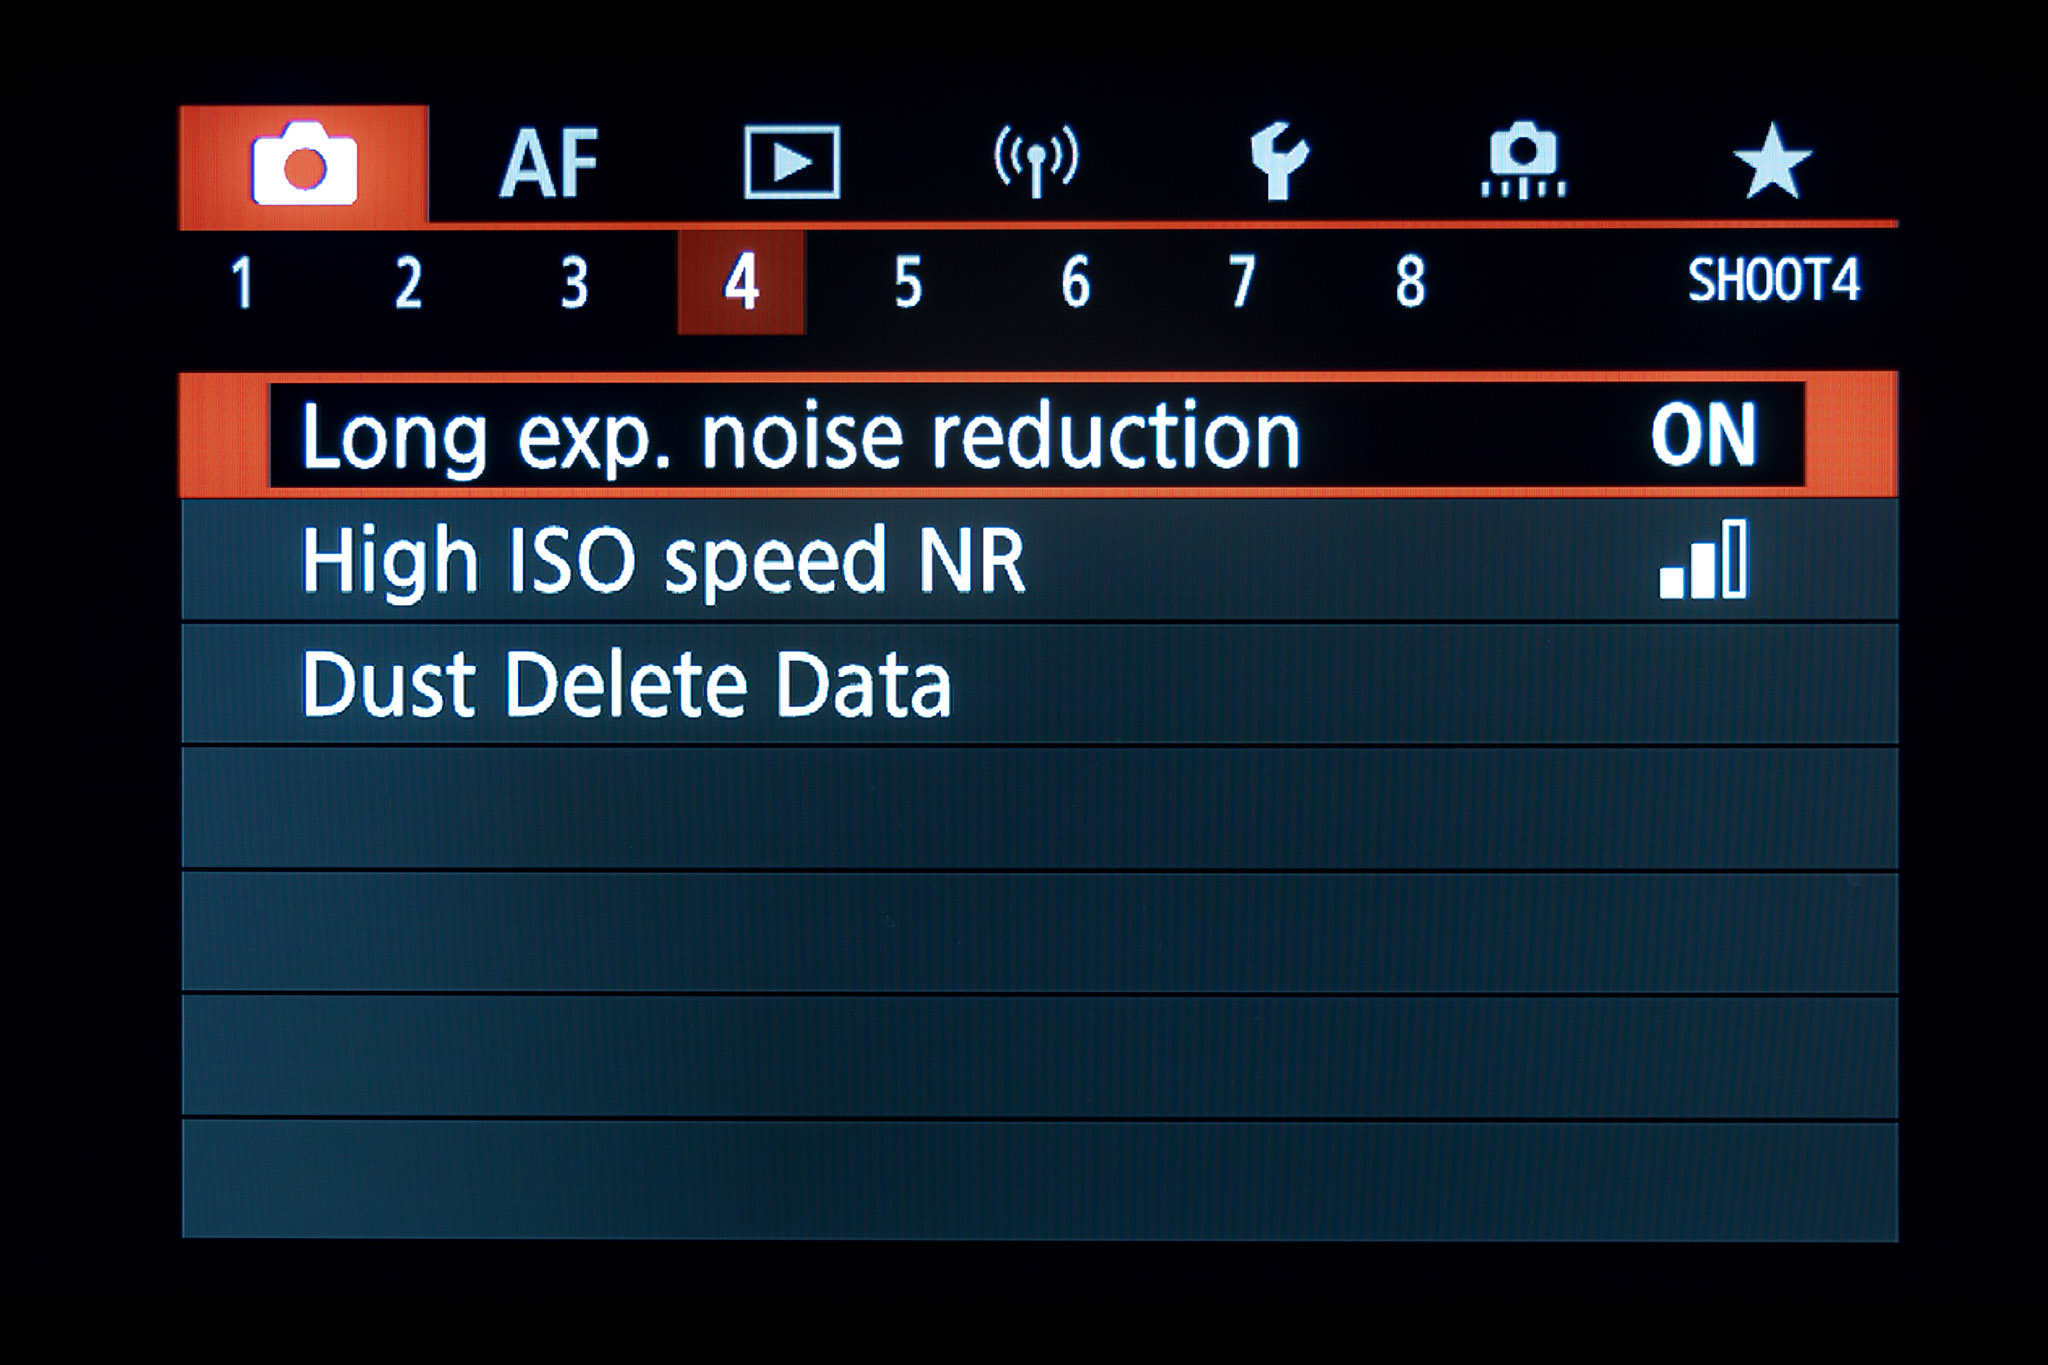
This shows a long-exposure nightscape scene both without and with Long Exposure Noise Reduction turned on. LENR eliminated most, though not all, of the hot pixels in the shadows.
I found the R5 was prone to many hot pixels in long nightscape exposures where they show up in dark, underexposed shadows. I did not find a prevalence of hot pixels in well-exposed deep-sky images.
LONG EXPOSURE NOISE REDUCTION
With all cameras a setting called Long Exposure Noise Reduction (LENR) eliminates this thermal noise by taking a “dark frame” and subtracting it in-camera to yield a raw file largely free of hot pixels, and other artifacts such as edge glows.
The LENR option on the R5 did eliminate most hot pixels, though sometimes still left, or added, a few (or they might be cosmic ray hits). LENR is needed more on warm nights, and with longer exposures at higher ISOs. So the extent of thermal noise in any camera can vary a lot from shoot to shoot, and season to season.
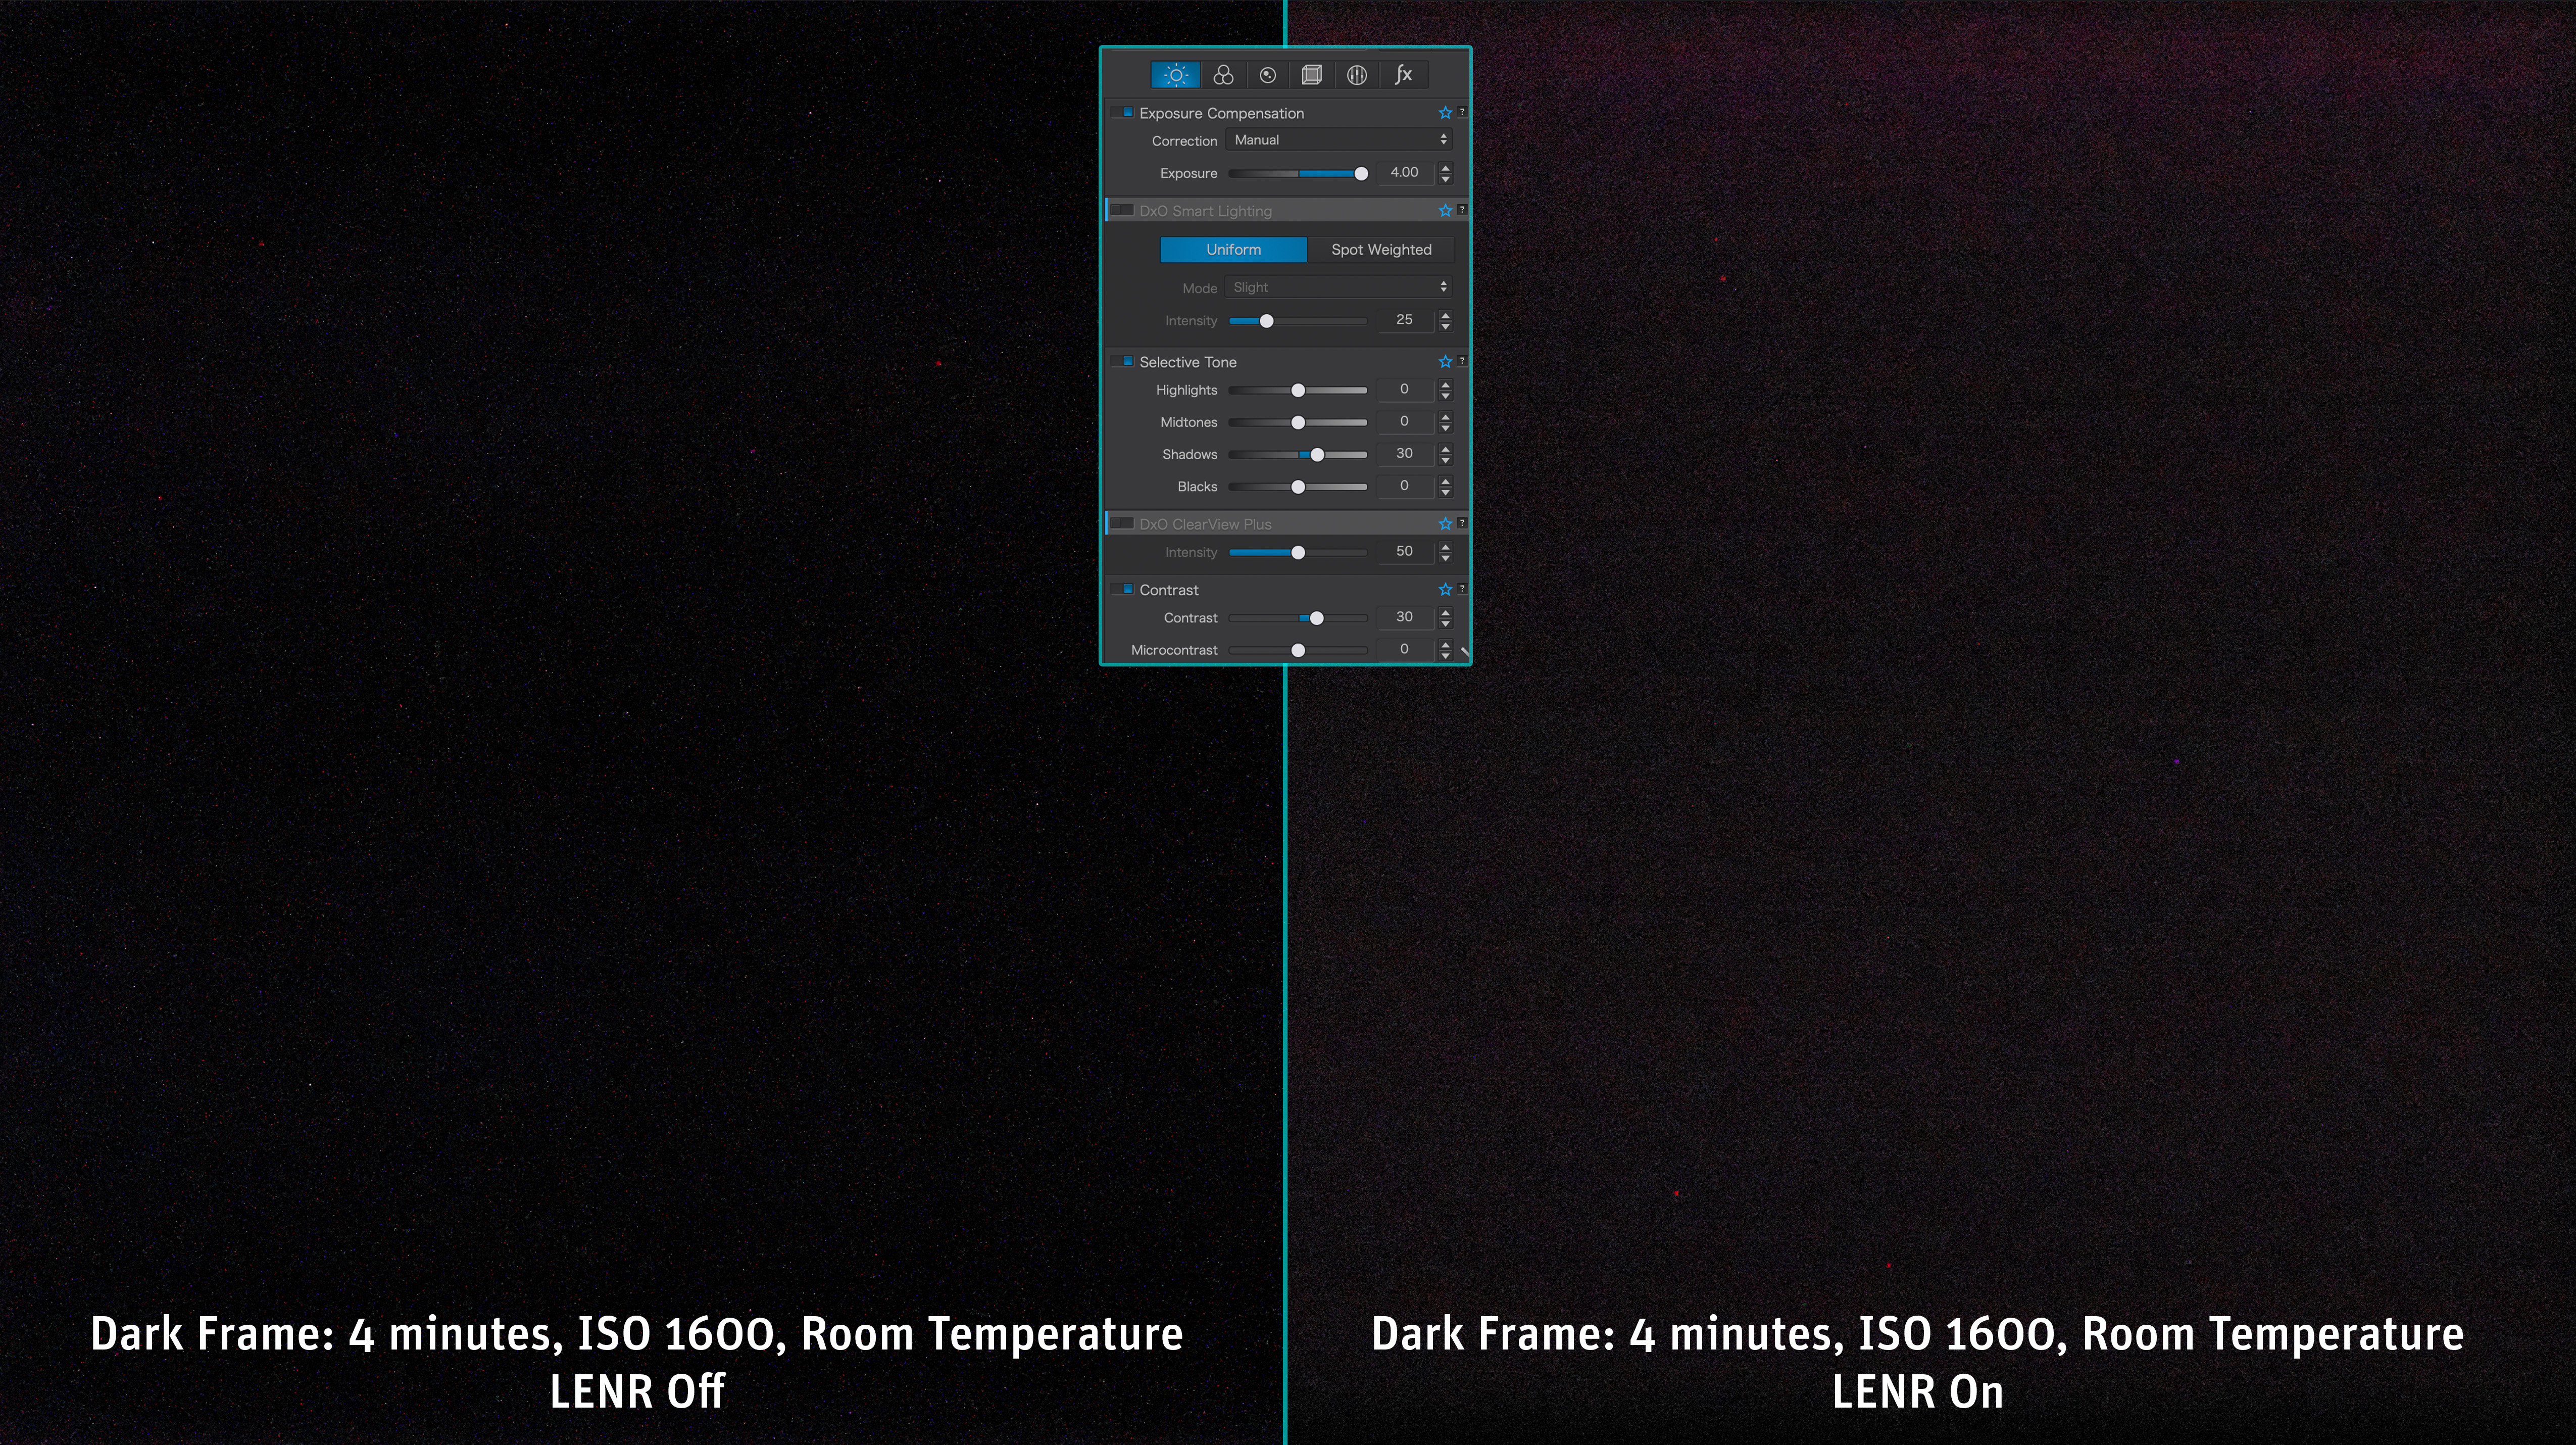
This compares a long exposure of nothing (with the lens cap on), both without LENR (left) and with LENR (right), to show the extent of just the thermal noise.
The comparison above shows just thermal noise in long exposures with and without LENR, to show its effectiveness. However, bear in mind in this demo the raw files have been boosted a lot in exposure and contrast (using DxO PhotoLab with the settings shown) to exaggerate the visibility of the noise.
Like the R6, when LENR is actively taking a dark frame, the R5’s rear screen indicates “Busy,” which is annoyingly bright at night, exactly when you would be employing LENR. To hide this display, the only option is to close the screen. Instead, the unobtrusive top LCD screen alone should be used to indicate a dark frame is in progress. It does with the Ra, though Busy also displays on its rear screen as well, which is unnecessary.
As with all mirrorless cameras, the R5 lacks the “dark frame buffer” present in Canon full frame DSLRs that allows several exposures to be taken in quick succession even with LENR on.
Long Exposure Noise Reduction is useful when the gap in time between exposures it produces is not critical.
With all Canon R cameras, turning on LENR forces the camera to take a dark frame after every light frame, doubling the time it takes to finish every exposure. That’s a price many photographers aren’t willing to pay, but on warm nights I find it can be essential, and a best practice, for the reward of cleaner images out of camera. I found it is certainly a good practice with the R5.
TIP: If you find hot pixels are becoming more obvious over time, try this trick: turn on the Clean Manually routine for 30 seconds to a minute. In some cameras this can remap the hot pixels so the camera can better eliminate them.
STAR QUALITY
Using LENR with the R5 did not introduce any oddities such as oddly-coloured, green or wiped-out stars. Even without LENR I saw no evidence of green stars, a flaw that plagues some Sony cameras at all times, or Nikons when using LENR.
This is a single developed raw frame from the stack of four minute exposures used to create the final image shown at the top. It shows sharp and nicely coloured stars, with no odd green stars.
Canons have always been known for their good star colours, and the R5 maintains the tradition. According to DPReview the R5 has a mild low-pass anti-alias filter in front of its sensor. Cameras which lack such a sensor filter do produce sharper images, but stars that occupy only one or two pixels might not de-Bayer properly into the correct colours. I did not find that an issue with the R5.
As in the R6, I also saw no evidence of “star-eating,” a flaw Nikons and Sonys have been accused of over the years, due to aggressive in-camera noise reduction even on raw files. Canons have largely escaped charges of star-eating.
RED SENSITIVITY
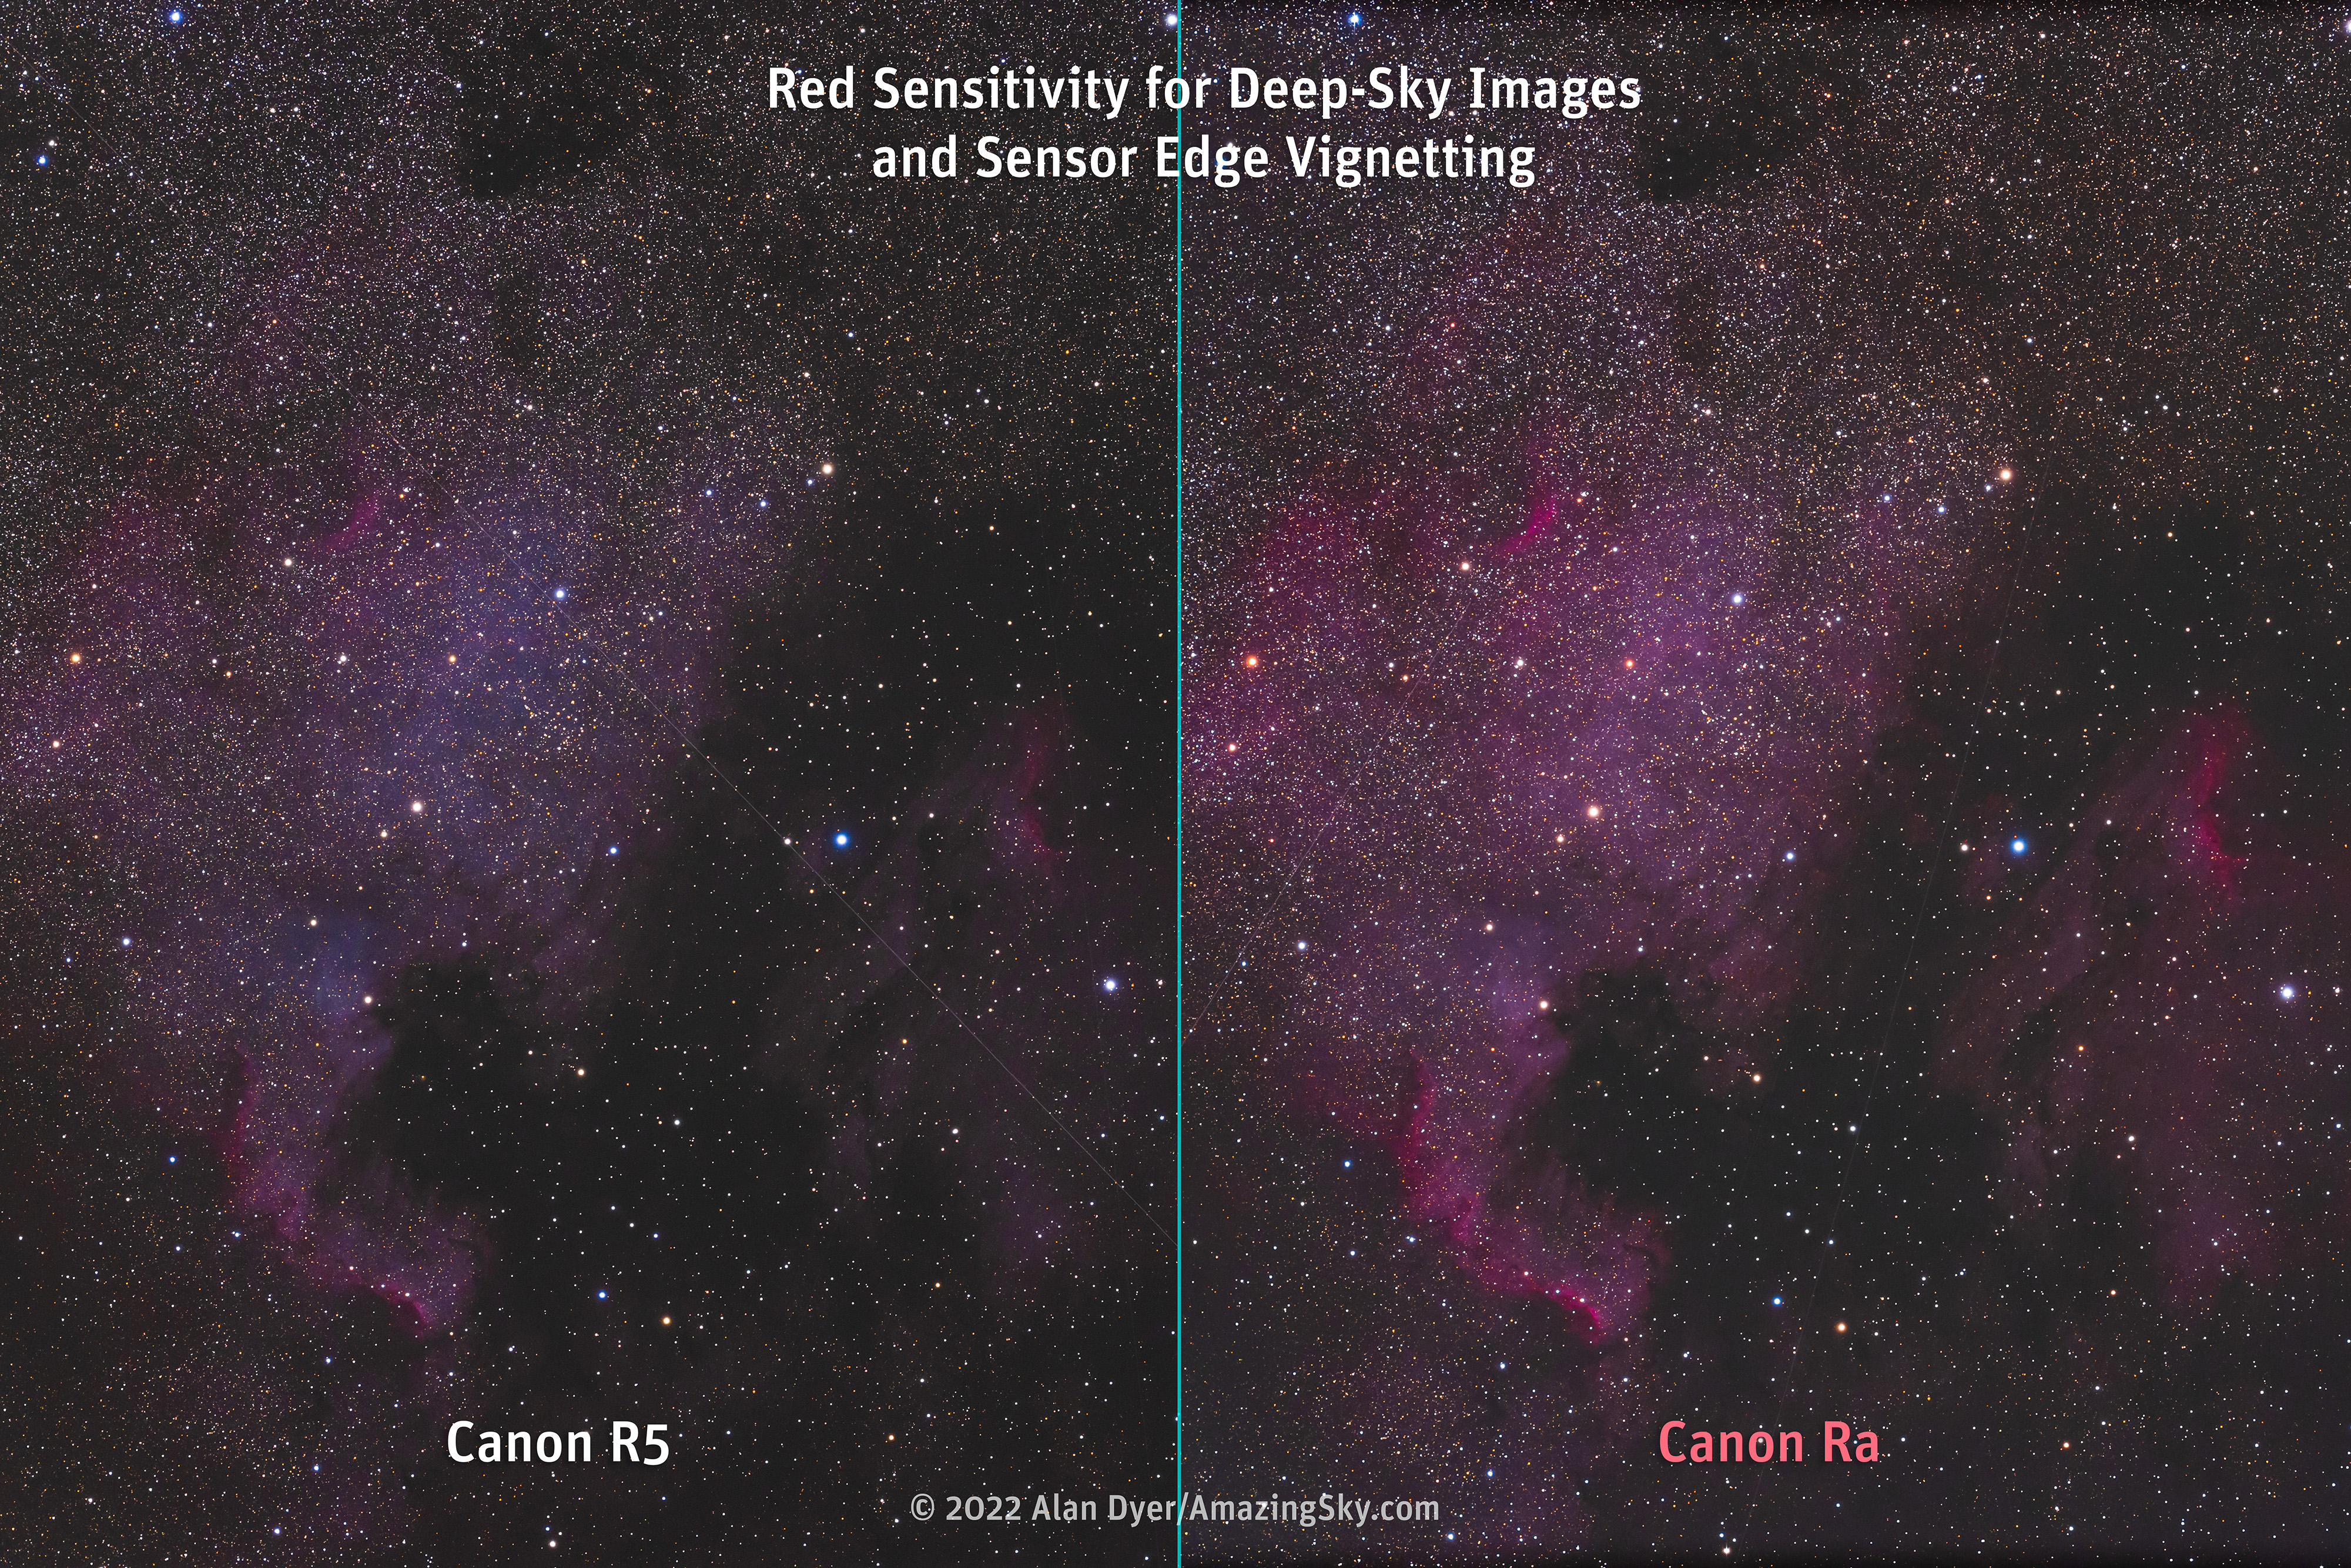
The R5 I bought was a stock “off-the-shelf” model. It is Canon’s now-discontinued EOS Ra that was “filter-modified” to record a greater level of the deep-red wavelength from red nebulas in the Milky Way. As I show below, compared to the Ra, the R5 did well, but could not record the depth of nebulosity the Ra can, to be expected for a stock camera.
However, bright nebulas will still be good targets for the R5. But if it’s faint nebulosity you are after, both in wide-field Milky Way images and telescopic close-ups, consider getting an R5 “spectrum modified” by a third-party supplier. Or modifying an EOS R.
This compares identically processed four-minute exposures at ISO 800 with the R5 vs. the red-sensitive Ra.
EDGE ARTIFACTS and EDGE GLOWS
DSLRs are prone to vignetting along the top and bottom of the frame from shadowing by the upraised mirror and mirror box. Not having a mirror, and a sensor not deeply recessed in the body, largely eliminates this edge vignetting in mirrorless cameras.
While the Ra shows a very slight vignetting along the bottom of the frame (visible in the example above), the R5 was clean and fully illuminated to the edges, as it should be.
I was also pleased to see the R5 did not exhibit any annoying “amp glows” — dim, often magenta glows at the edge of the frame in long exposures, created by heat emitted from sensor electronics adding infrared (IR) glows to the image.
I saw noticeable amp glows in the Canon R6 which could only be eliminated by taking LENR dark frames. It’s a flaw that has yet to be eliminated with firmware updates. Taking LENR darks is not required with the R5, except to reduce thermal hot pixels as noted above.
With a lack of IR amp glows, the R5 should work well when filter-modified to record either more visible Hydrogen-alpha red light, or deeper into the infrared spectrum.
Resolution — Nightscapes
Now we come to the very reason to get an R5, its high resolution. Is the difference visible in typical astrophotos? In a word, yes. If you look closely.
If people only see your photos on Facebook or Instagram, no one will ever see any improvement in your images! But if your photos are seen as large prints, or you are simply a stickler for detail, then you will be happy with the R5’s 45 megapixels. (Indeed, you might wish to wait for the rumoured even higher megapixel Canon 5S!)
This compares identically processed four-minute exposures at ISO 800 with the R5 vs. the red-sensitive Ra.
Nightscapes, and indeed all landscape photos by day or by night, is where you will see the benefit of more megapixels. Finer details in the foreground show up better. Images are less pixelated. In test images with all three cameras, the R5 did provide sharper images to be sure. But you do have to zoom in a lot to appreciate the improvement.
Resolution — lunar imaging
This compares blow-ups of images of the Moon taken through a 5-inch f/6 refractor (780mm focal length) with the R6 and R5.
The Moon through a telescope is another good test of resolution. The above comparison shows how the R5’s smaller 4.4-micron pixels do provide much sharper details and less pixelation than the R6.
Of course, one could shoot at an even longer focal length to increase the “plate scale” with the R6. But at that same longer focal length the R5 will still provide better resolution, up to the point where its pixels are sampling more than what the atmospheric seeing conditions permit to be resolved. For lunar and planetary imaging, smaller pixels are always preferred, as they allow you to reach the seeing limit with shorter and often faster optical systems.
Resolution — deep sky
This compares extreme blow-ups of images of the North America Nebula used for the other tests, shot with a 94mm f/4.5 refractor with the three cameras.
On starfields, the difference is not so marked. As I showed in my review of the R6, with “only” 20 megapixels the R6 can still provide detailed deep-sky images.
However, in comparing the three cameras above, with images taken at a focal length of 420mm, the R5 does provide sharper stars, with faint stars better recorded, and with less blockiness (i.e. “square stars”) on all the star images. At that focal length the plate scale with the R5 is 2.1 arc seconds per pixel. With the R6 it is 3.2 arc seconds per pixel.
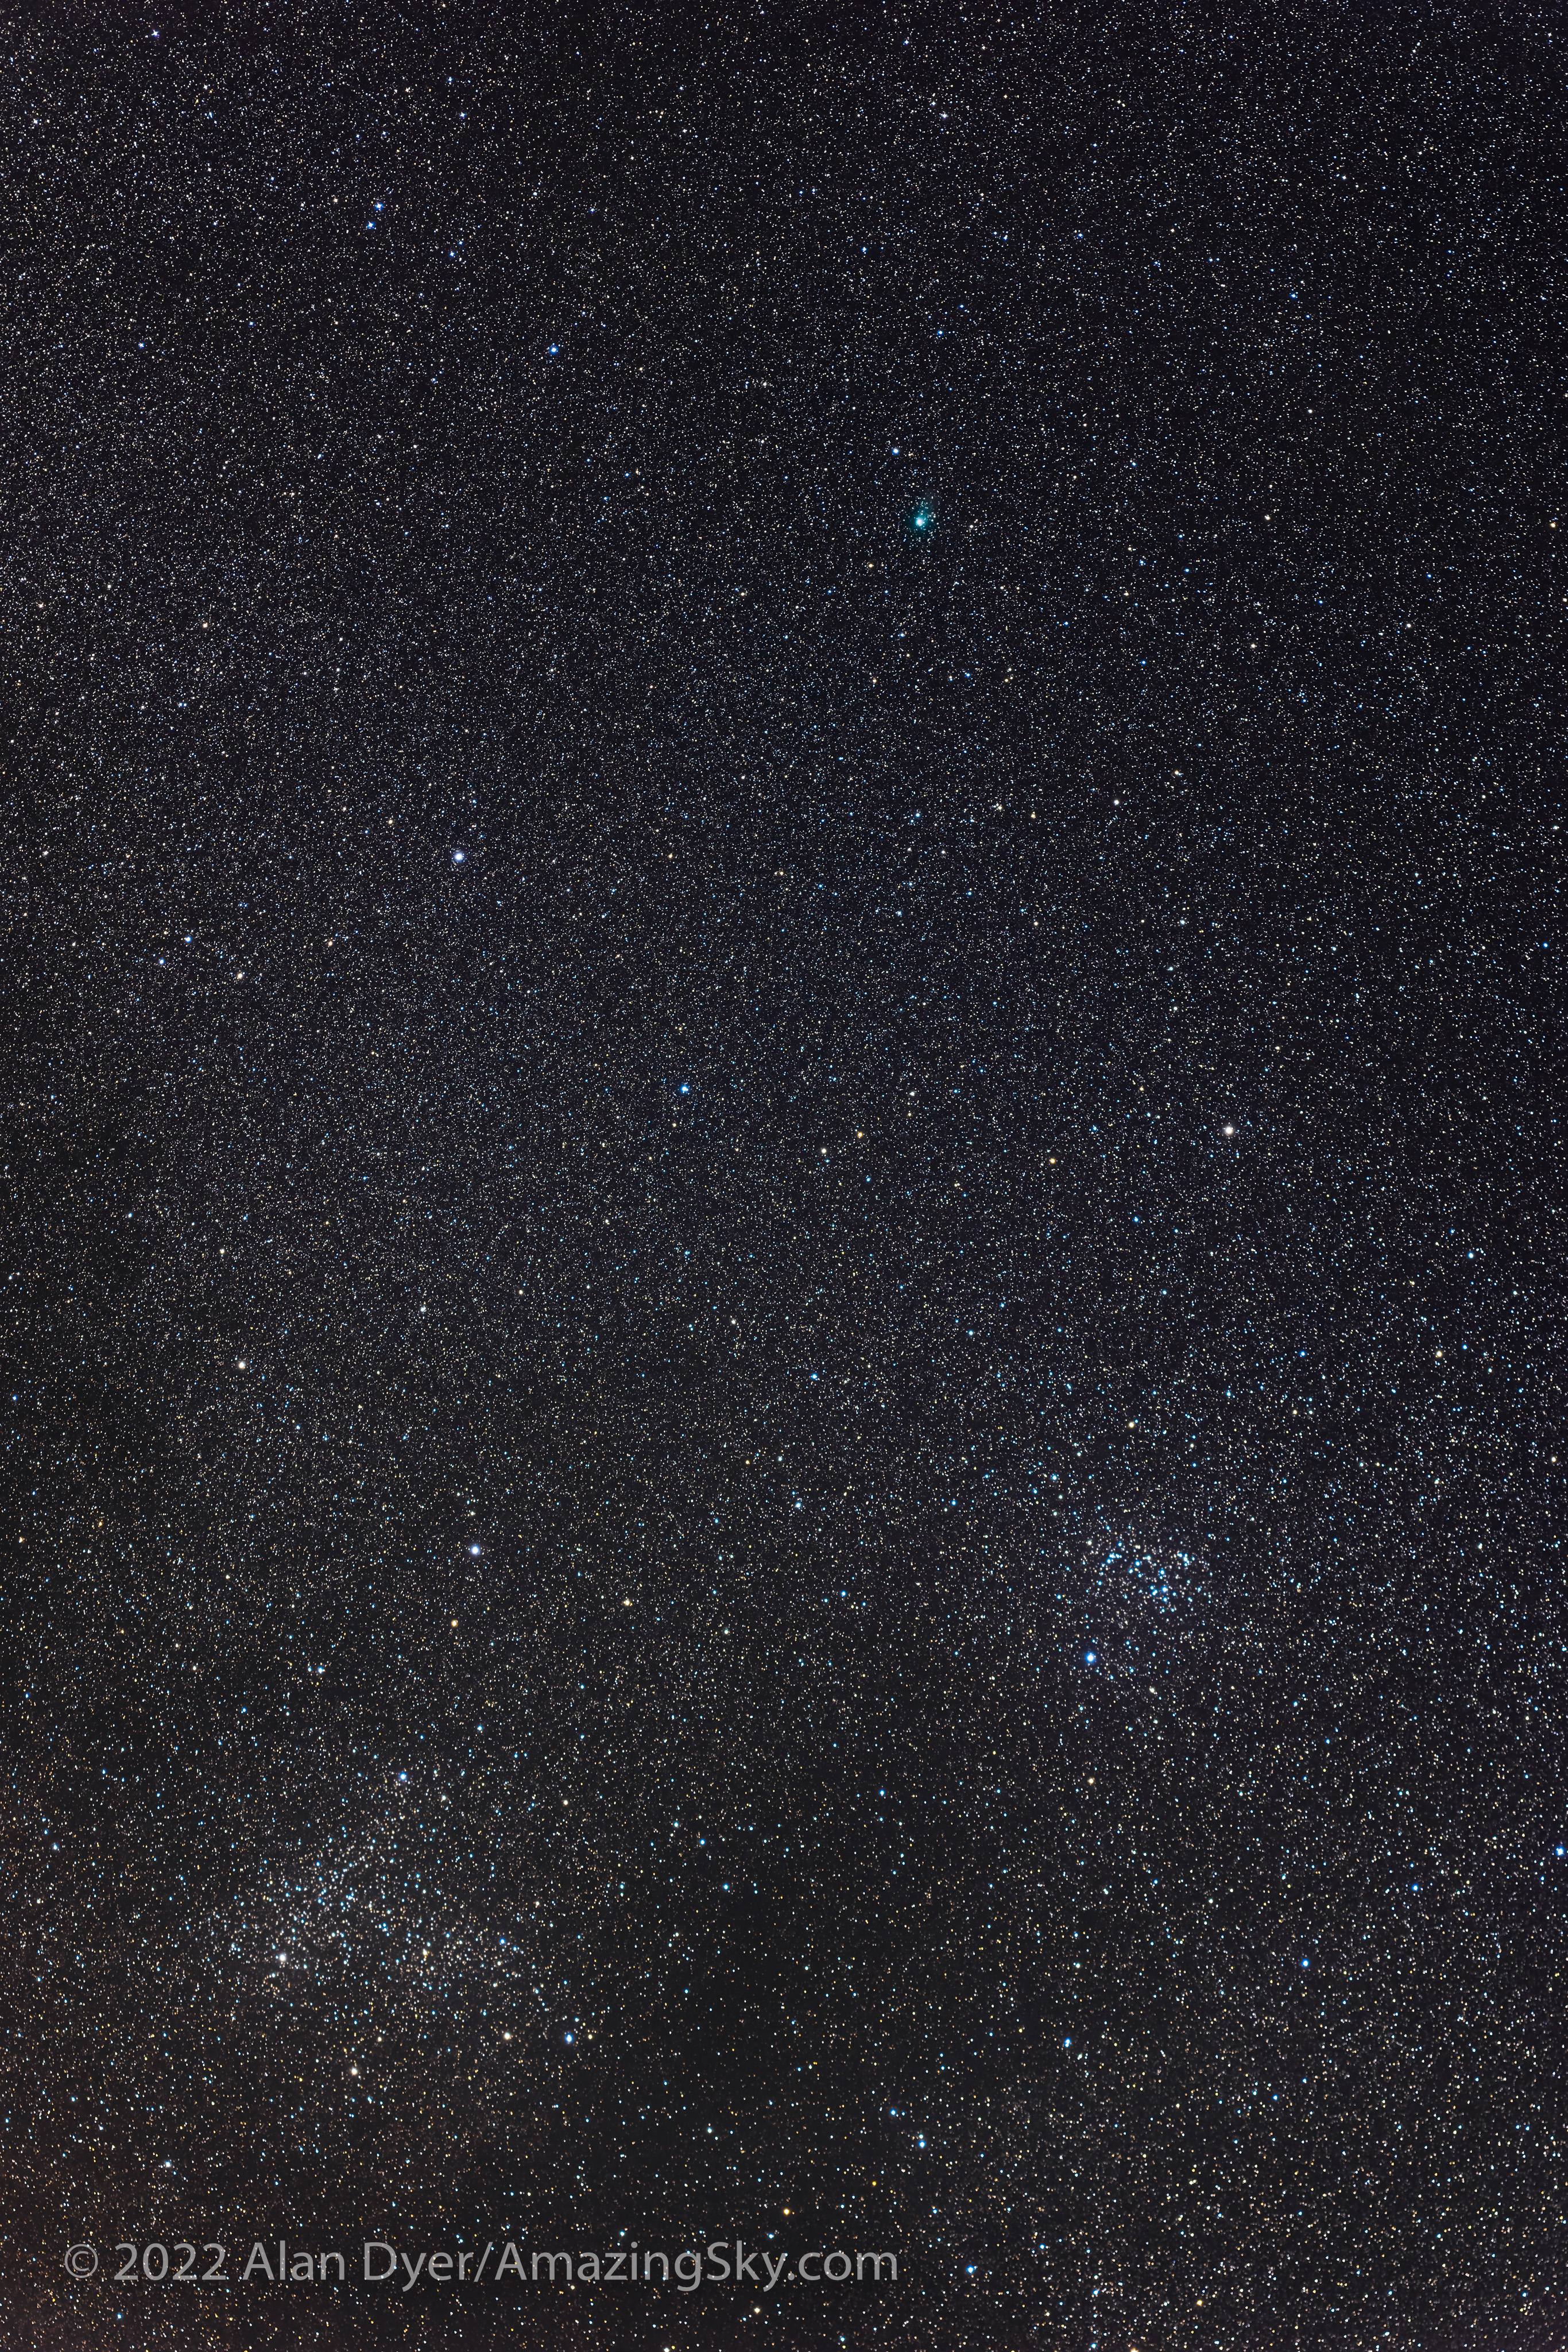
This is dim green Comet PanSTARRS C/2017 K2, at top, passing above the star clusters IC 4756 at lower left and NGC 6633 at lower right on May 25-26, 2022. This is a stack of ten 5-minute exposures with a William Optics RedCat 51 at f/4.9 and the Canon R5 at ISO 800.
The R5 is a good choice for shooting open and globular star clusters, or any small targets such as planetary nebulas, especially with shorter focal length telescopes. Bright targets will allow using lower ISOs, mitigating any of the R5’s extra noise.
With an 800mm focal length telescope, the plate scale with the R5 will be 1.1 arc seconds per pixel, about the limit most seeing conditions will permit resolving. With even longer focal length telescopes, the R5’s small pixels would be oversampling the image, with little gain in resolution, at least for deep-sky subjects. Lunar and planetary imaging can benefit from plate scales of 0.5 arc seconds per pixel or smaller.
CAN YOU CreatE resolution?
This compares an original R6 image with the same image rescaled 200% in ON1 Resize AI and Topaz Gigapixel AI, and with those three compared to an original R5 image.
Now, one can argue that today’s AI-driven scaling programs such as ON1 Resize AI and Topaz Gigapixel AI can do a remarkable job up-sizing images while enhancing and sharpening details. Why buy a higher-megapixel camera when you can just sharpen images from a lower-resolution model?
While these AI programs can work wonders on regular images, I’ve found their machine-learning seems to know little about stars, and can often create unwanted artifacts.
In scaling up an R6 image by 200%, ON1 Resize AI 2022 made a mess of the stars and sky background. Topaz Gigapixel AI did a much better job, leaving few artifacts. But using it to double the R6 image in pixel count still produced an image that does not look as sharp as an original R5 image, despite the latter having fewer pixels than the upsized R6 image.
Yes, we are definitely pixel-peeping! But I think this shows that it is better to have the pixels to begin with in the camera, and to not depend on software to generate sharpness and detail.
VIDEO Resolution
The R5’s 45-megapixel sensor also makes possible its headline selling point when it was released in 2020: 8K movie recording, with movies sized 8192 x 4320 (DCI standard) or 7680 x 4320 (UHD standard) at 29.97 frames per second, almost IMAX quality.
Where the R6’s major selling point for me was its low-light video capability, the R5’s 8K video prowess was less important. Or so I thought. With testing, I can see it will have its place in astrophotography, especially solar eclipses.
The R5 offers the options of 8K and 4K movies each in either the wider DCI Digital Cinema standard (8K-D and 4K-D) or more common Ultra-High Definition standard (8K-U and 4K-U), as well as conventional 1080 HD.This shows the Moon shot with the same 460mm-focal length telescope, with full-width frame grabs from movies shot in 8K, 4K, and 4K Movie Crop modes.
Unlike the original Canon R and Rp, the R5 and R6 can shoot 4K movies sampled from the full width of their sensors, so there is no crop factor in the field of view recorded with any lens.
However, like the R6, the R5 also offers the option of a Movie Crop mode which samples a 4K movie from the central 4096 (4K-D) or 3840 (4K-U) pixels of the sensor. As I show above, this provides a “zoomed-in” image with no loss of resolution, useful when wide field of view is not so important as is zooming into small targets, such as for lunar and solar movies.
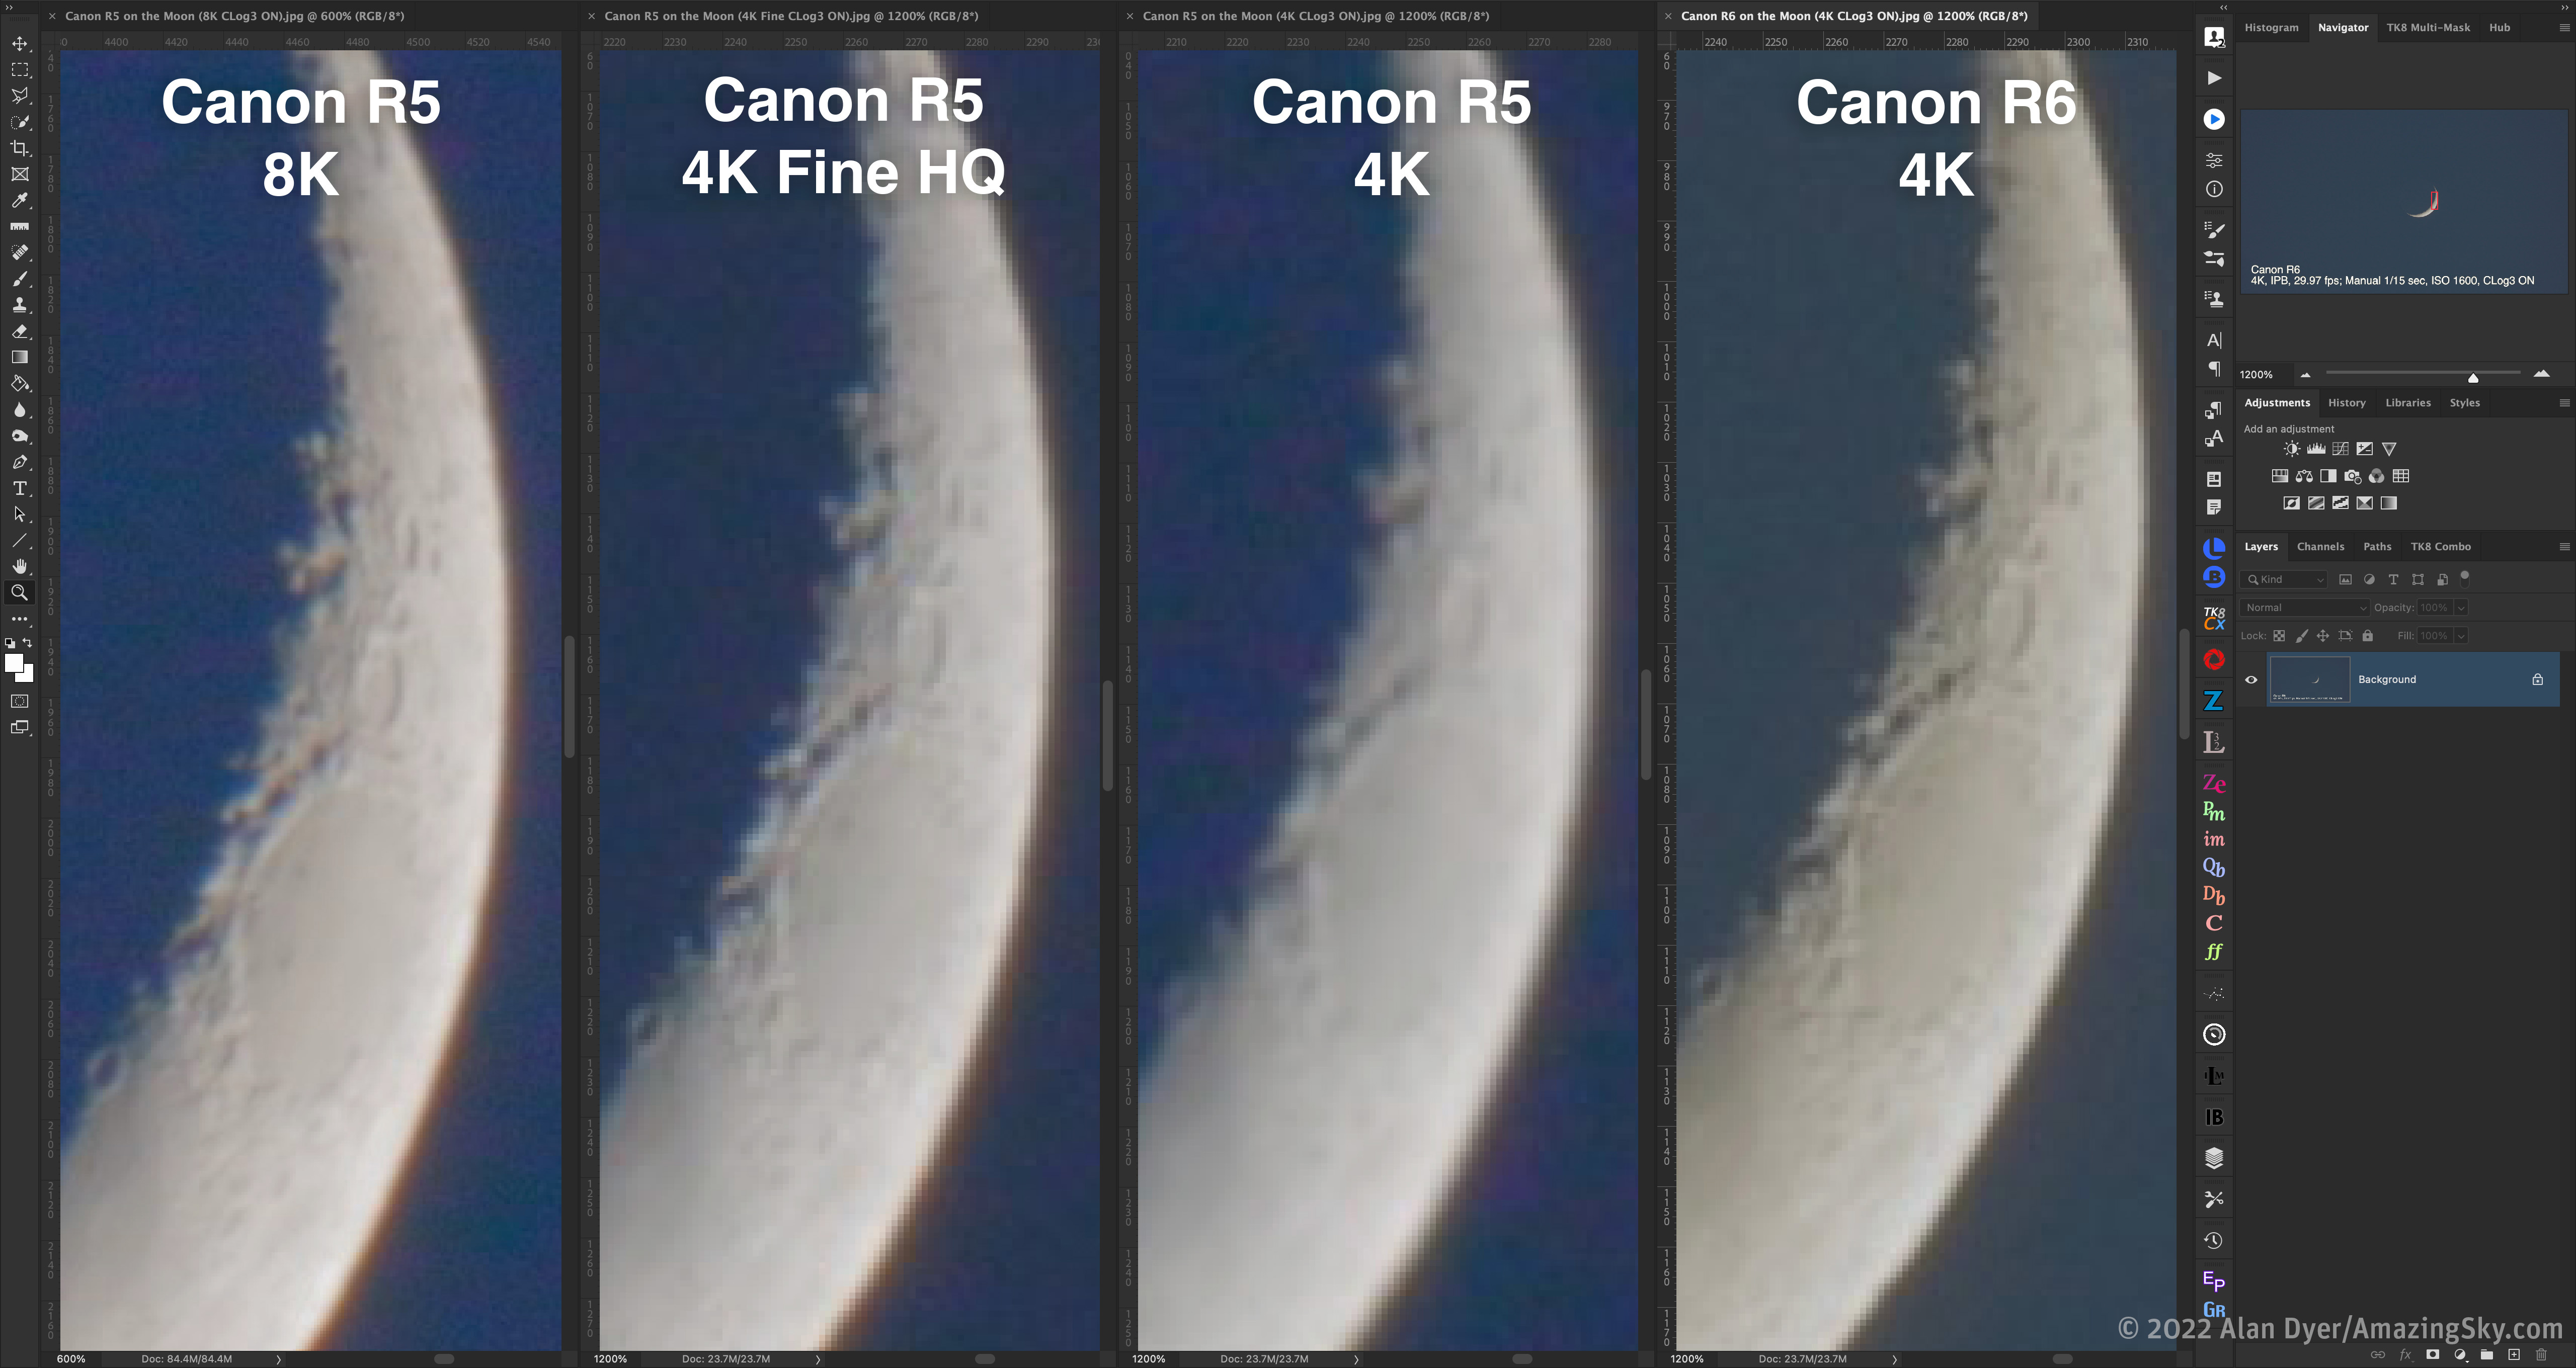
This compares close-ups of frame grabs of the Moon movies shown in full-frame above, as well as a frame from an R6 movie, to compare resolutions.
So what format produces the best resolution when shooting movies? As I show above, magnified frame grabs of the Moon demonstrate that shooting at 8K provides a much less pixelated and sharper result than either the 4K-Fine HQ (which creates a “High-Quality” 4K movie downsampled from 8K) or a standard 4K movie.
Shooting a 4K movie with the R6 also produced a similar result to the 4K movies from the R5. The slightly softer image in the R5’s 4K frame can, I think, be attributed more to atmospheric seeing.
Solar eclipse use
Shooting the highest resolution movies of the Moon will be of prime interest to astrophotographers when the Moon happens to be passing in front of the Sun!
That will happen along a narrow path that crosses North America on April 8, 2024. Capturing the rare total eclipse of the Sun in 8K video will be a goal of many. At the last total solar eclipse in North America, on August 21, 2017, I was able to shoot it in 4K by using a then state-of-the-art top-end Canon DSLR loaned to me by an IMAX movie production company!
And who knows, by 2024 we might have 100-megapixel cameras capable of shooting and recording the firehose of data from 12K video! But for now, even 8K can be a challenge.
This compares the R5 at 8K with it in the best quality 4K Fine HQ vs. the R5 and R6 in their 4K Movie Crop modes.
However, do you need to shoot 8K to get sharp Moon, Sun or eclipse movies? The above shows the 8K frame-grab compared to the R5’s best quality full-frame 4K Fine, and the R5’s and R6’s 4K Movie Crop mode that doesn’t resample or bin pixels from the larger sensor to create a 4K movie. The Cropped movies look only slightly softer than the R5 at 8K, with less pixelation than the 4K Fine HQ movie.
When shooting the Sun or Moon through a telescope or long telephoto lens, the wide field of a full-frame movie might not be required, even to take in the two- or three-degree-wide solar corona around the eclipsed Sun.
However, if a wide field for the maximum extent of the outer corona, combined with sharp resolution is the goal, then a camera like the Canon R5 capable of shooting 8K movies will be the ticket.
And 8K will be ideal for wide-angle movies of the passage of the Moon’s shadow during any eclipse, or for moderate fields showing the eclipsed Sun flanked by Jupiter and Venus on April 8, 2024.
Canon CLOG3
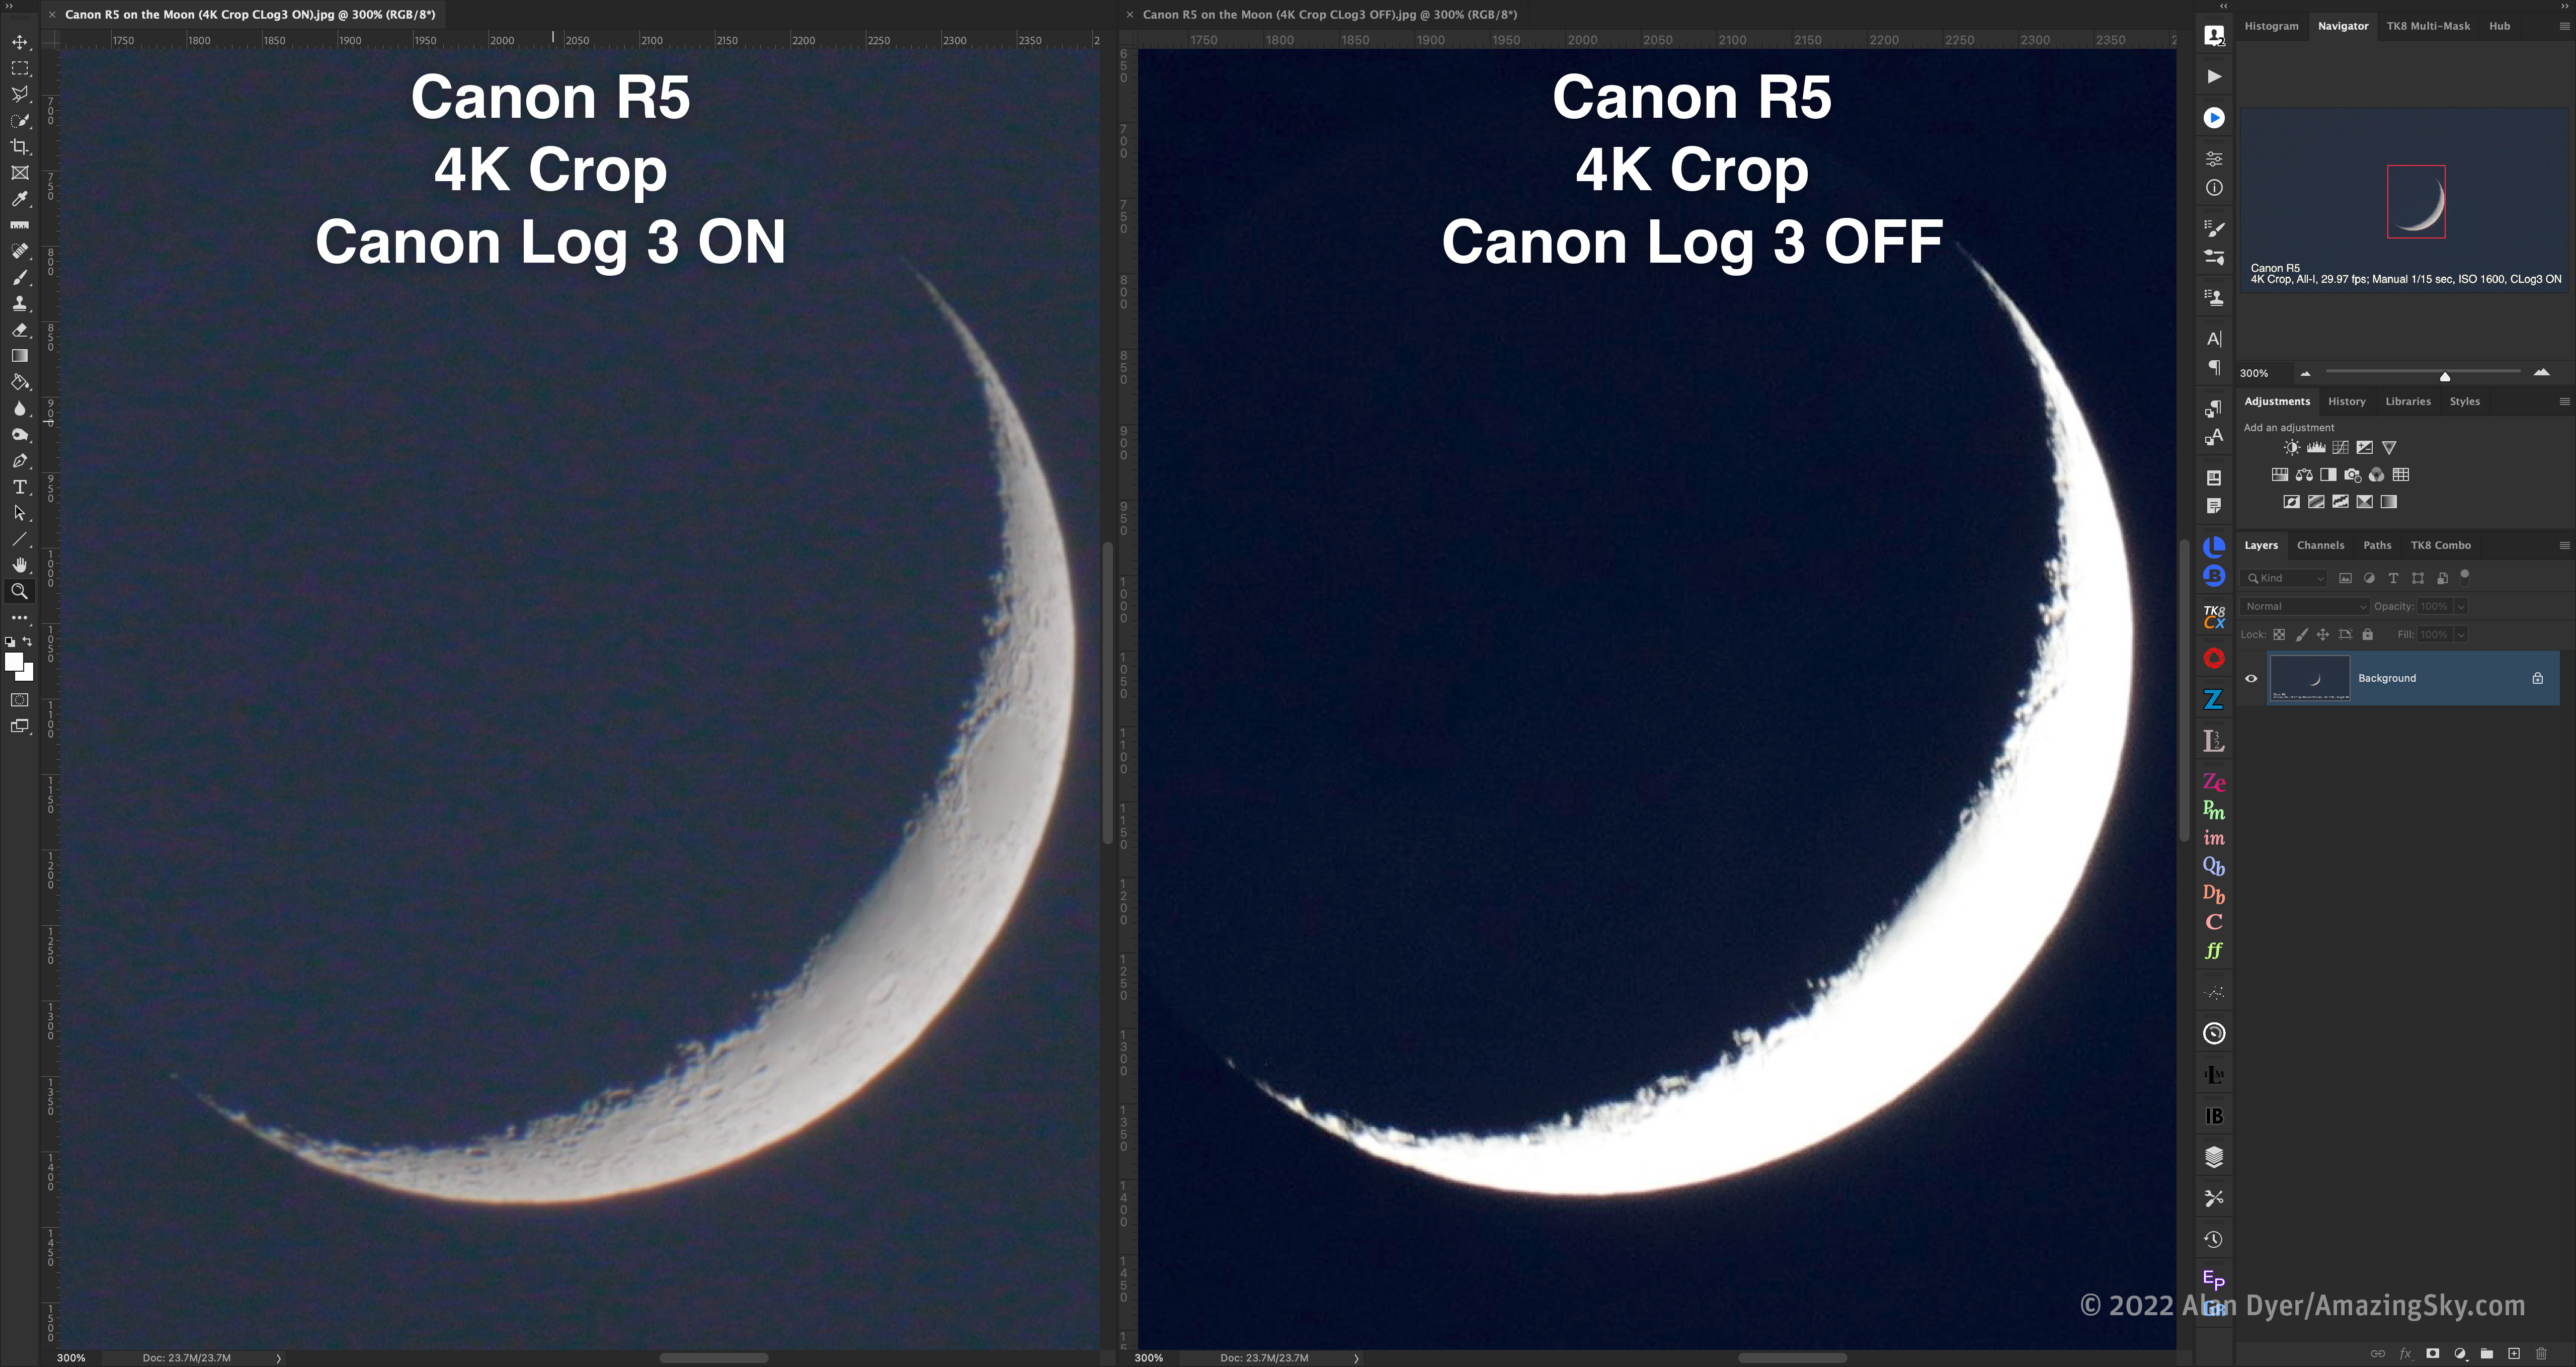
This shows the difference (using frame grabs from 4K movies) between shooting in Canon C-Log3 and shooting with normal “in-camera” colour grading. The exposures were the same.
Like the R6, the R5 offers the option of shooting movies in Canon’s C-Log3 profile, which records internally in 10-bit, preserving more dynamic range in movies, up to 12 stops. The resulting movie looks flat, but when “colour graded” later in post, the movie records much more dynamic range, as I show above. Without C-Log3, the bright sunlit lunar crescent is blown out, as will be the Sun’s inner corona.
The bright crescent Moon with dim Earthshine is a good practice-run stand-in for the eclipsed Sun with its wide range of brightness from the inner to the outer corona.
Sample Moon Movies
For the full comparison of the R5 and R6 in my test shoot of the crescent Moon, see this narrated demo movie on Vimeo for the 4K movies, shot in various modes, both full-frame and cropped, with C-Log3 on and off.
Keep in mind that video compression in the on-line version may make it hard to see the resolution difference between shooting modes.
A “private link” 10-minute video on Vimeo demonstrating 4K video clips with the R5 and R6.
For a movie of the 8K footage, though downsized to 4K for the Vimeo version (the full sized 8K file was 29 Gigs!), see this sample movie below on Vimeo.
A “private link” video on Vimeo demonstrating 8K video clips with the R5.
LOw-Light VIDEO
Like the R6, the R5 can shoot at a dragged shutter speed as slow as 1/8-second. That slow shutter, combined with a fast f/1.4 to f/2 lens, and ISOs as high as 51,200 are the keys to shooting movies of the night sky.
Especially auroras. Only when auroras get shadow-casting bright can we shoot at the normal 1/30-second shutter speed of movies and at lower ISOs.
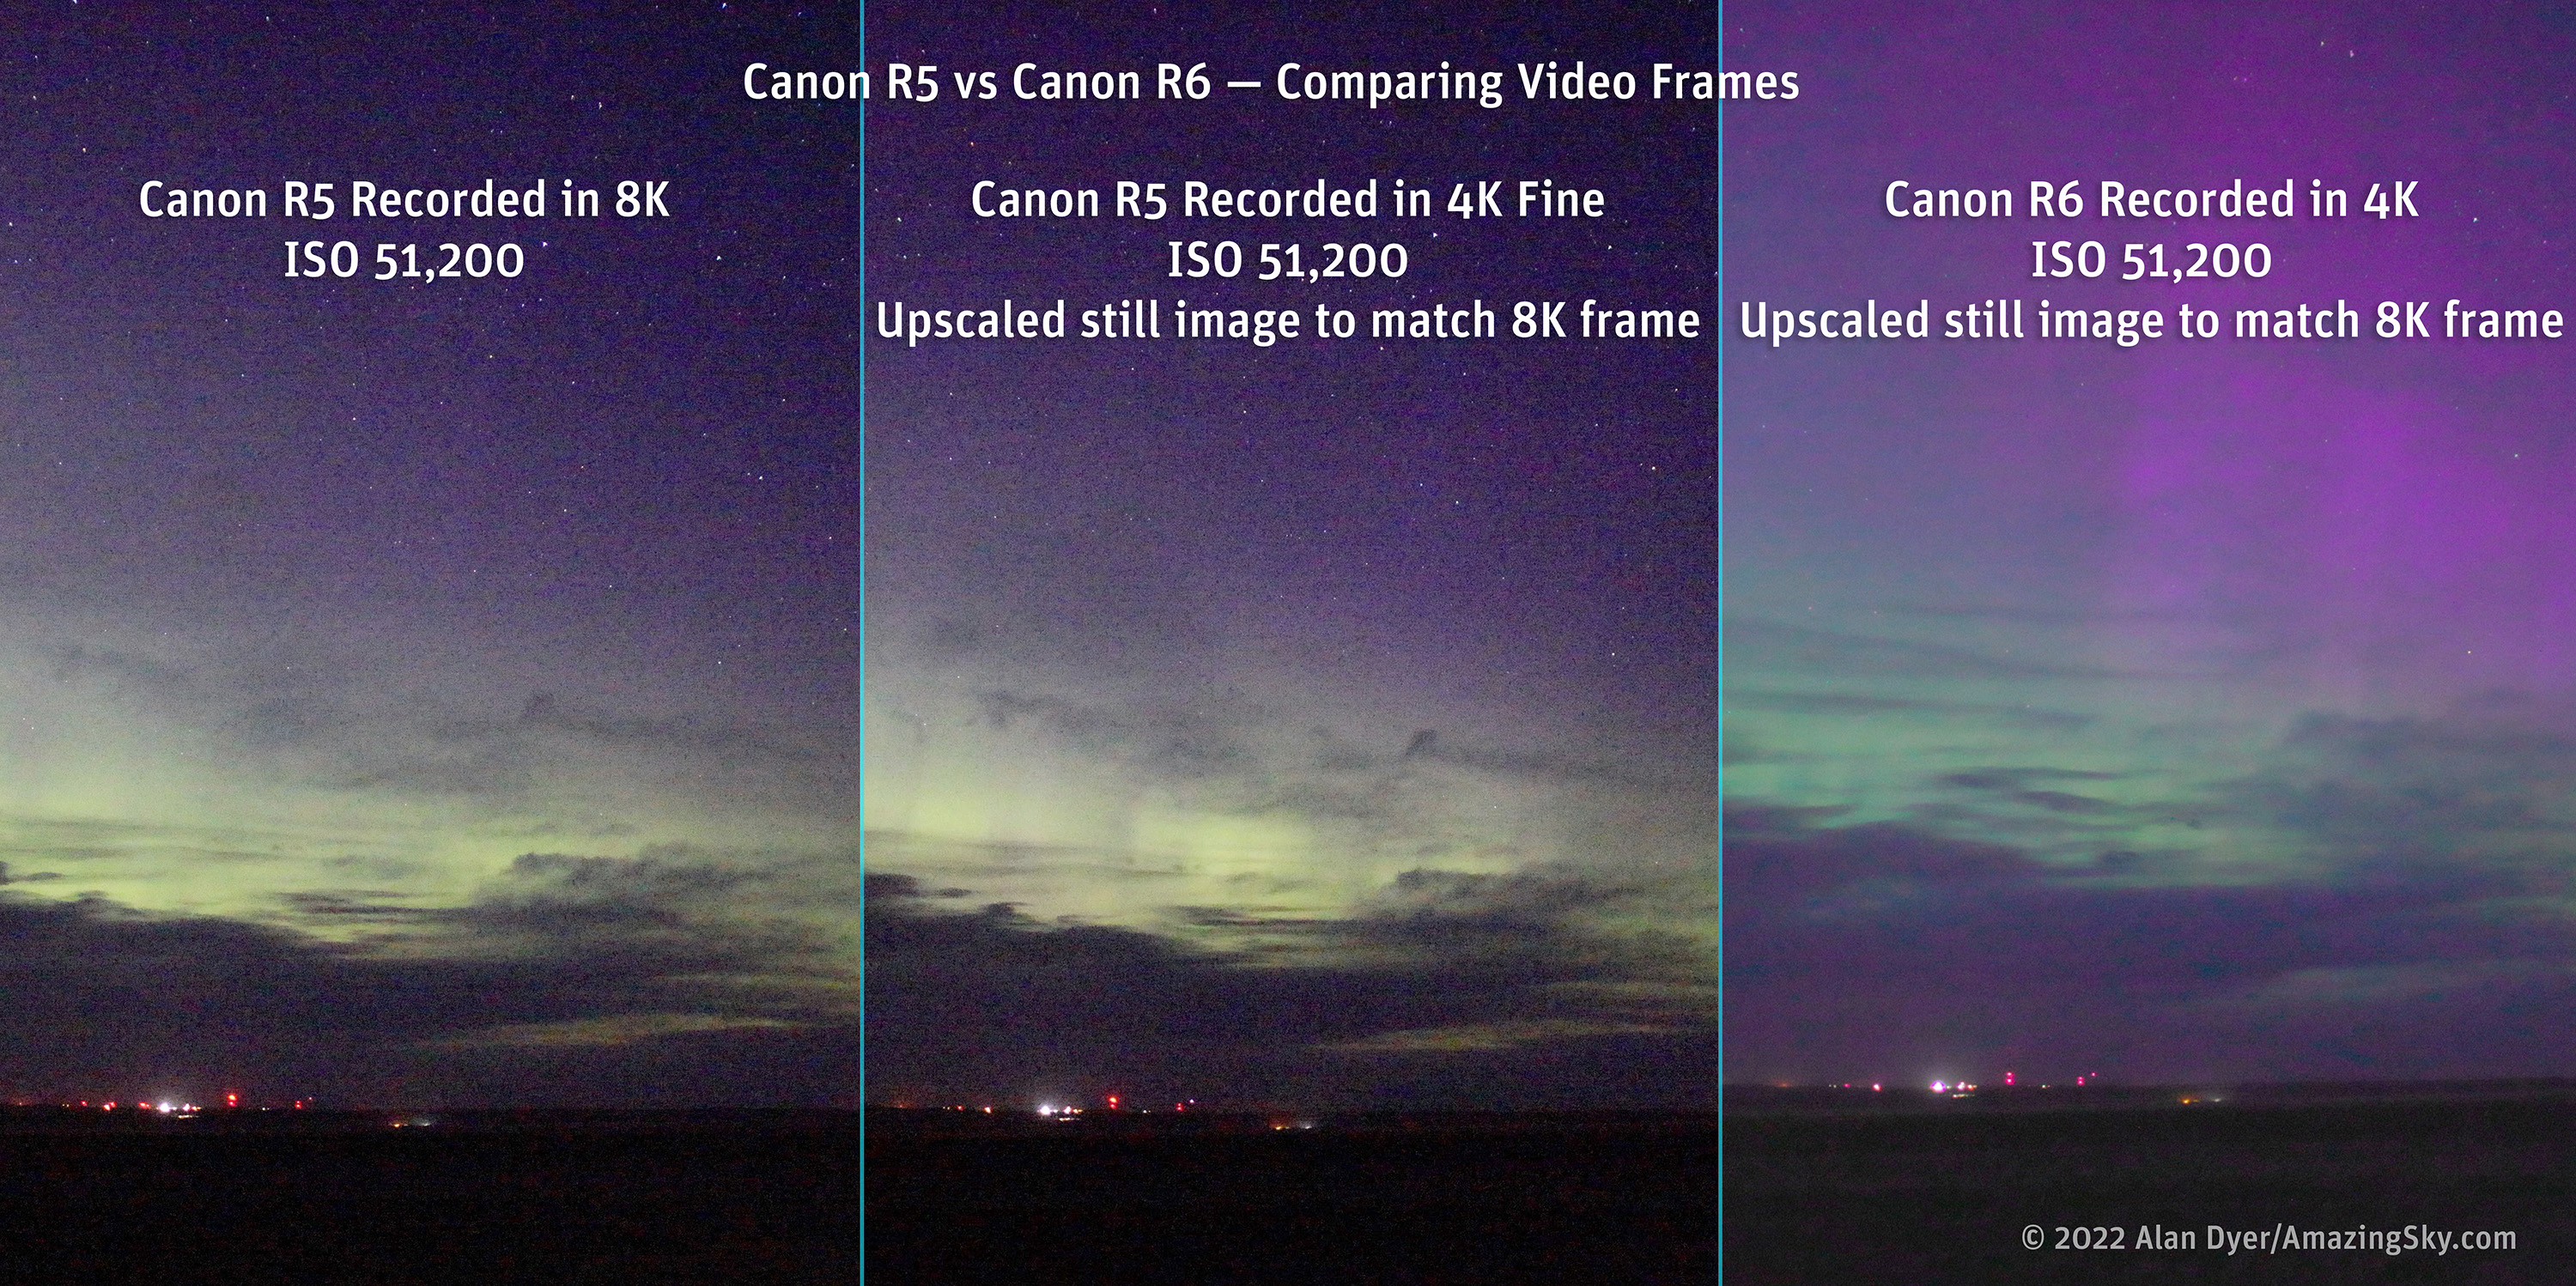
This compares frame grabs of aurora movies shot the same night with the R5 at 8K and 4K with the Canon R6 at 4K, all at ISO 51,200.
I was able to shoot a decent aurora one night from home with both the R5 and R6, and with the same fast TTArtisan 21mm f/1.5 RF lens. The sky and aurora changed in brightness from the time I shot with the R6 first to the R5 later. But even so, the movies serve as a look at how the two cameras perform for real-time aurora movies.
Auroras are where we need to shoot full-frame, for the maximum field of view, and at high ISOs. The R5’s maximum ISO is 51,200, while the R6 goes up to 204,800, though it is largely unusable at that speed for actual shooting, just for previewing scenes.
As expected, the R6 was much less noisy than the R5, by about two stops. The R5 is barely usable at ISO 51,200, while the R6 works respectably well at that speed. If auroras get very bright, then slower ISOs can be used, making the R5 a possible camera for low-light use, but it would not be a first choice, unless 8K auroras are a must-have.
Sample aurora Movies
For a narrated movie comparing the R5 and R6 at 4K on the aurora, stepping both through a range of ISO speeds, see this movie at Vimeo.
A “private link” video on Vimeo demonstrating 4K aurora clips with the R5 and R6.
For a movie showing the same aurora shot with the R5 at 8K, see this movie. However, it has been down-sized to 4K for on-line viewing, so you’ll see little difference between it and the 4K footage. Shooting at 8K did not improve or smooth noise performance.
A “private link” video on Vimeo demonstrating 8K aurora clips with the R5.
BATTERY LIFE — Stills and video
Canon’s new LP-E6NH battery supports charging through the USB-C port and has a higher 2130mAh capacity than the 1800mAh LP-E6 batteries. However, the R5 is compatible with the older batteries.
Like the R6, the R5 comes with a new version of Canon’s standard LP-E6 battery, the LP-E6NH.
On mild nights, I found the R5 ran fine on one battery for the 3 to 4 hours needed to shoot a time-lapse sequence, or set of deep-sky images, with power to spare. Now, that was with the camera in “Airplane Mode,” which I always use regardless, to turn off the power-consuming WiFi and Bluetooth, which I never use on cameras.
As I noted with the R6, for demanding applications, especially in winter, the R5 can be powered by an outboard USB power bank that has Power Delivery or “PD” capability.
The exception for battery use is when shooting videos, especially 8K. That can drain a battery after an hour of recording, though it takes only 10 to 12 minutes of 8K footage to fill a 128 gigabyte card. While less than half that length will be needed to capture any upcoming total eclipse from diamond ring to diamond ring, the result is still a massive file.
OVERHEATING
More critically, the R5 is also infamous for overheating and shutting down when shooting 8K movies, after a time that depends on how hot the environment is. I found the R5 shot 8K or 4K Fine HQ for about 22 minutes at room temperature before the overheat warning first came on, then shut off recording two or three minutes later. Movie recording cannot continue until the R5 cools off sufficiently, which takes at least 10 to 15 minutes.
That deficiency might befoul unwary eclipse photographers in 2024. The answer for “no-worry” 8K video recording is the Canon R5C, the video-centric version of the R5, with a built-in cooling fan.
Features and usability
While certainly not designed with astrophotography in mind, the R5 has several hardware and firmware features that are astrophoto friendly.
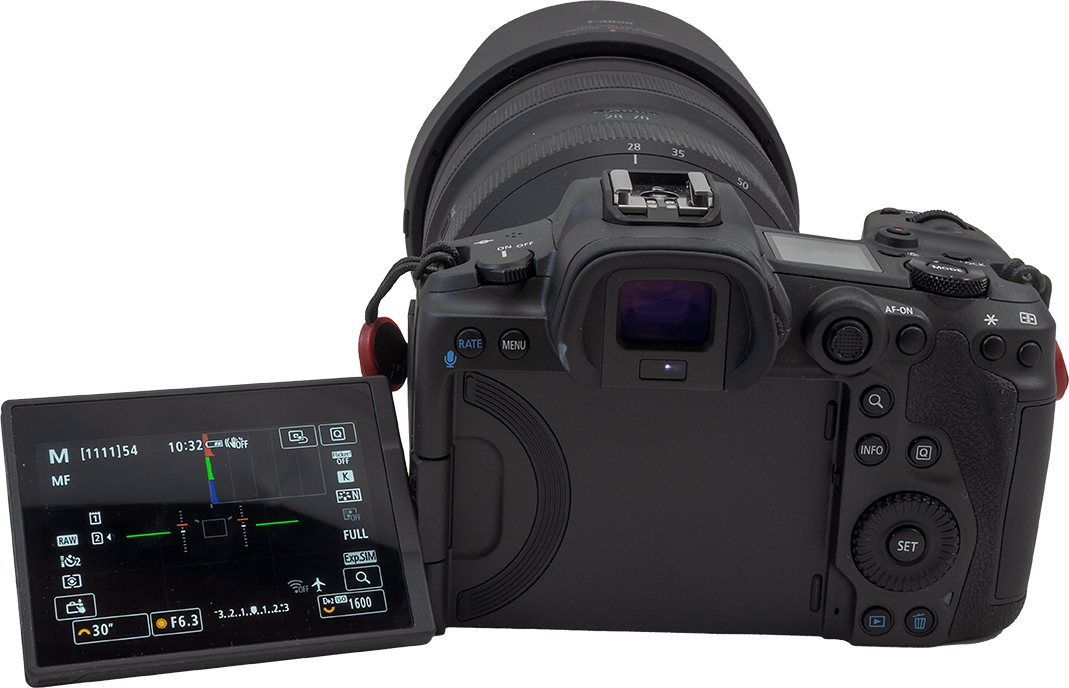
The R5’s Canon-standard flip screen
Like all Canon cameras made in the last few years, the R5 has Canon’s standard articulated screen, which can be angled up for convenient viewing when on a telescope. It is also a full touch screen, with all important camera settings and menus adjustable on screen, good for use at night.
With 2.1 million dots, the R5’s rear screen has a higher resolution than the 1.62-million-dot screen of the R6, and much higher than the 1 million pixels of the Rp’s screen, but is the same resolution as in the R and Ra.
The R5’s top-mounted backlit LCD screen
The R5, like the original R, has a top backlit LCD screen for display of current camera settings, battery level and Bulb timer. The lack of a top screen was one of my criticisms of the R6.
Yes, the hardware Mode dial of the R6 and Rp does make it easier to switch shooting modes, such as quickly changing from Stills to Movie. However, for astrophotography the top screen provides useful information during long exposures, and is handy to check when the camera is on a telescope or tripod aimed up to the sky, without spoiling dark adaptation. I prefer to have one.
The R5’s front-mounted N3-style remote port
The R5’s remote shutter port, used for connecting external intervalometers or time-lapse motion controllers, is Canon’s professional-grade three-pronged N3 connector. It’s sturdier than the 2.5mm mini-phono plug used by the Rp, R and R6. It’s a plus for the R5.
As with all new cameras, the R5’s USB port is a USB-C type. A USB-C cable is included.
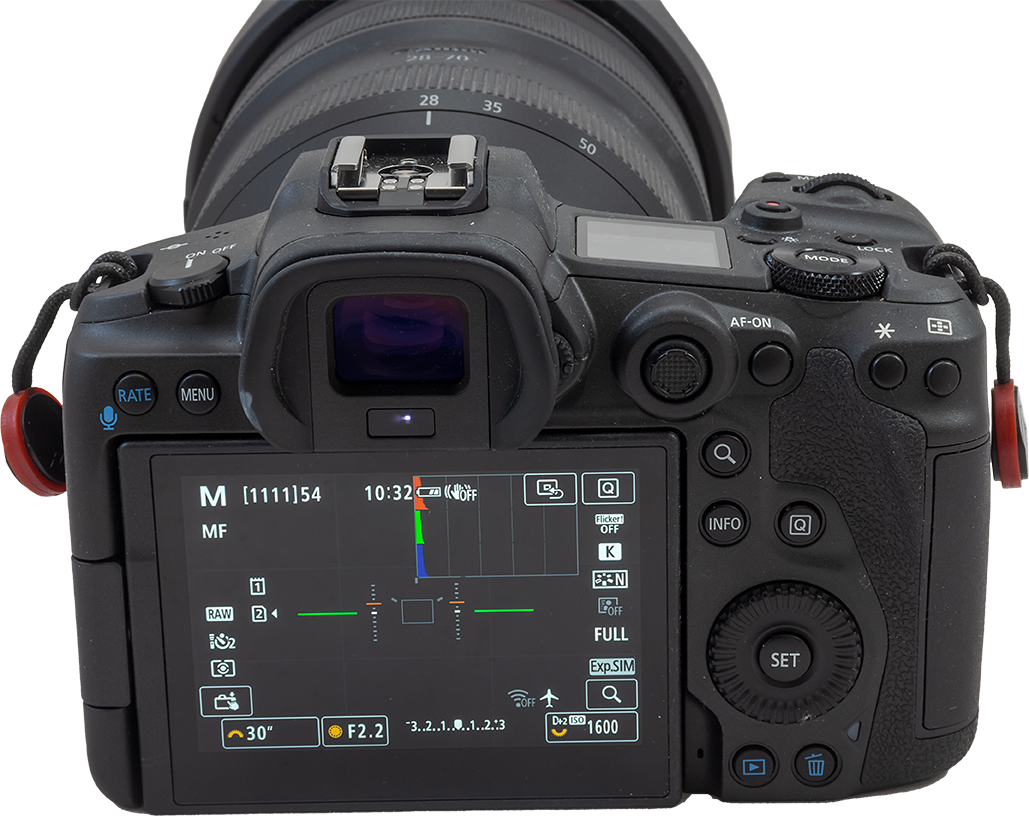
The R5’s back panel buttons and controls
Like the R6, the R5 has a dedicated magnification button on the back panel for zooming in when manually focusing or inspecting images. In the R and Ra, that button is only on the touch panel rear screen, where it has to be called up by paging to that screen, an inconvenience. While virtual buttons on a screen are easier to see and operate at night than physical buttons, I find a real Zoom button handy as it’s always there.
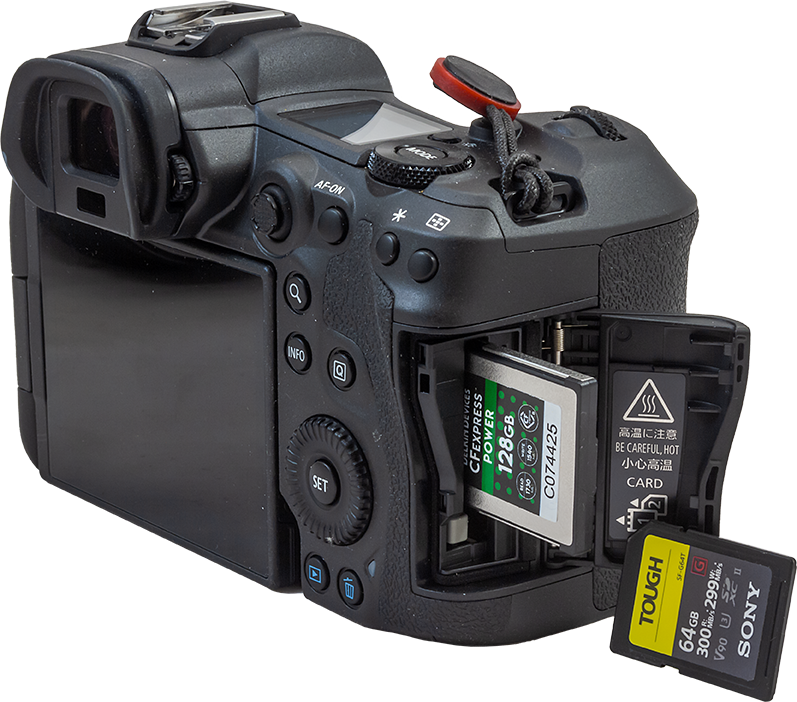
The R5’s twin cards, a CFexpress Type B and an SD UHS-II
To handle the high data rates of 8K video and also 4K video when set to the high frame rate option of 120 fps, one of the R5’s memory card slots requires a CFexpress Type B card, a very fast but more costly format.
As I had no card reader for this format, I had to download movies via a USB cable directly from the camera to my computer, using Canon’s EOS Utility software, as Adobe Downloader out of Adobe Bridge refused to do the job. Plan to buy a card reader.
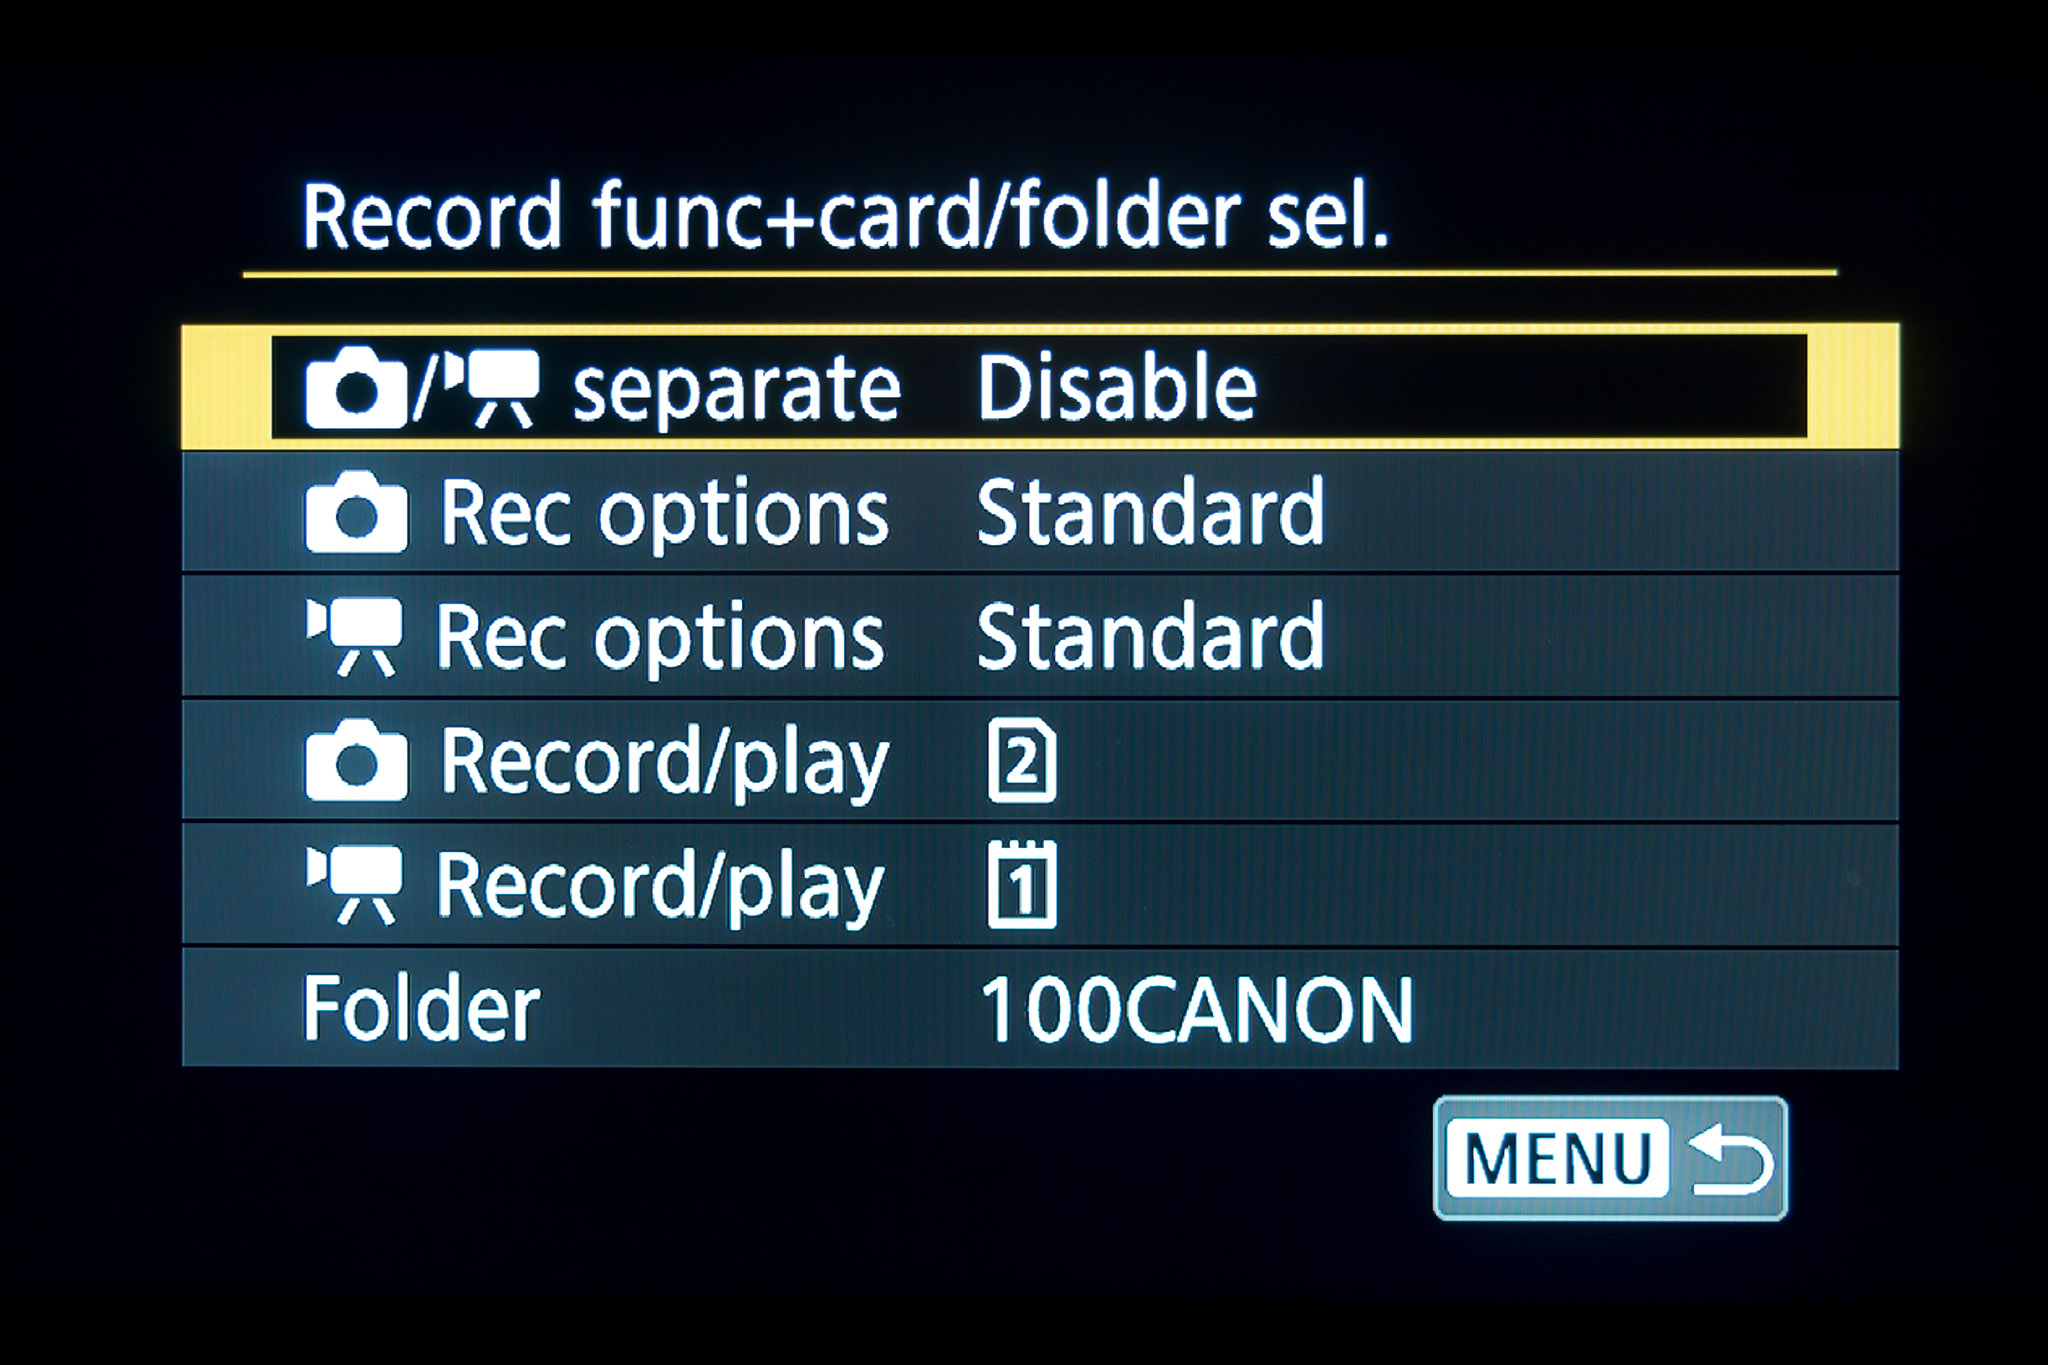
Allocating memory card use
In the menus, you can choose to record video only to the CFexpress, and stills only to the SD card, or both stills and movies to each card for a backup, with the limitation that 8K and 4K 120fps won’t record to the SD card, even very fast ones.
FIRMWARE FEATURES
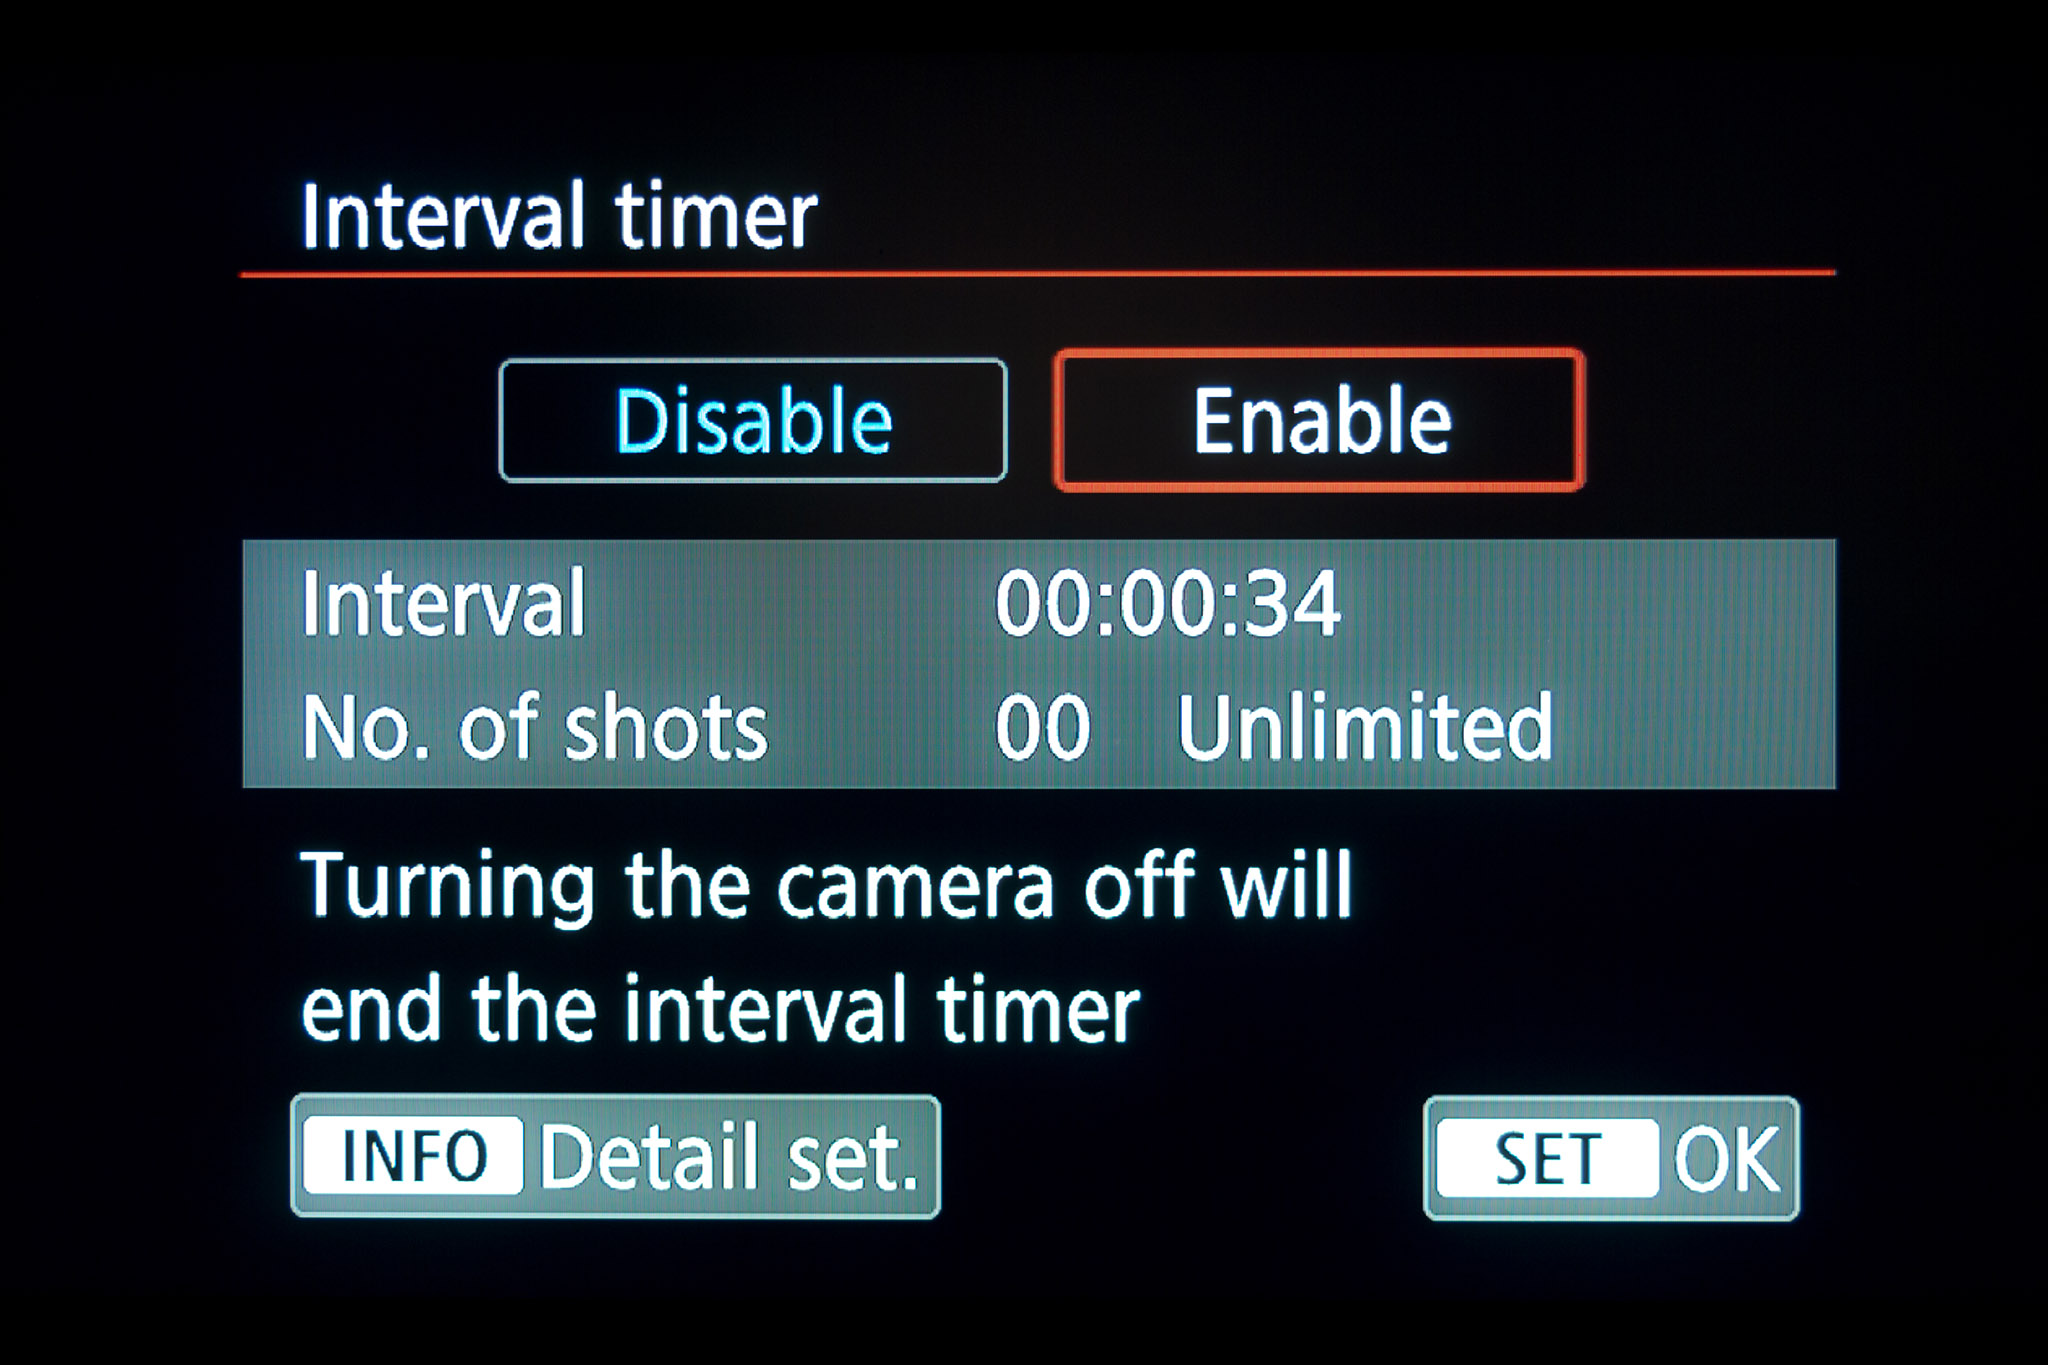
Setting the Interval Timer
Unlike the Canon R and Ra (which both annoyingly lack a built-in intervalometer), but like the R6, the R5 has an Interval Timer in its firmware. This can be used to set up a time-lapse sequence, but with exposures only up to the maximum of 30 seconds allowed by the camera’s shutter speed settings, true of most in-camera intervalometers. Even so, this is a useful function for simple time-lapses.
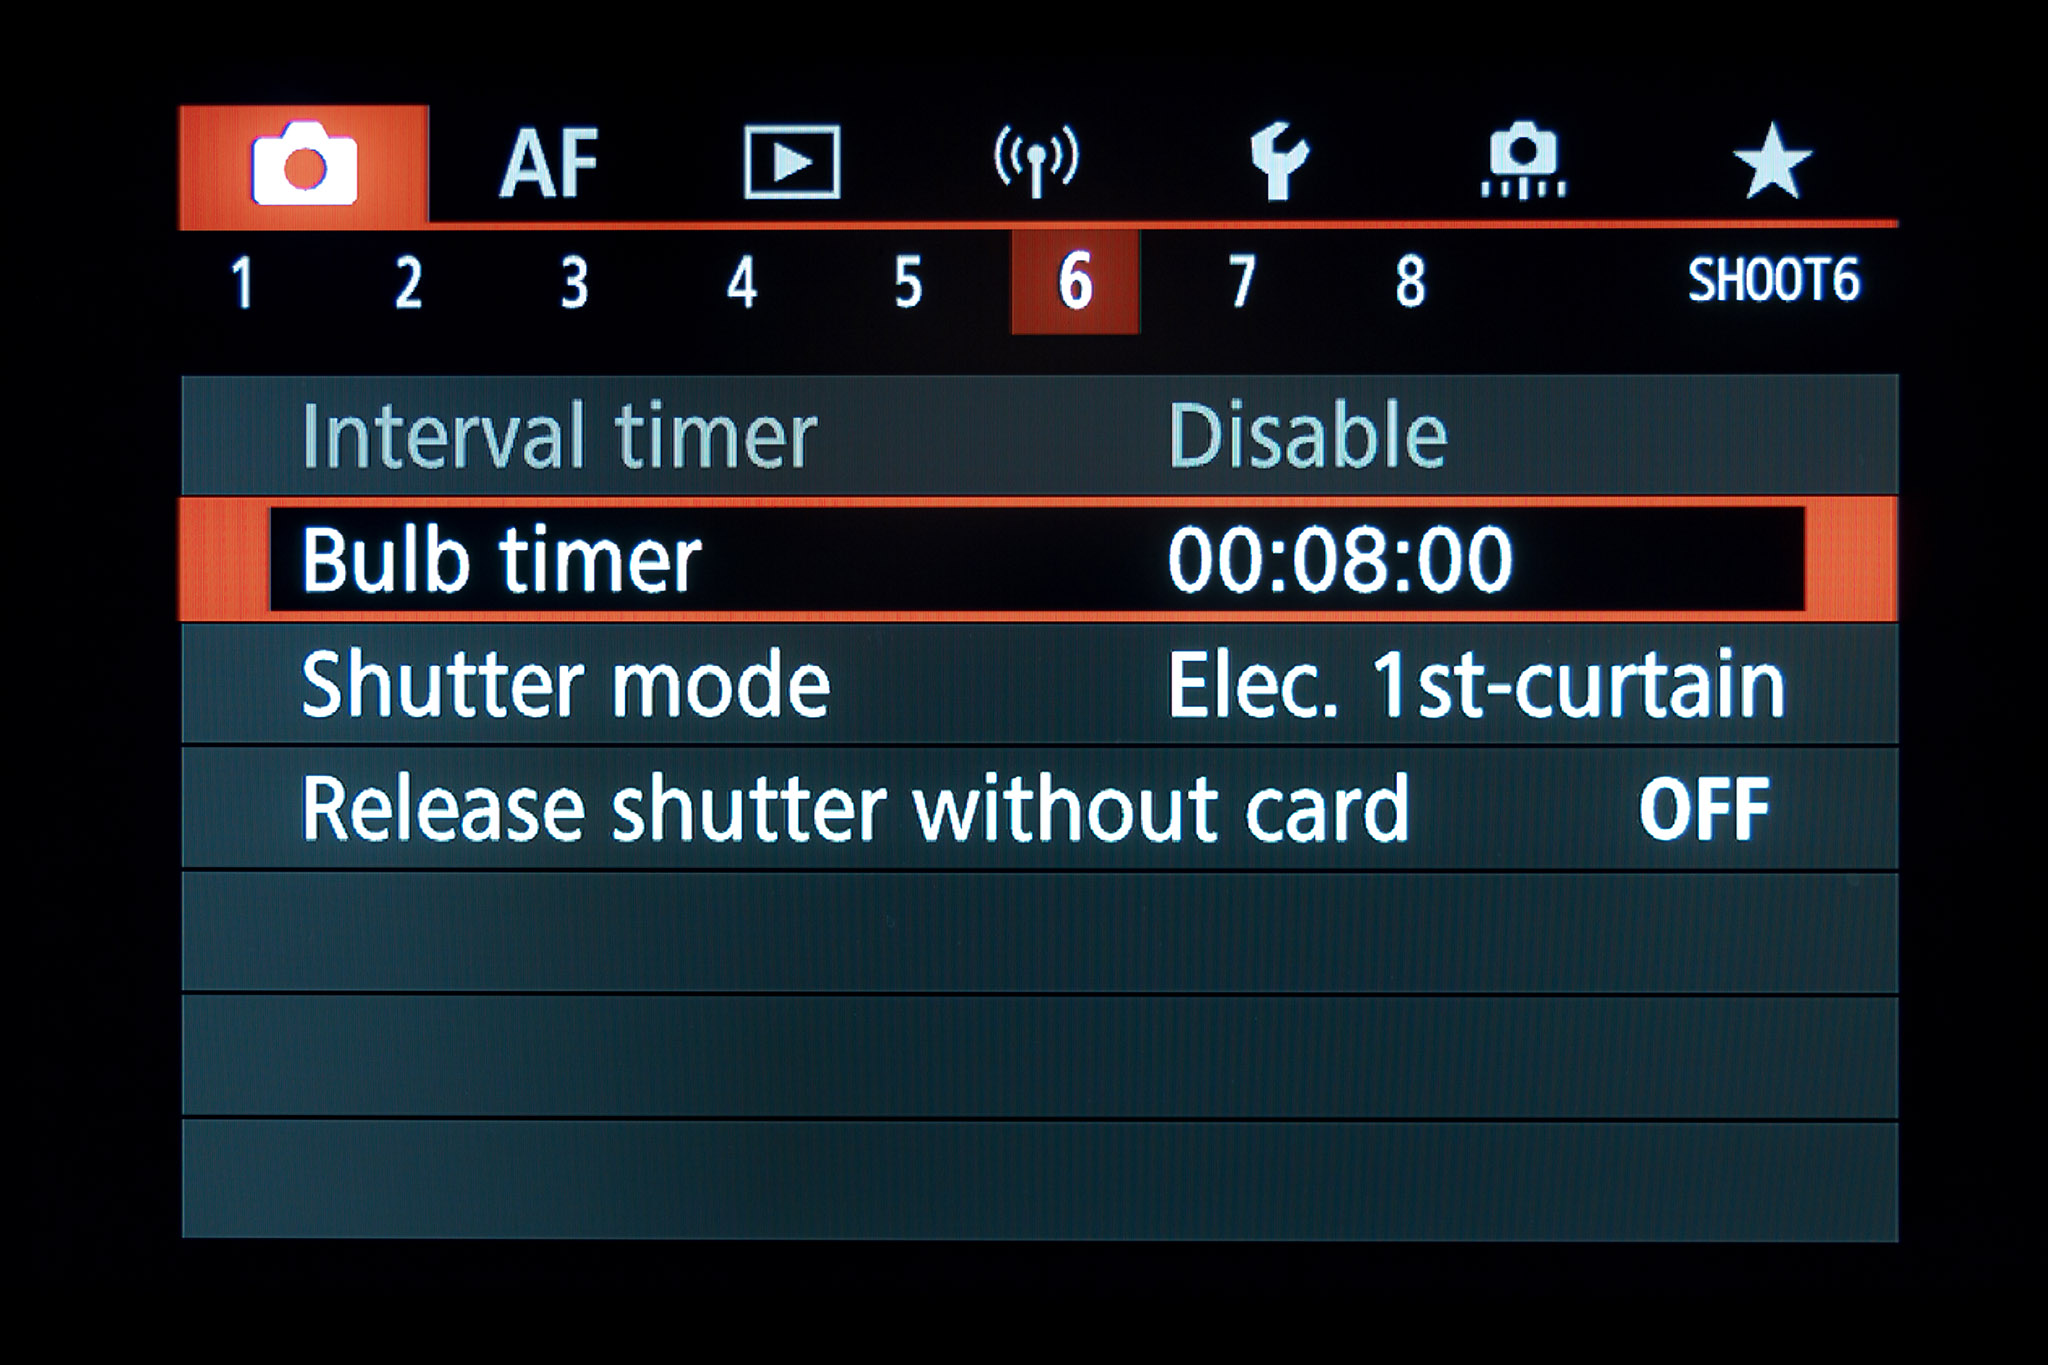
Setting the Bulb Timer
As with most recent Canon DSLRs and DSLMs, the R5 also includes a built-in Bulb Timer. This allows setting an exposure of any length (many minutes or hours) when the camera is in Bulb mode. However, it cannot be combined with the Interval Timer for multiple exposures; it is good only for single shots. Nevertheless, I find it useful for shooting long exposures for the ground component of nightscape scenes.
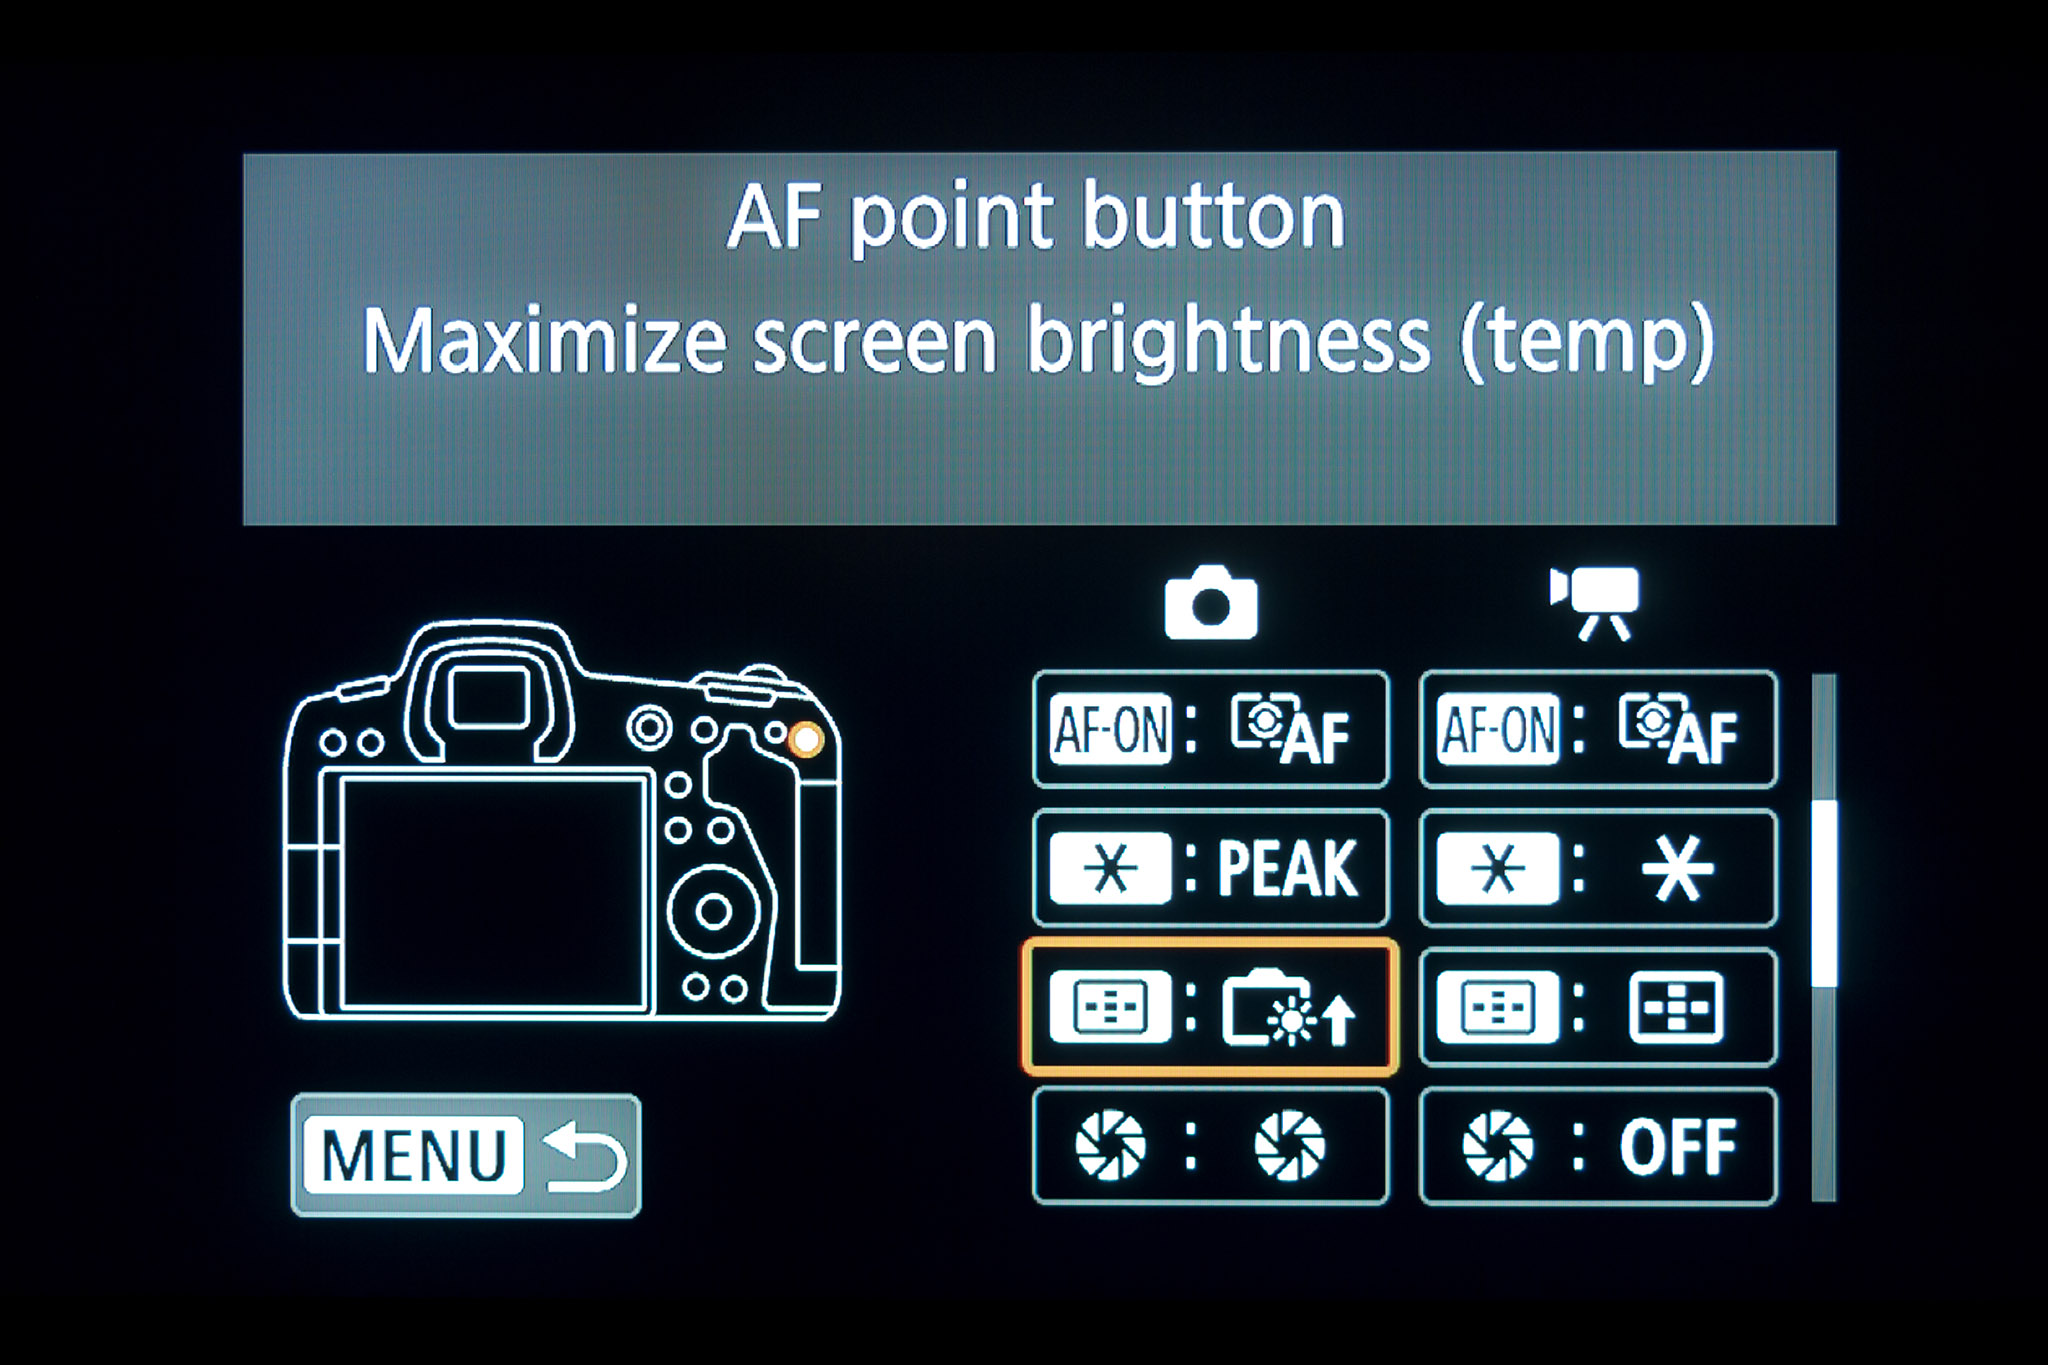
Custom button functions
While Canon cameras don’t have Custom Function buttons per se (unlike Sonys), the R5’s various buttons and dials can be custom programmed to functions other than their default assignments. I assign the * button to turning on and off the Focus Peaking display and, as shown, the AF Point button to a feature only available as a custom function, one that temporarily brightens the rear screen to full, good for quickly checking framing at night.
Assigning Audio Memos to the Rate button
A handy feature of the R5 is the ability to add an audio notation to images. You shoot the image, play it back, then use the Rate button (if so assigned) to record a voice memo of up to 30 seconds, handy for making notes in the field about an image or a shoot. The audio notes are saved as WAV files with the same file number as the image.
The infamous Release Shutter Without Lens command
Like other EOS R cameras, the R5 has this notorious “feature” that trips up every new user who attaches their Canon camera to a telescope or manual lens, only to find the shutter suddenly doesn’t work. The answer is to turn ON “Release Shutter w/o Lens” found buried under Custom Functions Menu 4. Problem solved!
OTHER FEATURES
I provide more details of other features and settings of the R5, many of which are common to the R6, in my review of the R6 here.
Multi-segment panoramas with the R5, like this aurora scene, yield superb resolution but can become massive in size, pressing the ability of software and hardware to process them.
CONCLUSION
No question, the Canon R5 is costly. Most buyers would need to have very good daytime uses to justify its purchase, with astrophotography a secondary purpose.
That said, other than low-light night sky videos, the R5 does work very well for all forms of astrophotography, providing a level of resolution that lesser cameras simply cannot.
Nevertheless, if it is just deep-sky imaging that is of interest, then you might be better served with a dedicated cooled-sensor CMOS camera, such as one of the popular ZWO models, and the various accessories that need to accompany such a camera.
But for me, when it came time to buy another premium camera, I still preferred to have a model that could be used easily, without computers, for many types of astro-images, particularly nightscapes, tracked wide-angle starfields, as well as telescopic images.
Since buying the R5, after first suspecting it would prove too noisy to be practical, it has in fact become my most used camera, at least for all images where the enhanced red sensitivity of the EOS Ra is not required. But for low-light night videos, the R6 is the winner.
However, to make use of the R5’s resolution, you do have to match it with sharp, high-quality lenses and telescope optics, and have the computing power to handle its large files, especially when stitching or stacking lots of them. The R5 can be just the start of a costly spending spree!
The tradition continued of chasing clear skies to see a lunar eclipse.
It wouldn’t be an eclipse without a chase. Total eclipses of the Sun almost always demand travel, often to the far side of the world, to stand in the narrow path of the Moon’s shadow.
By contrast, total eclipses of the Moon come to you — they can be seen from half the planet when the Full Moon glides through Earth’s shadow.
Assuming you have clear skies! That’s the challenge.
Of the 14 total lunar eclipses (TLEs) visible from here in Alberta since 2000, I have seen all but one, missing the January 21, 2000 TLE due to clouds.
But of the remaining 13 TLEs so far in the 21st century, I watched only three from home, the last home lunar eclipse being in December 2010.
The total lunar eclipse of May 26, 2021 here in the initial partial phases with it embedded in thin cloud. The clouds add a glow of iridescent colours around the Moon, with the part of the Moon’s disk in the umbral shadow a very deep, dim red. A subtle blue band appears along the umbral shadow line, usually attributed to ozone in Earth’s upper atmosphere. With the Canon 60Da and 200mm lens.
I viewed three TLEs (August 2007, February 2008, and December 2011) from the Rothney Observatory south-west of Calgary as part of public outreach programs I was helping with.
In April 2014, I was in Australia and viewed the eclipsed Moon rising in the evening sky over Lake Macquarie, NSW.
A year later, in April 2015, I was in Monument Valley, on the Arizona-Utah border for the short total eclipse of the Moon at dawn.
But of the eclipses I’ve seen from Alberta since 2014, I have had to chase into clear skies for all of them — to Writing-on-Stone Provincial Park in both October 2014 and September 2015, to the Crowsnest Pass for January 2018, and to Lloydminster for January 2019.
A selfie of the successful eclipse chaser bagging his trophy, the total lunar eclipse of January 20, 2019. This was from a site south of Lloydminster on the Alberta-Saskatchewan border, but just over into the Saskatchewan side.
The total lunar eclipse on the morning of May 26, 2021 was no exception.
Leading up to eclipse day prospects for finding clear skies anywhere near home in southern Alberta looked bleak. The province was under widespread cloud bringing much-needed rain. Good for farmers, but bad for eclipse chasers.
Then, two days prior to the eclipse a hole in the clouds was predicted to open up along the foothills in central Alberta just at the right time, at 4 a.m. The predictions stayed consistent a day later.
Environment Canada predictions, as displayed by the wonderful Astrospheric app, showed Rocky Mountain House (the red circle) on the edge of the retreating clouds.
So trusting the Environment Canada models that had served me well since 2014, I made plans to drive north the day before the eclipse to Rocky Mountain House, a sizeable town on Highway 11 west of Red Deer, where the foothills begin. “Rocky” was predicted to be on the edge of the clearing, with a large swath of clear sky in the right direction, to the southwest where the Moon would be.
Fortunately, COVID restrictions are not so severe here as to demand stay-at-home orders. I could travel, at least within Alberta. Hotels were open, but restaurants only for takeaway.
The Starry Night desktop planetarium program provided a preview of the eclipsed Moon’s location and movement, plus the field of view of lenses, to plan the main shots with an 85mm lens (the time-lapse) and a 200mm lens (the close-ups over the horizon).
This was going to be a tough eclipse even under the best of sky conditions, as for us in Alberta the Moon would be low and setting into the southwest at dawn. The Moon would be darkest and in mid-eclipse just as the sky was also brightening with dawn twilight.
However, a low eclipse offers the opportunity of a view of the reddened Moon over a scenic landscape, in this case of the eclipsed Moon setting over the Rockies. That was the plan.
Unfortunately, Rocky Mountain House wasn’t the ideal destination as it lies far from the mountains. I was hoping for a site closer to the Rockies in southern Alberta. But a site with clear skies is always the first priority.
The task is then finding a spot to set up with a clear view to the southwest horizon, which from the area around Rocky is tough — it’s all trees!
This is where planning apps are wonderful.
The Photographer’s Ephemeris app showed possible side road sites and the position of the eclipsed Moon relative to the site terrain. The arc of spheres is the Milky Way.
I used The Photographer’s Ephemeris (TPE) to search for a side road or spot to pull off where I could safely set up and be away from trees to get a good sightline to the horizon and possibly distant mountains.
A site not far from town was ideal, to avoid long pre- and post-eclipse drives in the wee hours of the morning. The timing of this eclipse was part of the challenge — in having to be on site at 4 a.m.
TPE showed several possible locations and a Google street view (not shown here) seemed to confirm that the horizon in that area off Highway 11 would be unobstructed over cultivated fields.
But you don’t know for sure until you get there.
The PhotoPills AR mode overlays a graphic of the night sky on top of a live view from the phone’s camera, useful when on site to check the shooting geometry for that night. The Moon was in the right place!
So as soon as I arrived, I went to one site I had found remotely, only to discover power lines in the way. Not ideal.
I found another nearby side road with a clean view. From there I used the PhotoPills app (above) and its augmented reality “AR” mode to confirm, that yes, the Moon would be in the right place over a clear horizon at eclipse time the next morning.
The Theodolite app records viewing directions onto site images, useful for documenting sites for later use at night.
Another app I like for site scouting, Theodolite, also confirmed that the view toward the eclipsed Moon’s direction (with an azimuth of about 220°) would be fine from that site.
As a Plan B — it’s always good to have a Plan B! — I also drove west along Highway 11, the David Thompson Highway, toward the mountains, in search of a rare site away from trees, just in case the only clear skies lay to the west. I found one, some 50 km west of Rocky, but thankfully it was not needed. The Plan A site worked fine, and was just 5 minutes south of town, and bed!
My eclipse gear at work with the eclipse in progress in the morning twilight at 4:30 a.m.
I set up two tripods. One was for the Canon R6 with an 85mm lens for a “time-lapse” sequence of the Moon moving across the frame as it entered the Earth’s umbral shadow.
The other tripod I used for closeups of just the Moon using the Canon 60Da and 200mm lens, then switched to the Canon Ra and a 135mm lens, then the longer 200mm lens once the Moon got low enough to also be in frame with the horizon. Those were for the prime shot of the eclipse over the distant mountains and skyline.
A composite “time-lapse” blend of the setting Full Moon entering the Earth’s umbral shadow on the morning of May 26, 2021. This shows the Moon moving into Earth’s shadow and gradually disappearing in the bright pre-dawn sky. I shot images with the 85mm lens at 1-minute intervals but choose only every 5th image for this blend, so the Moons are spaced at 5-minute intervals.
It all worked! The sky turned out to be clearer than predicted, a pleasant surprise, with only some light cloud obscuring the Moon halfway through the partial phases (the first image at top).
The other surprise was how dark the shadowed portion of the Moon was. This was a very short total eclipse, with totality only 14 minutes long. With the Moon passing through the outer, lighter part of the umbral shadow, I would have expected a brighter eclipse, making the reddened Moon stand out better in the blue twilight.
As it was, in the minutes before the official start of totality at 5:11 a.m. MDT, the Moon effectively disappeared from view, both to the eye and camera.
The total lunar eclipse of May 26, 2021, here in the late partial phase about 15 minutes before totality began, with a thin arc of the Full Moon at the top of the disk still in sunlight. The rest is in the red umbral shadow of the Earth. The same pinkish-red light is beginning to light the distant Rocky Mountains in the dawn twilight. This is a single 1.3-second exposure with the 200mm lens and Canon Ra, untracked on a tripod. I did blend in a short 1/6-second exposure for just the bright part of the Moon to tone down its brightness.
My best shots were of the Moon still in partial eclipse but with the umbral shaded portion bright enough to show up red in the images. The distant Rockies were also beginning to light up pink in the first light of dawn.
The total lunar eclipse of May 26, 2021, taken at 5:01 a.m. MDT, about 10 minutes before the start of totality, with a thin arc of the Full Moon at the top of the disk still in sunlight. The rest is in the red umbral shadow of the Earth but the eclipsed portion of the Moon was so dim it was disappearing into the brightening twilight. This is a single 0.8-second exposure with the 200mm lens and Canon Ra.
My last view was of a sliver-thin Moon disappearing into Earth’s shadow just prior to the onset of totality. I packed up and headed back to bed with technically the Moon still up and in total eclipse, but impossible to see. Still I was a happy eclipse chaser!
It was another successful eclipse trip, thwarted not so much by clouds, but by the darkness of our planet’s shadow, which might have been due to widespread cloud or volcanic ash in the atmosphere of Earth.
The other factor at play was that this was a “supermoon,” with the larger Moon near perigee entering more deeply into the umbra than a normal-sized Moon.
A preview using Starry Night of the November 18/19, 2021 near-total lunar eclipse from the longitude and latitude of Alberta, with the Moon hight in the south west of the Milky Way.
The next lunar eclipse is six months later, on the night of November 18/19, 2021 when the Moon will not quite fully enter Earth’s umbral shadow, for a 97% partial eclipse. But enough of the Moon will be in the dark umbra for most of the Moon to appear red, with a white crescent “smile” at the bottom.
As shown above, from my location in Alberta the Moon will appear high in the south, in Taurus just west of the Milky Way. The winter stars and Milky Way will “turn on” and fade into view as the eclipse progresses.
We shall see if that will be a rare “home” eclipse, or if it will demand another chase to a clear hole in the clouds on a chilly November night.