Chasing the Annular Eclipse


Like all eclipses, seeing the October 14 annular eclipse of the Sun was not a certainty. As good luck and planning would have it, the sky and location could not have been better!

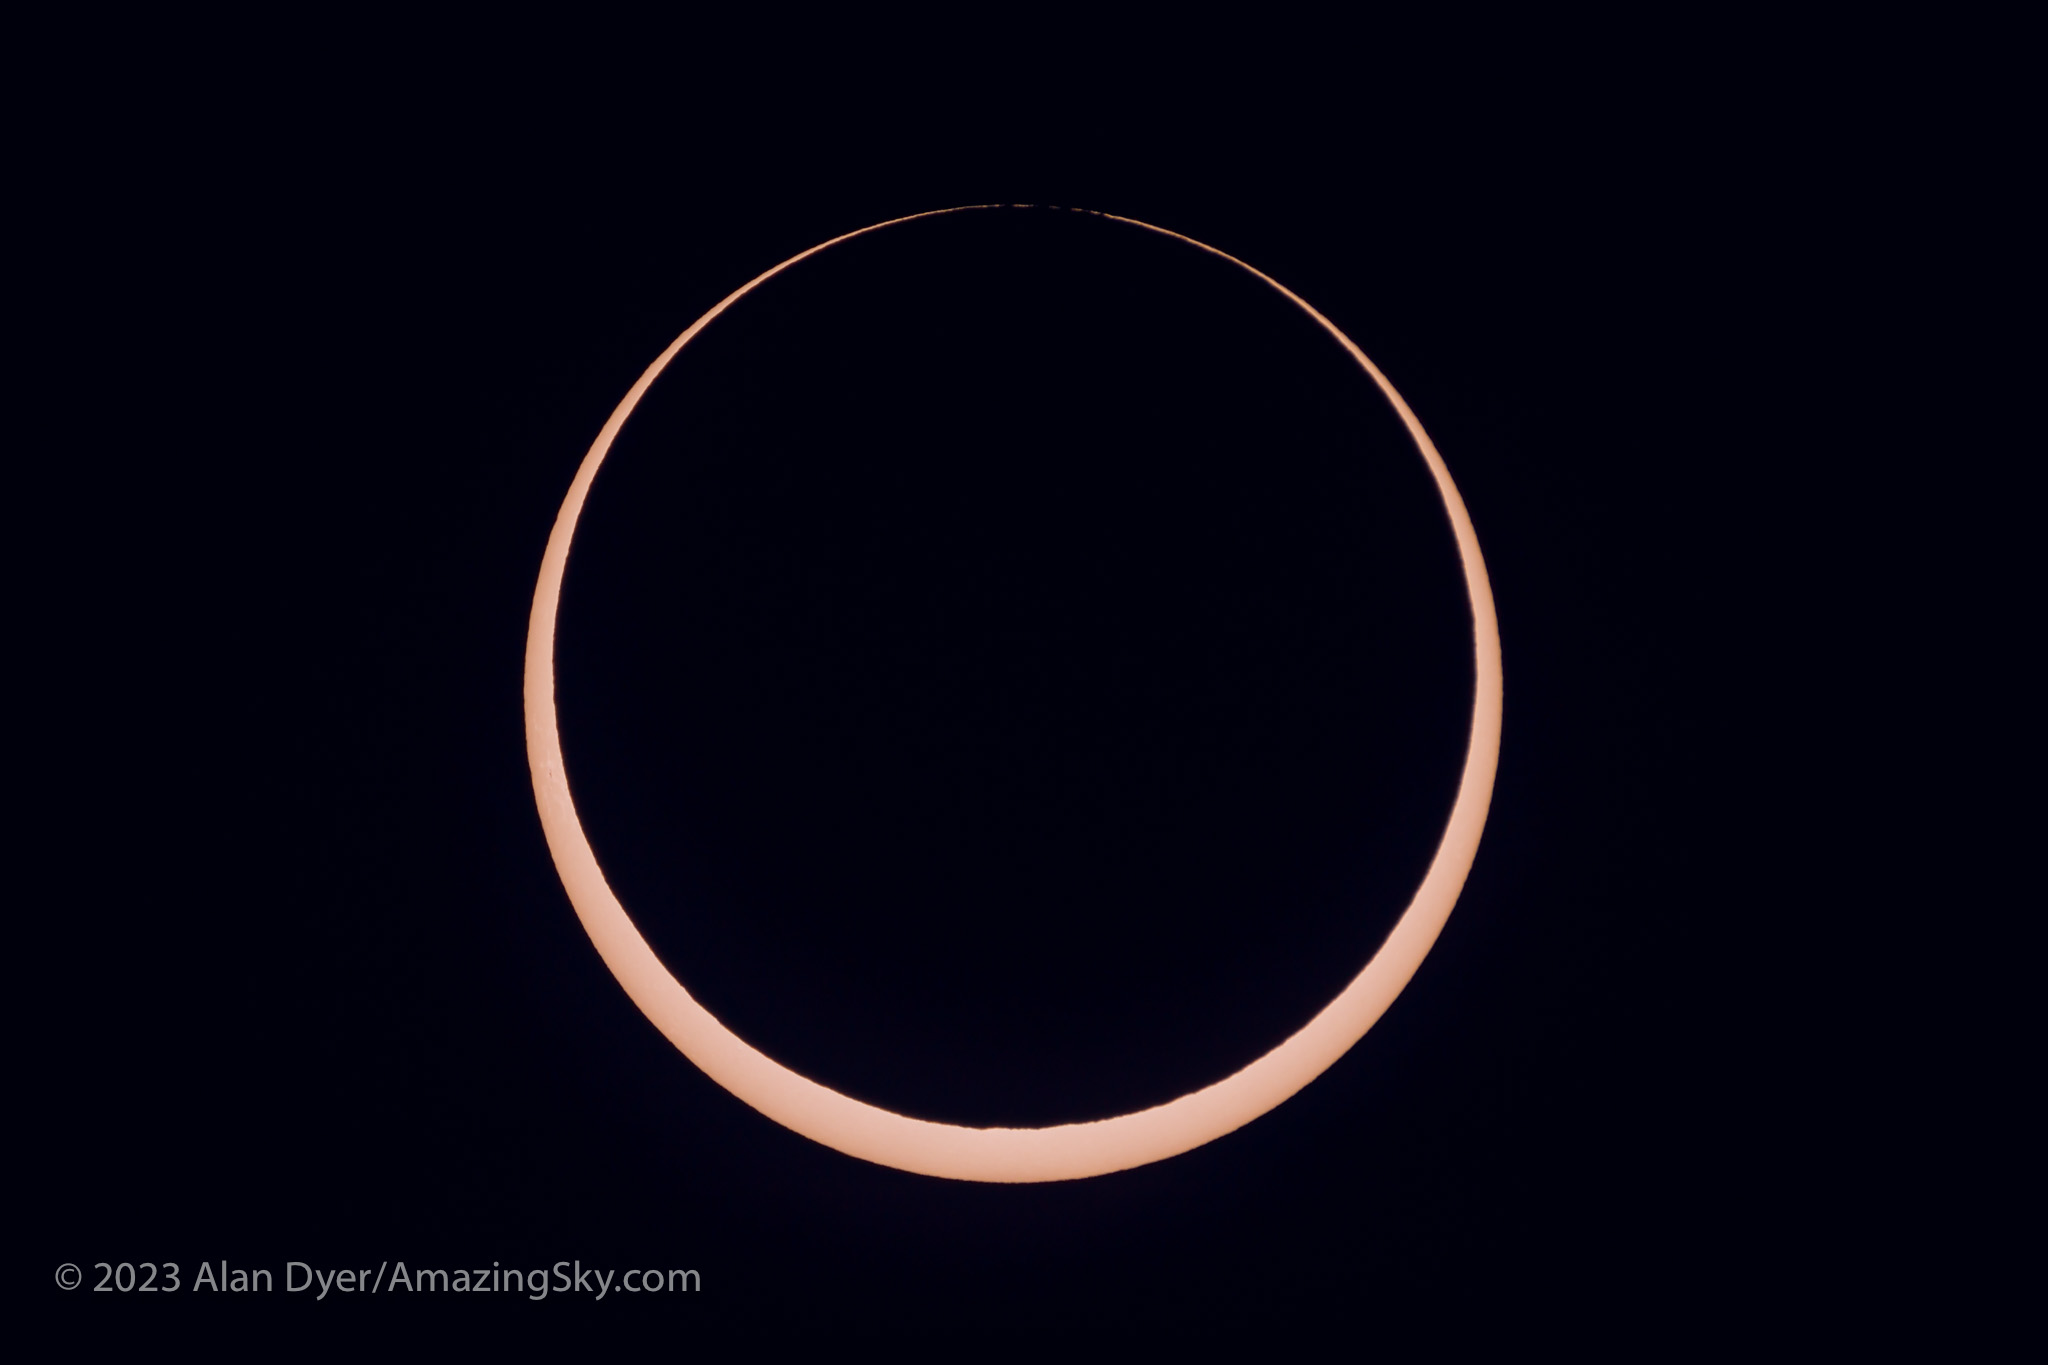
Annular eclipses of the Sun don’t present the spectacle of a total eclipse. Because the Moon is near its farthest point from Earth, its disk is not large enough to completely cover the Sun. At mid-eclipse, as I show below, a ring of sunlight (dubbed a “ring of fire”) remains, still too bright to view without a solar filter. 

The October 14, 2023 annular solar eclipse, in a single image captured at mid-eclipse, at 10:29 am MDT at the Ruby’s Inn Overlook on the rim of Bryce Canyon, Utah, a site well south of the centreline, with 3m03s of annularity.

While lacking the jaw-dropping beauty of a total, annular eclipses are rare and unique enough that every ardent skywatcher should make a point of seeing one. 

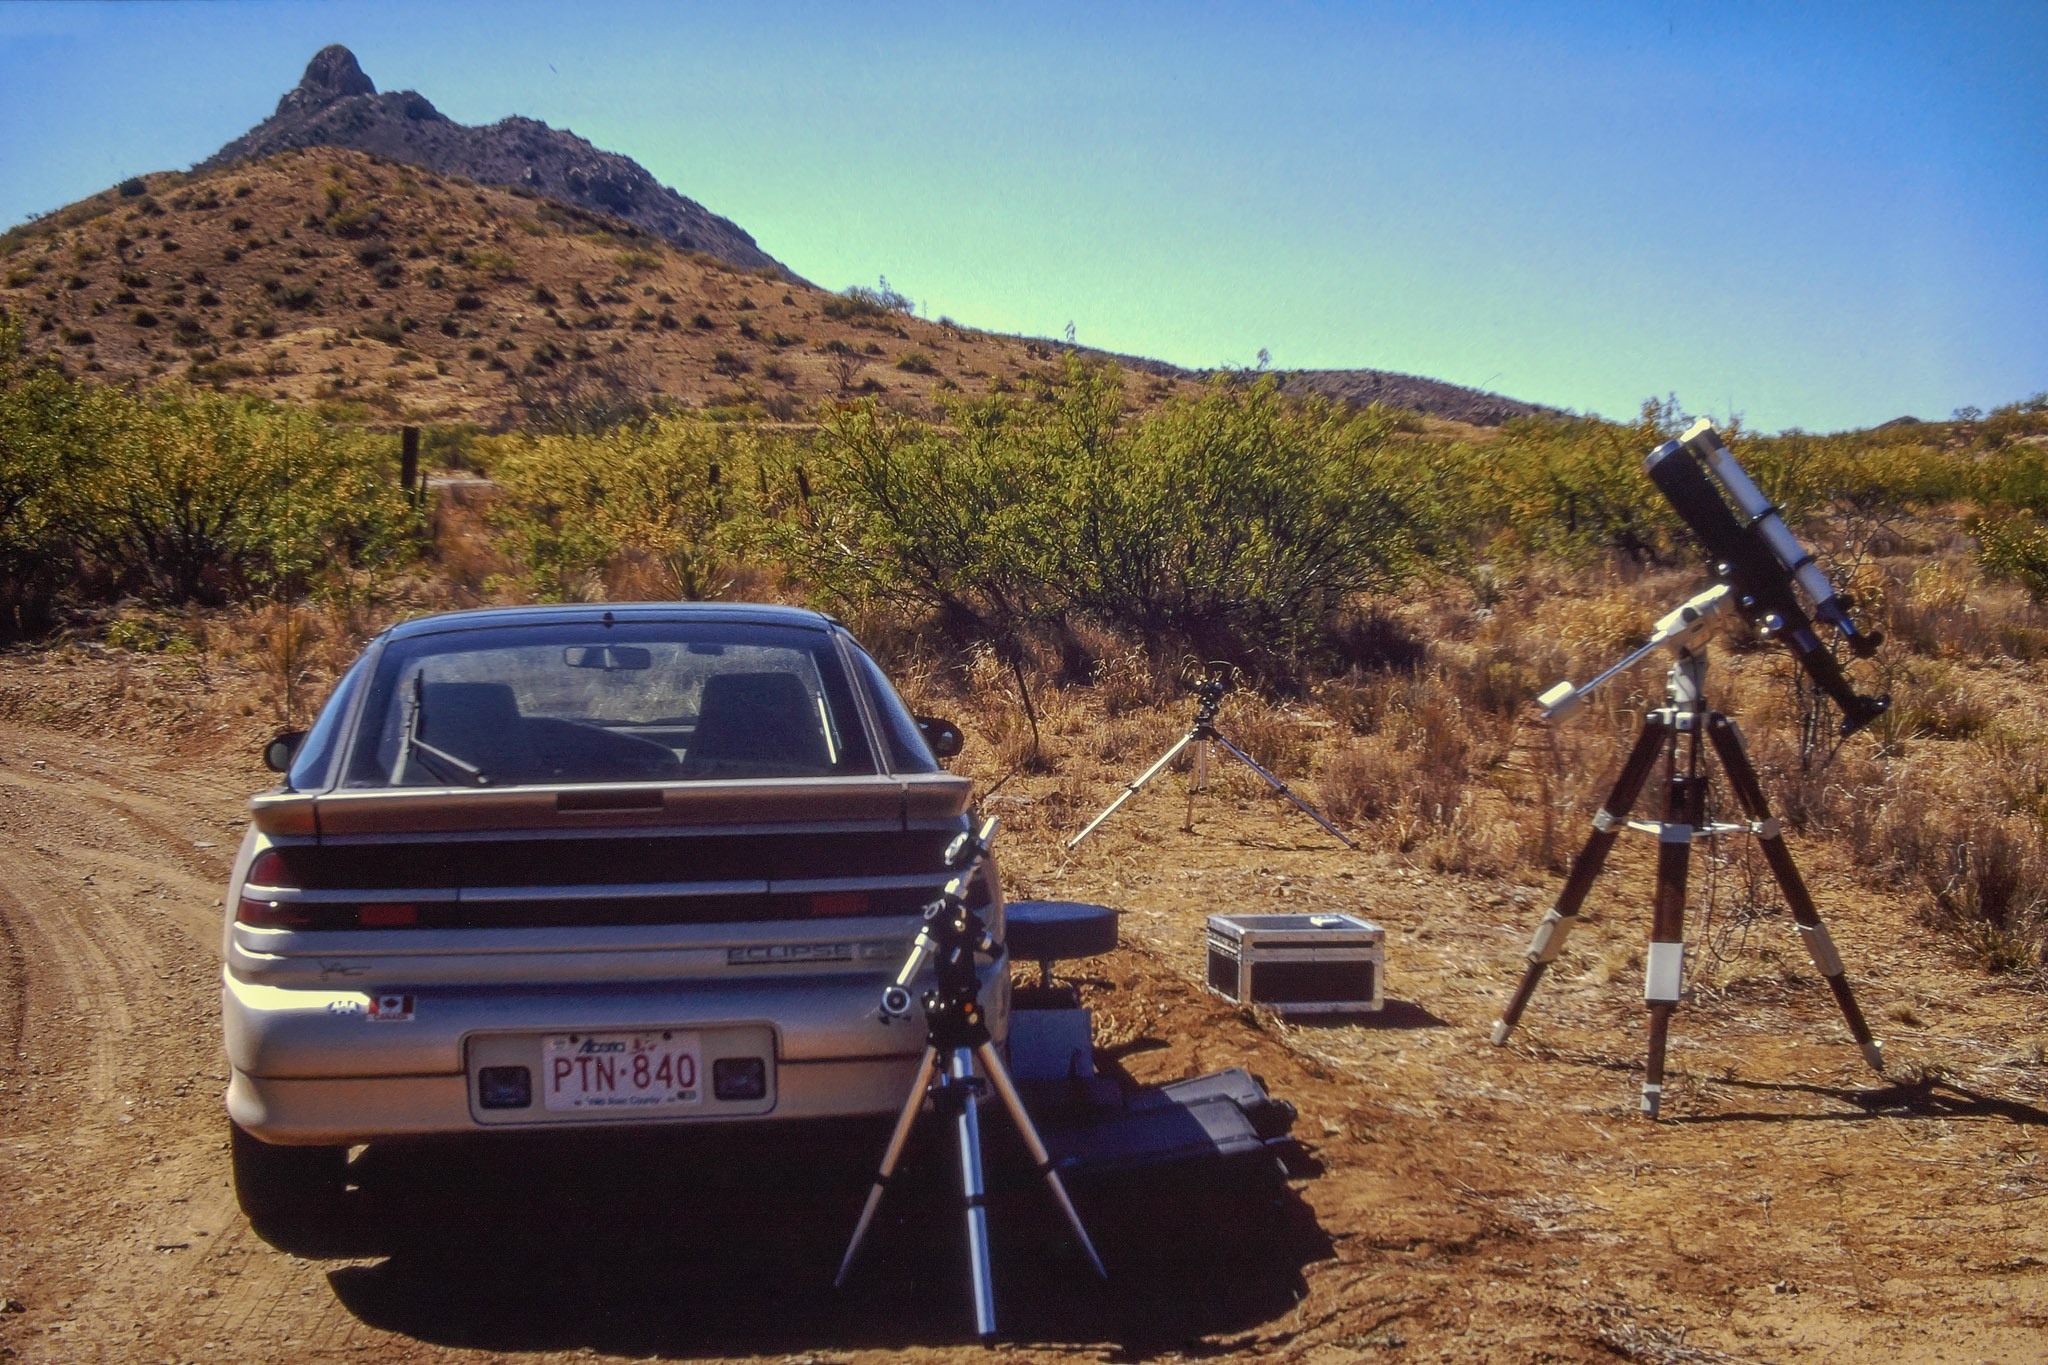
Prior to October 14, I had seen only one, on May 10, 1994, from southeast Arizona, an event I captured on film of course back then. 

A sunset annular on June 10, 2002 that I traveled to Puerto Vallarta, Mexico to see was mostly clouded out. The annular of May 20, 2012 traced a similar path across the U.S. Southwest as the 2023 eclipse. But work commitments at the science centre in Calgary kept me home for that one. A sunrise annular on June 10, 2021 in Northwestern Ontario was essentially out of reach due to COVID travel restrictions. 

With no other annular eclipses within easy reach in North America until 2039 and 2046, this was my next, and perhaps last, opportunity to see one, unless I chose to travel the world. 

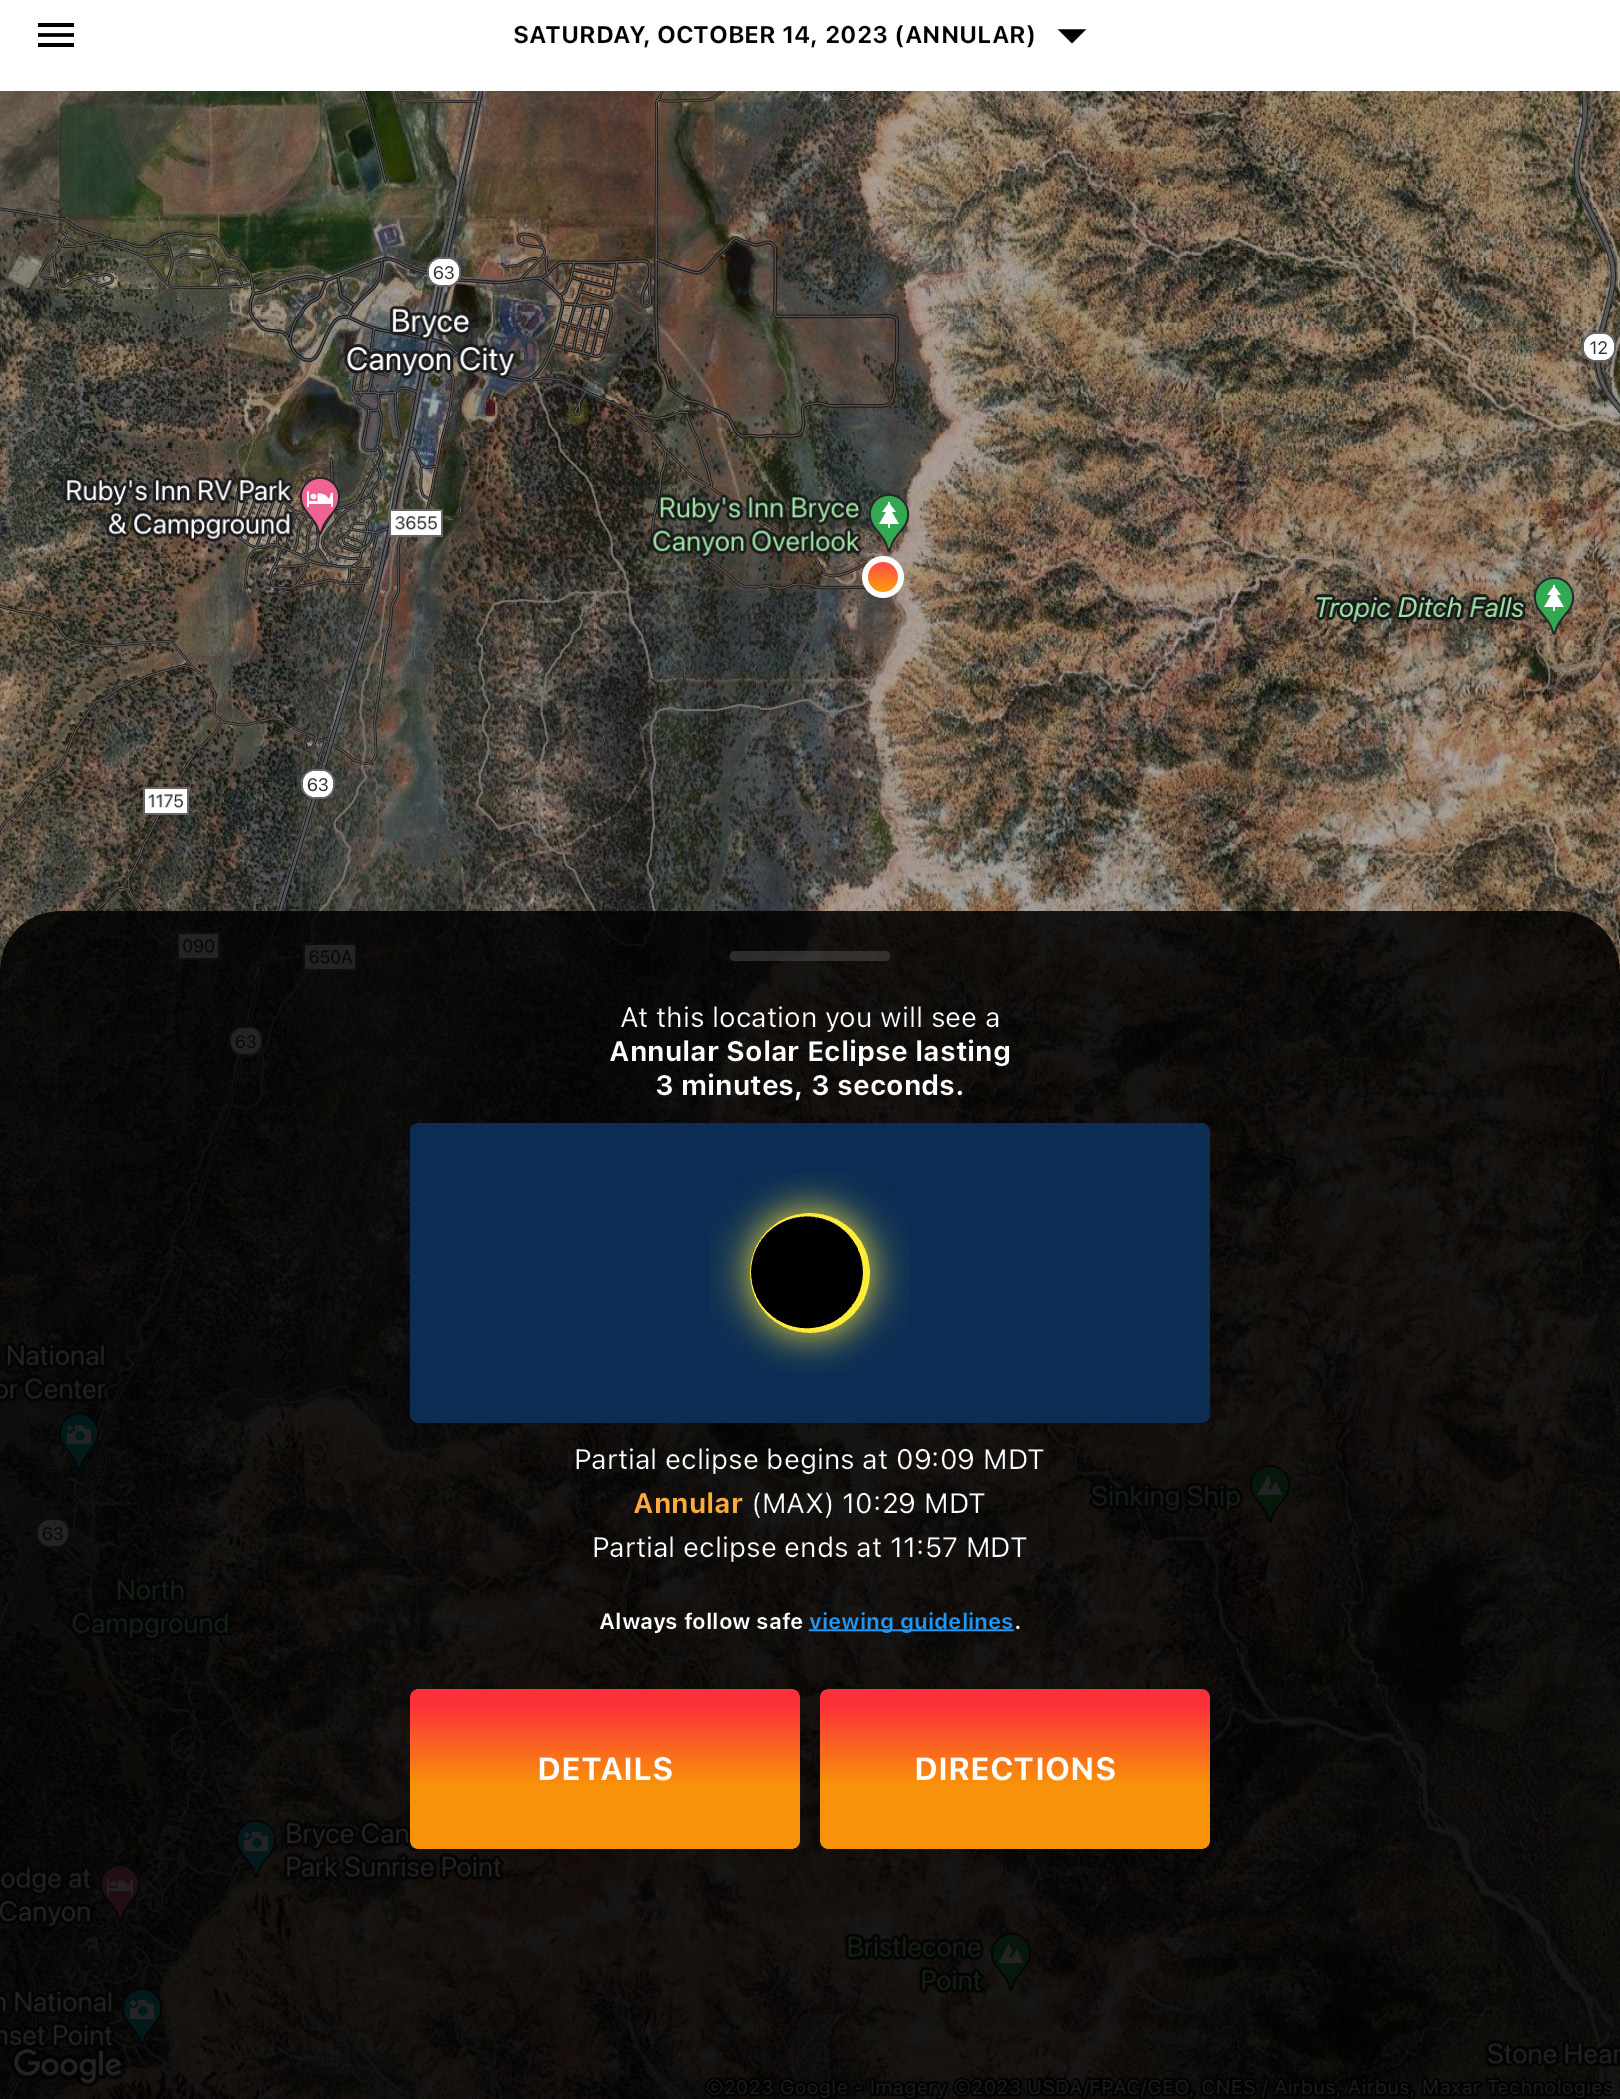
I had planned for several months to watch the annular eclipse from southern Utah, ideally from Bryce Canyon National Park, shown above. (Clicking on the images brings them up full screen.) I booked accommodations in January 2023, finding even then that popular hotels in the area were already sold out. 

The final spot for the wide-angle composite shown below. The camera had to be next to that very fence post to frame the scene well.

The attraction was the landscape below the morning Sun, for a planned composite image of the eclipse over the hoodoos of Bryce. However, I had learned weeks earlier that traffic was going to be restricted to just park shuttle buses on eclipse day. Should Plan A not work out then Plan B was Kodachrome Basin, a state park nearby, which a park employee assured me would be open to cars well before sunrise on eclipse day. 

Seen on I-15 past Salt Lake City. Eclipse ahead!

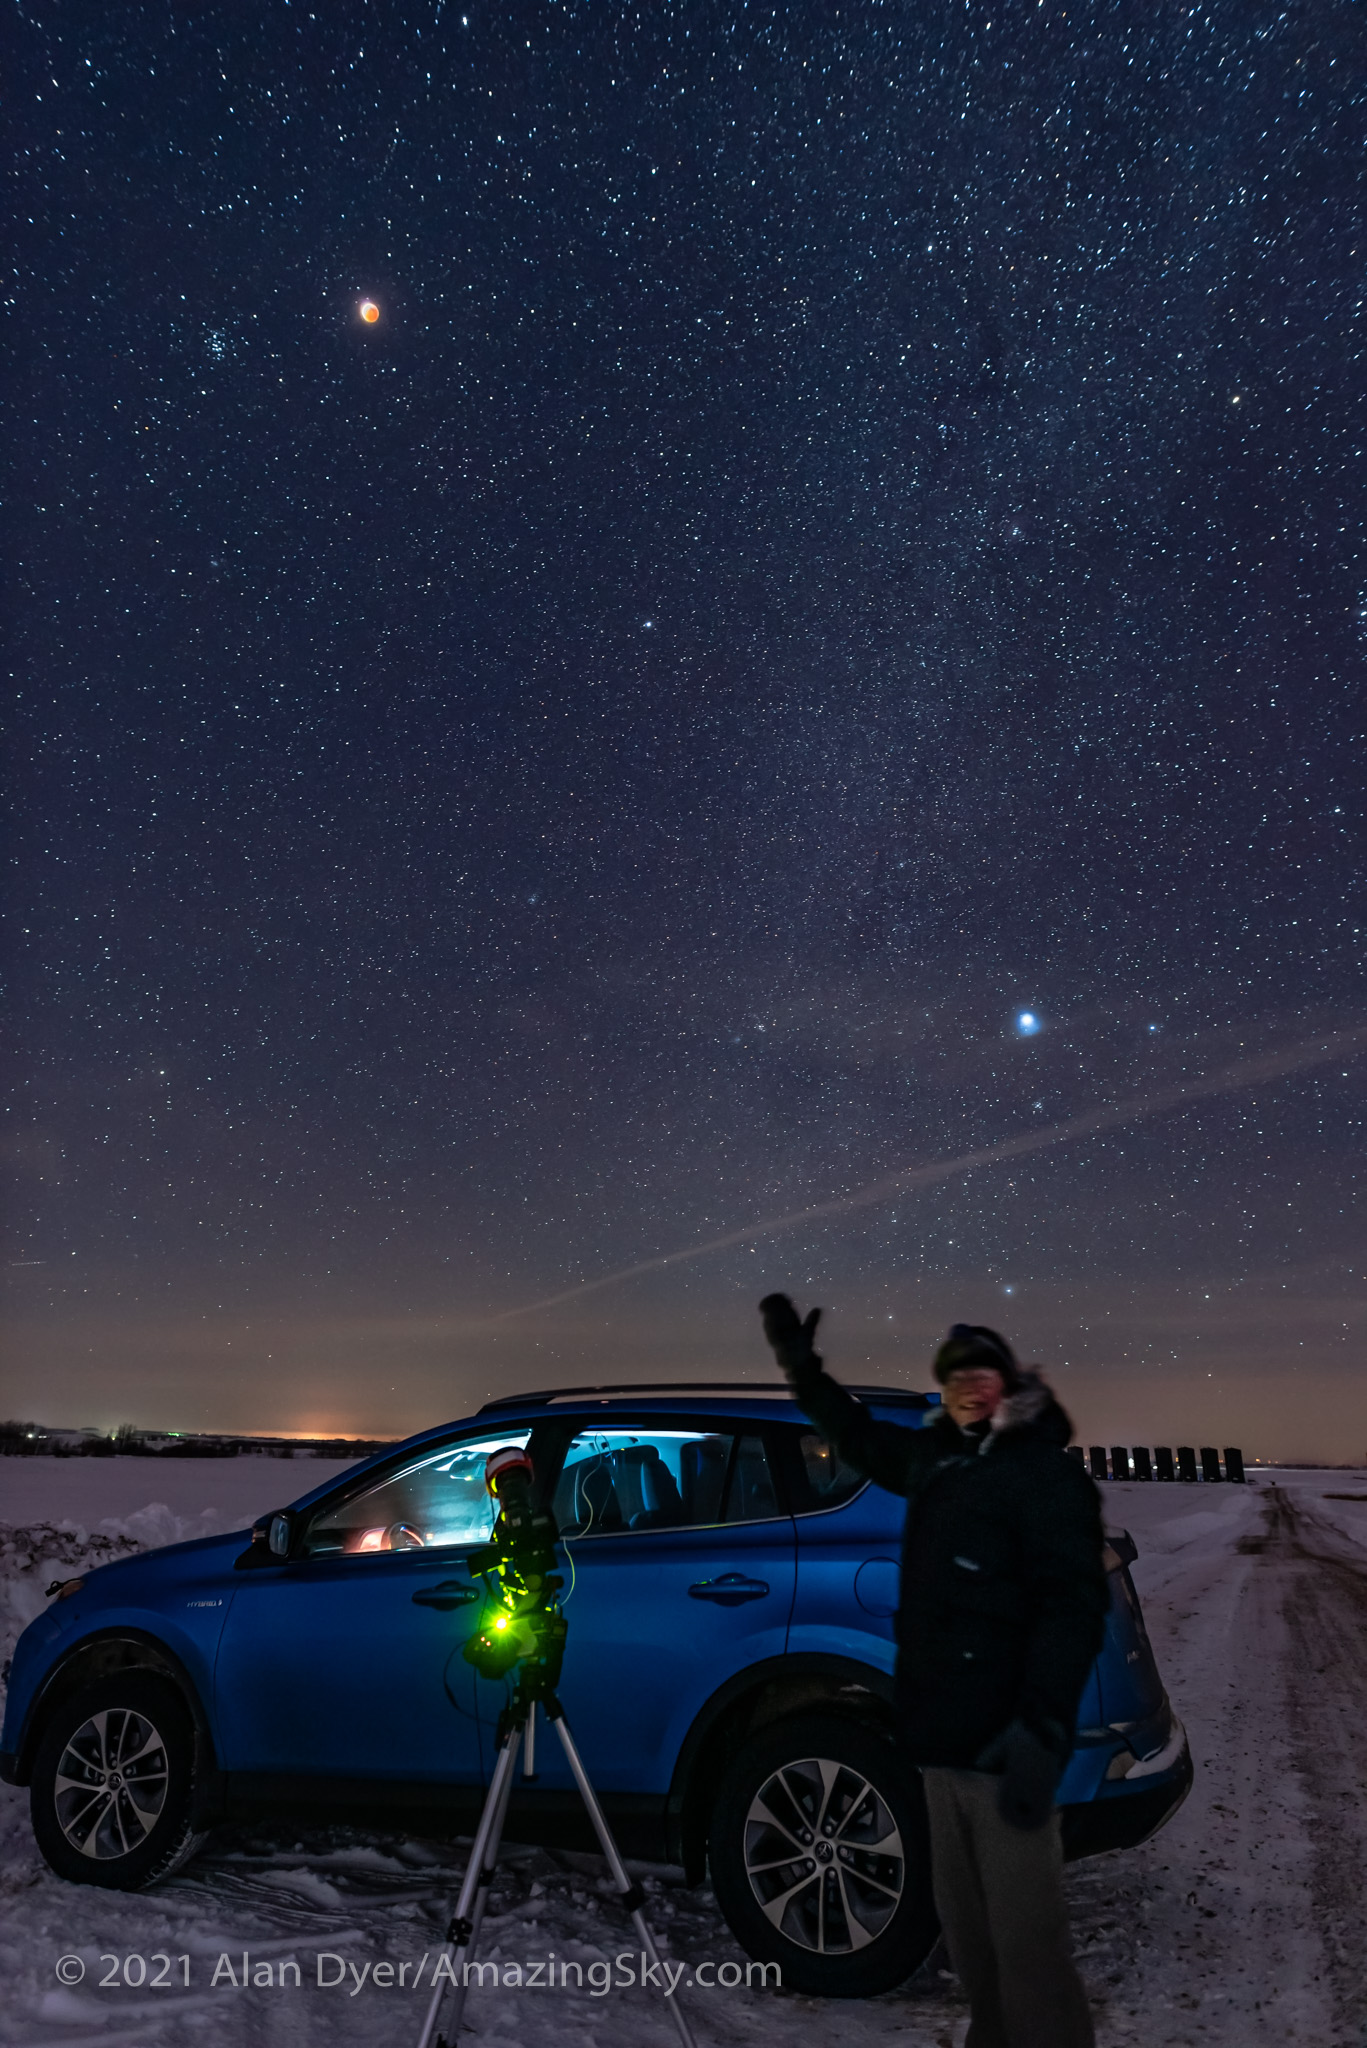
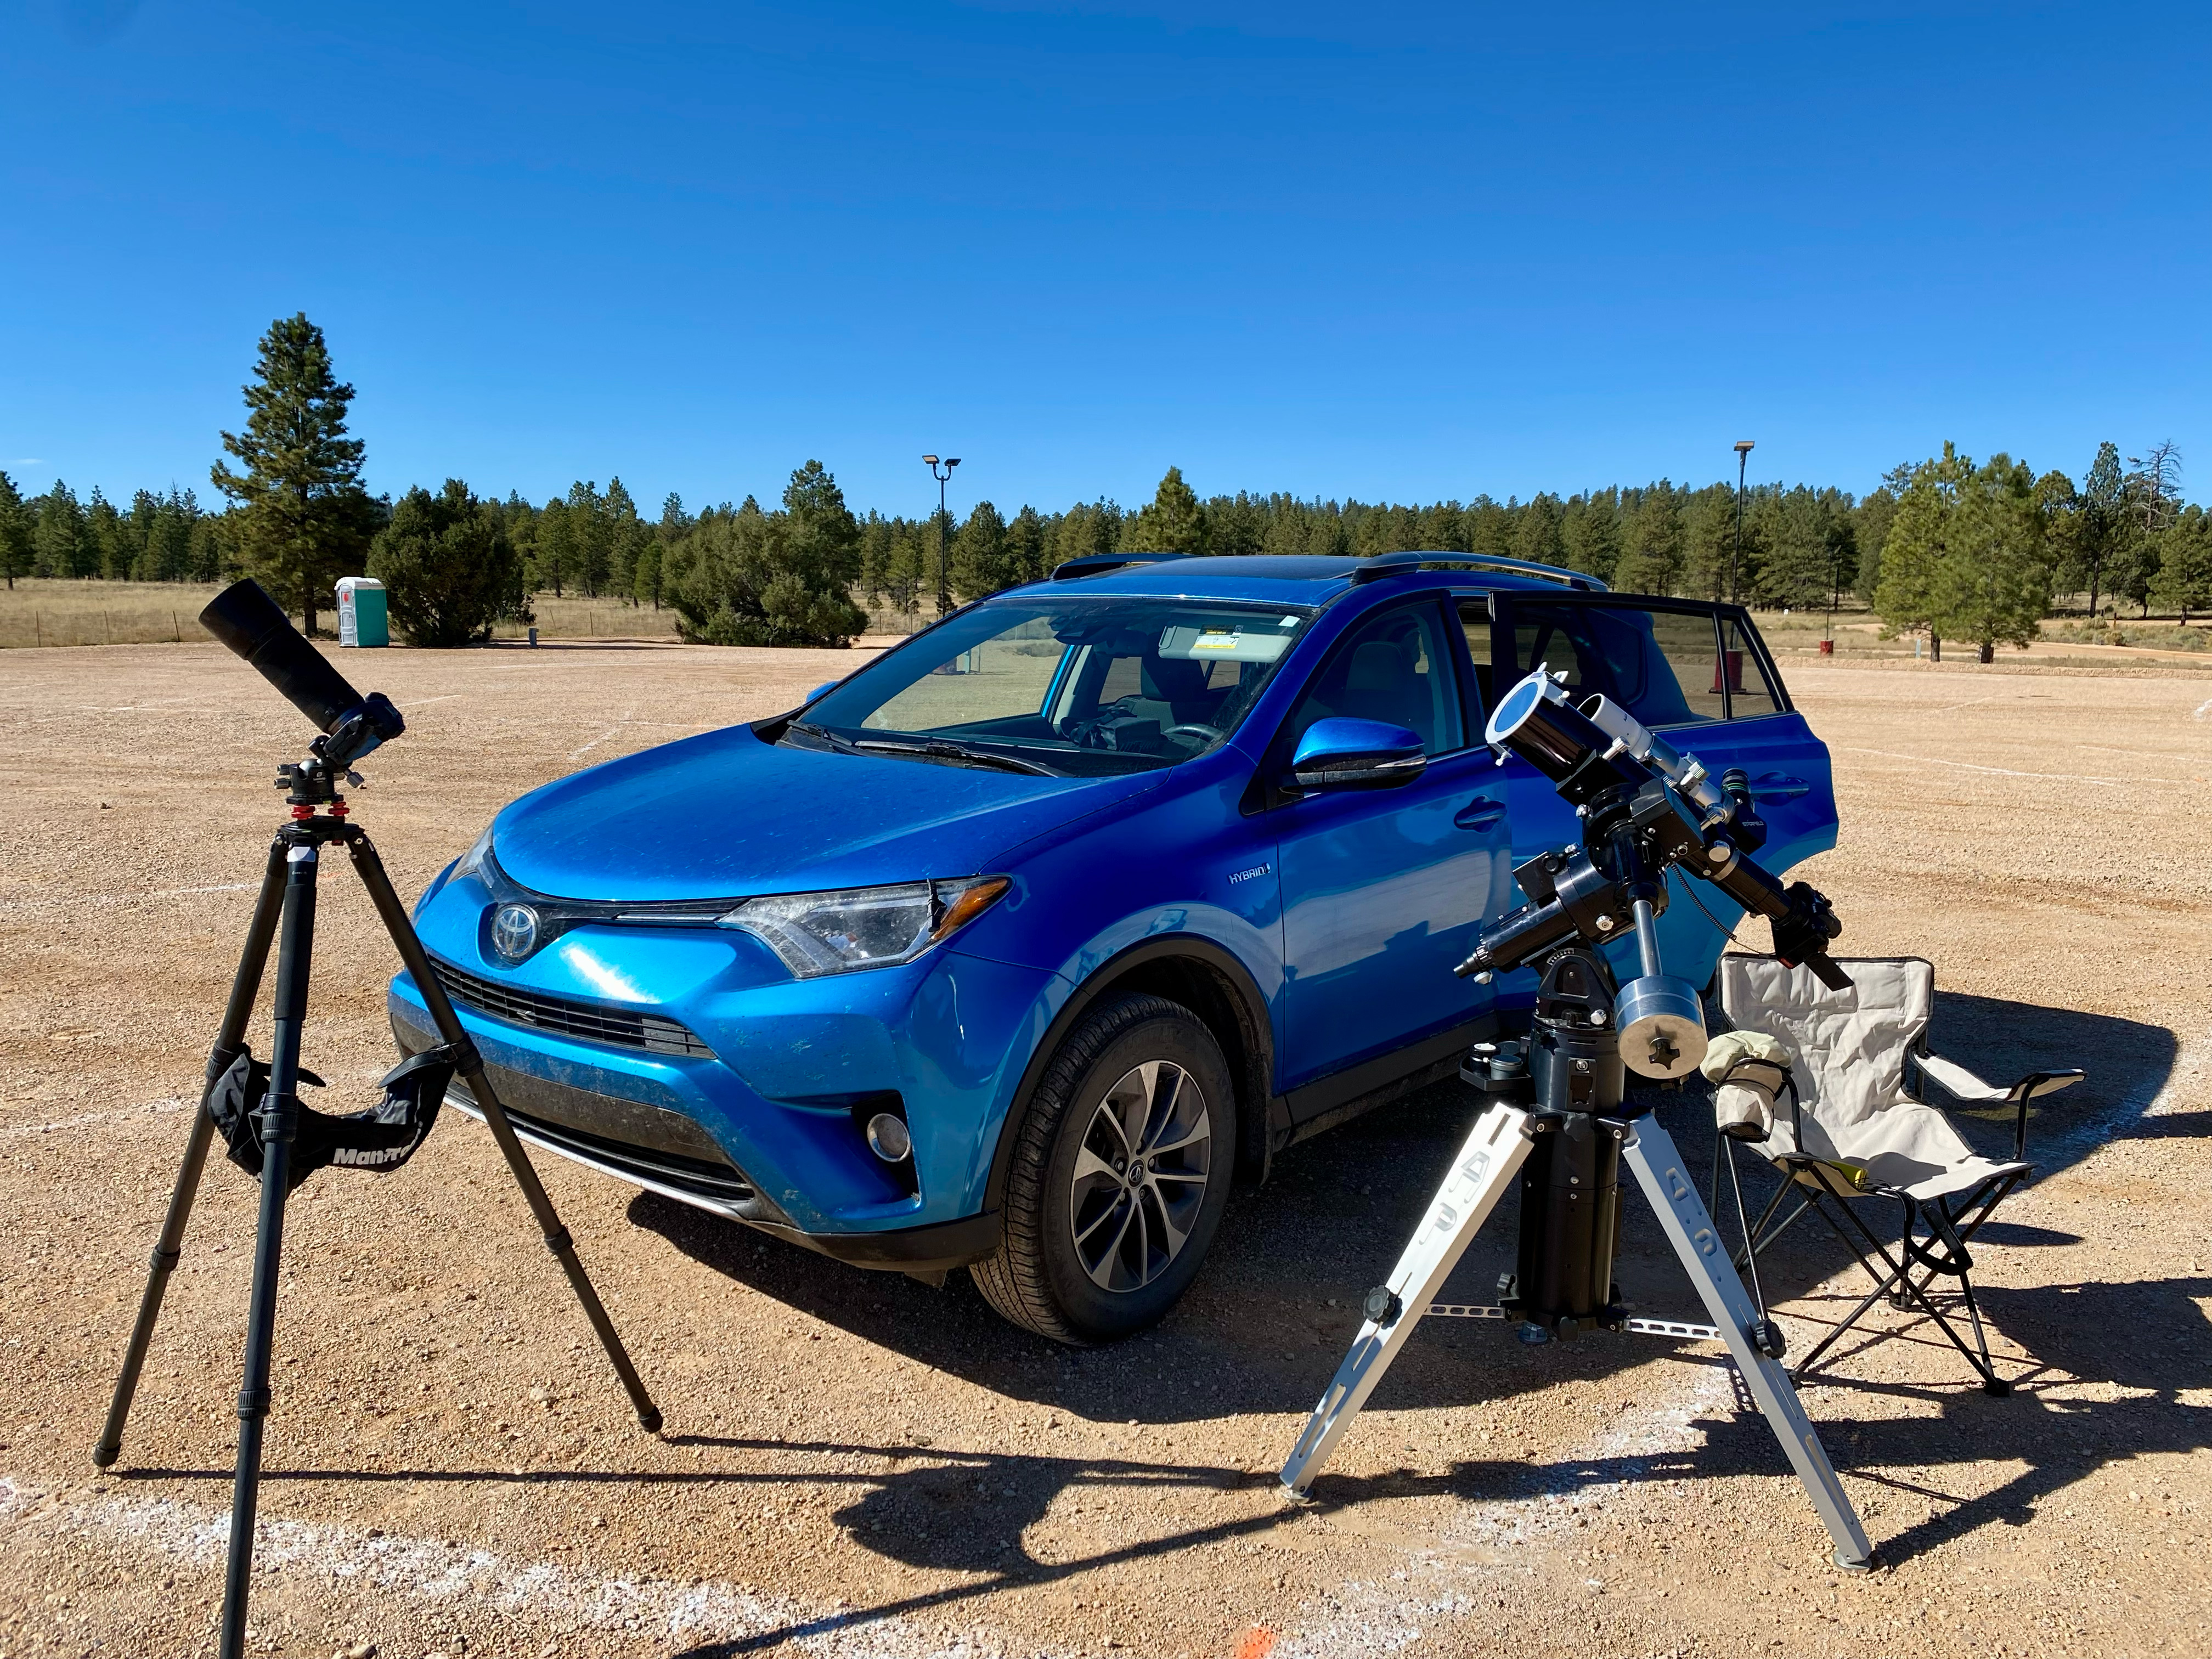
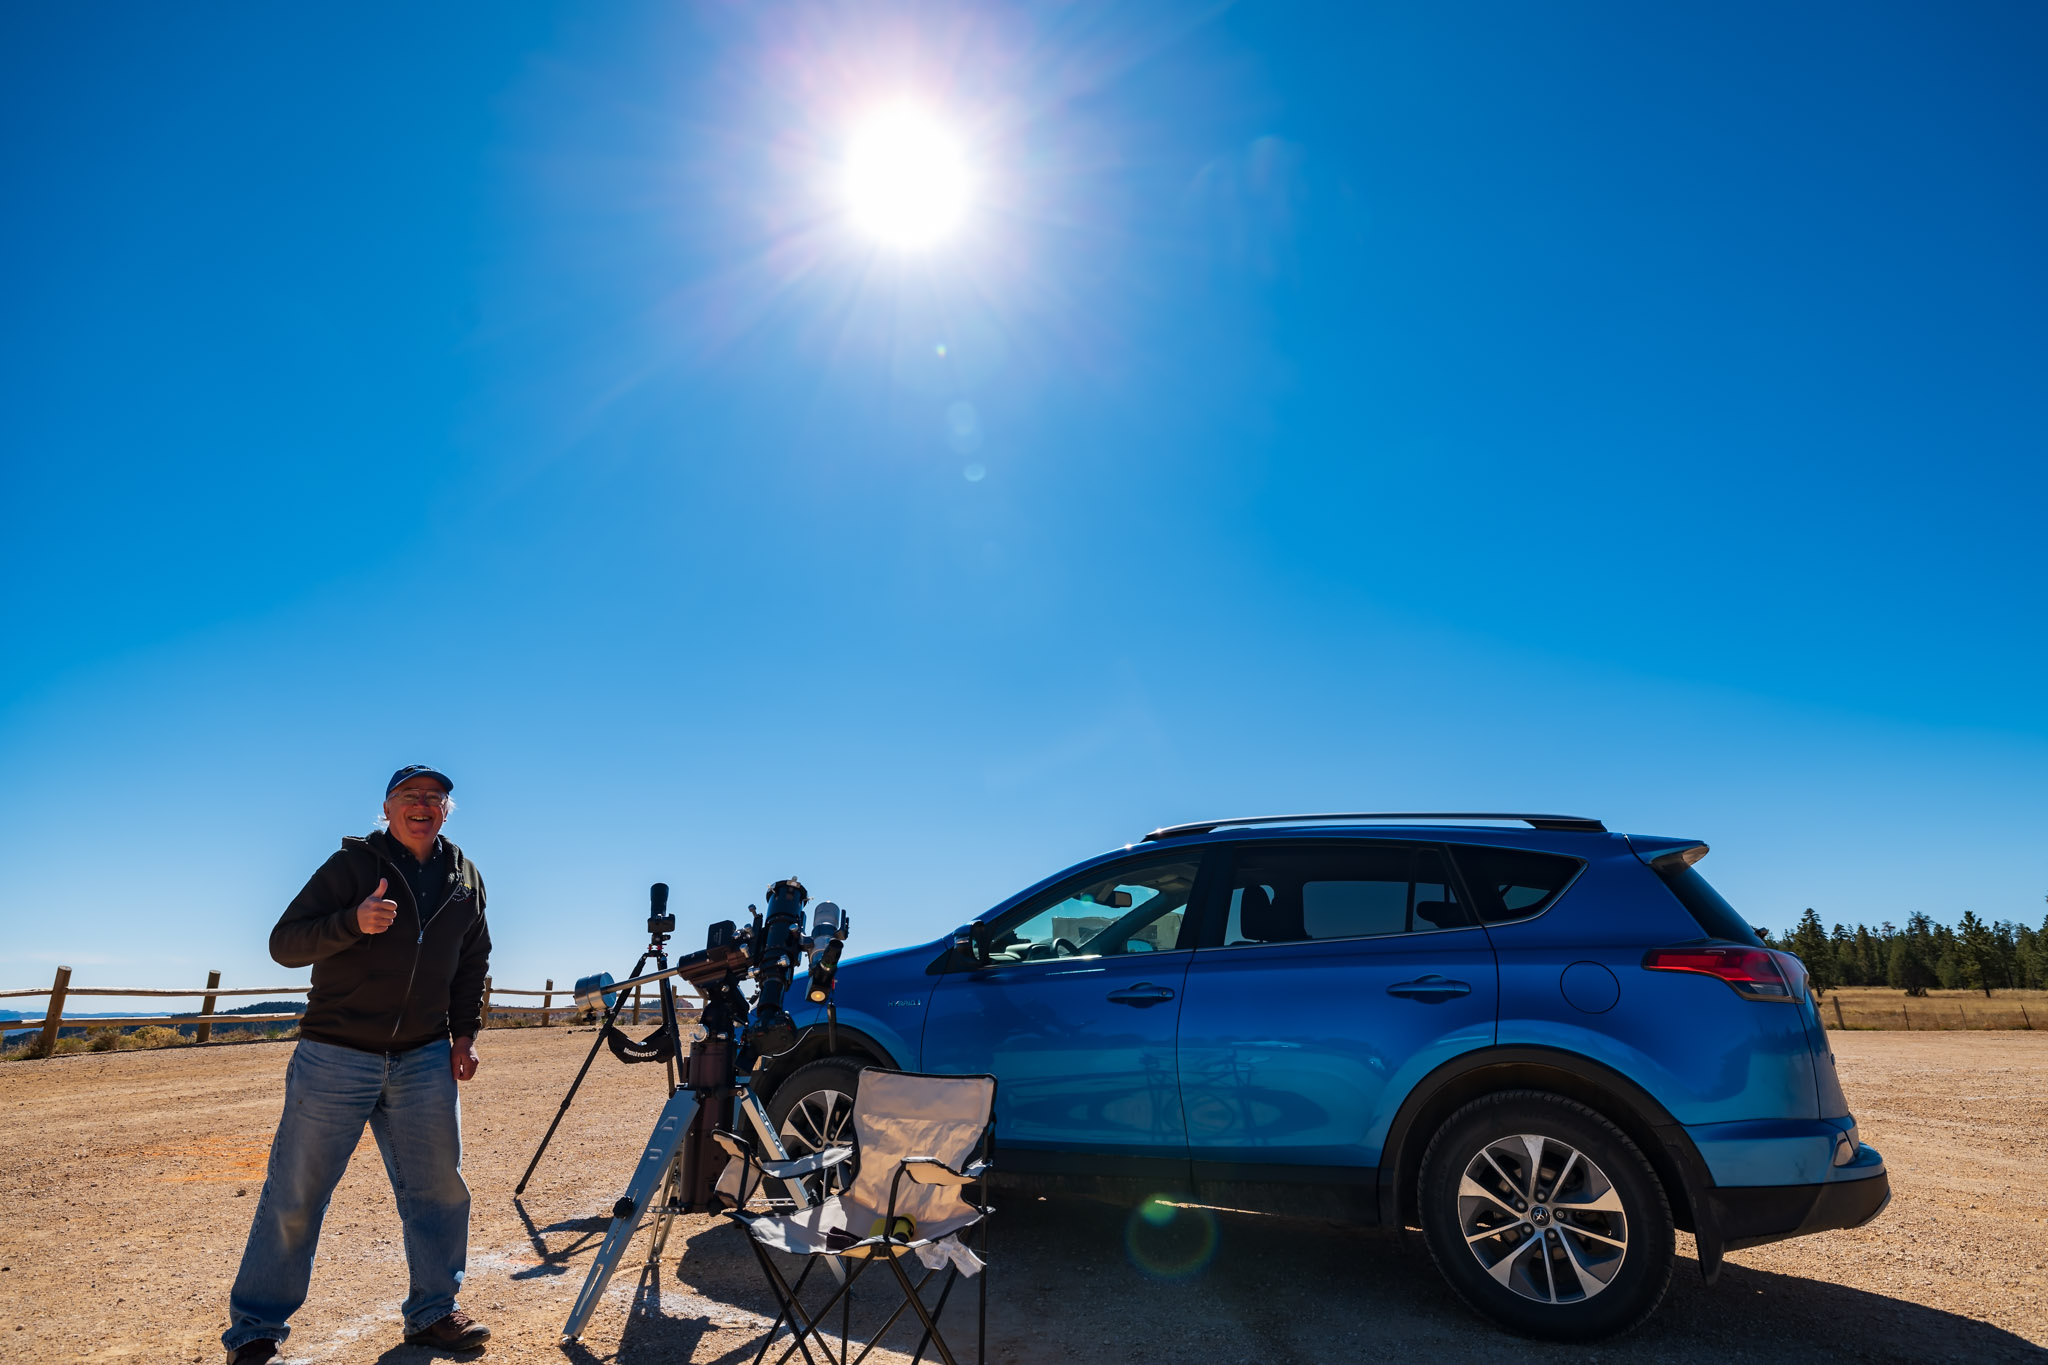
So I made my plans to drive south, taking with me a carload of telescope and camera gear, an array I would never be able to take to an overseas eclipse. The centrepiece was my venerable Astro-Physics Traveler 105mm (4-inch) refractor, a telescope created for the 1991 total eclipse in Mexico. Since I bought mine in 1992 I’ve used it for five central solar eclipses, including now two annulars. It’s in the 1994 and 2023 site images above.

As per the instructions in my eclipse ebook, I practiced with the gear in the summer of 2023, documented here on my previous blog.

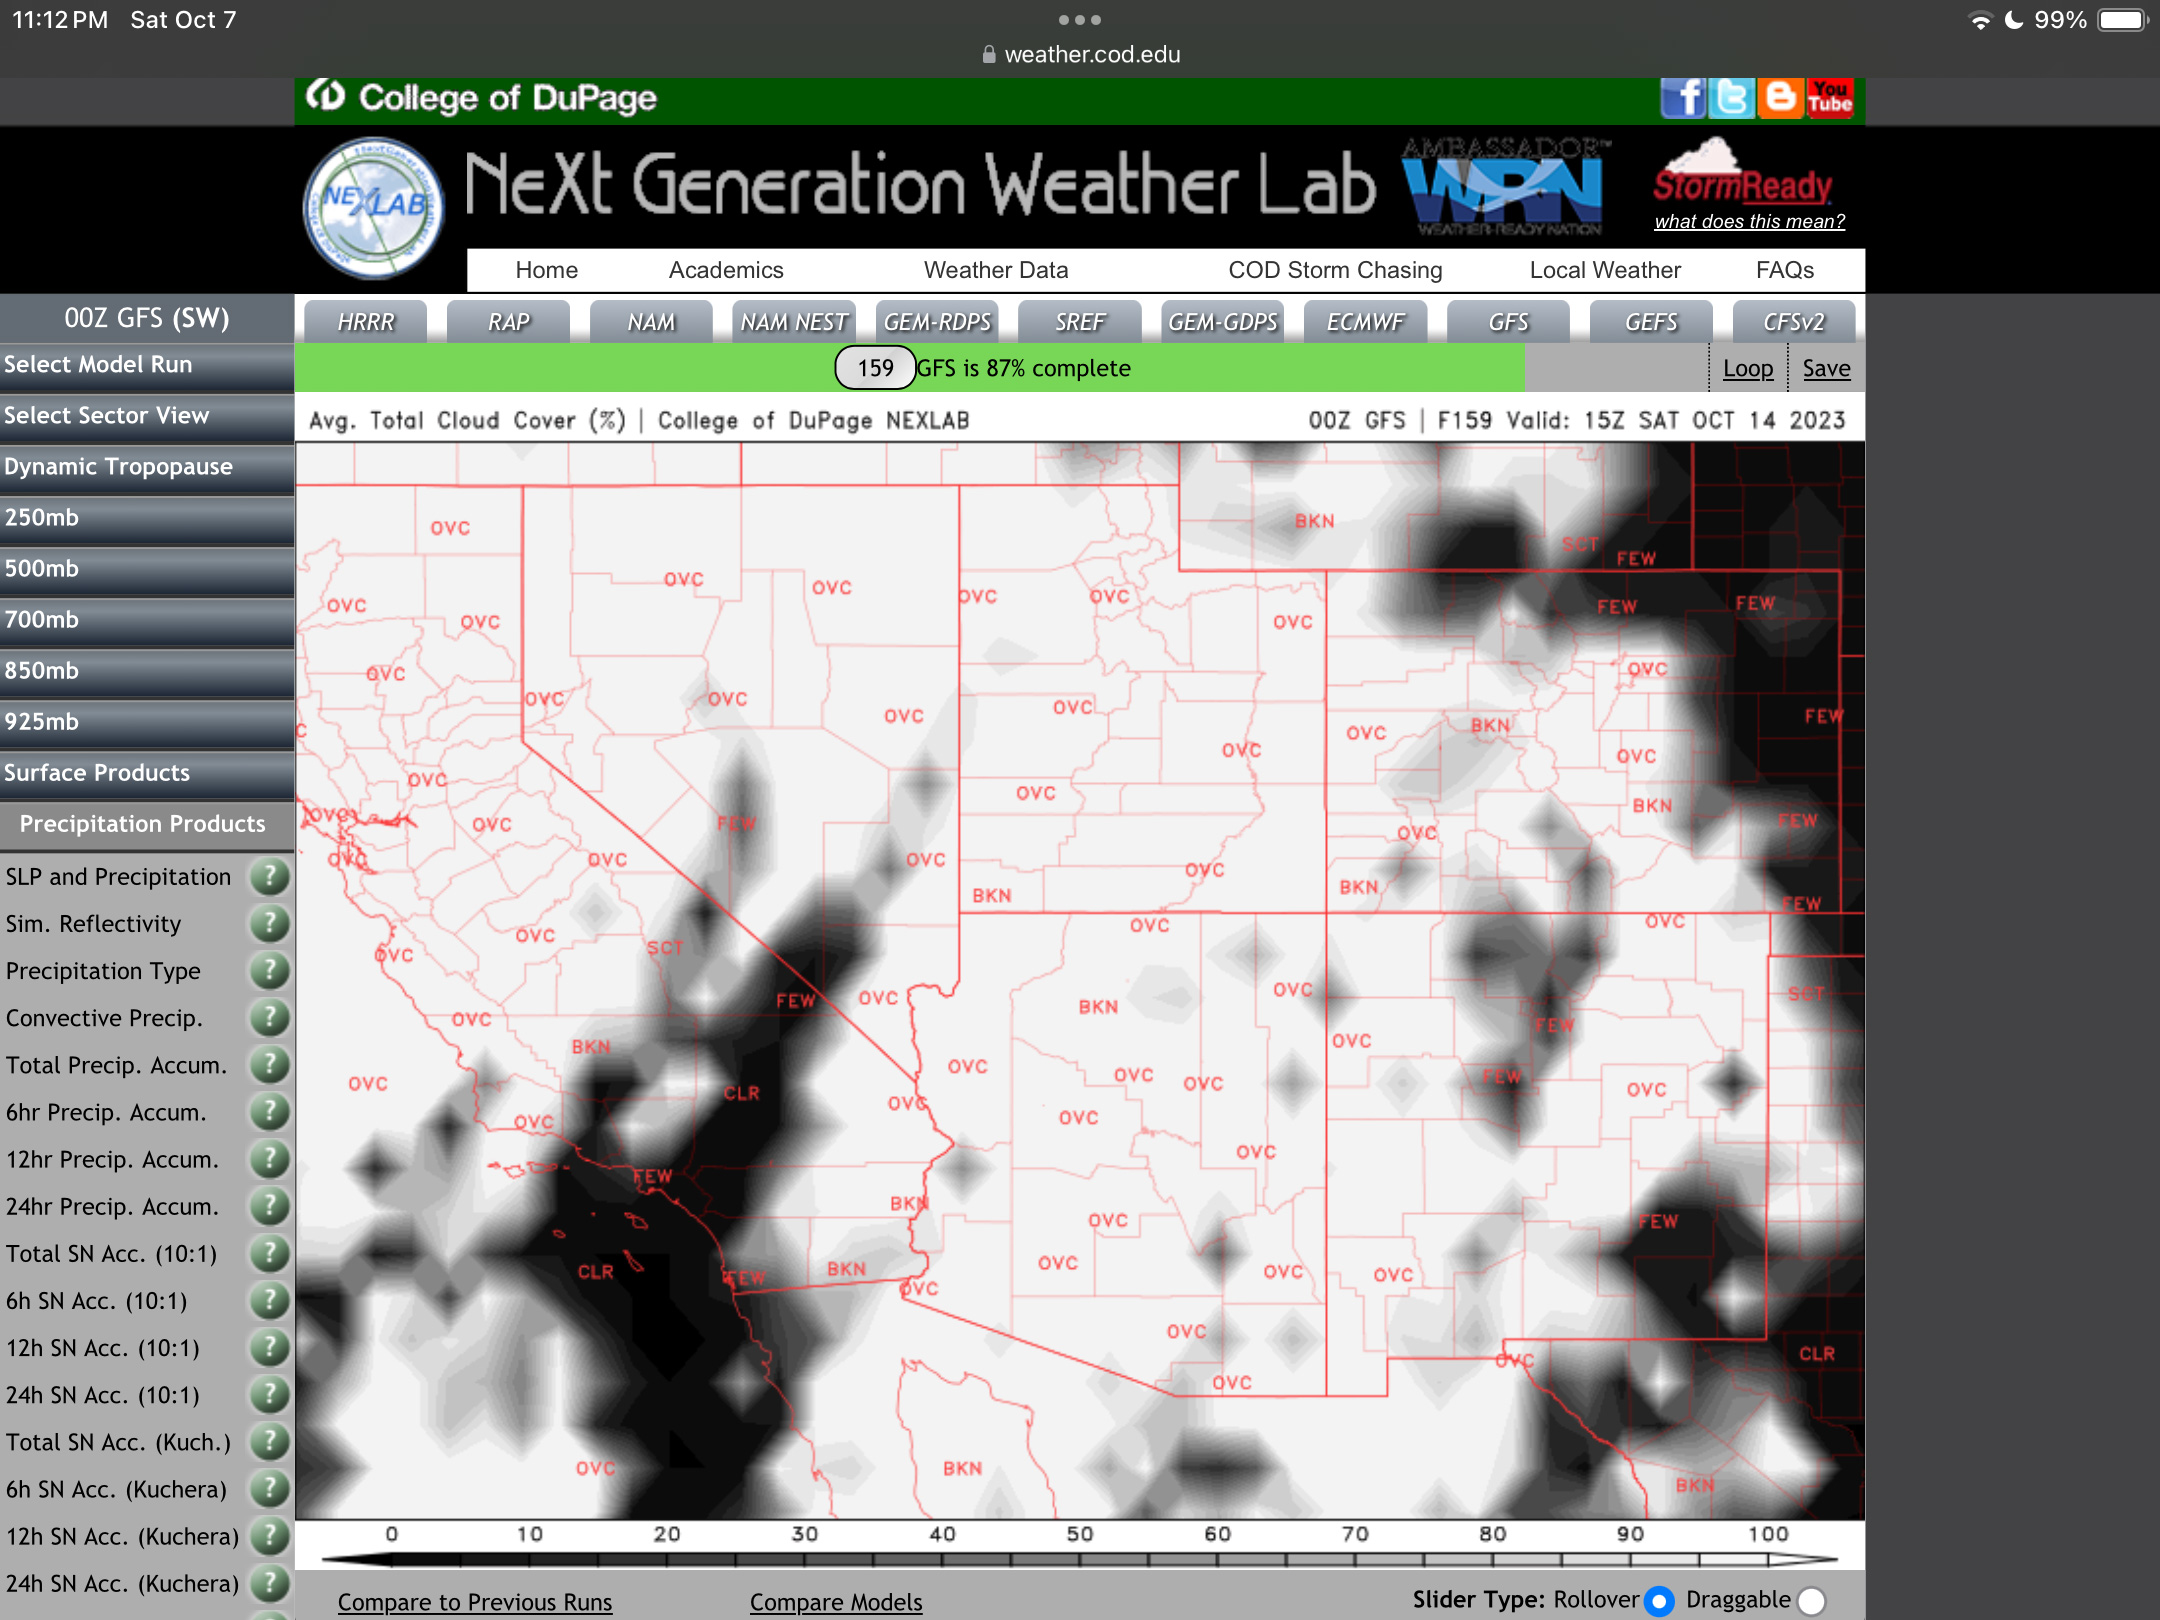
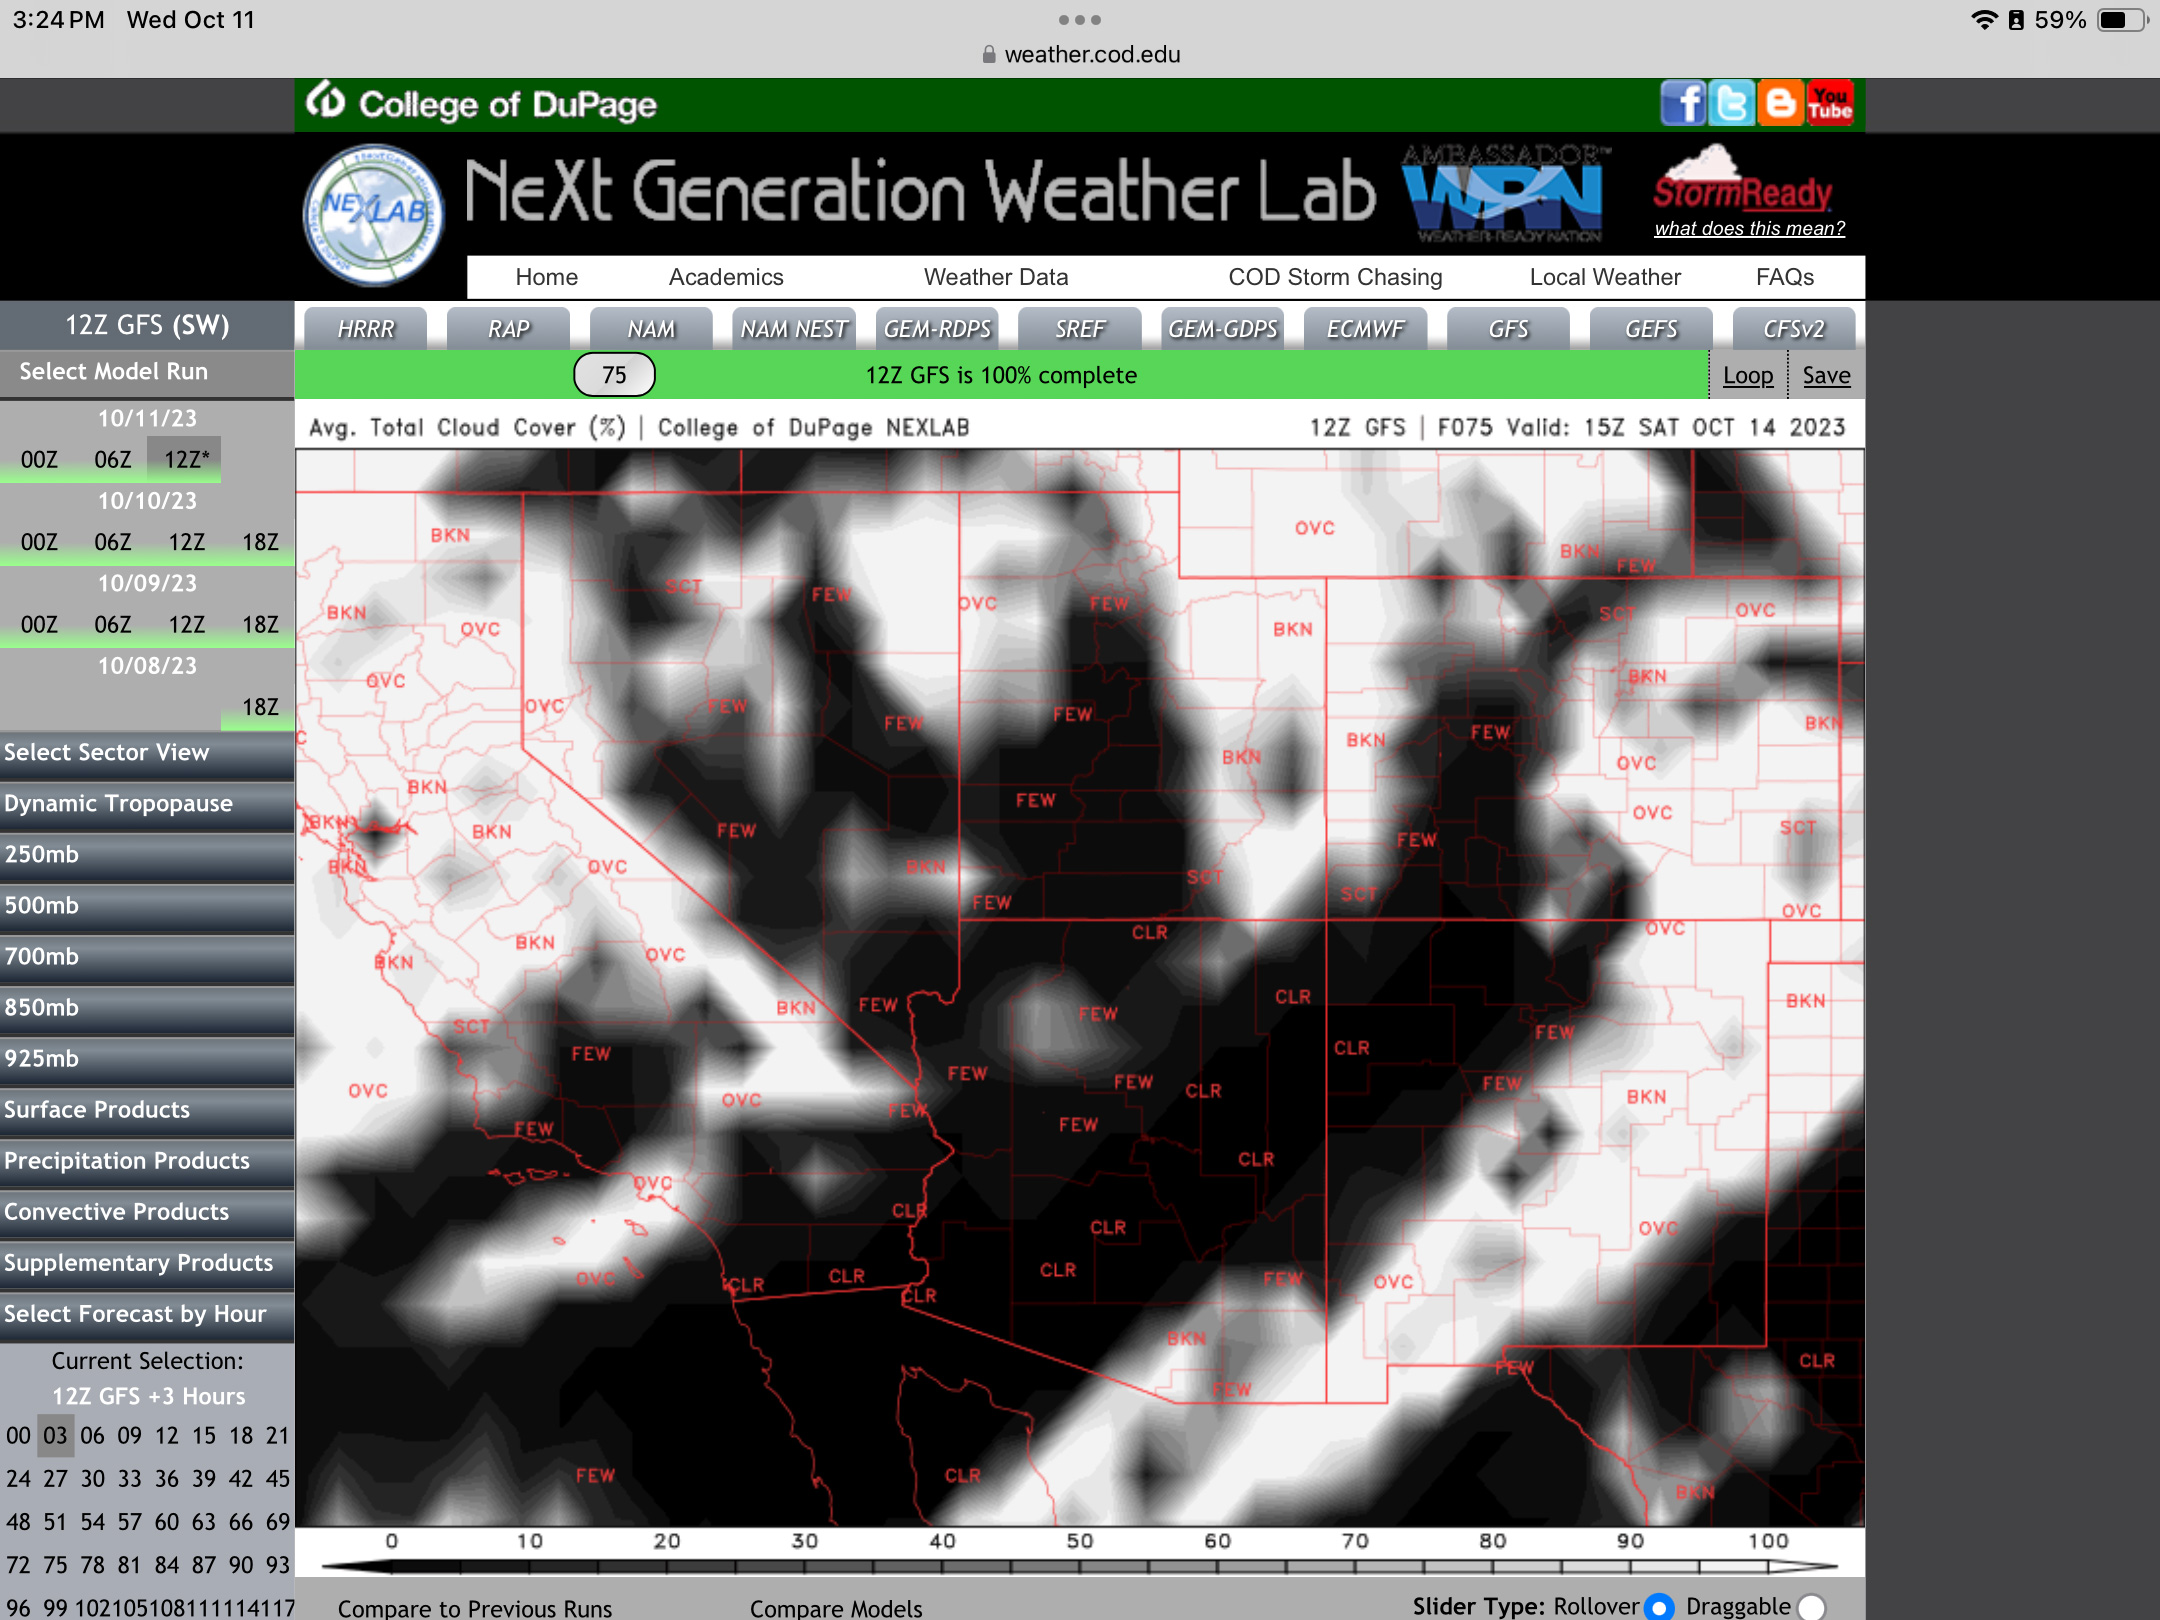
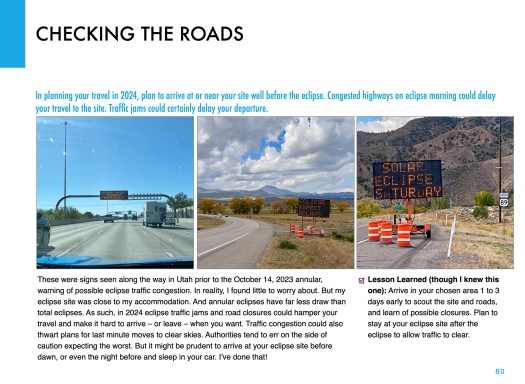
A week before the eclipse (as above at left), the weather prospects for the entire southwest looked poor. It was to be clouds everywhere. I even considered Plan S – Stay Home! And watch the 60% partial eclipse from Alberta where skies were to be clear. 

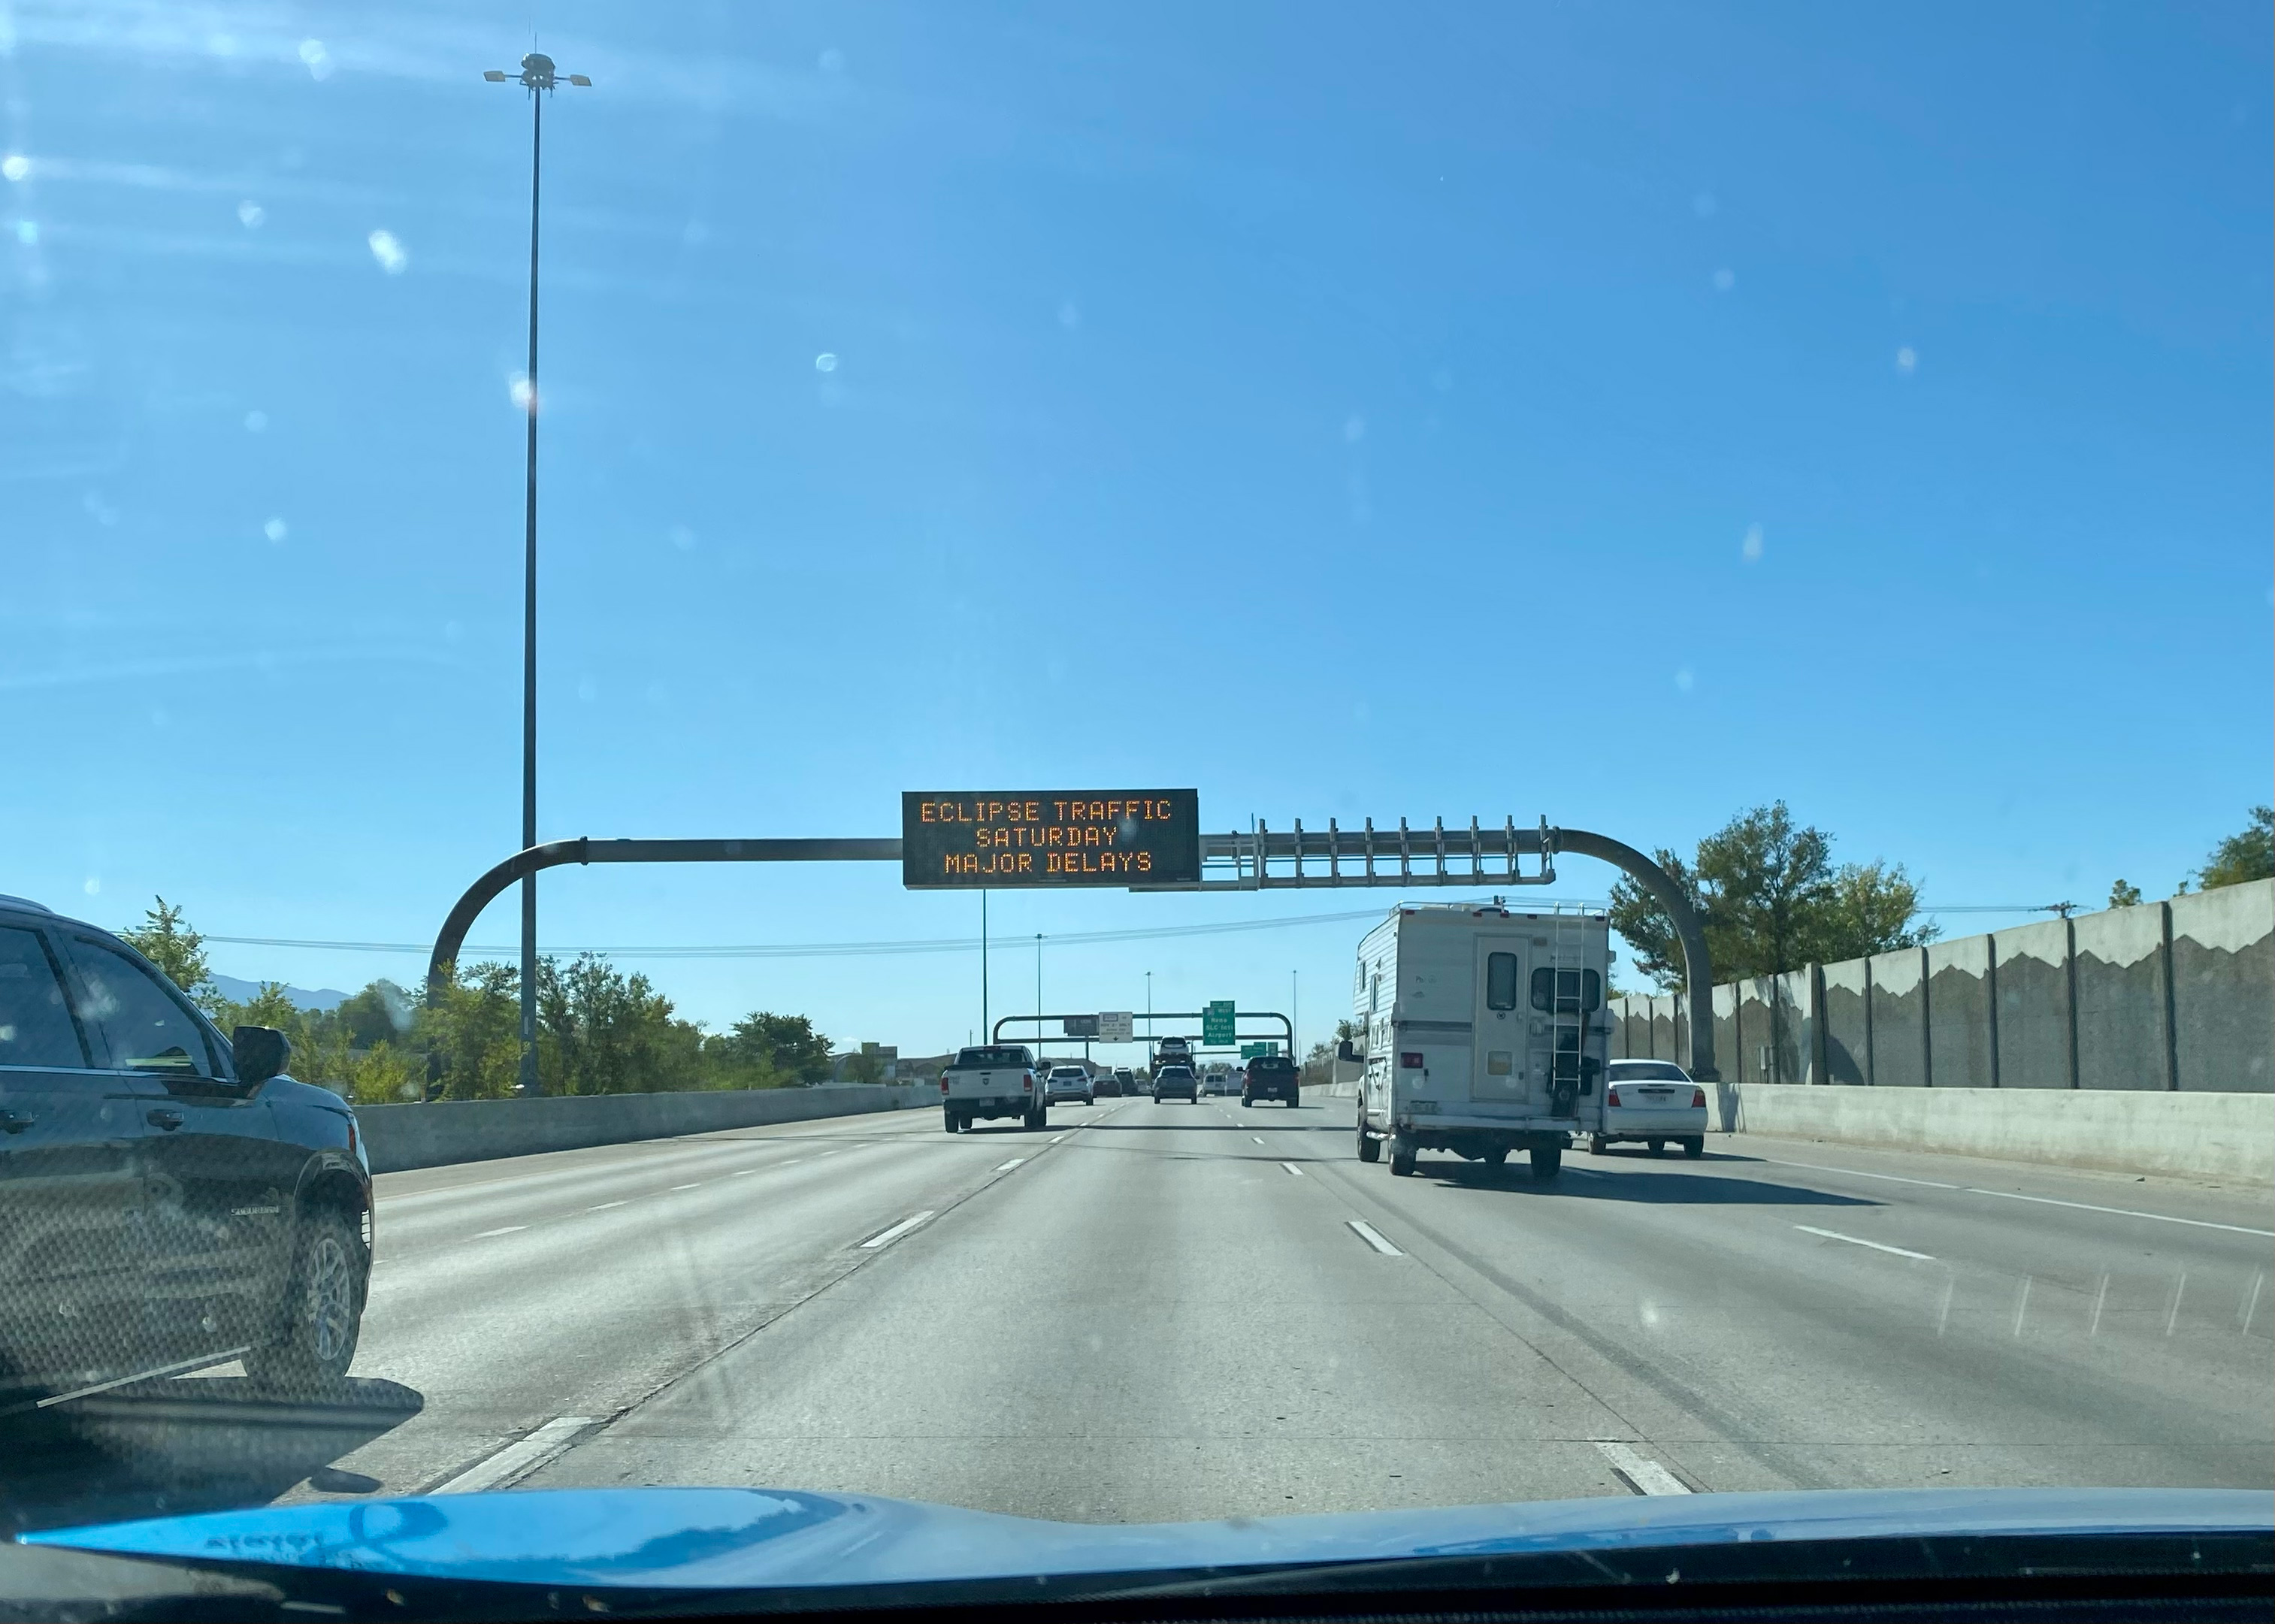
But undaunted, six days before the eclipse, I headed south on Interstate 15, checking the weather each day, and seeking out Plan C sites in New Mexico or Texas south of the projected mass of clouds. I checked where accommodation could be had at the last minute. 

At my stop in Richfield, Utah, four days before the eclipse, I had a crossroads turning point: either continue south to Bryce down US-89 (above), or head east on I-70, then south into New Mexico or Texas, with enough time to get there if needed. 

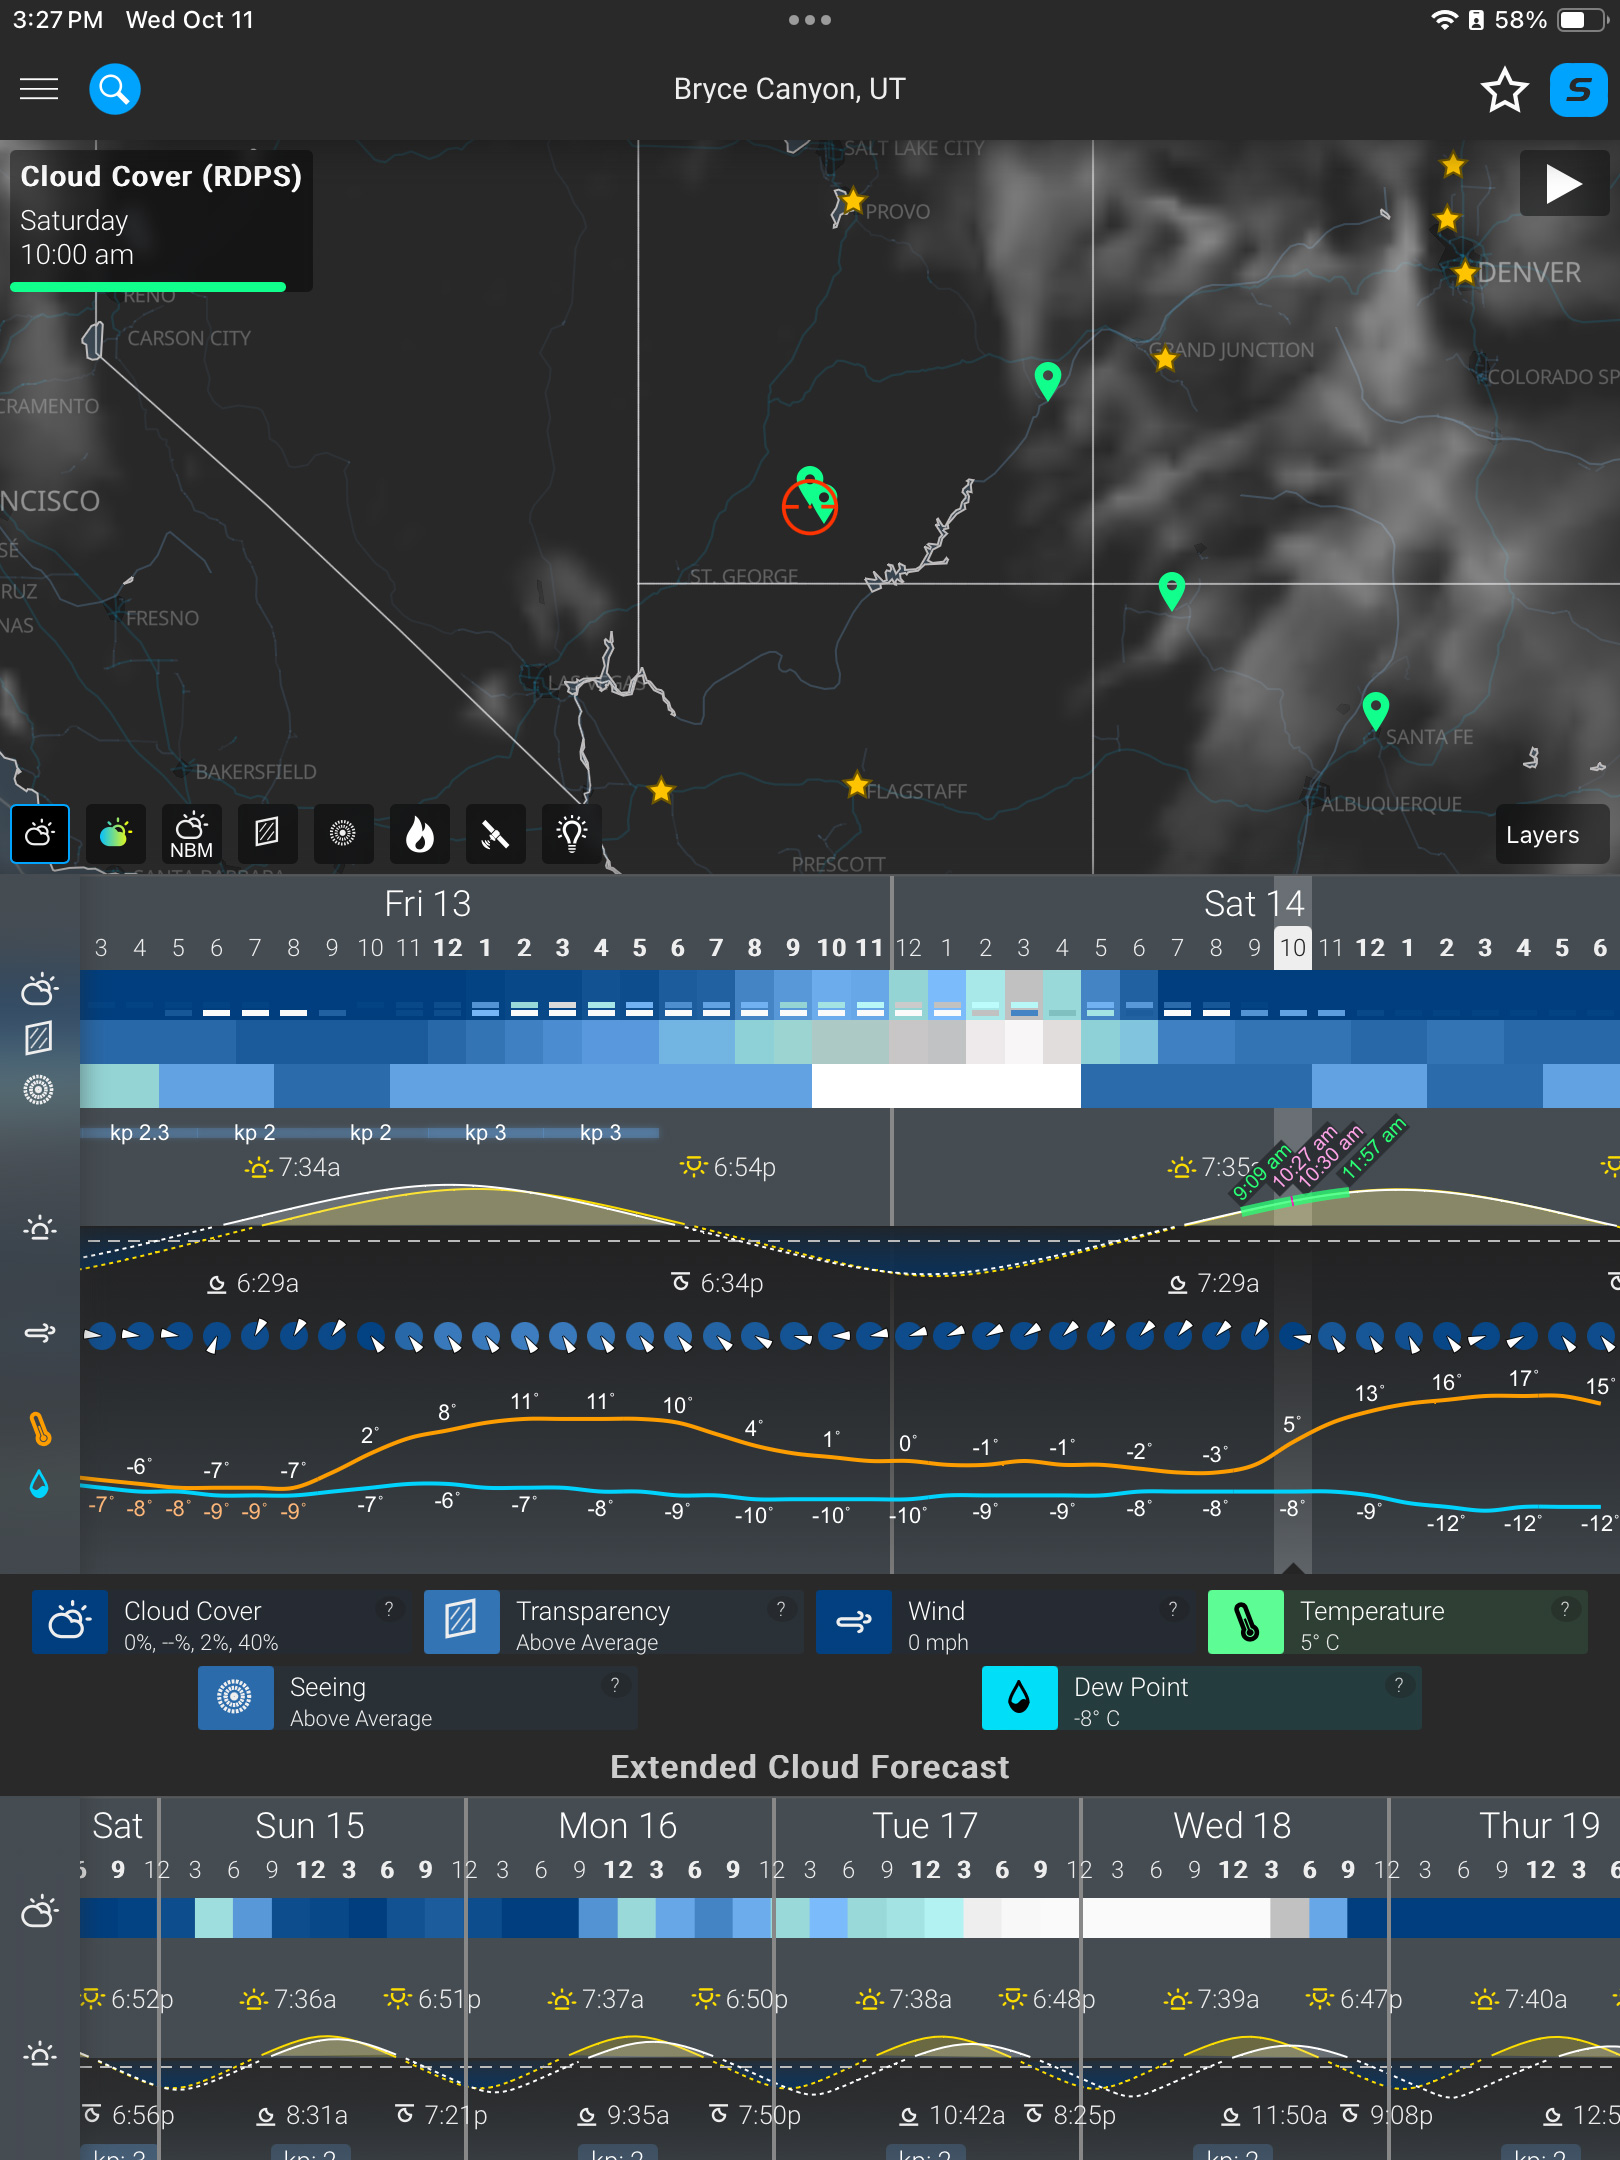
But by now the weather prospects were turning around. By three days out, and with the forecasts now much more reliable, it looked like southern Utah would be in the clear. I continued with my original plan to Bryce. But where exactly?

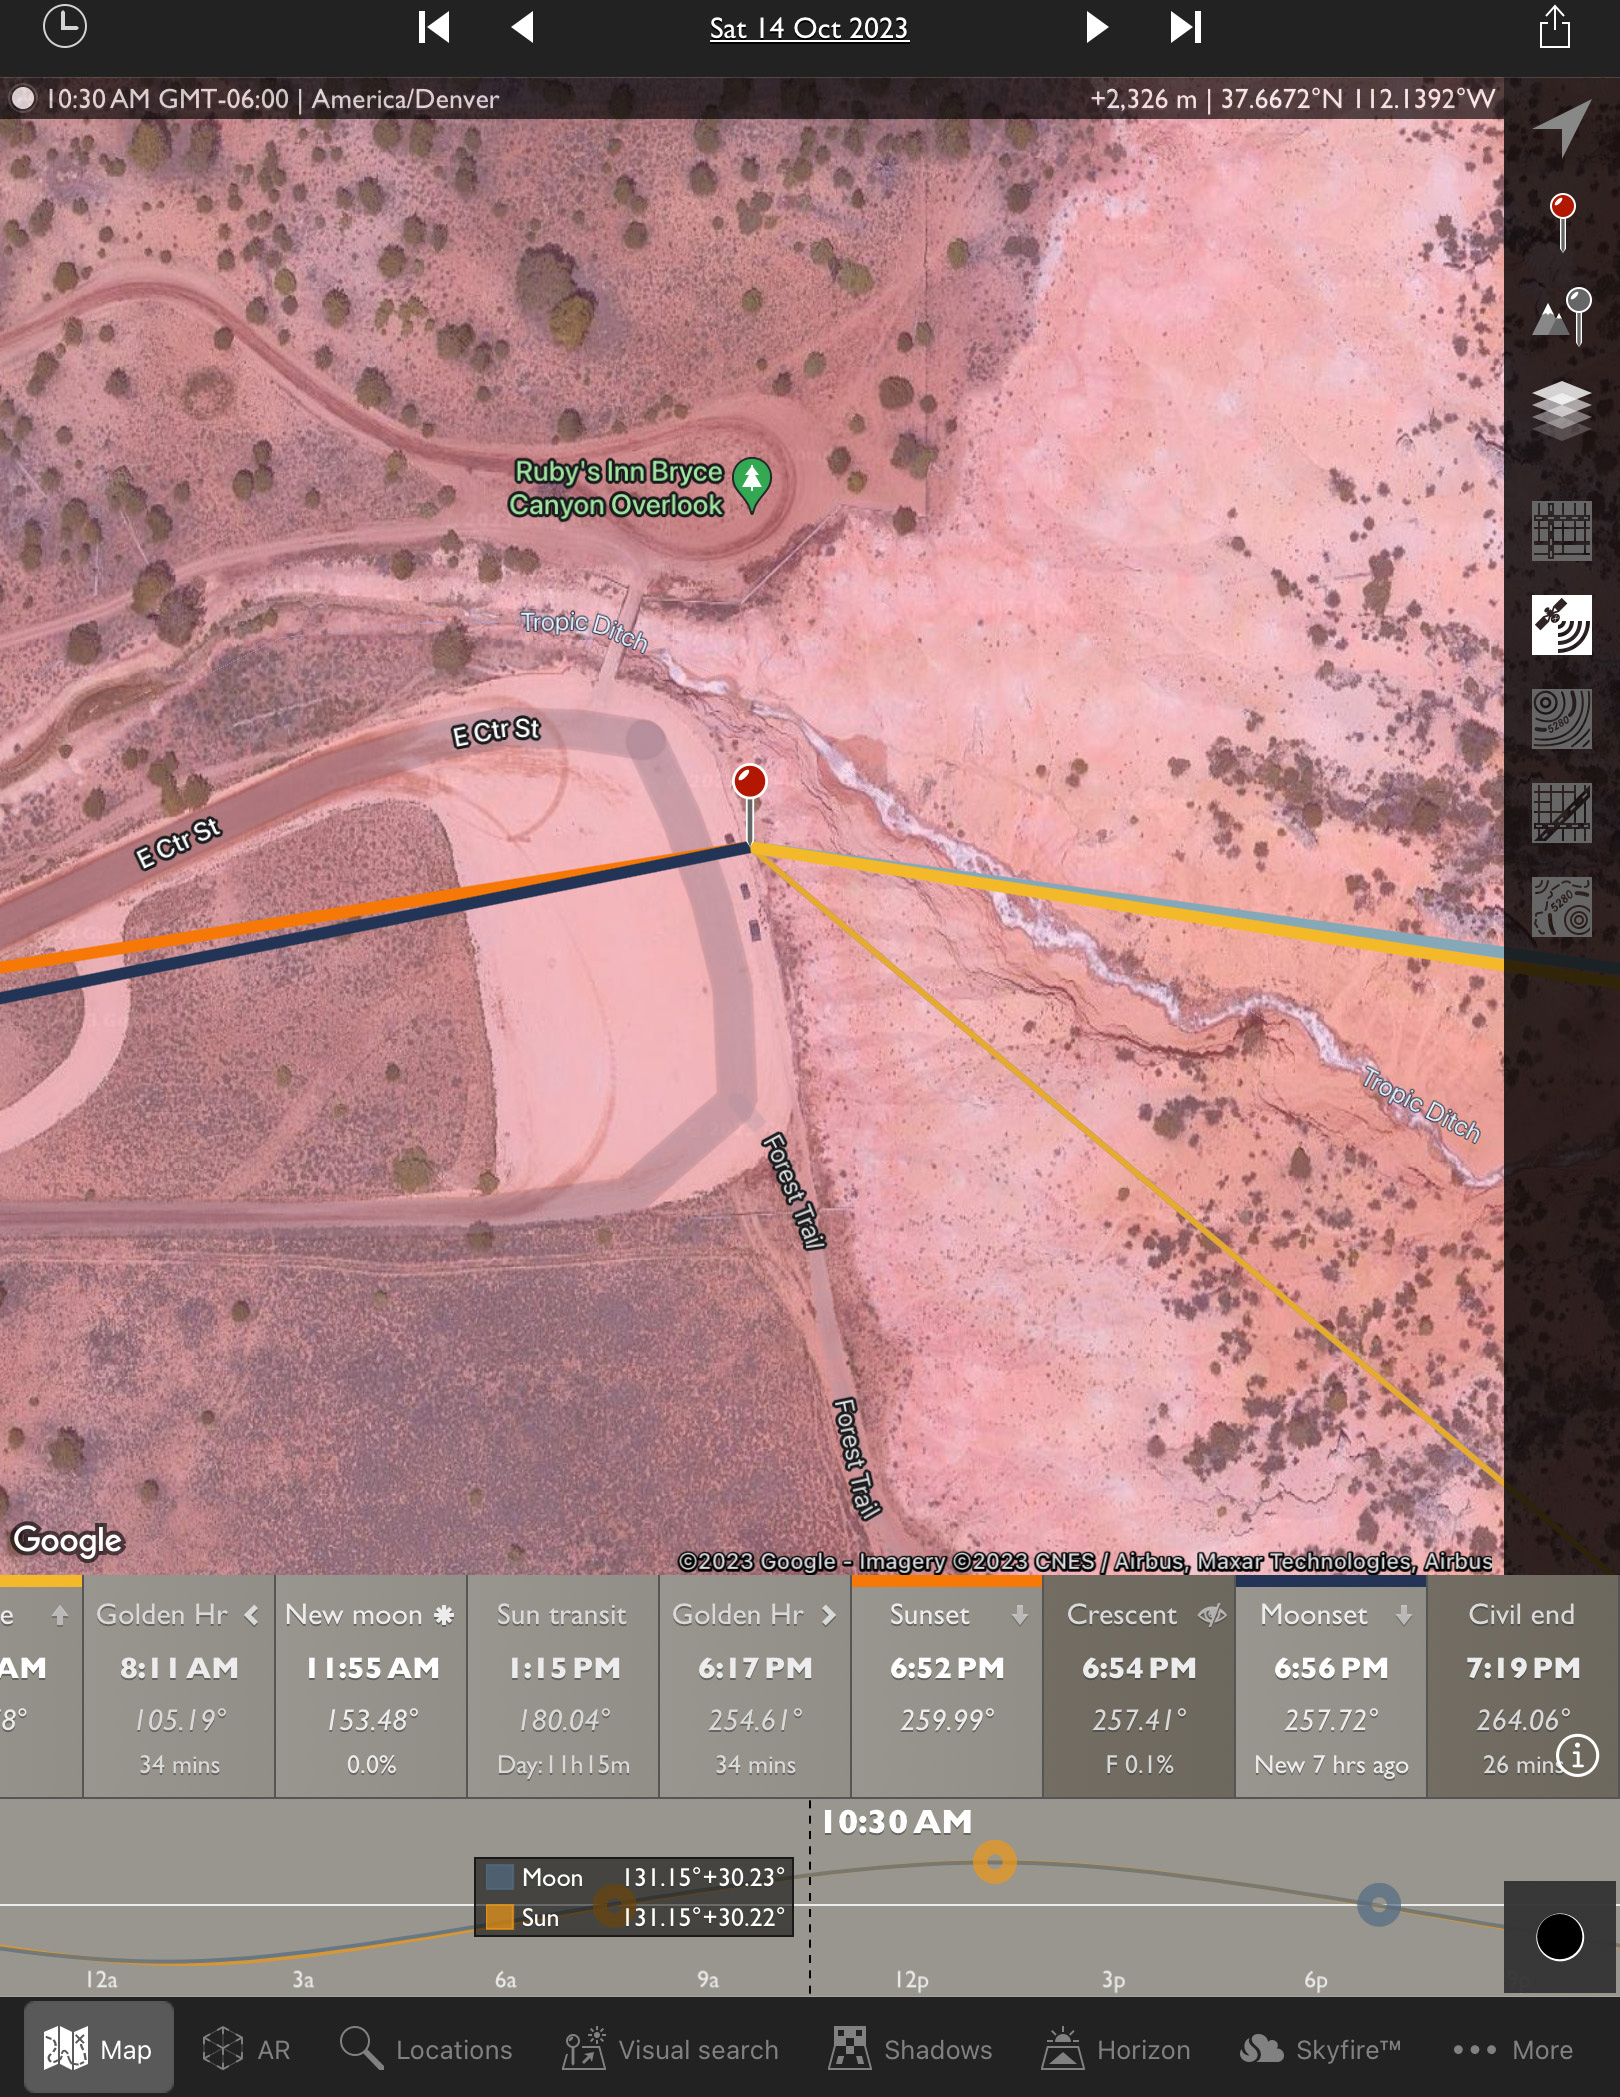
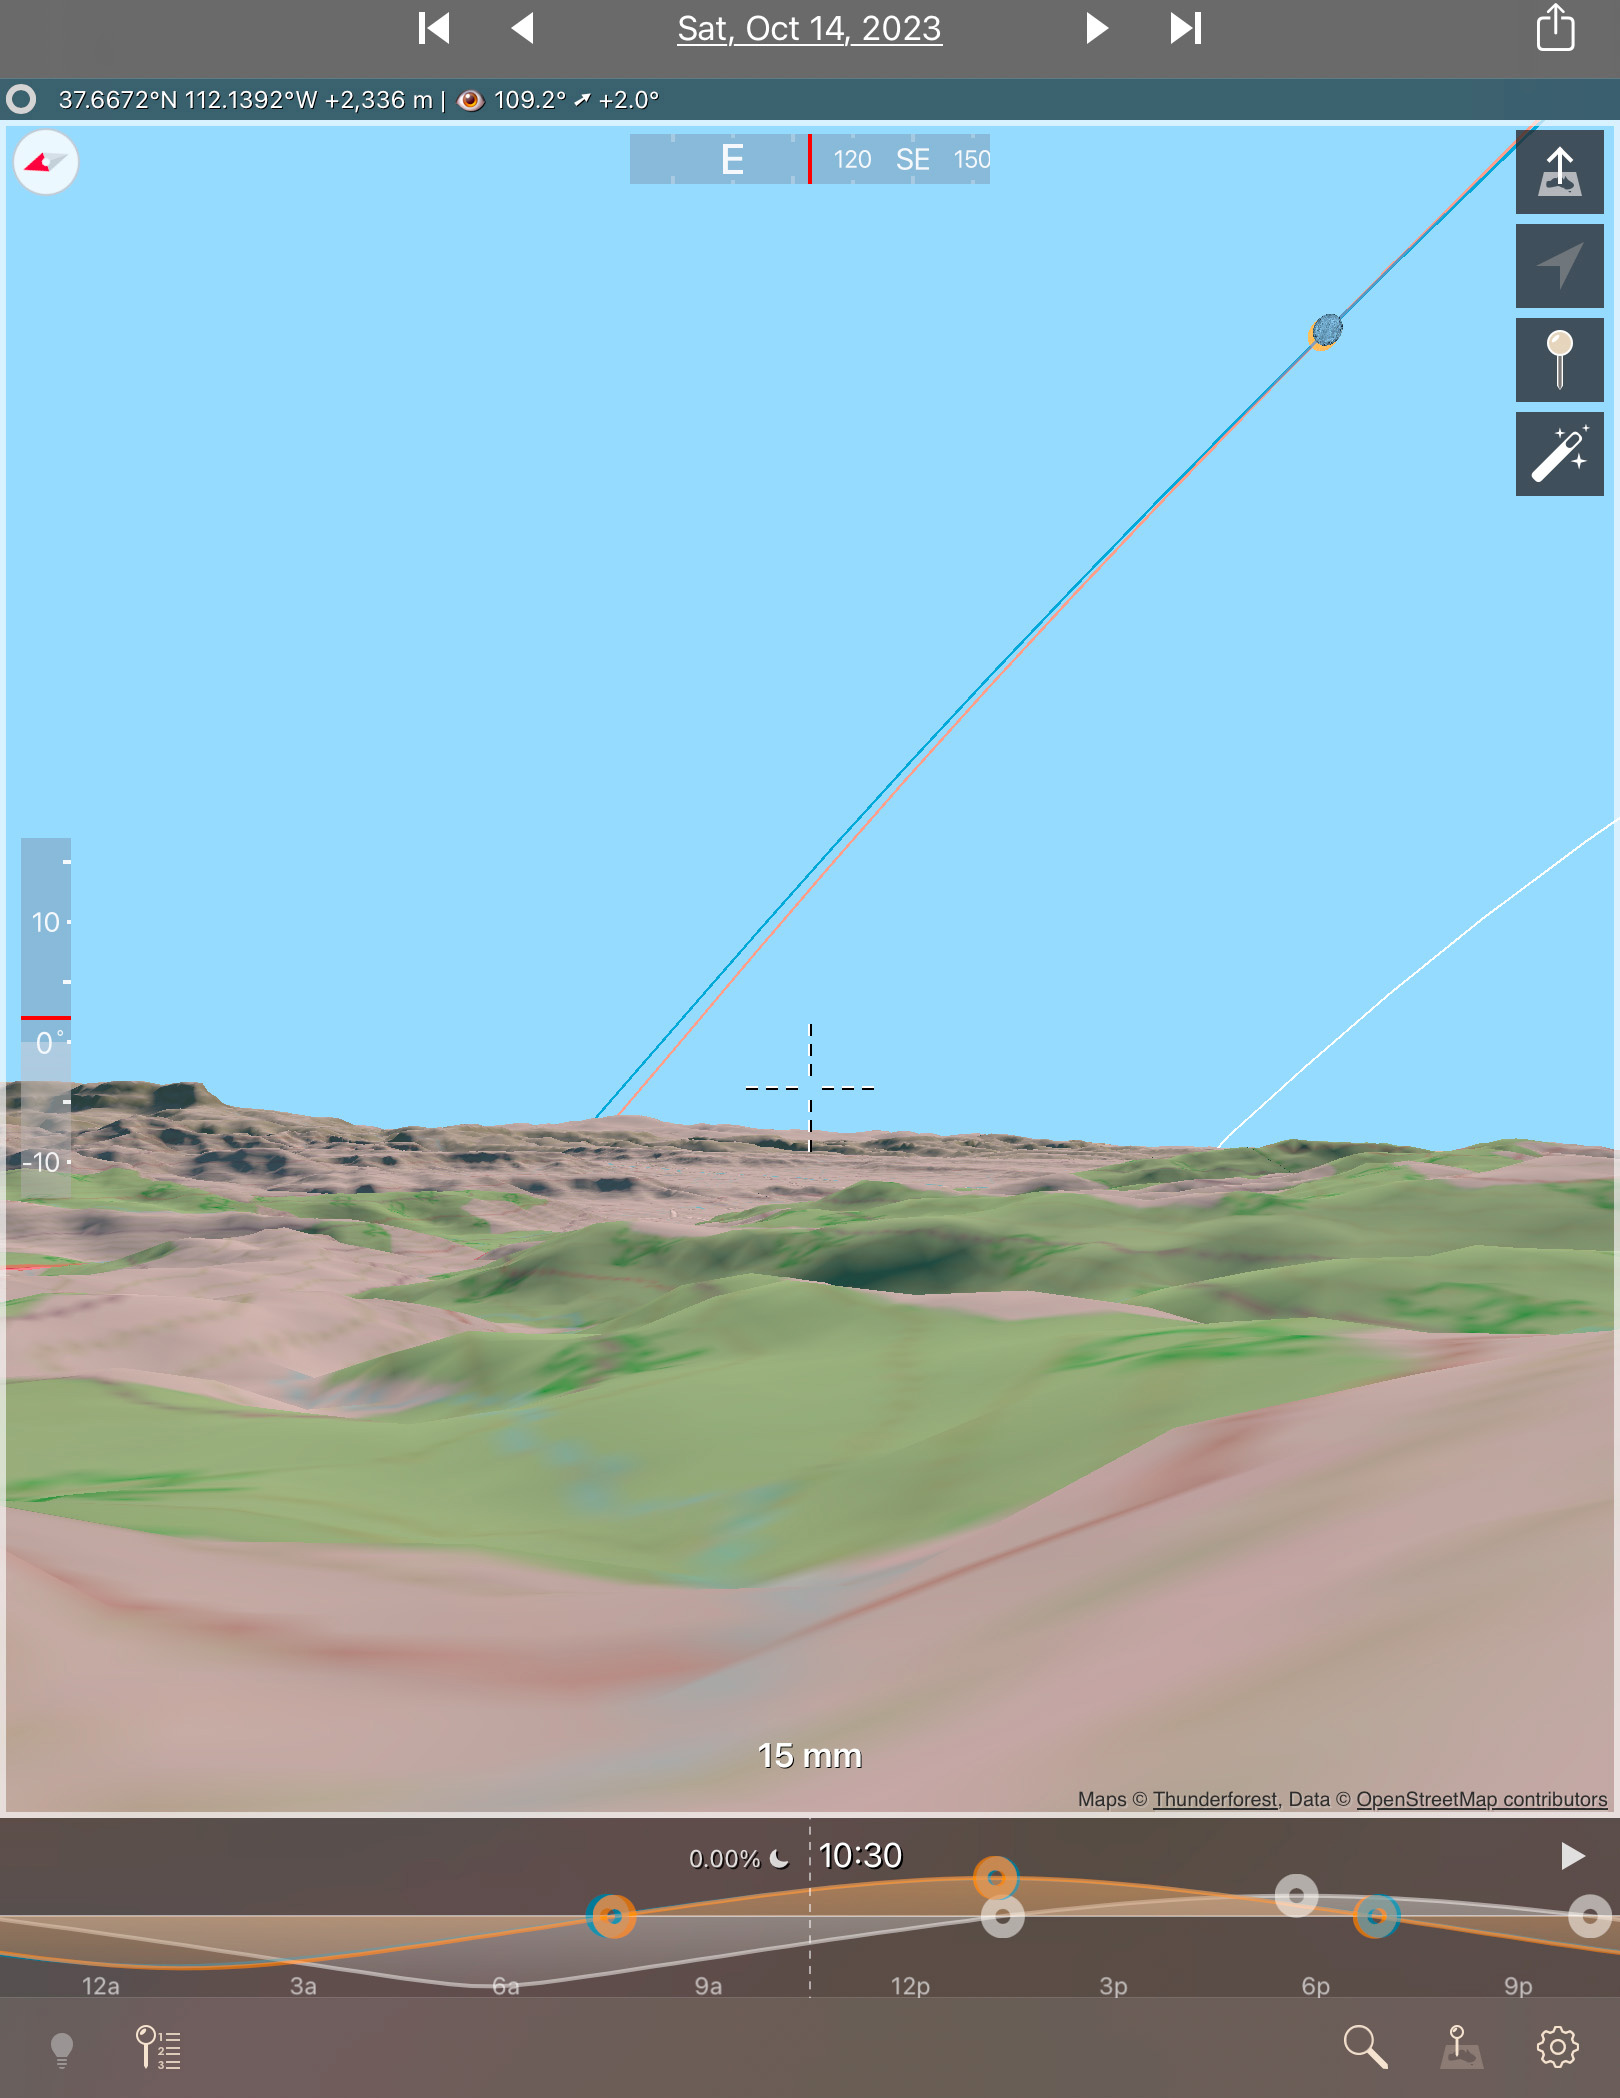
I had looked at possible sites on Google Earth and with the Sun-angle planning apps I use (such as The Photographer’s Ephemeris, or TPE) and found one just outside the Park that I hoped would be accessible to drive into. 

Upon arriving in the area three days early, the first priority was to inspect the site in person. It looked perfect! Almost too good to be true! 

A panorama of the Ruby’s Inn site with the eclipse in progress. My wide-angle camera is at left by that fencepost.

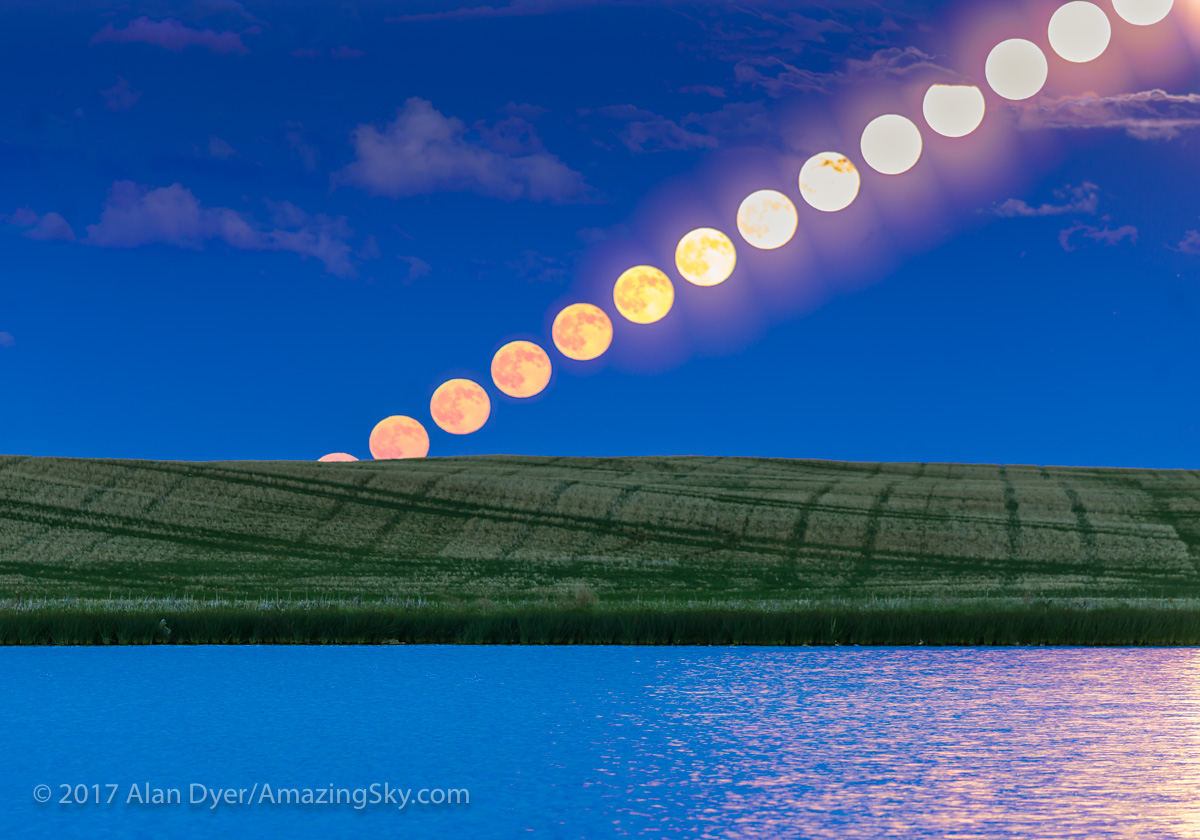
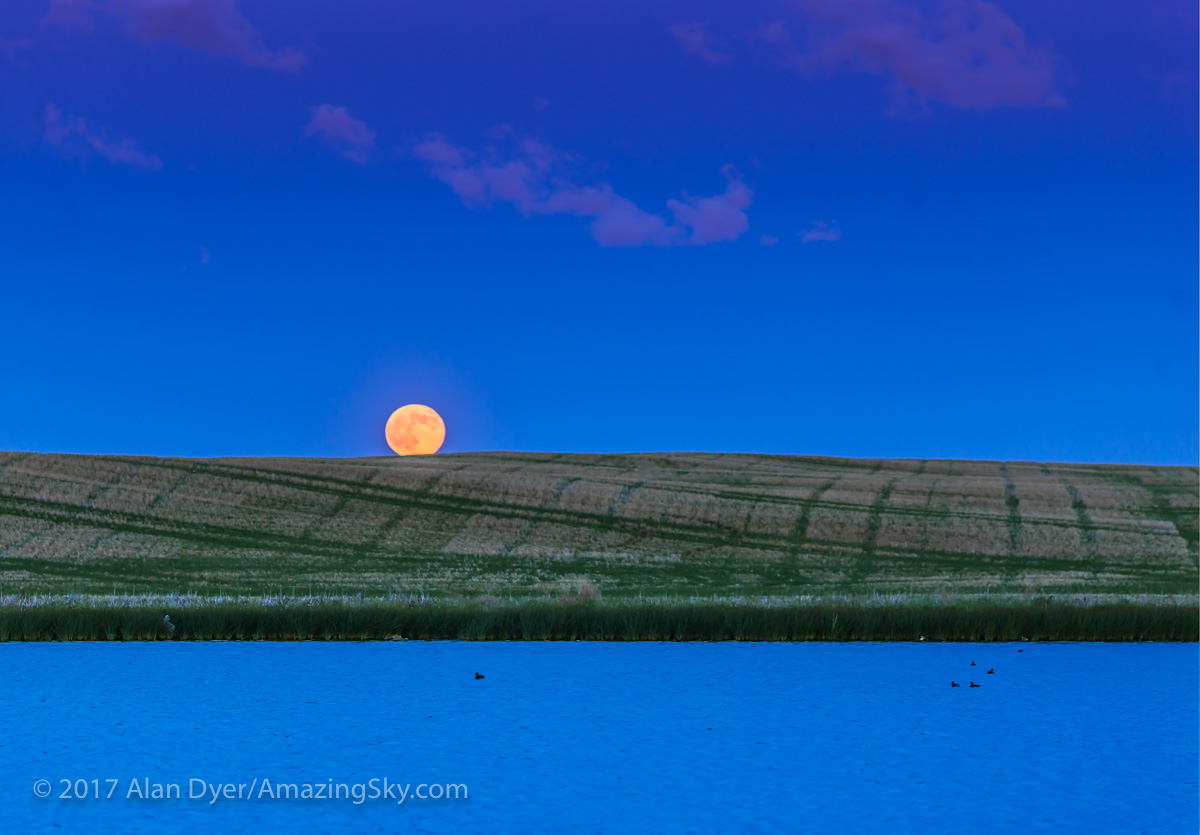
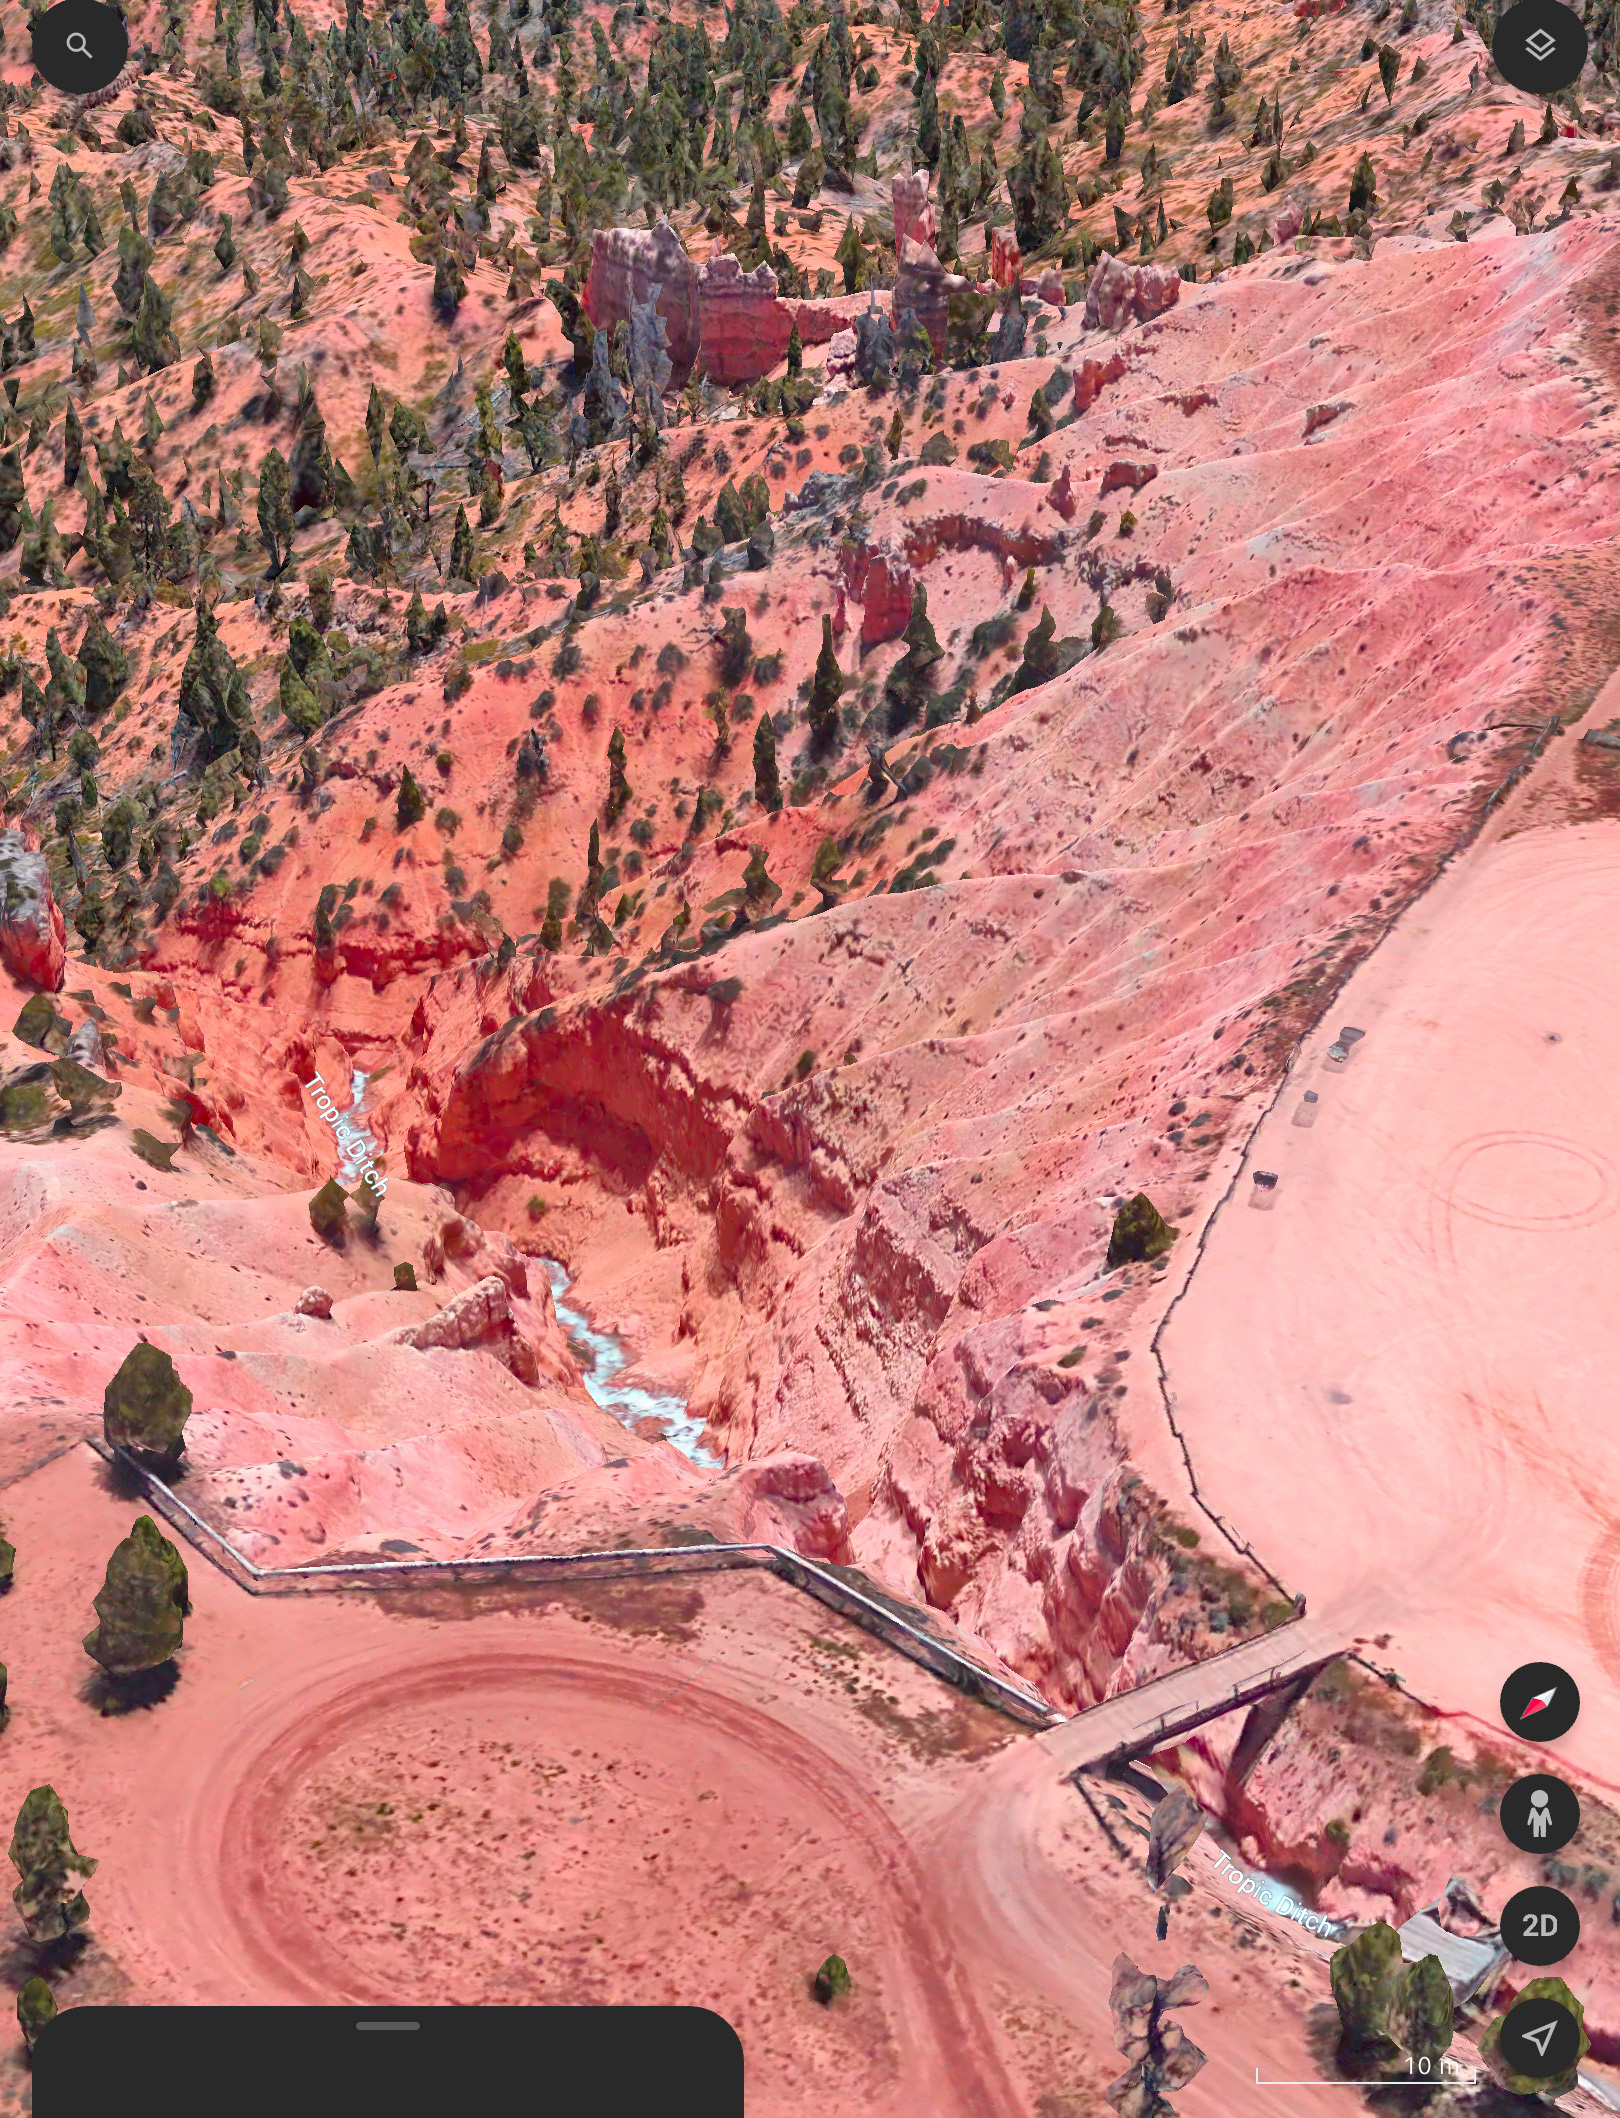
The site, known as the Ruby’s Inn Overlook, provided a great view toward the eclipse with a stunning landscape below, including a river! (Well, it was actually an irrigation channel called the Tropic Ditch.) And I could park right next to my wide-angle landscape camera, to keep an eye on it over the five hours of shooting, while setting up the scope gear next to my car. 

I stayed at the Bryce View Lodge on eclipse eve, a hotel just a few hundred metres from the site. So no long pre-dawn drive on eclipse morn. However, the gated site was not going to be open until 7 a.m. on eclipse day. And admission was $20 per car, a cash donation to the Bryce Canyon City school sports teams. Fine! 

As it turned out, by the time I got on site and setup the priority wide-angle camera for the base-image sunrise shots at 7:30 a.m., the sky was too bright to polar align the telescope mount on Polaris, for accurate tracking of the Sun across the sky. 

It turned out that was the least of my concerns. 

My three eclipse cameras: the wide-angle, the one on the 105mm refractor telescope (with a smaller 60mm scope on top for visual views with a Herschel Solar Wedge), and one with a 100-400mm lens on the tripod.

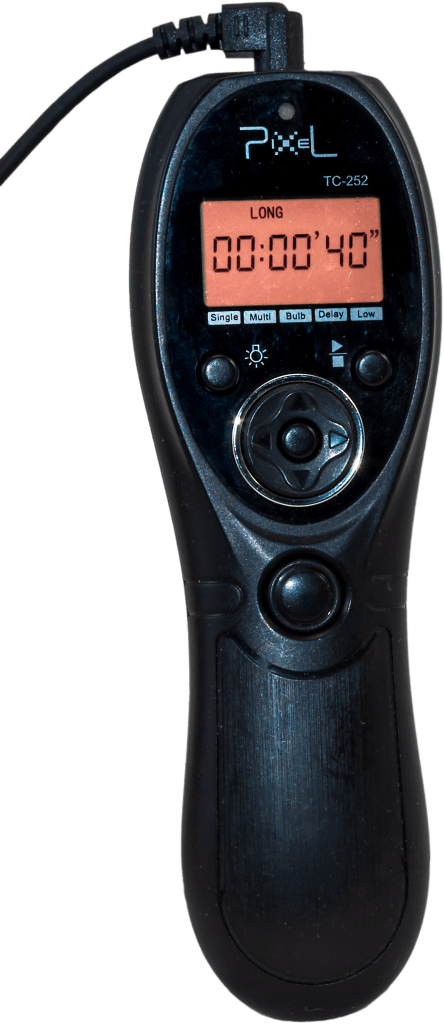
As I unpacked the carload of scope gear at 8 a.m. I realized I had forgotten a crucial cable to connect the mount to the drive electronics. So the mount was not going to be able to track anyway! 

So much for my plans for a time-lapse through the scope. I had to manually centre the Sun every minute or so. I took lots of photos, but gave up on any effort to take them at a regular cadence. But I had enough images for the singles and composites shown here.

This is a composite of the October 14, 2023 annular solar eclipse with a sequence of six images showing the Moon advancing across a sunspot, the largest one visible on the Sun that day. The images are placed for a photogenic spacing, with time running forward from lower left to upper right, to reflect the Sun’s motion up across the morning sky.

Of course, once I got home the first thing I did was look downstairs in my scope room. Sure enough there was the cable, mixed up with the similar electronics from another mount I have from the same company, as I had been testing both prior to the eclipse. So much for my checklists! They’re only good if they list every critical bit, and if you use them.

So that was one big user error. 

You don’t want to see this at an eclipse!

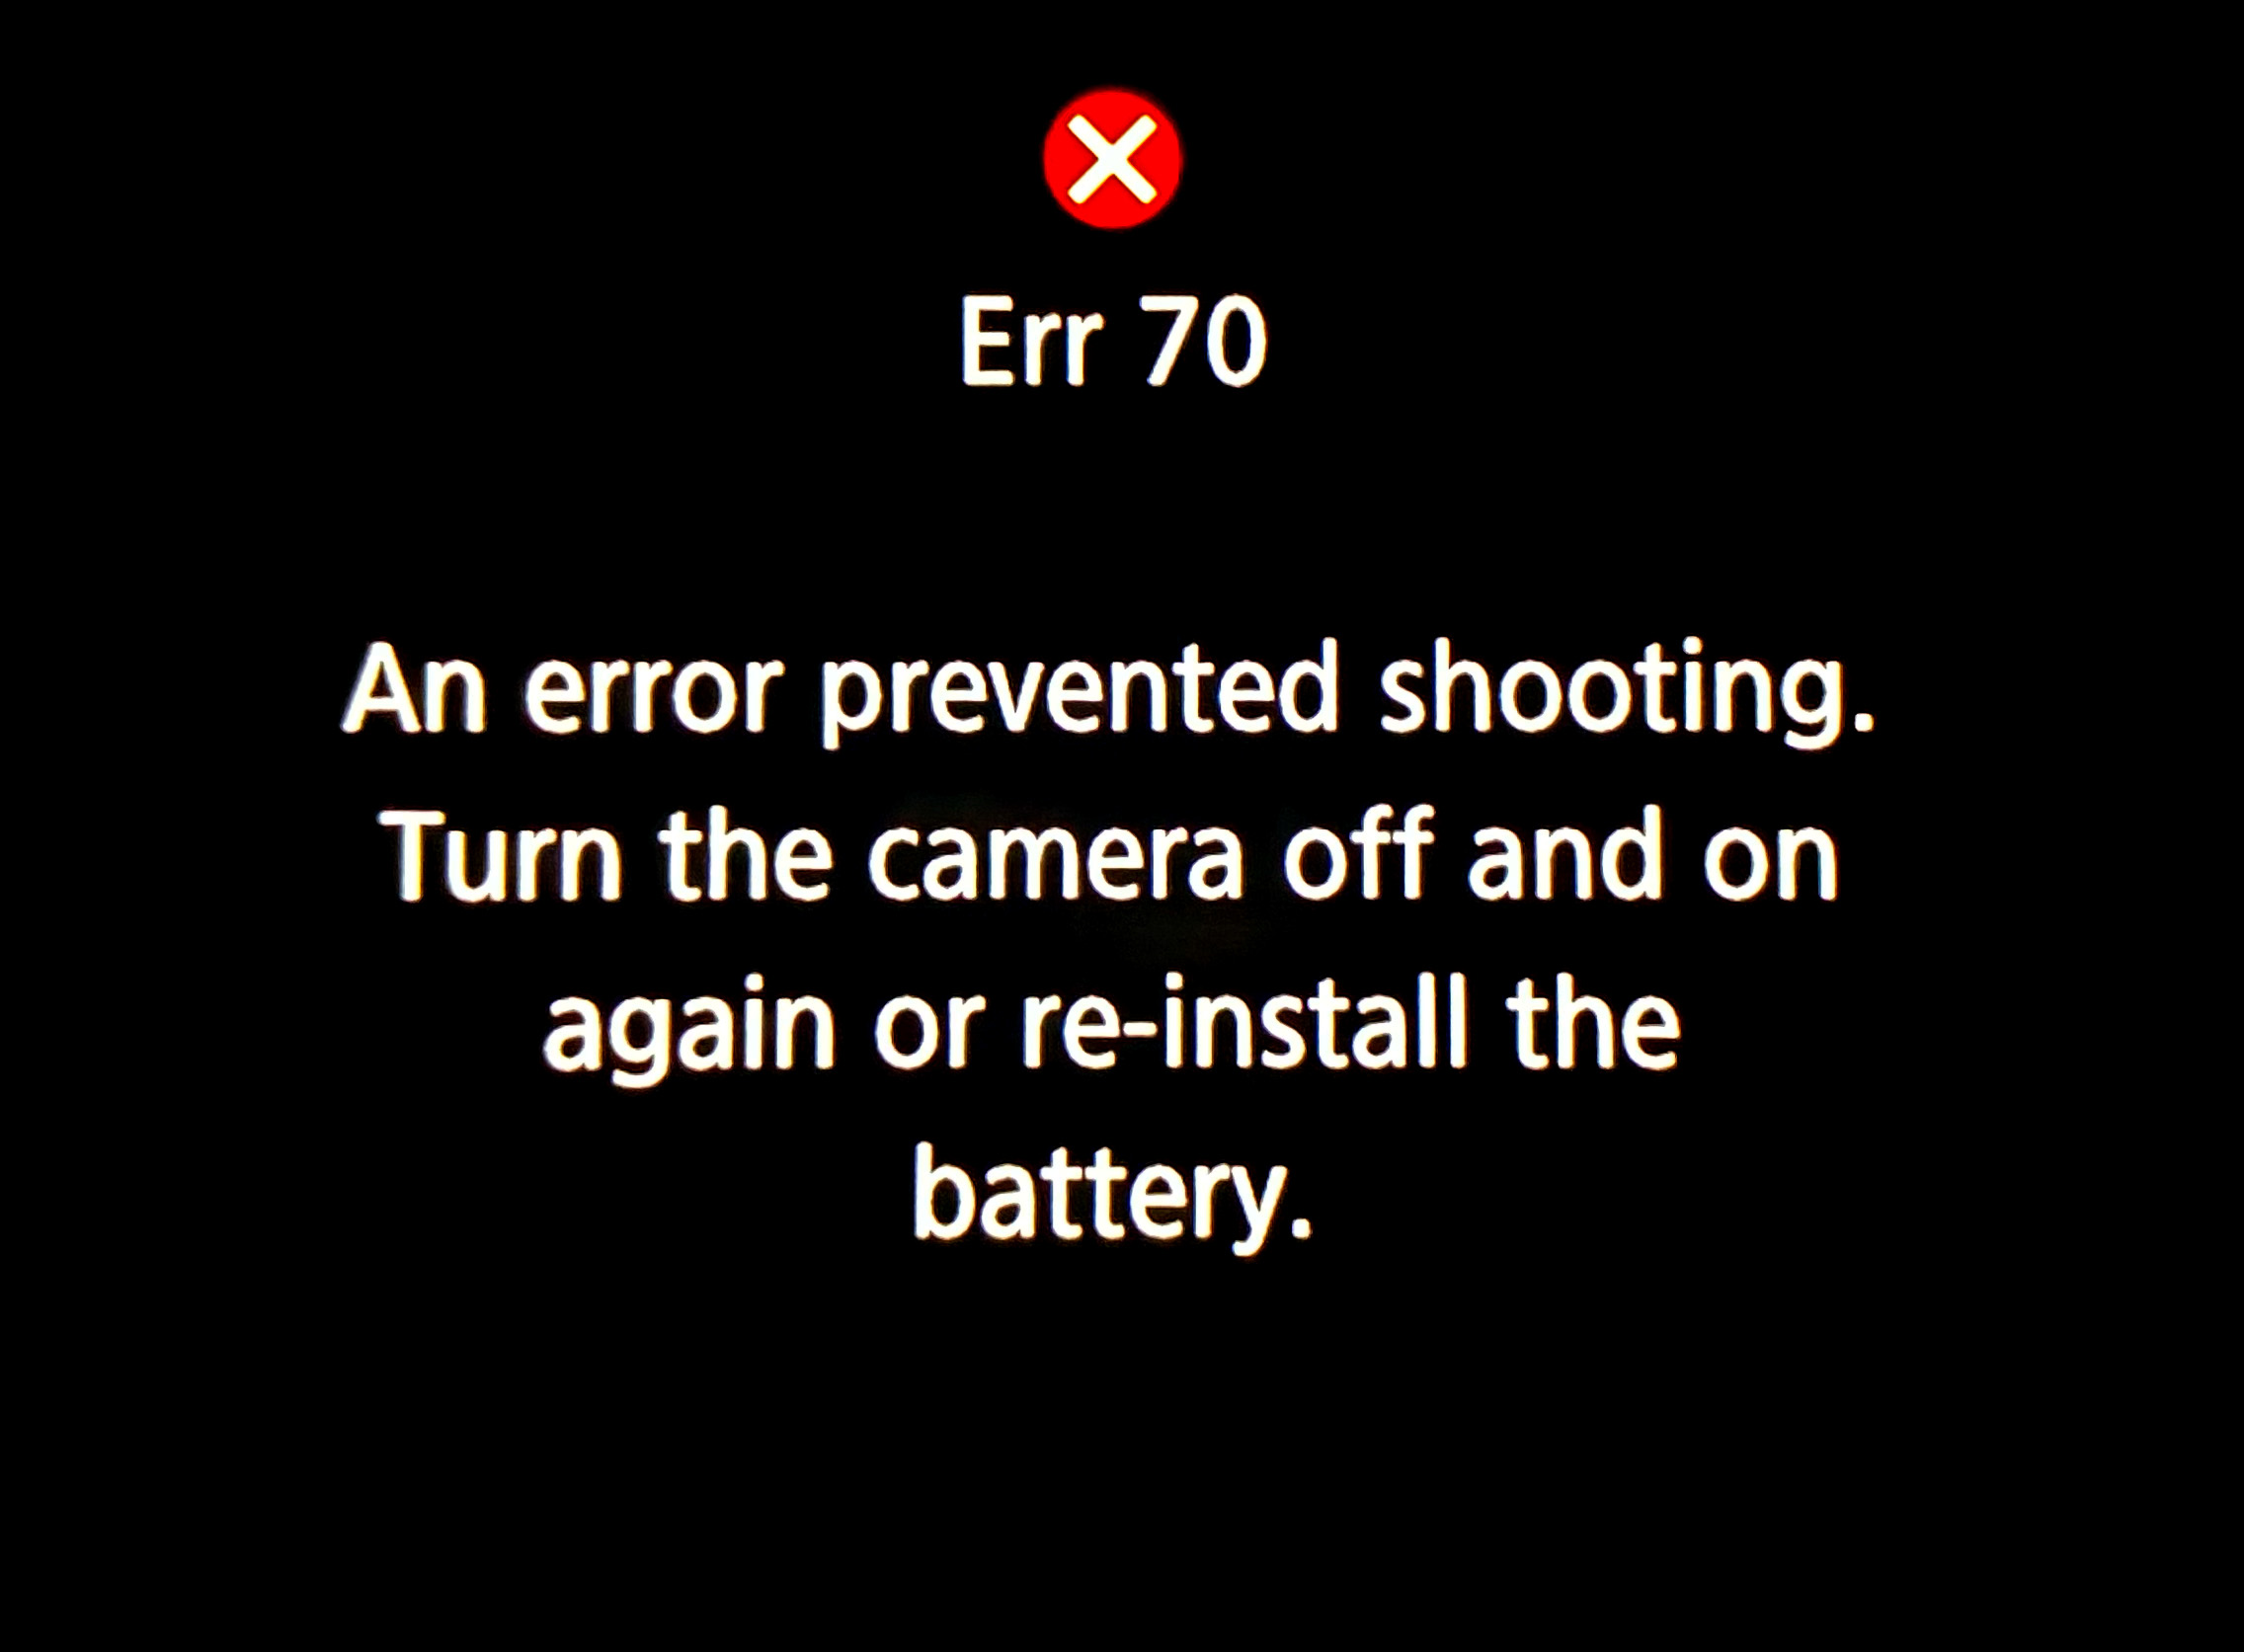
The other was a camera error, in fact Error70! I had set my main telescope camera to take rapid bursts of images (at up to 20 frames per second) at the crucial second and third contacts when annularity began and ended. With the Moon’s rough limb tangent to the inside edge of the Sun, you see beads of light rapidly form and disappear at the contacts. 

This is a composite of the October 14, 2023 annular solar eclipse at second contact. It illustrates the irregular edge of the Moon breaking up the rim of sunlight as the dark disk of the Moon became tangent to the inner edge of the Sun at second contact at the start of annularity. 15 exposures taken over 20 seconds at second contact are combined with a single exposure taken about 1.5 minutes later at mid-annularity.

The camera worked great at second contact, shooting 344 frames over 20 seconds. A composite of 15 of those frames is above, layered to exaggerate the rough lunar limb and its mountain peaks. A time-lapse from those frames is below.

A time-lapse of second contact from 344 frames over ~20 seconds.

And it appeared to be working at third contact three minutes later. Until I looked down and saw the dreaded error message. In checking the camera later, none of the third contact images had recorded to either memory card. 

It is a known but intermittent bug in Canon firmware that can happen when the camera is not connected to a Canon lens (it was on a telescope it cannot communicate with). I saw the error once in testing. And I had a hard time reproducing it to take the screen shot above once I got home. But if something can go wrong …! 

This is a portrait of the October 14, 2023 annular eclipse of the Sun, captured in a sequence of images taken from the rim of Bryce Canyon, Utah, from sunrise until nearly the end of the eclipse before noon local time. This is a composite blend of unfiltered exposures taken at sunrise for the landscape lit by the rising Sun, and for the dawn sky. Onto the base panorama of the ground and sky I layered in 66 filtered images of the Sun, as it rose into the morning sky, and with the Moon moving across its disk over nearly 3 hours, reaching mid-eclipse at about 10:29 local MDT at upper right. It then appears as a ring, or annulus of light for one frame.

Despite the errors both human and machine, I count eclipse day as successful, considering a week earlier prospects had looked so poor. As it was, apart from some thin but inconsequential cloud that drifted through before mid-eclipse, the sky was perfect.

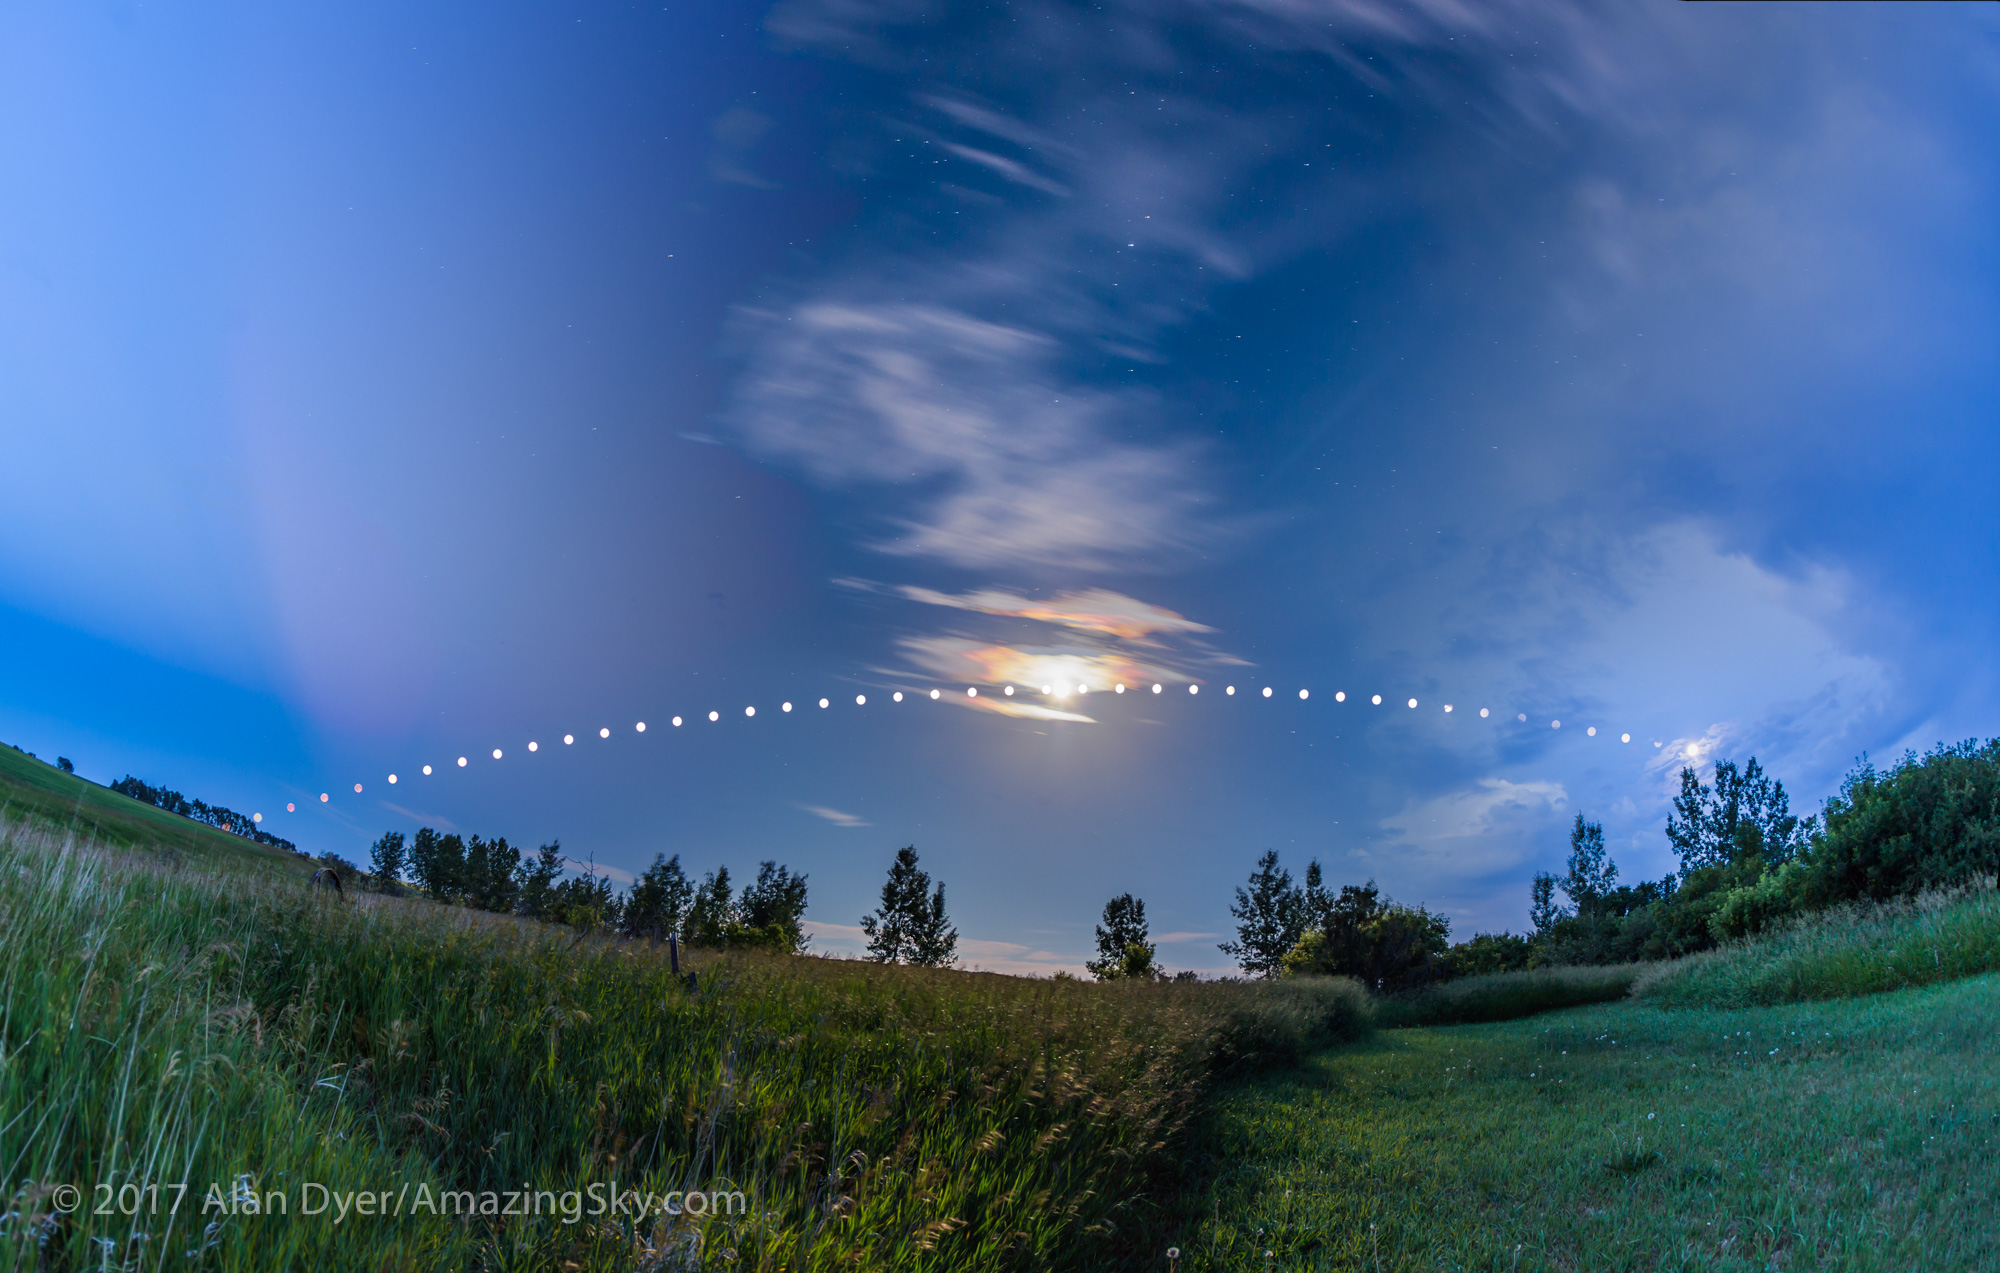
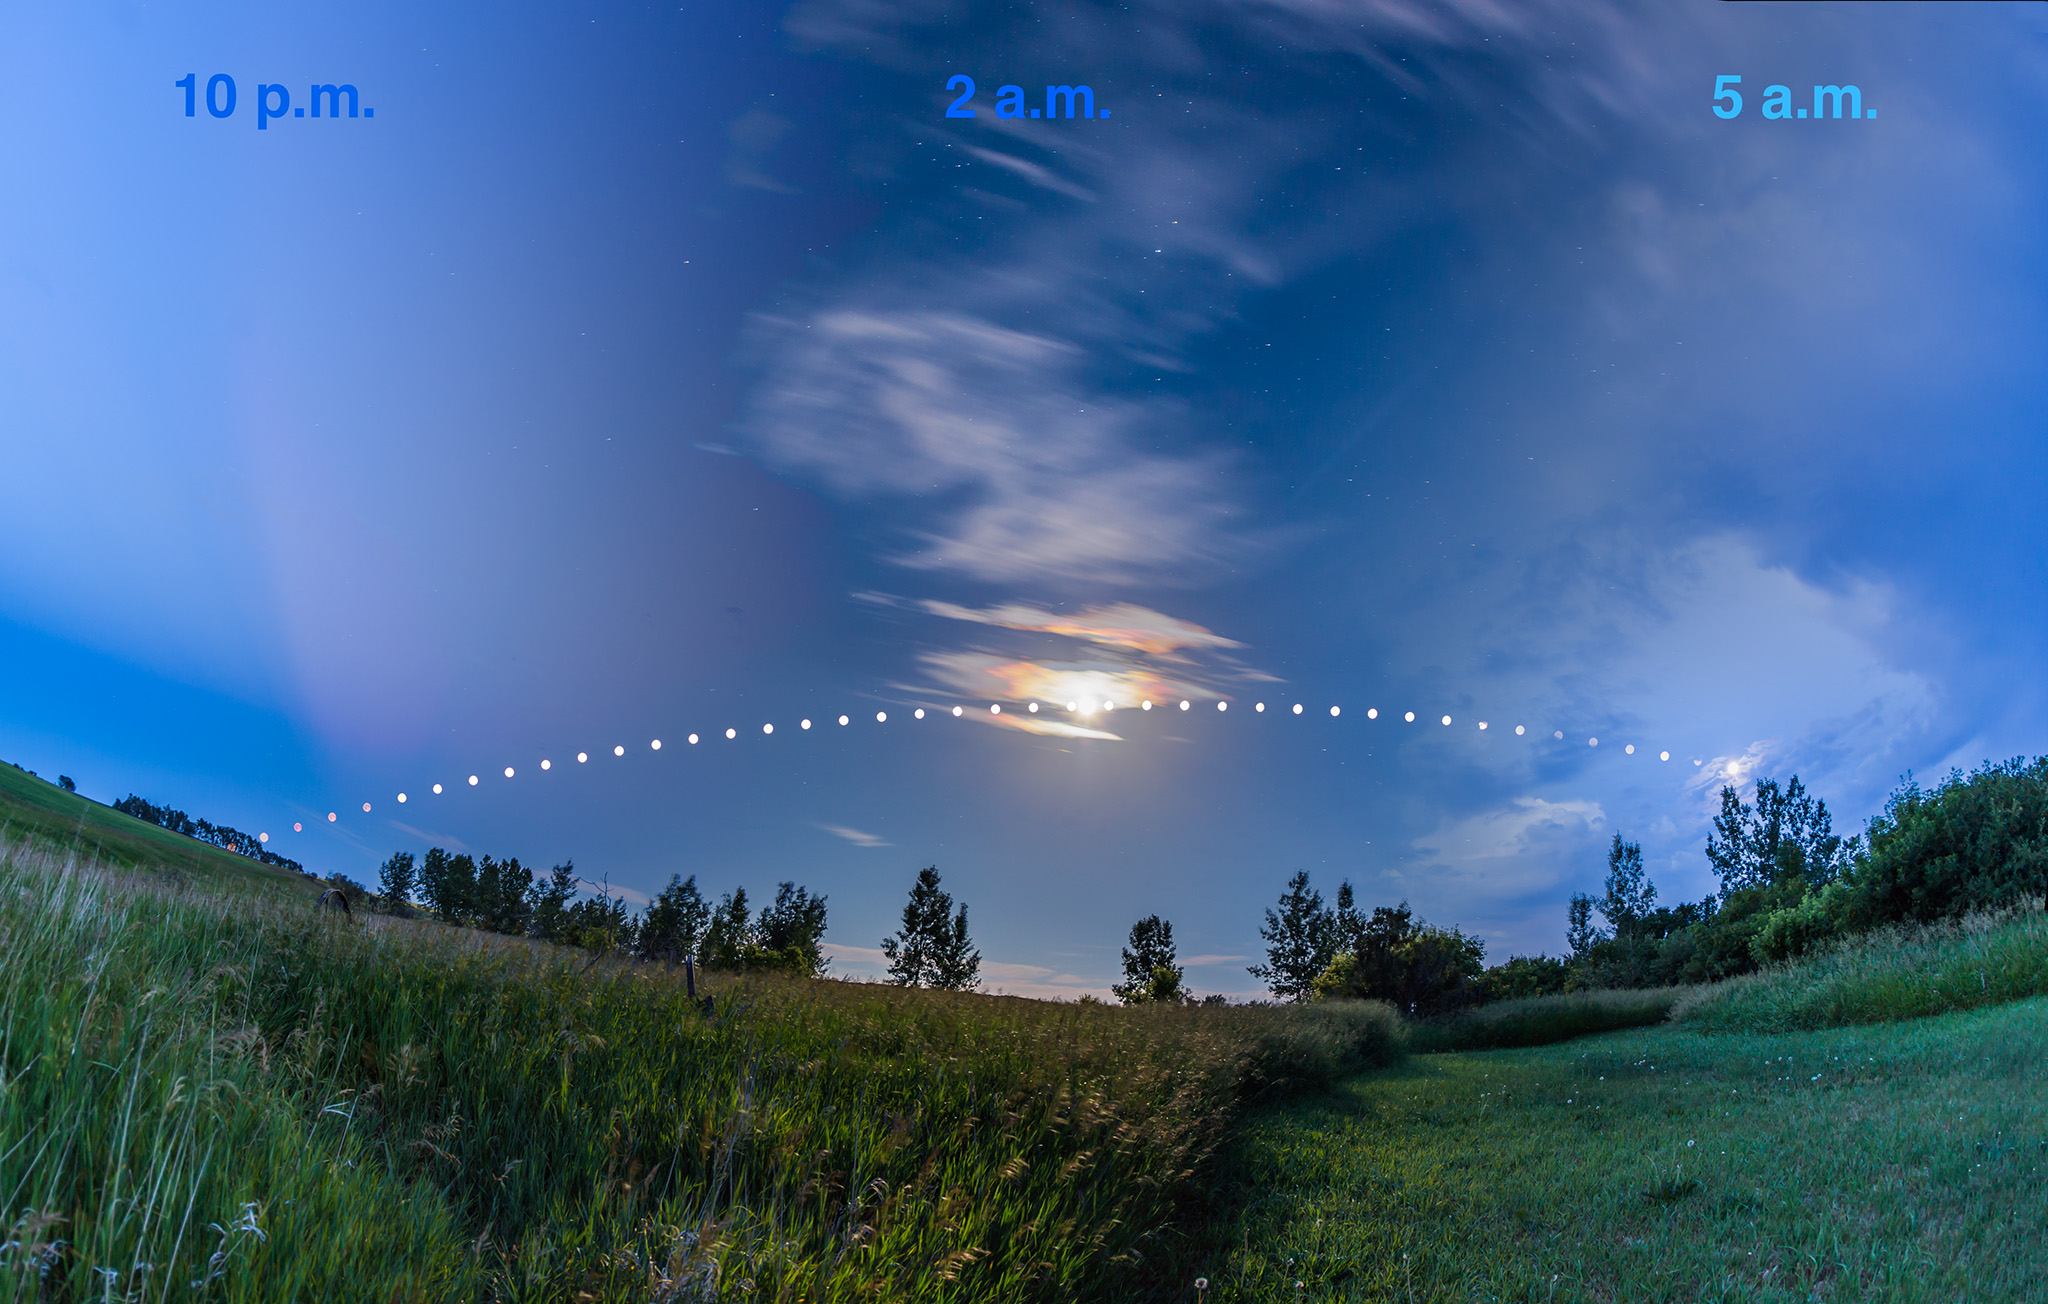
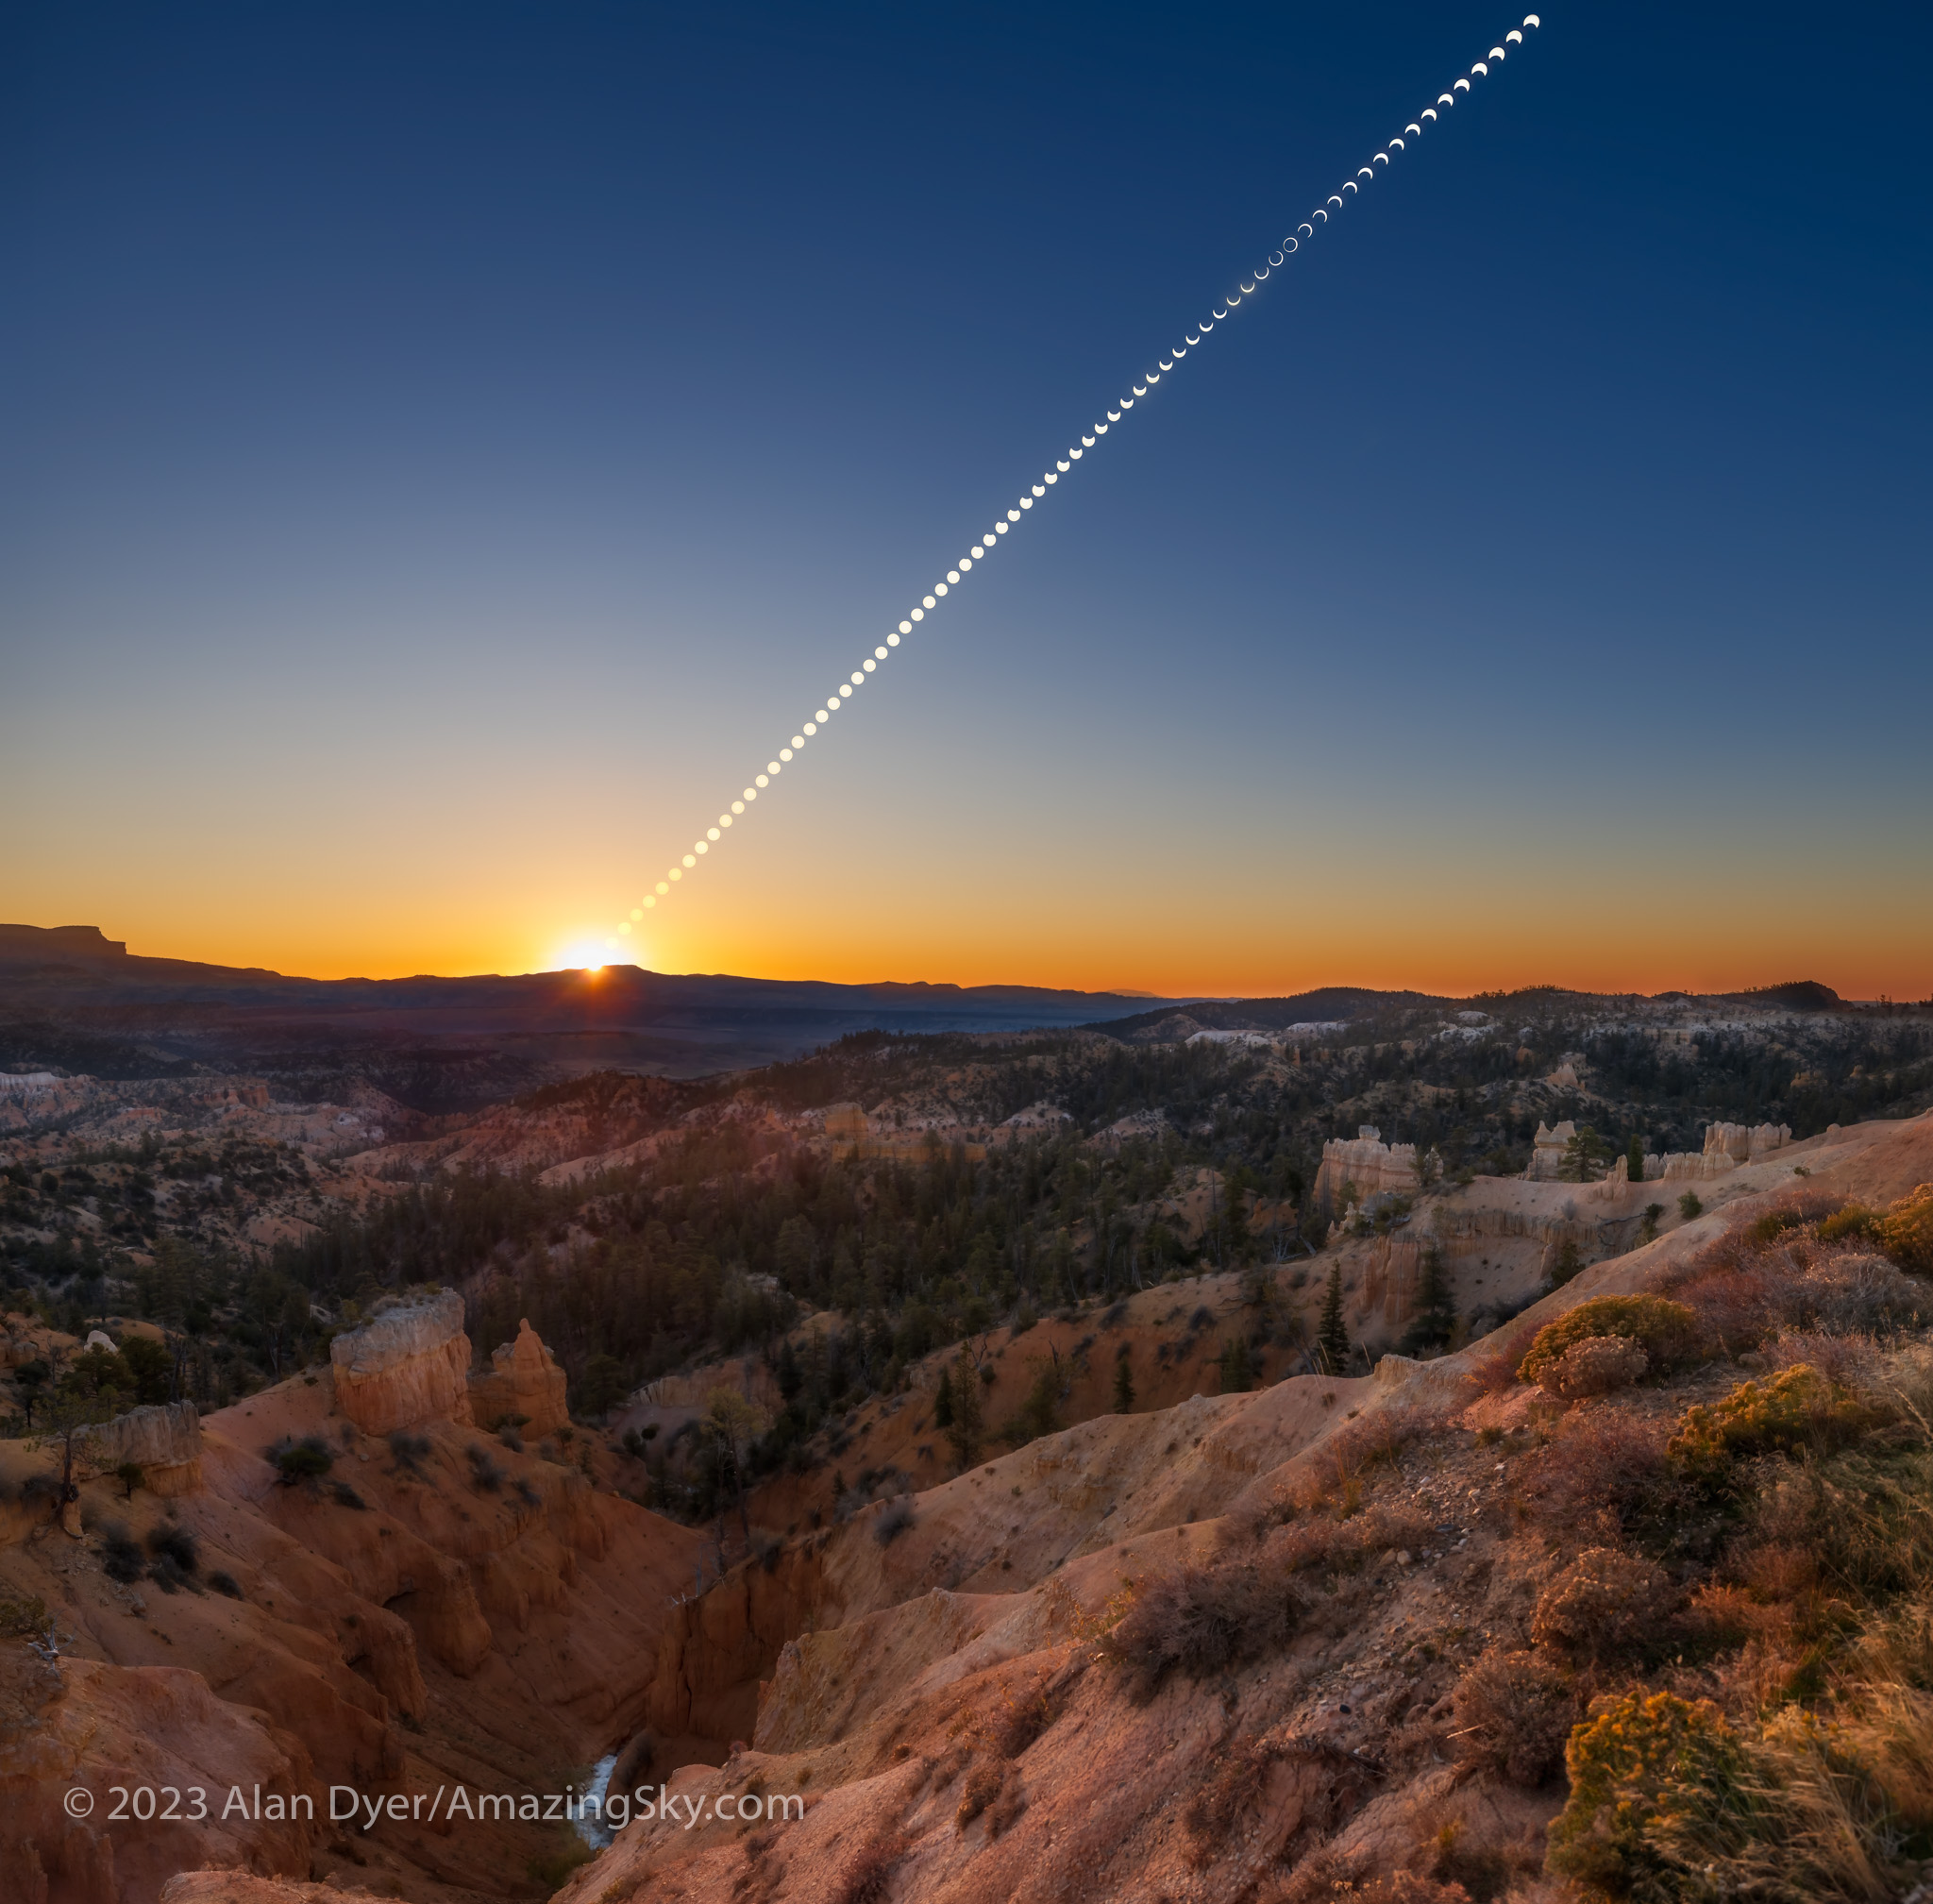
As was the site. I enabled me to get the main shot I was after, the wide-angle composite, above. It’s a winner! And it accurately depicts the size of the Sun and its motion across the sky, albeit set into a twilight sky taken at sunrise.

As it had been 29 years since my last annular, I wasn’t sure what to expect. But the darkening of the sky and eerie level of sunlight, despite a blazing Sun in the day sky, were impressive. The morning just looked strange! It was a taste of the total to come.

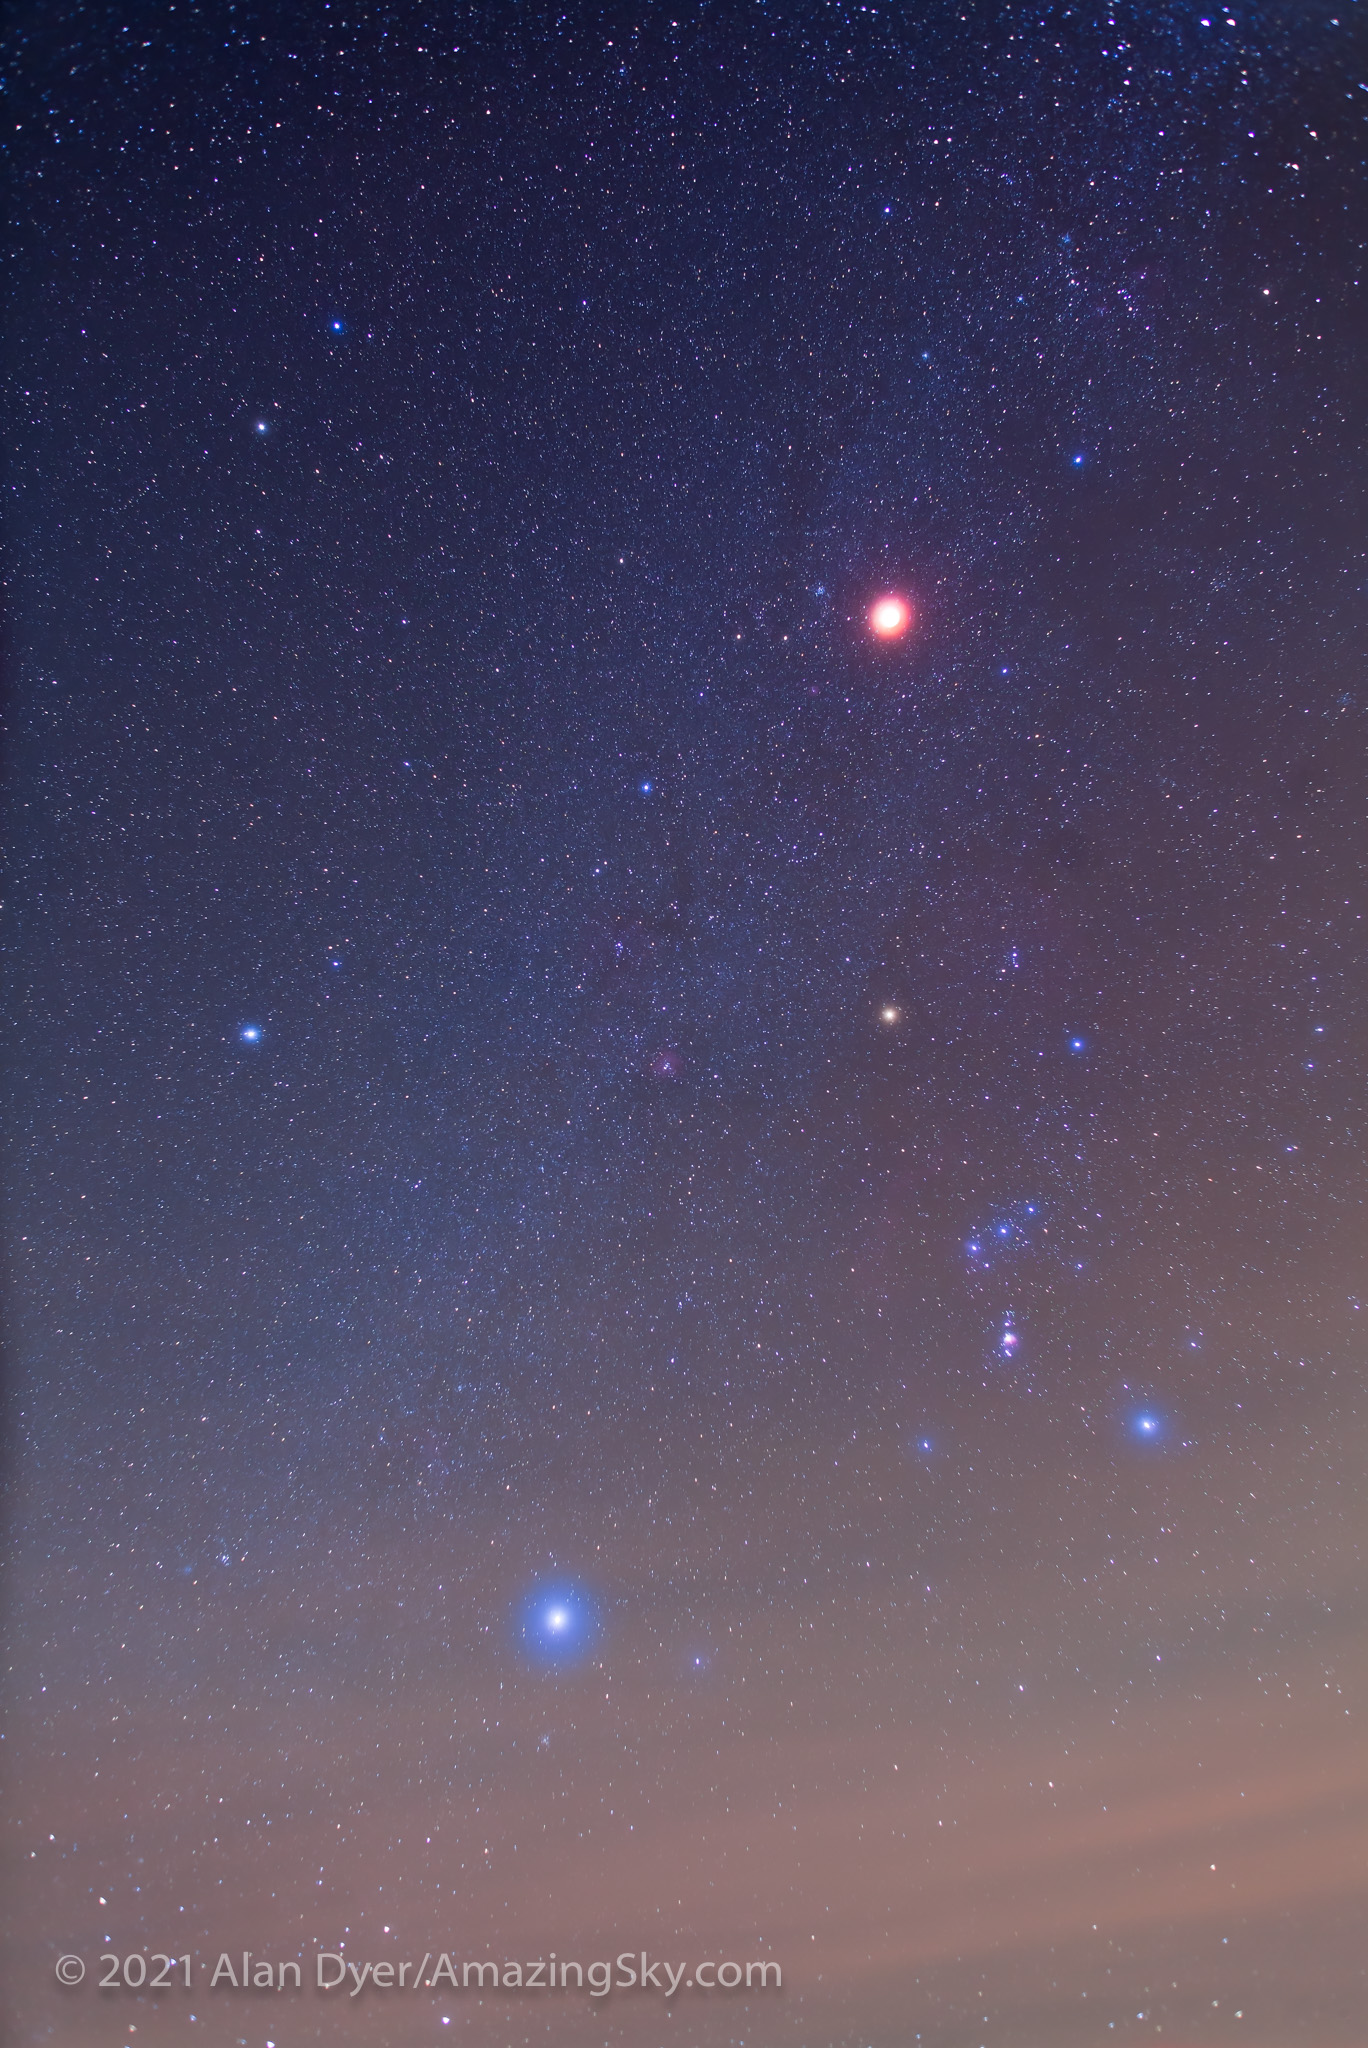
Venus at its widest angle west of the Sun was easy to spot in the deep blue sky. I regret not thinking to shoot even a phone camera image of that sight. 

Projecting the solar crescents with a made-on-the-spot pinhole projection sign.

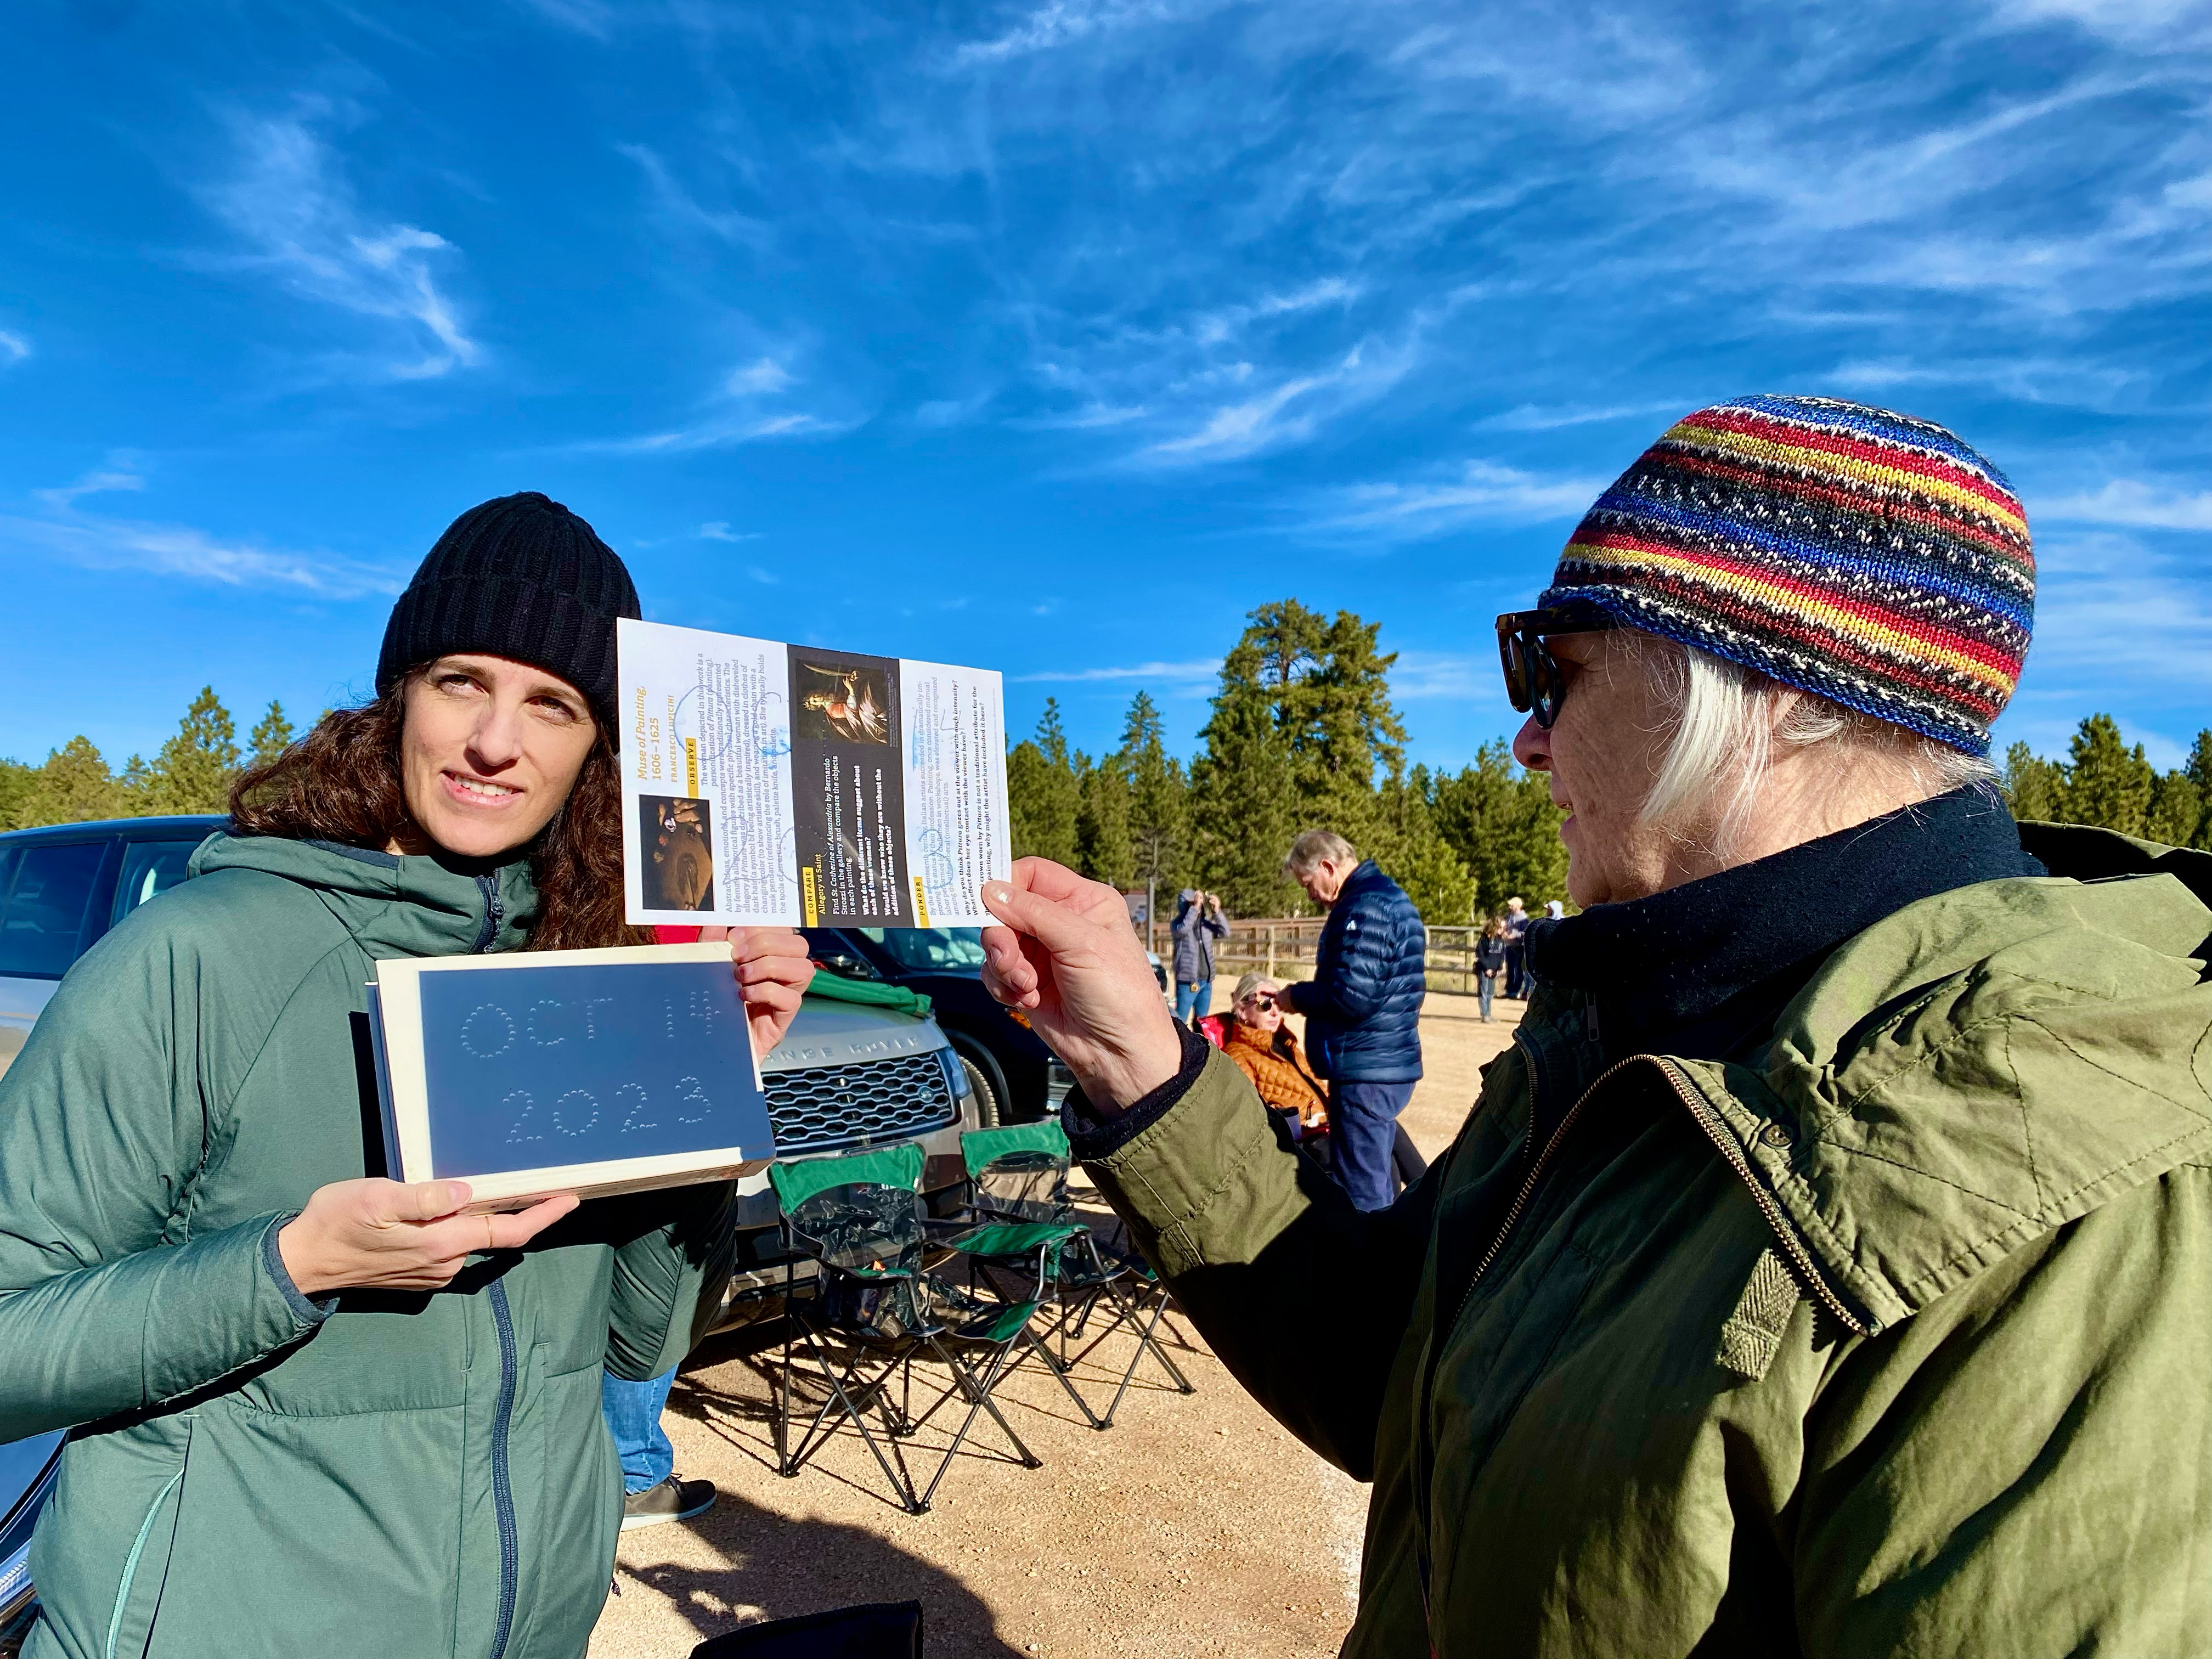
I had pleasant chats with other folks at the site, and enjoyed showing them telescopic views though the smaller visual scope I had piggybacked on the main scope, one that was just for looking through. Plus folks shot phone pix of my camera screen.

The October 14, 2023 annular solar eclipse, in a single image captured at second contact with the Moon tangent to the inside limb of the Sun, at 10:27 am MDT at the site I used.

But at the critical contacts, I was glued to that visual scope for the amazing sight of the horns of the crescent Sun rapidly wrapping around the Moon at second contact, then unwrapping at third contact. 

The October 14, 2023 annular solar eclipse, in a series of images captured at second contact with the Moon tangent to the inside limb of the Sun, at 10:27 am MDT at the site I used. The 7 frames here were selected from a set of 344 shot in high-speed continuous mode at 20 frames per second.

The breakup of the rim of sunlight into beads of light along the cratered and mountainous edge of the Moon was also impressive. I was not at the optimum site for seeing those beads, as the landscape dictated my choice of location. But those that I saw at each of the internal contacts were a fine bonus to a memorable morning. 

This is a composite that records the sequence around mid-eclipse of the October 14, 2023 annular eclipse of the Sun. This is a blend of 8 exposures each taken 2.25 minutes apart, about the minimum time to keep the disks separate and avoid them overlapping.

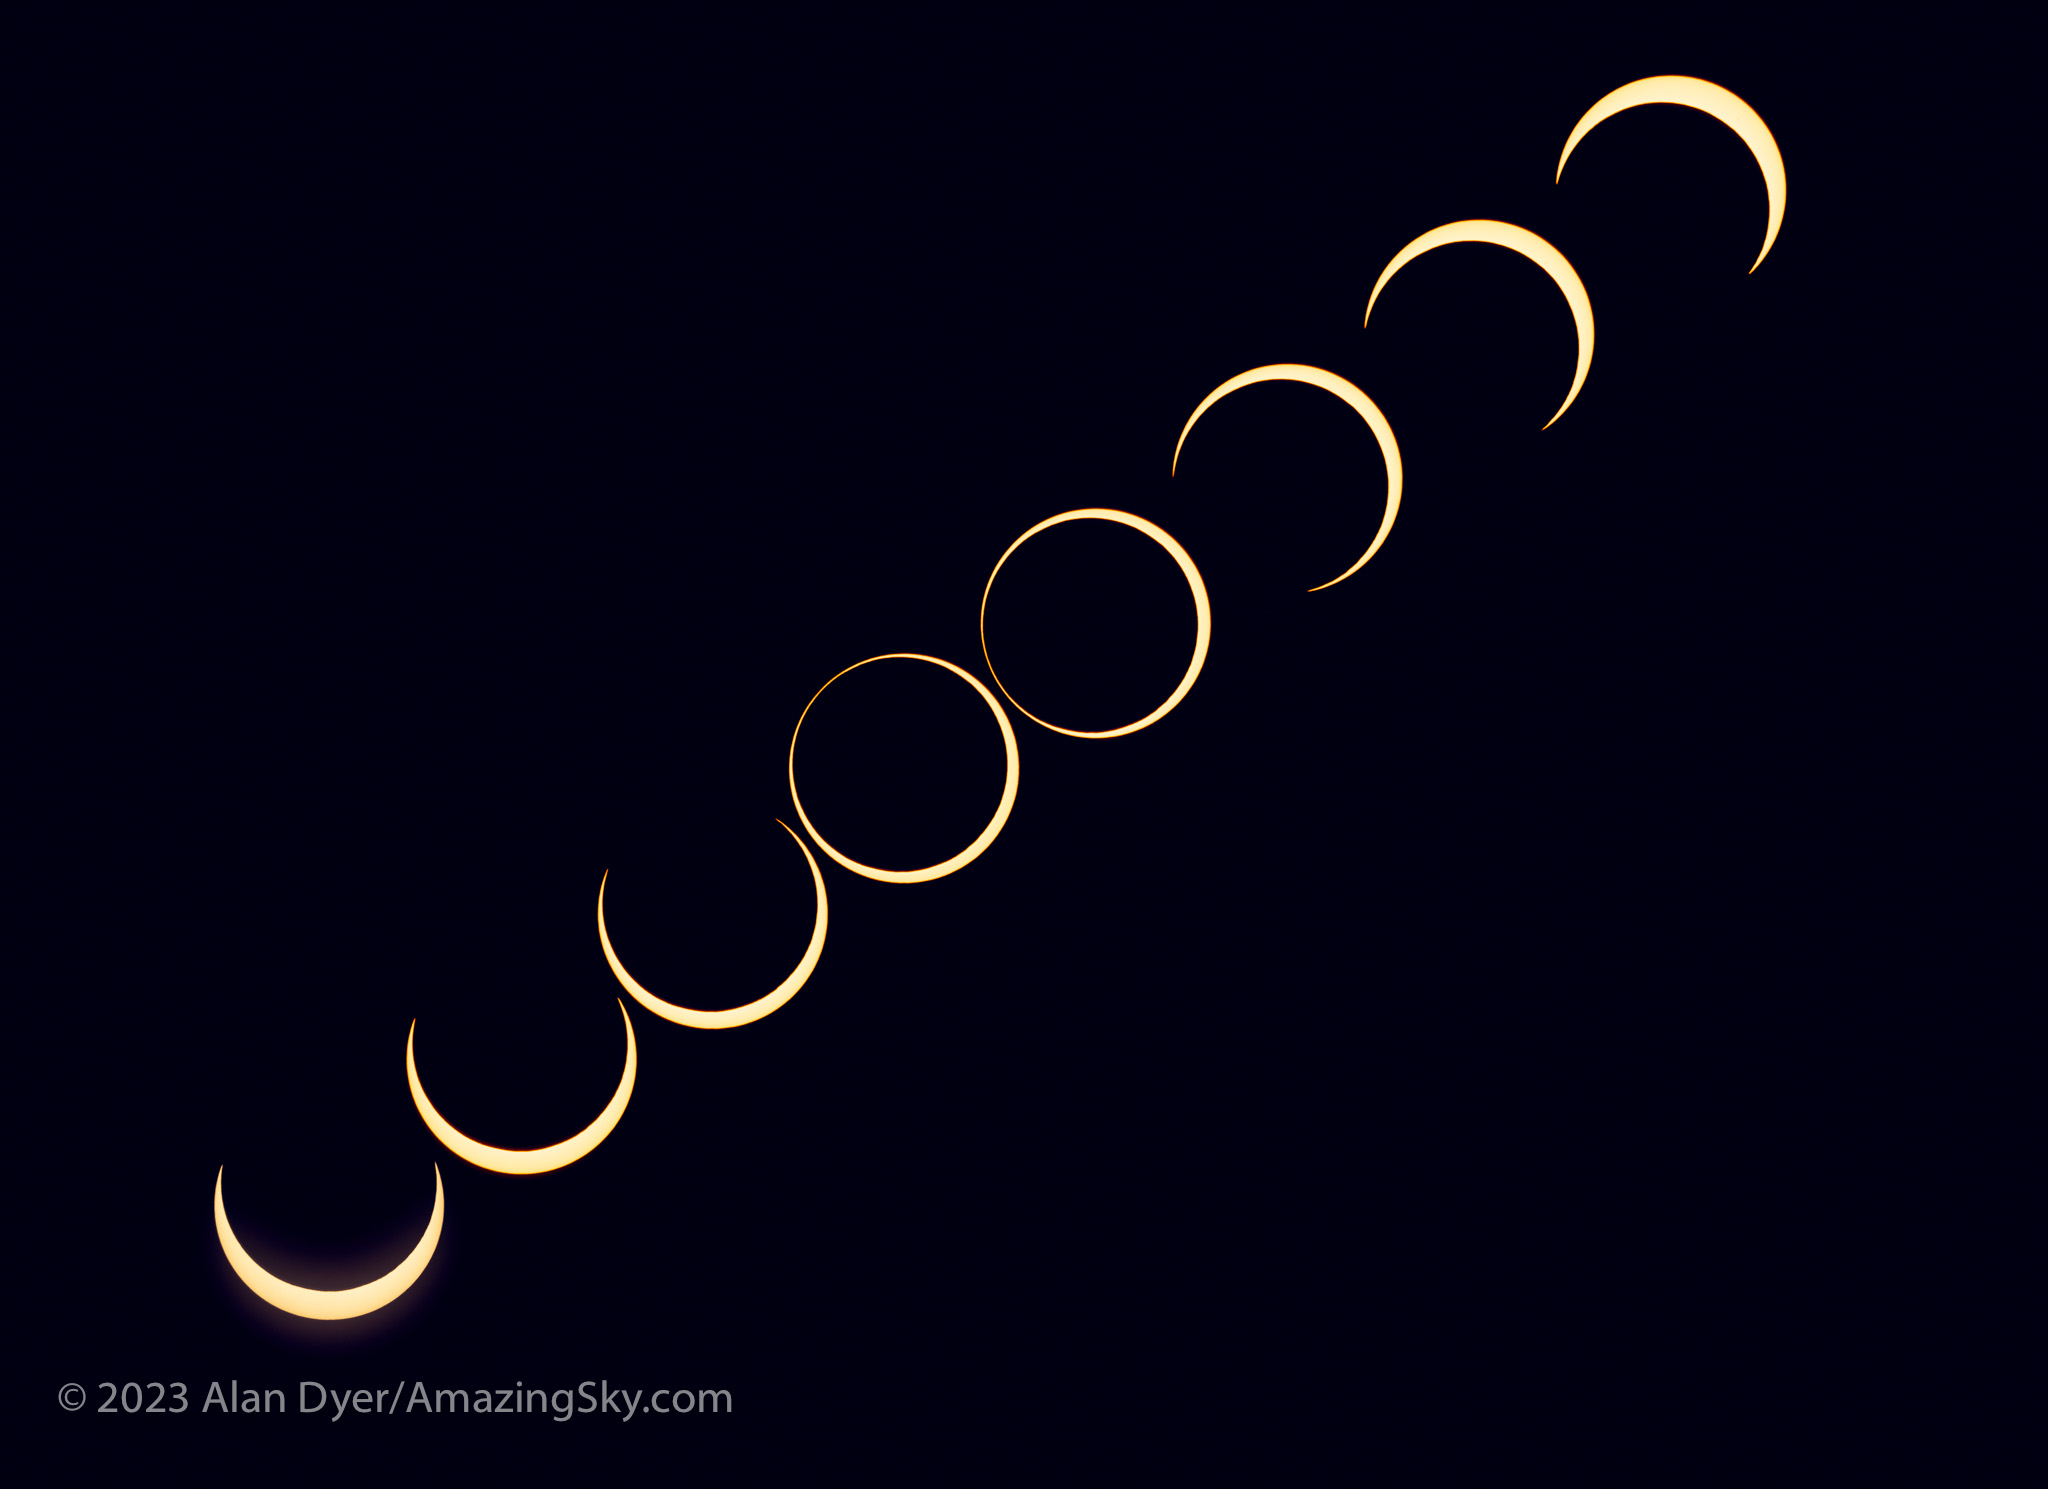
A third camera shooting a sequence with an untracked 400mm telephoto lens worked well. I used a subset of its images to create a still-image composite (above) and the full set for a time-lapse (below), with the position and motion of the Sun authentic, produced by the natural east-to-west motion of the sky. But against that you see the Moon’s orbital motion moving its dark disk down across the disk of the Sun. 

A time-lapse from 300 frames taken at 4-second intervals with the sky’s motion carrying the Sun across the frame.

As soon as annularity ended, everyone else started to pack up and leave. For them the show was over. Understandably. On many total eclipse tours I’ve been on we’ve been on the road back to the hotel after totality and the requisite happy group shot.

Eclipse success! The trophy shot after everyone else had left.

But at this eclipse my shooting plan dictated that I stick it out. By the end of the eclipse I was the last one standing, alone to enjoy last contact and then lunch, killing time for any road congestion to diminish, as I had to head to another motel for the post-eclipse night, in nearby Panguitch. 

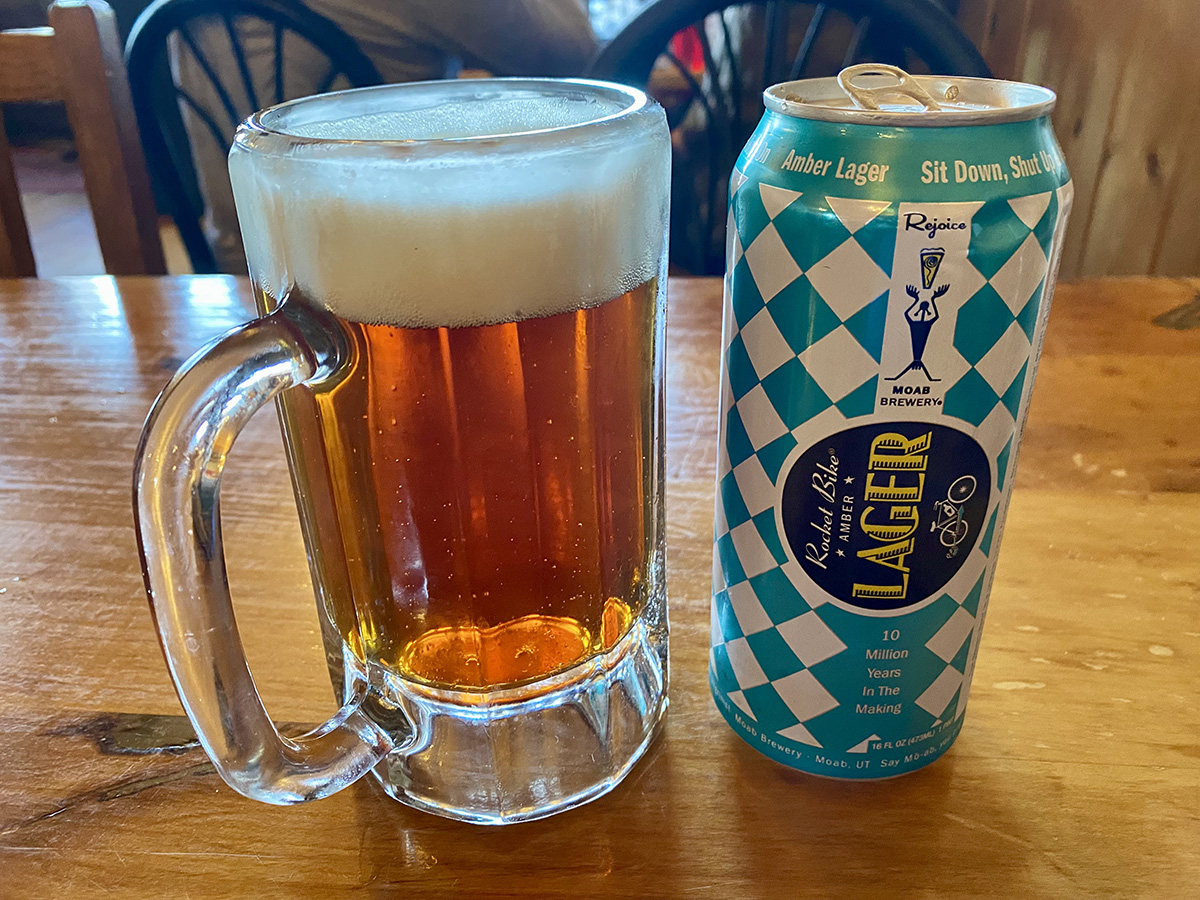
I had a celebratory dinner and Moab-brewed beer that night at Cowboy’s, the best restaurant in Panguitch, sporting my Annular 2023 eclipse hat! 

But the next day I started the drive north again, for the three-day trek back up I-15 to the border, then home. 

Priority one upon getting home was to finish processing images, and to include them in a revised version of my ebook How to Photograph the Solar Eclipses. It is linked to above and here on the title. Images of some sample pages from the revised edition are in the slide show below.

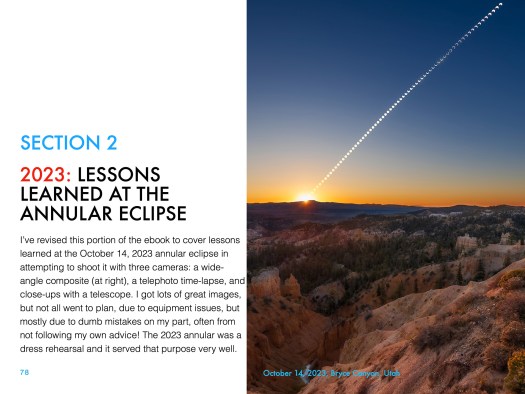
Post-annular, the book’s title remains the same, but I revised the pages in Chapter 4 on planning for the 2023 eclipse with pages on “lessons learned!” And there were several! 

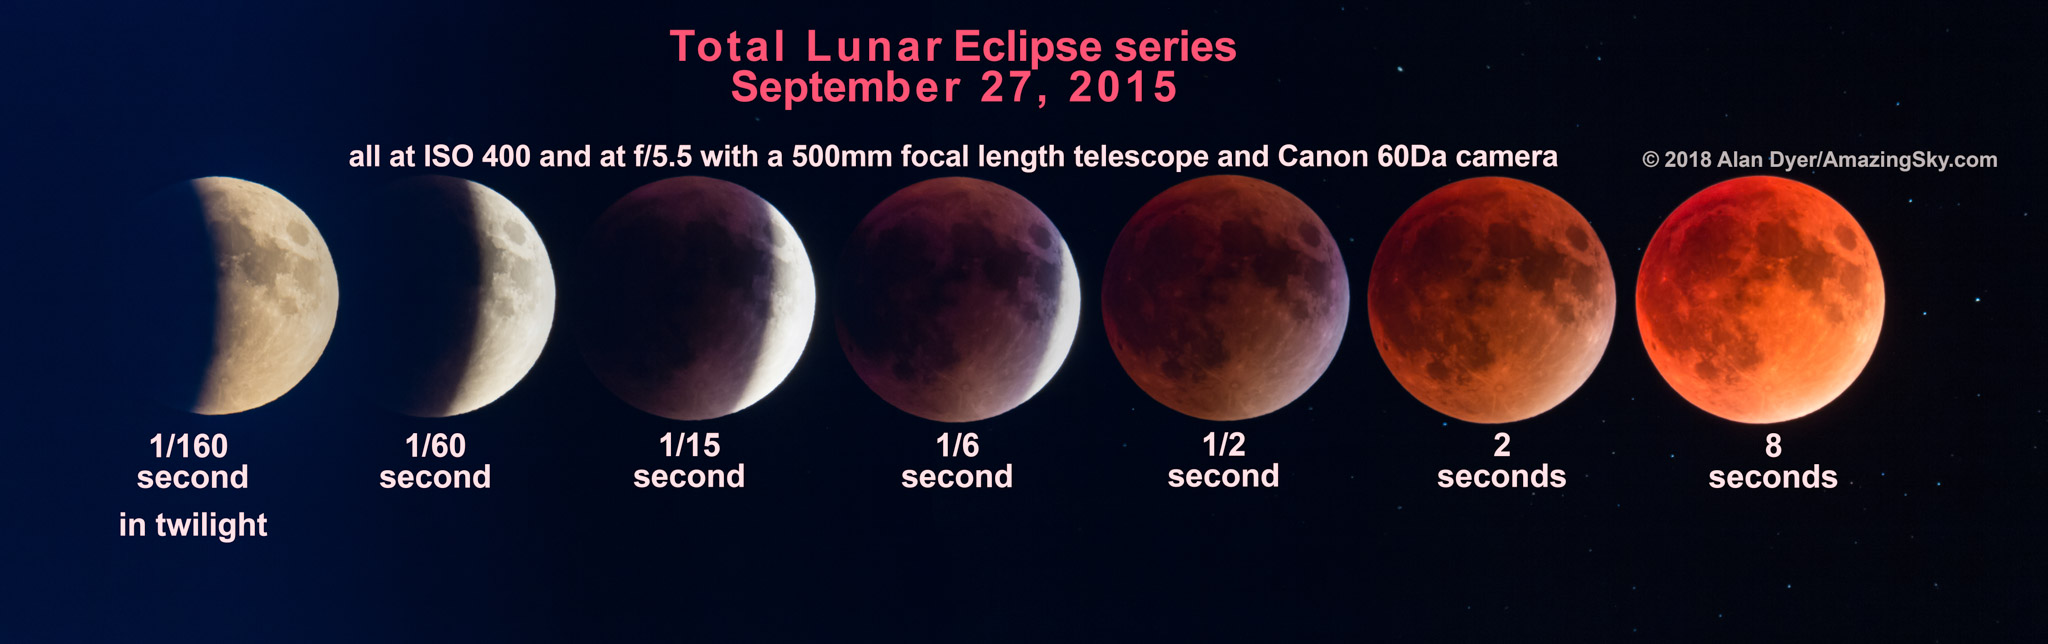
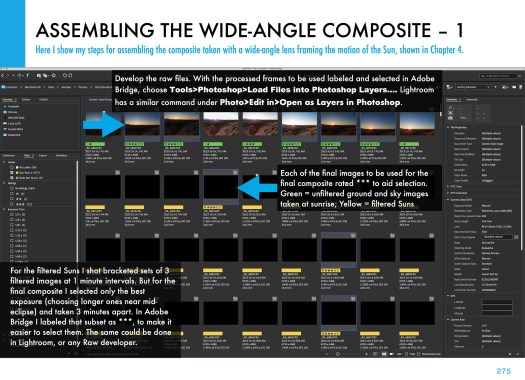
I expanded Chapter 11 on processing to include tutorials on assembling annular eclipse composites, now that I actually have some! 

Such as the composite of first- to last-contact telescopic close-ups below.

This is a composite of the various stages of the entire October 14, 2023 annular solar eclipse, from start (lower left) to end (upper right), with mid-eclipse at centre. So time runs forward from left to right, with the Suns positioned to reflect the approximate motion of the Sun in the morning sky when this eclipse occured at my site, with it rising higher through the progress of the eclipse. North is up in this image.

The new version of my ebook is 20 pages larger than the pre-annular edition. 

An email has gone out from eJunkie to all buyers of the earlier-edition PDF to alert them to the new version, and with a download link. Apple Books readers should get a notice when they open the book on their Mac or iPad in the Books app that a new version is available. 

I suspect that will be the last revision of my ebook before the big event – the total eclipse of the Sun on April 8, 2024. 

Here’s wishing us all clear skies for that one! That eclipse will indeed require a drive to Texas. This time I’ll remember that damned cable! 

— Alan Dyer, October 31, 2023

amazingsky.com 

How to Photograph the Lunar Eclipse


On the night of November 18/19 eclipse fans across North America can enjoy the sight of the Moon turning deep red. Here’s how to capture the scene.

Seeing and shooting this eclipse will demand staying up late or getting up very early. That’s the price to pay for an eclipse everyone on the continent can see.

Also, this is not a total eclipse of the Moon. But it’s the next best thing, a 97% partial eclipse – almost total! So the main attraction — a red Moon — will still be front and centre.

CLICK ON AN IMAGE to bring it up full screen for closer inspection.

NOT QUITE TOTAL

At mid-eclipse 97% of the disk of the Full Moon will be within Earth’s dark umbral shadow, and should appear a bright red colour to the eye and even more so to the camera. A sliver of the southern edge of the Moon will remain outside the umbra and will appear bright white, like a southern polar cap on the Moon. 

While some references will say the eclipse begins at 1:01 am EST, that’s when the Moon first enters the outer lighter penumbral shadow. Nothing unusual can be seen at that point, as the darkening of the Moon’s disk by the penumbra is so slight, you won’t notice any difference over the normally bright Full Moon. 

The extent of the umbra and penumbra at the October 2004 total lunar eclipse.

It isn’t until the Moon begins to enter the umbra that you can see a dark bite being taken out of the edge of the Moon. 

WHAT TO SEE

At mid-eclipse the Full Moon will look deep red or perhaps bright orange — the colours can vary from eclipse to eclipse, depending on the clarity of the Earth’s atmosphere through which the sunlight is passing to light the Moon. The red is the colour of all the sunsets and sunrises going on around the Earth during the eclipse.

The total lunar eclipse of August 2007. At the November 18 eclipse the bottom edge of the Moon, as it did here, will be bright, but brighter than it appears here.

The unique aspect of this eclipse is that for the 15 to 30 minutes around mid-eclipse we might see some unusual colour gradations at the edge of the umbral shadow, from sunlight passing through Earth’s upper atmosphere and ozone layer. This can tint the shadow edge blue or even green. 

Eclipse chart courtesy Fred Espenak / EclipseWise.com

WHERE CAN THE ECLIPSE BE SEEN?

The last lunar eclipse six months ago on the morning of May 26, 2021 (see my blog here) was visible during its total phase only from western North America, and then only just. However, this eclipse can be seen from coast to coast. 

Only from the very easternmost points in North America does the Moon set with the eclipse in progress, but during the inconsequential penumbral phase. All of the umbral phase is visible from the Eastern Seaboard, though the last stages will be in progress with the Moon low in the west in the pre-dawn hours. But that positioning can make for photogenic sight. 

The start, middle and end times of the umbral eclipse for Eastern and Pacific time zones. The background image is a simulation of the path of the November 18/19, 2021 eclipse when the Moon travels through the southern part of the umbra.

WHEN IS THE ECLIPSE?

The show really begins when the Moon begins to enter the umbra at 2:18 am EST (1:18 am CST, 12:18 am MST, 11:18 pm PST). 

But note, these times are for the night of November 18/19. If you go out on the evening of November 19 expecting to see the eclipse, you’ll be sadly disappointed as you will have missed it. It’s the night before! 

The eclipse effectively ends at 5:47 am EST (4:47 am CST, 3:47 am MST, 2:47 am PST) when the Moon leaves the umbra. That makes the eclipse 3 1/2 hours long, though the most photogenic part will be for the 15 to 30 minutes centred on mid-eclipse at 4:03 am EST (3:03 am CST, 2:03 am MST, 1:03 am PST). 

The sky at mid-eclipse from my home on Alberta, Canada (51° N)

WHERE WILL THE MOON BE?

The post-midnight timing places the Moon at mid-eclipse high in the south to southwest for most of North America, just west (right) of the winter Milky Way and below the distinctive Pleiades star cluster. 

The view from the West Coast.

The high altitude of the Moon (some 60º to 70º above the horizon) puts it well above haze and murk low in the sky, but makes it a challenge to capture in a frame that includes the landscape below for an eclipse nightscape. 

ASTRONOMY 101: The high altitude of the Moon is a function of both the eclipse timing in the middle of the night and its place on the ecliptic. The Full Moon is always 180° away from the Sun. So it sits where the Sun was six months earlier, in this case back in May, when the high Sun was bringing us warmer and longer days. Winter lunar eclipses are always high; summer lunar eclipses are always low, the opposite of what the Sun does. 

The view from the East Coast.

From eastern North America the Moon appears lower in the west at mid-eclipse, making it easier to frame above a landscape. For example from Boston the Moon is 30º up, lending itself to nightscape scenes. 

However, the sky will still be dark. To make use of the darkness to capture scenes which include the Milky Way, I suggest making the effort to travel away from urban light pollution to a dark sky site. That applies to all locations. Yes, that means a very long night!

PHOTO OPTIONS 1 — CAMERA ON A FIXED TRIPOD

With just a camera on a tripod, if you are on the East Coast (I show Boston here) it will be possible to frame the eclipsed Moon above a landscape with a 24mm lens (assuming a full frame camera; a cropped frame camera will require a 16mm lens). 

Framing the scene from the East Coast.

What exposure will be best will depend on the level of local light pollution at your site. But from a dark site, 30 seconds at ISO 1600 and f/2.8 should work well. But without tracking, you will see some star trailing at 30 seconds. Also try shorter exposures at a higher ISO. 

There’s lots of time, so take lots of shots. Include some short shots of just the Moon to blend in later, as the exposures best for picking up the Milky Way will still overexpose the Moon, even when it is darkest at mid-eclipse. 

Framing the scene from the West.

From western North America, including the landscape below will require wide lenses and a vertical format, with the Moon appearing quite small. But from a photogenic site, it might be worth the effort. 

Total eclipse of the Moon, December 20/21, 2010, taken from home with 15mm lens at f/3.2 and Canon 5D MkII at ISO 1600 for 1 minute single exposure, toward the end of totality.
Total eclipse of the Moon, December 20/21, 2010, taken from home with Canon 5D MKII and 24mm lens at f2.8 for stack of 4 x 2 minutes at ISO 800. Taken during totality..

However, as my images above from the December 2010 eclipse show, if there’s any haze, the Moon could turn into a reddish blob. 

You might be tempted to shoot with a long telephoto lens, but unless the camera is on a tracker, as below, the result will likely be a blurry mess. The sky moves enough during the long (over 1 second) exposures needed to pick up the reddened portion of the Moon that the image will smear when shot with long focal lengths. The solution is to use a sky tracker.

PHOTO OPTIONS 2 — CAMERA ON A TRACKER

Placing the camera on a motorized tracker that has been polar aligned to follow the motion of the stars opens up many more possibilities. 

Camera on a Star Adventurer tracker showing the field of a 24mm lens.

From a dark site, make use of the Moon’s position near the Milky Way to frame it and Orion and his fellow winter constellations. A 24mm lens will do the job nicely, in exposures up to 2 to 4 minutes long. But take short ones for just the Moon to layer in later. 

Showing the field of a 50mm lens.

A 50mm lens (again assuming a full frame camera) frames the Moon with the Pleiades and Hyades star clusters in Taurus. 

Showing the field of an 85mm lens,

Switching to an 85mm lens frames the clusters more tightly and makes the Moon’s disk a little larger. For me, this is the best shot to go for at this eclipse, as it tells the story of the eclipse and its unique position near the two star clusters. 

Showing the field of 200mm and 250mm lenses.

But going with a longer lens allows framing the red eclipsed Moon below the blue Pleiades cluster, a fine colour contrast. A 200mm lens will do the job nicely (or a 135mm on a cropped frame camera). 

Or, as I show here, the popular William Optics RedCat with its 250mm focal length will also work well. But such a lens must be on a polar-aligned tracker to get sharp shots. Use the Sidereal rate drive speed to ensure the sharpest stars over the 1 to 4 minutes needed to record lots of stars. 

Typical settings for tracker images, with an image of the January 2019 eclipse.

Take lots of exposures over a range of settings — long to bring out the deep sky detail and shorter to preserve detail in the reddened lunar disk. These can be layered and blended later in Photoshop, or in the layer-based image editing program of your choice, such as Affinity Photo or ON1 Photo RAW. 

PHOTO OPTIONS 3 — THROUGH A TELESCOPE

While I think the tracked wide-field options are some of the best for this eclipse, many photographers will want frame-filling close-ups of the red Moon. While a telescope will do the job, unless it has motors to track the sky, your options are limited.

Phone on a simple Dobsonian reflector.

A phone clamped to the eyepiece of a telescope can capture the shrinking bright part of the eclipsed Moon as the Moon enters more deeply into the umbra. Exposures for the bright part of the Moon are short enough a motor drive on the telescope is not essential. 

But if you haven’t shot the Moon with this gear before, eclipse night is not the time to learn. Practice on the Moon before the eclipse. 

DSLR on a beginner refractor telescope showing the adapter.

For shooting with a DSLR camera through a telescope you’ll need a special camera adapter nosepiece and T-ring for your camera. Again, if you don’t have the gear and the experience doing this, I would suggest not making the attempt at two in the morning on eclipse night! 

DSLR on a beginner reflector with an often necessary Barlow lens.

For example, owners of typical beginner reflectors are often surprised to find their cameras won’t even reach focus on their telescope. Many are simply not designed for photography. Adding a Barlow lens is required for the camera to reach focus, though without a drive, exposures will be limited to short (under 1/15s) shots of the bright part of the Moon.

An exposure composite of short and long exposures.

The challenge with this and all lunar eclipses is that the Moon presents a huge range of brightness. Short snapshots can capture the bright part of the Moon not in the umbra, but the dark umbral-shaded portion requires much longer exposures, usually over one second. 

Your eye can see the whole scene (as depicted above) but the camera cannot, not in one exposure. This example is a “high dynamic range” blend of several exposures. 

A series of the September 27, 2015 total lunar eclipse to demonstrate an exposure sequence from partial to total phase.

Plus as the eclipse progresses, longer and longer exposures are needed to capture the sequence as the Moon is engulfed by more of the umbra. 

After mid-eclipse, the exposures must get progressively shorter again in reverse order. So attempting to capture an entire sequence requires a lot of exposure adjustments. 

TIP: Bracket a lot! Take lots of frames at each burst of images shot every minute, or however often you wish to capture the progress of the eclipse for a final set. Unlike total solar eclipses, lunar eclipses provide lots of time to take lots of images. 

PHOTO OPTIONS 4 — THROUGH A TRACKING TELESCOPE

If you want close-ups of the eclipsed red Moon, you will need to use a mount equipped with a tracking motor, such as an equatorial mount shown here. But for use with telephoto lenses and short telescopes, a polar-aligned sky tracker, as above, will work. 

A small apo refractor on an equatorial mount with typical settings for mid-eclipse.

Exposures can now be several seconds long, and at a lower ISO speed for less noise, allowing the Moon to be captured in sharp detail and with great colour. Long exposures will even pick up stars near the Moon. 

However, when shooting close-ups, use the Lunar drive rate (if your mount offers that choice) to follow the Moon itself, as it has a motion of its own against the background stars. It’s that orbital motion that takes it from west to east (right to left) through the Earth’s shadow. 

The fields of view and size of the Moon’s disk with typical telescope focal lengths.

Filling the camera frame with the Moon requires a surprising amount of focal length. The Moon appears big to our eyes, but is only 1/2º across. 

Even with 800mm of focal length, the Moon fills only a third of a full frame camera field. Using a cropped frame camera has the advantage of tightening the field of view, but it still takes 1200mm to 1500mm of focal length to fill the frame. 

But I wouldn’t worry about doing so, as longer focal lengths typically also come with slower f-ratios, requiring longer exposure times or higher ISOs, both of which can blur detail. 

A camera on an alt-azimuth GoTo Schmidt-Cassegrain.

For close-ups, a polar-aligned equatorial mount is best. But if your telescope is a GoTo telescope on an alt-azimuth mount (such as a Schmidt-Cassegrain shown here), you should be able to get good shots.

The field of view will slowly rotate during the eclipse, making it more difficult to later accurately assemble a series of shots documenting the entire sequence. 

But any one shot should be fine, though it might be best to keep exposures shorter by using a higher ISO speed. As always, take lots of shots at different settings. 

You won’t be able to tell which is sharpest until you inspect them later at the computer.

TIP: People worry about exposures, but the flaw that ruins many eclipse shots is poor focus. Use Live View to focus carefully on the sharp edge of the bright part of the Moon. Or better yet, focus on a bright star nearby. Zoom up to 10x to make it easier to see when the star is in sharpest focus. It can be a good idea to refocus through the night as the changing temperature can shift the focus point of long lenses and telescopes. That might take moving the scope over to a bright star, which won’t be possible if you need to preserve the framing for a composite. 

PHOTO OPTIONS 5 — HDR COMPOSITES

Using an equatorial mount tracking at the lunar rate keeps the Moon stationary. This opens up the possibility of taking a series of shots over the wide range of exposures needed to capture the Moon from bright to dark, to assemble later in processing. Take 5 to 7 shots in quick succession. 

An HDR composite from the December 2010 eclipse.

High dynamic range software can blend the images, or use luminosity masks created by extension panels for Photoshop such as Lumenzia, TK8 or Raya Pro. Either technique can create a final image that looks like what your eye saw. The key is making sure all the images are aligned. HDR software likely won’t align them for you very well.

The January 2019 eclipse layered and blended in Photoshop.

Blending multiple exposures will also be needed to properly capture the eclipsed Moon below the Pleiades, similar to what I show here (and below) from the January 2019 eclipse when the Moon appeared near the Beehive star cluster. 

PHOTO OPTIONS 6 — ECLIPSE TRACK COMPOSITES

Another popular form of eclipse image (though also one rife for laughably inaccurate fakes) is capturing the entire path of the Moon across the sky over the duration of the eclipse from start to end. 

The track of the September 2015 eclipse, accurately assembled to correct scale.

It can be done with a fixed camera on a tripod but requires a wide (14mm to 20mm) and properly framed lens, to capture the sequence as it actually appeared to proper scale, and not created by just pasting over-sized moons onto a sky to “simulate” the scene, usually badly. By the end of the day on November 19 the internet will be filled with such ugly fakes. 

You could set the camera at one exposure setting (one best for when the Moon and sky are darkest at mid-eclipse) and let the camera run, shooting frames every 5 seconds or so. The result might work well as a time-lapse sequence, showing the bright sky darkening, then brightening again. 

But chances are the frames taken at the start and end when the sky is lit by full moonlight will be blown out. It will still take some manual camera adjustments through the eclipse. 

For a still-image composite, you should instead expose properly for the Moon’s disk at all times, a setting that will change every few minutes, then take a long exposure at mid-eclipse to pick up the stars and Milky Way. The short Moon shots are then blended into the base-layer sky image later in processing. 

Framing the eclipse path for the start of the sequence.
Framing the path so the Moon ends up at a desired location on the frame.

If the camera has been well-framed and was not moved over the 3.5 hours of the eclipse, the result is an accurate and authentic record of the Moon’s path and passage into the shadow, and not a faked atrocity! 

But creating a real image requires a lot of work at the camera, and at the computer. 

TIP: Shooting for composites is not work I would recommend attempting while also running other cameras. Focus on one type of image and get it right, rather than trying to do too many and doing them all poorly. 

PHOTO OPTION 7 — ECLIPSE SHADOW COMPOSITE

One of the most striking types of lunar eclipse images is a close-up composite showing the Moon passing through the Earth’s umbral shadow, with the arc of the shadow edge on the Moon defining the extent of the shadow, which is about three times larger than the Moon.

Such a composite can be re-created later by placing individual exposures accurately on a wider canvas, using screen shots from planetarium software as a template guide. 

A composite of the Moon moving through the umbra.

But to create an image that is more accurate, it is possible to do it “in camera.” Unlike in the film days, we don’t have to do it with multiple exposures onto one piece of film. 

We take lots of separate frames with a telescope or lens wide enough to contain the entire path of the Moon through the umbra. A polar-aligned equatorial mount tracking at the sidereal rate is essential. That way the scope follows the stars, not the Moon, and so the Moon travels across the frame from right to left. 

Framing for a shadow composite.

Start such a sequence with the Moon at lower right if you are framing just the path through the shadow. Use planetarium software (I used Starry Night™ to create the star charts for this blog) to plan the framing for your camera, lens and site, so the Moon ends up in the middle of the frame at mid-eclipse. This is not a technique for the faint of heart!  

A shadow-defining composite from January 2019, with the Moon near the Beehive cluster.

An interesting variation would be using a 200mm to 250mm lens to frame the Moon’s shadow passage below the Pleiades, to create an image as above. That will be unique. Again, an accurately aligned tracker turning at the sidereal rate will be essential.

Acquiring the frames for any composite takes constantly adjusting the exposure during the length of eclipse, which can try your patience and gear during the wee hours of the morning. 

I’ll be happy just to get a good set of images at mid-eclipse to make a single composite of the red Moon below the Pleiades. 

TIP: It could be cold and lenses can frost over. A battery-powered heater coil on the optics might be essential. And spare warm batteries.

The 4-day-old waxing crescent Moon on April 8, 2019 in a blend of 7 exposures from 1/30 second to 2 seconds, blended with luminosity masks in Photoshop.

PRACTICE!

To test your equipment and your skills at focusing, you can use the waning crescent Moon in the dawn hours on the mornings of October 29 to November 2 or, after New Moon on November 4, the waxing crescent Moon on the evenings of November 6 to 10. While the crescent Moon isn’t as bright as the Full Moon, it will be a good stand in for the bright part of the eclipsed Moon when it is deep in the umbra. 

Even better, the dark part of the crescent Moon lit by Earthshine is a good stand-in for the part of the Moon in the umbra. Like the eclipsed Moon, the crescent Moon’s bright and dark parts can’t be captured in one exposure. So it’s a good test for the range of exposures you’ll need for the eclipse, for practising changing settings on your camera, and for checking your tracking system.  

The crescent Moon is also useful to test your manual focusing, though the sharp detail along the terminator (the line dividing the bright crescent from the earthlit dark part of the Moon) is much easier to focus on than the flat, low contrast Full Moon.

A selfie of me looking up at the total eclipse of the Moon on January 20, 2019, using binoculars to enjoy the view.

DON’T FORGET TO LOOK!

Amid all the effort needed to shoot this or any eclipse, lunar or solar, don’t forget to just look at it. No photo can ever quite capture the glowing nature of the eclipsed Moon set against the stars. 

A selfie of the successful eclipse chaser bagging his trophy, the total lunar eclipse of January 20, 2019.

I wish you clear skies and good luck with your lunar eclipse photography. If you miss it, we have two more visible from North America next year, both total eclipses, on May 15/16 and November 8, 2022. 

— Alan, www.amazingsky.com 

How to Photograph the Geminid Meteor Shower


The annual Geminid meteor shower peaks under ideal conditions this year, providing a great photo opportunity. 

The Geminids is the best meteor shower of the year, under ideal conditions capable of producing rates of 80 to 120 meteors an hour, higher than the more widely observed Perseids in August. And this year conditions are ideal! 

The Perseids get better PR because they occur in summer. For most northern observers the Geminids demand greater dedication and warm clothing to withstand the cool, if not bitterly cold night. 

A Good Year for Geminids

While the Geminids occur every year, many years are beset by a bright Moon or poor timing. This year conditions couldn’t be better:

• The shower peaks on the night of December 13-14 right at New Moon, so there’s no interference from moonlight at any time on peak night.

• The shower peaks in the early evening of December 13 for North America, about 8 p.m. EST (5 p.m. PST). This produces a richer shower than if it peaked in the daytime hours, as it can in some years. 

The two factors make this the best year for the Geminids since 2017 when I shot all the images here. 

A composite of the 2017 Geminid meteor shower looking east to the radiant point. This is a stack of 40 images, each a 30-second exposure at f/2.5 with the Rokinon 14mm SP lens and Canon 6D MkII at ISO 6400. The images are the 40 frames with meteors out of 357 taken over 3.25 hours. The ground is a stack of 8 images, mean combined to smooth noise. The background base-image sky is from one exposure. The camera was on a fixed tripod, not tracking the sky. I rotated and moved each image in relation to the base image and around Polaris at upper left, in order to place each meteor at approximately the correct position in relation to the background stars, to preserve the effect of the meteors streaking from the radiant near Castor at centre.

What Settings to Use?

To capture the Geminids, as is true of any meteor shower, you need:

  • A good DSLR or mirrorless camera set to ISO 1600 to 6400.
  • A fast, wide-angle lens (14mm to 24mm) set to f/2.8 or wider, perhaps f/2. Slow f/4 to f/.6 kit zooms are not very suitable.
  • Exposures of 30 to 60 seconds each.
  • An intervalometer to fire the shutter automatically with no more than 1 second between exposures. As soon as one exposure ends and the shutter closes, the next exposure begins. 
  • Take hundreds of images over as long a time period as you can on peak night.
Use an intervalometer to control the shutter speed, with the camera on Bulb. Set the interval to one second to minimize the time the shutter is closed.

Out of hundreds of images, a dozen or more should contain a meteor! You increase your chances by using:

  • A high ISO, so the meteor records in the brief second or two it appears.
  • A wide aperture, to again increase the light-gathering ability of the lens for those fainter meteors.
  • A wide-angle lens so you capture as much area of sky as possible. 
  • Running two or more cameras aimed at different spots, perhaps to the east and south to maximize sky coverage.
  • A minimum interval between exposures. Increase the interval to more than a second and you know it’s during that “dark time” when the shutter is closed that the brightest meteor of the night will occur. Keep the shutter open as much as possible.
This sky chart looking east for December 13, 2020 shows the position of the radiant and the constellation of Gemini at about 7 p.m. local time. Orion is just rising in the east.

When to Shoot?

The radiant point of the shower meteors in Gemini rises in the early evening, so you might see some long, slow Earth-grazing meteors early in the night, streaking out of the east.

For Europe the peak of the shower occurs in the middle of the night of December 13/14. 

For North America, despite the peak occurring in the early evening hours, meteors will be visible all night and will likely be best after your local midnight.

So wherever you are, start shooting as the night begins and keep shooting for as long as you and your camera can withstand the cold! 

A single bright meteor from the Geminid meteor shower of December 2017, dropping toward the horizon in Ursa Major. Gemini itself and the radiant of the shower is at top centre. It is one frame from a 700-frame sequence for stacking and time-lapses. The ground is a mean stack of 8 frames to smooth noise. Exposures were 30 seconds at ISO 6400 with the Rokinon 14mm lens at f/2.5 and Canon 6D MkII.

Where to Go?

To take advantage of the moonless night, get away from urban light pollution to as dark a sky as you can. Preferably, put the major urban skyglow to the west or north. 

While from brightly lit locations the very brightest meteors will show up, they are the rarest, so you’d be fortunate to capture one in a night of shooting from a city or town. 

From a dark site, you can use longer exposures, wider apertures and higher ISOs to boost your chances of capturing more and fainter meteors. Plus the Milky Way will show up. 

The Geminid meteor shower of December 13, 2017 in a view framing the winter Milky Way from Auriga (at top) to Puppis (at bottom) with Gemini itself, the radiant of the shower at left, and Orion at right. The view is looking southeast. This is a composite stack of one base image with the brightest meteor, then 20 other images layered in each with a meteor. The camera was not tracking the sky, so I rotated and moved each of the layered-in frames so that their stars mroe or less aligned with the base layer. The images for this composite were taken over 107 minutes, with 22 images containing meteors picked from 196 images in total over that time. Each exposure was 30 seconds with the Rokinon 14mm SP lens at f/2.5 and Canon 6D MkII at ISO 6400.

Where to Aim?

You can aim a camera any direction, even to the west. 

But aiming east to frame the constellation of Gemini (marked by the twin stars Castor and Pollux) will include the radiant point, perhaps capturing the effect of meteors streaking away from that point, especially if you stack multiple images into one composite, as most of my images here are. 

The Star Adventurer star tracker, on its optional equatorial wedge to aid precise polar alignment of its motorized rotation axis.

Using a Tracker

Using a star tracker such as the Sky-Watcher Star Adventurer shown here, makes it possible to obtain images with stars that remain untrailed even in 1- or 2-minute exposures. The sky remains framed the same through hours of shooting, making it much easier to align and stack the images for a multi-meteor composite. 

A tracked composite showing the 2017 Geminid meteors streaking from the radiant point in Gemini at upper left. This is a stack of 43 exposures, each 1-minute with the 24mm Canon lens at f/2.5 and filter-modified Canon 5D MkII camera at ISO 6400, set fast to pick up the fainter meteors. These were 43 exposures with meteors (some with 2 or 3 per frame) out of 455 taken over 5 hours. The background sky comes from just one of the exposures. All the other frames are masked to show just the meteor.

However, a tracker requires accurate polar alignment of its rotation axis (check its instruction manual to learn how to do this) or else the images will gradually shift out of alignment through a long shoot. Using Photoshop’s Auto-Align feature or specialized stacking programs can bring frames back into registration. But good polar alignment is still necessary. 

If you aim east you can frame a tracked set so the first images include the ground. The camera frame will move away from the ground as it tracks the rising sky. 

A composite of the 2017 Geminid meteor shower, from the peak night of December 13, with the radiant in Gemini, at top, high overhead. So meteors appear to be raining down to the horizon. This was certainly the visual impression. This is a stack of 24 images, some with 2 or 3 meteors per frame, each a 30-second exposure at f/2.5 with the Rokinon 14mm SP lens and Canon 6D MkII at ISO 6400. The images are the 24 frames with meteors out of 171 taken over 94 minutes. The ground is a stack of 8 images, mean combined to smooth noise. The background base-image sky is from one exposure. The camera was on a fixed tripod, not tracking the sky.

Using a Tripod and Untracked Camera

The simpler method for shooting is to just use a camera (or two!) on a fixed tripod, and keep exposures under about 30 seconds to minimize star trailing. That might mean using a higher ISO than with tracked images, especially with slower lenses. 

The work comes in post-processing, as stacking untracked images will produce a result with meteors streaking in many different orientation and locations, ruining the effect of meteors bursting from a single radiant. 

To make it easier to stack untracked images, try to include Polaris in the field of the wide-angle lens, perhaps in the upper left corner. The sky rotates around Polaris, so it will form the easy-to-identify point around which you can manually rotate images in editing to bring them back into at least rough alignment.

Covering the steps to composite tracked and untracked meteor shower images is beyond the purview of this blog. 

But I cover the process in multi-step tutorials in my How to Photograph and Process Nightscapes and Time-Lapses ebook, linked to above. 

The images shown here were layered, masked and blended with those steps and are used as examples in the book’s tutorials. 

A trio of Geminid meteors over the Chiricahua Mountains in southeast Arizona, with Orion and the winter stars setting. I shot this at the end of the night of December 13/14, 2017 with the rising waxing crescent Moon providing some ground illumination. This is a stack of one image for the ground and two fainter meteors, and another image with the bright meteor. The camera was on a Star Adventurer Mini tracker so the stars are not trailed, though the ground will be slightly blurred. All were 30-second exposures at f/2.8 with the 24mm Canon lens and filter-modified Canon 5D MkII at ISO 5000.

Keeping Warm

Keeping yourself warm is important. But your camera is going to get cold. It should work fine but its battery will die sooner than it would on a warm night. Check it every hour, and have spare, warm batteries ready to swap in when needed.

Lenses can frost up. The only way to prevent this is with low-voltage heater coils, such as the DewDestroyer from David Lane. It works very well. Other types are available on Amazon. 

Good luck and happy meteor hunting!

— Alan, December 2, 2020 / © 2020 AmazingSky.com 


Arc of the Low Summer Moon


Arc of the Summer MoonThe summer Full Moon arcs low across the southern sky, mimicking the path of the winter Sun.

This is a project I had in mind for the last month, and hoped to capture at the July Full Moon. A clear, dry, and cooperative night provide the chance.

The still images are composites of 40 images of the Moon traveling across the sky from dusk to dawn, taken at 10-minute intervals. They are layered onto a blend of background images of the 10 p.m. dusk sky (left), 2 a.m. middle-of-the-night sky (middle), and 5 a.m dawn sky (right).

As a bonus, the 10 p.m. sky shows some dark crepuscular rays in the twilight, while at 2 a.m. the Moon was in light cloud and surrounded by iridescent colours. By 5 a.m. denser clouds were moving in to obscure the Moon.

Arc of the Summer Moon

I shot the still image composite (above) and time-lapse movie (below) to illustrate the low arc of a summer Full Moon. In summer (June or July) the Full Moon sits at a similar place near the ecliptic as does the Sun in winter near the December solstice.

From the northern hemisphere the low position of the winter Sun gives us the short, cold days of winter. In summer, the similar low position of the Full Moon simply gives us a low Full Moon! But it is one that can be impressive and photogenic.

The time-lapse movie uses all 400 frames of the moving Moon superimposed onto the same background sky images, but now dissolving from one to the other.


The movie is 4K in resolution, though can be viewed at a smaller resolution to speed up playback if needed.


For the technically minded:

The Moon disks in the time-lapse and still composite come from a series of short 1/15-second exposures, short enough to record just the disks of the bright Moon set against a dark, underexposed sky.

I took these shots every minute, for 400 in total. They are blended into the bright background sky images using a Lighten blend mode, both in Photoshop for the still image, and in Final Cut for the movie.

The background sky images are longer exposures to record the sky colours, and stars (in the case of the 2 a.m. image). They are blended with gradient masks for the still image, but dissolved from one to the other in the time-lapse movie.

I shot the frames with a 15mm full-frame fish-eye lens and Canon 6D, with the camera not moved during the 7-hour shoot.

— Alan, July 12, 2017 / © 2017 Alan Dyer / amazingsky.com 

Rising of the “Strawberry” Moon


The Rising Strawberry Moon of June 9, 2017 (Composite)

The Full Moon of June rose into a twilight sky over a prairie pond. 

On June 9, the clouds cleared to present an ideal sky for capturing the rising of the so-called “Strawberry Moon,” the popular name for the Full Moon of June.

The lead image is a composite of 15 frames, taken at roughly 2.5-minute intervals and stacked in Photoshop with the Lighten blend mode.

The image below is a single frame.

The Rising Strawberry Moon of June 9, 2017
The rising Full Moon of June, dubbed the “Strawberry Moon” in the media, as seen rising over a prairie pond in southern Alberta, on June 9, 2017. This is a single exposure stack, from a time-lapse sequence of 1100 frames, with images taken at two second intervals. Shot with the Canon 6D and 200mm lens.
I set up beside a small local prairie pond, to shoot the moonrise over the water. Ducks enjoyed the view and a muskrat swam by at one point.

I shot over 1100 frames, at two-second intervals to create a time-lapse of the rising Moon, as it brightened and turned from yellow-orange (not quite strawberry pink) to a bright white.

Here’s the time-lapse vignette.

Click on HD for the best view.

While the Harvest Moon gets lots of PR, as this sequence shows any Full Moon can provide a fine sight, and look yellow, due to absorption of the blue wavelengths by the atmosphere as the Moon rises, or as it sets.

However, the timing can vary from Full Moon to Full Moon. This one was ideal, with it rising right at sunset. If the Moon comes up too late, the sky might have already darkened, producing too great a difference in brightness between the Moon and background sky to be photogenic.

But what of these Moon names? How authentic are they? 

Who called this the Strawberry Moon? Native Americans? No. Or at best only one or two nations. 

Check the site at Western Washington University at http://www.wwu.edu/depts/skywise/indianmoons.html and you’ll see there were an enormous number of names in use, assuming even this listing is authentic. 

The names like “Strawberry Moon” that are popularized in the media today come from the American Farmers Almanac, and everyone – science writers and bloggers – ends up copying and pasting the same wrong, or at best misleading, information from the Almanac. 

Search for “Strawberry Moon” or “Moon names” and you’ll find the same explanation repeated verbatim and unquestioned by many writers. Alas, the Almanac is not an authoritative source – after all, they were the source of a misleading definition of Blue Moon decades ago. 

Yes, people around the world may have long had names for months and moons, but they were not necessarily the ones that make the rounds of news sites and blogs today. Most are a modern media concoction. A few years ago, pre-internet, no one knew about nor used these names. 
— Alan, June 10, 2017 / © 2017 Alan Dyer / www.amazingsky.com

The Lunar Eclipse, to True Scale


This is a multiple-exposure composite of the total lunar eclipse of Sunday, September 27, 2015, as shot from Writing-on-Stone Provincial Park, Alberta, Canada. From this location the Moon rose in the east at lower left already in partial eclipse. As it rose it moved into Earth’s shadow and became more red and the sky darkened from twilight to night, bringing out the stars. Then, as the Moon continued to rise higher it emerged from the shadow, at upper right, and returned to being a brilliant Moon again, here overexposed and now illuminating the landscape with moonlight. The disks of the Moon become overexposed here as the sky darkened because I was setting exposures to show the sky and landscape well, not just the Moon itself. That’s because I shot the frames used to assemble this multiple-exposure still image primarily for use as a time-lapse movie where I wanted the entire scene well exposed in each frame. Indeed, for this still image composite of the eclipse from beginning to end, I selected just 40 frames taken at 5-minute intervals, out of 530 I shot in total, taken at 15- to 30-second intervals for the full time-lapse sequence. All were taken with a fixed camera, a Canon 6D, with a 35mm lens, to nicely frame the entire path of the Moon, from moonrise at left, until it left the frame at top right, as the partial eclipse was ending. The ground comes from a blend of 3 frames taken at the beginning, middle and end of the sequence, so is partly lit by twilight, moonlight and starlight. Lights at lower left are from the Park’s campground. The sky comes from a blend of 2 exposures: one from the middle of the eclipse when the sky was darkest and one from the end of the eclipse when the sky was now deep blue. The stars come from the mid-eclipse frame, a 30-second exposure. PLEASE NOTE: The size of the Moon and its path across the sky are accurate here, because all the images for this composite were taken with the same lens using a camera that did not m

My multiple-exposure composite shows the complete September 27, 2015 total lunar eclipse to true scale, with the Moon accurately depicted in size and position in the sky.

From my location at Writing-on-Stone Provincial Park in southern Alberta, Canada, the Moon rose in the east at lower left already in partial eclipse.

As it rose it moved into Earth’s shadow and became more red, while the sky darkened from twilight to night, bringing out the stars.

Then, as the Moon continued to rise higher it emerged from Earth’s shadow, at upper right, and returned to a brilliant Full Moon again, here overexposed and now illuminating the landscape with moonlight.


TECHNICAL

The disks of the Moon become overexposed in my composite as the sky darkened because I was setting exposures to show the sky and landscape well, not just the Moon itself. That’s because I shot these frames – and many more! – primarily for use as a time-lapse movie where I wanted the entire scene well exposed in each frame.

Indeed, for this still-image composite of the eclipse from beginning to end, I used just 40 frames taken at 5-minute intervals, selected from 530 I shot, taken at 15- to 30-second intervals for the full time-lapse sequence.

All were taken with a fixed camera, a Canon 6D, with a 35mm lens, to nicely frame the entire path of the Moon, from moonrise at lower left, until it exited the frame at top right, as the partial eclipse was ending.

In the interest of full disclosure, the ground comes from a blend of three frames taken at the beginning, middle, and end of the sequence, and so is partly lit by twilight and moonlight, to reveal the ground detail better than in the single starlit frame from mid-eclipse. Lights at lower left are from the Park’s campground.

The background sky comes from a blend of two exposures: one from the middle of the eclipse when the sky was darkest, and one from the end of the eclipse when the sky was now lit deep blue. The stars come from the mid-eclipse frame, a 30-second exposure.


MY RANT FOR REALITY

So, yes, this is certainly a composite assembled in Photoshop – a contrast to the old days of film where one might attempt such an image just by exposing the same piece of film multiple times, usually with little success.

However … the difference between this image and most you’ve seen on the web of this and other eclipses, is that the size of the Moon and its path across the sky are accurate, because all the images for this composite were taken with the same lens using a camera that did not move during the 3-hour eclipse.

This is how big the Moon actually appeared in the sky in relation to the ground and how it moved across the sky during the eclipse, in what is essentially a straight line, not a giant curving arc as in many viral eclipse images.

And, sorry if the size of the Moon seems disappointingly small, but it is small! This is what a lunar eclipse really looks like to correct scale.

By comparison, many lunar eclipse composites you’ve seen are made of giant moons shot with a telephoto lens that the photographer then pasted into a wide-angle sky scene, often badly, and pasted in locations on the frame that usually bear no resemblance to where the Moon actually was in the sky, but are just placed where the photographer thought would look the nicest.

You would never, ever do that for any other form of landscape photography, at least not without having your reputation tarnished. But with the Moon it seems anything is permitted, even amongst professional landscape photographers.

No, you cannot just place a Moon anywhere you like in your image, eclipse or no eclipse, then pass it off as a real image. Fantasy art perhaps. Fine. But not a photograph of nature.

Sorry for the rant, but I prefer accuracy over fantasy in such lunar eclipse scenes, which means NOT having monster-sized red Moons looming out of proportion and in the wrong place over a landscape. Use Photoshop to inform, not deceive.

– Alan, October 4, 2015 / © 2015 Alan Dyer / www.amazingsky.com