
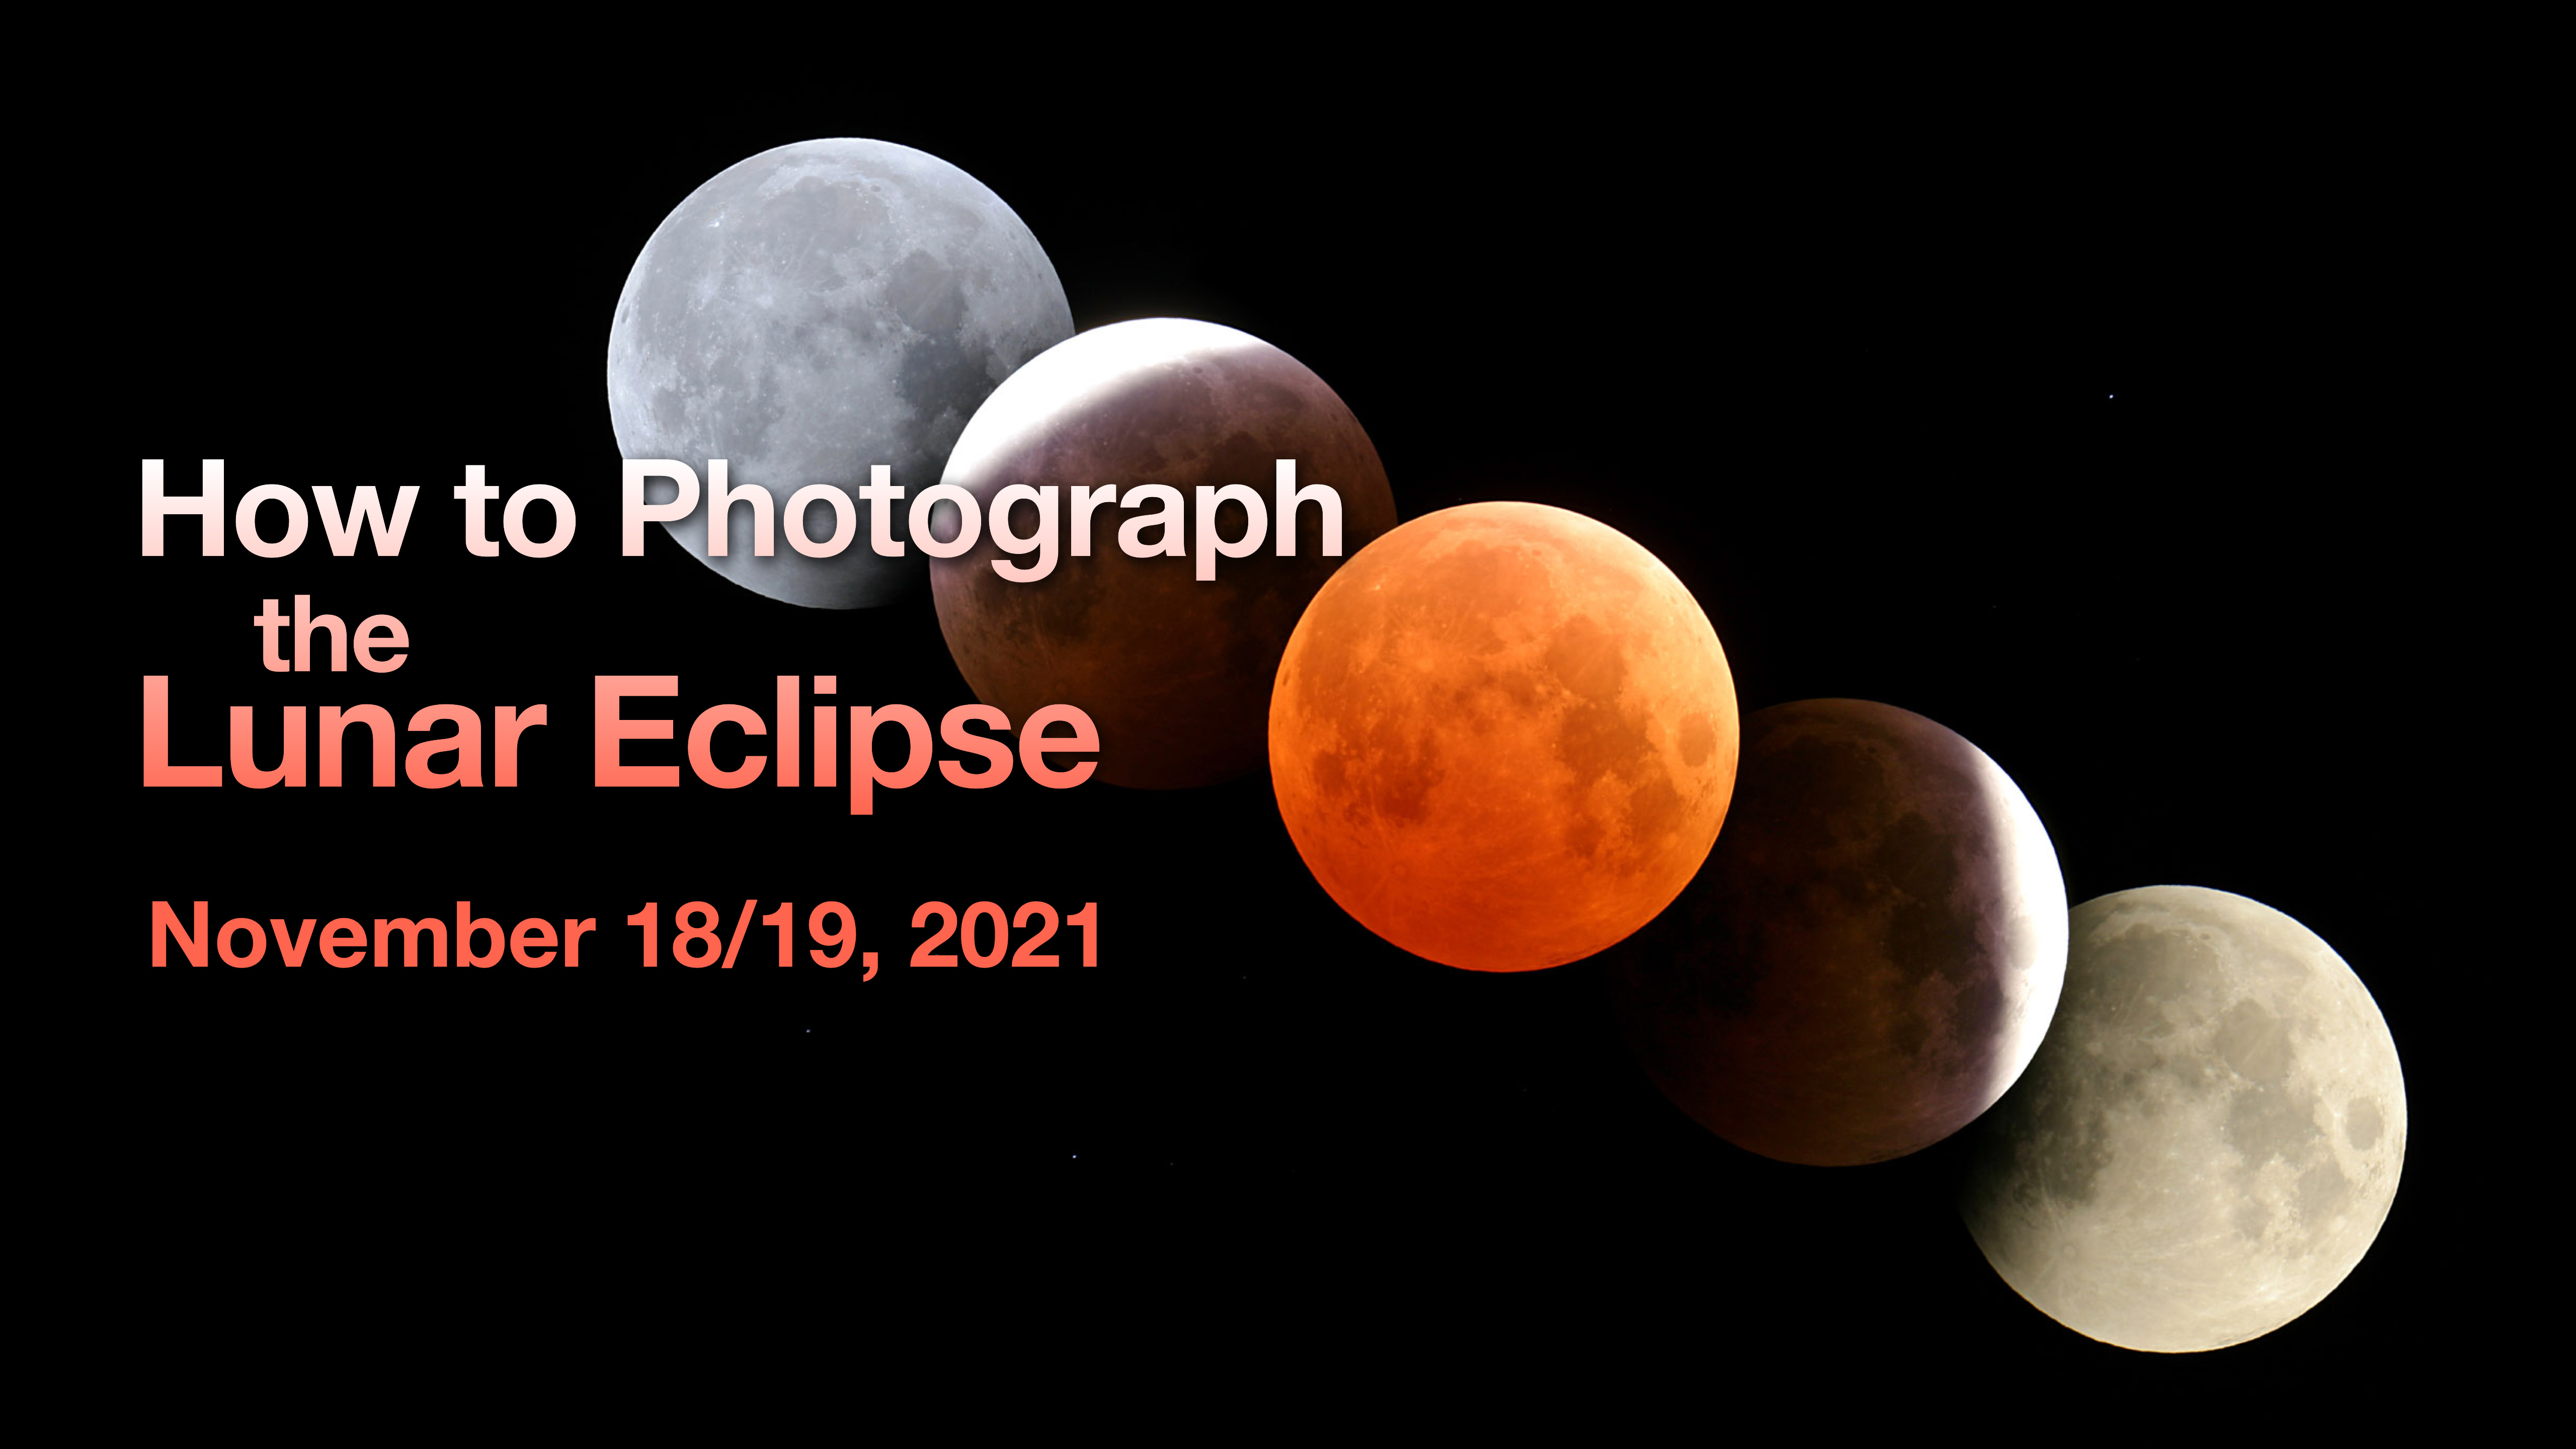
On the night of November 18/19 eclipse fans across North America can enjoy the sight of the Moon turning deep red. Here’s how to capture the scene.
Seeing and shooting this eclipse will demand staying up late or getting up very early. That’s the price to pay for an eclipse everyone on the continent can see.
Also, this is not a total eclipse of the Moon. But it’s the next best thing, a 97% partial eclipse – almost total! So the main attraction — a red Moon — will still be front and centre.
CLICK ON AN IMAGE to bring it up full screen for closer inspection.
NOT QUITE TOTAL
At mid-eclipse 97% of the disk of the Full Moon will be within Earth’s dark umbral shadow, and should appear a bright red colour to the eye and even more so to the camera. A sliver of the southern edge of the Moon will remain outside the umbra and will appear bright white, like a southern polar cap on the Moon.
While some references will say the eclipse begins at 1:01 am EST, that’s when the Moon first enters the outer lighter penumbral shadow. Nothing unusual can be seen at that point, as the darkening of the Moon’s disk by the penumbra is so slight, you won’t notice any difference over the normally bright Full Moon.

It isn’t until the Moon begins to enter the umbra that you can see a dark bite being taken out of the edge of the Moon.
WHAT TO SEE
At mid-eclipse the Full Moon will look deep red or perhaps bright orange — the colours can vary from eclipse to eclipse, depending on the clarity of the Earth’s atmosphere through which the sunlight is passing to light the Moon. The red is the colour of all the sunsets and sunrises going on around the Earth during the eclipse.
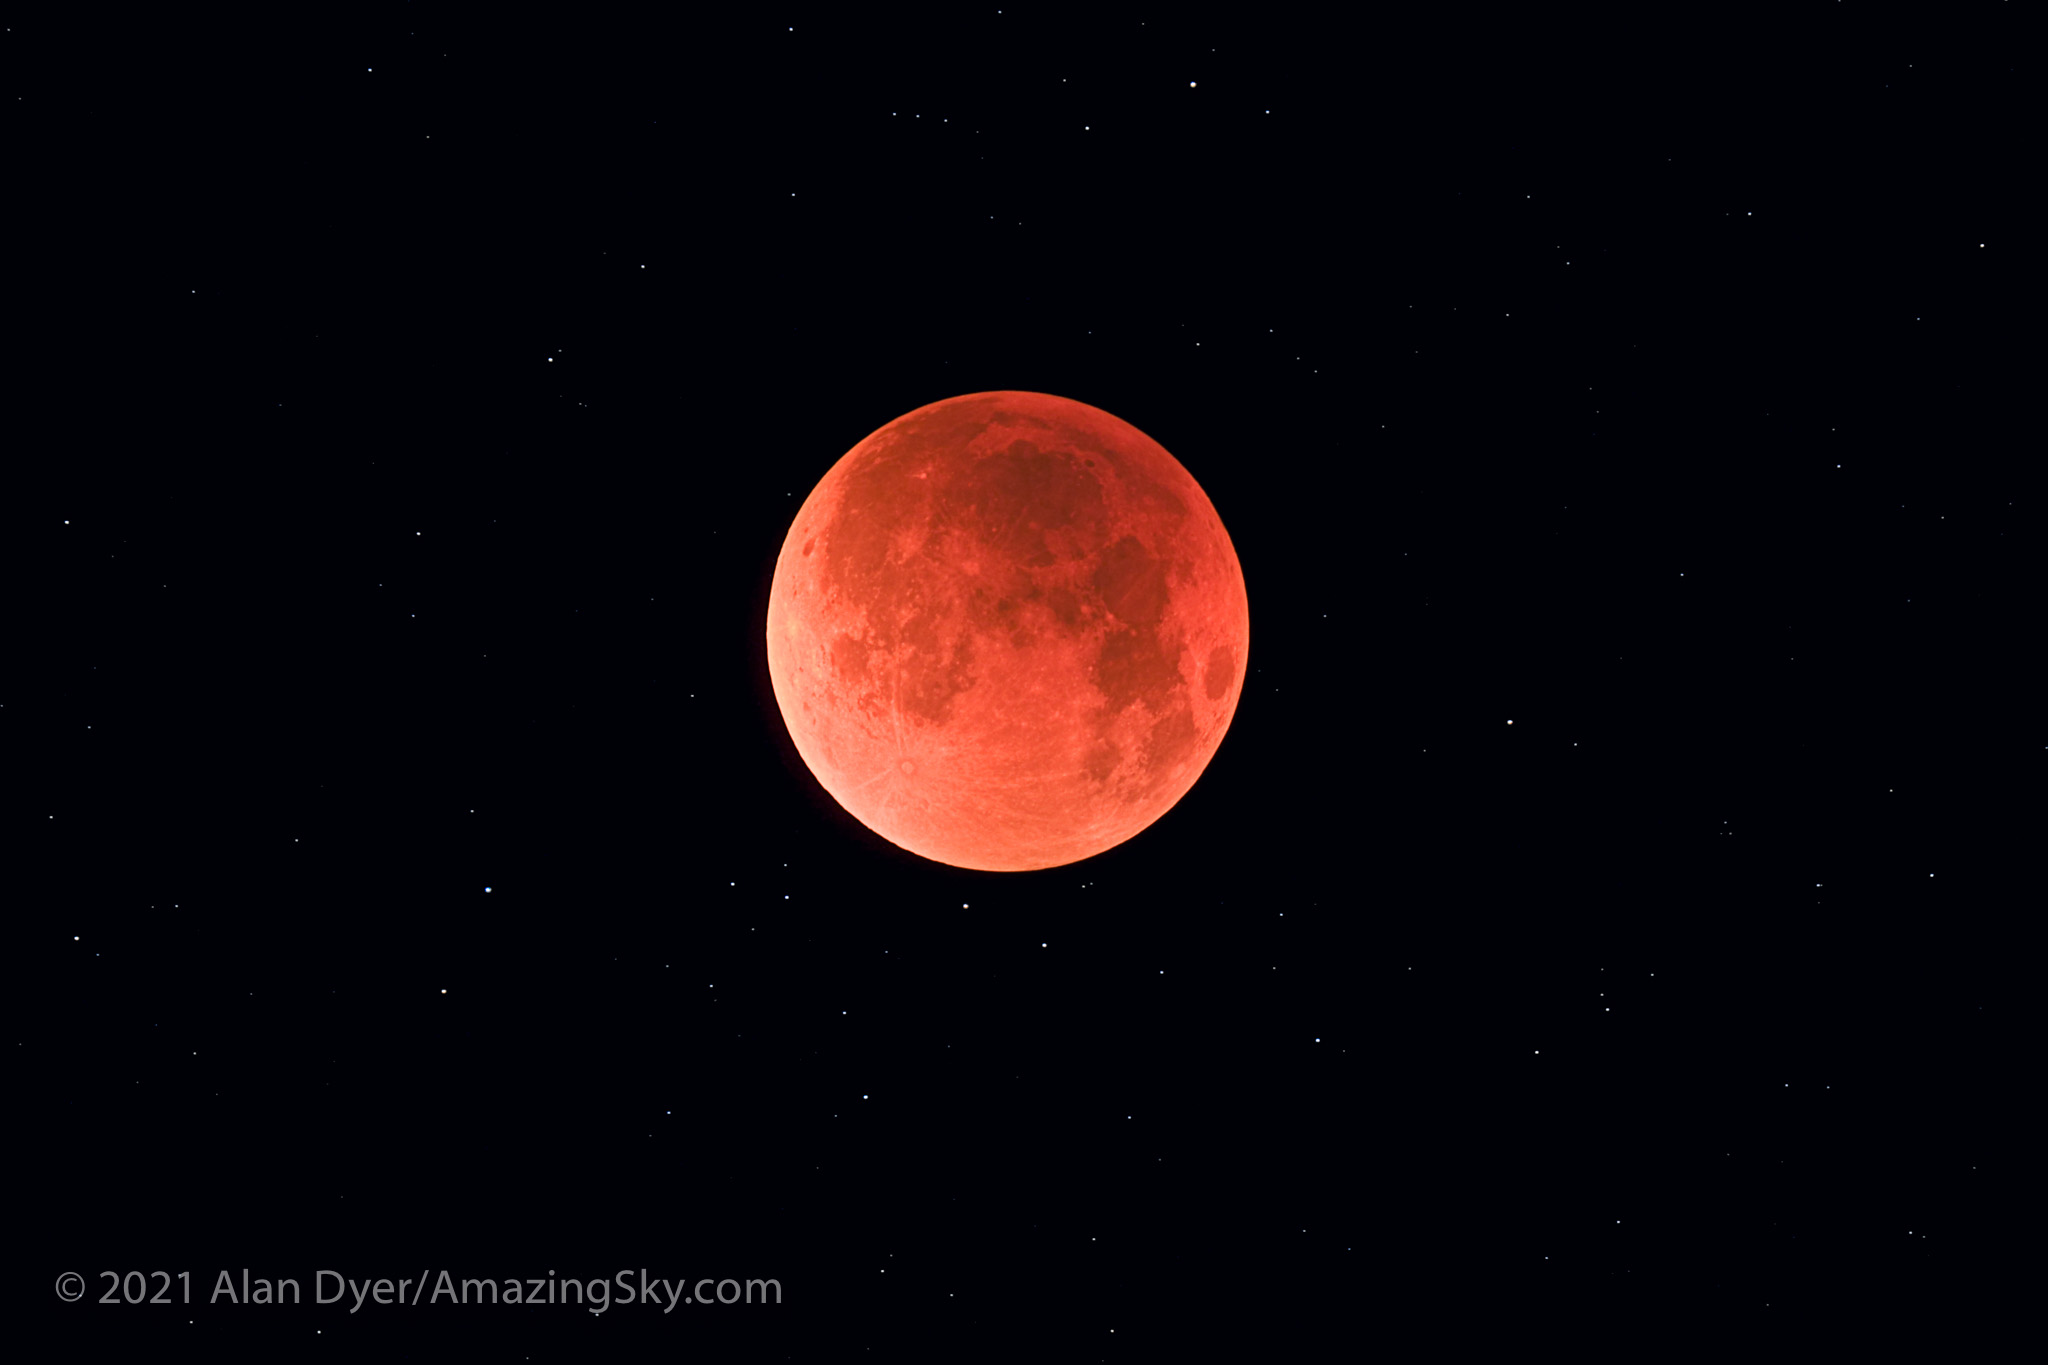
The unique aspect of this eclipse is that for the 15 to 30 minutes around mid-eclipse we might see some unusual colour gradations at the edge of the umbral shadow, from sunlight passing through Earth’s upper atmosphere and ozone layer. This can tint the shadow edge blue or even green.
WHERE CAN THE ECLIPSE BE SEEN?
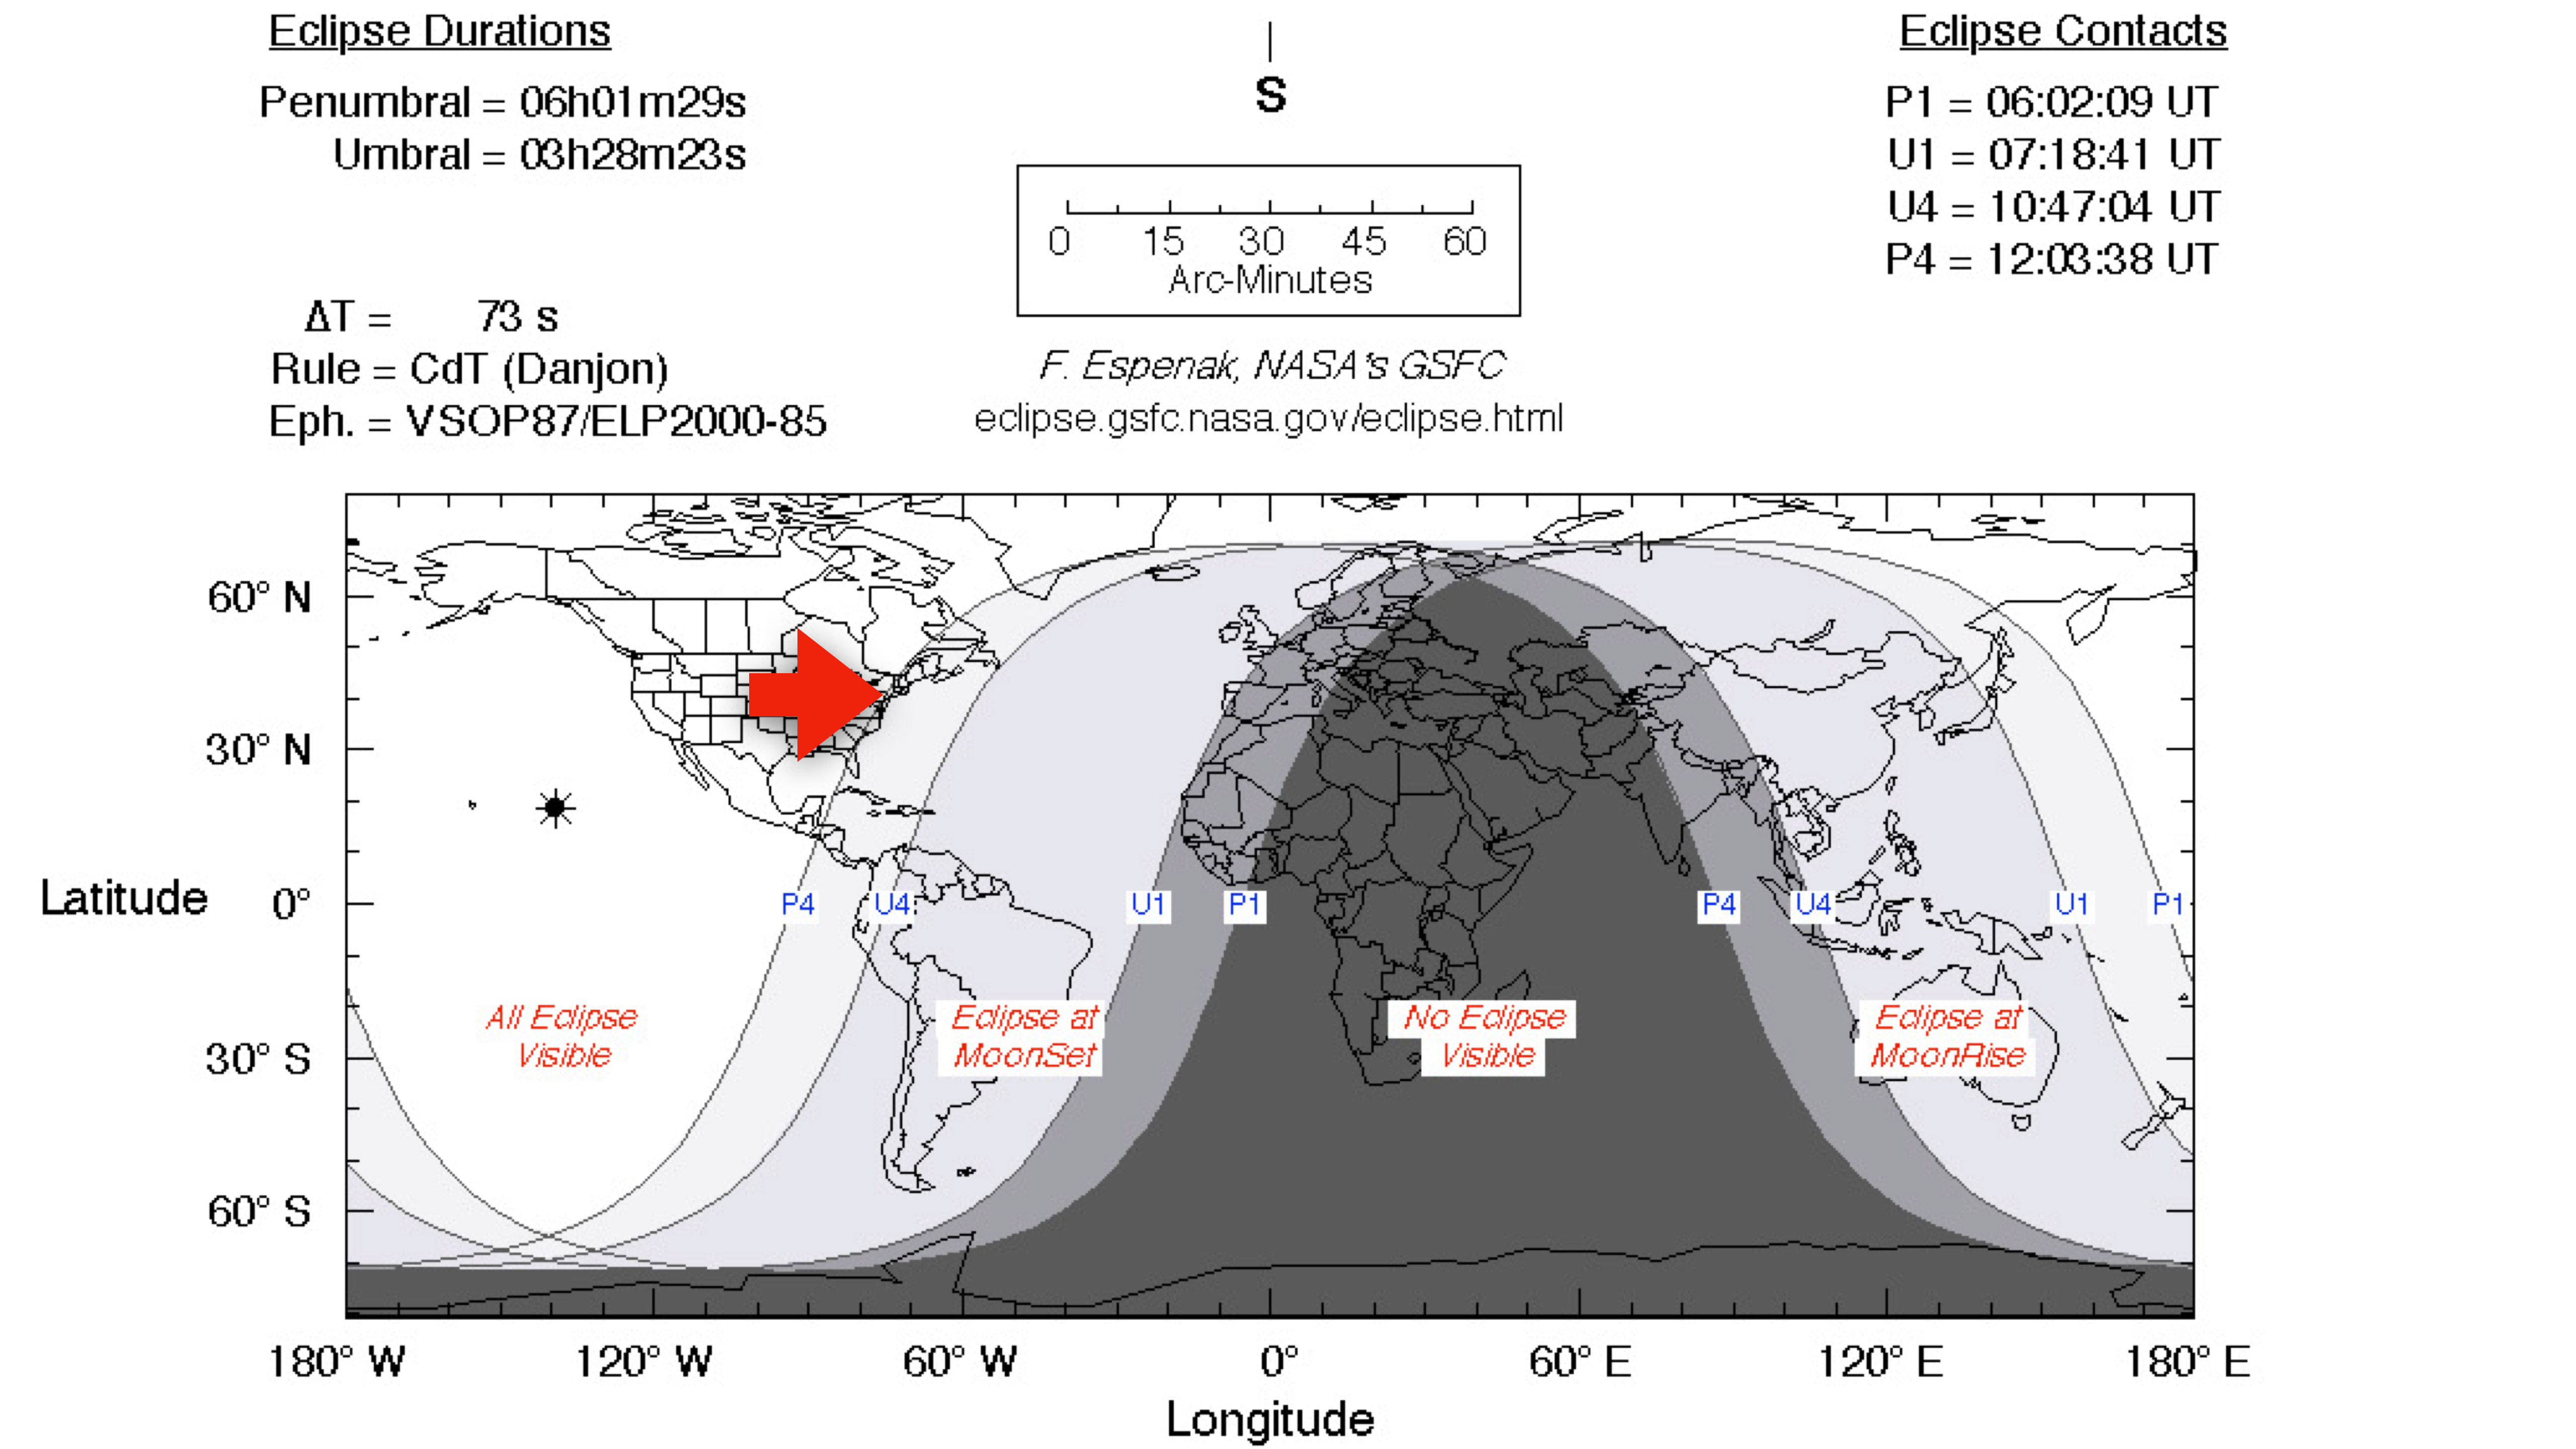
The last lunar eclipse six months ago on the morning of May 26, 2021 (see my blog here) was visible during its total phase only from western North America, and then only just. However, this eclipse can be seen from coast to coast.
Only from the very easternmost points in North America does the Moon set with the eclipse in progress, but during the inconsequential penumbral phase. All of the umbral phase is visible from the Eastern Seaboard, though the last stages will be in progress with the Moon low in the west in the pre-dawn hours. But that positioning can make for photogenic sight.
WHEN IS THE ECLIPSE?
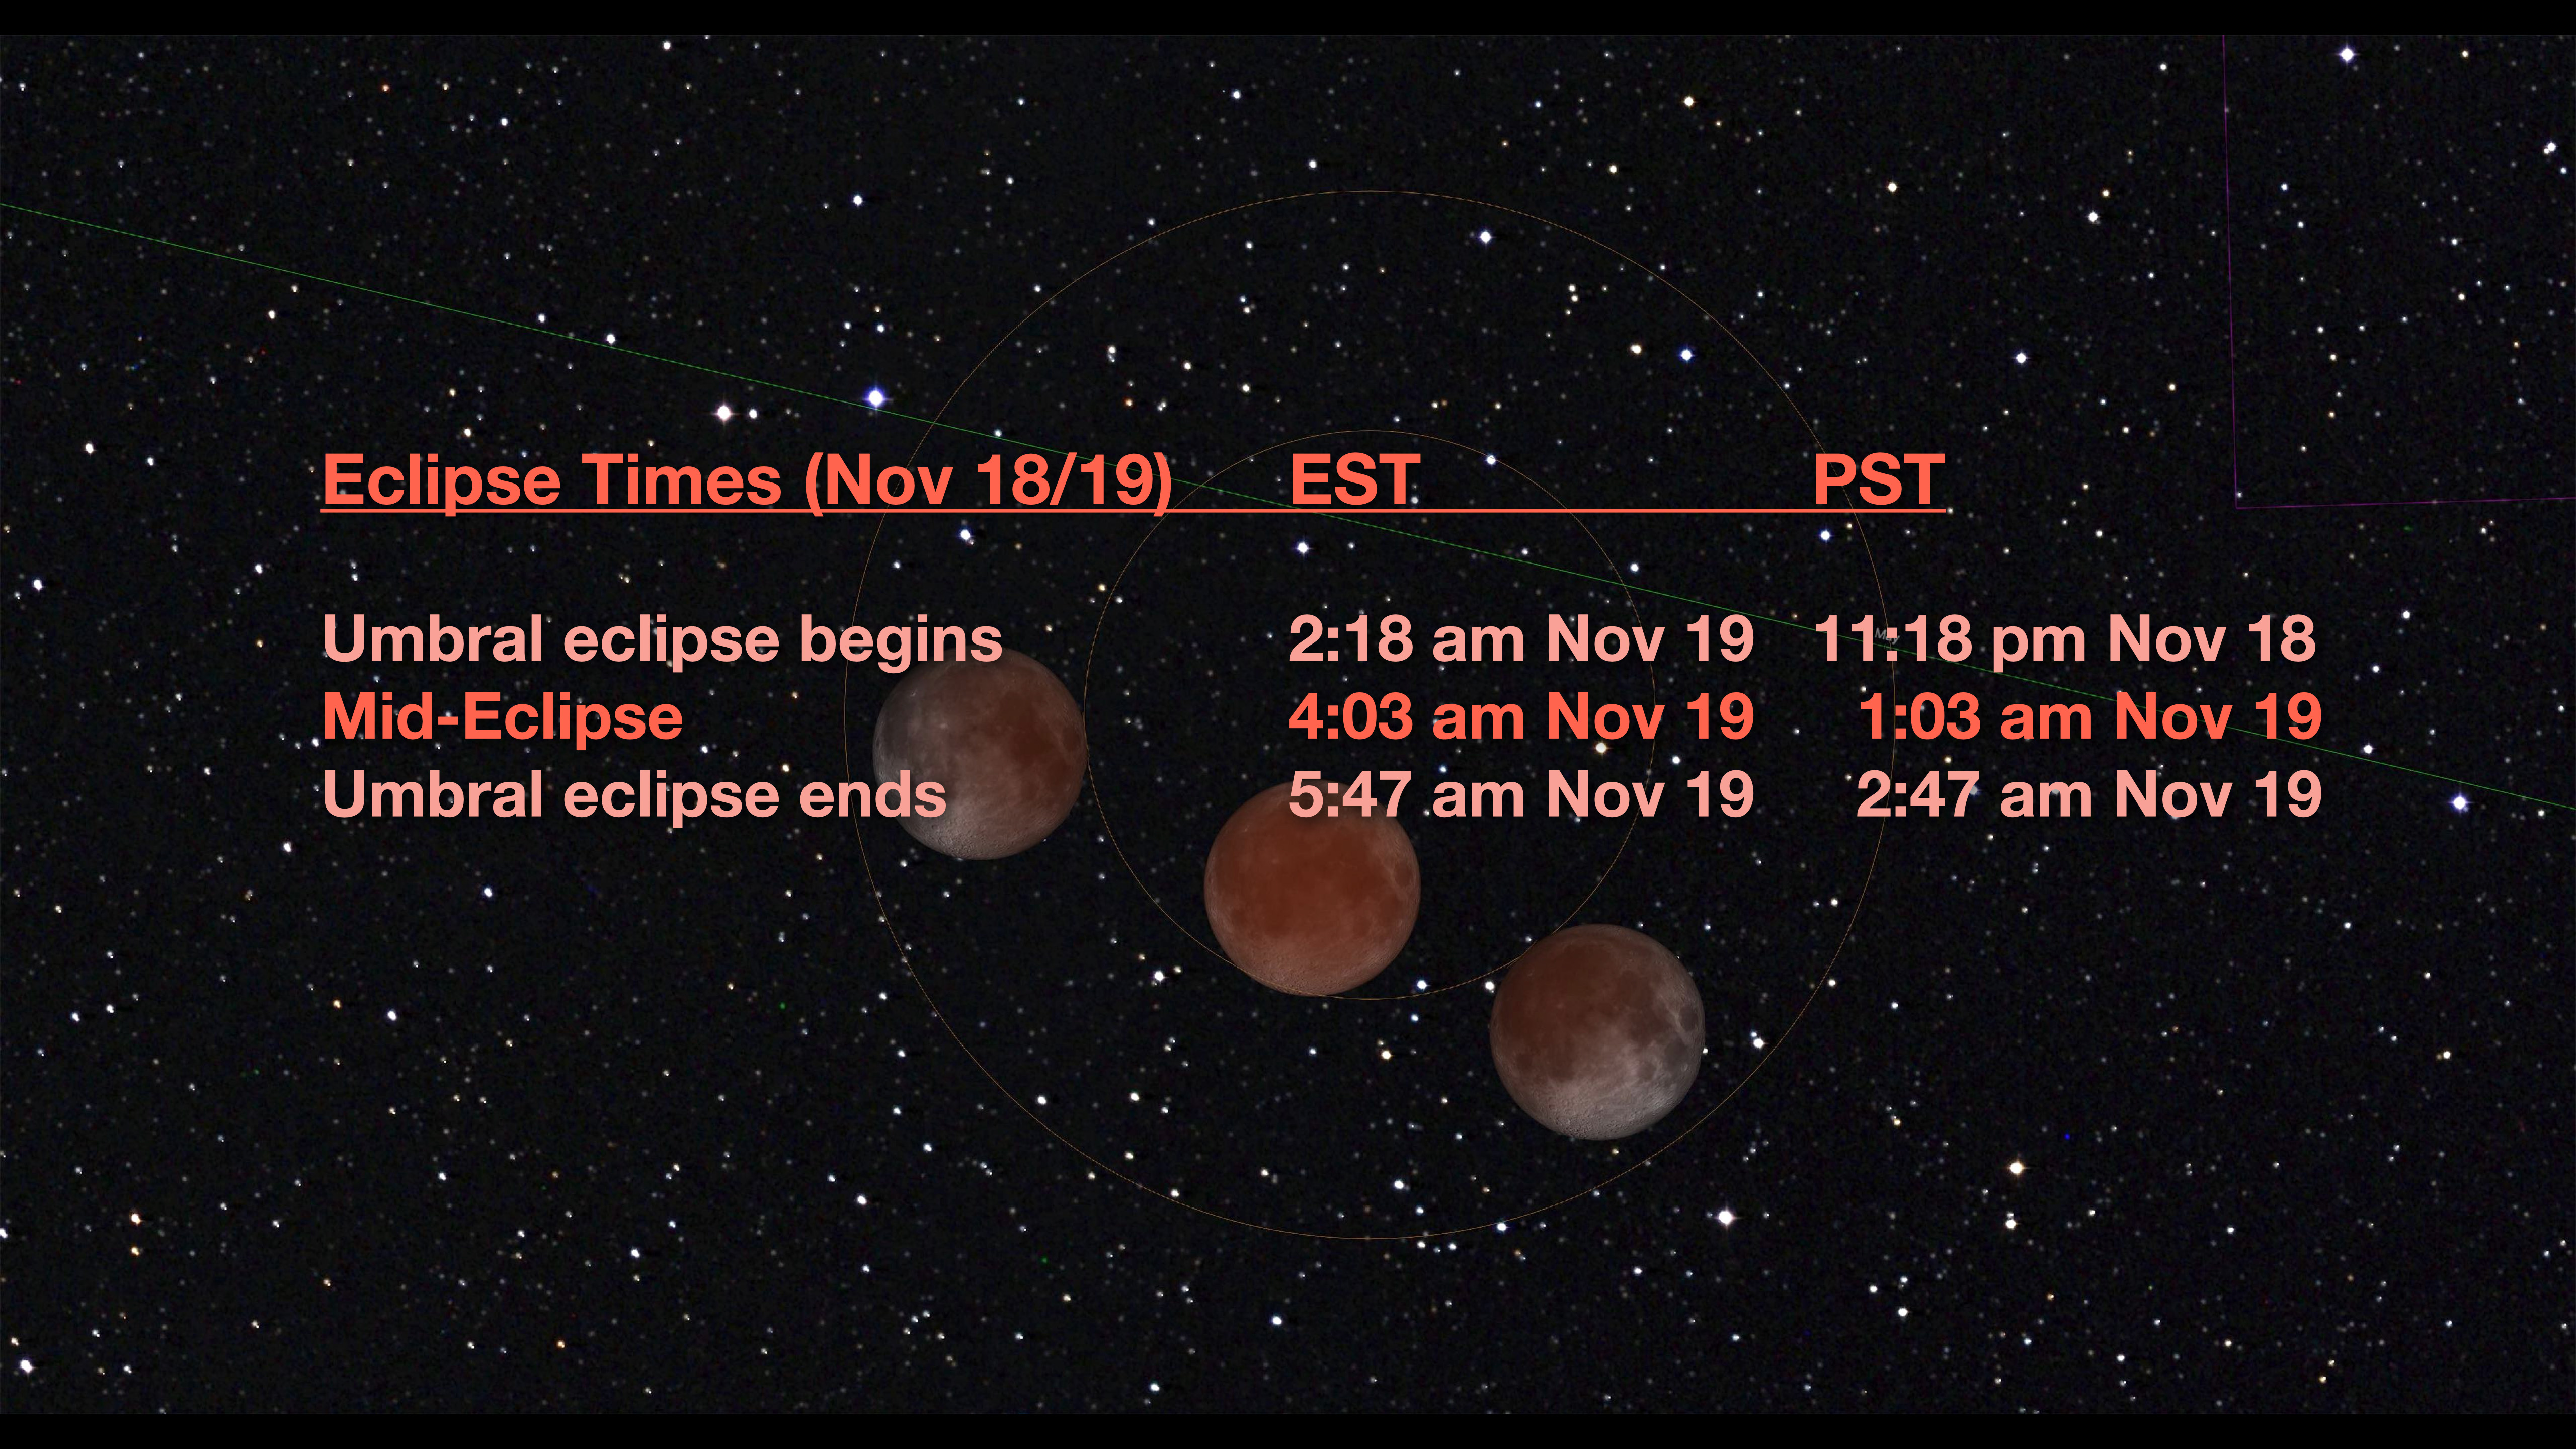
The show really begins when the Moon begins to enter the umbra at 2:18 am EST (1:18 am CST, 12:18 am MST, 11:18 pm PST).
But note, these times are for the night of November 18/19. If you go out on the evening of November 19 expecting to see the eclipse, you’ll be sadly disappointed as you will have missed it. It’s the night before!
The eclipse effectively ends at 5:47 am EST (4:47 am CST, 3:47 am MST, 2:47 am PST) when the Moon leaves the umbra. That makes the eclipse 3 1/2 hours long, though the most photogenic part will be for the 15 to 30 minutes centred on mid-eclipse at 4:03 am EST (3:03 am CST, 2:03 am MST, 1:03 am PST).

WHERE WILL THE MOON BE?
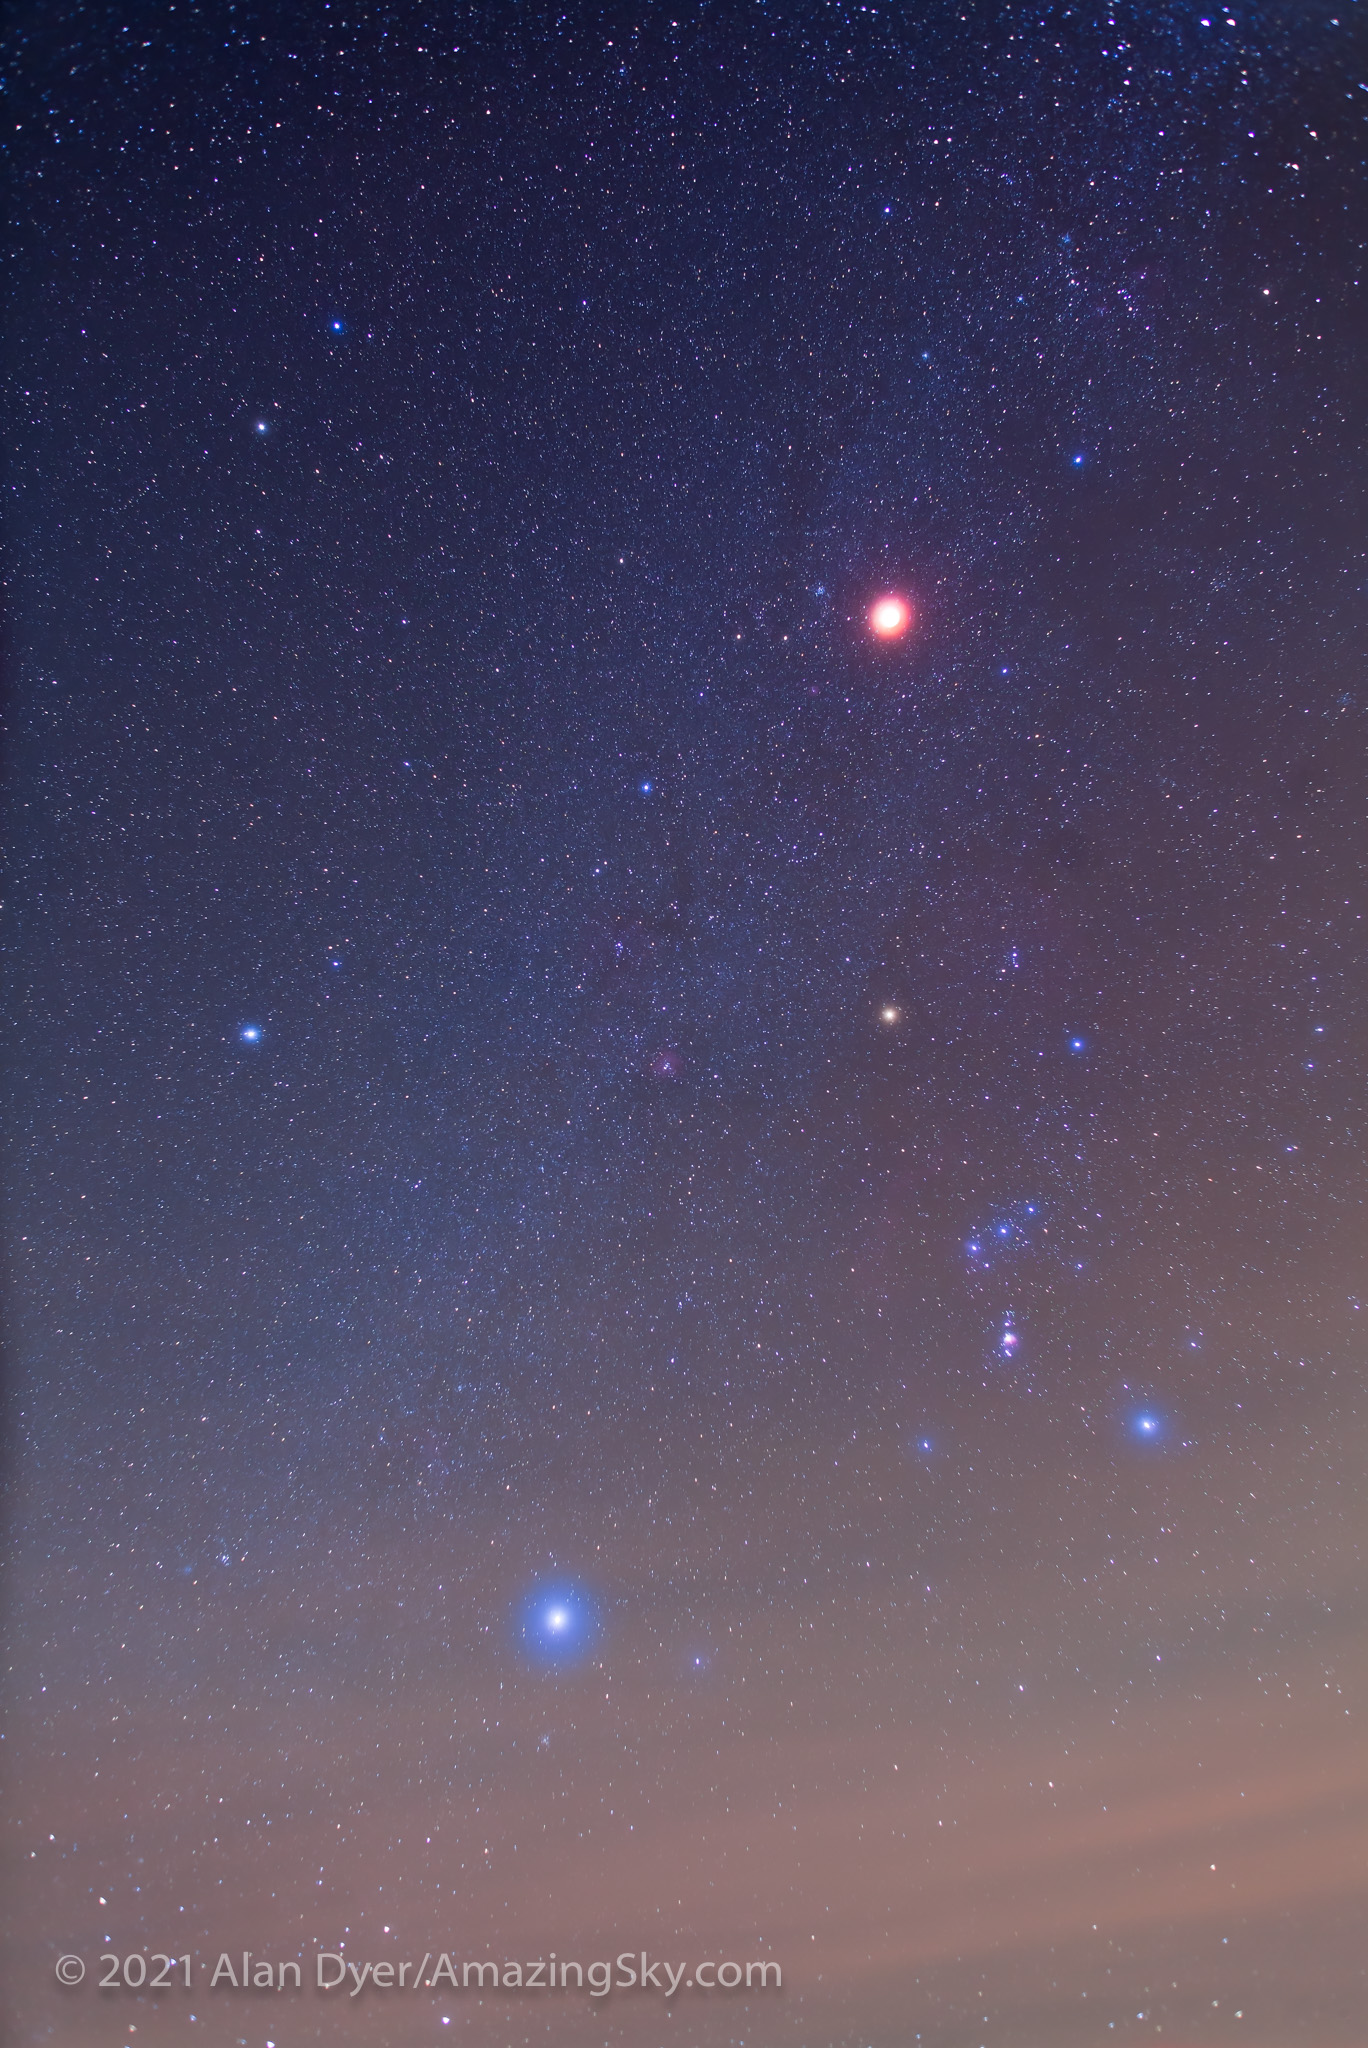
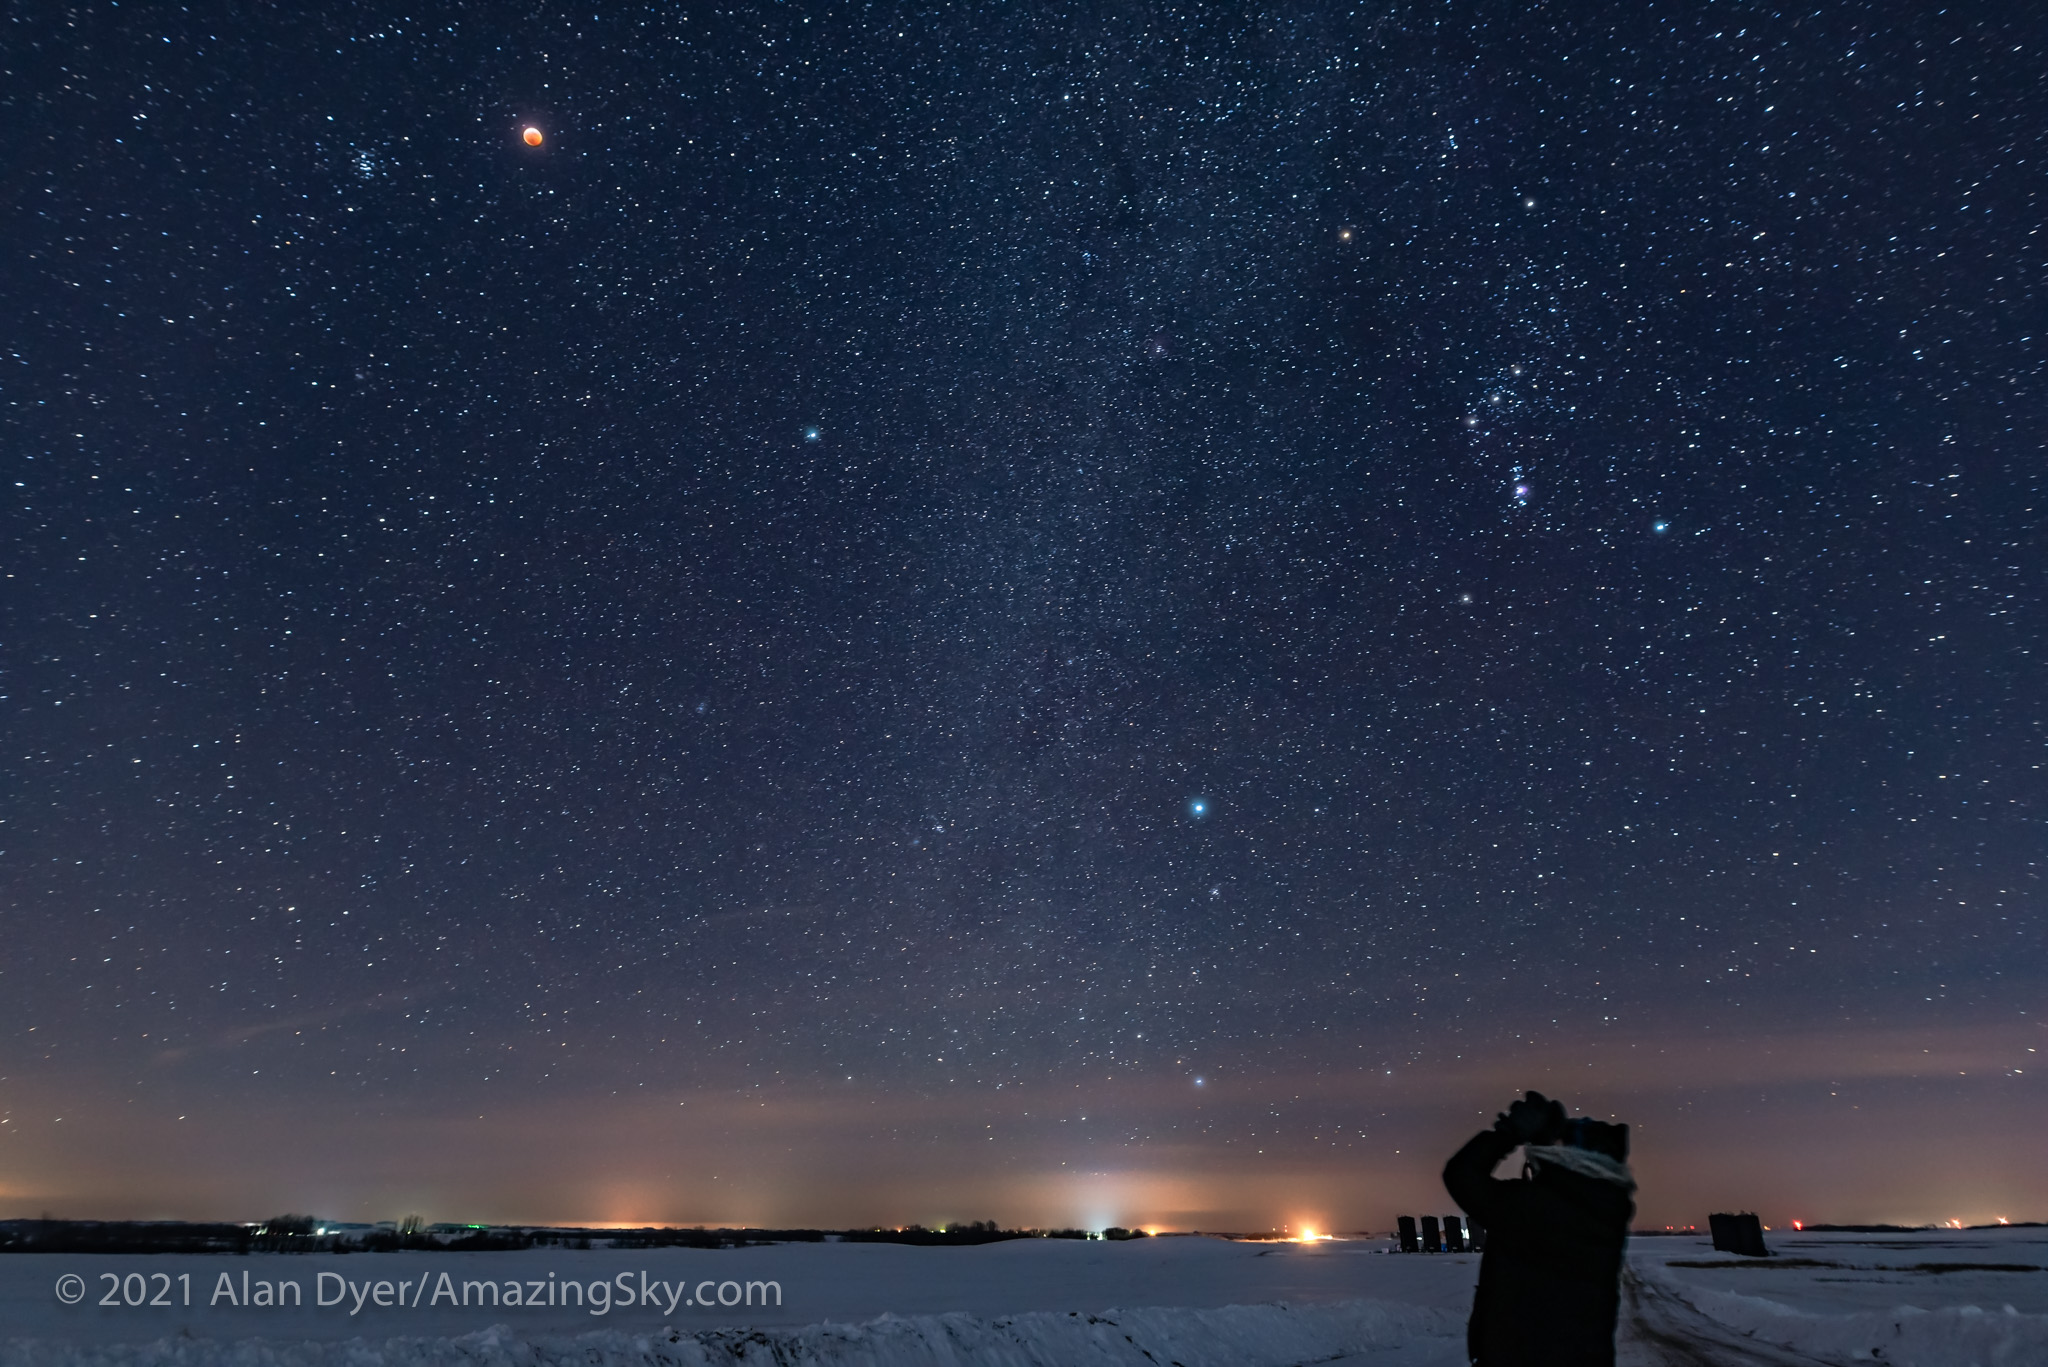
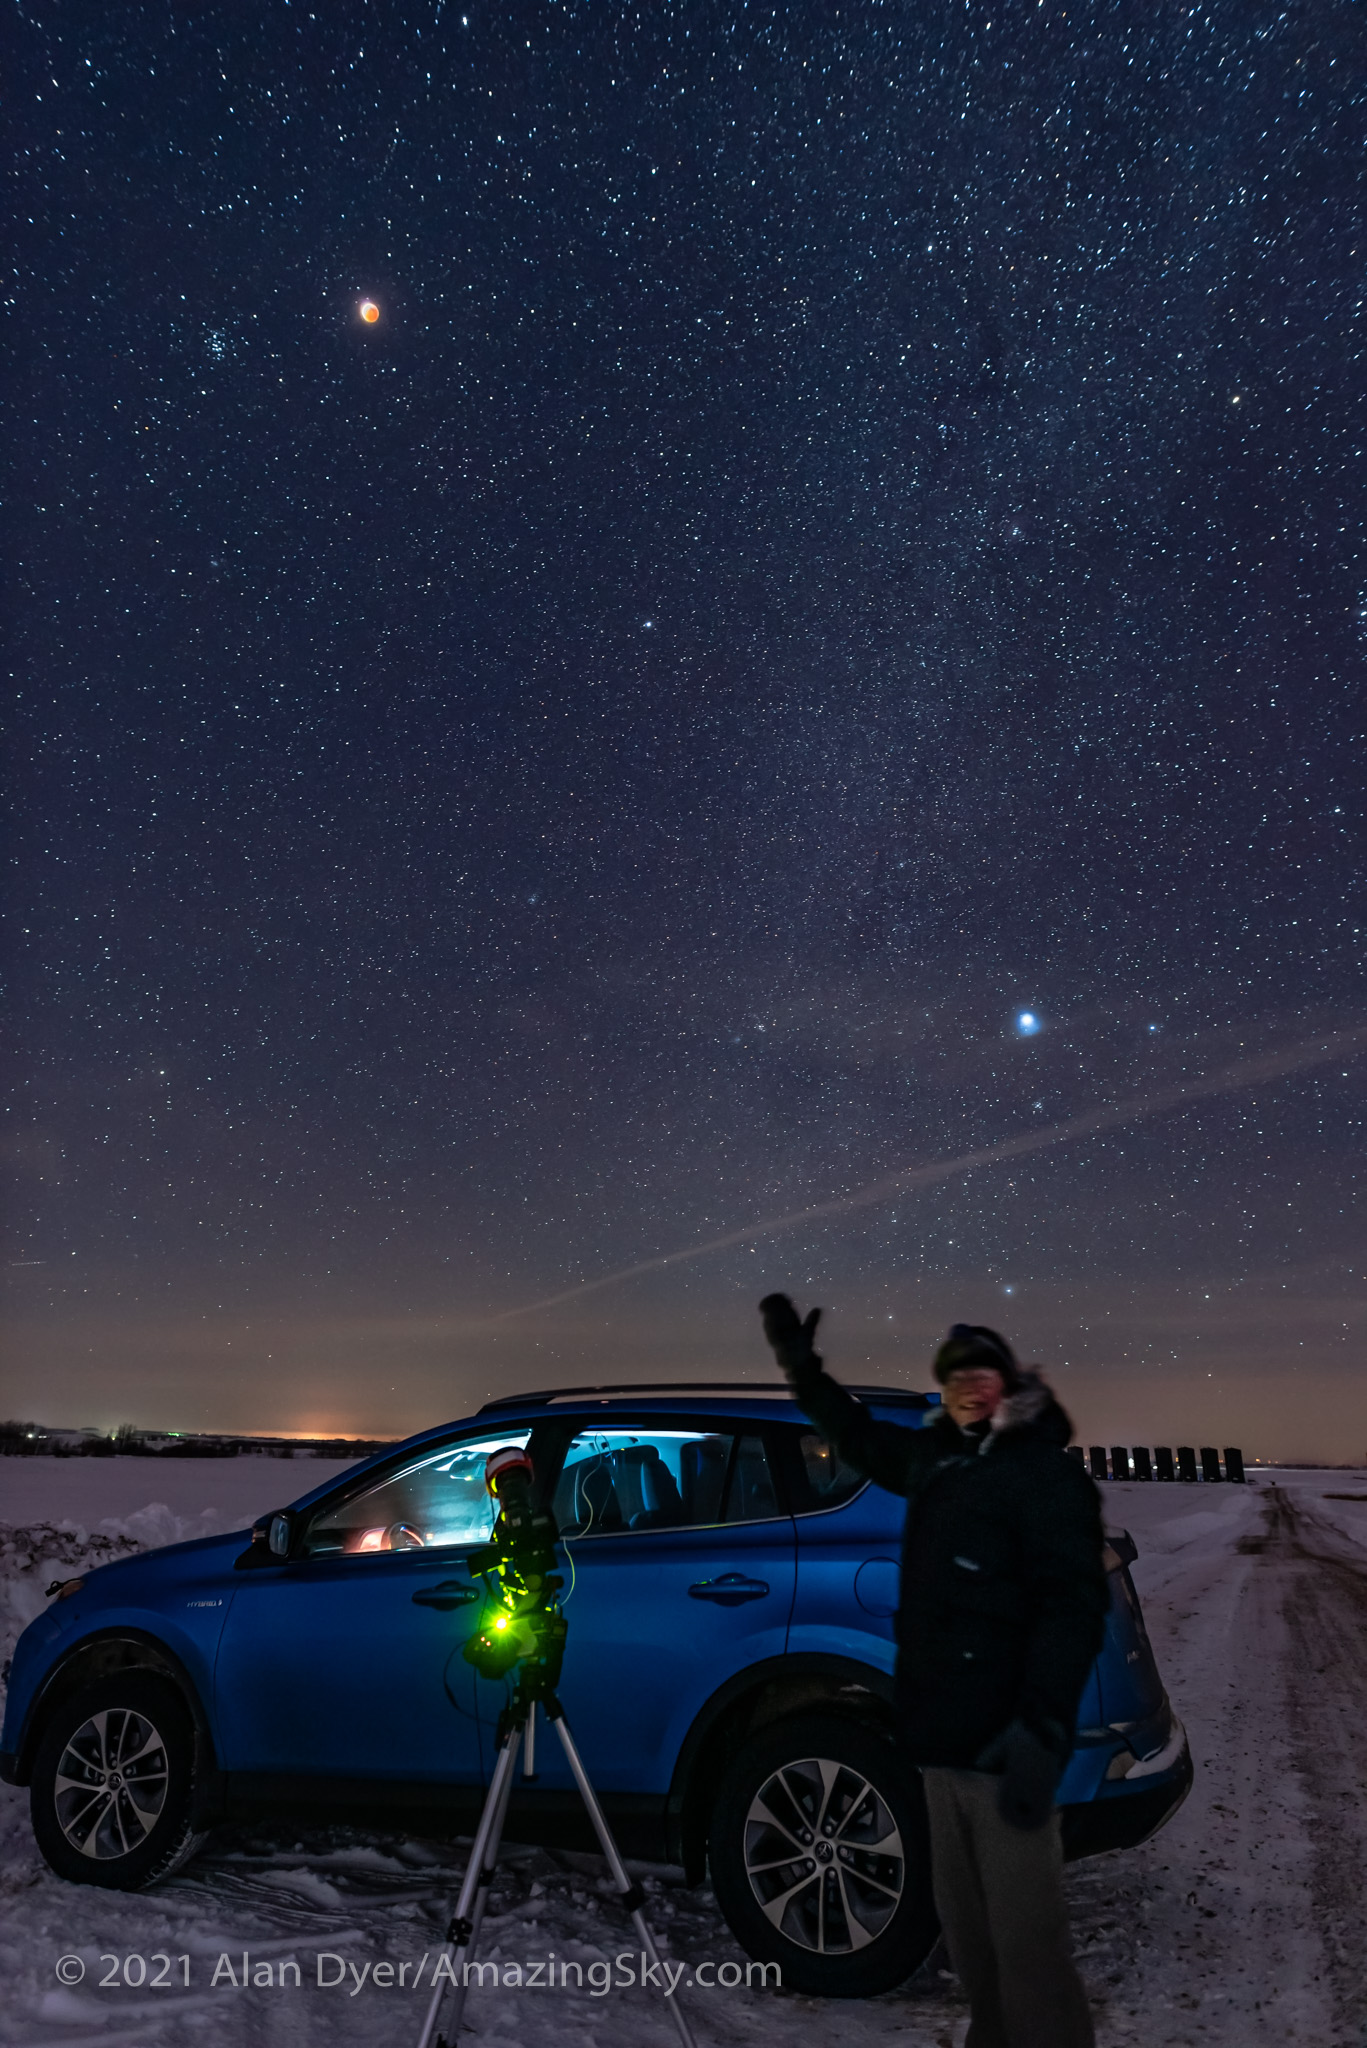
The post-midnight timing places the Moon at mid-eclipse high in the south to southwest for most of North America, just west (right) of the winter Milky Way and below the distinctive Pleiades star cluster.
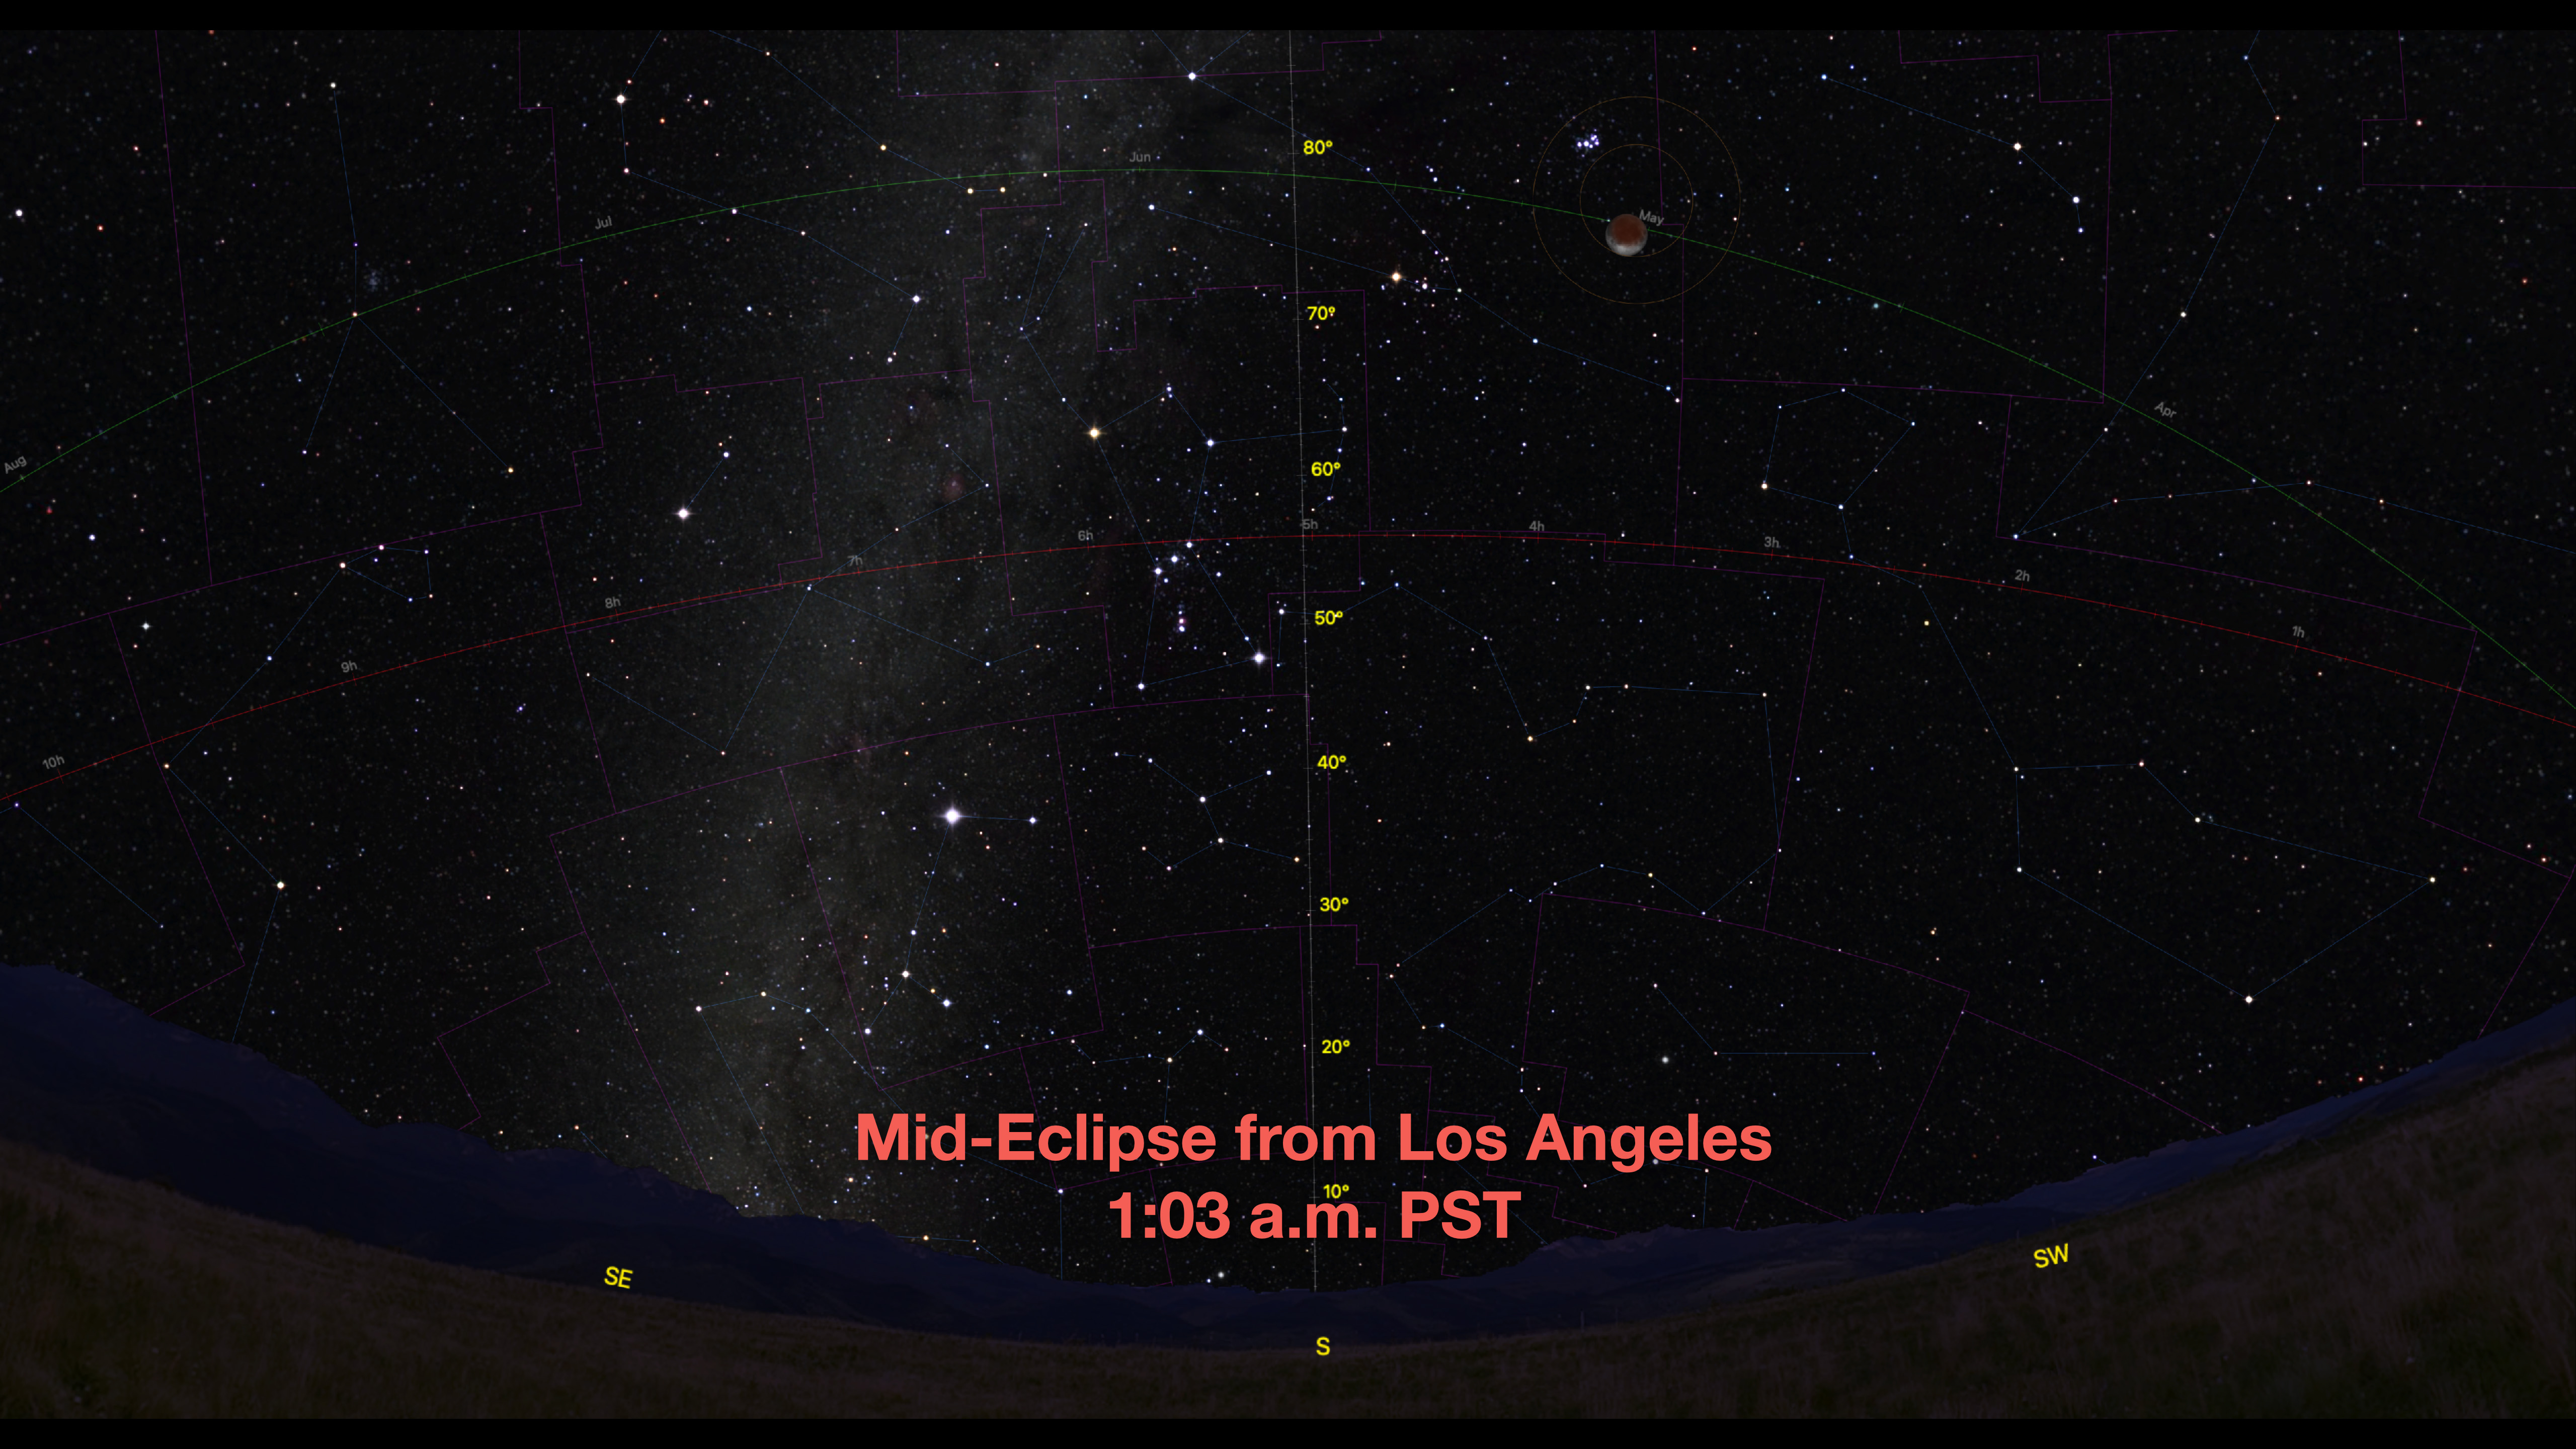
The high altitude of the Moon (some 60º to 70º above the horizon) puts it well above haze and murk low in the sky, but makes it a challenge to capture in a frame that includes the landscape below for an eclipse nightscape.
ASTRONOMY 101: The high altitude of the Moon is a function of both the eclipse timing in the middle of the night and its place on the ecliptic. The Full Moon is always 180° away from the Sun. So it sits where the Sun was six months earlier, in this case back in May, when the high Sun was bringing us warmer and longer days. Winter lunar eclipses are always high; summer lunar eclipses are always low, the opposite of what the Sun does.
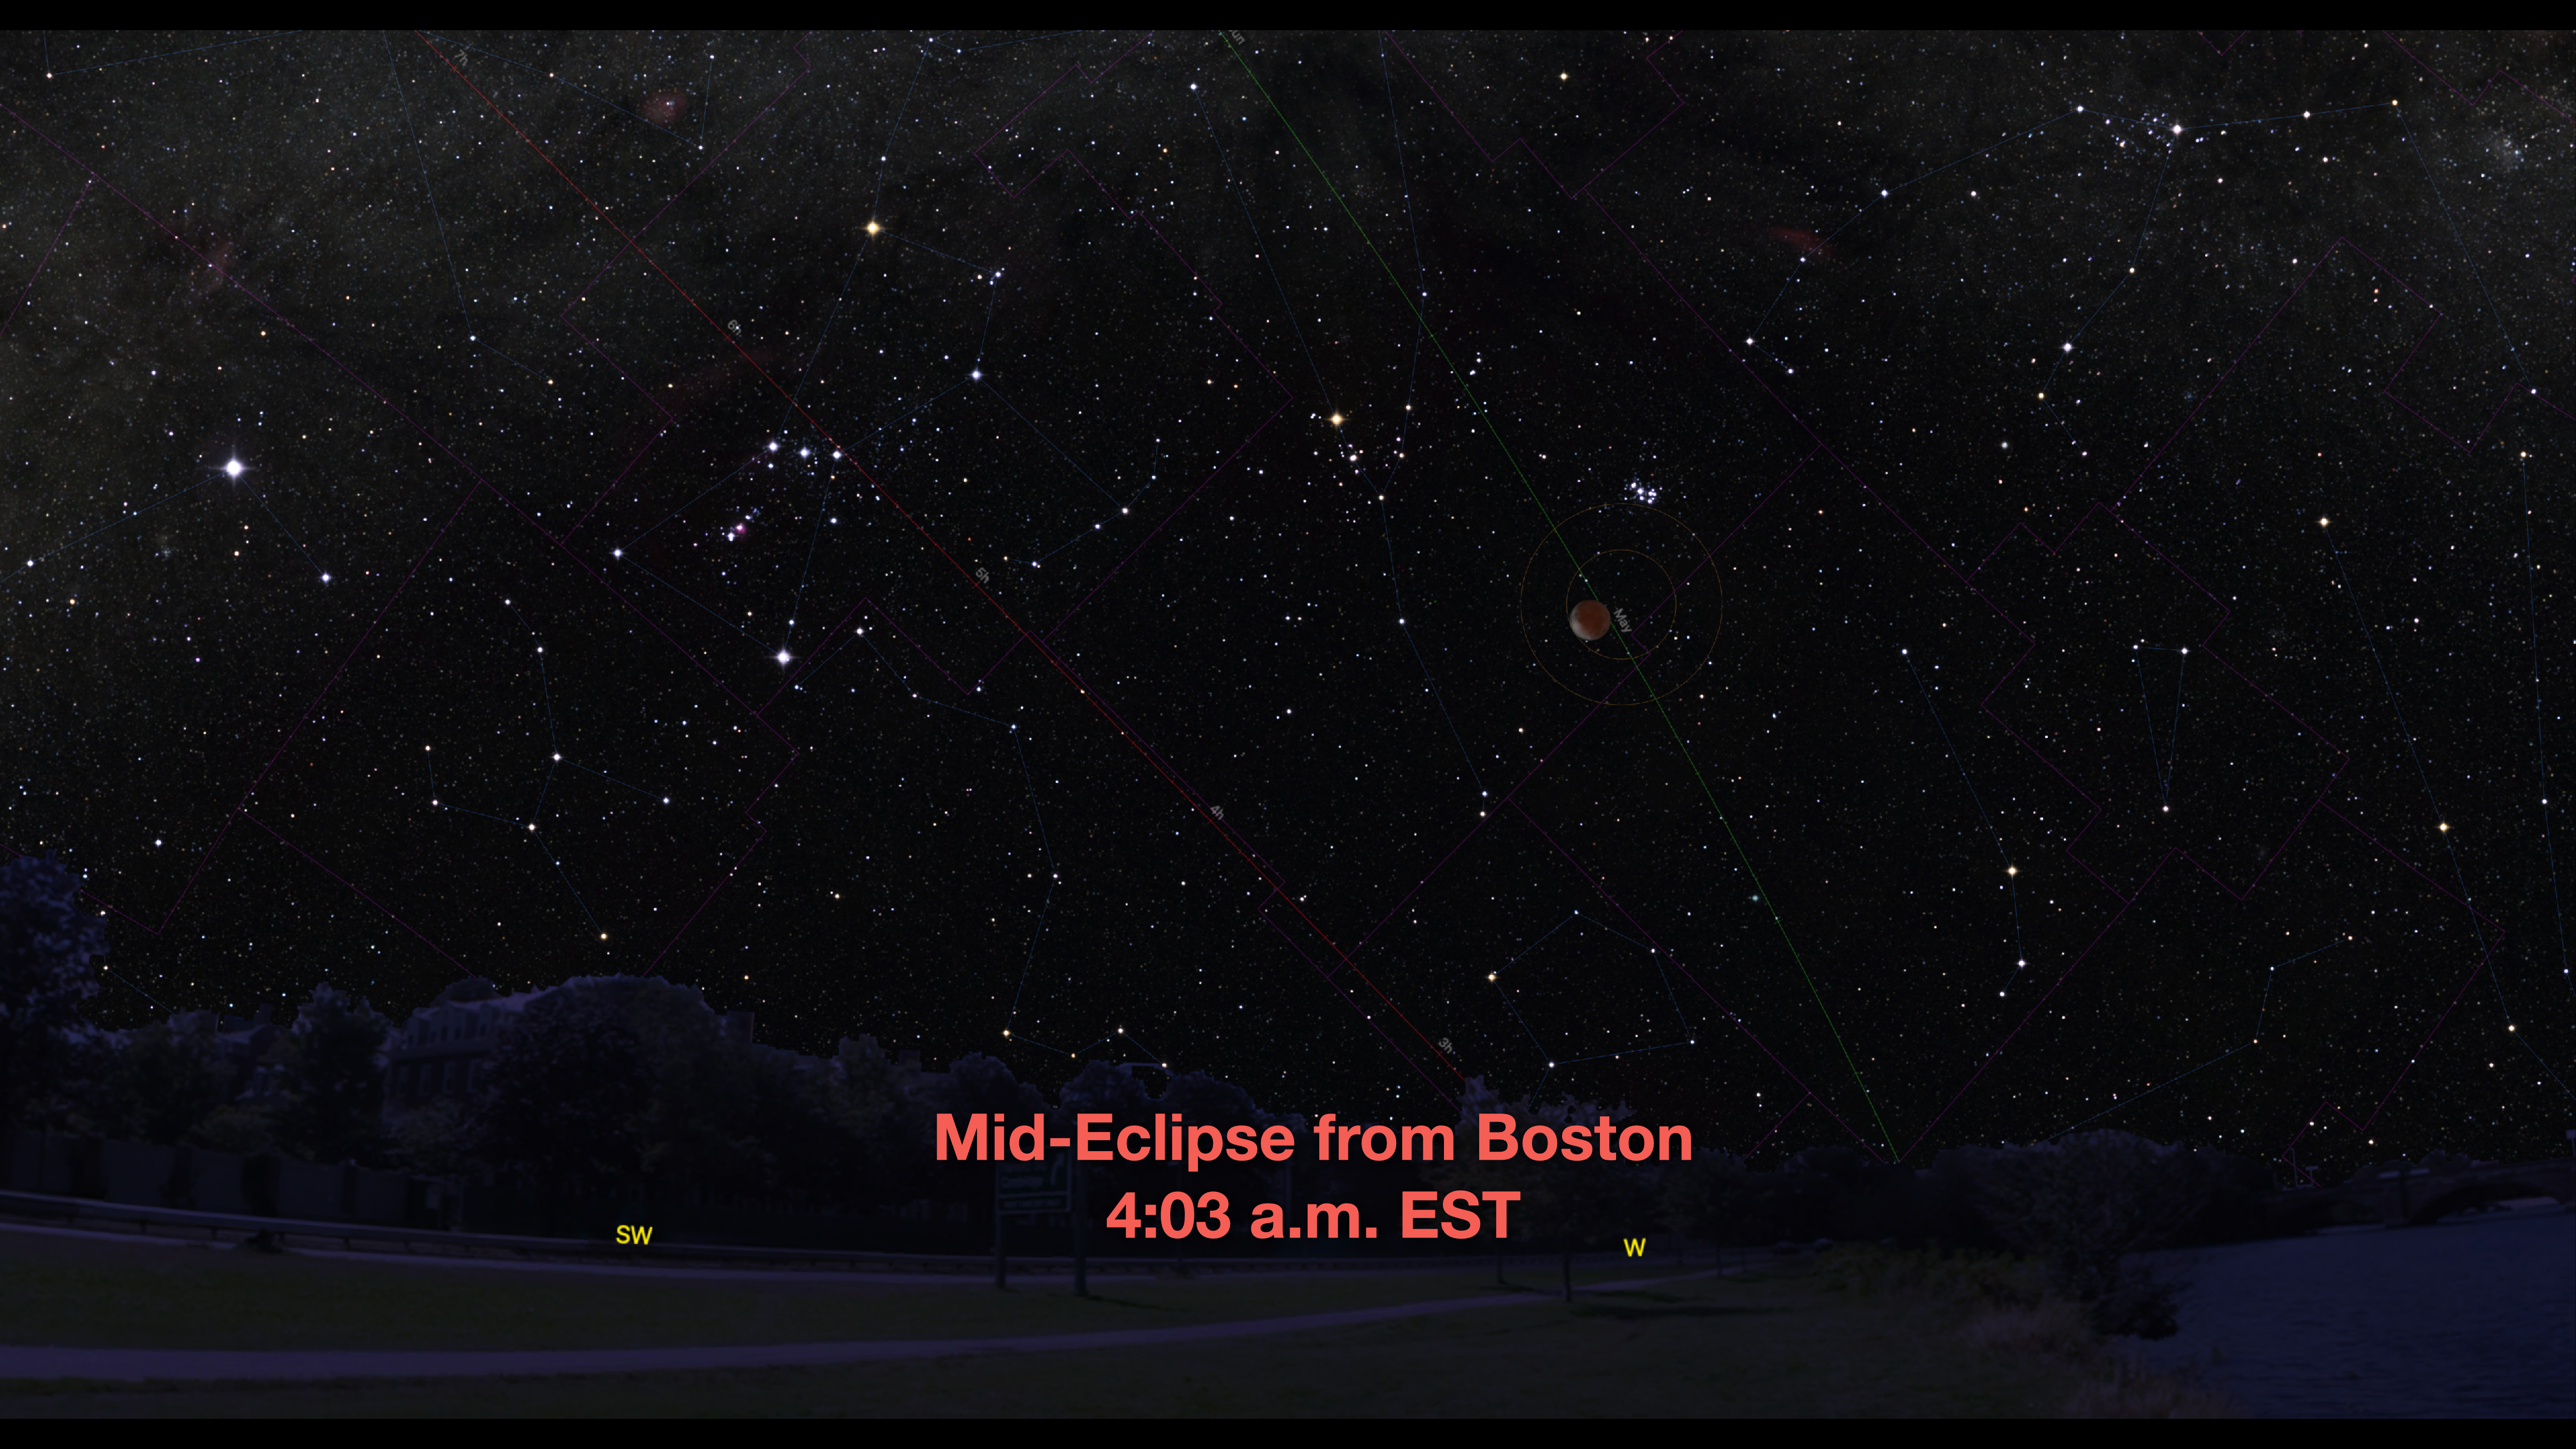
From eastern North America the Moon appears lower in the west at mid-eclipse, making it easier to frame above a landscape. For example from Boston the Moon is 30º up, lending itself to nightscape scenes.
However, the sky will still be dark. To make use of the darkness to capture scenes which include the Milky Way, I suggest making the effort to travel away from urban light pollution to a dark sky site. That applies to all locations. Yes, that means a very long night!
PHOTO OPTIONS 1 — CAMERA ON A FIXED TRIPOD
With just a camera on a tripod, if you are on the East Coast (I show Boston here) it will be possible to frame the eclipsed Moon above a landscape with a 24mm lens (assuming a full frame camera; a cropped frame camera will require a 16mm lens).
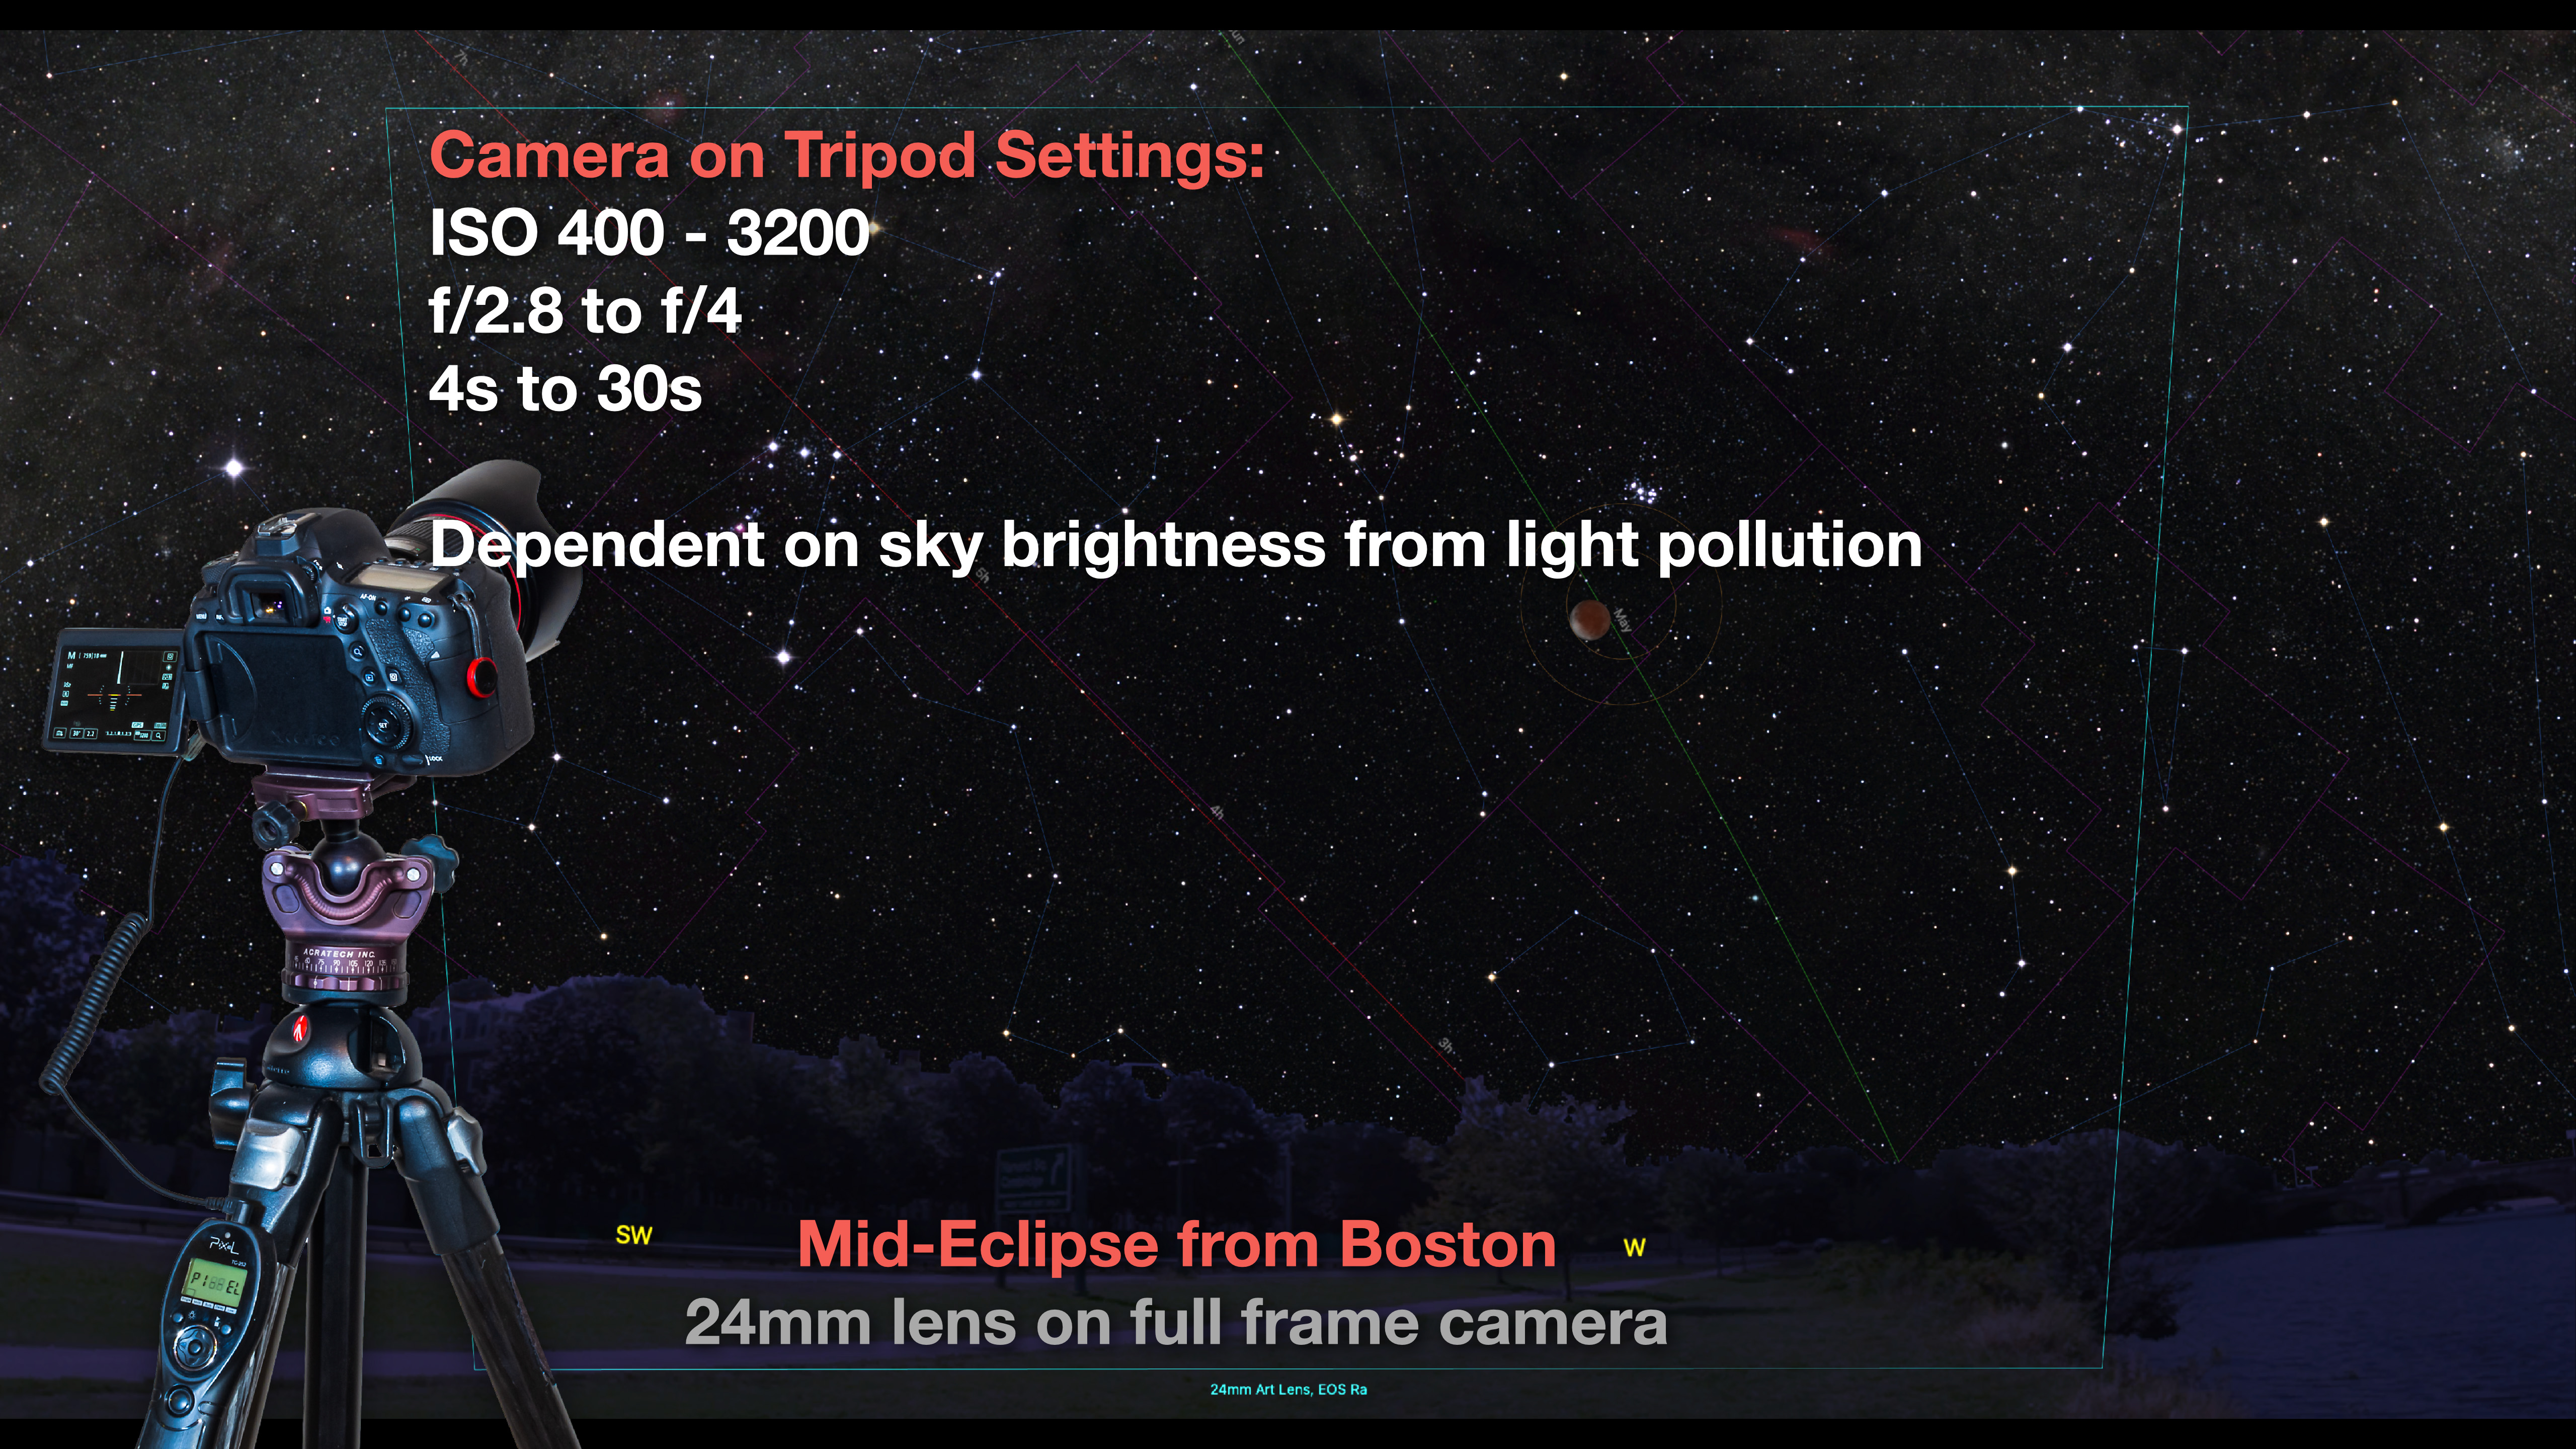
What exposure will be best will depend on the level of local light pollution at your site. But from a dark site, 30 seconds at ISO 1600 and f/2.8 should work well. But without tracking, you will see some star trailing at 30 seconds. Also try shorter exposures at a higher ISO.
There’s lots of time, so take lots of shots. Include some short shots of just the Moon to blend in later, as the exposures best for picking up the Milky Way will still overexpose the Moon, even when it is darkest at mid-eclipse.
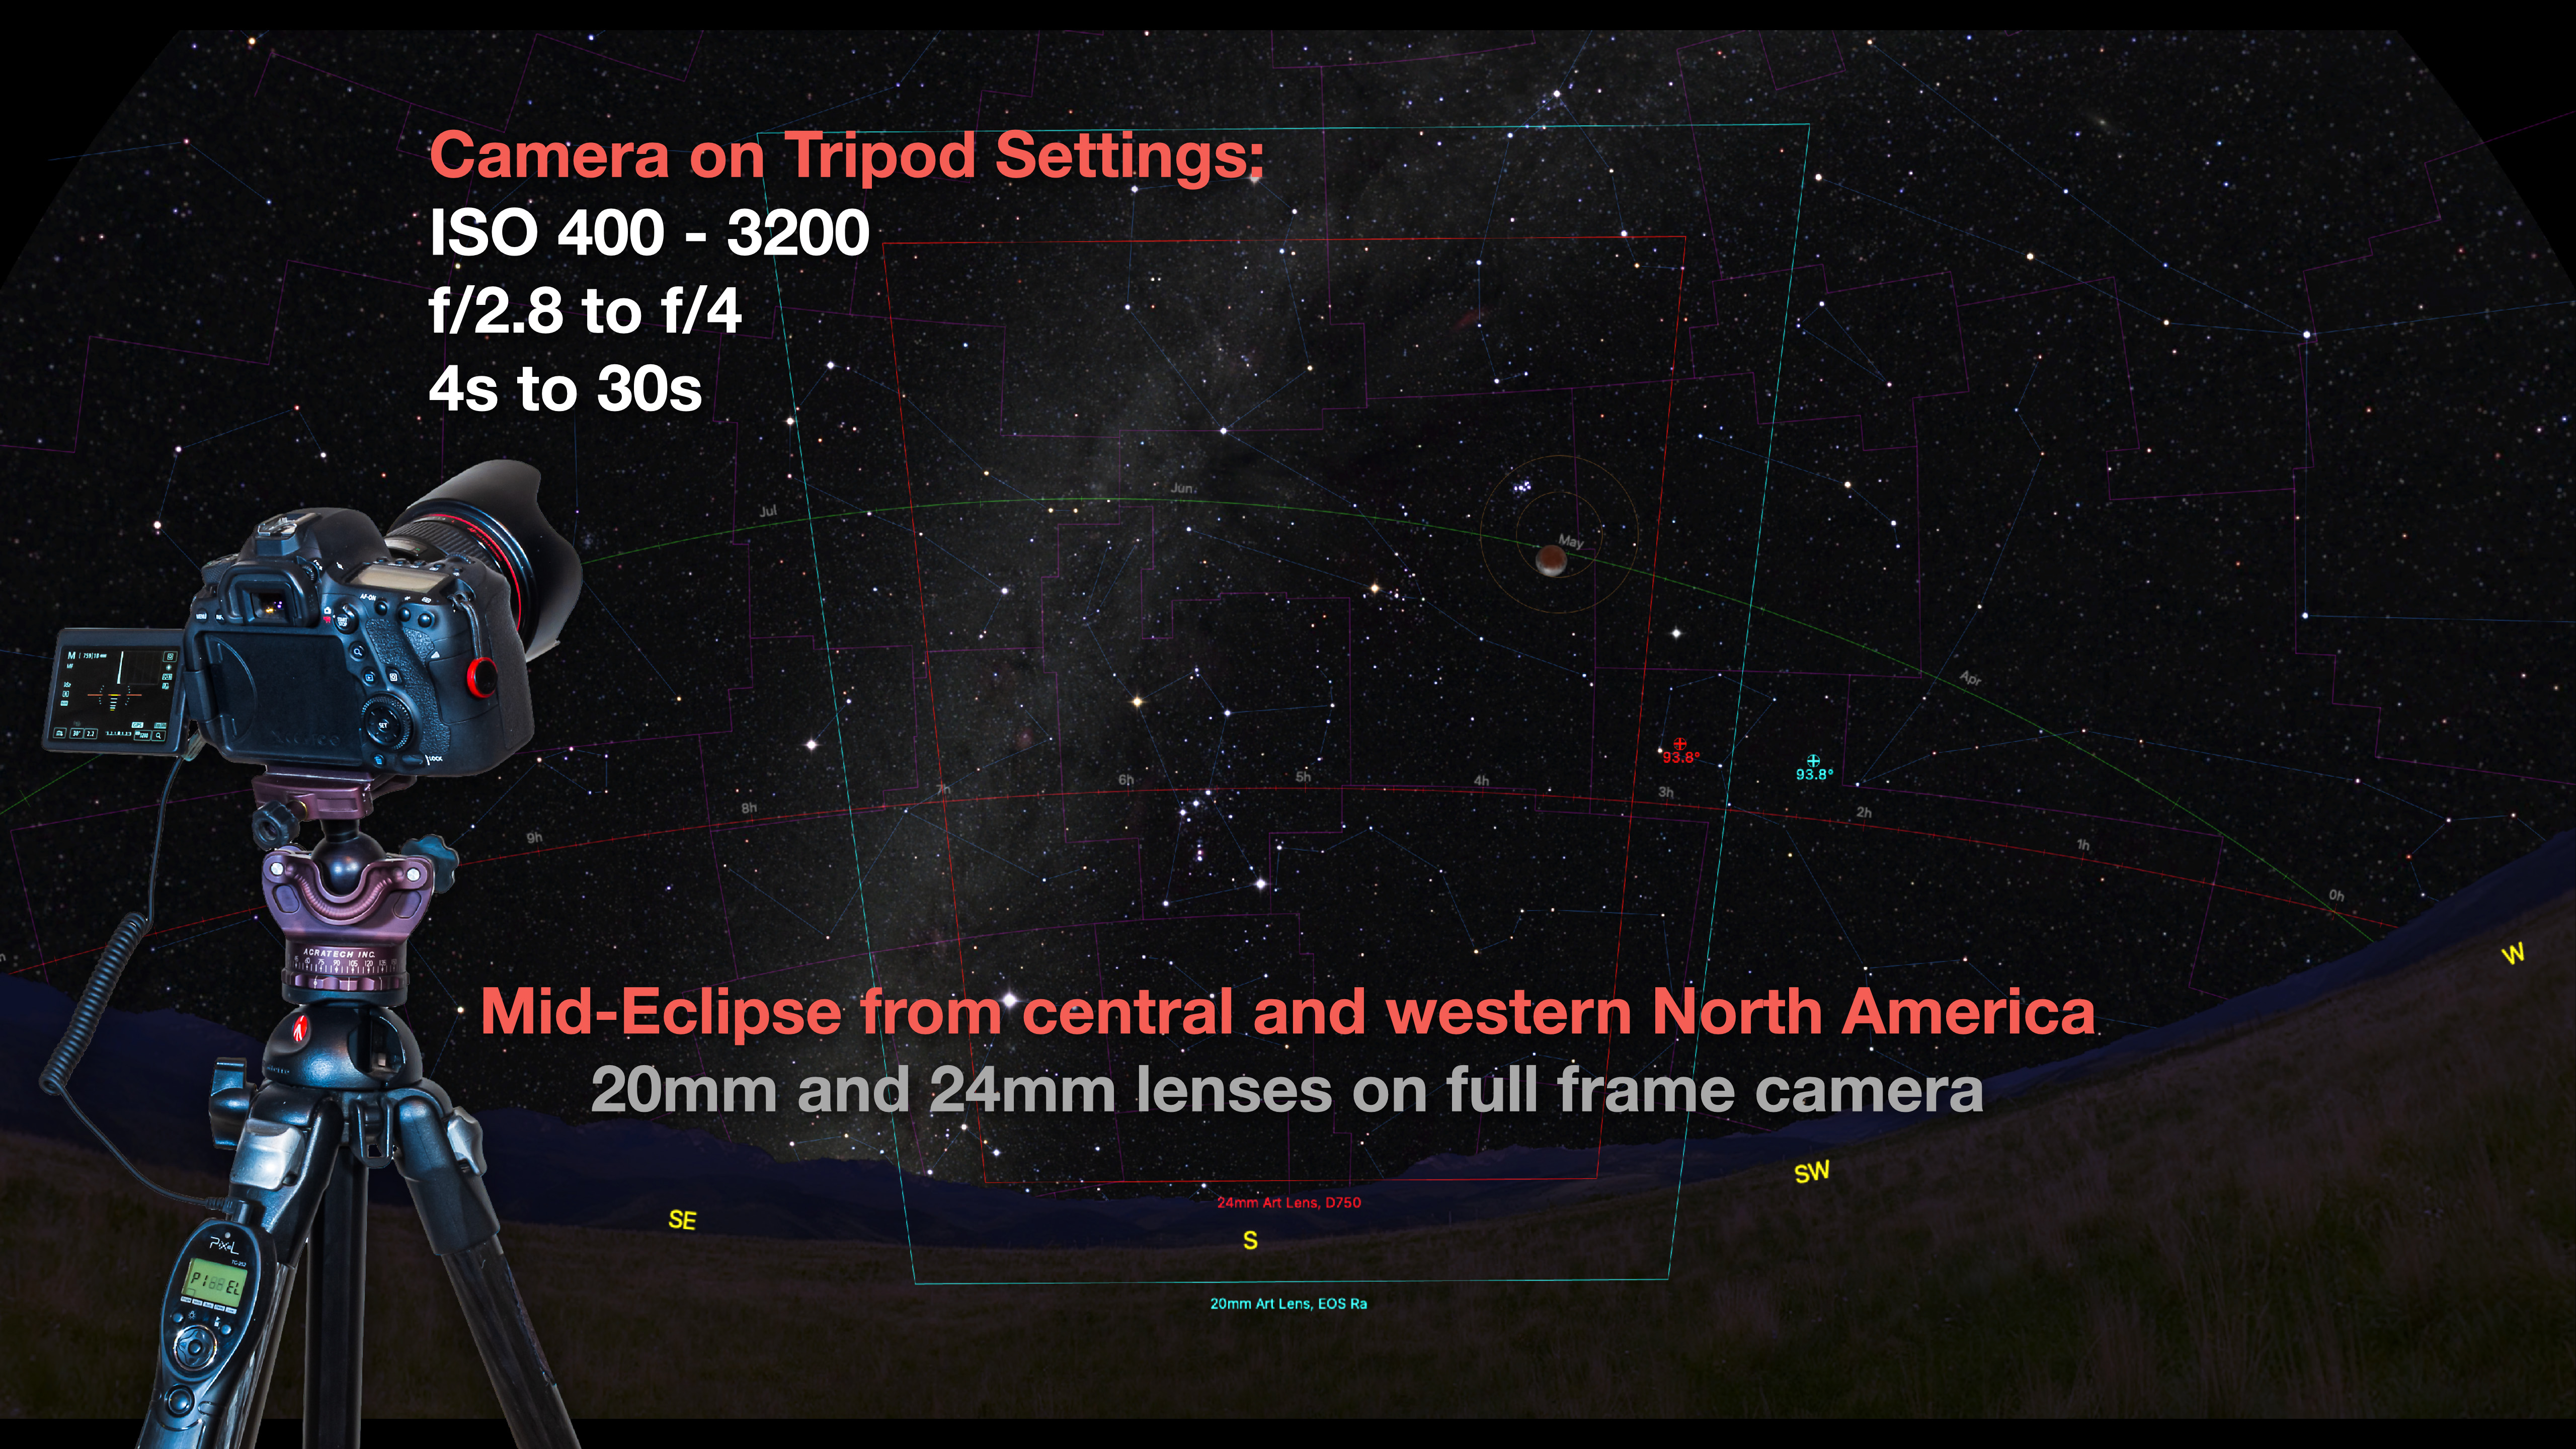
From western North America, including the landscape below will require wide lenses and a vertical format, with the Moon appearing quite small. But from a photogenic site, it might be worth the effort.

However, as my images above from the December 2010 eclipse show, if there’s any haze, the Moon could turn into a reddish blob.
You might be tempted to shoot with a long telephoto lens, but unless the camera is on a tracker, as below, the result will likely be a blurry mess. The sky moves enough during the long (over 1 second) exposures needed to pick up the reddened portion of the Moon that the image will smear when shot with long focal lengths. The solution is to use a sky tracker.
PHOTO OPTIONS 2 — CAMERA ON A TRACKER
Placing the camera on a motorized tracker that has been polar aligned to follow the motion of the stars opens up many more possibilities.
From a dark site, make use of the Moon’s position near the Milky Way to frame it and Orion and his fellow winter constellations. A 24mm lens will do the job nicely, in exposures up to 2 to 4 minutes long. But take short ones for just the Moon to layer in later.
A 50mm lens (again assuming a full frame camera) frames the Moon with the Pleiades and Hyades star clusters in Taurus.
Switching to an 85mm lens frames the clusters more tightly and makes the Moon’s disk a little larger. For me, this is the best shot to go for at this eclipse, as it tells the story of the eclipse and its unique position near the two star clusters.
But going with a longer lens allows framing the red eclipsed Moon below the blue Pleiades cluster, a fine colour contrast. A 200mm lens will do the job nicely (or a 135mm on a cropped frame camera).
Or, as I show here, the popular William Optics RedCat with its 250mm focal length will also work well. But such a lens must be on a polar-aligned tracker to get sharp shots. Use the Sidereal rate drive speed to ensure the sharpest stars over the 1 to 4 minutes needed to record lots of stars.
Take lots of exposures over a range of settings — long to bring out the deep sky detail and shorter to preserve detail in the reddened lunar disk. These can be layered and blended later in Photoshop, or in the layer-based image editing program of your choice, such as Affinity Photo or ON1 Photo RAW.
PHOTO OPTIONS 3 — THROUGH A TELESCOPE
While I think the tracked wide-field options are some of the best for this eclipse, many photographers will want frame-filling close-ups of the red Moon. While a telescope will do the job, unless it has motors to track the sky, your options are limited.
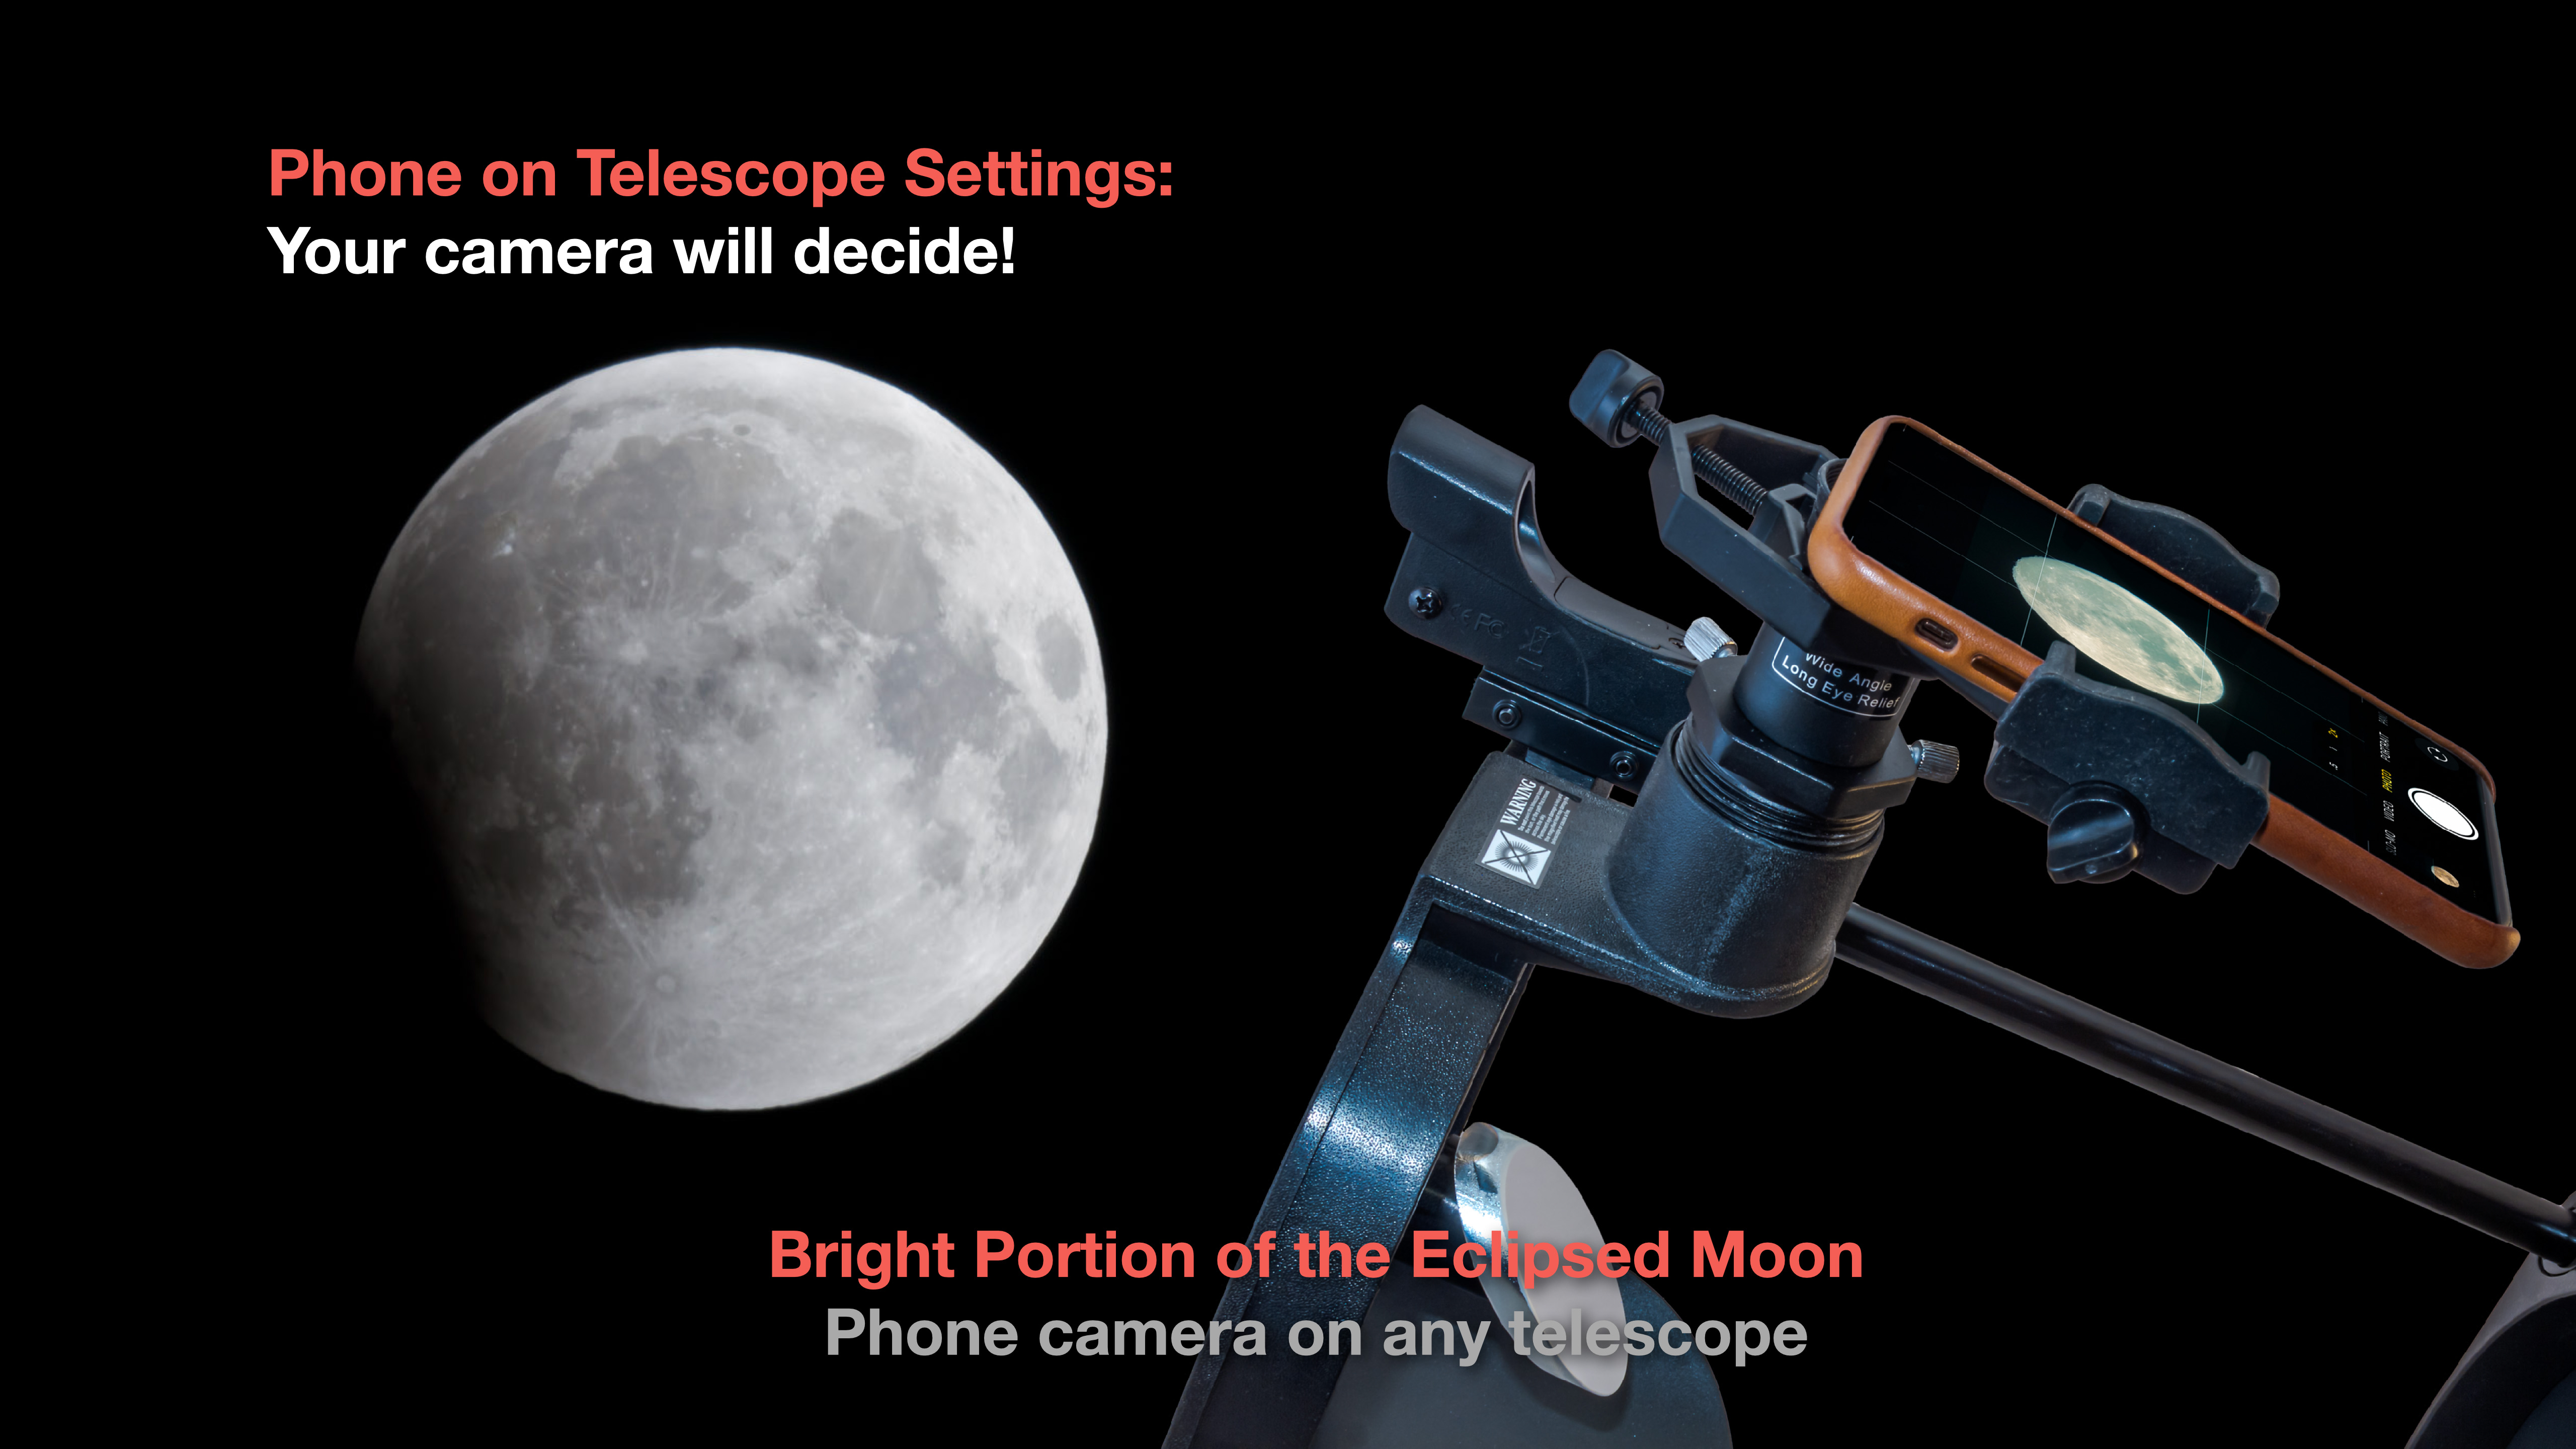
A phone clamped to the eyepiece of a telescope can capture the shrinking bright part of the eclipsed Moon as the Moon enters more deeply into the umbra. Exposures for the bright part of the Moon are short enough a motor drive on the telescope is not essential.
But if you haven’t shot the Moon with this gear before, eclipse night is not the time to learn. Practice on the Moon before the eclipse.

For shooting with a DSLR camera through a telescope you’ll need a special camera adapter nosepiece and T-ring for your camera. Again, if you don’t have the gear and the experience doing this, I would suggest not making the attempt at two in the morning on eclipse night!
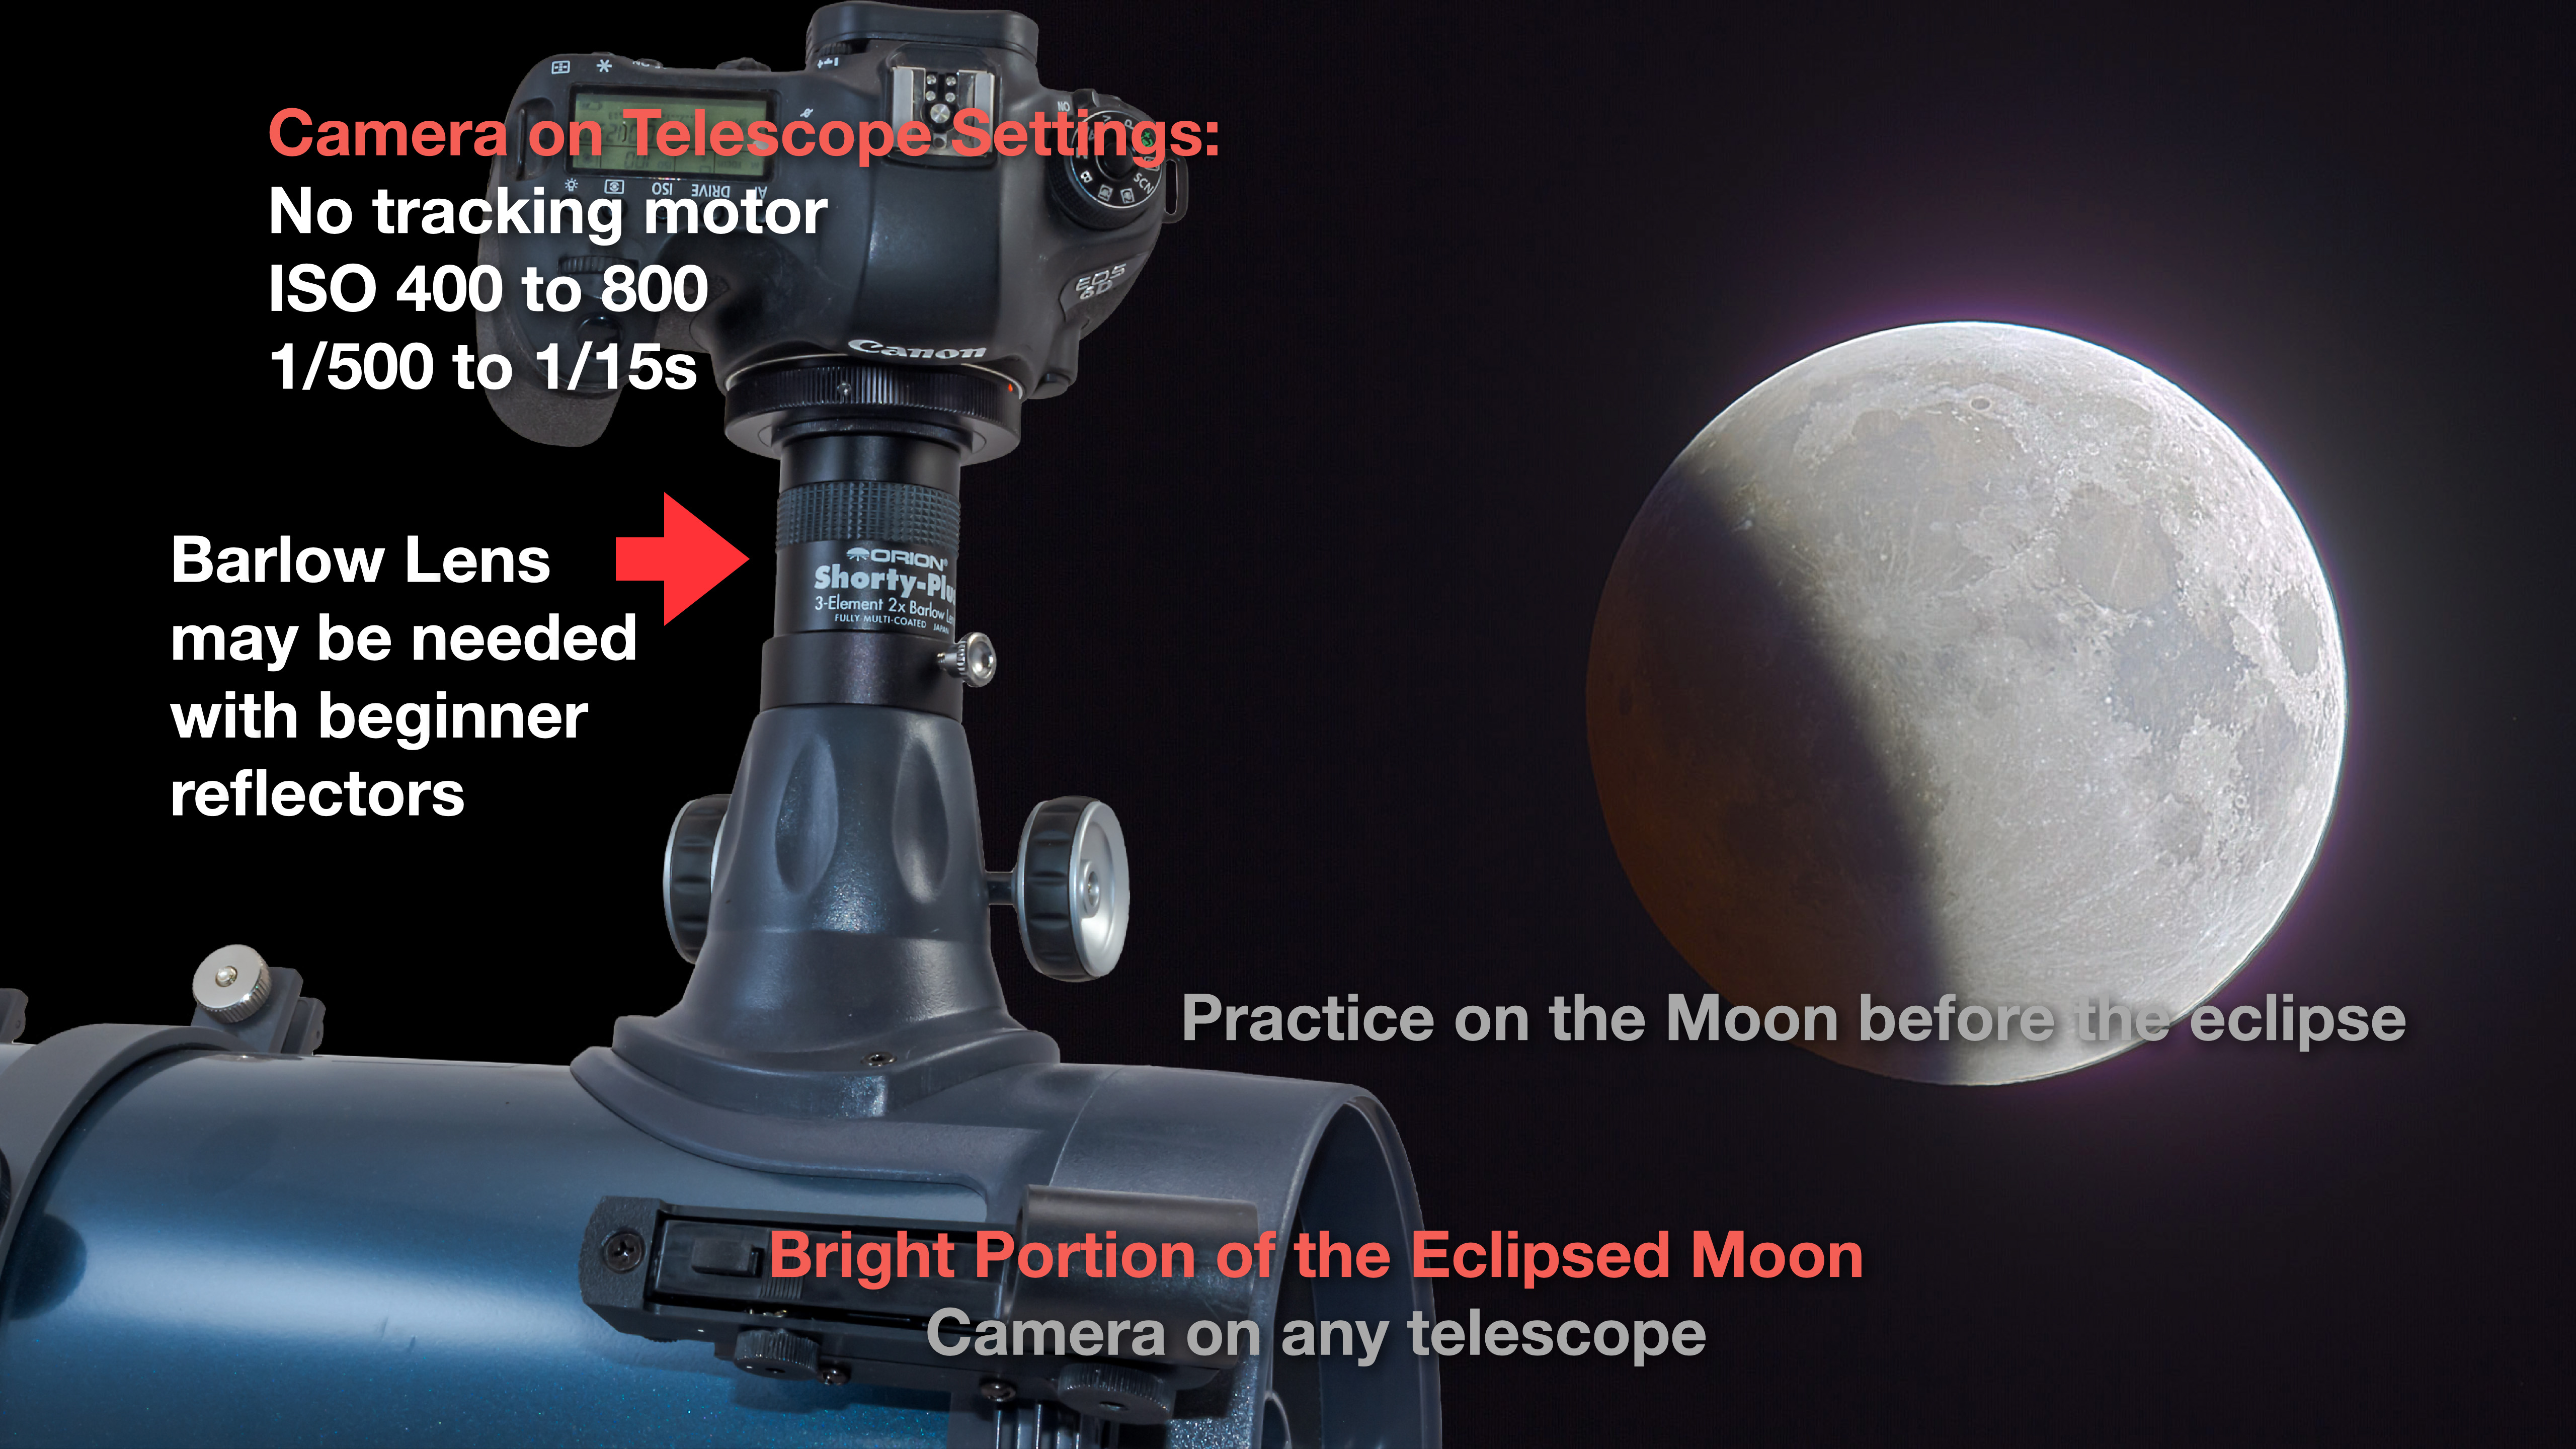
For example, owners of typical beginner reflectors are often surprised to find their cameras won’t even reach focus on their telescope. Many are simply not designed for photography. Adding a Barlow lens is required for the camera to reach focus, though without a drive, exposures will be limited to short (under 1/15s) shots of the bright part of the Moon.
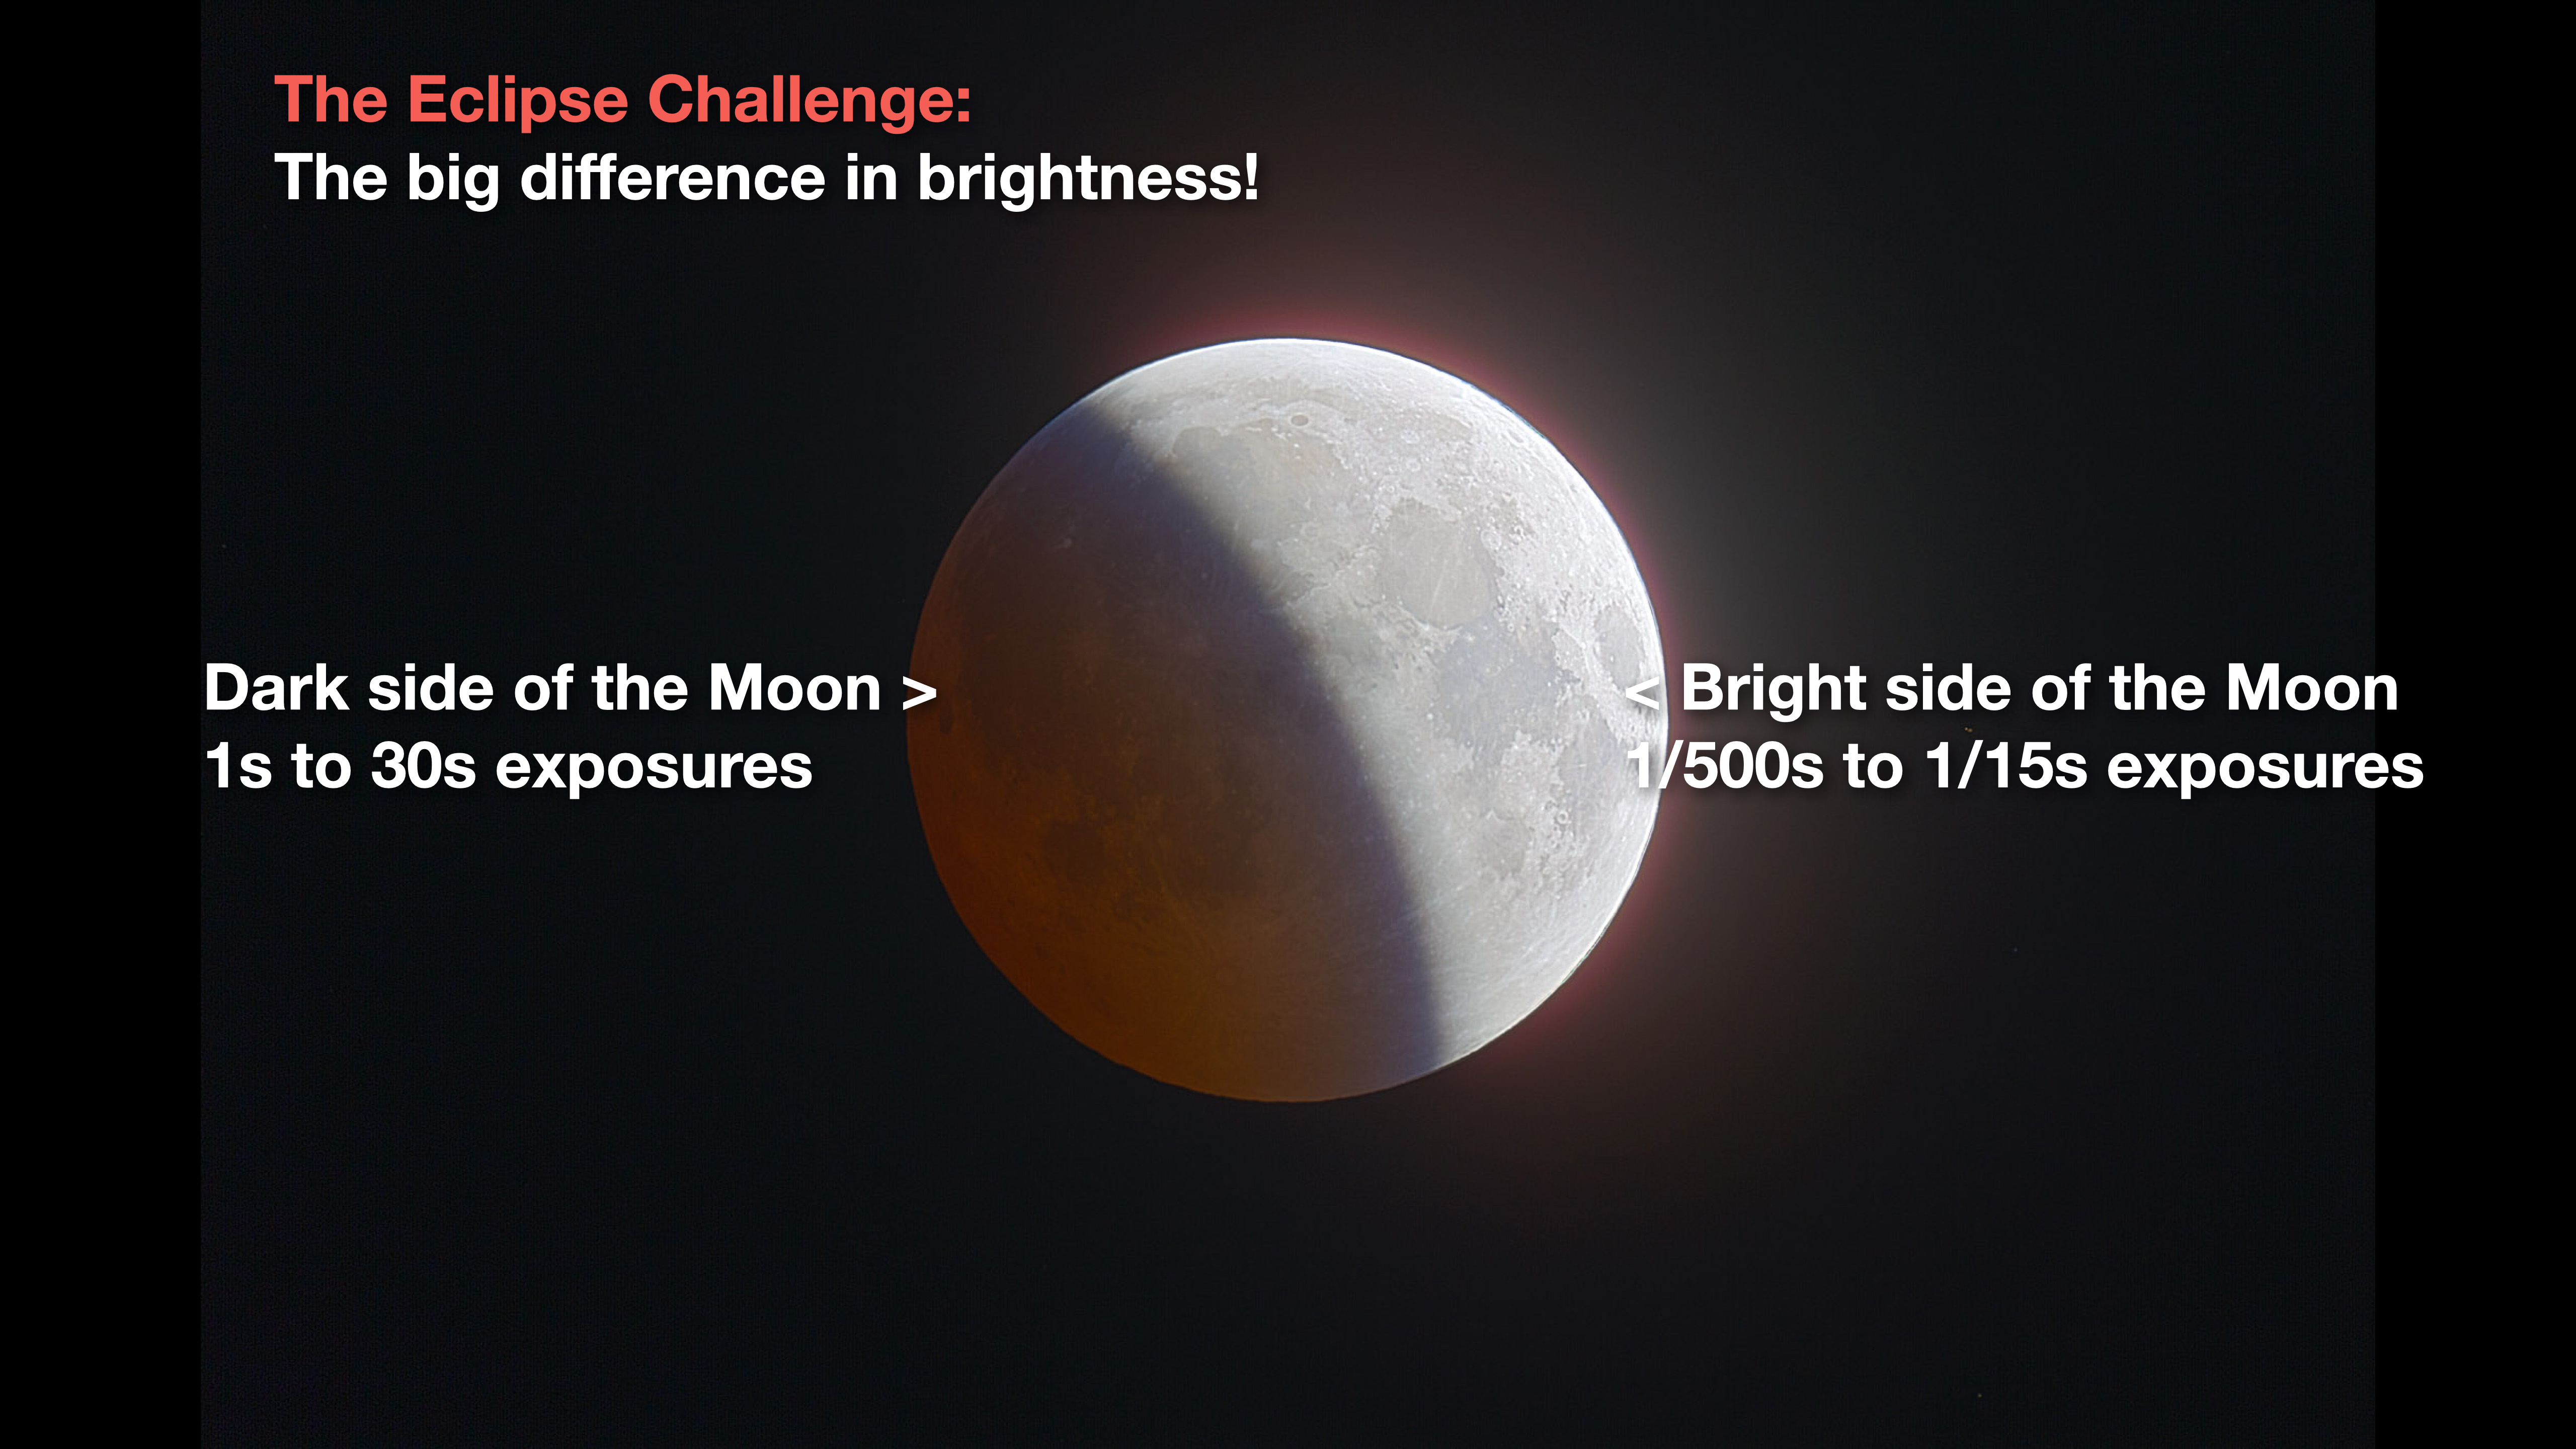
The challenge with this and all lunar eclipses is that the Moon presents a huge range of brightness. Short snapshots can capture the bright part of the Moon not in the umbra, but the dark umbral-shaded portion requires much longer exposures, usually over one second.
Your eye can see the whole scene (as depicted above) but the camera cannot, not in one exposure. This example is a “high dynamic range” blend of several exposures.
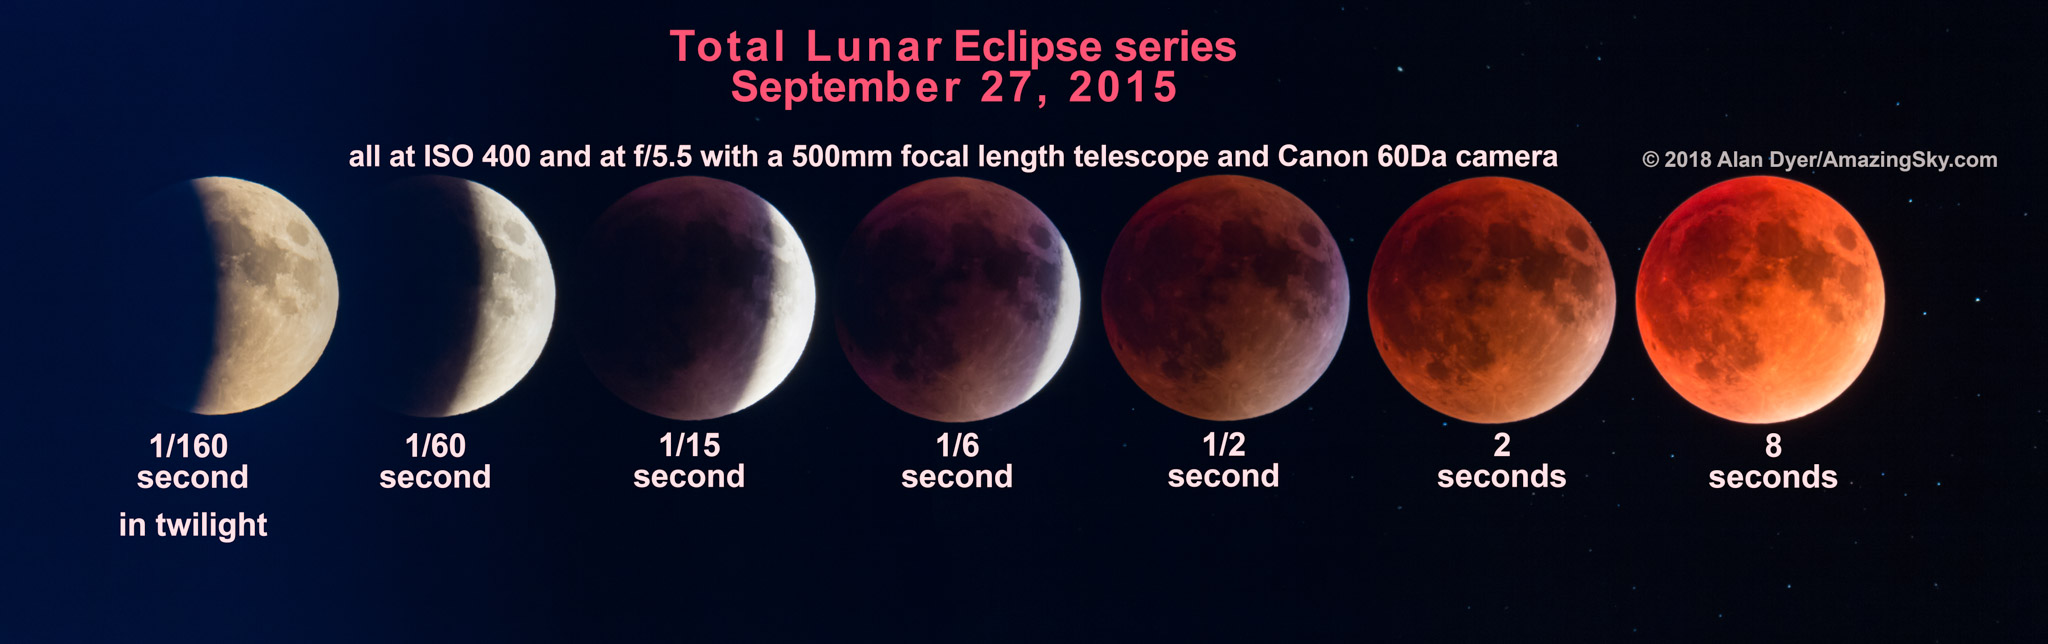
Plus as the eclipse progresses, longer and longer exposures are needed to capture the sequence as the Moon is engulfed by more of the umbra.
After mid-eclipse, the exposures must get progressively shorter again in reverse order. So attempting to capture an entire sequence requires a lot of exposure adjustments.
TIP: Bracket a lot! Take lots of frames at each burst of images shot every minute, or however often you wish to capture the progress of the eclipse for a final set. Unlike total solar eclipses, lunar eclipses provide lots of time to take lots of images.
PHOTO OPTIONS 4 — THROUGH A TRACKING TELESCOPE
If you want close-ups of the eclipsed red Moon, you will need to use a mount equipped with a tracking motor, such as an equatorial mount shown here. But for use with telephoto lenses and short telescopes, a polar-aligned sky tracker, as above, will work.
Exposures can now be several seconds long, and at a lower ISO speed for less noise, allowing the Moon to be captured in sharp detail and with great colour. Long exposures will even pick up stars near the Moon.
However, when shooting close-ups, use the Lunar drive rate (if your mount offers that choice) to follow the Moon itself, as it has a motion of its own against the background stars. It’s that orbital motion that takes it from west to east (right to left) through the Earth’s shadow.
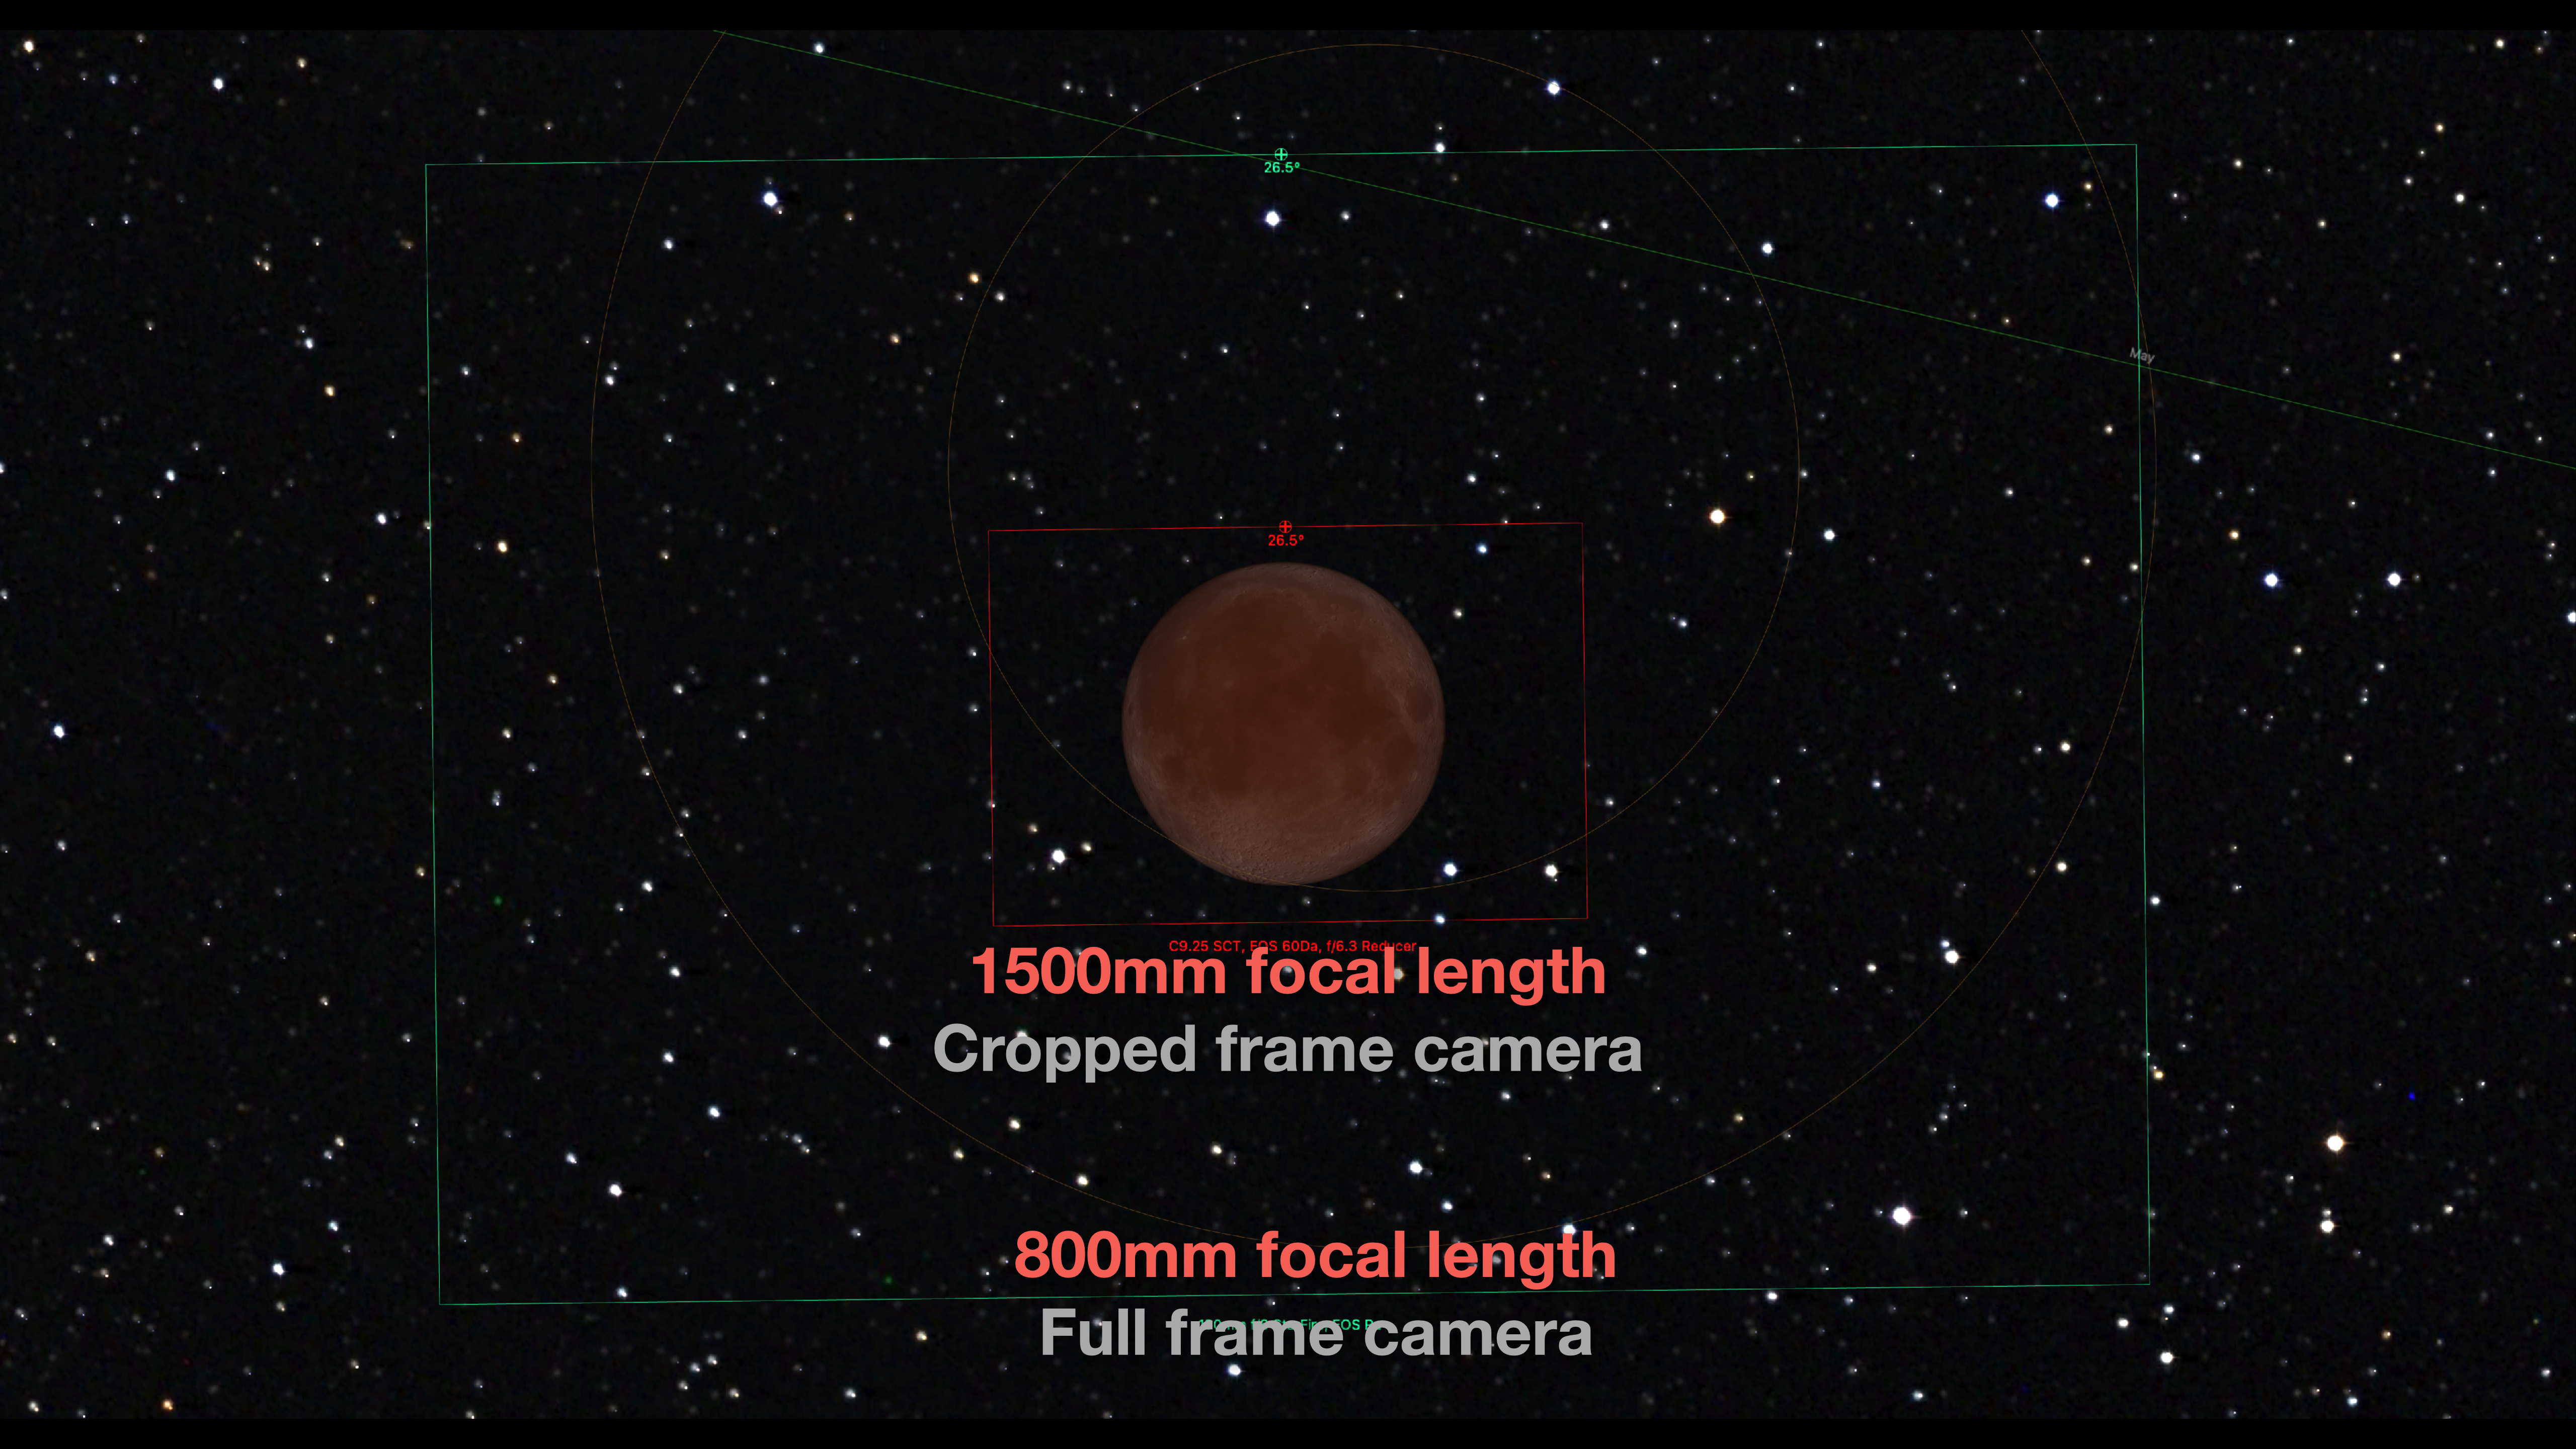
Filling the camera frame with the Moon requires a surprising amount of focal length. The Moon appears big to our eyes, but is only 1/2º across.
Even with 800mm of focal length, the Moon fills only a third of a full frame camera field. Using a cropped frame camera has the advantage of tightening the field of view, but it still takes 1200mm to 1500mm of focal length to fill the frame.
But I wouldn’t worry about doing so, as longer focal lengths typically also come with slower f-ratios, requiring longer exposure times or higher ISOs, both of which can blur detail.
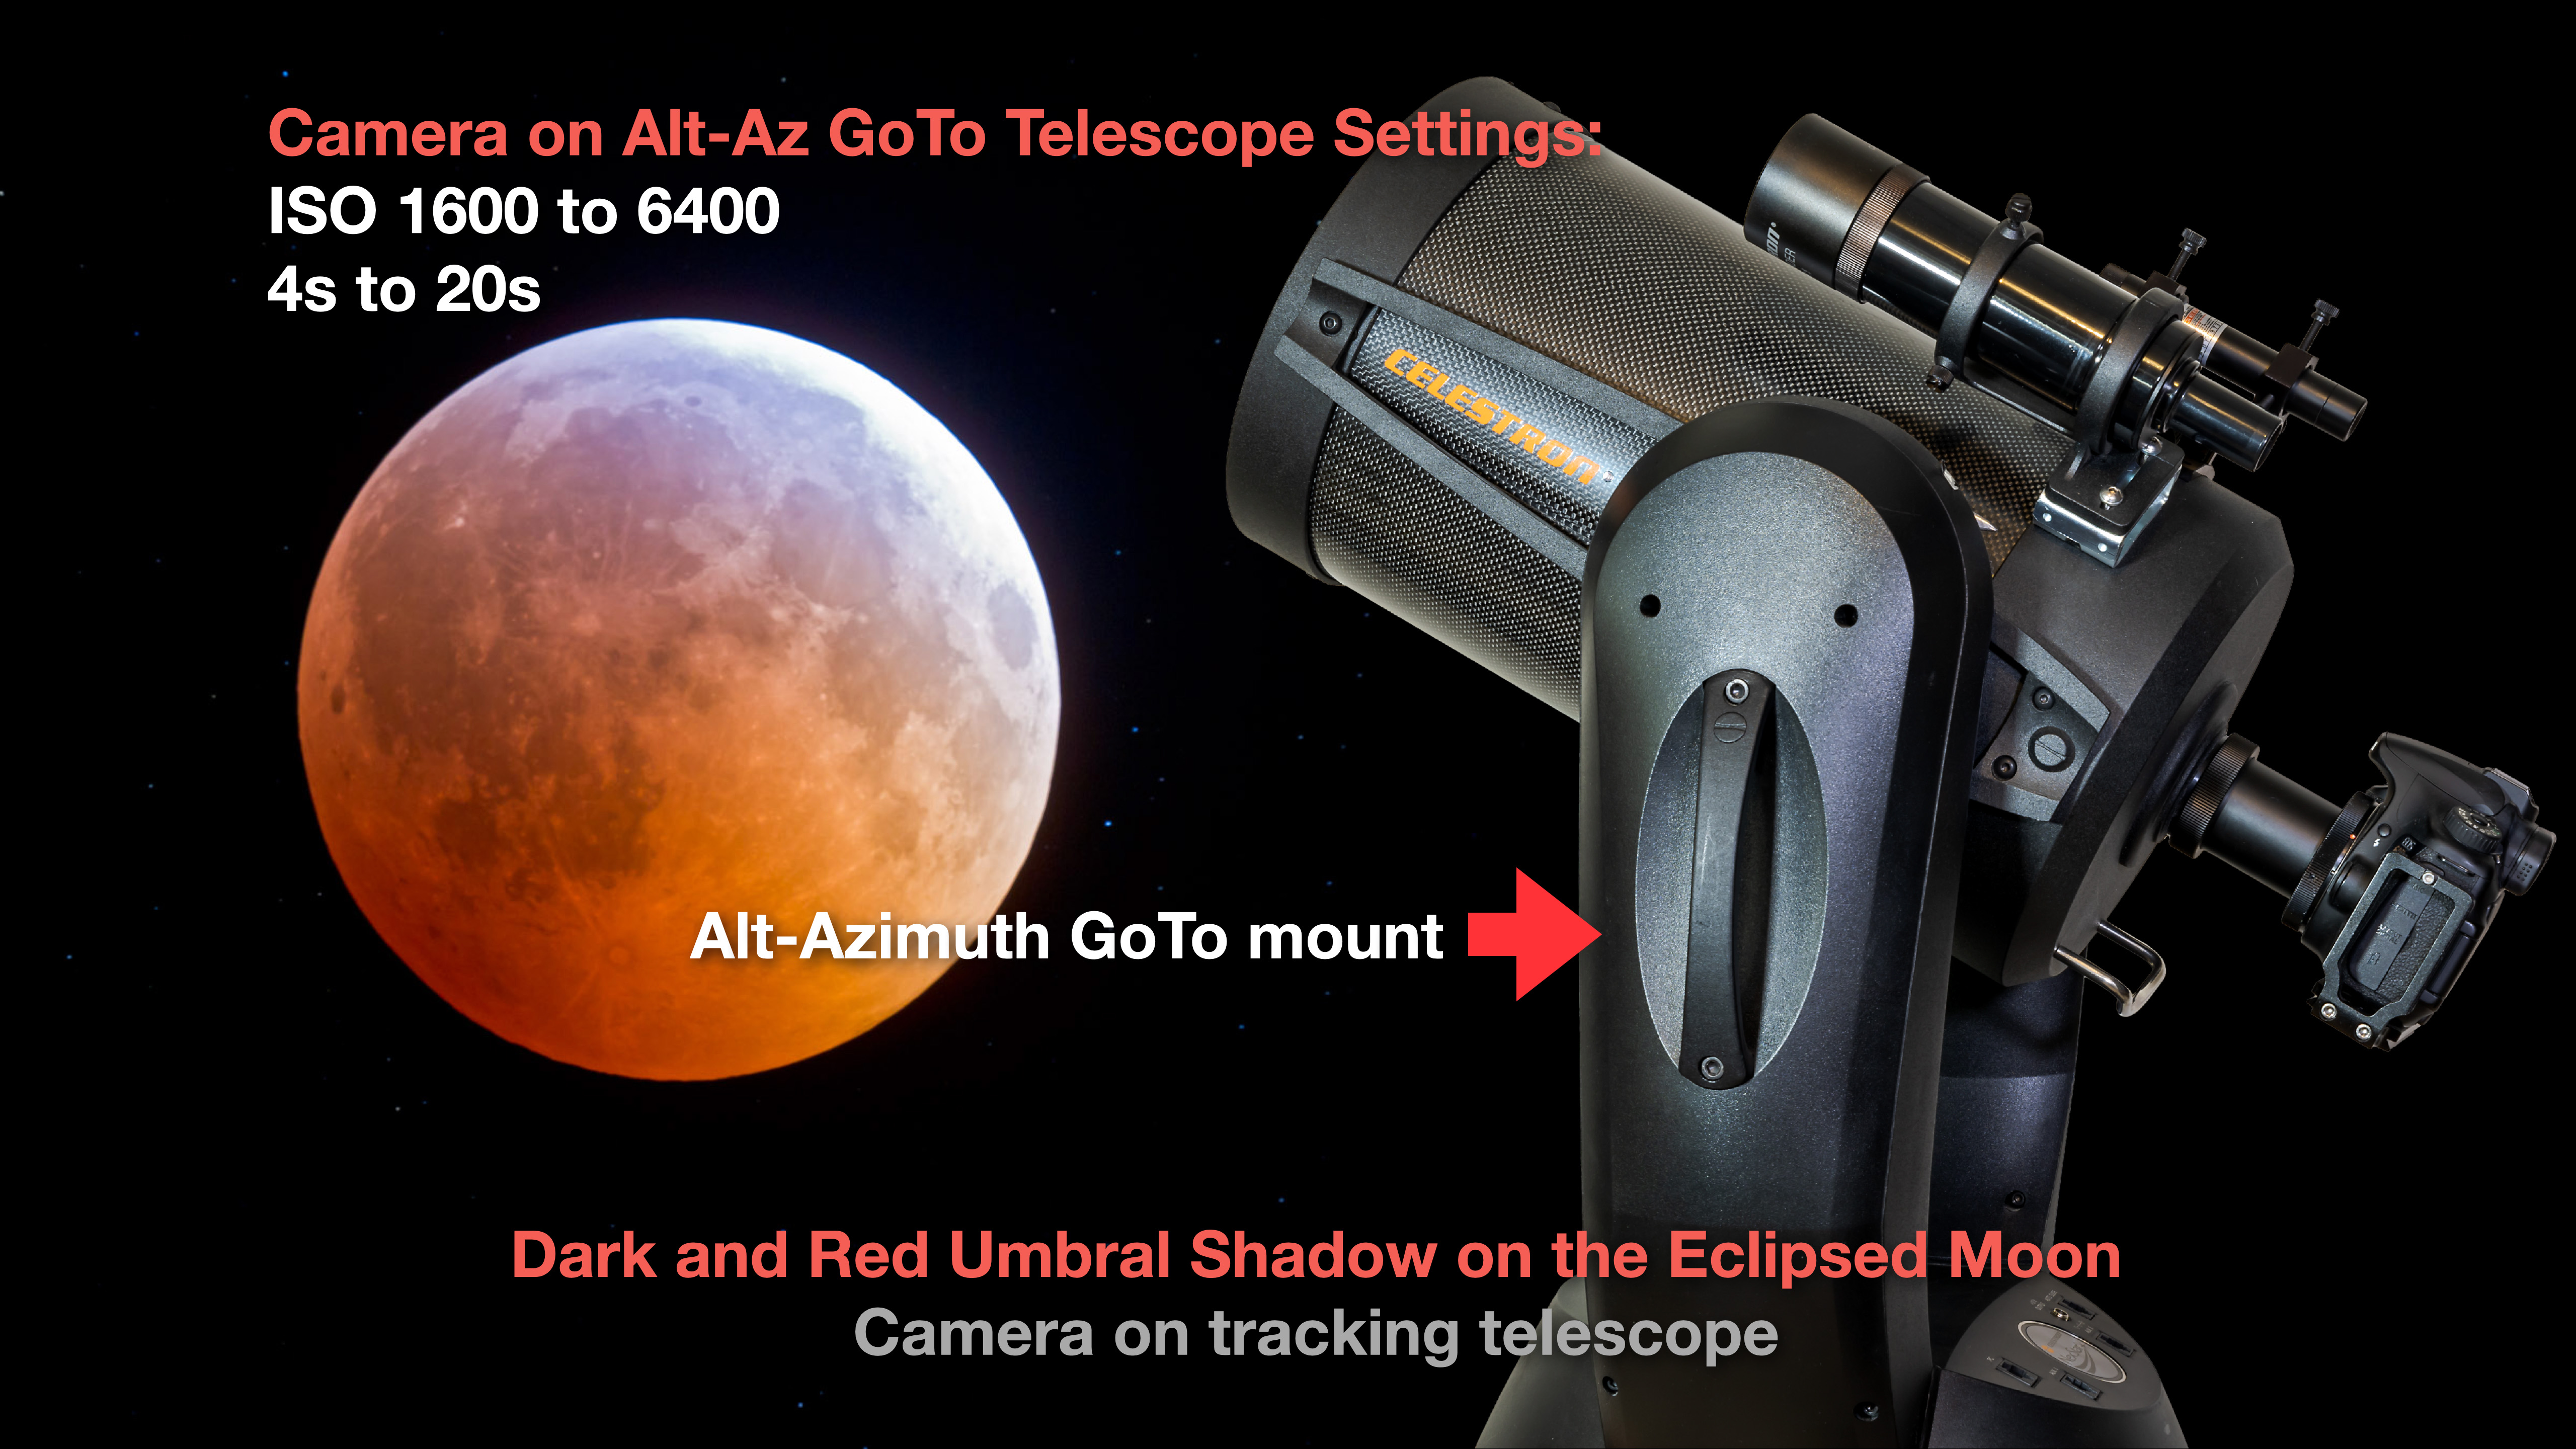
For close-ups, a polar-aligned equatorial mount is best. But if your telescope is a GoTo telescope on an alt-azimuth mount (such as a Schmidt-Cassegrain shown here), you should be able to get good shots.
The field of view will slowly rotate during the eclipse, making it more difficult to later accurately assemble a series of shots documenting the entire sequence.
But any one shot should be fine, though it might be best to keep exposures shorter by using a higher ISO speed. As always, take lots of shots at different settings.
You won’t be able to tell which is sharpest until you inspect them later at the computer.
TIP: People worry about exposures, but the flaw that ruins many eclipse shots is poor focus. Use Live View to focus carefully on the sharp edge of the bright part of the Moon. Or better yet, focus on a bright star nearby. Zoom up to 10x to make it easier to see when the star is in sharpest focus. It can be a good idea to refocus through the night as the changing temperature can shift the focus point of long lenses and telescopes. That might take moving the scope over to a bright star, which won’t be possible if you need to preserve the framing for a composite.
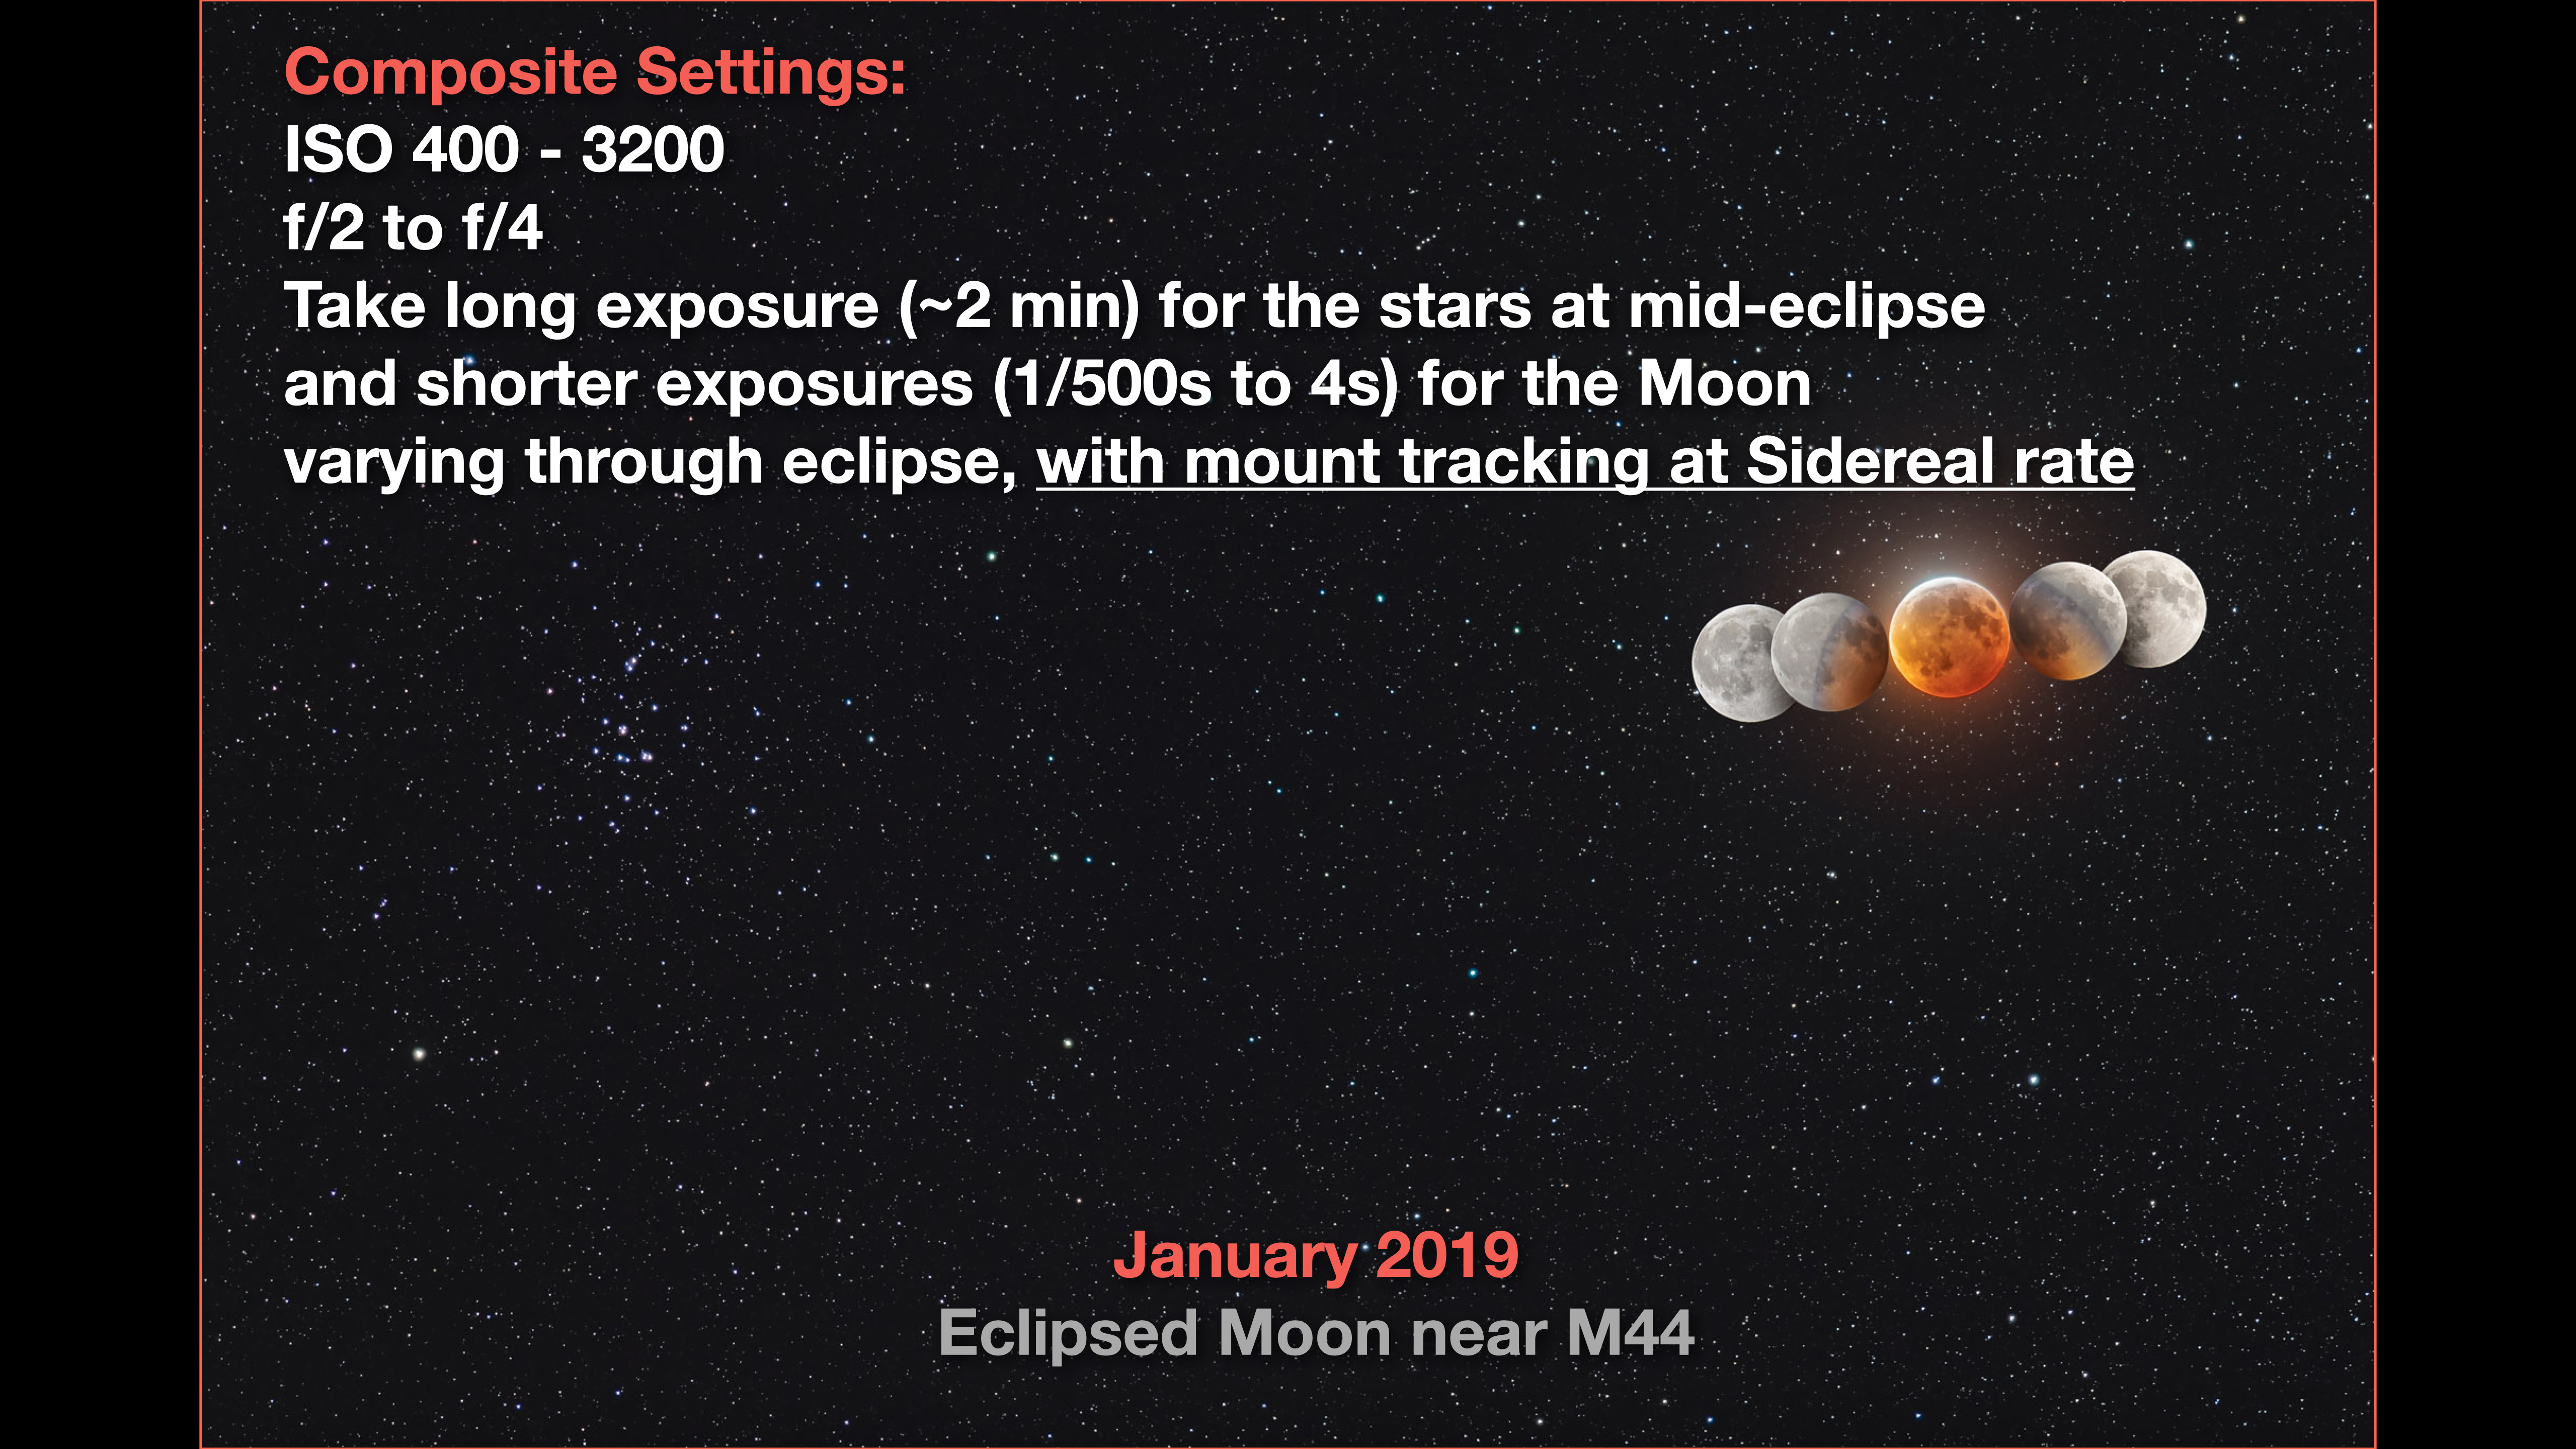
PHOTO OPTIONS 5 — HDR COMPOSITES
Using an equatorial mount tracking at the lunar rate keeps the Moon stationary. This opens up the possibility of taking a series of shots over the wide range of exposures needed to capture the Moon from bright to dark, to assemble later in processing. Take 5 to 7 shots in quick succession.
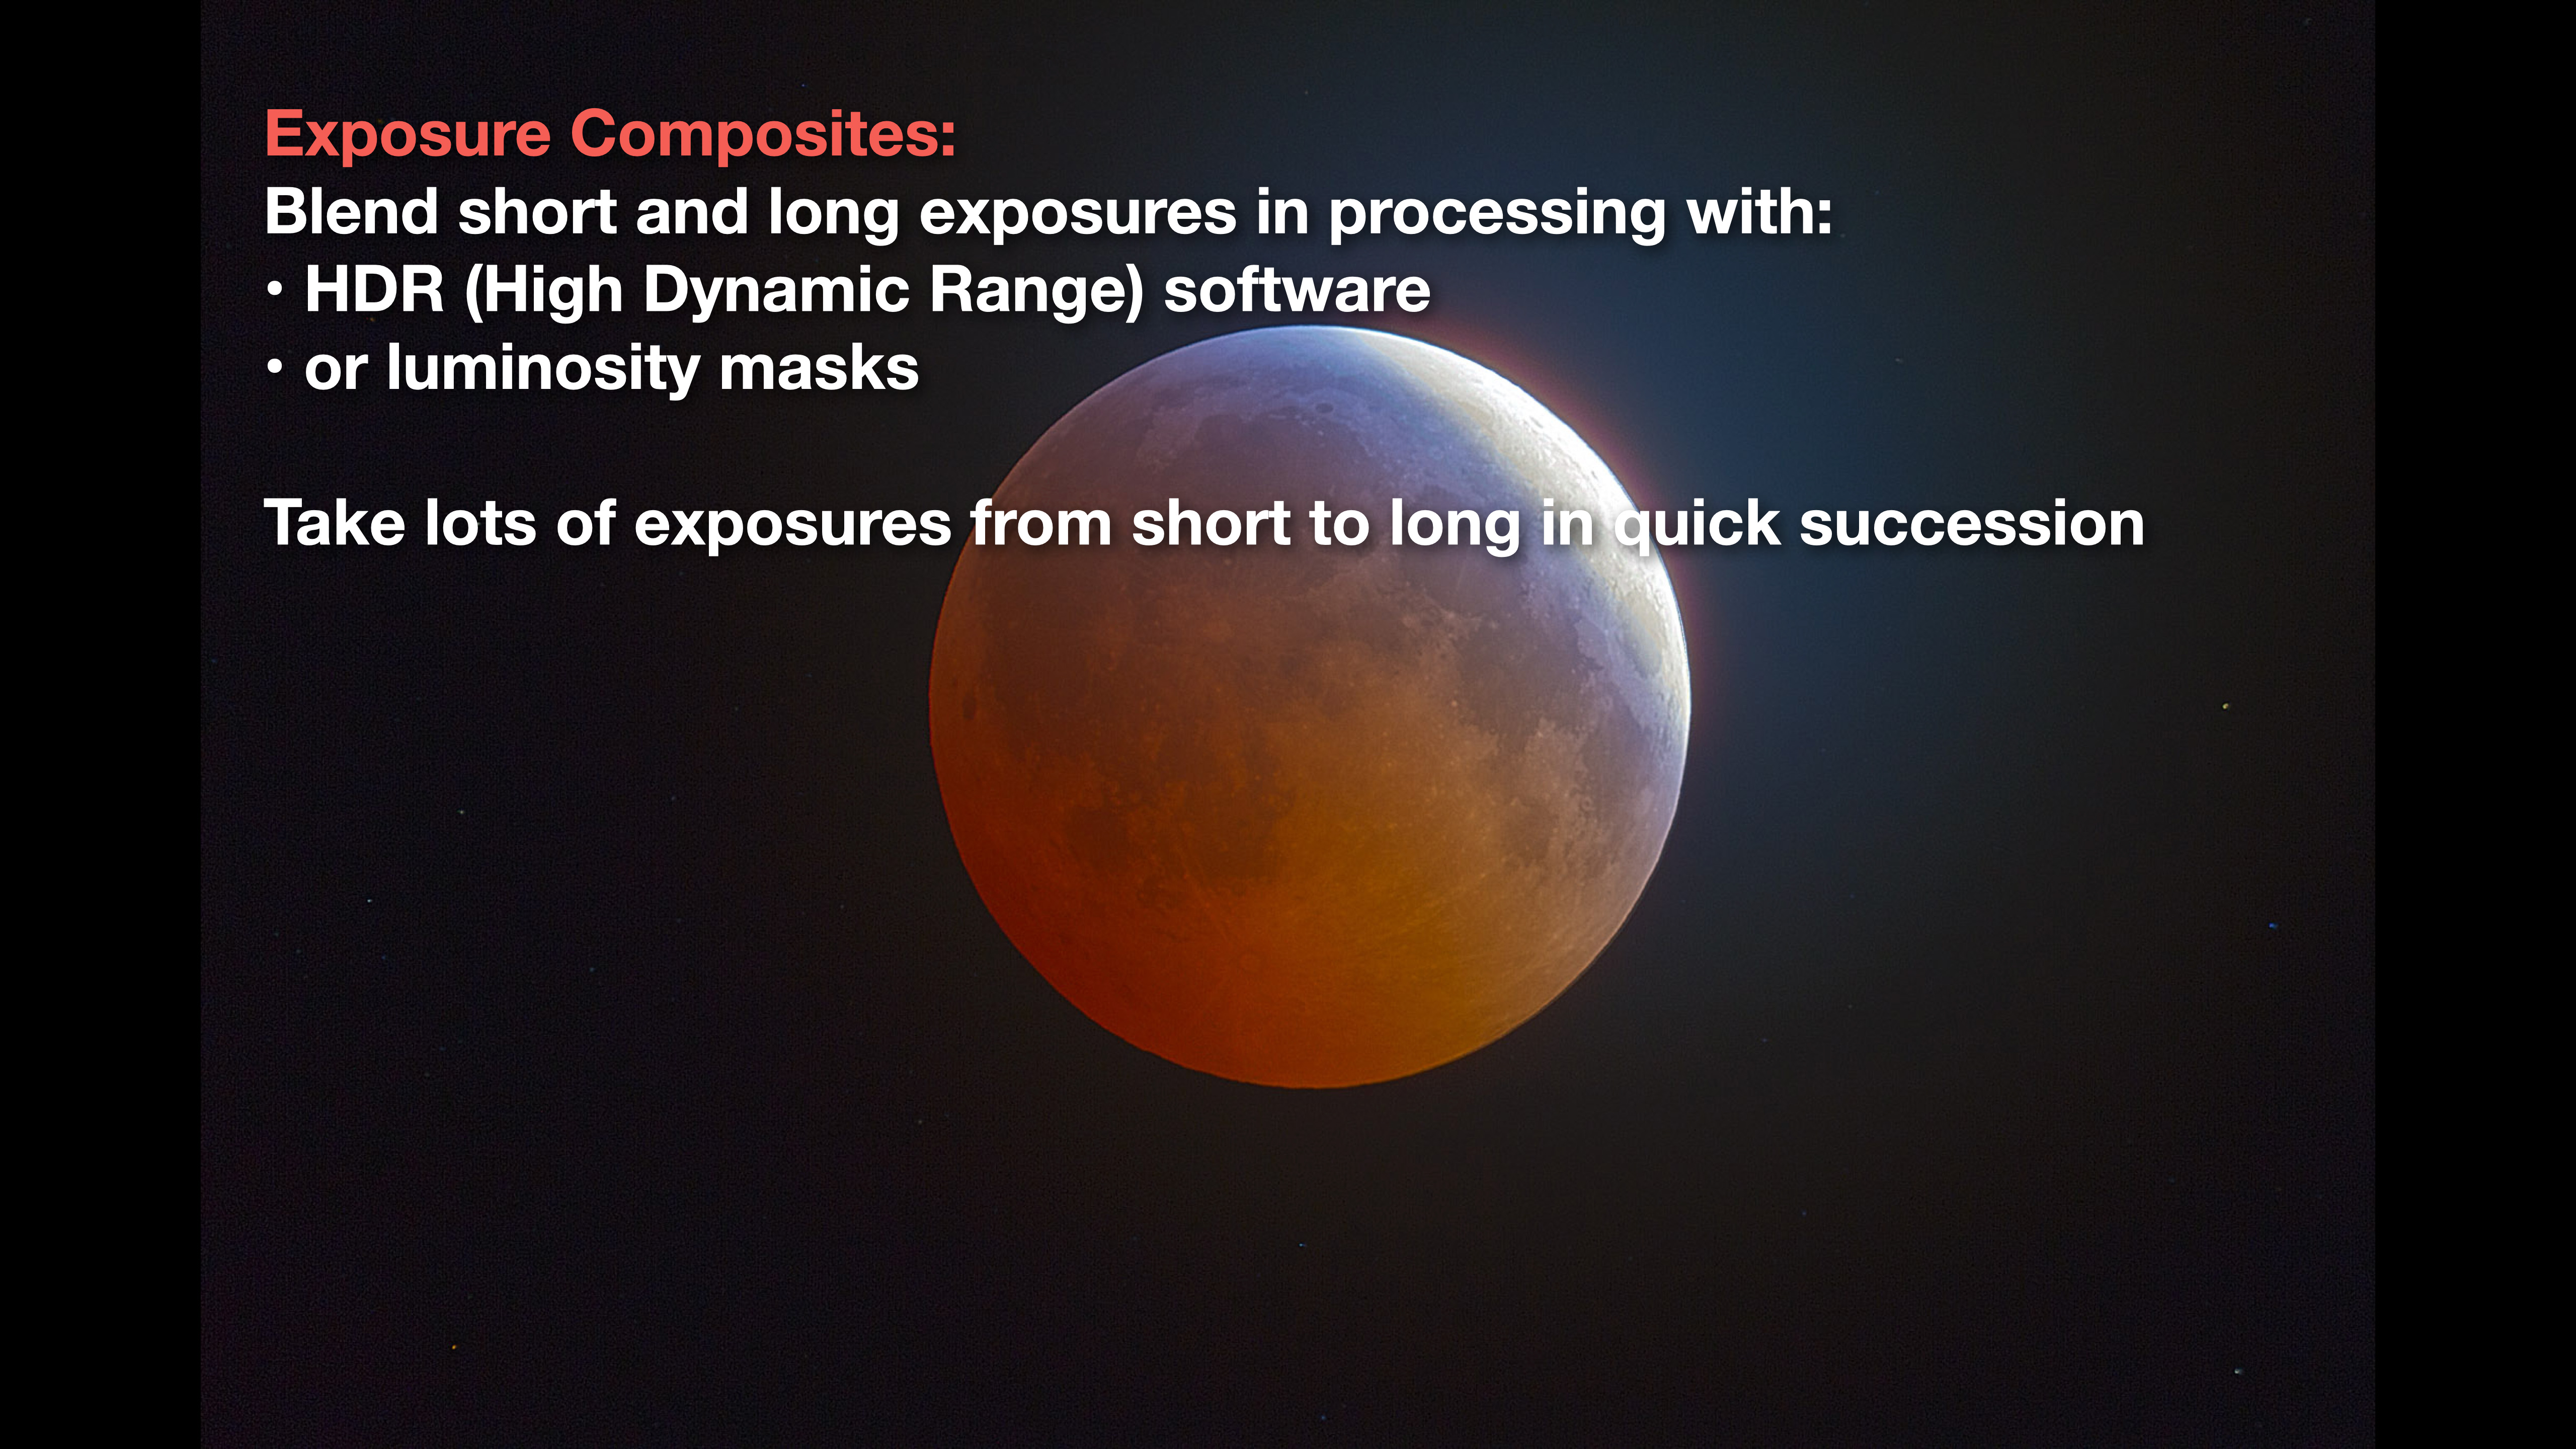
High dynamic range software can blend the images, or use luminosity masks created by extension panels for Photoshop such as Lumenzia, TK8 or Raya Pro. Either technique can create a final image that looks like what your eye saw. The key is making sure all the images are aligned. HDR software likely won’t align them for you very well.
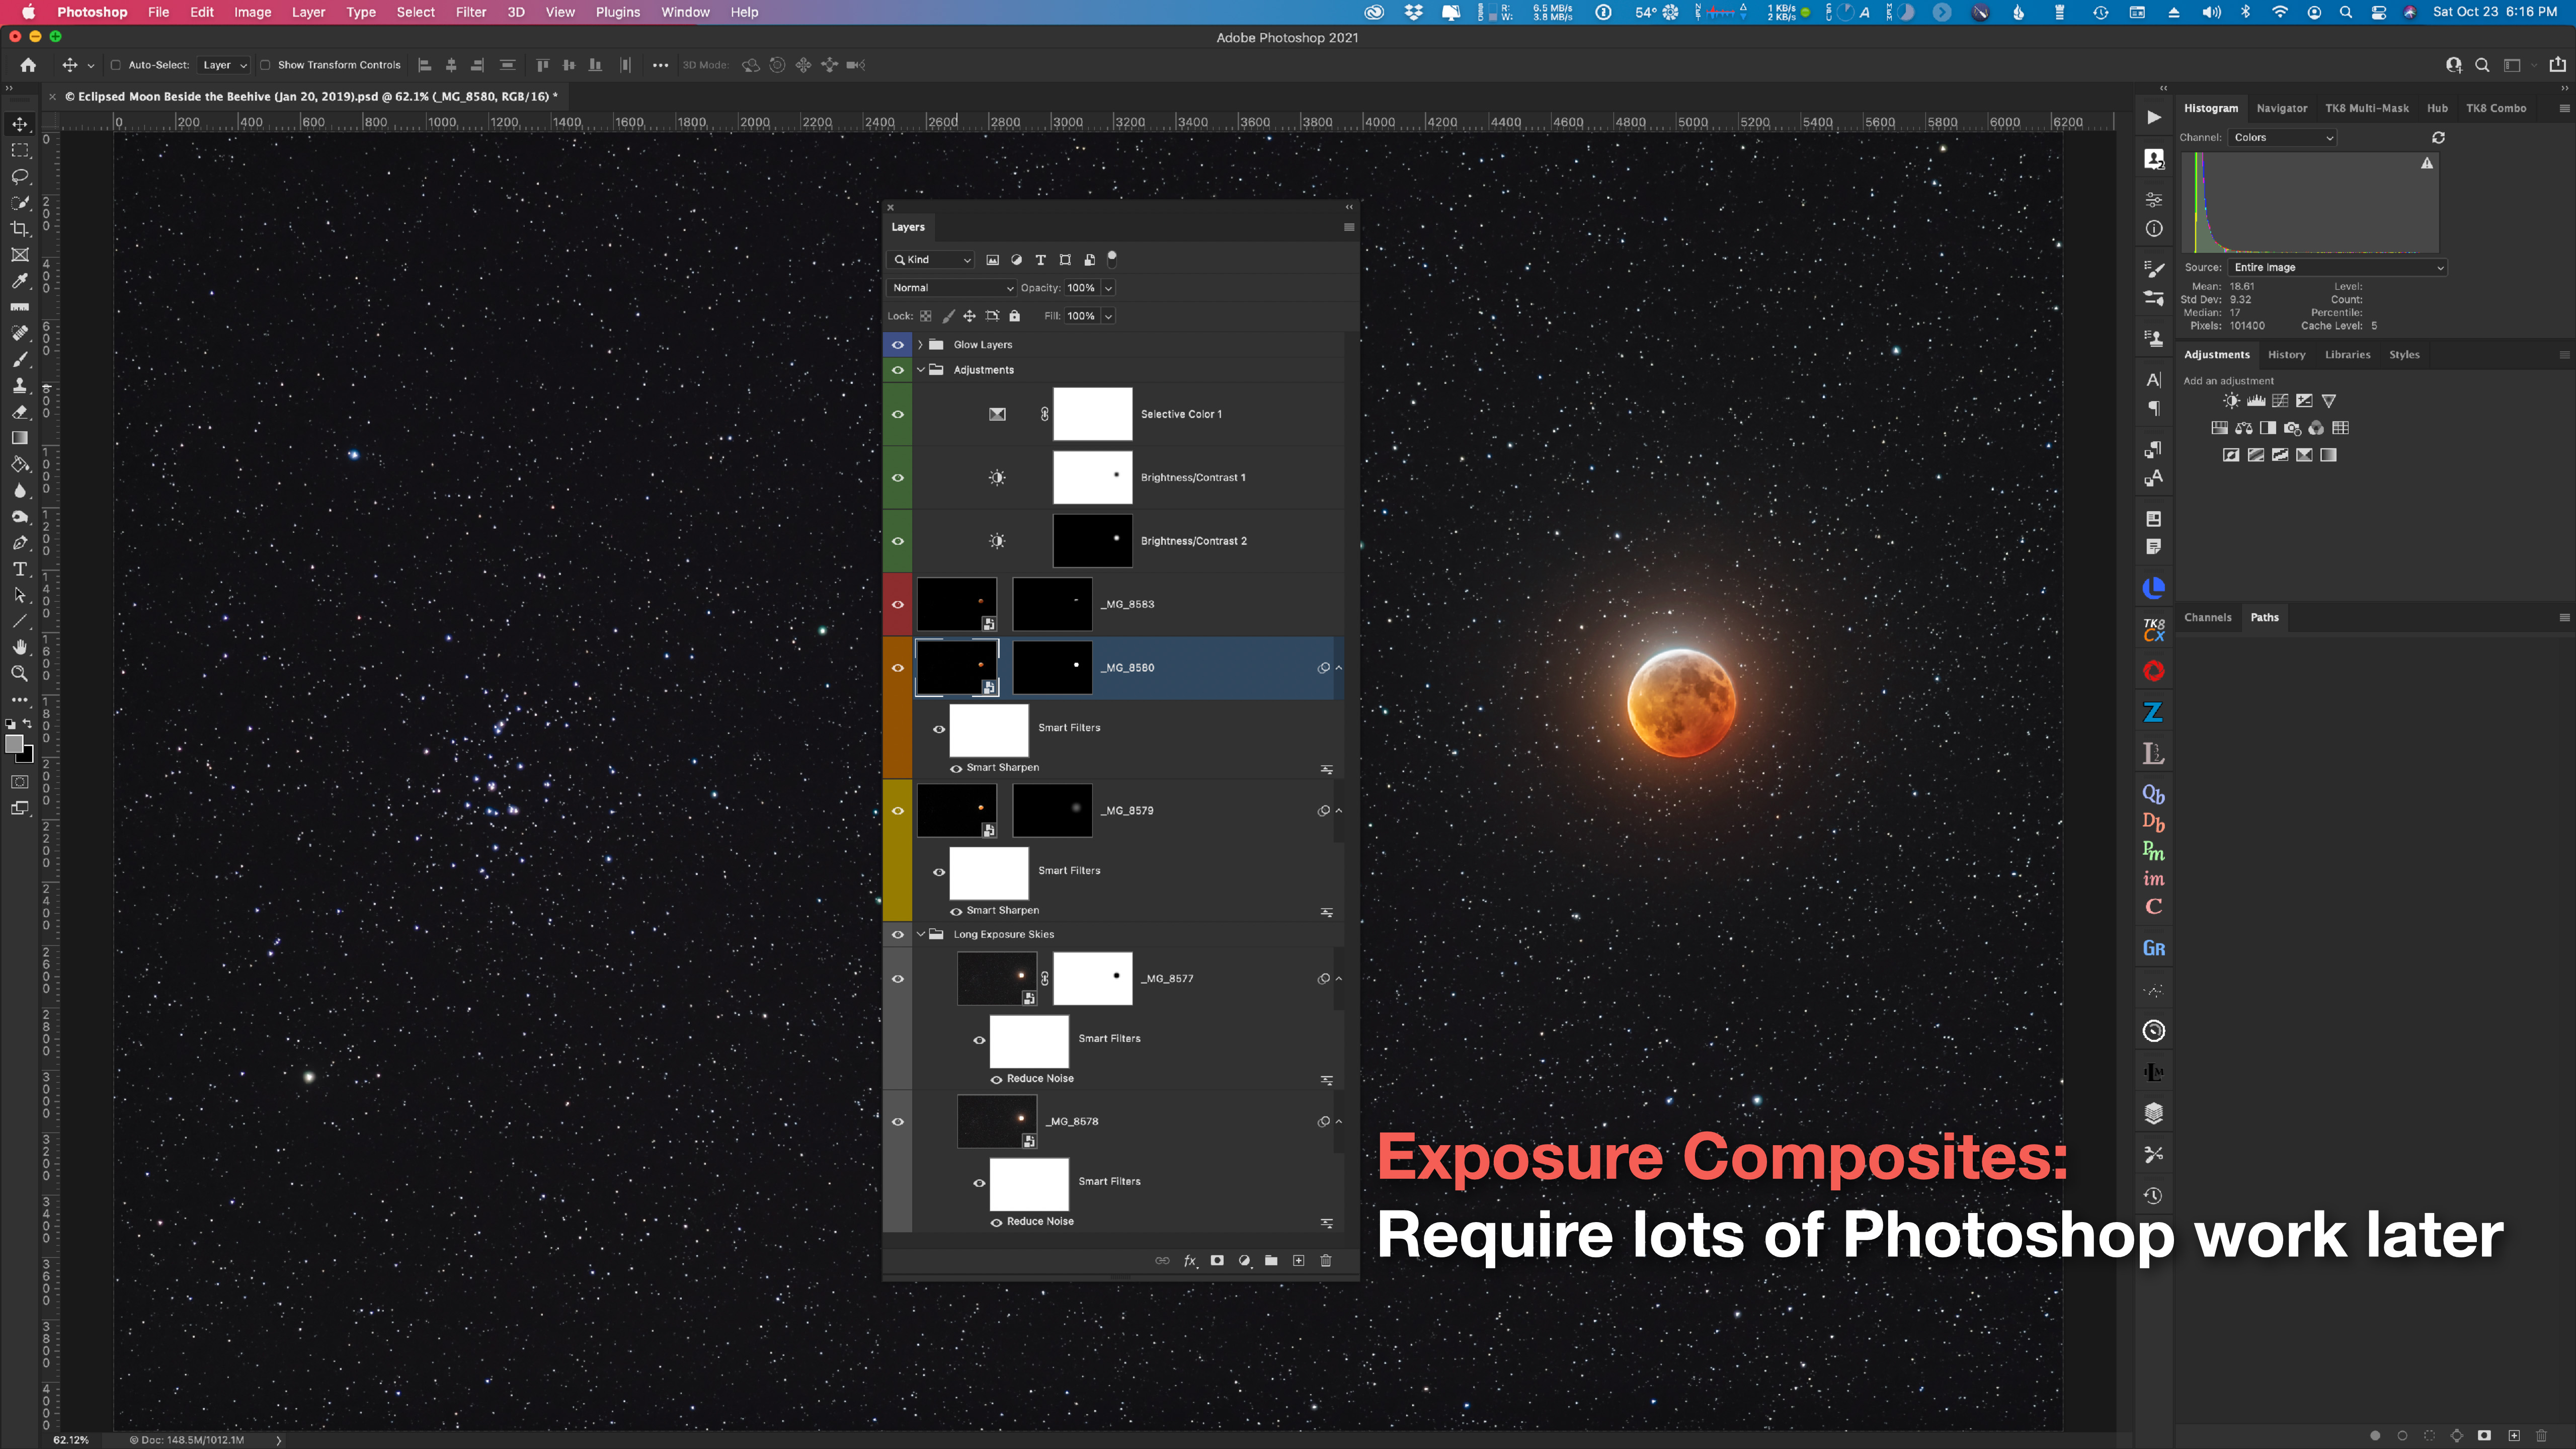
Blending multiple exposures will also be needed to properly capture the eclipsed Moon below the Pleiades, similar to what I show here (and below) from the January 2019 eclipse when the Moon appeared near the Beehive star cluster.
PHOTO OPTIONS 6 — ECLIPSE TRACK COMPOSITES
Another popular form of eclipse image (though also one rife for laughably inaccurate fakes) is capturing the entire path of the Moon across the sky over the duration of the eclipse from start to end.
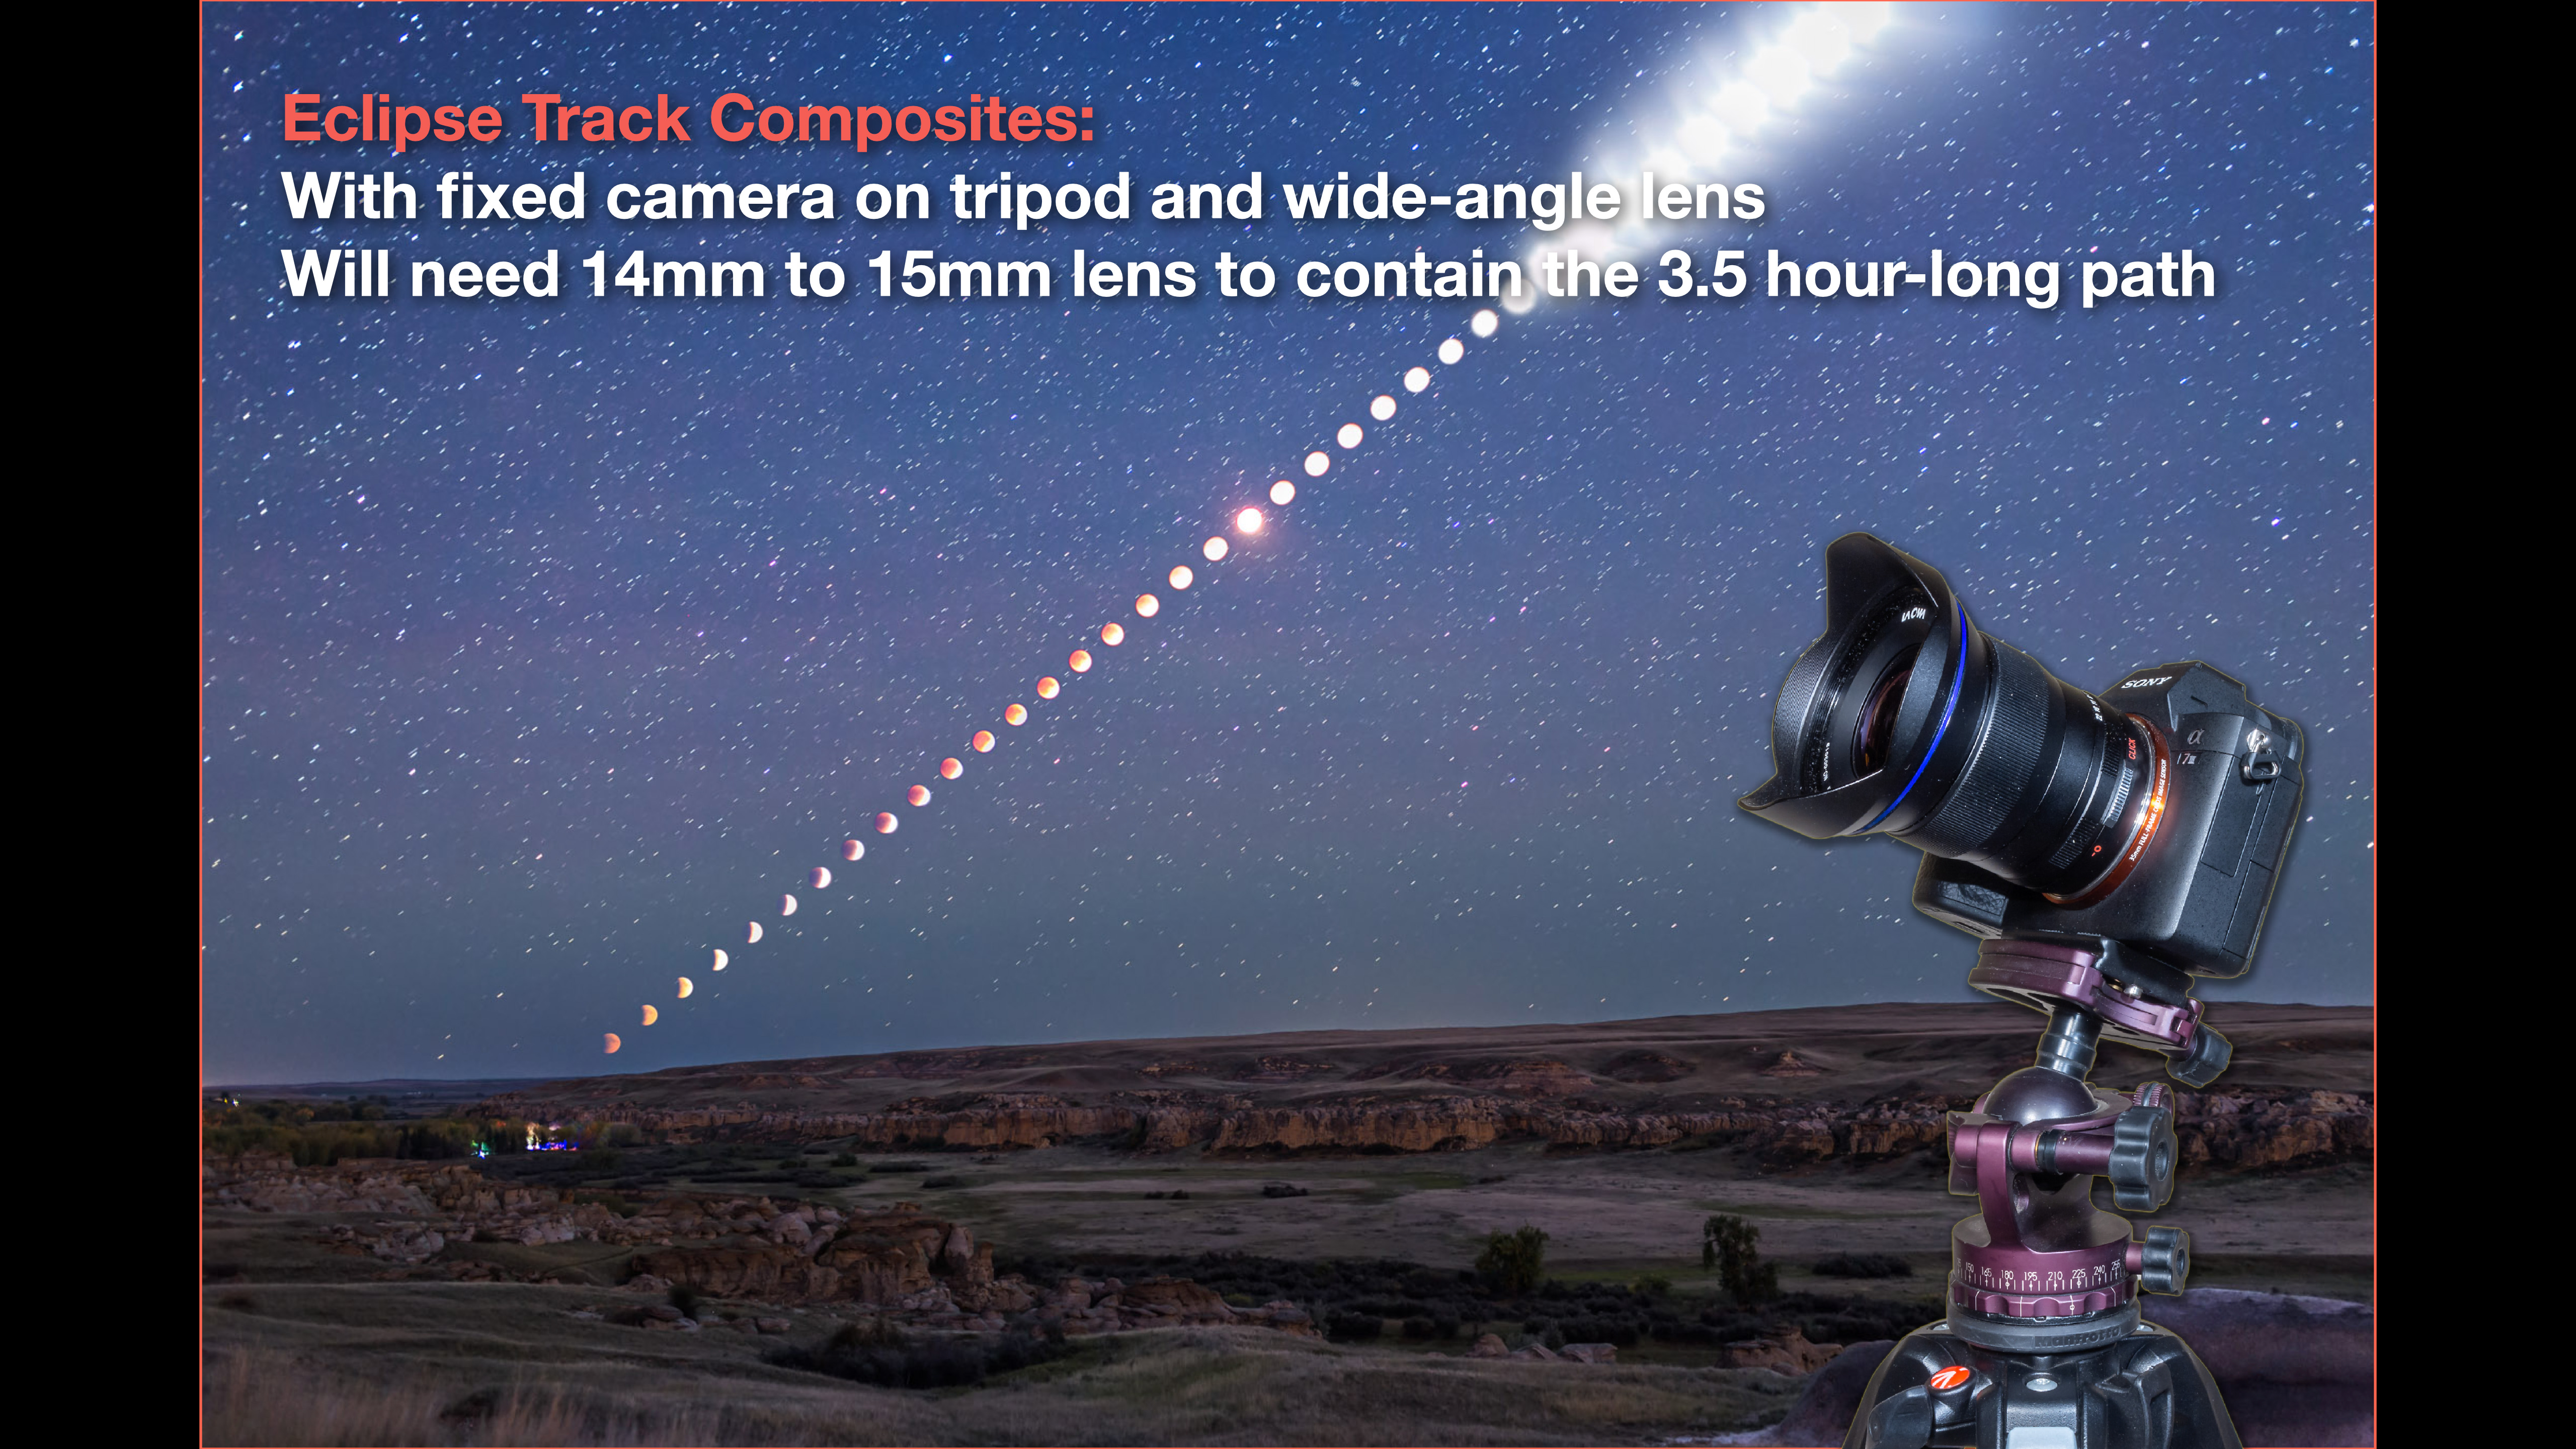
It can be done with a fixed camera on a tripod but requires a wide (14mm to 20mm) and properly framed lens, to capture the sequence as it actually appeared to proper scale, and not created by just pasting over-sized moons onto a sky to “simulate” the scene, usually badly. By the end of the day on November 19 the internet will be filled with such ugly fakes.
You could set the camera at one exposure setting (one best for when the Moon and sky are darkest at mid-eclipse) and let the camera run, shooting frames every 5 seconds or so. The result might work well as a time-lapse sequence, showing the bright sky darkening, then brightening again.
But chances are the frames taken at the start and end when the sky is lit by full moonlight will be blown out. It will still take some manual camera adjustments through the eclipse.
For a still-image composite, you should instead expose properly for the Moon’s disk at all times, a setting that will change every few minutes, then take a long exposure at mid-eclipse to pick up the stars and Milky Way. The short Moon shots are then blended into the base-layer sky image later in processing.

If the camera has been well-framed and was not moved over the 3.5 hours of the eclipse, the result is an accurate and authentic record of the Moon’s path and passage into the shadow, and not a faked atrocity!
But creating a real image requires a lot of work at the camera, and at the computer.
TIP: Shooting for composites is not work I would recommend attempting while also running other cameras. Focus on one type of image and get it right, rather than trying to do too many and doing them all poorly.
PHOTO OPTION 7 — ECLIPSE SHADOW COMPOSITE
One of the most striking types of lunar eclipse images is a close-up composite showing the Moon passing through the Earth’s umbral shadow, with the arc of the shadow edge on the Moon defining the extent of the shadow, which is about three times larger than the Moon.
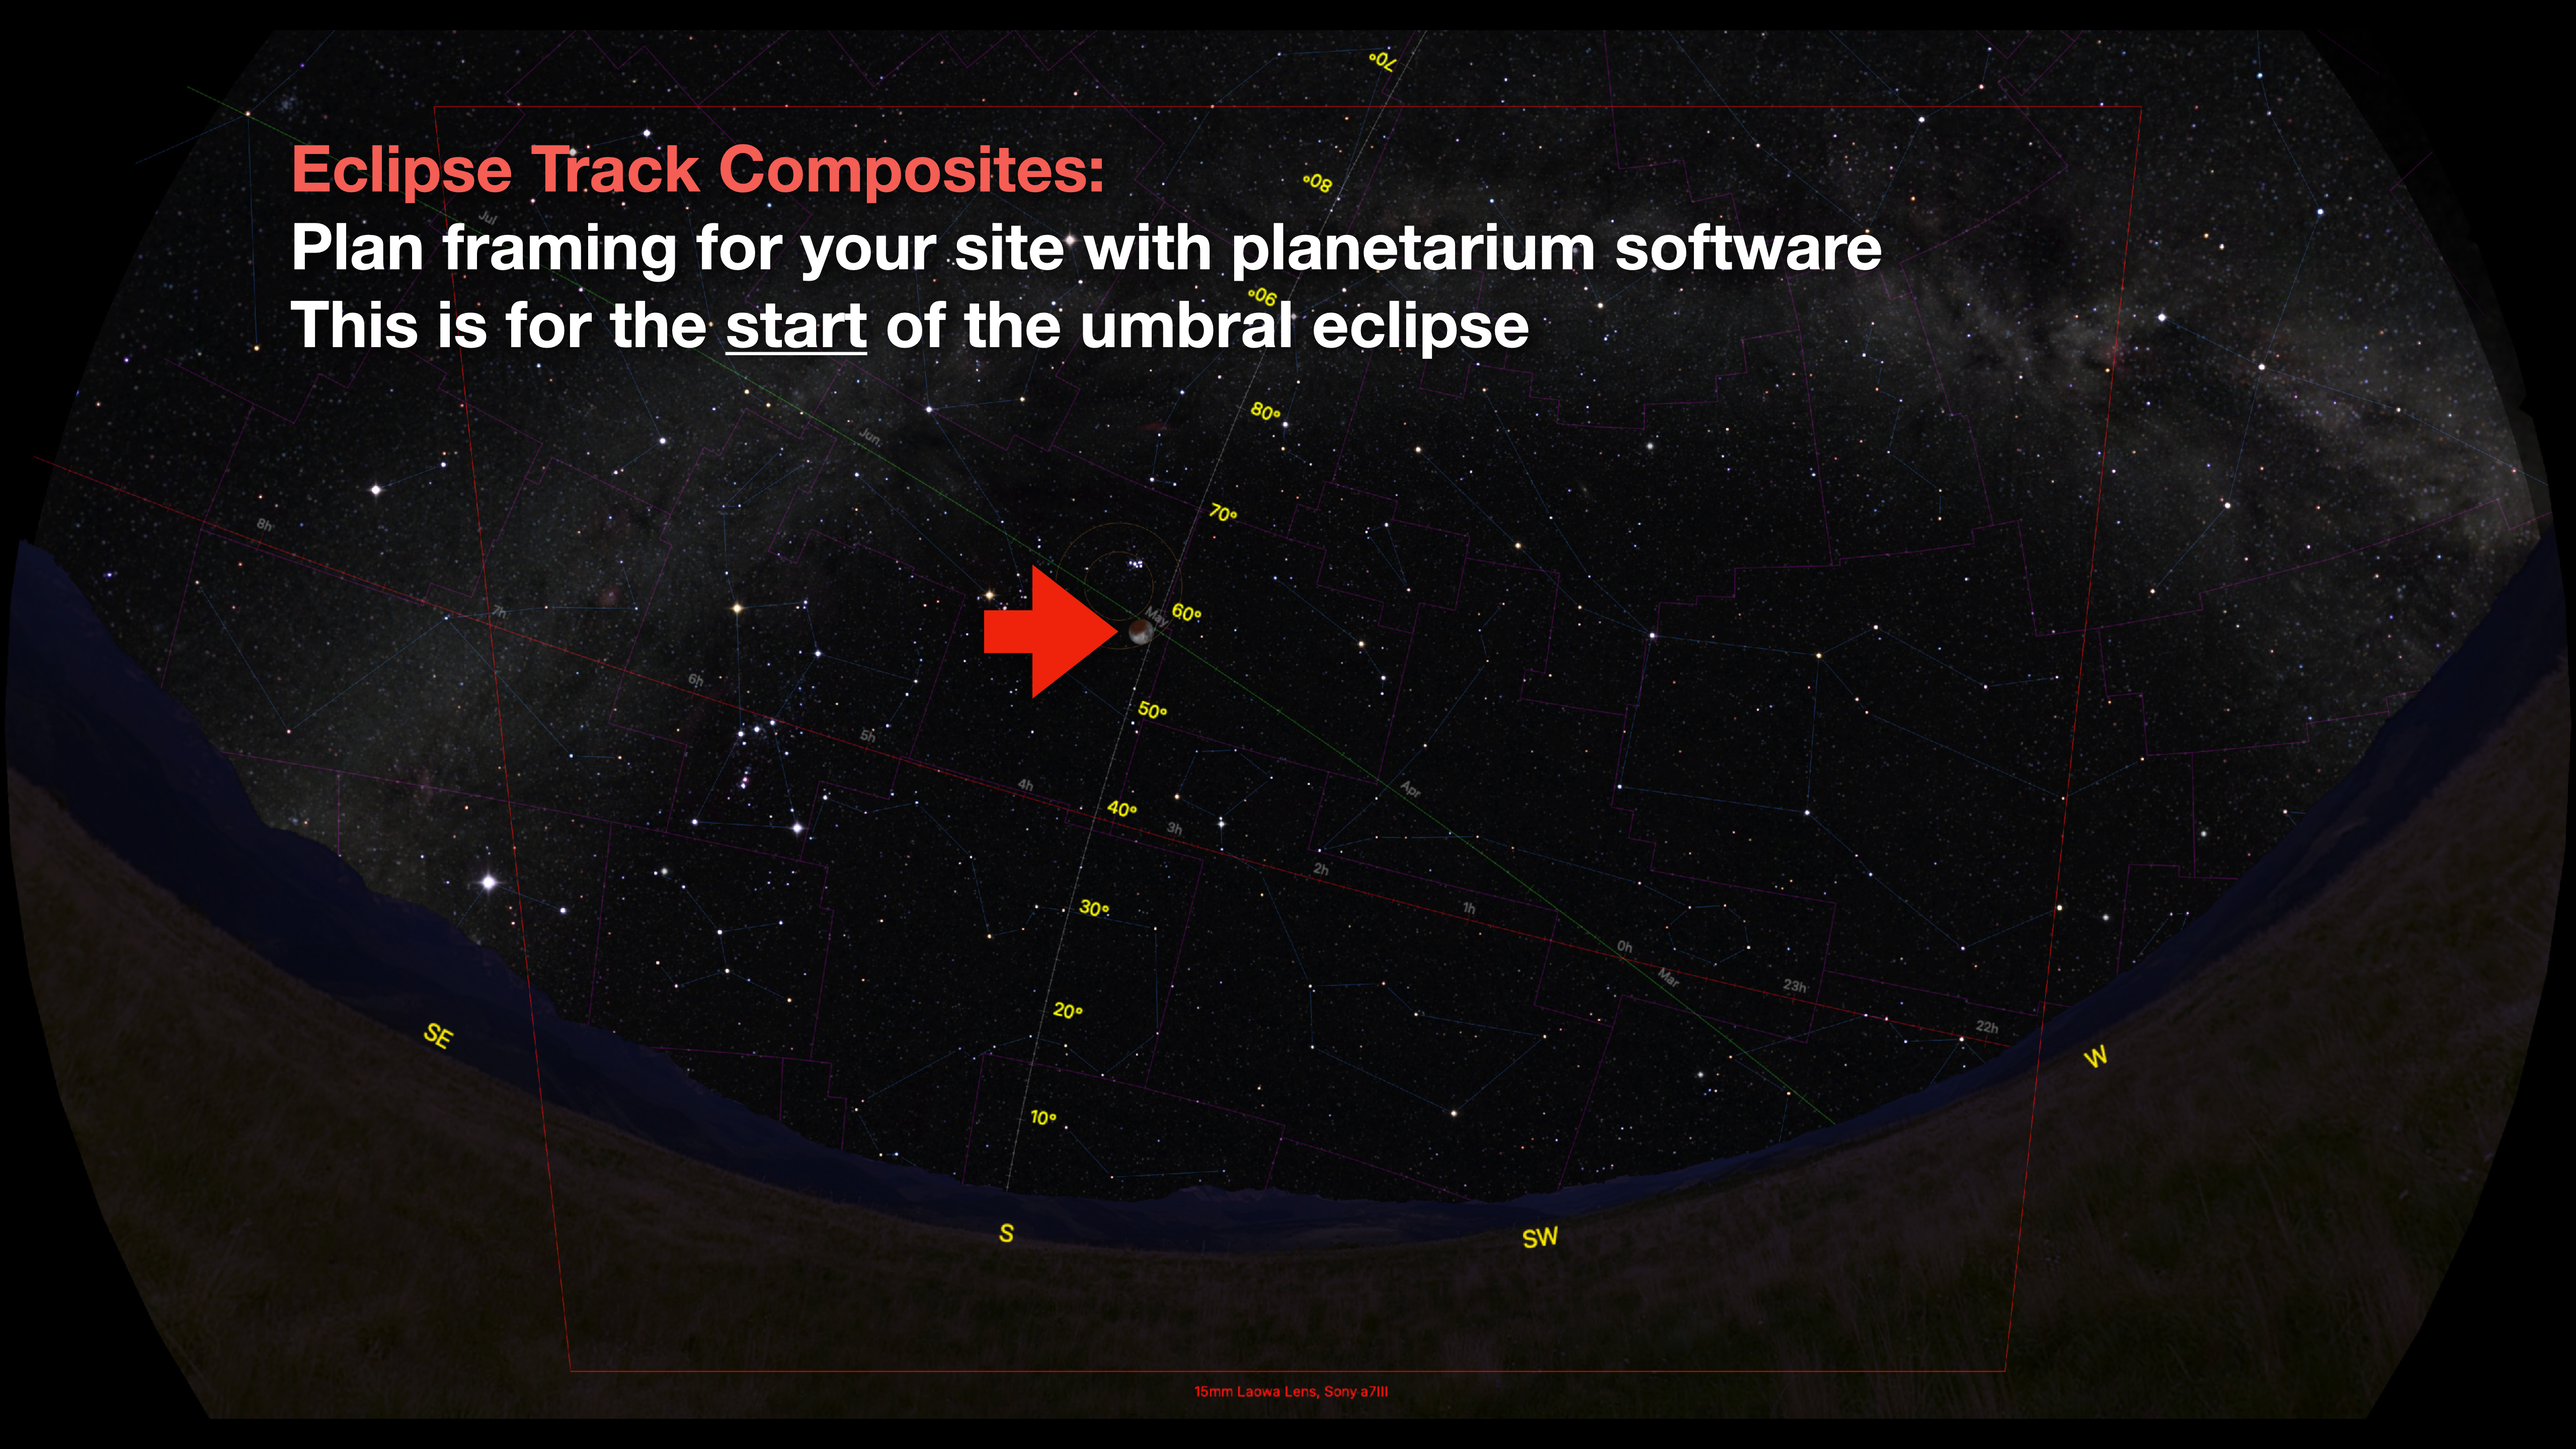
Such a composite can be re-created later by placing individual exposures accurately on a wider canvas, using screen shots from planetarium software as a template guide.
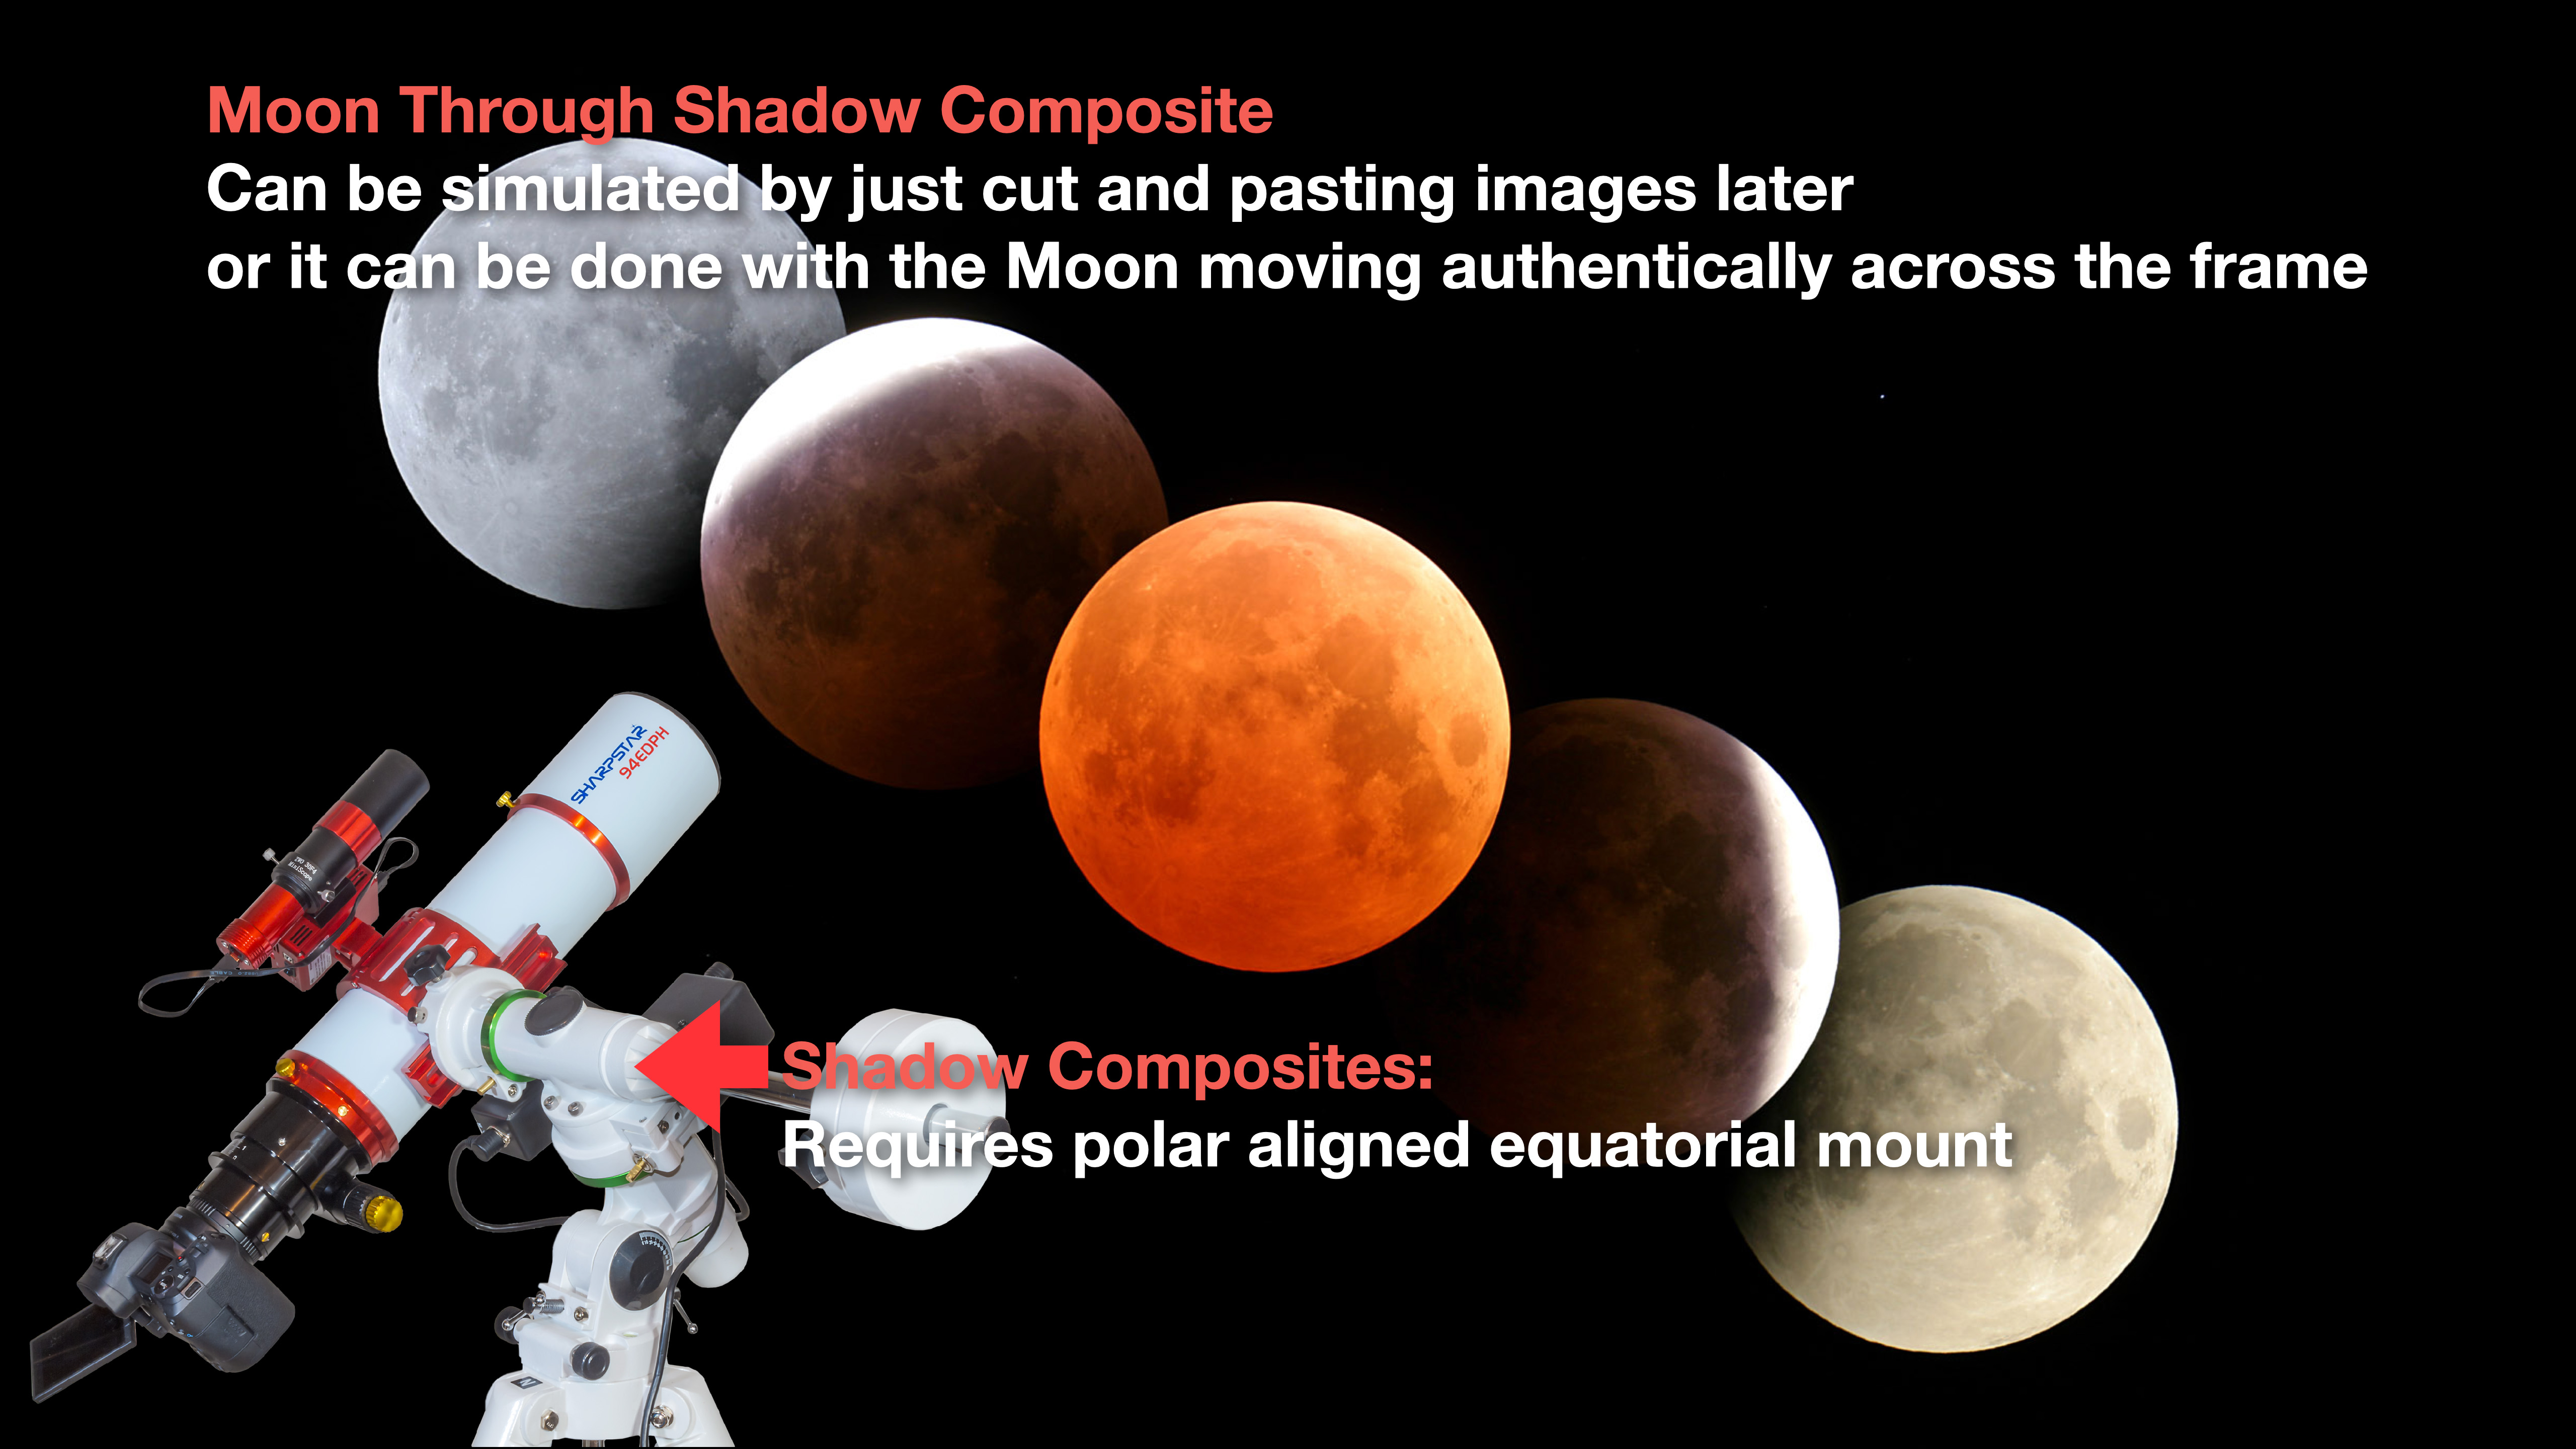
But to create an image that is more accurate, it is possible to do it “in camera.” Unlike in the film days, we don’t have to do it with multiple exposures onto one piece of film.
We take lots of separate frames with a telescope or lens wide enough to contain the entire path of the Moon through the umbra. A polar-aligned equatorial mount tracking at the sidereal rate is essential. That way the scope follows the stars, not the Moon, and so the Moon travels across the frame from right to left.
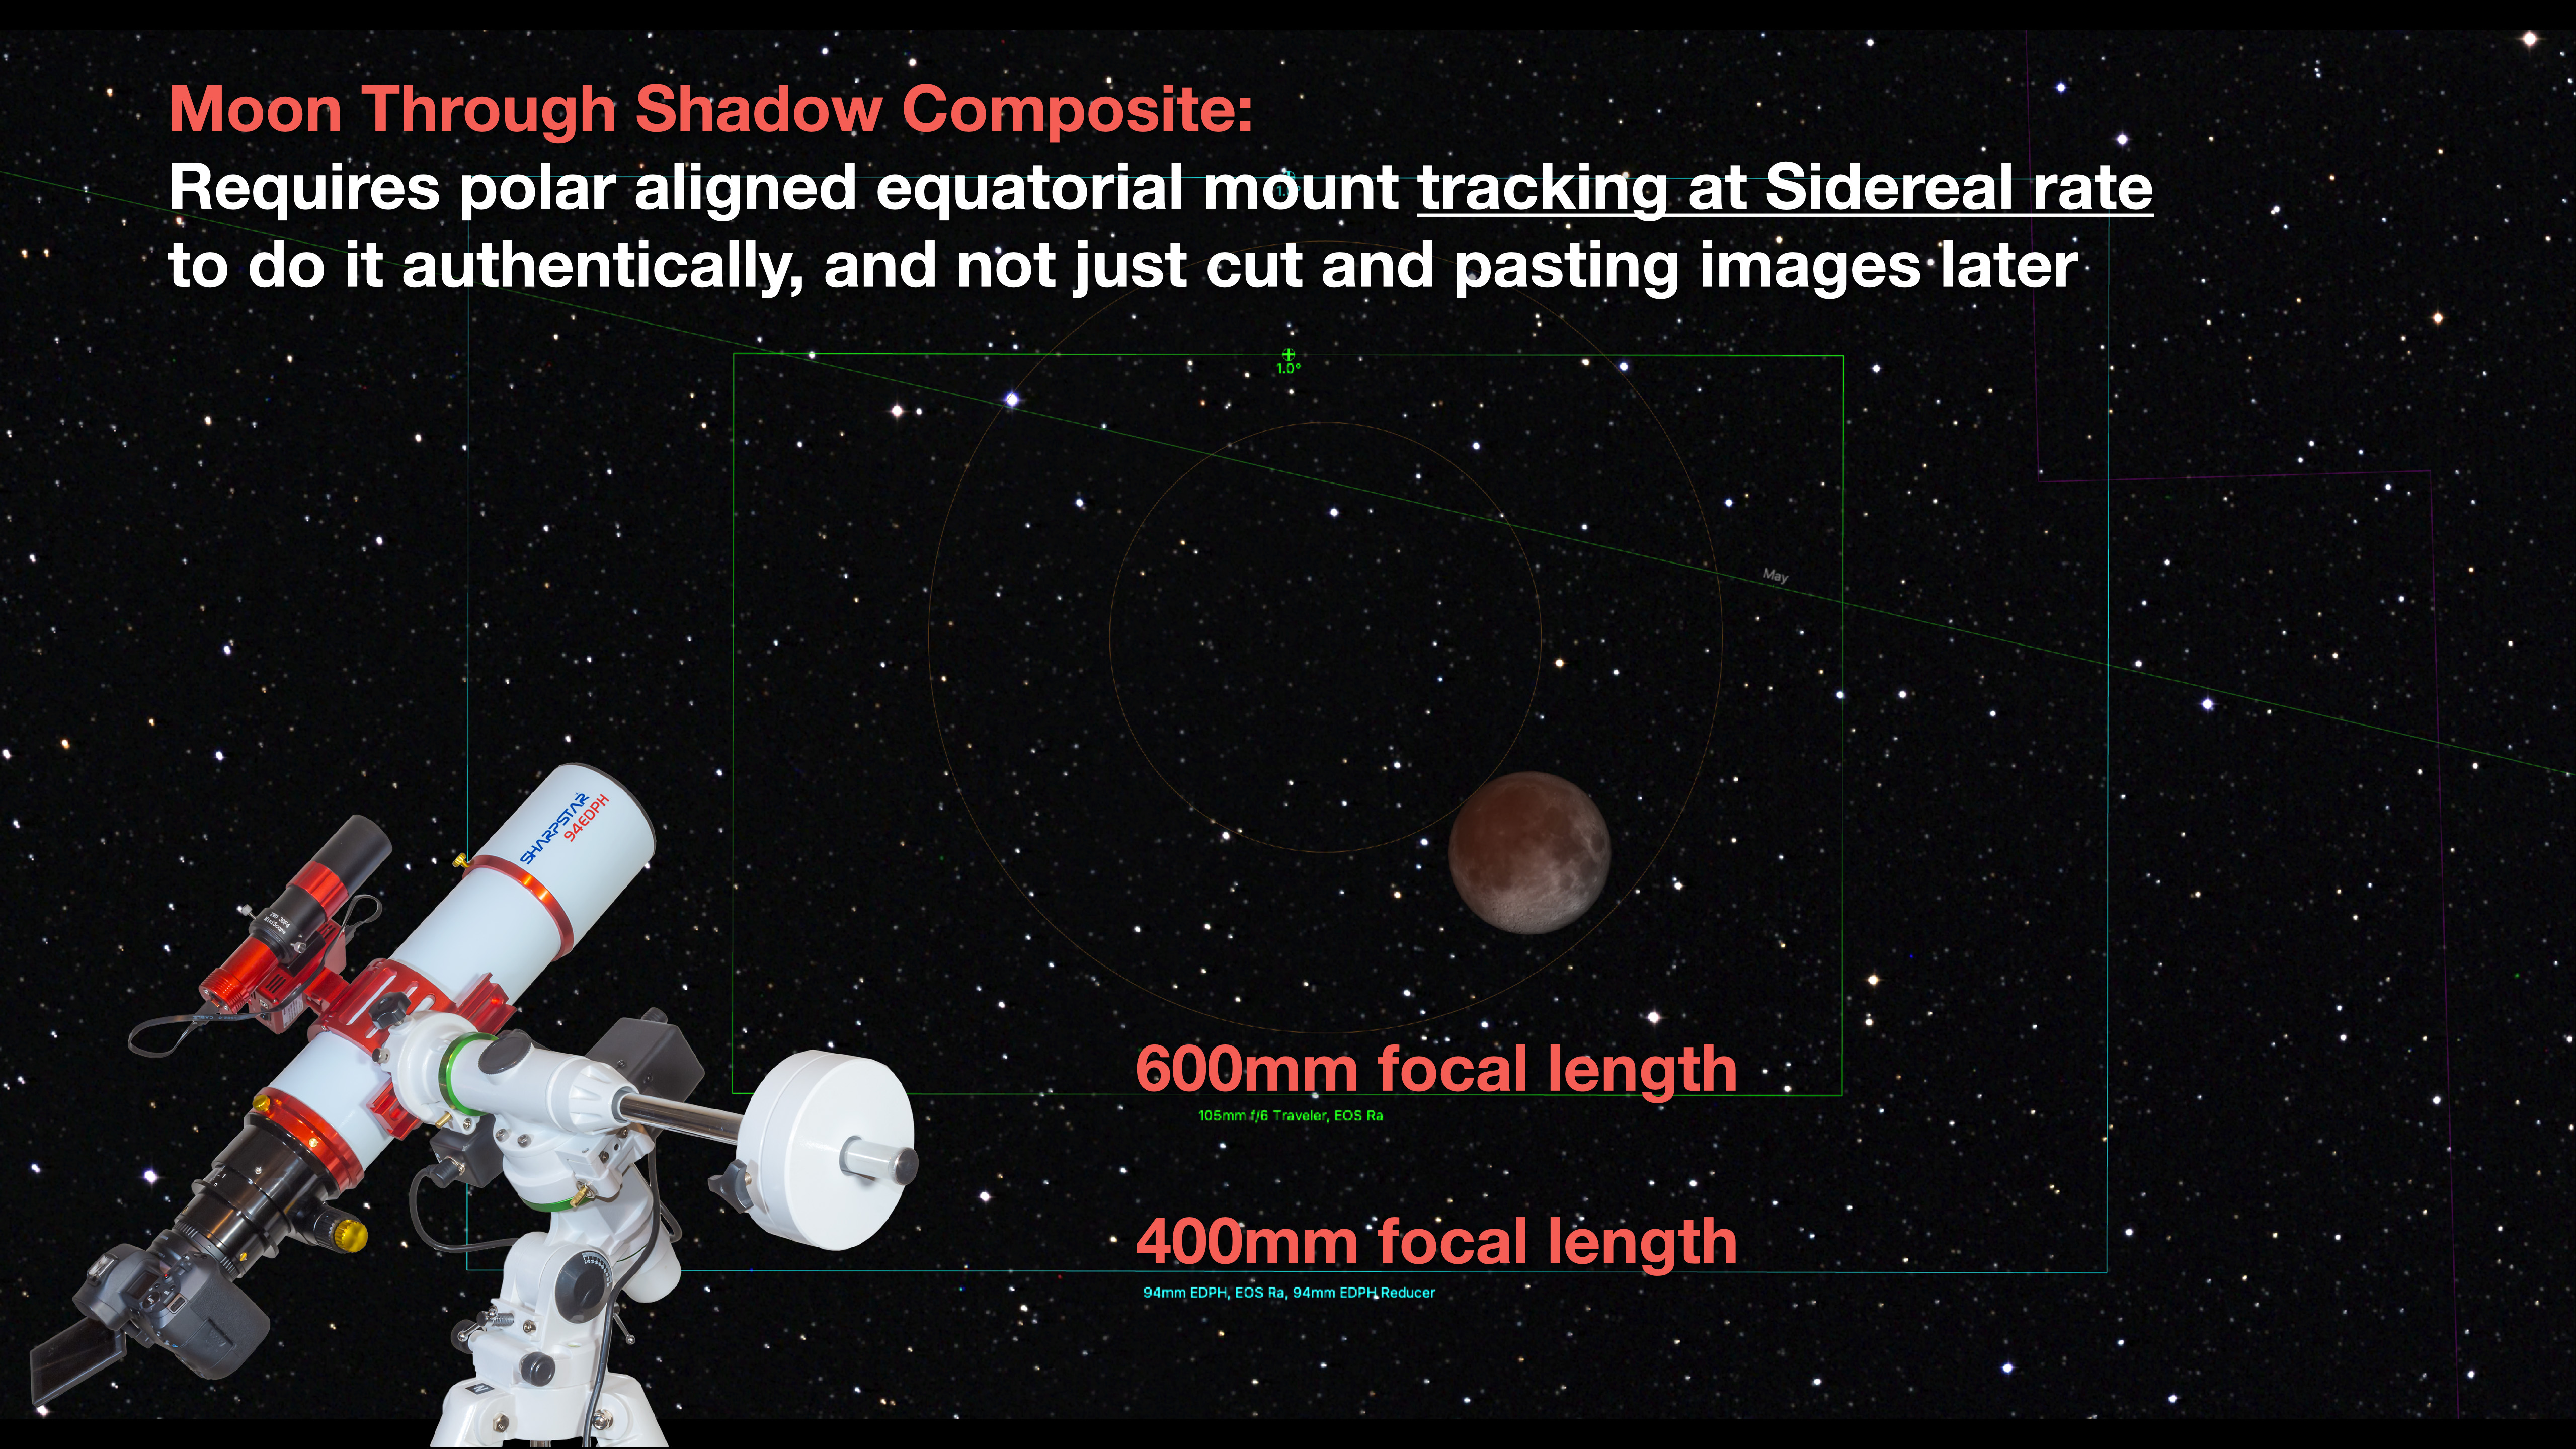
Start such a sequence with the Moon at lower right if you are framing just the path through the shadow. Use planetarium software (I used Starry Night™ to create the star charts for this blog) to plan the framing for your camera, lens and site, so the Moon ends up in the middle of the frame at mid-eclipse. This is not a technique for the faint of heart!
An interesting variation would be using a 200mm to 250mm lens to frame the Moon’s shadow passage below the Pleiades, to create an image as above. That will be unique. Again, an accurately aligned tracker turning at the sidereal rate will be essential.
Acquiring the frames for any composite takes constantly adjusting the exposure during the length of eclipse, which can try your patience and gear during the wee hours of the morning.
I’ll be happy just to get a good set of images at mid-eclipse to make a single composite of the red Moon below the Pleiades.
TIP: It could be cold and lenses can frost over. A battery-powered heater coil on the optics might be essential. And spare warm batteries.
PRACTICE!
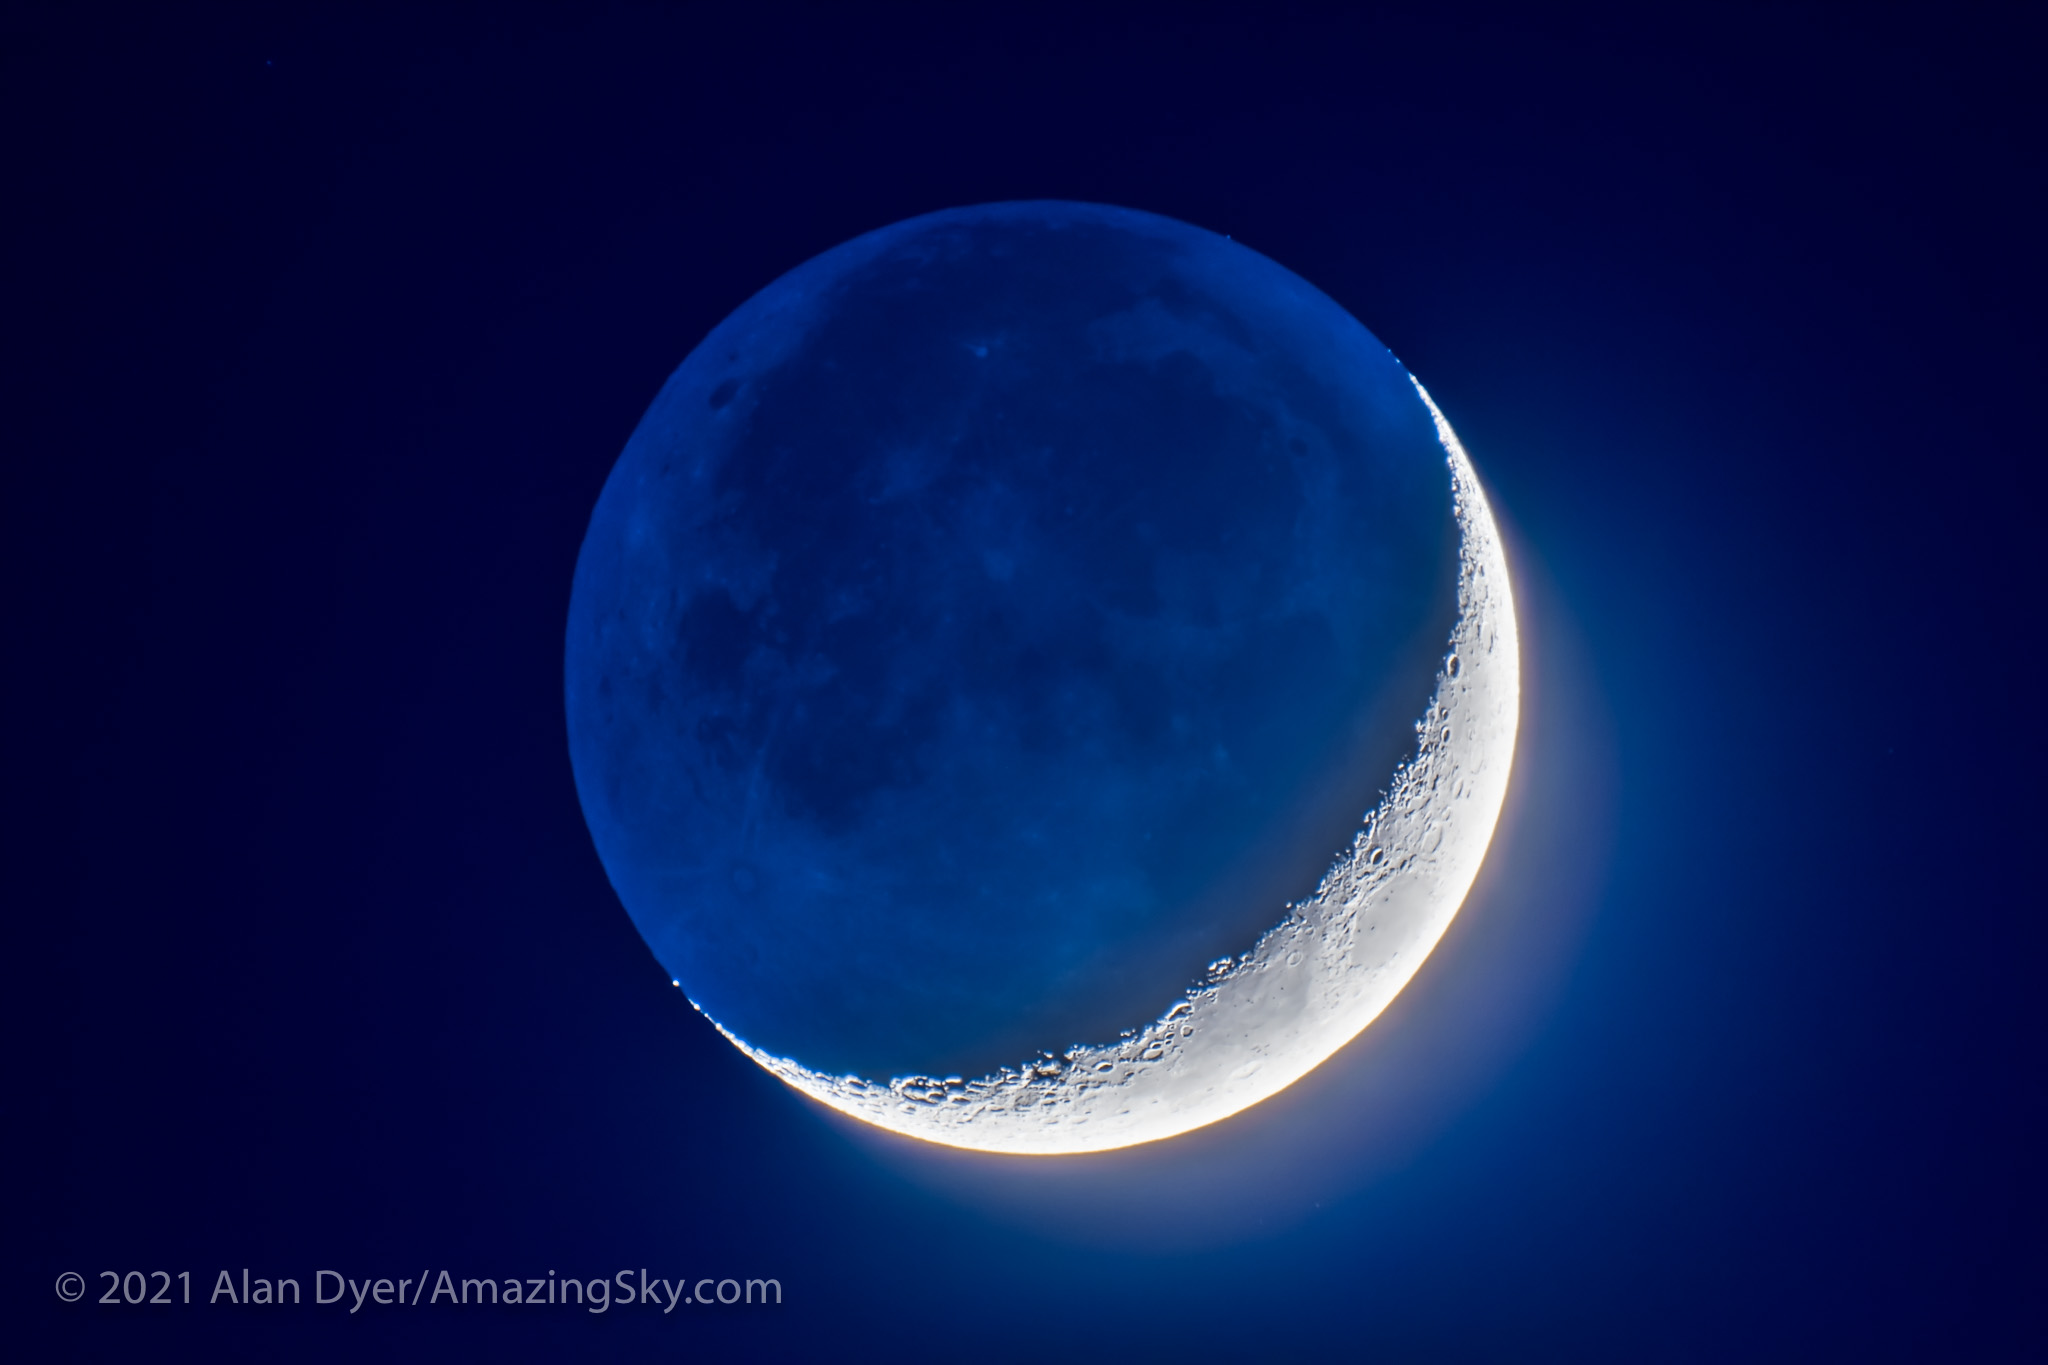
To test your equipment and your skills at focusing, you can use the waning crescent Moon in the dawn hours on the mornings of October 29 to November 2 or, after New Moon on November 4, the waxing crescent Moon on the evenings of November 6 to 10. While the crescent Moon isn’t as bright as the Full Moon, it will be a good stand in for the bright part of the eclipsed Moon when it is deep in the umbra.
Even better, the dark part of the crescent Moon lit by Earthshine is a good stand-in for the part of the Moon in the umbra. Like the eclipsed Moon, the crescent Moon’s bright and dark parts can’t be captured in one exposure. So it’s a good test for the range of exposures you’ll need for the eclipse, for practising changing settings on your camera, and for checking your tracking system.
The crescent Moon is also useful to test your manual focusing, though the sharp detail along the terminator (the line dividing the bright crescent from the earthlit dark part of the Moon) is much easier to focus on than the flat, low contrast Full Moon.
DON’T FORGET TO LOOK!
Amid all the effort needed to shoot this or any eclipse, lunar or solar, don’t forget to just look at it. No photo can ever quite capture the glowing nature of the eclipsed Moon set against the stars.
I wish you clear skies and good luck with your lunar eclipse photography. If you miss it, we have two more visible from North America next year, both total eclipses, on May 15/16 and November 8, 2022.
— Alan, www.amazingsky.com
