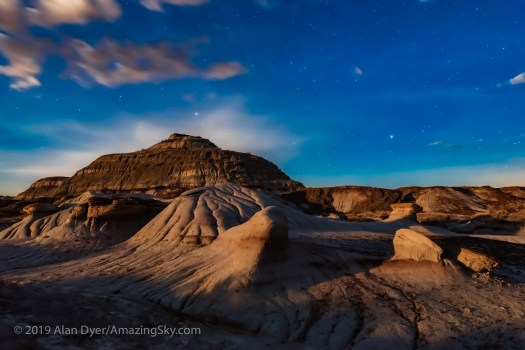
It was a magical night as the rising Moon lit the Badlands with a golden glow.
When doing nightscape photography it’s often best not to fight the Moon, but to embrace it and use it as your light source.
I did this on a fine night, Easter Sunday, at one of my favourite nightscape spots, Dinosaur Provincial Park.
I set up two cameras to frame different views of the hoodoos as they lit up with the light of the rising waning Moon.
The night started out as a dark moonless evening as twilight ended. Then about 90 minutes after the arrival of darkness, the sky began to brighten again as the Moon rose to illuminate the eroded formations of the Park.
The formations of Dinosaur Provincial Park, Alberta, lit by the rising gibbous Moon, off camera at left, on April 21/22, 2019. This is looking west, with the stars of the winter sky setting. Procyon is at right. Aphard in Hydra is above the hill. This is a stack of 8 exposures, mean combined to smooth noise, for the ground, and a single exposure for the sky, all with the 24mm Sigma Art lens at f/5.6 and Nikon D750 at ISO 6400, each for 25 seconds. The images were from the end of a sequence shot for a time-lapse using the TimeLapse+ View intervaolometer.
This was a fine example of “bronze hour” illumination, as some have aptly called it.
Photographers know about the “golden hour,” the time just before sunset or just after sunrise when the low Sun lights the landscape with a golden glow.
The Moon does the same thing, with a similar tone, though greatly reduced in intensity.
The low Moon, especially just after Full, casts a yellow or golden tint over the scene. This is caused by our atmosphere absorbing the “cold” blue wavelengths of moonlight, and letting through the “warm” red and yellow tones.
Making use of the rising (or setting) Moon to light a scene is one way to capture a nightscape lit naturally, and not with artificial lights, which are increasingly being frowned upon, if not banned at popular nightscape destinations.
A screen shot from the desktop app Starry Night (by Simulation Curriculum) showing the waning gibbous Moon rising in the SE on April 21. Such “planetarium” apps are useful for simulating the sky of a planned shoot.
“Bronze hour” lighting is great in still-image nightscapes. But in time-lapses the effect is more striking — indeed, in time-lapse lingo it is called a “moonstrike” scene.
The dark landscape suddenly lights up as if it were dawn, yet stars remain in the sky.
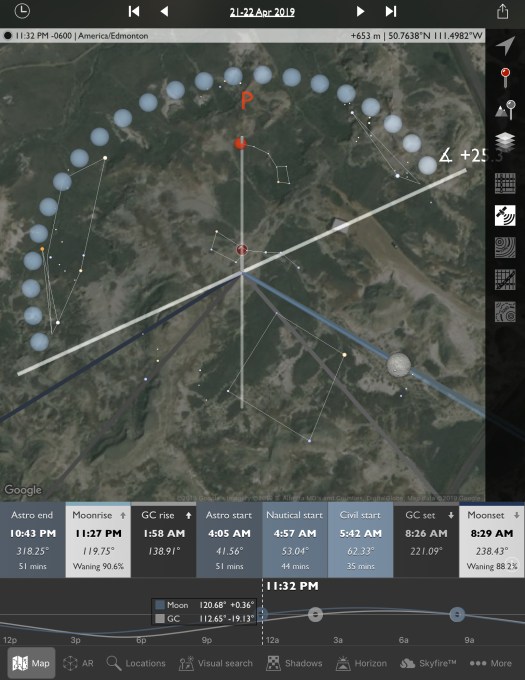
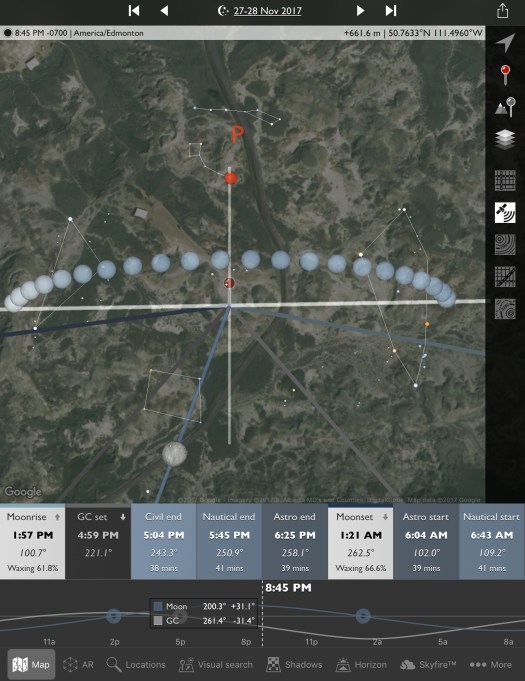
A screen shot of a planning app that is a favourite of mine, The Photographer’s Ephemeris, set up to show the scene for moonrise on April 21 from the Park.
The best nights for such a moonstrike are ones with a waning gibbous or last quarter Moon. At these phases the Moon rises after sunset, to re-light a scene after evening twilight has faded.
On April 21 I made use of such a circumstance to shoot moonstrike stills and movies, not only for their own sake, but for use as illustrations in the next edition of my Nightscapes and Time-lapse eBook (at top here).
One camera, the Nikon D750, I coupled with a device called a bramping intervalometer, in this case the TimeLapse+ View, shown above. It works great to automatically shift the shutter and ISO speeds as the sky darkens then brightens again.
Yes, in bright situations the camera’s own Auto Exposure and Auto ISO modes might accomplish this.
But … once the sky gets dark the Auto circuits fail and you’re left with hugely underexposed images.
The TimeLapse+ View, with its more sensitive built-in light meter, can track right through into full darkness, making it possible to shoot so-called “holy grail” time-lapses that go from daylight to darkness, from sunset to the Milky Way, all shot unattended.
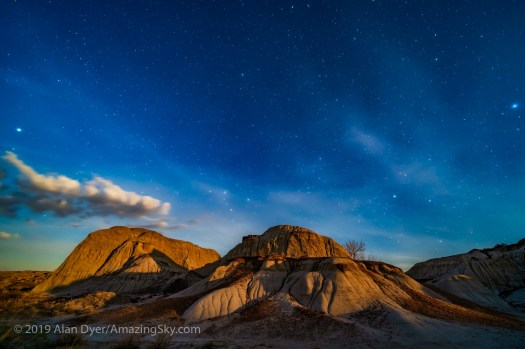
The eroding formations of Dinosaur Provincial Park, Alberta, lit by the rising gibbous Moon, off camera at right, on April 21/22, 2019. This is looking north, with Polaris at upper centre, Capella setting at left, Vega rising at right, and the W of Cassiopeia at lower centre. This is a stack of 8 exposures, mean combined to smooth noise, for the ground, and one exposure from that set for the sky. All with the 15mm Laowa lens at f/2.8 and Sony a7III at ISO 3200, each for 30 seconds.
For the other camera, the Sony a7III (with the Laowa 15mm lens I just reviewed) I set the camera manually, then shifted the ISO and shutter speed a couple of times to accommodate the darkening, then brightening of the scene.
Processing the resulting RAW files in the highly-recommended program LRTimelapse smoothed out all the jumps in brightness to make a seamless transition.
I also used the new intervalometer function that Sony has just added to the a7III with its latest firmware update. Hurray! I complained about the lack of an intervalometer in my original review of the Sony a7III. But that’s been fixed.
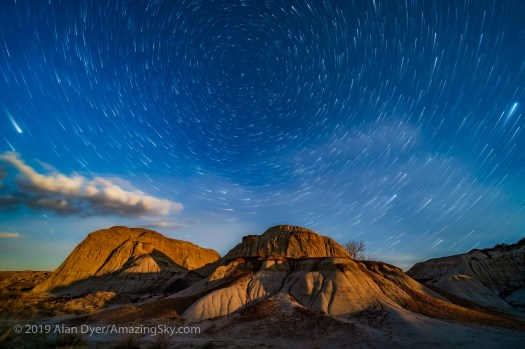
This is looking north, with the stars of the northern sky pivoting around Polaris. This is a stack of 8 exposures, mean combined to smooth noise, for the ground, and 250 exposures for the sky, blended with Lighten mode to create the stails. However, I used the Advanced Stacker Plus actions in Photoshop to do the stacking, creating the tapering effect in the process. All exposures with the 15mm Laowa lens at f/2.8 and Sony a7III at ISO 3200, each for 30 seconds.
I shot 425 frames with the Sony, which I not only turned into a movie but, as one can with time-lapse frames, I also stacked into a star trail still image, in this case looking north to the circumpolar stars.
I prefer this action set over dedicated programs such as StarStaX, because it works directly with the developed Raw files. There’s no need to create a set of JPGs to stack, compromising image quality, and departing from the non-destructive workflow I prefer to maintain.
While the still images are very nice, the intended final result was this movie above, a short time-lapse vignette using clips from both cameras. Do watch in HD.
I rendered out the frames from the Sony both as a “normal” time-lapse, and as one with accumulating star trails, again using the Advanced Stacker Plus actions to create the intermediate frames for assembling into the movie.
All these techniques, gear, and apps are explained in tutorials in my eBook, above. However, it’s always great to get a night perfect for putting the methods to work on a real scene.
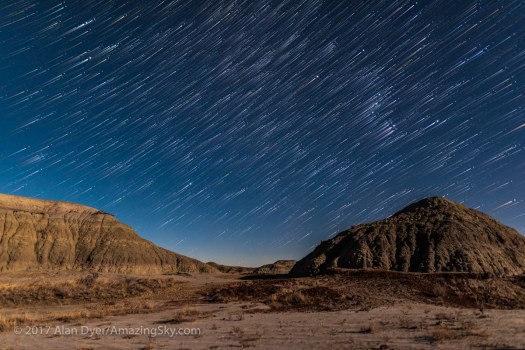
The clouds cleared to present a magical night under the Moon in the Badlands of southern Alberta.
At last, a break in the incessant clouds of November, to provide me with a fine night of photography at one of my favourite places, Dinosaur Provincial Park, declared a U.N. World Heritage Site for its deposits of late Cretaceous fossils.
I go there to shoot the night sky over the iconic hoodoos and bentonite clay hills.
November is a great time to capture the equally iconic constellation of Orion rising in the east in the early evening. The scene is even better if there’s a Moon to light the landscape.
November 27 presented the ideal combination of circumstances: clear skies (at least later at night), and a first quarter Moon to provide enough light without washing out the sky too much and positioned to the south and west away from the target of interest – Orion and the winter sky rising in the east.
Below is a slide show of some of the still images I shot, all with the Canon 6D MkII camera and fine Rokinon 14mm f/2.5 lens, used wide open. Most are 15-second exposures, untracked.
This slideshow requires JavaScript.
I kept another camera, the Nikon D750 and Sigma 24mm Art lens, busy all night shooting 1200 frames for a time-lapse of Orion rising, with clouds drifting through, then clearing.
Below is the resulting video, presented in two versions: first with the original but processed frames assembled into a movie, followed by a version where the movie frames show accumulating star trails to provide a better sense of sky motion.
To create the frames for this version I used the Photoshop actions Advanced Stacker Plus, from StarCircleAcademy. They can stack images then export a new set of frames each with the tapering trails, which you then assemble into a movie. I also used it to produce the lead image at top.
The techniques and steps are all outlined in my eBook, highlighted at top right.
The HD movie is just embedded here, and is not published on Vimeo or YouTube. Expand to fill your screen.
To help plan the shoot I used the astronomy software Starry Night, and the photo planning software The Photographer’s Ephemeris, or TPE. With it, you can place yourself at the exact spot to see how the Sun, Moon and stars will appear in sightlines to the horizon.
Here’s the example screen shot. The spheres across the sky represent the Milky Way.
Look east to see Orion now in the evening sky. Later this winter, Orion will be due south at nightfall.
In a “10 Steps” tutorial I review my tips for going from “raw to rave” in processing a nightscape or time-lapse sequence.
NOTE: Click on any of the screen shots below for a full-res version that will be easier to see.
In my preferred “workflow,” Steps 1 through 6 can be performed in either Photoshop (using its ancillary programs Bridge and Adobe Camera Raw) or in Adobe Lightroom. The Develop module of Lightroom is identical to Adobe Camera Raw (ACR for short).
However, my illustrations show Adobe Bridge, Camera Raw and Photoshop CC 2014. Turn to Photoshop to perform advanced filtering, masking and stacking (Steps 7 to 10).
To use Lightroom to assemble a time-lapse movie from processed Raw frames you need the third-party program LRTimelapse, described below. Otherwise, you need to export frames from Lightroom – or from Photoshop – as “intermediate” JPGs (see Step 6), then use other third party programs to assemble them into movies (Step 10B).
–
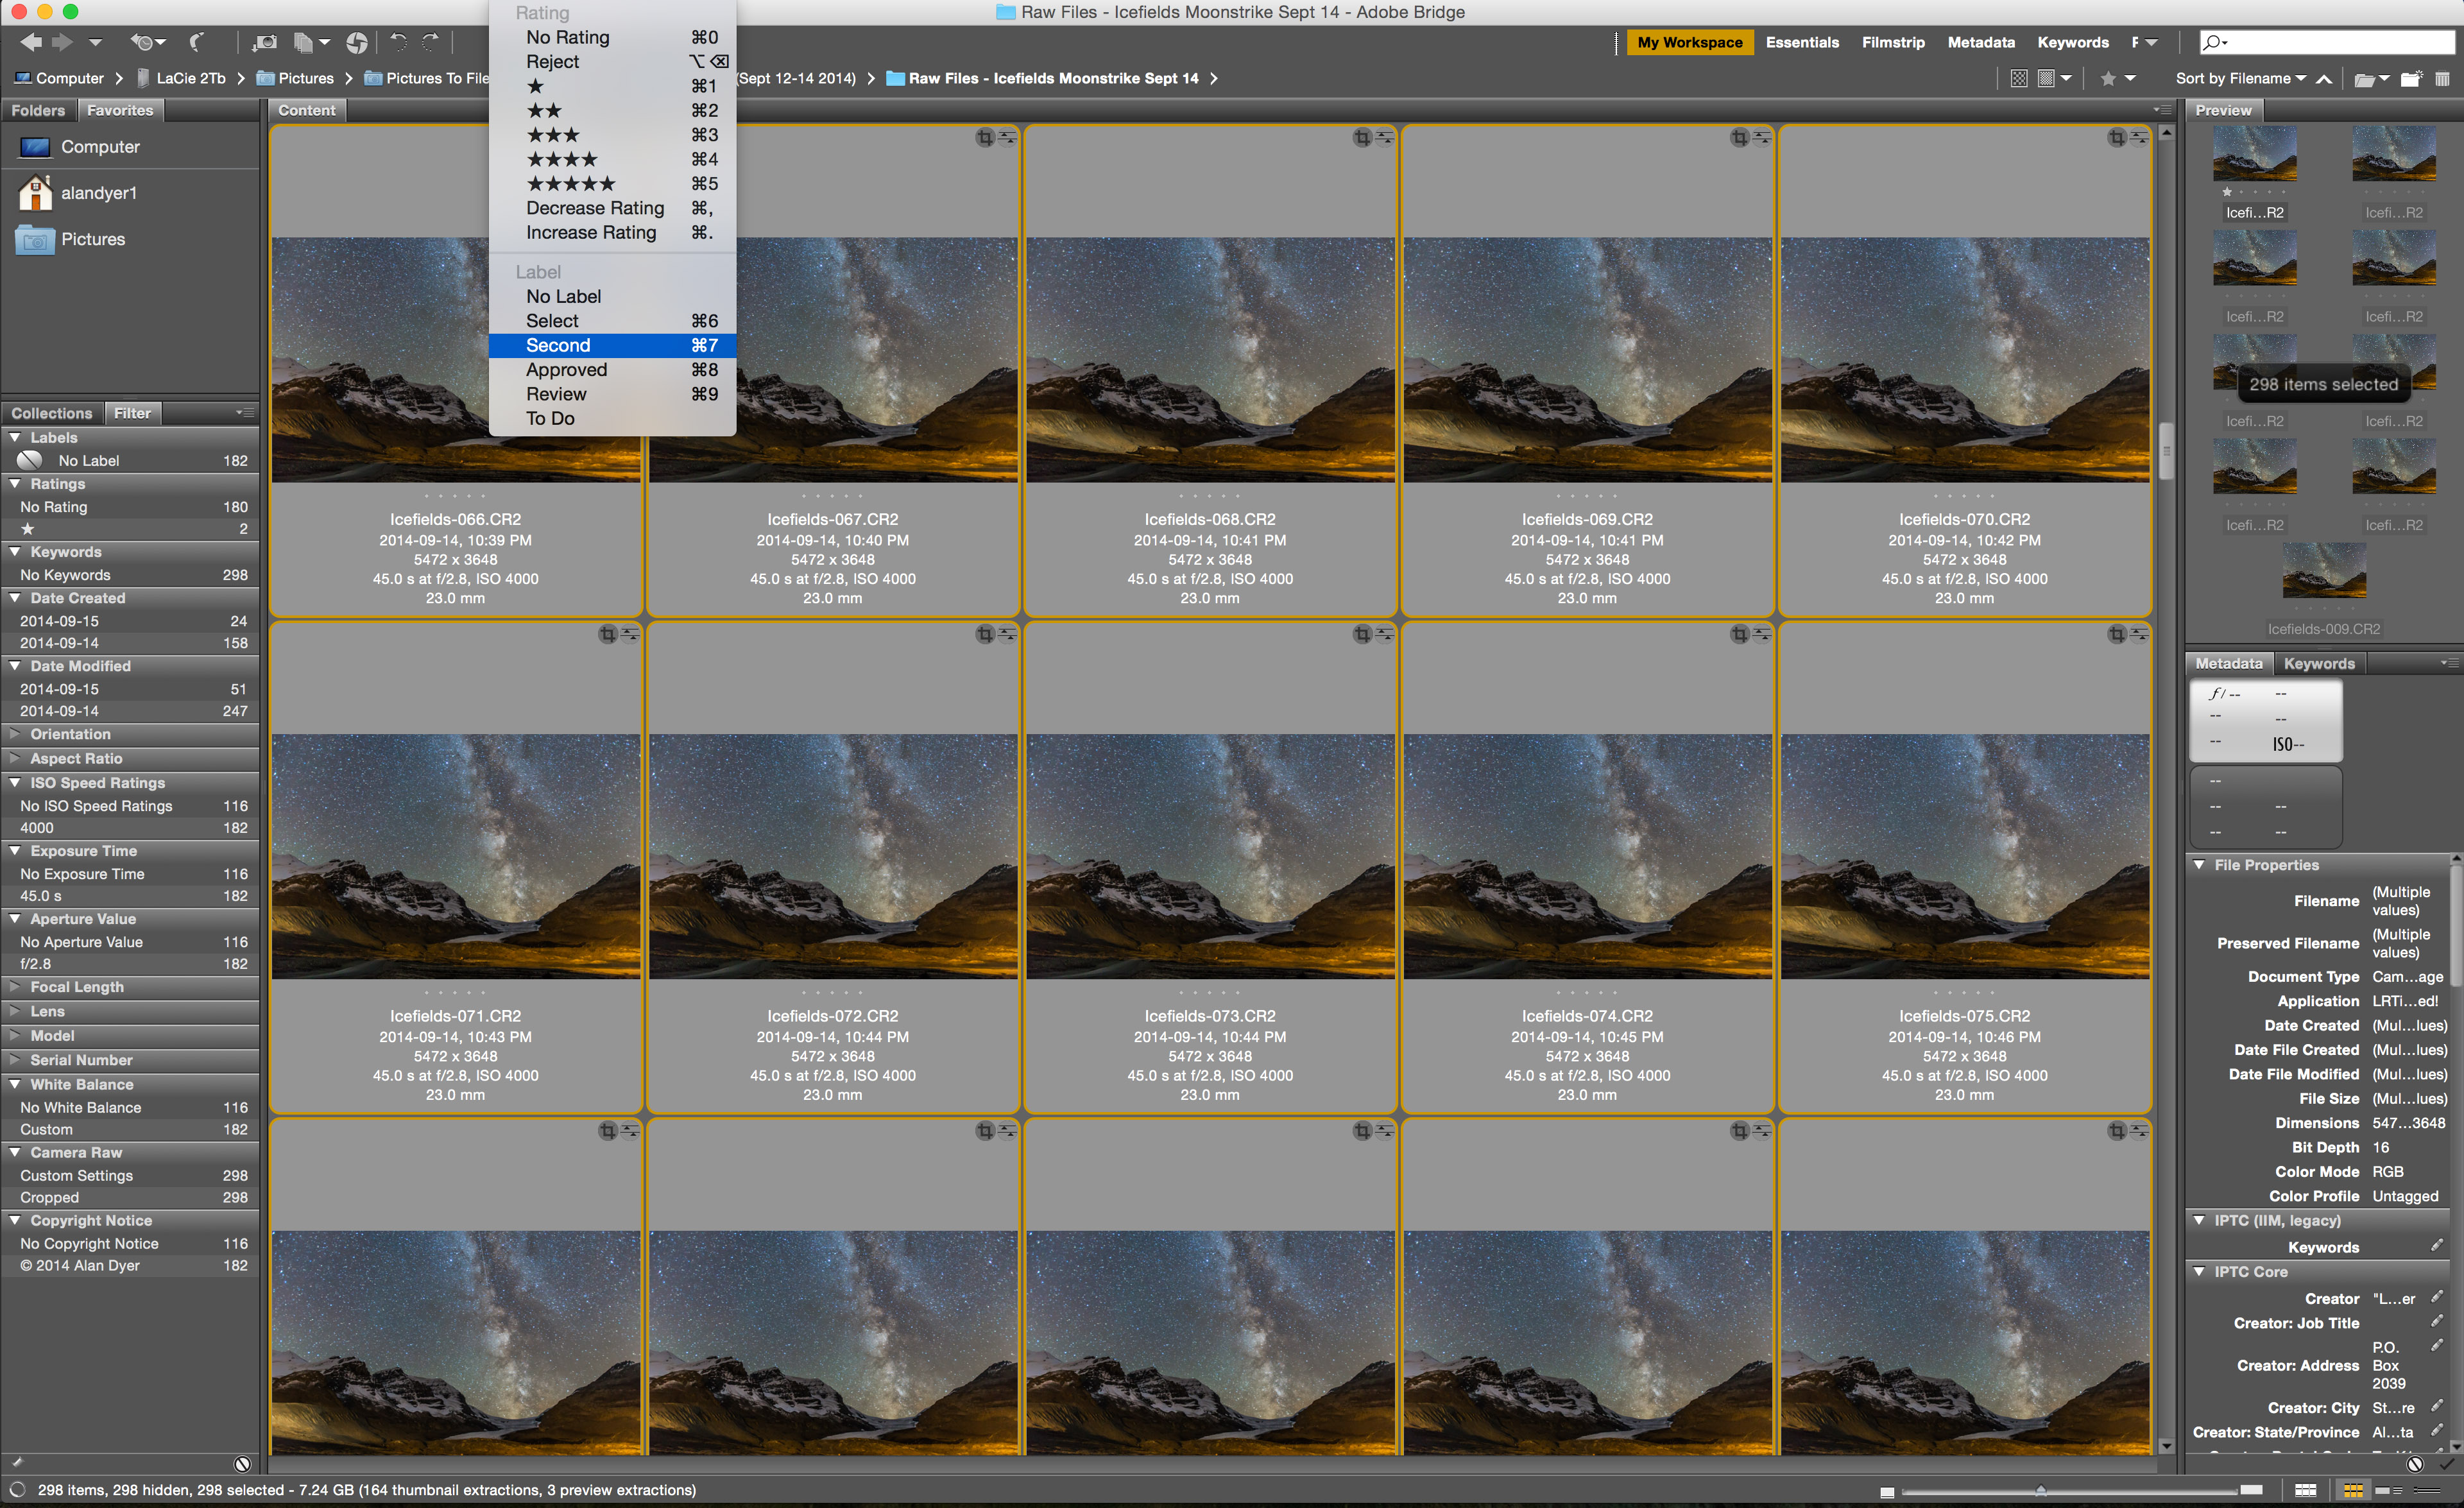
Step 1 – Bridge or Lightroom – Import & Select
Use Adobe Bridge (shown above) or Lightroom to import the images from your camera’s card.
As you do so you can add “metadata” to each image – your personal information, copyright, keywords, etc. As you import, you can also choose to convert and save images into the open and more universal Adobe DNG format, rather than keep them in the camera’s proprietary Raw format.
Once imported, you can review images, keeping the best and tossing the rest. Mark images with star ratings or colour labels, and group images together (called “stacking” in Bridge), such as frames for a panorama or “high dynamic range” set.
Always save images to both your working drive and to an external drive (which itself should automatically back up to yet another external drive). Never, ever save images to only one location.
–
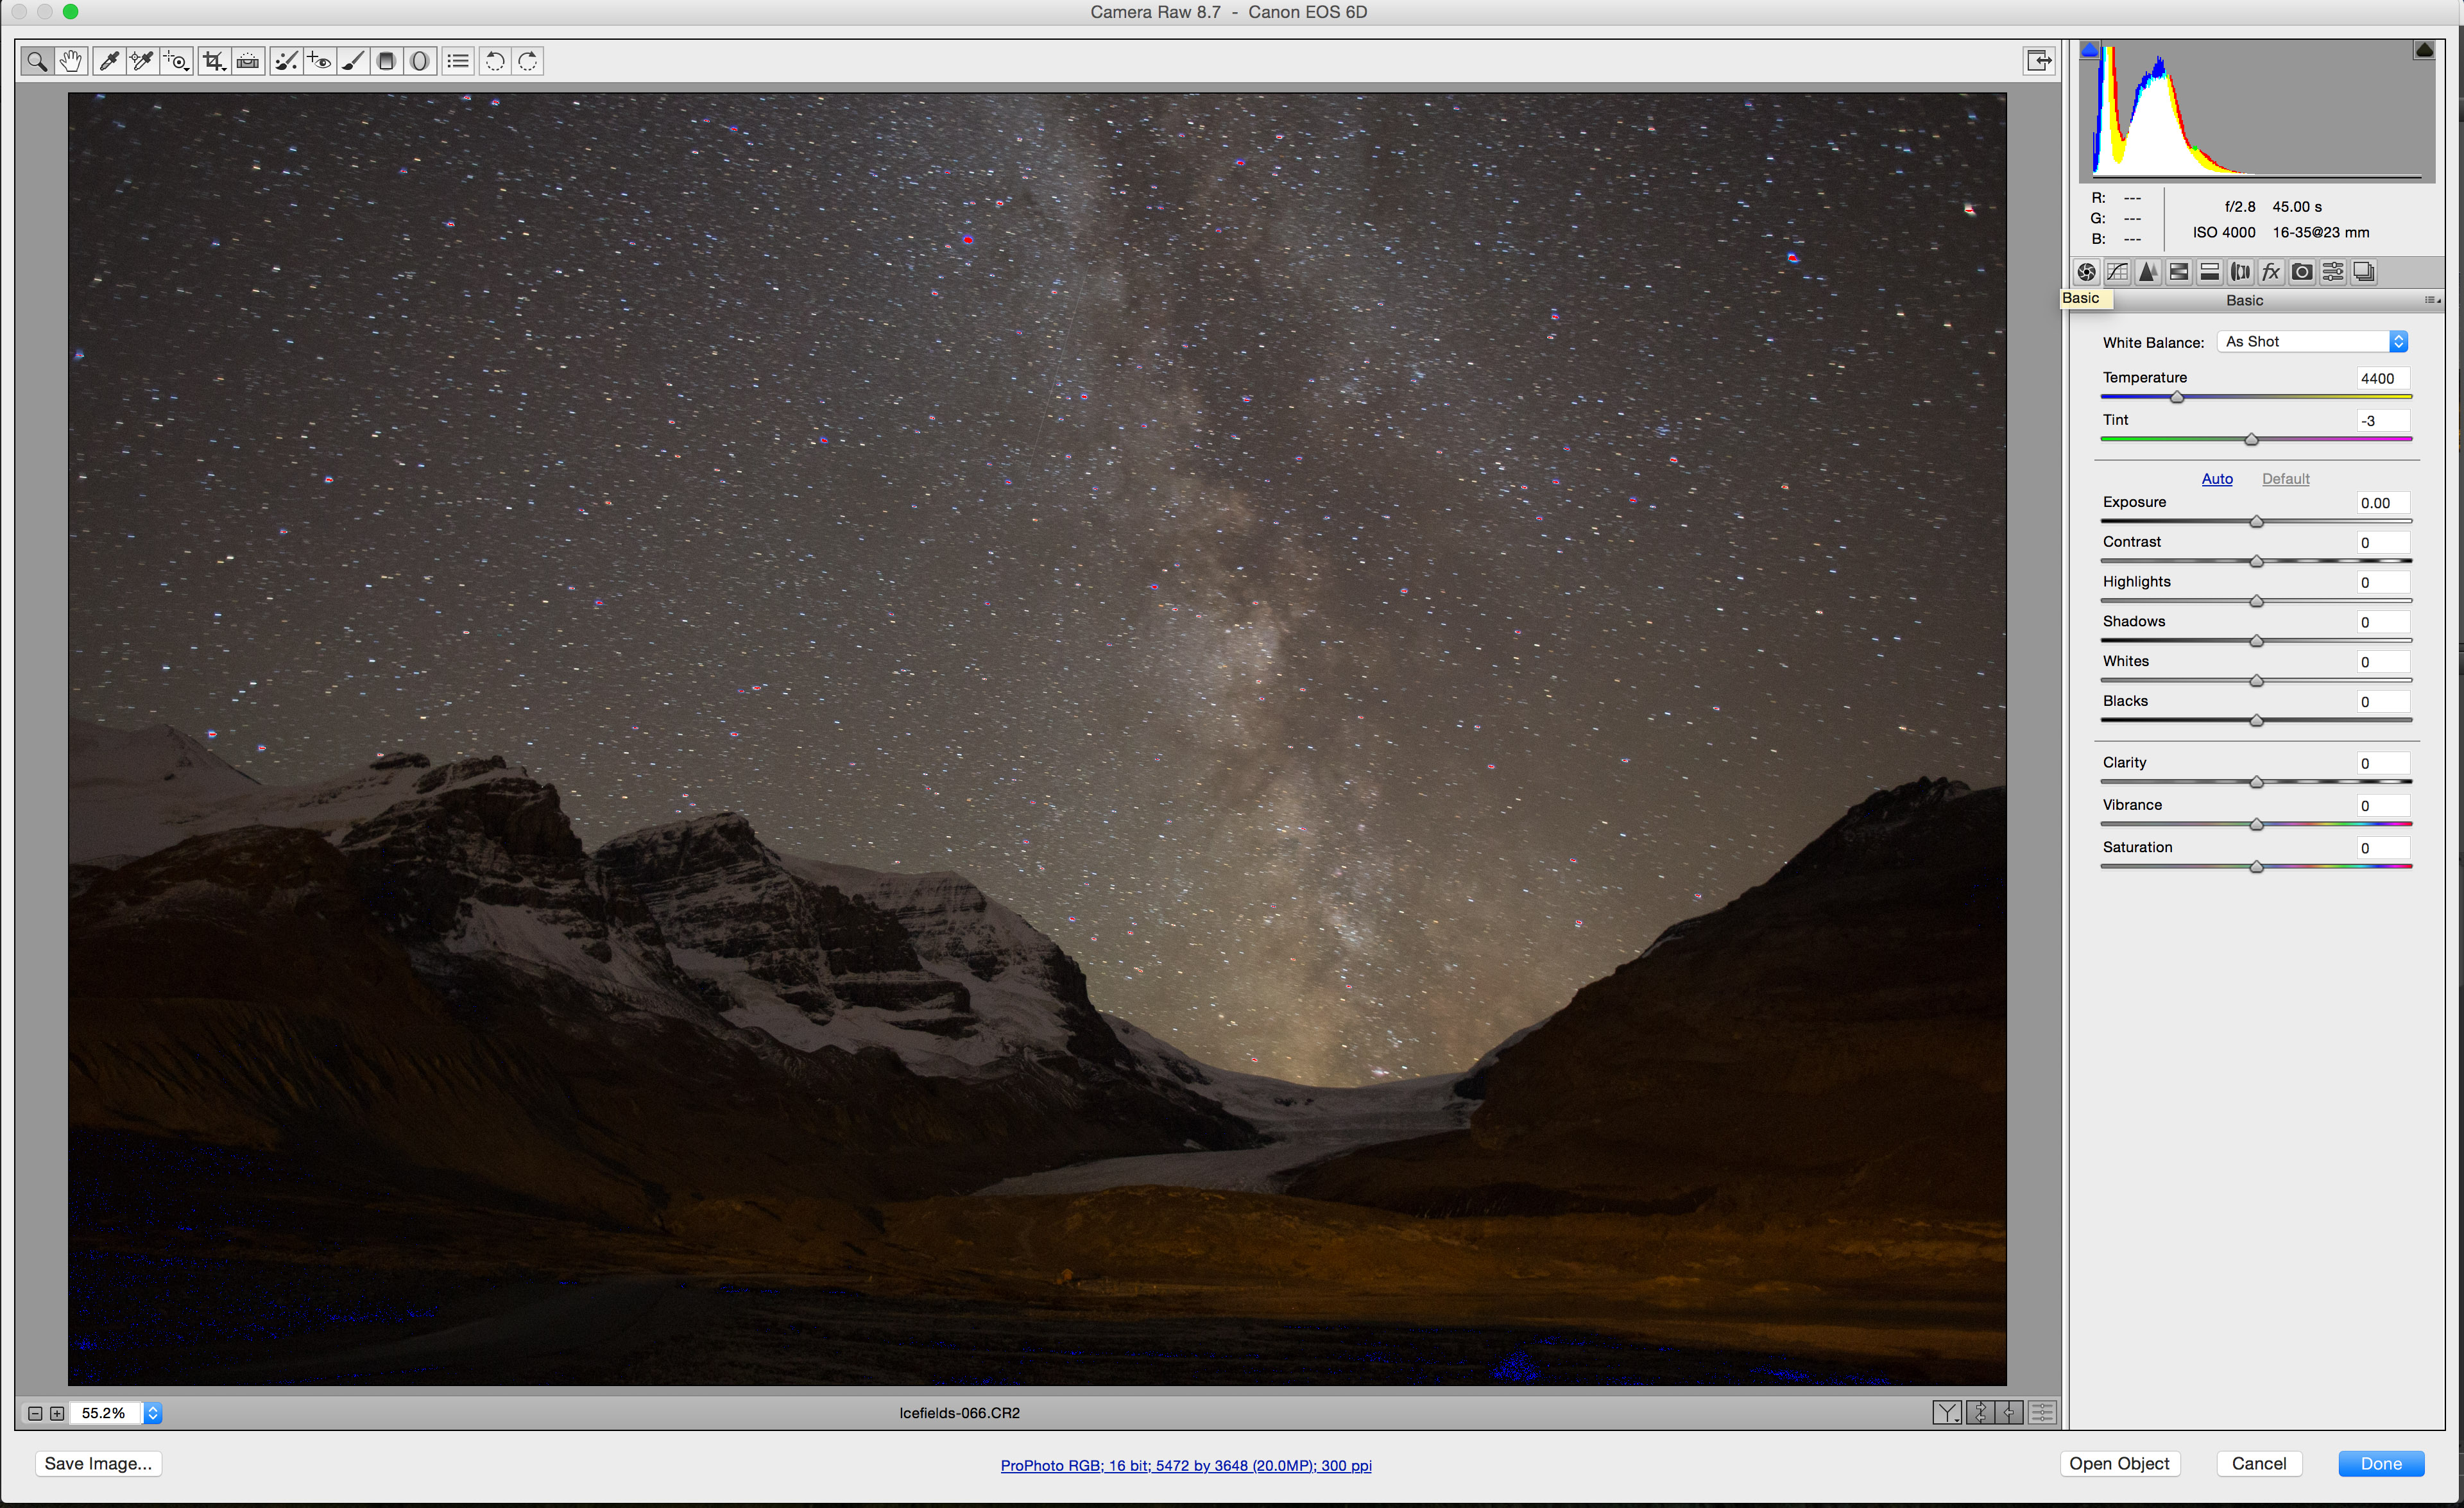
Step 2 – Adobe Camera Raw or Lightroom – Basics
Open the Raw files you want to process. From Bridge, double click on raw images and they will open in ACR. In Lightroom select the images and switch to its Develop module.
In Adobe Camera Raw be sure to first set the Workflow Preset (the blue link at the bottom of the screen) to 16 bits/channel and ProPhoto RGB colour space, for maximum tonal range. This is a one-time setting. Lightroom defaults to 16-bit and the AdobeRGB colour space.
The Basics panel (the first tab) allows you to fix Exposure and White Balance. For the latter, use the White Balance Tool (the eyedropper, keyboard shortcut I) to click on an area that should be neutral in colour.
You can adjust Contrast, and recover details in the Highlights and Shadows (turn the latter up to show details in starlit landscapes). Clarity and Vibrance improves midrange contrast and colour intensity.
Use Command/Control Z to Undo, or double click on a slider to snap it back to zero. Or under the pull-down menu in the Presets tab go to Camera Raw Defaults to set all back to zero.
–
Step 3 – Adobe Camera Raw or Lightroom – Detail
The Detail panel allows you to set the noise reduction and sharpness as you like it, one of the benefits of shooting Raw.
Generally, settings of Sharpness: Amount 25, Radius 1 work well. Turn up Masking while holding the Option/Alt key to see what areas will be sharpened (they appear in white). There’s no need to sharpen blank, noisy sky, just the edge detail.
Setting Noise Reduction: Luminance to 30 to 50 and Color to 25, with others sliders left to their defaults works well for all but the noisiest of images. Luminance affects the overall graininess of the image. Color, also called chrominance, affects the coloured speckling. Turning the latter up too high wipes out star colours.
Turn up Color Smoothness, however, if the image has lots of large scale colour blotchiness.
Zoom in to at least 100% to see the effect of all noise reduction settings. Adobe Camera Raw and Lightroom have the best noise reduction in the business. Without it your images will be far noisier than they need to be.
–
Step 4 – Adobe Camera Raw or Lightroom – Lens Correction
Wide angle lenses, especially when used at fast apertures, suffer a lot from light falloff at the corners (called vignetting). There’s no need to have photos looking as if they were taken through a dark tunnel.
ACR or Lightroom can automatically detect what lens you used and apply a lens correction to brighten the corners, plus correct for other flaws such as chromatic aberration and lens distortion.
Use the Color tab to “Remove Chromatic Aberration” and dial up the Defringe sliders.
For lenses not in the database (manual lenses like the Rokinons and Samyangs will not be included, nor will any telescopes) use the Manual tab to dial in your own vignetting correction. This can take some trial-and-error to get right, but once you have it, save it as a Preset to apply in future to all photos from that lens or telescope.
I usually apply Lens Corrections as a first step, but sometimes find I have to back it off it as I boost the contrast under Basics.
–
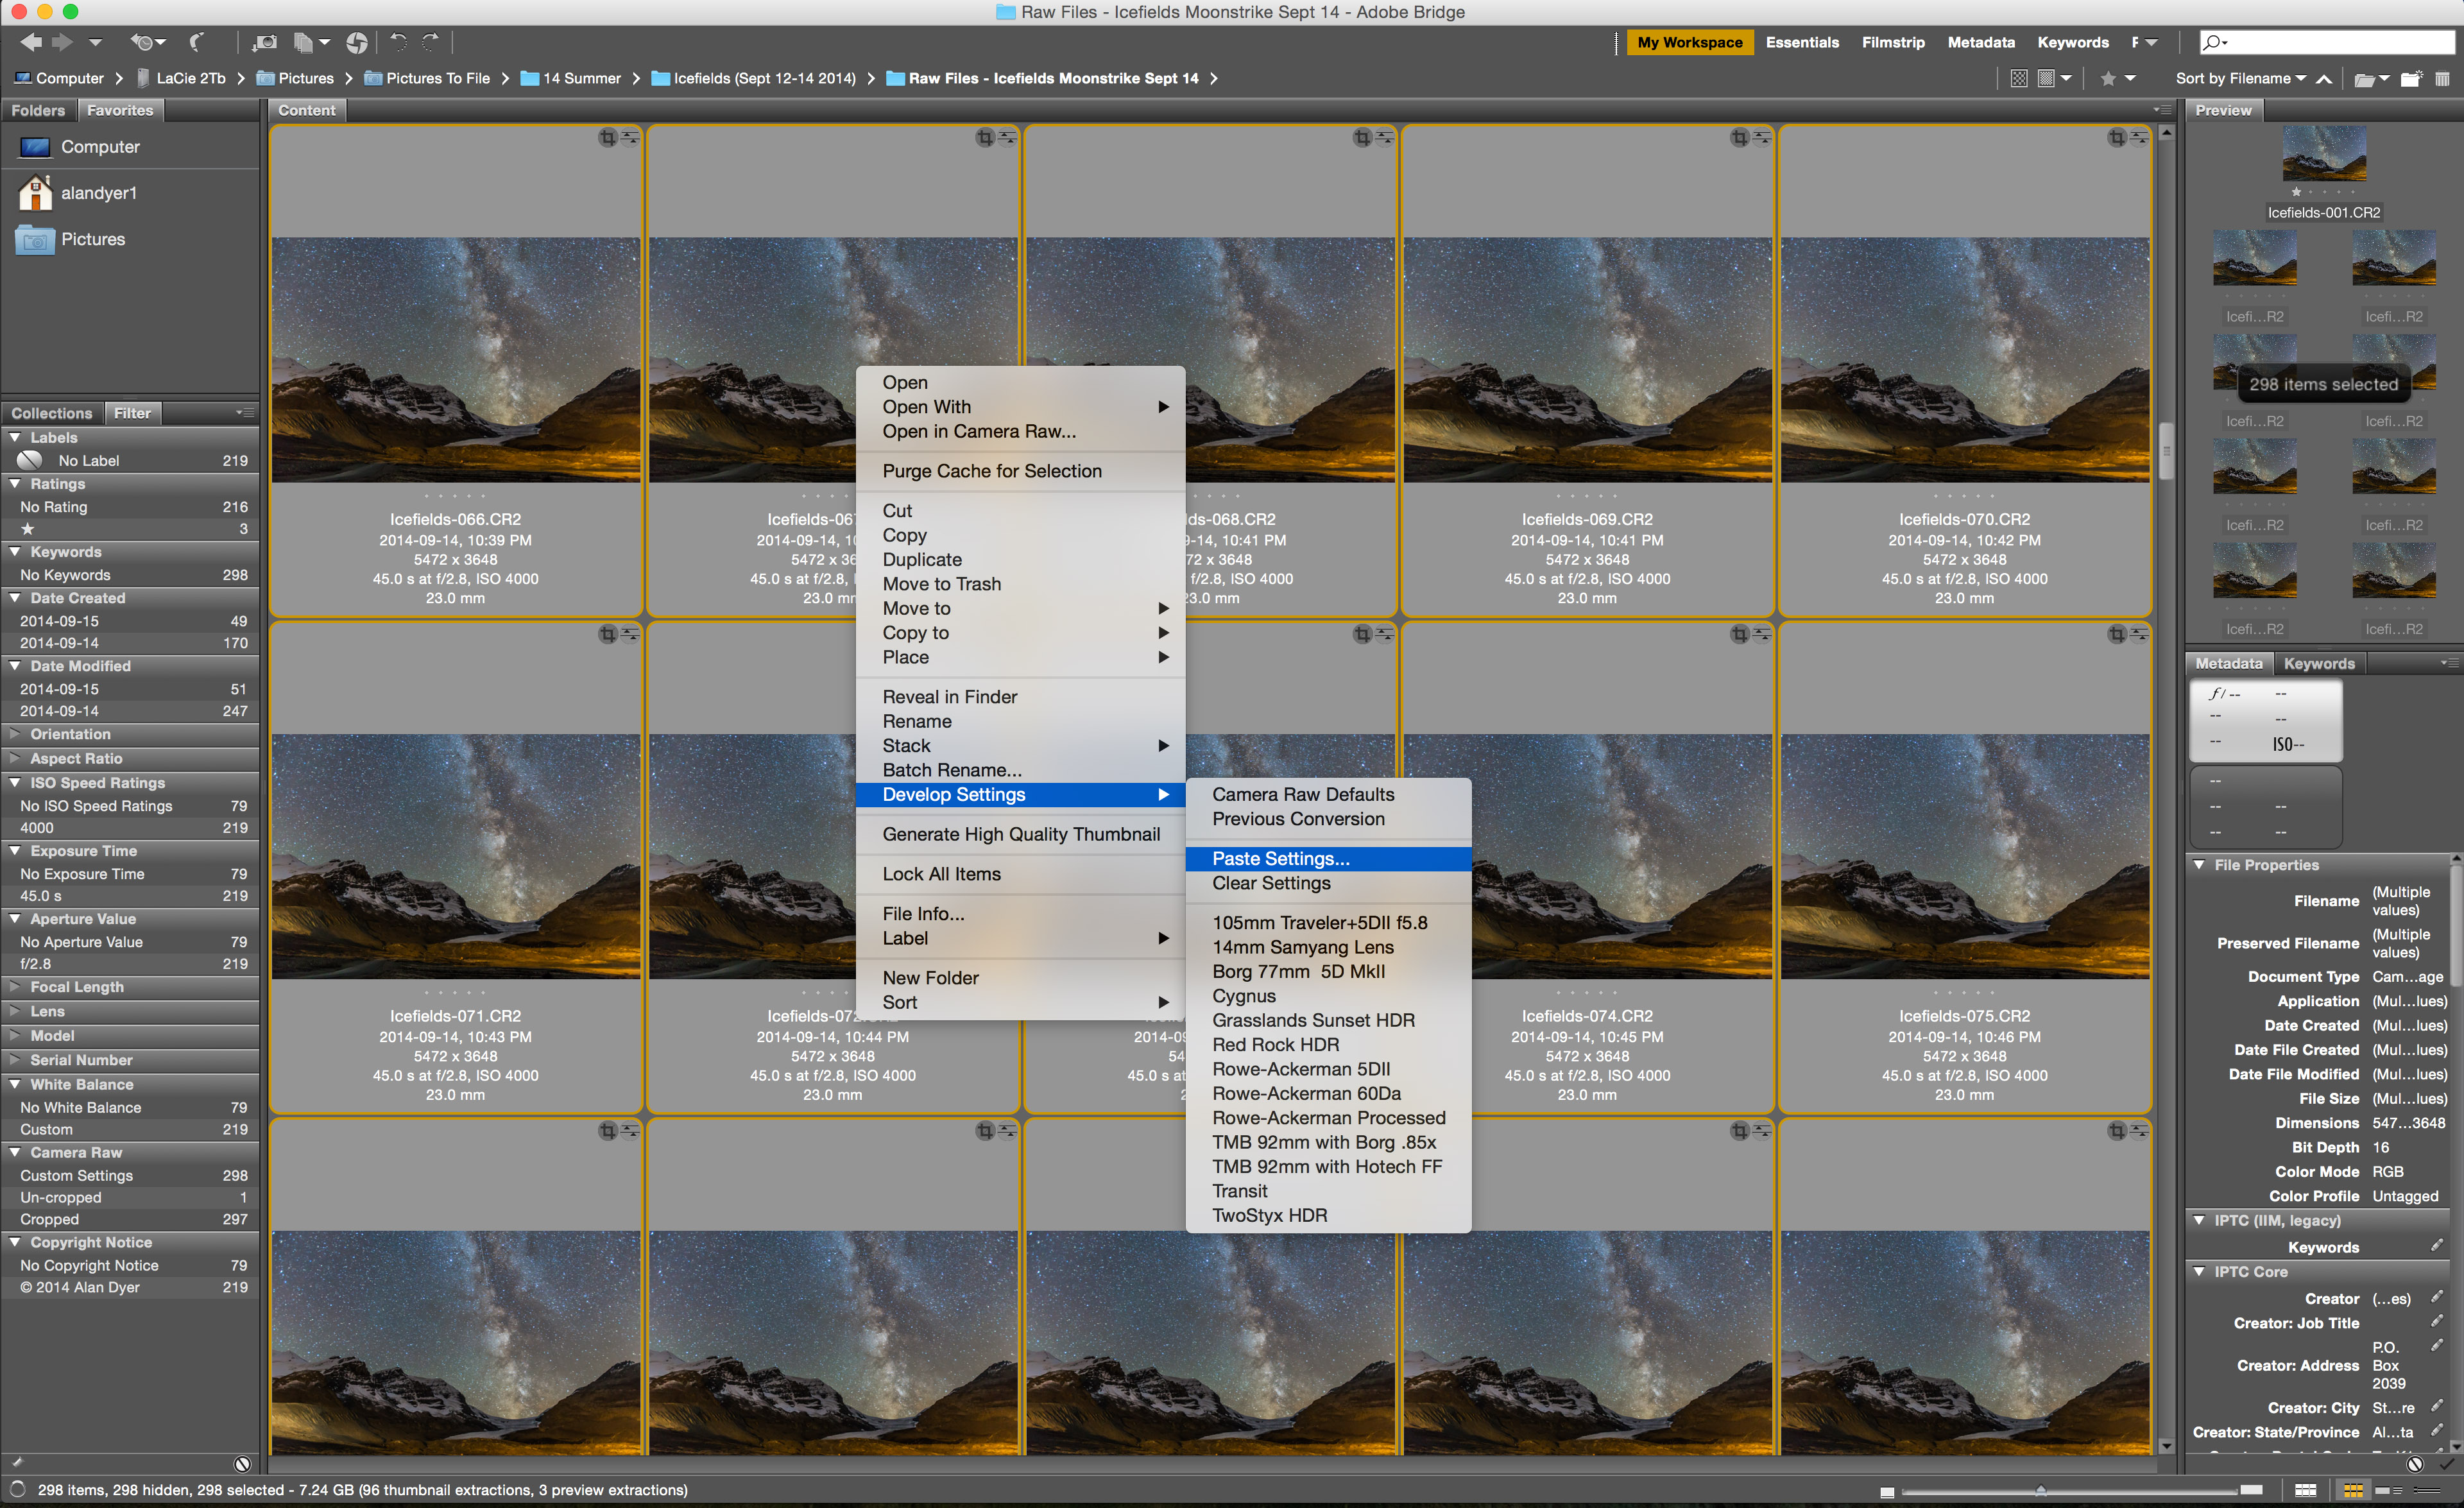
Step 5 – Bridge or Lightroom – Copy & Paste
For a small number of images you could open them all, then Select All in ACR to apply the same settings to all images at the same time.
Or you can adjust one, then Select All and hit Synchronize.
Another method useful for processing dozens or hundreds of frames from a star trail or time-lapse set is to choose one representative image and process it. Then in Bridge choose Edit>Develop Settings>Copy Camera Raw Settings. If you are in Lightroom’s Library module, choose Photo>Develop Settings>Copy Settings.
With either program you can also right-click on an image to get to the same choices. Then select all the other images in the set (Command/Control A) and use the same menus to Paste Settings.
A dialog box comes up for choosing what settings you wish to transfer.
If you cropped the image (a good idea for images destined for an HD movie with a 16:9 aspect ratio), pick that option as well. In moments all your images get processed with identical settings. Nice!
–
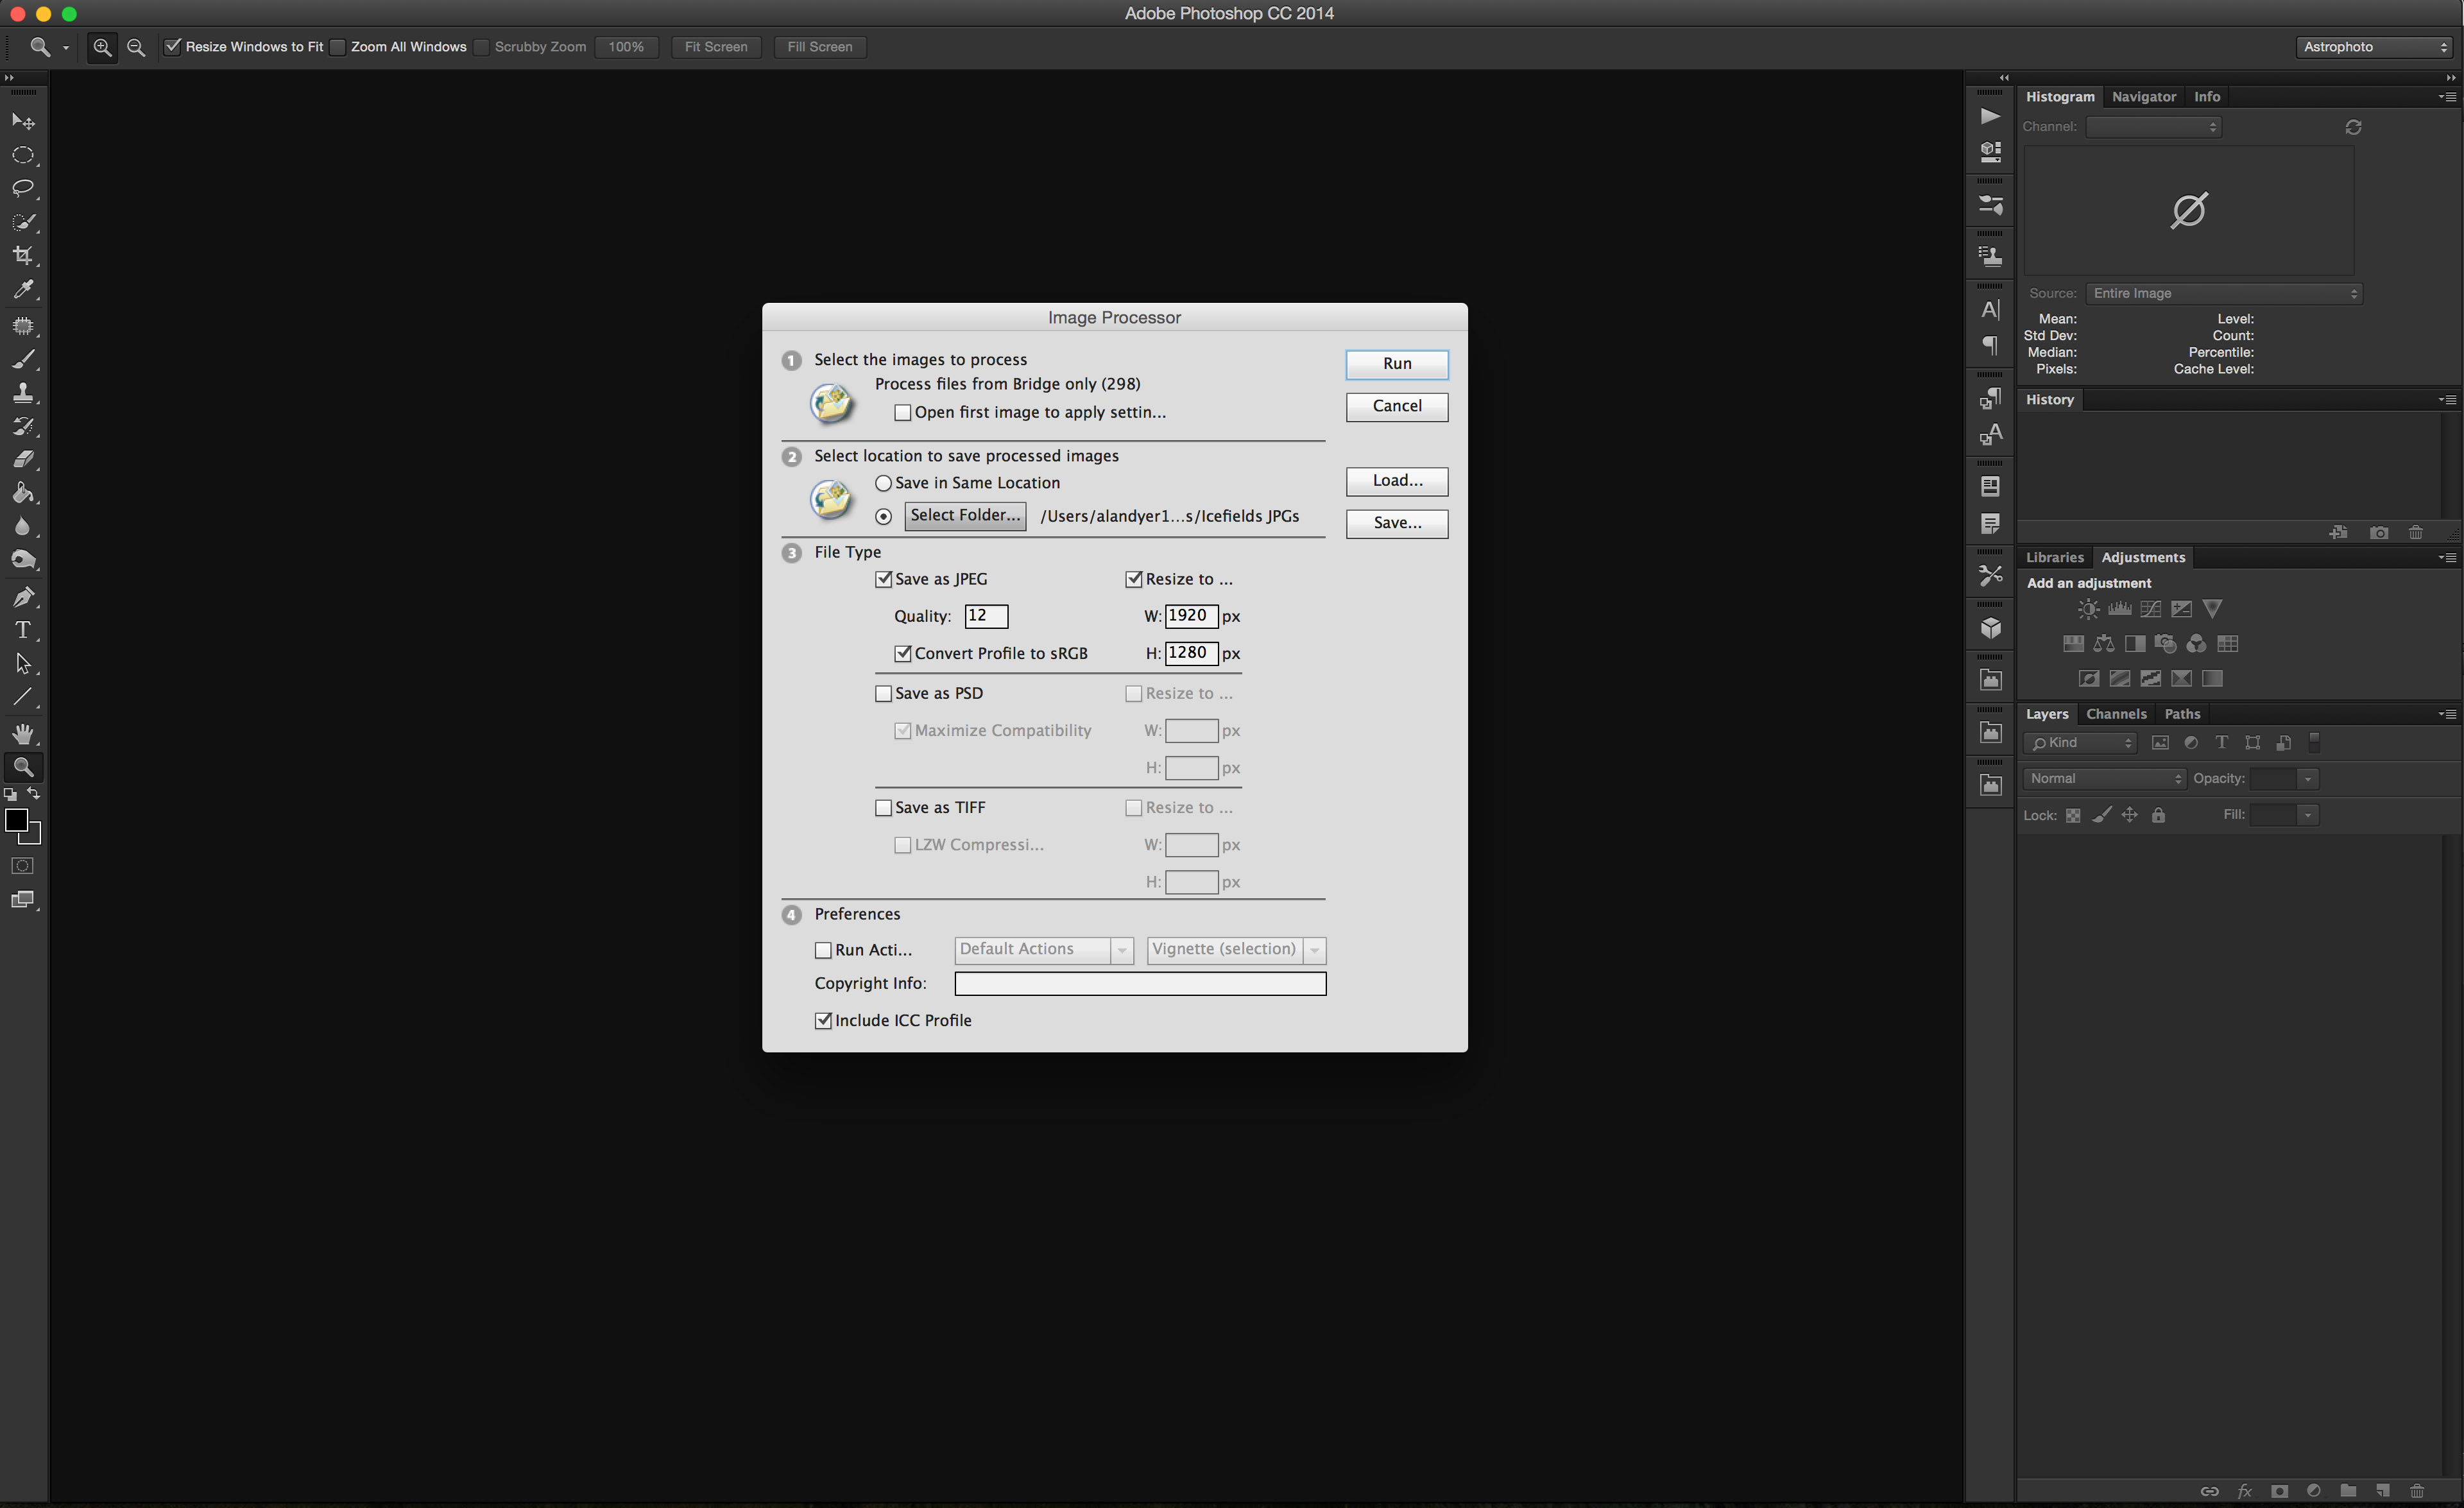
Step 6 – Lightroom or Photoshop – Export
You now have a set of developed Raw images. However, the actual Raw files are never altered. They remain raw!
Instead, with Adobe Camera Raw the information on how you processed the images is stored in the “sidecar” XMP text files that live in the same folder as the Raw files.
In Lightroom’s case your settings are stored in its own database, unless you choose Metadata>Save Metadata to File (Command/Control S). In that case, Lightroom also writes the changes to the same XMP sidecar files.
To convert the images into final Photoshop PSDs, TIFFs or JPGs you have a couple of choices. In Lightroom go to the Library module and choose Export. It’s an easy way to export and convert hundreds of images, perhaps into a folder of smaller JPGs needed for assembling a time-lapse movie.
To do that from within Adobe Bridge, select the images, then go to Tools>Photoshop>Image Processor. The dialogue box allows you to choose how and where to export the images. Photoshop then opens, processes, and exports each image.
–
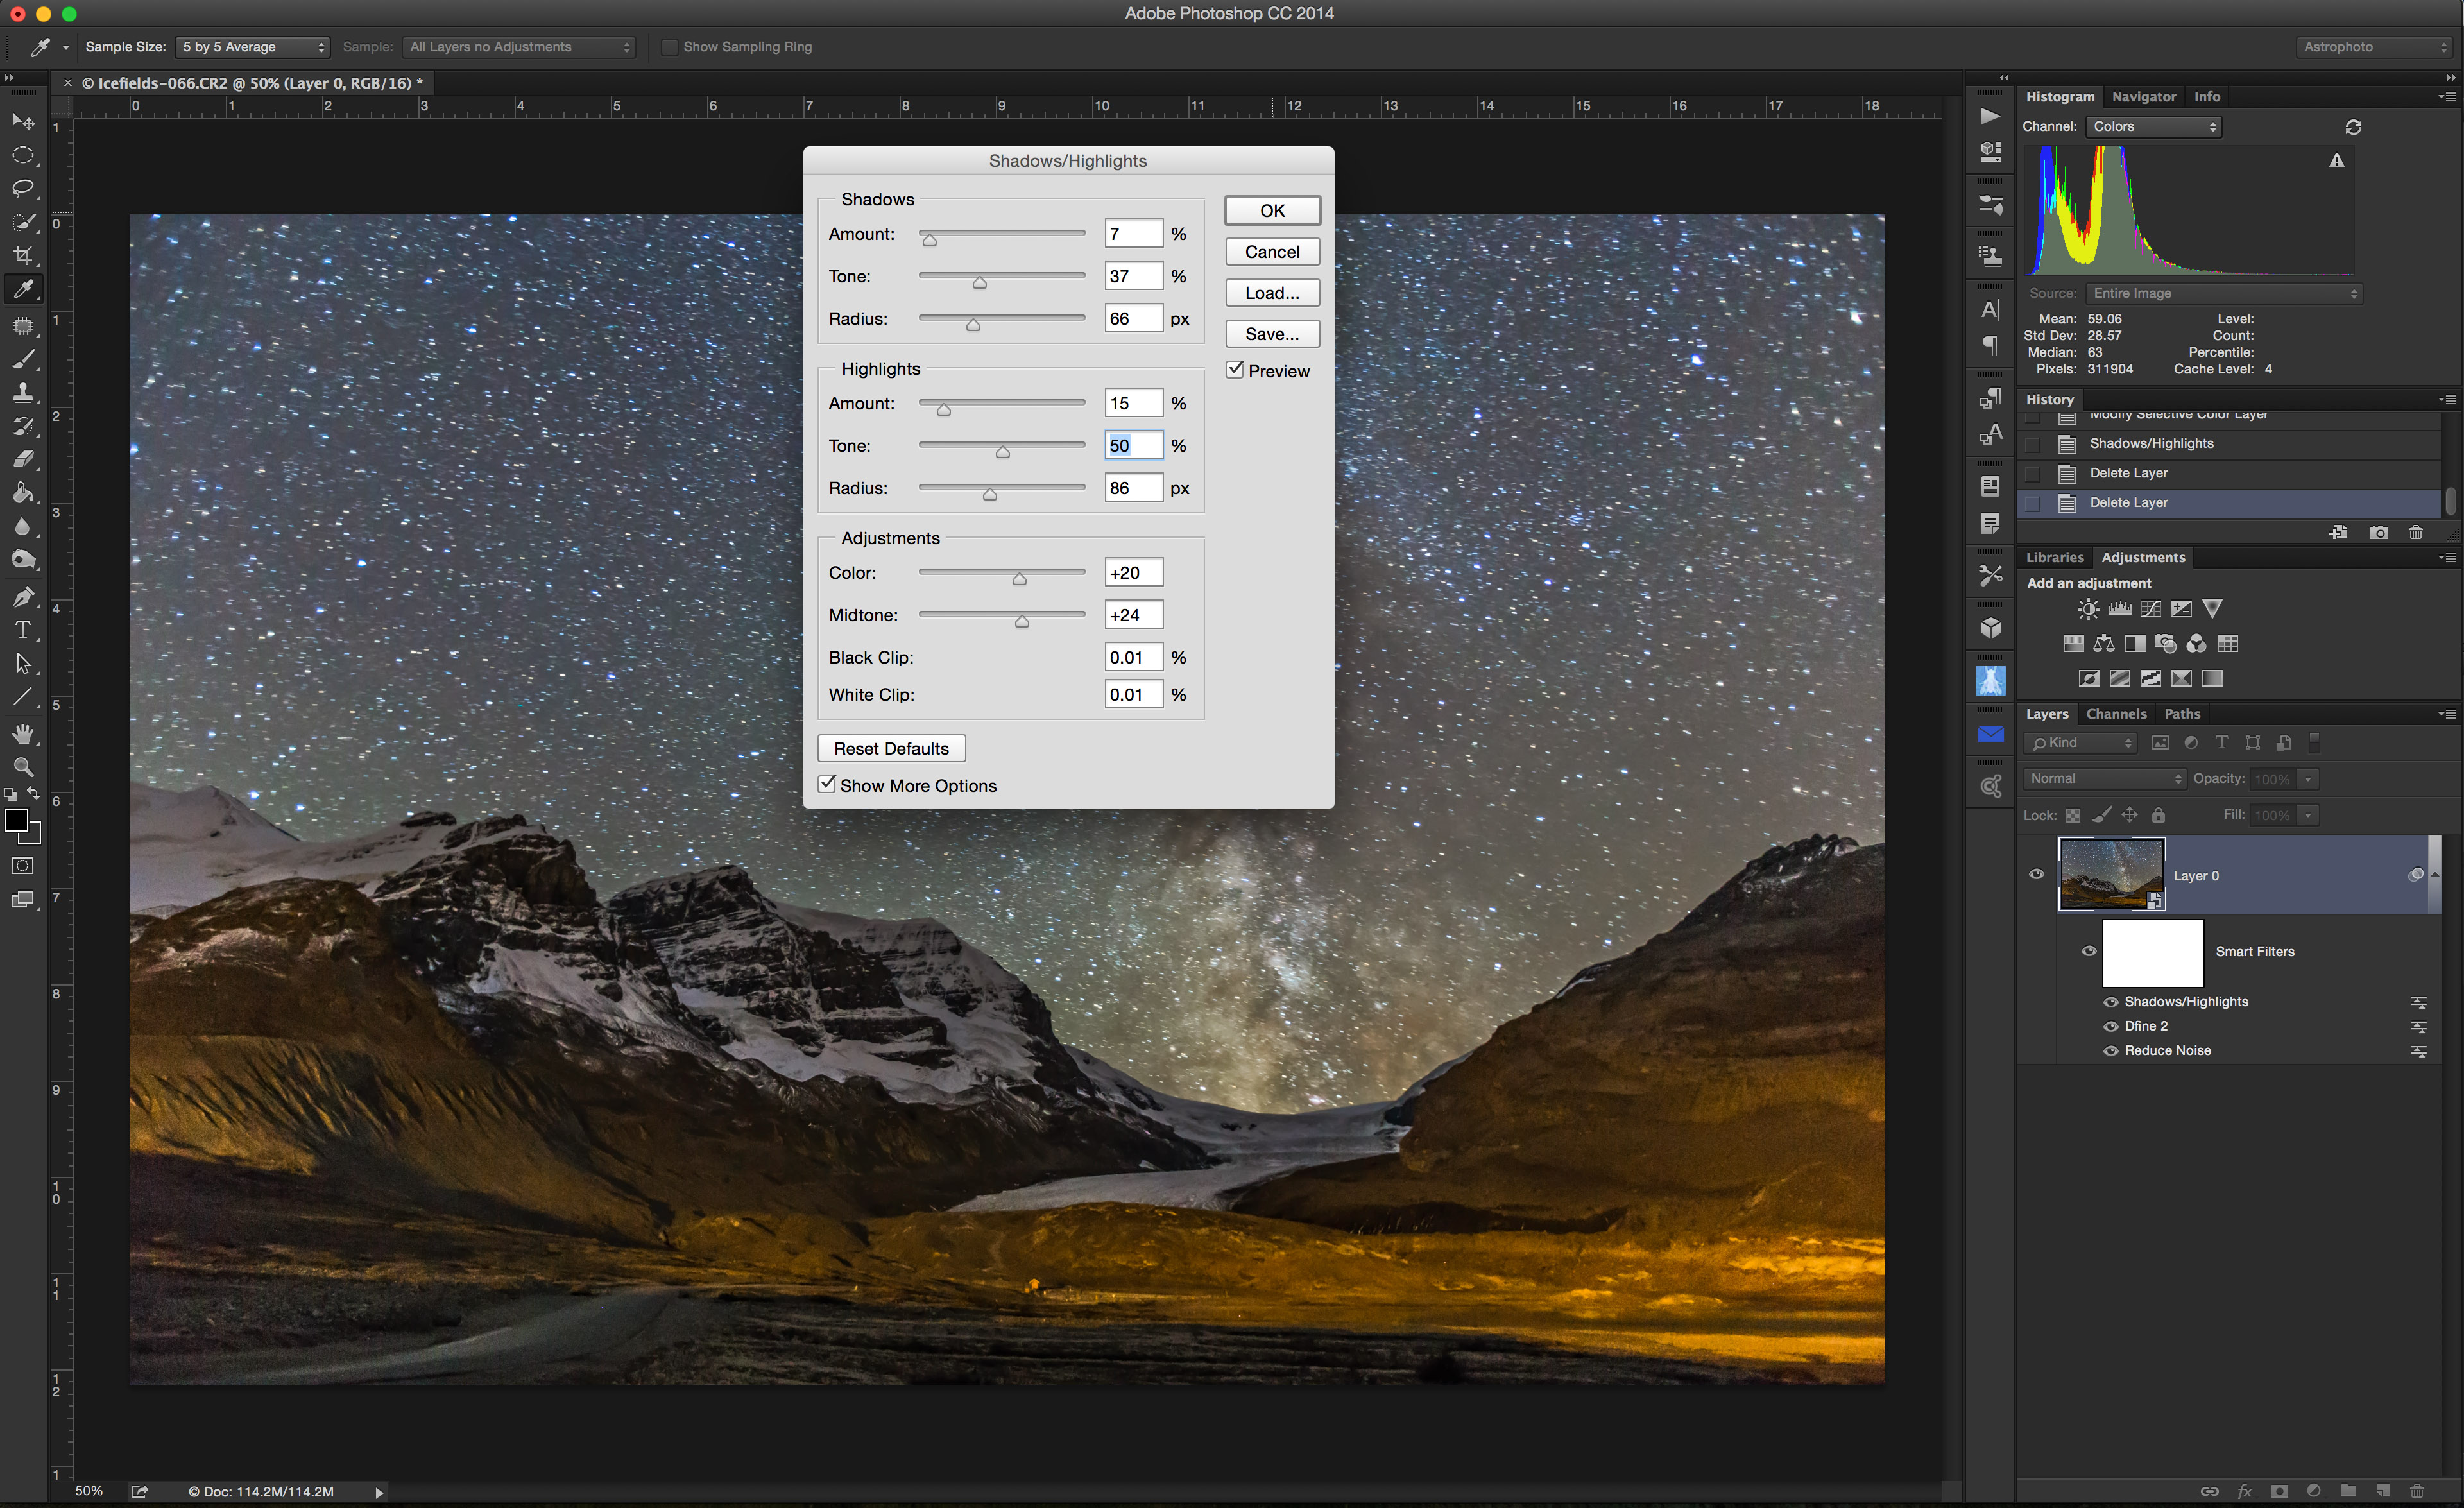
Step 7 – Photoshop – Smart Filters
For a folder of images intended to be stacked into star trails (Step 10A) or time-lapse movies (Step 10B), you’re done processing.
But individual nightscape images can often benefit from more advanced work in Photoshop. The next steps make use of a non-destructive workflow, allowing you to alter settings at any time after the fact. At no time do we actually change pixels.
One secret to doing that is to open an image in Photoshop and then select Layer>Smart Objects>Convert to Smart Object. Or go to Filter>Convert for Smart Filters.
OR … better yet, back in Adobe Camera Raw hold down the Shift key while clicking the Open Image button, so it becomes Open Object. That image will then open in Photoshop already as a Smart Object, which you can re-open and re-edit in ACR at any time later should you wish.
Either way, with the image as a Smart Object, you can now apply useful filters such as Reduce Noise, Smart Sharpen, and Dust & Scratches, plus third-party filters such as Nik Software’s Dfine 2 Noise Reduction, all non-destructively as “smart filters.” They can be re-adjusted or turned off at any time.
–
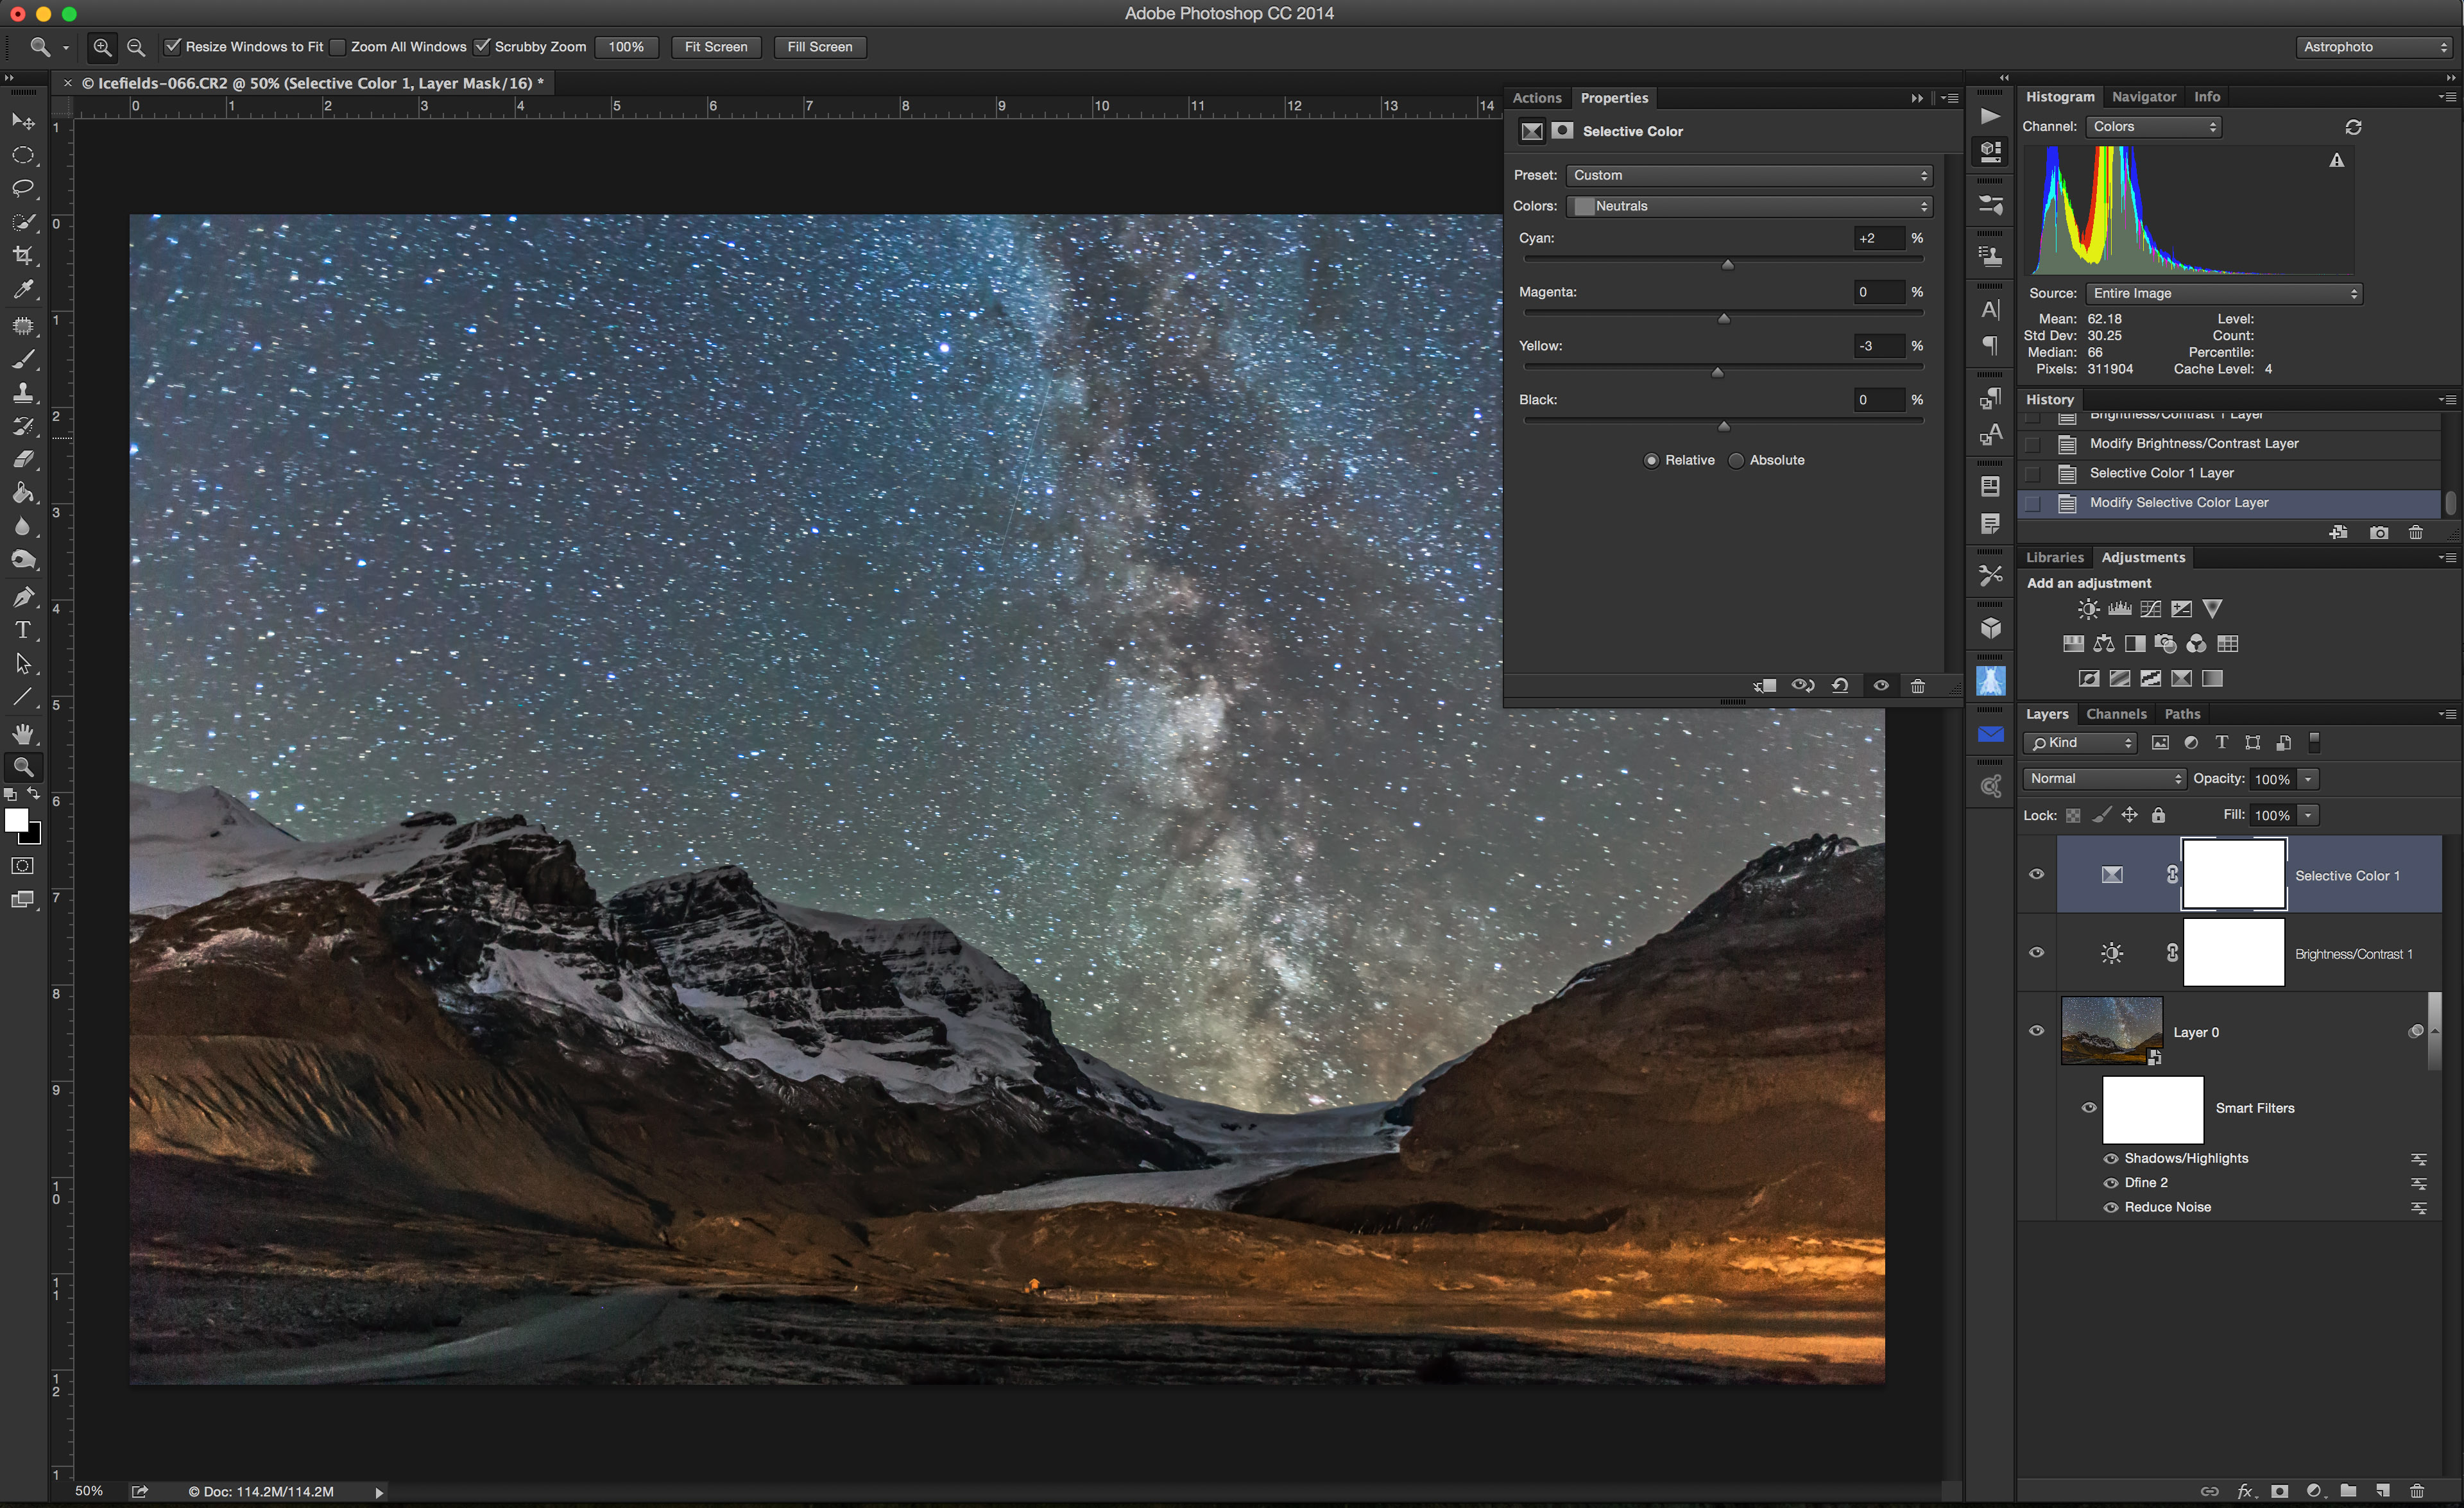
Step 8 – Photoshop – Adjustment Layers
The other secret to non-destructive processing is to apply adjustment layers.
Go to Layer>New Adjustment Layer, or click on any of the icons in the Adjustments panel. If that panel is not visible at right, then under the Window menu check “Adjustments.”
This panel is where you can alter the colour balance, the brightness and contrast, the vibrancy, and many other choices. I find Selective Color most useful for tweaking colour.
Curves allows you to bring up detail in dark areas. Levels allows setting the black and white points, and overall contrast.
The beauty of adjustment layers is that you can click on the layer’s little icon and bring up the dialog box for changing the setting at any time. You never permanently alter pixels.
The image adjustment “Shadows & Highlights” is also immensely useful, but appears as a smart filter, not as an adjustment layer. It’s one of the prime tools for creating images with great detail in scenes lit only by starlight.
–
Step 9 – Photoshop – Masks
The power of adjustment layers is that you can apply them to just portions of an image. This is useful in nightscapes where the sky and ground often need different processing.
To create a mask first select the region you want to work on. Try the Quick Selection Tool (found near the top of the Tool palette at left). Use it to brush across the sky, or the ground, so that the entire area is outlined by “marching ants.”
Use the Refine Edge option to tweak the selection by brushing across intricate areas such as tree branches.
Once you have an area selected, hit one of the Adjustments to add an adjustment layer with the mask automatically applied. Double click on the mask to tweak it: hit Mask Edge to clean up the edge, or turn up the Feather to blur the edge.
To apply the same mask to another adjustment layer, drag the mask from one layer to another while holding down the Option/Alt key.
Invert the mask (or select it and hit Command/Control I) to apply it to the other half of the image. Paint the mask with black or white brushes if you need manually alter it. Remember – black “conceals,” while white “reveals.”
When done, be sure to always save the image as a layered “master” .PSD file.
Never, ever flatten and save – that will wipe out all your non-destructive filters and adjustment layers.
If you need to save the image as a JPG for social mediia or emailing, then Flatten and Save As … Or use Photoshop’s File>Export>Export As .. function.
–
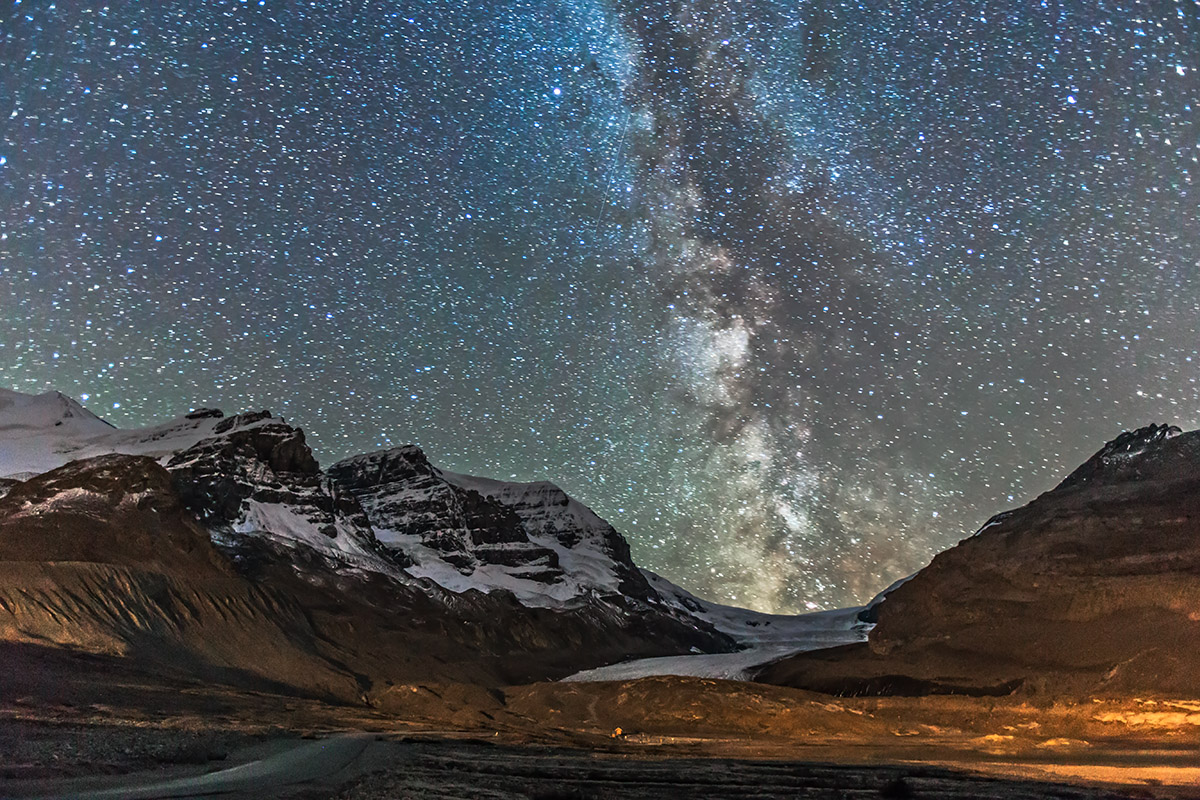
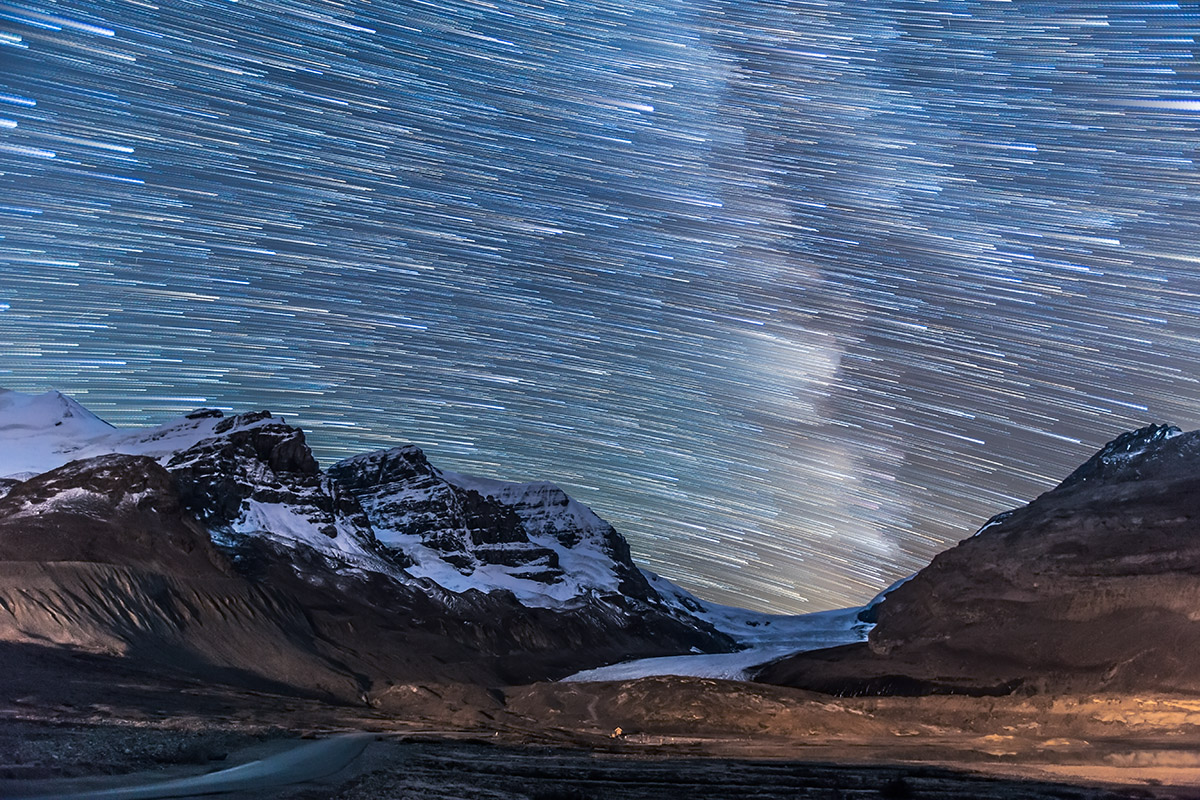
Stars setting in trails over the Athabasca Glacier and Columbia Icefields, Sept 14, 2014. The Milky Way is trailed at right. This is a stack of 100 exposures, composited with Advanced Stacker Plus actions in Photoshop, with the ground coming from a subset stack of 8 images to reduce noise. Each exposure, taken as part of a time-lapse sequence, was 45 seconds at f/2.8 with the 16-35mm lens at 23mm and Canon 6D at ISO 4000.
Step 10A – Photoshop or 3rd Party Programs – Stack for Star Trails
One popular way to shoot images of stars trailing in arcs across the sky is to shoot dozens or hundreds of well-exposed frames at a fairly high ISO and wide aperture, and at a shutter speed no longer than 30 to 60 seconds. You then “stack” the images to create the equivalent of one frame shot for many minutes, if not an hour or more. The image above is an example.
There are several ways to stack.
From within Photoshop CC (or using an Extended version of the older CS5 or CS6) one method is to go to File>Scripts>Statistics. In the dialog box, drill down to the images you wish to stack (put them all in one folder) and choose Stack Mode: Maximum, and uncheck “Attempt to Automatically Align.” The result is a huge (!) smart object. This method works best on just a few dozen images. In this case, you’ll need to use Layers>Flatten to reduce its size.
Other options for stacking hundreds of images include the free program StarStax (Windows and Mac), which requires a folder of “intermediate” TIFFs or JPGs. See Step 6 above.
The Advanced Stacker Actionsfrom Star Circle Academy are actions you install in Photoshop that work directly from Raw files to create some impressive effects. I use them and recommend them.
–
Step 10B – Photoshop or 3rd Party Programs – Assemble for Movies
The same folder of images taken for star trail stacking can also be turned into a time-lapse movie. Instead of stacking the images on top of one another in space, you string them together one after the other in time.
There are many methods for assembling movies. Free or low cost programs such as Quicktime 7 Pro, Time-Lapse Assembler, Sequence (a Mac program shown above), VirtualDub, or Time-Lapse Tool can do the job, all offering options for the final movie’s format.
Generally, an HD video of 1920×1080 pixels in the H264 format, or “codec,” is best, rendered at 15 to 30 frames per second.
Most movie assembly programs will need to work from a folder of JPGs of the right size, produced using one of the choices listed under Step 6: Export.
But … you can also use Photoshop to assemble a movie.
Choose the Window>Workspace>Motion to bring up a video timeline. Then File>Open to drill to your folder of processed and down-sized JPG files. Select one image, then check “Image Sequence.” Choose the frame rate (15 to 30 fps is best). Then go to File>Export>Render Video to turn the resulting file into a final H264 or Quicktime movie suitable for use in other movie editing programs.
–
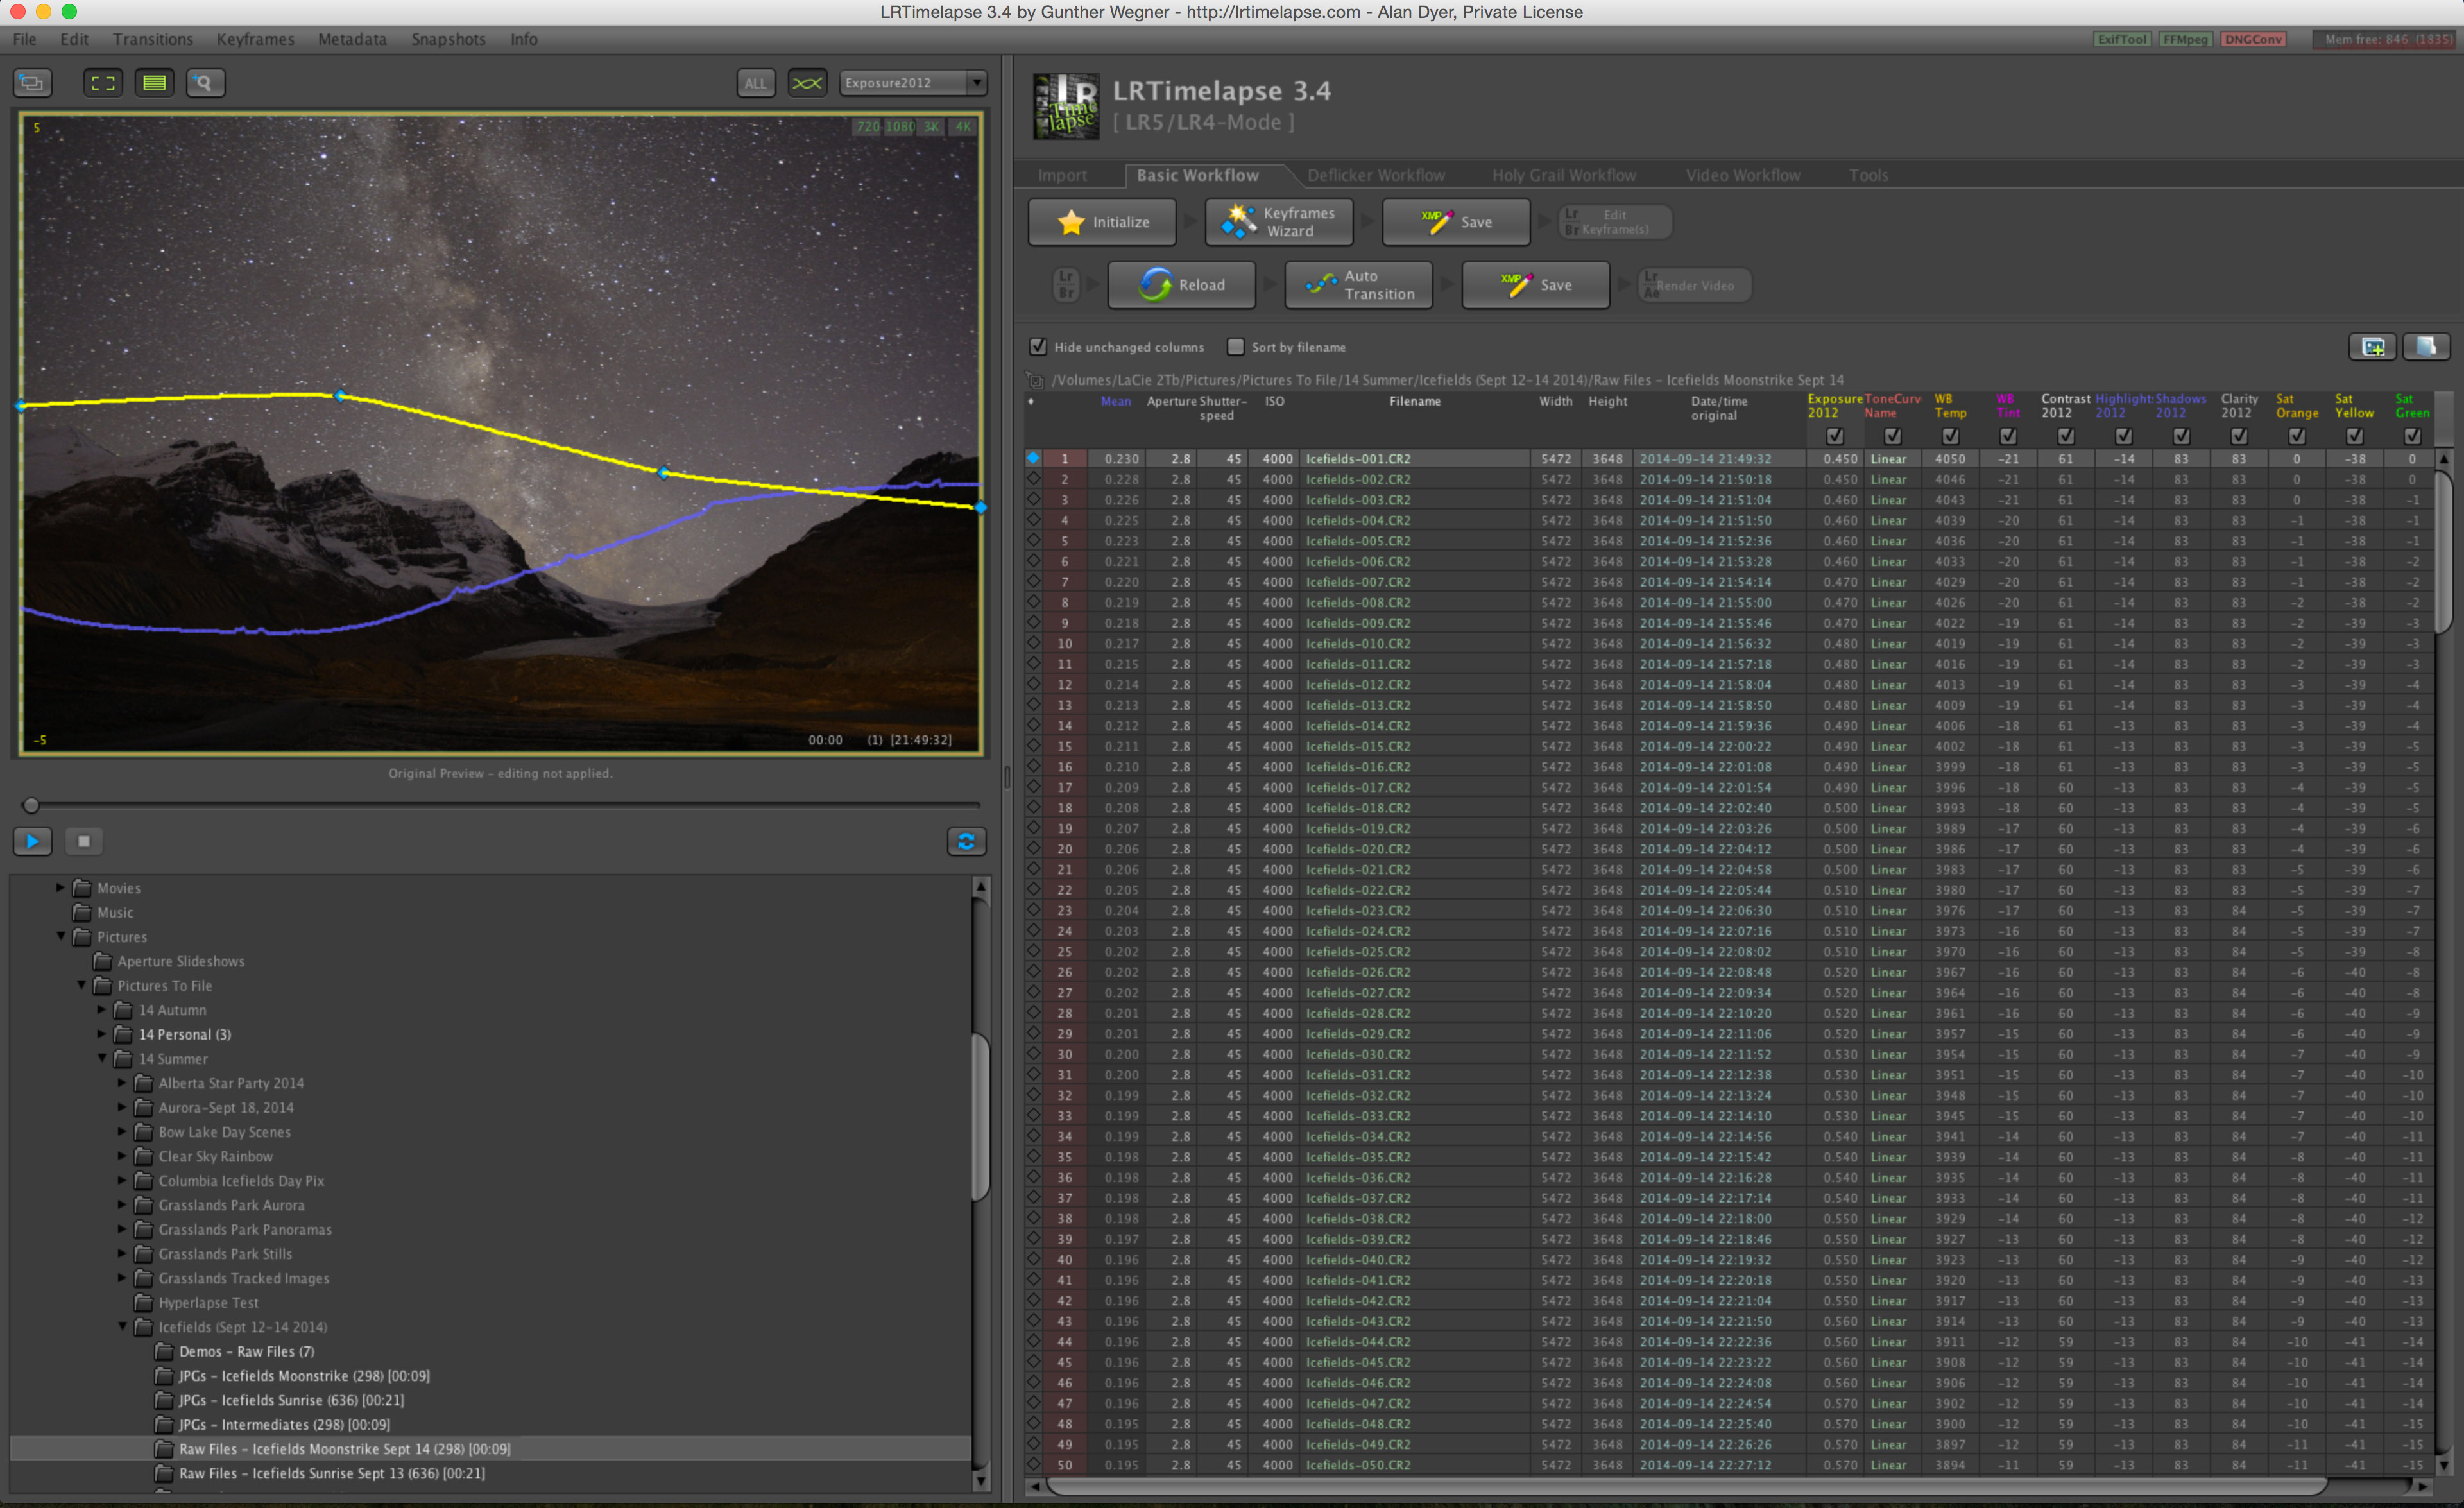
Advanced Techniques: Using LRTimelapse
The workflow I’ve outlined works great when you can apply the same development settings to all the images in a folder. For star trail and time-lapse sequences shot once it gets dark and under similar lighting conditions that will be the case.
But if the Moon rises or sets during the shoot, or if you are taking a much more demanding sequence that runs from sunset to night, the same settings won’t work for all frames.
The answer is to turn to the program LRTimelapse (100 Euros for the standard version, and available in a free but limited trial copy). LRTimelapse works with either Lightroom or Bridge/Adobe Camera Raw.
To use it you process just a few selected “keyframes” – at least two, at the start and end of the sequence, and perhaps other frames throughout the sequence, processing them so each frame looks great. You read that processing data into LRTimelapse and, like magic, it interpolates your settings, creating a folder of images with every setting changing incrementally from frame to frame, something you could never do by hand.
It can then work with Lightroom to export the frames out to a video in formats from HD up to 4K in size. For serious time-lapse work, LRTimelapse is an essential tool.
–
Much, much more information and tutorials are included in my multimedia Apple eBook, linked to below.
But I hope this quick tutorial helps in providing you with tips to make your images and movies even better! If you found it useful, please feel free to share a link to this blog page through your social media channels. Thanks!
A strange red arc of aurora moved slowly across the sky on May 10.
All indicators looked favourable early in the evening on May 10 for a good auroral display later that night, and sure enough we got one. But it was an unusual display.
From my site in southern Alberta, the northern sky did have a diffuse glow of “normal” green aurora that never did take much form or structure.
But overhead the aurora took the form of an arc across the sky, starting as an isolated ray in the southeast initially, then reaching up to arch across the sky with what looked to the eye like a colourless band.
But the camera showed it as a red arc, with just a fringe of green curtains appearing for a few minutes.
Be sure to click HD and enlarge the video to fill your screen.
The time-lapse movie shows the sequence, over about 90 minutes, with 170 frames playing back at 12 frames per second. You can see the red arc develop, then become more narrow, then exhibit a few green curtains. Then it fades away.
Large-scale pulses also brighten the whole sky momentarily.
The other images are individual frames taken during the evening, showing snapshots of the red arc development, as it became more narrow in structure and gained green curtain-like fringes.
Presumably the red structure was very high in the atmosphere while the green curtains attached to it that did appear hung down from the high-altitude red arc.
I shot all images with an 8mm fish-eye lens to capture most of the sky. The camera is looking north toward Polaris, with the Big Dipper almost directly overhead near the centre of the frames.
The main image at top is a star-trail stack of 80 frames showing the sky’s circumpolar motion around Polaris and the aurora blurred and blended over 45 minutes of motion. I stacked the frames with the Advanced Stacker Actions from StarCircleAcademy.com
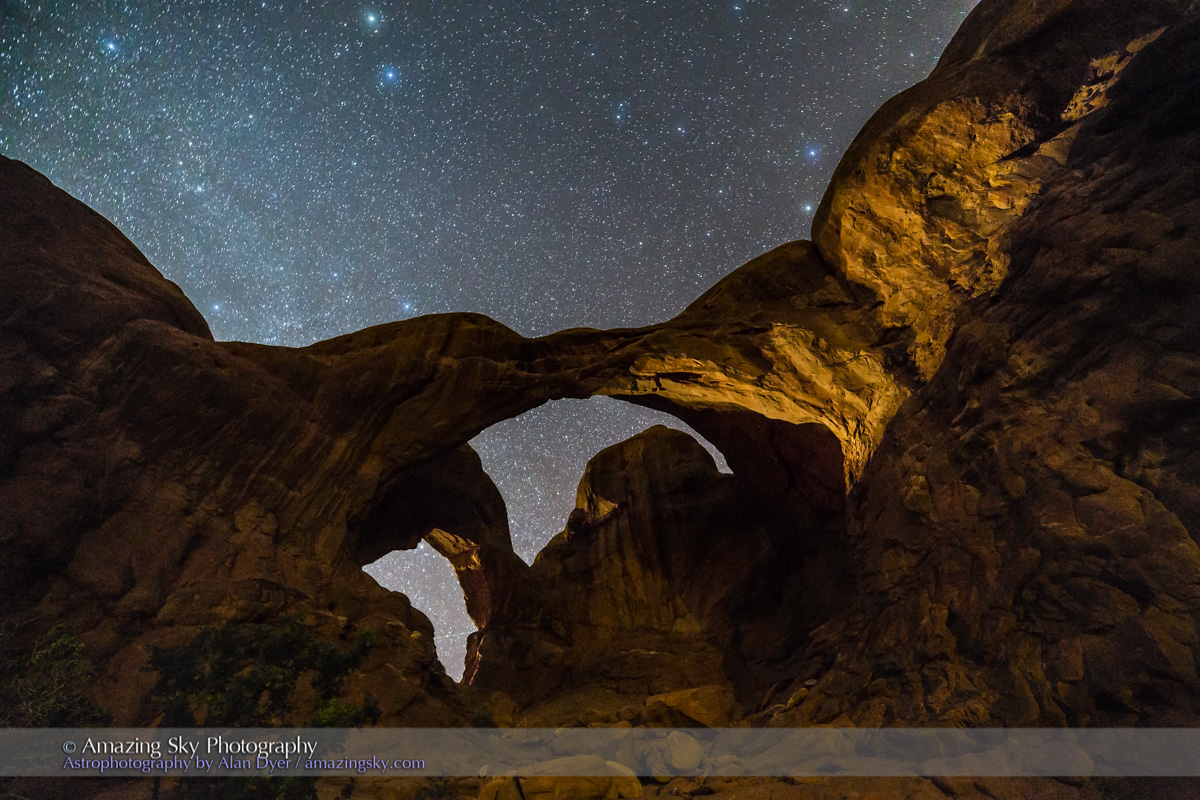
The iconic Double Arch looks great under dark skies, moonlight, or painted with artificial light.
Last night, I returned to the Double Arch at Arches National Park, to capture a star trail series, starting from the onset of darkness at 9:30 p.m., and continuing for 2.5 hours until midnight, an hour after moonrise at 11:00 p.m. The lead image is the result.
I think it turned out rather well.
The Big Dipper is just streaking into frame at top right, as I knew it would from shooting here the night before. The bright streak at upper left is Jupiter turning into frame at the end of the sequence. Note how the shadow of the moonlit foreground arch matches the shape of the background arch.
On the technical end, the star trail composite is a stack of 160 frames, each 45 seconds at f/2.8 and ISO 3200, with the Canon 6D and 14mm lens. The foreground, however, comes from a stack of 8 frames taken toward the end of the shoot, as the moonlight was beginning to light the arches. An additional 45-second exposure taken a couple of minutes after the last star trail frame adds the star-like points at the “head” of the star trail streaks.
I used the excellent Advanced Stacker Actions from StarCircleAcademy to do the stacking in Photoshop.
Before starting the star trail set, I took some initial short-exposure nightscapes while the sky was still dark. The result is the above image, of Double Arch in a dark sky. Passing car headlights provided some rather nice accent illumination.
On such a fine night I thought others might be there as well. Arches is a very popular place for nightscape imaging.
Sure enough, 6 others came and went through the early evening before moonrise. We had a nice time chatting about gear and techniques.
As expected, a few photographers came armed with bright lights for artificially lighting the arches. I kept my camera running, knowing any illumination they shone on the foreground wouldn’t affect my star trails, and that I’d mask in the foreground from frames taken after moonrise.
Here’s one frame from my star trail sequence where one photographer headed under the arch to light it for his photos. It did make for a nice scene – a human figure adds scale and dimension.
However, I always find the light from the LED lamps too artificial and harsh, and comes from the wrong direction to look natural. I also question the ethics of blasting a dark sky site with artificial light.
On a night like this I’d rather wait until moonrise and let nature provide the more uniform, warmer illumination with natural shadows.
As an example, I took this image the night before using short exposures in the moonlight to capture the Big Dipper over Double Arch. When I shot this at 11 p.m. I had the site to myself. Getting nature to provide the right light requires the photographer’s rule of “waiting for the light.”
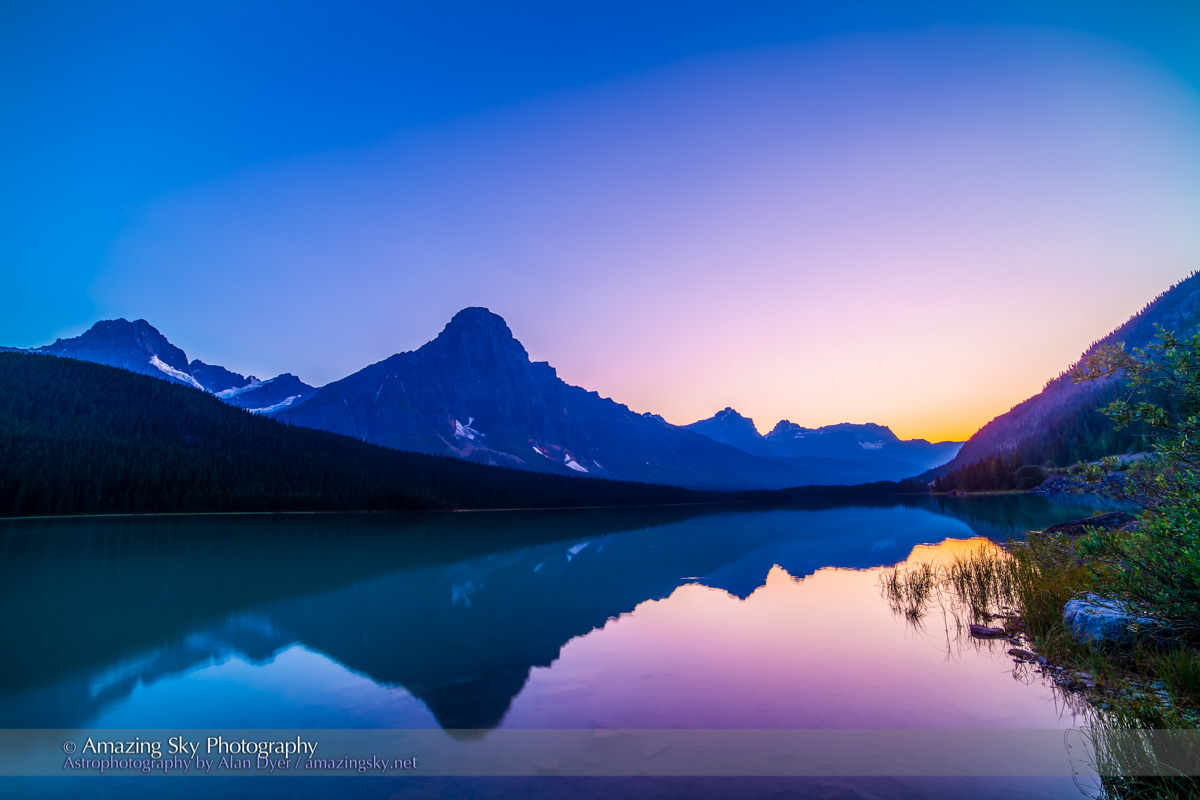
Peaks of the Continental Divide reflect in the calm waters of Lower Waterfowl Lake.
These images provide a sense of what a beautiful night this was, last Monday on the Icefields Parkway in Banff.
The evening started with a super-clear twilight providing subtle shadings – from the last glow of sunset on the horizon, through the “twilight purple” above, to the deep blue of the darkening sky at top.
The purple hue comes from red sunlight still illuminating the upper atmosphere and blending with the blue sky from the usual scattering of short blue wavelengths.
The twilight scene is a high-dynamic range blend of several exposures processed with Photoshop’s HDR Pro as a 32-bit file in Adobe Camera Raw.
Taking different frames from the same set that I used to capture the Space Station I created this star trail scene, of the western stars setting over Mt. Cephren. Light from the one-day-past Full Moon illuminated the peaks that line the Continental Divide.
The star trail scene is a composite – of many images stacked to create the star trails, blended with a masked single image from the set to supply the landscape.
For the star trail stacking I used the excellent Advanced Stacker Plus actions from Star Circle Academy. To separate and mask out the sky from the landscape image I used Photoshop’s Quick Selection tool and its wonderful Refine Mask function.
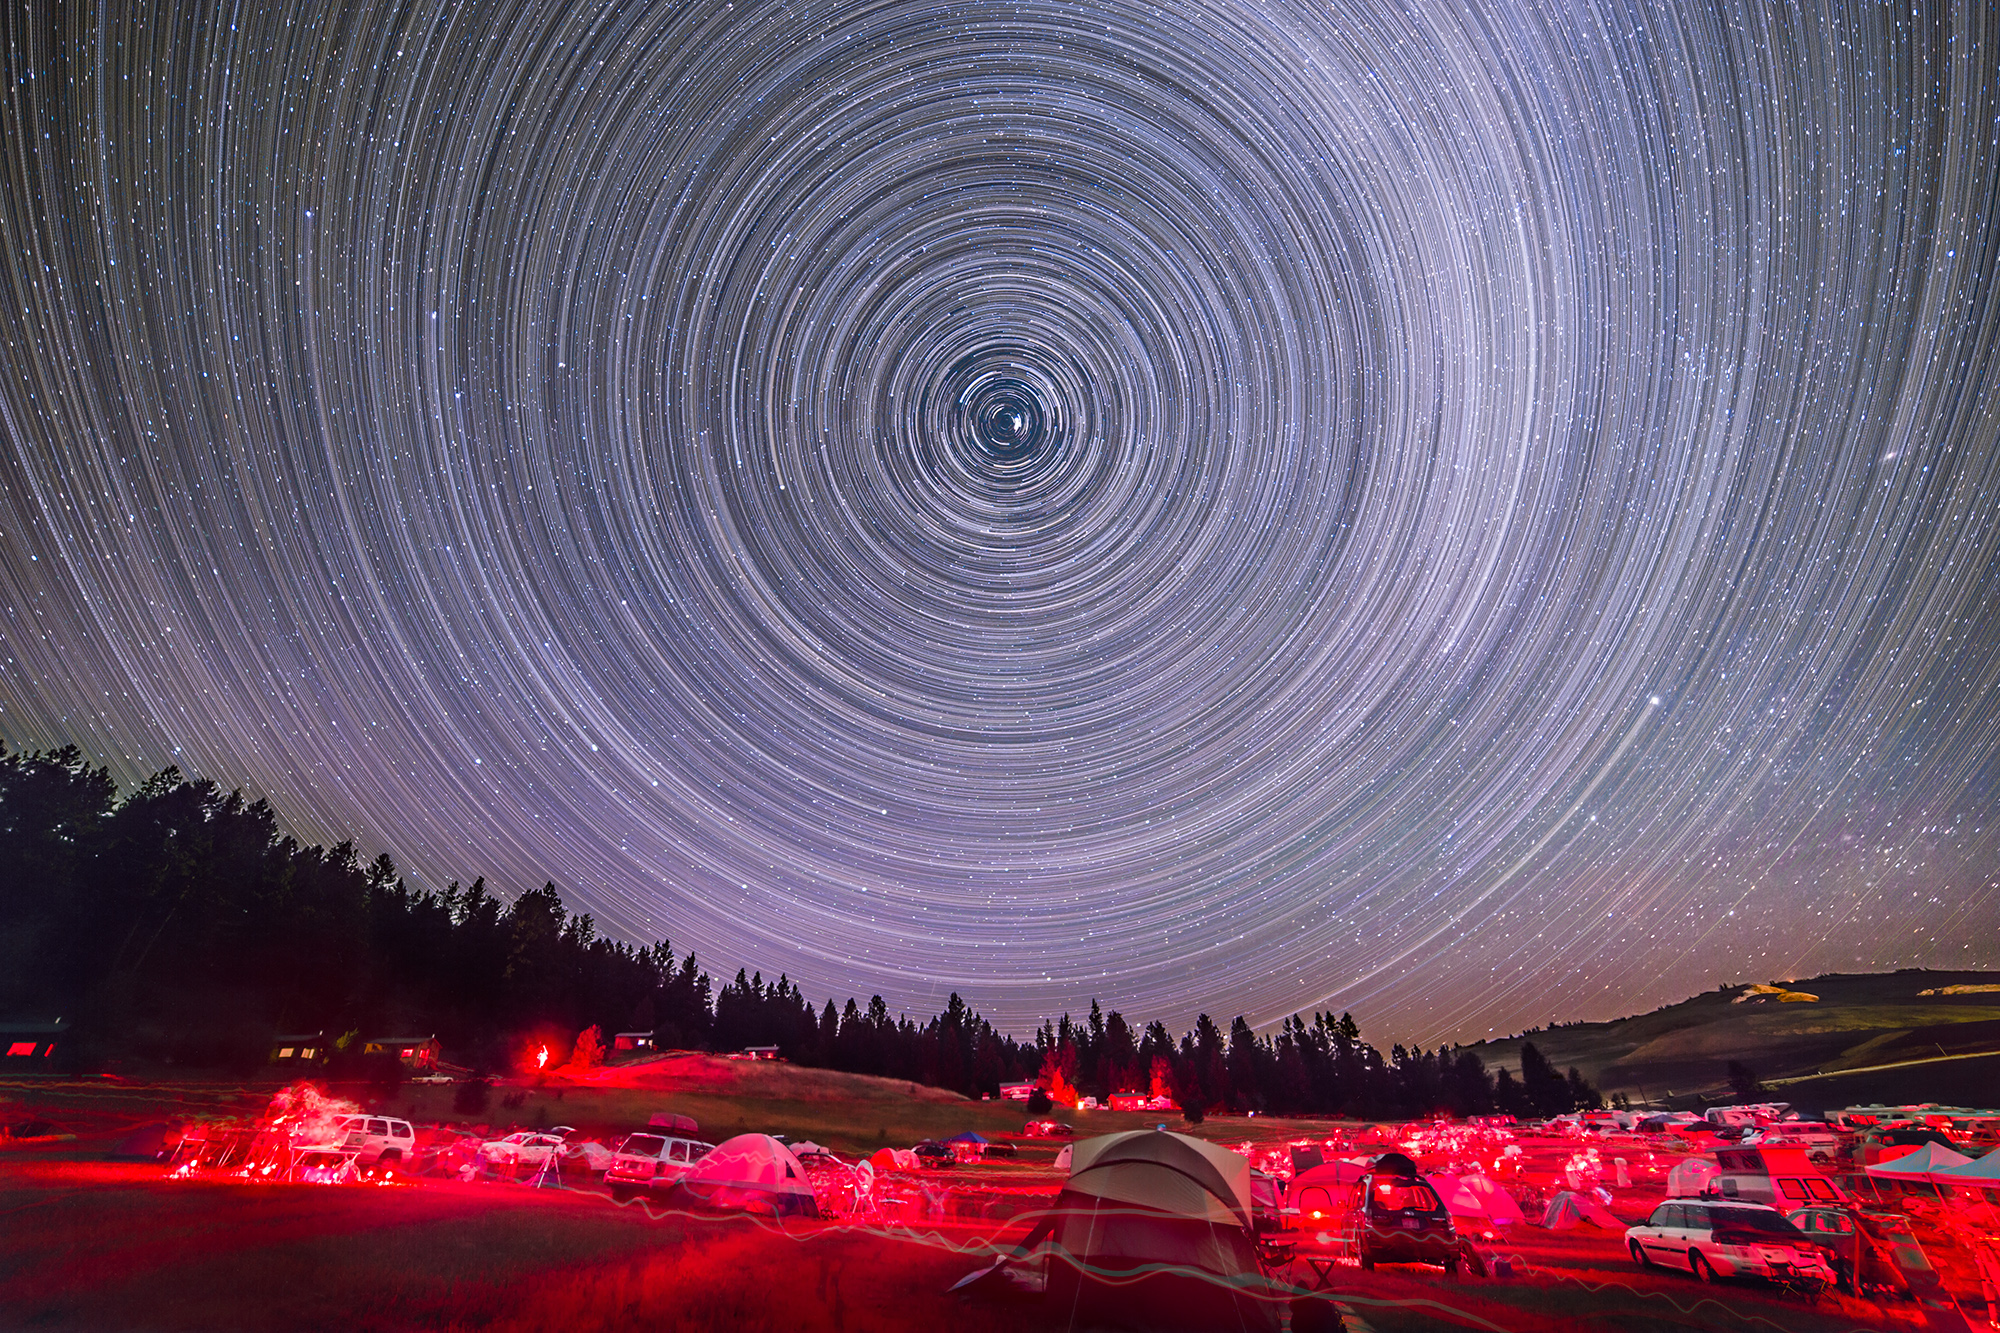
I present a set of short time-lapse videos shot at the Table Mountain Star Party.
At the star party in Washington state last week I shot about a 3-hour-long set of images each night for assembly into time-lapse movies. Here’s the compilation.
Click the Enlarge button for a full-screen view.
For the first two clips I used the eMotimo motion controller to pan across the star party field looking south to the Milky Way.
For the last two clips I used a static camera aimed north to capture the turning sky around the north celestial pole. I took the same 350 frames and assembled them two ways: as a standard movie and as an “accumulating star trails” movie where the stars seem to draw themselves across the sky like a sky full of comets.
That clip cross-fades to the still image above, created with the Advanced Stacker Plus actions that automatically stacks and blends images via a choice of effects. I used the “elastic stars” effect for the still image.
Many thanks to the organizers and volunteers at the Table Mountain Star Party for the opportunity to attend and speak at the party. I was a great three nights. I highly recommend the site and event.
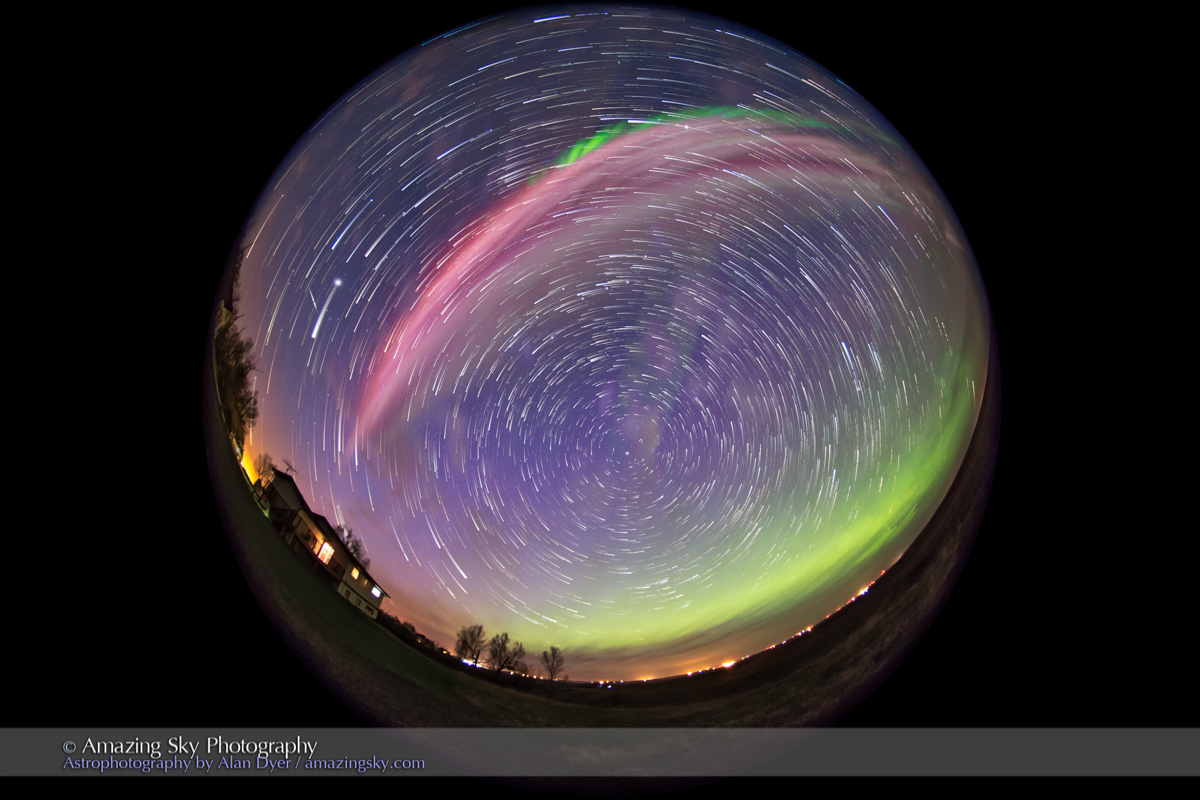
The stars of the northern sky swirl in circles around the North Star.
This is admittedly a fanciful effect but an attractive one. The above image records the rotating night sky as it spins around the north celestial pole near Polaris. I stacked 250 image to create this concentric star swirl.
To produce the image I used the excellent Advanced Stacker Actions from StarCircleAcademy, using the new version 14e actions. They include this novel “elastic” effect which produces trails with point-like stars at the beginning and end of the trails.
Another variation, the Short Comets effect, produced this image, with the stars turned into swirling comets.
I took the images for these composites at the Table Mountain Star Party near Oroville, Washington last week under superb skies. The same images that went into these still image stacks can be used to create time-lapse movies.
It was a good year for time-lapse photography at home. Here’s my compilation of Alberta time-lapses in a 3-minute music video.
For a year-end look back at 2013 I assembled these highlights of my year of shooting time-lapse movies of the Alberta sky, by day and night.
I’ve included clips shot around home in rural southern Alberta, and further afield at popular photo spots around the province such as Waterton Lakes National Park, Banff, Writing-on-Stone Provincial Park, and Cypress Hills Provincial Park.
I hope you enjoy it! Be sure to maximize the video screen and select HD. Or for a better grade version check out my Vimeo channel.
________________________________________________
Some technical background:
I shot all the frames for the movies (150 to 300 frames for each clip) with either a Canon 5D MkII or a Canon 60Da camera, equipped with various lenses from 8mm to 200mm. For many of the clips the cameras were on motion control devices: the Radian azimuth panning unit, an Orion TeleTrack mount, or aDynamic Perception Stage Zerodolly unit. You see the latter in action behind the credits.