AI-based noise reduction programs continue to improve, to provide remarkable results on many images. But … how well do they work on star-filled astrophotos?
As we know, software evolves rapidly. So here’s my latest look at versions of those programs current of as May 2024, plus new entries into the category, all with a focus on how well they perform on a variety of astrophotos. Only two programs tested here, NoiseXTerminator and GraXpert, are specifically designed to be used on astrophotos, primarily telescopic images of deep-sky objects.
The other programs on test are general purpose, for use on noisy images such as wildlife photos shot at high ISOs to freeze motion, or any photos shot under low light. But the latter includes nightscapes.
I tested programs in three categories, defined primarily by how they are used in a processing workflow:
Adobe DeNoise AI in Camera RawDxO PureRAW 4 stand-alone app
General programs usable only on Raw files at the start of a workflow:
Adobe DeNoise AI from within Adobe Camera Raw (v16.3) or Lightroom (v13.3)
DxO PureRAW 4 (v4.1), a stand-alone app only
Luminar Neo Noiseless AION1 NoNoise AI 2024Topaz Photo AI
General programs usable as stand-alone apps on Raw files, but also as plug-ins for Photoshop for use later in a workflow (I tested both workflows):
Luminar Neo (v1.19.1) and its Noiseless AI filter
ON1 NoNoise AI 2024 (v18.3)
Topaz Photo AI (v3.02)
GraXpert stand-alone app
Programs specialized for astro work:
RC-Astro NoiseXTerminator (v1.1.3), usable only as a Photoshop plug-in
GraXpert (v3.0.2), usable only as a stand-alone application
(The latter two can also be installed as “processes” accessed from within the specialized astrophoto program PixInsight; I did not test that workflow.)
Comparing ACR’s standard noise reduction to 5 AI-based noise reduction programs
MY METHODS (“BUT WHAT ABOUT …?”)
I tested the five general-purpose programs on four types of astrophotos:
Nightscapes
Aurora images
Total solar eclipse images
Deep-sky images, both wide-field and telescopic
I tested the two specialized programs only on sample deep-sky photos, the types of images they are designed and trained for.
In all cases, the test images are single frames. I did not stack any images for these examples, as I wanted to show what the programs could do with noisy originals.
I tested only on Raw files from mirrorless cameras. I did not test on FITS files from specialized cooled astronomy cameras, as those require a quite different workflow and software.
Anticipating the “What about …?” question — no, I did not test Topaz DeNoise AI. While popular among astrophotographers, both it and its companion program, Sharpen AI, were discontinued in 2023, in favor of Topaz concentrating on their single program, Photo AI, that can de-noise, sharpen, and upscale.
I made an exception for Luminar Neo. While it includes general processing functions, it is used more often (certainly by me!) just as a plug-in for its AI-driven effects and filters, noise reduction being one.
PLEASENOTE:
All the test images are full-resolution JPGs (6,000 to 8,000 pixels wide) that you can download (by right-clicking) for detailed inspection. You will often need to do so, to see the pixel-level differences I refer to.
But the sizes of the images make the blog page slow to load initially. Patience, please!
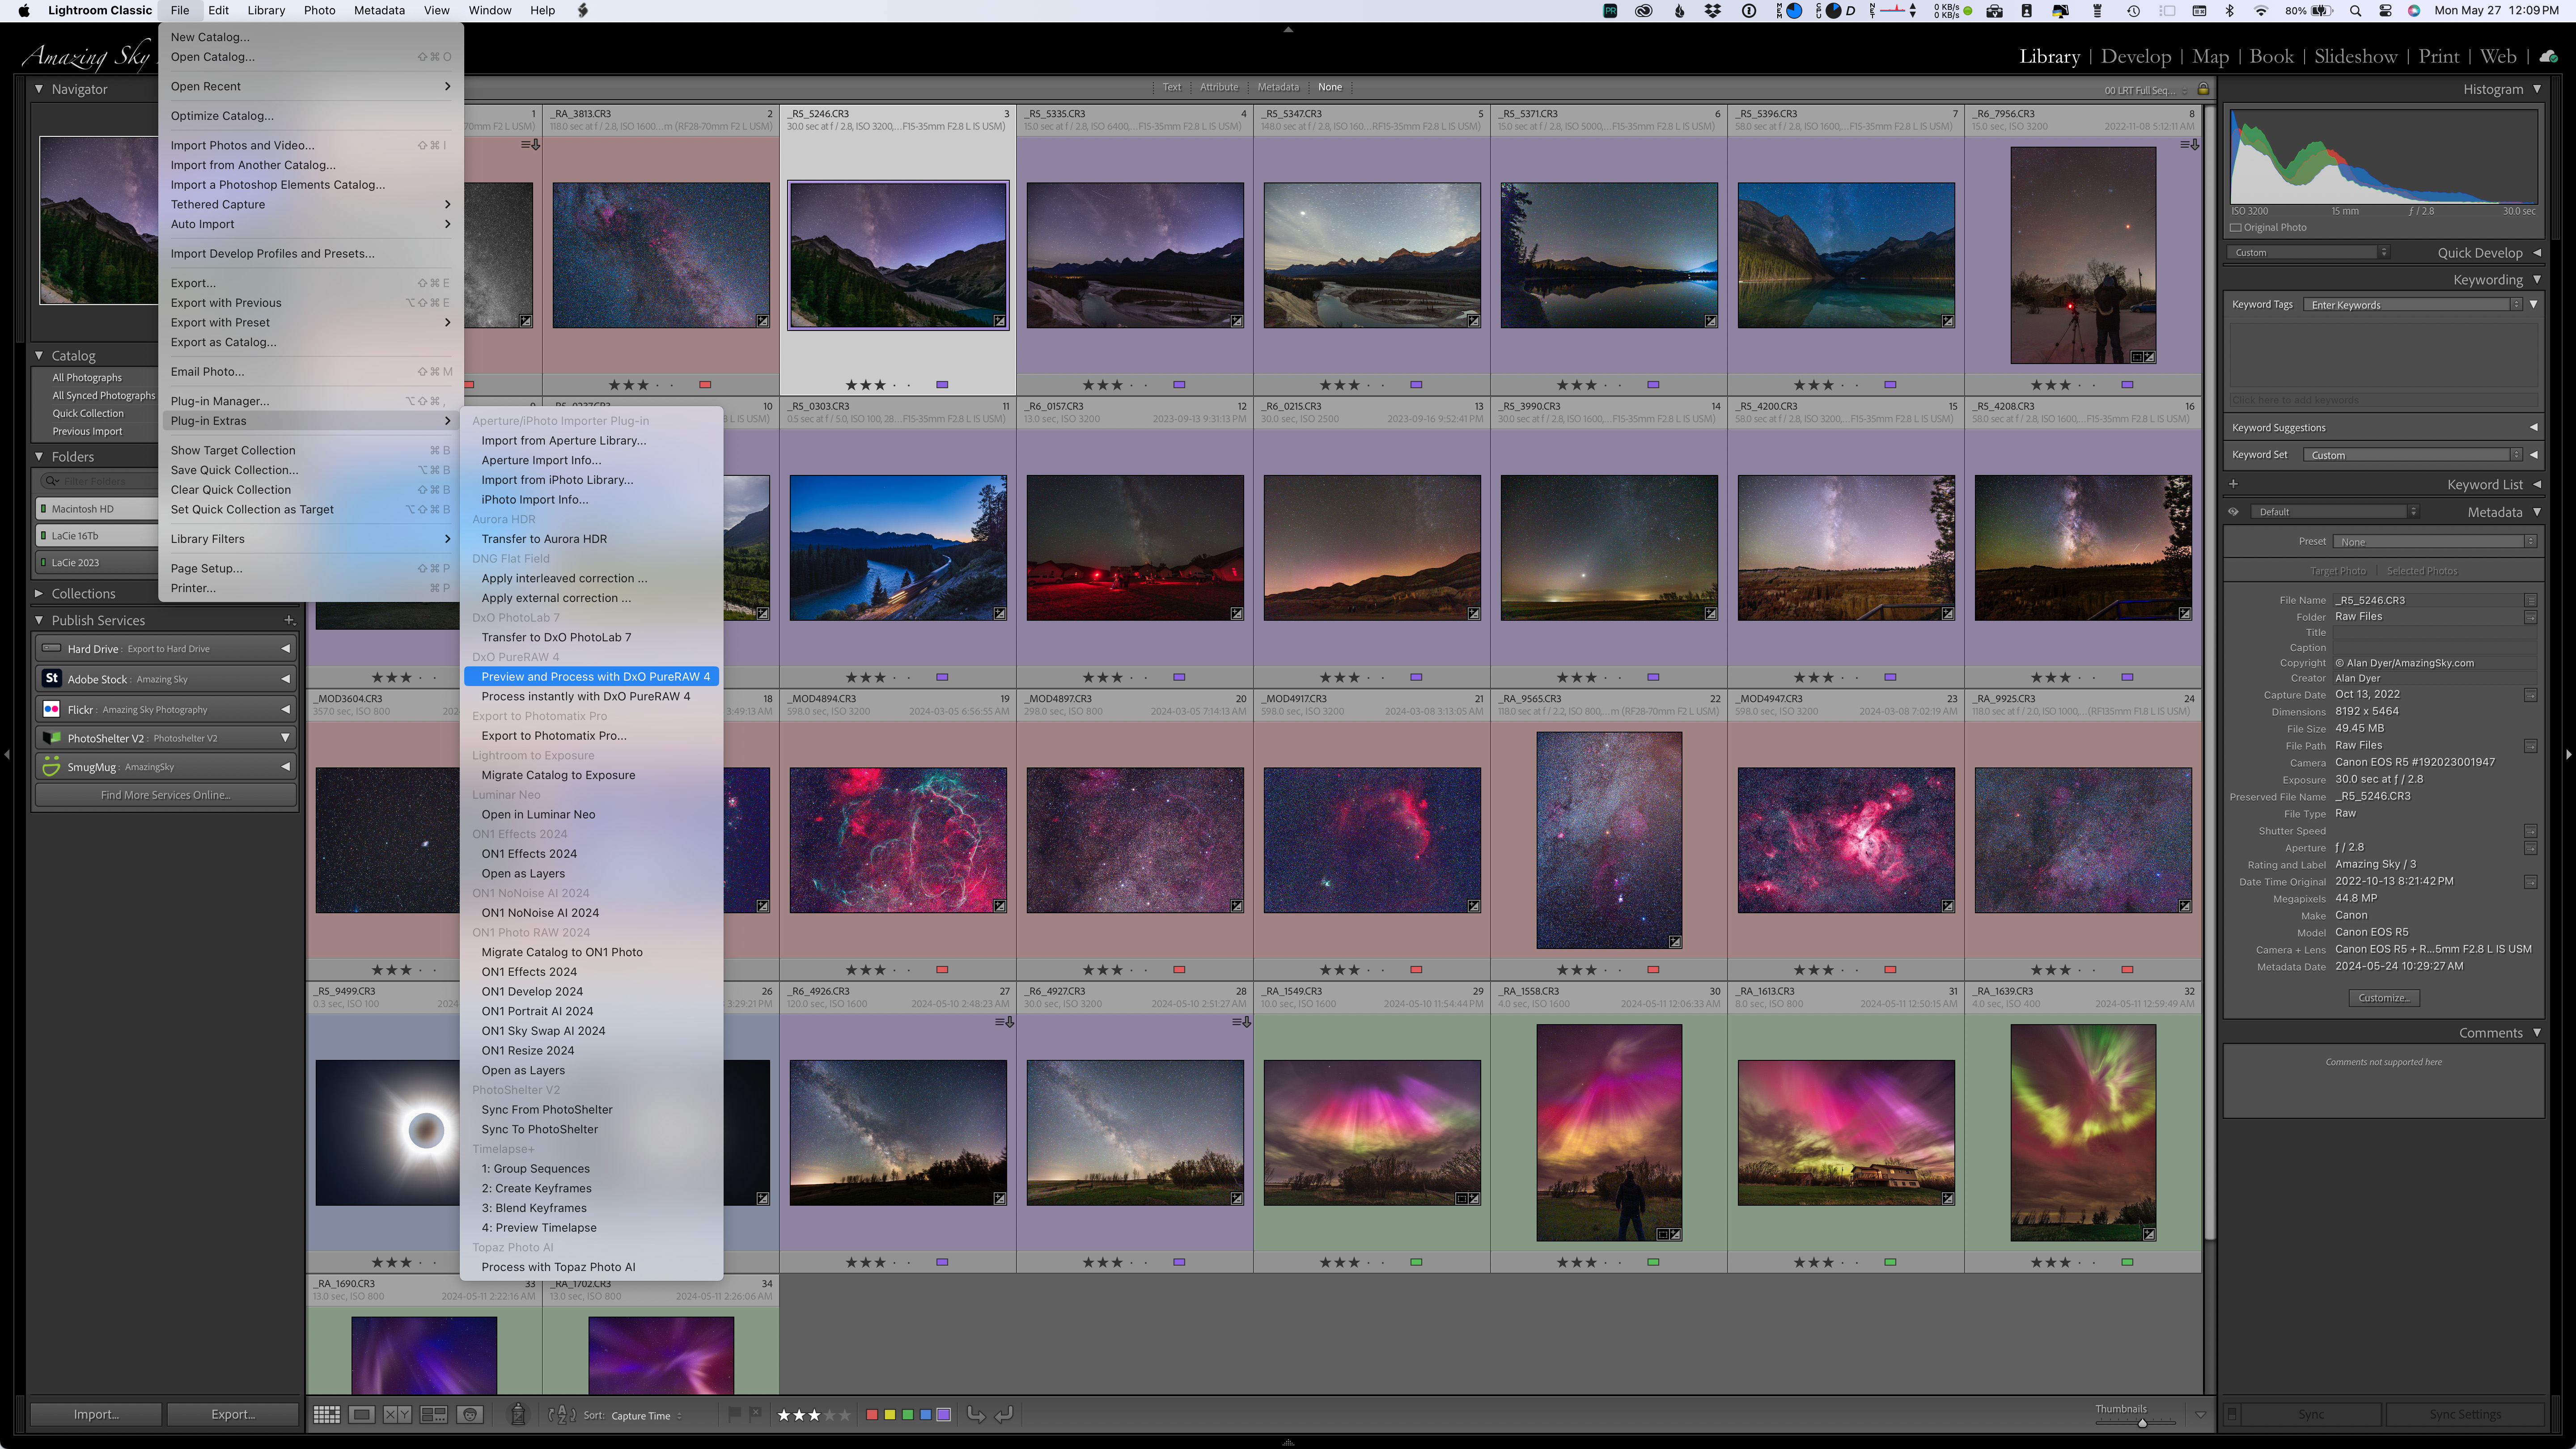
DxO PureRAW can be called up from within Adobe Bridge by going to File>Open With … and choosing DxO PureRAW.
In Lightroom, the route to send images to PureRAW is File>Plug-In Extras>Process and Preview with DxO PureRaw 4. You cannot choose Photo>Edit In … as you might do to send images to other programs.
TL;DR SUMMARY (with links to the software websites)
Of the two Raw-only programs, Adobe’s DeNoise AI and DxO’s PureRAW 4, both worked well, with v4 of PureRAW much improved over its earlier artifact-prone v2 I tested and dismissed in 2022. Similarly, unlike its early version, Adobe DeNoise AI did not invent structures, such as auroral arcs.
Adobe’s DeNoise AI brought out details in the shadows much better than DxO’s PureRAW 4, which blocked up shadows. But PureRAW produced sharper details in illuminated landscapes, yielding less of the plastic appearance that Adobe DeNoise is still prone to. However, both programs turned star trails into wiggly worms.
Each of the three other general-purpose programs failed as stand-alone apps when importing Raw files, then exporting them as either Raw DNG (Digital Negative) files (ON1 NoNoise AI and Topaz Photo AI), or as TIFF files (Luminar Neo). Their exported images were either dark, vignetted, or hugely shifted in color or tonal balance. Results with that Raw-to-DNG/TIFF workflow were often unusable.
However, the same three programs (Luminar Neo, ON1 NoNoise AI and Topaz Photo AI) worked well as plug-ins from within Adobe Photoshop. Images now looked fine, with ON1 NoNoise producing what I thought was the best overall noise reduction with the fewest artifacts and “patchiness” in most examples. Luminar Neo’s Noiseless AI was consistently the poorest performer in all cases. It’s the program I can rule out of the running for noise reduction.
The two specialized astro programs, NoiseXTerminator and GraXpert, did a fine job on deep-sky images, reducing fine-grained noise without eliminating stars, just what they are “trained” to do. However, I felt NoiseXTerminator did the better job, with the new (as of May 2024) GraXpert 3.0 softening stars or leaving residual mottled artifacts. Neither worked well on nightscapes — while they didn’t harm detail too much, other programs performed better on what are often detailed but dark and noisy foregrounds.
My main takeaway — No one piece of AI software works best on all astrophotos. A program that provides great results on one image or class of image might perform poorly on another image. That’s the nature of AI-driven processing.
So … my overall conclusion and personal workflow picks? —
Adobe DeNoise AI would be my first choice for noisy nightscape images, where it has to be applied early in the workflow. It will be worth trying on deep-sky images.
DxO PureRAW might work better on some nightscapes with lots of ground textures.
ON1 NoNoise AI works well on many images when applied as a plug-in later in the workflow, but its sliders often need adjusting from the defaults.
NoiseXTerminator remains my preferred plug-in for deep-sky images.
PLEASENOTE:
I have not provided prices and explained buying options, as frankly some can be complex!
For those details, go to the software’s website by clicking on the links in the names above. With the exception of Luminar Neo, all are available as free trial copies.
All programs are available for Windows and MacOS. I tested the latter versions, on an M1 Max MacBook Pro.
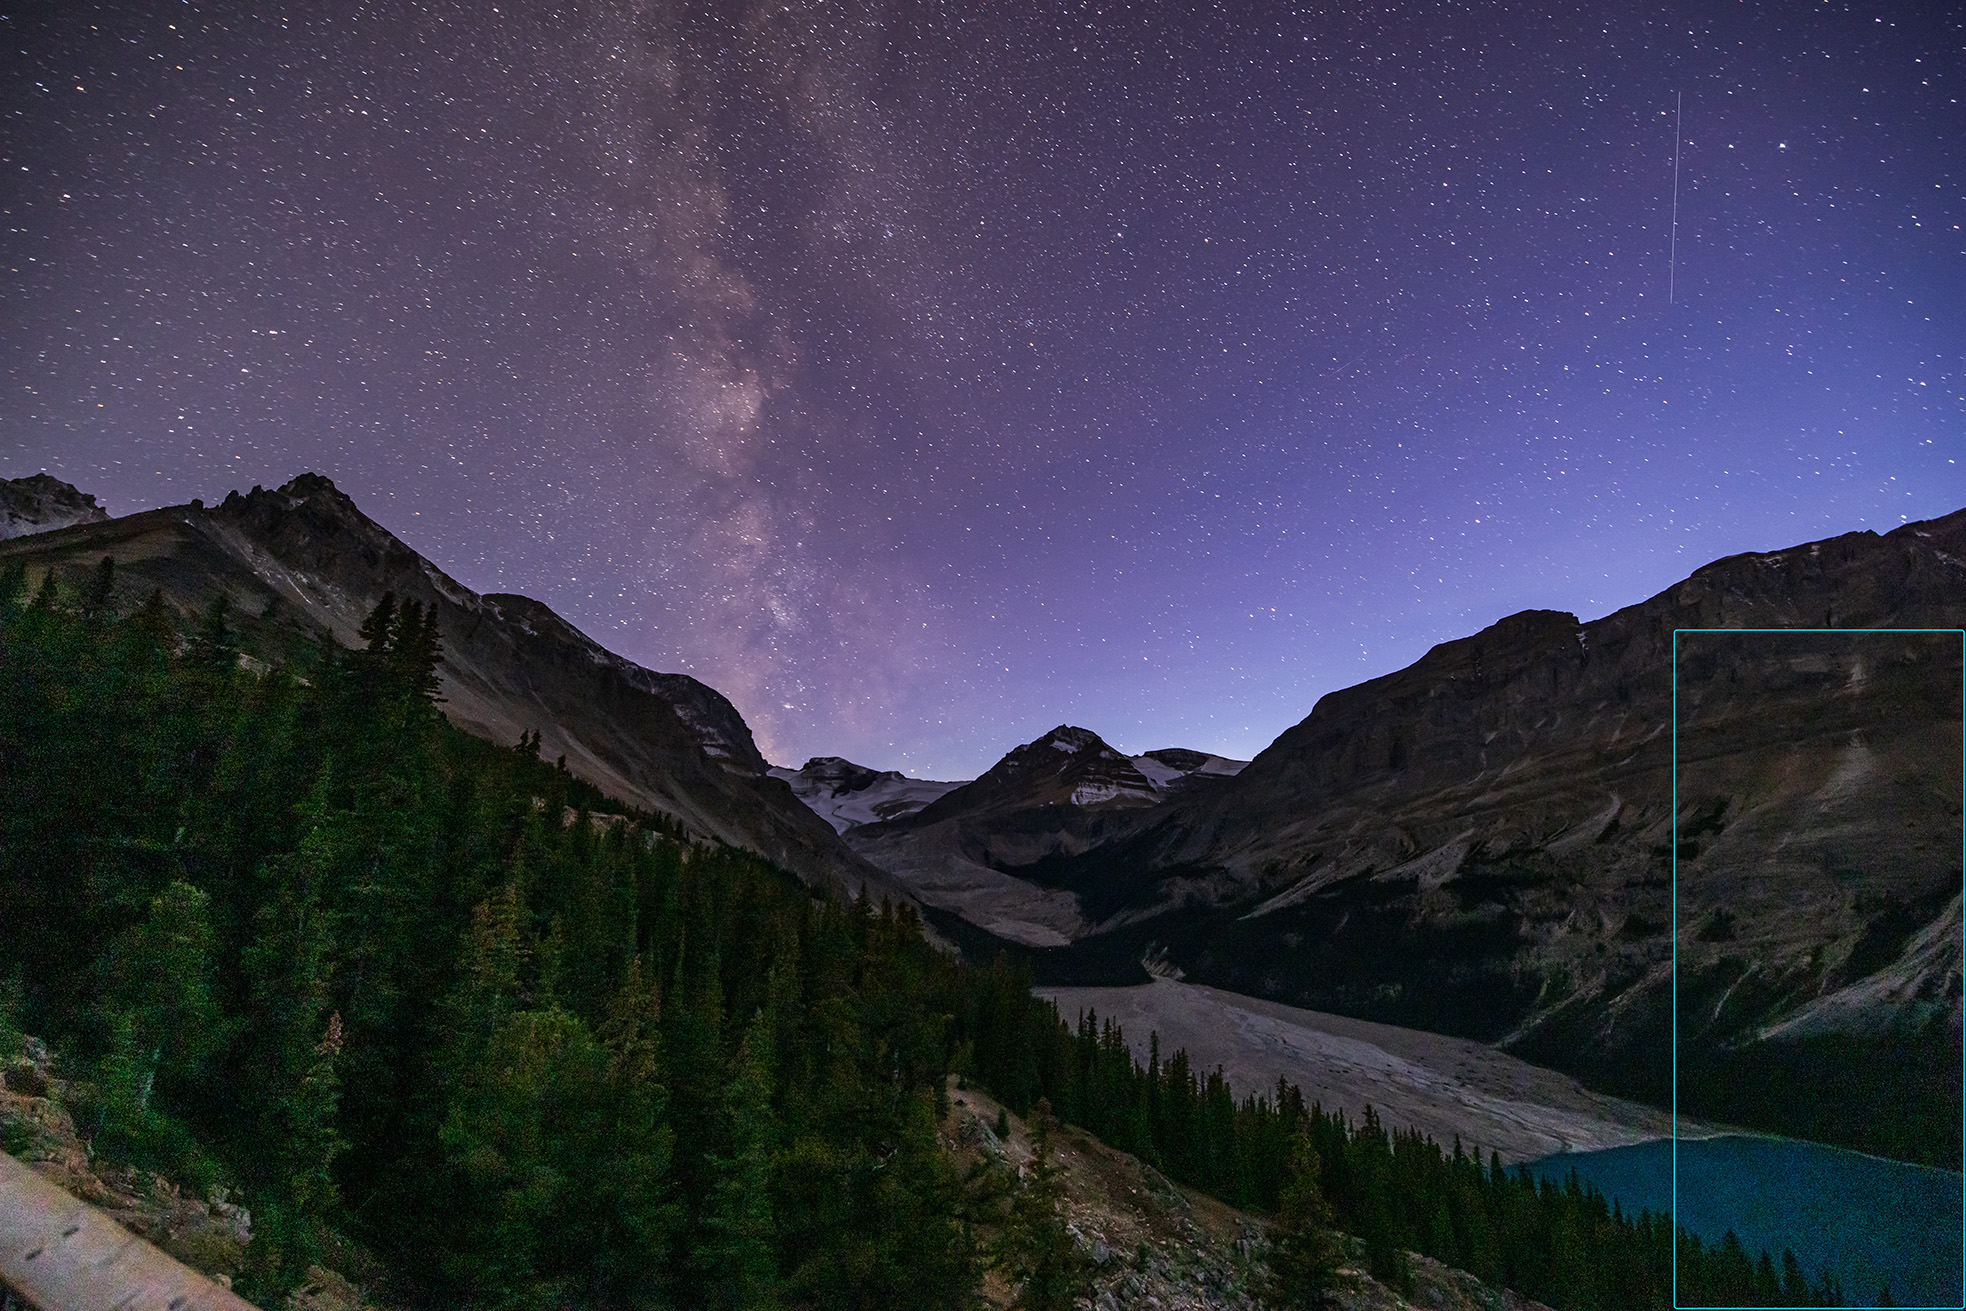
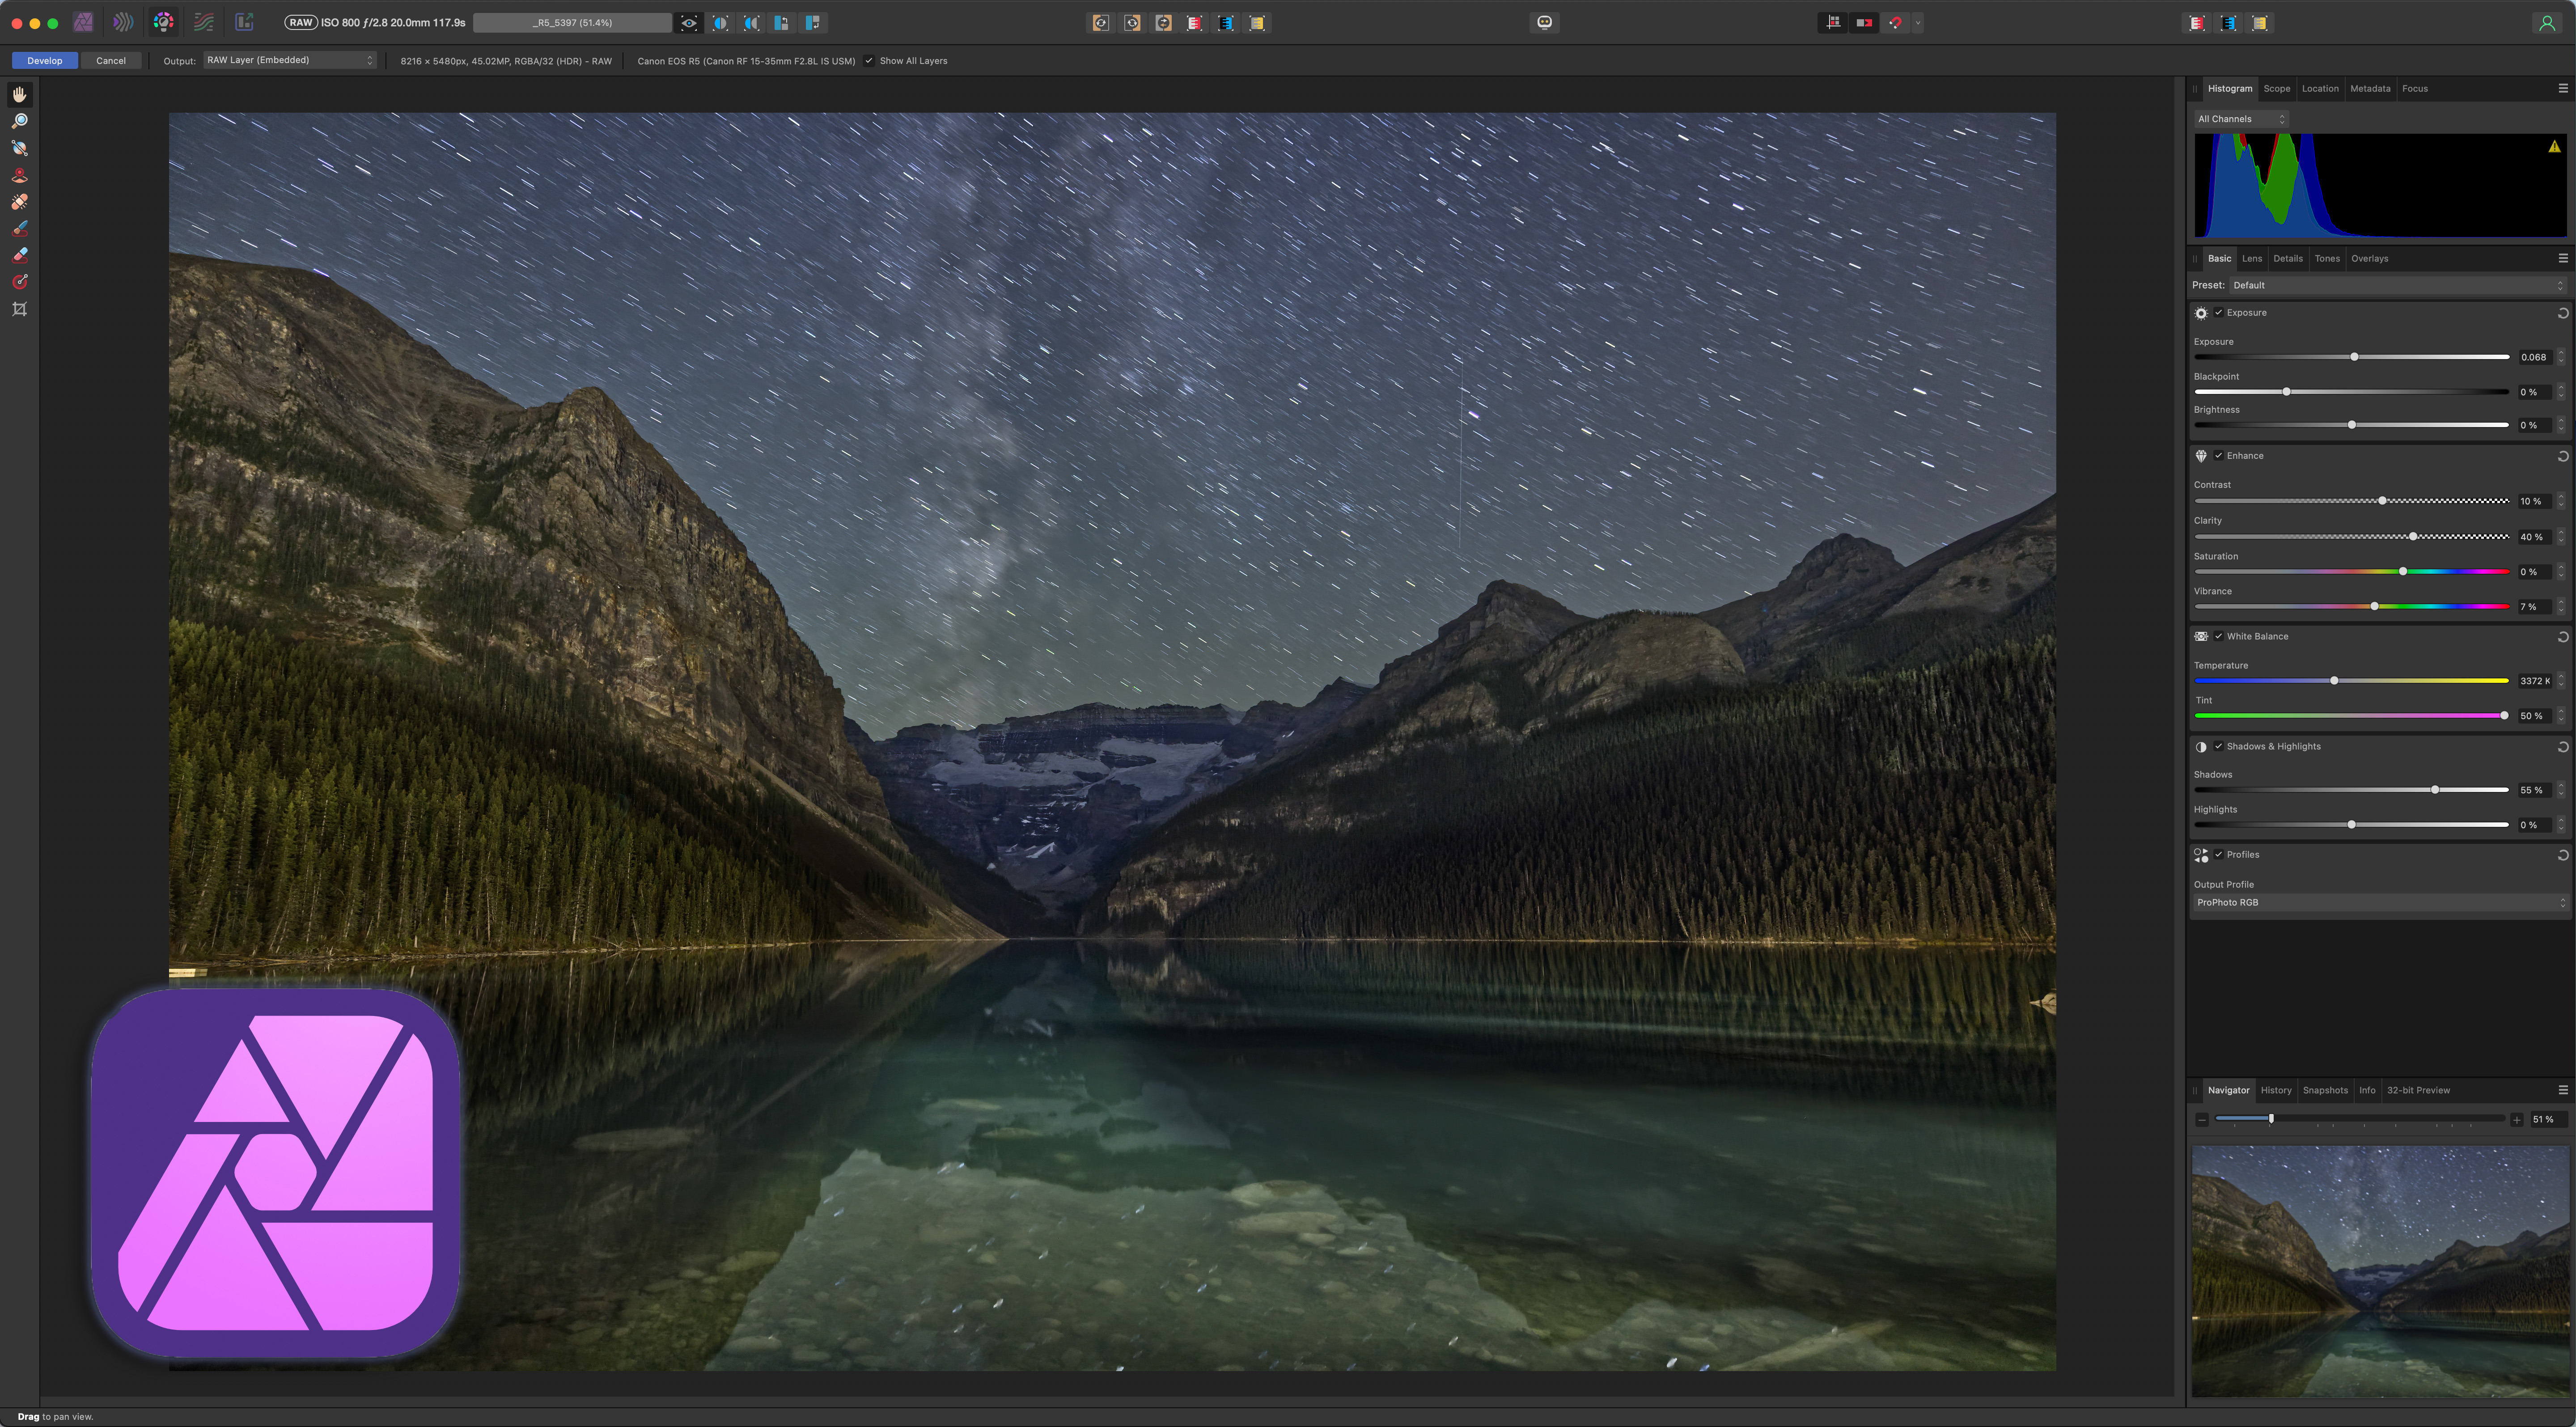
A typical test image, showing the small section that the comparison examples zoom in on. This is the first image shown below in detail.
RAW-ONLY PROGRAMS — NIGHTSCAPES
To provide evidence for my conclusions, I focus first on the two Raw-only programs, Adobe DeNoise AI and DxO PureRAW 4, as they produced by far the best results of all the programs on demanding nightscapes, often remarkably so. They not only reduce noise, they also recover fine details with AI sharpening you cannot turn off. How well that works is what I demonstrate below.
In each of the following examples, I show the two programs compared to an image processed in Adobe Camera Raw (ACR) using the Detail panel’s old non-AI adjustments for sharpening and noise reduction.
I developed all the images in ACR, then sent them through Adobe’s DeNoise AI option or into DxO PureRAW. Both options produce new raw DNG files, with all the develop settings intact and accurate, with some exceptions with PureRAW as shown below.
Peyto Lake Nightscape
Peyto Lake corner closeup — with Canon R5 at ISO 3200
In most cases I show only a section of images blown up by 250% to 500%. Here, in the first example of a nightscape shot I zoom in on a corner, as illustrated above, where noise often lurks due to lens vignetting. (I shot this and many of the nightscape examples with the 45-megapixel Canon R5. See my test of it for astrophotography here.)
The standard ACR noise reduction leaves a blizzard of fine noise and large color blotches. The Adobe DeNoise AI version (with it at 60%, the setting I used for all the DeNoise images) shows much less noise and somewhat reduced color blotches. The PureRAW version shows even better noise reduction, but the trees turn very dark with no detail.
But compare the mountainside. Adobe turns the rock layers into artificial-looking ropey bands; PureRAW’s detail recovery looks much more natural for texture.
Lake Edith Nightscape
Lake Edith corner closeup — with Canon R5 at ISO 5000
In this example, I again zoom in on a badly underexposed corner. The standard ACR version looks awful, riddled with color splotches and banding. The Adobe DeNoise version has cleaned up most of the mess. But the PureRAW version is better, eliminating even more noise and artifacts.
So is PureRAW better? Not so fast!
Storm Mountain Nightscape
Storm Mountain corner closeup — with Canon R5 at ISO 100
In this close-up of the Storm Mountain twilight image (that I show in full farther down the page), the normal image shot at ISO 100 isn’t marred too much by noise. But it does exhibit the magenta discoloration often seen in underexposed frame corners when the shadows are “lifted” brighter, as I show in the inset of the Basics panel.
The Adobe DeNoise version automatically corrected the color back to normal (I made no manual adjustments) and brought out the fine details. By comparison, PureRAW turned the trees completely dark, a lazy way to reduce noise! I tried further lifting the shadows with some reverse vignetting (as shown), but the result was a muddy mess. PureRAW crushed the shadows to the point no detail was recoverable.
So is Adobe better? Not necessarily ….
Lake Louise Nightscape
Lake Louise close-up — with Canon R5 at ISO 1600
Here I zoom in on famous Mount Victoria at the end of Lake Louise in Banff, in a one-minute exposure taken for the ground. As before, I think PureRAW has done a better job at recovering details in the mountain, though maybe to the point of over-sharpening? Adobe DeNoise perhaps looks more natural here.
But look at the star trails, which we sometimes want in our nightscapes, or have whether we want them or not! Yes, the sky in the AI-processed images looks less noisy, but the star trails now look like wiggly irregular streaks. PureRAW is a little worse, but both programs suffer from the same AI misinterpretation of the content. Both ruined the sky.
Will this always be the case?
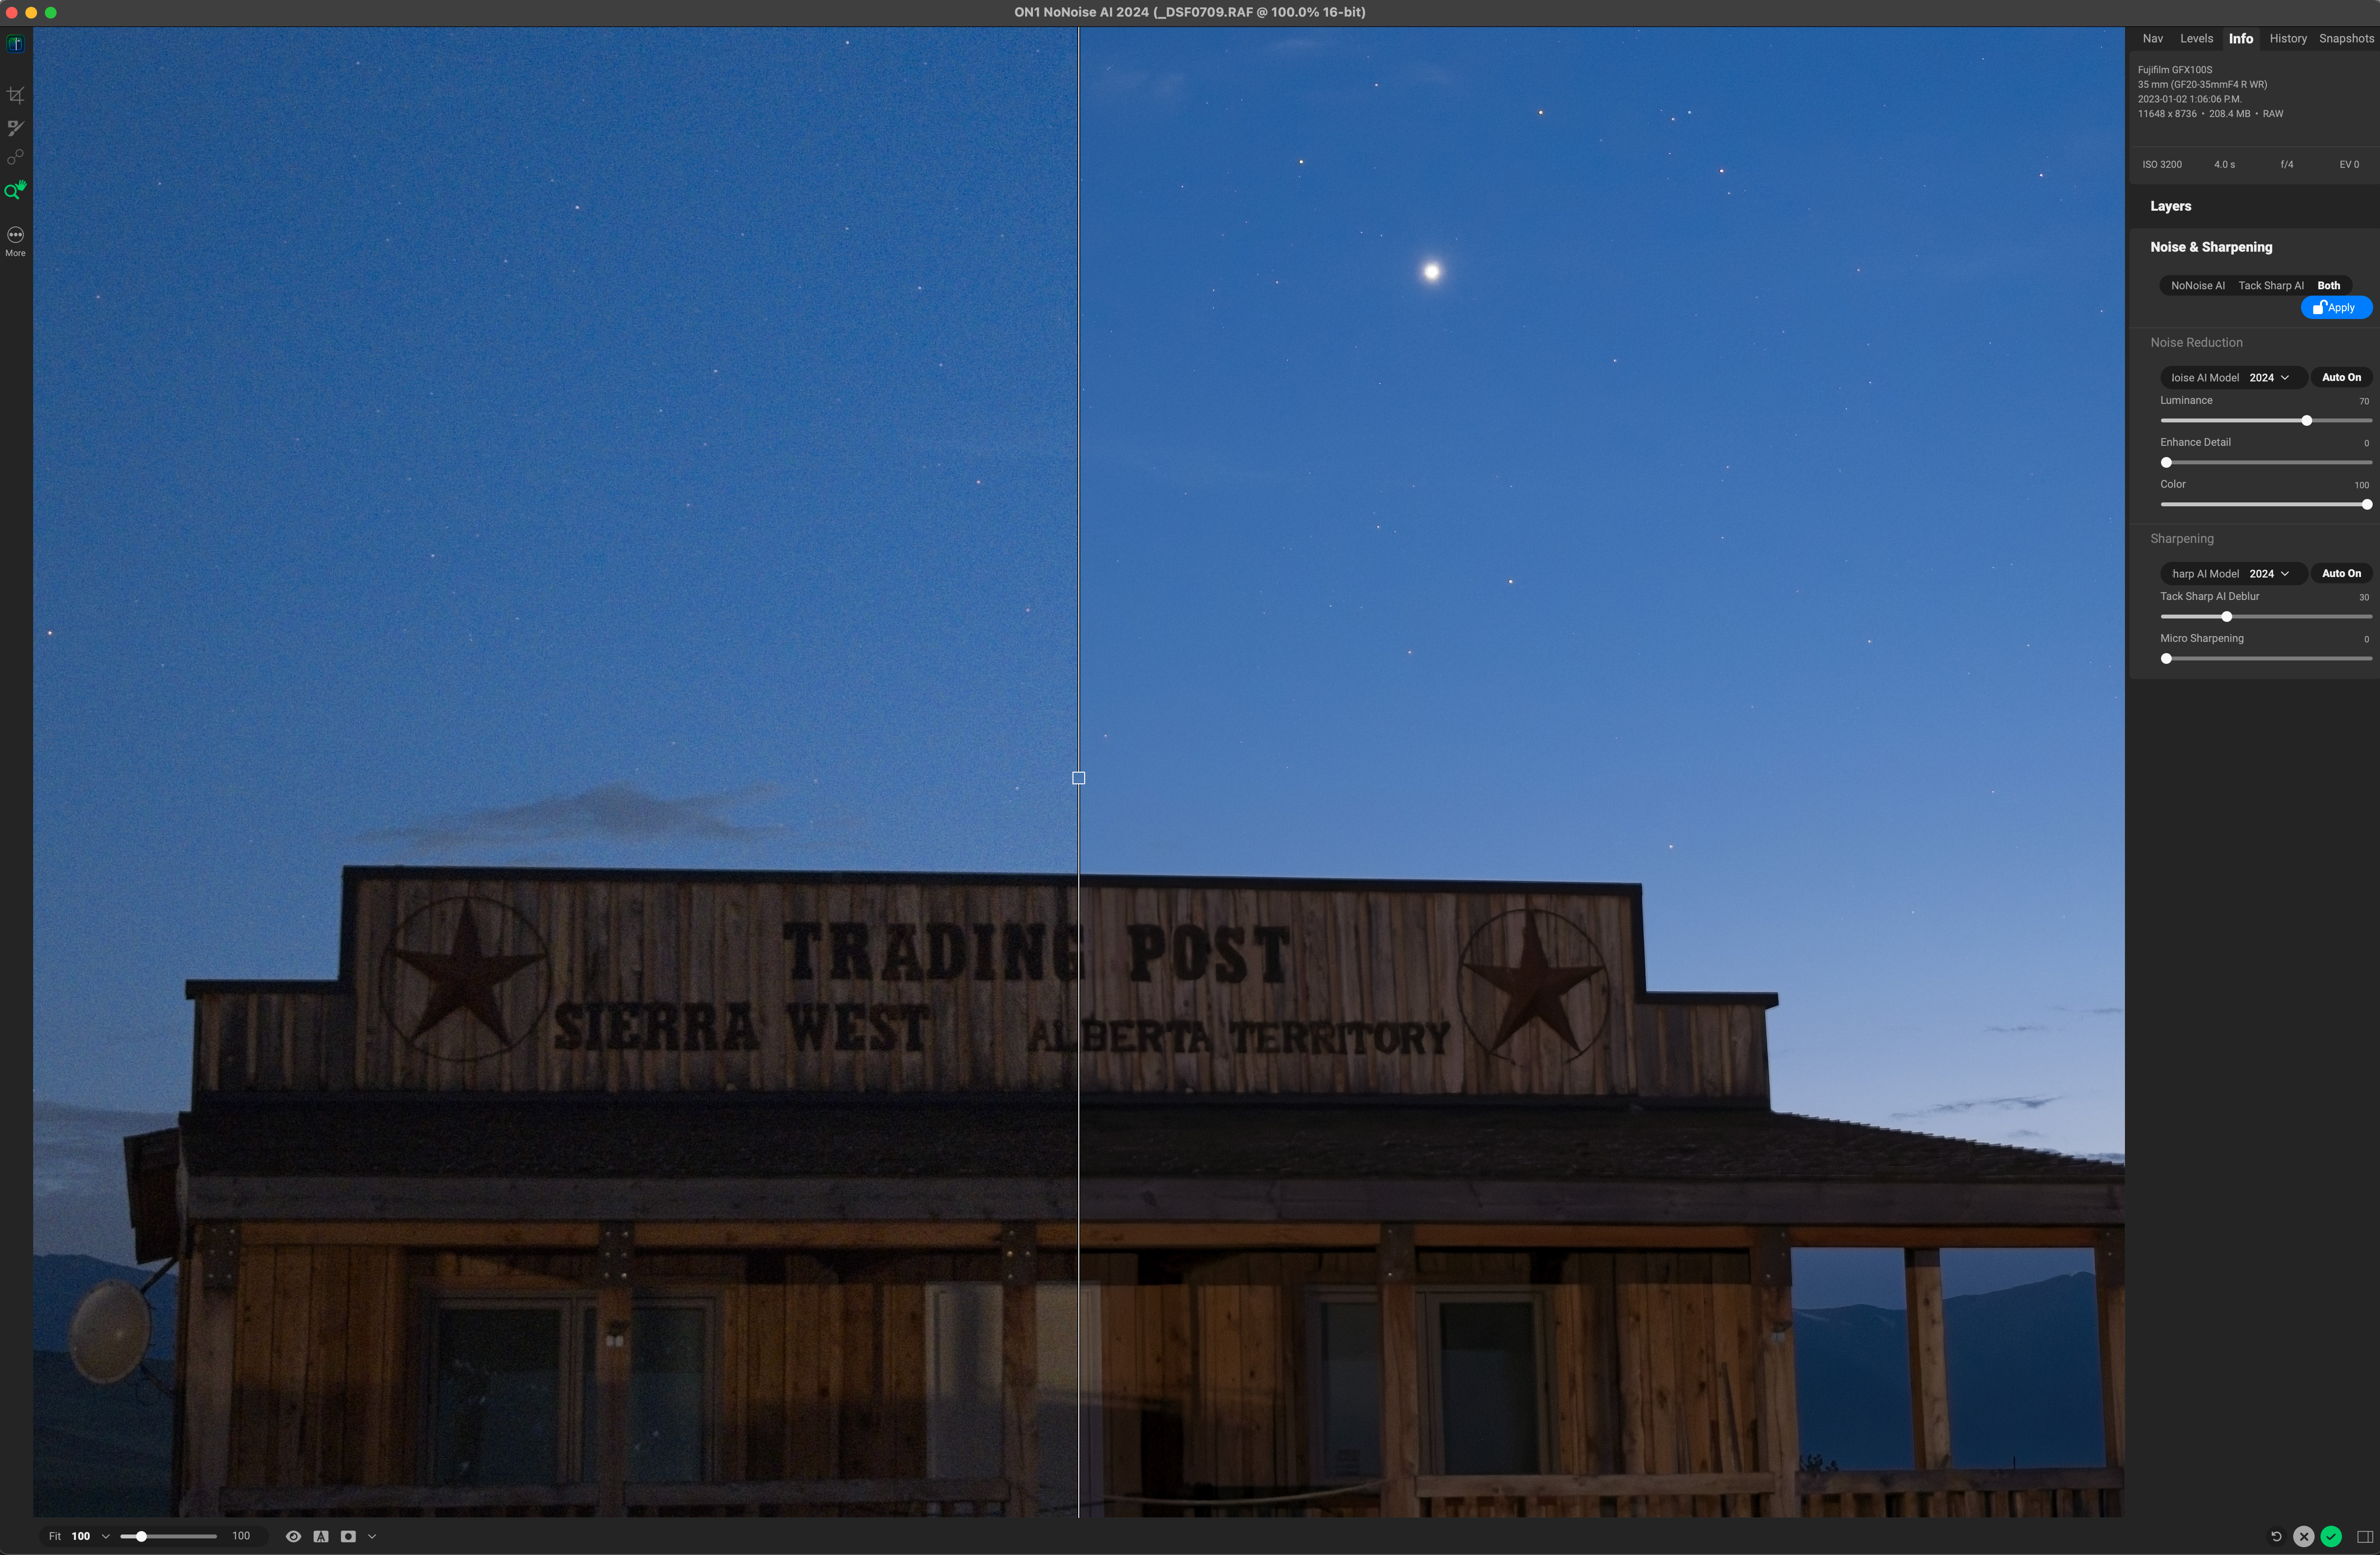
Sierra Cabins Nightcape
Sierra Cabins close-up — with Fuji GFX100S at ISO 3200
All the other image examples are from Canon mirrorless cameras: the EOS R, Ra or R5. But this is a blow-up of a 100-megapixel photo from a medium-format Fuji GFX100S. The rustic cabin and the sky is less noisy in the AI images, with PureRAW the better performer here by a small margin. Stars look fine, and the AI sharpening of both programs has brought out the faint stars without any artifacts, a welcome improvement I think.
RAW-ONLY PROGRAMS — AURORA
I include this as a separate example, as an aurora photo provides a sky with a different type of content. In the past I’ve seen Adobe AI invent aurora rays.
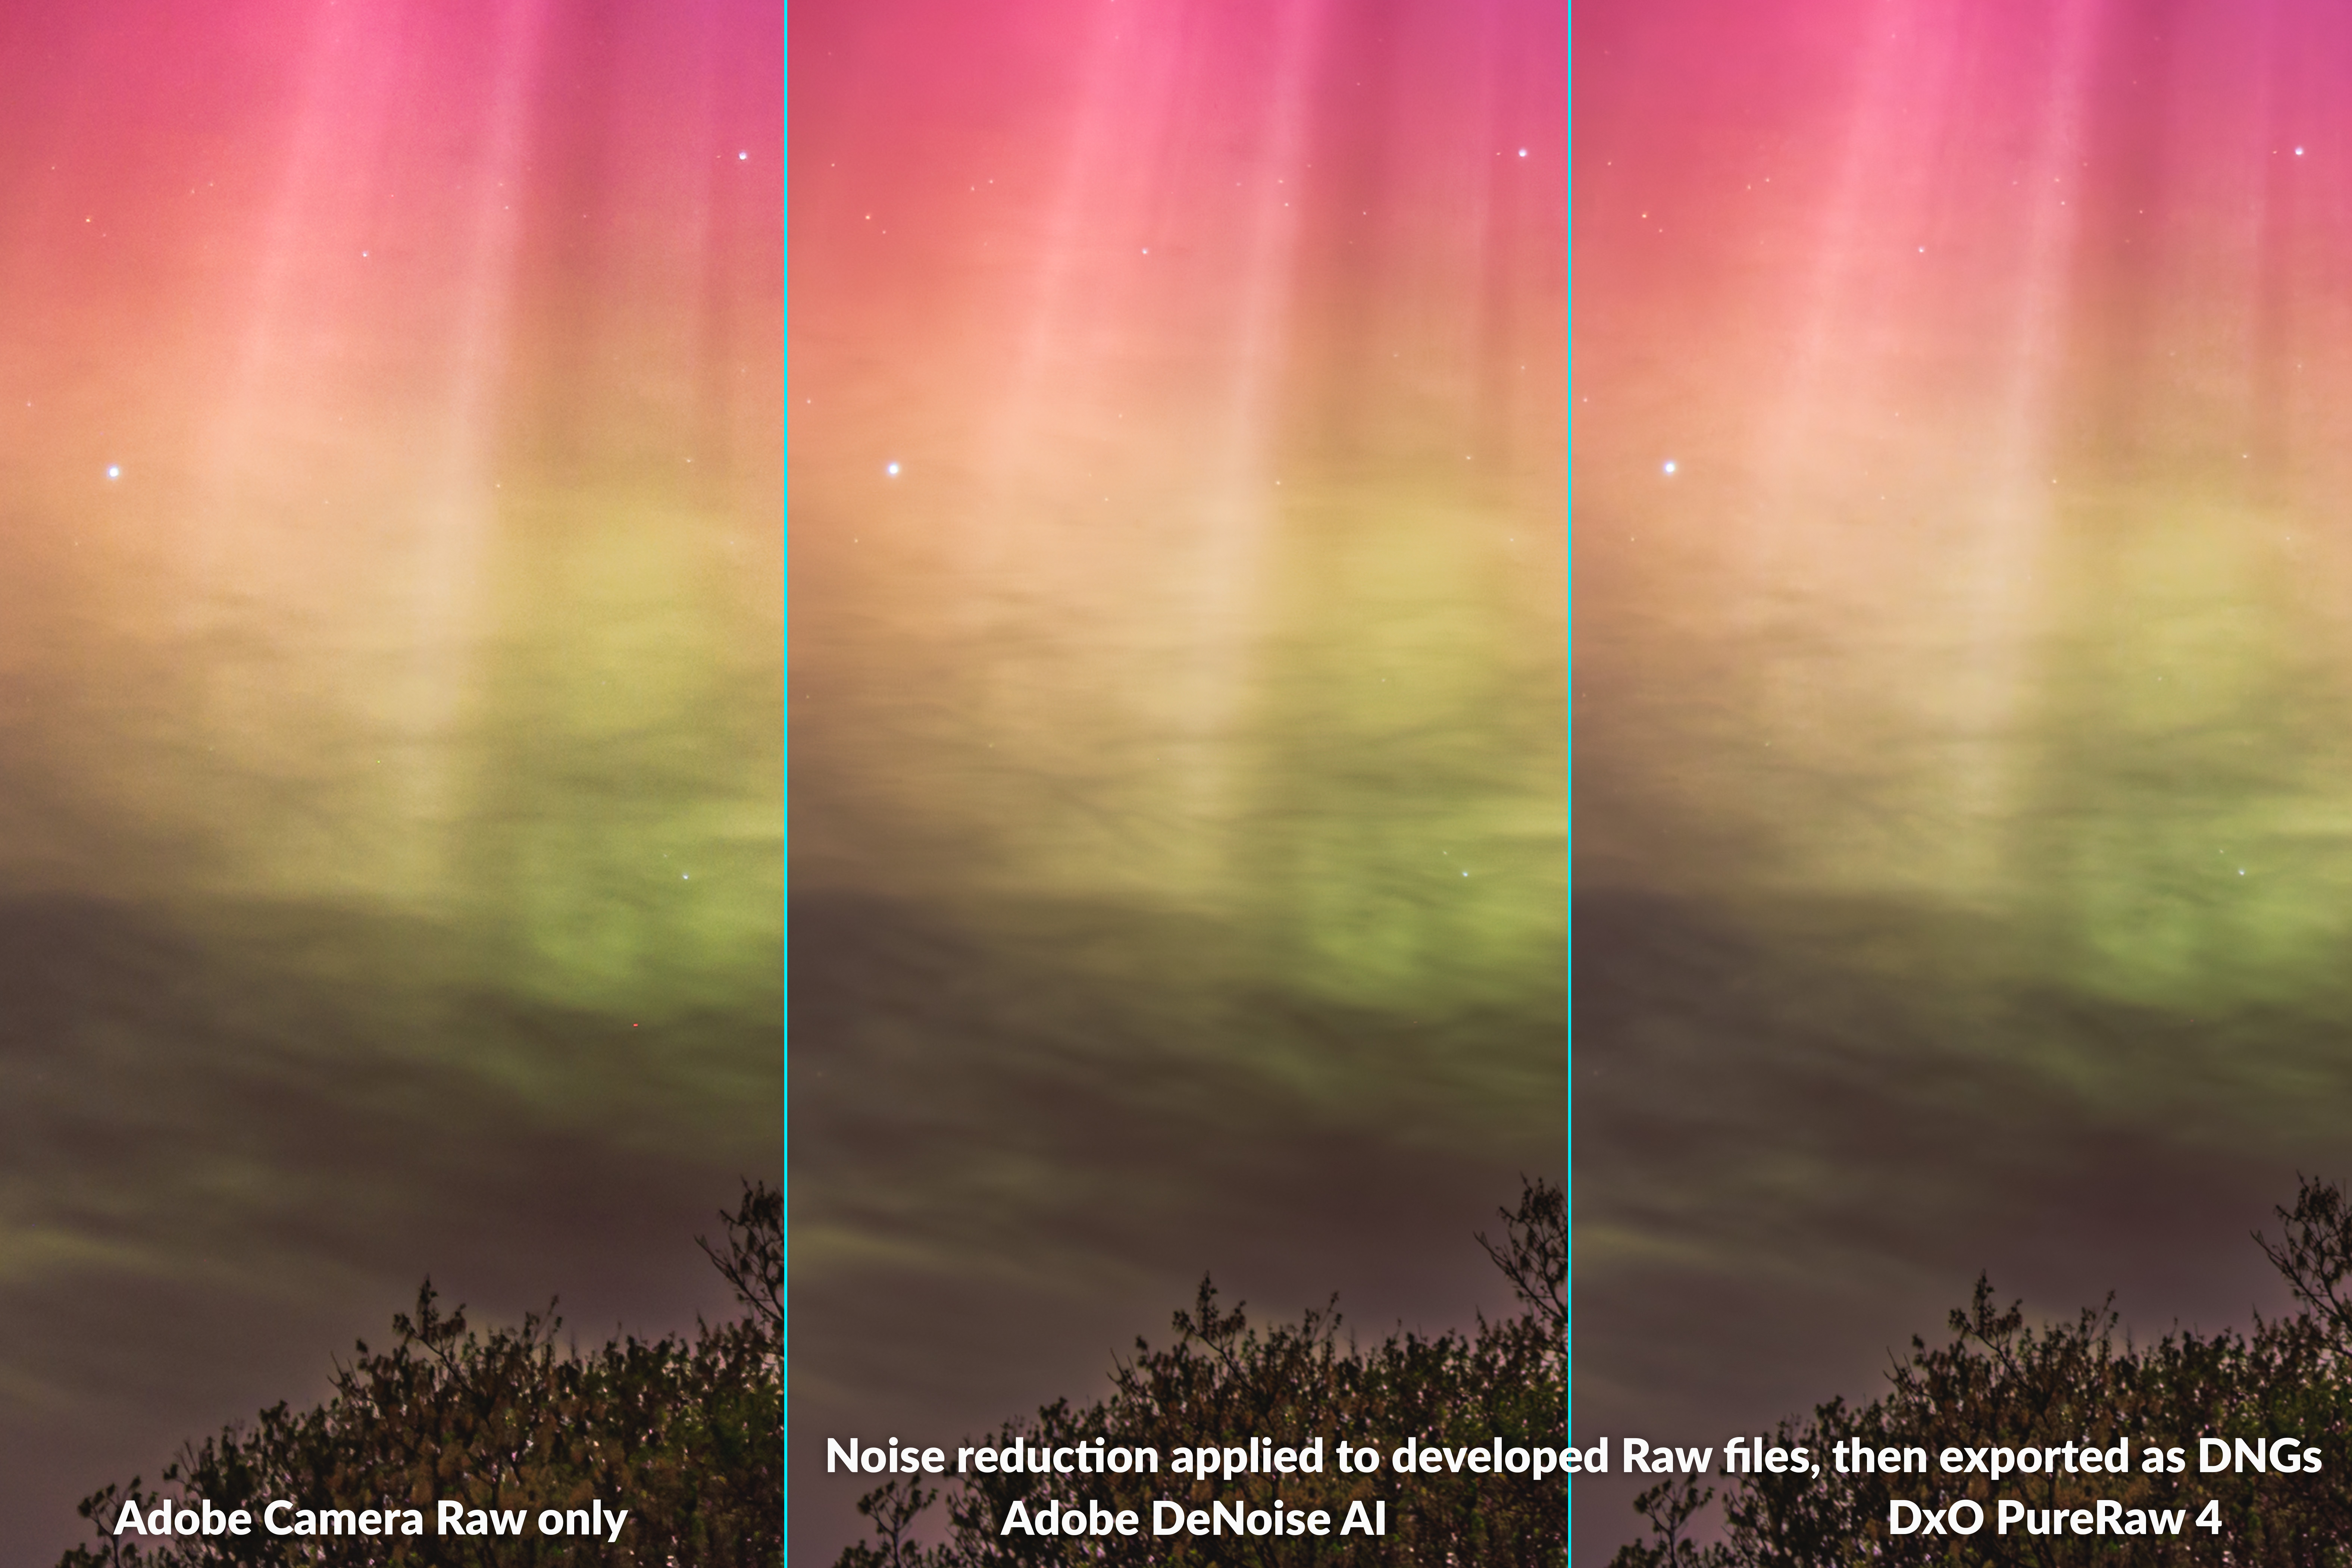
Aurora Curtain
Aurora close-up — with Canon Ra at ISO 1600
This is an image from the Great Aurora show of May 10, 2024. There’s less noise in the AI versions of this example, and both programs also eliminated the errant hot red pixel at lower right in the ACR image. I’ve found these two AI programs can correctly identify and eliminate some hot pixels, though hot pixel removal can be hit or miss.
In all, I found the AI routines of Adobe and DxO did a fine job on auroras, reducing noise without introducing artifacts such as banding or posterized color gradations. Neither overly sharpened foreground details, nor added structures into the aurora or clouds that shouldn’t be there or that look unrealistic.
RAW-ONLY PROGRAMS — SOLAR ECLIPSE
Many of us have close-ups of the April 8, 2024 total eclipse of the Sun. Even though you might have shot them at a low ISO (even when eclipsed, the Sun is bright), you might have been surprised to see how much fine noise remains in the corona and sky.
Solar Eclipse Corona Close-Up
Corona close-up — with Canon R5 at ISO 100
This is a close-up of a frame taken through a 105mm f/6 refractor at a focal length of 630mm. Even at ISO 100, there’s a pixel-level granulation visible, but in this case I don’t think either Adobe DeNoise or PureRAW provided much of an improvement, likely because this is a low-ISO original.
In fact, I think Adobe DeNoise AI made noise worse, as its inherent sharpening added some dark flecks throughout the corona. But neither program introduced any banding, unlike Topaz was guilty of below.
RAW-ONLY PROGRAMS — DEEP-SKY
Here I compare the two Raw-only programs on several examples of deep-sky images — photos of the Milky Way and nebulas taken with tracking mounts so the stars remain pinpoints, ideally! These examples are tough tests, as the AI models have likely received little training on what these are supposed to look like! And faint stars can look like noise.
Orion Portrait
Orion close-up — with Canon Ra at ISO 800
First is a wide-angle portrait of Orion, blowing up the center of a tracked exposure with a 28-70mm zoom lens set to 46mm. (See my test of Canon RF zoom lenses here.) Shot at ISO 800, low for deep-sky images, this single frame is fairly clean to begin with. The AI programs do smooth the noise, without wiping out stars. Nice!
But they do accentuate the residual chromatic aberration (the blue haloes) on stars. PureRAW looks a little worse as it seems to have shifted the color to more magenta. All three Raw files have identical settings and profiles applied, yet PureRAW looks slightly different.
Cygnus H-alpha Monochrome
Cygnus close-up — with Canon Ra at ISO 3200 with Astronomik 12nm H-a clip-in filter
This is a more demanding example, shot with the same lens but at 70mm, and with the red-sensitive Canon Ra. It is rendered in monochrome as it was shot through a deep-red hydrogen-alpha filter to isolate the red light from the nebulas, here in Cygnus.
This is a single frame (you would normally stack lots of these!), very noisy due not only to the high ISO used, but also because only the red pixels (one quarter of the total on the sensor) recorded any signal.
Both Adobe DeNoise AI and DxO PureRaw have cleaned up the noise well. PureRAW has added more sharpening, tightening the stars and enhancing fine structure. Whether this is good or not depends on your goals and tolerance for AI-induced changes. In this case, I don’t think it has invented details.
But then there’s this example ….
Vela Supernova Remnant
Vela SNR close-up — with modified Canon R at ISO 3200
This, too, is a filtered single frame, taken through a 61mm-aperture telescope equipped with a “dual narrowband” filter which isolates the red H-alpha wavelength, but also the cyan Oxygen emission lines prominent in supernova remnants like this one in Vela. The deep filter requires shooting at a high ISO. So there’s lots of noise.
In this trio, I also applied NoiseXTerminator to the left image, an AI-based noise reduction program designed for just such images. I show more examples with “NoiseX” at the end.
I don’t think Adobe DeNoise or PureRAW have done any better job than NoiseX at reducing noise. If anything, each might have added some additional texturing that looks artificial, and accentuated chromatic aberration haloes on the stars. NoiseX wins here, right?
Well … look at the fine structures of the wisps of nebulas in all three panes. In the two panels at center and right, you can see more structure in the nebulosity, such as the protruding red fingers at top, that are not there in the NoiseX version at left. Is this real? Might other sharpening routines later in the workflow have brought it out anyway? Or are these details the products of AI imagination!?
Before purists dismiss the Adobe and DxO AI programs for fabricating details, here’s another example.
Crab Nebula
Crab Nebula close-up — with modified Canon R at ISO 800
This is another supernova remnant, the famous Crab Nebula in Taurus. It is a 500% blow-up of the center of a single exposure with a modified Canon R on a 120mm f/7 refractor.
In this case, the “normal” image on the left has had just ACR’s old-style noise reduction applied, nothing else. In the middle and on the right, the Adobe and DxO AI versions are noticeably less noisy.
But … the small red tendrils are also more obvious with AI enhancement — and they are real (as comparisons to other more detailed astrophotos showed me). So here the AI has helped bring out subtle details while smoothing noise. I think PureRAW has sharpened stars a little too much, and shifted the colors, again to magenta.
Summary Points:
Both Adobe DeNoise AI and DxO PureRAW 4 can work wonders on nightscapes…
… Except on star trails! Both programs ruin star trails.
Their improvements to low ISO images is not so great, if minimal.
In its conversion of Raw to DNG, PureRAW sometimes introduced minor and unwelcome changes to images’ brightness and color. Adobe DeNoise did not.
But PureRAW recovered details in textured landscapes much better than DeNoise, which can suffer from plastic looking artifacts.
Both programs are worth trying on deep-sky images, if your workflow allows working with Raw files.
But you have to look carefully at the details – pixel peep! – as you might see oddities introduced by either program that you feel are unacceptable. Or you might see welcome sharpening, saving you more work later in processing.
Recommendations:
Adobe DeNoise AI has the advantage that if you are an Adobe Cloud subscriber you already have it. It is included with Lightroom and Camera Raw. So try DeNoise AI; you might like the results. Or not! But as with DxO PureRAW, it can be applied only to Raw files and only at the start of a workflow.
Download the trial copy of DxO PureRAW and test it on your own images. You might prefer it in your workflow.
OTHER PROGRAMS — WORKING STAND-ALONE ON RAW FILES
Now I test Luminar Neo Noiseless AI, ON1 NoNoise AI, and Topaz Photo AI — three AI noise reduction programs that can work not only on Raw files but on other file formats, allowing them to be applied at various points in a workflow.
All three programs can read Raw files from a wide range of cameras. Like PureRAW, ON1 and Topaz can also export DNG files, Adobe’s universal version of a Raw file. The best format Luminar can export to is a 16-bit TIFF.
I sent all the raw images I’ve shown above, plus a dozen more I’m not showing, through all three programs working as stand-alone apps, similar to how PureRAW operates. I usually applied their default or auto settings for noise reduction, and also for sharpening, as both Adobe and DxO also sharpen — you can’t have them not sharpen. I wanted to compare like to like.
Aurora Curtain
Aurora Curtain with three programs as stand-alone apps
The exported files from all three programs showed noticeable differences in brightness and color on this aurora example from the May 10, 2024 display. Again, all have had the same develop settings applied to them as were applied to the original file in Camera Raw. Topaz shows over-sharpening, but that can be turned down from the usually excessive level chosen by its “Auto Pilot” routine.
Aurora over House
Aurora over House with three programs as stand-alone apps
Another aurora example also shows significant differences in brightness, color and contrast. Auroras are particularly sensitive to shifts in white balance and to the camera profile chosen. In this case the profile was Camera Neutral. Only Luminar honored that profile; ON1 and Topaz offered only a generic Color profile in their DNGs. Luminar did not apply the lens correction for the Venus Optics 15mm lens used here, as it was not in its database. So its image looks dark and vignetted, requiring manual adjustments.
Peyto Lake Nightscape
Peyto Lake nightscape with three programs as stand-alone apps
The differences became even more marked on some of my test nightscapes. In this ISO 3200 Canon R5 image from Peyto Lake in Banff only Topaz’s exported DNG succeeds in resembling the original developed Raw file from ACR. Luminar’s TIFF is far too dark and ON1’s DNG is way too bright and contrasty. What happened there?
Storm Mountain Nightscape
Storm Mountain twilight scene with three programs as stand-alone apps
Another example, shot at ISO 100 with the Canon R5, also shows major disparities between the original Raw files and the exported images, with Luminar’s now looking the closest, ON1 still too bright and contrasty, and Topaz’s way too dark. There is no predicting what you’ll get.
I think the differences might be due to how each program interprets the camera profile used, but the reason is a mystery.
Summary Points:
Unlike DxO PureRAW 4, none of these three programs can be used in practice as stand-alone noise reduction apps, at least not with reliable results.
Recommendations:
Use Luminar Neo, ON1 NoNoise AI and Topaz Photo AI only as plug-ins, at least for noise reduction. That’s what I test next.
THE SAME TRIO — AS PLUG-INS WITHIN PHOTOSHOP
Thankfully, when I used the same three programs called up from within Photoshop as filter plug-ins, all worked well, though with varying levels of noise reduction quality.
All three can also be called up from within Adobe Lightroom.
Sending images to Plug-Ins with Lightroom, using Edit in ….
However, for the latter, do not use the route I advised at the beginning for DxO PureRAW. Do not send images to them via File>Plug-In Extras …. While that will work, you’ll get the same bad results I show in the previous section when using the programs as stand-alone apps.
Instead, as I show immediately above, from Lightroom, use Photo>Edit In… and choose your plug-in. That will produce the same good results I show below.
An even better method is to choose Photo>Edit In>Open as Smart Object in Photoshop. You can then apply these or any plug-in as a non-destructive “smart filter,” with settings you can re-adjust at any time, rather than being “baked into” the resulting TIFF file. That’s what I did for the tests below.
I can hear the anti-Adobe faction clamouring! For those who do not use Photoshop, all three programs will also install as plug-ins into Affinity Photo 2, a very Photoshop-like layer-based editor available under a perpetual license at low cost. However, I did not test that workflow variation.
Peyto Lake Nightscape
Peyto Lake close-up — with Canon R5 at ISO 3200
Here, on blow-ups of a noisy frame corner, I show the settings I used. Most are default, except for ON1 where I backed off its Tack Sharp Deblur from the 100 it had picked. While ON1 NoNoise ostensibly has an Auto function for detecting and applying an amount of noise reduction and sharpening suitable for each photo, it often picks 100%.
However, ON1 NoNoise AI did the best job. Topaz Photo AI still left noise in the foreground. Luminar Noiseless AI wasn’t bad, but left a noisier sky with some patchy artifacts.
Aurora Curtain
Aurora Curtain — with Canon Ra at ISO 1600
On the aurora example, I also applied Photoshop’s old Reduce Noise filter to the image brought in from Camera Raw. It can do a good job smoothing fine-scale noise.
With that conventional filter applied I found there wasn’t a big difference among the four versions. The three AI programs did a good job, with ON1 and Topaz better than Luminar, which still left some noise. Topaz over-sharpened the stars and trees, leaving colorful ringing artifacts on the latter. And that was with its Sharpen filter backed off to 30 from the 50 the Auto Pilot routine suggested using.
Vela Supernova Remnant Deep-Sky
Vela SNR close-up — with modified Canon R at ISO 3200
Luminar Noiseless AI improved this noisy frame by only a small degree. ON1 and Topaz were much better, providing good noise reduction without adding significant artifacts or odd “invented” structures. As usual, Topaz sharpened stars by default, and perhaps a little too much.
Cygnus Starfield Deep-Sky
Cygnus close-up — with Canon Ra at ISO 1600
This star-rich field taken with a 70mm lens tests how well the programs can retain tiny stars while smoothing noise. Luminar left stars intact but didn’t provide much better noise reduction over what Camera Raw’s old manual noise sliders produced.
ON1 did provide a smoother background sky. But retaining faint stars required backing off Luminance noise reduction and increasing Enhance Detail to bring back the faint stars it wiped out with its default settings. Boosting Deblur and Micro Contrast can add ugly haloes on stars. So, with a deft touch to the sliders the results with ON1 can be very good, with the added benefit that it appears to reduce residual chromatic aberration around stars without affecting star colors.
With Topaz, sliding up Original Detail helped bring back stars lost to noise smoothing. However, there was an odd general reduction in contrast over the image.
Solar Eclipse Corona Close-Up
Corona close-up — with Canon R5 at ISO 100
Each program handled this low-ISO file a little differently. Luminar seemed to actually increase noise, adding coarser structures and some banding. ON1 was the smoothest, with noticeably less noise than the original Camera Raw image. Topaz left (or added?) some fine scale color noise. It sharpened the lunar limb very well, though with a slight dark halo.
But the real revelation was when I zoomed out to look at the darker sky beyond the brightest parts of the corona.
Solar Corona Banding Artifacts
Corona sky close-up — with Canon R5 at ISO 100, showing Topaz banding artifacts
Topaz Photo AI introduced very noticeable banding in the form of square blocks, an artifact of how AI programs analyze images in “tiles.” I did see this in other photos processed with Photo AI, in areas that should look smooth. The culprit is the noise reduction; turn it off and the banding goes away, but now you have noise!
In this case, Topaz’s noise reduction ruined the image, though its sharpening was useful. Overall, I think ON1 NoNoise AI 2024 was the winning plug-in for noise reduction. But I’ve used Photo AI to sharpen solar prominences.
Summary Points:
All three programs worked well as plug-ins, with none of the extreme shifts in color or tone shown in the previous section in the stand-alone app exports.
However, even as a plug-in I felt Luminar Neo’s Noiseless AI filter consistently produced the worst results, or often little benefit at all.
Topaz Photo AI can produce good results, but watch for banding artifacts and over-sharpening. I also found that Topaz was prone to crashes and lock-ups, requiring force-quitting.
ON1 NoNoise AI 2024 provided the best overall noise reduction among these three plug-ins. The 2024 version is much improved over the 2023 version which had a High Detail mode that was awful! Even so, watch for loss of stars, or sharpening haloes. Play with the sliders.
Recommendations:
While Topaz Photo AI is popular among nature photographers, I would suggest ON1’s NoNoise AI 2024 is the better choice for astrophotographers looking for a noise reduction plug-in.
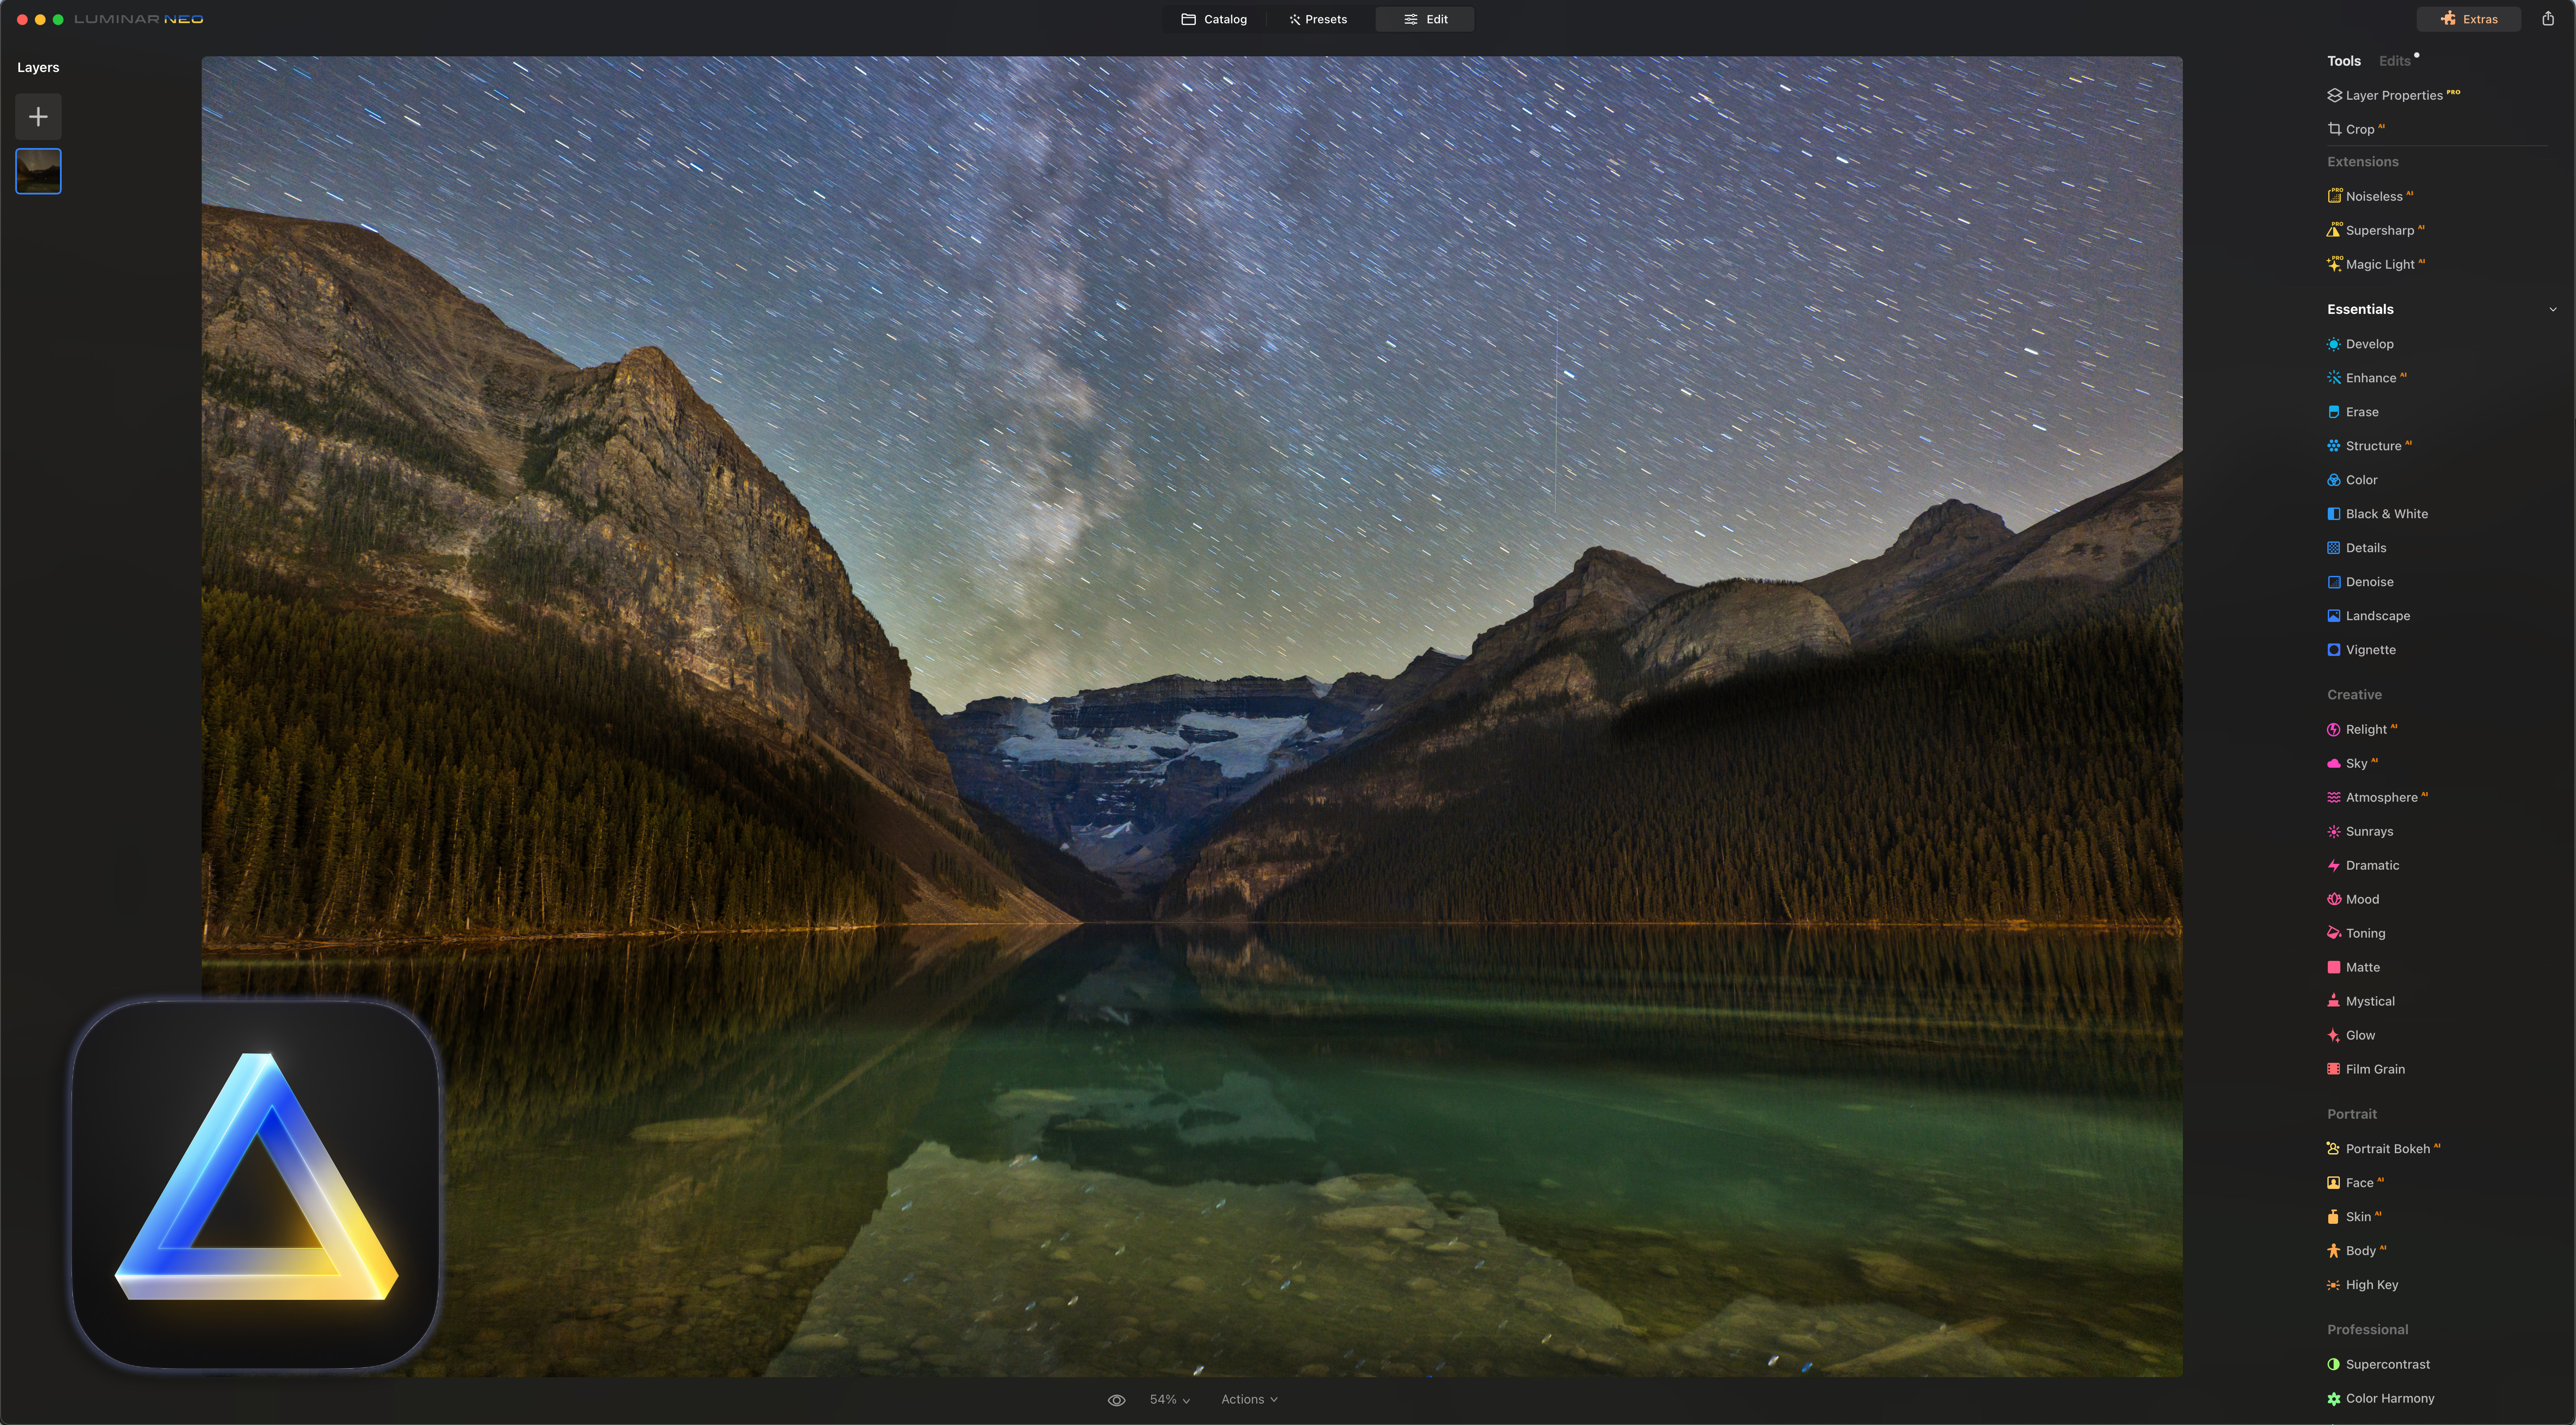
I can’t dismiss Luminar Neo. I like it for some of its other special effect filters, such as Orton glows, Magic Light, Sky Enhancer AI, and Accent AI. I find it a useful plug-in for effects and finishing touches. However, I would not recommend Luminar for noise reduction.
SPECIALIZED PROGRAMS — NOISE XTERMINATOR and GRAXPERT
No review of AI programs for astrophotography can leave out RC-Astro’s XTerminator plug-ins. Here I show Russell Croman’s NoiseXTerminator which uses AI trained on star-filled astrophotos. I tested it as a filter plug-in for Photoshop.
Also becoming popular in the last year is the free stand-alone application GraXpert. Developed first to eliminate nasty gradients of tone and color across deep-sky images due to light pollution, GraXpert now also includes AI-based noise reduction. I tested it as a stand-alone application; it does not install as a plug-in, though like NoiseXTerminator, it can install as a process accessible from within the popular astrophoto program PixInsight.
As a stand-alone app, GraXpert can only import and work on TIFFs, JPGs, or FITS files, the latter format produced by dedicated astro cameras.
I show only deep-sky image examples, as that’s the domain of these two programs.
Crab Nebula with NoiseXTerminator vs. ON1 and Topaz
Crab Nebula close-up — with modified Canon R at ISO 800
First I show a comparison of the Crab Nebula test image with ACR’s standard non-AI noise reduction applied plus Photoshop’s old Reduce Noise filter. I compare this to the same image but with NoiseXTerminator also applied at 60% strength. Now compare this to versions with ON1 NoNoise and Topaz Photo AI.
NoiseXTerminator produced the smoothest result with no detrimental affect on the stars or nebulosity. ON1 is a good second place for noise reduction, with slightly sharper stars, which may or may not be desirable. Topaz produced subtle patchy artifacts and added tiny structures that may or may not be real.
NGC 1763 with NoiseXTerminator vs. ON1 and Topaz
NGC 1763 in LMC — with modified Canon R at ISO 3200
This is a single-frame close-up of the second best nebula in the Large Magellanic Cloud (after the Tarantula), taken at ISO 3200 through a dual-narrowband filter. So it is noisy.
The left panel is again with ACR and Photoshop’s Reduce Noise. But applying NoiseXTerminator cleaned the image up a lot. ON1 looks almost as good. Topaz sharpened detail to the point of revealing pinprick faint stars that are just blurs in the other images. These may indeed be real!
Vela Supernova Remnant with Noise XTerminator and GraXpert
Vela SNR close-up — with modified Canon R at ISO 3200
The same Vela SNR image I used earlier shows excellent noise reduction from NoiseXTerminator, with star colors and nebula structures left alone. GraXpert at 50% strength (the developers have suggested backing off the settings) did not produce as smooth a sky. Applying GraXpert at 100% strength did yield noise reduction on par with NoiseX, but produced a slightly softer overall image.
Crab Nebula with Noise XTerminator and GraXpert
Crab Nebula close-up — with modified Canon R at ISO 800
Processing the Crab Nebula image shows much the same results. Though I think here even at 100% GraXpert isn’t producing as good a level of noise reduction as NoiseX, leaving some patchiness amid the nebula, and a mottled texturing to the background sky.
Summary Points:
For the best noise reduction on deep-sky images, especially telescopic close-ups, the dedicated programs NoiseXTerminator and GraXpert trained on such images can do a better job than general-purpose AI programs.
I find NoiseXTerminator the better of the two, but GraXpert is new and evolving.
Recommendations:
GraXpert has the great benefit of being free! But on Macs it runs very slowly, something the developers admit and seem resigned to, as their market is Windows users. My test images each took 2 to 2.5 minutes to process, some 5 to 10 times slower than any of the other programs. And it runs only as a stand-alone app, yet it cannot read Raw files from DSLRs or mirrorless cameras, unlike PureRAW. But if you are a deep-sky imager, try it, as its main purpose – gradient removal – might prove indispensable.
As I prefer to accomplish as much of my editing as possible within one program, I prefer NoiseXTerminator as it can be applied from within Photoshop, and as an editable smart filter. I use it on most of my deep-sky images. I highly recommend it and RC-Astro’s other plug-ins.
YOUR MILEAGE MAY VARY!
The nature of AI means that results with any program can vary from image to image. That’s why no one, me included, can claim that one program is “the best!” Best for what? And with what workflow?
As some programs, such as Topaz Photo AI, offer multiple AI models and settings for strength and sharpening, results on the same image can be quite different. In most of my testing I used either the program’s auto defaults or backed off from those defaults where I thought the effect was too strong and detrimental to the image.
This is all by way of saying, your mileage may vary! In fact, it certainly will.
So don’t take my word for it. Most programs (Luminar Neo is an exception) are available as free trial copies to test out on your astro-images and in your preferred workflow. Test for yourself.
But do pixel peep. That’s where you’ll see the flaws. And the benefits. We are fortunate to have such a great arsenal of tools at our disposal. They will only get better as the AI models improve.
I hope my review – as lengthy as it is! – has helped you make an informed decision on what to buy.
I test nine programs for processing raw files for the demands of nightscape astrophotography.
Warning! This is a long and technical blog, but for those interested in picking the best software, I think you’ll find it the most comprehensive test of programs for processing nightscapes. The review is illustrated with 50 high-resolution, downloadable images which will take a while to load. Patience!
As a background, in December 2017 I tested ten contenders vying to be alternatives to Adobe’s suite of software. You can find that earlier survey here on my blog. But 2017 was ages ago in the lifetime of software. How well do the latest versions of those programs compare now for astrophotography? And what new software choices do we have as we head into 2023?
To find out, I compared eight programs, pitting them against what I still consider the standard for image quality when developing raw files, Adobe Camera Raw (the Develop module in Adobe Lightroom is essentially identical). I tested them primarily on sample nightscape images described below.
I tested only programs that are offered for both MacOS and Windows, with identical or nearly identical features for both platforms. However, I tested the MacOS versions.
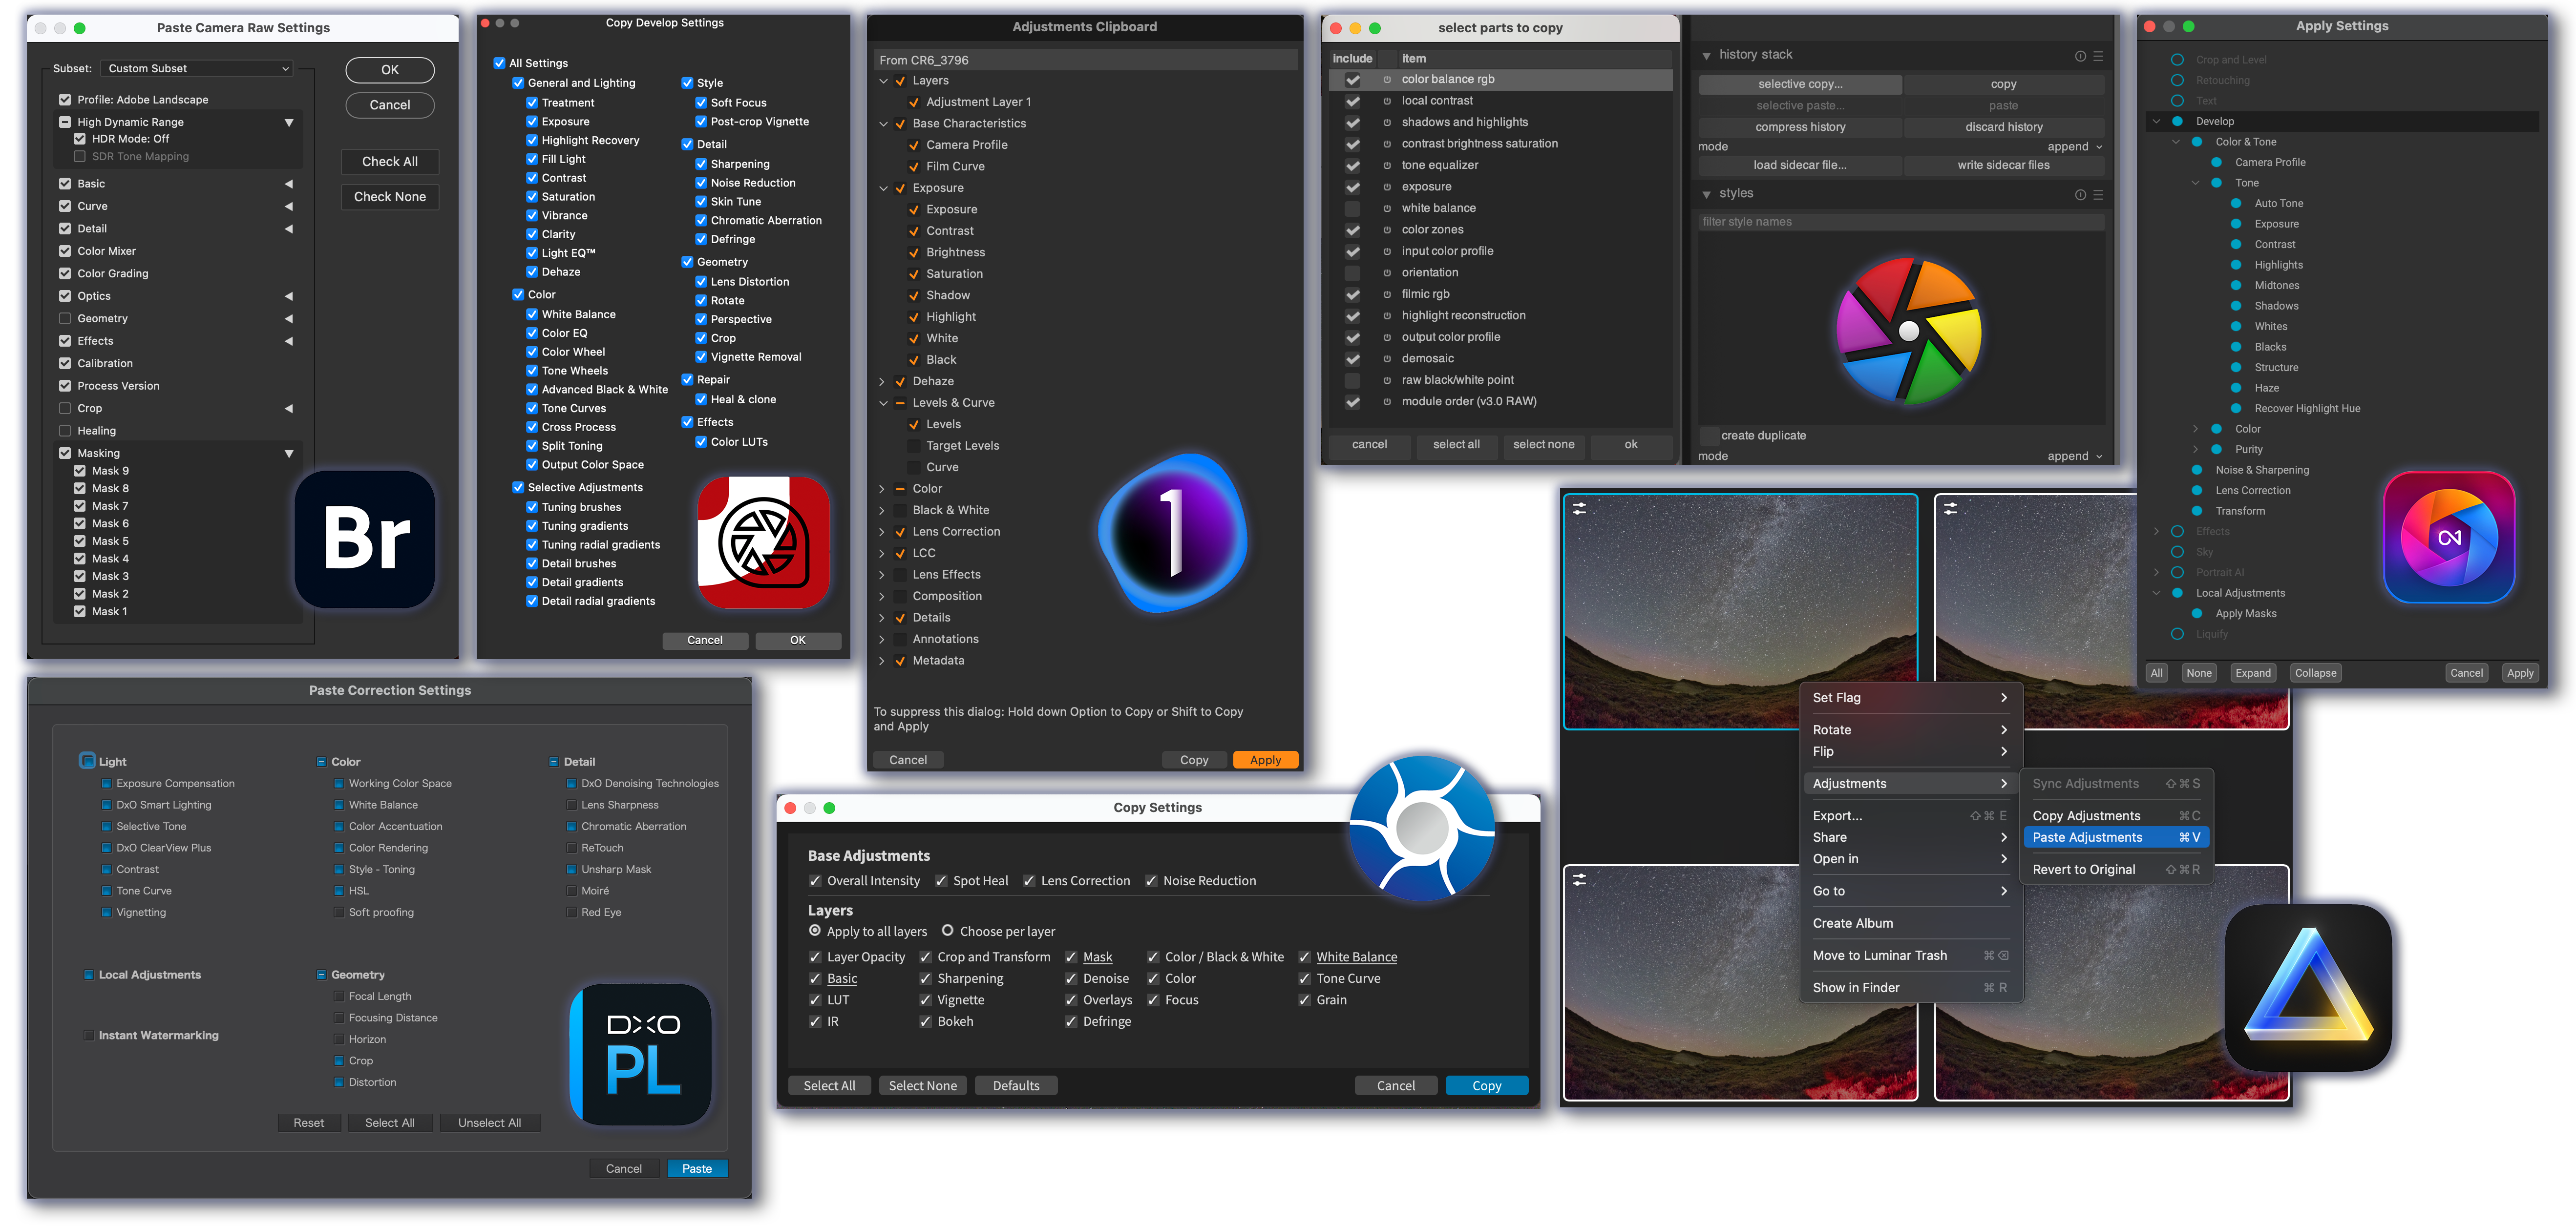
In addition to Adobe Camera Raw (represented by the Adobe Bridge icon), I tested, in alphabetical order, and from left to right in the icons above:
ACDSee Photo Studio
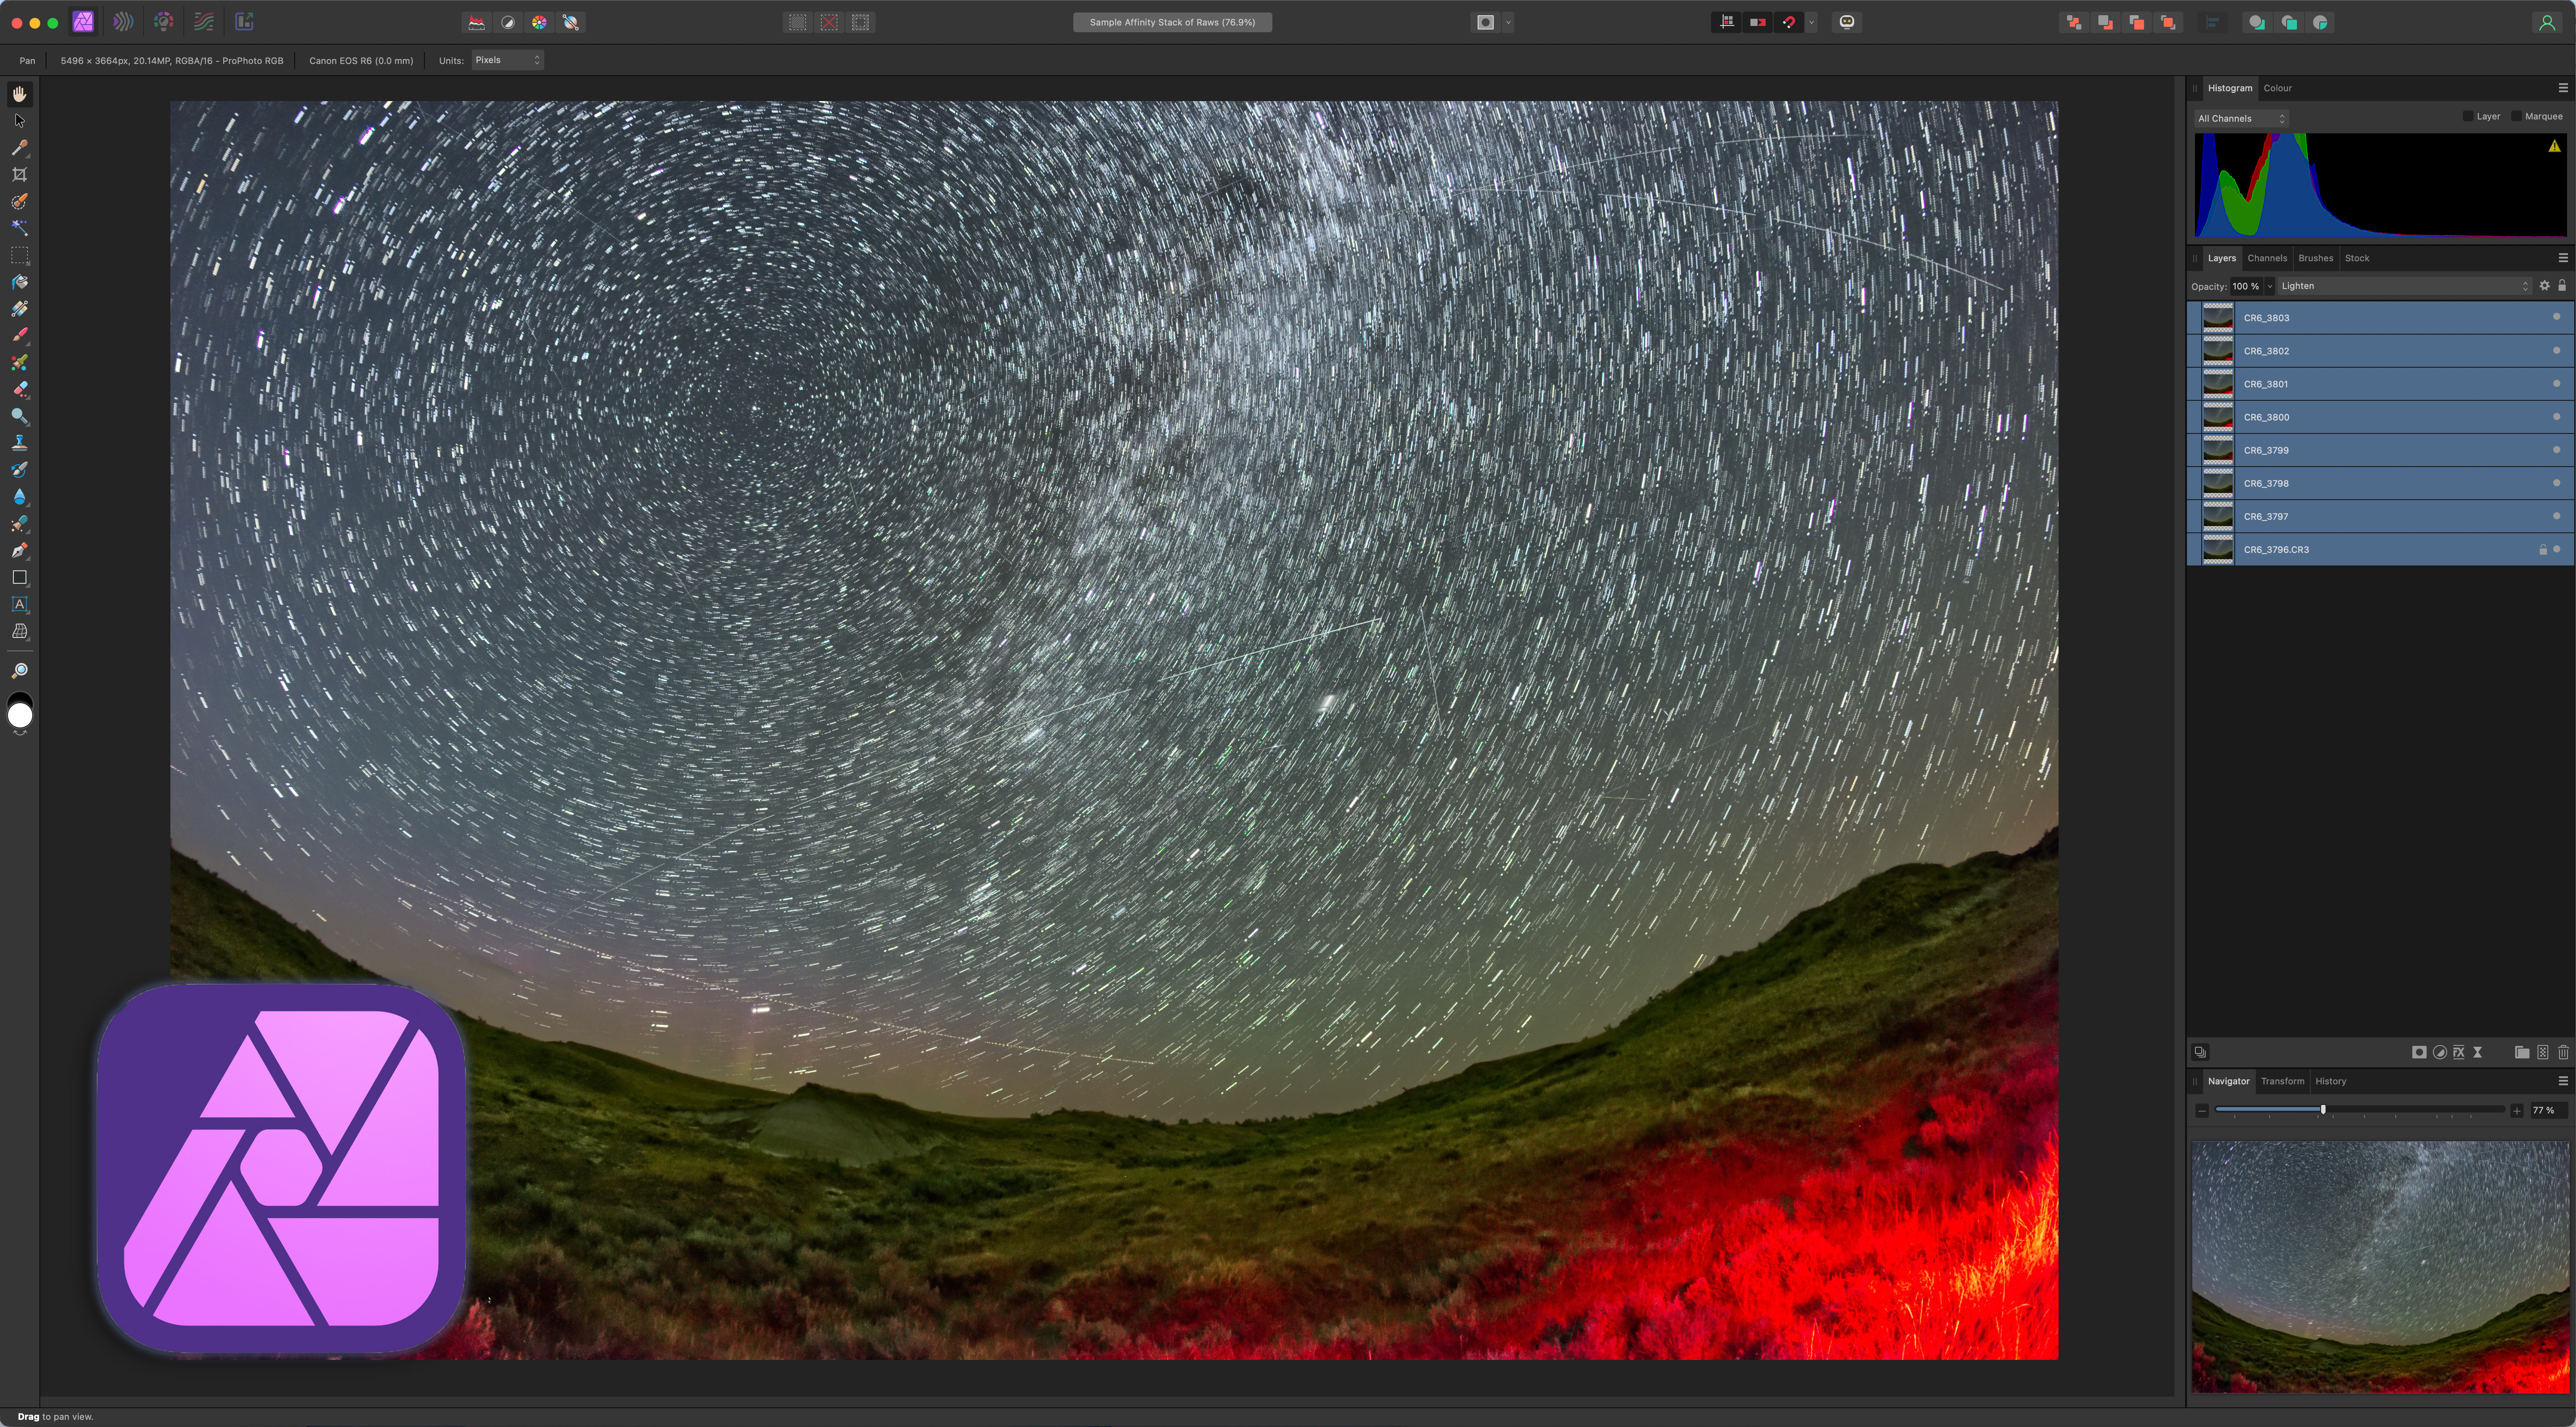
Affinity Photo 2 (from Serif)
Capture One 23
Darktable 4
DxO PhotoLab 6
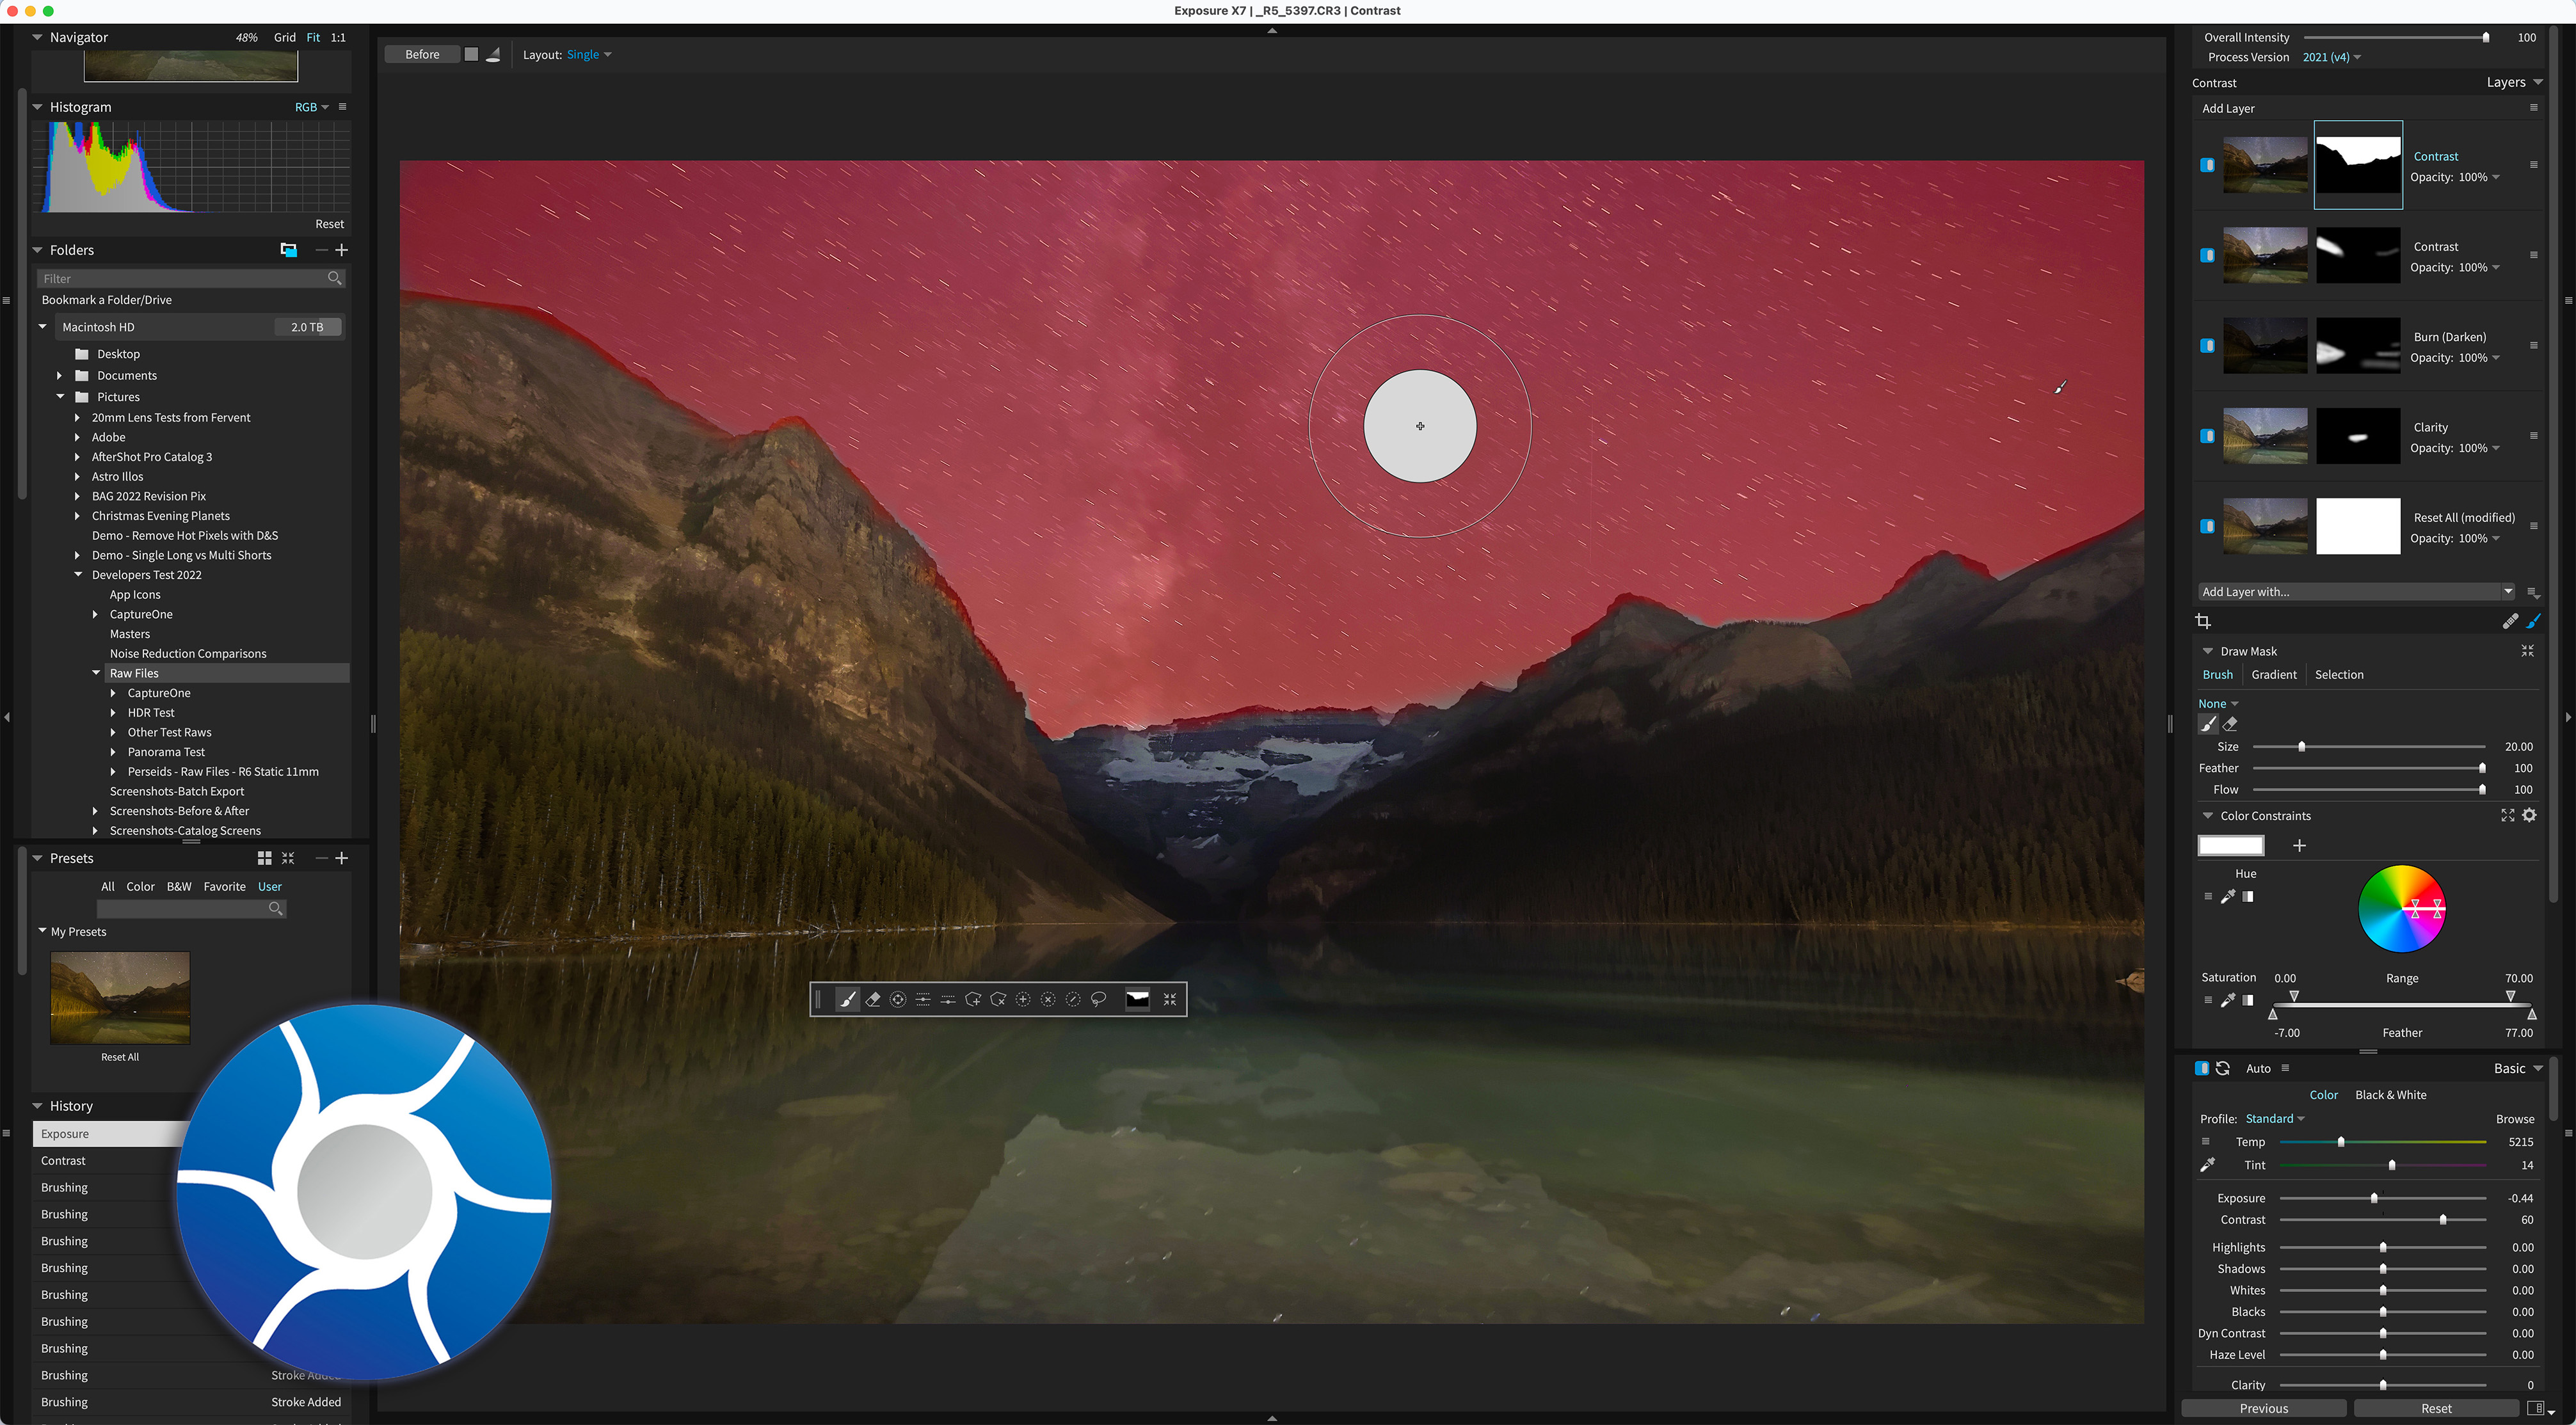
Exposure X7
Luminar Neo (from SkyLum)
ON1 Photo RAW 2023
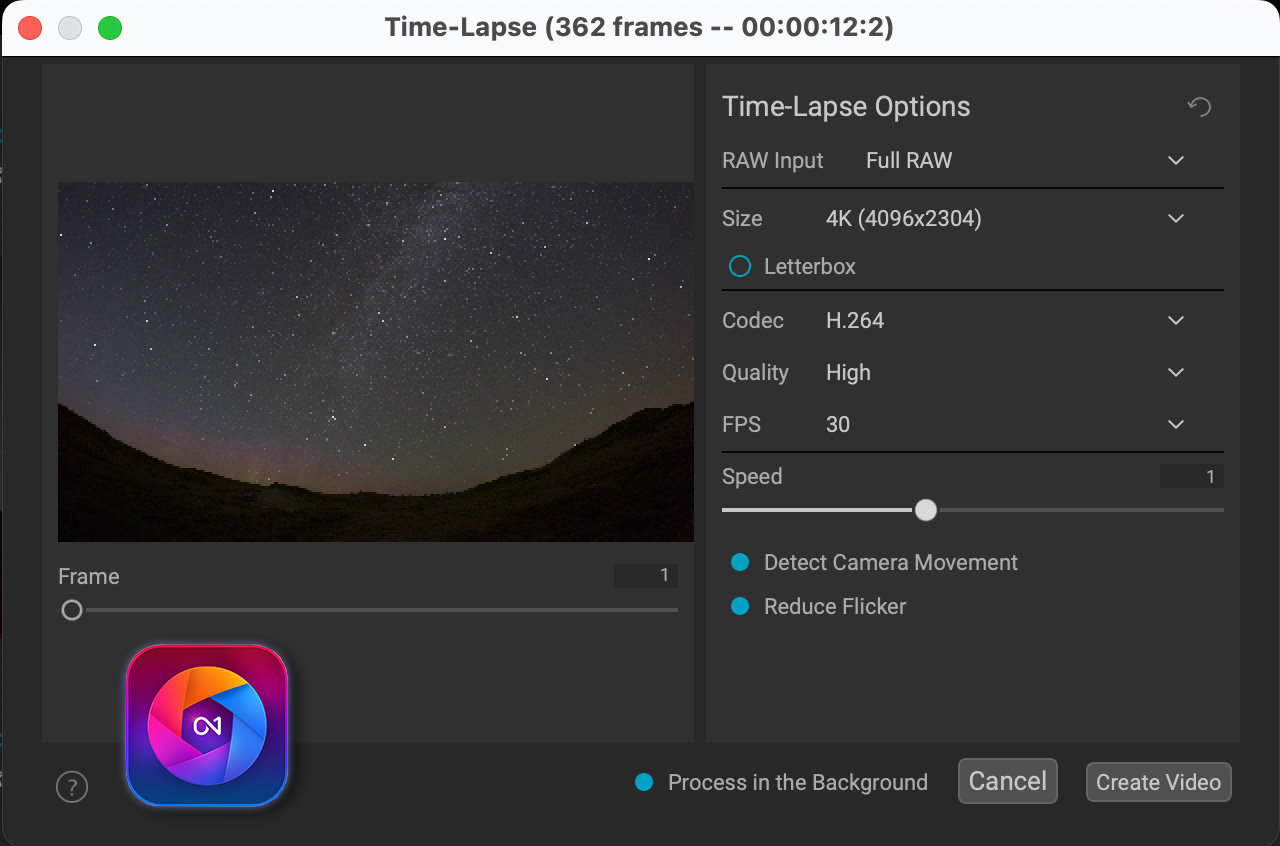
I tested all the programs strictly for the purpose of processing, or “developing” raw files, using nightscape images as the tests. I also looked at features for preparing and exporting a large batch of images to assemble into time-lapse movies, though the actual movie creation usually requires specialized software.
NOTE: I did not test the programs with telescope images of nebulas or galaxies. The reason — most deep-sky astrophotographers never use a raw developer anyway. Instead, the orthodox workflow is to stack and align undeveloped raw files with specialized “calibration” software such as DeepSkyStacker or PixInsight that outputs 16-bit or 32-bit TIFFs, bypassing any chance to work with the raw files.
TL;DR Conclusions
Here’s a summary of my recommendations, with the evidence for my conclusions presented at length (!) in the sections that follow:
What’s Best for Still Image Nightscapes?
Adobe Camera Raw (or its equivalent in Adobe Lightroom) still produces superb results, lacking only the latest in AI noise reduction, sharpening and special effects. Though, as I’ve discovered, AI processing can ruin astrophotos if not applied carefully.
The Adobe alternatives that provided the best raw image quality in my test nightscapes were Capture One and DxO PhotoLab.
ACDSee Photo Studio, Exposure X7,and Luminar Neo produced good results, but all had flaws.
ON1 Photo RAW had its flaws as well, but can serve as a single-program replacement for both Lightroom and Photoshop.
Affinity Photo works well as a Photoshop replacement, and at a low one-time cost. But it is a poor choice for developing raw images.
If you are adamant about avoiding subscription software, then a combination of DxO PhotoLab and Affinity Photo can work well, providing great image quality, and serving to replace both Lightroom and Photoshop.
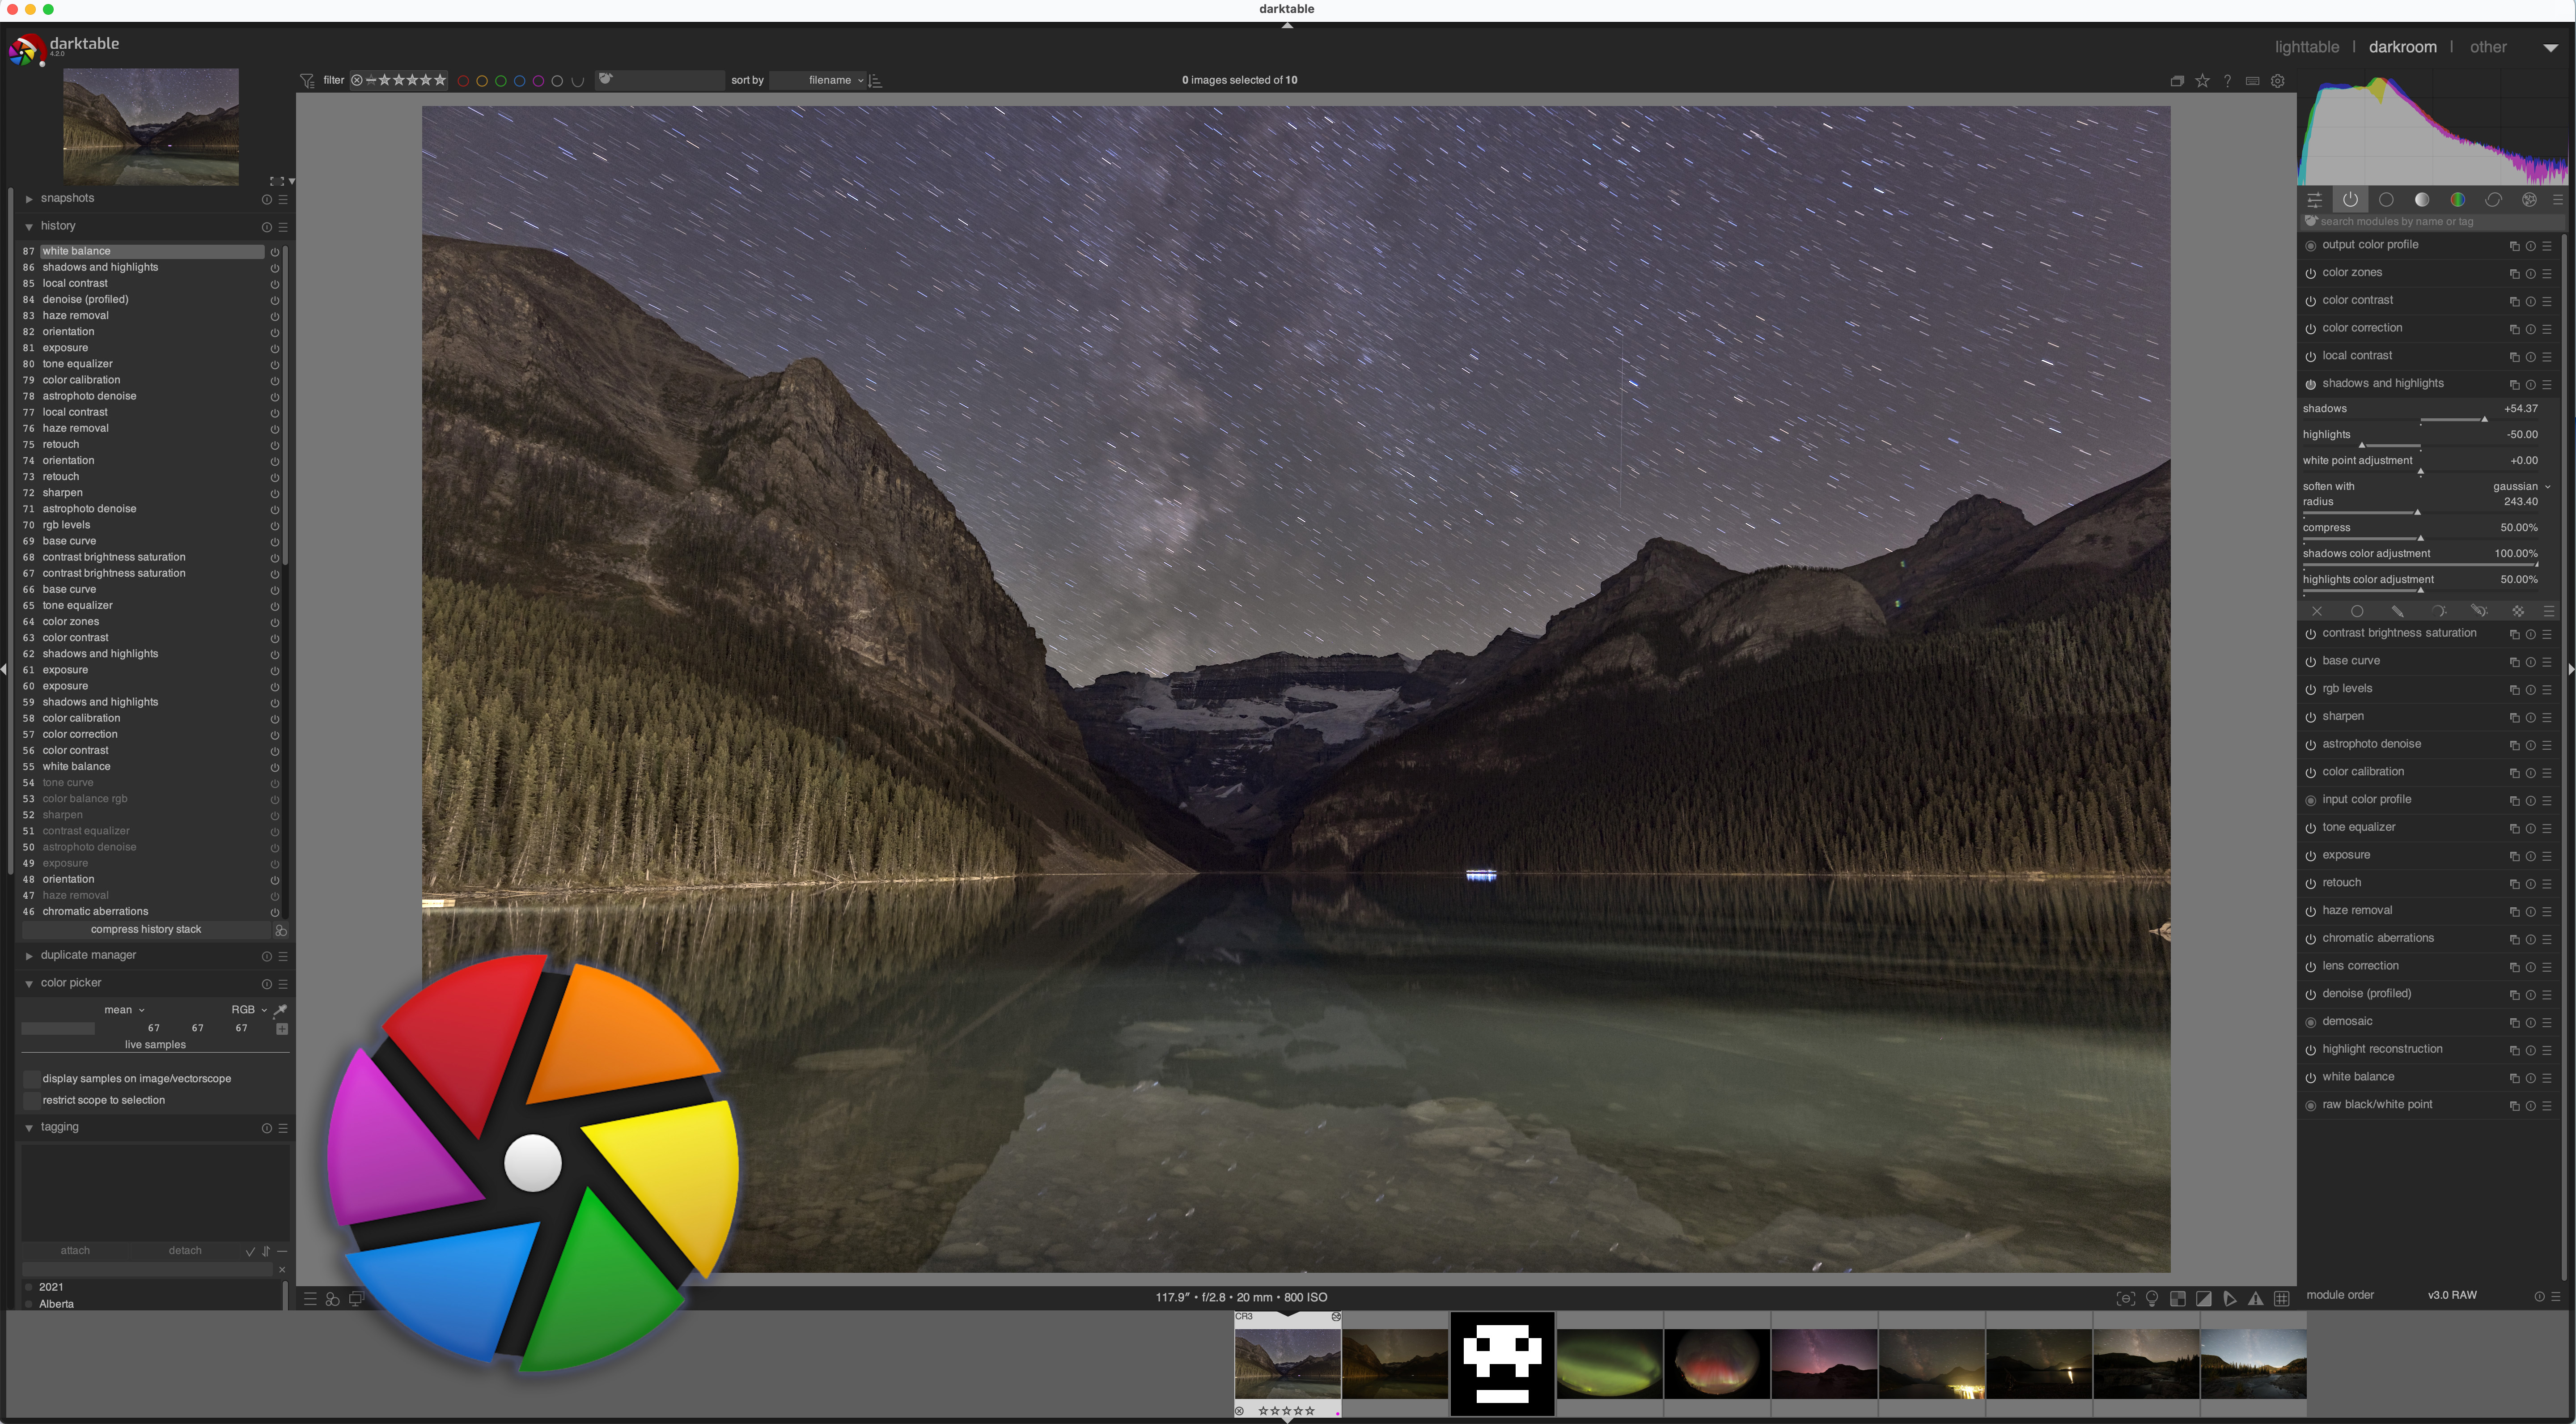
I cannot recommend Darktable, despite its zero price. I struggled to use its complex and overly technical interface, only to get poor results. It also kept crashing, despite me using the new ARM version on my M1 MacBook Pro. It was worth what I paid for it.
At the end of my blog, I explain the reasons why I did not include other programs in the test, to answer the inevitable “But what about …!?” questions.
What’s Best for Basic Time-Lapses?
For simple time-lapse processing, where the same settings can be applied to all the images in a sequence, all the programs except Affinity Photo, can copy and paste settings from one key image to all the others in a set, then export them out as JPGs for movie assembly.
However, for the best image quality and speed, I feel the best choices are:
Adobe, either Lightroom or the combination of Camera Raw/Bridge
Capture One 23
DxO PhotoLab 6
While ON1 Photo RAW can assemble movies directly from developed raw files, I found Capture One or DxO PhotoLab can do a better job processing the raw files. And ON1’s time-lapse function is limited, so in my opinion it is not a major selling point of ON1 for any serious time-lapse work.
Luminar Neo was so slow at Copy & Paste and Batch Export it was essentially unusable.
What’s Best for Advanced Time-Lapses?
None of the non-Adobe programs will work with the third-party software LRTimelapse (www.lrtimelapse.com). It is an essential tool for advanced time-lapse processing.
While ON1 offers time-lapse movie assembly, it cannot do what LRTimelapse does — gradually shift processing settings over a sequence based on keyframes to accommodate changing lighting, and to micro-adjust exposure levels based on actual image brightness to smooth out the bane of time-lapse shooters — image flickering.
LRTimelapse works only with Lightroom or ACR/Bridge. If serious and professional time-lapse shooting is your goal, none of the Adobe contenders will do the job. Period. Subscribe to Adobe software. And buy LRTimelapse.
Avoiding Adobe?
My testing demonstrated to me that for nightscape photography, Adobe software remains a prime choice, for its image quality and ease of use. However, the reasons to go with any program other than Adobe are:
For equal or even better image quality, or for features not offered by Adobe.
But mostly to avoid Adobe’s subscription model of monthly or annual payments.
Capture One pricing as of early 2023, in Canadian funds.
All the non-Adobe alternatives can be purchased as a “perpetual license” for a one-time fee, though often with significant annual upgrade costs for each year’s major new release. However, you needn’t purchase the upgrade; your old version will continue to run. Below, I provide purchase prices in U.S. funds, but most companies have frequent sales and discount offers.
While all of Adobe’s competitors will proclaim one-time pricing, several also offer their software via annual subscriptions, with additional perks and bonuses, such as file syncing to mobile apps, or better long-term or package pricing, to entice you to subscribe.
Keep in mind that whatever program you use, its catalog and/or sidecar files where your raw image settings are stored will always be proprietary to that program. ON1 and Affinity also each save files in their own proprietary format. Switch to any other software in the future and your edits will likely not be readable by that new software.
Raw Editing vs. Layer-Based Editing
As I mentioned, I tested all the programs strictly for their ability to process, or “develop,” raw image files for nightscapes. (Raw files are likened to being digital negatives that we “develop.”)
For some nightscape still images, raw developing might be all that’s needed, especially as software companies add more advanced “AI” (artificial intelligence) technology to their raw developers for precise selection, masking, and special effects.
In the case of time-lapse sequences made of hundreds of raw frames, raw developing is the only processing that is practical. What we need for time-lapses is to:
Develop a single key raw file to look great, then …
Copy all its settings to the hundreds of other raw files in the time-lapse set, then …
Export that folder of raw images to “intermediate JPGs” for assembly into a movie, usually with a specialized assembly program.
The programs that offer layer-based editing: Adobe Photoshop, ON1 Photo RAW, and Serif Affinity Photo
However, for most still-image astrophotography, including nightscapes, we often stack and/or blend multiple images to create the final scene, for several reasons:
To stack multiple images with a Mean or Median stack mode to smooth noise.
To layer dozens of images with a Lighten blend mode to create star trails.
To layer and blend images via masking to combine the different exposures often needed to record the ground and sky each at their best.
Or often as not, a combination of all of the above!
All those methods require a layer-based program. Adobe Photoshop is the most popular choice.
Of the programs tested here, only two also offer the ability to layer multiple images for stacks, blends and composites. They are:
Affinity Photo 2
ON1 Photo RAW 2023
I did not test these two programs to compare their image layering and masking abilities vs. Photoshop, as important as those functions might be.
Fans of Skylum’s Luminar Neo will point out that it also supports image layers. In theory. In the version I tested (v1.6.2) bugs made it impossible to load files into layers properly — the layer stack became confused and failed to display the stack’s contents. I could not tell what it was stacking! Skylum is notorious for its buggy releases.
Those determined not to use Adobe software should be aware that, apart from Affinity Photo and ON1 Photo RAW, all the other programs tested here are not replacements for Adobe Photoshop, nor are they advertised as such. They are just raw developers, and so can serve only to replace Adobe Lightroom or Adobe Camera Raw/Adobe Bridge.
The Challenge
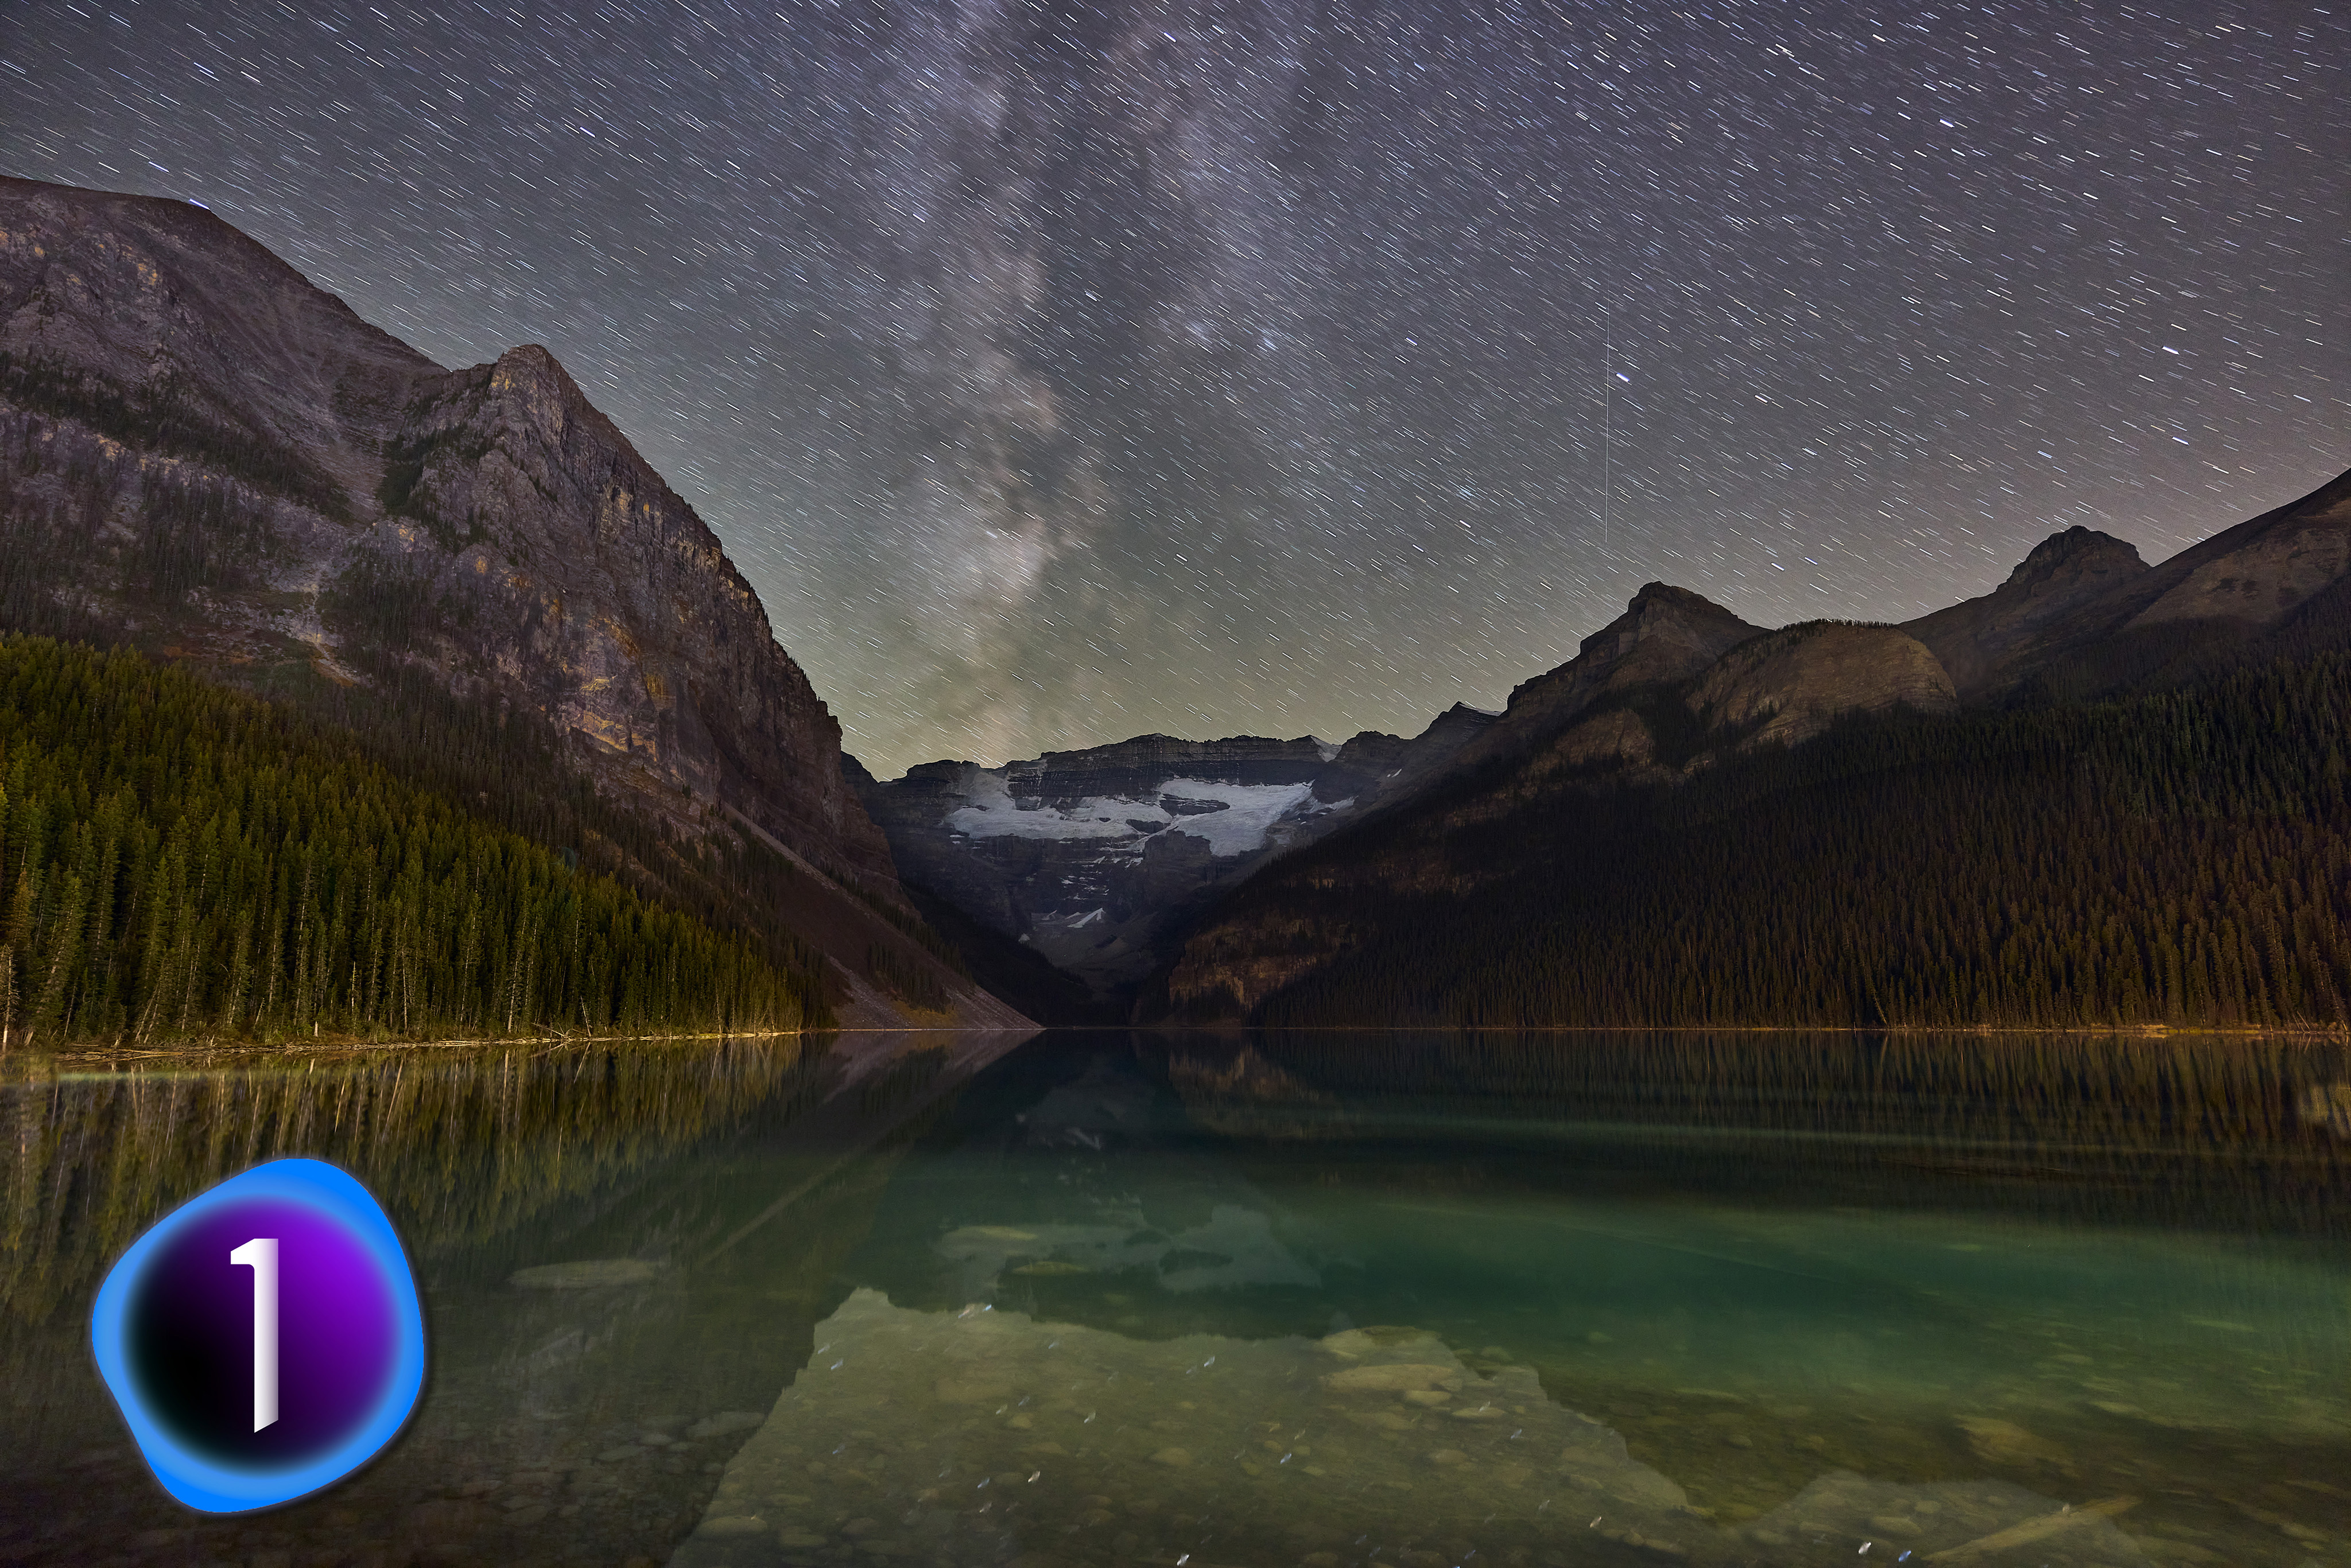
This is the main image I threw at all nine programs, a single 2-minute exposure taken at Lake Louise, Alberta in October 2022. The lens was the Canon RF15-35mm at f/2.8 on a Canon R5 camera at ISO 800.
The original raw image
Above is the raw image as it came out of camera, with the default Adobe Color camera profile applied, but no other adjustments. The length of exposure on a static tripod meant the stars trailed. The image has:
A sky that needs color correcting and contrast enhancement.
Dark shadows in the foreground and distance that need recovery.
Bright foreground areas that need suppressing, where lights from the Chateau Lake Louise hotel illuminate the mountainsides and water.
Lens flares and lights from night hikers that need retouching out.
It is an iconic scene, but when shot at night, it’s a challenging one to process.
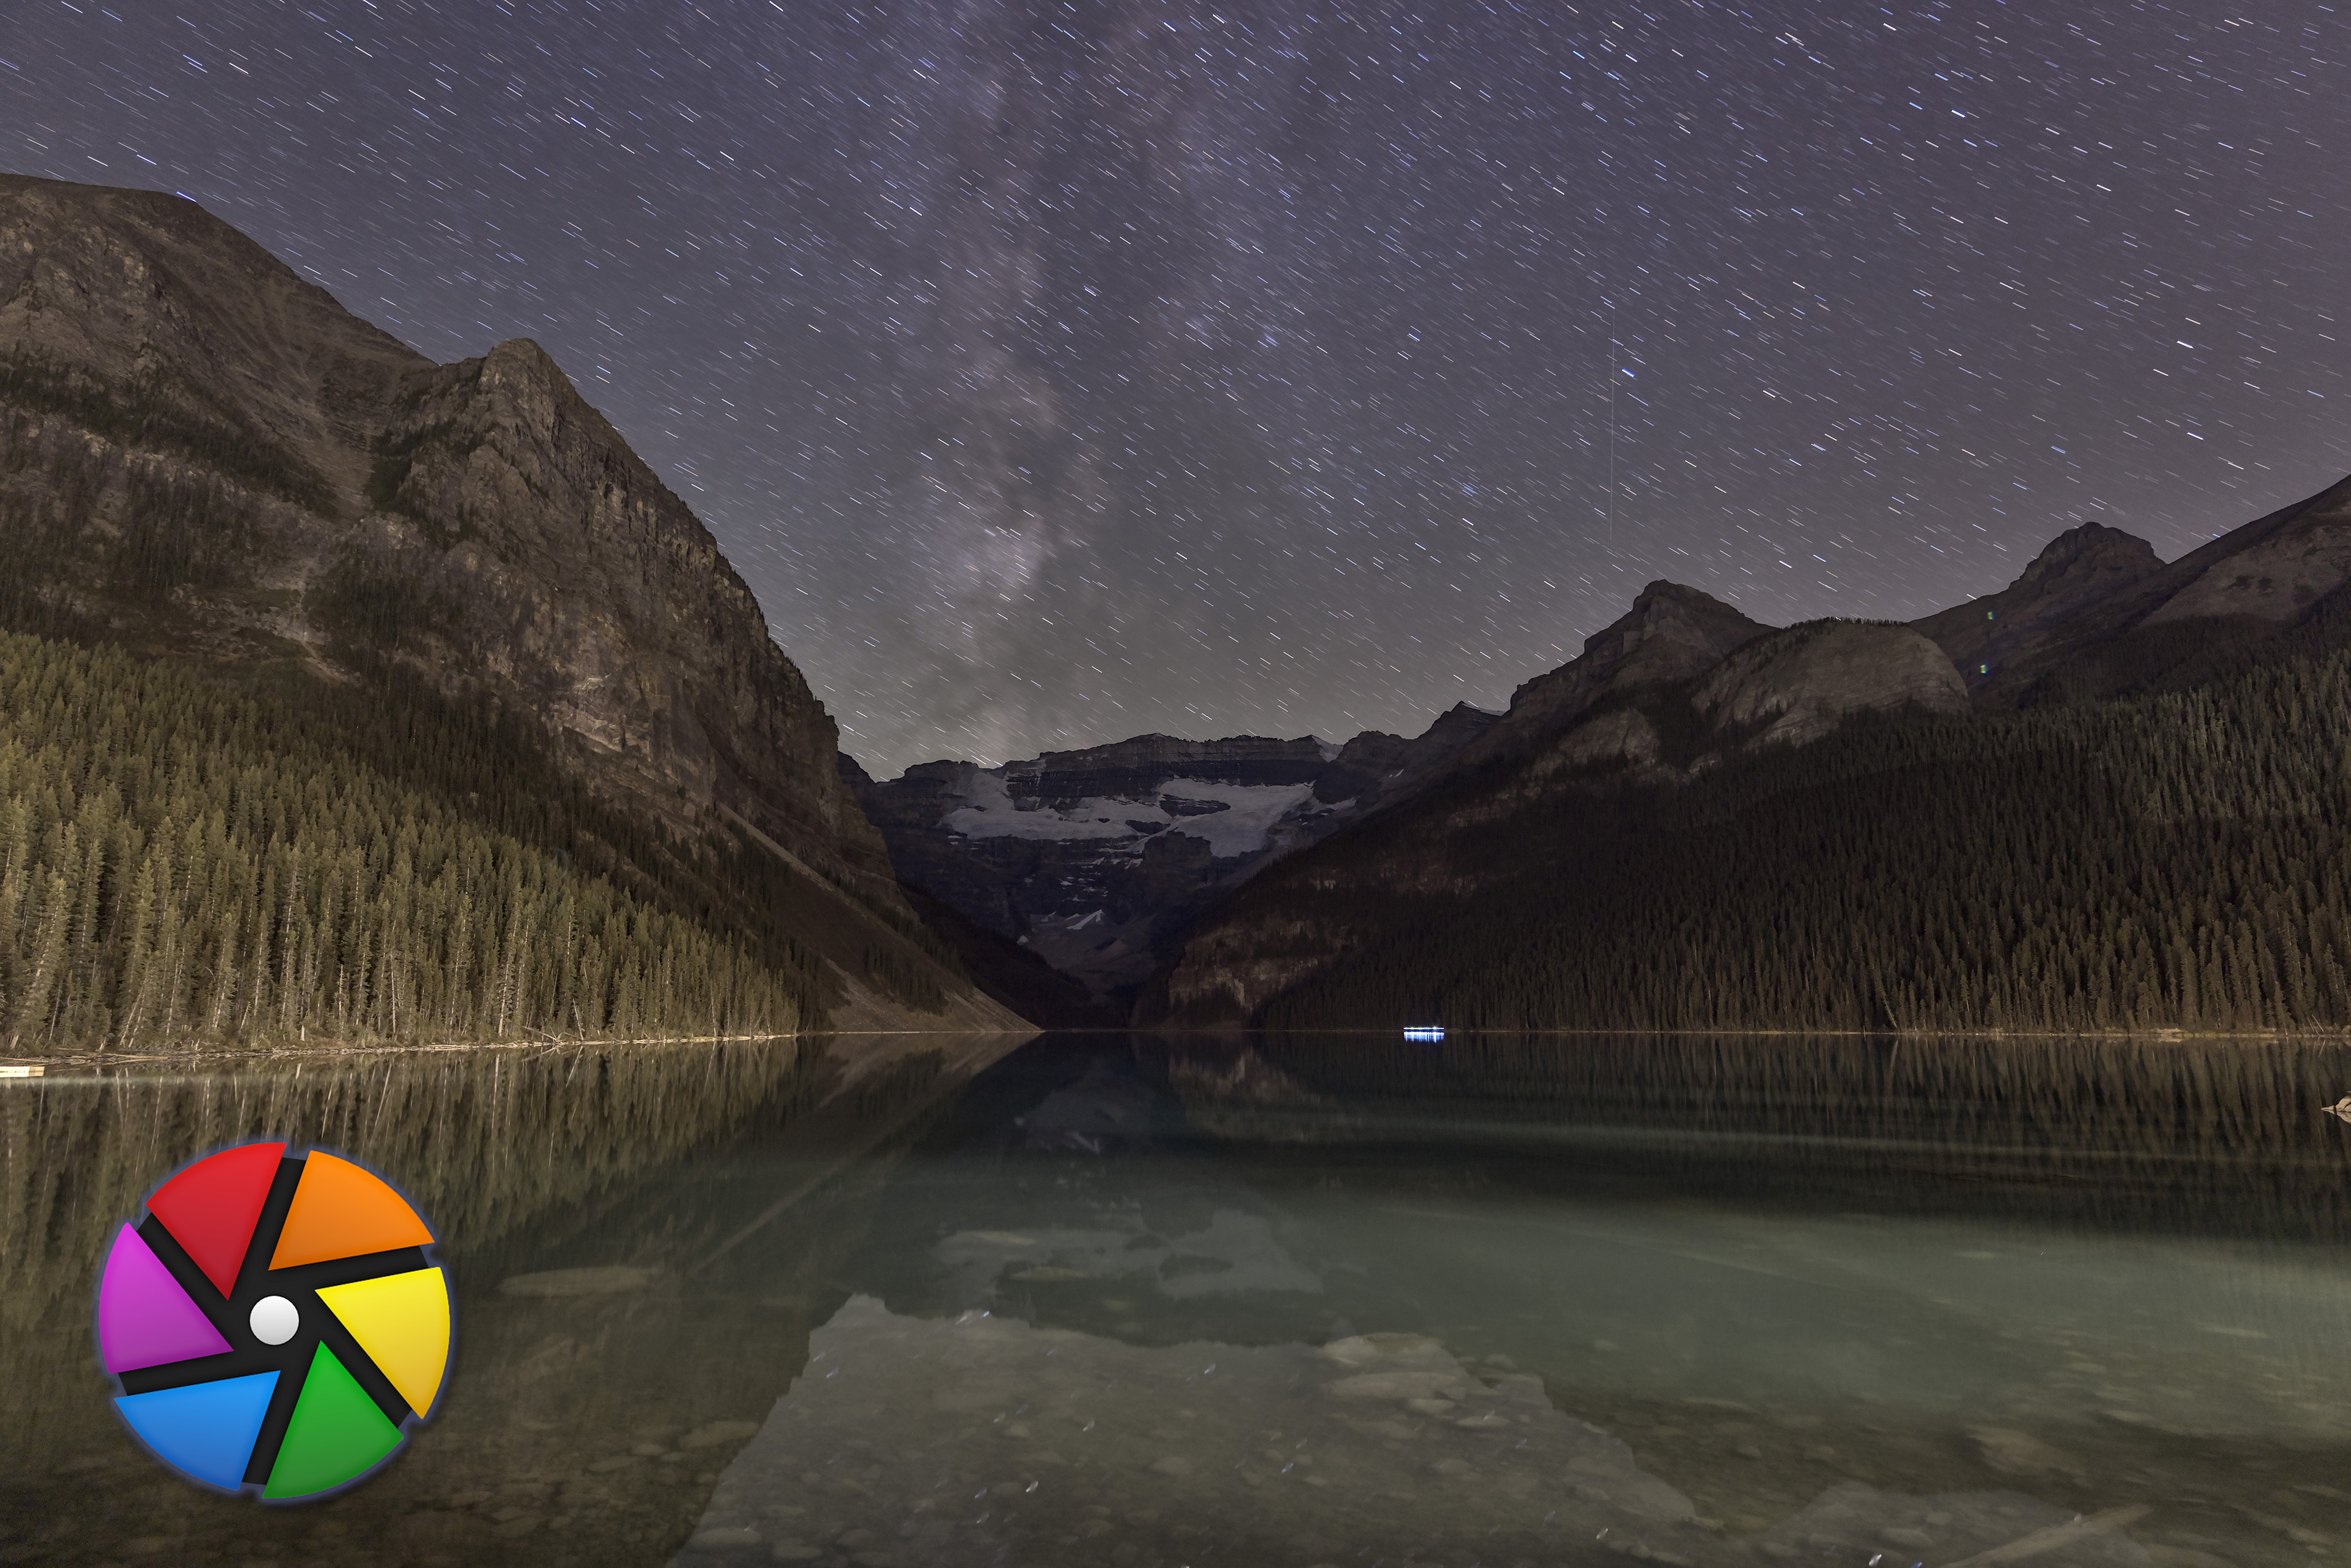
The untracked image developed in Adobe Camera Raw
Above is the image after development in Adobe Camera Raw (ACR), using sliders under its Basic, Optics, Detail, Curve, Color Mixer, and Calibration tabs, and applying the Adobe Landscape camera profile. Plus I added retouching, and local adjustments with ACR’s masks to affect just the sky and parts of the ground individually. This is the result I think looks best, and is the look I tried to get all other programs to match or beat. You might prefer a different look or style.
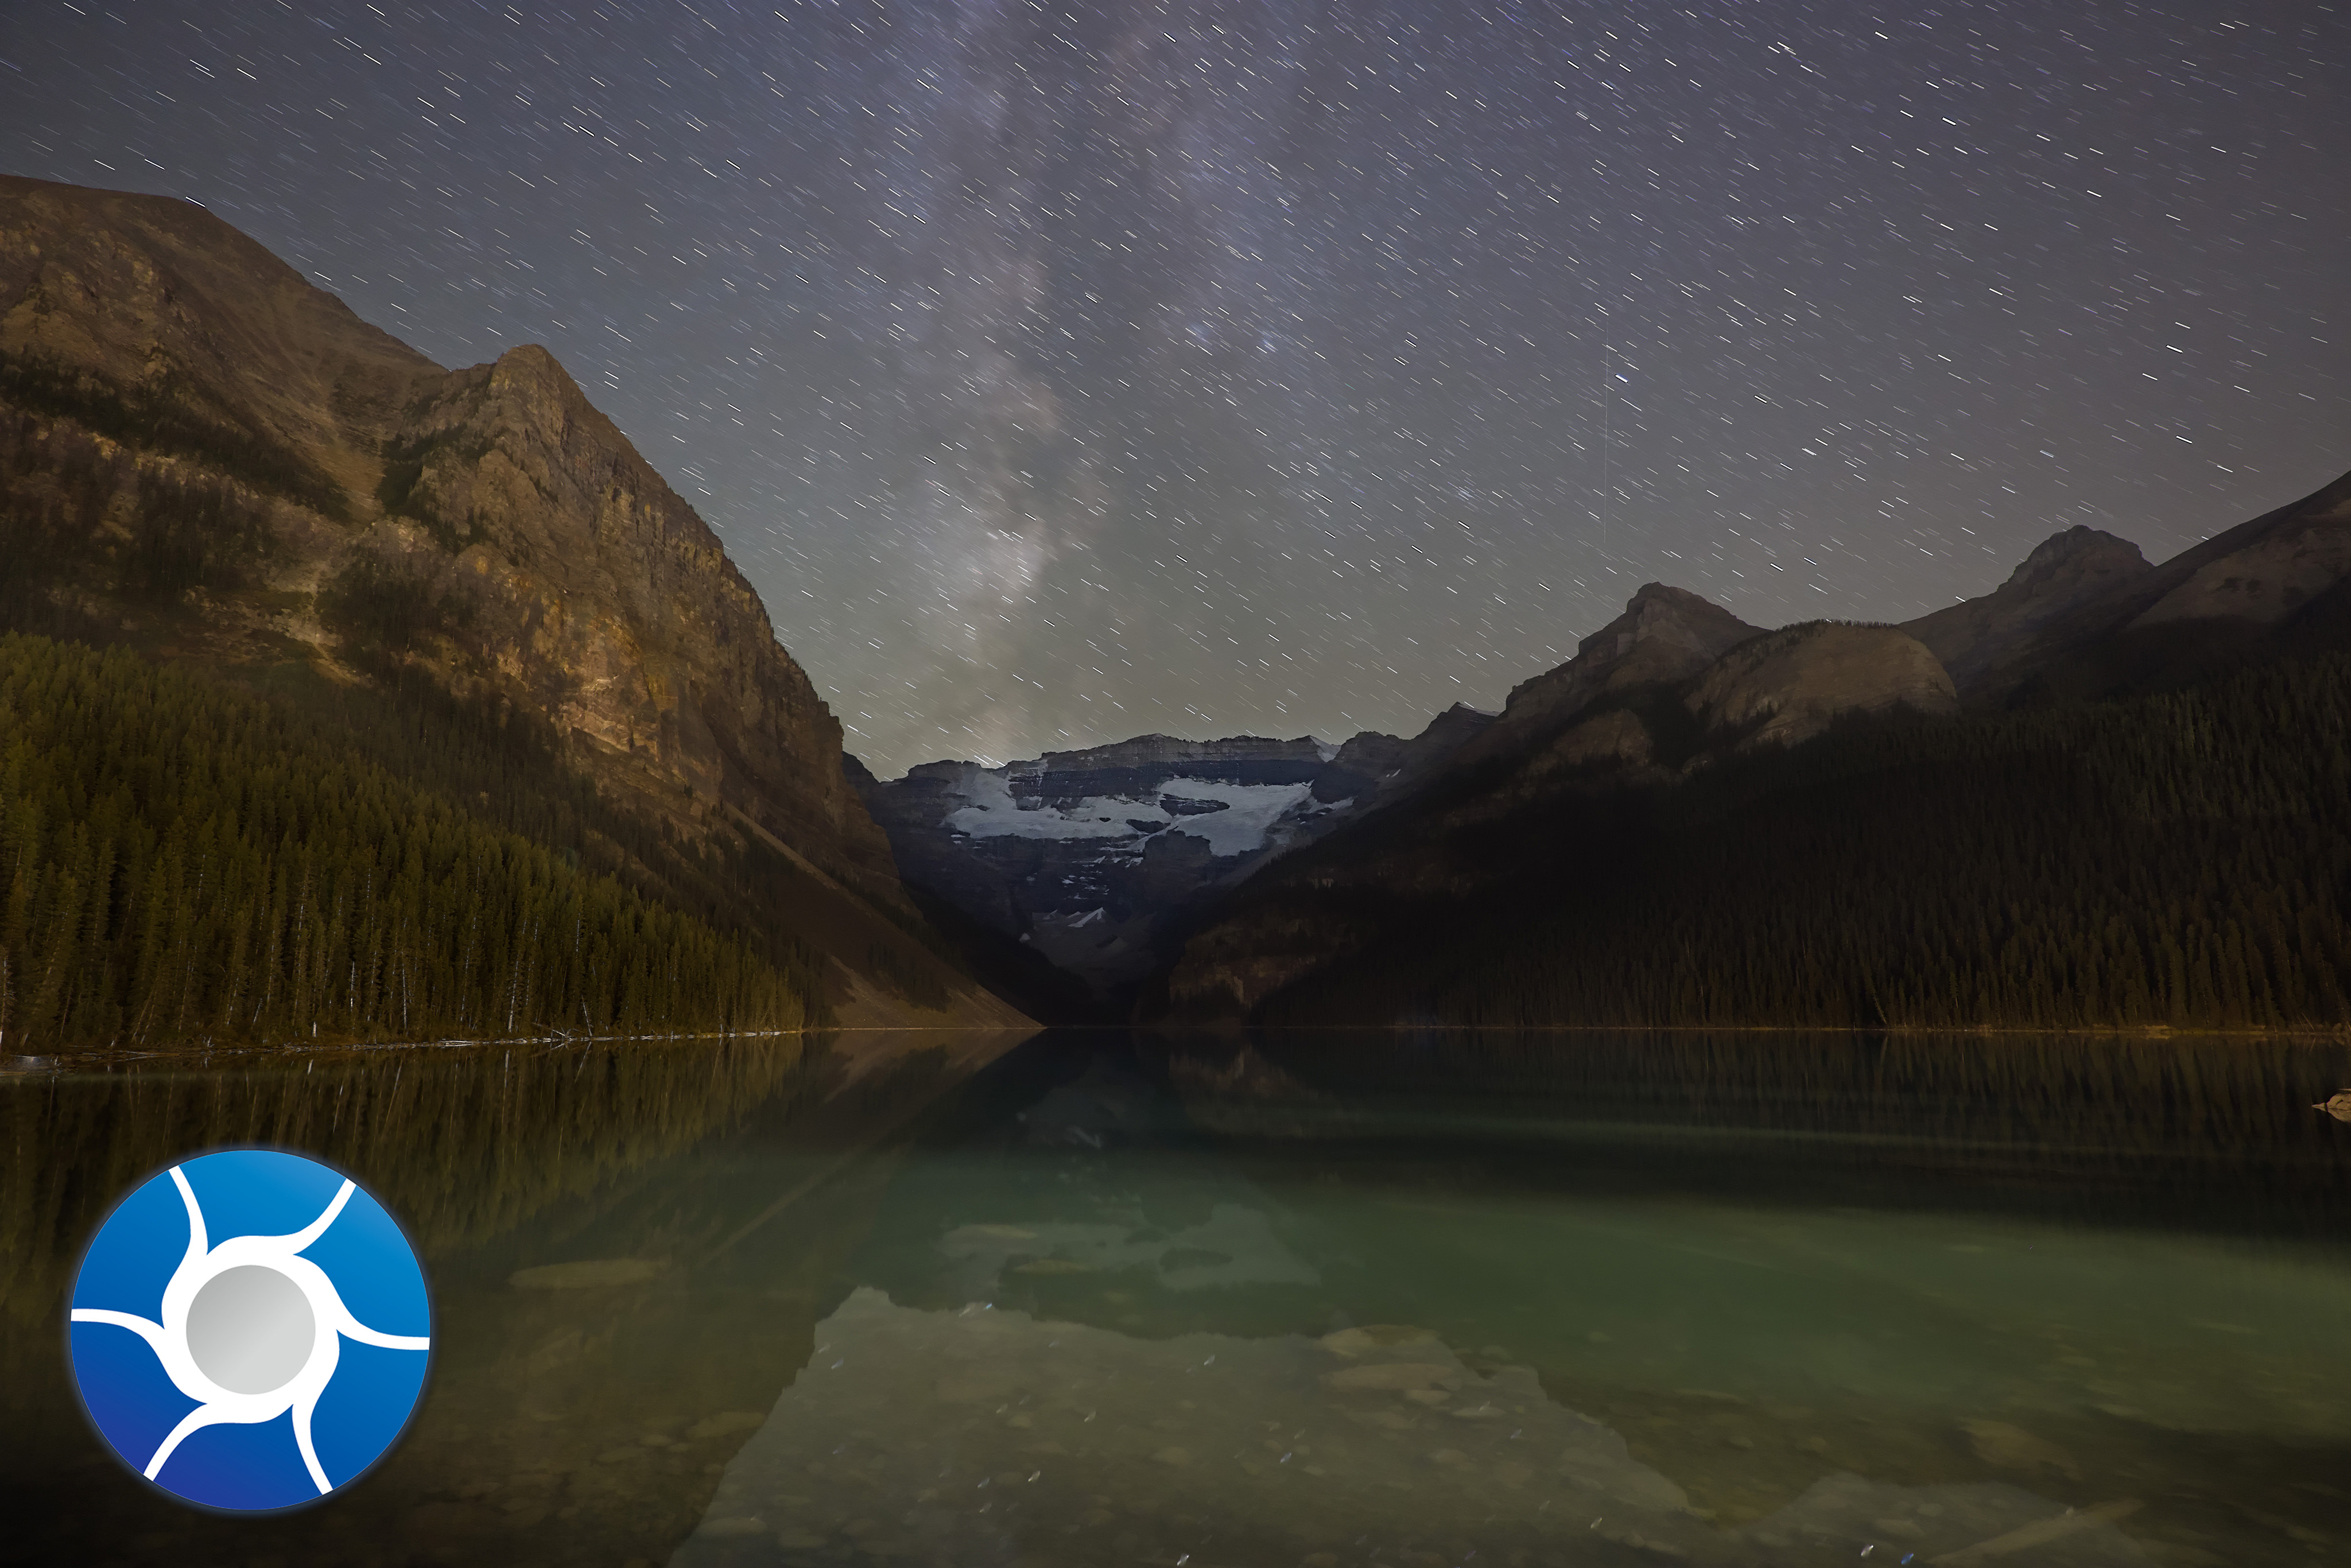
The developed tracked image
In addition, I tried all programs on another two-minute exposure of the scene (shown above) but taken on a star tracker to produce untrailed, pinpoint stars, but a blurred ground. It served to test how well each program’s noise reduction and sharpening dealt with stars.
The final layered and blended image in Adobe Photoshop
I shot that tracked version to blend with the untracked version to produce the very final image above, created from the Camera Raw edits. That blending of sky and ground images (with each component a stack of several images) was done in Photoshop. However, Affinity Photo or ON1 Photo RAW could have done the required layering and masking. I show a version done with Affinity at the end of the blog.
The Competitors
In a statement I read some time ago, DxO stated that Adobe products enjoy a 90% share of the image processing market, leaving all the competitors to battle over the remaining 10%. I’m not sure how accurate that is today, especially as many photographers will use more than one program.
However, I think it is fair to say Adobe’s offerings are the programs all competitors are out to beat.
NOTE: Click/tap on any of the images to bring them up full screen as high-res JPGs so you can inspect them more closely.
The Established Standard
Adobe Camera Raw (included with Photoshop, Adobe Bridge and Lightroom)
Cost: $10 a month, or $120 a year by subscription for 20 Gb of cloud storage (all prices in U.S. $)
Adobe Camera Raw (ACR) is the raw development utility that comes with Photoshop and Adobe Bridge, Adobe’s image browsing application. Camera Raw is equivalent to the Develop module in Lightroom, Adobe’s cataloguing and asset management software. Camera Raw and Lightroom have identical processing functions and can produce identical results, but I tested ACR. I use it in conjunction with Adobe Bridge as an image browser. Bridge can then send multiple developed images into Photoshop as layers for stacking. All programs are included in Adobe’s Photo subscription plan.
The Contenders (in Alphabetical Order)
Here are the eight programs I tested, comparing them to Adobe Camera Raw. All but Skylum’s Luminar Neo offer free trial copies.
ACDSee Photo Studio
Cost: $100 to $150, depending on version. $50 on up for annual major upgrades. By subscription from $70 a year.
I tested Photo Studio for Mac v9. Windows users have a choice of Photo Studio Professional or Photo Studio Ultimate. All three versions offer a suite of raw development tools, in addition to cataloging functions. However, the Ultimate version (Windows only) also offers layer-based editing, making it similar to Photoshop. ACDSee assured me that Photo Studio for Mac resembles the Windows Professional version, at least for basic raw editing and image management. However, Photo Studio Professional for Windows also has HDR and Panorama merging, which the Mac version does not.
Affinity Photo 2
Cost: $70. Upgrades are free except for rare whole-number updates (in seven years there’s been only one of those!). No subscription plan is offered.
Apart from the free Darktable, this is the lowest-cost raw developer on offer here. But Affinity’s strength is as a layer-based editor to compete with Photoshop. As such, Affinity Photo has some impressive features, such as the unique ability to calibrate and align deep-sky images, its stack modes (great for star trails and noise smoothing) which only Photoshop also has, and its non-destructive adjustment layers, filters and masks. Affinity Photo is the most Photoshop-like of all the programs here. However, it alone of the group lacks any image browser or cataloging function, so this is not a Lightroom replacement.
Capture One 23 Pro
Cost: $299. 33% off (about $200) for annual major upgrades. By subscription for $180 a year.
Capture One started life as a program for tethered capture shooting in fashion studios. It has evolved into a very powerful raw developer and image management program. While Capture One advertises that it now offers “layers,” these are only for applying local adjustments to masked areas of a single underlying image. While they work well, you cannot layer different images. So Capture One cannot be used like Photoshop, to stack and composite images. It is a Lightroom replacement only, but a very good one. However, it is the most costly to buy, upgrade each year, or subscribe to, which appears to be the sales model Capture One is moving toward, following Adobe.
In contrast to Capture One, you cannot argue with Darktable’s price! For a free, open-source program, Darktable is surprisingly full-featured, while being fairly well supported and updated. As with most free cross-platform programs, Darktable uses an unconventional and complex user interface lacking any menus. It has two main modules: Lighttable for browsing images, and Darkroom for editing images. Map, Slideshow, Print and Tethering modules clearly signal this program is intended to be a free version of Lightroom. The price you pay, however, is in learning to use its complex interface.
DxO PhotoLab 6 ELITE
Cost: $219. $99 for annual major upgrades. No subscription plan is offered.
DxO PhotoLab is similar to Capture One in being a very complete and feature-rich raw developer with good image management functions and a well-designed interface. While it has an image browser for culling, keywording and rating images, PhotoLab does not create a catalog as such, so this isn’t a full Lightroom replacement. But it is a superb raw developer, with very good image quality and noise reduction. While PhotoLab is also available in a $140 ESSENTIAL edition, it lacks the DeepPrime noise reduction and ClearView Plus haze reduction, both useful features for astrophotos.
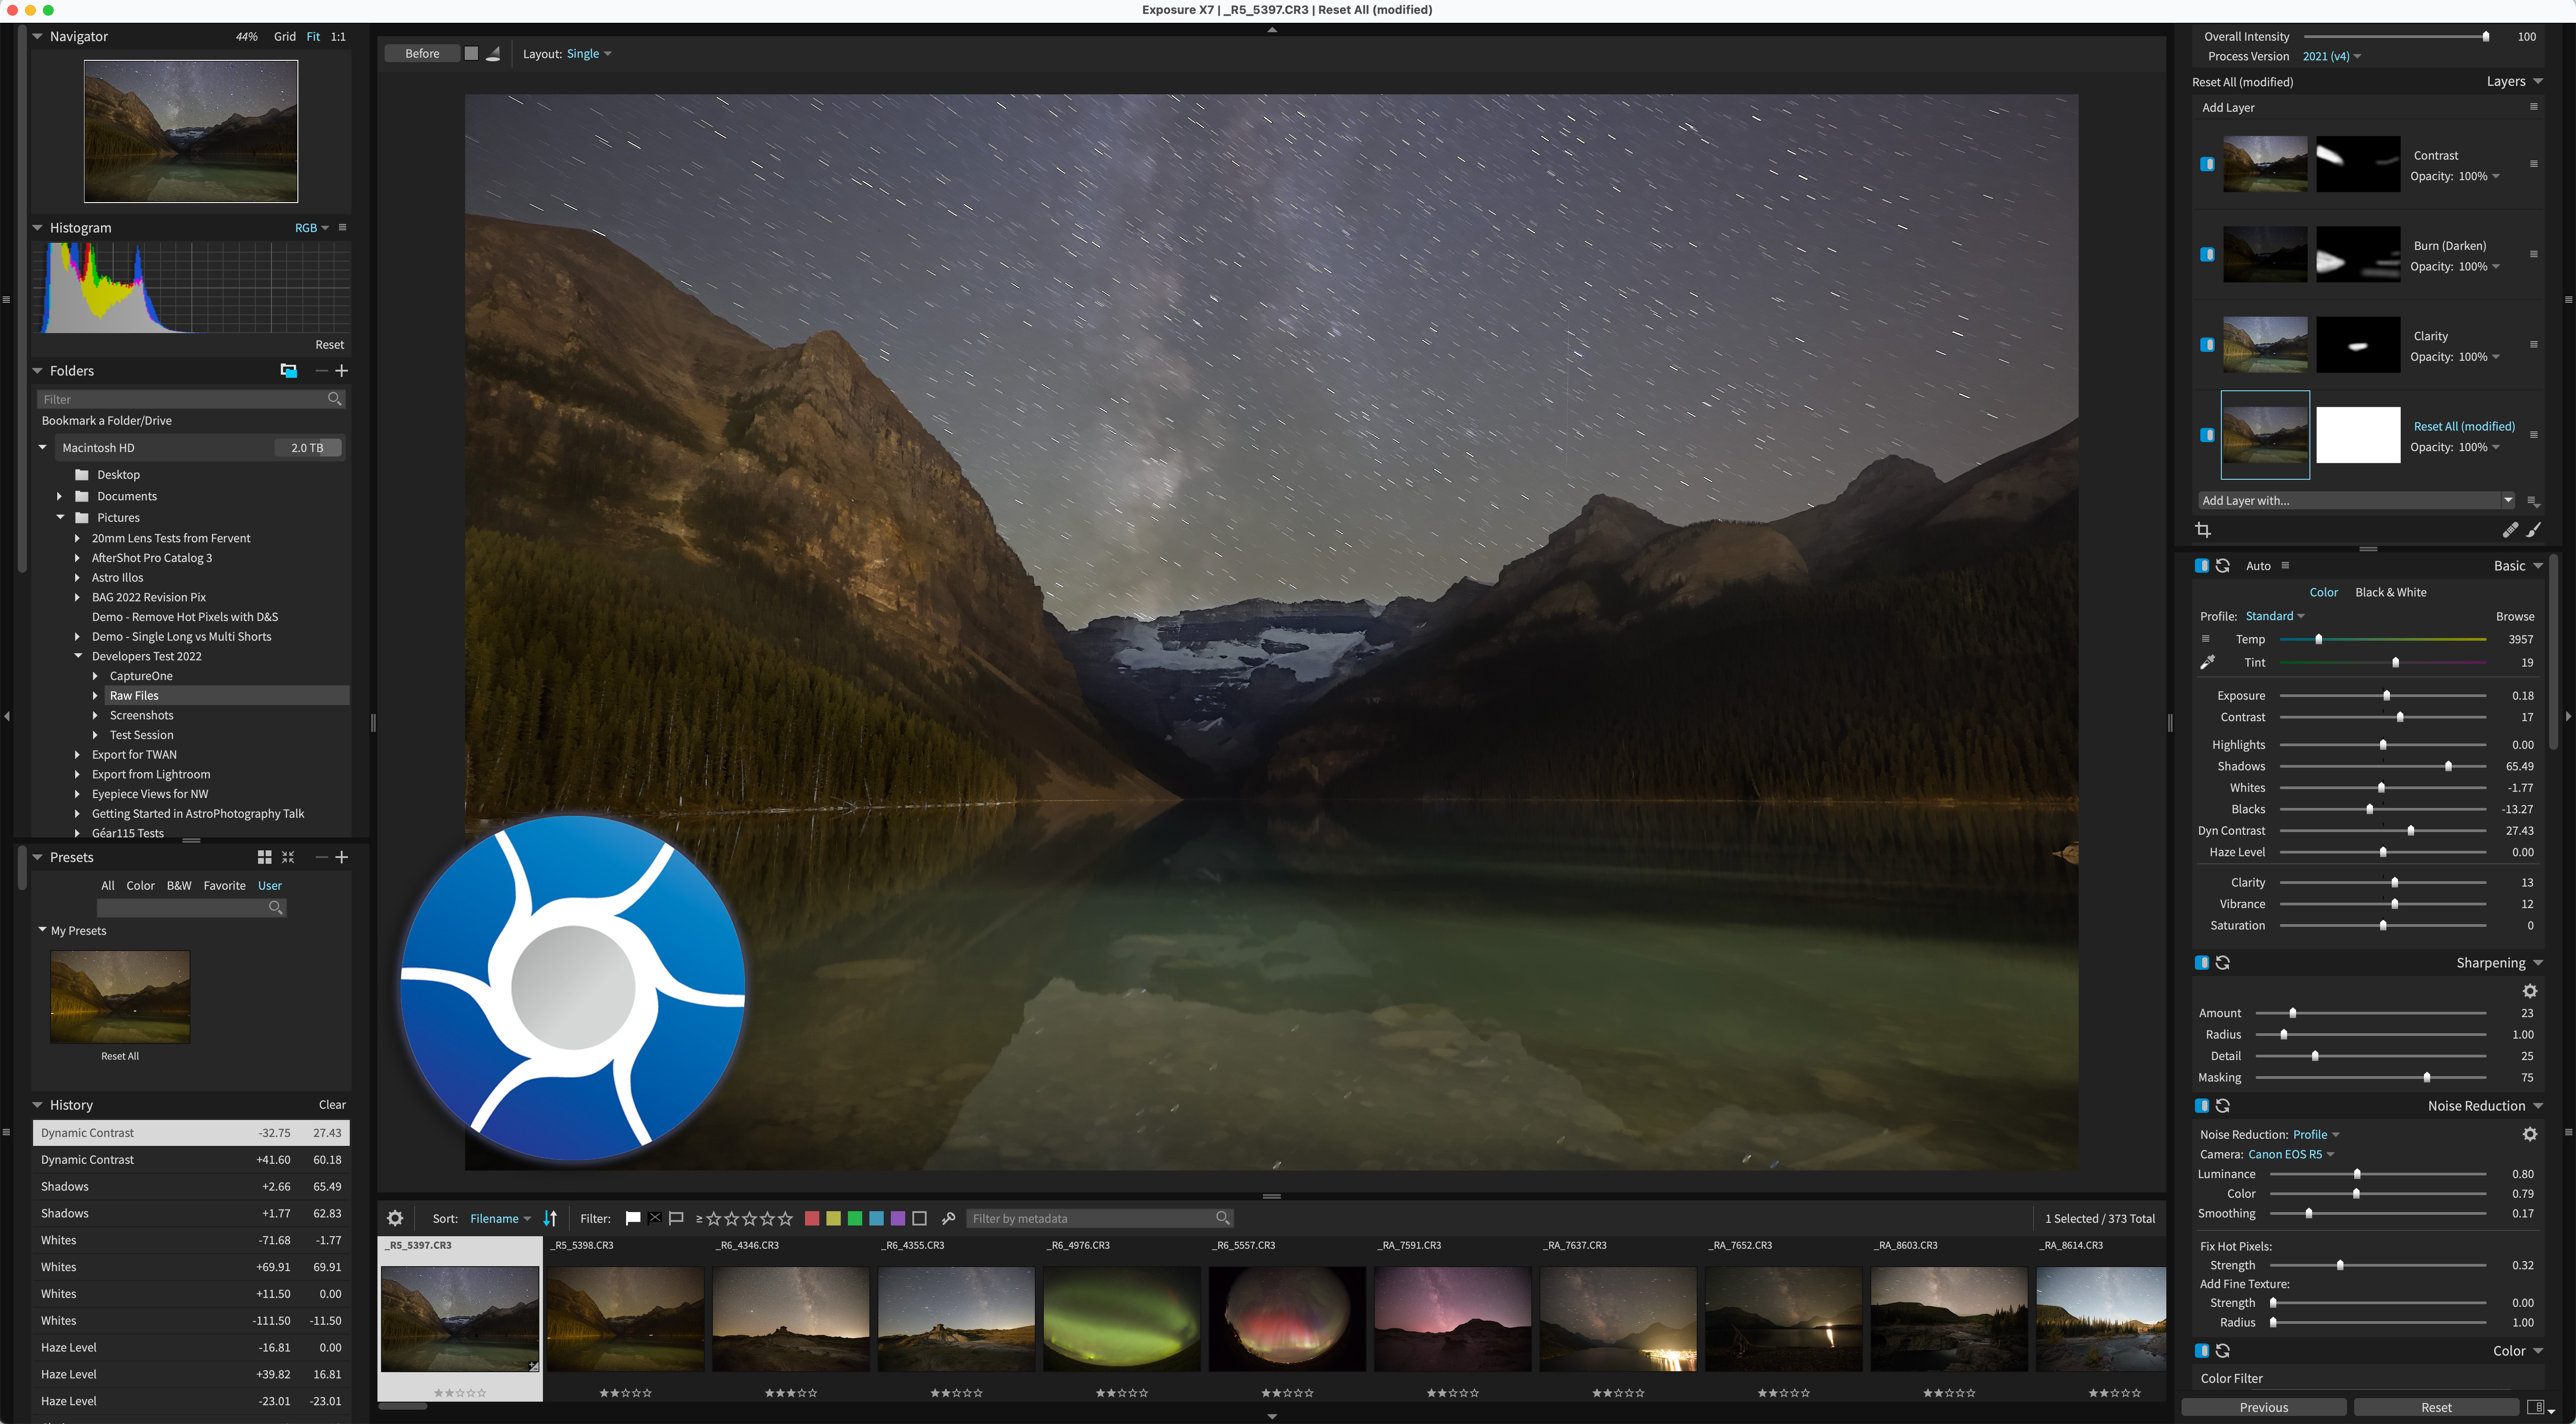
Exposure X7
Cost: $129. $89 for annual major upgrades. No subscription plan is offered.
Formerly known as Alien Skin Exposure, from the makers of the once-popular utilities Blow Up and Eye Candy, Exposure X7 is a surprisingly powerful raw editor (considering you might not have heard of it!), with all the expected adjustment options, plus a few unique ones such as Bokeh for purposely blurring backgrounds. It enjoys annual major updates, so is kept up to date, though is a little behind the times in lacking any AI-based effects or masking, or even automatic edge detection. Like Capture One, Exposure offers adjustment layers for ease of applying local edits.
Luminar Neo
Cost: $149. $39 to $59 for individual Extensions. $179 for Extensions pack. By subscription for $149 a year which includes Neo and all Extensions. Frequent discounts and changing bundles make the pricing confusing and unpredictable.
By contrast to Exposure X7, Luminar Neo from Skylum is all about AI. Indeed, its predecessor was called Luminar AI. Introduced in 2022, Neo supplanted Luminar AI, whose image catalog could not be read by Neo, much to the consternation of users. Luminar AI is now gone. All of Skylum’s effort now goes into Neo. It offers the expected raw editing adjustments, along with many powerful one-click AI effects and tools, some offered as extra-cost extensions in a controversial à la carte sales philosophy. Neo’s cataloging ability is basic and unsuitable for image management.
ON1 Photo RAW 2023
Cost: $99. $60 for annual major upgrades. $70 for individual plug-ins, each with paid annual updates. By subscription for $90 a year which includes all plug-ins and updates.
Of all the contenders tested, this is the only program that can truly replace both Lightroom and Photoshop, in that ON1 Photo RAW has cataloging, raw developing, and image layering and masking abilities. In recent years ON1 has introduced AI functions for selection, noise reduction, and sharpening. Some of these are also available as individual plug-ins for Lightroom and Photoshop at an additional cost. While the main program and plug-ins can be purchased as perpetual licences, the total cost makes an annual subscription the cheapest way to get and maintain the full ON1 suite. Like Capture One, they are moving customers to be subscribers.
Feature Focus
I have assumed a workflow that starts with raw image files, not JPGs, for high-quality results. And I have assumed the goal of making that raw image look as good as possible at the raw stage, an important step in the workflow, as it is the only time we have access to the full dynamic range of the 14-bit raw data that comes from the camera.
I judged each program based on several features I consider key to great nightscapes and time-lapses:
Browser/Cataloging Functions —Because we often deal with lots of images from an astrophoto shoot, the program should allow us to sort, rate, and cull images before proceeding with developing the best of the set for later stacking, and to easily compare the results.
Lens Corrections —Does the program apply automatic lens corrections for distortion and vignetting? How extensive is its lens database? Or are manual adjustments required?
Noise Reduction —We shoot at high ISOs, so good noise reduction is essential for removing digital noise without sacrificing details such as pixel-level stars, or adding AI artifacts.
Shadow Recovery —While good highlight recovery can be important (and a prime reason for shooting and processing raw images), in nightscapes good shadow recovery is even more crucial. The starlit ground is dark, but rich in detail. We want to recover that shadow detail, without affecting other tonal ranges or introducing noise.
Local Adjustments and Masking —Good masking tools allow us to do more at the raw stage while we have access to the full range of image data. But how precise can the masks be? How easy is it to apply different settings to the ground and sky, the most common need for local adjustments with nightscapes.
Overall Finished Image Quality —Tools such as Dehaze and Clarity can work wonders at boosting contrast in the sky. Good color adjustments from HSL sliders can help fine-tune the overall color balance. How good did the final image look? — an admittedly subjective judgement.
Copy & Paste Settings —A program should not only develop one image well, but also then be able to transfer all of that key image’s settings to several other images taken for noise stacking, or to what could be hundreds of images shot for a time-lapse movie or star trail scene.
Batch Export —For stacking images for star trails, or for creating panoramas in advanced stitching programs such as PTGui, or when assembling time-lapse movies, the program should allow a “batch export” of selected images to TIFFs or JPGs for use elsewhere.
Advanced Features —Does the program support panorama stitching and HDR (High Dynamic Range) merging of selected developed raw files? If so, what type of file does it create?
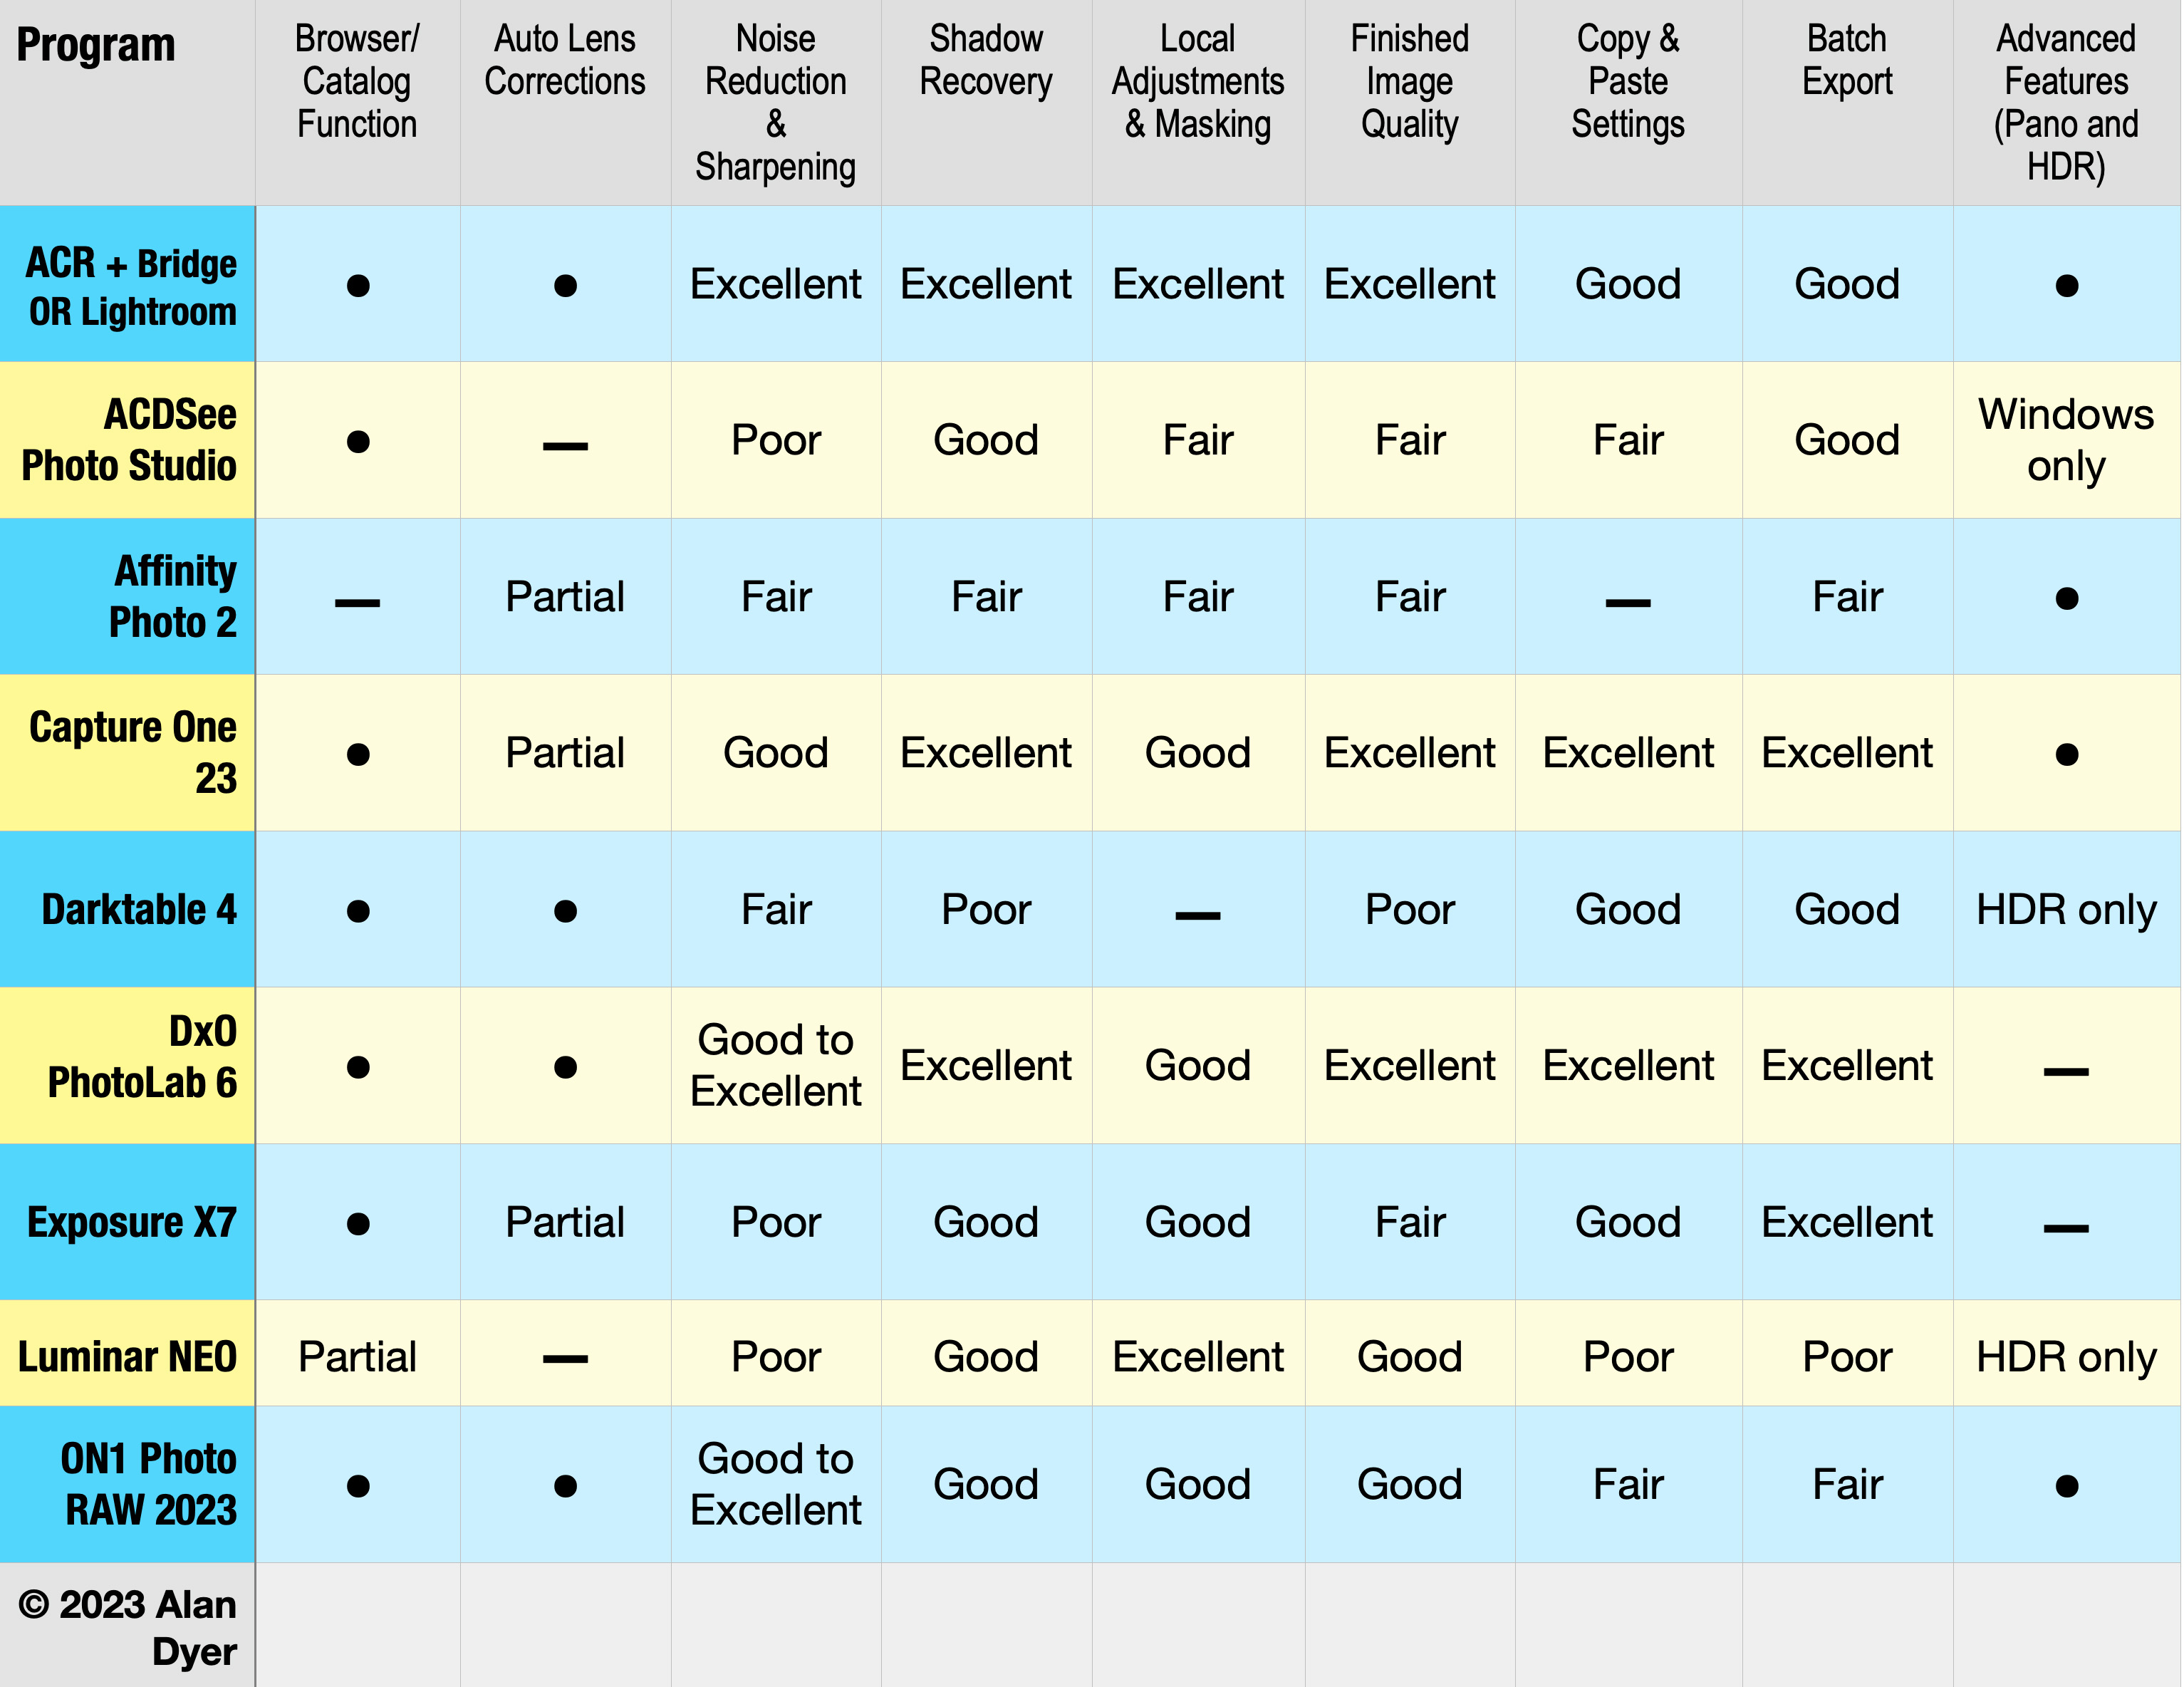
Summary Comparison Table
• = Feature is present; ticks the boxes!
— = Feature is missing
Partial = Feature only partially implemented (e.g. Only has distortion correction but not vignetting correction, or has limited cataloging functions)
I judged other features on an admittedly subjective scale of Poor, Fair, Good, or Excellent, based on my overall impressions of the reliability, options offered, quality, and/or speed of operation.
Feature-by-Feature Details — 1. Browsing and Cataloging
Here, feature by feature, are what I feel are the differences among the programs, comparing them using the key factors I listed above.
All programs, but one, offer a Browse or Library module presenting thumbnails of all the images in a folder or on a drive. (For Adobe Camera Raw that module is Adobe Bridge, included with the Creative Cloud Photo subscription.) From the Browse/Library module you can sort, rate and cull images.
The Catalog screens from six of the programs tested
Luminar Neo’s Catalog function (as of early 2023) allows only flagging images as favorites. It is very crude.
The other programs have more full-featured image management, allowing star rating, color label rating, pick/reject flags, keywording, grouping into collections or projects, and searching.
Capture One and ON1 Photo RAW provide the option of importing images into formal catalogs, just as Adobe Lightroom requires. However, unlike Lightroom, both programs can also work with images just by pointing them to a folder, without any formal import process. Capture One calls this a “session.” Adobe Bridge works that way — it doesn’t produce a catalog.
While not having to import images first is convenient, having a formal catalog allows managing a library even when the original images are off-line on a disconnected hard drive, or for syncing to a mobile app. If that’s important, then consider Capture One, ON1 Photo RAW, or Adobe Lightroom. They each have mobile apps.
Adobe Lightroom (but not Bridge) is also able to connect directly to what it calls “Publish Services” — Flickr, PhotoShelter, and SmugMug for example, using plug-ins offered by those services. I use that feature almost daily. ACDSee offers that feature only in its Windows versions of Photo Studio. As best I could tell, all other programs lacked anything equivalent.
SerifAffinity Photo is the lone exception lacking any form of image browser or asset management. It’s hard to fathom why in late 2022, with their major update to Version 2 of their software suite, Serif did not introduce a digital asset management program to link their otherwise excellent Photo, Designer and Publisher programs. This is a serious limitation of Serif’s Affinity creative suite, which is clearly aimed at competing one-on-one with Adobe Photoshop, Illustrator and InDesign, yet Serif has no equivalent of Adobe Bridge for asset management.
WINNERS: Capture One and ON1 Photo RAW, for the most flexibility in informal browsing vs. formal cataloguing. Adobe Lightroom for its Publish Services.
LOSER: Affinity Photo for lacking any image management or catalog.
Feature-by-Feature Details — 2. Lens Corrections
The wide-angle lenses we typically use in nightscape and time-lapse imaging suffer from vignetting and lens distortions. Ideally, software should automatically detect the camera and lens used and apply accurate corrections based on its equipment database.
The Lens Corrections panels from all nine programs.
Of the nine programs tested, only four — Adobe Camera Raw, Darktable, DxO PhotoLab, and ON1 Photo Raw — automatically applied both distortion and vignetting corrections for the Canon RF15-35mm lens I used for the test images. DxO is particularly good at applying corrections, drawing upon the company’s vast repository of camera and lens data. If your local copy of PhotoLab is missing a camera-lens combination, what it calls a “module,” DxO allows you to download it or request it.
Capture One and Exposure X7 both detected the lens used and applied distortion correction, but did nothing to adjust vignetting. I had to apply vignetting correction, a more important adjustment, manually by eye.
ACDSee and Luminar have no Auto Lens Corrections at all; distortion and vignetting both have to be dialed in manually.
Affinity Photo lacked any automatic correction data for the Canon RF15-35mm lens in question, despite the lens being introduced in 2019. I selected the similar Canon EF16-35mm lens instead, as I show above circled in blue. Affinity gets marks off for having an outdated and incomplete lens database.
WINNERS: Adobe, Darktable, DxO PhotoLab, and ON1 Photo RAW, for full Auto Lens Corrections.
LOSERS: ACDSee and Luminar, for lacking Auto Lens Corrections.
Feature-by-Feature Details — 3. Noise Reduction and Sharpening
Absolutely essential to astrophotography is effective noise reduction, of both grainy “luminance” noise, as well as colorful speckles and splotches from “chrominance” noise. Programs should smooth noise without eliminating stars, removing star colors, or adding odd structures and artifacts.
Conversely, programs should offer a controllable level of sharpening, without introducing dark halos around stars, a sure sign of over-zealous sharpening.
Closeups of the tracked image comparing noise reduction and star image quality in all 9 programs. Tap or click to download a high-res version for closer inspection to see the pixel-level differences.
I tested noise reduction using the tracked version of my test images, as the pinpoint stars from the 45-megapixel Canon R5 will reveal any star elimination or discoloration.
Adobe Camera Raw’s aging noise reduction routine stood up very well against the new AI competitors. It smoothed noise acceptably, while retaining star colors and Milky Way structures. But turn it up too high, as might be needed for very high ISO shots, and it begins to blur or wipe out stars. AI noise reduction promises to solve this.
AI-Based Noise Reduction:
DxO PhotoLab’s Prime and DeepPrime AI-based options can also do a good job. But … I find DeepPrime (shown above) and the newer DeepPrimeXD (shown below) can introduce wormy looking artifacts to starfields. The older Prime method might be a better choice. However, the annoyance with DxO PhotoLab is that it is not possible to preview any of its Prime noise reduction results full-screen, only in a tiny preview window, making the best settings a bit of a guess, requiring exporting the image to see the actual results.
ON1 Photo RAW’s NoNoise AI can also do a good job, but has to be backed off a lot from the automatic settings its AI technology applies. Even so, I found it still left large-scale color blotches, a pixel-level mosaic pattern, and worst of all, dark halos around stars, despite me applying no sharpening at all to the image. ON1 continues to over-sharpen under the hood. I criticized it for star halos in my 2017 survey — the 2023 version behaves better, but still leaves stars looking ugly.
The other AI program, Luminar Neo with its Noiseless AI extension (an extra-cost option) did a poor job, adding strange artifacts to the background sky and colored halos around stars.
Comparing DxO’s three Prime noise reduction options on the untracked image. DeepPrimeXD is sharper!Comparing DxO’s three Prime noise reduction methods on the tracked image. DeepPrimeXD is riddled with artifacts.
So beware of AI. As I show above with DxO, because they are not trained on starfields, AI routines can introduce unwanted effects and false structures. What works wonders on high-ISO wildlife or wedding shots can ruin astrophotos.
For a more complete test of AI programs, such as Topaz DeNoise AI and Noise XTerminator, made specifically for noise reduction, see my review from November 2022, Testing Noise Reduction Programs for Astrophotography.
Non AI-Based Noise Reduction:
Capture One smoothed noise very well, but tended to bloat stars and soften fine detail with its Single Pixel control turned up even to one pixel, as here.
Affinity Photo nicely smoothed noise, but also removed star colors, yet added colored rims to some stars, perhaps from poor de-Bayering. Serif Lab’s raw engine still has its flaws.
ACDSee Photo Studio also added loads of unacceptable halos to stars, and could not reduce noise well without smoothing details.
Darktable has very good noise reduction, including a panel specifically for Astrophoto Denoise. Great! Pity its routines seemed to wipe out star colors and fine structures in the Milky Way.
Exposure X7 smoothed noise well, but also wiped out details and structures, and its sharpening adds dark halos to stars.
That said, it might be possible to eke out better results from all these programs with more careful settings. Backing off sharpening or noise reduction can avoid some of the unwanted side effects I saw, but leave more noise.
Adobe Camera Raw does eliminate most random hot or dead pixels “under the hood.” However, I wish it had an adjustable filter for removing any that still remain (usually from thermal noise) and that can plague the shadows of nightscapes. Single-pixel filters are offered by Capture One, Darktable, DxO, and Exposure X7. Though turning them up too high can ruin image detail.
WINNERS: Adobe and DxO PhotoLab (if the latter is used cautiously)
LOSERS: ACDSee, Affinity, Darktable, Exposure X7, and Luminar Neo for unacceptable loss of detail and star colors, while adding in false structures (Neo)
Feature-by-Feature Details — 4. Shadow Recovery
While all programs have exposure and contrast adjustments, the key to making a Milky Way nightscape look good is being able to boost the shadows in the dark starlit ground, while preventing the sky or other areas of the image from becoming overly bright or washed out.
Comparing Shadow Recovery in two programs (Camera Raw – top – and DxO PhotoLab – middle) that worked quite well, with Darktable (bottom) that did not.
In the three examples above I have applied only white balance and exposure correction, then “lifted” the Shadows. I added some contrast adjustment to Darktable, to help improve it, and Smart Lighting to the DxO image, which was needed here.
Here are my findings, roughly in order of decreasing image quality, but with Adobe first as the one to match or beat.
Adobe Camera Raw has a very good Shadows slider that truly affects just the dark tonal areas and with a slight touch (turning it up to 100 doesn’t wipe out the image). Some other programs’ Shadows adjustments are too aggressive, affect too wide a range of tones, or just add a grey wash over the image, requiring further tweaks to restore contrast.
Capture One did an excellent job on Shadow recovery under its High Dynamic Range set of sliders. The dark landscape brightened without becoming flat or grey. This is a primary contributor to its excellent image quality.
DxO PhotoLab’s Shadows slider affects a wider tonal range than ACR or Capture One, also brightening mid-tones, though it has a Midtones slider to separately adjust those. On its own, the Shadows slider didn’t work as well as in ACR or Capture One. But DxO’s superb feature is its “Smart Lighting,” which can work wonders on a scene with one click. Another unique adjustment is “ClearView Plus,” a form of Dehaze which can snap up contrast, often too aggressively, but it can be backed off in intensity. Those two adjustments alone might be reason enough to use PhotoLab.
ON1 Photo RAW’s Shadows slider affected too wide a range of tonal values, brightening the entire scene and making it look flat. This can be overcome with some tweaks to the Contrast, Blacks and Midtones sliders. It takes more work to make a scene look good.
ACDSee’s Fill Light and Shadows sliders were also much too broad. But its unique LightEQ panel has options for “Standard” and “Advanced” settings which each provide an equalizer interface for making more selective tonal adjustments. It worked well, though the image looked too harsh and contrasty, despite me adding no contrast adjustments, the opposite flaw of other programs.
Luminar Neo’s Shadows slider under its DevelopRAW panel was also broad, washing out contrast, requiring a liberal application of its SuperContrast slider to return the image to a better look. But the final result looked fine.
Exposure X7’s Shadows slider also lowered overall contrast, requiring boosting Contrast and Blacks to return the image to a pleasing tonal balance.
Affinity Photo’s Shadows slider did a far better job in its new v2 (released in late 2022) than in the original Affinity Photo, which was frankly awful. Even so, I found Affinity Photo 2 still tended to produce flat results, hard to compensate for from within the Develop Persona, as its options are so limited.
Darktable’s Shadows slider (which has several sub-sliders) produced a flat result. Despite the numerous variations of other contrast and level adjustments scattered over various panels, I could not get a pleasing result. It will take a true Darktable fan and expert to exact a good image from its bewildering options, if it’s even possible.
WINNERS: Capture One and DxO PhotoLab, plus Adobe still works well
LOSERS: Affinity Photo and Darktable
Feature-by-Feature Details — 5. Local Adjustments and Masking
This is the area where programs have made major improvements in the five years since my last survey of raw developers. Thus I devote a major section to the feature.
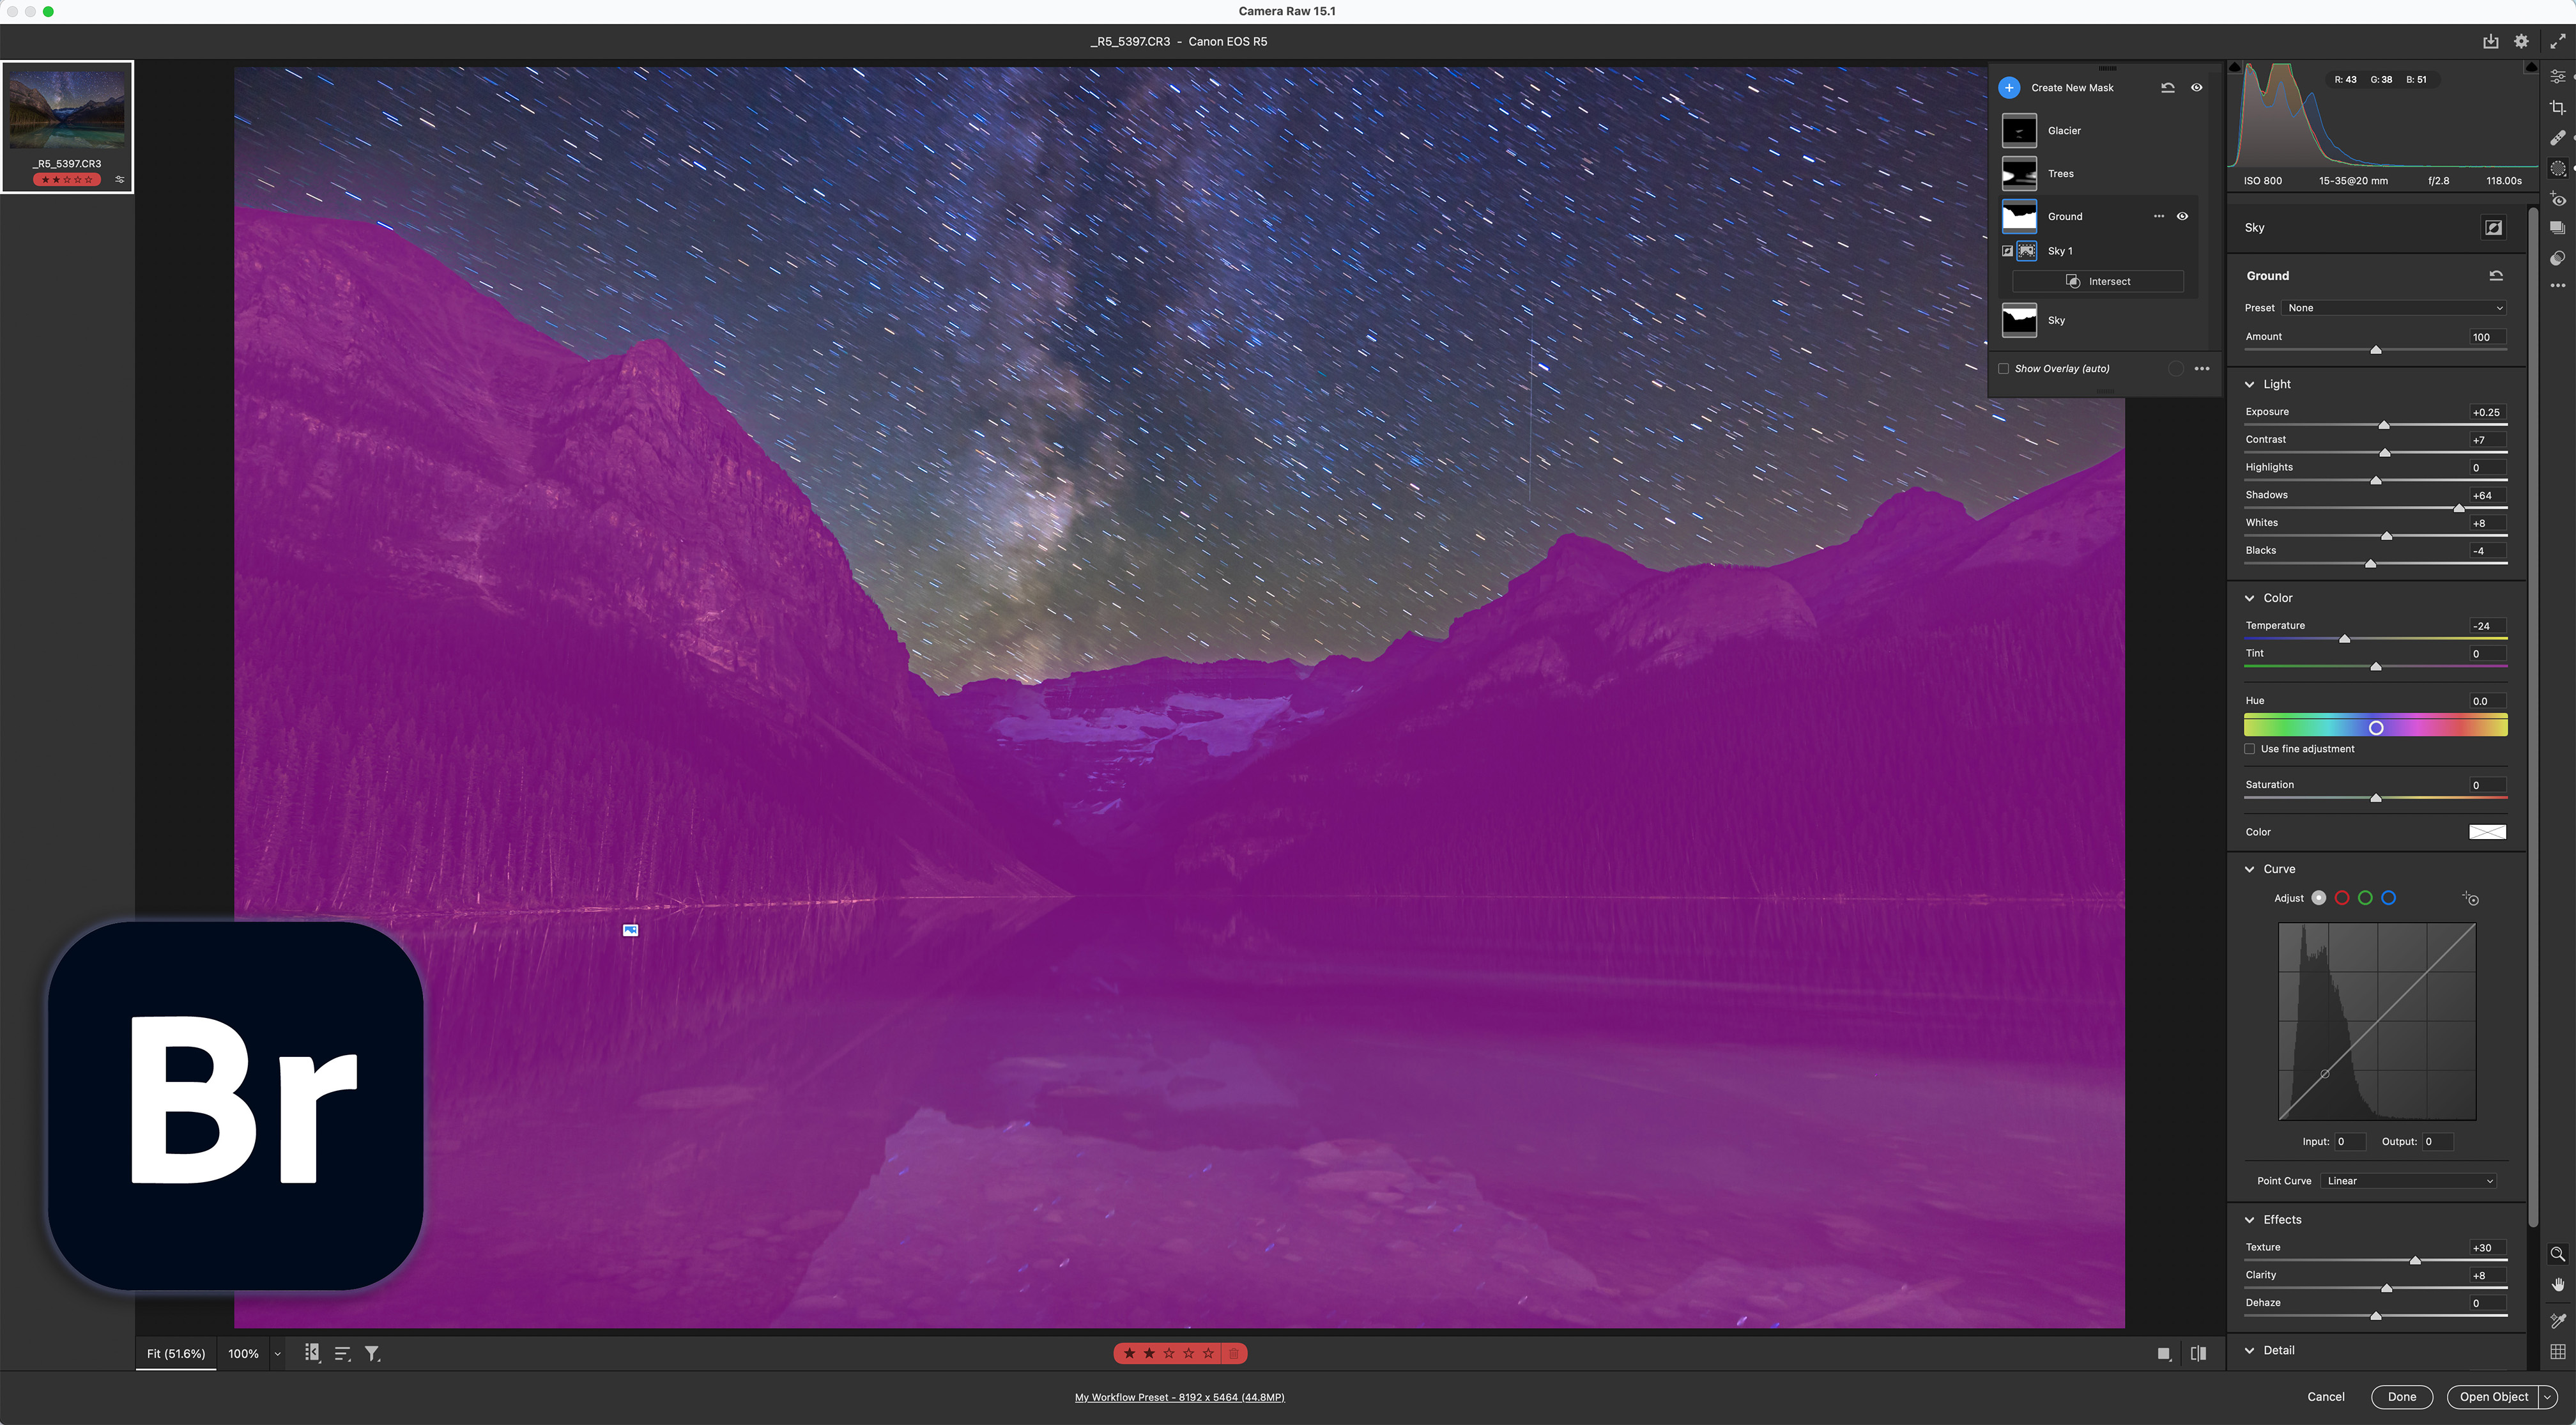
With accurate and easy masking it is now easier to apply adjustments to just selected areas of a raw image. We can finish off a raw file to perhaps be publication ready, without having to use a layer-based program like Photoshop to perform those same types of local adjustments. Adobe Camera RAW, Luminar Neo, and ON1 Photo Raw are leaders in this type of advanced AI masking. But other programs have good non-AI methods of masking – and making – local adjustments.
Adobe Camera Raw (and Adobe Lightroom) now has far better masking than in older versions that used the awkward method of applying multiple “pins.” Masks now occupy separate layers, and AI masks can be created in one-click for the sky (and ground by inverting the Sky mask) and for key subjects in the image. Other non-AI masks can be created with brushes (with an Auto Mask option for edge detection) and gradient overlays, and with the option of luminance and color range masks. The AI-created Sky masks proved the most accurate compared to other programs’ AI selections, though they can intrude into the ground at times. But the sky masks do include the stars. In all, Camera Raw (or Lightroom) has the most powerful masking tools of the group, though they can be tricky to master.
ACDSee Photo Studio allows up to eight different brushed-on mask areas, each with its own adjustments, in addition to gradient masks. There is no edge detection as such, though the brushes can be limited to selecting areas of similar brightness and color. The “Magic” brush option didn’t help in selecting just the sky and stars. Local adjustments are possible to only Exposure, Saturation, Fill Light, Contrast, and Clarity. So no local color adjustments are possible. In all, local adjustments are limited.
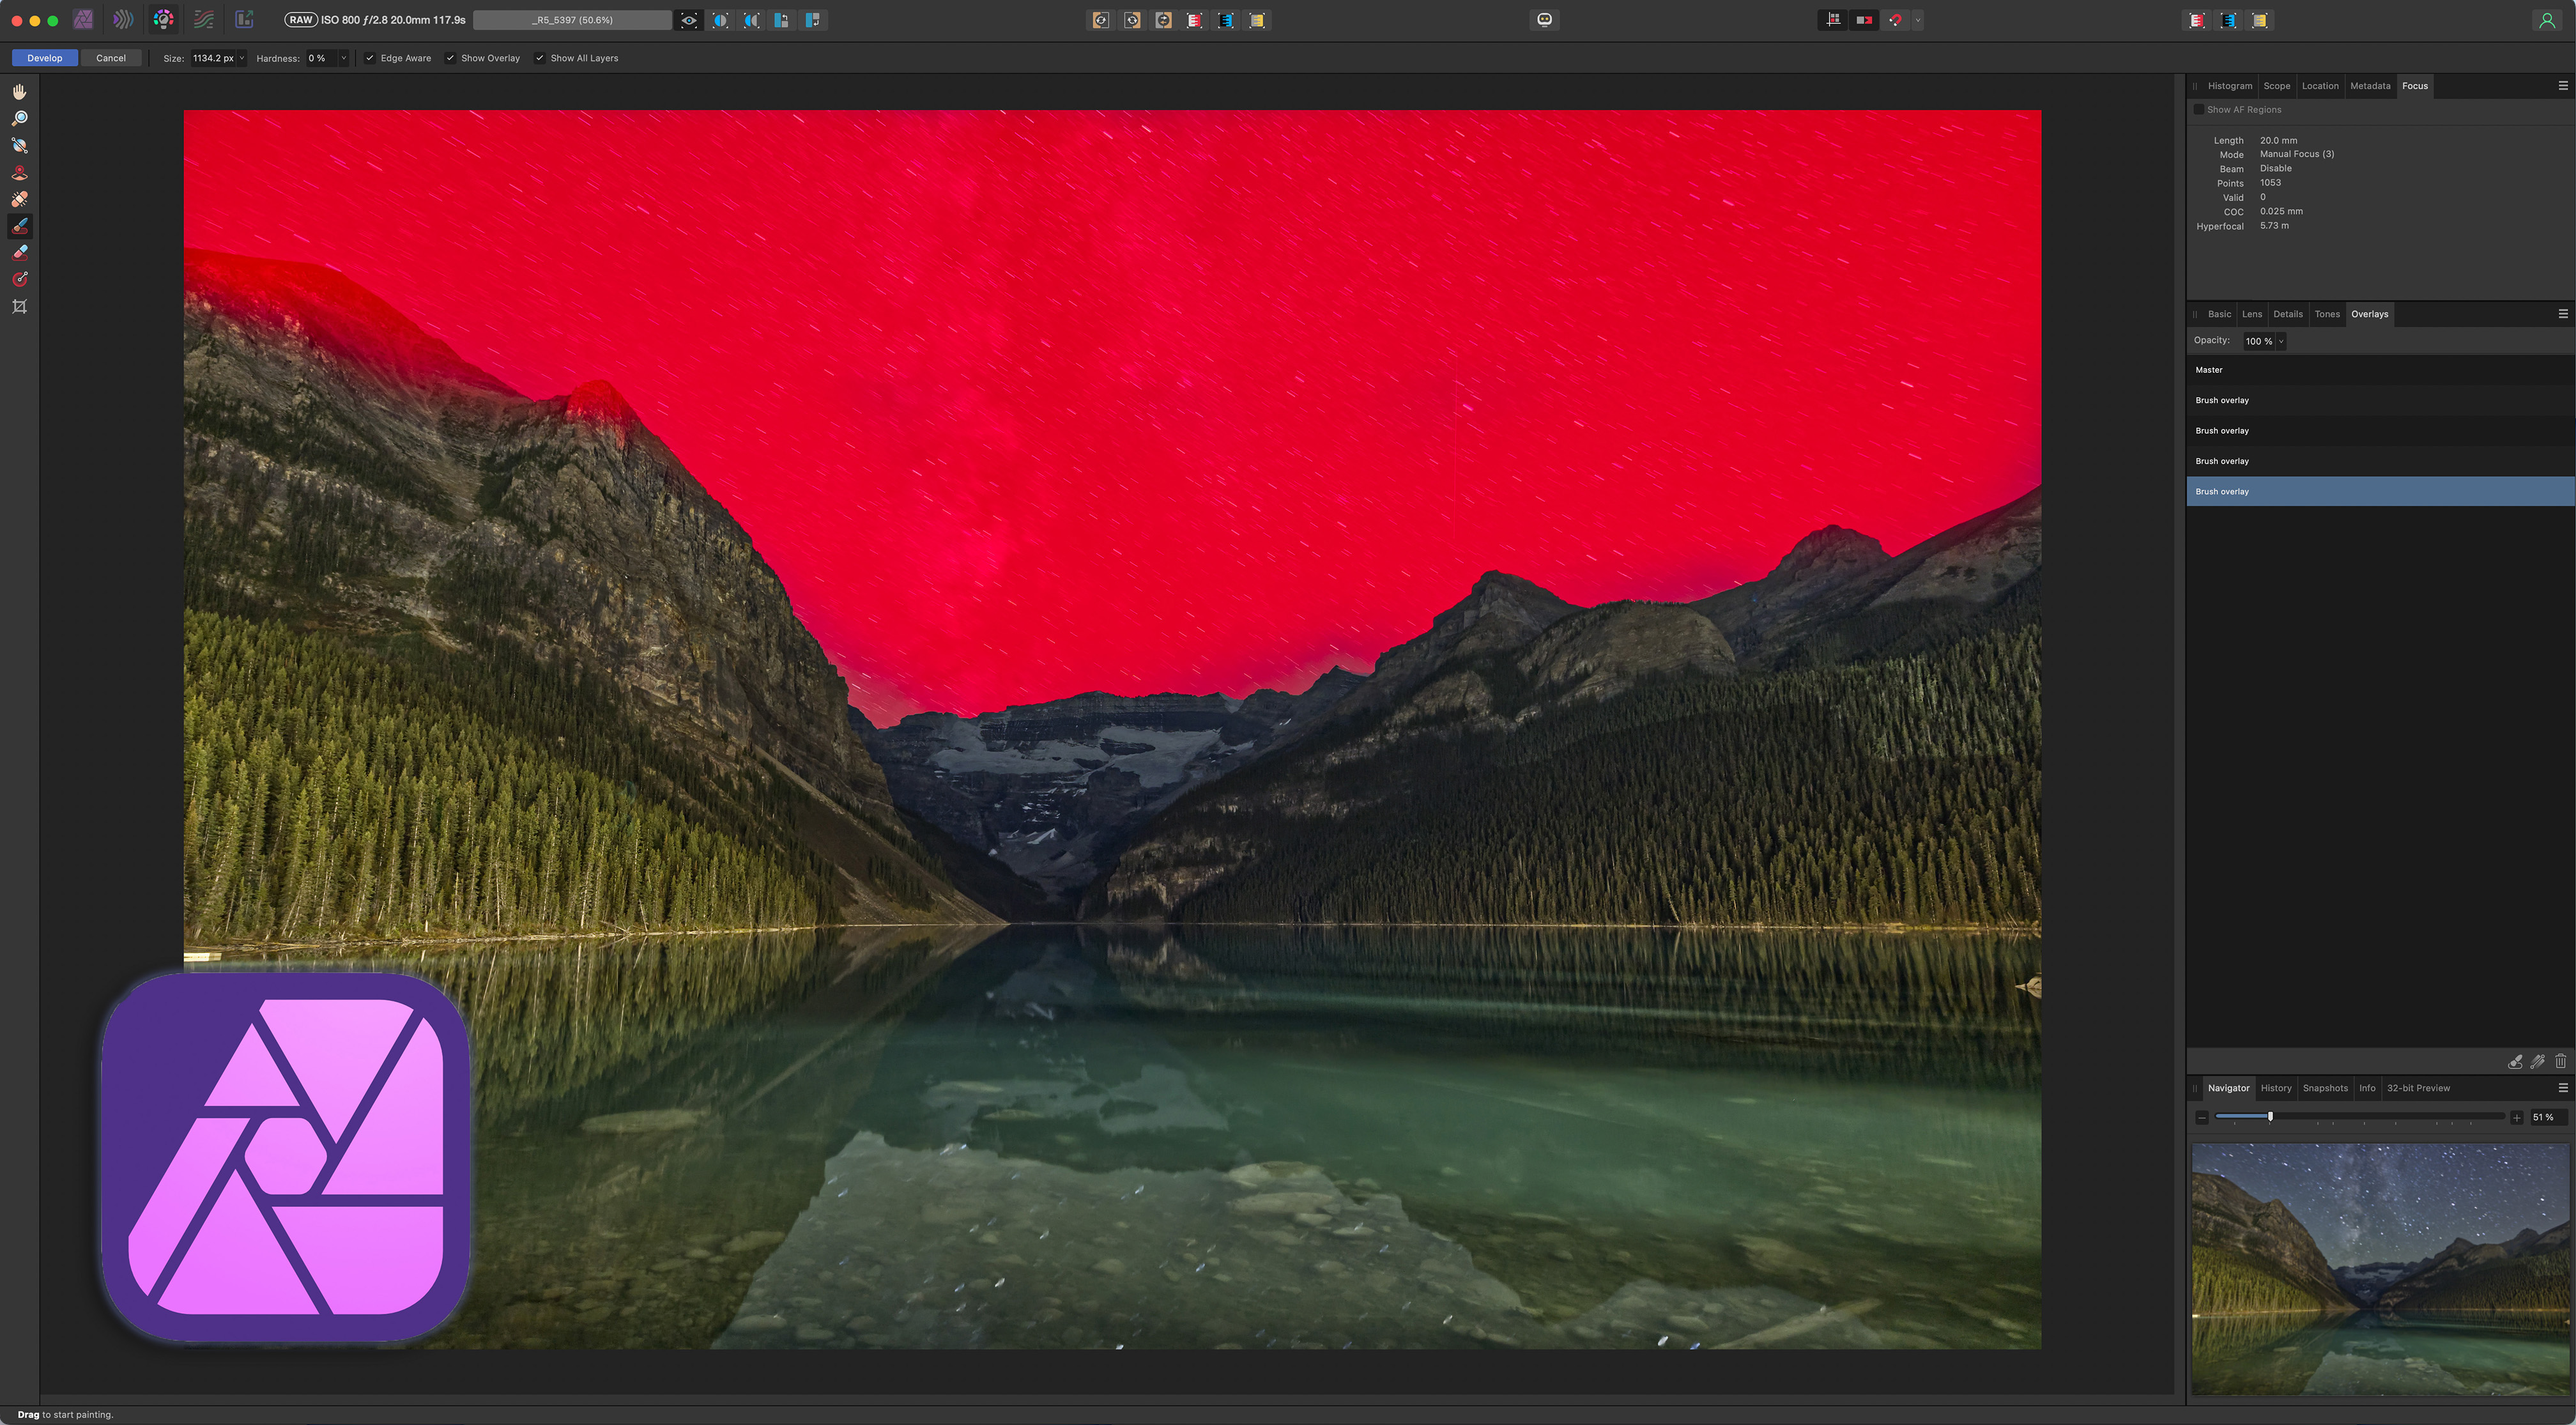
Affinity Photo has, in its Develop Persona, what it calls Overlays, where for each Overlay, or layer, you can brush on separate sets of adjustments using all the sliders in the Develop Persona. Oddly, there is no option for decreasing the opacity of a brush, only its size and feathering. While there is an Edge Aware option, it did a poor job on the test image detecting the boundary between land and sky, despite the edge being sharply defined. So local adjustments require a lot of manual brushing and erasing to get an accurate mask. The red mask Overlay, useful at times, has to be turned on and off manually. Other programs (ACR and Capture One) have the option of the colored overlay appearing automatically just when you are brushing.
Capture One offers adjustment layers for each mask required. The only “smart” brush is the Magic Brush which affects areas across the entire image with similar luminosity. There isn’t any edge detection option as such, so creating masks for the sky and ground is still largely a manual process requiring careful brushing. Separate layers can be added for healing and retouching. While Capture One’s local adjustments can work well, they require a lot more manual work than do programs equipped with AI-driven selection tools.
DxO PhotoLab allows multiple local adjustments, with the option of an Auto Mask brush that nicely detects edges, though the mask overlay itself (as shown above on the sky) doesn’t accurately show the area being affected. Strange. Masks can also be added with what are called Control Points to affect just areas of similar luminance within a wide circle, often requiring multiple Control Points to create an adjustment across a large region. Masks can also be created with adjustable brushes. Each masked area is then adjusted using a set of equalizer-like mini-controls, rather than in the main panels. In all, it’s a quirky interface, but it can work quite well once you get used to it.
Exposure X7 offers adjustment layers with options to add a gradient, or to draw or brush on an area to make a selection. There is no edge detection, only a color range mask option, so creating a sky or ground mask can require lots of hand painting. I found the preview sluggish, making it a bit of a trial-and-error exercise to make fine adjustments. However, the full range of tone and color adjustments can be applied to any local mask, a plus compared to ACDSee for example.
Luminar was first out with AI masks to automatically select the sky, and various landscape elements it detects. In all it does a good job, making it easy to add local adjustments. There are also gradient tools and normal brushes, but oddly, considering the amount of AI Luminar relies on, there is no edge detection (at least, as of early 2023). So brushing to create a mask requires a lot of finicky painting and erasing to refine the mask edge. The strong point is that masks can be added to any of Luminar’s many filters and adjustment panels, allowing for lots of options for tweaking the appearance of selected areas, such as adding special effects like glows to the sky or landscape. However, most of those filters and effects are added to the image after it is developed, and not to the original raw file.
ON1’s AI Sky mask does not include the stars.
ON1 Photo RAW has always offered good local adjustments, with each occupying its own layer. Photo RAW 2023 added its new “Super Select” AI tools to compete with Adobe. But they are problematic. The select Sky AI masking fails to include stars, leaving a sky mask filled with black holes, requiring lots of hand painting to eliminate. You might as well have created the mask by hand to begin with. Plus in the test image, selecting “Mountain” to create a ground mask just locked up the program, requiring a Force Quit to exit it. However, ON1’s conventional masks and adjustments work well, with a wide choice of brush options. The Perfect Brush detects areas of similar color, not edges per se.
WINNERS: Adobe and Luminar for accurate AI masks
LOSER: Darktable— it has no Local Adjustments at all
I provide each of the finished images for the untracked star trail example below, under Program-by-Program Results. But here’s a summary, in what I admit is a subjective call. One program would excel in one area, but be deficient in another. But who produced the best looking end result?
Overall, I think Capture One came closest to matching or exceeding Adobe Camera Raw for image quality. Its main drawback is the difficulty in creating precise local adjustment masks.
DxO PhotoLab also produced a fine result, but still looking a little flat compared to ACR and Capture One. But it does have good AI noise reduction.
In the middle of the ranking are the group of ACDSee Photo Studio, Exposure X7, and ON1 Photo RAW. Their results look acceptable, but closer examination reveals the flaws such as haloed stars and loss of fine detail. So they rank from Fair to Good, depending on how much you pixel peep!
Luminar Neo did a good job, though achieving those results required going beyond what its DevelopRAW panel can do, to apply Neo’s other filters and effects. So in Neo’s case, I did more to the image than what was possible with just raw edits. But with Luminar, the distinction between raw developer and layer-based editor is fuzzy indeed. It operates quite differently than other programs tested here, perhaps refreshingly so.
For example, with the more conventionally structured workflow of Affinity Photo, I could have exacted better results from it had I taken the developed raw image into its Photo Persona to apply more adjustments farther down the workflow. The same might be said of ON1 Photo RAW.
But the point of this review was to test how well programs could do just at the raw-image stage. Due to the unique way it operates, I’ll admit Luminar Neo did get the advantage in this raw developer test. Though it failed on several key points.
WINNERS: Adobe and Capture One, with DxO a respectable second
Getting one image looking great is just the first step. Even when shooting nightscape stills we often take several images to stack later.
As such, we want to be able to process just one image, then copy and paste its settings to all the others in one fell swoop. And then we need to be able to inspect those images in thumbnails to be sure they all look good, as some might need individual tweaking.
While it’s a useful feature for images destined for a still-image composite, Copy & Paste Settings is an absolutely essential feature for processing a set for a time-lapse movie or a star trail stack.
The Copy and Paste Settings panels from the 8 programs that offer this feature.
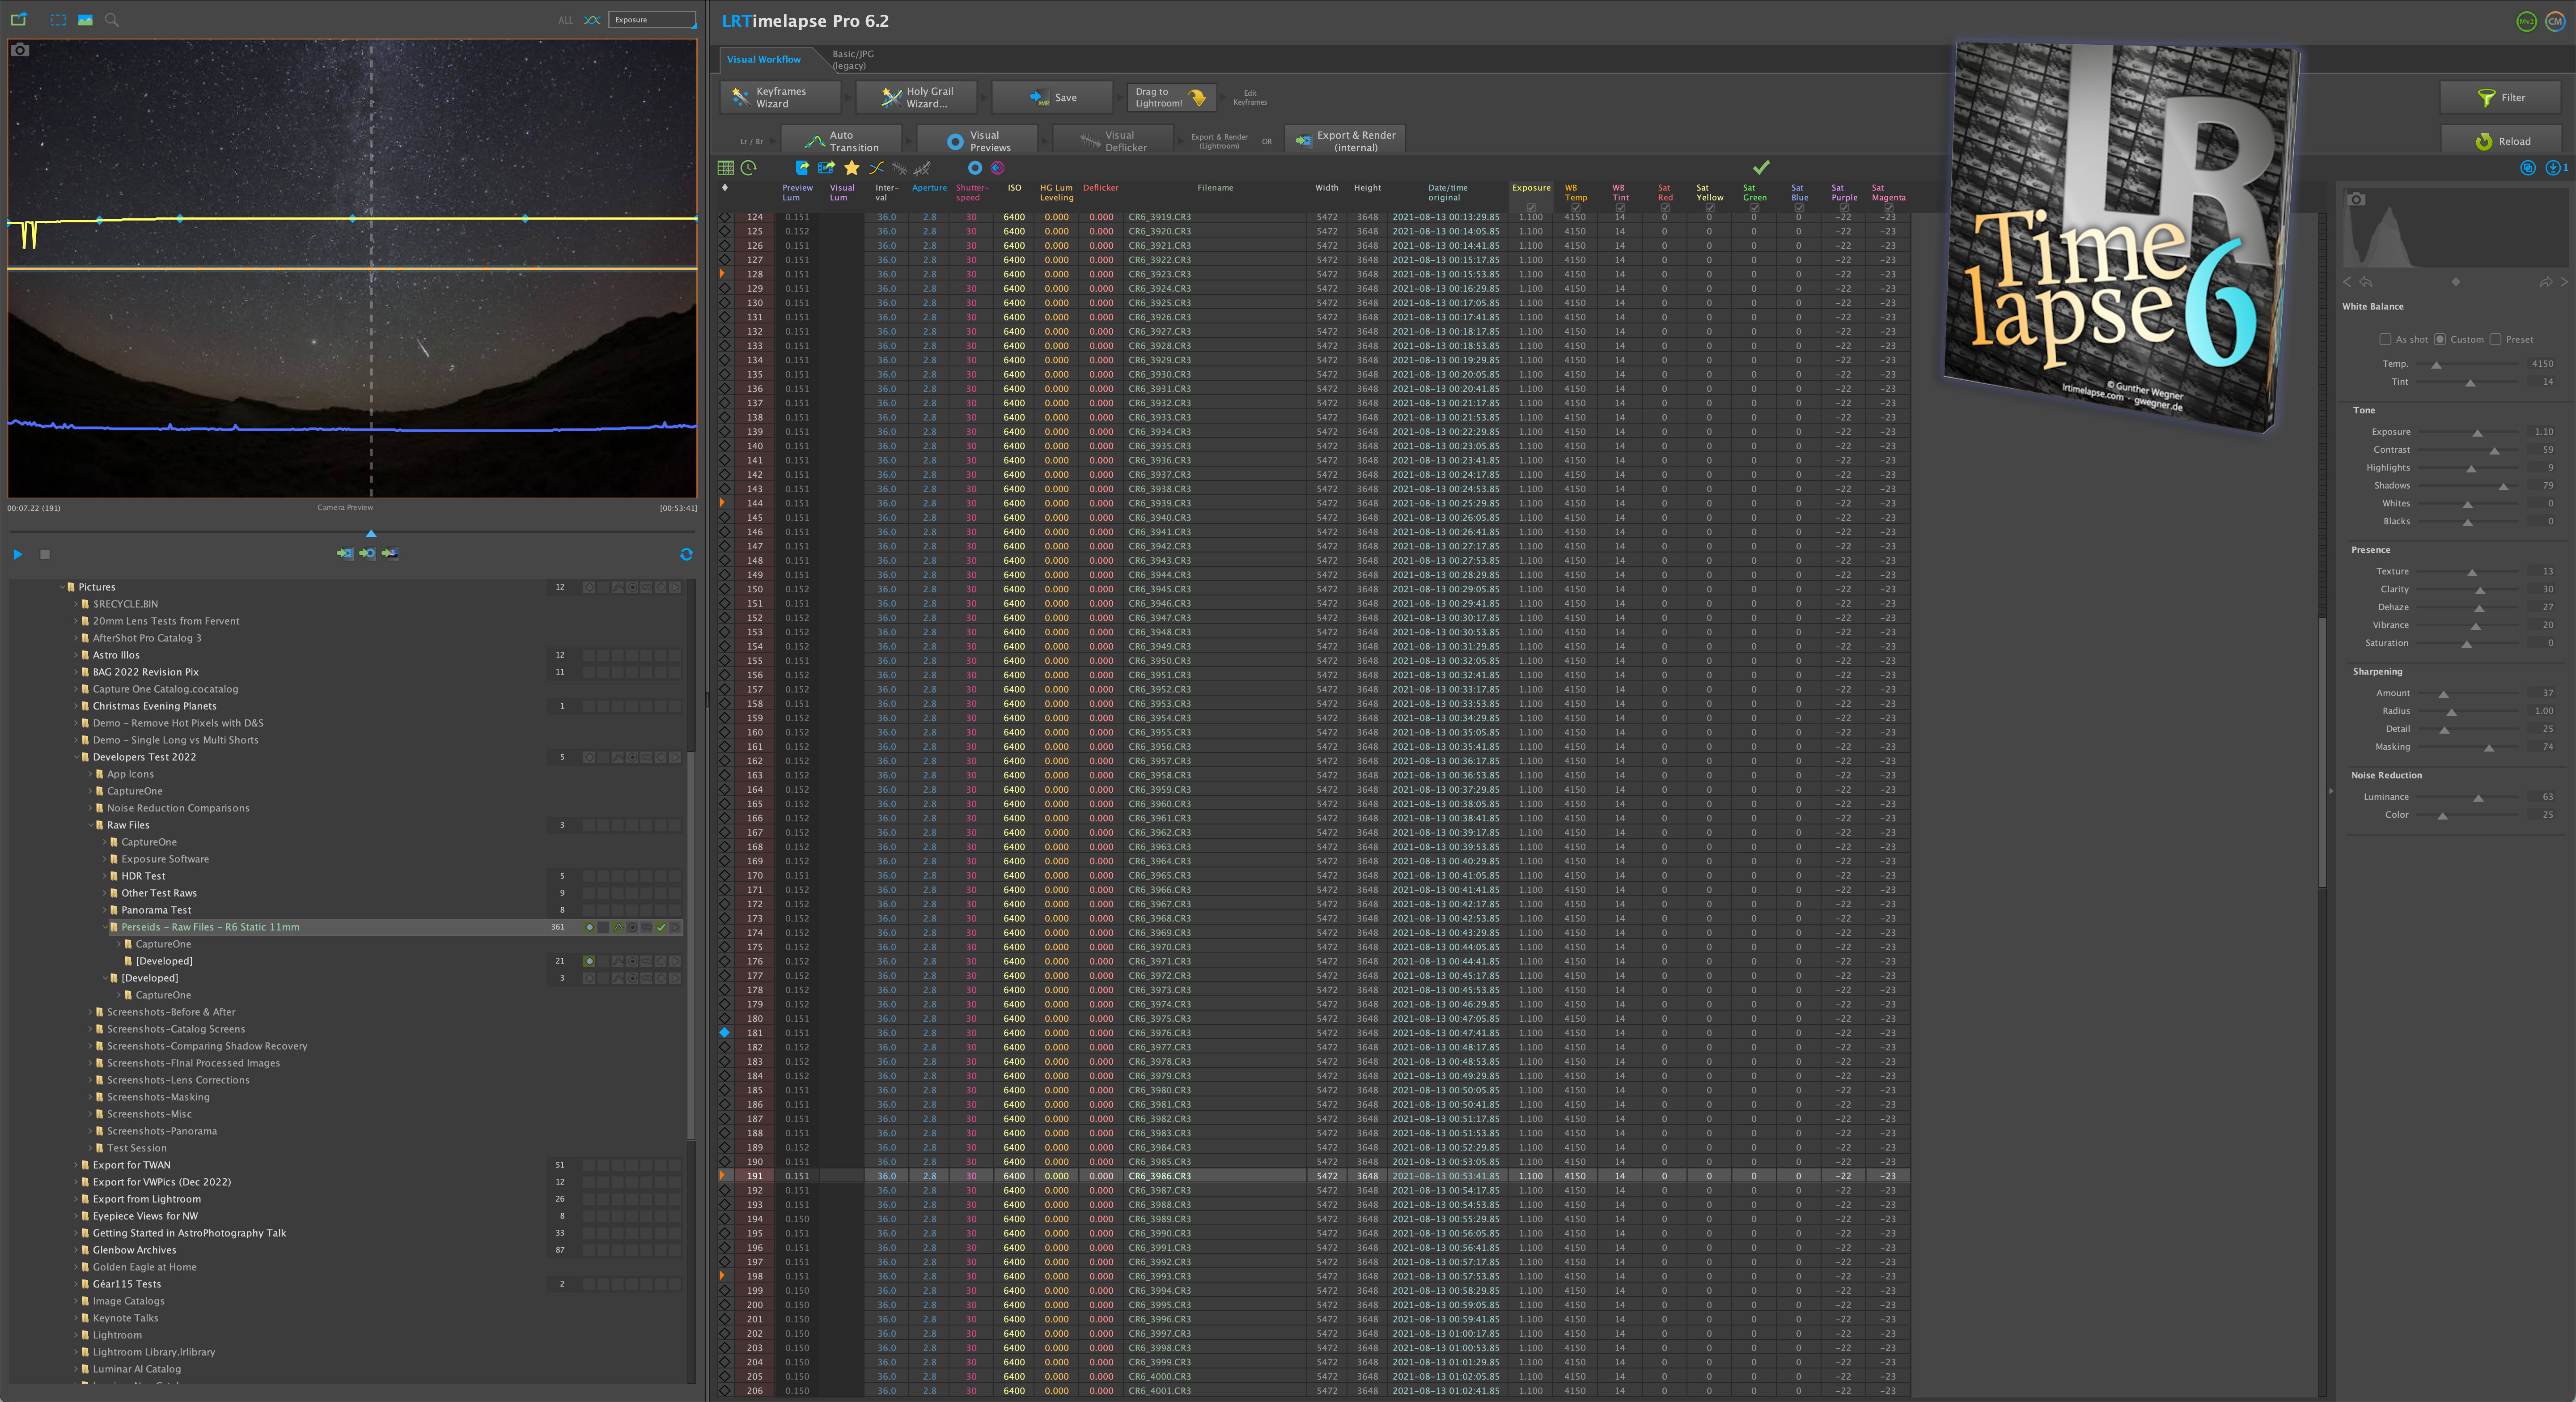
I tested the programs on the set of 360 time-lapse frames of the Perseid meteor shower used next for the Batch Export test.
Adobe Bridge makes it easy to copy and paste Camera Raw settings to identically process all the files in a folder. Lightroom has a similar function. Adobe also has adaptive masks, where a sky mask created for one image will adapt to all others, even if the framing or composition changes, as it would in a motion-control time-lapse sequence or panorama set. Applying settings to several hundred images is fairly quick, though Bridge can be slow at rendering the resulting thumbnails.
ON1 Photo RAW can also copy and paste AI masks adaptively, so a Sky mask created for one image will adapt to match another image, even if the framing is different. However, applying all the settings to a large number of images and rendering the new previews proved achingly slow. And it’s a pity it doesn’t create a better sky mask to begin with.
Capture One has a single Copy and Apply Adjustments command where you develop one image, select it plus all the other undeveloped images in the set to sync settings from the processed image to all the others. But the adjustment layers and their masks copy identically; there is no adaptive masking because there are no AI-generated masks. However, applying new settings to hundreds of images and rendering their thumbnails is very fast, better than other programs.
DxO PhotoLab’s Control Point masks and local adjustments also copy identically. Copying adjustments from one image to the rest in the set of 360 test images was also very fast.
ACDSee Photo Studio and Exposure X7 also allow copying and pasting all or selected settings, including local adjustment masks. ACDSee was slow, but Exposure X7 was quite quick to apply settings to a large batch of images, such as the 360 test images.
Darktable’s function is under the History Stack panel where you can copy and paste all or selected settings, but all are global — there are no local adjustments or masks.
Luminar Neo allows only copying and pasting of all settings, not a selected set. When testing it on the set of 360 time-lapse frames, Neo proved unworkably slow, taking as much as an hour to apply settings and render the resulting thumbnails in its Catalog view, during which time my M1 MacBook Pro warned the application was running out of memory, taking up 110 Gb! I had to Force Quit it.
Affinity Photo is capable of editing only one image at a time. There is no easy or obvious way to copy the Develop Persona settings from one raw image, open another, then paste in those settings. You can only save Presets for each Develop Persona panel, making transferring settings from one image to even just one other image a tedious process.
Affinity Photo with several raw images stacked and identically processed with the method below.
Affinity Workaround
But … there is a non-obvious and unintuitive method in Affinity which works for stacking and processing a few raw files for a blend:
Process one raw image and then click Develop so it moves into the Photo Persona, as a “RAW Layer (Embedded),” a new feature in Affinity Photo 2.
Find the other raw image files (they won’t have any settings applied) and simply drag them onto the Photo Persona screen.
Use the Move tool to align the resulting new layers with the original image.
Select all the image layers (but only the first will have any settings applied) and hit the Develop Persona button.
Then hit the Develop button — this will apply the settings from the first image to all the others in the layer stack. It’s the best Affinity can do for a “copy and paste” function.
Change the blend mode or add masks to each layer to create a composite or star trail stack.
Each layer can be re-opened in the Develop Persona if needed to adjust its settings.
It’s all a bit of a kludge, but it does work.
WINNERS: Capture One for blazing speed; Adobe and ON1 for adaptive masks
LOSER: Affinity Photo, for lacking this feature entirely, except for a method that is not at all obvious and limited in its use.
Feature-by-Feature Details — 8. Batch Export
Once you develop a folder of raw images with “Copy & Paste,” you now have to export them with all those settings “baked into” the exported files.
This step creates an intermediate set of TIFFs or JPGs to either assemble into a movie with programs such as TimeLapse DeFlicker, or to stack into a star trail composite using software such as StarStaX.
The Batch Export panels from all 9 programs.
To test the Batch Export function, I used each program to export the same set of 360 developed raw files taken with a 20-megapixel Canon R6, shot for a meteor shower time-lapse, exporting them into full-resolution, low-compression JPGs.
While all programs can do the task, some are much better than others.
Adobe Bridge has a configurable Export panel (though it can be buggy at times), as does Lightroom. Its speed is good, but is beaten by several of the competitors.
Even Affinity Photo can do a batch export, done through its “New Batch Job” function. As with its other image selection operations, Affinity depends on your operating system’s Open dialog box to pick images. Exporting worked well, though without being able to develop a batch of raw files, I’m not sure why you would have cause to use this batch function to export them. I had to test it with undeveloped raws. Oddly, Affinity’s exported JPGs (at 5496 x 3664 pixels) were slightly larger than the size of the original raws (which were 5472 x 3648 pixels). No other program did this.
Most programs allow saving combinations of Export settings as frequently used presets. An exception is Exposure X7 where separate presets have to be saved and loaded for each option in its Export panel, awkward. And Luminar Neo’s batch export is basic, with no option for saving Export presets at all.
In the export of the 360 test images, each program took:
Adobe Bridge 15 minutes (after 3 attempts to get it to actually work!)
ACDSee Photo Studio 33 minutes
Affinity Photo 2 32 minutes
Capture One 23 6 minutes
Darktable 4 16 minutes
DxO PhotoLab 6 8 minutes
Exposure X7 5 minutes 30 seconds
Luminar Neo 8.5 hours (!)
ON1 Photo RAW 2023 1.4 hours
This was on my M1 Max MacBook Pro. Your mileage will vary! The clear winners in the export race were Exposure X7, Capture One, and DxO. ON1 was way behind the pack. Luminar was impossibly slow. It is not a program for working with lots of images.
ON1’s Time-Lapse Function
Unique among these programs, ON1 Photo RAW provides a Time-Lapse function that allows directly exporting developed raw files to a final movie, without the need to export an intermediate JPG set. That sounds like a great time saver. Only Adobe After Effects can do the same.
However … ON1’s options are limited: up to a maximum DCI 4K size, in H264 or Apple ProRes codecs, and with a choice of just three frame rates: 24, 25, or 30 frames per second. A dedicated assembly program such as TimeLapse DeFlicker can do a much better job, and faster, with more options such as frame blending, and up to 8K movie sizes.
And oddly, ON1’s Time-Lapse panel provides no option for where to save the movie or what to name it — it defaults to saving the movie to the original folder with the images, and with the name of one of the images. I had to search for it to locate it.
WINNERS: Exposure X7 and Capture One for sheer speed
LOSER: Luminar Neo for being unusably slow
Feature-by-Feature Details — 9. Advanced Features
Here I’ve noted what programs offer what features, but I tested only the panorama stitching function. For a panorama test I used a set of seven images shot with the Canon R5 and RF15-35mm lens at Peyto Lake, Banff.
The Panorama options from 4 programs. ON1 (lower left) failed to stitch 2 of the 7 segments).
Adobe Camera Raw (and Lightroom) offers HDR Merge and Panorama stitching plus, uniquely, the ability to merge multi-exposure HDR panoramas. But it has no Focus Stack option (that’s in Photoshop). For panoramas, ACR offers a choice of projection geometries, and the very excellent Boundary Warp function for filling in blank areas, as well as content-aware Fill Edges. The result is a raw DNG file.
Capture One has HDR Merge and Panorama stitching, but no Focus Stack option. Like ACR, Capture One’s panorama mode offers a choice of projection geometries and results in a raw DNG file for further editing at the raw level. It worked well on the test set, though lacks anything equivalent to ACR’s content-aware Fill Edges and Boundary Warp options.
ON1 Photo RAW offers HDR Merge, Focus Stack, and Panorama stitching of raw files. Using the same seven images that ACR and Capture One succeeded with, ON1 failed to stitch two of the segments, leaving a partial pano. It does offer a limited choice of projection methods and, like ACR, has the option to warp the image to fill blank areas. It creates a raw DNG file.
Affinity Photo also offers HDR Merge, Focus Stack, and Panorama stitching, all from raw files. However, the panorama function is quite basic, with no options for projection geometry or content-aware fill. But it did a good job blending all segments of the test set seamlessly. The result is a raw file that can be further processed in the Develop Persona.
ACDSee Photo Studio for Mac lacks any HDR, Focus Stack, or Panorama stitching. Those functions are available in the Windows versions (Pro and Ultimate), but I did not test them.
Luminar Neo offers HDR Merge and Focus Stack through two extra-cost extensions. As of this writing it does not offer Panorama stitching, but more extensions (yet to be identified!) will be released in 2023.
Darktable offers just HDR Merge, but no Focus Stack or Panorama functions.
DxO PhotoLab 6 lacks any HDR, Focus Stack or Panorama functions. Ditto for Exposure X7. Those are serious deficiencies, as we have a need for all those functions when processing nightscapes. You would have to develop the raw files in DxO or Exposure, then export TIFFs to merge or stitch them using another program such as Affinity Photo.
WINNERS: Adobe and Capture One
LOSER: DxO for missing key functions expected in a premium “Adobe killer”
Program-by-Program Summary
I could end the review here, but I feel it’s important to present the evidence, in the form of the final images, as best I could process them with each of the programs. I rate their overall image quality and performance on a subjective scale of Poor / Fair / Good / Excellent, with additional remarks about the Pros and Cons of each program, as I see them.
Adobe Camera Raw (also applies to Adobe Lightroom)
IMAGE QUALITY: Excellent
PROS: ACR has excellent selective shadow recovery and good noise reduction which, while not up to the level of new AI methods, doesn’t introduce any weird AI artifacts. Its panels and sliders are fairly easy to use, with a clean user interface. Its new AI masking and local adjustments are superb, though take some practice to master.
CONS: It is available only by monthly or annual subscription, and lacks the more advanced AI noise reduction, sharpening, and one-click special effects of some competitors. Using the Adobe suite requires moving between different Adobe programs to perform all functions. Adobe Bridge, a central program in my workflow, tends to be neglected by Adobe, and suffers from bugs and deficiencies that go uncorrected.
ACDSee Photo Studio (for Mac)
IMAGE QUALITY: Fair
PROS: Photo Studio in its various versions offers good image management functions, making it suitable as a non-subscription Lightroom alternative. It offers an advanced array of tonal and color adjustments in an easy-to-use interface.
CONS: It produced badly haloed stars and had poor noise reduction. Its local adjustments are limited and lag behind the competition with no AI functions. It has no panorama stitching or HDR merging functions in the Mac version — the Windows versions get much more love and attention from ACDSee.
Affinity Photo 2
IMAGE QUALITY: Fair (for its Develop Persona) / Good to Excellent (as a Photoshop replacement)
PROS: Affinity Photo is certainly the best alternative to Photoshop for anyone looking to avoid Adobe. It is an excellent layer-based program (far better than GIMP) with unique features for astrophotographers such as stacking and gradient removal. With v2, it is now possible to transfer a raw file from the Develop Persona to the Photo Persona non-destructively, allowing re-opening the raw file for re-editing, similar to Adobe’s Camera Raw Smart Objects.
CONS: Affinity Photo’s Develop Persona for raw files is basic, with limited adjustments and producing average results at best. Transferring settings from one raw file to others is difficult, if not impossible. Affinity Photo is designed for editing single images only.
Capture One 23
IMAGE QUALITY: Excellent
PROS: Capture One has excellent shadow recovery and color adjustment controls. Local adjustments are easy to add and edit, though lack edge detection and AI selection. It has excellent cataloging functions, and overall superb image quality. It’s a good Lightroom alternative.
CONS: It’s costly to purchase, and more expensive than Adobe’s Creative Cloud to subscribe to. It can easily soften stars if not careful. It lacks AI masking, and overall the program tends to lag behind competitors by a few years for advanced features — Capture One added panorama stitching only a couple of versions back. I found the program also tended to litter my drive with Capture One folders.
Darktable
IMAGE QUALITY: Poor
PROS: It’s free! And it offers many adjustments and intricate options not found elsewhere that the technically minded will enjoy experimenting with.
CONS: Darktable’s community of developers has added a bewildering array of panels in a confusing interface, making Darktable not for beginners nor the feint of heart. I struggled with it, all for poor results. Just finding the Export function was a challenge. Darktable is a program designed by programmers for use by other programmers who love to play with image data, and who care little for a user interface friendly to “the rest of us!”
DxO PhotoLab 6
IMAGE QUALITY: Excellent
PROS: Along with Capture One, I found DxO PhotoLab capable of producing a good-looking image, the equal of or perhaps better than Camera Raw, partly because of DxO’s ClearView and Smart Lighting options. It has lots of downloadable camera and lens modules for automatic lens corrections. Its noise reduction was excellent, though its DeepPrime and DeepPrimeXD options can add AI artifacts.
CONS: There are no adjustment layers or masks as such. Local adjustments are done through DxO’s quirky Control Point interface which isn’t as visually intuitive nor as precise as masks and layers. As of PhotoLab 6, DxO has yet to offer panorama or HDR merging, lagging far behind the competition.
Exposure X7
IMAGE QUALITY: Fair
PROS: Exposure has a full set of tonal and color adjustments, and essential image management functions. It has good local adjustment layers, though with no AI or smart brushes to automatically detect edges. It produced acceptable final results, though still looking a little flat.
CONS: Exposure lacks any panorama stitching or HDR merging functions. Its noise reduction can wipe out stars and image details, and its sharpening adds dark halos to stars. It often crashed during my testing, by simply quitting unexpectedly. Annoying.
Luminar Neo
IMAGE QUALITY: Good to Excellent
PROS: Luminar has a clean, fresh interface with many powerful AI-driven functions and effects unique to Luminar and that are easy to apply. The final result looks fine. Its AI masks work quite well. Neo also works as a plug-in for Photoshop or Lightroom.
CONS: Luminar is expensive to purchase outright with all the Extensions, with a subscription the most economical method of acquiring, and maintaining, the full package. Its Noiseless AI didn’t handle starfields well. Neo lacks a useable cataloging function, and the version tested had numerous serious bugs. It is best for editing just single images.
ON1 Photo RAW 2023
IMAGE QUALITY: Good
PROS: ON1 Photo RAW is the only program of the set that can: catalog images, develop raw files, and then layer and stack images, performing all that Lightroom and Photoshop can do. It can serve as a one-program solution, and has excellent Effects and NoNoise AI, also available as plug-ins for Adobe software. It offers layer-based editing as well.
CONS: ON1 consistently produces dark halos around stars from over-sharpening in its raw engine. These cannot be eliminated. Its AI selection routines are flawed. Its AI noise reduction can leave artifacts if applied too aggressively, which is the default setting. Opening images from the Browse module as layers in the Edit module can be slow. It offers no stack modes (present in Photoshop and Affinity) for easy noise smoothing or star trail stacking, and the alternative — changing layer Blend modes — has to be done one at a time for each layer, a tedious process for a large image stack.
Why Didn’t I Test …?
… [Insert your favorite program here!] No doubt it’s one you consider badly neglected by all the world’s photographers!
But … as I stated at the outset, I tested only programs offered for both MacOS and Windows. I tested the MacOS versions — and for nightscapes, which are more demanding than normal daytime scenes.
Icons for the programs not tested. How many can you identify? Hint: They are in alphabetical order.
I did not test:
Adobe Photoshop Elements —Effectively Photoshop “Lite,” Elements is available for $99 as a one-time purchase with a perpetual license, for both MacOS and Windows. Optional annual updates cost about $80. While it offers image and adjustment layers, and can open .PSD files, Elements cannot do much with 16-bit images, and has limited functions for developing raw files, in its version of Camera Raw “Lite.” And its Lightroom-like Organizer module does not not have any Copy & Paste Settings or batch export functions, making it unsuitable for batch editing or time-lapse production.
Like Apple’s Photos and other free photo apps, I don’t consider Elements to be a serious option for nightscape and time-lapse work. A Creative Cloud Photo subscription doesn’t cost much more per year, yet gets you far, far more in Adobe’s professional-level software.
Corel PaintShop — As with ACDSee’s product suite, Corel’s PaintShop is available in Pro and Pro Ultimate versions, both updated for 2023, and each with extensive raw and layer-based editing features. But they are only for Windows. If you are a PC user, PaintShop is certainly worth testing out. Their neglected MacOS program (also available for Windows and Linux) is the raw developer AfterShot Pro 3 (currently at v3.7.0.446). It is labeled as being from 2017, and last received a minor bug fix update in January 2021. I included it in my 2017 survey, but could not this year as it refused to recognize the CR3 raw files from my Canon R5 and R6 cameras.
Darkroom and Acorn are two Mac-only apps wth just basic features. There are no doubt numerous other similar Windows-only apps that I am not familiar with.
GIMP — Being free, it has its loyal fans. But it is not a raw developer, so it is not tested here. It is favorite of some astrophotographers as a no-cost substitute for Adobe Photoshop or Affinity Photo. It’s available for MacOS and Windows.
Iridient Developer — Its anachronistic, text-only website looks like it comes from 1995, giving the impression that this raw developer should be free, open-source software. It isn’t; it costs $99. It is a basic raw developer but only for MacOS. It is updated frequently, and a trial copy is available.
Pixelmator Pro — While it is a very capable and well-supported program with some excellent features, it too is available only for MacOS. Like Affinity Photo, it seems to be primarily for editing individual raw images, and lacks any image management functions, notably Copy & Paste Settings.
PixInsight — This specialized astrophoto program is designed for deep-sky image processing and bringing out the most subtle structures in faint nebulas and galaxies. For those it works wonders. But it is not suitable for nightscapes. Examples I’ve seen from PI fans who have used it for nightscapes, including images I’ve sent them for their expert processing, have not impressed me.
RawTherapee — As of early January 2023 when I completed my testing, the latest version of this free open-source program, v5.9, was available only for Windows and Linux. The MacOS version was still back at v5.8 from February 2020, a version that was unable to open the Canon CR3 raw files I was using in my tests. While the CR3 format has been out for several years, RawTherapee was still not supporting it, a hazard of open-source software dependent on the priorities of volunteer programmers who mostly use Windows. Like Darktable, RawTherapee is an incredibly complex program to use, with programmers adding every possible panel, slider and checkbox they could think of. [UPDATE MARCH 2023: RawTherapee 5.9 for MacOS is now available and opens Canon .CR3 files. Mac users might certainly want to try it. And Windows users, too!]
Topaz Studio — While Topaz Labs has been busy introducing some fine AI specialty programs, such as DeNoise AI, their main photo editor, Topaz Studio, has been neglected for years and, as of late 2022, was not even listed as a product for sale. It’s gone.
What About? — To prevent the number of programs tested from growing even larger, I did not include a few other little-known and seldom-used programs such as Cyberlink PhotoDirector and Picktorial, though I’m sure they have their fans.
I also did not test any camera manufacturer programs, such as Canon’s Digital Photo Professional, Nikon’s CaptureNX, or Sony’s ImagingEdge. They will open raw images only from their own cameras. Few photographers use them unless forced to, perhaps to open new raw files not yet supported by Adobe, DxO, et al, or to access files created by special camera functions such as Pixel Shift or Raw Burst Mode.
Recommendations
Having used Adobe software for decades, I’m used to its workings and the look it provides images. I’ve yet to see any of the competitors produce results so much better that they warrant me switching programs. At best, the competitors produce results as good as Adobe, at least for nightscape astrophotos, though with some offering unique and attractive features.
For example, the AI noise reduction routines in DxO PhotoLab and ON1 Photo RAW can outperform Adobe Camera Raw and Lightroom. Adobe needs to update its raw editing software with more advanced noise reduction and sharpening. Even so, the AI routines in the competitors are prone to creating odd artifacts, so have to be applied carefully to astrophotos.
A possible workflow: DxO PhotoLab or Capture One into Affinity Photo
As I recommended in 2017, for those who refuse to use Adobe — or any software by subscription — a possible combination for the best astrophoto image quality might be DxO PhotoLab 6 for raw developing and basic time-lapse processing, paired with Affinity Photo 2 for stacking and compositing still images, from finished TIFF files exported out of DxO then opened and layered with Affinity.
An example of images developed in Capture One and then layered and masked in Affinity Photo.
The pairing of Capture One with Affinity could work just as well, though is more costly. And anyone who hates software by subscription in principle might want to avoid Capture One as they are pushing customers toward buying only by subscription, as is ON1.
For a single-program solution, I’d recommend ON1 Photo RAW more highly, if only it produced better star image quality. Its raw engine continues to over-sharpen, and its AI masking functions are flawed, though will likely improve. I routinely use ON1’s Effects plug-in from Photoshop, as it has some excellent “finishing-touch” filters such as Dynamic Contrast. I find ON1’s NoNoise AI plug-in also very useful.
The same applies to Luminar Neo. While I can’t see using it as a principle processing program, it works very well as a Photoshop plug-in for adding special effects, some with its powerful and innovative AI routines.
Finally — Download Trials and Test!
But don’t take my word for all of this. Please test for yourself!
With the exception of Luminar Neo, all the programs I tested (and others I didn’t, but you might be interested in) are available as free trial copies. Try them out on your images and workflow. You might find you like one program much better than any of the others or what you are using now.
Often, having more than one program is useful, if only for use as a plug-in from within Lightroom or Photoshop. Some plug-ins made for Photoshop also work from within Affinity Photo, though it is hit-and-miss what plug-ins will actually work. (In my testing, plug-ins from DxO/Nik Collection, Exposure X7, ON1, RC-Astro, and Topaz all work; ones from Skylum/Luminar install but fail to run.)
LRTimelapse working on the meteor shower time-lapse frames.
While I was impressed with Capture One and DxO PhotoLab, for me the need to use the program LRTimelapse (shown above) for processing about 80 percent of all the time-lapse sequences I shoot means the question is settled. LRTimelapse works only with Adobe software, and the combination works great and improves wth every update of LRTimelapse.
Even for still images, the ease of working within Adobe’s ecosystem to sort, develop, layer, stack, and catalog images makes me reluctant to migrate to a mix of programs from different companies, especially when the cost of upgrading many of those programs is not much less than, or even more costly, than an Adobe Photo plan subscription.
However … if it’s just a good raw developer you are after for astro work, without paying for a subscription, try Capture One 2023 or DxO PhotoLab 6. Try Affinity Photo if you want a good Photoshop replacement.