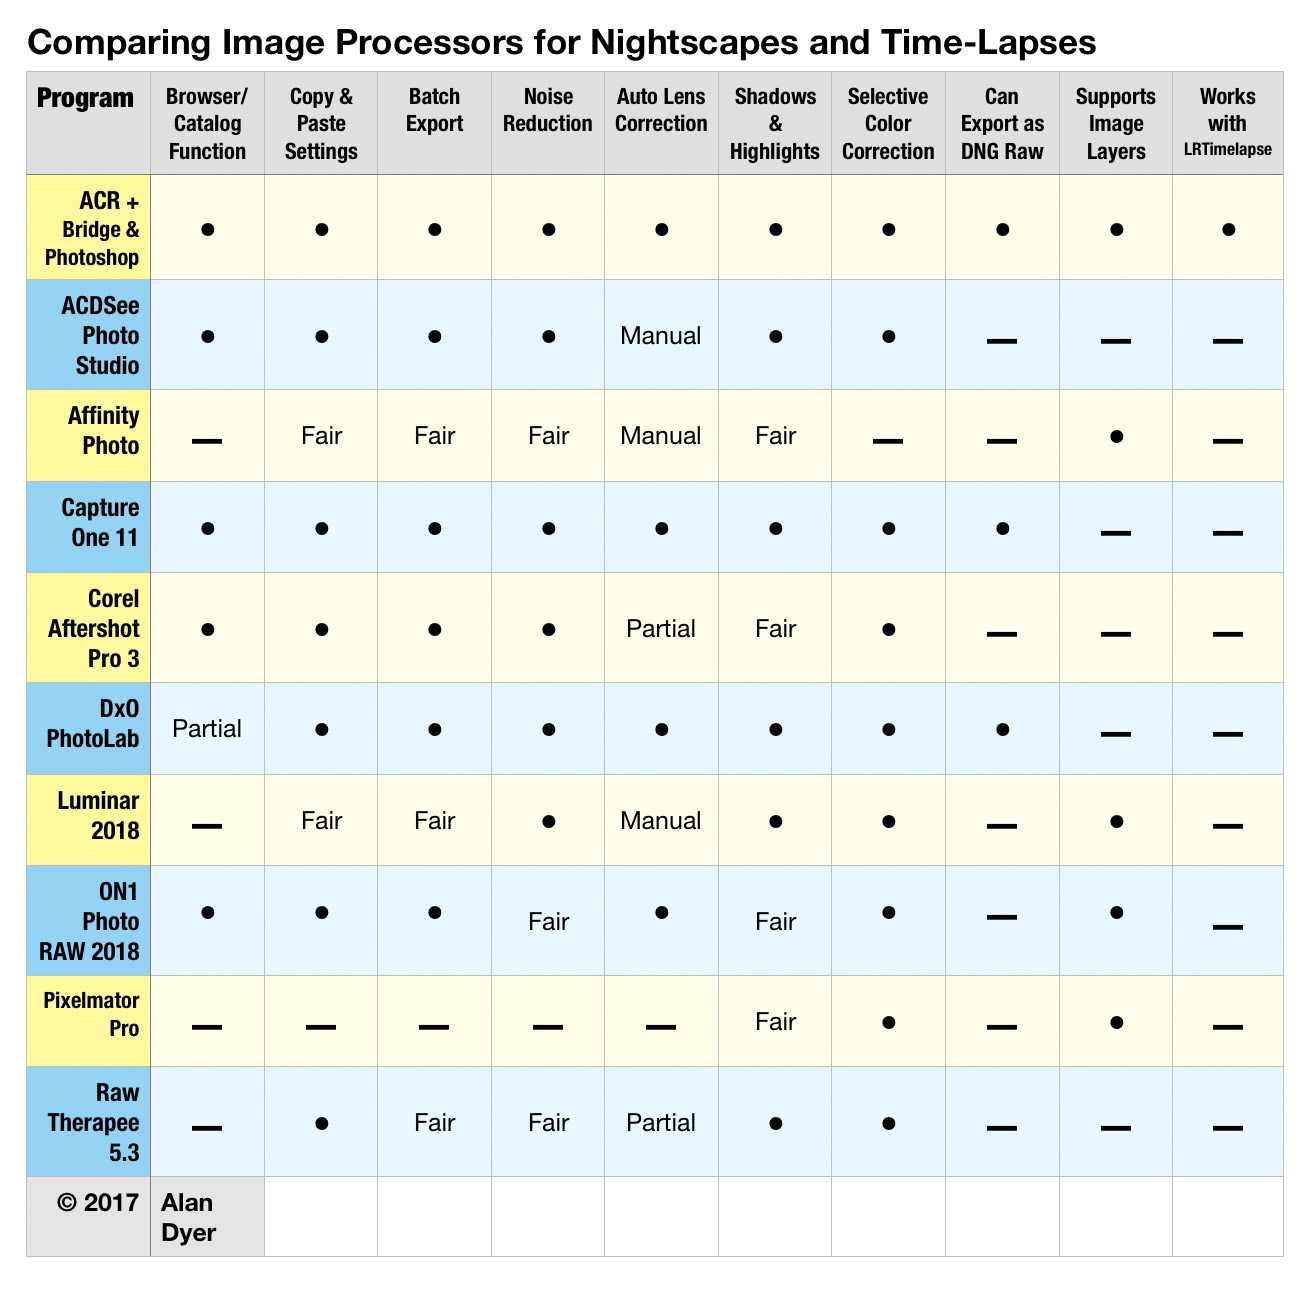
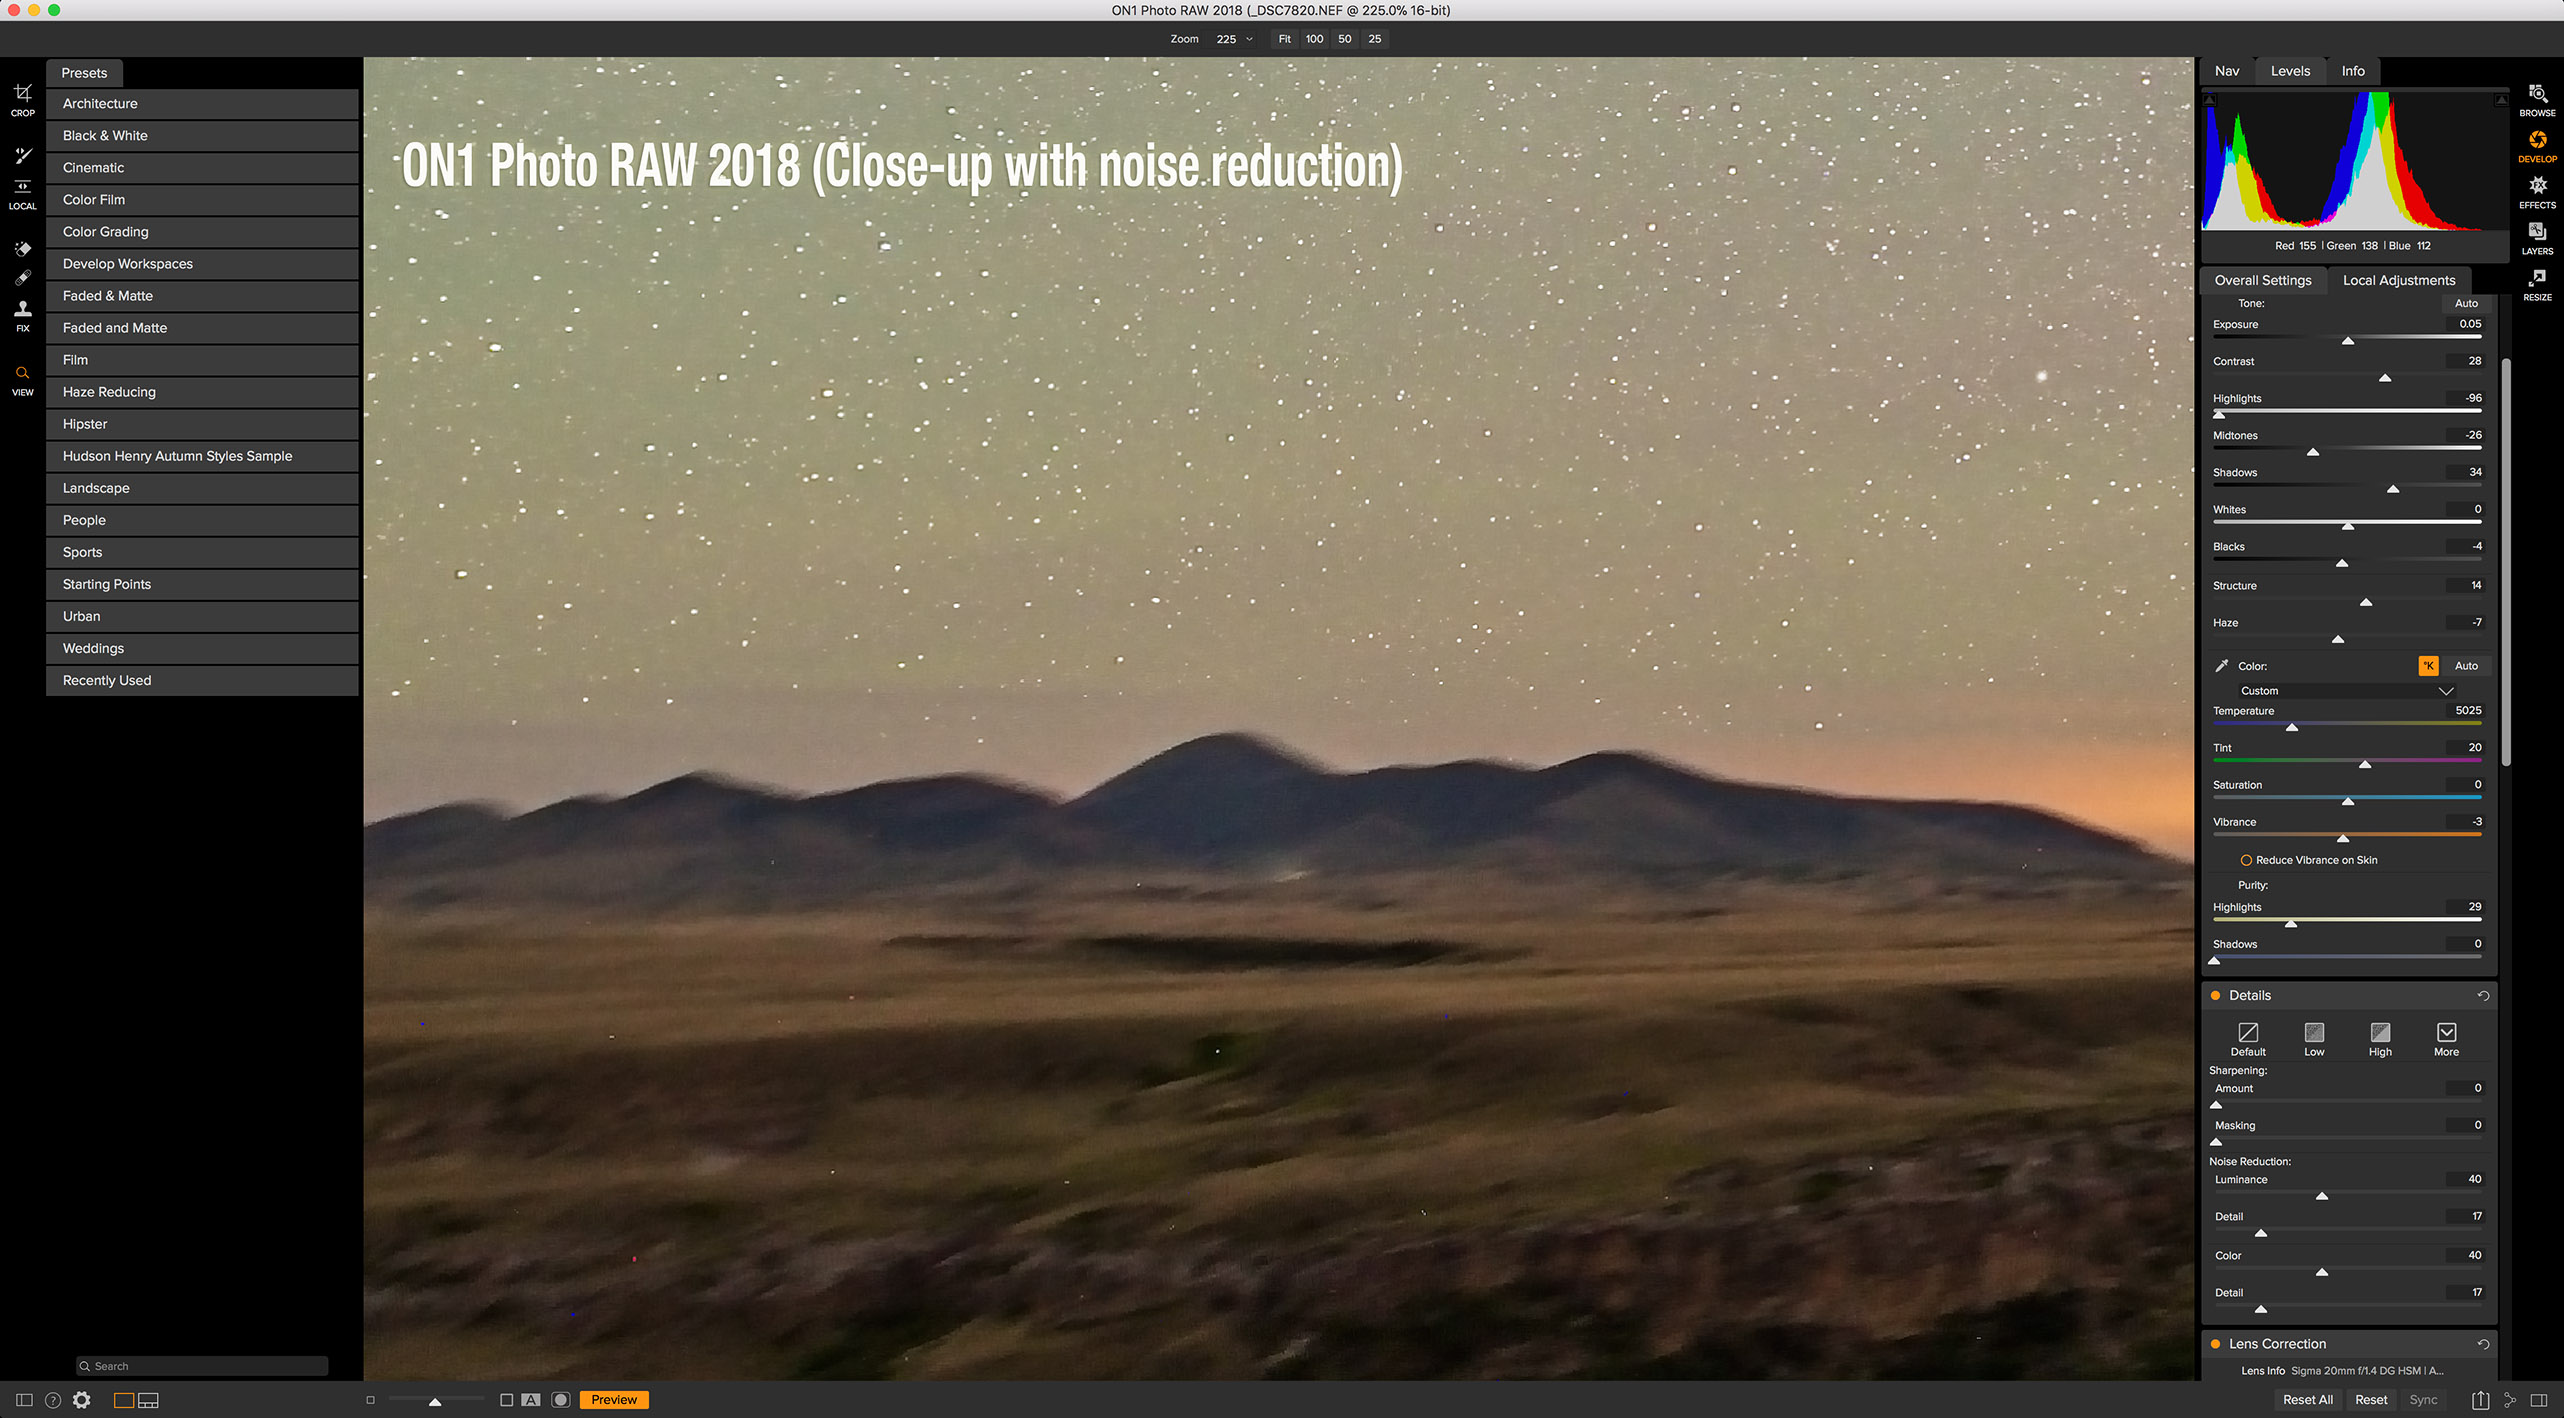
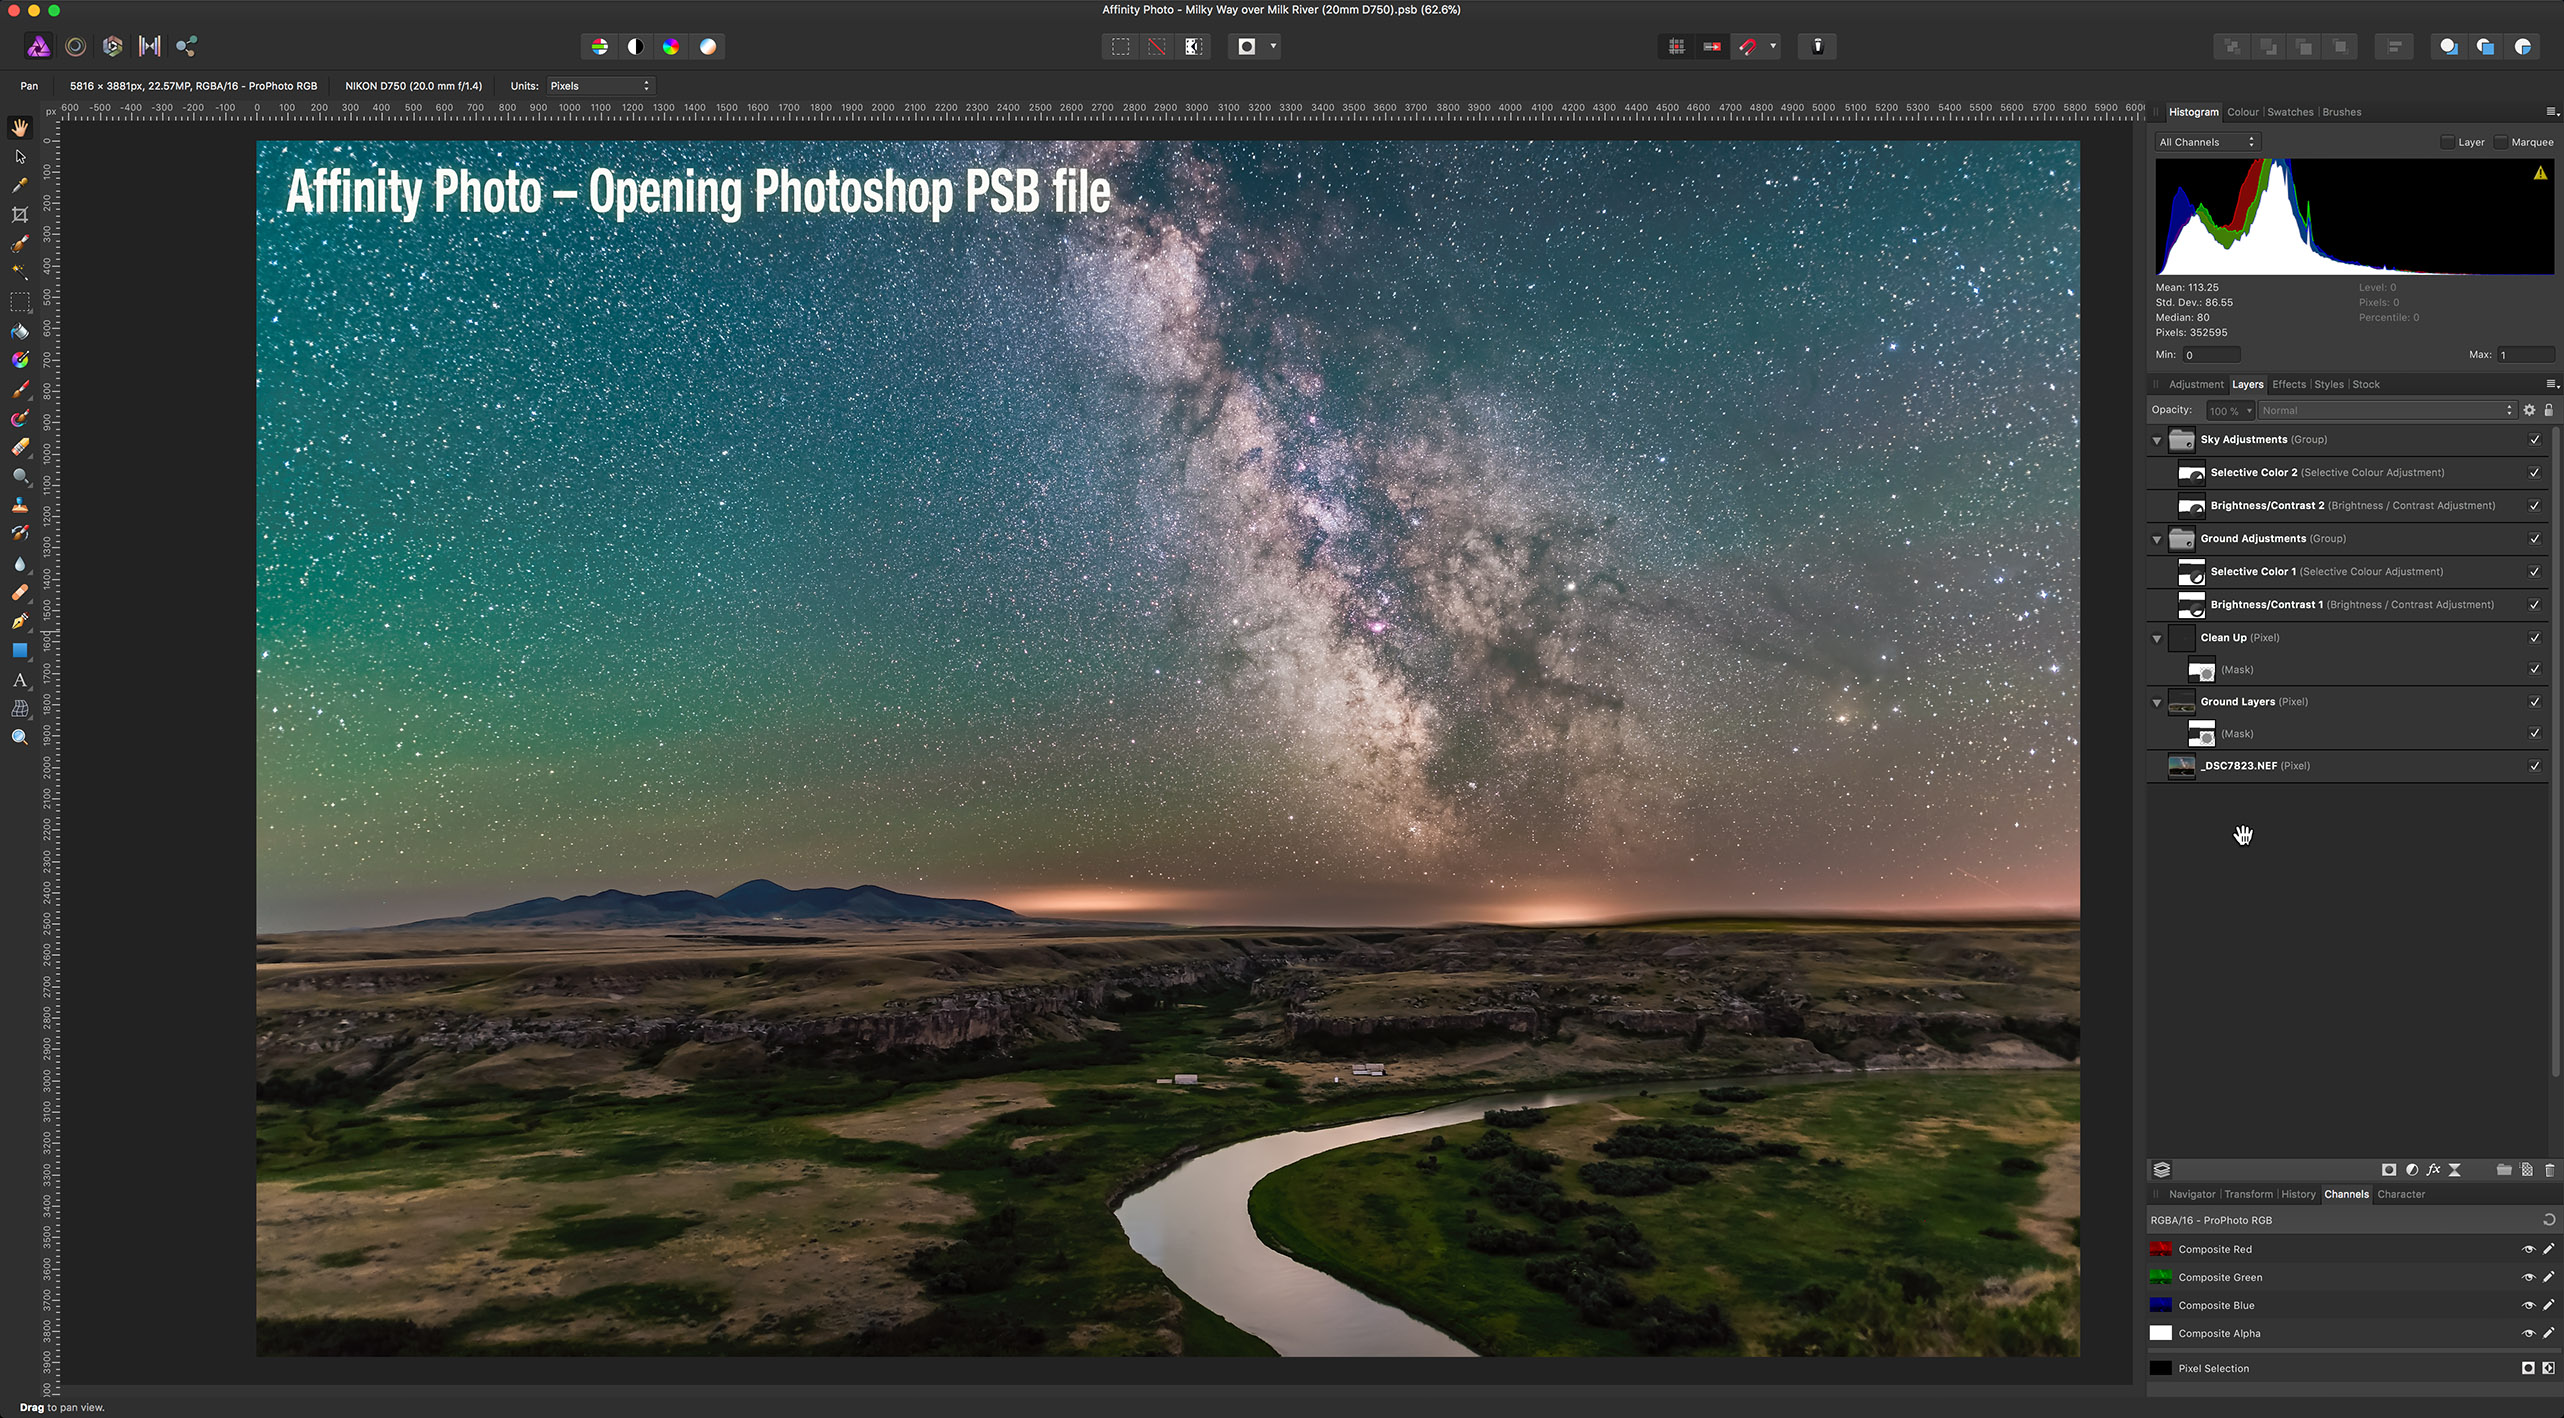
The new star tracker from Move Shoot Move improves upon their original model, eliminating its flaws to provide a reliable and compact tracker.
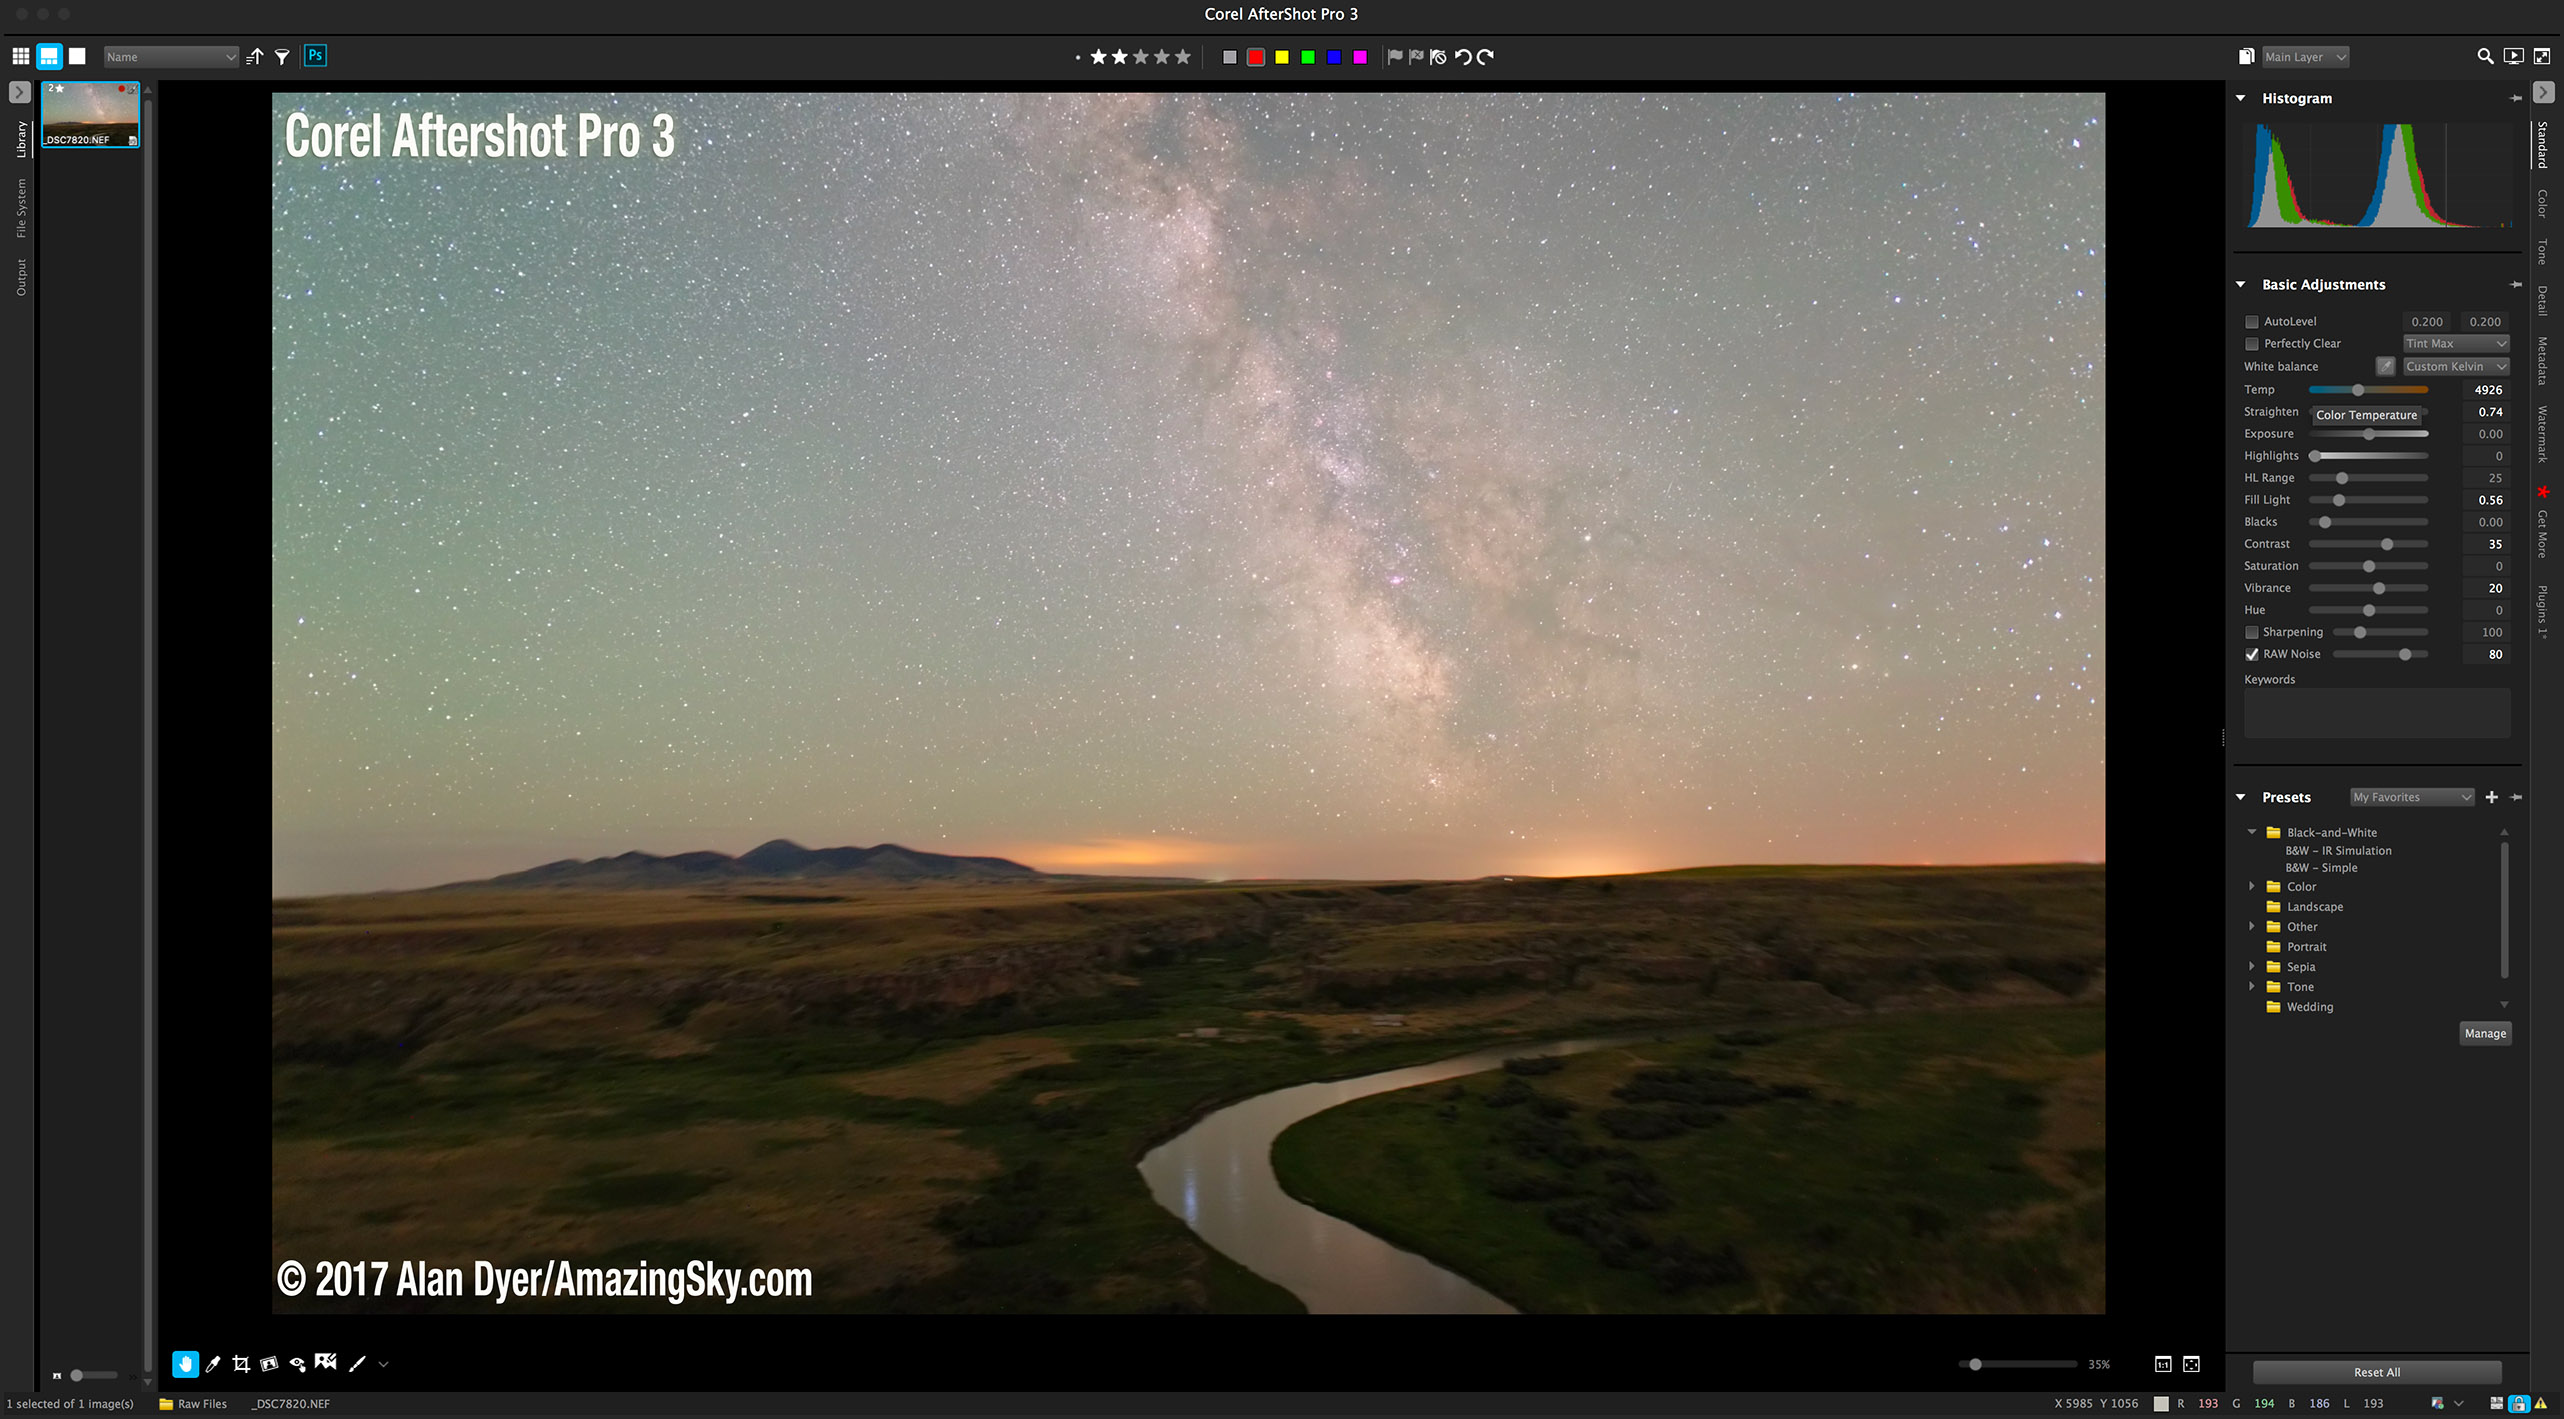
A few years ago the start-up company Move Shoot Move (MSM) introduced a low-cost (about $250), compact star tracker they called the Rotator. Like all other star trackers, the Rotator allowed a camera to follow the turning sky for untrailed, pinpoint stars in long exposures.
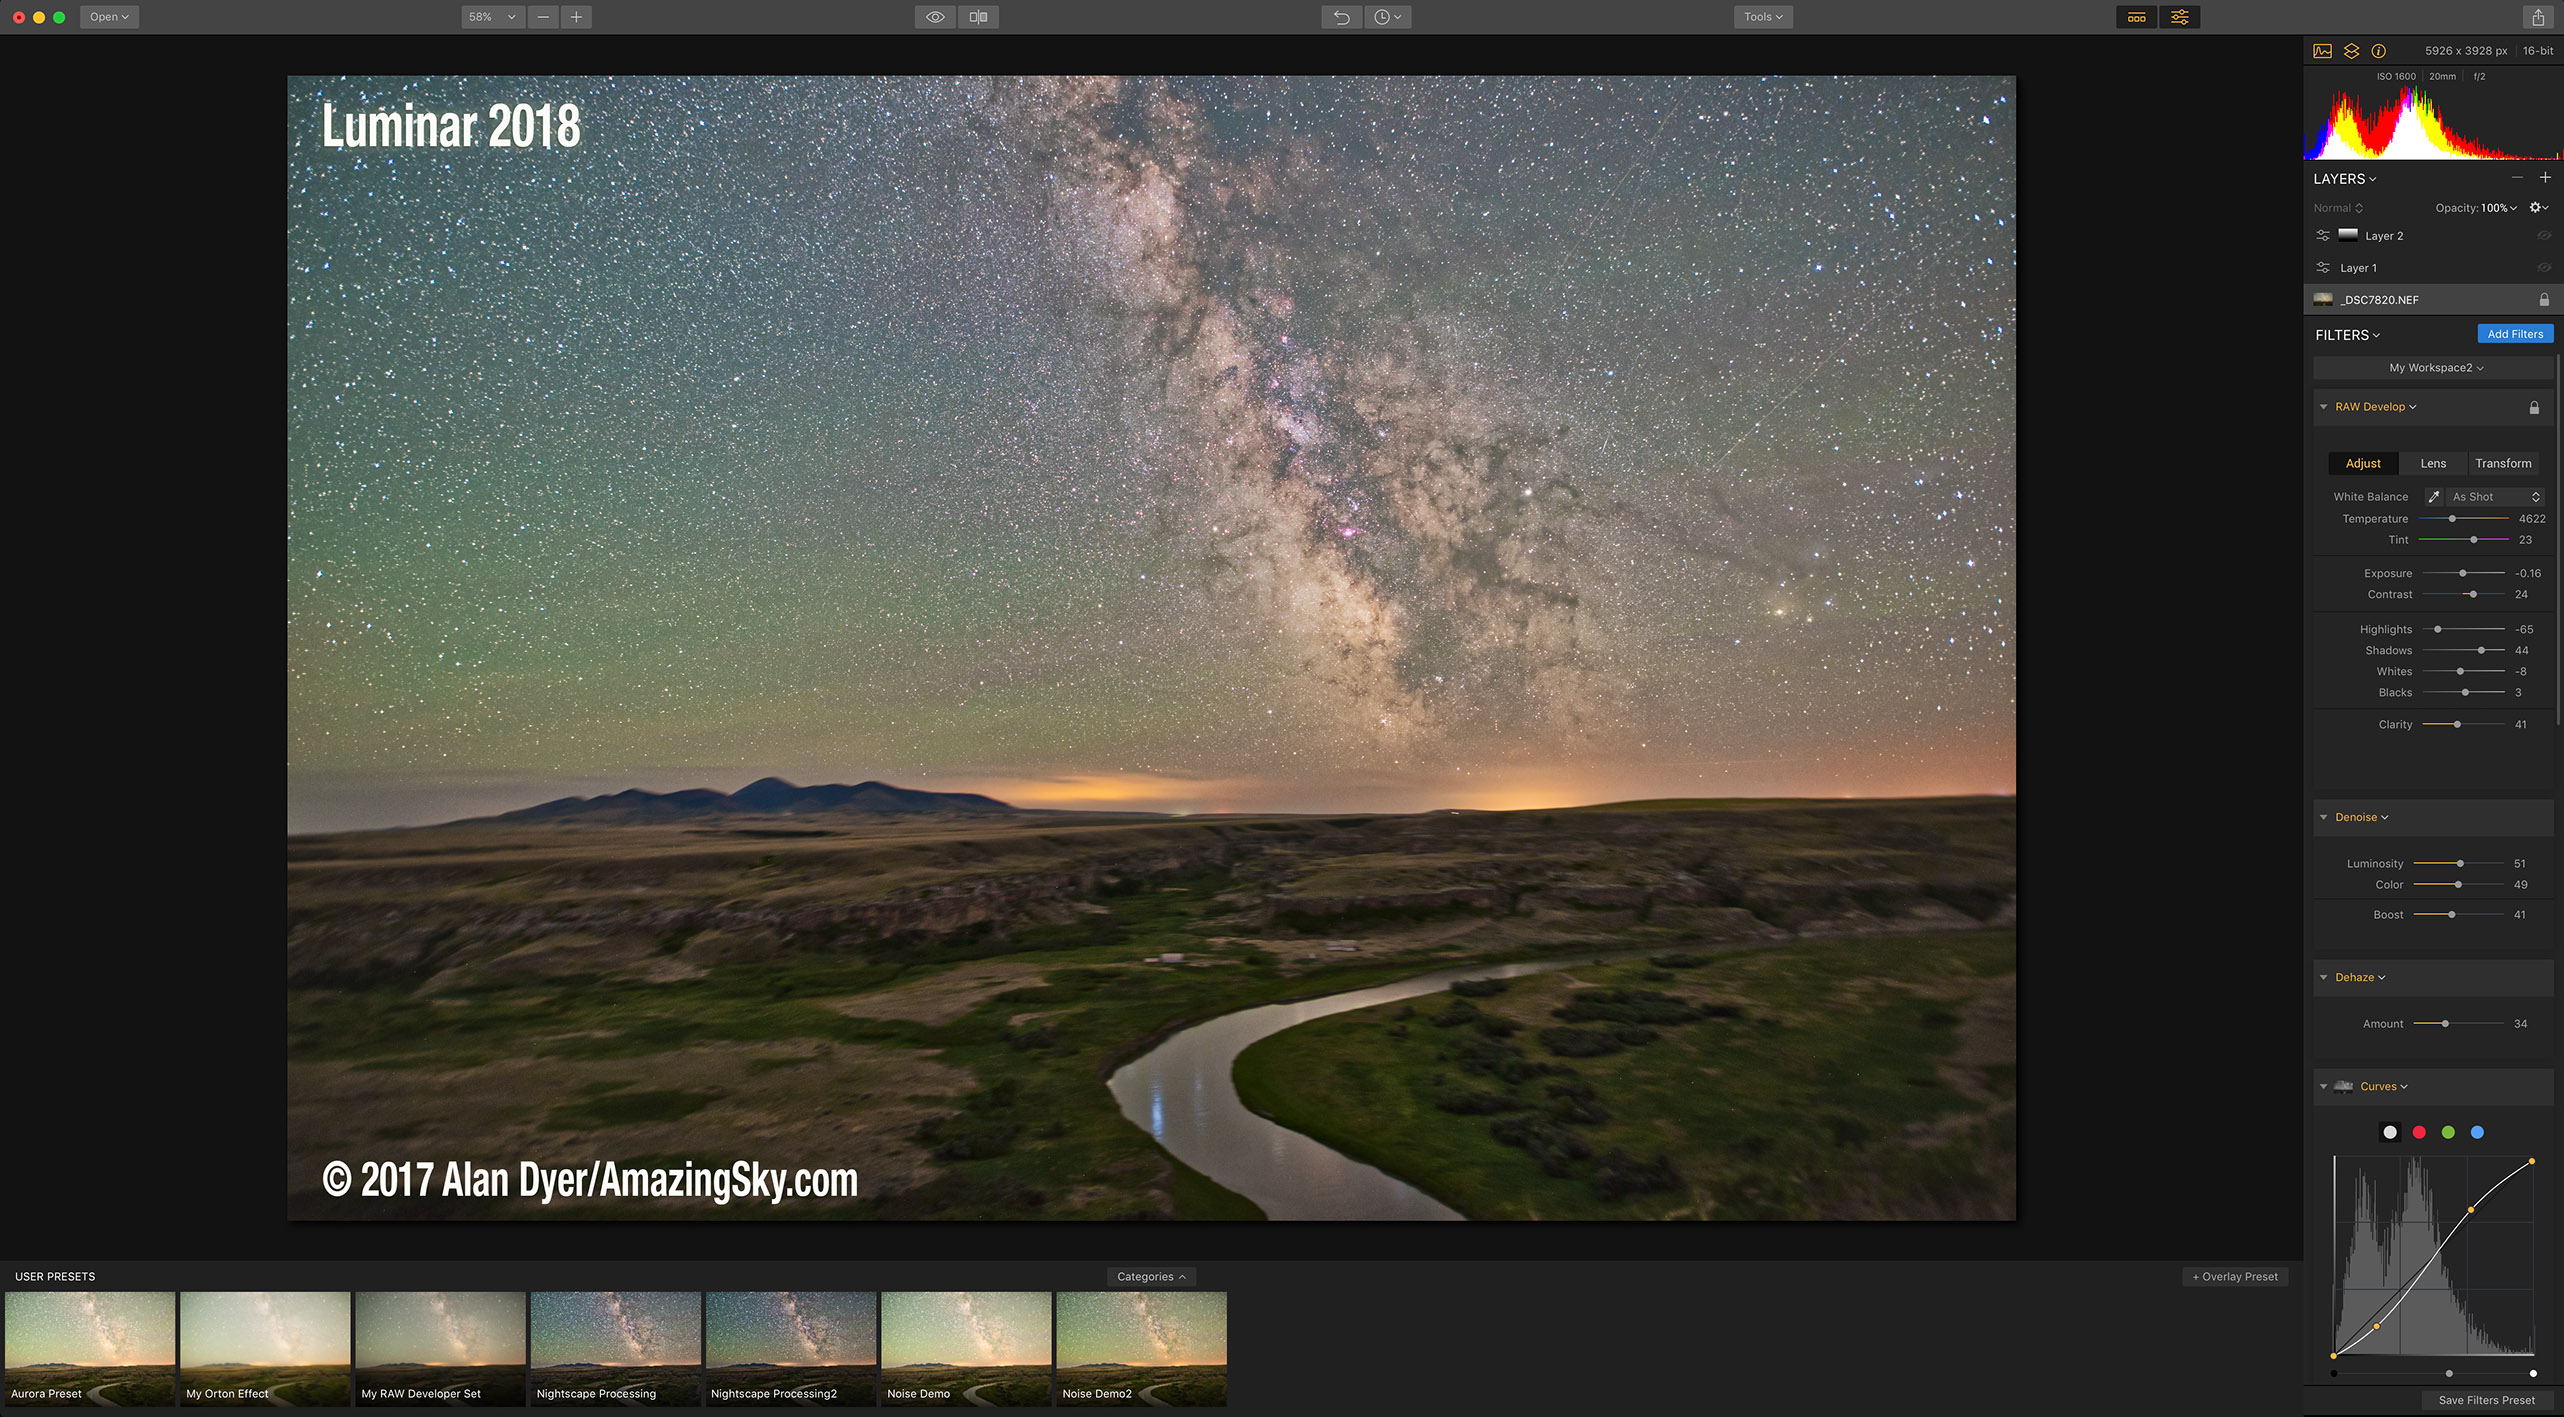
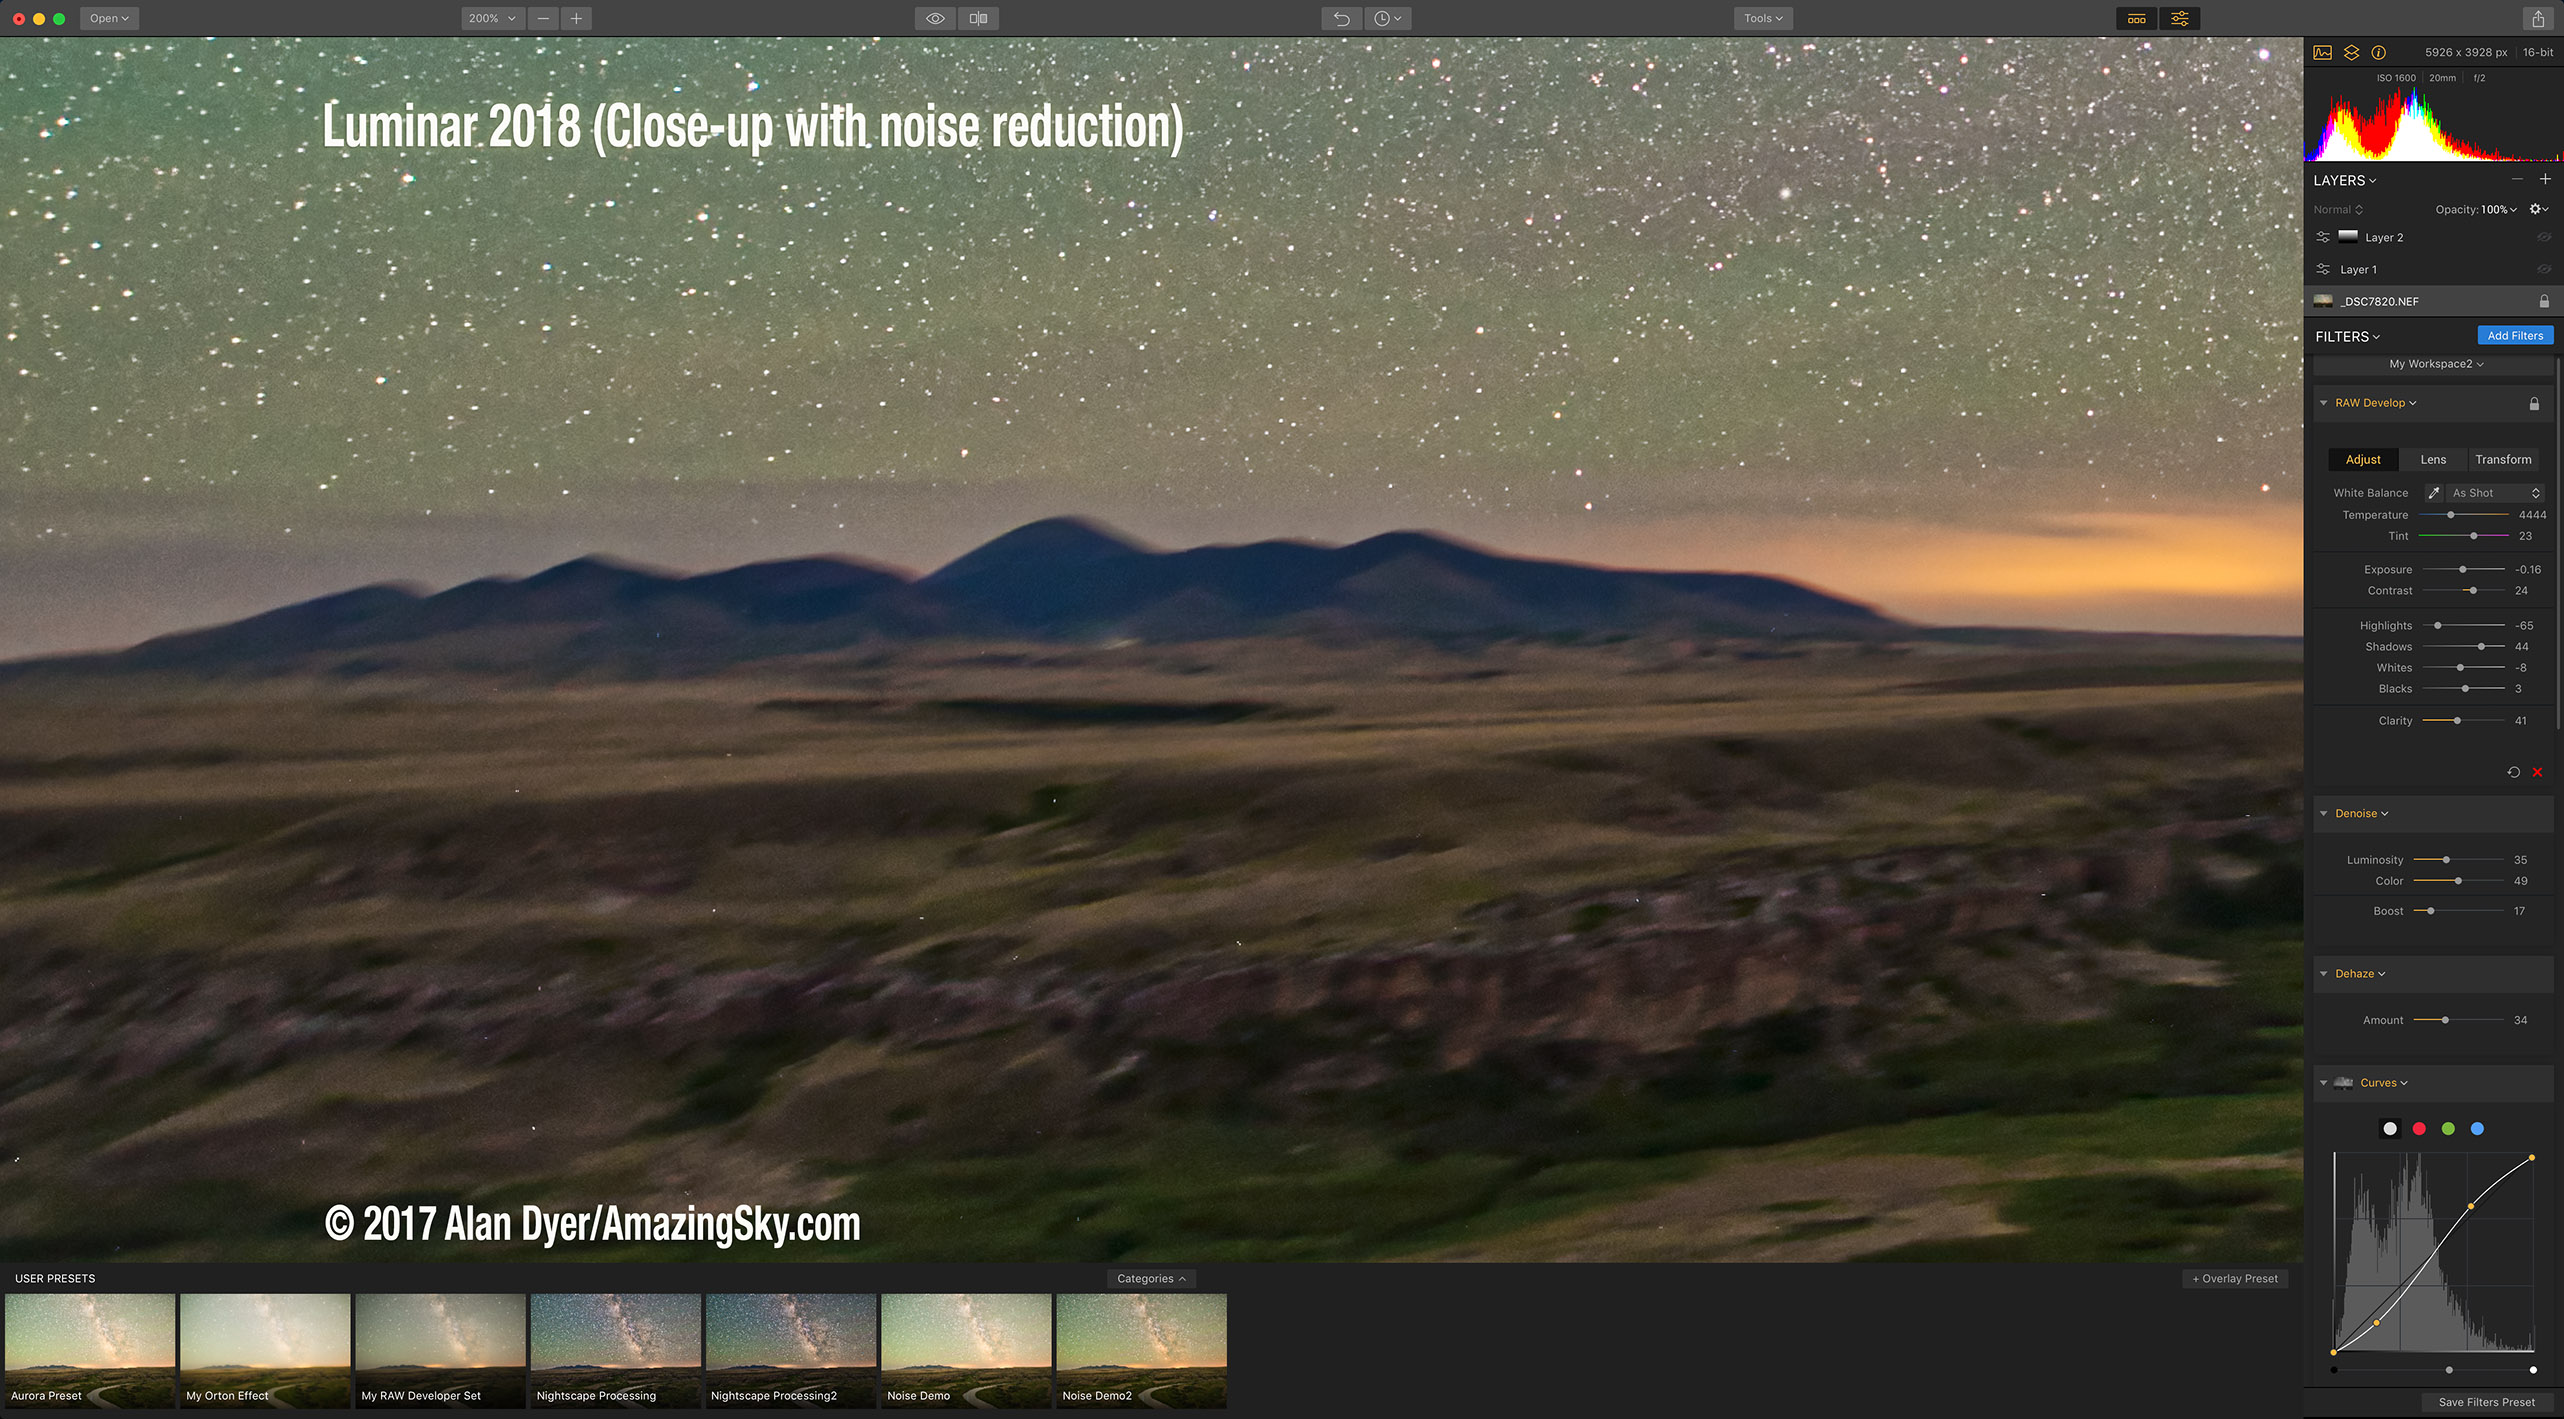
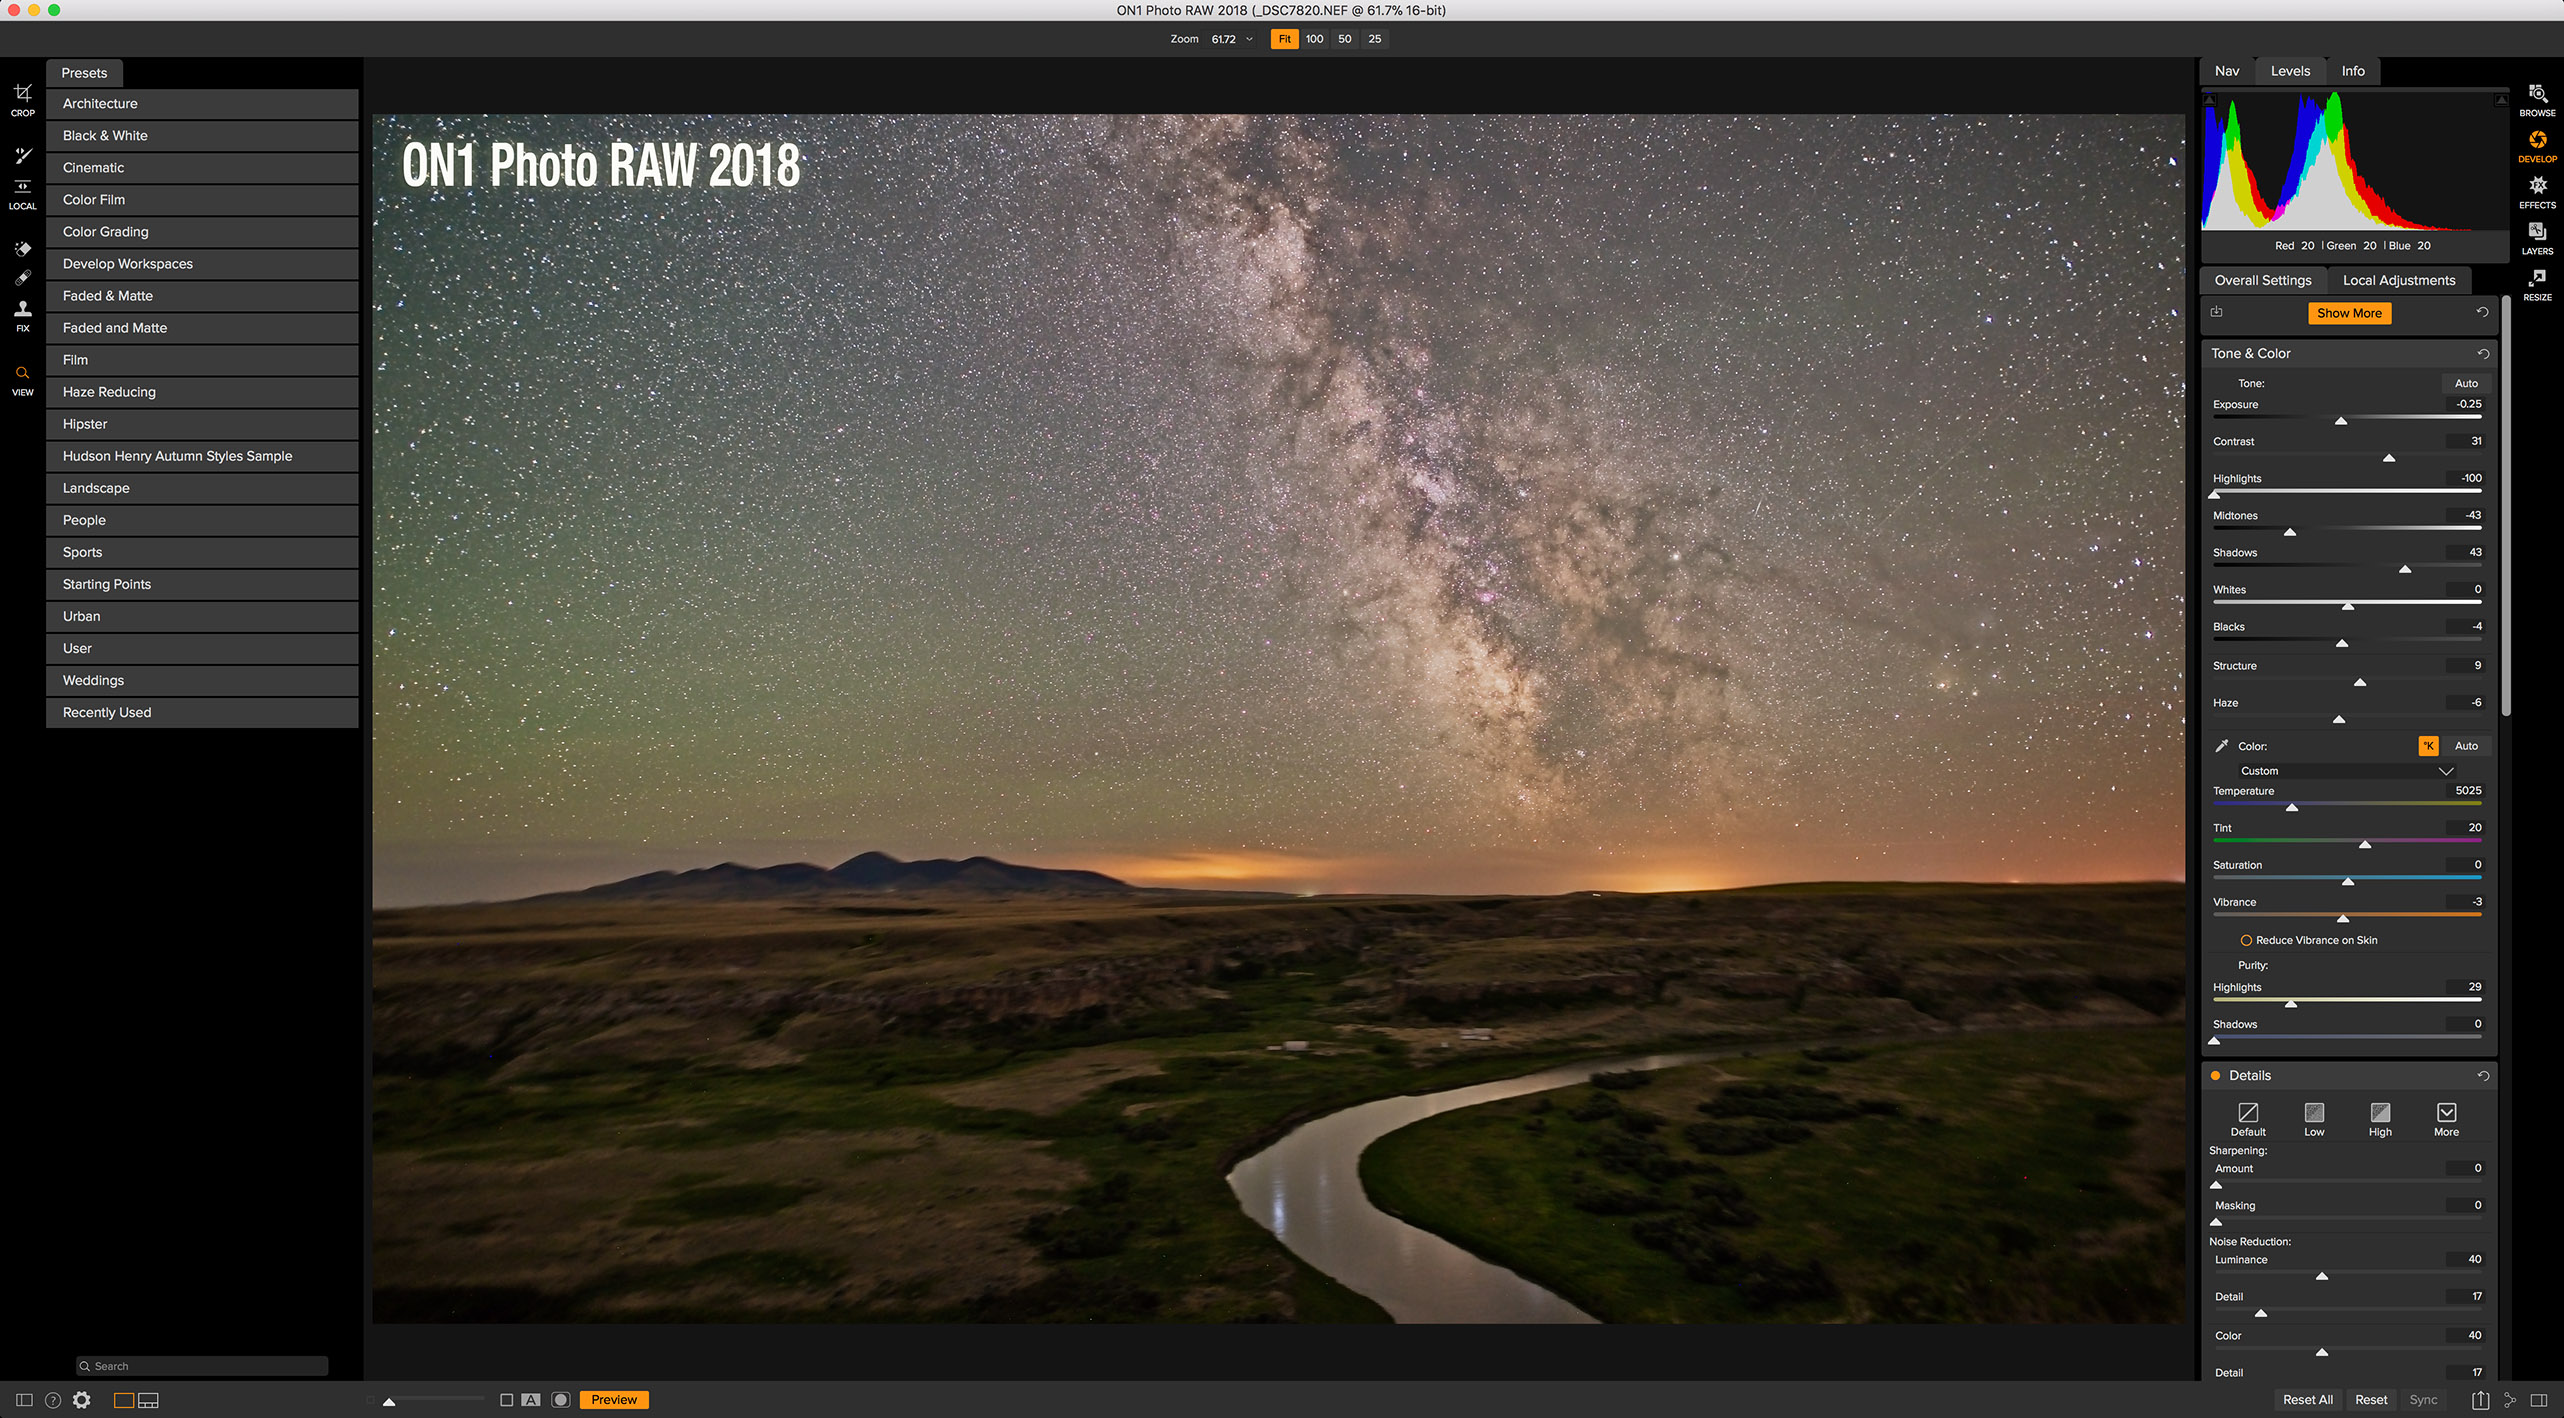
Trackers are essential for rich Milky Way images, and are great for nightscapes, for shooting the sky, blended with untracked shots of the ground, as I show in examples below.
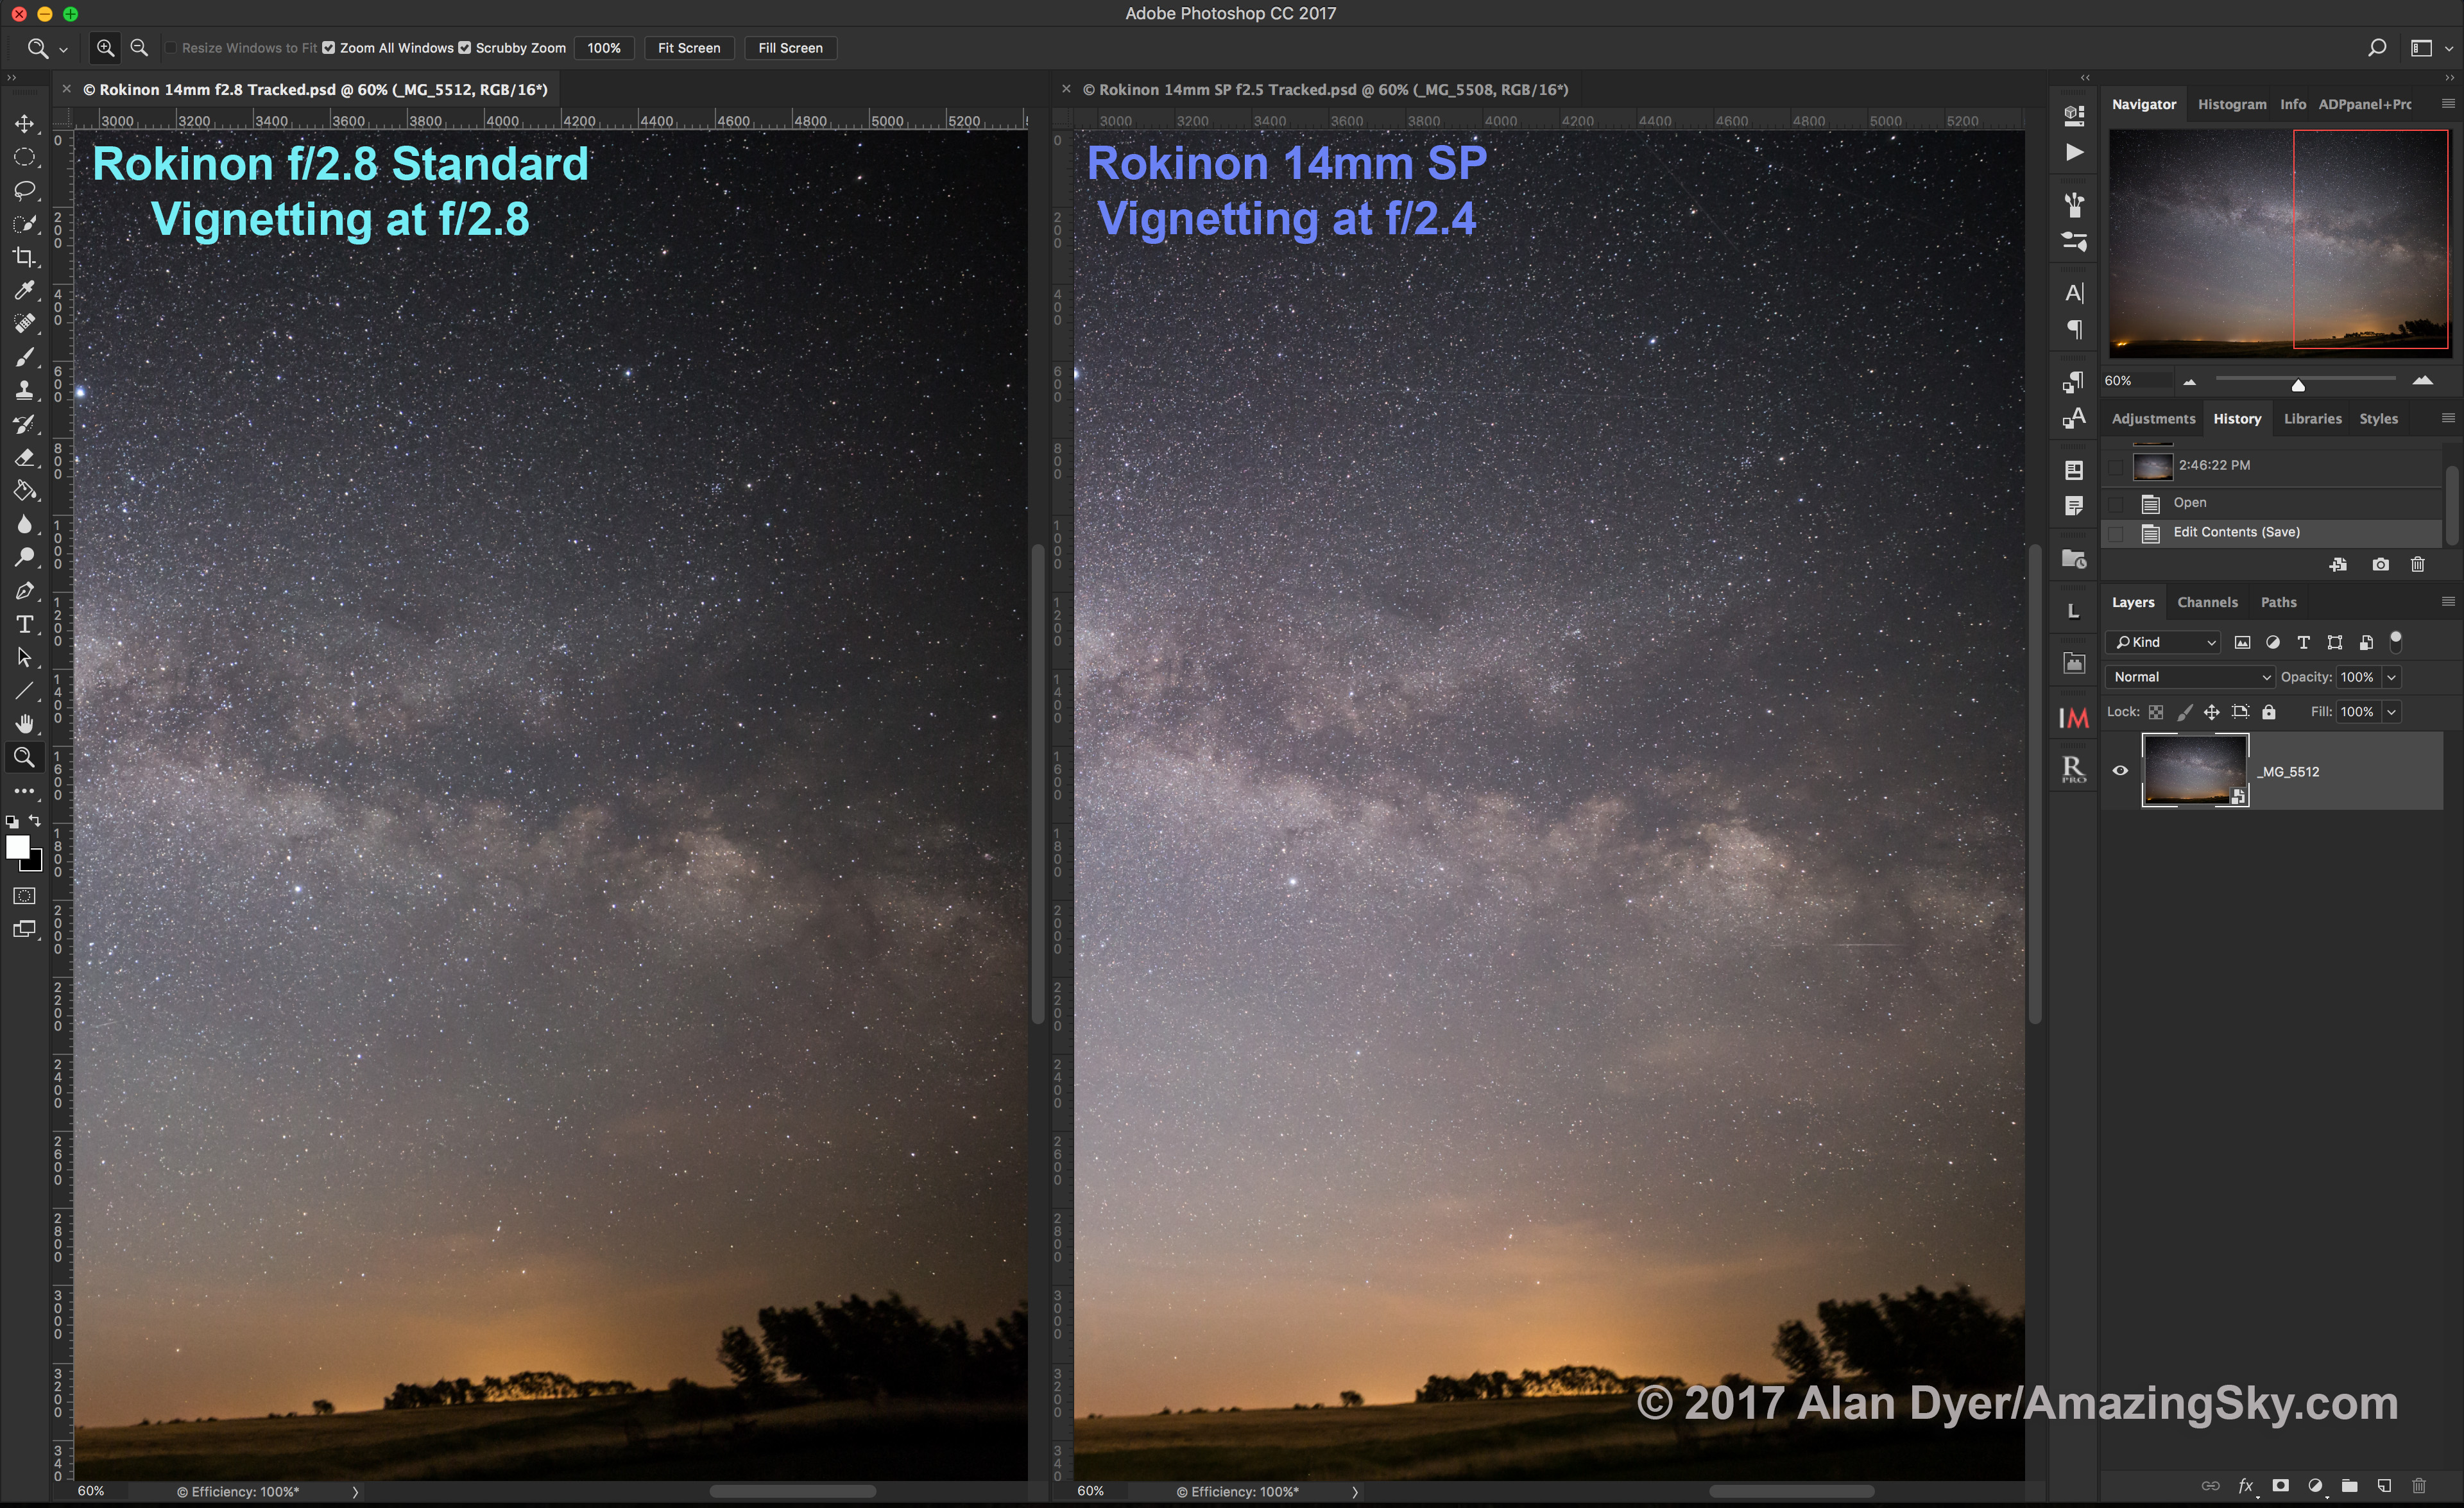
The original Rotator (L) and new Nomad (R). The Nomad is even smaller than the Rotator.
Out with the Old …
The original Rotator went through a couple of design changes during its lifetime. I tested the last versions to be marketed, using three different sample units I either purchased or were sent to me by MSM. (My reviews appeared in 2019 on my blog here, and in the June 2021 issue of Sky & Telescope magazine.)
The bottom line is that I found all the samples of the Rotator I tested to be unreliable for accurate tracking, indeed for tracking period, as units would sometimes not start tracking for a few minutes, or just stop tracking mid-shoot and then restart intermittently. Getting a set of untrailed exposures was a hit or miss affair.
But with a cost lower than most other trackers on the market (ostensibly, as explained below), a pocketable compact size, and with endorsements from notable nightscape photographers, the original Rotator garnered a loyal following of fans. I was not one of them.
MSM obviously recognized the design flaws of the Rotator, because in early 2024 they replaced it with an all-new model, dubbed the Nomad. It works!
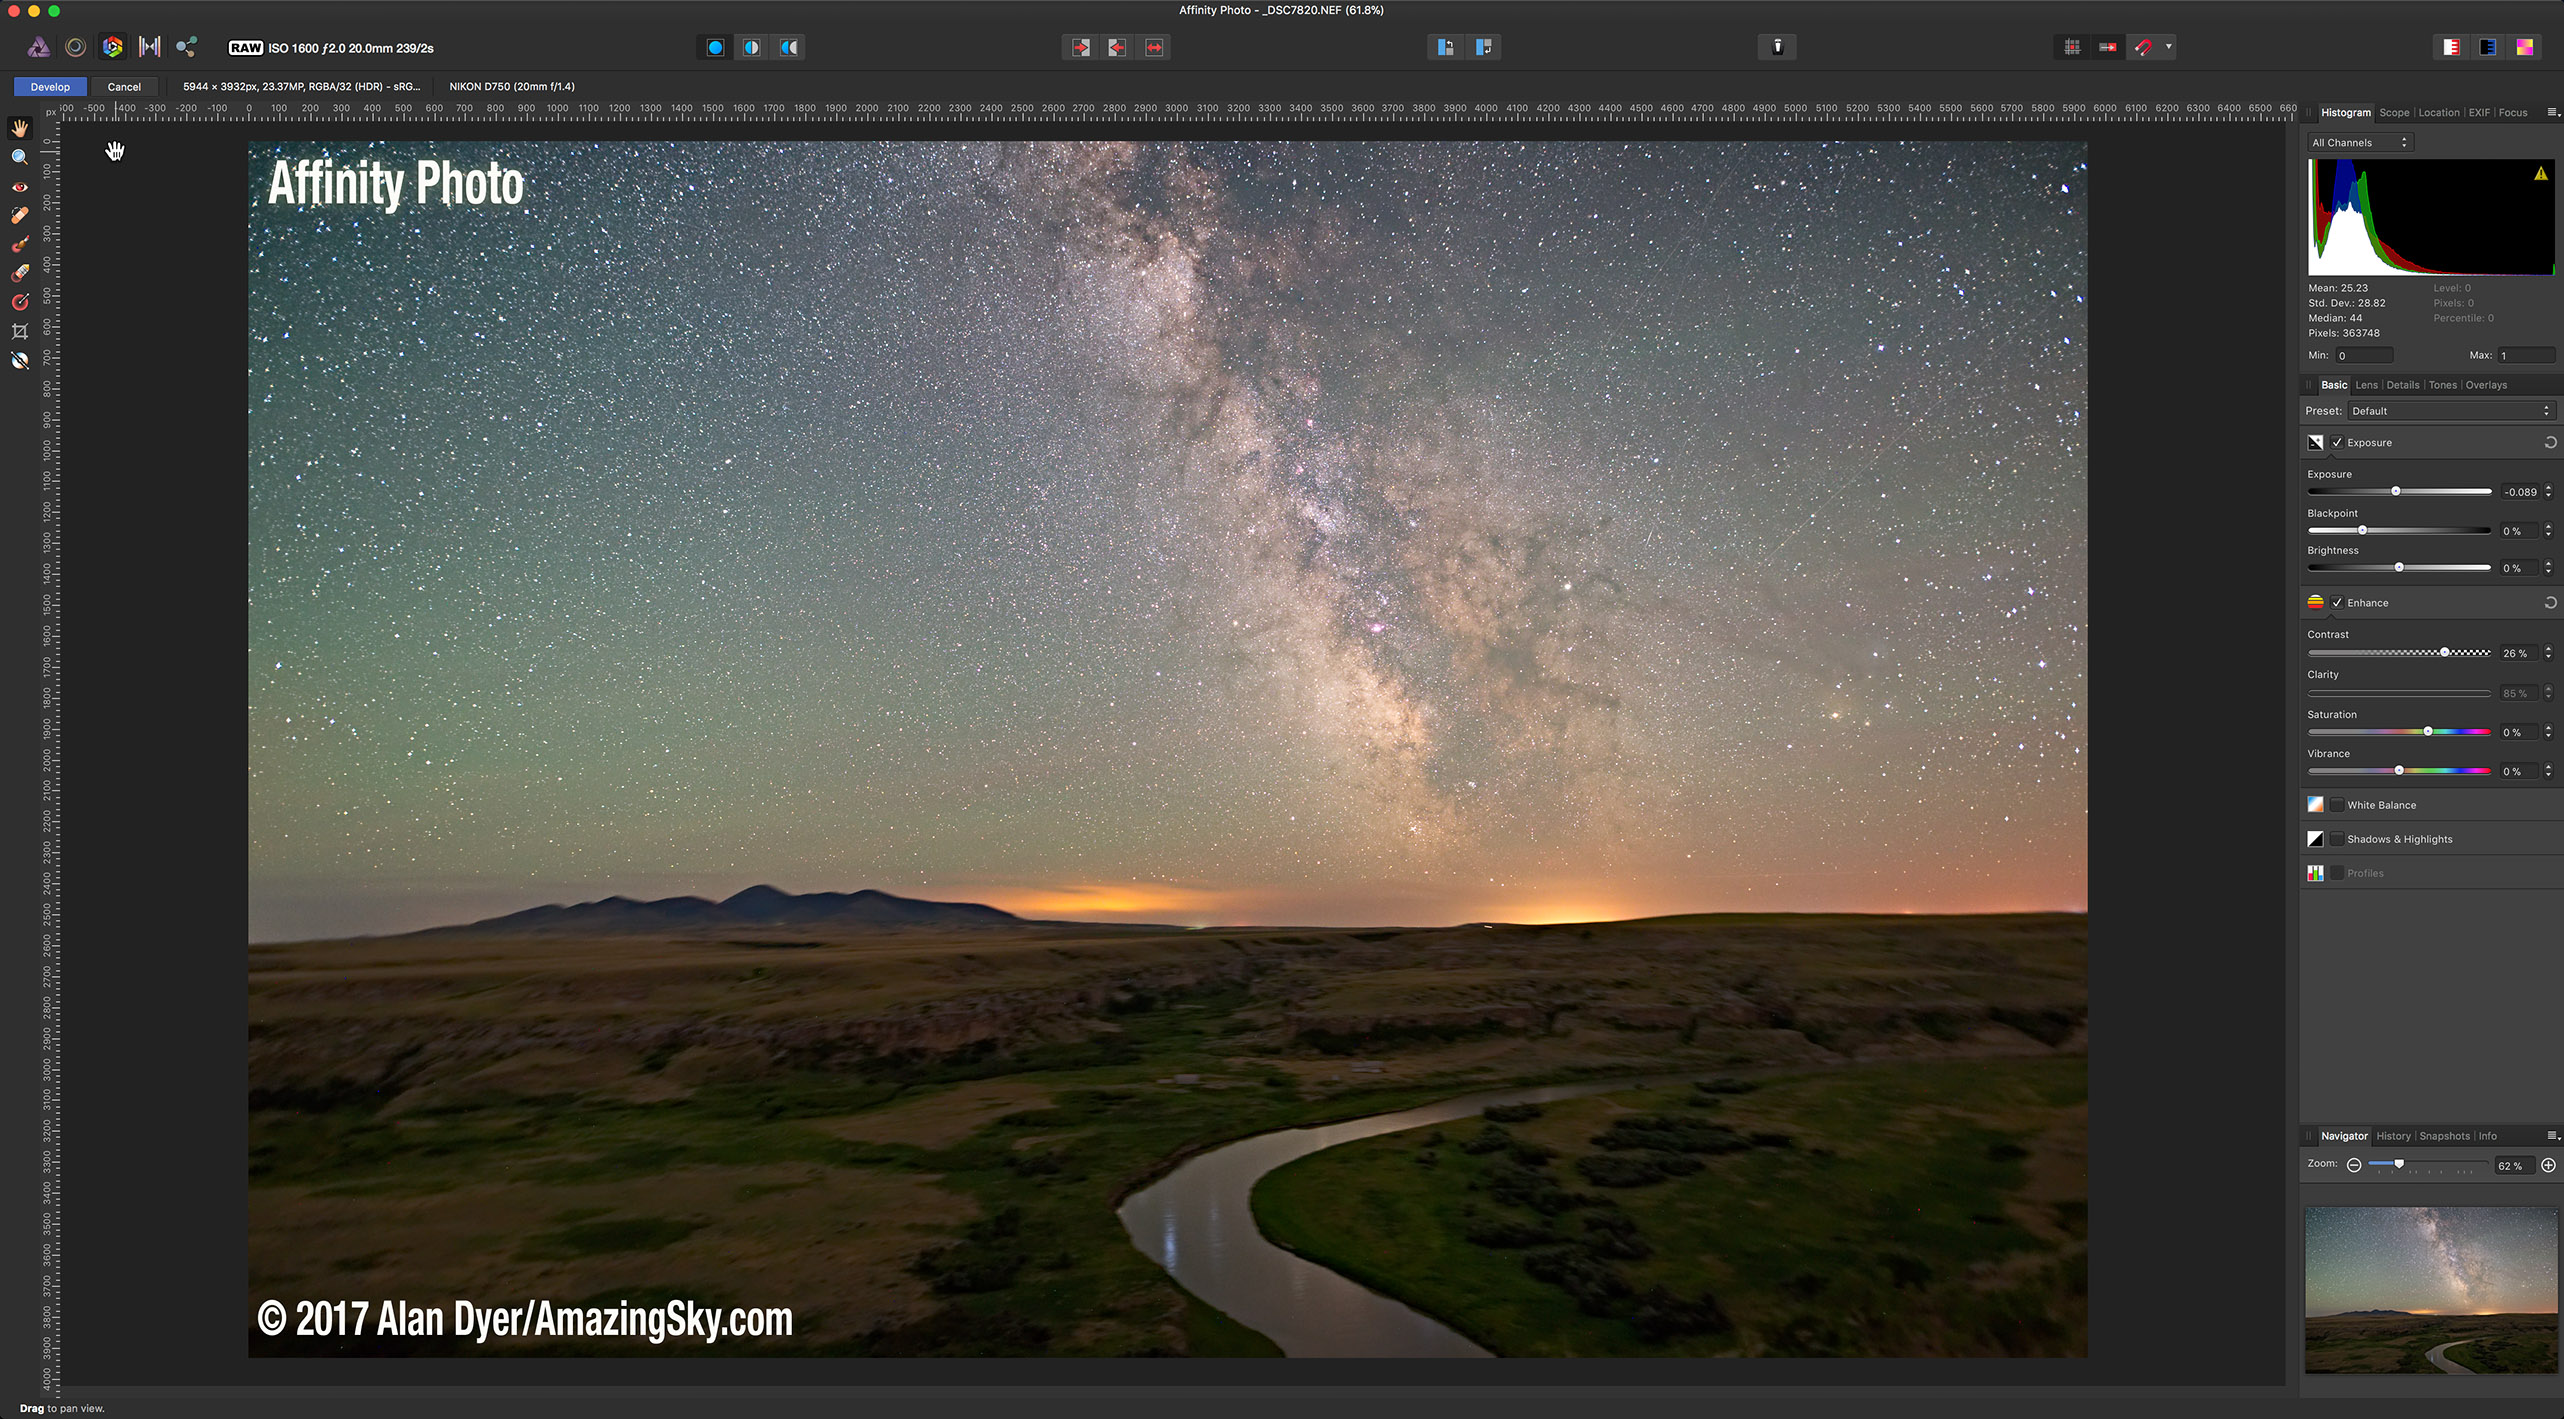
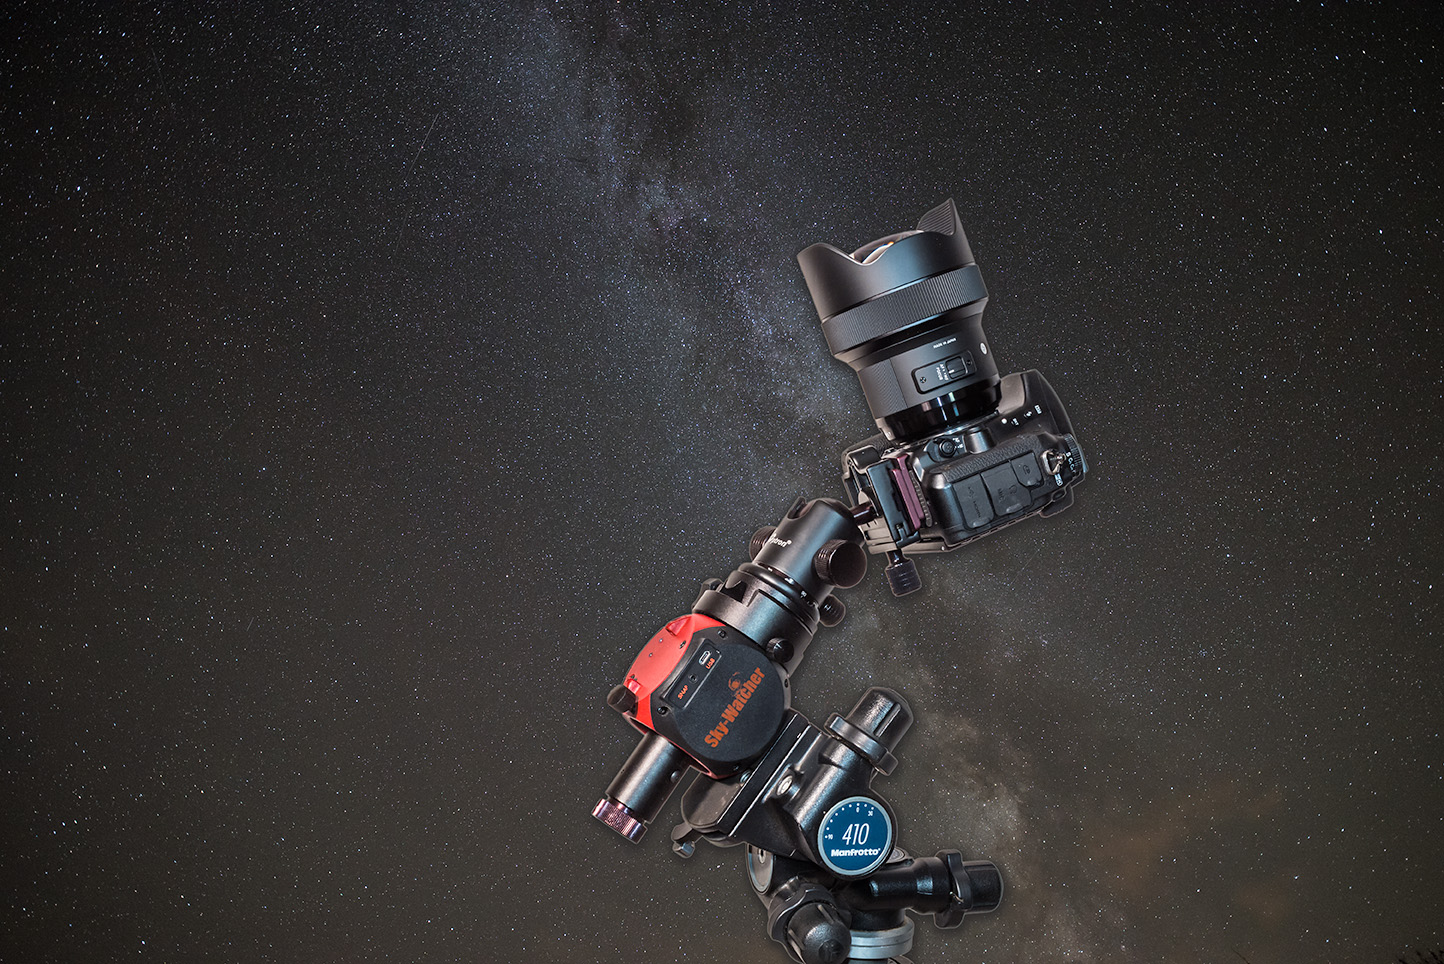
The Nomad on the Benro 3-Way Head, with Laser and Polar Scope, and with a camera and 135mm lens. The ball head is not one from MSM.
I purchased a unit in January 2024 when the Nomad came out, and have used it extensively and successfully over the last few months. I found it has addressed all the serious flaws of the Rotator.
Polar Alignment Accessories
With a weight of about 400 grams, the Nomad is about 70 grams lighter than the old Rotator. It is one of the lightest and smallest trackers on the market, a benefit for those wanting to hike to remote nightscape sites, or pack gear for airline travel. (I took my Nomad to Australia this year; one result is below, shot with the Nomad.)
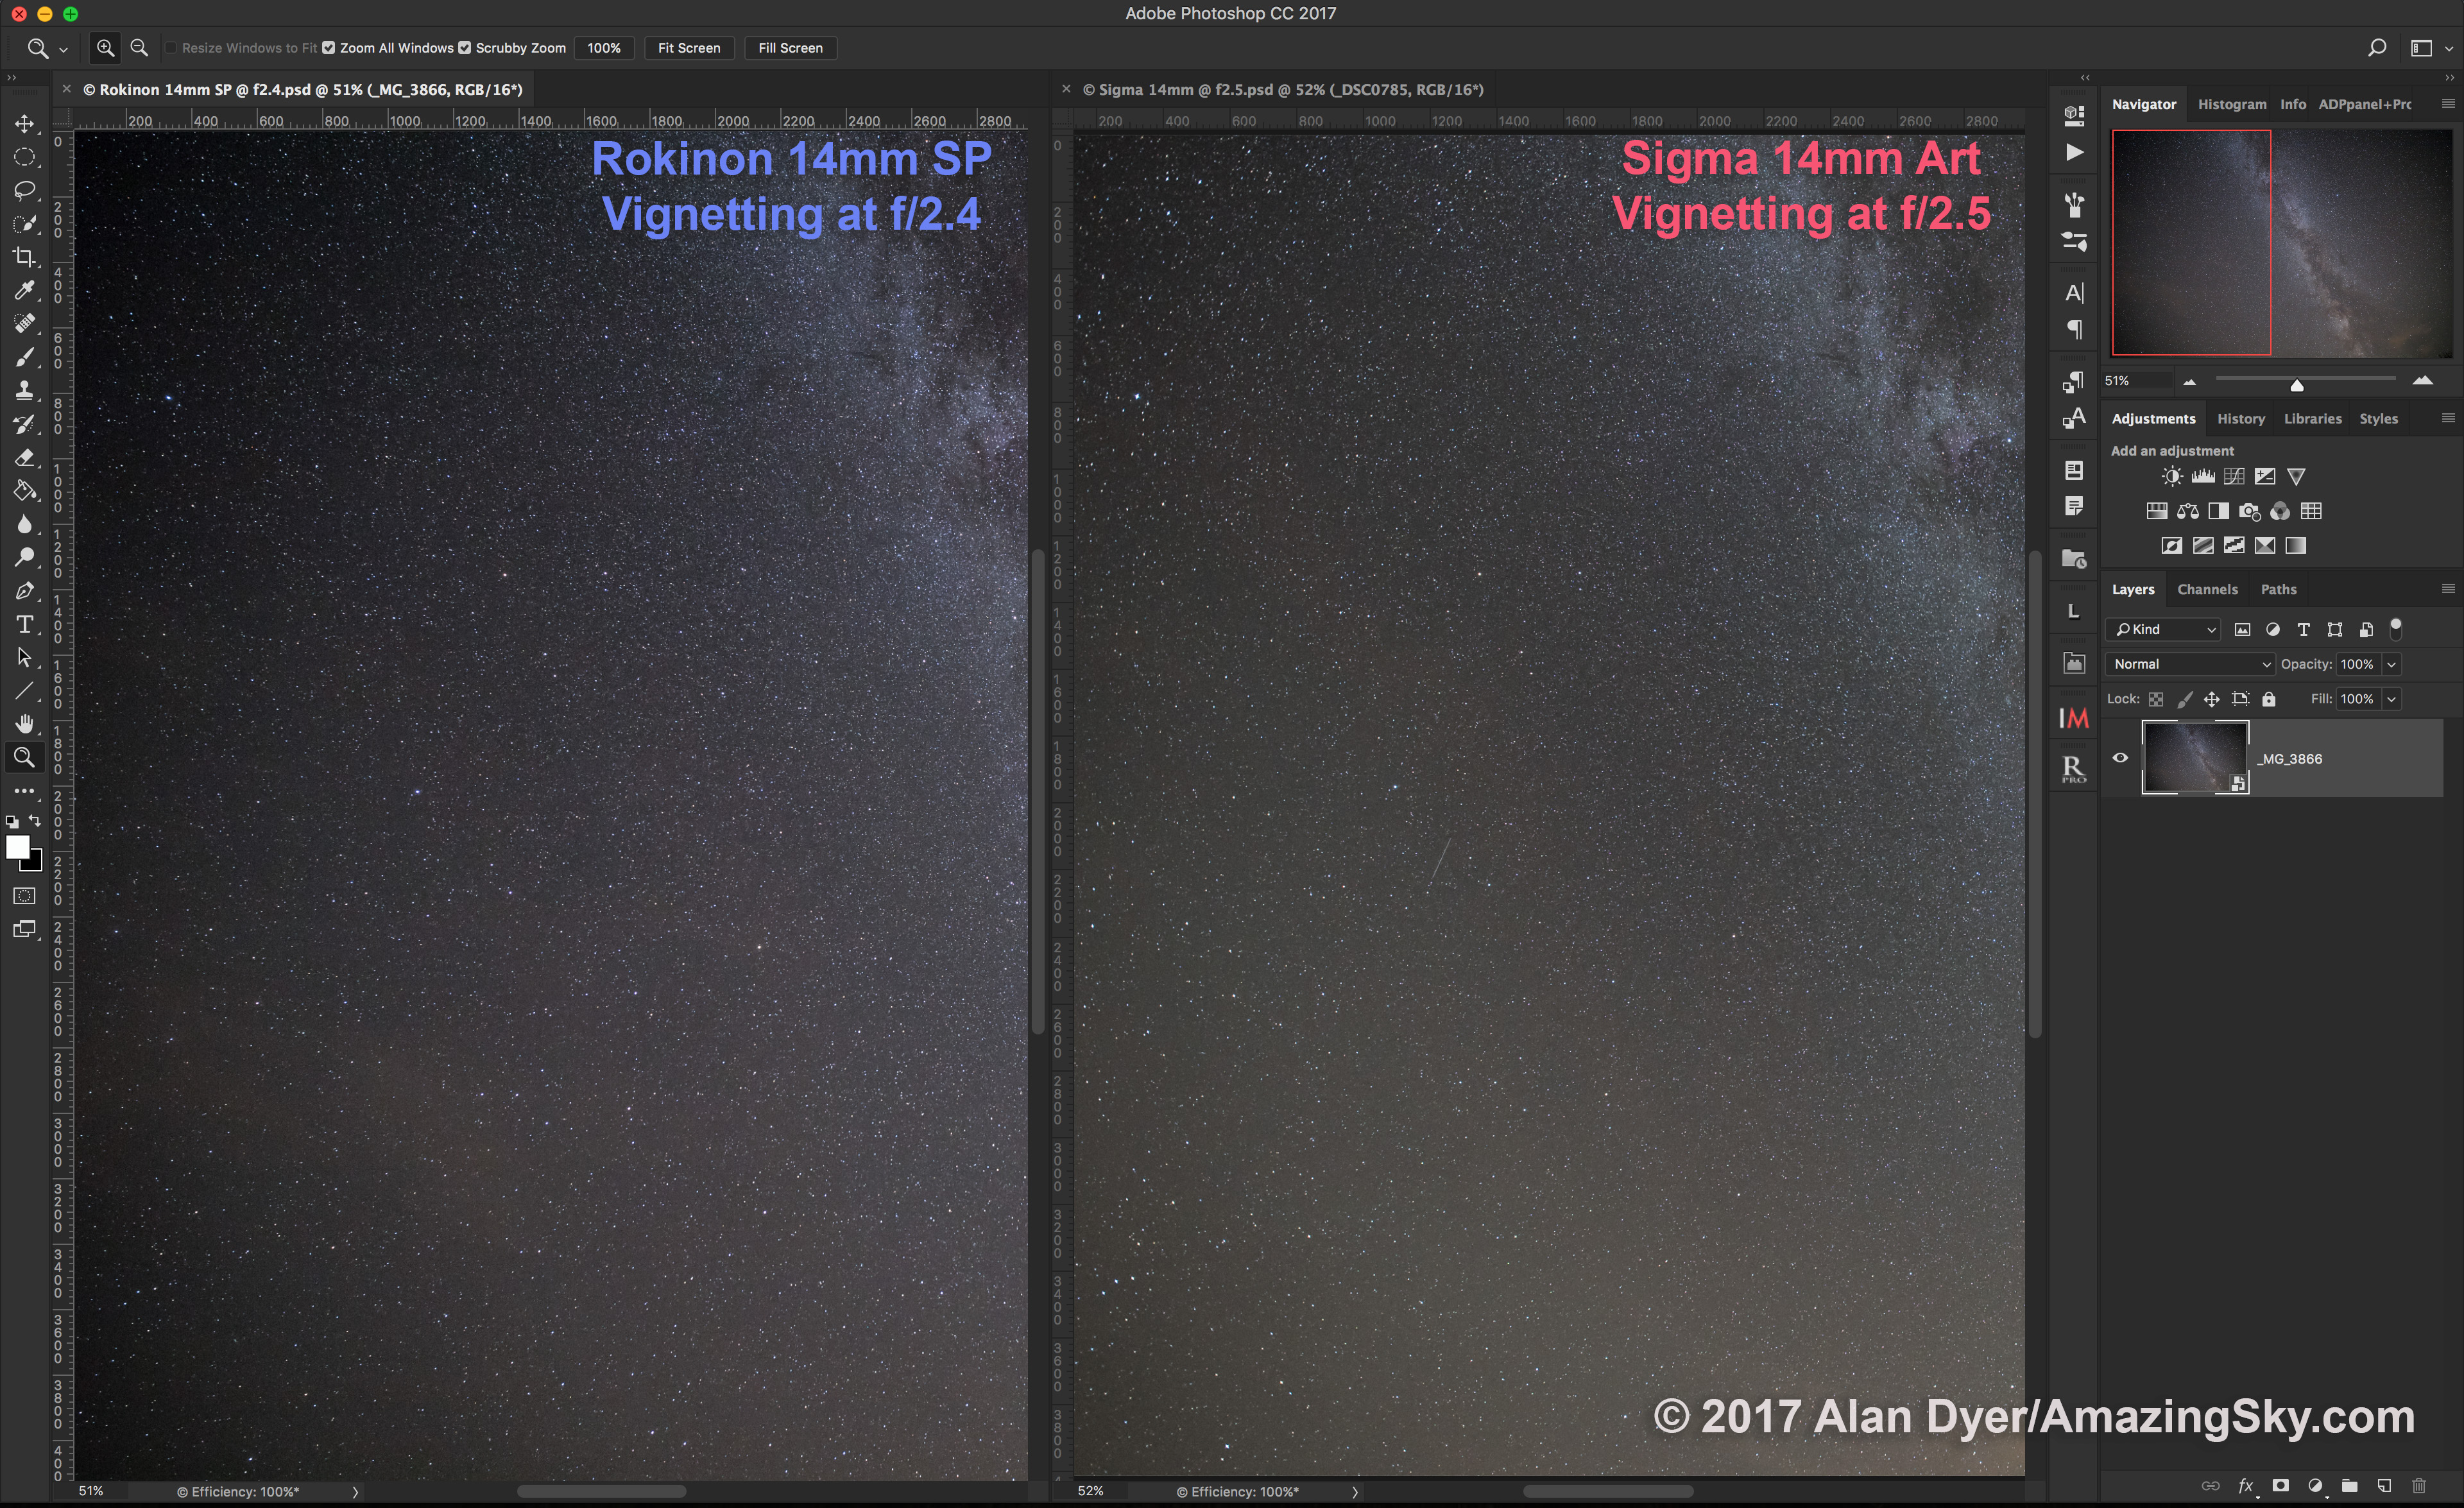
This frames the spectacular area of the southern Milky Way from Centaurus at left, to Carina at right, with Crux, the Southern Cross, at centre. This is a stack of 8 x 4-minute exposures with the Canon RF28-70mm lens at 48mm and f/2.8, on the Canon Ra at ISO 800. All on the MSM Nomad tracker.
However, unlike the popular Star Adventurer 2i and Mini trackers from Sky-Watcher, the Nomad, like MSM’s older Rotator, does not have a polar alignment scope built in, just a peep sight hole. That makes it easier for MSM to fit a tracker inside a compact box.
And yet, I feel some form of polar alignment aid (not just a peep sight) is essential if a tracker is to follow the sky accurately. Like the Rotator, the Nomad can be purchased with two add-on choices (shown below):
• a 5 mw green laser pointer,
• and an optical polar scope …
… each of which attaches to the side of the Nomad as outboard accessories. I purchased both, bundled with the Nomad as “Basic Kit C” for $309 U.S., and find both accessories useful.
NOTE: When shopping at the MSM website don’t be fooled by what looks like temporary sale prices. The prices are always marked down, though MSM does offer coupon codes now and then for genuine discounts. I’ve always found MSM’s delivery by parcel post prompt, and in my case, shipments came from a warehouse in Canada, not China.
The Laser and Polar Scope as they come suppliedWith the Laser threaded on using the red capWith the Polar Scope clamp attachedWith both the Polar Scope and Laser attached. Don’t lose the caps at bottom!
As with the Rotator, the need to add essential accessories makes the Nomad more expensive and more complex to pack than buyers might think. And it can be more complex to initially set up than imagined, not helped by the lack of any instructions. (I’m told by MSM that a downloadable PDF sheet is being prepared.) In place of factory-supplied instructions, MSM depends on its YouTuber fans to provide tutorials.
It took me a moment to figure out how the laser attaches to the Nomad — it does so by replacing the black cap that comes on the laser with a supplied threaded red cap, so the laser can screw into the peep hole on the Nomad’s body that is covered by yet another cap you remove — but don’t lose it, as you might need it.
The optical polar scope attaches by way of an included clamp held onto the Nomad by the laser, or by the removable threaded cap (so you will need it if you aren’t using the laser, but it is easily lost).
Out of the box I found I had to adjust the beam of the laser (using the two tiny set screws on the laser) so the beam exited straight out the laser and up the peep hole in the Nomad’s case.
Once collimated, the laser pointer has proved to be an accurate and convenient way to polar align, especially for shooting with wide-angle lenses. (Keep in mind, green laser pointers over 1 mw are illegal in some jurisdictions.)
The laser uses a removable and rechargeable 3.7-volt battery, and comes with a little USB-powered charger. The laser’s battery has lasted for months of momentary use. The laser works briefly in winter when it is warm, but as soon as it gets cold, as is true of most laser pointers, it refuses to lase!
This frames the small constellations of Sagitta the Arrow and Vulpecula the Fox. At lower left is the green planetary nebula Messier 27, aka the Dumbbell, shown in the close-up tracking test image below. This is a stack of 14 x 2-minute exposures with the Canon RF135mm lens on the Canon Ra, on the MSM Nomad tracker. The images were the best 14 out of a series shot to test the Nomad’s tracking.
However, for the more accurate polar alignment needed when shooting with telephoto lenses (an example is above), and for winter use, I prefer to use the optical polar scope, with the laser a handy complement just to get close to the pole.
The polar scope has a reticle etched with star patterns for both the North and South Celestial Poles. I found the latter worked well in Australia. The mounting clamp held the polar scope securely and consistently well centered, another welcome improvement over the polar scope clamp supplied with the Rotator, which could wiggle around.
Polar scope with its glow-in-the-dark Illuminator. The Nomad comes with an Arca-Swiss dovetail plate bolted onto the bottom edge, for attaching it to a tripod head or to the optional MSM Wedge.
The polar scope does not have an illuminator LED. Instead, it comes with a novel phosphorescent cap which you hit briefly with white light so it glows in the dark.
Placed over the front of the polar scope, it lights up the field allowing the reticle to be seen in silhouette. While it works fine for sighting Polaris, the bright field can make it hard to see the faint stars in Octans around the South Celestial Pole.
The Nomad on the Benro 3-Way Geared Head, using the Arca-Swiss attachment plate. Another method of mounting the Nomad to the Benro is shown below.
To aid polar alignment I purchased the Benro 3-Way Geared Head, also sold by MSM but available from many sources. Its geared motions make it easy to aim the tracker’s rotation axis precisely at the pole and hold it there solidly.
The Benro accepts standard Arca-Swiss mounting plates, so I’ve found it a useful head to have for other purposes and gear combinations. It has replaced my old Manfrotto 410 3-axis head which uses a proprietary mounting plate.
However, MSM also sells its own latitude adjustment Wedge which, at $90, is a cheaper alternative to the $200 Benro. I’ve not used the MSM Wedge, so I can’t say how solid and precise it is. But the Wedge is lighter than the Benro head, and so may be a better choice when weight is a prime consideration.
I would recommend either the Wedge or Benro for their fine adjustments of azimuth and altitude that are essential for easy, yet precise and stable polar alignment.
Tracking Accuracy
All-important is how well the Nomad tracks. When shooting with wide-angle lenses (14mm to 35mm) for nightscapes and wide Milky Way shots, the majority of images I’ve taken over the last few months, using exposures of 1 to 3 minutes, have been reliably well tracked, with pinpoint stars.
The Nomad begins tracking right away, with no wait for gear backlash to be taken up, or for the drive mechanism to settle in. I also found no tendency for tracking to be better or worse with camera position, unlike the Rotator that seemed to work better with the camera aimed at one area of sky vs another. And the Nomad didn’t suffer from any stalls or moments when it just stopped in its tracks, again unlike the problematic Rotator.
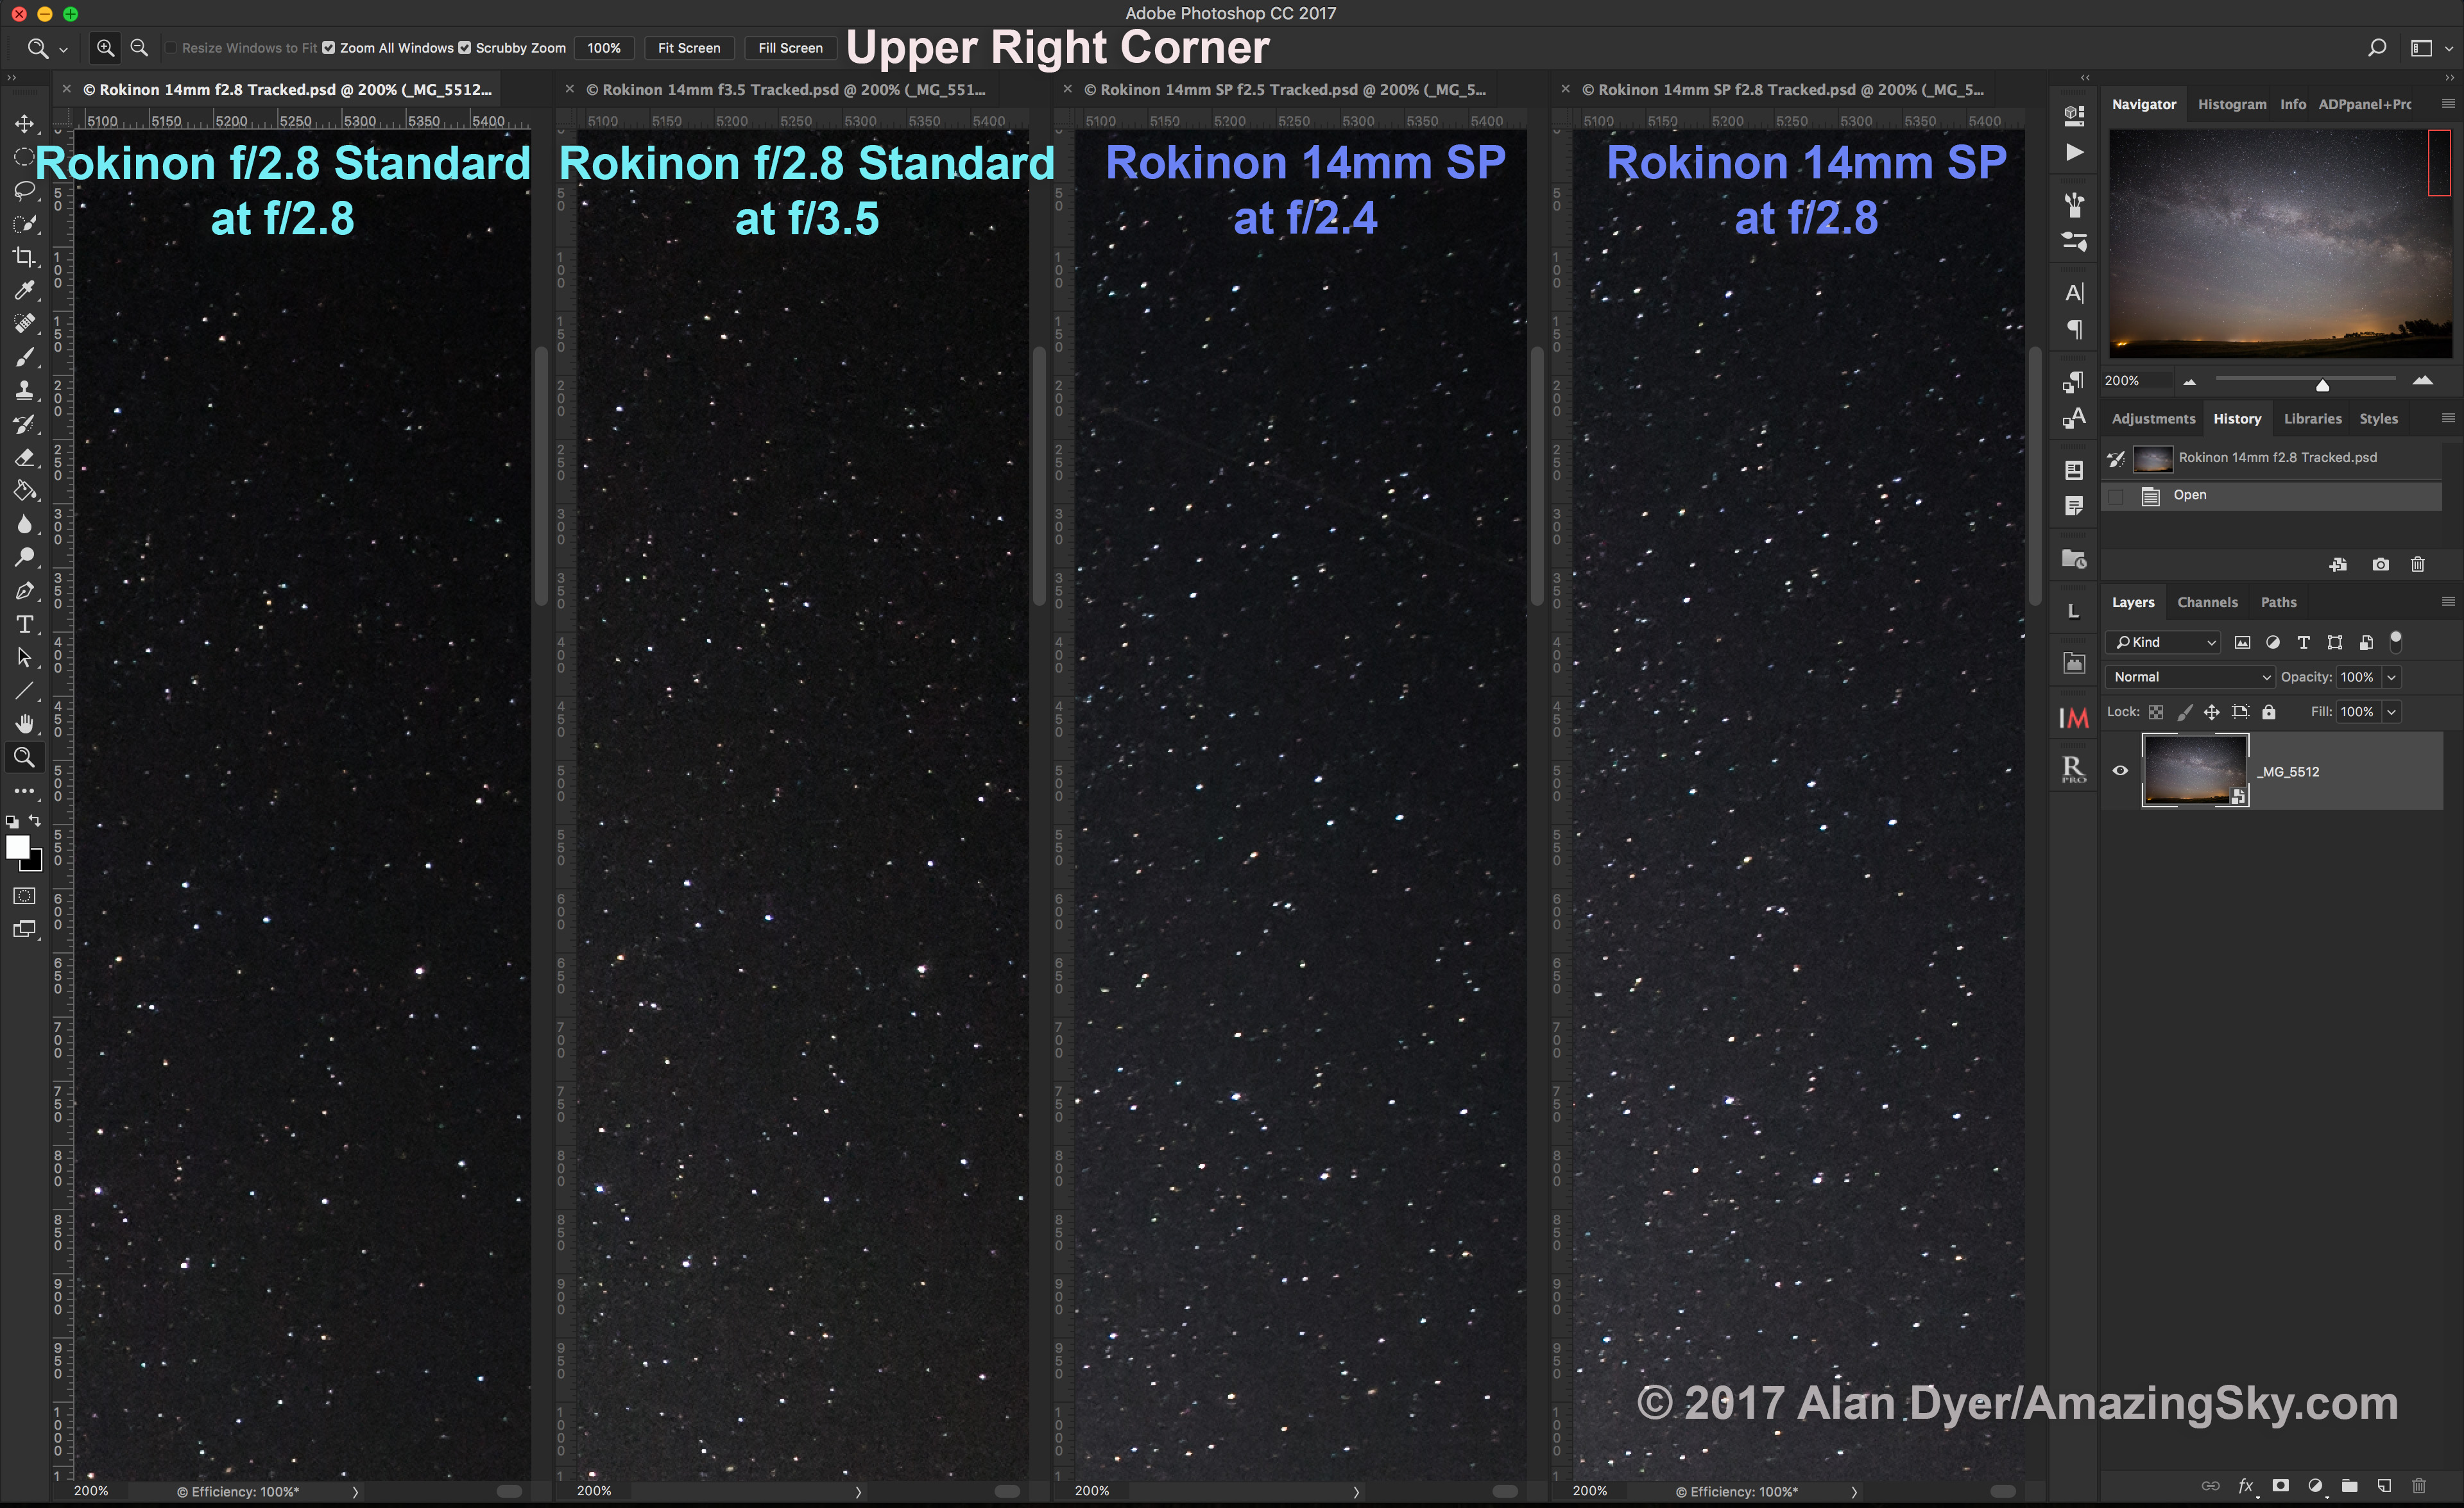
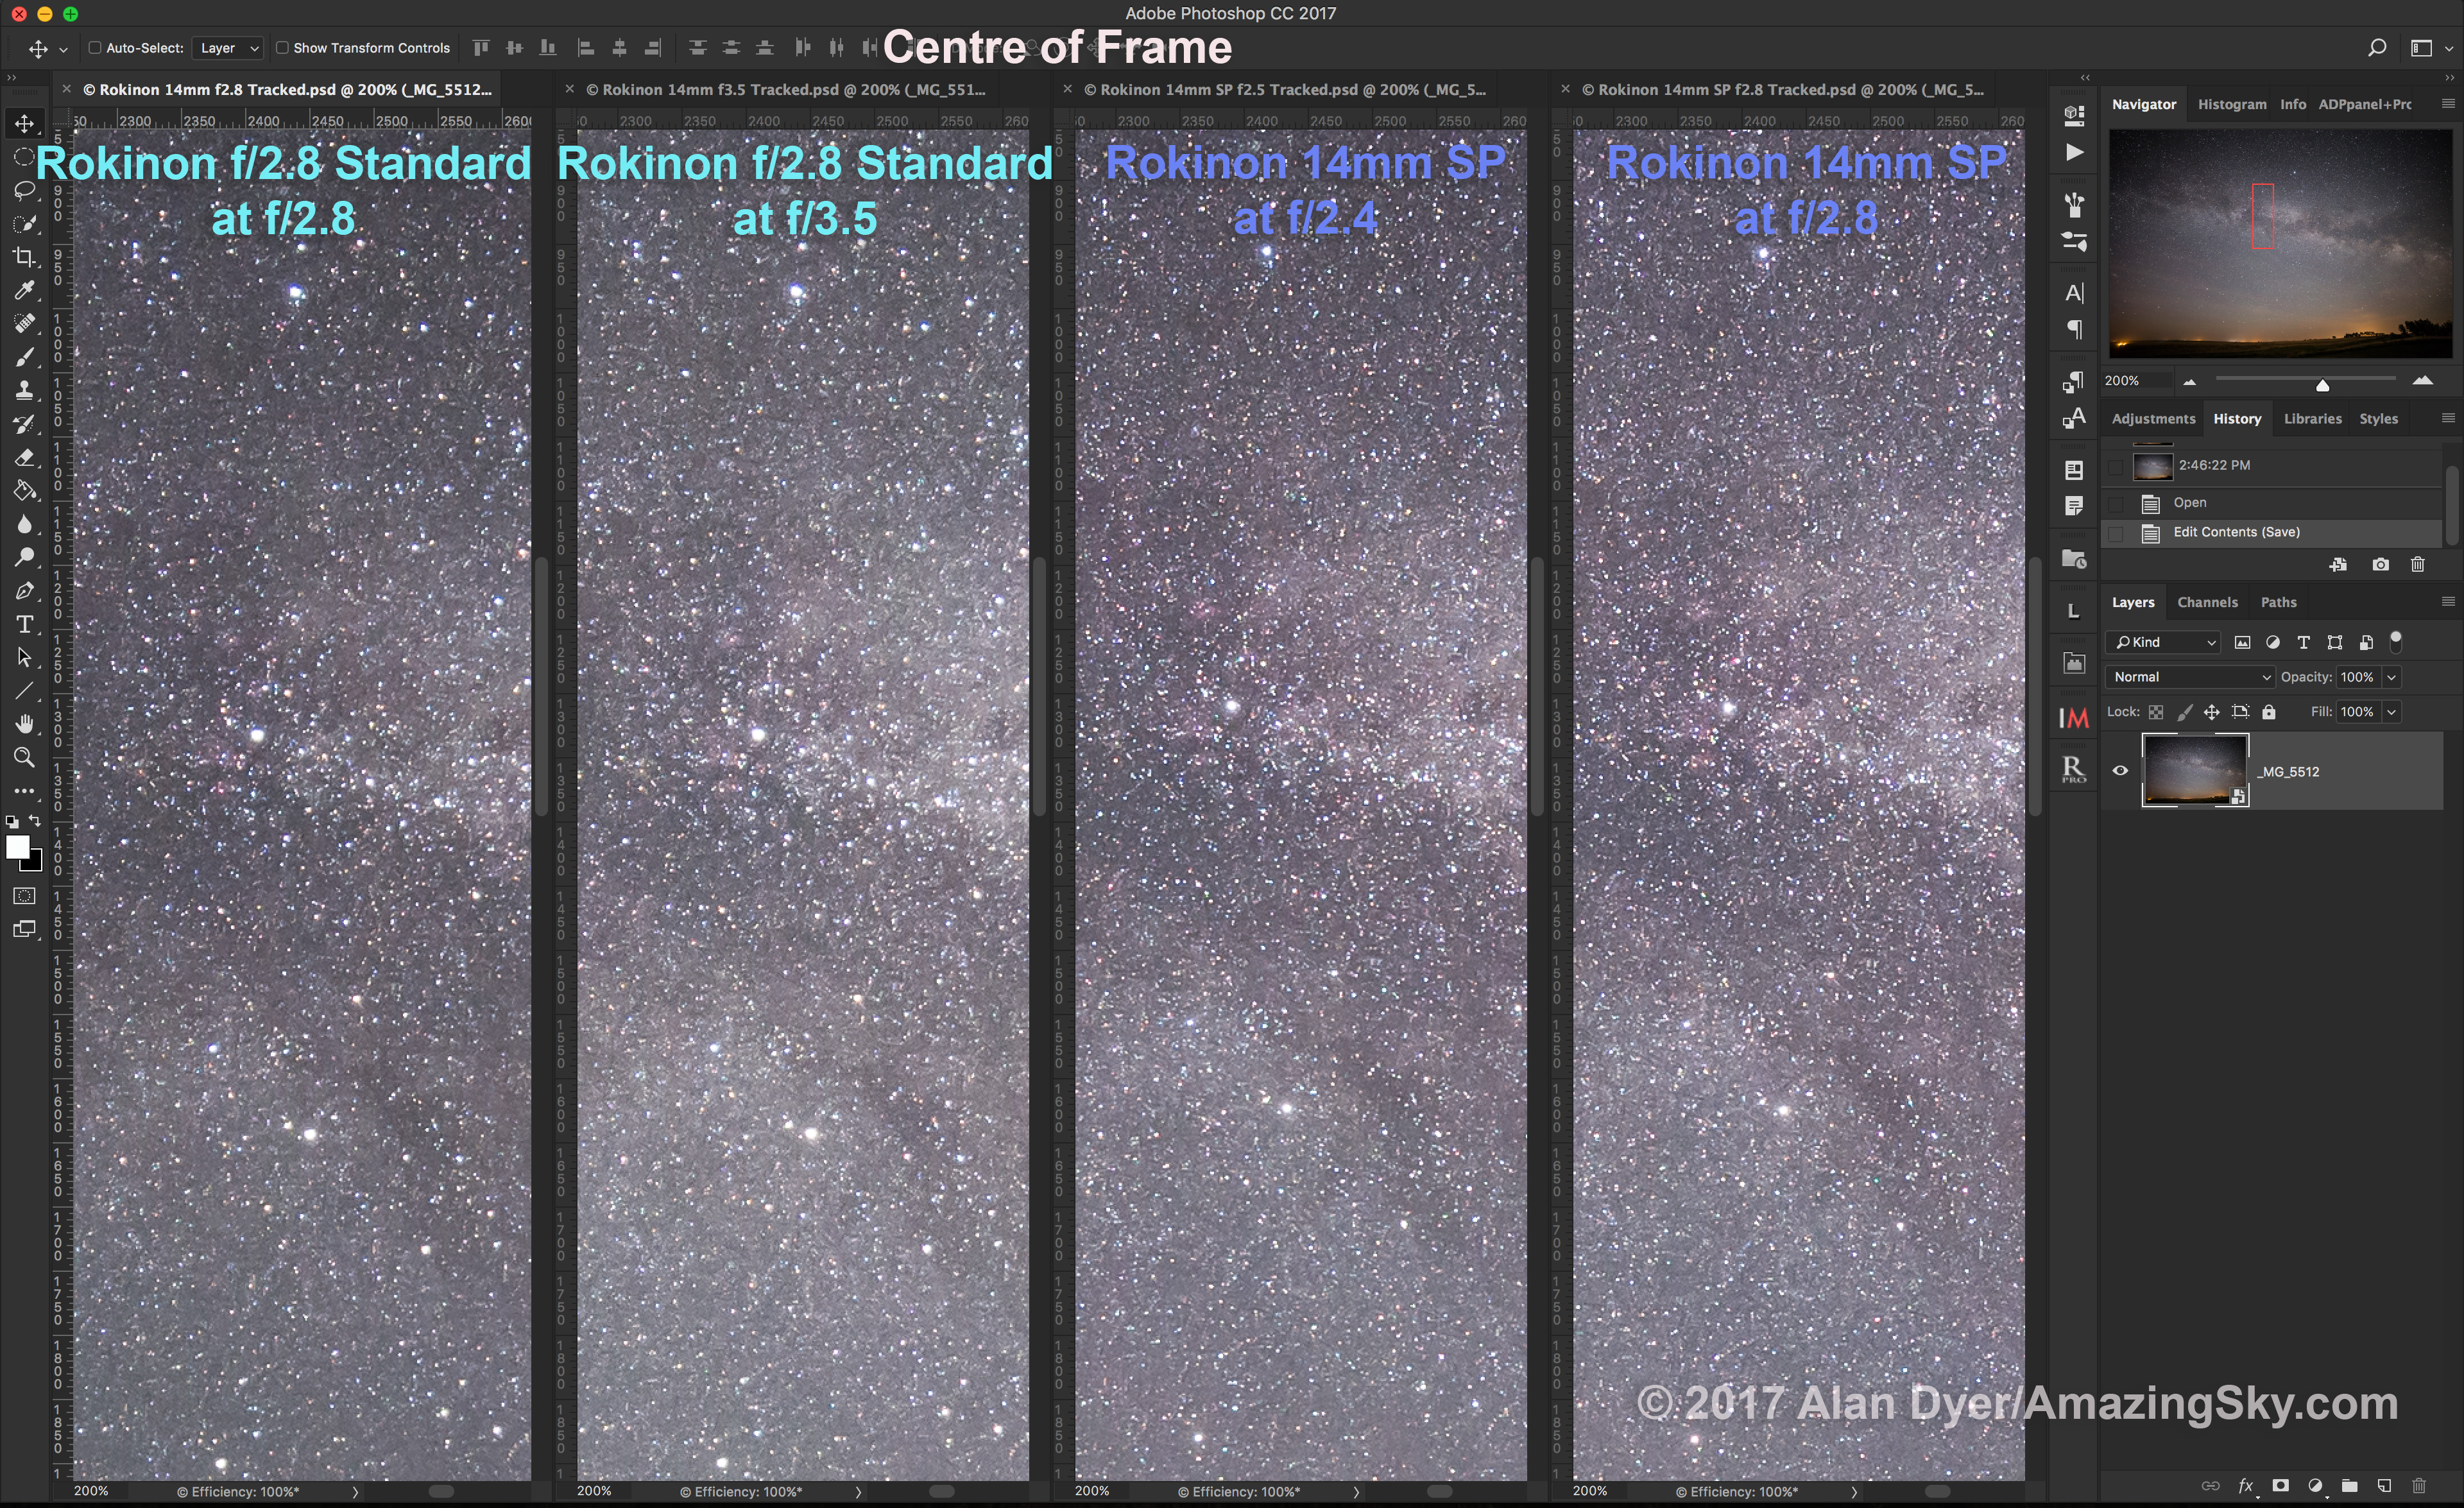
20 consecutive 2-minute exposures with a 135mm lens, to show the variations in tracking accuracy. Tap on the image to download it for closer inspection.
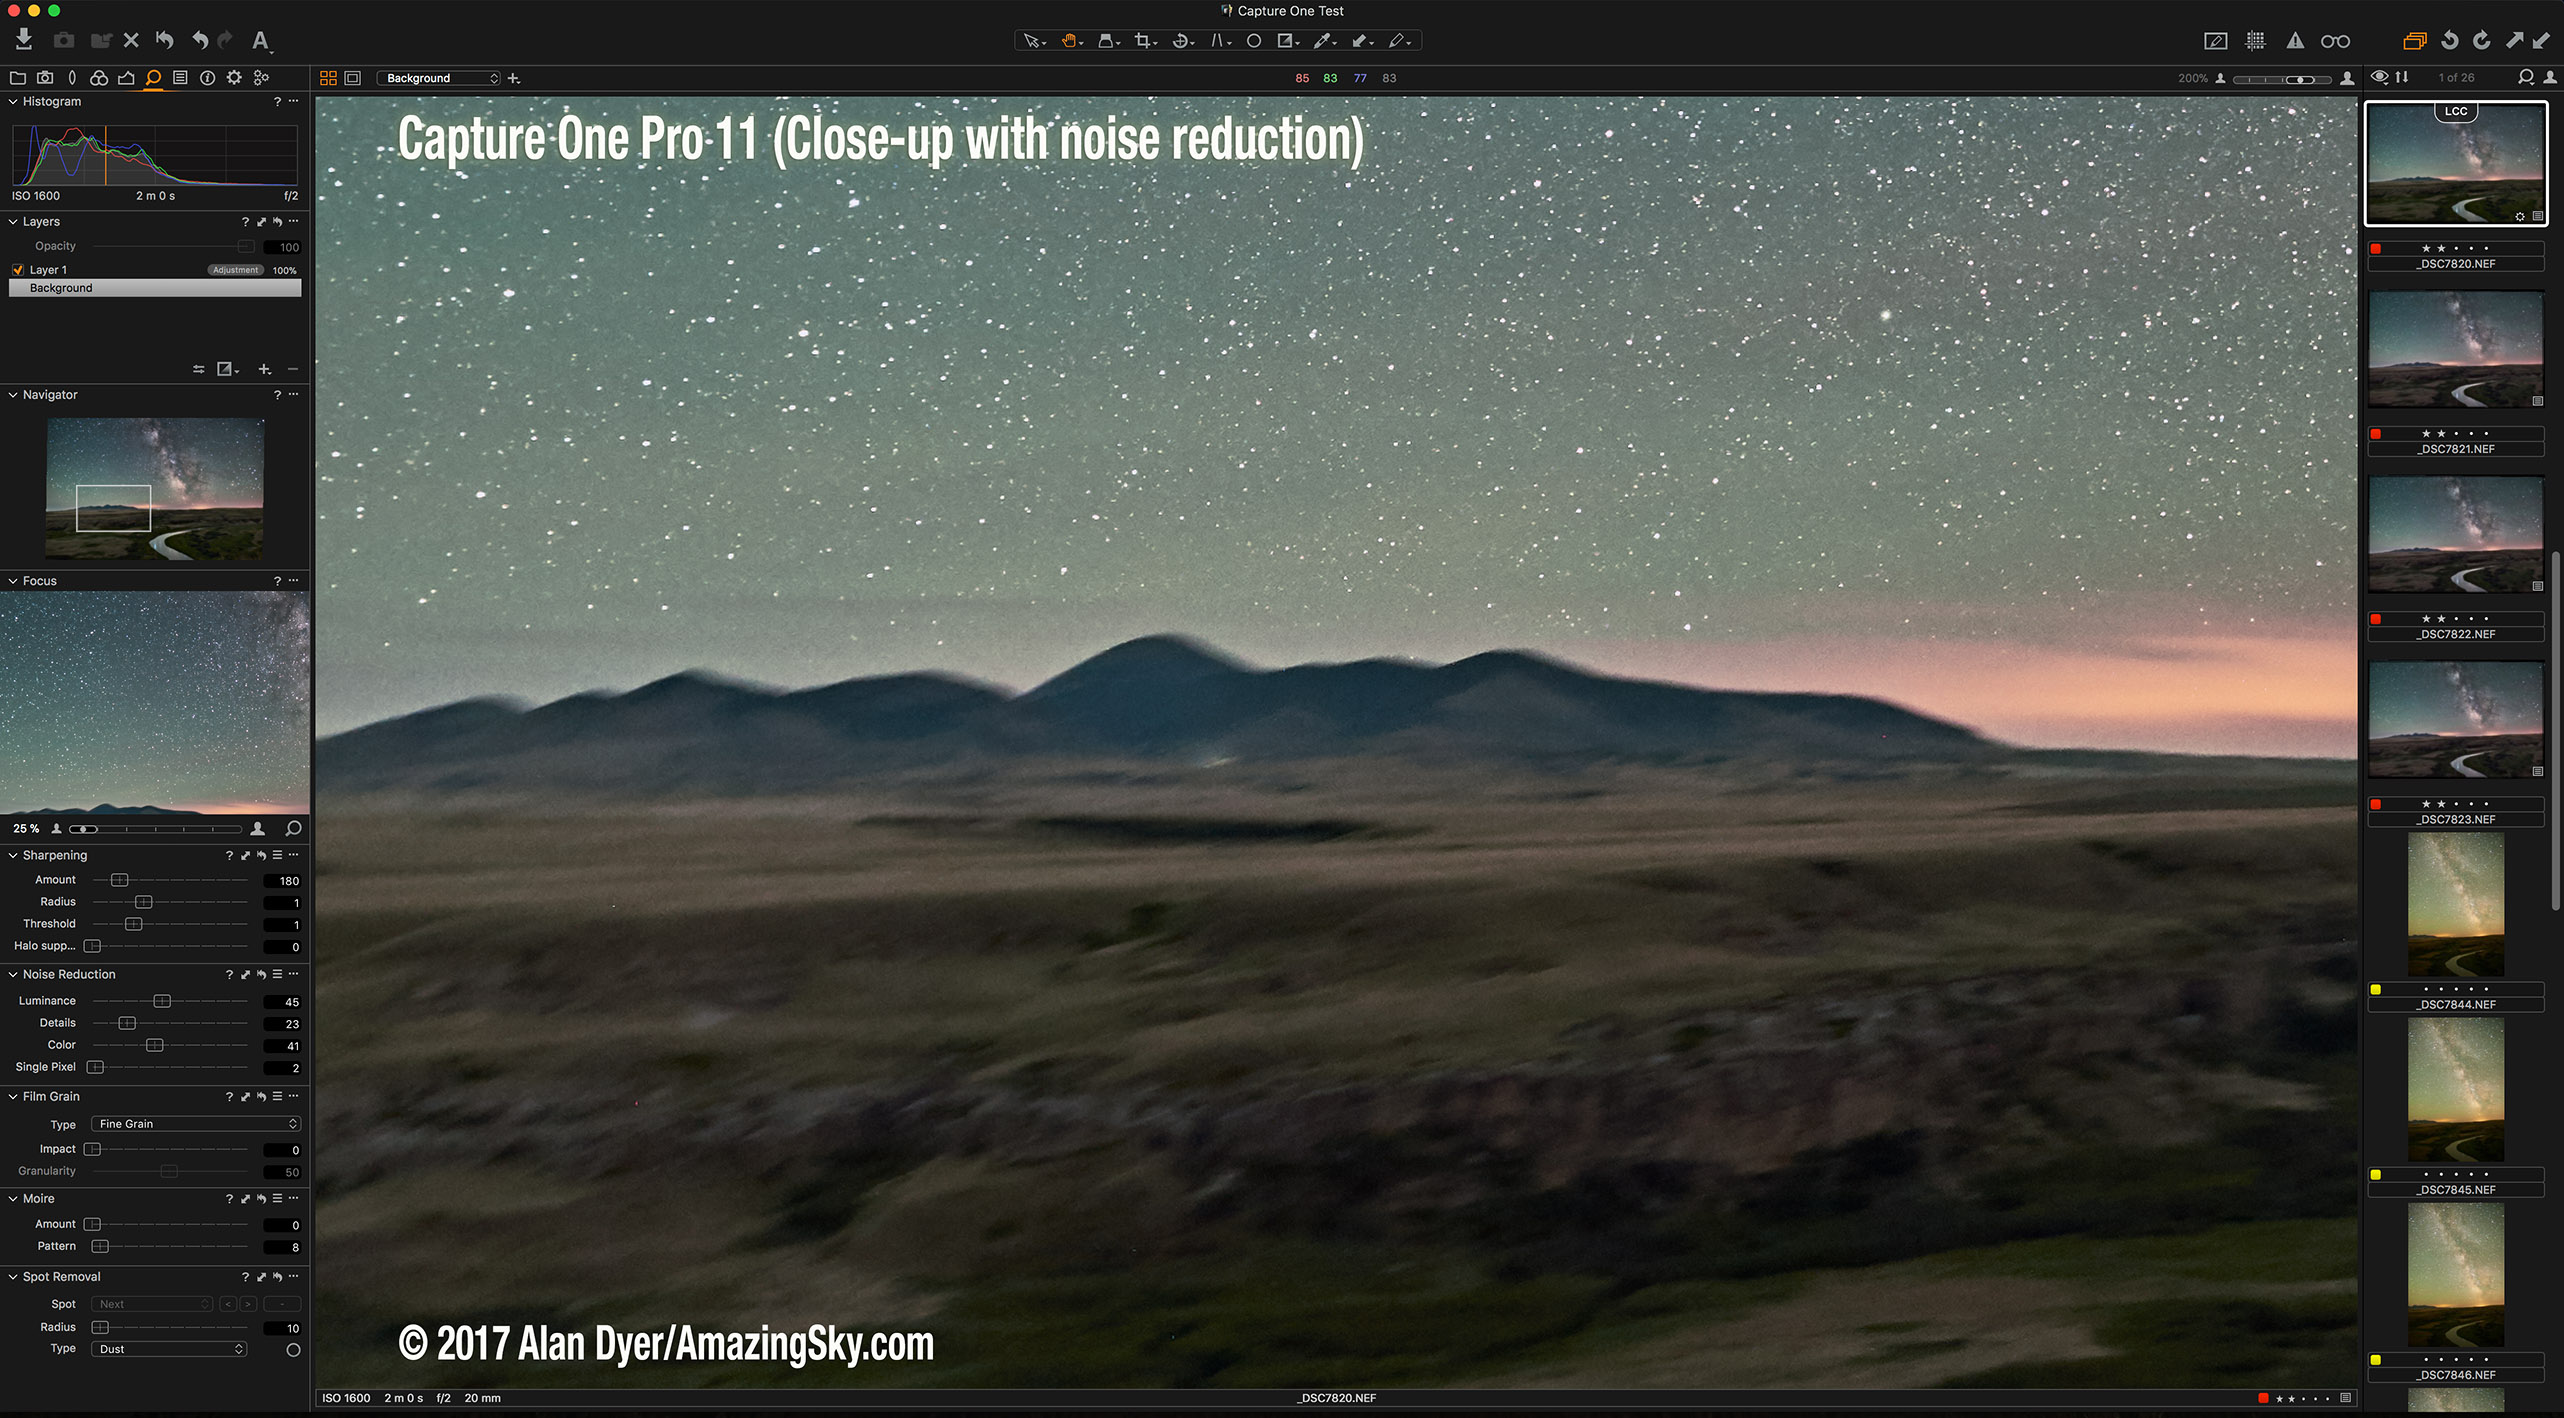
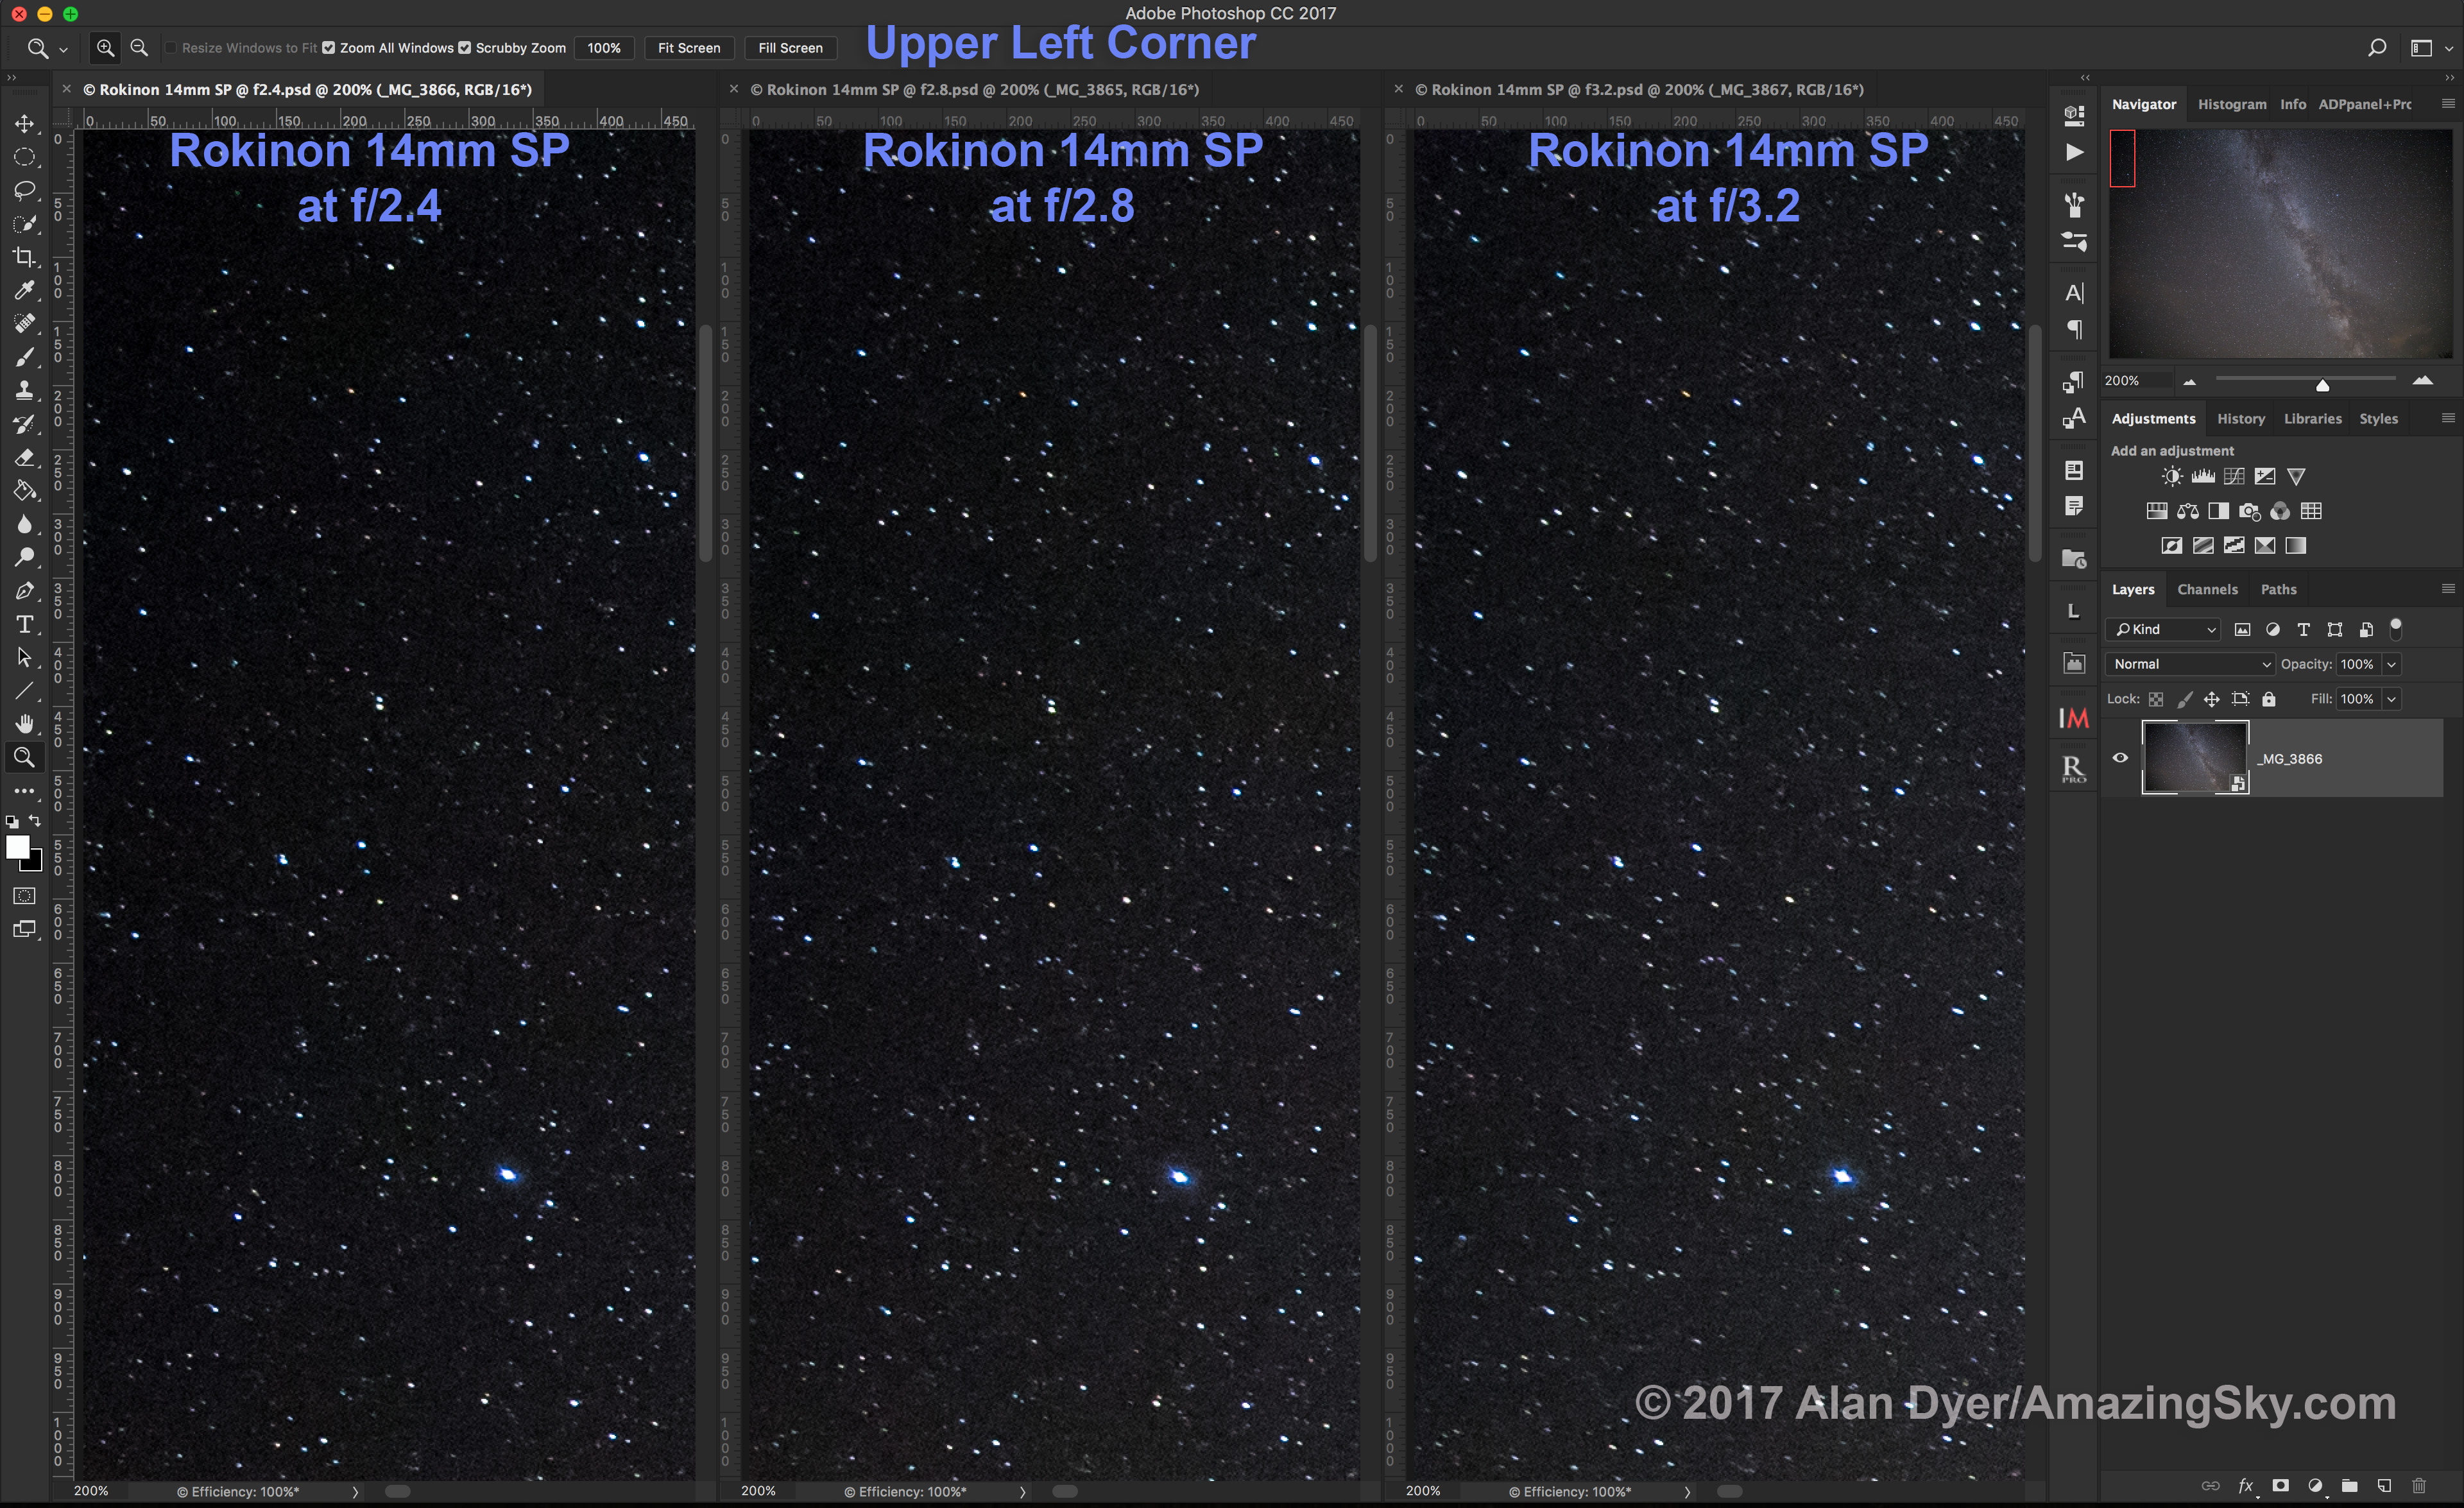
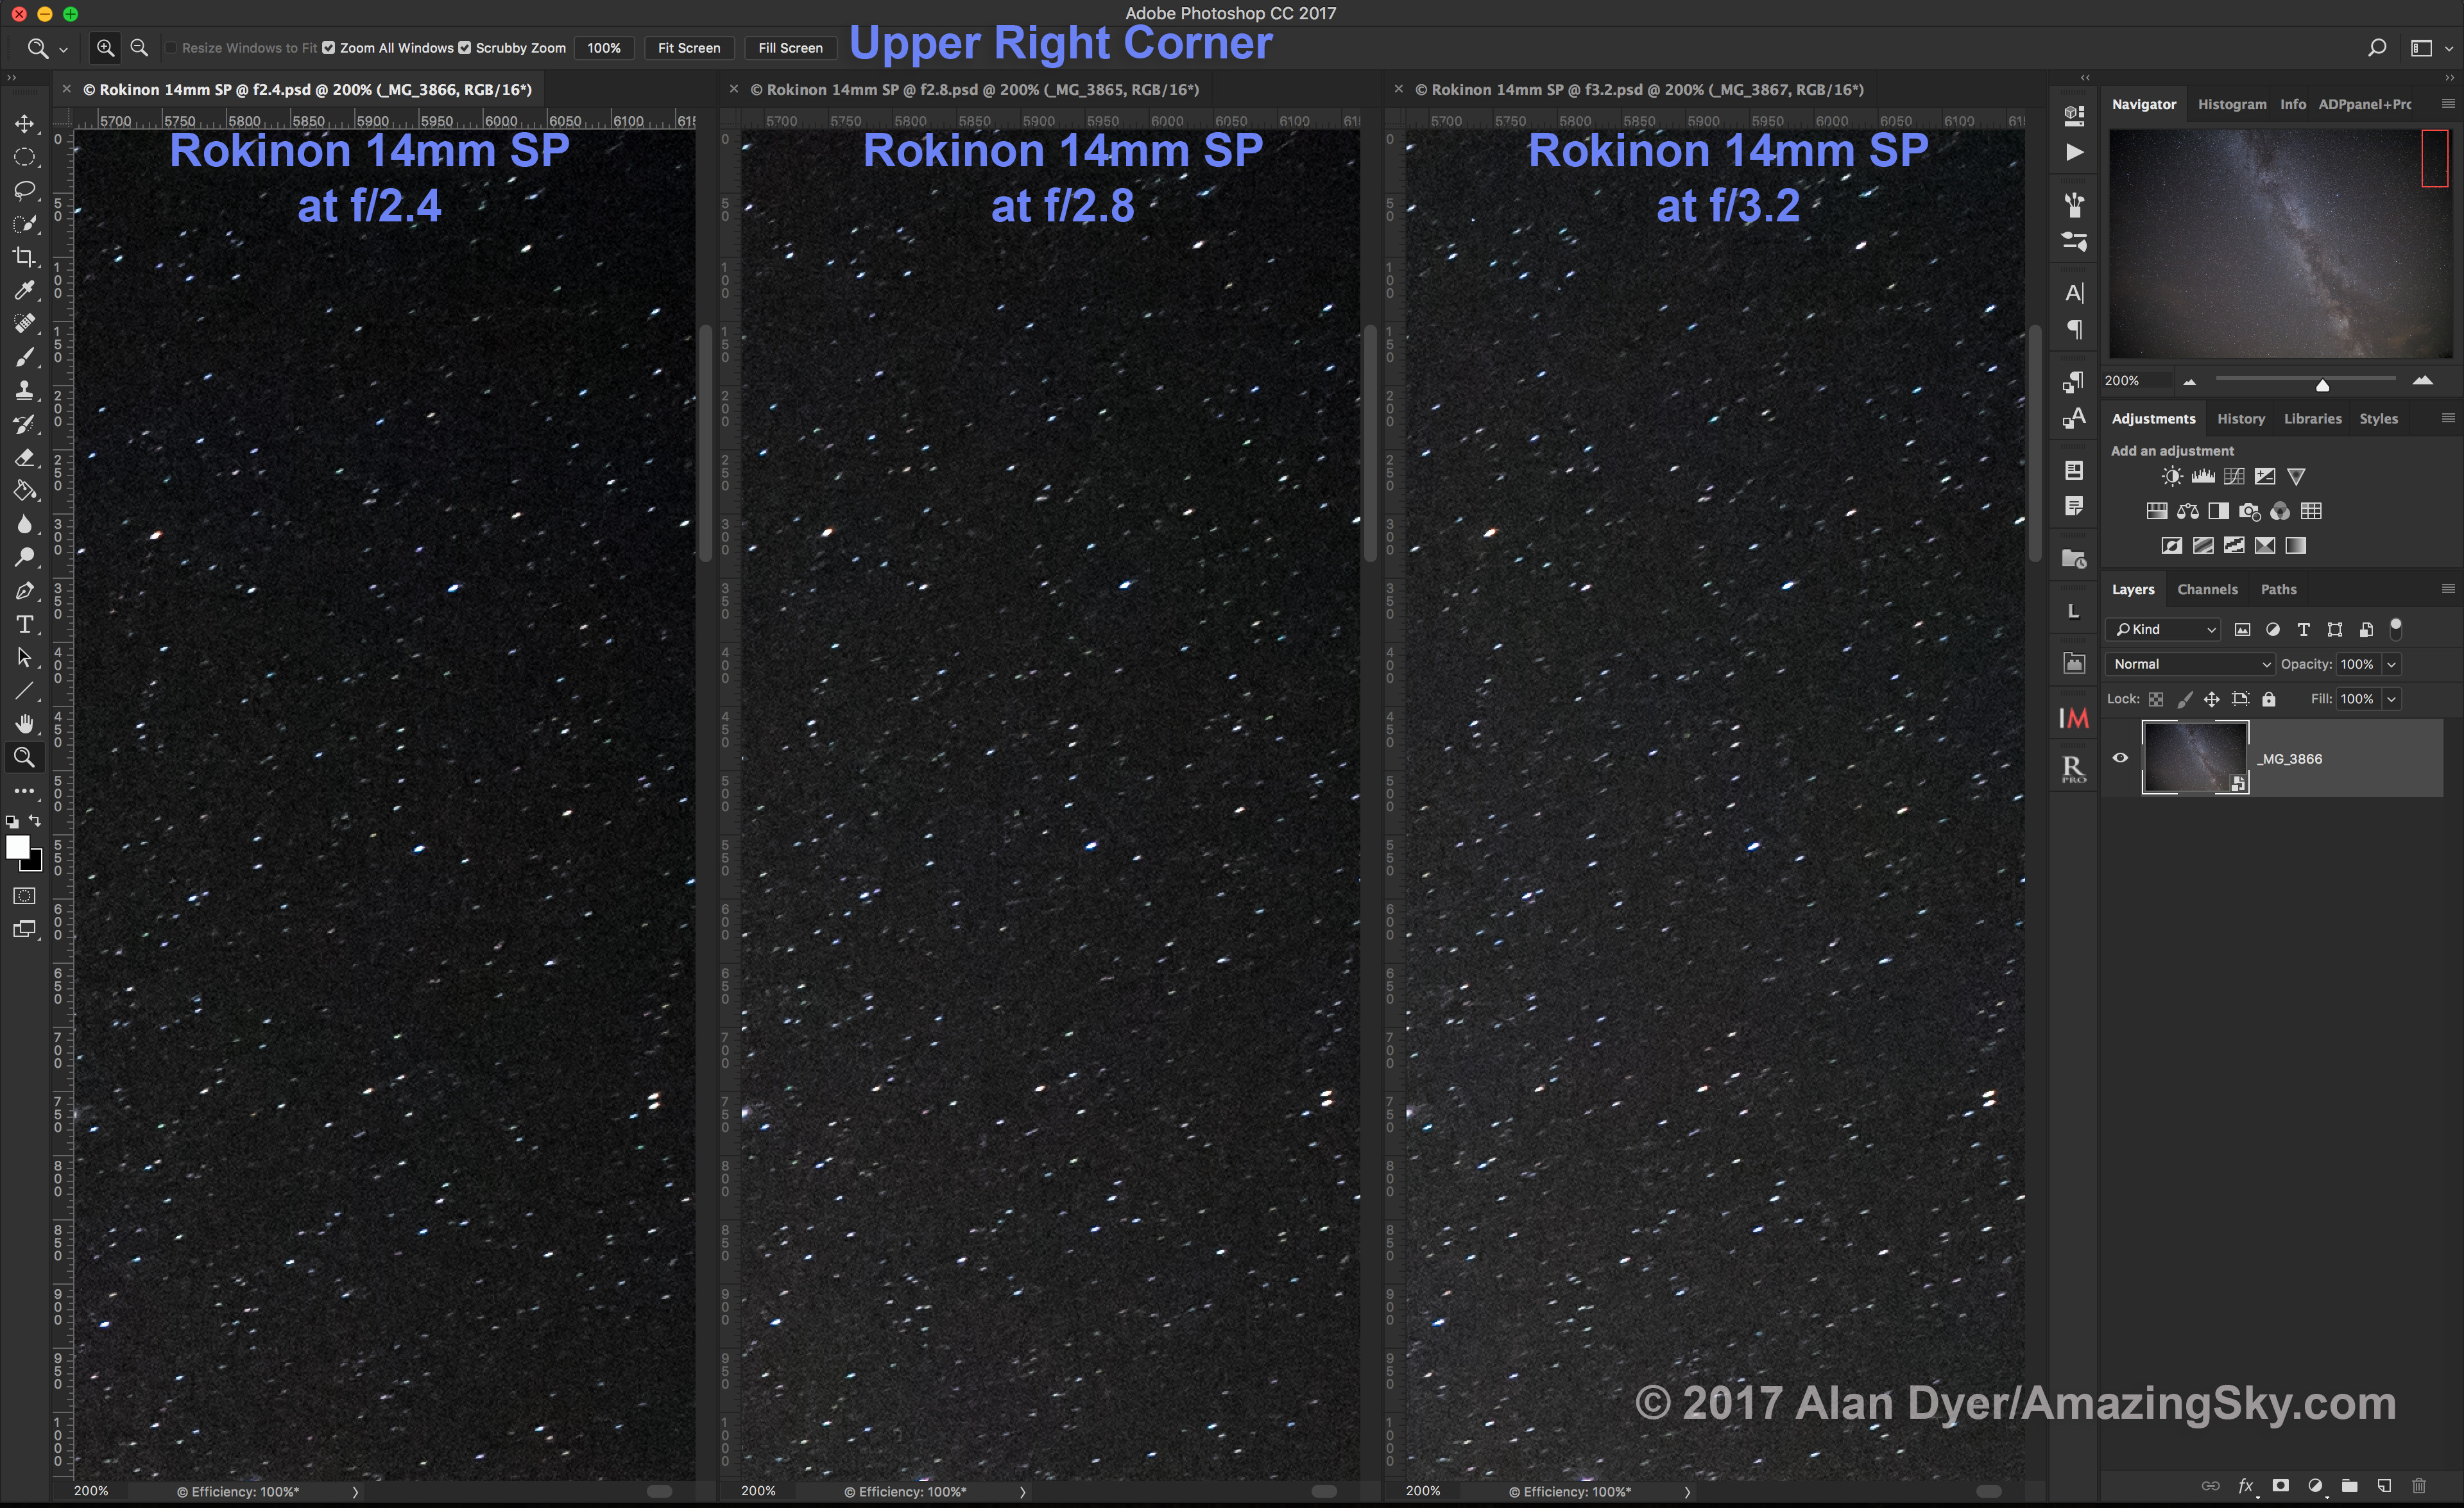
As with any tracker, where you do see mistracking is when using longer lenses. I tested, and indeed have used, the Nomad with 85mm and 135mm telephoto lenses, as many owners will want to do, for close-ups of Milky Way starfields and for so-called “deepscapes.” (An example of the latter is at the end.) The demo image above shows blow-ups of consecutive frames from the 135mm shoot of the Vulpecula/Sagitta starfield shown earlier.
In those more demanding tests, as I demonstrate here, I found that typically about 50% to 60% of images (taken with 1- to 2-minute exposures) were tracked well enough to be usable. The longer the focal length used, or the longer the exposures, the more frames will be trailed enough to be unusable in an image stack. And a well-tracked frame can be followed by a badly tracked one, then the next is fine again. That’s the nature of small drive gears.
As with other trackers, I would suggest that the Nomad is best used with lenses no longer than a fast 135mm. Even then, plan to shoot twice as many frames as you’ll need. Half may need to be discarded. While I know some users will want to push the Nomad beyond its limits, I would not recommend burdening it with monster telephoto lenses or small telescopes. Like all other trackers, that’s not its purpose.
When there was mistracking it was usually in the east-west direction, due to errors in the drive mechanism, and not north-south due to flexure. (If it occurs, north-south drift is likely due to poor polar alignment.)
I found the Nomad did indeed turn at the sidereal rate to follow the stars, something I was never confident the Rotator actually did.
While you might think a 50% success rate with telephotos is not good, in fact the Nomad’s tracking performance is on par with other competing trackers I’ve used, from Sky-Watcher and iOptron. At wide-angle focal lengths the success rate proved closer to 100%.
So for a tracker as compact as the Nomad to perform so well is very welcome indeed. It’s the main area where the Nomad beats the old Rotator by a long shot!
NOTE: While the MSM website mentions an “optional counterweight system,” as of my review’s publication date it is still being developed, MSM tells me. However, I don’t feel it will be necessary for the Nomad’s main purpose of wide-field imaging.
Mechanical Stability
Another flaw of the old Rotator was that it had several single-point attachments that, under the torque of a turning camera, could cause the camera to come loose and suddenly flop down.
Exploded view of the ratcheted mounting plate to attach a ball head to the NomadShowing the set screw to prevent the ball head coming loose
The Nomad uses a ratcheted clamp to attach a user-supplied ball head to the tracker body, and that clamp has an additional safety set screw to help ensure the ball head does not unscrew itself as a camera turns.
I’ve had no issues with cameras coming loose. Of course, the solidness of the ball head used will be critical as well. A large ball head can be better, but introduce some of the issues I report on below.
While MSM offers its own ball head, I have not used it, preferring to use a couple of other ball and pano heads I like, and that I show in the images here.
Simplicity of Operation
The Nomad improves upon the old Rotator by doing away with all its time-lapse features. You might think that eliminating features can’t be an improvement, but in this case it is.
I suspect few owners used the Rotator’s preset functions for slowly turning a camera along the horizon while firing the camera shutter between each incremental time-lapse move (the very function that gave the company its name!). The Rotator’s options for creating time-lapses were confusing to set up and limited in their choice of speeds. A serious time-lapse photographer would never use it.
(If you do want a tracker with time-lapse motion-control capabilities the Star Adventurer Mini works well. Its WiFi connection and mobile app allows a user to set all the factors needed for a good time-lapse: interval, angle increment, number of frames, and length of shoot.)
Instead, MSM has focused the Nomad on being just a star tracker, and I think wisely so. Its only controls are a three-position S-OFF-N switch, for using the Nomad in either the southern or northern hemisphere. It worked very well “Down Under,” with the exception noted below.
There is no solar or lunar drive rate, unnecessary in a tracker, and also no half-speed rate for nightscapes, used to lessen star trailing while also minimizing ground blurring. I’ve never liked using trackers at such a compromise half-speed rate, so I don’t miss it.
Using the optional V-Plate described below, I have used the Nomad to take tracked Milky Way panoramas, as shown here. It has worked very well for that purpose, with it easy to switch the tracking on (for the sky) and off (for the ground).
This is a 200° panorama of the arch of the northern Milky Way rising over Dinosaur Provincial Park, Alberta. Shot with the Nomad, with a blend of an untracked panorama for the ground and tracked panos for the sky.The gear used to take the panorama above, including the Alyn Wallace V-Plate, supporting an Acratech 2-axis pan head. The Nomad is ON here, set to N. Below the power switch is the USB-C port for charging and external power.
My only criticism is that the power switch is a little mushy and perhaps easy to slide on by mistake when it is packed in a bag.
An LED for each of the N and S directions glows red to indicate the power is on and the direction chosen, handy to help prevent you from choosing the wrong direction by mistake.
The Nomad is powered by an internal lithium battery that charges from any 5-volt USB charger (the Nomad comes with a USB-C cord, but no charger). The Nomad takes about 2.5 hours to charge to full and runs for 6 to 7 hours of continuous tracking at room temperatures. A second LED by the USB port glows yellow when the Nomad is charging, and green when it has fully charged.
In practice the Nomad has lasted for several nights of shooting on one charge. When the battery level is low, the red LED for the other direction begins blinking. As a backup in the field, the Nomad can be powered via its USB-C port by any external 5-volt power bank.
Collisions
The Nomad hasn’t been without issues, though the main problem I’ve had I can’t, in fairness, blame on the Nomad.
Due to the Nomad’s small size and shape, ball heads sit close to the Nomad body. Locks and clamps sticking out from ball heads can collide with the Nomad, or with the Benro head, as it rotates the ball head. Here I show how a collision can occur when aimed up at the zenith.
Showing the ball head colliding with the Benro when aimed high.
But collisions can also occur when aimed at the Celestial Pole. I ran into that issue in Australia, where many of the wide-field targets in the Milky Way (such as the field in Carina and Crux shown earlier) lie close to the South Celestial Pole.
A camera aimed toward the Celestial Pole (either South or North) is more likely to collide with the Nomad than when a camera is aimed toward the sky opposite the Pole.
Aimed toward the Celestial PoleAs it turns, the ball head hits the Nomad
As I show above, one night when tracking targets in Carina I found the ball head had jammed against the Nomad, seizing its motion. As I feared, that caused something inside the Nomad to come loose.
After the collision incident no frame was well-tracked. The Nomad was wandering all over the place!
From then on it failed to track well for any shots. The drive was wobbling the stars in random directions. No frame was usable. The Nomad was now out of commission, not a welcome prospect when you have traveled to the other side of the world to shoot the sky.
The access hole with a handy adjustment screw that fixed the issue.
What was the solution? There was only one point of adjustment accessible to users, a mysterious hole on the side of the tracker with a small hex screw at the bottom. This is normally covered by a rubber plug, though that was either missing on arrival or got lost along the way from my unit. Upon inquiry, MSM told me the screw is for use just at the factory, for a final adjustment of the gear and bearing distance.
But in my case, tightening it slightly seemed to do the trick, restoring normal tracking. However, my unit still tends to make intermittent clicking sounds now and then, though it seems to track well enough again.
The lesson here is don’t let gear collide with the Nomad. It likely has no internal clutch, making it unforgiving of being jammed.
Collision Avoidance
How do you avoid collisions? What I should have used in Australia was MSM’s optional V-Plate designed by the late and sadly missed Alyn Wallace.
Aimed toward the Celestial PoleAimed toward the zenith
I bought one a couple of years ago, but never thought to bring it with me on the Australia trip. As I show above, the V-Plate allows for much more freedom to aim a camera, either toward the Poles or straight up (as I show above), or low in the sky 180° away from the Pole, without fear of the ball head hitting other components.
The V-Plate’s shortcoming is that, despite cranking down the levers that hold it in position, it can still slip under the weight of a heavy camera sitting on the diving-board-like platform supported only on one end. The V-Plate’s locks are not as solid and secure as they should be. But with care it can work well. And you need buy only the V-Plate; not the Z-Plate.
I should note that since I got my V-Plate, it has been upgraded with a larger lever handle to aid tightening the tilt lock. However, it really needs another support point on the tilt adjustment, so it can’t move as readily under load.
V-Plate lock knob hard to get at and adjustV-Plate lock knob hitting the Polar Scope
In addition, MSM now offers a taller Arca-Swiss mounting block as an option, to replace the plate that comes bolted onto the Nomad with two Torx screws. That optional riser block moves the Nomad farther from the Wedge or Benro head, helping to prevent some collisions. By putting more space between the Nomad and the Benro head, the riser block makes it easier to get at the small locking clamp on the V-Plate’s rotation axis. But …
Shortly after I first published this review, a loyal reader (thanks, John!) pointed out his method of placing the Nomad on the Benro, with the Nomad turned 90° to the way I pictured it earlier. As I show below, this places the Benro’s lock knob on the side of the Nomad, not back. The benefit is that the V-Plate’s azimuth lock lever is now more accessible and well-separated from the Benro. That method makes the taller riser block unnecessary.
Here’s a reader-suggested alternative method for mounting the Nomad and orienting the Benro head that puts more space between the V-Plate and Benro, for ease of adjustment.
Even with this alternative method, the V-Plate tends to block the laser’s beam, as does a camera once it is mounted. The polar scope can also be blocked. It’s an example of how one MSM accessory can interfere with another accessory, perhaps requiring yet another accessory to solve!
Laser beam hitting the V-Plate with it horizontalV-Plate rotated out of the way of the laser
In practice, with the V-Plate installed, polar alignment often has to be done before attaching the camera or setting up the V-Plate to the desired orientation. When adding the camera, care has to be taken to then not bump the Nomad off alignment. That’s why I like the Benro head as a stable platform for the Nomad, despite its extra weight.
As I illustrated earlier, the V-Plate is also an essential accessory for shooting tracked-sky Milky Way panoramas, as it allows a camera to be turned parallel to the horizon from segment to segment while it also tracks the sky.
A “deepscape” of the Sagittarius starclouds over Mt. Blakiston, in Waterton Lakes National Park, Alberta. This is a blend of two exposures: a single untracked 2-minute exposure at ISO 1600 for the ground, and a single tracked 2-minute exposure at ISO 800 for the sky, taken immediately after, with the Nomad tracker motor now on. With a 28-70mm lens at 70mm, on the rig shown.
Recommendations
So, as with the Rotator, when buying a Nomad, plan on adding several “optional” accessories to your cart. They can, in fact, be essential.
However, they can add another $150 (for V-Plate + Wedge + riser block) to $250 (V-Plate + Benro head + riser block) to the total. These are in addition to the cost of the polar alignment aids offered in the various Basic bundles. I like having both the laser and polar scope, but for shooting just wide-angle nightscapes, the laser alone will do.
The cost of accessories makes the Nomad not quite the low-cost tracker you might have been sold on, nor as self-contained and compact as it first appears. Just choosing what combination of gear to buy can be daunting for beginners.
The Milky Way and its core region in Sagittarius and Scorpius over the Badlands of Dinosaur Provincial Park, Alberta. This is a blend of untracked exposures for the ground and tracked exposures for the sky, with the Canon Ra on the Nomad, with the Canon RF15-35mm lens at 20mm at f/2.8.
But when well-equipped, the little Nomad can work very well. Despite my run-in with a collision glitch, I can recommend the Nomad as a good choice for anyone looking for a solid, accurate, but portable tracker that can slip into any camera bag.
Just make room in your bag – and budget! – for polar alignment aids, V-Plates, wedges, and ball heads to complete your tracking kit.
And then don’t let anything collide with the Nomad!
— Alan, June 27, 2024 – Revised June 28 / AmazingSky.com
In an extensive technical blog, I put the Canon R6 mirrorless camera through its paces for the demands of astrophotography.
Every major camera manufacturer, with the lone exception of stalwart Pentax, has moved from producing digital lens reflex (DSLR) cameras, to digital single lens mirrorless (DSLM) cameras. The reflex mirror is gone, allowing for a more compact camera, better movie capabilities, and enhanced auto-focus functions, among other benefits.
But what about for astrophotography? I reviewed the Sony a7III and Nikon Z6 mirrorless cameras here on my blog and, except for a couple of points, found them excellent for the demands of most astrophotography.
For the last two years I’ve primarily used Canon’s astro-friendly and red-sensitive EOS Ra mirrorless, a model sadly discontinued in September 2021 after just two years on the market. I reviewed that camera in the April 2020 issue of Sky & Telescope magazine, with a quick first look here on my blog.
The superb performance of the Ra has prompted me to stay with the Canon mirrorless R system for future camera purchases. Here I test the mid-priced R6, introduced in August 2020.
NOTE: In early November 2022 Canon announced the EOS R6 MkII, which one assumes will eventually replace the original R6 once stock of that camera runs out. The MkII has a 24 Mp sensor for slightly better resolution, and offers longer battery life. But the main improvements over the R6 is to autofocus accuracy, a function of little use to astrophotographers. Only real-world testing will tell if the R6 MkII has better or worse noise levels than the R6, or has eliminated the R6’s amp glow, reported on below.
M31, the spiral galaxy in Andromeda, with the Canon R6 mirrorless camera. It is a stack of 8 x 8-minute exposures at ISO 800, blended with a stack of 8 x 2-minute exposures at ISO 400 for the core, to prevent it from overexposing too much, all with a SharpStar 76mm apo refractor at f/4.5 with its field flattener/reducer.
TL;DR SUMMARY
The Canon R6 has proven excellent for astrophotography, exhibiting better dynamic range and shadow recovery than most Canon DSLRs, due to the ISO invariant design of the R6 sensor. It is on par with the low-light performance of Nikon and Sony mirrorless cameras.
The preview image is sensitive enough to allow easy framing and focusing at night. The movie mode produces usable quality up to ISO 51,200, making 4K movies of auroras possible. Canon DSLRs cannot do this.
Marring the superb performance are annoying deficiencies in the design, and one flaw in the image quality – an amp glow – that particularly impacts deep-sky imaging.
R6 pros
The Canon R6 is superb for its:
Low noise, though not exceptionally so
ISO invariant sensor performance for good shadow recovery
Sensitive live view display with ultra-high ISO boost in Movie mode
Relatively low noise Movie mode with full frame 4K video
Low light auto focus and accurate manual focus assist
Good battery life
R6 cons
The Canon R6 is not so superb for its:
Design Deficiencies
Lack of a top LCD screen
Bright timer display in Bulb on the rear screen
No battery level indication when shooting
Low grade R3-style remote jack, same as on entry-level Canon DSLRs
Image Quality Flaw
Magenta edge “amp glow” in long exposures
The Canon Ra on the left with the 28-70mm f/2 RF lens and the Canon R6 on the right with the 70-200mm f/2/8 RF lens, two superb but costly zooms for the R system cameras.
CHOOSING THE R6
Canon’s first full-frame mirrorless camera, the 30-megapixel EOS R, was introduced in late 2018 to compete with Sony. As of late-2021 the main choices in a Canon DSLM for astrophotography are either the original R, the 20-megapixel R6, the 26-megapixel Rp, or the 45-megapixel R5.
The new 24-megapixel Canon R3, while it has impressive low-noise performance, is designed primarily for high-speed sports and news photography. It is difficult to justify its $6,000 cost for astro work.
I have not tested Canon’s entry-level, but full-frame Rp. While the Rp’s image quality is likely quite good, its small battery and short lifetime on a single charge will be limiting factors for astrophotography.
Nor have I tested the higher-end R5. Friends who use the R5 for nightscape work love it, but with smaller pixels the R5 will be noisier than the R6, which lab tests at sites such as DPReview.com seem to confirm.
Meanwhile, the original EOS R, while having excellent image quality and features, is surely destined for replacement in the near future – with a Canon EOS R Mark II? The R’s successor might be a great astrophoto camera, but with the Ra gone, I feel the R6 is currently the prime choice from Canon, especially for nightscapes.
I tested an R6 purchased in June 2021 and updated in August with firmware v1.4. I’ll go through its performance and functions with astrophotography in mind. I’ve ignored praised R6 features such as eye tracking autofocus, in-body image stabilization, and high speed burst rates. They are of limited or no value for astrophotography.
Along the way, I also offer a selection of user tips, some of which are applicable to other cameras.
LIVE VIEW FOCUSING AND FRAMING
“Back-of-the-camera” views of the R6 in its normal Live View mode (upper left) and its highly-sensitive Movie Mode (upper right), compared to views with four other cameras. Note the Milky Way visible with the R6 in its Movie mode, similar to the Sony in Bright Monitoring mode.
The first difference you will see when using any new mirrorless camera, compared to even a high-end DSLR, is how much brighter the “Live View” image is when shooting at night. DSLM cameras are always in Live View – even the eye-level viewfinder presents a digital image supplied by the sensor.
As such, whether on the rear screen on in the viewfinder, you see an image that closely matches the photo you are about to take, because it is the image you are about to take.
To a limit. DSLMs can do only so much to simulate what a long 30-second exposure will look like. But the R6, like many DSLMs, goes a long way in providing a preview image bright enough to frame a dark scene and focus on bright stars. Turn on Exposure Simulation to brighten the live image, and open the lens as wide as possible.
The Canon R6 in its Movie Mode at ISO 204,800 and with a lens wide open.
But the R6 has a trick up its sleeve for framing nightscapes. Switch the Mode dial to Movie, and set the ISO up to 204,800 (or at night just dial in Auto ISO), and with the lens wide open and shutter on 1/8 second (as above), the preview image will brighten enough to show the Milky Way and dark foreground, albeit in a noisy image. But it’s just for aiming and framing.
This is similar to the excellent, but well-hidden Bright Monitoring mode on Sony Alphas. This high-ISO Movie mode makes it a pleasure using the R6 for nightscapes. The EOS R and Ra do not have this ability. While their live view screens are good, they are not as sensitive as the R6’s, with the R and Ra’s Movie modes able to go up to only ISO 12,800. The R5 can go up to “only” ISO 51,200 in its Movie mode, good but not quite high enough for live framing on dark nights.
Comparing Manual vs. Auto Focus results with the R6.
The R6 will also autofocus down to a claimed EV -6.5, allowing it to focus in dim light for nightscapes, a feat impossible in most cameras. In practice with the Canon RF 15-35mm lens at f/2.8, I found the R6 can’t autofocus on the actual dark landscape, but it can autofocus on bright stars and planets (provided, of course, the camera is fitted with an autofocus lens).
Autofocusing on bright stars proved very accurate. By comparison, while the Ra can autofocus on distant bright lights, it fails on bright stars or planets.
Turning on Focus Peaking makes stars turn red, yellow or blue (your choice of colours) when they are in focus, as a reassuring confirmation.
The Focus Peaking and Focus Guide menu.The R6 live view display with Focus Guide arrows on and focused on a star, Antares.
In manual focus, an additional Focus Aid overlay provides arrows that close up and turn green when in focus on a bright star or planet. Or you can zoom in by 5x or 10x to focus by eye the old way by examining the star image. I wish the R6 had a 15x or 20x magnification; 5x and 10x have long been the Canon standards. Only the Ra offered 30x for ultra-precise focusing on stars.
In all, the ease of framing and focusing will be the major improvement you’ll enjoy by moving to any mirrorless, especially if your old camera is a cropped-frame Canon Rebel or T3i! But the R6 particularly excels at ease of focusing and framing.
NOISE PERFORMANCE
The key camera characteristic for astrophoto use is noise. I feel it is more important than resolution. There’s little point in having lots of fine detail if it is lost in a blizzard of high-ISO noise. And for astro work, we are almost always shooting at high ISOs.
Comparing the R6’s noise at increasingly higher ISO speeds on a starlit nightscape.
With just 20 megapixels, low by today’s standards, the R6 has individual pixels, or more correctly “photosites,” that are each 6.6 microns in size, the “pixel pitch.”
By comparison, the 30-megapixel R (and Ra) has a pixel pitch of 5.4 microns, the 45-megapixel R5’s pixel pitch is 4.4 microns, while the acclaimed low-light champion in the camera world, the 12-megapixel Sony a7sIII, has large 8.5-micron photosites.
The bigger the photosites (i.e. the larger the pixel pitch), the more photons each photosite can collect in a given amount of time – and the more photons they can collect, period, before they overfill and clip highlights. More photons equals more signal, and therefore a better signal-to-noise ratio, while the greater “full-well depth” yields higher dynamic range.
Each generation of camera also improves the signal-to-noise ratio by suppressing noise via its sensor design and improved signal processing hardware and firmware. The R6 uses Canon’s latest DIGIC X processor shared by the company’s other mirrorless cameras.
Comparing the R6noise with the 6D MkII and EOS Ra on a deep-sky subject, galaxies.
In noise tests comparing the R6 against the Ra and Canon 6D Mark II, all three cameras showed a similar level of noise at ISO settings from 400 up to 12,800. But the 6D Mark II performed well only when properly exposed. Both the R6 and Ra performed much better for shadow recovery in underexposed scenes.
Comparing the R6noise with with the 6D MkII and EOS Ra on a shadowed nightscape.Comparing the R6 noise with the EOS Ra on the Andromeda Galaxy at typical deep-sky ISO speeds.
In nightscapes and deep-sky images the R6 and Ra looked nearly identical at each of their ISO settings. This was surprising considering the Ra’s smaller photosites, which perhaps attests to the low noise of the astronomical “a” model.
Or it could be that the R6 isn’t as low noise as it should be for a 20 megapixel camera. But it is as good as it gets for Canon cameras, and that’s very good indeed.
I saw no “magic ISO” setting where the R6 performed better than at other settings. Noise increased in proportion to the ISO speed. It proved perfectly usable up to ISO 6400, with ISO 12,800 acceptable for stills when necessary.
ISO INVARIANCY
The flaw in many Canon DSLRs, one documented in my 2017 review of the 6D Mark II, was their poor dynamic range due to the lack of an ISO invariant sensor design.
The R6, as with Canon’s other R-series cameras, has largely addressed this weakness. The sensor in the R6 appears to be nicely ISO invariant and performs as well as the Sony and Nikon cameras I have used and tested, models praised for their ISO invariant behaviour.
Where this trait shows itself to advantage is on nightscapes where the starlit foreground is often dark and underexposed. Bringing out detail in the shadows in raw files requires a lot of Shadow Recovery or increasing the Exposure slider. Images from an ISO invariant sensor can withstand the brightening “in post” far better, with minimal noise increase or degradations such as a loss of contrast, added banding, or horrible discolourations.
Comparing the R6 for ISO Invariancy on a starlit nightscape.
To test the R6, I shot sets of images at the same shutter speed, one well-exposed at a high ISO, then several at successively lower ISOs to underexpose by 1 to 5 stops. I then brightened the underexposed images by increasing the Exposure in Camera Raw by the same 1 to 5 stops. In an ideal ISO invariant sensor, all the images should look the same.
The R6 did very well in images underexposed by up to 4 stops. Images underexposed by 5 stops started to fall apart, but I’ve seen that in Sony and Nikon images as well.
Comparing the R6 for ISO Invariancy on a moonlit nightscape.
This behaviour applies to images underexposed by using lower ISOs than what a “normal” exposure might require. Underexposing with lower ISOs can help maintain dynamic range and avoid highlight clipping. But with nightscapes, foregrounds can often be too dark even when shot at an ISO high enough to be suitable for the sky. Foregrounds are almost always underexposed, so good shadow recovery is essential for nightscapes, and especially time-lapses, when blending in separate longer exposures for the ground is not practical.
With its improved ISO invariant sensor, the R6 will be a fine camera for nightscape and time-lapse use, which was not true of the 6D Mark II.
Comparing R6 images underexposed in 1-stop increments by using shorter shutter speeds.Comparing R6 images underexposed in 1-stop increments by using smaller apertures.
However, to be clear, ISO invariant behaviour doesn’t help you as much if you underexpose by using too short a shutter speed or too small a lens aperture. I tested the R6 in series of images underexposed by keeping ISO the same but decreasing the shutter speed then the aperture in one-stop increments.
The underexposed images fell apart in quality much sooner, when underexposed more than 3 stops. Again, this is behaviour similar to what I’ve seen in Sonys and Nikons. For the best image quality I feel it is always a best practice to expose well at the camera. Don’t count on saving images in post.
An in-camera image fairly well exposed with an ETTR histogram.
TIP: Underexposing by using too short an exposure time is the major mistake astrophotographers make, who then wonder why their images are riddled with odd artifacts and patten noise. Always Expose to the Right (ETTR), even with ISO invariant cameras. The best way to avoid noise is to give your sensor more signal, by using longer exposures or wider apertures. Use settings that push the histogram to the right.
LONG EXPOSURE NOISE REDUCTION
All cameras will exhibit thermal noise in long exposures, especially on warm nights. This form of noise peppers the shadows with hot pixels, often brightly coloured.
This is not the same as the shot and read noise that adds graininess to high-ISO images and that noise reduction software can smooth out. This is a common misunderstanding, even among professional photographers who should know better!
Long Exposure Noise Reduction (LENR) eliminates this thermal noise by taking a “dark frame” and subtracting it in-camera to yield a raw file free of hot pixels.
And yes, LENR does apply to raw files, another fact even many professional photographers don’t realize. It is High ISO Noise Reduction that applies only to JPGs, along with Color Space and Picture Styles.
Comparing a dark nightscape without and with LENR on a warm night. Hot pixels are mostly gone at right.
The LENR option on the R6 did eliminate most hot pixels, though sometimes still left, or added, a few. LENR is needed more on warm nights, and with longer exposures at higher ISOs. So the extent of thermal noise in any camera can vary a lot from shoot to shoot.
When LENR is active, the R6’s rear screen lights up with “Busy,” which is annoyingly bright. To hide this display, the only option is to close the screen.
As with the EOS Ra, and all mirrorless cameras, the R6 has no “dark frame buffer” that allows several exposures to be taken in quick succession even with LENR on. Canon’s full-frame DSLRs have this little-known buffer that allows 3, 4, or 5 “light frames” to be taken in a row before the LENR dark frame kicks in a locks up the camera on Busy.
Comparing long exposure images with the lens cap on (dark frames), to show just thermal noise. The right edge of the frame is shown, blown up, to reveal the amp glow, which LENR removes.
With all Canon R cameras, and most other DSLRs, turning on LENR forces the camera to take a dark frame after every light frame, doubling the time it takes to finish every exposure. That’s a price many photographers aren’t willing to pay, but on warm nights it can be necessary, and a best practice, for the reward of cleaner images.
The standard Canon Sensor Cleaning menu.
TIP: If you find hot pixels are becoming more obvious over time, try this trick: turn on the Clean Manually routine for 30 seconds to a minute. In some cameras this can remap the hot pixels so the camera can better eliminate them.
STAR QUALITY
Using LENR with the R6 did not introduce any oddities such as oddly-coloured, green or wiped-out stars. Even without LENR I saw no evidence of green stars, a flaw that plagues some Sony cameras at all times, or Nikons when using LENR.
Comparing the R6 for noise and star colours at typical deep-sky ISOs and exposure times.
Canons have always been known for their good star colours, and the R6 is no exception. According to DPReview the R6 has a low-pass anti-alias filter in front of its sensor. Cameras which lack such a sensor filter do produce sharper images, but stars that occupy only one or two pixels might not de-Bayer properly into the correct colours. That’s not an issue with the R6.
I also saw no “star-eating,” a flaw Nikons and Sonys have been accused of over the years, due to aggressive in-camera noise reduction even on raw files. Canons have always escaped charges of star-eating.
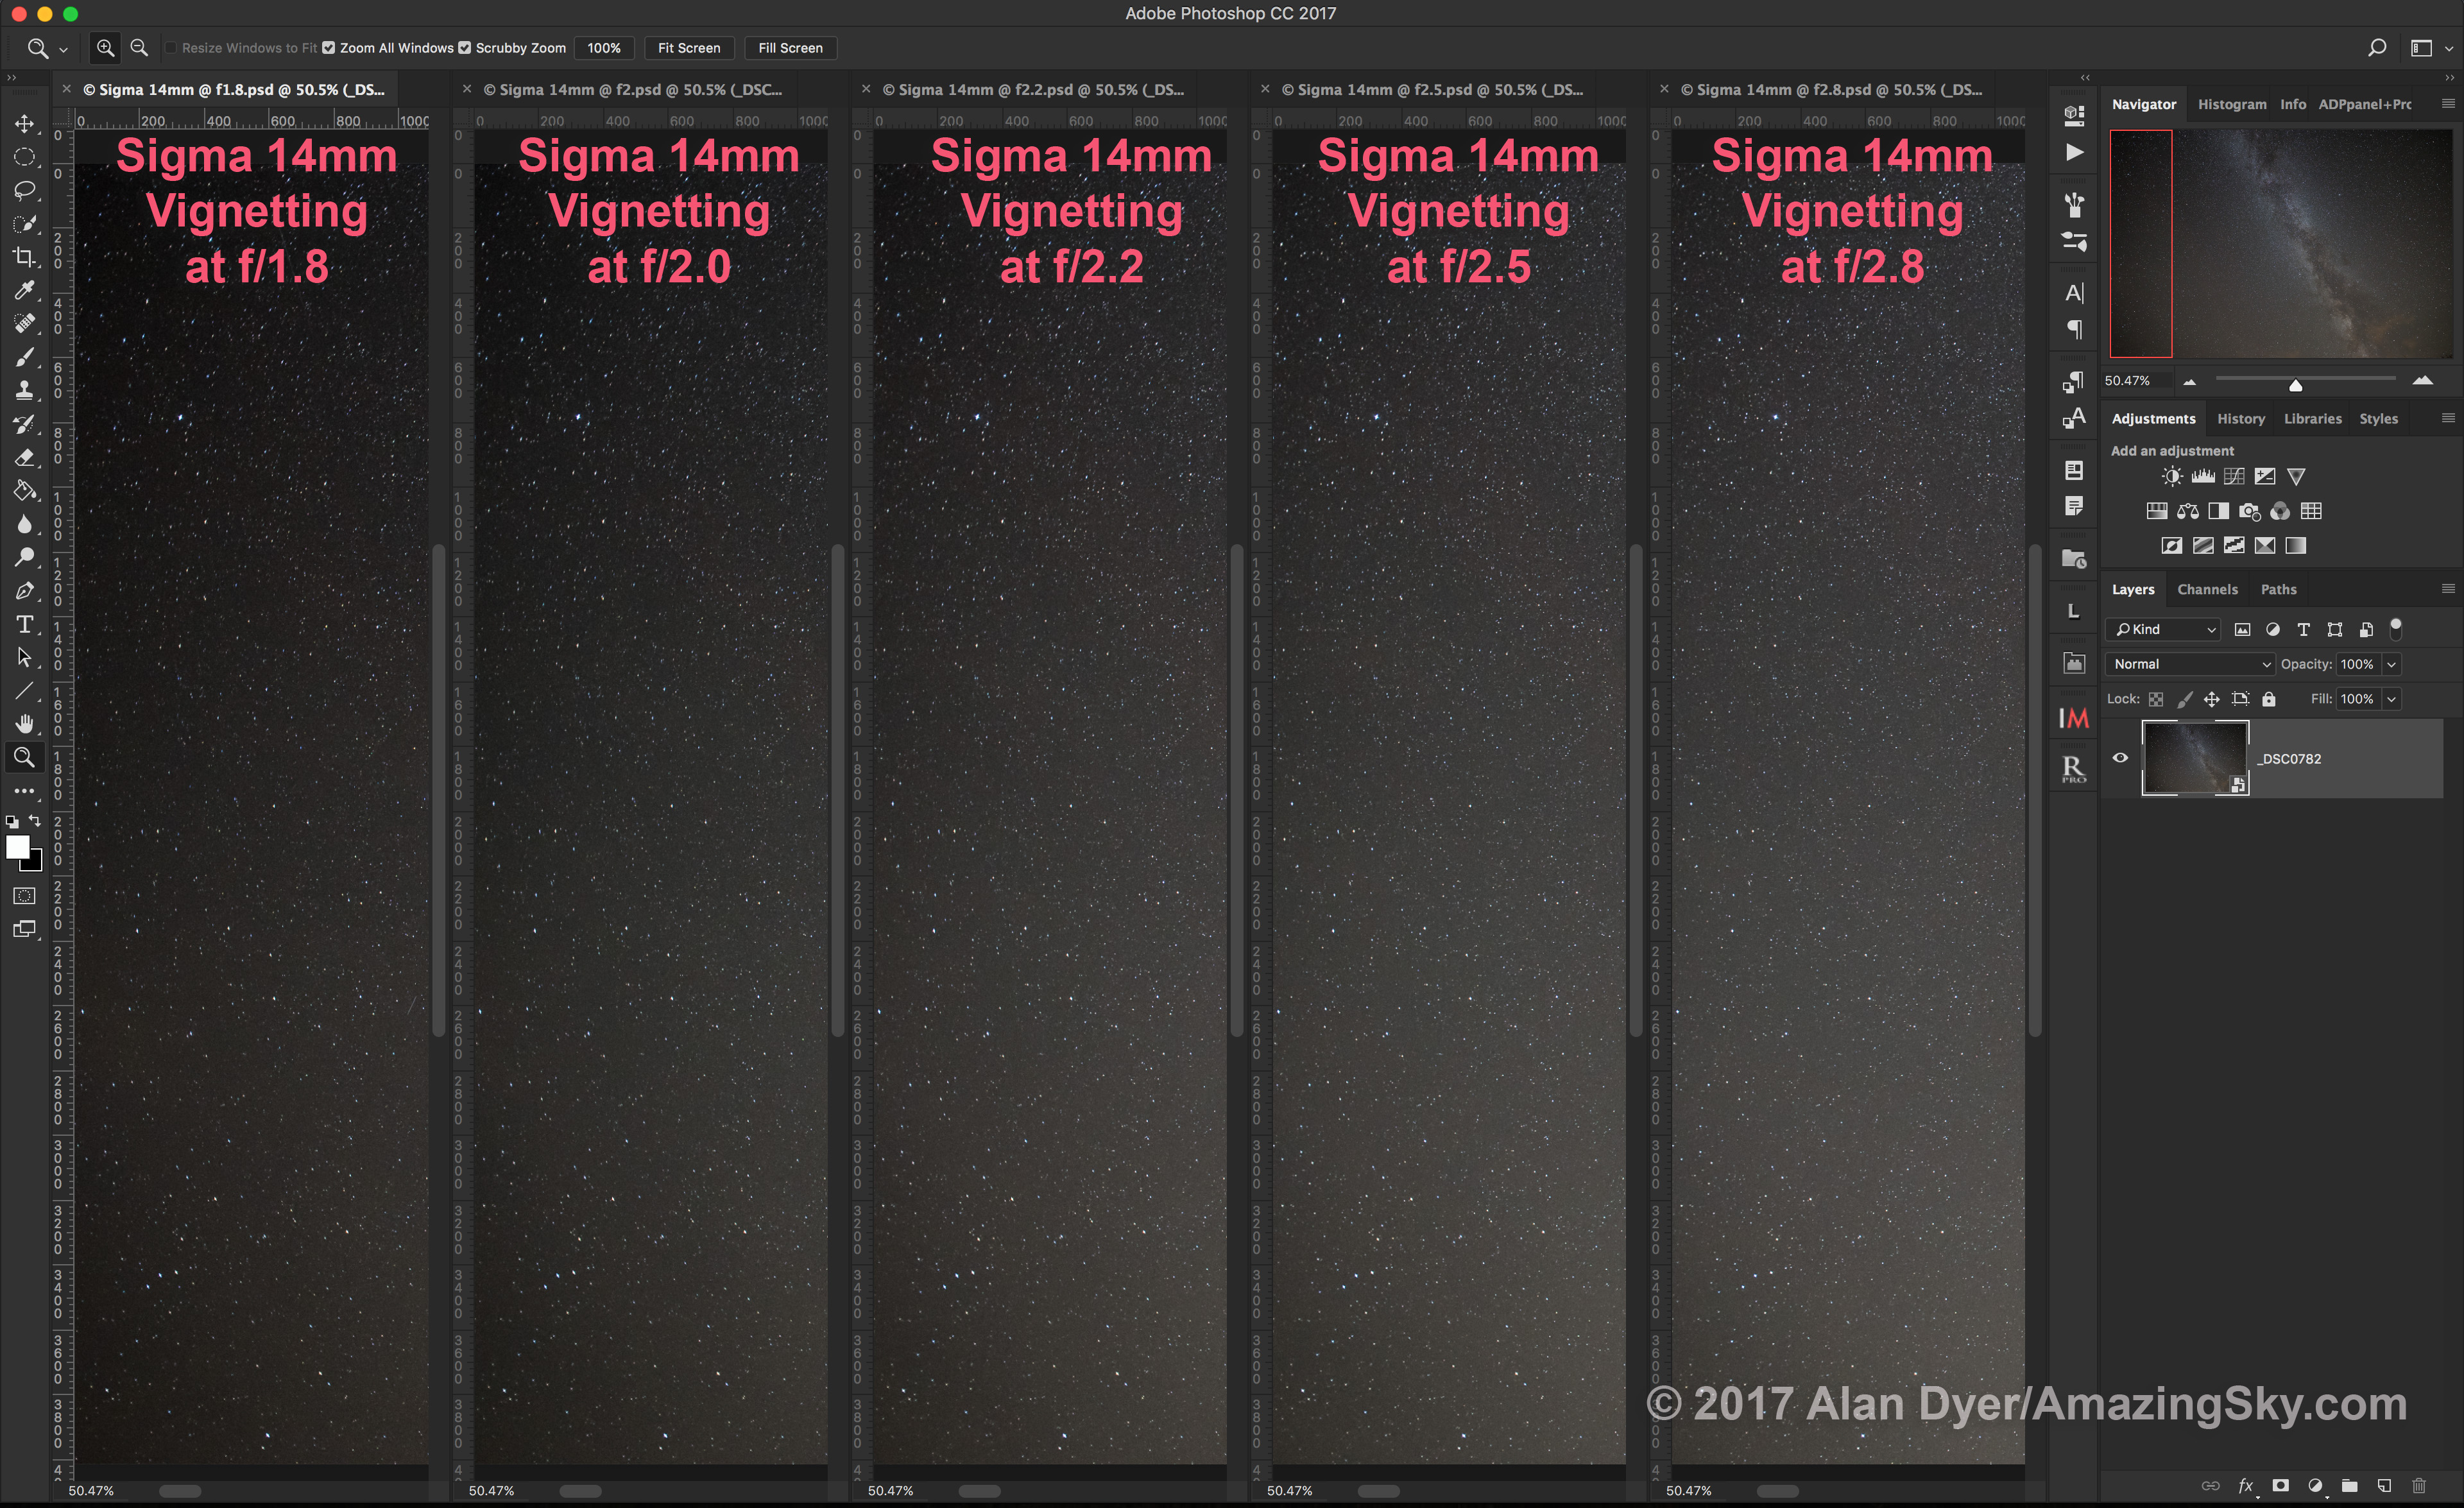
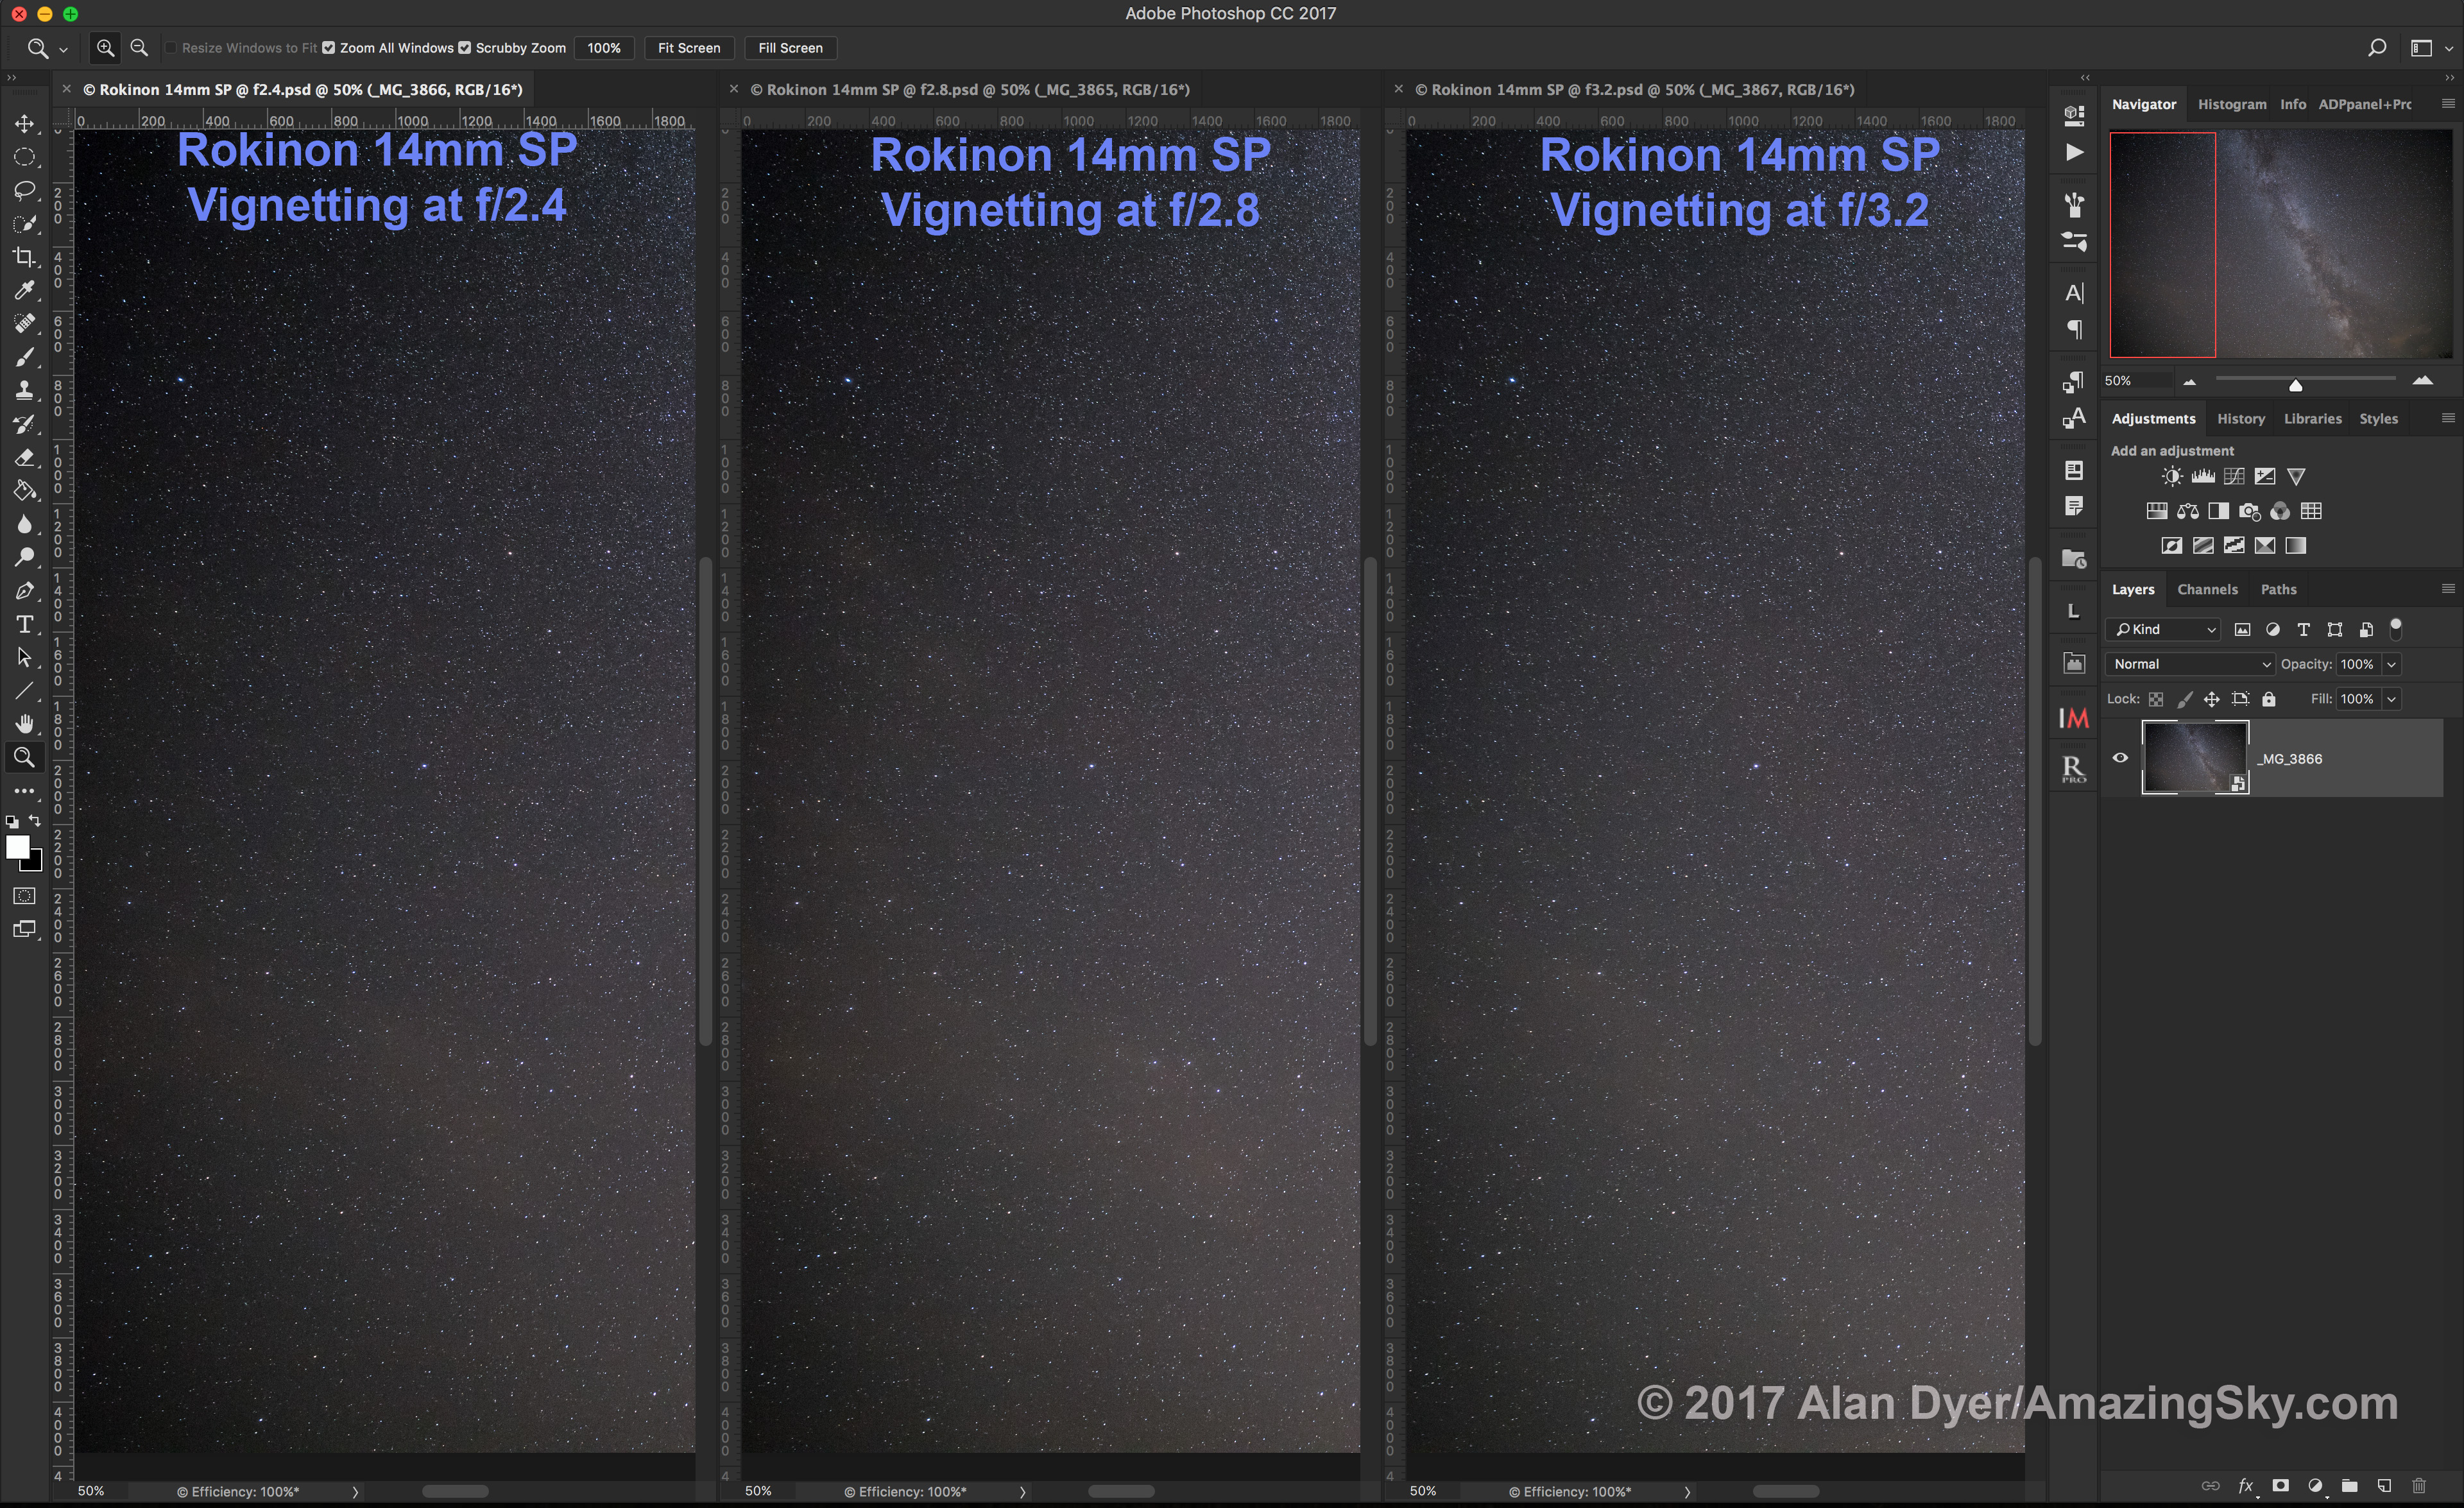
VIGNETTING/SHADOWING
DSLRs are prone to vignetting along the top and bottom of the frame from shadowing by the upraised mirror and mirror box. Not having a mirror, and a sensor not deeply recessed in the body, largely eliminates this edge vignetting in mirrorless cameras.
This illustrates the lack of edge shadows but magenta edge glows in a single Raw file boosted for contrast.
That is certainly true of the R6. Images boosted a lot in contrast, as we do with deep-sky photos, show not the slightest trace of vignetting along the top or bottom edges There were no odd clips or metal bits intruding into the light path, unlike in the Sony a7III I tested in 2018.
The full frame of the R6 can be used without need for cropping or ad hoc edge brightening in post. Except …
EDGE ARTIFACTS/AMP GLOWS
The R6 did exhibit one serious and annoying flaw in long-exposure high-ISO images – a magenta glow along the edges, especially the right edge and lower right corner.
Comparing a close-up of a nightscape, without and with LENR, to show the edge glow gone with LENR on.
Whether this is the true cause or not, it looks like “amplifier glow,” an effect caused by heat from circuitry illuminating the sensor with infra-red light. It shows itself when images are boosted in contrast and brightness in processing. It’s the sort of flaw revealed only when testing for the demands of astrophotography. It was present in images I took through a telescope, so it is not IR leakage from an auto-focus lens.
I saw this type of amp glow with the Sony a7III, a flaw eventually eliminated in a firmware update that, I presume, turned off unneeded electronics in long exposures.
Amp glow is something I have not seen in Canon cameras for many years. In a premium camera like the R6 it should not be there. Period. Canon needs to fix this with a firmware update.
UPDATE AUGUST 1, 2022: As of v1.6 of the R6 firmware, released in July 2022, the amp glow issue remains and has not been fixed. It may never be at this point.
It is the R6’s only serious image flaw, but it’s surprising to see it at all. Turning on LENR eliminates the amp glow, as it should, but using LENR is not always practical, such as in time-lapses and star trails.
For deep-sky photography high-ISO images are pushed to extremes of contrast, revealing any non-uniform illumination or colour. The usual practice of taking and applying calibration dark frames should also eliminate the amp glow. But I’d rather it not be there in the first place!
RED SENSITIVITY
The R6 I bought was a stock “off-the-shelf” model. It is Canon’s now-discontinued EOS Ra model that is (or was) “filter-modified” to record a greater level of the deep red wavelength from red nebulas in the Milky Way. Compared to the Ra, the R6 did well, but could not record the depth of nebulosity the Ra can, to be expected for a stock camera.
Comparing the stock R6 with the filter-modified Ra on Cygnus nebulosity.
In wide-field images of the Milky Way, the R6 picked up a respectable level of red nebulosity, especially when shooting through a broadband light pollution reduction filter, and with careful processing.
Comparing the stock R6 with the filter-modified Ra on the Swan Nebula with a telescope with minimal processing to the Raw images.Comparing the stock R6 with the filter-modified Ra on the Swan Nebula with a telescope with a dual narrowband filter and with colour correction applied to the single Raw images.
However, when going after faint nebulas through a telescope, even the use of a narrowband filter did not help bring out the target. Indeed, attempting to correct the extreme colour shift introduced by such a filter resulted in a muddy mess and accentuated edge glows with the R6, but worked well with the Ra.
While the R6 could be modified by a third party, the edge amp glow might spoil images, as a filter modification can make a sensor even more sensitive to IR light, potentially flooding the image with unwanted glows.
TIP: Buying a used Canon Ra (if you can find one) might be one choice for a filter-modified mirrorless camera, one much cheaper than a full frame cooled CMOS camera such as a ZWO ASI2400MC. Or Spencer’s Camera sells modified versions of all the R series cameras with a choice of sensor filters. But I have not used any of their modded cameras.
RESOLUTION
A concern of prospective buyers is whether the R6’s relatively low 20-megapixel sensor will be sharp enough for their purposes. R6 images are 5472 by 3648 pixels, much less than the 8000+ pixel-wide images from high-resolution cameras like the Canon R5, Nikon Z7II or Sony a1.
Unless you sell your astrophotos as very large prints, I’d say don’t worry. In comparisons with the 30-megapixel Ra I found it difficult to see a difference in resolution between the two cameras. Stars were nearly as well resolved in the R6, and only under the highest pixel-peeping magnification did stars look a bit more pixelated in the R6 than in the Ra. Faint stars were equally well recorded.
Comparing resolution of the R6 vs. Ra with a blow-up of wide-field 85mm imagesComparing resolution of the R6 vs. Ra on blow-ups of the Andromeda Galaxy with a 76mm apo refractor. The R6 is more pixellated but it takes pixel peeping to see it!
The difference between 20 and 30 megapixels is not as great as you might think for arc-second-per-pixel plate scale. I think it would take going to the R5 with its 45 megapixel sensor to provide enough of a difference in resolution over the R6 to be obvious in nightscape scenes, or when shooting small, detailed deep-sky subjects such as globular clusters.
If landscape or wildlife photography by day is your passion, with astrophotography a secondary purpose, then the more costly but highly regarded R5 might be the better choice.
Super Resolution menu in Adobe Lightroom.
TIP: Adobe now offers (in Lightroom and in Camera Raw) a Super Resolution option, that users might think (judging by the rave reviews on-line) would be the answer to adding resolution to astro images from “low-res” cameras like the R6.
Comparing a normal R6 image with the same image upscaled with Super Resolution.
Sorry! In my tests on astrophotos I’ve found Super Resolution results unsatisfactory. Yes, stars were less pixelated, but they became oddly coloured in the AI-driven up-scaling. Green stars appeared! The sky background also became mottled and uneven.
I would not count on such “smart upscaling” options to add more pixels to astro-images from the R6. Then again, I don’t think there’s a need to.
RAW vs. cRAW
Canon now offers the option of shooting either RAW or cRAW files, the latter being the same megapixel count but compressed in file size by almost a factor of two. This allows shooting twice as many images before card space runs out, perhaps useful for shooting lots of time-lapses on extended trips away from a computer.
The R6 Image Quality menu with the cRAW Option.Comparing an R6 cRAW with a RAW image.
However, the compression is not lossless. In high-ISO test images purposely underexposed, then brightened in post, I could see a slight degradation in cRAW images – the noise background looked less uniform and exhibited a blocky look, like JPG artifacts.
The R6’s dual SD card slots.
TIP: With two SD card slots in the R6 (the second card can be set to record either a backup of images on card one, or serve as an overflow card) and the economy of large SD cards, there’s not the need to conserve card space as there once was. I would suggest always shooting in the full RAW format. Why accept any compression and loss of image quality?
BATTERY LIFE
The R6 uses a new version of Canon’s standard LP-E6 battery, the LP-E6NH, that supports charging through the USB-C port and has a higher 2130mAh capacity than the 1800mAh LP-E6 batteries. However, the R6 is compatible with older batteries.
On warm nights, I found the R6 ran fine on one battery for the 3 to 4 hours needed to shoot a time-lapse sequence, with power to spare. However, as noted below, the lack of a top LCD screen means there’s no ongoing display of battery level, a deficiency for time-lapse and deep-sky work.
For demanding applications, especially in winter, the R6 can be powered by an outboard USB power bank that has “Power Delivery” capability. That’s a handy feature. There’s no need to install a dummy battery leading out to a specialized power source.
The R6’s Connection menu with Airplane mode to turn off battery-eating WiFi and Bluetooth.
TIP: Putting the camera into Airplane mode (to turn off WiFi and Bluetooth), turning off the viewfinder, and either switching off or closing the rear screen all helps conserve power. The R6 does not have GPS built in. Tagging images with location data requires connecting to your phone.
VIDEO USE
A major selling point for me was the R6’s low-light video capability. It replaces my Sony A7III, which had been my “go to” camera for real-time 4K movies of auroras.
As best I can tell (from the dimmer auroras I’ve shot to date), the R6 performs equally as well as the Sony. It is able to record good quality (i.e. acceptably noise-free) 4K movies at ISO 25,600 to ISO 51,200. While it can shoot at up to ISO 204,800, the excessive noise makes the top ISO an emergency-use only setting.
The R6’s Movie size and quality options, with 4K and Full HD formats and frame rates.
Comparing the R6 on a dim aurora at various high ISO speeds. Narrated at the camera — excuse the wind noise! Switch to HD mode for the best video playback quality. This was shot in 4K but WordPress plays back only in HD.
The R6 can shoot at a dragged shutter speed as slow as 1/8-second – good, though not as slow as the Sony’s 1/4-second slowest shutter speed in movie mode. That 1/8-second shutter speed and a fast f/1.4 to f/2 lens are the keys to shooting movies of the night sky. Only when auroras get shadow-casting bright can we shoot at the normal 1/30-second shutter speed and at lower ISOs.
As with Nikons (but not Sonys), the Canon R6 saves its movie settings separately from its still settings. When switching to Movie mode you don’t have to re-adjust the ISO, for example, to set it higher than it might have been for stills, very handy for taking both stills and movies of an active aurora, where quick switching is often required.
Unlike the R and Rp, the R6 captures 4K movies from the full width of the sensor, preserving the field of view of wide-angle lenses. This is excellent for aurora shooting.
The R6’s Movie Cropping menu option
A 4K movie of the Moon in full-frame and copped-frame modes, narrated at the camera. Again, this was shot in 4K but WordPress plays back only in HD.Comparing blow-ups of frame-grabbed stills from a full-frame 4K vs. Cropped frame 4K. The latter is less pixellated.
However, the R6 offers the option of a “Movie Crop” mode. Rather than taking the 4K movie downsampled from the entire sensor, this crop mode records from a central 1:1 sampled area of the sensor. That mode can be useful for high-magnification lunar and planetary imaging, for ensuring no loss of resolution. It worked well, producing videos with less pixelated fine details in test movies of the Moon.
Though of course I have yet to test it on one, the R6 should be excellent for movies of total solar eclipses. It can shoot 4K up to 60 frames per second in both full frame and cropped frame. It cannot shoot 6K (buy the R3!) or 8K (buy the R5!).
The R6’s Canon Log settings menu for video files.
Shooting in the R6’s Canon cLog3 profile records internally in 10-bit, preserving more dynamic range in movies, up to 12 stops. During eclipses, that will be a benefit for recording totality, with the vast range of brightness in the Sun’s corona. It should also aid in shooting auroras which can vary over a huge range in brightness.
Grading a cLog format movie in Final Cut under Camera LUT.
TIP: Processing cLog movies, which look flat out of camera, requires applying a cLog3 Look Up Table, or LUT, to the movie clips in editing, a step called “colour grading.” This is available from Canon, from third-party vendors or, as it was with my copy of Final Cut Pro, might be already installed in your video editing software. When shooting, turn on View Assist so the preview looks close to what the final graded movie will look like.
EXPOSURE TRACKING IN TIME-LAPSES
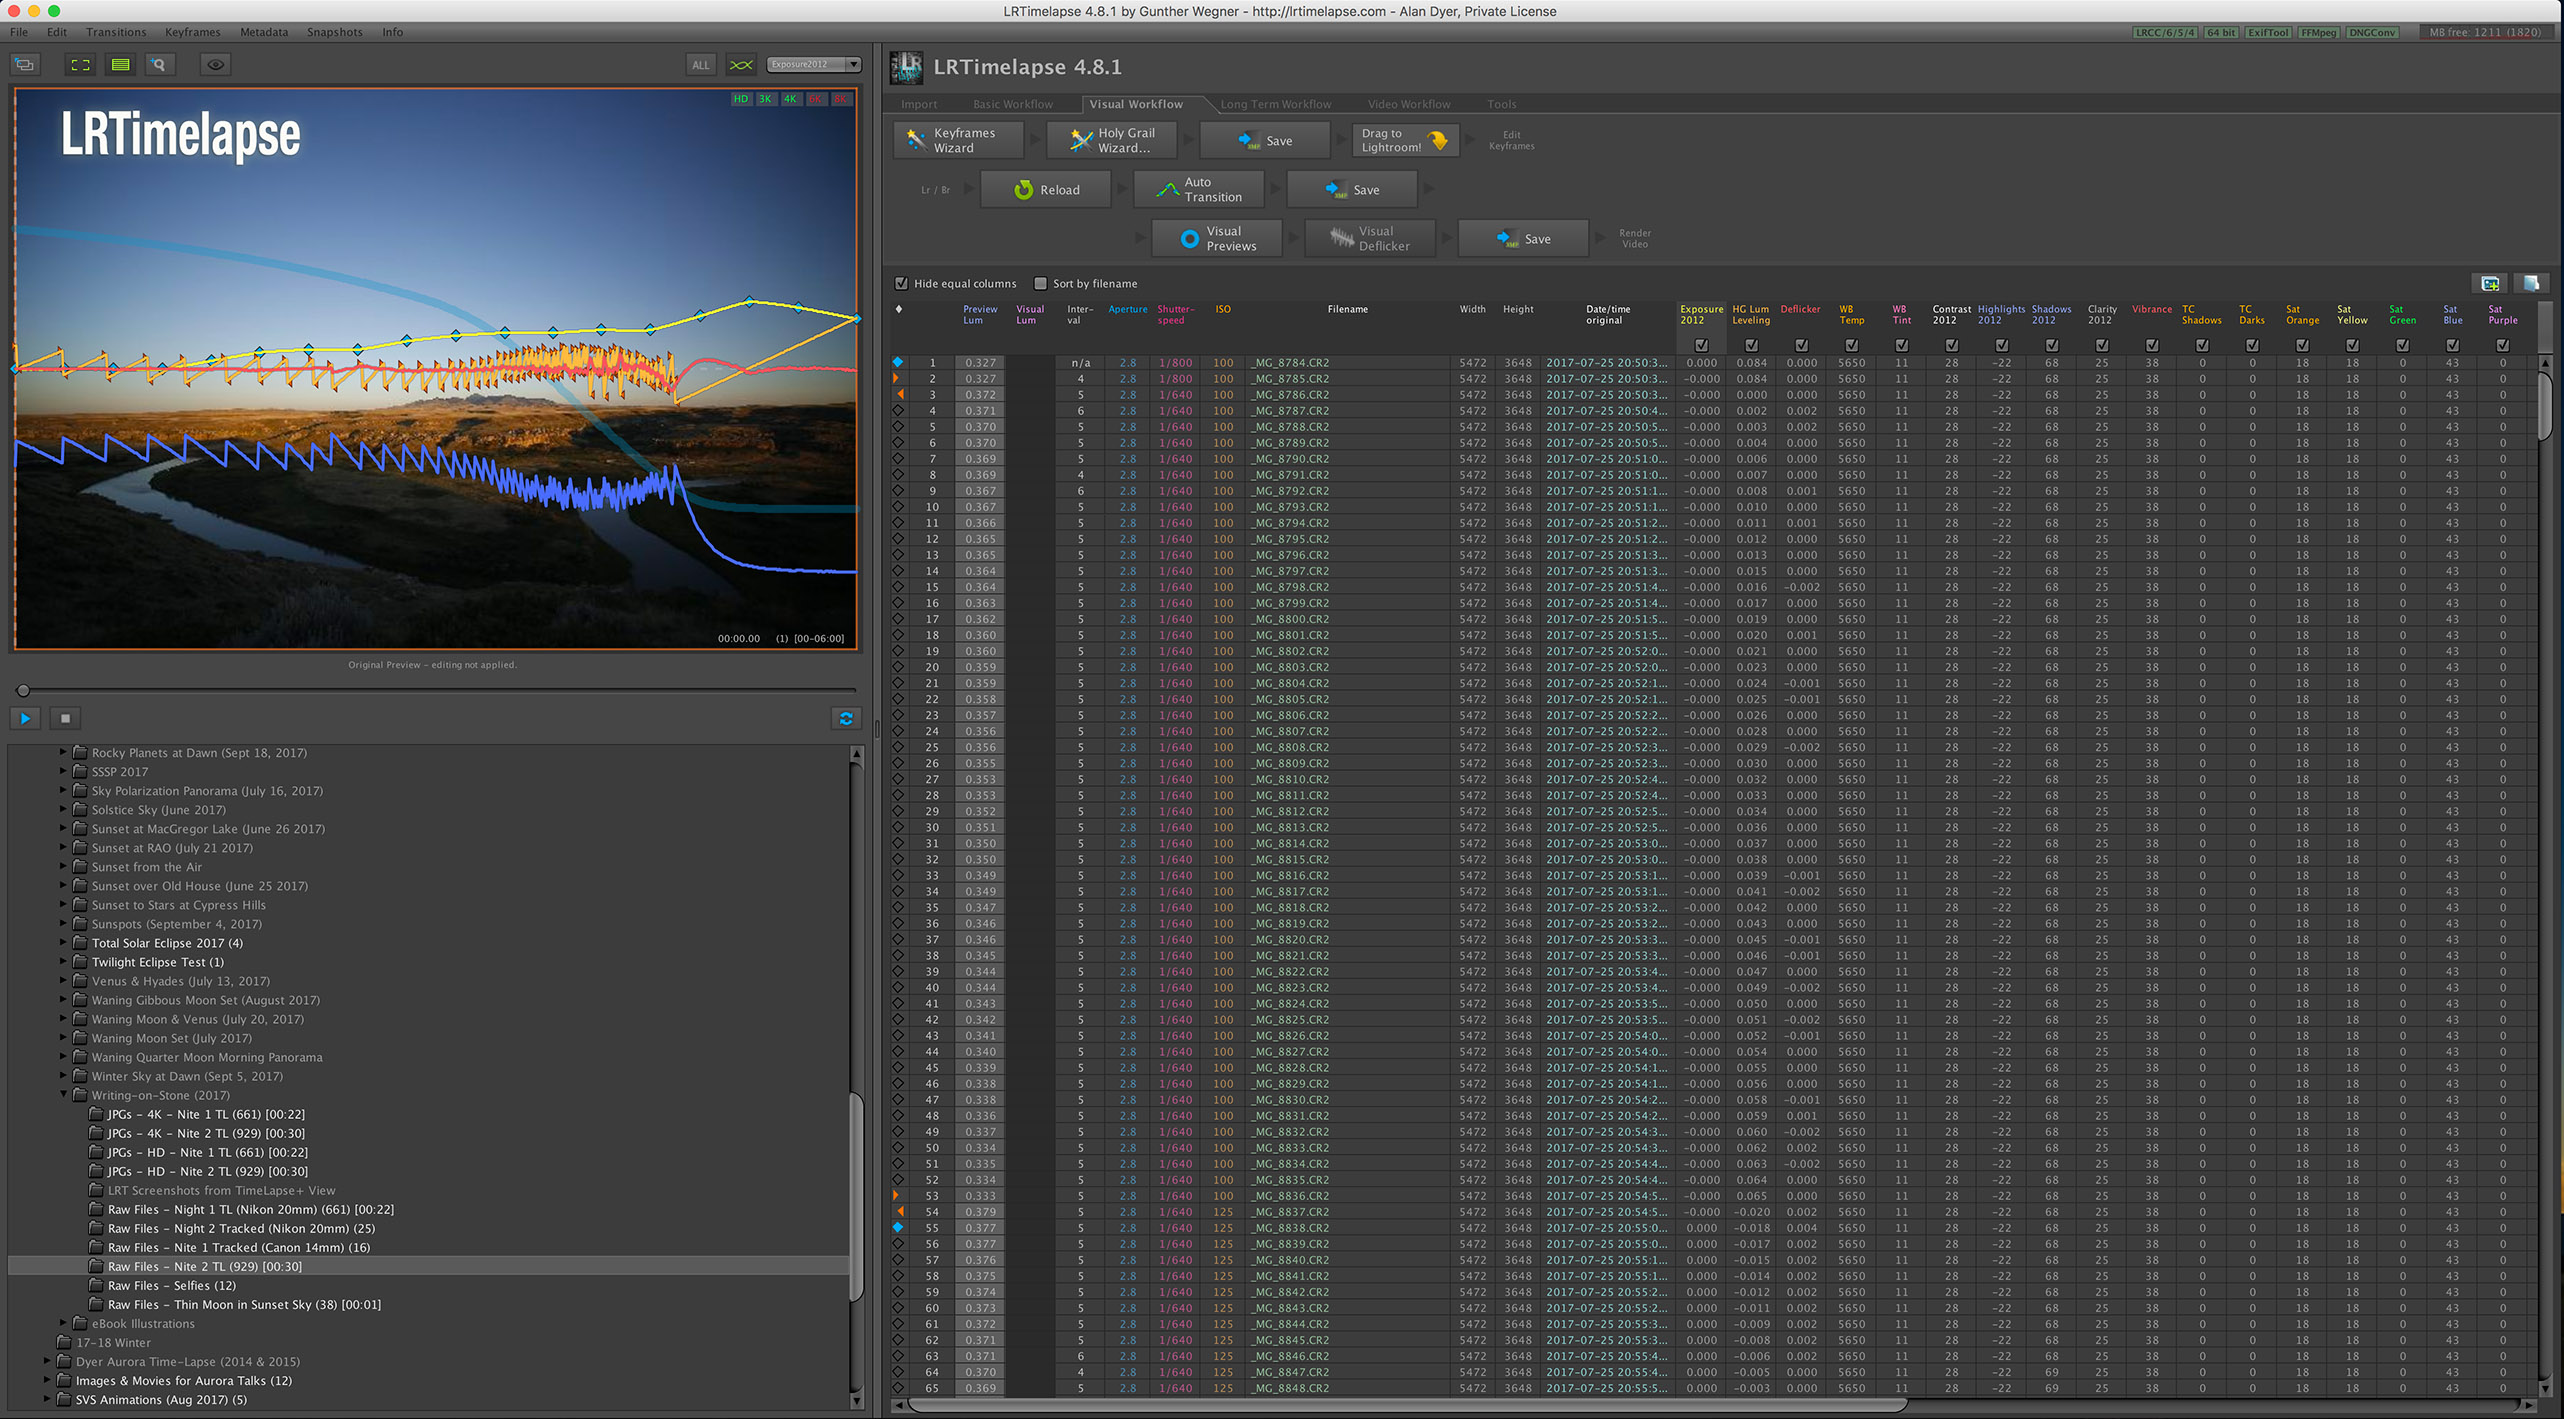
In one test, I shot a time-lapse from twilight to darkness with the R6 in Aperture Priority auto-exposure mode, of a fading display of noctilucent clouds. I just let the camera lengthen the shutter speed on its own. It tracked the darkening sky very well, right down to the camera’s maximum exposure time of 30 seconds, using a fish-eye lens at f/2.8. This demonstrated that the light meter in the R6 was sensitive enough to work well in dim light.
Other cameras I have used cannot do this. The meter fails at some point and the exposure stalls at 5 or 6 seconds long, resulting in most frames after that being underexposed. By contrast, the R6 showed excellent performance, negating the need for special bulb ramping intervalometers for some “holy grail” scenes. Here’s the resulting movie.
A time-lapse of 450 frames from 0.4 seconds to 30 seconds, with the R6 in Av mode. Set to 1080P for the best view! A screenshot from LRTimelapse showing the smoothness of the exposure tracking (the blue line) through the sequence,
In addition, the R6’s exposure meter tracked the darkening sky superbly, with nary a flicker or variation. Again, few cameras can do this. Nikons have an Exposure Smoothing option in their Interval Timers which works well.
The R6 has no such option but doesn’t seem to need it. The exposure did fail at the very end, when the shutter reached its maximum of 30 seconds. If I had the camera on Auto ISO, it might have started to ramp up the ISO to compensate, a test I have yet to try. Even so, this is impressive time-lapse performance in auto-exposure.
MISSING FEATURES
The R6, like the low-end Rp, lacks a top LCD screen for display of camera settings and battery level. In its place we get a traditional Mode dial, which some daytime photographers will prefer. But for astrophotography, a backlit top LCD screen provides useful information during long exposures.
The R6 top and back of camera view.
Without it, the R6 provides no indication of battery level while a shoot is in progress, for example, during a time-lapse. A top screen is also useful for checking ISO and other settings by looking down at the camera, as is usually the case when it’s on a tripod or telescope.
The lack of a top screen is an inconvenience for astrophotography. We are forced to rely on looking at the brighter rear screen for all information. It is a flip-out screen, so can be angled up for convenient viewing on a telescope.
The R6’s flip screen, similar to most other new Canon cameras.
The R6 has a remote shutter port for an external intervalometer, or control via a time-lapse motion controller. That’s good!
However, the port is Canon’s low-grade 2.5mm jack. It works, and is a standard connector, but is not as sturdy as the three-pronged N3-style jack used on Canon’s 5D and 6D DSLRs, and on the R3 and R5. Considering the cost of the R6, I would have expected a better, more durable port. The On/Off switch also seems a bit flimsy and easily breakable under hard use.
The R6’s side ports, including the remote shutter/intervalometer port.
These deficiencies provide the impression of Canon unnecessarily “cheaping out” on the R6. You can forgive them with the Rp, but not with a semi-professional camera like the R6.
INTERVAL TIMER
Unlike the Canon R and Ra (which still mysteriously lack a built-in interval timer, despite firmware updates), the R6 has one in its firmware. Hurray! This can be used to set up a time-lapse sequence, but on exposures only up to the maximum of 30 seconds allowed by the camera’s shutter speed settings, true of most in-camera intervalometers.
The Interval Timer menu page.
For 30-second exposures taken in succession as quickly as possible the interval on the R6 has to be set to 34 seconds. The reason is that the 30-second exposure is actually 32 seconds, true of all cameras. With the R6, having a minimum gap in time between shots requires an Interval not of 33 seconds as with some cameras, but 34 seconds. Until you realize this, setting the intervalometer correctly can be confusing.
Like all Canon cameras, the R6 can be set to take only up to 99 frames, not 999. That seems a dumb deficiency. Almost all time-lapse sequences require at least 200 to 300 frames. What could it possibly take in the firmware to add an extra digit to the menu box? It’s there at in the Time-lapse Movie function that assembles a movie in camera, but not here where the camera shoots and saves individual frames. It’s another example where you just can’t fathom Canon’s software decisions.
Setting the Interval Timer for rapid sequence shots with a 30-second exposure.
TIP: If you want to shoot 100 or more frames, set the Number of Frames to 00, so it will shoot until you tell the camera to stop. But awkwardly, Canon says the way to stop an interval shoot is to turn off the camera! That’s crude, as doing so can force you to refocus if you are using a Canon RF lens. Switching the Mode dial to Bulb will stop an interval shoot, an undocumented feature.
BULB TIMER
As with most recent Canon DSLRs and DSLMs, the menu also includes a Bulb Timer. This allows setting an exposure of any length (many minutes or hours) when the camera is in Bulb mode. This is handy for single long shots at night.
The Bulb Timer menu page. Bulb Timer only becomes an active choice when the camera is on Bulb.
However, it cannot be used in conjunction with the Interval Timer to program a series of multi-minute exposures, a pity. Instead, a separate outboard intervalometer has to be used for taking an automatic set of any exposures longer than 30 seconds, true of all Canons.
In Bulb and Bulb Timer mode, the R6’s rear screen lights up with a bright Timer readout. While the information is useful, the display is too bright at night and cannot be dimmed, nor turned red for night use, exactly when you are likely to use Bulb. The power-saving Eco mode has no effect on this display, precisely when you would want it to dim or turn off displays to prolong battery life, another odd deficiency in Canon’s firmware.
The Bulb Timer screen active during a Bulb exposure. At night it is bright!
The Timer display can only be turned off by closing the flip-out screen, but now the viewfinder activates with the same display. Either way, a display is on draining power during long exposures. And the Timer readout lacks any indication of battery level, a vital piece of information during long shoots. The Canon R, R3 and R5, with their top LCD screens, do not have this annoying “feature.”
TIP: End a Bulb Timer shoot prematurely by hitting the Shutter button. That feature is documented.
IN-CAMERA IMAGE STACKING
The R6 offers a menu option present on many recent Canon cameras: Multiple Exposure. The camera can take and internally stack up to 9 images, stacking them by using either Average (best for reducing noise) or Bright mode (best for star trails). An Additive mode also works for star trails, but stacking 9 images requires reducing the exposure of each image by 3 stops, say from ISO 1600 to ISO 200, as I did in the example below.
The Multiple Exposure menu page.
The result of the internal stacking is a raw file, with the option of also saving the component raws. While the options work very well, in all the cameras I’ve owned that offer such functions, I’ve never used them. I prefer to do any stacking needed later at the computer.
Comparing a single image with a stack of 9 exposures with 3 in-camera stacking methods.
TIP: The in-camera image stacking options are good for beginners wanting to get advanced stacking results with a minimum of processing fuss later. Use Average to stack ground images for smoother noise. Use Bright for stacking sky images for star trails. Activate one of those modes, then control the camera with a separate intervalometer to automatically shoot and internally stack several multi-minute exposures.
SHUTTER OPERATION
Being a mirrorless camera, there is no reflex mirror to introduce vibration, and so no need for a mirror lockup function. The shutter can operate purely mechanically, with physical metal curtains opening and closing to start and end the exposure.
However, the default “out of the box” setting is Electronic First Curtain, where the actual exposure, even when on Bulb, is initiated electronically, but ended by the mechanical shutter. That’s good for reducing vibration, perhaps when shooting the Moon or planets through a telescope at high magnification.
R6 Shutter Mode options.
In Mechanical, the physical curtains both start and end the exposure. It’s the mode I usually prefer, as I like to hear the reassuring click of the shutter opening. I’ve never found shutter vibration a problem when shooting deep sky images on a telescope mount of any quality.
In Mechanical mode the shutter can fire at up to 12 frames a second, or up to 20 frames a second in Electronic mode where both the start and end of the exposure happen without the mechanical shutter. That makes for very quiet operation, good for weddings and golf tournaments!
Electronic Shutter Mode is for fastest burst rates but has limitations.
Being vibration free, Electronic shutter might be great during total solar eclipses for rapid-fire bursts at second and third contacts when shooting through telescopes. Maximum exposure time is 1/2 second in this mode, more than long enough for capturing fleeting diamond rings.
Longer exposures needed for the corona will require Mechanical or Electronic First Curtain shutter. Combinations of shutter modes, drive rates (single or continuous), and exposure bracketing can all be programmed into the three Custom Function settings (C1, C2 and C3) on the Mode dial, for quick switching at an eclipse. It might not be until April 8, 2024 until I have a chance to test these features. And by then the R6 Mark II will be out!
TIP: While the R6’s manual doesn’t state it, some reviews mention (including at DPReview) that when the shutter is in fully Electronic mode the R6’s image quality drops from 14-bit to 12-bit, true of most other mirrorless cameras. This reduces dynamic range. I would suggest not using Electronic shutter for most astrophotography, even for exposures under 1/2 second. For longer exposures, it’s a moot point as it cannot be used.
The menu option that fouls up all astrophotographers using an R-series camera.
TIP: The R6 has the same odd menu item that befuddles many a new R-series owner, found on Camera Settings: Page 4. “Release Shutter w/o Lens” defaults to OFF, which means the camera will not work if it is attached to a manual lens or telescope it cannot connect to electronically. Turn it ON and all will be solved. This is a troublesome menu option that Canon should eliminate or default to ON.
OTHER MENU FEATURES
The rear screen is fully touch sensitive, allowing all settings to be changed on-screen if desired, as well as by scrolling with the joystick and scroll wheels. I find going back to an older camera without a touchscreen annoying – I keep tapping the screen expecting it to do something!
The Multi-Function Button brings up an array of 5 settings to adjust. This is ISO.
The little Multi-Function (M-Fn) button is a worth getting used to, as it allows quick access to a choice of five important functions such as ISO, drive mode and exposure compensation. However, the ISO, aperture and shutter speed are all changeable by the three scroll wheels.
The Q button brings up the Quick Menu for displaying and adjusting key functions.
There’s also the Quick menu activated by the Q button. While the content of the Quick menu screen can’t be edited, it does contain a good array of useful functions, adjustable with a few taps.
Under Custom settings, the Dials and Buttons can be re-assigned to other functions.
Unlike Sonys, the R6 has no dedicated Custom buttons per se. However, it does offer a good degree of customization of its buttons, by allowing users to re-assign them to other functions they might find more useful than the defaults. For example ….
This shows the AF Point button being re-assigned to the Maximize Screen Brightness (Temporary) command.
I’ve taken the AF Point button and assigned it to the Maximize Screen Brightness function, to temporarily boost the rear screen to full brightness for ease of framing.
The AE Lock button I assigned to switch the Focus Peaking indicators on and off, to aid manual focusing when needed.
The Depth of Field Preview button I assigned to switching between the rear screen and viewfinder, through that switch does happen automatically as you put your eye to the viewfinder.
The Set button I assigned to turning off the Rear Display, though that doesn’t have any effect when the Bulb Timer readout is running, a nuisance.
While the physical buttons are not illuminated, having a touch screen makes it less necessary to access buttons in the dark. It’s a pity the conveniently positioned but mostly unused Rate button can’t be re-programmed to more useful functions. It’s a waste of a button.
Set up the Screen Info as you like it by turning on and off screen pages and deciding what each should show.
TIP: The shooting screens, accessed by the Info button (one you do need to find in the dark!), can be customized to show a little, a lot, or no information, as you prefer. Take the time to set them up to show just the information you need over a minimum of screen pages.
LENS AND FILTER COMPATIBILITY
The new wider RF mount accepts only Canon and third-party RF lenses. However, all Canon and third-party EF mount lenses (those made for DSLRs) will fit on RF-mount bodies with the aid of the $100 Canon EF-to-RF lens adapter.
The Canon ER-to-RF lens adapter will be needed to attach R cameras to most telescope camera adapters and Canon T-rings made for older DSLR cameras.
This adapter will be necessary to attach any Canon R camera to a telescope equipped with a standard Canon T-ring. That’s especially true for telescopes with field flatterers where maintaining the standard 55mm distance between the flattener and sensor is critical for optimum optical performance.
The shallower “flange distance” between lens and sensor in all mirrorless cameras means an additional adapter is needed not just for the mechanical connection to the new style of lens mount, but also for the correct scope-to-sensor spacing.
The extra spacing provided by a mirrorless camera has the benefit of allowing a filter drawer to be inserted into the light path. Canon offers a $300 lens adapter with slide-in filters, though the choice of filters useful for astronomy that fit Canon’s adapter is limited. AstroHutech offers a few IDAS nebula filters.
Clip-in filters made for the EOS R, such as those offered by Astronomik, will also fit the R6. Though, again, most narrowband filters will not work well with an unmodified camera.
The AstroHutech adapter allows inserting filters into the light path on telescopes.
TIP: Alternatively, AstroHutech also offers its own lens adapter/filter drawer that goes from a Canon EF mount to the RF mount, and accepts standard 52mm or 48mm filters. It is a great way to add interchangeable filters to any telescope when using an R-series camera, while maintaining the correct back-focus spacing. I use an AstroHutech drawer with my Ra, where the modified camera works very well with narrowband filters. Using such filters with a stock R6 won’t be as worthwhile, as I showed above.
A trio of Canon RF zooms — all superb but quite costly.
As of this writing, the selection of third-party lenses for the Canon RF mount is limited, as neither Canon or Nikon have “opened up” their system to other lens makers, unlike Sony with their E-mount system. For example, we have yet to see much-anticipated RF-mount lenses from Sigma, Tamron and Tokina.
A trio of third party RF lenses — L to R: the TTArtisan 7.5mm f/2 and 11mm f/2.8 fish-eyes and the Samyang/Rokinon AF 85mm f/1.4.
The few third-party lenses that are available, from TTArtisan, Venus Optics and other boutique Chinese lens companies, are usually manual focus lenses with reverse-engineered RF mounts offering no electrical contact with the camera. Some of these wide-angle lenses are quite good and affordable. (I tested the TTArtisan 11mm fish-eye here.)
Until other lens makers are “allowed in,” if you want lenses with auto-focus and camera metadata connections, you almost have to buy Canon. Their RF lenses are superb, surpassing the quality of their older EF-mount equivalents. But they are costly. I sold off a lot of my older lenses and cameras to help pay for the new Canon glass!
Astrophotographers often like to operate their cameras at the telescope using computers running specialized control software. I tested the R6 with two popular Windows programs for controlling DSLR and now mirrorless cameras, BackyardEOS (v3.2.2) and AstroPhotographyTool (v3.88). Both recognized and connected to the R6 via its USB port.
Both programs recognized the Canon R6.
Another popular option is the ASIair WiFi controller from ZWO. It controls cameras via one of the ASIair’s USB ports, and not (confusingly) through the Air’s remote shutter jack marked DSLR. Under version 1.7 of its mobile app, the ASIair now controls Canon R cameras and connected to the R6 just fine, allowing images to be saved both to the camera and to the Air’s own MicroSD card.
With an update in 2021, the ZWOASIair now operates Canon R-series cameras.
The ASIair is an excellent solution for both camera control and autoguiding, with operation via a mobile device that is easier to use and power in the field than a laptop. I’ve not tried other hardware and software controllers with the R6.
TIP: While the R6, like many Canon cameras, can be controlled remotely with a smartphone via the CanonConnect mobile app, the connection process is complex and the connection can be unreliable. The Canon app offers no redeeming features for astrophotography, and maintaining the connection via WiFi or Bluetooth consumes battery power.
A dim red and green aurora from Dinosaur Provincial Park, Alberta, on August 29/30, 2021. This is a stack of 4 exposures for the ground to smooth noise and one exposure for the sky, all 30 seconds at f/2.8 with the Canon 15-35mm RF lens at 25mm and the Canon R6 at ISO 4000.
SUGGESTIONS TO CANON
To summarize, in firmware updates, Canon should:
Fix the low-level amp glow. No camera should have amp glow.
Allow either dimming the Timer readout, turning it red, or just turning it off!
Add a battery display to the Timer readout.
Expand the Interval Timer to allow up to 999 frames, as in the Time-Lapse Movie.
Allow the Rate button to be re-assigned to more functions.
Default the Release Shutter w/o Lens function to ON.
Revise the manual to correctly describe how to stop an Interval Timer shoot.
Allow programming multiple long exposures by combining Interval and Bulb Timer, or by expanding the shutter speed range to longer than 30 seconds, as some Nikons can do.
The Zodiacal Light in the dawn sky, September 14, 2021, from home in Alberta, with the winter sky rising. This is a stack of 4 x 30-second exposures for the ground to smooth noise, and a single 30-second exposure for the sky, all with the TTArtisan 7.5mm fish-eye lens at f/2 and on the Canon R6 at ISO 1600.
CONCLUSION
The extended red sensitivity of the Canon EOS Ra makes it better suited for deep-sky imaging. But with it now out of production (Canon traditionally never kept its astronomical “a” cameras in production for more than two years), I think the R6 is now Canon’s best camera (mirrorless or DSLR) for all types of astrophotography, both stills and movies.
However, I cannot say how well it will work when filter-modified by a third-party. But such a modification is necessary only for recording red nebulas in the Milky Way. It is not needed for other celestial targets and forms of astrophotography.
A composite showing about three dozen Perseid meteors accumulated over 3 hours of time, compressed into one image showing the radiant point of the meteor shower in Perseus. All frames were with the Canon R6 at ISO 6400 and with the TTArtisan 11mm fish-eye lens at f/2.8.
The low noise and ISO invariant sensor of the R6 makes it superb for nightscapes, apart from the nagging amp glow. That glow will also add an annoying edge gradient to deep-sky images, best dealt with when shooting by the use of LENR or dark frames.
As the image of the Andromeda Galaxy, M31, at the top of the blog attests, with careful processing it is certainly possible to get fine deep-sky images with the R6.
For low-light movies the R6 is Canon’s answer to the Sony alphas. No other Canon camera can do night sky movies as well as the R6. For me, it was the prime feature that made the R6 the camera of choice to complement the Ra.
I put the new Sony a7III mirrorless camera through its paces for the features and functions we need to shoot the night sky.
Sony’s a7III camera has enjoyed rave reviews since its introduction earlier in 2018. Most tests focus on its superb auto exposure and auto focus capabilities that rival much more costly cameras, including Sony’s own a7rIII and a9.
For astrophotography, none of those auto functions are of any value. We shoot everything on manual. Indeed, the ease of manually focusing in Live View is a key function.
In my testing I compared the Sony a7III to two competitive DSLRs, the Canon 6D MkII and Nikon D750.
All three are “entry-level” full-frame cameras, with 24 to 26 megapixels and in a similar price league of $1,500 (Nikon) to 2,000 (Sony).
I tested a Sony a7III purchased locally. It was not supplied to me by Sony in return for an “influential” blog post.
I did this testing in preparation for the new third edition of my Nightscapes and Time-Lapse eBook, which includes information on Sony mirrorless cameras, as well as many, many other updates and additions!
NOTE:Click or Tap on most images to bring them up full-frame for inspection.
MILKY WAY AT DINOSAUR PARK A stack of 2 x 90-second exposures for the ground, to smooth noise, and at f/2.8 for better depth of field, plus a single 30-second untracked exposure at f/2 for the sky. All with the Laowa 15mm lens and Sony a7III at ISO 3200.
Mirrorless vs. DSLR
COMPACT CAMERA and LENS The Sony a7III with the compact but fast Laowa Venus Optics 15mm f/2 lens.
As with Sony’s other popular Alpha 7 and 9 series cameras, the new Alpha 7III is a full-frame mirrorless camera, a class of camera Canon and Nikon have yet to offer, though models are rumoured or promised.
In the meantime, Sony commands the full-frame mirrorless market.
As its name implies, a mirrorless camera lacks the reflex mirror of a digital single lens reflex camera that, in a DSLR, provides the light path for framing the scene though the optical viewfinder.
SONY LIVE VIEW The Sony a7III’s excellent Live View screen display. You can see the Milky Way!
In a mirrorless, the camera remains in “live view” all the time, with the sensor always feeding a live image to either or both the rear LCD screen and electronic viewfinder (EVF). While you can look through and frame using the EVF as you would with a DSLR, you are looking at an electronic image from the sensor, not an optical image from the lens.
The advantage of purely electronic viewing is that the image you are previewing matches the image you’ll capture, at least for short exposures. The disadvantage is that full-time live view draws more power, with mirrorless cameras notorious for being battery hungry.
Other mirrorless advantages include:
Compact size and lighter weight, yet offering all the image quality of a full-frame DSLR.
The thinner body allows the use of lenses from any manufacturer, albeit requiring the right adapter, an additional expense.
Lenses developed natively for mirrorless models can be smaller and lighter. An example is the Laowa 15mm f/2 I used for some of the testing.
The design lends itself to video shooting, with many mirrorless cameras offering 4K as standard, while often in DSLRs only high-end models do.
More rapid-fire burst modes and quieter shutters are a plus for action and wedding photographers, though they are of limited value for astrophotography.
Points of Comparison
CAMERA TRIO The Sony a7III, Nikon D750, and Canon 6D Mark II. Note the size difference.
In testing the Sony a7III I ignored all the auto functions. Instead, I concentrated on those points I felt of most concern to astrophotographers, such as:
Noise levels
Effectiveness of Long Exposure Noise Reduction (LENR)
Quality of Raw files, such as sharpness of stars
Brightness of Live View for framing and focusing
Uniformity of sensor illumination
Compatibility for time-lapse imaging
Battery life
TL;DR Conclusions
DEEP-SKY TEST The North America Nebula with the Sony a7III and a Meade 70mm f/5 astrographic refractor, for a single 4-minute exposure at ISO 1600. The reds have been boosted in processing.
Noise
Levels of luminance and chrominance noise were excellent and similar to – but surprisingly not better than – the Nikon D750.
Star Eater
The Star Eater is effectively gone. Stars are not smoothed out in long exposures.
ISO Invariance
The Sony exhibited good – though not great – “ISO invariant” performance.
Dark Frames
Dark frame subtraction using Long Exposure Noise Reduction removed most – but not all – hot pixels from thermal noise.
Live View Focusing and Framing
Live View was absolutely superb, though the outstanding Bright Monitoring function is as well-hidden as Sony could possibly make it.
Sensor Illumination Uniformity
The Sony showed some slight edge-of-frame shadowing from the mask in front of the sensor, as well as a weak purple amp glow.
Features
• The a7III lacks any internal intervalometer or ability to add one via an app. But it is compatible with many external intervalometers and controllers.
• The a7III’s red sensitivity for recording H-Alpha-emitting nebulas was poor.
• It lacks the “light-frame” buffer offered by full-frame Canons that allows shooting several frames in quick succession even with LENR turned on.
Video Capability
The a7III offers 4K video and, at 24 frames-per-second, is full-frame. Shutter speeds can be as slow as 1/4-second, allowing real-time aurora shooting at reasonable ISO speeds.
Battery Life
Shooting typical 400-frame time-lapses used about 40% of the battery capacity, similar to the other DSLRs.
Overall Recommendations
The Sony a7III is a superb camera for still and time-lapse nightscape shooting, and excellent for real-time aurora videos. It is good, though not great, for long-exposure deep-sky imaging.
STAR TRAILS and AURORA With the Laowa 15mm lens and Sony a7III, for 155 exposures, all 20 seconds at f/2.8 and at ISO 800, and taken as part of a 360-frame time-lapse.
Noise
The Sony a7III uses a sensor that is “Backside Illuminated,” a feature that promises to improve low-light performance and reduce noise.
I saw no great benefit from the BSI sensor. Noise at typical astrophoto ISO speeds – 800 to 6400 – were about equal to the four-year-old Nikon D750.
That was a bit surprising. I expected the new BSI-equipped Sony to better the Nikon by about a stop. It did not. This emphasizes just how good the Nikon D750 is.
Nevertheless, noise performance of the Sony a7III was still excellent, with both the Sony and Nikon handily outperforming the Canon 6D MkII, with its slightly smaller pixels, by about a stop in noise levels.
NOTE: I performed all Raw developing with Adobe Camera Raw v10.3. It is possible some of the artifacts I saw are due to ACR not handling the a7III’s .ARW files as well as it should. But to develop all the images from Sony, Nikon, and Canon equally for comparisons, ACR is the best choice.
COMPARING NOISE The Sony a7III exhibited noise levels similar to the Nikon D750 at high ISOs, with the Sony and Nikon each about a stop better for noise than the Canon 6D MkII.
NOISE AT ISO 3200 At ISO 3200, a common nightscape ISO speed, all three cameras performed well in this moonlit scene. The Canon shows a darker sky as its images were taken a few minutes later. The Nikon had the Sigma 14mm Art lens; the Canon and Sony used the same Rokinon 14mm SP lens.
NOISE AT ISO 6400 At ISO 6400, the Canon begins to show excessive noise, about a stop worse than the Nikon and Sony. No luminance noise reduction was applied to these images. All cameras show an equal number of stars recorded.
ISO Invariance
Both the Sony and Nikon use sensor and signal path designs that are “ISO invariant.” As a result, images shot underexposed at slower ISOs, then boosted in exposure later in processing look identical to properly exposed high-ISO images. Well, almost.
The Sony still showed some discoloration artifacts and added noise when boosting images by +4 EV that the Nikon did not. Even with uncompressed Raws, the Sony was not quite as ISO invariant as the Nikon, though the difference shows up only under extreme push-processing of badly underexposed frames.
Plus, the Sony was far better than the Canon 6D MkII’s “ISO variant” sensor. Canon really needs to improve their sensors to keep in the game.
ISO INVARIANCE COMPARISON Here I shot all three cameras at ISO 6400 for a correct exposure for the scene, and also at ISO 1600 and ISO 400, for images 2 and 4 stops underexposed respectively. These were then boosted in Adobe Camera Raw by 2 and 4 stops in Exposure Value (EV) to compensate. With ISO invariant sensors the boosted images should look similar to the well-exposed image.
ISO INVARIANCE CLOSE-UP A closeup of the scene shows the ISO variant Canon exhibited more noise and magenta discoloration in the +4 EV boosted image. The Nikon looks very clean, but the Sony also shows discoloration, green here, and an increase in noise. These are all uncompressed 14-bit Raw files.
SONY vs. NIKON Comparing just the two ISO-invariant cameras, the Sony and the Nikon, on another night, shows a similar performance difference when boosting underexposed slow-ISO images later in Camera Raw. The Sony begins to show more noise and now a magenta discoloration in the +3 and +4 EV images, similar to, but not as badly as does the ISO-variant Canon 6D MkII.
Compressed vs. Uncompressed
The Sony a7III offers a choice of shooting Uncompressed or Compressed Raw files. Uncompressed Raws are 47 Mb in size; Compressed Raws are 24 Mb.
In well-exposed images, I saw little difference in image quality.
But the dark shadows in underexposed nightscapes withstood shadow recovery better in the uncompressed files. Compressed files showed more noise and magenta discoloration in the shadows.
It is not clear if Sony’s compressed Raws are 12-bit vs. 14-bit for uncompressed files.
Nevertheless, for the demands of nightscape and deep-sky shooting and processing, I suggest shooting Uncompressed Raws. Use Compressed only if you plan to take lots of time-lapse frames and need to conserve memory card space on extended shoots.
UNCOMPRESSED vs. COMPRESSED Here I compare any image degradation from using compressed vs. uncompressed Raws, and from employing Long Exposure Noise Reduction. Images are only slightly underexposed and boosted by +1 EV in Camera Raw. Shadow noise is similar in all images, with the ones taken with LENR on showing elimination of colored hot pixels, as they should.
UNCOMPRESSED vs. COMPRESSED at -4EV The same scene but now underexposed by 4 stops and boosted by +4 EV later shows greater differences. The compressed image shows more noise and discoloration, and the images taken with LENR on, while eliminating hot pixels, show more random luminance noise. Keep in mind, these are vastly underexposed images.
UNCOMPRESSED vs. COMPRESSED DEEP-SKY A real-world deep-sky example shows the same comparison. All images are well-exposed, for tracked and guided 4-minute exposures. The ones taken with LENR on show fewer hot pixels. The compressed images appear identical to the uncompressed files for noise and star content.
Star Eater (Updated March 27, 2021)
Over the last year or so, firmware updates from Sony introduced a much-publicized penchant for Sony Alphas to “eat” stars even in Raw files, apparently due to an internal noise reduction or anti-aliasing routine users could not turn off. Stars were smoothed away along with the noise in exposures longer than 3.2 seconds in some Sony cameras (longer than 30 seconds in others).
I feel that in the a7III the Star Eater has been largely vanquished.
While others beg to differ and claim this camera still eats stars, they offer no evidence of it other than graphs and charts, not A-B photos of actual tracked starfields taken with the Sony vs. another camera thought not to eat stars.
As the images below show, there is a very slight one-pixel-level softening that kicks in at 4 seconds and longer but it did not eat or wipe out stars. Stars are visible to the same limiting magnitude and close double stars are just as well resolved across all exposures. Indeed, at slower ISOs and longer exposures, more stars are visible.
I saw none of the extreme effects reported by others with other Sonys, where masses of faint stars disappeared or turned into multi-colored blotches. It is possible the effect is still present in other Sony Alpha models. I have not tested those.
But in the a7III, I did not see any significant “star eating” in any long exposures even up to the 4 minutes I used for some deep-sky shots. In images taken at the same time with other cameras not accused of star eating, the Sony showed just as many faint stars as the competitors. Stars were visible to just as faint a limiting magnitude, and that’s what counts, NOT graphs and charts, especially when such results are not shown for other cameras.
In short, long exposures showed just as many stars as did short exposures.
This was true whether I was shooting compressed or uncompressed Raws, with or without Long Exposure Noise Reduction. Neither compression nor LENR invoked “star eating.”
STAR EATER SERIES at 200% This series of tracked images (shown here blown up 200%) goes from 2 seconds to 2 minutes, with decreasing ISO speed to equalize the exposure value across the series. Between 3.2s and 4s a very slight one-pixel-level softening does kick in, reducing noise and very slightly blurring stars. Yet, just as many stars are recorded and are resolved, and at the lower ISOs/longer exposures more stars are visible because faint stars are not lost in the noise.
STAR EATER SERIES at 400% This is the same series as above but now blown up 400% to better reveal the very subtle change in pixel-level sharpness as exposure lengthened from 3.2 to 4 seconds. Noise (most noticeable in the trees) is reduced and stars are very slightly softened. But none are “eaten” or wiped out. And star colors are not affected, though very small stars are sometimes green, an effect seen in other cameras due to de-Bayering artifacts.
STAR EATER DEEP-SKY #1 Tracked deep-sky images through a telescope using 4-minute exposures show the Sony a7III recording an equal number of faint stars as the Canon 6D MkII. No luminance noise reduction was applied to these images in processing.
STAR EATER DEEP-SKY #2 Another example with 4-minute exposures again demonstrates no problems recording faint stars. The Canon does show more noise than the Sony. No noise reduction was applied in processing.
SONY and NIKON COMPARED For yet more evidence, this is a comparison of the Sony a7III vs. the Nikon D750 in tracked 90-second exposures with 14mm lenses. Again, the Sony records just as many stars as the Nikon.
LENR Dark frames
For elimination of hot pixels from thermal noise I prefer to use Long Exposure Noise Reduction when possible for nightscape and deep-sky images, especially on warm summer nights.
Exceptions are images taken for star trail stacking and for time-lapses, images that must be taken in quick succession, with minimal time gap between frames.
Turning on LENR did eliminate most hot pixels in long exposures, but not all. A few remained. Also, when boosting the exposure a lot in processing, the images taken with LENR on showed more shot and read noise than non-LENR frames.
The dark frame the camera was taking and subtracting was actually adding some noise, perhaps due to a temperature difference. The cause is not clear.
Sony advises that when using LENR Raw images are recorded with only 12-bit depth, not 14-bit. This might be a contributing factor. Yet frames taken with LENR on were the same 47 Mb size as normal uncompressed frames.
For those who think this is normal for LENR use, the Nikon D750 shows nothing like this – frames taken with LENR on are free of all hot pixels and do not show more shot or read noise, nor deterioration of shadow detail from lower bit depths.
However, I emphasize that the noise increase from using LENR with the Sony was visible only when severely boosting underexposed images in processing.
In most shooting situations, I found using LENR provided the overriding positive benefit of reducing hot pixels. It just needs to be better, Sony!
SONY WITH AND WITHOUT LENR These are 4-minute exposures of dark frames (i.e. the lens cap on!) taken at room temperature with and without Long Exposure Noise Reduction. In the Sony, LENR did not eliminate all hot pixels nor the magenta amp glow at the left edge. LENR also added a background level of fine noise. These have had exposure and contrast increased to exaggerate the differences.
NIKON WITH AND WITHOUT LENR Dark frames taken with the Nikon D750 under the same circumstances and processed the same show none of the residual hot pixels and added background noise when LENR is employed. Nor is there any amp glow anywhere along the frame edges.
SONY REAL-WORLD LENR COMPARISON A real-world example with the Sony, with a properly exposed nightscape, shows that the ill effects of using LENR don’t show up under normal processing. You do get the benefit of reduced hot pixels in shadows, especially on a warm night like this was. This is a blow-up of the lower corner of the frame, as indicated.
Sensor Illumination
How evenly an image is illuminated is a common factor when testing lenses.
But astrophotography, which often requires extreme contrast boosts, reveals non-uniform illumination of the sensor itself, regardless of the optics, originating from hardware elements in front of the sensor casting shadows onto the sensor.
This is most noticeable – indeed usually only noticeable – when shooting deep-sky targets though telescopes.
With DSLRs it is the raised mirror which often casts a shadow, produced a dark vignetted band along the bottom of the frame. Its extent varies from camera model to model.
With a mirrorless camera the sensor is not set far back in a mirror box, as it is in a DSLR. As such, I would have expected a more uniformly illuminated sensor.
SENSOR CLOSE-UP showing intruding mask edges.
Instead, I saw a slight shadowing at the top and bottom edges but just at the corners. This is from a thin metal mask in front of the sensor. It intrudes into the light path ever so slightly. It shouldn’t.
This is an annoying flaw, though applying “flat fields” or ad hoc local adjustments should eliminate this. But that’s a nuisance to do, and should not be necessary with a mirrorless camera.
Worse is that long deep-sky exposures at high ISOs also exhibited a faint purple glow at the left edge, perhaps from heat from nearby electronics, a so-called “amp glow.” Or I’ve read where this is from an internal infrared source near the sensor.
Taking a dark frame with LENR did not eliminate this, and it should, demonstrating again that for whatever reason in the a7III LENR is not as effective as it should be.
I have not seen such “amp” glows in cameras (at least in the DSLRs I’ve used) for a number of years, so seeing it in the new Sony a7III was another surprise.
This would be much tougher to eliminate in deep-sky images where the extreme contrast boosts we typically apply to images of nebulas and galaxies will accentuate any odd glows.
UPDATE: March 27, 2021 — Subsequent firmware updates seem to have eliminated this amp glow. One supplier of filter-modified cameras, Spencer’s Camera, who had refused to modify Sonys because of this glow, now lists many Sony Alphas as suitable for modification. However, the sensor masks and “green stars” (described below) still make the Sony a7III less desirable for deep-sky imaging than other mirrorless cameras I’ve tested.
SONY FIELD ILLUMINATION #1 The full field of a deep-sky image taken through an f/5 70mm astrographic refractor shows the minor level of edge darkening at the corners from shadowing of the sensor in the Sony.
SONY FIELD ILLUMINATION #2 The full field of a deep-sky image taken through an f/6 105mm refractor shows the level of edge darkening at the edges from shadowing of the sensor in the Sony, and the purple “amplifier” glow at the left edge present in all very long exposures.
Red Sensitivity
When shooting deep-sky objects, particularly red nebulas, we like a camera to have a less aggressive infrared cutoff filter, to pick up as much of the deep red Hydrogen-Alpha emission line as possible.
The Sony showed poor deep-red sensitivity, though not unlike other cameras. It was a little worse than the stock Canon 6D MkII.
This isn’t a huge detriment, as anyone who really wants to go after deep nebulosity must use a “filter-modified” camera anyway.
Canon and Nikon both offered factory modified cameras at one time, notably the Canon 60Da and Nikon D810a. Sony doesn’t have an “a” model mirrorless.
To get the most out of the Sony for deep-sky imaging you would have to have it modified by a third-party, though the amp glow described above makes it a poor choice for modification.
RED SENSITIVITY COMPARED Three deep-sky exposures compare cameras for red sensitivity: a filter-modified Canon 5D MkII, a stock Canon 6D MkII, and the stock Sony a7III. As expected the filter-modified camera picks up much more red nebulosity. The Sony doesn’t do quite as well as the Canon 6D MkII.
Live View Focusing and Framing
Up to now my report on the Sony a7III hasn’t shown as glowing a performance as all the YouTube reviews would have you believe.
But Live Focus is where the a7III really stands out. I love it!
In Live View it is possible to make the image so bright you can actually see the Milky Way live on screen! Wow! This makes it so easy to frame nightscapes and deep-sky fields.
FINDING BRIGHT MONITORING The excellent Bright Monitoring function is accessible only off the Custom Key menu where it appears as a choice on the Display/Auto Review2 page (below) that can be assigned to a C button.
But this special “Bright Monitoring” mode is as well hidden as Sony could make it. Unless you actually read the full-length 642-page PDF manual (you have to download it), you won’t know about it. Bright Monitoring does not appear in any of the in-camera menus you can scroll through, so you won’t stumble across it.
Instead, you have to go to the Camera Settings 2 page, then select Still Image–Custom Key. In the menu options that appear you can now scroll to one called Bright Monitoring. Surprise! Assign it to one of the hardware Custom C buttons. I put it on C2, making it easy to call up when needed.
The other Live View function that works well, but also needs assigning to a C button is the Camera Settings 1 > Focus Magnifier. I put this on C1. It magnifies the Live View by 5.9x or 11.7x, allowing for precise manual focusing on a star.
Two other functions are useful for Live View:
Camera Settings 2 > Live View Display > Setting Effect ON. This allows the Live View image to reflect the camera settings in use, better simulating the actual exposure, even without Bright Monitoring on.
Camera Settings 1 > Peaking Setting. Turning this ON superimposes a shimmering effect on parts of an image judged in focus. This might be an aid, or an annoyance. Try it.
In all, the Sony provides superb, if well-hidden, Live View options that make accurately framing and focusing a nightscape or time-lapse scene a joy.
Great Features for Astrophotography
Here are some other Sony a7III features I found of value for astrophotography, and for operating the camera at night.
SONY TILTING SCREEN It tilts up and down but does not flip out as with the Canon 6D MkII’s. Still, this is a neck- and back-saving feature for astrophotography.
Tilting LCD Screen
Like the Nikon D750, the Sony’s screen tilts vertically up and down, great for use when on a telescope, or on any tripod when aimed up at the sky. As photographers age, this becomes a more essential feature!
Custom Buttons
The four C buttons can be programmed for oft-used functions, making them easy to access at night. Standard functions such as ISO and Drive Mode are easy to get at on the thumb wheel, unlike the Nikon D750 where I am forever hunting for the ISO or Focus Zoom buttons, or the Canon 6D MkII which successfully hides the Focus Zoom and Playback buttons at night.
My Menu
In new models, Sony now offers the option of a final “My Menu” page which you can populate with often-used functions from the other 35 pages of menu commands!
Adaptability to Many Lenses
Using the right lens adapter (I use one from Metabones), it is possible to use lenses with mounts made for Canon, Nikon, Sigma and others. Plus there are an increasing number of lenses from third parties offered with native Sony E-mounts. This is good news, as astrophotography requires fast, high-quality lenses, and the Sony allows more choices.
Lighter Weight / Smaller Size
The compact a7III body weighs a measured 750 grams, vs. 900 grams each for the Nikon D750 and Canon 6D MkII. The lower weight can be helpful for use on lightweight telescopes, on small motion control devices, and for simply keeping weight and bulk down when traveling.
Dual Card Slots
Not essential, but having two card slots is very helpful, for backup, for handling overflows from very long time-lapse shoots, or assigning them for stills vs. movies, or Raws vs. JPGs. Only Slot 1 will work with the fastest UHS II cards that are needed for recording the highest quality 4K video.
USB Power
It is possible to power the camera though the USB port (indeed that’s how you charge the battery, as no separate battery charger is supplied as standard, a deficiency). This might be useful for long shoots, though likely as not that same USB port will be needed for an intervalometer or motion control device. But if the Sony had a built-in intervalometer…!
Display Options
To reduce battery drain it is possible to turn off the EVF completely – I find I never use it at night – and to turn off the LCD display when shooting, though the latter is an option you have to activate to add to the Display button’s various modes.
The downside is that when shooting is underway you get no reassuring indication anything is happening, except for a brief LED flash when an image is written to a card.
Electronic Front Curtain Shutter
Most DSLRs do not offer this, but the Sony’s option of an electronic front curtain shutter and the additional Silent Shooting mode completely eliminates vibration, useful for some high-magnification shooting through telephotos and telescopes.
LUNAR CLOSE-UPS COMPARED This trio compares closeups of the Moon taken with and without electronic front curtain shutter. All were taken through a 130mm refractor telescope at f/12 using a Barlow lens. The image with e-shutter and in Silent Mode is a tad sharper, but that could be just as much from variations in seeing conditions as from the lower vibration from using the electronic shutter.
What’s Missing for Astrophotography
Intervalometer — NOW INCLUDED! UPDATE: In April 2019 Sony issued a v3 Firmware update for the a7III which added an internal intervalometer. I’ve used this new function and it works very well.
I had originally remarked that this useful function was missing. But no more! Thank you Sony!
While a built-in intervalometer is not essential, I find I often do use the Canon and Nikon in-camera intervalometers for simple shoots. So it is great to have one available on the Sony. However, like other brands’ internal intervalometers Sony’s is good only for exposures up to 30 seconds long.
Bulb Timer or Long Exposures
However, while the Sony has a Bulb setting there is no Bulb Timer as there is with the Canon. The Bulb Timer would allow setting long Bulb exposures of any length in the camera.
Instead, for any exposures over 30 seconds long (or time-lapses with >30-second-long frames) the Sony must be used with an external Intervalometer. I use a $50 Vello unit, and it works very well. It controls the Sony through the camera’s Multi USB port.
In-Camera Image Stacking
Also missing, and present on most new Canons, are Multiple Exposure modes for in-camera stacking of exposures in a Brighten mode (for star trails) or Averaging mode (for noise smoothing).
Yes, this can all be done later in processing, but having the camera do the stacking can often be convenient, and great for beginners, as long as they understand what those functions do, or even that they exist!
Time-Lapse Smoothing
When using its internal intervalometer, the Nikon D750 has an excellent Exposure Smoothing option. This does a fine job smoothing frame-to-frame flickering in time-lapses, something the Canon cannot do. Nor the Sony, as it has no intervalometer at all.
Light Frame Buffer in LENR
This feature is little known and utilized, and only Canon full-frame cameras offer it. Turn on LENR and it is possible to shoot three (with the 6D MkII) or four (with the 6D) Raw images in quick succession even with LENR turned on. The Canon 5D series also has this.
The dark frame kicks in and locks up the camera only after the series of “light frames” are taken. This is wonderful for taking a set of noise-reduced deep-sky images for later stacking. Nikons don’t have this, not even the D810a, and not Sonys.
Illuminated Buttons
The Sony’s buttons are not illuminated. While these might add glows to long exposure images, if they could be designed not to do that (i.e. they turn off during exposures), lit buttons would be very handy at night.
Limited Touch Screen Functions
An alternative would be an LCD screen that was touch sensitive. The Sony a7III’s screen is, but only to select an area for auto focus or zooming up an image in playback. The Canon 6D MkII has a fully functional touch screen which can be, quite literally, handy at night.
INTERVALOMETER For time-lapses, the Sony must be used with an external intervalometer like this Vello unit.
Video Capability
Here’s another area where the new Sony a7III really shines.
It offers 4K (or more precisely UltraHD) video recording for videos of 3840 x 2160 pixels. (True 4K is actually 4096 x 2160 pixels.)
With a fast enough UHS-II Class card it can record 4K video up to 30 frames per second and at a bit rate of either 60 or 100 Mbps.
At 24 fps videos are full-frame with no cropping. Hurray! You can take full advantage of wide-angle lenses, great for auroras. At 30 fps, 4K videos are cropped with a 1.2x crop factor.
In Movie Mode ISO speeds go up to ISO 102,400, but are pretty noisy, if unusable at such speeds.
But when shooting aurora videos I found, to my surprise, I could “drag” the shutter speeds as slow as 1/4-second, fully 4 stops better than the Nikon’s slowest shutter speed of 1/60 second in Full HD, and 3 stops better than the Canon’s slowest movie shutter of 1/30 second.
Coupled with a fast f/1.4 to f/2 lens, the slow shutter speed allows real-time aurora shooting at “only” ISO 6400 to 12,800, for quite acceptable levels of noise. I am very impressed!
Real-time video of auroras is not possible with anything like this quality with the Nikon (I’ve used it often), and absolutely not with the Canon. And neither are 4K.
Is the a7III as good for low-light video as the Sony a7s models, with their larger 8.5-micron pixels?
I would assume not, but not having an a7s (either Mark I or II) to test I can’t say for sure. But the a7III should do the job for bright auroras, the ones with rapid motion worth recording with video, plus offer 24 megapixels for high-quality stills of all sky subjects.
I think it’s a great camera for both astrophoto stills and video.
AURORA VIDEO FRAME This is a frame grab from a real-time 4K video of a “Steve” aurora.
An example is in a 4K video I shot on May 6, 2018 of an usual aurora known as “STEVE.”
Steve Aurora – May 6, 2018 (4K) from Alan Dyer on Vimeo.
For another example of using the Sony a7III for recording real-time video of the night sky see this video of the aurora shot from Norway in March 2019.
The Northern Lights At Sea from Alan Dyer on Vimeo.
Battery Life
I found the a7III would use up about about 40% of the battery capacity in a typical 400-frame time-lapse on mild spring nights, with 30-second exposures. This is with the EVF and rear LCD Display OFF, and the camera in Airplane mode to turn off wireless functions to further conserve battery power. I was using the wired Vello intervalometer.
This is excellent performance on par with the DSLRs I use. At last, we have a mirrorless camera that not only doesn’t eat stars, it also does not eat batteries!
One battery can get you through a night of shooting, though performance will inevitably decline in winter, as with all cameras.
MILKY WAY and PLANETS With the Sony a7III and Laowa 15mm lens at f/2 for a stack of 4 exposures for the ground to smooth noise and one exposure for the sky, all 30 seconds at ISO 3200.
Lens and Telescope Compatibility
As versatile as a mirrorless camera is for lens choice, making use of that versatility requires buying the right lens adapter(s). They can cost anywhere from $100 to $400. The lowest cost units just adapt the lens mechanically; the more costly units also transfer lens data and allow auto focusing with varying degrees of compatibility.
WITH METABONES CANON ADAPTER The MetaBones Canon EF-to-Sony E mount adapter transfers lens data and allows auto focus to function.
For use on telescopes, the simple adapters will be sufficient, and necessary as many telescope-to-camera adapters and field flatteners are optimized for the longer lens flange-to-sensor distance of a DSLR. Even if you could get a mirrorless camera to focus without a lens adapter to add the extra spacing, the image quality across the field might be compromised on many telescopes.
I used the Metabones Canon-to-Sony adapter when attaching the Sony to my telescopes using my existing Canon telescope adapters. Image quality was just fine.
ADAPTING TO A TELESCOPE The MetaBones adapter, as will other brands, adds the correct lens flange to sensor distance for telescope field flatteners to work best.
Time-Lapse Controller Compatibility
Due to limitations set by Sony, controlling one of their cameras with an external controller can be problematic.
Devices that trigger only the shutter should be fine. That includes simple intervalometers like the Vello, the Syrp Genie Mini panning unit, and the Dynamic Perception and Rhino sliders, to name devices I use. However, all will need the right camera control cable, available from suppliers like B&H.
And, as I found, the Sony might need to be placed into Continuous shooting mode to have the shutter fire with every trigger pulse from the motion controller. When used with the Genie Mini (below) the Sony fired at only every other pulse if it was in Single shot mode, an oddity of Sony’s firmware.
Some time-lapse controllers are able to connect to a camera through its USB port and then adjust the ISO and aperture as well, for ramped “holy grail” sunset-to-Milky Way sequences.
For example, the TimeLapse+ View (see http://www.timelapseplus.com) works great for automated holy grails, but the developer recommends that with most Sonys the minimum allowed interval between shots is longer (8 to 14 seconds) than with Canons and Nikons. See http://docs.view.tl/#camera-specific-notes
SONY WITH THE SYRP GENIE MINI The Sony A7III worked well with the Syrp Genie Mini motion controller with the right shutter cable but only when placed in Continuous mode.
Recommendations
In conclusion, here’s my summary recommendations for the three competitive cameras, rating them from Poor, to Fair, to Good, to Excellent.
SONY: I deducted marks from the Sony a7III for deep-sky imaging for its lack of a light frame buffer, poor red sensitivity, odd LENR performance, and purple amp glow not seen on the other cameras and that dark frames did not eliminate.
However, I did not consider “star eating” to be a negative factor, as the Sony showed just as many stars and as well-resolved as did the competitors, and what more could you ask for?
I rate the Sony excellent for nightscape imaging and for real-time aurora videos. I list it as just “good” for time-lapse work only because it will not be fully compatible with some motion controllers and rampers. So beware!
NIKON: I deducted points for real-time video of auroras – the D750 can do them but is pretty noisy with the high ISOs needed. Its red sensitivity is not bad, but its lack of a light frame buffer results a less productive imaging cycle when using LENR on deep-sky shooting.
I know … people shoot dark frames separately for subtracting later in processing. However, I’ve found these post-shoot darks rarely work well, as the dark frames are not at the same temperature as the light frames, and often add noise or dark holes.
CANON: The 6D MkII’s lack of an ISO invariant sensor rears its ugly head in underexposed shadows in dark-sky nightscapes. I like its image stacking options, which can help alleviate the noise and artifacts in still images, but aren’t practical for time-lapses. Thus my Good rating for nightscapes but Fair rating for time-lapses. (See my test at https://amazingsky.net/2017/08/09/testing-the-canon-6d-mark-ii-for-nightscapes/)
While the 6D MkII has HD video, it is incapable of any low-light video work.
And its light-frame buffer is great for minimizing shooting time for a series of deep-sky images with in-camera LENR dark frames, which I find are the best for minimizing thermal noise. Give me a Canon full-frame any day for prime-focus deep-sky shooting.
It’s just a pity the 6D MkII has only a 3-frame buffer when using LENR. Really Canon? The 2008-vintage 5D MkII had a 5-frame buffer! Your cameras are getting worse for astrophotography while Sony’s are getting better.
SONY a7III
NIKON D750
CANON 6D Mk II
Nightscapes
Excellent
Excellent
Good
Time-Lapse
Good
Excellent
Fair
Real-Time Video (Auroras)
Excellent
Fair
Poor
Wide-field Deep Sky
Good
Good
Excellent
Telescopic Deep Sky
Fair
Good
Excellent
I trust you’ll find the review of value. Thanks for reading!
ADDENDUM as of JUNE 6, 2018
Since publishing the first results a number of people commented with suggestions for further testing, to check claims that:
The Sony would perform better for noise under dark sky conditions, at high ISOs, rather than the moonlit scene above. OK, let’s try that.
The Sony would perform better in an ISO Invariancy “face-off” if its ISOs were kept above 640, to keep all the images within the Sony’s upper ISO range of its dual-gain sensor design, with two ranges (100 to 400, and 640 on up). Fair enough.
What little “star-eater” effect I saw might be mitigated by shooting on Continuous drive mode or by firing the shutter with an external timer. That’s worth a check, too.
For the additional tests, I shot all images within a 3-hour span on the night of June 5/6, using the Sony a7III, Nikon D750, and Canon 6D MkII, with the respective lenses: the Laowa 15mm lens at f/2, the Sigma 14mm Art at f/2, and the Rokinon 14mm SP at f/2.5.
The cameras were on a Star Adventurer Mini tracker to keep stars pinpoints, though the ground blurred in the longer exposures.
DARK SKY NOISE TEST
I show only the Sony and Nikon compared here, shot at the common range of ISOs used for nightscape shooting, 800 to 12800. All images are equally well exposed. The inset image at right in Photoshop shows the scene, the Milky Way above dark trees in my backyard!
To the eye, the Sony and Nikon look very similar for noise levels, just as in the moonlit scene. Both are very good – indeed, among the best performing cameras for high-ISO noise levels. But the Sony, being four years newer than the Nikon, is not better.
BUT … what the Sony did exhibit was better details in the shadows than the Nikon.
And this was with equal processing and no application of Shadow Recovery. This is where the Sony’s Backside Illuminated sensor with presumably higher quantum efficiency in gathering photons might be providing the advantage. With its good shadow details, you have to apply less shadow recovery in post-processing, which does keep noise down. So points to Sony here.
SONY vs NIKON HIGH ISO under DARK SKIES Noise levels appeared visually similar but the Sony showed more shadow details. Excellent!
I did put all the high ISO images through the classic noise reduction program Noise Ninja to measure total Luminance and Chrominance noise, and included the Canon 6D MkII’s images.
The resulting values and graph show the Sony actually measured worse for noise than the Nikon at each high ISO speed, 3200 to 12800, though with both performing much better than the Canon.
The higher noise of the Canon is visually obvious, but I’d say the Sony a7III and Nikon D750 are pretty equal visually for noise, despite the numbers.
COMPARING NOISE WITH NOISE NINJA
DARK SKY ISO INVARIANCY
Again, here I show only the Sony and Nikon, the two “ISO invariant” cameras. The correct exposure for the scene was 30 seconds at ISO 6400 and f/2. The images shown here were shot at lower ISOs to underexposure the dark scene by 2 to 4 stops or EV. Those underexposed images were then boosted later in processing (in Adobe Camera Raw) by the required Exposure Value to equalize the image brightness.
Contrary to expectations, the Sony did not show any great loss in image quality as it crossed the ISO 640 boundary into its lower ISO range. But the Nikon did show more image artifacts in the “odd-numbered” ISOs of 640 and 500. In this test, the Nikon did not perform as well as the Sony for ISO invariancy. Go figure!
Again, the differences are in images vastly underexposed. And both cameras performed much better than the ISO “variant” Canon in this test.
DARK SKY ISO INVARIANCY Here the Sony a7III performed well and better than the Nikon D750.
STAR EATER REVISITED
I shot images over a wide-range of exposures, from 2 seconds to 2 minutes, but show only the ones covering the 2-second to 4-second range, where the “star-eater” anti-aliasing or noise smoothing applied by Sony kicks in (above 3.2 seconds it seems).
I shot with the Sony a7III on Single shot drive mode, on Continuous Low drive mode (with the camera controlling the shutter speed in both cases), and a set with the Sony on Bulb and the shutter speed set by an external Vello intervalometer.
This is really pixel peeping at 400%. In Single drive mode, stars and noise soften ever so slightly at 4 seconds and higher. In Continuous mode, I think the effect is still there but maybe a little less. In shots on Bulb controlled by the External Timer, maybe the stars at 4 seconds are a little sharper still. But this is a tough call. To me, the star eater effect on the Sony a7III is a non-issue. It may be more serious on other Sony alphas.
STAR EATING vs DRIVE MODE This series shows star sharpness in images taken in Single and Continuous drive modes, and in Externally Timed exposures.
DE-BAYERING STAR ARTIFACTS
An issue that, to me, has a more serious effect on star quality is the propensity of the Sony, and to some extent the Nikon, to render tiny stars as brightly colored points, unrealistically so. In particular, many stars look green, from the dominance of green-filtered photosites on Bayer-array sensors.
Here I compare all three cameras for this effect in two-minute tracked exposures taken with Long Exposure Noise Reduction (i.e. in-camera dark frame subtraction) off and on.
The Sony shows a lot of green stars with or without LENR. The Nikon seems to discolor stars only when LENR is applied. Why would that be? The Canon is free of any such issue – stars are naturally colored whether LENR dark frames are applied or not.
This is all with Raws developed with Adobe Camera Raw.
When opening the same Raws in other programs (ON1 Photo RAW, Affinity Photo, DxO PhotoLab, and Raw Therapee) the results can be quite different, with stars often rendered with fringes of hot, colored pixels. Or rendered with little or no color at all. Raw Therapee offers a choice of de-Bayering, or “de-mosaic,” routines, and each produces different looking stars, and none look great! Certainly not as good as the Canon rendered with Camera Raw.
What’s going on here is a mystery – it’s a combination of the cameras’ unique Raw file formats, anti-alias filter in front of the sensor (or lack thereof in the Sony), and the de-Bayering routines of all the many Raw developers wrestling with the task of rendering stars that occupy only a few pixels. It’s unfair to blame just the hardware or the software.
But this test re-emphasized my thoughts that Canon DSLRs remain the best for long-exposure deep-sky imaging where you can give images as much exposure time as they need, while the ISO invariant Sony and Nikons exceed at nightscape shooting where exposures are often limited and plagued by dark shadows and noise.
COLORED STARS COMPARISON The Sony shows a propensity to render small stars in many vivid and unreal colors. The Nikon can do so after LENR is applied. The Canon is more neutral and natural.
To Adobe or not to Adobe. That is the question many photographers are asking with the spate of new image processing programs vying to “kill Photoshop.”
I tested more than ten contenders as alternatives to Adobe’s image processing software, evaluating them ONLY for the specialized task of editing demanding nightscape images taken under the Milky Way, both for single still images and for time-lapses of the moving sky. I did not test these programs for other more “normal” types of images.
Also, please keep in mind, I am a Mac user and tested only programs available for MacOS, though many are also available for Windows. I’ve indicated these.
But I did not test any Windows-only programs. So sorry, fans of Paintshop Pro (though see my note at the end), Photoline, Picture Window Pro, or Xara Photo & Graphic Designer. They’re not here. Even so, I think you will find there’s plenty to pick from!
This review expands upon and updates mini-reviews I included in my Nightscapes and Time-Lapses eBook, shown at right.
If you are hoping there’s a clear winner in the battle against Adobe, one program I can say does it all and for less cost and commitment, I didn’t find one.
However, a number of contenders offer excellent features and might replace at least one member of Adobe’s image processing suite.
For example, only four of these programs can truly serve as a layer-based editing program replacing Photoshop.
The others are better described as Adobe Lightroom competitors – programs that can catalog image libraries and develop raw image files, with some offering adjustment layers for correcting color, contrast, etc. But as with Lightroom, layering of images – to stack, composite, and mask them – is beyond their ability.
For processing time-lapse sequences, however, we don’t need, nor can we use, the ability to layer and mask several images into one composite.
What we need for time-lapses is to:
Develop a single key raw file, then …
Copy its settings to the hundreds of other raw files in the time-lapse set, then …
Export that folder of raw images to “intermediate JPGs” for assembly into a movie.
Even so, not all these contenders are up to the task.
Here are the image processing programs I looked at. Costs are in U.S. dollars. Most have free trial copies available.
The Champion from Adobe
Adobe Camera Raw (ACR), Photoshop, Bridge, and Lightroom, the standards to measure others by
Cost: $10 a month by subscription, includes ACR, Photoshop, Bridge, and Lightroom
Adobe Camera Raw (ACR) is the raw development plug-in that comes with Photoshop and Adobe Bridge, Adobe’s image browsing application that accompanies Photoshop. Camera Raw is equivalent to the Develop module in Lightroom, Adobe’s cataloguing and raw processing software. Camera Raw and Lightroom have identical processing functions and can produce identical results.
Photoshop and Lightroom complement each other and are now available together, but only by monthly subscription through Adobe’s Creative Cloud service, at $10/month. Though $120 for a year is not far off the cost of purchasing many of these other programs and perhaps upgrading them annually, many photographers prefer to purchase their software and not subscribe to it.
Thus the popularity of these alternative programs. Most offered major updates in late 2017.
My question is, how well do they work? Are any serious contenders to replace Photoshop or Lightroom?
Lightroom Contenders: Five Raw Developers
ACDSee Photo Studio (current as of late 2017)
Cost: $60 to $100, depending on version, upgrades $40 to $60.
I tested the single MacOS version. Windows users have a choice of either a Standard or Professional version. Only the Pro version offers the full suite of raw development features, in addition to cataloging functions. The MacOS version resembles the Windows Pro version.
Capture One v11 (late 2017 release)
Cost: $299, and $120 for major upgrades, or by subscription for $180/year
As of version 11 this powerful raw developer and cataloguing program offers “Layers.” But these are only for applying local adjustments to masked areas of an image. You cannot layer different images. So Capture One cannot be used like Photoshop, to stack and composite images. It is a Lightroom replacement only, but a very good one indeed.
Here’s a low cost Lightroom replacement for image management and raw processing abilities. Noise reduction is “Perfectly Clear” from Athentech and works well.
The ELITE version of what DxO now calls “PhotoLab” offers DxO’s superb PRIME noise reduction and excellent ClearView contrast enhancement feature. While it has an image browser, PhotoLab does not create a catalog, so this isn’t a full Lightroom replacement, but it is a superb raw developer. DxO also recently acquired the excellent Nik Collection of image processing plug-ins, so we can expect some interesting additions and features.
This free open source program has been created and is supported by a loyal community of programmers. It offers a bewildering blizzard of panels and controls, among them the ability to apply dark frames and flat field images, features unique among any raw developer and aimed specifically at astrophotographers. Yes, it’s free, but the learning curve is precipitous.
Photoshop Contenders: Four Raw Developers with Layering/Compositing
These programs can not only develop at least single raw images, if not many, but also offer some degree of image layering, compositing, and masking like Photoshop.
However, only ON1 Photo RAW can do that and also catalog/browse images as Lightroom can. Neither Affinity, Luminar, or Pixelmator offer a library catalog like Lightroom, nor even a file browsing function such as Adobe Bridge, serious deficiencies I feel.
This is the lowest cost raw developer and layer-based program on offer here, and has some impressive features, such as stacking images, HDR blending, and panorama stitching. However, it lacks any library or cataloguing function, so this is not a Lightroom replacement, but it could replace Photoshop.
Macphun has changed their name to Skylum and now makes their fine Luminar program for both Mac and Windows. While adding special effects is its forte, Luminar does work well both as a raw developer and layer-based editor. But like Affinity, it has no cataloguing feature. It cannot replace Lightroom.
Of all the contenders tested here, this is the only program that can truly replace both Lightroom and Photoshop, in that ON1 has cataloguing, raw developing, and image layering and masking abilities. In fact, ON1 allows you to migrate your Lightroom catalog into its format. However, ON1’s cost to buy and maintain is similar to Adobe’s Creative Cloud Photo subscription plan. It’s just that ON1’s license is “perpetual.”
NOTE: Windows users might find Corel’s Paintshop Pro 2018 a good “do-it-all” solution – I tested only Corel’s raw developer program Aftershot Pro, which Paintshop Pro uses.
The “Pro” version of Pixelmator was introduced in November 2017. It has an innovative interface and many fine features, and it allows layering and masking of multiple images. However, it lacks some of the key functions (listed below) needed for nightscape and time-lapse work. Touted as a Photoshop replacement, it isn’t there yet.
The Challenge
This is the image I threw at all the programs, a 2-minute exposure of the Milky Way taken at Writing-on-Stone Provincial Park in southern Alberta in late July 2017.
NOTE: Click/tap on any of the screen shots to bring them up full screen so you can inspect and save them.
Original Raw Image Out of the Camera, BEFORE Development
The lens was the Sigma 20mm Art lens at f/2 and the camera the Nikon D750 at ISO 1600.
Thus the ground is blurred. Keep that in mind, as it will always look fuzzy in the comparison images. But it does show up noise well, including hot pixels. This image of the sky is designed to be composited with one taken without the tracker turning, to keep the ground sharp.
Raw Image AFTER Development in Adobe Camera Raw
Above is the image after development in Adobe Camera Raw (ACR), using sliders under its Basic, Tone Curve, Detail, HSL, Lens Corrections, and Effects tabs. Plus I added a “local adjustment” gradient to darken the sky at the top of the frame. I judged programs on how well they could match or beat this result.
Same Image Developed in Adobe Lightroom
Above is the same image developed in Adobe Lightroom, to demonstrate how it can achieve identical results to Camera Raw, because at heart it is Camera Raw.
Feature Focus
I have assumed a workflow that starts with raw image files from the camera, not JPGs, for high-quality results.
And I have assumed the goal of making that raw image look as good as possible at the raw stage, before it goes to Photoshop or some other bit-mapped editor. That’s an essential workflow for time-lapse shooting, if not still-image nightscapes.
However, I made no attempt to evaluate all these programs for a wide range of photo applications. That would be a monumental task!
Nor, in the few programs capable of the task, did I test image layering. My focus was on developing a raw image. As such, I did not test the popular free program GIMP, as it does not open raw files. GIMP users must turn to one of the raw developers here as a first stage.
If you are curious how a program might perform for your purposes and on your photos, then why not test drive a trial copy?
Instead, my focus was on these programs’ abilities to produce great looking results when processing one type of image: my typical Milky Way nightscape, below.
TIFF Exported from DxO PhotoLab … then Imported into Photoshop
Such an image is a challenge because…
The subject is inherently low in contrast, with the sky often much brighter than the ground. The sky needs much more contrast applied, but without blocking up the shadows in the ground.
The sky is often plagued by off-color tints from artificial and natural sky glows.
The ground is dark, perhaps lit only by starlight. Bringing out landscape details requires excellent shadow recovery.
Key to success is superb noise reduction. Images are shot at high ISOs and are rife with noise in the shadows. We need to reduce noise without losing stars or sharpness in the landscape.
I focused on being able to make one image look as good as possible as a raw file, before bringing it into Photoshop or a layer-based editor – though that’s where it will usually end up, for stacking and compositing, as per the final result shown at the end.
I then looked at each program’s ability to transfer that one key image’s settings over to what could be hundreds of other images taken that night, either for stacking into star trails or for assembling into a time-lapse movie.
Summary Conclusions
Results of 8 Programs compared to ACR (at left)
None of the programs I tested ticked all the boxes in providing all the functions and image quality of the Adobe products.
But here’s a summary of my recommendations:
For Advanced Time-Lapse
None of the non-Adobe programs will work with the third-party software LRTimelapse (www.lrtimelapse.com). It is an essential tool for advanced time-lapse processing. LRTimelapse works with Lightroom or ACR/Bridge to gradually shift processing settings over a sequence, and smooth annoying image flickering.
If serious and professional time-lapse shooting is your goal, none of the Adobe contenders will work. Period. Subscribe to Creative Cloud. And buy LRTimelapse.
For Basic Time-Lapse
However, for less-demanding time-lapse shooting, when the same settings can be applied to all the images in a sequence, then I feel the best non-Adobe choices are, in alphabetical order:
ACDSee
Capture One
Corel Aftershot Pro
DxO PhotoLab
ON1 Photo RAW
… With, in my opinion, DxO and Capture One having the edge for image quality and features. But all five have a Library or Browser mode with easy-to-use Copy & Paste and Batch Export functions needed for time-lapse preparation.
Also worth a try is PhotoDirector9 (MacOS and Windows), a good Lightroom replacement. Scroll to the end for more details and a link.
For Still Image Nightscapes
If you are processing just individual still images, perhaps needing only to stack or composite a few exposures, and want to do all the raw development and subsequent layering of images within one non-Adobe program, then look at (again alphabetically):
Affinity Photo
Luminar 2018
ON1 Photo RAW 2018
… With Affinity Photo having the edge in offering a readily-available function off its File menu for stacking images, either for noise smoothing (Mean) or creating star trails (Maximum).
However, I found its raw development module did not produce as good a result as most competitors due to Affinity’s poorer noise reduction and less effective shadow and highlight controls. Using Affinity’s “Develop Persona” module, I could not make my test image look as good as with other programs.
Luminar 2018 has better noise reduction but it demands more manual work to stack and blend images.
While ON1 Photo Raw has some fine features and good masking tools, it exhibits odd de-Bayering artifacts, giving images a cross-hatched appearance at the pixel-peeping level. Sky backgrounds just aren’t smooth, even after noise reduction.
To go into more detail, these are the key factors I used to compare programs.
Noise Reduction
Absolutely essential is effective noise reduction, of luminance noise and chrominance color speckles and splotches.
Ideally, programs should also have a function for suppressing bright “hot” pixels and dark “dead” pixels.
Here’s what I consider to be the “gold standard” for noise reduction, Adobe Camera Raw’s result using the latest processing engine in ACR v10/Photoshop CC 2018.
BEFORE and AFTER Noise Reduction with Adobe Camera Raw (ACR)
I judged other programs on their ability to produce results as good as this, if not better, using their noise reduction sliders. Some programs did better than others in providing smooth, noiseless skies and ground, while retaining detail.
BEFORE and AFTER Noise Reduction and Other Adjustments with DxO PhotoLab
For example, one of the best was DxO PhotoLab, above. It has excellent options for reducing noise without being overwhelming in its choices, the case with a couple of other programs. For example, DxO has a mostly effective dead/hot pixel removal slider.
ACR does apply such a hot pixel removal “under the hood” as a default, but often still leaves many glaring hot specks that must be fixed later in Photoshop.
Comparing Noise Reduction
300% Close-Ups to Compare Noise Reduction
Above are 8 of the contender programs compared to Camera Raw for noise reduction.
Missing from this group is the brand new Pixelmator Pro, for MacOS only. It does not yet have any noise reduction in its v1 release, a serious deficiency in imaging software marketed as “Pro.” For that reason alone, I cannot recommend it. I describe its other deficiencies below.
Lens Corrections
The wide-angle lenses we typically use in nightscape and time-lapse imaging suffer from vignetting and lens distortions. Having software that can automatically detect the lens used and apply bespoke corrections is wonderful.
Lens Corrections in Capture One
Only a few programs, such as Capture One (above), have a library of camera and lens data to draw upon to apply accurate corrections with one click. With others you have to dial in corrections manually by eye, which is crude and inaccurate.
Shadows and Highlights
All programs have exposure and contrast adjustments, but the key to making a Milky Way nightscape look good is being able to boost the shadows (the dark ground) while preventing the sky from becoming overly bright, yet while still applying good contrast to the sky.
Shadows and Highlight and other Enhancements in DxO PhotoLab
Of the contenders, I liked DxO PhotoLab best (shown above), not only for its good shadow and highlight recovery, but also excellent “Smart Lighting” and “ClearView” functions which served as effective clarity and dehaze controls to snap up the otherwise low-contrast sky. With most other programs it was tough to boost the shadows without also flattening the contrast.
On the other hand, Capture One’s excellent layering and local adjustments did make it easier to brush in adjustments just to the sky or ground.
However, any local adjustments like those will be feasible only for still images or time-lapses where the camera does not move. In any motion control sequences the horizon will be shifting from frame to frame, making precise masking impractical over a sequence of hundreds of images.
Therefore, I didn’t place too much weight on the presence of good local adjustments. But they are nice to have. Capture One, DxO PhotoLab, and ON1 win here.
Selective Color Adjustments
All programs allow tweaking the white balance and overall tint.
But it’s beneficial to also adjust individual colors selectively, to enhance red nebulas, enhance or suppress green airglow, bring out green grass, or suppress yellow or orange light pollution.
Some programs have an HSL panel (Hue, Saturation, Lightness) or an equalizer-style control for boosting or dialing back specific colors.
Color Adjustments in Capture One
Capture One (above) has the most control over color correction, with an impressive array of color wheels and sliders that can be set to tweak a broad or narrow range of colors.
And yet, despite this, I was still unable to make my test image look quite the way I wanted for color balance. ACR and DxO PhotoLab still won out for the best looking final result.
Copy and Paste Settings
Even when shooting nightscape stills we often take several images to stack later. It’s desirable to be able to process just one image, then copy and paste its settings to all the others in one fell swoop. And then to be able to inspect those images in thumbnails to be sure they all look good.
Some programs (Affinity Photo, Luminar, Pixelmator Pro) lack any library function for viewing or browsing a folder of thumbnail images. Yes, you can export a bunch of images with your settings applied as a user preset, but that’s not nearly as good as actually seeing those images displayed in a Browser mode.
Copy and Paste Settings in ON1 Photo RAW
What’s ideal is a function such as ON1 Photo RAW displays here, and that some other programs have: the ability to inspect a folder of images, work on one, then copy and paste its settings to all the others in the set.
This is absolutely essential for time-lapse work, and nice to have even when working on a small set to be stacked into a still image.
Batch Export
Once you develop a folder of raw images with “Copy and Paste,” you now have to export them with all those settings “baked into” the exported files.
This step is to create an intermediate set of JPGs to assemble into a movie. Or perhaps to stack into a star trail composite using third party software such as StarStaX, or to work on the images in another layer-based program of your choice.
Batch Export in ON1 Photo RAW
As ON1 Photo RAW shows above, this is best done using a Library or Browser mode to visually select the images, then call up an Export panel or menu to choose the image size, format, quality, and location for the exports.
Click Export and go for coffee – or a leisurely dinner – while the program works through your folder. All programs took an hour or more to export hundreds of images.
Design
Those functions were the key features I looked for when evaluating the programs for nightscape and time-lapse work.
Every program had other attractive features, often ones I wished were in Adobe Camera Raw. But if the program lacked any of the above features, I judged it unsuitable.
Yes, the new contenders to the Photoshop crown have the benefit of starting from a blank slate for interface design.
Luminar 2018’s Clean User Interface
Many, such as Luminar 2018 above, have a clean, attractive design, with less reliance on menus than Photoshop.
Photoshop has grown haphazardly over 25 years, resulting in complex menus. Just finding key functions can take many tutorial courses!
But Adobe dares to “improve” Photoshop’s design and menu structure at its peril, as Photoshop fans would scream if any menus they know and love were to be reorganized!
The new mobile-oriented Lightroom CC is Adobe’s chance to start afresh with a new interface.
Summary Table of Key Features
Click or tap to view and save full screen version.
Fair = Feature is present but doesn’t work as easily or produce as good a result
Partial = Program has lens correction but failed to fully apply settings automatically / DxO has a Browse function but not Cataloging
Manual = Program has only a manually-applied lens correction
– = Program is missing that feature altogether
Program-by-Program Results
I could end the review here, but I feel it’s important to present the evidence, in the form of screen shots of all the programs, showing both the whole image, and a close-up to show the all-important noise reduction.
ACDSee Photo Studio
ACDSee Full Screen
ACDSee Enlargement
PROS: This capable cataloging program has good selective color and highlight/shadow recovery, and pretty smooth noise reduction. It can copy and paste settings and batch export images, for time-lapses. It is certainly affordable, making it a low-cost Lightroom contender.
CONS: It lacks any gradient or local adjustments, or even spot removal brushes. Lens corrections are just manual. There is no dehaze control, which can be useful for snapping up even clear night skies. You cannot layer images to create composites or image stacks. This is not a Photoshop replacement.
Affinity Photo
Affinity Photo Full Screen
Affinity Photo Enlargement
PROS: Affinity supports image layers, masking with precise selection tools, non-destructive “live” filters (like Photoshop’s Smart Filters), and many other Photoshop-like functions. It has a command for image stacking with a choice of stack modes for averaging and adding images.
It’s a very powerful but low cost alternative to Photoshop, but not Lightroom. It works fine when restricted to working on just a handful of images.
CONS: Affinity has no lens correction database, and I found it hard to snap up contrast in the sky and ground without washing them out, or having them block up. Raw noise reduction was acceptable but not up to the best for smoothness. It produced a blocky appearance. There are no selective color adjustments.
Nor is there any library or browse function. You can batch export images, but only through an unfriendly dialog box that lists images only by file name – you cannot see them. Nor can you copy and paste settings visually, but only apply a user-defined “macro” to develop images en masse upon export.
This is not a program for time-lapse work.
Capture One 11
Capture One 11 Full Screen
Capture One 11 Enlargement
PROS: With version 11 Capture One became one of the most powerful raw developers, using multiple layers to allow brushing in local adjustments, a far better method than Adobe Camera Raw’s local adjustment “pins.” It can create a catalog from imported images, or images can be opened directly for quick editing. Its noise reduction was good, with hot pixel removal lacking in Camera Raw.
Its color correction options were many!
It can batch export images. And it can export files in the raw DNG format, though in tests only Adobe Camera Raw was able to read the DNG file with settings more or less intact.
CONS: It’s costly to purchase, and more expensive than Creative Cloud to subscribe to. Despite all its options I could never quite get as good looking an image using Capture One, compared to DxO PhotoLab for example.
It is just a Lightroom replacement; it can’t layer images.
Corel Aftershot Pro 3
Corel Aftershot Pro Full Screen
Corel Aftershot Pro Enlargement
PROS: This low-cost option has good noise reduction using Athentech’s Perfectly Clear process, with good hot pixel or “impulse” noise removal. It has good selective color and offers adjustment layers for brushing in local corrections. And its library mode can be used to copy and paste settings and batch export images.
Again, it’s solely a Lightroom alternative.
CONS: While it has a database of lenses, and identified my lens, it failed to apply any automatic corrections. Its shadow and highlight recovery never produced a satisfactory image with good contrast. Its local adjustment brush is very basic, with no edge detection.
DxO PhotoLab
DxO PhotoLab Full Screen
DxO PhotoLab Enlargement
PROS: I found DxO produced the best looking image, better perhaps than Camera Raw, because of its DxO ClearView and Smart Lighting options. It has downloadable camera and lens modules for automatic lens corrections. Its noise reduction was excellent, with its PRIME option producing by far the best results of all the programs, better perhaps than Camera Raw, plus with hot pixel suppression.
DxO has good selective color adjustments, and its copy and paste and batch export work fine.
CONS: There are no adjustment layers as such. Local adjustments and repairing are done through the unique U-Point interface which works something like ACR’s “pins,” but isn’t as visually intuitive as masks and layers. Plus, DxO is just a raw developer; there is no image layering or compositing. Nor does it create a catalog as such.
So it is not a full replacement for either Lightroom or Photoshop. But it does produce great looking raw files for export (even as raw DNGs) to other programs.
Luminar 2018
Luminar 2018 Full Screen
Luminar 2018 Enlargement
PROS: Luminar has good selective color adjustments, a dehaze control, and good contrast adjustments for highlights, mid-tones, and shadows. Adjustments can be added in layers, making them easier to edit. Noise reduction was smooth and artifact-free, but adjustments were basic. Many filters can be painted on locally with a brush, or with a radial or gradient mask.
CONS: It has no lens correction database; all adjustments are manual. The preview was slow to refresh and display results when adjusting filters. The interface is clean but always requires adding filters to the filter panel to use them when creating new layers. Its batch export is crude, with only a dialog box and no visual browser to inspect or select images.
Settings are applied as a user preset on export, not through a visual copy-and-paste function. I don’t consider that method practical for time-lapses.
ON1 Photo RAW 2018
ON1 Photo RAW Full Screen
ON1 Photo RAW Enlargement
PROS: ON1 is the only program of the bunch that can: catalog images, develop raw files, and then layer and stack images, performing all that Lightroom and Photoshop can do. It is fast to render previews in its “Fast” mode, but in its “Accurate” mode ON1 is no faster than Lightroom. It has good layering and masking functions, both in its Develop mode and in its Photoshop-like Layers mode.
Selective color and contrast adjustments were good, as was noise reduction. Developing, then exporting a time-lapse set worked very well, but still took as long as with Lightroom or Photoshop.
CONS: Despite promising automatic lens detection and correction, ON1 failed to apply any vignetting correction for my 20mm Sigma lens. Stars exhibited dark haloes, even with no sharpening, dehaze, or noise reduction applied. Its de-Bayering algorithm produced a cross-hatched pattern at the pixel level, an effect not seen on other programs.
Noise reduction did not smooth this. Thus, image quality simply wasn’t as good.
Pixelmator Pro
Pixelmator Pro Full Screen
Pixelmator Pro Enlargement
PROS: It is low cost. And it has an attractive interface.
CONS: As of version 1 released in November 2017 Pixelmator Pro lacks: any noise reduction (it’s on their list to add!), any library mode or copy and paste function, nor even the ability to open several images at once displayed together.
It is simply not a contender for “Photoshop killer” for any photo application, despite what click-bait “reviews” promise, ones that only re-write press releases and don’t actually test the product.
Raw Therapee v5.3
Raw Therapee Full Screen
Raw Therapee Enlargement – With and Without Noise Reduction
PROS: It’s free! It offers an immense number of controls and sliders. You can even change the debayering method. It detects and applies lens corrections (though in my case only distortion, not vignetting). It has good selective color with equalizer-style sliders. It has acceptable (sort of!) noise reduction and sharpening with a choice of methods, and with hot and dead pixel removal.
It can load and apply dark frames and flat fields, the only raw developer software that can. This is immensely useful for deep-sky photography.
CONS: It offers an immense number of controls and sliders! Too many! It is open source software by committee, with no one in charge of design or user friendliness. Yes, there is documentation, but it, too, is a lot to wade through to understand, especially with its broken English translations. This is software for digital signal processing geeks.
But worst of all, as shown above, its noise reduction left lots of noisy patches in shadows, no matter what combination of settings I applied. Despite all its hundreds of sliders, results just didn’t look as good.
What About …? (updated December 28)
No matter how many programs I found to test, someone always asks, “What about …?” In some cases such comments pointed me to programs I wasn’t even aware of, but subsequently tried out. So here are even more to pick from…
Billed as having “everything you need in an image editor,” this low-cost ($30) MacOS-only program is anything but. Its raw developer module is crude and lacks any of the sophisticated range of adjustments offered by all the other programs on offer here. It might be useful as a layer-based editor of images developed by another program.
Available for Mac and Windows for $150, this Lightroom competitor offers a good browser function, with the ability to “copy-from-one and paste-to-many” images (unlike some of the programs below), and a good batch export function for time-lapse work. It has good selective color controls and very good noise reduction providing a smooth background without artifacts like blockiness or haloes. Local adjustments, either through brushed-on adjustments or through gradients, are applied via handy and easy to understand (I think!) layers.
While it has auto lens corrections, its database seemed limited — it did not have my Sigma 20mm lens despite it being on the market for 18 months. Manual vignetting correction produced a poor result with just a washed out look.
The main issue was that its shadow, highlight, and clarity adjustments just did not produce the snap and contrast I was looking for, but that other programs could add to raw files. Still, it looks promising, and is worth a try with the trial copy. You might find you like it. I did not. For similar cost, other programs did a better job, notably DxO PhotoLab.
In the same ilk as Raw Therapee, I also tested out another free, open-source raw developer, one simply called “darktable,” with v2.2.5 shown below. While it has some nice functions and produced a decent result, it took a lot of time and work to use.
darktable RAW Developer
The MacOS version I tried (on a brand new 5K iMac) ran so sluggishly, taking so long to re-render screen previews, that I judged it impractical to use. Sliders were slow to move and when I made any adjustments often many seconds would pass before I would see the result. Pretty frustrating, even for free.
A similar crowd-developed raw processing program, Iridient Developer (above), sells for $99 US. I tested a trial copy of v3.2. While it worked OK, I was never able to produce a great looking image with it. It had no redeeming features over the competition that made its price worthwhile.
Paintshop Pro’s included but very basic Raw developer.
Using Parallels running Windows 10 on my Mac, I did try out this popular Windows-only program from Corel. By itself, Paintshop Pro’s raw developer module (shown above) is basic, crude and hardly up to the tax of processing demanding raw files. You are prompted to purchase Corel’s Aftershot Pro for more capable raw development, and I would agree – Aftershot would be an essential addition. However …
As I showed above, I did test the MacOS version of Aftershot Pro on my raw sample image, and found it did the poorest job of making my raw test image look good. Keep in mind that it is the ability of all these programs to develop this typical raw nightscape image that I am primarily testing.
That said, given a well-developed raw file, Paintshop Pro can do much more with it, such as further layering of images and applying non-destructive and masked adjustment layers, as per Photoshop. Indeed, it is sold as a low-cost (~ $60) Photoshop replacement. As such, many Windows users find Paintshop’s features very attractive. However, Paintshop lacks the non-destructive “smart” filters, and the more advanced selection and masking options offered by Photoshop, Affinity Photo, and ON1 Photo Raw. If you have never used these, you likely don’t realize what you are missing.
If it’s an Adobe alternative you are after, I would suggest Windows users would be better served by other options. Why not test drive Affinity and ON1?
PhotoDirector’s very Lightroom-like interface and controls.
This was a surprising find. Little known, certainly to me, this Windows and MacOS program from the Taiwanese company Cyberlink, is best described as a Lightroom substitute, but it’s a good one. Its regular list price is $170. I bought it on sale for $60.
Like Lightroom, working on any images with PhotoDirector requires importing them into a catalog. You cannot just browse to the images. Fine. But one thing some people complain about with Lightroom is the need to always import images.
I was impressed with how good a job PhotoDirector did on my raw test image. PhotoDirector has excellent controls for shadow and highlight recovery, HSL selective color, copying-and-pasting settings, and batch exporting. So it will work well for basic time-lapse processing.
Noise reduction was very good and artifact-free. While it does have automatic lens corrections, its database did not include the 2-year old Sigma 20mm Art lens I used. So it appears its lens data is not updated frequently.
PhotoDirector has good local adjustments and gradients using “pins” rather than layers, similar to Camera Raw and Lightroom.
After performing raw image “Adjustments,” you can take an image into an Edit module (for adding special effects), then into a Layers module for further work. However, doing so destructively “flattens” the image to apply the raw adjustments you made. You cannot go back and tweak the raw settings in the Adjustment module, as you can when opening a raw file as a “smart object” in Adobe Photoshop.
While PhotoDirector does allow you to layer in other images to make basic composites (such as adding type or logos), there is no masking function nor any non-destructive adjustment layers. So this is most assuredly not a Photoshop substitute, despite what the advertising might suggest. But if it’s a Lightroom replacement you are after, do check it out in a trial copy.
MacOS-only Picktorial v3, with its clean interface
This little-known MacOS-only program (only $40 on sale) for developing raw images looks very attractive, with good selective color, lots of local adjustments, and good masking tools, the features promoted on the website. It does have a browse function and can batch export a set of developed files.
However … its noise reduction was poor, introducing glowing haloes around stars when turned up to any useful level. Its shadows, highlights, and contrast adjustments were also poor – it was tough to make the test image look good without flattening contrast or blocking up shadows. Boosting clarity even a little added awful dark haloes to stars, making this a useless function. It has no lens correction, either automatic or manual. Like Topaz Studio, below, it cannot copy and paste settings to a batch of images, only to one image at a time, so it isn’t useful for time-lapse processing.
I cannot recommend this program, no matter how affordable it might be.
Popular among some camera manufacturers as their included raw developer, Silky Pix can be purchased separately ($80 list price for the standard version, $250 list price for the Pro version) with support for many cameras’ image files. It is available for MacOS and Windows. I tried the lower-cost “non-Pro” version 8. It did produce a good-looking end result, with good shadow and highlight recovery, and excellent color controls. Also on the plus side, Silky Pix has very good copy-and-paste functions for development settings, and good batch export functions, so it can be used to work on a folder of time-lapse frames.
On the down side, noise reduction, while acceptable, left an odd mottled pattern, hardly “silky.” The added “Neat” noise reduction option only smoothed out detail and was of little value except perhaps for very noisy images. Noise reduction did nothing to remove hot pixels, leaving lots of colored specks across the image. The program uses unorthodox controls whose purposes are not obvious. Instead of Highlights and Shadows you get Exposure Bias and HDR. Instead of Luminance and Color noise reduction, you get sliders labeled Smoothness and Color Distortion. You really need to read the extensive documentation to learn how to use this program.
I found sliders could be sticky and not easy to adjust precisely. The MacOS version was slow, often presenting long bouts of spinning beachballs while it performed some function. This is a program worth a try, and you might find you like it. But considering what the competition offers, I would not recommend it.
While Topaz Labs previously offered only plug-ins for Photoshop and other programs (their Topaz DeNoise 6 is very good), their Topaz Studio stand-alone program now offers full raw processing abilities.
It is for Mac and Windows. While it did a decent job developing my test Milky Way image (above), with good color and contrast adjustments, it cannot copy and paste settings from one image to a folder of images, only to one other image. Nor can it batch export a folder of images. Both deficiencies make it useless for time-lapse work.
In addition, while the base program is free, adding the “Pro Adjustments” modules I needed to process my test image (Noise Reduction, Dehaze, Precision Contrast, etc.) would cost $160 – each Adjustment is bought separately. Some users might like it, but I wouldn’t recommend it.
And … Adobe Photoshop Elements v18 (late 2017 release)
What about Adobe’s own Photoshop “Lite?” Elements is available for $99 as a boxed or downloadable one-time purchase, but with annual updates costing about $50. While it offers image and adjustment layers, it cannot do much with 16-bit images, and has very limited functions for developing raw files.
And its Lightroom-like Organizer module does not have any copy-and-paste settings or batch export functions, making it unsuitable for time-lapse production.
Photoshop Elements v18 – Showing its Version of Camera Raw Lite
Elements is for processing photos for the snapshot family album. Like Apple’s Photos and other free photo apps, I don’t consider Elements to be a serious option for nightscape and time-lapse work. But it can be pressed into service for raw editing and layering single images, especially by beginners.
However, a Creative Cloud Photo subscription doesn’t cost much more than buying, then upgrading Elements outright, yet gets you far, far more in professional-level software.
And Yet More…!
In addition, for just developing raw files, you likely already have software to do the job – the program that came with your camera.
Canon Digital Photo Professional v4
For Canon it’s Digital Photo Professional (shown above); for Nikon it’s Capture NX; for Pentax it’s Digital Camera Utility, etc.
These are all capable raw developers, but have no layering capabilities. And they read only the files from their camera brand. If theirs is the only software you have, try it. They are great for learning on.
But you’ll find that the programs from other companies offer more features and better image quality.
What Would I Buy?
Except for Capture One, which I tested as a trial copy, I did buy all the software in question, for testing for my Nightscapes eBook.
However, as I’ve described, none of the programs tick all the boxes. Each has strengths, but also weaknesses, if not outright deficiencies. I don’t feel any can fully replace Adobe products for features and image quality.
A possible non-Adobe combination for the best image quality might be DxO PhotoLab for raw developing and basic time-lapse processing, and Affinity Photo for stacking and compositing still images, from finished TIFF files exported out of DxO and opened and layered with Affinity.
But that combo lacks any cataloging option. For that you’d have to add ACDSee or Aftershot for a budget option. It’s hardly a convenient workflow I’d want to use.
ON1 De-Bayer Artifacts (Right) Compared to DxO PhotoLab (Left), at 400%
I’d love to recommend ON1 Photo RAW more highly as a single solution, if only it had better raw processing results, and didn’t suffer from de-Bayering artifacts (shown in a 400% close-up above, compared to DxO PhotoLab). These add the star haloes and a subtle blocky pattern to the sky, most obvious at right.
To Adobe or Not to Adobe
I’m just not anxious, as others are, to “avoid Adobe.”
I’ve been a satisfied Creative Cloud subscriber for several years, and view the monthly fee as the cost of doing business. It’s much cheaper than the annual updates that boxed Photoshop versions used to cost. Nor am I worried about Adobe suddenly jacking up the fees or holding us hostage with demands.
LRTimelapse at Work on a Time-Lapse Sequence
For me, the need to use LRTimelapse (shown above) for about 80 percent of all the time-lapse sequences I shoot means the question is settled. LRTimelapse works only with Adobe software, and the combination works great. Sold.
I feel Camera Raw/Lightroom produces results that others can only just match, if that.
Only DxO PhotoLab beat Adobe for its excellent contrast enhancements and PRIME noise reduction.
Yes, other programs certainly have some fine features I wish Camera Raw or Lightroom had, such as:
Hot and dead pixel removal
Dark frame subtraction and flat field division
Better options for contrast enhancement
And adding local adjustments to raw files via layers, with more precise masking tools
Among others!
But those aren’t “must haves.”
Using ACR or Lightroom makes it easy to export raw files for time-lapse assembly, or to open them into Photoshop for layering and compositing, usually as “smart objects” for non-destructive editing, as shown below.
Final Layered Photoshop Image
Above is the final layered image, consisting of:
A stack of 4 tracked exposures for the sky (the test image is one of those exposures)
And 4 untracked exposures for the ground.
The mean stacking smooths noise even more. The masking reveals just the sky on the tracked set. Every adjustment layer, mask, and “smart filter” is non-destructive and can be adjusted later.
I’ll work on recreating this same image with the three non-Adobe programs capable of doing so – Affinity, Luminar, and ON1 Photo RAW – to see how well they do. But that’s the topic of a future blog.
Making the Switch?
The issue with switching from Adobe to any new program is compatibility.
While making a switch will be fine when working on all new images, reading the terabytes of old images I have processed with Adobe software (and being able to re-adjust their raw settings and layered adjustments) will always require that Adobe software.
If you let your Creative Cloud subscription lapse, as I understand it the only thing that will continue to work is Lightroom’s Library module, allowing you to review images only. You can’t do anything to them.
None of the contender programs will read Adobe’s XMP metadata files to display raw images with Adobe’s settings intact.
Conversely, nor can Adobe read the proprietary files and metadata other programs create.
With final layered Photoshop files, while some programs can read .PSD files, they usually open them just as flattened images, as ON1 warns it will do above. It flattened all of the non-destructive editing elements created in Photoshop. Luminar did the same.
A Layered Photoshop PSB File Opened in Affinity Photo
Only Affinity Photo (above) successfully read a complex and very large Photoshop .PSB file correctly, honouring at least its adjustment and image layers. So, if backwards compatibility with your legacy Photoshop images is important, choose Affinity Photo.
However, Affinity flattened Photoshop’s smart object image layers and their smart filters. Even Adobe’s own Photoshop Elements doesn’t honor smart objects.
Lest you think that’s a “walled garden” created by “evil Adobe,” keep in mind that the same will be true of the image formats and catalogs that all the contender programs produce.
To read the adjustments, layers, and “live filters” you create using any another program, you will need to use that program.
Will Affinity, DxO, Luminar, ON1, etc. be around in ten years?
Yes, you can save out flattened TIFFs that any program can read in the future, but that rules out using those other programs to re-work any of the image’s original settings.
In Conclusion!
U-Point Local Adjustments in DxO PhotoLab
I can see using DxO PhotoLab (above) or Raw Therapee for some specific images that benefit from their unique features.
Or using ACDSee as a handy image browser.
Luminar 2018 as a Plug-In Within Photoshop
And ON1 and Luminar have some lovely effects that can be applied by calling them up as plug-ins from within Photoshop, and applied as smart filters. Above, I show Luminar working as a plug-in, applying its “Soft & Airy” filter.
In the case of Capture One and DxO PhotoLab, their ability to save images back as raw DNG files (the only contender programs of the bunch that can), means that any raw processing program in the future should be able to read the raw image.
DNG Raw File Created by Capture One Opened in ACR
However, only Capture One’s Export to DNG option produced a raw file readable and editable by Adobe Camera Raw with its settings from Capture One (mostly) intact (as shown above).
Even so, I won’t be switching away from Adobe any time soon.
But I hope my survey has given you useful information to judge whether you should make the switch. And if so, to what program.
I put two new fast 14mm lenses to the test: the Sigma 14mm f/1.8 Art vs. the Rokinon 14mm f/2.4 SP.
Much to the delight of nightscape and astrophotographers everywhere we have a great selection of new and fast wide-angle lenses to pick from.
Introduced in 2017 are two fast ultra-wide 14mm lenses, from Sigma and from Rokinon/Samyang. Both are rectilinear, not fish-eye, lenses.
I tested the Nikon version of the Sigma 14mm f/1.8 Art lens vs. the Canon version of the Rokinon 14mm f/2.4 SP. I used a Nikon D750 and Canon 6D MkII camera.
I also tested the new faster Rokinon SP against the older and still available Rokinon 14mm f/2.8, long a popular lens among nightscape photographers.
The Sigma 14mm is a fully automatic lens with auto focus. It is the latest in their highly regarded Art series of premium lenses. I have their 20mm and 24mm Art lenses and love them.
The Rokinon 14mm SP (also sold under the Samyang brand) is a manual focus lens, but with an AE chip so that it communicates with the camera. Adjusting the aperture is done on the camera, not by turning a manual aperture ring, as is the case with many of Rokinon’s lower cost series of manual lenses. The lens aperture is then recorded in each image’s EXIF metadata, an aid to later processing. It is part of Rokinon’s premium “Special Performance” SP series which includes an 85mm f/1.2 lens.
All units I tested were items purchased from stock, and were not supplied by manufacturers as samples for testing. I own these!
CONCLUSIONS
For those with no time to read the full review, here are the key points:
• The Sigma f/1.8 Art exhibits slightly more off-axis aberrations than the Rokinon 14mm SP, even at the same aperture. But aberrations are very well controlled.
• As its key selling point, the Sigma offers another full stop of aperture over the Rokinon SP (f/1.8 vs. f/2.4), making many types of images much more feasible, such as high-cadence aurora time-lapses and fixed-camera stills and time-lapses of a deeper, richer Milky Way.
• The Sigma also has lower levels of vignetting (darkening of the frame corners) than the Rokinon 14mm SP, even at the same apertures.
• Both the Sigma Art and Rokinon SP lenses showed very sharp star images at the centre of the frame.
• Comparing the new premium Rokinon 14mm SP against the older Rokinon 14mm f/2.8 revealed that the new SP model has reduced off-axis aberrations and lower levels of vignetting than the lower-cost f/2.8 model. However, so it should for double the price or more of the original f/2.8 lens.
• The Rokinon 14mm SP is a great choice for deep-sky imaging where optical quality is paramount. The Sigma 14mm Art’s extra speed will be superb for time-lapse imaging where the f/1.8 aperture provides more freedom to use shorter shutter speeds or lower ISO settings.
•Though exhibiting the lowest image quality of the three lenses, the original Rokinon 14mm f/2.8 remains a superb value, at its typical price of $350 to $500. For nightscapers on a budget, it’s an excellent choice.
TESTING PROCEDURES
For all these tests I placed the camera and lens on a tracking mount, the Sky-Watcher Star Adventurer Mini shown below. This allowed the camera to follow the sky, preventing any star trailing. Any distortions you see are due to the lens, not sky motion.
Star Adventurer Mini Tracker (with Sigma 14mm on Nikon D750)
As I stopped down the aperture, I lengthened the exposure time to compensate, so all images were equally well exposed.
In developing the Raw files in Adobe Camera Raw, I applied a standard level of Contrast (25) and Clarity (50) boost, and a modest colour correction to neutralize the background sky colour. I also applied a standard level of noise reduction and sharpening.
However, I did not apply any lens corrections that, if applied, would reduce lateral chromatic aberrations and compensate for lens vignetting.
So what you see here is what the lens produced out of the camera, with no corrections. Keep in mind that the vignetting you see can be largely compensated for in Raw development, with the provisos noted below. But I wanted to show how much vignetting each lens exhibited.
OFF-AXIS ABERRATIONS
Stars are the severest test of any lens. Not test charts, not day shots of city skylines. Stars.
The first concern with any fast lens is how sharp the stars are not only in the centre of the frame, but also across the frame to the corners. Every lens design requires manufacturers to make compromises on what lens aberrations they are going to suppress at the expense of other lens characteristics. You can never have it all!
However, for astrophotography we do look for stars to be as pinpoint as possible to the corners, with little coma and astigmatism splaying stars into seagull and comet shapes. Stars should also not become rainbow-coloured blobs from lateral chromatic aberration.
SIGMA 14mm ART
Sigma 14mm Art – Upper Left Corner Close-up at 5 Apertures
Sigma 14mm Art – Upper Right Corner Close-up at 5 Apertures
These images show 200% blowups of the two upper corners of the Sigma 14mm Art lens, each at five apertures, from wide open at f/1.8, then stopped down at 1/3rd stop increments to f/2.8. As you would expect, performance improves as you stop down the lens, though some astigmatism and coma are still present at f/2.8.
But even wide open at f/1.8, off-axis aberrations are very well controlled and minimal. You have to zoom up this much to see them.
There was no detectable lateral chromatic aberration.
Aberrations were also equal at each corner, showing good lens centering and tight assembly tolerances.
ROKINON 14mm SP
Rokinon 14mm SP at 3 Apertures
Rokinon 14mm SP at 3 Apertures
Similarly, these images show 200% blow-ups of the upper corners of the Rokinon SP, at its three widest apertures: f/2.4, f/2.8 and f/3.2.
Star images look tighter and less aberrated in the Rokinon, even when compared at the same apertures.
But images look better on the left side of the frame than on the right, indicating a slight lens de-centering or variation in lens position or figuring, a flaw noted by other users in testing Rokinon lenses. The difference is not great and takes pixel-peeping to see. Nevertheless, it is there, and may vary from unit to unit. This should not be the case with any “premium” lens.
SIGMA vs. ROKINON
Rokinon vs. Sigma Corner Aberrations Compared
This image shows both lenses in one frame, at the same apertures, for a more direct comparison. The Rokinon SP is better, but of course, doesn’t go to f/1.8 as does the Sigma.
ON-AXIS ABERRATIONS
We don’t want good performance at the corners if it means sacrificing sharp images at the centre of the frame, where other aberrations such as spherical aberration can take their toll and blur images.
These images compare the two lenses in 200% blow-ups of an area in the Cygnus Milky Way that includes the Coathanger star cluster. Both lenses look equally as sharp.
SIGMA 14mm ART
Sigma 14mm Art – Centre of Frame Close-up
Even when wide open at f/1.8 the Sigma Art shows very sharp star images, with little improvement when stopped down. Excellent!
ROKINON 14mm SP
Rokinon 14mm SP – Centre of Frame Close-up
The same can be said for the Rokinon SP. It performs very well when wide open at f/2.4, with star images as sharp as when stopped down 2/3rds of an f-stop to f/3.2
SIGMA vs. ROKINON
Sigma vs. Rokinon Centre Sharpness Compared
This image shows both lenses in one frame, but with the Sigma wide open at f/1.8 and stopped down to f/2.8, vs. the Rokinon wide open at f/2.4 and stopped to f/2.8. All look superb.
VIGNETTING
The bane of wide-angle lenses is the light fall-off that is inevitable as lens focal lengths decrease. We’d like this vignetting to be minimal. While it can be corrected for later when developing the Raw files, doing so can raise the visibility of noise and discolouration, such as magenta casts. The less vignetting we have to deal with the better.
As with off-axis aberrations, vignetting decreases as lenses are stopped down. Images become more uniformly illuminated across the frame, with less of a “hot spot” in the centre.
SIGMA 14mm ART
Sigma 14mm Art – Vignetting Compared at 5 Apertures
This set compares the left edge of the frame in the Sigma SP at five apertures, from f/1.8 to f/2.8. You can see how the image gets brighter and more uniform as the lens is stopped down. (The inset image at upper right show what part of the frame I am zooming into.)
ROKINON 14mm SP
Rokinon 14mm SP – Vignetting Compared at 3 Apertures
This similar set compares the frame’s left edge in the Rokinon SP at its three widest apertures, from f/2.4 to f/3.2. Again, vignetting improves but is still present at f/3.2.
SIGMA vs. ROKINON
Rokinon vs. Sigma – Vignetting Compared
This compares both lenses at similar apertures side by side for a direct comparison. The Sigma is better than the Rokinon with a much more uniform illumination across the frame.
Sigma 14mm Art – Vignetting at f/1.8 Maximum Aperture
Rokinon 14mm SP – Vignetting at f/2.4 Maximum Aperture
In these two images, above, of the entire frame at their respectively widest apertures, I’d say the Sigma exhibits less vignetting than the Rokinon, even when wide open at f/1.8. The cost for this performance, other than in dollars, is that the Sigma is a large, heavy lens with a massive front lens element.
ROKINON 14mm f/2.4 SP vs. ROKINON 14mm f/2.8 Standard
Even the Rokinon 14mm SP, though a manual lens, carries a premium price, at $800 to $1000 U.S., depending on the lens mount.
The 14mm Rokinon/Samyang f/2.8 Lens
For those looking for a low-cost, ultra-wide lens, the original Rokinon/Samyang 14mm f/2.8 (shown above) is still available and popular. It is a fully manual lens, though versions are available with a AE chip to communicate lens aperture information to the camera.
I happily used this f/2.8 lens for several years. Before I sold it earlier in 2017 (before I acquired the Sigma 14mm), I tested it against Rokinon’s premium SP version.
The older f/2.8 lens exhibited worse off-axis and on-axis aberrations and vignetting than the SP, even with the SP lens set to the same f/2.8 aperture. But image quality of the original lens is still very good, and the price is attractive, at half the price or less, than the 14mm SP Rokinon.
TWO 14mm ROKINONS: OFF-AXIS ABERRATIONS
Two Rokinons (Older “Standard” vs. new SP) – Upper Left Corner Close-up
Two Rokinons (Older “Standard” vs. new SP) – Upper Right Corner Close-up
Here, in closeups of the upper corners, I show the difference between the two Rokinons, the older standard lens on the left, and the new SP on the right.
The SP, as it should, shows lower aberrations and tighter star images, though with the improvement most marked on the left corner; not so much on the right corner. The original f/2.8 lens holds its own quite well.
TWO 14mm ROKINONS: ON-AXIS ABERRATIONS
Two Rokinons (Older “Standard” vs. new SP) – Centre of Frame Close-up
At the centre of the frame, the difference is more apparent, with the SP lens exhibiting sharper star images than the old 14mm with its generally softer, larger star images. The latter likely has more spherical aberration.
TWO 14mm ROKINONS: VIGNETTING
Two Rokinons (Older “Standard” vs. new SP) – Vignetting Compared
The new SP lens clearly has the advantage here, with less vignetting and brighter corners even when wide open at f/2.4 than the older lens does at its widest aperture of f/2.8. This is another reason to go for the new SP if image quality is paramount
PRICES
The new Sigma 14mm Art lens is costly, at $1600 U.S., though with a price commensurate with its focal length and aperture. Other premium lenses in this focal length range, either prime or zoom, from Nikon and Canon sell for much more, and have only an f/2.8 maximum aperture. So in that sense, the Sigma Art is a bargain.
The new Rokinon 14mm SP sells for $800 to $1000, still a premium price for a manual focus lens. But its optical quality competes with the best.
The older Rokinon 14mm f/2.8 is a fantastic value at $350 to $500, depending on lens mount and AE chip. For anyone getting into nightscape and Milky Way photography, it is a great choice.
RECOMMENDATIONS
With such a huge range in price, what should you buy?
A 14mm is a superb lens for nightscape shooting – for sky-filling auroras, for panoramas along the Milky Way, or of the entire sky. But the lens needs to be fast. All three lenses on offer here satisfy that requirement.
Sigma 14mm Art (left) and Rokinon 14mm SP (right)
SIGMA 14mm f/1.8 ART
If you want sheer speed, this is the lens. It offers a full stop gain over the already fast Rokinon f/2.5, allowing exposures to be half the length, or shooting at half the ISO speed for less noise.
Its fast speed comes into its own for rapid cadence aurora time-lapses, to freeze auroral motion as much as possible in exposures as short as 1 to 2 seconds at a high ISO. The fast speed might also make real-time movies of the aurora possible on cameras sensitive and noiseless enough to allow video shooting at ISO 25,000 and higher, such as the Sony a7s models.
The Sigma’s fast speed also allows grabbing rich images of the Milky Way in exposures short enough to avoid star trailing, either in still images or in time-lapses of the Milky Way in motion.
While the Sigma does exhibit some edge aberrations, they are very well controlled (much less than I see with some 24mm and 35mm lenses I have) and are a reasonable tradeoff for the speed and low level of vignetting, which results in less noisy corners.
Photographers obsess over corner aberrations when, for fixed-camera nightscape shooting, a low level of vignetting is probably more critical. Correcting excessive vignetting introduces noise, while the corner aberrations may well be masked by star trailing. Only in tracked images do corner aberrations become more visible, as in the test images here.
I’d suggest the Sigma is the best choice for nightscape and time-lapse shooting, with its speed allowing for kinds of shots not possible otherwise.
The Sigma also appears to be the best coated of all the lenses, as you can see in the reflections in the lenses in the opening image, and below. However, I did not test the lenses for flares and ghosting.
As a footnote, none of the lenses allow front-mounted filters, and none have filter drawers.
ROKINON 14mm f/2.4 SP
For less money you get excellent optical quality, though with perhaps some worrisome variation in how well the lens elements are figured or assembled, as evidenced by the inconsistent level of aberration from corner to corner.
Nevertheless, stars are tight on- and off-axis, and vignetting is quite low, for corners that will be less noisy when the shadows are recovered in processing.
I’d suggest the Rokinon SP is a great choice if tracked deep-sky images are your prime interest, where off-axis performance is most visible. However, the SP’s inconsistent aberrations from corner to corner are evidence of lower manufacturing tolerances than Sigma’s, so your unit may not perform like mine.
For nightscape work, the SP’s f/2.4 aperture might seem a minor gain over Rokinon’s lower-cost f/2.8 lens. But it is 1/3 of an f-stop. That means, for example, untracked Milky Way exposures could be 30 seconds instead of 40 seconds, short enough to avoid obvious star trailing. At night, every fraction of an f-stop gain is welcome and significant.
ROKINON 14mm f/2.8 Standard
You might never see the difference in quality between this lens and its premium SP brother in images intended for time-lapse movies, even at 4K resolution.
But those intending to do long-exposure deep-sky imaging, as these test images are, will want the sharpest stars possible across the frame. In which case, consider the 14mm SP.
But if price is a prime consideration, the original f/2.8 Rokinon is a fine choice. You’ll need to apply a fair amount of lens correction in processing, but the lens exists in the Camera Raw/Lightroom database, so correction is just a click away.
That was a lengthy report, I know! But there’s no point in providing recommendations without the evidence to back them up.
All images, other than the opening “beauty shot,” can be clicked/tapped on to download a full-resolution original JPG for closer inspection.
As I’ve just received the Sigma Art lens I’ve not had a chance to shoot any “real” nightscape images with it yet, just these test shots. But for a real life deep-sky image of the Milky Way shot with the Rokinon SP, see this image from Australia. https://flic.kr/p/SSQm7G
I hope you found the test of value in helping you choose a lens.

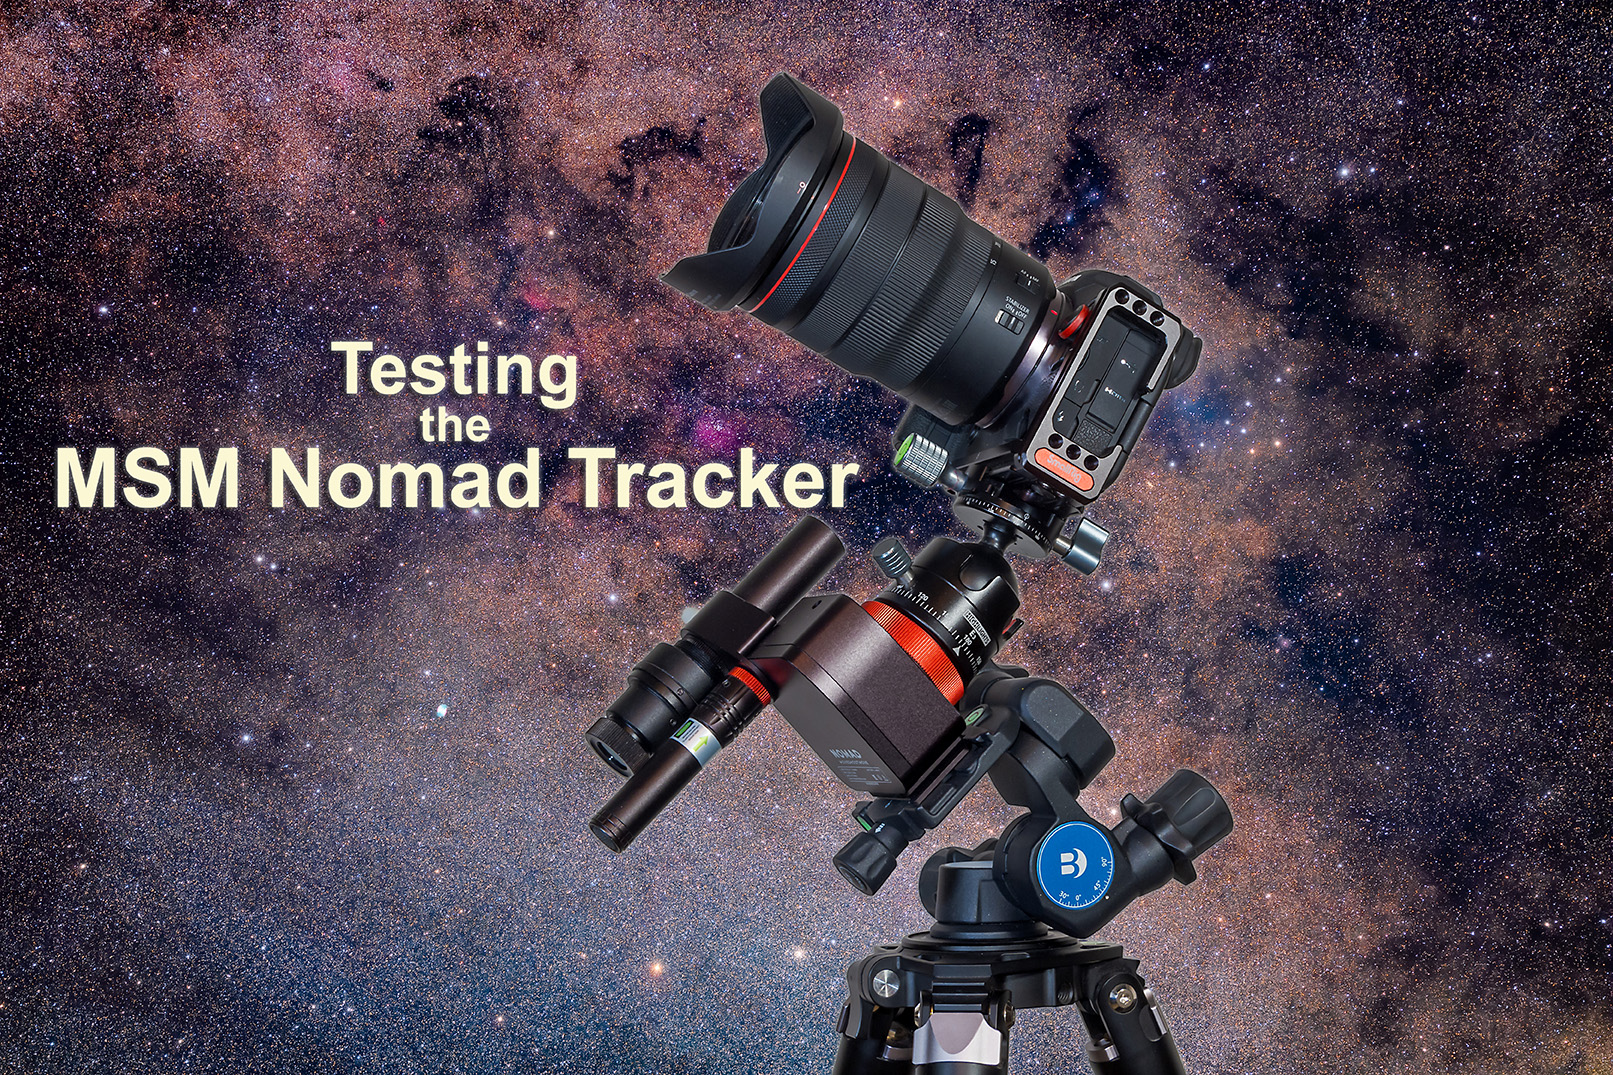
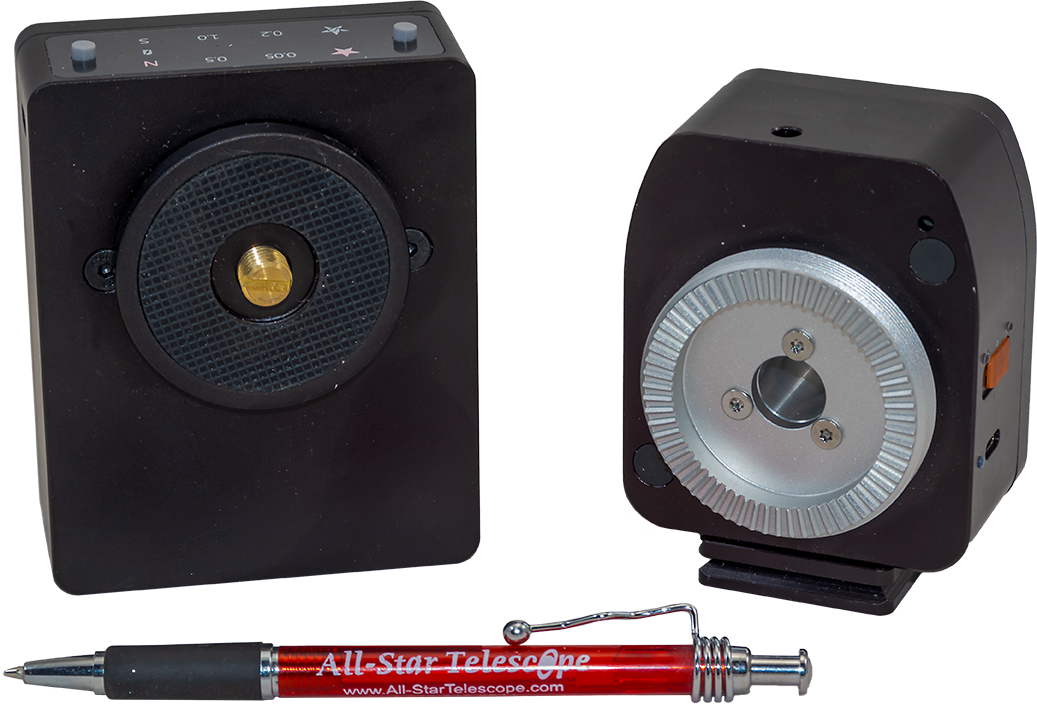
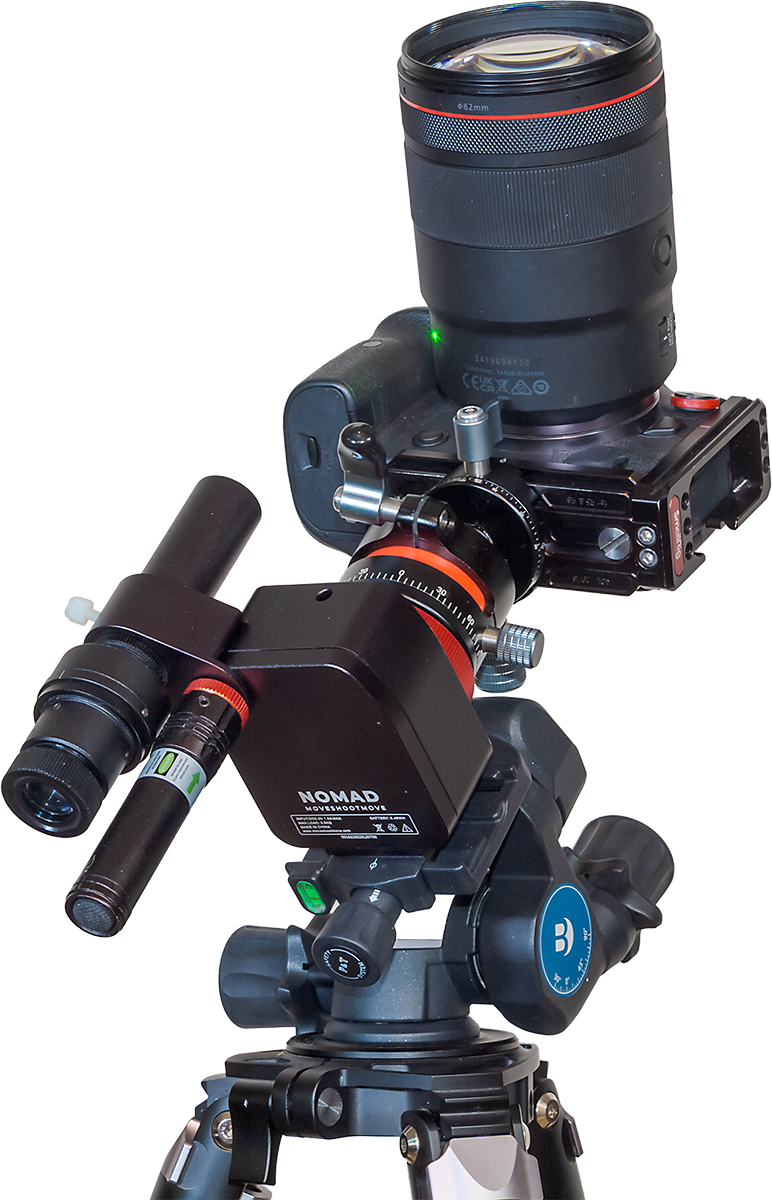
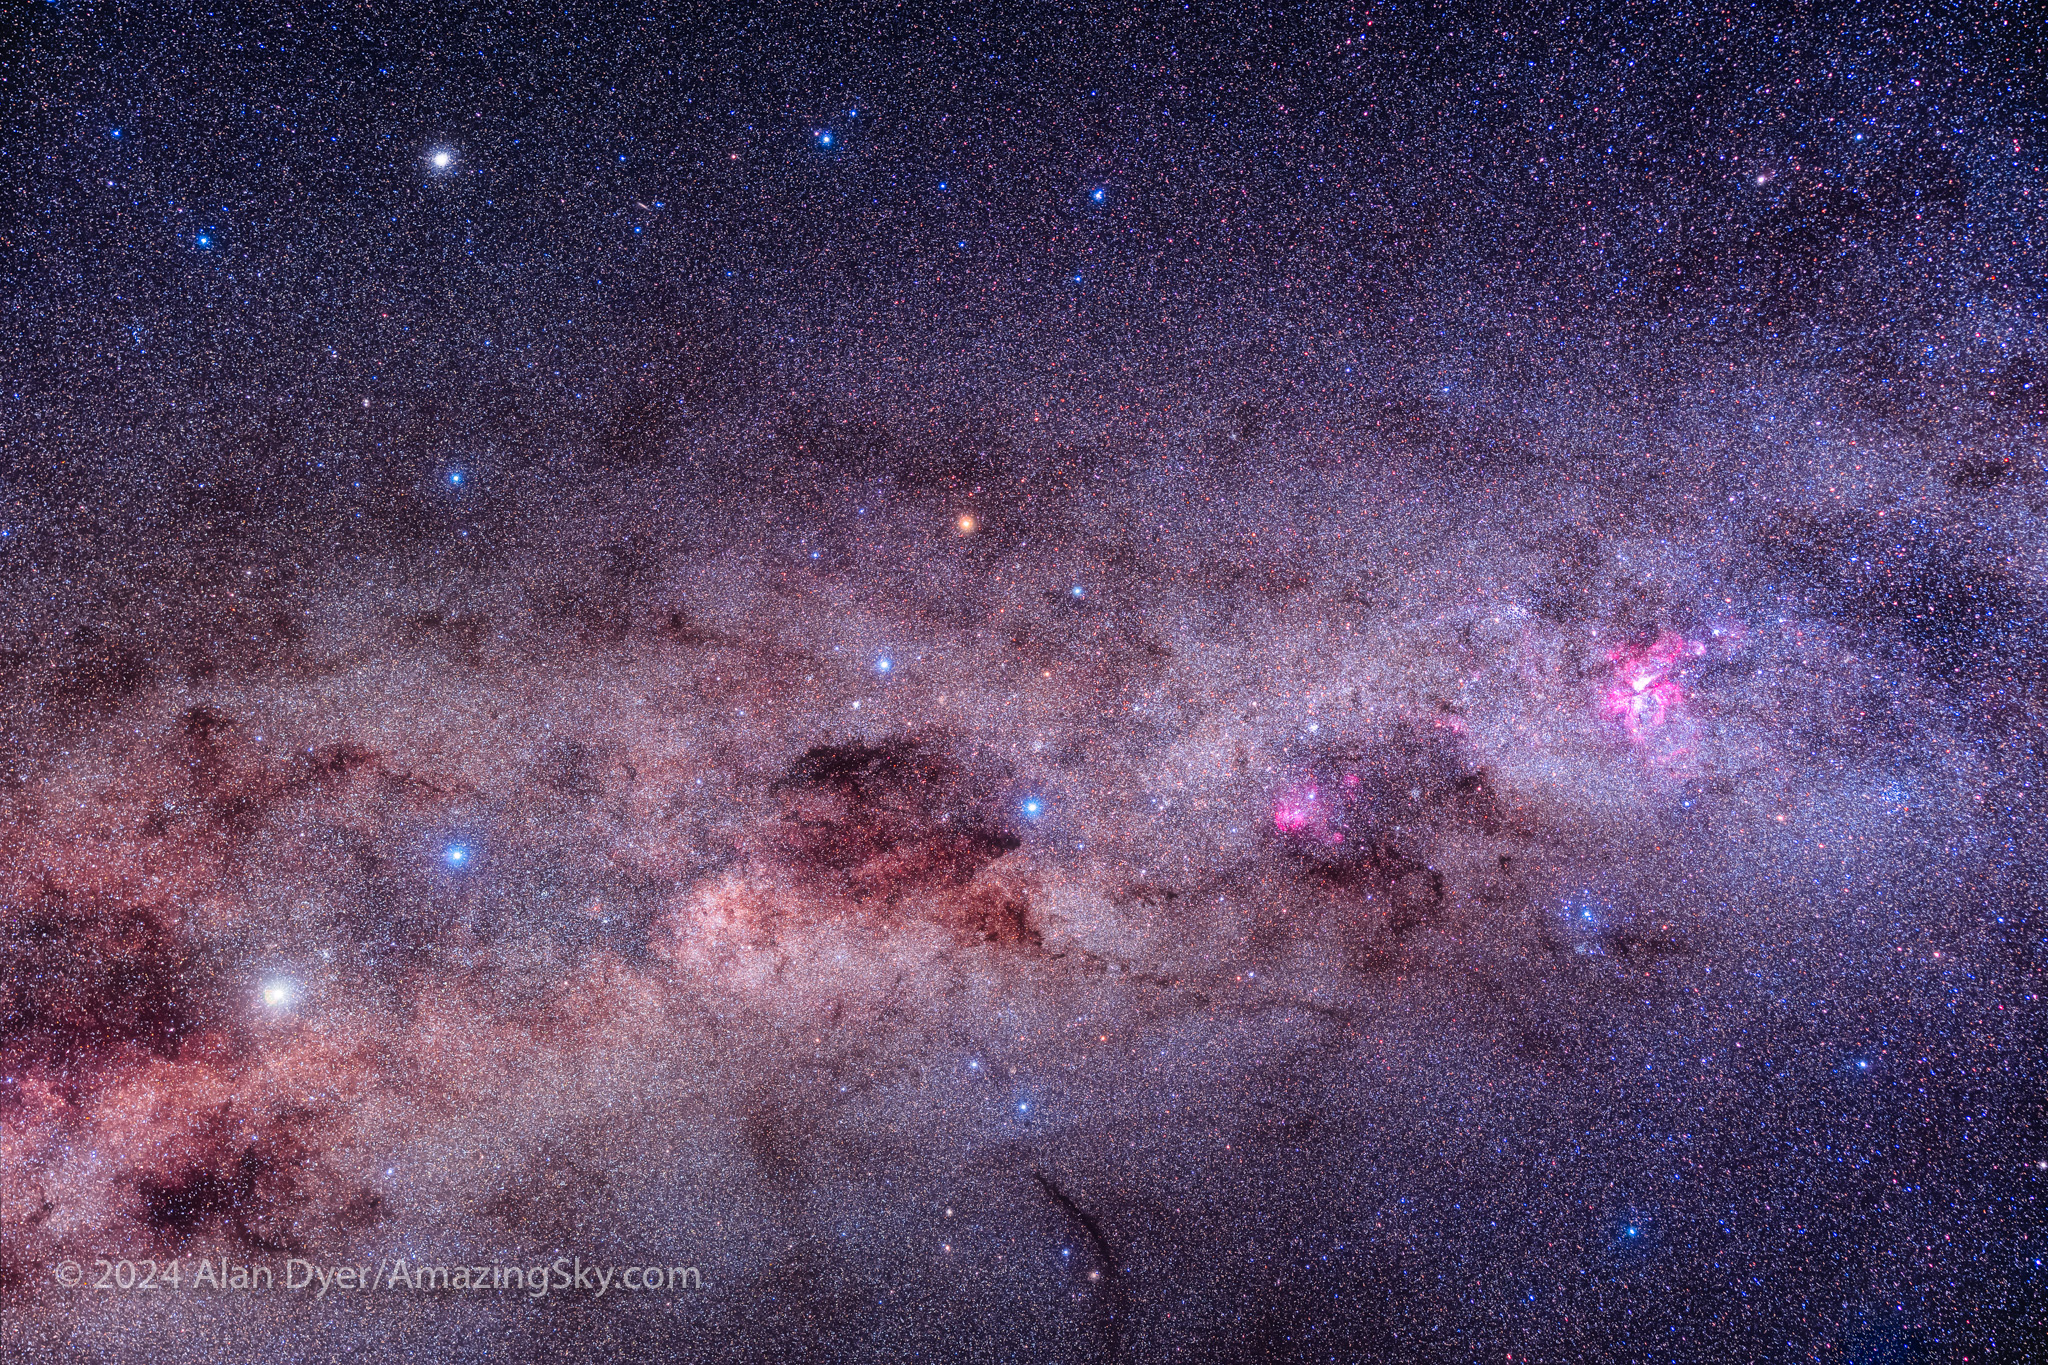
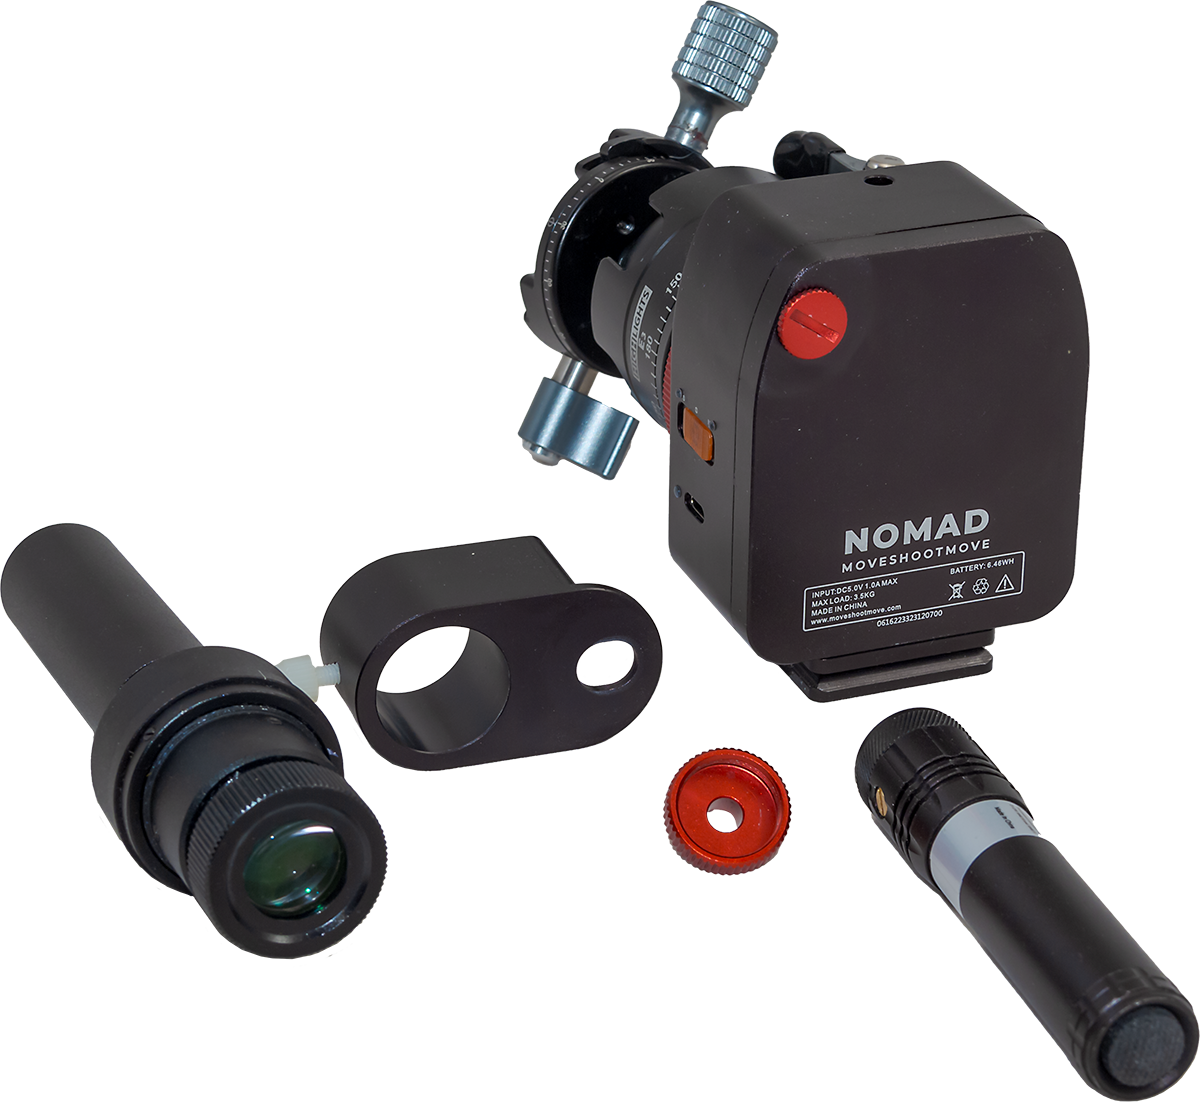
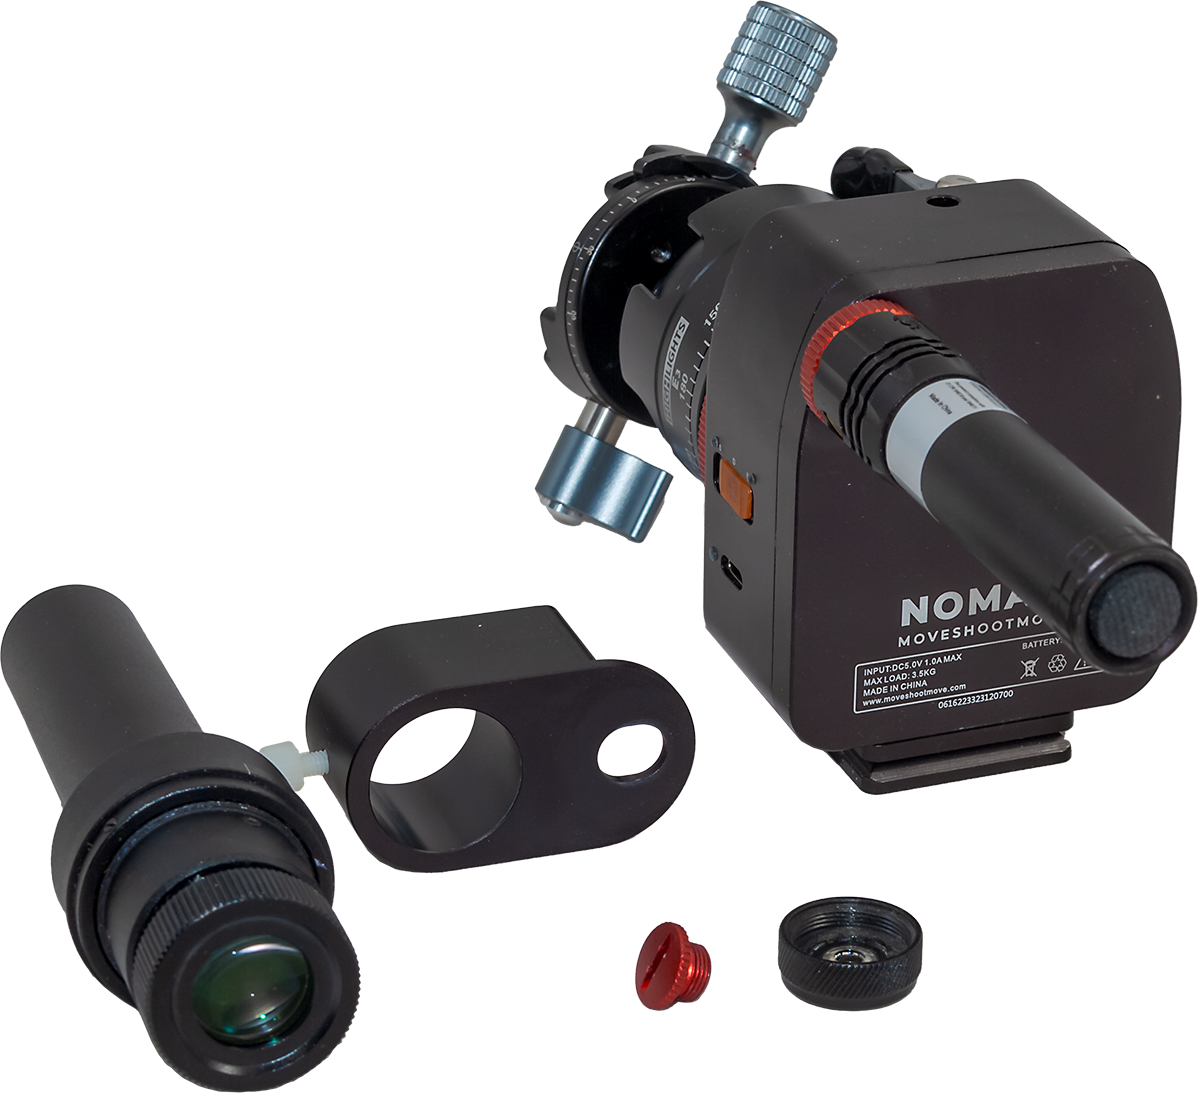
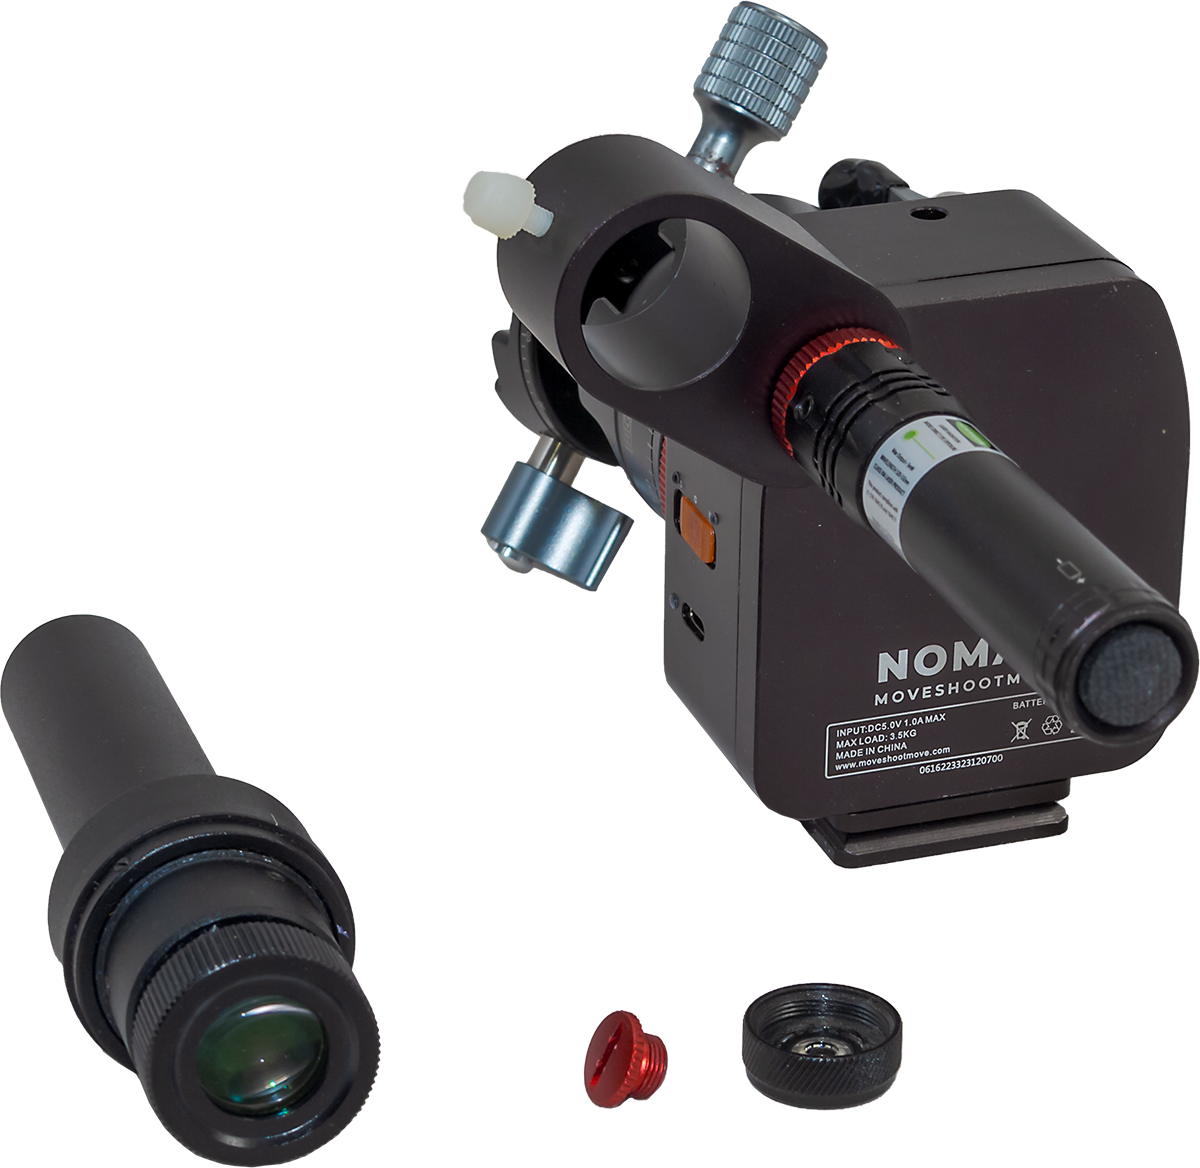
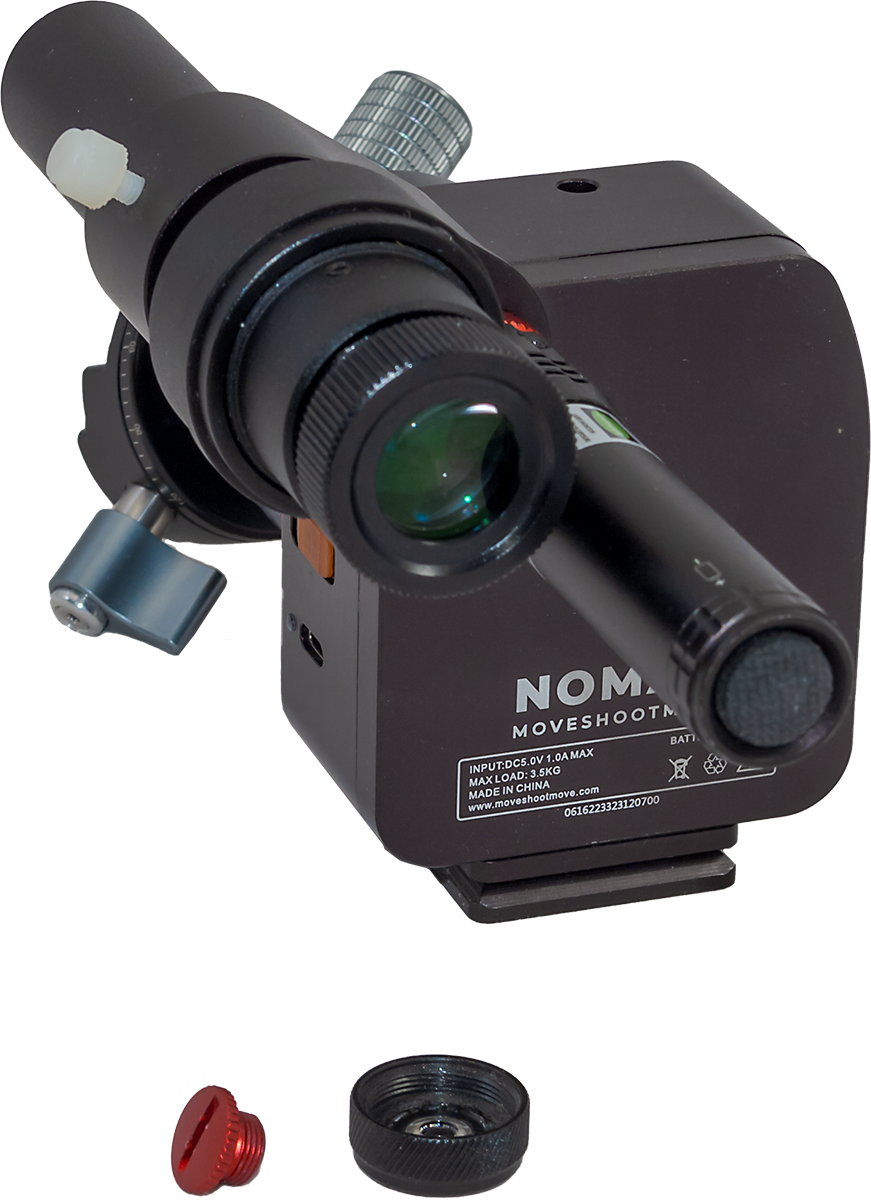
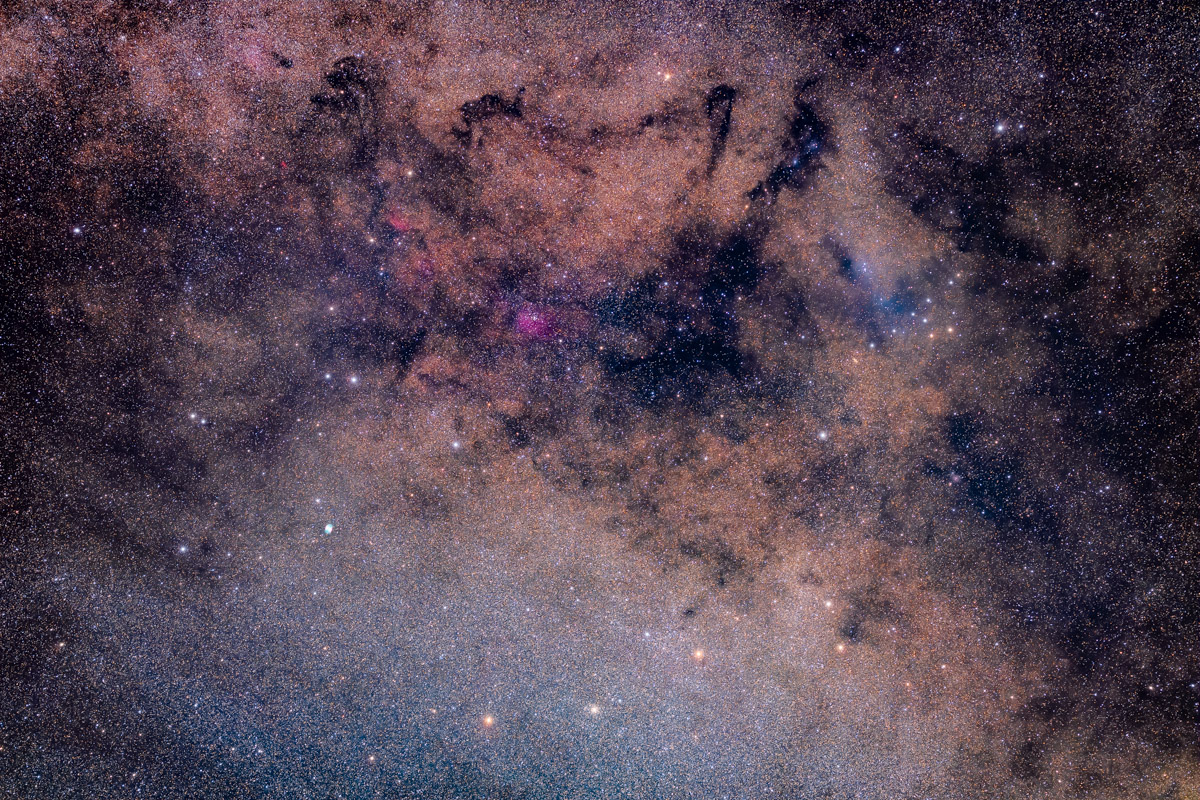
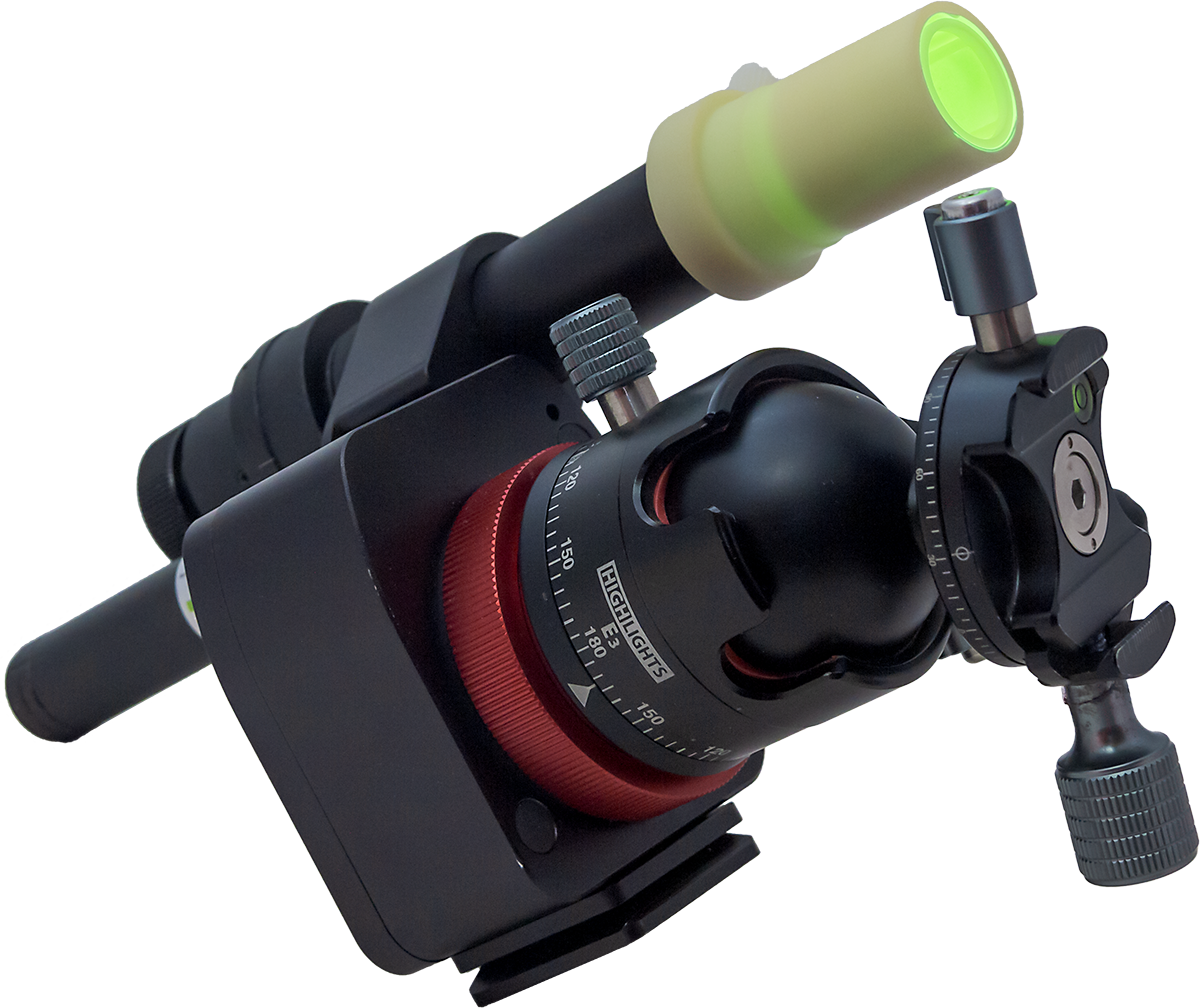
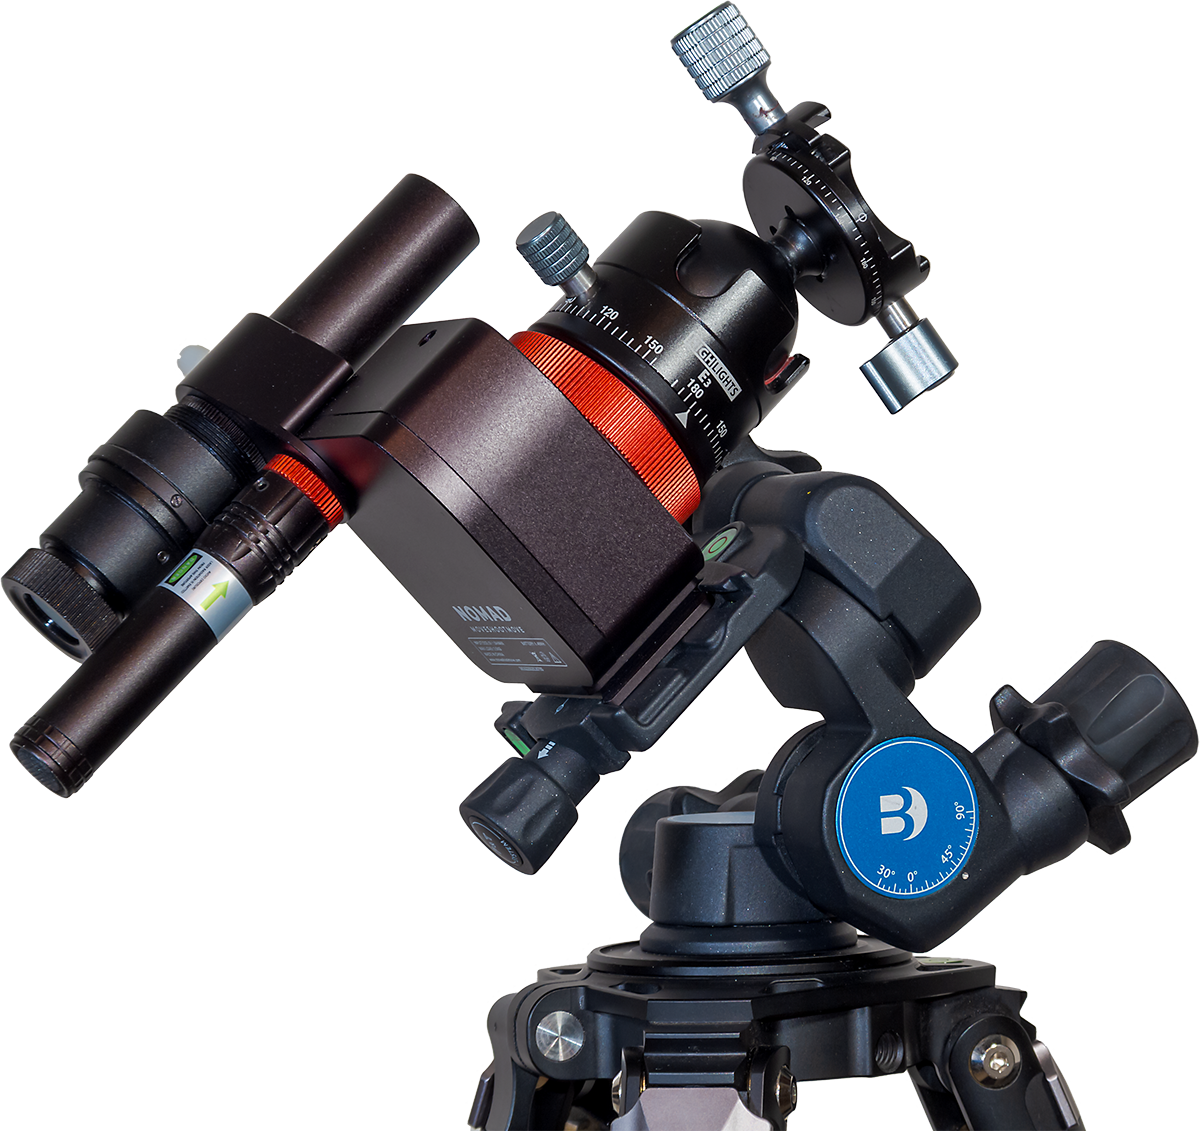
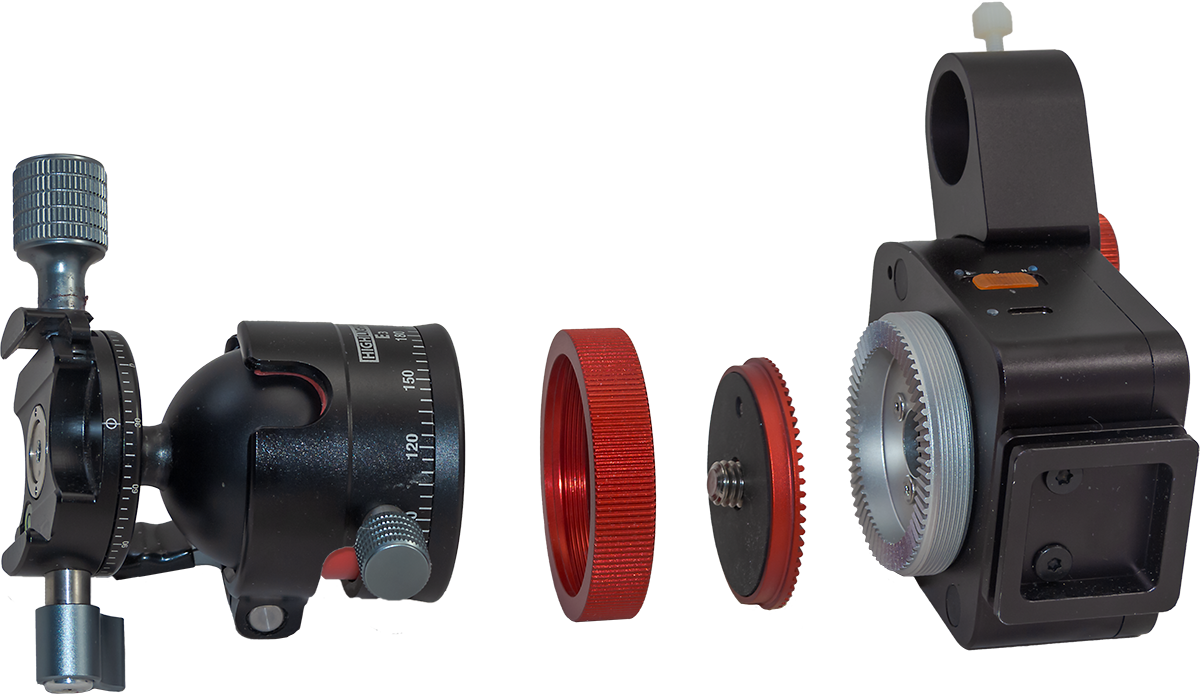
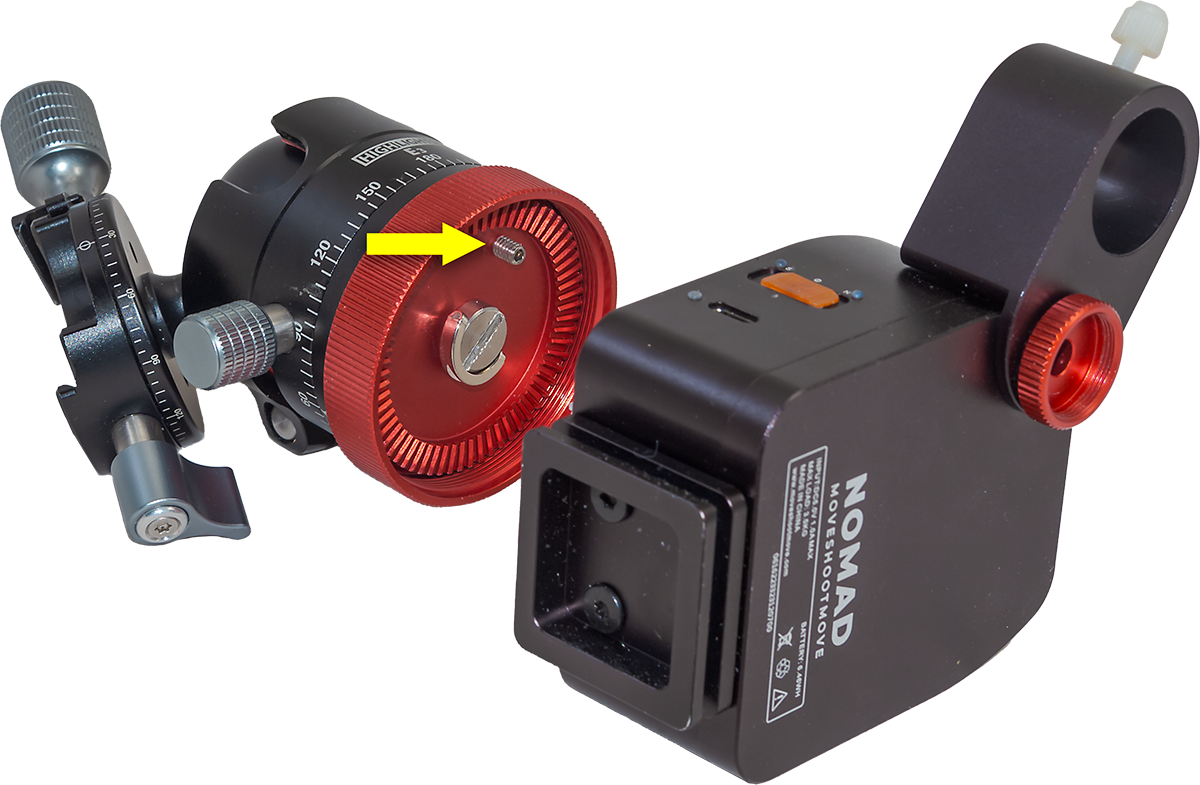
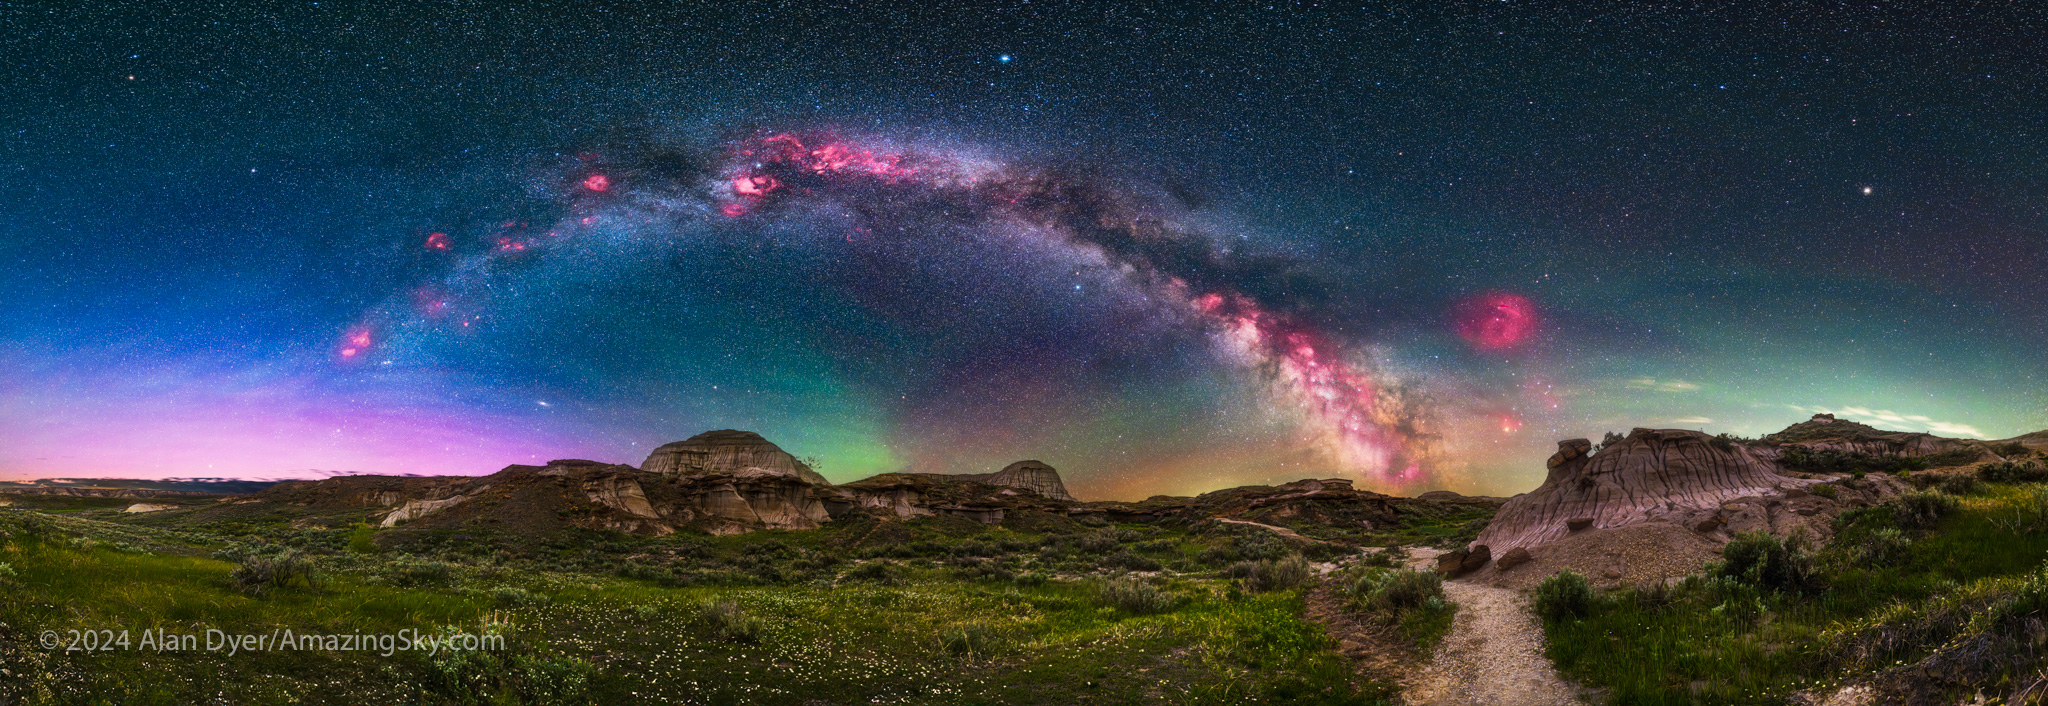
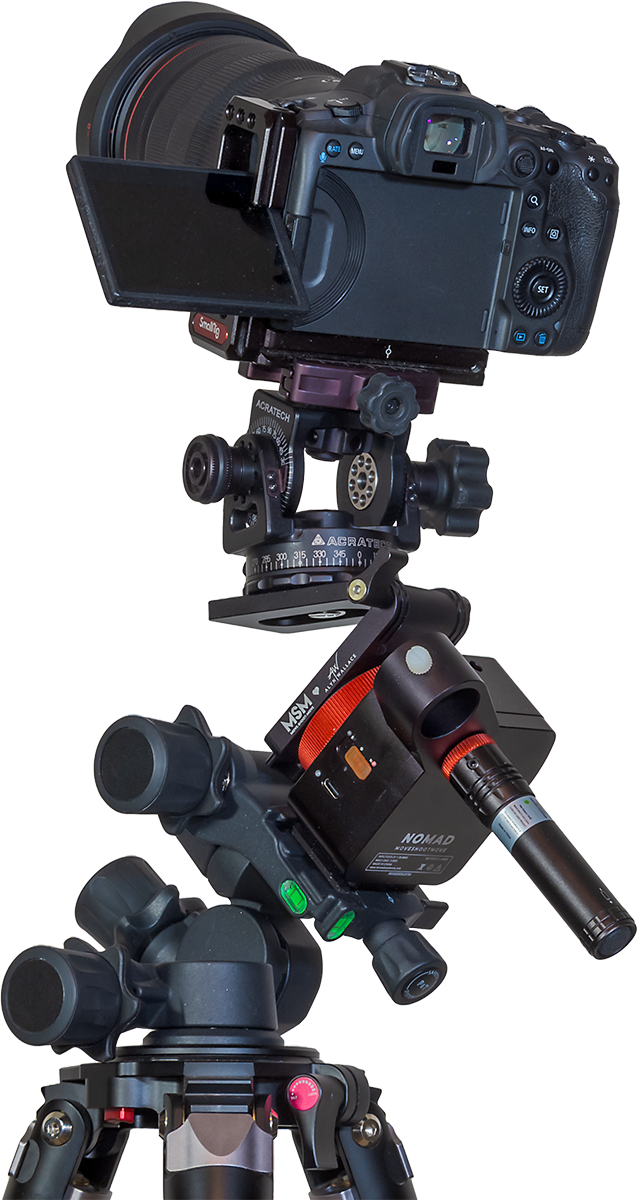
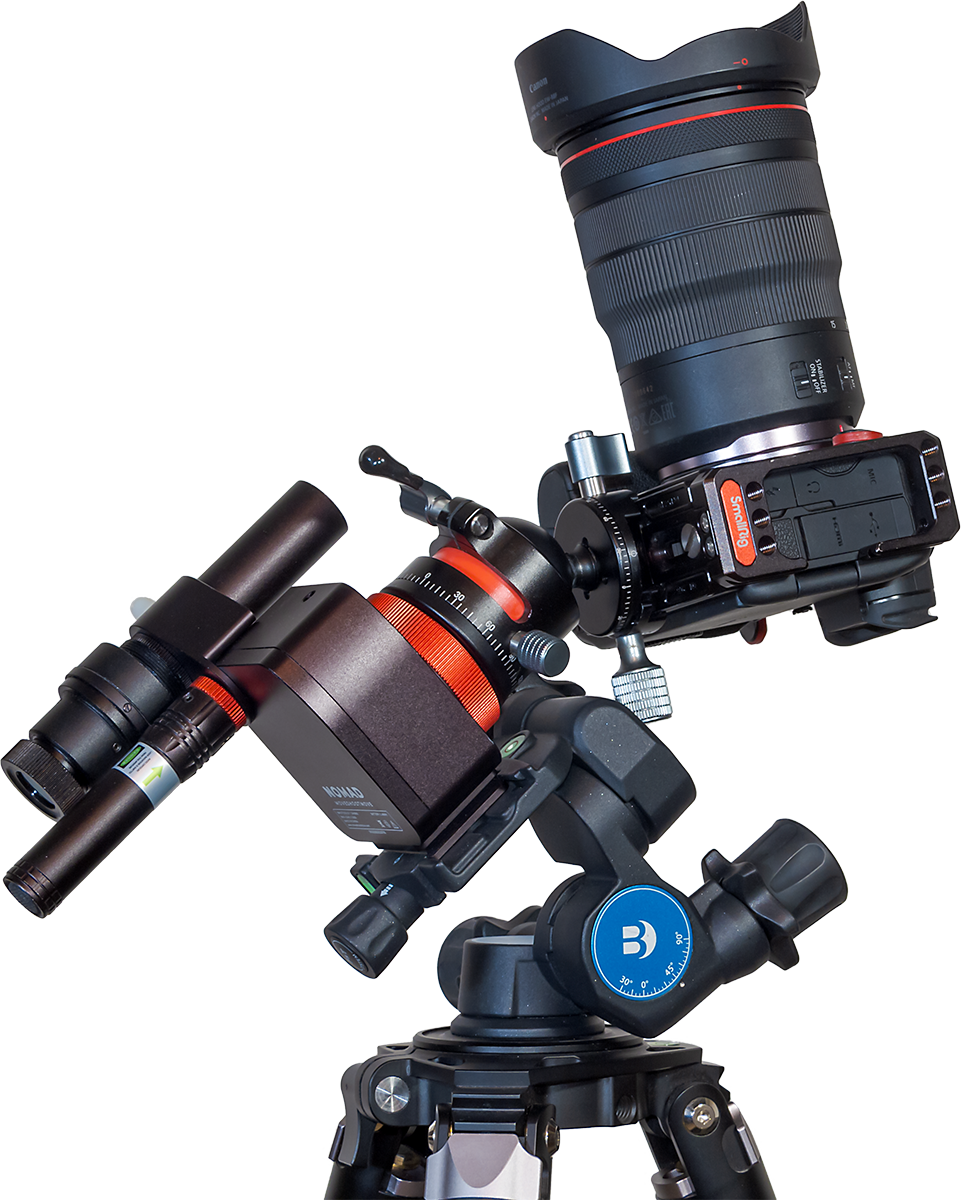
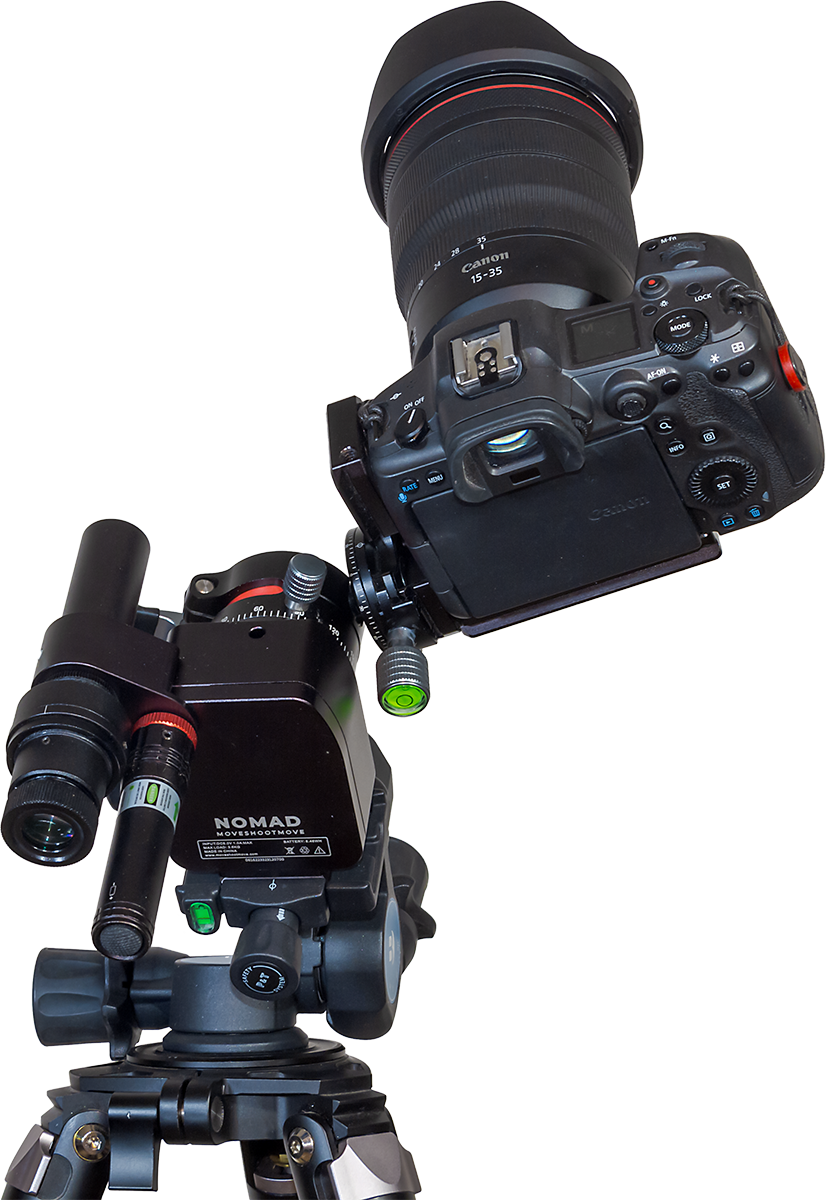
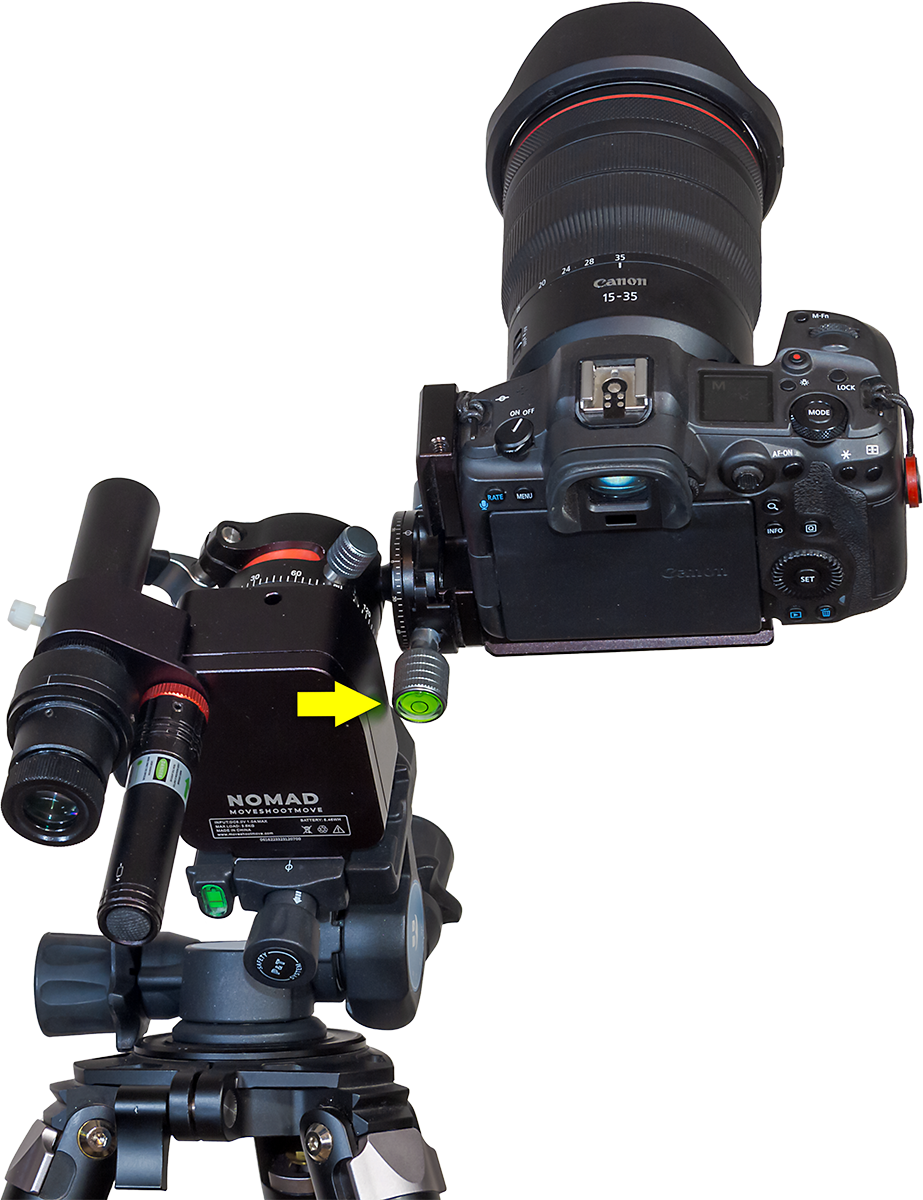
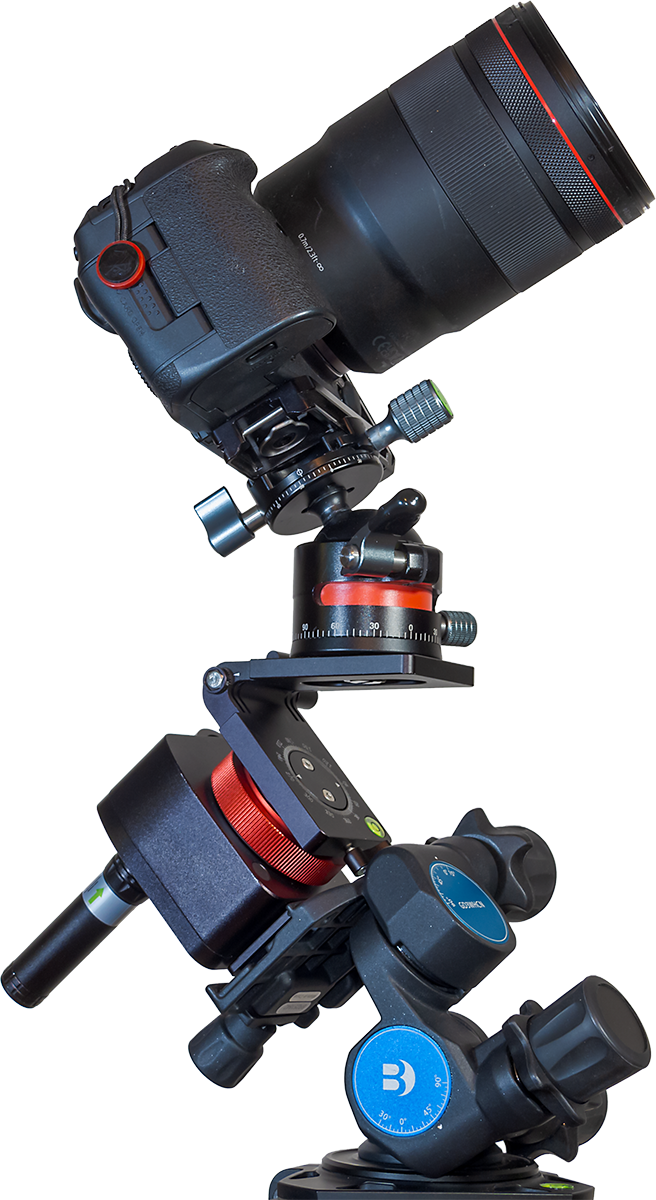
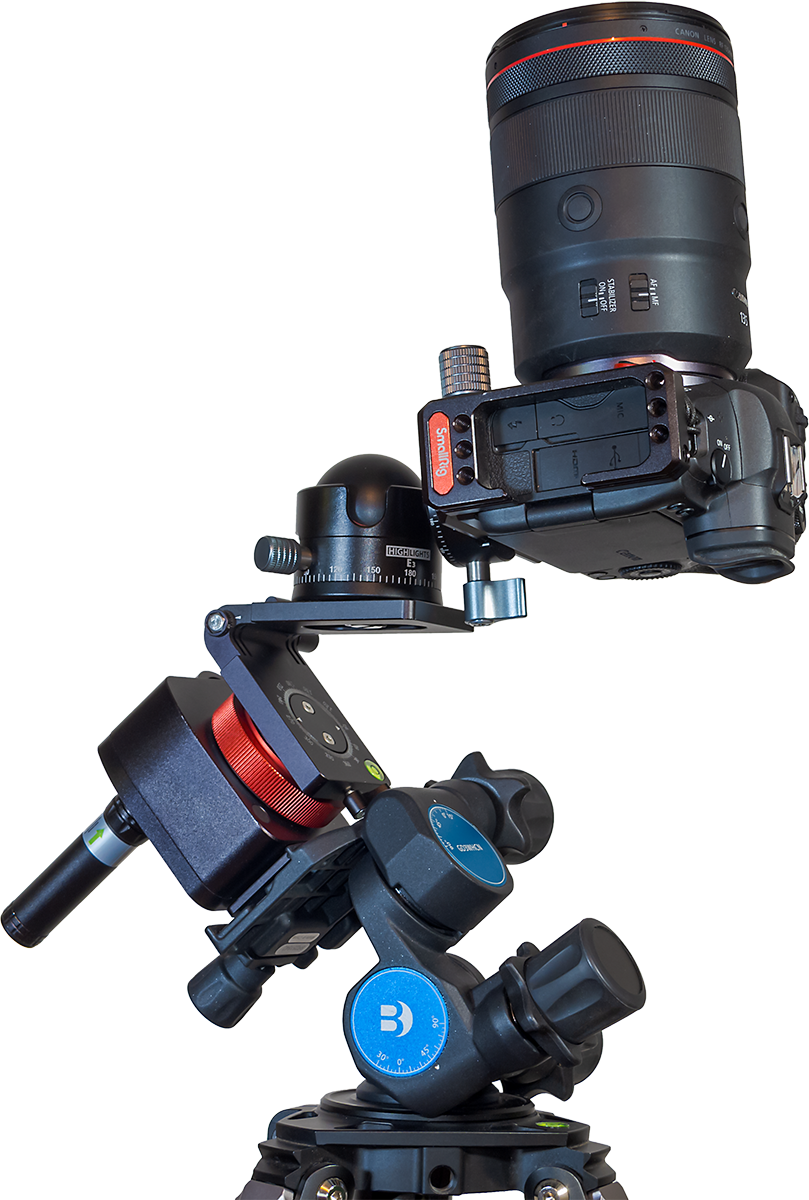
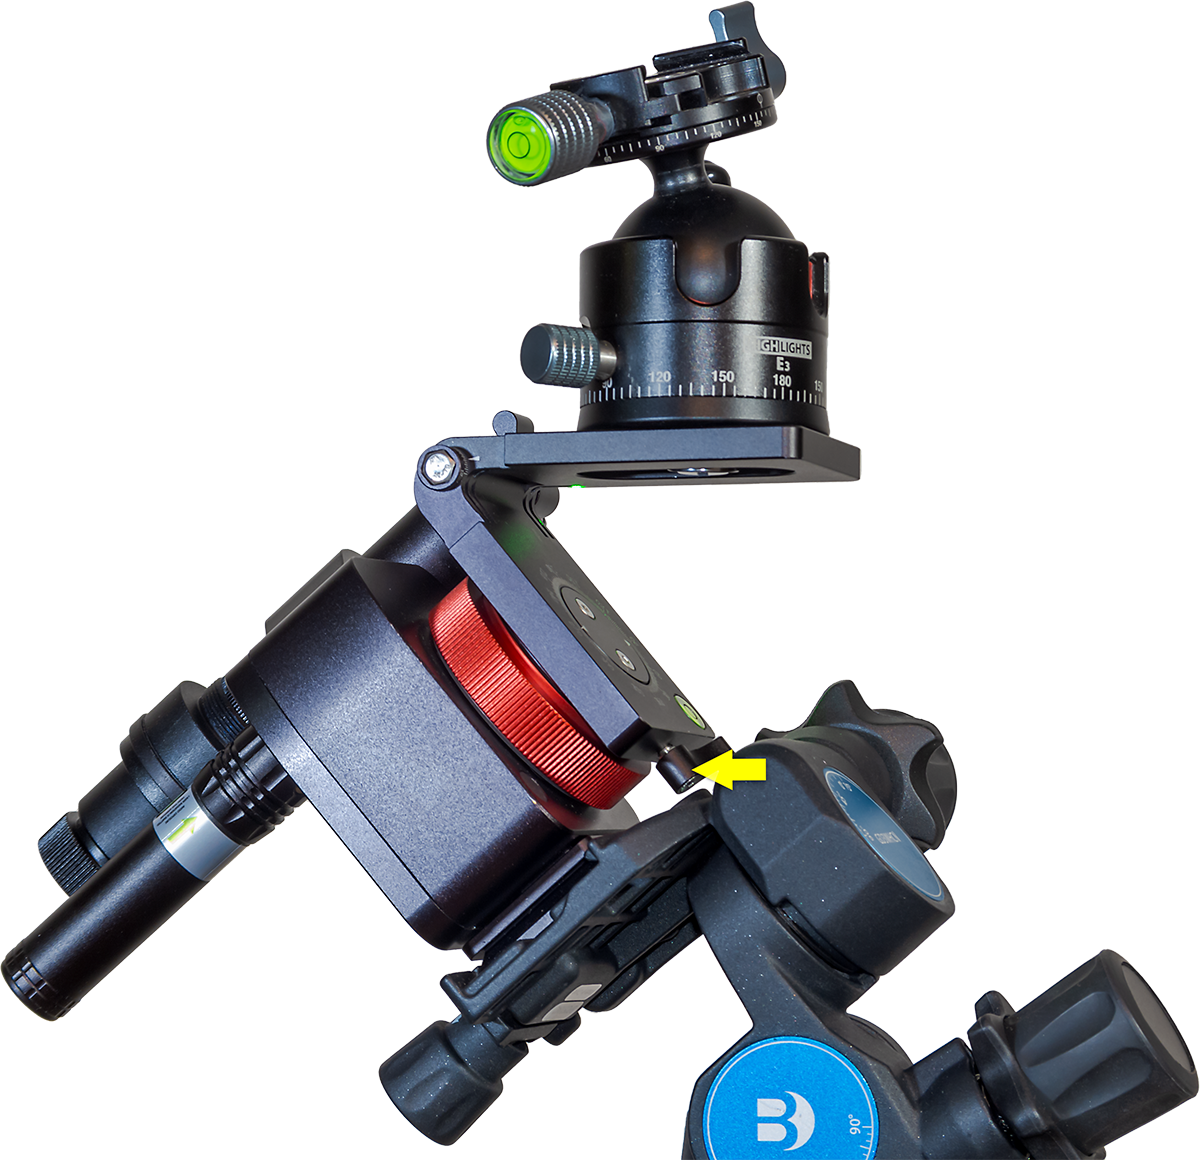
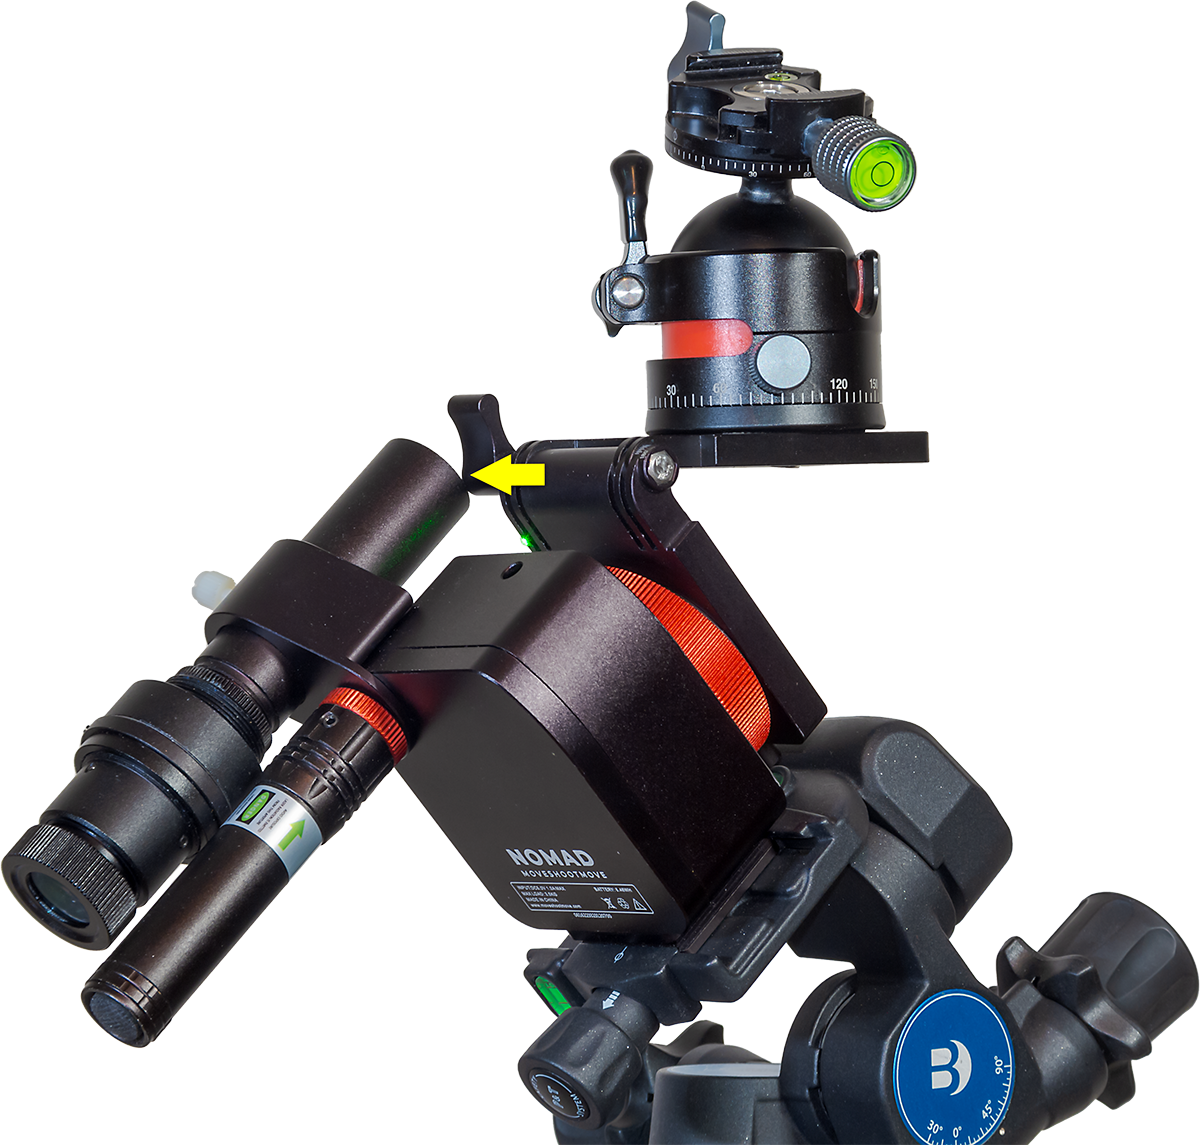
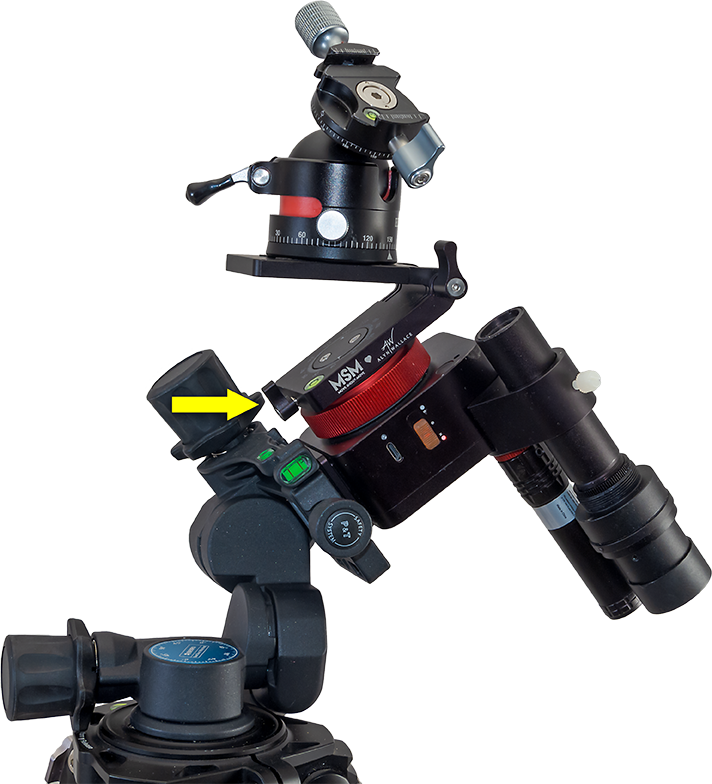
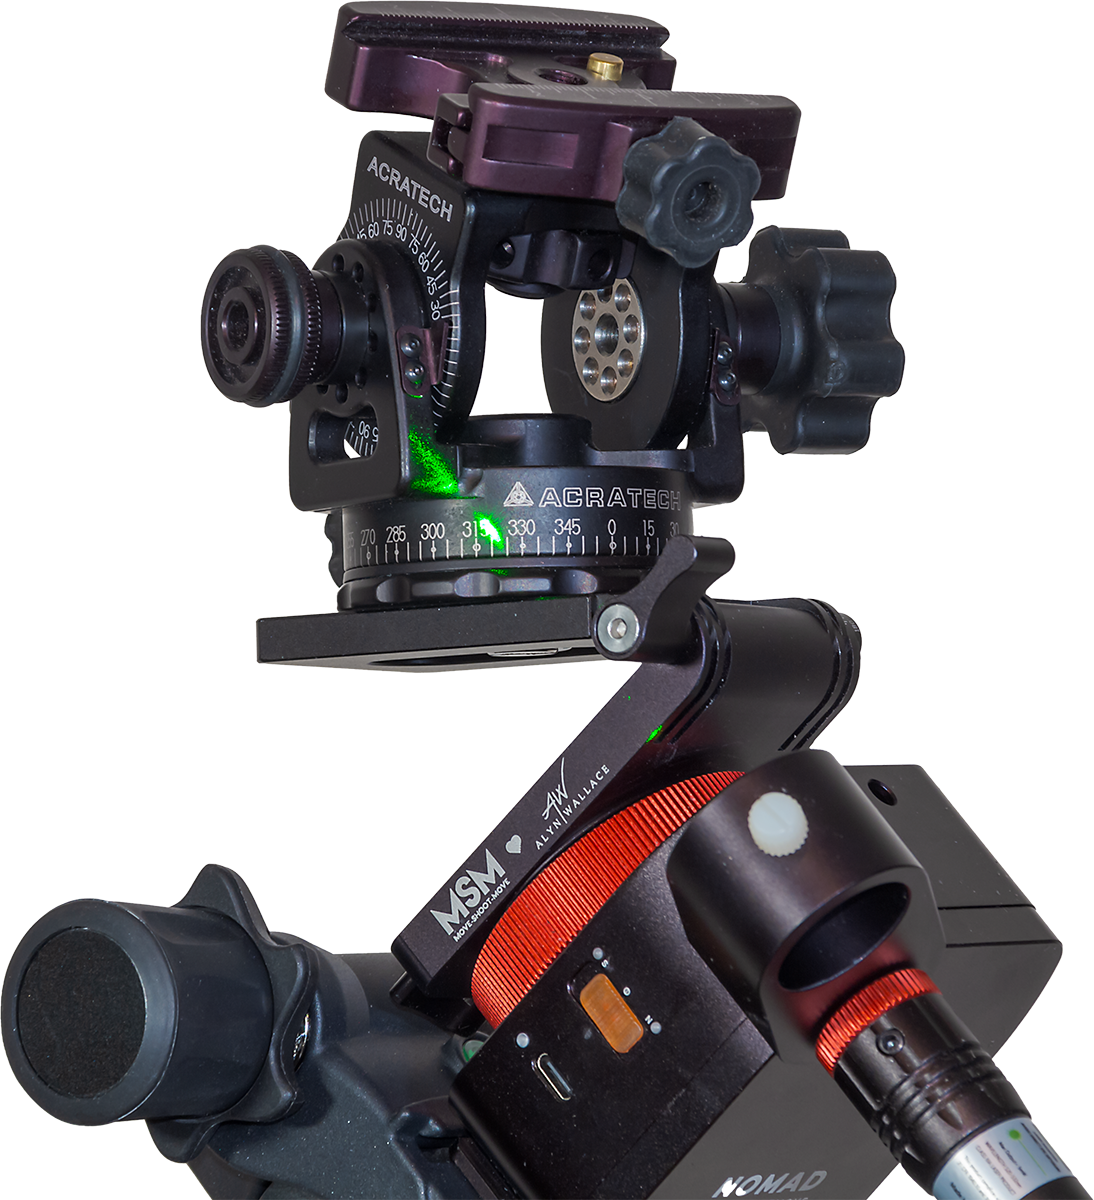
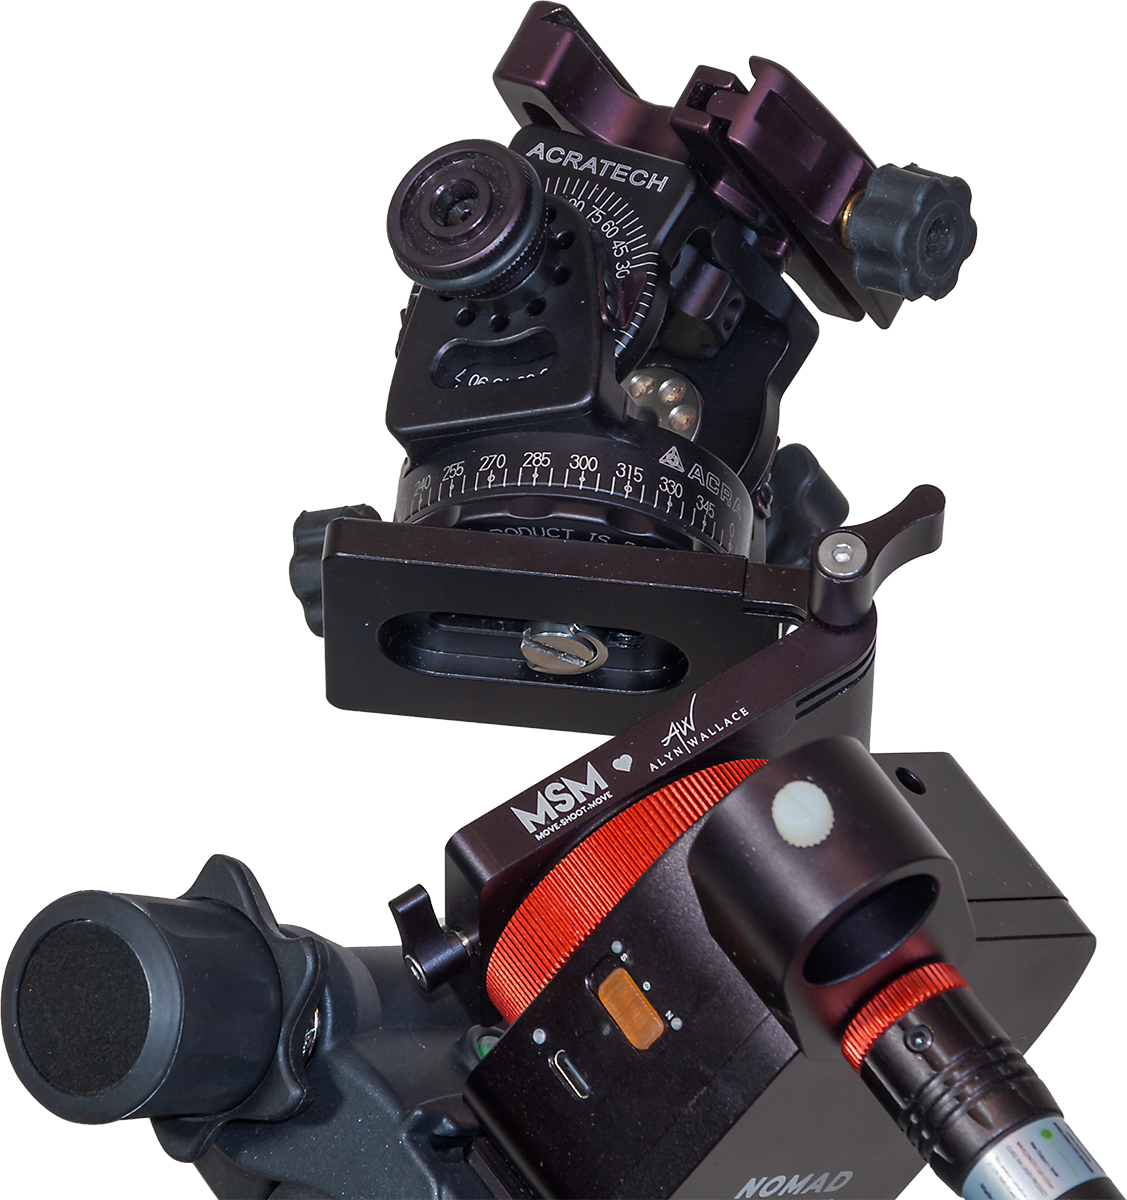


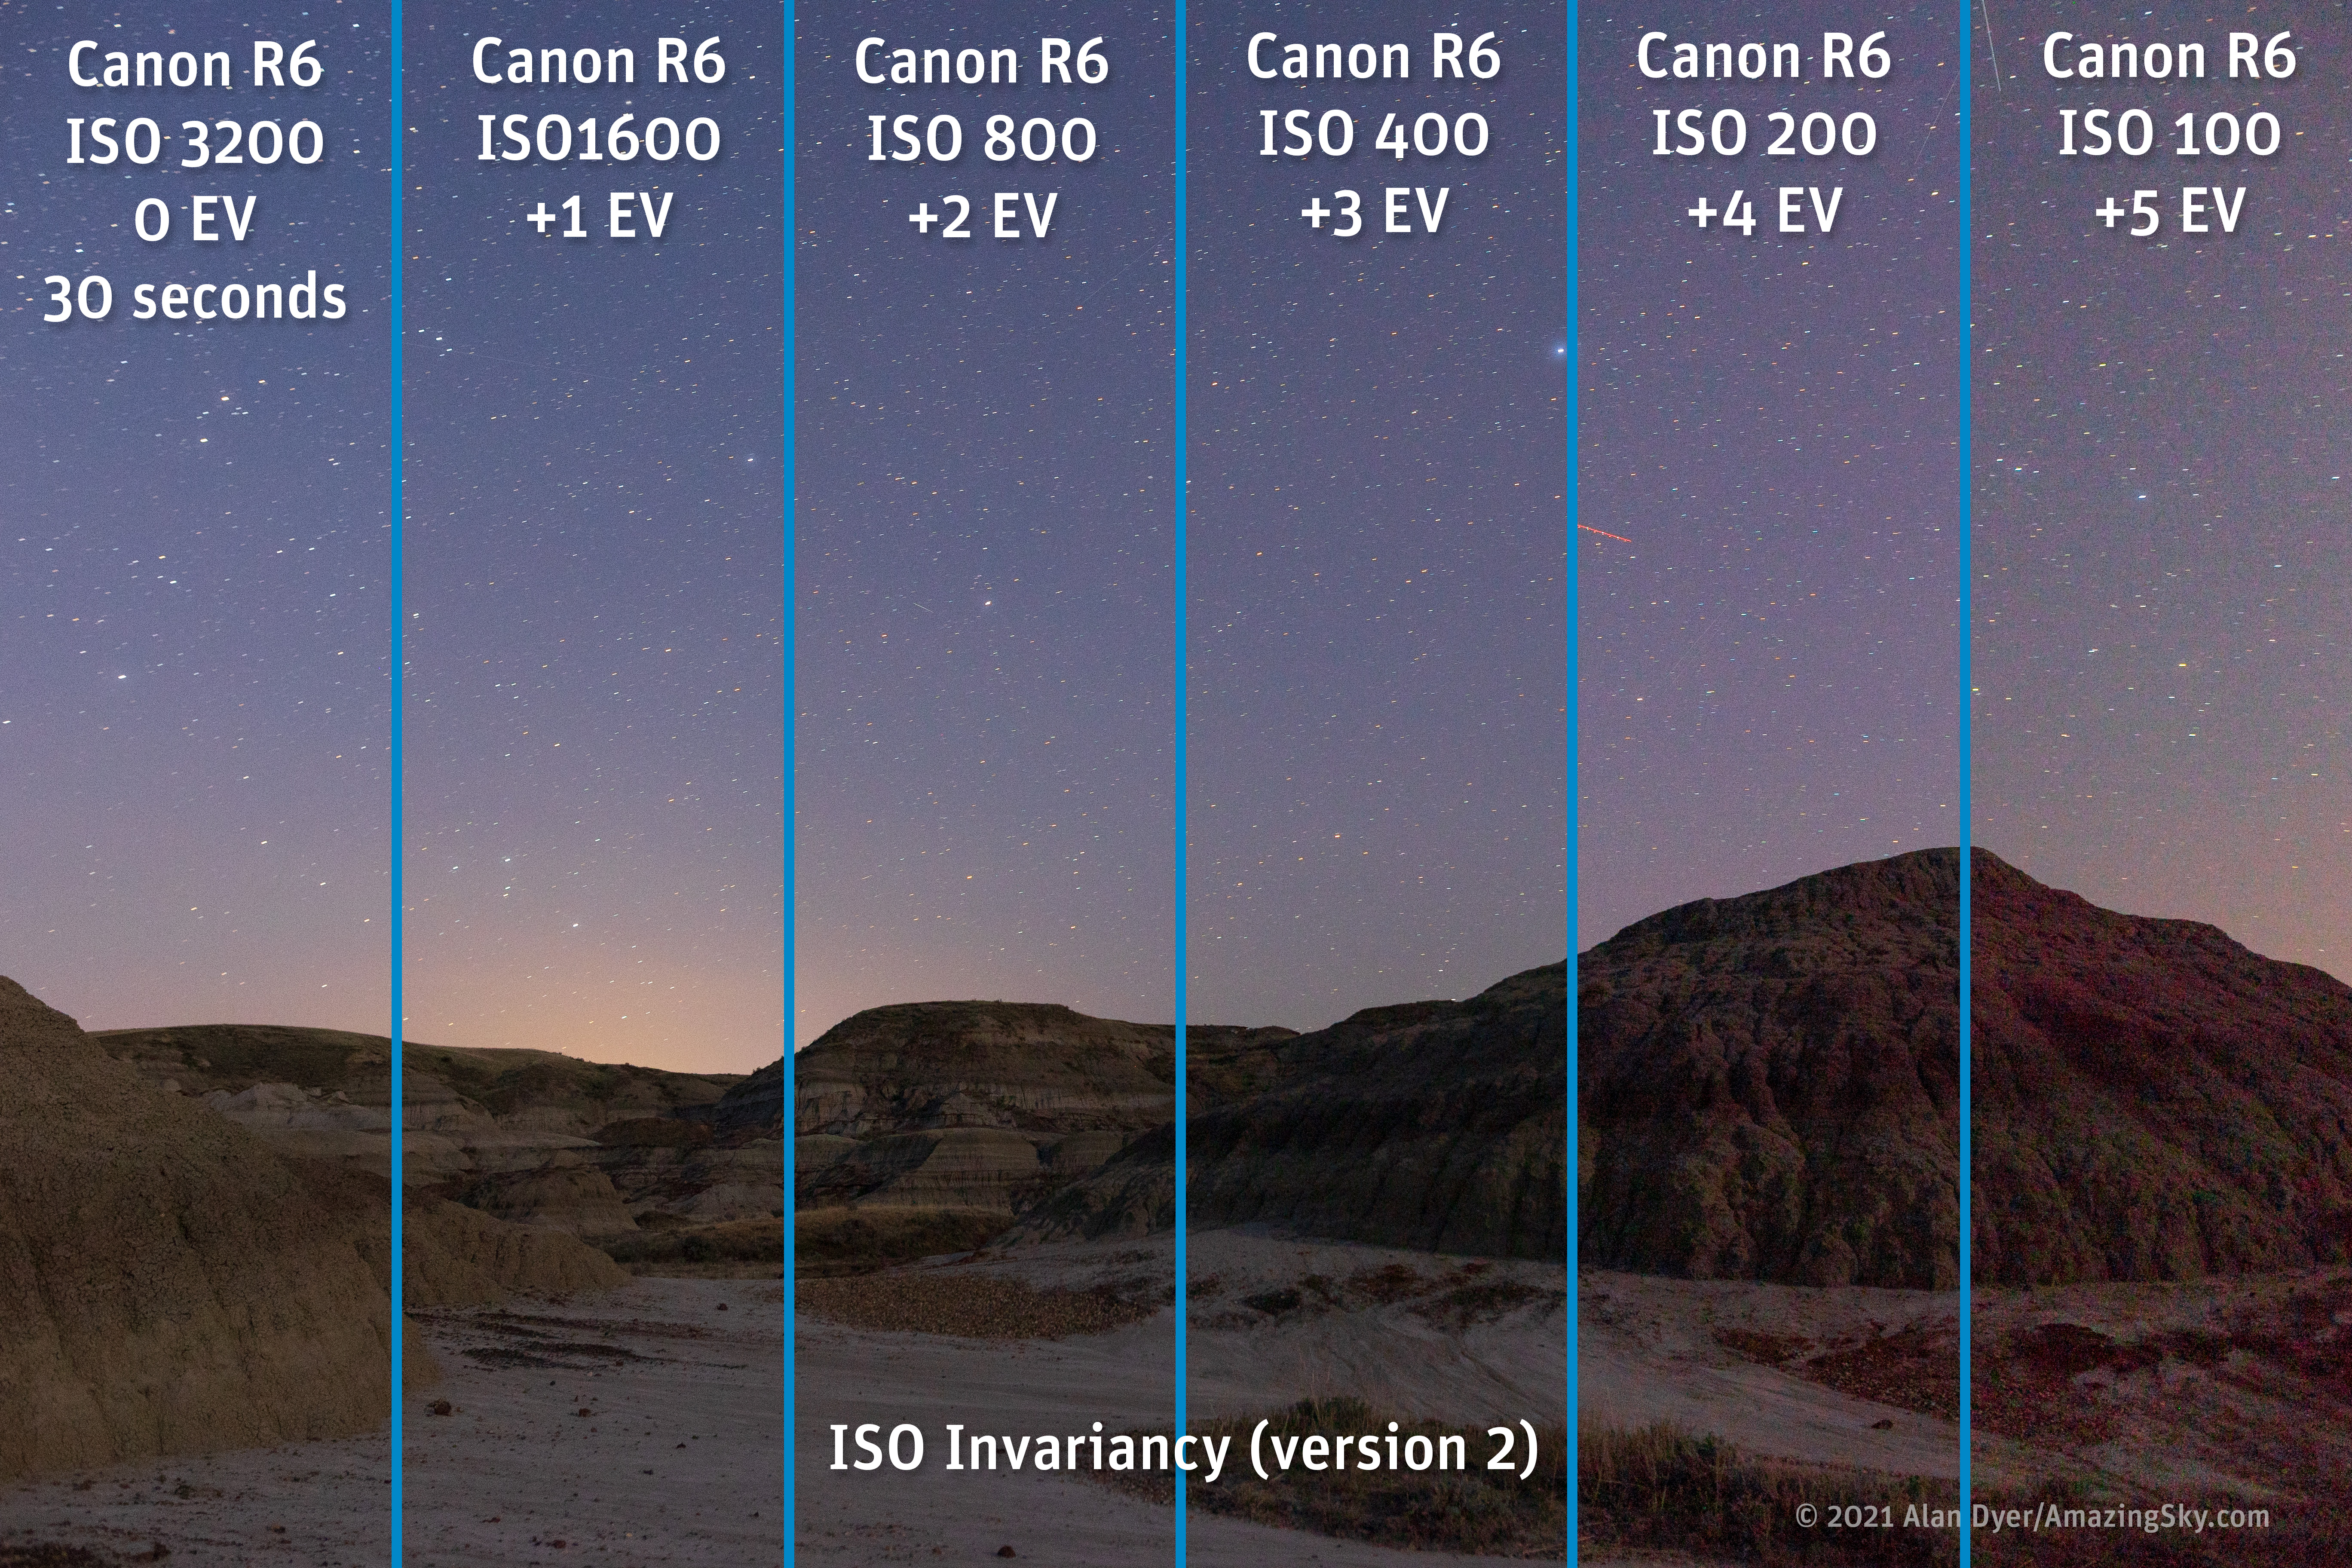
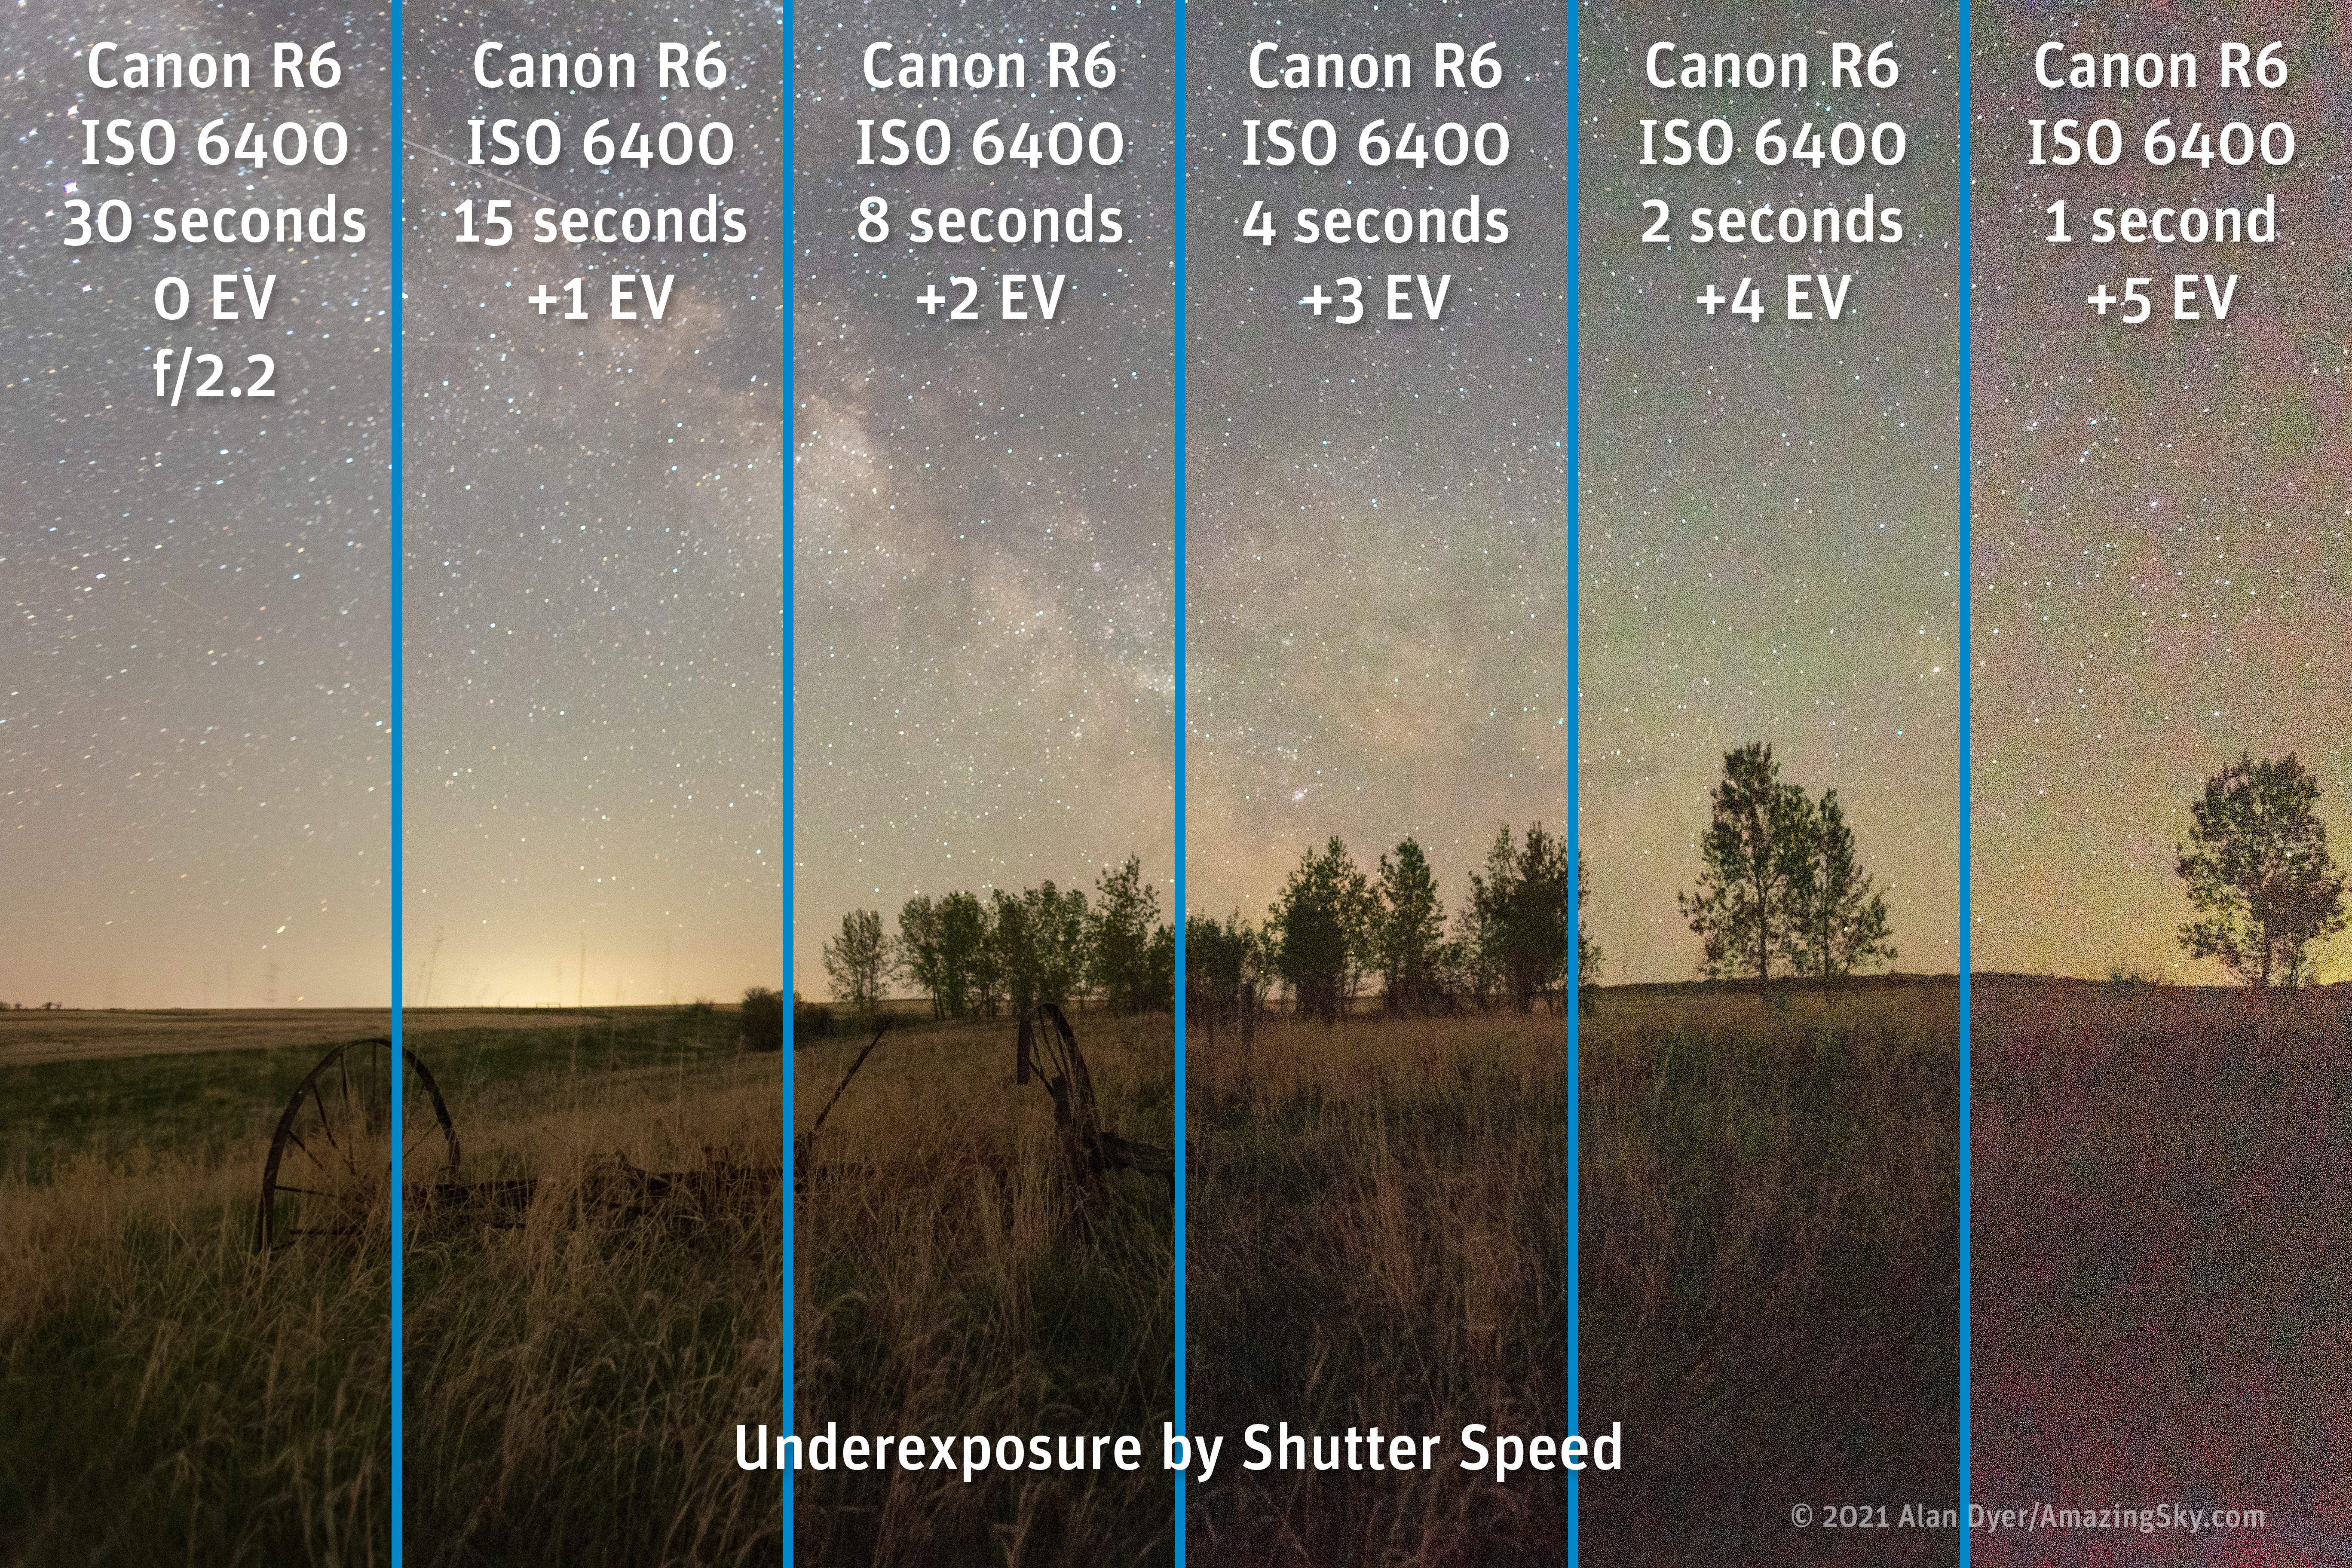


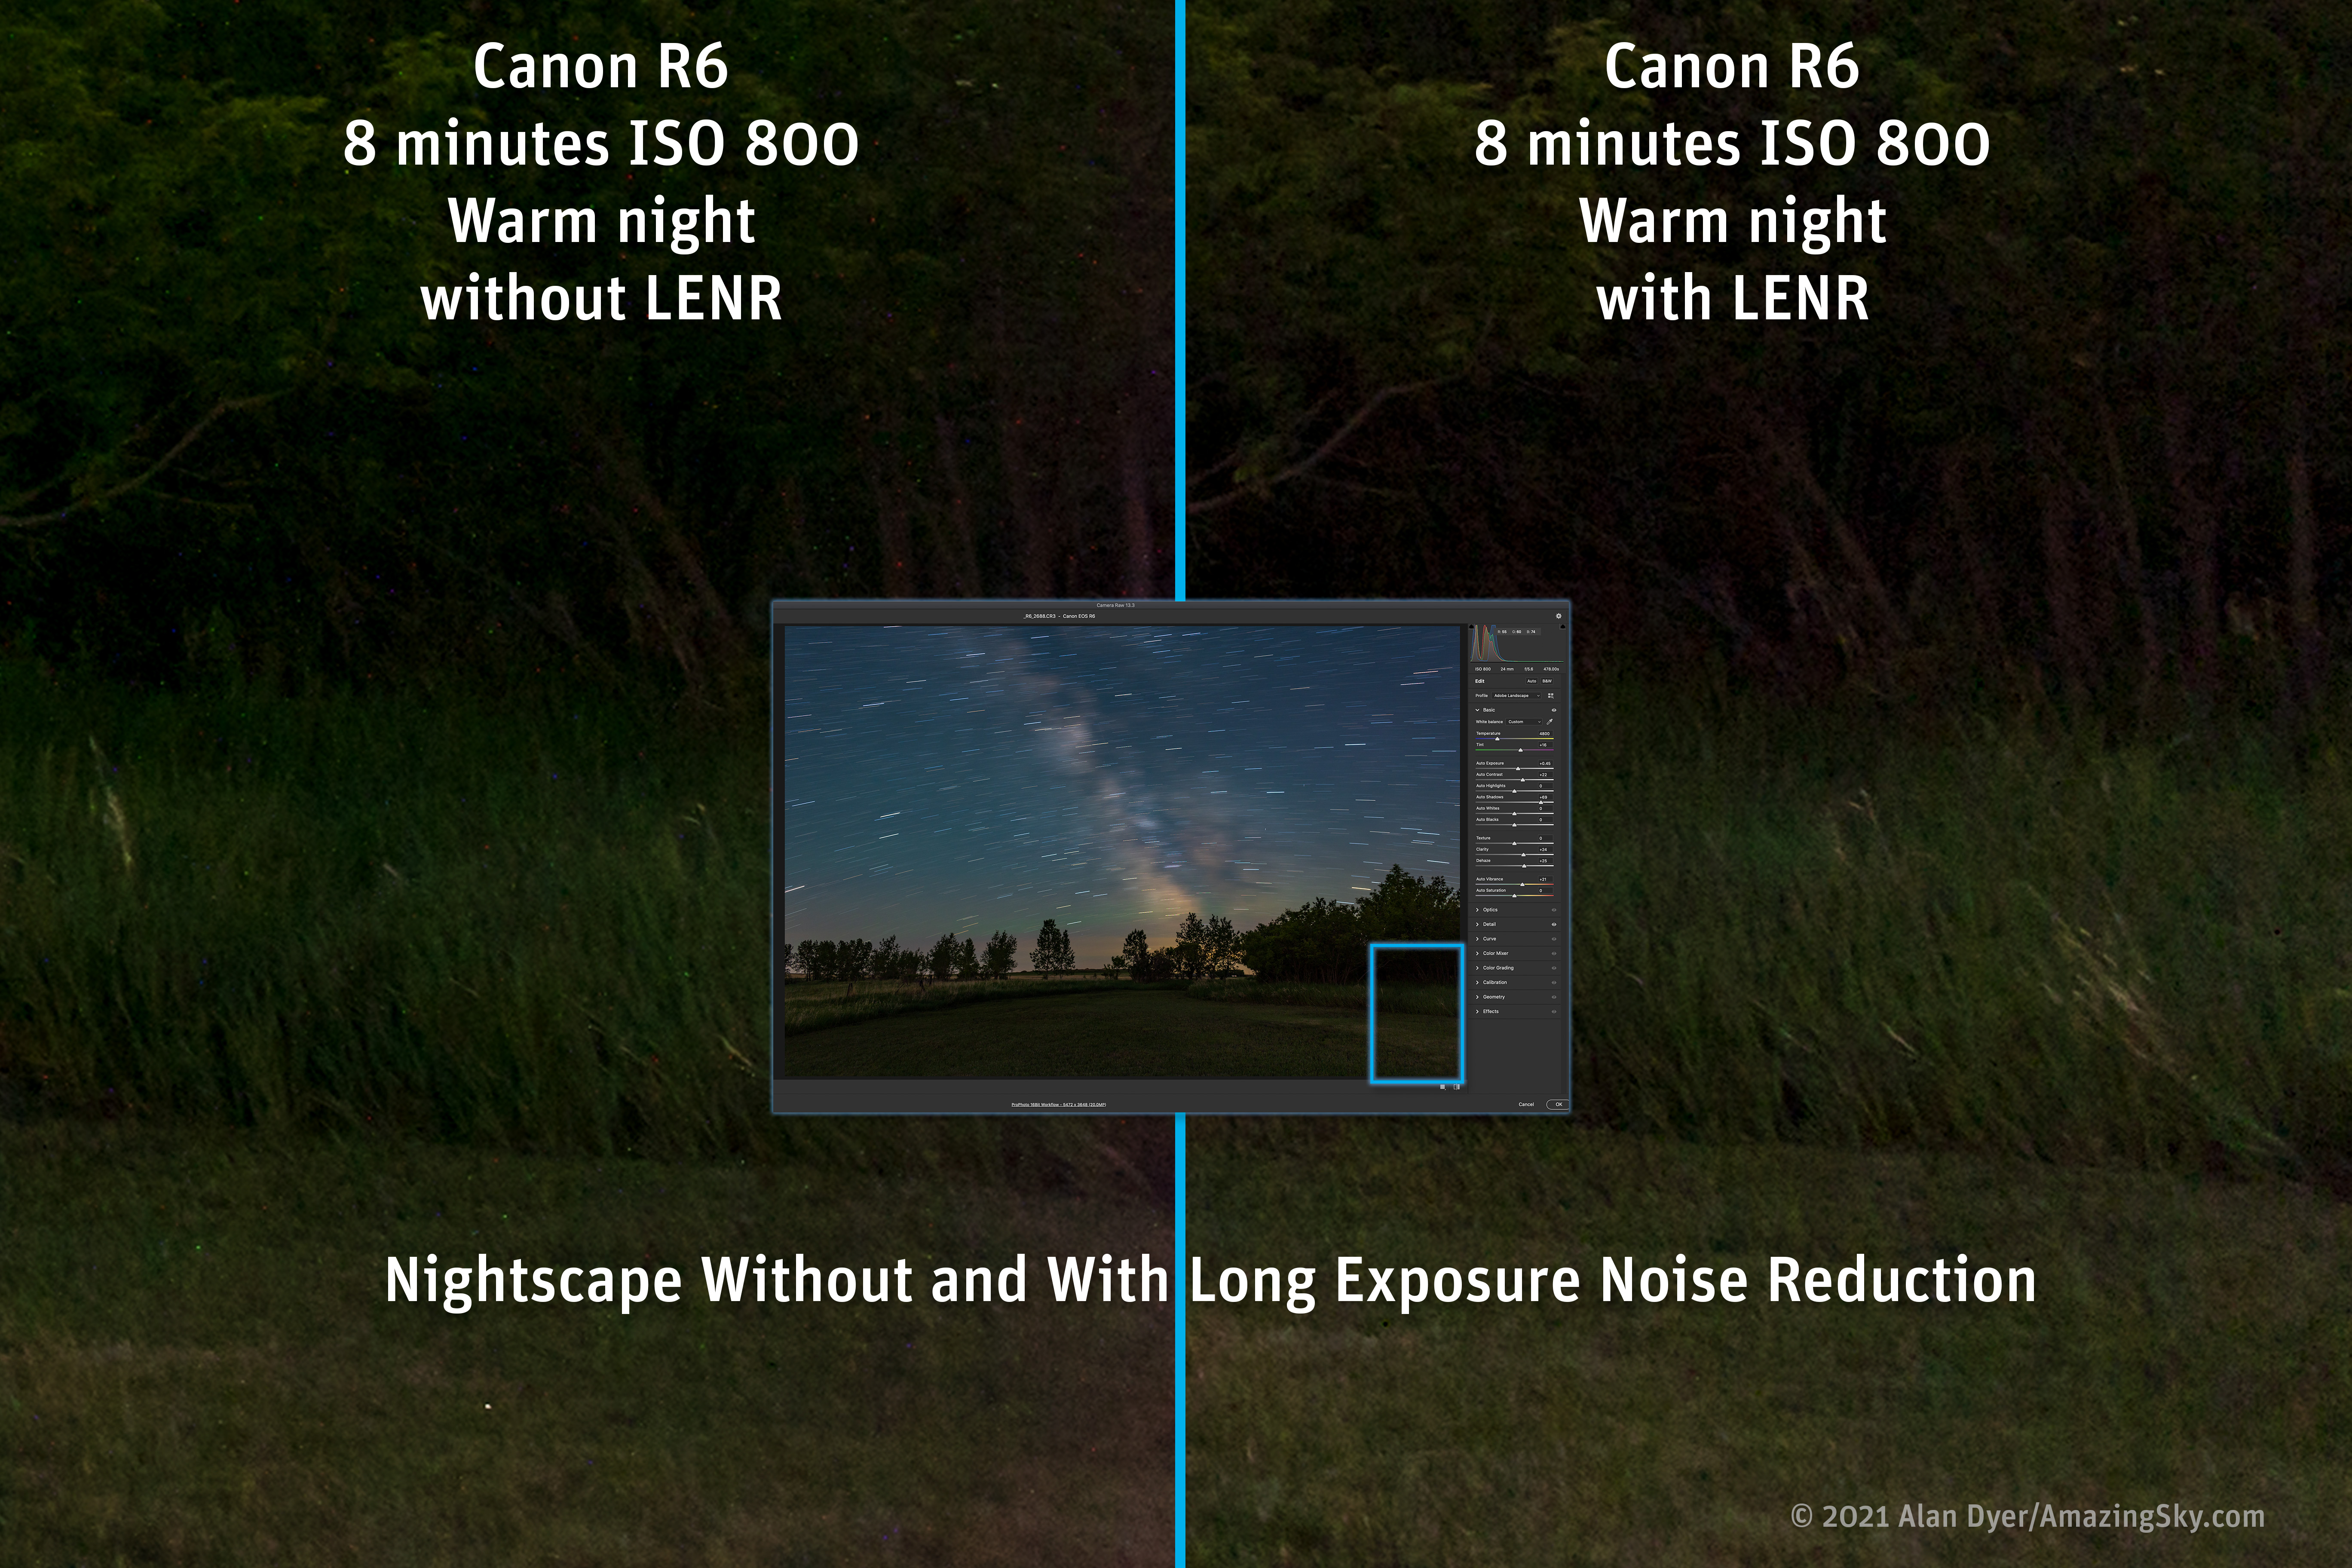

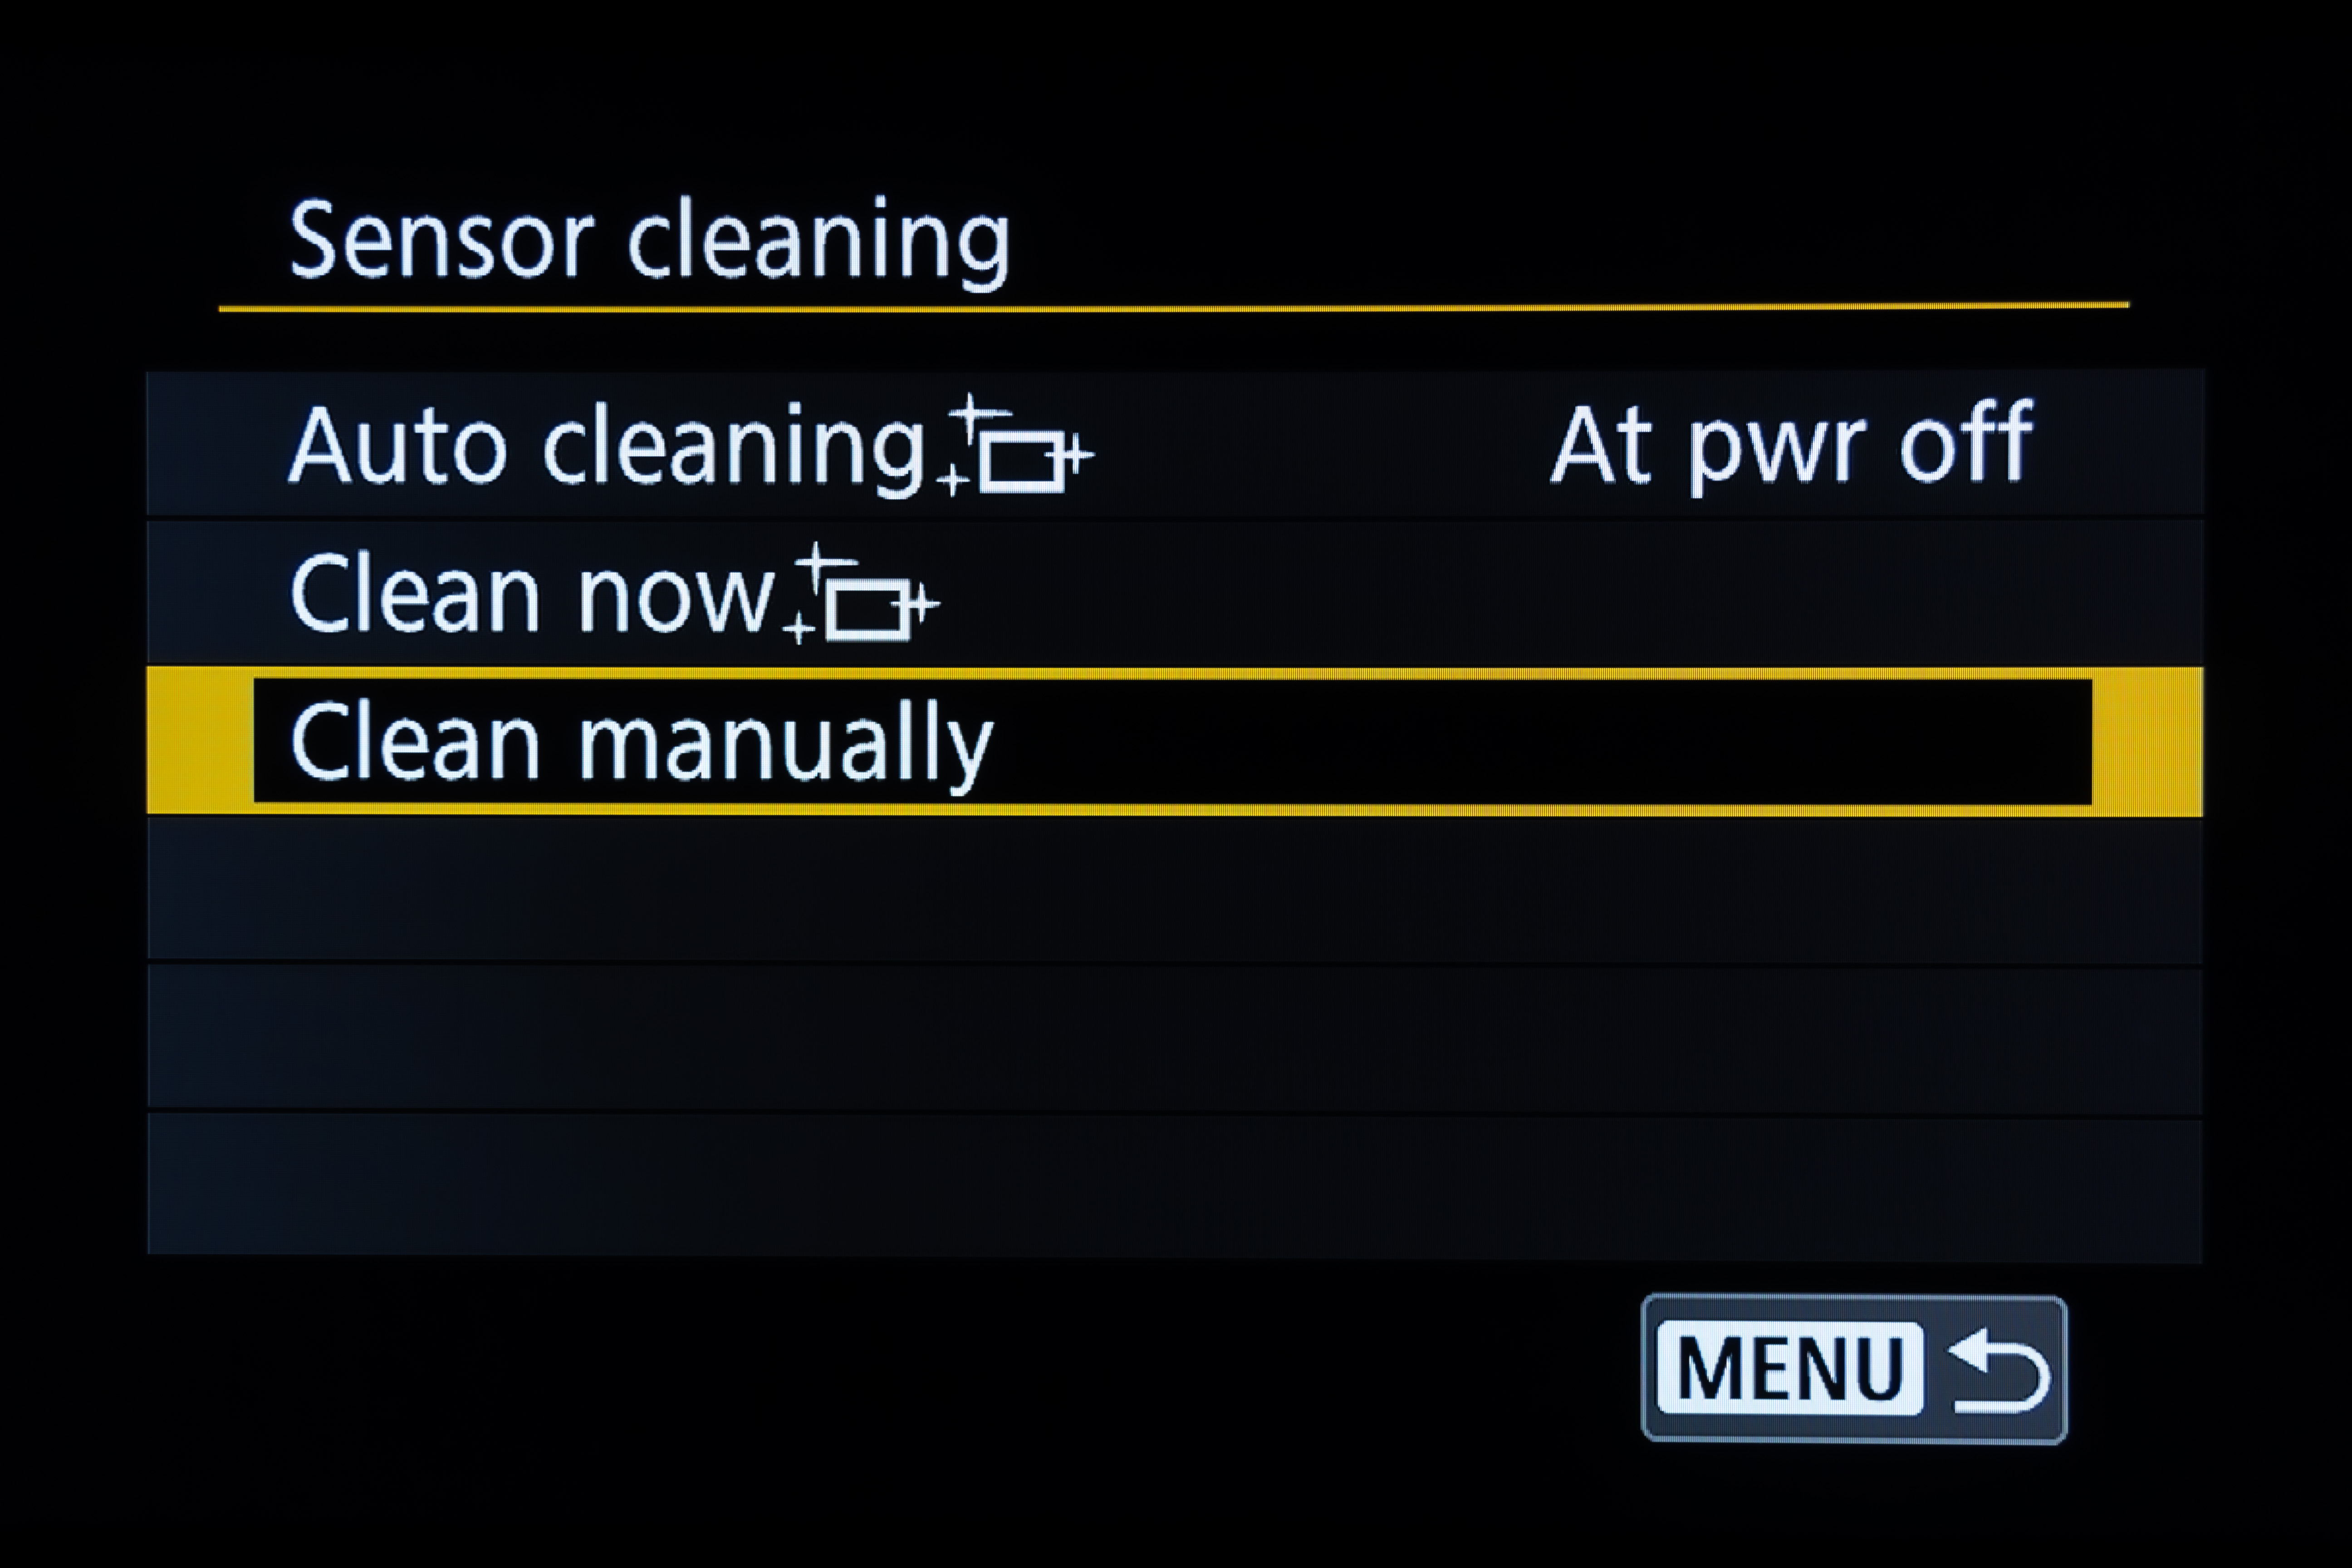
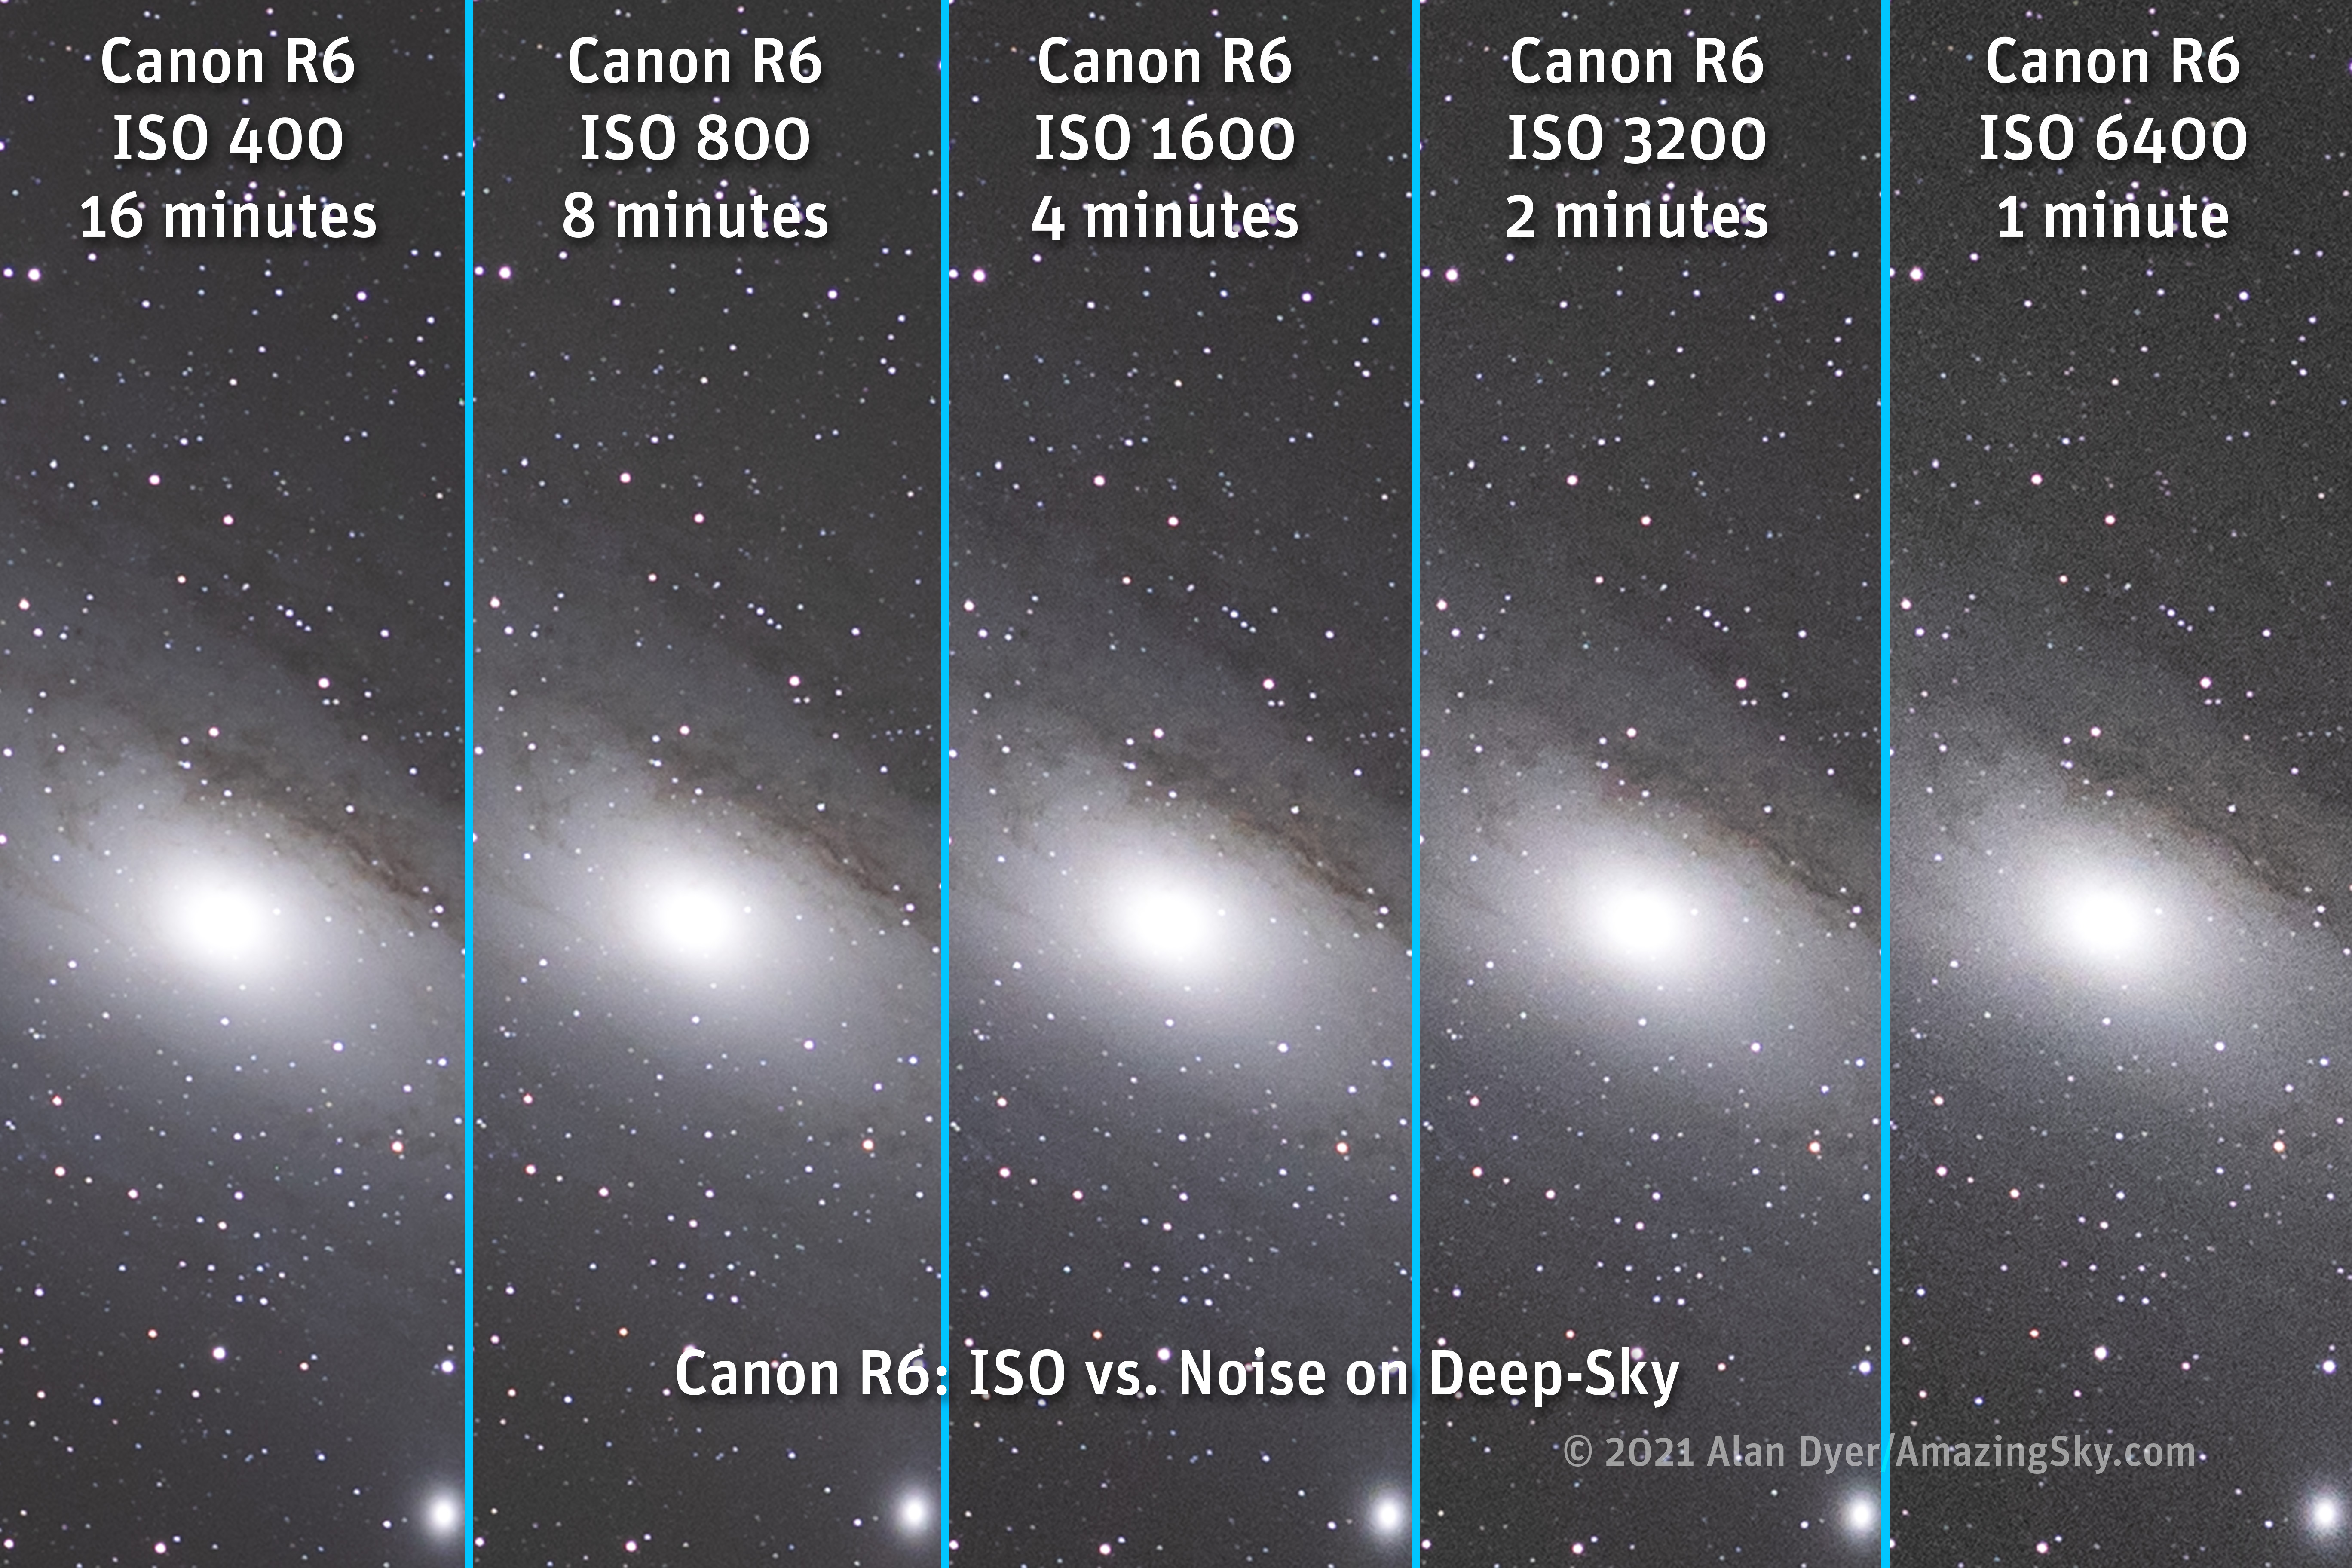
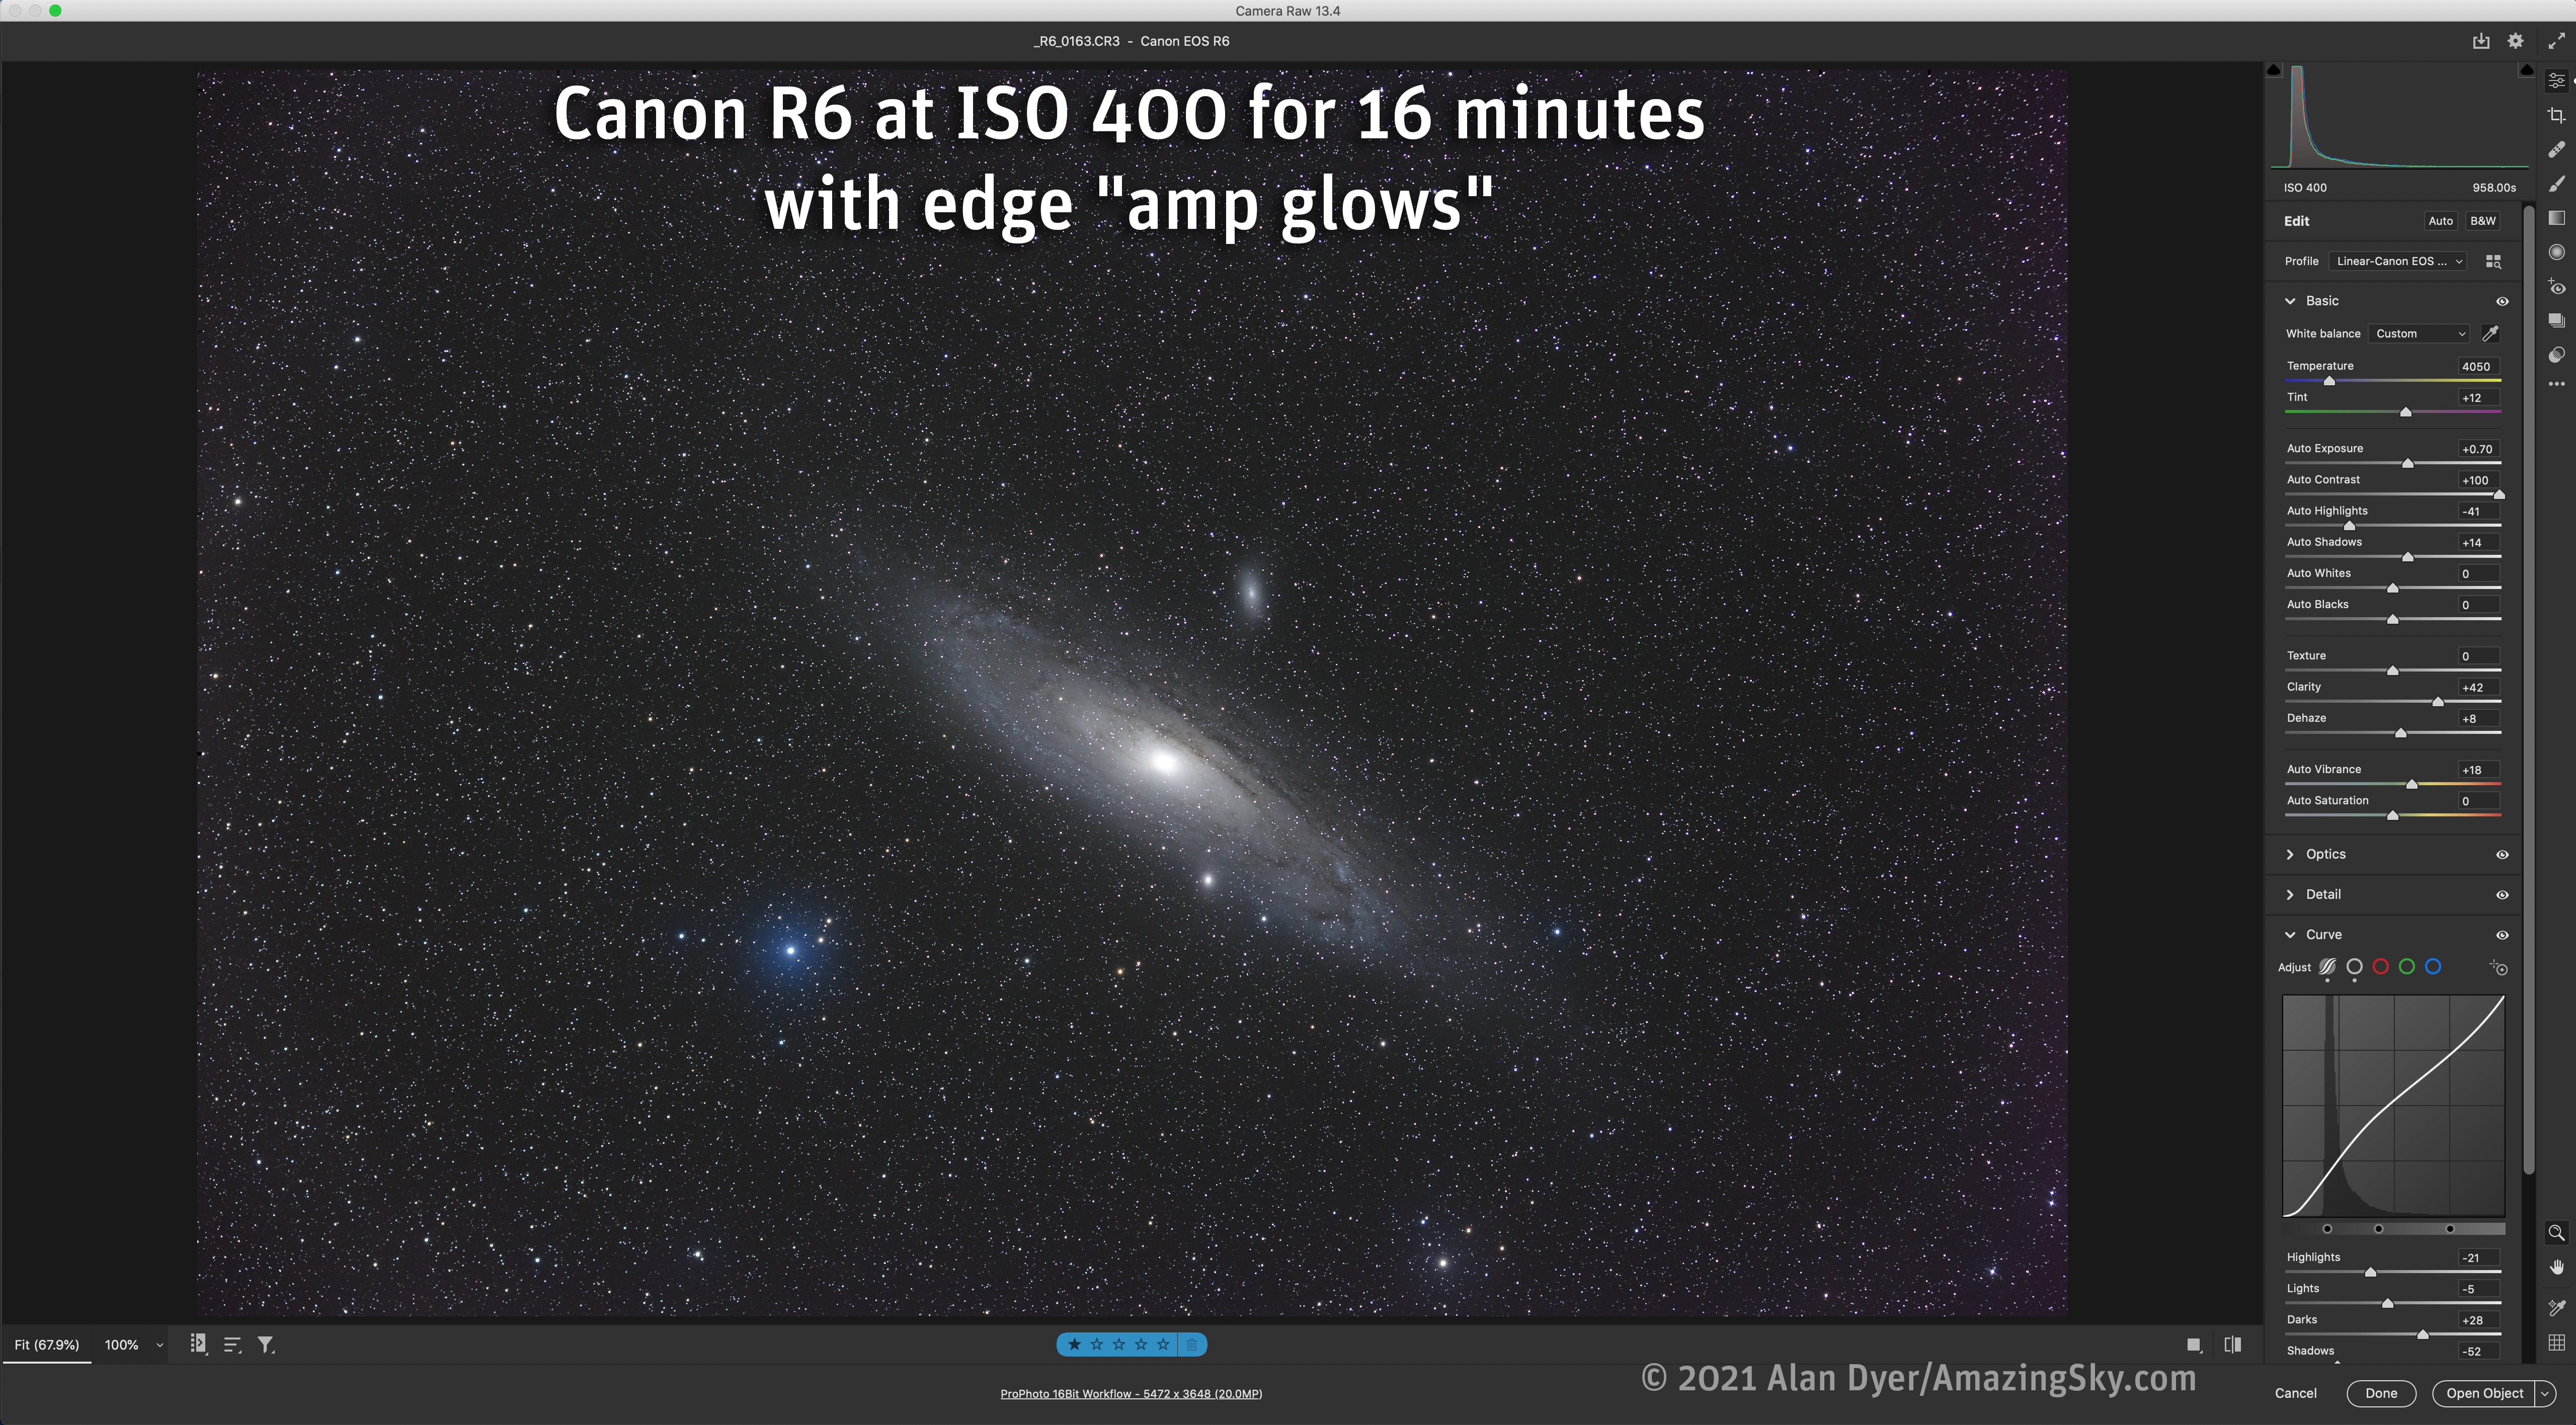
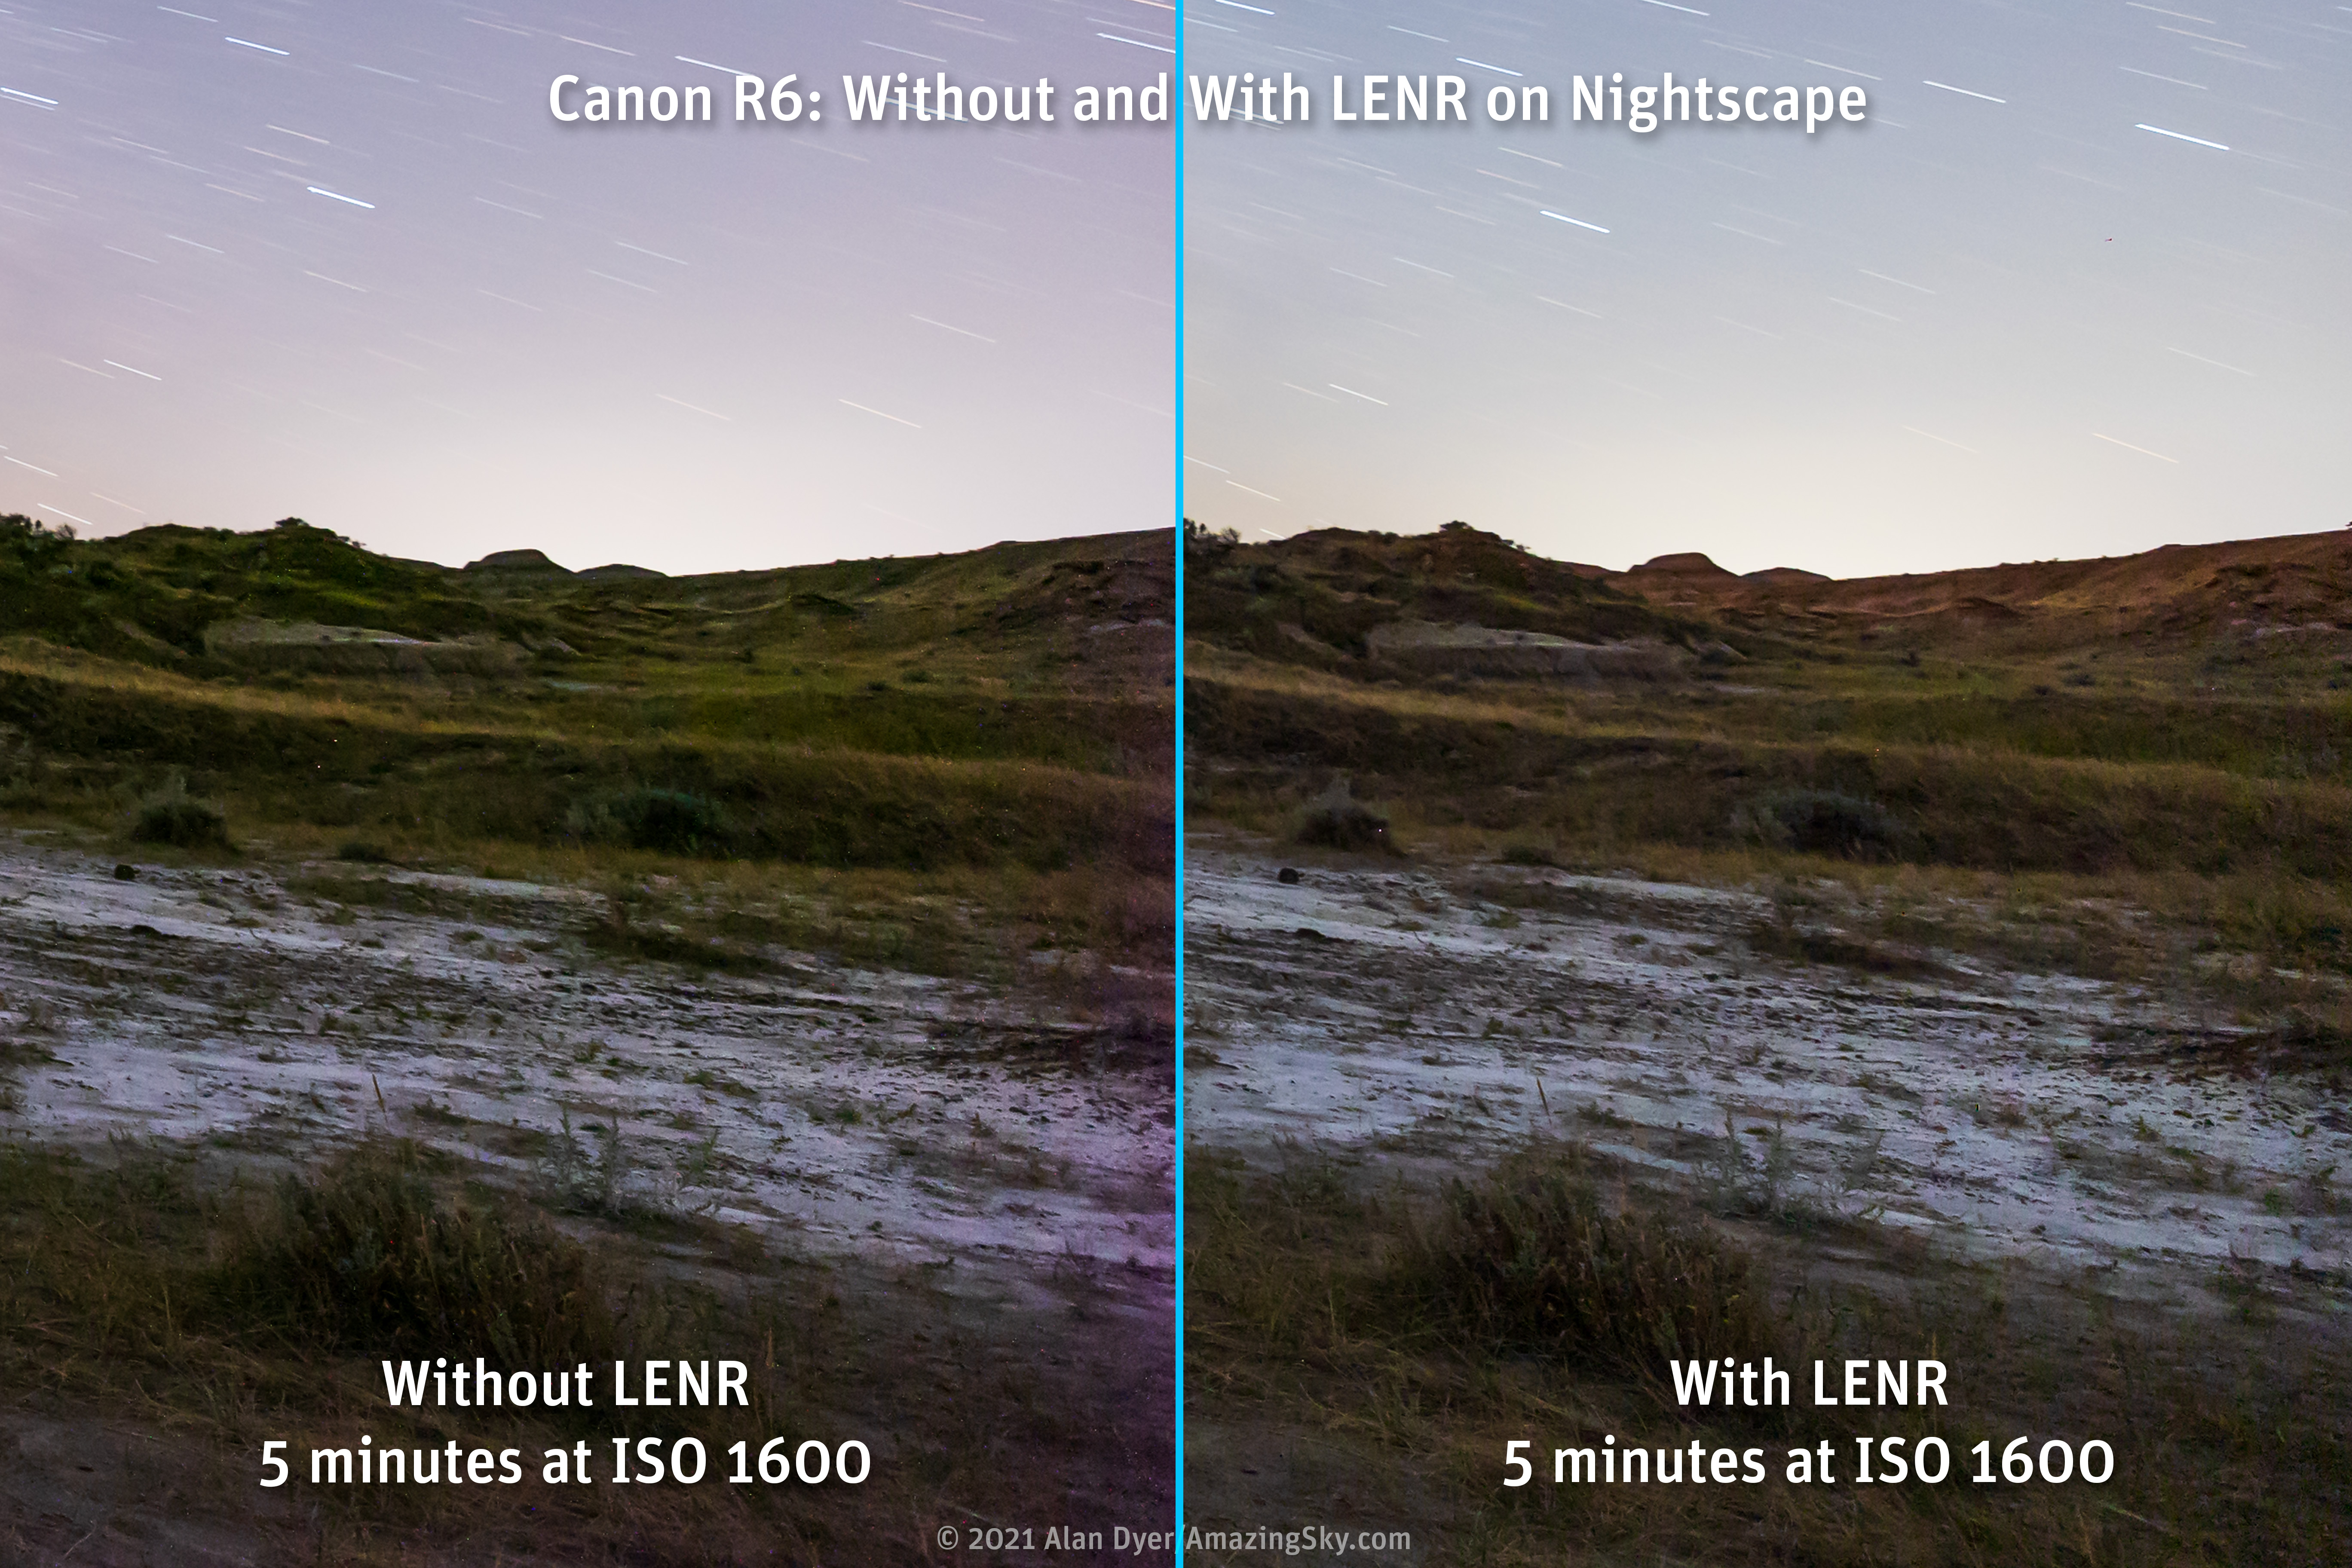
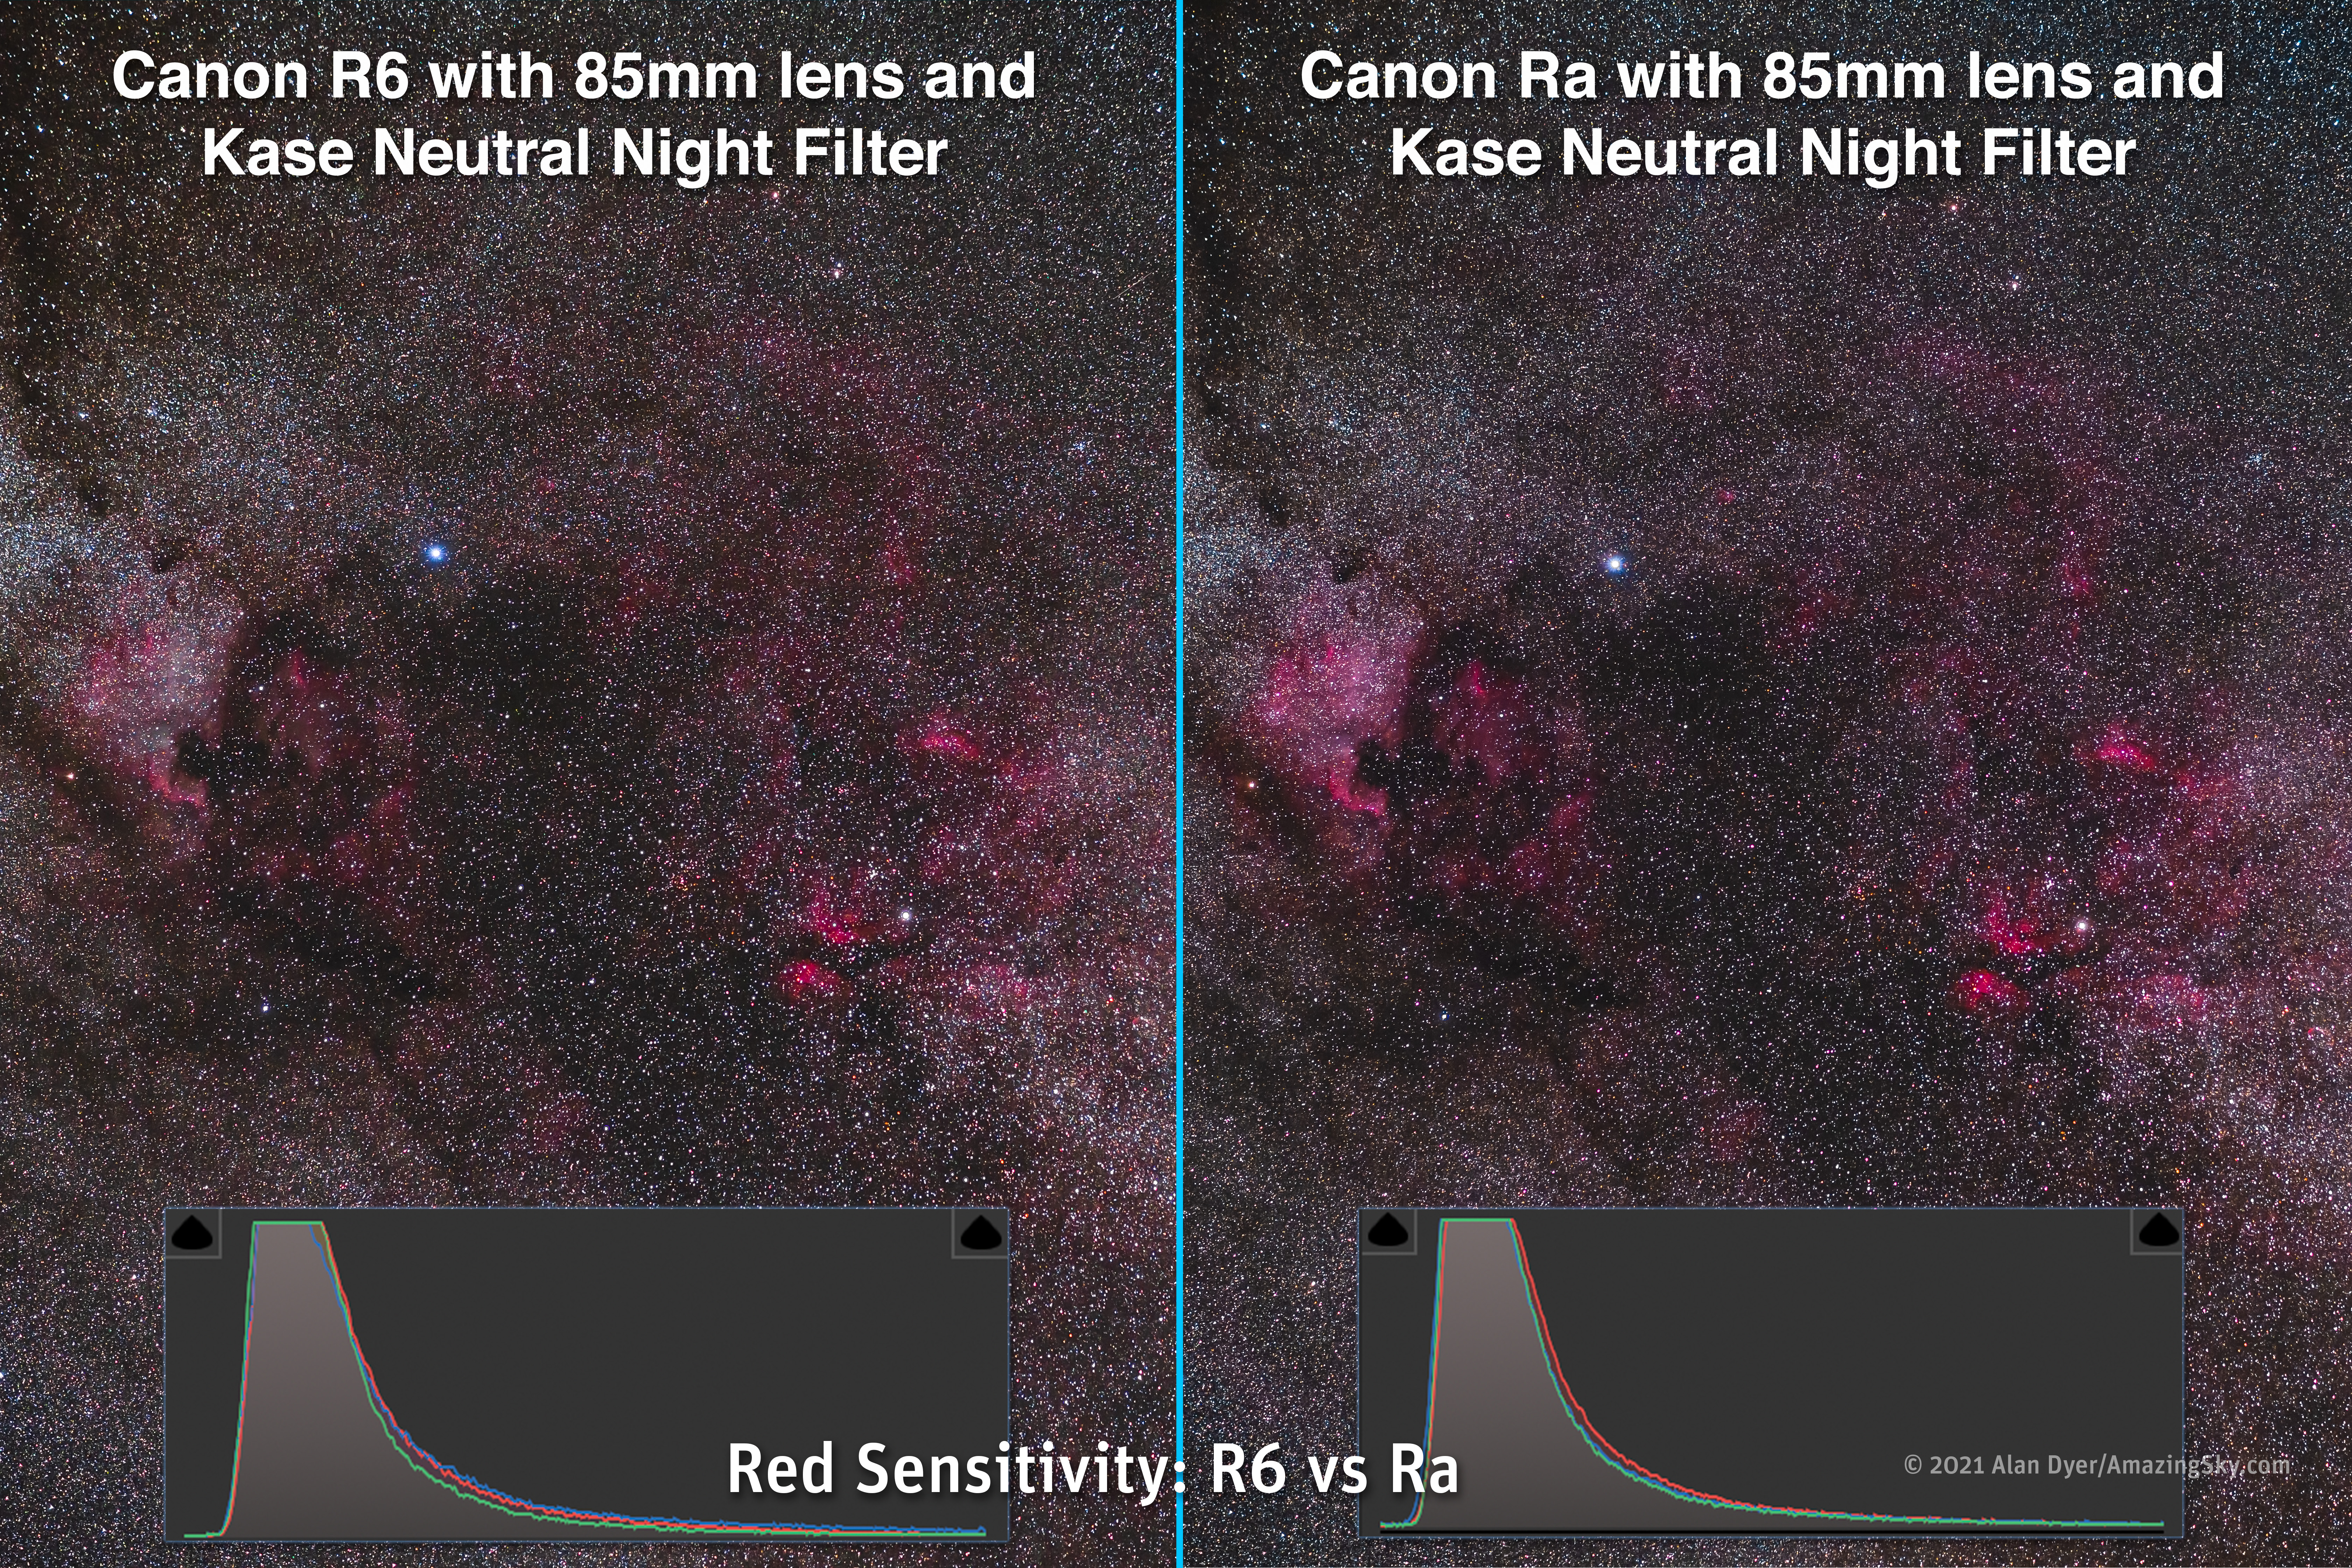

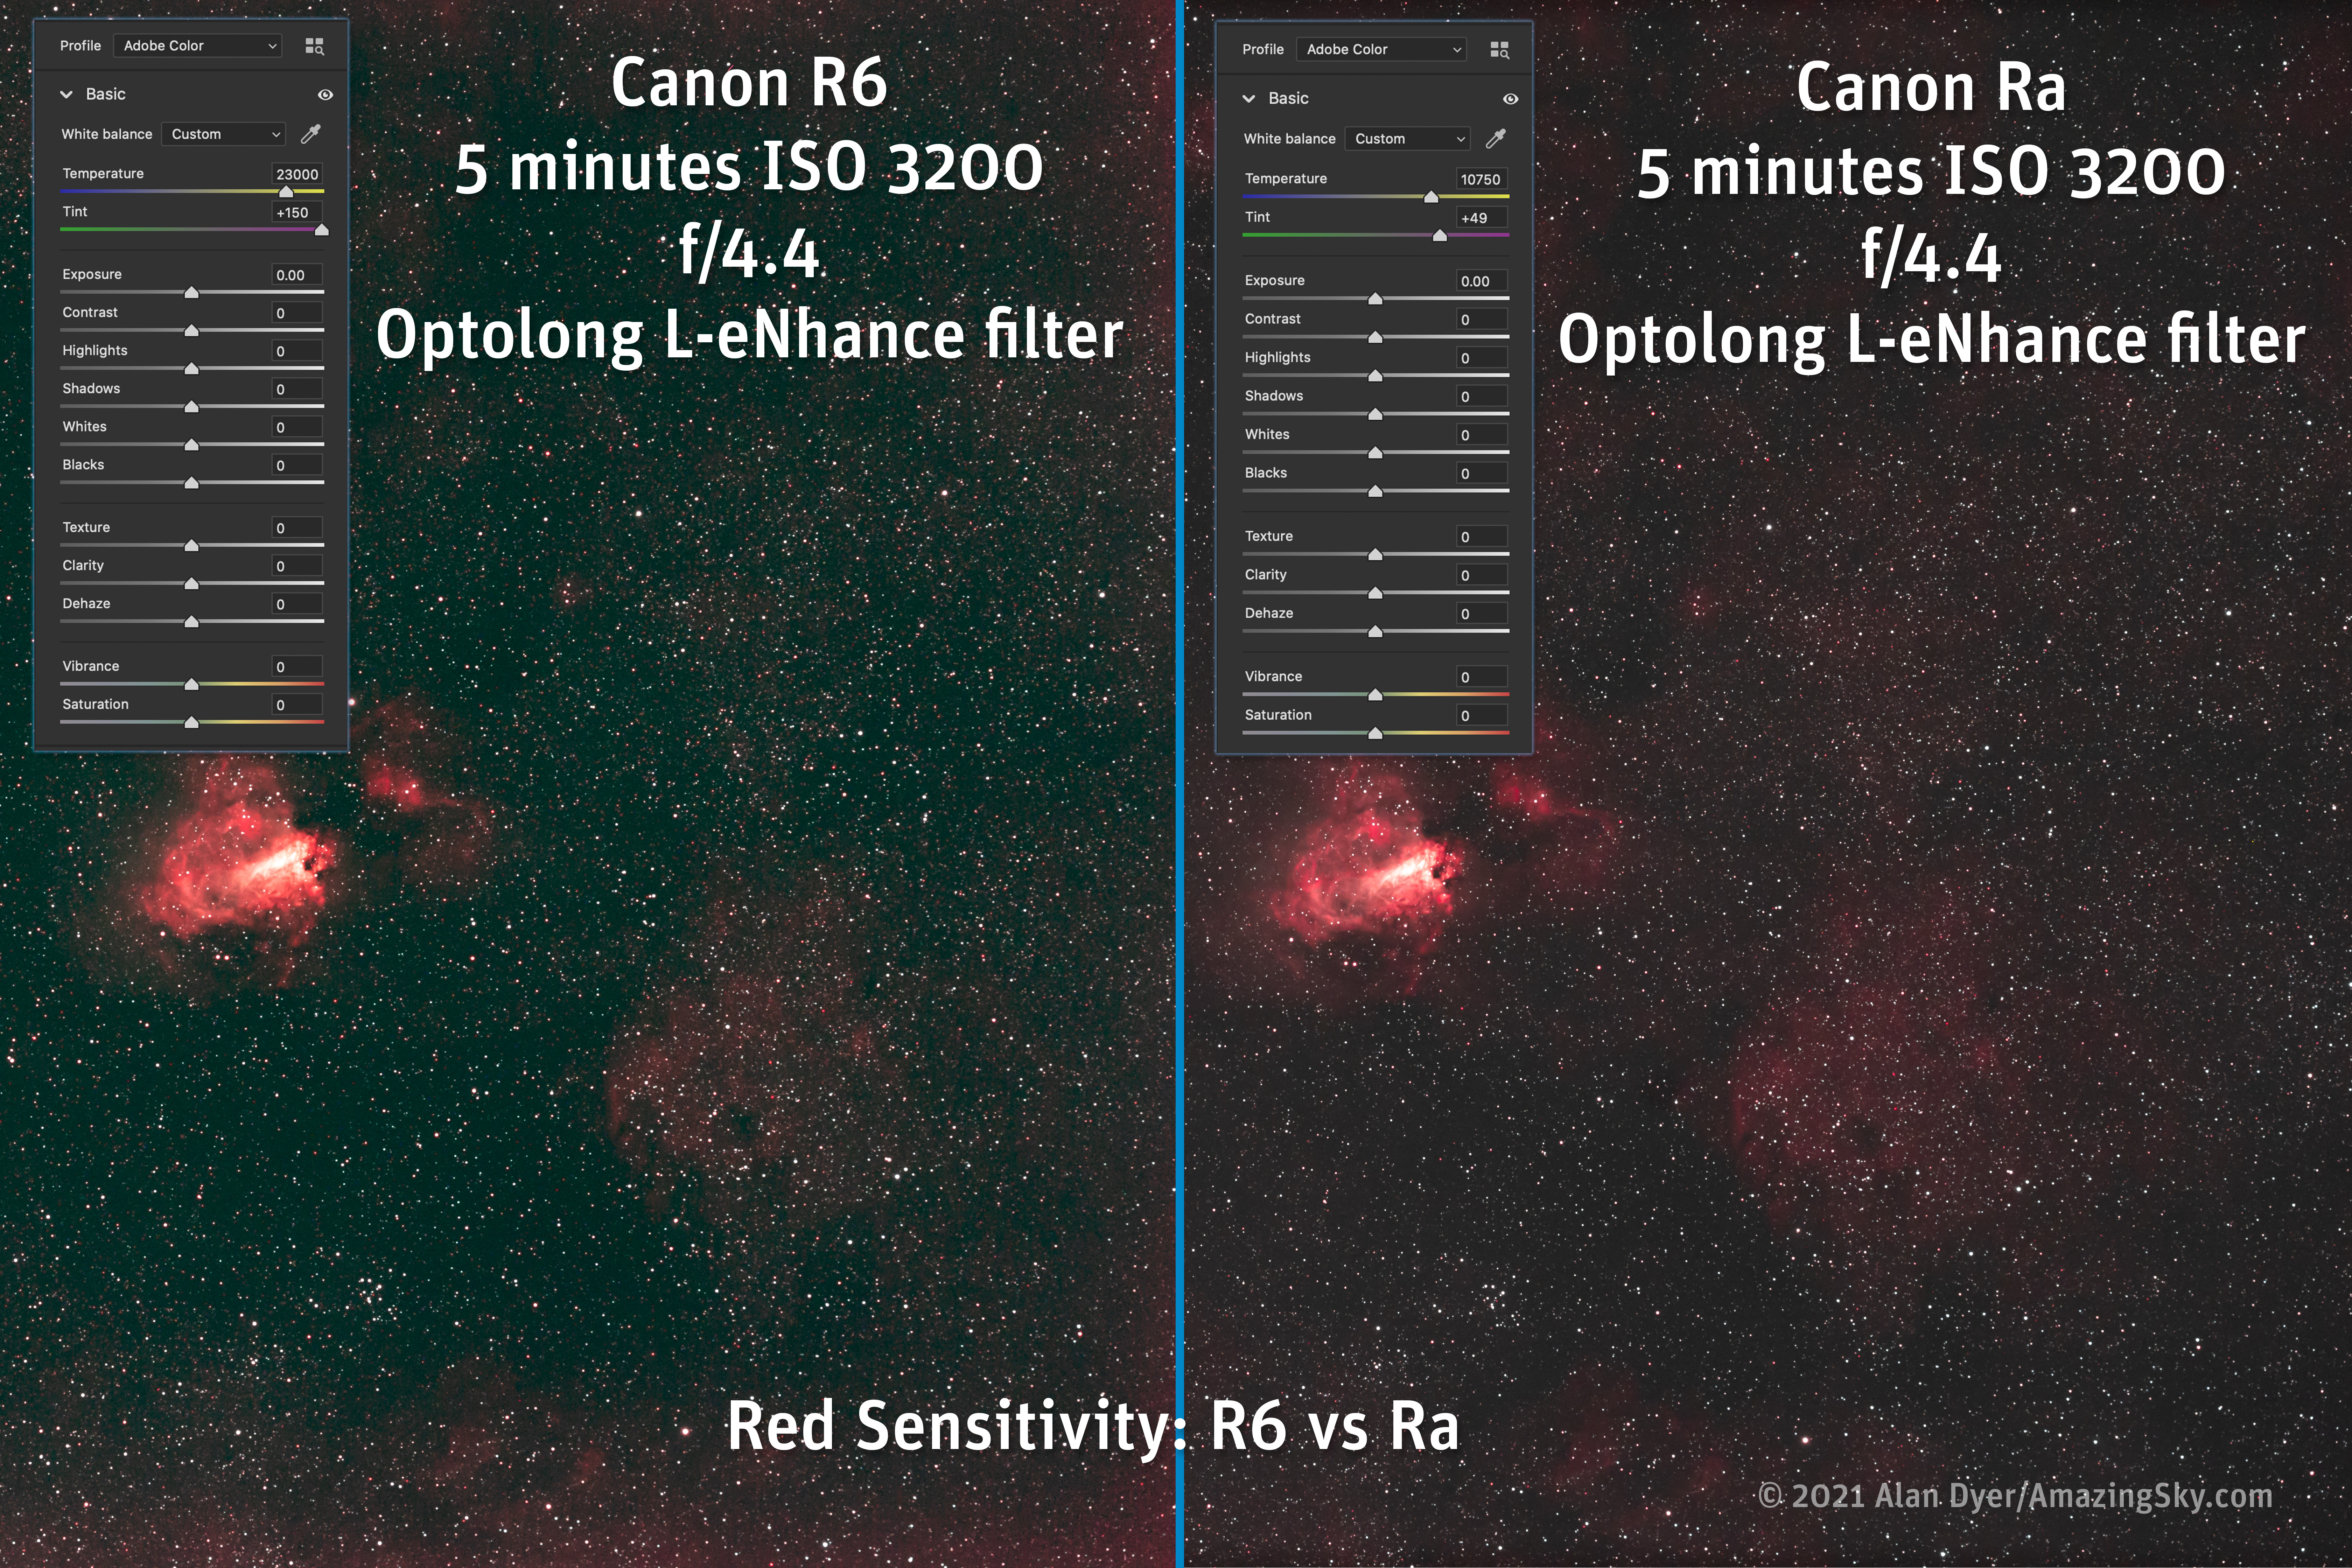


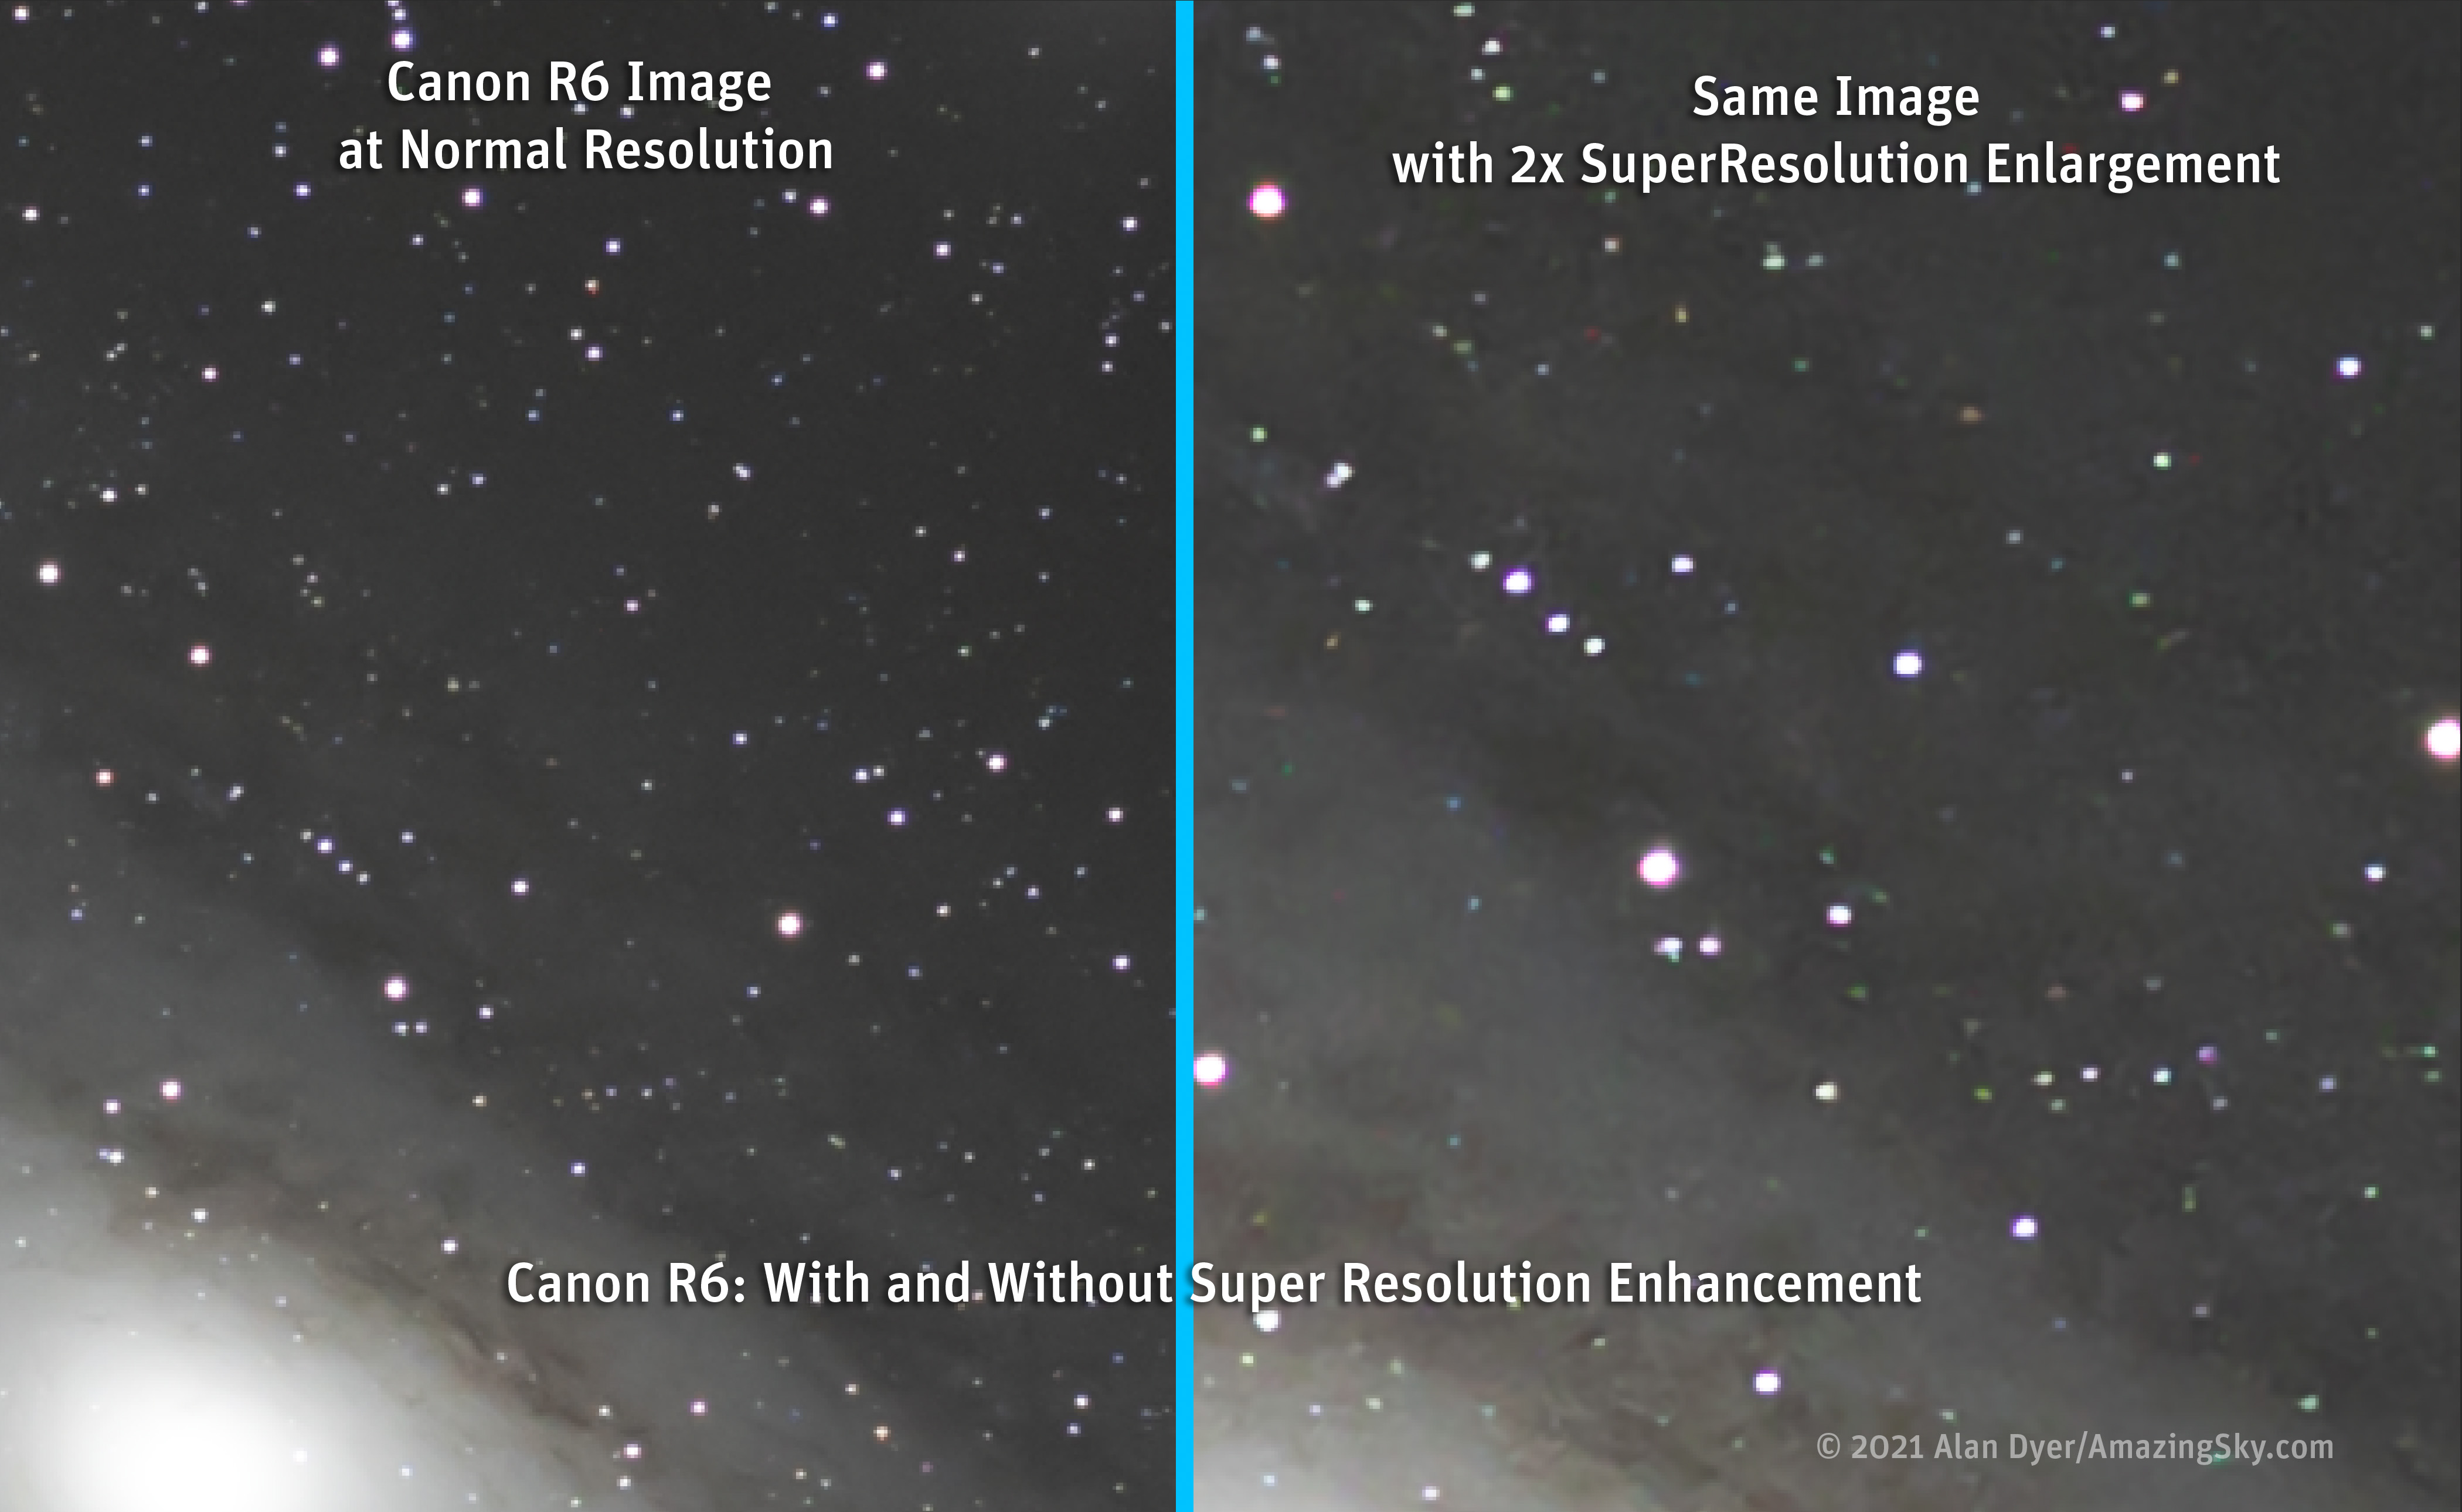
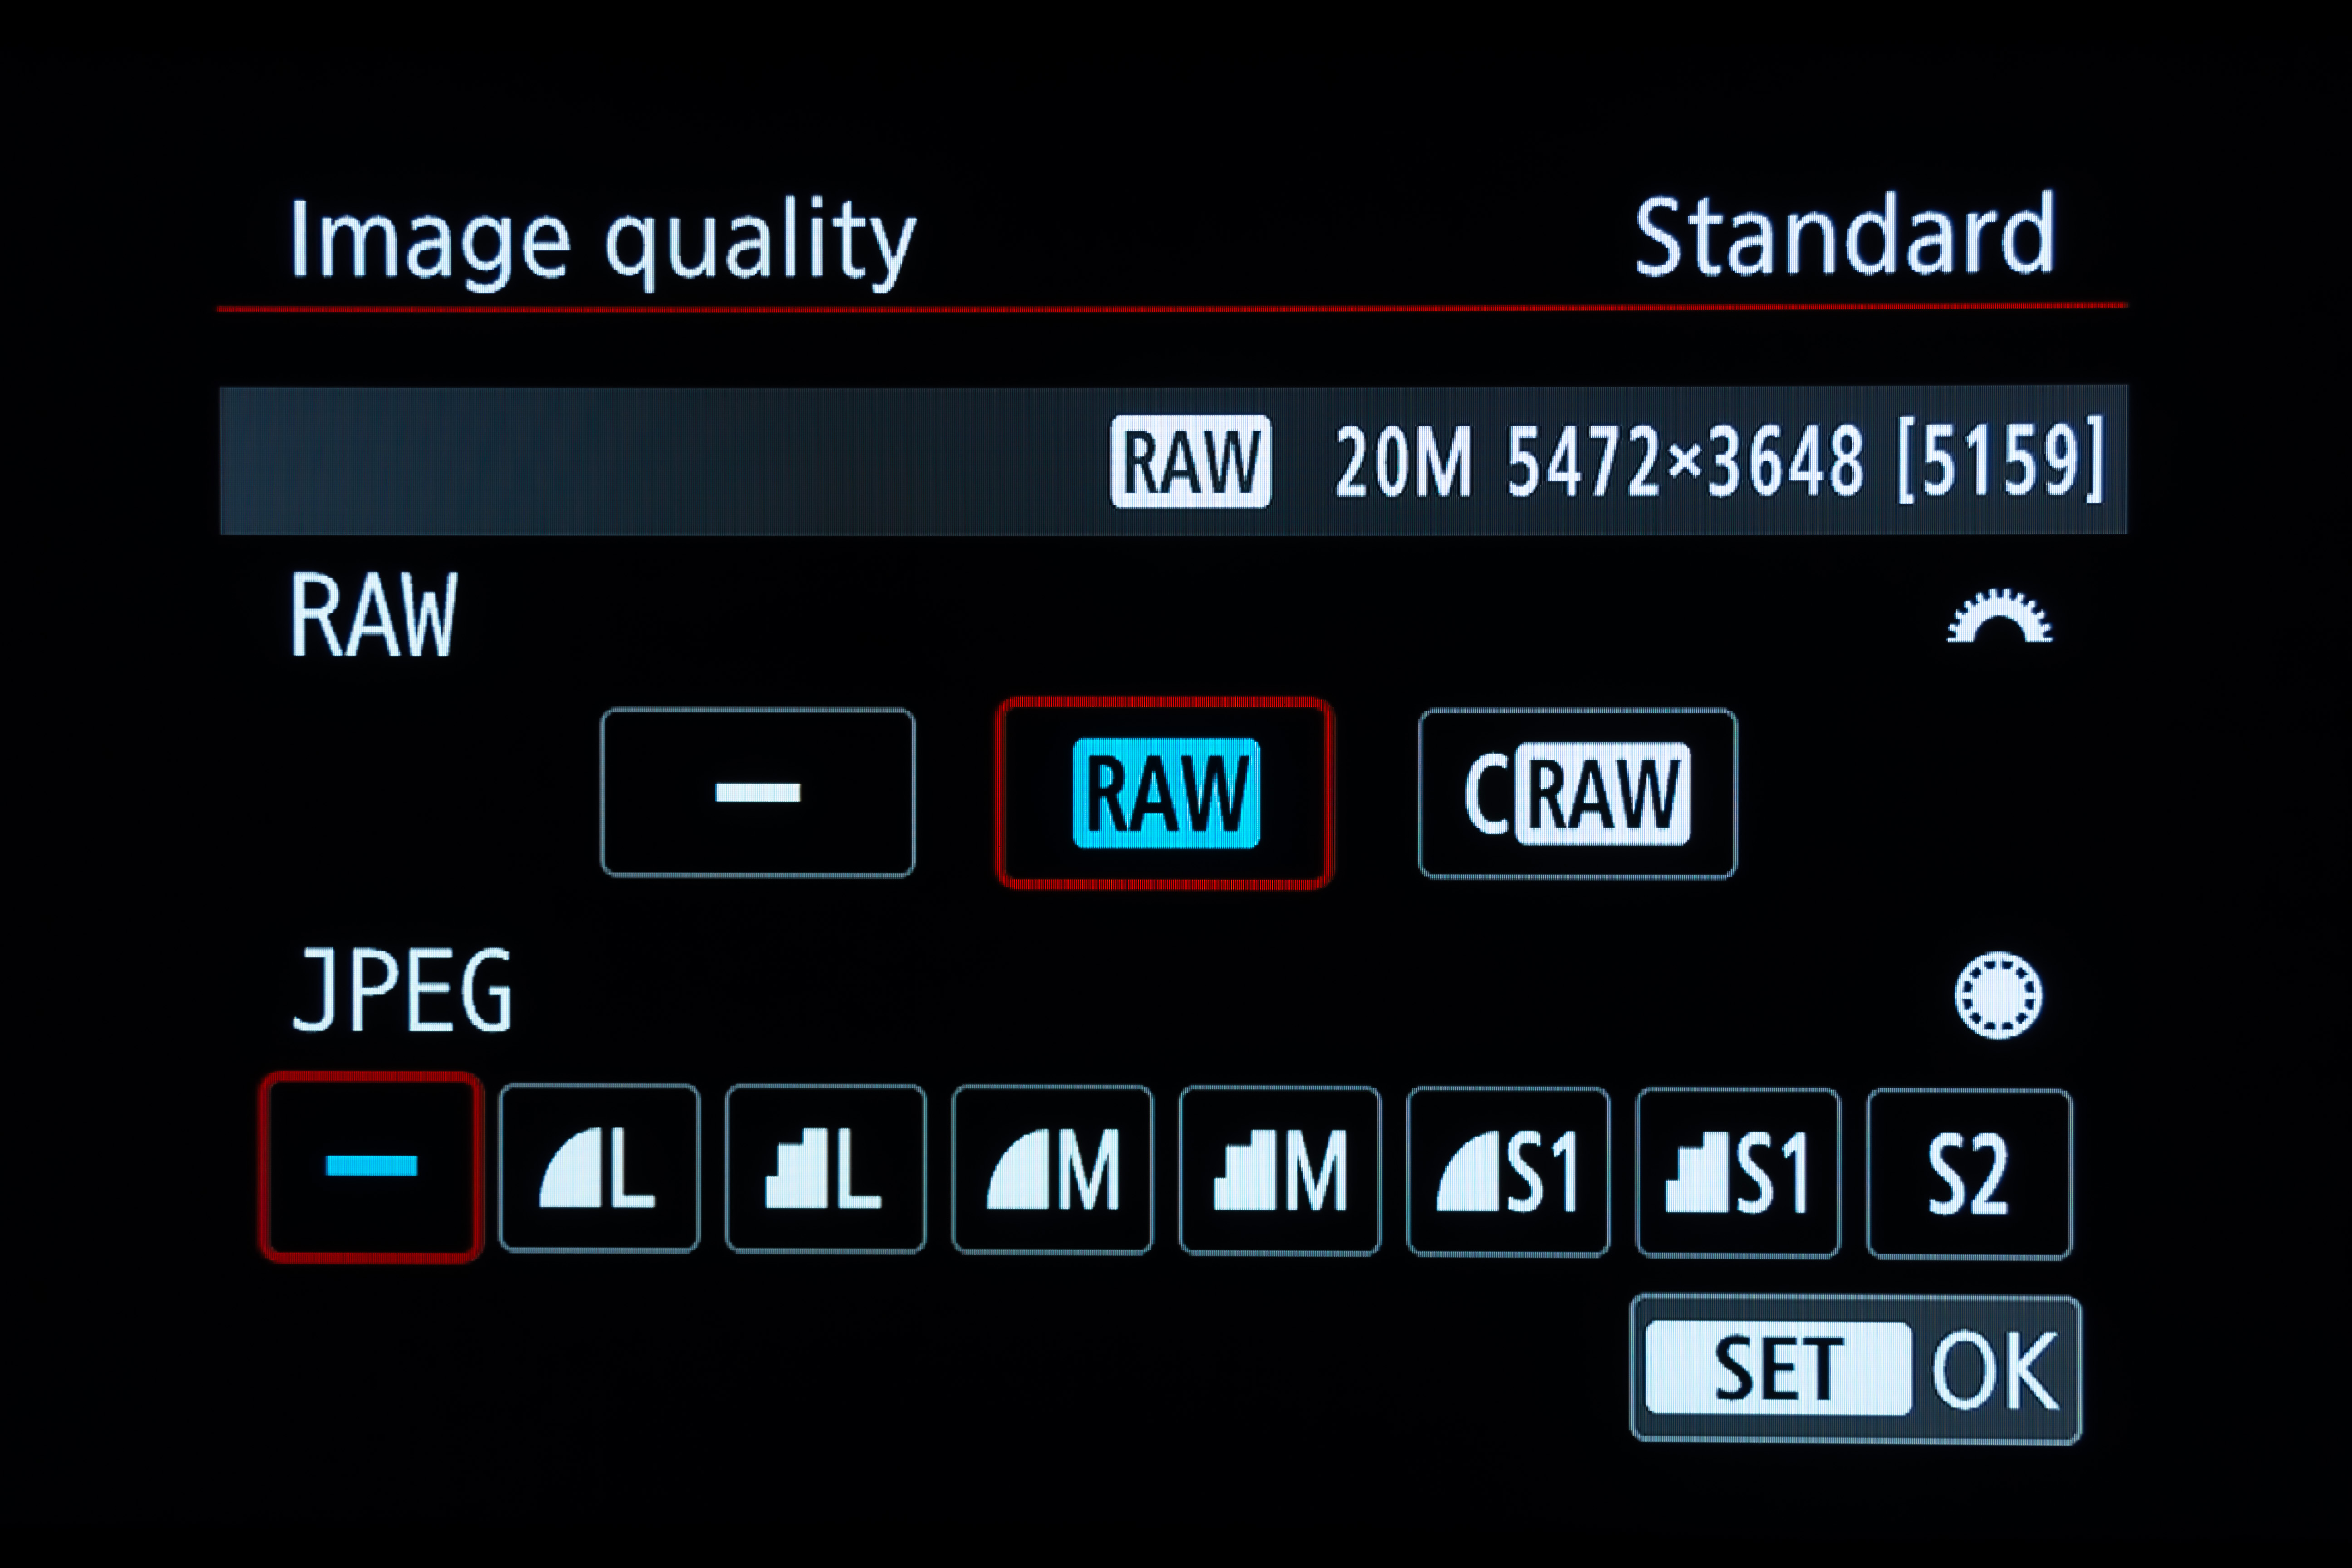

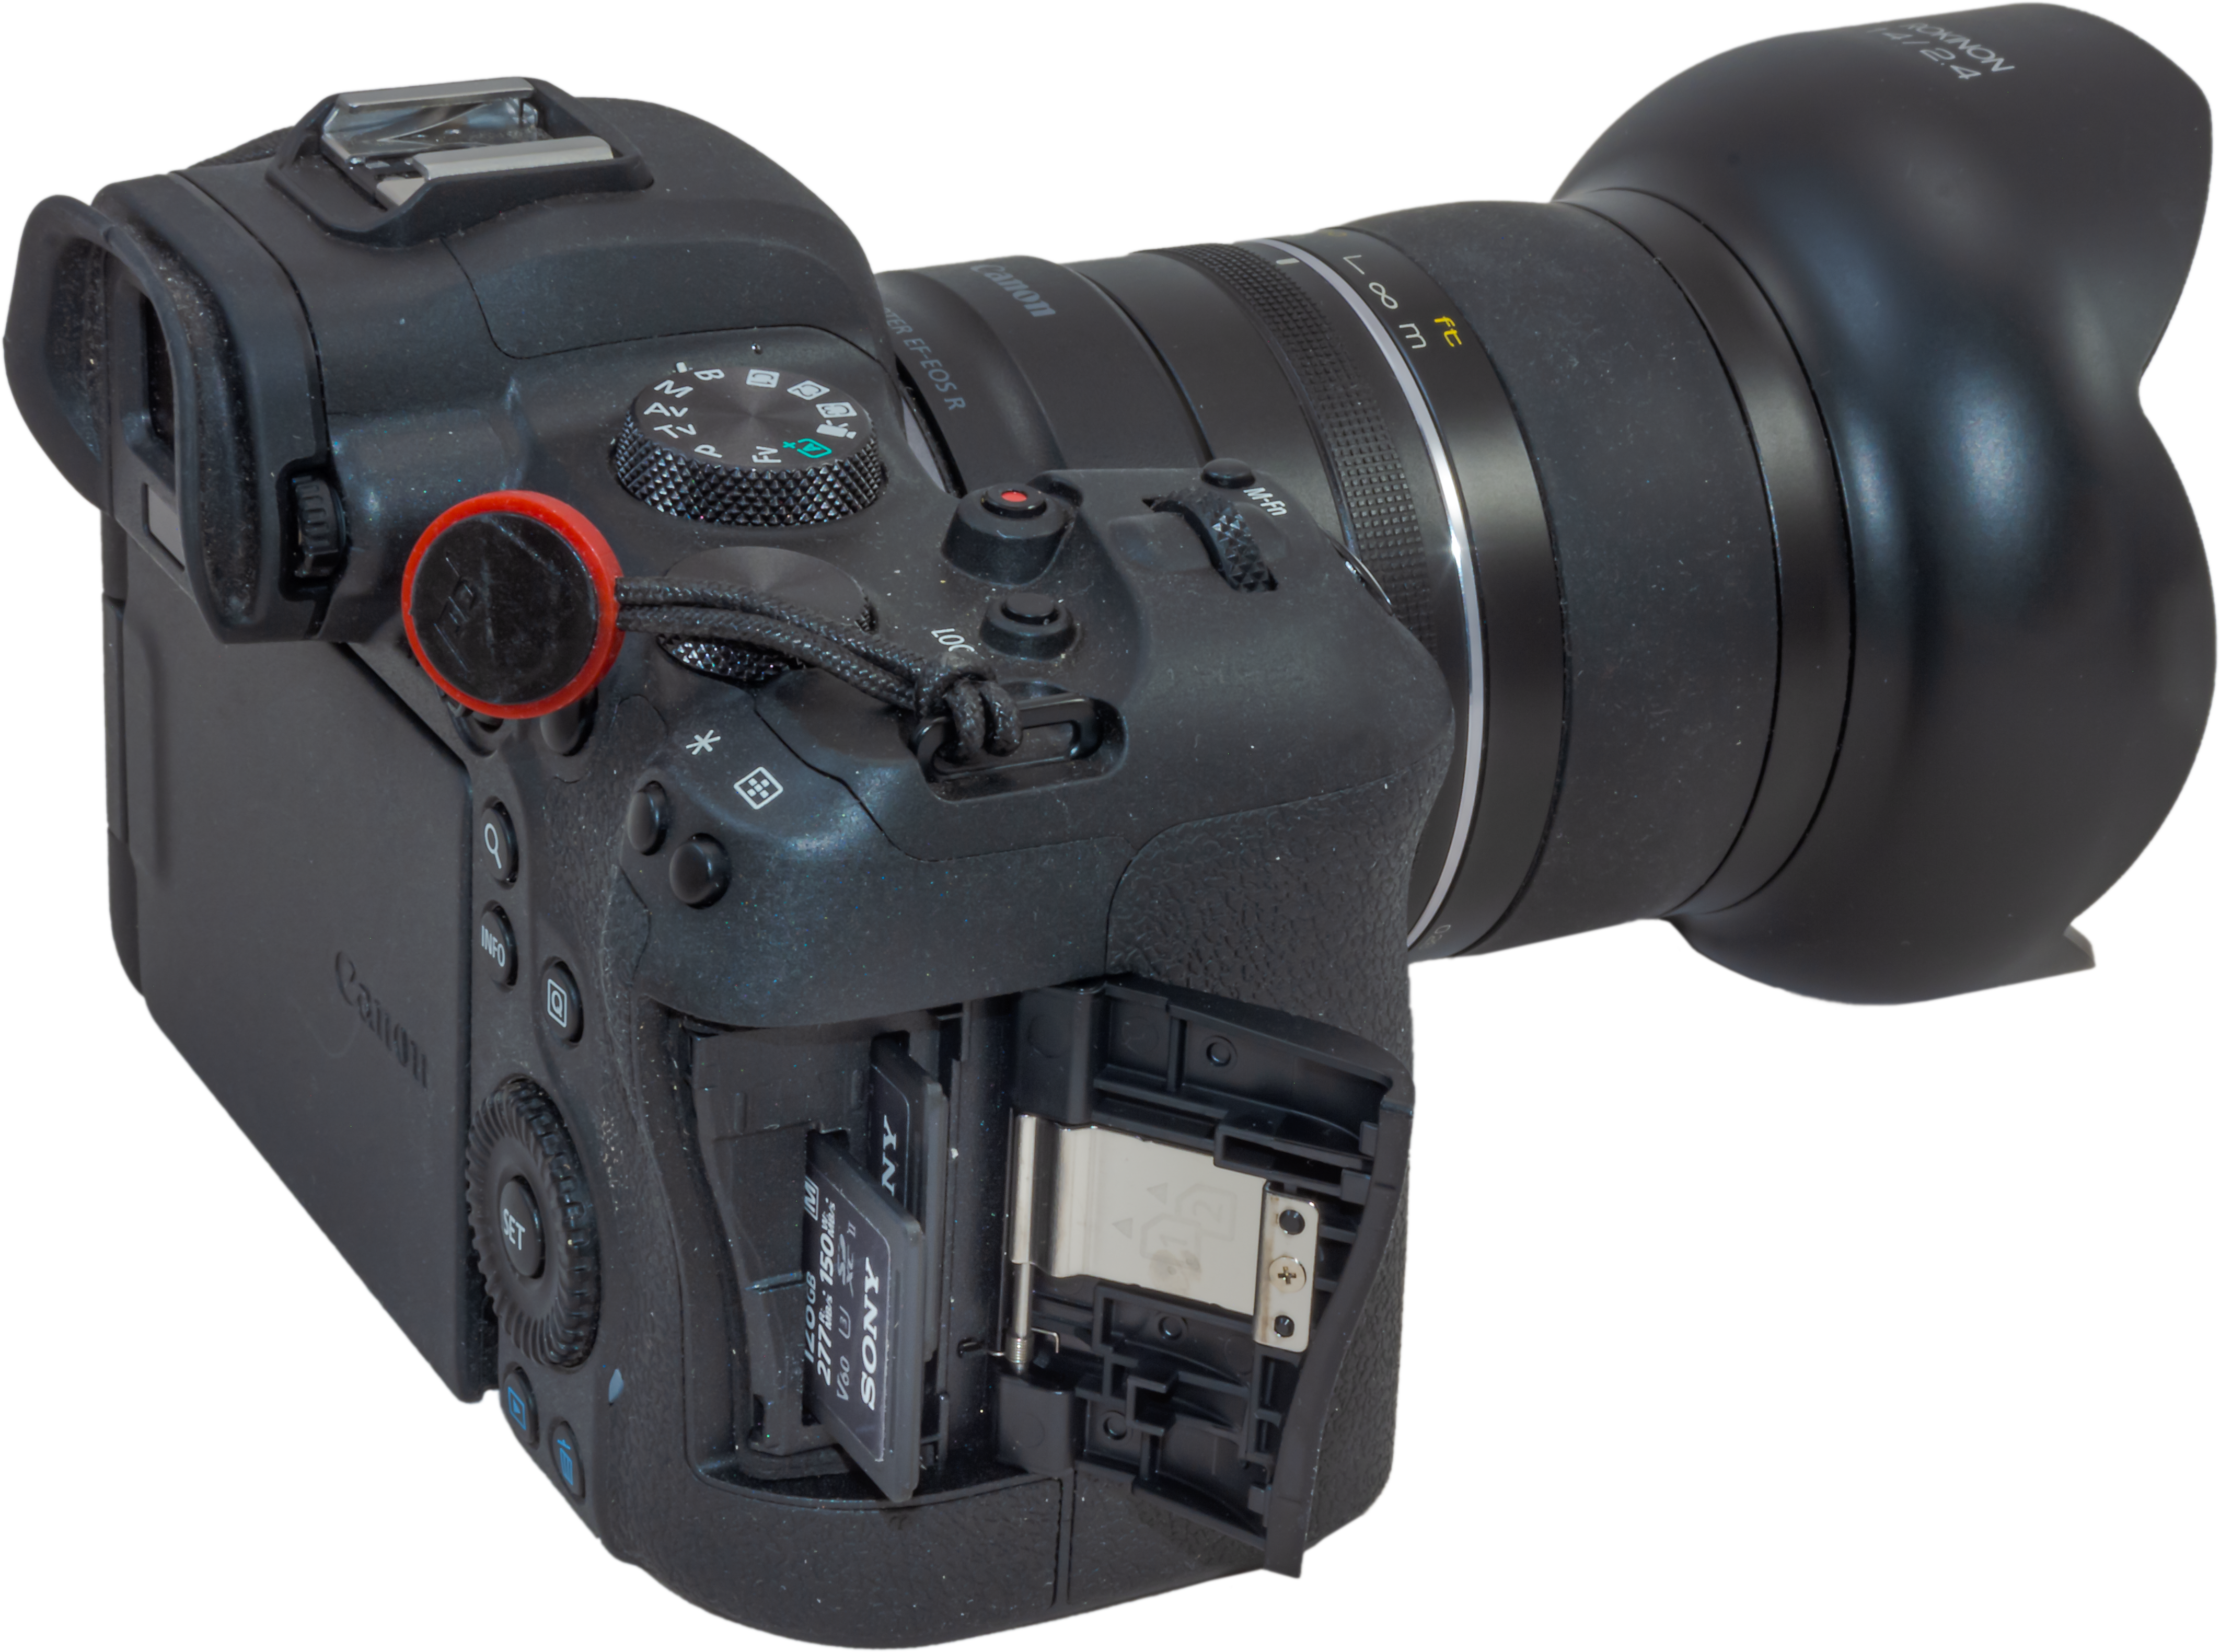
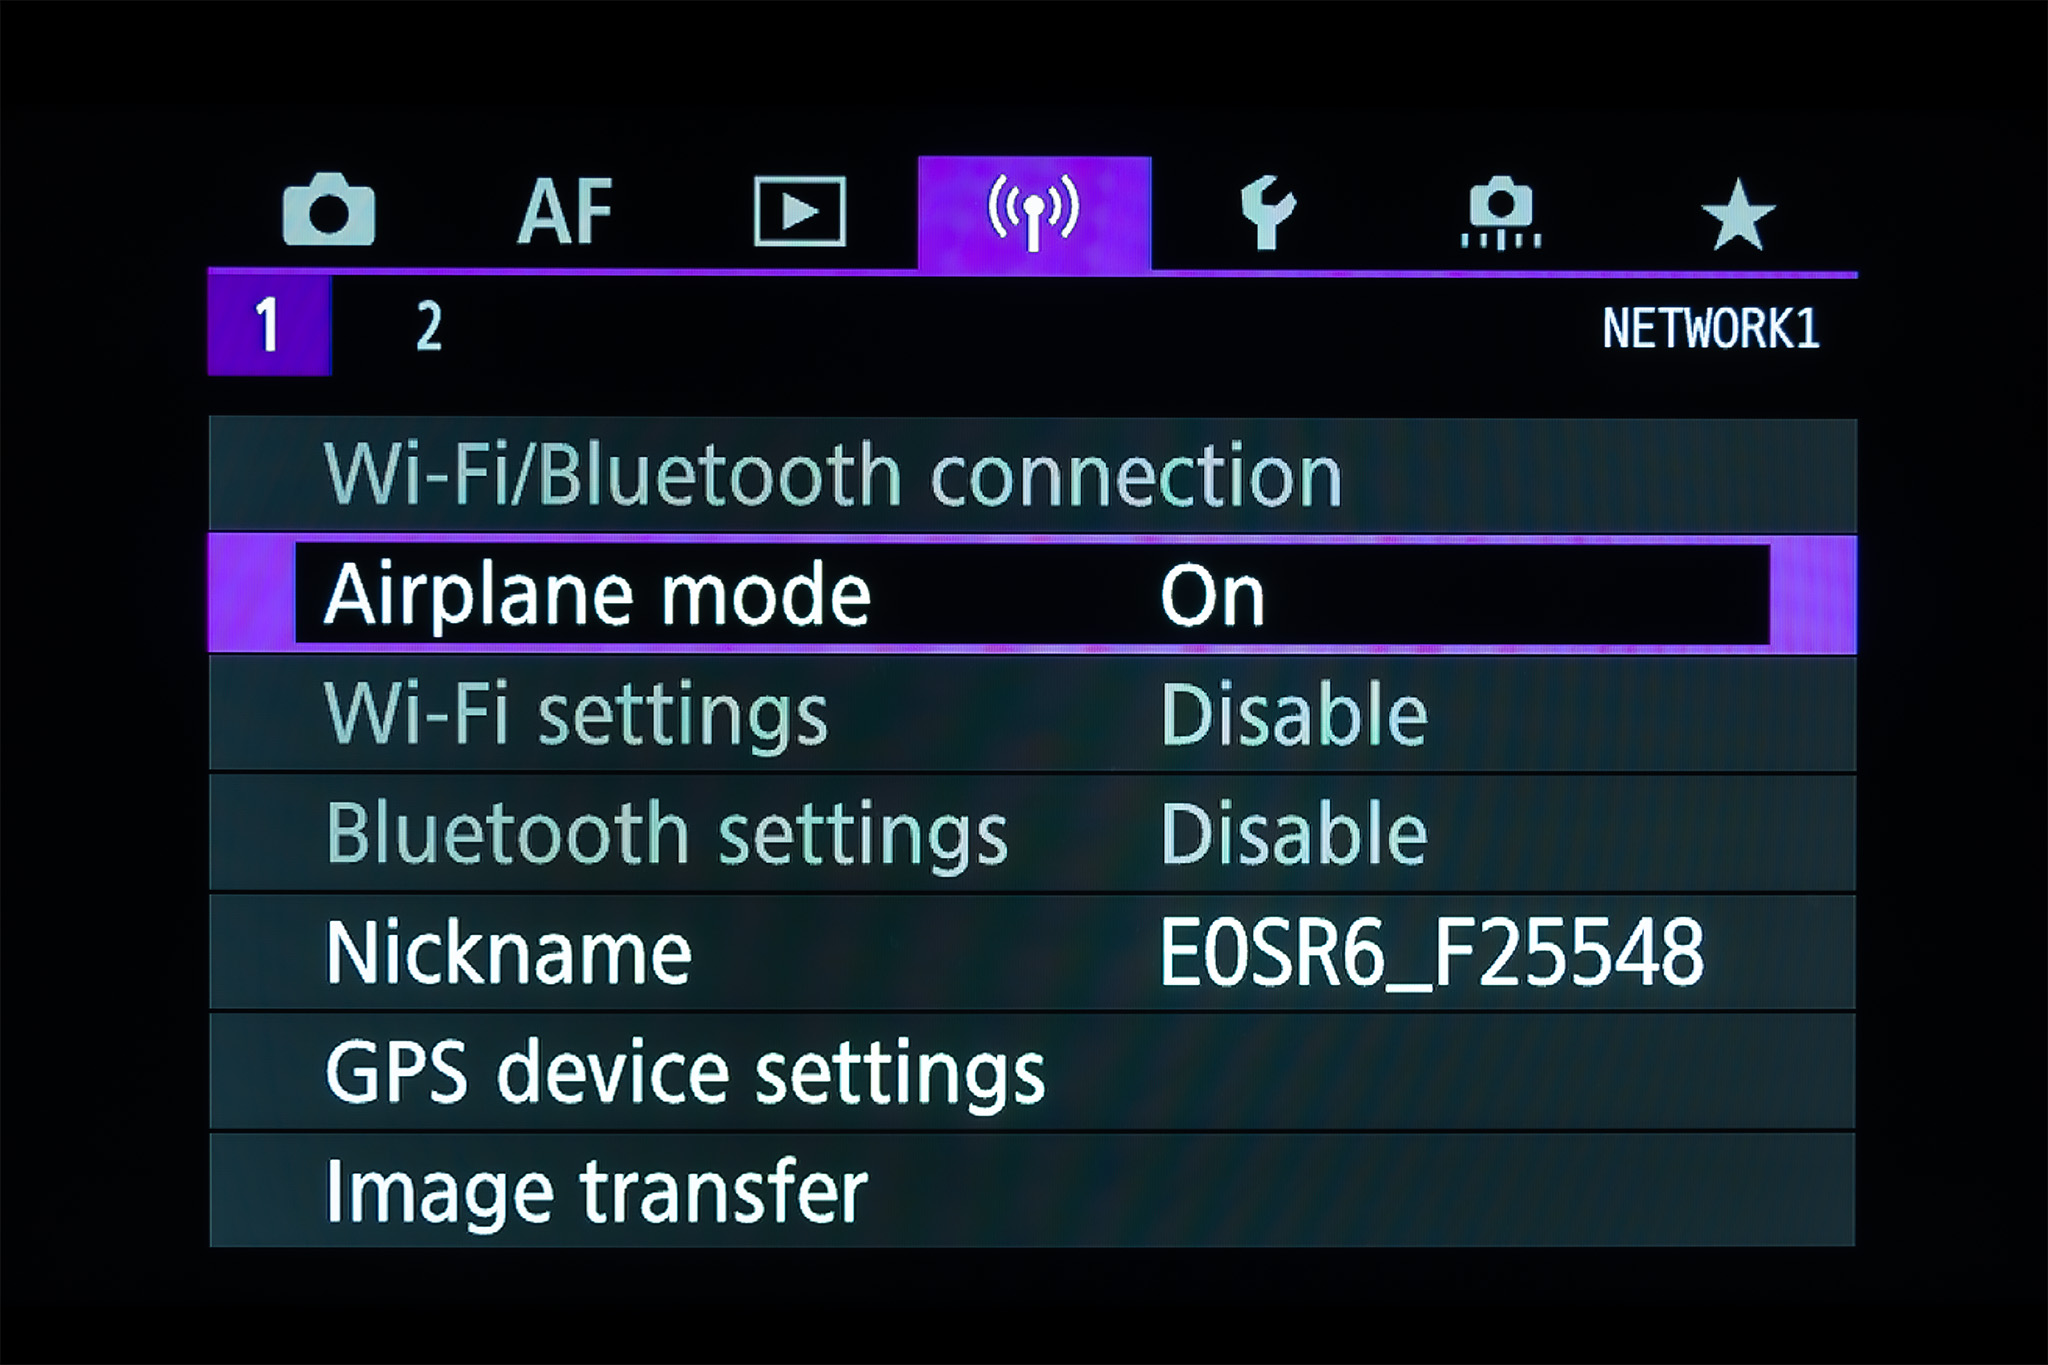

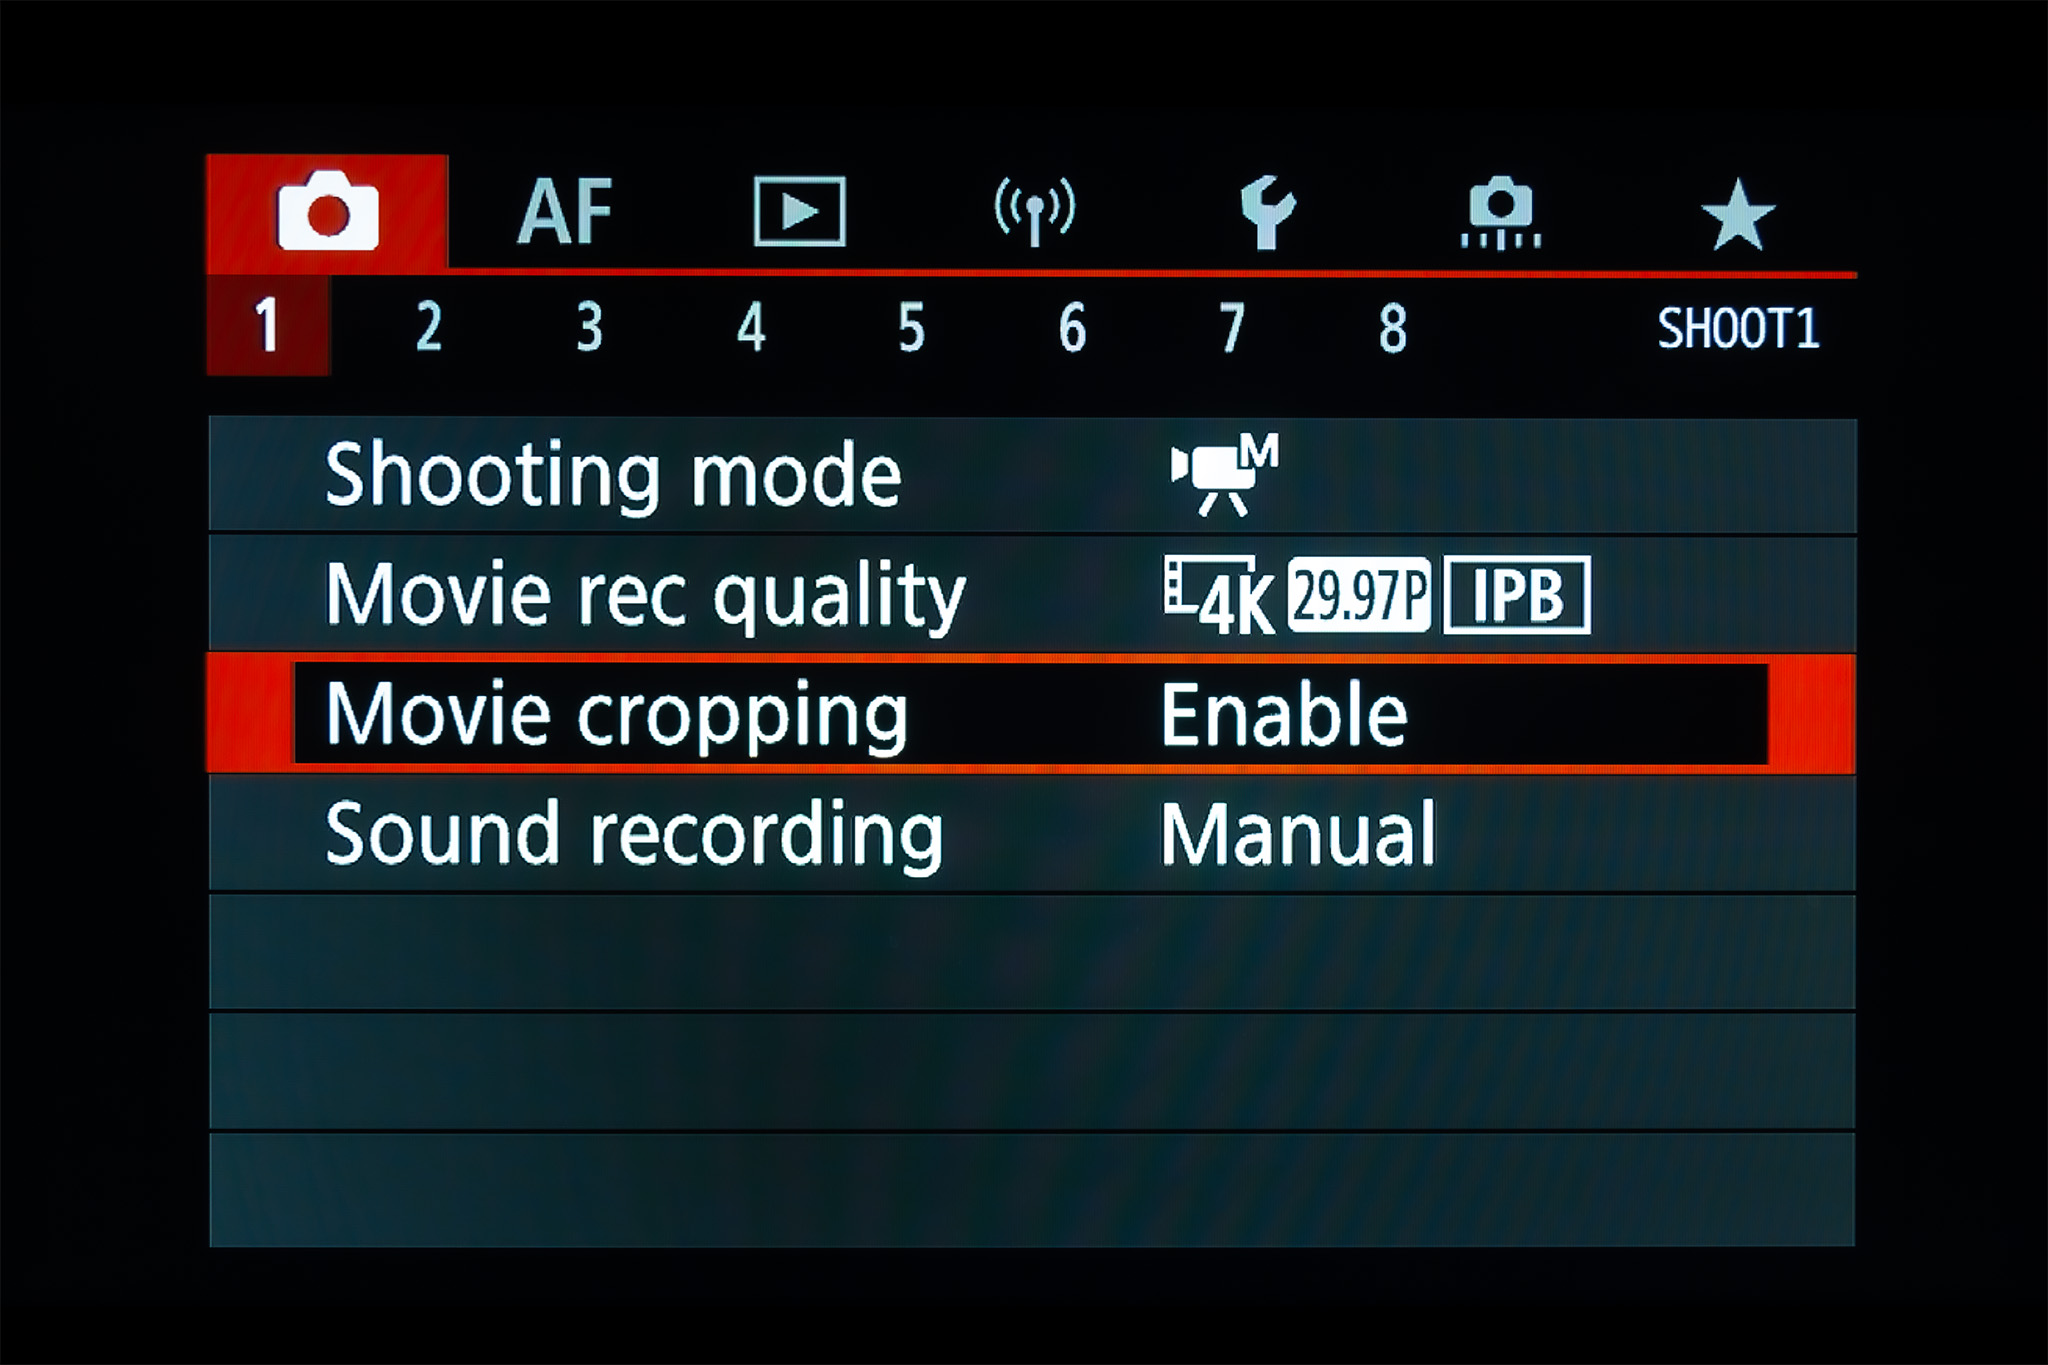
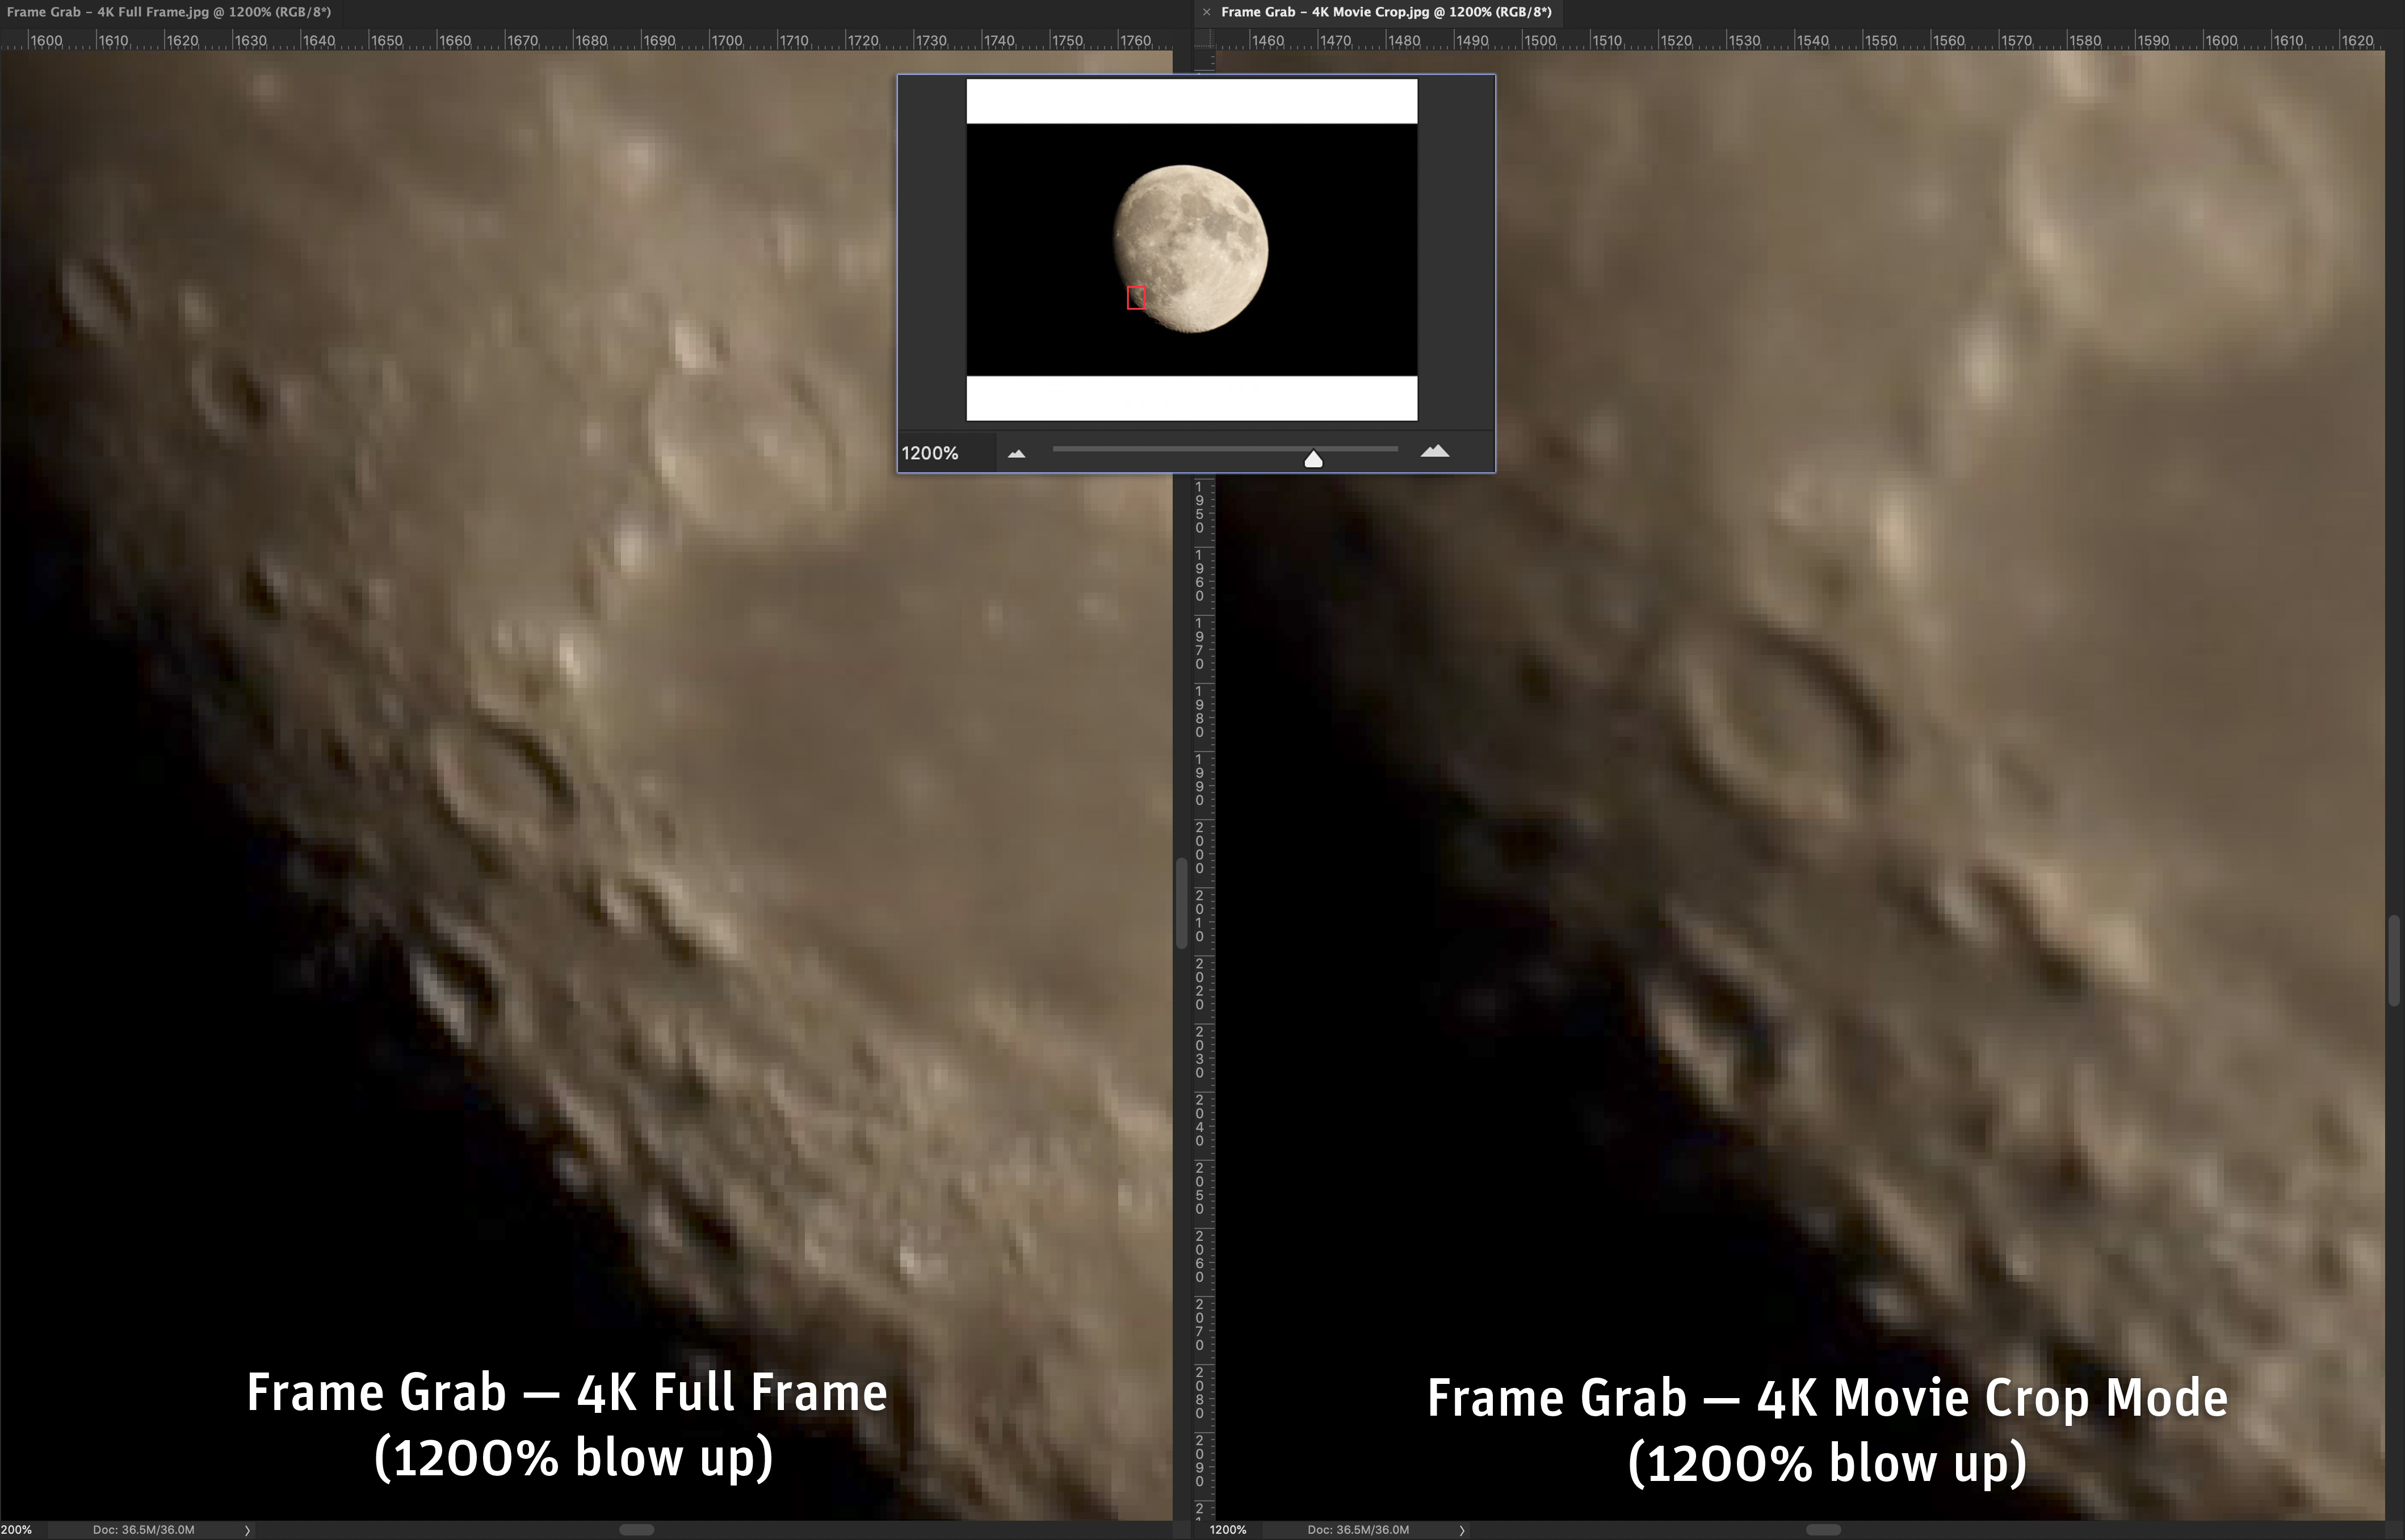

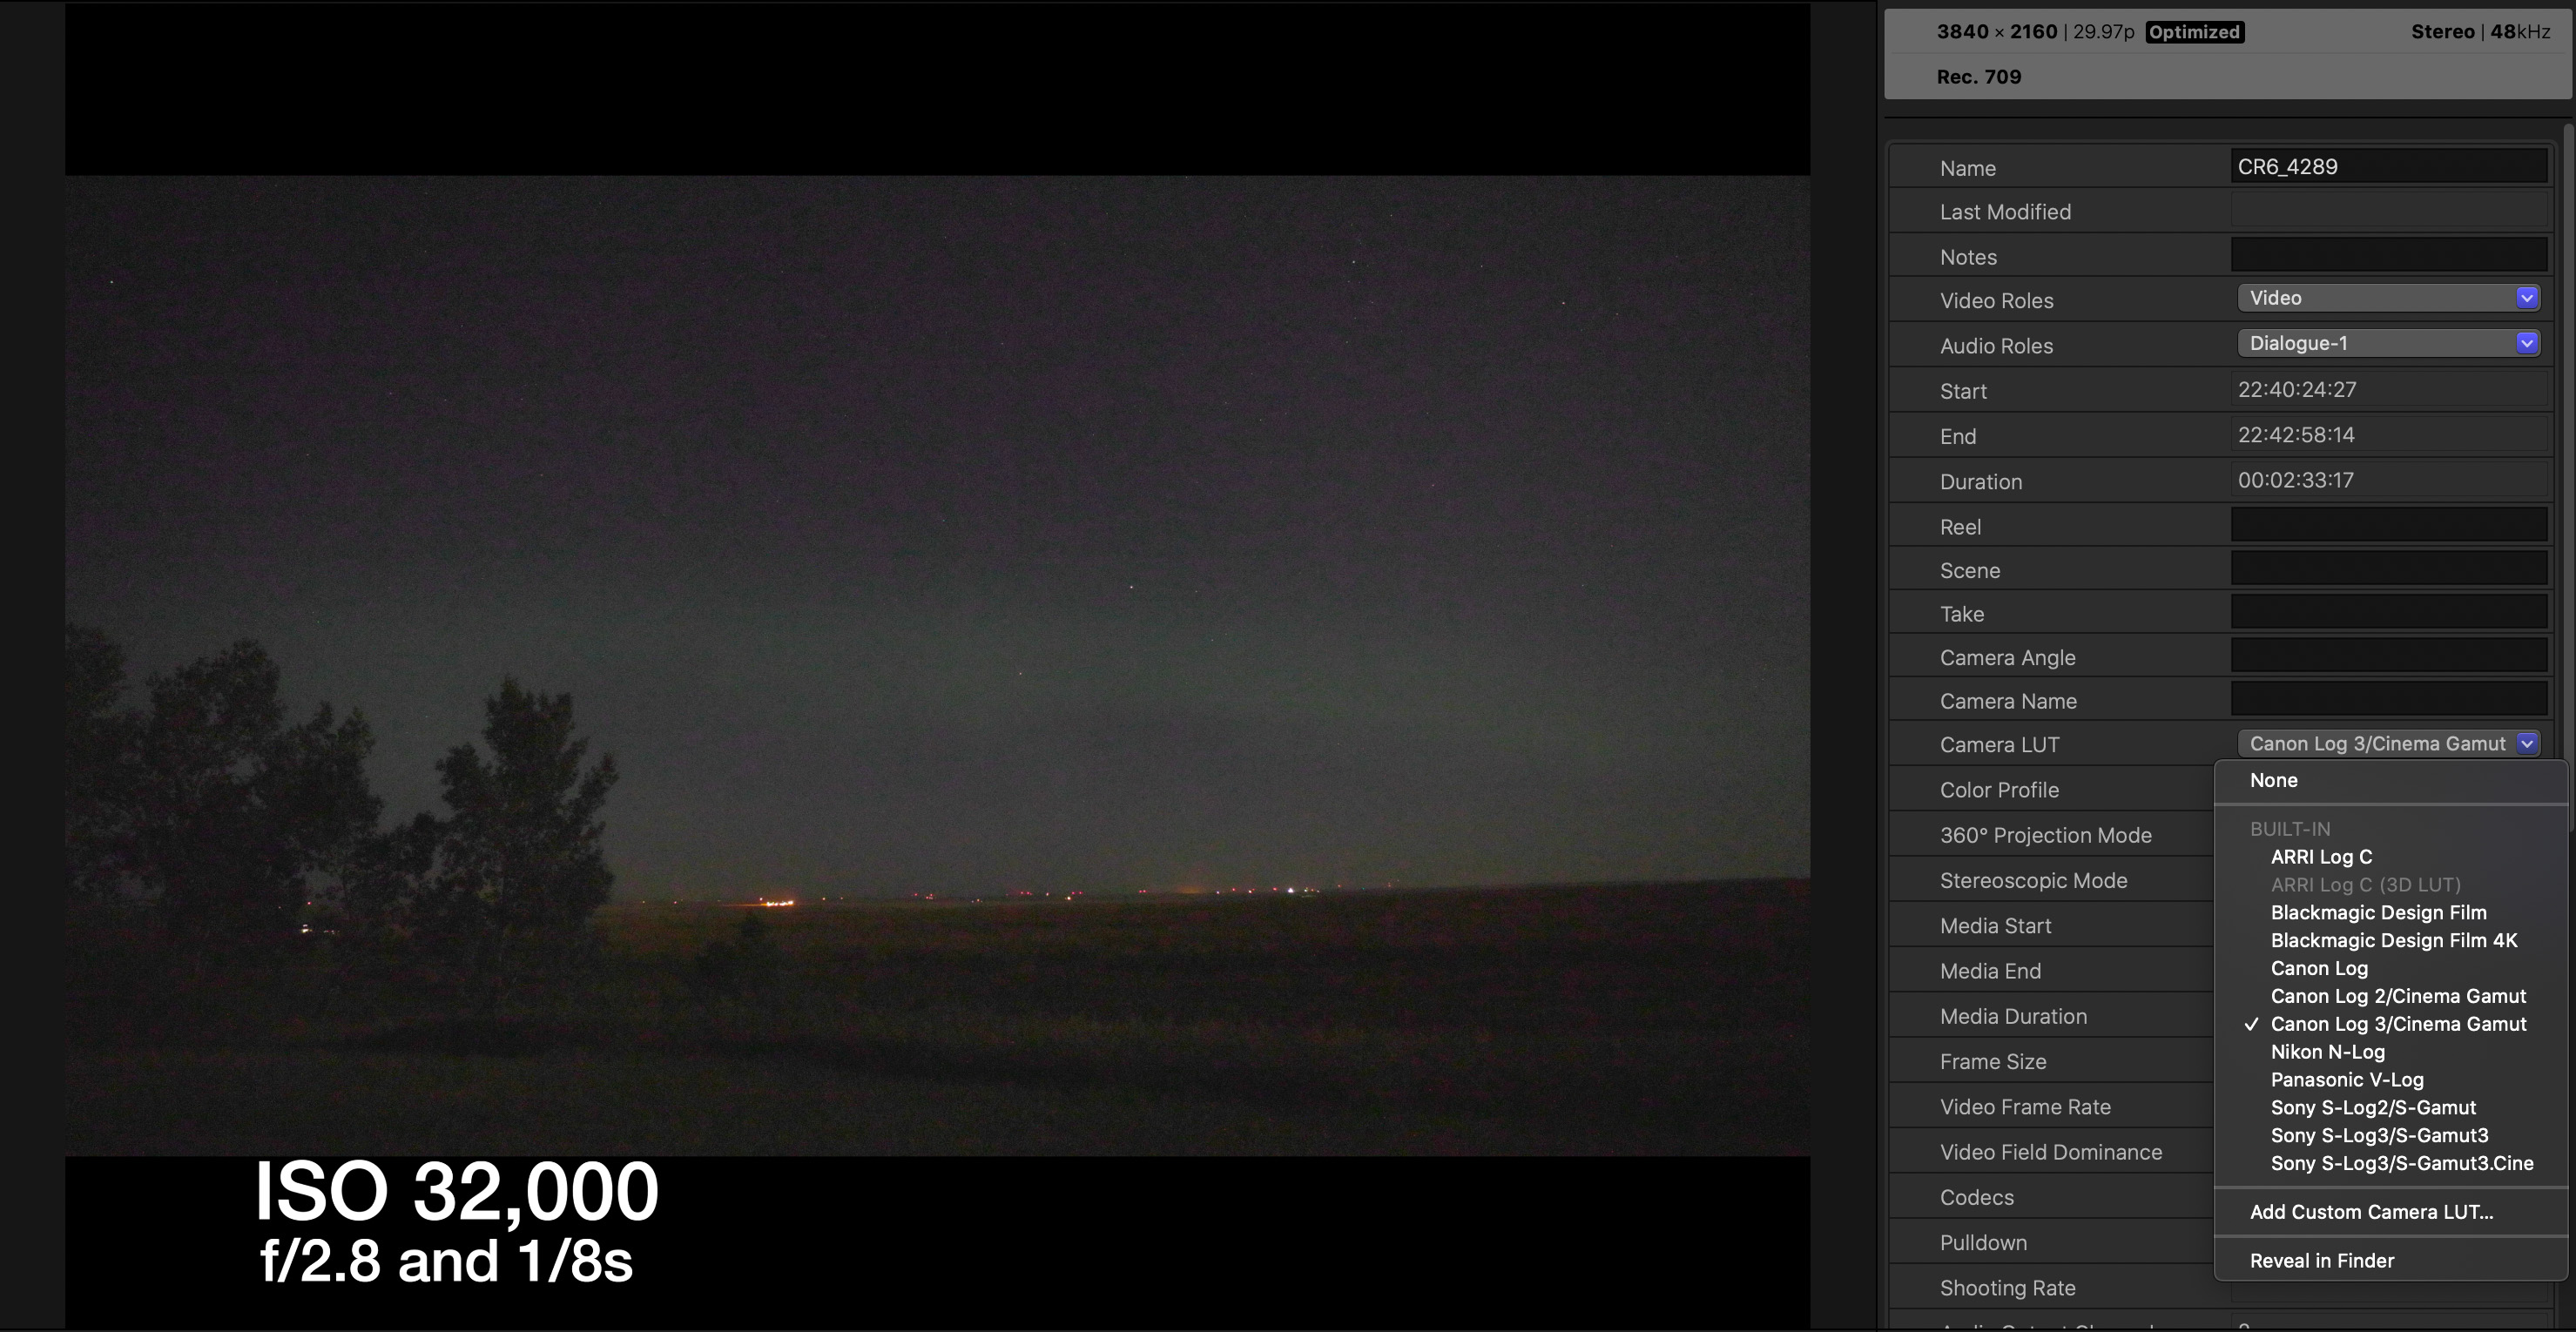
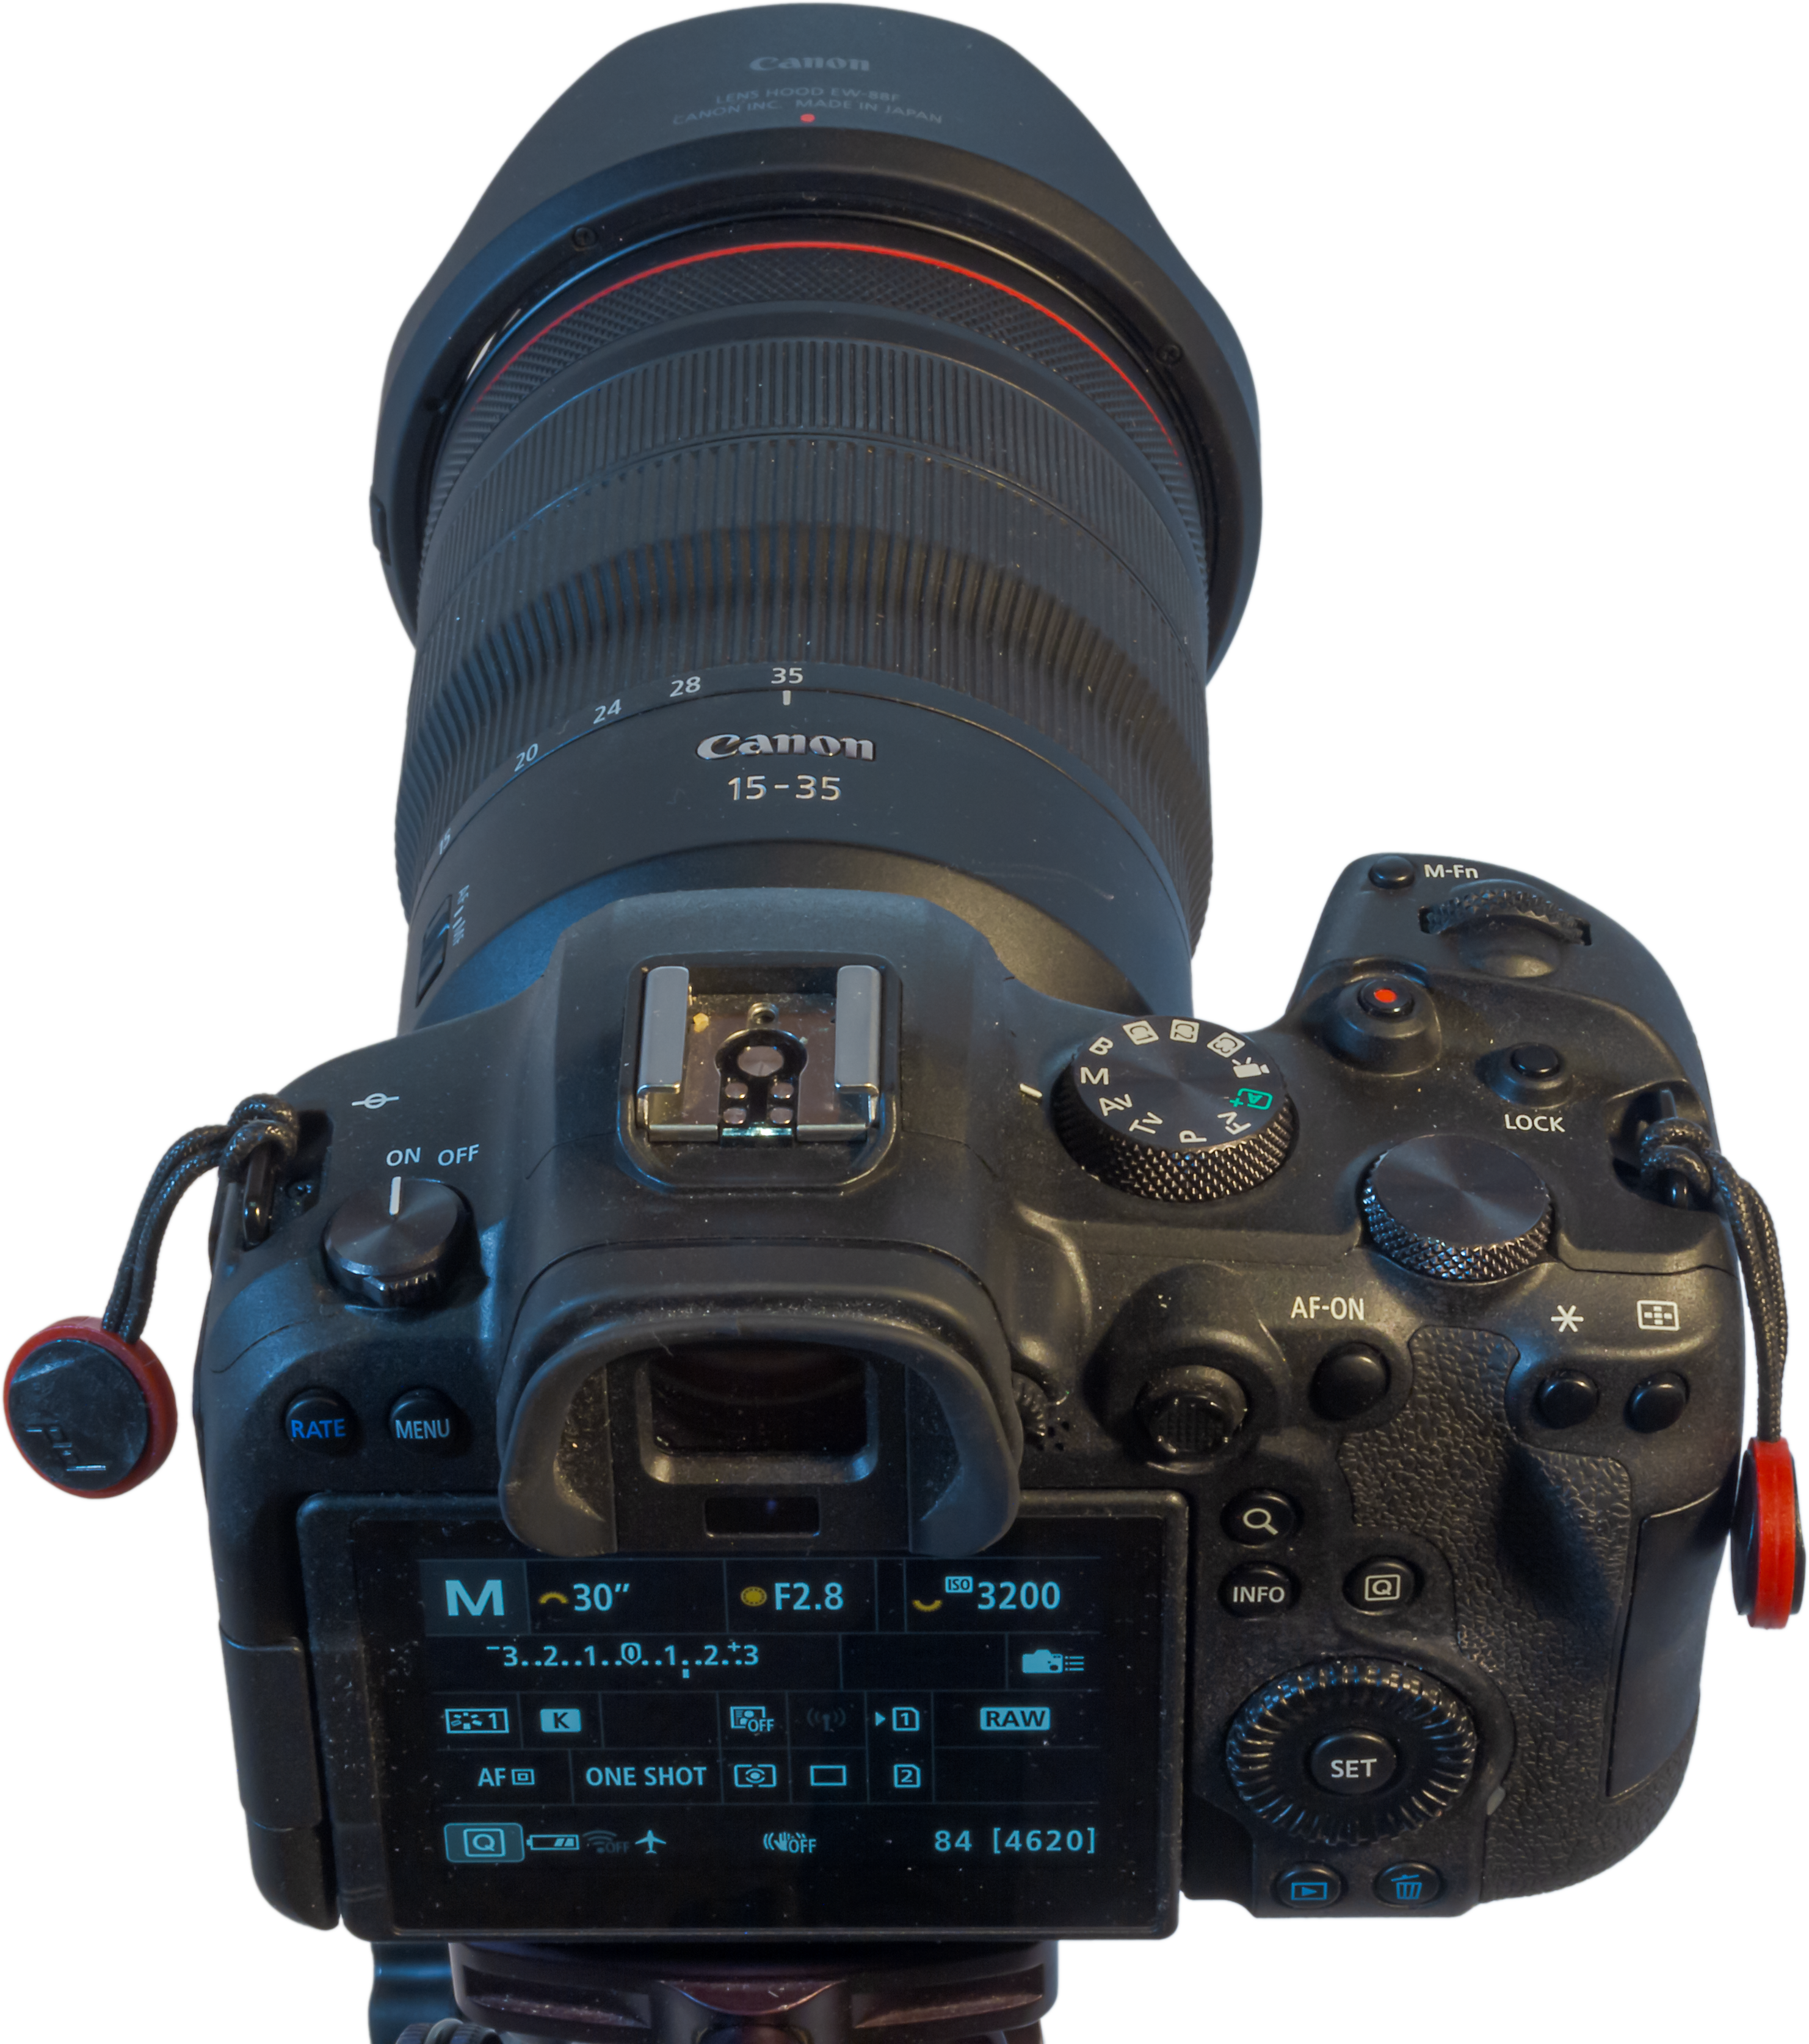


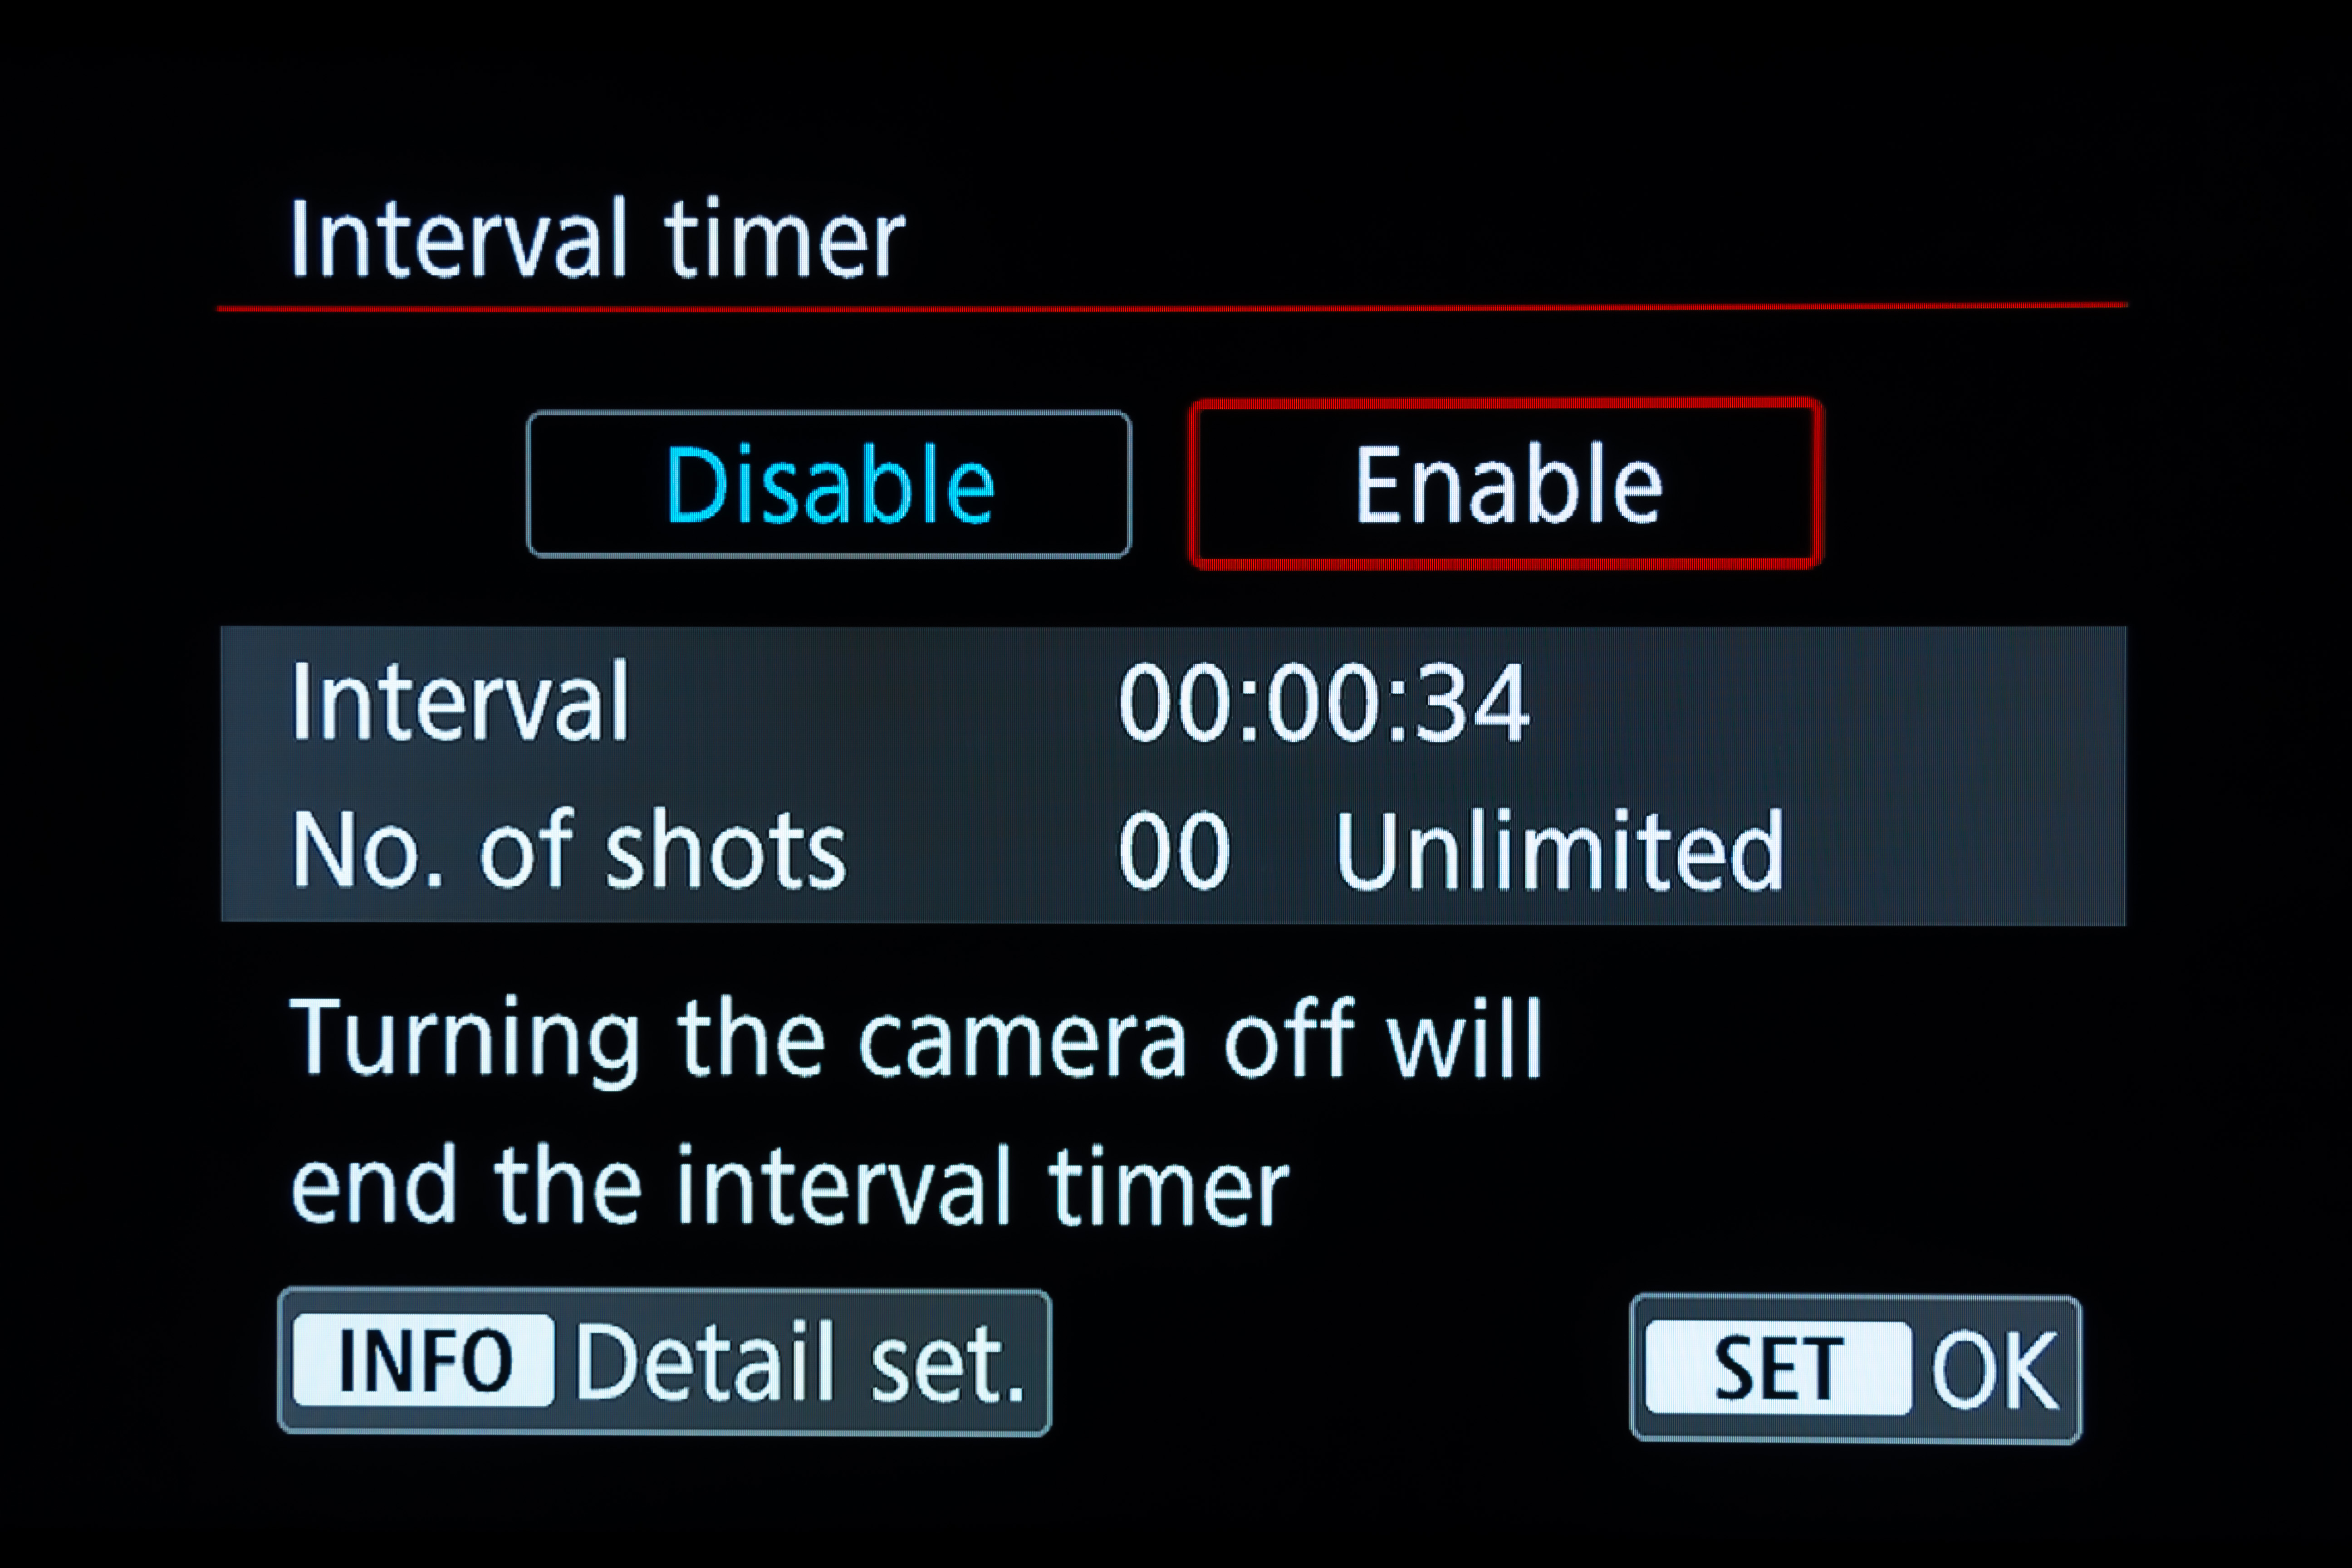
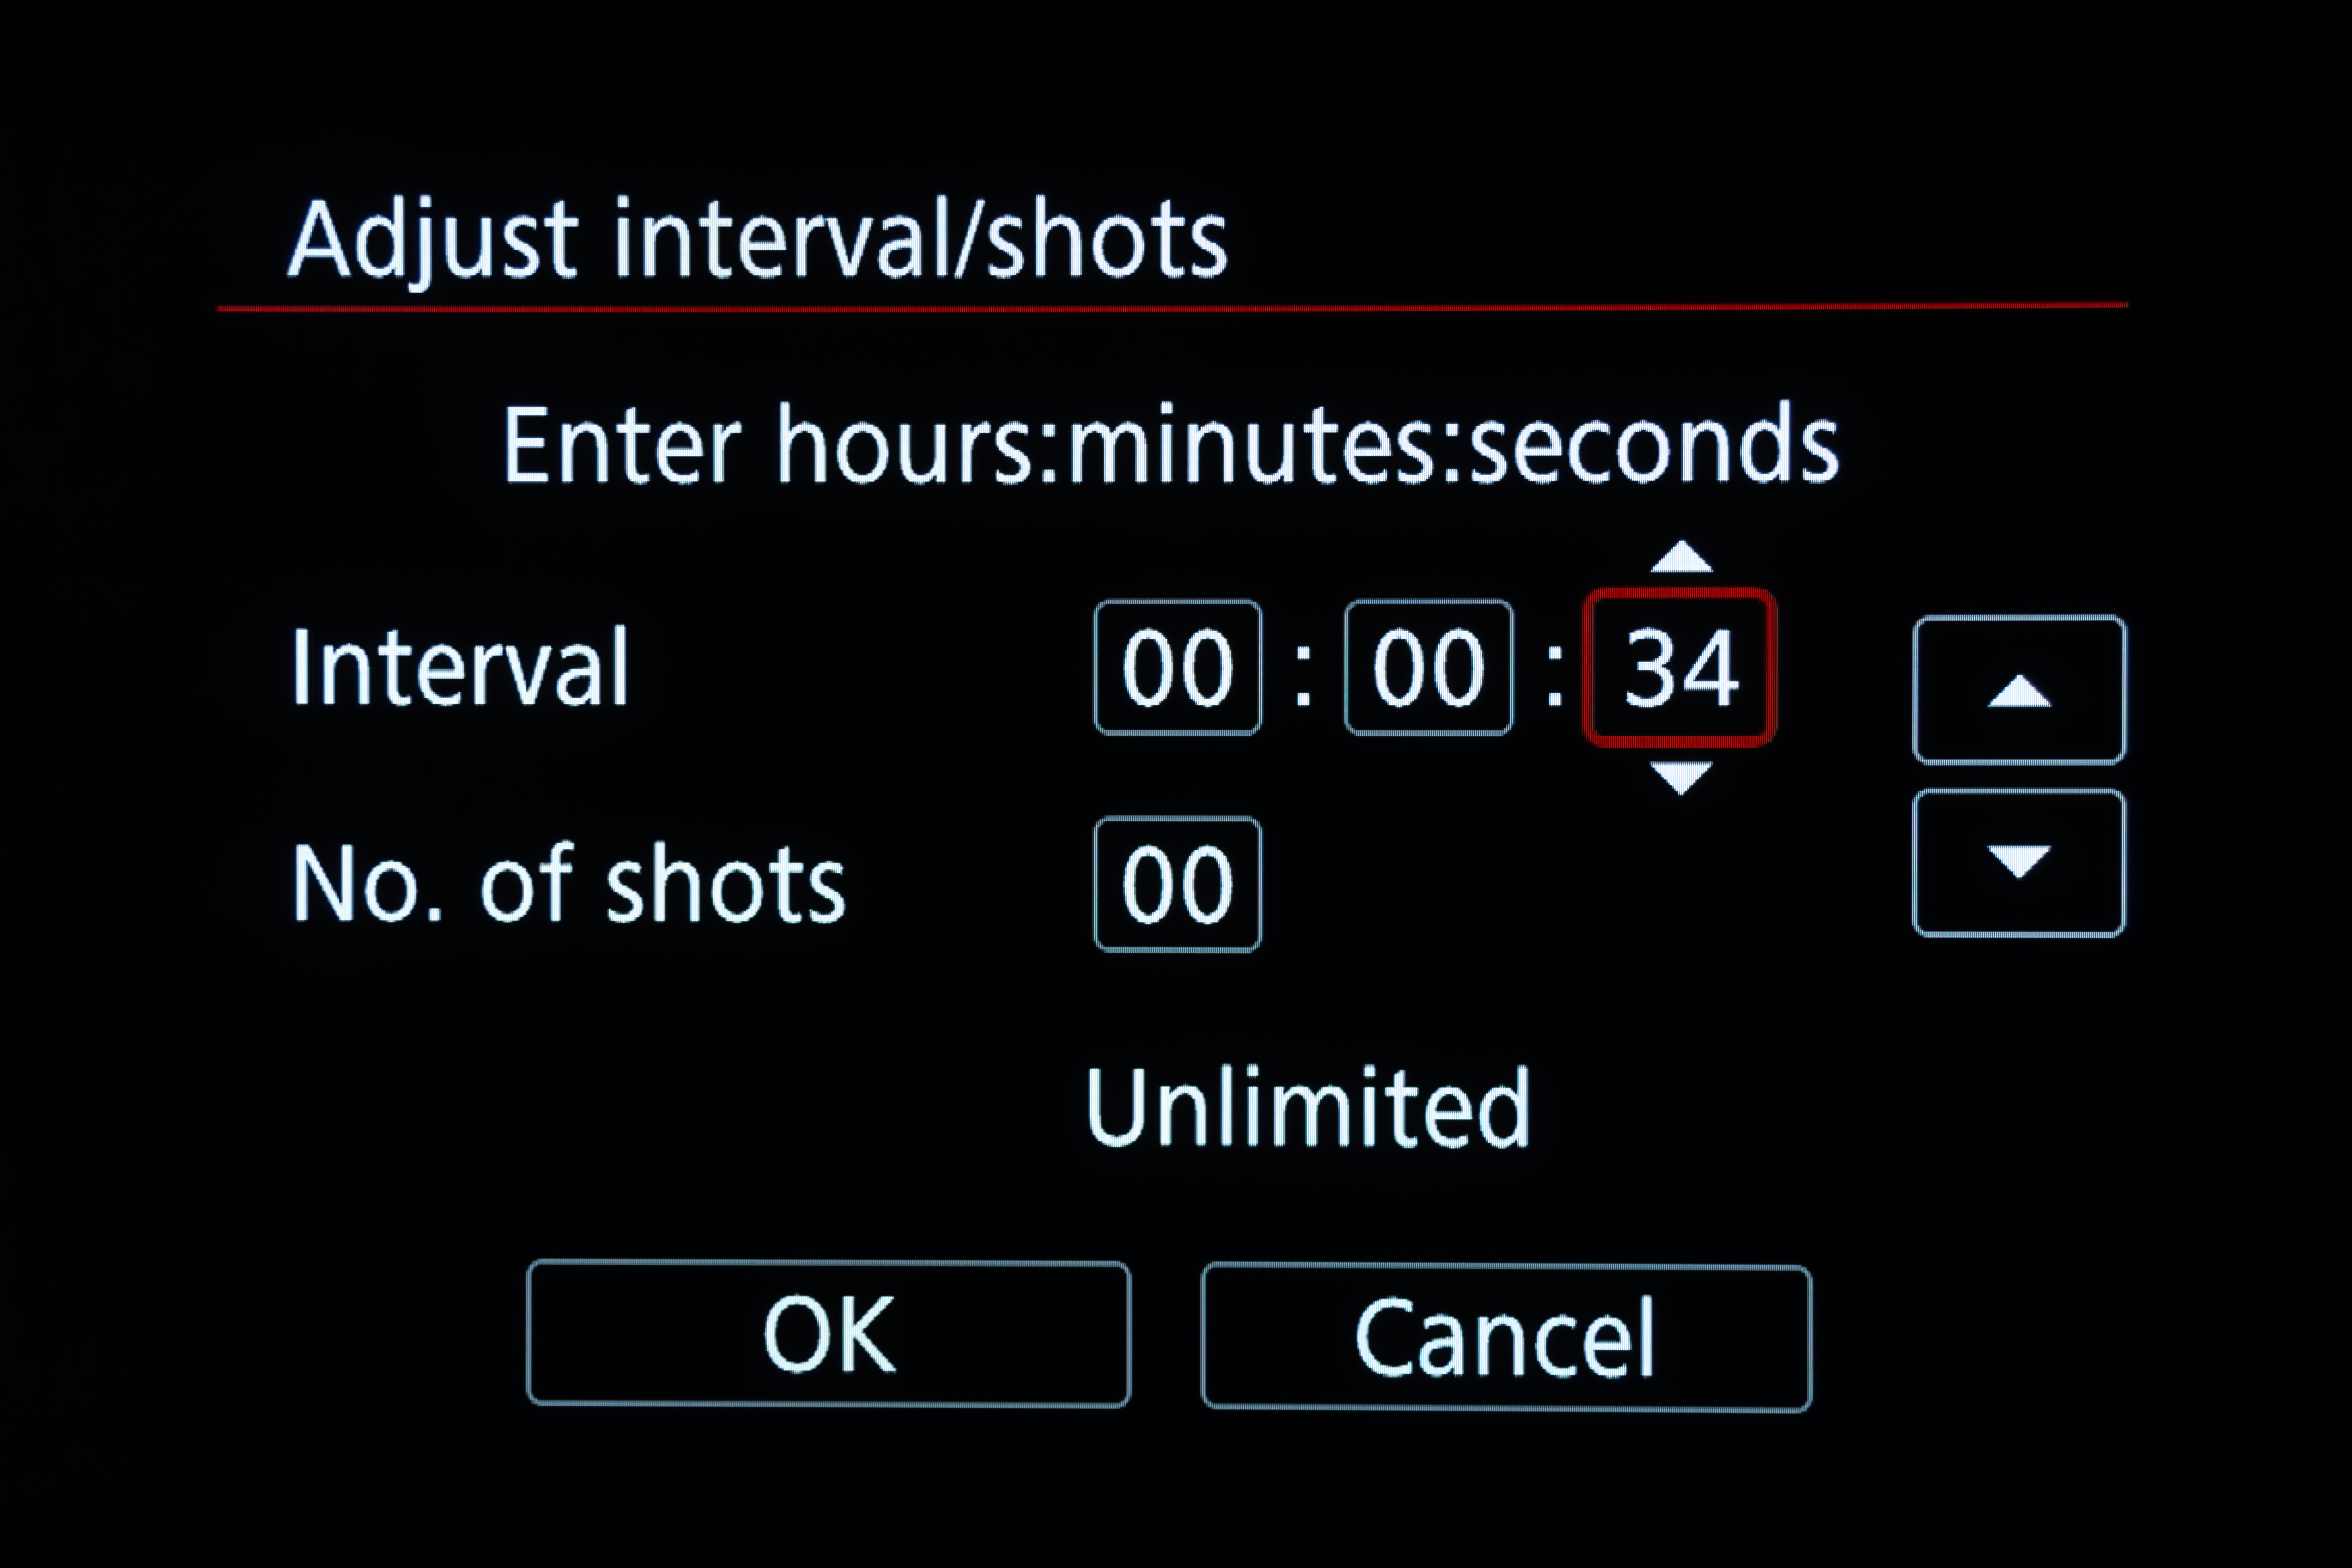

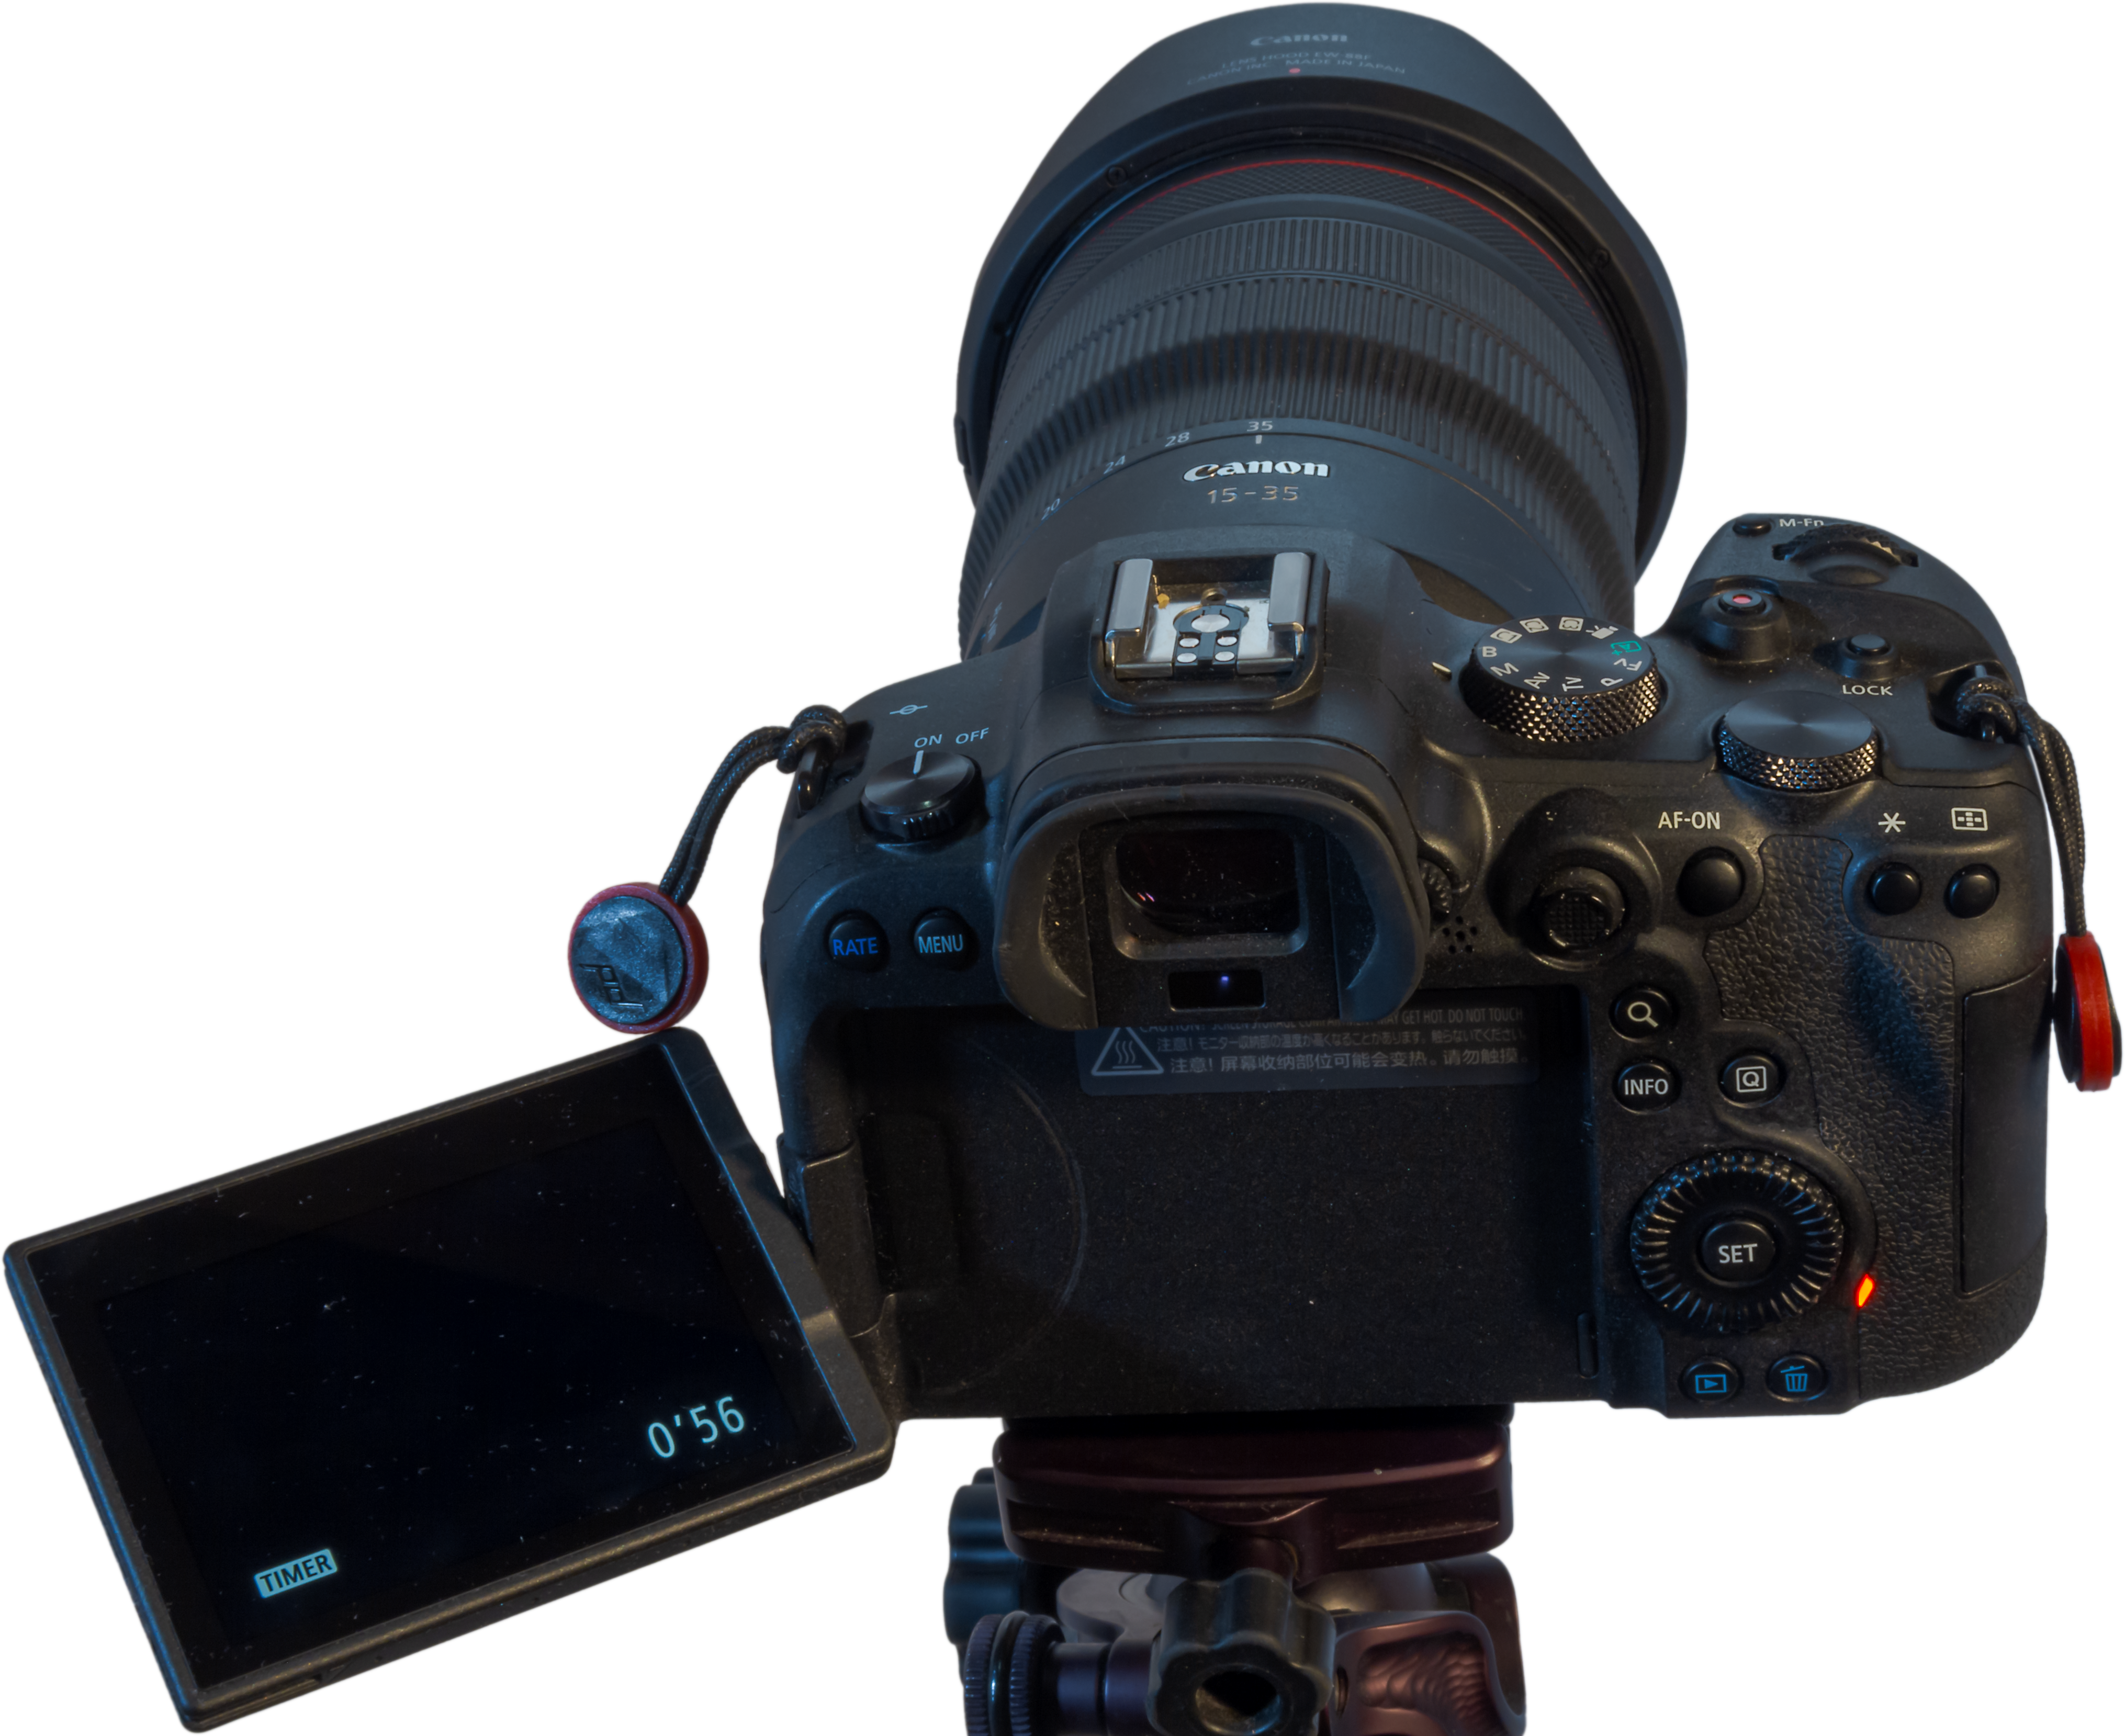
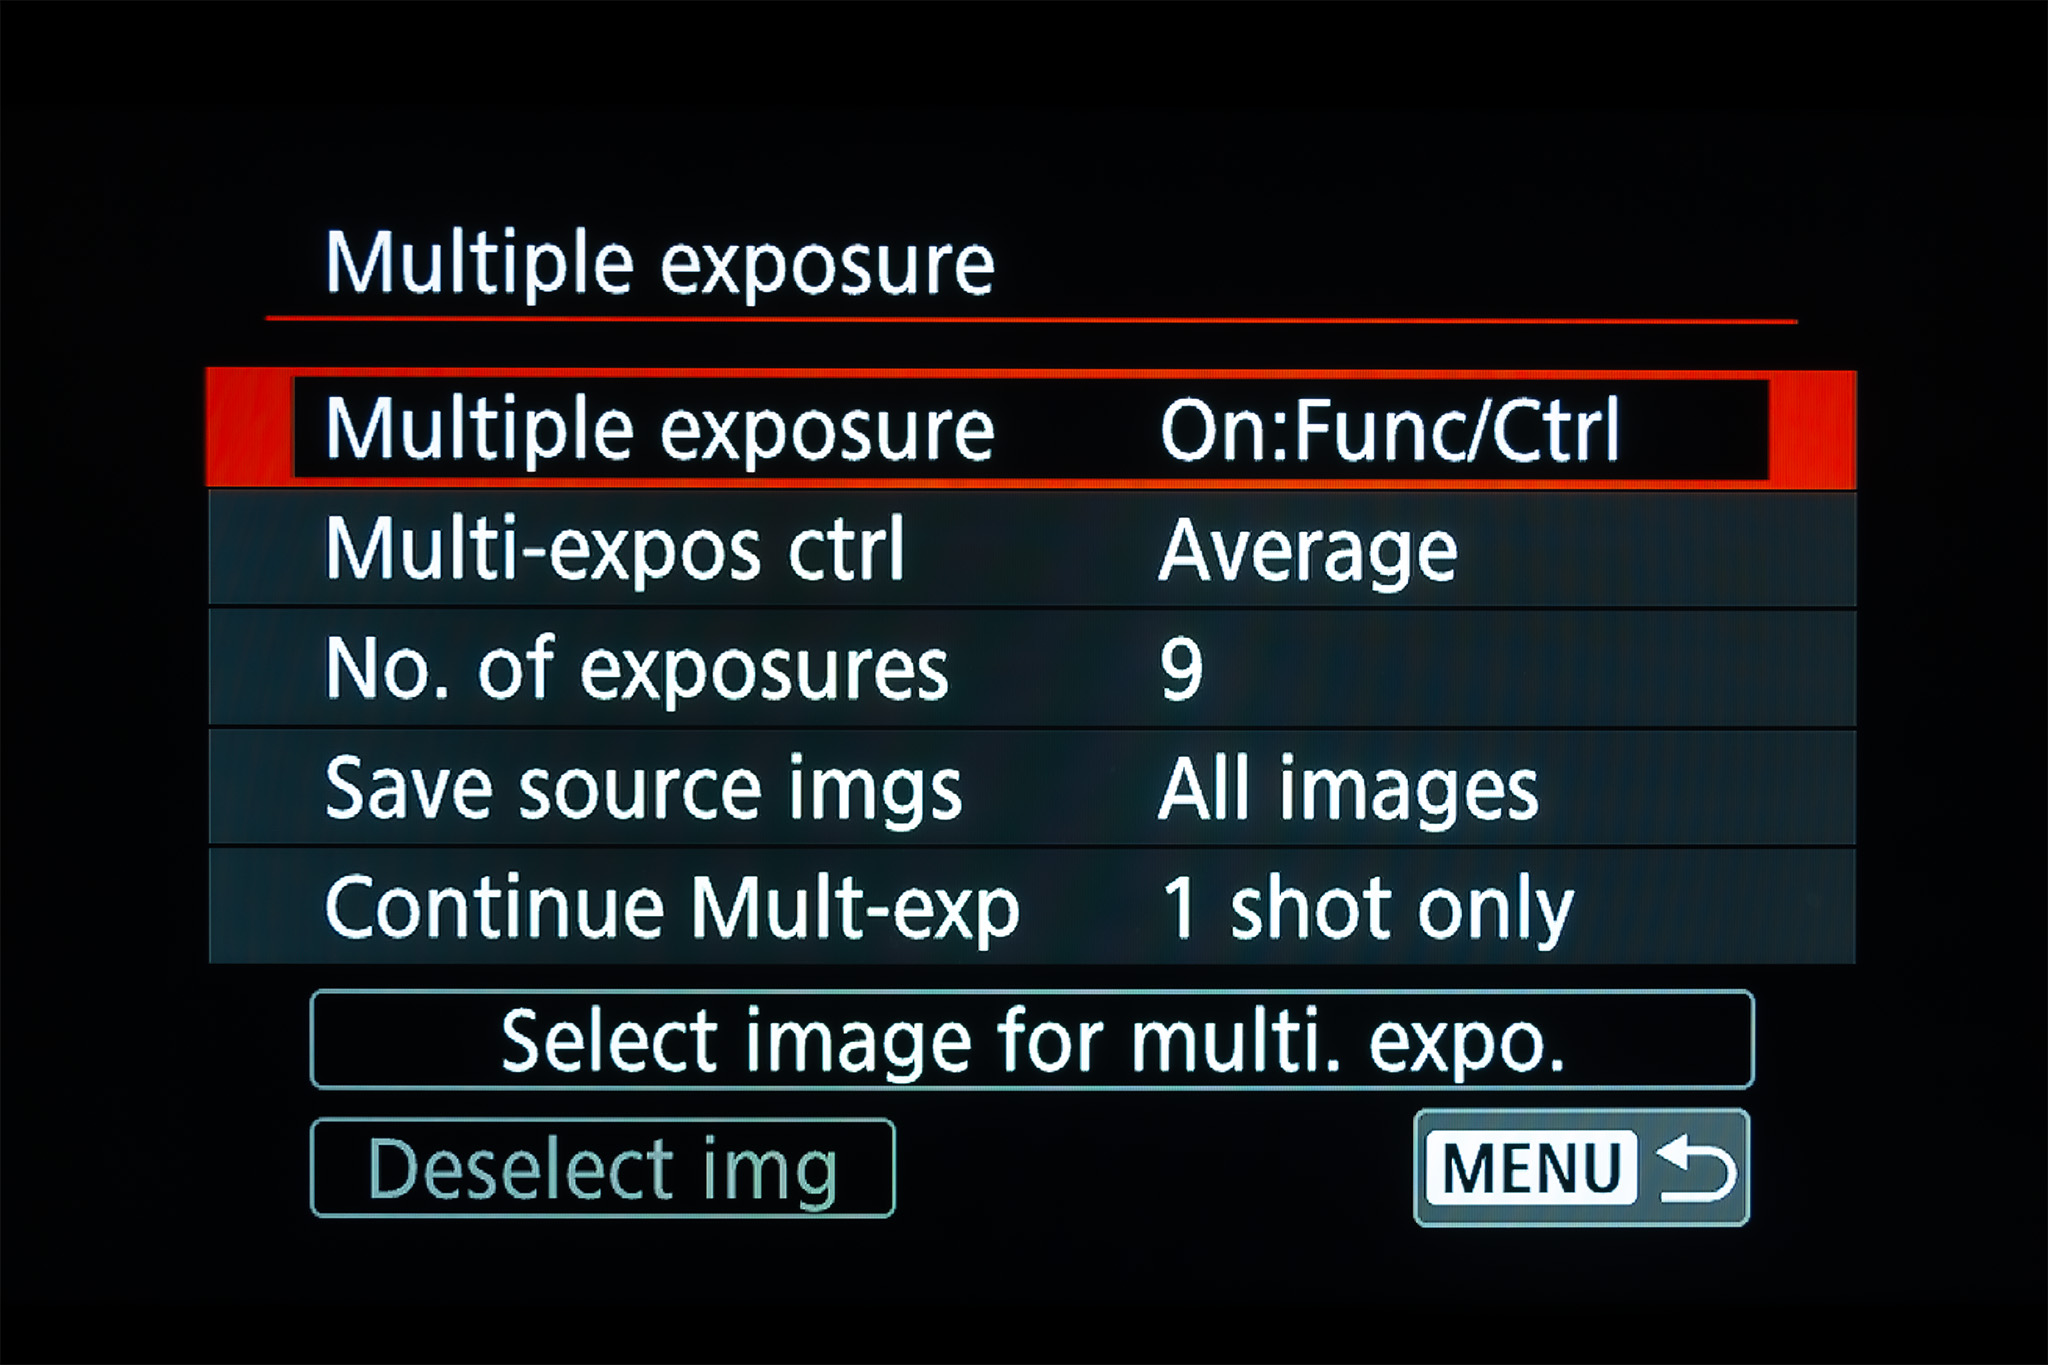
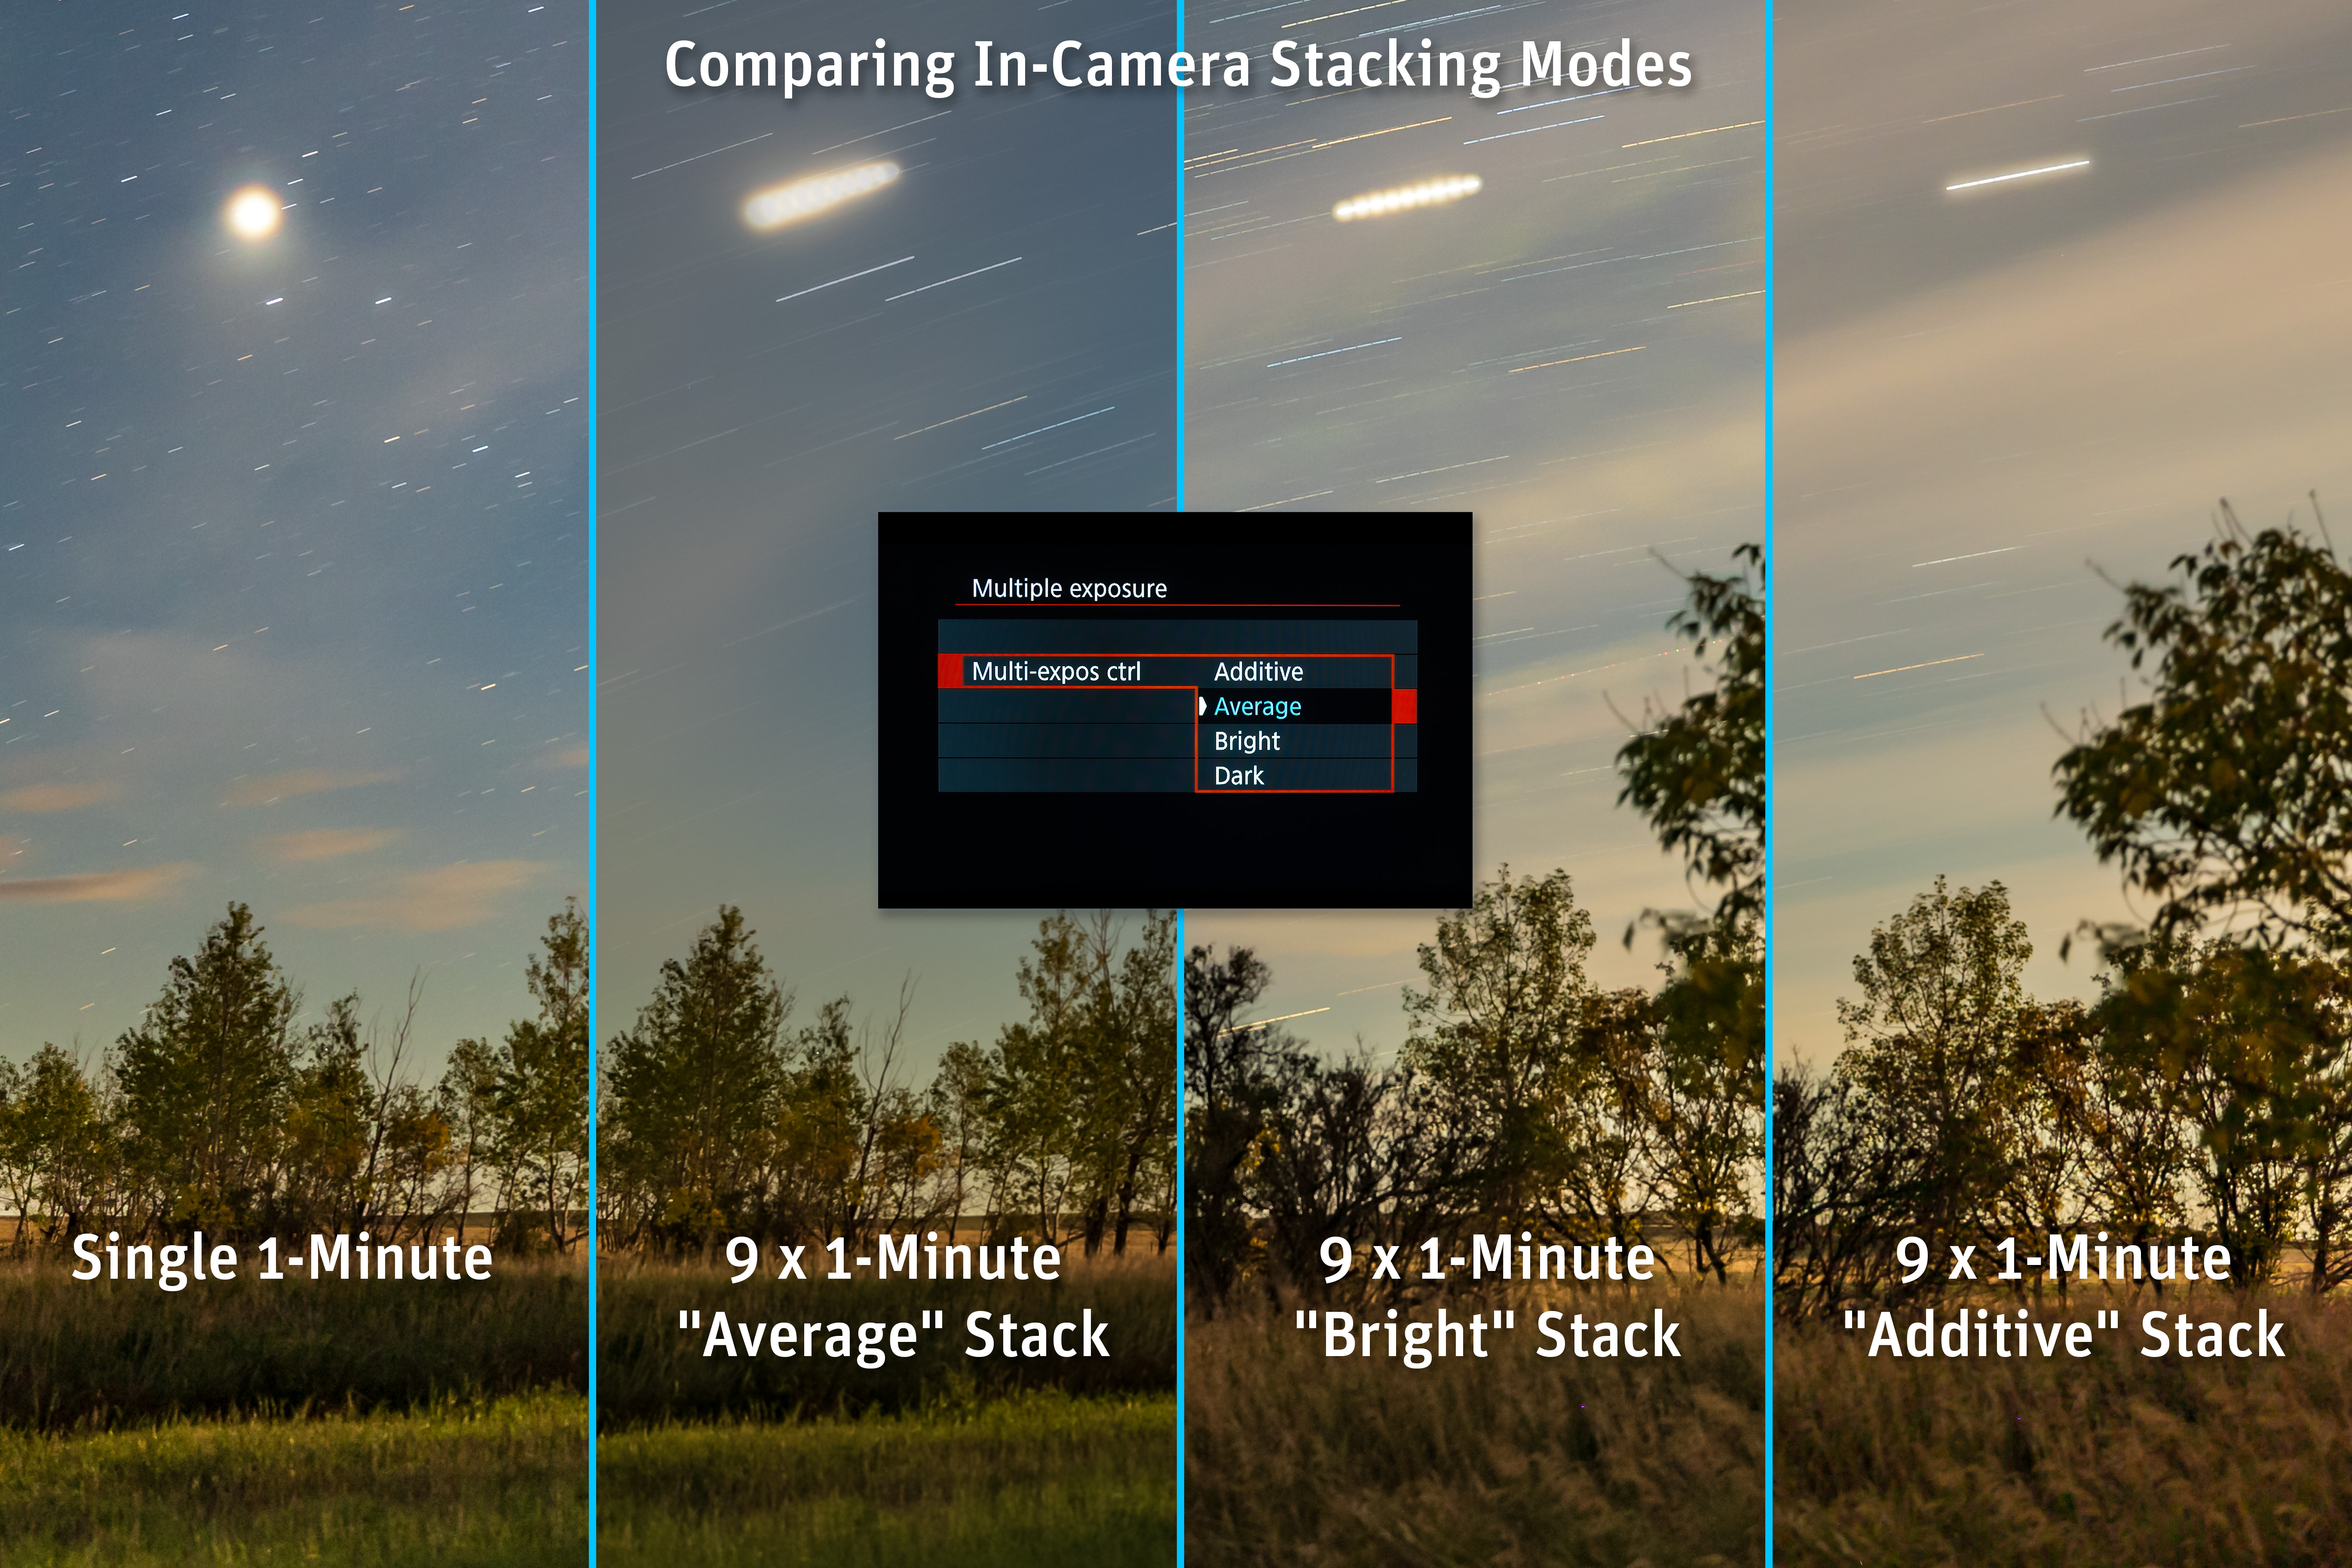
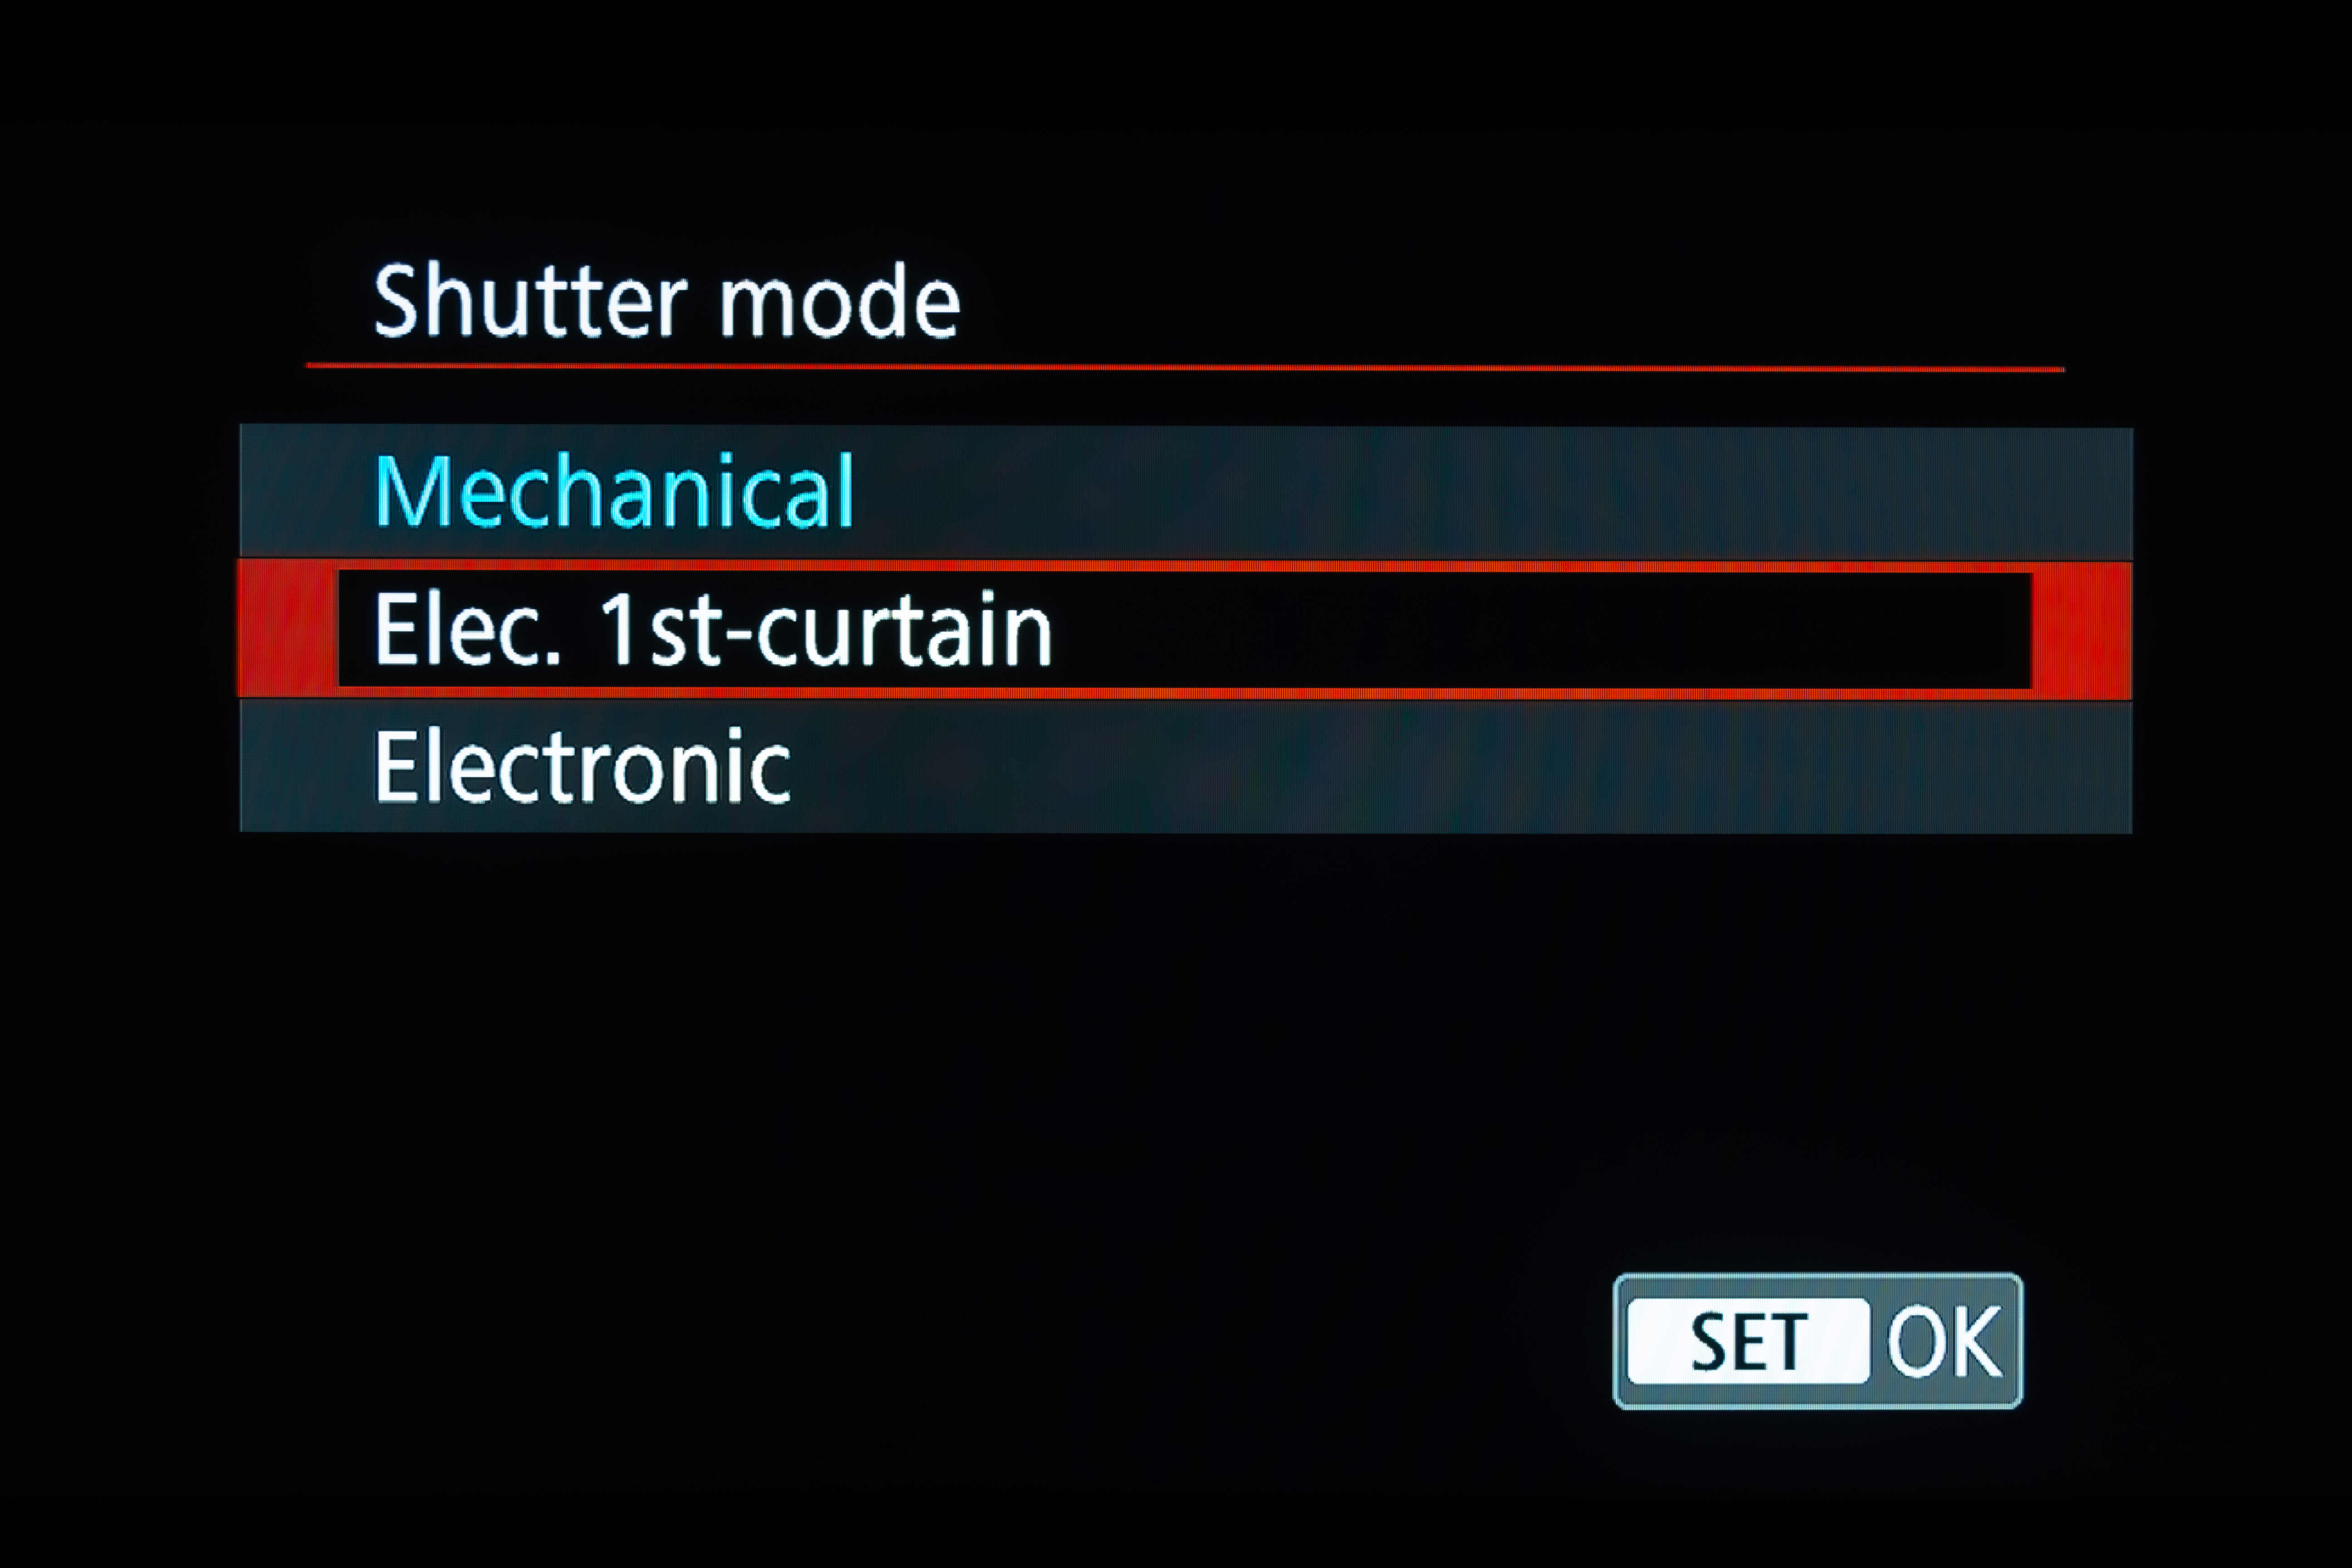
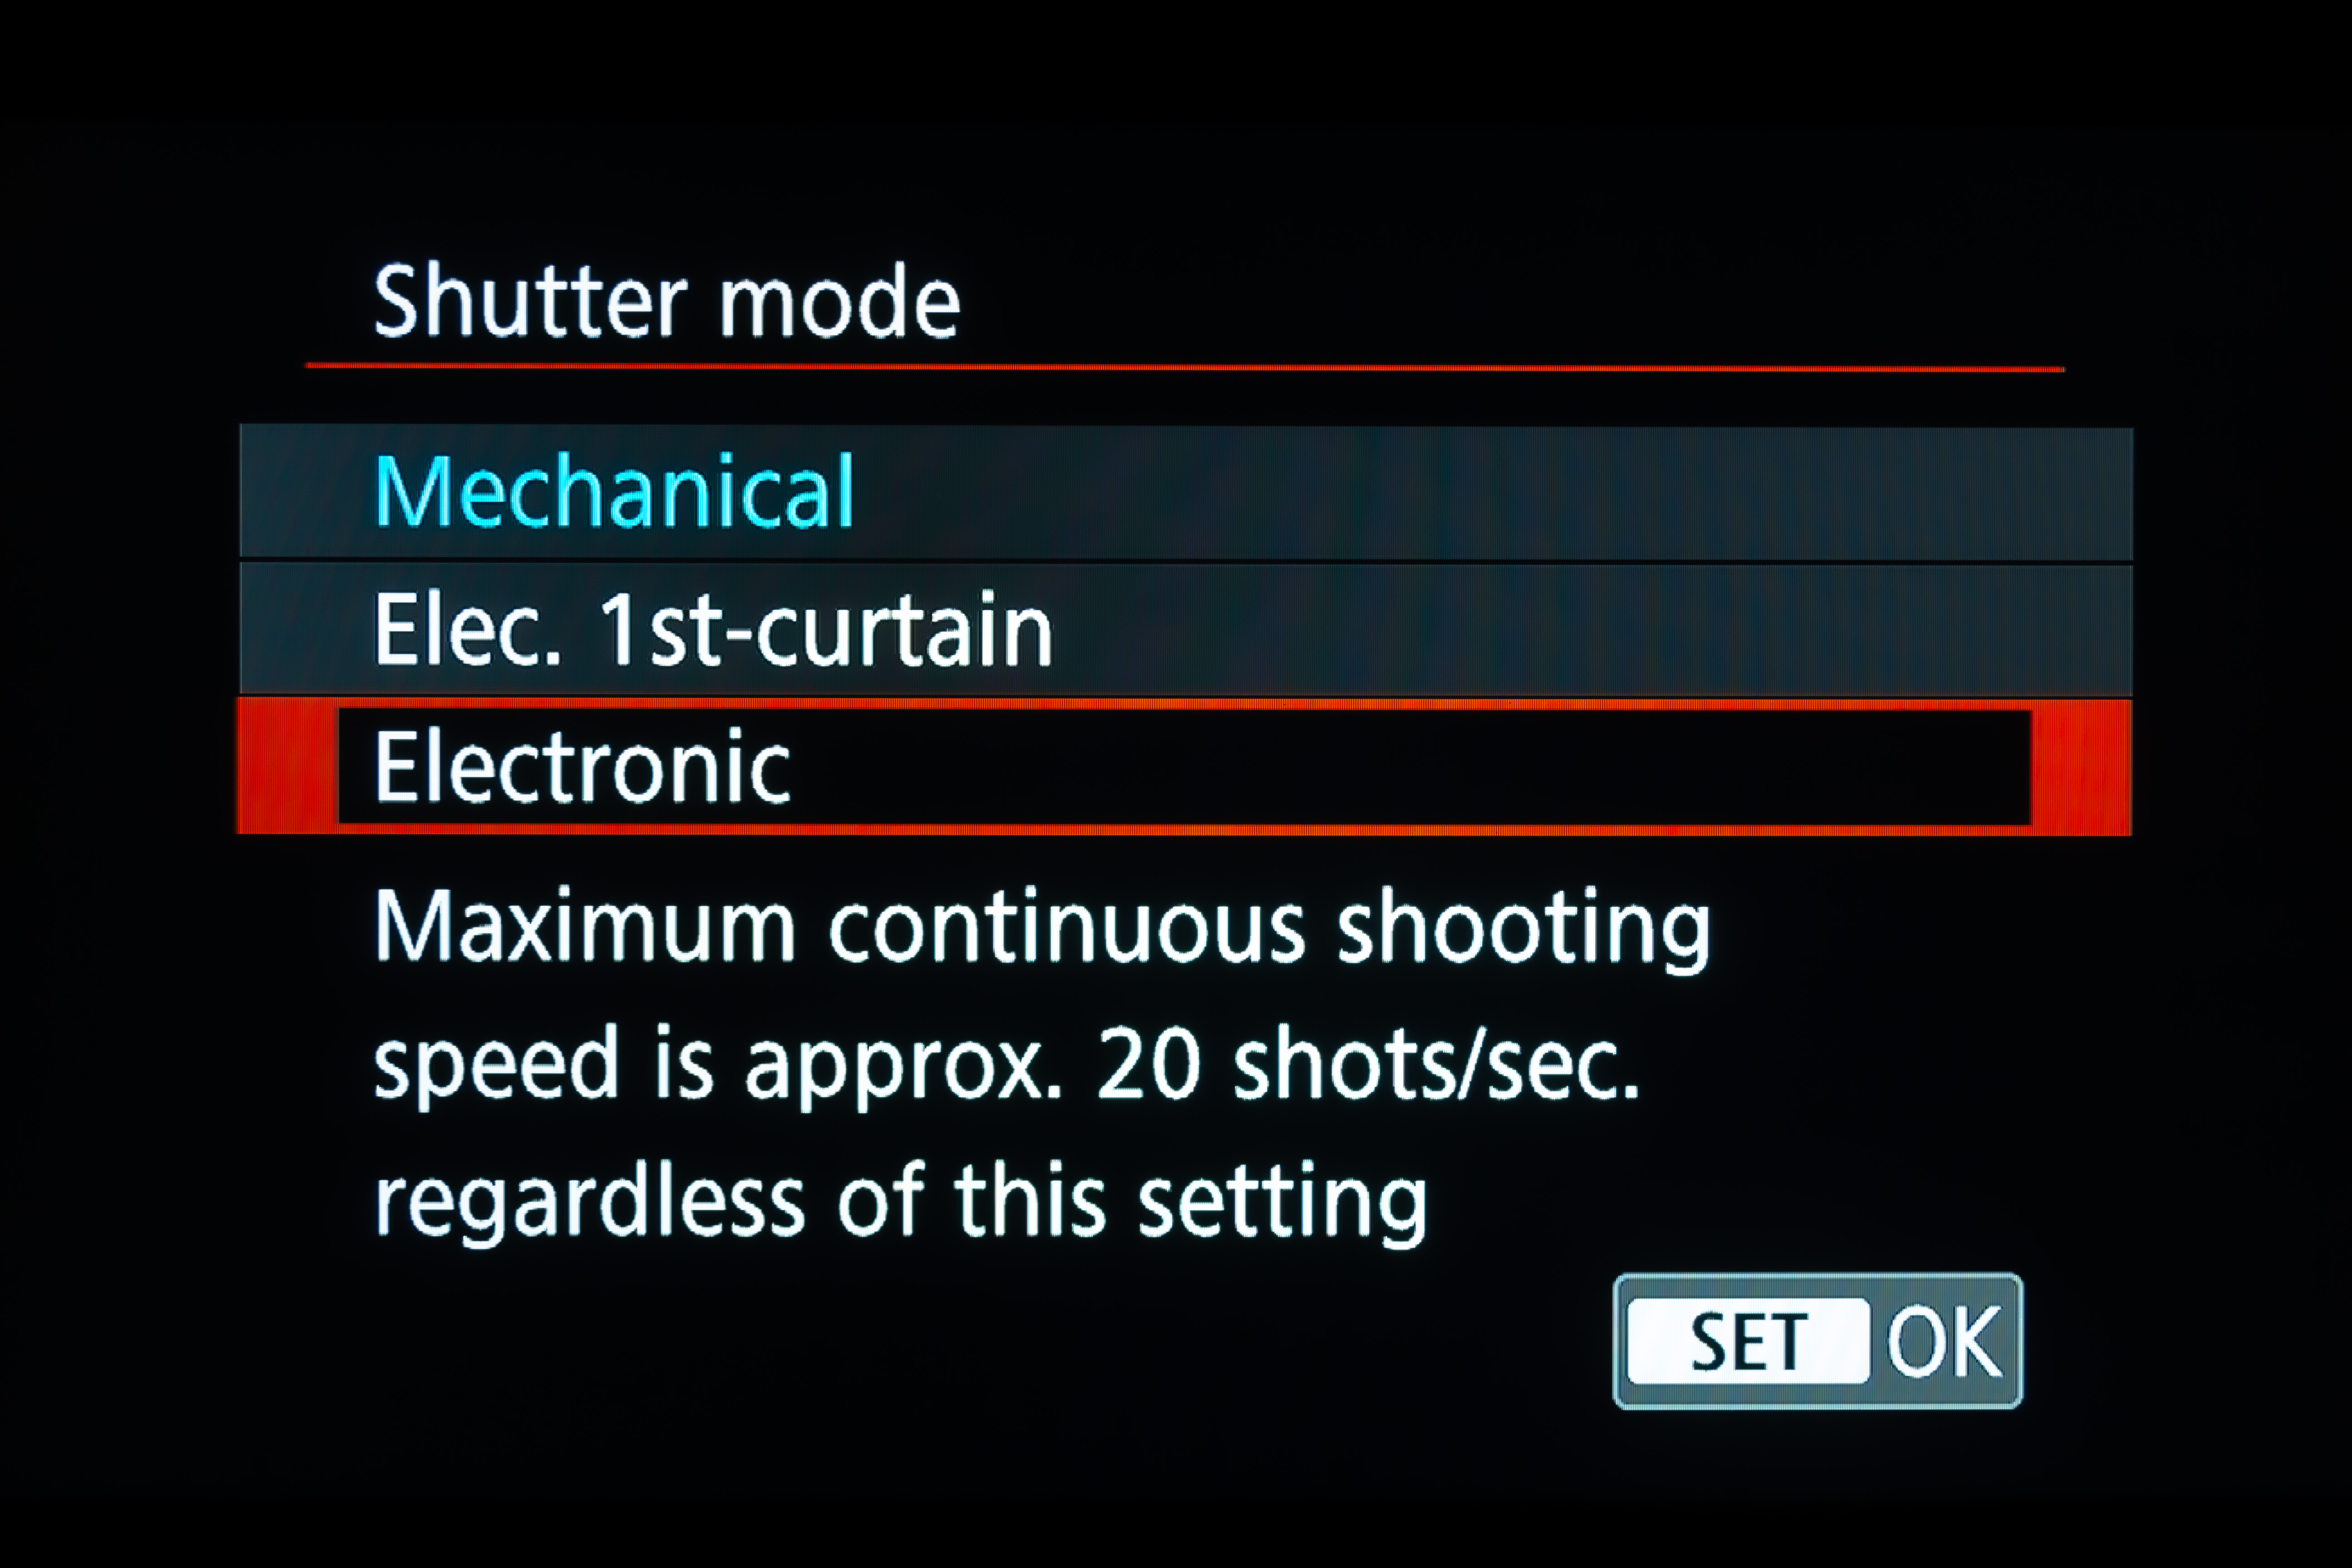


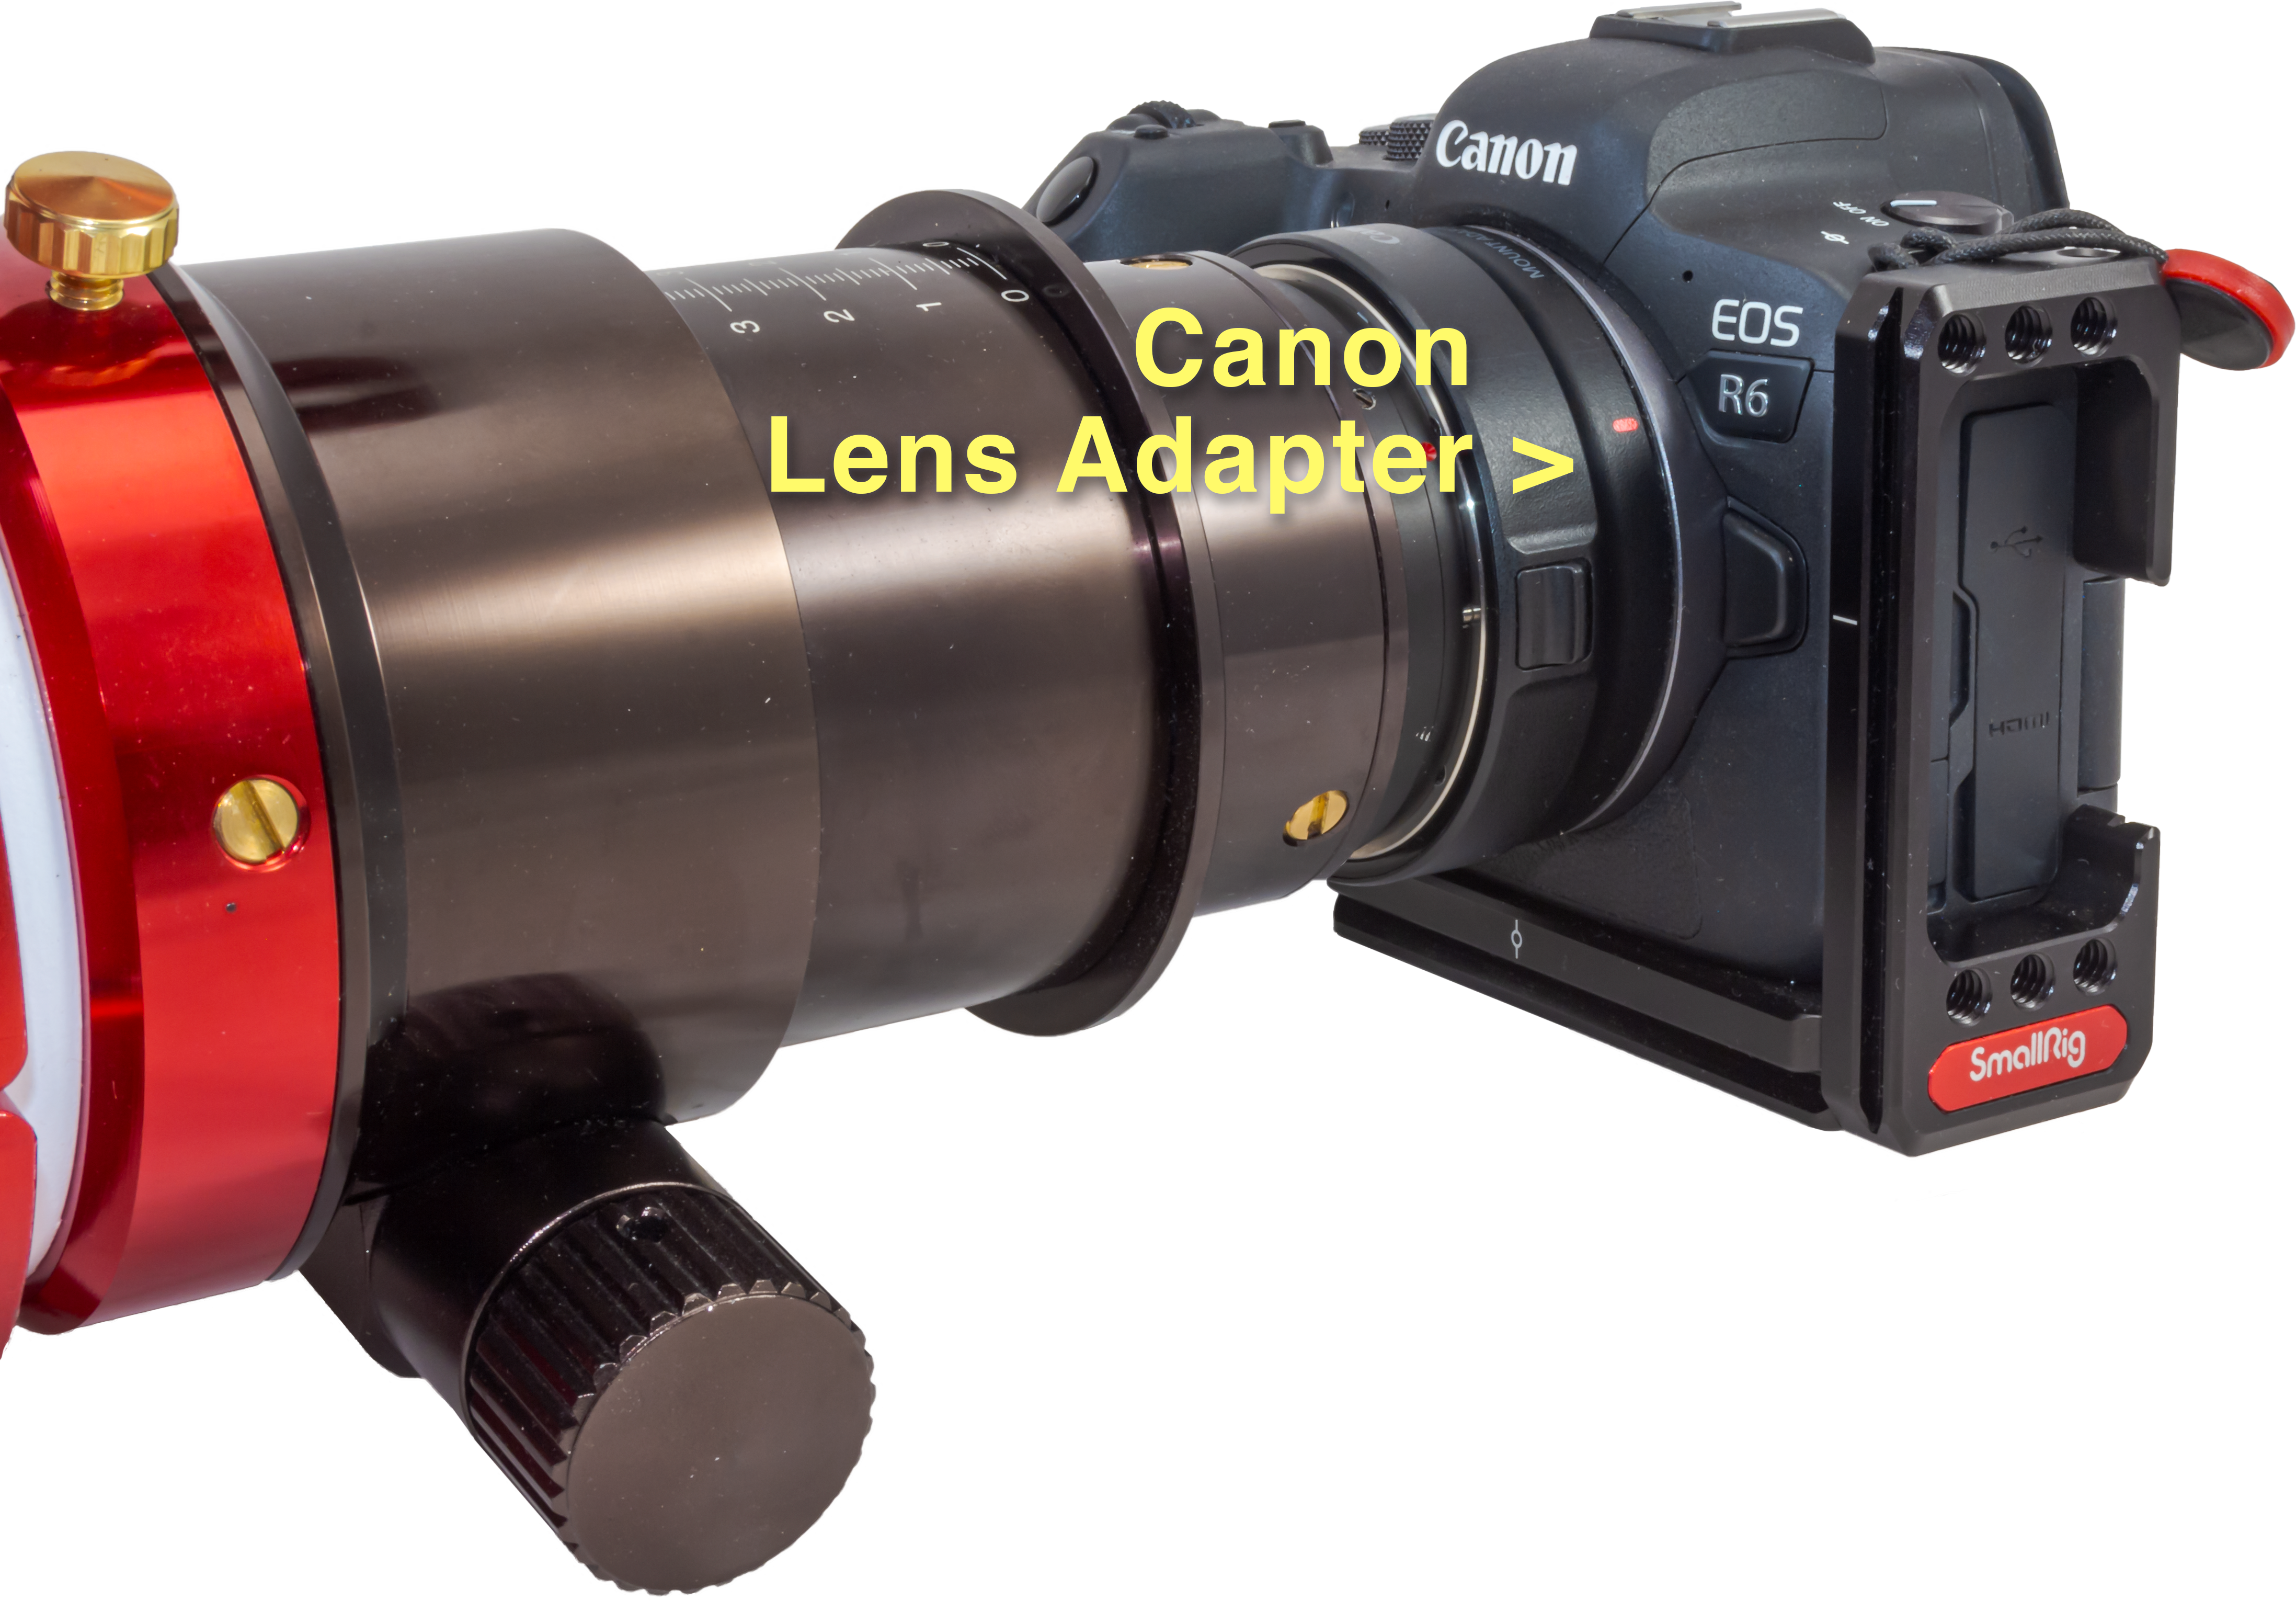


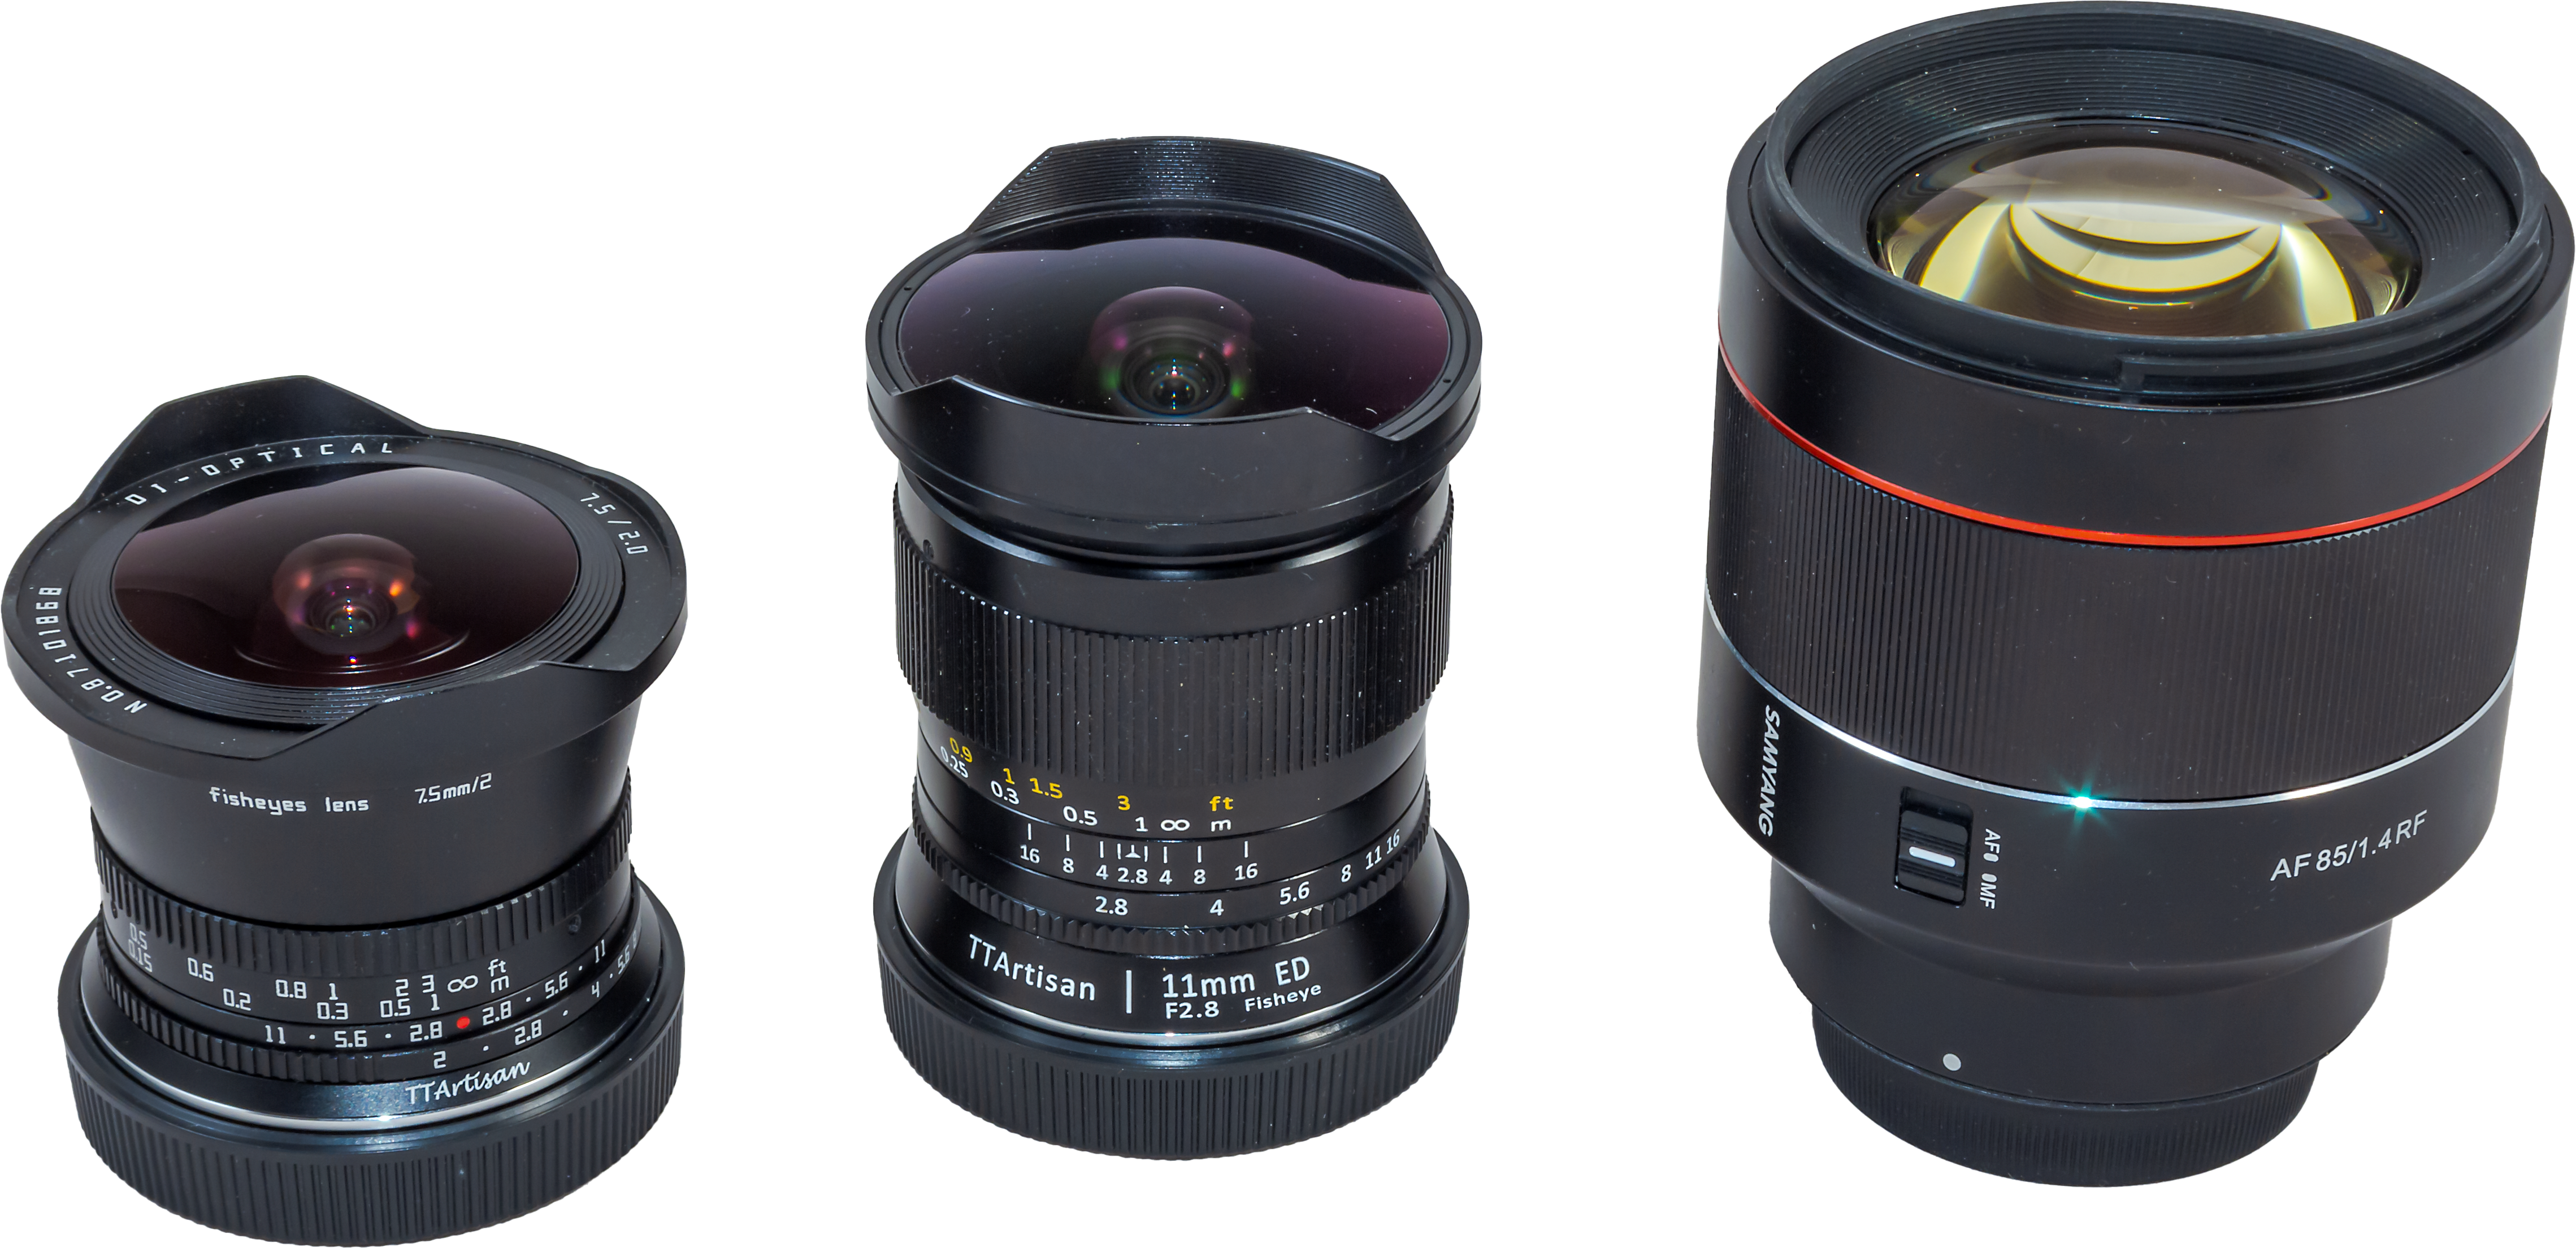
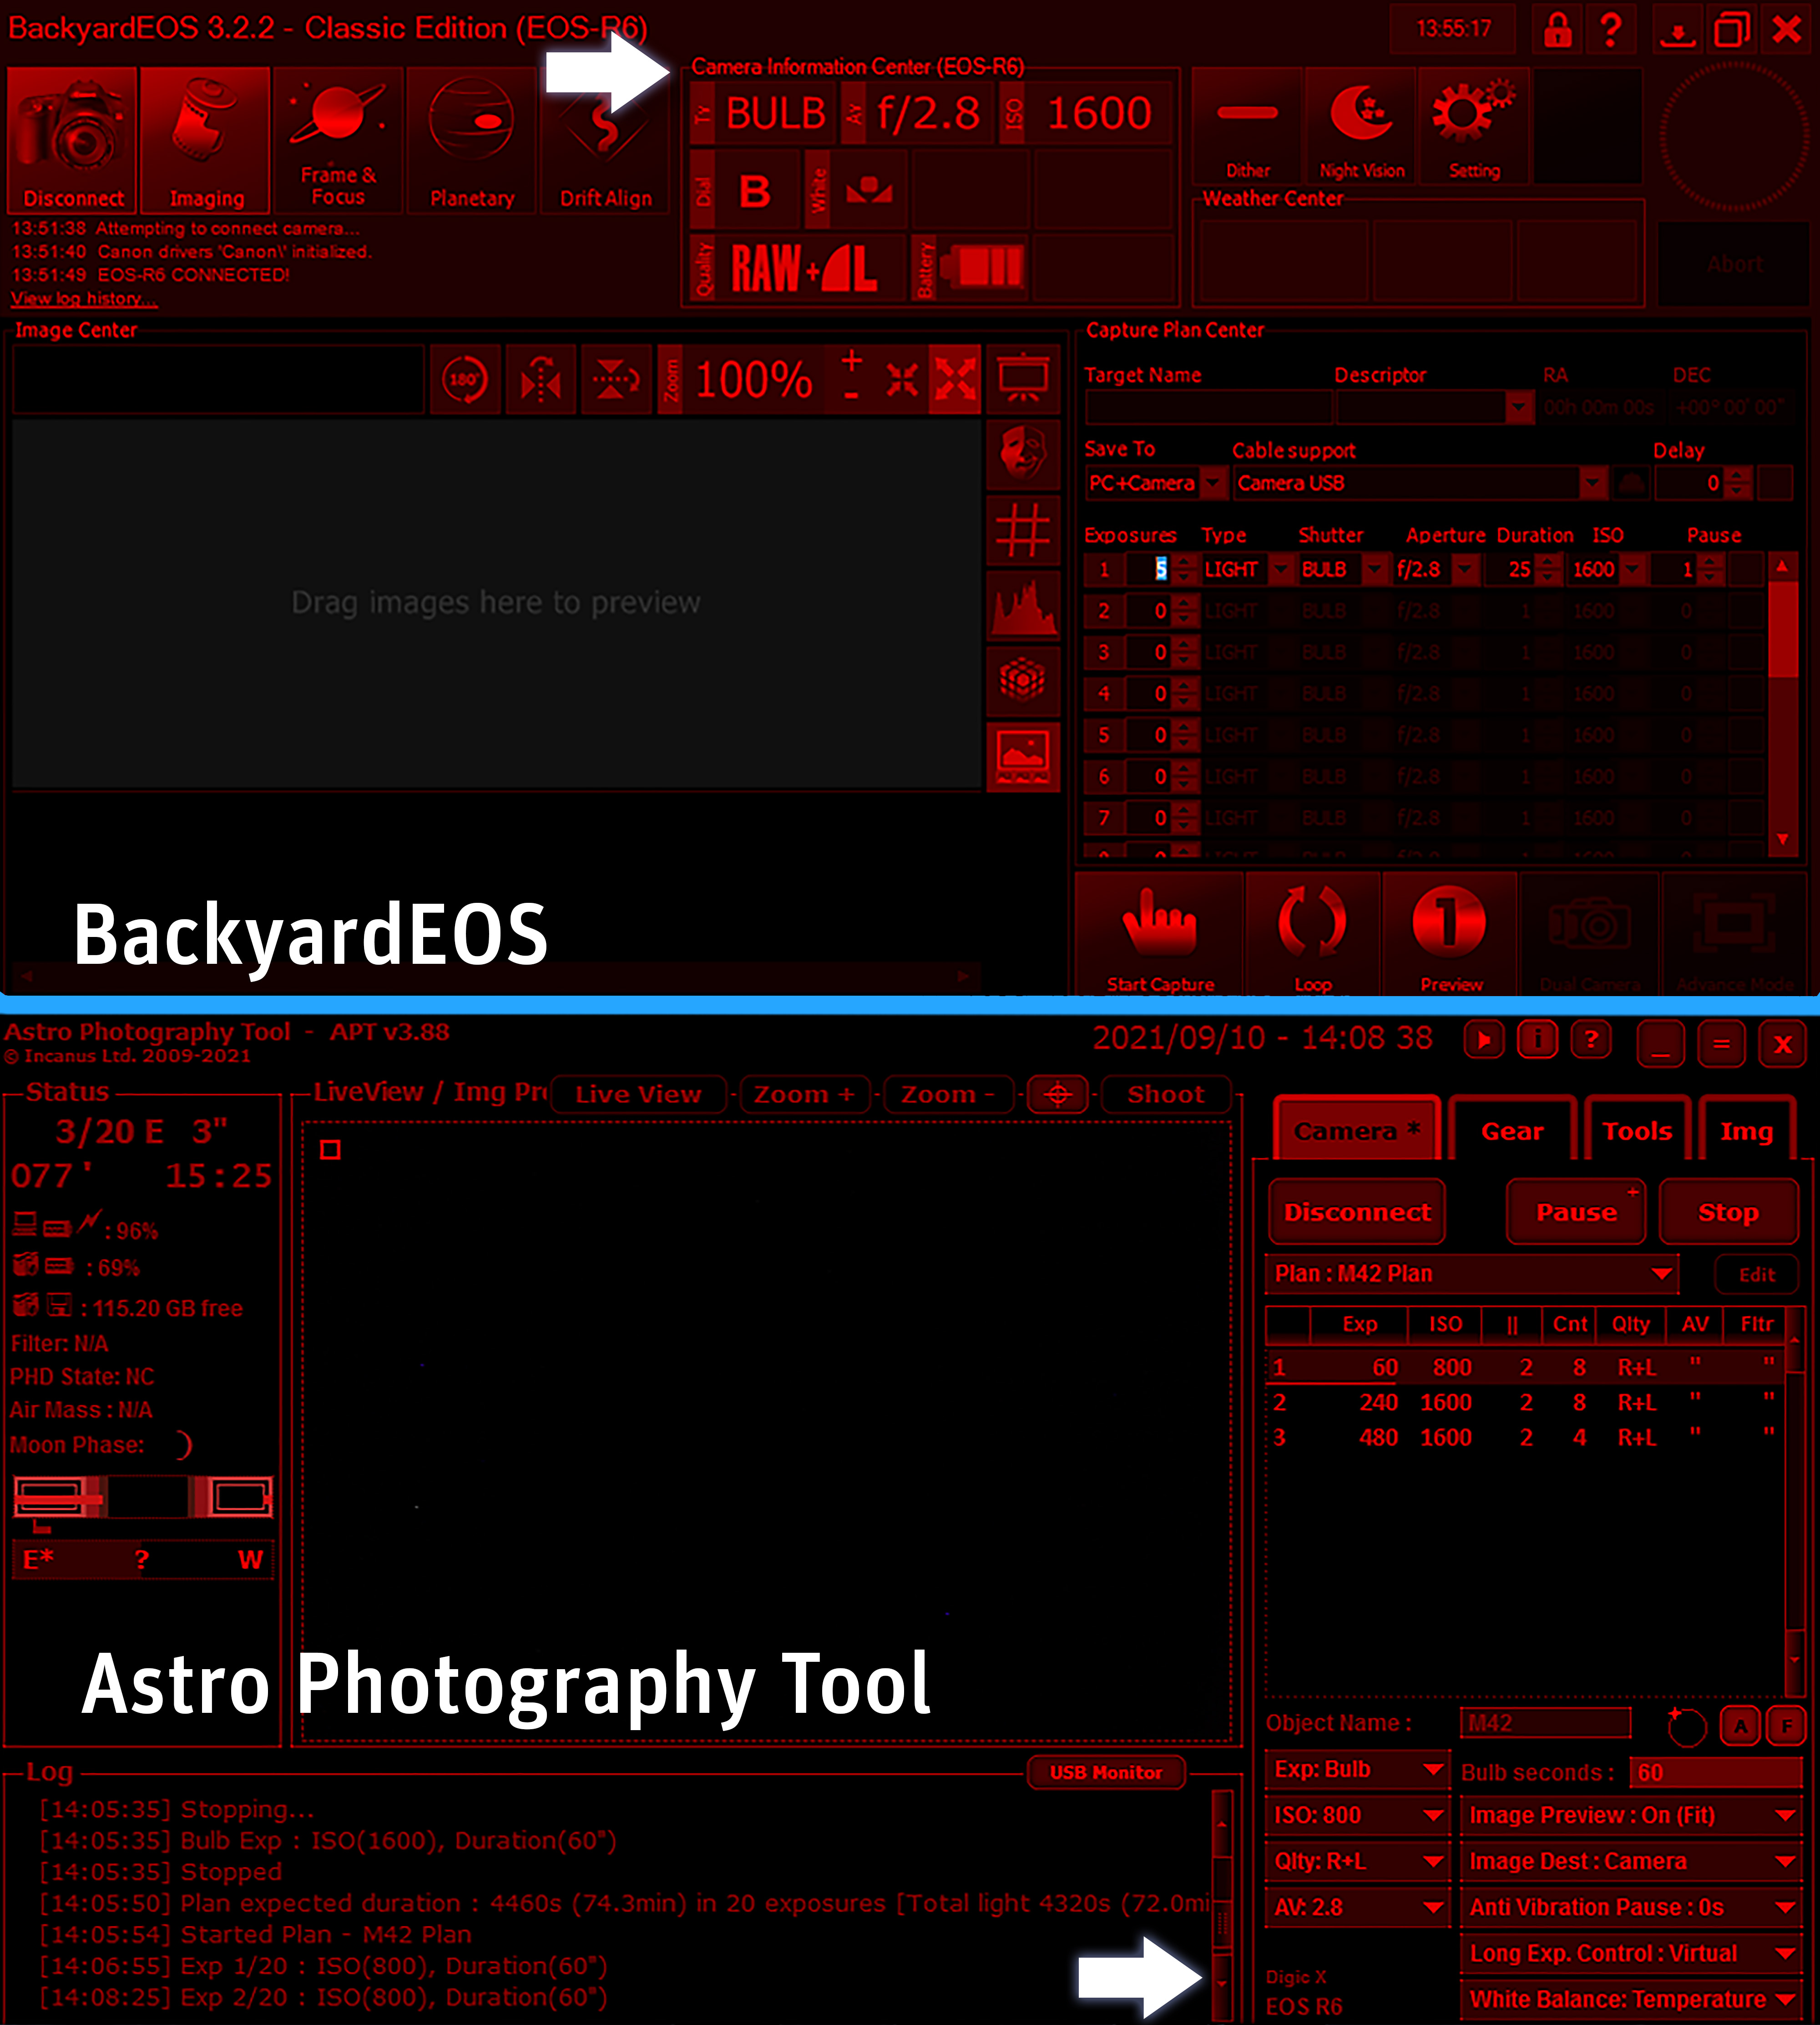
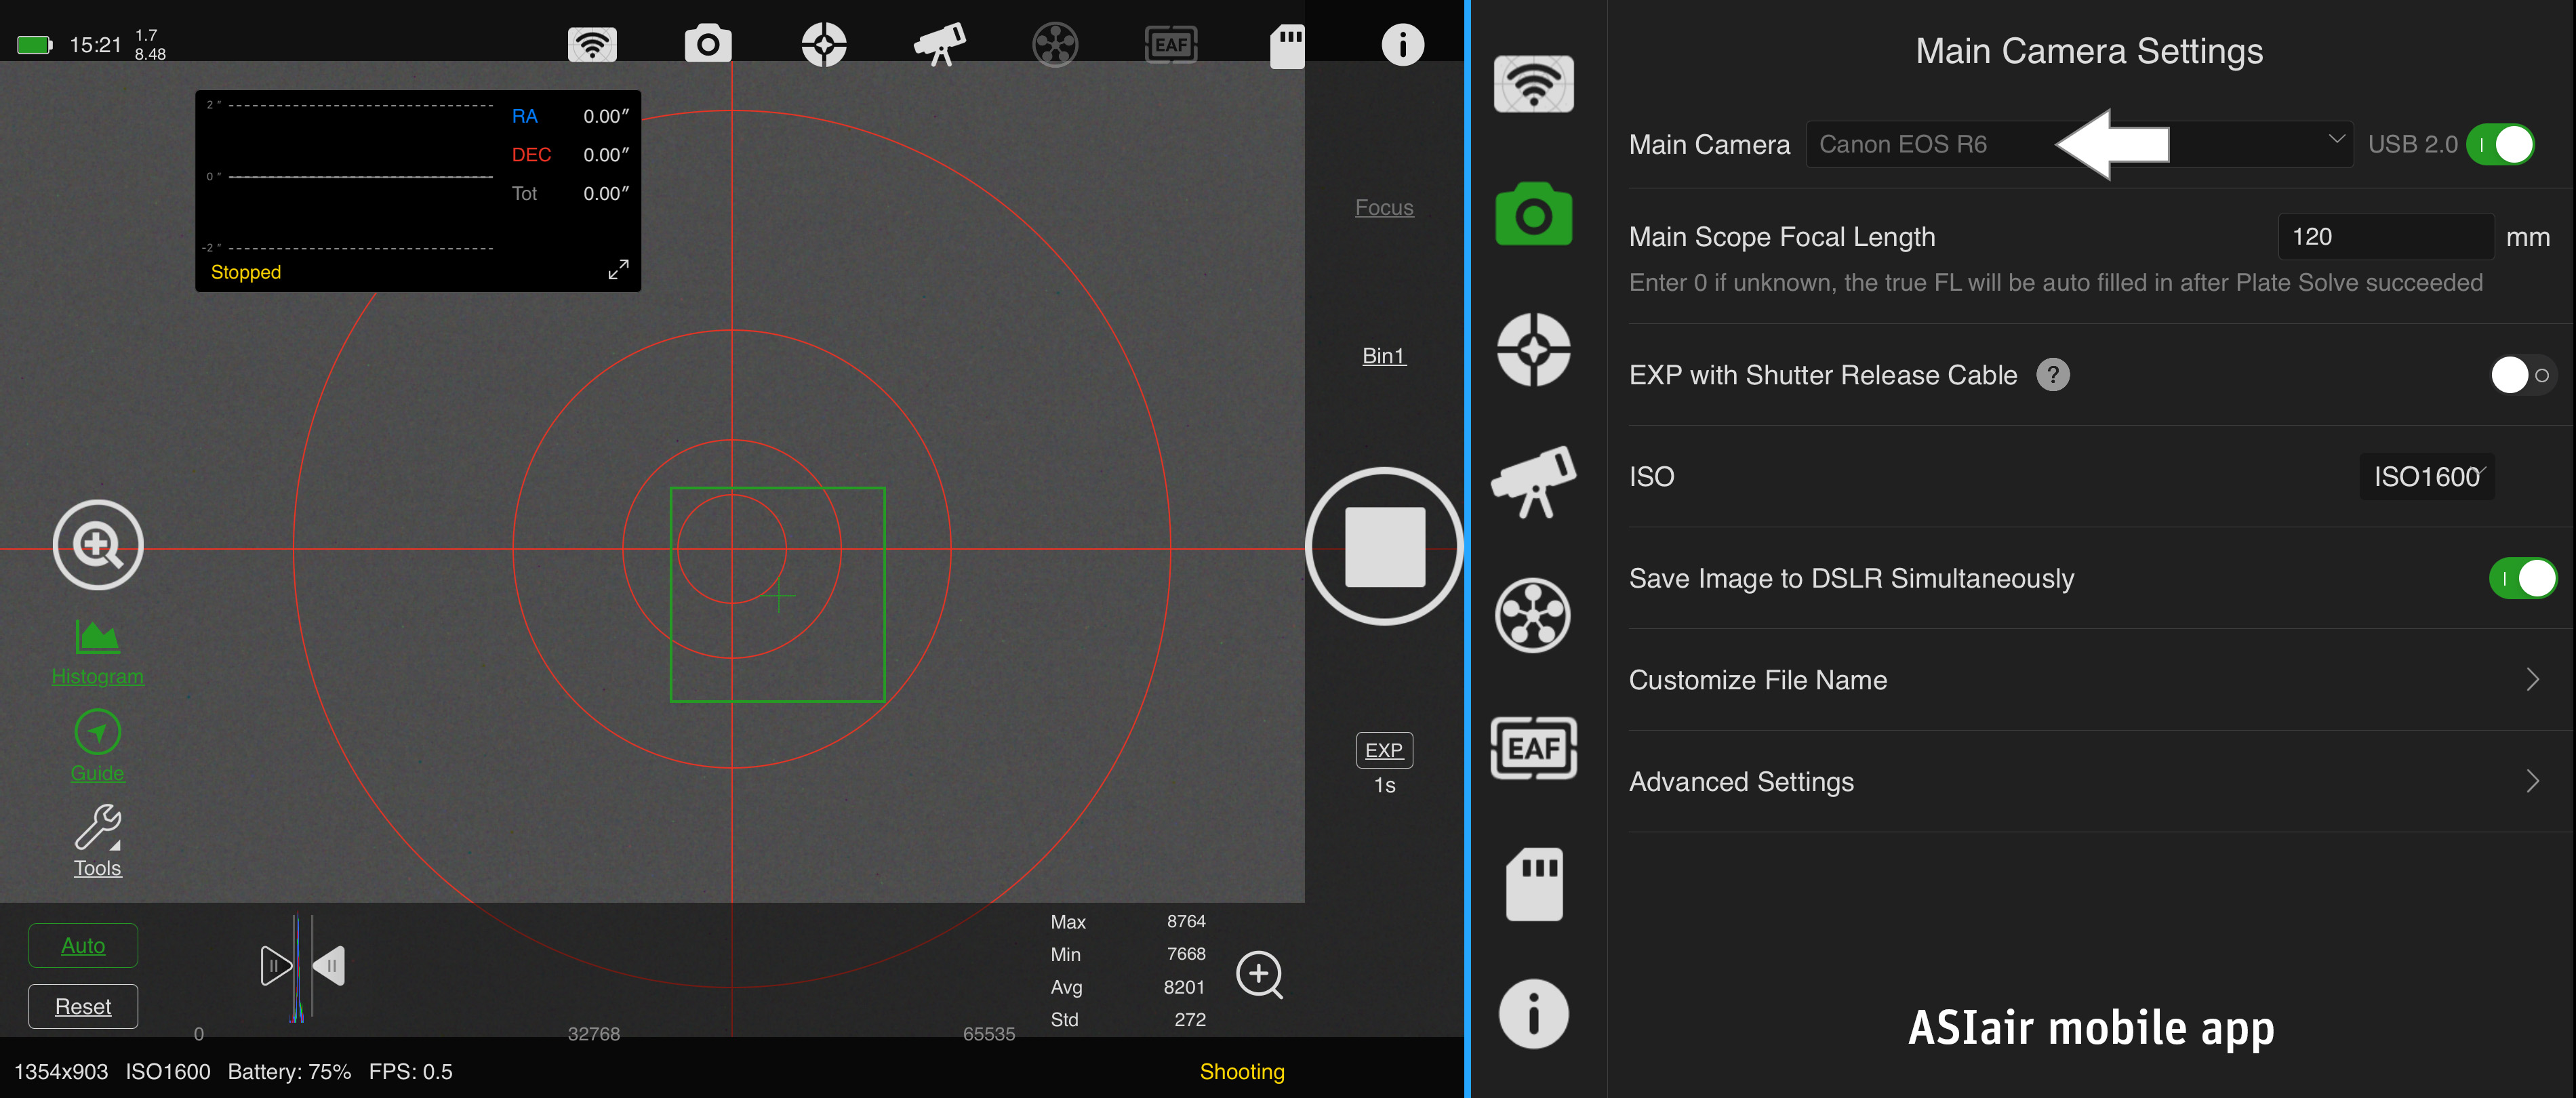
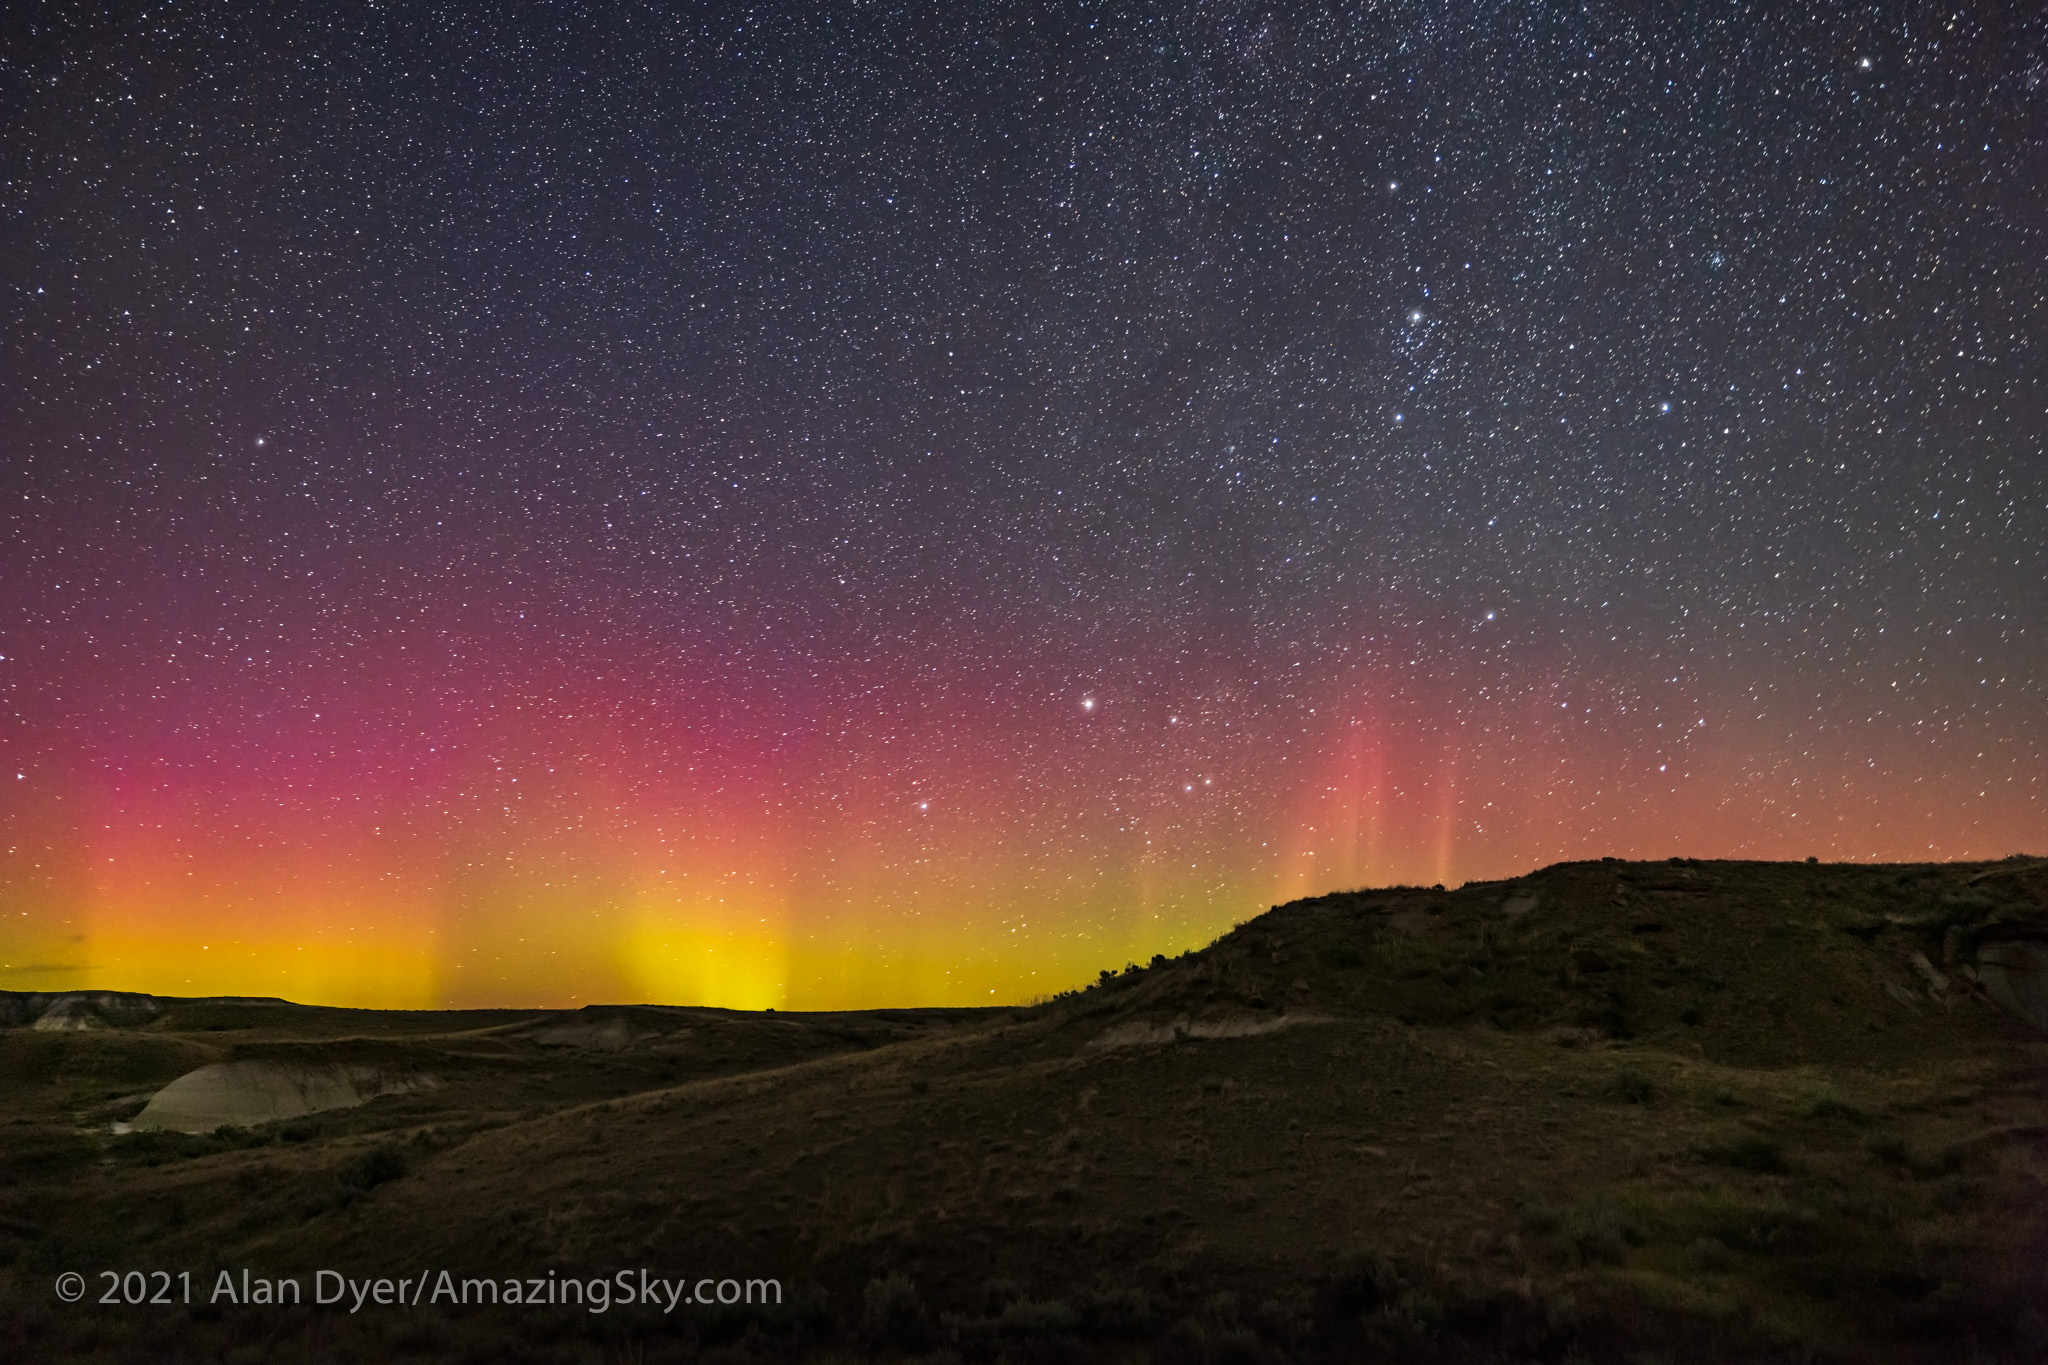
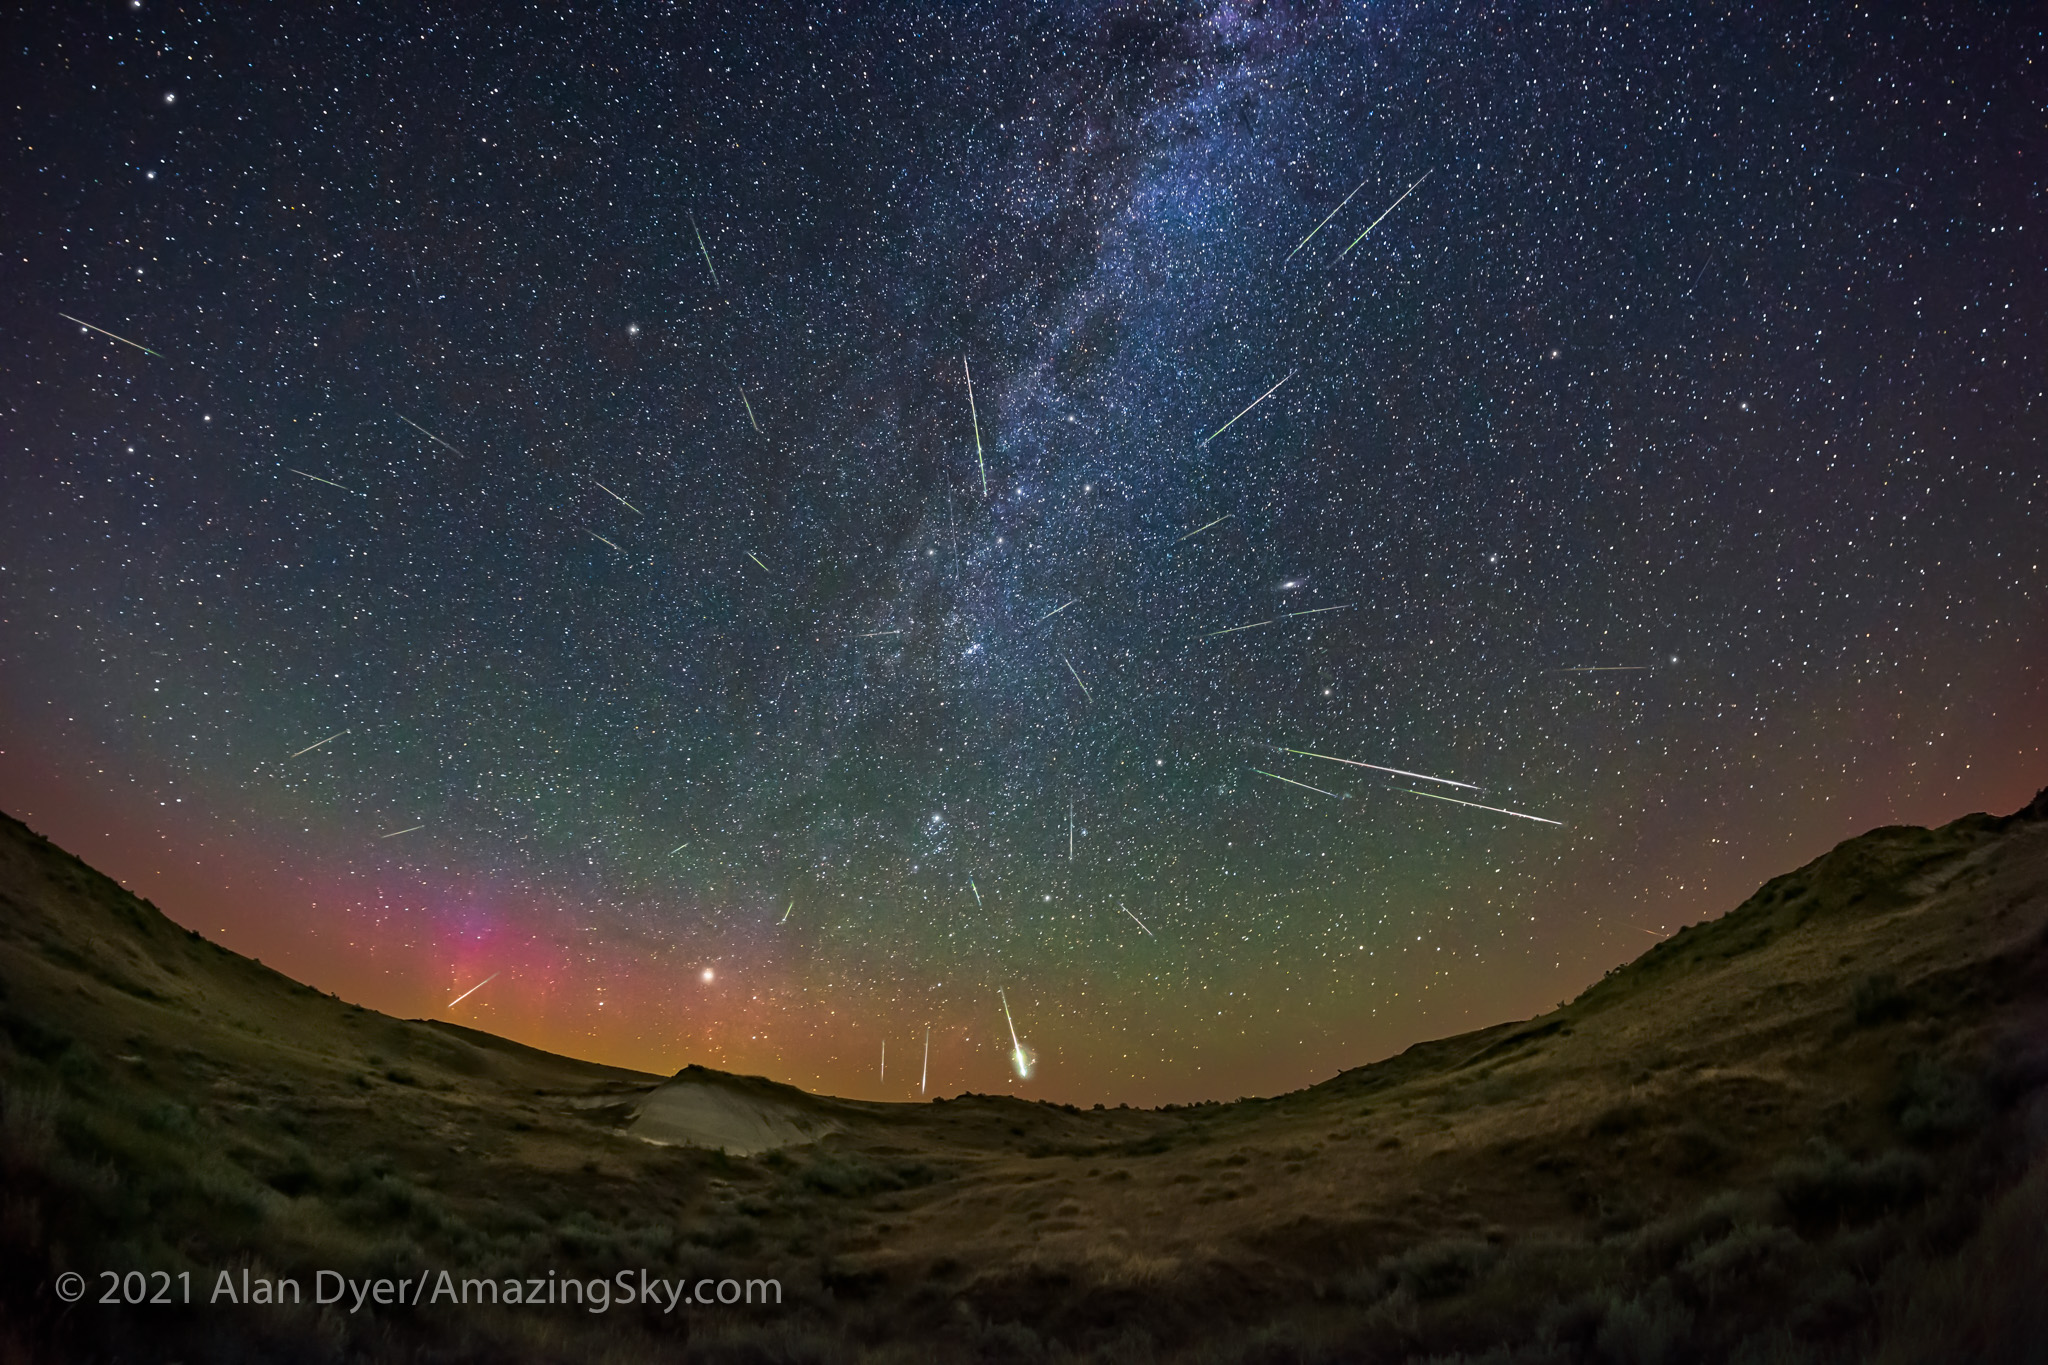


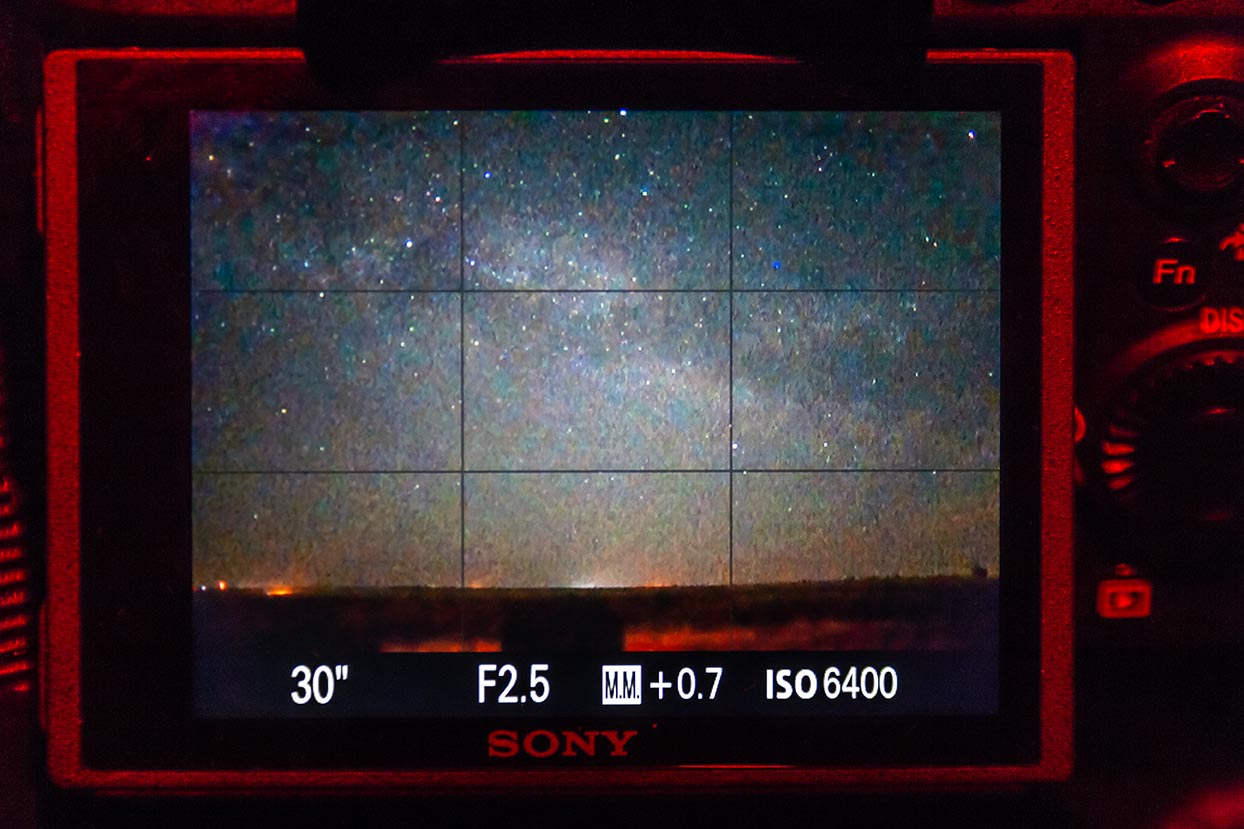
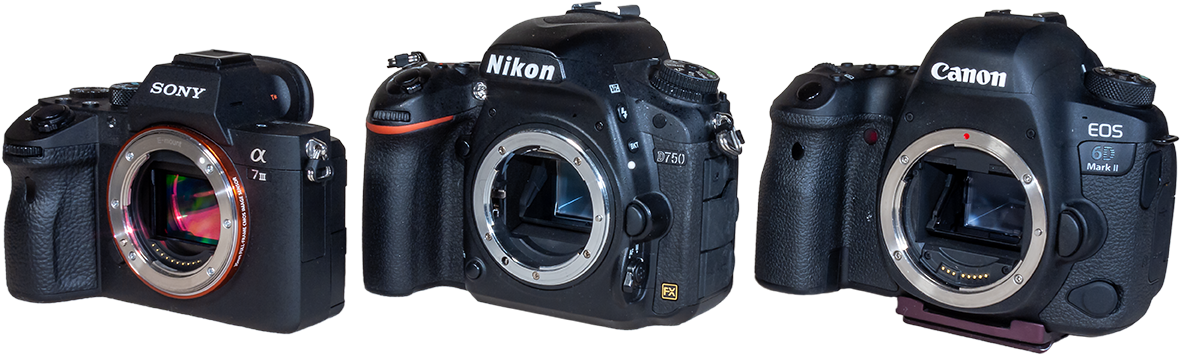
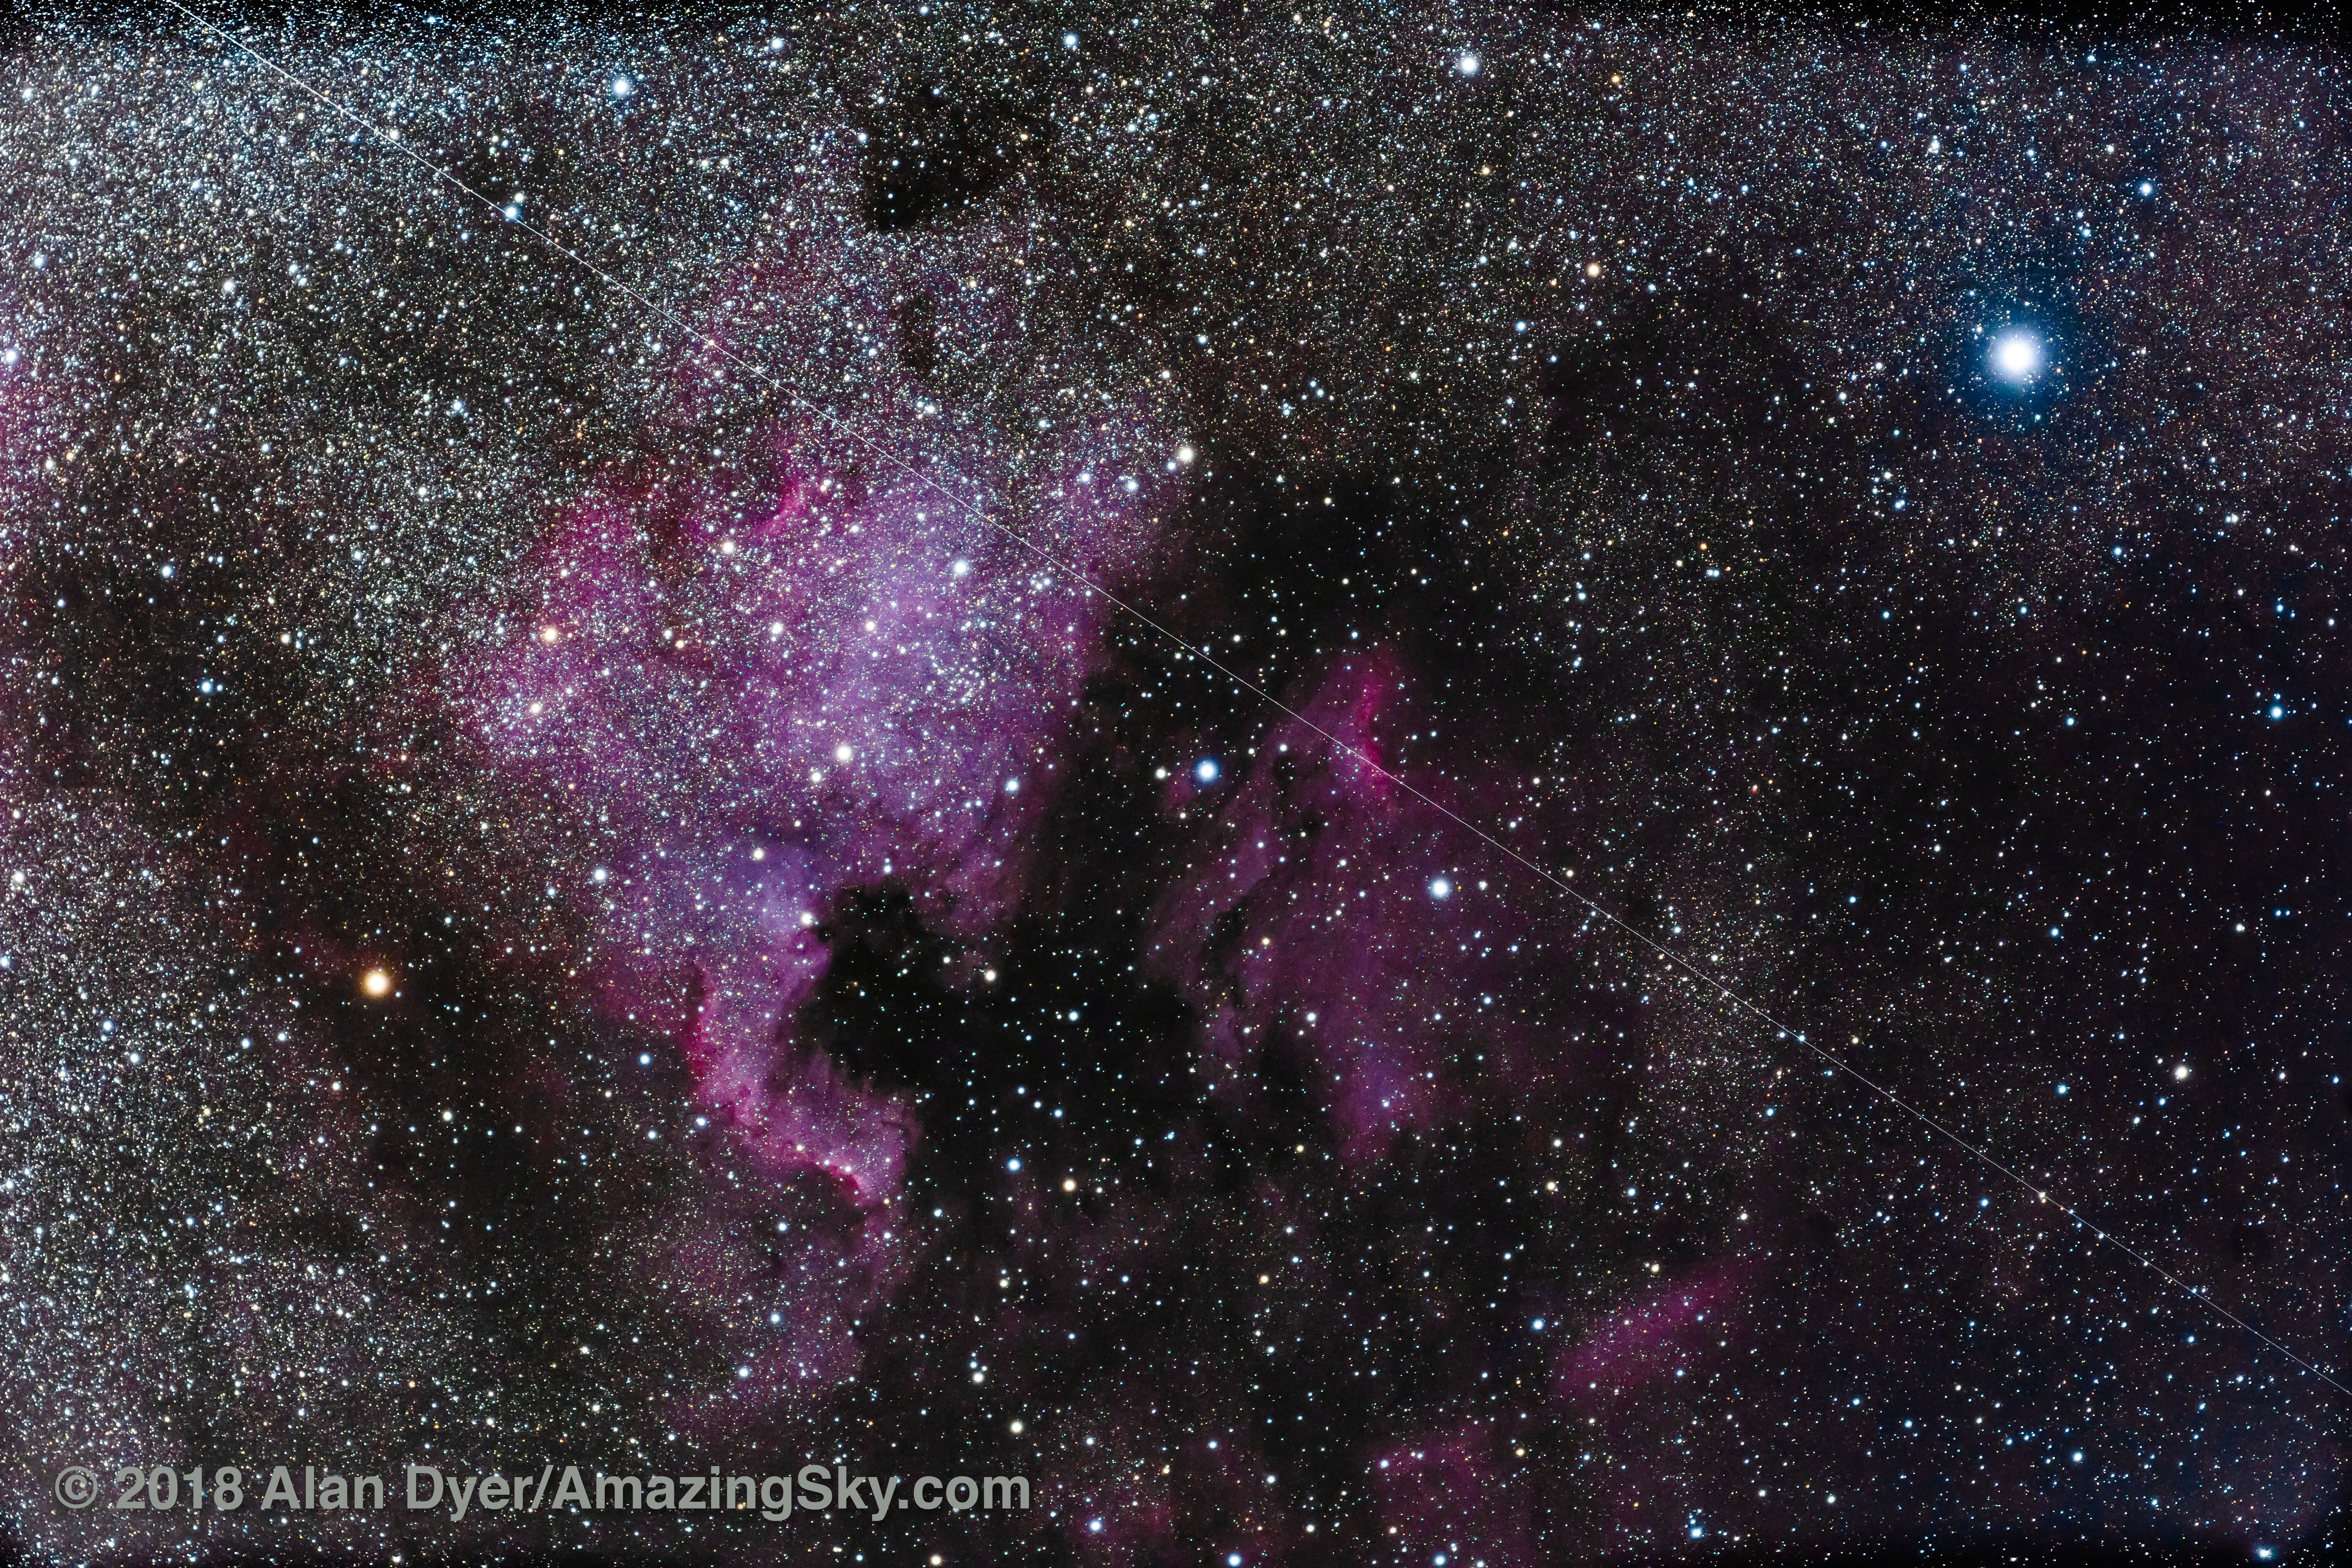
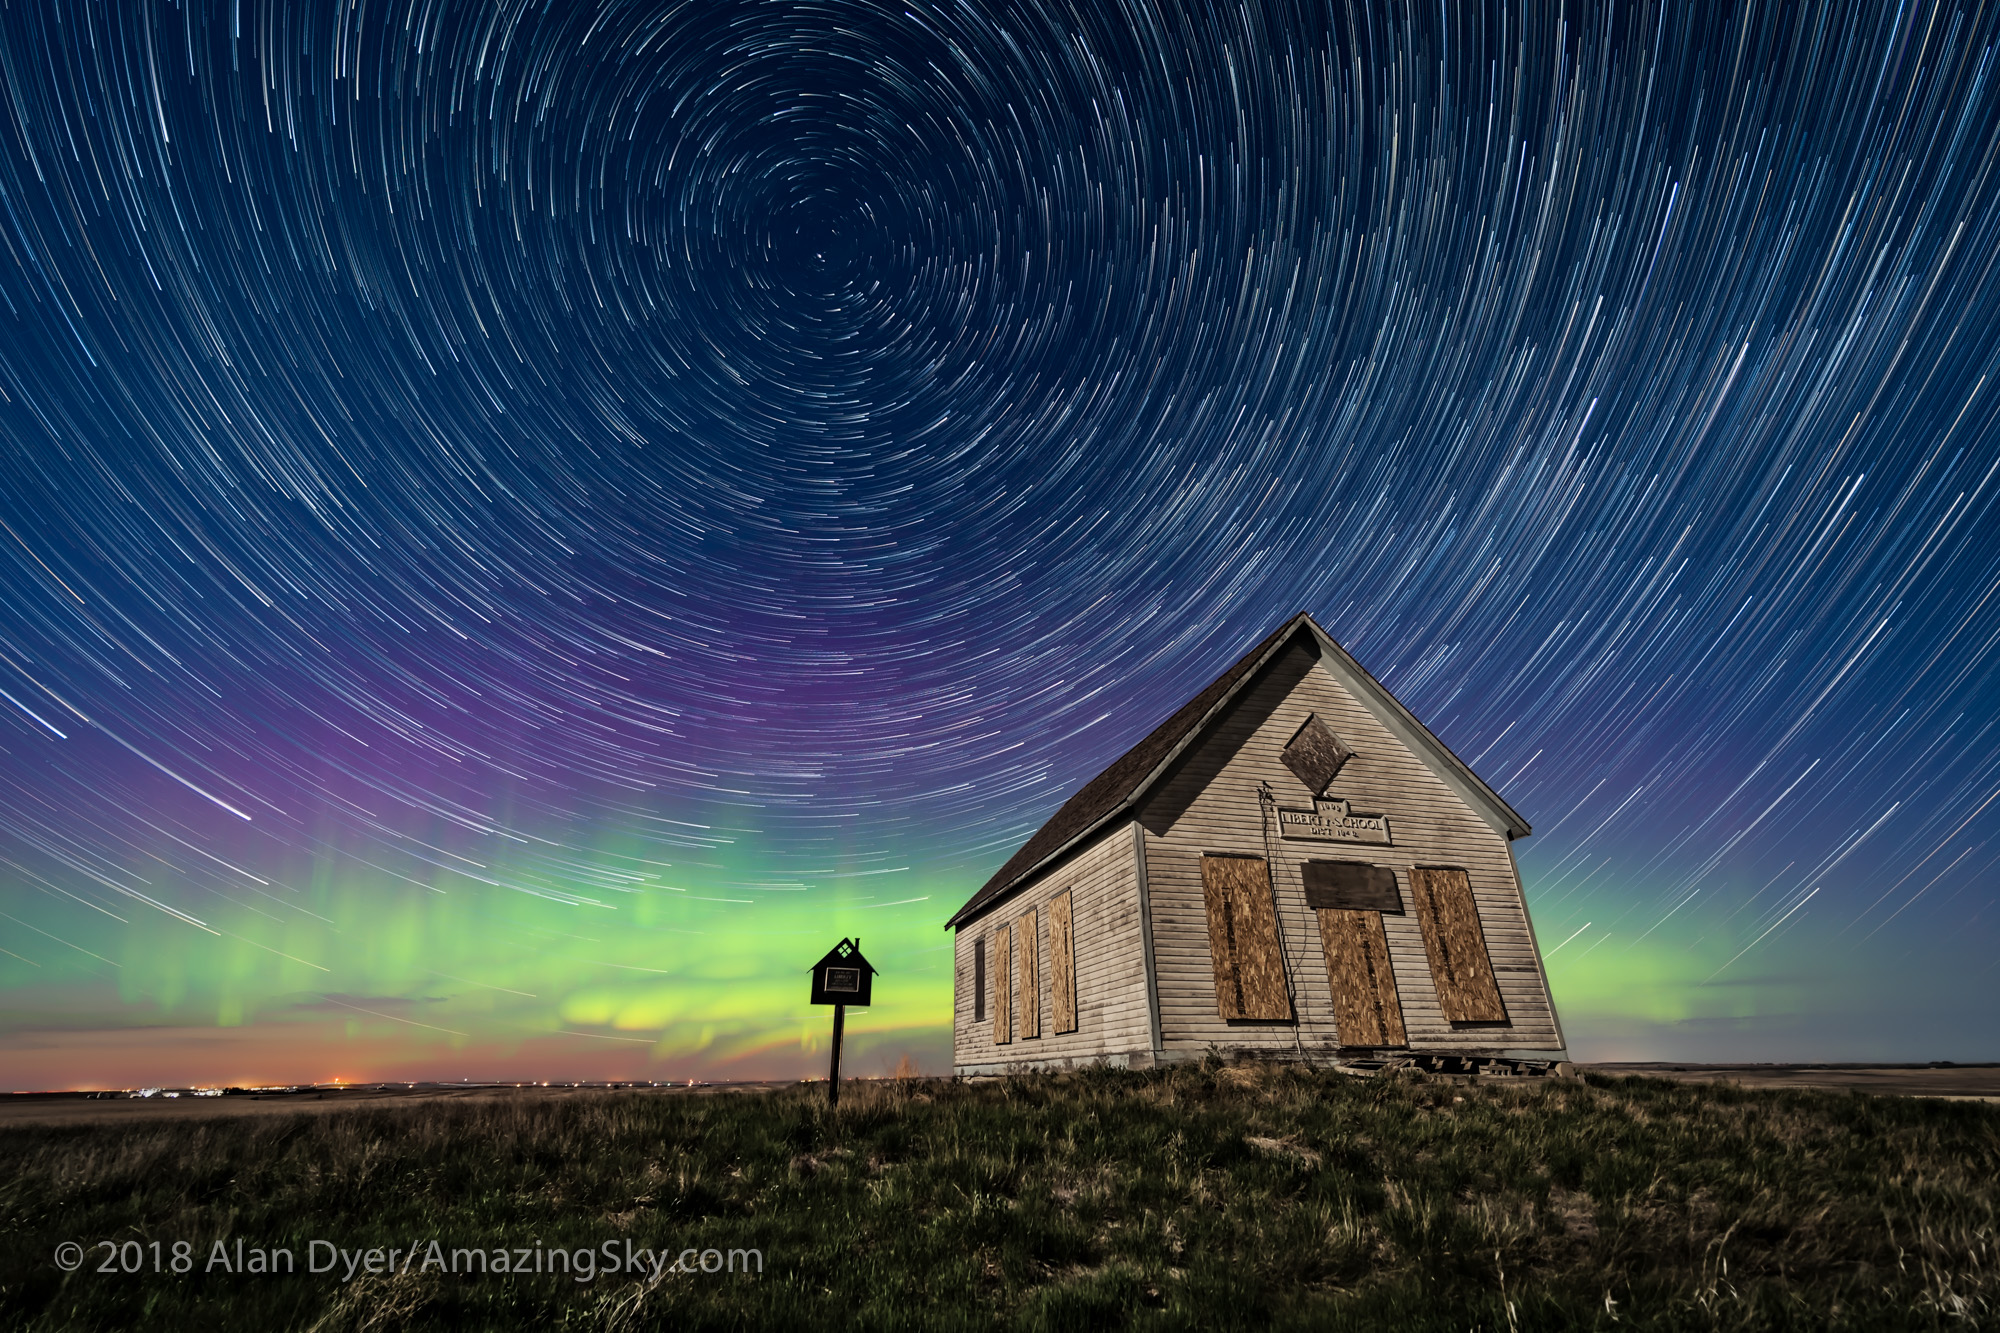

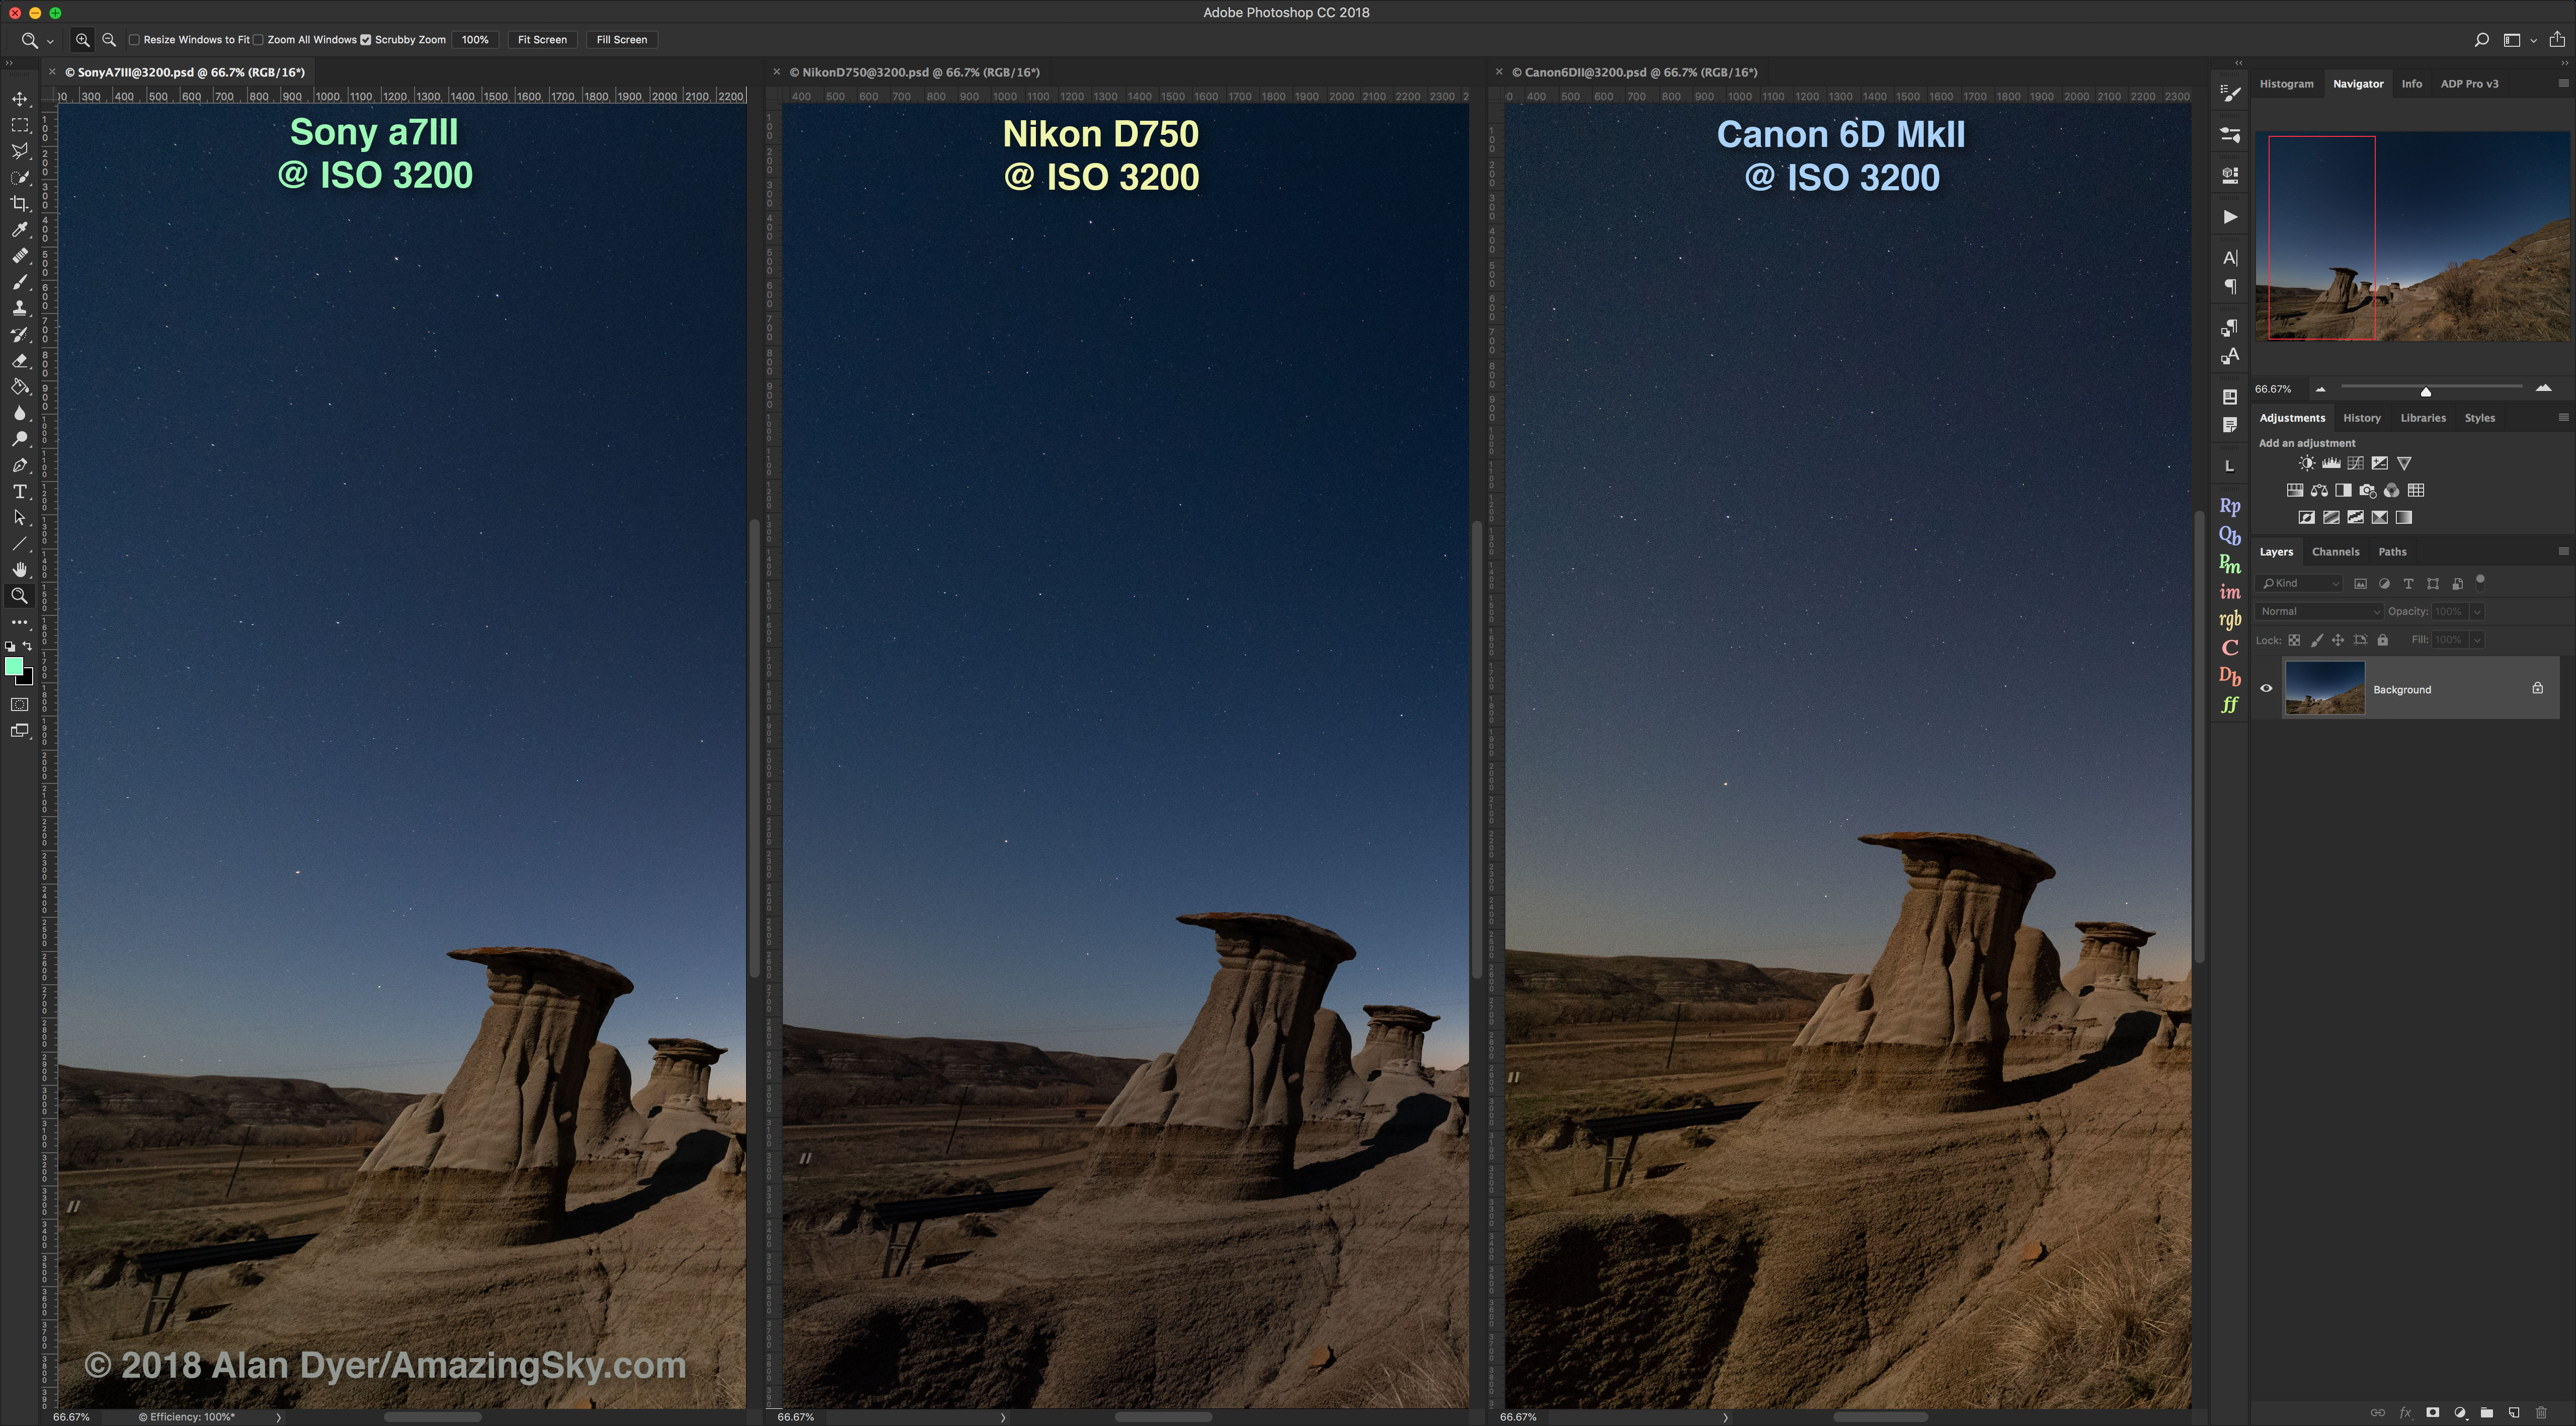

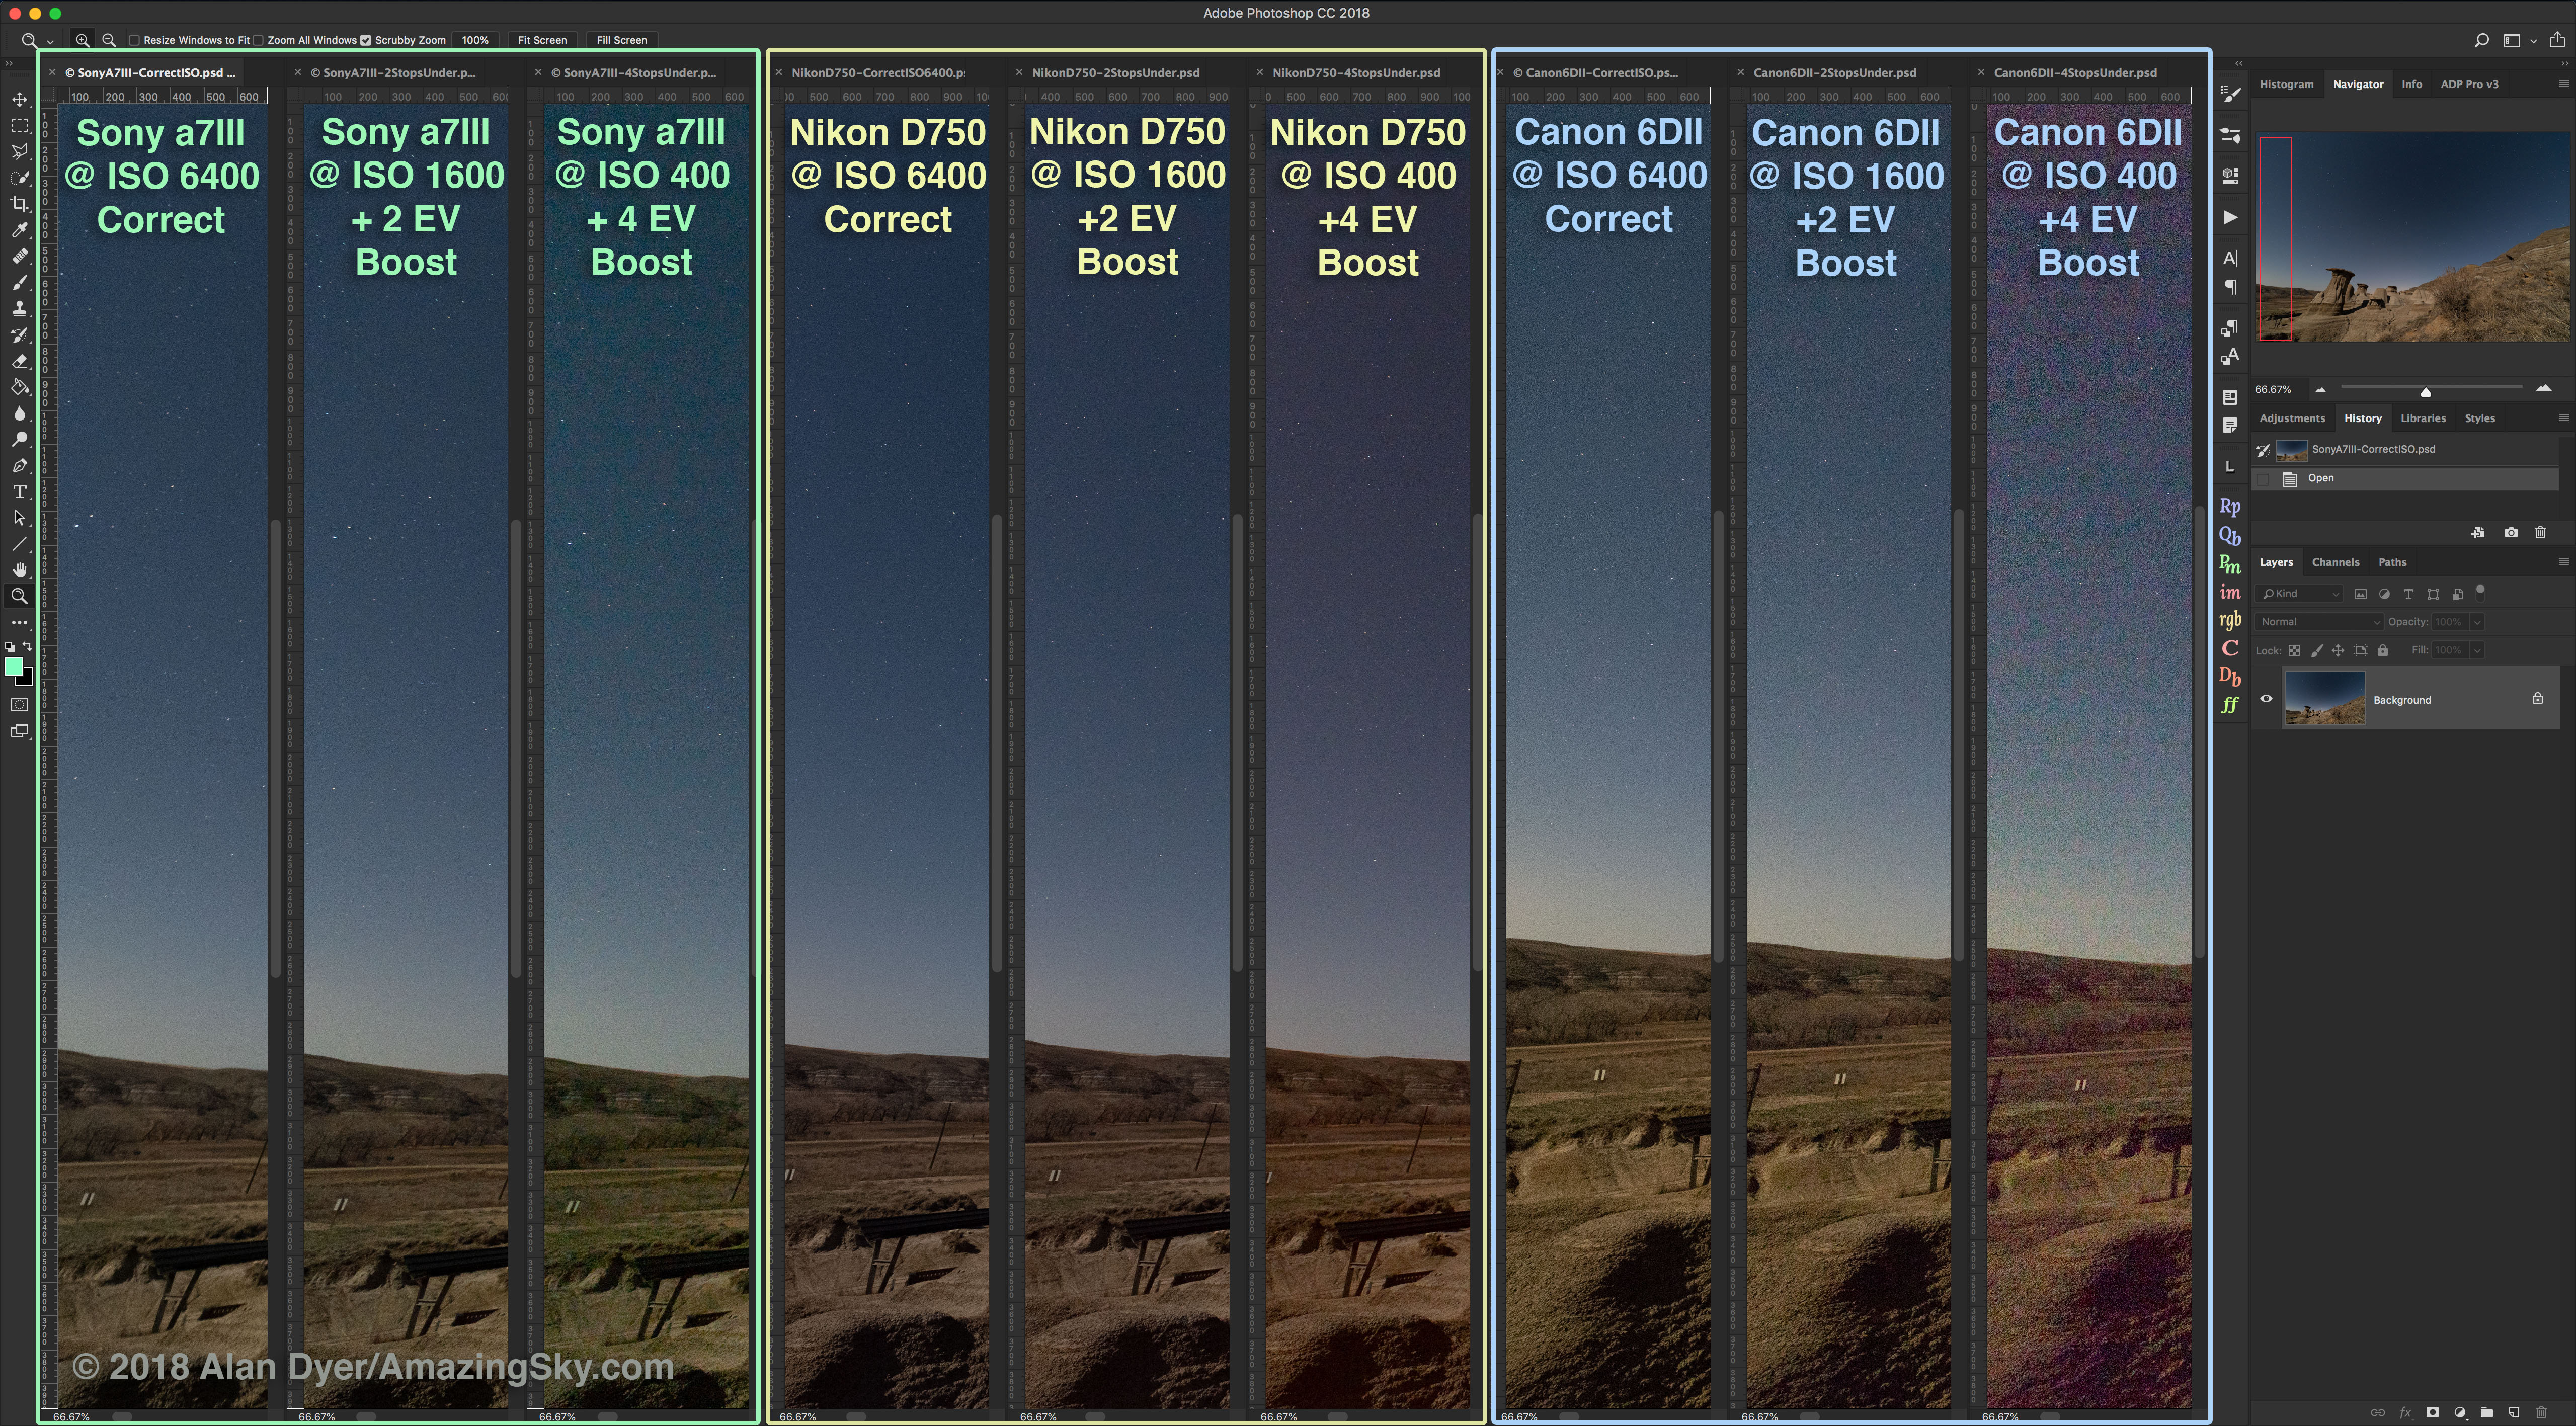

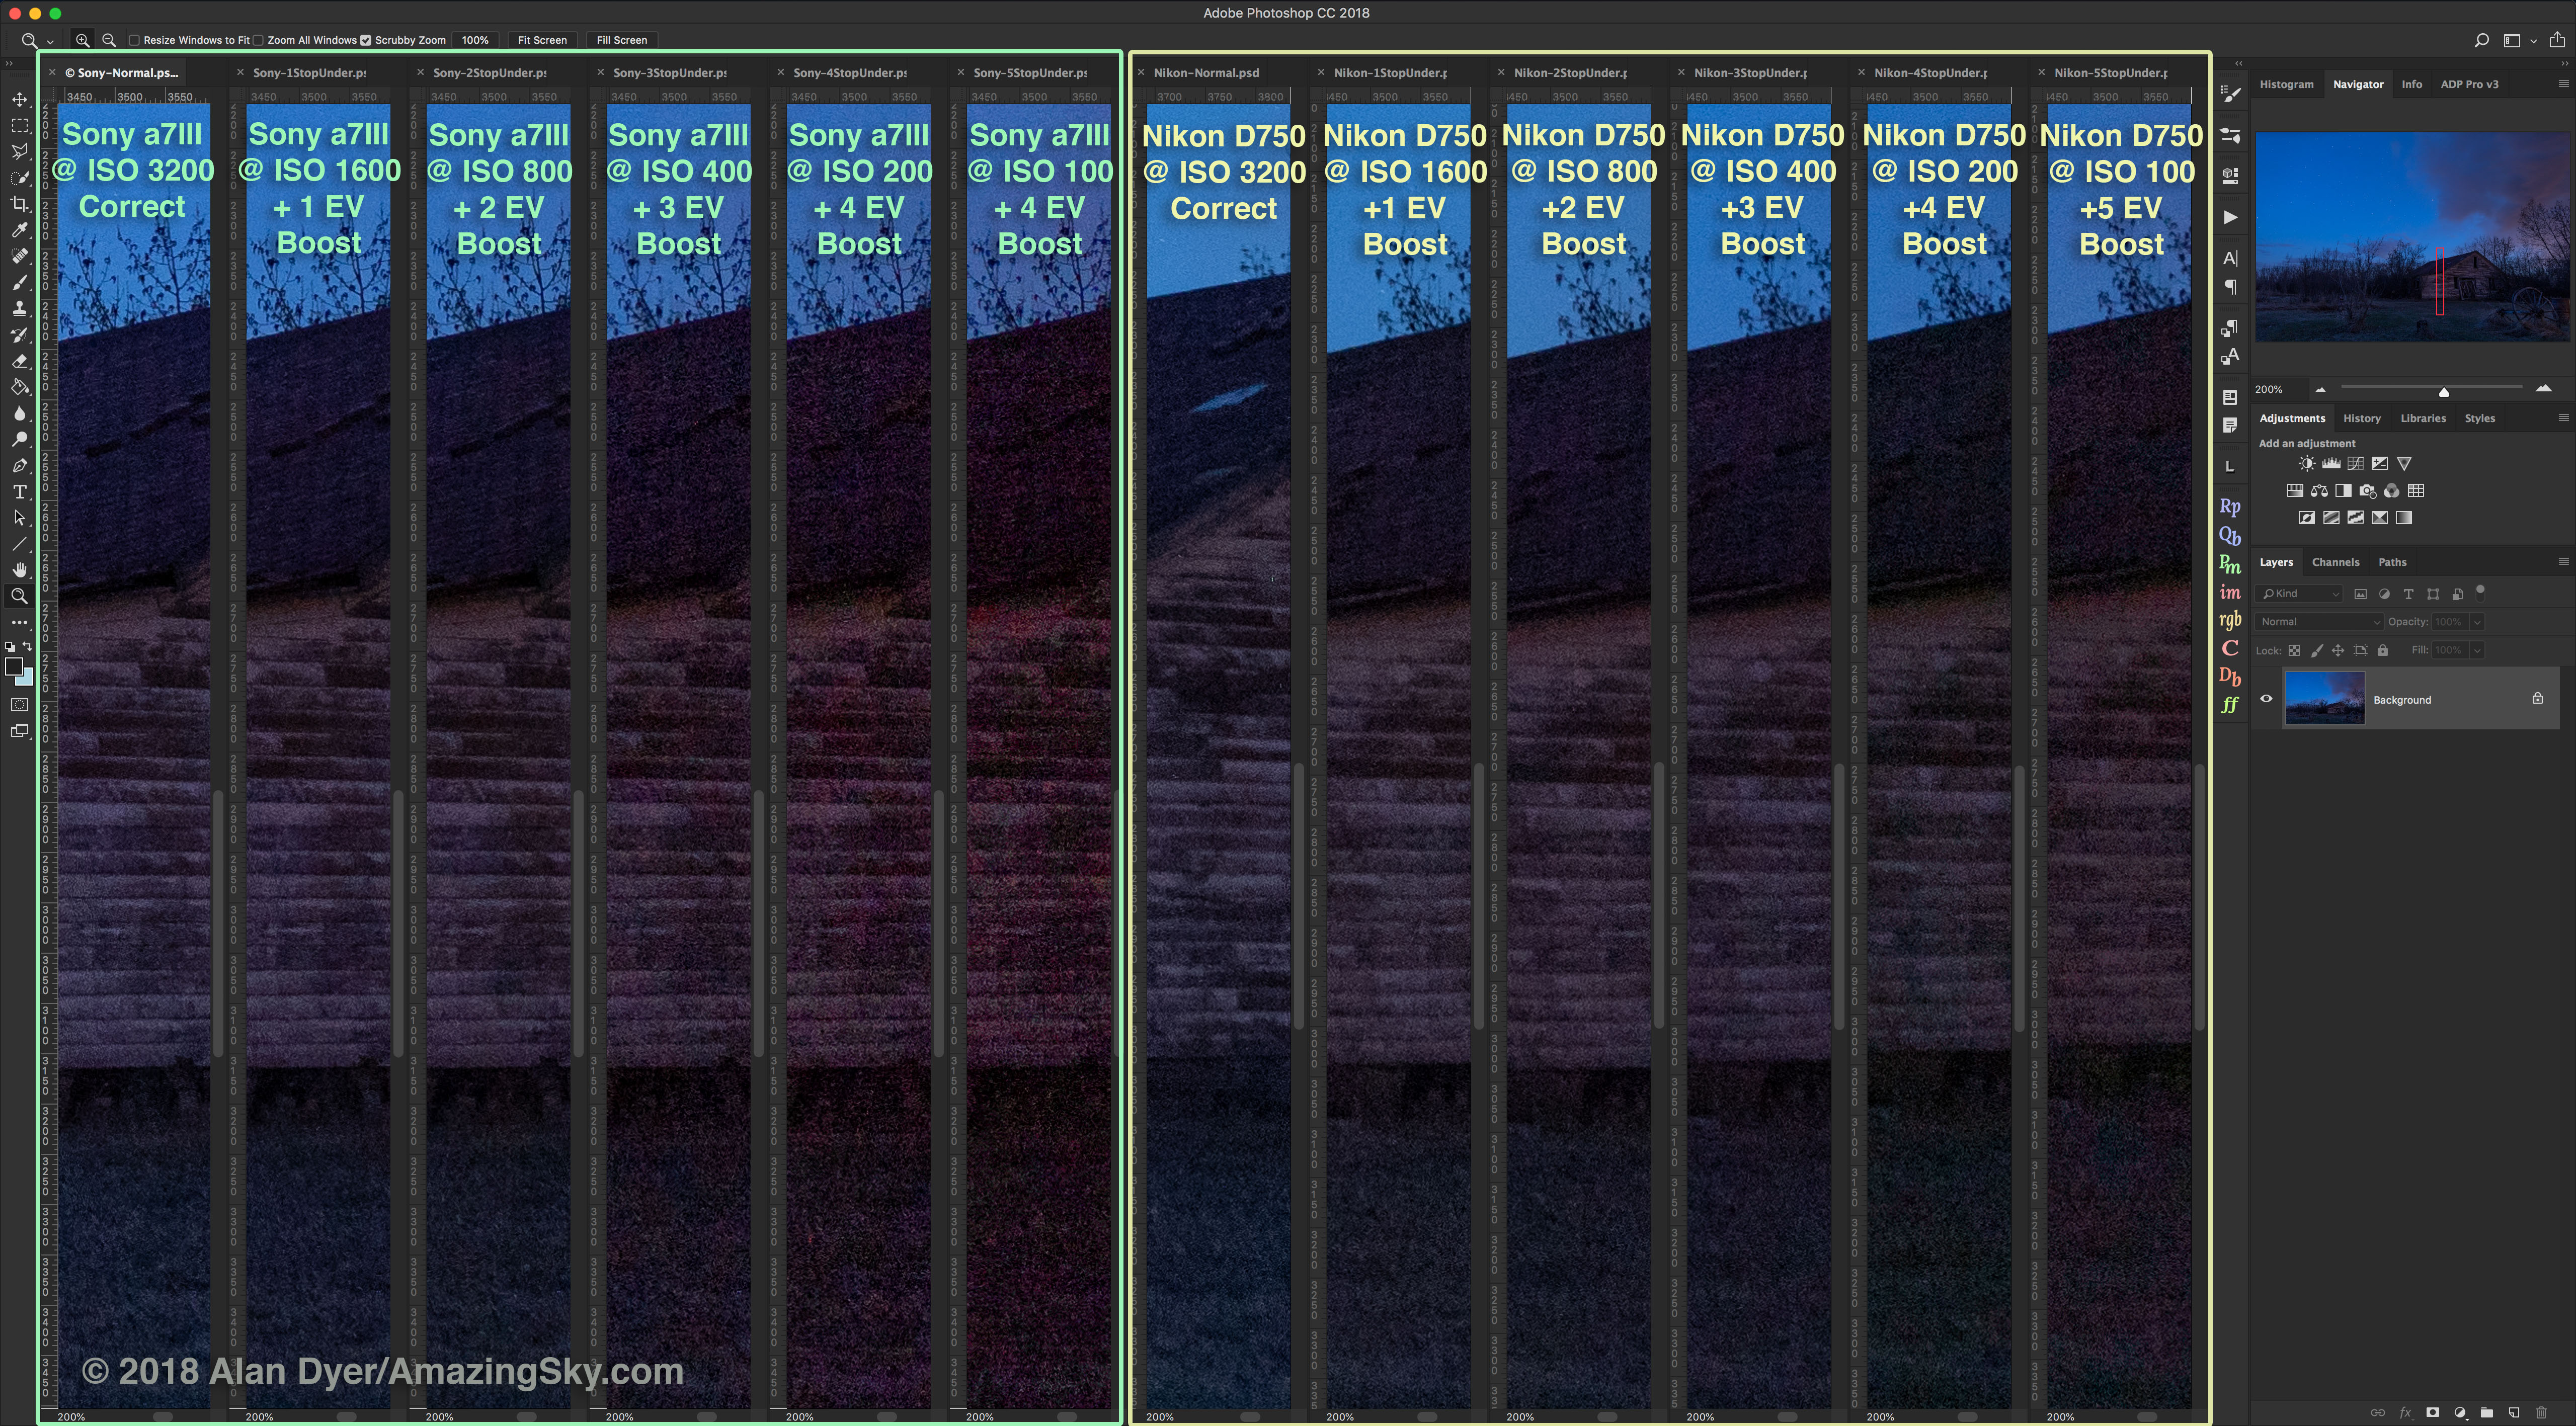
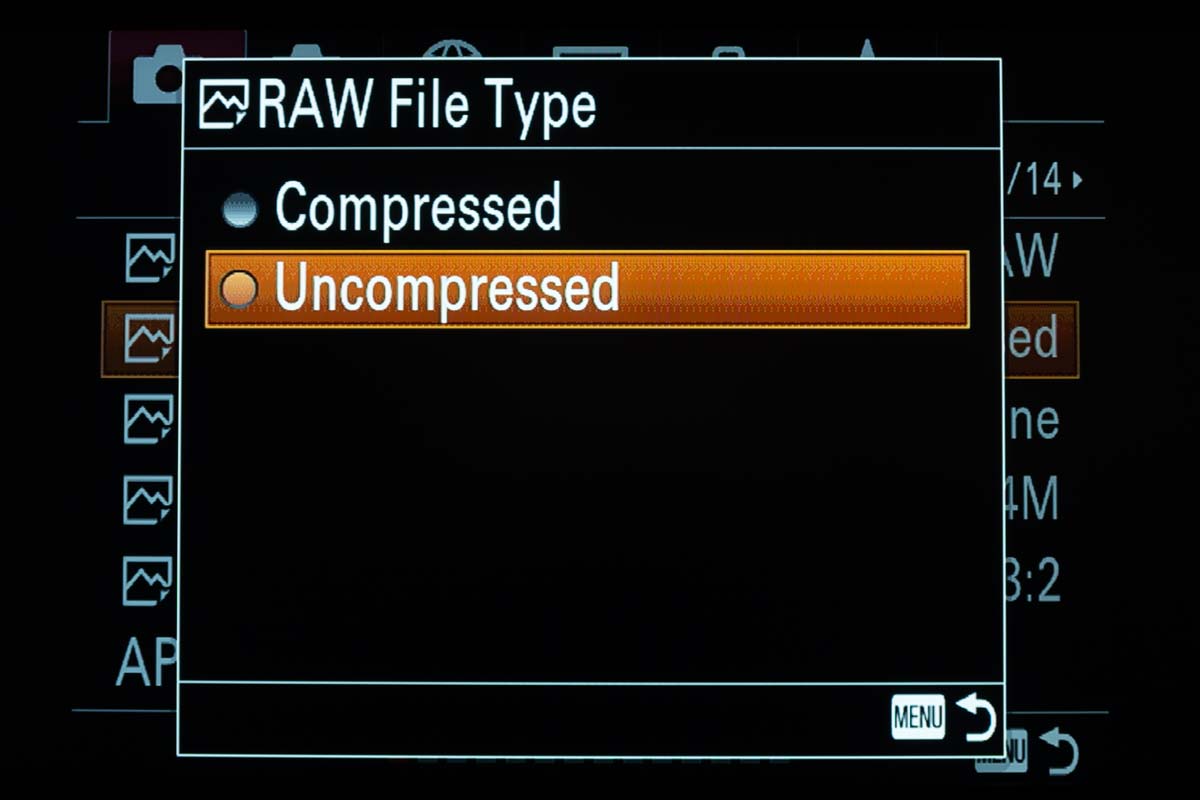
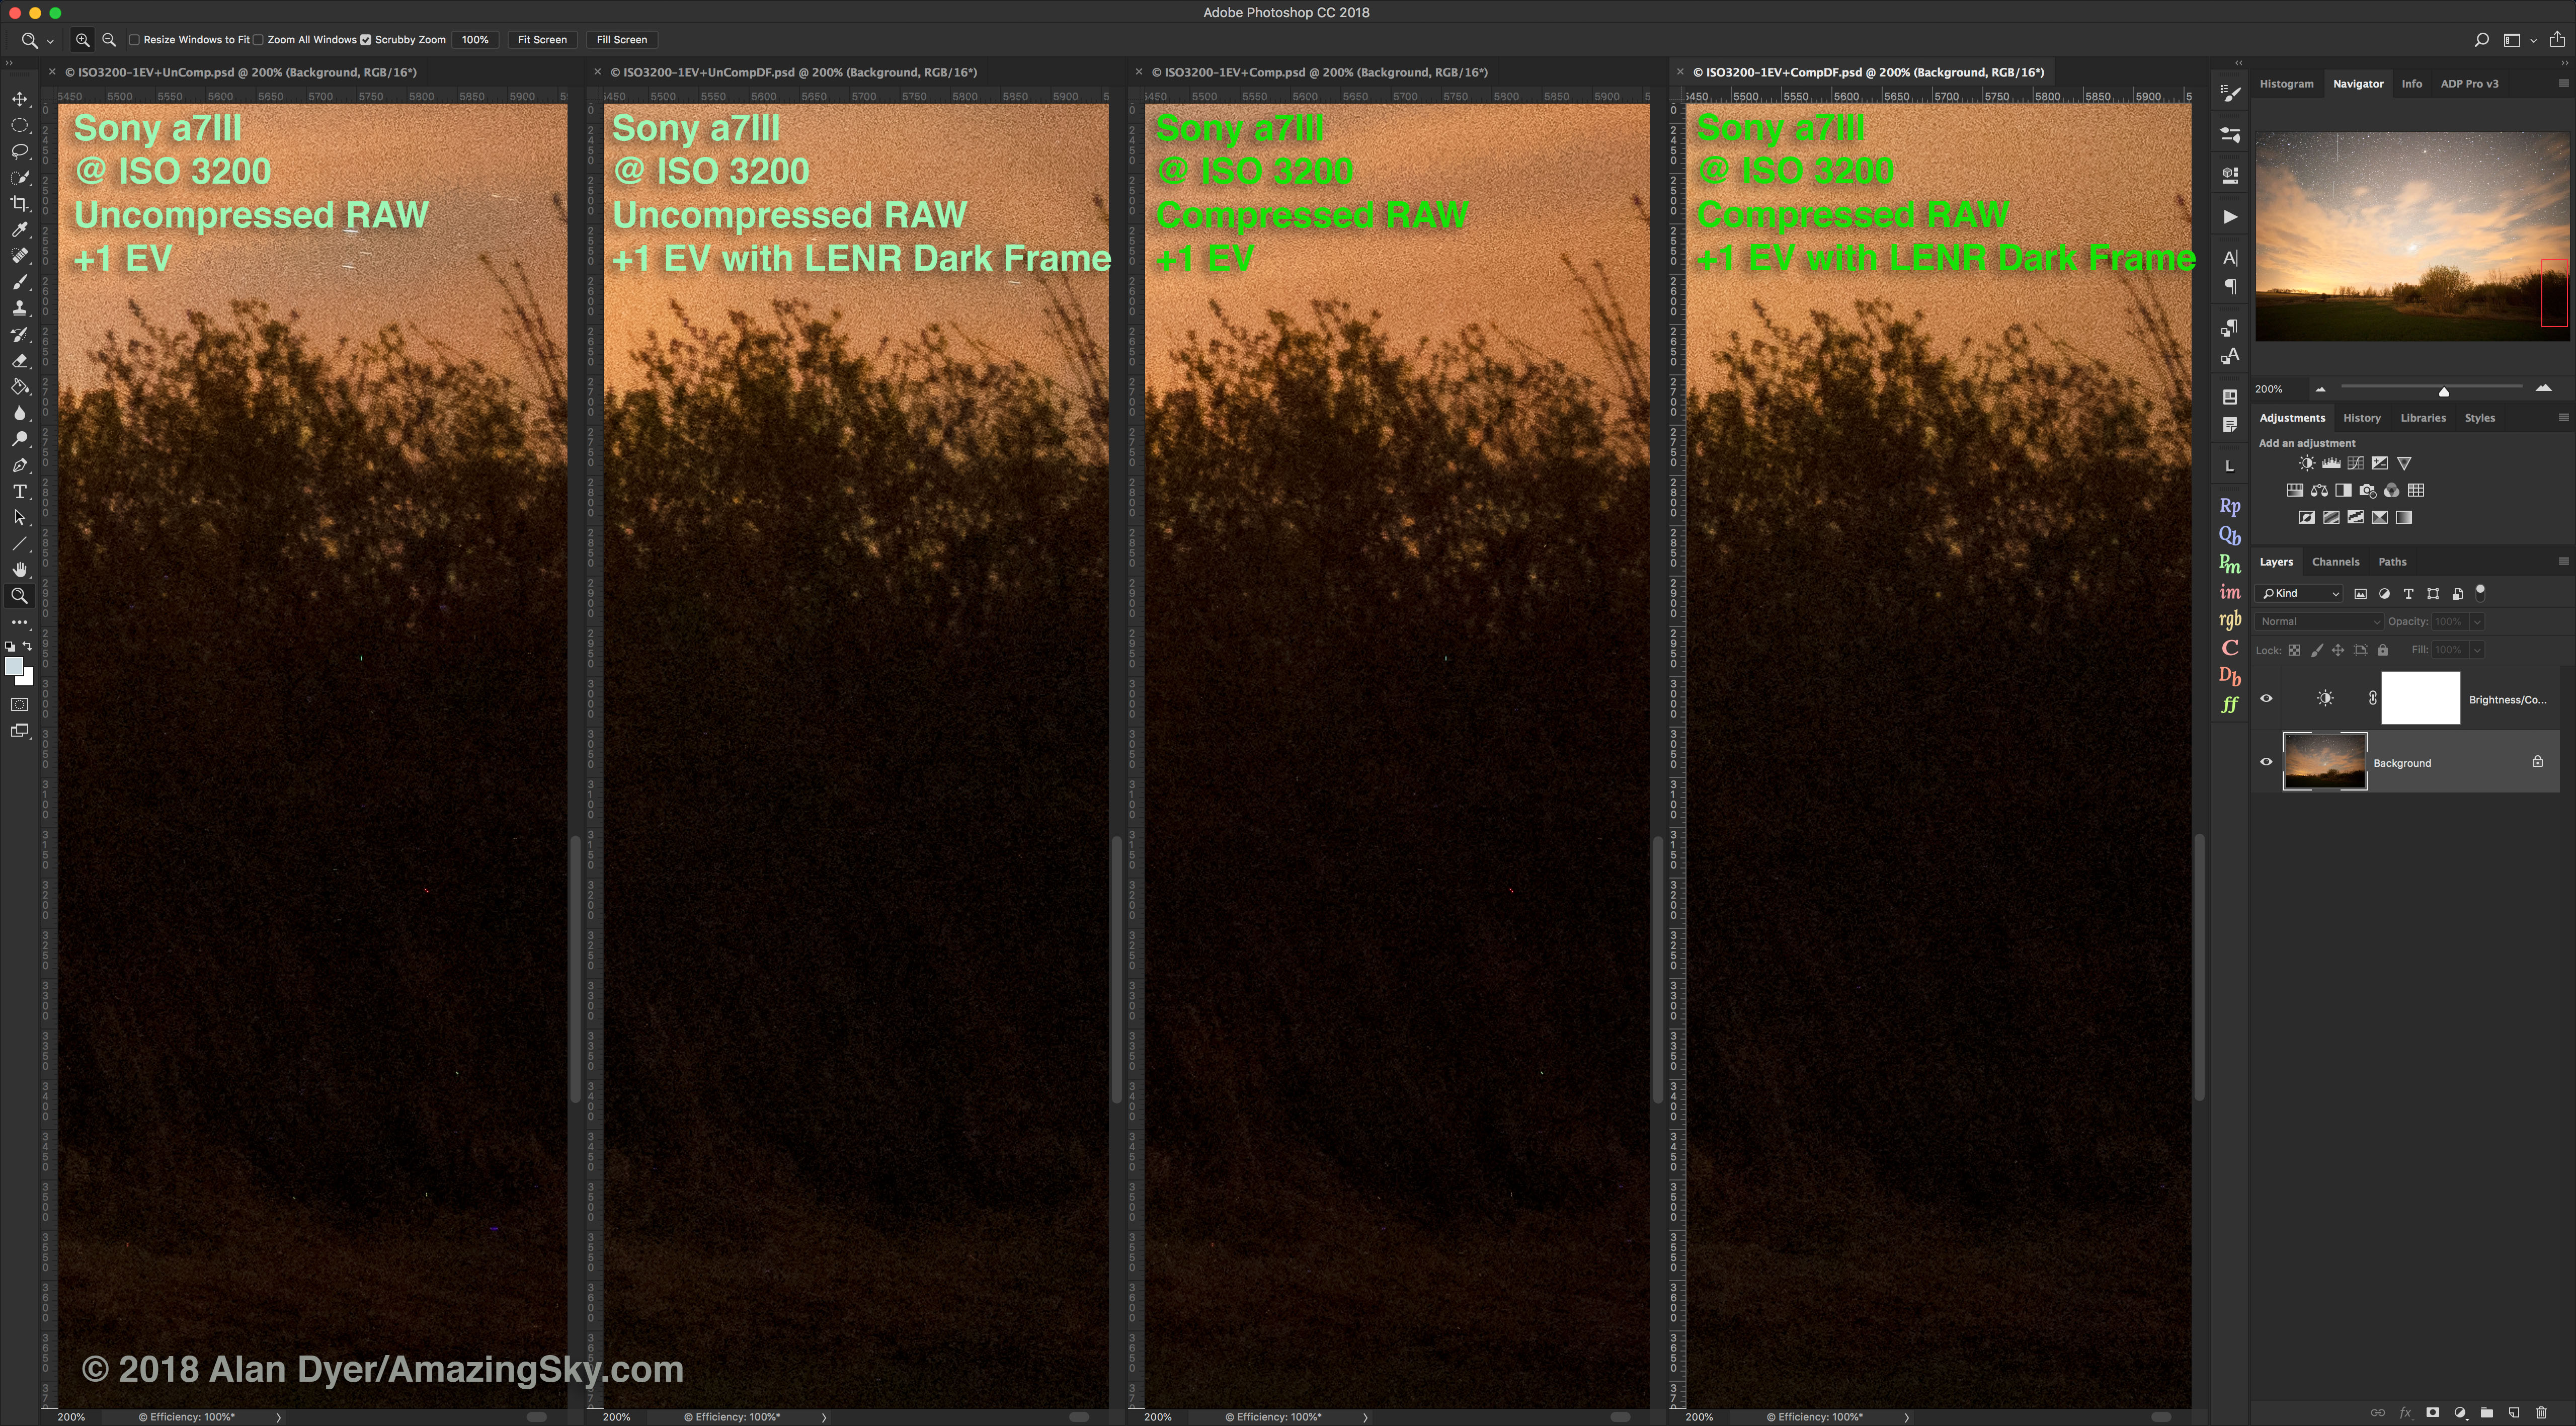
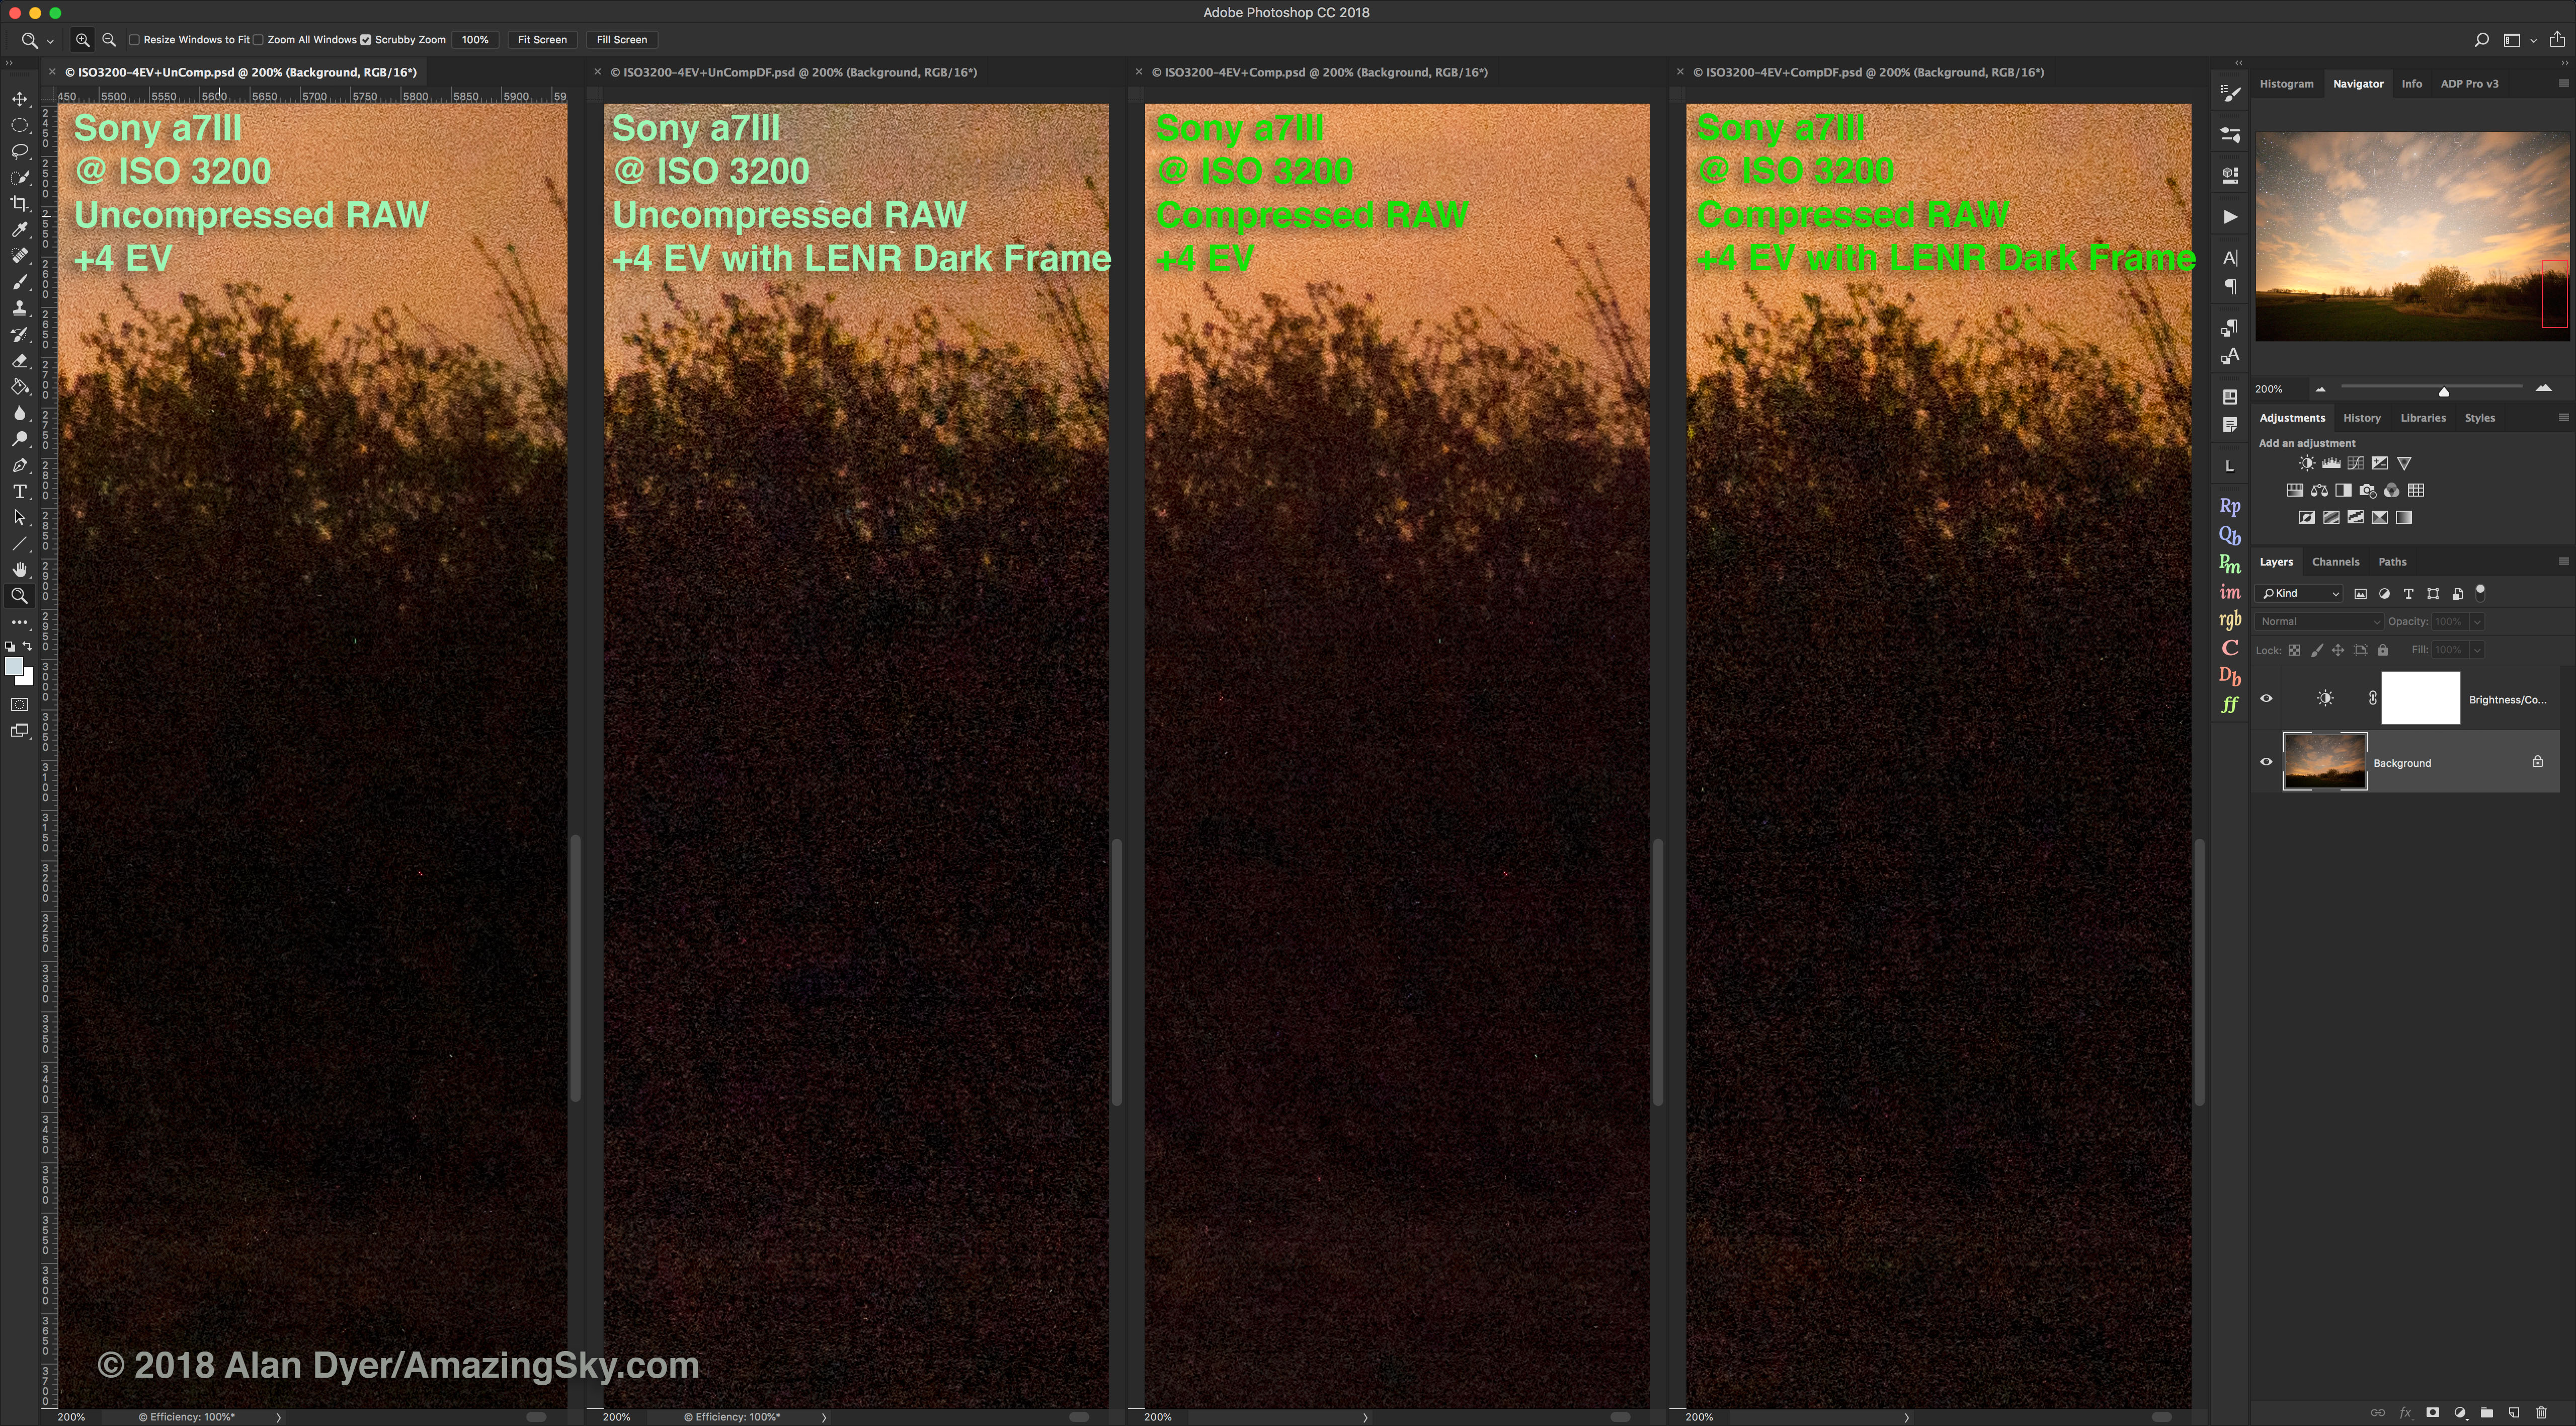
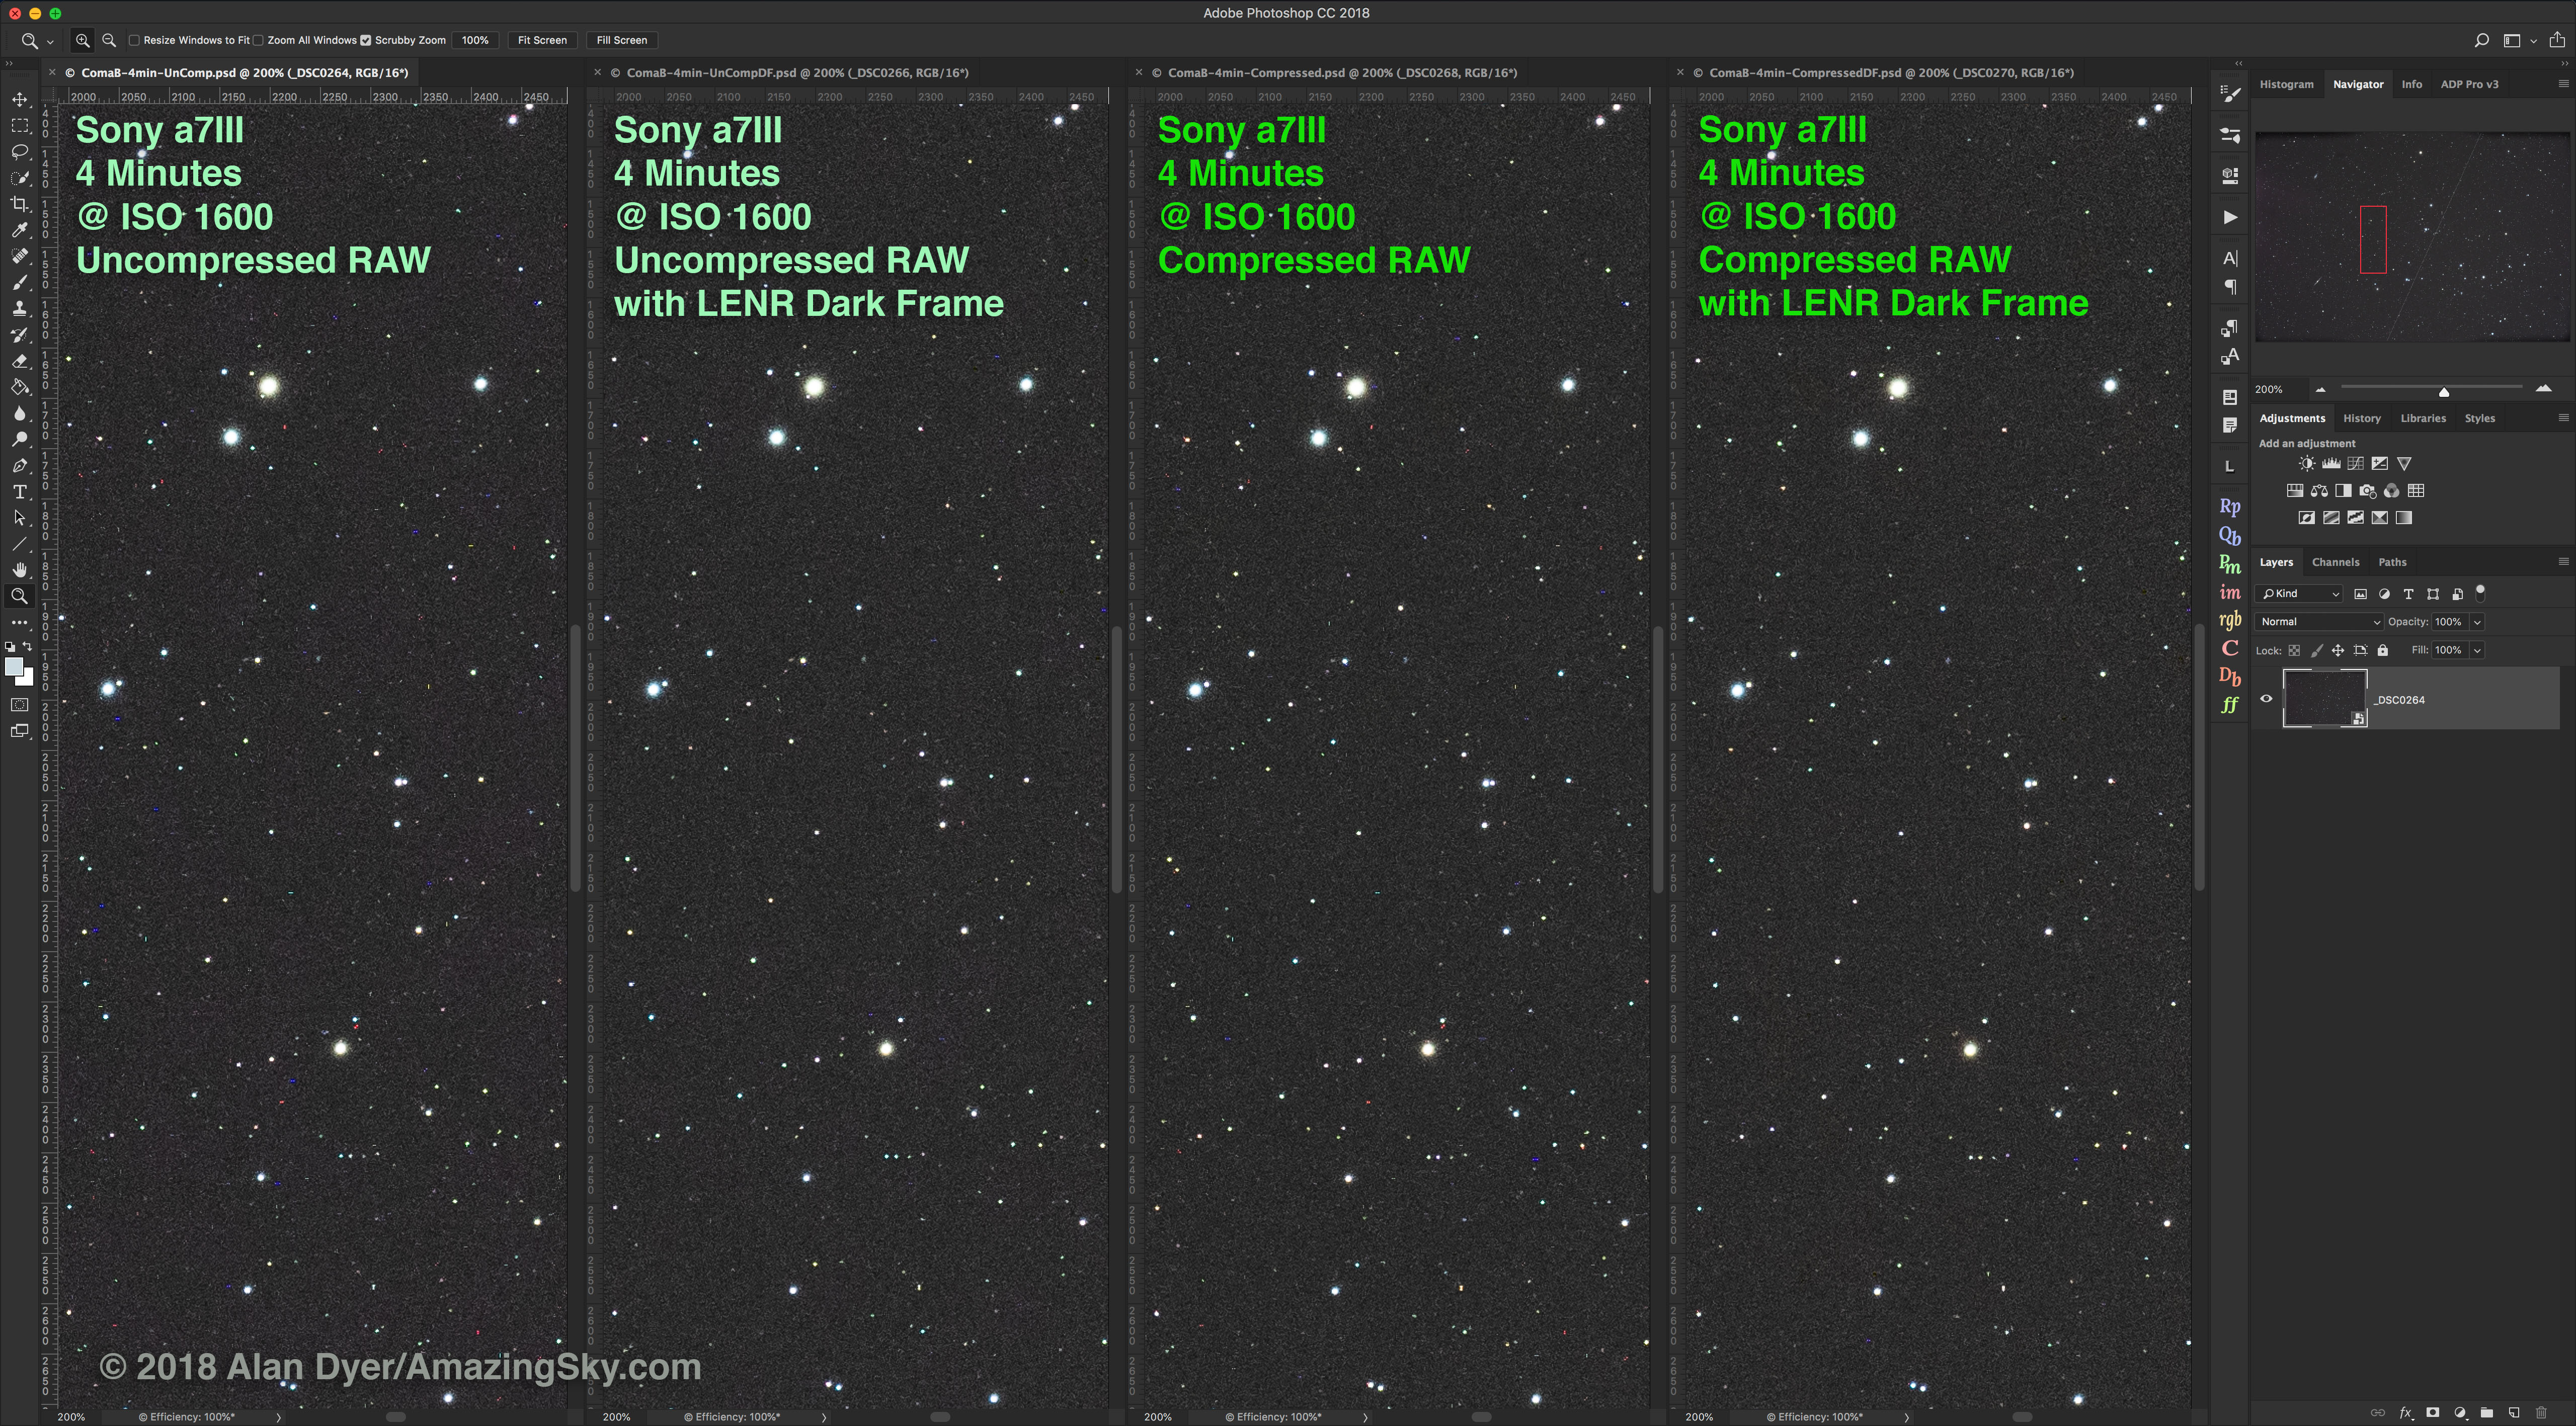
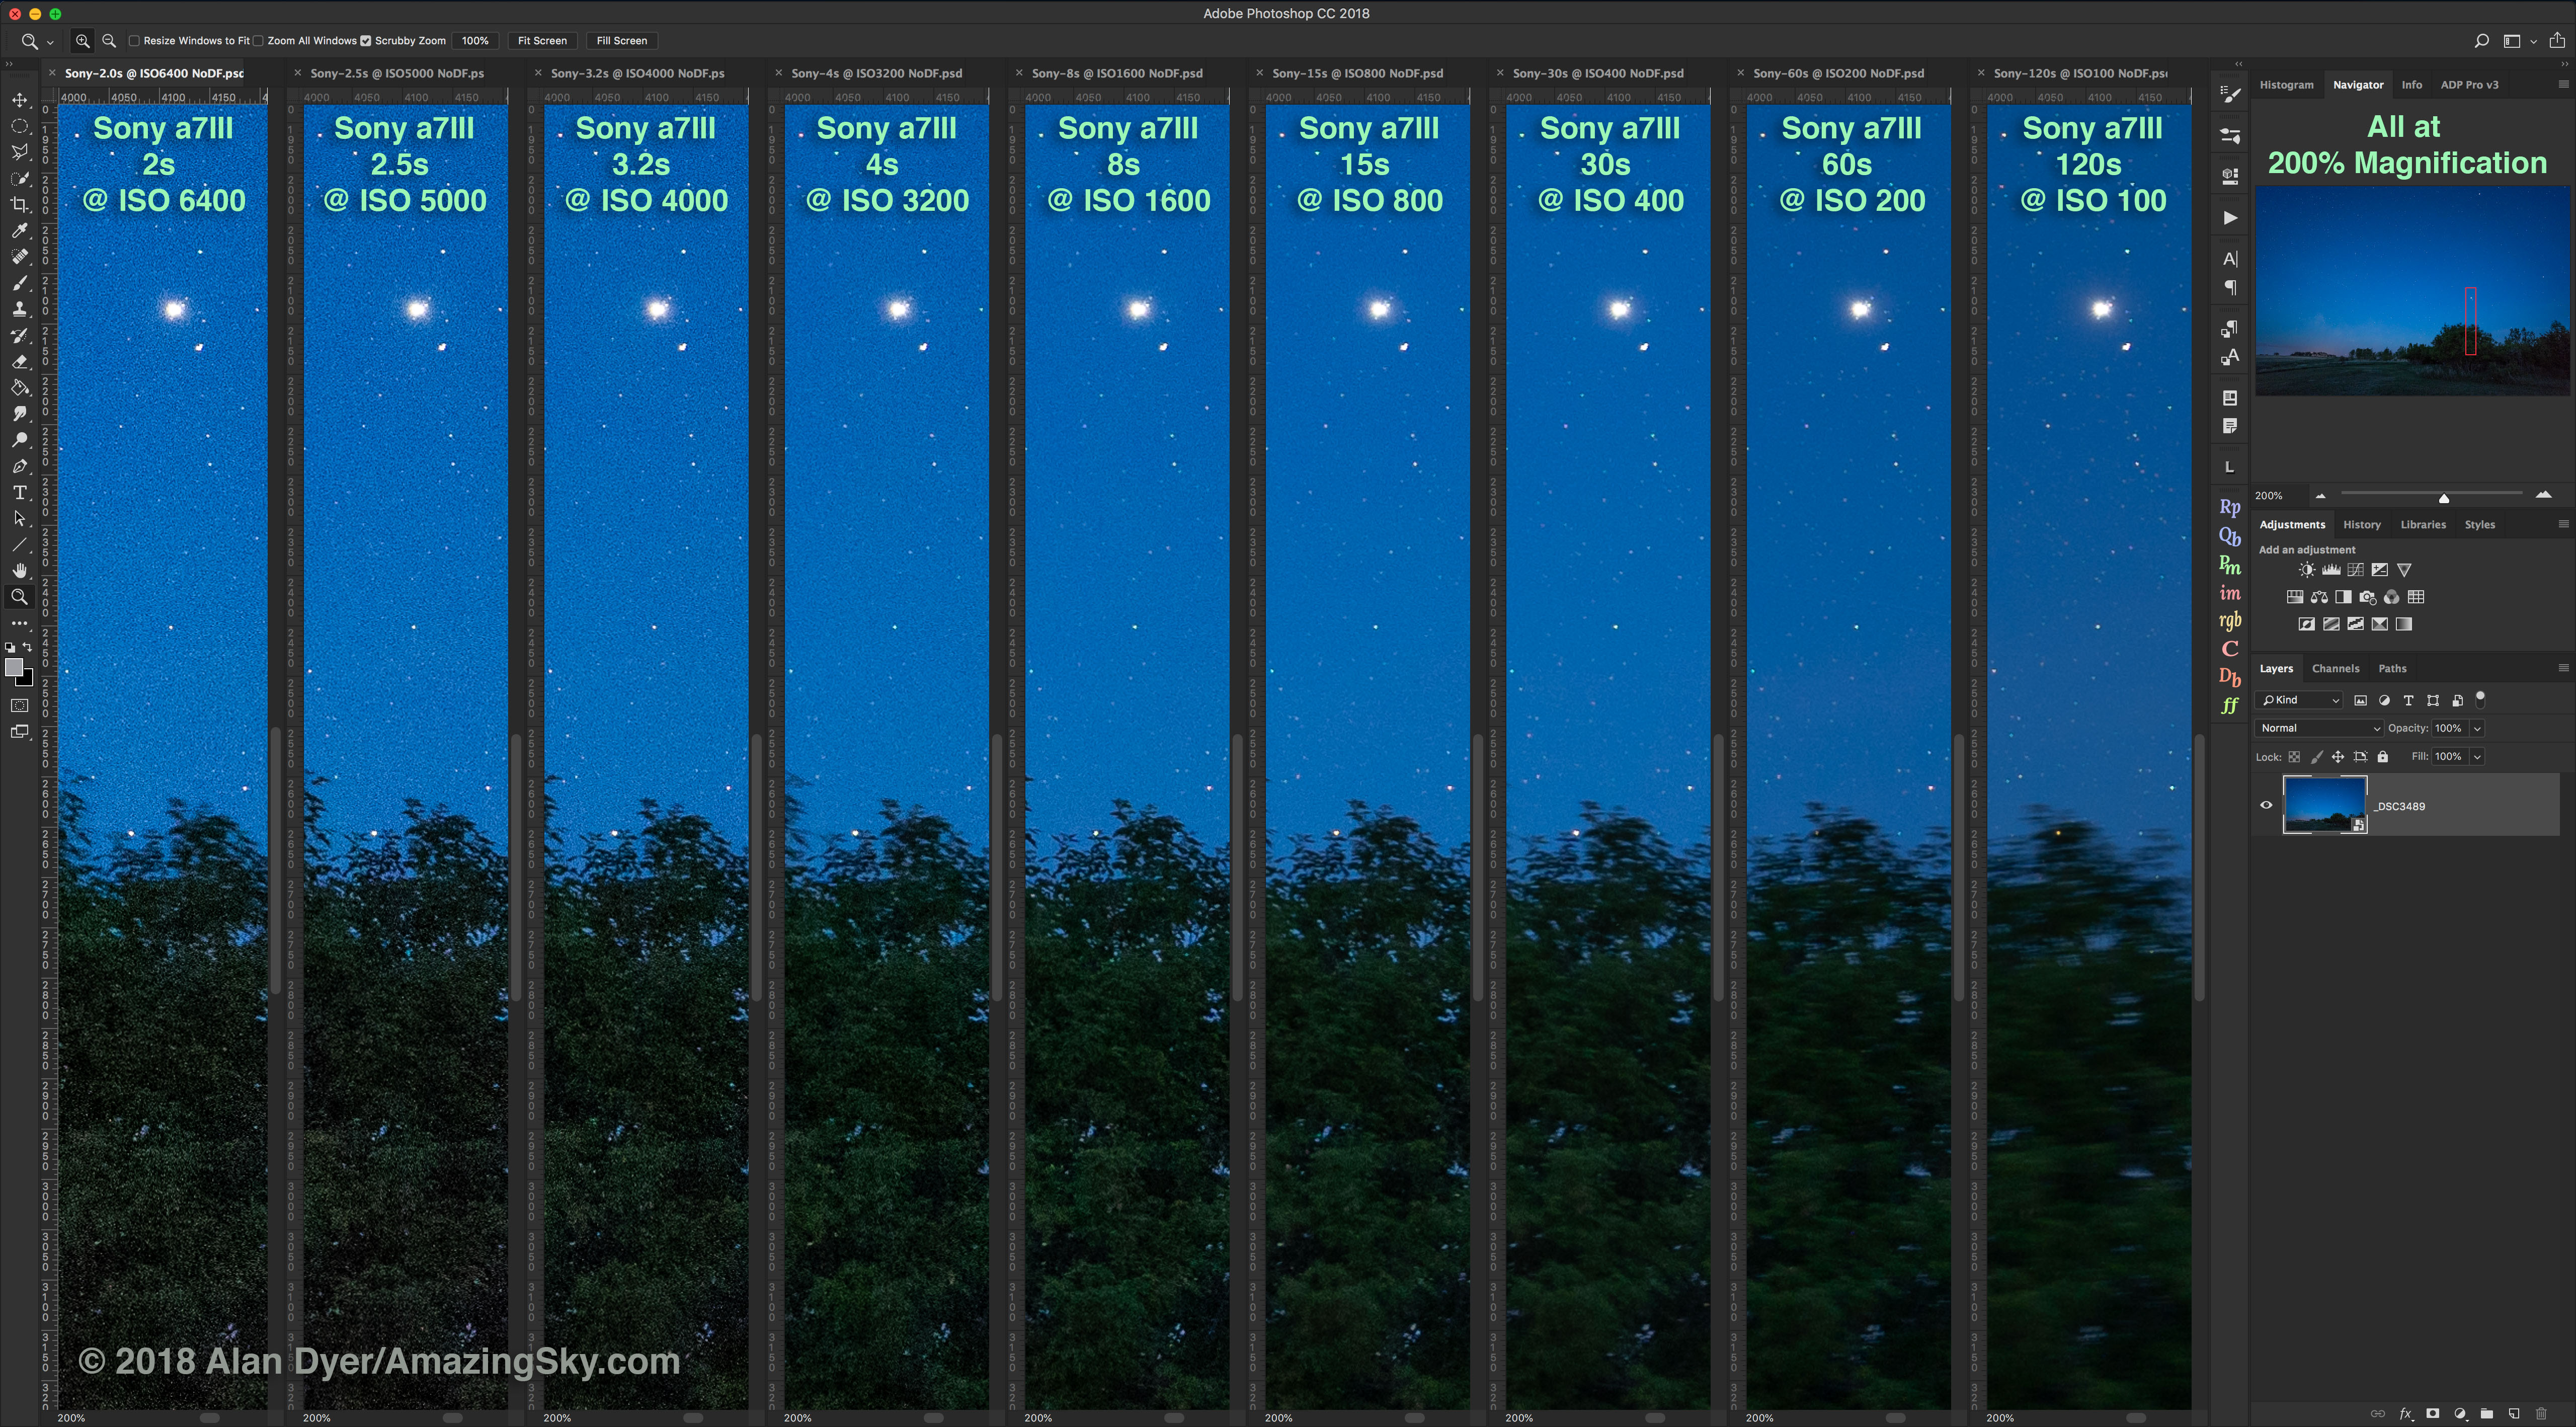

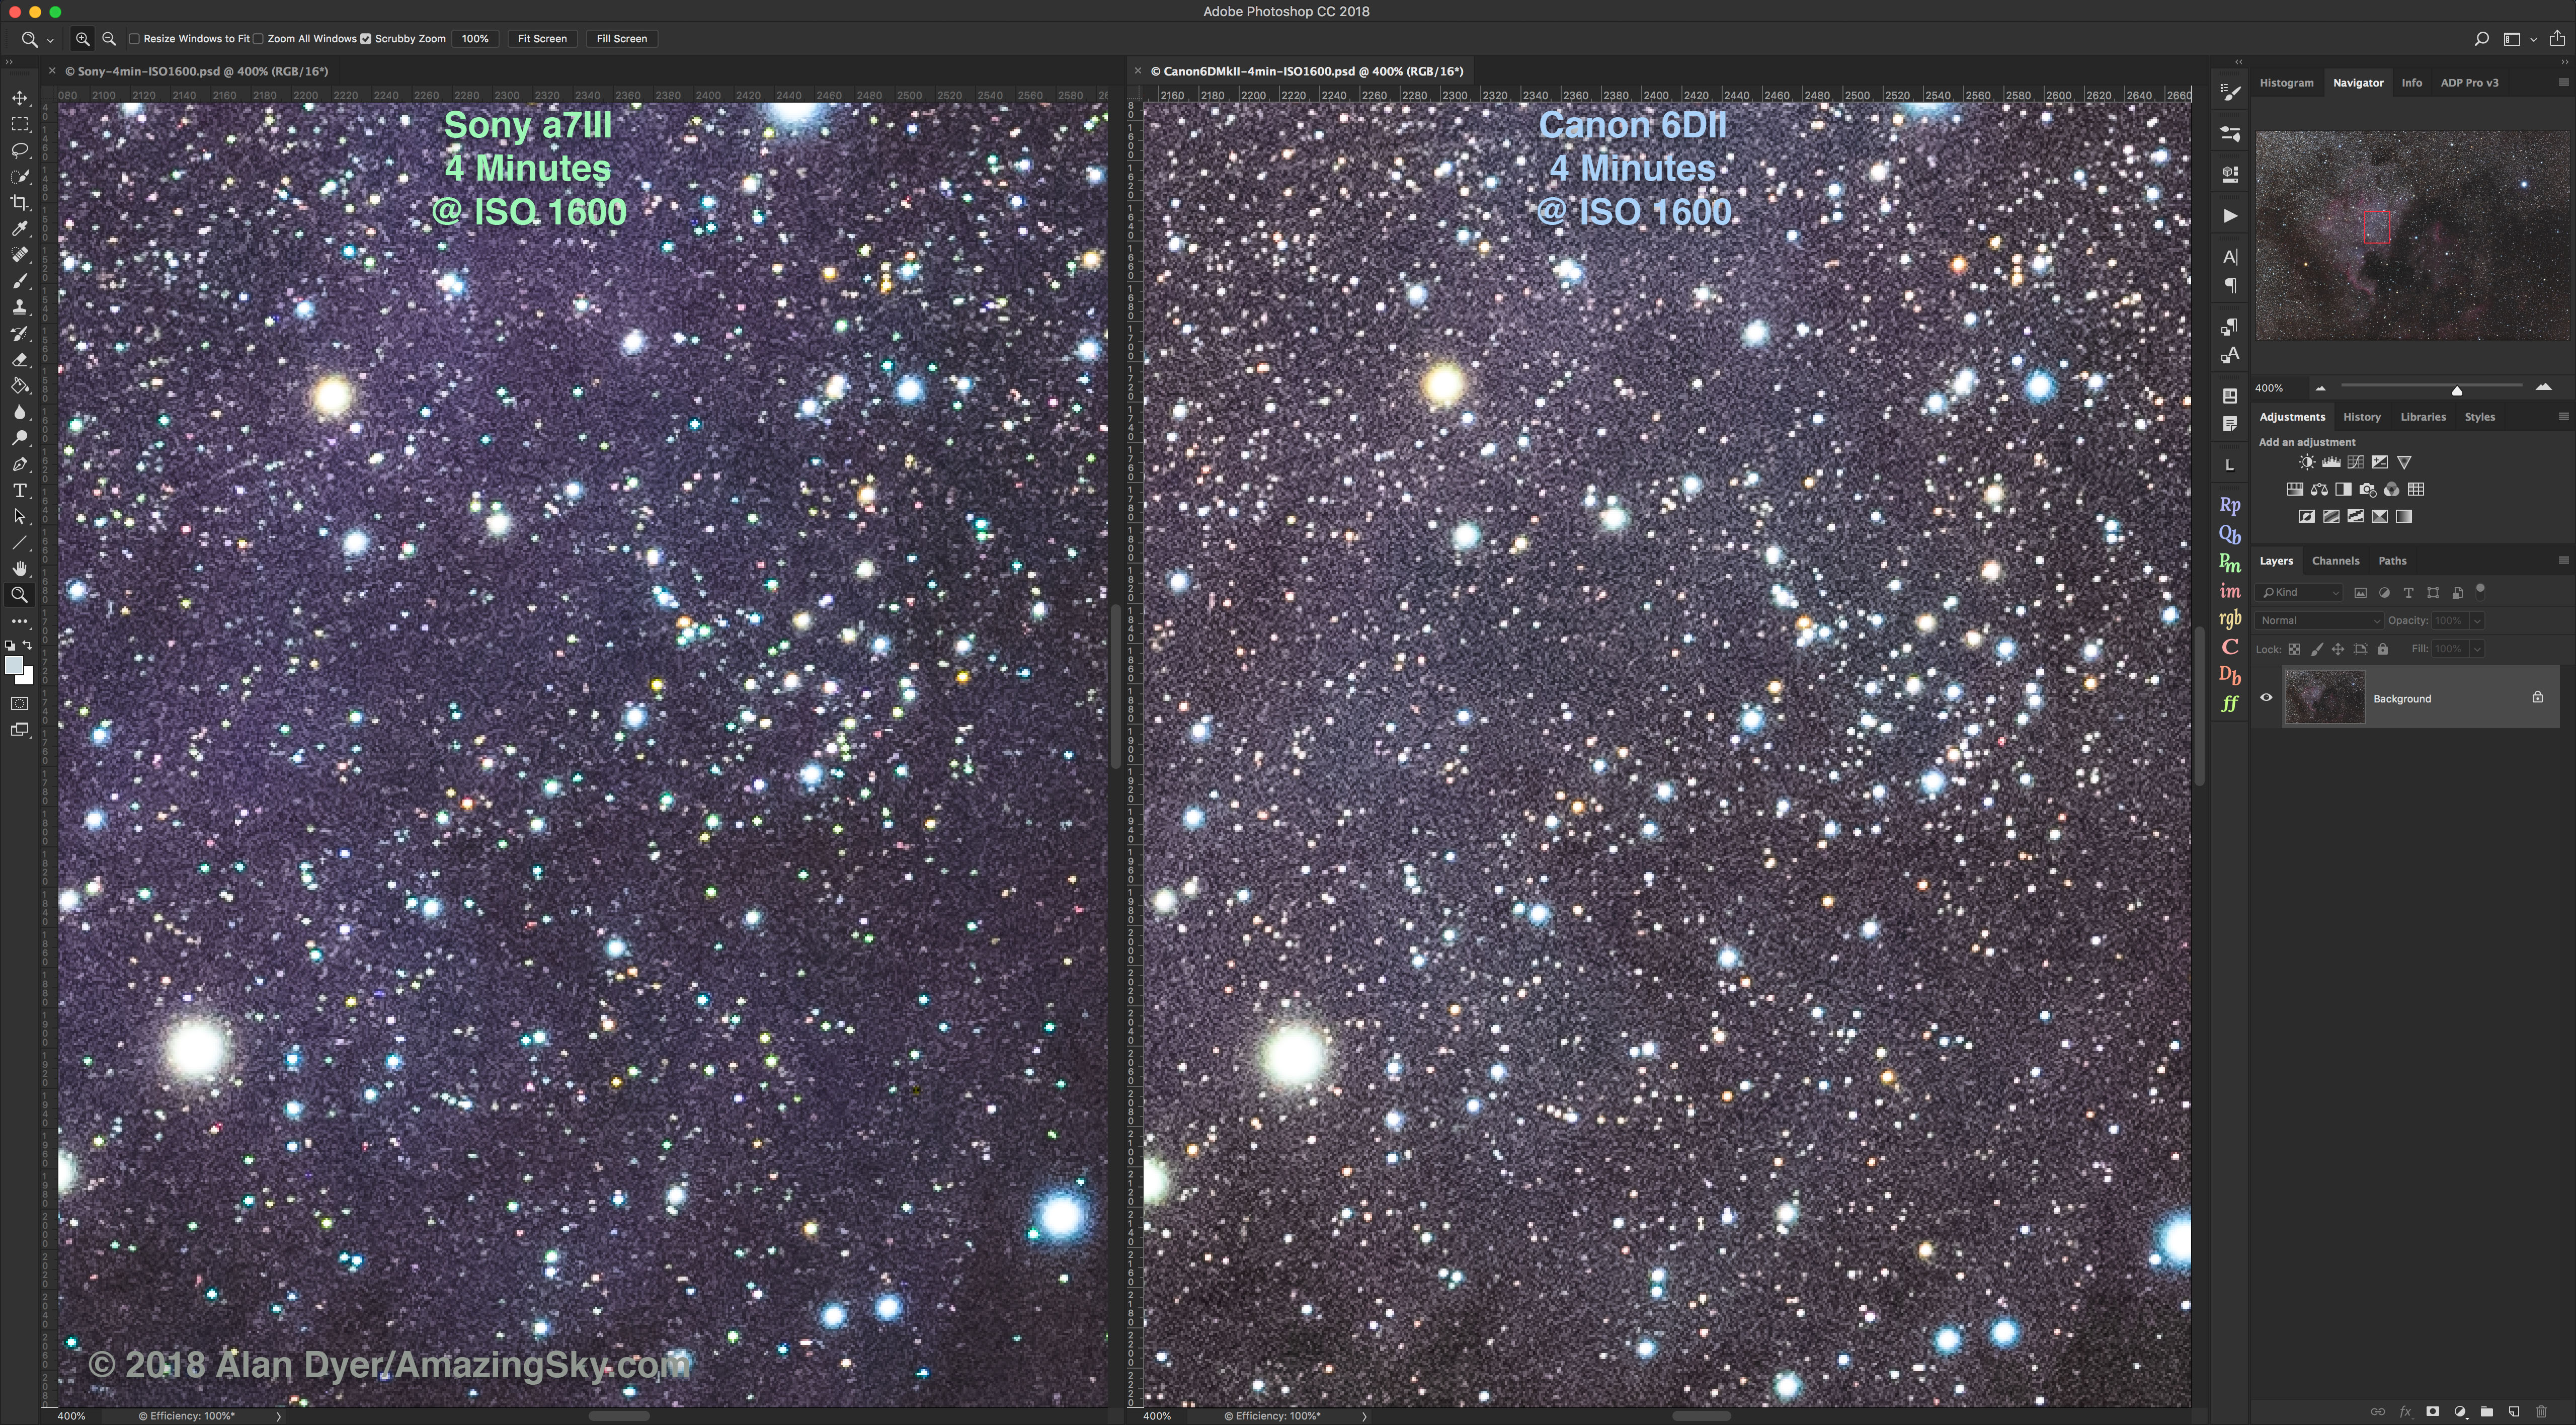
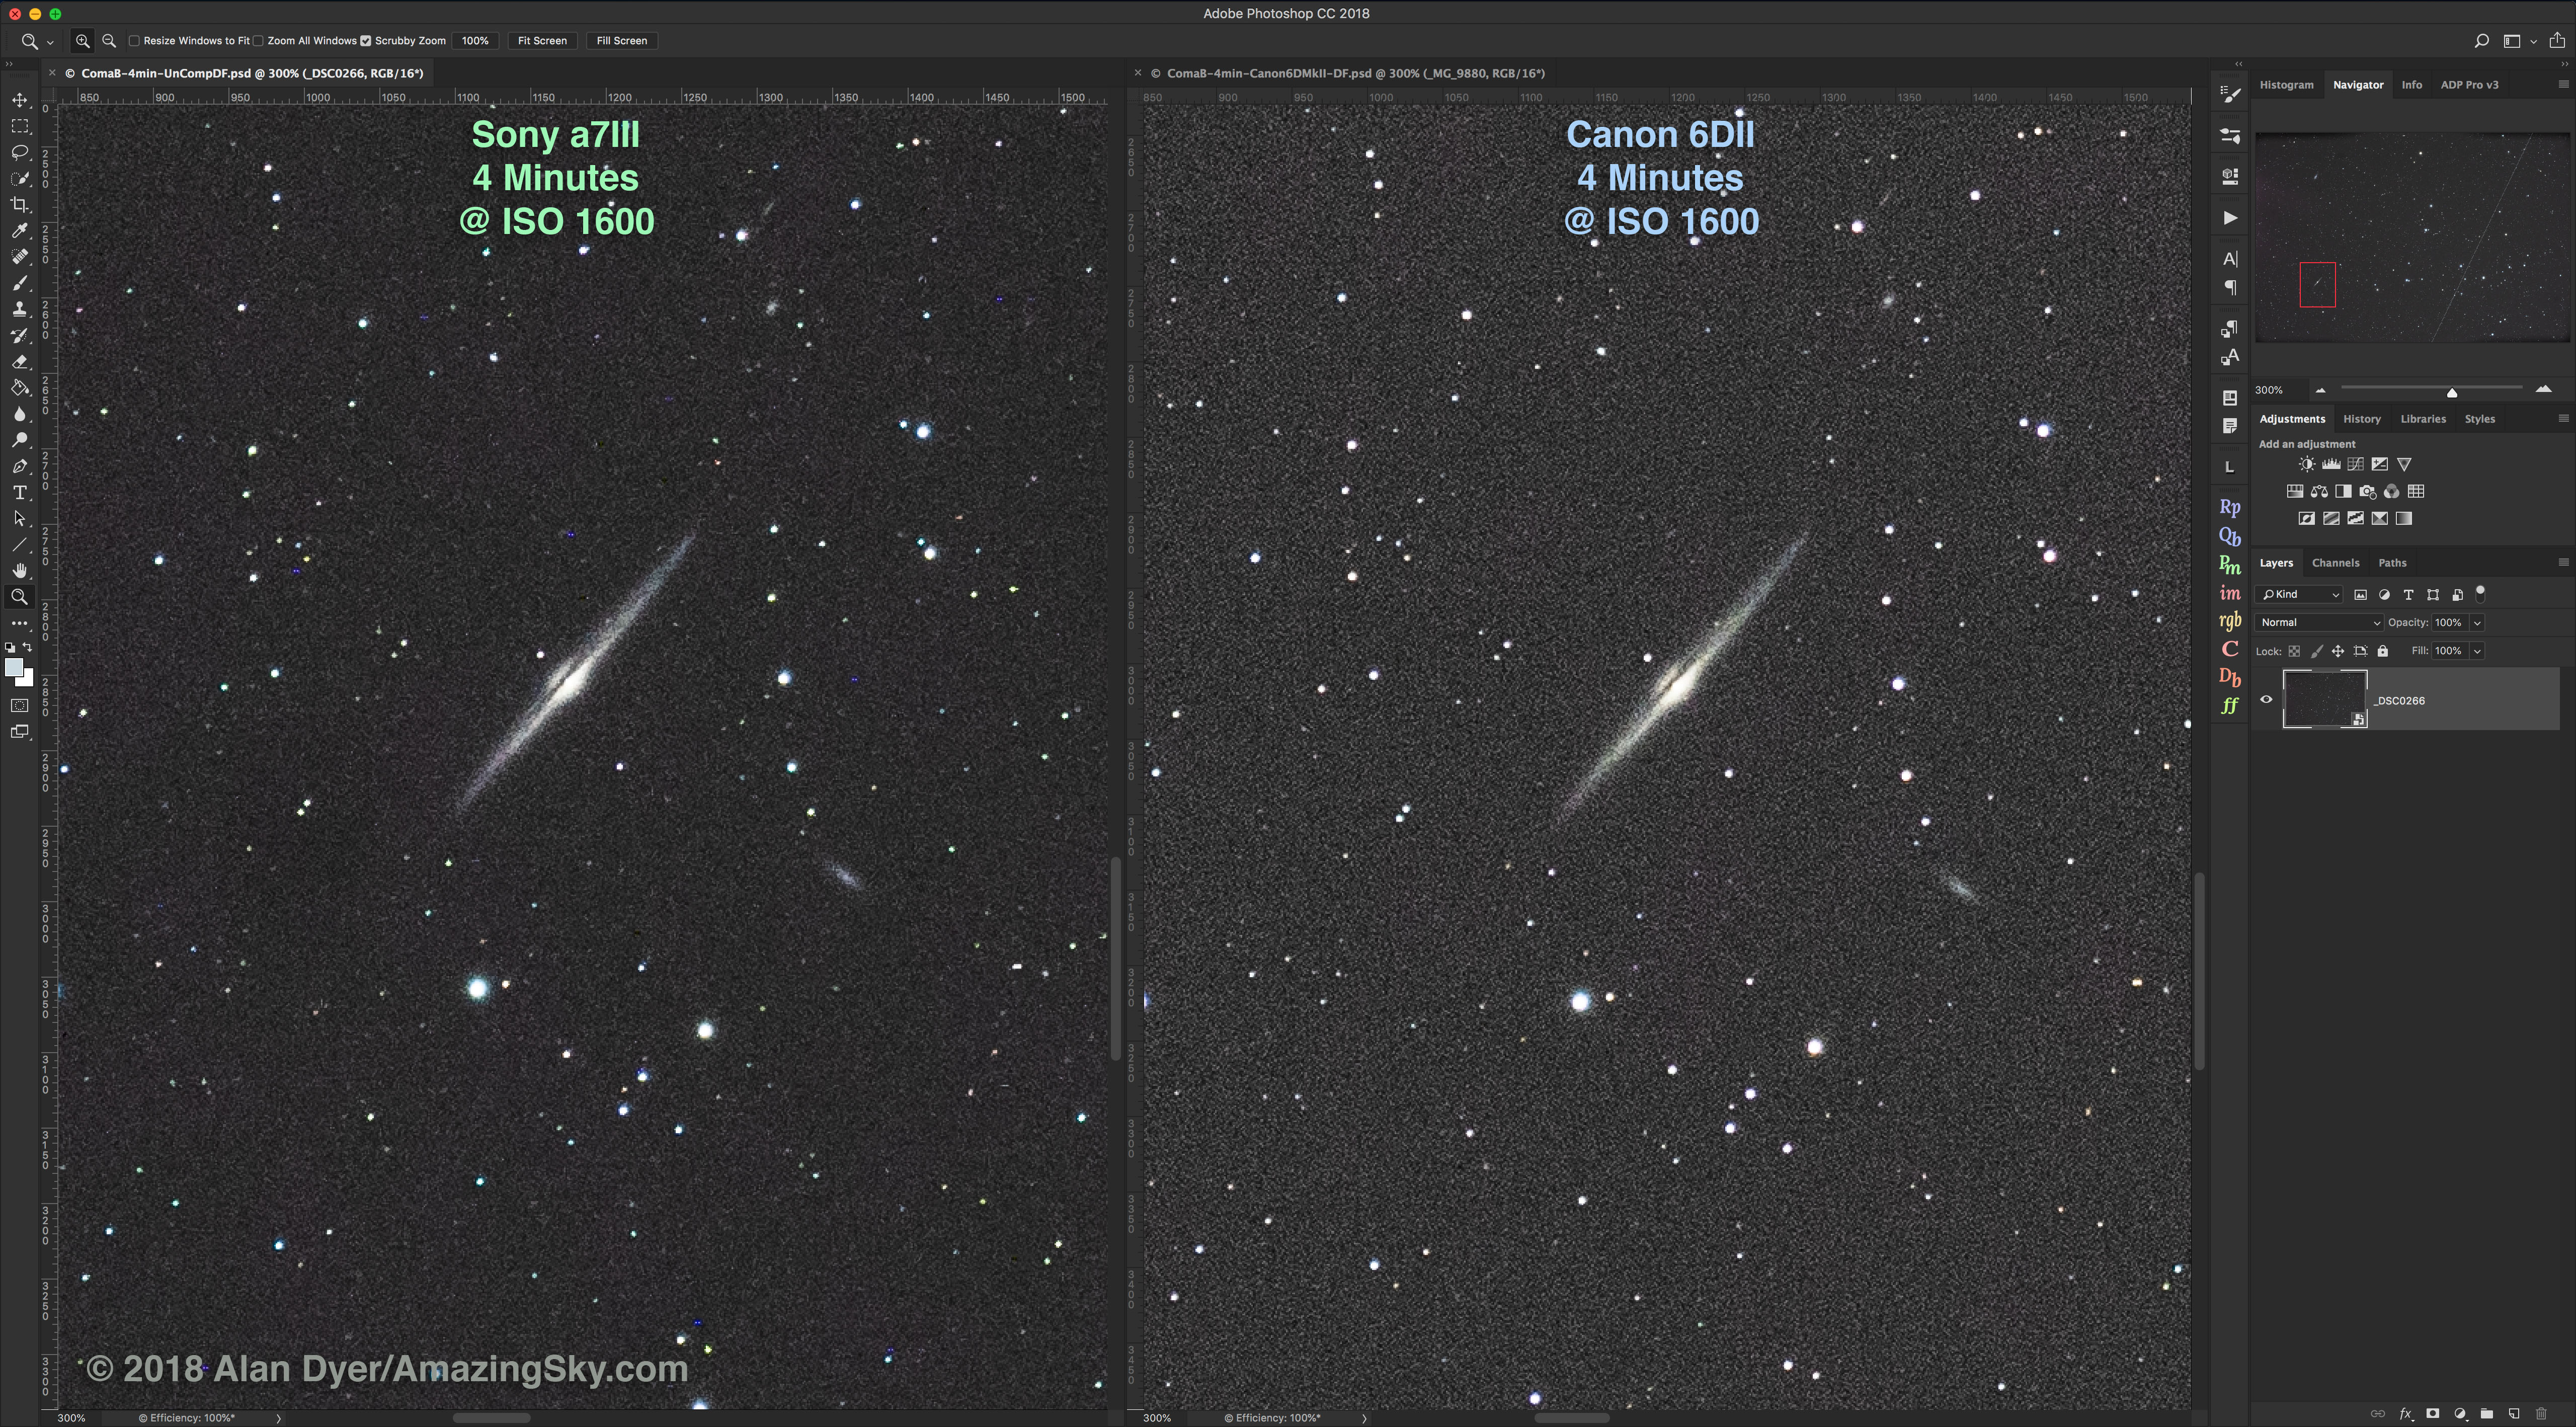
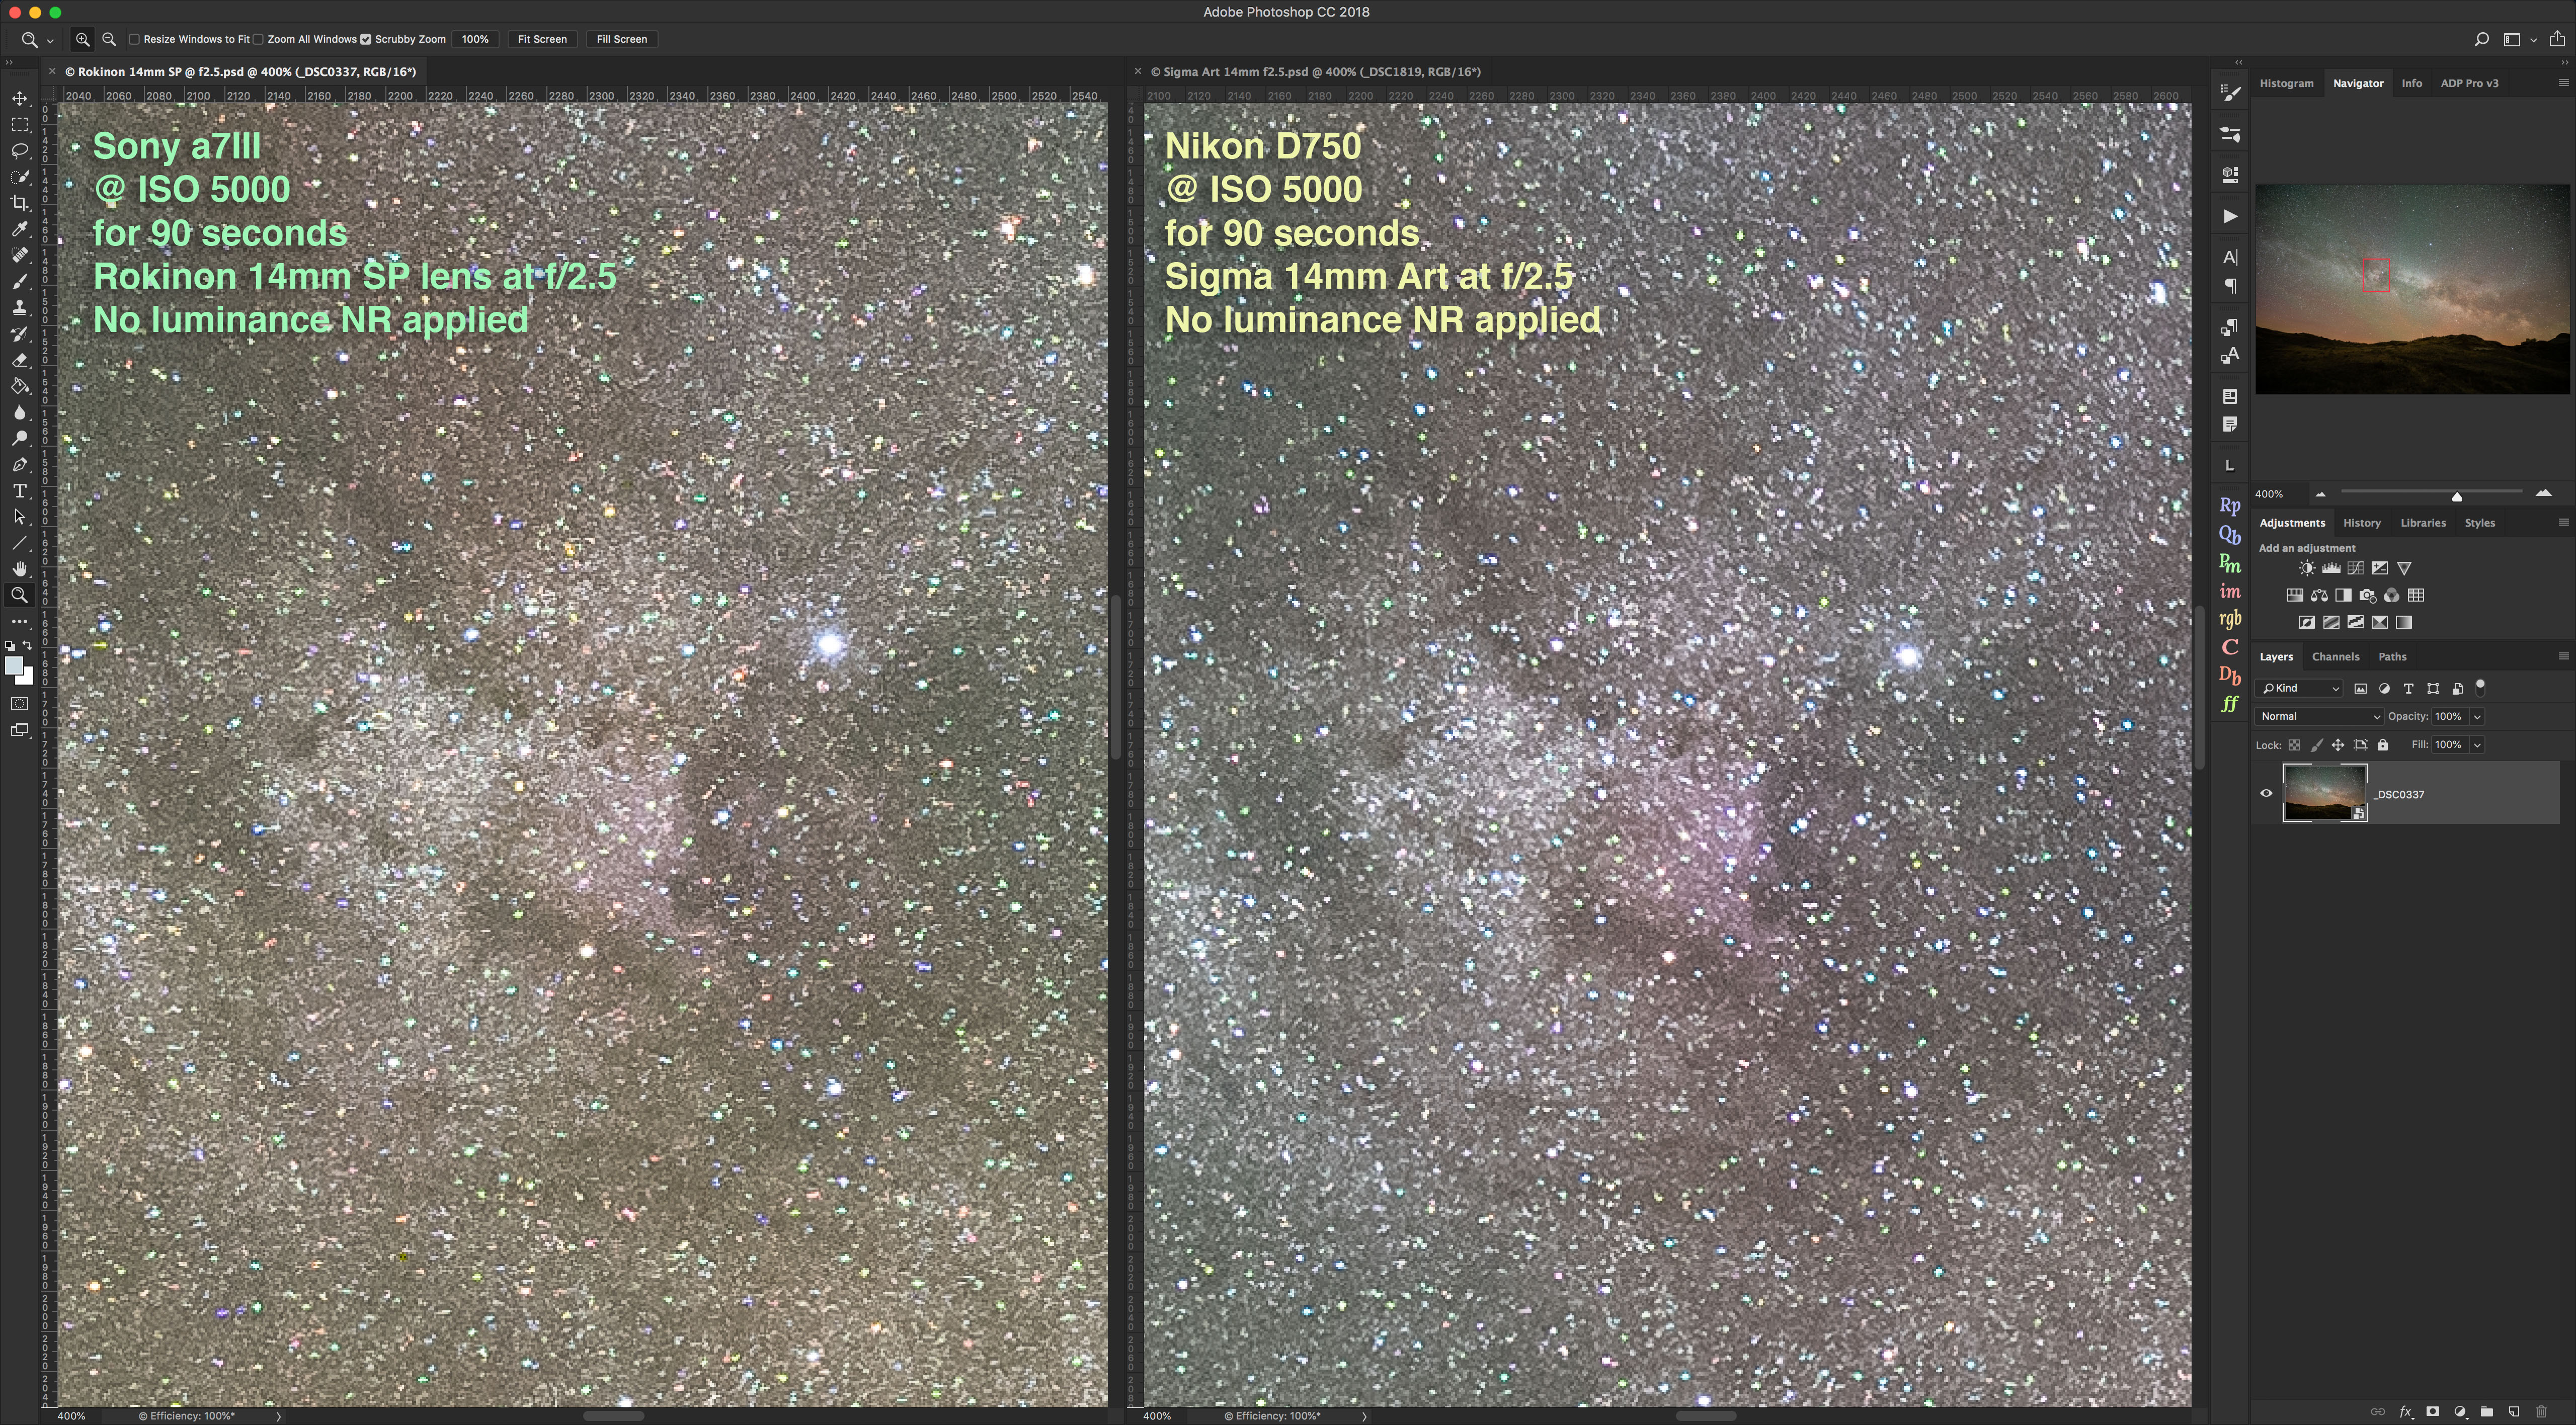
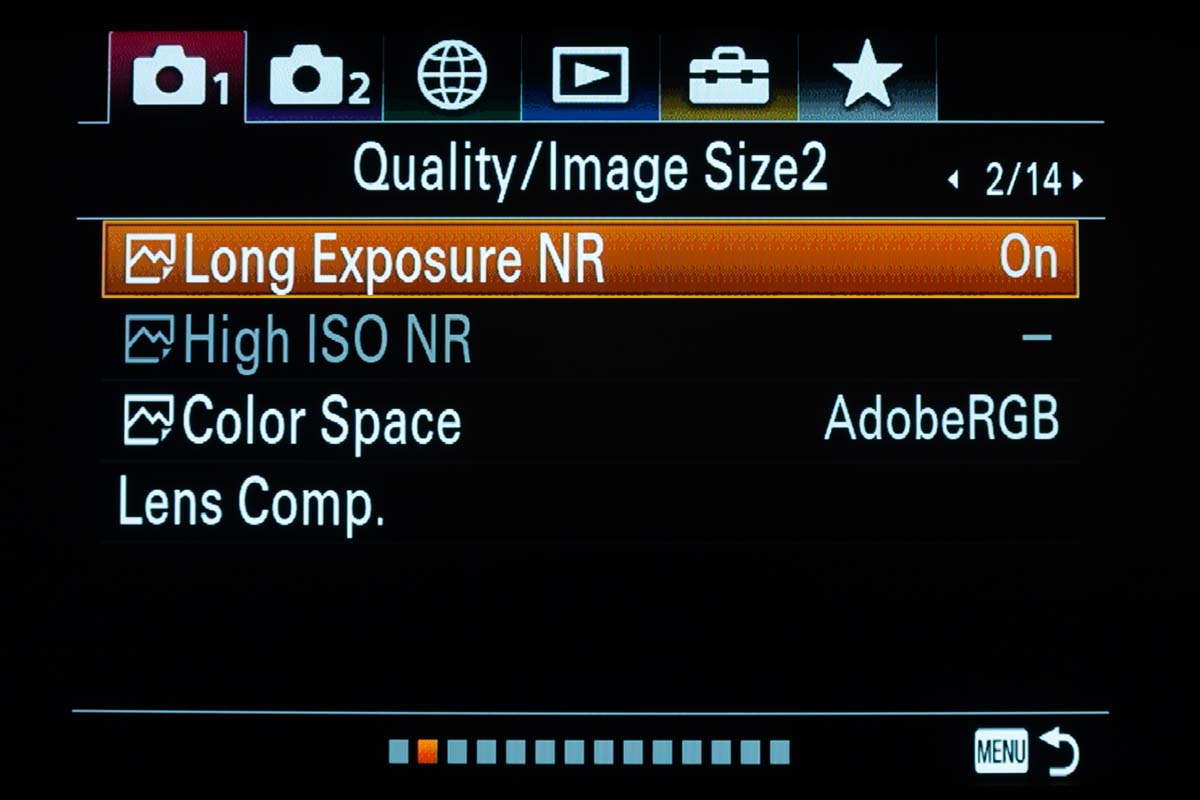
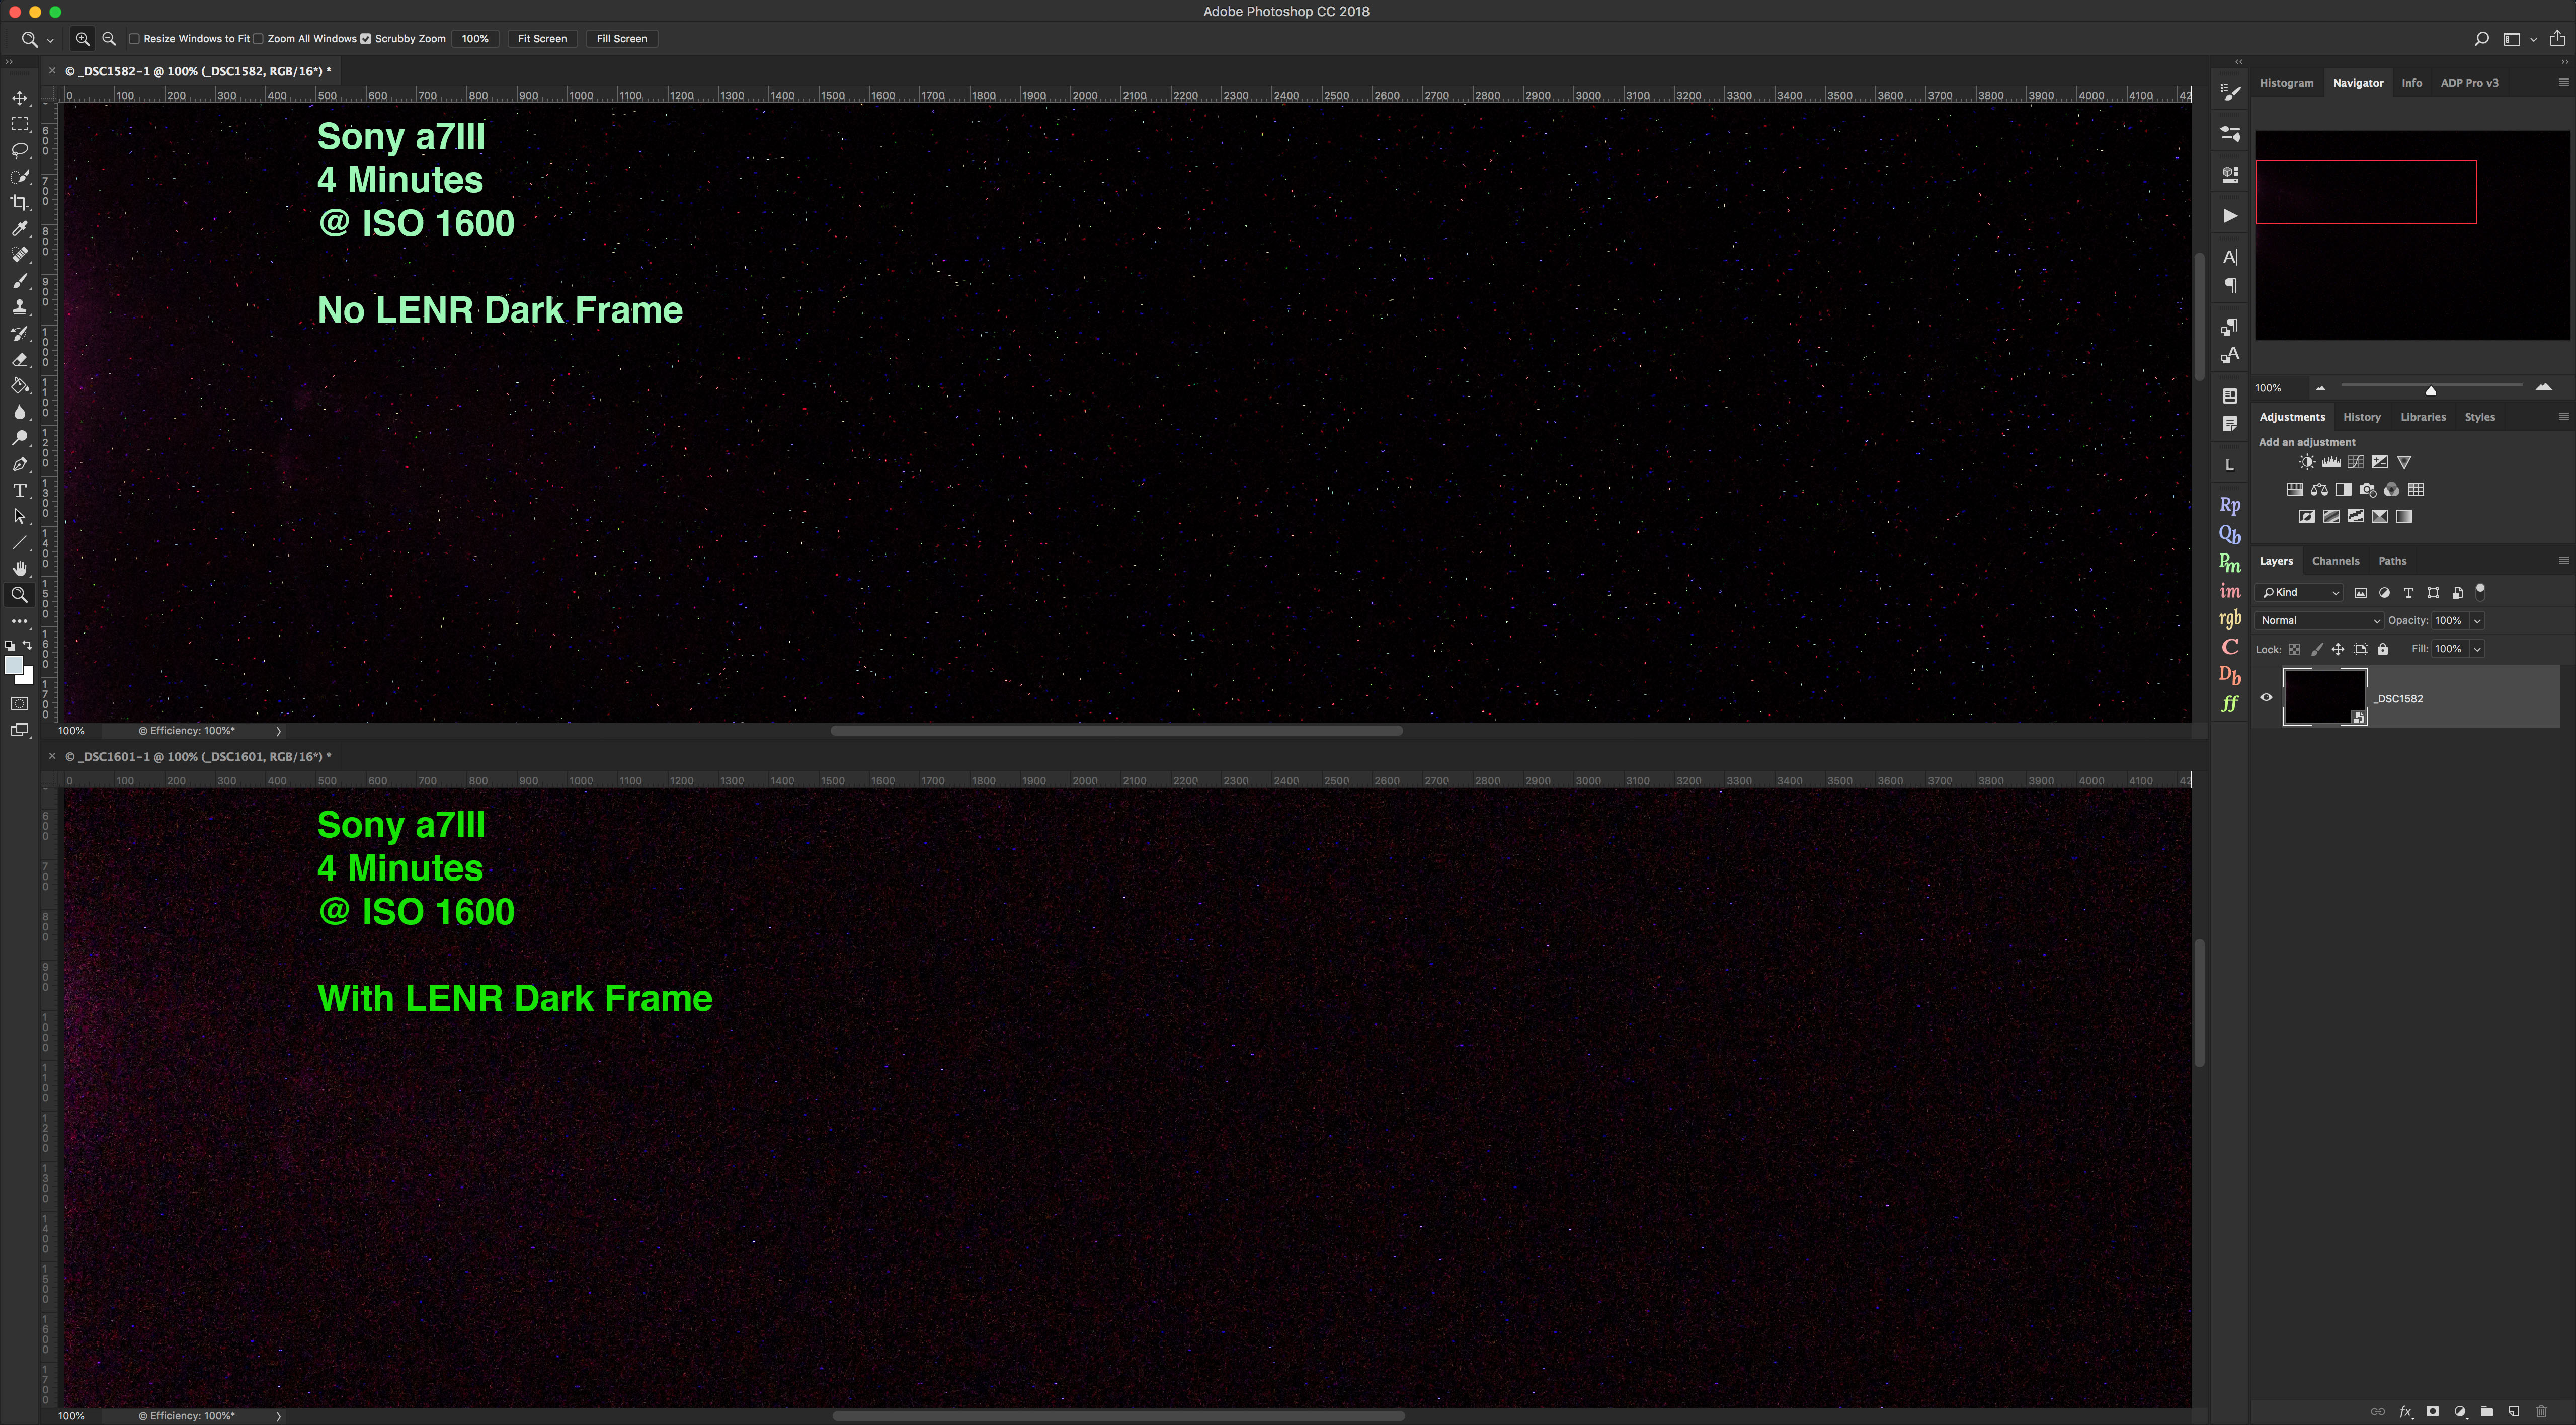
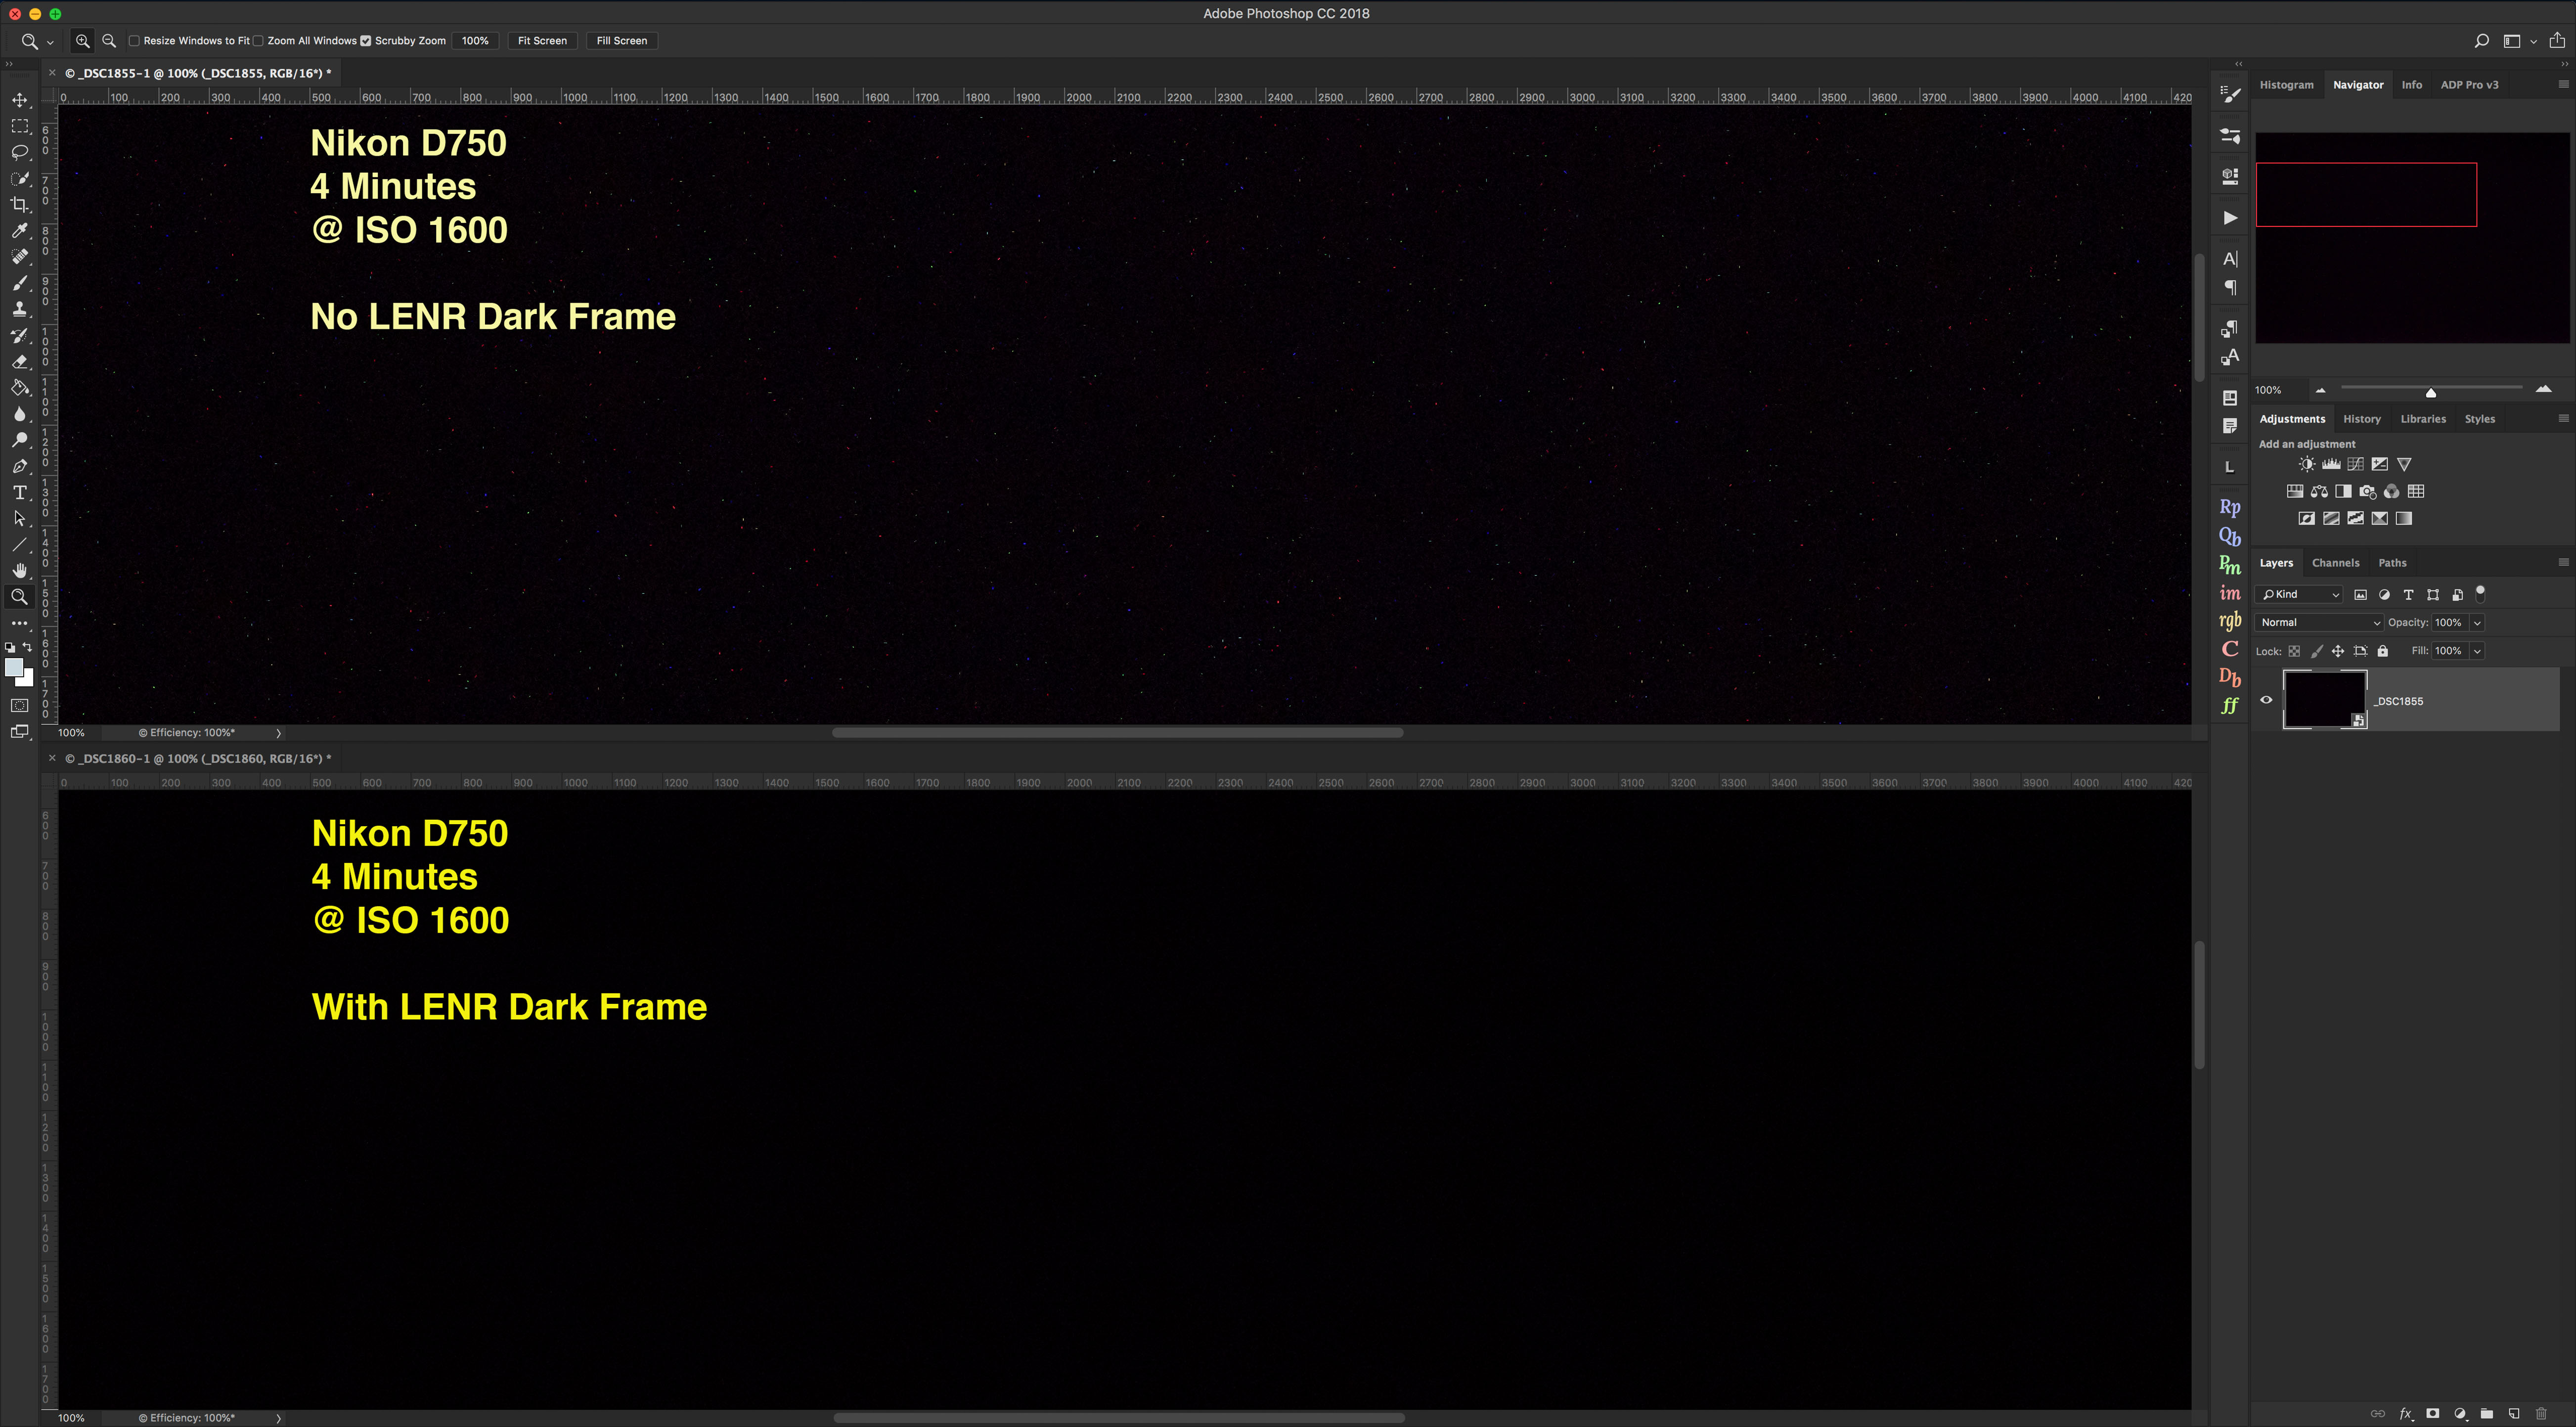


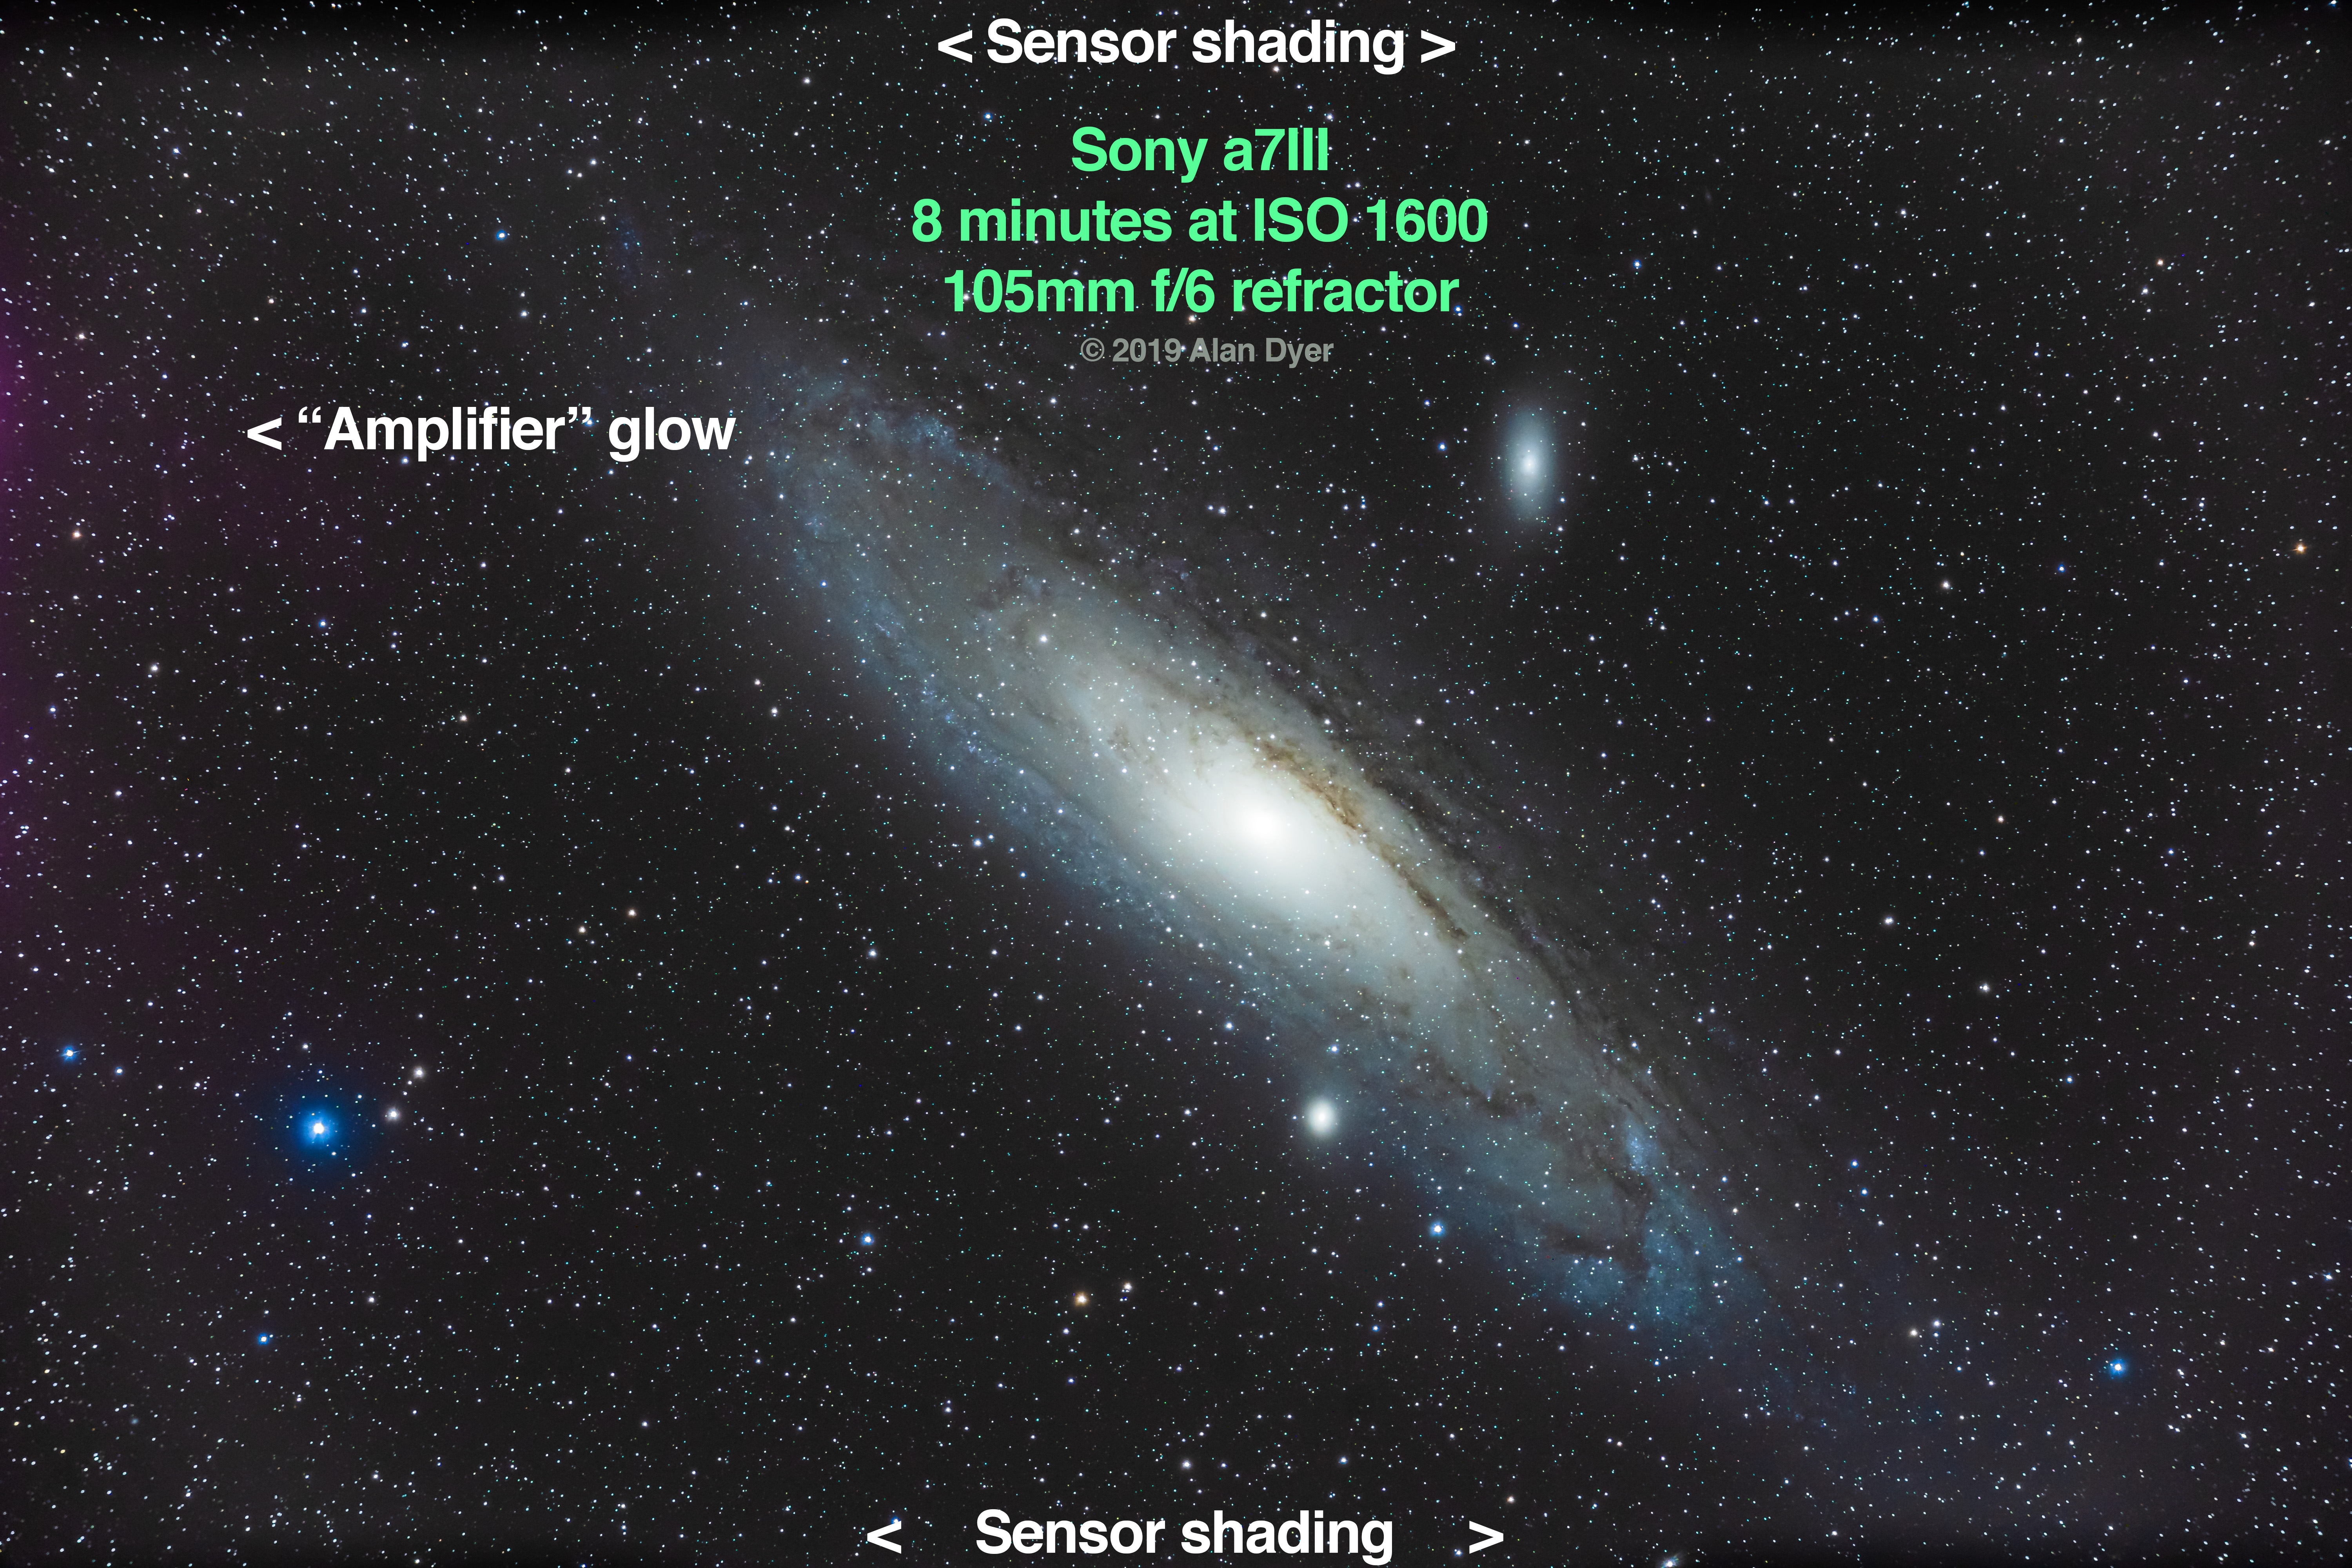

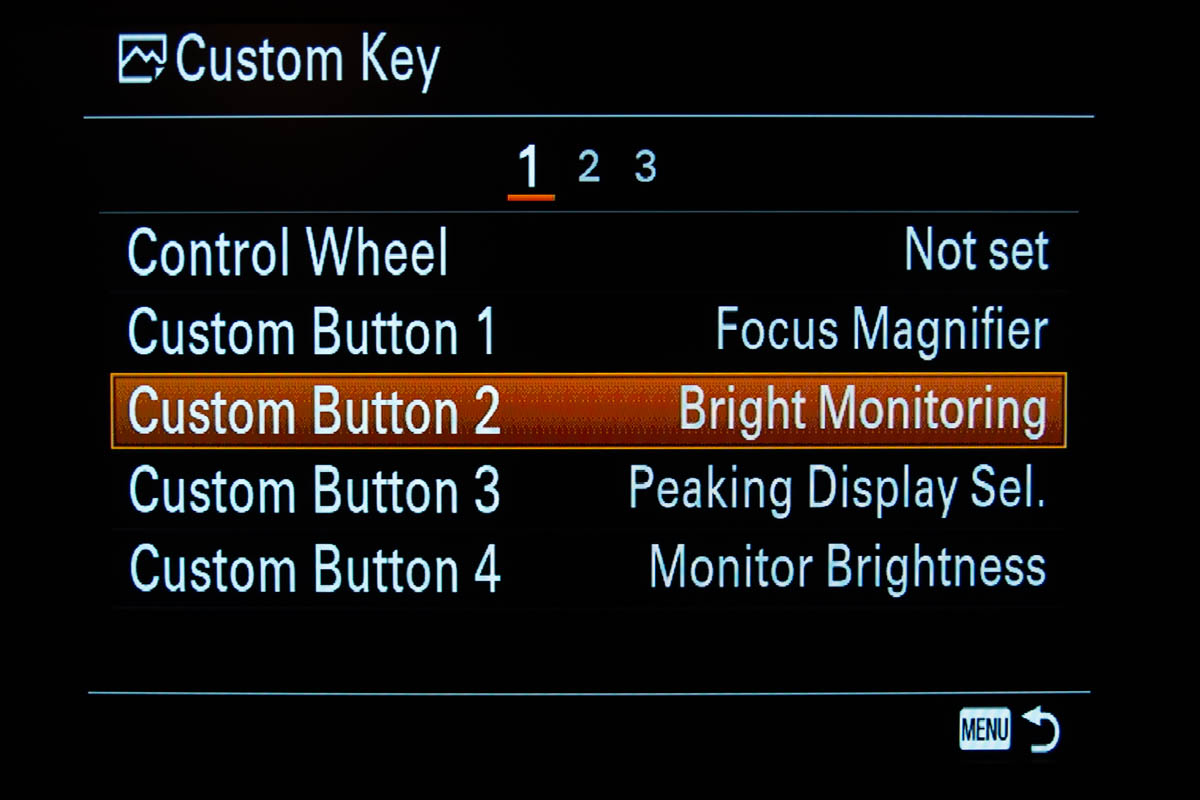
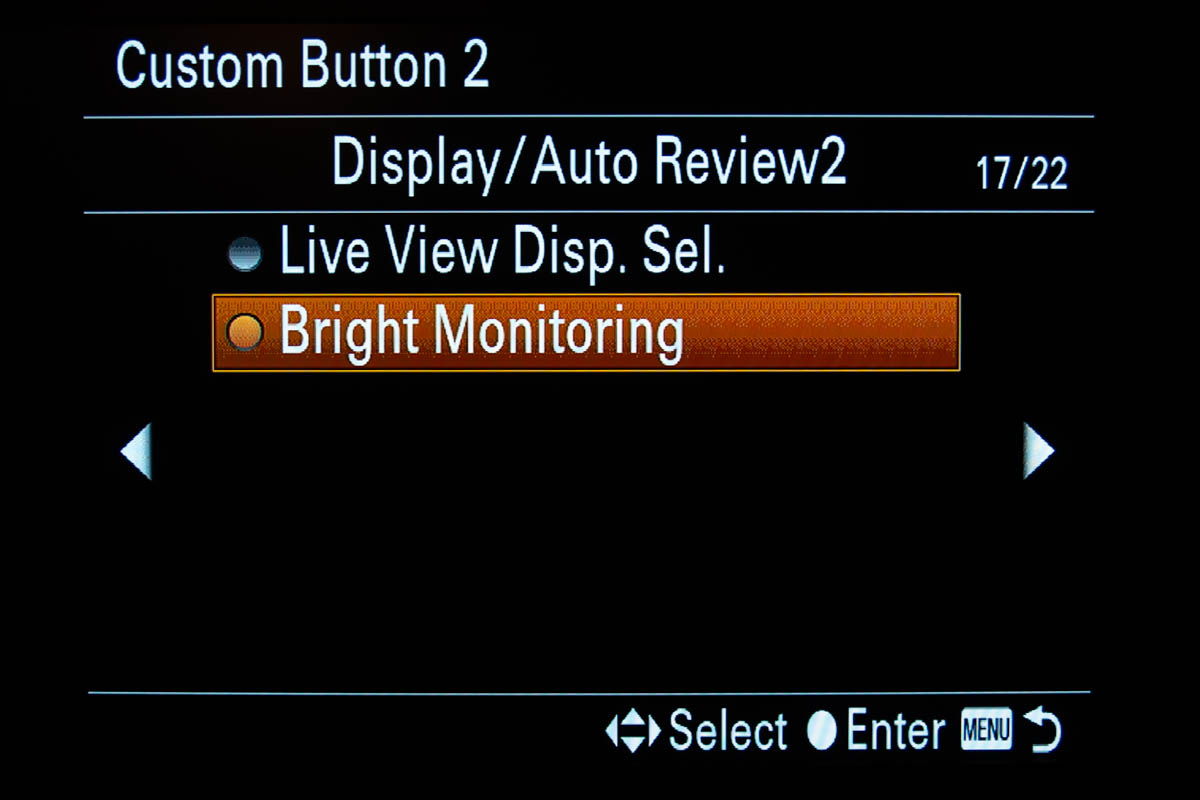

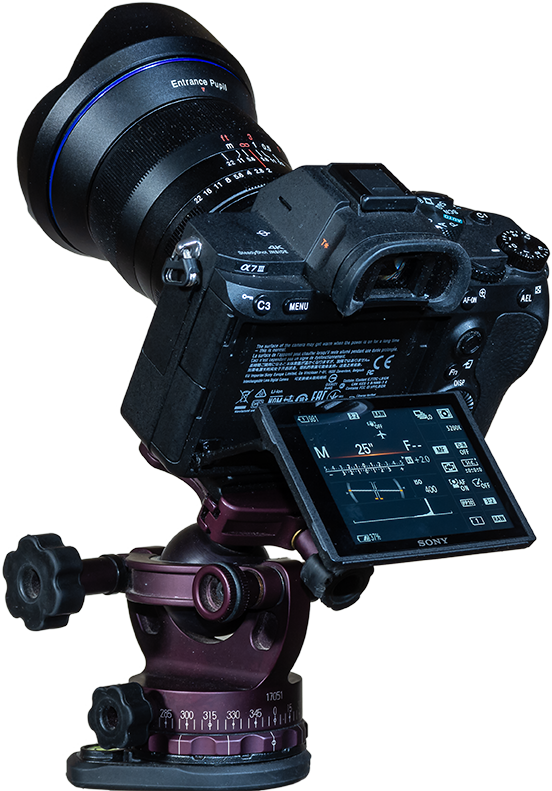


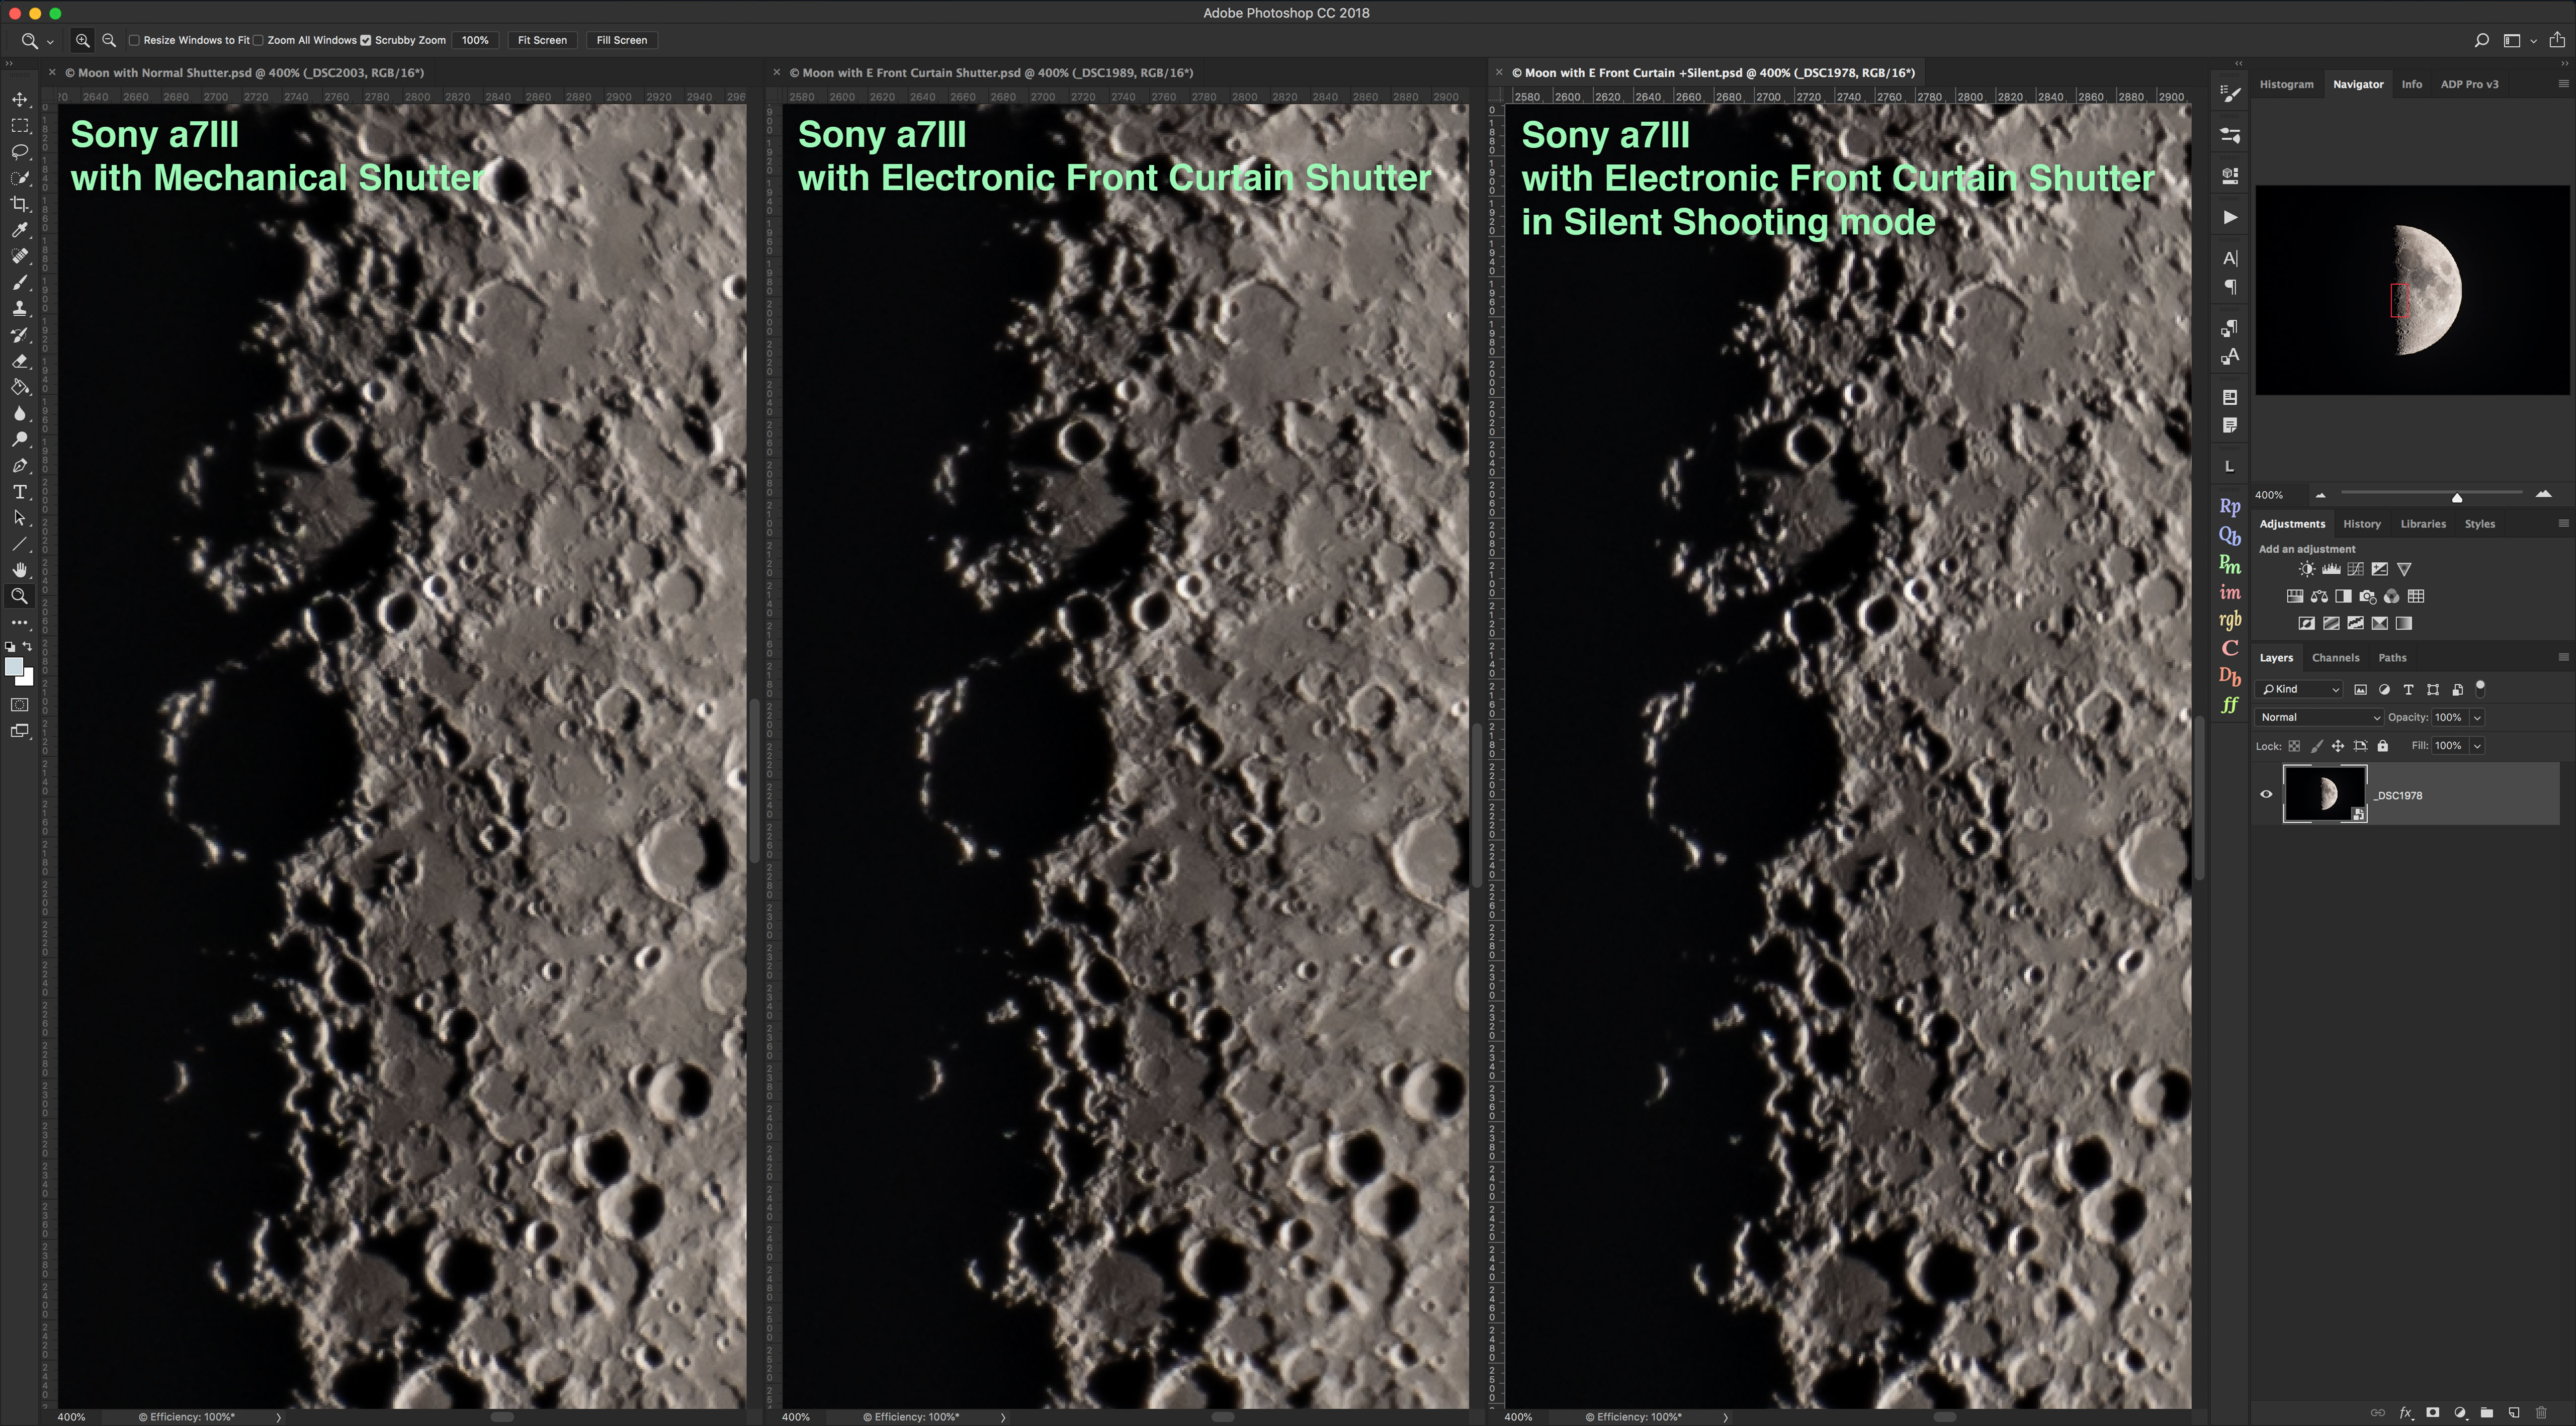
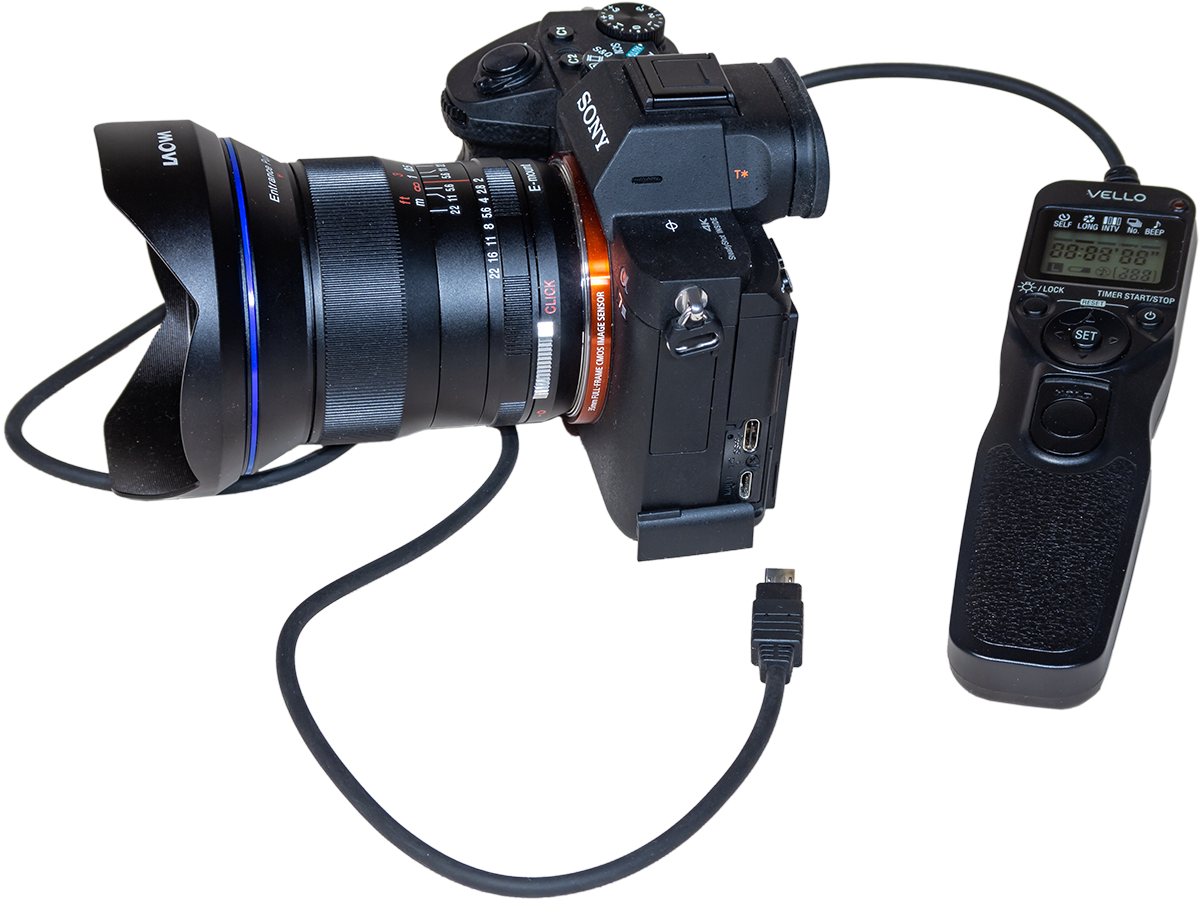
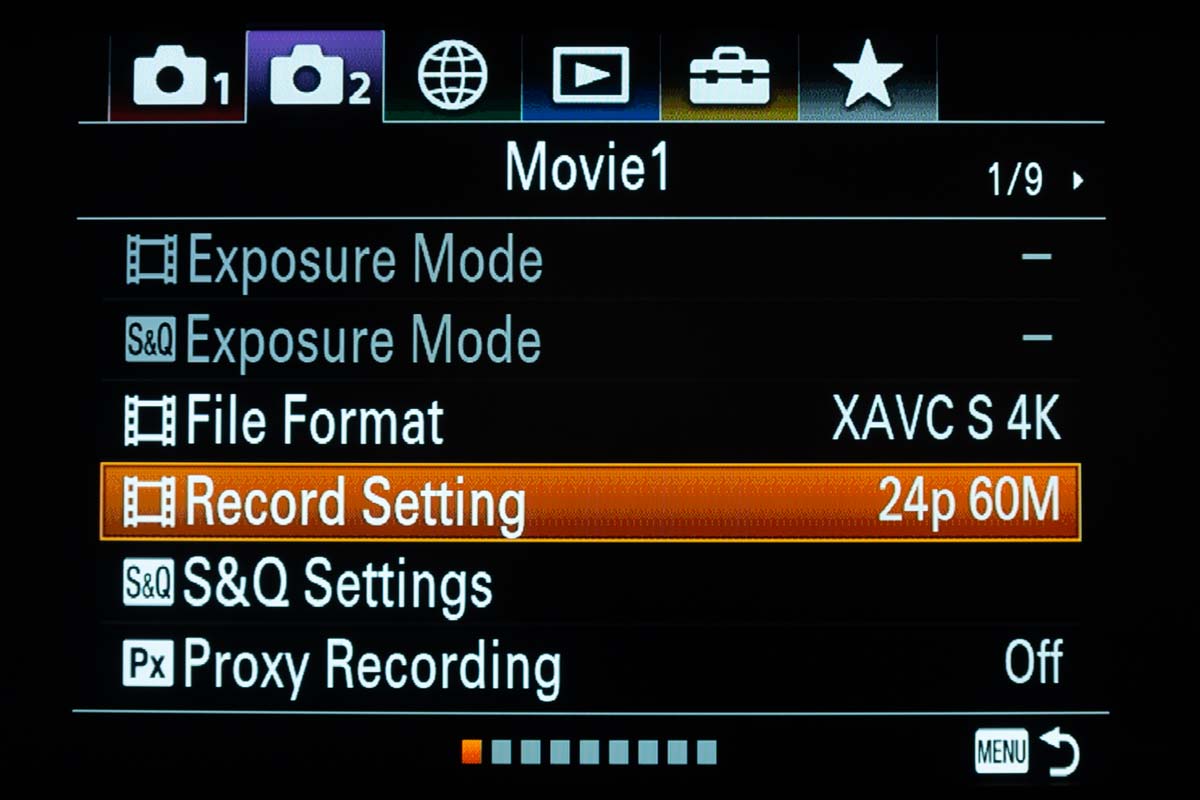


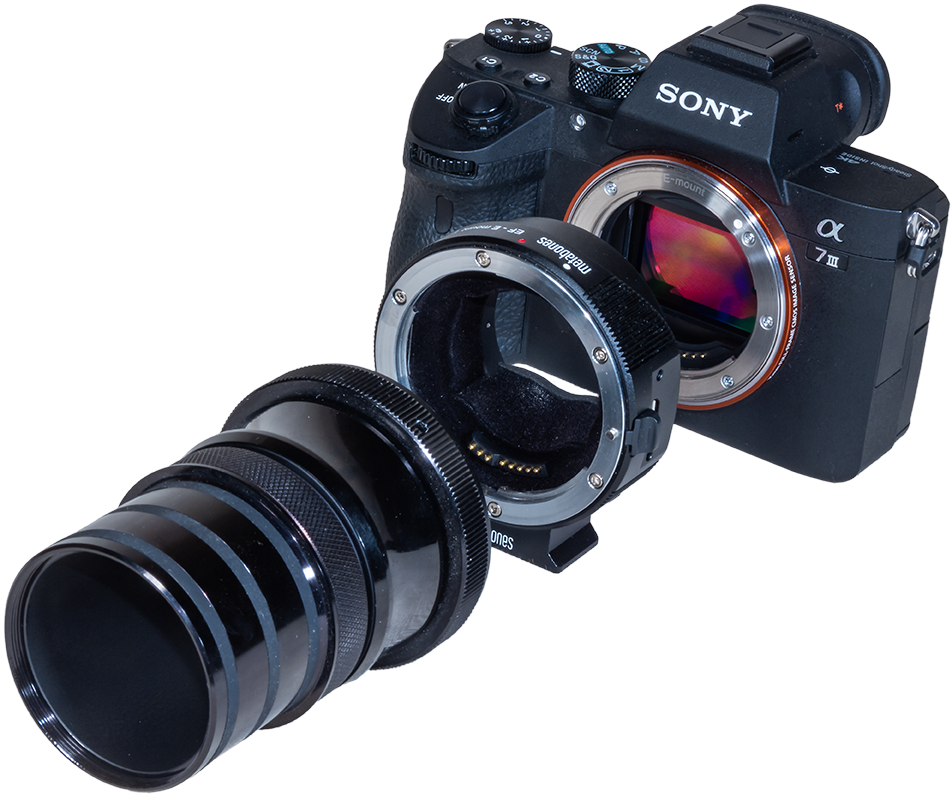
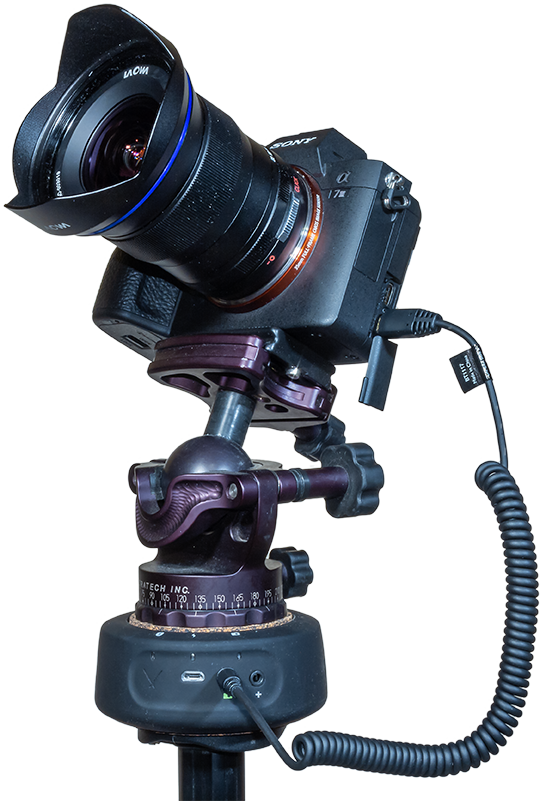

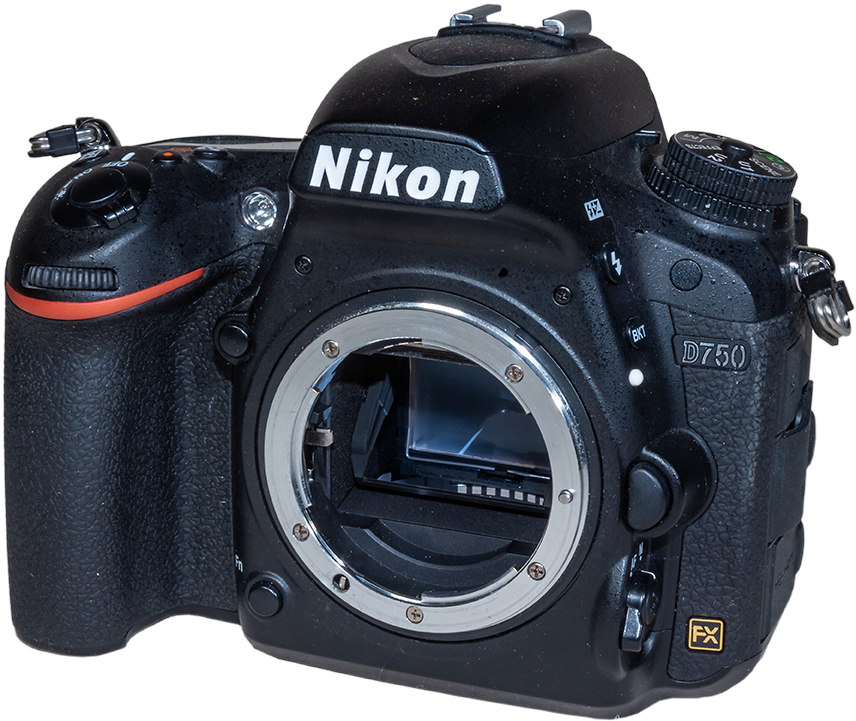
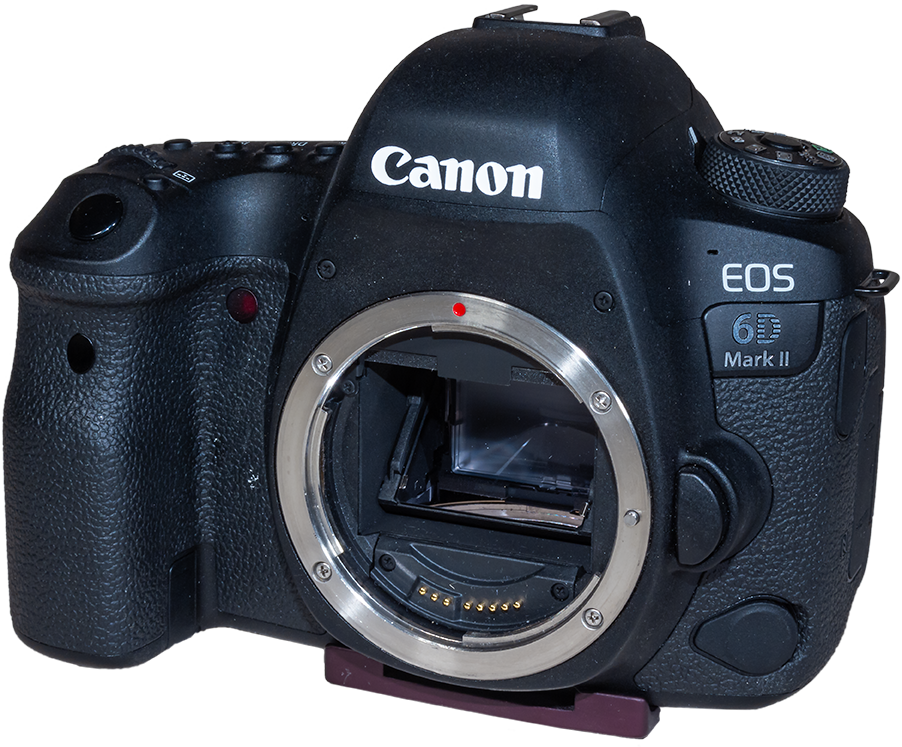
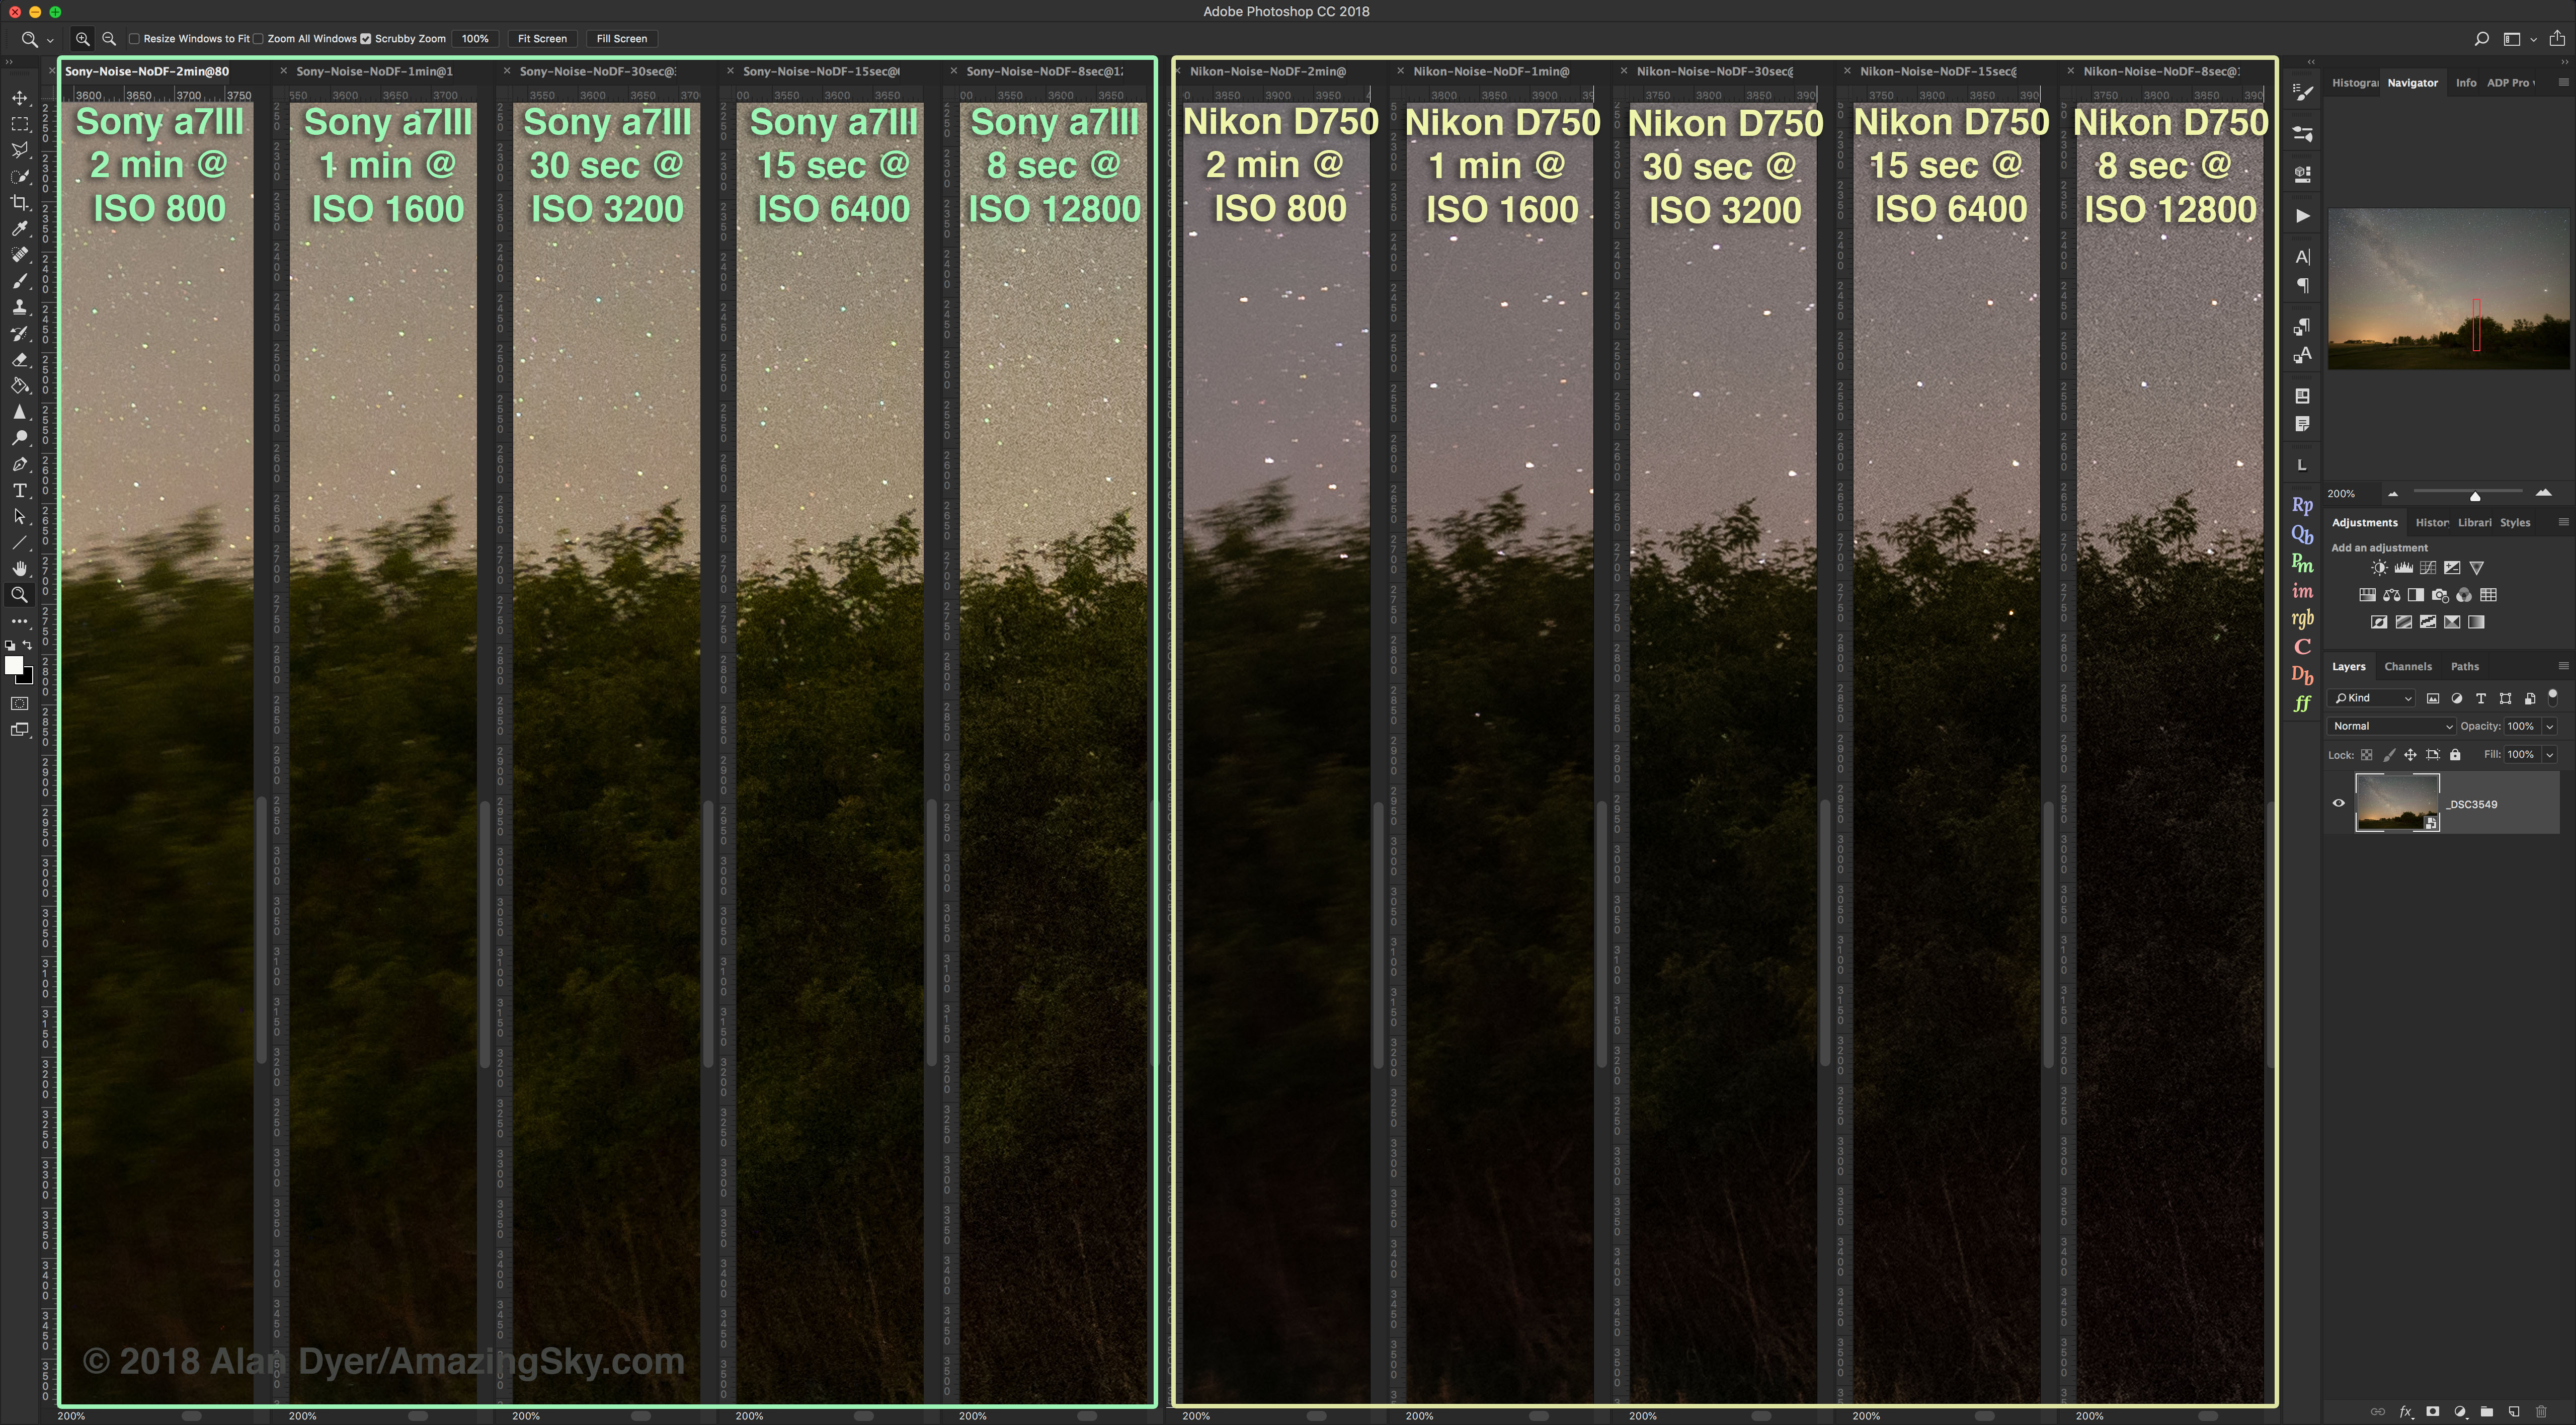
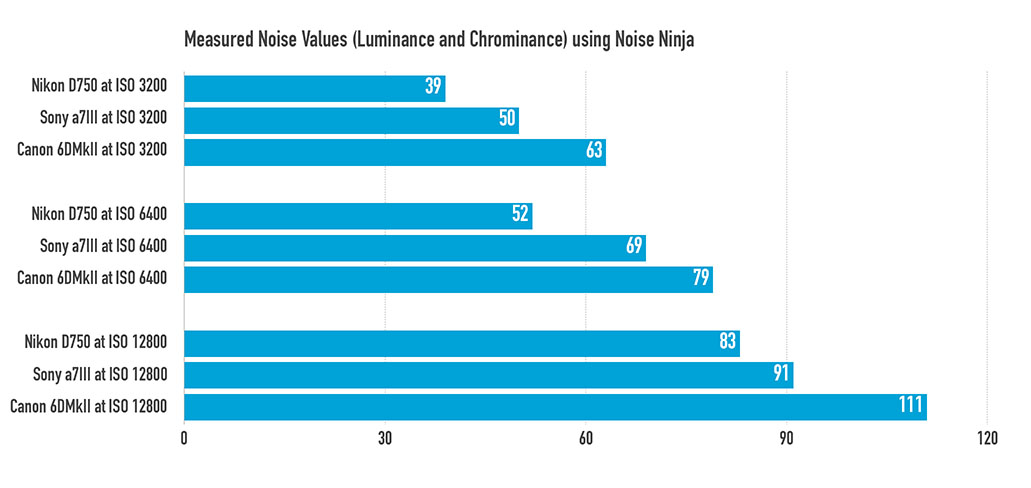

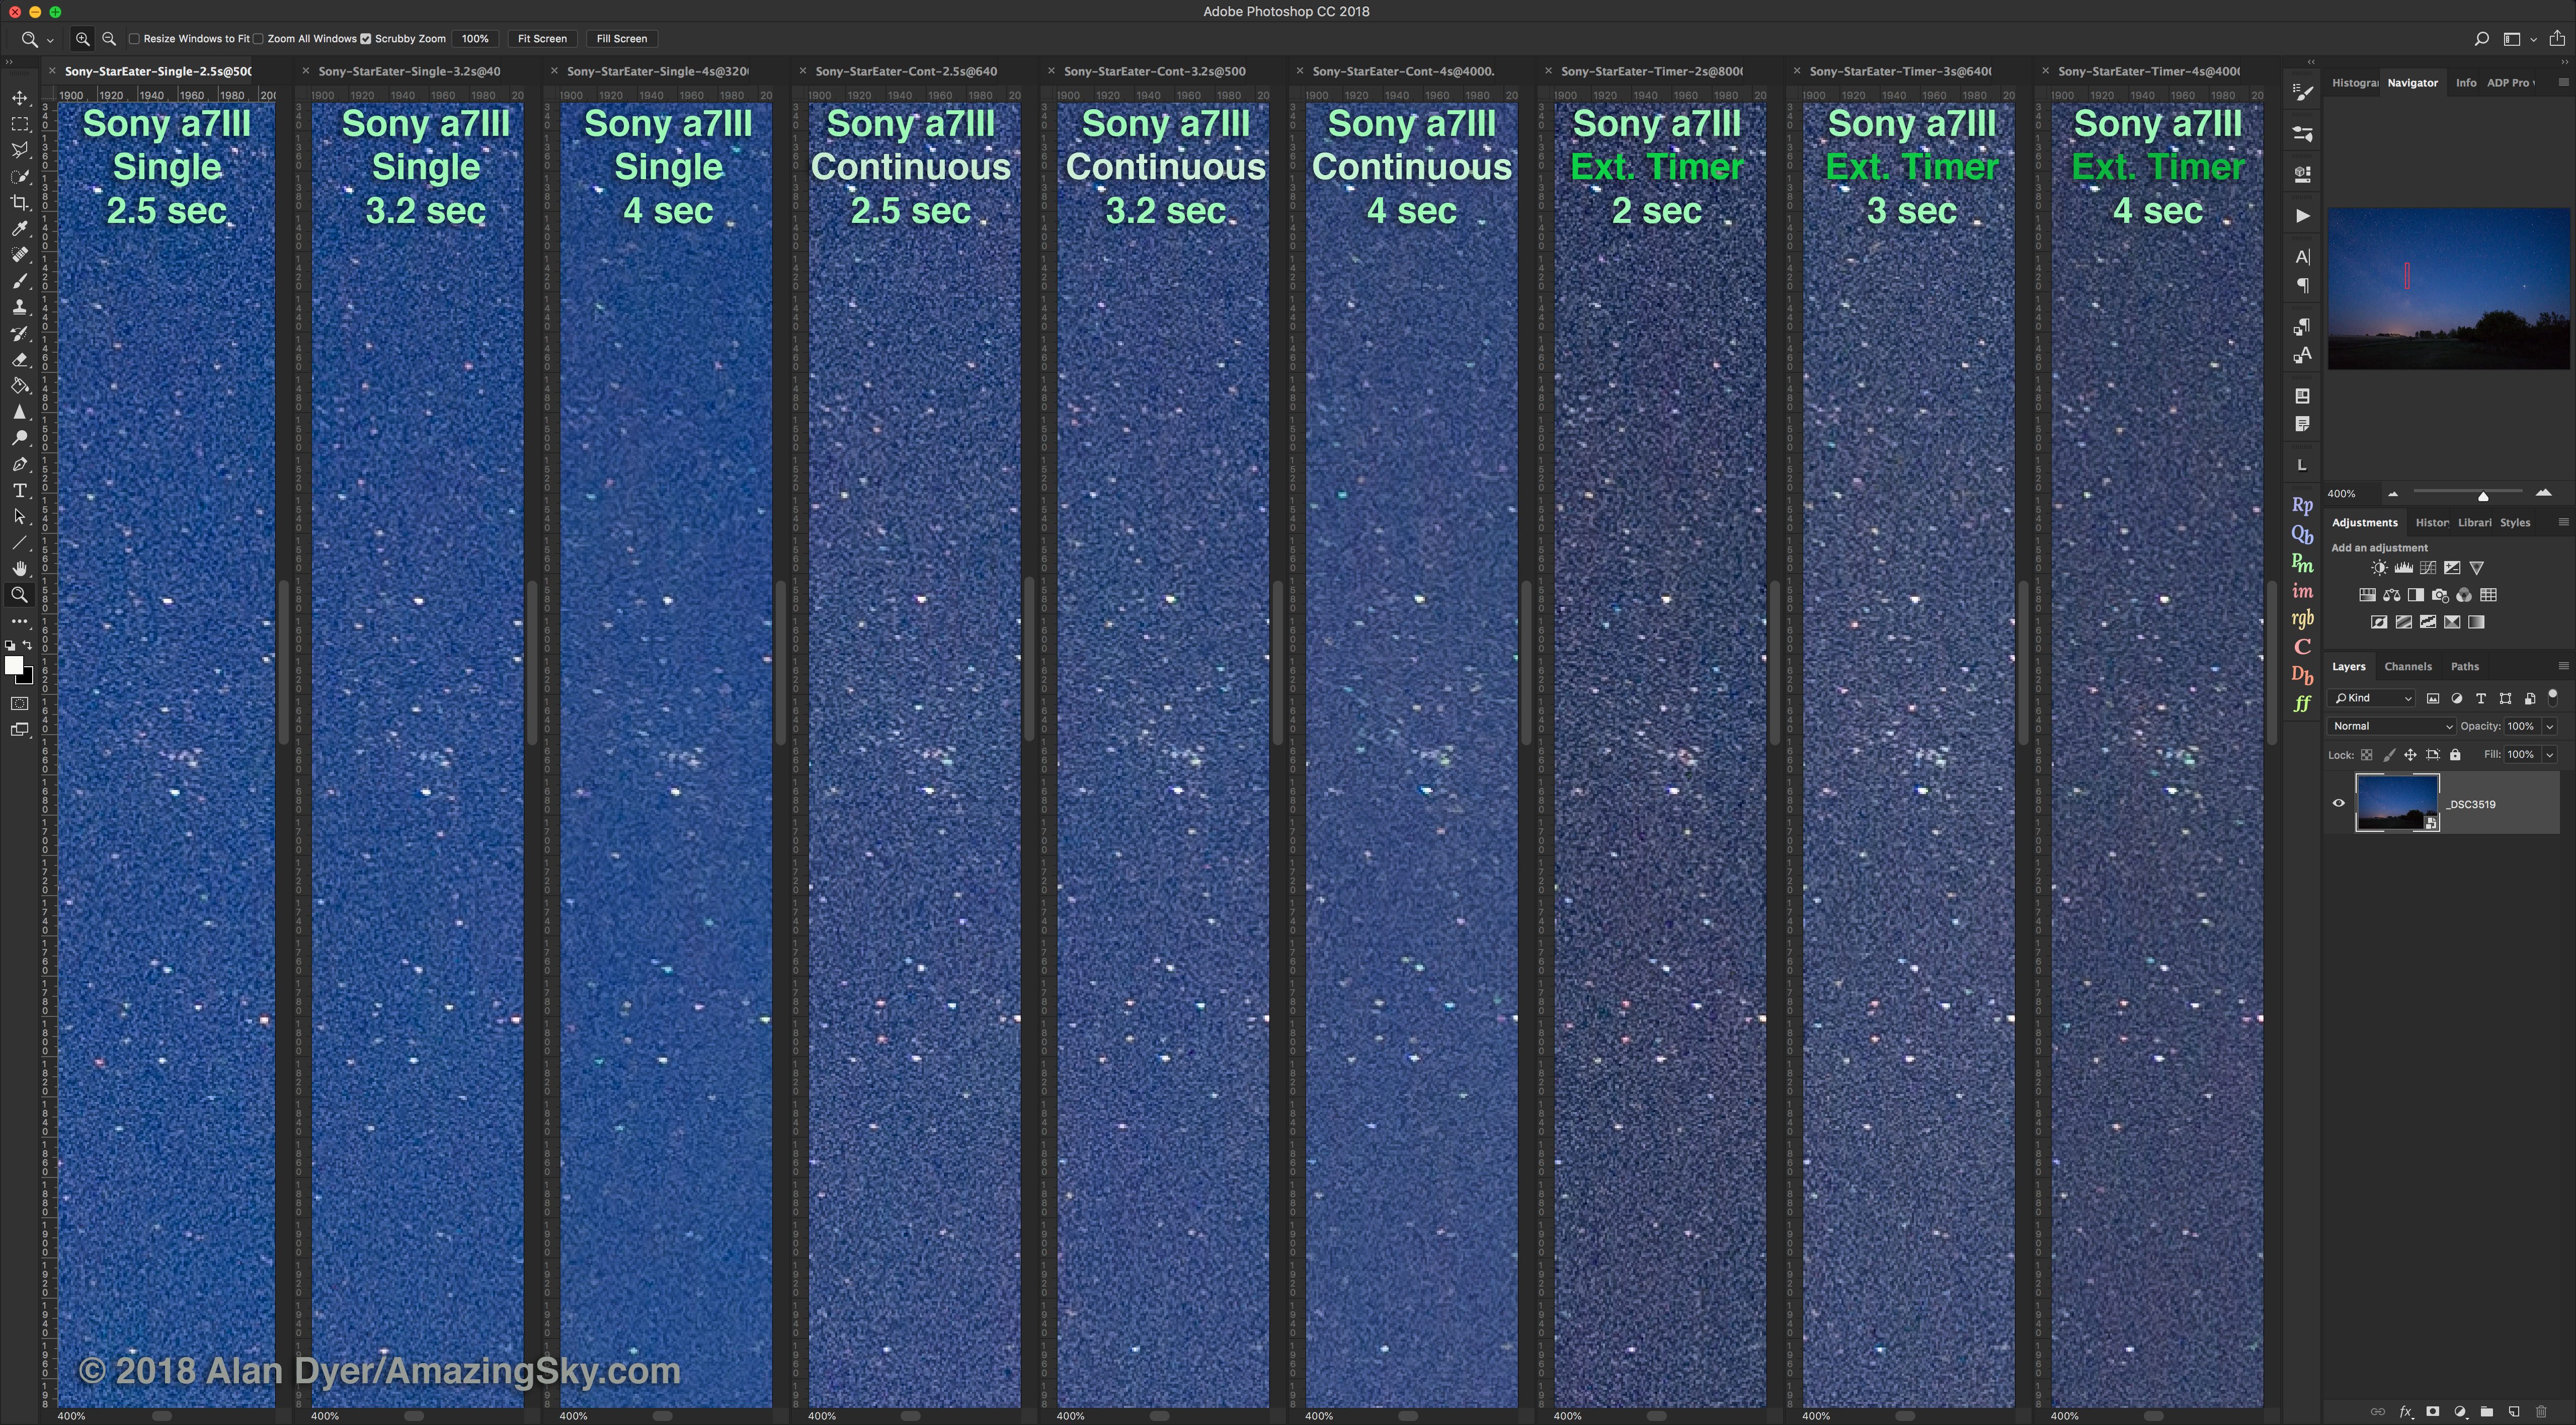
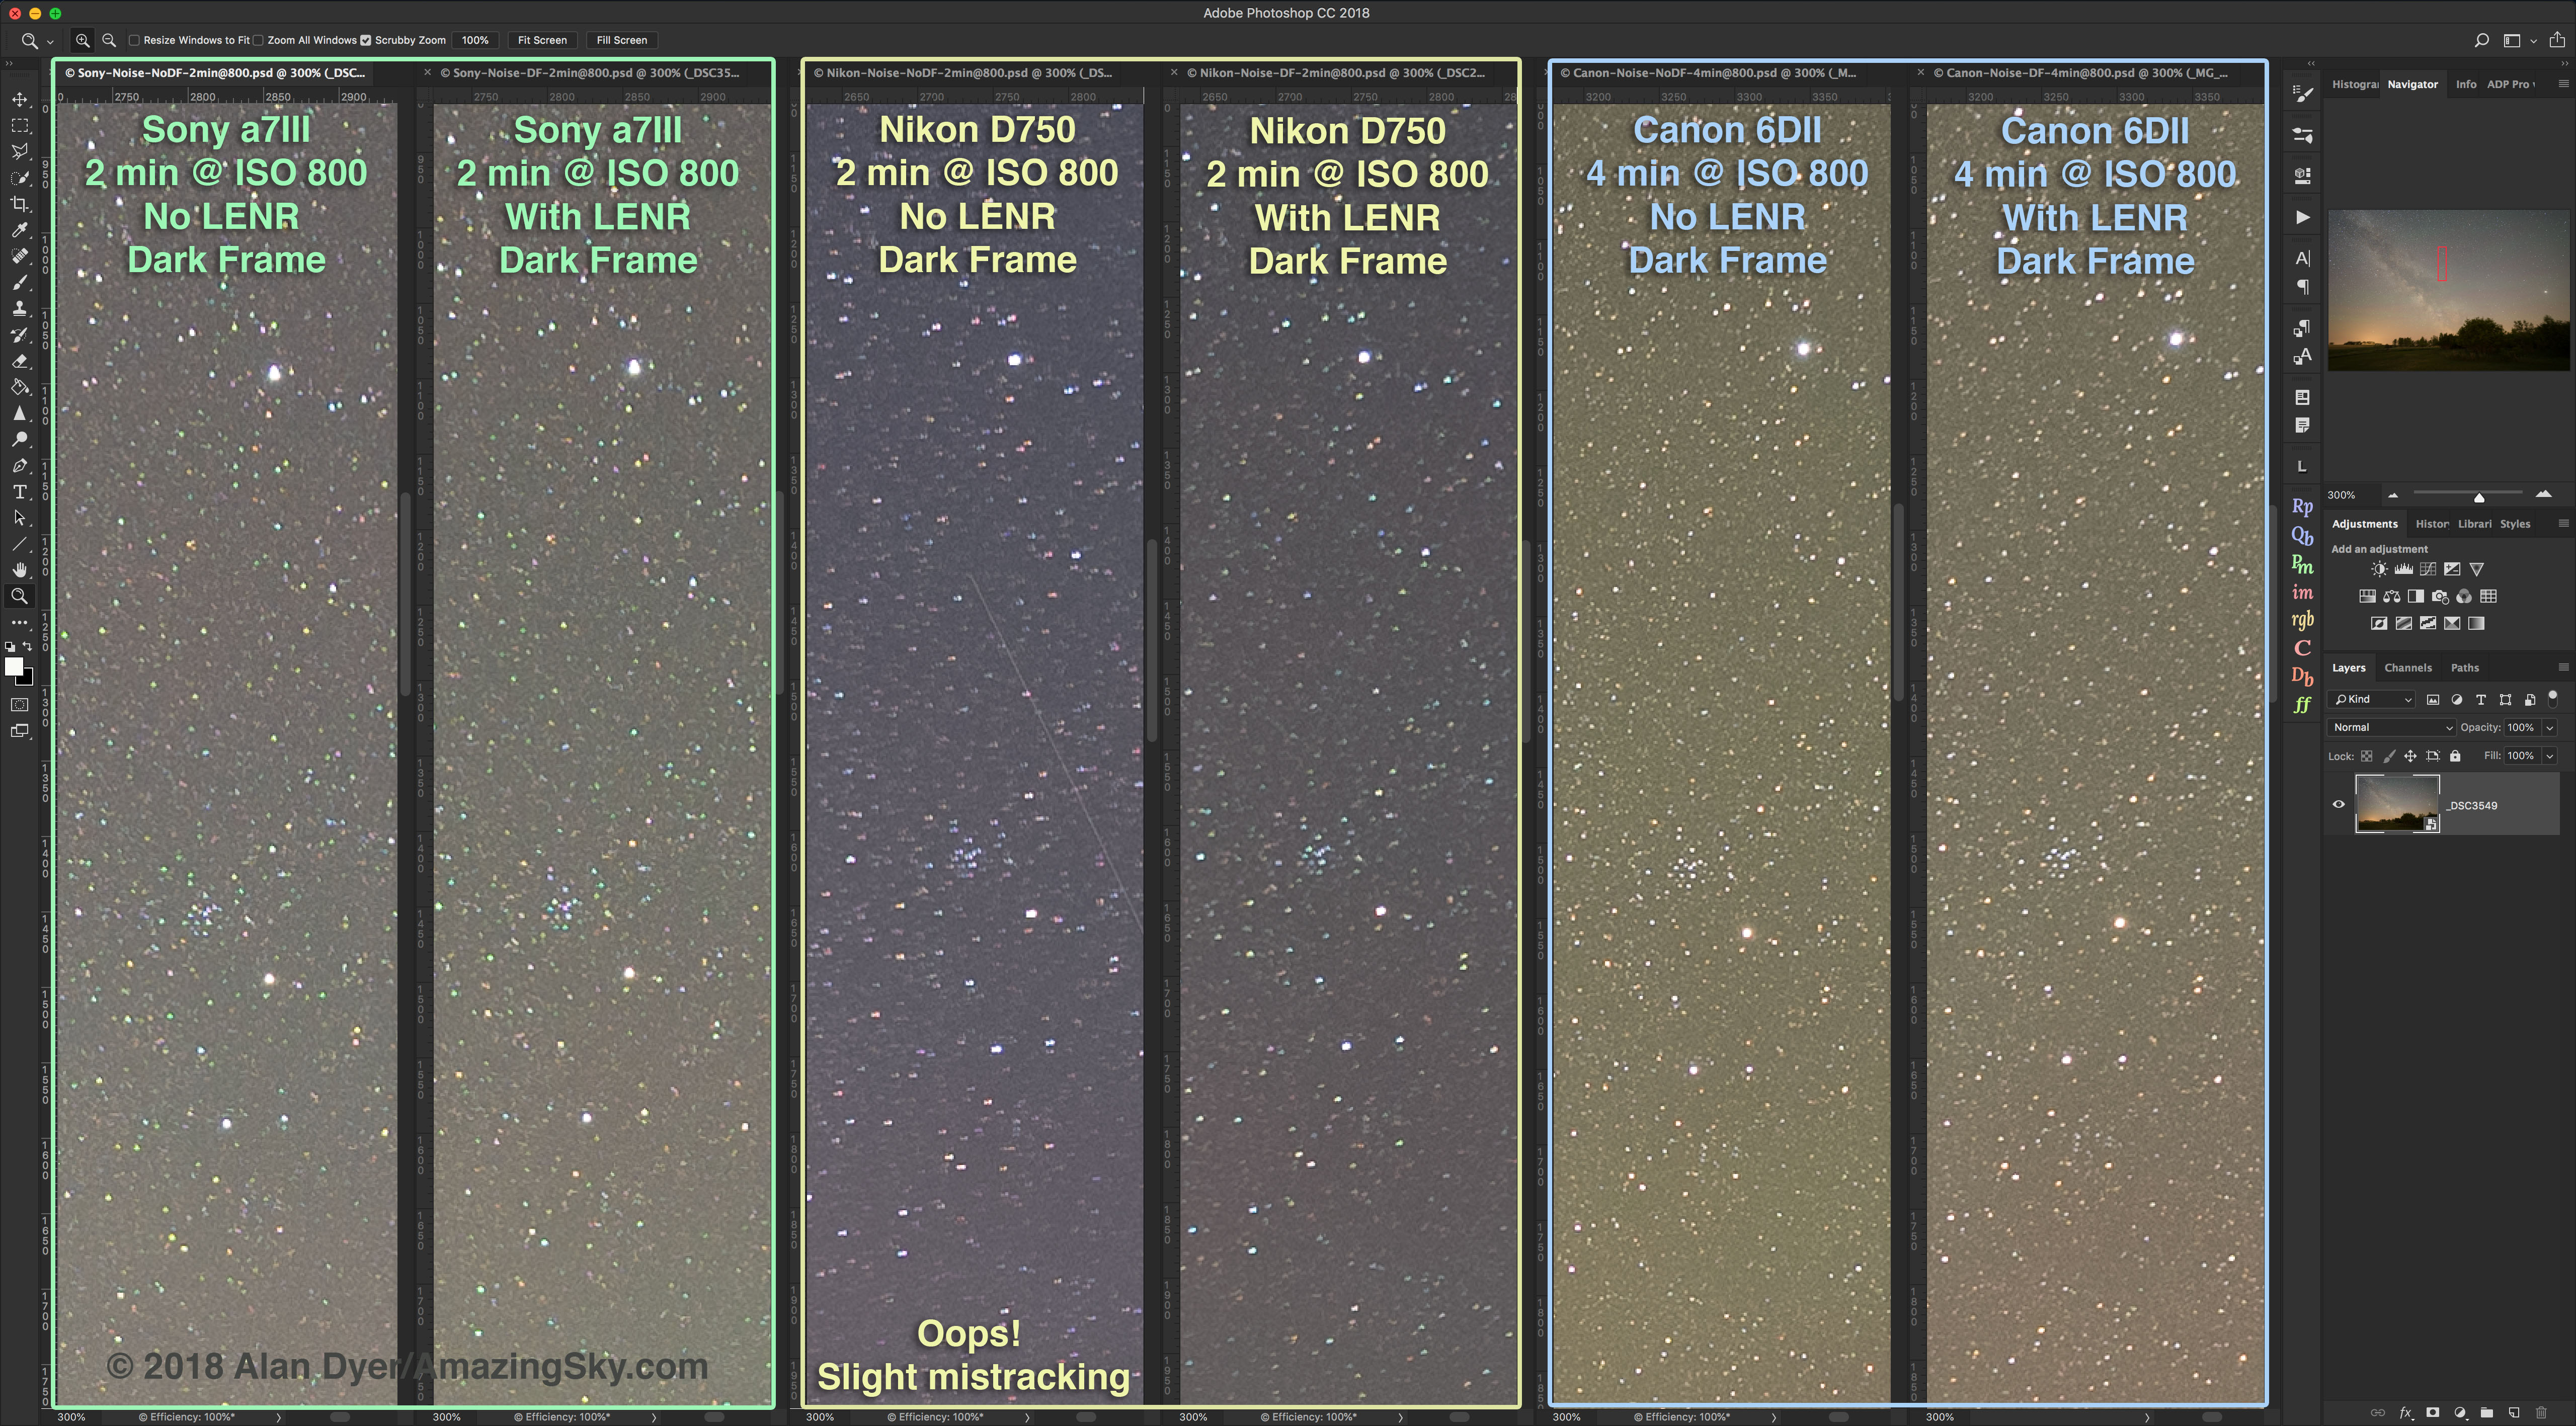
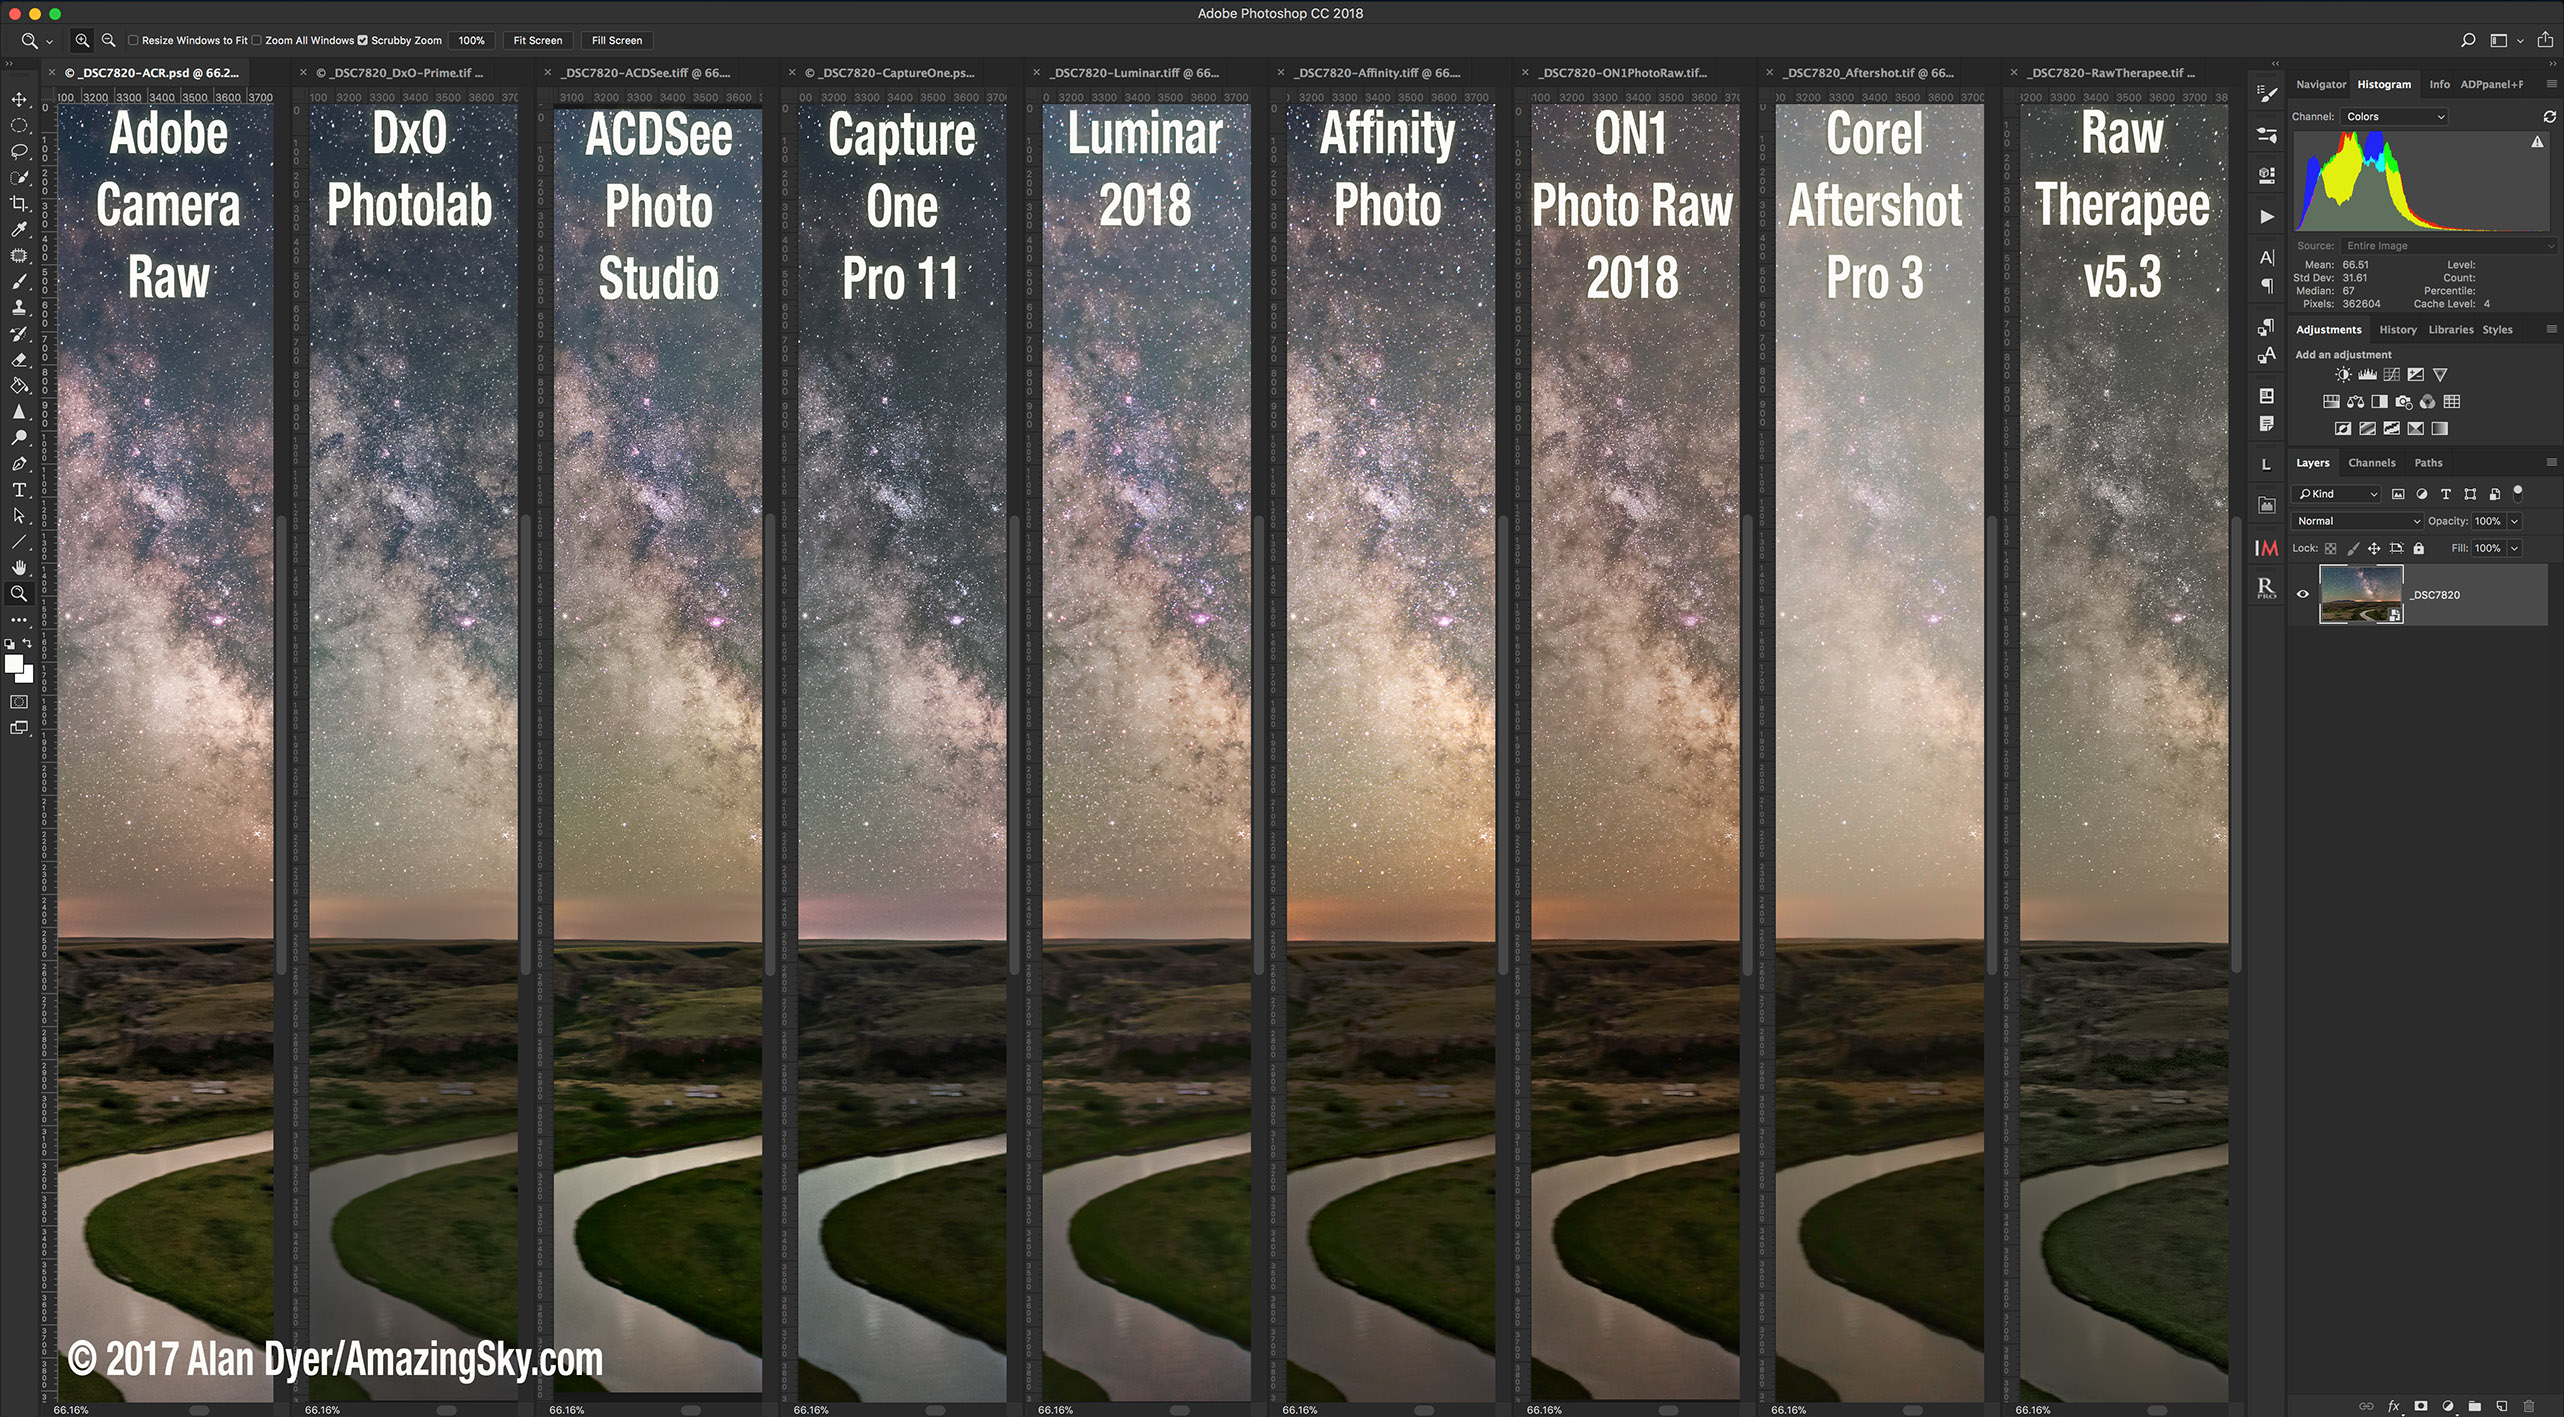


 Lightroom Contenders: Five Raw Developers
 Photoshop Contenders: Four Raw Developers with Layering/Compositing