Southern Saskatchewan is a fine place to capture nightscapes of the Milky Way over the grand prairie landscape.
In late August 2025 I took a short road trip around southwest Saskatchewan, taking advantage of a run of wonderfully clear nights to shoot “nightscapes” at some of my favourite locations.
Southern Saskatchewan, and more specifically Southwest Saskatchewan, is a stargazing paradise. The skies are dark and there’s nothing to get in the way of seeing them! Yet, the landscapes have their unique beauty.
And in the case of Grasslands National Park the landscape preserves the endangered realm of original short-grass prairie. It is what the land was like long ago, even including some bison at large.
Grasslands National Park
Technical: This is a blend of tracked and stacked sky exposures with a single untracked ground exposure: – 7 x 60 seconds at f/2 tracked and focused for the sky, plus – 1 x 4 minutes at f/2.8 untracked and focused for the foreground to bring out the details lit only by starlight. No light painting was employed here. – All with the Nikon Z8 at ISO 800 and Nikkor 20mm S lens, on the MSM Nomad tracker. And all from the same tripod position. However, the camera was reframed upward for the sky shots.
In fact, my main destination on my visit to Grasslands this year was to revisit a site I had intended to shoot from in 2019 – the Bison Rubbing Stone overlooking the Frenchman Creek Valley, with the Milky Way as a backdrop.
This year I was assured the bison were in the outback, so I set up at their rubbing stone. This is one of the many glacial erratic boulders the Ice Age left scattered across the prairies. With no trees about, the bison have long loved to use them to scratch an itch. But the connection with the stars is that one legend of the sky told by Blackfoot First Nations describes the Milky Way as the “Buffalo Trail,” the dust left by a cosmic herd of bison.
I got the shot! Then all I had to do was turn the camera around to face north to get this scene.
Technical: This is a panorama of 5 segments, each 30 seconds untracked at f/2 with the Nikkor 20mm S-Line lens and Nikon Z8 at ISO 1600. Stitched with Adobe Camera Raw. I removed aircraft trails, but at left I retained the many faint satellite trails in the northwest still lit by twilight, as this was early at about 10:30 pm CST. I did not focus stack these frames. Nor was the camera tracking the stars.
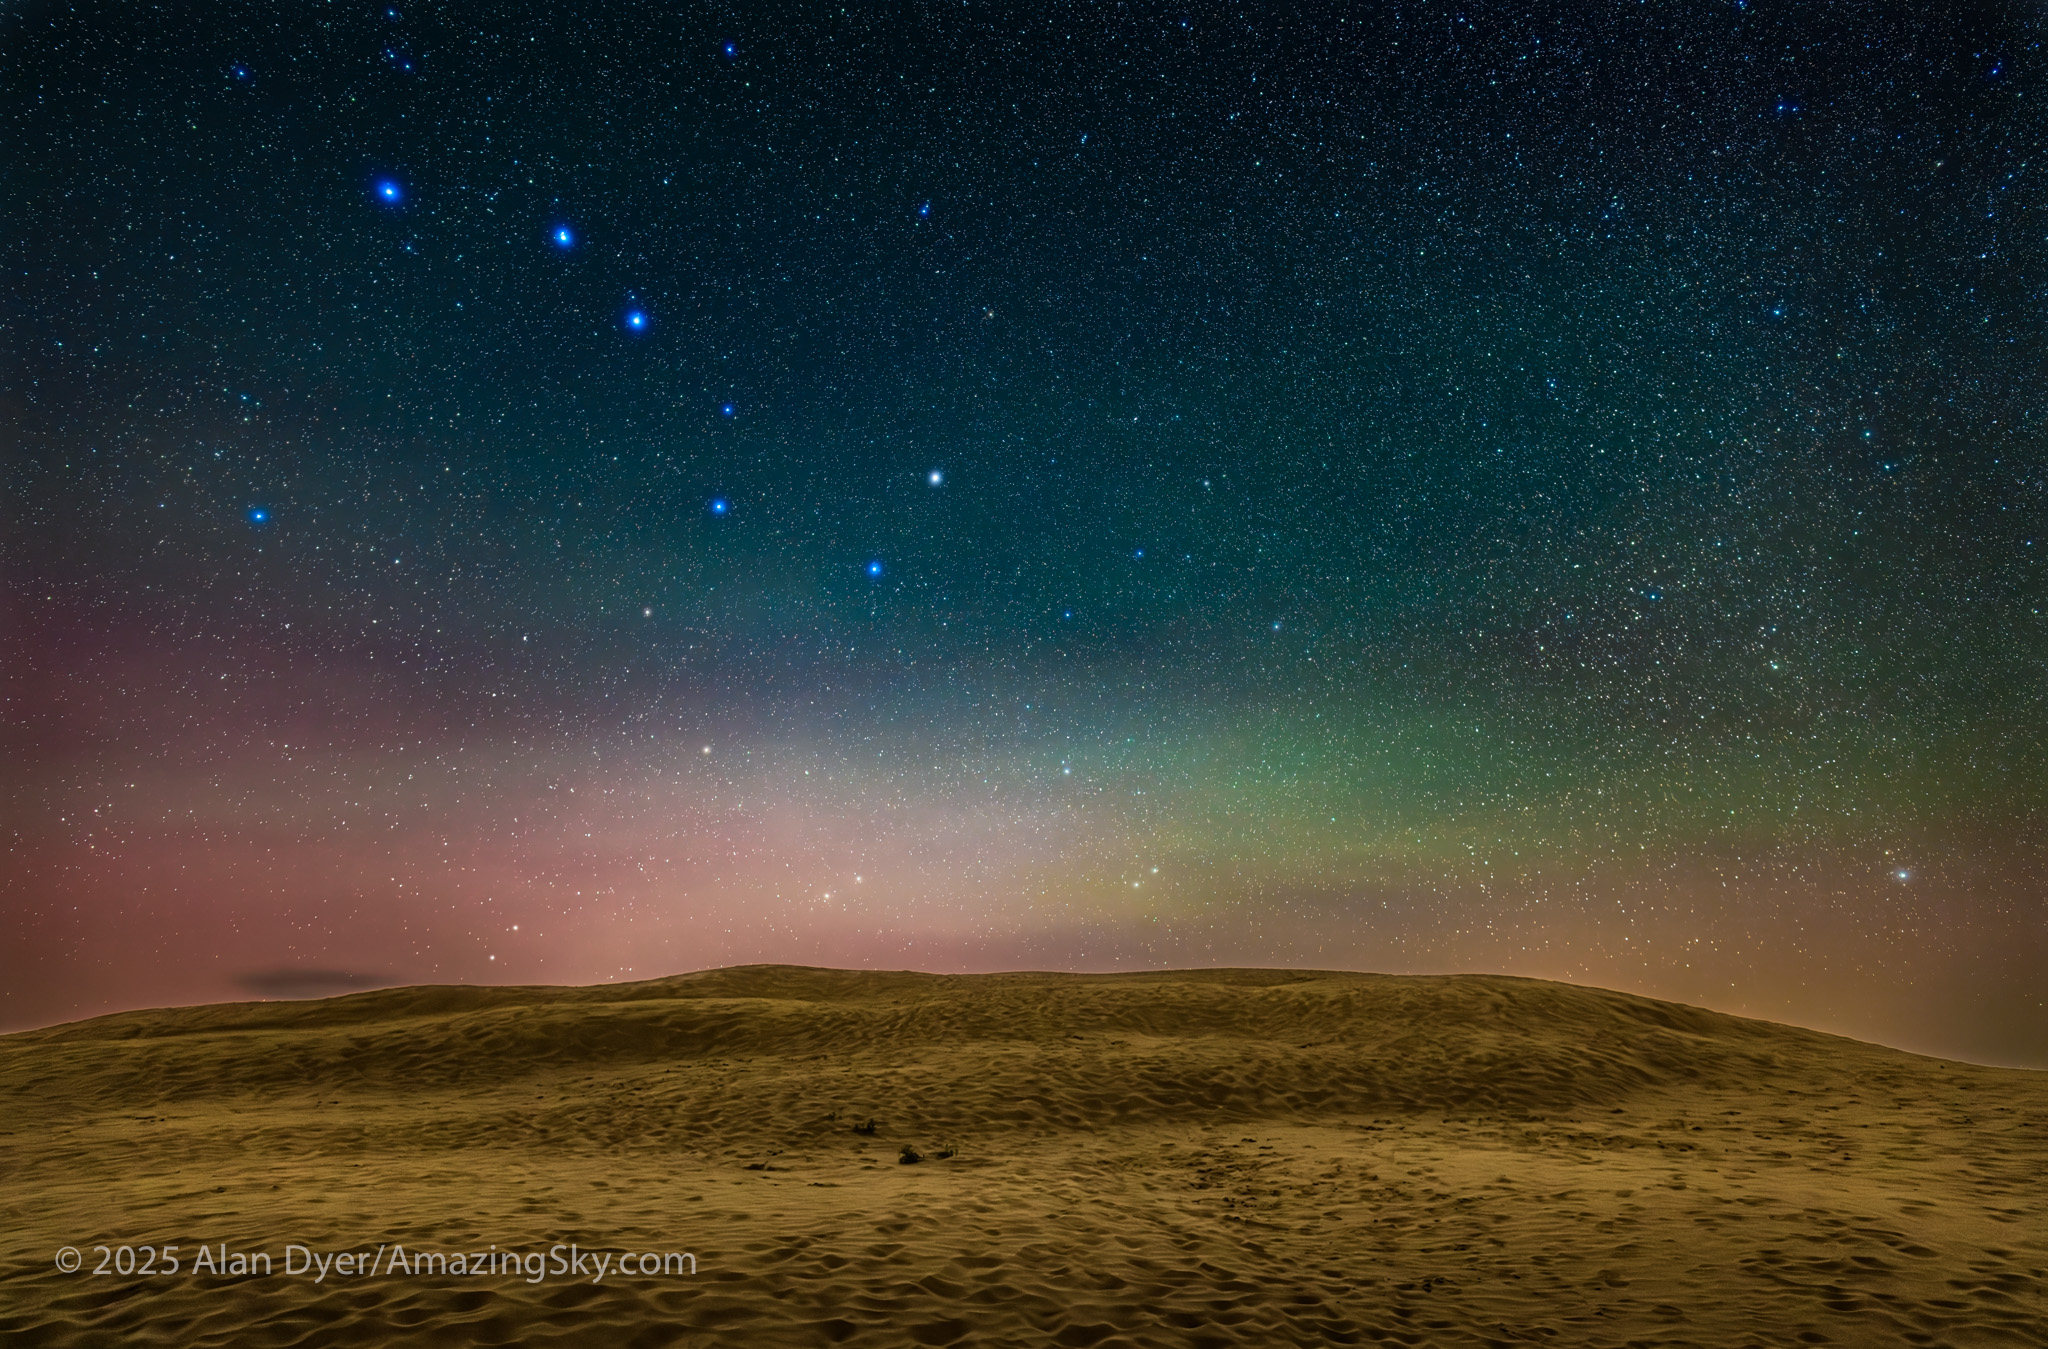
A mild aurora appeared in a classic arc across the north, and framed between the hiking trail, with the Big Dipper to the left and the Milky Way rising to the right. This is the wonderful sky that awaits in the “big sky” country of Grasslands. On the horizon only 3 distant lights could be seen. Grasslands is a Dark Sky Preserve. May it always be so!
Technical: This is a blend of tracked and stacked sky exposures with a single untracked ground exposure: – 4 x 30 seconds at f/2 tracked for the sky, plus – 1 x 2 minutes at f/2.8 untracked for the ground to bring out the details lit by starlight, plus – A single 30-second tracked exposure through a Tiffen Double Fog 3 filter layered in, to add the star glows. – All with the Nikon Z8 at ISO 800 and Nikkor 20mm S lens, on the MSM Nomad tracker. And all from the same tripod position. The camera was not moved for the sky photos.
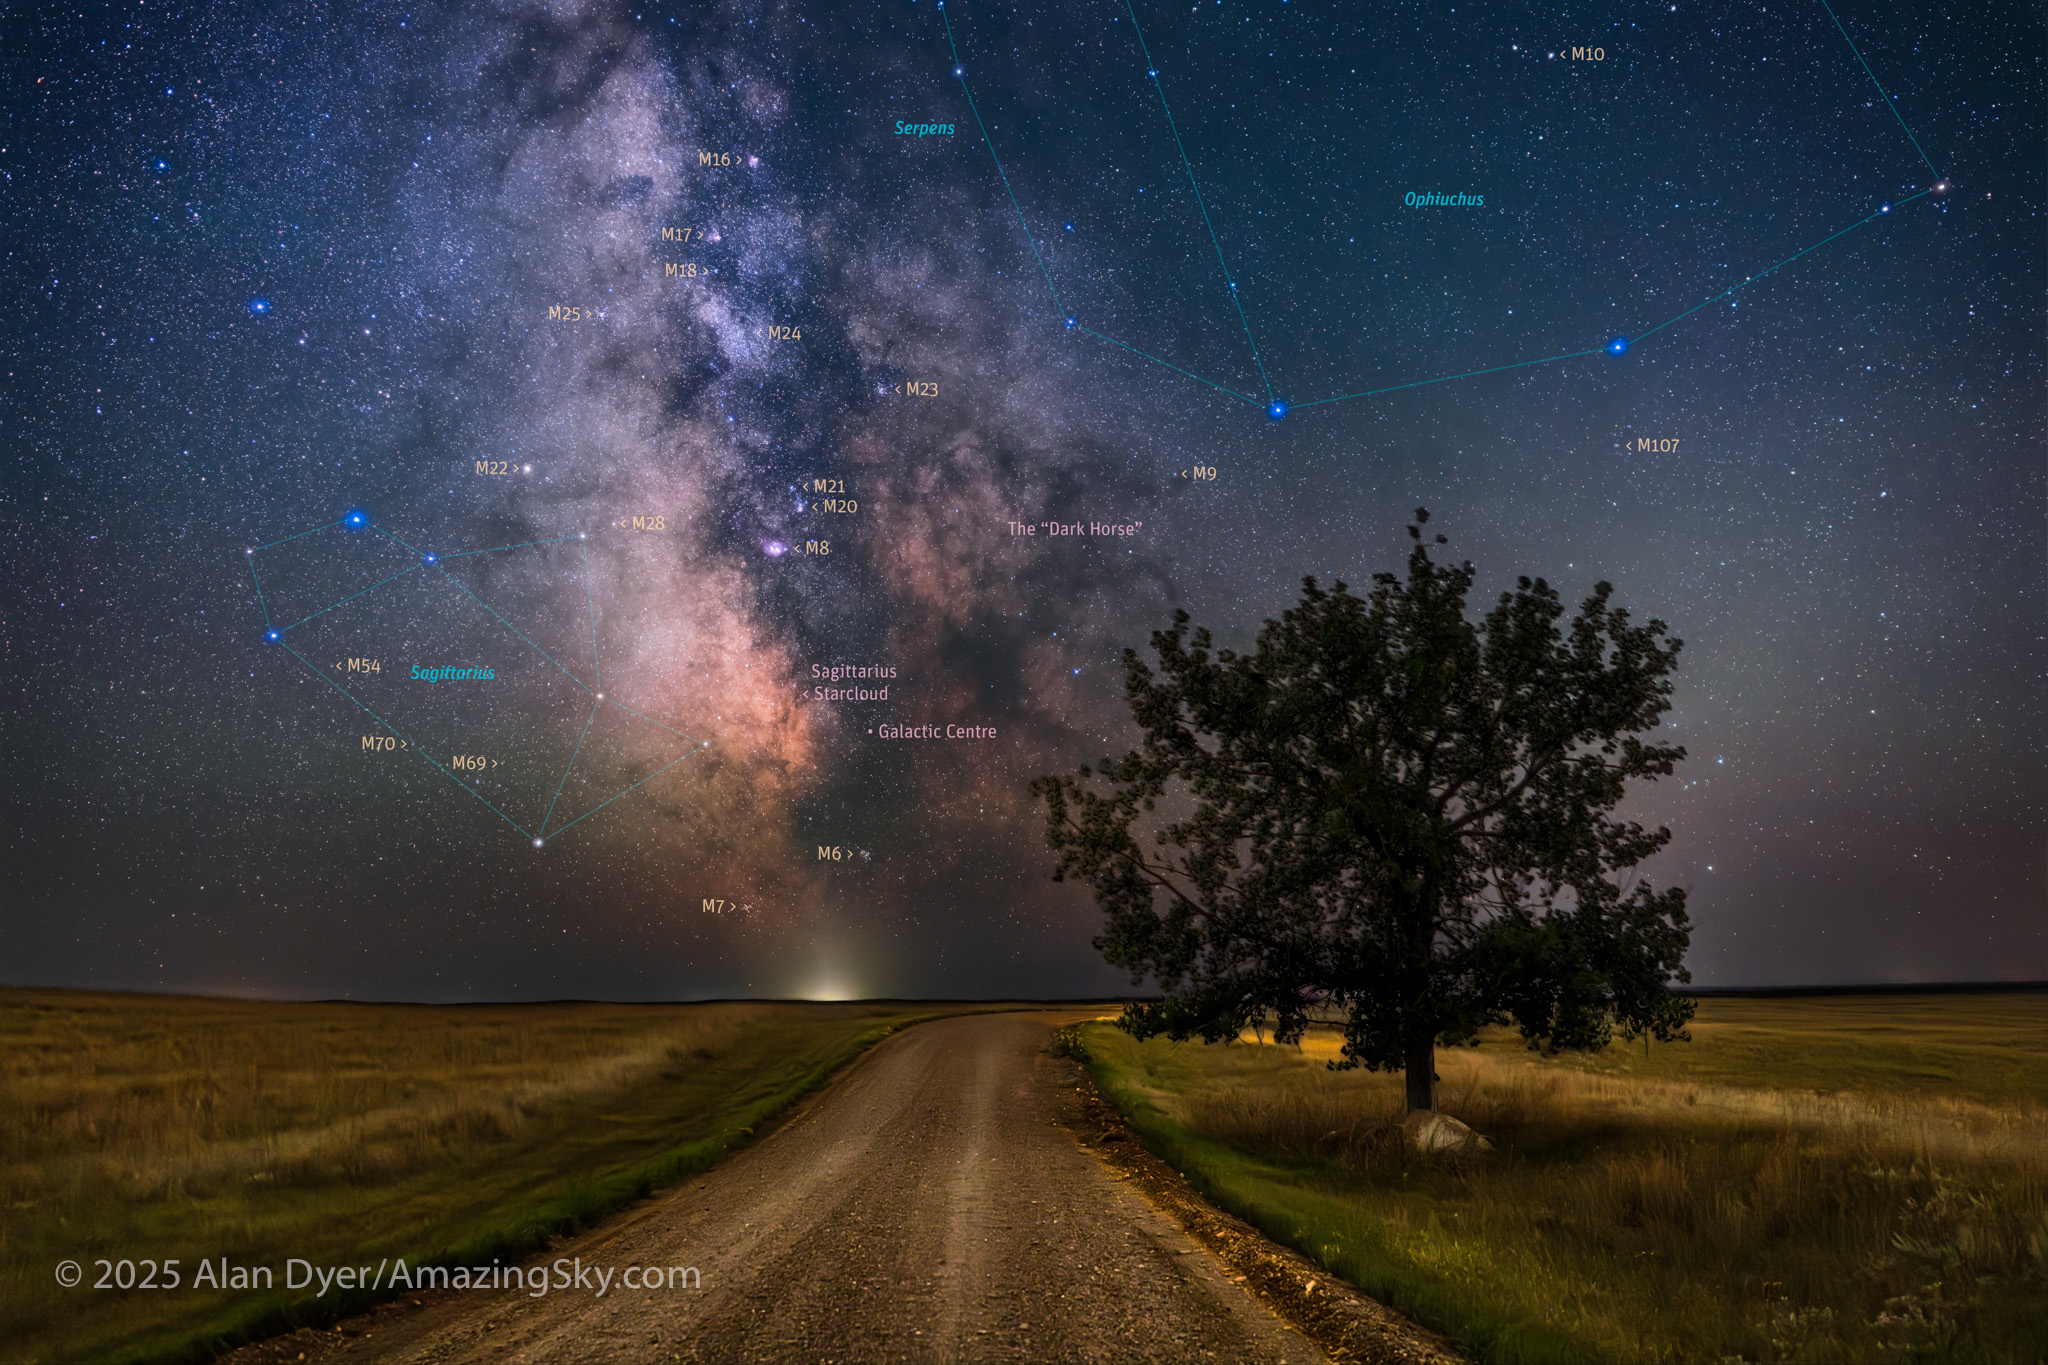
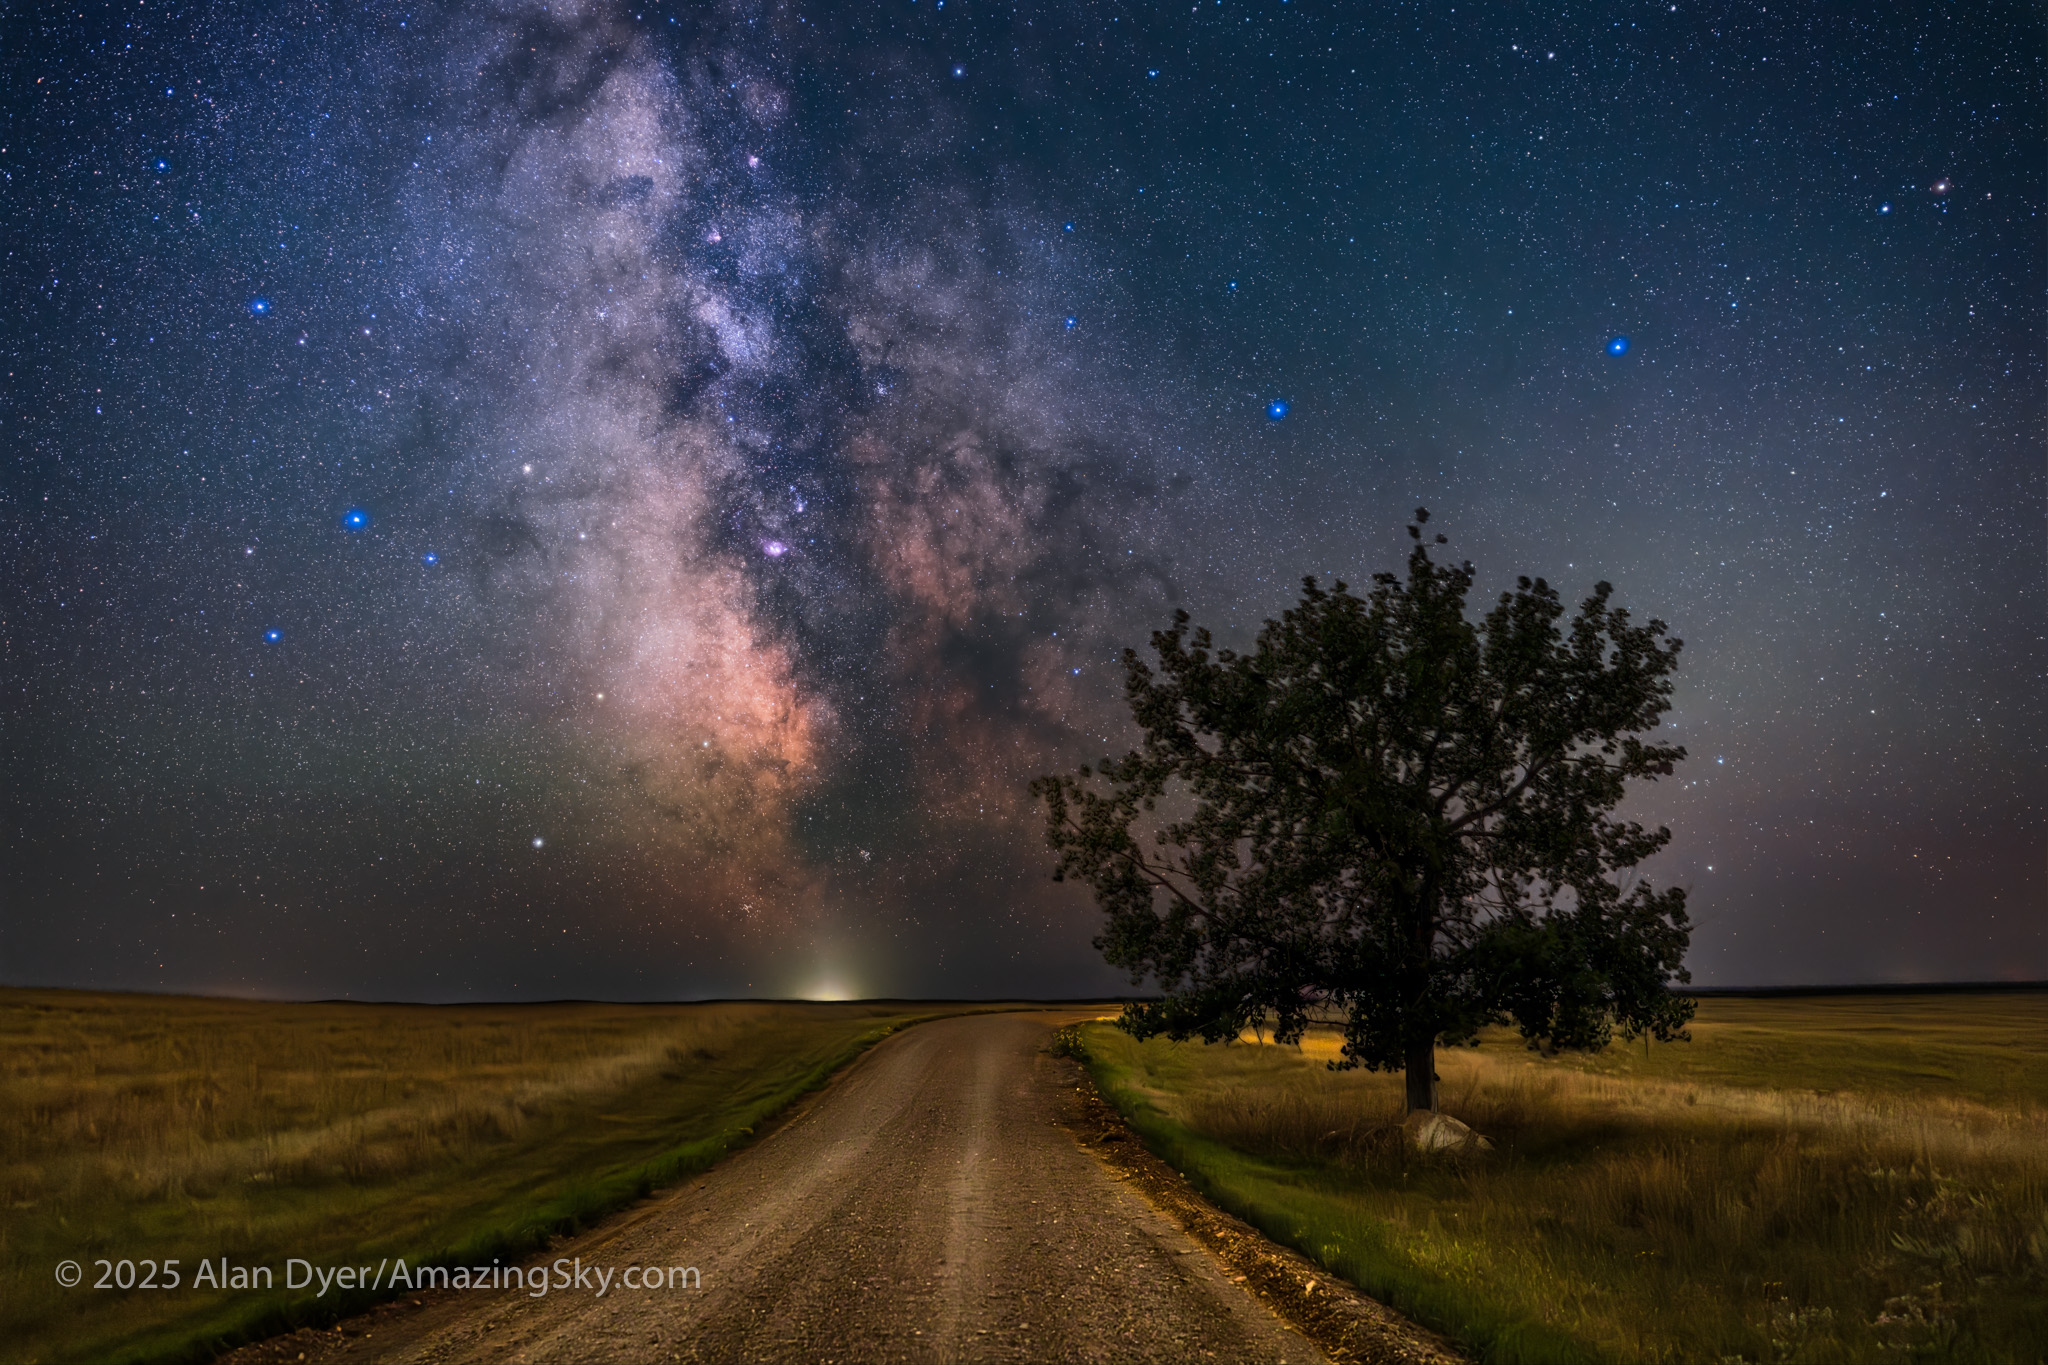
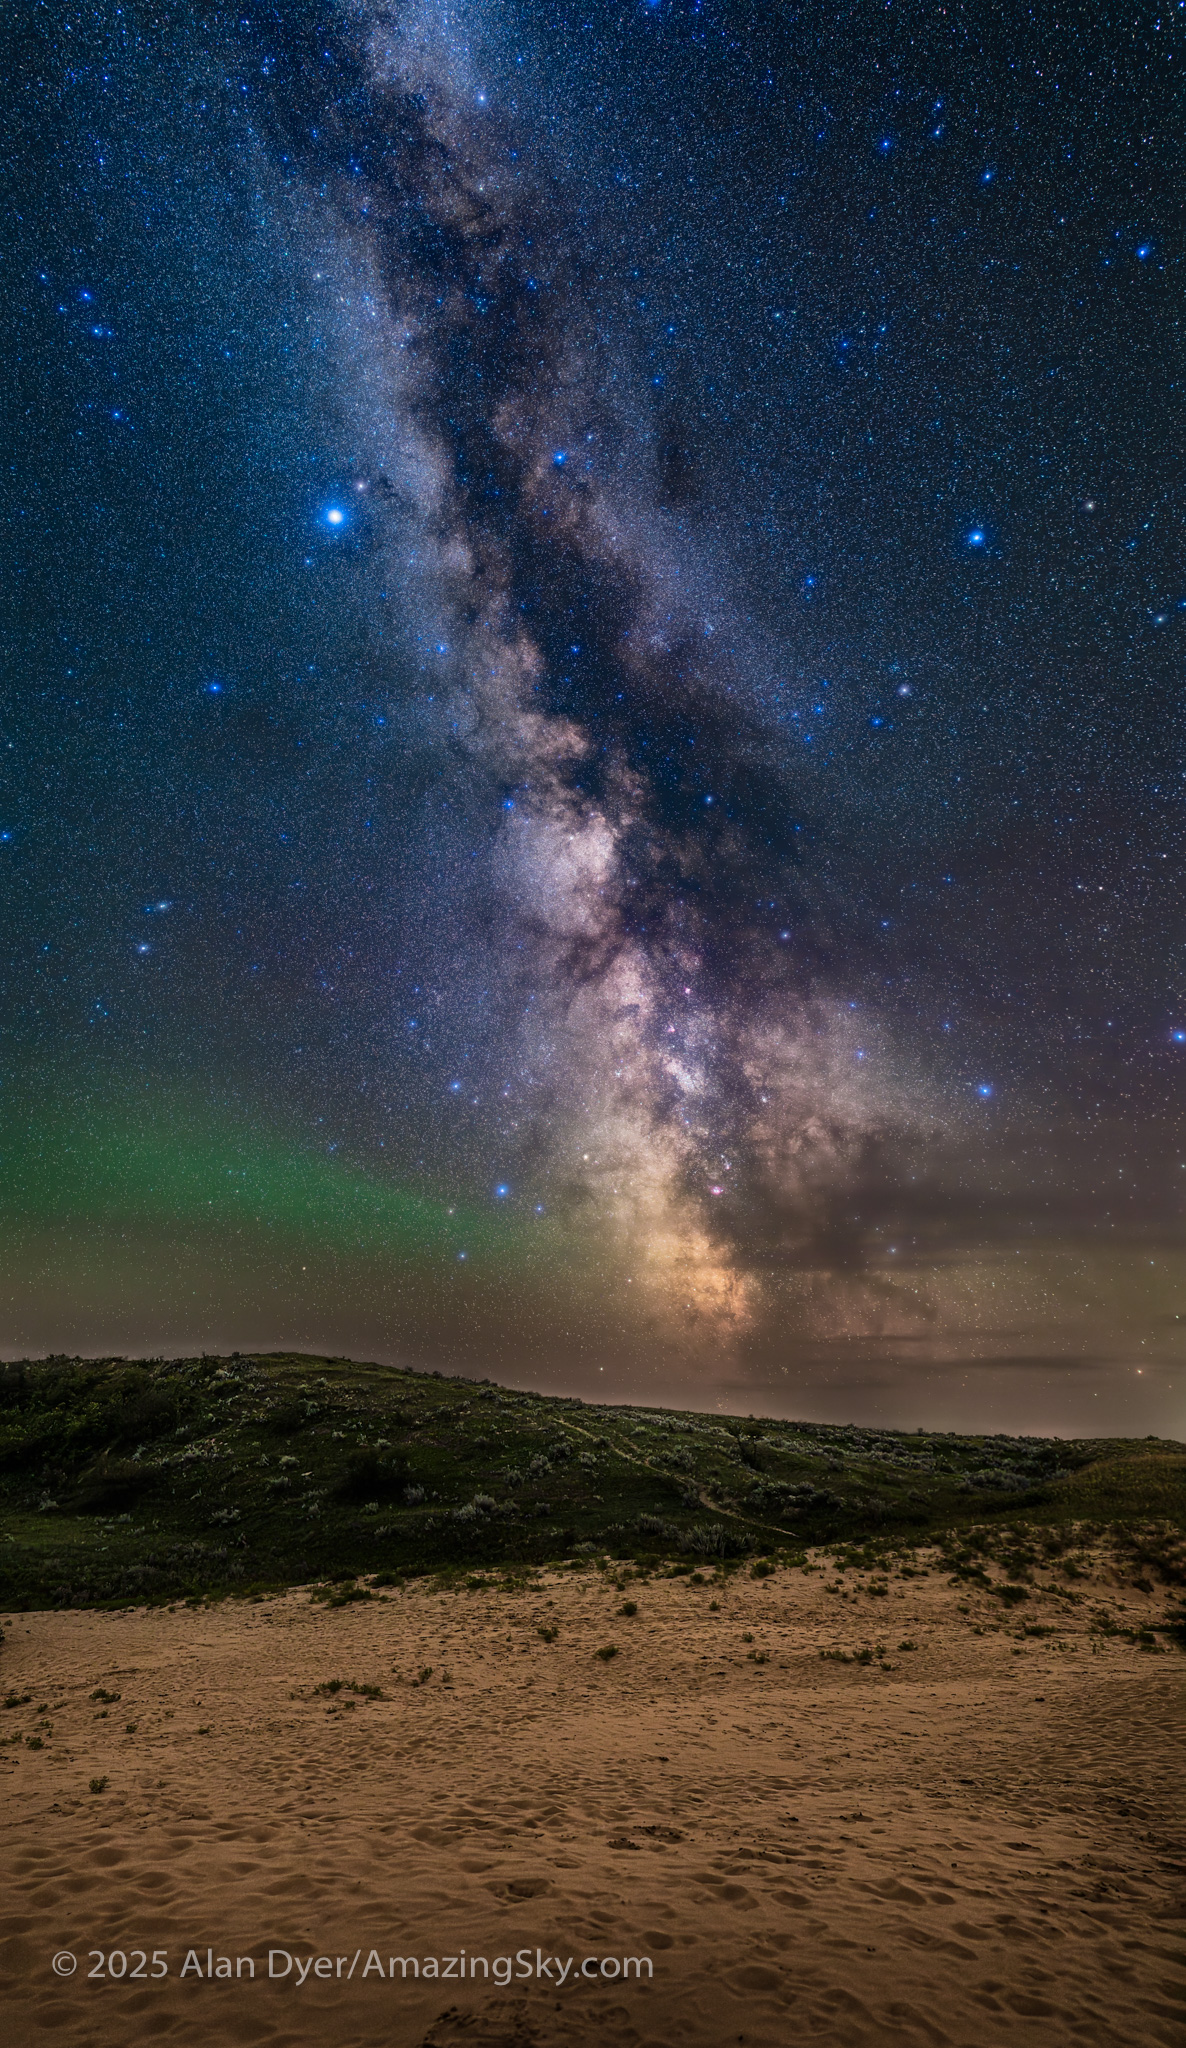
The night before I headed south out of the little town of Val Marie to a favourite spot high on the hill overlooking the Park. It is called Two Trees, but now only one tree remains! It made a fine foreground for the classic “lone tree and Milky Way” nightscape.
In August the galactic centre lies in the southwest quickly setting in the early evening. But from this latitude of 49º N even with it at its highest, the Milky Way core lies low in the south, making for good compositions with foregrounds below.
Here I present a “landscape” version of the image above, in versions with and without labels to indicate all the rich nebulas and star clusters in this area of sky in Sagittarius the Archer, home of the Milky Way core. Tap on the images to bring them up full screen.
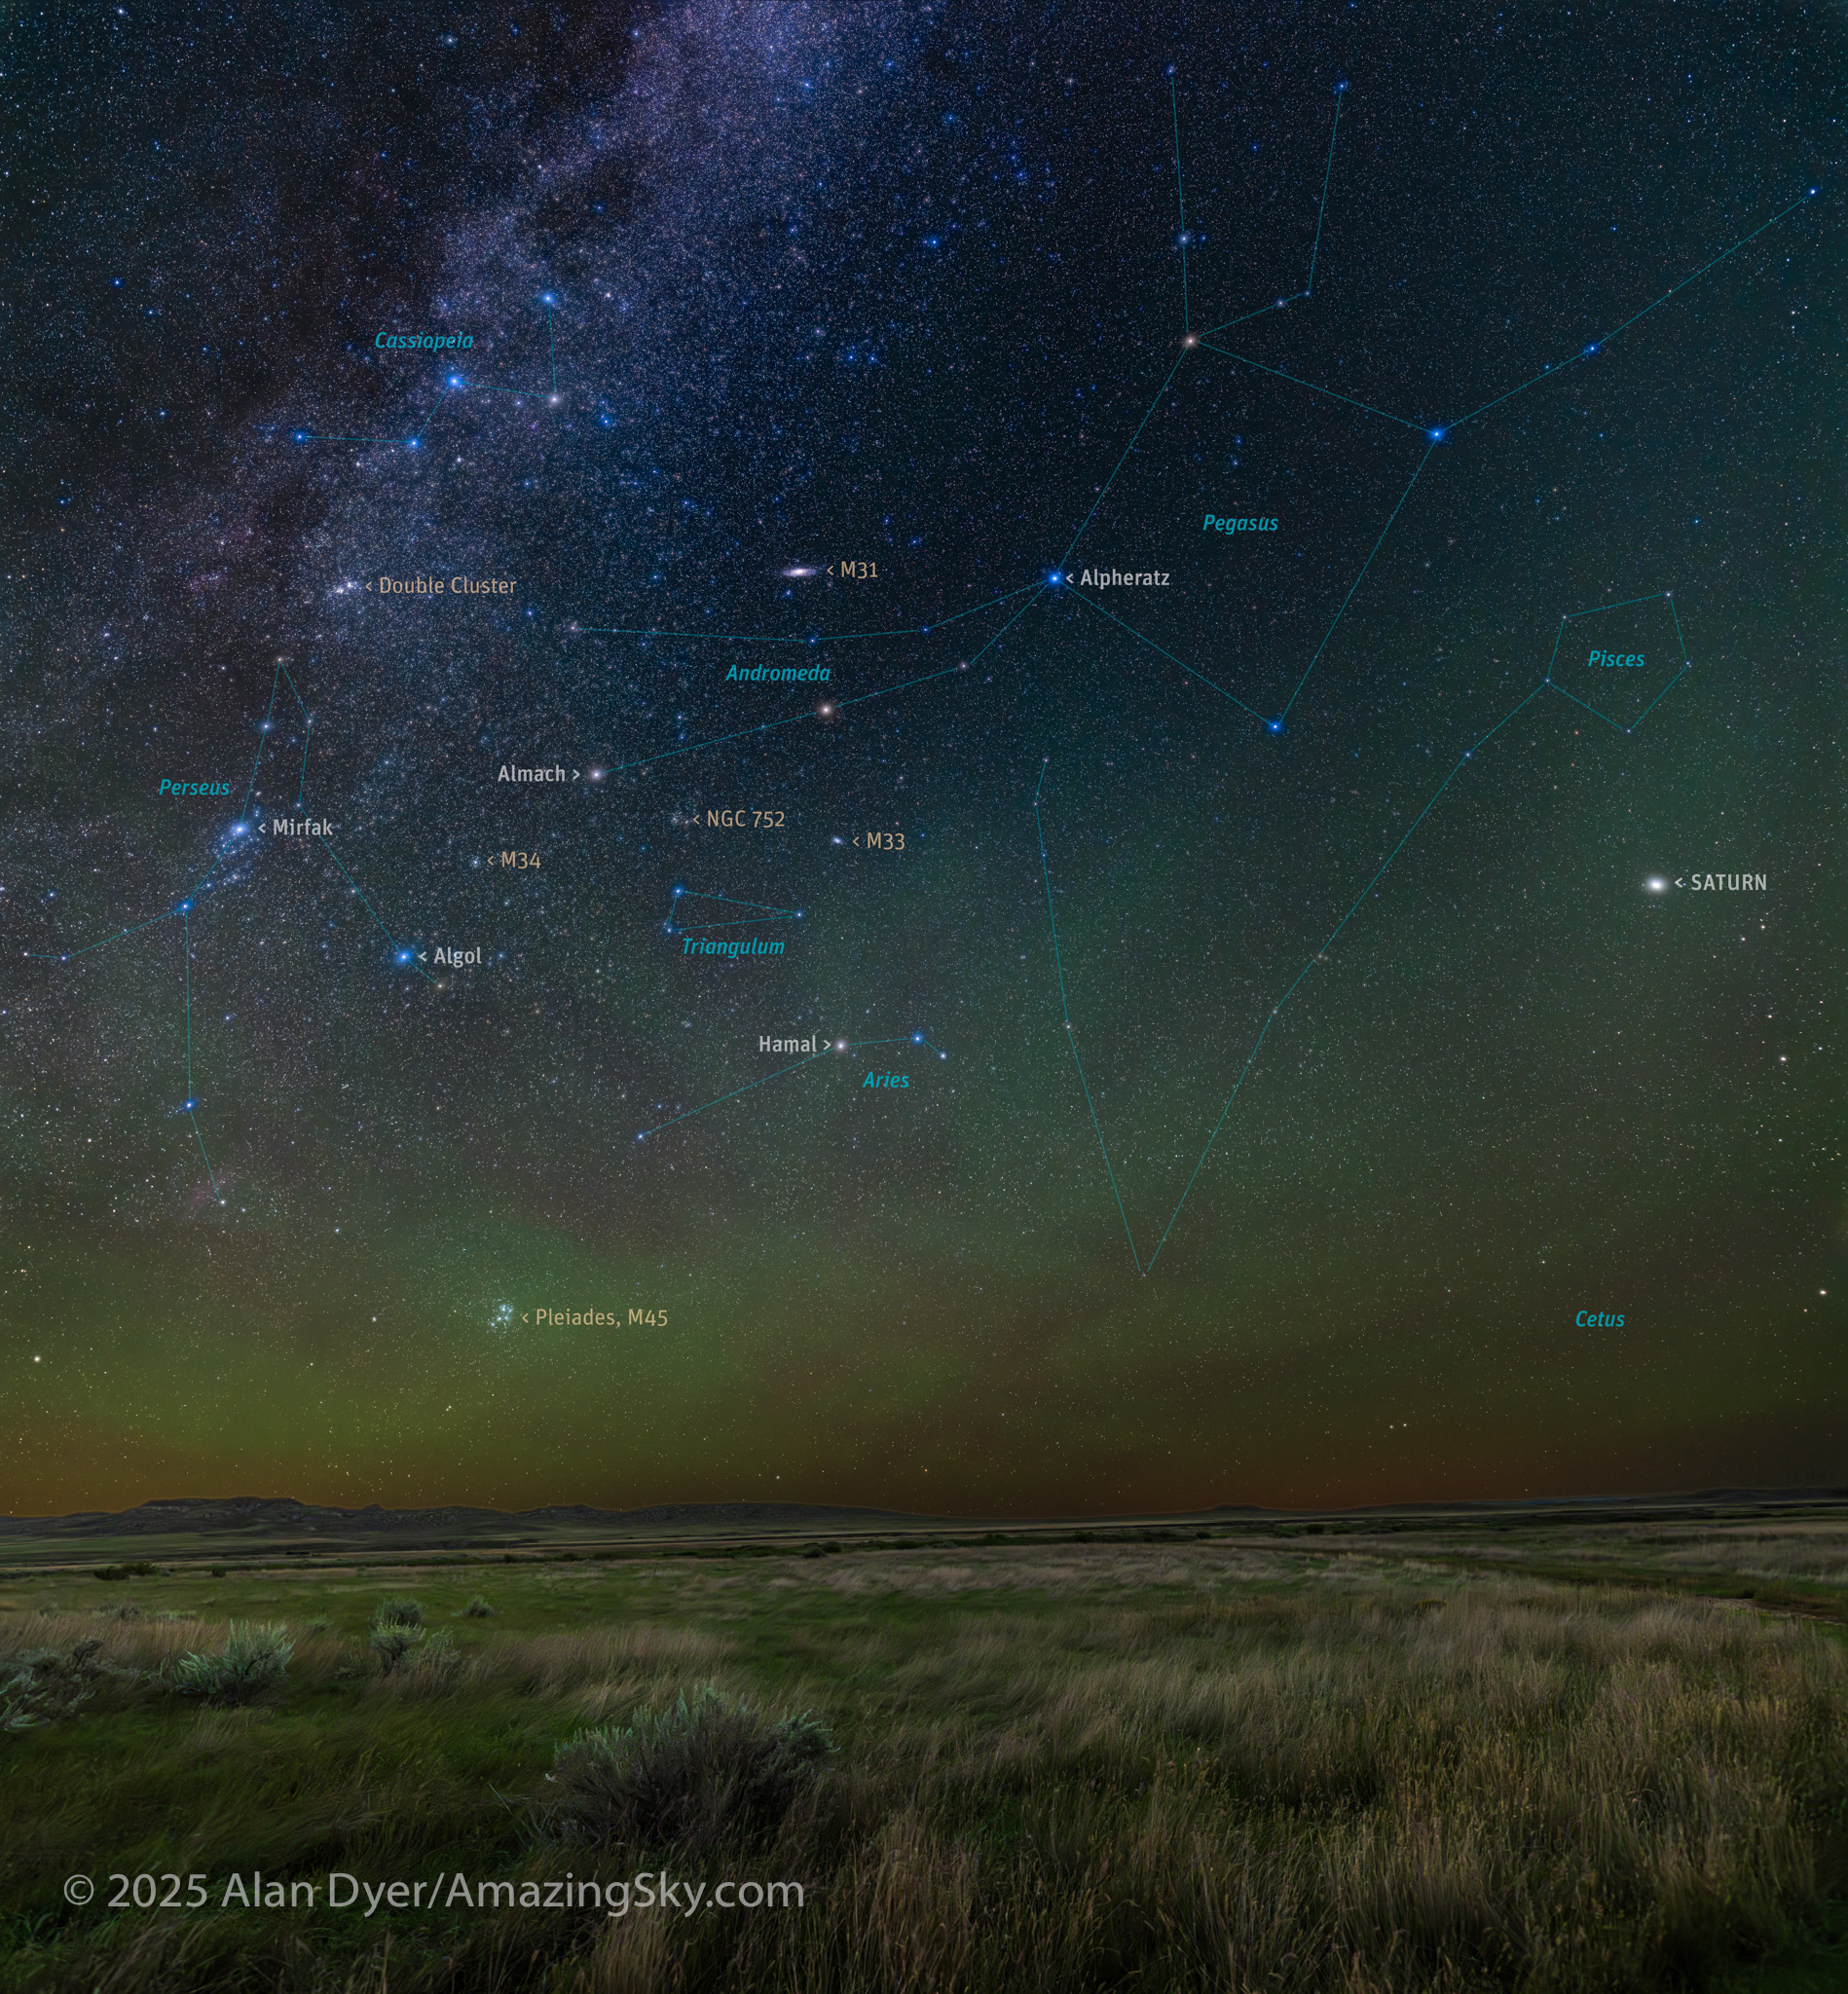
Similarly, below I present views looking east to the autumn constellations rising over the prairie. This was from the valley below Two Trees Hill, at the Riverwalk day use site. Here there were absolutely no lights visible, and hardly a sky glow on the horizon from towns and light pollution. This was paradise for a stargazing session.
The constellations in this area of sky are the ones made famous in the classic tale of the hero Perseus riding on Pegasus the Flying Horse to rescue the lovely Princess Andromeda from Cetus the Sea Monster, while vain Queen Cassiopeia looks on.
Here the sky was also tinted green, not with aurora but airglow, a natural effect caused by high-altitude oxygen fluorescing at night, giving off energy it has absorbed by day. It discolours the sky but it belongs there! It is visible only at dark sky sites.
The Great Sand Hills
From Grasslands I ventured north to the little town of Leader, Saskatchewan, one of the jumping off points to visit the Great Sand Hills nearby. You have to have a local map to find them, but the sand dunes are extensive, and an oddity on the prairie, another Ice Age relic.
They are not a Park but are an ecological reserve, with limited access. I shot from the main spot with parking for visitors and a trail off into the dunes.
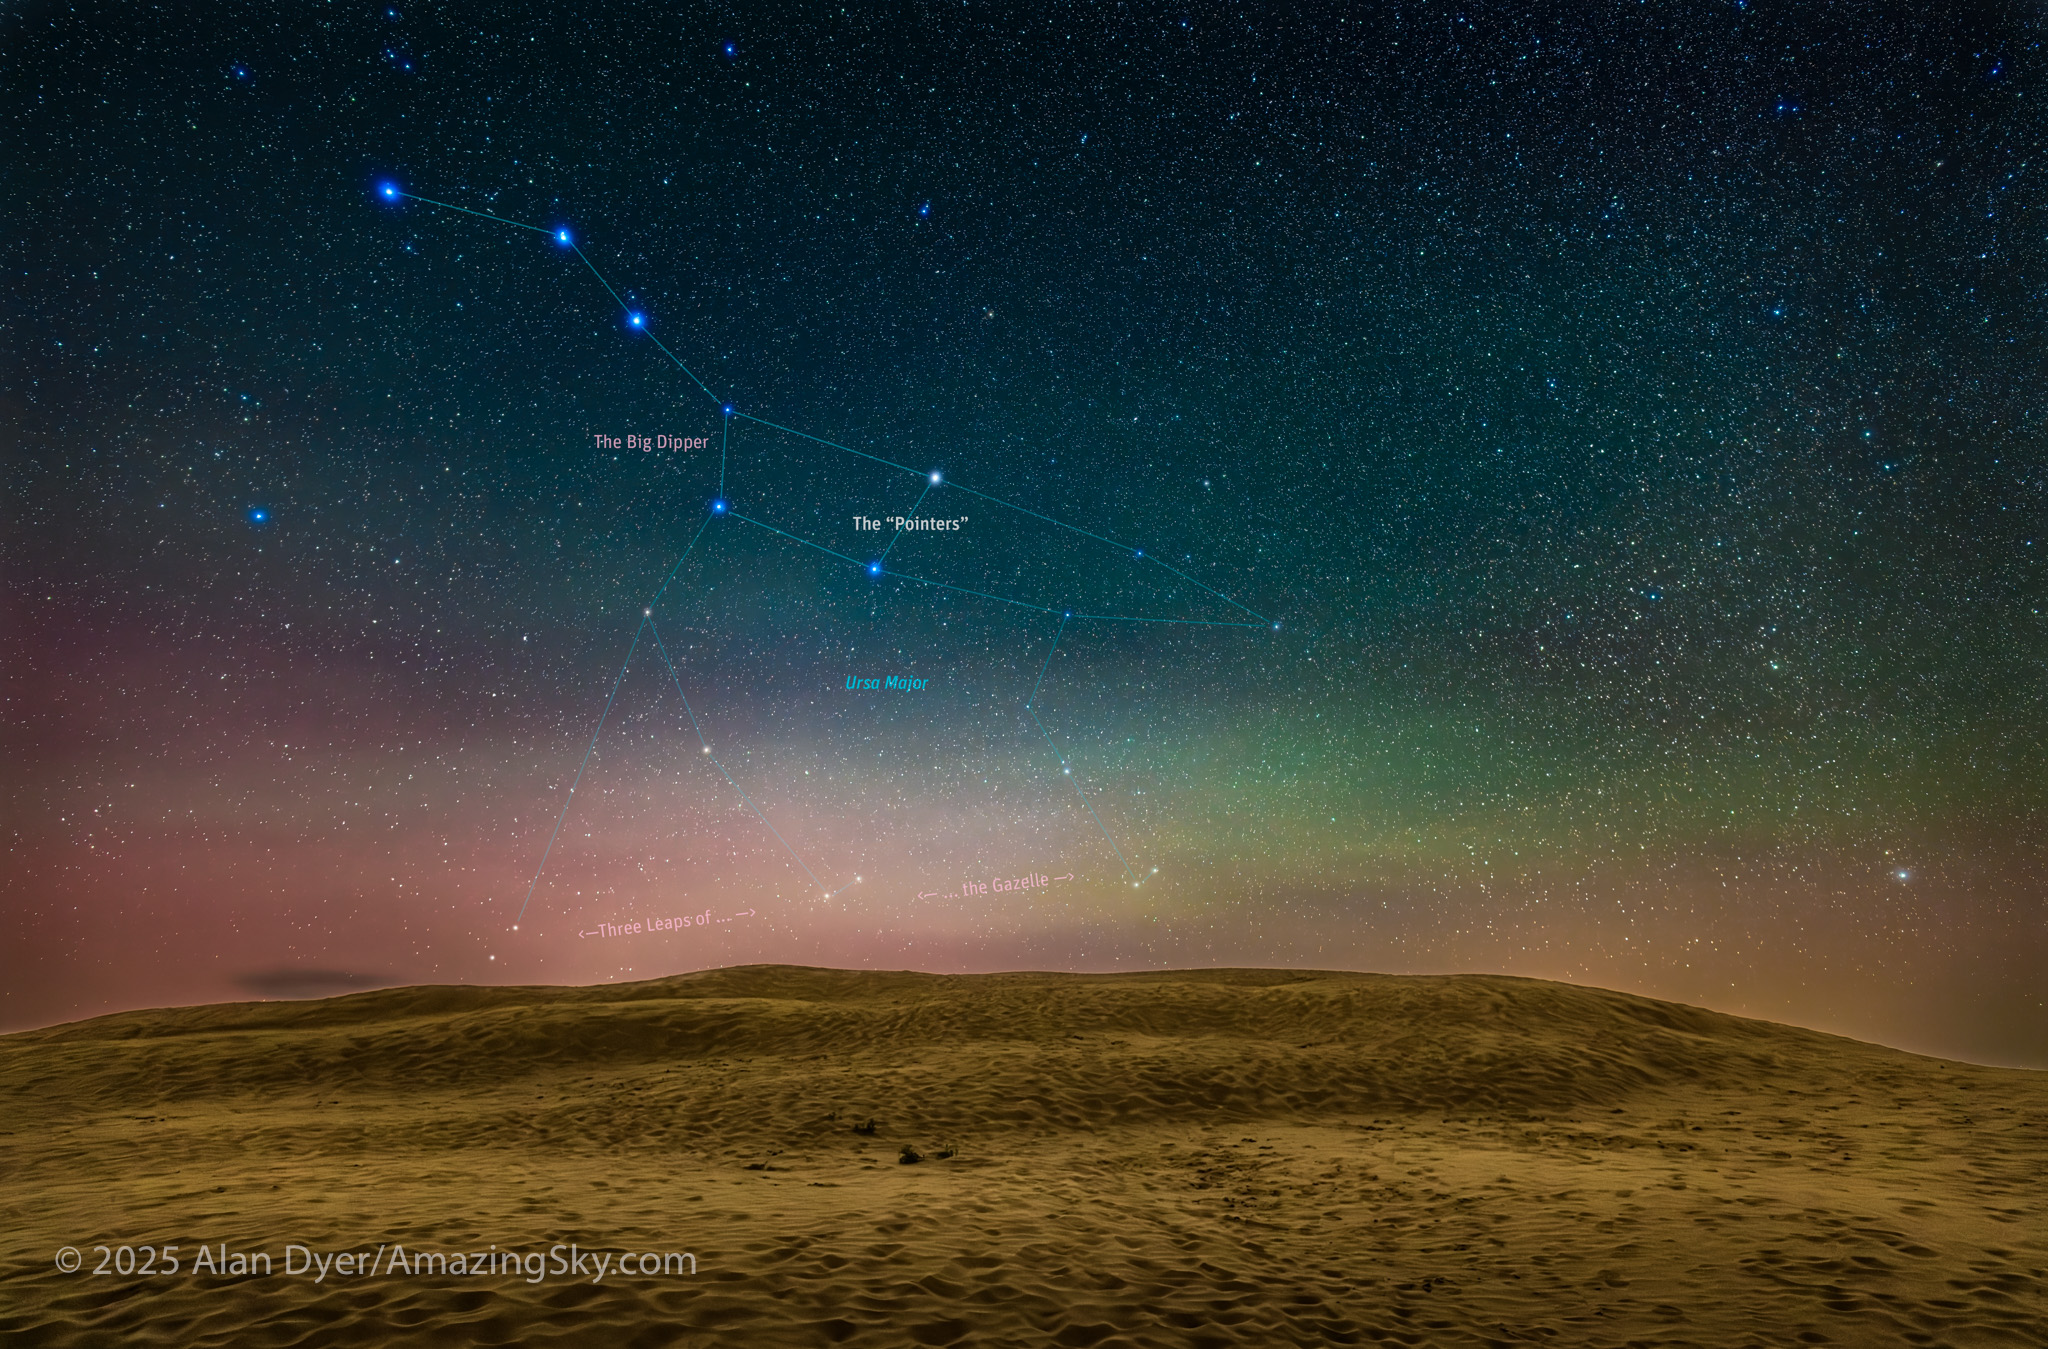
Here is another pair of images with annotations, looking north from the main dune field toward Ursa Major and the Big Dipper.
An extensive display of airglow also tints the sky, at least I think that’s the source, and not aurora.
Technical: This is a blend of tracked and stacked sky exposures with a single untracked ground exposure: – A stack of 4 x 60 seconds at f/2 tracked for the sky, plus – 1 x 4 minutes at f/2.8 untracked for the ground, plus – A single 60-second tracked exposure through a Tiffen Double Fog 3 diffusion filter layered in, to add the star glows. – All with the Nikon Z8 at ISO 800 and Nikkor 20mm S lens, on the MSM Nomad tracker. And all from the same tripod position. However, the camera framing was changed for the sky and ground shots, tilting it up it to include more of the sky up the northern Milky Way.
Turning around to face south again frames the sweep of the summer Milky Way over the well-trodden dunes. Not quite the Saharan or Namibian scene you might want, but this is Saskatchewan and having even this scene on the prairies is unique. The only other dune fields are far up north and not readily accessible.
Technical: This is a blend of tracked and stacked sky exposures with a single untracked ground exposure: – A stack of 4 x 60 seconds at f/2 tracked for the sky, plus – 1 x 3 minutes at f/2.8 untracked for the ground to bring out the details lit only by starlight, plus – A single 60-second tracked exposure through a Tiffen Double Fog 3 diffusion filter layered in, to add the star glows. – All with the Nikon Z8 at ISO 800 and Nikkor 20mm S lens, on the MSM Nomad tracker. And all from the same tripod position. However, the camera framing was changed for the sky and ground shots, tilting it up it to include all the constellations in one frame but with just a sliver of ground in the frame.
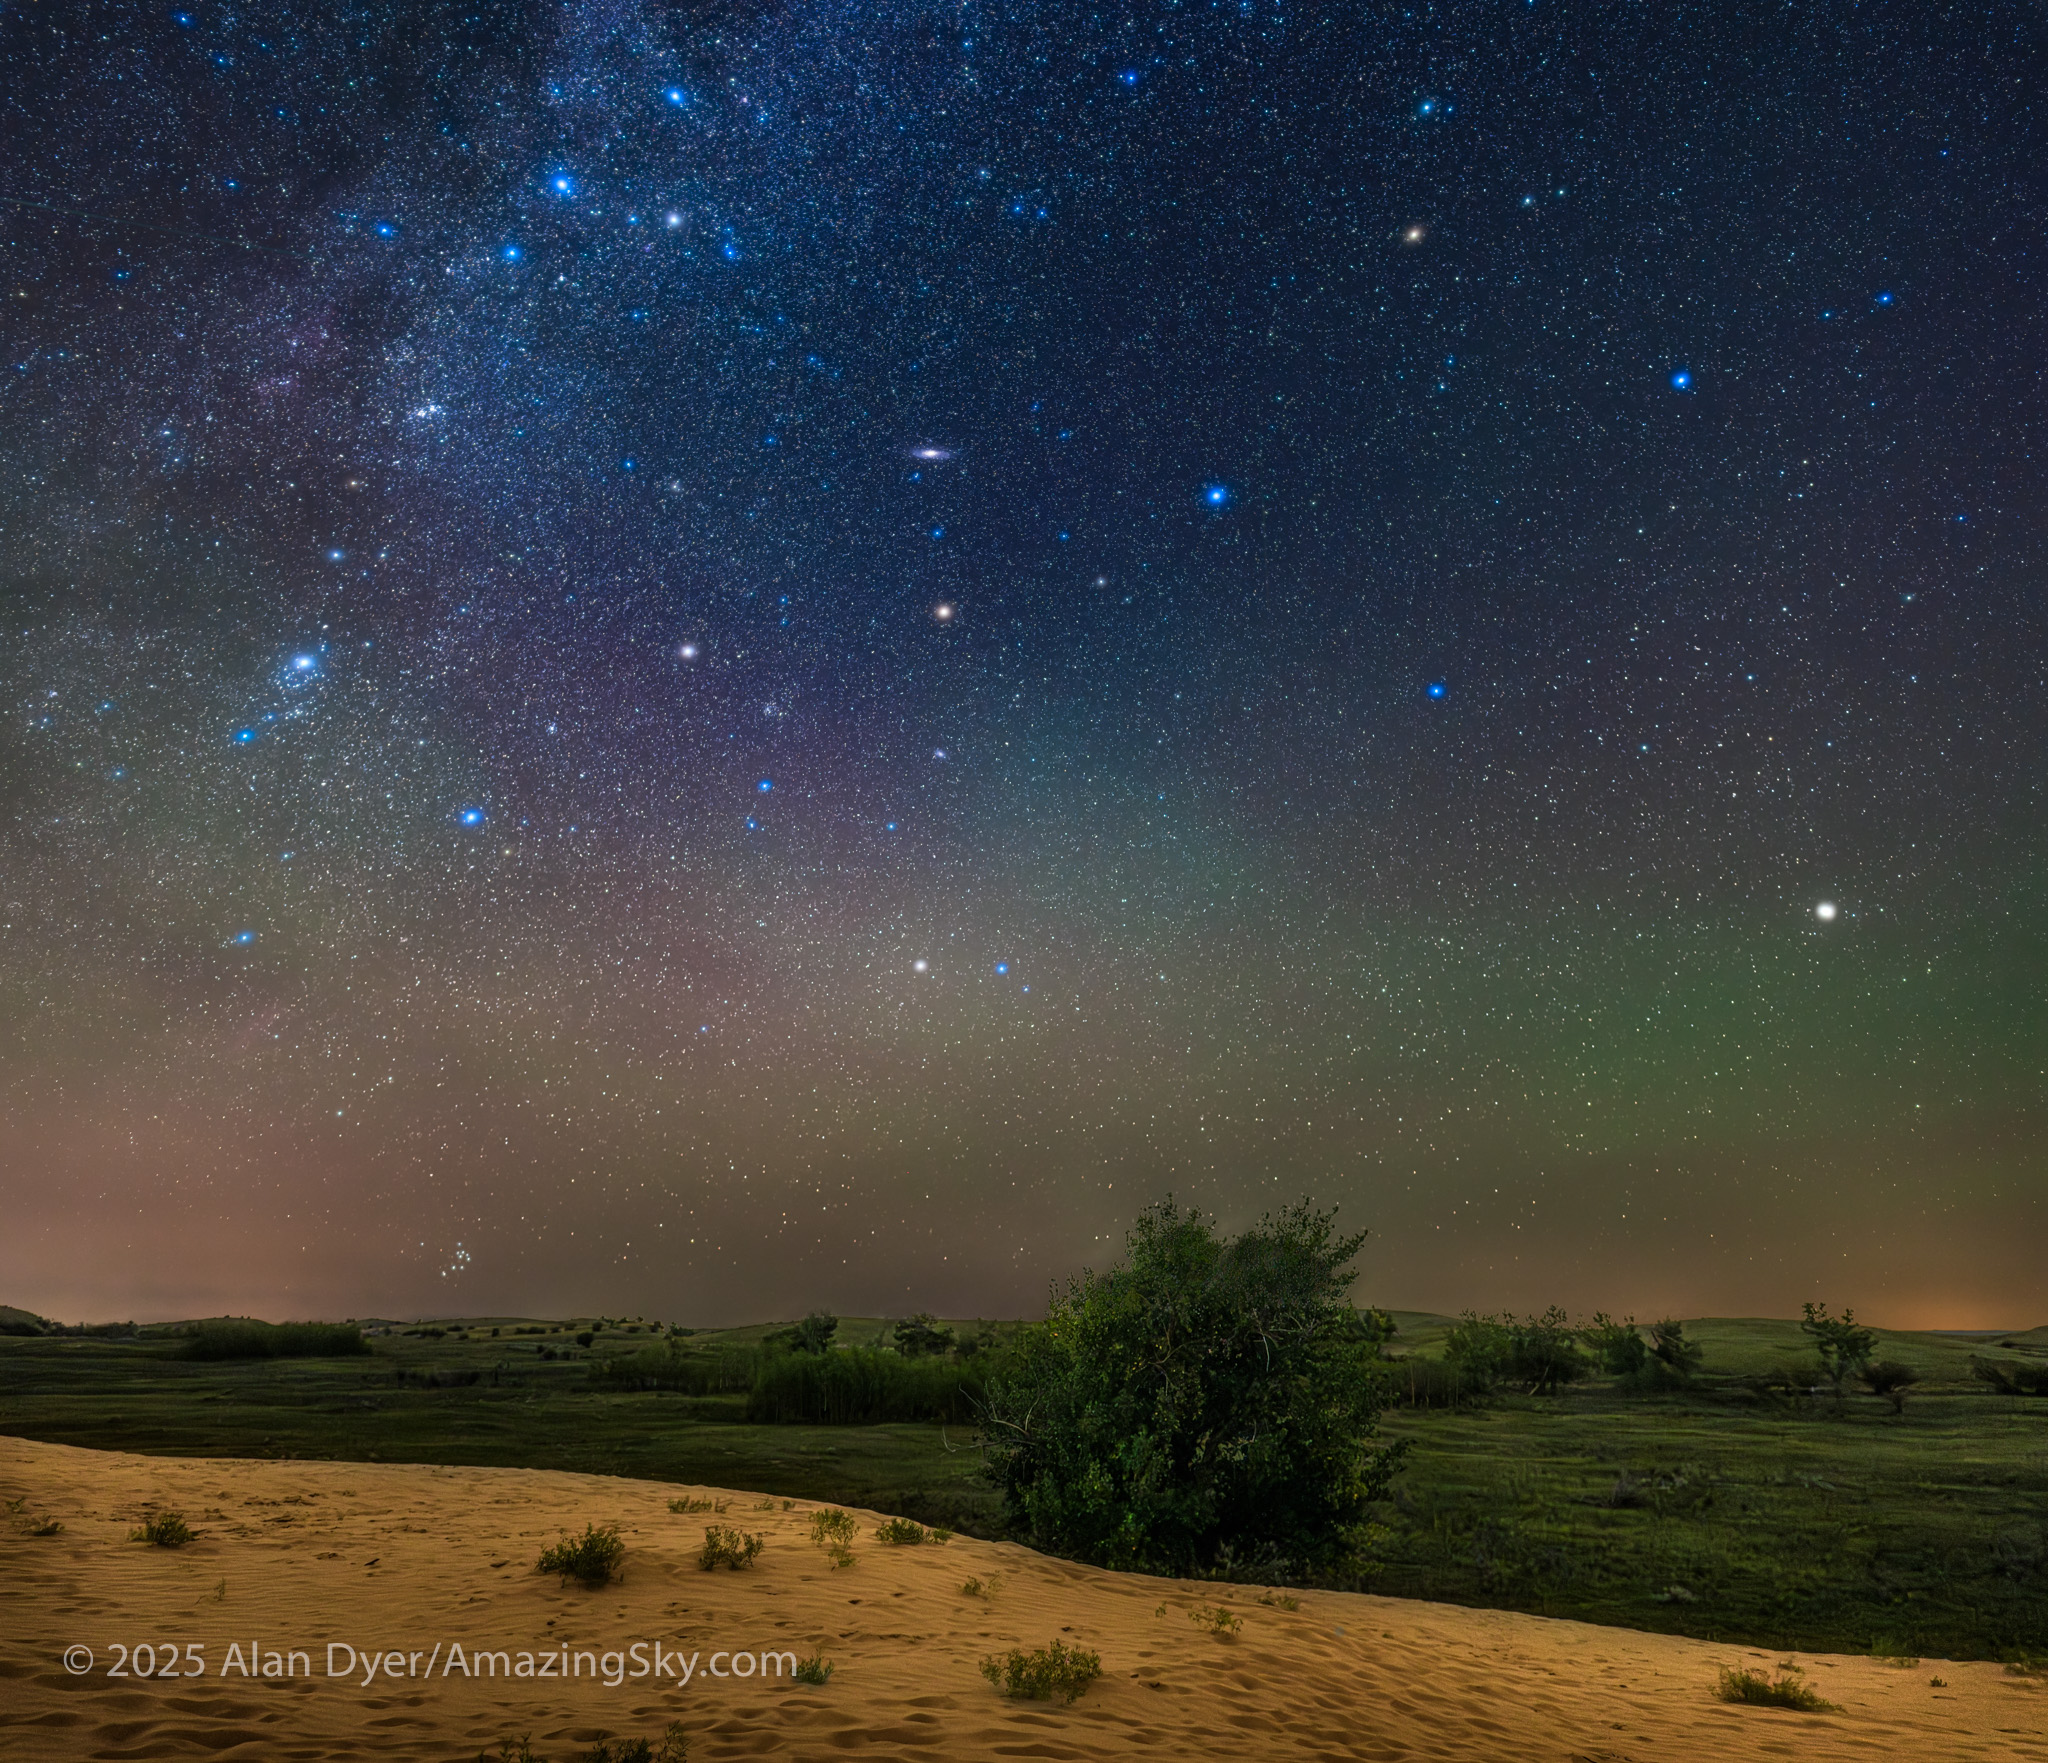
Looking east from the dune again frames the mythological autumn constellations, with the “W” of Cassiopeia at top amid the Milky Way. The bright “star” at lower right is Saturn. The Pleiades are just rising at left.
The Cypress Hills
I had started my Saskatchewan journey in the Cypress Hills, another formation created by the Ice Age, or rather left untouched by the glaciers creating a high wooded oasis on the prairie. I was there for the annual Saskatchewan Summer Star Party, the subject of my previous blog here.
Technical: This is a blend of: – A stack of 4 x 1 minute exposures, tracked, for the sky with … – A stack of 2 x 1-minute exposures, untracked, for the ground, – All with the Canon RF 28-70mm lens at f/2 and set to 48mm, on the astro-modified Canon EOS R at ISO 1600, and on the MSM Nomad tracker. No filters were employed here. Masking and blending all the images, with the trees in the foreground was a challenge! The camera was not moved — all images were from the same tripod position.
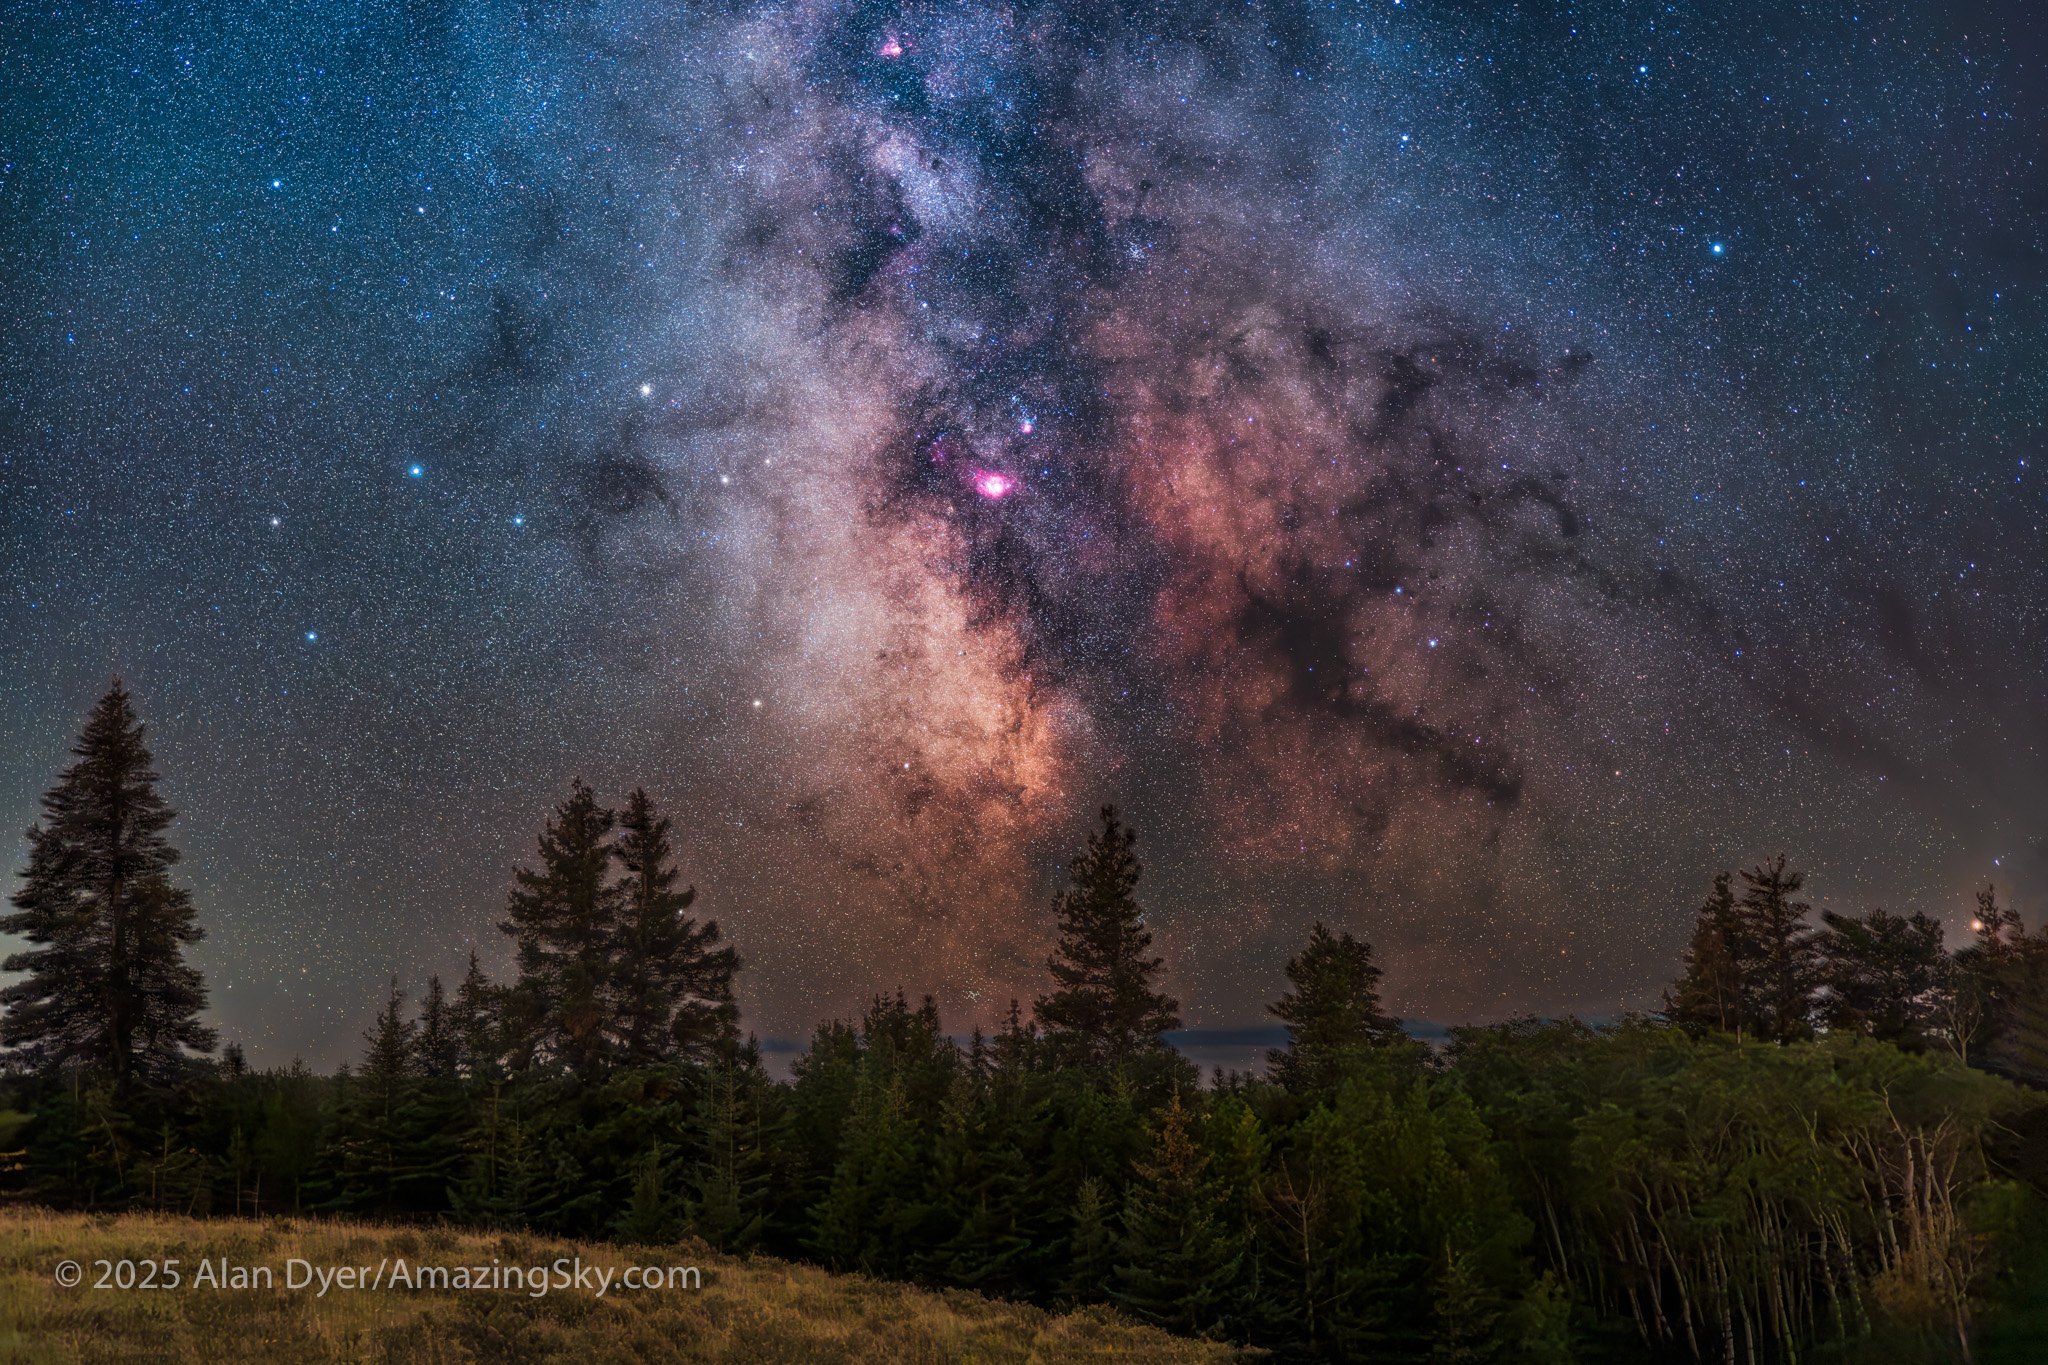
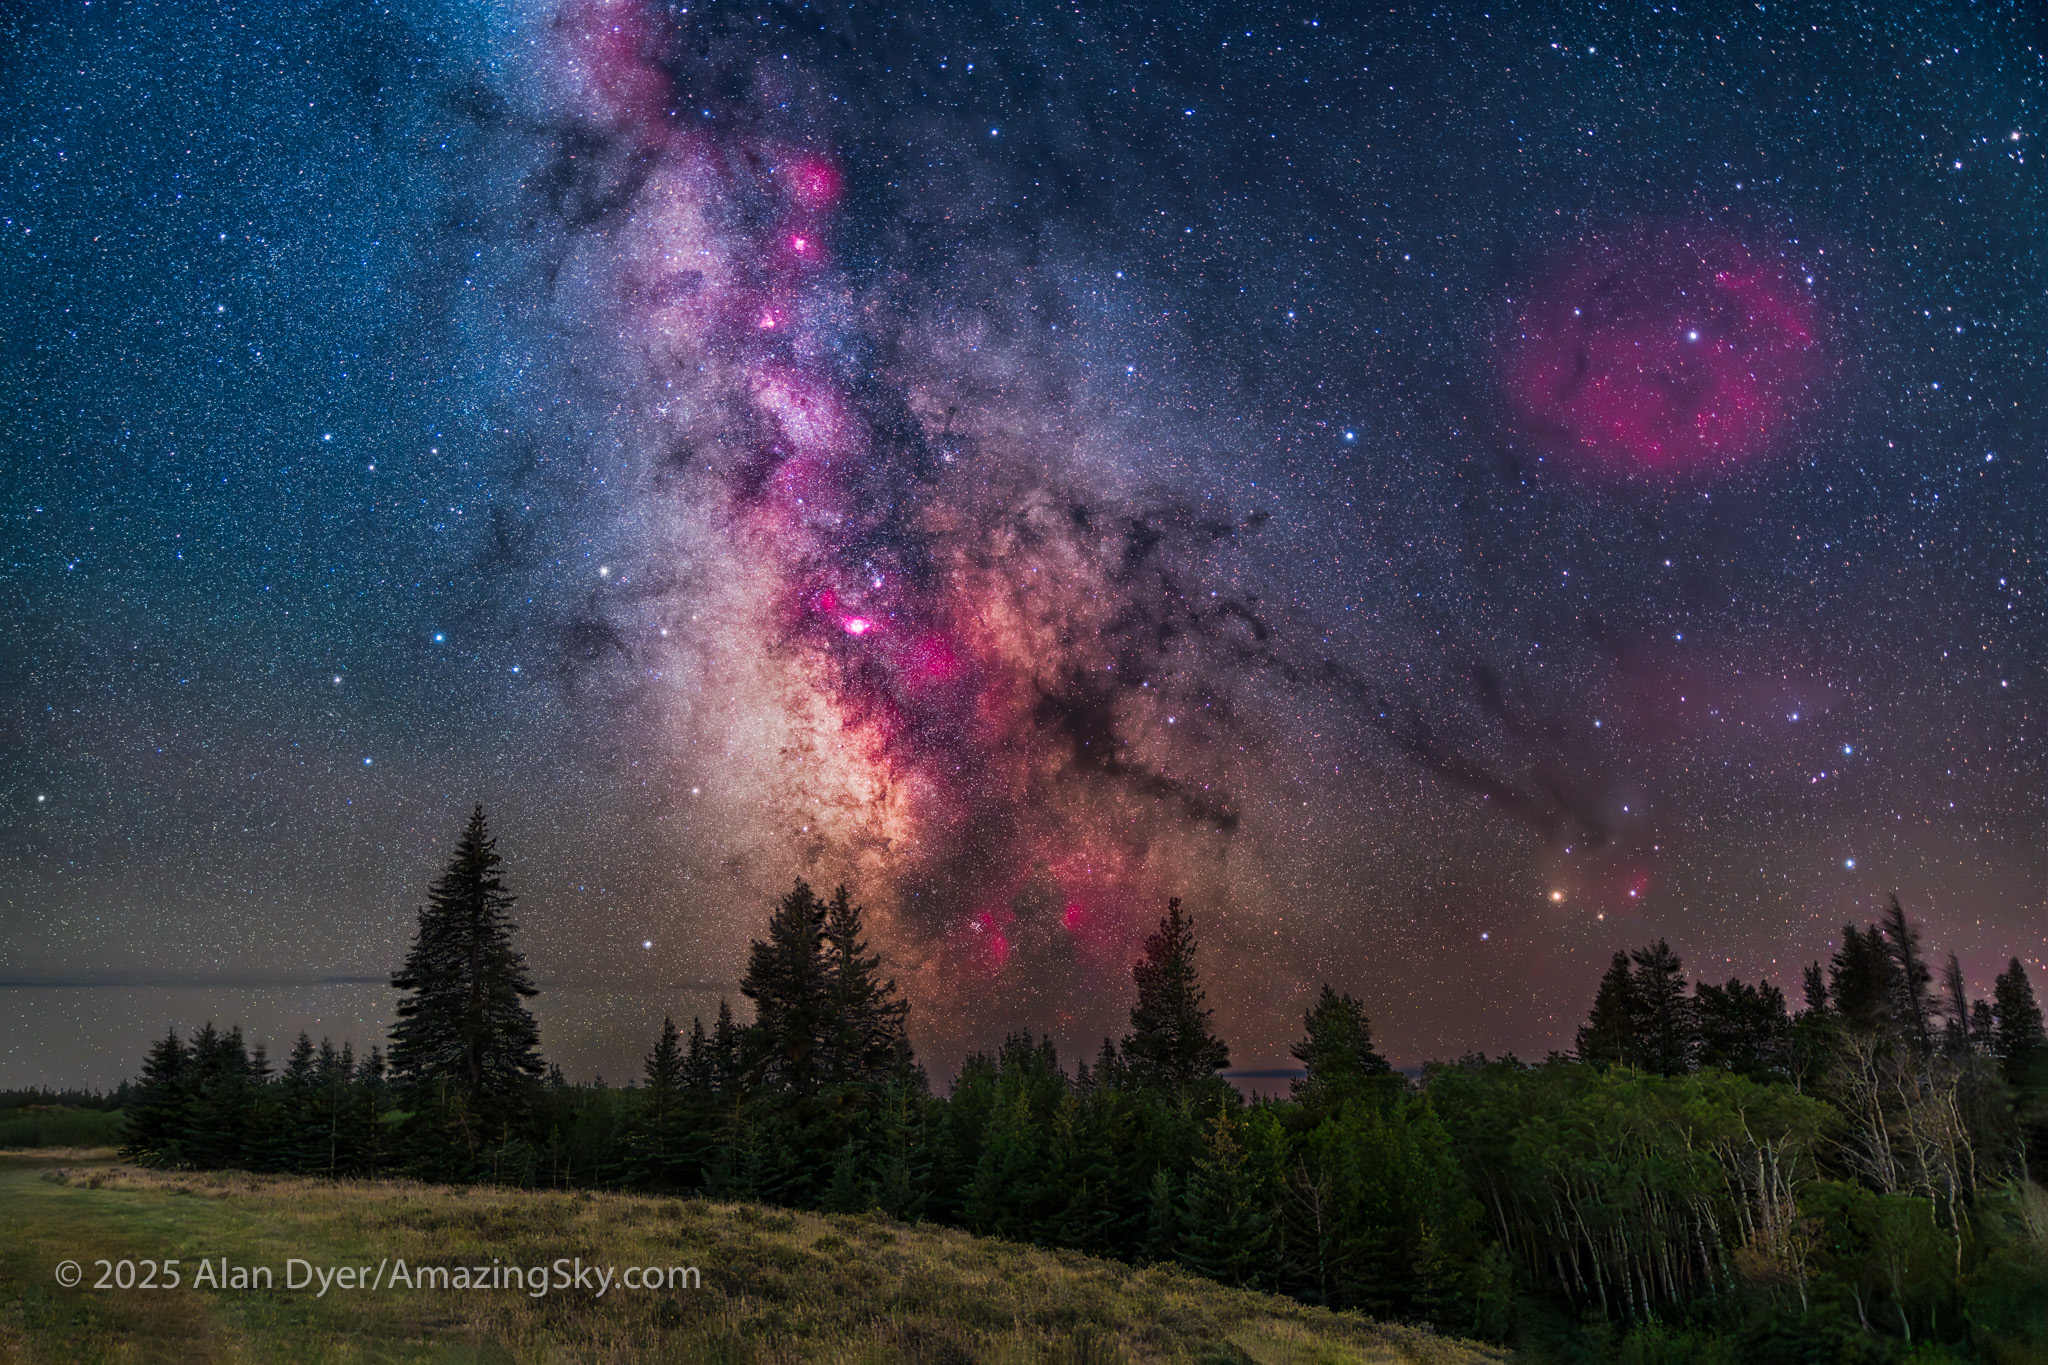
But on the first couple of nights, with the entire four nights of the Party promising to be clear, I left the Party and headed off on my own to shoot some nightscapes over the pine trees at Lookout Point, to again catch the photogenic galactic core in its last appearance for the season.
For the image below, I employed a special filter that isolates the deep red light emitted by the many hydrogen-gas nebulas toward the Milky Way core.
Technical: This is a blend of: – A single 2-minute exposure, untracked, for the ground, blended with … – A stack of 5 x 1 minute exposures, tracked, for the sky, plus … – An additional tracked 2-minute exposure layered in, taken at the end of the set through an Astronomik “narrowband” H-Alpha clip-in filter, to add the red nebulas. – All with the Canon RF 28-70mm lens at f/2 and set to 35mm, on the astro-modified Canon EOS R at ISO 1600 (3200 for the Ha shot), and on the MSM Nomad tracker. Masking and blending all the images, with the trees in the foreground was a challenge! The camera was not moved — all images were from the same tripod position.
This is a technique borrowed from “deep-sky” imaging but now popular among nightscape photographers to create an even more enhanced night sky than a normal unfiltered view.
But even without the filter the long exposures used for the sky record far more detail and colours than even dark-adapted eyes could see. The filter takes that even further.
But those nebulas are there, and they do glow red. Just like the airglow that unaided eyes usually cannot see, the long exposures reveal the unseen, in this case some of the wonderful content of our Galaxy.
And that’s the attraction of astrophotography, to reveal the otherwise elusive or invisible structure of the sky, and in this case juxtaposed over familiar earthly landscapes below.
I can highly recommend Southwest Saskatchewan for anyone interested in stargazing and astrophotography. It’s always been one of my favourite destinations.
I test a trio of wide-angle, auto-focus lenses for astrophotography, all for Nikon Z mount: the Nikkor 20mm f/1.8 S, the Viltrox 16mm f/1.8, and the Laowa 10mm f/2.8 Zero D.
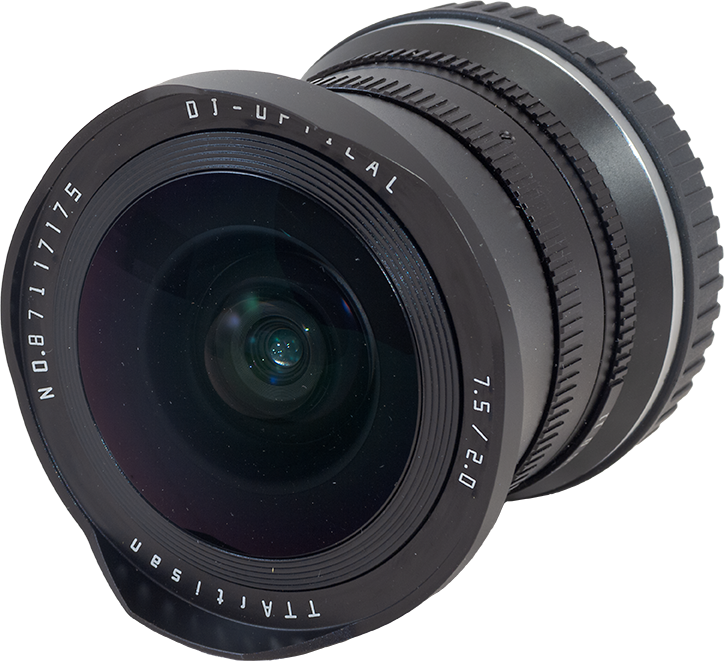
As a bonus, I also test a fourth lens: the TTArtisan manual-focus 7.5mm f/2 fish-eye.
NOTE: Images are large and may take a while to load.
While the selection of lenses for Nikon Z mirrorless cameras is not as diverse as it is for Sony E-mount, Nikon shooters have more brands of lenses to pick from than do users of Canon R mirrorless cameras. For nightscapes and Milky Way photography we want fast, wide-angle lenses, usually in the 14mm to 24mm range.
Canon, Nikon, and Sony all have excellent zoom lenses that cover the range. I use Canon’s RF 15-35mm L lens a lot, and reviewed it here on my blog from 2022.
But all these wide-angle zooms are f/2.8. While that’s a good speed for most astro work, having an even faster lens can be valuable. An aperture of f/2 or faster allows for:
— Shorter exposures for untrailed stars when shooting just on a tripod with no tracker.
— Capturing fainter and more numerous meteors during a shower.
— Rapid-cadence time-lapses of auroras, freezing the motions of curtains.
— Real-time movies of auroras and satellite passages at lower, less noisy ISO settings.
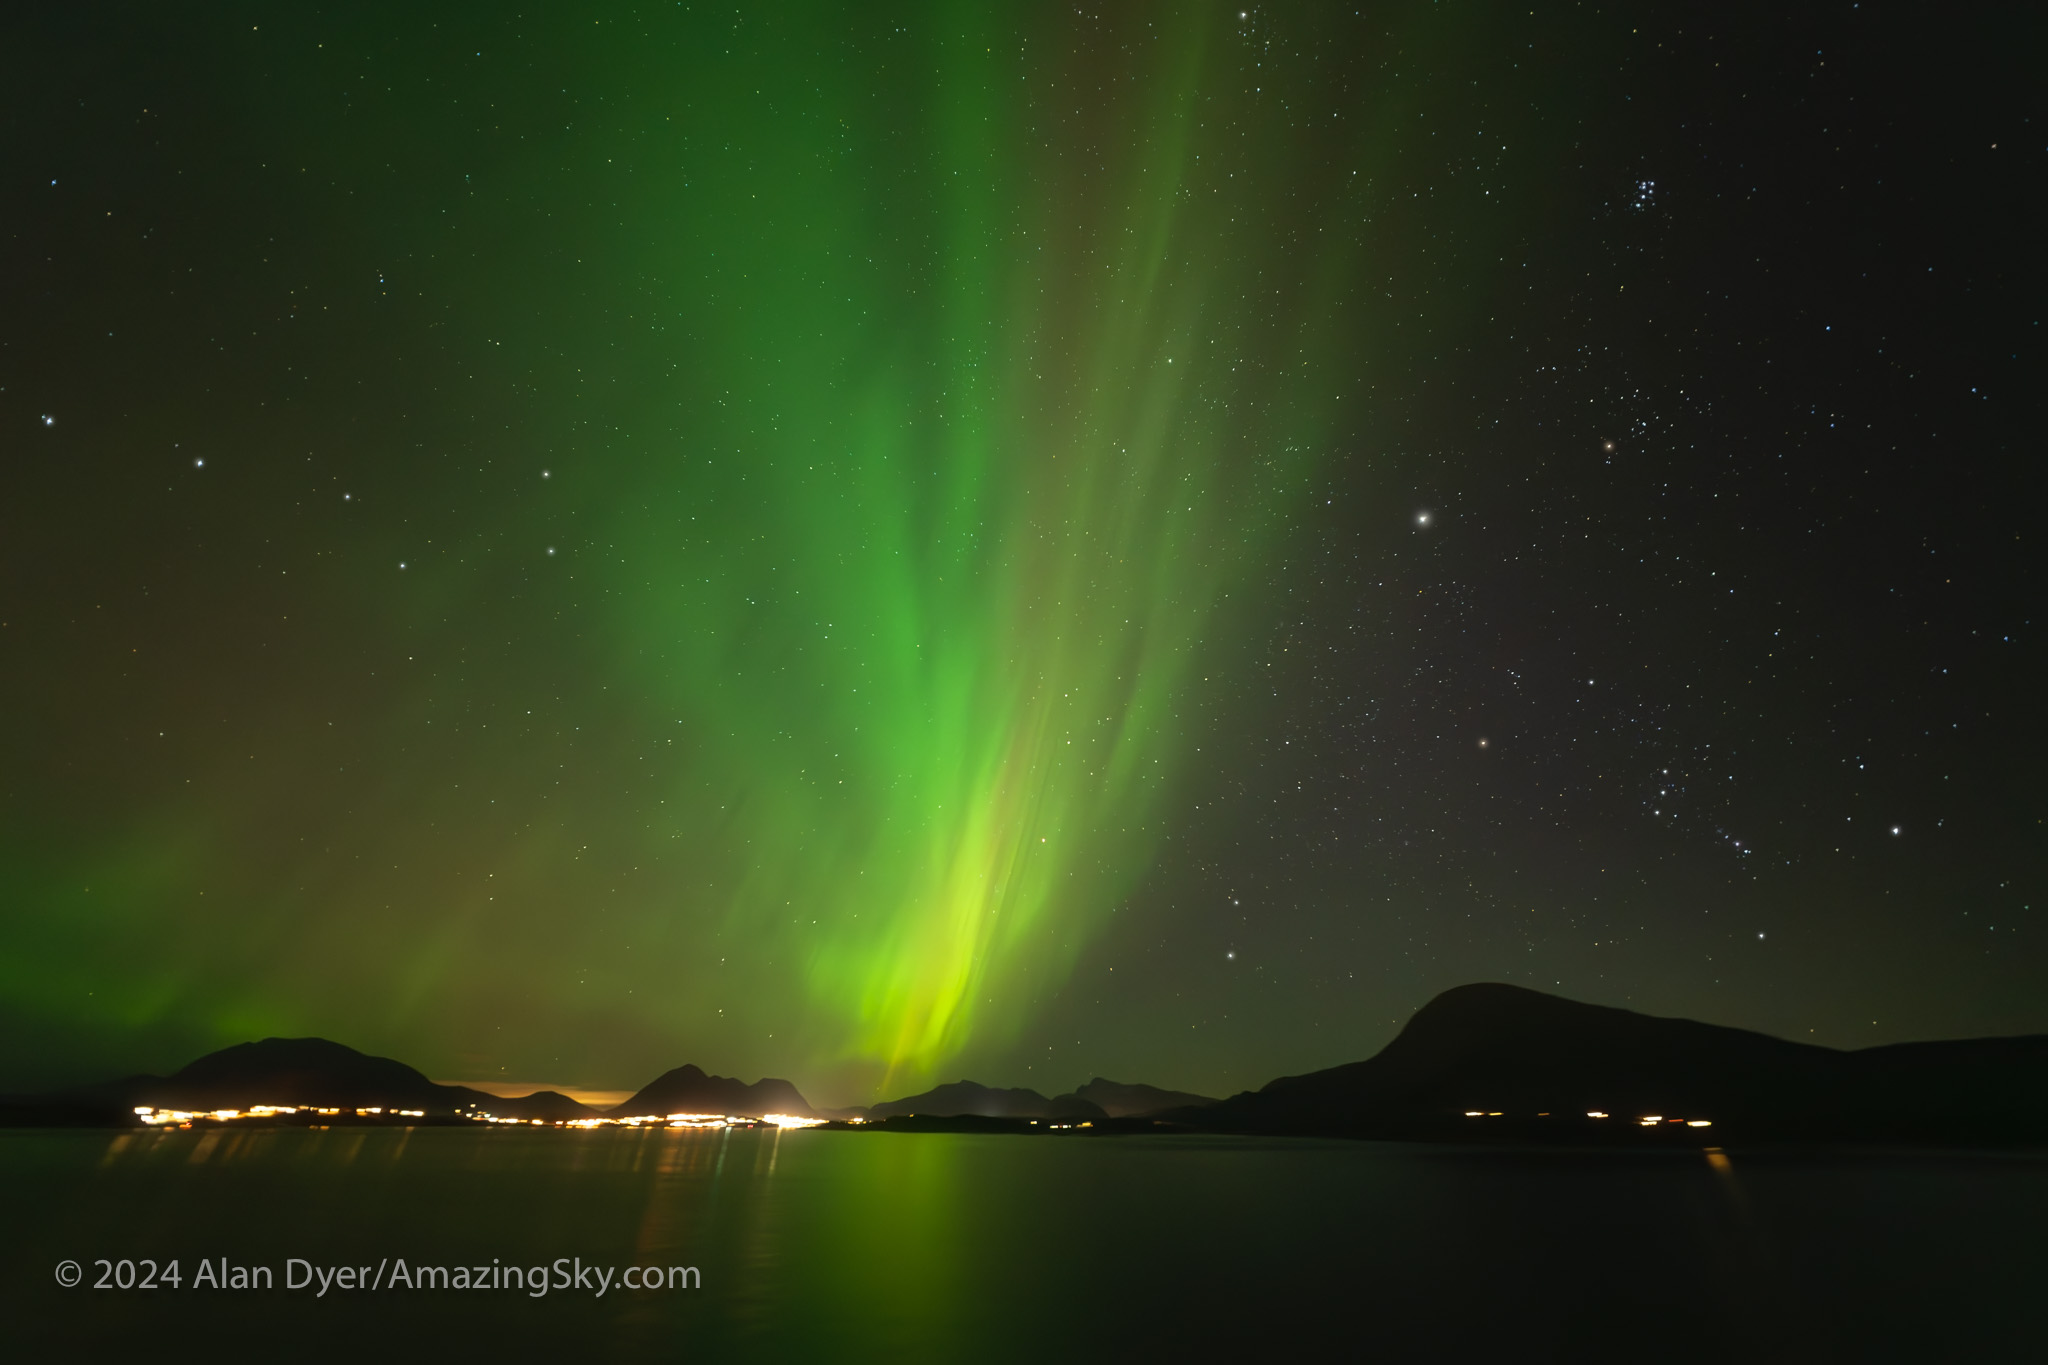
The Nikkor 20mm at f/1.8 allowed a short 1.3-second exposure for capturing the aurora from a ship off the coast of Norway, to minimize ship motion trailing the stars.
Also, stopping those faster lenses down to f/2.8 can sometimes yield better image quality than shooting with a native f/2.8 lens wide open.
Canon and Sony each have fast f/2 zooms that cover the range from 28mm to 70mm. While those focal lengths can be useful, both lenses are expensive and heavy. And they are still not wide enough for many astro subjects. For fast lenses with even shorter focal lengths we need to turn to “prime” lenses, ones with fixed focal lengths.
As of this writing Canon has few fast, wide primes for their RF lens mount (their new 24mm f/1.4 VCM is a costly choice designed primarily for video use). A few third-party lens makers offer fast (f/2 or faster) primes for Canon full-frame cameras, always as manual focus lenses. For example, Laowa has a 15mm f/2, and TTArtisan has a 21mm f/1.5.
Yes, Sigma now offers auto-focus 16mm and 23mm f/1.4 primes, and Samyang has a new 12mm f/2, but they are only for Canon RF-S cropped-frame cameras. Canon has yet to allow other companies to produce auto-focus lenses for their full-frame cameras.
Nikon has been restrictive as well. Sigma’s much-lauded Art series that includes the 14mm rectilinear (i.e. the horizon remains straight) and 15mm fish-eye (with a curved horizon), both f/1.4 and aimed at astrophotographers, are not offered for Nikon or Canon, only for Sony E-mount and Panasonic/Leica L-mount cameras.
However, while Sigma lenses are missing, there is a wider choice of third-party lenses for Nikon Z-mount compared to Canon RF, plus Nikon itself makes a very fine 20mm prime in their premium S-series.
That’s what I test here — three wide-angle rectilinear primes for Nikon Z: A 20mm Nikkor, and two third-party primes: one from Viltrox, their 16mm; and one from Laowa, their new 10mm.
As a bonus, I add in a test of a fast fish-eye lens, from TTArtisan, their 7.5mm f/2.
NOTE: All test images can be downloaded as full-resolution JPGs for closer inspection. Click or tap on the images.
Prices are from B&H Photo, but will vary with sales and special promotions.
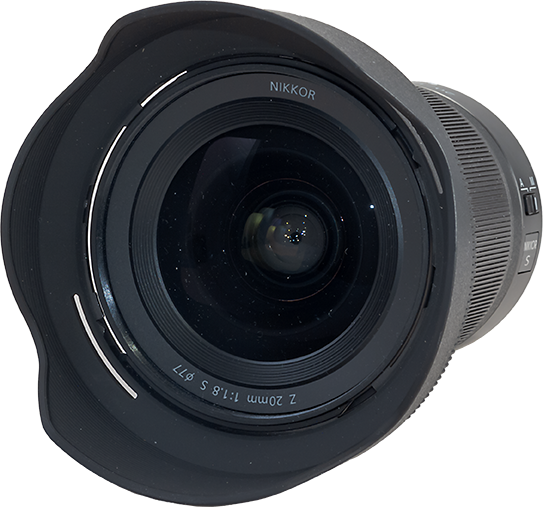
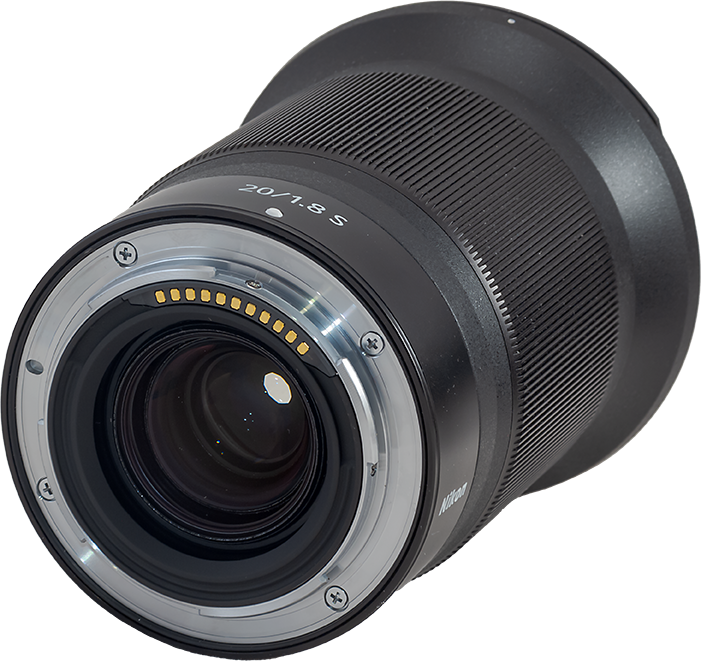
The Nikkor 20mm S-Line Lens ($1,050)
The Nikkor 20mm accepts 77mm filters.The rear mount has weather sealing.
I shot the northern summer Milky Way (below) with the three rectilinear wide-angle lenses (meaning these are not fish-eyes) with the camera on a star tracker, to prevent star trailing. The tracker was the Move-Shoot-Move Nomad, reviewed here on my blog.
The Nikon Z6III and 20mm Nikkor on the MSM Nomad tracker.
I shot with Nikon’s new Z6III, a 24-megapixel full-frame camera I reviewed in the December 2024 issue of Sky & Telescope magazine. It offers a number of excellent features for nightscape photography. Most notably, auto-focus lenses zip to the infinity focus point automatically when the camera is turned on, something I wish Canon cameras would do.
The Nikkor 20mm has a field of view along the long dimension of 84°.
The Nikkor 20mm is the widest prime lens in Nikon’s premium S-Line series. It offers what I consider to be an ideal focal length for most nightscape and wide-field Milky Way images.
While a 14mm lens is often thought of as the default nightscape lens, a 20mm presents less distortion (objects leaning in or stretched out at the corners) and a more natural perspective. Plus the lens can be made faster (in this case f/1.8), smaller, and not cost as much as an ultra-fast 14mm like the Sigma f/1.4 Art lens.
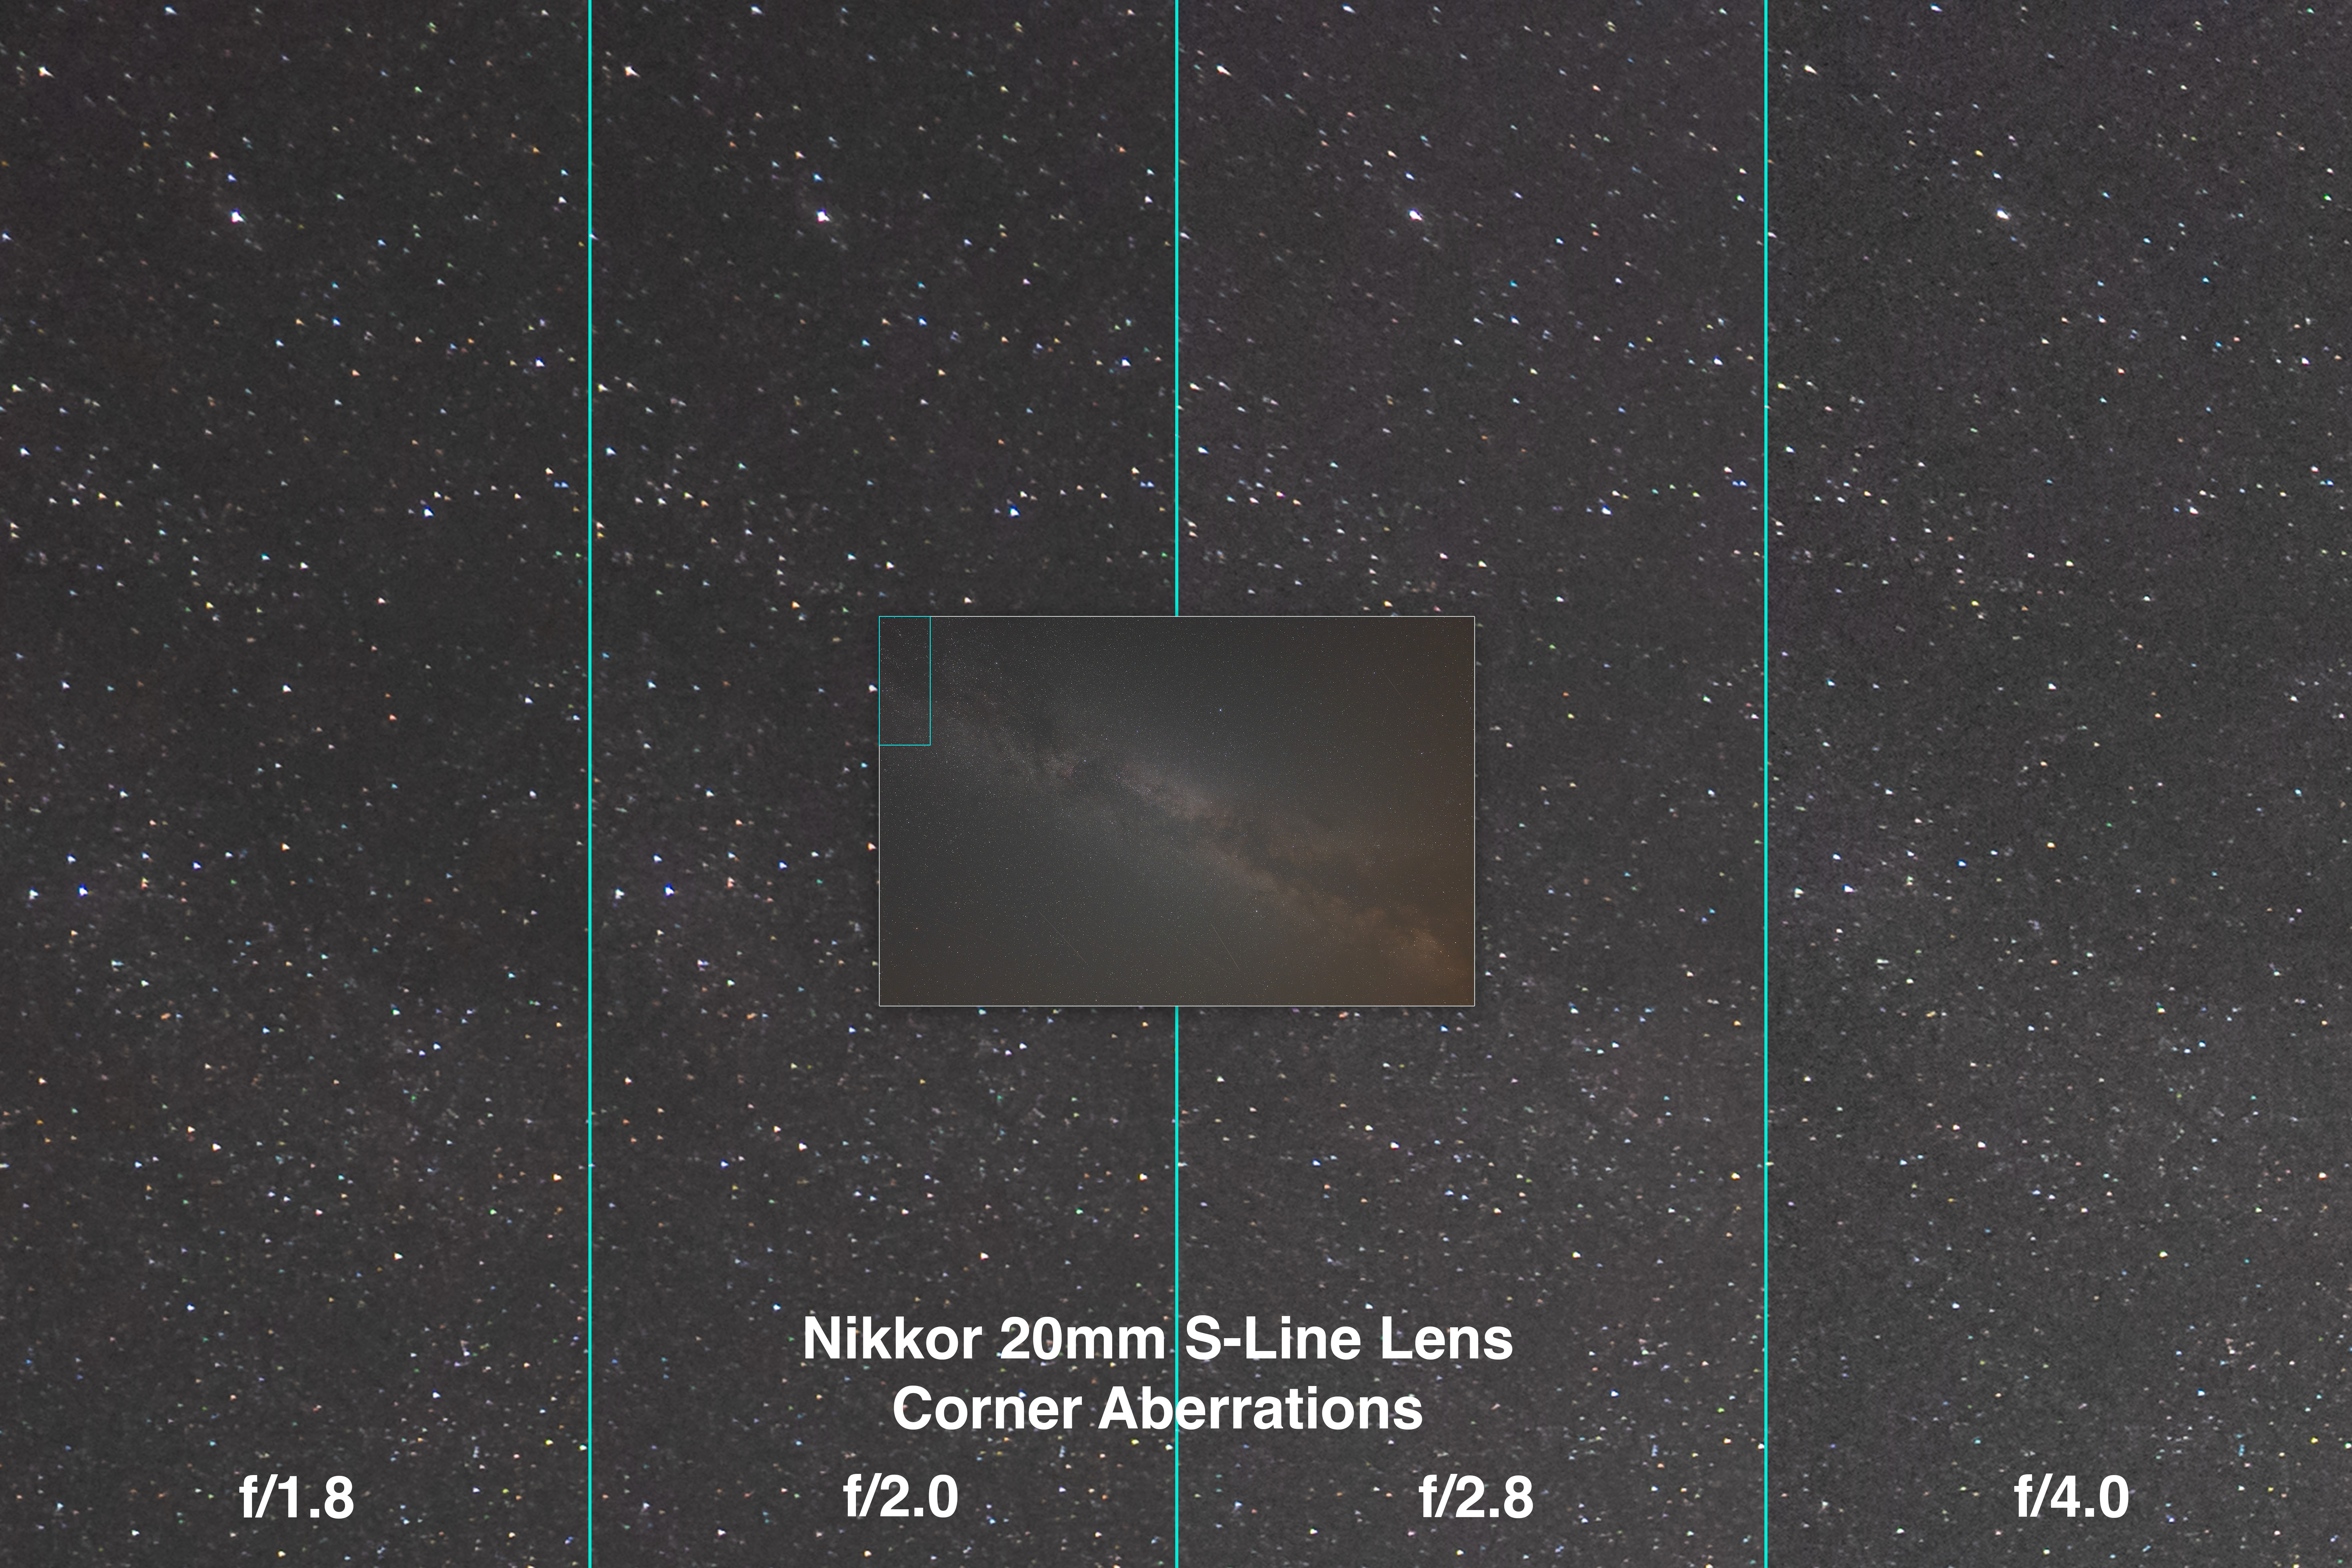
Nikkor 20mm Corner Aberrations
The four panels show the upper left corner, in the area outlined in the inset that shows the full frame.
Sharp stars right to the corners is the ideal for all forms of astro images. We don’t want stars to turn into winged seagulls or coloured streaks. They should remain as pinpoint as possible.
The Nikkor 20mm shows very little aberrations across the frame. Stars are elongated by tangential astigmatism and discoloured by lateral chromatic aberration only slightly and only at the extreme corners.
Stopping down the lens decreased the aberrations, but some residual astigmatism remained, even at f/4. However, the corner aberrations are low enough, and so restricted to the very corners, that this is a lens you can certainly use wide open at f/1.8, or perhaps at f/2, without any penalty of image sharpness.
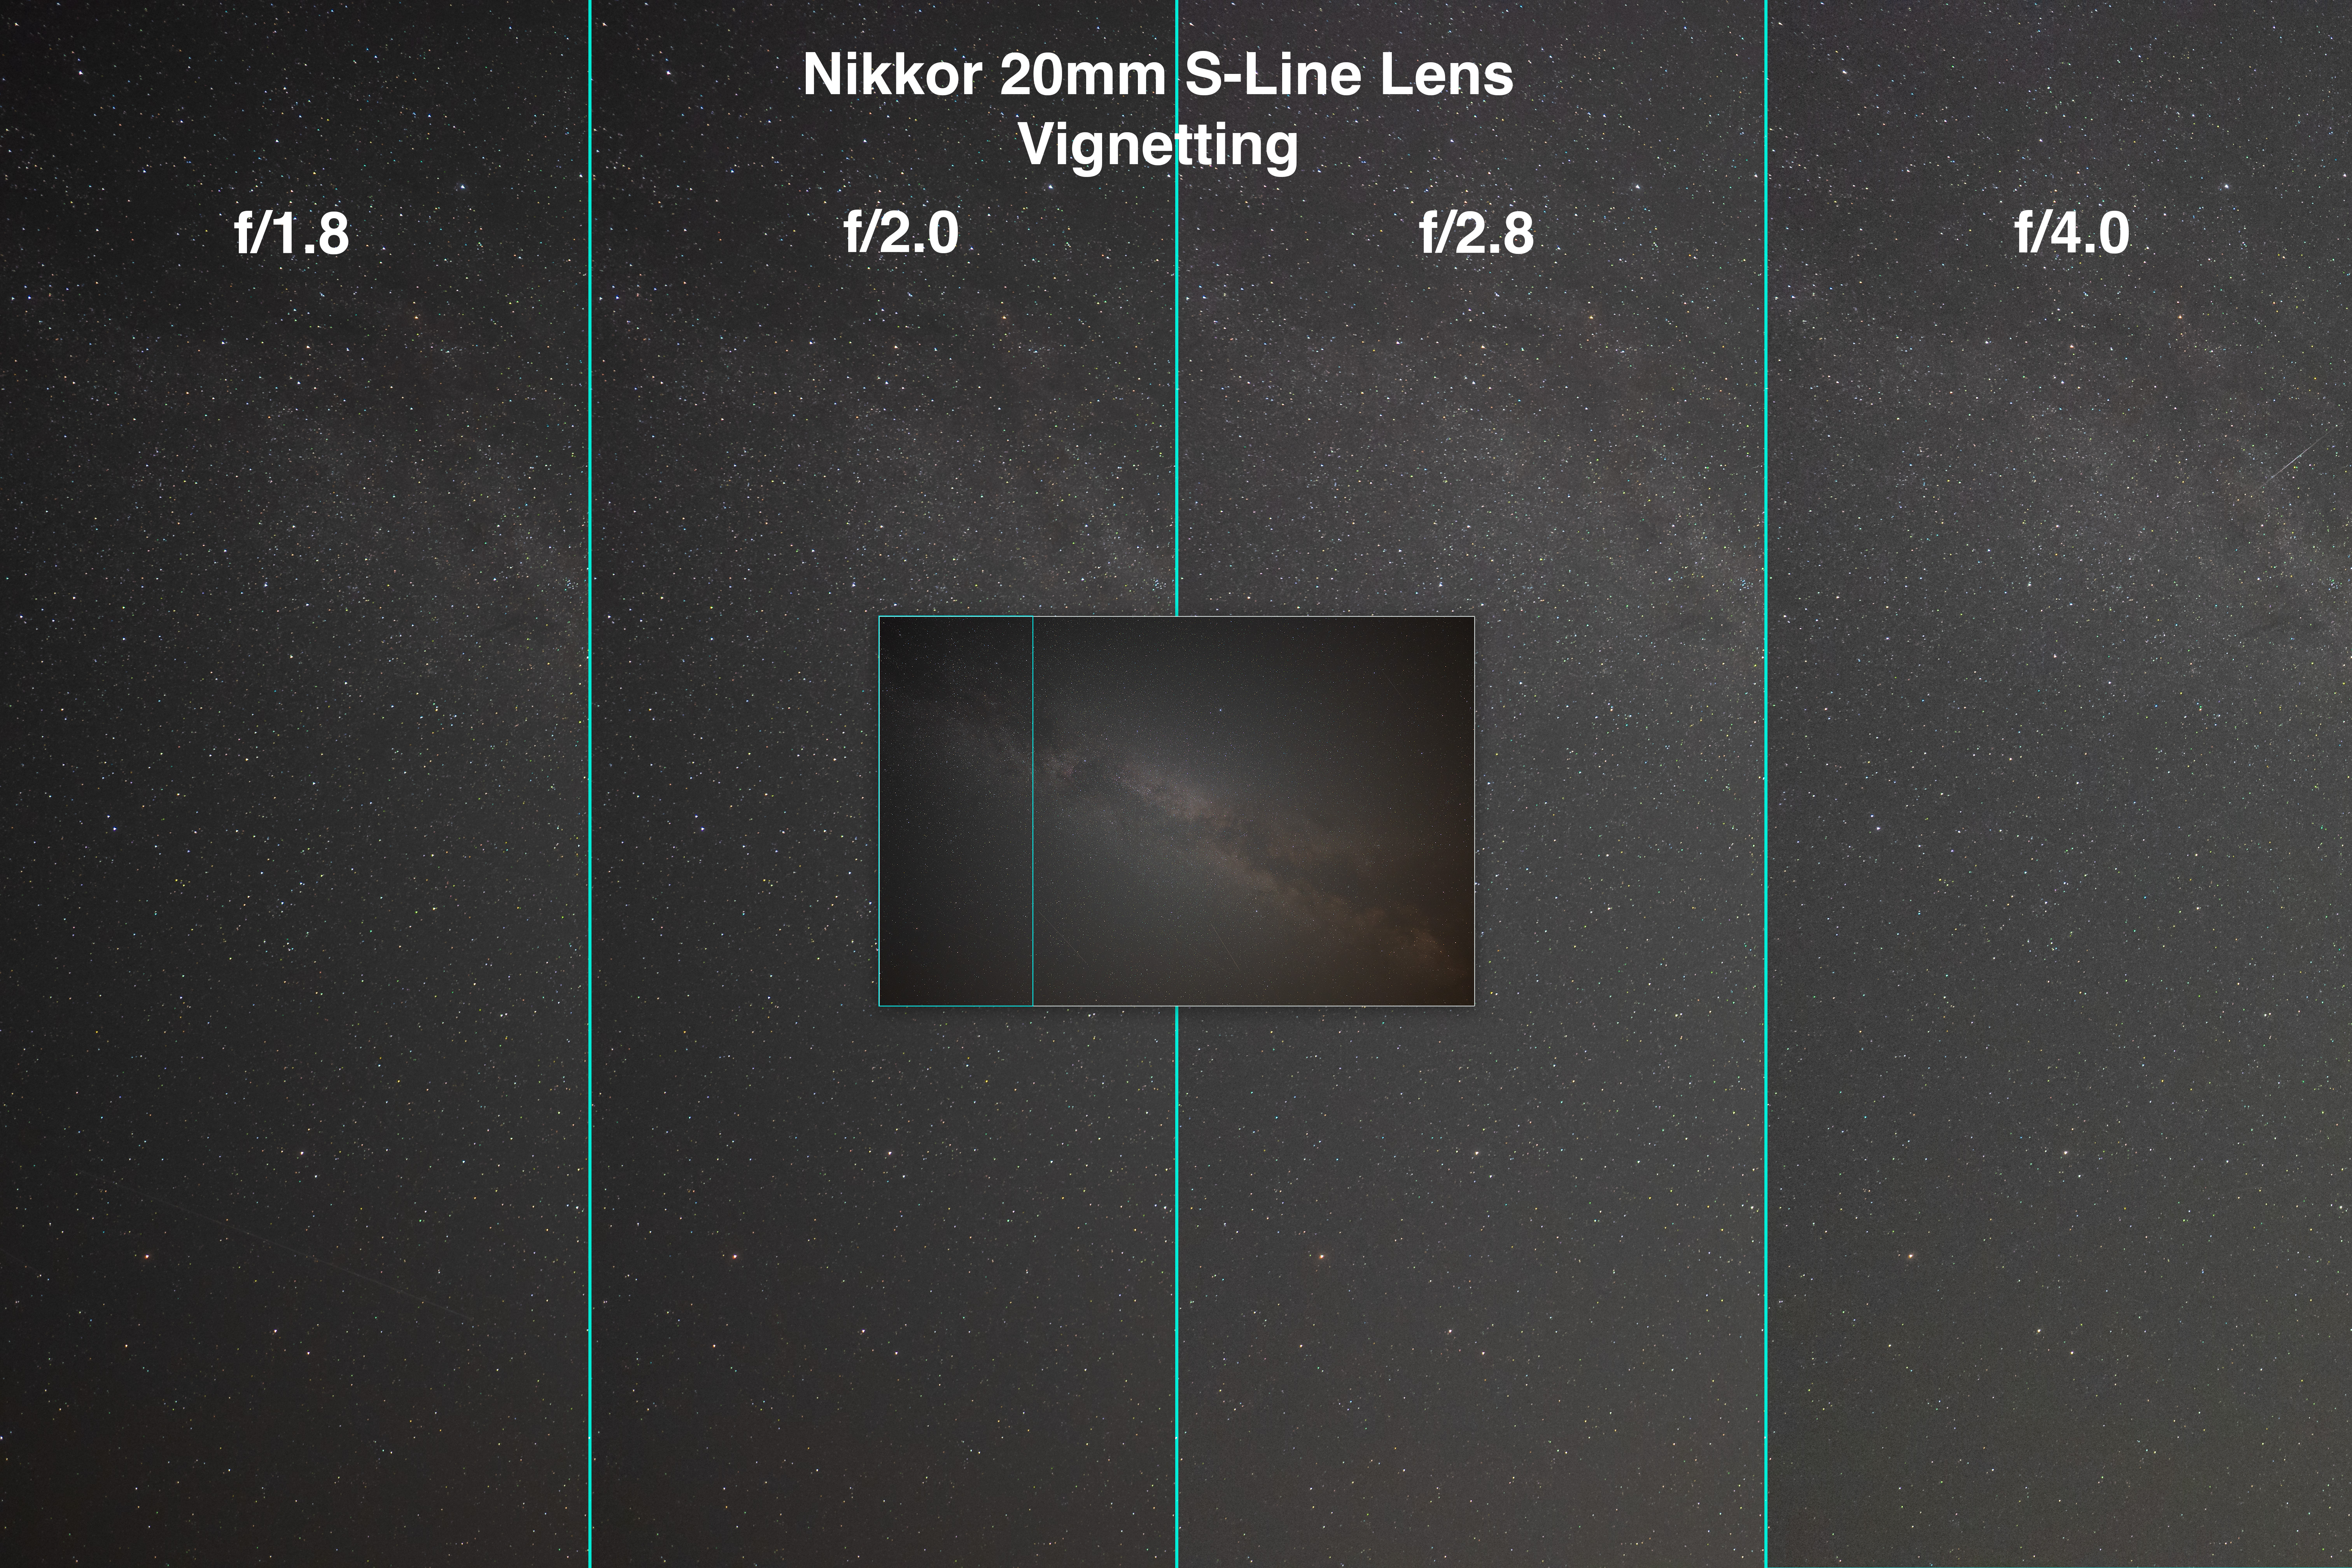
Nikkor 20mm Vignetting
The four panels show the left side, as outlined in the inset. The inset is the f/1.8 sample.
Ideally, we also want images to be as fully-illuminated across the frame as possible. Light fall-off, or vignetting, creates dark corners with less signal reaching the sensor. Less signal gives rise to more noise, noticeable when brightening the corners in processing. That can reveal unsightly noise, banding, and discolouration in nightscapes, especially in the ground, often the darkest part of a scene, not the starry sky.
The 20mm shows a fair degree of edge and corner darkening when wide open at f/1.8. Stopping the lens down to f/2 improves the field illumination notably. And by f/2.8 the field is fairly uniformly lit. There is little need to go as slow as f/4.
In all, the Nikkor 20mm S is a superb lens ideal for nightscapes and Milky Way images.
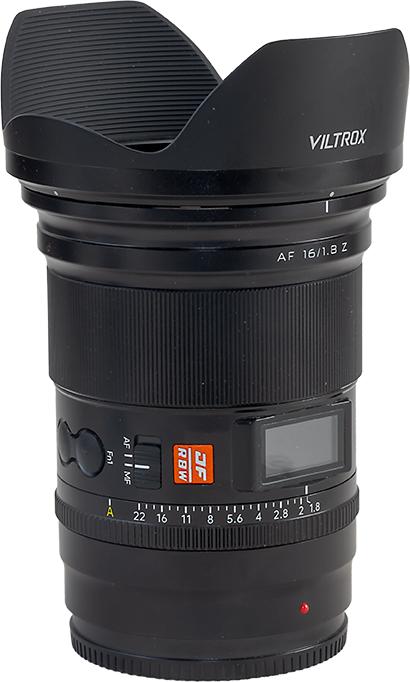
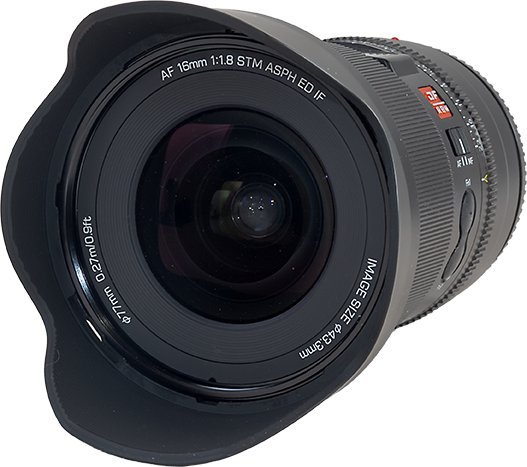
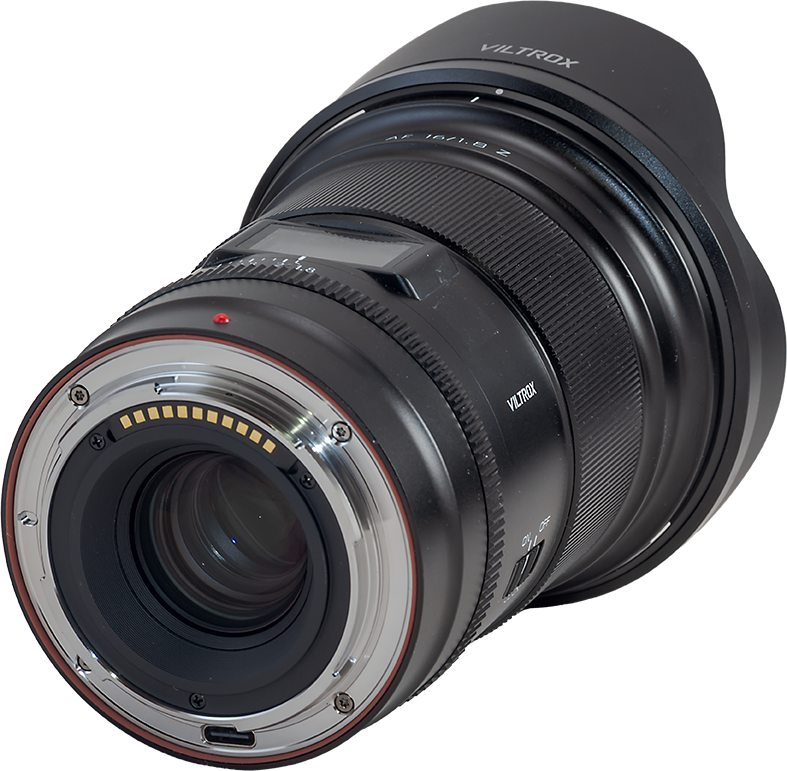
The Viltrox AF 16mm STM ASPH ED IF ($580)
The Viltrox also accepts 77mm filters. The Viltrox has weather sealing and a USB port, obscured here, for powering the lens when not on a camera.
The new company Viltrox has been making a name for themselves recently with the introduction of a number of top-quality pro-grade lenses to compete with the best from any brand, and at much more affordable prices.
The horizontal field of view of the Viltrox 16mm is 100°.
Their 16mm is an auto-focus lens that, on the Nikon, can actually auto-focus on stars, as can the Nikkor 20mm. However, it, too, will zip to infinity focus when powered up. Plus two function buttons can be programmed to rack between two preset focus distances, one of which can be infinity.
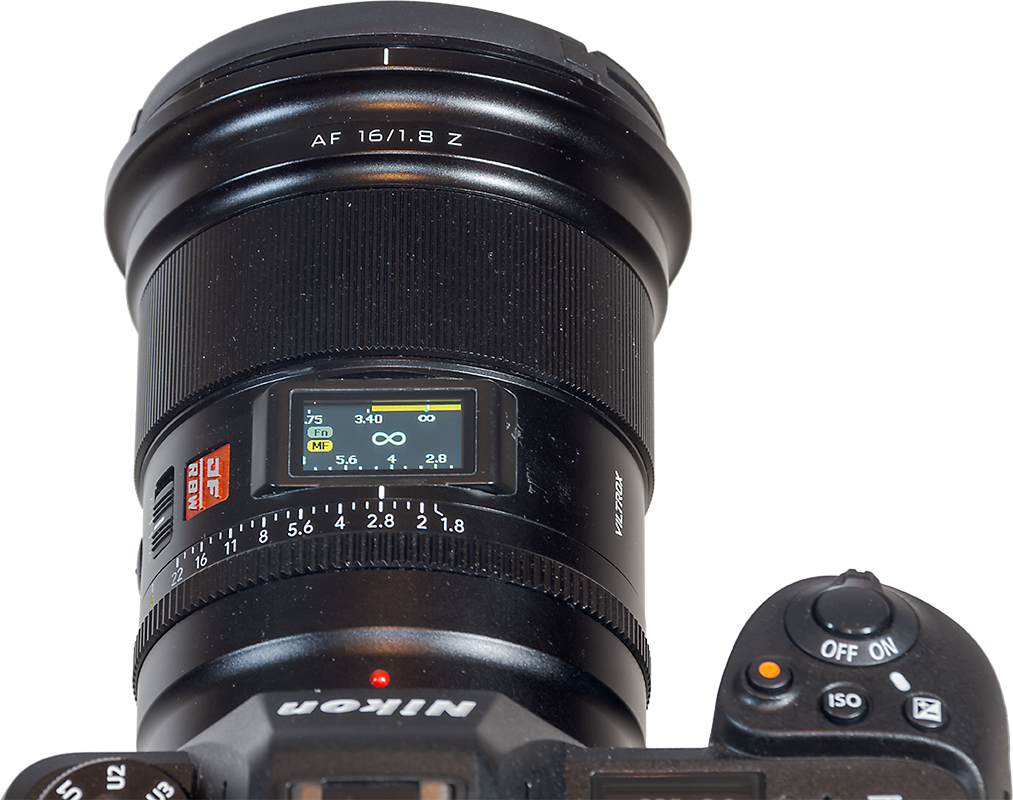
The buttons at left are for preset distances.The display shows depth of field as well as focus distance and aperture.
A manual aperture ring (above left) has 1/3rd-stop detents, or it can be set to A for controlling the aperture in the camera.
A colour OLED display (above right) shows the focus distance and aperture, a nice way to confirm your settings at night. The display is too bright on the darkest nights; I cover it with red gel.
An option to turn it red using the Viltrox app would be welcome. Or to turn it off! ….
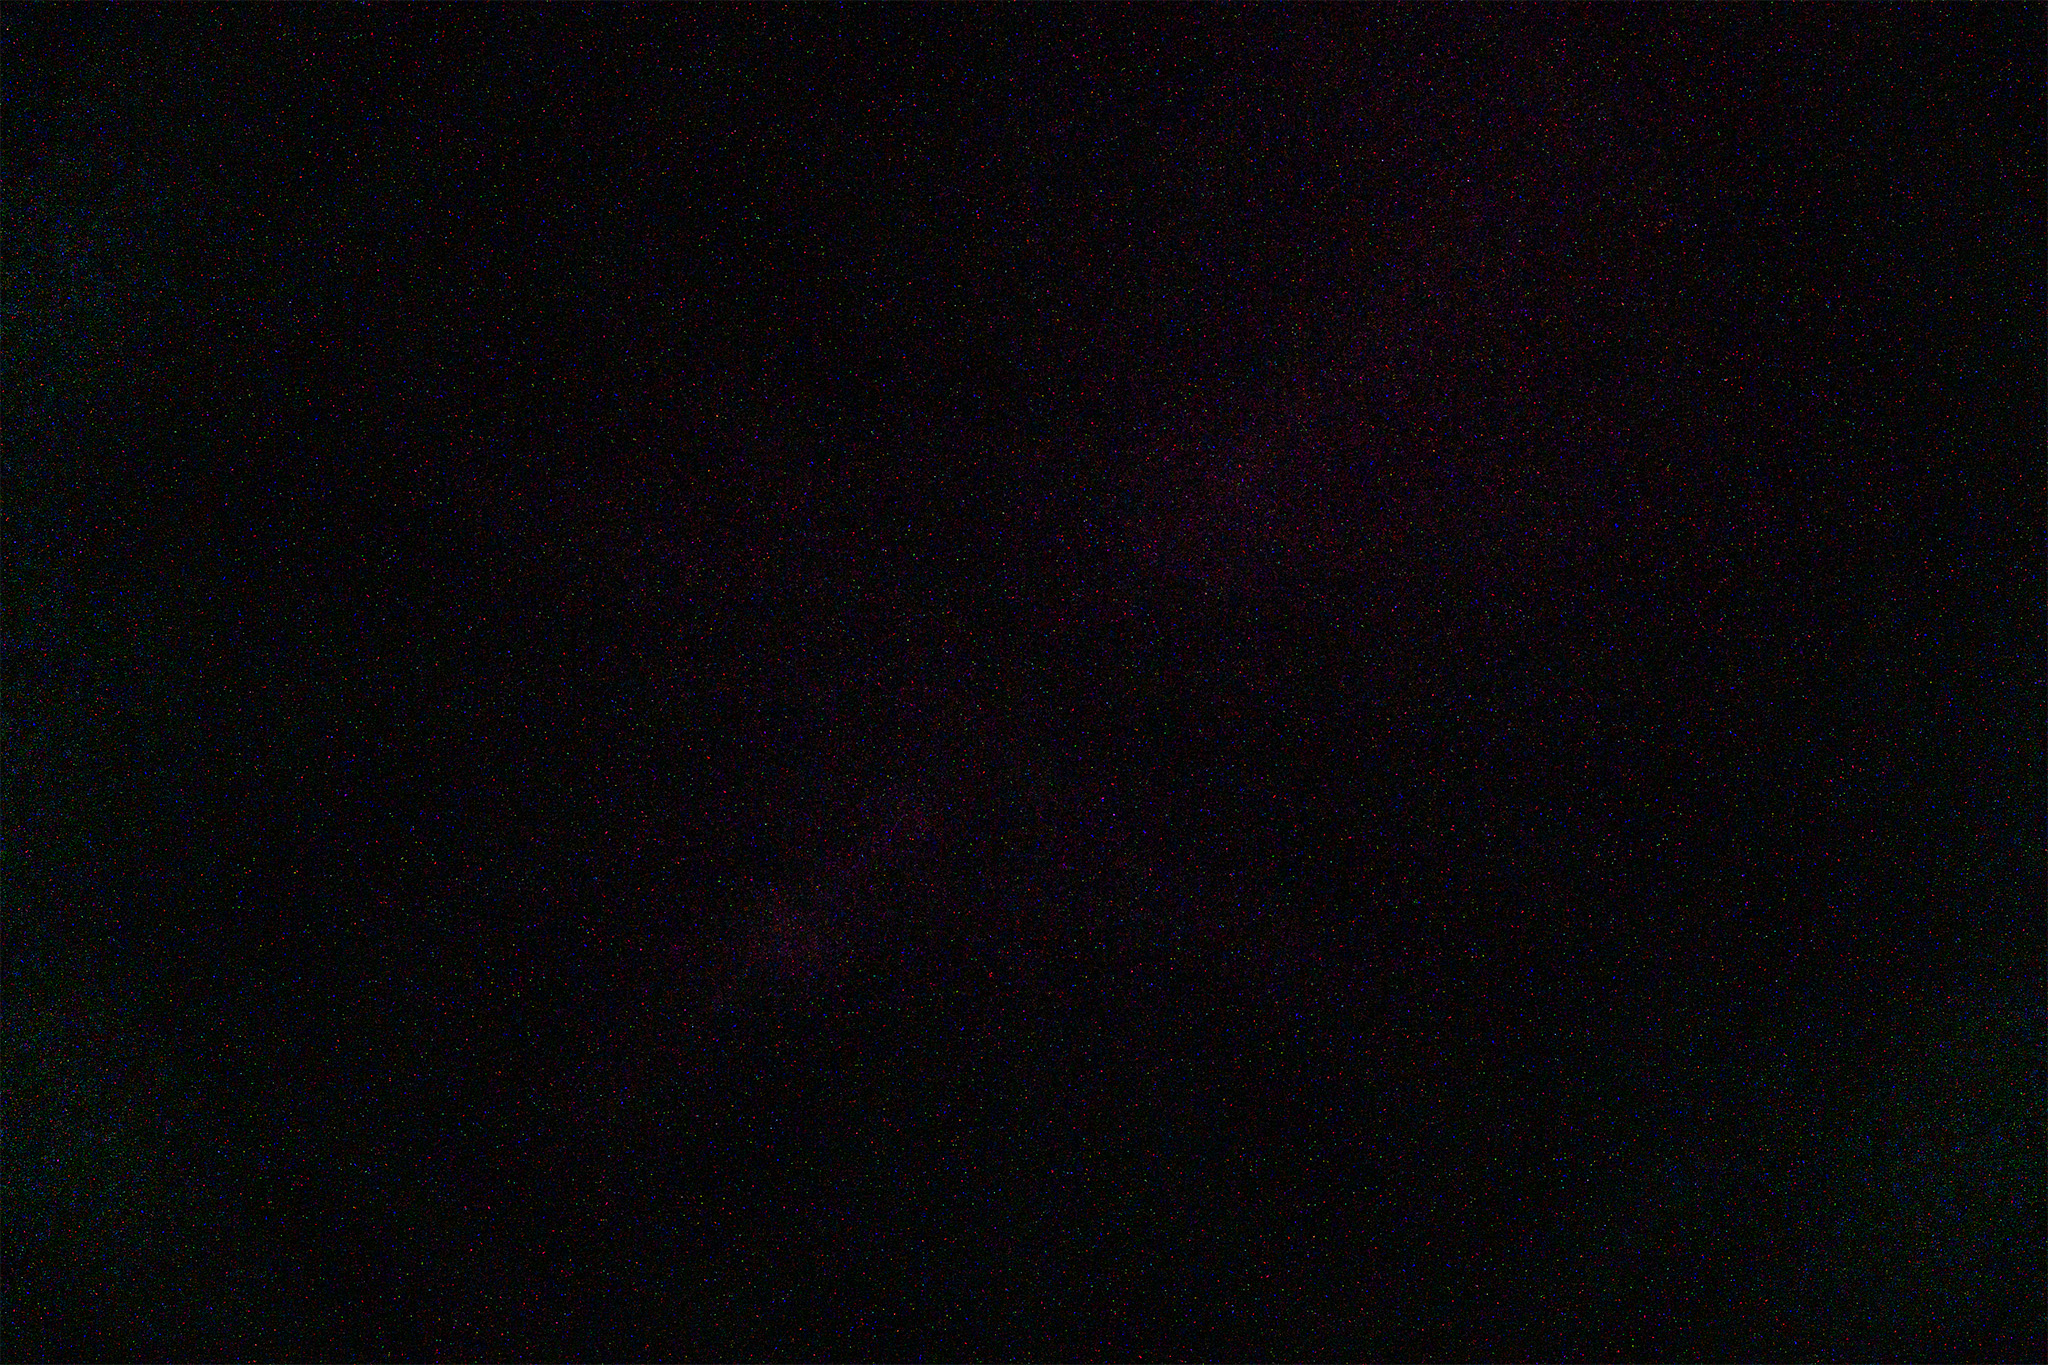
NOTE ADDED FEB 24, 2025 — I tested all lenses on a stock camera. But when used on an astro-modified camera with greater red and infra-red sensitivity, the Viltrox 16mm can add a noticeable red glow or flare to images, as a colleague has found and reported to me. I did confirm this with very long exposures and high ISOs with my stock Z6III. It barely shows up in dark frames boosted a lot for brightness (see below – it’s the faint magenta band across the centre of the frame).
But in modded cameras it is much more obvious. This comes from the lens’s top OLED display. The trick is to slightly dismount the lens, which turns the display off, but still maintains data contact to the camera. Viltrox is aware of the issue and has said they will fix it in a firmware update.
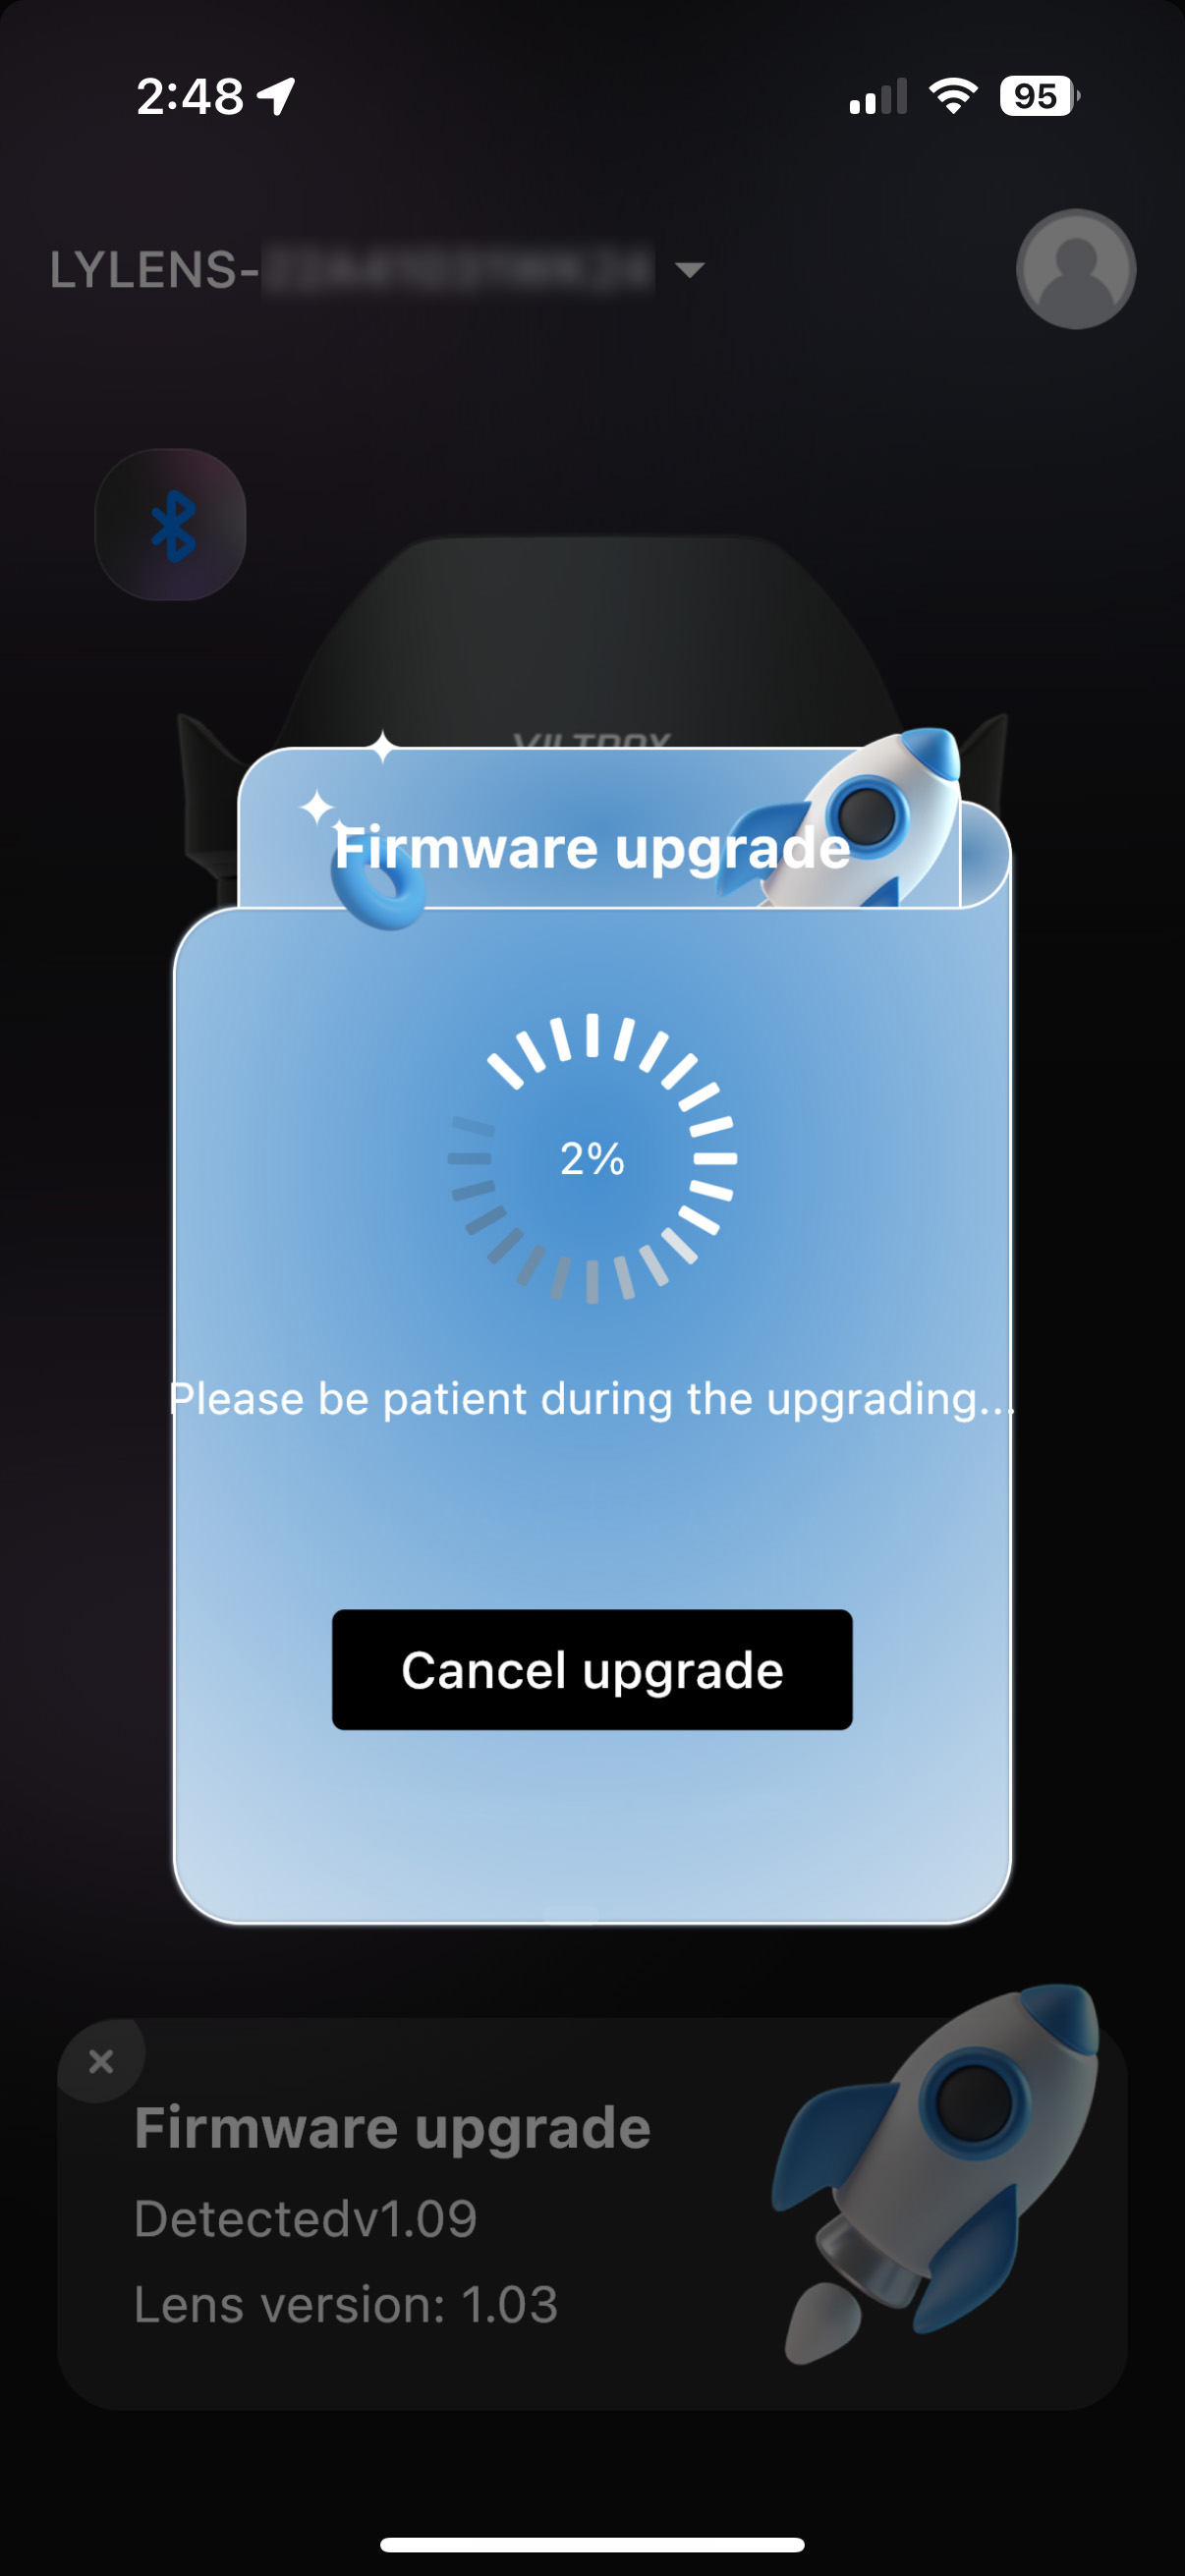
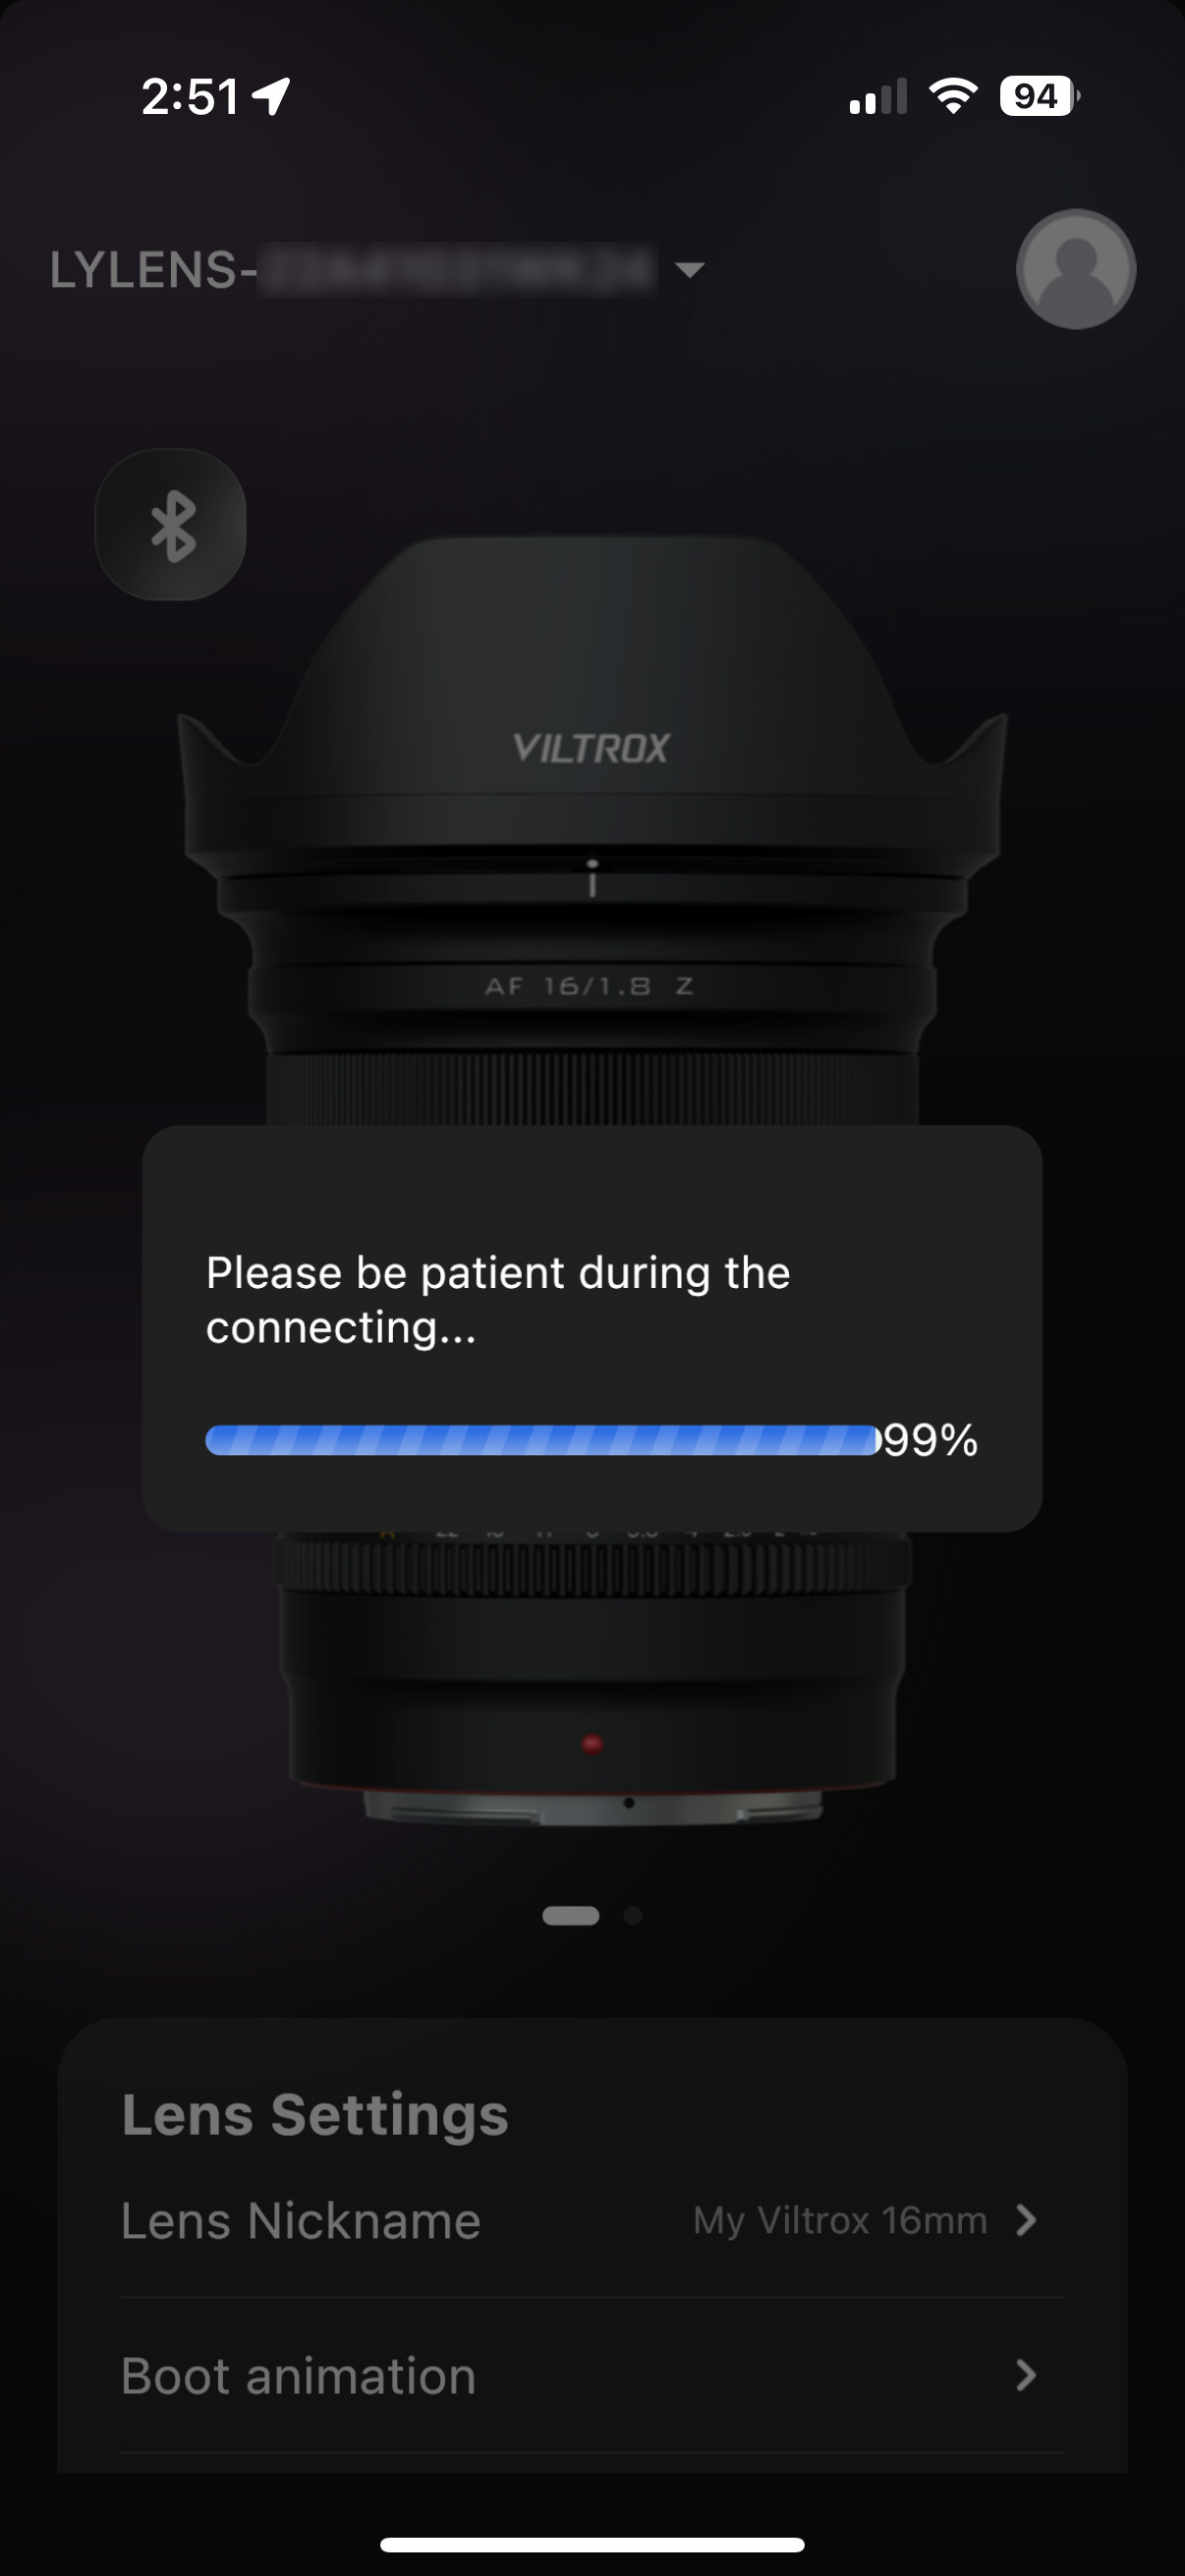
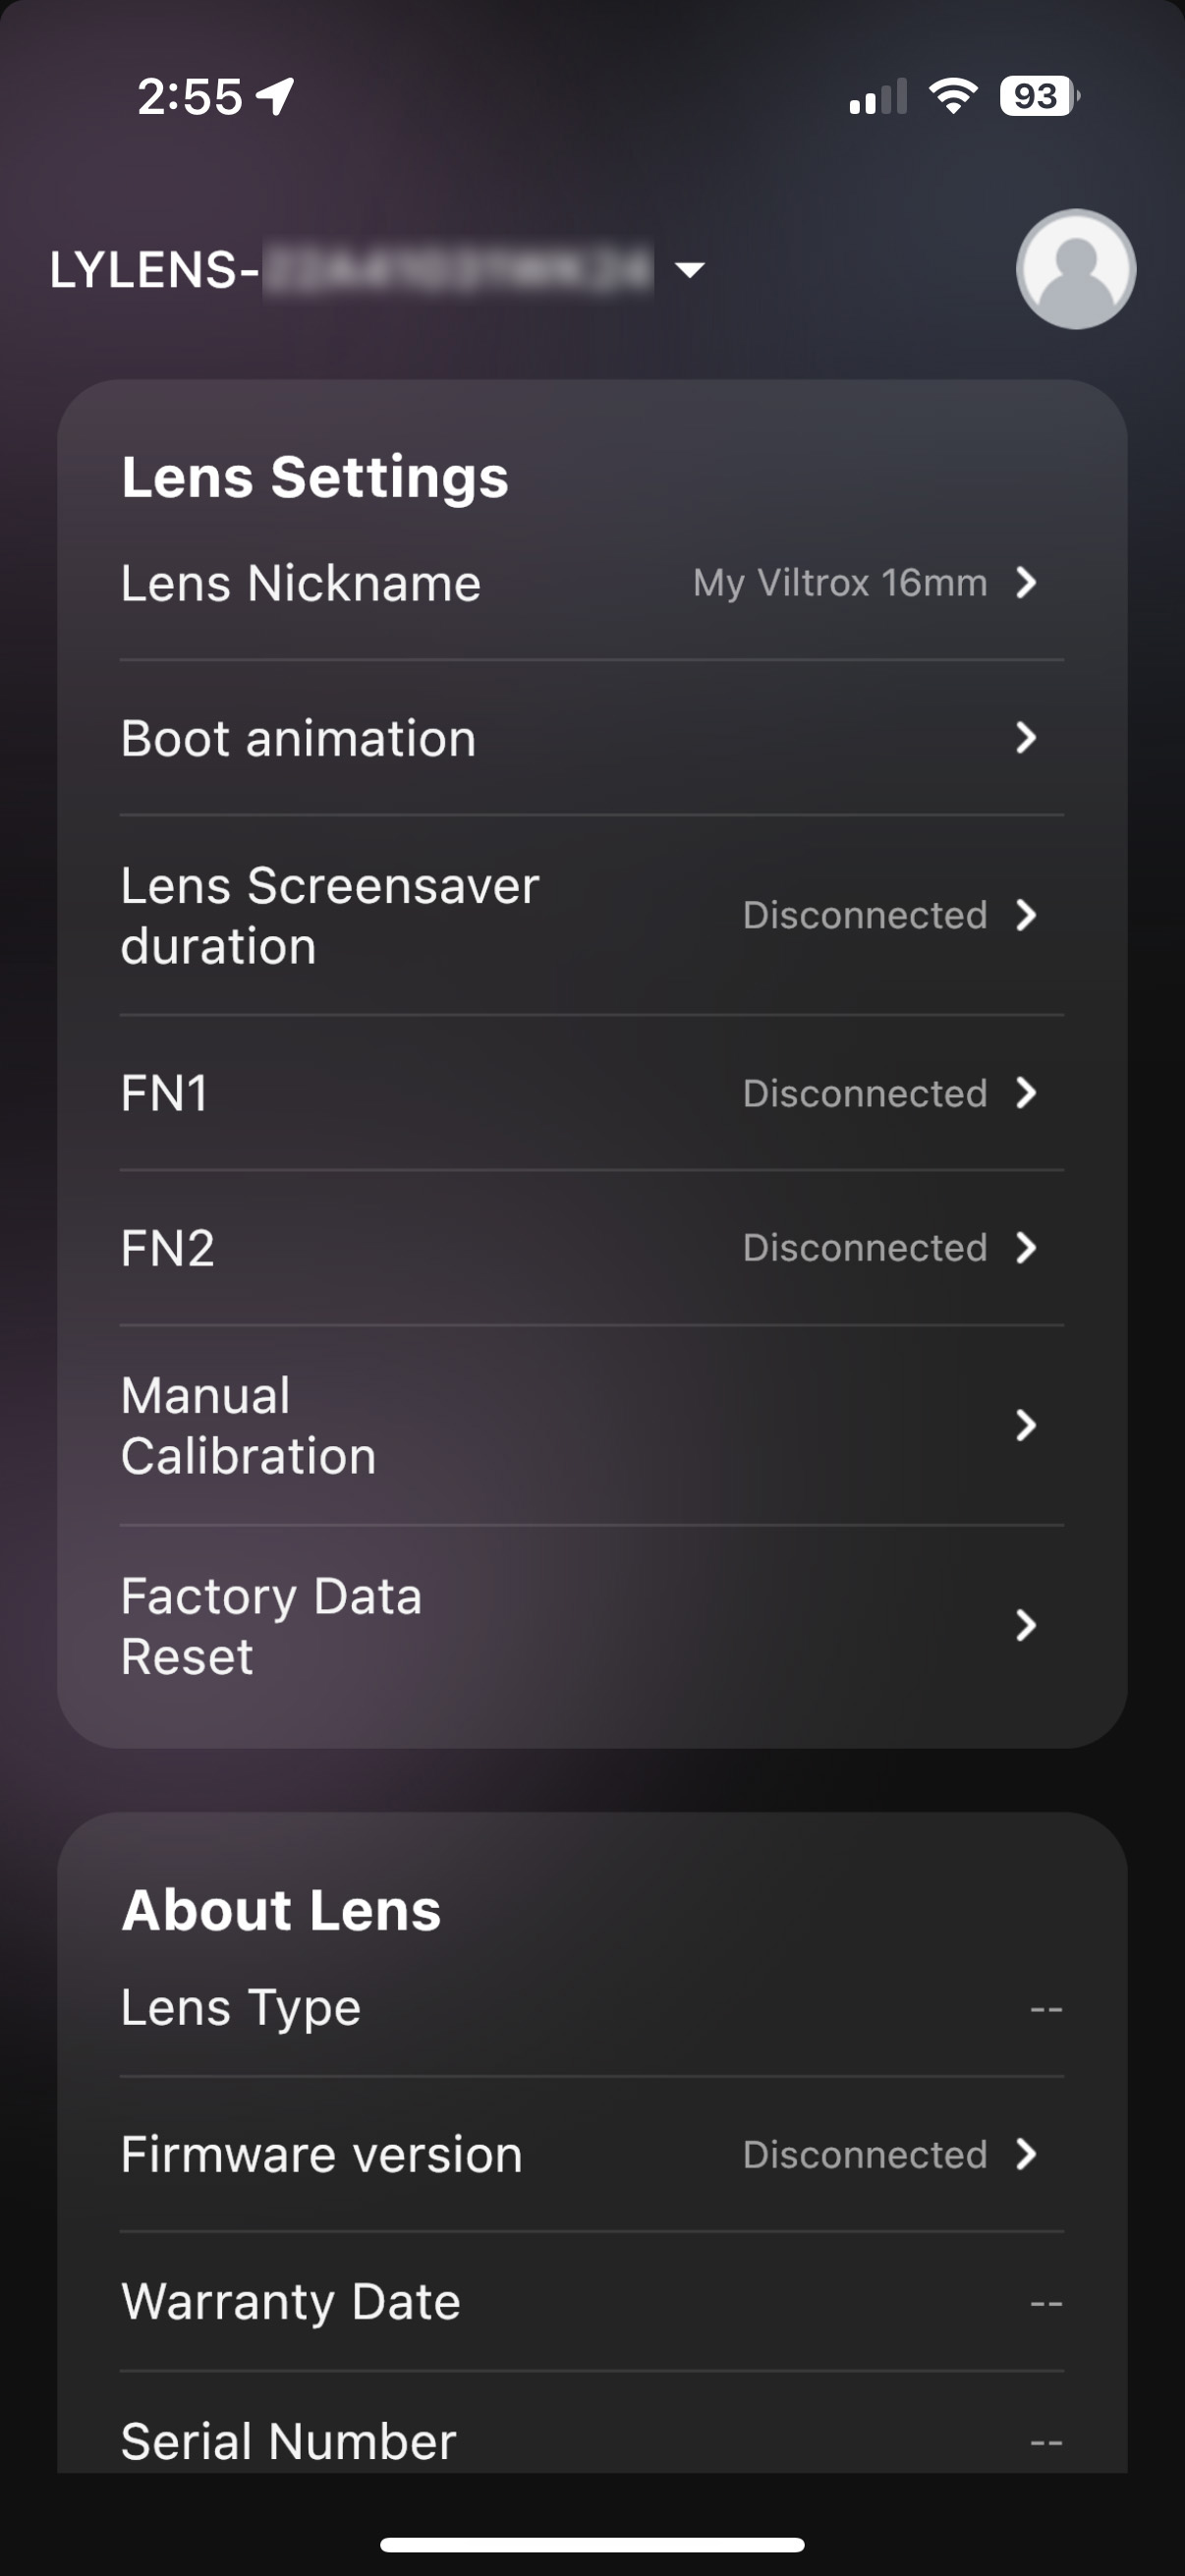
With Viltrox lens fully engaged and display ONUpdate at your risk!Connect if you can!Set if you can!
Uniquely, this and other Viltrox lenses have Bluetooth built in, for direct connection to a mobile device for firmware updates and lens settings, shown above. However, I found the app buggy; it would connect to the lens, but then refuse to allow settings to be changed, claiming the lens was not connected. Or the app would freeze, disconcerting during a firmware update. Luckily, that did not brick the lens.
Viltrox 16mm Corner Aberrations
The four panels show the small corner area outlined in the centre inset that shows the entire image.
At the extreme corners, the Viltrox shows some softness (perhaps from field curvature), but only minimal astigmatism and lateral chromatic aberration when wide open at f/1.8, and slightly sharper corners at f/2. At f/2.8 corner performance is nearly perfect, and certainly is at f/4.
This is a level of aberration correction even the most premium of lenses have a hard time matching.
Viltrox 16mm Vignetting
The panels show the left side outlined in the centre inset, which shows the f/1.8 image.
As is often the case with wider lenses, the Viltrox does show a great deal of vignetting at f/1.8, more so than the Nikkor 20mm. While this can be corrected in processing it will raise noise levels.
Stopping down to just f/2 helps, but the field becomes more uniform only at f/2.8, the sweet spot for this lens for the best all-round performance. But it offers the speed of f/1.8 when needed, such as for auroras.
If you prefer a wider field than a 20mm provides, the Viltrox 16mm (also available for Sony) is a great choice that won’t break the bank. Until Canon changes their third-party lens policy, Canon owners are out of luck getting this excellent lens.
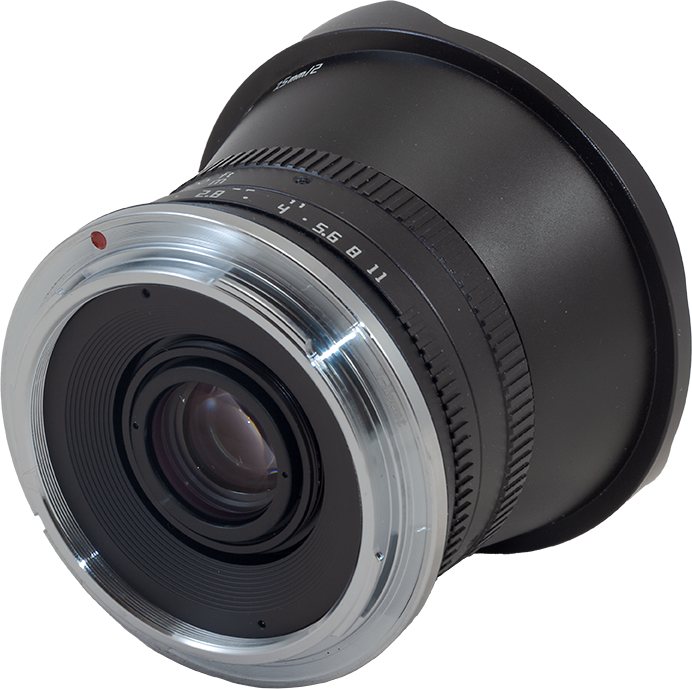
The Venus Optics/Laowa 10mm Zero-D FF ($800)
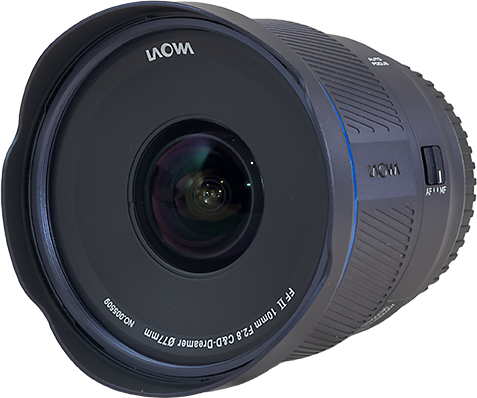
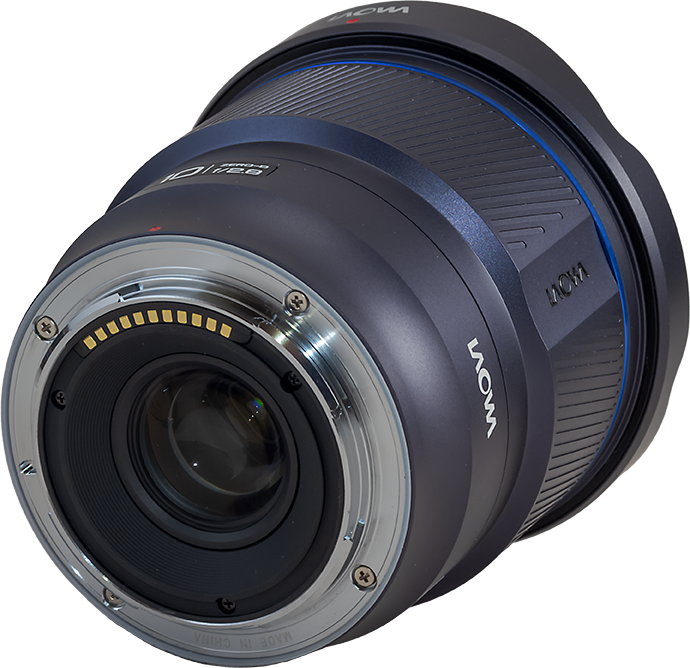
The Laowa also accepts 77mm filters, unusual for such a wide lens..The Laowa also has a weather-sealing gasket. The lens has a unique blue-grey finish.
The lens maker Venus Optics (aka Laowa) is known for its innovative and often unusual lens designs.
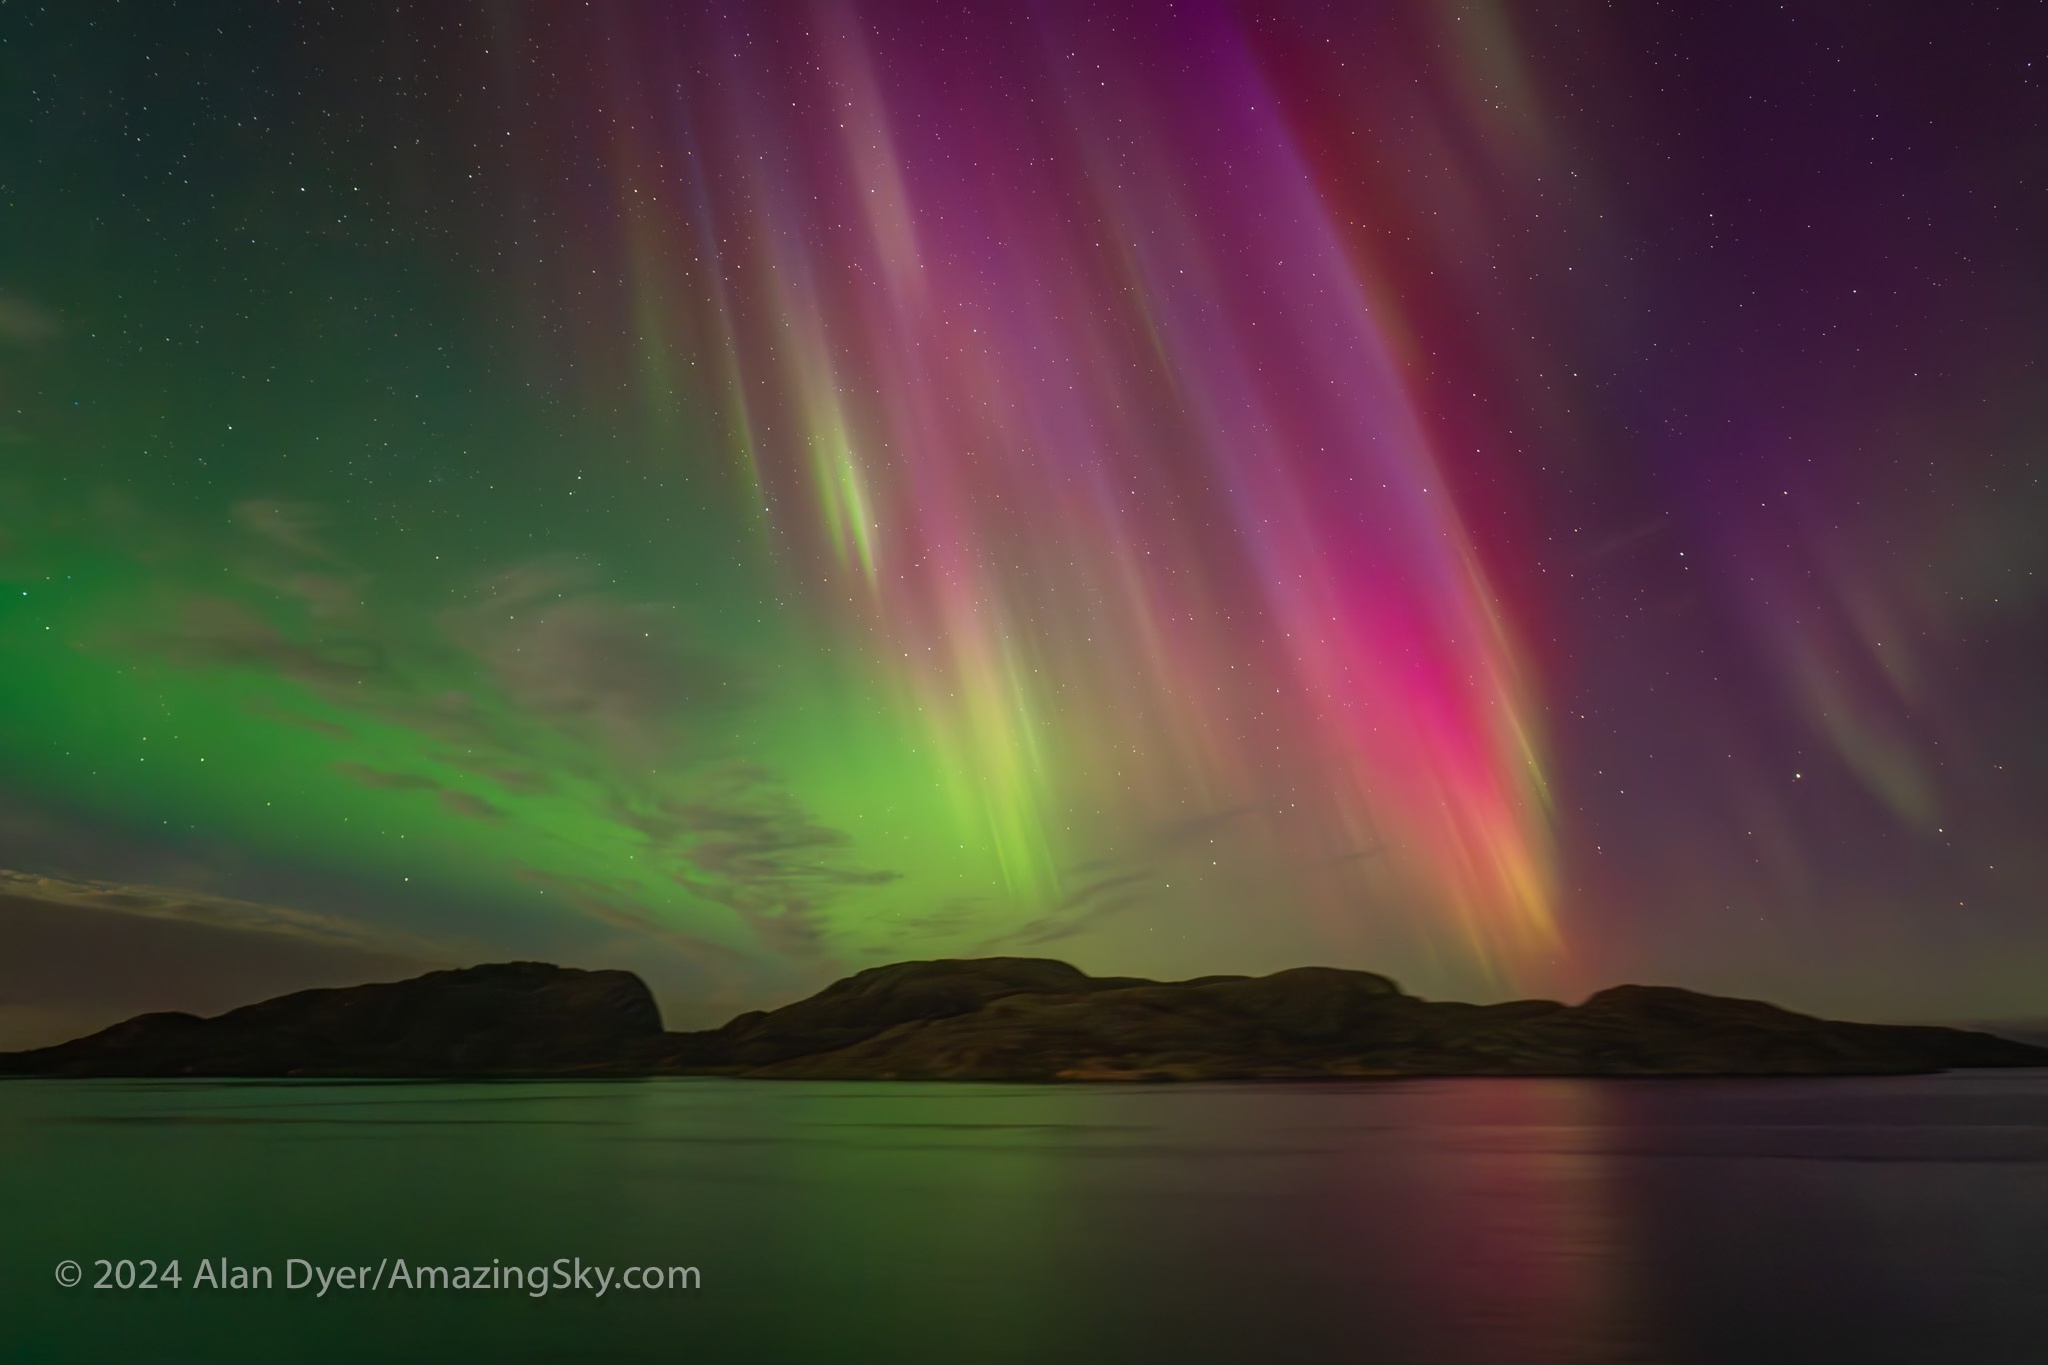
Introduced in 2024, their new 10mm offers the widest field available in a rectilinear (not fish-eye) lens for full-frame cameras. The “Zero-D” label is for the lens’s lack of pincushion or barrel distortion. Horizons remain straight no matter where they fall on the frame. However, objects at the corners become elongated a lot.
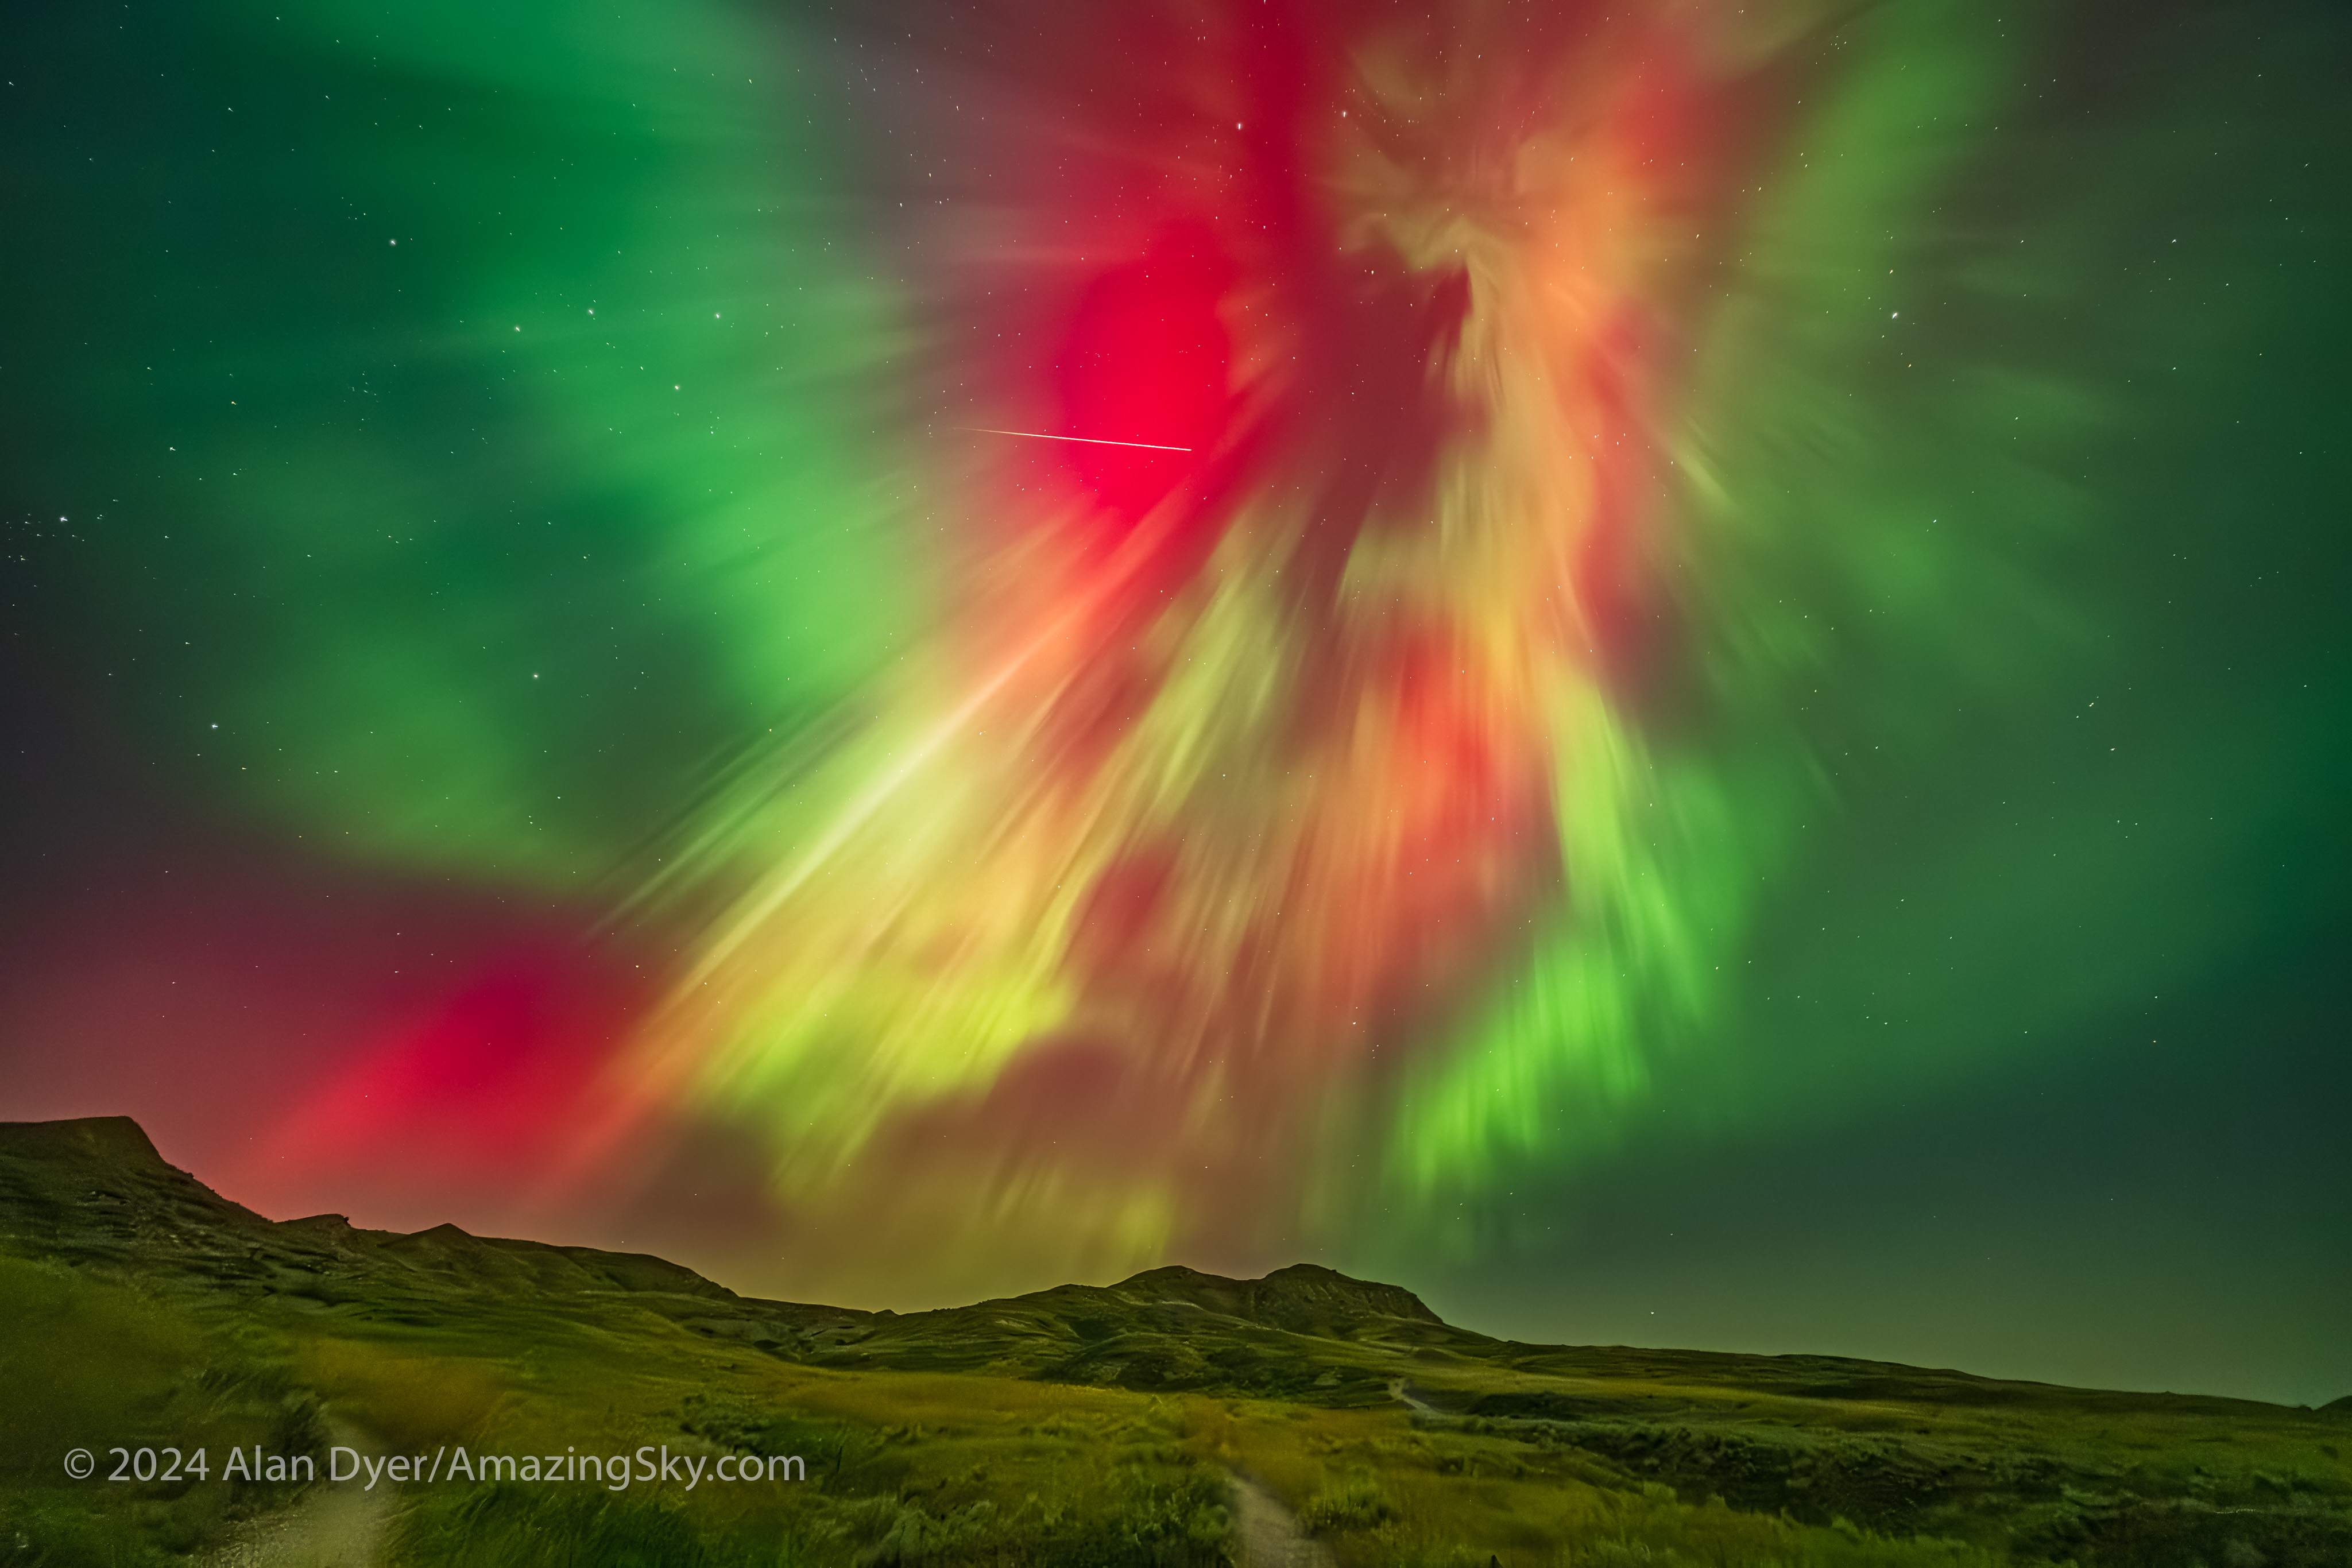
The Northern Lights in a superb display on August 11-12, 2024, at Grasslands National Park, Saskatchewan. This is with the Laowa 10mm wide open at f/2.8 on the Nikon Z6III at ISO 6400.
Even so, there’s a lot to be said for having a field that extends for 130° across the long dimension of a full-frame sensor. That’s more than enough to go from well below the horizon to past the zenith when the camera is in portrait orientation. Even in landscape orientation (as above) the lens covers nearly a 90° field across the short dimension, enough to go almost from horizon to zenith.
The f/2.8 speed is slower than the other lenses on test here, but is still faster than most ultra-wide lenses. Remarkably, it accepts common 77mm filters, the same as the Nikkor 20mm and Viltrox 16mm.
The 10mm is available as an auto-focus lens for Sony E and Nikon Z, and in manual focus versions for Canon RF and Panasonic L, oddly all at the same price.
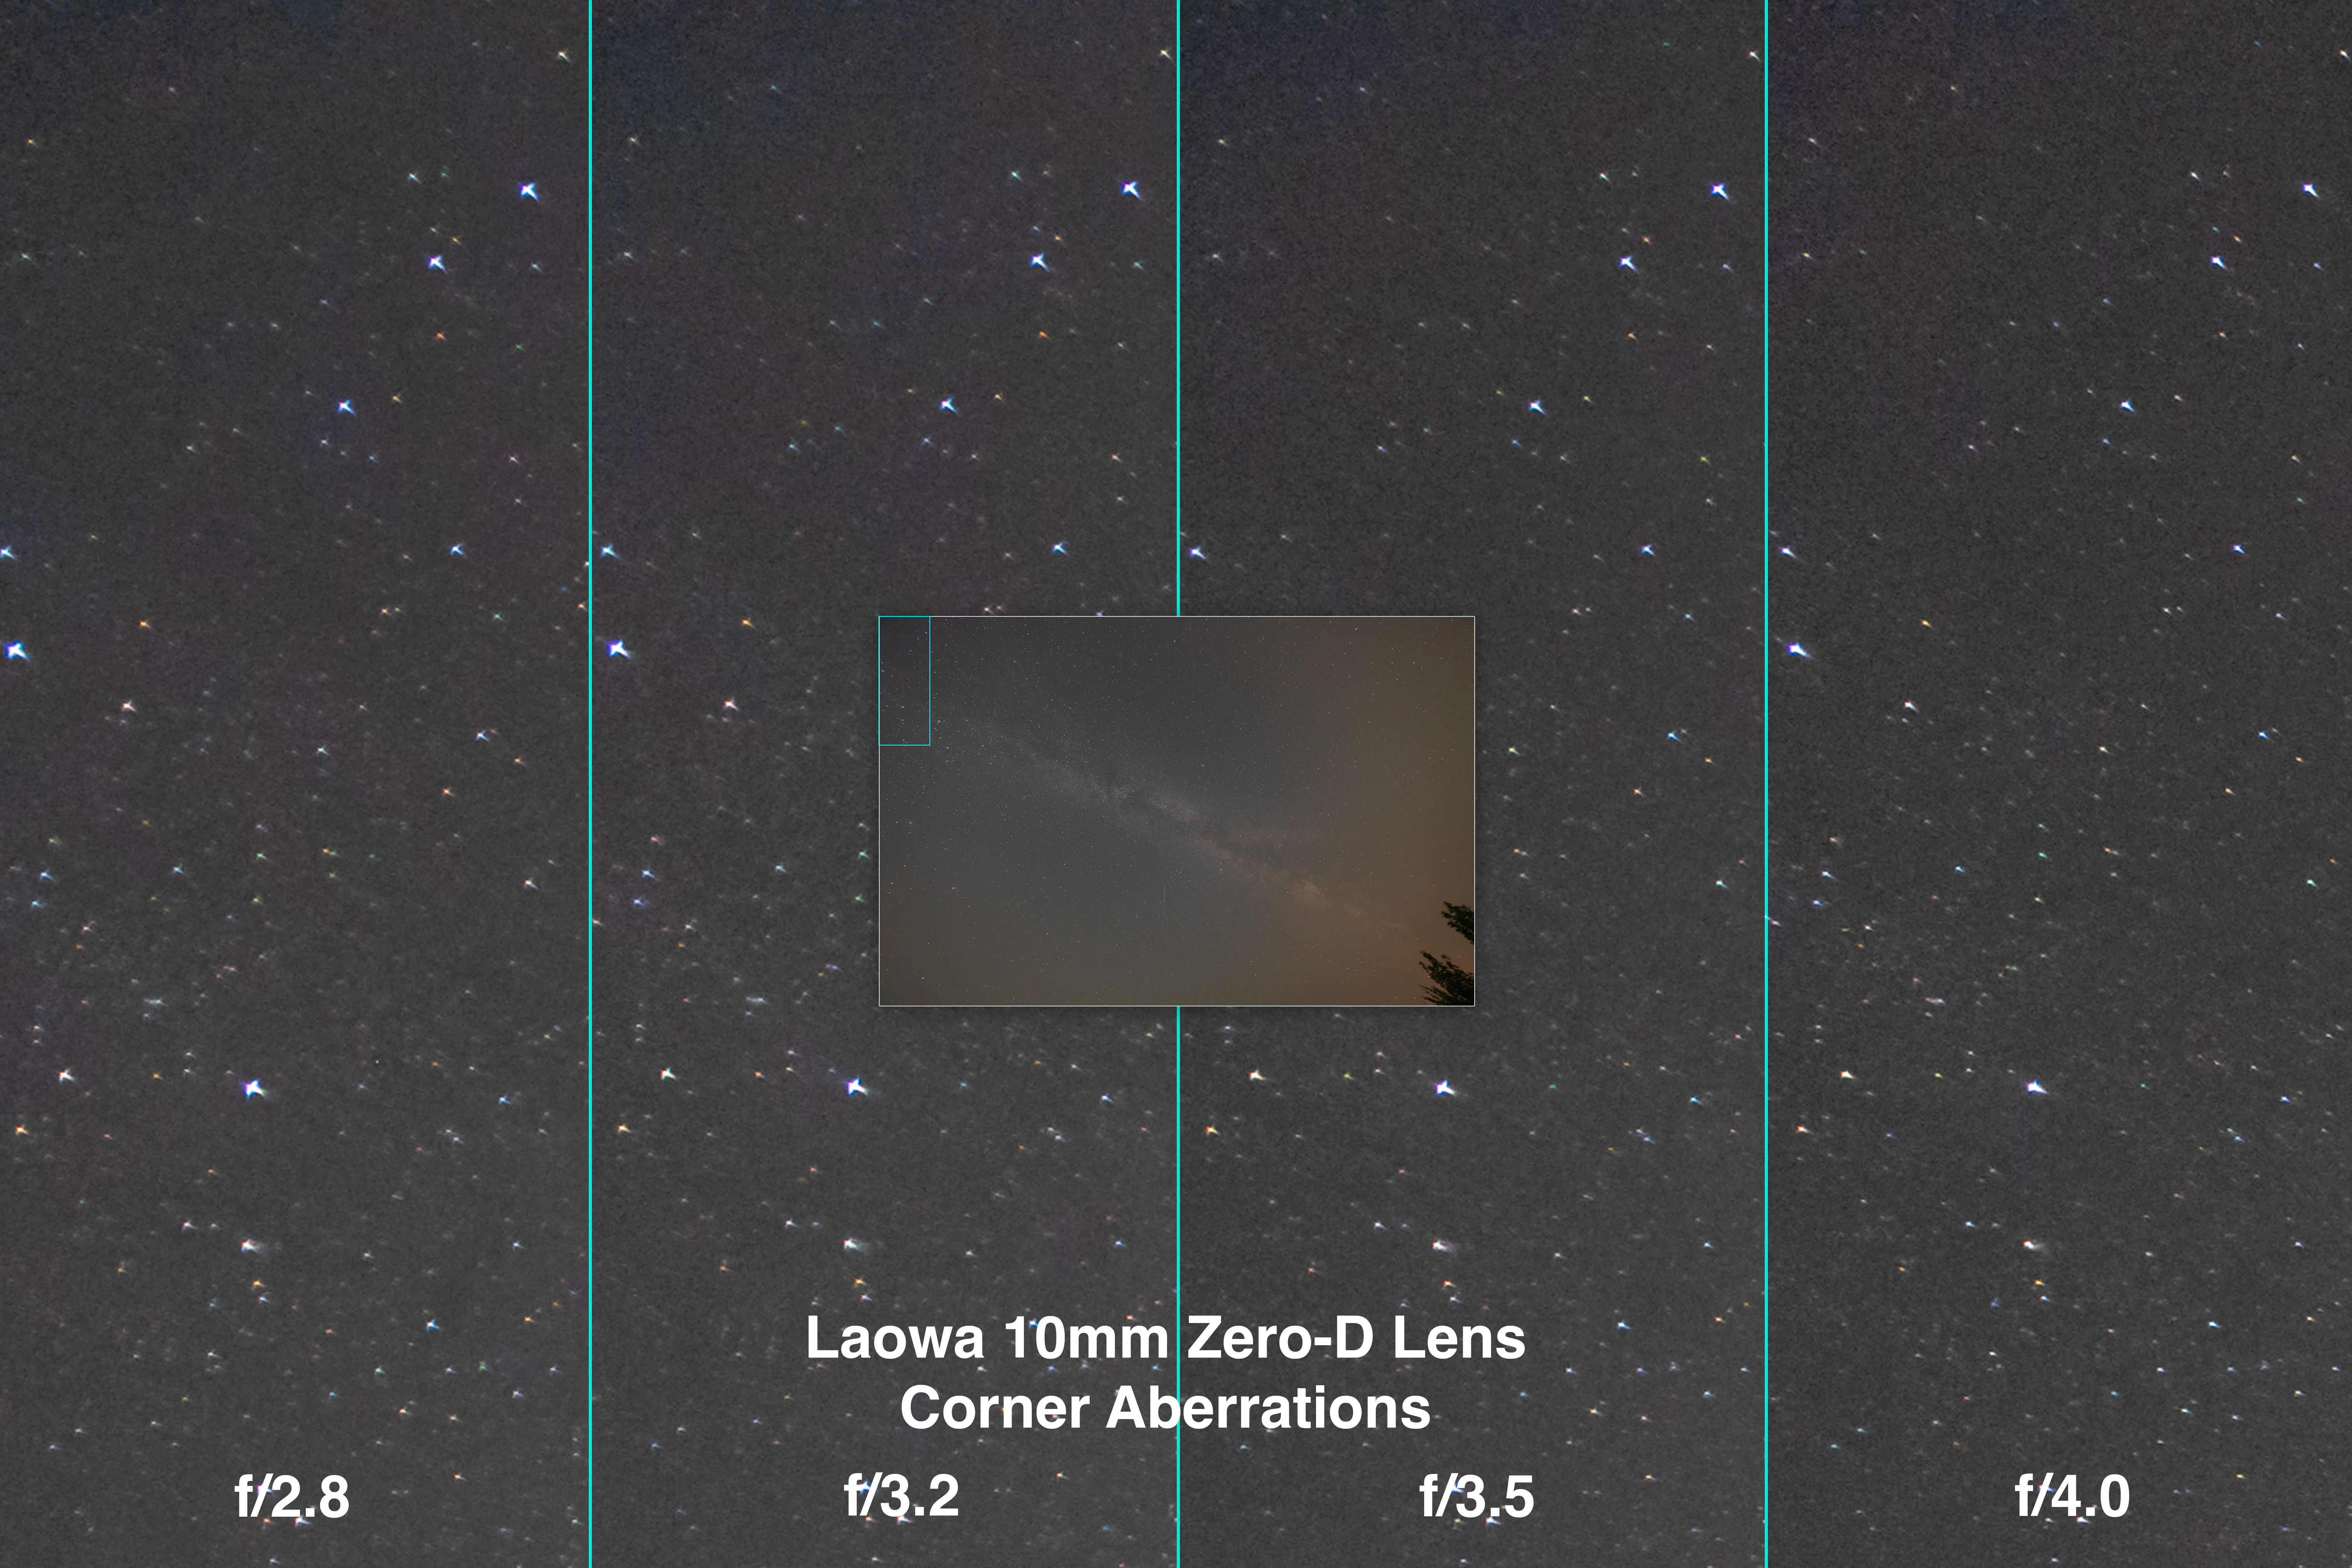
Laowa 10mm Corner Aberrations
The four panels show the corner area outlined in the inset, at four apertures between f/2.8 and f/4.
Corner aberrations are much worse than in the 20mm and 16mm lenses, showing a fair degree of tangential and sagittal astigmatism, elongating stars radially and adding wings to them, respectively. The aberrations are larger and reach deeper into the frame than in the Nikkor and Viltrox lenses.
There’s also some lateral chromatic aberration adding blue and purple fringes to the stars at the corners. Stopping down to f/4 improves, but doesn’t eliminate, the aberrations.
Laowa 10mm Vignetting
The four panels show the left side, as outlined in the inset, which shows the f/2.8 image.
Edge and corner darkening were also worse than in the other lenses and required about a +50 setting to correct in Adobe Camera Raw, far less than the maximum of +100. So it’s still quite acceptable and correctable.
However, while stopping the lens down to f/4 improves vignetting, it does not eliminate it, still requiring a +40 correction. Vignetting will be a factor to deal with in all astrophotos with this ultra-wide lens.
Laowa 10mm Lens Flares
Three panels showing the Moon framed in the left corner (L), centred (C), and in the right corner (R).
With such a wide lens, the Moon or other bright light sources are bound to be within the frame. The Laowa exhibits a prominent internal lens flare when bright objects are in the corners, but just in the corners. Objects near the edge but centered are fine.
Showing the effect of decreasing aperture on the lens flare and bright light source.
Stopping down the lens adds diffraction spikes (or “sunstars”) to bright lights, but doesn’t eliminate the circular internal reflection. None of this is a serious issue for most images, but it is something to be mindful of when framing nightscapes.
With the Laowa 10mm lens at f/2.8 on the Nikon Z6III at ISO 3200. Note the Big Dipper at left and Orion at right.
In Milky Way and starfield images, constellations in the corners can distort into unnatural shapes that look odd, as I show above. While the lens can take in a great swath of sky, its distortion and corner aberrations make it less than desirable for tracked Milky shots.
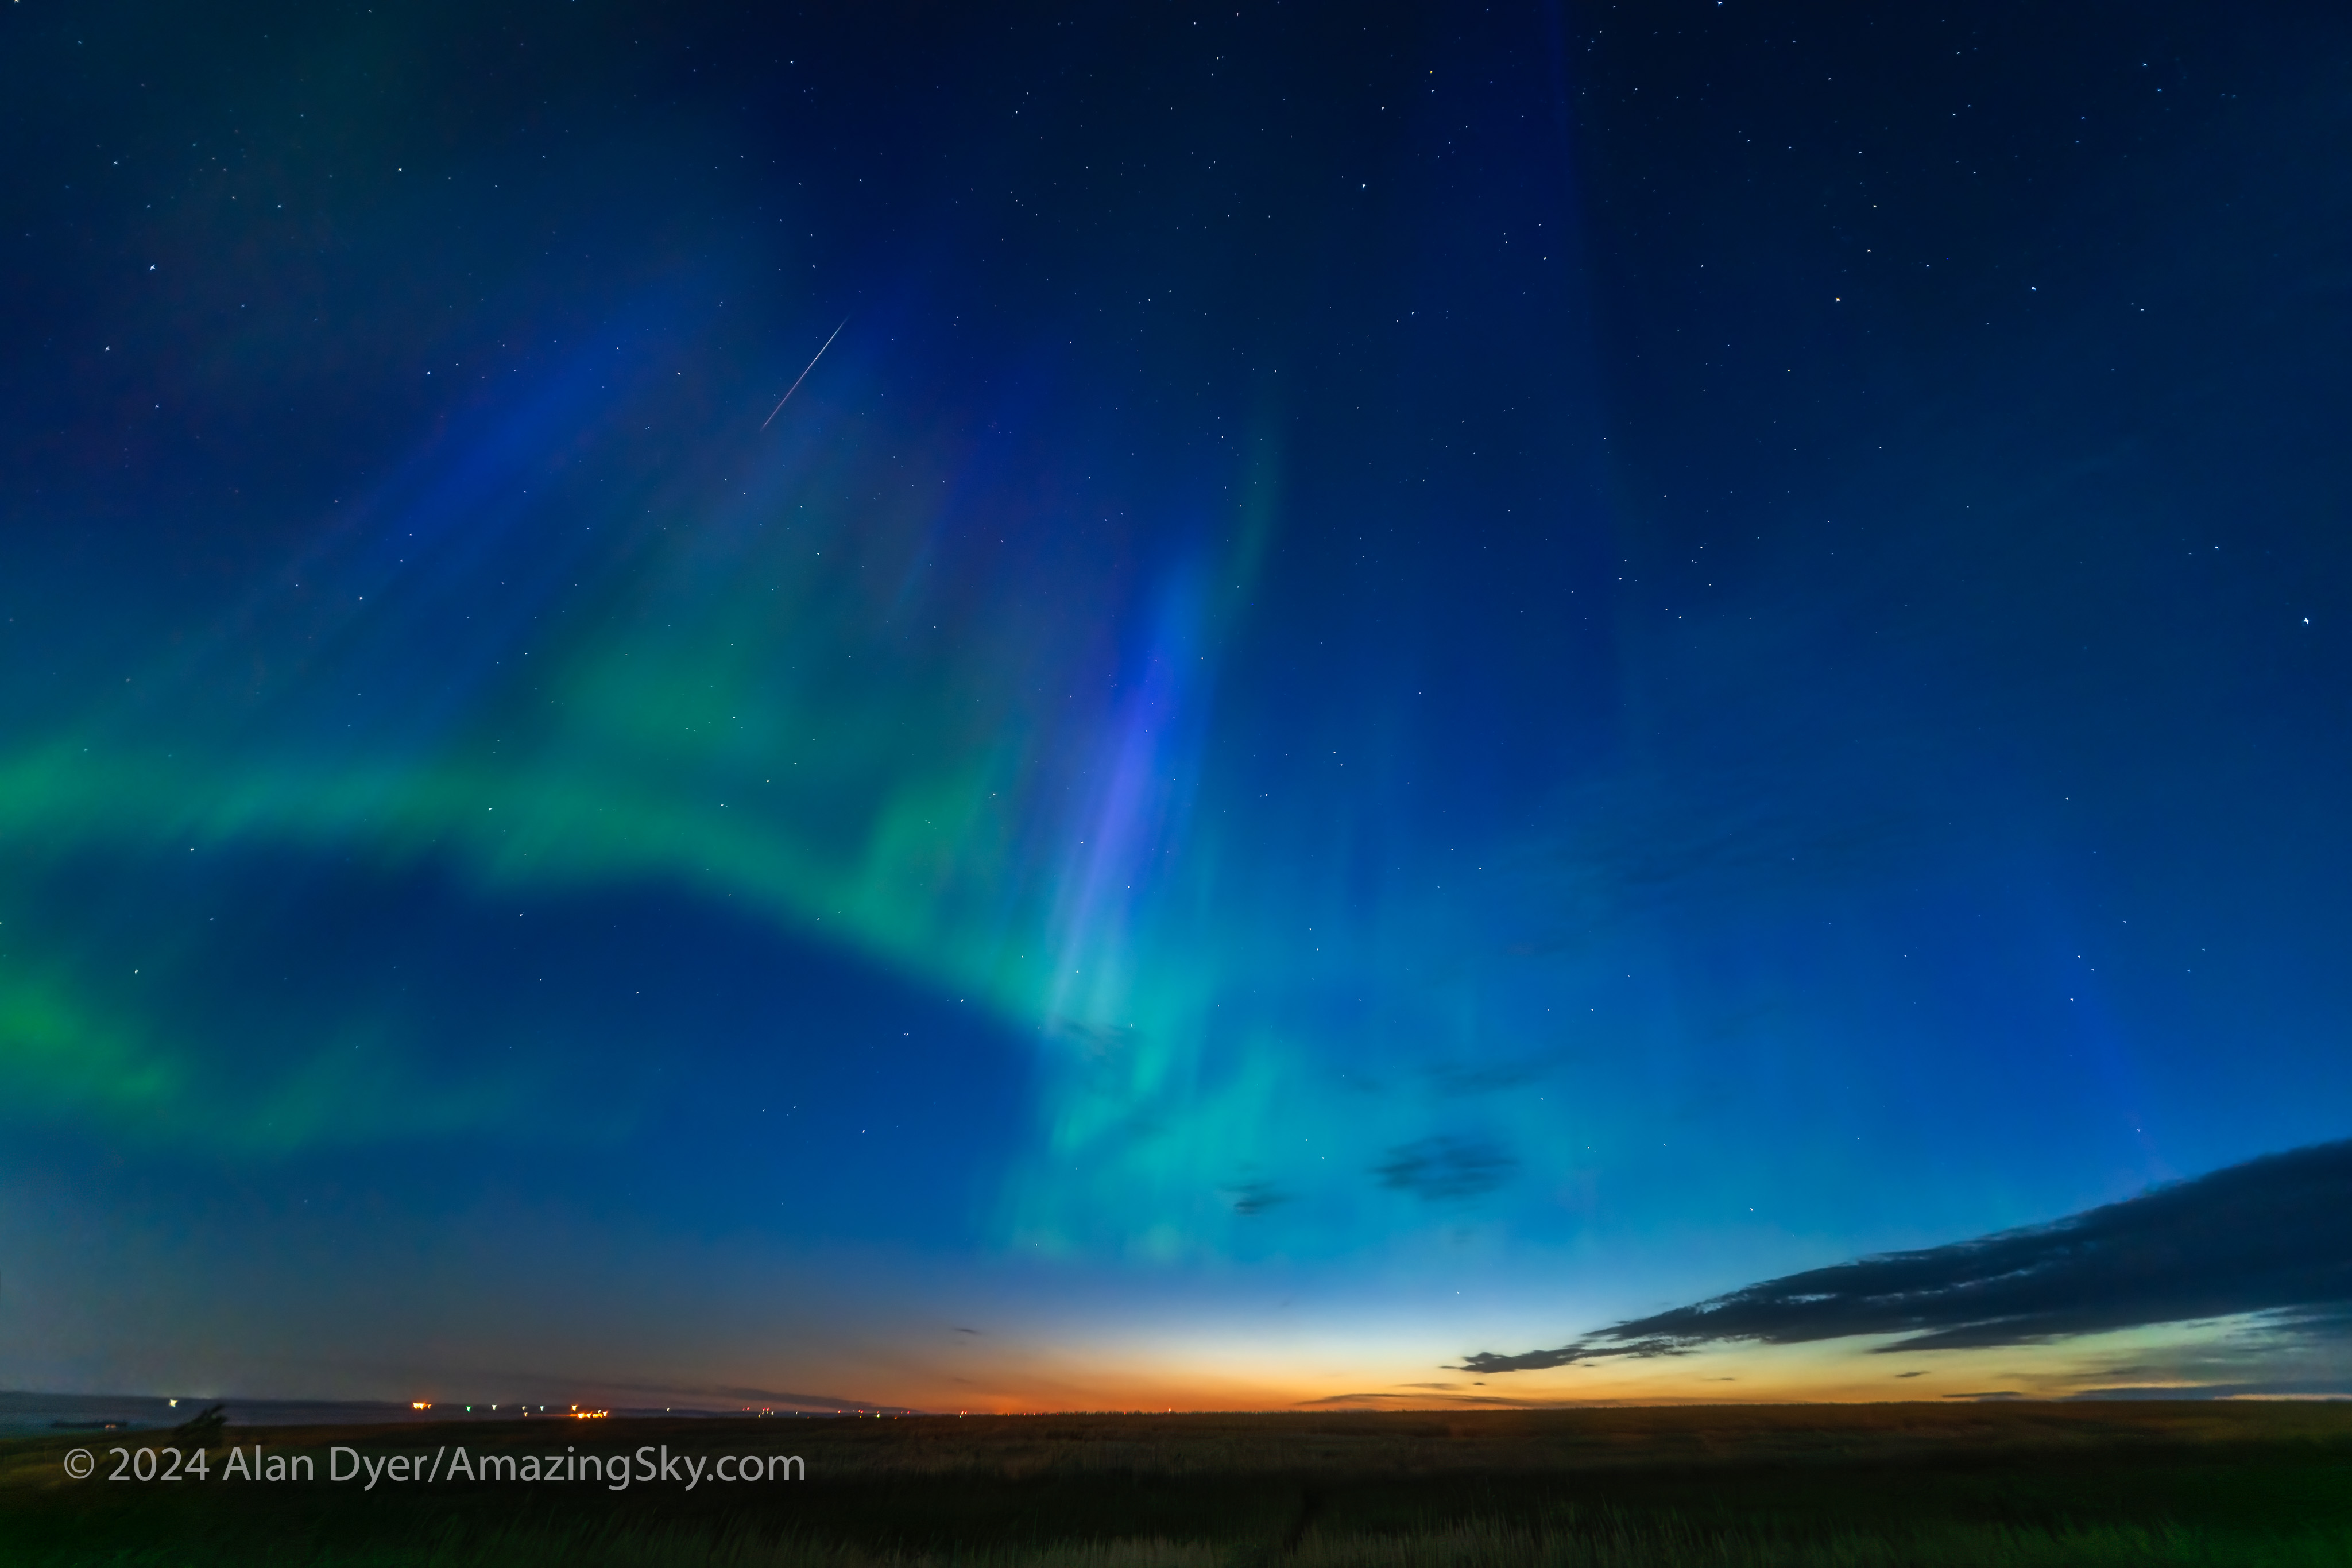
An aurora in the dawn twilight on September 17, 2024. A 4-second exposure with the Laowa 10mm at f/2.8.
Where the Laowa 10mm really proves its worth is for auroras, as above, which can require as wide a field as you can muster. Note the flat horizon.
For ultra-wide nightscapes in a single image (not a panorama) with a natural looking (not curved) horizon, and for meteor showers, the Laowa is just the ticket.
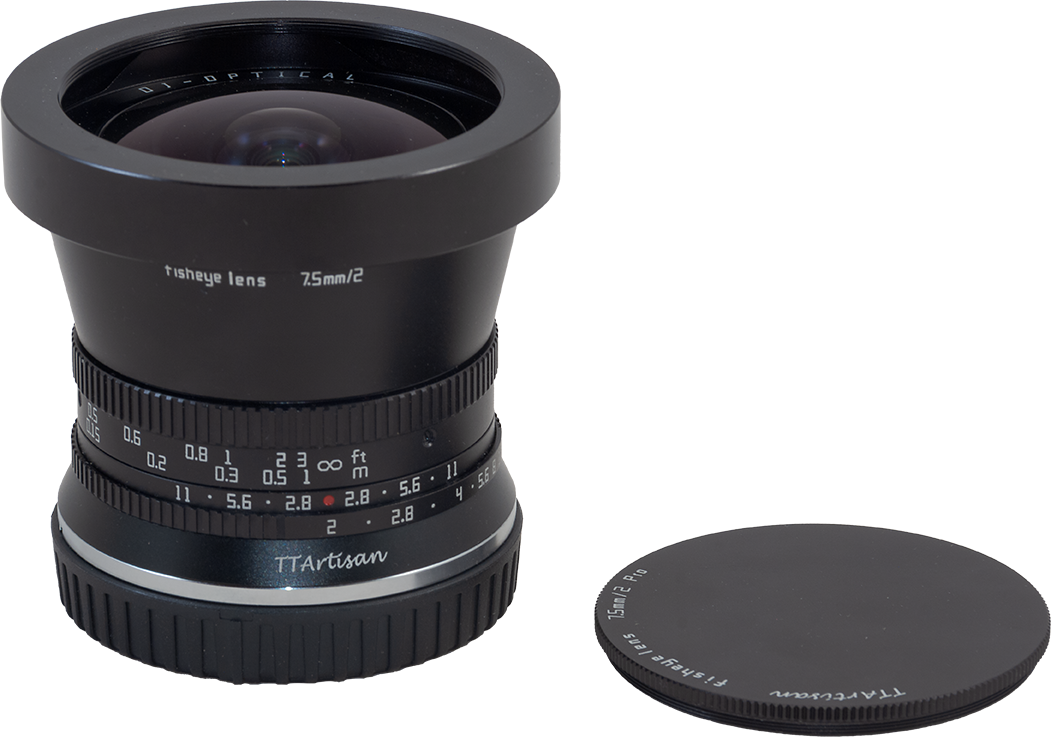
BONUS TEST: The TTArtisan 7.5mm f/2 Fish-Eye ($140)
The TTArtisan has a fixed lens hood. Front filters are not possible without vignetting. There’s no weather sealing or electrical connections at this price.
Technically, this lens is designed to be used on cropped-frame (or APS-sensor) cameras where it fills the frame with a curving horizon. But it works on a full-frame camera where it projects a circular image slightly larger in diameter than the short dimension of the frame, so not a complete circle as with a true circular fish-eye like the old Sigma 8mm f/3.5.
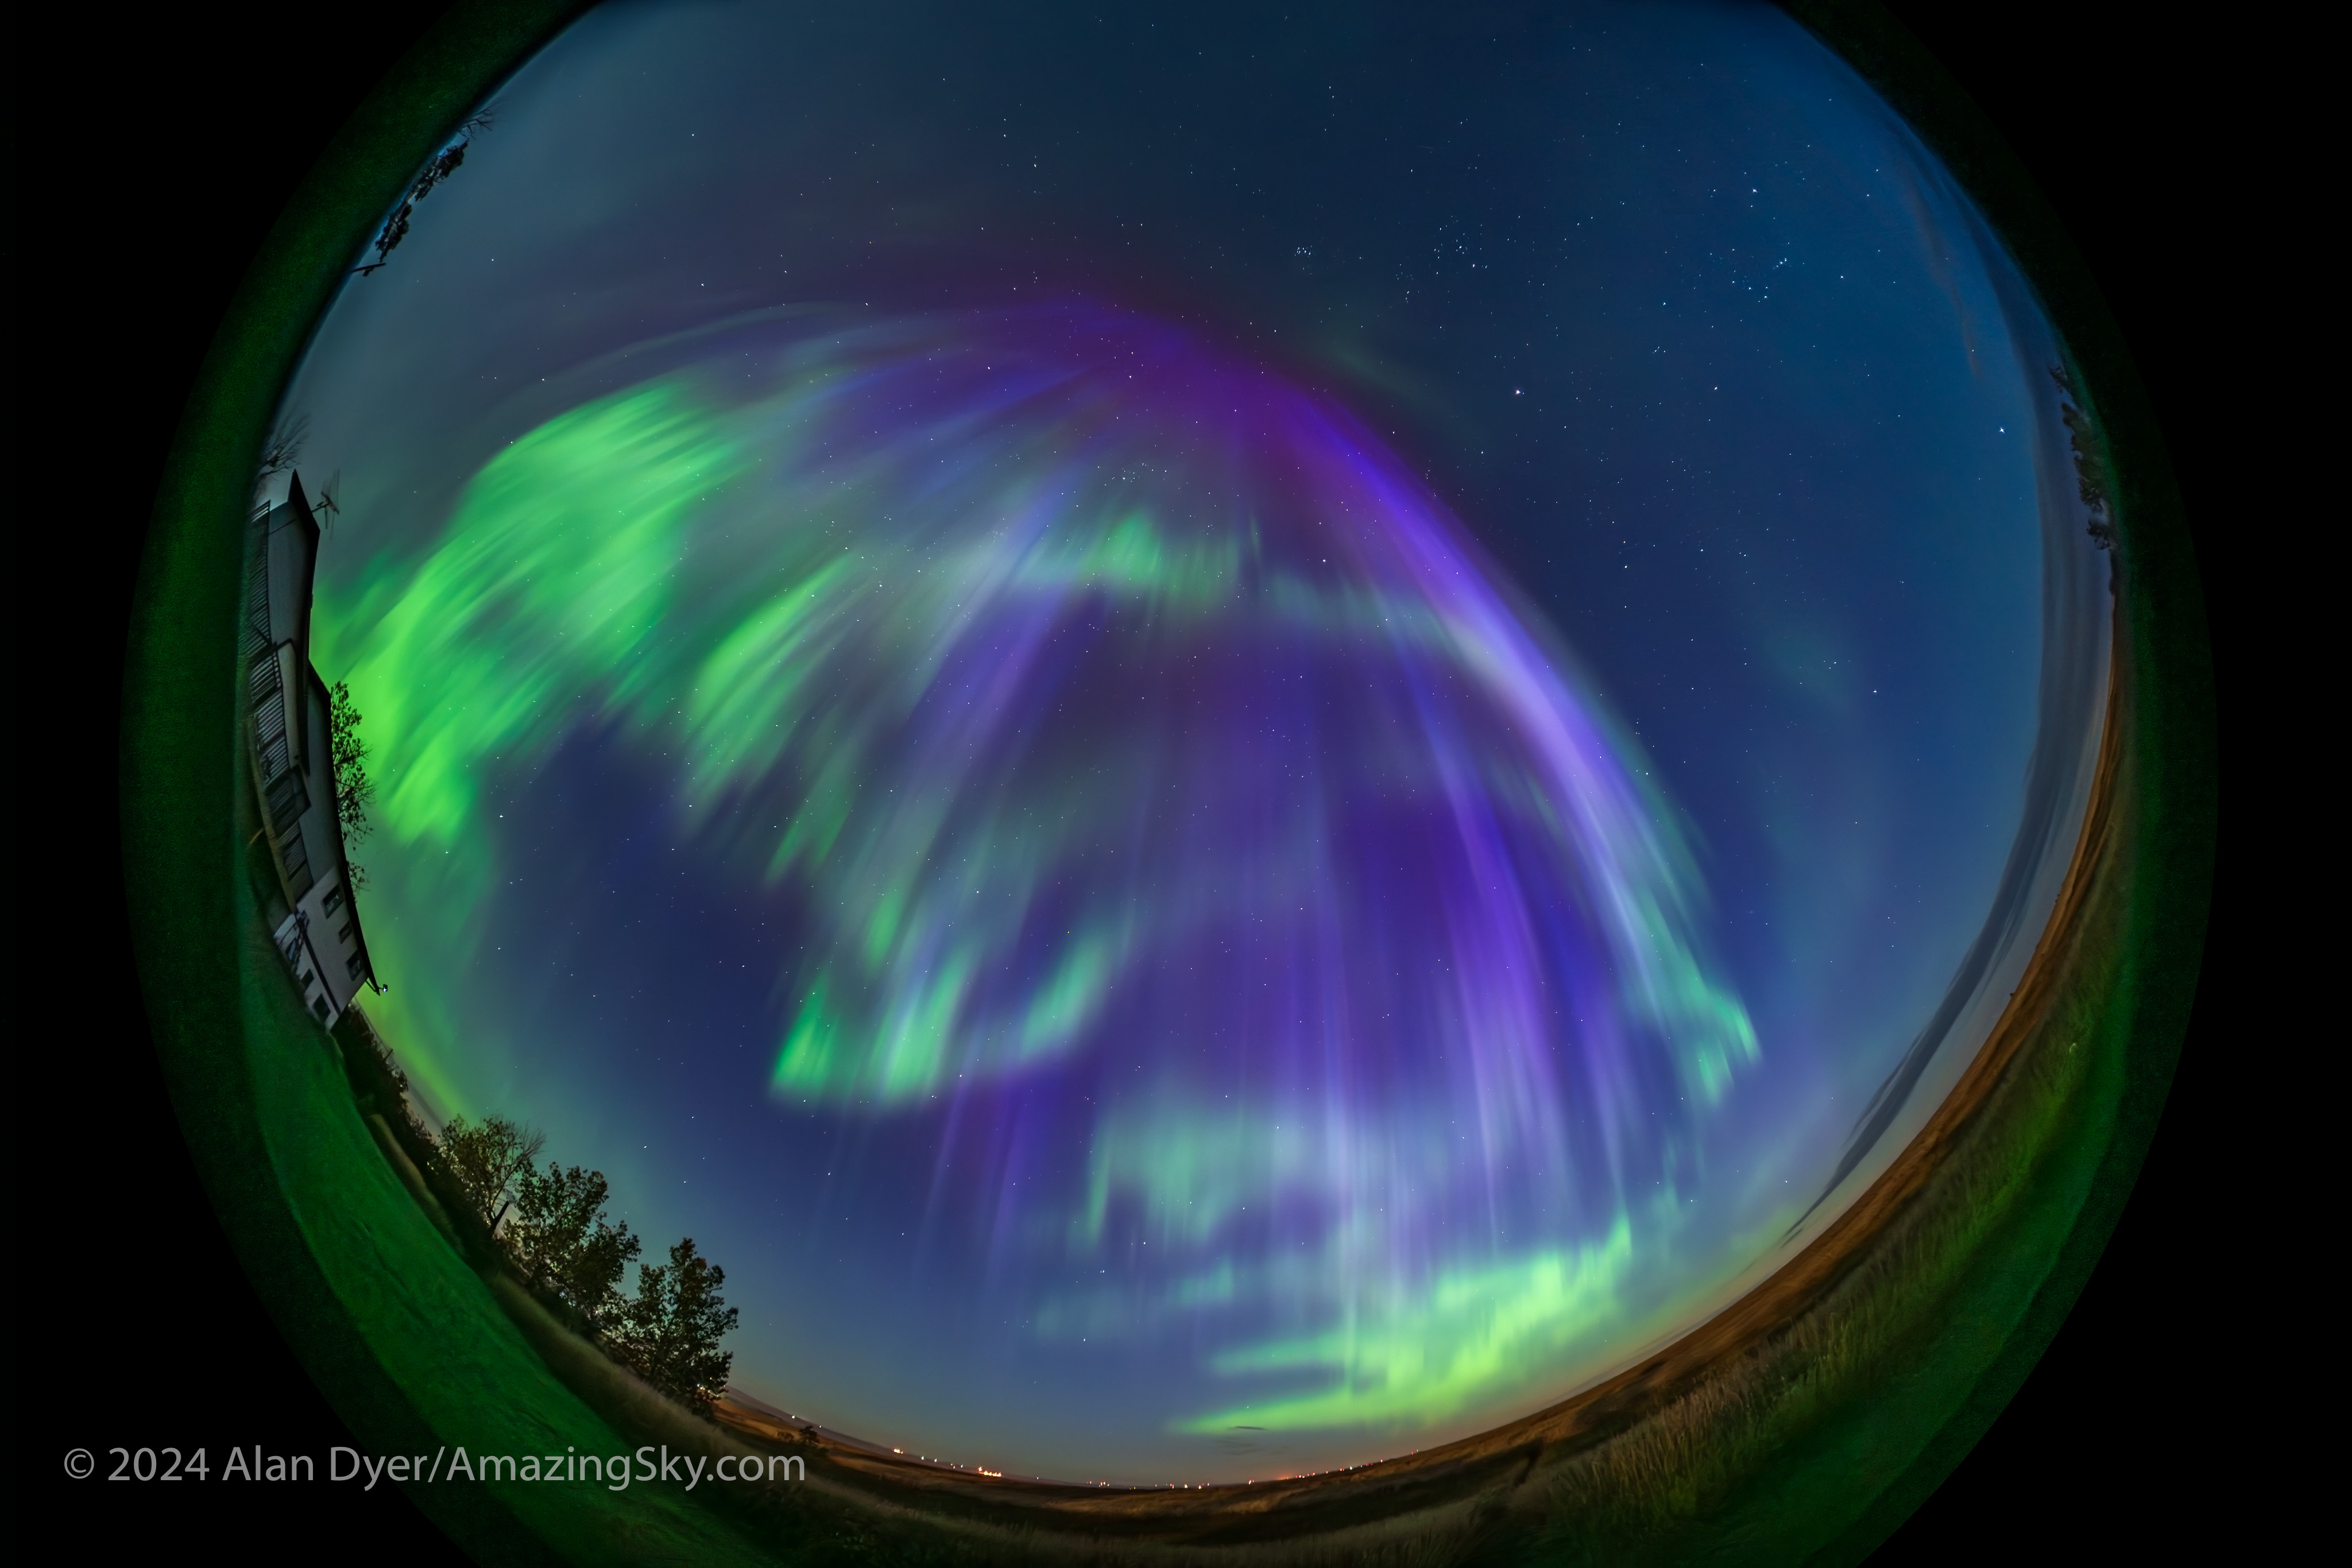
An aurora in the dawn twilight on September 17, 2024 in a 2-second exposure with the TTArtisan 7.5mm fish-eye lens at f/2 on the Nikon Z6III at ISO 800.
For all-sky auroras, this is ideal, where the TTArtisan’s fast f/2 speed is unprecedented in a fish-eye lens. That makes rapid-cadence time-lapses possible, as well as real-time movies. An example is here on my YouTube channel.
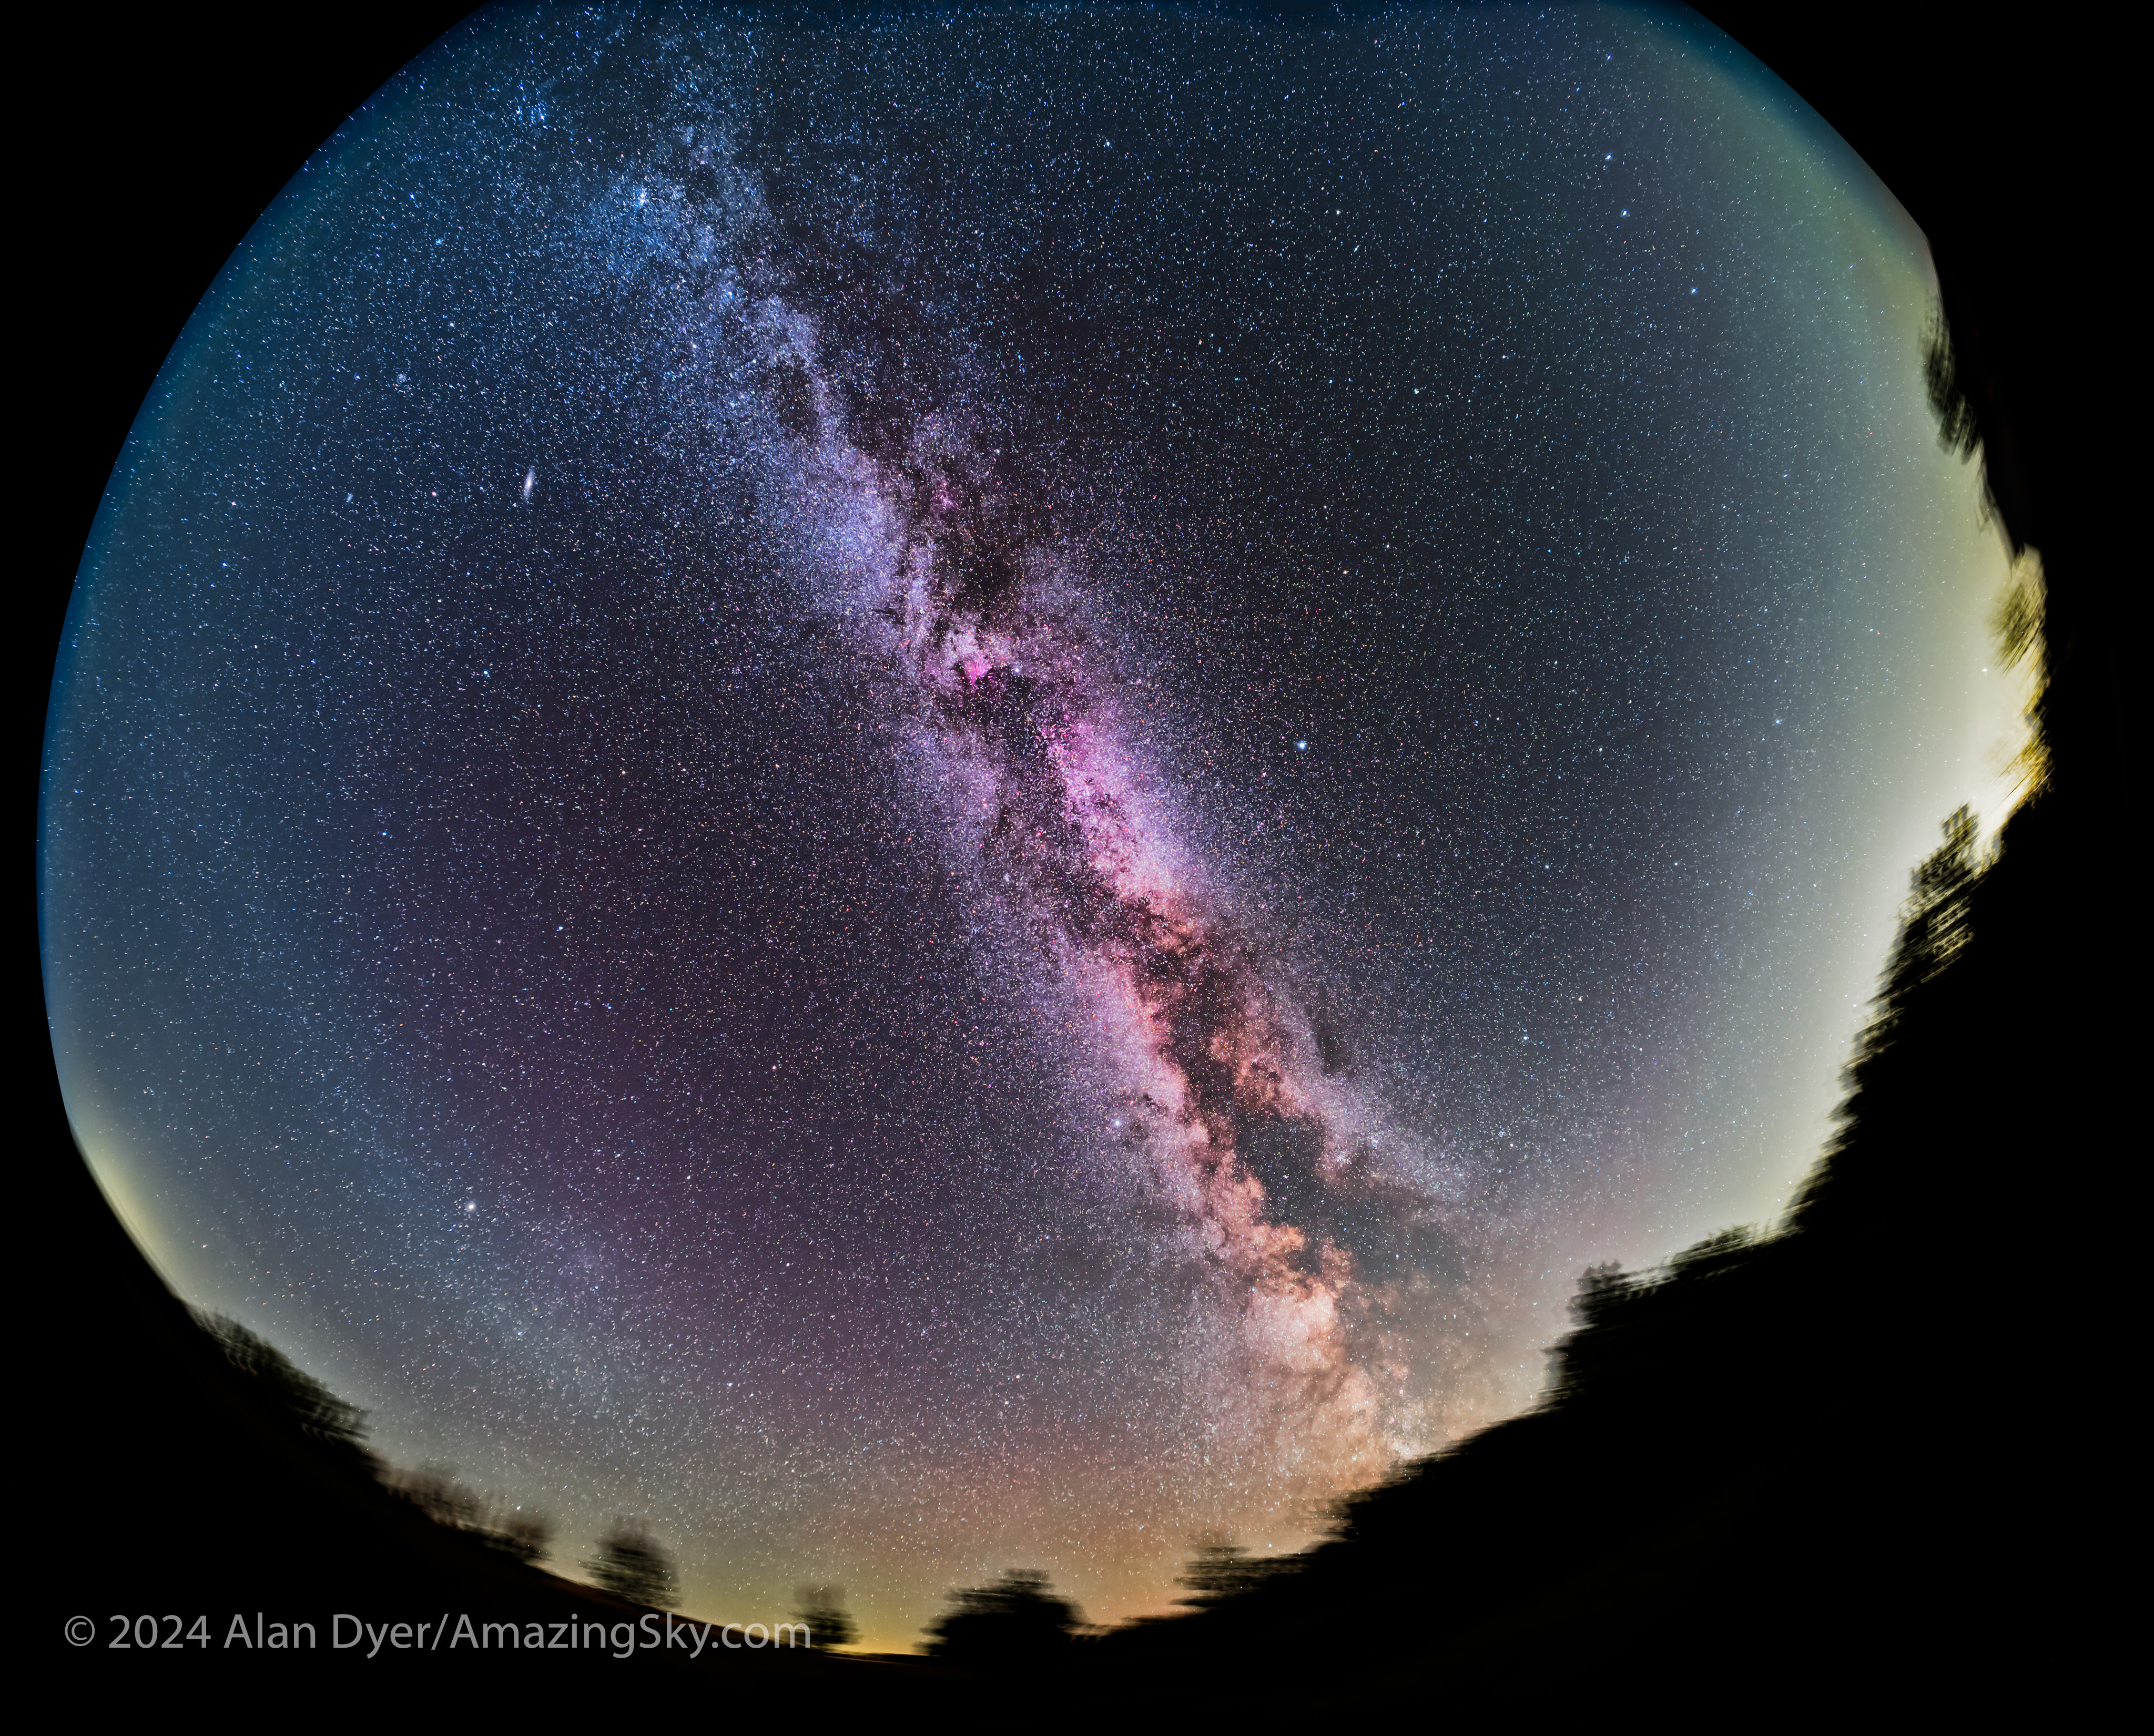
A stack of 4 x 4-minute exposures with the TTArtisan 7.5mm f/2 fish-eye lens stopped down to f/2.8 on the Nikon Z6III at ISO 1600, on the MSM Nomad tracker.
Or you can just capture the Milky Way from horizon to horizon, as above. For the latter, having stars sharp across the circular field is still desirable.
I have this lens for Canon RF as well, but that unit shows a noticeable softening of the left edge with defocused stars, likely from lens de-centering. I was told by TTArtisan that was a normal unit-to-unit variation and not a defect warranting replacement. Annoying!
I hesitated to buy one for my Nikon. But this is such a unique lens, and so affordable, I took the chance. The Nikon Z-mount version proved much better.
TTArtisan 7.5mm Edge Performance
There is no corner performance or vignetting to test here.
TTArtisan 7.5mm lens at f/2, showing the left side area shown in the blowups below.
Instead, I’m inspecting the same side on the Nikon Z version that caused a problem on my Canon version.
Comparing f/2 and f/2.8 edge aberrations.
The Nikon version looks fine, with stars sharp along the edge even at f/2, showing just a low level of astigmatism, to be expected in such a fast, wide lens. Stars tighten up a bit more at f/2.8. Most critically, the field was flat and in focus across the frame. There was no evidence of lens de-centering or optical defects.
The edges do show some discolouration and a soft edge to the image area. I also see two odd dark protrusions at the top of the frame. Looking through the lens, there’s nothing obvious intruding into the light path.
Keep in mind when used on a full-frame camera you’re seeing more of the projected image than was intended in the design.
The 7.5mm lens comes with a metal lens cap with a threaded centre disk. Remove it to create an aperture that vignettes the image to a smaller but complete circle.
The TTArtisan 7.5mm is a specialty lens to be sure. But at its low price it isn’t a big outlay to include in your lens arsenal, for unique all-sky images, of auroras, satellite passages, sky colours, and the Milky Way. And it is terrific for time-lapses and movies of the whole sky. It is a no-frills manual lens available for most camera mounts.
Recommendations
The Viltrox 16mm, Laowa 10mm and TTArtisan 7.5mm are all available for Sony E-mount. The Laowa and TTArtisan are available for Canon RF, but the Viltrox 16mm is not, as it is an auto-focus, full-frame lens, the class of lenses Canon has yet to allow on their RF mounts, much to the disdain of all concerned but Canon management it seems.
Viltrox 16mm — For nightscape use, the Viltrox 16mm might be the single best choice, as being the most versatile and affordable of the trio of wide-angle lenses. Its focal length is a good balance between the usual 14mm and what I think is a more useful 20mm.
Nikkor 20mm — I like the Nikkor 20mm for its lower level of vignetting, slightly tighter framing, and very sharp stars. I think a 20mm is an ideal focal length for many nightscapes and Milky Way scenes. But it is the most expensive lens tested here.
Laowa 10mm — While nearly as costly as the Nikkor 20mm, the Laowa 10mm is much more specialized and, I think, not as useful as the others for general nightscape and Milky Way shooting. But it is superb for auroras, if you are in a place where they are common, as they are here in Alberta. Otherwise, I think you’d find the 10mm a costly lens that might not see a lot of use for astrophotography. Its real forté is architecture and real-estate interiors.
TTArtisan 7.5mm — Ditto on its limited use. But it is so affordable it’s easy to justify even if it doesn’t get a lot of use. The astro images, time-lapses, and movies it can produce are unique and impossible to create any other way. Be sure to buy it from a source where you can return it easily if you find your sample defective.
Reason To Go Mirrorless
The quality of these and other premium lenses from Nikon, and also from Canon, Sony and third-party makers like Sigma and Viltrox, is one of the major benefits of migrating to mirrorless cameras. DSLRs, and the lenses made for them, are now effectively dead as new gear choices.
Yes, mirrorless cameras can be better in many aspects of their operation than DSLRs. But it is the lenses made for mirrorless that show the greatest improvement over their DSLR equivalents, many of which date back to the forgiving film days.
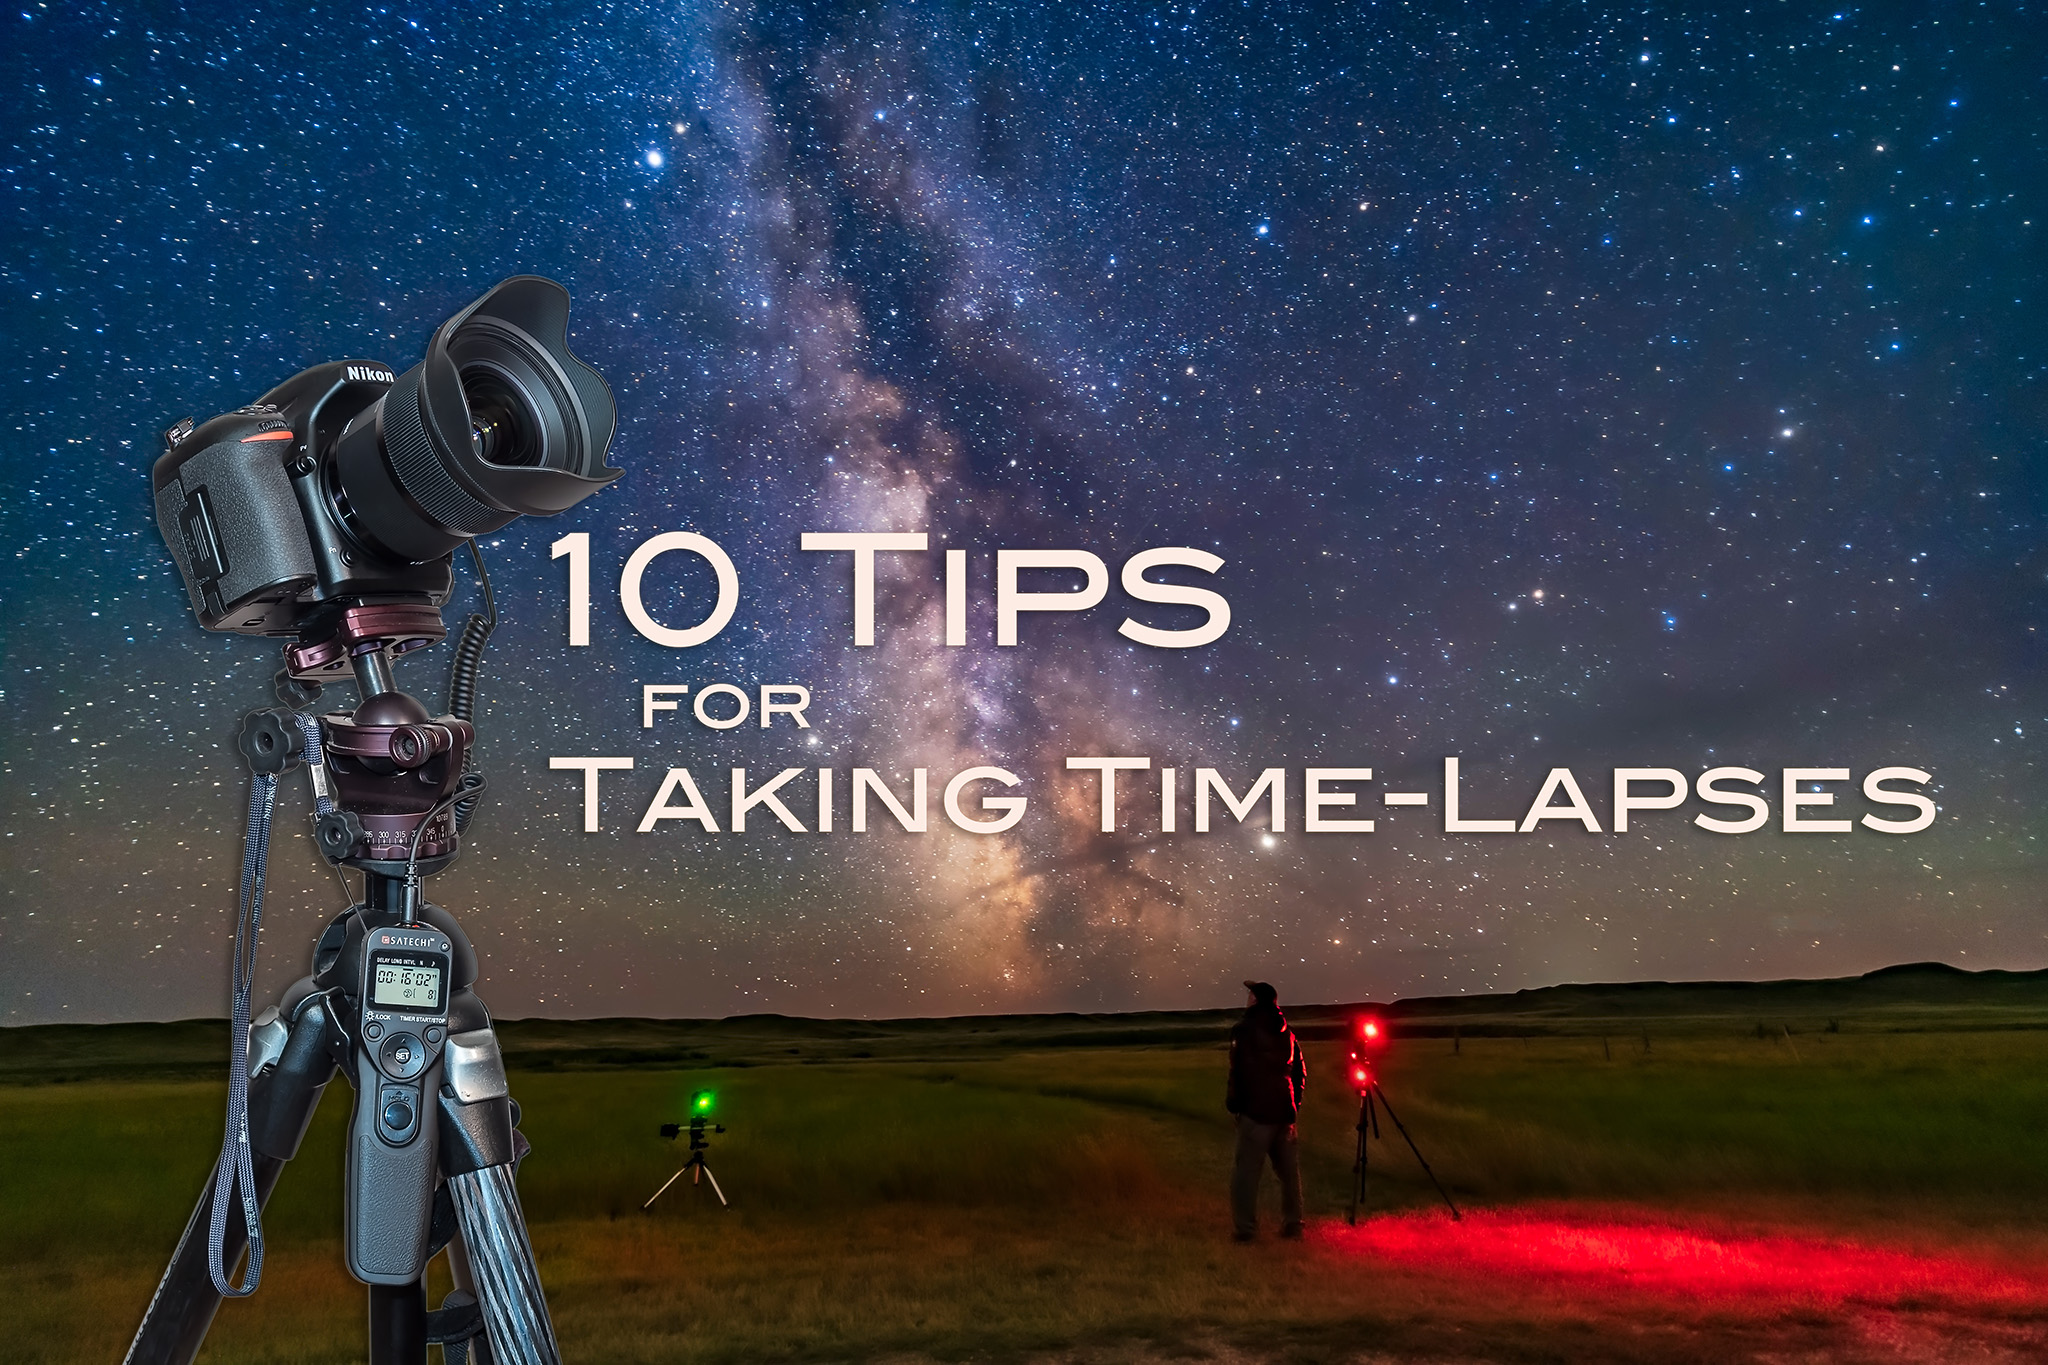
I present my top 10 tips for capturing time-lapses of the moving sky.
If you can take one well-exposed image of a nightscape, you can take 300. There’s little extra work required, just your time. But if you have the patience, the result can be an impressive time-lapse movie of the night sky sweeping over a scenic landscape. It’s that simple.
Or is it?
Here are my tips for taking time-lapses, in a series of “Do’s” and “Don’ts” that I’ve found effective for ensuring great results.
But before you attempt a time-lapse, be sure you can first capture well-exposed and sharply focused still shots. Shooting hundreds of frames for a time-lapse will be a disappointing waste of your time if all the images are dark and blurry.
For that reason many of my tips apply equally well to shooting still images. But taking time-lapses does require some specialized gear, techniques, planning, and software. First, the equipment.
NOTE: This article appeared originally in Issue #9 of Dark Sky Travels e-magazine.
SELECTING EQUIPMENT
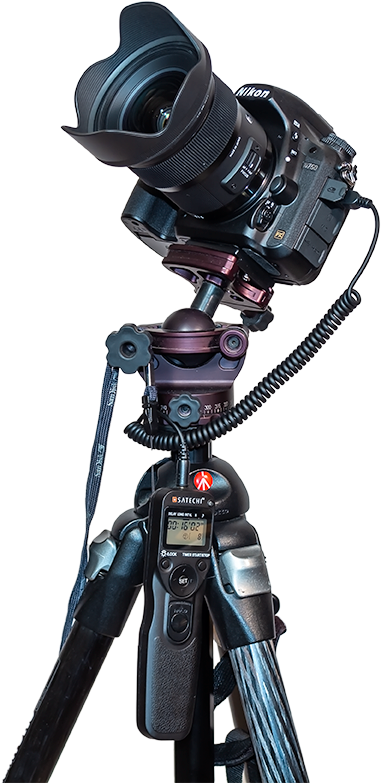
Essential Gear Time-lapse photography requires just the camera and lens you might already own, but on a solid tripod (a carbon-fibre Manfrotto with an Acratech ball-head is shown here), and with an intervalometer.
TIP 1 — DO: Use a solid tripod
A lightweight travel tripod that might suffice for still images on the road will likely be insufficient for time-lapses. Not only does the camera have to remain rock steady for the length of the exposure, it has to do so for the length of the entire shoot, which could be several hours. Wind can’t move it, nor any camera handling you might need to do mid-shoot, such as swapping out a battery.
The tripod needn’t be massive. For hiking into scenic sites you’ll want a lightweight but sturdy tripod. While a carbon fibre unit is costly, you’ll appreciate its low weight and good strength every night in the field. Similarly, don’t scrimp on the tripod head.
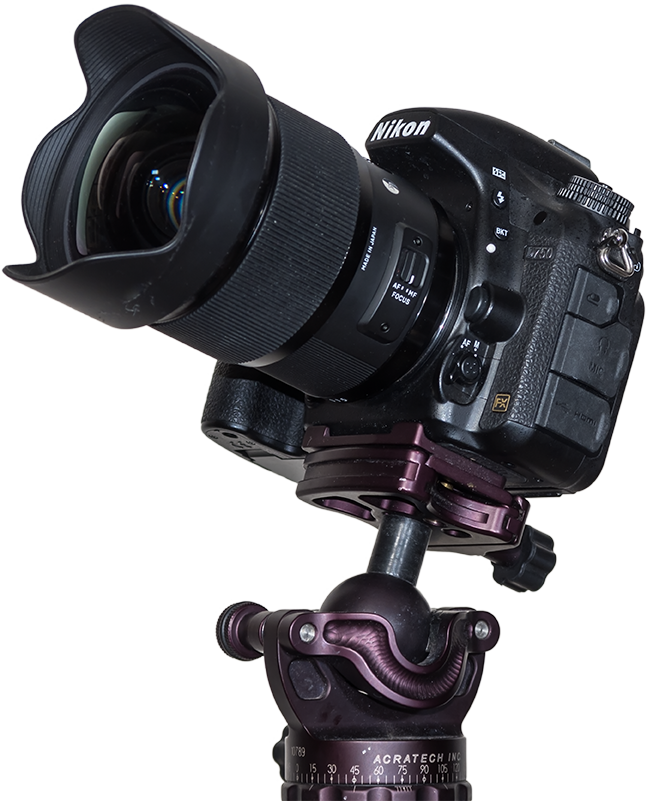
TIP 2 — DO: Use a fast lens
The All-Important Lens A fast lens is especially critical for time-lapses to allow capturing good sky and ground detail in each exposure, as compositing later won’t be feasible. This is the Sigma 20mm f/1.4 Art lens.
As with nightscape stills, the single best purchase you can make to improve your images of dark sky scenes is not buying a new camera (at least not at first), but buying a fast, wide-angle lens.
Ditch the slow kit zoom and go for at least an f/2.8, if not f/2, lens with 10mm to 24mm focal length. This becomes especially critical for time-lapses, as the fast aperture allows using short shutter speeds, which in turn allows capturing more frames in a given period of time. That makes for a smoother, slower time-lapse, and a shoot you can finish sooner if desired.
TIP 3 — DO: Use an intervalometer
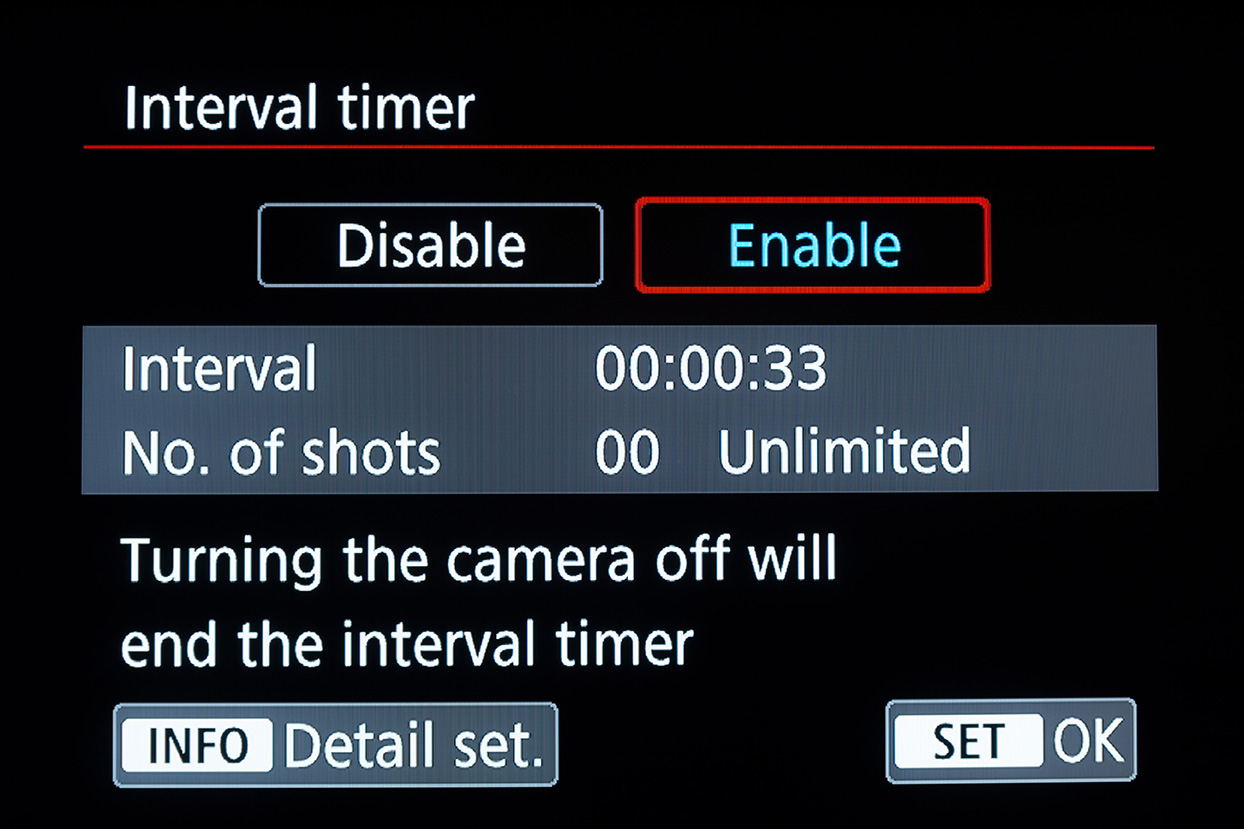
Canon intervalometer functions
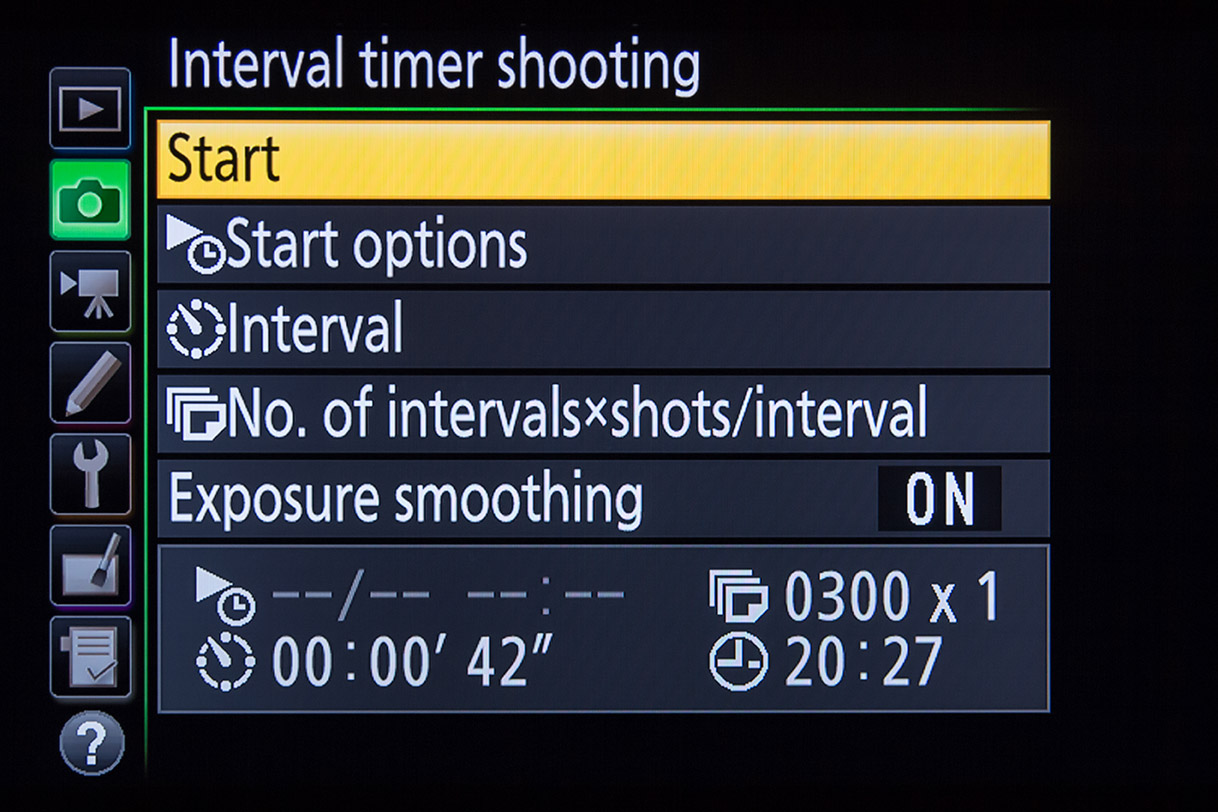
Nikon intervalometer functions
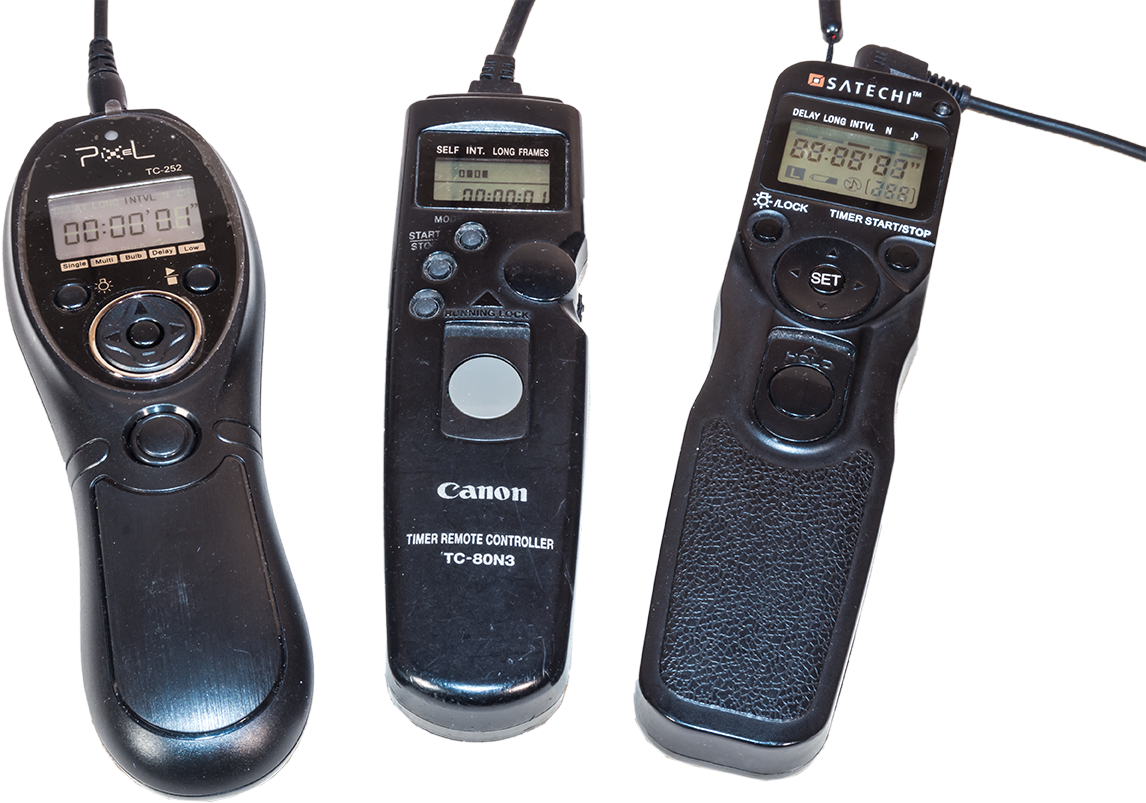
Automating the Camera The intervalometer is also key. For cameras without an internal intervalometer (screens from a Canon and a Nikon are shown above), an outboard unit like one of these, is essential. Be sure to get the model that fits your camera’s remote control jack.
Time-lapses demand the use of an intervalometer to automatically fire the shutter for at least 200 to 300 images for a typical time-lapse. Many cameras have an intervalometer function built into their firmware. The shutter speed is set by using the camera in Manual mode.
Just be aware that a camera’s 15-second exposure really lasts 16 seconds, while a 30-second shot set in Manual is really a 32-second exposure.
So in setting the interval to provide one second between shots, as I advise below, you have to set the camera’s internal intervalometer for an interval of 17 seconds (for a shutter speed of 15 seconds) or 33 seconds (for a shutter speed of 30 seconds). It’s an odd quirk I’ve found true of every brand of camera I use or have tested.
Alternatively, you can set the camera to Bulb and then use an outboard hardware intervalometer (they sell for $60 on up) to control the exposure and fire the shutter. Test your unit. Its interval might need to be set to only one second, or to the exposure time + one second.
How intervalometers define “Interval” varies annoyingly from brand to brand. Setting the interval incorrectly can result in every other frame being missed and a ruined sequence.
SETTING YOUR CAMERA
TIP 4 — DON’T: Underexpose
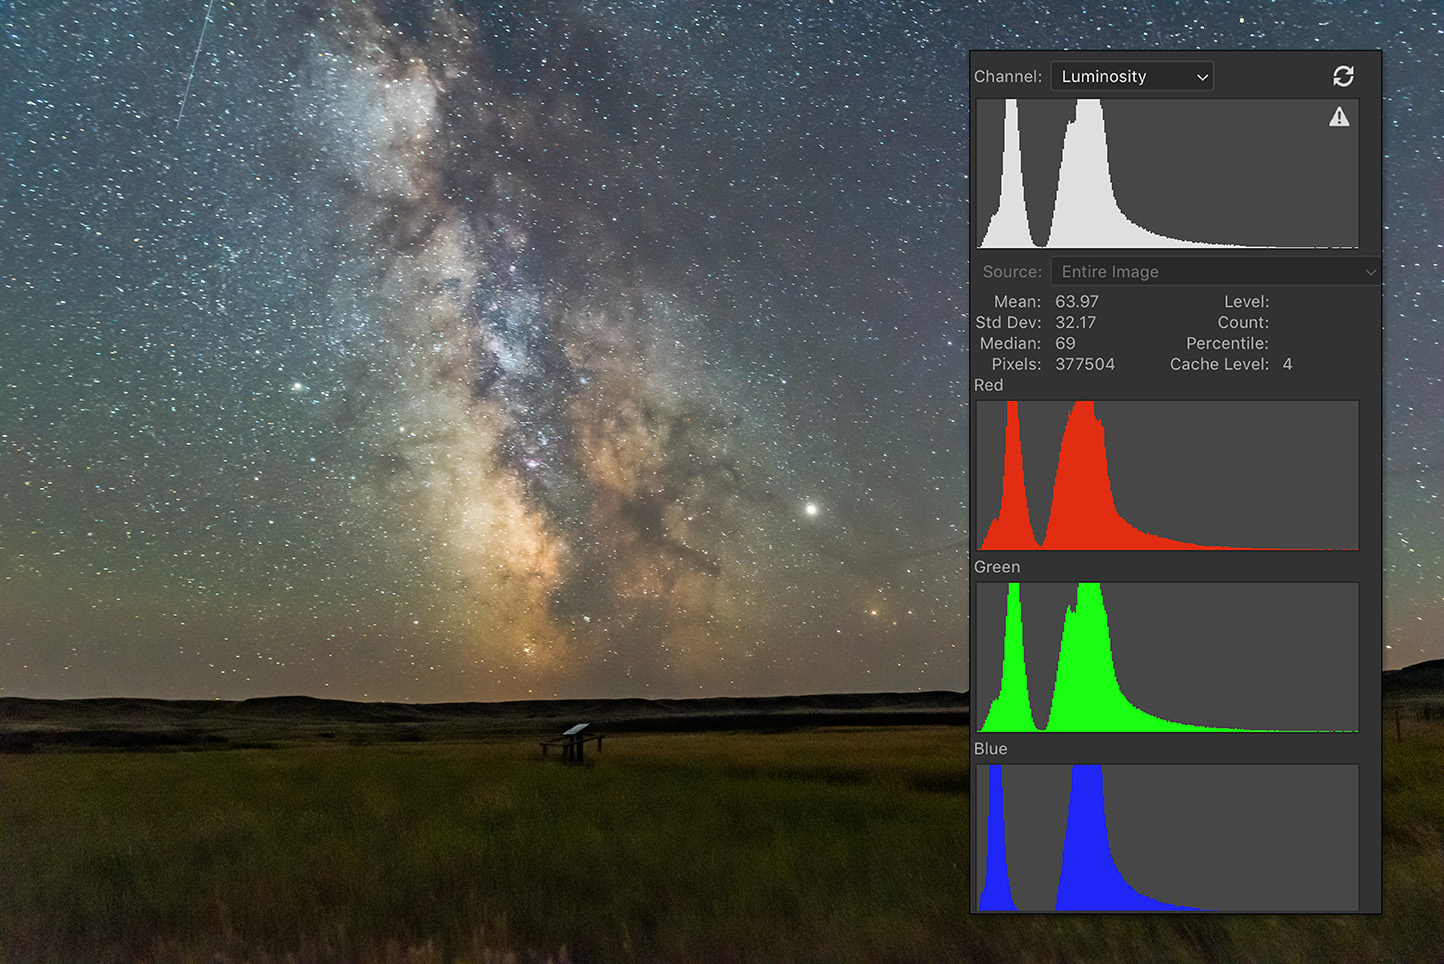
Expose to the Right When shooting, choose settings that will yield a histogram that is not slammed to the left, but is shifted to the right to minimize noise and lift details in the shadows.
As with still images, the best way to beat noise is to give the camera signal. Use a wider aperture, a longer shutter speed, or a higher ISO (or all of the above) to ensure the image is well exposed with a histogram pushed to the right.
If you try to boost the image brightness later in processing you’ll introduce not only the very noise you were trying to avoid, but also odd artifacts in the shadows such as banding and purple discolouration.
With still images we have the option of taking shorter, untrailed images for the sky, and longer exposures for the dark ground to reveal details in the landscape, to composite later. With time-lapses we don’t have that luxury. Each and every frame has to capture the entire scene well.
At dark sky sites, expose for the dark ground as much as you can, even if that makes the sky overly bright. Unless you outright clip the highlights in the Milky Way or in light polluted horizon glows, you’ll be able to recover highlight details later in processing.
After poor focus, underexposure, resulting in overly noisy images, is the single biggest mistake I see beginners make.
TIP 5 — DON’T: Worry about 500 or “NPF” Exposure Rules
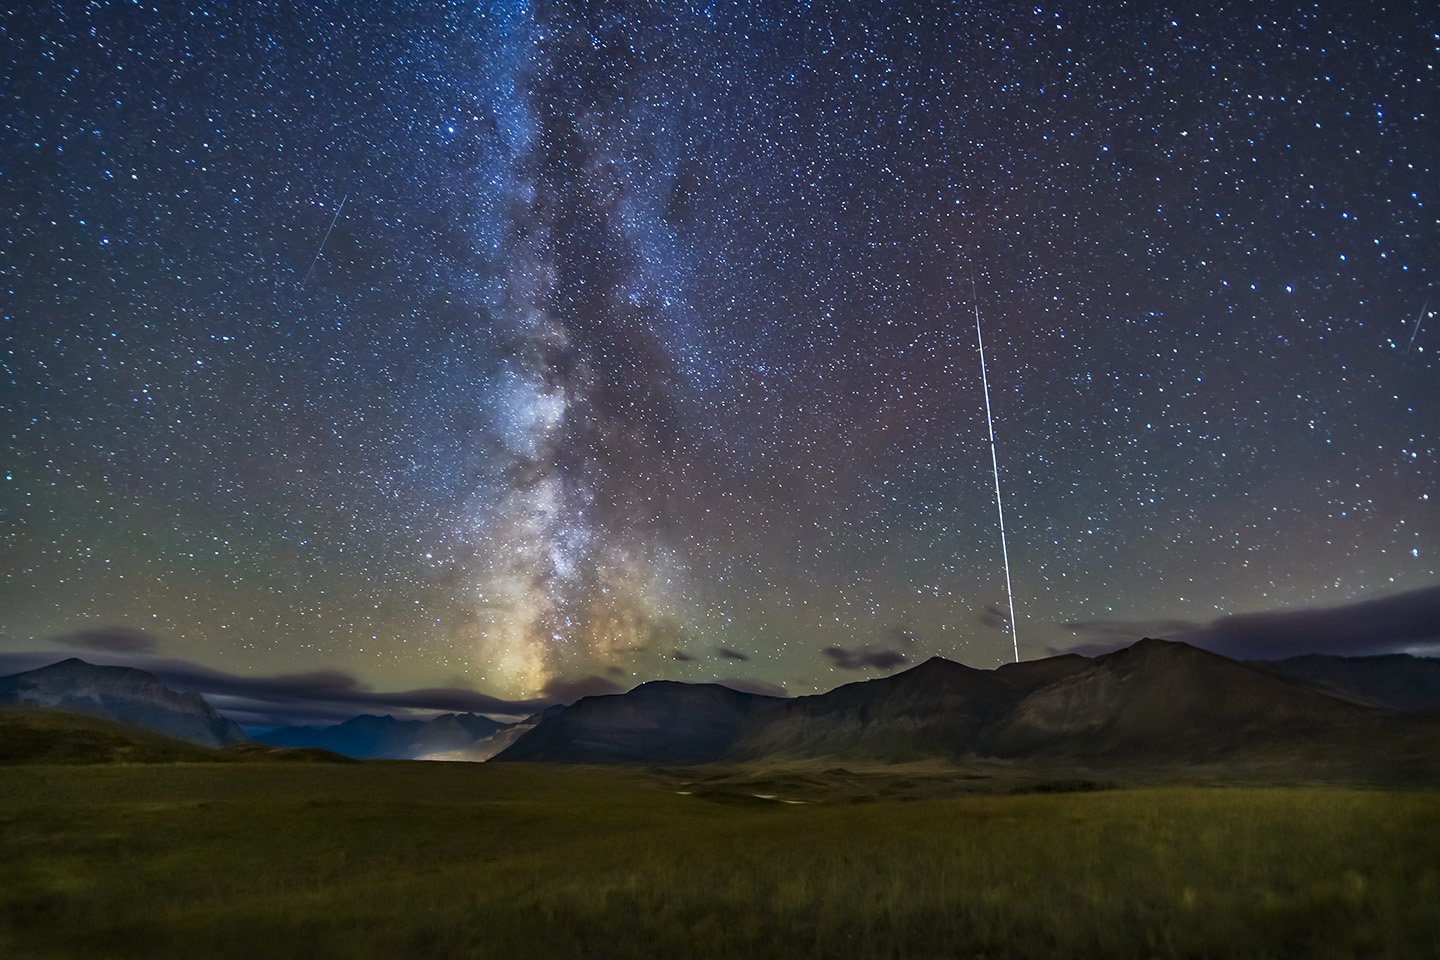
Stills from a Sequence A stack of single frames from a time-lapse sequence can often make a good still image, such as this scene of the Space Station rising over Waterton Lakes National Park. The 30-second exposures were just within the “500 Rule” for the 15mm lens used here, but minor star trailing won’t be that noticeable in a final movie.
While still images might have to adhere to the “500 Rule” or the stricter “NPF Rule” to avoid star trailing, time-lapses are not so critical. Slight trailing of stars in each frame won’t be noticeable in the final movie when the stars are moving anyway.
So go for rule-breaking, longer exposures if needed, for example if the aperture needs to be stopped down for increased depth of field and foreground focus. Again, with time-lapses we can’t shoot separate exposures for focus stacking later.
Just be aware that the longer each exposure is, the longer it will take to shoot 300 of them.
Why 300? I find 300 frames is a good number to aim for. When assembled into a movie at 30 frames per second (a typical frame rate) your 300-frame clip will last 10 seconds, a decent length of time in a final movie.
You can use a slower frame rate (24 fps works fine), but below 24 the movie will look jerky unless you employ advanced frame blending techniques. I do that for auroras.
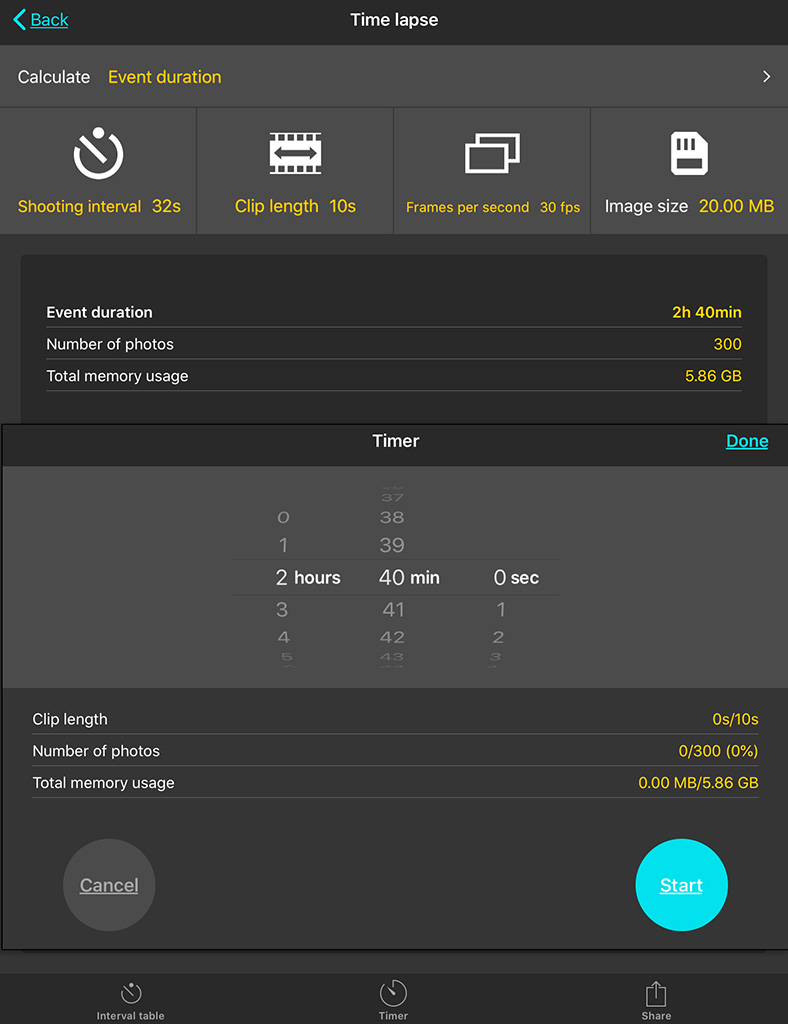
PhotoPills Calculator Apps such as PhotoPills offer handy calculators for juggling exposure time vs. the number of frames to yield the length of the time-lapse shoot.
Bonus Tip
How long it will take to acquire the needed 300 frames will depend on how long each exposure is and the interval between them. An app such as PhotoPills (via its Time lapse function) is handy in the field for calculating exposure time vs. frame count vs. shoot length, and providing a timer to let you know when the shoot is done.
TIP 6 — DO: Use short intervals
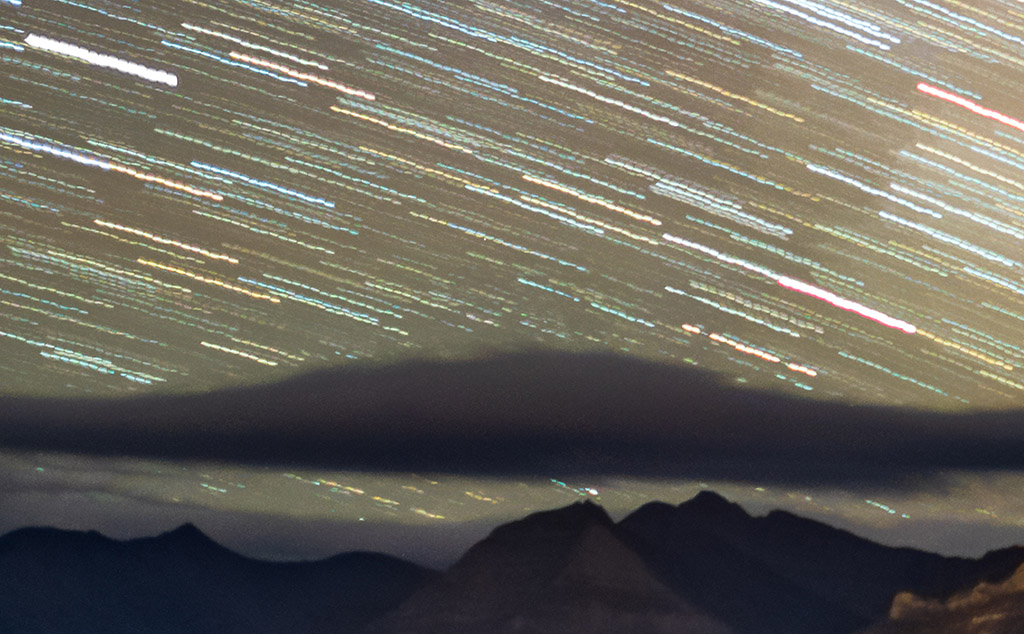
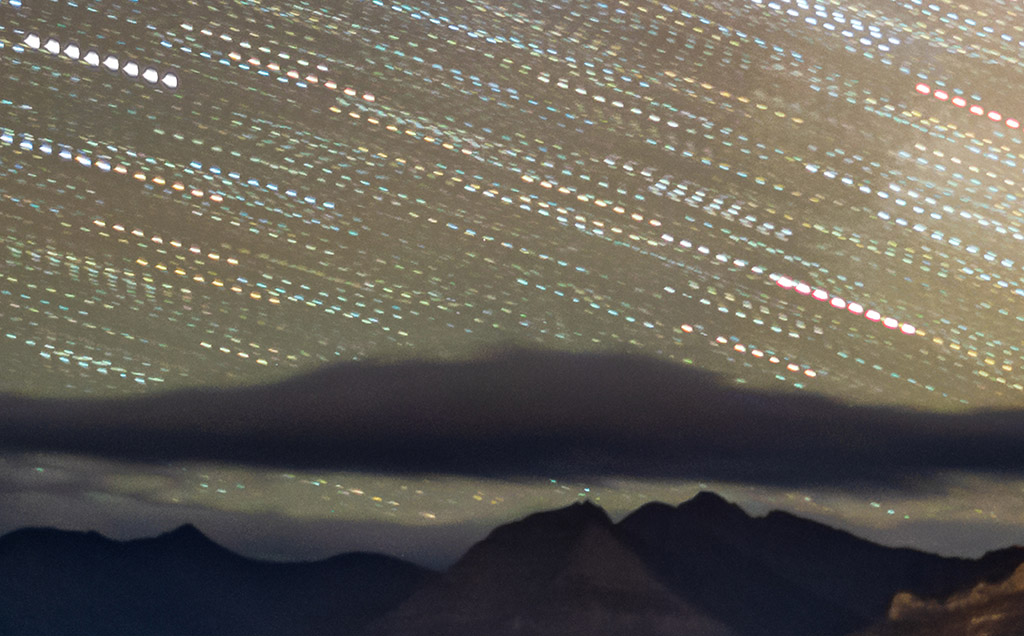
Mind the Gap! At night use intervals as short as possible to avoid gaps in time, simulated here (at top) by stacking several time-lapse frames taken at a one-second interval into one image. Using too long an interval, as demonstrated just above, yields gaps in time and jumps in the star motion, simulated here by stacking only every other frame in a sequence.
At night, the interval between exposures should be no more than one or two seconds. By “interval,” I mean the time between when the shutter closes and when it opens again for the next frame.
Not all intervalometers define “Interval” that way. But it’s what you expect it means. If you use too long an interval then the stars will appear to jump across the sky, ruining the smooth motion you are after.
In practice, intervals of four to five seconds are sometimes needed to accommodate the movement of motorized “motion control” devices that turn or slide the camera between each shot. But I’m not covering the use of those advanced units here. I cover those options and much, much more in 400 pages of tips, techniques and tutorials in my Nightscapes ebook, linked to above.
However, during the day or in twilight, intervals can be, and indeed need to be, much longer than the exposures. It’s at night with stars in the sky that you want the shutter to be closed as little as possible.
TIP 7 — DO: Shoot Raw
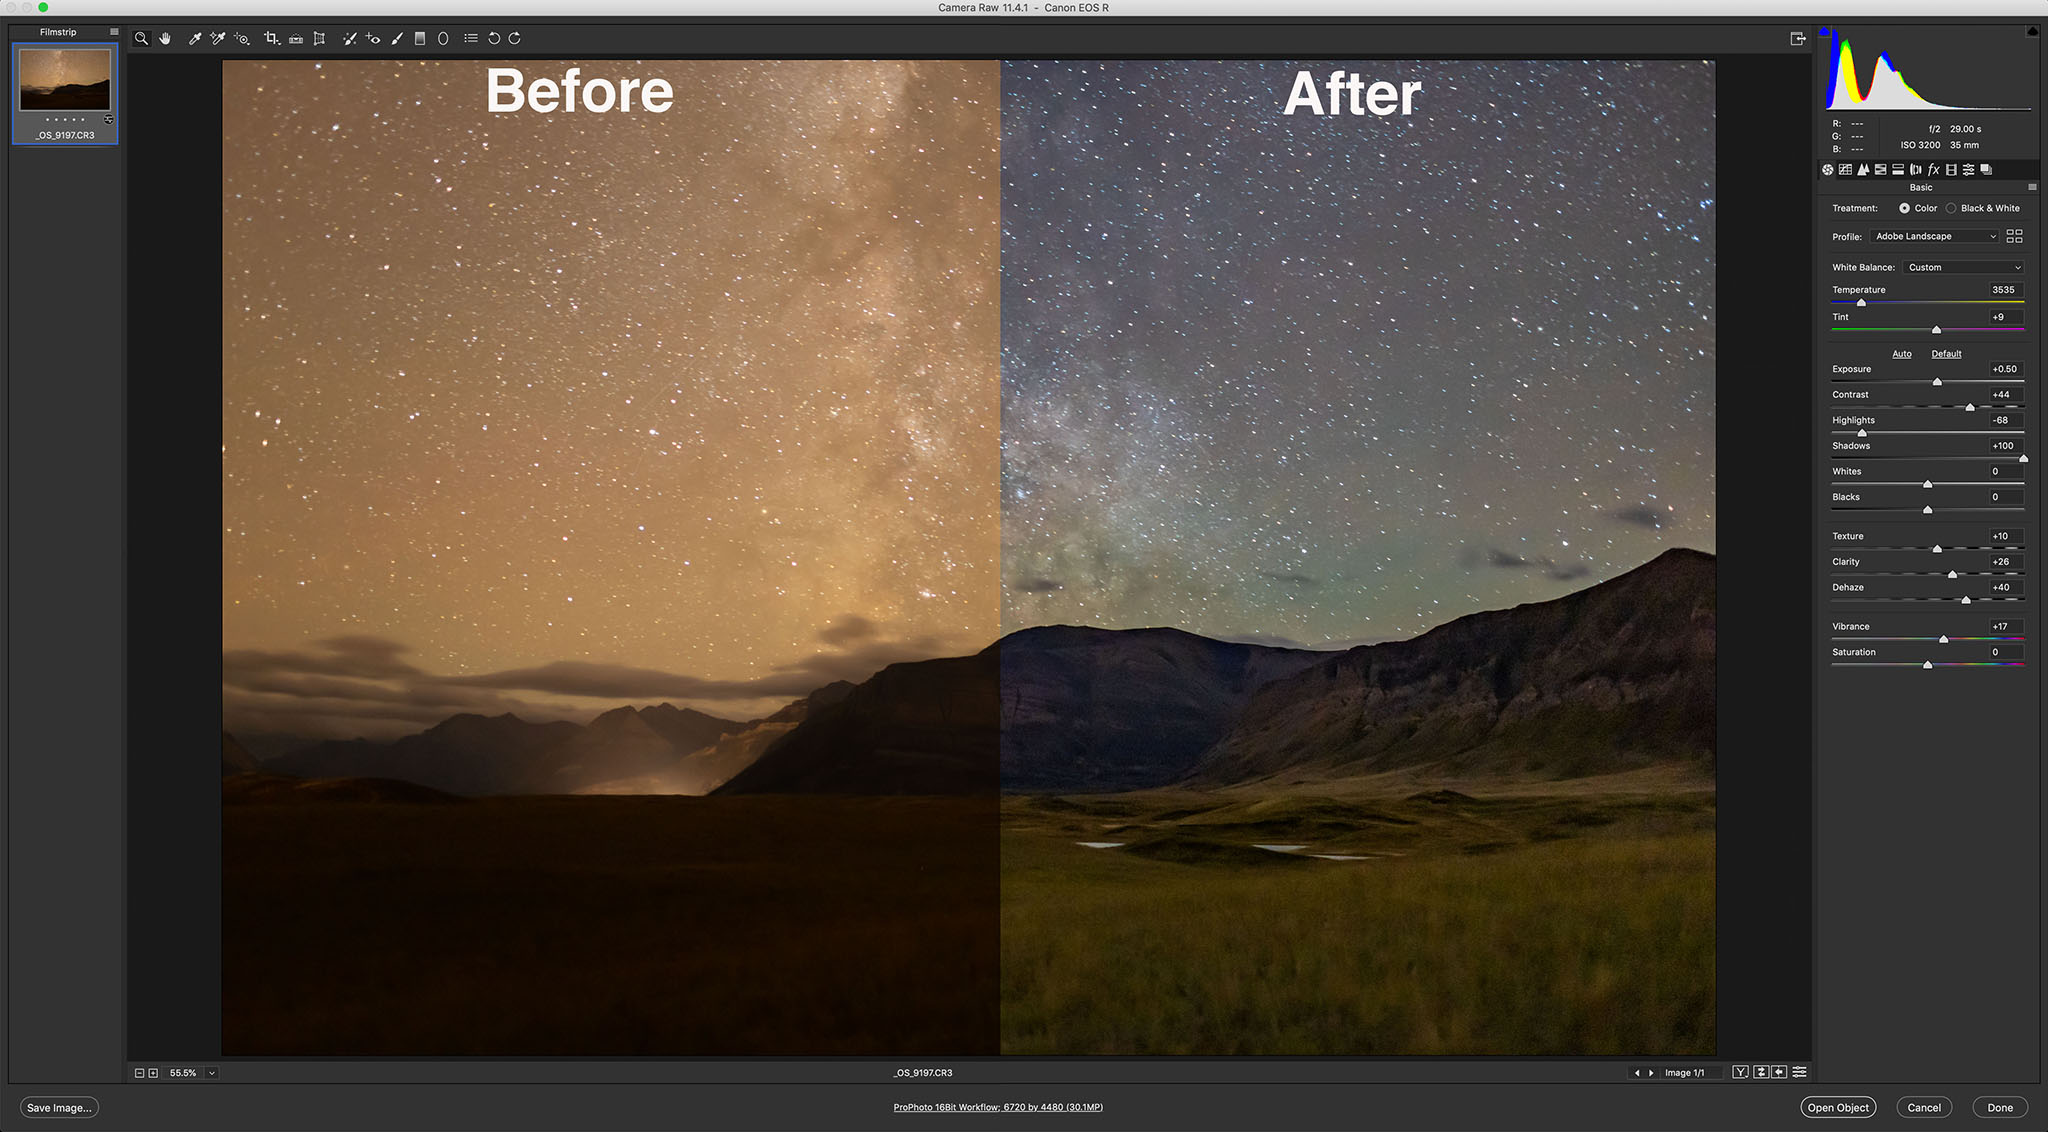
The Power of Raw Shooting raw, even for time-lapse frames that will eventually be turned into JPGs, allows for maximum control of shadows, highlights, colour balance, and noise reduction. “Before” is what came out of the camera; “After” is with the development settings shown applied in Camera Raw.
This advice also applies to still images where shooting raw files is essential for professional results. But you likely knew that.
However, with time-lapses some cameras offer a mode that will shoot time-lapse frames and assemble them into a movie right in the camera. Don’t use it. It gives you a finished, pre-baked movie with no ability to process each frame later, an essential step for good night time-lapses. And raw files provide the most data to work with.
So even with time-lapses, shoot raw not JPGs.
If you are confident the frames will be used only for a time-lapse, you might choose to shoot in a smaller S-Raw or compressed C-Raw mode, for smaller files, in order to fit more frames onto a card.
But I prefer not to shrink or compress the original raw files in the camera, as some of them might make for an excellent stacked and layered still image where I want the best quality originals (such as for the ISS over Waterton Lakes example above).
To get you through a long field shoot away from your computer buy more and larger memory cards. You don’t need costly, superfast cards for most time-lapse work.
PLANNING AND COMPOSITION
TIP 8 — DO: Use planning apps to frame
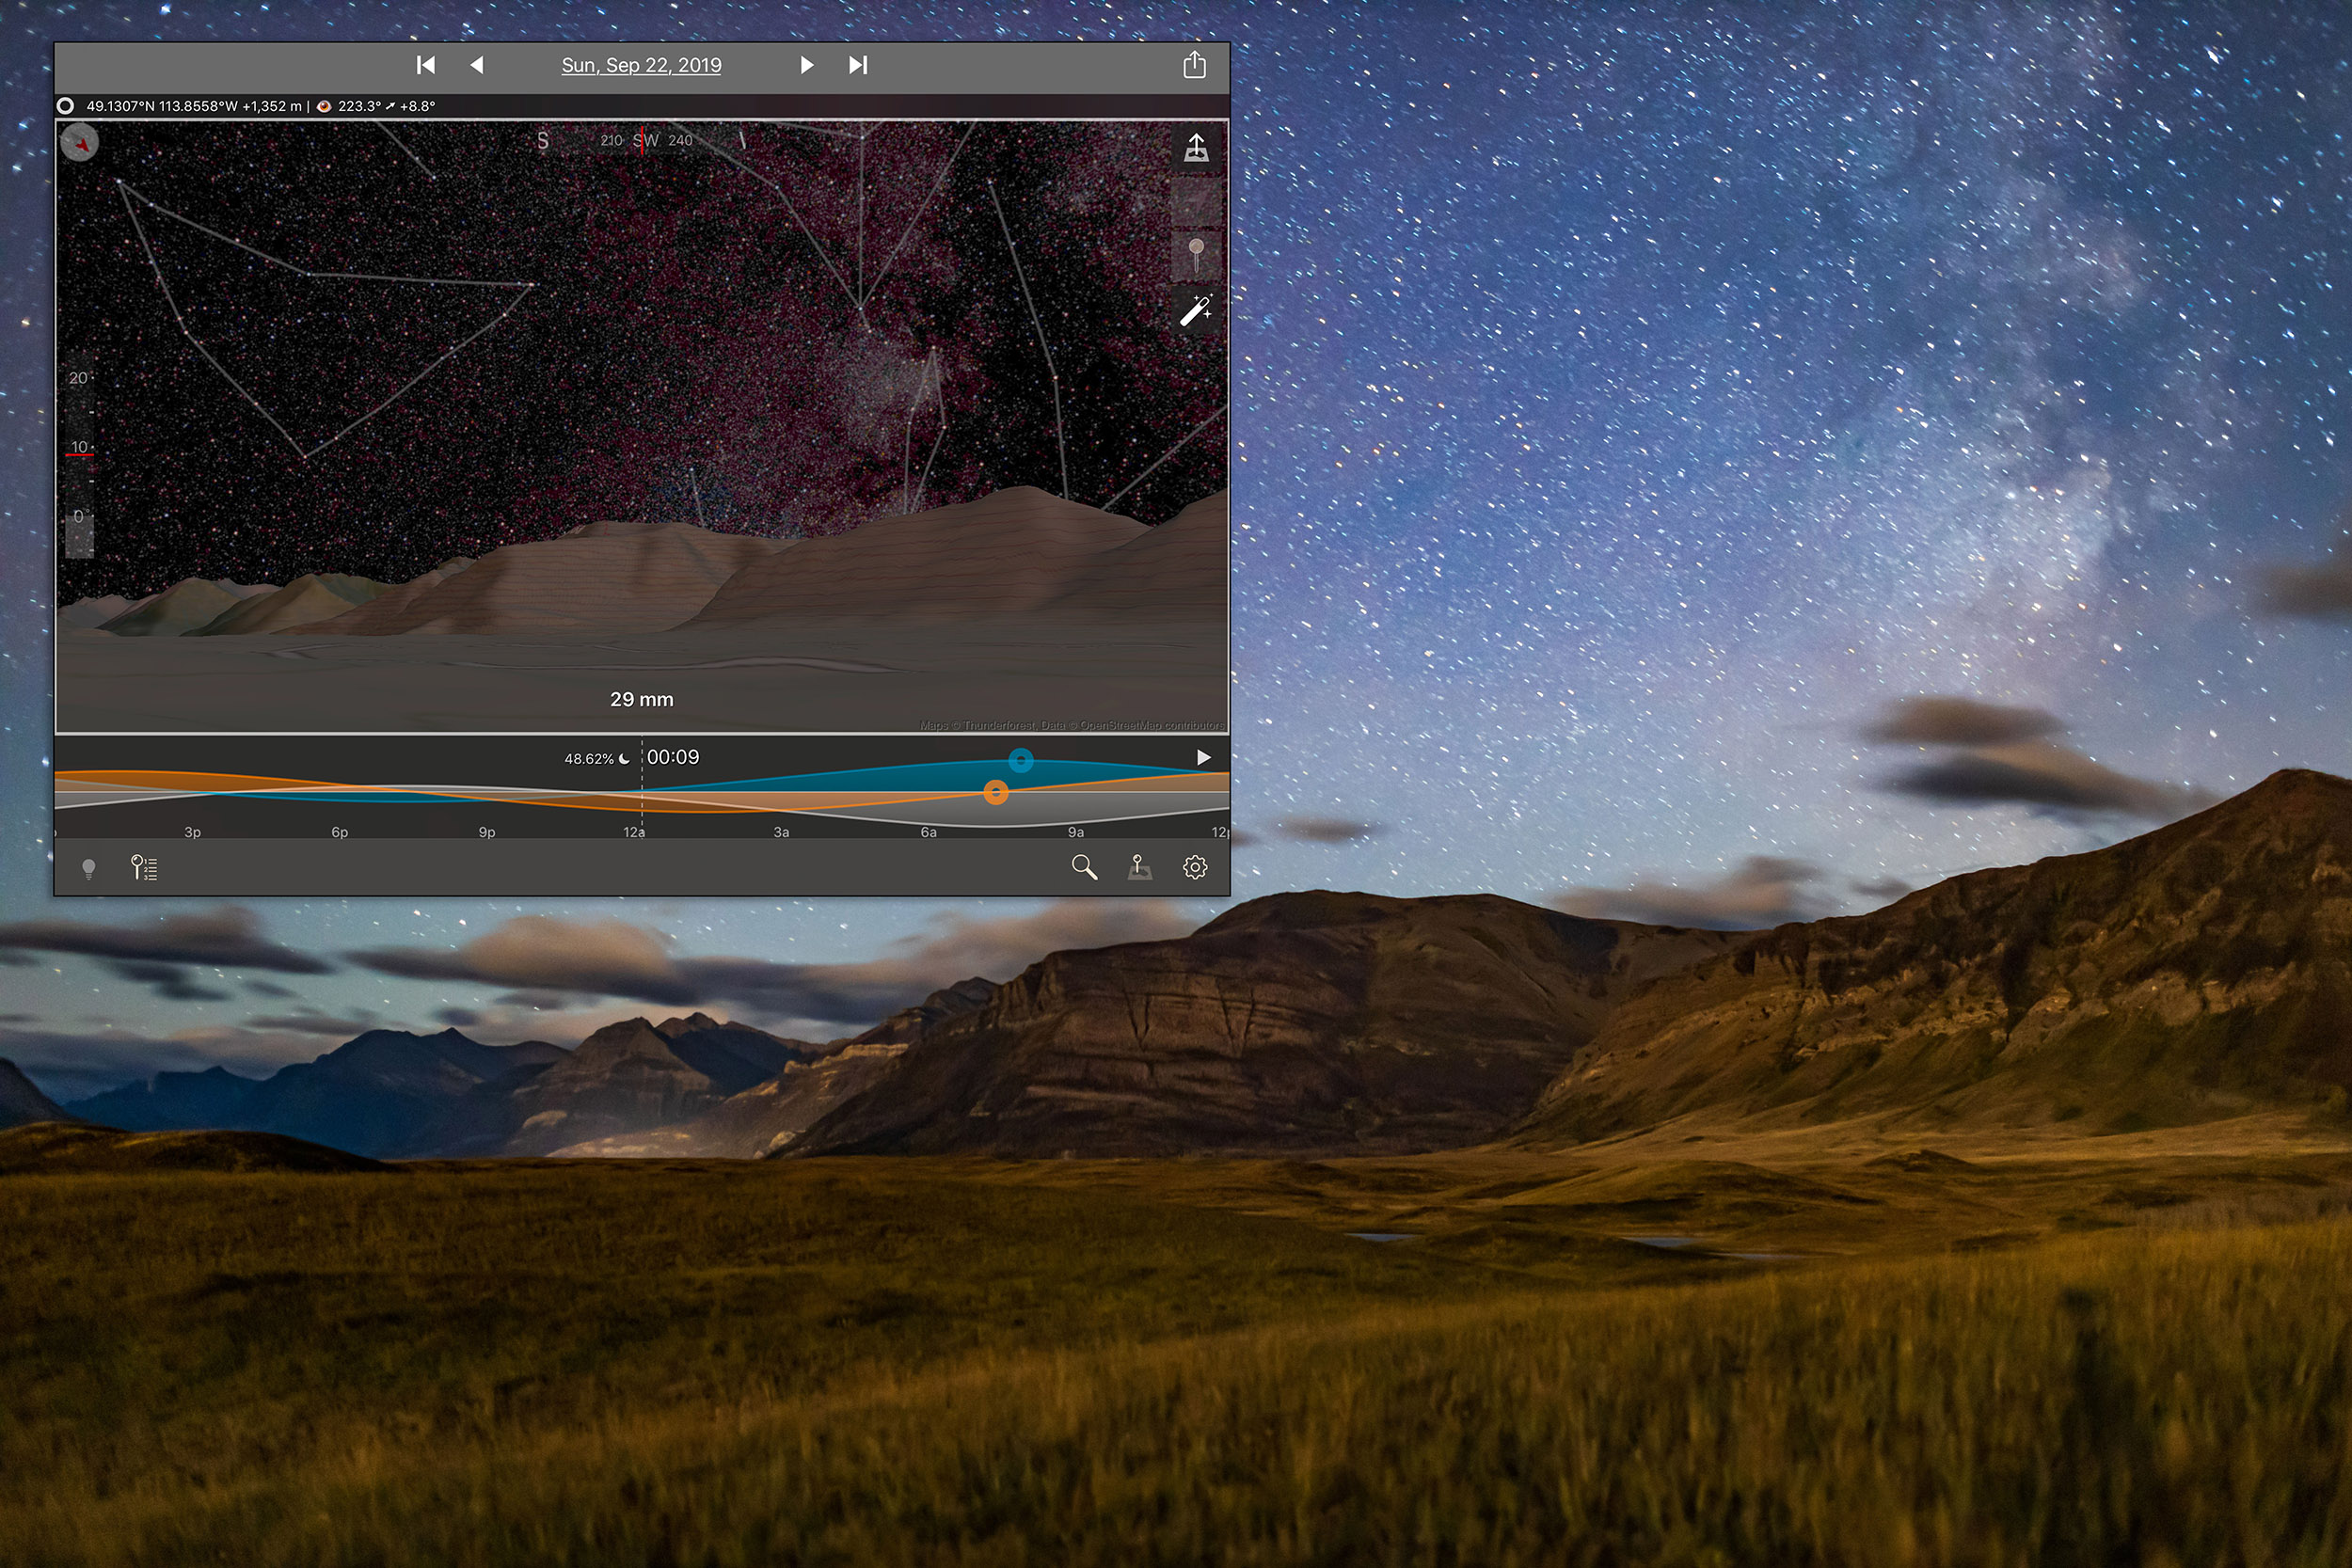
Planning the Shoot Apps such as The Photographer’s Ephemeris (shown here set for the author’s Waterton Lakes site for moonrise) help in planning where the Sun, Moon and Milky Way will be from your site during the shoot.
Simulating the Shoot The companion app to The Photographer’s Ephemeris, TPE 3D, shown above in the inset, exactly matches the real scene for the mountain skyline, placement of the Milky Way, and lighting from the rising Moon.
All nightscape photography benefits from using one of the excellent apps we now have to assist us in planning a shoot. They are particularly useful for time-lapses.
Apps such as PhotoPills and The Photographer’s Ephemeris are great. I like the latter as it links to its companion TPE 3D app to preview what the sky and lighting will look like over the actual topographic horizon from your site. You can scrub through time to see the motion of the Milky Way over the scenery. The Augmented Reality “AR” modes of these apps are also useful, but only once you are on site during the day.
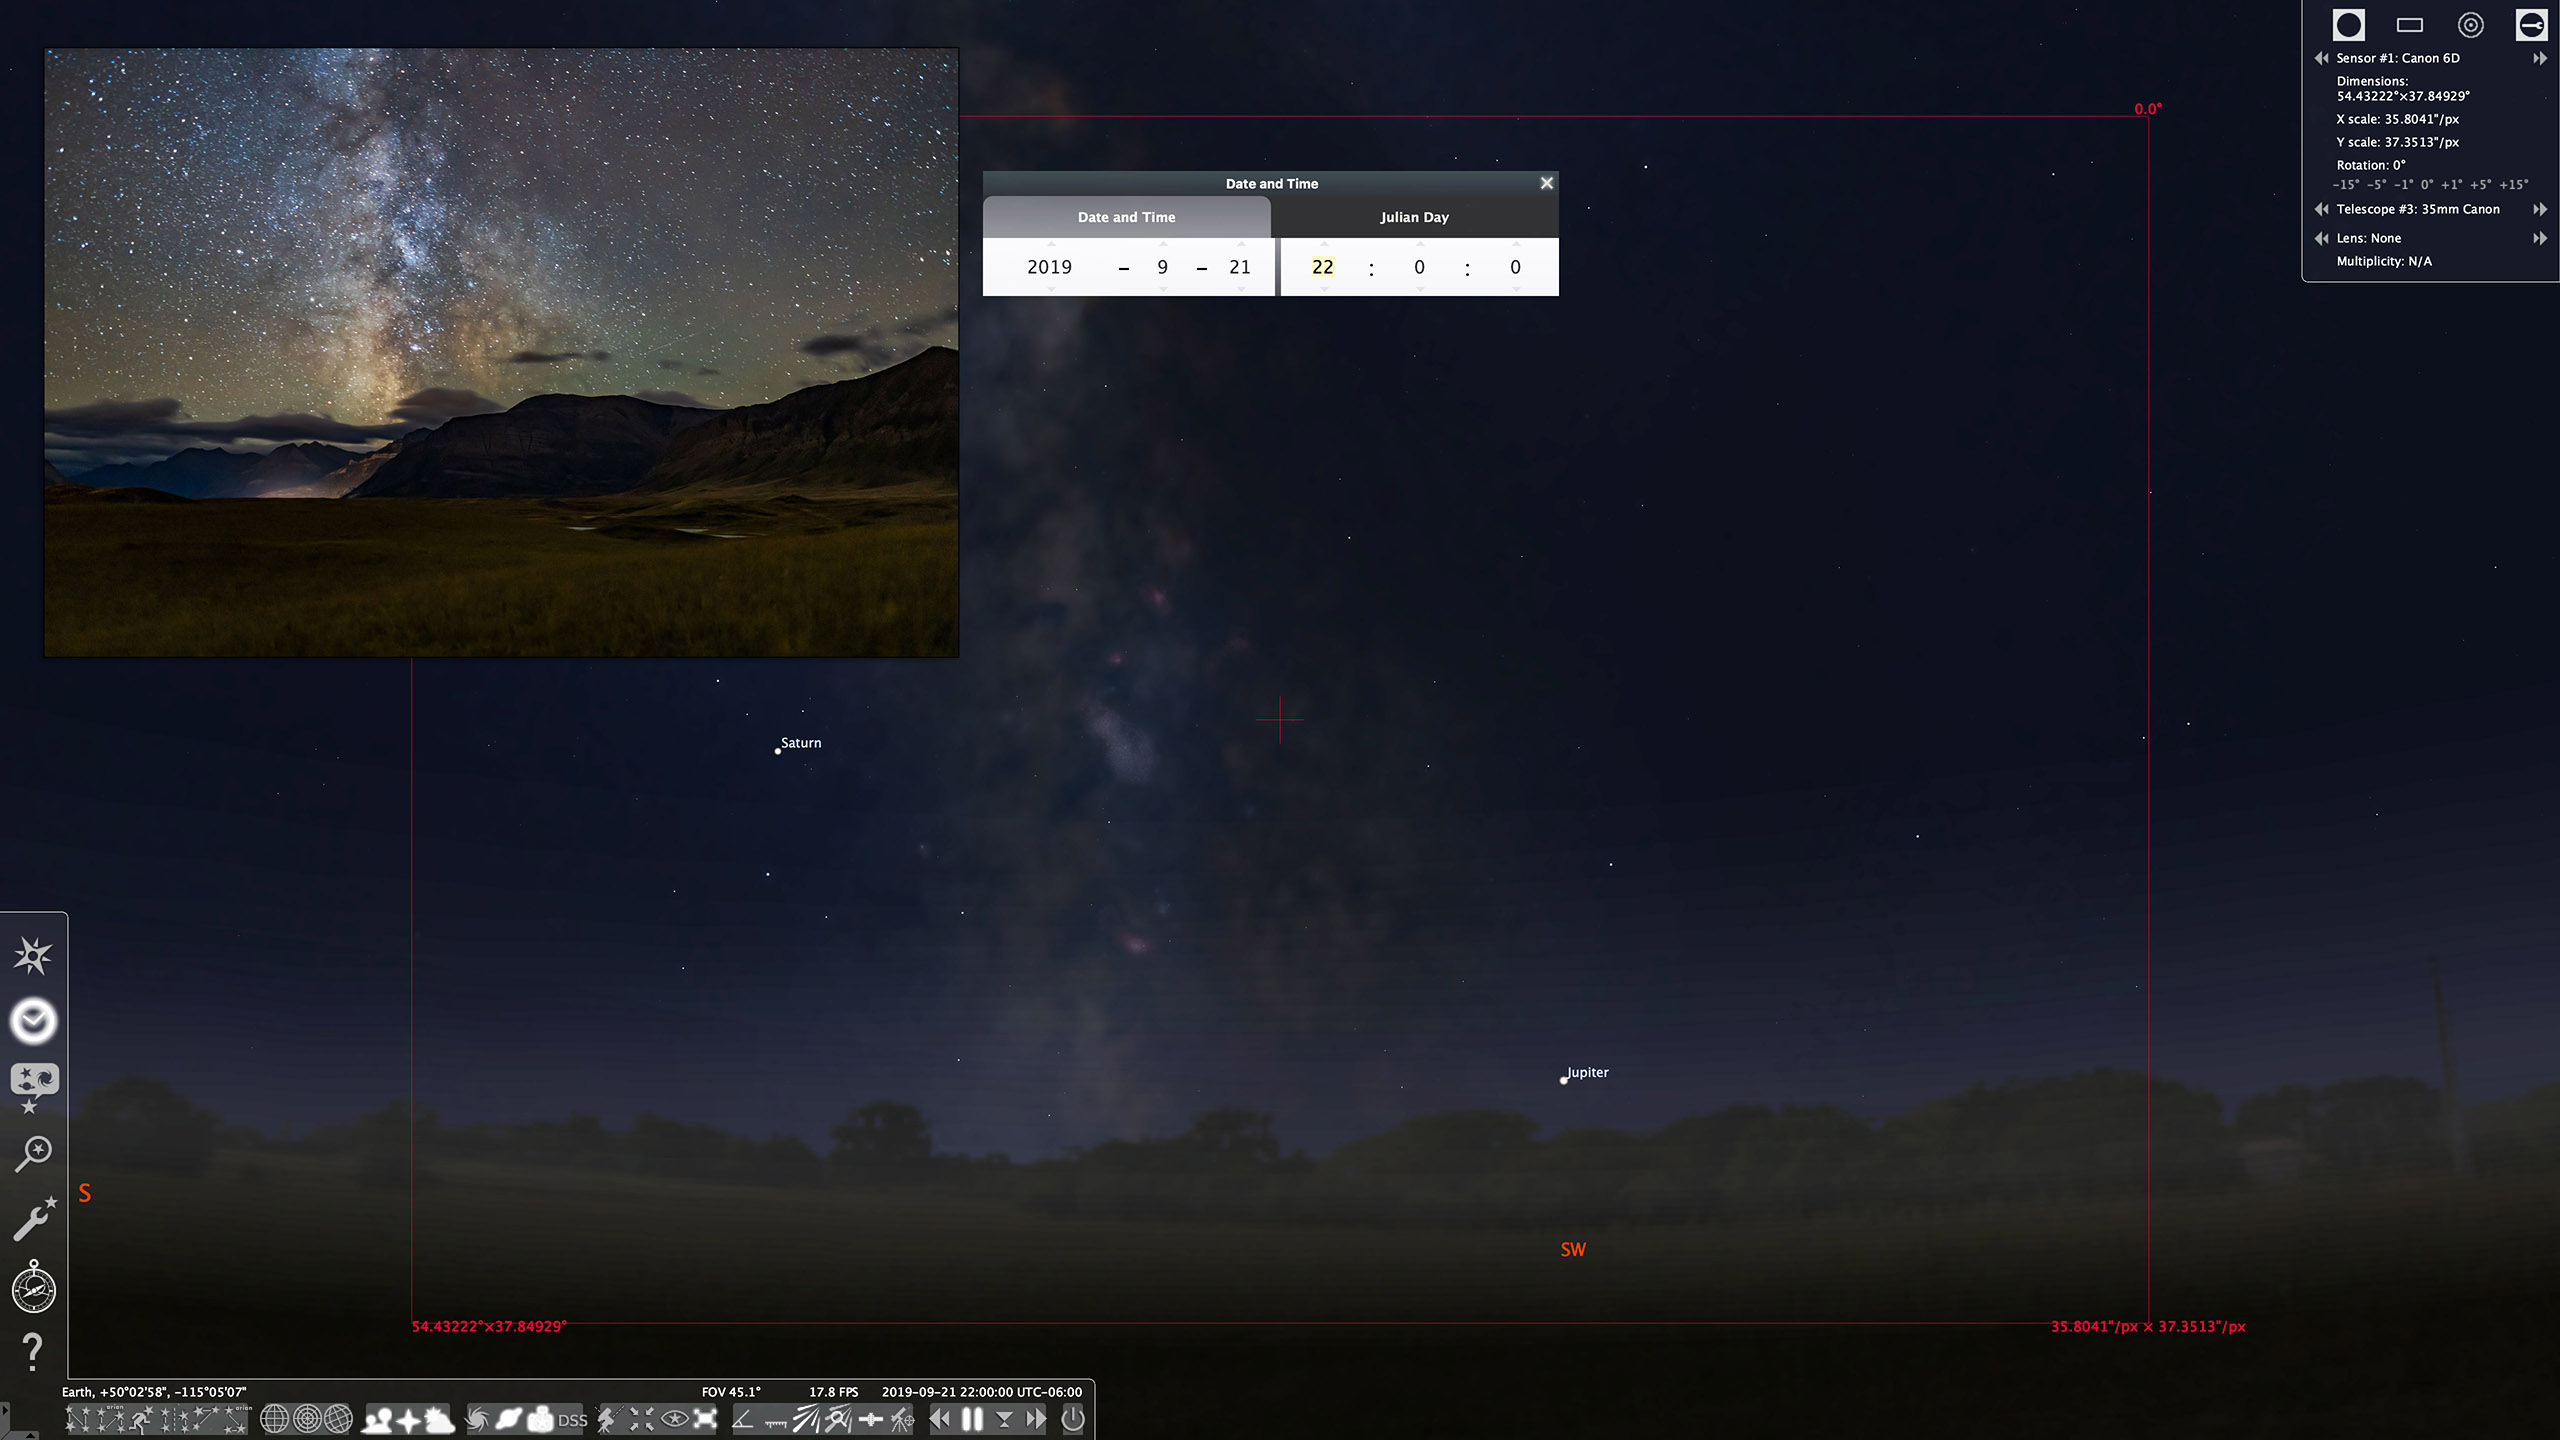
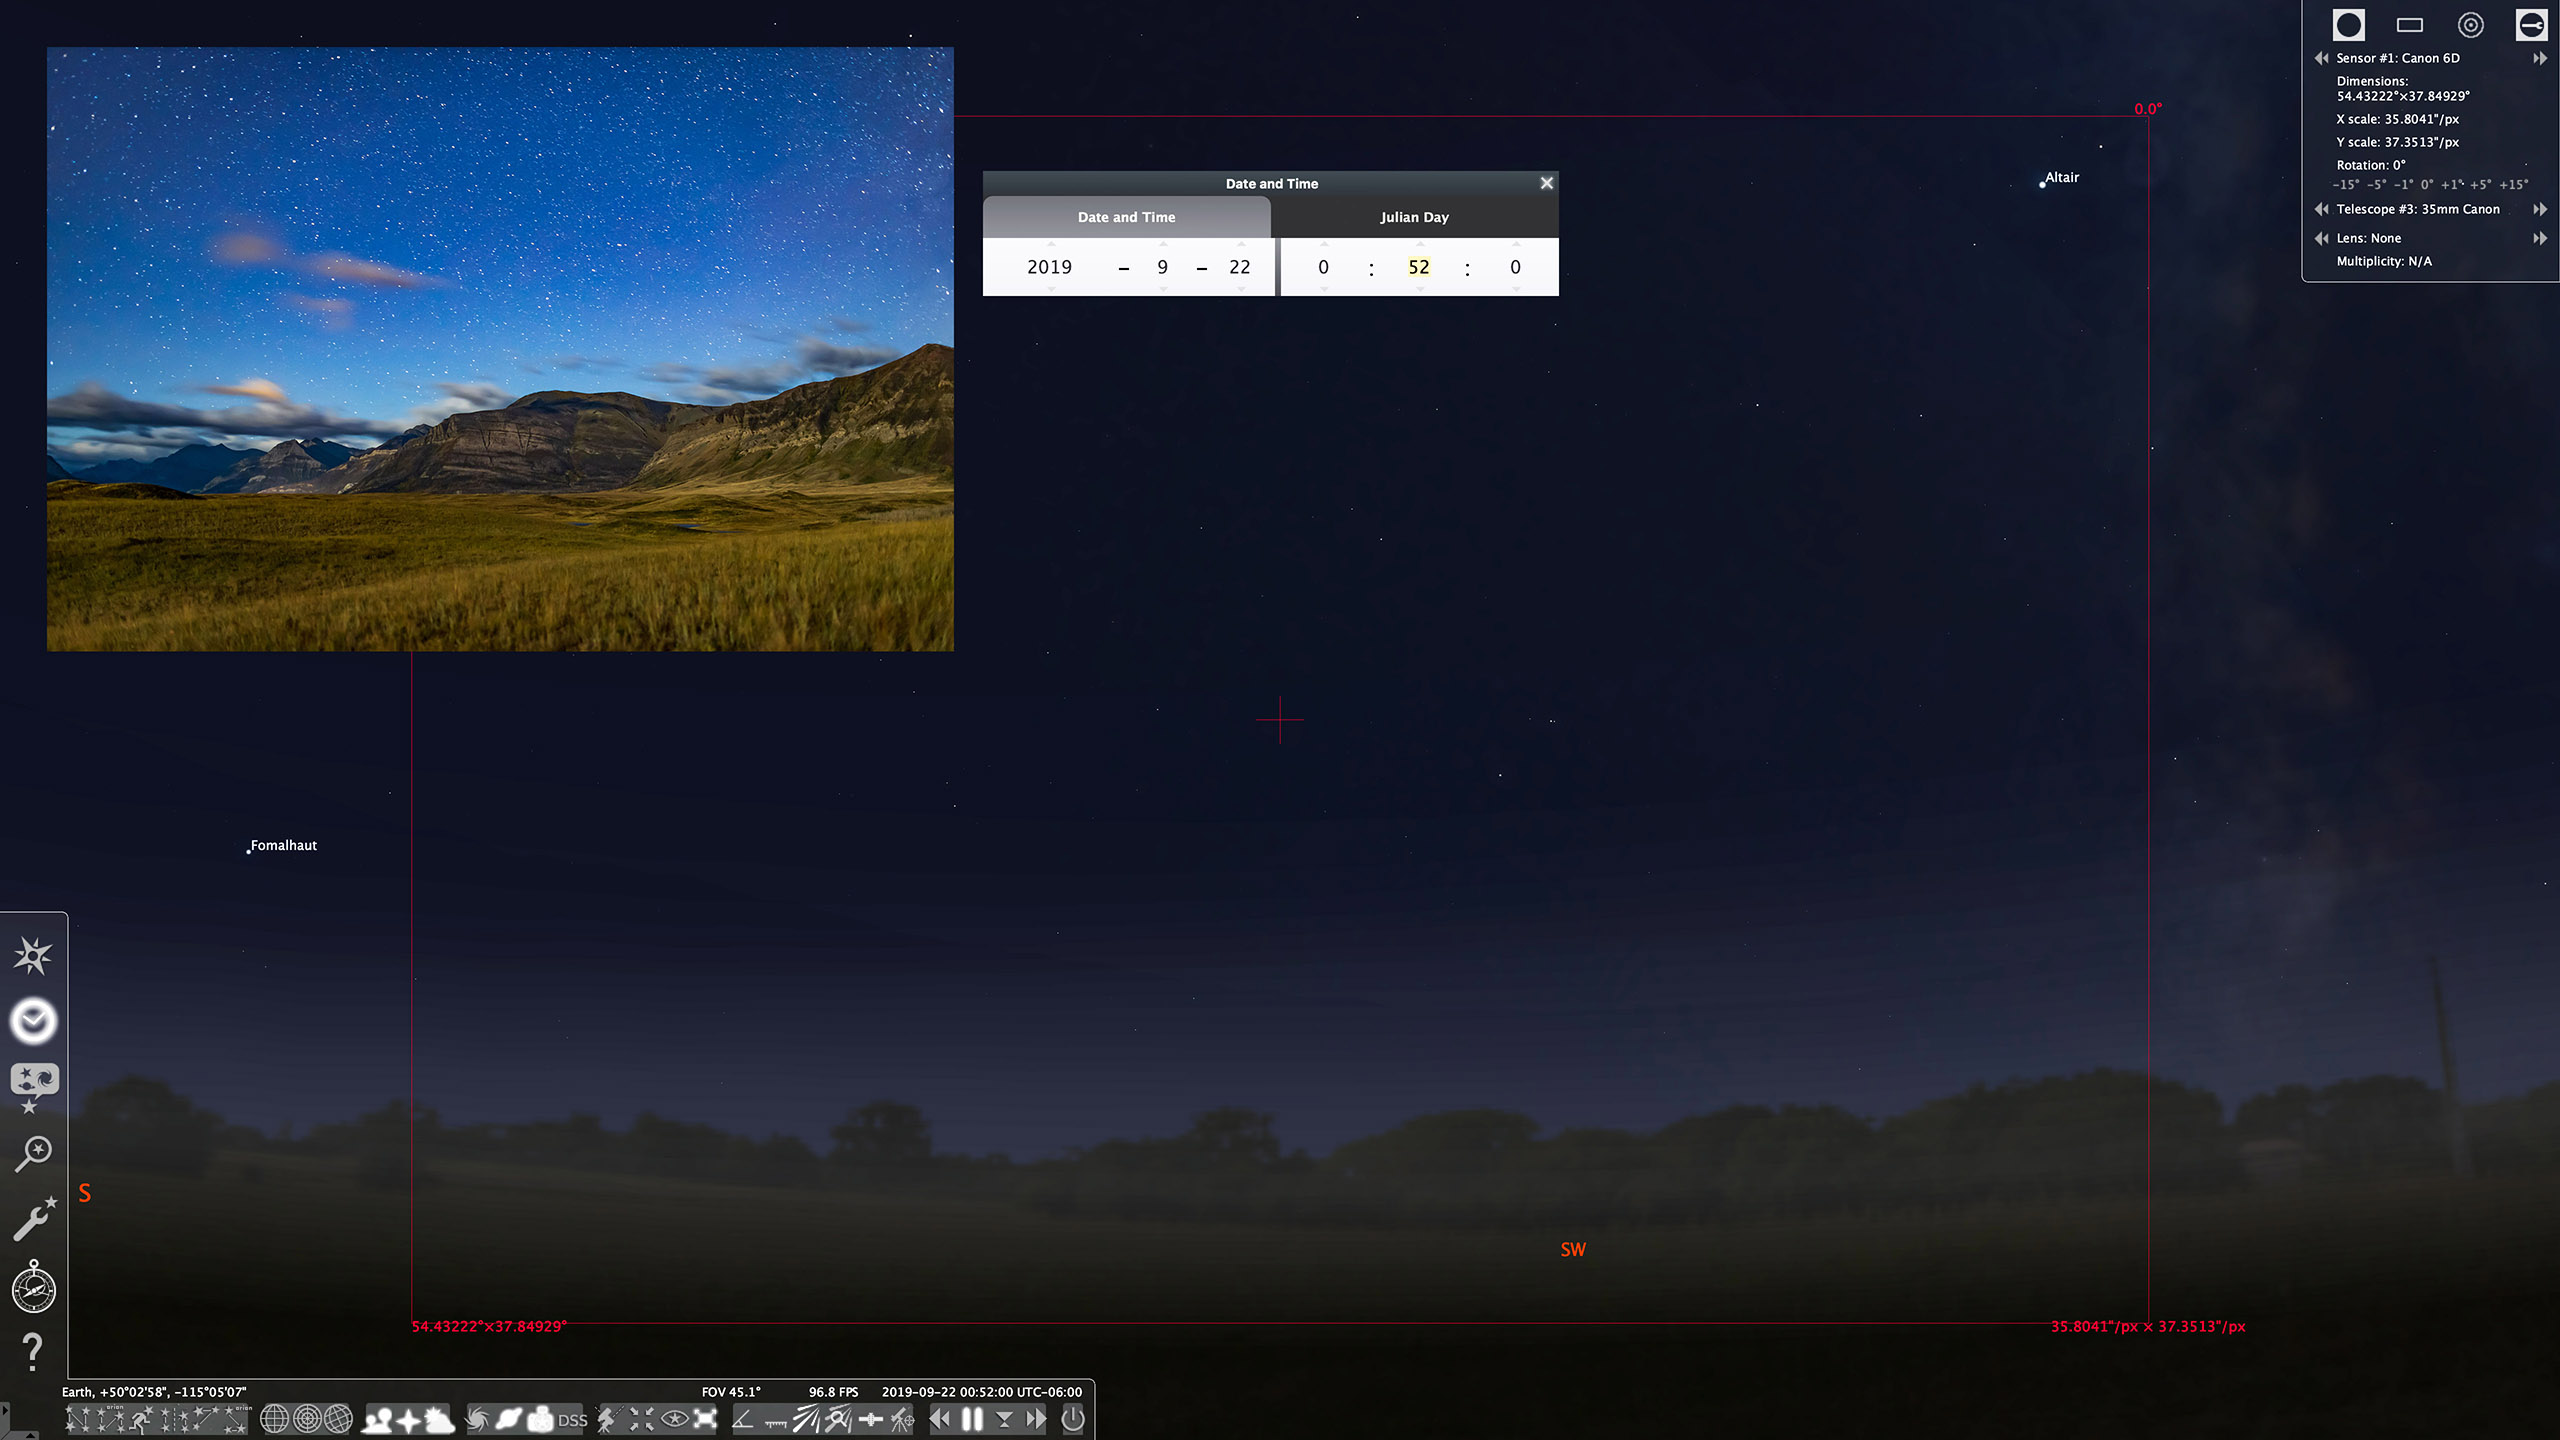
For planning a time-lapse at home I always turn to a “planetarium” program to simulate the motion of the sky (albeit over a generic landscape), with the ability to add in “field of view” indicators to show the view your lens will capture.
You can step ahead in time to see how the sky will move across your camera frame during the length of the shoot. Indeed, such simulations help you plan how long the shoot needs to last until, for example, the galactic core or Orion sets.
Planetarium software helps ensure you frame the scene properly, not only for the beginning of the shoot (that’s easy — you can see that!), but also for the end of the shoot, which you can only predict.
Planetarium Planning An alternative is to use a planetarium program such as the free Stellarium, shown above, which can display lens fields of view. These scenes show the simulated vs. real images (insets) for the start (top) and end (bottom) of the Waterton Lakes time-lapse with a 35mm lens frame, outlined in red.
If your shoot will last as long as three hours, do plan to check the battery level and swap batteries before three hours is up. Most cameras, even new mirrorless models, will now last for three hours on a full battery, but likely not any longer. If it’s a cold winter night, expect only one or two hours of life from a single battery.
PROCESSING
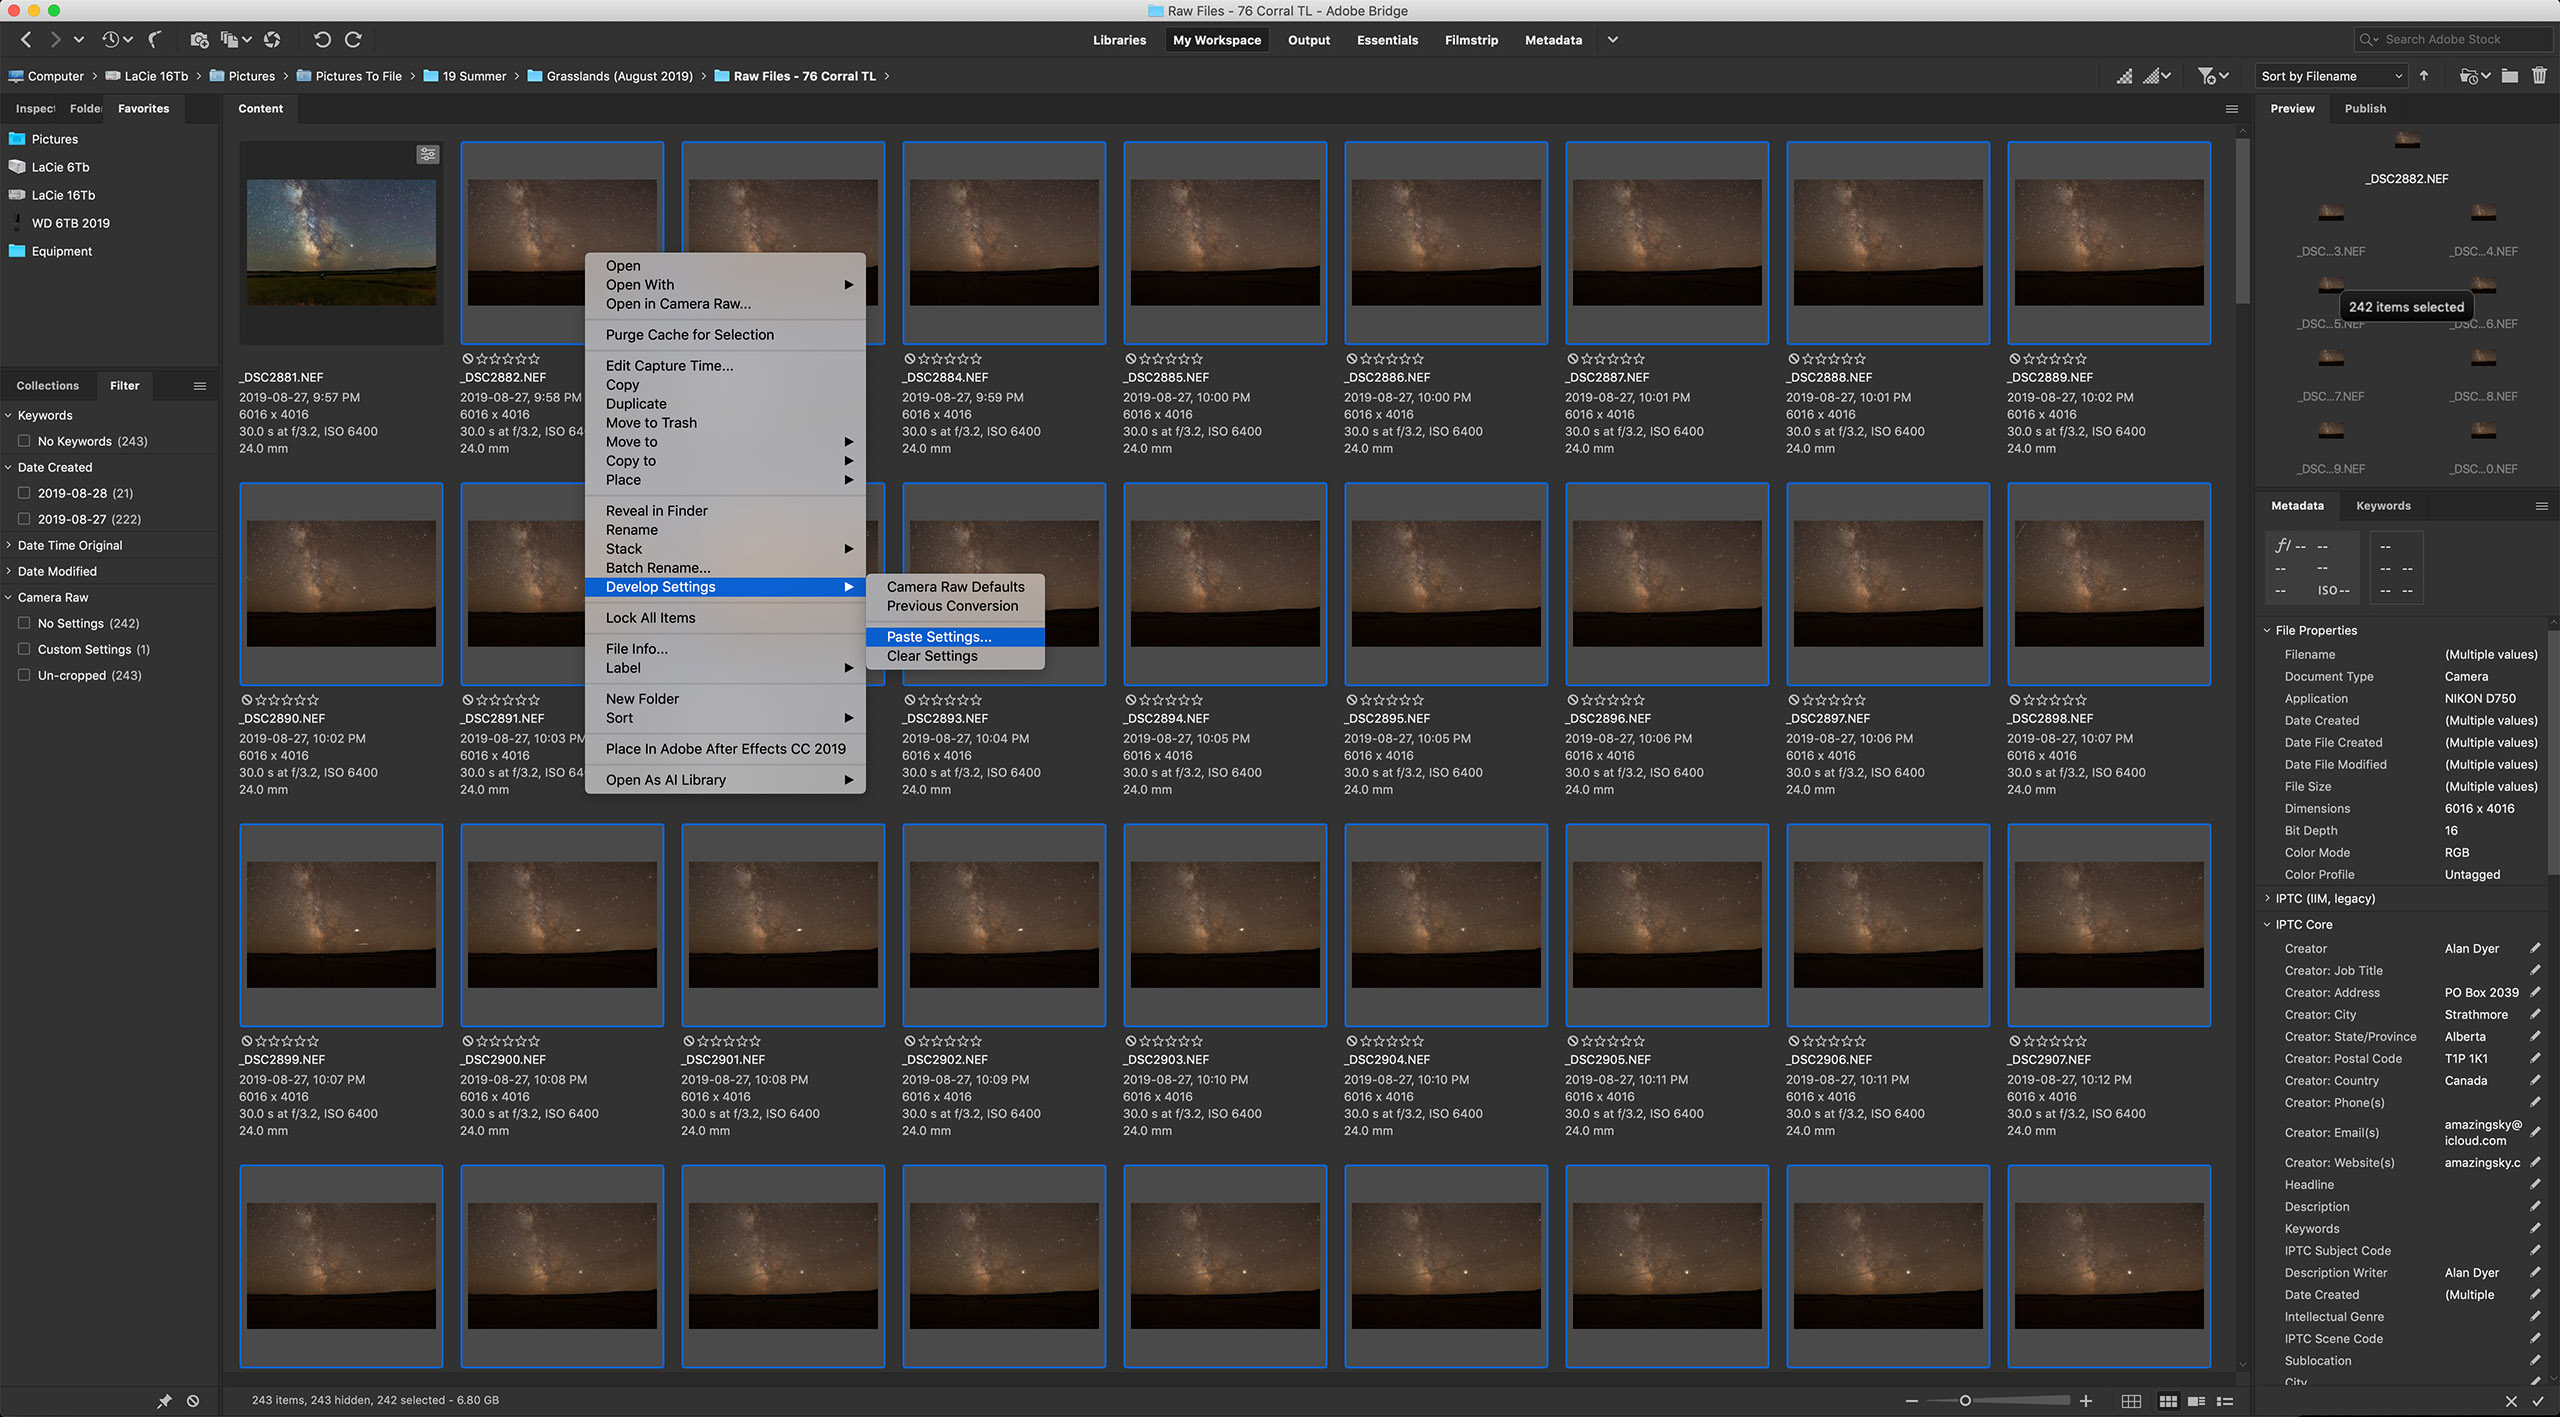
TIP 9 — DO: Develop one raw frame and apply settings to all
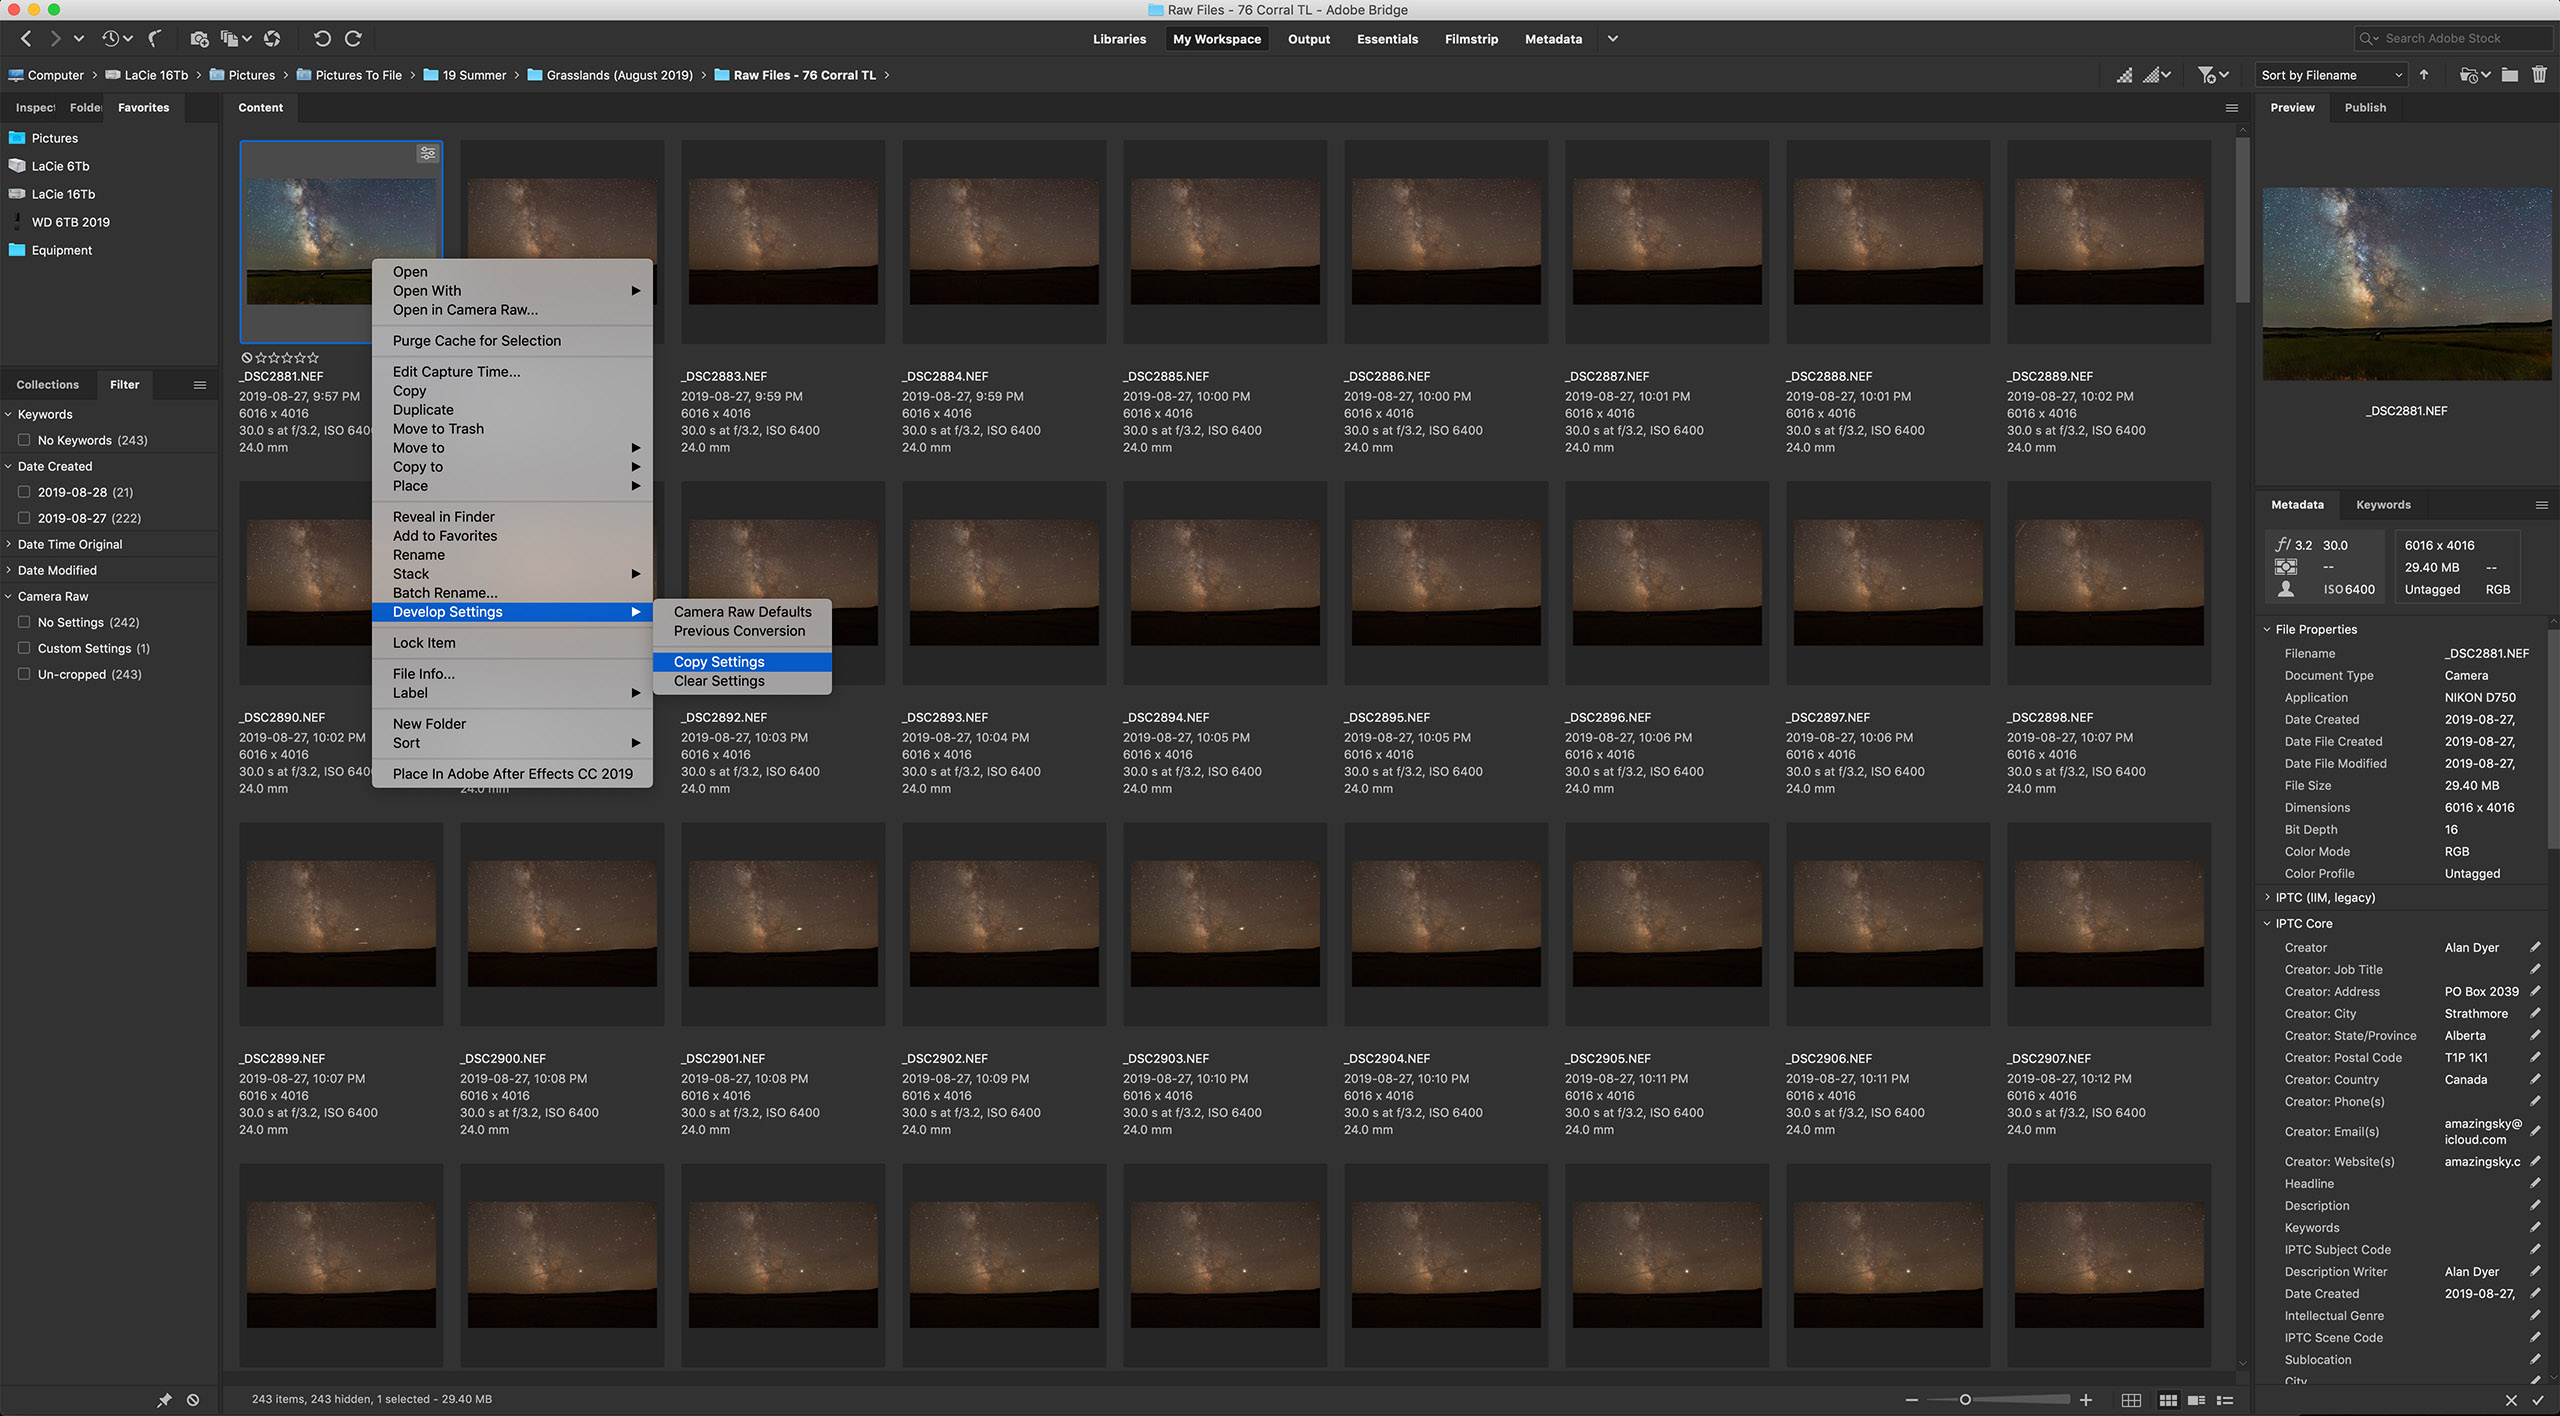
Copy and Paste Settings Most raw developers or photo library programs (Adobe Bridge is shown here) offer the essential ability to copy settings from one image and paste them onto hundreds of others in a folder, developing all the time-lapse frames in a snap.
Processing the raw files takes the same steps and settings as you would use to process still images.
With time-lapses, however, you have to do all the processing required within your favourite raw developer software. You can’t count on bringing multiple exposures into a layer-based processor such as Photoshop to stack and blend images. That works for a single image, but not for 300.
I use Adobe Camera Raw out of Adobe Bridge to do all my time-lapse processing. But many photographers use Lightroom, which offers all the same settings and non-destructive functions as Adobe Camera Raw.
For those who wish to “avoid Adobe” there are other choices, but for time-lapse work an essential feature is the ability to develop one frame, then copy and paste its settings (or “sync” settings) to all the other frames in the set.
Not all programs allow that. Affinity Photo does not. Luminar doesn’t do it very well. DxO PhotoLab, ON1 Photo RAW, and the free Raw Therapee, among others, all work fine.
HOW TO ASSEMBLE A TIME-LAPSE
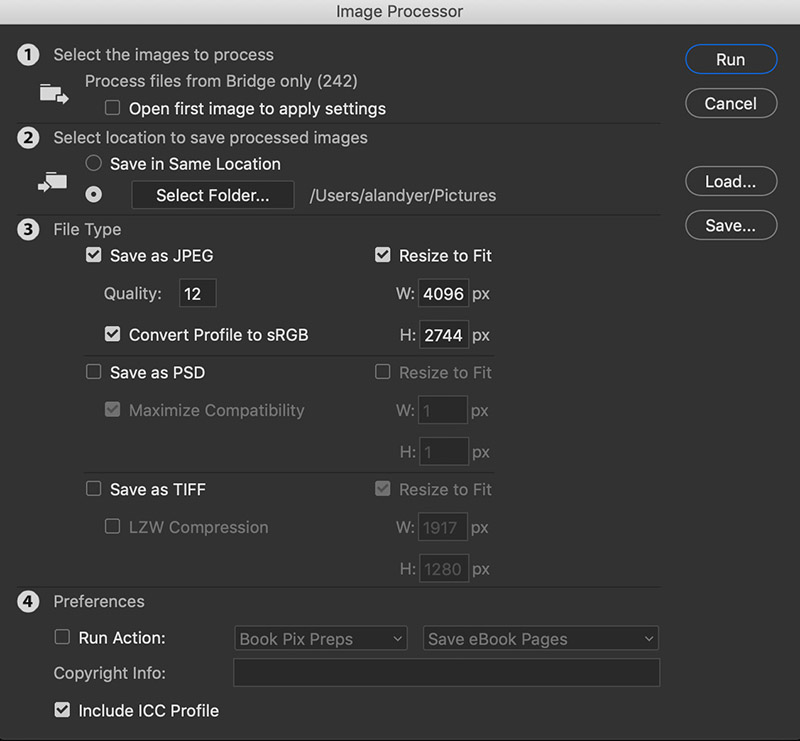
Once you have a set of raws all developed, the usual workflow is to export all those frames out as high-quality JPGs which is what movie assembly programs need. Your raw developing software has to allow batch exporting to JPGs — most do.
Photoshop Batch Export Raw developers usually have a batch export function. So does Photoshop, via its Image Processor utility, shown here (found under File>Scripts>Image Processor) that can export a folder of raws into JPGs or TIFFs, and re-size them, often needed for final 4K or HD movies.
However, none of the programs above (except Photoshop and Adobe’s After Effects) will create the final movie, whether it be from those JPGs or from the raws.
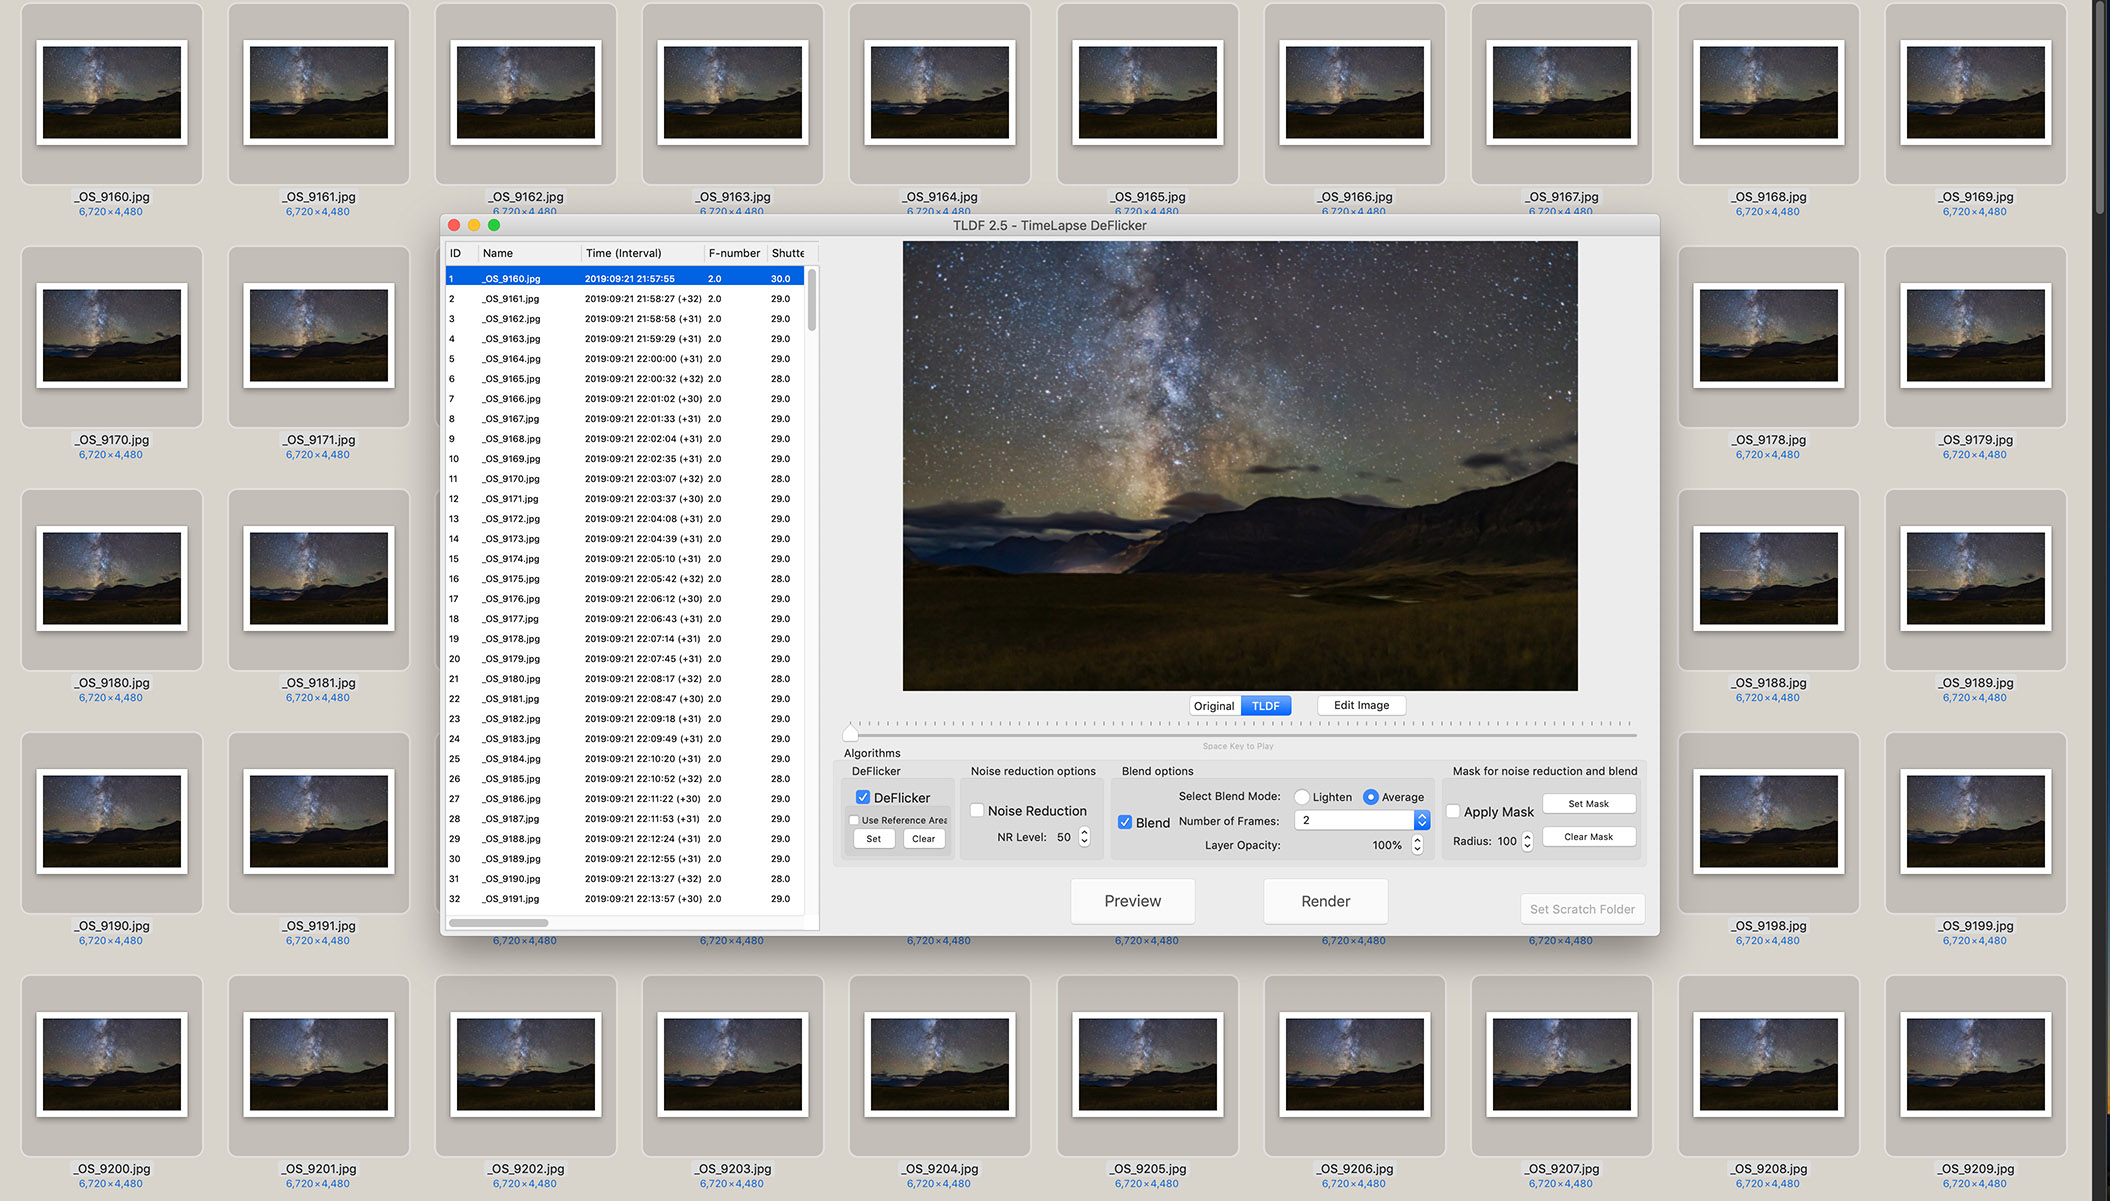
Assembling JPGs The author’s favourite assembly program is TimeLapse DeFlicker (TLDF). It can turn a folder of JPGs into movies as large as 8K and with ProRes codecs for the highest quality.
So for assembling the intermediate JPGs into a movie, I often use a low-cost program called TLDF (TimeLapse DeFlicker) available for MacOS and Windows (timelapsedeflicker.com). It offers advanced functions such as deflickering (i.e. smoothing slight frame-to-frame brightness fluctuations) and frame blending (useful to smooth aurora motions or to purposely add star trails).
While there are many choices for time-lapse assembly, I suggest using a program dedicated to the task and not, as many do, a movie editing program. For most sequences, the latter makes assembly unnecessarily difficult and harder to set key parameters such as frame rates.
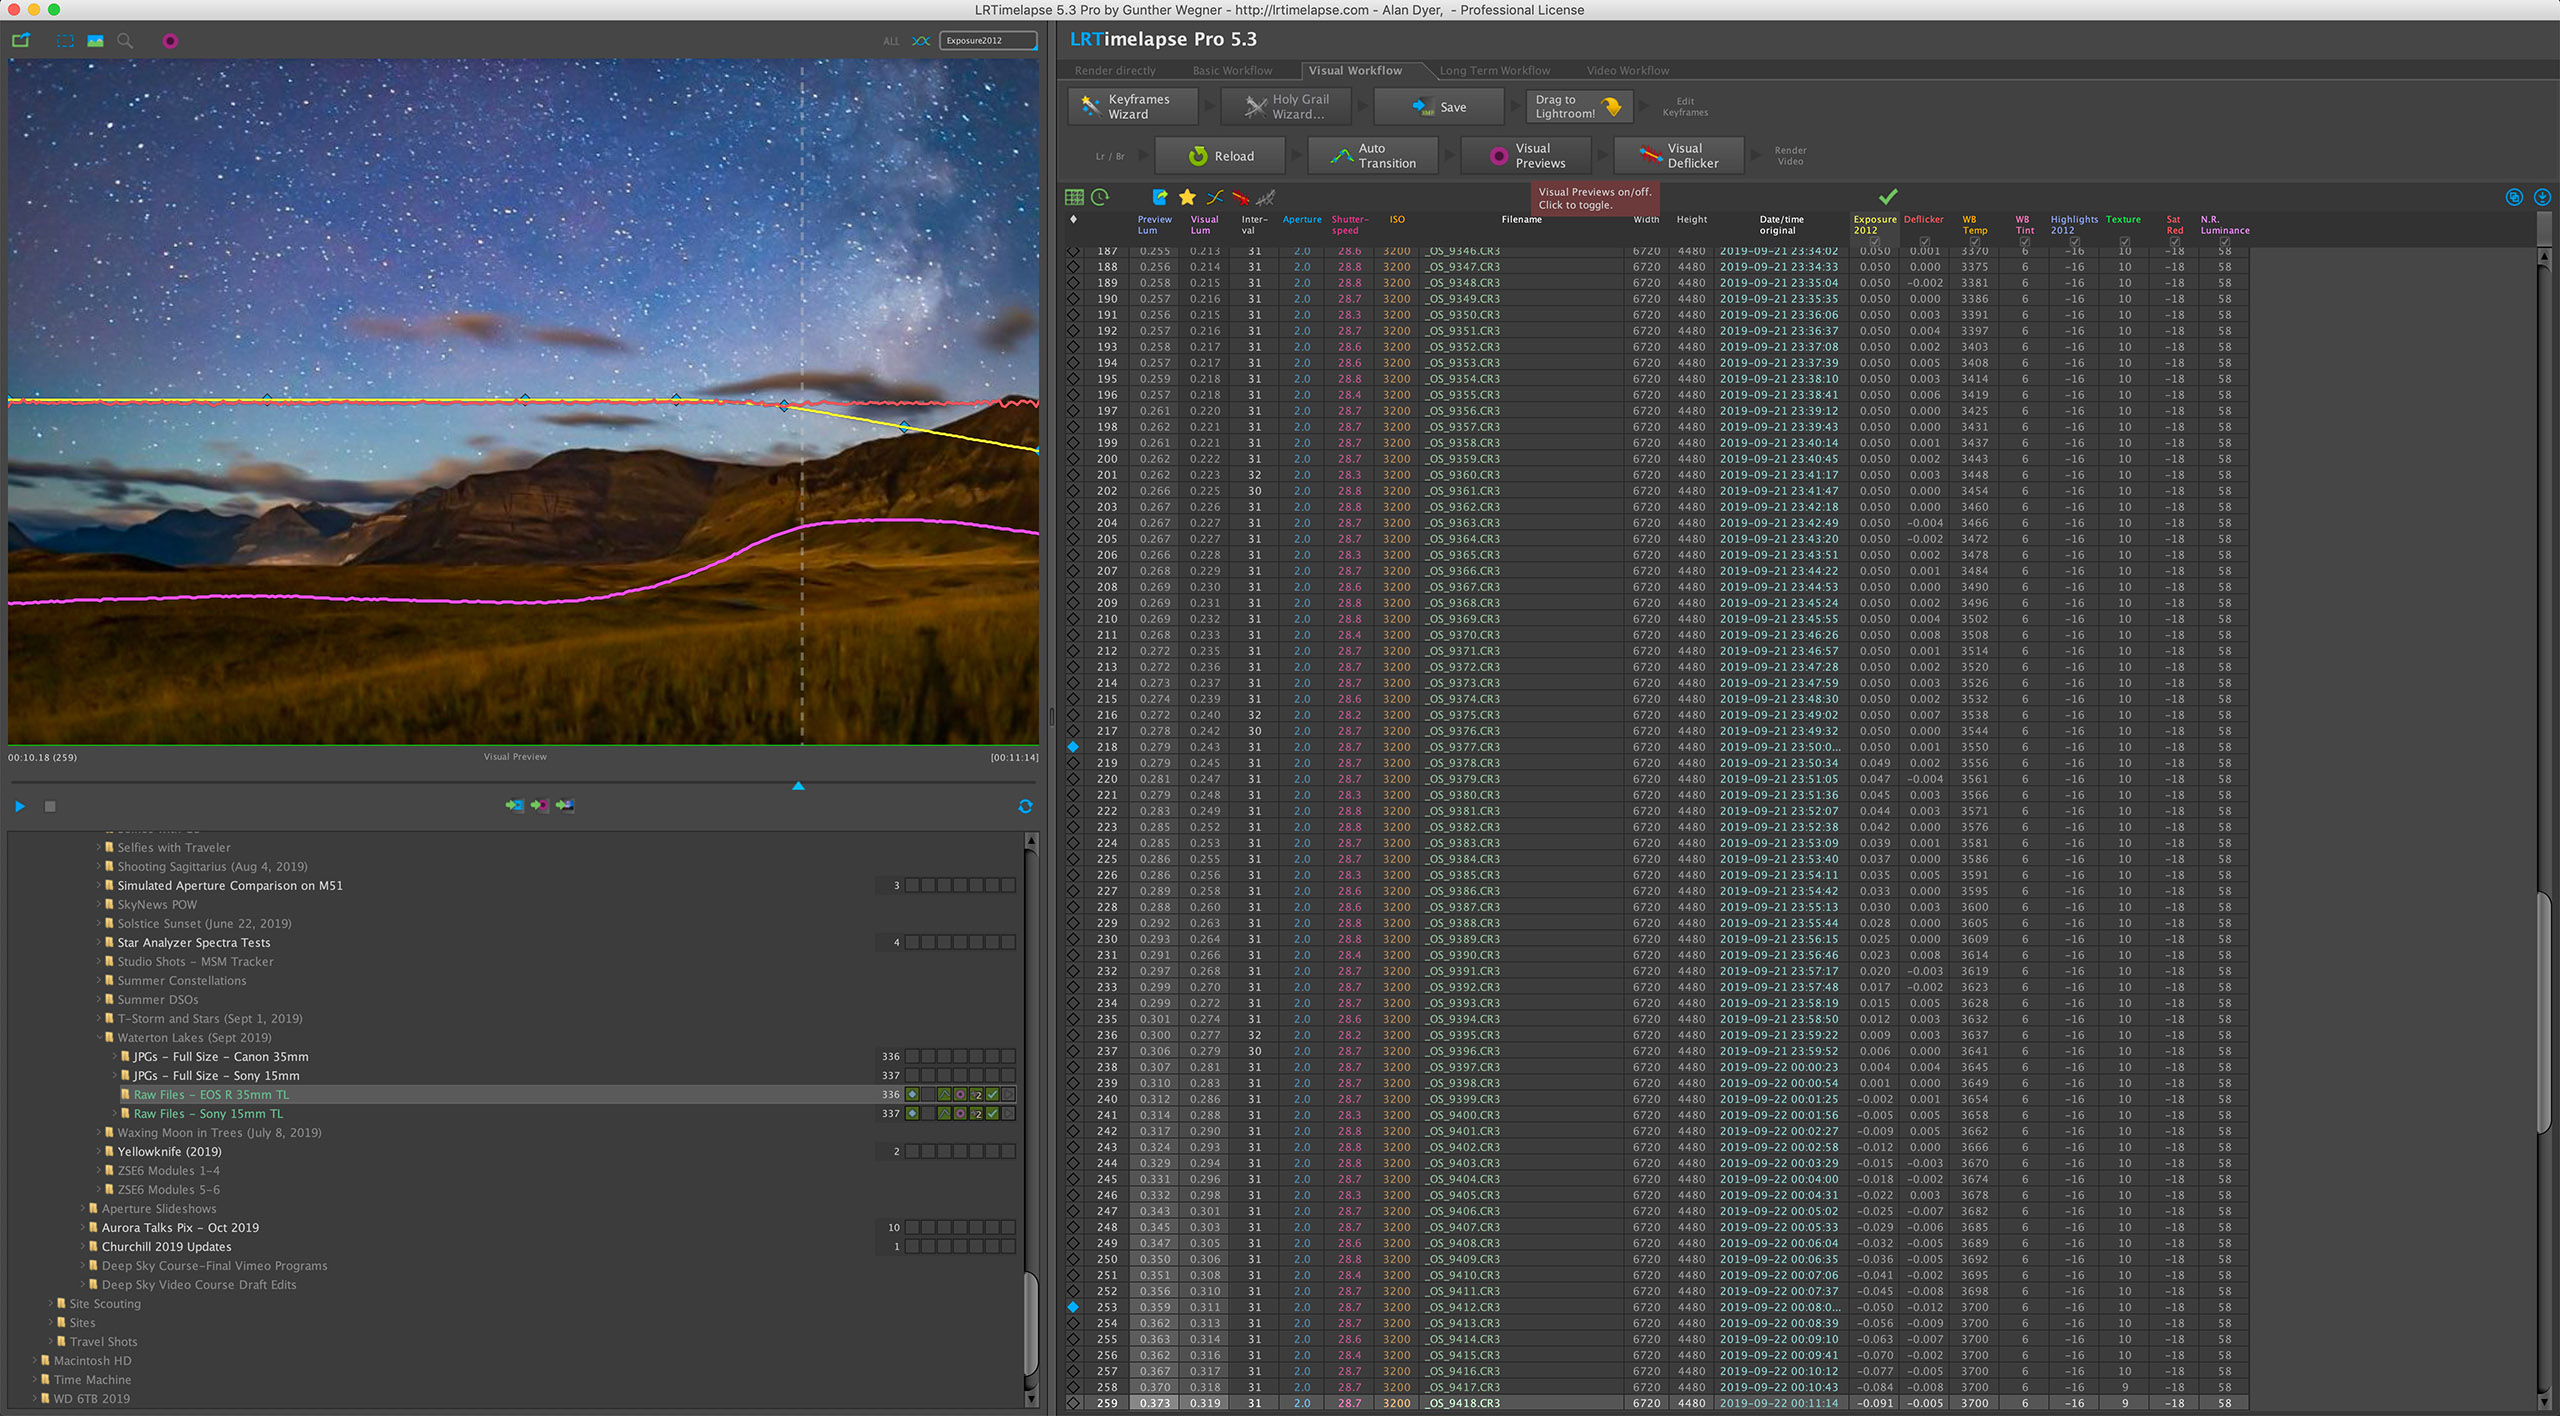
TIP 10 — DO: Try LRTimelapse for more advanced processing
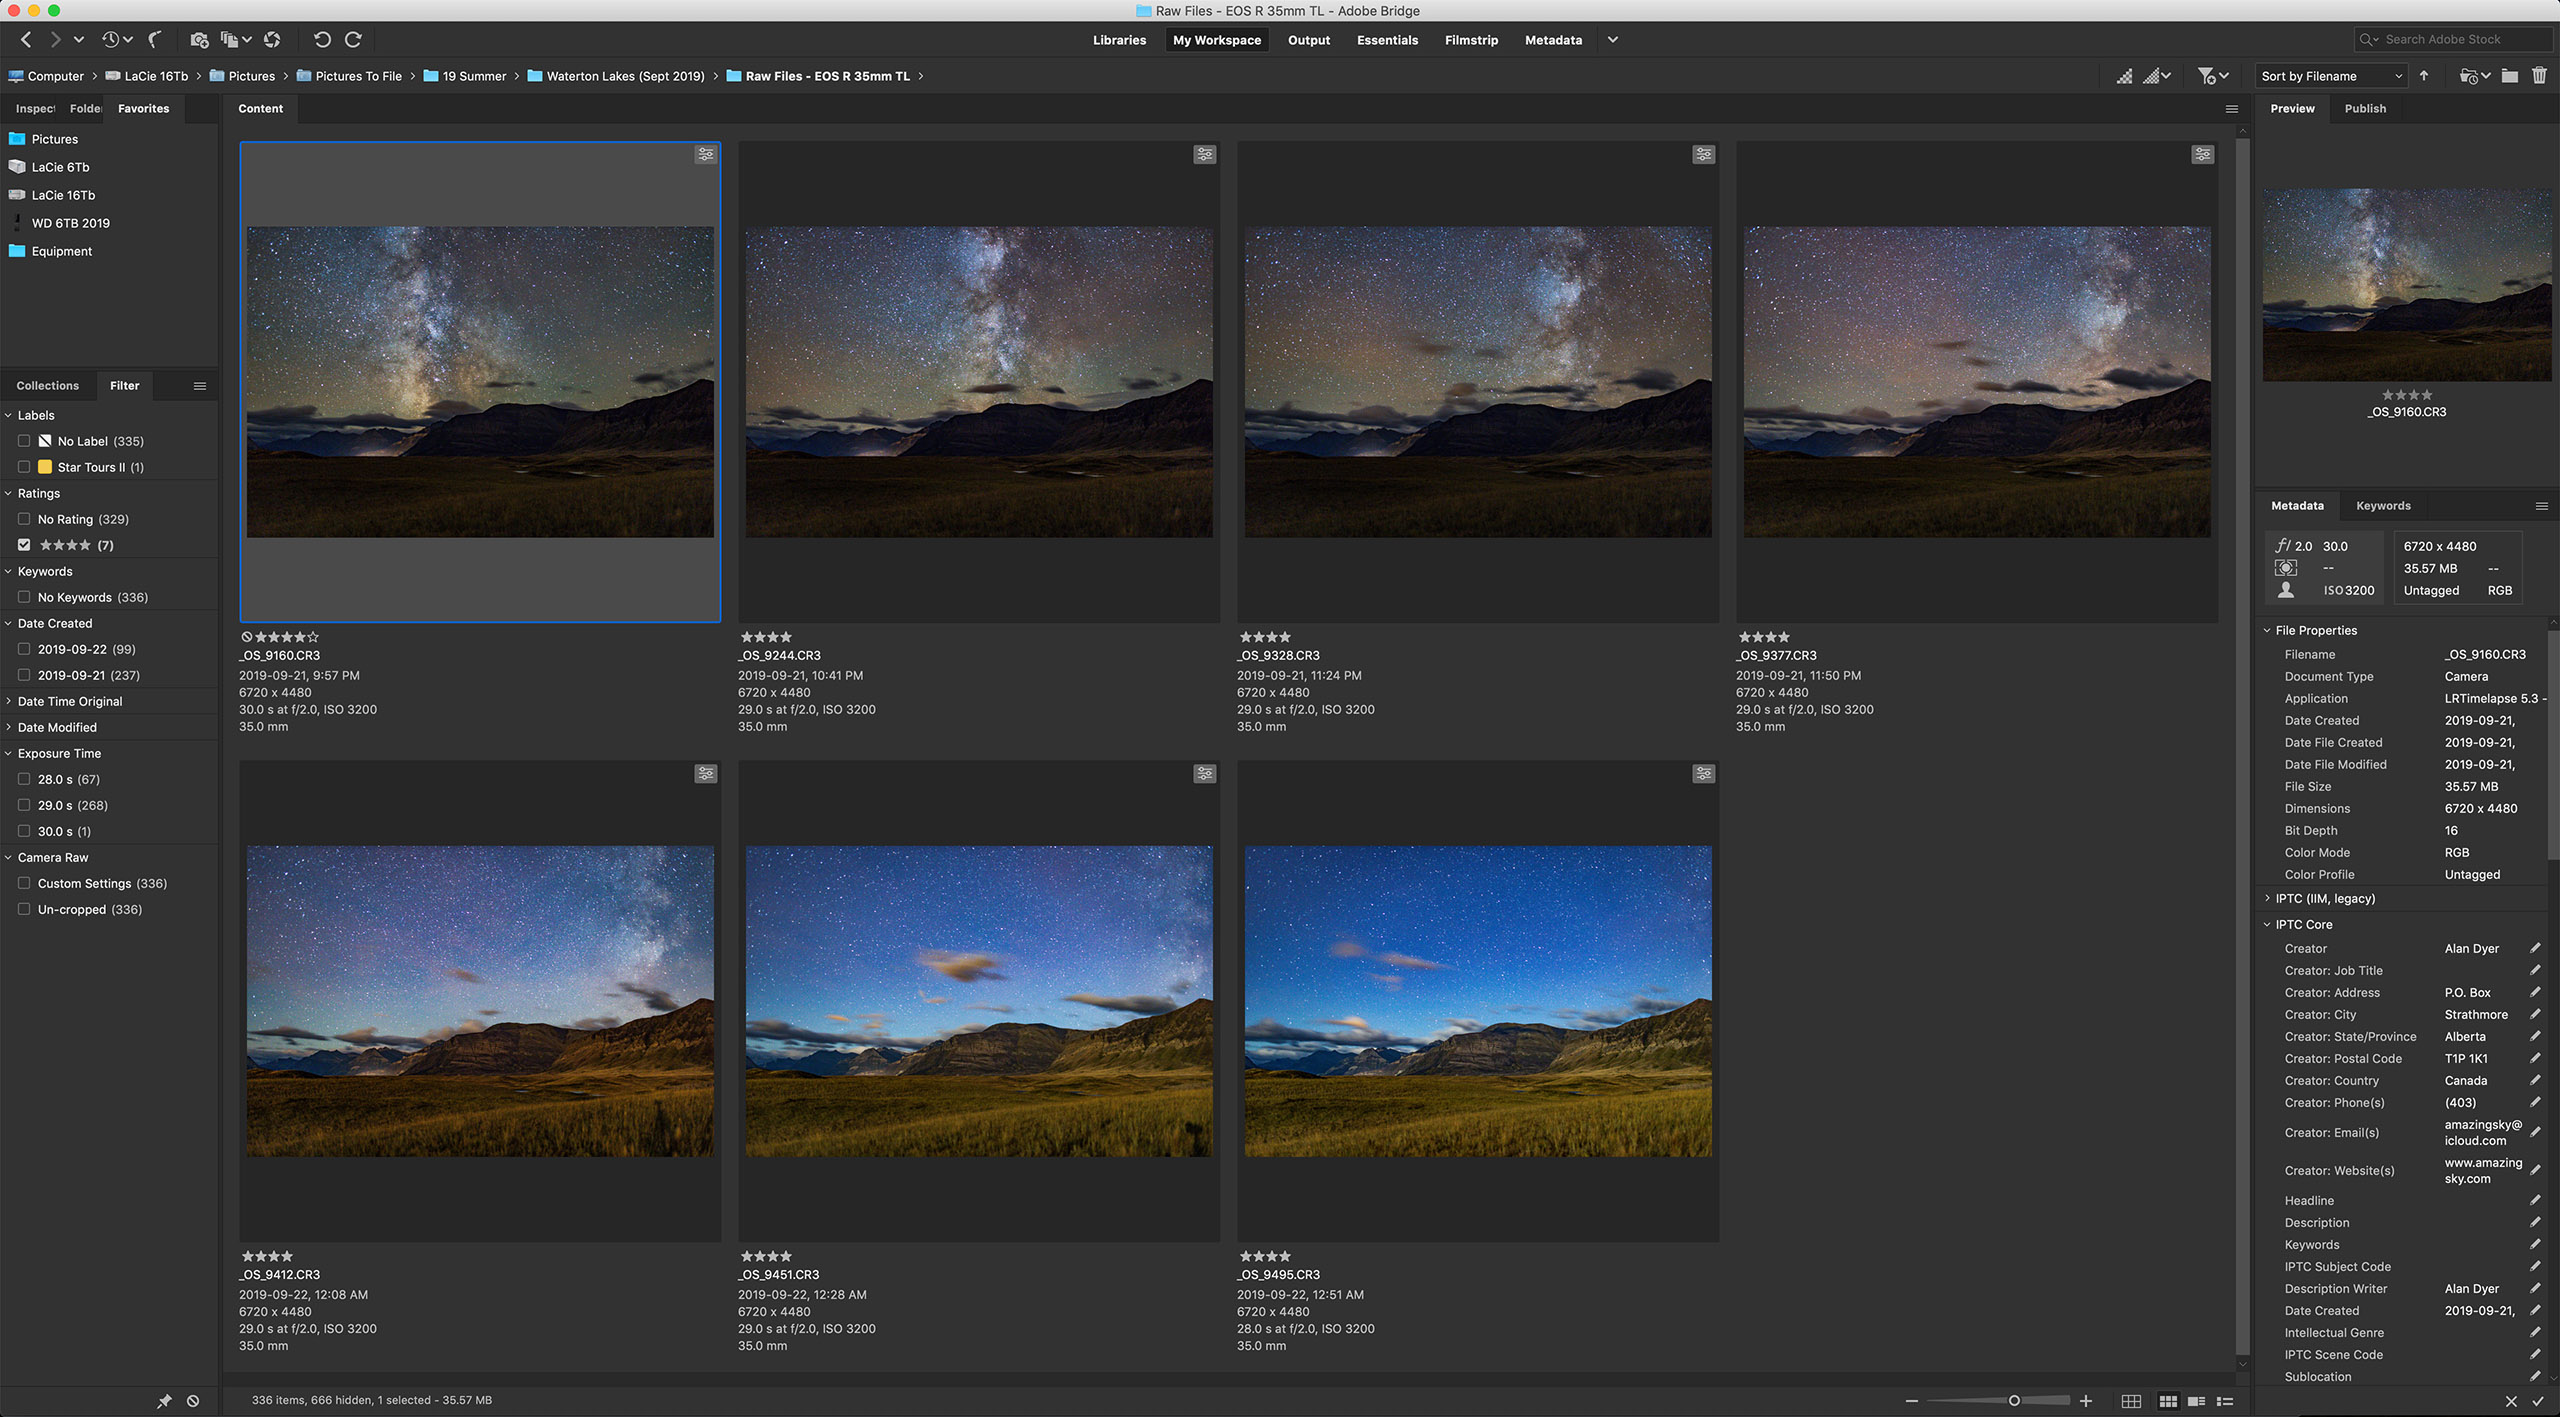
Working on Keyframes The advanced processing program LRTimelapse creates several keyframes through the sequence (seven are shown here in Adobe Bridge) which you develop so each looks its best. During this sequence, the Moon rose changing the lighting toward the end of the shoot (in the last three keyfames).
Get serious about time-lapse shooting and you will want — indeed, you will need — the program LRTimelapse (LRTimelapse.com). A free but limited trial version is available.
This powerful program is for sequences where one setting will not work for all the frames. One size does not fit all.
Instead, LRTimelapse allows you to process a few keyframes throughout a sequence, say at the start, middle, and end. It then interpolates all the settings between those keyframes to automatically process the entire set of images to smooth (or “ramp”) and deflicker the transitions from frame to frame.
LRTimelapse Ramping LRTimelapse reads your developed keyframe data and applies smooth transitions of all settings to each of the raw files between the keyframes. The result is a seamless and smooth final movie. The pink curve shows how the scene brightened at moonrise. The blue diamonds on the yellow line mark the seven keyframes.
This is essential for sequences where the lighting changes during the shoot (say, the Moon rises or sets), and for so-called “holy grails.” Those are advanced sequences that track from daylight or twilight to darkness, or vice versa, over a wide range of camera settings.
However, LRTimelapse works only with Adobe Lightroom or the Adobe Camera Raw/Bridge combination. So for advanced time-lapse work Adobe software is essential.
A Final Bonus Tip
Keep it simple. You might aspire to emulate the advanced sequences you see on the web, where the camera pans and dollies during the movie. I suggest avoiding complex motion control gear at first to concentrate on getting well-exposed time-lapses with just a static camera. That alone is a rewarding achievement.
But before that, first learn to shoot still images successfully. All the settings and skills you need for a great looking still image are needed for a time-lapse. Then move onto capturing the moving sky.
I end with a link to an example music video, shot using the techniques I’ve outlined. Thanks for reading and watching. Clear skies!
The Beauty of the Milky Way from Alan Dyer on Vimeo.
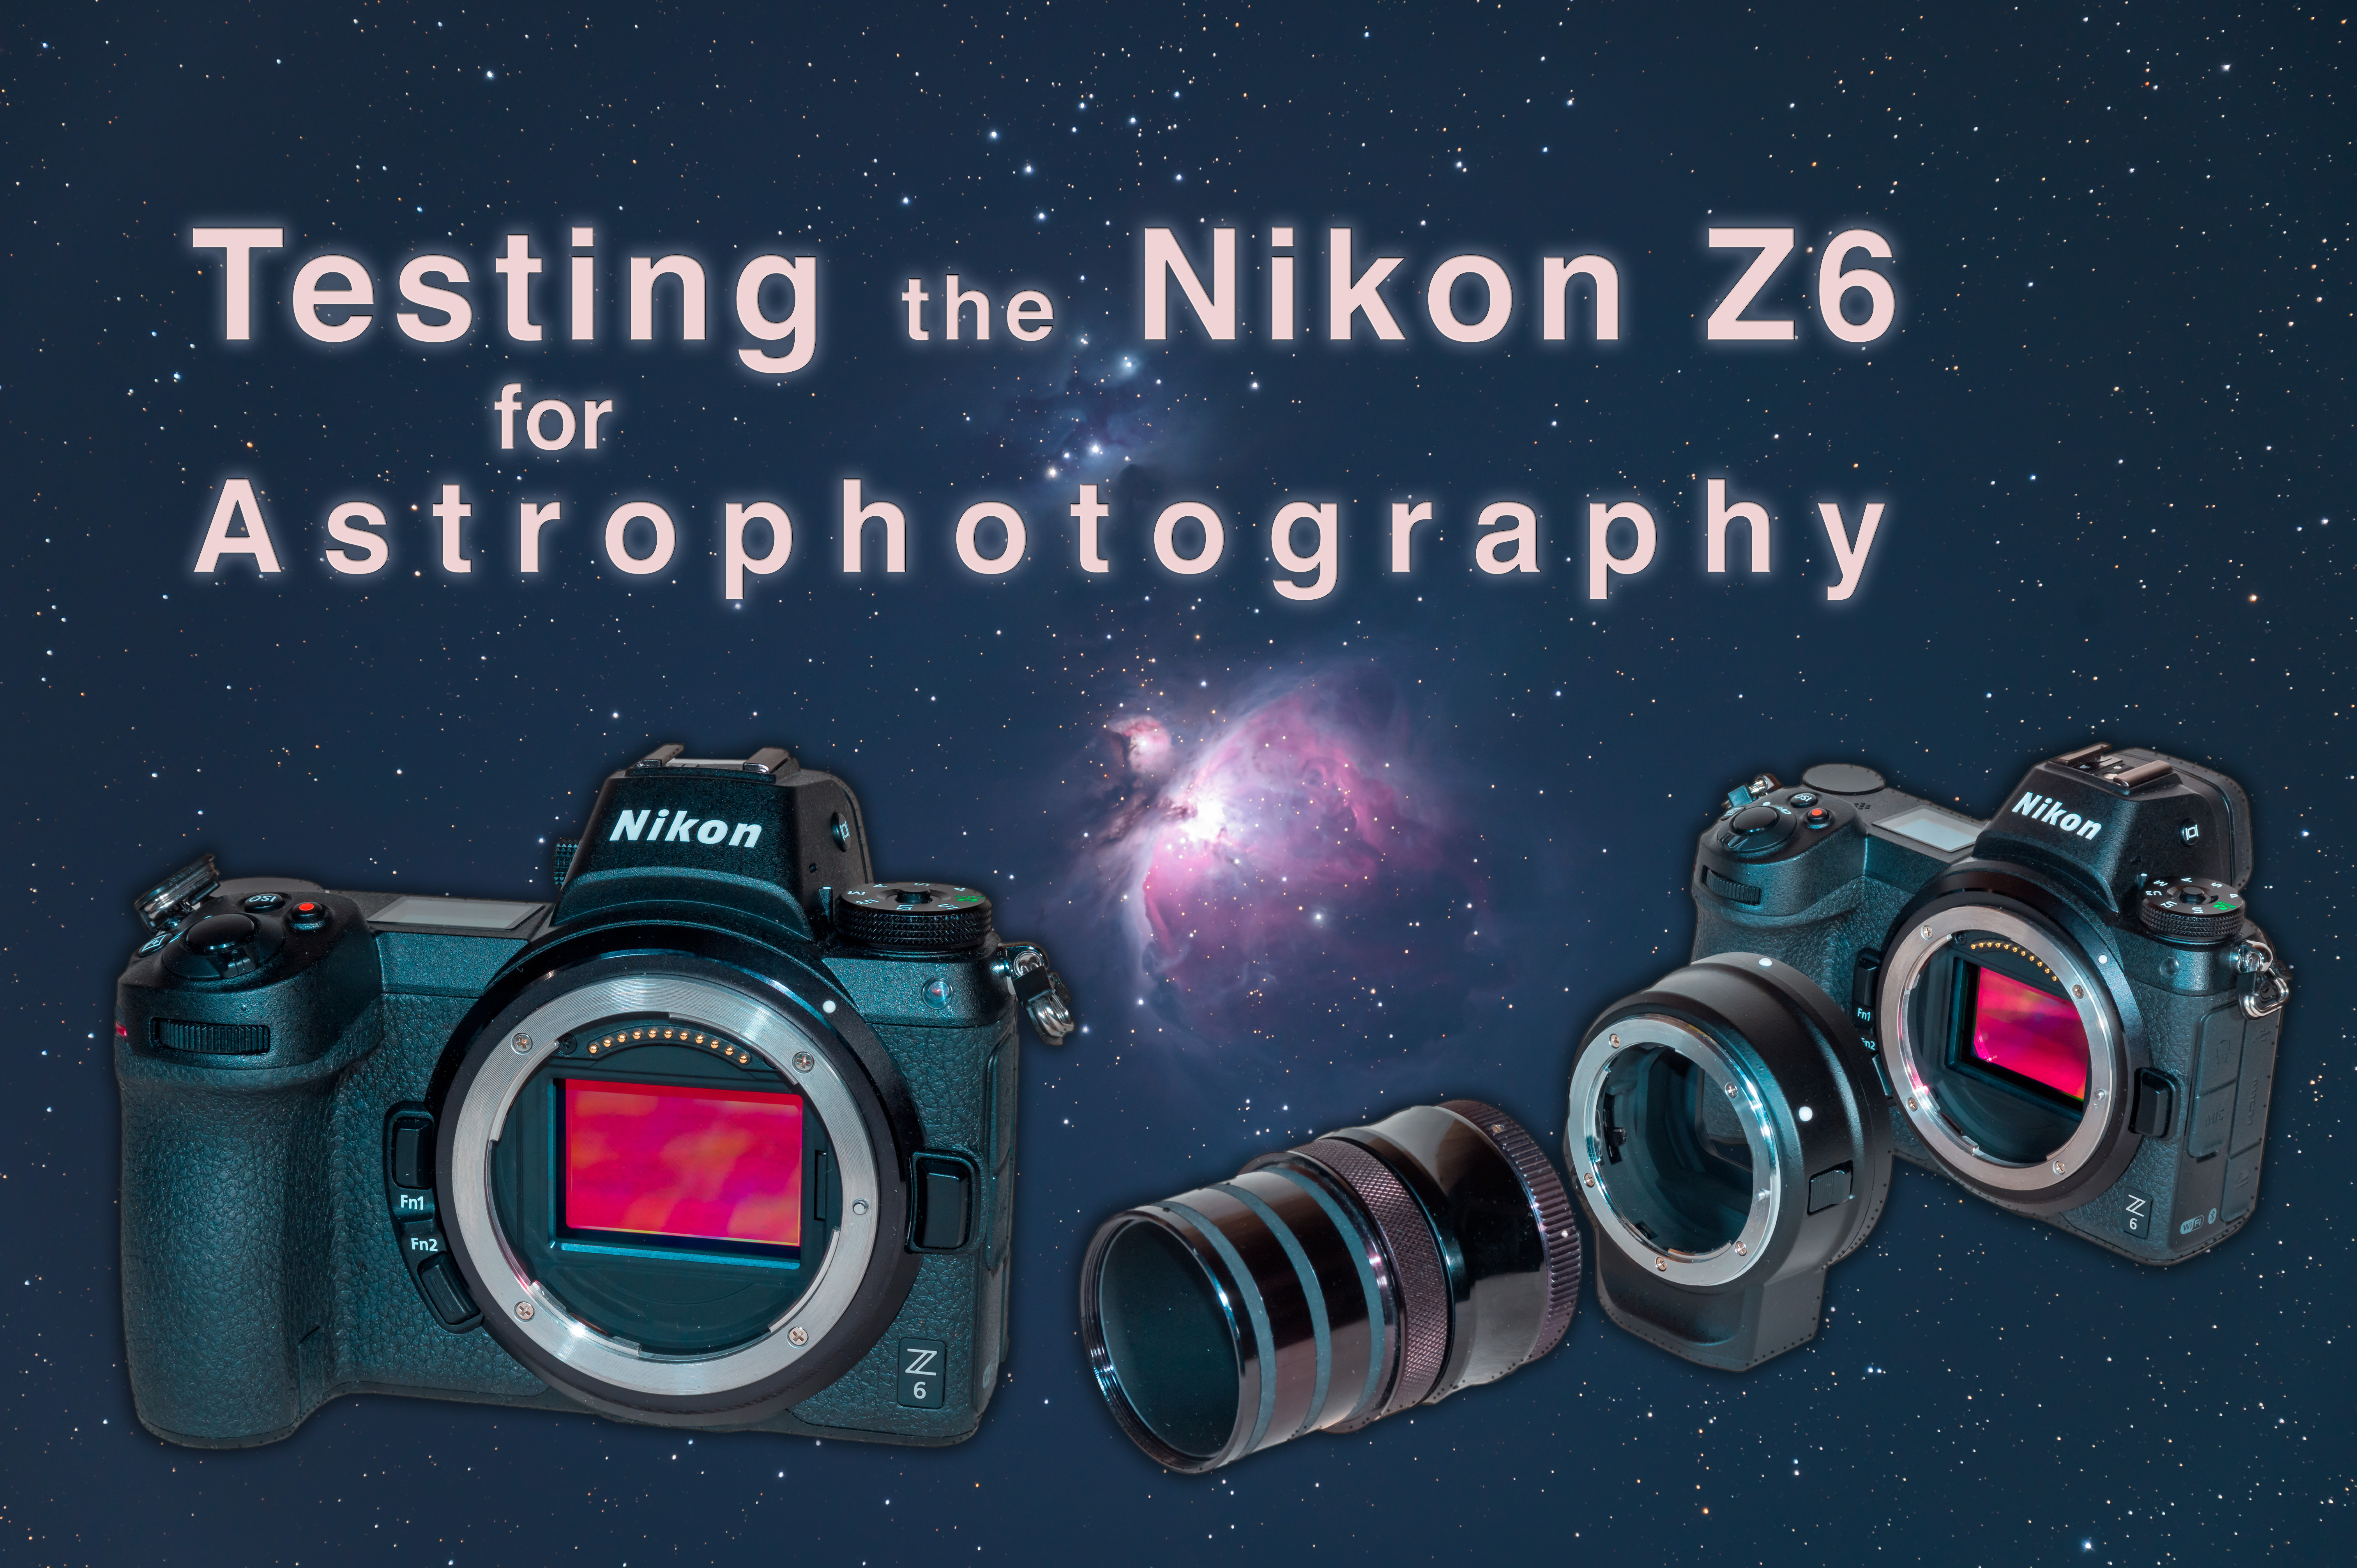
I put the new Nikon Z6 mirrorless camera through its paces for astrophotography.
Following Sony’s lead, in late 2018 both Nikon and Canon released their entries to the full-frame mirrorless camera market.
Here I review one of Nikon’s new mirrorless models, the Z6, tested solely with astrophotography in mind. I did not test any of the auto-exposure, auto-focus, image stabilization, nor rapid-fire continuous mode features.
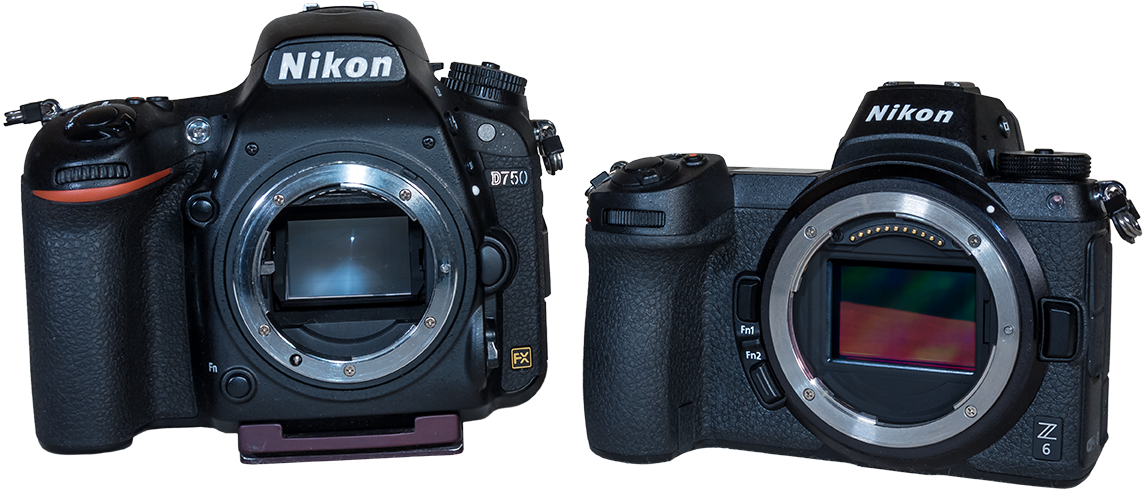
In my testing I compared the Nikon Z6 (at right above) to two competitive cameras, the relatively new Sony a7III mirrorless (at left above) and 2015-vintage Nikon D750 DSLR.
All three are “entry-level” full-frame cameras, with 24 megapixels and in a similar $2,000 price league, though the older D750 now often sells at a considerable discount.
Disclosure
I should state at the outset that my conclusions are based on tests conducted over only three weeks in mid-winter 2019 while I had the camera on loan from Nikon Canada’s marketing company.
I don’t own the camera and didn’t have many moonless nights during the loan period to capture a lot of “beauty” shots under the stars with the Z6.
An arc of the auroral oval across the northern horizon on the night of January 10-11, 2019. With the Sigma 14mm lens and Nikon Z6 for testing.
However, I think my testing was sufficient to reveal the camera’s main traits of interest — as well as deficiencies it might have — for astrophotography.
I should also point out that I do not participate in “affiliate links,” so I have no financial motivation to prompt you to buy gear from merchants.
In short — I found the Nikon Z6 superb for astrophotography.
Summary:
• It offers as low a noise level as you’ll find in a 24-megapixel full-frame camera, though its noise was not significantly lower than the competitive Sony a7III, nor even the older Nikon D750.
• The Z6’s ISO-invariant sensor proved excellent when dealing with the dark underexposed shadows typical of Milky Way nightscapes.
• The Live View was bright and easy to enhance to even brighter levels using the Movie mode to aid in framing nightscapes.
• When shooting deep-sky images through telescopes using long exposures, the Z6 did not exhibit any odd image artifacts such as edge vignetting or amplifier glows, unlike the Sony a7III. See my review of that camera in my blog from 2018.
Recommendations:
• Current owners of Nikon cropped-frame cameras wanting to upgrade to full-frame would do well to consider a Z6 over any current Nikon DSLR.
• Anyone wanting a full-frame camera for astrophotography and happy to “go Nikon” will find the Z6 nearly perfect for their needs.
Nikon Z6 vs. Z7
I opted to test the Z6 over the more expensive Z7, as the 24-megapixel Z6 has 6-micron pixels resulting in lower noise (according to independent tests) than the 46 megapixel Z7 with its 4.4 micron pixels.
In astrophotography, I feel low noise is critical, with 24-megapixel cameras hitting a sweet spot of noise vs. resolution.
However, if the higher resolution of the Z7 is important for your daytime photography needs, then I’m sure it will work well at night. The Nikon D850 DSLR, with a sensor similar to the Z7, has been proven by others to be a good astrophotography camera, albeit with higher noise than the lesser megapixel Nikons such as the D750 and Z6.
NOTE: Tap or click on images to download and display them full screen for closer inspection.
High ISO Noise
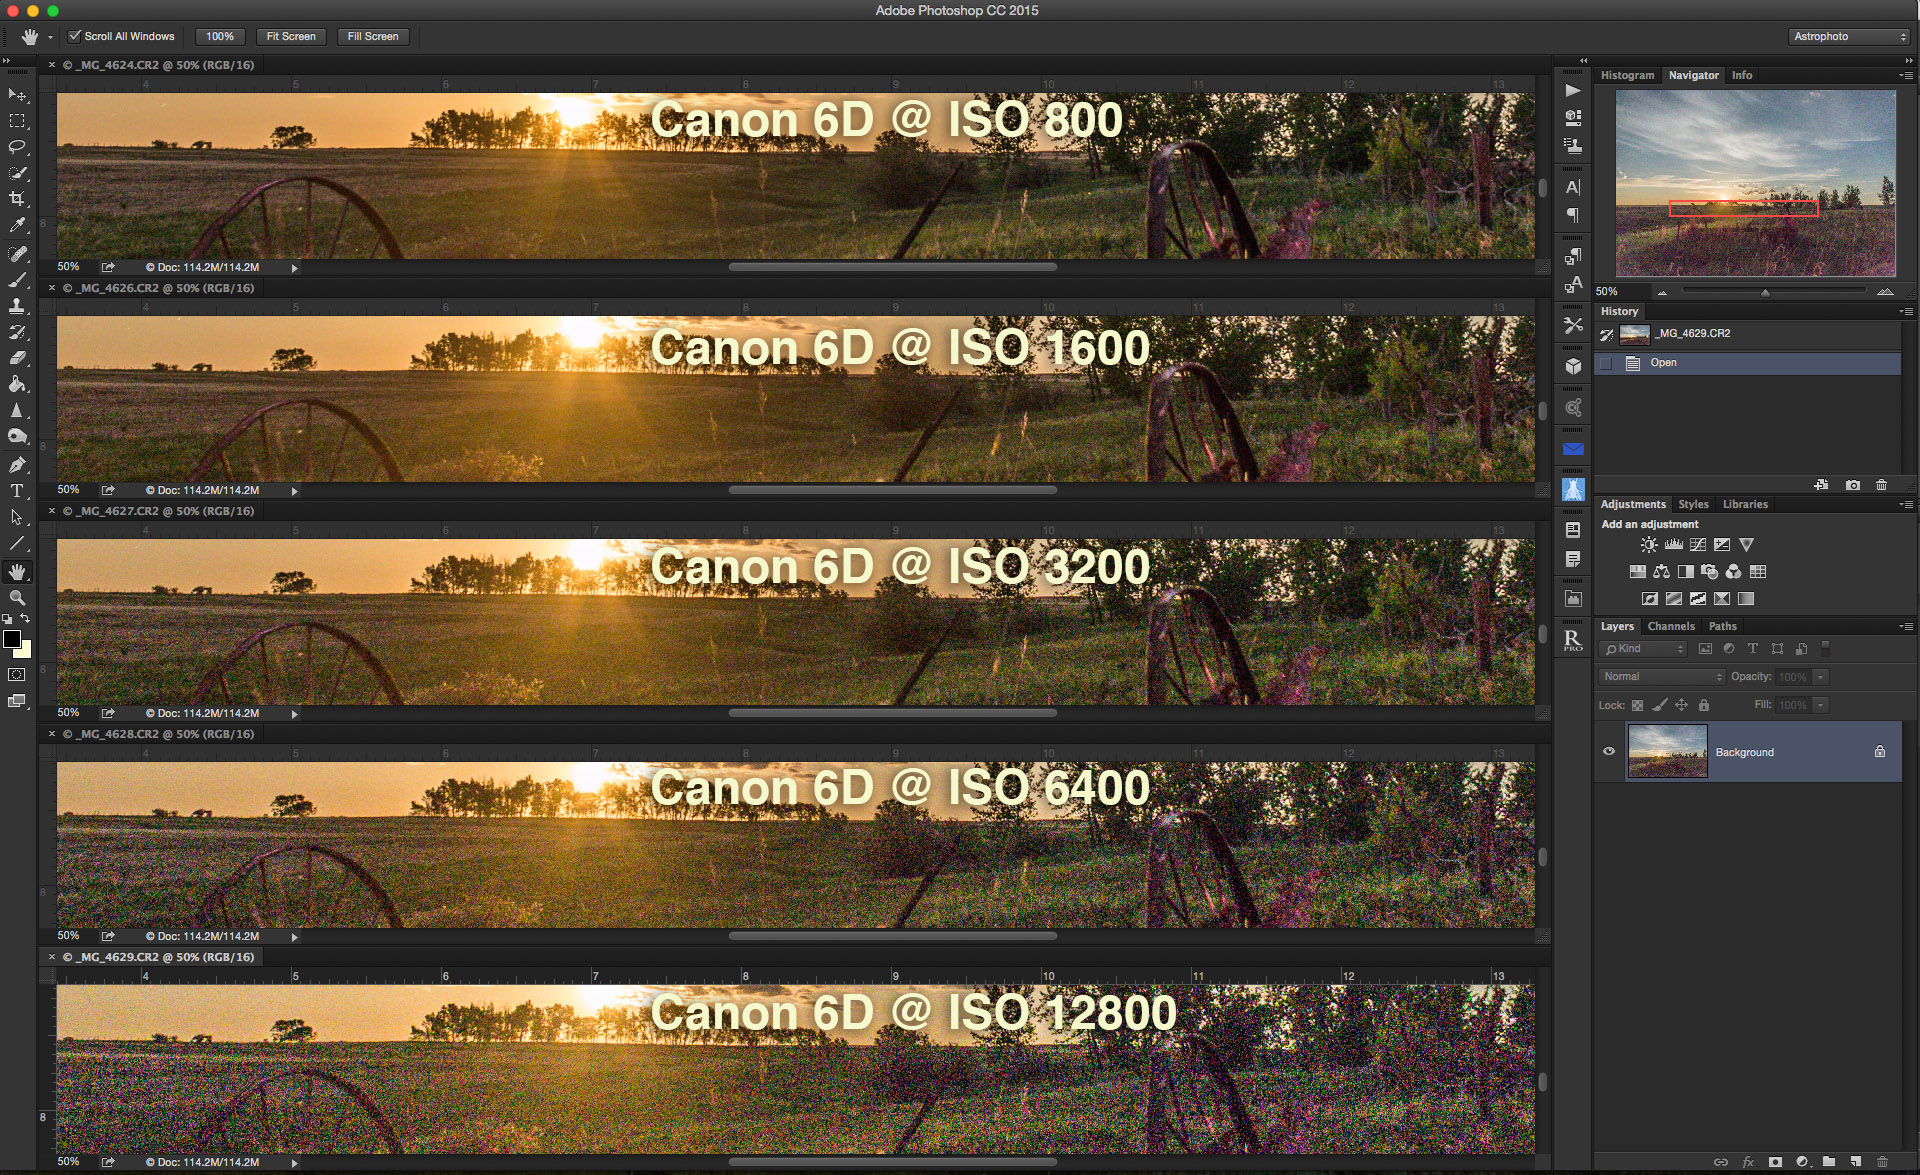
The three 24-megapixel cameras compared at three high ISO levels in a close-up of a dark-sky nightscape.
To test noise in a real-world situation, I shot a dark nightscape scene with the three cameras, using a 24mm Sigma Art lens on the two Nikons, and a 24mm Canon lens on the Sony via a MetaBones adapter. I shot at ISOs from 800 to 12,800, typical of what we use in nightscapes and deep-sky images.
The comparison set above shows performance at the higher ISOs of 3200 to 12,800. I saw very little difference among the trio, with the Nikon Z6 very similar to the Sony a7III, and with the four-year-old Nikon D750 holding up very well against the two new cameras.
The comparison below shows the three cameras on another night and at ISO 3200.
The three cameras compared for noise at properly exposed moonlit scenes at ISO 3200, a typical nightscape setting.
Both the Nikon Z6 and Sony a7III use a backside illuminated or “BSI” sensor, which in theory is promises to provide lower noise than a conventional CMOS sensor used in an older camera such as the D750.
In practice I didn’t see a marked difference, certainly not as much as the one- or even 1/2-stop improvement in noise I might have expected or hoped for.
Nevertheless, the Nikon Z6 provides as low a noise level as you’ll find in a camera offering 24 megapixels, and will perform very well for all forms of astrophotography.
ISO Invariance
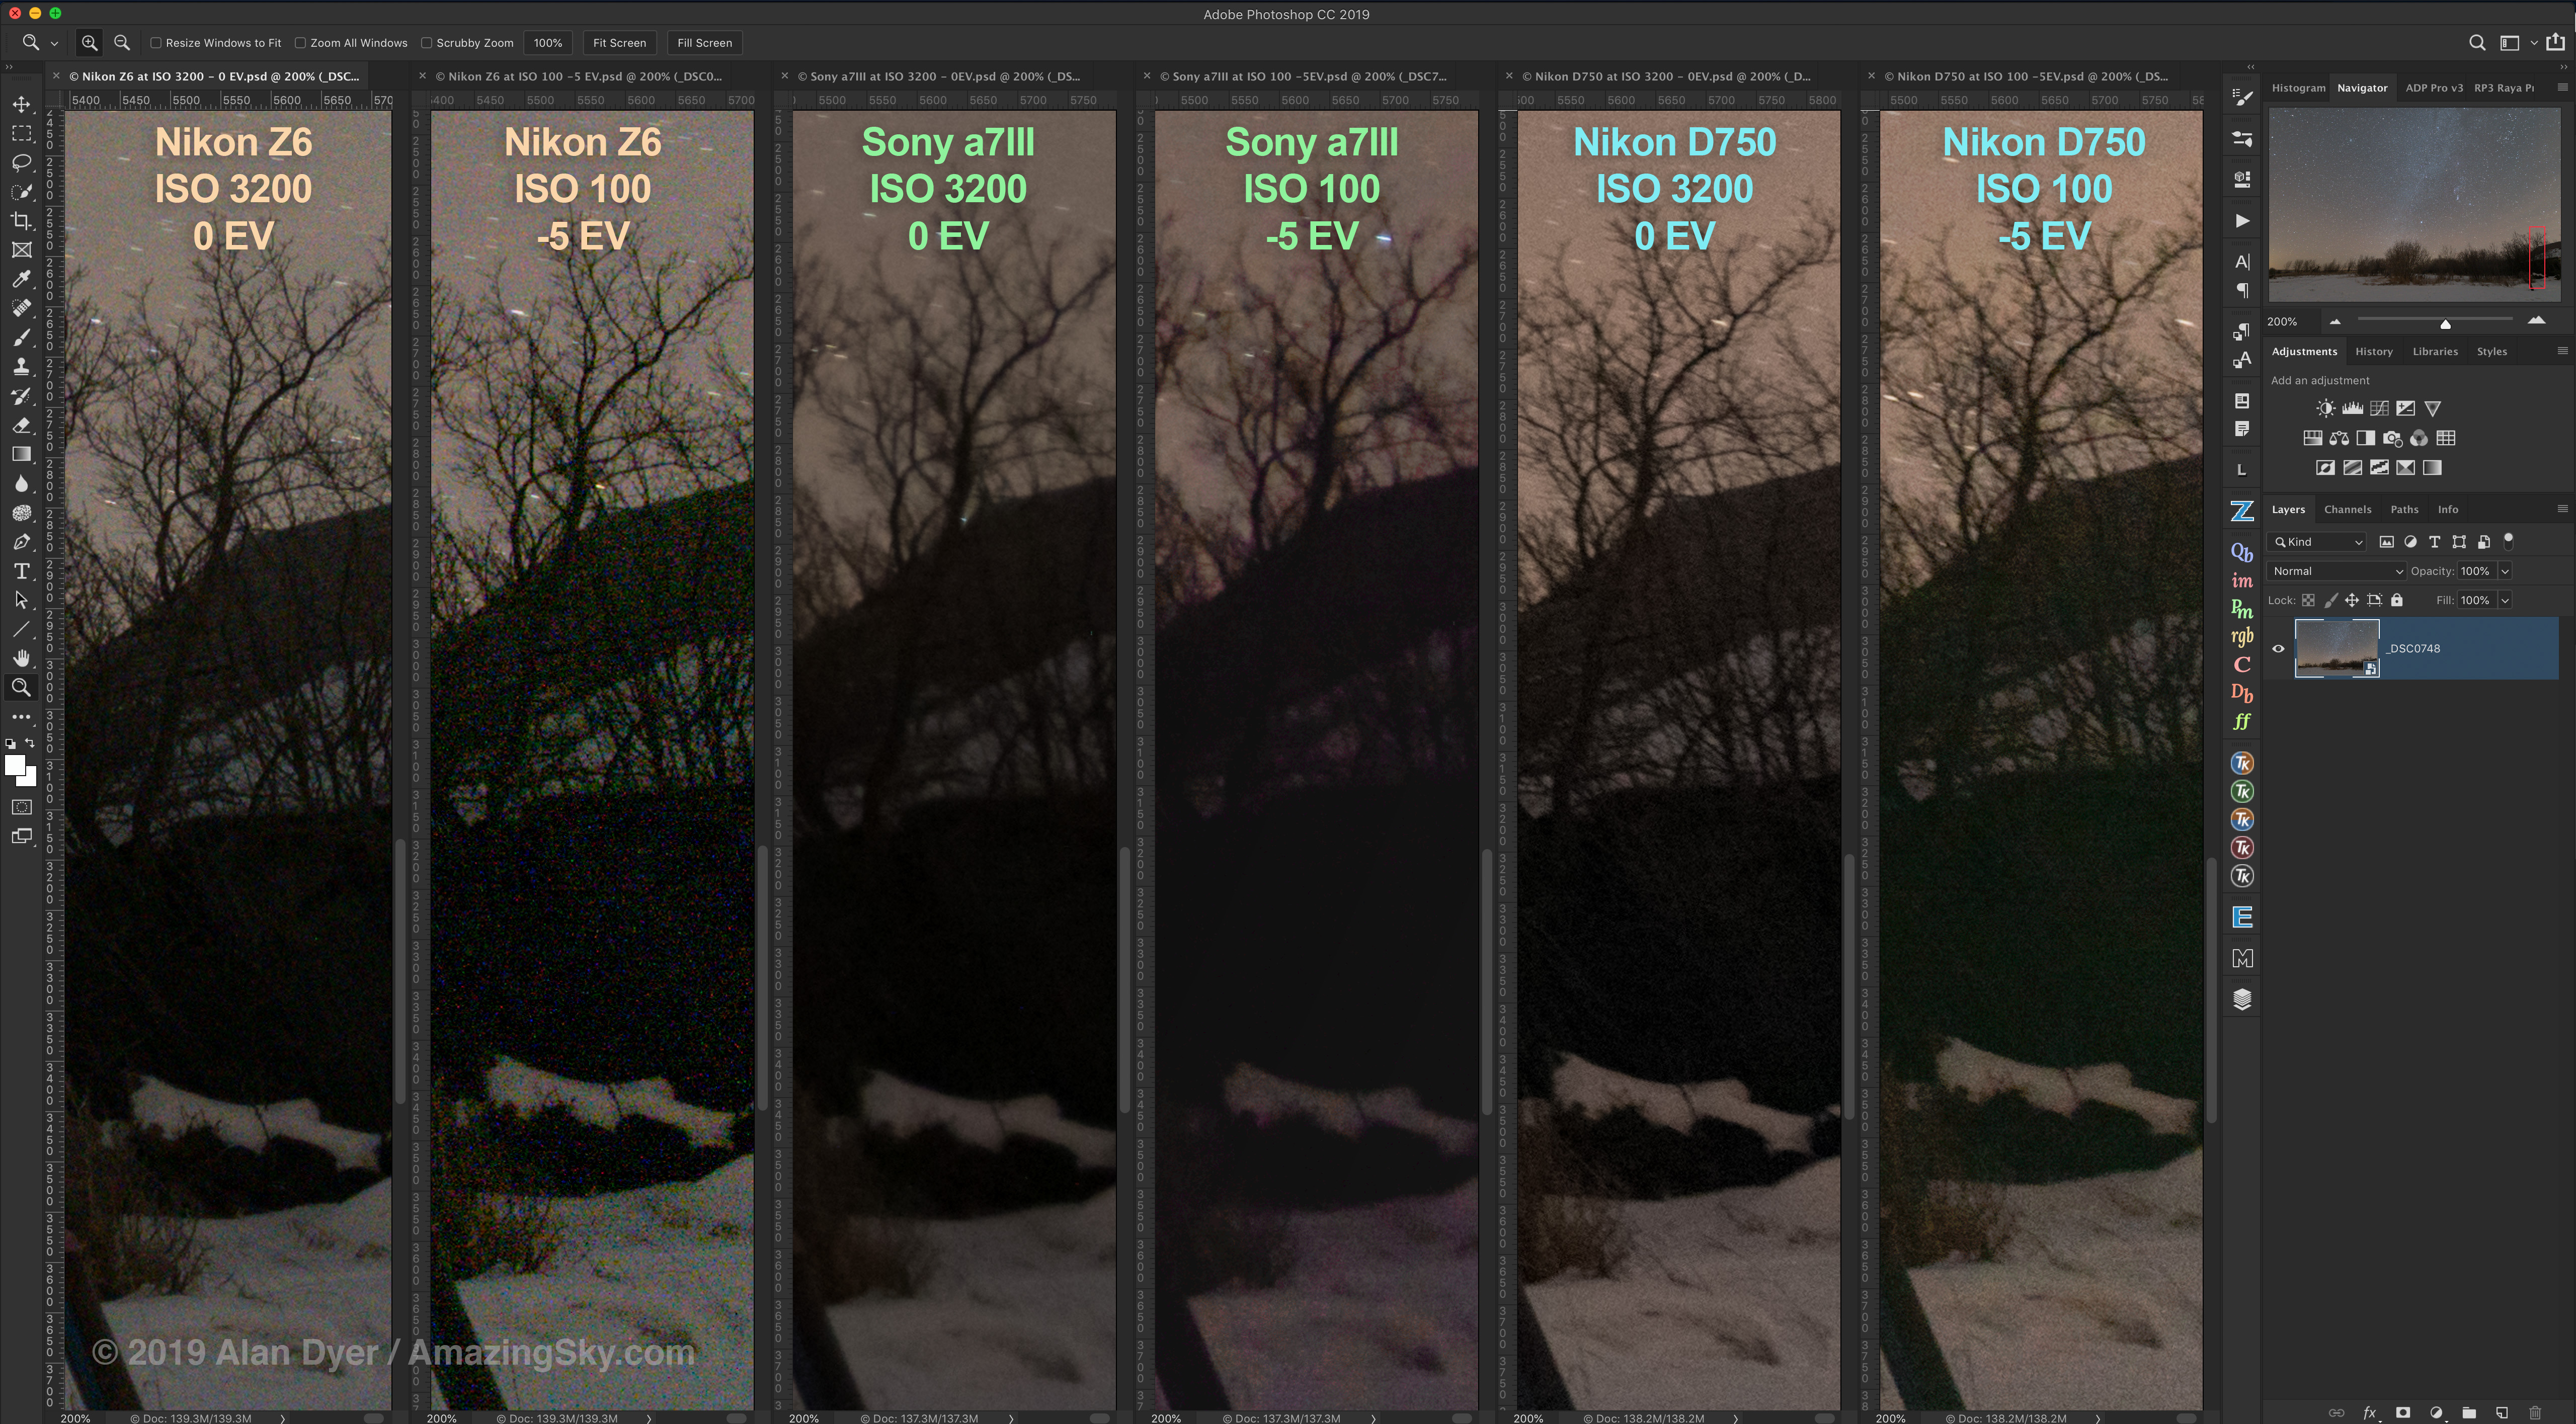
The three cameras compared for ISO invariance at 0EV (well exposed) and -5EV (5 stops underexposed then brightened in processing).
Nikon and Sony both employ an “ISO-invariant” signal flow in their sensor design. You can purposely underexpose by shooting at a lower ISO, then boost the exposure later “in post” and end up with a result similar to an image shot at a high ISO to begin with in the camera.
I find this feature proves its worth when shooting Milky Way nightscapes that often have well-exposed skies but dark foregrounds lit only by starlight. Boosting the brightness of the landscape when developing the raw files reveals details in the scene without unduly introducing noise, banding, or other artifacts such as magenta tints.
That’s not true of “ISO variant” sensors, such as in most Canon cameras. Such sensors are far less tolerant of underexposure and are prone to noise, banding, and discolouration in the brightened shadows.
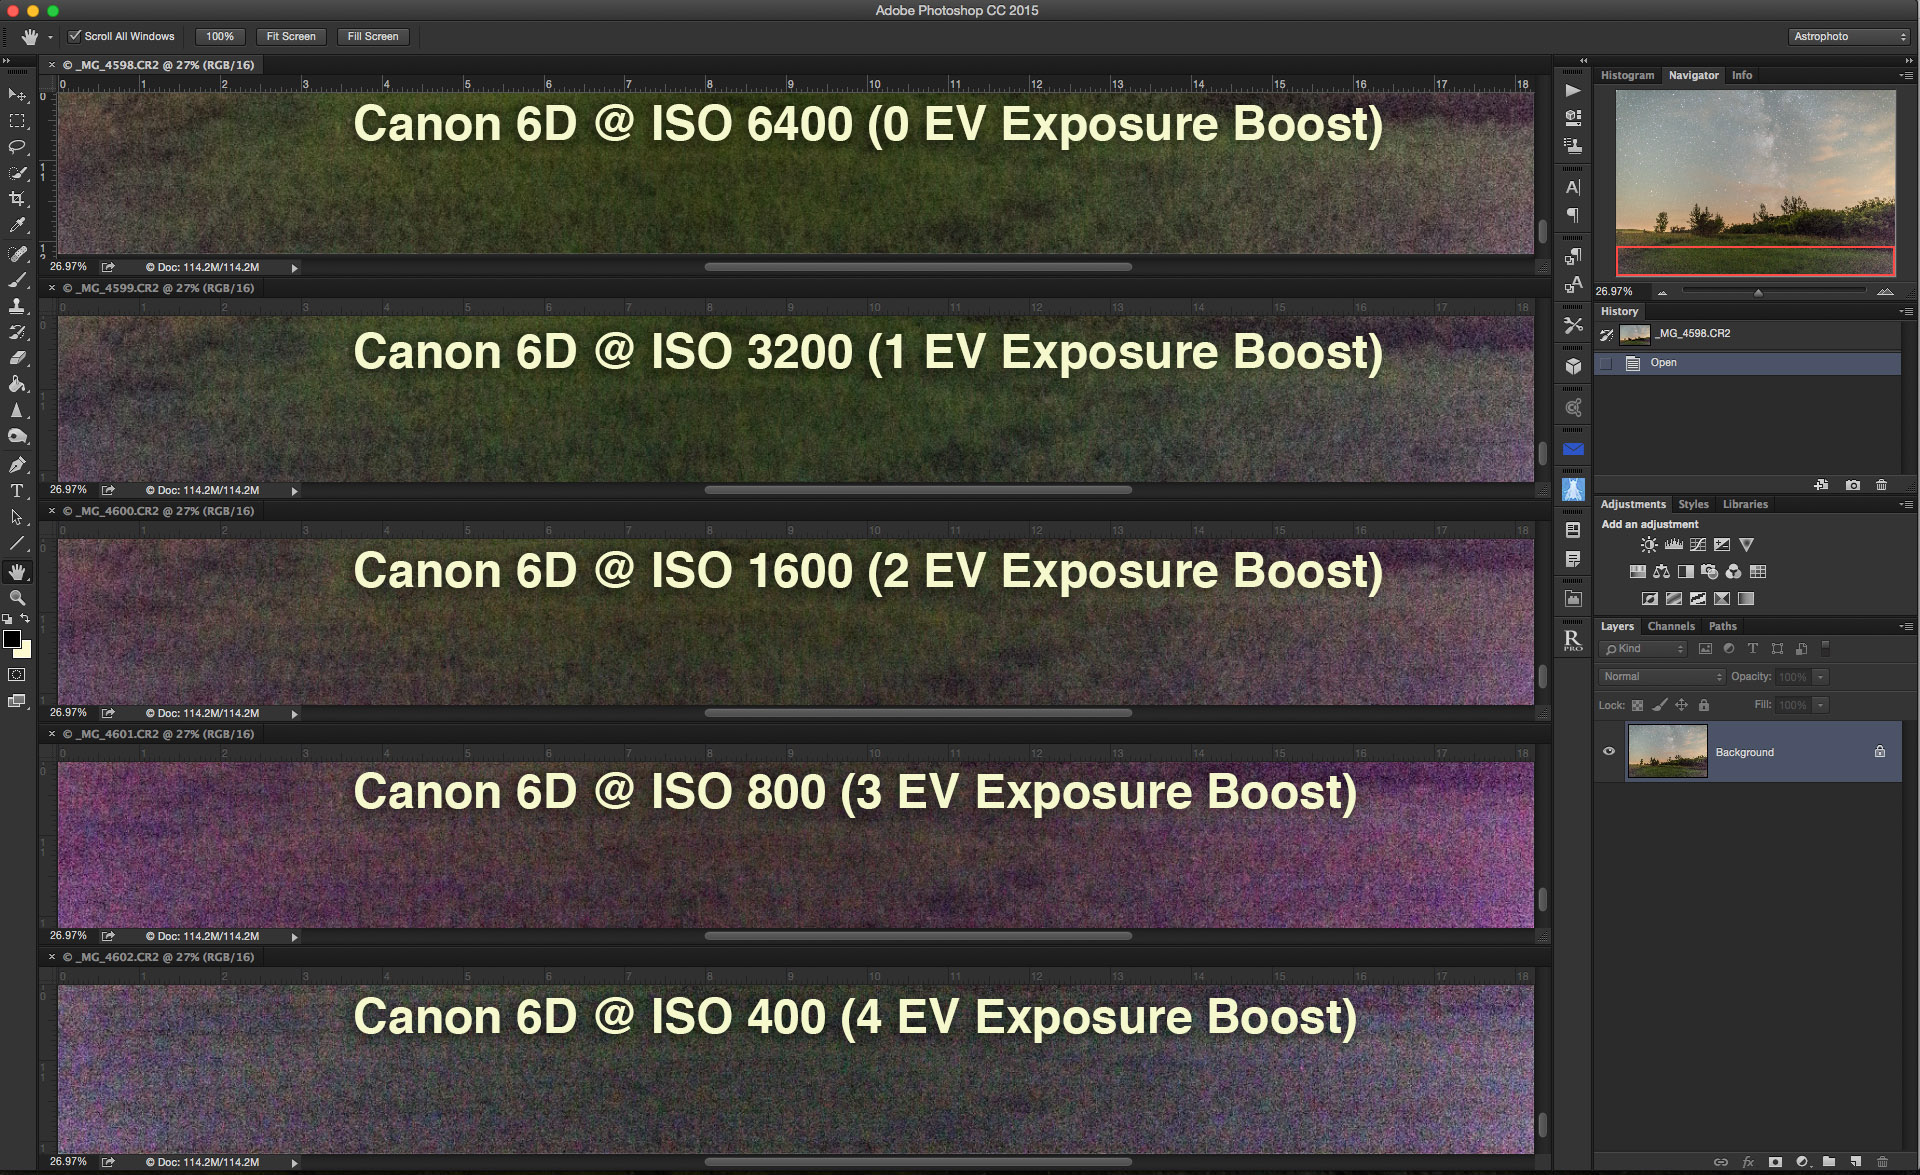
To test the Z6’s ISO invariance (as shown above) I shot a dark nightscape at ISO 3200 for a properly exposed scene, and also at ISO 100 for an image underexposed by a massive 5 stops. I then boosted that image by 5 stops in exposure in Adobe Camera Raw. That’s an extreme case to be sure.
I found the Z6 provided very good ISO invariant performance, though with more chrominance specking than the Sony a7III and Nikon D750 at -5 EV.
Below is a less severe test, showing the Z6 properly exposed on a moonlit night and at 1 to 4 EV steps underexposed, then brightened in processing. Even the -4 EV image looks very good.
This series taken under moonlight shows that even images underexposed by -4 EV in ISO and boosted later by +4 EV in processing look similar for noise and image quality as an image properly exposed in the camera (at ISO 800 here).
In my testing, even with frames underexposed by -5 EV, I did not see any of the banding effects (due to the phase-detect auto-focus pixels) reported by others.
As such, I judge the Z6 to be an excellent camera for nightscape shooting when we often want to extract detail in the shadows or dark foregrounds.
Compressed vs. Uncompressed / Raw Large vs. Small
Comparing Z6 images shot at full resolution and at Medium Raw size. to show resolution and noise differences.
The Z6, as do many Nikons, offers a choice of shooting 12-bit or 14-bit raws, and either compressed or uncompressed.
I shot all my test images as 14-bit uncompressed raws, yielding 46 megabyte files with a resolution of 6048 x 4024 pixels. So I cannot comment on how good 12-bit compressed files are compared to what I shot. Astrophotography demands the best original data.
However, as the menu above shows, Nikon now also offers the option of shooting smaller raw sizes. The Medium Raw setting produces an image 4528 x 3016 pixels and a 18 megabyte file (in the files I shot), but with all the benefits of raw files in processing.
The Z cameras use the XQD style memory cards and in a single card slot. The fast XQDs are ideal for recording 4K movies at high data rates but are more costly than the more common SD cards.
The Medium Raw option might be attractive when shooting time-lapses, where you might need to fit as many frames onto the single XQD card as possible, yet still have images large enough for final 4K movies.
However, comparing a Large Raw to a Medium Raw did show a loss of resolution, as expected, with little gain in noise reduction.
This is not like “binning pixels” in CCD cameras to increase signal-to-noise ratio. I prefer to never throw away information in the camera, to allow the option of creating the best quality still images from time-lapse frames later.
Nevertheless, it’s nice to see Nikon now offer this option on new models, a feature which has long been on Canon cameras.
Star Image Quality
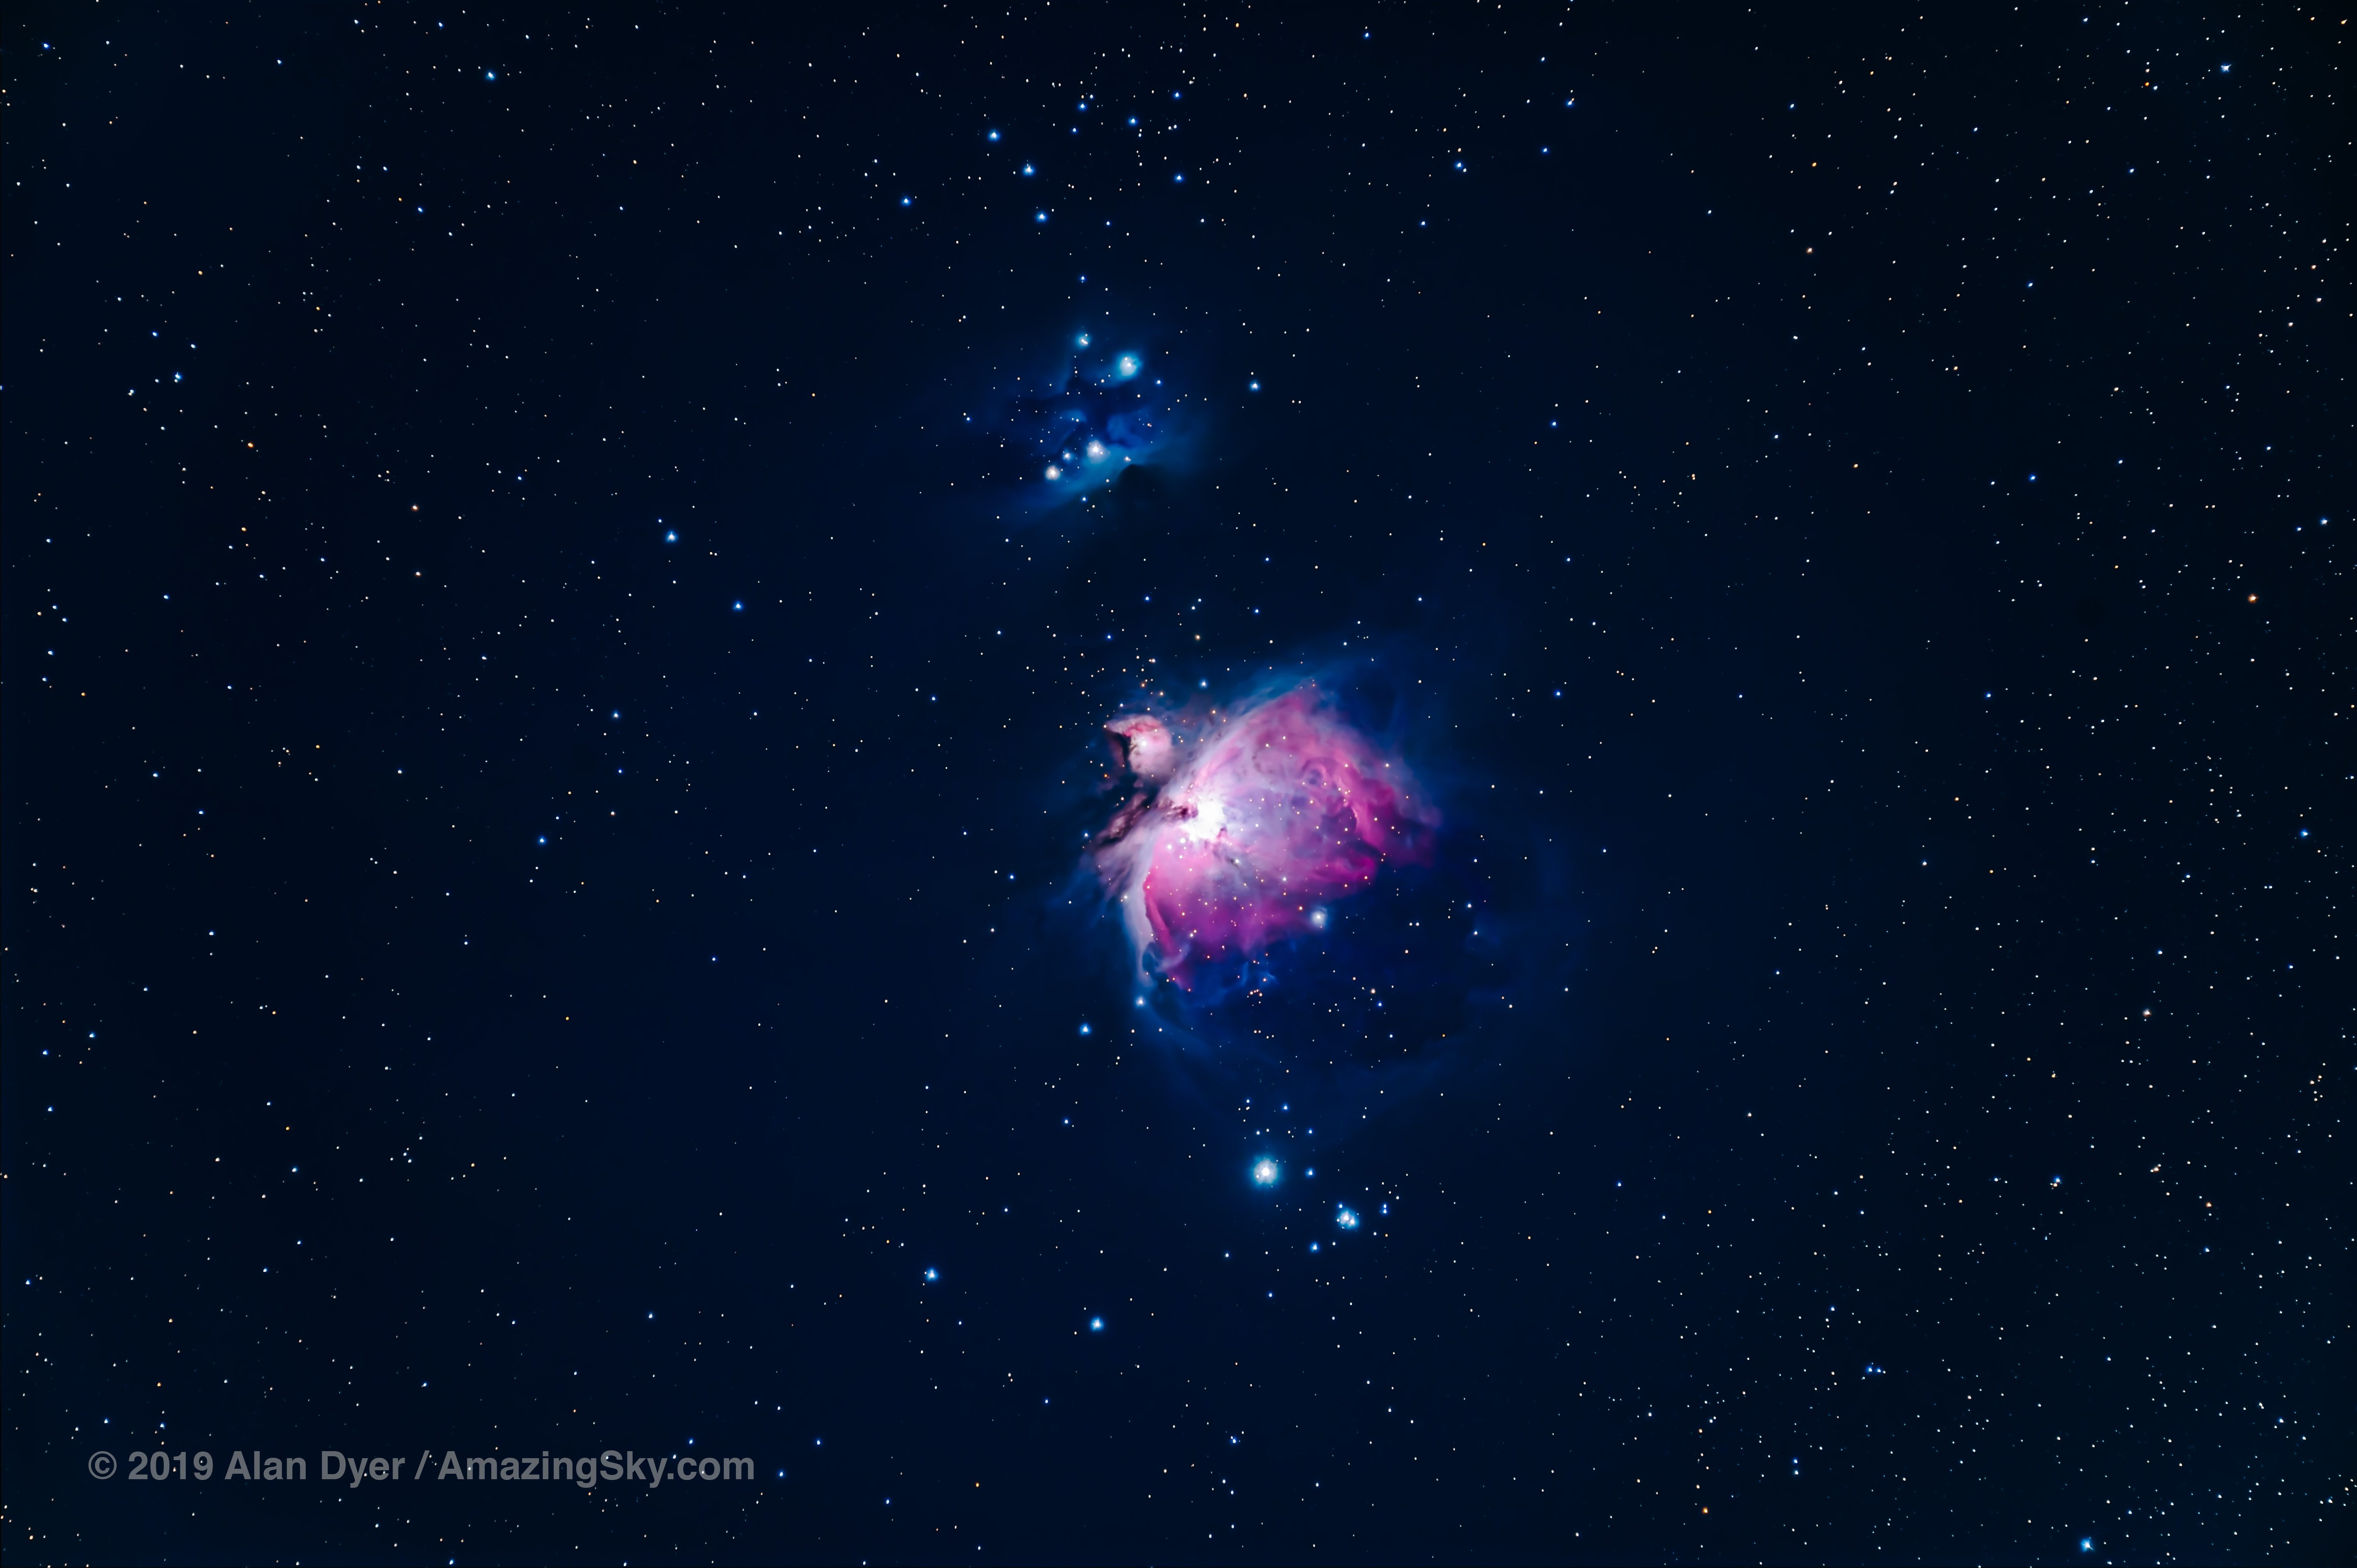
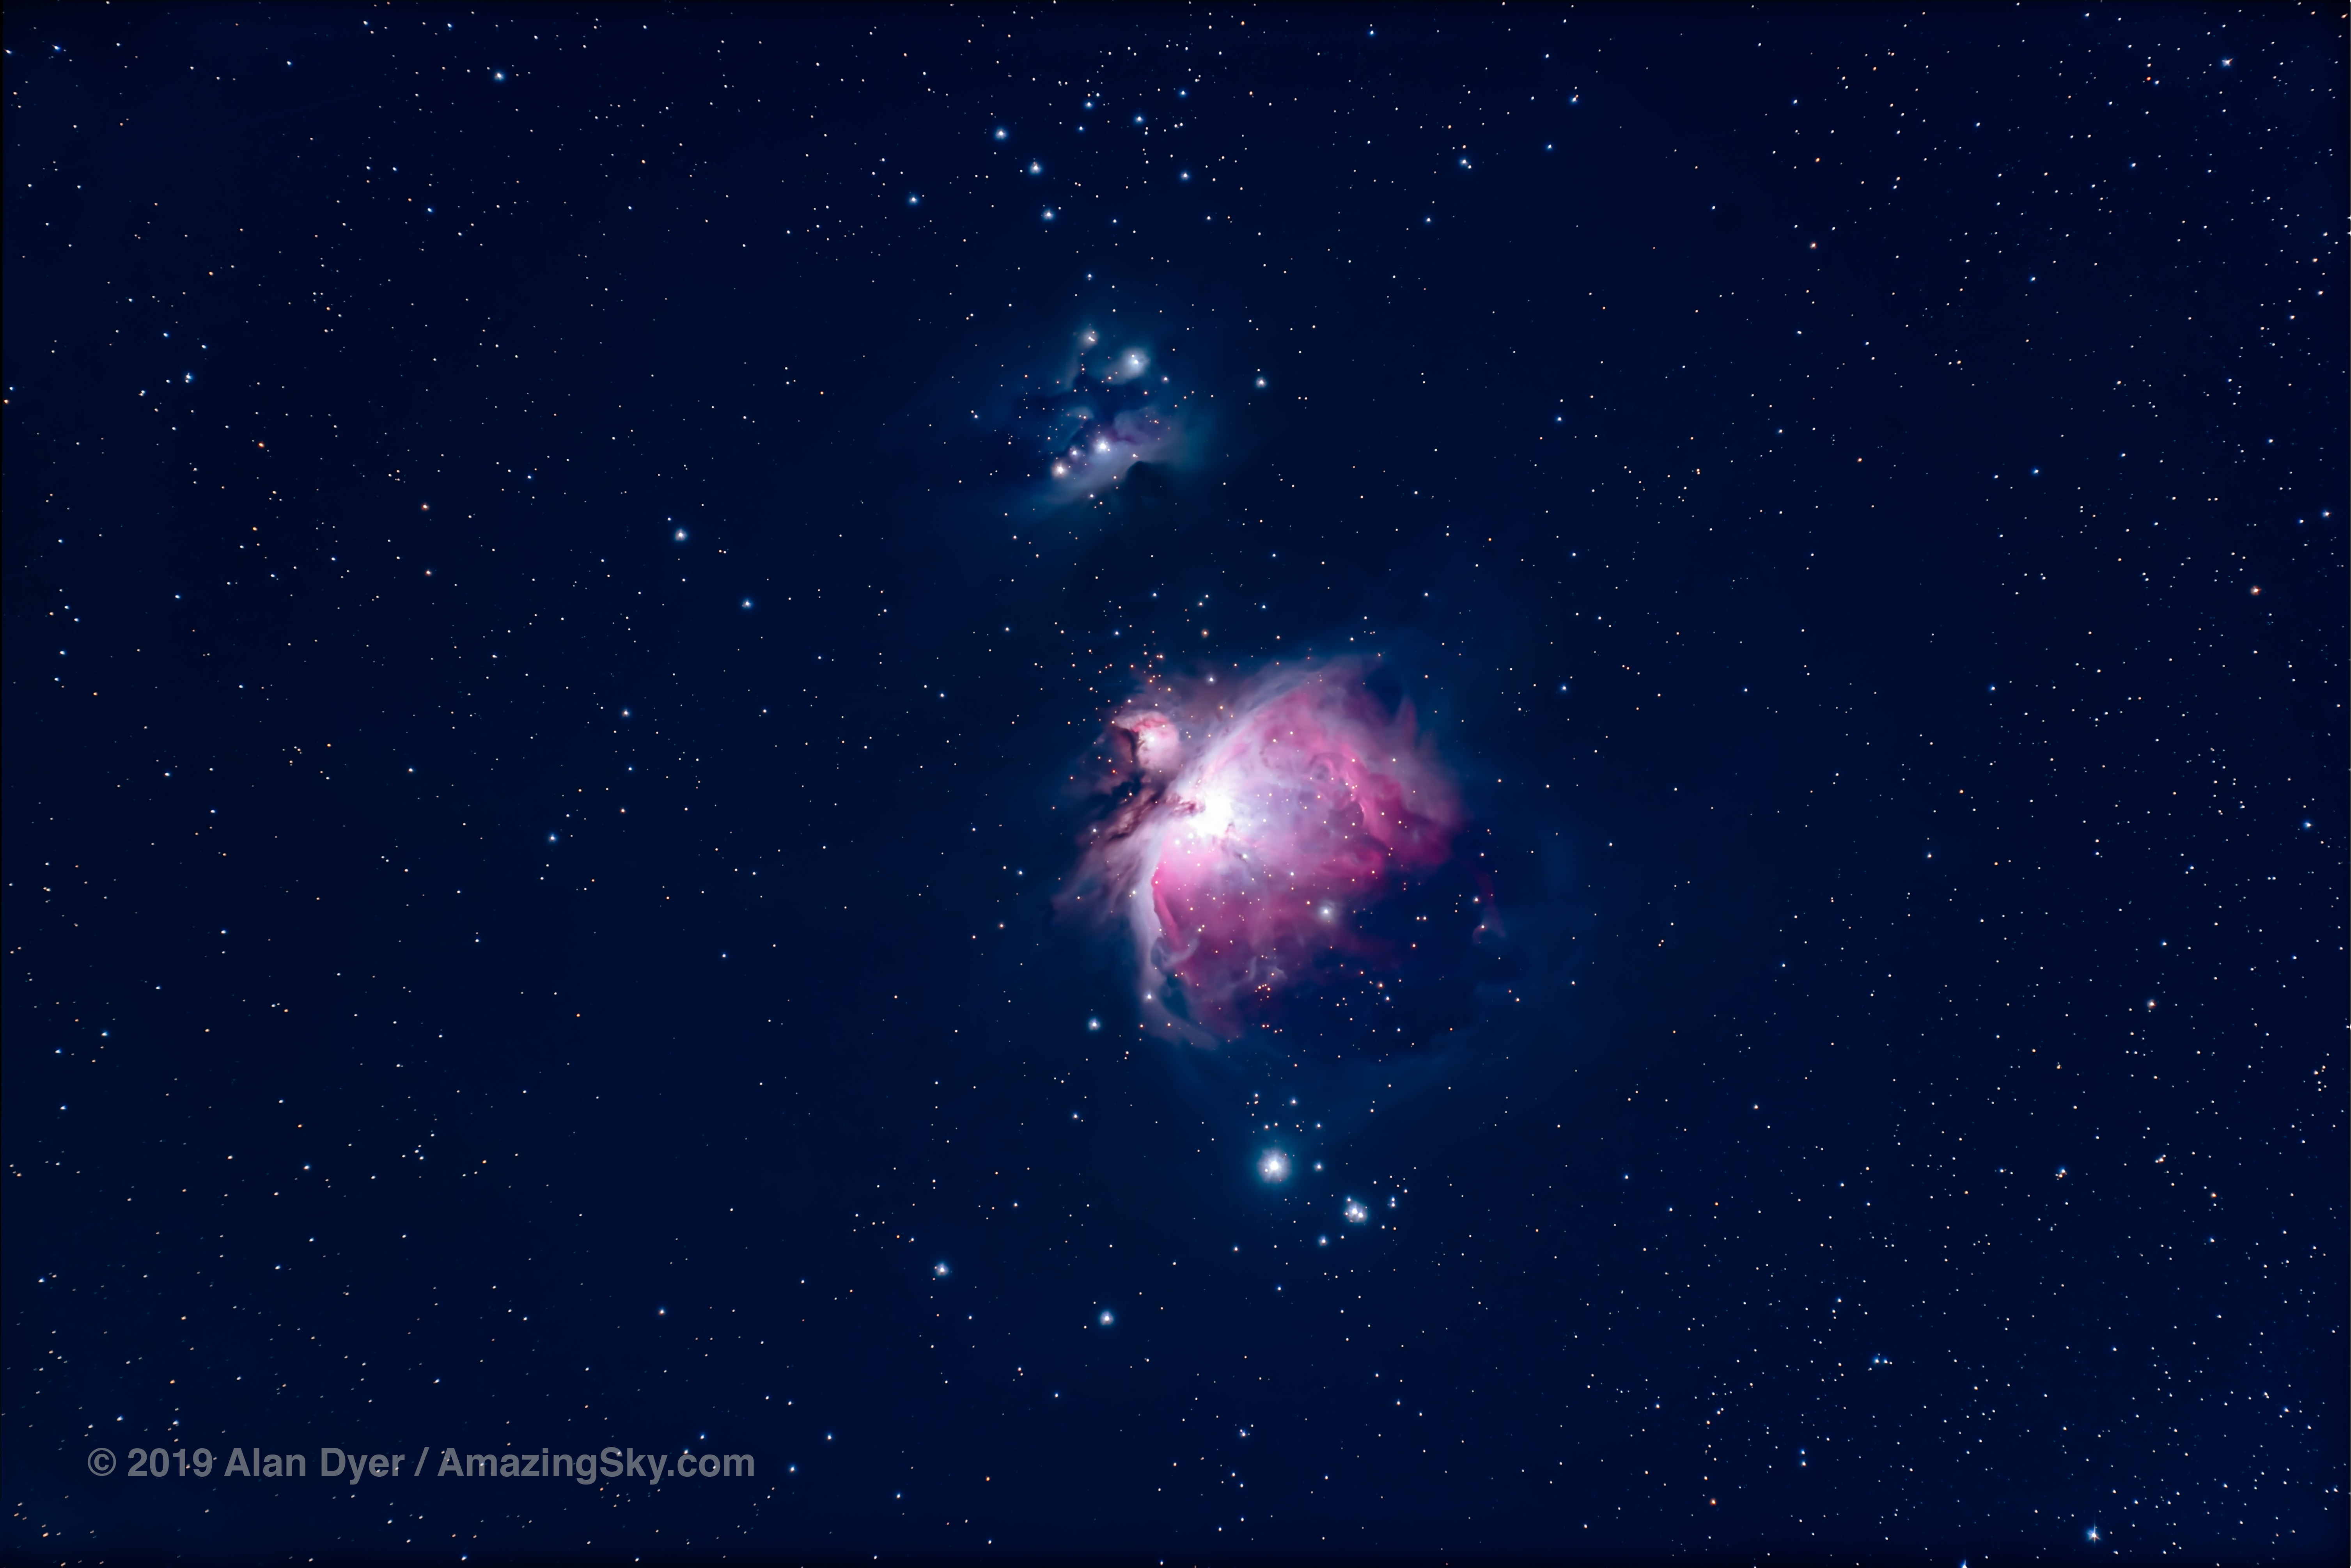
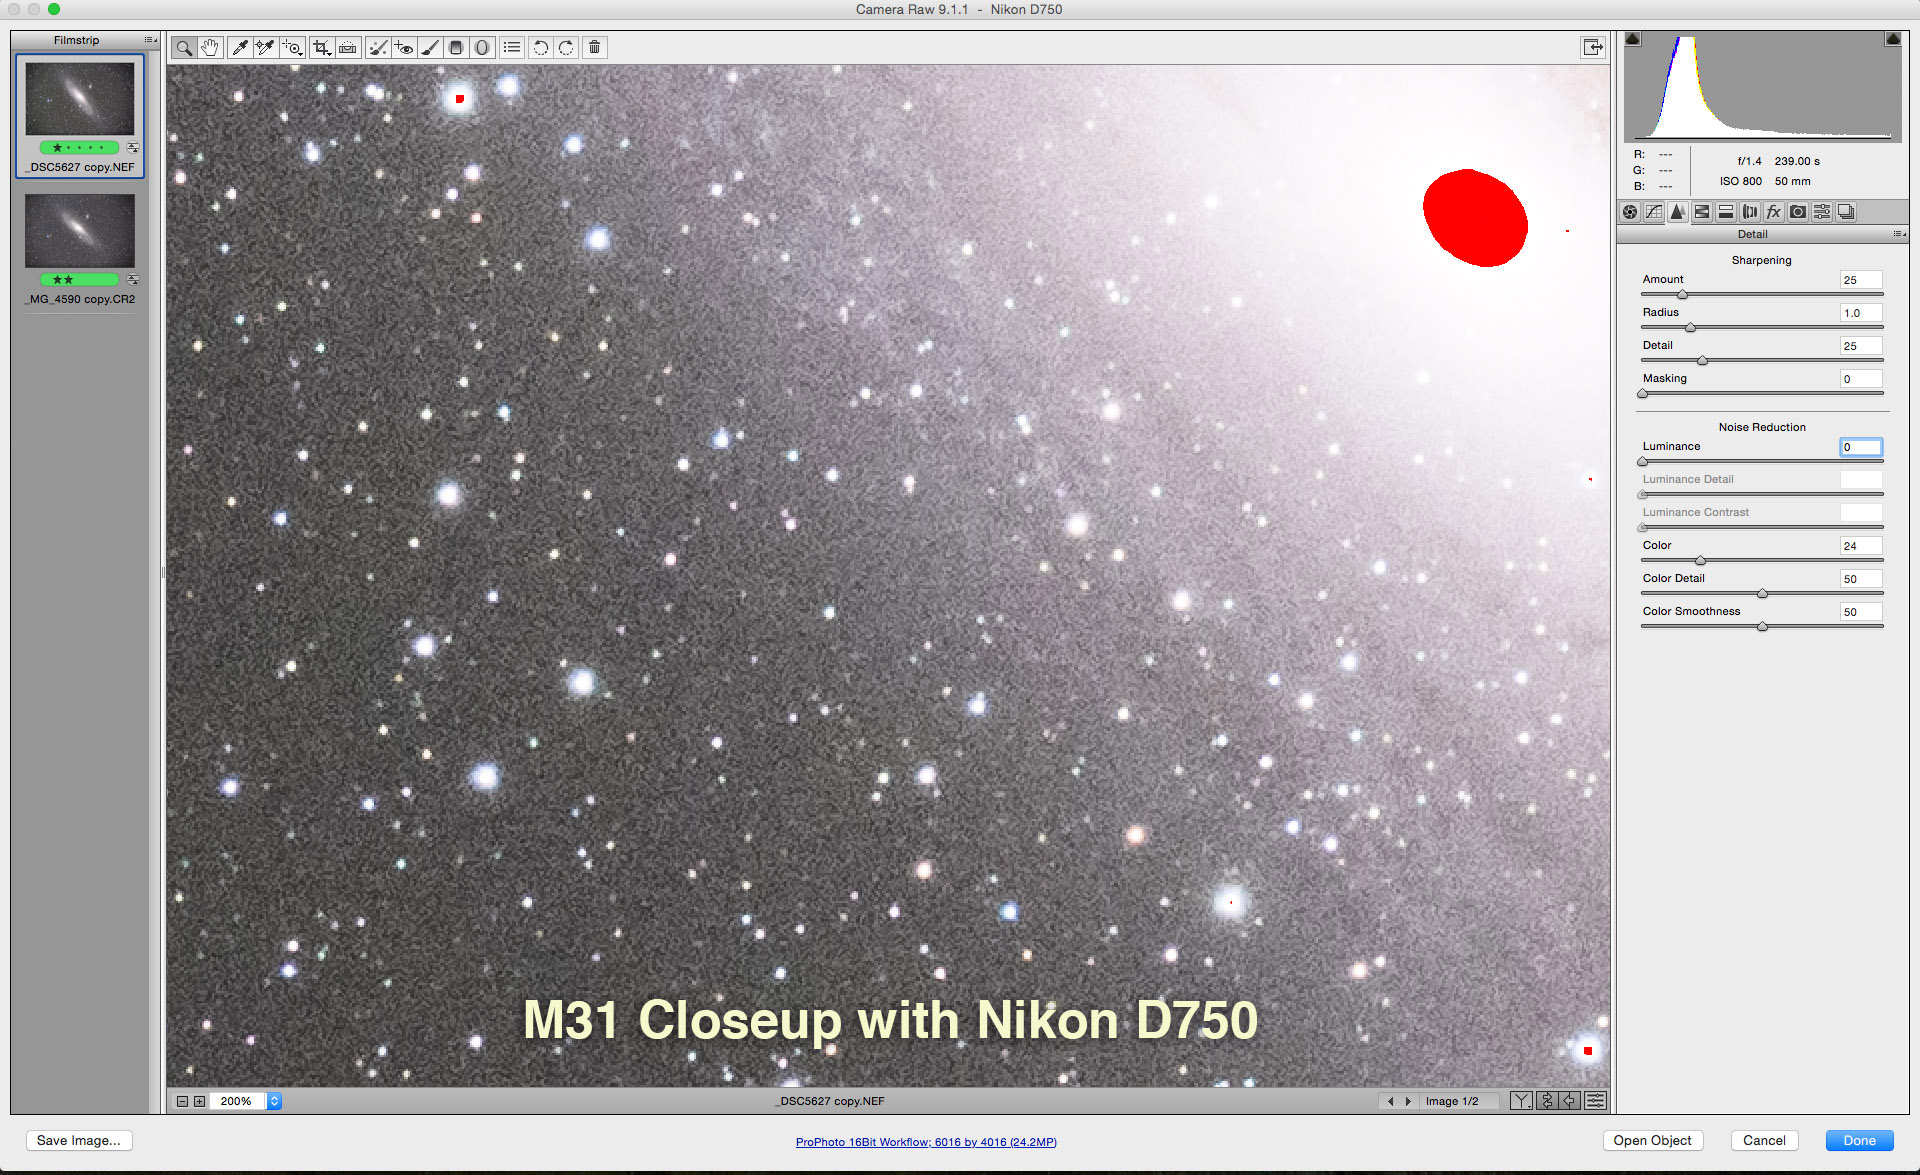
The Orion Nebula with the Nikon Z6
The Orion Nebula with the Nikon D750
Above is the Orion Nebula with the D750 and with the Z6, both shot in moonlight with the same 105mm refractor telescope.
I did not find any evidence for “star-eating” that Sony mirrorless cameras have been accused of. (However, I did not find the Sony a7III guilty of eating stars either.) Star images looked as good in the Z6 as in the D750.
A single Orion Nebula image with the Z6 in a 600% blow-up in Adobe Camera Raw, showing clean artifact-free star images with good, natural colours.
Raw developers (Adobe, DxO, ON1, and others) decoded the Z6’s Bayer-array NEF files fine, with no artifacts such as oddly-coloured or misshapen stars, which can arise in cameras lacking an anti-alias filter.
LENR Dark frames
A blank long exposure with no LENR applied – click or tap to open the image full screen
A blank long exposure with LENR – tap or click to open the image full screen
Above, 8-minute exposures of nothing, taken with the lens cap on at room temperature: without LENR, and with LENR, both boosted a lot in brightness and contrast to exaggerate the visibility of any thermal noise. These show the reduction in noise speckling with LENR activated, and the clean result with the Z6. At small size you’ll likely see nothing but black!
For deep-sky imaging a common practice is to shoot “dark frames,” images recording just the thermal noise that can then be subtracted from the image.
The Long Exposure Noise Reduction feature offered by all cameras performs this dark frame subtraction internally and automatically by the camera for any exposures over one second long.
I tested the Z6’s LENR and found it worked well, doing the job to effectively reduce thermal noise (hot pixels) without adding any other artifacts.
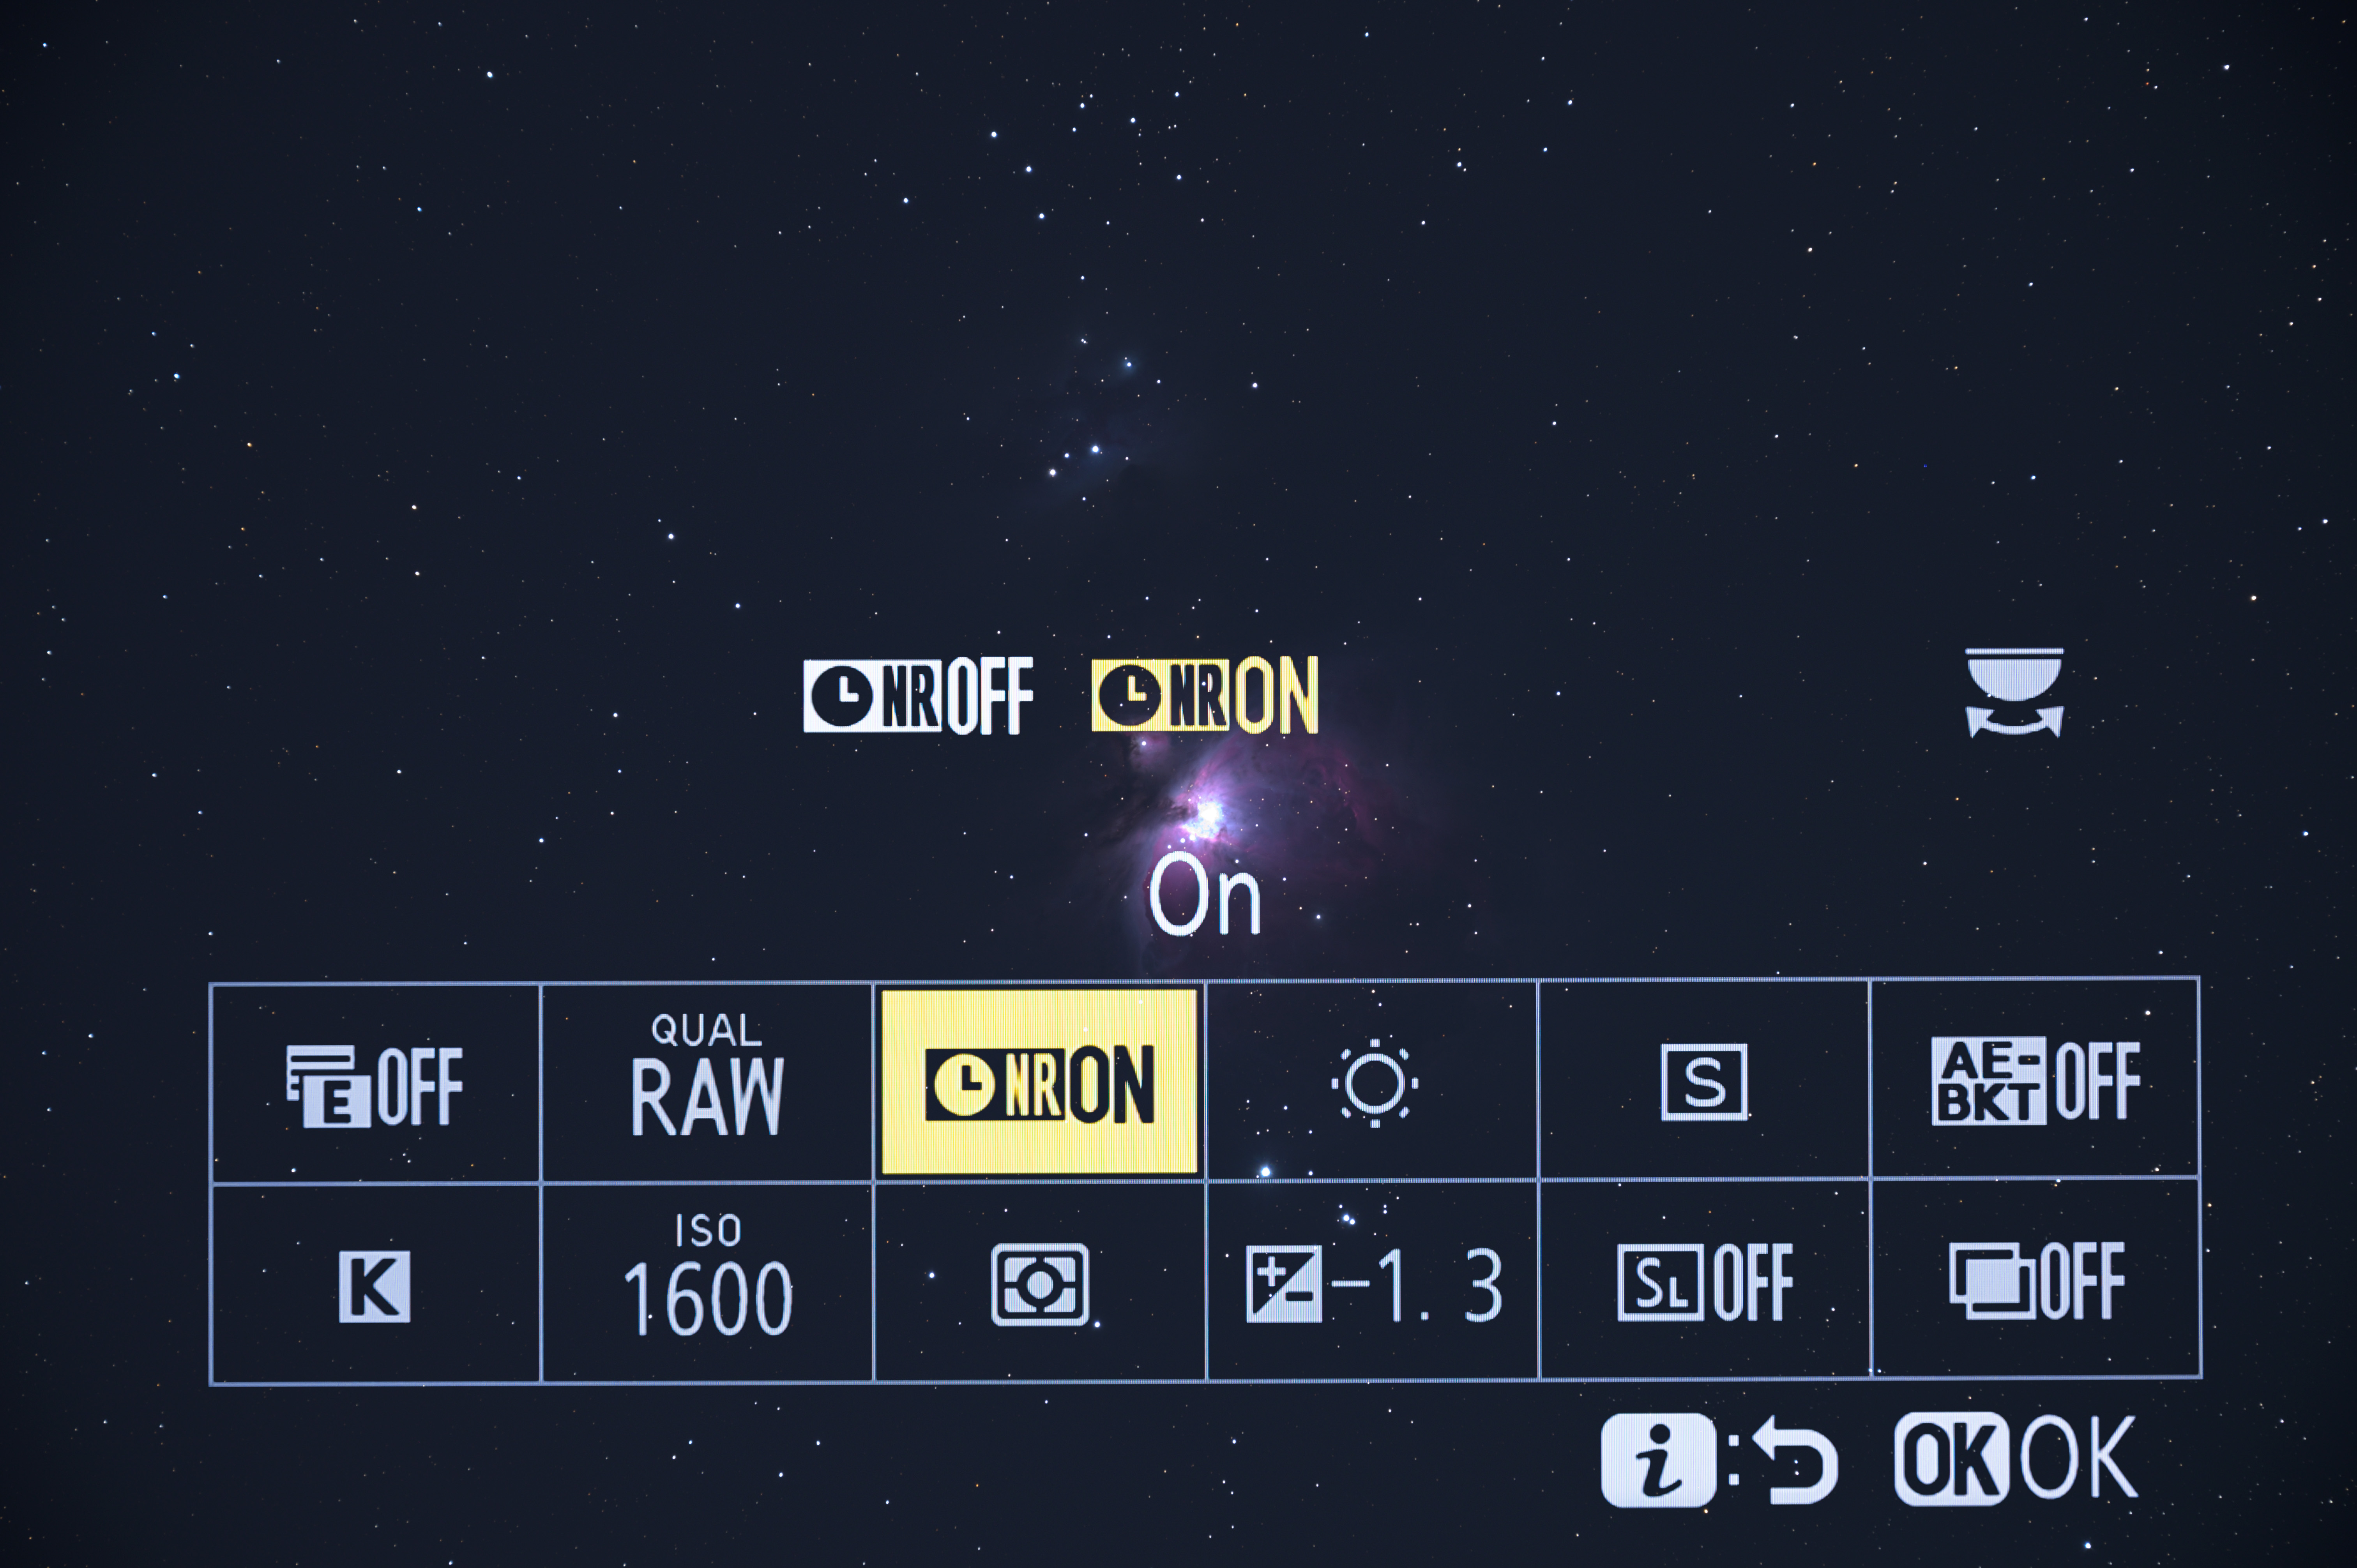
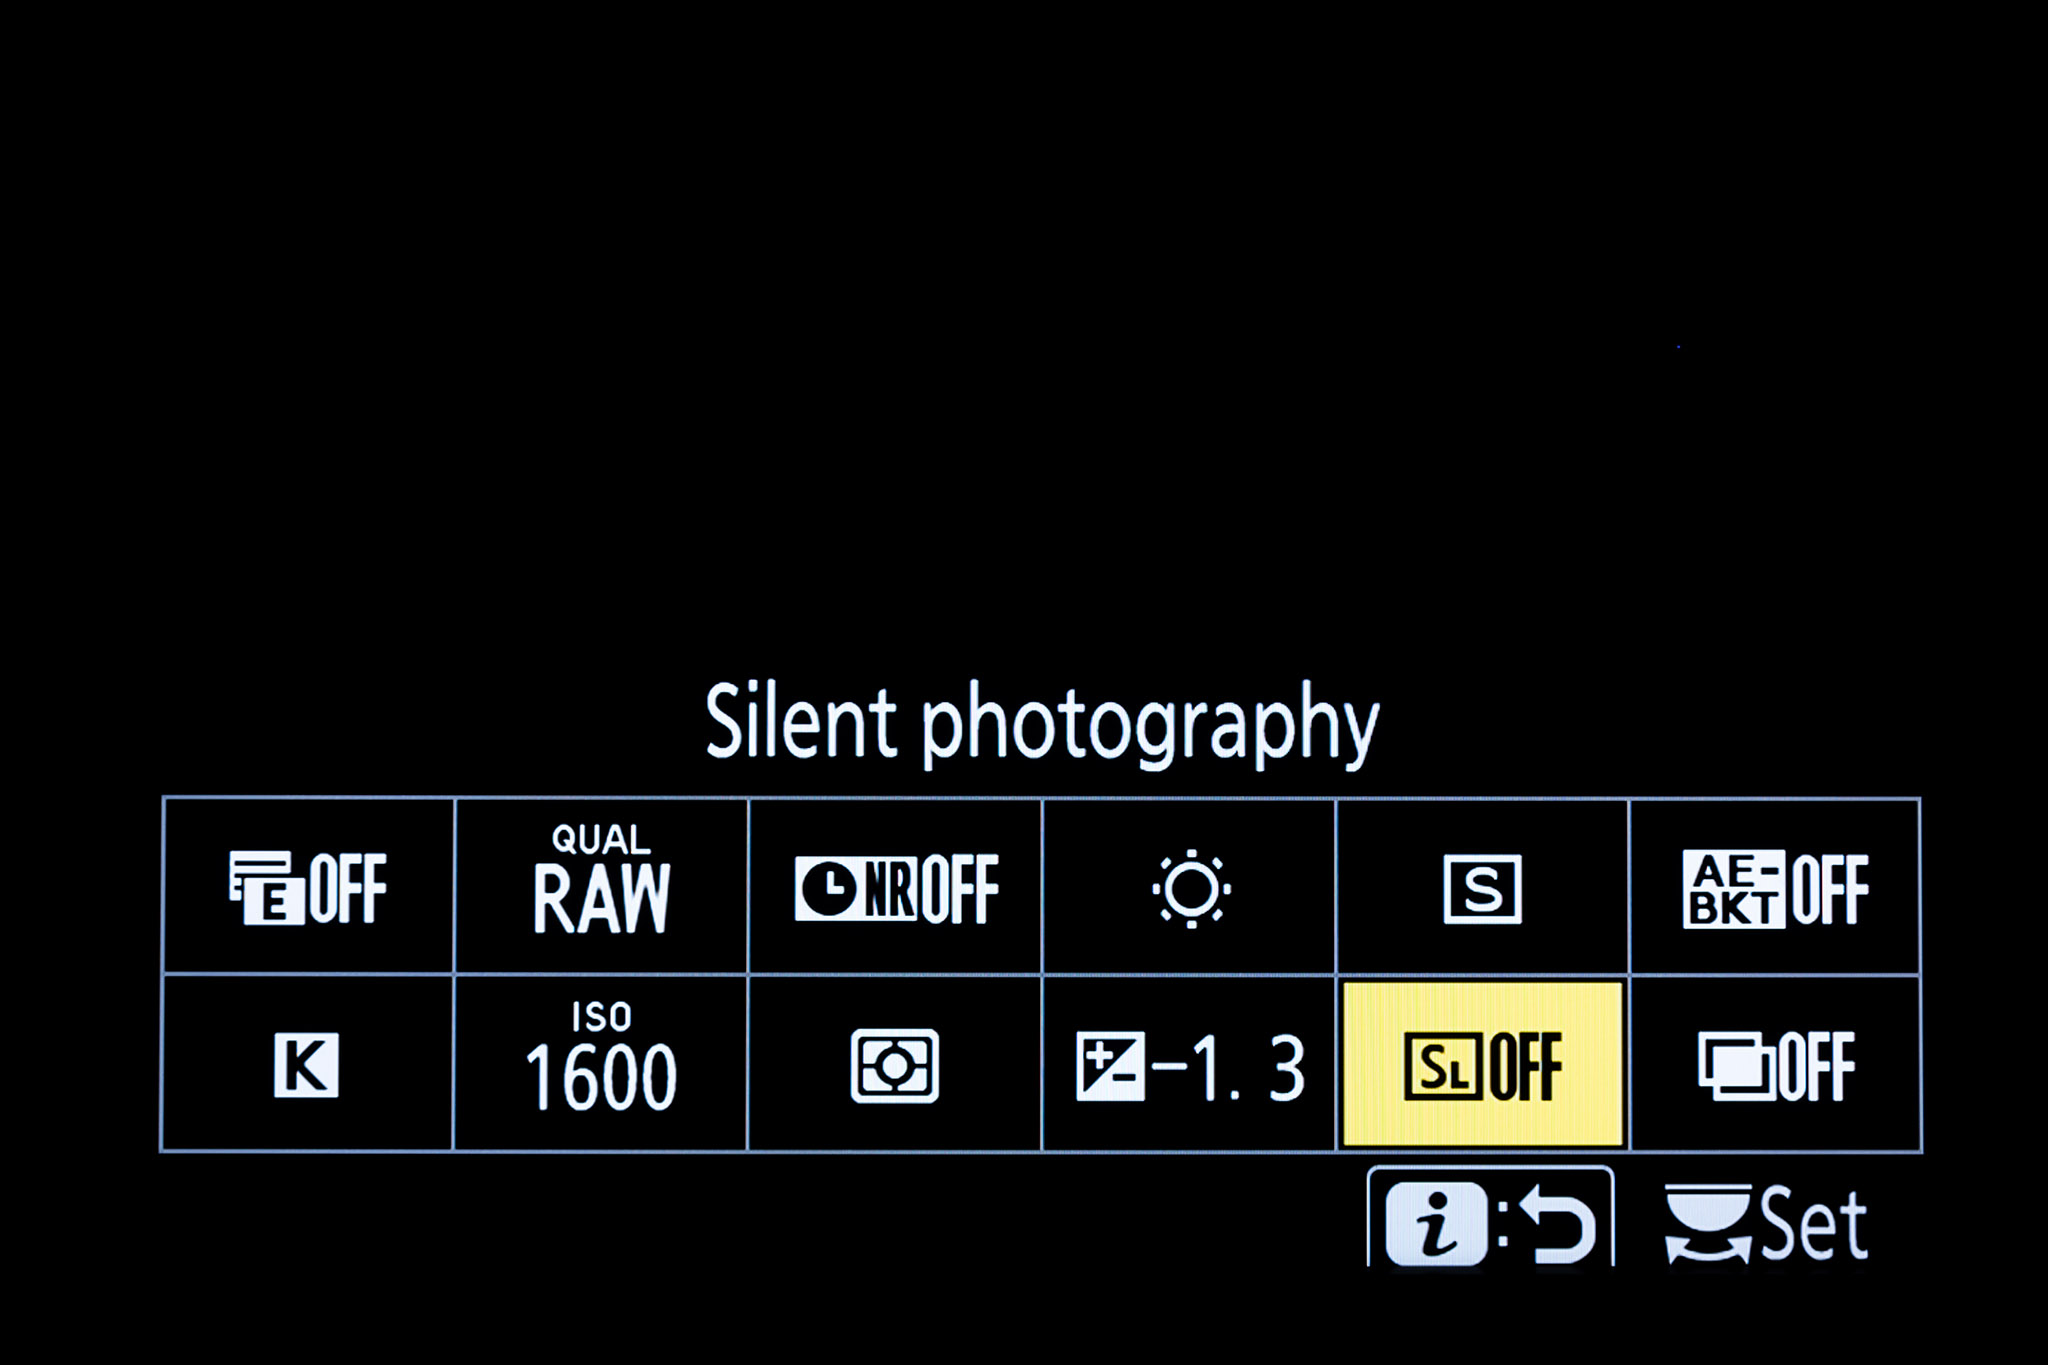
The rear screen “i” menu as I had it customized for my testing, with functions for astrophotography such as LENR assigned to the 12 boxes.
NOTE:
Some astrophotographers dismiss LENR and never use it. By contrast, I prefer to use LENR to do dark frame subtraction. Why? Through many comparison tests over the years I have found that separate dark frames taken later at night rarely do as good a job as LENR darks, because those separate darks are taken when the sensor temperature, and therefore the noise levels, are different than they were for the “light” frames.
I’ve found that dark frames taken later, then subtracted “in post” inevitably show less or little effect compared to images taken with LENR darks. Or worse, they add a myriad of pock-mark black specks to the image, adding noise and making the image look worse.
The benefit of LENR is lower noise. The penalty of LENR is that each image takes twice as long to shoot — the length of the exposure + the length of the dark frame. Because …
As Expected on the Z6 … There’s no LENR Dark Frame Buffer
Only Canon full-frame cameras offer this little known but wonderful feature for astrophotography. Turn on LENR and it is possible to shoot three (with the Canon 6D MkII) or four (with the Canon 6D) raw images in quick succession even with LENR turned on. The Canon 5D series also has this feature.
The single dark frame kicks in and locks up the camera only after the series of “light frames” are taken. This is excellent for taking a set of noise-reduced deep-sky images for later stacking without need for further “image calibration.”
No Nikon has this dark frame buffer, not even the “astronomical” D810a. And not the Z6.
ANOTHER NOTE:
I have to mention this every time I describe Canon’s dark frame buffer: It works only on full-frame Canons, and there’s no menu function to activate it. Just turn on LENR, fire the shutter, and when the first exposure is complete fire the shutter again. Then again for a third, and perhaps a fourth exposure. Only then does the LENR dark frame lock up the camera as “Busy” and prevent more exposures. That single dark frame gets applied to each of the previous “light” frames, greatly reducing the time it takes to shoot a set of dark-frame subtracted images.
But do note that Canon’s dark frame buffer will not work if…:
a) You leave Live View on. Don’t do that for any long exposure shooting.
b) You control the camera through the USB port via external software. It works only when controlling the camera via its internal intervalometer or via the shutter port using a hardware intervalometer.
Sensor Illumination
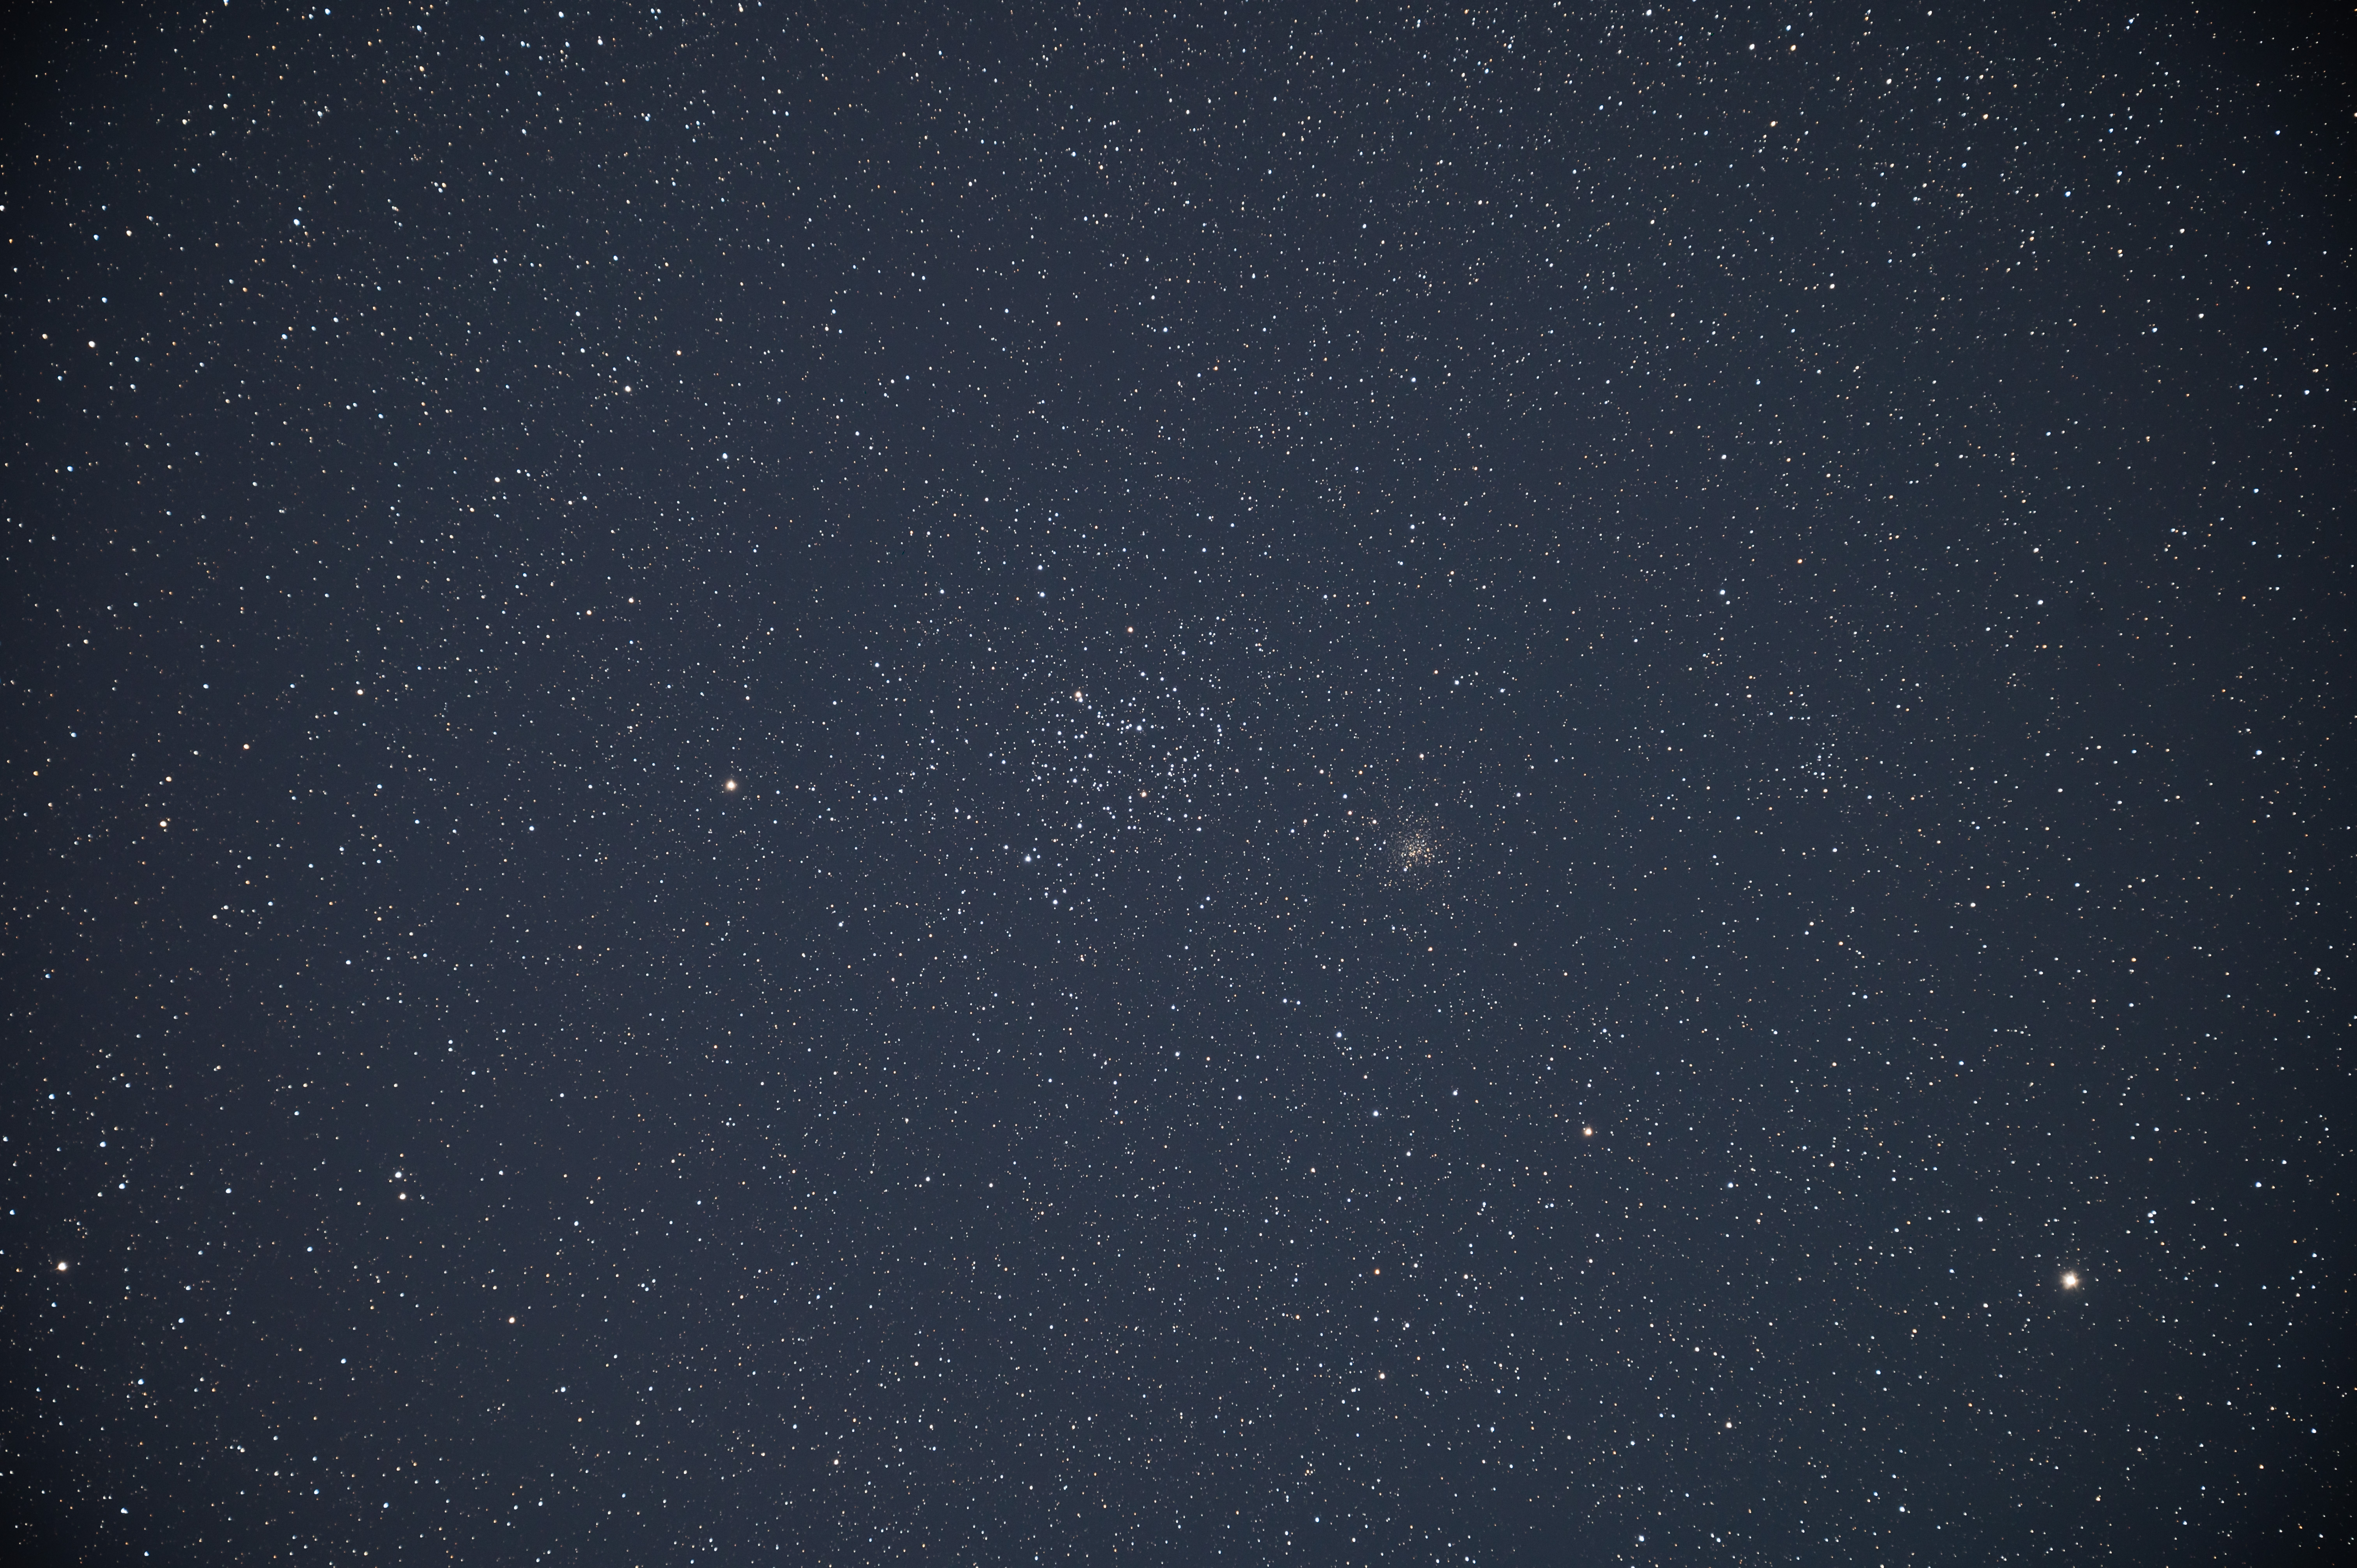
A single 4-minute exposure of Messier 35 in moonlight at ISO 400 with the Z6 and 105mm apo refractor, with no flat fielding or lens correction applied, showing the clean edges and lack of amp glows. The darkening of the corners is inherent in the telescope optical system and is not from the camera.
With DSLRs deep-sky images shot through telescopes, then boosted for contrast in processing, usually exhibit a darkening along the bottom of the frame. This is caused by the upraised mirror shadowing the sensor slightly, an effect never noticed in normal photography.
Mirrorless cameras should be free of this mirror box shadowing. The Sony a7III, however, still exhibits some edge shadows due to an odd metal mask in front of the sensor. It shouldn’t be there and its edge darkening is a pain to eliminate in the final processing.
As I show in my review of the a7III, the Sony also exhibits a purple edge glow in long-exposure deep-sky images, from an internal light source. That’s a serious detriment to its use in deep-sky imaging.
Happily, the Z6 proved to be free of any such artifacts. Images are clean and evenly illuminated to the edges, as they should be. I saw no amp glows or other oddities that can show up under astrophotography use. The Z6 can produce superb deep-sky images.
Red Sensitivity
Messer 97 planetary nebula and Messier 108 galaxy in a lightly processed single 4-minute exposure at ISO 1600 with the 105mm refractor, again showing a clean field. The glow at top right is from a Big Dipper star just off the edge of the field.
During my short test period, I was not able to shoot red nebulas under moonless conditions. So I can’t say how well the Z6 performs for recording H-alpha regions compared to other “stock” cameras.
However, I would not expect it to be any better, nor worse, than the competitors. Indeed, the stock Nikon D750 I have does a decent job at picking up red nebulas, though nowhere near as well as Nikon’s sadly discontinued D180a. See my blog post from 2015 for an example shot with that camera.
With the D810a gone, if it is deep red nebulosity you are after with a Nikon, then consider buying a filter-modified Z6 or having yours modified.
Both LifePixel and Spencer’s Camera offer to modify the Z6 and Z7 models. However, I have not used either of their services, so cannot vouch for them first hand.
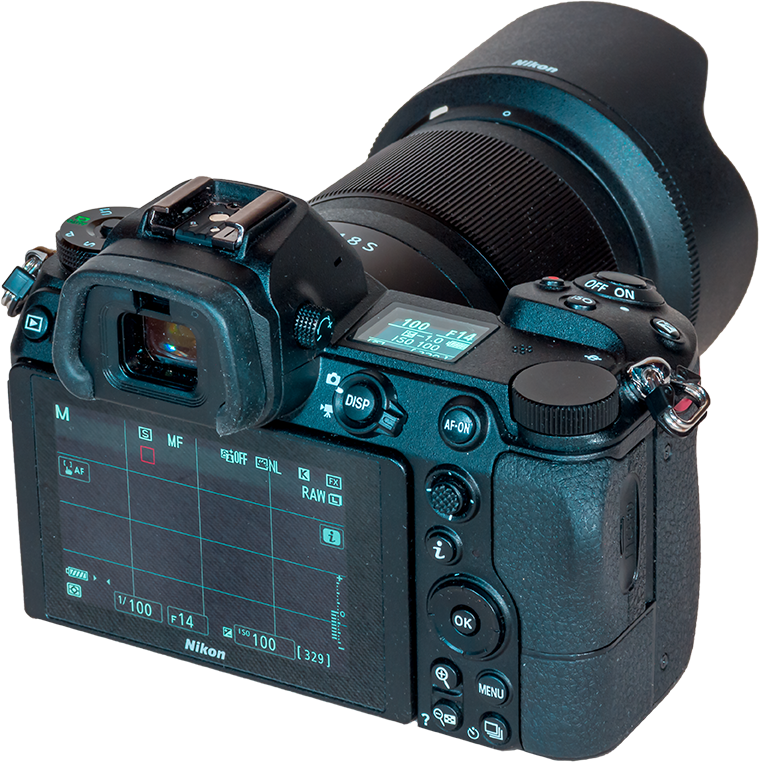
Live View Focusing and Framing
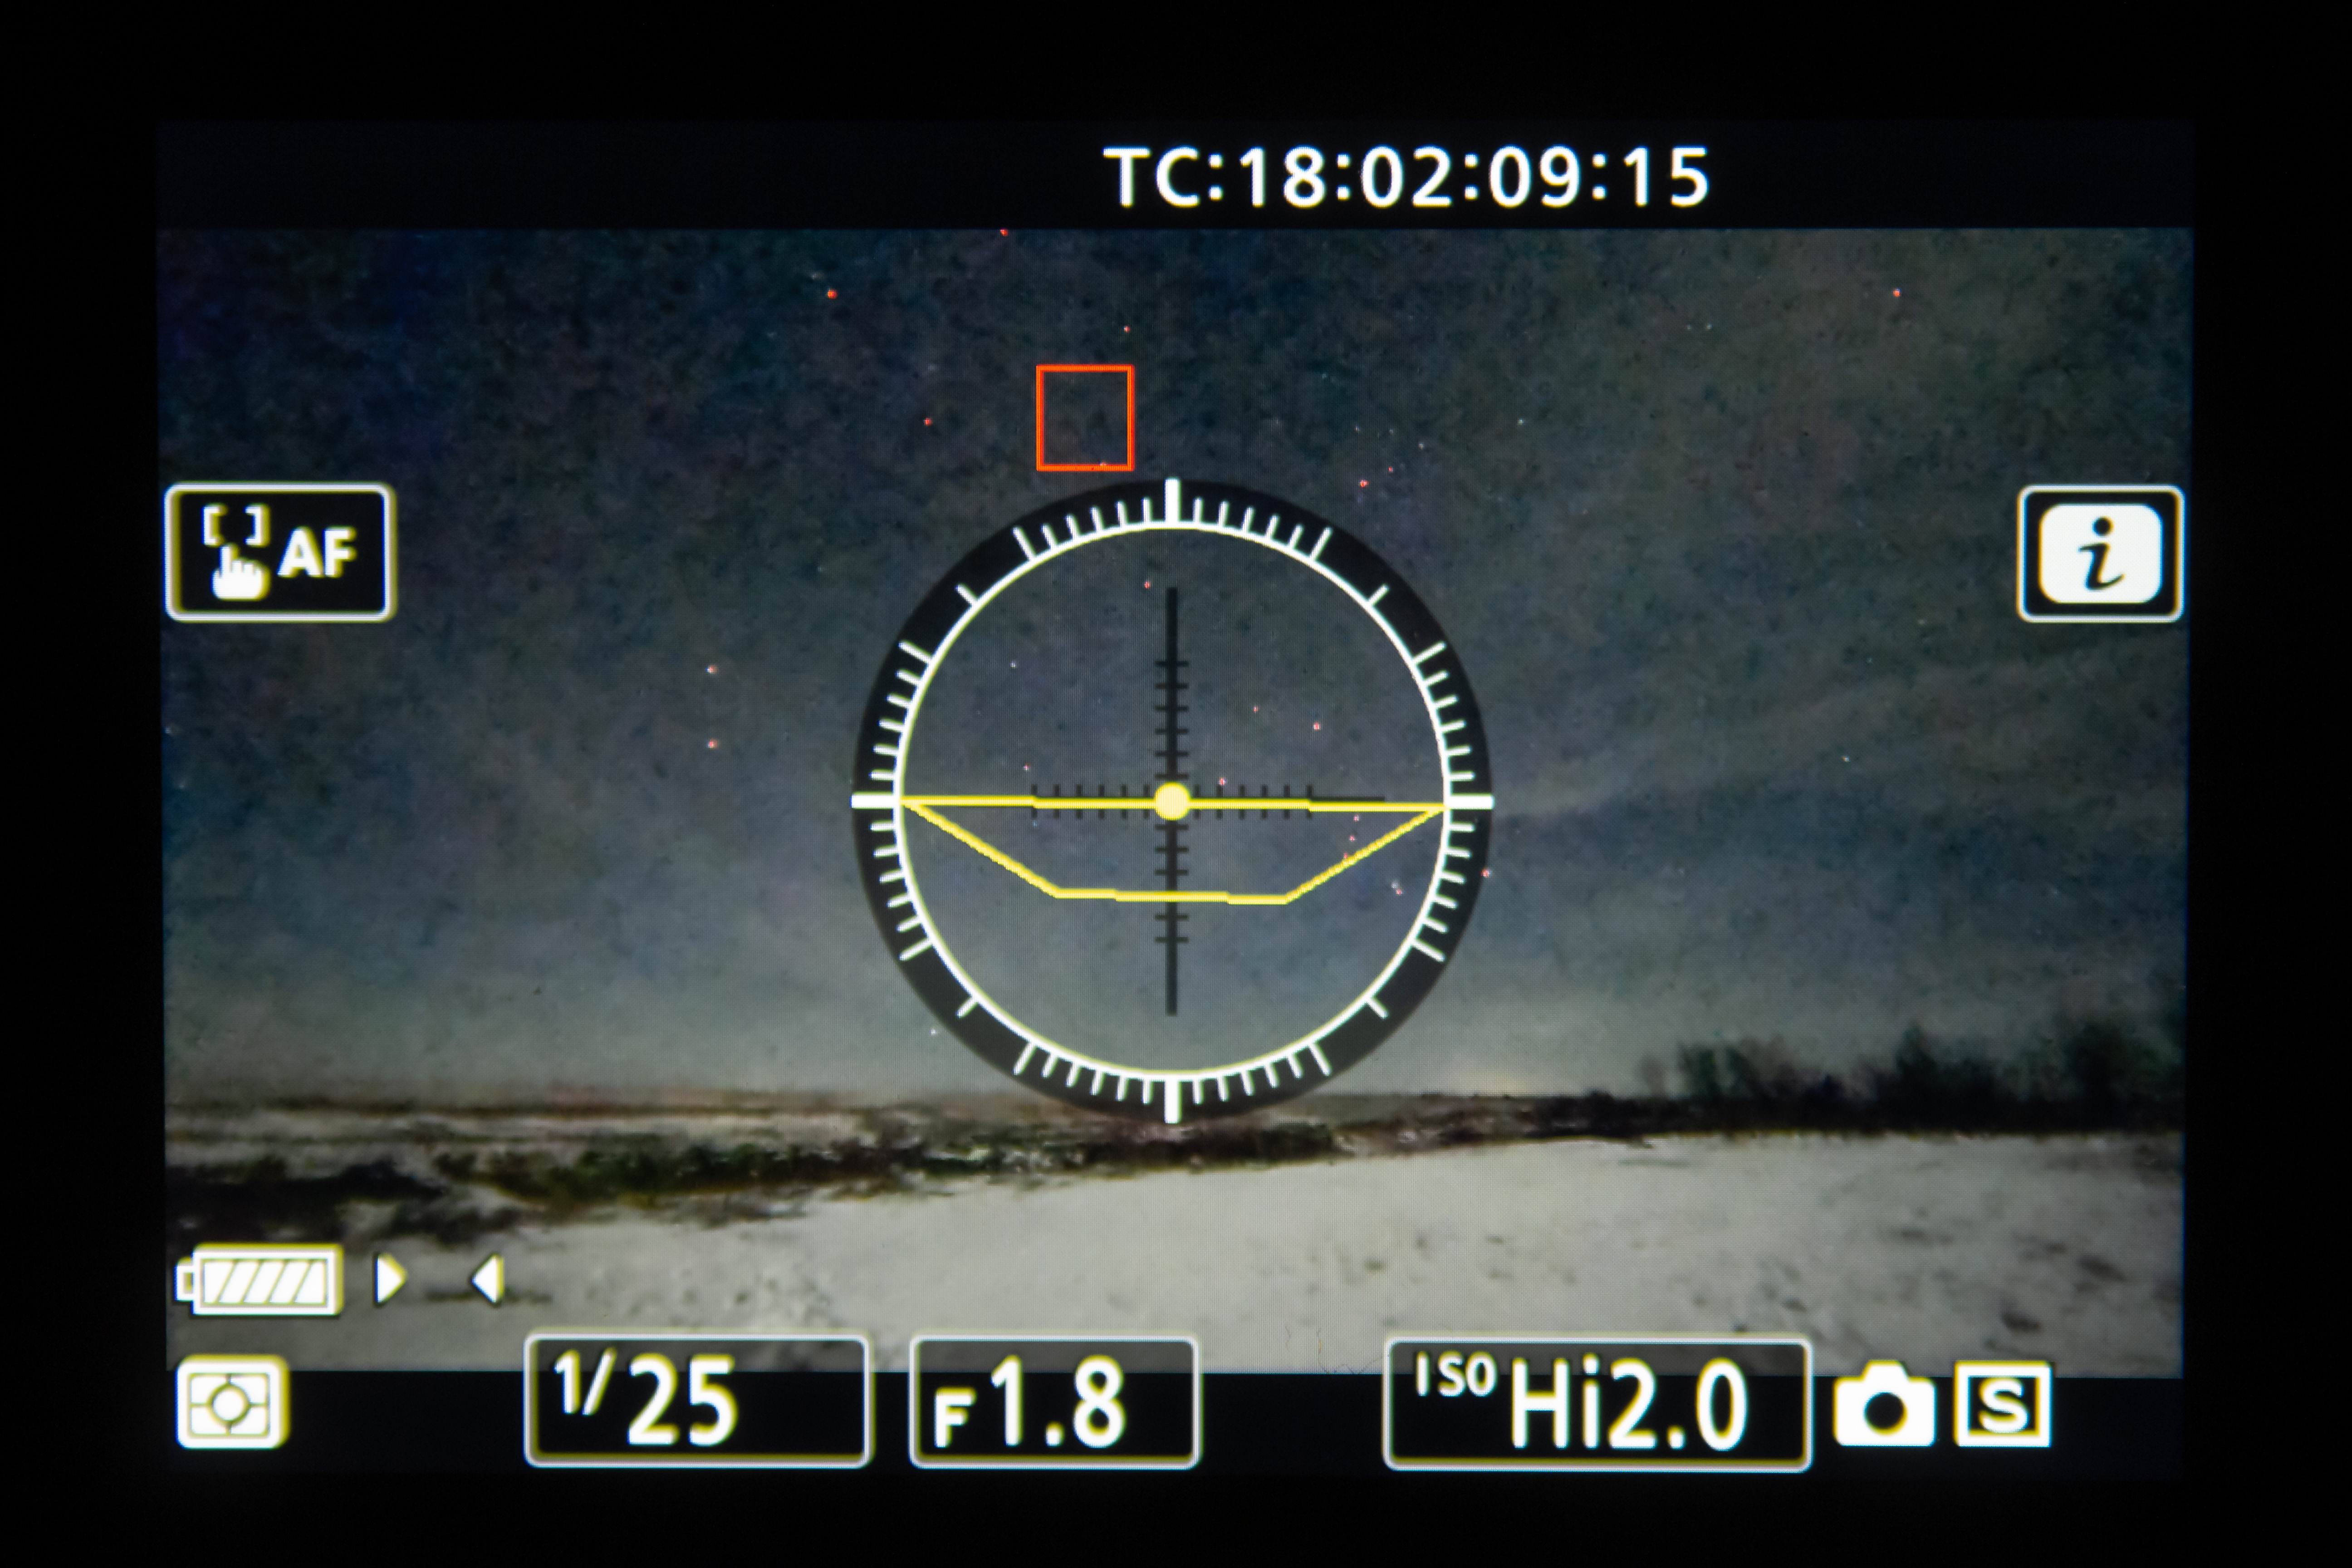
An image of the back of the camera with a scene under moonlight, with the Z6 set to the highest ISO speed in the movie mode, to aid framing the scene at night.
For all astrophotography manually focusing with Live View is essential. And with mirrorless cameras there is no optical viewfinder to look through to frame scenes. You are dependent on the live electronic image (on the rear LCD screen or in the eye-level electronic viewfinder, or EVF) for seeing anything.
Thankfully, the Z6 presents a bright Live View image making it easy to frame, find, and focus on stars. Maximum zoom for precise focusing is 15x, good but not as good as the D750’s 20x zoom level, but better than Canon’s 10x maximum zoom in Live View.
The Z6 lacks the a7III’s wonderful Bright Monitoring function that temporarily ups the ISO to an extreme level, making it much easier to frame a dark night scene. However, something similar can be achieved with the Z6 by switching it temporarily to Movie mode, and having the ISO set to an extreme level.
As with most Nikons (and unlike Sonys), the Z6 remembers separate settings for the still and movie modes, making it easy to switch back and forth, in this case for a temporarily brightened Live View image to aid framing.
That’s very handy, and the Z6 works better than the D750 in this regard, providing a brighter Live View image, even with the D750’s well-hidden Exposure Preview option turned on.
Video Capability
Comparing the three cameras using 1/25-second still frames grabbed from moonlit night movies (HD with the D750 and 4K with the Z6 and a7III) shot at ISO 51200, plus a similarly exposed frame from the a7III shot with a shutter speed of only 1/4 second allowing the slower ISO of 8000.
Where the Z6 pulls far ahead of the otherwise similar D750 is in its movie features.
The Z6 can shoot 4K video (3840 x 2160 pixels) at either 30, 25, or 24 frames per second. Using 24 frames per second and increasing the ISO to between 12,800 to 51,200 (the Z6 can go as high as ISO 204,800!) it is possible to shoot real-time video at night, such as of auroras.
But the auroras will have to be bright, as at 24 fps, the maximum shutter speed is 1/25-second, as you might expect.
The a7III, by comparison, can shoot 4K movies at “dragged” shutter speeds as slow as 1/4 second, even at 24 fps, making it possible to shoot auroras at lower and less noisy ISO speeds, albeit with some image jerkiness due to the longer exposures per frame.
The D750 shoots only 1080 HD and, as shown above, produces very noisy movies at ISO 25,600 to 51,200. It’s barely usable for aurora videos.
The Z6 is much cleaner than the D750 at those high ISOs, no doubt due to far better internal processing of the movie frames. However, if night-sky 4K videos are an important goal, a camera from the Sony a7 series will be a better choice, if only because of the option for slower dragged shutter speeds.
For examples of real-time auroras shot with the Sony a7III see my music videos shot in Yellowknife and in Norway.
Battery Life
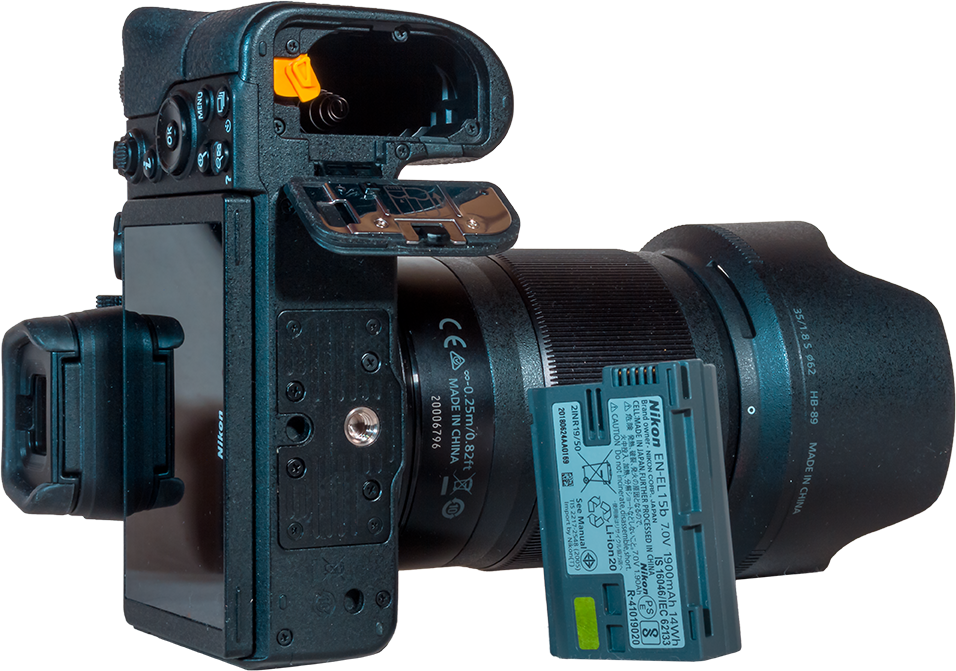
The Z6 uses the EN-EL15b battery compatible with the battery and charger used for the D750. But the “b” variant allows for in-camera charging via the USB port.
In room temperature tests the Z6 lasted for 1500 exposures, as many as the D750 was able to take in a side-by-side test. That was with the screens off.
At night, in winter temperatures of -10 degrees C (14° F), the Z6 lasted for three hours worth of continuous shooting, both for long deep-sky exposure sets and for a test time-lapse I shot, shown below.
A time-lapse movie, downsized here to HD from the full-size originals, shot with the Z6 and its internal intervalometer, from twilight through to moonrise on a winter night. Processed with Camera Raw and LRTimelapse.
However, with any mirrorless camera, you can extend battery life by minimizing use of the LCD screen and eye-level EVF. The Z6 has a handy and dedicated button for shutting off those screens when they aren’t needed during a shoot.
The days of mirrorless cameras needing a handful of batteries just to get through a few hours of shooting are gone.
Lens and Telescope Compatibility
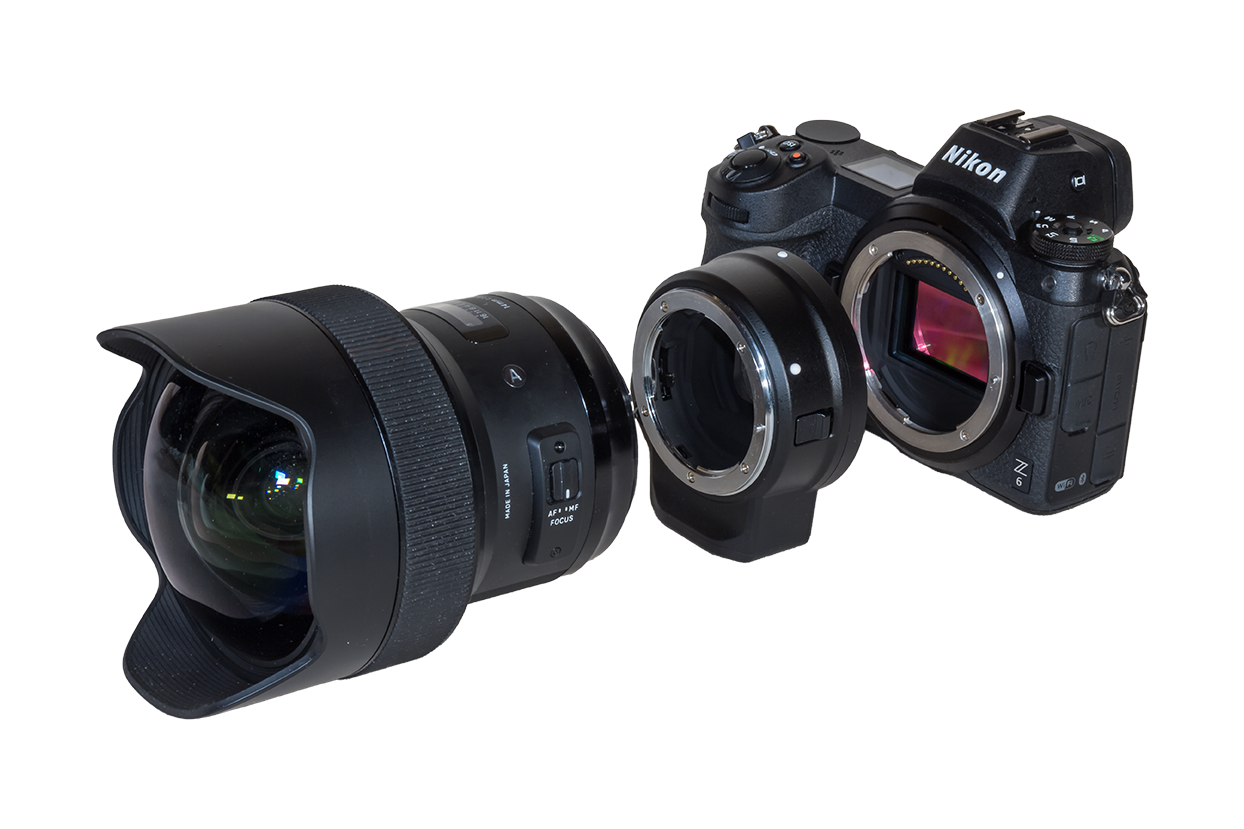
A 14mm Sigma Art lens with the Nikon FTZ lens adapter needed to attach any “legacy” F-mount lens to the Z6.
As with all mirrorless cameras, the Nikon Z cameras use a new lens mount, one that is incompatible with the decades-old Nikon F mount.
The Z mount is wider and can accommodate wider-angle and faster lenses than the old F mount ever could, and in a smaller package. While we have yet to see those lenses appear, in theory that’s the good news.
The bad news is that you’ll need Nikon’s FTZ lens adapter to use any of your existing Nikon F-mount lenses on either the Z6 or Z7. As of this writing, Nikon is supplying an FTZ free with every Z body purchase.
I got an FTZ with my loaner Z6 and it worked very well, allowing even third-party lenses like my Sigma Art lenses to focus at the same point as they normally do (not true of some thIrd-party adapters), preserving the lens’s optical performance. Autofocus functions all worked fine and fast.
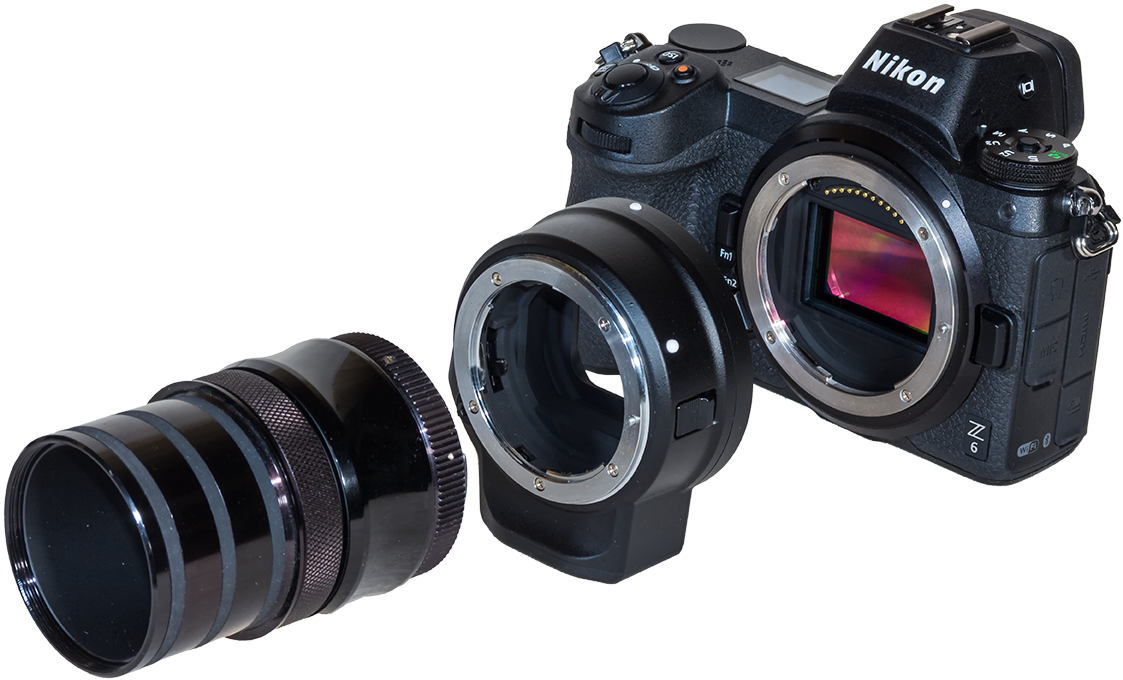
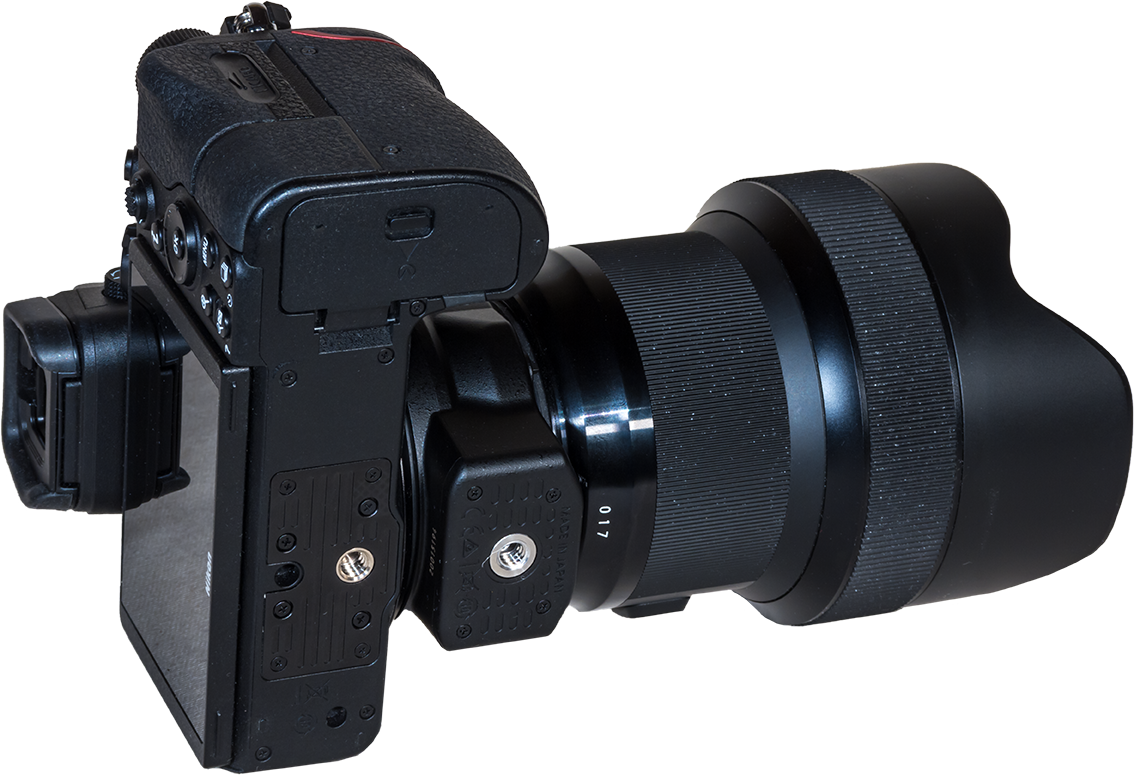
The FTZ adapter needed to attach the Z6 to a telescope camera adapter (equipped with a standard Nikon T-ring) and field flattener lens for a refractor.
You’ll also need the FTZ adapter for use on a telescope, as shown above, to go from your telescope’s camera adapter, with its existing Nikon T-ring, to the Z6 body.
The reason is that the field flattener or coma corrector lenses often required with telescopes are designed to work best with the longer lens-to-sensor distance of a DSLR body. The FTZ adapter provides the necessary spacing, as do third-party adapters.
The FTZ lens adapter has its own tripod foot, useful for balancing front-heavy lenses like the big Sigma here.
The only drawback to the FTZ is that any tripod plate attached to the camera body itself likely has to come off, and the tripod foot incorporated into the FTZ used instead. I found myself often having to swap locations for the tripod plate, an inconvenience.
Camera Controller Compatibility
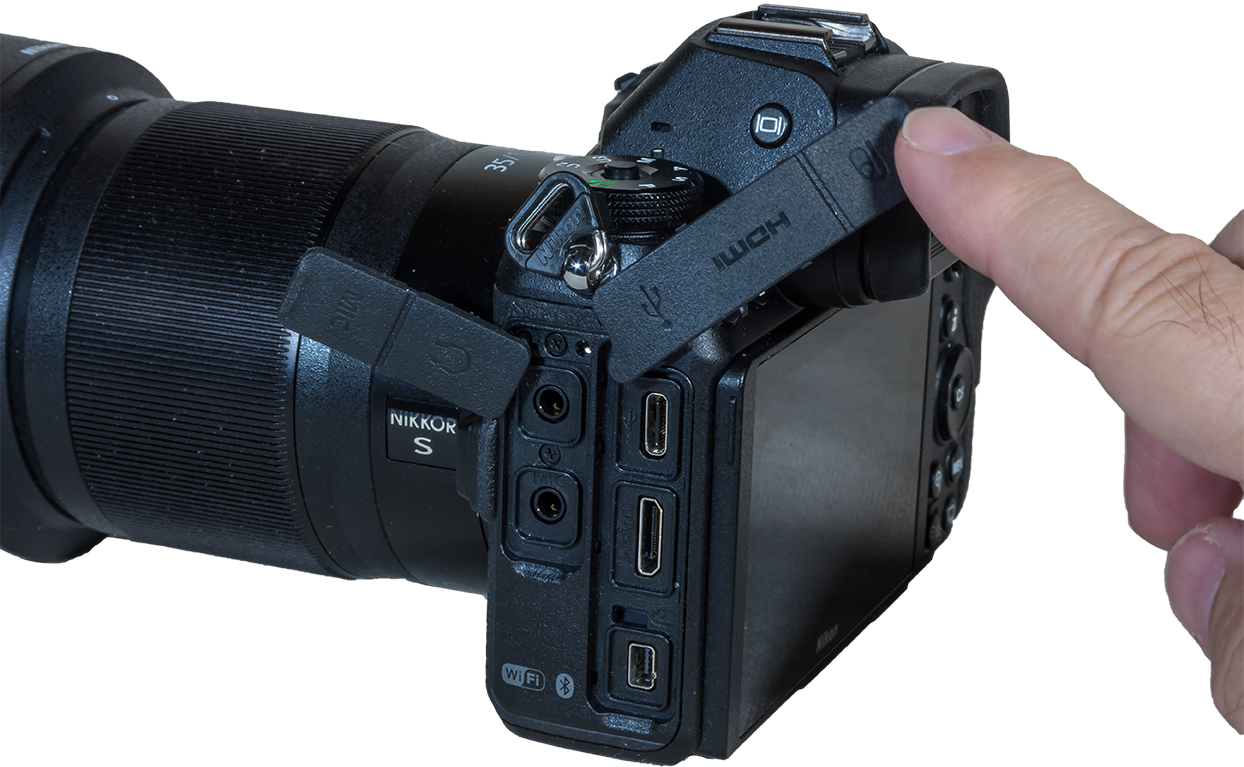
The port side of the Z6, with the DC2 shutter remote jack at bottom, and HDMI and USB-C ports above. There’s also a mic and headphone jack for video use.
Since it uses the same Nikon-type DC2 shutter port as the D750, the Z6 it should be compatible with most remote hardware releases and time-lapse motion controllers that operate a Nikon through the shutter port. An example are the controllers from SYRP.
On the other hand, time-lapse devices and external intervalometers that run Nikons through the USB port might need to have their firmware or apps updated to work with the Z6.
For example, as of early May 2019, CamRanger lists the Z6 as a supported camera; the Arsenal “smart controller” does not. Nor does Alpine Labs for their Radian and Pulse controllers, nor TimeLapse+ for its excellent View bramping intervalometer. Check with your supplier.
For those who like to use laptops to run their camera at the telescope, I found the Windows program Astro Photography Tool (v3.63) worked fine with the Z6, in this case connecting to the camera’s USB-C port using the USB-C to USB-A cable that comes with the camera. This allows APT to shift not only shutter speed, but also ISO and aperture under scripted sequences.
However, BackyardNikon v2.0, current as of April 2019, does not list the Z6 as a supported camera.
Raw File Compatibility
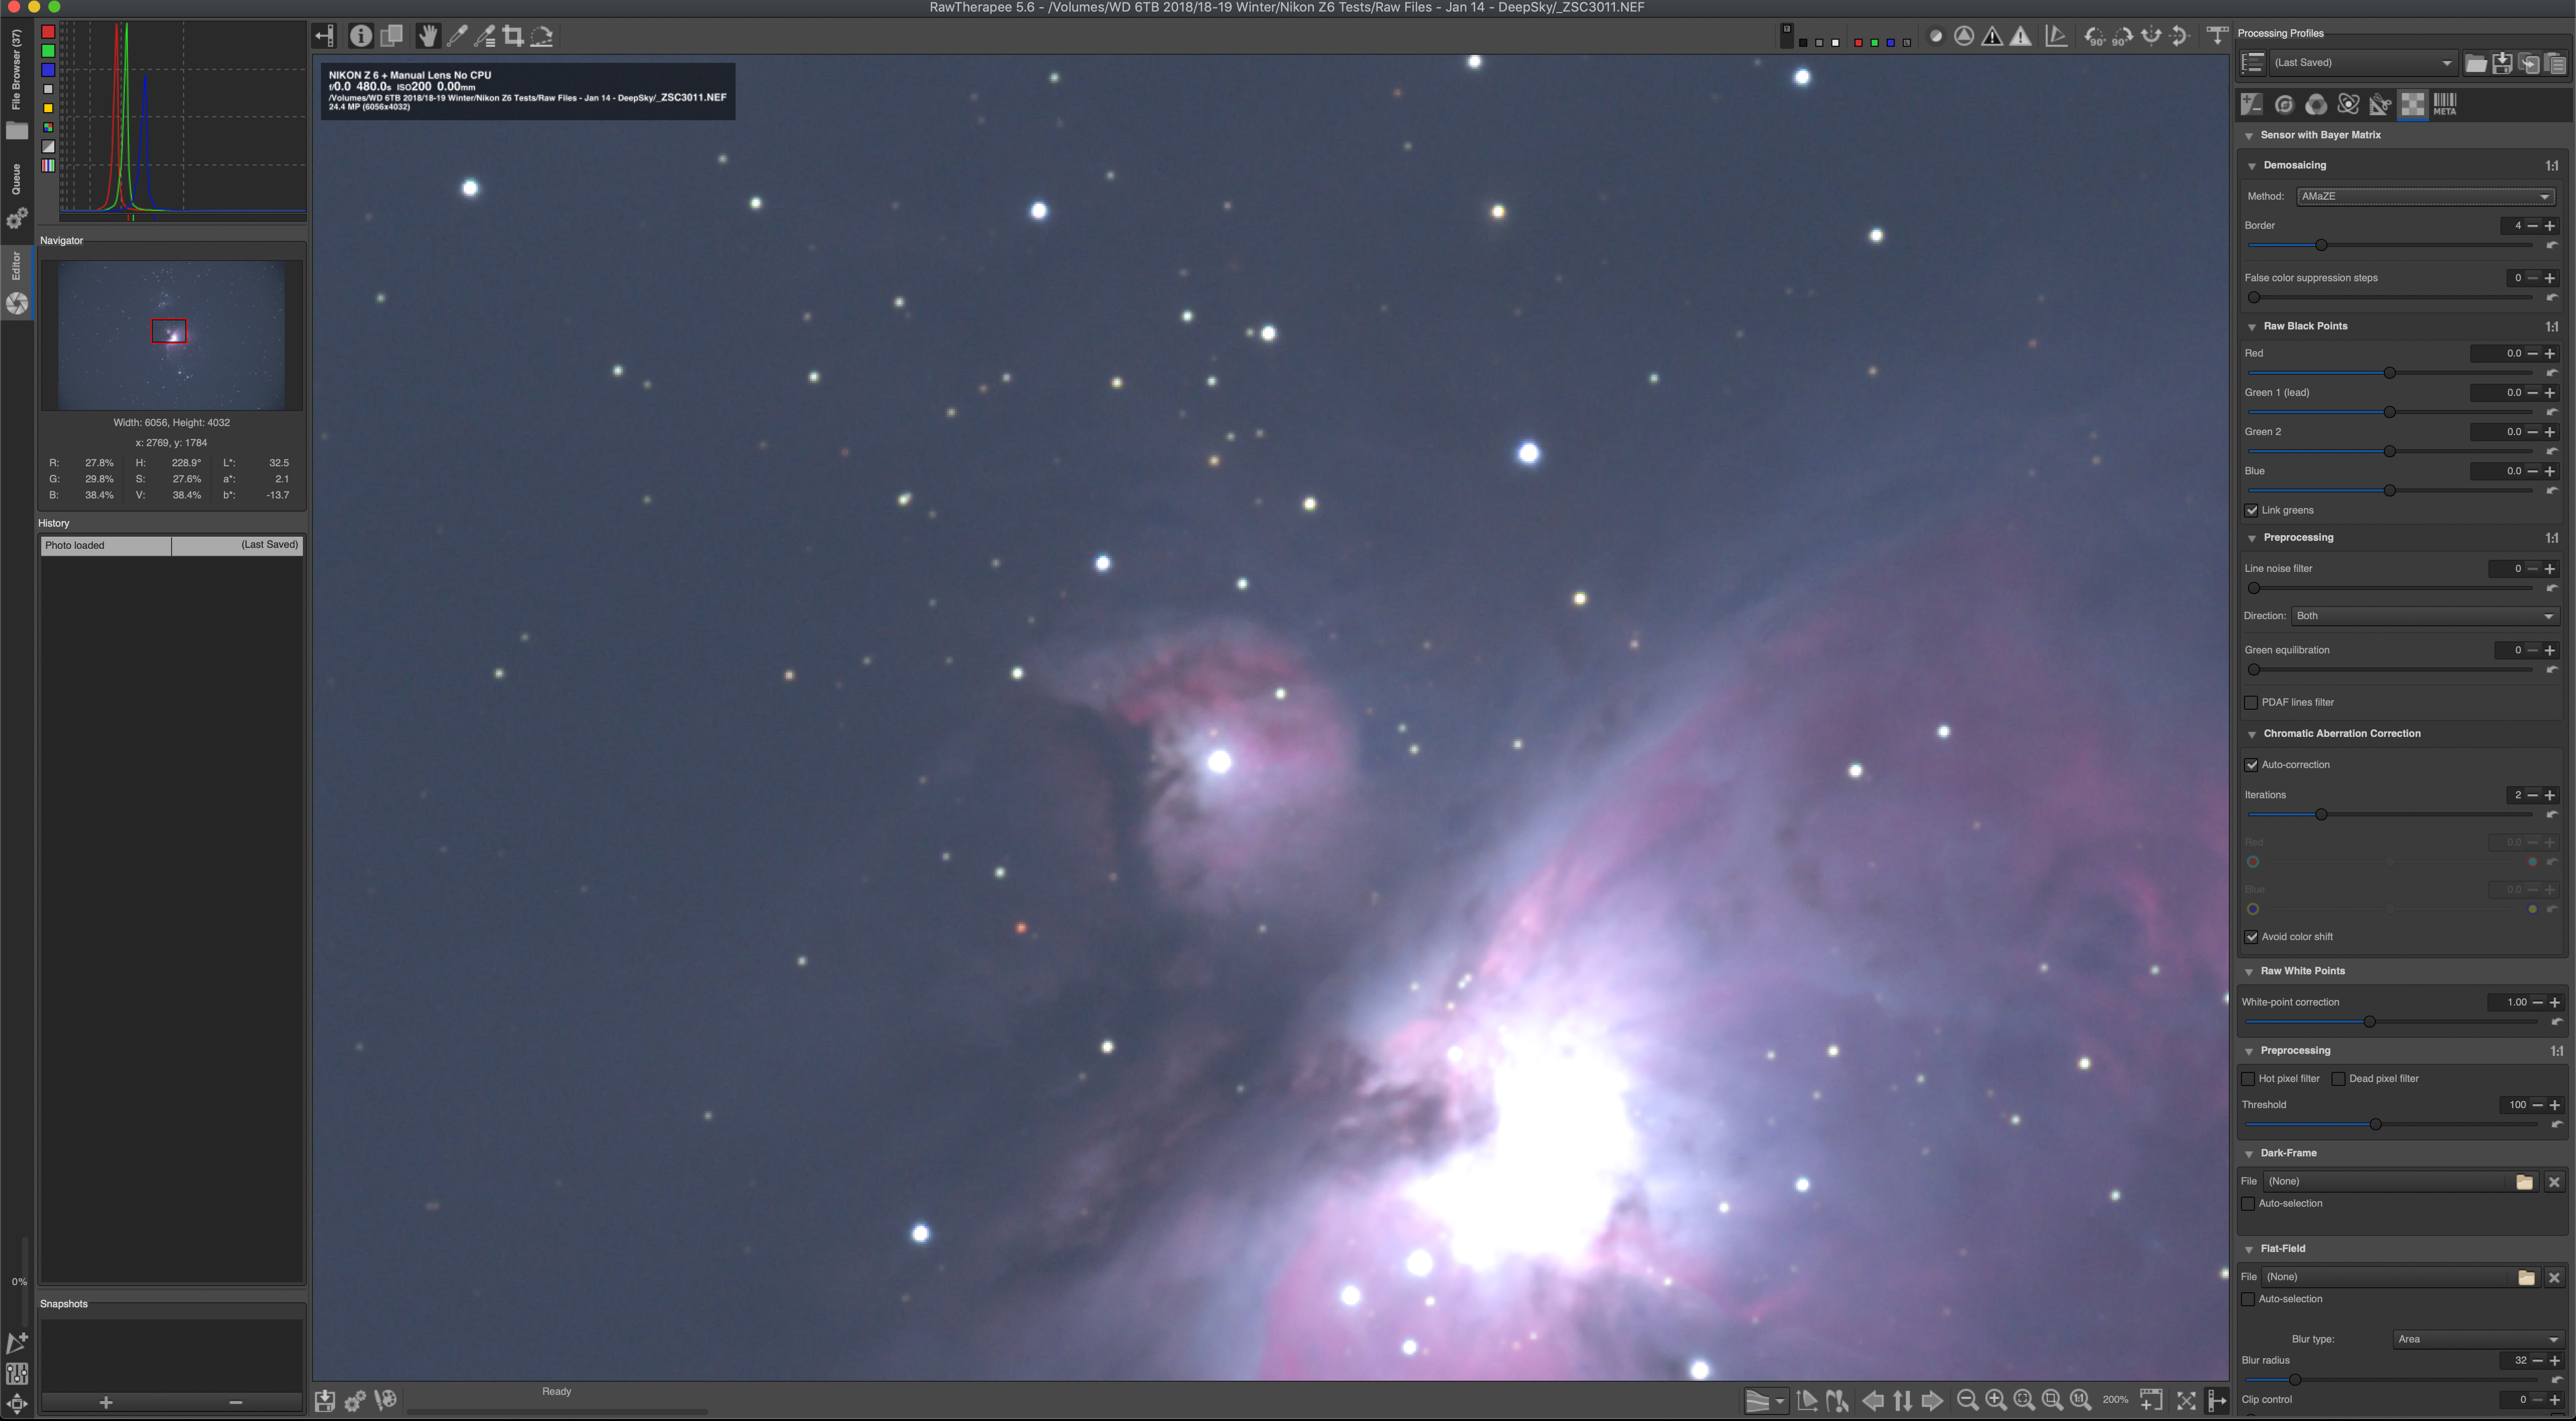
A Z6 Raw NEF file open in Raw Therapee 5.6, showing good star images and de-Bayering.
Inevitably, raw files from brand new cameras cannot be read by any raw developer programs other than the one supplied by the manufacturer, Nikon Capture NX in this case. However, even by the time I did my testing in winter 2019 all the major software suppliers had updated their programs to open Z6 files.
Adobe Lightroom and Photoshop, Affinity Photo, DxO PhotoLab, Luminar 3, ON1 PhotoRAW, and the open-source Raw Therapee all open the Z6’s NEF raw files just fine.
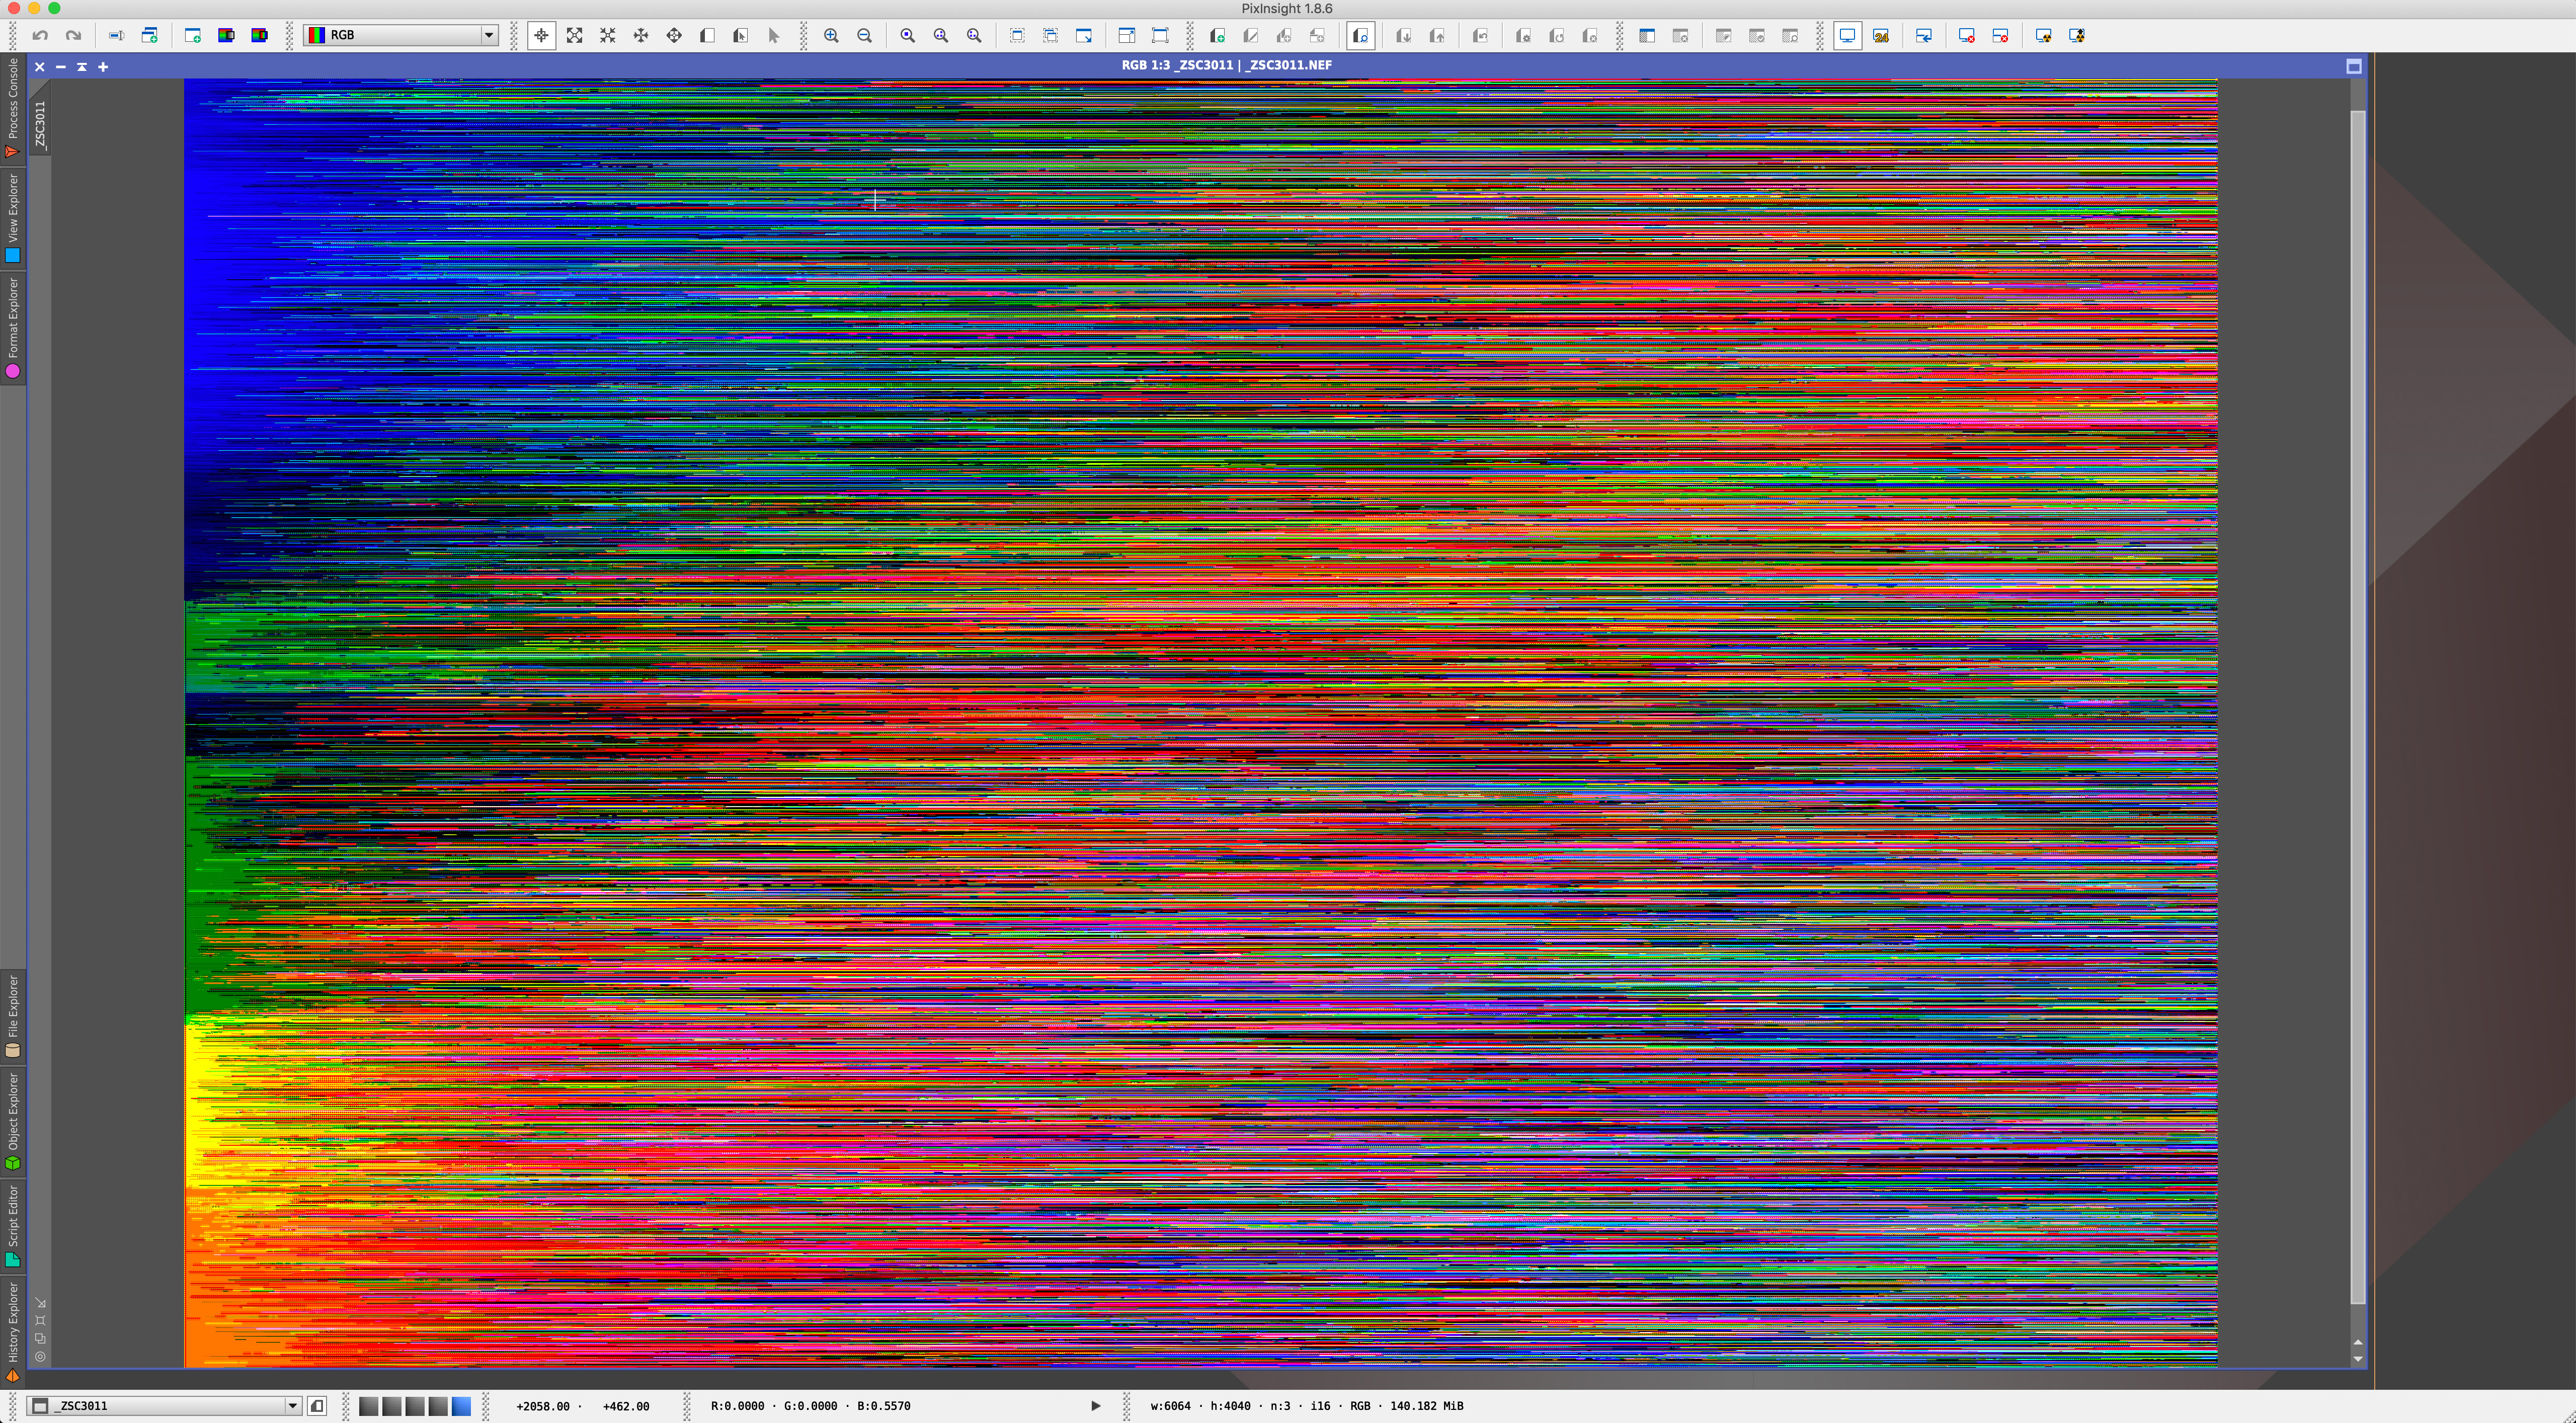
PixInsight 1.8.6 failing to open a Z6 raw NEF file.
Specialized programs for processing astronomy images might be another story. For example, as of v1.08.06, PixInsight, a favourite program among astrophotographers, does not open Z6 raw files. Nor does Nebulosity v4. But check with the developers for updates.
Other Features for Astrophotography
Here are other Nikon Z6 features I found of value for astrophotography, and for operating the camera at night.
Tilting LCD Screen
Like the Nikon D750 and Sony A7III, the Z6 offers a tilting LCD screen great for use on a telescope or tripod when aimed up at the sky. However, the screen does not flip out and reverse, a feature useful for vloggers, but seldom needed for astrophotography.
Showing the top OLED screen and dedicated ISO button that is easy to access in the dark. It works in conjunction with the top dial.
OLED Top Screen (Above)
The Sony doesn’t have one, and Canon’s low-cost mirrorless Rp also lacks one. But the top-mounted OLED screen of the Z6 is a great convenience for astrophotography. It makes it possible to monitor camera status and battery life during a shoot, even with the rear LCD screen turned off to prolong battery life.
Touch Screen
Sony’s implementation of touch-screen functions is limited to just choosing autofocus points. By contrast, the Nikon Z6 offers a full range of touchscreen functions, making it easy to navigate menus and choose settings.
I do wish there was an option, as there is with Pentax, to tint the menus red for preserving night vision.
Built-in Intervalometer
As with other Nikons, the Z6 offers an internal intervalometer capable of shooting time-lapses, just as long as individual exposures don’t need to be longer than 30 seconds.
In addition, there’s the Exposure Smoothing option which, as I have found with the D750, is great for smoothing flickering in time-lapses shot using auto exposure.
Sony has only just added an intervalometer to the a7III with their v3 firmware update, but with no exposure smoothing.
Custom i Menu / Custom Function Buttons
The Sony a7III has four custom function buttons users can assign to commonly used commands, for quick access. For example, I assign one Custom button to the Bright Monitoring function which is otherwise utterly hidden in the menus, but superb for framing nightscapes, if only you know it’s there!
The Nikon Z6 has two custom buttons beside the lens mount. However, I found it easier to use the “i” menu (shown above) by populating it with those functions I use at night for astrophotography. It’s then easy to call them up and adjust them on the touch screen.
Thankfully, the Z6’s dedicated ISO button is now on top of the camera, making it much easier to find at night than the awkwardly placed ISO button on the back of the D750, which I am always mistaking for the Image Quality button, which you do not want to adjust by mistake.
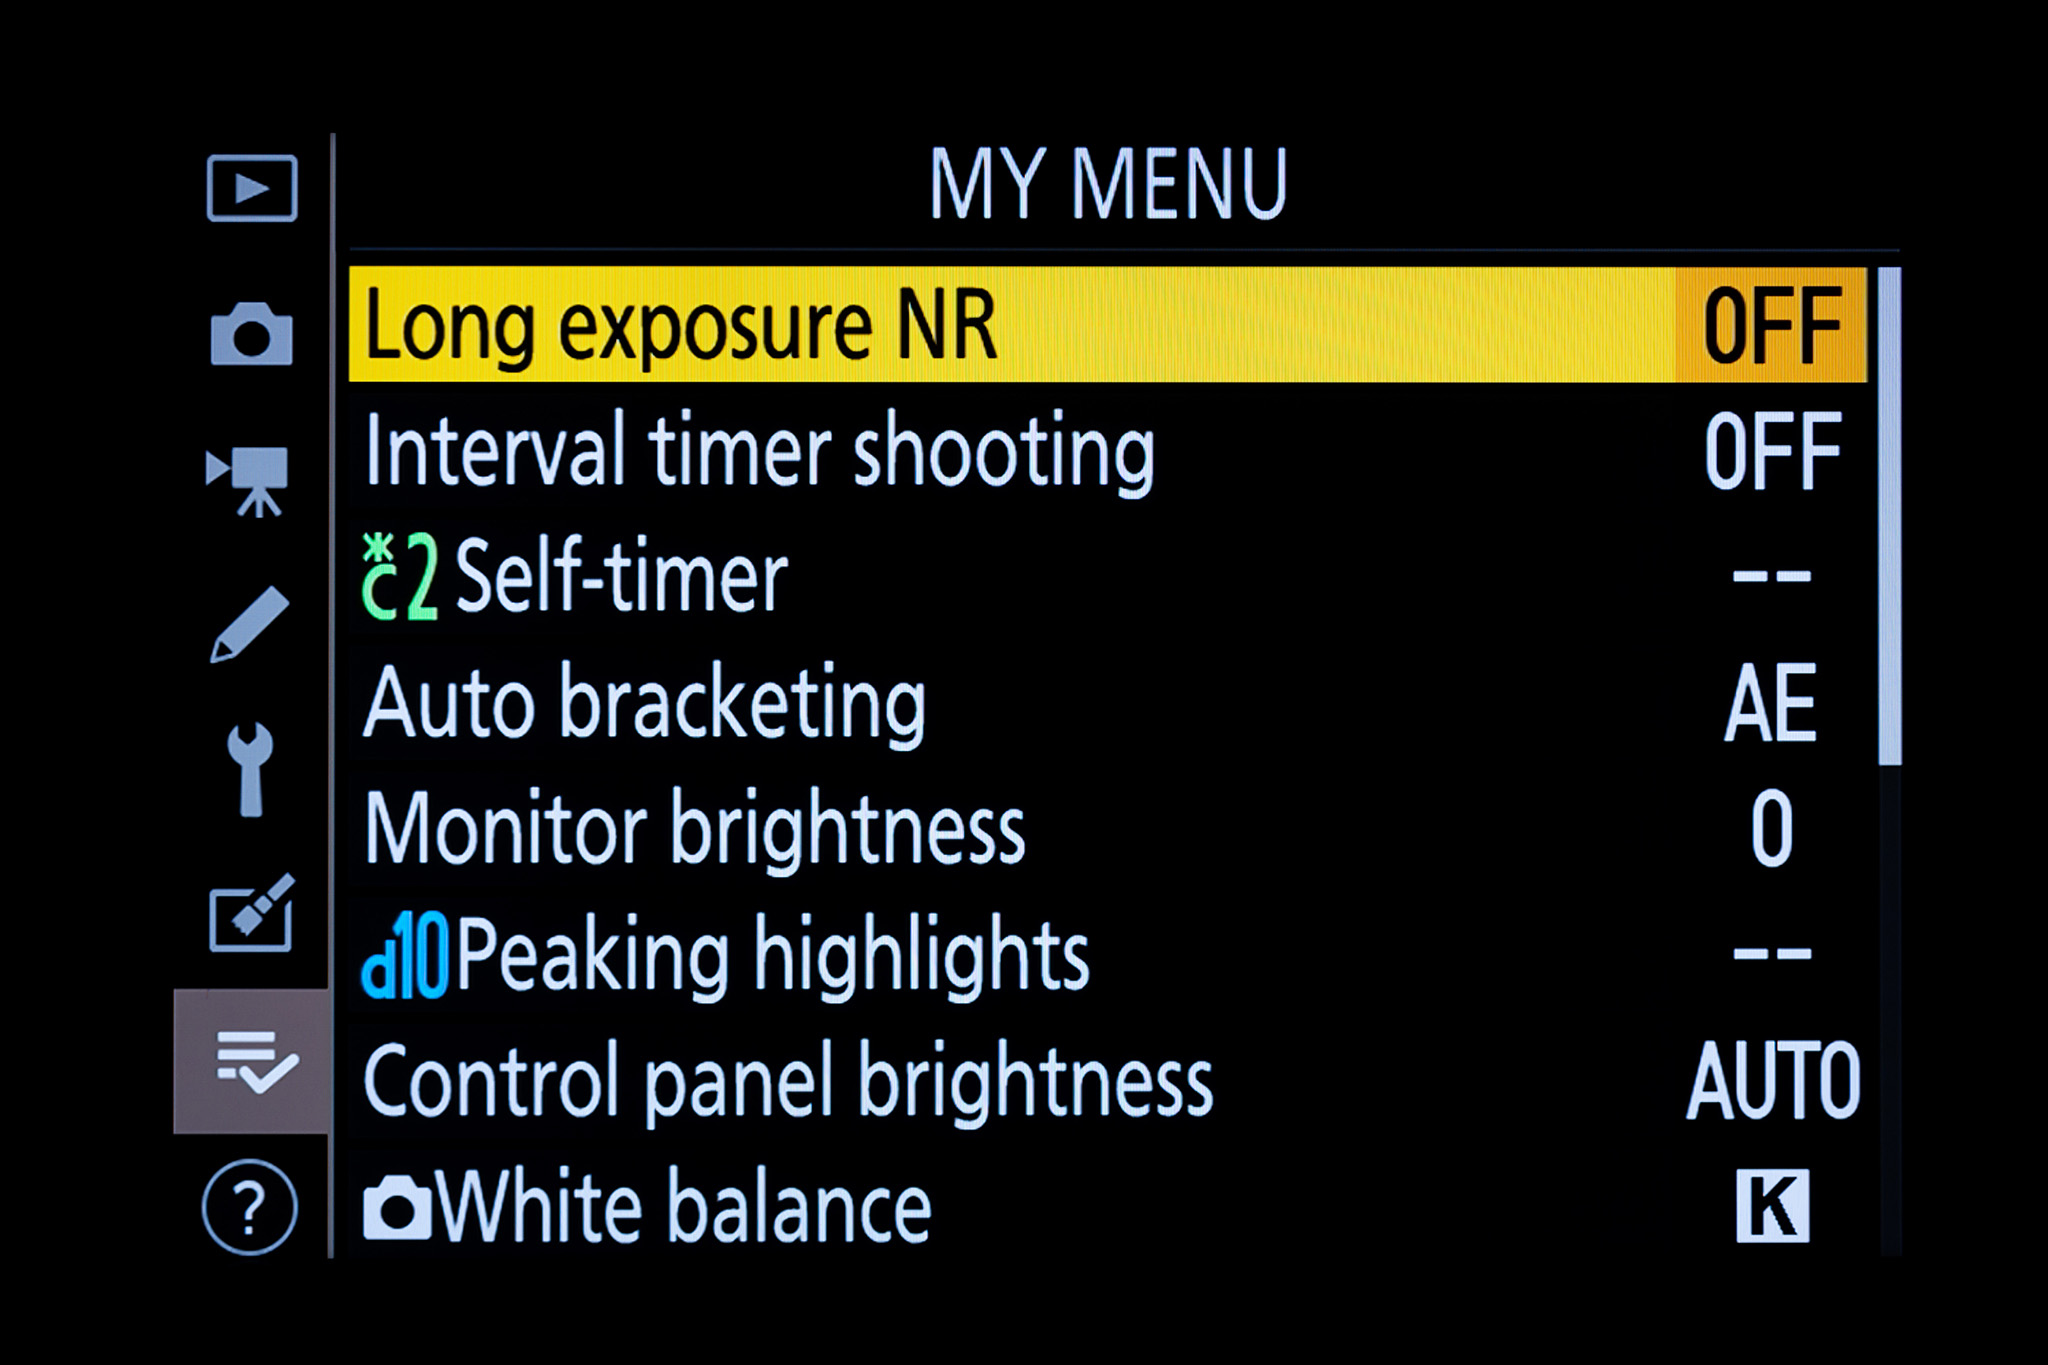
My Menu
As most cameras do, the Z6 also has a “My Menu” page which you can also populate with favourite menu commands.
The D750 (left) compared to the smaller and lighter Z6 (right). This shows the wider Z lens mount compared to Nikon’s old F-mount standard.
Lighter Weight / Smaller Size
The Z6 provides similar imaging performance, if not better (for movies) than the D750, and in a smaller and lighter camera, weighing 200 grams (0.44 pounds) less than the D750. Being able to downsize my equipment mass is a welcome plus to going mirrorless.
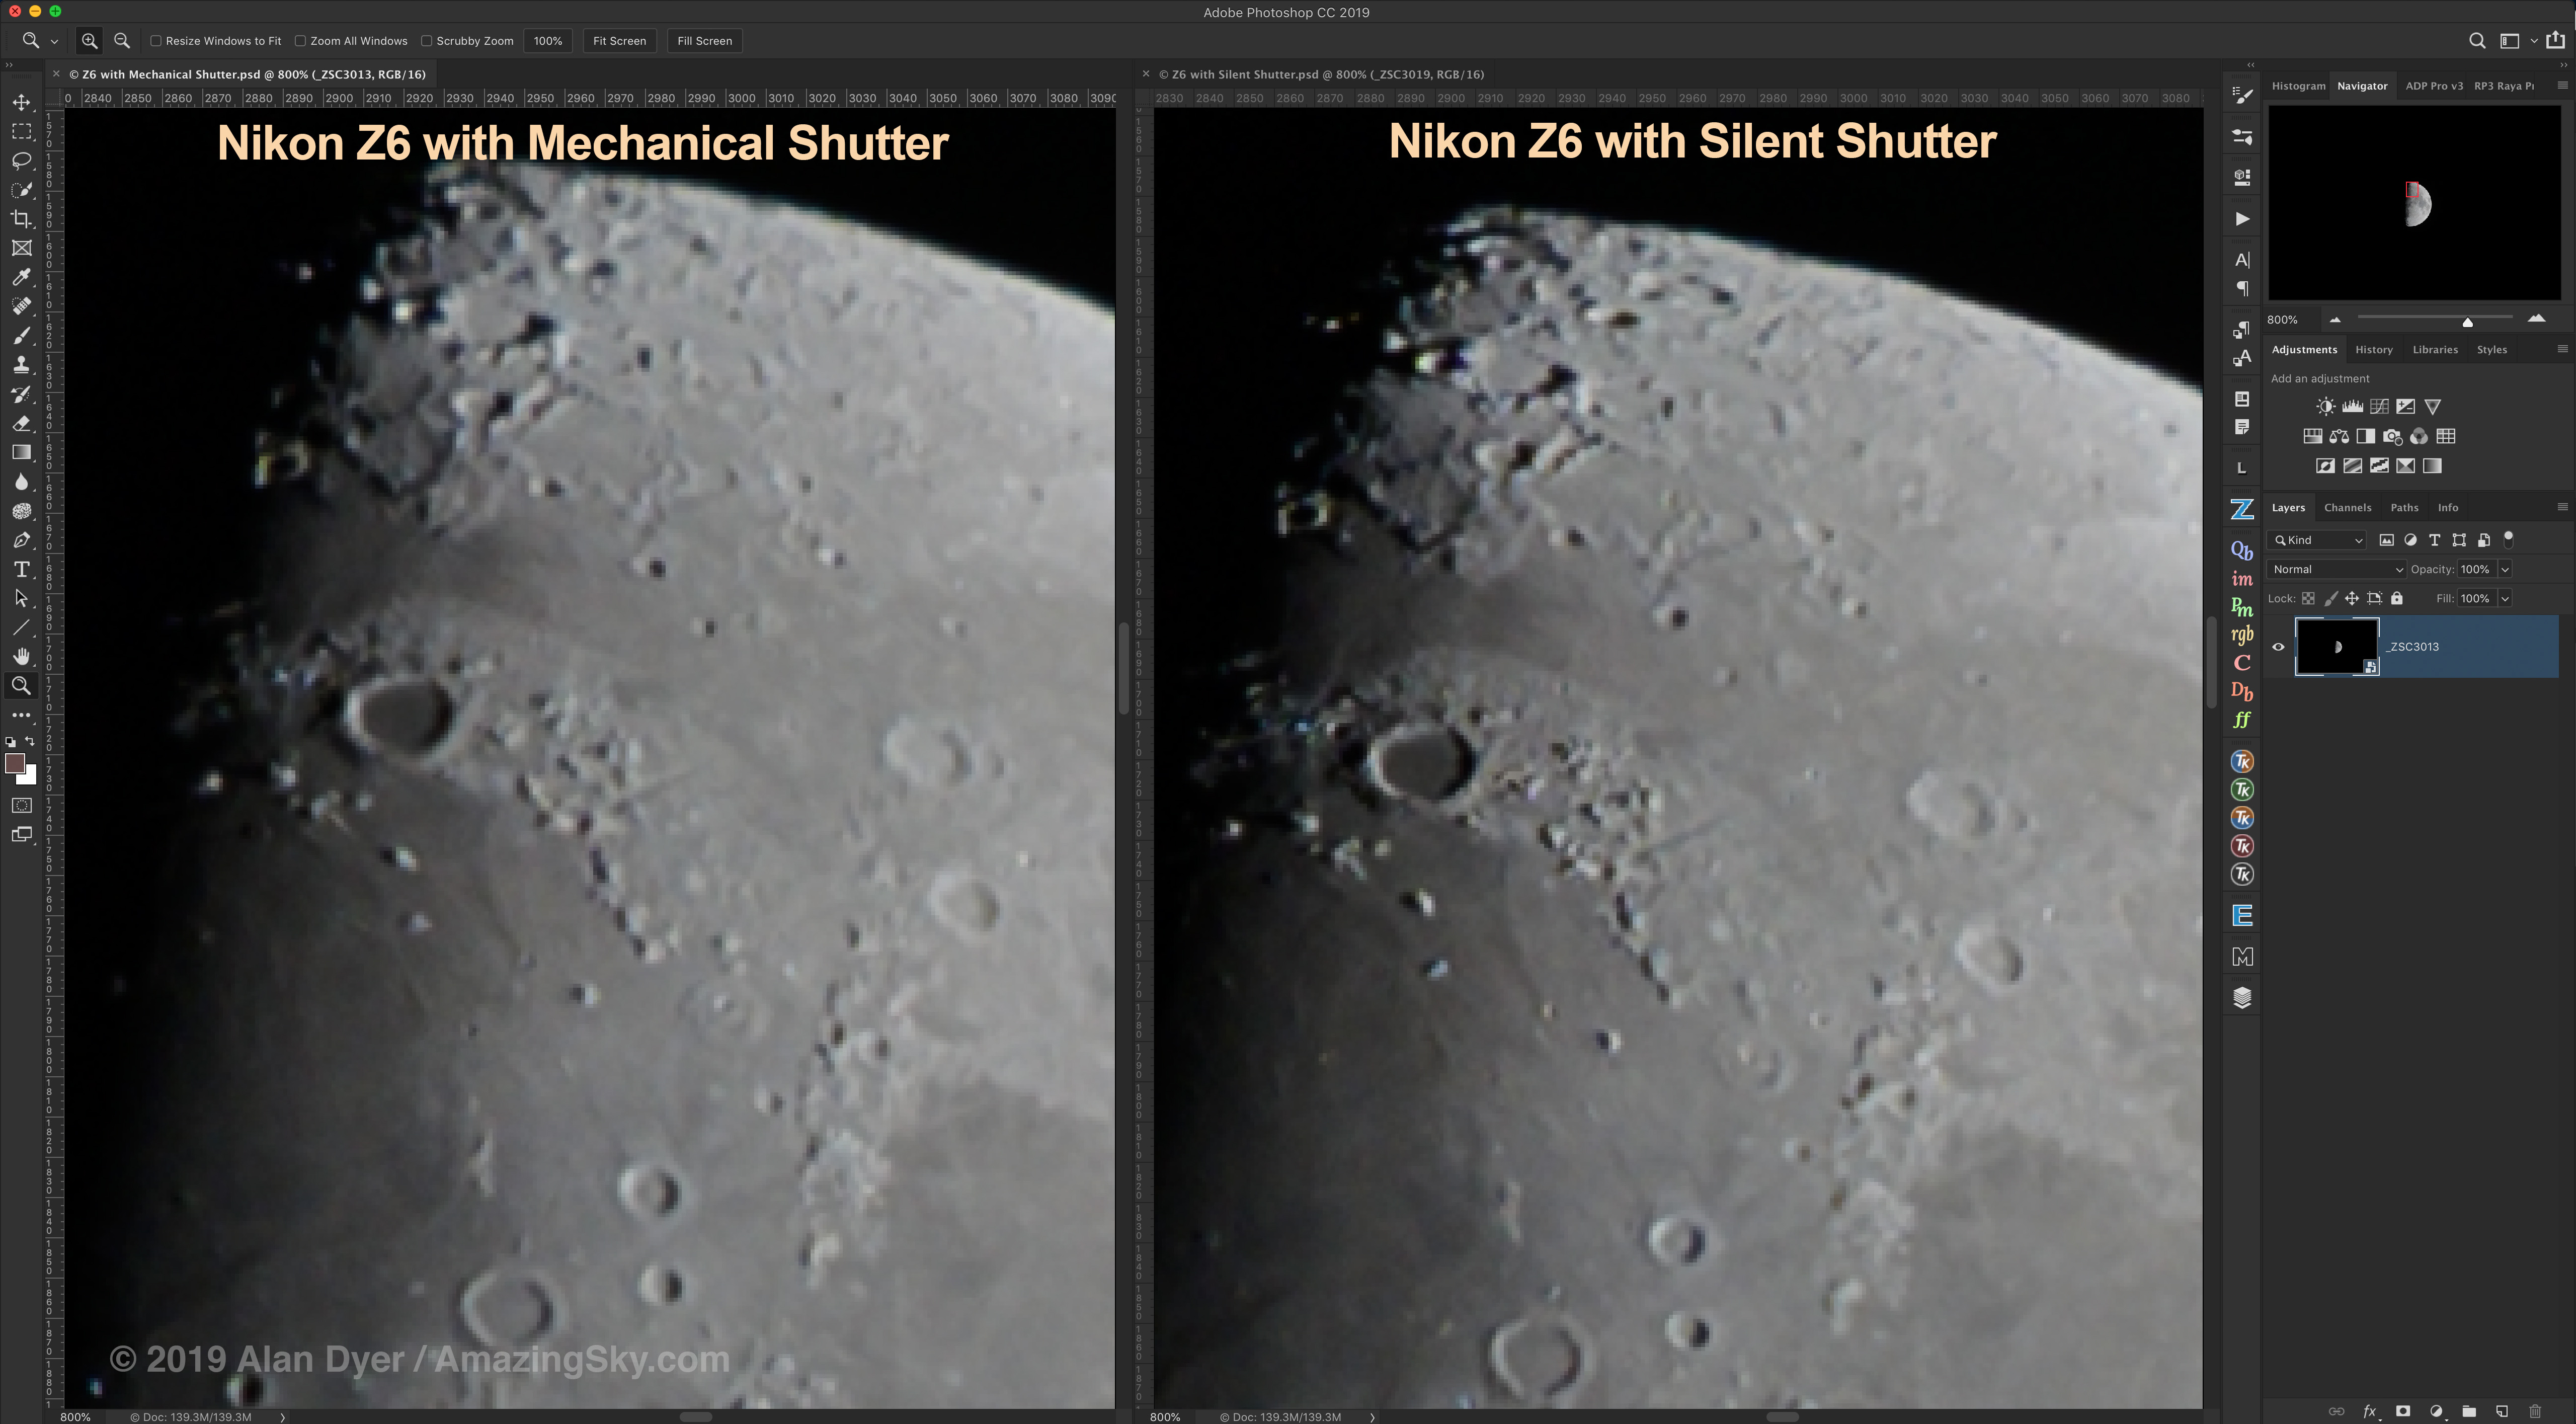
Extreme 800% blow-ups of the Moon show a slightly sharper image with the Z6 set to Silent Shutter.
Electronic Front Curtain Shutter / Silent Shooting
By design, mirrorless cameras lack any vibration from a bouncing mirror. But even the mechanical shutter can impart vibration and blurring to high-magnification images taken through telescopes.
The electronic front curtain shutter (lacking in the D750) helps eliminate this, while the Silent Shooting mode does just that — it makes the Z6 utterly quiet and vibration free when shooting, as all the shutter functions are now electronic. This is great for lunar and planetary imaging.
What’s Missing for Astrophotography (not much!)
Bulb Timer for Long Exposures
While the Z6 has a Bulb setting, there is no Bulb Timer as there is with Canon’s recent cameras. A Bulb Timer would allow setting long Bulb exposures of any length in the camera, though Canon’s cannot be combined with the intervalometer.
Instead, the Nikon must be used with an external Intervalometer for any exposures over 30 seconds long. Any number of units are compatible with the Z6, through its shutter port which is the same type DC2 jack used in the D750.
In-Camera Image Stacking to Raws
The Z6 does offer the ability to stack up to 10 images in the camera, a feature also offered by Canon and Pentax. Images can be blended with a Lighten (for star trails) or Average (for noise smoothing) mode.
However, unlike with Canon and Pentax, the result is a compressed JPG not a raw file, making this feature of little value for serious imaging. Plus with a maximum of only 10 exposures of up to 30-seconds each, the ability to stack star trails “in camera” is limited.
Illuminated Buttons
Unlike the top-end D850, the Z6’s buttons are not illuminated, but then again neither are the Z7’s.
As a bonus — the Nikon 35mm S-Series Lens
The upper left frame corner of a tracked star image shot with the 35mm S lens wide open at f/1.8 and stopped down at third stop increments.
With the Z6 I also received a Nikkor 35mm f/1.8 S lens made for the Z-mount, as the lens perhaps best suited for nightscape imaging out of the native Z-mount lenses from Nikon. See Nikon’s website for the listing.
If there’s a downside to the Z-series Nikons it’s the limited number of native lenses that are available now from Nikon, and likely in the future from anyone, due to Nikon not making it easy for other lens companies to design for the new Z mount.
In testing the 35mm Nikkor on tracked shots, stars showed excellent on- and off-axis image quality, even wide open at f/1.8. Coma, astigmatism, spherical aberration, and lateral chromatic aberration were all well controlled.
However, as with most lenses now offered for mirrorless cameras, the focus is “by-wire” using a ring that doesn’t mechanically adjust the focus. As a result, the focus ring turns continuously and lacks a focus scale.
So it is not possible to manually preset the lens to an infinity mark, as nightscape photographers often like to do. Focusing must be done each night.
Until there is a greater selection of native lenses for the Z cameras, astrophotographers will need to use the FTZ adapter and their existing Nikon F-mount or third-party Nikon-mount lenses with the Zs.
Recommendations
I was impressed with the Z6.
The Owl Nebula, Messier 97, a planetary nebula in our galaxy, and the edge-on spiral galaxy Messier 108, paired below the Bowl of the Big Dipper in Ursa Major. This is a stack of 5 x 4-minute exposures at ISO 1600 with the Nikon Z6 taken as part of testing. This was through the Astro-Physics Traveler refractor at f/6 with the Hotech field flattener and FTZ adapter.
For any owner of a Nikon cropped-frame DSLR (from the 3000, 5000, or 7000 series for example) wanting to upgrade to full-frame for astrophotography I would suggest moving to the Z6 over choosing a current DSLR.
Mirrorless is the way of the future. And the Z6 will yield lower noise than most, if not all, of Nikon’s cropped-frame cameras.
The Z6 with the Nikkor 35mm f/1.8 S lens native for the Z mount.
For owners of current Nikon DSLRs, especially a 24-megapixel camera such as the D750, moving to a Z6 will not provide a significant improvement in image quality for still images.
But … it will provide 4K video and much better low-light video performance than older DSLRs. So if it is aurora videos you are after, the Z6 will work well, though not quite as well as a Sony alpha.
In all, there’s little downside to the Z6 for astrophotography, and some significant advantages: low noise, bright live view, clean artifact-free sensor images, touchscreen convenience, silent shooting, low-light 4K video, all in a lighter weight body than most full-frame DSLRs.
Orion appears in his winter element, over snowscapes on crisp January nights.
A couple of clear-ish winter nights this past weekend allowed me to capture that most iconic of constellations, Orion, over snowy landscapes close to home here in Alberta.
At top, he rises over the famous Hoodoos near East Coulee, Alberta in the Red Deer River valley. Clouds moving in on Sunday night, January 10, added the photogenic glows around the stars, emphasizing their colour and brilliance.
Here, from a shot on Saturday, January 9, Orion appears down the end of my rural country Range Road, with Sirius, his companion Dog Star, following at his heels above the treetops and in some haze.
If this looks cold, it was – at minus 25° C. Though two hours later it was only -15° C and by morning it was 0° C. Winter in Alberta!
Both images are short exposures, 10 to 15 seconds, at f/2 or f/2.8 with the wonderful Sigma 24mm Art lens and my new favourite camera, the Nikon D750 at ISO 3200. In both cases the ground is from a stack of several exposures to smooth noise but the sky is from a single exposure to minimize star trailing.
The summer Milky Way sets into the southwest on a late November night.
On Saturday, November 28, well into winter here in Alberta, the stars of the Summer Triangle and the summer Milky Way set into the southwest on a clear, though slightly hazy, late November night.
This is the last of the summer Milky Way, with the centre of the Galaxy now long gone, but the Summer Triangle stars remaining in the evening sky well into autumn. Glows from light pollution in the west light the horizon, in a quick series of images shot in my rural backyard.
In the Summer Triangle, Vega is at right, as the brightest star; Deneb is above centre, and Altair is below centre, farthest south in the Milky Way.
I shot this as a test image for the Nikkor 14-24mm lens, here wide-open at f/2.8 and at 14mm, where it performs beautifully, with very tight star images to the corners. It does very well at 24mm, too! This is astonishing performance for a zoom lens. It matches or beats many “prime” lenses for quality.
The camera was the 36-megapixel Nikon D810a, Nikon’s “astronomical DSLR” camera, also on test. Here it shows its stuff by picking up the red nebulas in Cygnus and Cepheus.
Thorough tests of both the camera and lens will appear later in the year. Stay tuned.
Do subscribe to my blog (click below) to get email notices of new entries.
For the even more technically-minded, this image is a stack, mean combined, of five 2-minute tracked exposures, at f/2.8 and ISO 800. The camera was on the iOptron Sky-Tracker. So the stars are not trailed but the ground is! I made no attempt here to layer in an untracked ground shot, as there isn’t much detail of interest worth showing, quite frankly.
At least not in the ground. But the Milky Way is always photogenic.
Learn the basics of shooting nightscape and time-lapse images with my three new video tutorials.
In these comprehensive and free tutorials I take you from “field to final,” to illustrate tips and techniques for shooting the sky at night.
At sites in southern Alberta I first explain how to shoot the images. Then back at the computer I step you through how to process non-destructively, using images I shot that night in the field.
Tutorial #1 – The Northern Lights
This 24-minute tutorial takes you from a shoot at a lakeside site in southern Alberta on a night with a fine aurora display, through to the steps to processing a still image and assembling a time-lapse movie.
Tutorial #2 – Moonlit Nightscapes
This 28-minute tutorial takes you from a shoot at Waterton Lakes National Park on a bright moonlit night, to the steps for processing nightscapes using Camera Raw and Photoshop, with smart filters, adjustment layers and masks.
Tutorial #3 – Star Trails
This 35-minute tutorial takes you from a shoot at summer solstice at Dinosaur Provincial Park, then through the steps for stacking star trail stills and assembling star trail time-lapse movies, using specialized programs such as StarStaX and the Advanced Stacker Plus actions for Photoshop.
As always, enlarge to full screen for the HD versions. These are also viewable at my Vimeo channel.
I’ve been an avowed Canon DSLR user for a decade. I may be ready to switch!
[NOTE:This review dates from 2015. Tests done today with current models would certainly differ. Canon’s EOS R mirrorless series, for example, offer much better ISO Invariancy performance but lack the “dark frame buffer” advantage of Canon DSLRs. And indeed, I have used the Nikon D750 a lot since 2015. But I did not give up my Canons!]
Here, in a technical blog, I present my tests of two leading contenders for the best DSLR camera for nightscape and astronomical photography: the Canon 6D vs. the Nikon D750. Which is better?
To answer, I subjected both to side-by-side outdoor tests, using exposures you’ll actually use in the field for typical nightscapes and for deep-sky images.
Both cameras are stock, off-the-shelf models. They have not had their filters modified for astronomy use. Both are 20- to 24-megapixel, full-frame cameras, roughly competitive in price ($1,900 to $2,300).
For images shot through lenses, I used the Canon L-Series 24mm on the Canon 6D, and the Sigma 24mm Art lens on the Nikon D750.
The bottom line:Both are great cameras, with the Nikon D750 having the edge for nightscape work, and the Canon 6D the edge for deep-sky exposures.
The 24.3-megapixel Nikon D750 has 5.9-micron pixels, while the 20.2-megapixel Canon 6D has slightly larger 6.5-micron pixels which, in theory, should lead to lower noise for the Canon. How do they compare in practice?
The scene used to test for noise (here with the Nikon images) showing the development settings applied to both the Nikon and Canon sets. NO noise reduction (colour or lunminance) was applied to any of the images, but Exposure, Shadows, Contrast and Clarity were boosted, and Highlights reduced.
I shot a moonlit nightscape scene (above) at five ISO settings, from 800 to 12800, at increasingly shorter exposures to yield identically exposed frames. I processed each frame as shown above, with boosts to shadows, clarity, and contrast typical for nightscapes. However, I applied no noise reduction (either luminance or color) in processing. Nor did I take and apply dark frames.
The blowups of a small section of the frame (outlined in the box in the upper right of the Photoshop screen) show very similar levels of luminance noise. The Canon shows slightly more color noise, in particular more magenta pixels in the shadows at high ISOs. Its larger pixels didn’t provide the expected noise benefit.
TEST #2 — Resolution
Much has been written about the merits of Canon vs. Nikon re: the most rigorous of tests, resolving stars down at the pixel level.
I shot the images below of the Andromeda Galaxy the same night through a 92mm aperture apo refractor. They have had minimal but equal levels of processing applied. At this level of inspection the cameras look identical.
But what if we zoom in?
For many years Nikon DSLRs had a reputation for not being a suitable for stellar photography because of a built-in noise smoothing that affected even Raw files, eliminating tiny stars along with noise. Raw files weren’t raw. Owners worked around this by turning on Long Exposure Noise Reduction, then when LENR kicked in after an exposure, they would manually turn off the camera power.
This so-called “Mode 3” operation yielded a raw frame without the noise smoothing applied. Clearly, this clumsy workaround made it impossible to automate the acquisition of raw image sequences with Nikons.
Are Nikons still handicapped? In examining deep-sky images at the pixel-peeping level (below), I saw absolutely no difference in resolution or the ability to record tiny and faint stars. With its 4-megapixel advantage the Nikon should resolve finer details and smaller stars, but in practice I saw little difference.
Closeup of telescope view of Andromeda Galaxy with Canon 6D 4 minute exposure at ISO 800 No noise reduction applied in processing
Closeup of telescope view of Andromeda Galaxy with Nikon D750 4 minute exposure at ISO 800 No noise reduction applied in processing
On the other hand I saw no evidence for Nikon’s “star eater” reputation. I think it is time to lay this bugbear of Nikons to rest. The Nikon D750 proved to be just as sharp as the Canon 6D.
Note that in the closeups above, the red area marks a highlight (the galaxy core) that is overexposed and clipped. Nikon DSLRs also have a reputation for having sensors with a larger dynamic range than Canon, allowing better recording of highlights before clipping sets in.
However, in practice I saw very little difference in dynamic range between the two cameras. Both clipped at the same points and to the same degree.
TEST #3 — Mirror Box Shadowing
An issue little known outside of astrophotography is that a DSLR’s deeply-inset sensor can be shadowed by the upraised mirror and sides of the mirror box. Less light falls on the edges of the sensor.
The vignetting effect is noticeable only when we boost the contrast to the high degree demanded by deep-sky images, and when shooting through fast telescope systems.
Here I show the vignetting of the Canon and Nikon when shooting through my 92mm refractor at f/4.5.
The circular corner vignetting visible in the images below is from the field flattener/reducer I employed on the telescope. It can be compensated for by using Lens Correction in Adobe Camera Raw, or eliminated by taking flat fields.
Demonstrating the level of vignetting and mirror-box shadowing with the Canon 6D on a TMB 92mm apo refractor with a 0.85x field flattener/reducer lens
Demonstrating the level of vignetting and mirror-box shadowing with the Nikon D750 on a TMB 92mm apo refractor with a 0.85x field flattener/reducer lens
The dark edge at the bottom of the frame is from shadowing by the upraised mirror. It can be eliminated only by taking flat fields, or reduced by using masked brightness adjustments in processing.
Both cameras showed similar levels of vignetting, with the Canon perhaps having the slight edge.
TEST #4 — ISO Invariancy
So far the Nikon D750 and Canon 6D are coming up fairly equal in performance. But not here. This is where the Nikon outperforms the Canon by quite a wide margin.
Sony sensors (used in Sony cameras and also used by Nikon) have a reputation for being “ISO Invariant.”
What does that mean?
A typical Milky Way nightscape with the Nikon D750 and Sigma 24mm Art lens. With no Moon, shot at very high ISO of 6400 and wide aperture of f/1.4 to show image quality under these demanding shooting circumstances. Lens correction and basic development setttings applied.
A typical Milky Way nightscape with the Canon 6D and Canon 24mm L lens (original model). With no Moon, shot at very high ISO of 6400 and wide aperture of f/1.4 to show image quality under these demanding shooting circumstances. Lens correction and basic development setttings applied.
In the examples above, the correct exposure for the starlit scene was 15 seconds at f/1.4 at ISO 6400. See how the two cameras rendered the scene? Very similar, albeit with the Canon showing more noise and discoloration in the dark frame corners.
What if we shoot at the same 15 seconds at f/1.4 … but at ISO 3200, 1600, 800, and 400? These are now 1-, 2-, 3-, and 4-stops underexposed, respectively.
Then we boost the Exposure setting of the underexposed Raw files later in processing, by 1, 2, 3 or 4 f-stops. What do we see?
Nikon D750 – Comparing ISO Invariancy from ISO 6400 to 400 (Nightscape)
With the Nikon (above) we see images that look nearly identical for noise to what we got with the properly exposed ISO 6400 original. It really didn’t matter what ISO speed the image was shot at – we can turn it into any ISO we want later with little penalty.
Canon 6D – Comparing ISO Invariancy from ISO 6400 to 400 (Nightscape)
With the Canon (above) we get images with grossly worse noise in the shadows and with ugly magenta discoloration. Canons cannot be underexposed. You must use as high an ISO as needed for the correct exposure.
This “ISO Invariant” advantage of Nikon over Canon is especially noticeable in nightscapes scenes lit only by starlight, as above. The Canon turns ugly purple at -3EV underexposure, and loses all detail and contrast at -4EV underexposure.
For nightscape imaging this is an important consideration. We are limited in exposure time and aperture, and so are often working at the ragged edge of exposure. Dark areas of a scene are often underexposed and prone to noise. With the Nikon D750 these areas may still look noisy, but not much more so than they would be at that ISO speed.
With the Canon 6D, underexpose the shadows and you pay the price of increased noise and discoloration when you try to recover details in the shadows.
Apparently, the difference comes from where the manufacturer places the analog-to-digital circuitry: on the sensor (ISO invariant) or outboard on a separate circuit (ISO variant), and thus where in the signal path the amplification occurs when we boost ISO speed.
TEST #6 — Features
One could go on endlessly about features, but here I compare the two cameras on just a few key operating features very important to astrophotographers.
Intervalometer:
The Canon 6D has none, though newer Canons do. The Nikon D750, as do many Nikons, has a built-in intervalometer (shown above), even with a deflickering “Exposure Smoothing” option. However, exposure time is limited to the camera’s maximum of 30 seconds. Any longer requires an outboard intervalometer, as with the Canon.
If you use your camera with any motion control time-lapse unit, then it becomes the intervalometer, negating any capability built into the camera. But it’s nice to have.
Small Advantage: Nikon
Interval Length:
REVISED JUNE 2020:
When taking time-lapse or star trail images with the Canon I can set an interval as short as 1 second between frames, for a minimum of gaps or jumps in the stars. With the Nikon, controlled internally by its built-in intervalometer, a 1-second interval is possible but only if you set the interval to 33 seconds for a 30-second shutter speed.
That’s true of Canon and Sony built-in intervalometers as well, because on all cameras setting the exposure to 30 seconds really gives you a 32-second exposure. A little known fact! So the interval between shutter firings has to be set to 33 seconds. It’s tricky.
Advantage: None to either
Tiltable LCD Screen:
The Canon 6D has none. The Nikon D750 has a very useful tilt-out screen as shown above. This is hugely convenient for all forms of astrophotography. Only cropped-frame Canons have tilt-out screens. This feature might add weight, but it’s worth it!
Big Advantage: Nikon
Dark Frame Buffer:
The Nikon has none. With Long Exposure Noise Reduction ON, the Canon 6D allows up to four exposures to be shot in quick succession before the dark frame kicks in and locks up the camera. (Put the camera into Raw+JPG.)
[JUNE 2020: With the Canon 6D MkII the buffer allows three frames to be taken in quick succession.]
This is very useful for deep-sky imaging, for acquiring a set of images for stacking that have each had a dark frame subtracted in-camera, with a minimum of “down-time” at the camera.
Big Advantage: Canon
Live View Screen Brightness:
As pointed out to me by colleague Christoph Malin, with the Nikon you cannot dim the screen when in Live View mode and with Exposure Simulation ON. So it can be too bright at night. With the Canon you can dim the Live View screen — the LCD Brightness control affects the screen both during Live View as well as during playback of images.
Small Advantage: Canon
Software Compatibility:
Canon EOS cameras are well supported by advanced software, such as GBTimelapse (above) that controls only Canons, not Nikons, in complex time-lapse sequences, and Nebulosity, popular among deep-sky imagers for DSLR control.
Small Advantage: Canon
My take-away conclusions:
• Nikon DSLRs now are just as good for astrophotography as Canons, though that wasn’t always the case – early models did suffer from more noise and image artifacts than their Canon counterparts.
• Canon DSLRs, due to their sensor design, are more prone to exhibiting noise and image artifacts when images are greatly underexposed then boosted later in processing. Just don’t underexpose them – good advice for any camera.