As eclipse day approaches here are some tips and video tutorials from me about how best to capture the total eclipse of April 8, 2024.
There are many ways to capture great images and movies of a total eclipse of the Sun. I outline them all in great detail in my 380-page ebook How to Capture the Solar Eclipses, linked to at right.
Originally published in June 2023, I revised the ebook following the October 14, 2023 annular eclipse of the Sun to include “lessons learned at the eclipse,” and some processing tutorials on assembling annular eclipse composites. I’ve also added new content on using software to control cameras and updated information about solar filters.
Brief Tips and Techniques
The August 21, 2017 total solar eclipse over the Grand Tetons as seen from the Teton Valley in Idaho, near Driggs. With the Canon 6D and 14mm SP Rokinon lens at f/2.5 for 1/10 second at ISO 100.
My breakdown of recommend methods, in order from simplest to most complex, and with increasing demands on your time, is generally this:
Use a Phone Camera for a Movie. While they can be used for a quick handheld grab shot during totality, a better method is to place a phone on a tripod using a clamp of some kind. Then a few minutes before totality aim and frame the scene, with no filter over the camera lens. Start it in movie mode to record video of the eclipse and sky changes, and the excited sounds of your group! Just remember to stop the video shortly after the end of totality and aim the phone away from the Sun. Never leave any unfiltered camera aimed at the Sun for a long time.
Shoot a Wide-Angle Time-Lapse. Using a DSLR or mirrorless camera and a wide-angle lens (it might need to be as wide as a 14mm at sites in Mexico and the southern U.S.) aim and frame the camera to include the Sun and landscape below. Focus the lens! And leave it on manual focus. But put the camera into Auto-Exposure Aperture Priority (Av) with wide-area metering and with it set to underexpose by -1 EV Exposure Compensation. With the camera at ISO 100 or 200, use either its internal intervalometer (if it has one) or an external intervalometer to take frames once per second. Start the sequence with no filter on the lens a few minutes before totality. Let it run on its own until a few minutes after totality. The result is hundreds of frames you can turn into a time-lapse movie of the lunar shadow approaching and receding, and of the changes in sky colours. Or you can extract single frames at key points to process individually, as I did for the image above from August 2017. The advantage, as with the phone camera movie method, is that the camera, once going, requires no further attention. You can enjoy the eclipse!
Shoot a Telephoto Video. Use a 300mm to 500mm lens on a DSLR or mirrorless camera to shoot a real-time close-up video of the eclipse. Start the video a minute or two before totality with the Sun positioned to the left of frame centre and with a solar filter over the lens. Use a slow ISO, the lens wide open (typically f/4 to f/5.6) and the camera on Auto-Exposure Aperture Priority (Av). Just be careful to focus precisely on the filtered Sun before starting the video. Poor focus is what spoils most eclipse images, not poor exposure. Just before totality (about 30 seconds prior to Second Contact) remove the filter. The auto-exposure will compensate and provide a proper exposure for the rest of totality. Just let the camera run and the Sun drift across the frame from left to right. Just remember to replace the filter, or cap the lens, and stop the video shortly (~30 seconds) after totality and Third Contact. The video will capture the diamond rings and a well-exposed corona. Vary the exposure compensation during totality if you wish, but that involves more work at the camera. Otherwise, you can just let the camera run. But, as I illustrate in my ebook, it’s important to plan and place the Sun correctly to begin with (using a planetarium app to plan the sequence), so it does not drift off the frame or close to the edge.
Shoot Telephoto Close-Up Stills. Use the same type of gear to shoot still images. While you could shoot stills on Auto-Exposure, it’s better to shoot still images over a range of exposures, from very short (~1/1000 second) for the diamond rings and prominences, to long (~1 second) for the outer corona. No one exposure can capture all that the eye can see during totality. This takes more work at the camera, and with the camera on a static tripod you might have to re-centre the Sun during totality, another thing to fuss with and where things can go wrong. Using the camera’s Auto-Bracketing mode can help automate the shooting, allowing the camera to automatically shoot a set of 7 to 9 exposures at say, one-stop increments in quick succession with just one press of the shutter button (by using the self-timer set to 2 seconds).
Shoot with a Telescope on a Tracking Mount. Telescopes (I like 60mm- to 100mm-aperture apochromatic refractors) allow longer focal lengths, though I would advise against shooting with any optics longer than 600mm to 800mm, so the image frames the corona well. Use similar settings as above, but with the telescope (or a telephoto lens) on a tracking mount to turn from east to west at the same rate as the sky moves. That will ensure the Sun stays centred on its own, provided you have at least roughly polar aligned the mount. (Set it to your site’s latitude and aim the polar axis as due north as you can determine from compass apps.)
Those are brief summaries of the methods I recommend, as they are ones I’ve used with success in the past and plan to use on April 8. My ebook contains much more information, and answers to most of the “But what about using ….?” questions. And I provide lots of information on what can go wrong! Some learned the hard way over 16 previous total solar eclipses.
Video Tutorials
For a video tutorial, check out the webinar I conducted as part of the Kalamazoo Astronomical Society’s excellent Eclipse Series here on YouTube. It is about a 1-hour presentation, plus with lots of Q&A at the end.
KAS Eclipse Series — Part 1: Shooting
Of course, once you have all your images, you need to process them. My ebook’s biggest chapter (at 80 pages) is the one on processing still images and time-lapses.
So, a month after I presented the above webinar on Shooting, I was back on-line again for a follow-up webinar on Processing. You can view that KAS Eclipse Series tutorial here on YouTube.
KAS Eclipse Series — Part 2: Processing
I cover processing single wide-angle images, a wide-angle time-lapse series, single-image close-ups, and blending multiple exposure composites.
A month later, I presented a further webinar to the Astronomical League as part of their AL Live series, again on shooting the eclipse, but now with an emphasis on techniques amateur astronomers and astrophotographers with typical telescope gear might use.
You can view the AL Live webinar here. My presentation begins at the 44-minute mark.
AL Live Webinar — Scrub ahead to 44 minutes
I emphasized that the kinds of gear astrophotographers use these days with great success on deep-sky objects might not work well for the eclipse. The specialized cameras, and software used to control them, are just not designed for the demands of a total eclipse, where exposures have to range over a wide array of settings and change very quickly. Images have to be taken and recorded in rapid succession.
I suspect a lot of ambitious and overly-confident astrophotographers will come away from the 2024 eclipse disappointed — and what’s worse, without having seen the eclipse because they were too wrapped up looking at laptop screens trying to get their high-tech gear working.
The Checklist page from my eBook
Practice, Practice, Practice
In these webinars and in my ebook, my common theme is the importance of practicing.
Don’t assume something will work. Practice with the gear you intend to use, on the Sun now (with proper filters) and on the Moon. The crescent Moon, with dim Earthshine lighting the lunar night side, is a great practice target because of its wide range of brightness. And it moves like the Sun will, to check maximum exposure times vs. image blurring from motion.
Practice with your tripod or mount aimed to the altitude and location in the sky where the Sun will be from the site you have chosen. Set a tracking mount to the latitude you will be at to be sure it will aim at and track the Sun without issues. Some telescope mounts stop tracking when they reach due south, exactly where the Sun will be at totality from southern sites. That’s a nasty surprise you do not want to encounter on eclipse day.
All this and much more is covered in my ebook, available for Apple Books and as a PDF for all platforms here from my website at https://www.amazingsky.com/EclipseBook
With the October 14, 2023 annular eclipse of the Sun only weeks or days away, it’s time to test your equipment, to ensure success on eclipse day.
On October 14 everyone in North America, Central America, and much of South America can see an eclipse of the Sun, as shown in the map below, courtesy GreatAmericanEclipse.com. The closer you are to the “path of annularity” drawn in yellow here, the more of the Sun you see covered by the Moon.
Eclipse map showing area of visibility of the October 14 eclipse courtesy GreatAmericanEclipse.com
However, for the best experience, plan to be in the central path of the Moon’s shadow. In North America, as shown in the map below, that path crosses the western states, passing over the scenic landscapes of the American southwest.
Courtesy GreatAmericanEclipse.com
Those in the main path will see an annular eclipse – the Moon will travel across the center of the Sun’s disk, but won’t be large enough to completely cover the Sun. The result, as shown below, is that the Sun will be reduced to a thin ring or “annulus” of light at mid-eclipse, but only for a few minutes.
The May 10, 1994 annular eclipse of the Sun, with a trio of eclipse rigs.
To view or photograph the annular eclipse well, you need to use a long telephoto lens or a telescope. A focal length of 400mm or longer is required to make the Sun’s and Moon’s disks large enough to show detail well.
As I show above, the lens or telescope can be on a solid tripod, or on an untracked alt-azimuth telescope mount, or on a mount that can track the sky, such as the equatorial mount on the right above. All will work fine, as exposures will always be short, just a fraction of a second.
I go into the many options for photographing the eclipse in my ebook, linked to at right. It contains thorough tutorials on how to shoot the eclipses in 2023 and 2024. In this blog I’m focusing on extolling the need to practice now, with whatever gear you own and intend to use for the eclipse.
An array of solar filers, for unaided eyes, lenses and telescopes
No matter what optics you plan to use, they must be equipped with a safe solar filter mounted over the front of the optics. For the October 14 eclipse, even from sites in the path of annularity, a filter must be used at all times. It will never be safe to look at or shoot the Sun without a filter.
And it must be a filter dense enough and designed for the purpose of aiming at the Sun. Do not use stacked neutral density filters or other jury-rigged arrangements, as other filters can transmit ultraviolet or infrared light that can still damage eyes and cameras.
The eyeglass or handheld style of solar filters are good for unaided eye views, and most are made by American Paper Optics or Rainbow Symphony. A list of recommended filter suppliers is available at the American Astronomical Society’s eclipse website at https://eclipse.aas.org/eye-safety. In addition, many astronomy clubs, planetariums and science centers will offer safe eyeglass-style filters they purchased in bulk from one of the suppliers above.
However, for photography through a lens or telescope you need a filter that either screws onto the lens or clamps over the telescope, as I show below.
Comparing different types of telescope filters – the Baader Mylar worked best in this test.
In my testing, I’ve found that the aluminized Mylar® (or polyethylene) type of filter – one that looks like a silvery sheet – provides the best sharpness and contrast, despite the wrinkles. The most popular type is made by Baader Planetarium, and sold by them or by other dealers and resellers.
While metal-coated glass filters also work very well, in recent years they have become hard to find, with past suppliers of glass filters switching to black polymer plastic material. While safe and good for naked-eye views, I’ve found the image through black polymer filters can be soft and surrounded by lots of light scatter when used for photography at long focal lengths.
TESTING, TESTING!
An eclipse rig under test, with dual scopes for shooting and looking
Once properly equipped, test your setup as soon as possible on the Sun. In the rig above I have piggybacked a smaller telescope onto the larger telescope, both with filters, the latter to shoot through while I look through the smaller scope, good for watching the few minutes of annularity.
The key things to test for are:
Finding the Sun (not as easy as you might think!)
Focusing on the Sun (also critical and can be tough – focus on the edge or on sunspots)
Checking for any focus shift over a couple of hours time
Determining the correct exposures with your filter
Checking for any vibration that can blur the image
Operating your camera to change settings, without vibration
Checking to see how long batteries will last
Seeing how much the Sun moves across the frame during a few minutes time
Following the Sun or keeping it centered
Making a checklist of the gear you need on eclipse day, plus any backups such as a spare battery, and tools for last-minute fixes or adjustments.
The filters from Kendrick Astro Instruments have a handy Sun finder attachment.
You want to test how solid your setup is when aimed up. Your super-telephoto lens and tripod that work great for birds and wildlife might not be as well-suited as you thought when aimed high at the Sun. Best to find out now about any shortcomings in your gear.
A series of images with an 80mm refractor and Kendrick Mylar filter shows a range from under to over-exposed.
Run through a set of exposures to see what produces the best result with your optics and filter. Even with the October 14 eclipse underway, the Sun will be a similar brightness as it is on any normal day.
At best, on eclipse day you might wish to shoot a bracketed set of exposures throughout the eclipse, perhaps a frame taken at your pre-determined “best” exposure, and two others: at one stop and two stops overexposed, to account for the slightly dimmer solar disk when it is mostly covered by the Moon in a deep partial or annular phase.
Alter exposures by changing shutter speeds, not aperture or ISO. Keep the ISO speed low, and the aperture either wide open or at some middle setting such as f/5.6 for the sharpest images.
But also check what exposures might be needed when shooting the Sun through thin clouds. Any cloud or haze will require longer exposures. And you might need to change shutter speeds quickly if the Sun goes into and out of clouds. Practice that – without introducing vibration from handling the camera.
Leave the rig for a couple of hours to test how the focus might shift, as it is certain to do, as the temperature changes through the morning or afternoon. Practice touching up the focus. People fuss over the “best” exposure, when it is poor focus that is the common spoiler of eclipse photos.
You can find more tips for practicing for eclipse close-ups at a blog I wrote for AstronomyByNight.ca.
WIDE-FIELD OPTIONS
May 10, 1994 annular eclipse in a series of multiple exposures every 10 minutes.
An alternative way to shoot the eclipse is with a wide-angle lens, but also equipped with a solar filter, as shown above. Frame the scene to include the expected path of the Sun, determined by using planetarium software such as SkySafari or Stellarium (my ebook also has charts). Take images every minute or so, then layer those onto an unfiltered image of the sky and foreground taken either before the Sun enters the frame or after it leaves it.
A test set for a composite image.
Practice that method now, to shoot images for a test composition as I show above. It layers filtered images taken at 5-minute intervals onto an unfiltered background sky image taken after the Sun left the frame.
However, composite images can be complex to plan and execute.
The partial solar eclipse of October 23, 2014 as seen from Jasper, Alberta, at a public event in Centennial Park as part of the annual Dark Sky Festival. This is a single-exposure image showing the scene near mid-eclipse with telescopes from volunteers from the Royal Astronomical Society of Canada, and the mostly clear skies above with the crescent Sun visible through the handheld polymer solar filter.
A simpler method for grabbing a souvenir eclipse photo is to simply hold a handheld solar filter in front of the lens to dim the Sun but leave the rest of the scene visible.
Again, you can practice that now to see what exposure might be best. For this type of shot I find black polymer filters best as they are less reflective than the Mylar type.
That method, or using a long lens or telescope will work well on eclipse day no matter where you are, either in the path or elsewhere enjoying the partial eclipse, as in the example image below, also from October 23, 2014, shot with my small scope at lower left in the image above.
The partial eclipse of the Sun, October 23, 2014, as seen from Jasper, Alberta, shot under clear skies through a Mylar filter, on the front of a 66mm f/6 apo refractor.
No matter the method and gear you use, success on eclipse day will require practicing beforehand to learn what can go wrong, and what works best for the setup you plan to use. Never assume something will work!
Clear skies on October 14! The annular eclipse that day will serve as a great dress rehearsal for the big eclipse to come – the total eclipse of the Sun on April 8, 2024. That’s the event you really want to get right!
On the night of November 18/19 eclipse fans across North America can enjoy the sight of the Moon turning deep red. Here’s how to capture the scene.
Seeing and shooting this eclipse will demand staying up late or getting up very early. That’s the price to pay for an eclipse everyone on the continent can see.
Also, this is not a total eclipse of the Moon. But it’s the next best thing, a 97% partial eclipse – almost total! So the main attraction — a red Moon — will still be front and centre.
CLICK ON AN IMAGE to bring it up full screen for closer inspection.
NOT QUITE TOTAL
At mid-eclipse 97% of the disk of the Full Moon will be within Earth’s dark umbral shadow, and should appear a bright red colour to the eye and even more so to the camera. A sliver of the southern edge of the Moon will remain outside the umbra and will appear bright white, like a southern polar cap on the Moon.
While some references will say the eclipse begins at 1:01 am EST, that’s when the Moon first enters the outer lighter penumbral shadow. Nothing unusual can be seen at that point, as the darkening of the Moon’s disk by the penumbra is so slight, you won’t notice any difference over the normally bright Full Moon.
The extent of the umbra and penumbra at the October 2004 total lunar eclipse.
It isn’t until the Moon begins to enter the umbra that you can see a dark bite being taken out of the edge of the Moon.
WHAT TO SEE
At mid-eclipse the Full Moon will look deep red or perhaps bright orange — the colours can vary from eclipse to eclipse, depending on the clarity of the Earth’s atmosphere through which the sunlight is passing to light the Moon. The red is the colour of all the sunsets and sunrises going on around the Earth during the eclipse.
The total lunar eclipse of August 2007. At the November 18 eclipse the bottom edge of the Moon, as it did here, will be bright, but brighter than it appears here.
The unique aspect of this eclipse is that for the 15 to 30 minutes around mid-eclipse we might see some unusual colour gradations at the edge of the umbral shadow, from sunlight passing through Earth’s upper atmosphere and ozone layer. This can tint the shadow edge blue or even green.
The last lunar eclipse six months ago on the morning of May 26, 2021 (see my blog here) was visible during its total phase only from western North America, and then only just. However, this eclipse can be seen from coast to coast.
Only from the very easternmost points in North America does the Moon set with the eclipse in progress, but during the inconsequential penumbral phase. All of the umbral phase is visible from the Eastern Seaboard, though the last stages will be in progress with the Moon low in the west in the pre-dawn hours. But that positioning can make for photogenic sight.
The start, middle and end times of the umbral eclipse for Eastern and Pacific time zones. The background image is a simulation of the path of the November 18/19, 2021 eclipse when the Moon travels through the southern part of the umbra.
WHEN IS THE ECLIPSE?
The show really begins when the Moon begins to enter the umbra at 2:18 am EST (1:18 am CST, 12:18 am MST, 11:18 pm PST).
But note,these times are for the night of November 18/19. If you go out on the evening of November 19 expecting to see the eclipse, you’ll be sadly disappointed as you will have missed it. It’s the night before!
The eclipse effectively ends at 5:47 am EST (4:47 am CST, 3:47 am MST, 2:47 am PST) when the Moon leaves the umbra. That makes the eclipse 3 1/2 hours long, though the most photogenic part will be for the 15 to 30 minutes centred on mid-eclipse at 4:03 am EST (3:03 am CST, 2:03 am MST, 1:03 am PST).
The sky at mid-eclipse from my home on Alberta, Canada (51° N)
WHERE WILL THE MOON BE?
The post-midnight timing places the Moon at mid-eclipse high in the south to southwest for most of North America, just west (right) of the winter Milky Way and below the distinctive Pleiades star cluster.
The view from the West Coast.
The high altitude of the Moon (some 60º to 70º above the horizon) puts it well above haze and murk low in the sky, but makes it a challenge to capture in a frame that includes the landscape below for an eclipse nightscape.
ASTRONOMY 101: The high altitude of the Moon is a function of both the eclipse timing in the middle of the night and its place on the ecliptic. The Full Moon is always 180° away from the Sun. So it sits where the Sun was six months earlier, in this case back in May, when the high Sun was bringing us warmer and longer days. Winter lunar eclipses are always high; summer lunar eclipses are always low, the opposite of what the Sun does.
The view from the East Coast.
From eastern North America the Moon appears lower in the west at mid-eclipse, making it easier to frame above a landscape. For example from Boston the Moon is 30º up, lending itself to nightscape scenes.
However, the sky will still be dark. To make use of the darkness to capture scenes which include the Milky Way, I suggest making the effort to travel away from urban light pollution to a dark sky site. That applies to all locations. Yes, that means a very long night!
PHOTO OPTIONS 1 — CAMERA ON A FIXED TRIPOD
With just a camera on a tripod, if you are on the East Coast (I show Boston here) it will be possible to frame the eclipsed Moon above a landscape with a 24mm lens (assuming a full frame camera; a cropped frame camera will require a 16mm lens).
Framing the scene from the East Coast.
What exposure will be best will depend on the level of local light pollution at your site. But from a dark site, 30 seconds at ISO 1600 and f/2.8 should work well. But without tracking, you will see some star trailing at 30 seconds. Also try shorter exposures at a higher ISO.
There’s lots of time, so take lots of shots. Include some short shots of just the Moon to blend in later, as the exposures best for picking up the Milky Way will still overexpose the Moon, even when it is darkest at mid-eclipse.
Framing the scene from the West.
From western North America, including the landscape below will require wide lenses and a vertical format, with the Moon appearing quite small. But from a photogenic site, it might be worth the effort.
Total eclipse of the Moon, December 20/21, 2010, taken from home with 15mm lens at f/3.2 and Canon 5D MkII at ISO 1600 for 1 minute single exposure, toward the end of totality.
Total eclipse of the Moon, December 20/21, 2010, taken from home with Canon 5D MKII and 24mm lens at f2.8 for stack of 4 x 2 minutes at ISO 800. Taken during totality..
However, as my images above from the December 2010 eclipse show, if there’s any haze, the Moon could turn into a reddish blob.
You might be tempted to shoot with a long telephoto lens, but unless the camera is on a tracker, as below, the result will likely be a blurry mess. The sky moves enough during the long (over 1 second) exposures needed to pick up the reddened portion of the Moon that the image will smear when shot with long focal lengths. The solution is to use a sky tracker.
PHOTO OPTIONS 2 — CAMERA ON A TRACKER
Placing the camera on a motorized tracker that has been polar aligned to follow the motion of the stars opens up many more possibilities.
Camera on a Star Adventurer tracker showing the field of a 24mm lens.
From a dark site, make use of the Moon’s position near the Milky Way to frame it and Orion and his fellow winter constellations. A 24mm lens will do the job nicely, in exposures up to 2 to 4 minutes long. But take short ones for just the Moon to layer in later.
Showing the field of a 50mm lens.
A 50mm lens (again assuming a full frame camera) frames the Moon with the Pleiades and Hyades star clusters in Taurus.
Showing the field of an 85mm lens,
Switching to an 85mm lens frames the clusters more tightly and makes the Moon’s disk a little larger. For me, this is the best shot to go for at this eclipse, as it tells the story of the eclipse and its unique position near the two star clusters.
Showing the field of 200mm and 250mm lenses.
But going with a longer lens allows framing the red eclipsed Moon below the blue Pleiades cluster, a fine colour contrast. A 200mm lens will do the job nicely (or a 135mm on a cropped frame camera).
Or, as I show here, the popular William Optics RedCat with its 250mm focal length will also work well. But such a lens must be on a polar-aligned tracker to get sharp shots. Use the Sidereal rate drive speed to ensure the sharpest stars over the 1 to 4 minutes needed to record lots of stars.
Typical settings for tracker images, with an image of the January 2019 eclipse.
Take lots of exposures over a range of settings — long to bring out the deep sky detail and shorter to preserve detail in the reddened lunar disk. These can be layered and blended later in Photoshop, or in the layer-based image editing program of your choice, such as Affinity Photo or ON1 Photo RAW.
PHOTO OPTIONS 3 — THROUGH A TELESCOPE
While I think the tracked wide-field options are some of the best for this eclipse, many photographers will want frame-filling close-ups of the red Moon. While a telescope will do the job, unless it has motors to track the sky, your options are limited.
Phone on a simple Dobsonian reflector.
A phone clamped to the eyepiece of a telescope can capture the shrinking bright part of the eclipsed Moon as the Moon enters more deeply into the umbra. Exposures for the bright part of the Moon are short enough a motor drive on the telescope is not essential.
But if you haven’t shot the Moon with this gear before, eclipse night is not the time to learn. Practice on the Moon before the eclipse.
DSLR on a beginner refractor telescope showing the adapter.
For shooting with a DSLR camera through a telescope you’ll need a special camera adapter nosepiece and T-ring for your camera. Again, if you don’t have the gear and the experience doing this, I would suggest not making the attempt at two in the morning on eclipse night!
DSLR on a beginner reflector with an often necessary Barlow lens.
For example, owners of typical beginner reflectors are often surprised to find their cameras won’t even reach focus on their telescope. Many are simply not designed for photography. Adding a Barlow lens is required for the camera to reach focus, though without a drive, exposures will be limited to short (under 1/15s) shots of the bright part of the Moon.
An exposure composite of short and long exposures.
The challenge with this and all lunar eclipses is that the Moon presents a huge range of brightness. Short snapshots can capture the bright part of the Moon not in the umbra, but the dark umbral-shaded portion requires much longer exposures, usually over one second.
Your eye can see the whole scene (as depicted above) but the camera cannot, not in one exposure. This example is a “high dynamic range” blend of several exposures.
A series of the September 27, 2015 total lunar eclipse to demonstrate an exposure sequence from partial to total phase.
Plus as the eclipse progresses, longer and longer exposures are needed to capture the sequence as the Moon is engulfed by more of the umbra.
After mid-eclipse, the exposures must get progressively shorter again in reverse order. So attempting to capture an entire sequence requires a lot of exposure adjustments.
TIP: Bracket a lot! Take lots of frames at each burst of images shot every minute, or however often you wish to capture the progress of the eclipse for a final set. Unlike total solar eclipses, lunar eclipses provide lots of time to take lots of images.
PHOTO OPTIONS 4 — THROUGH A TRACKING TELESCOPE
If you want close-ups of the eclipsed red Moon, you will need to use a mount equipped with a tracking motor, such as an equatorial mount shown here. But for use with telephoto lenses and short telescopes, a polar-aligned sky tracker, as above, will work.
A small apo refractor on an equatorial mount with typical settings for mid-eclipse.
Exposures can now be several seconds long, and at a lower ISO speed for less noise, allowing the Moon to be captured in sharp detail and with great colour. Long exposures will even pick up stars near the Moon.
However, when shooting close-ups, use the Lunar drive rate (if your mount offers that choice) to follow the Moon itself, as it has a motion of its own against the background stars. It’s that orbital motion that takes it from west to east (right to left) through the Earth’s shadow.
The fields of view and size of the Moon’s disk with typical telescope focal lengths.
Filling the camera frame with the Moon requires a surprising amount of focal length. The Moon appears big to our eyes, but is only 1/2º across.
Even with 800mm of focal length, the Moon fills only a third of a full frame camera field. Using a cropped frame camera has the advantage of tightening the field of view, but it still takes 1200mm to 1500mm of focal length to fill the frame.
But I wouldn’t worry about doing so, as longer focal lengths typically also come with slower f-ratios, requiring longer exposure times or higher ISOs, both of which can blur detail.
A camera on an alt-azimuth GoTo Schmidt-Cassegrain.
For close-ups, a polar-aligned equatorial mount is best. But if your telescope is a GoTo telescope on an alt-azimuth mount (such as a Schmidt-Cassegrain shown here), you should be able to get good shots.
The field of view will slowly rotate during the eclipse, making it more difficult to later accurately assemble a series of shots documenting the entire sequence.
But any one shot should be fine, though it might be best to keep exposures shorter by using a higher ISO speed. As always, take lots of shots at different settings.
You won’t be able to tell which is sharpest until you inspect them later at the computer.
TIP: People worry about exposures, but the flaw that ruins many eclipse shots is poor focus. Use Live View to focus carefully on the sharp edge of the bright part of the Moon. Or better yet, focus on a bright star nearby. Zoom up to 10x to make it easier to see when the star is in sharpest focus. It can be a good idea to refocus through the night as the changing temperature can shift the focus point of long lenses and telescopes. That might take moving the scope over to a bright star, which won’t be possible if you need to preserve the framing for a composite.
PHOTO OPTIONS 5 — HDR COMPOSITES
Using an equatorial mount tracking at the lunar rate keeps the Moon stationary. This opens up the possibility of taking a series of shots over the wide range of exposures needed to capture the Moon from bright to dark, to assemble later in processing. Take 5 to 7 shots in quick succession.
An HDR composite from the December 2010 eclipse.
High dynamic range software can blend the images, or use luminosity masks created by extension panels for Photoshop such as Lumenzia, TK8 or Raya Pro. Either technique can create a final image that looks like what your eye saw. The key is making sure all the images are aligned. HDR software likely won’t align them for you very well.
The January 2019 eclipse layered and blended in Photoshop.
Blending multiple exposures will also be needed to properly capture the eclipsed Moon below the Pleiades, similar to what I show here (and below) from the January 2019 eclipse when the Moon appeared near the Beehive star cluster.
PHOTO OPTIONS 6 — ECLIPSE TRACK COMPOSITES
Another popular form of eclipse image (though also one rife for laughably inaccurate fakes) is capturing the entire path of the Moon across the sky over the duration of the eclipse from start to end.
The track of the September 2015 eclipse, accurately assembled to correct scale.
It can be done with a fixed camera on a tripod but requires a wide (14mm to 20mm) and properly framed lens, to capture the sequence as it actually appeared to proper scale, and not created by just pasting over-sized moons onto a sky to “simulate” the scene, usually badly. By the end of the day on November 19 the internet will be filled with such ugly fakes.
You could set the camera at one exposure setting (one best for when the Moon and sky are darkest at mid-eclipse) and let the camera run, shooting frames every 5 seconds or so. The result might work well as a time-lapse sequence, showing the bright sky darkening, then brightening again.
But chances are the frames taken at the start and end when the sky is lit by full moonlight will be blown out. It will still take some manual camera adjustments through the eclipse.
For a still-image composite, you should instead expose properly for the Moon’s disk at all times, a setting that will change every few minutes, then take a long exposure at mid-eclipse to pick up the stars and Milky Way. The short Moon shots are then blended into the base-layer sky image later in processing.
Framing the eclipse path for the start of the sequence. Framing the path so the Moon ends up at a desired location on the frame.
If the camera has been well-framed and was not moved over the 3.5 hours of the eclipse, the result is an accurate and authentic record of the Moon’s path and passage into the shadow, and not a faked atrocity!
But creating a real image requires a lot of work at the camera, and at the computer.
TIP: Shooting for composites is not work I would recommend attempting while also running other cameras. Focus on one type of image and get it right, rather than trying to do too many and doing them all poorly.
PHOTO OPTION 7 — ECLIPSE SHADOW COMPOSITE
One of the most striking types of lunar eclipse images is a close-up composite showing the Moon passing through the Earth’s umbral shadow, with the arc of the shadow edge on the Moon defining the extent of the shadow, which is about three times larger than the Moon.
Such a composite can be re-created later by placing individual exposures accurately on a wider canvas, using screen shots from planetarium software as a template guide.
A composite of the Moon moving through the umbra.
But to create an image that is more accurate, it is possible to do it “in camera.” Unlike in the film days, we don’t have to do it with multiple exposures onto one piece of film.
We take lots of separate frames with a telescope or lens wide enough to contain the entire path of the Moon through the umbra. A polar-aligned equatorial mount tracking at the sidereal rate is essential. That way the scope follows the stars, not the Moon, and so the Moon travels across the frame from right to left.
Framing for a shadow composite.
Start such a sequence with the Moon at lower right if you are framing just the path through the shadow. Use planetarium software (I used Starry Night™ to create the star charts for this blog) to plan the framing for your camera, lens and site, so the Moon ends up in the middle of the frame at mid-eclipse. This is not a technique for the faint of heart!
A shadow-defining composite from January 2019, with the Moon near the Beehive cluster.
An interesting variation would be using a 200mm to 250mm lens to frame the Moon’s shadow passage below the Pleiades, to create an image as above. That will be unique. Again, an accurately aligned tracker turning at the sidereal rate will be essential.
Acquiring the frames for any composite takes constantly adjusting the exposure during the length of eclipse, which can try your patience and gear during the wee hours of the morning.
I’ll be happy just to get a good set of images at mid-eclipse to make a single composite of the red Moon below the Pleiades.
TIP: It could be cold and lenses can frost over. A battery-powered heater coil on the optics might be essential. And spare warm batteries.
The 4-day-old waxing crescent Moon on April 8, 2019 in a blend of 7 exposures from 1/30 second to 2 seconds, blended with luminosity masks in Photoshop.
PRACTICE!
To test your equipment and your skills at focusing, you can use the waning crescent Moon in the dawn hours on the mornings of October 29 to November 2 or, after New Moon on November 4, the waxing crescent Moon on the evenings of November 6 to 10. While the crescent Moon isn’t as bright as the Full Moon, it will be a good stand in for the bright part of the eclipsed Moon when it is deep in the umbra.
Even better, the dark part of the crescent Moon lit by Earthshine is a good stand-in for the part of the Moon in the umbra. Like the eclipsed Moon, the crescent Moon’s bright and dark parts can’t be captured in one exposure. So it’s a good test for the range of exposures you’ll need for the eclipse, for practising changing settings on your camera, and for checking your tracking system.
The crescent Moon is also useful to test your manual focusing, though the sharp detail along the terminator (the line dividing the bright crescent from the earthlit dark part of the Moon) is much easier to focus on than the flat, low contrast Full Moon.
A selfie of me looking up at the total eclipse of the Moon on January 20, 2019, using binoculars to enjoy the view.
DON’T FORGET TO LOOK!
Amid all the effort needed to shoot this or any eclipse, lunar or solar, don’t forget to just look at it. No photo can ever quite capture the glowing nature of the eclipsed Moon set against the stars.
A selfie of the successful eclipse chaser bagging his trophy, the total lunar eclipse of January 20, 2019.
I wish you clear skies and good luck with your lunar eclipse photography. If you miss it, we have two more visible from North America next year, both total eclipses, on May 15/16 and November 8, 2022.
On December 21 we have a chance to see and shoot a celestial event that no one has seen since the year 1226.
As Jupiter and Saturn each orbit the Sun, Jupiter catches up to slower moving Saturn and passes it every 20 years. For a few days the two giant planets appear close together in our sky. The last time this happened was in 2000, but with the planets too close to the Sun to see.
Back on February 18, 1961 the two planets appeared within 14 arc minutes or 0.23° (degrees) of each other low in the dawn sky.
But on December 21 they will pass each other only 6 arc minutes apart. To find a conjunction that close and visible in a darkened sky you have to go all the way back to March 5, 1226 when Jupiter passed only 3 arc minutes above Saturn at dawn. Thus the media headlines of a “Christmas Star” no one has seen for 800 years!
Photographing the conjunction will be a challenge precisely because the planets will be so close to each other. Here are several methods I can suggest, in order of increasing complexity and demands for specialized gear.
Easy — Shooting Nightscapes with Wide Lenses
This shows the field of view of various lenses on full-frame cameras (red outlines) and a 200mm lens with 1.4x tele-extender on a cropped frame camera (blue outline). The date is December 17 when the waxing crescent Moon also appears near the planet pair for a bonus element in a nightscape image.
Conjunctions of planets in the dusk or dawn twilight are usually easy to capture. Use a wide-angle (24mm) to short telephoto (85mm) lens to frame the scene and exposures of no more than a few seconds at ISO 200 to 400 with the lens at f/2.8 to f/4.
The sky and horizon might be bright enough to allow a camera’s autoexposure and autofocus systems to work.
Indeed, in the evenings leading up to and following the closest approach date of December 21 that’s a good method to use. Capture the planet pair over a scenic landscape or urban skyline to place them in context.
For most locations the planets will appear no higher than about 15° to 20° above the southwestern horizon as it gets dark enough to see and shoot them, at about 5 p.m. local time. A 50mm lens on a full-frame camera (or a 35mm lens on a cropped frame camera) will frame the scene well.
This was Jupiter and Saturn on December 3, 2020 from the Elbow Falls area on the Elbow River in the Kananaskis Country southwest of Calgary. This is a blend of 4 untracked images for the dark ground, stacked to smooth noise, for 30 seconds each, and one untracked image for the bright sky for 15 seconds to preserve colours and highlights, all with the 24mm Sigma lens and Canon EOS Ra at ISO 200.
NIGHTSCAPE TIP — Use planetarium software such as Stellarium (free), SkySafari, or StarryNight (what I used here) to simulate the framing with your lens and camera. Use that software to determine where the planets will be in azimuth, then use a photo planning app such as PhotoPills or The Photographer’s Ephemeris to plan where to be to place the planets over the scene you want at that azimuth (they’ll be at about 220° to 230° — in the southwest — for northern latitude sites).
This was Jupiter and Saturn on December 10, 2020 from Red Deer River valley, north of Drumheller, Alberta. This is a blend of 4 images for the dark ground, stacked to smooth noise, for 20 seconds each at f/5.6, and a single image for the sky for 5 seconds at f/2.8, all with the 35mm Canon lens and Canon EOS Ra at ISO 400. All untracked.
Harder — Shooting With Longer Lenses
The planet pair will sink lower and closer to the horizon, to set about 7:00 to 7:30 p.m. local time each night.
As the sky darkens and the planet altitude decreases you can switch to ever-longer lenses to zoom in on the scene and still frame the planets above a carefully-chosen horizon, assuming you have very clear skies free of haze and cloud.
For example, by 6 p.m. they will be low enough to allow a 135mm telephoto to frame the planets and still have the horizon in the frame. Using a longer lens has the benefit or resolving the two planets better, showing them as two distinct objects, which will become more of a challenge the closer you are to December 21.
On December 21 wide-angle and even short telephoto lenses will likely show the two planets as an unresolved point of light, no brighter than Jupiter on its own.
On closest approach day the planets will be so close that using a wide-angle or even a normal lens might only show them as an unresolved blob of light. You’ll need more focal length to split the planets well into two objects.
However, using longer focal lengths introduces a challenge — the motion of the sky will cause the planets to trail during long exposures, turning them from points into streaks. That trailing will get more noticeable more quickly the longer the lens you use.
A rule-of-thumb says the longest exposure you can employ before trailing becomes apparent is 500 / the focal length of the lens. So for a 200mm lens, maximum exposure is 500 / 200 = 2.5 seconds.
To be conservative, a “300 Rule” might be better, restricting exposures with a 200mm telephoto to 300 / 200 = 1.5 seconds. Now, 1.5 seconds might be long enough for the scene, especially if you use a fast lens wide open at f/2.8 or f/2 and a faster ISO such as 400 or 800.
This shows the motion of Jupiter relative to Saturn from December 17 to 25, with the outer frame representing the field of view of a 200mm lens and 1.4x tele-extender on a cropped frame camera. The smaller frame shows the field of a telescope with an effective focal length of 1,200mm.
TELEPHOTO TIP — Be sure to focus carefully using Live View to manually focus on a magnified image of the planets. And refocus through an evening of shooting. While people fuss about getting the one “correct” exposure, it is poor focus that ruins more astrophotos.
Even More Demanding — Tracking Longer Lenses
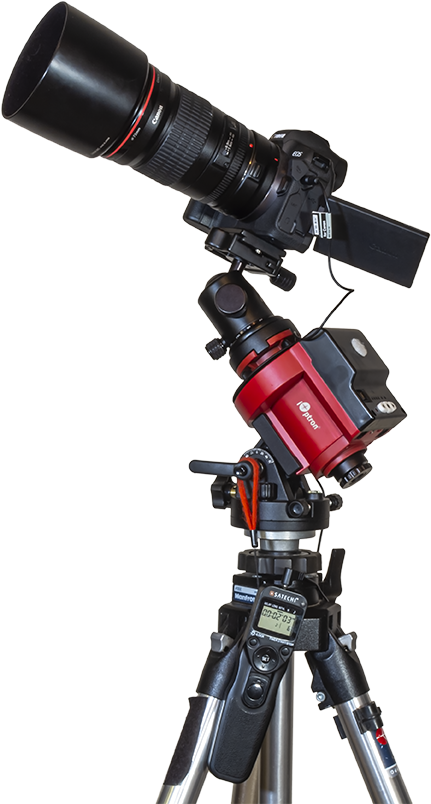
This one popular sky tracker, the iOptron SkyGuider Pro, here with a telephoto lens. It and other trackers such as the Sky-Watcher Star Adventurer seen in the opening image, can be used with lenses and telescopes up to about 300mm focal length, if they are balanced well. Even longer lenses might work for the short exposures needed for the planets, but vibration and wind can blur images.
However, longer exposures might be needed later in the evening when the sky is darker, to set the planets into a starry background. After December 17 we will have a waxing Moon in the evening sky to light the sky and foreground, so the sky will not be dark, even from a rural site.
Even so, to ensure untrailed images with long telephotos — and certainly with telescopes — you will need to employ a sky tracker, a device to automatically turn the camera to follow the sky. If you don’t have one, it’s probably too late to get one and learn how to use it! But if you have one, here’s a great opportunity to put it to use.
Polar align it (you’ll have to wait for it to get dark enough to see the North Star) and then use it to take telephoto close-up images of the planets with exposure times that can now be as long as you like, though they likely won’t need to be more than 10 to 20 seconds.
You can now also use a slower ISO speed for less noise.
TRACKER TIP — Use a telephoto to frame just the planets, or include some foreground content such as a hilltop, if it can be made to fit in the frame. Keep in mind that the foreground will now blur from the tracking, which might not be an issue. If it is, take exposures of the foreground with the tracker motor off, to blend in later in processing.
The Most Difficult Method — Using a Telescope
An alt-azimuth mounted GoTo scope like this Celestron SE6 can work for short exposures of the planets, provided it is aligned and is tracking properly. Good focus will be critical.
Capturing the rare sight of the planets as two distinct disks (not just dots of light) accompanied by their moons, all together in the same frame, is possible anytime between now and the end of the year.
But … resolving the disks of the planets takes focal length — a lot of focal length! And that means using a telescope on a mount that can track the stars.
While a sky tracker might work, they are not designed to handle long and heavy lenses and telescopes. You’d need a telescope on a solid mount, though it could be a “GoTo” telescope on an alt-azimuth mount. Such a mount, while normally not suited for long-exposure deep-sky imaging, will be fine for the short exposures needed for the planets.
You will need to attach your camera to the telescope using a camera adapter, so the scope becomes the lens. If you have never done this, to shoot closeups of the Moon for example, and don’t have the right adapters and T-rings, then this isn’t the time to learn how to do it.
A simulation of the view with a 1,200mm focal length telescope on December 21. Even with such a focal length the planet disks still appear small.
TELESCOPE TIP — As an alternative, it might be possible to shoot the planets using a phone camera clamped to the low-power eyepiece of a telescope, but focusing and setting the exposure can be tough. It might not be worth the fuss in the brief time you have in twilight, perhaps on the one clear night you get! Just use your telescope to look and enjoy the view!
But if you have experience shooting the Moon through your telescope with your DSLR or mirrorless camera, then you should be all set, as the gear and techniques to shoot the planets are the same.
This is the setup I might use for a portable rig best for a last-minute chase to clear skies. It’s a Sky-Watcher EQM-35 mount with a 105mm apo refractor (the long-discontinued Astro-Physics Traveler), and here with a 2x Barlow to double the effective focal length to 1,200mm.
However, once again the challenge is just how close the planets are going to get to each other. Even a telescope with a focal length of 1200mm (typical for a small scope) still gives a field of view 1° wide using a cropped frame camera. That’s 60 arc minutes, ten times the 6 arc minute separation of Jupiter and Saturn on December 21!
TELESCOPE TIP — Use a 2x or 3x Barlow lens if needed to increase the effective focal length of the scope. Beware that introducing a Barlow into the light path usually requires racking the focus out and/or adding extension tubes to reach focus. Test your configuration as soon as possible to make sure you can focus it.
TELESCOPE TIP — With such long focal lengths shoot lots of exposures. Some will be sharper than others.
TELESCOPE TIP — But be sure to focus precisely, and refocus over the hour or so you might be shooting, as changing temperatures will shift the focus. You can’t fix bad focus!
Jupiter and Saturn in the same telescope field on December 5, 2020. Some of the moons are visible in this exposure taken in twilight before the planets got too low in the southwest. This is a single exposure with a 130mm Astro-Physics apo refractor at f/6 (so 780mm focal length) for 4 seconds at ISO 200 with the Canon 6D MkII. The disks of the planets are overexposed to bring out the moons.
Short exposures under one second might be needed to keep the planet disks from overexposing. Capturing the moons of Jupiter (it has four bright moons) and Saturn (it has two, Titan and Rhea, that are bright) will require exposures of several seconds. Going even longer will pick up background stars.
Or … with DSLRs and mirrorless cameras, try shooting HD or 4K movies. They will likely demand a high and noisy ISO, but might capture the view more like you saw and remember it.
FINAL TIP — Whatever combination of gear you decide to use, test it! Don’t wait until December 21 to see if it works, nor ask me if I think such-and-such a mount, telescope or technique will work. Test for yourself to find out.
Jupiter and Saturn taken in the deep twilight on December 3, 2020 from the Allen Bill flats area on the Elbow River in the Kananaskis Country southwest of Calgary, Alberta. This is a blend of 4 untracked images for the dark ground, stacked to smooth noise, for 2 minutes each at ISO 400, and two tracked images for the sky (and untrailed stars) for 30 seconds each at ISO 400, all with the 35mm Canon lens at f/2.8 and Canon EOS Ra. The tracker was the Sky-Watcher Star Adventurer 2i.
Don’t Fret or Compete. Enjoy!
The finest images will come from experienced planetary imagers using high-frame-rate video cameras to shoot movies, from which software extracts and stacks the sharpest frames. Again, if you have no experience with doing that (I don’t!), this is not the time to learn!
And even the pros will have a tough time getting sharp images due to the planets’ low altitude, even from the southern hemisphere, where some pro imagers have big telescopes at their disposal, to get images no one else in the world can compete with!
In short, use the gear you have and techniques you know to capture this unique event as best you can. And if stuff fails, just enjoy the view!
Jupiter and Saturn taken December 3, 2020 from the Allen Bill flats area on the Elbow River in the Kananaskis Country southwest of Calgary, Alberta. This is a blend of 4 untracked images for the dark ground, stacked to smooth noise, for 2 minutes each at ISO 400, and two tracked images for the sky for 30 seconds at ISO 1600, all with the 35mm Canon lens at f/2.8 and Canon EOS Ra. The tracker was the Sky-Watcher Star Adventurer 2i.
If you miss closest approach day due to cloud, don’t worry.
Even when shooting with telephoto lenses the photo ops will be better in the week leading up to and following December 21, when the greater separation of the planets will make it easier to capture a dramatic image of the strikingly close pairing of planets over an Earthly scene.
The annual Geminid meteor shower peaks under ideal conditions this year, providing a great photo opportunity.
The Geminids is the best meteor shower of the year, under ideal conditions capable of producing rates of 80 to 120 meteors an hour, higher than the more widely observed Perseids in August. And this year conditions are ideal!
The Perseids get better PR because they occur in summer. For most northern observers the Geminids demand greater dedication and warm clothing to withstand the cool, if not bitterly cold night.
A Good Year for Geminids
While the Geminids occur every year, many years are beset by a bright Moon or poor timing. This year conditions couldn’t be better:
• The shower peaks on the night of December 13-14 right at New Moon, so there’s no interference from moonlight at any time on peak night.
• The shower peaks in the early evening of December 13 for North America, about 8 p.m. EST (5 p.m. PST). This produces a richer shower than if it peaked in the daytime hours, as it can in some years.
The two factors make this the best year for the Geminids since 2017 when I shot all the images here.
A composite of the 2017 Geminid meteor shower looking east to the radiant point. This is a stack of 40 images, each a 30-second exposure at f/2.5 with the Rokinon 14mm SP lens and Canon 6D MkII at ISO 6400. The images are the 40 frames with meteors out of 357 taken over 3.25 hours. The ground is a stack of 8 images, mean combined to smooth noise. The background base-image sky is from one exposure. The camera was on a fixed tripod, not tracking the sky. I rotated and moved each image in relation to the base image and around Polaris at upper left, in order to place each meteor at approximately the correct position in relation to the background stars, to preserve the effect of the meteors streaking from the radiant near Castor at centre.
What Settings to Use?
To capture the Geminids, as is true of any meteor shower, you need:
A good DSLR or mirrorless camera set to ISO 1600 to 6400.
A fast, wide-angle lens (14mm to 24mm) set to f/2.8 or wider, perhaps f/2. Slow f/4 to f/.6 kit zooms are not very suitable.
Exposures of 30 to 60 seconds each.
An intervalometer to fire the shutter automatically with no more than 1 second between exposures. As soon as one exposure ends and the shutter closes, the next exposure begins.
Take hundreds of images over as long a time period as you can on peak night.
Use an intervalometer to control the shutter speed, with the camera on Bulb. Set the interval to one second to minimize the time the shutter is closed.
Out of hundreds of images, a dozen or more should contain a meteor! You increase your chances by using:
A high ISO, so the meteor records in the brief second or two it appears.
A wide aperture, to again increase the light-gathering ability of the lens for those fainter meteors.
A wide-angle lens so you capture as much area of sky as possible.
Running two or more cameras aimed at different spots, perhaps to the east and south to maximize sky coverage.
A minimum interval between exposures. Increase the interval to more than a second and you know it’s during that “dark time” when the shutter is closed that the brightest meteor of the night will occur. Keep the shutter open as much as possible.
This sky chart looking east for December 13, 2020 shows the position of the radiant and the constellation of Gemini at about 7 p.m. local time. Orion is just rising in the east.
When to Shoot?
The radiant point of the shower meteors in Gemini rises in the early evening, so you might see some long, slow Earth-grazing meteors early in the night, streaking out of the east.
For Europe the peak of the shower occurs in the middle of the night of December 13/14.
For North America, despite the peak occurring in the early evening hours, meteors will be visible all night and will likely be best after your local midnight.
So wherever you are, start shooting as the night begins and keep shooting for as long as you and your camera can withstand the cold!
A single bright meteor from the Geminid meteor shower of December 2017, dropping toward the horizon in Ursa Major. Gemini itself and the radiant of the shower is at top centre. It is one frame from a 700-frame sequence for stacking and time-lapses. The ground is a mean stack of 8 frames to smooth noise. Exposures were 30 seconds at ISO 6400 with the Rokinon 14mm lens at f/2.5 and Canon 6D MkII.
Where to Go?
To take advantage of the moonless night, get away from urban light pollution to as dark a sky as you can. Preferably, put the major urban skyglow to the west or north.
While from brightly lit locations the very brightest meteors will show up, they are the rarest, so you’d be fortunate to capture one in a night of shooting from a city or town.
From a dark site, you can use longer exposures, wider apertures and higher ISOs to boost your chances of capturing more and fainter meteors. Plus the Milky Way will show up.
The Geminid meteor shower of December 13, 2017 in a view framing the winter Milky Way from Auriga (at top) to Puppis (at bottom) with Gemini itself, the radiant of the shower at left, and Orion at right. The view is looking southeast. This is a composite stack of one base image with the brightest meteor, then 20 other images layered in each with a meteor. The camera was not tracking the sky, so I rotated and moved each of the layered-in frames so that their stars mroe or less aligned with the base layer. The images for this composite were taken over 107 minutes, with 22 images containing meteors picked from 196 images in total over that time. Each exposure was 30 seconds with the Rokinon 14mm SP lens at f/2.5 and Canon 6D MkII at ISO 6400.
Where to Aim?
You can aim a camera any direction, even to the west.
But aiming east to frame the constellation of Gemini (marked by the twin stars Castor and Pollux) will include the radiant point, perhaps capturing the effect of meteors streaking away from that point, especially if you stack multiple images into one composite, as most of my images here are.
The Star Adventurer star tracker, on its optional equatorial wedge to aid precise polar alignment of its motorized rotation axis.
Using a Tracker
Using a star tracker such as the Sky-Watcher Star Adventurer shown here, makes it possible to obtain images with stars that remain untrailed even in 1- or 2-minute exposures. The sky remains framed the same through hours of shooting, making it much easier to align and stack the images for a multi-meteor composite.
A tracked composite showing the 2017 Geminid meteors streaking from the radiant point in Gemini at upper left. This is a stack of 43 exposures, each 1-minute with the 24mm Canon lens at f/2.5 and filter-modified Canon 5D MkII camera at ISO 6400, set fast to pick up the fainter meteors. These were 43 exposures with meteors (some with 2 or 3 per frame) out of 455 taken over 5 hours. The background sky comes from just one of the exposures. All the other frames are masked to show just the meteor.
However, a tracker requires accurate polar alignment of its rotation axis (check its instruction manual to learn how to do this) or else the images will gradually shift out of alignment through a long shoot. Using Photoshop’s Auto-Align feature or specialized stacking programs can bring frames back into registration. But good polar alignment is still necessary.
If you aim east you can frame a tracked set so the first images include the ground. The camera frame will move away from the ground as it tracks the rising sky.
A composite of the 2017 Geminid meteor shower, from the peak night of December 13, with the radiant in Gemini, at top, high overhead. So meteors appear to be raining down to the horizon. This was certainly the visual impression. This is a stack of 24 images, some with 2 or 3 meteors per frame, each a 30-second exposure at f/2.5 with the Rokinon 14mm SP lens and Canon 6D MkII at ISO 6400. The images are the 24 frames with meteors out of 171 taken over 94 minutes. The ground is a stack of 8 images, mean combined to smooth noise. The background base-image sky is from one exposure. The camera was on a fixed tripod, not tracking the sky.
Using a Tripod and Untracked Camera
The simpler method for shooting is to just use a camera (or two!) on a fixed tripod, and keep exposures under about 30 seconds to minimize star trailing. That might mean using a higher ISO than with tracked images, especially with slower lenses.
The work comes in post-processing, as stacking untracked images will produce a result with meteors streaking in many different orientation and locations, ruining the effect of meteors bursting from a single radiant.
To make it easier to stack untracked images, try to include Polaris in the field of the wide-angle lens, perhaps in the upper left corner. The sky rotates around Polaris, so it will form the easy-to-identify point around which you can manually rotate images in editing to bring them back into at least rough alignment.
Covering the steps to composite tracked and untracked meteor shower images is beyond the purview of this blog.
The images shown here were layered, masked and blended with those steps and are used as examples in the book’s tutorials.
A trio of Geminid meteors over the Chiricahua Mountains in southeast Arizona, with Orion and the winter stars setting. I shot this at the end of the night of December 13/14, 2017 with the rising waxing crescent Moon providing some ground illumination. This is a stack of one image for the ground and two fainter meteors, and another image with the bright meteor. The camera was on a Star Adventurer Mini tracker so the stars are not trailed, though the ground will be slightly blurred. All were 30-second exposures at f/2.8 with the 24mm Canon lens and filter-modified Canon 5D MkII at ISO 5000.
Keeping Warm
Keeping yourself warm is important. But your camera is going to get cold. It should work fine but its battery will die sooner than it would on a warm night. Check it every hour, and have spare, warm batteries ready to swap in when needed.
Lenses can frost up. The only way to prevent this is with low-voltage heater coils, such as the DewDestroyer from David Lane. It works very well. Other types are available on Amazon.
A bright comet is a once-a-decade opportunity to capture some unique nightscapes. Here are my suggested tips and FAQs for getting your souvenir shot.
My guide to capturing Comet NEOWISE assumes you’ve done little, if any, nightscape photography up to now. Even for those who have some experience shooting landscape scenes by night, the comet does pose new challenges — for one, it moves from night to night and requires good planning to get it over a scenic landmark.
So here are my tips and techniques, in answers to the most frequently asked questions I get and that I see on social media posts.
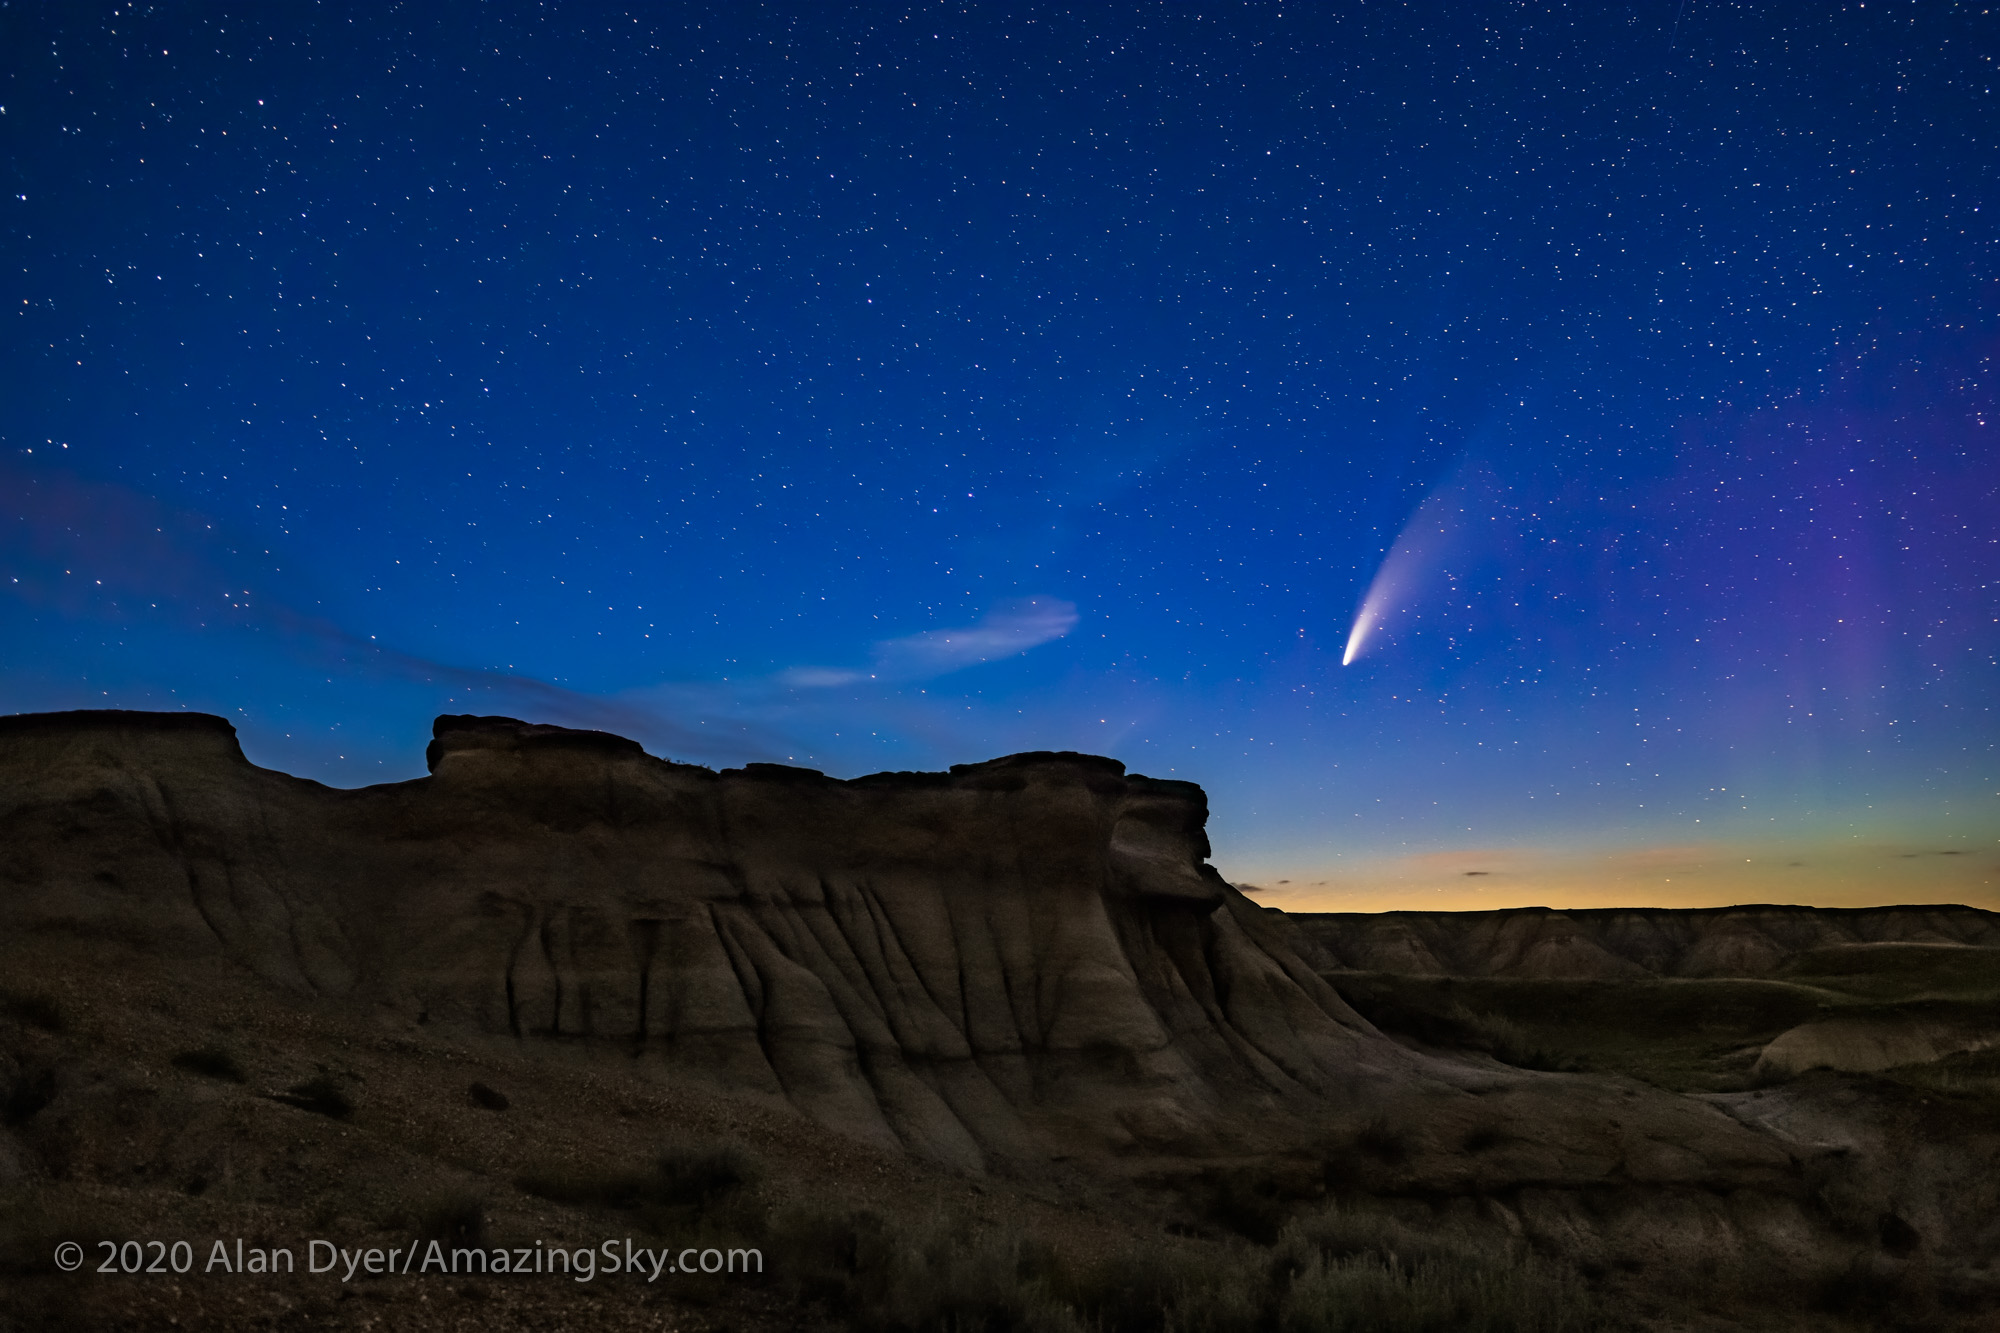
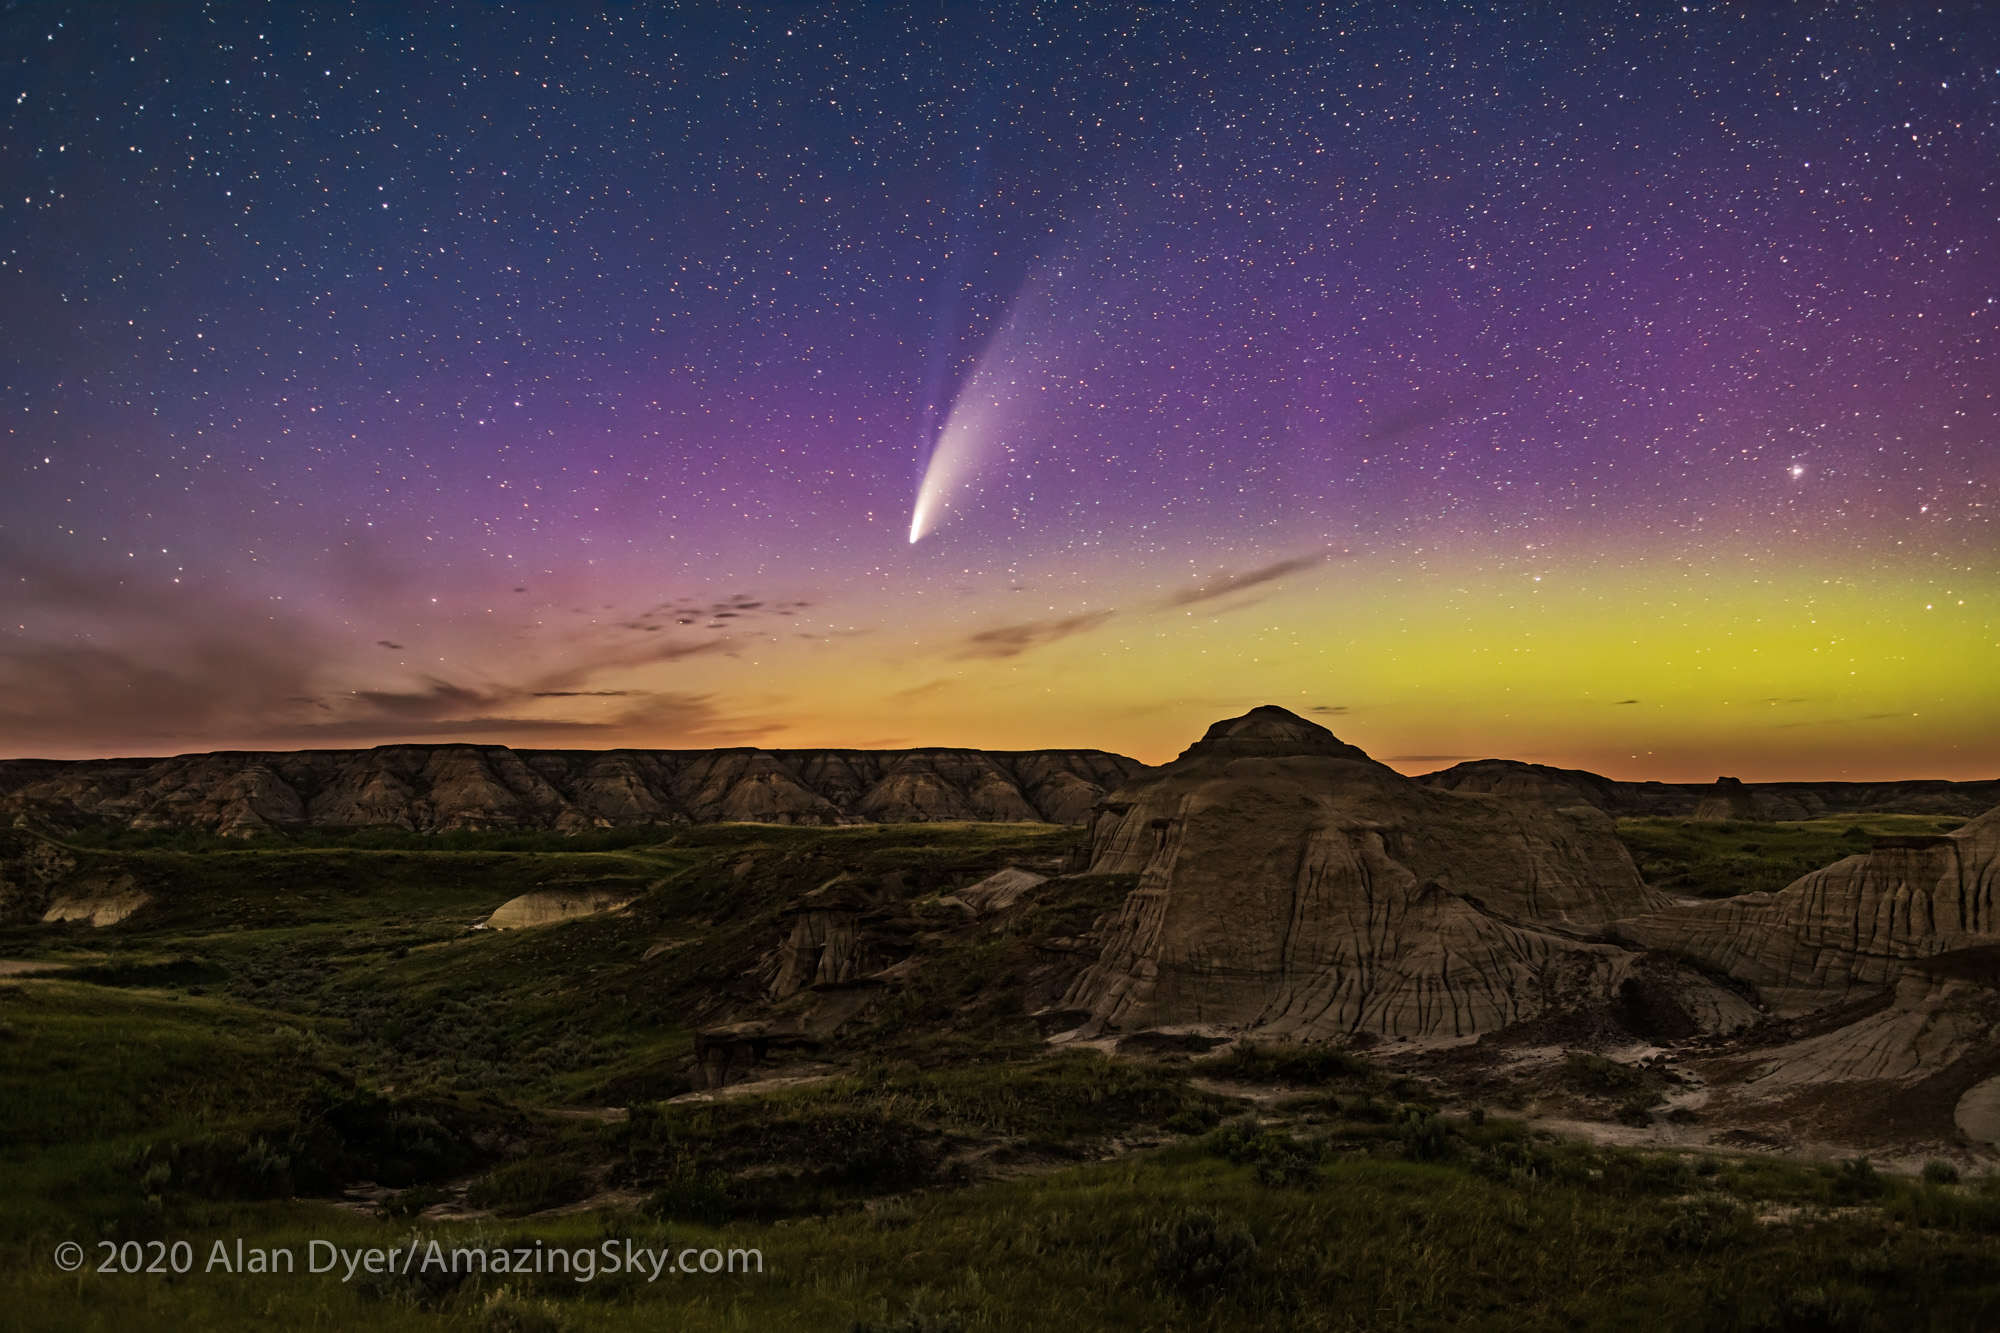
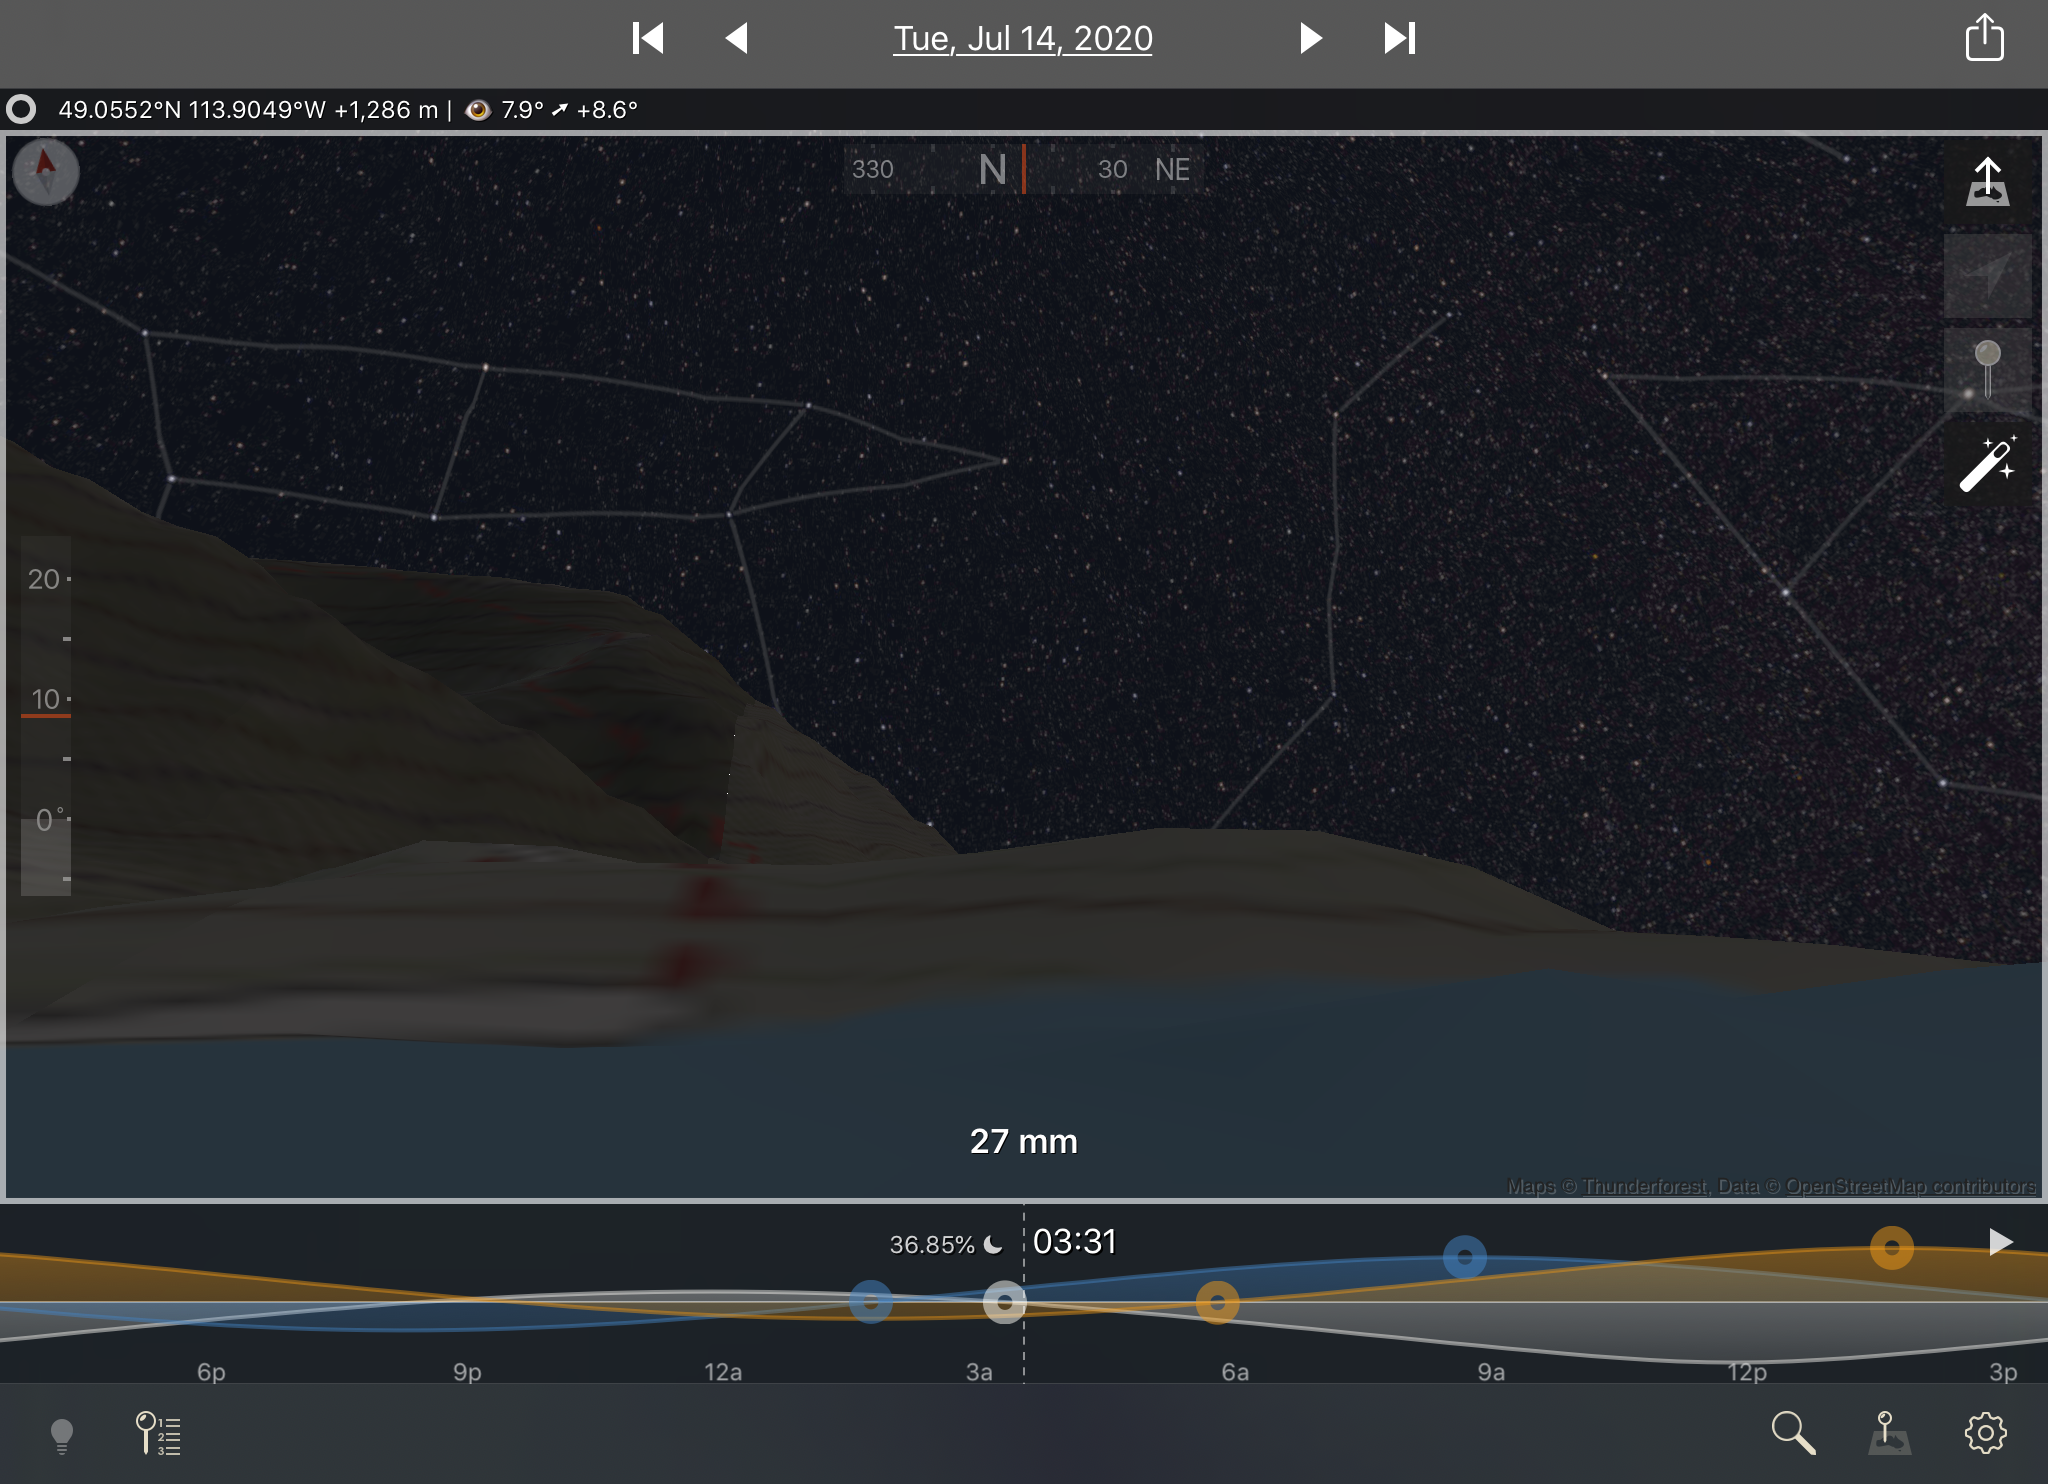
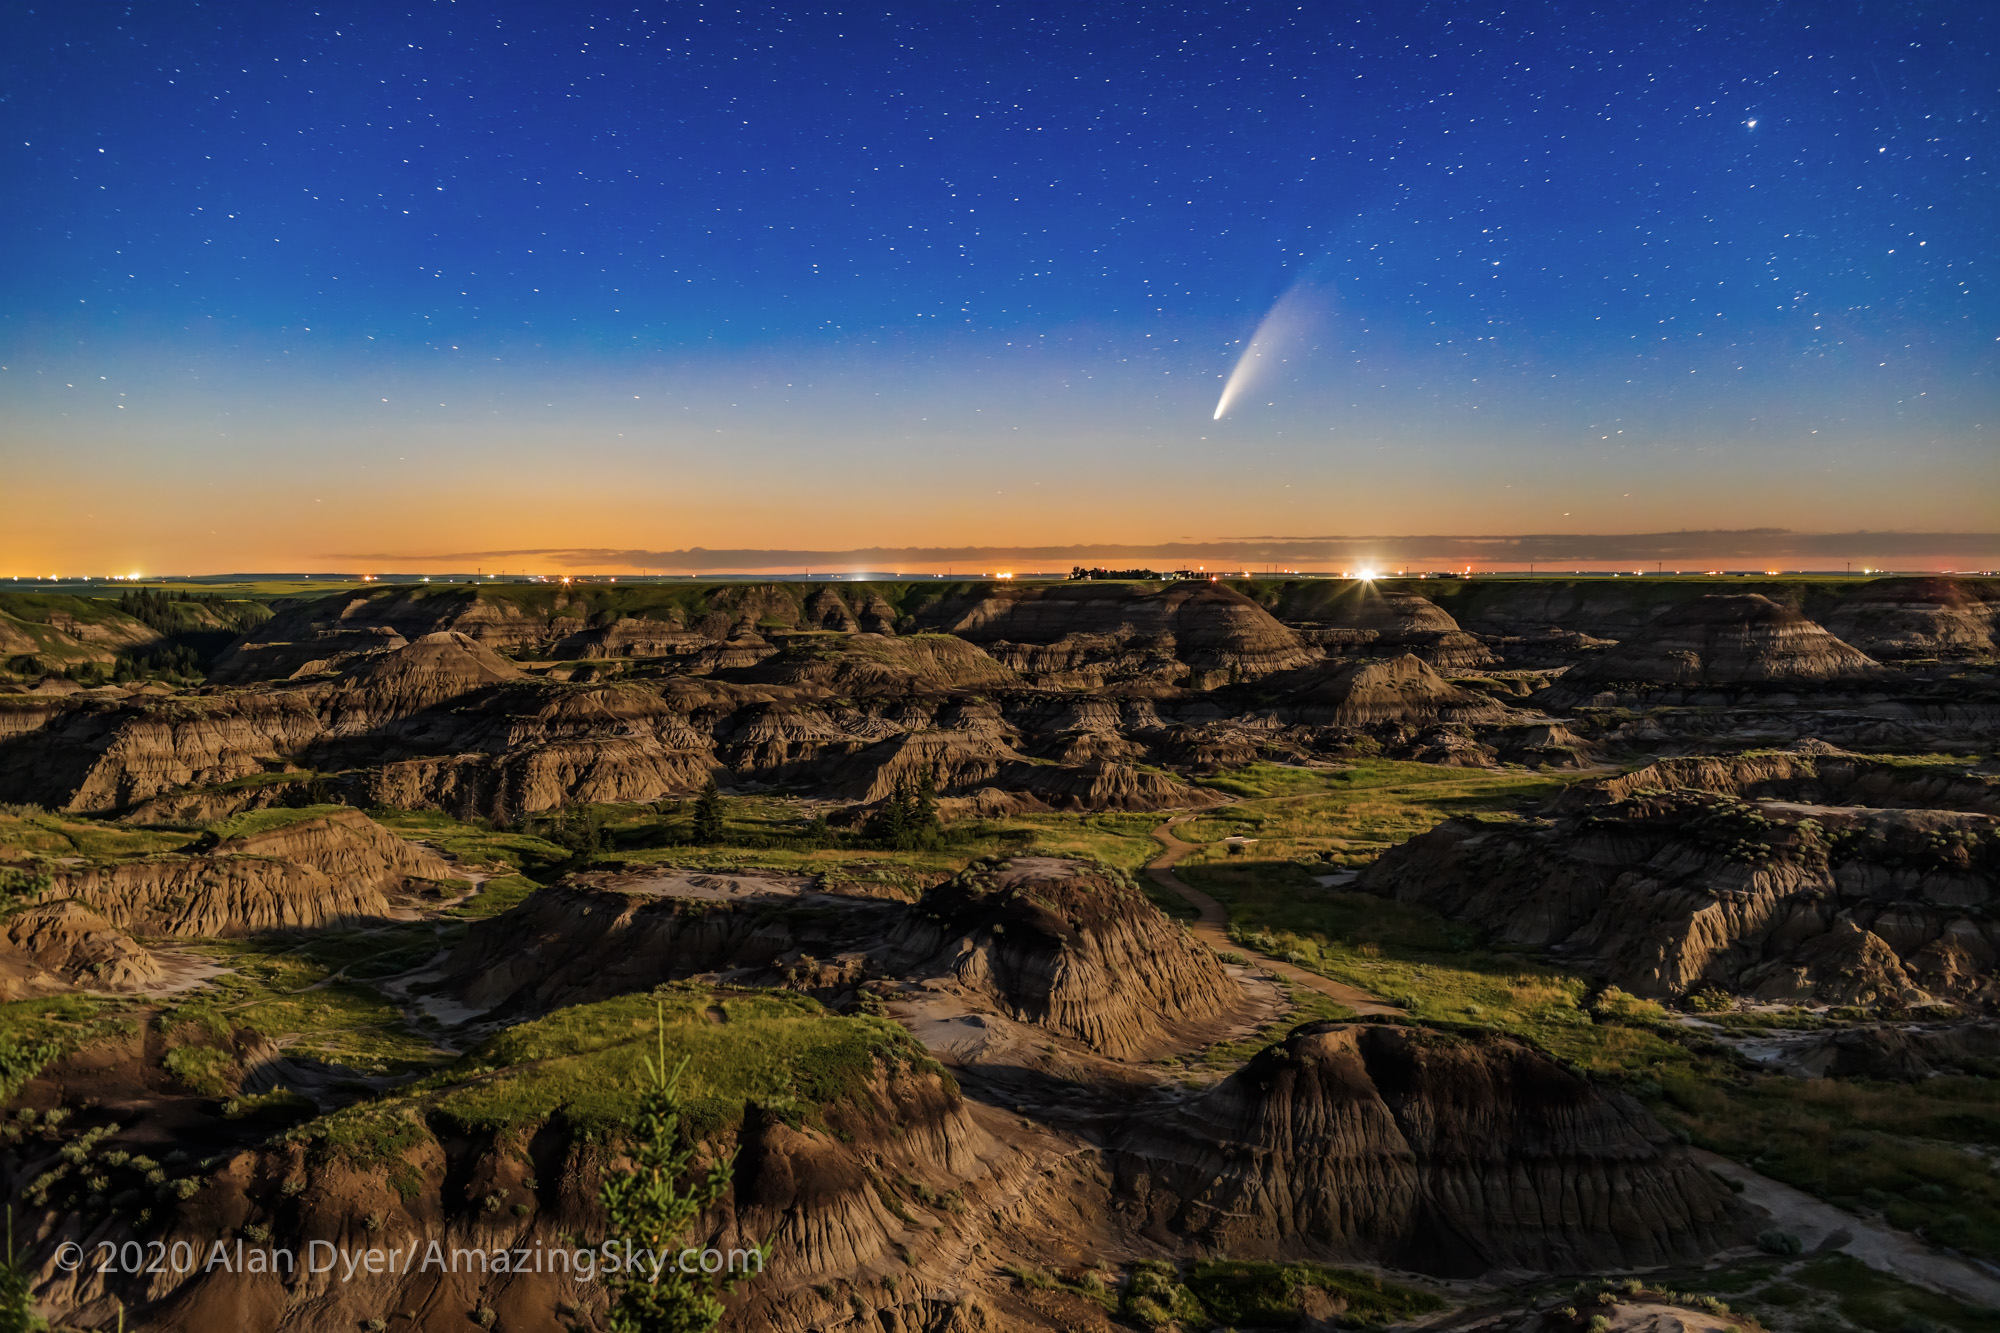
Comet NEOWISE (C/2020 F3) over the eroded hoodoo formations at Dinosaur Provincial Park, Alberta, July 14-15, 2020. A faint aurora is at right. The foreground is lit by starlight only; there was no light painting employed here. This is a stack of 12 exposures for the ground to smooth noise, blended with a single untracked exposure of the sky, all at 20 seconds at f/2.8 and ISO 1600, all with the 35mm Canon lens and Canon 6D MkII camera.
How Long Will the Comet be Visible?
The comet is not going to suddenly whoosh away or disappear. It is in our northern hemisphere sky and fairly well placed for shooting and watching all summer.
But … it is now getting fainter each night so the best time to shoot it is now! Or as soon as clouds allow on your next clear night.
As of this writing on July 18 it is still bright enough to be easily visible to the unaided eye from a dark site. How long this will be the case is unknown.
But after July 23 and its closest approach to Earth the comet will be receding from us and that alone will cause it to dim. Later this summer it will require binoculars to see, but might still be a good photogenic target, but smaller and dimmer than it was in mid-July.
This chart shows the position of Comet NEOWISE at nightly intervals through the rest of the summer. However, the rest of July are the prime nights left for catching the comet at its best. Click or tap on the image to download a full-res copy.
When is the Best Time to Shoot?
The comet has moved far enough west that it is now primarily an evening object. So look as soon as it gets dark each night.
Until later in July it is still far enough north to be “circumpolar” for northern latitudes (above 50° N) and so visible all night and into the dawn.
But eventually the comet will be setting into the northwest even as seen from northern latitudes and only visible in the evening sky. Indeed, by the end of July the comet will have moved far enough south that observers in the southern hemisphere anxious to see the comet will get their first looks.
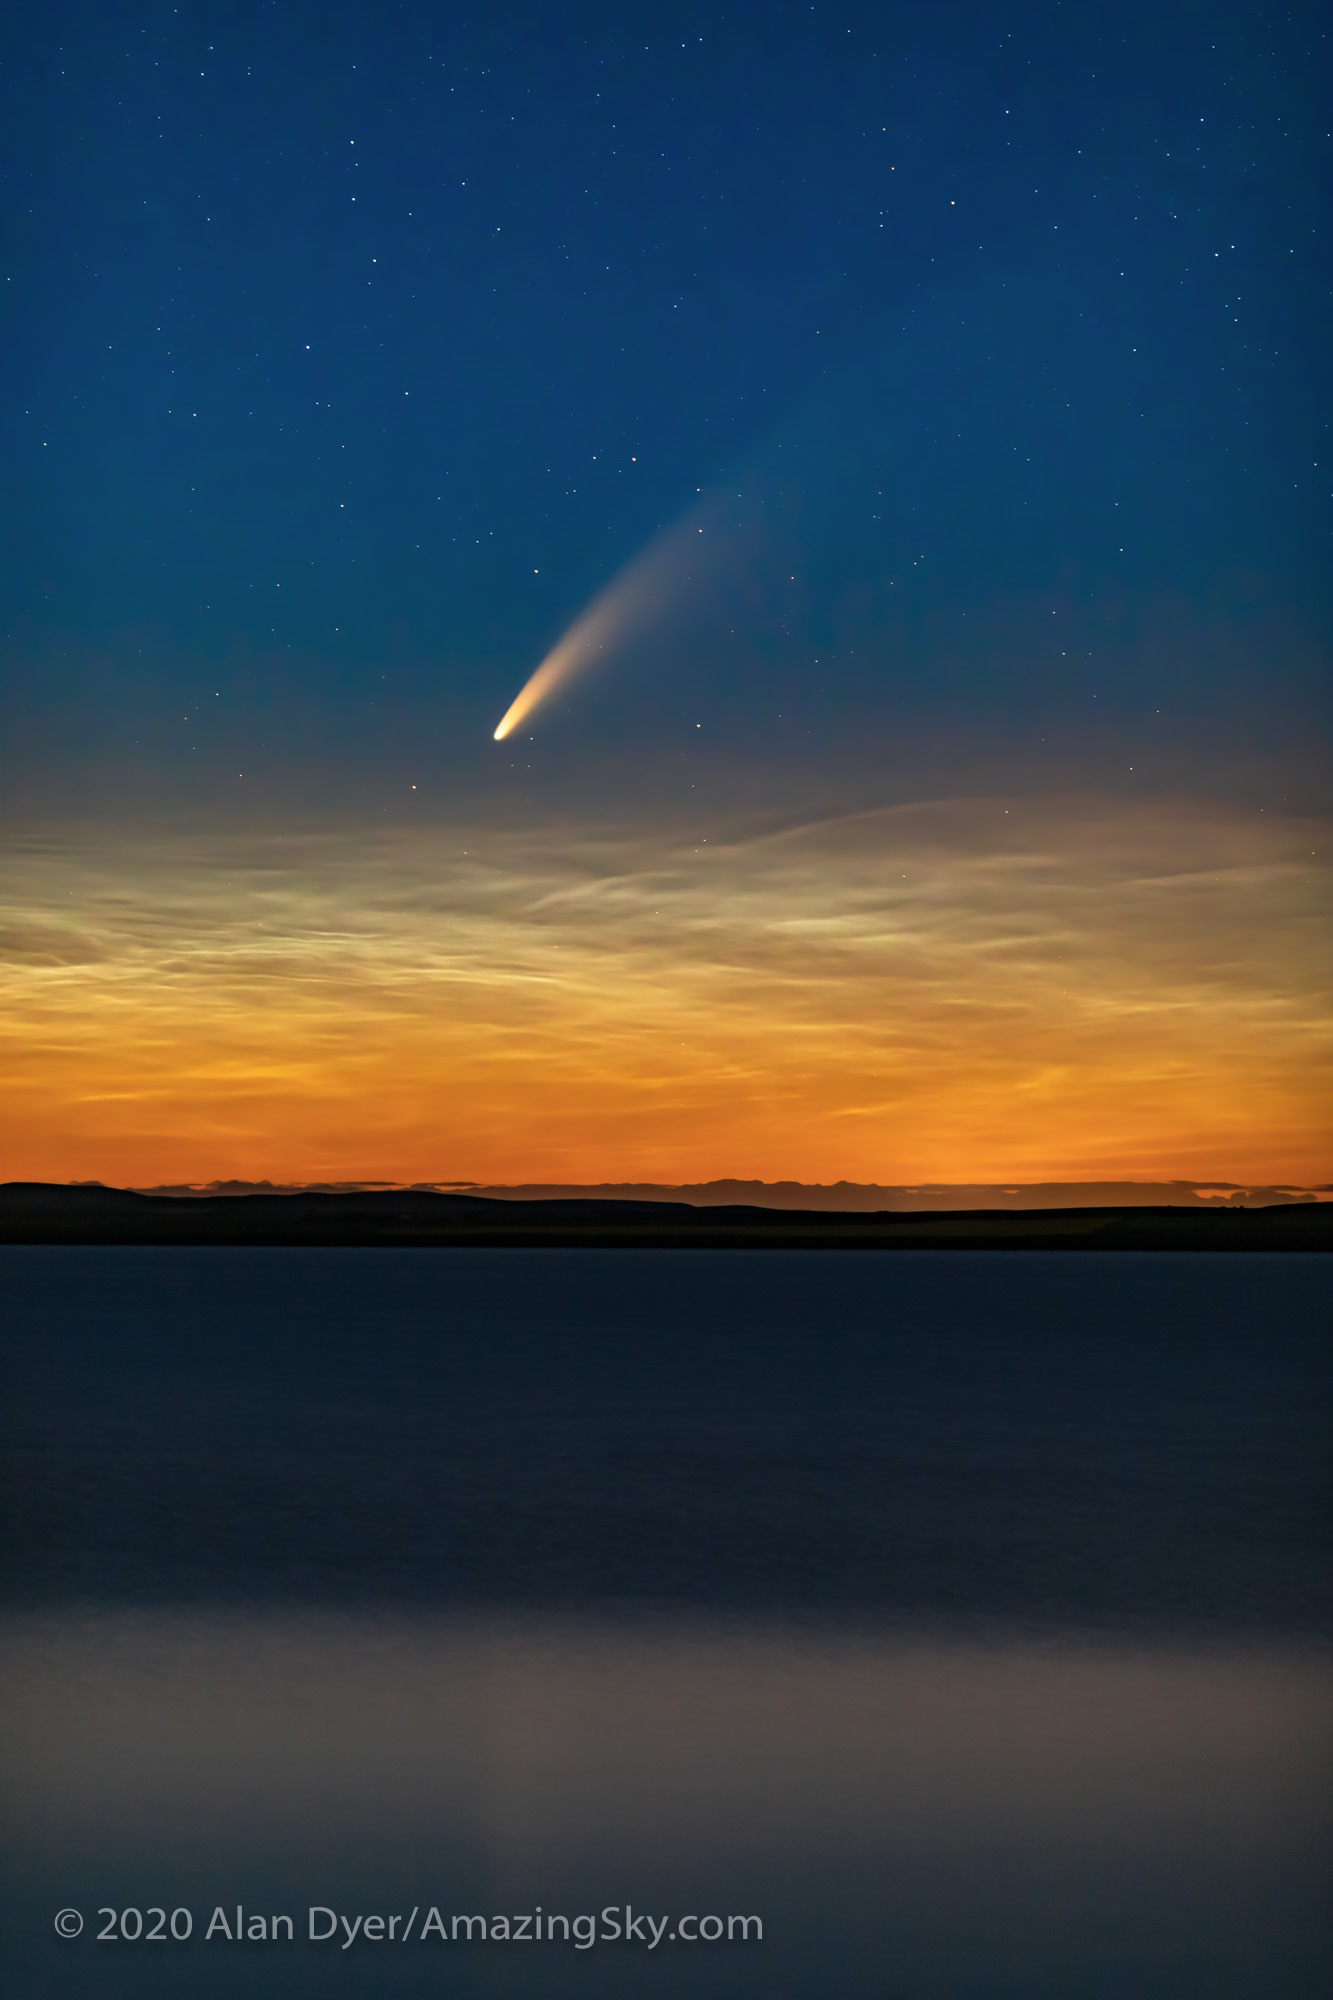
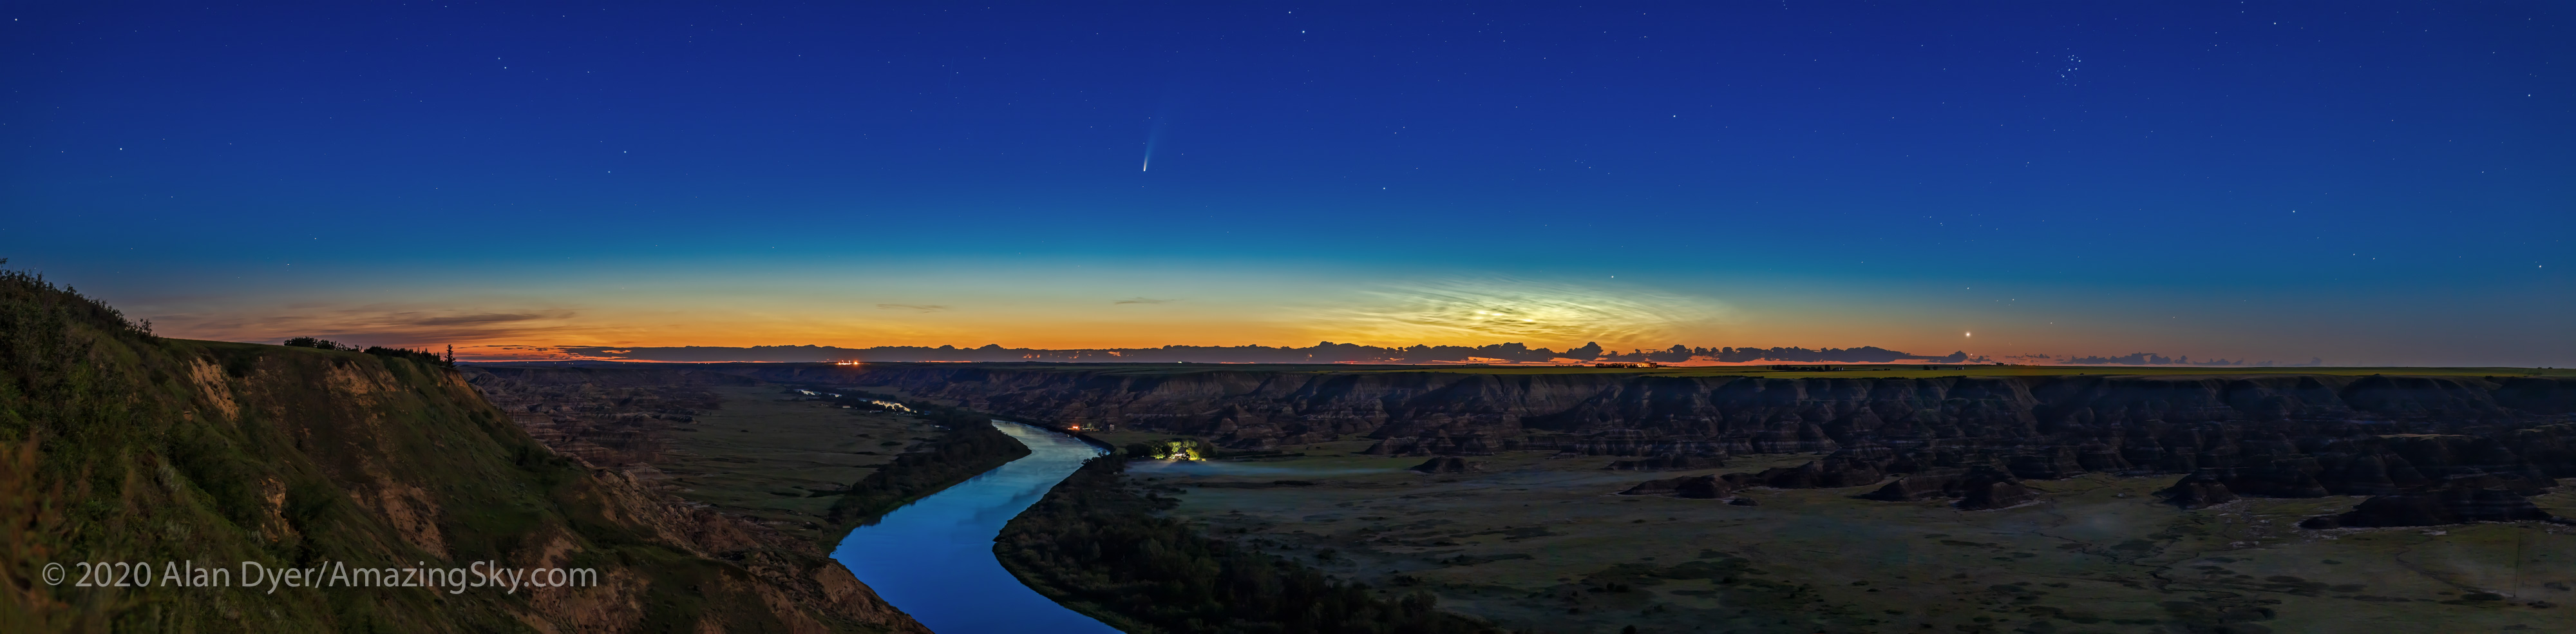
Comet NEOWISE (C/2020 F3) over the Red Deer River from Orkney Viewpoint north of Drumheller, Alberta, on the morning of July 11, 2020. The sky is brightening with dawn twilight and a small display of noctilucent clouds is on the horizon at right. This is a two-segment vertical panorama with the 35mm Canon lens at f/2.8 and Canon 6D MkII at ISO 200 for 13 seconds each. Stitched with Adobe Camera Raw.
Where Do I Look?
In July look northwest below the Big Dipper. By August the comet is low in the west below the bright star Arcturus. By then it will be moving much less from night to night. The chart above shows the comet at nightly intervals; you can see how its nightly motion slows as it recedes from us and from the Sun.
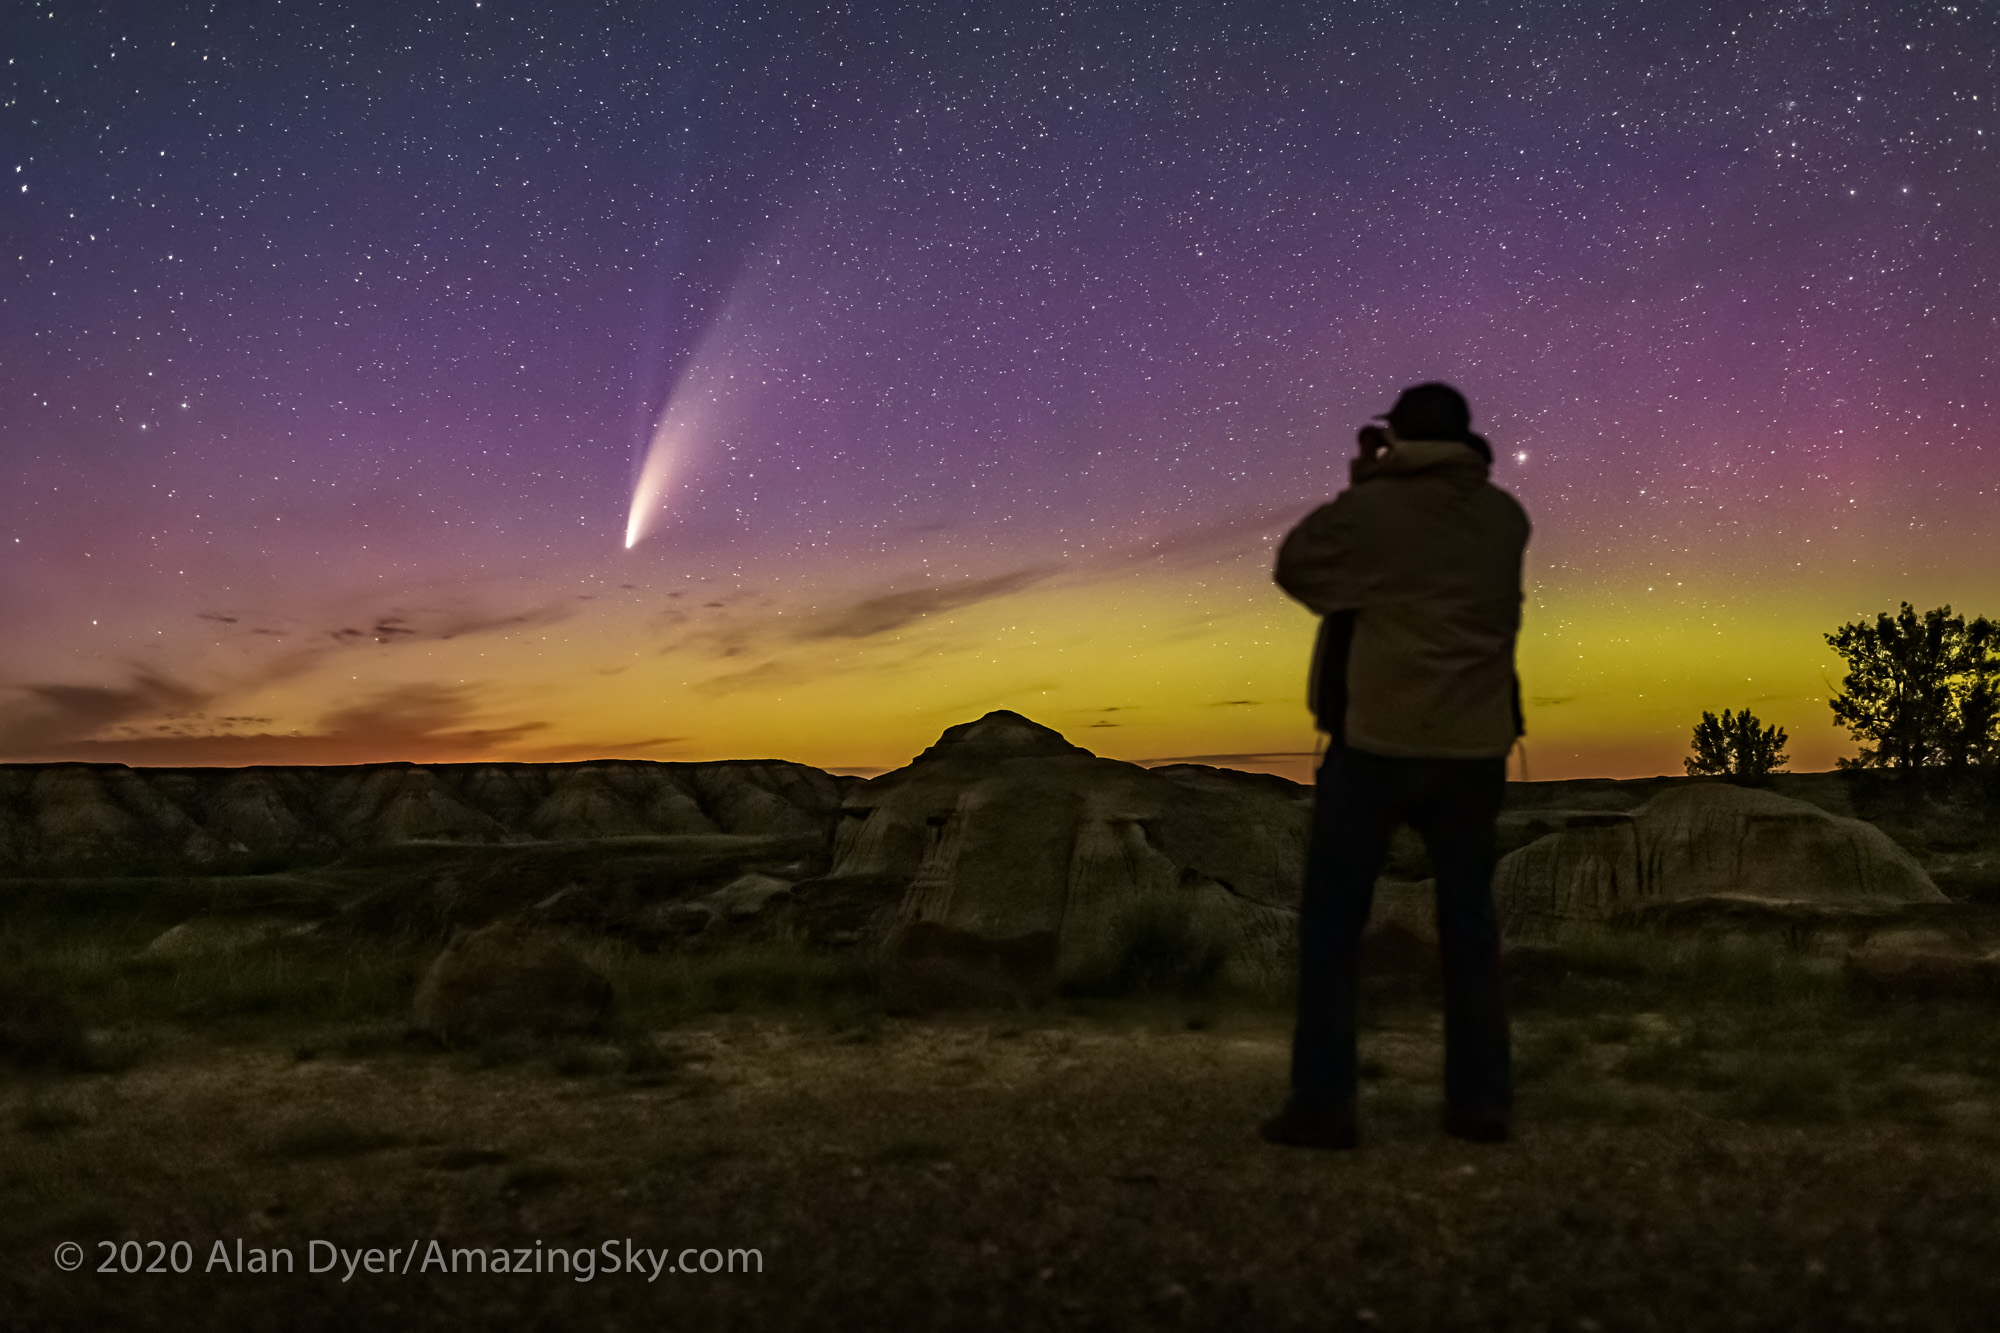
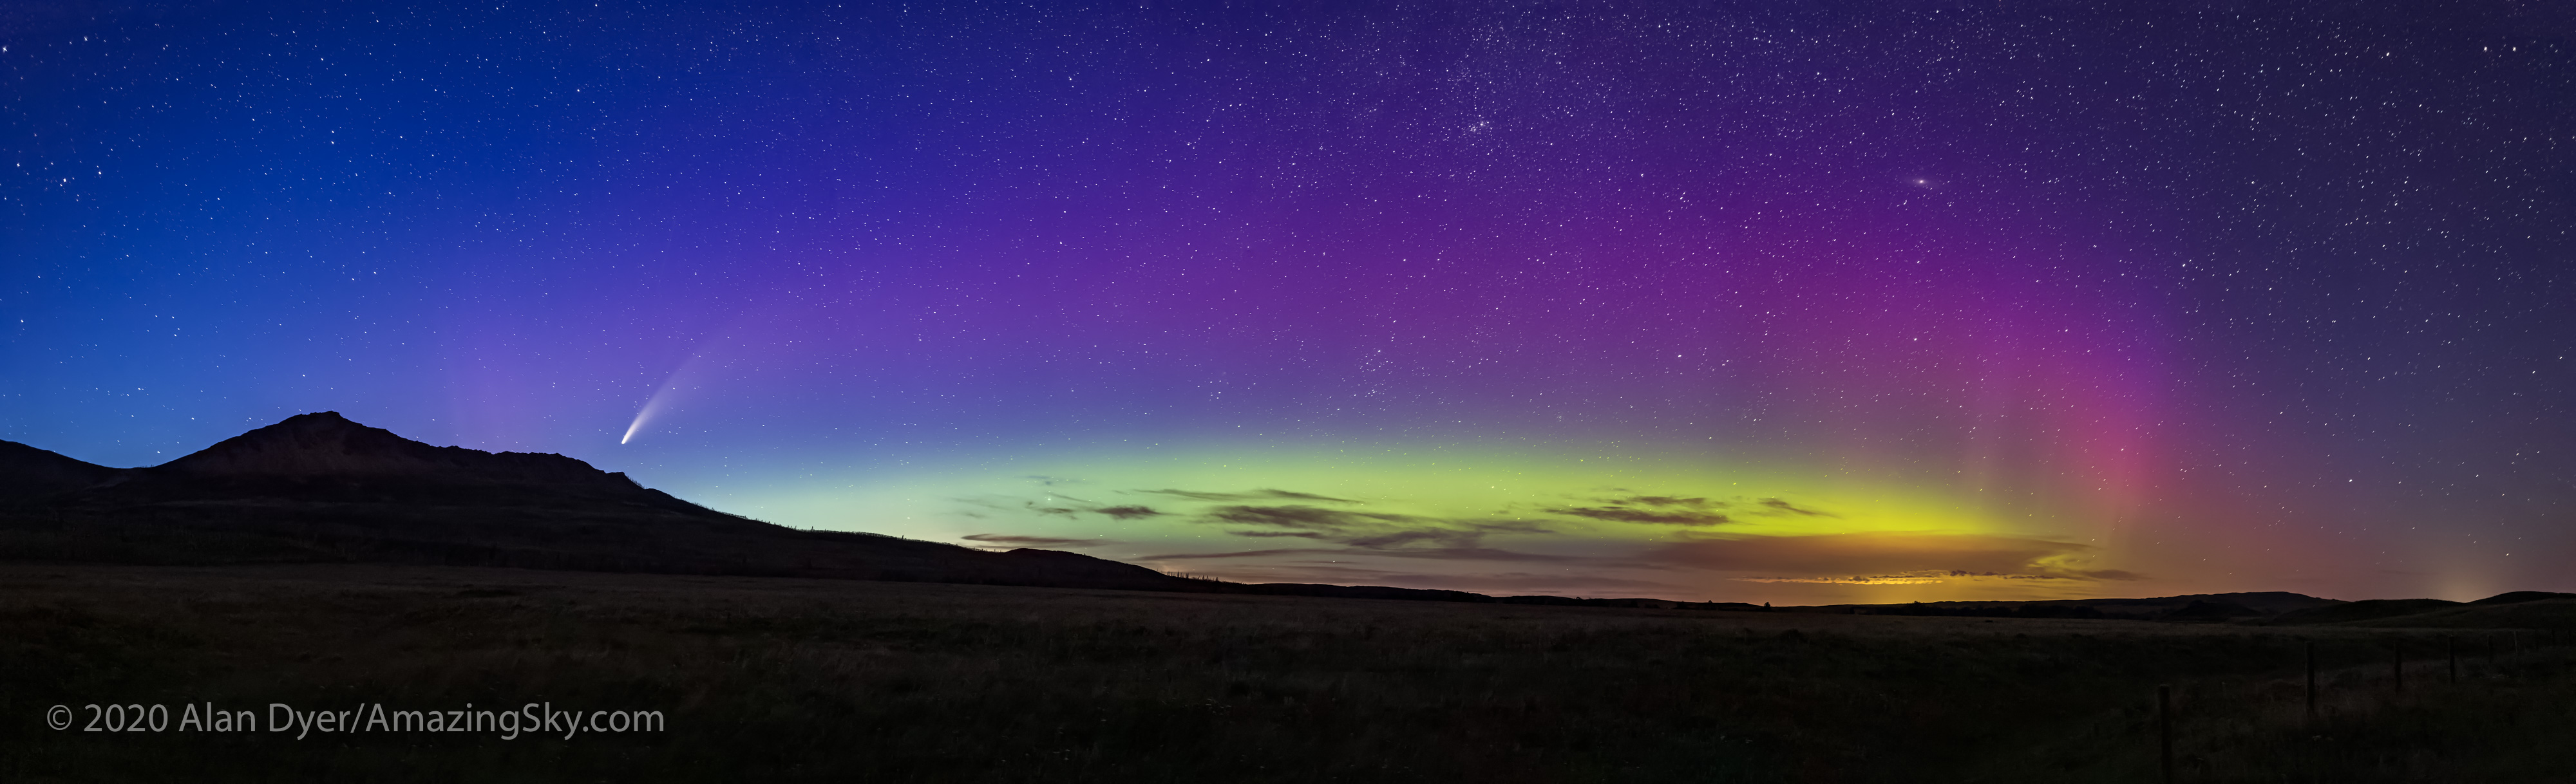
A selfie observing Comet NEOWISE (C/2020 F3) with binoculars on the dark moonless night of July 14/15, 2020 from Dinosaur Provincial Park, Alberta. A faint aurora colours the sky green and magenta. The faint blue ion tail of the comet is visible in addition to its brighter dust tail. The ground is illuminated by starlight and aurora light only. This is a blend of 6 exposures stacked for the ground (except me) to smooth noise, and one exposure for the sky and me, all 13 seconds at f/2.5 with the 35mm lens and Canon 6D MkII at ISO 6400. Topaz DeNoise AI applied.
What Exposures Do I Use?
There is no single best setting. It depends on …
— How bright the sky is from your location (urban vs a rural site).
— Whether the Moon is up — it will be after July 23 or so when the Moon returns to the western sky as a waxing crescent.
— The phase of the Moon — in late July it will be waxing to Full on August 3 when the sky will be very bright and the comet faint enough it might lost in the bright sky.
However, here are guidelines:
— ISO 400 to 1600
— Aperture f/2 to f/4
— Shutter speed of 4 to 30 seconds
Unless you are shooting in a very bright sky, your automatic exposure settings are likely not going to work.
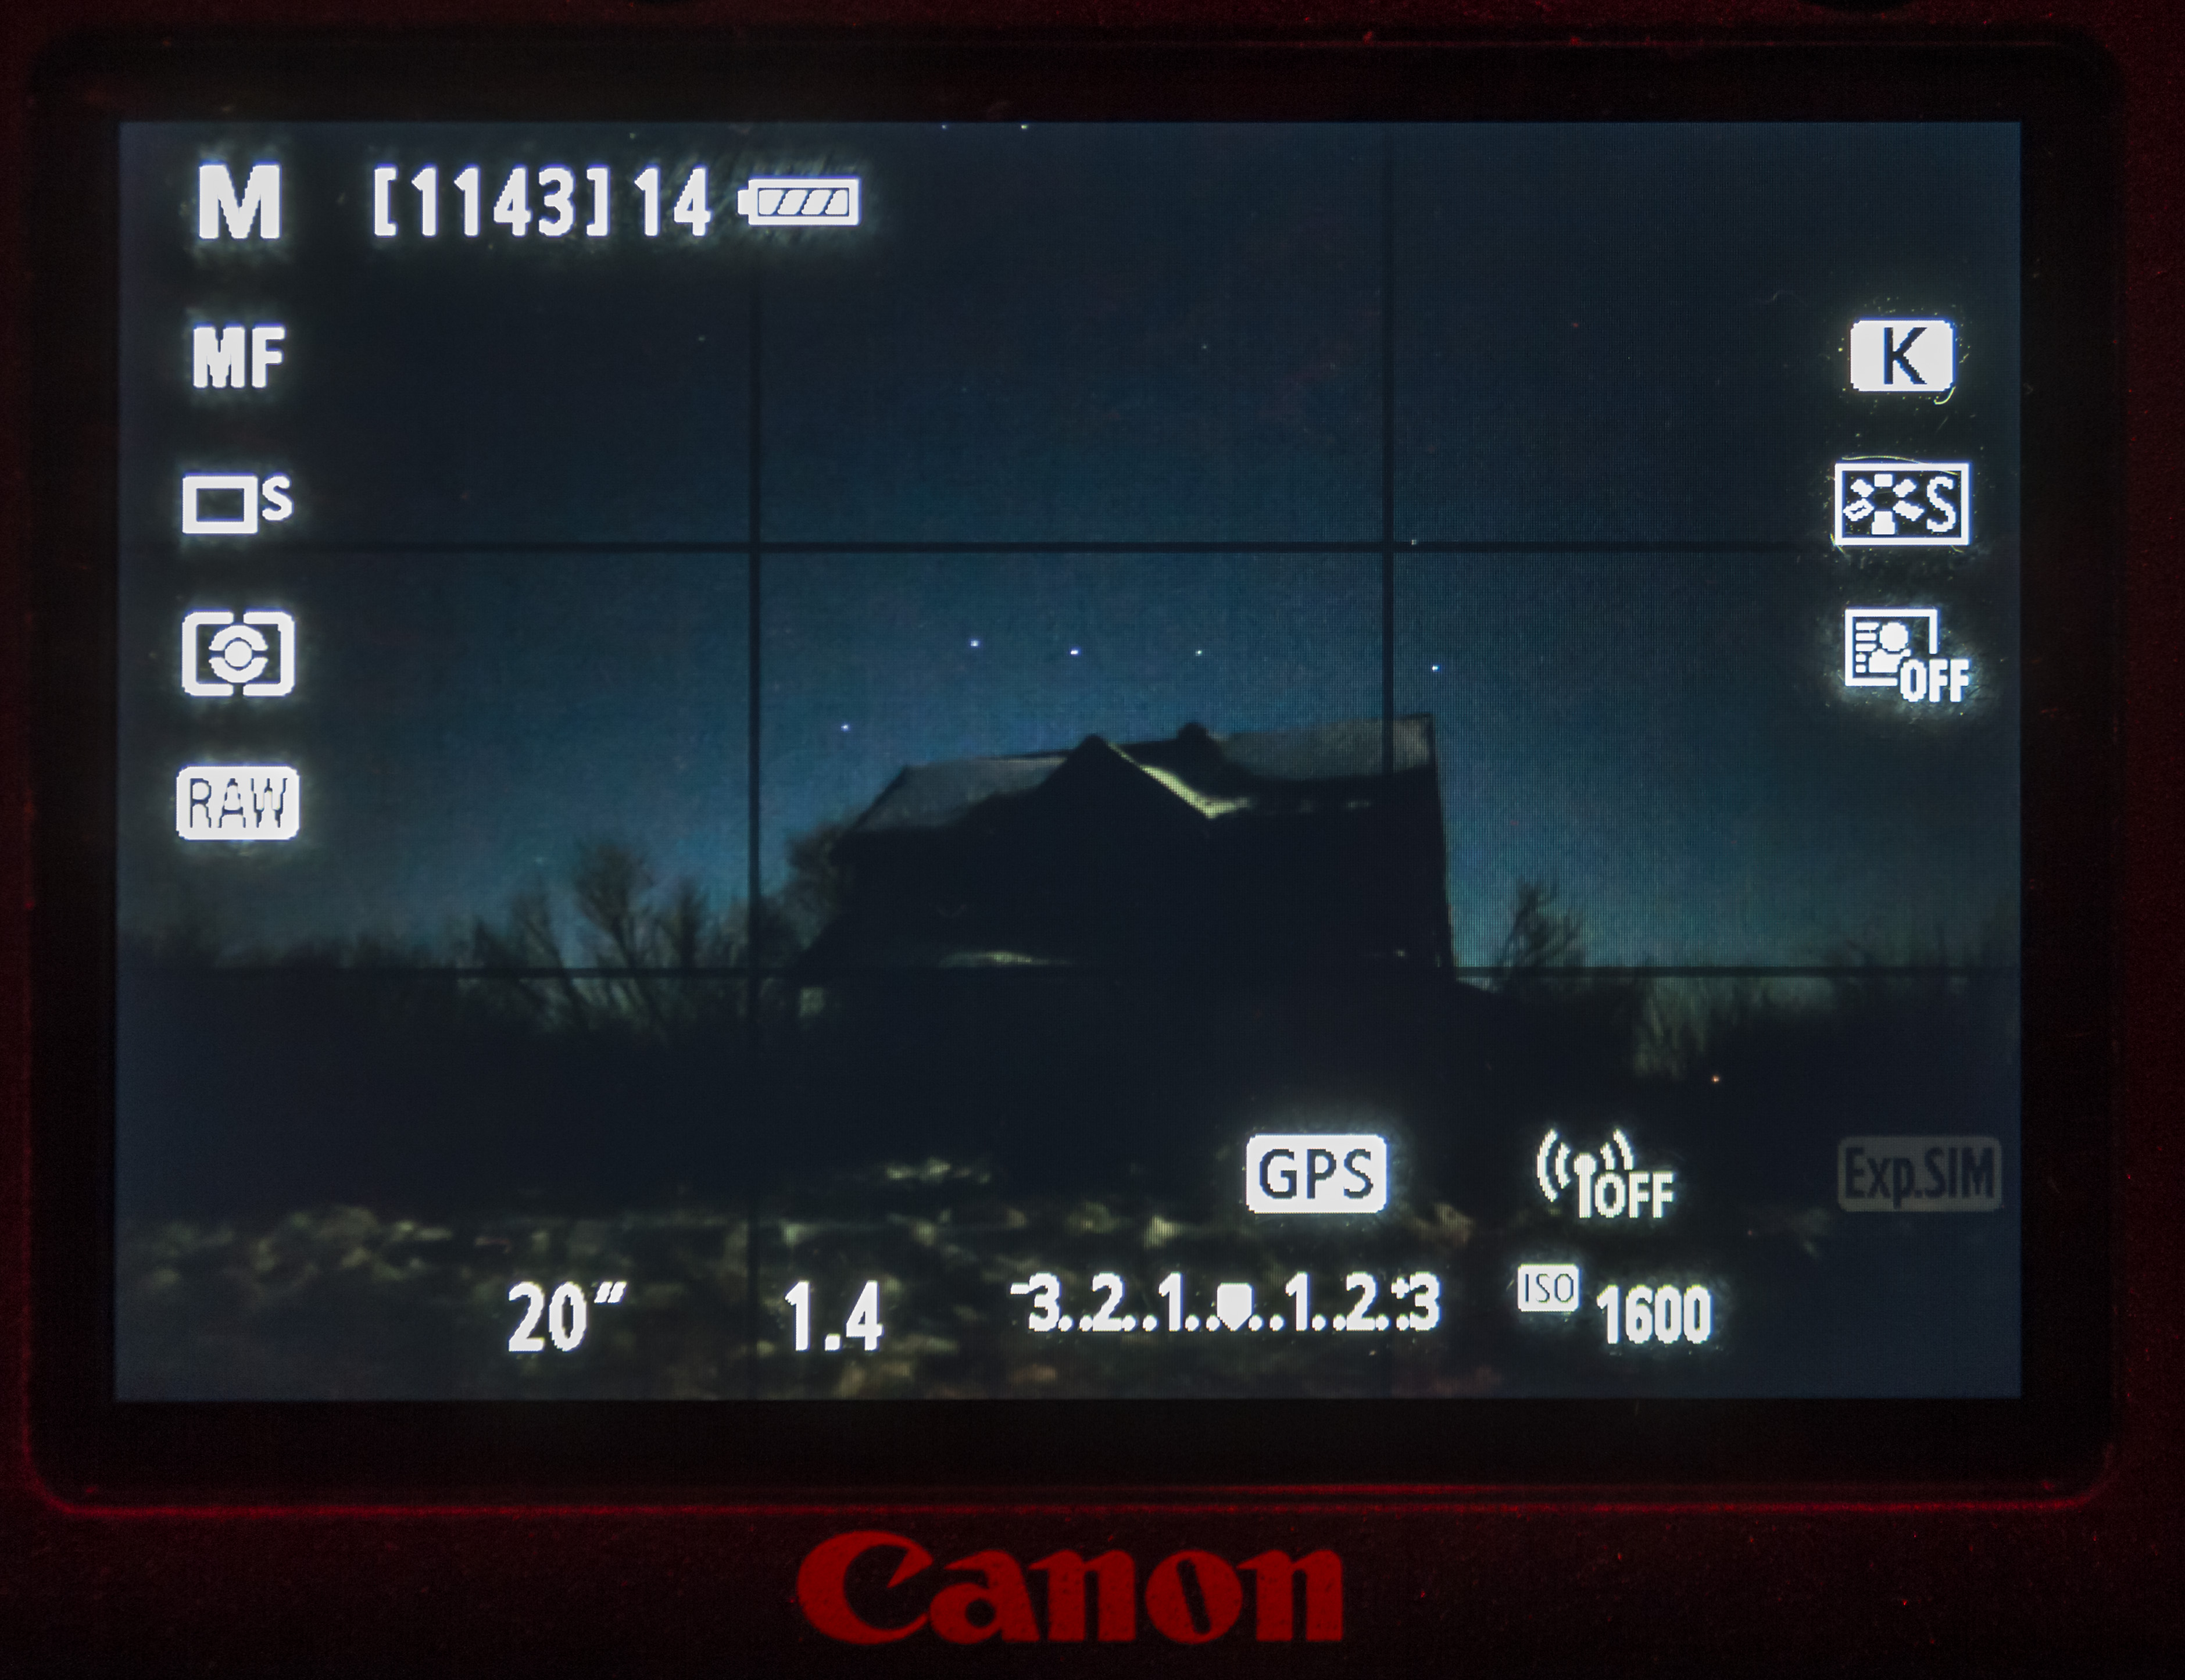
As with almost all nightscape photography you will need to set your camera on Manual (M) and dial in those settings for ISO, Aperture and Shutter Speed manually. Just how is something you need to consult your camera’s instruction manual for, as some point-and-shoot snapshot cameras are simply not designed to be used manually.
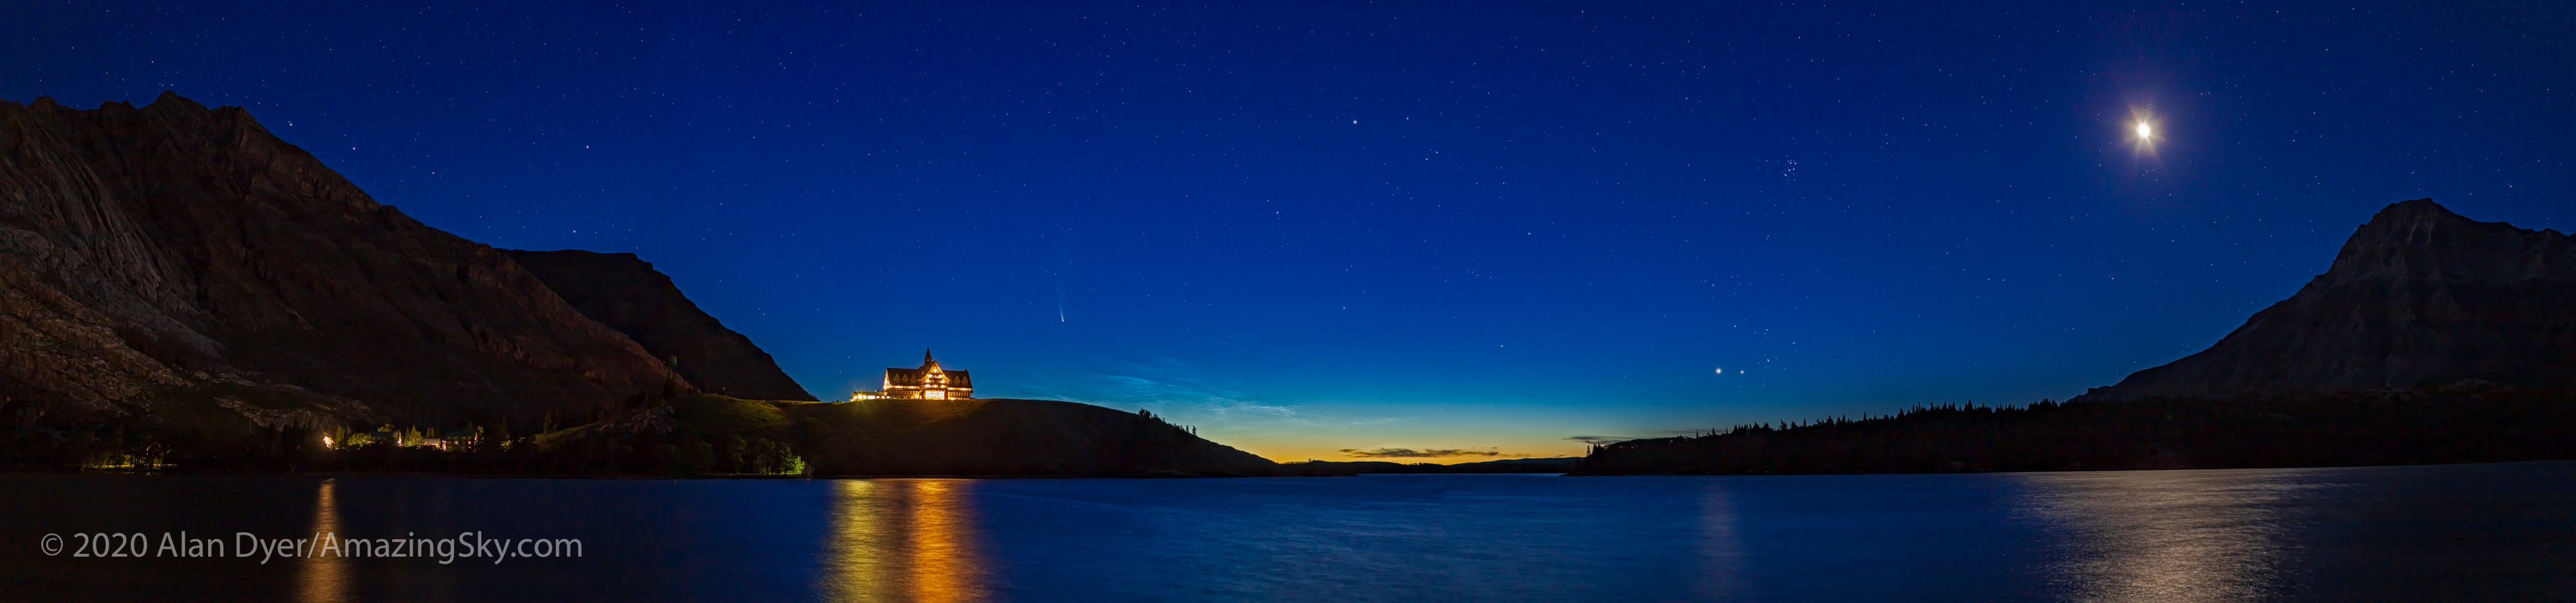
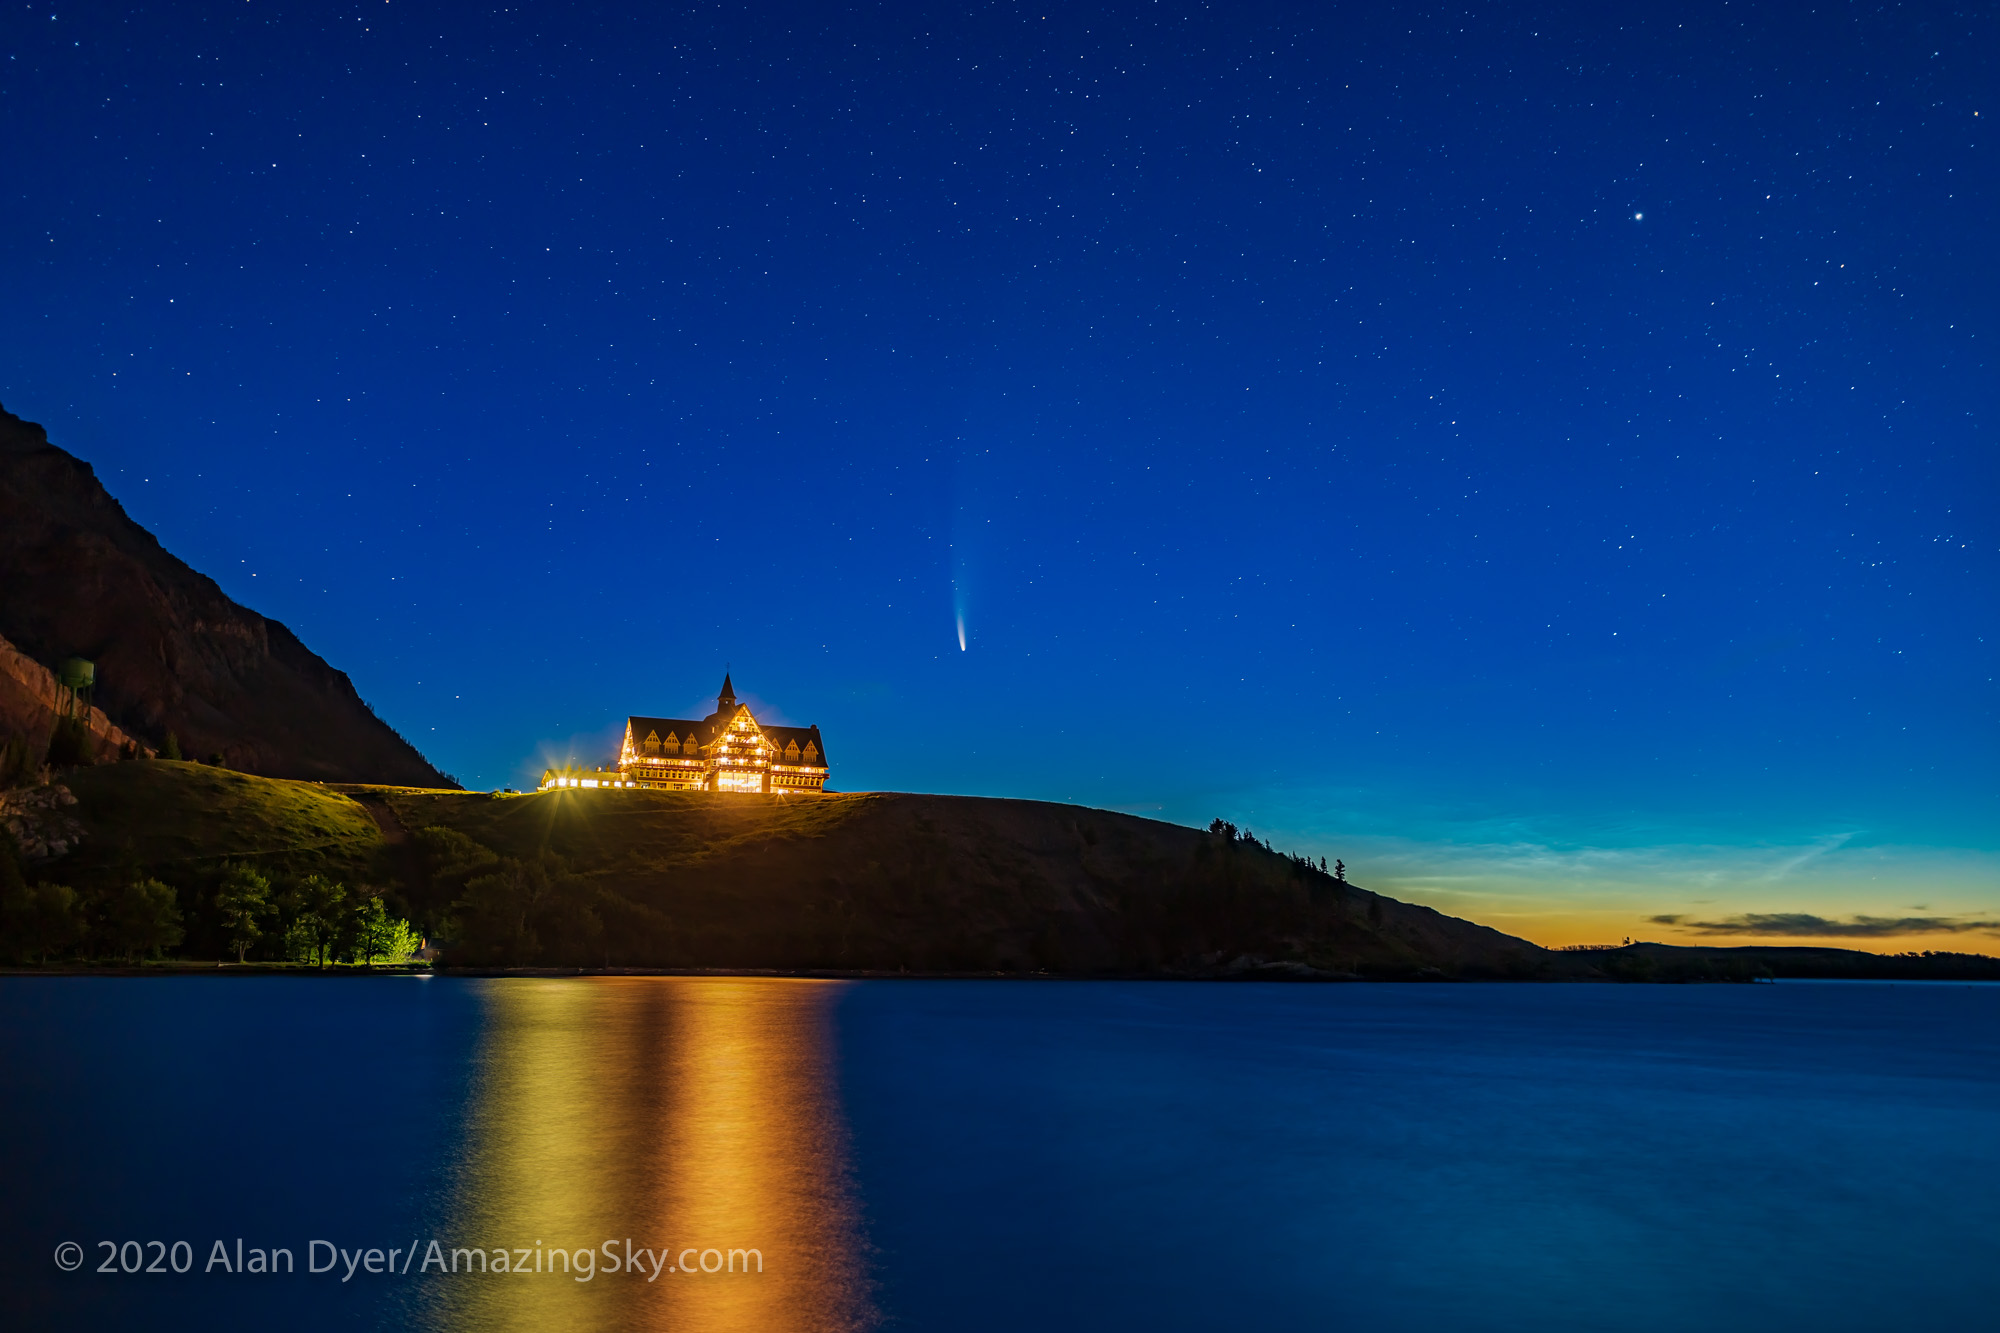
A once-in-a-lifetime scene — A panorama of the dawn sky at 4 am on July 14, 2020 from Waterton Lakes National Park, Alberta, Canada with Comet NEOWISE (C/2020 F3) over the iconic Prince of Wales Hotel. Noctilucent clouds glow below the comet in the dawn twilight. Venus is rising right of centre paired with Aldebaran and the Hyades star cluster, while the Pleiades cluster shine above. The waning quarter Moon shines above the Vimy Peak at far right. The Big Dipper is partly visible above the mountain at far left. Capella and the stars of Auriga are at centre. This is an 8-segment panorama with the 35mm Canon lens at f/2.5 for 15 seconds each at ISO 100 with the Canon 6D MkII and stitched with Adobe Camera Raw.
Exposure Considerations
As a rule you want to …
— Keep the ISO as low as possible for the lowest noise. The higher the ISO the worse the noise. But … do raise the ISO high enough to get a well-exposed image. Better to shoot at ISO 3200 and expose well, than at ISO 800 and end up with a dark, underexposed image.
— Shoot at a wide aperture, such as f/2 or f/2.8. The wider the aperture (smaller the f-number) the shorter the exposure can be and/or lower the ISO can be. But … lens aberrations might spoil the sharpness of the image.
— Keep exposures short enough that the stars won’t trail too much during the exposure due to Earth’s rotation. The “500 Rule” of thumb says exposures should be no longer than 500 / Focal length of your lens.
So for a 50mm lens exposures should be no longer than 500/50 = 10s seconds. You’ll still see some trailing but not enough to spoil the image. And going a bit longer in exposure time can make it possible to use a slower and less noisy ISO speed or simply having a better exposed shot.
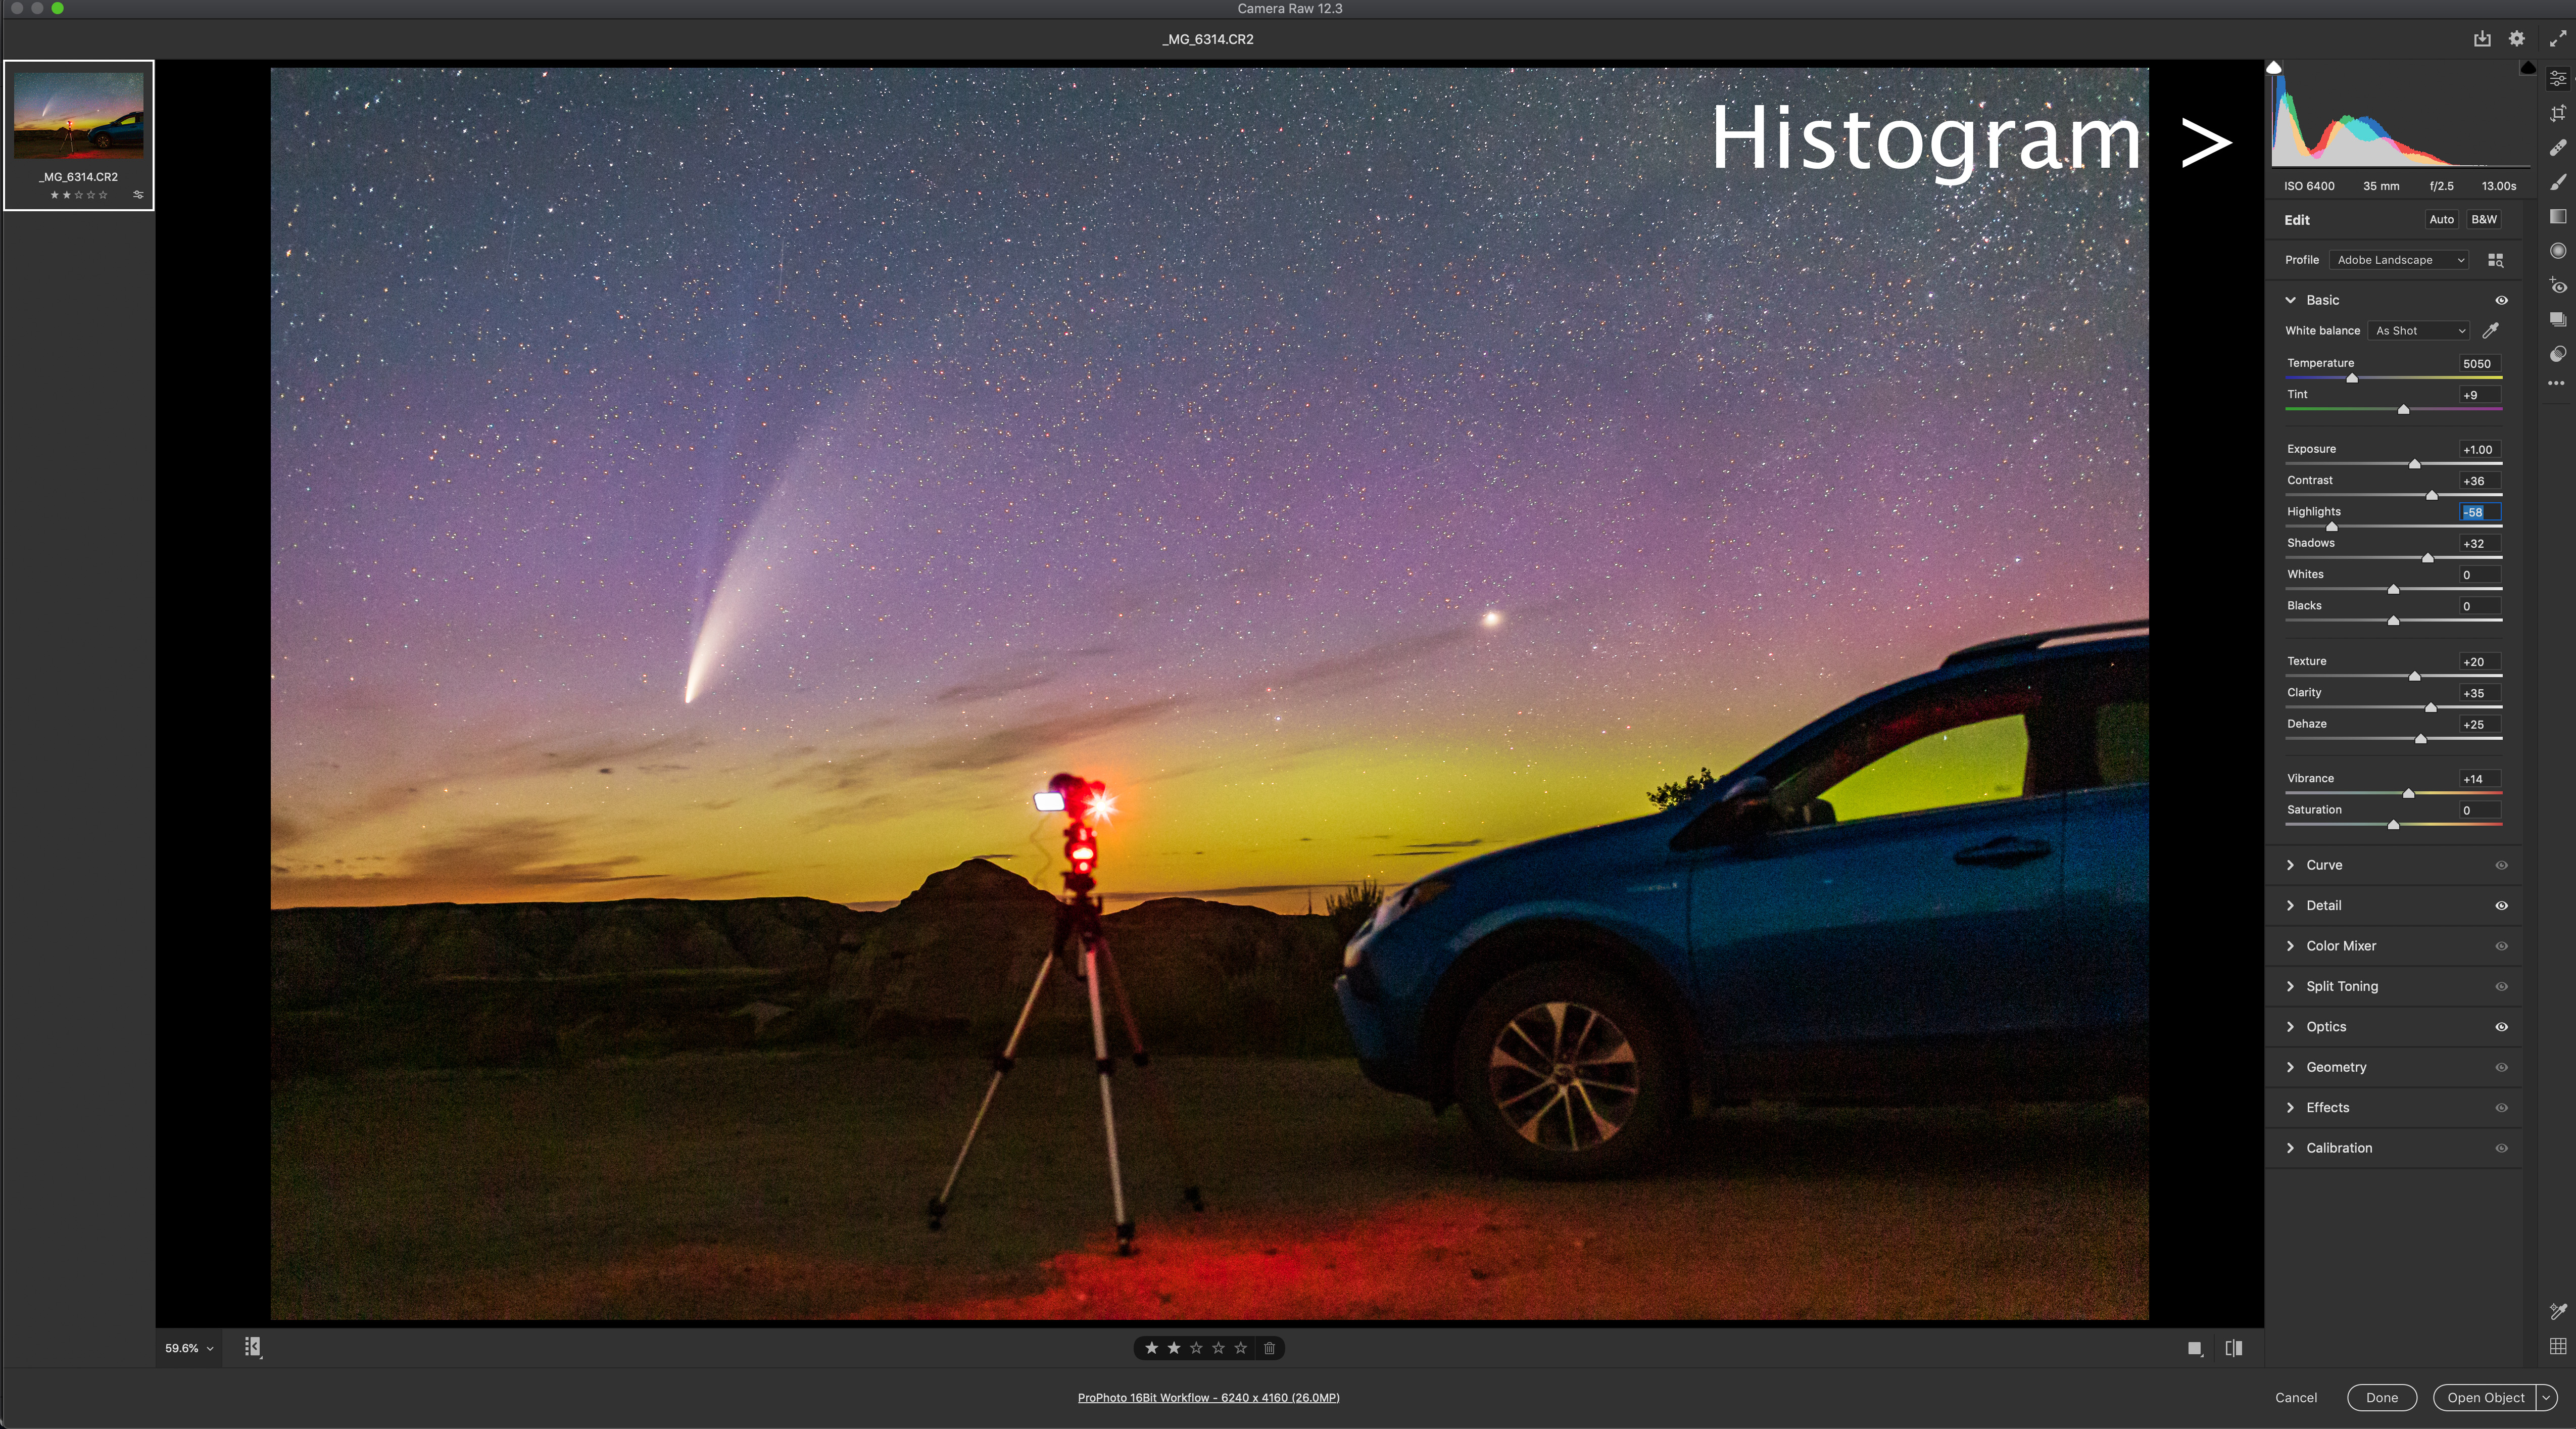
The histogram as shown in Adobe Camera Raw. Cameras also display the image’s histogram in the Live View preview and in playback of recorded images. Keep the histogram from slamming to the left.
— Avoid underexposing. If you can, call up the “histogram”— the graph of exposure values — on the resulting image in playback on your camera. The histogram should look fairly well distributed from left to right and not all bunched up at the left.
This is Comet NEOWISE (C/2020 F3) over the badlands and formations of Dinosaur Provincial Park, Alberta, on the night of July 14-15, 202. This is a blend of 6 exposures for the ground stacked to smooth noise, with a single exposure for the sky, with the 35mm Canon lens and Canon 6D MkII. The ground exposures are 1- and 2-minutes at ISO 1600 and f/2.8, while the single untracked sky exposure was 20 seconds at ISO 3200 and f/2.5.
When and where you are will also affect your exposure combination.
If you are at a site with lots of lights such as overlooking a city skyline, exposures will need to be shorter than at a dark site.
And nights with a bright Moon will require shorter exposures than moonless nights.
Take test shots and see what looks good! Inspect the histogram. This isn’t like shooting with film when we had no idea if we got the shot until it was too late!
What Lens Do I Use?
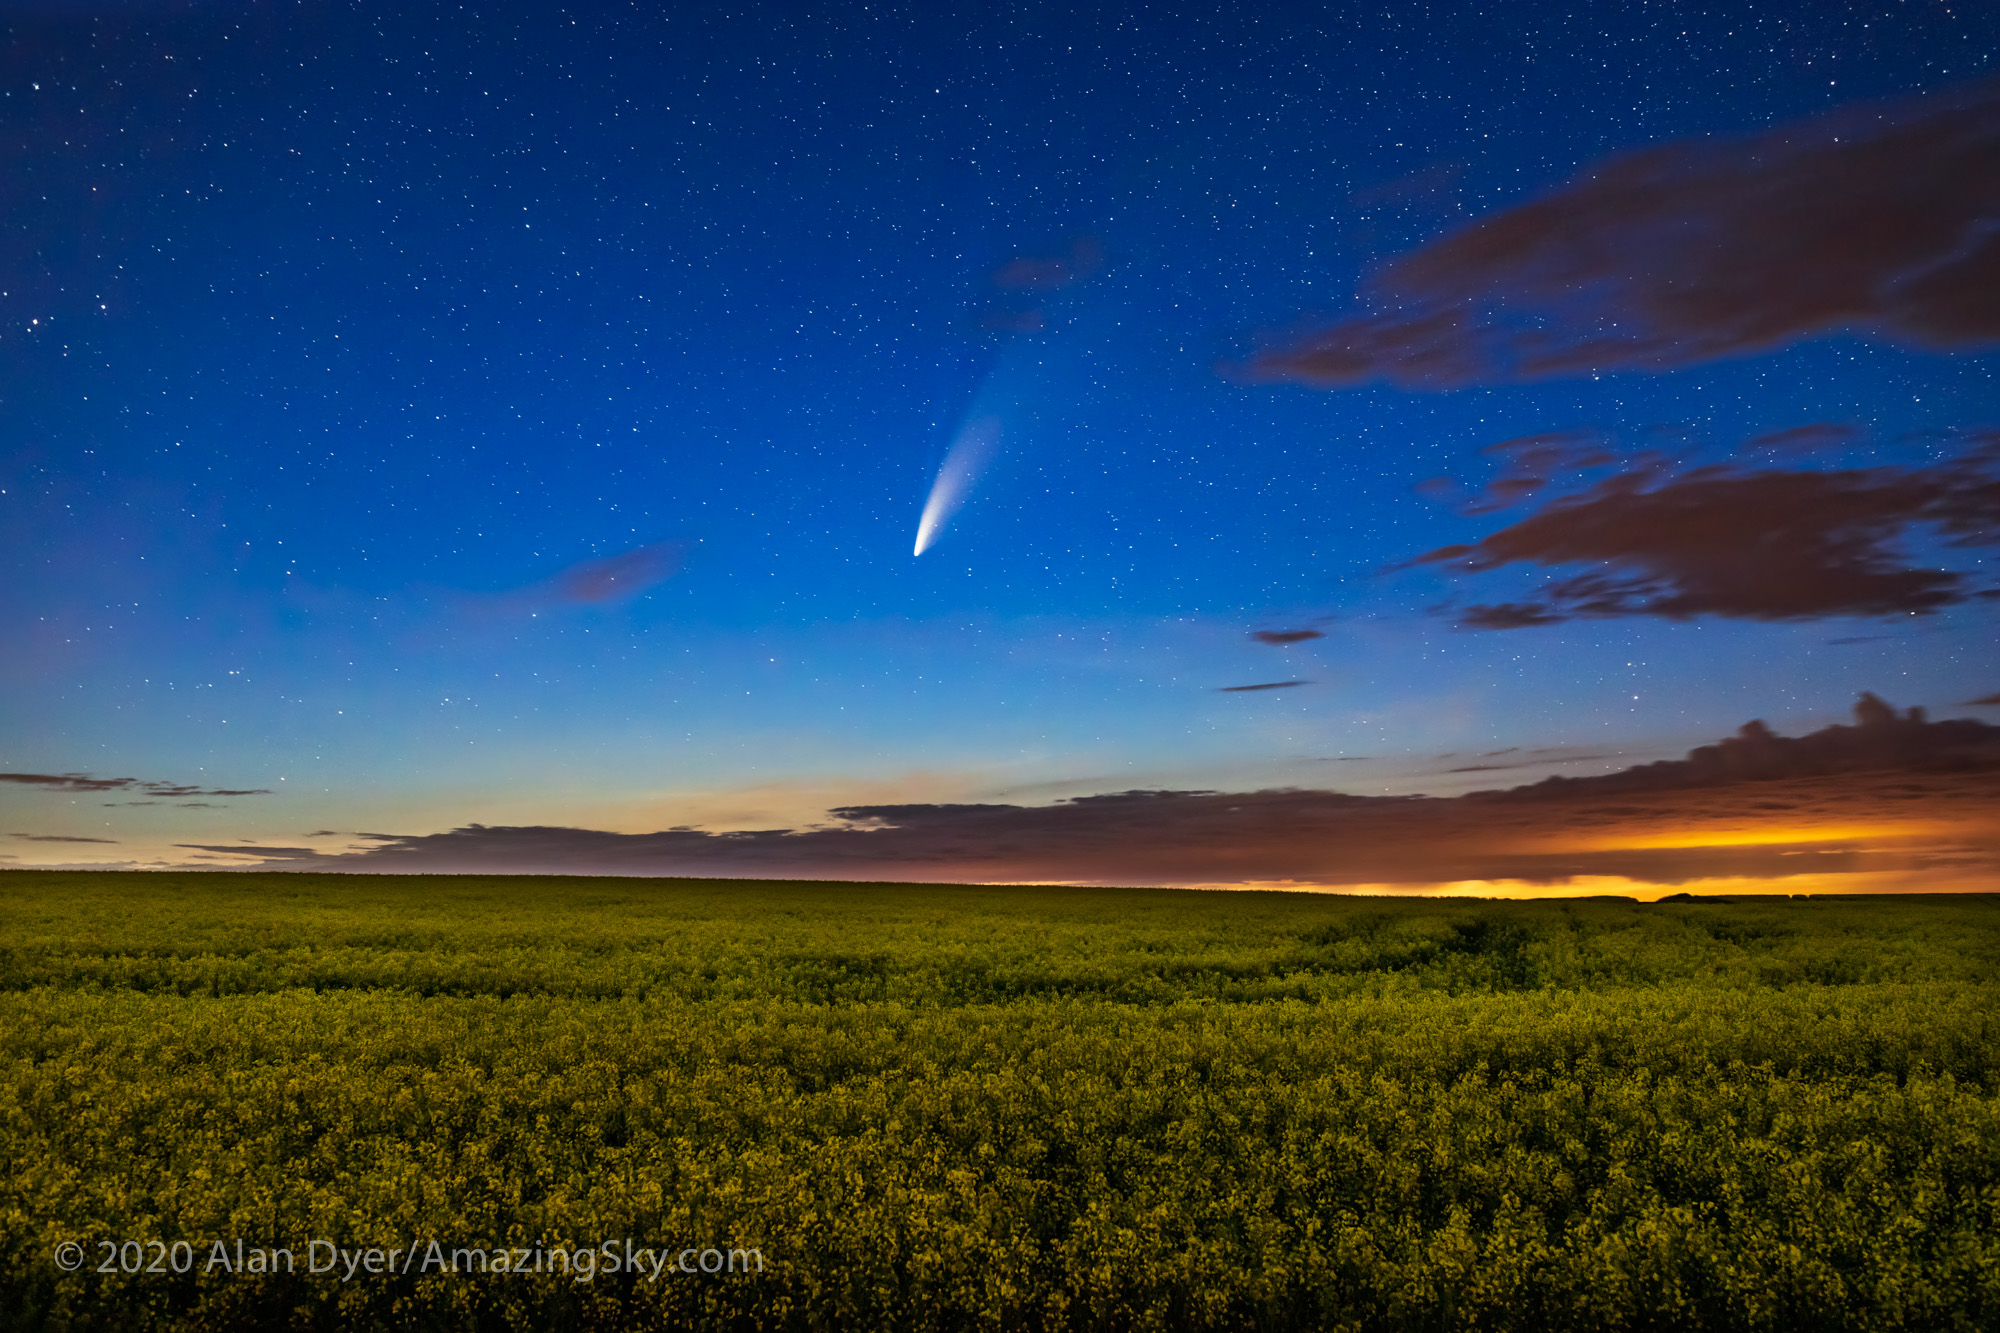
With a 35mm lens. Comet NEOWISE (C/2020 F3) over a ripening canola field near home in southern Alberta, on the night of July 15-16, 2020. This is a blend of a stack of six 2-minute exposures at ISO 3200 and f/5.6 to smooth noise, provide depth of field, and bring out the colours of the canola, blended with a single short 15-second exposure of the sky at f/2.8 and ISO 1600, all with the 35mm lens and Canon 6D MkII camera.
With a 50mm lens. Comet NEOWISE (C/2020 F3) over a ripening canola field near home in southern Alberta, on the night of July 15-16, 2020. This is a blend of a stack of three 2-minute exposures at ISO 1600 and f/5 to smooth noise, provide depth of field, and bring out the colours of the canola, blended with a single short 15-second exposure of the sky at f/2.8 and ISO 3200, all with the 50mm Sigma lens and Canon 6D MkII camera.
Any lens can produce a fine shot. Choose the lens to frame the scene well.
Using a longer lens (105mm to 200mm) does make the comet larger, but … might make it more difficult to also frame it above a landscape. A good choice is likely a 24mm to 85mm lens.
A fast lens is best, to keep exposure times below the 500 Rule threshold and ISO speeds lower. Slow f/5.6 kit zooms can be used but do pose challenges for getting well exposed and untrailed shots.
Shooting with shorter focal lengths can help keep the aperture wider and faster. Long focal lengths aren’t needed, especially for images of the comet over a landscape. Avoid the temptation to use that monster 400mm or 600mm telephoto wildlife lens. Unless it is on a tracker (see below) it will produce a trailed mess. It is best to shoot with no more than a 135mm telephoto, the faster the better, IF you want a close-up.
Planetarium programs that I recommend below offer “field of view” indicators so you can preview how much of the horizon and sky your camera and lens combination will show.
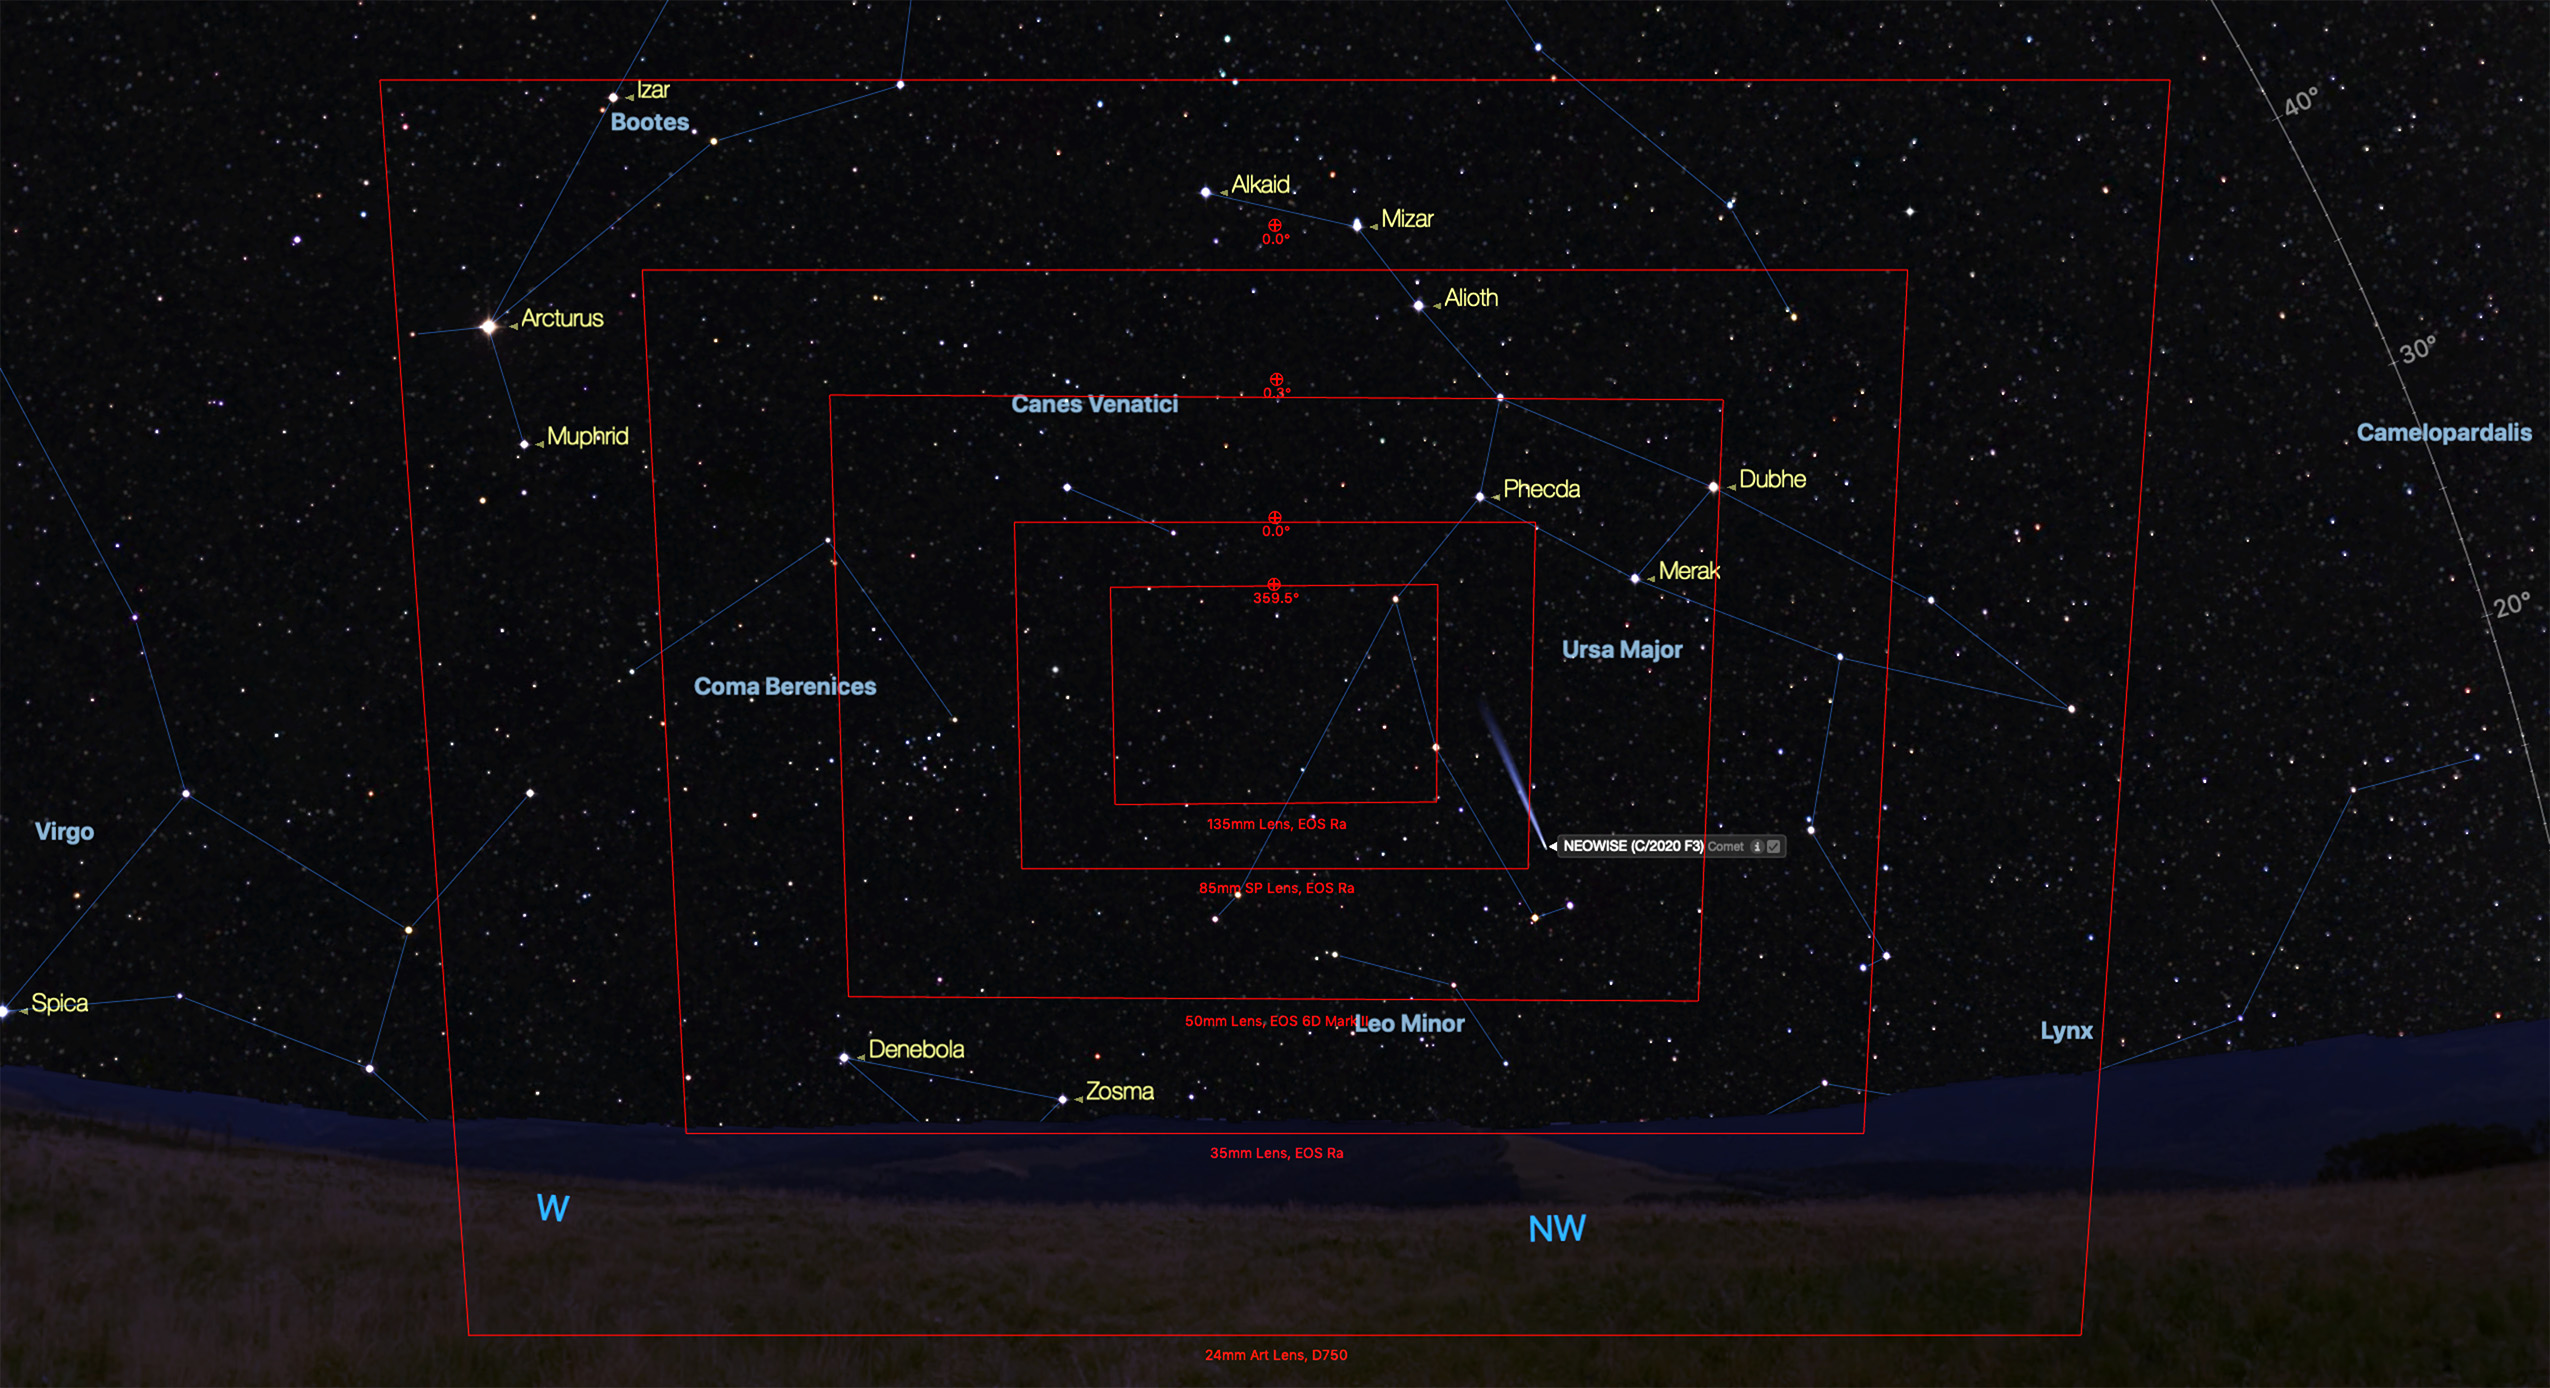
StarryNight™ and other programs offer “Field of View” indicator frames that can show how the scene will frame with (in this example) lenses from 24mm to 135mm.
Can I Use My [insert camera here] Camera?
Yes. Whatever you have, try it.
However, the best cameras for any nightscape photography are DSLRs and Mirrorless cameras, either full-frame or cropped frame. They have the lowest noise and are easiest to set manually.
In my experience in teaching workshops I find that the insidious menus of automatic “point-and-shoot” pocket cameras make it very difficult to find the manual settings. And some have such noisy sensors they do not allow longer exposures and/or higher ISO speeds. But try their Night or Fireworks scene modes.
It doesn’t hurt to try, but if you don’t get the shot, don’t fuss. Just enjoy the view with your eyes and binoculars.
But … if you have an iPhone11 or recent Android phone (I have neither!) their “Night scene” modes are superb and use clever in-camera image stacking and processing routines to yield surprisingly good images. Give them a try — keep the camera steady and shoot.
This is Comet NEOWISE (C/2020 F3) over Deadhorse Lake near Hussar in southern Alberta, taken just after midnight on July 10-11, 2020 during its evening appearance. The comet shines just above low noctilucent clouds. This is a blend of nine exposures for the ground stacked to smooth noise and the water, with a single exposure for the sky, all 4 seconds with the 135mm Canon lens at f/2 and Canon 6D MkII at ISO 1600.
What No One Asks: How Do I Focus?
Everyone fusses about “the best” exposure.
What no one thinks of is how they will focus at night. What ruins images is often not bad exposure (a lot of exposure sins can be fixed in processing) but poor focus (which cannot be fixed later).
On bright scenes it is possible your camera’s Autofocus system will “see” enough in the scene to work and focus the lens. Great.
On dark scenes it will not. You must manually focus. Do that using your camera’s “Live View” function (all DSLRs and Mirrorless cameras have it — but check your user manual as on DSLRs it might need to be activated in the menus if you have never used it).
The Live View screen of a Canon DSLR. Look in your manual for tips on how to boost the Live screen image brightness with the Exposure Simulation option.
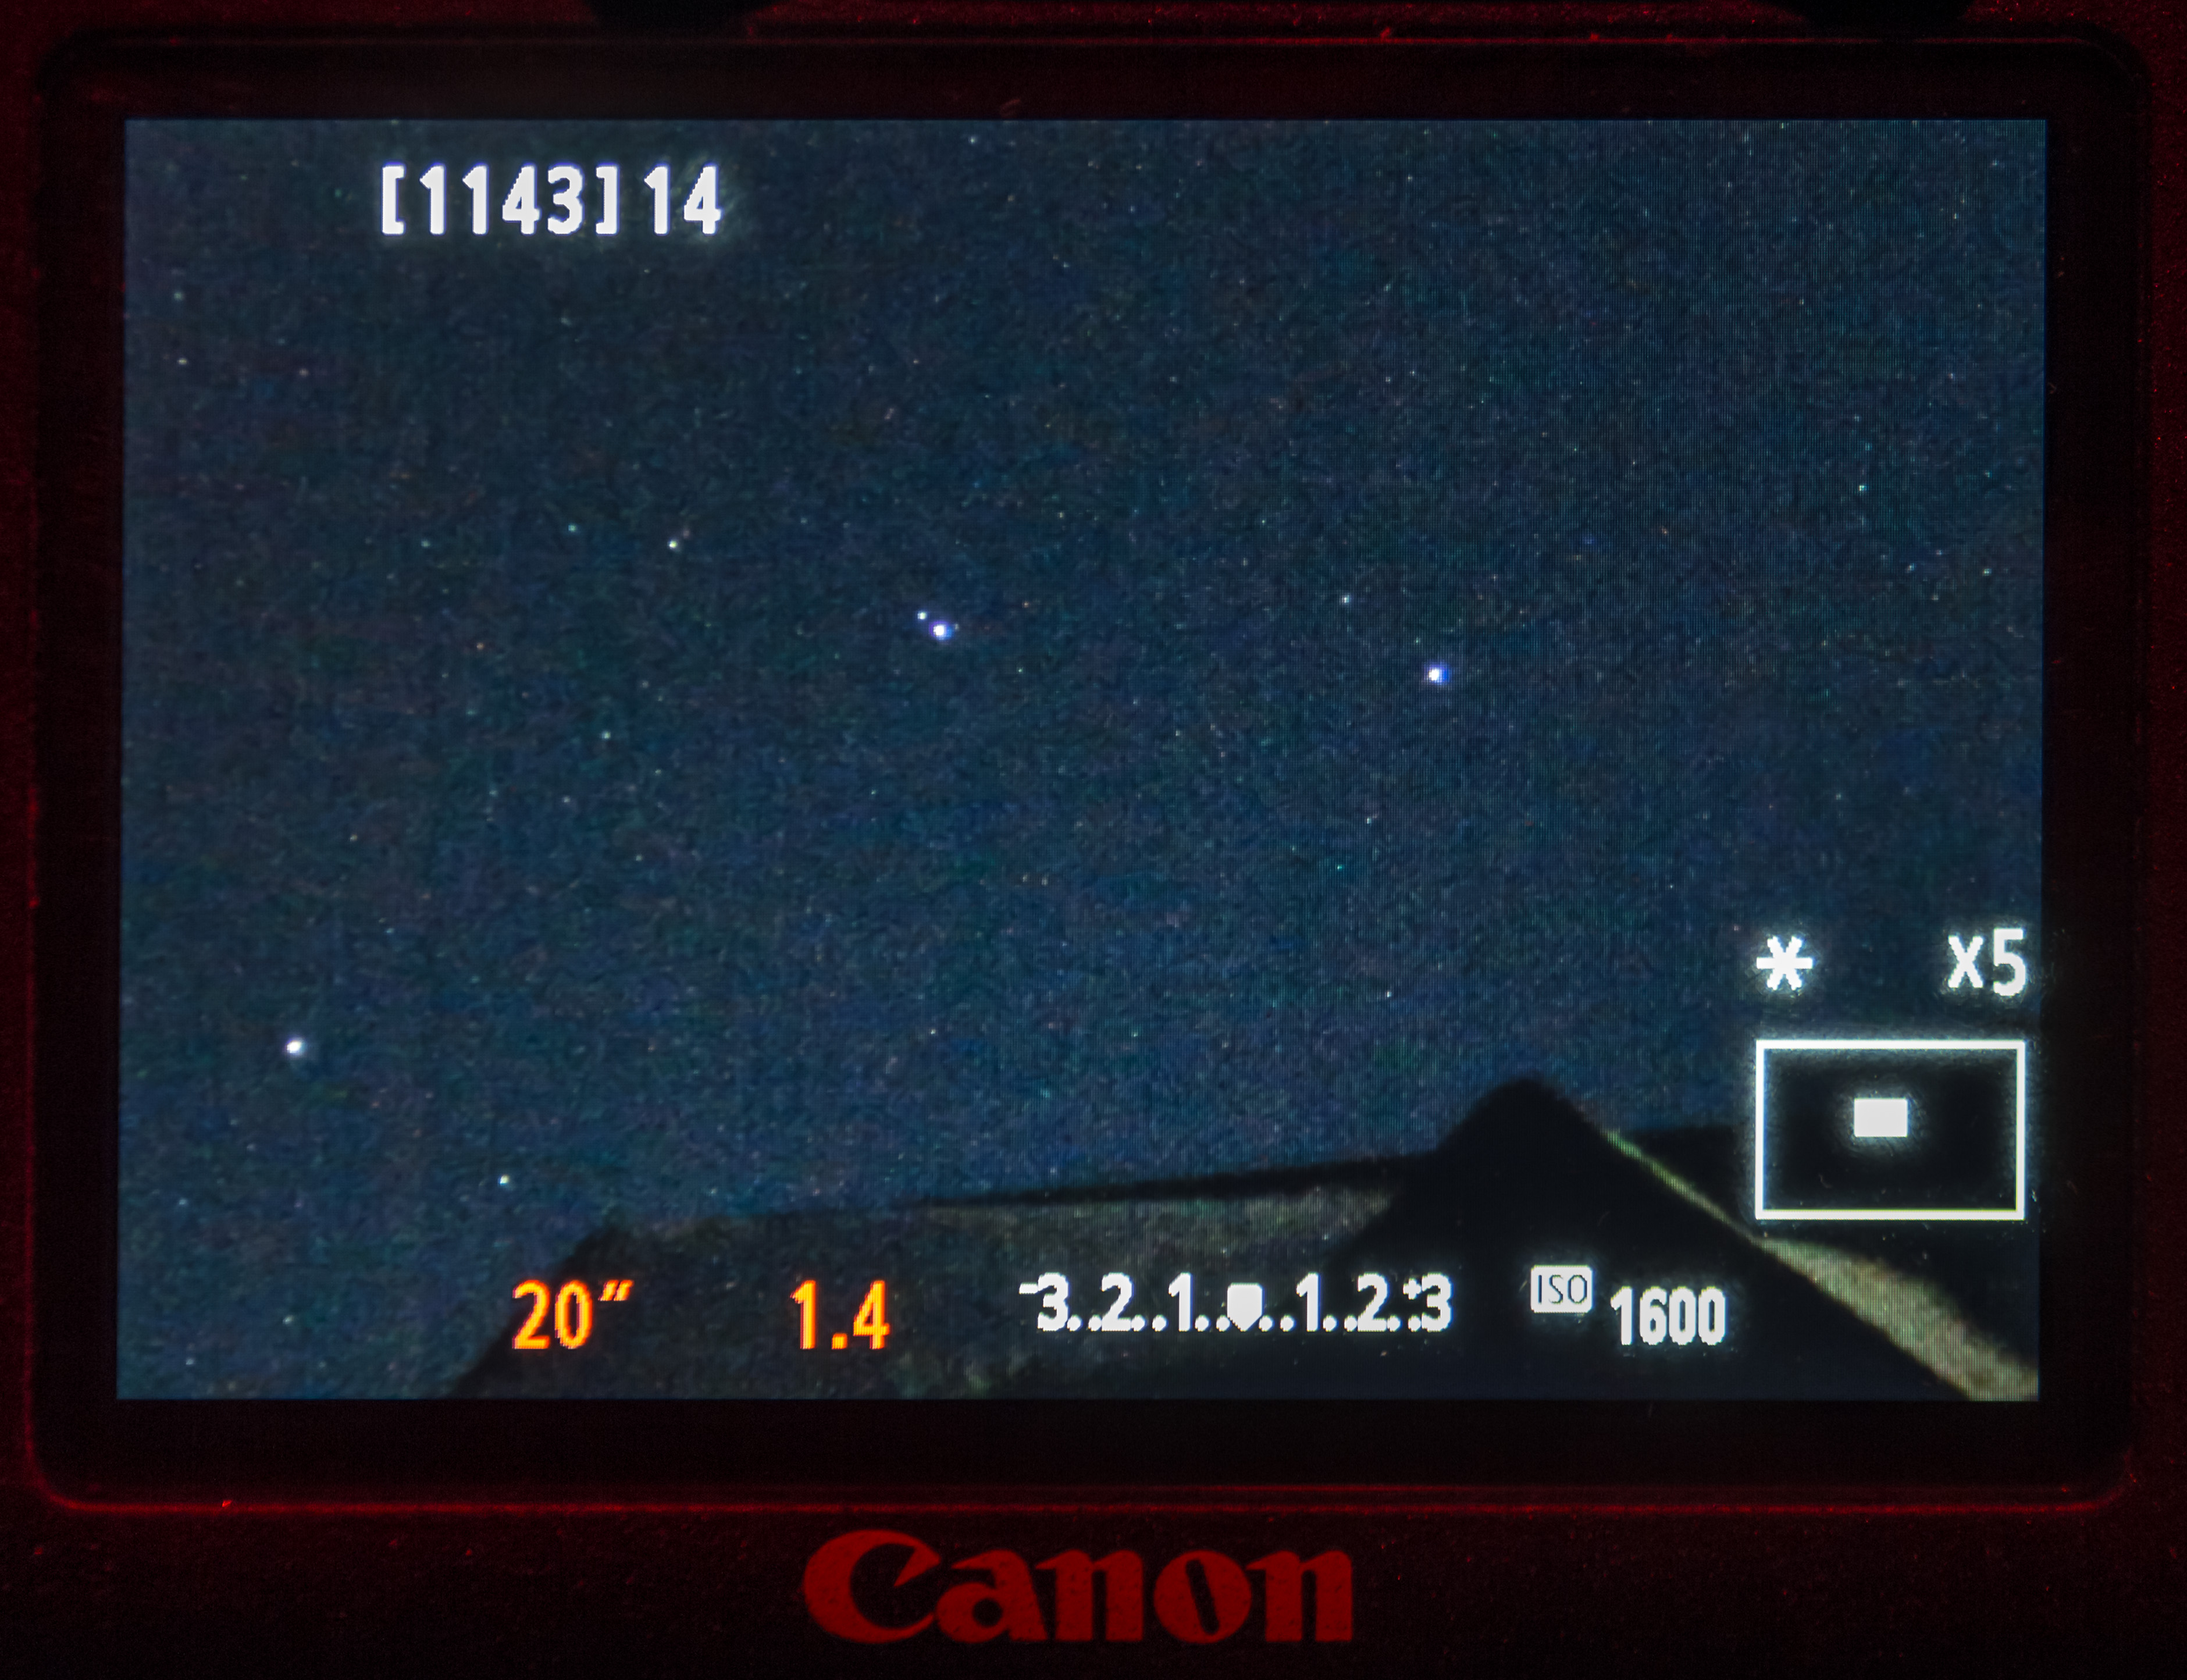
Magnify the image 5x, 10x or more with the Zoom box centred on a star to focus the star to a pinpoint.
Aim at a bright star or distant light and magnify the image 5x or 10x (with the + button) to inspect the star or light. Put the lens on MF (not AF) and focus the lens manually to make the star as pinpoint as possible. Do not touch the lens afterwards.
Practice on a cloudy night on distant lights.
All shooting must be done with a camera on a good tripod. As such, turn OFF any image stabilization (IS), whether it be on the lens or in the camera. IS can ruin shots taken on a tripod.
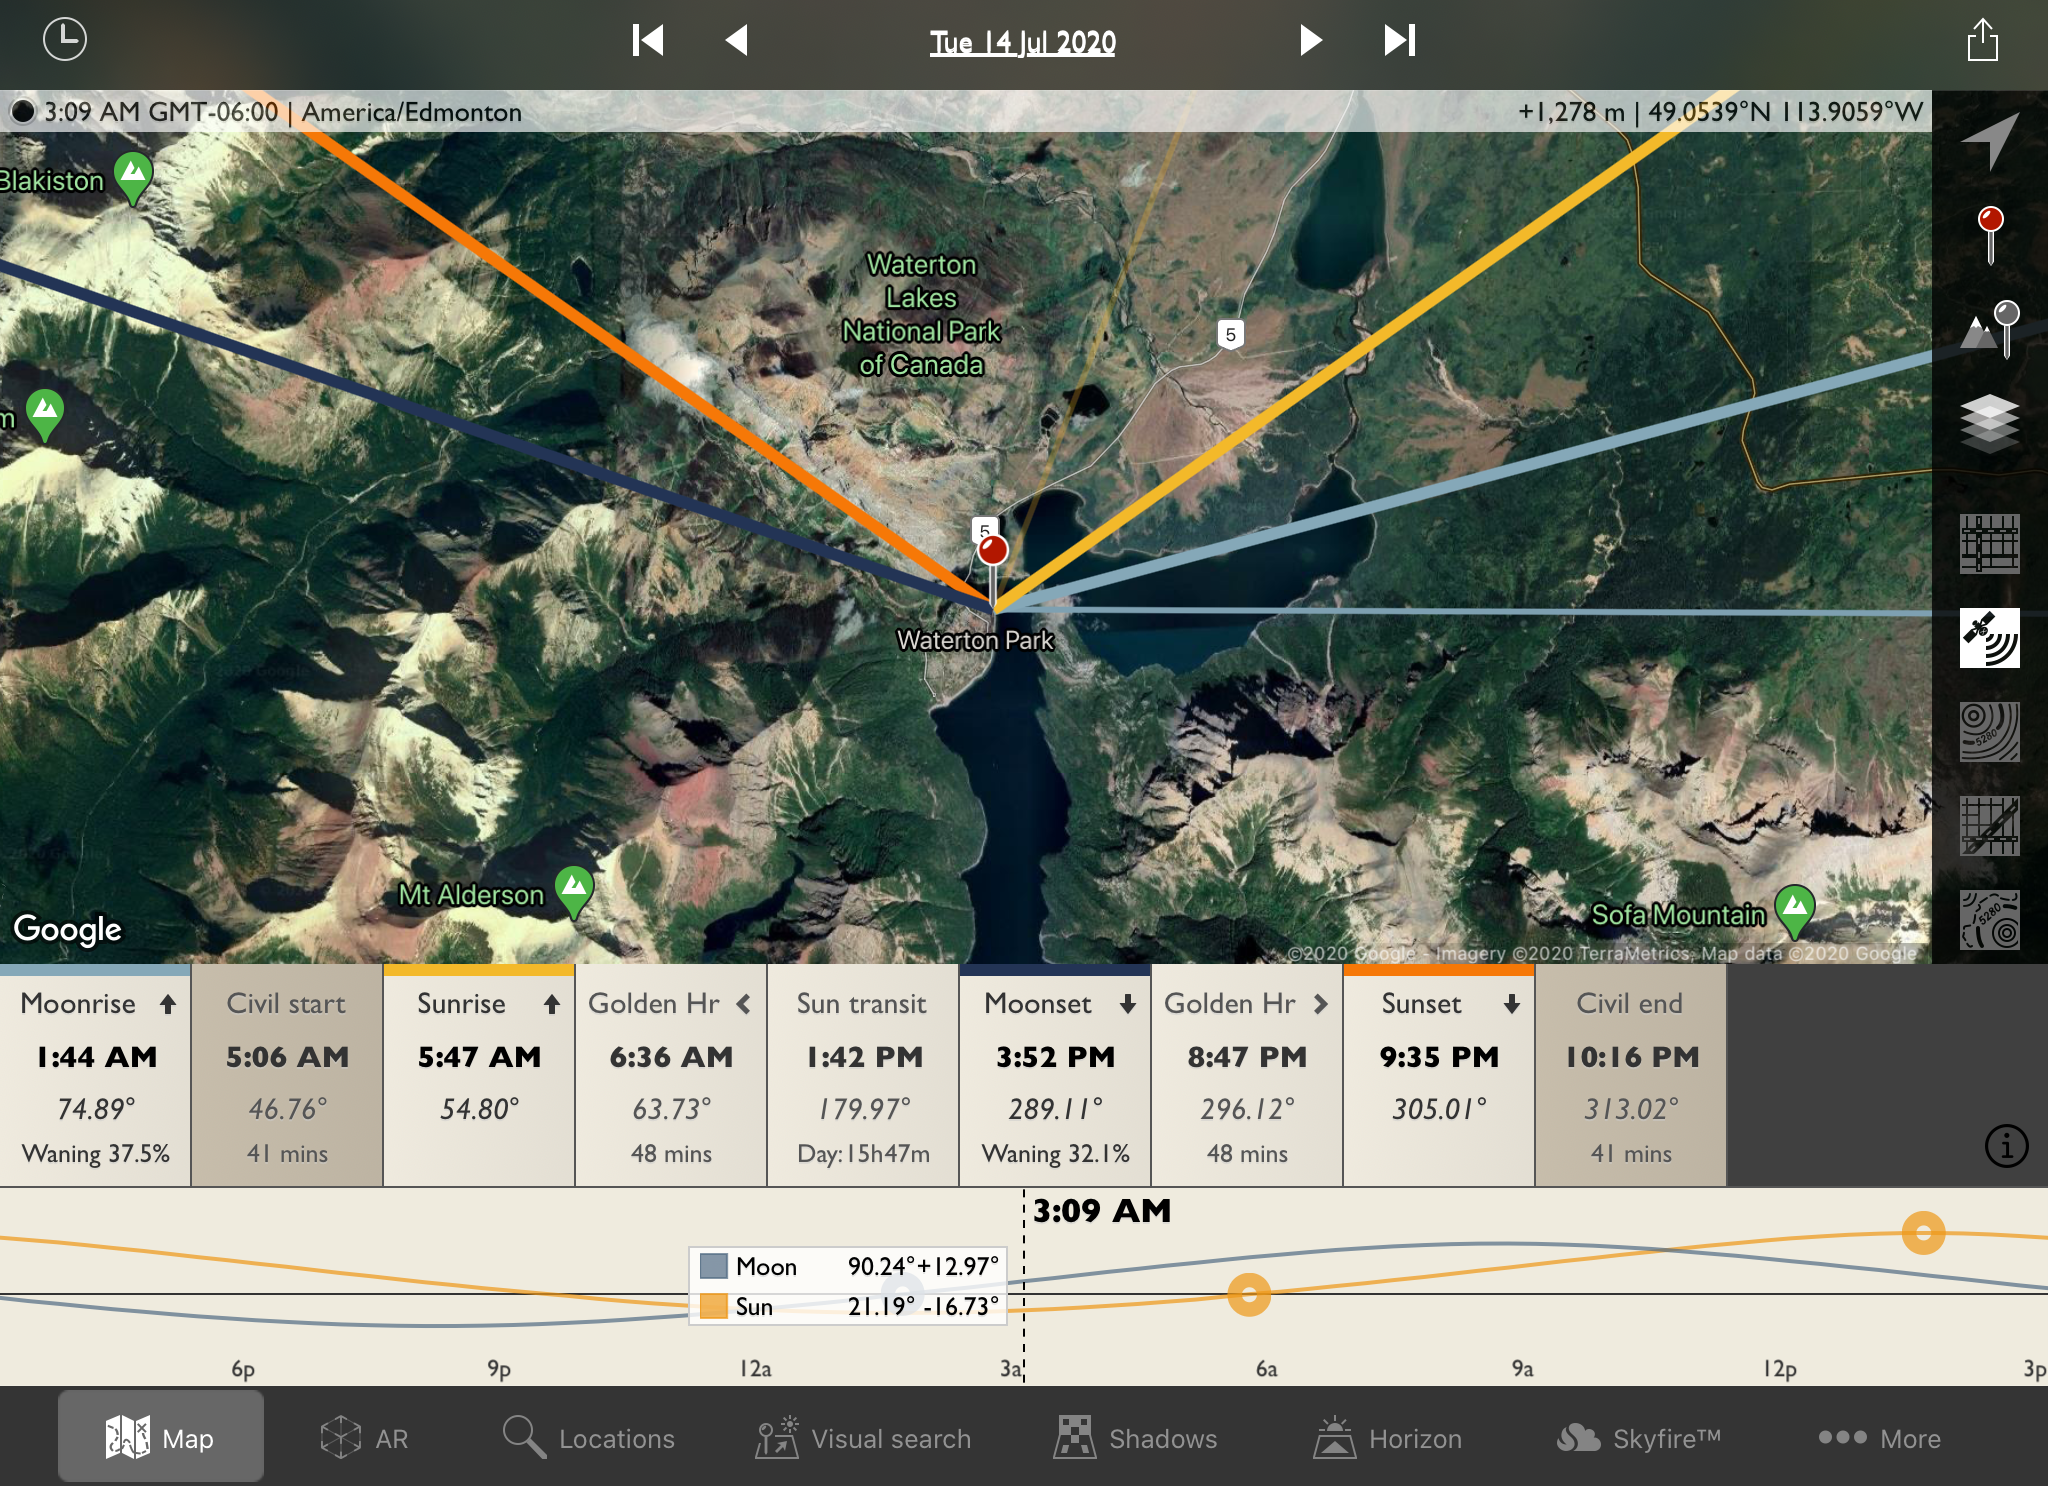
What Few Ask: How Do I Plan a Shoot?
Good photos rarely happen by accident. They require planning. That’s part of the challenge and satisfaction of getting the once-in-a-lifetime shot.
To get the shot of the comet over some striking scene below, you have to figure out:
— First, where the comet will be in the sky,
— Then, where you need to be to look toward that location.
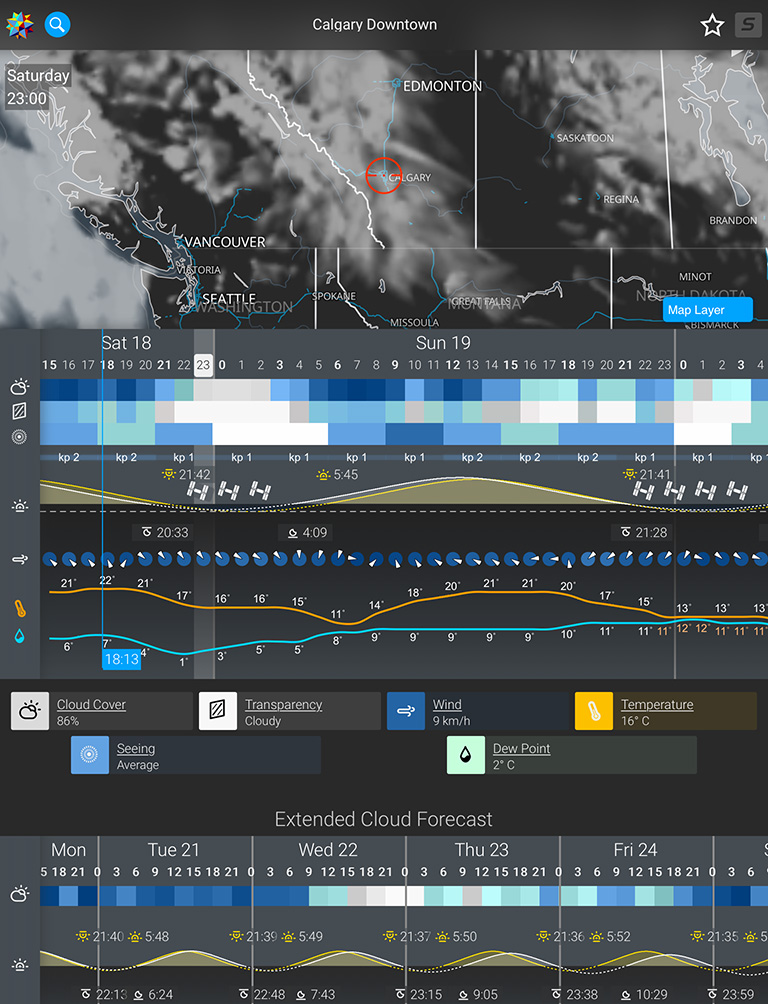
— And of course, you need to be where the sky will be clear!
The free web version of Stellarium shows the comet, as do the paid mobile apps.
Planning Where the Comet Will Be
Popular planning software such as PhotoPills and The Photographer’s Ephemeris can help immensely, but won’t have the comet itself included in their displays, just the position of the Sun, Moon and Milky Way.
For previewing the comet’s position in the sky, I use the planetarium programs Starry Night (desktop) or SkySafari (mobile app). Both include comet positions.
The program Stellarium (stellarium.org) is free for desktop while the mobile Stellarium Plus apps (iOS and Android) have a small fee. There is also a free web-based version at https://stellarium-web.orgBe sure to allow it to access your location.
Set the programs to the night in question to see where the comet will be in relation to the stars and patterns such as the Big Dipper. Note the comet’s altitude in degrees and azimuth (how far along the horizon it will be). For example, an azimuth of 320° puts it in the northwest (270° is due west; 0° or 360° is due north, 315° is directly northwest).
Comet NEOWISE (C/2020 F3) with a small display of noctilucent clouds over Emerald Bay and the iconic Prince of Wales Hotel at Waterton Lakes National Park, Alberta, at dawn on July 14, 2020. This is a blend of a stack of four exposures for the ground and water to smooth noise, blended with a single short exposure for the sky, all 20 seconds at f/2.5 and ISO 400. All with the 35mm Canon lens and Canon 6D MkII camera.
With either you can dial in the time and date and see lines pointing toward where the Sun would be, but below the horizon. Scrub through time to move that line to the same azimuth angle as where the comet will be and then see if the comet is sitting in the right direction.
The screen from The Photographer’s Ephemeris app showing the planning map for the image above, with the faint yellow line indicating the line toward the comet’s azimuth.
Move your location to place the line toward the comet over what you want to include in the scene.
The simulation of the real scene above, of the comet over the Prince of Wales Hotel, using TPE 3D app. The simulation matches the real scene very well!
I like The Photographer’s Ephemeris as it links to the companion app TPE3D that can show the stars over the actual topographic landscape. It won’t show the comet, but if you know where it is in the sky you can see if if will clear mountains, for example.
The Astrospheric app prediction of skies for me for the night I prepared this blog. Not great! But clear skies could be found to to east with a fresh hours drive.
Planning for the Weather
All is for nought if the sky is cloudy.
For planning astro shoots I like the app Astrospheric (https://www.astrospheric.com). It is free for mobile and there is a web-based version. It uses Environment Canada predictions of cloud cover for North America. Use it to plan where to be for clear skies first, then figure out the best scenic site that will be under those clear skies.
Be happy to get a well-composed and exposed single shot.
But … if you wish to try some more advanced techniques for later processing, here are suggestions.
A panorama of the sky just before midnight on July 13, 2020 from Waterton Lakes National Park, Alberta, Canada with Comet NEOWISE (C/2020 F3) over the front range of the Rocky Mountains and an arc of aurora across the north. This is a 6-segment panorama with the 35mm Canon lens at f/2.2 for 25 seconds each at ISO 800 with the Canon 6D MkII and stitched with Adobe Camera Raw.
1. Panoramas
On several nights I’ve found a panorama captures the scene better, including the comet in context with the wide horizon, sweep of the twilight arch or, as we’ve had in western Canada, some Northern Lights.
Take several identical exposures, moving the camera 10 to 15 degrees between images. Editing programs such as Lightroom, Adobe Camera Raw, ON1 Photo RAW and Affinity Photo have panorama stitching routines built in.
My Nightscapes and Time-Lapses ebook shown above provides tutorials for shooting and processing nightscape panoramas.
What a magical scene this was! This is Comet NEOWISE (C/2020 F3) over the sweep of the Red Deer River and Badlands from Orkney Viewpoint north of Drumheller, Alberta, on the morning of July 11, 2020. Light from the waning gibbous Moon provides the illumination, plus twilight. This nicely shows the arch of the twilight colours. This is a 6-segment panorama with the 50mm Sigma lens at f/2.8 and Canon 6D MkII at ISO 400 for 13 seconds each. Stitched with Adobe Camera Raw. Topaz DeNoise AI and Sharpen AI applied.
2. Exposure Blending
If you have a situation where the sky is bright but the ground is dark, or vice versa, and one exposure cannot record both well, then shoot two exposures, each best suited to recording the sky and ground individually.
For example, on moonless nights I’ve been shooting 2- to 5-minute long exposures for the ground and with the lens stopped down to f/5.6 or f/8 for better depth of field to be sure the foreground was in focus.
This is Comet NEOWISE (C/2020 F3) over the Horseshoe Canyon formation near Drumheller, Alberta on the night of July 10-11, 2020, taken about 2 a.m. MDT with the comet just past lower culmination with it circumpolar at this time. Warm light from the rising waning gibbous Moon provides the illumination. This is a blend of six 1- and 2-minute exposures for the ground at ISO 800 and 400 stacked to smooth noise, with a single 30-second exposure at ISO 1600 for the sky, all with the 35mm Canon lens at f/2.8 and Canon 6D MkII.
3. Exposure Stacking
To reduce noise, it is also possible to shoot multiple exposures to stack later in processing to smooth noise. This is most useful in scenes with dark foregrounds where noise is most obvious, and where I will stack 4 to 8 images.
Just how to do this is beyond the scope of this blog. I also give step-by-step tutorials for the process in my Nightscapes and Time-Lapses ebook shown above. It be done in Photoshop, or in specialized programs such as StarryLandscapeStacker (for MacOS) or Sequator (Windows).
But shoot the images now, and learn later how to use them.
A close-up of Comet NEOWISE (C/2020 F3) on the night of July 14/15, 2020 with a 135mm telephoto lens. This is a stack of nine 1-minute exposures with the 135mm Canon lens wide-open at f/2 and Canon EOS Ra camera at ISO 800. The camera was on the iOptron SkyGuider Pro tracker tracking the stars not the comet. Stacked and aligned in Photoshop.
4. Tracking the Sky
If it is close-ups of the comet you want, then you will need to use a 135mm to 300mm telephoto lens (especially later in the summer when the comet is farther away and smaller).
But with such lenses any exposure over a few seconds will result in lots of trailing.
The iOptron SkyGuider Pro and 135mm lens used to take the close-up shot of the comet above.
The solution is a tracking device such as the Sky-Watcher Star Adventurer or iOptron SkyGuider. These need to be set up so their rotation axis aims at the North Celestial Pole near Polaris. The camera can then follow the stars for the required exposures of up to a minute or more needed to record the comet and its tails well.
This is the Sky-Watcher Star Adventurer. All trackers have a polar axis that needs to be aligned to the Celestial Pole, near Polaris.
Just how to use a tracker is again beyond the scope of this blog. But if you have one, it will work very well for comet shots with telephoto lenses. However, trackers are not essential for wide-angle shots, especially once the Moon begins to light the sky.
But later in the summer when the comet is fainter and smaller, a tracked and stacked set of telephoto lens images will likely be the best way to capture the comet.


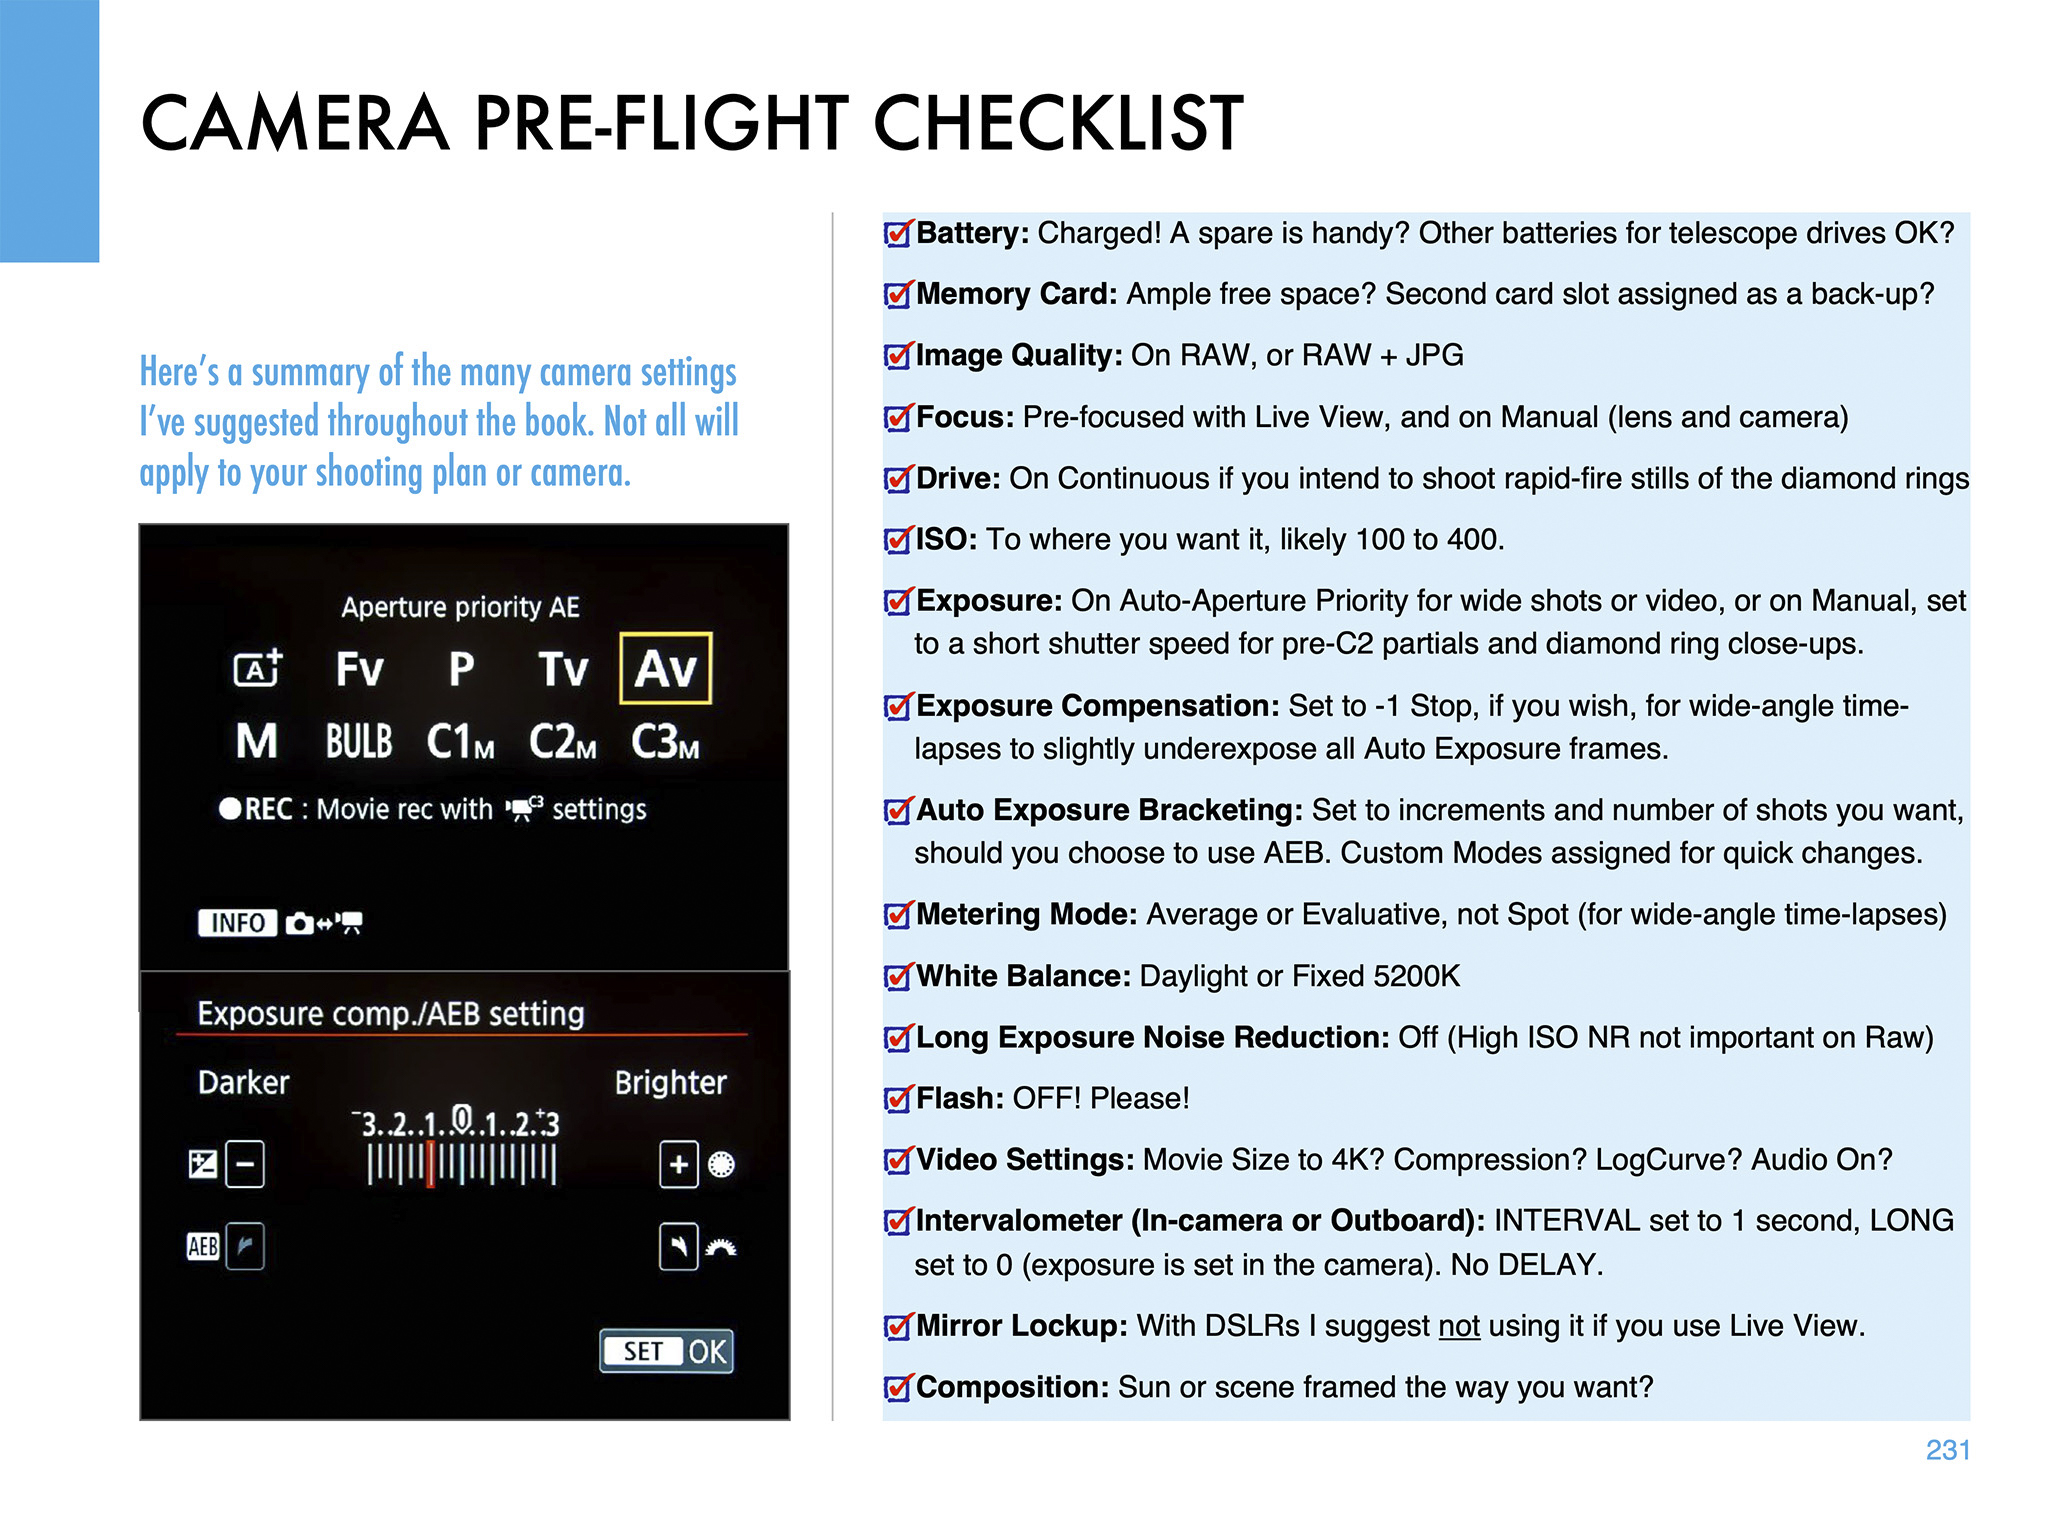


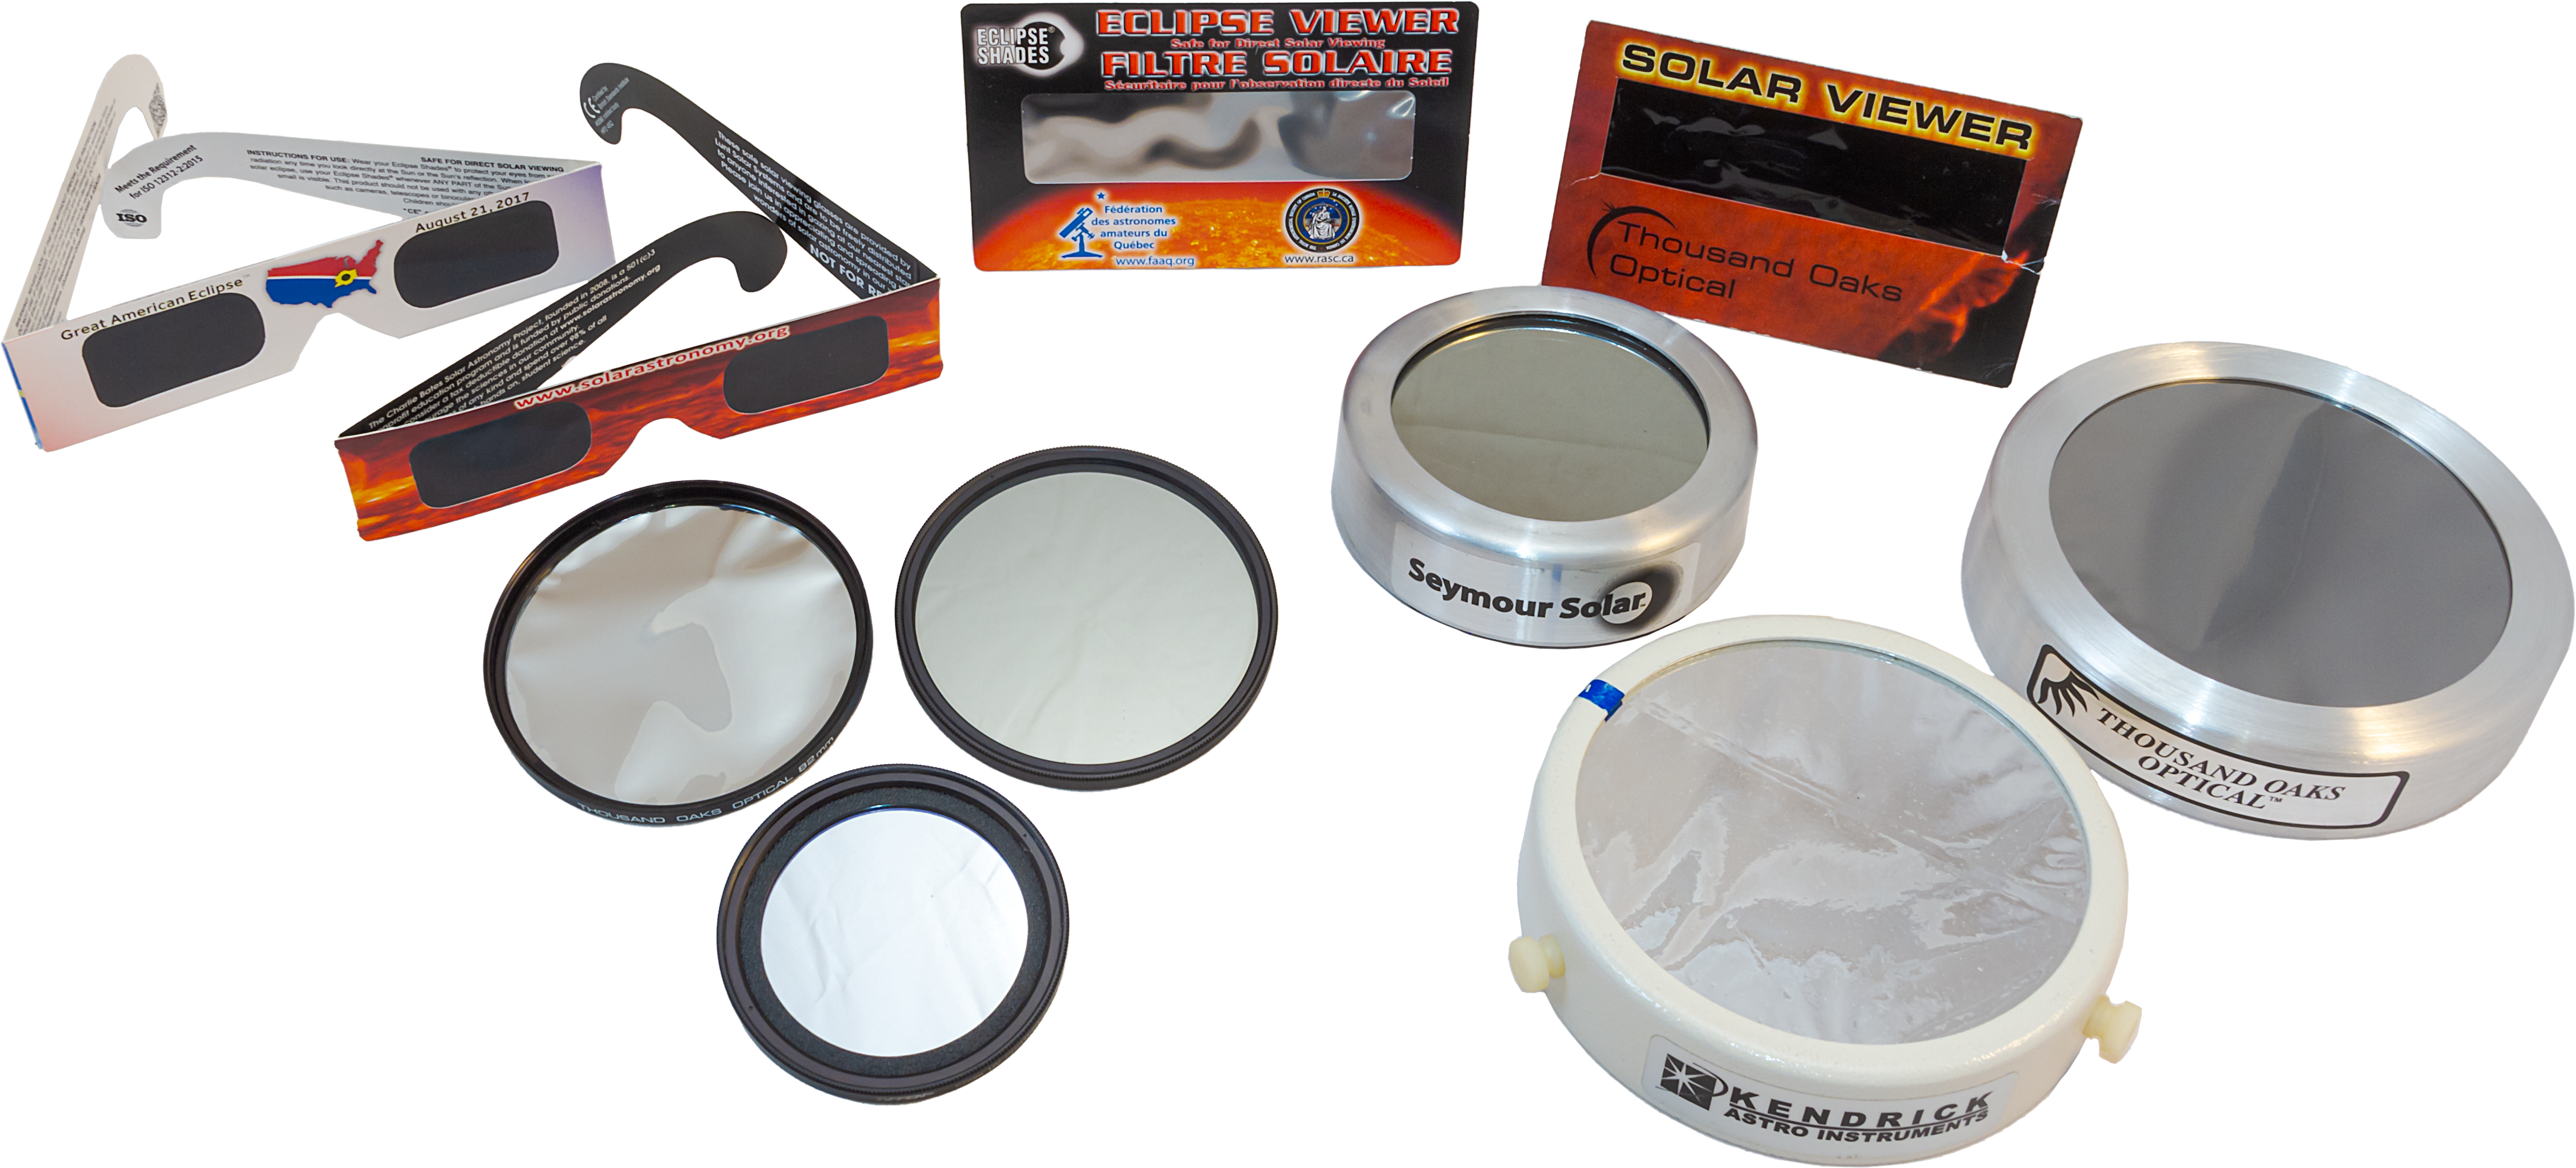

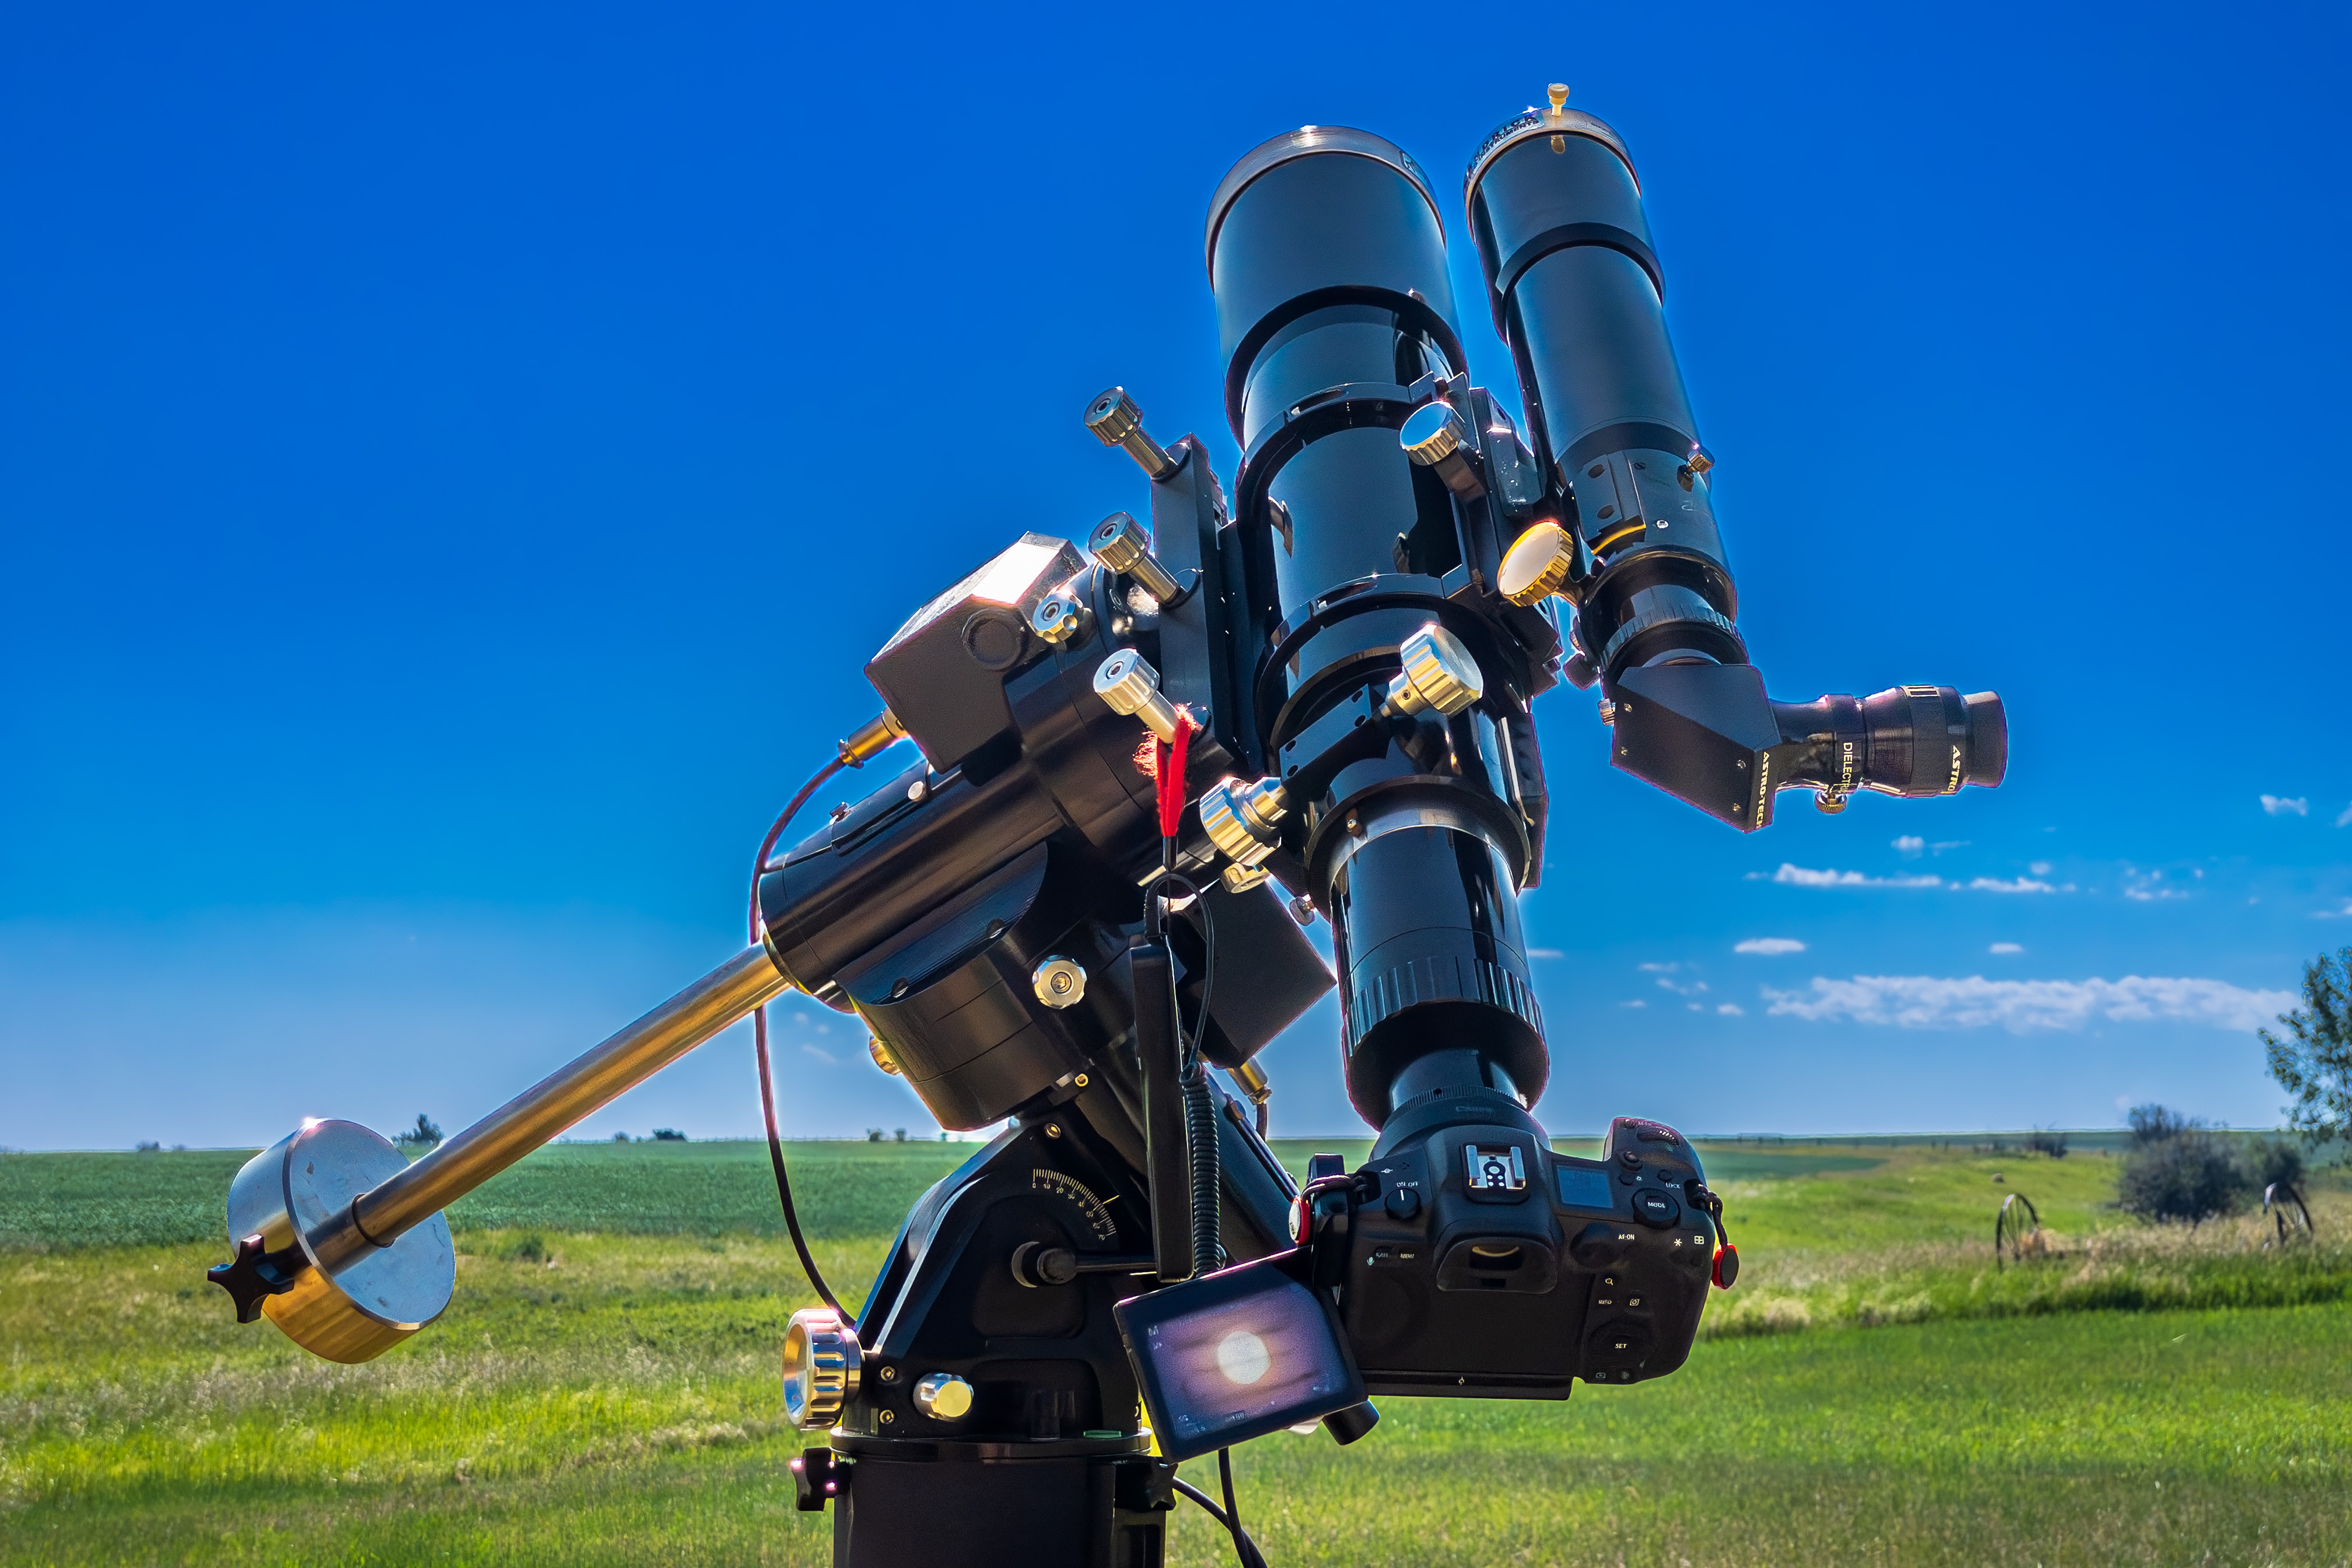
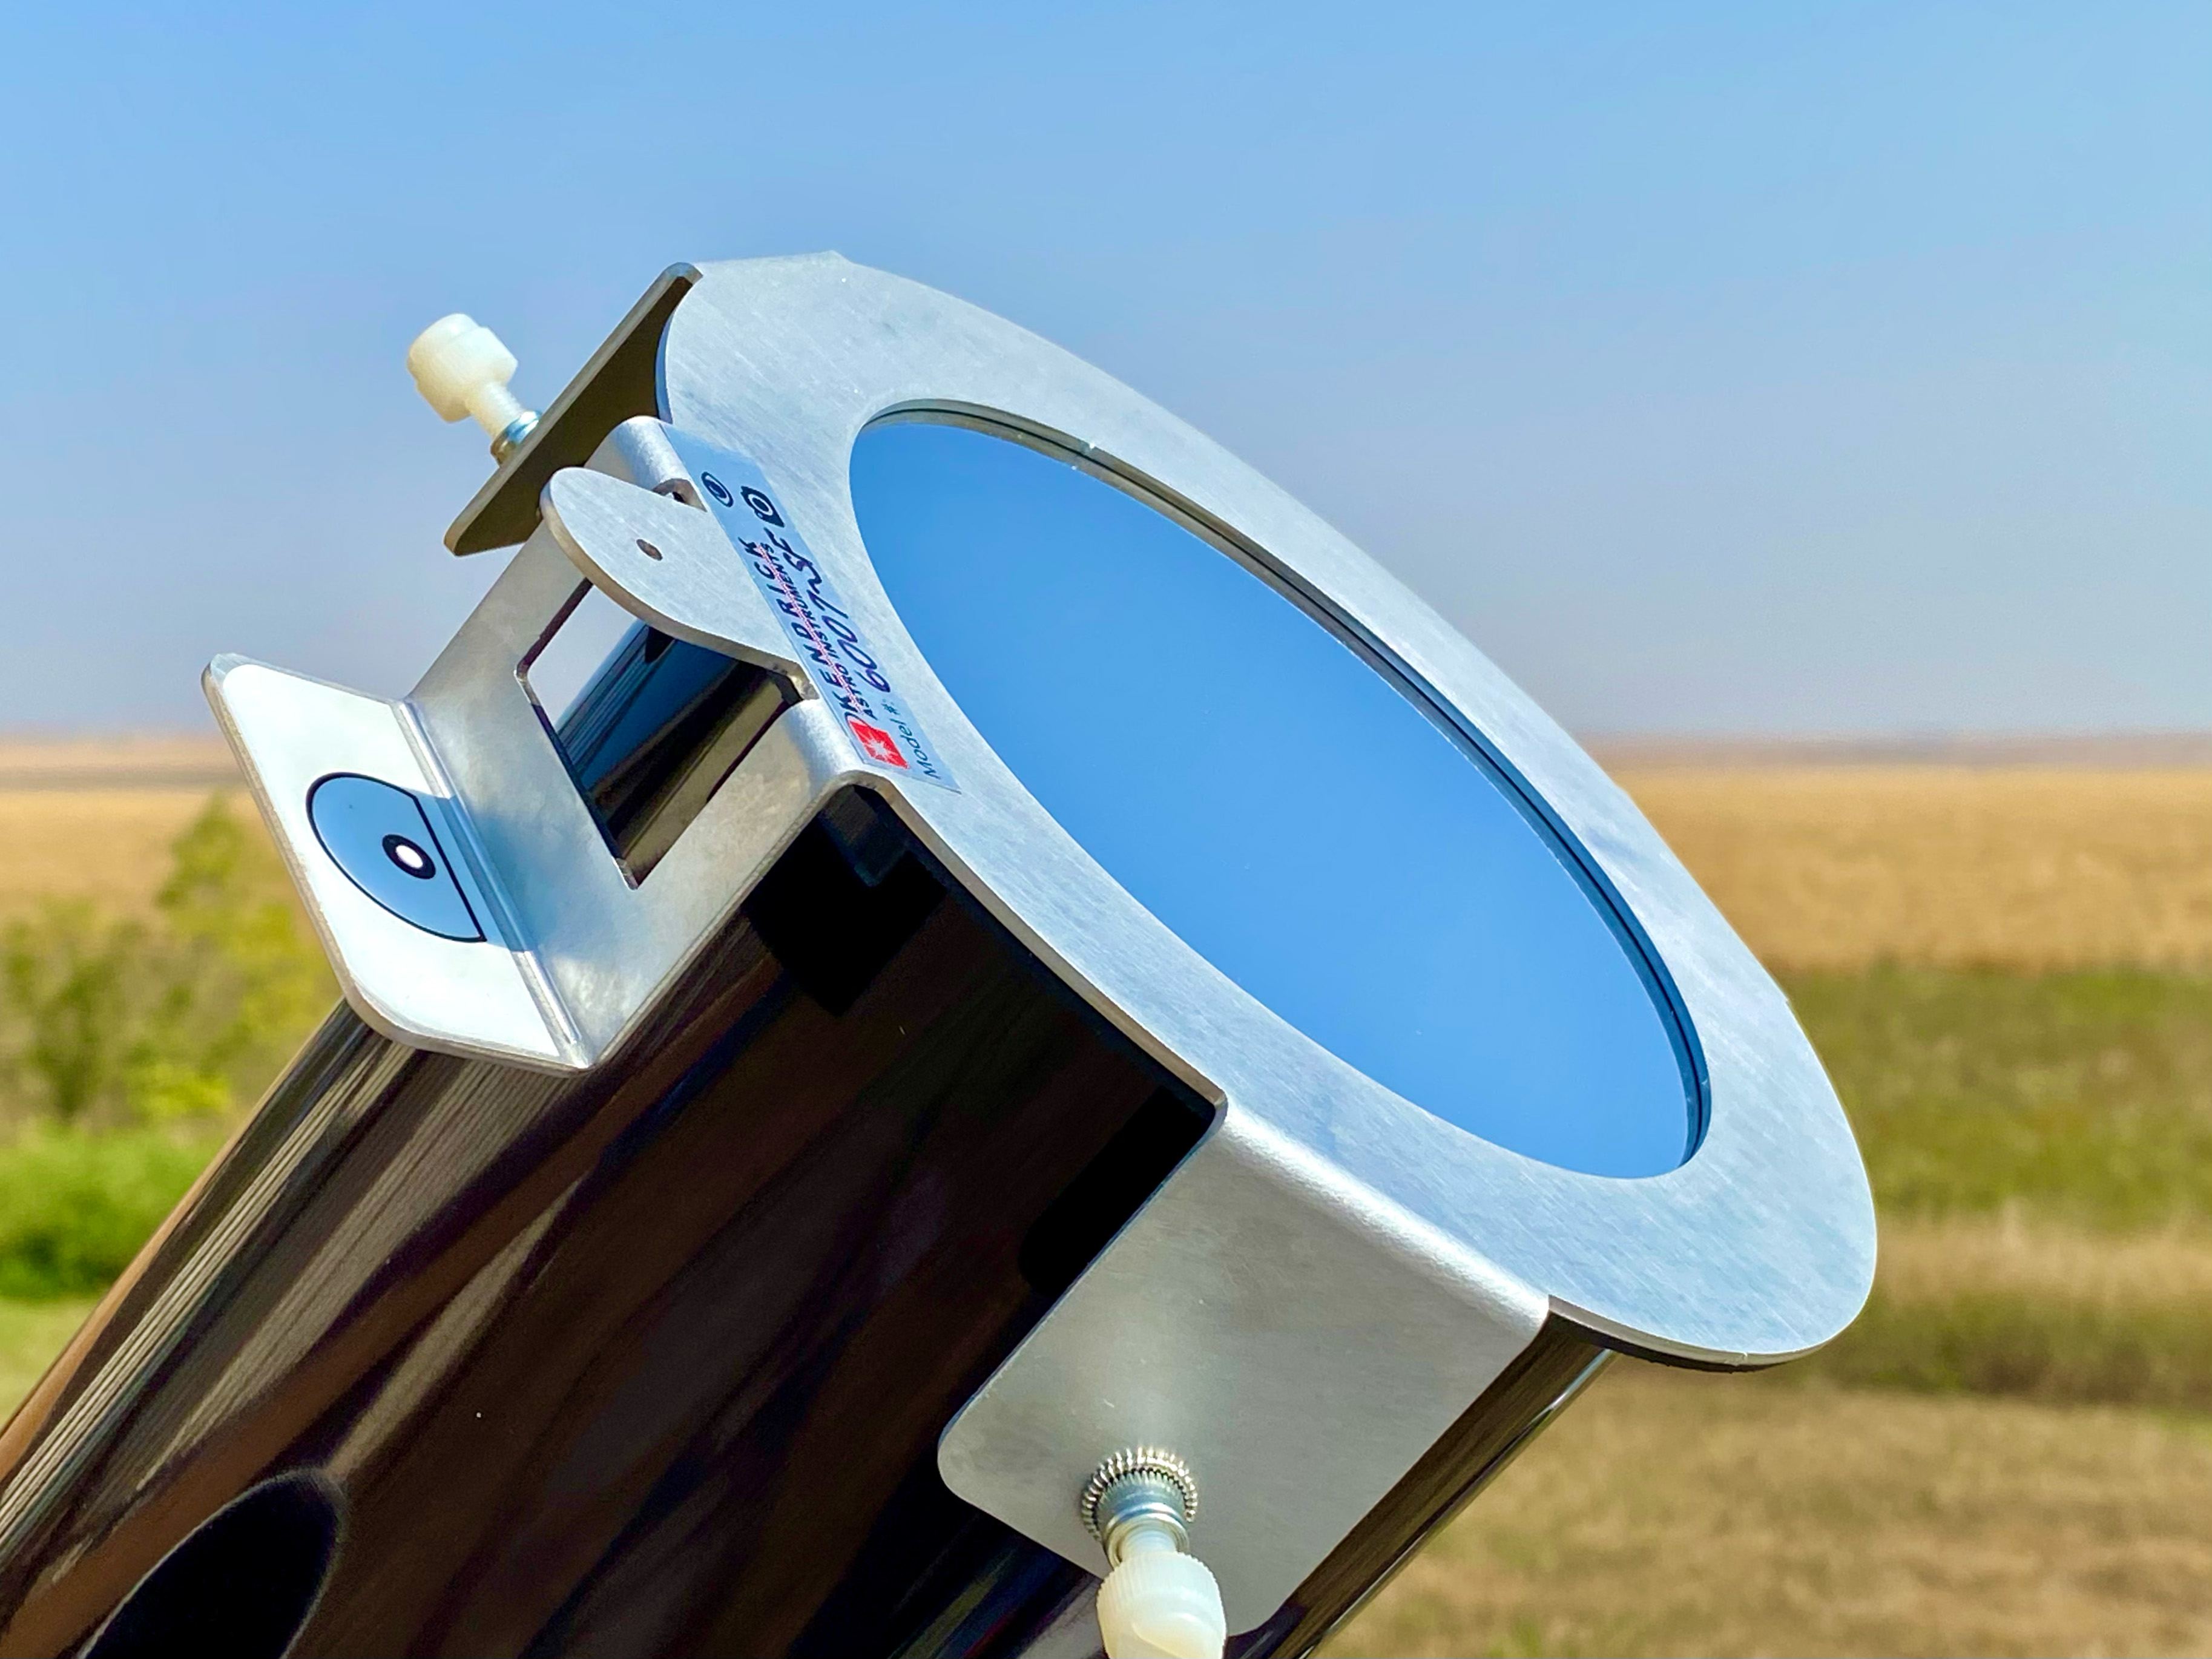


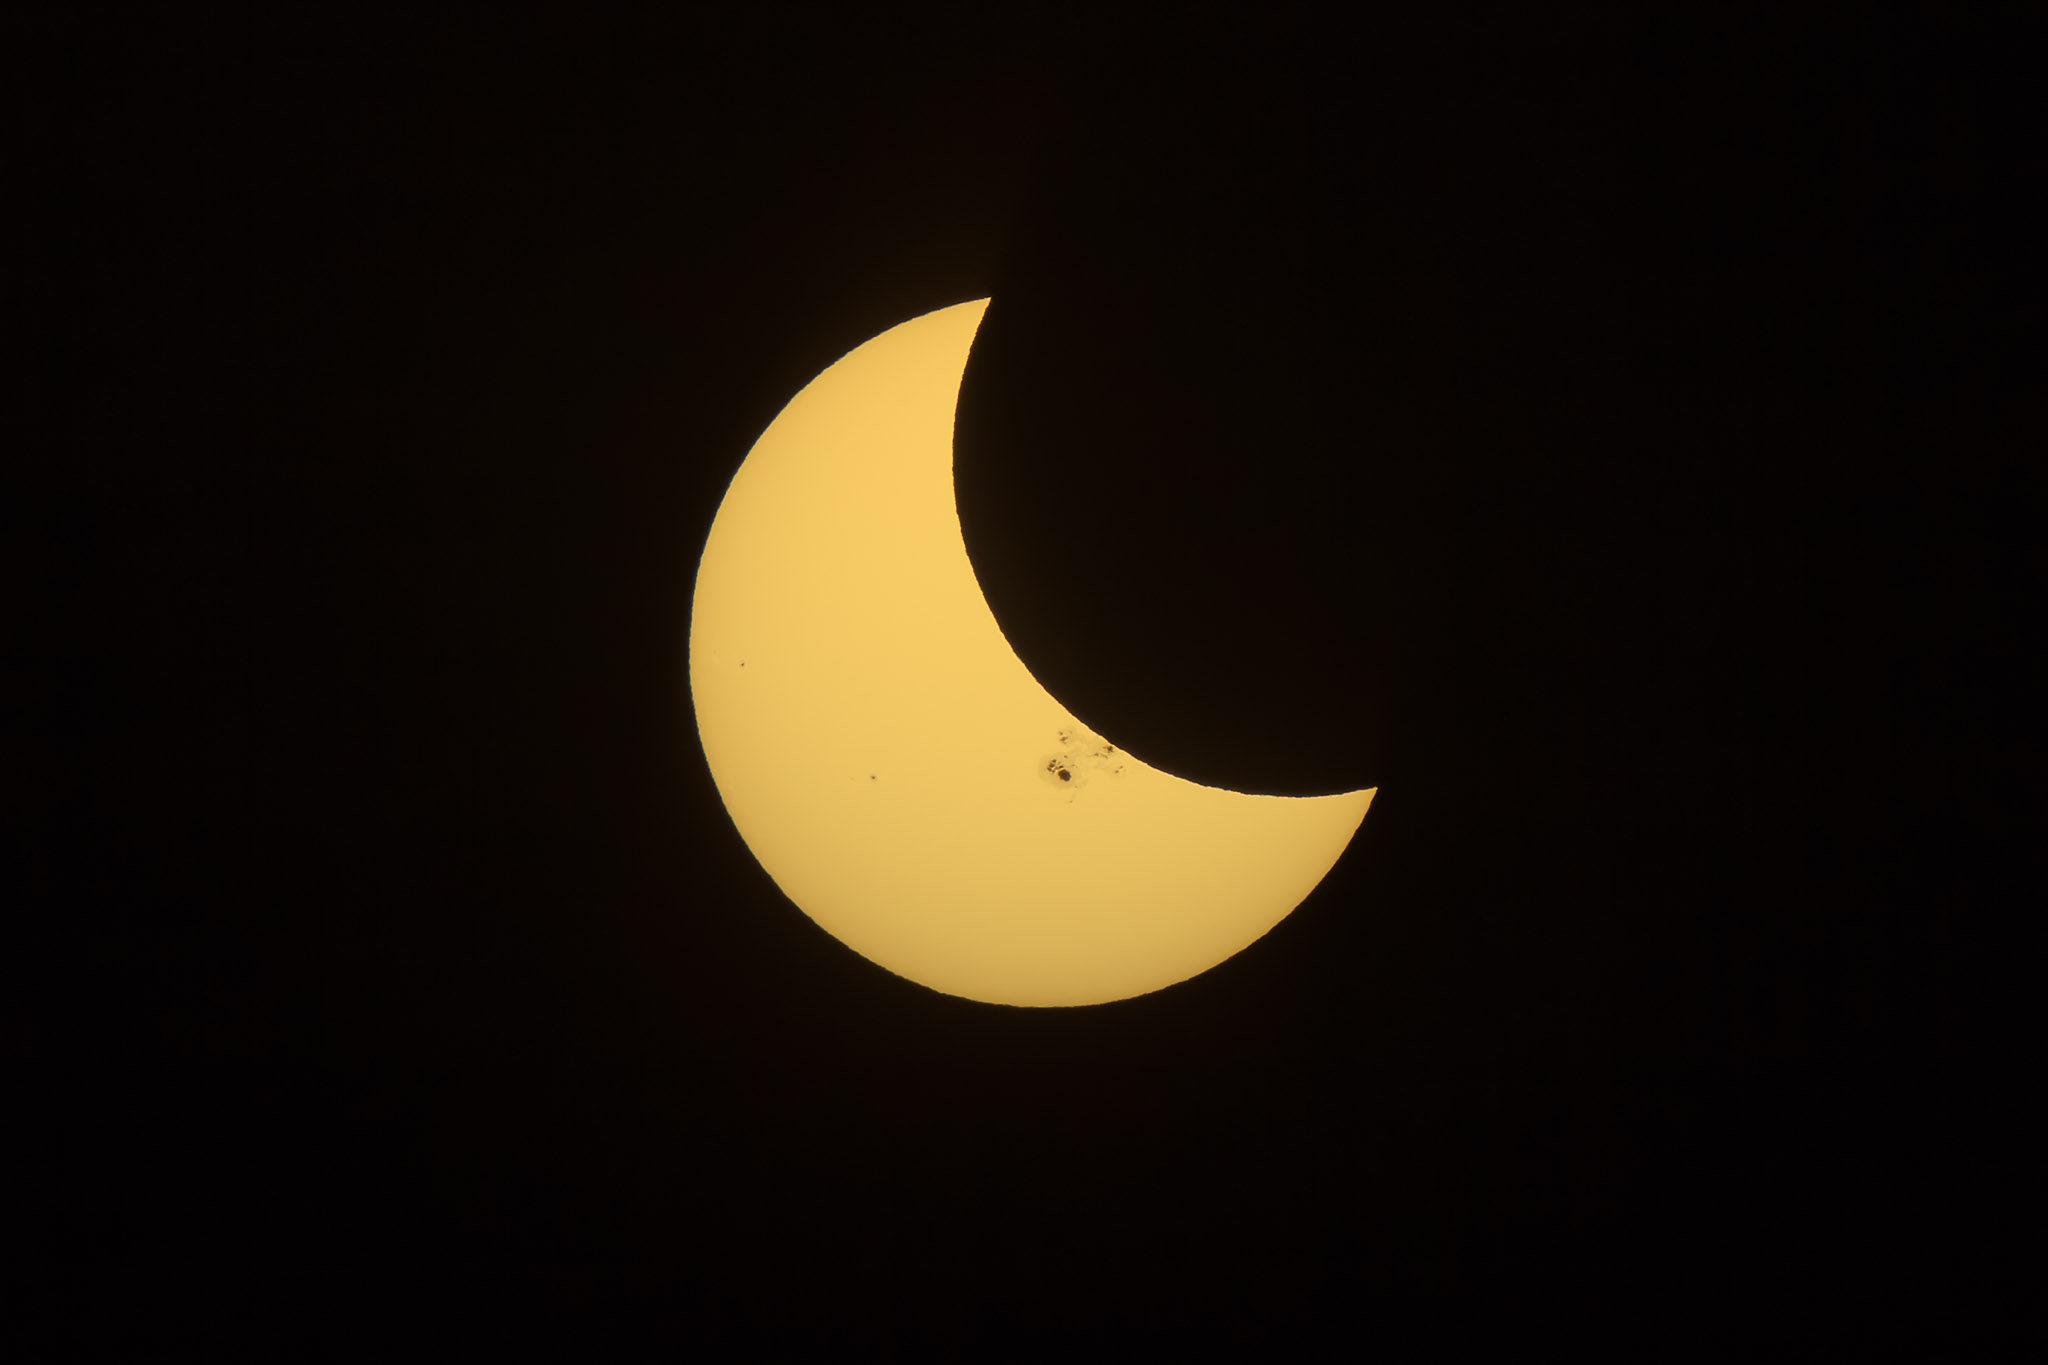
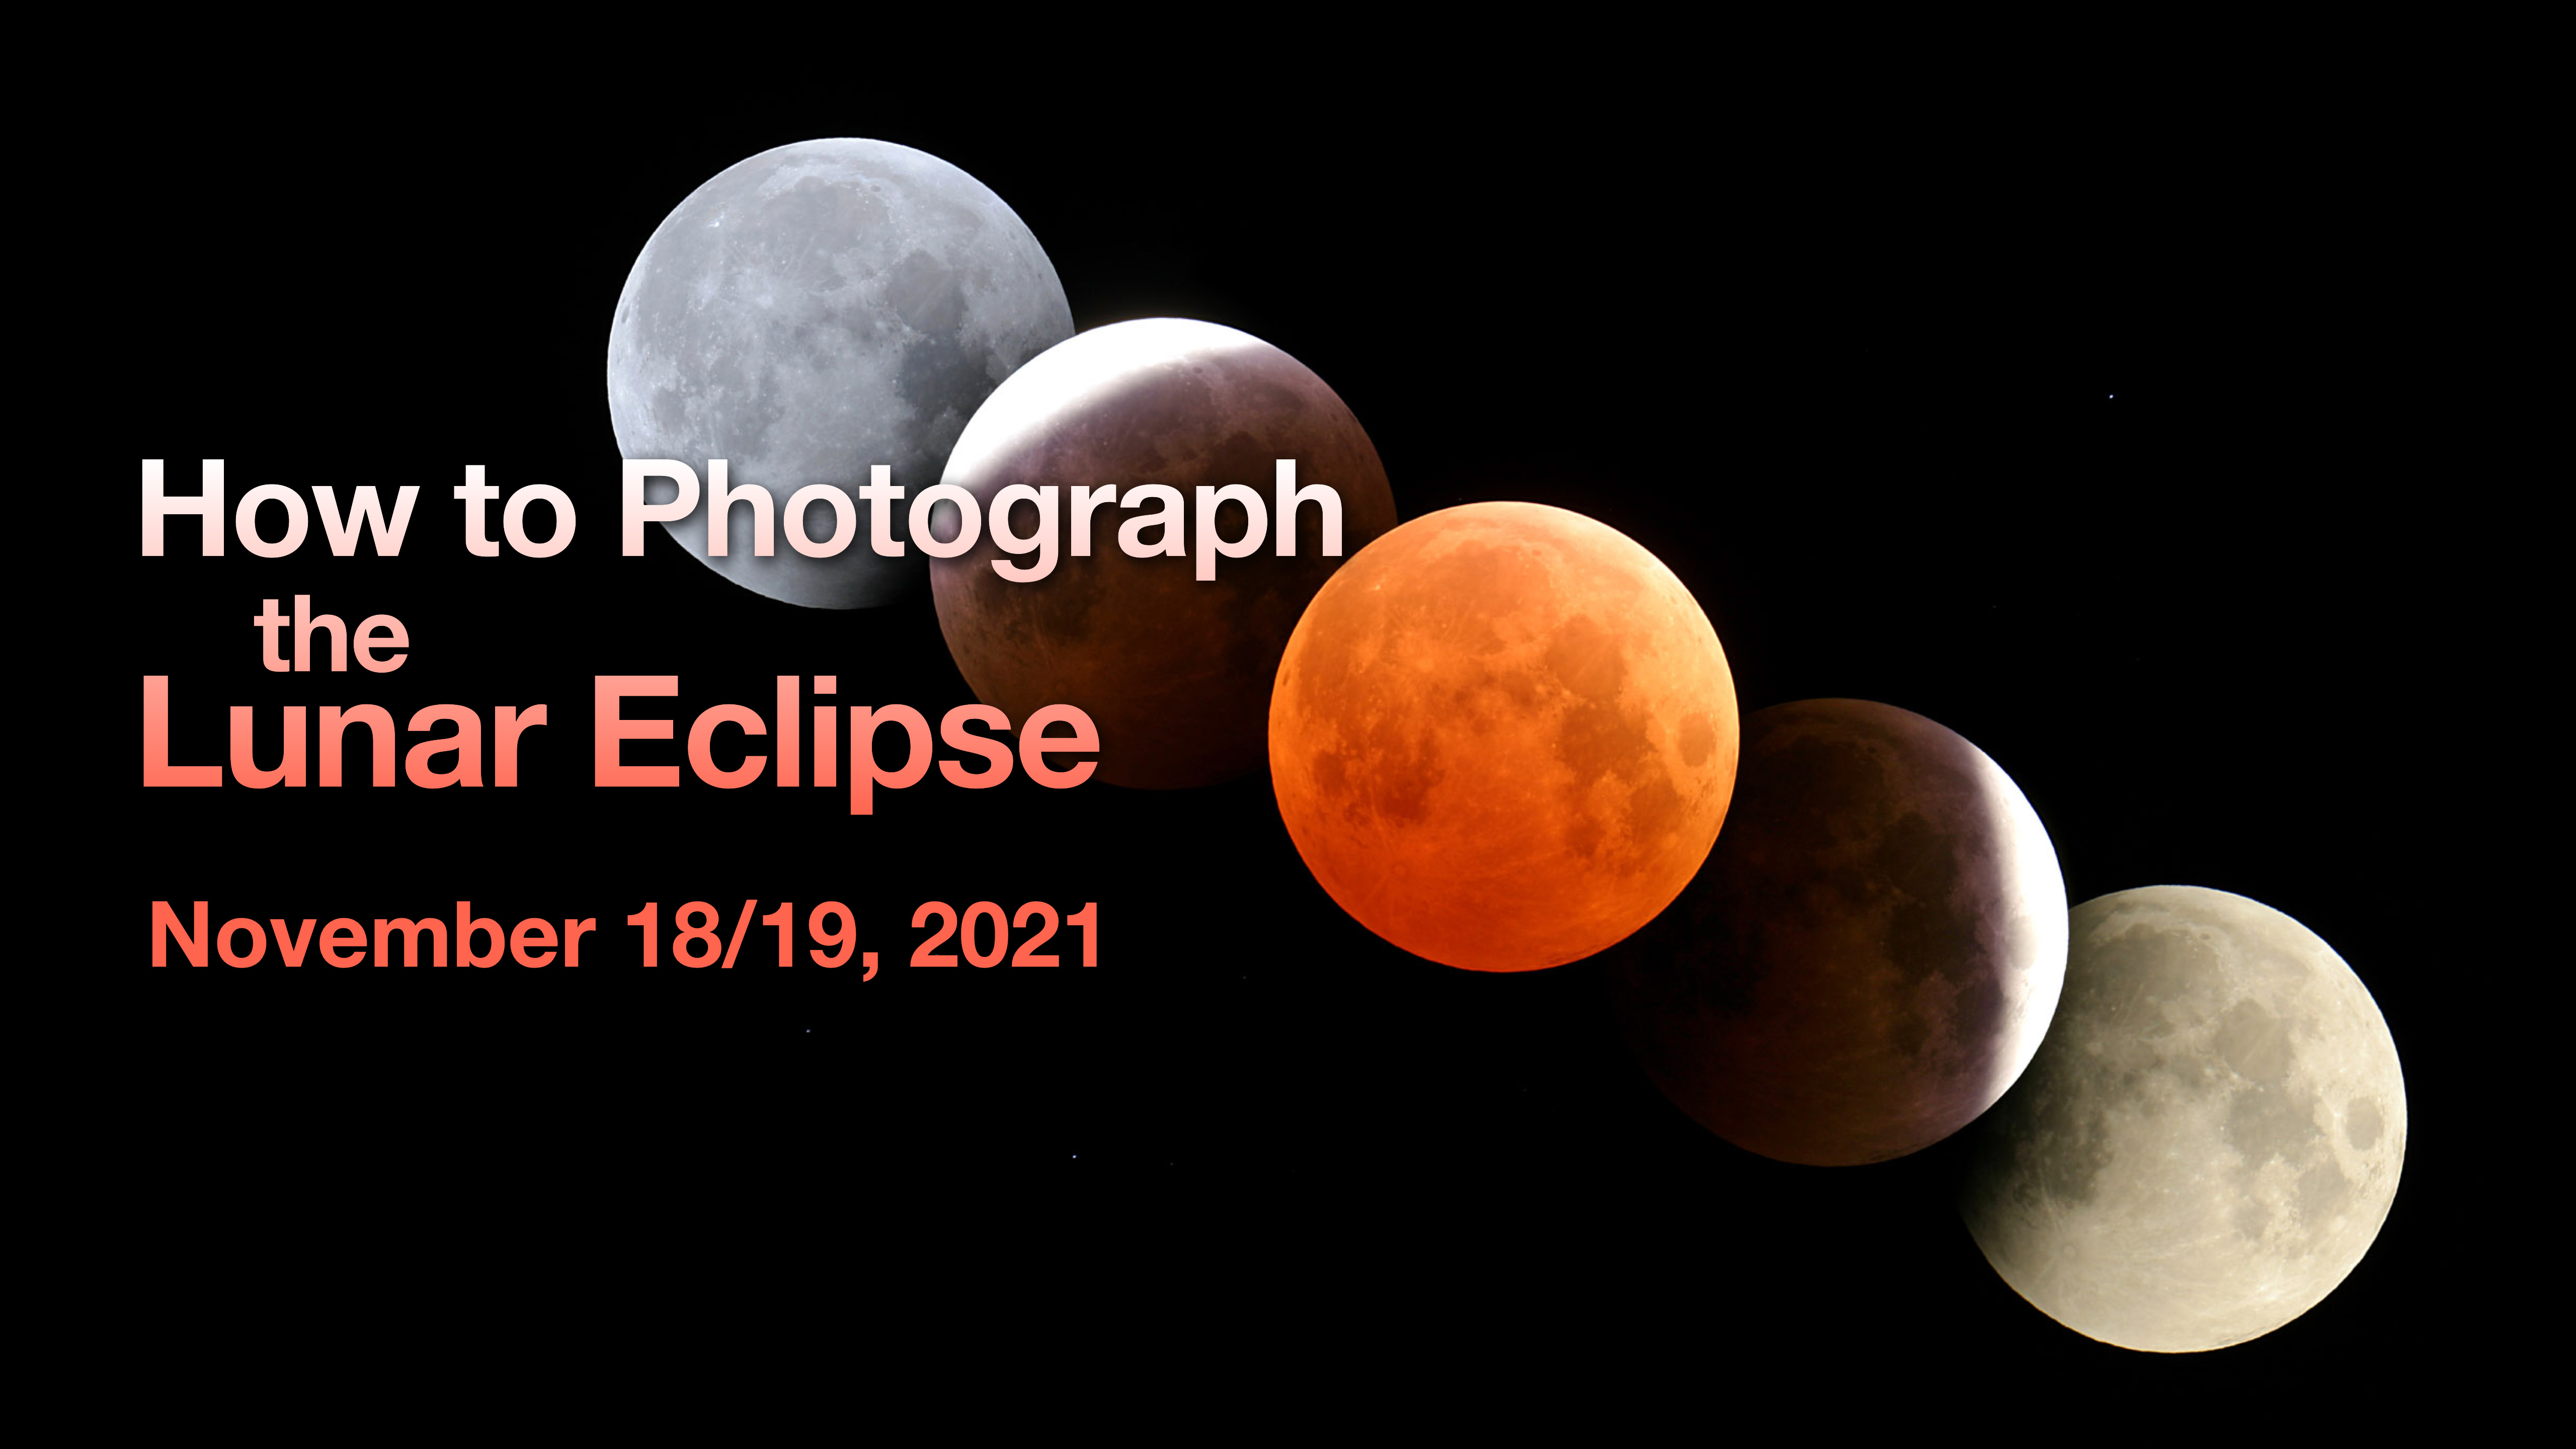

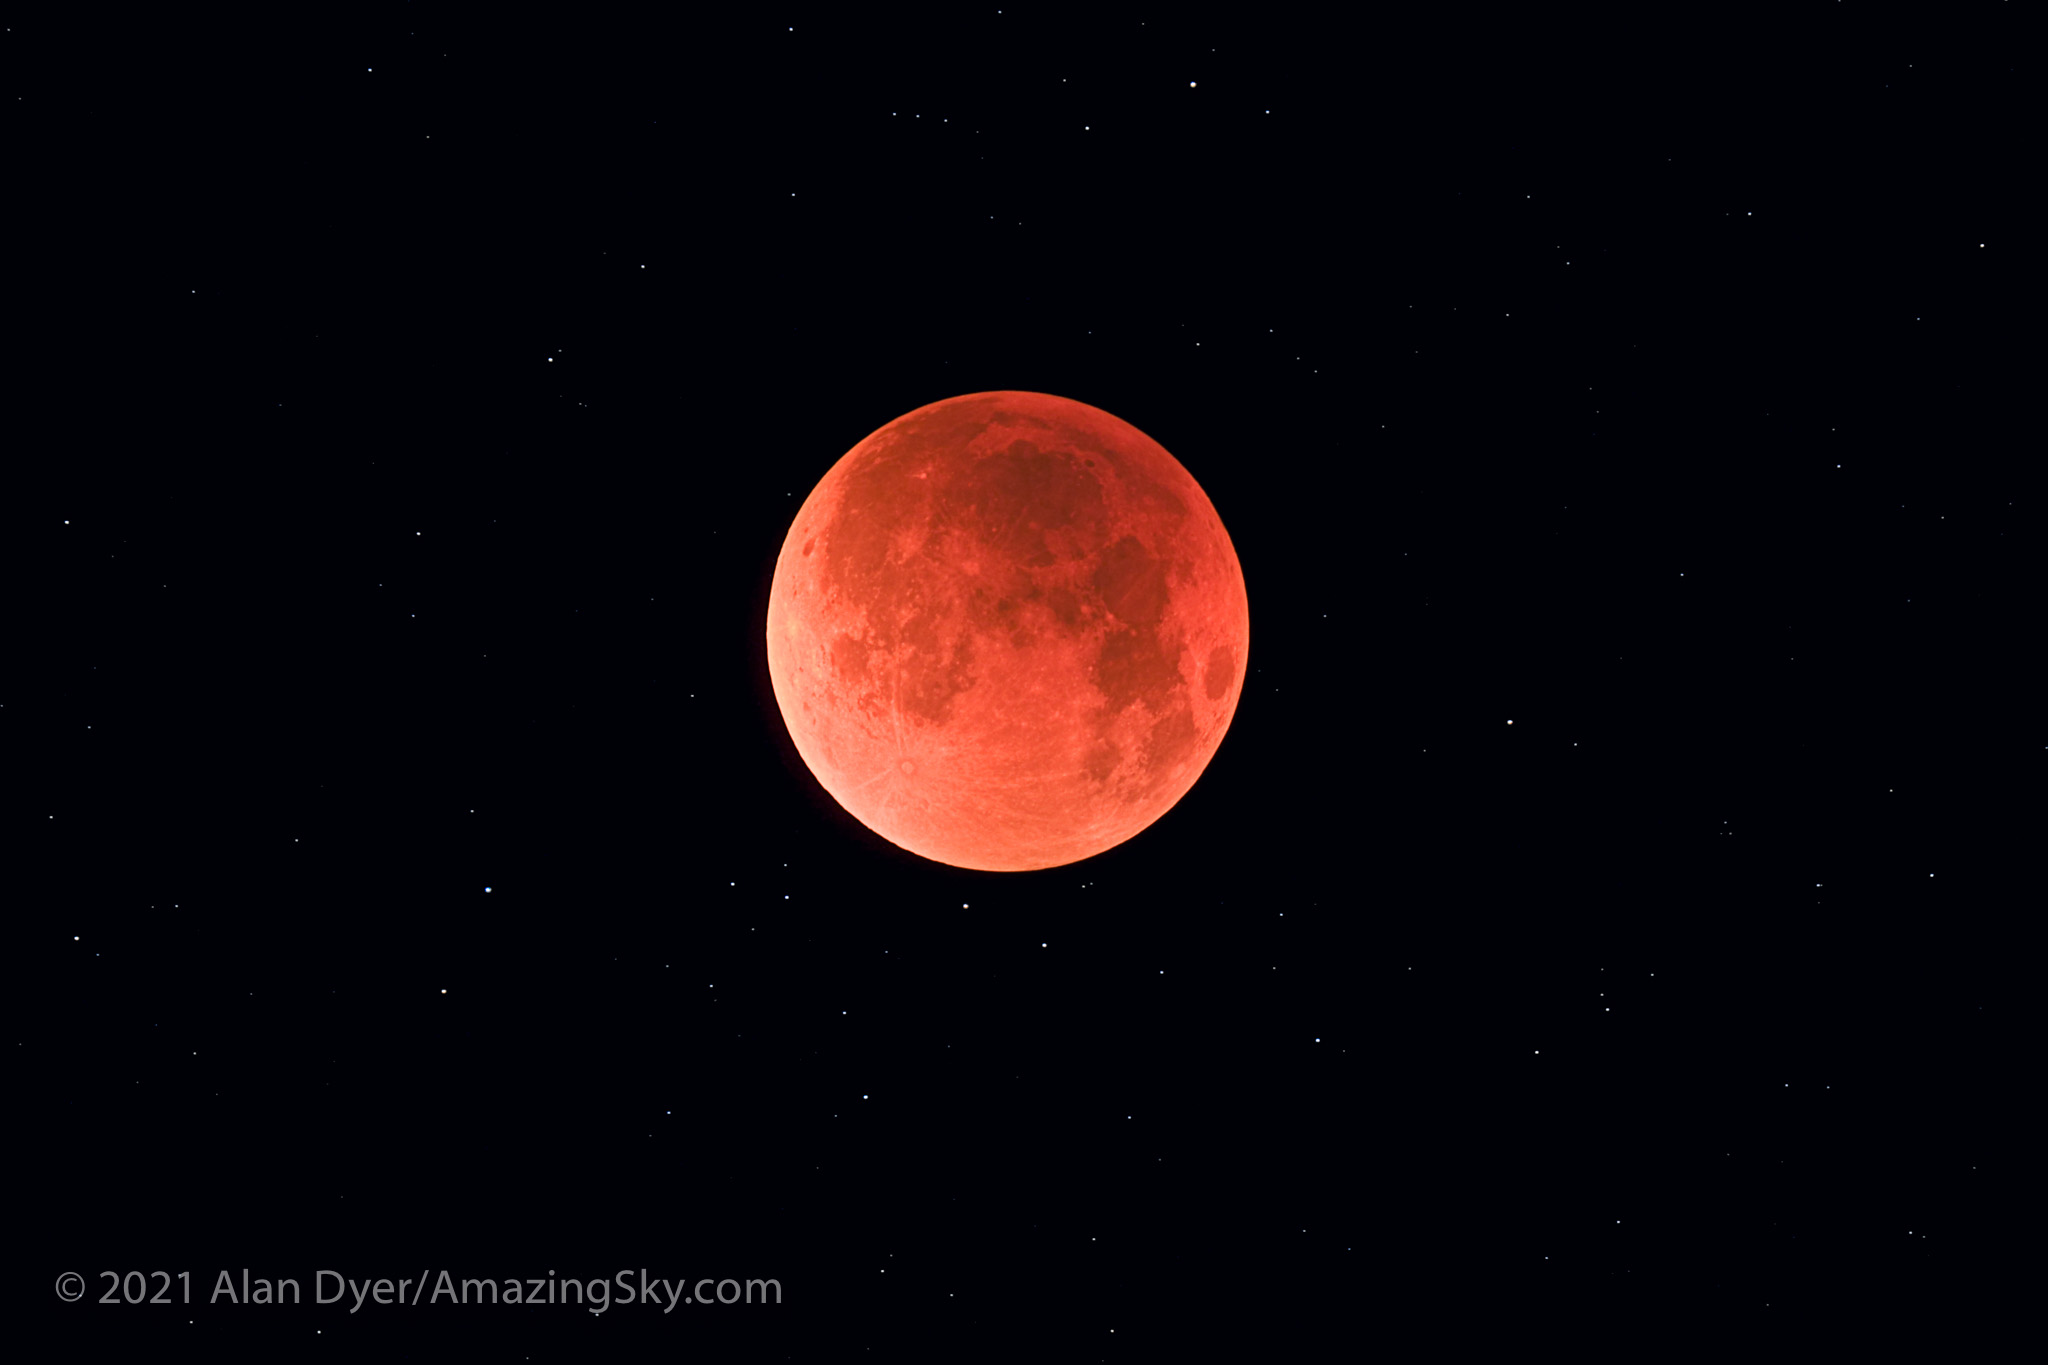
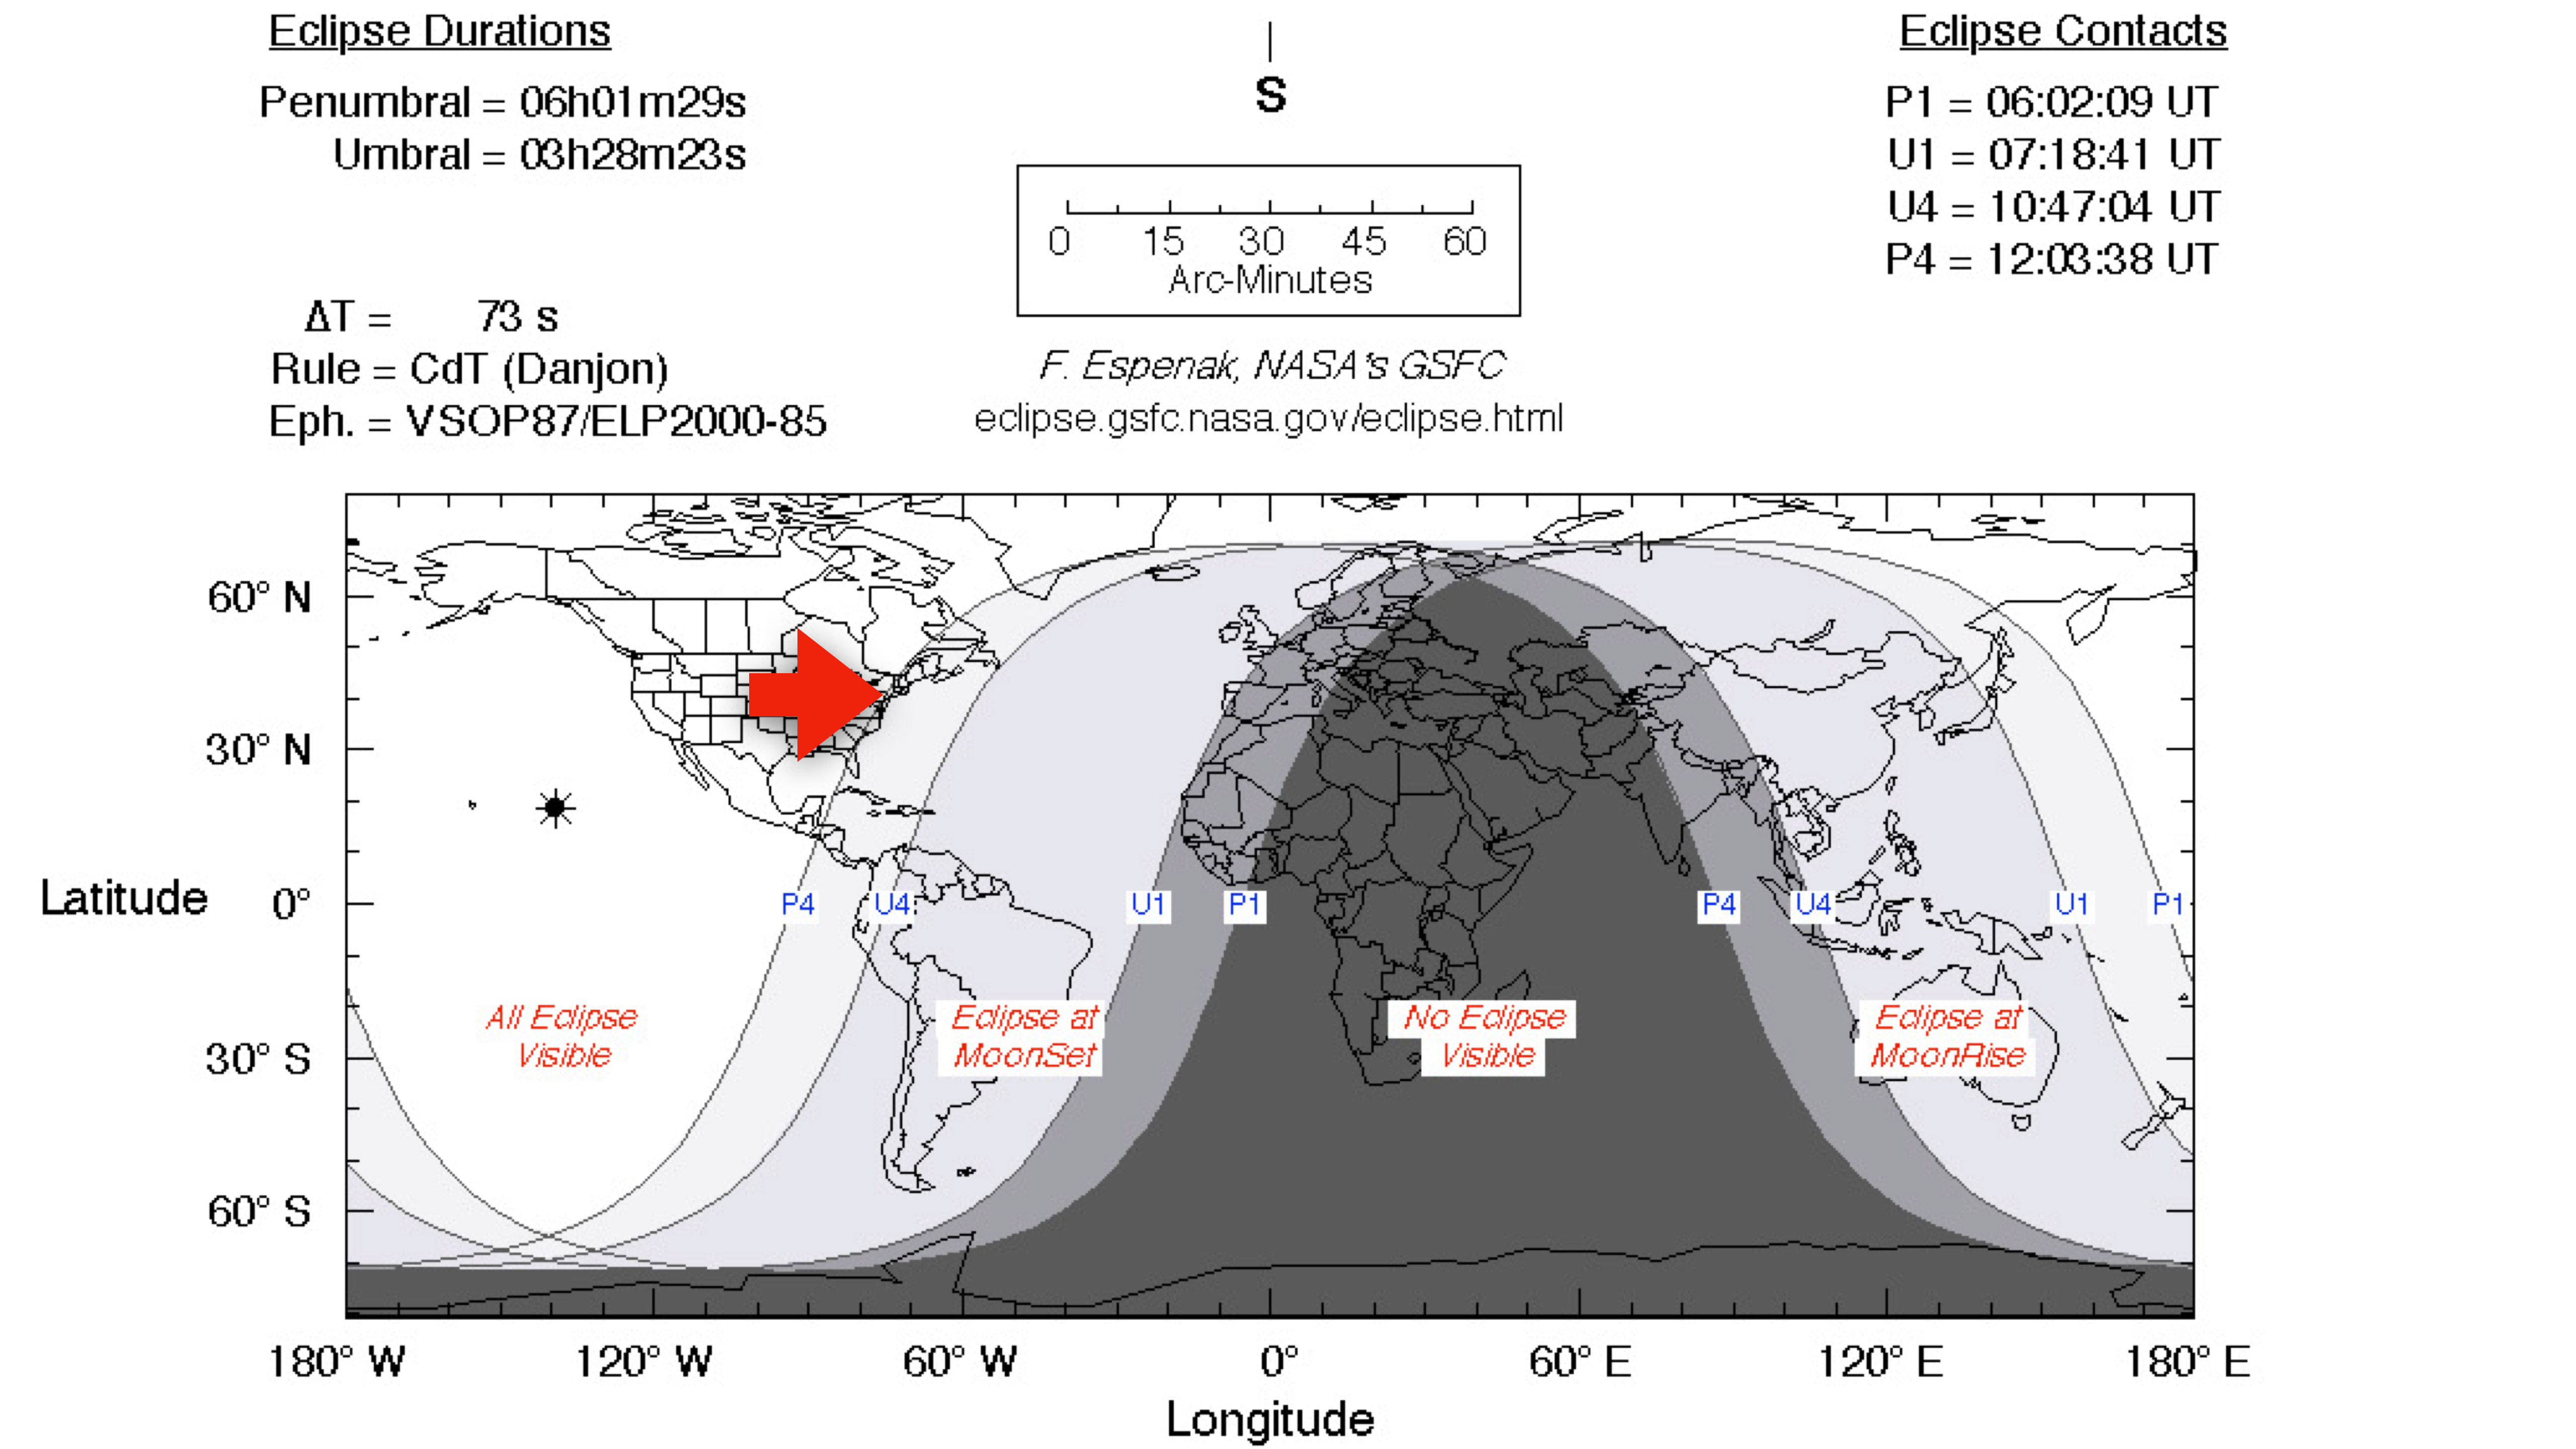
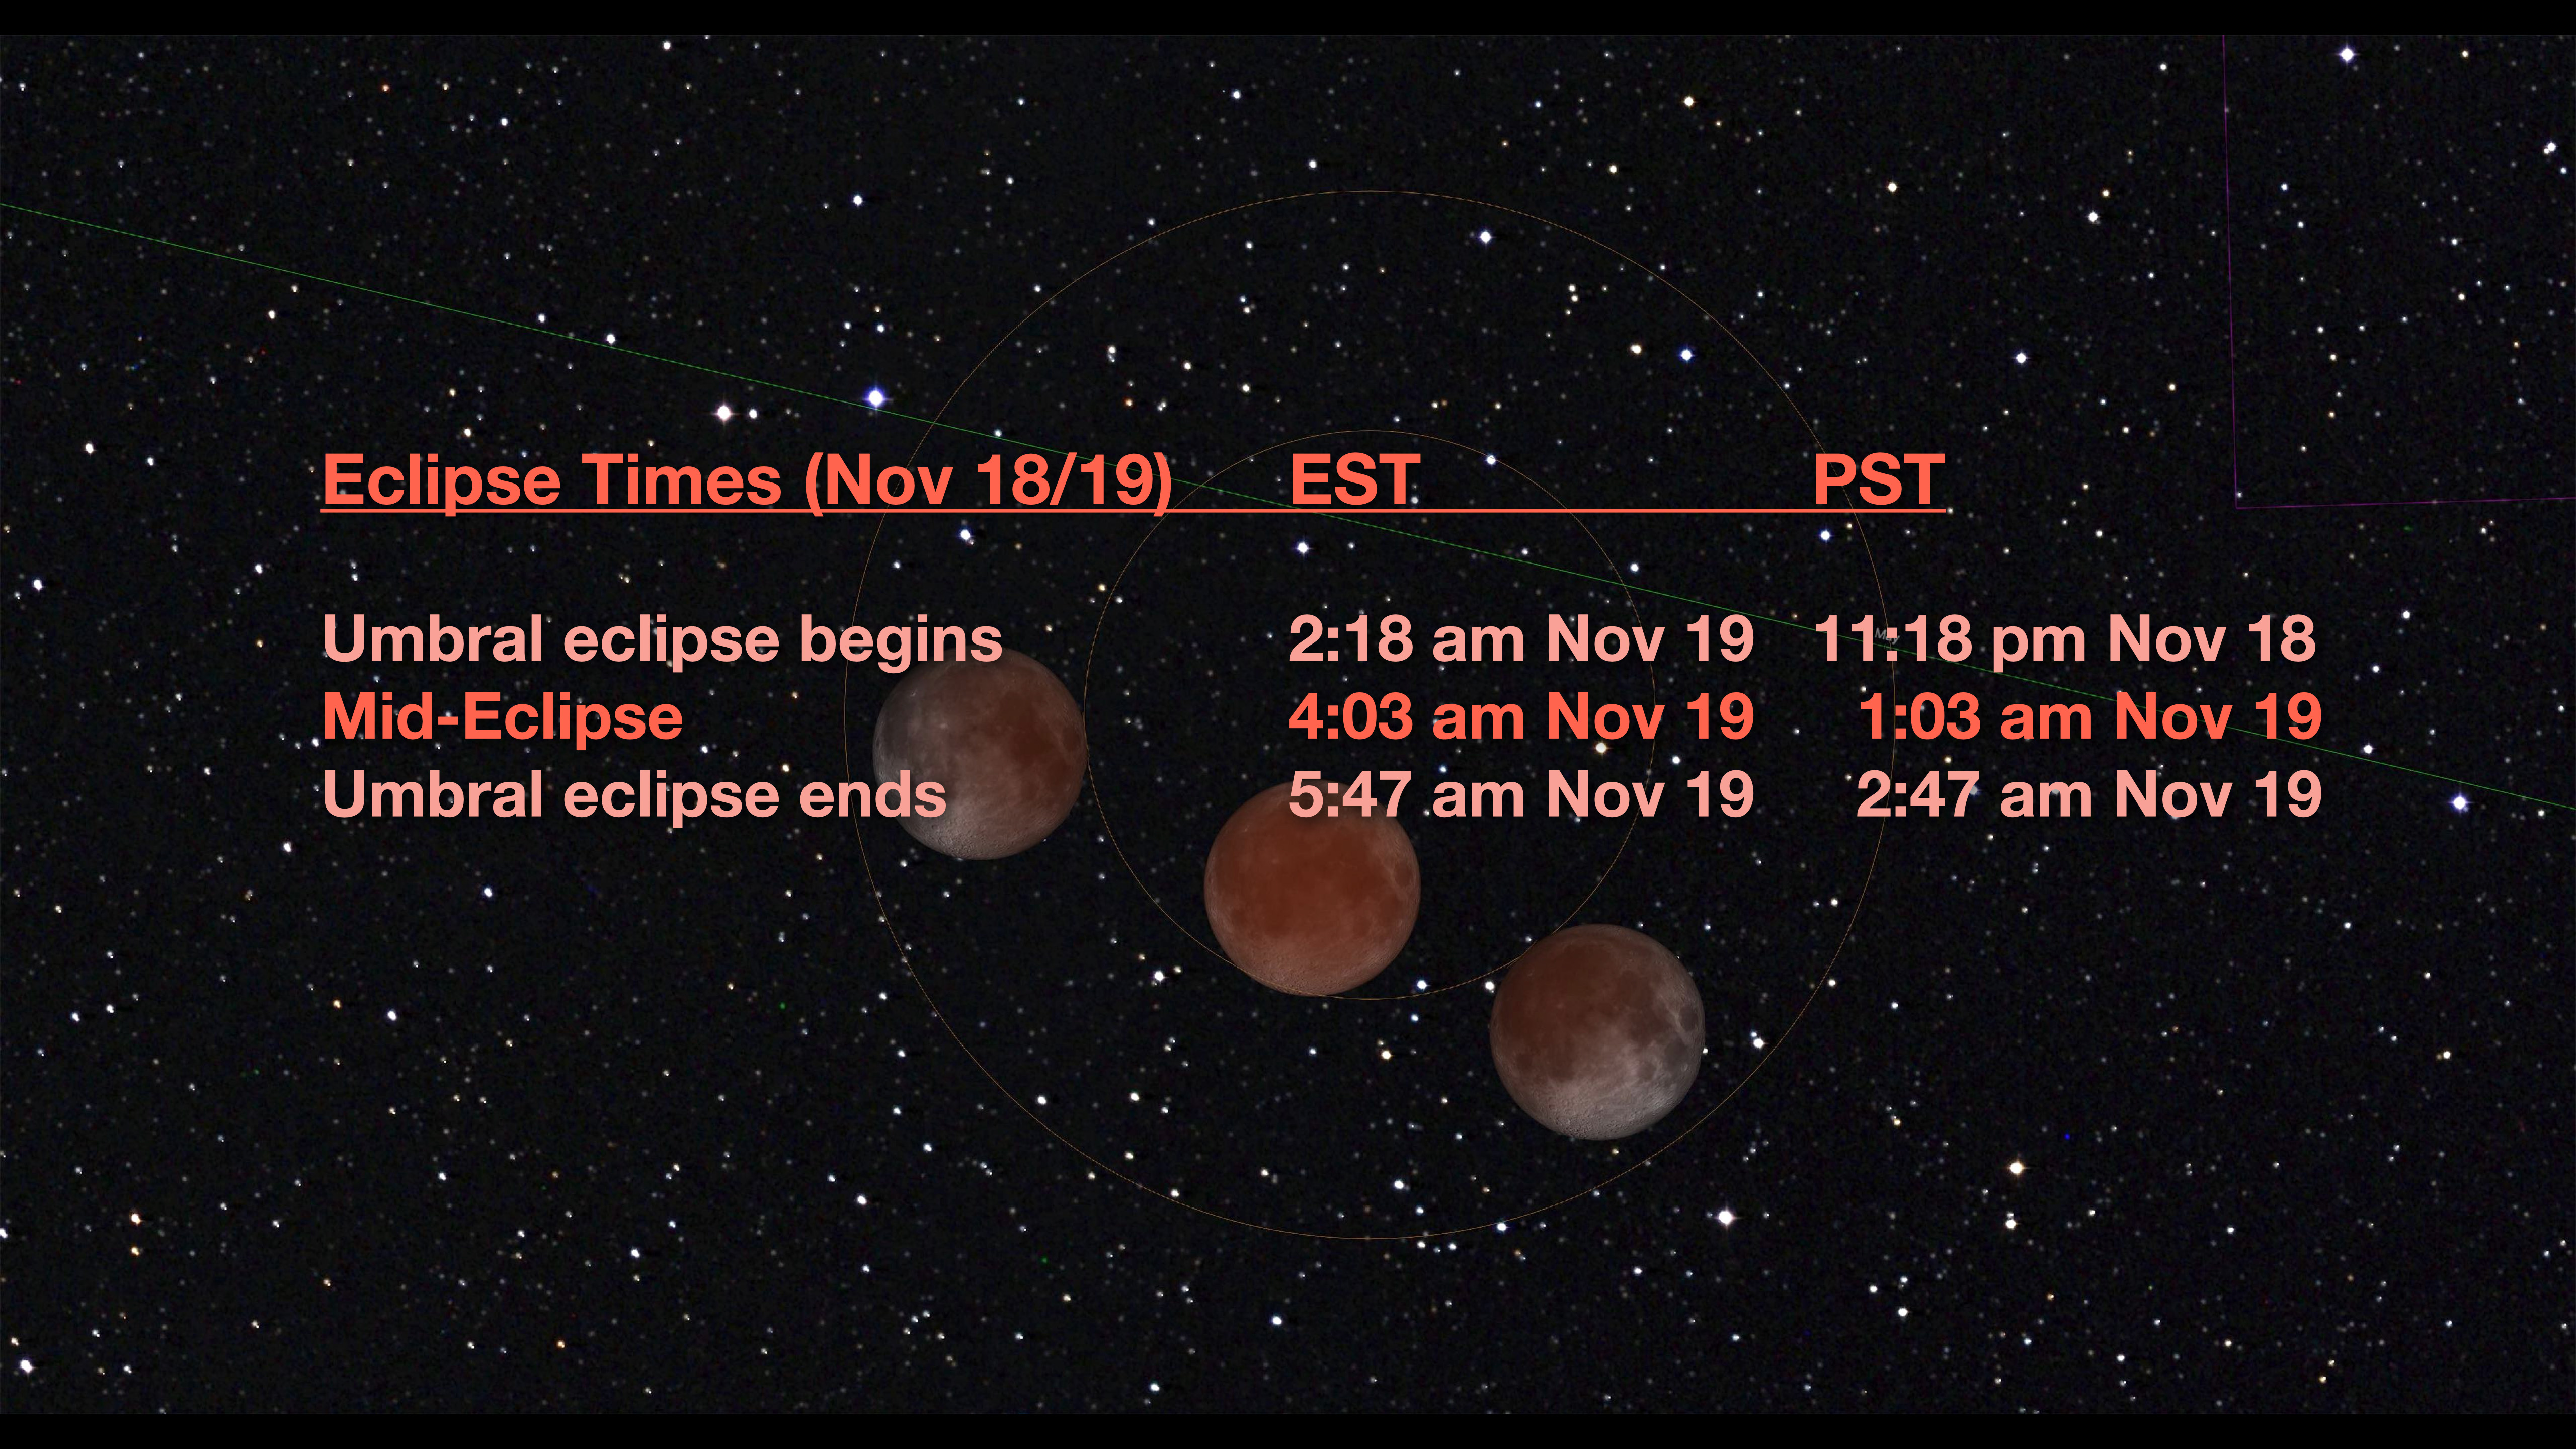

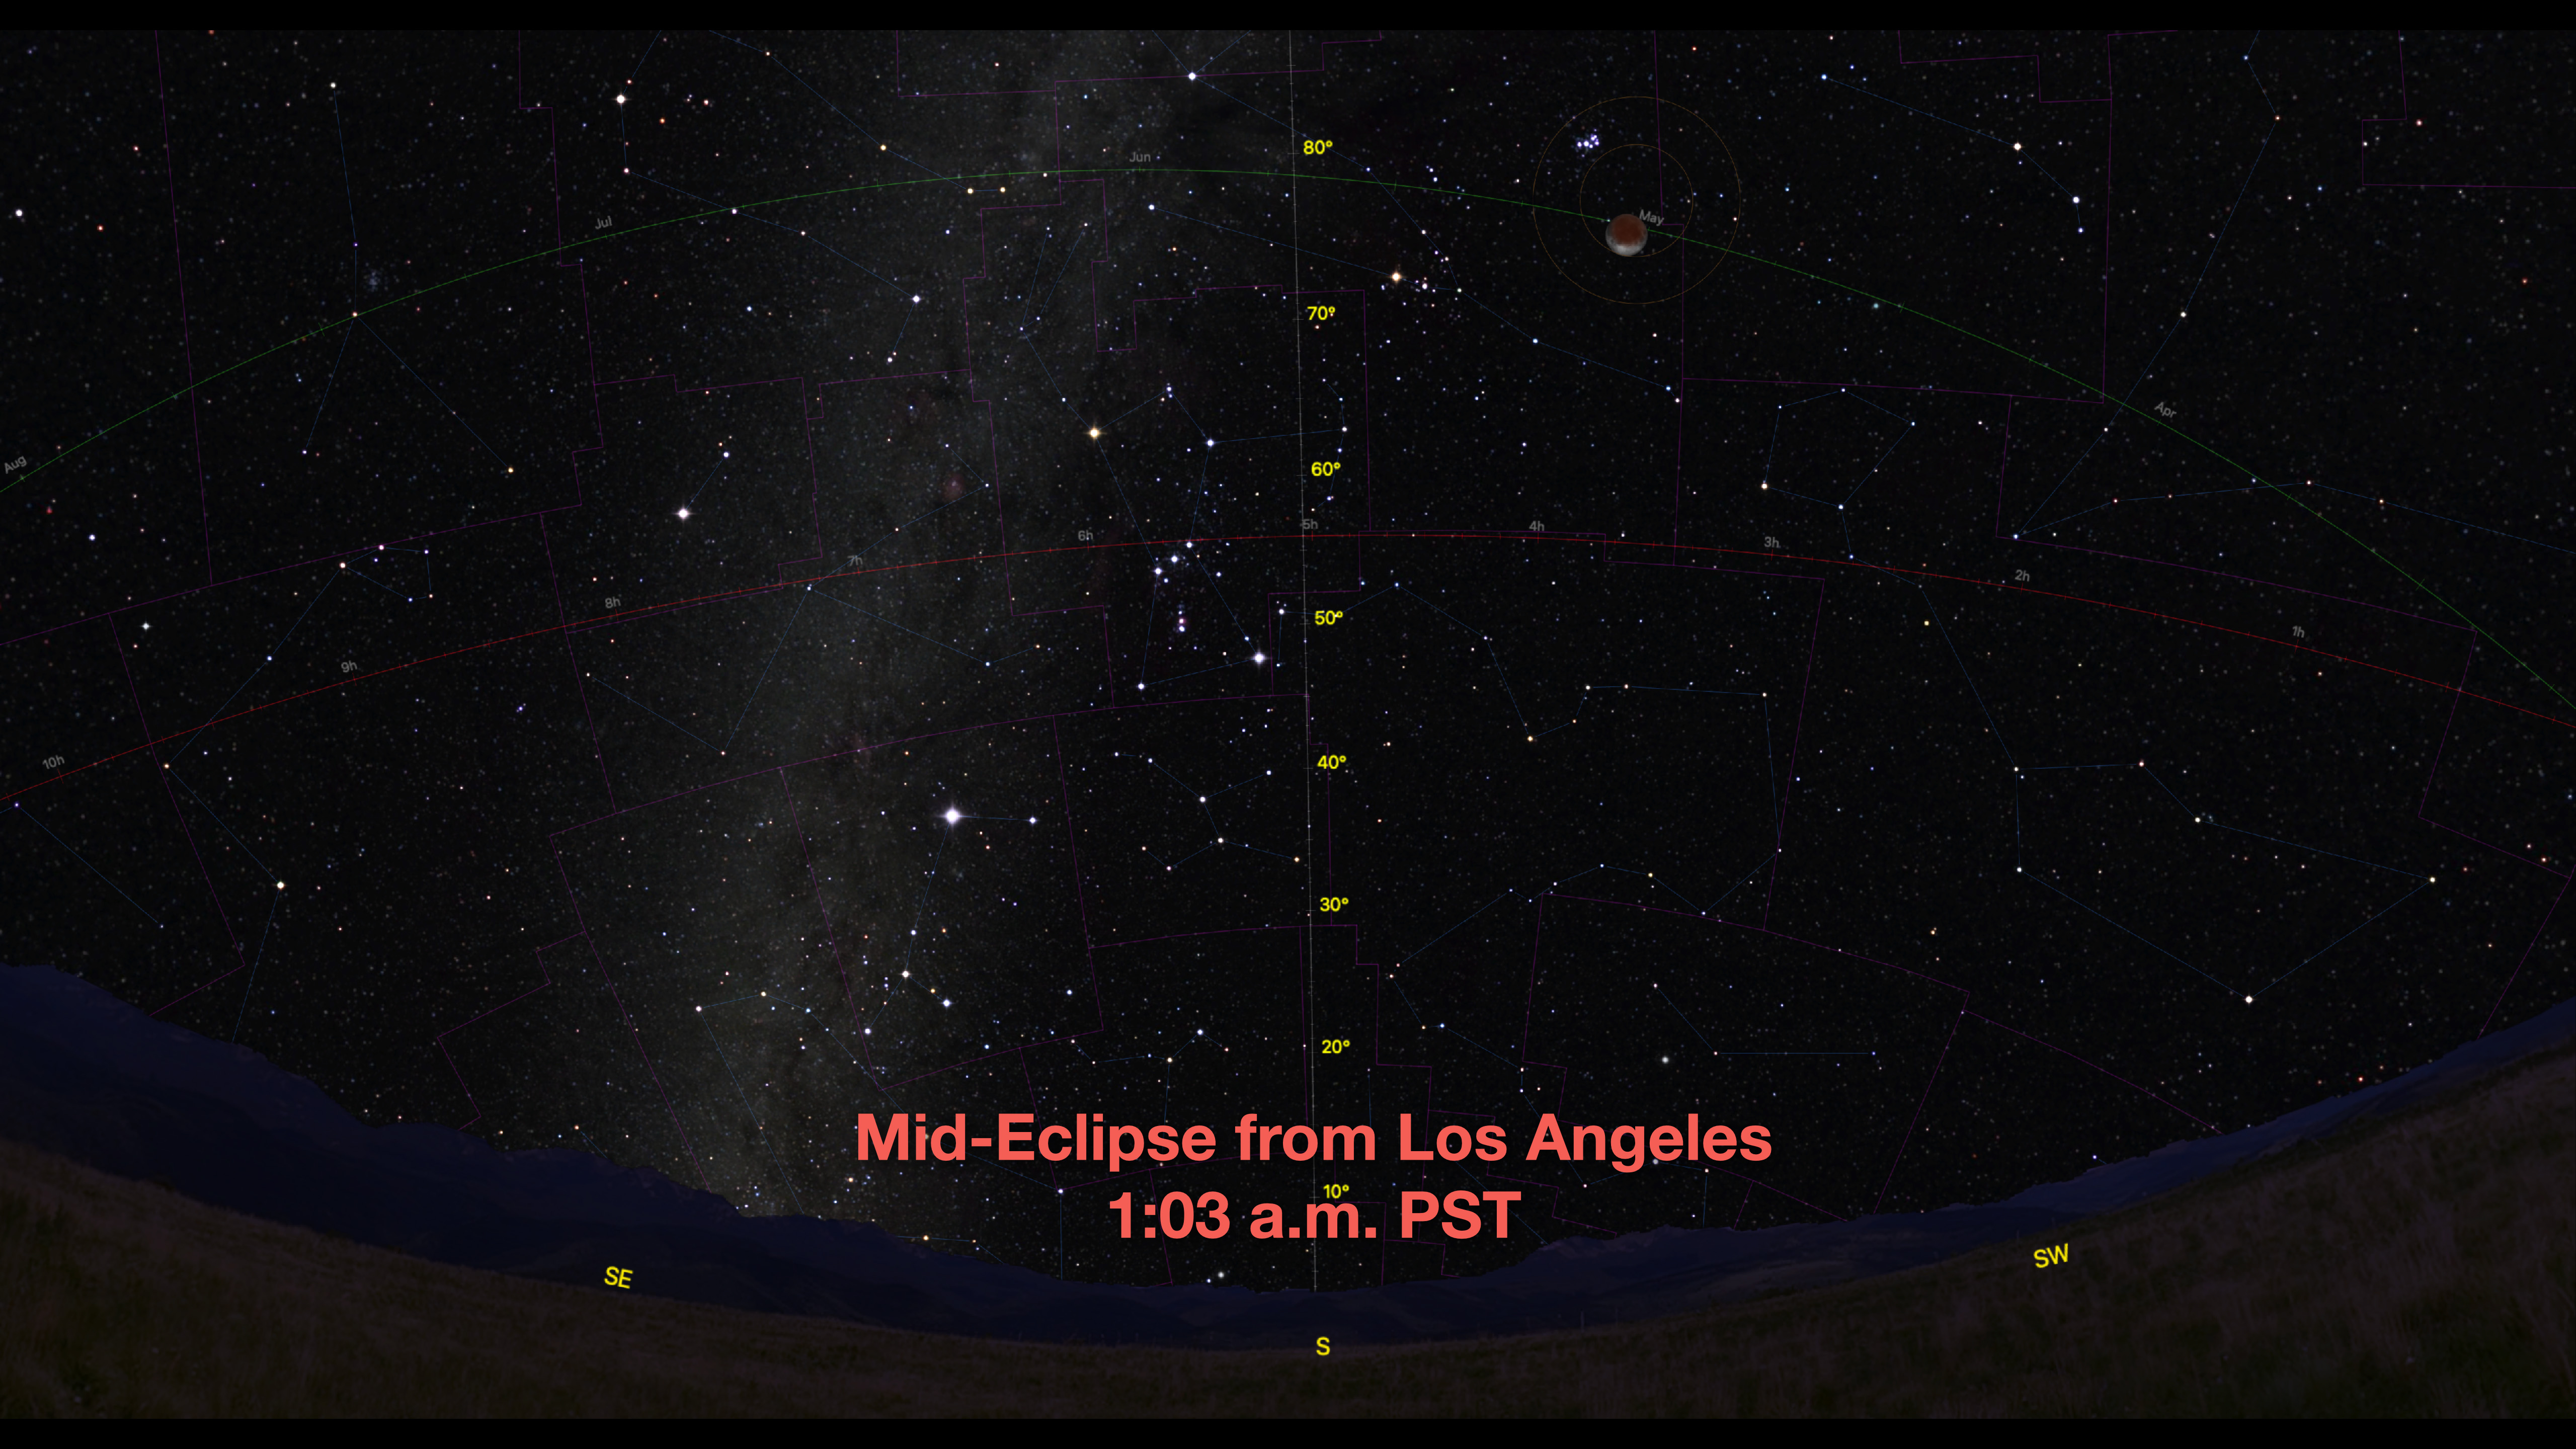
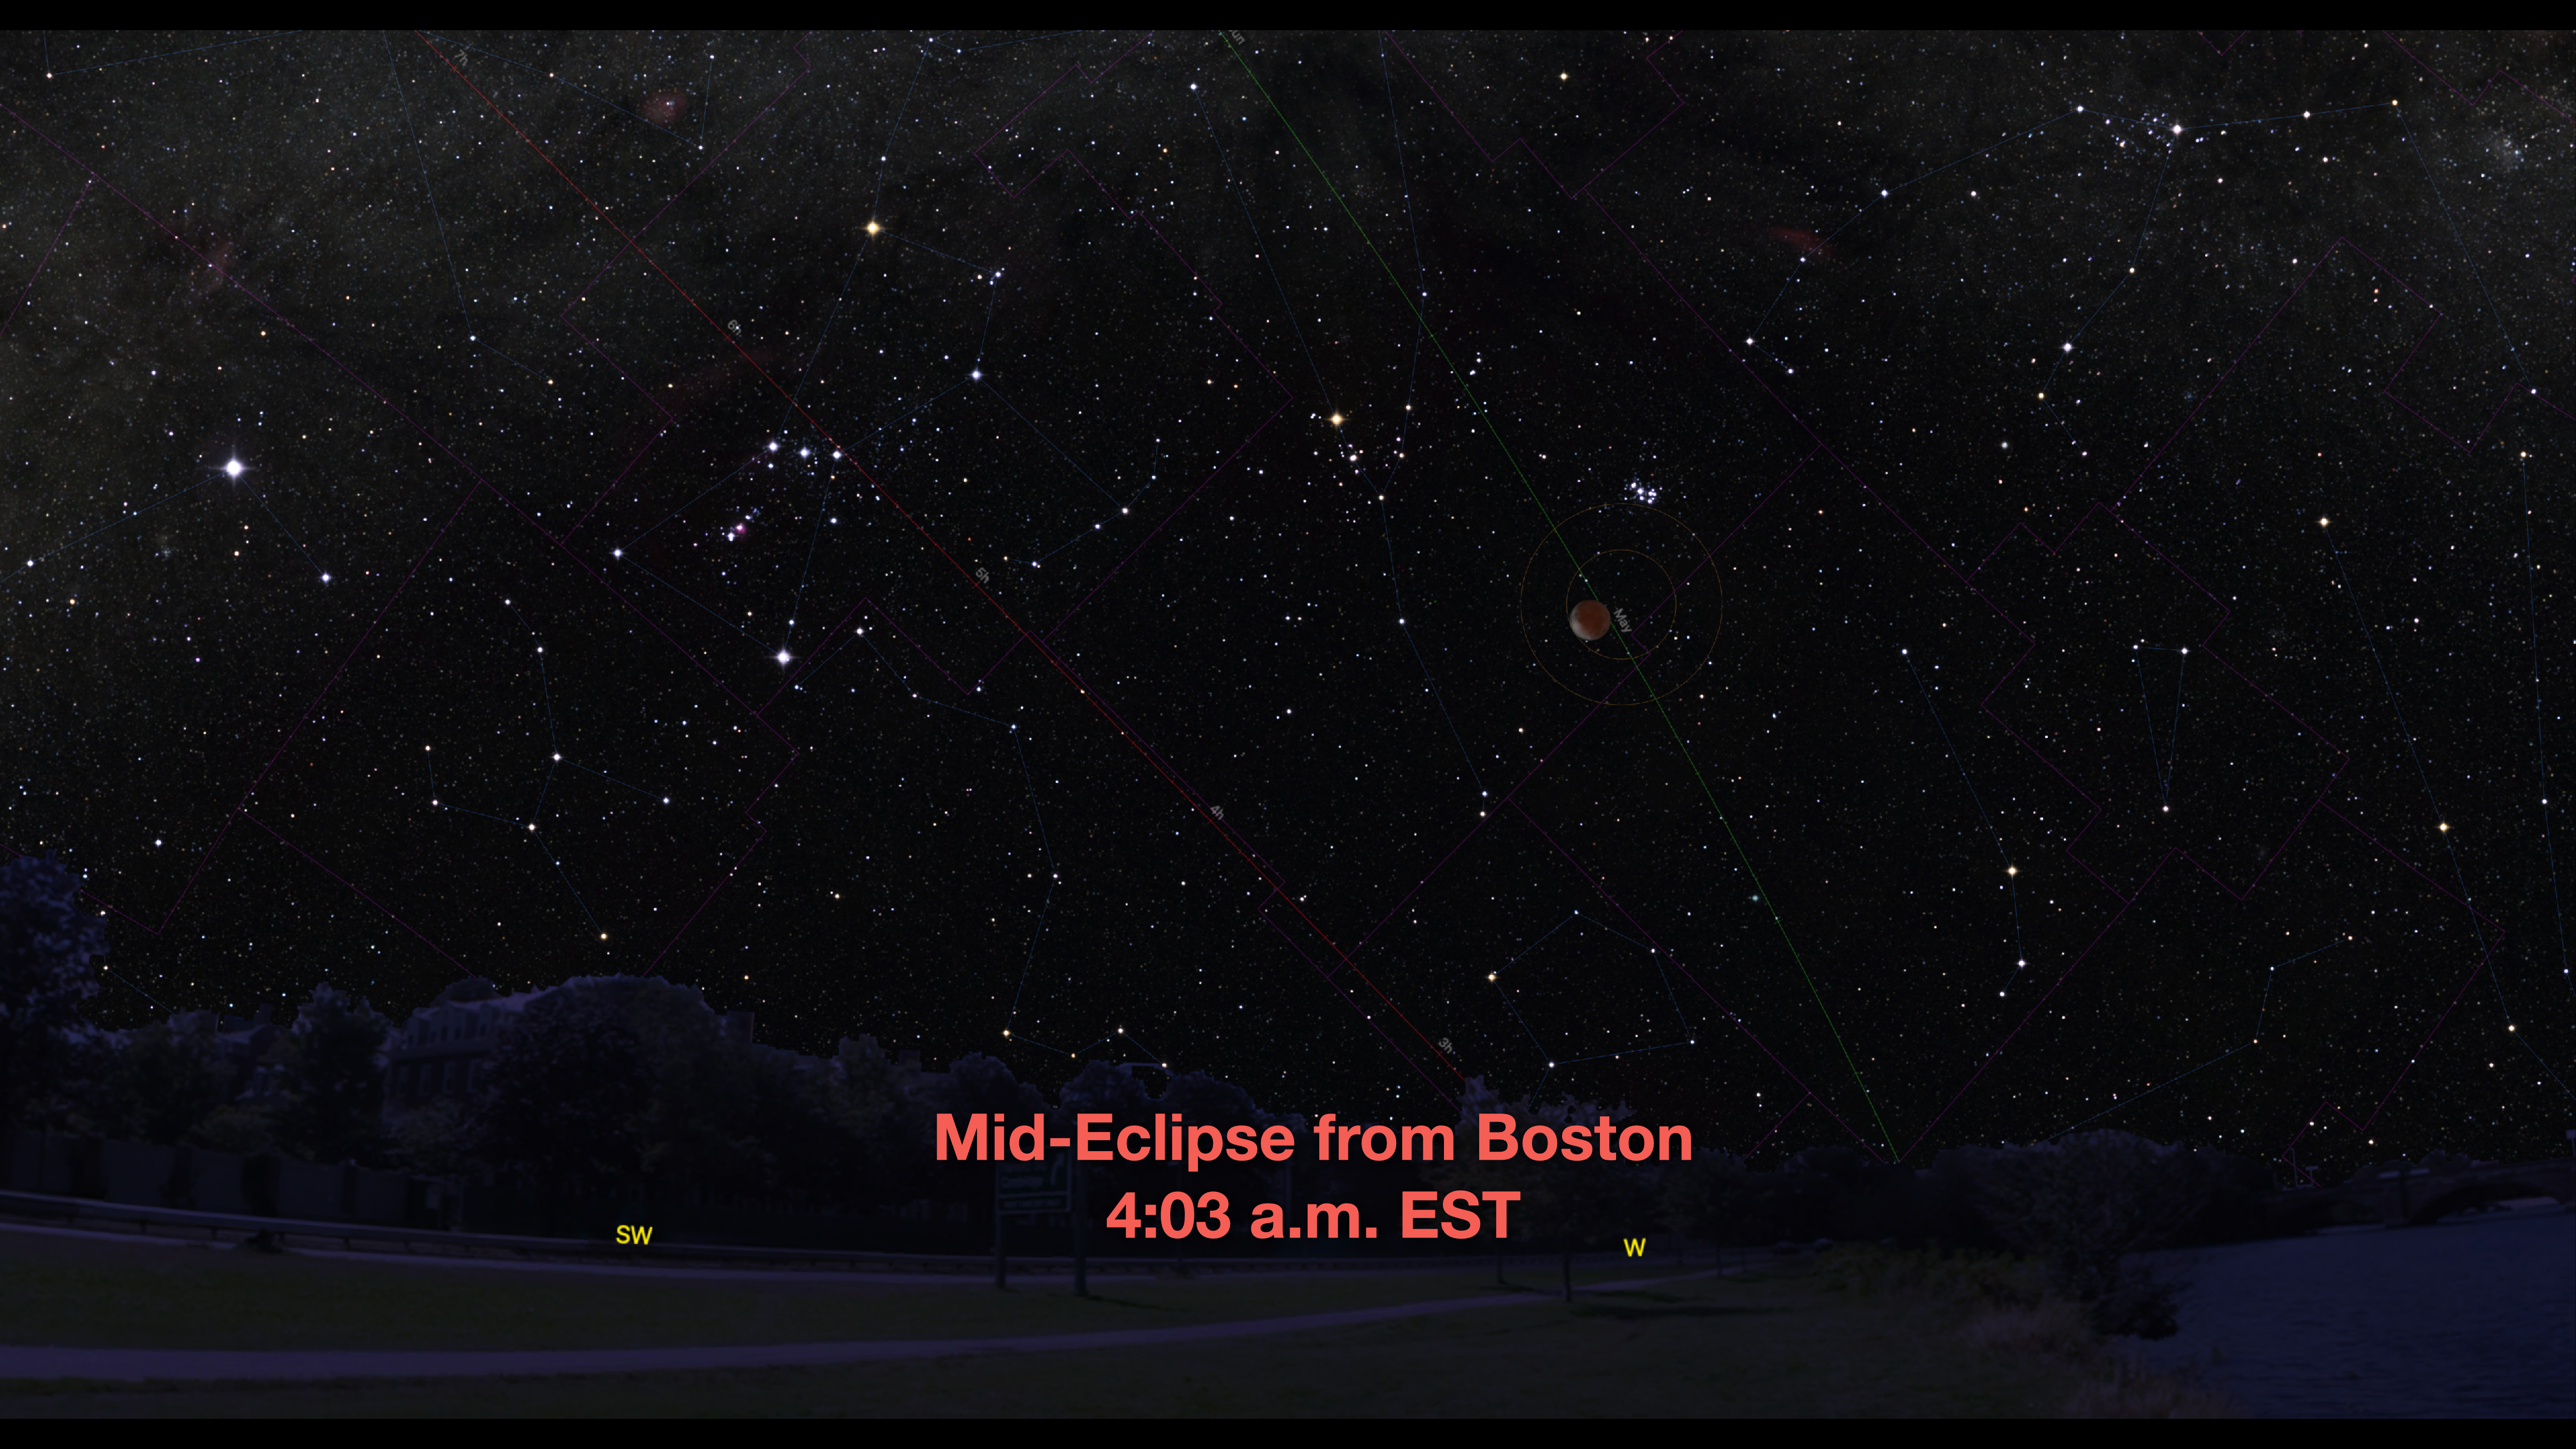
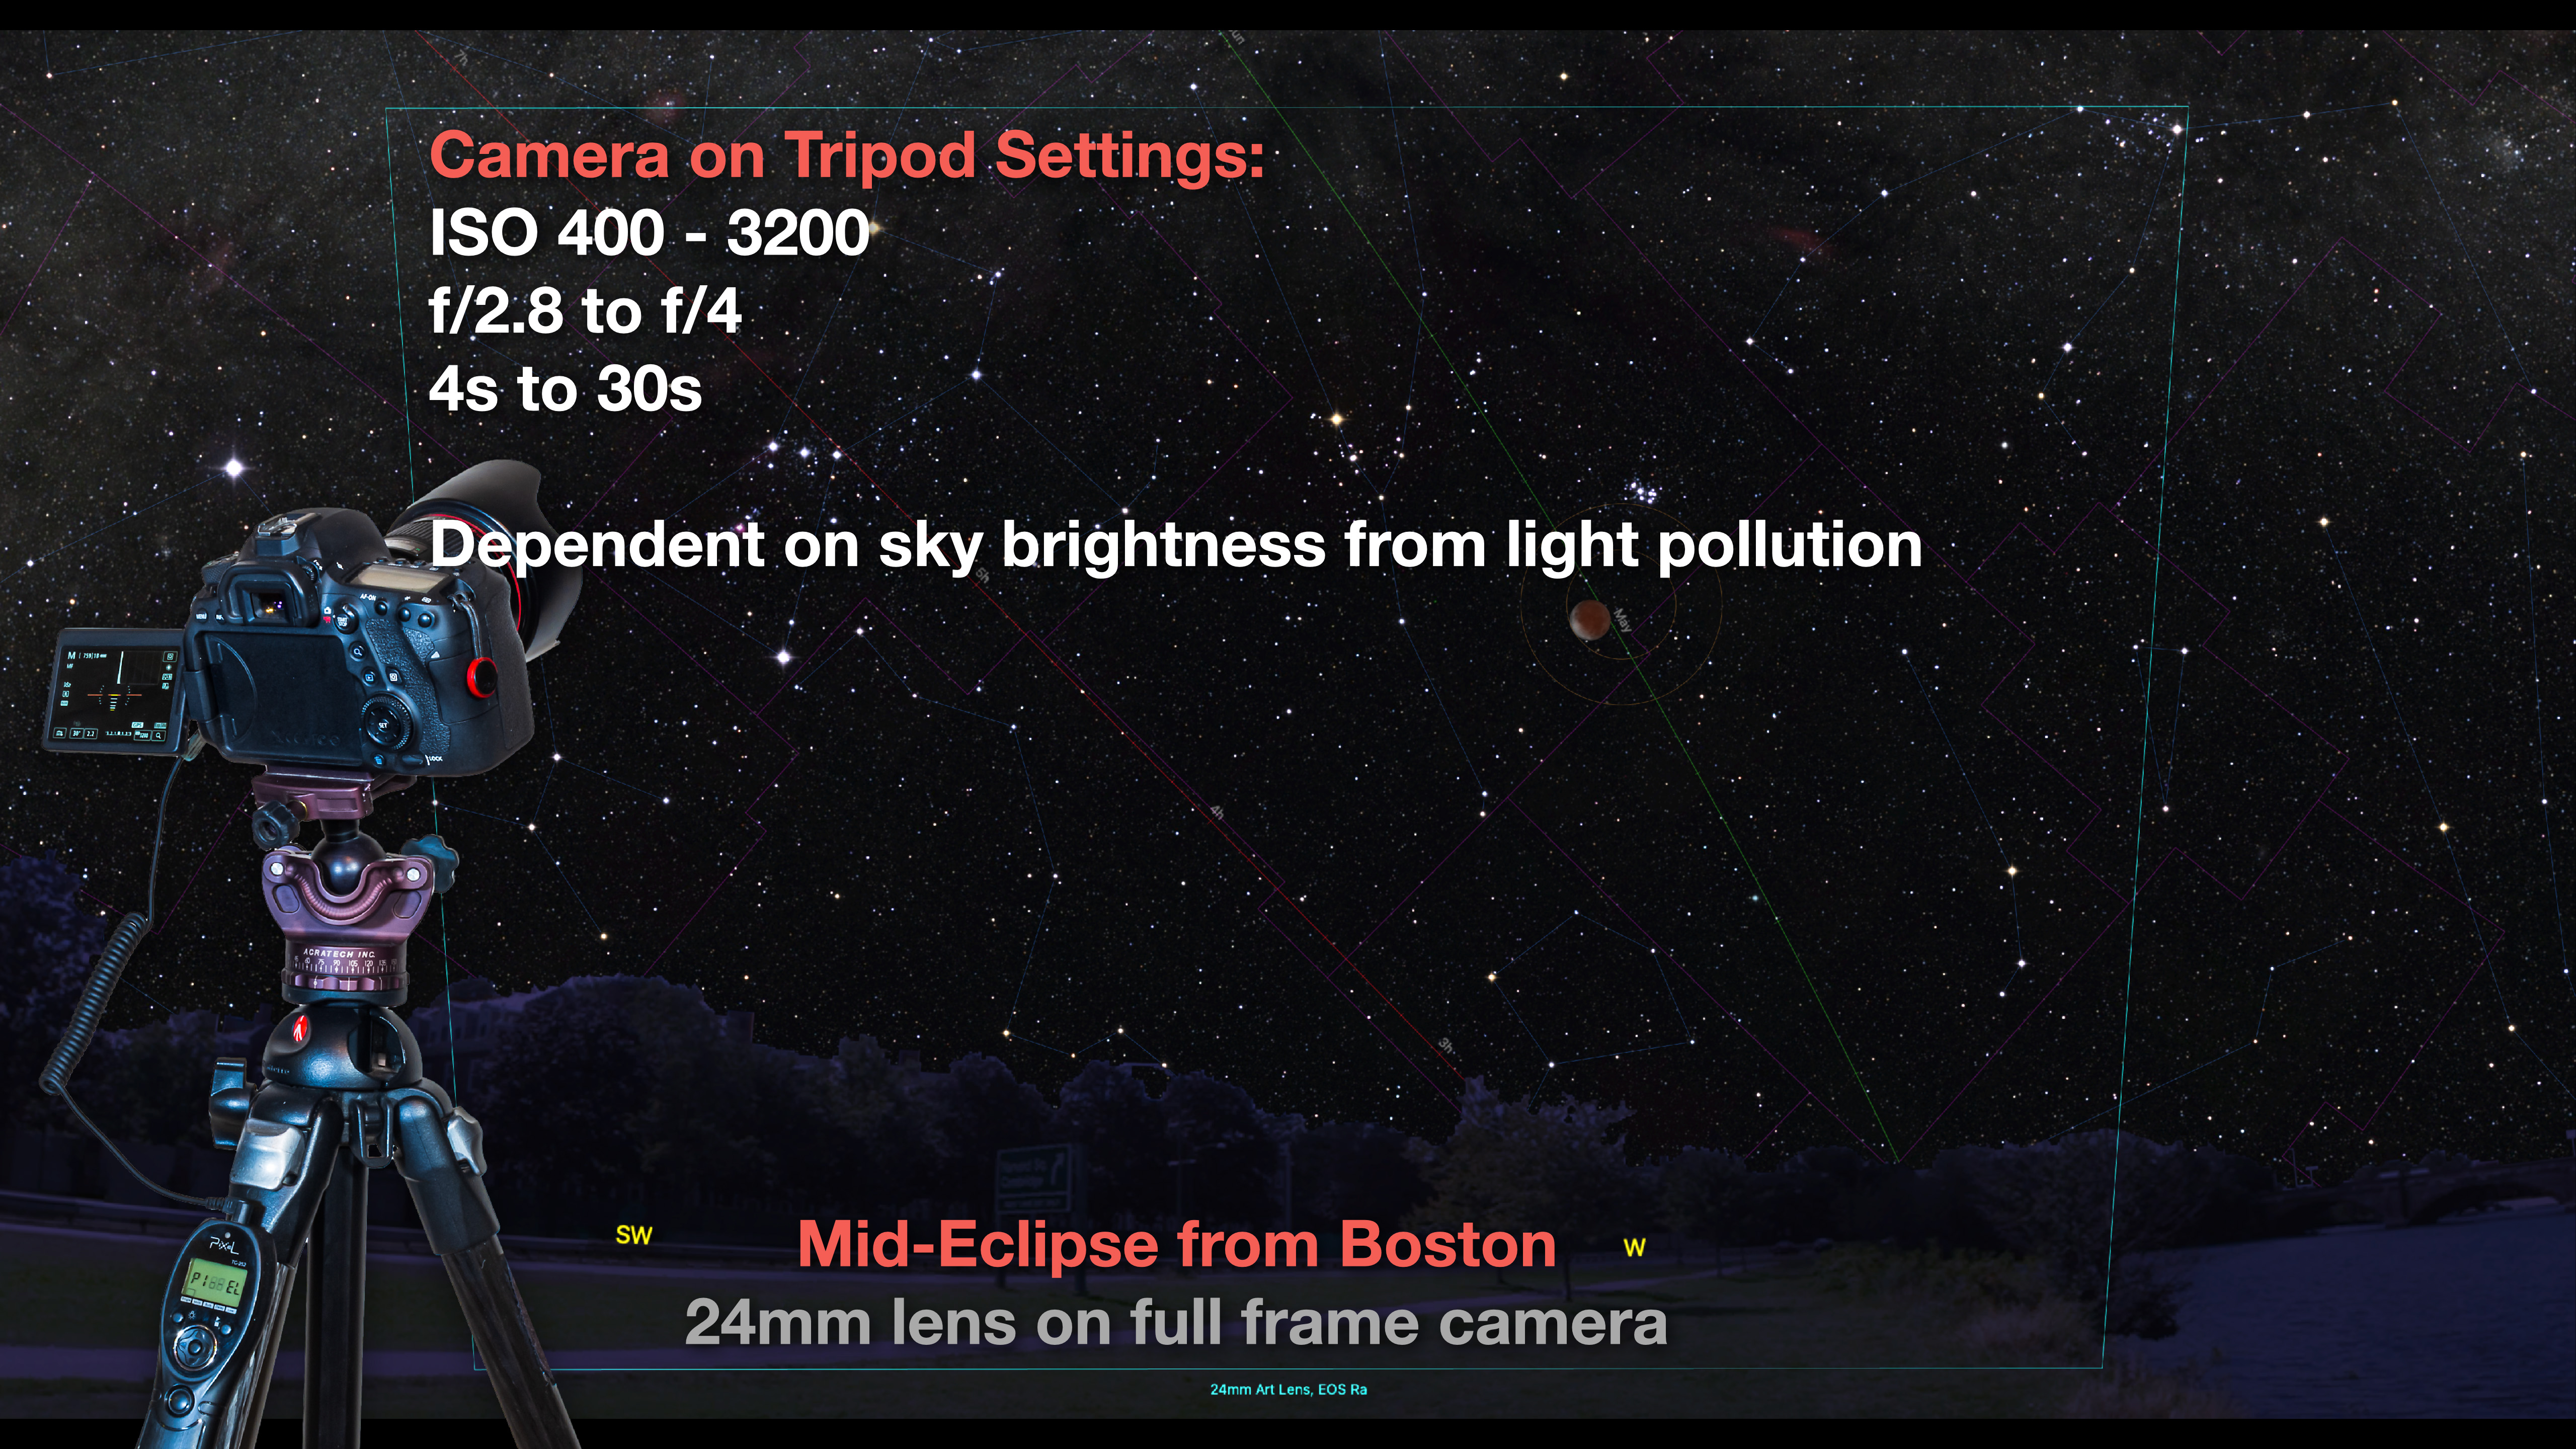
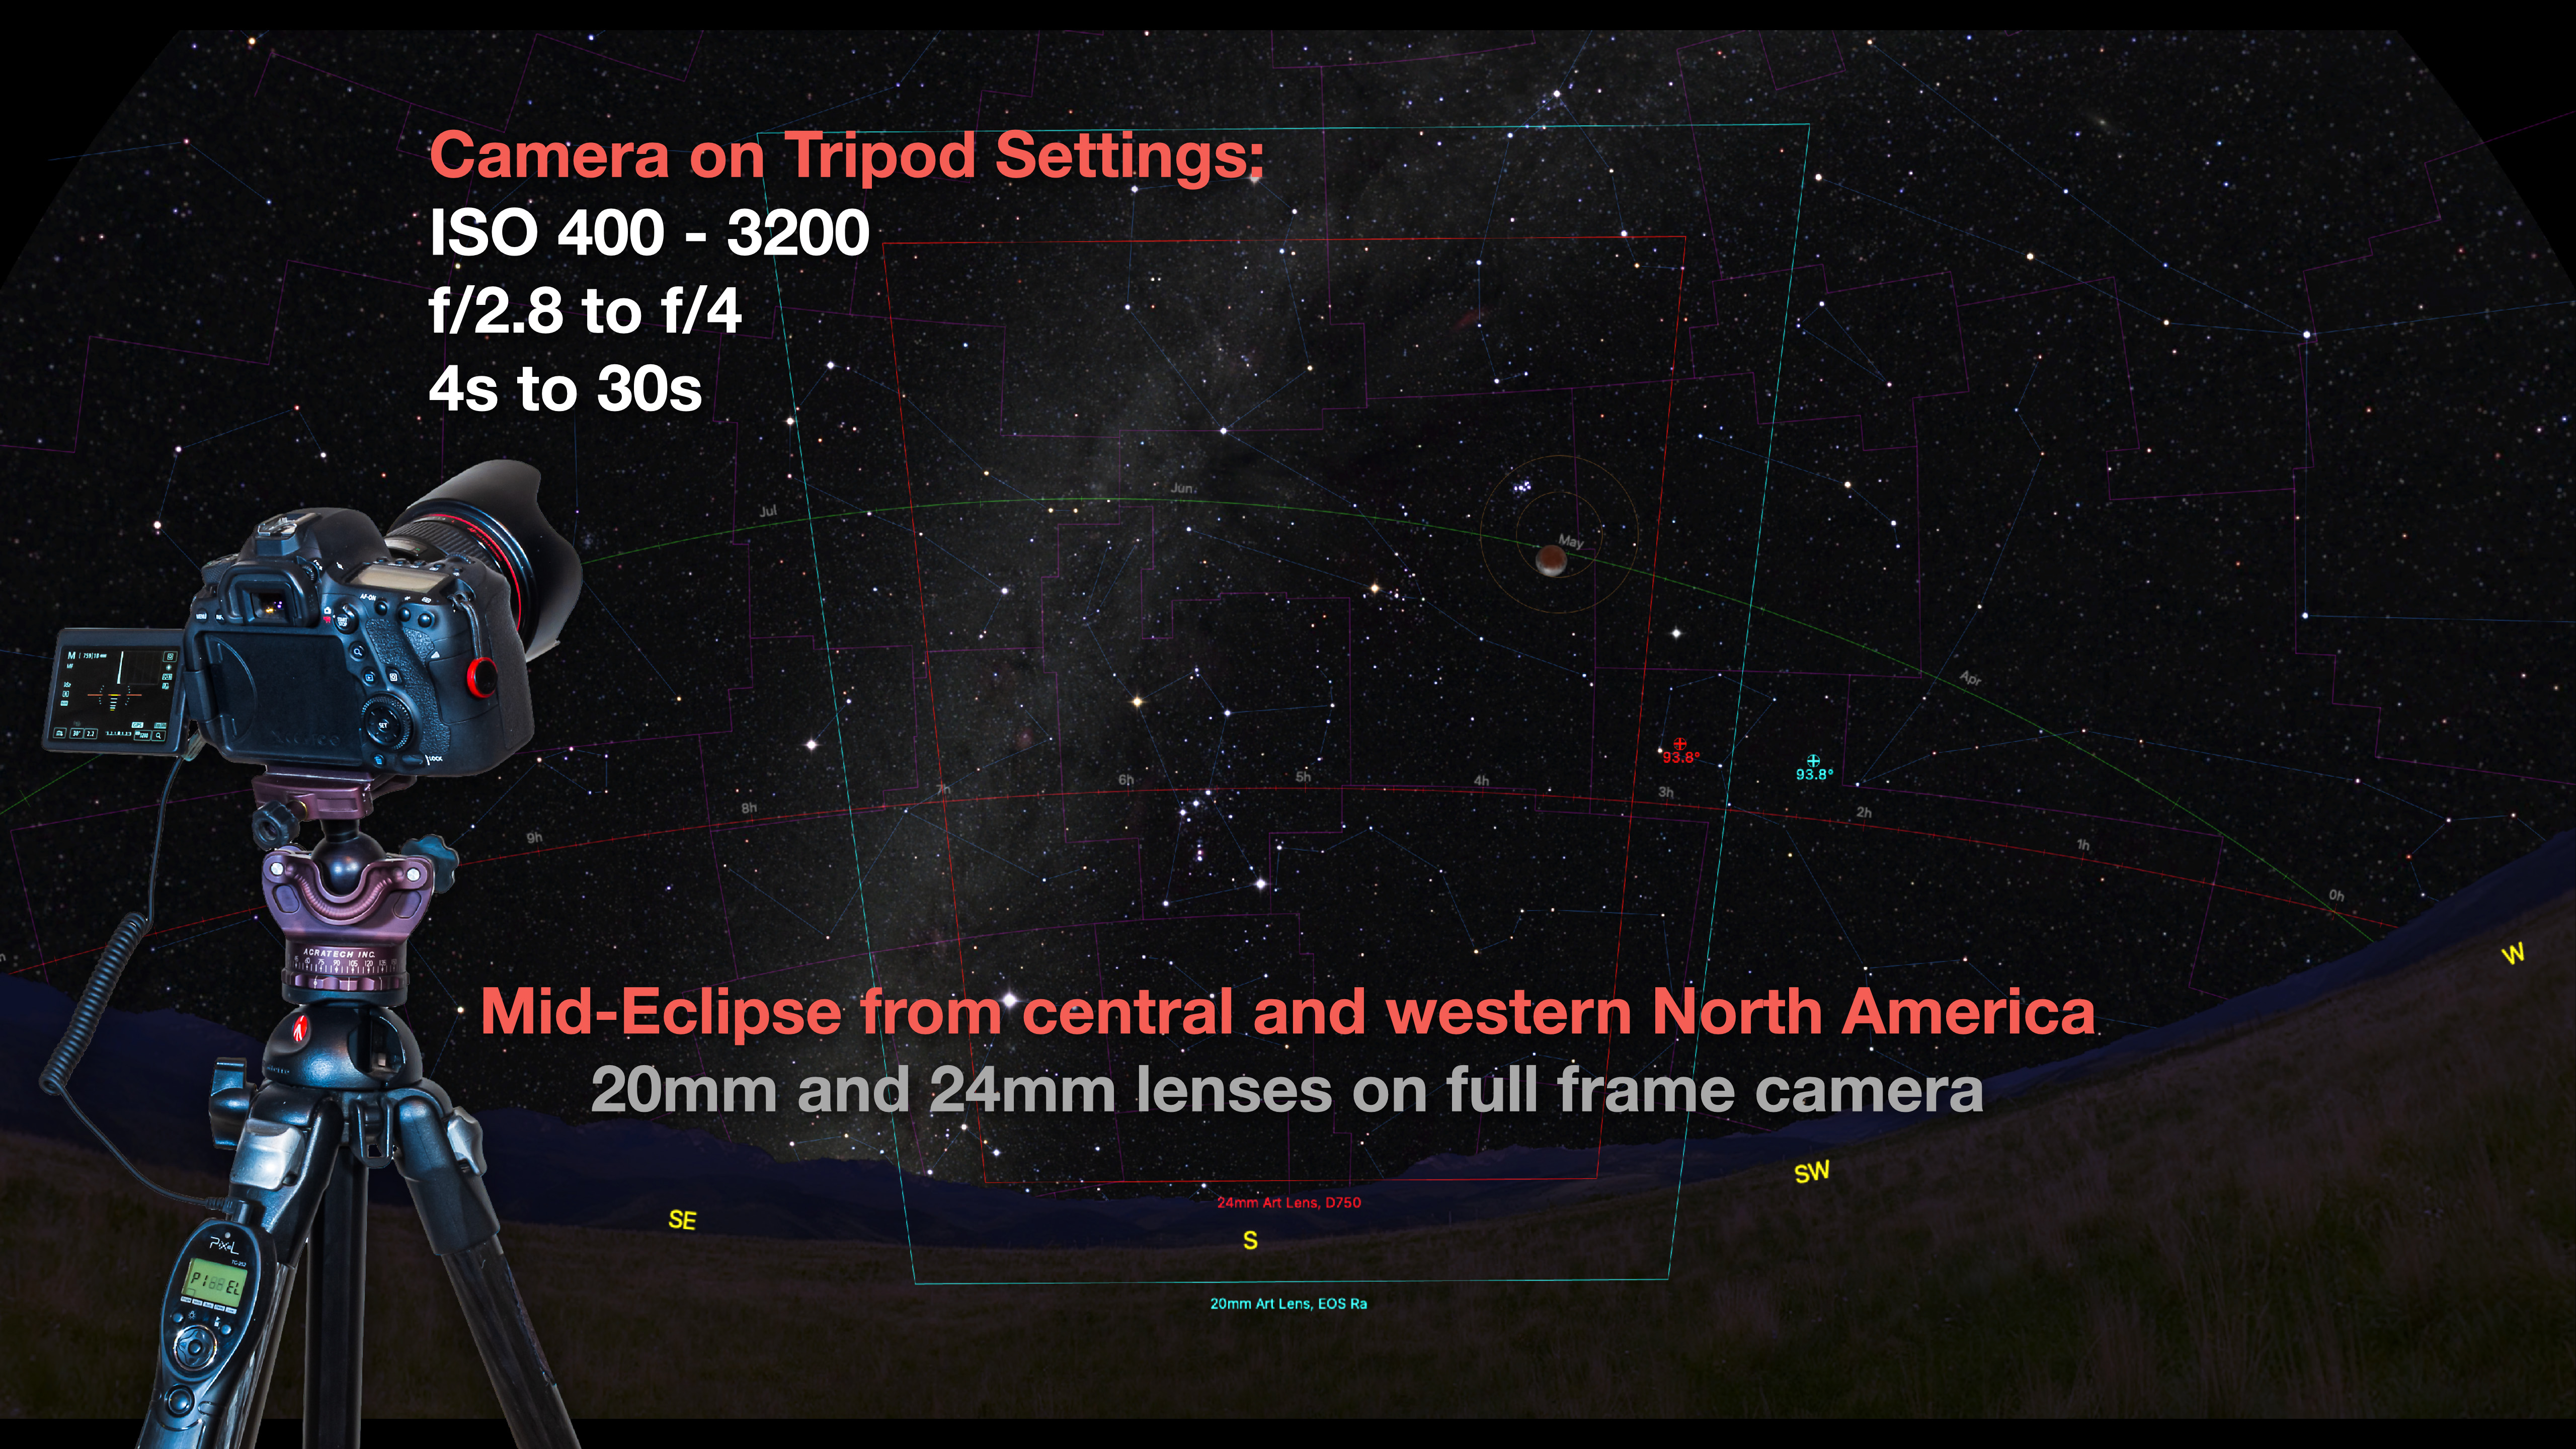

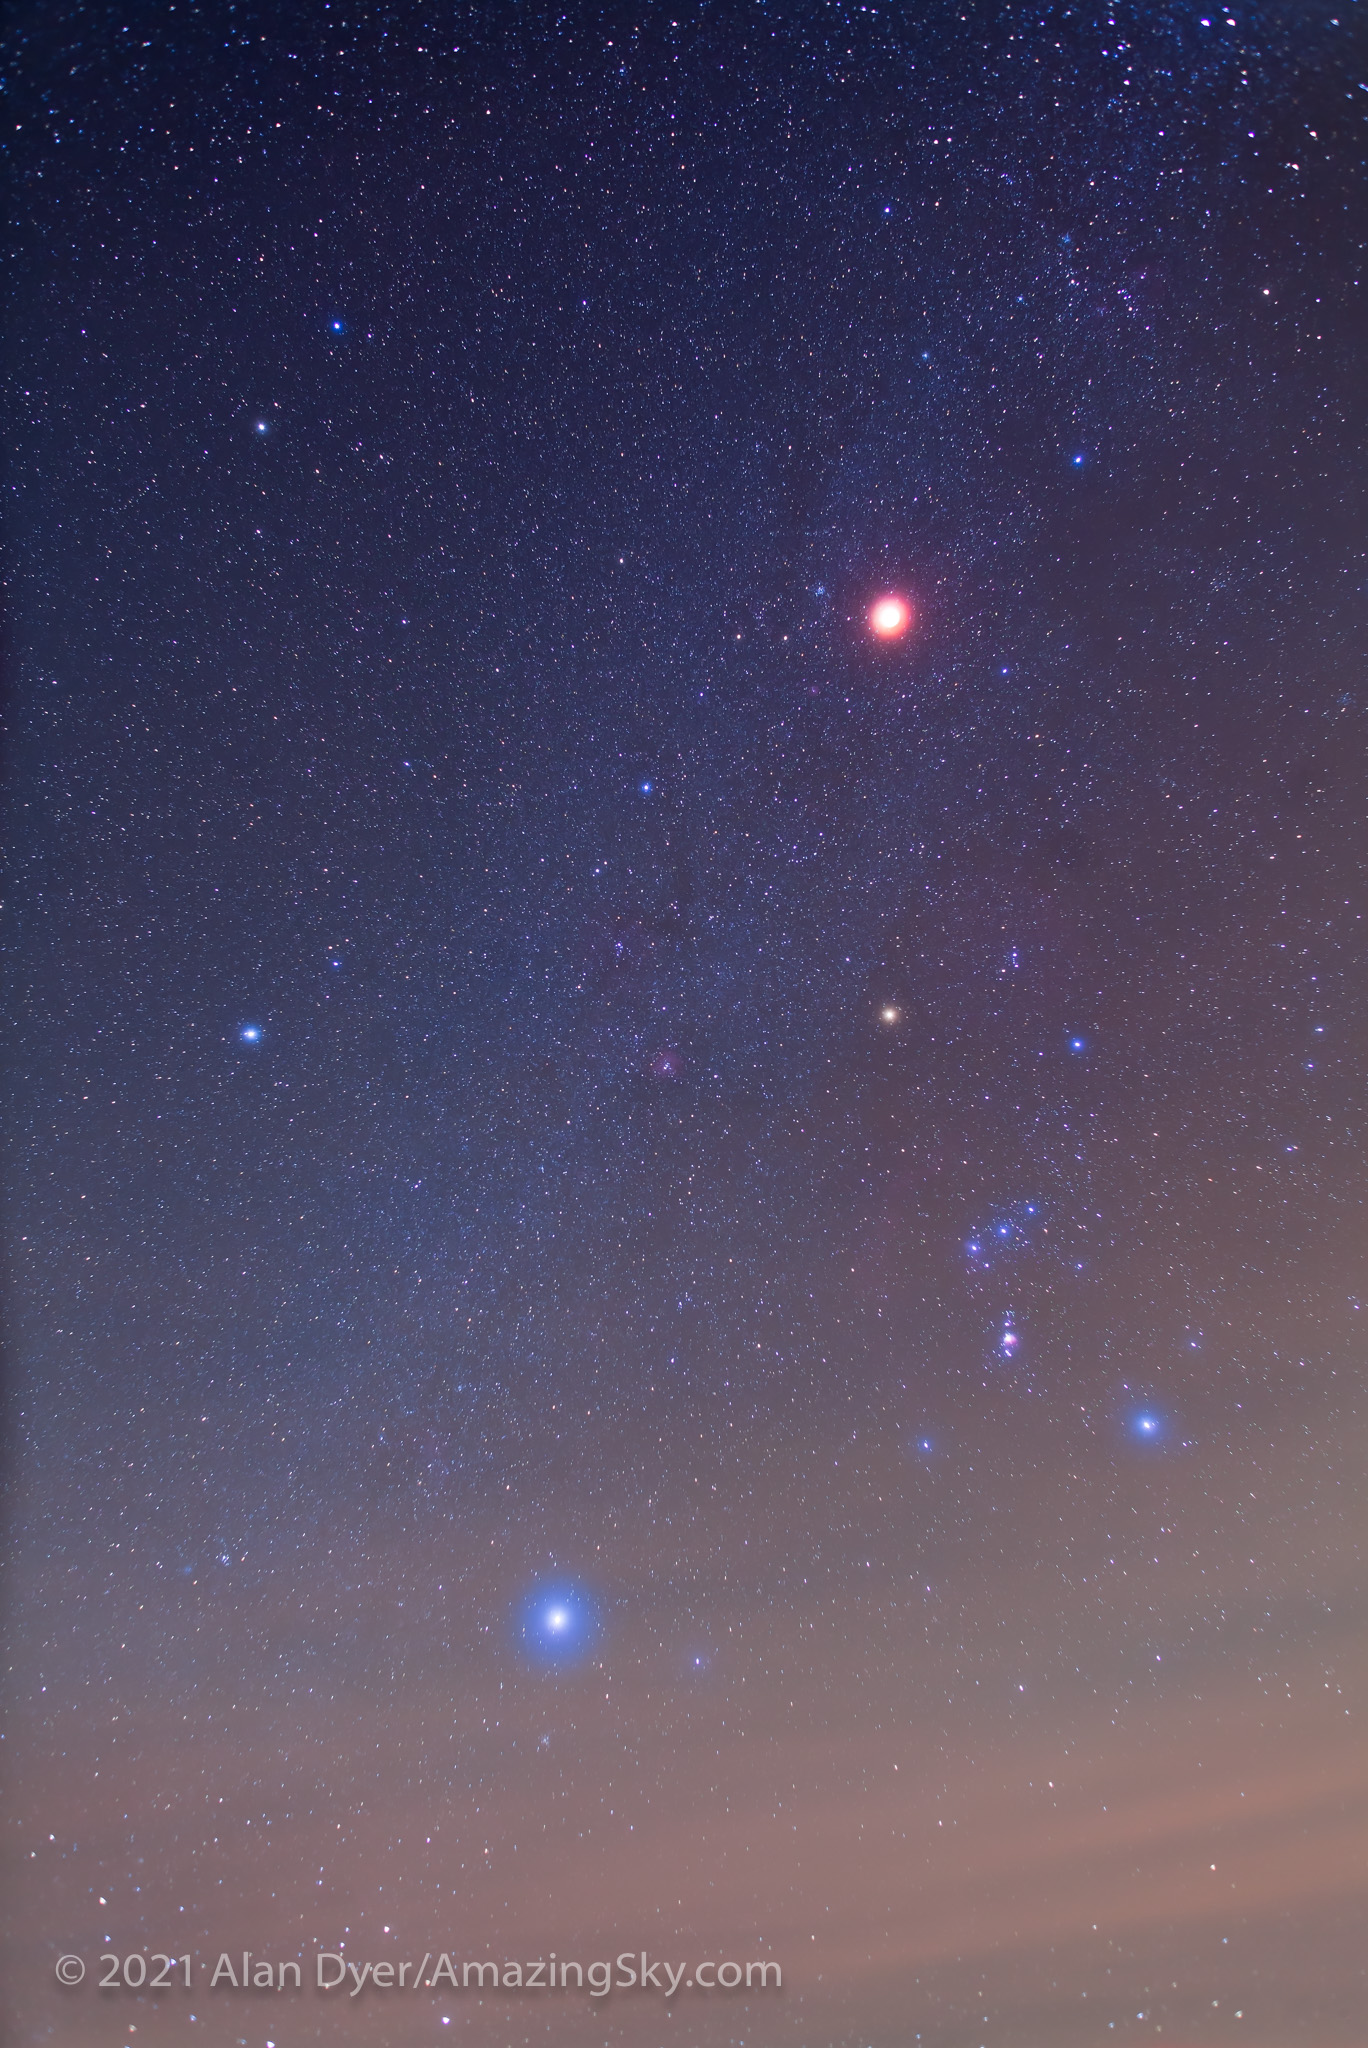
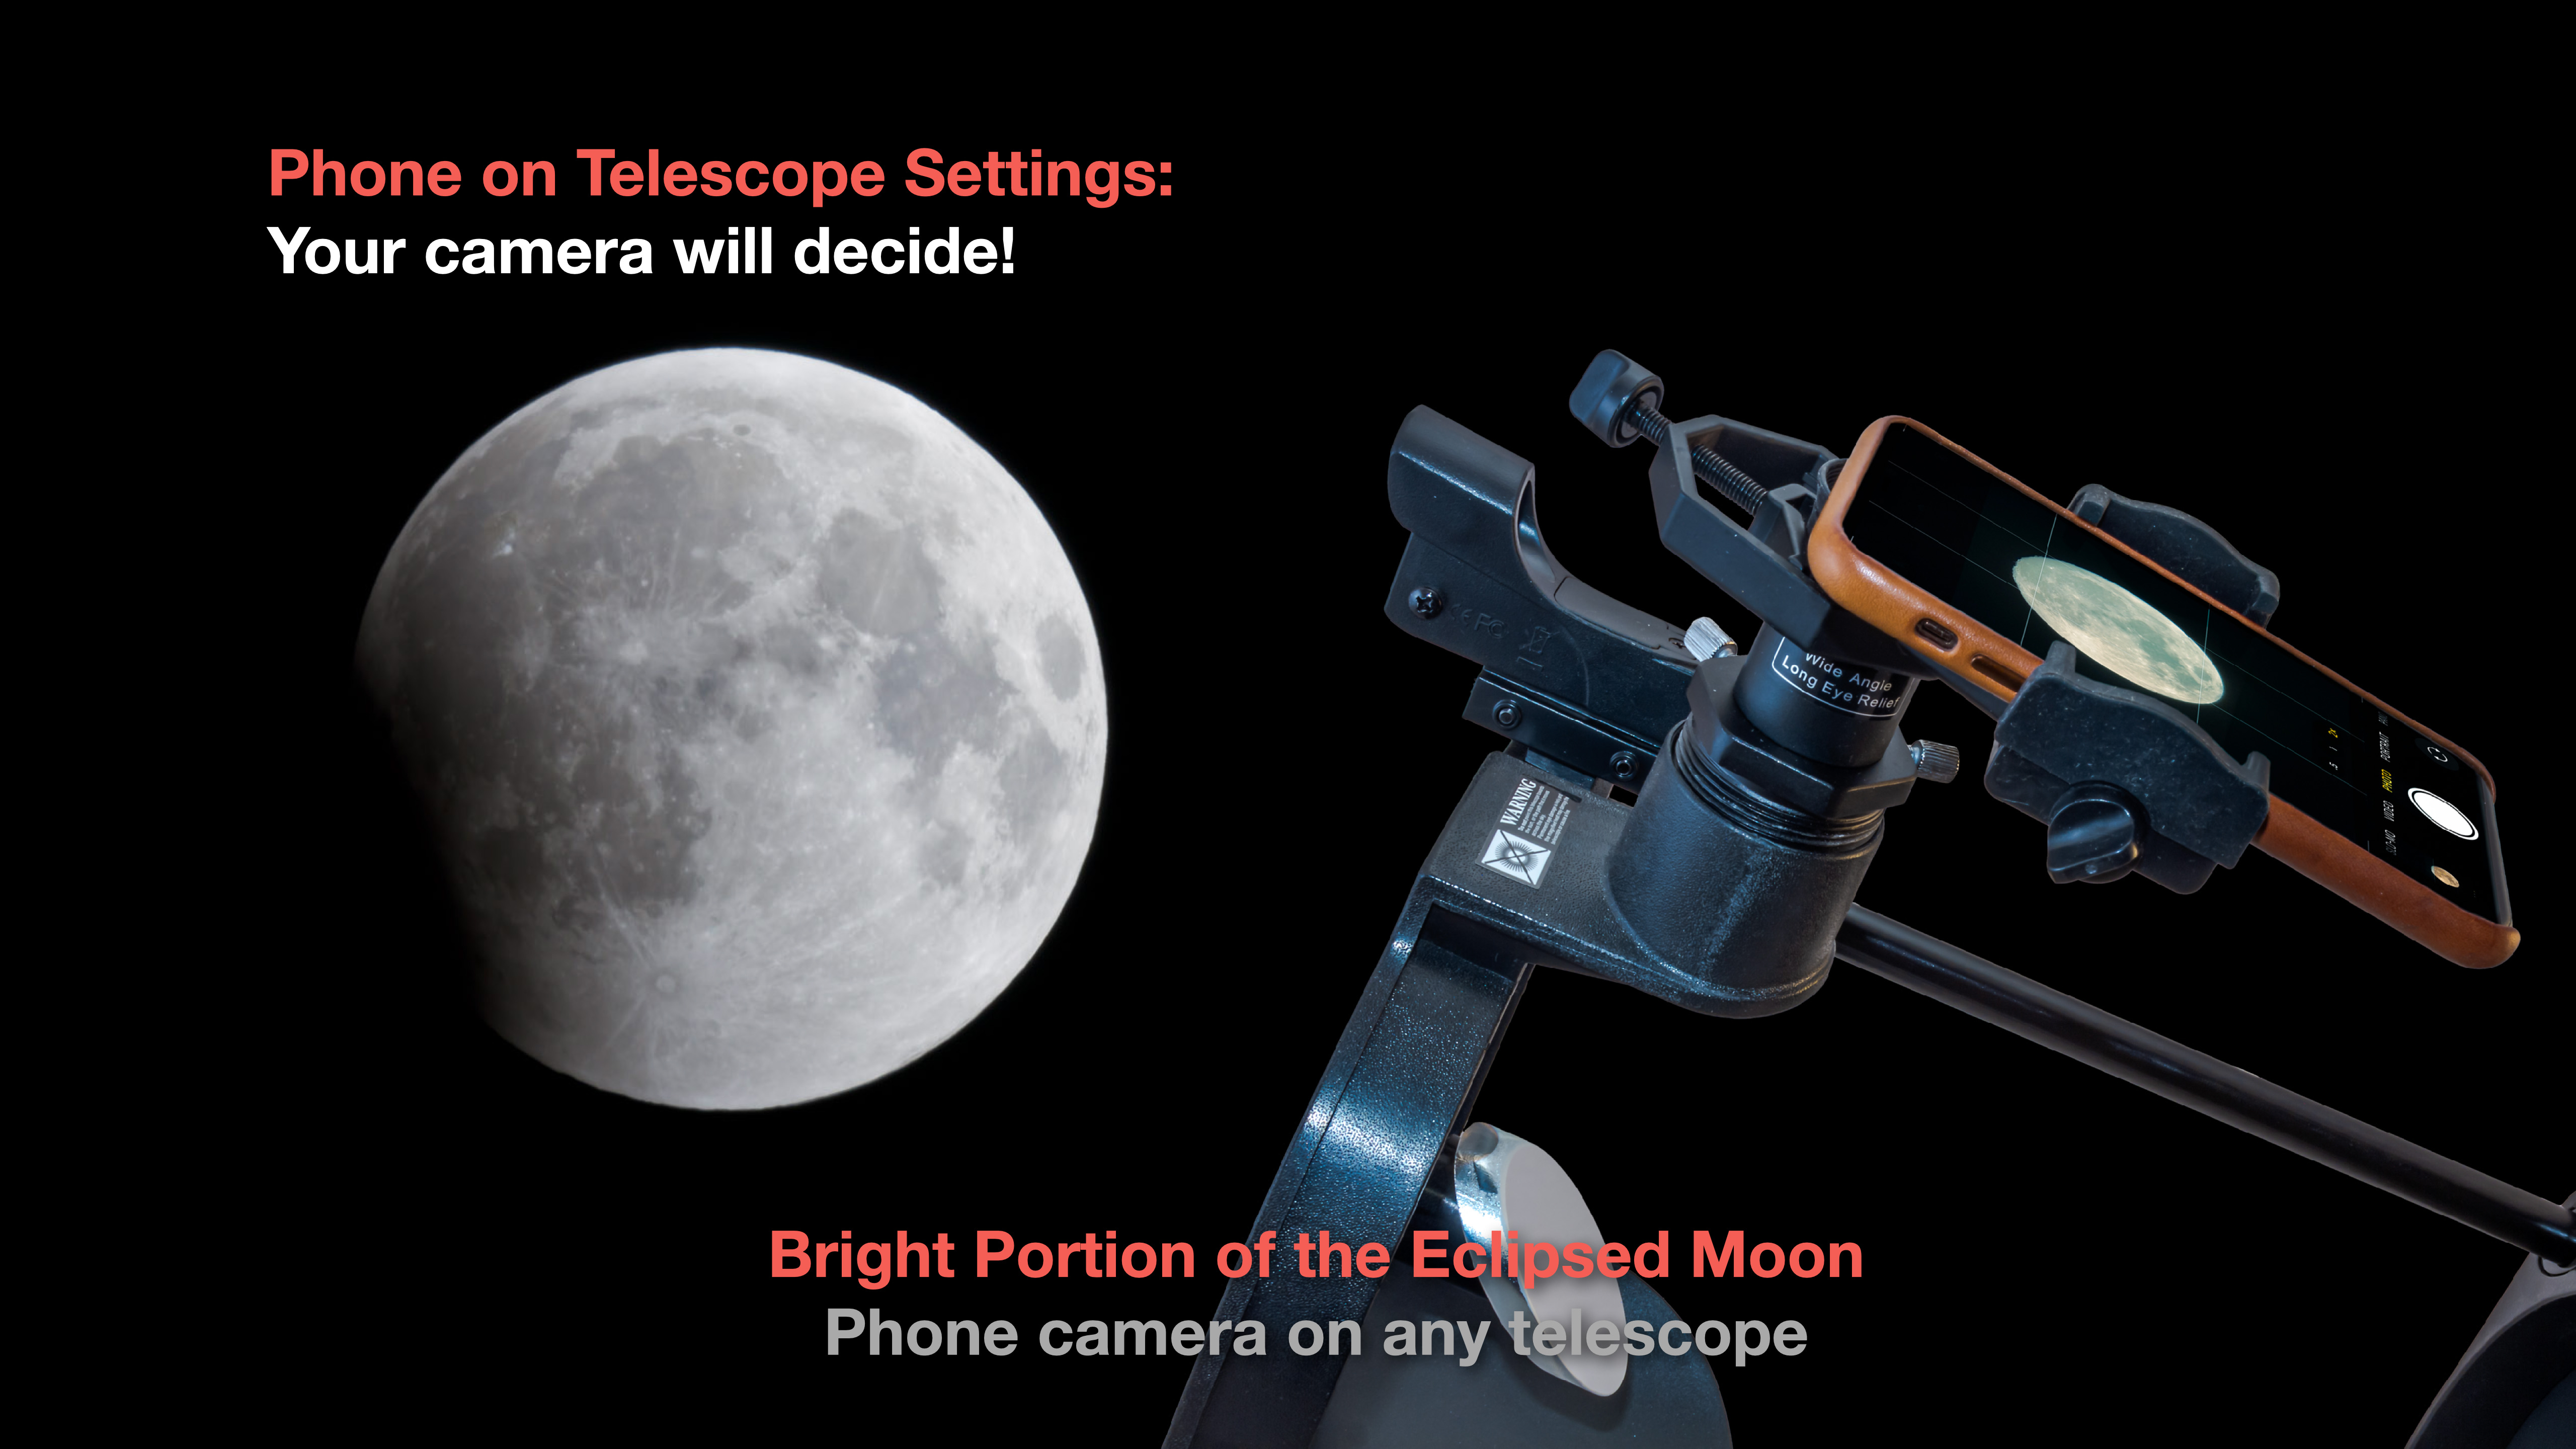

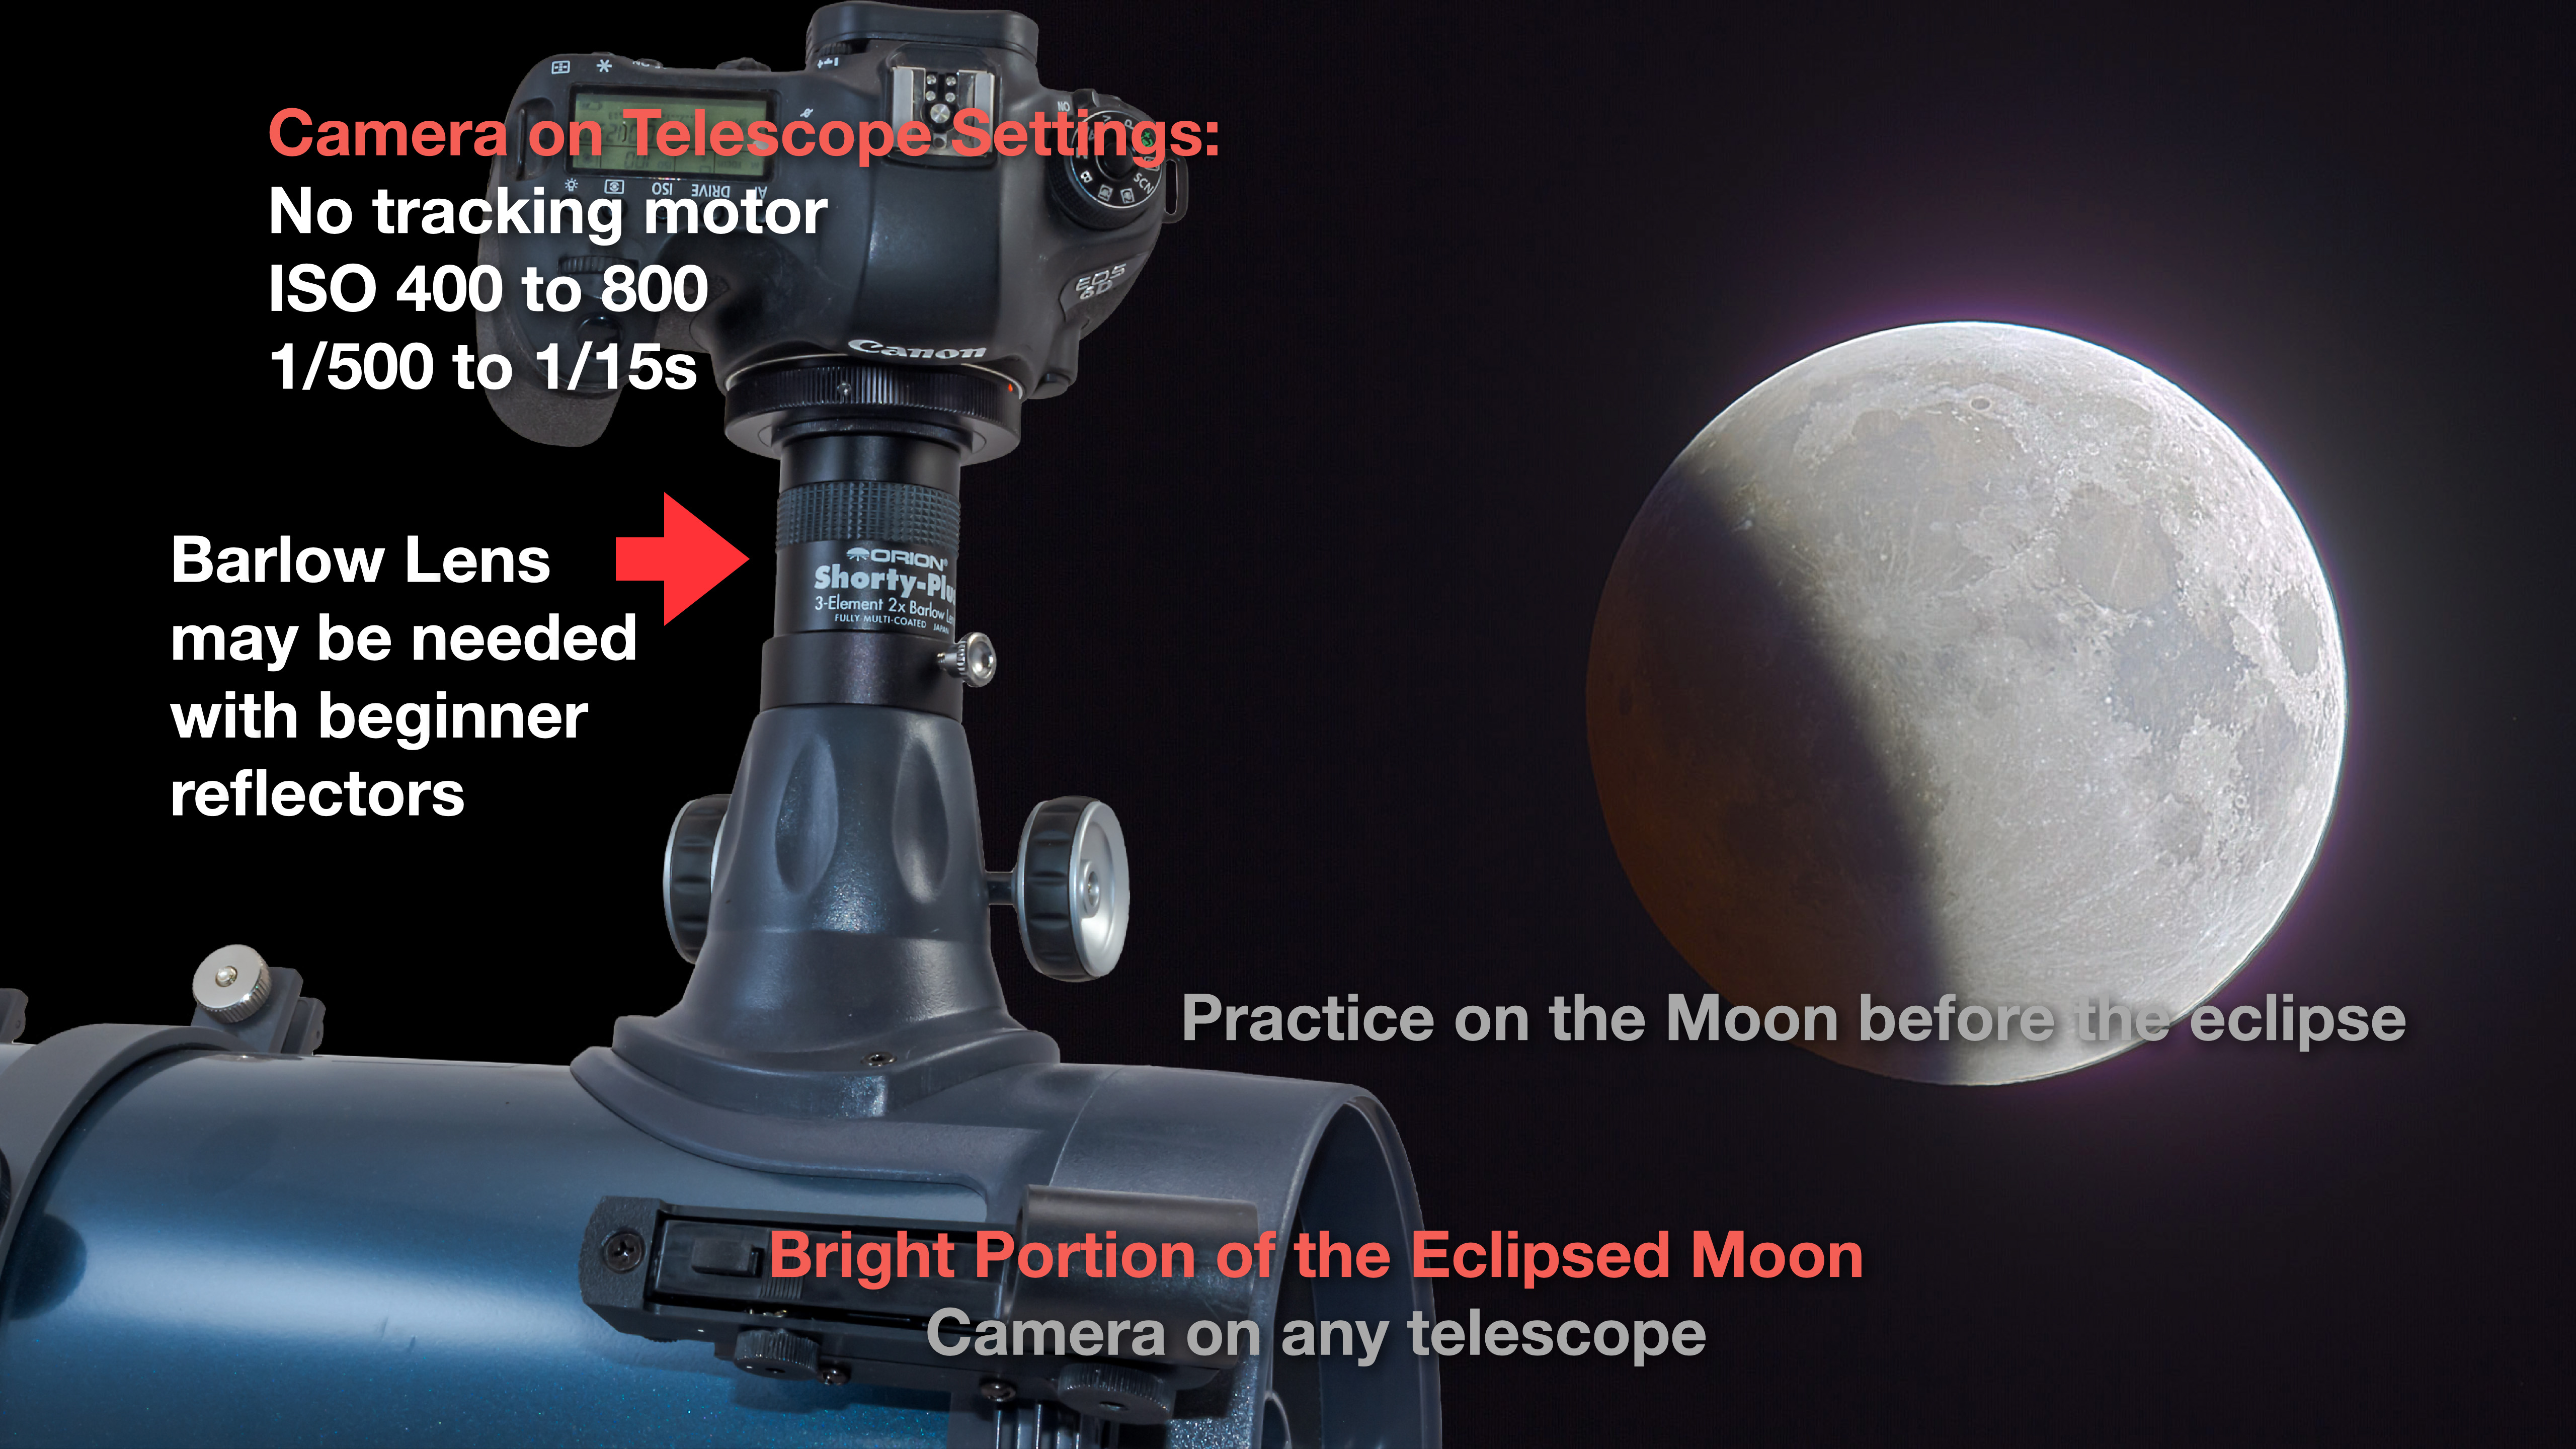
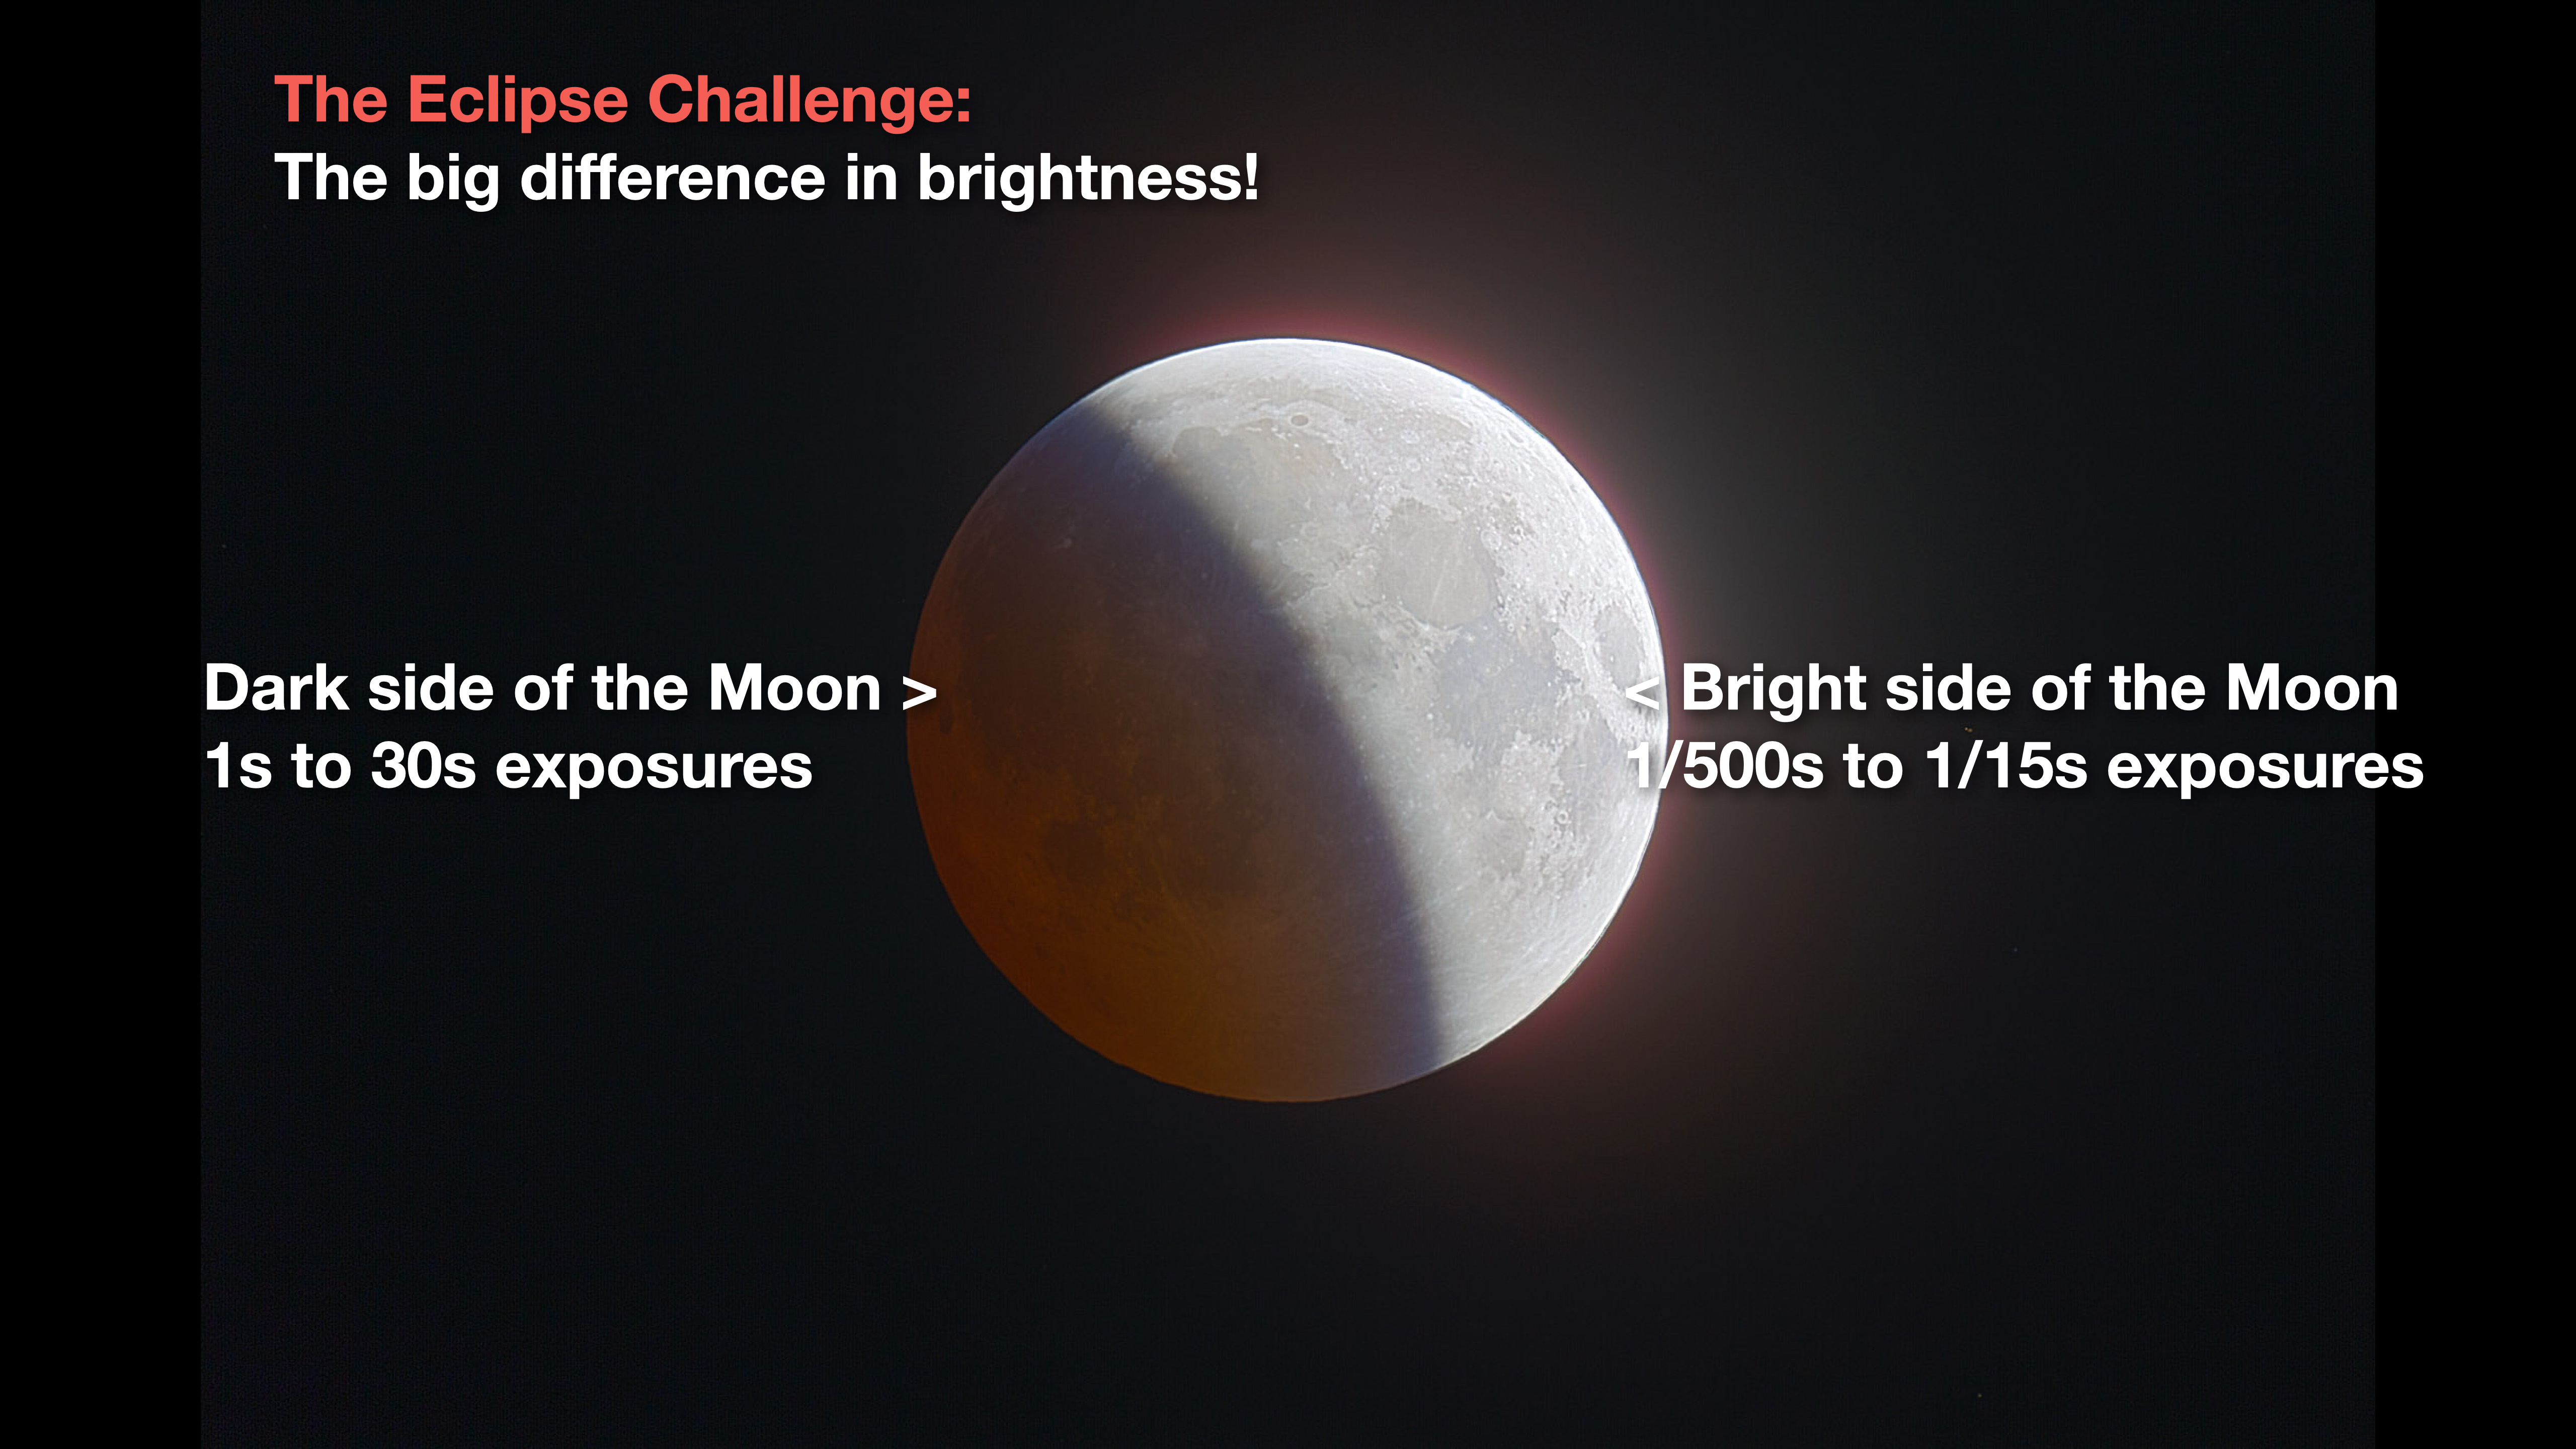
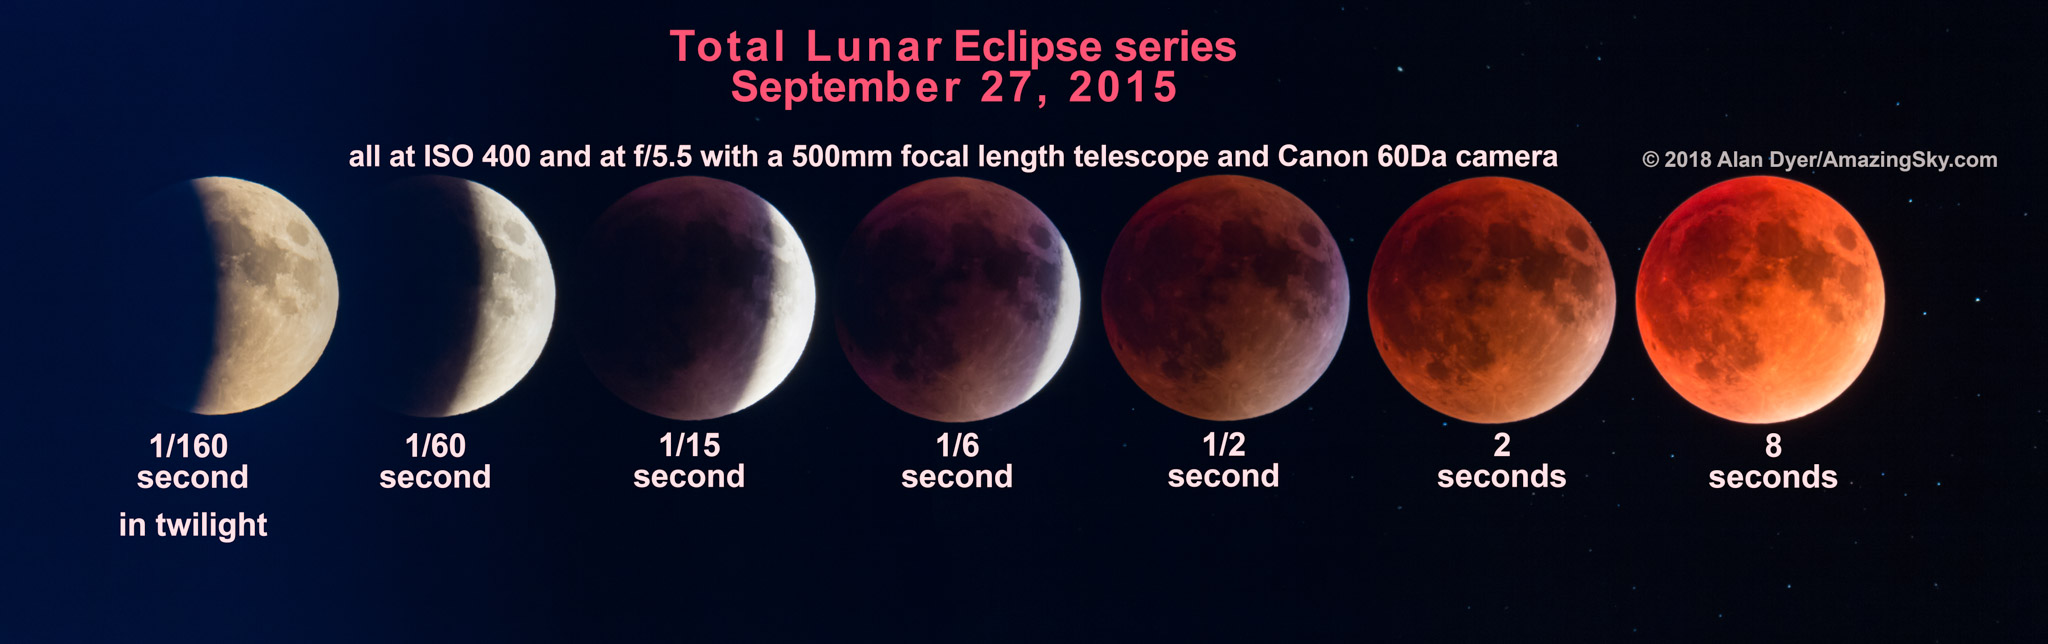
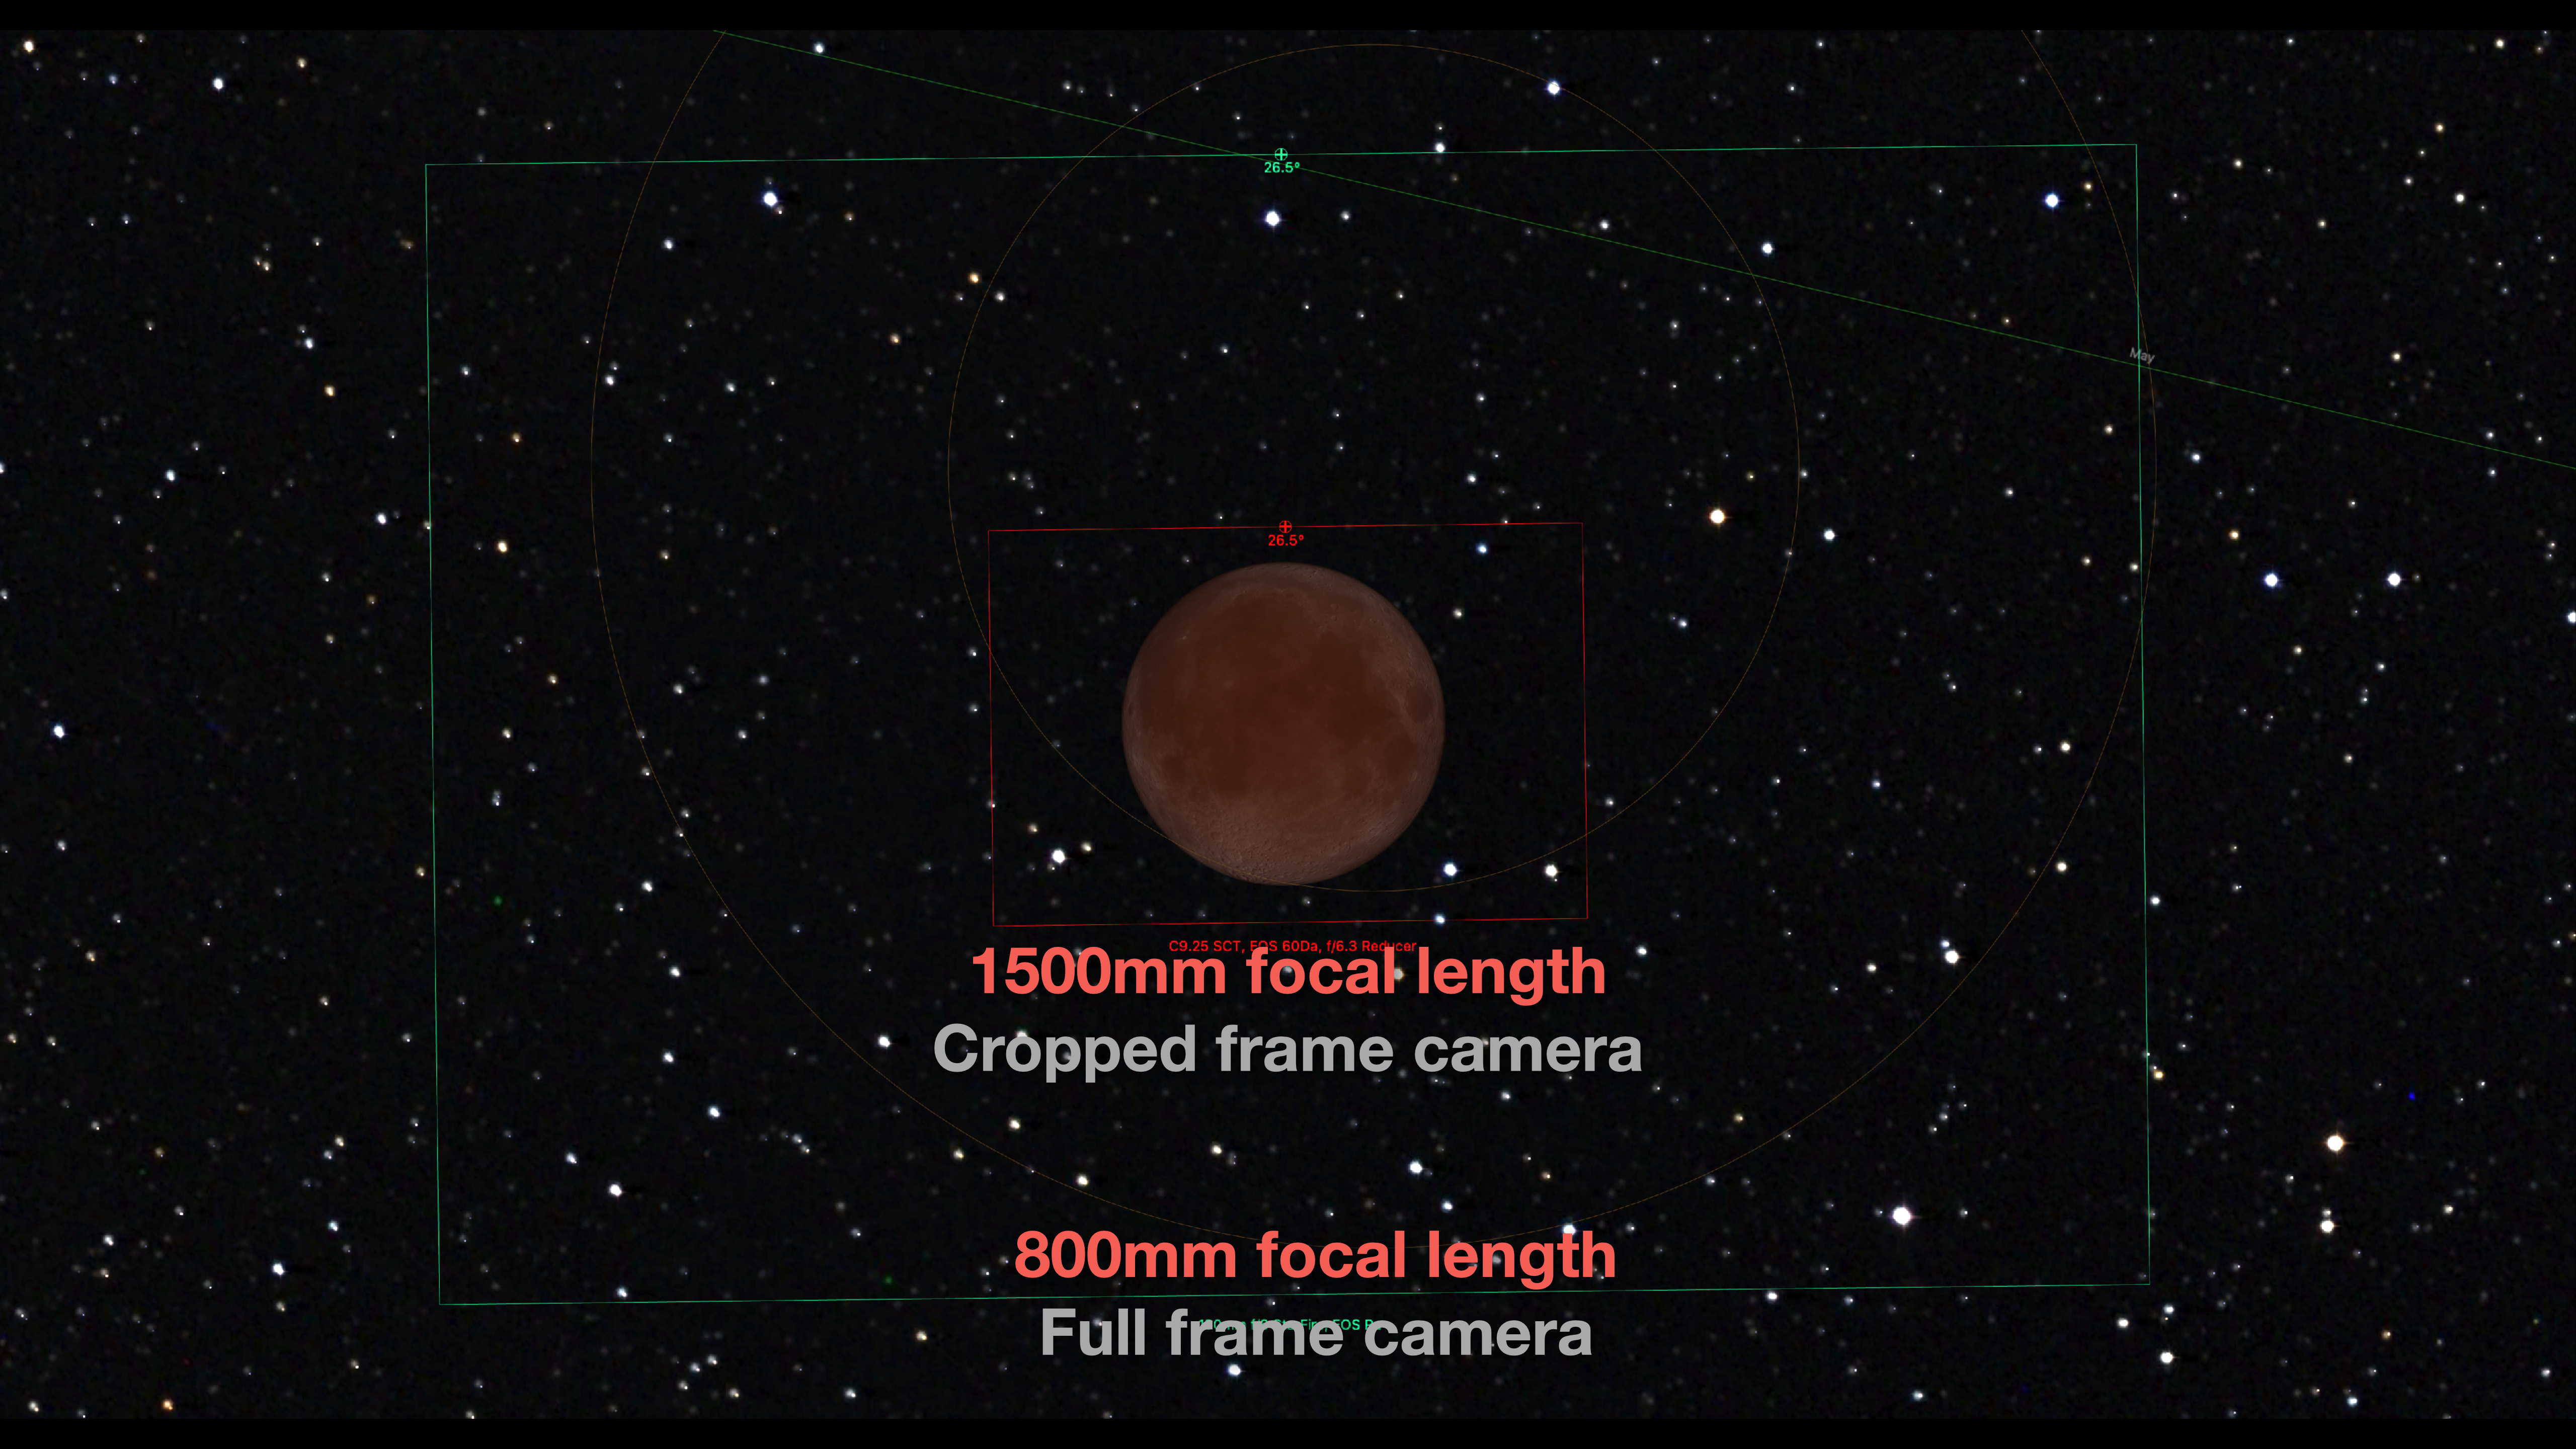
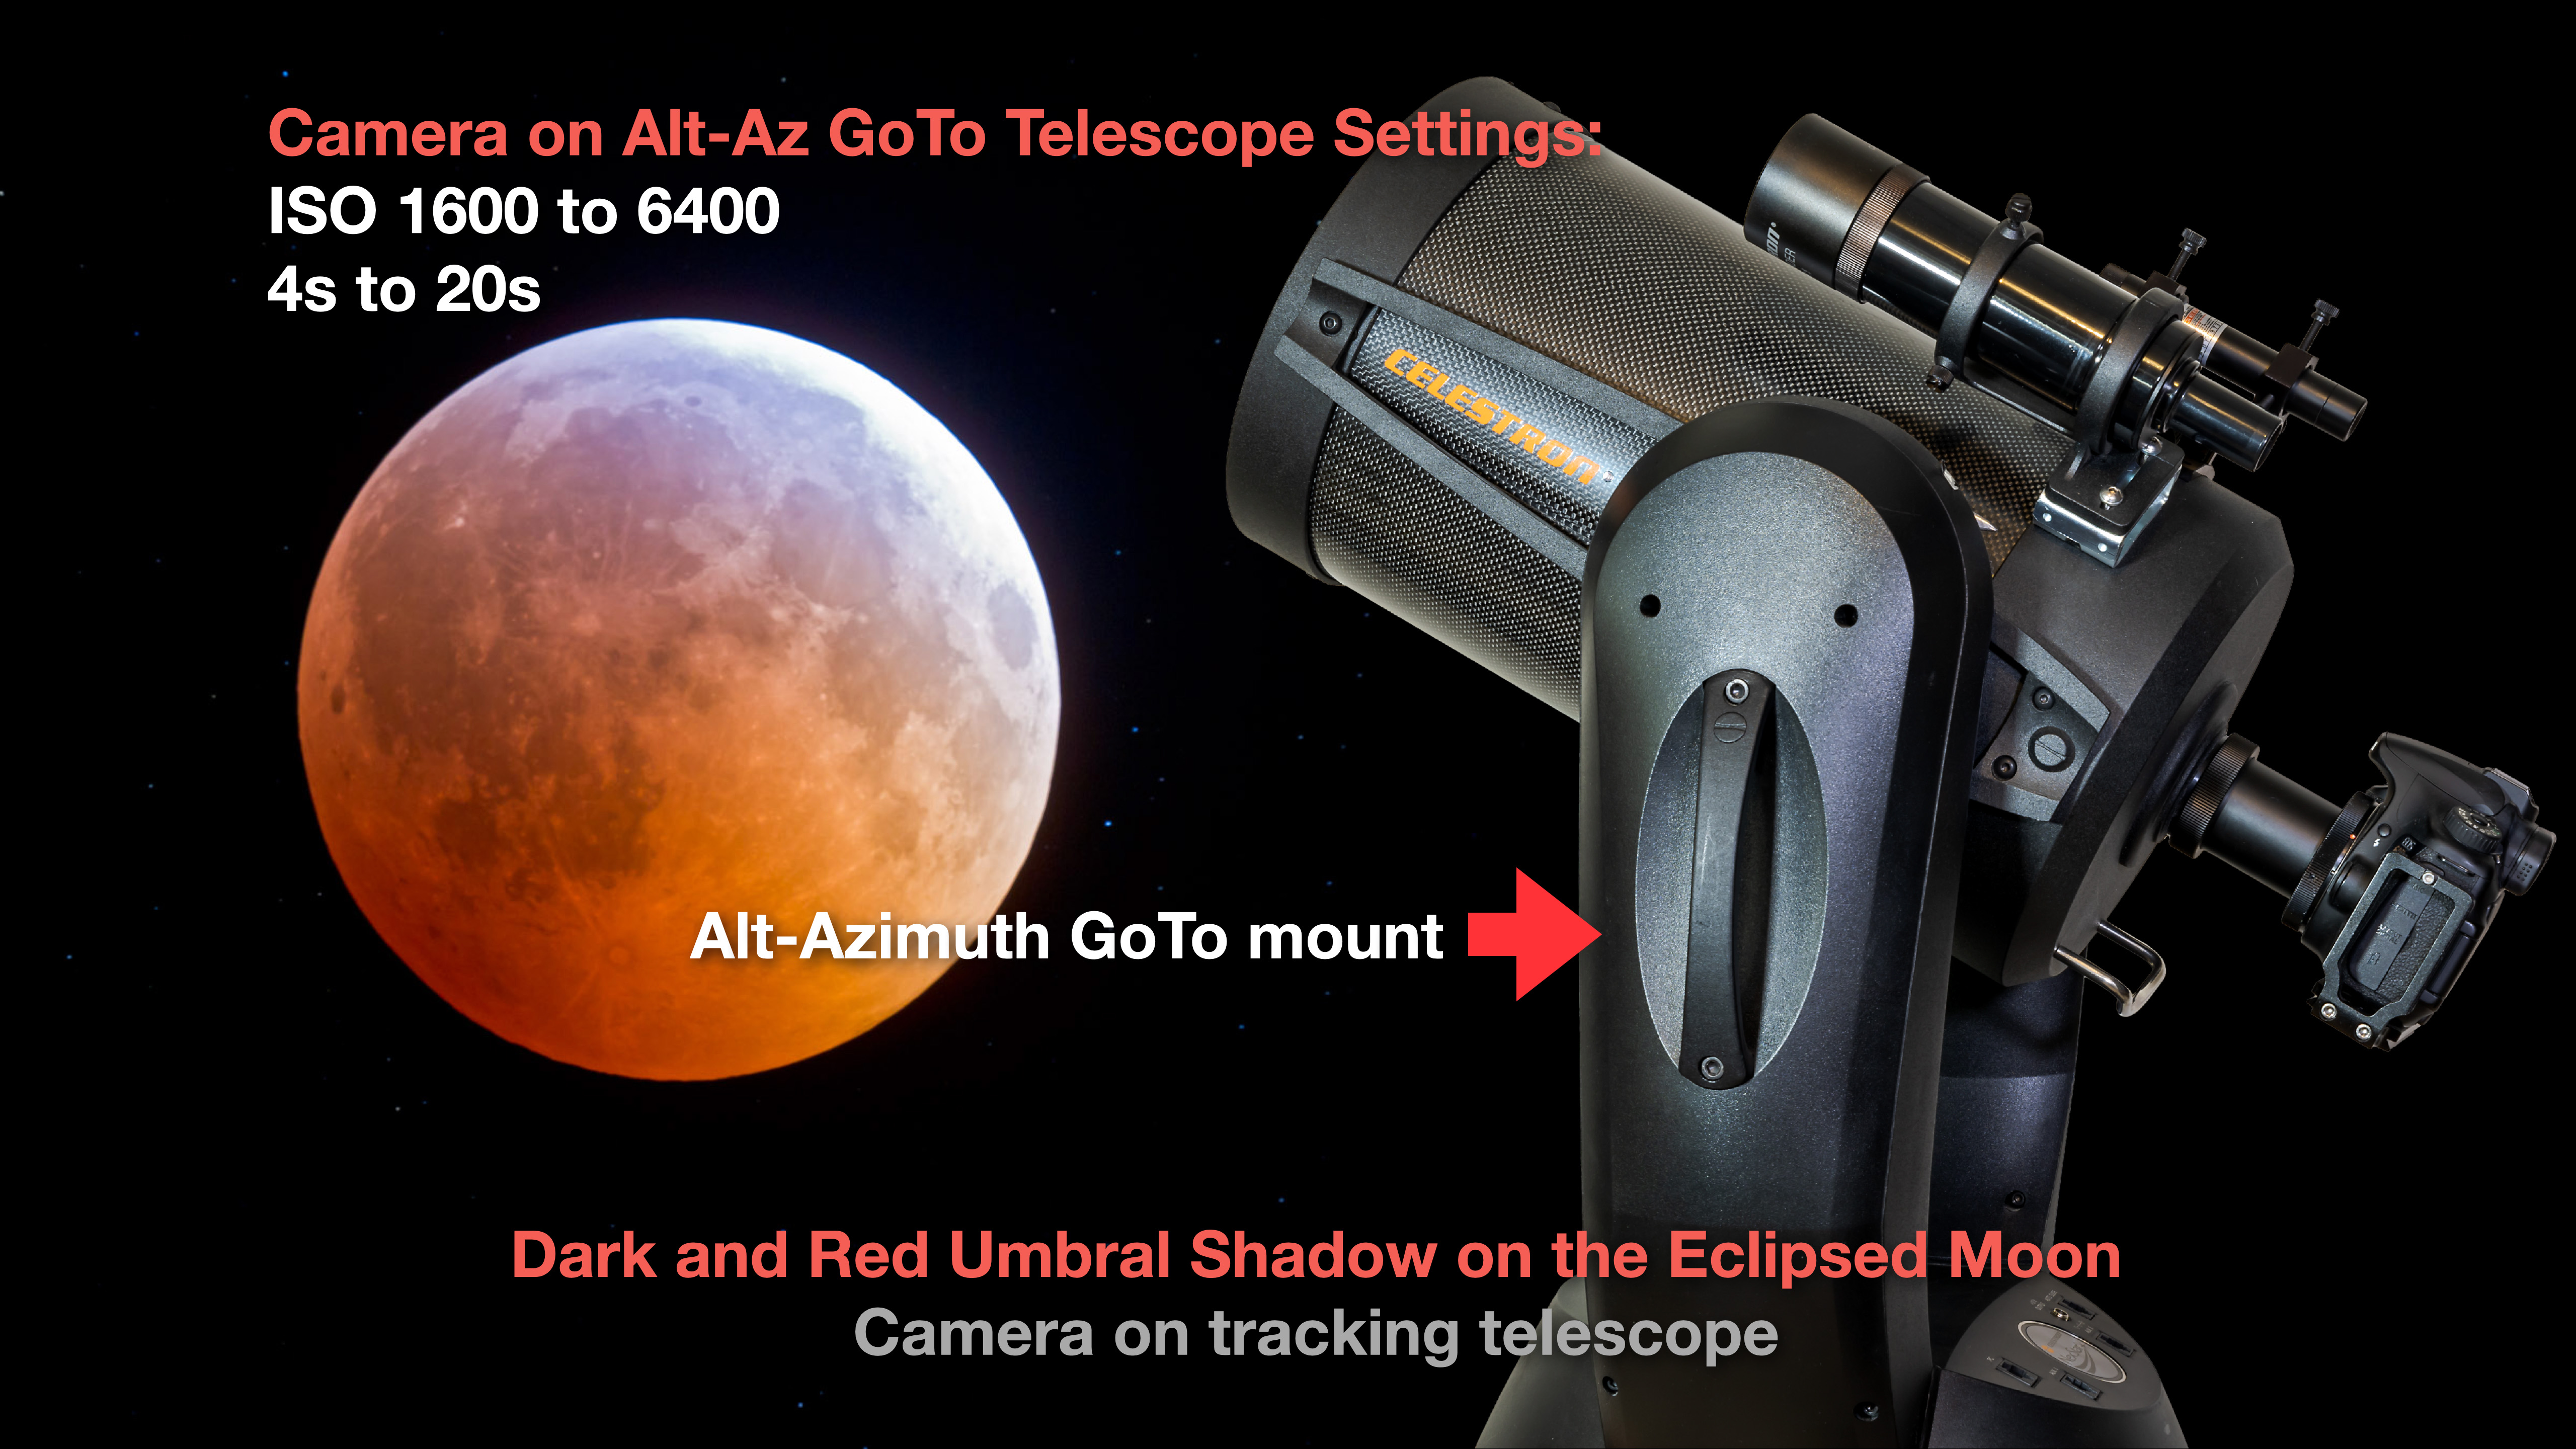
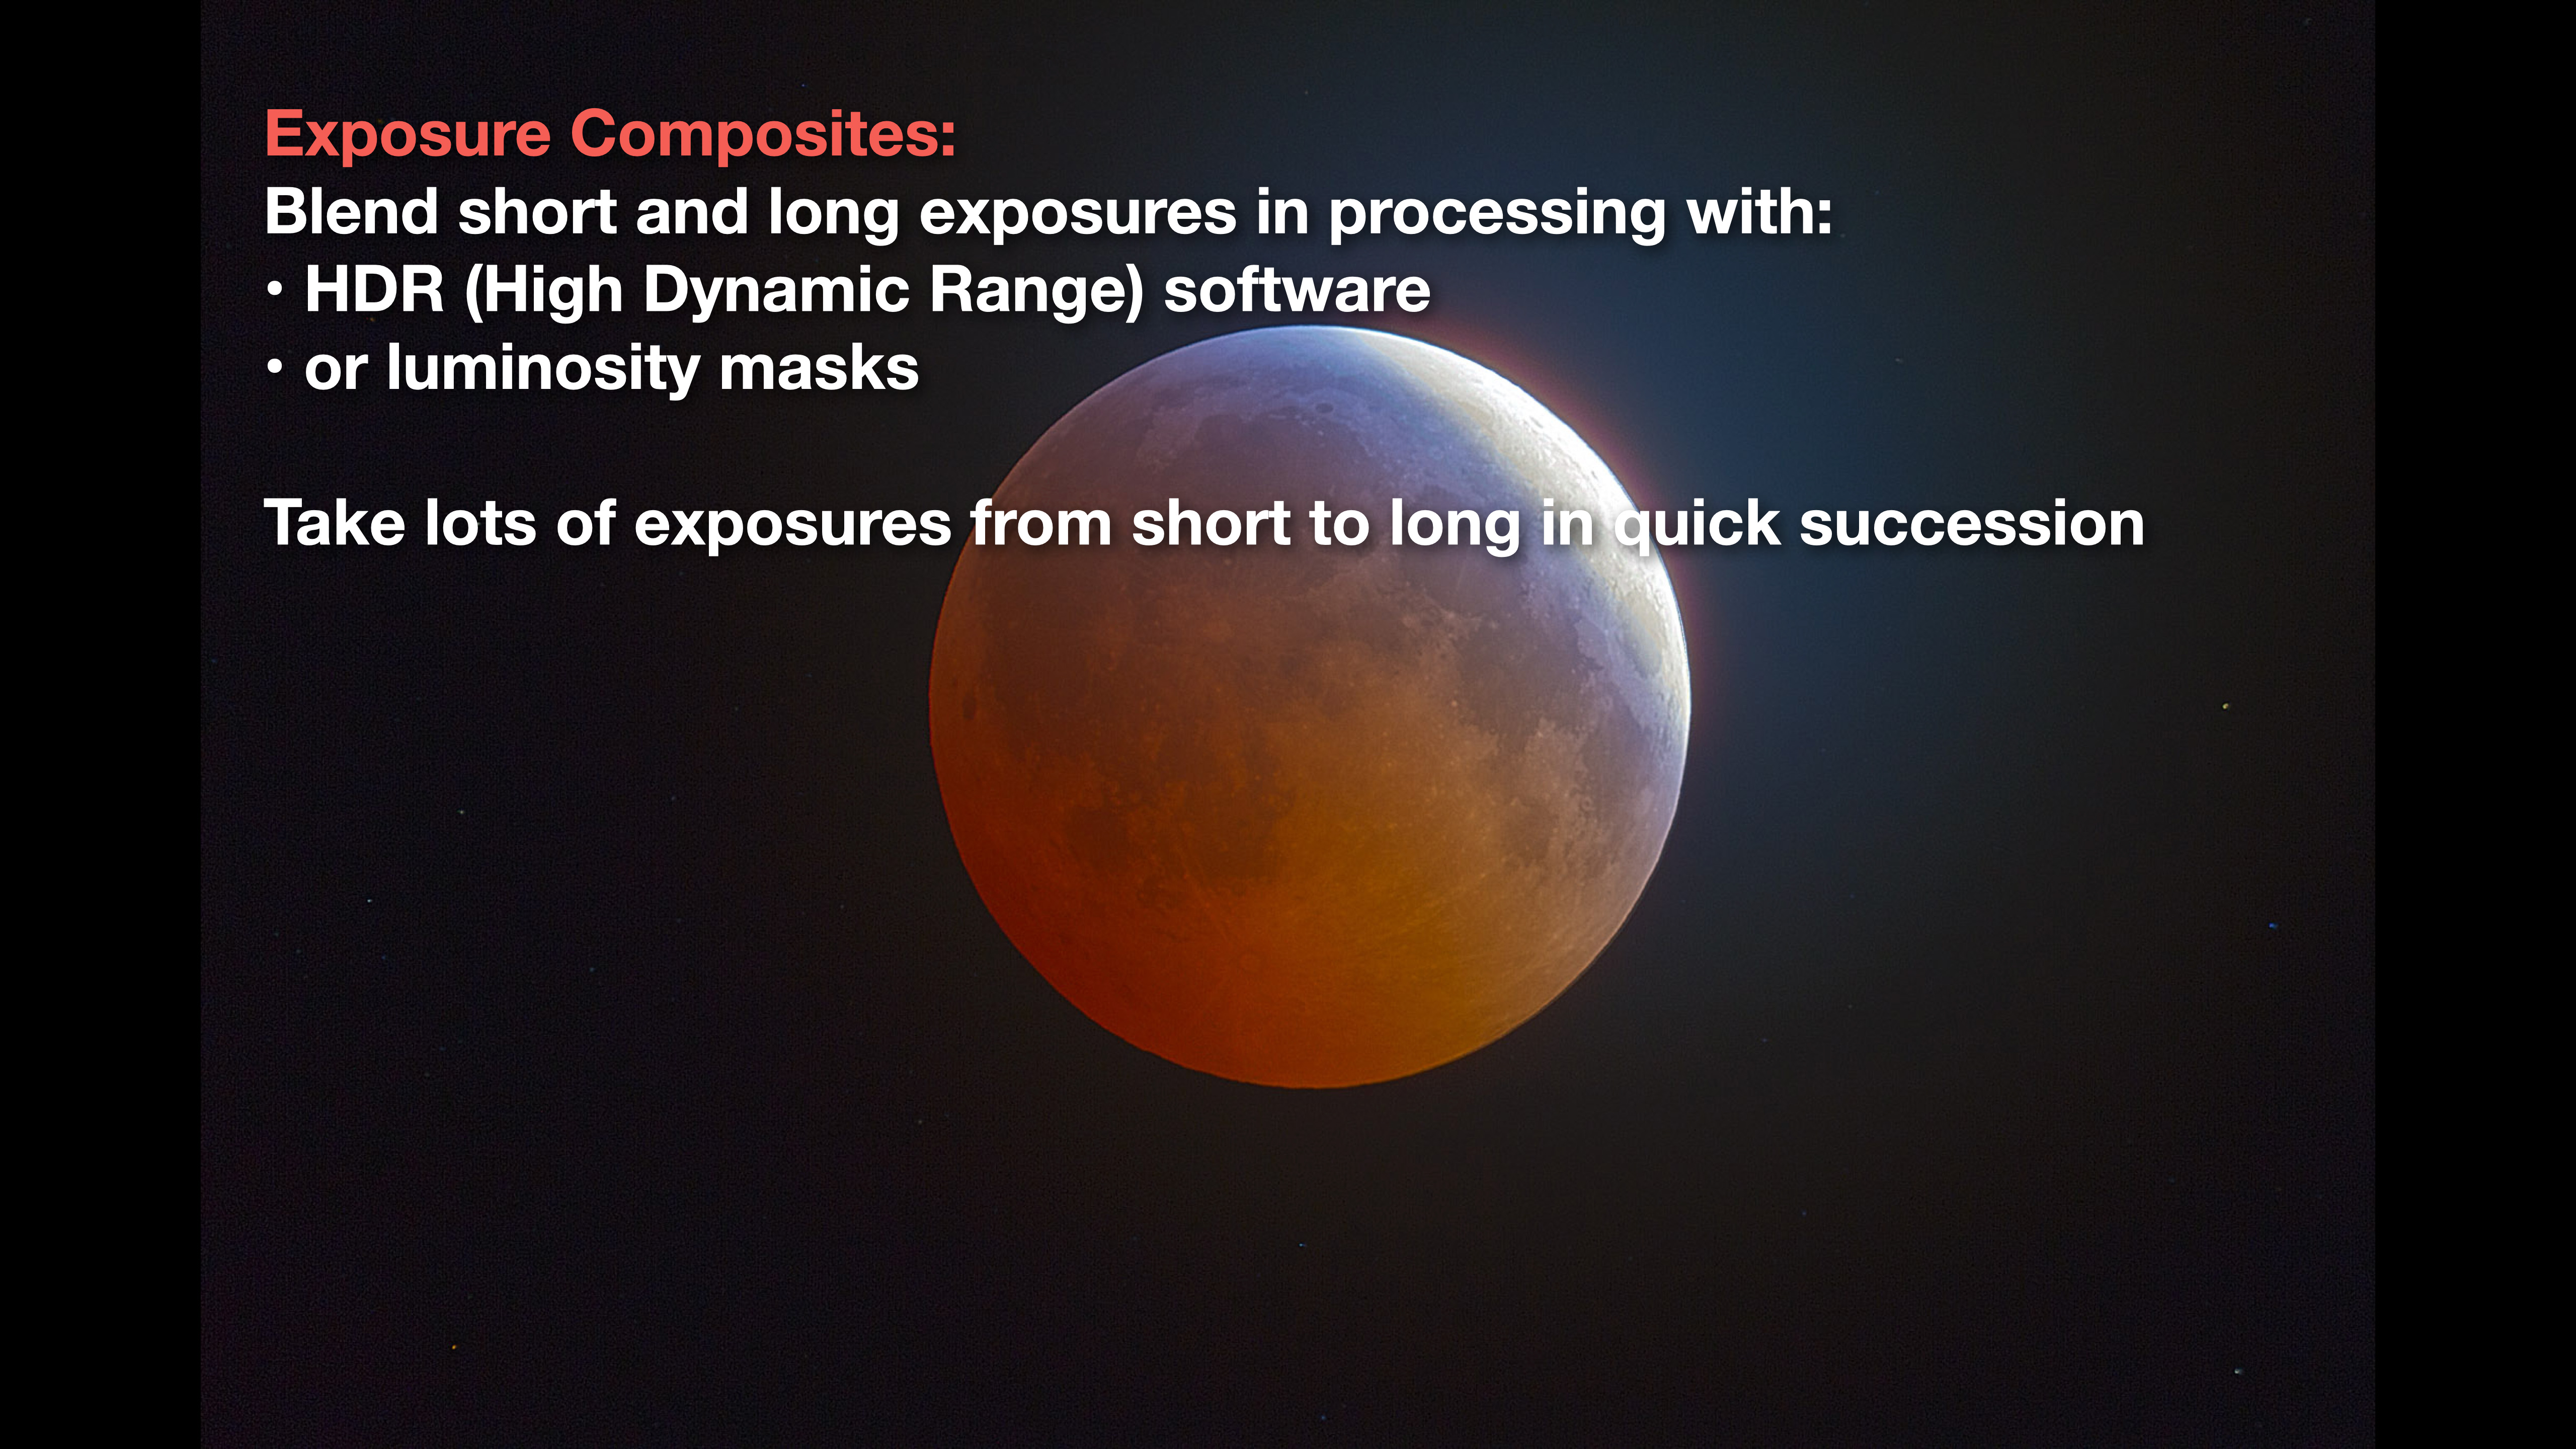
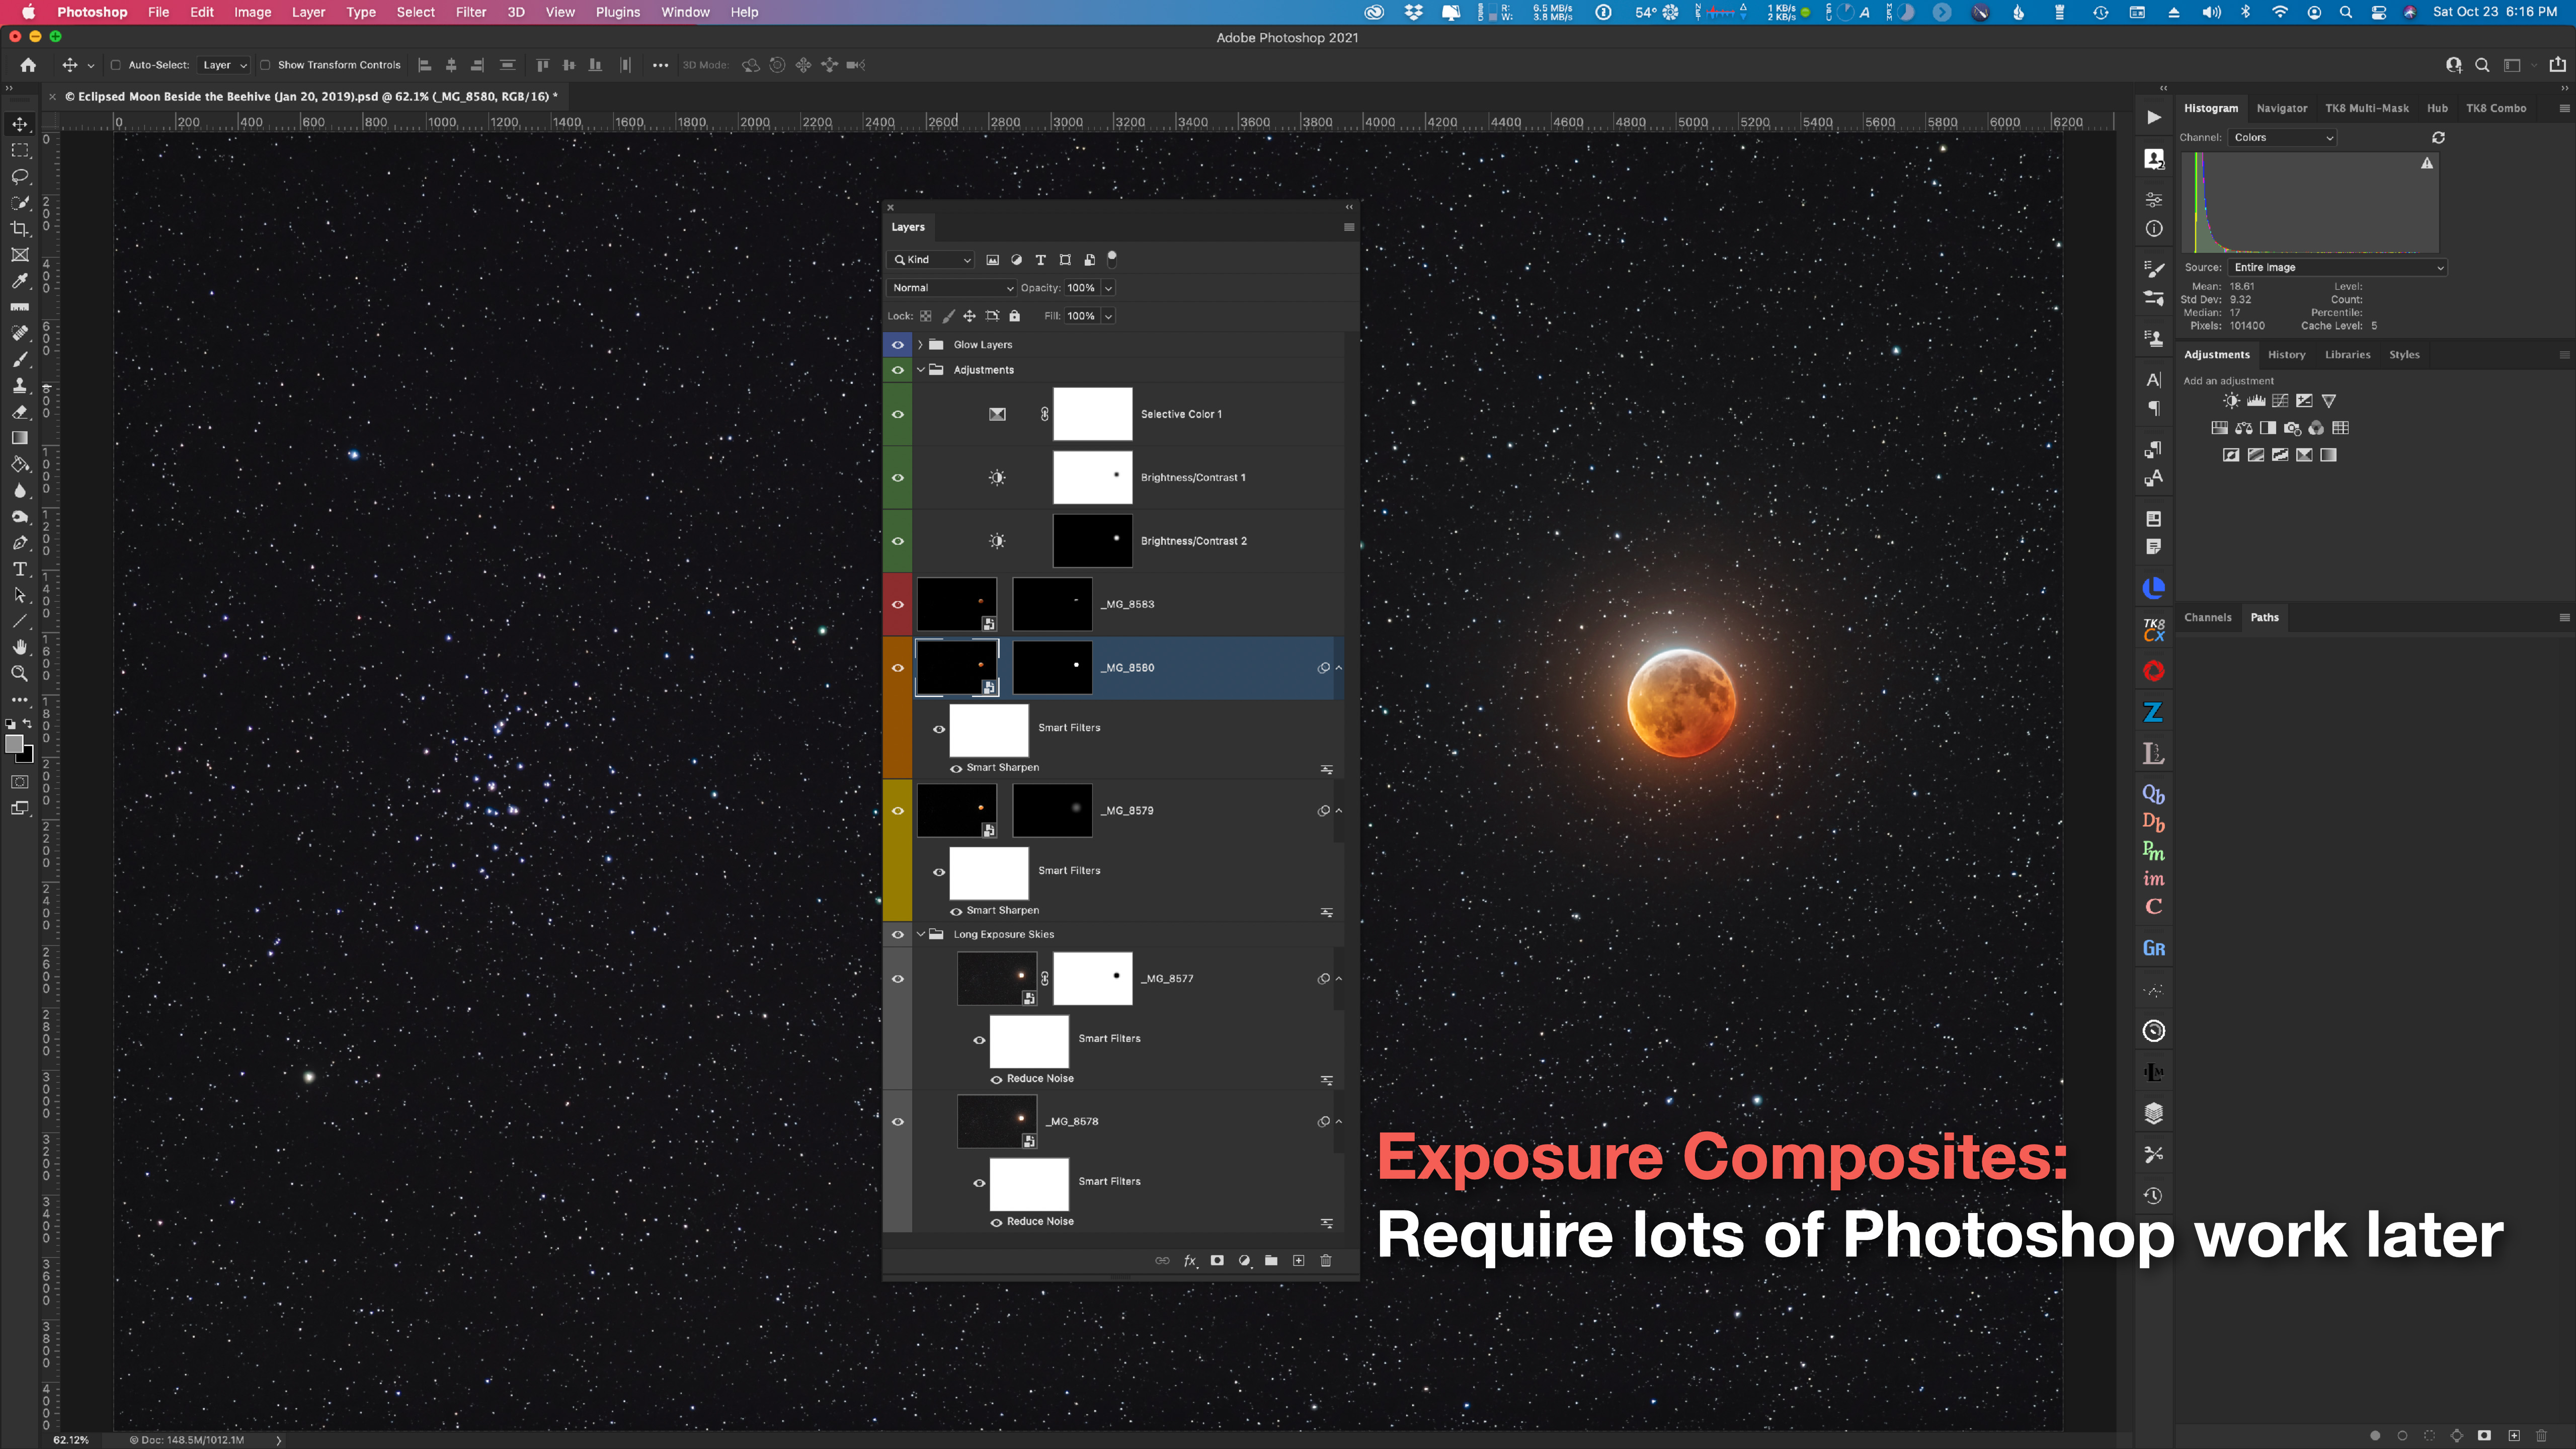
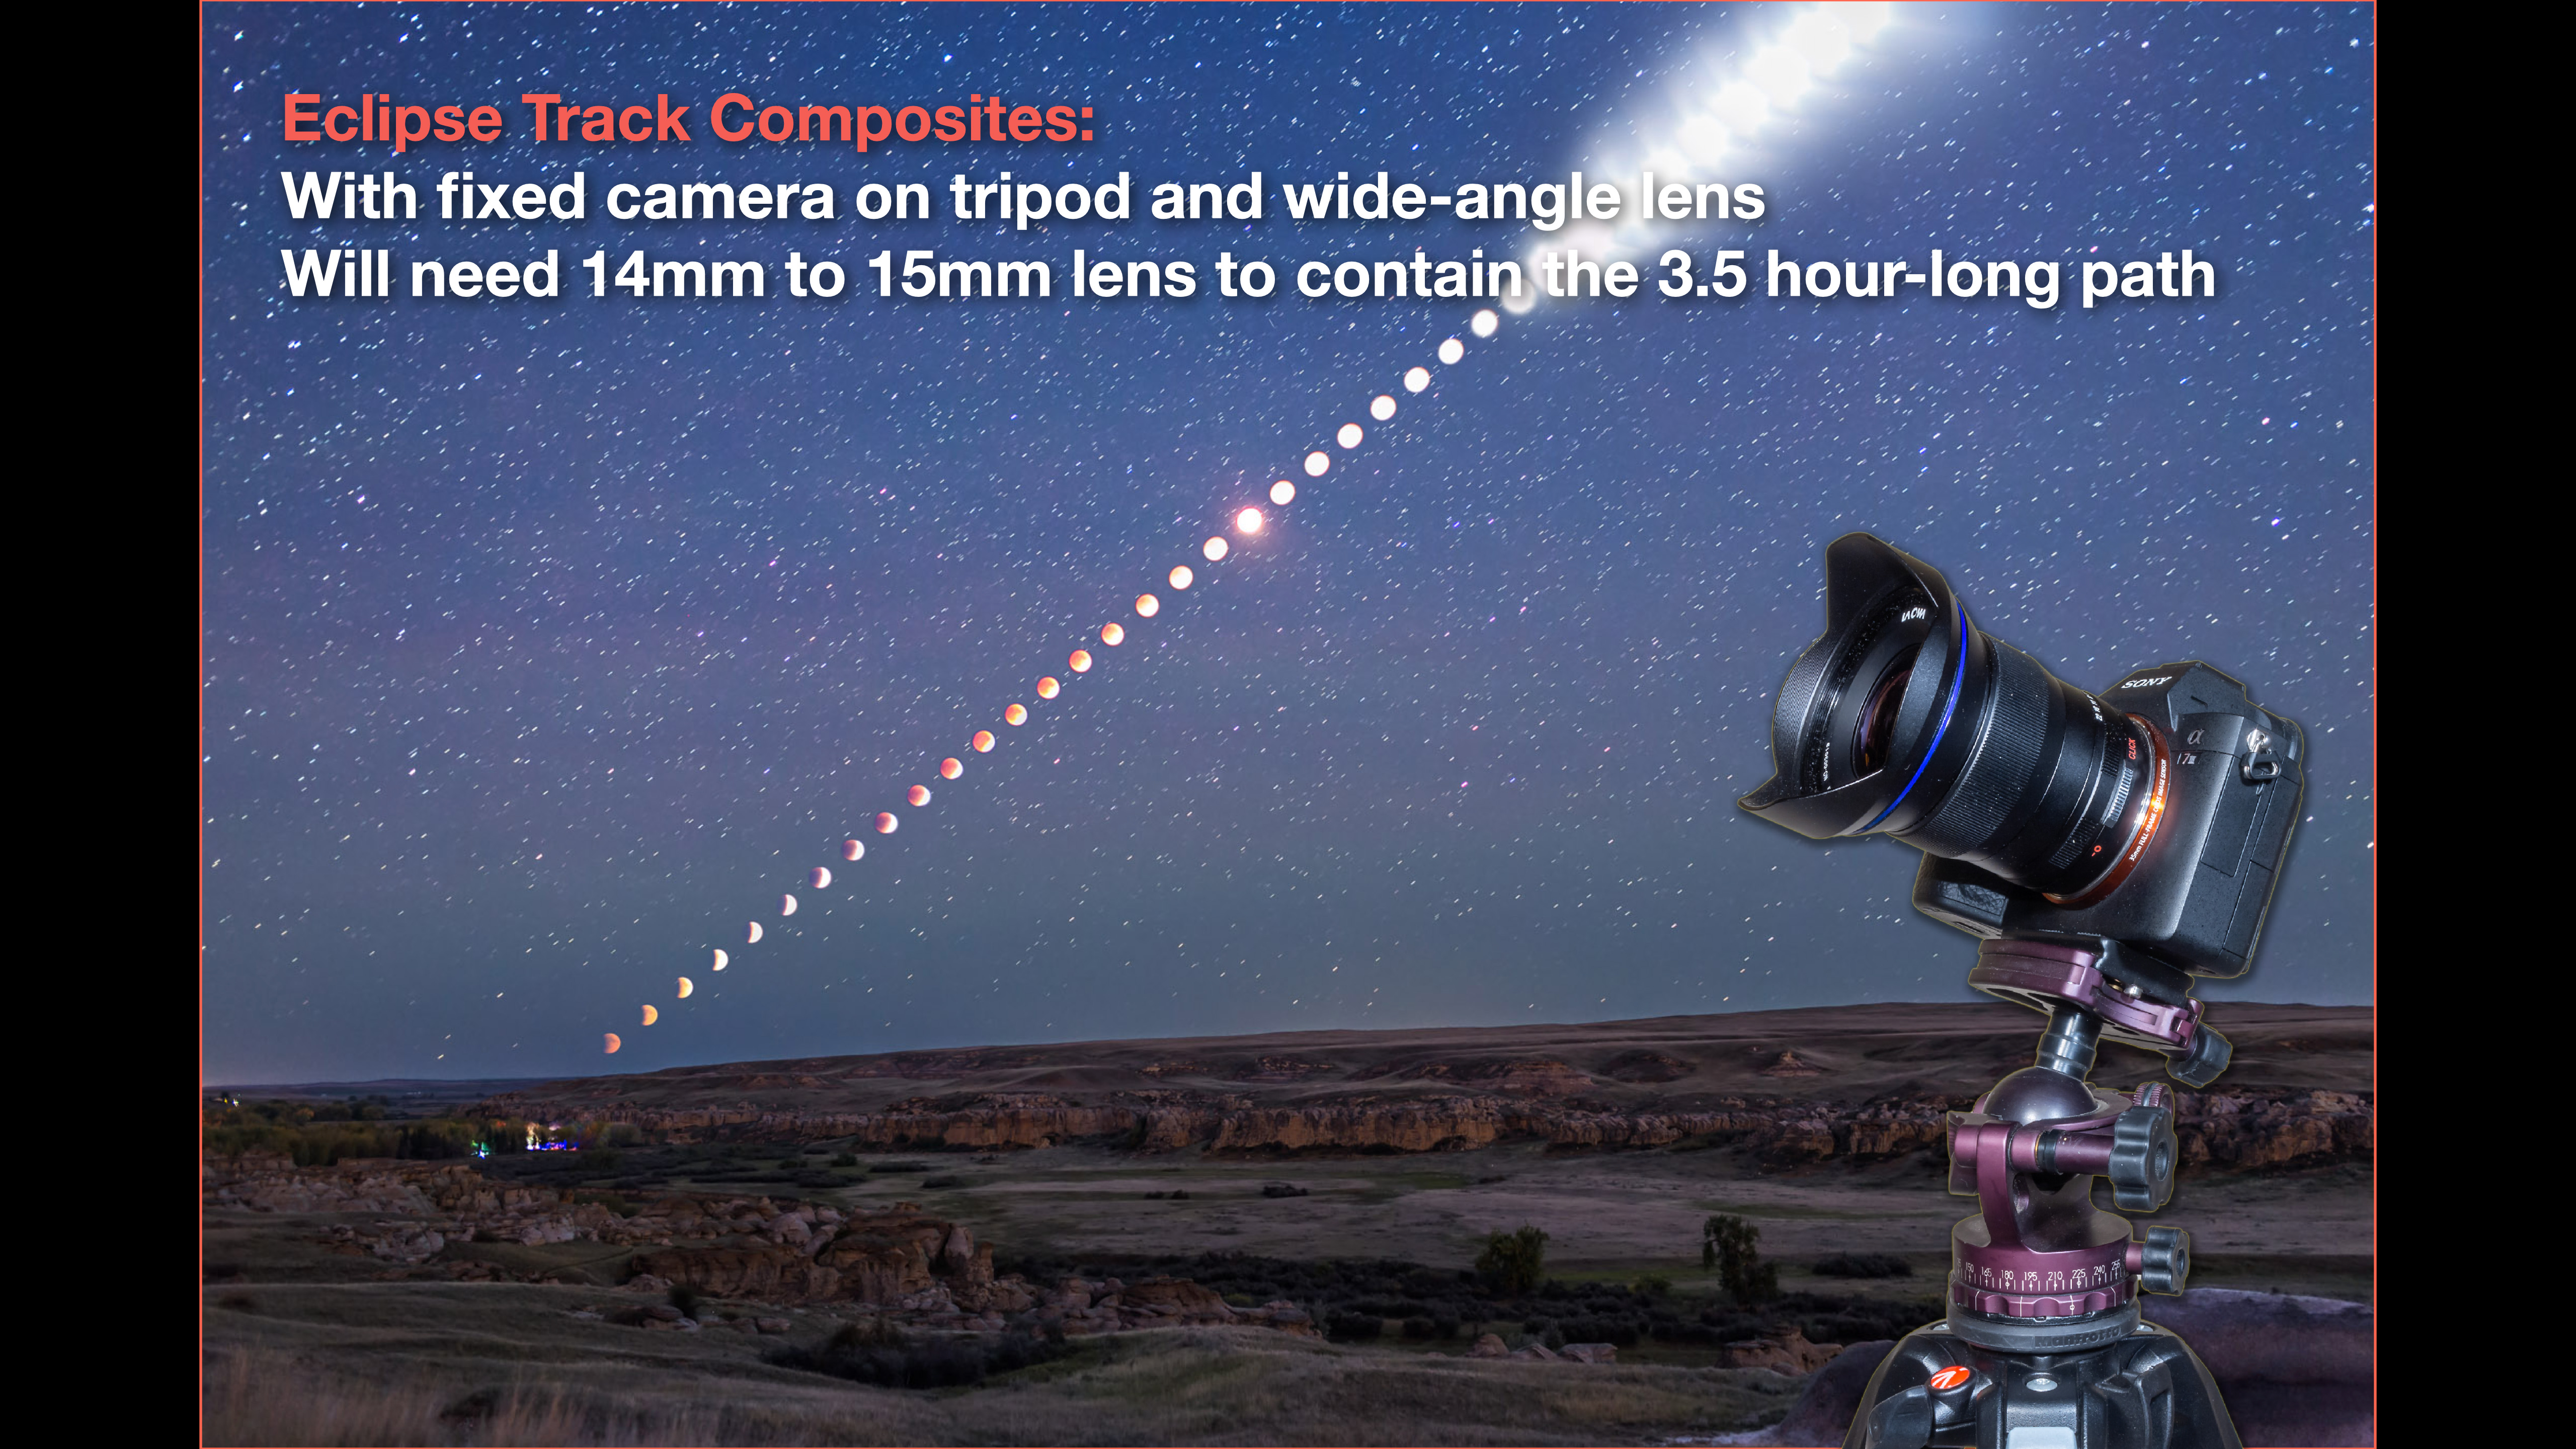
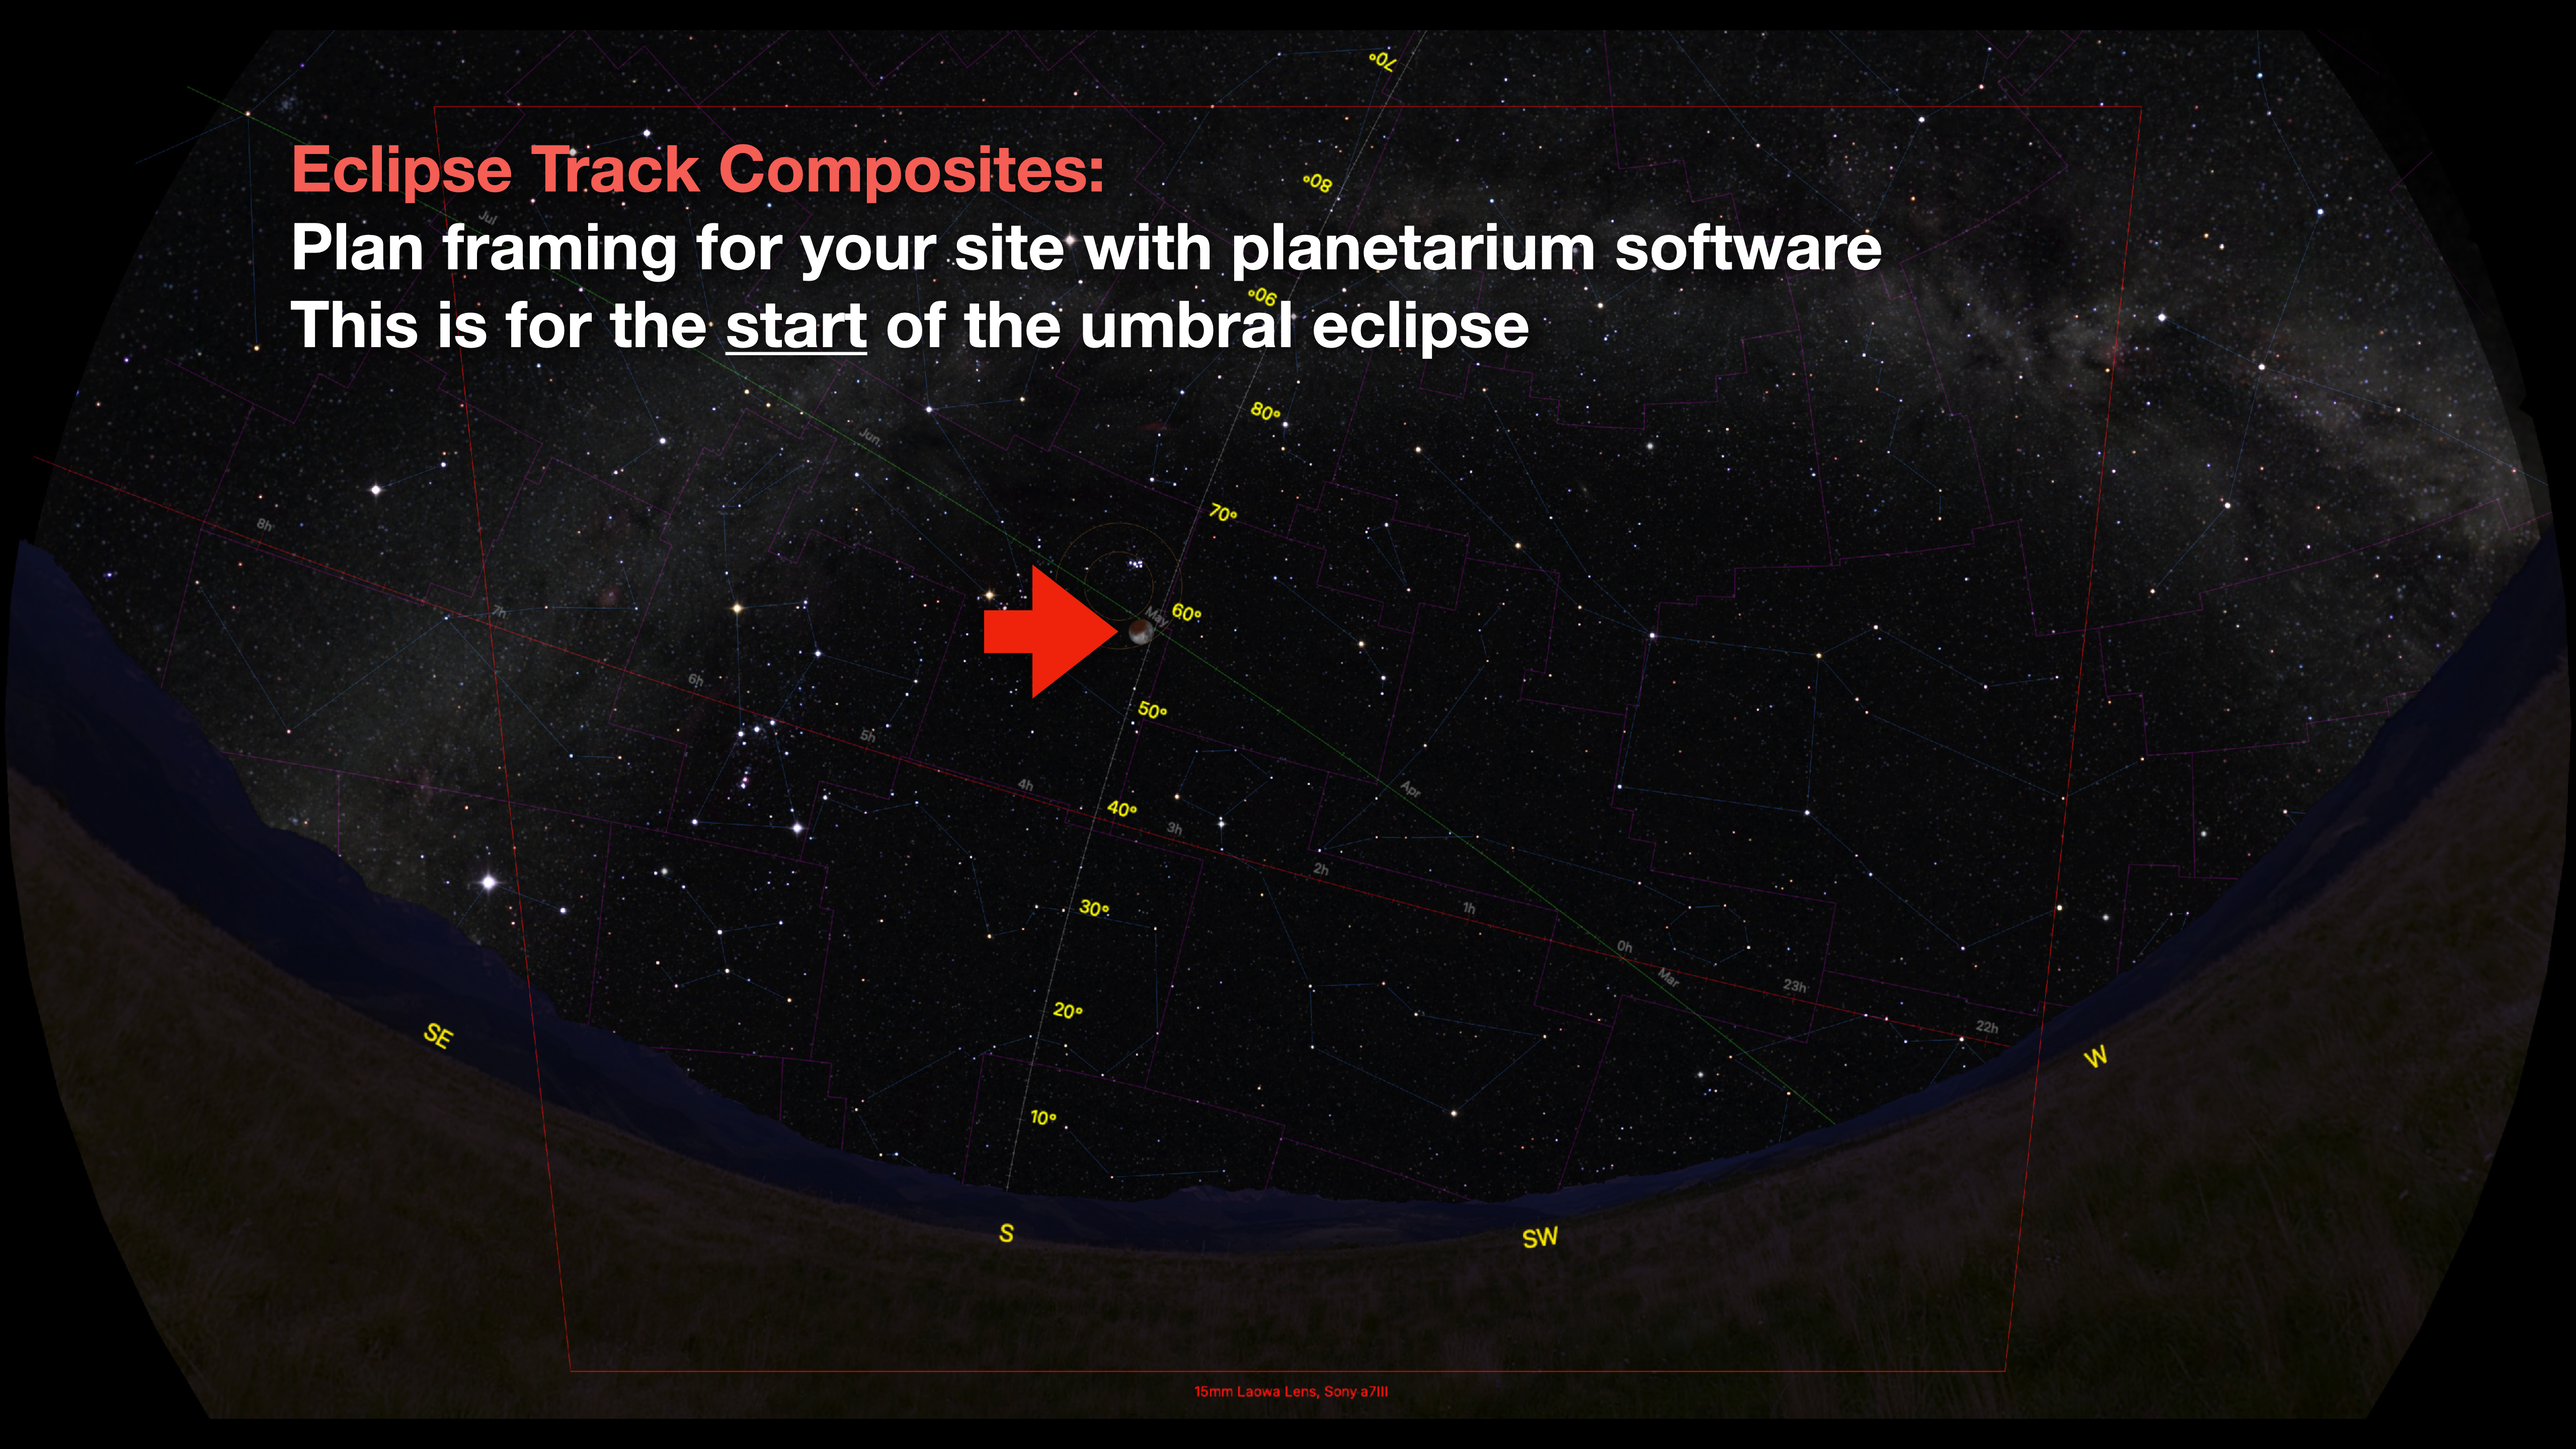

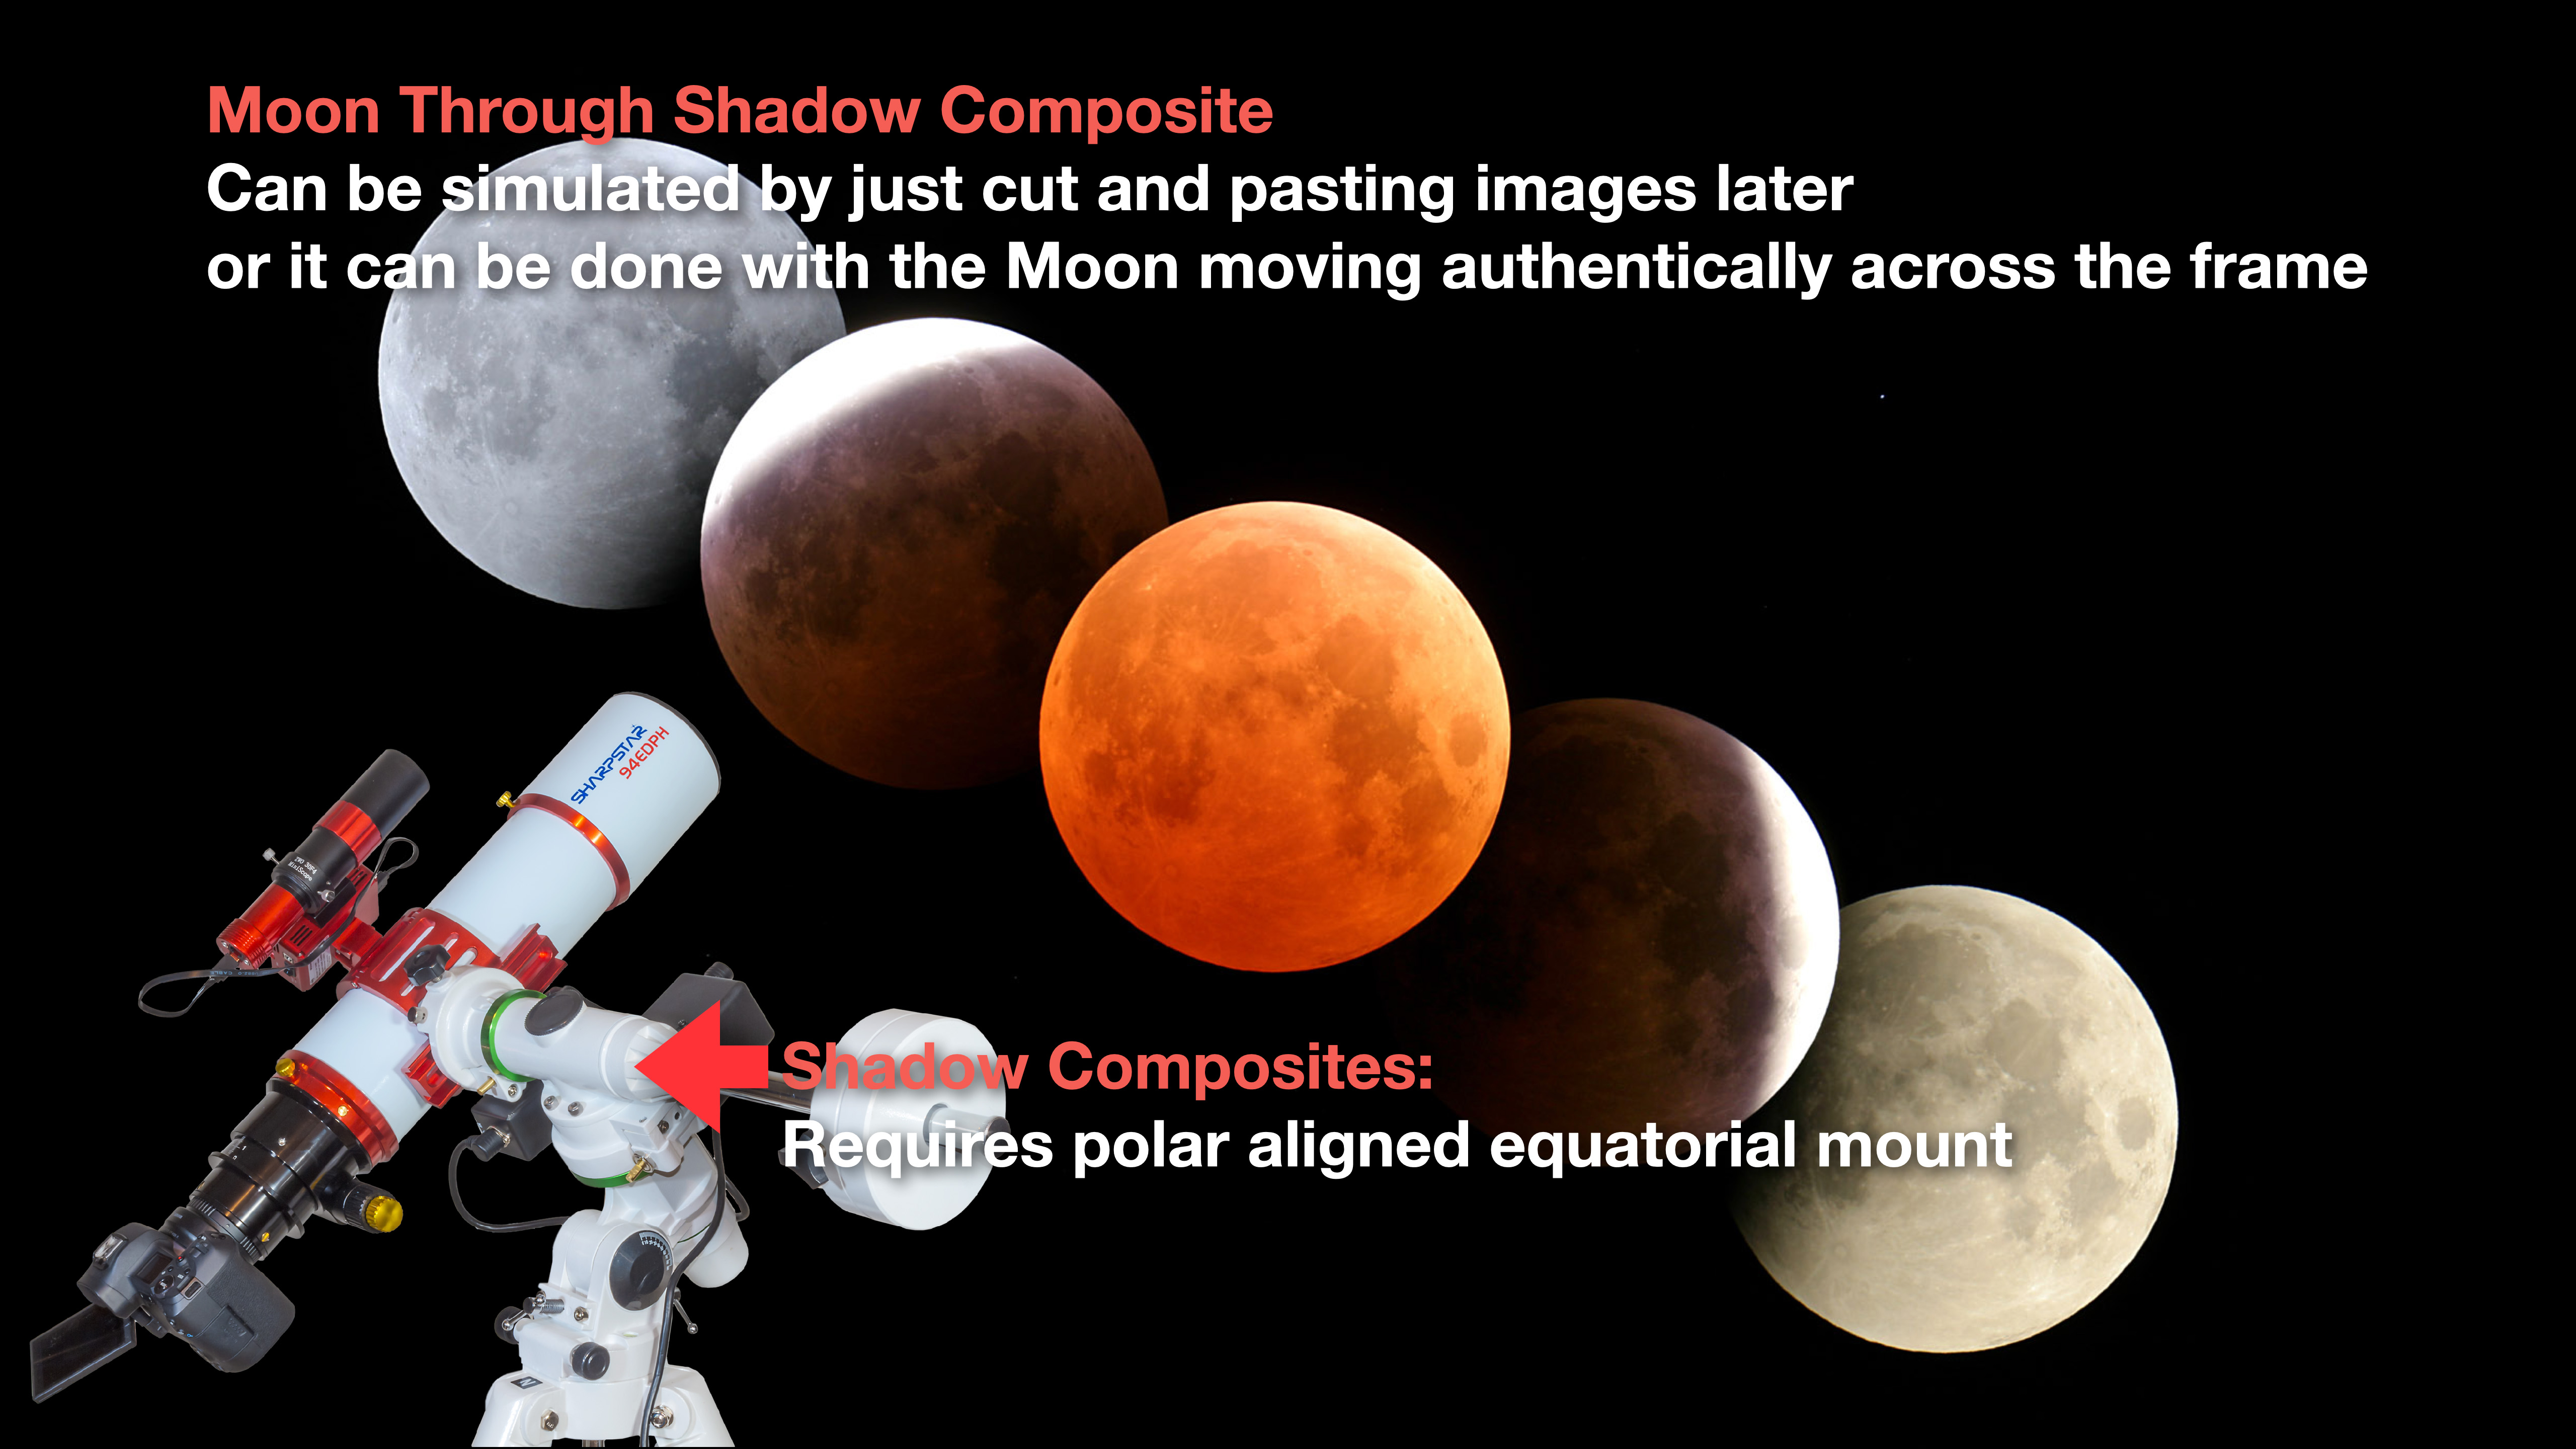
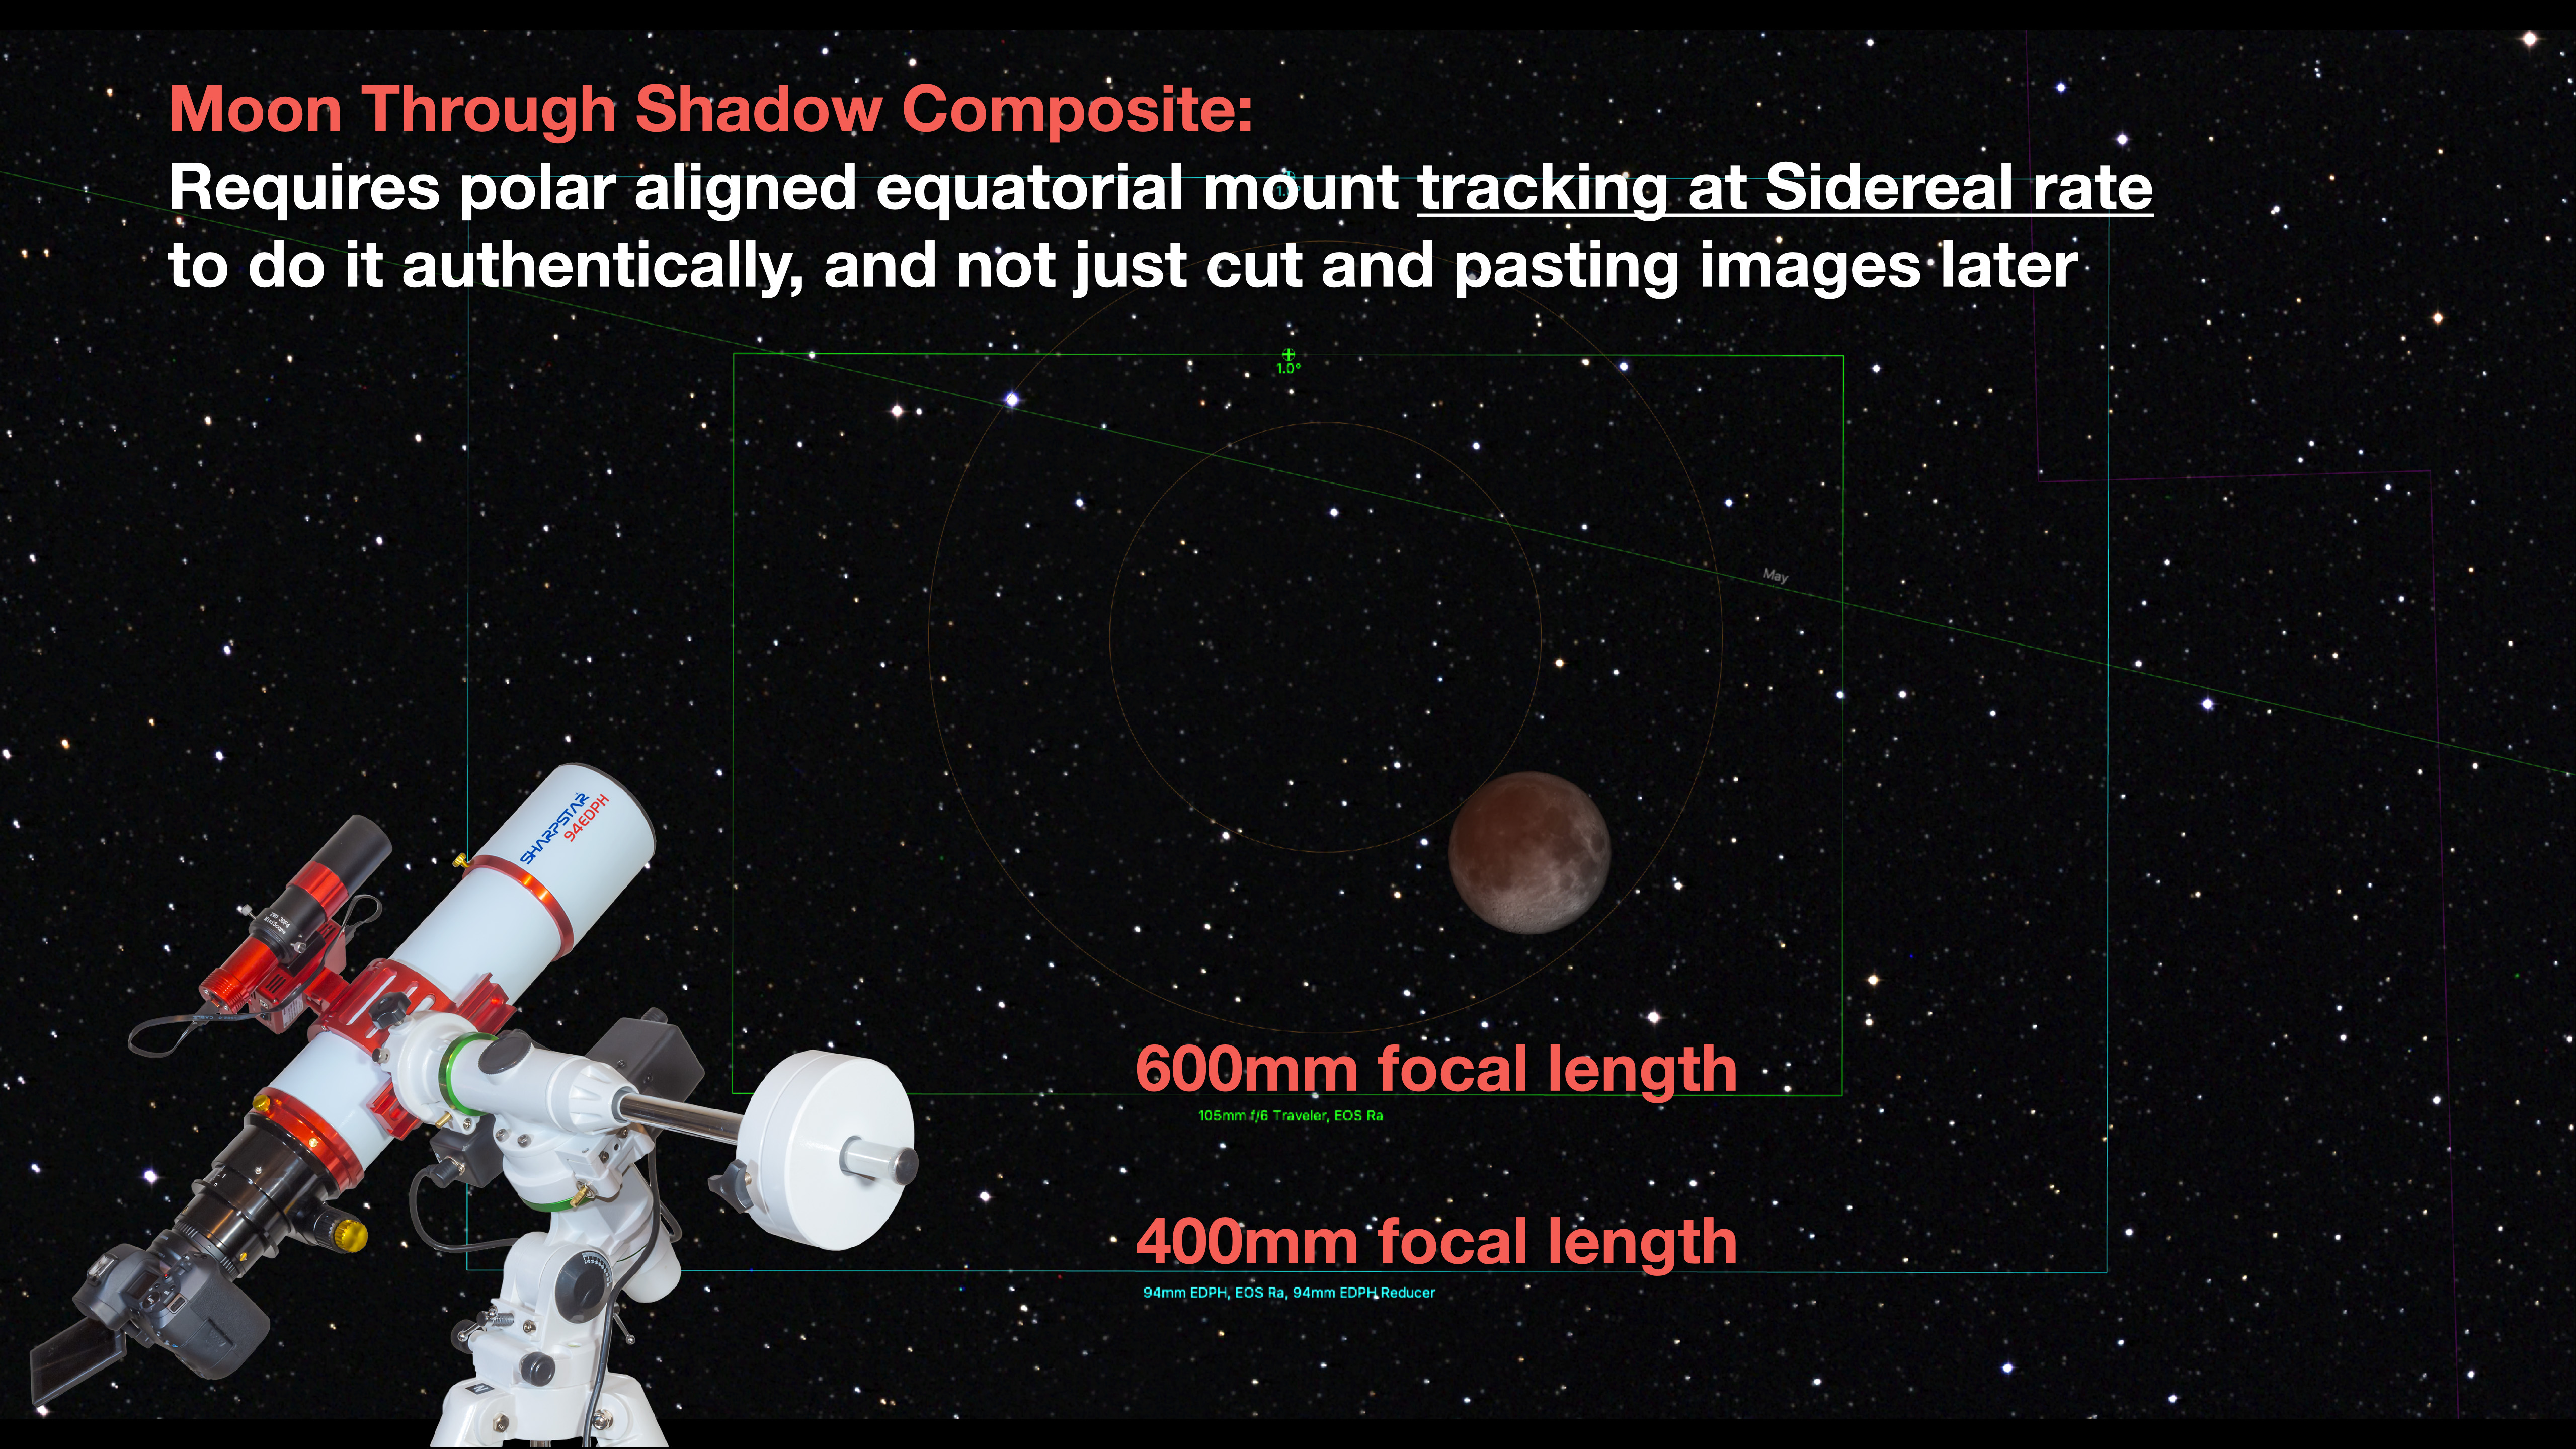
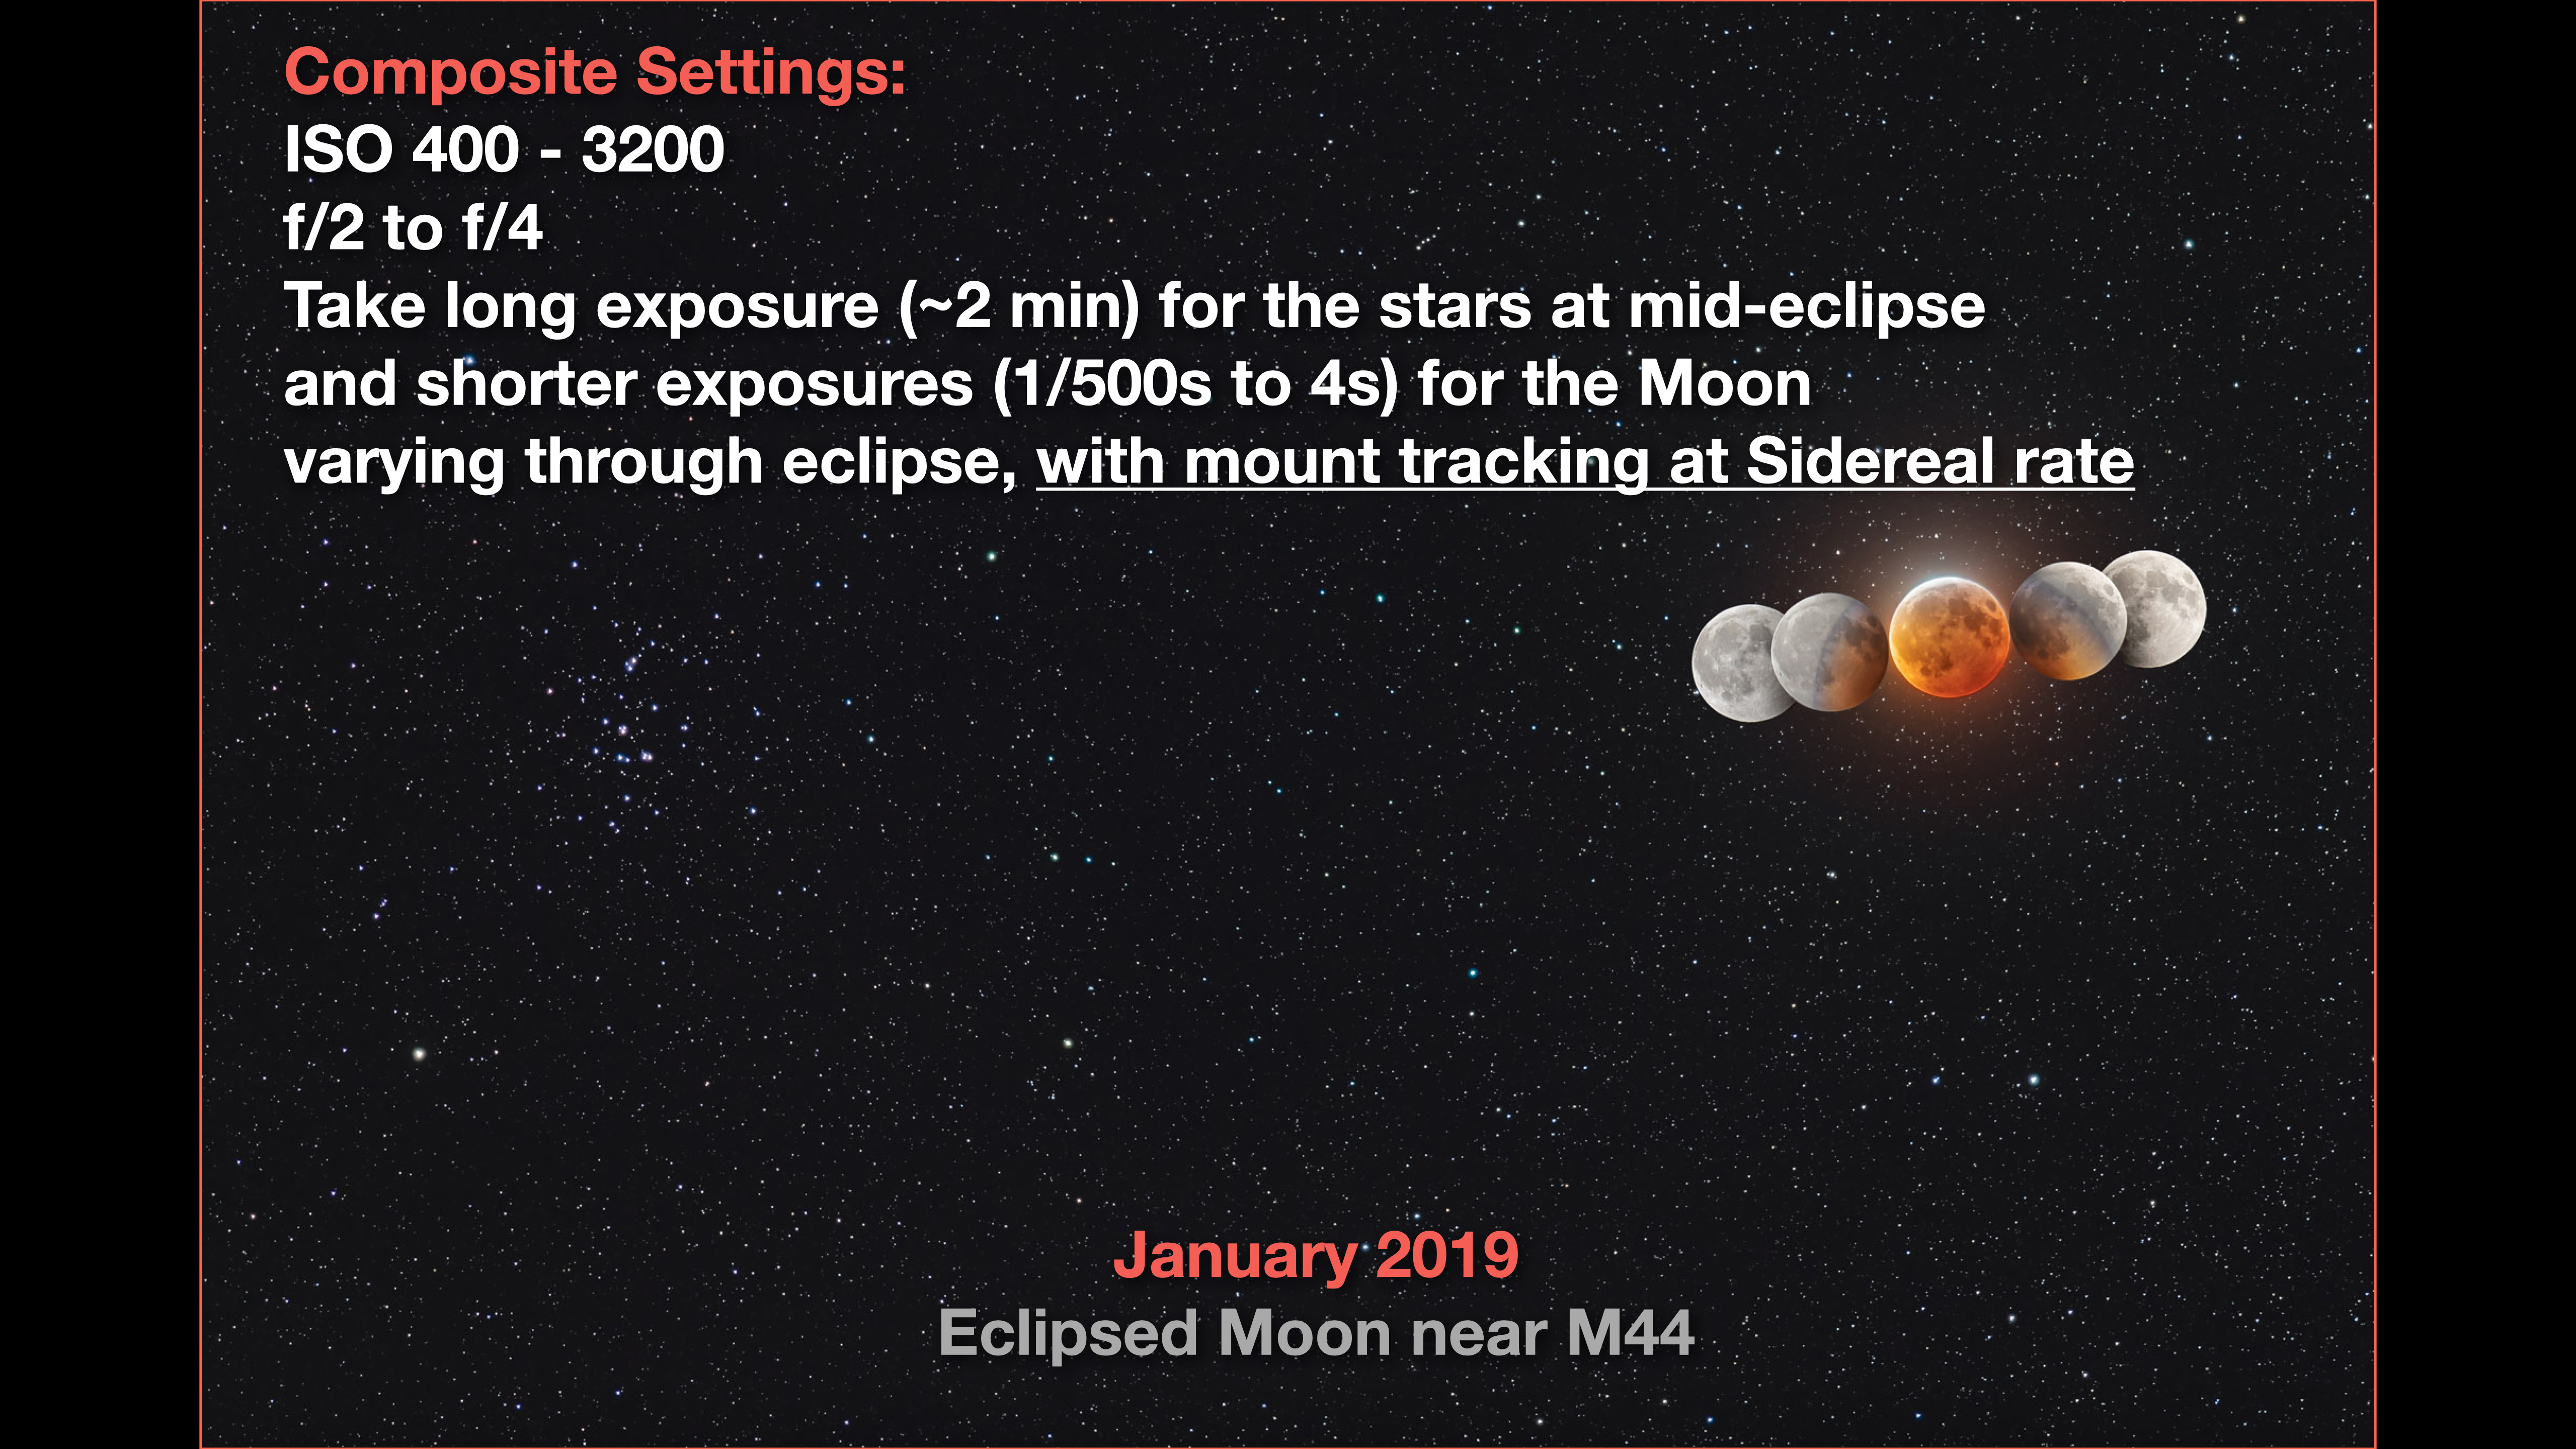
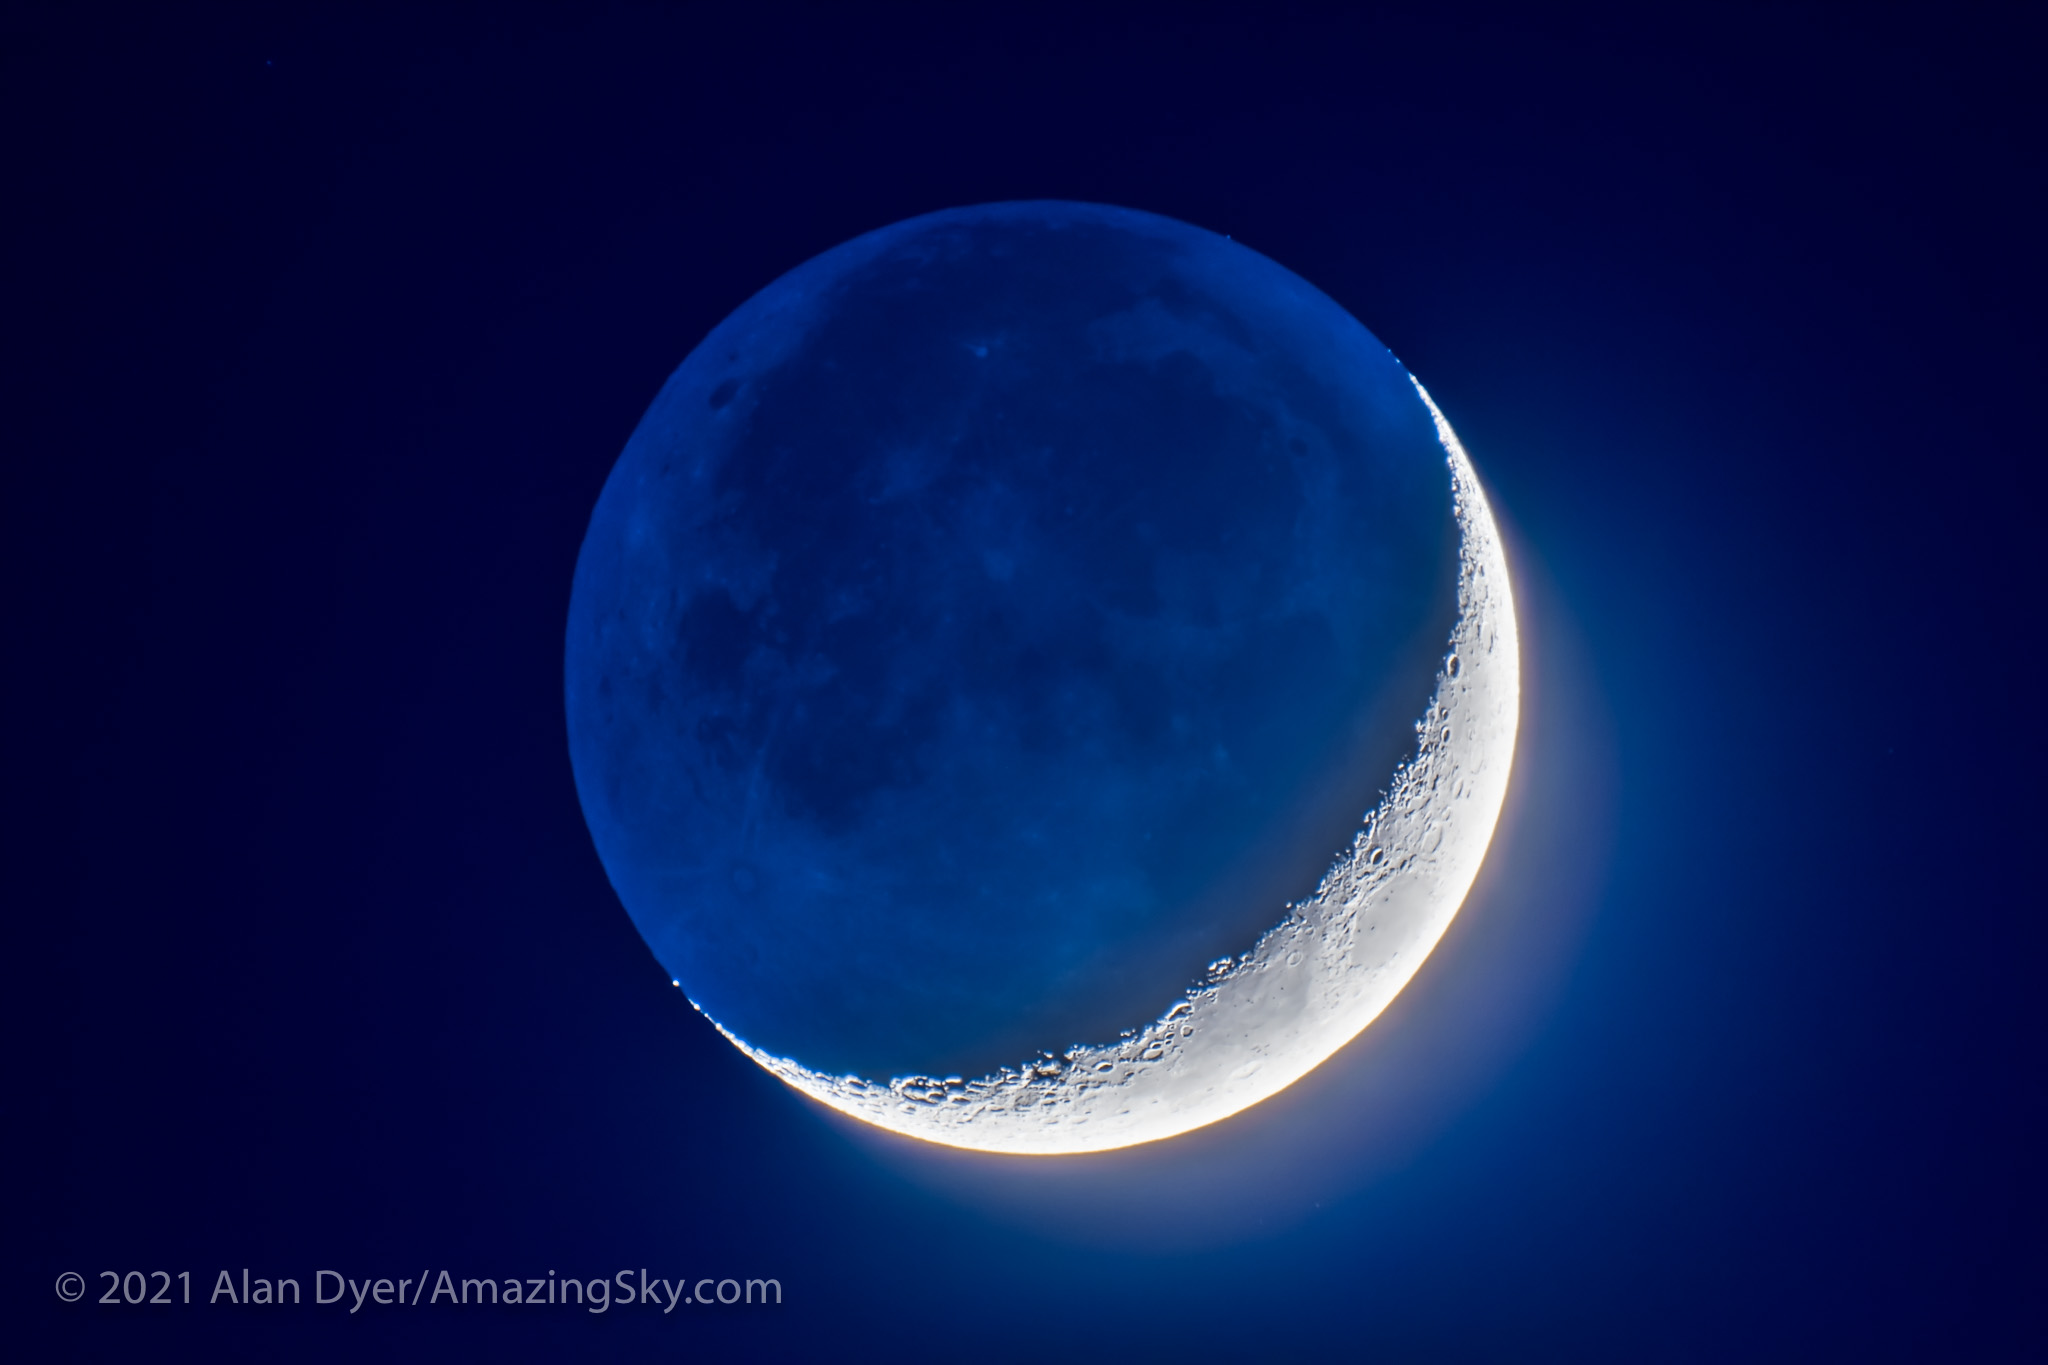
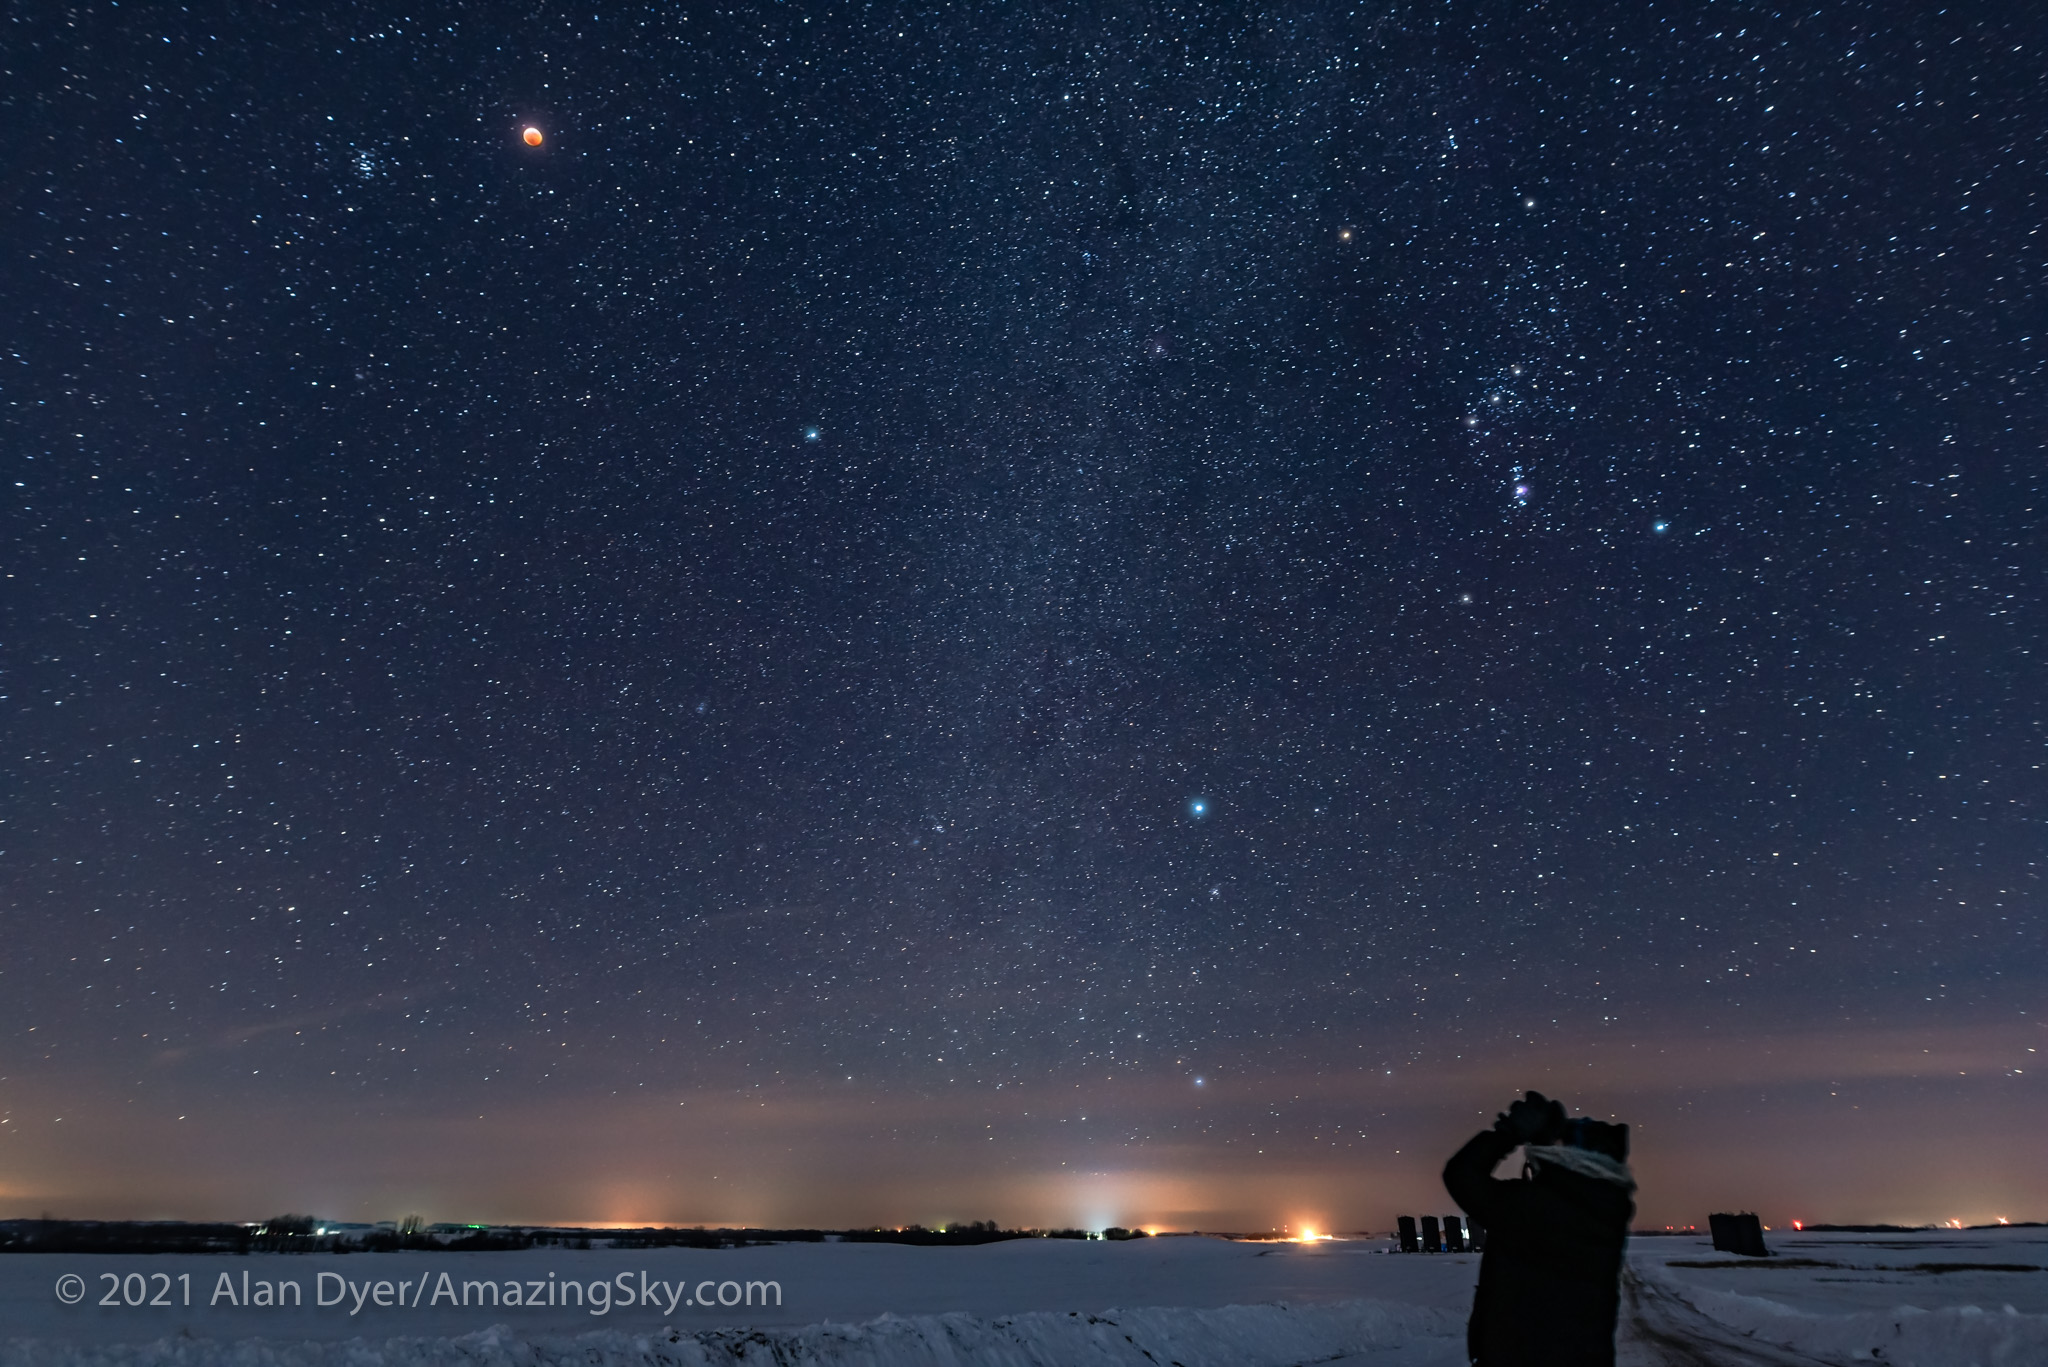
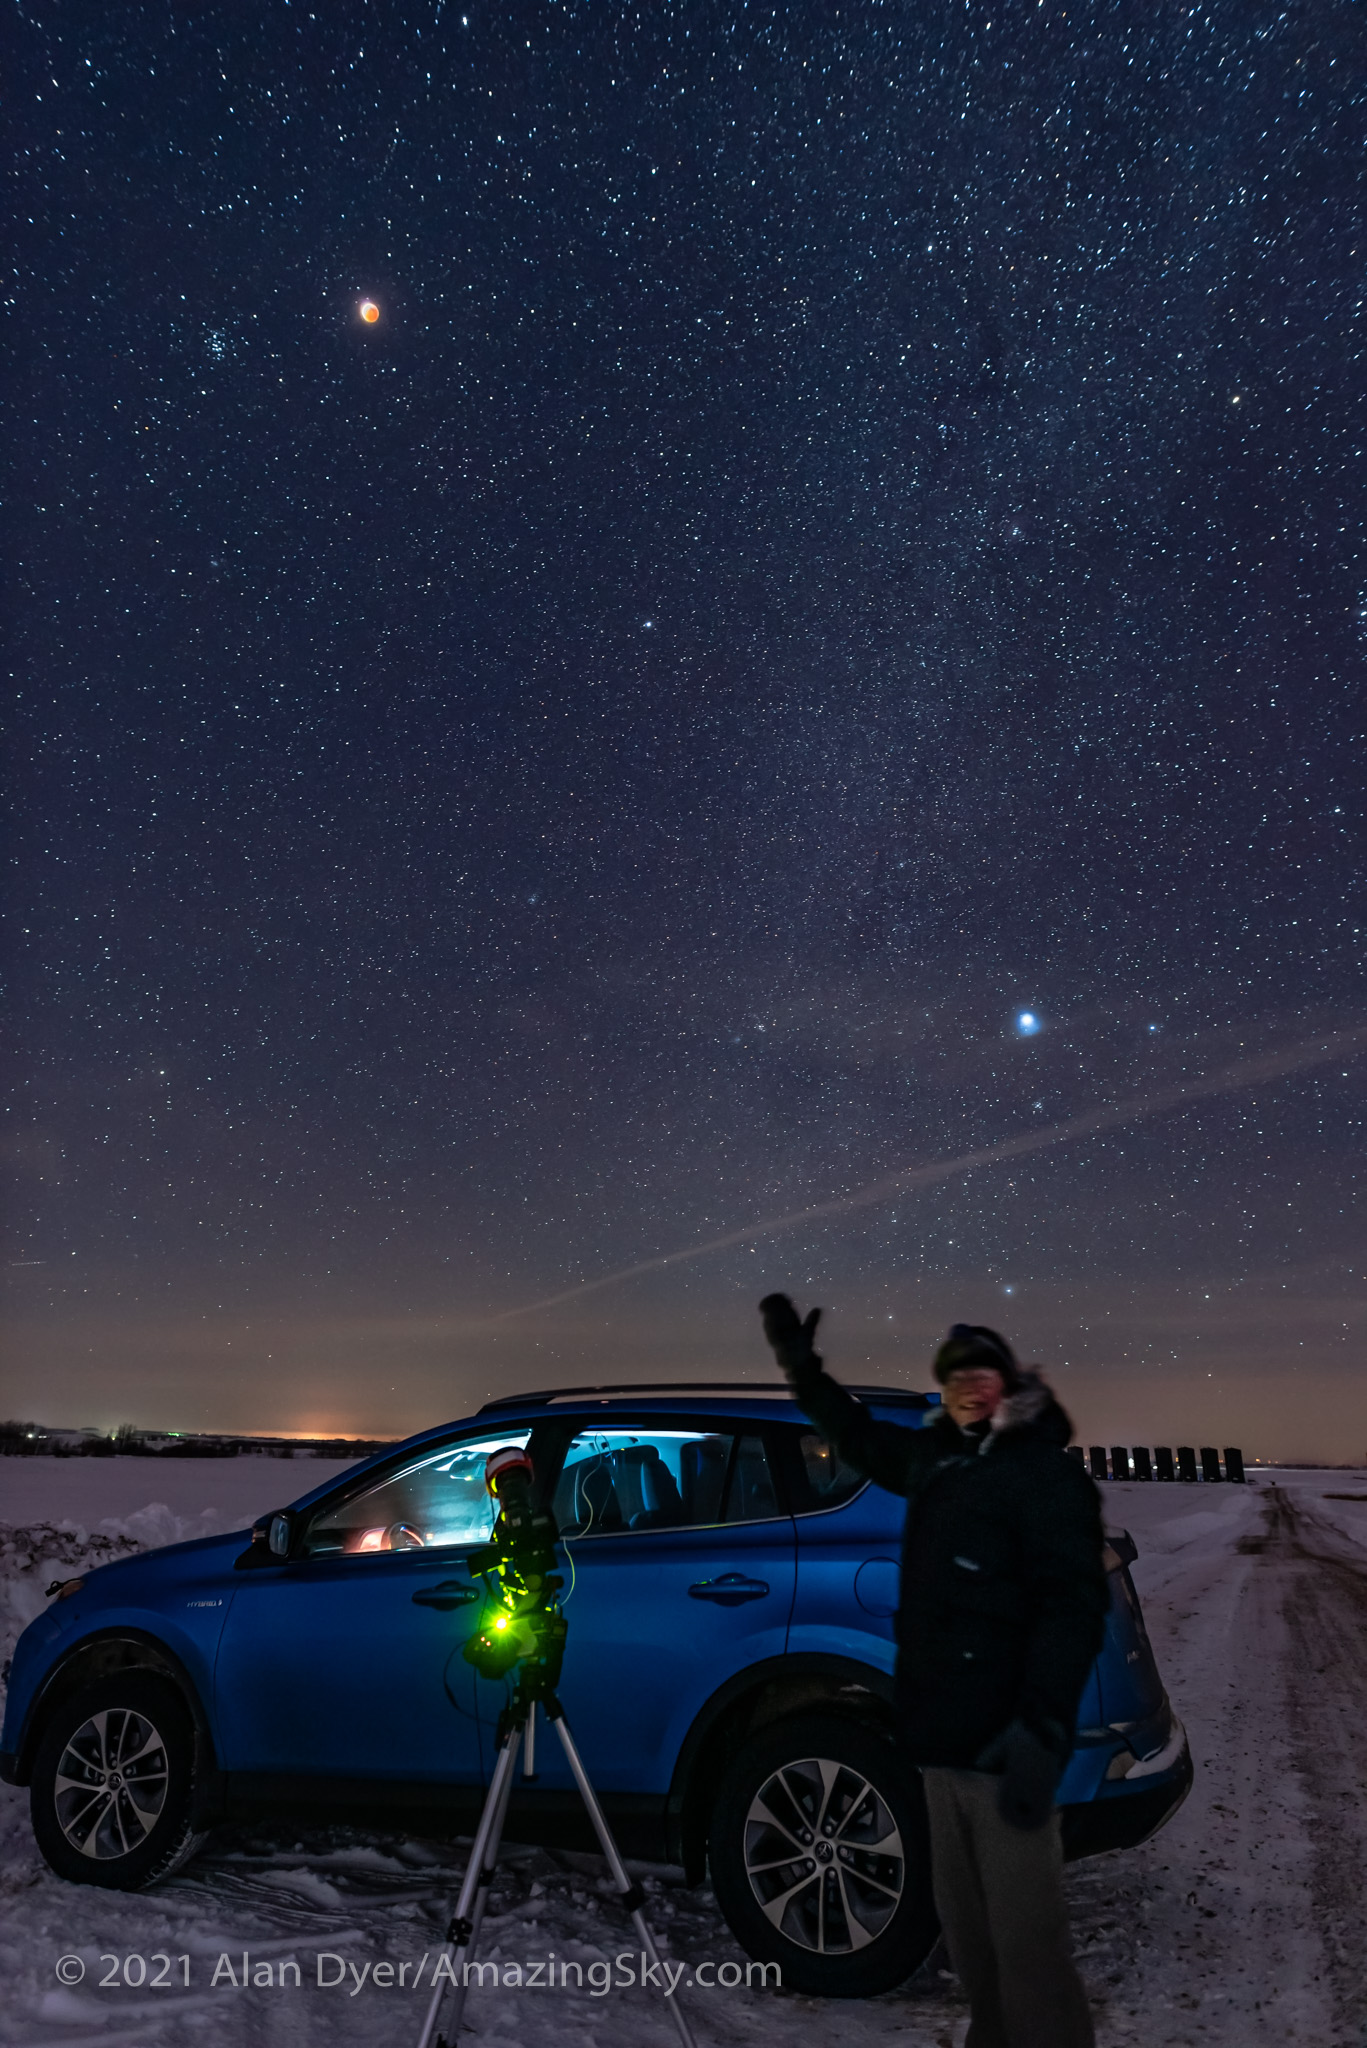


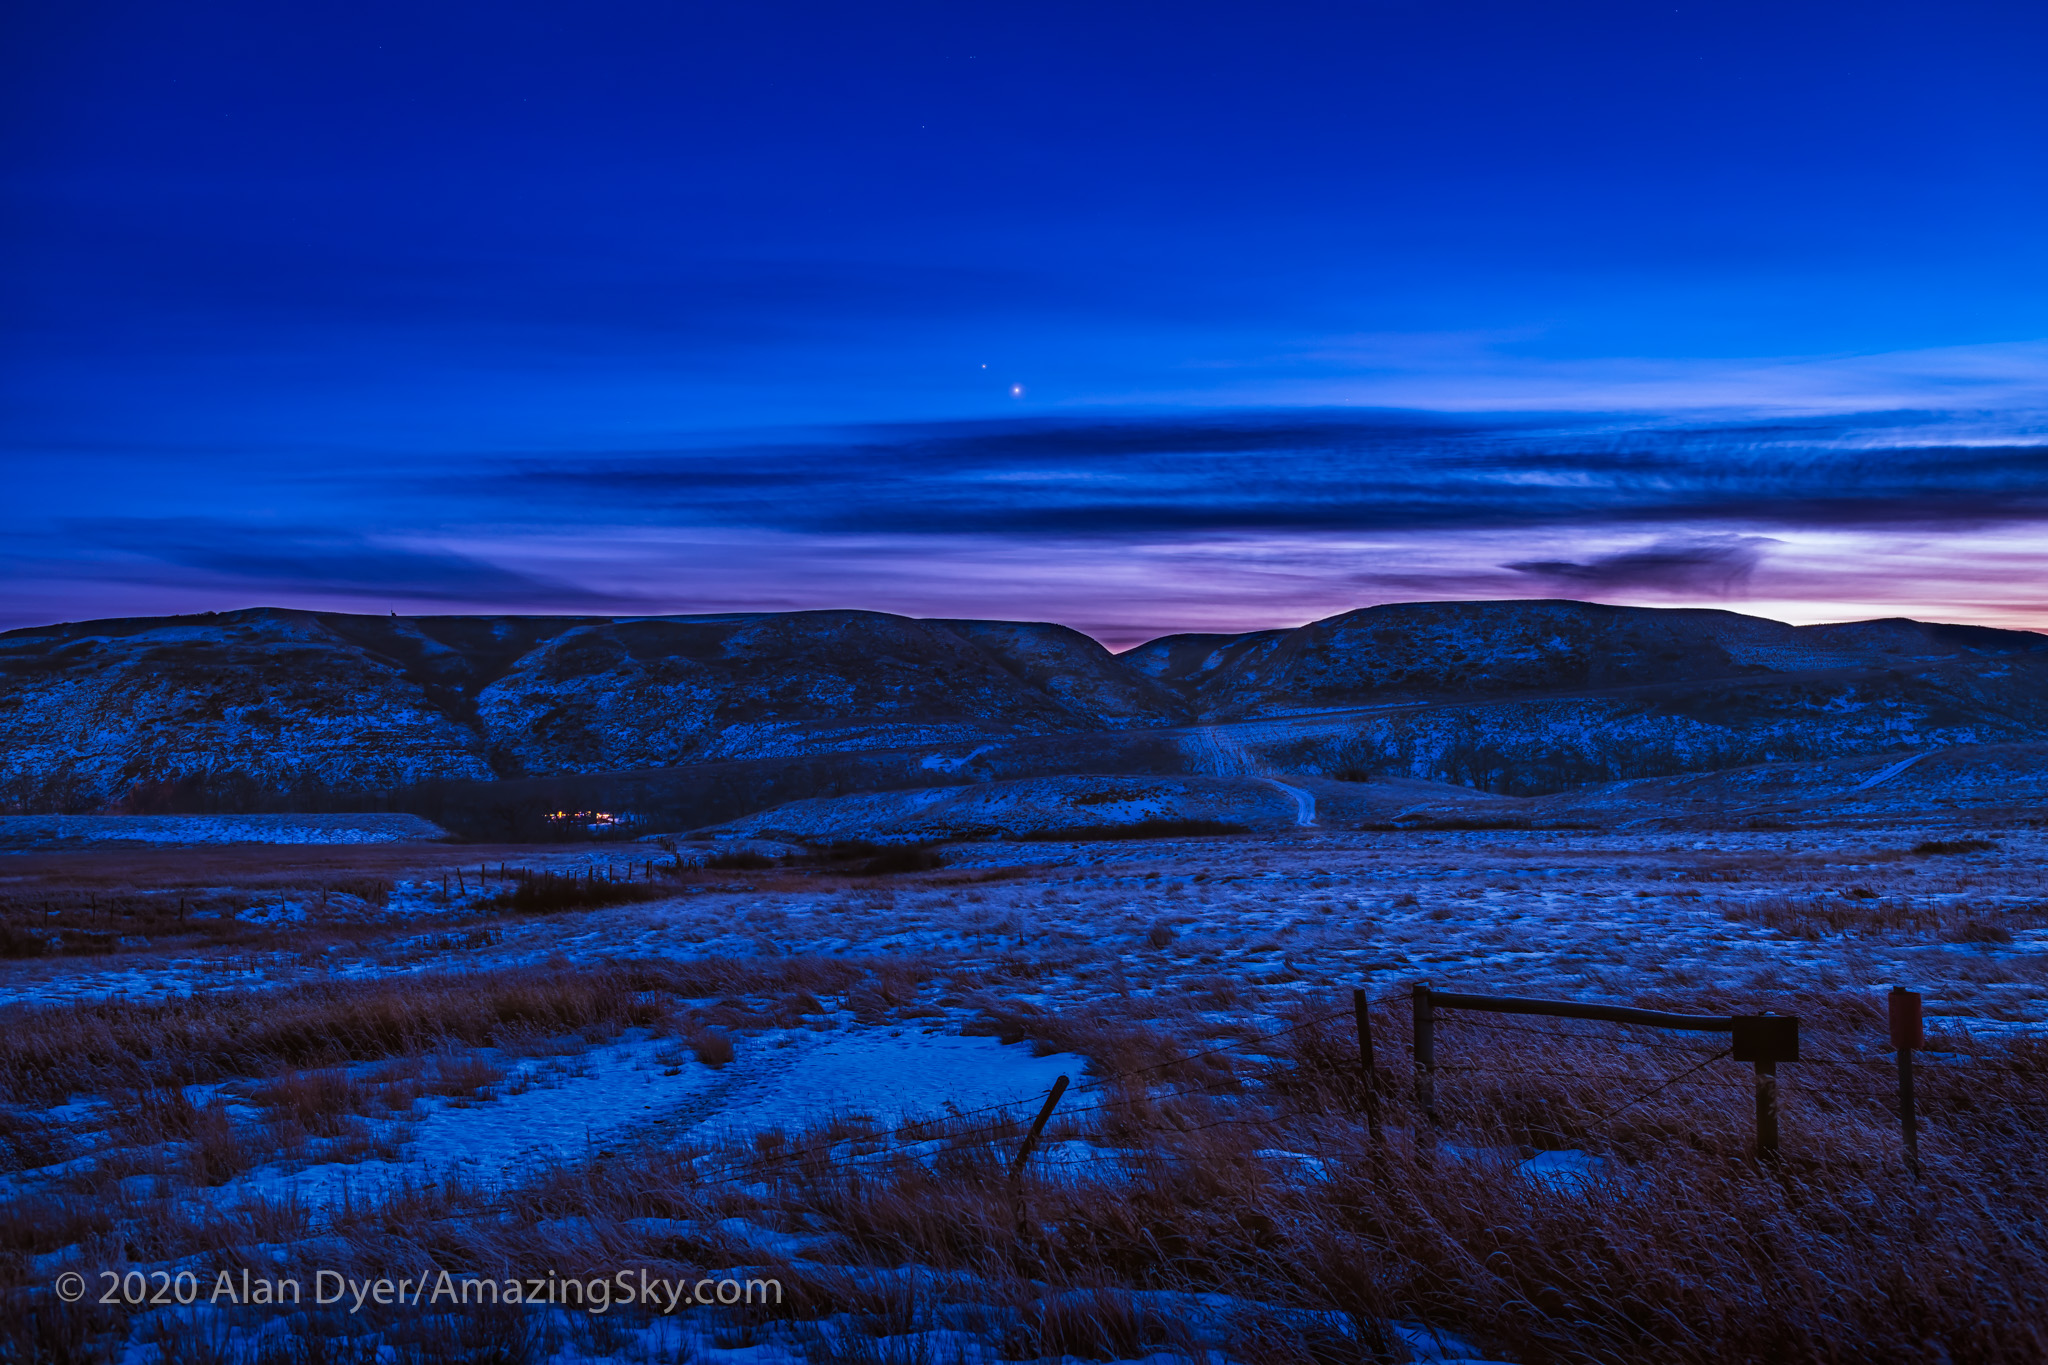
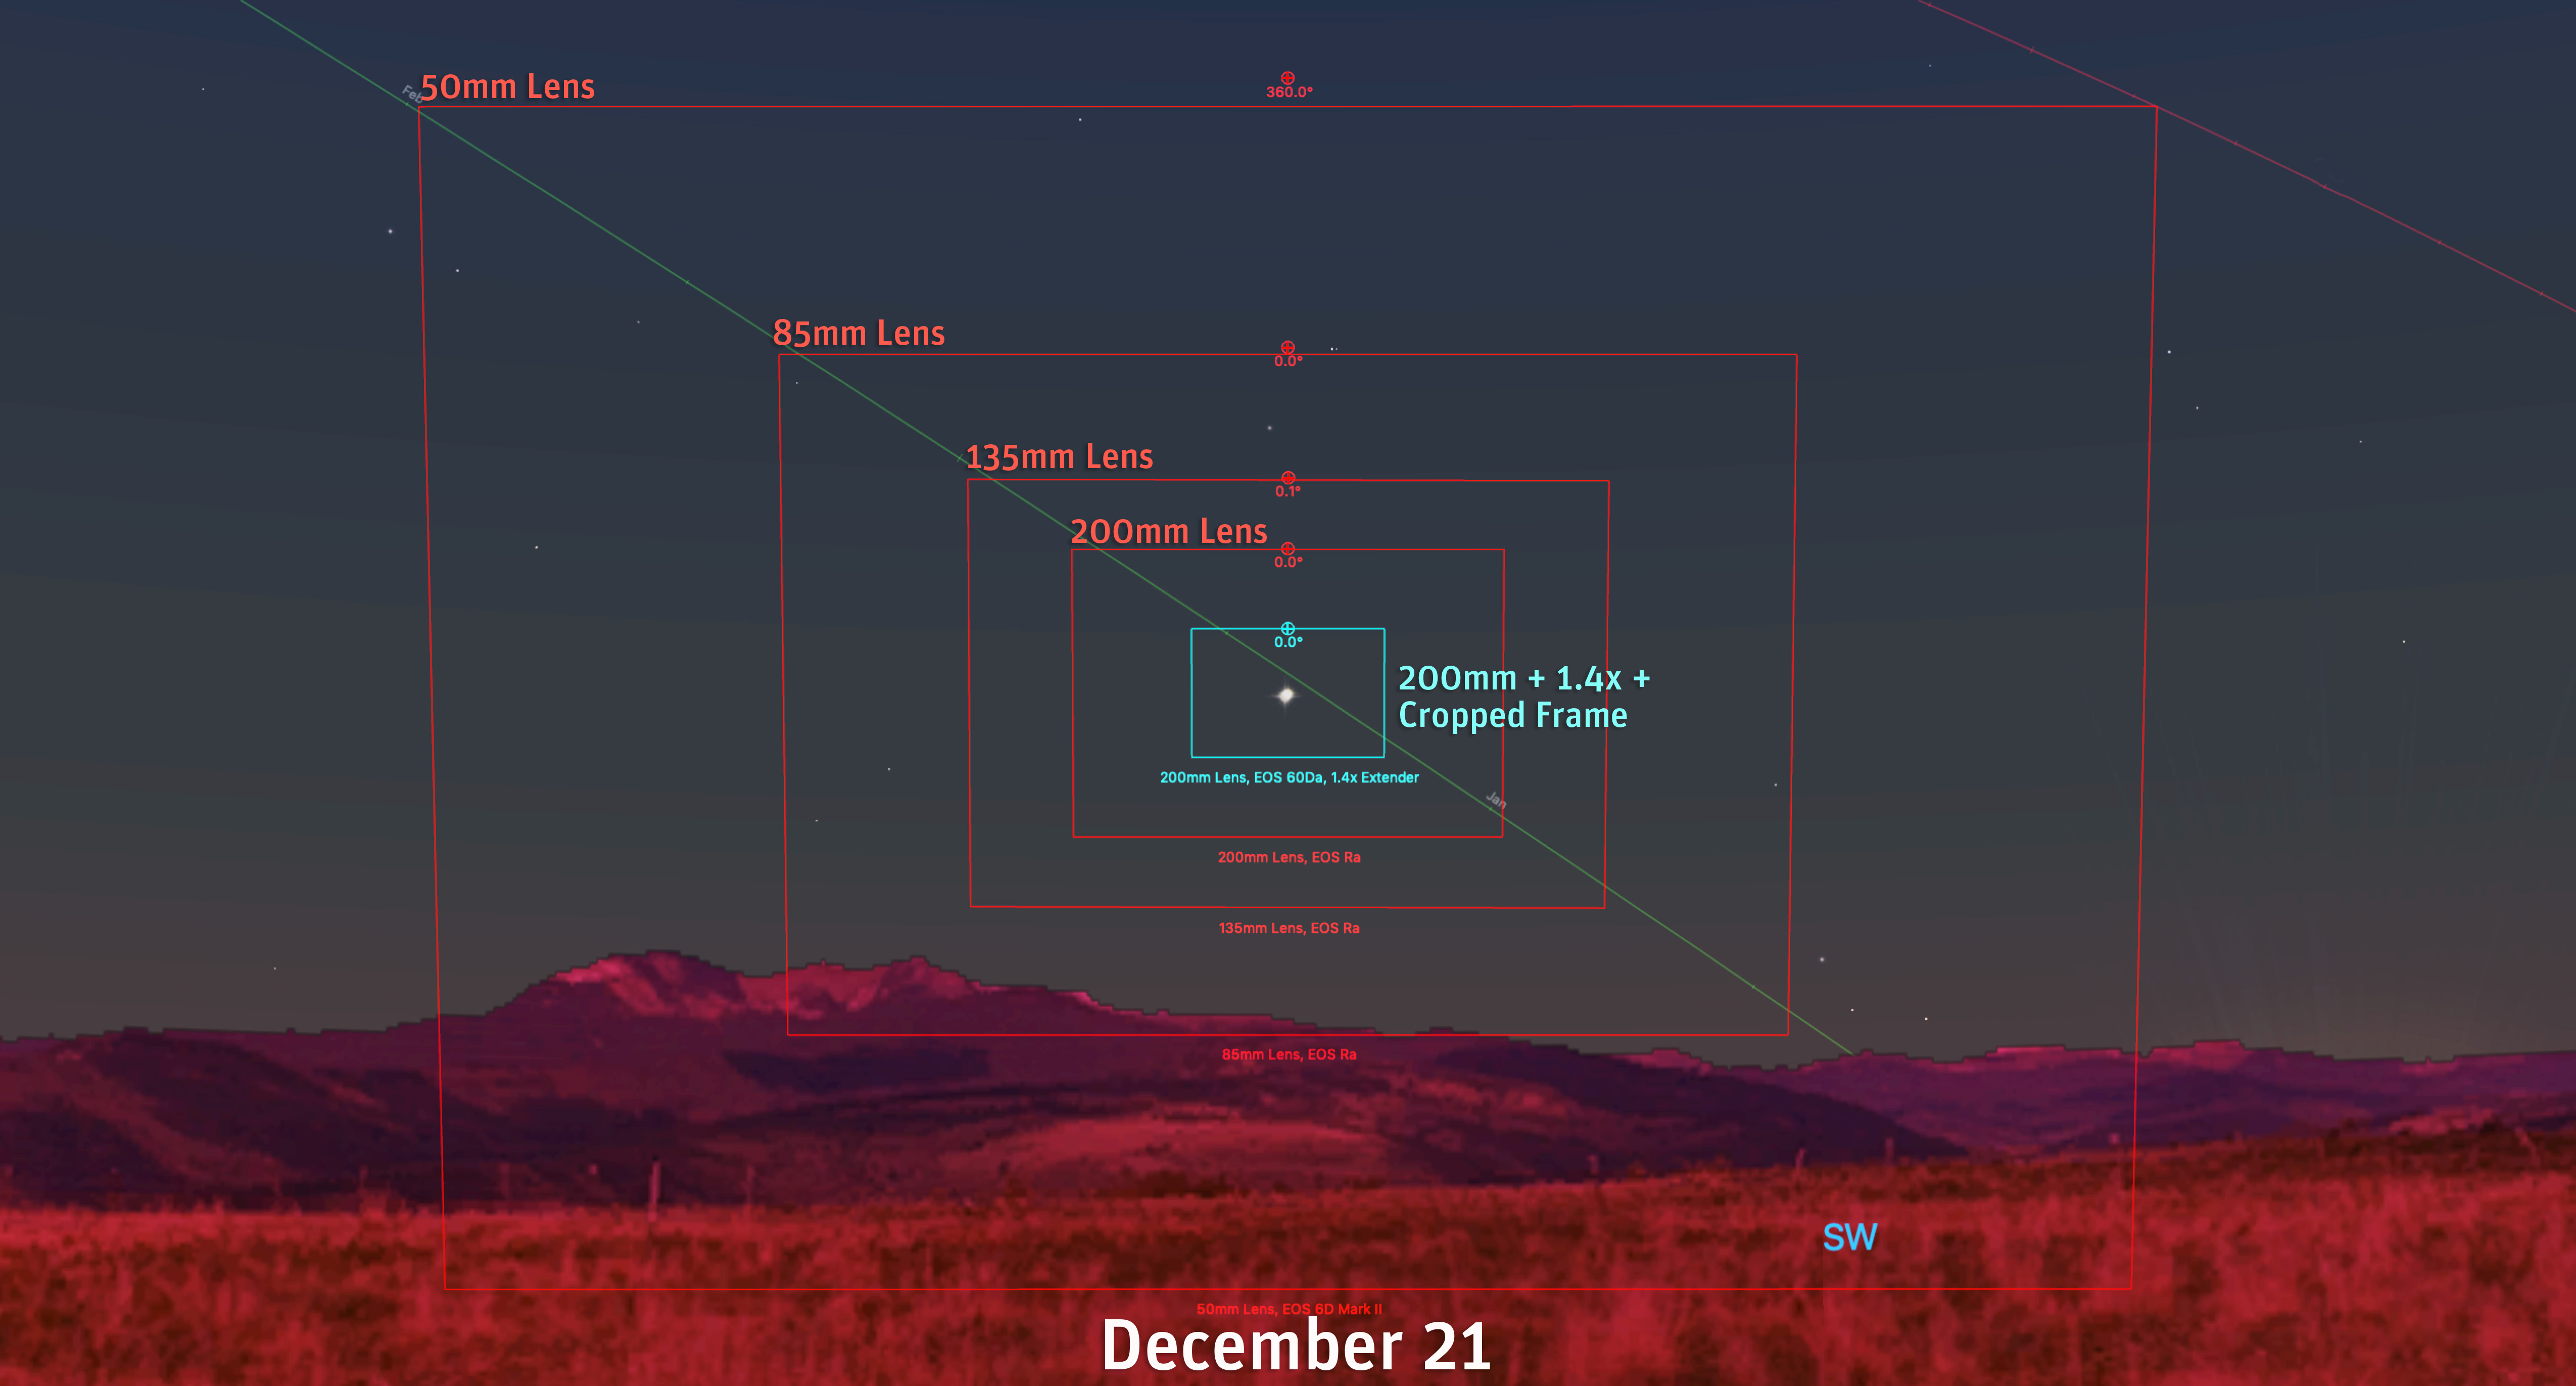
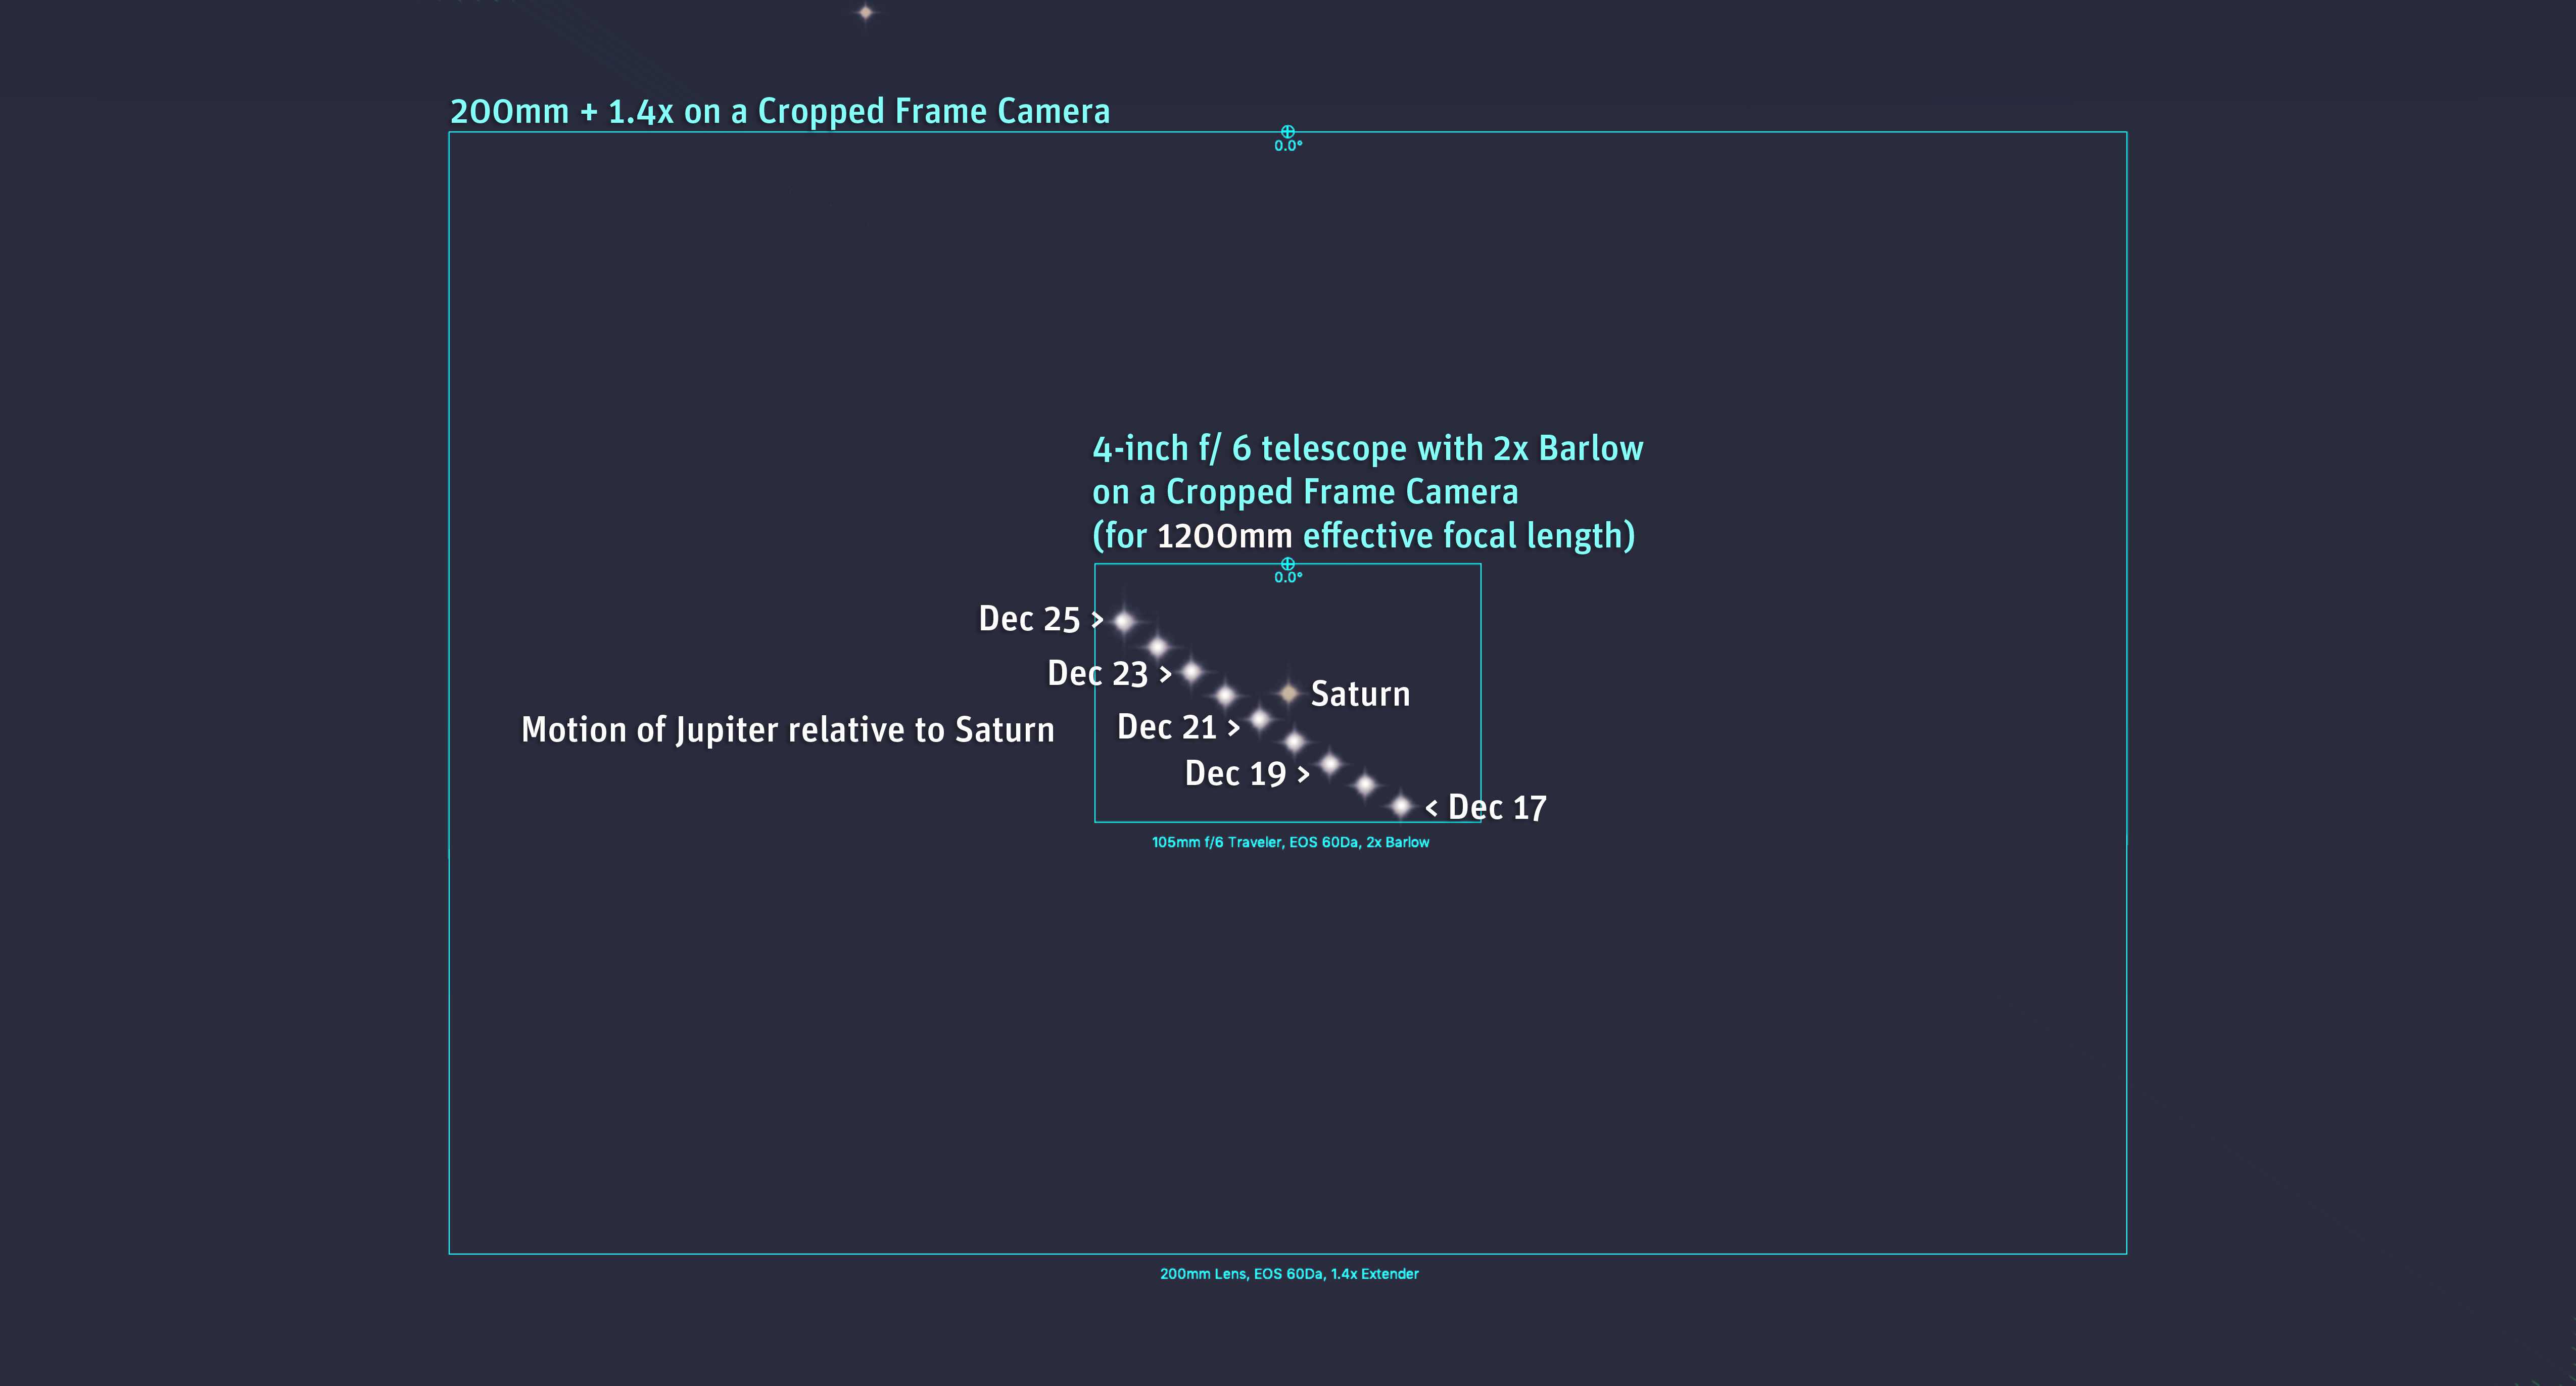


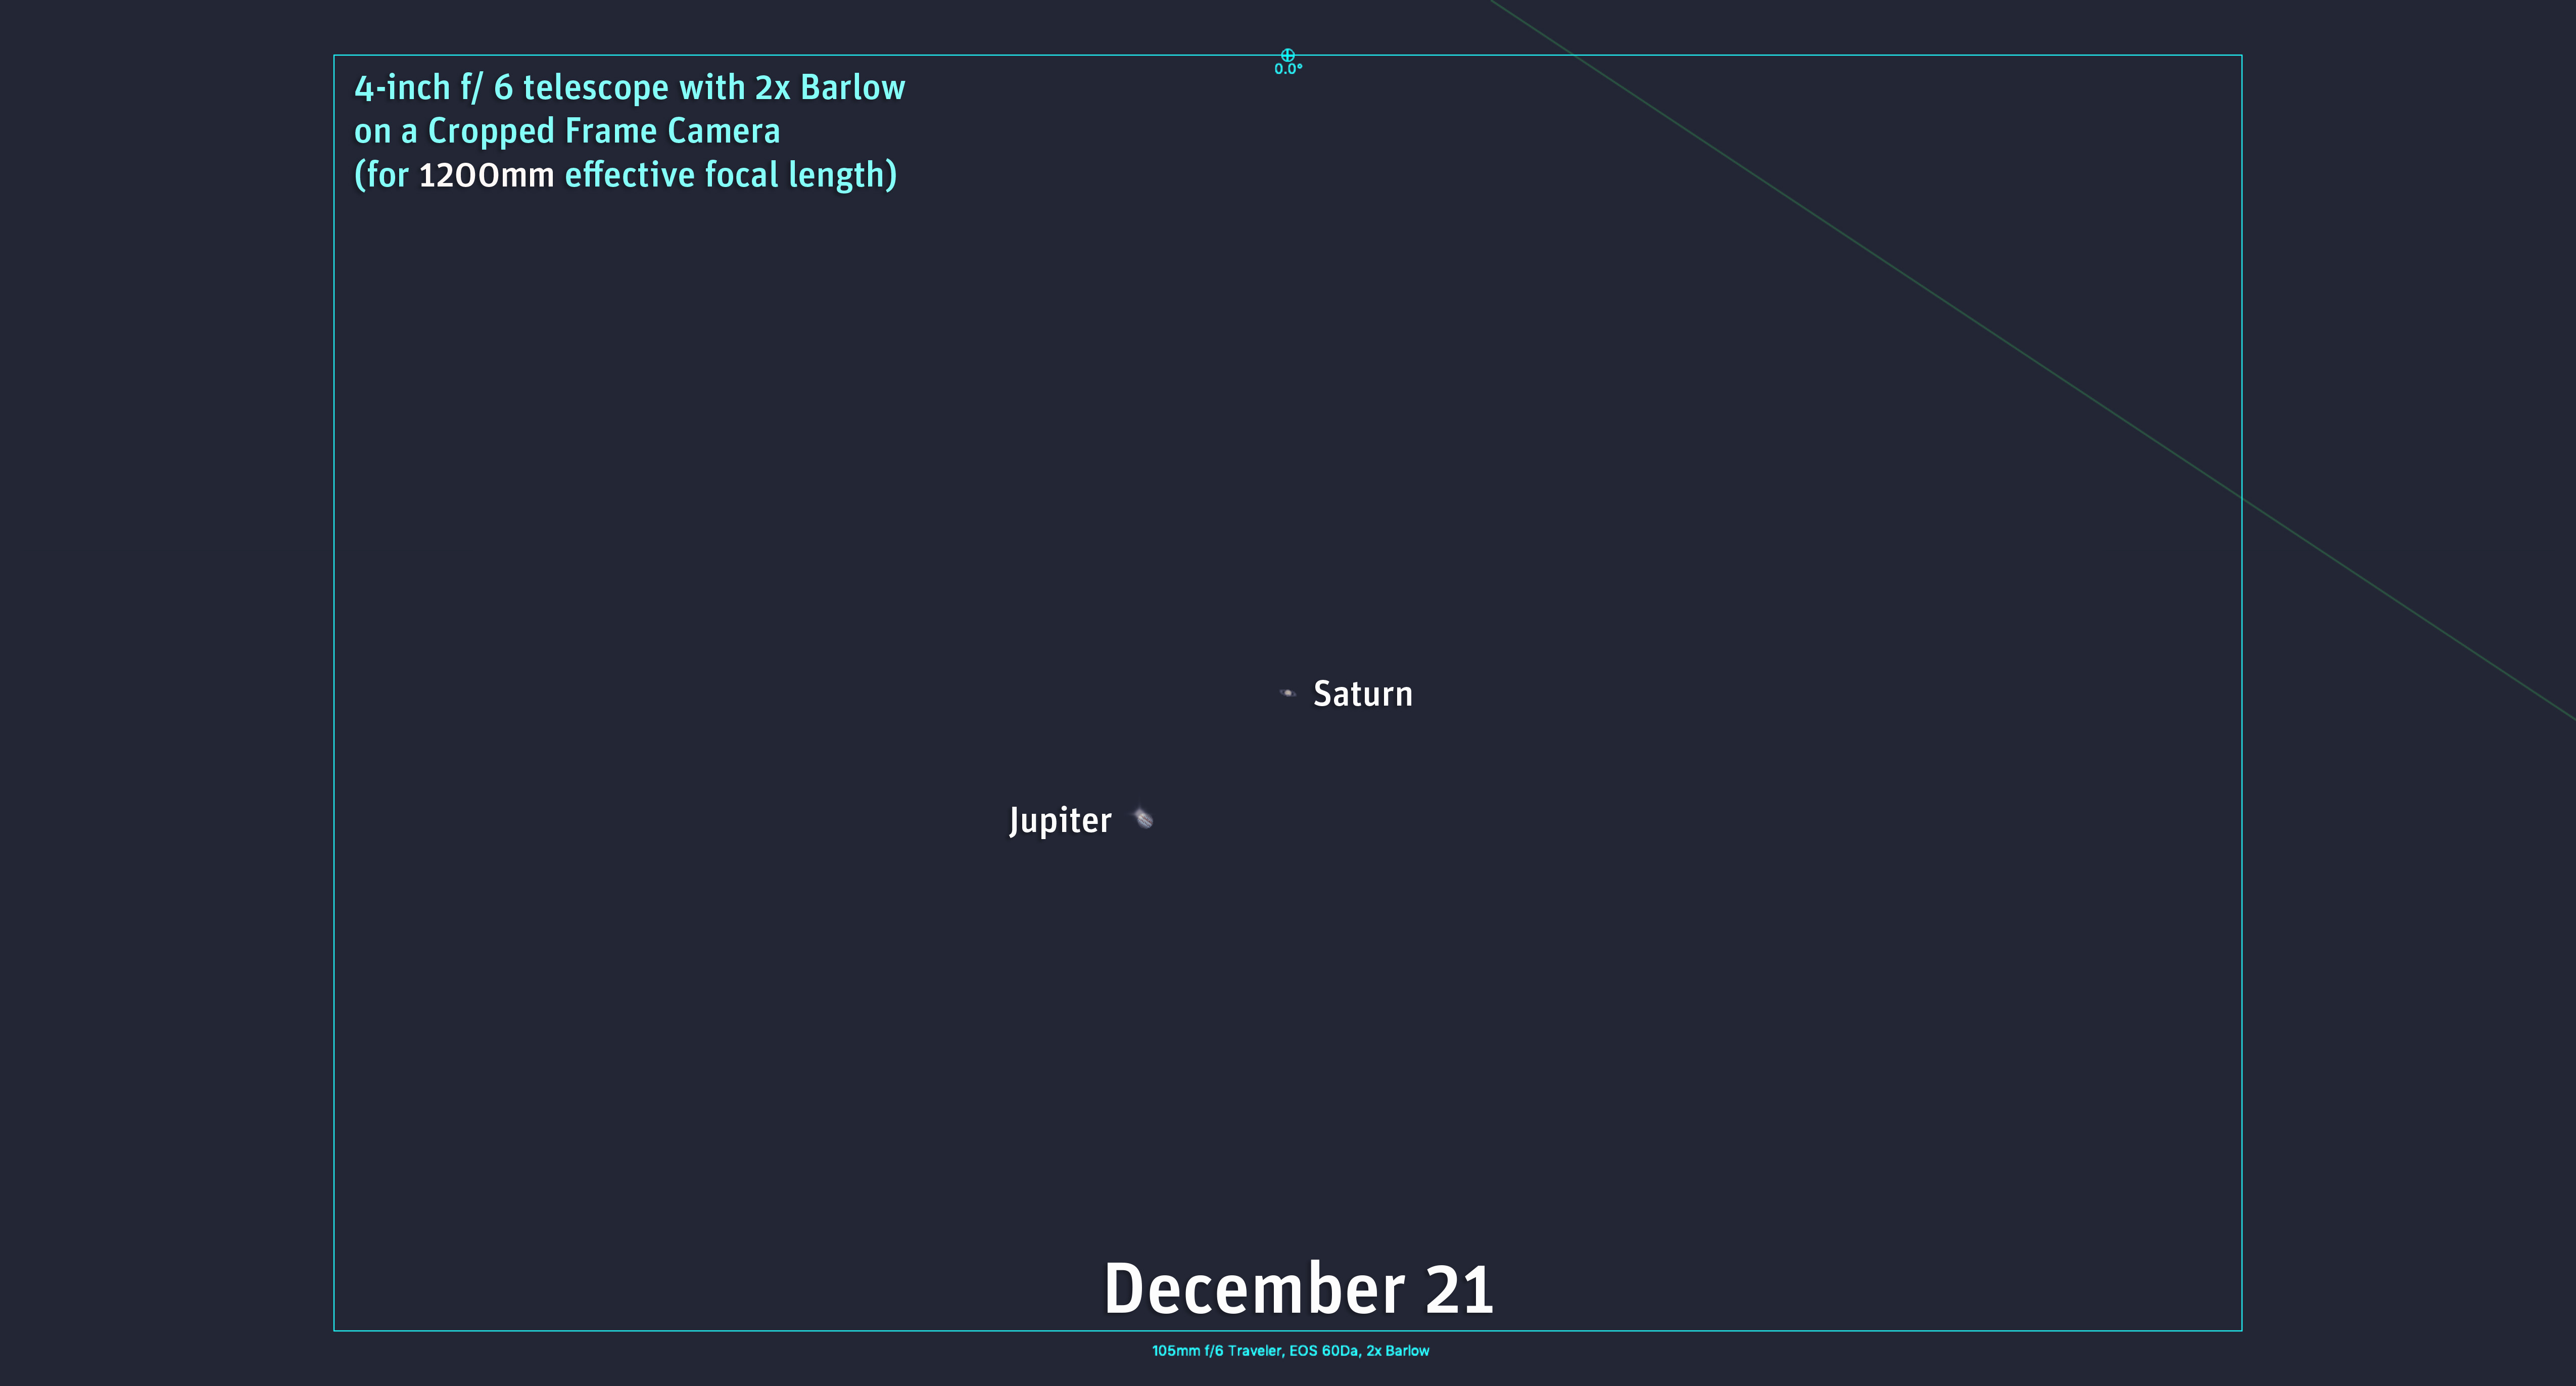

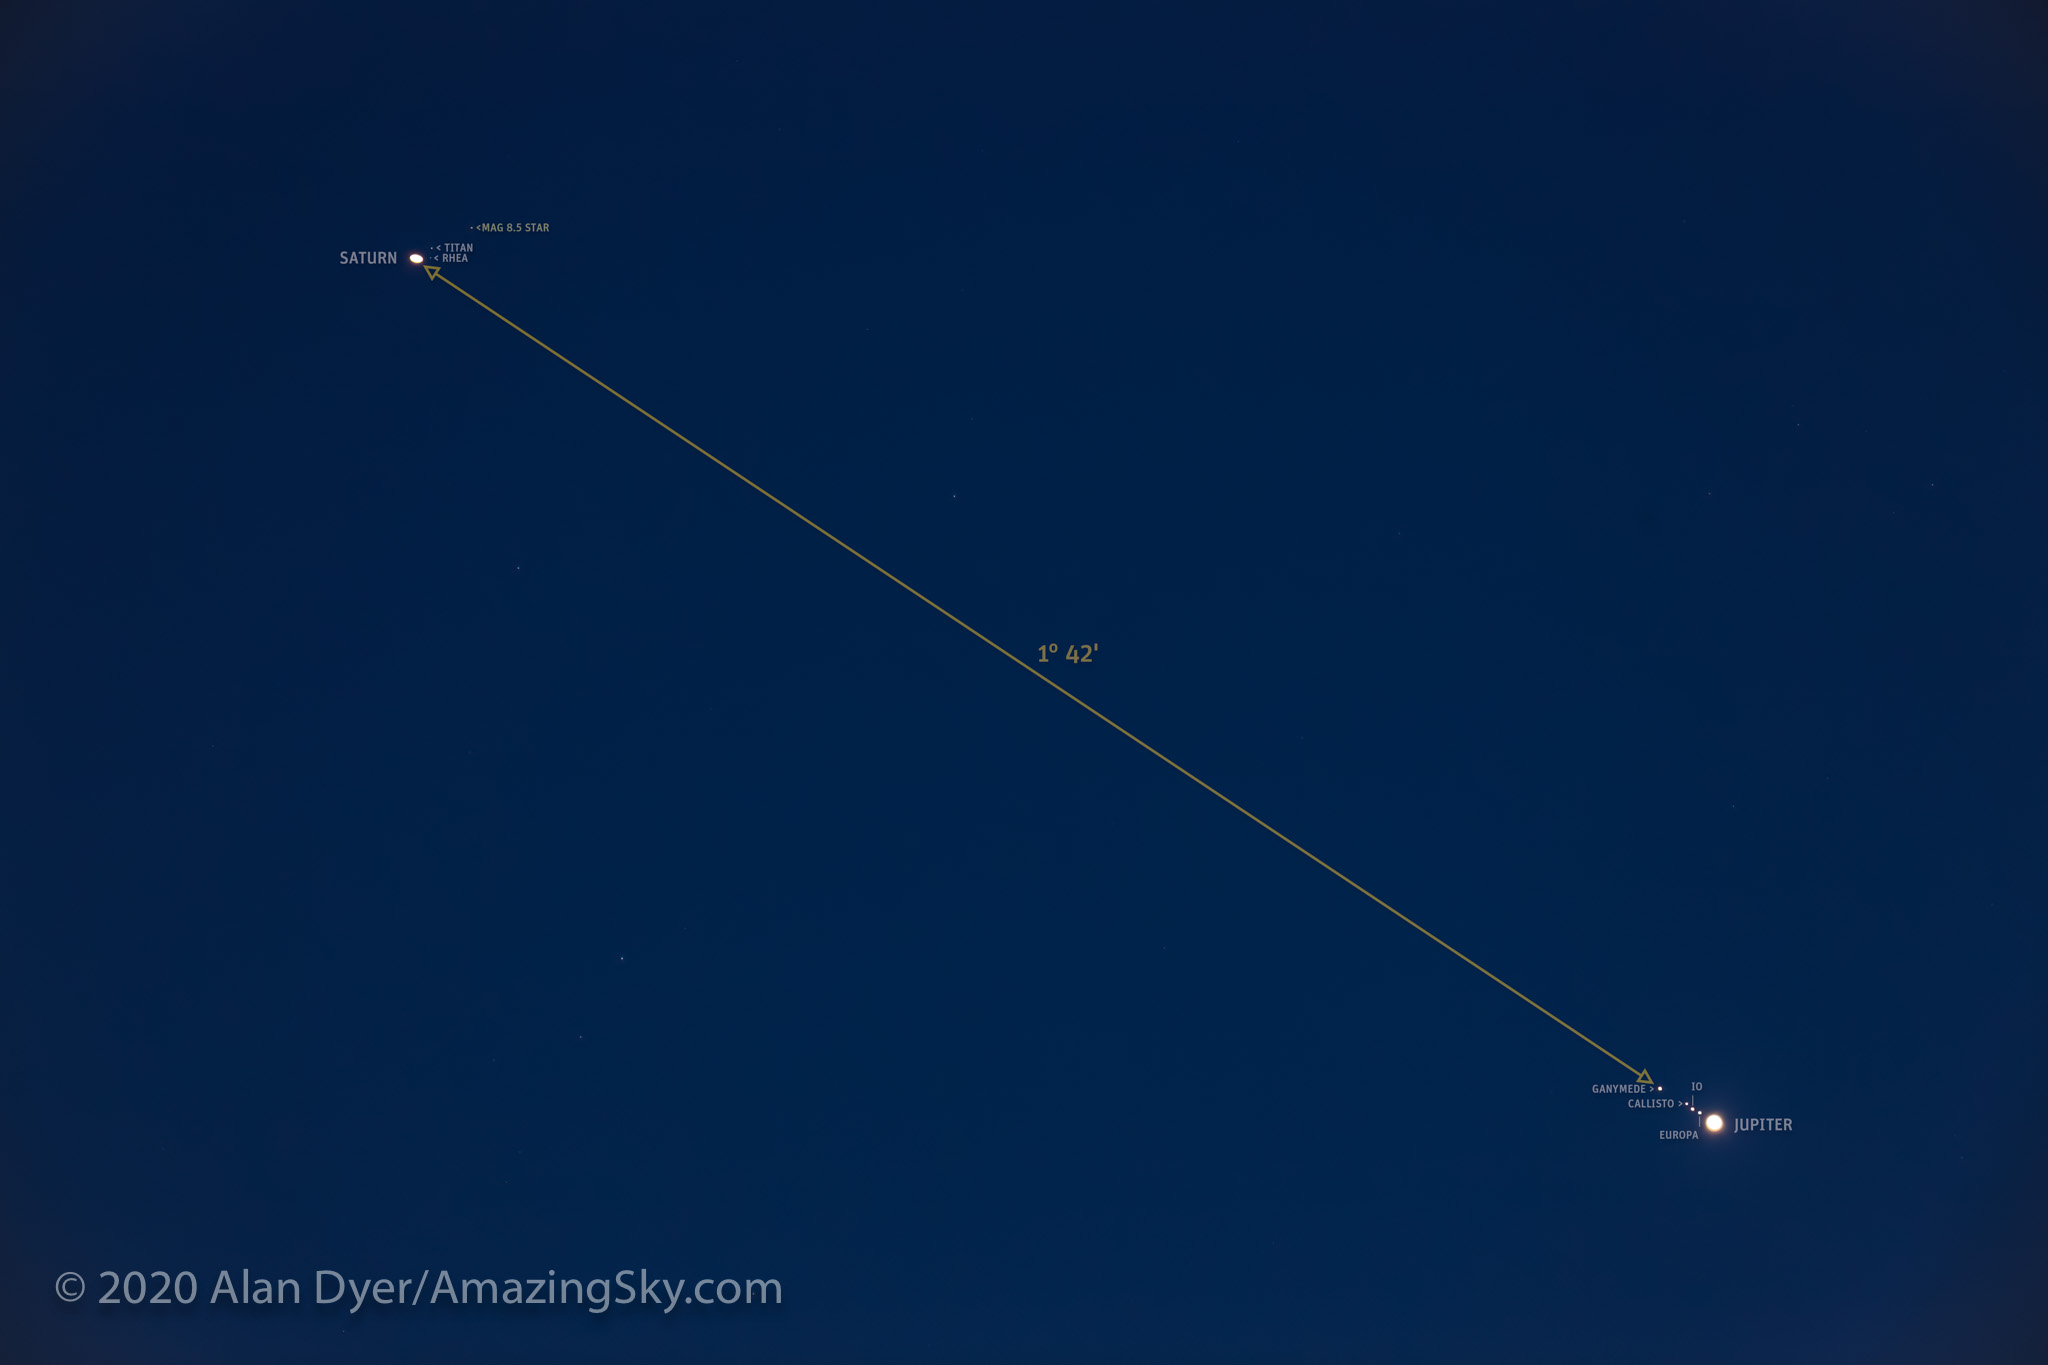
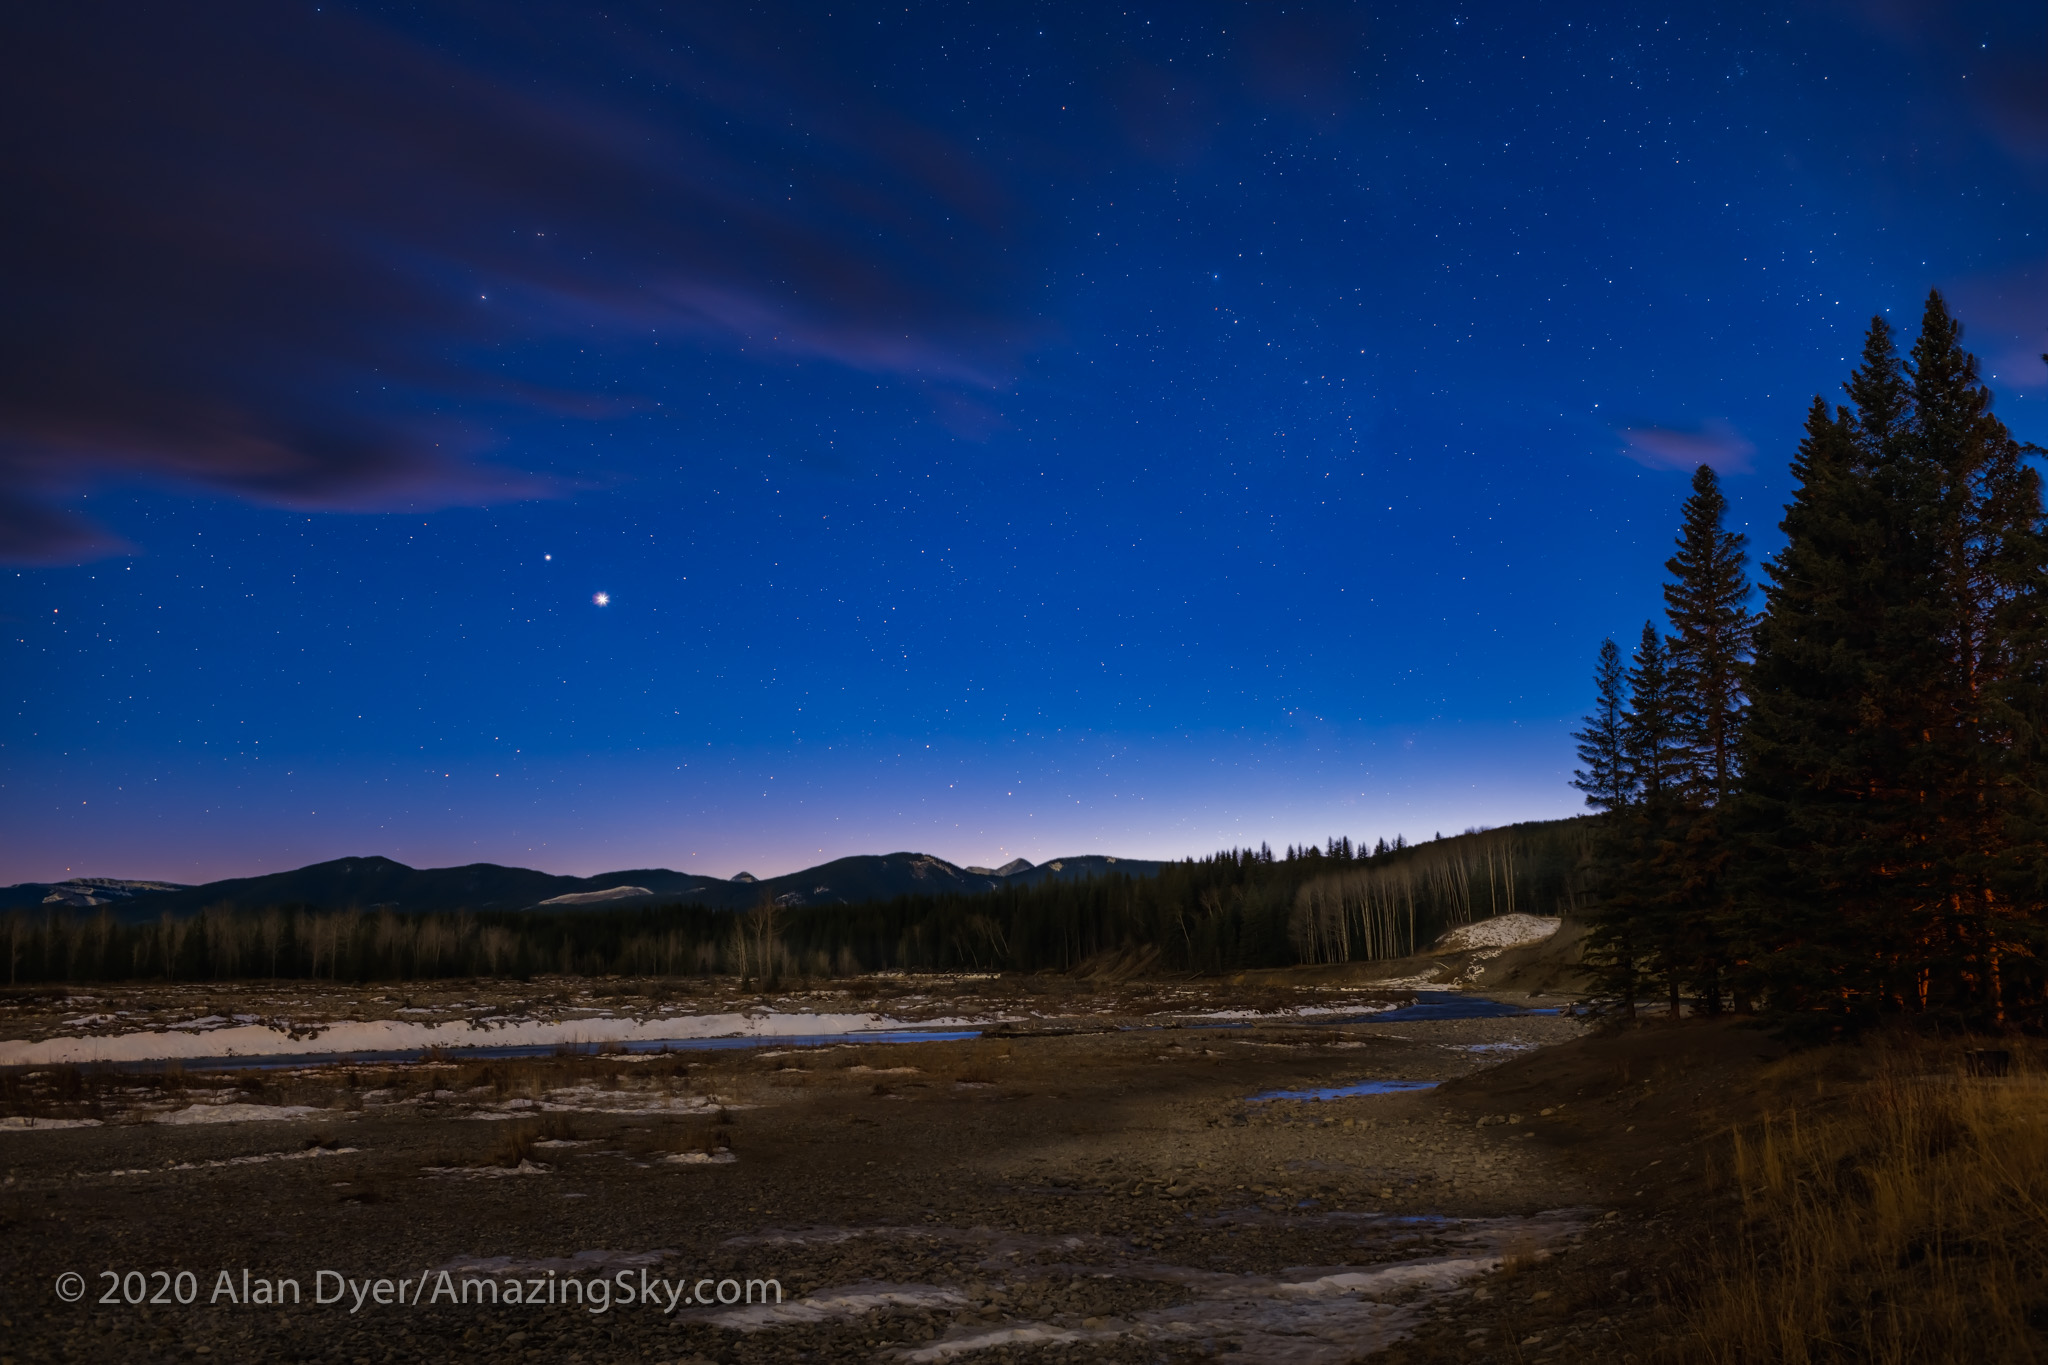

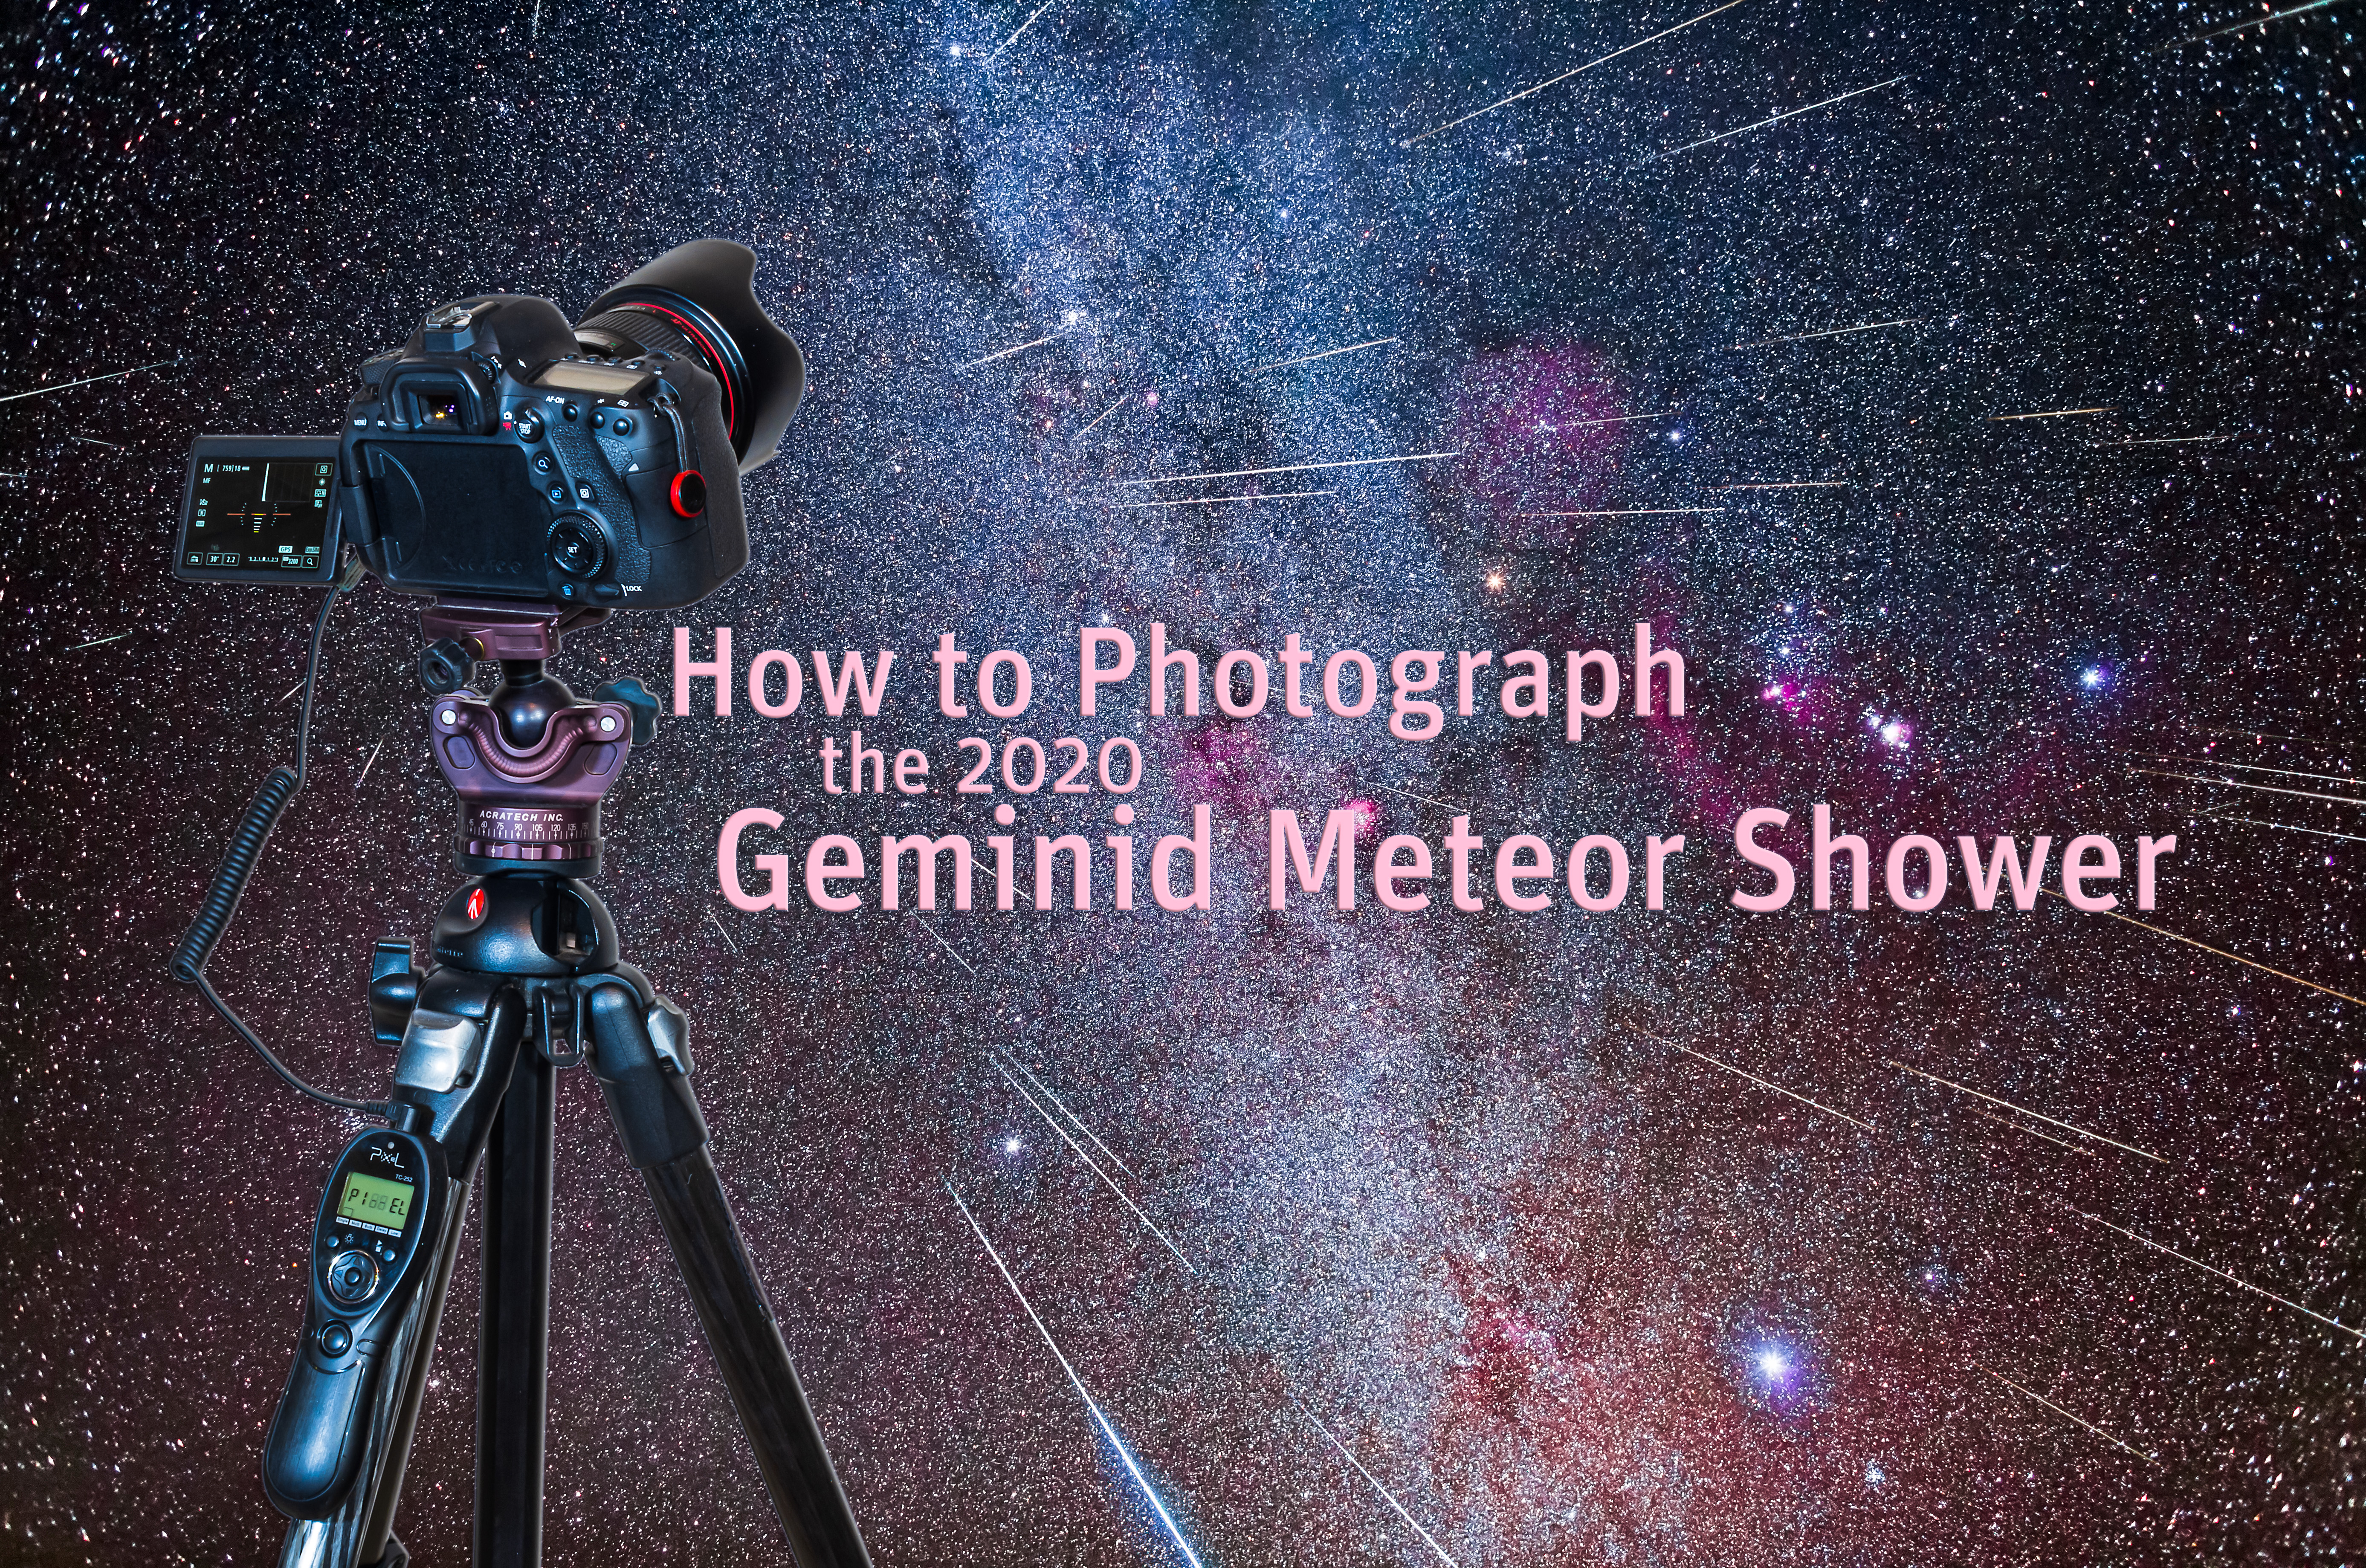
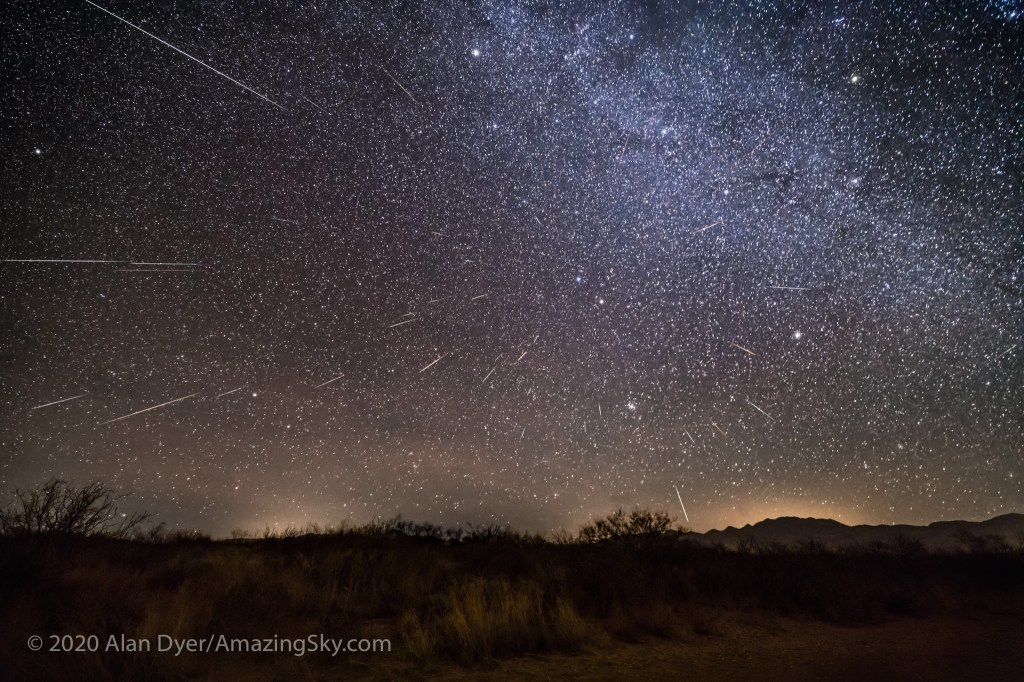
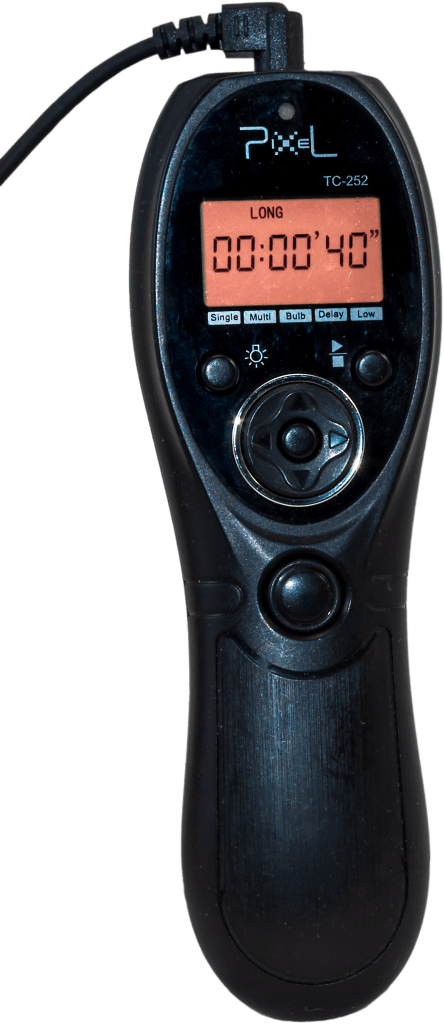
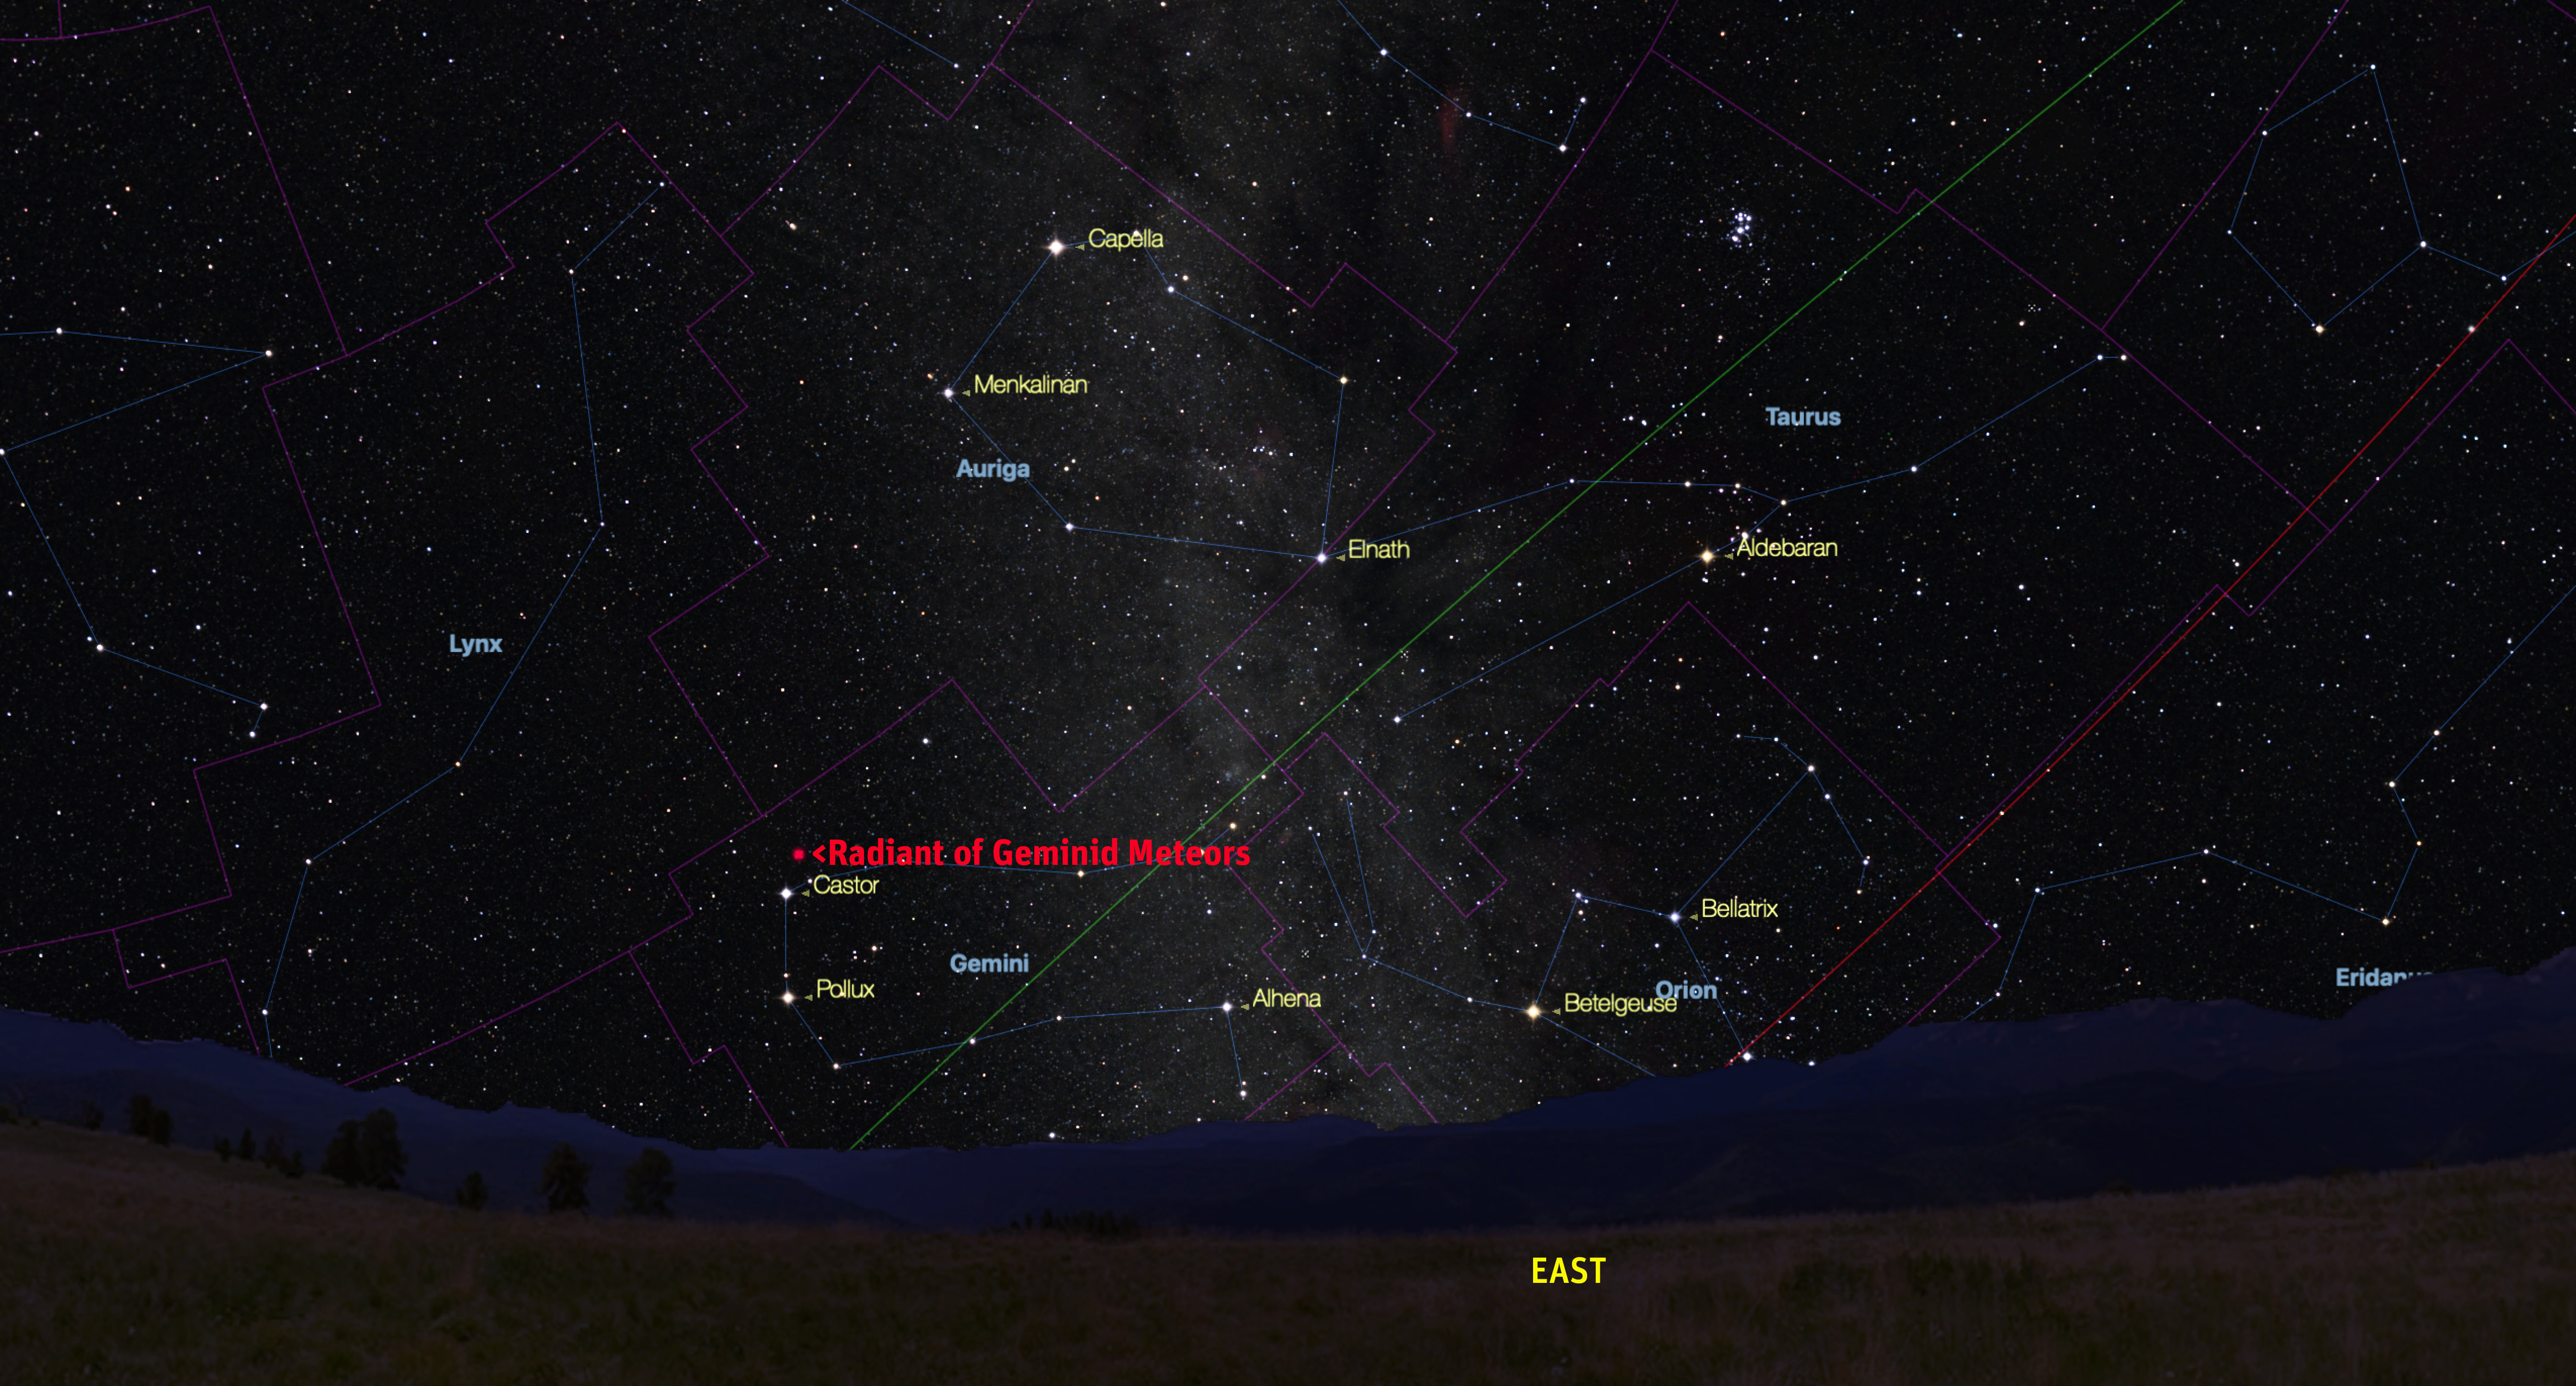
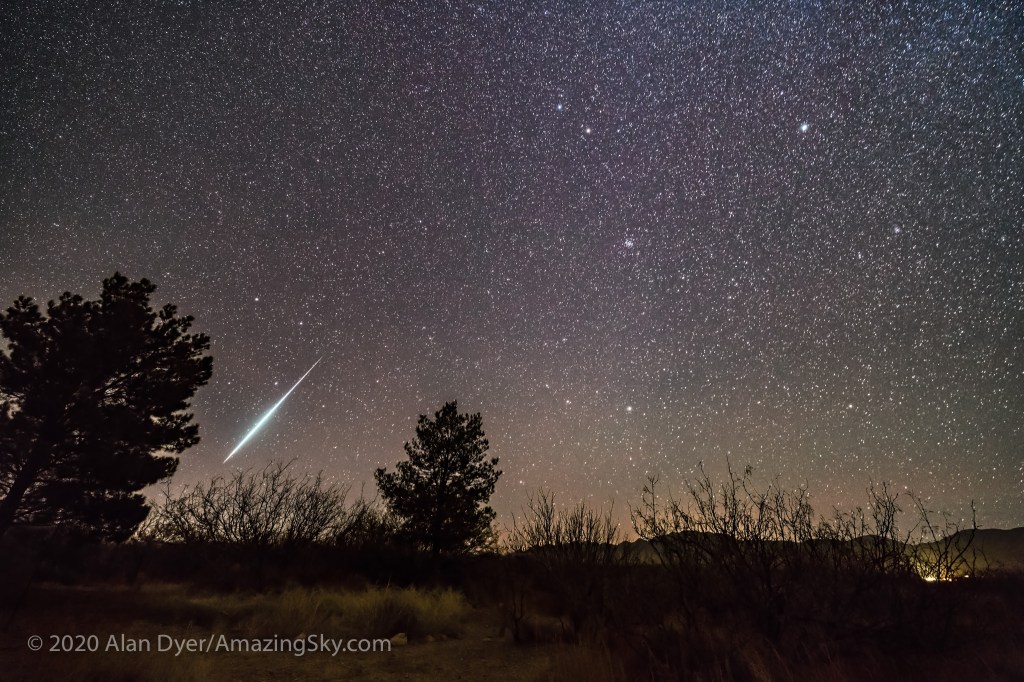
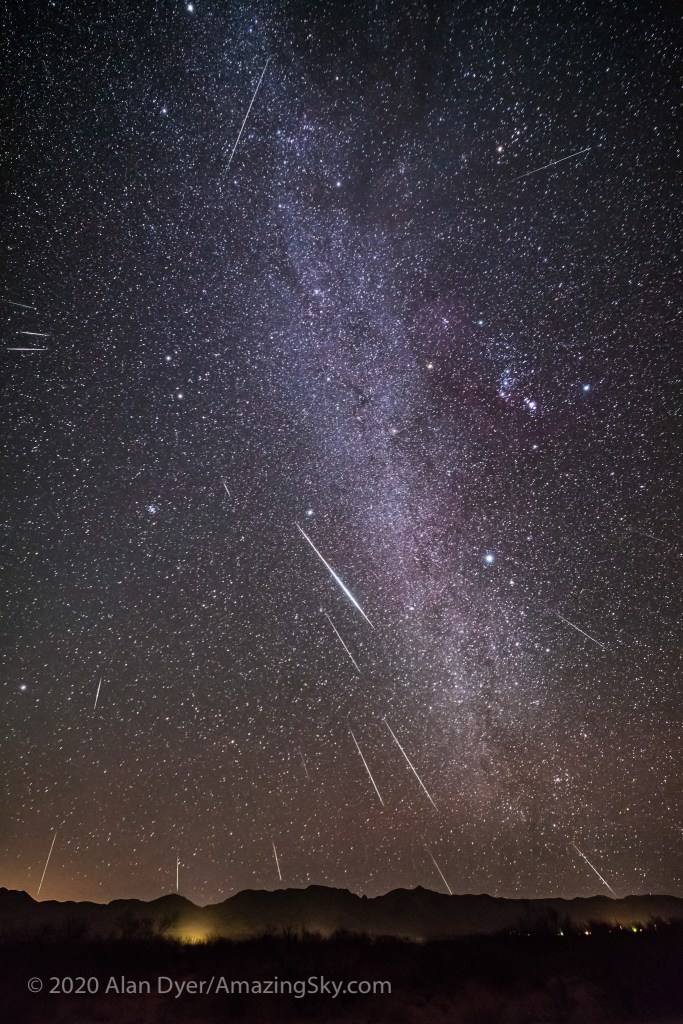
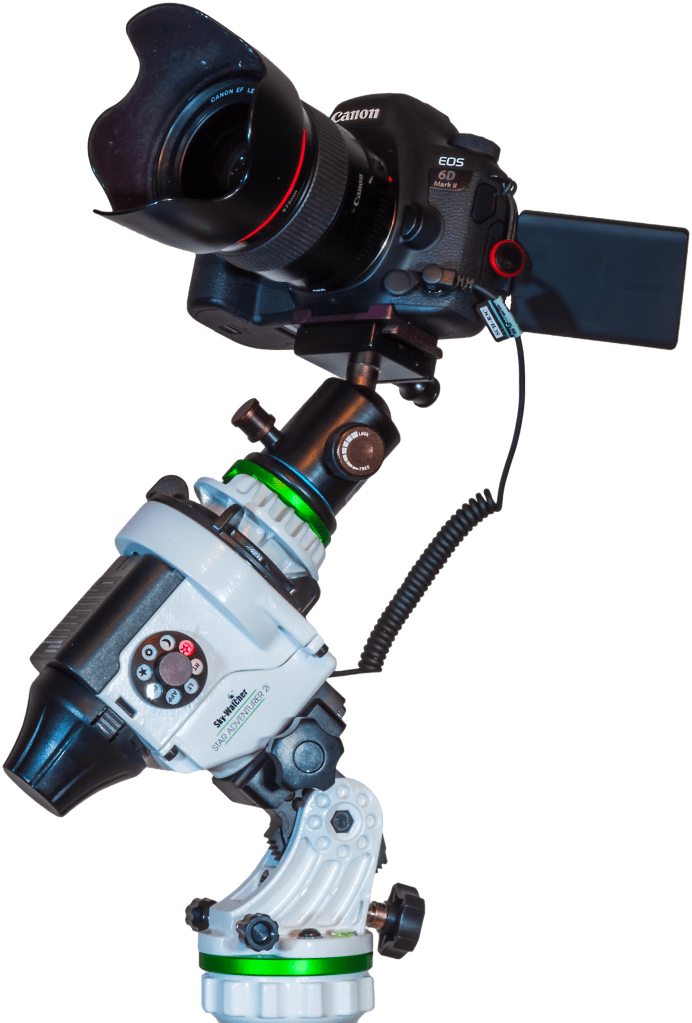
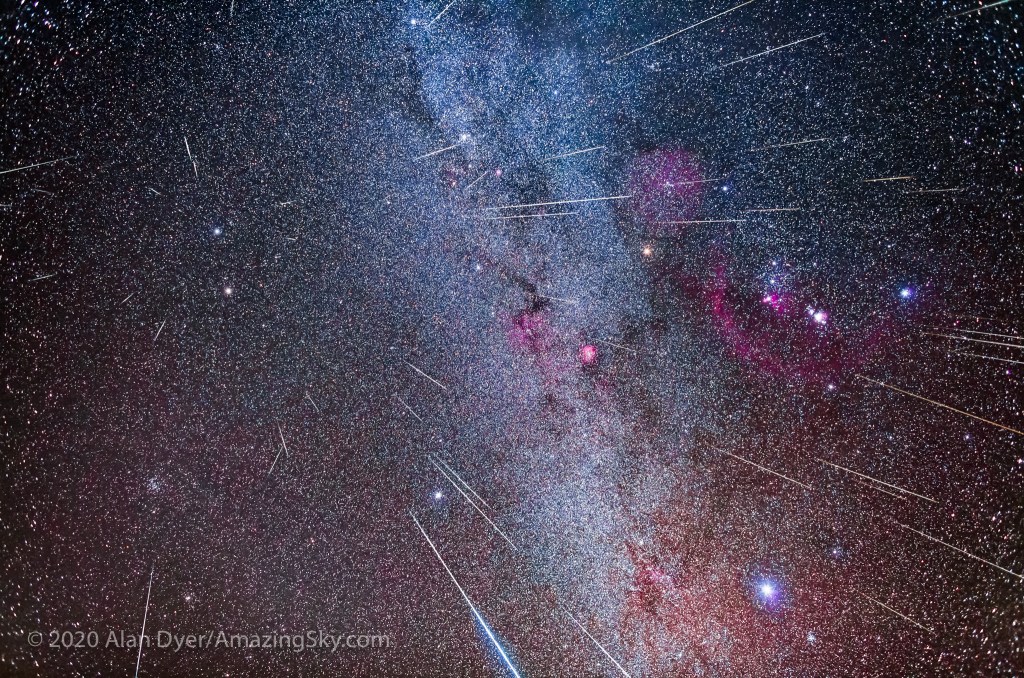
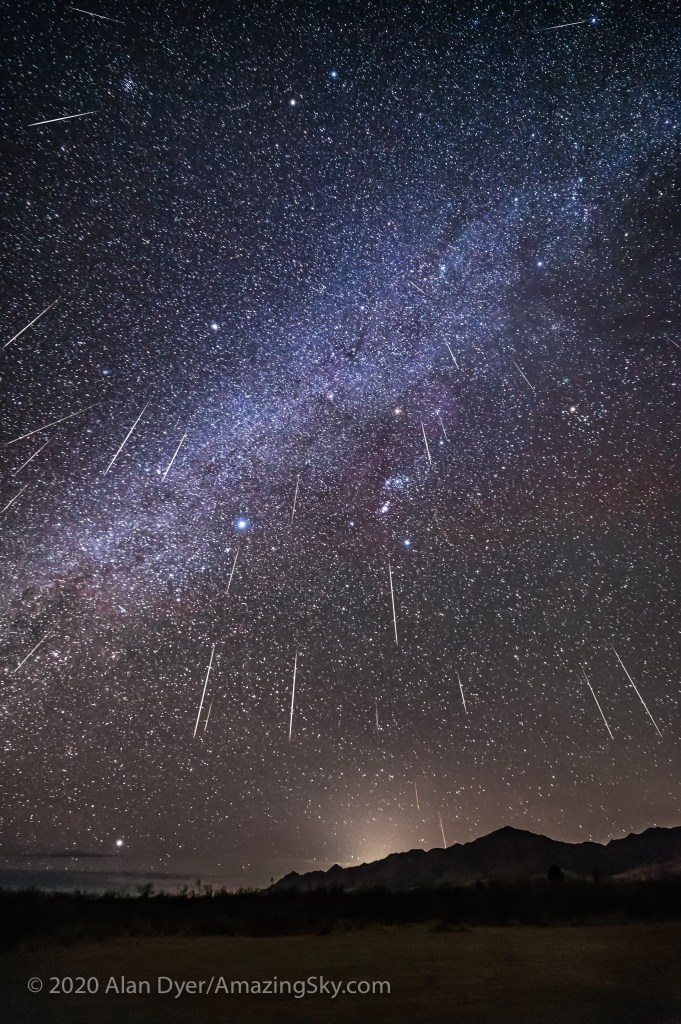
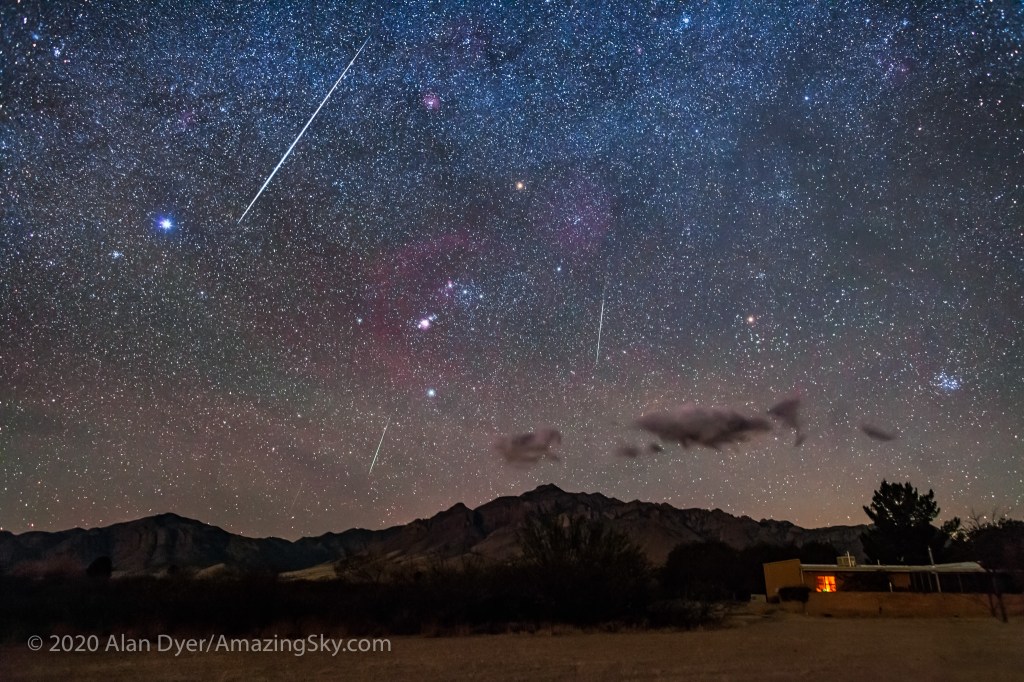
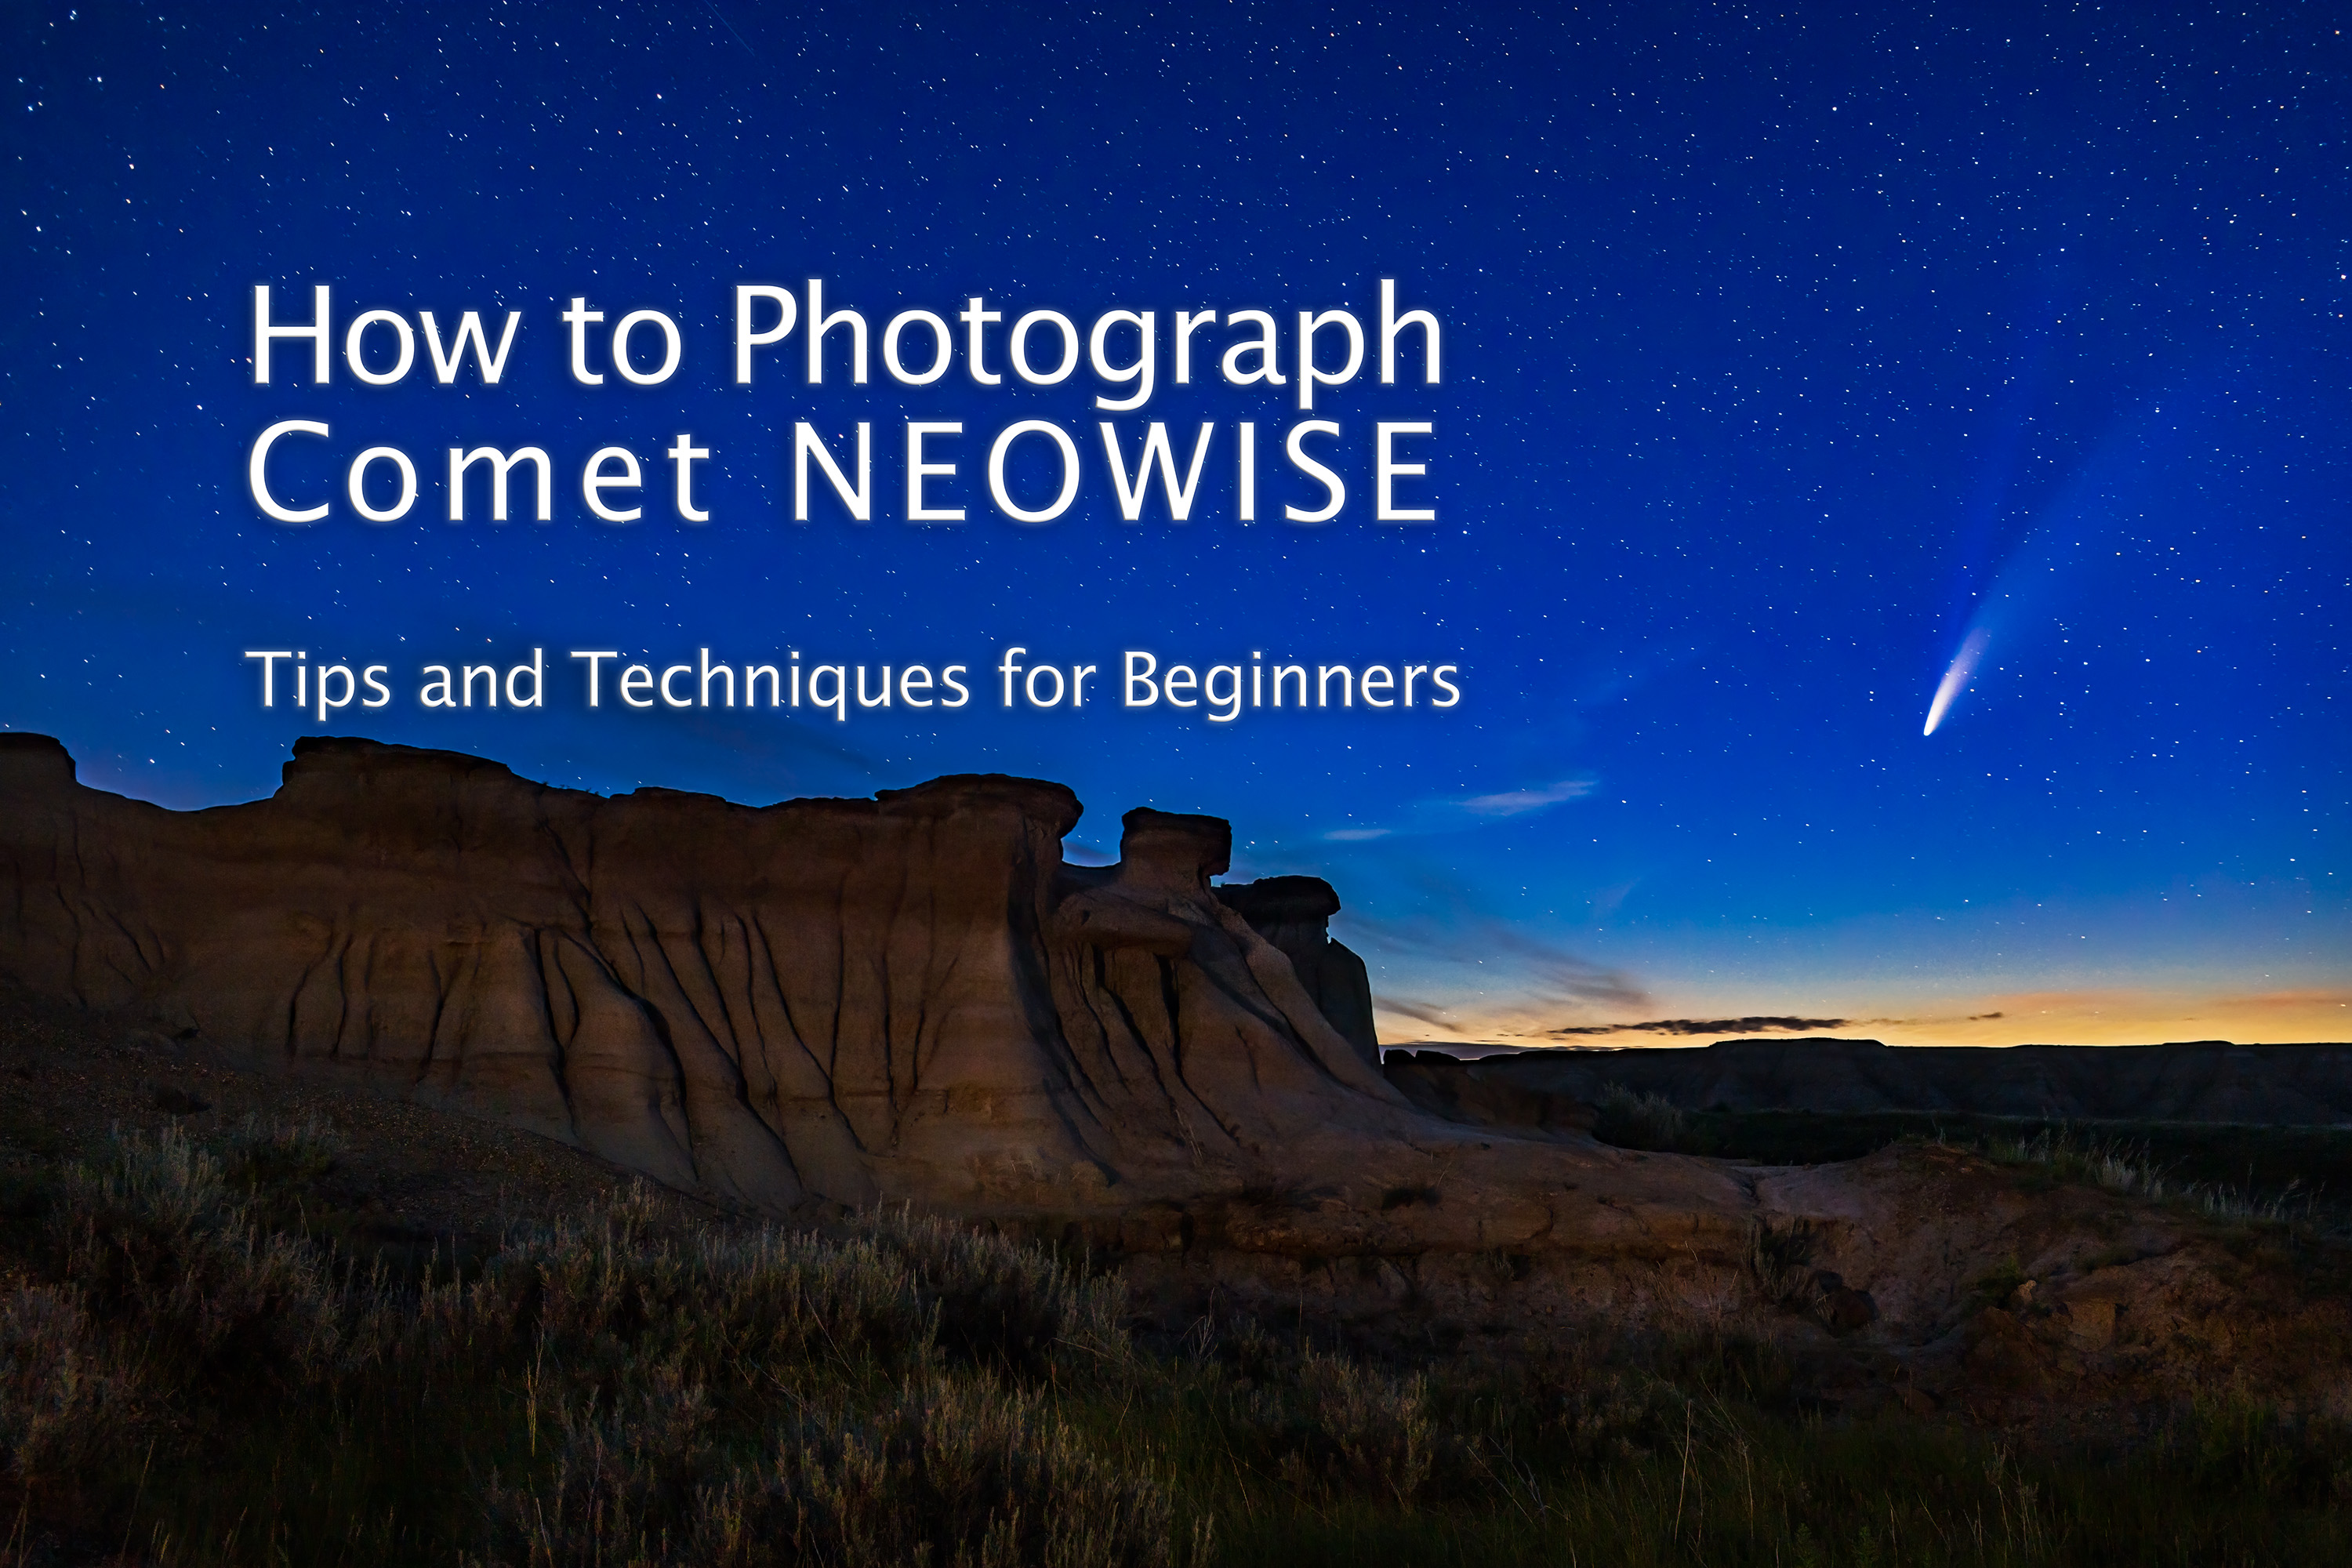 A bright comet is a once-a-decade opportunity to capture some unique nightscapes. Here are my suggested tips and FAQs for getting your souvenir shot.