Last night I shot into the autumn Milky Way at the Heart Nebula.
I’m currently just finishing off a month of testing the new Nikon D810a camera, a special high-end DSLR aimed specifically at astrophotographers.
I’ll post a more thorough set of test shots and comparisons in a future blog, but for now here are some shots from the last couple of nights.
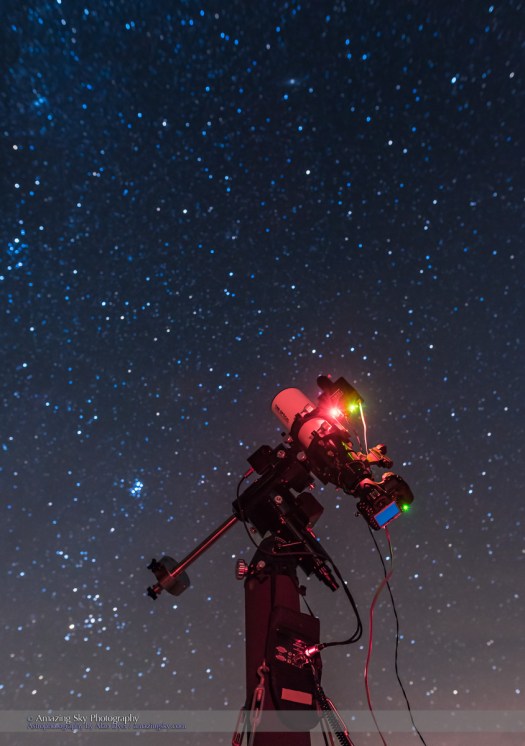
Above is the setup I used to shoot the image below, shot in the act of taking the image below!
The Nikon is at the focus of my much-loved TMB 92mm refractor, riding on the Astro-Physics Mach One mount. The mount is being “auto-guided” by the wonderful “just-press-one-button” SG-4 auto-guider from Santa Barbara Instruments. The scope is working at a fast f/4.4 with the help of a field flattener/reducer from Borg/AstroHutech.
I shot a set of 15 five-minute exposures at ISO 1600 and stacked, aligned and averaged them (using mean stack mode) in Photoshop. I explain the process in my workshops, but there’s also a Ten Steps page at my websitewith my deep-sky workflow outlined.
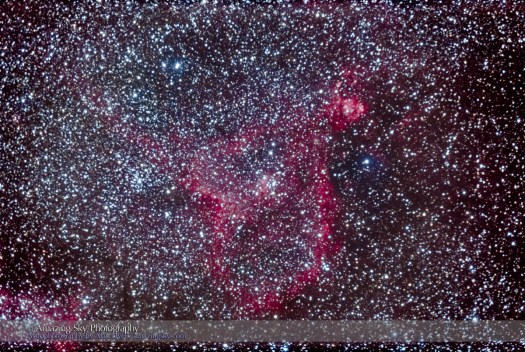
The Heart Nebula, IC 1805, in Cassiopeia, with nebula NGC 896 at upper right and star cluster NGC 1027 at left of centre. This is a stack of 15 x 5-minute exposures with the Nikon D810a as part of testing, at ISO 1600, and with the TMB 92mm apo refractor at f/4.4 with the Borg 0.85x field flattener. Taken from home Nov 29, 2015.
The main advantage of Nikon’s special “a” version of the D810 is its extended red sensitivity for a capturing just such objects in the Milky Way, nebulas which shine primarily in the deep red “H-alpha” wavelength emitted by hydrogen.
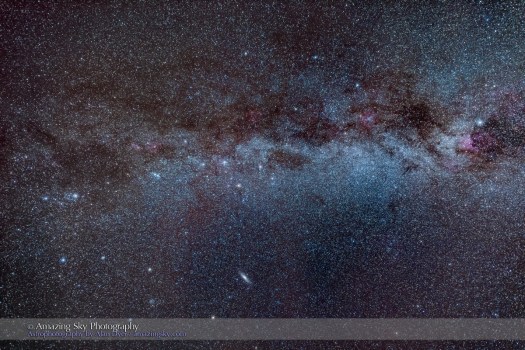
It works very well! And the D810a’s 36 megapixels really do resolve better detail, something you appreciate in wide-angle shots like this one, below, of the autumn Milky Way.
It’s taken with the equally superb 14-24mm f/2.8 Nikkor zoom lens. Normally, you would never use a zoom lens for such a demanding subject as stars, but the 14-24mm is stunning, matching or beating the performance of many “prime” lenses.
The Milky Way from Perseus, at left, to Cygnus, at right, with Cassiopeia (the “W”) and Cepheus at centre. Dotted along the Milky Way are various red H-alpha regions of glowing hydrogen. The Andromeda Galaxy, M31, is at botton. The Double Cluster star cluster is left of centre. Deneb is the bright star at far right, while Mirfak, the brightest star in Perseus, is at far left. The Funnel Nebula, aka LeGentil 3, is the darkest dark nebula left of Deneb. This is a stack of 4 x 1-minute exposures at f/2.8 with the Nikkor 14-24mm lens wide open, and at 24mm, and with the Nikon D810a red-sensitive DSLR, at ISO 1600. Shot from home, with the camera on the iOptron Sky-Tracker.
The D810a’s extended red end helps reveal the nebulas along the Milky Way. The Heart Nebula, captured in the close-up at top, is just left of centre here, left of the “W” forming Cassiopeia.
The Nikon D810a is a superb camera, with low noise, high-resolution, and features of value to astrophotographers. Kudos to Nikon for serving our market!
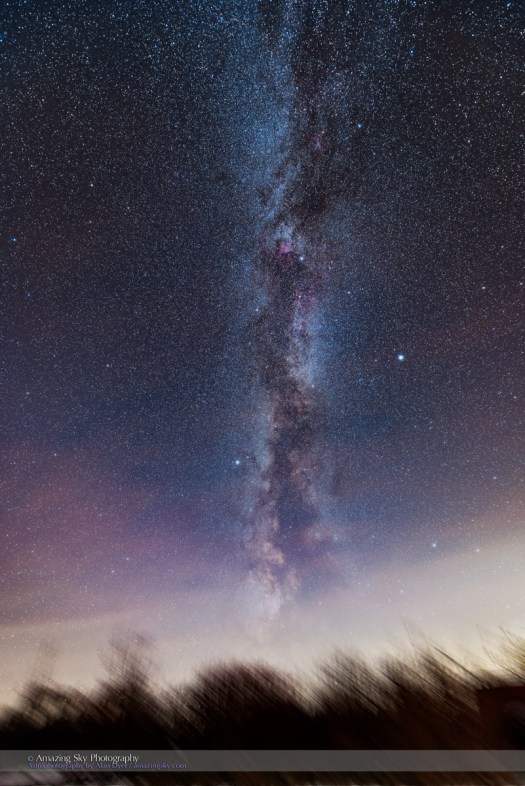
The summer Milky Way sets into the southwest on a late November night.
On Saturday, November 28, well into winter here in Alberta, the stars of the Summer Triangle and the summer Milky Way set into the southwest on a clear, though slightly hazy, late November night.
This is the last of the summer Milky Way, with the centre of the Galaxy now long gone, but the Summer Triangle stars remaining in the evening sky well into autumn. Glows from light pollution in the west light the horizon, in a quick series of images shot in my rural backyard.
In the Summer Triangle, Vega is at right, as the brightest star; Deneb is above centre, and Altair is below centre, farthest south in the Milky Way.
I shot this as a test image for the Nikkor 14-24mm lens, here wide-open at f/2.8 and at 14mm, where it performs beautifully, with very tight star images to the corners. It does very well at 24mm, too! This is astonishing performance for a zoom lens. It matches or beats many “prime” lenses for quality.
The camera was the 36-megapixel Nikon D810a, Nikon’s “astronomical DSLR” camera, also on test. Here it shows its stuff by picking up the red nebulas in Cygnus and Cepheus.
Thorough tests of both the camera and lens will appear later in the year. Stay tuned.
Do subscribe to my blog (click below) to get email notices of new entries.
For the even more technically-minded, this image is a stack, mean combined, of five 2-minute tracked exposures, at f/2.8 and ISO 800. The camera was on the iOptron Sky-Tracker. So the stars are not trailed but the ground is! I made no attempt here to layer in an untracked ground shot, as there isn’t much detail of interest worth showing, quite frankly.
At least not in the ground. But the Milky Way is always photogenic.
Orion ascends into the sky on a clear autumn night, with its stars drawing trails behind it as it rises.
Only on November nights is it possible to capture Orion rising in the evening sky. Here, I used the light of the waxing gibbous Moon to illuminate the landscape … and the sky, creating the deep blue tint.
The lead image above is an example of a star trail, a long exposure that uses Earth’s rotation to turn the stars into streaks across the sky. In the old days of film you would create such an exposure by opening the shutter for an hour or more and hoping for the best.
Today, with digital cameras, the usual method is to shoot lots of short exposures, perhaps no more than 20 to 40 seconds each in rapid succession. You then stack them later in Photoshop or other specialized software to create the digital equivalent of a single long exposure.
The image above is a stack of 350 images taken over 2.5 hours.
With a folder of such images, you can either stack them to create a single image, such as above, or string them together in time to create a time-lapse of the stars moving across the sky. The short video below shows the result. Enlarge the screen and click HD for the best quality.
For the still image and time-lapse, I used the Advanced Stacker Plus actions from StarCircleAcademyto do the stacking in Photoshop and create the tapering star trail effect. A separate exposure after the main trail set added the point-like stars at the end of the trails.
My tutorial on Vimeo provides all the details on how to shoot, then stack, such a star trail image…
… While this video illustrates how to capture and process nightscapes shot under the light of the Moon.
Learn the basics of shooting nightscape and time-lapse images with my three new video tutorials.
In these comprehensive and free tutorials I take you from “field to final,” to illustrate tips and techniques for shooting the sky at night.
At sites in southern Alberta I first explain how to shoot the images. Then back at the computer I step you through how to process non-destructively, using images I shot that night in the field.
Tutorial #1 – The Northern Lights
This 24-minute tutorial takes you from a shoot at a lakeside site in southern Alberta on a night with a fine aurora display, through to the steps to processing a still image and assembling a time-lapse movie.
Tutorial #2 – Moonlit Nightscapes
This 28-minute tutorial takes you from a shoot at Waterton Lakes National Park on a bright moonlit night, to the steps for processing nightscapes using Camera Raw and Photoshop, with smart filters, adjustment layers and masks.
Tutorial #3 – Star Trails
This 35-minute tutorial takes you from a shoot at summer solstice at Dinosaur Provincial Park, then through the steps for stacking star trail stills and assembling star trail time-lapse movies, using specialized programs such as StarStaX and the Advanced Stacker Plus actions for Photoshop.
As always, enlarge to full screen for the HD versions. These are also viewable at my Vimeo channel.
The morning planets are now strung out along the ecliptic, visualizing this line in the sky.
This was the view this morning, November 14, of the three dawn planets lined up along the ecliptic, with the stars Spica and Regulus also defining this imaginary line.
The ecliptic is the Earth’s orbital path around the Sun projected into the sky. So it is along this line that we see the Sun appear to move around the sky over a year. But it is also the path along which we find the seven other major planets – in this case, three of them: Venus, Mars and Jupiter.
These three worlds were clustered together in October, but are now spreading out along the ecliptic, as Venus drops lower but Mars and Jupiter climb higher.
The stars Spica and Regulus also lie along the ecliptic, where the Moon can occasionally pass in front of, or occult, these stars.
So the two stars and three planets are now nicely drawing the ecliptic line for us in the dawn sky. At this time of year, the ecliptic is also steeply angled above the eastern horizon.
The main image above is a stack of 4 x 20 second exposures for the ground, to smooth noise, and one 20-second exposure for the sky, all with the Nikon D810a at ISO 1000 and Nikkor 14-24mm lens at f/2.8 and at 14mm.
Venus (brightest), with dim Mars above it, then bright Jupiter, in a diagonal line across the dawn sky on November 14, 2015, with the Zodiacal Light barely visible in the brightening twilight sky. Arcturus is a left and Spica is just rising at centre. Corvus is just above the treetops at right. Spica, Venus, Mars and Jupiter more or less define the line of the ecliptic in the autumn morning sky here. This is a stack of 4 x 20 second exposures for the ground, to smooth noise, and one 20-second exposure for the sky, all with the Nikon D810a at ISO 1000 and Nikkor 14-24mm lens at f/2.8 and at 24mm
This image just above is with the same gear but with the lens at the 24mm setting to more tightly frame the planets.
Meanwhile, on the other side of the sky at dawn, Orion and his winter sky friends were setting into the west (image below).
Orion and the winter constellations setting over the old Farmhouse at home, in the dawn twilight on the morning of November 14, 2015. Canis Major and Sirius are at left; Taurus and Aldebaran and the Pleiades are at right. Procyon is at upper left. This is a stack of 4 x 20 second exposoures for the ground to smooth noise and one 20-second exposure for the sky, all with the Nikon D810a at ISO 1600 and 14-24mm Nikkor zoom lens at f/2.8.
All the images here are shot with the Nikon D810a camera and the amazing Nikkor 14-24mm lens, two items in hand this month for testing and review. A thorough test will appear in future blogs.
Of course, as wonderful as the gear is, it cannot extract the ecliptic line and labels from the sky – those are added in Photoshop!
In a “10 Steps” tutorial I review my tips for going from “raw to rave” in processing a nightscape or time-lapse sequence.
NOTE: Click on any of the screen shots below for a full-res version that will be easier to see.
In my preferred “workflow,” Steps 1 through 6 can be performed in either Photoshop (using its ancillary programs Bridge and Adobe Camera Raw) or in Adobe Lightroom. The Develop module of Lightroom is identical to Adobe Camera Raw (ACR for short).
However, my illustrations show Adobe Bridge, Camera Raw and Photoshop CC 2014. Turn to Photoshop to perform advanced filtering, masking and stacking (Steps 7 to 10).
To use Lightroom to assemble a time-lapse movie from processed Raw frames you need the third-party program LRTimelapse, described below. Otherwise, you need to export frames from Lightroom – or from Photoshop – as “intermediate” JPGs (see Step 6), then use other third party programs to assemble them into movies (Step 10B).
–
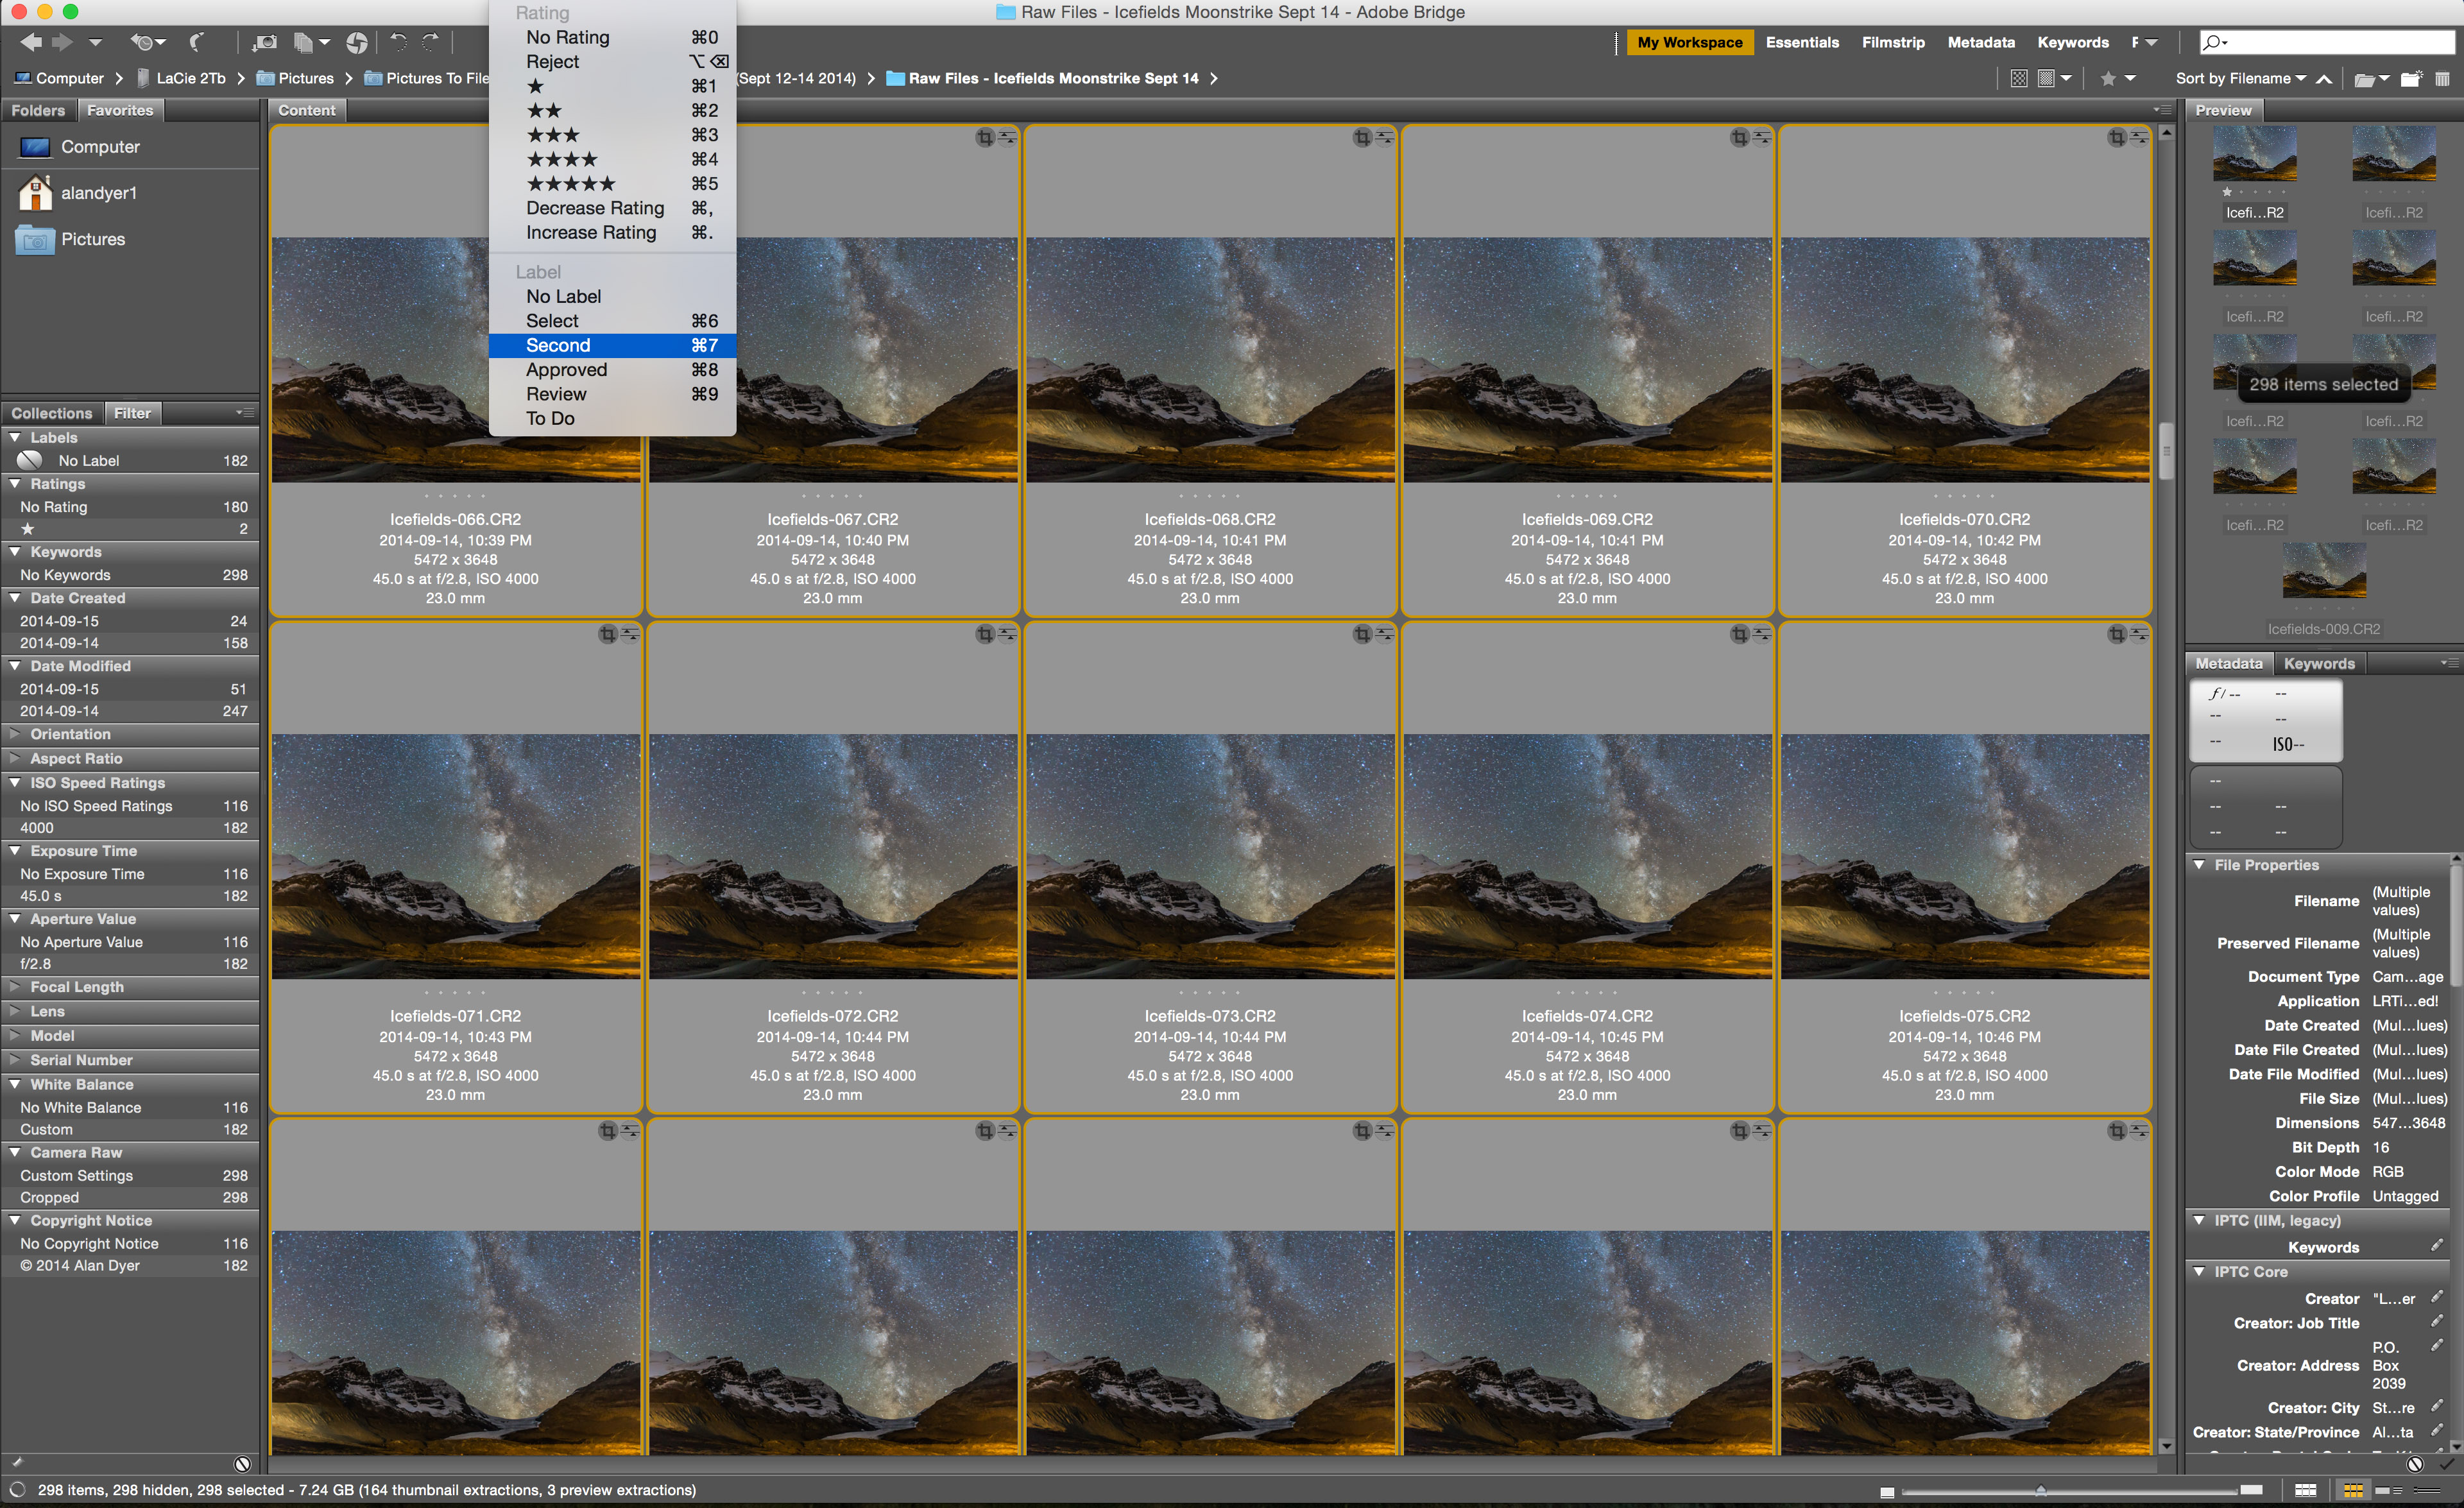
Step 1 – Bridge or Lightroom – Import & Select
Use Adobe Bridge (shown above) or Lightroom to import the images from your camera’s card.
As you do so you can add “metadata” to each image – your personal information, copyright, keywords, etc. As you import, you can also choose to convert and save images into the open and more universal Adobe DNG format, rather than keep them in the camera’s proprietary Raw format.
Once imported, you can review images, keeping the best and tossing the rest. Mark images with star ratings or colour labels, and group images together (called “stacking” in Bridge), such as frames for a panorama or “high dynamic range” set.
Always save images to both your working drive and to an external drive (which itself should automatically back up to yet another external drive). Never, ever save images to only one location.
–
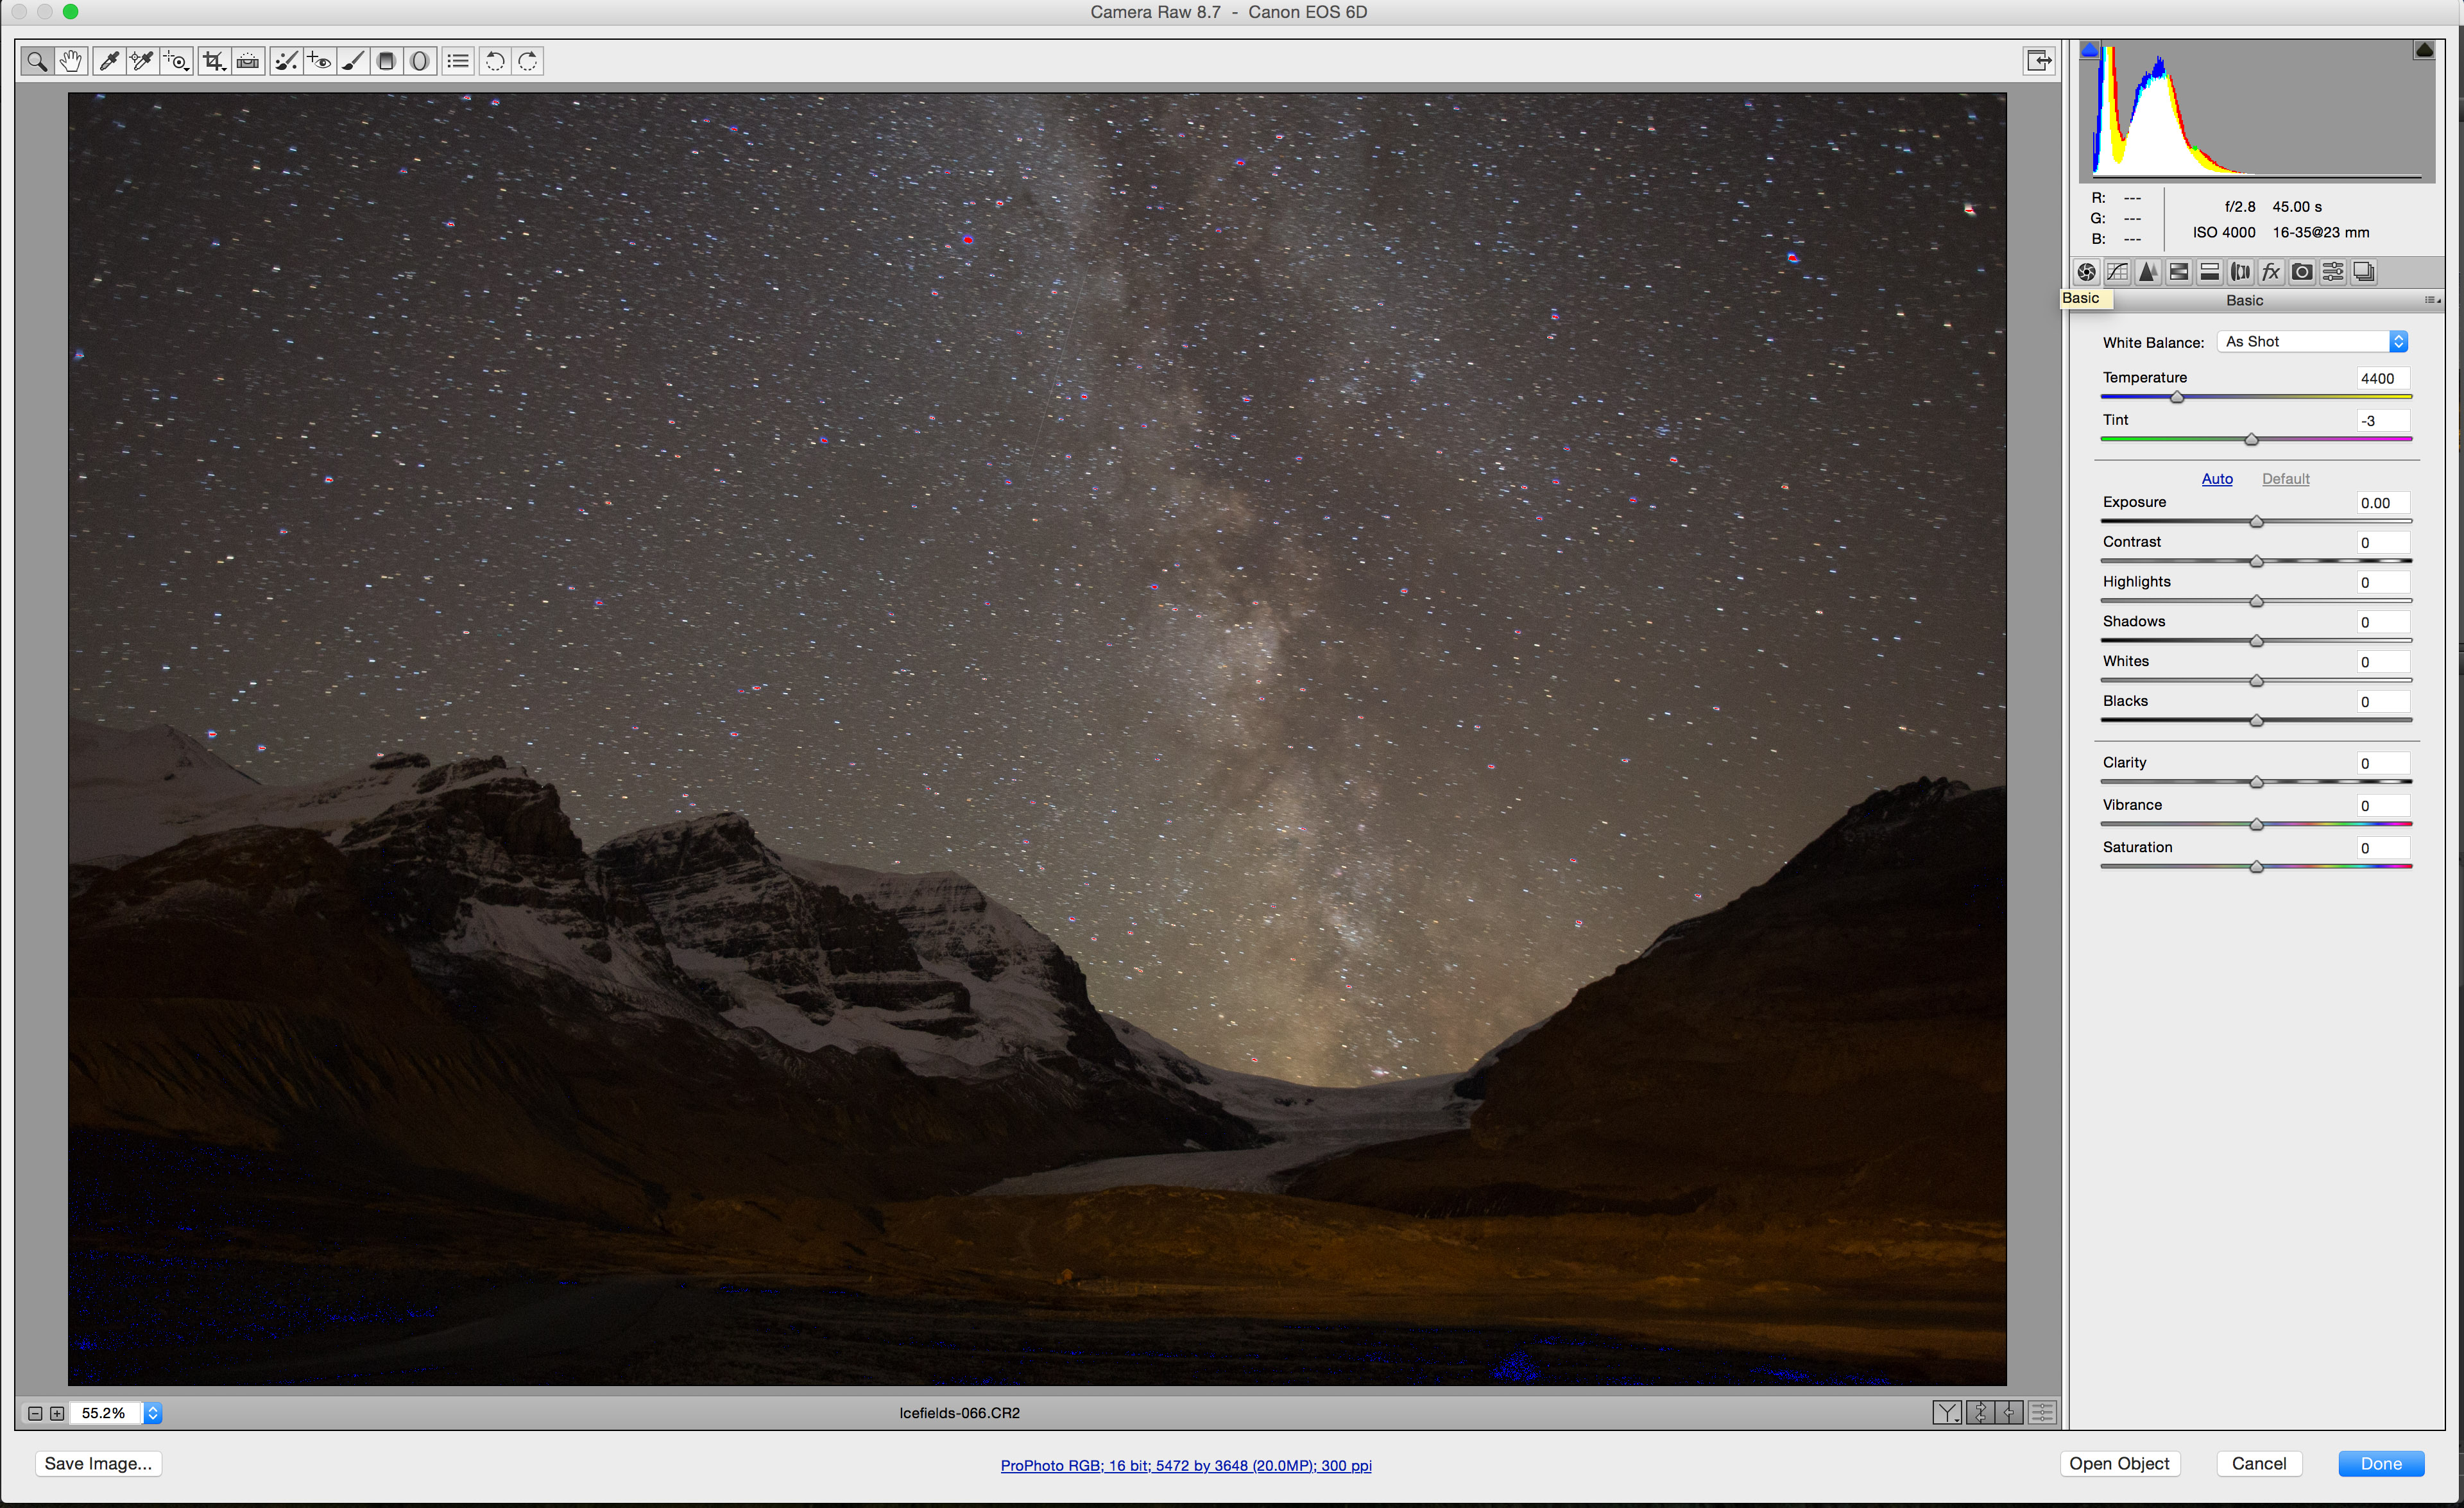
Step 2 – Adobe Camera Raw or Lightroom – Basics
Open the Raw files you want to process. From Bridge, double click on raw images and they will open in ACR. In Lightroom select the images and switch to its Develop module.
In Adobe Camera Raw be sure to first set the Workflow Preset (the blue link at the bottom of the screen) to 16 bits/channel and ProPhoto RGB colour space, for maximum tonal range. This is a one-time setting. Lightroom defaults to 16-bit and the AdobeRGB colour space.
The Basics panel (the first tab) allows you to fix Exposure and White Balance. For the latter, use the White Balance Tool (the eyedropper, keyboard shortcut I) to click on an area that should be neutral in colour.
You can adjust Contrast, and recover details in the Highlights and Shadows (turn the latter up to show details in starlit landscapes). Clarity and Vibrance improves midrange contrast and colour intensity.
Use Command/Control Z to Undo, or double click on a slider to snap it back to zero. Or under the pull-down menu in the Presets tab go to Camera Raw Defaults to set all back to zero.
–
Step 3 – Adobe Camera Raw or Lightroom – Detail
The Detail panel allows you to set the noise reduction and sharpness as you like it, one of the benefits of shooting Raw.
Generally, settings of Sharpness: Amount 25, Radius 1 work well. Turn up Masking while holding the Option/Alt key to see what areas will be sharpened (they appear in white). There’s no need to sharpen blank, noisy sky, just the edge detail.
Setting Noise Reduction: Luminance to 30 to 50 and Color to 25, with others sliders left to their defaults works well for all but the noisiest of images. Luminance affects the overall graininess of the image. Color, also called chrominance, affects the coloured speckling. Turning the latter up too high wipes out star colours.
Turn up Color Smoothness, however, if the image has lots of large scale colour blotchiness.
Zoom in to at least 100% to see the effect of all noise reduction settings. Adobe Camera Raw and Lightroom have the best noise reduction in the business. Without it your images will be far noisier than they need to be.
–
Step 4 – Adobe Camera Raw or Lightroom – Lens Correction
Wide angle lenses, especially when used at fast apertures, suffer a lot from light falloff at the corners (called vignetting). There’s no need to have photos looking as if they were taken through a dark tunnel.
ACR or Lightroom can automatically detect what lens you used and apply a lens correction to brighten the corners, plus correct for other flaws such as chromatic aberration and lens distortion.
Use the Color tab to “Remove Chromatic Aberration” and dial up the Defringe sliders.
For lenses not in the database (manual lenses like the Rokinons and Samyangs will not be included, nor will any telescopes) use the Manual tab to dial in your own vignetting correction. This can take some trial-and-error to get right, but once you have it, save it as a Preset to apply in future to all photos from that lens or telescope.
I usually apply Lens Corrections as a first step, but sometimes find I have to back it off it as I boost the contrast under Basics.
–
Step 5 – Bridge or Lightroom – Copy & Paste
For a small number of images you could open them all, then Select All in ACR to apply the same settings to all images at the same time.
Or you can adjust one, then Select All and hit Synchronize.
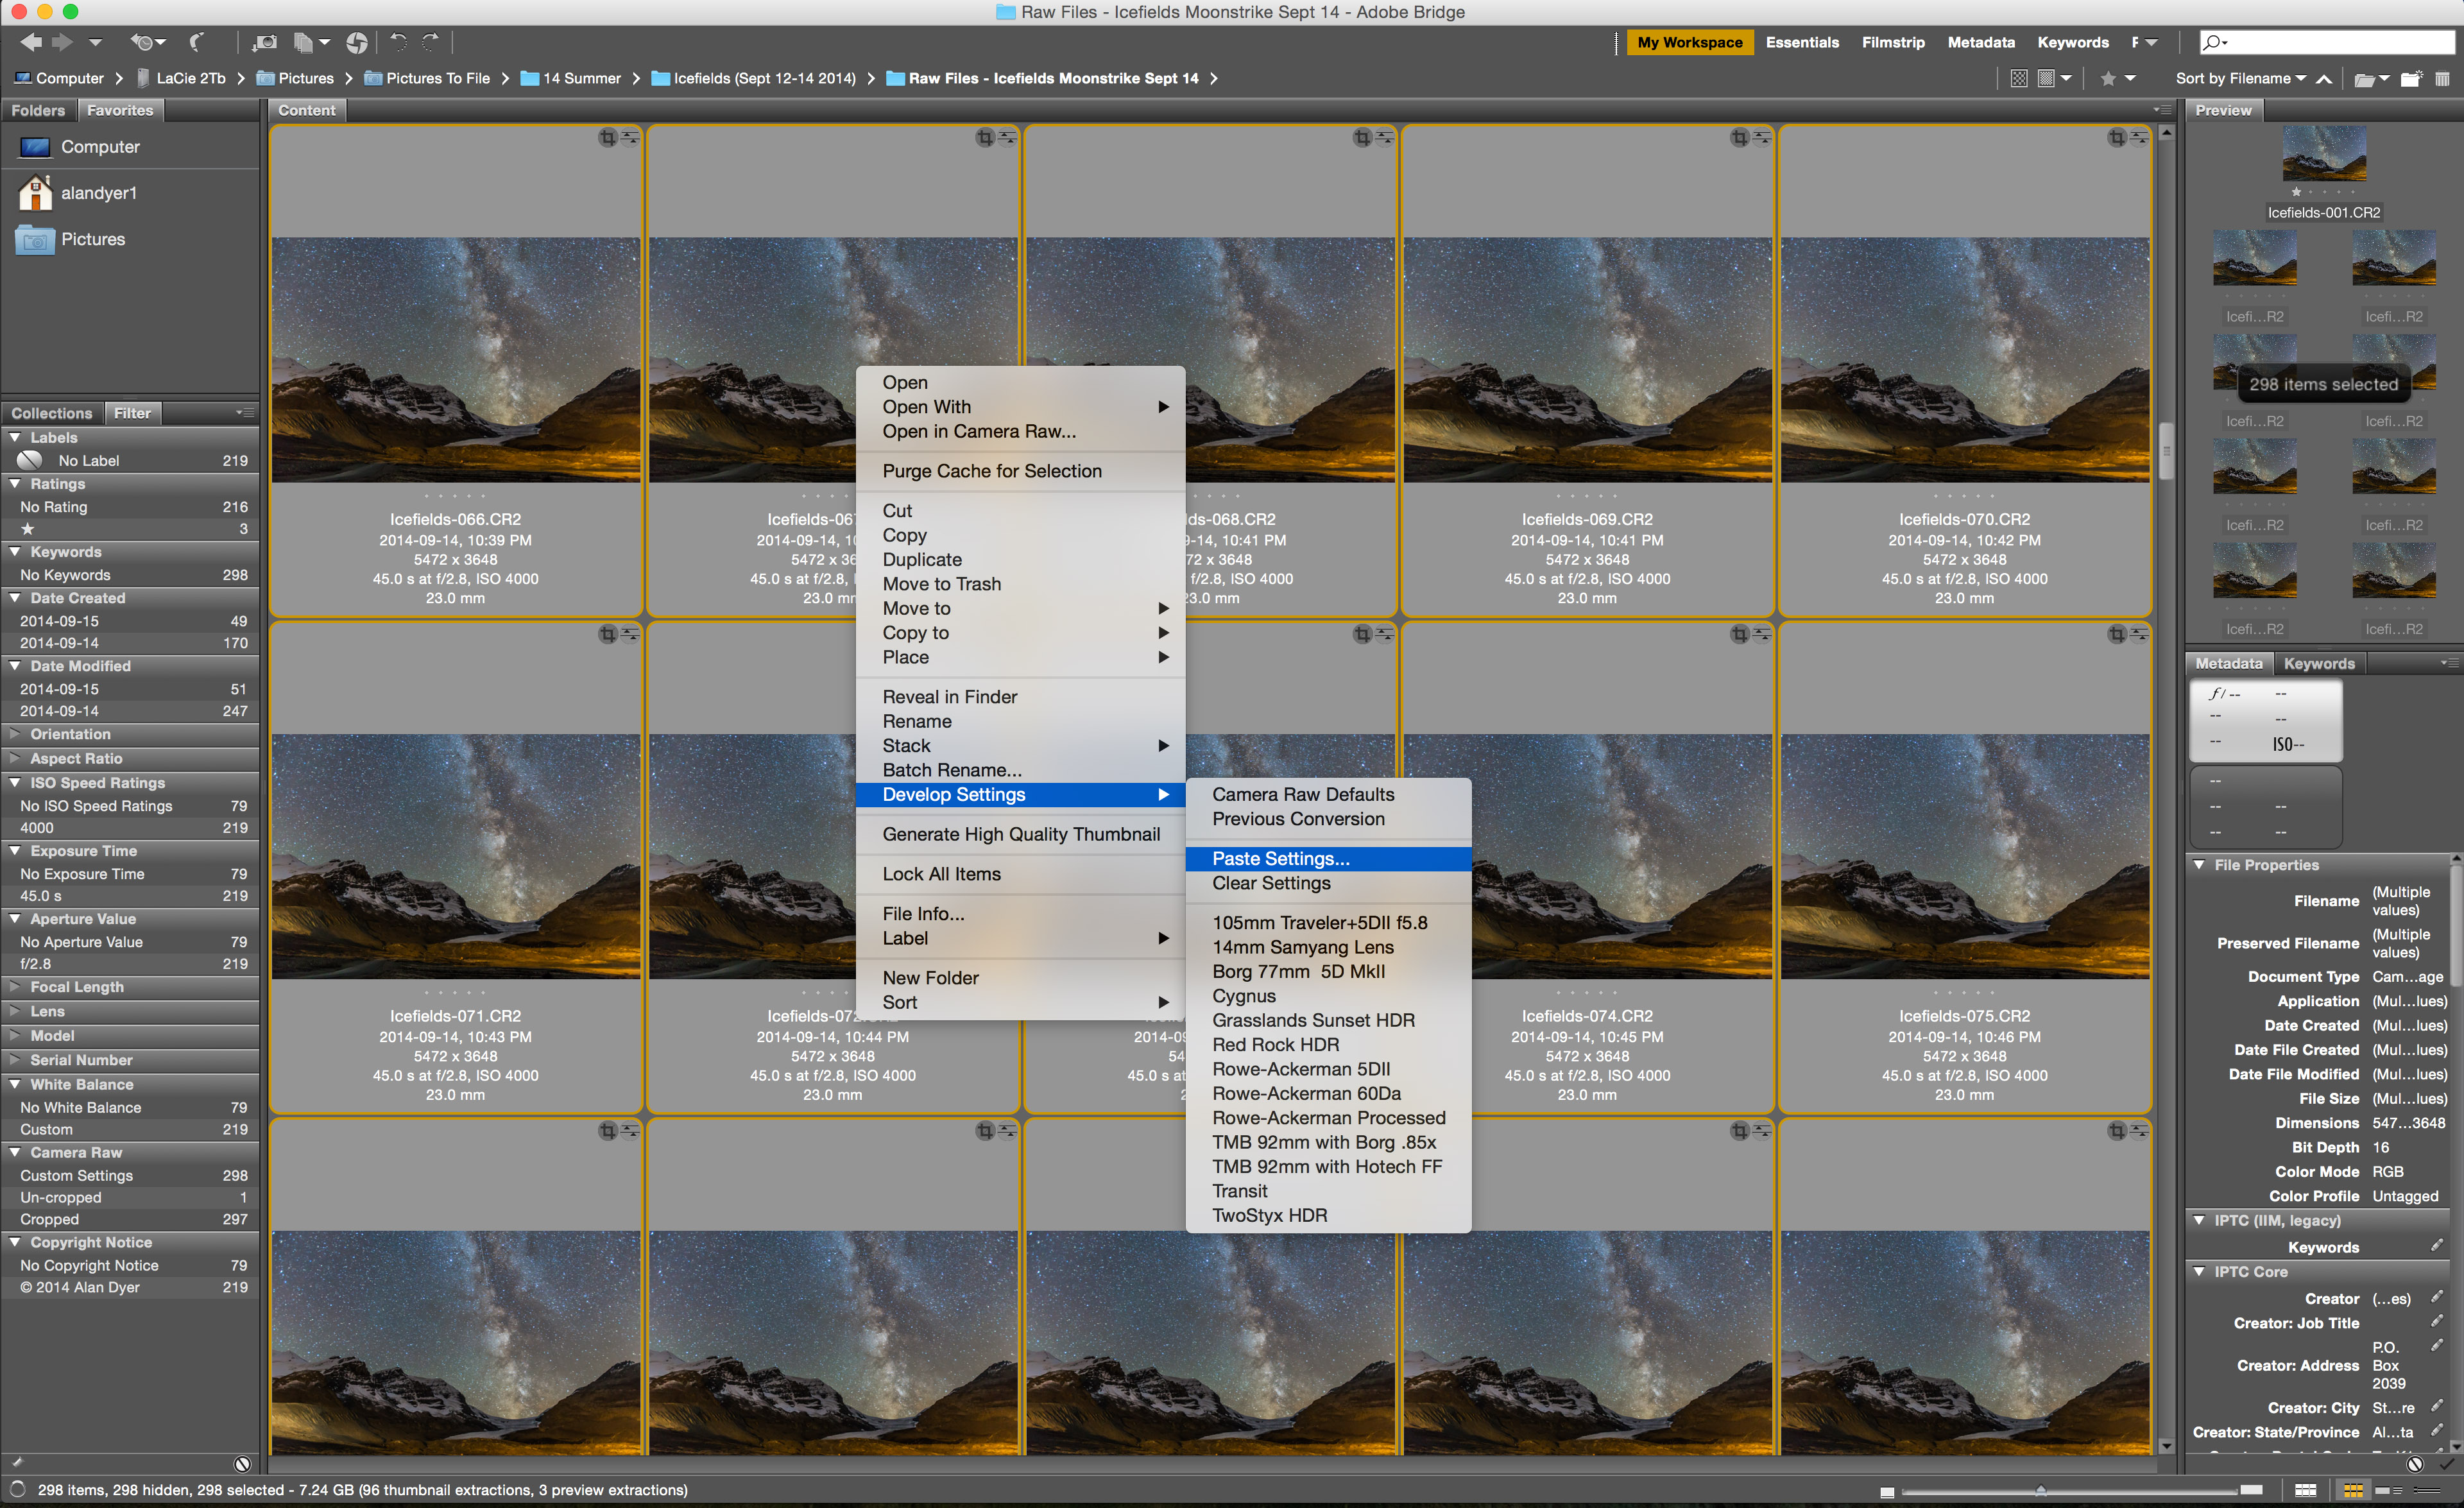
Another method useful for processing dozens or hundreds of frames from a star trail or time-lapse set is to choose one representative image and process it. Then in Bridge choose Edit>Develop Settings>Copy Camera Raw Settings. If you are in Lightroom’s Library module, choose Photo>Develop Settings>Copy Settings.
With either program you can also right-click on an image to get to the same choices. Then select all the other images in the set (Command/Control A) and use the same menus to Paste Settings.
A dialog box comes up for choosing what settings you wish to transfer.
If you cropped the image (a good idea for images destined for an HD movie with a 16:9 aspect ratio), pick that option as well. In moments all your images get processed with identical settings. Nice!
–
Step 6 – Lightroom or Photoshop – Export
You now have a set of developed Raw images. However, the actual Raw files are never altered. They remain raw!
Instead, with Adobe Camera Raw the information on how you processed the images is stored in the “sidecar” XMP text files that live in the same folder as the Raw files.
In Lightroom’s case your settings are stored in its own database, unless you choose Metadata>Save Metadata to File (Command/Control S). In that case, Lightroom also writes the changes to the same XMP sidecar files.
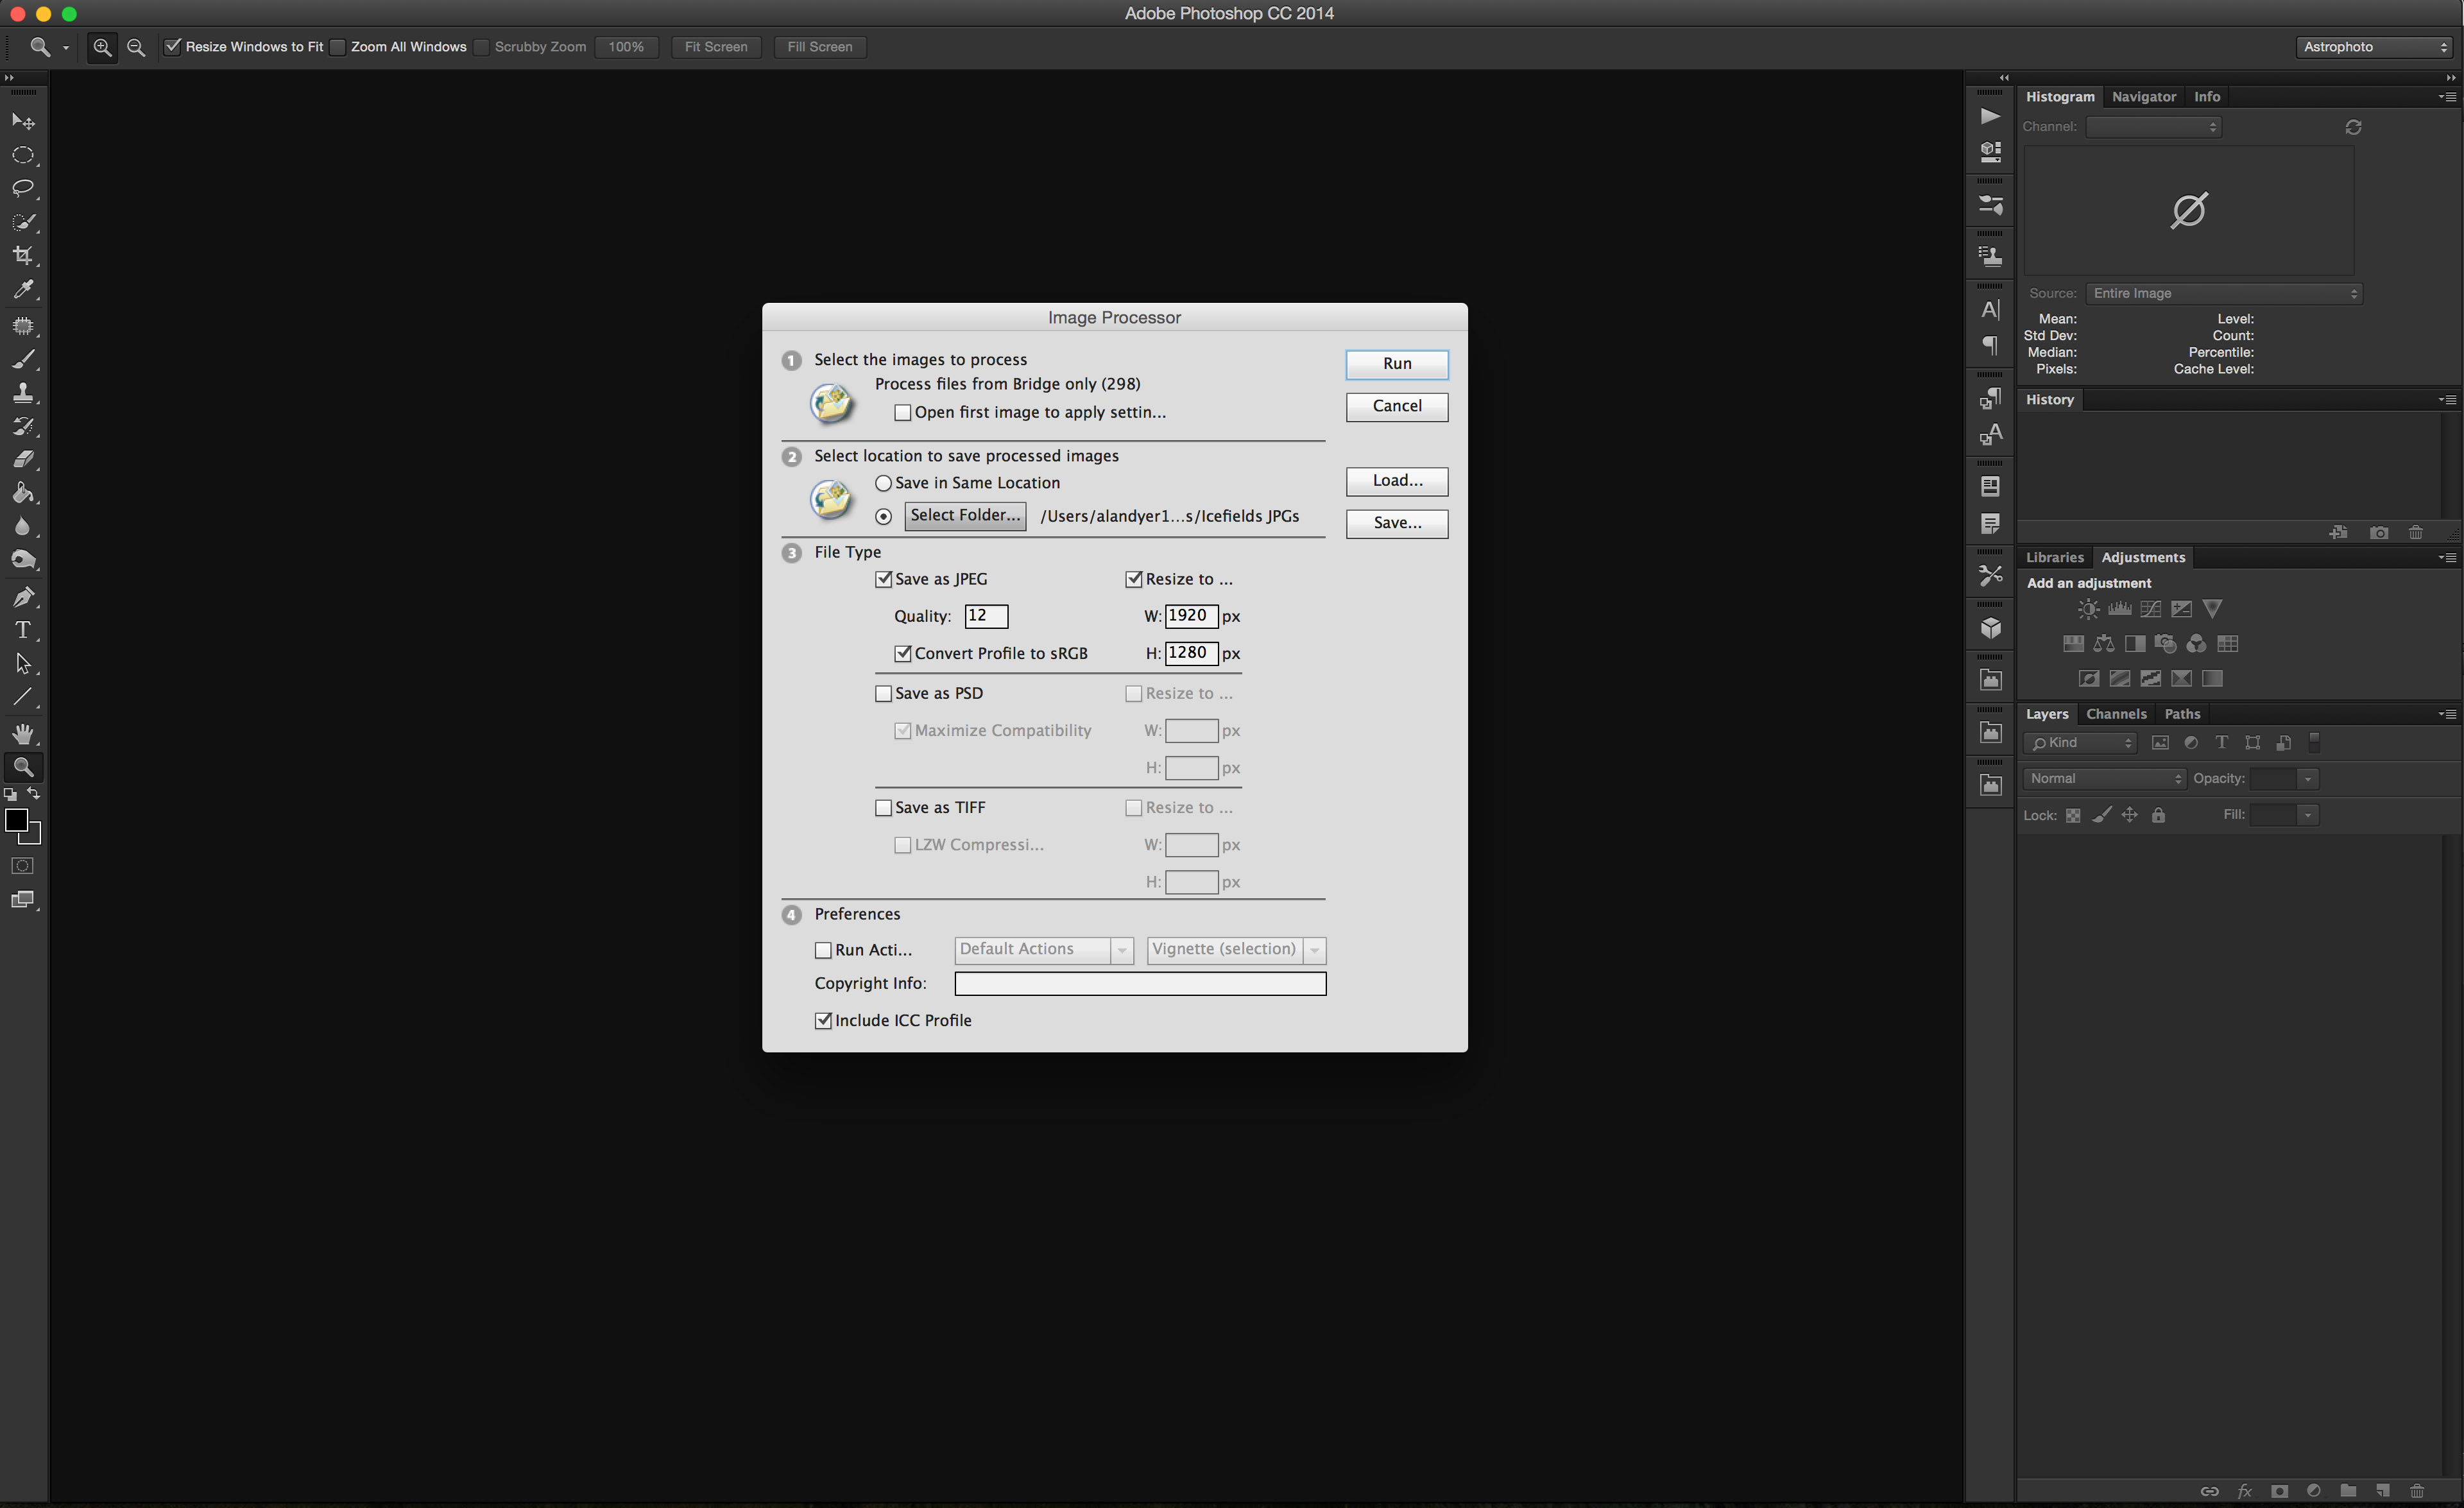
To convert the images into final Photoshop PSDs, TIFFs or JPGs you have a couple of choices. In Lightroom go to the Library module and choose Export. It’s an easy way to export and convert hundreds of images, perhaps into a folder of smaller JPGs needed for assembling a time-lapse movie.
To do that from within Adobe Bridge, select the images, then go to Tools>Photoshop>Image Processor. The dialogue box allows you to choose how and where to export the images. Photoshop then opens, processes, and exports each image.
–
Step 7 – Photoshop – Smart Filters
For a folder of images intended to be stacked into star trails (Step 10A) or time-lapse movies (Step 10B), you’re done processing.
But individual nightscape images can often benefit from more advanced work in Photoshop. The next steps make use of a non-destructive workflow, allowing you to alter settings at any time after the fact. At no time do we actually change pixels.
One secret to doing that is to open an image in Photoshop and then select Layer>Smart Objects>Convert to Smart Object. Or go to Filter>Convert for Smart Filters.
OR … better yet, back in Adobe Camera Raw hold down the Shift key while clicking the Open Image button, so it becomes Open Object. That image will then open in Photoshop already as a Smart Object, which you can re-open and re-edit in ACR at any time later should you wish.
Either way, with the image as a Smart Object, you can now apply useful filters such as Reduce Noise, Smart Sharpen, and Dust & Scratches, plus third-party filters such as Nik Software’s Dfine 2 Noise Reduction, all non-destructively as “smart filters.” They can be re-adjusted or turned off at any time.
–
Step 8 – Photoshop – Adjustment Layers
The other secret to non-destructive processing is to apply adjustment layers.
Go to Layer>New Adjustment Layer, or click on any of the icons in the Adjustments panel. If that panel is not visible at right, then under the Window menu check “Adjustments.”
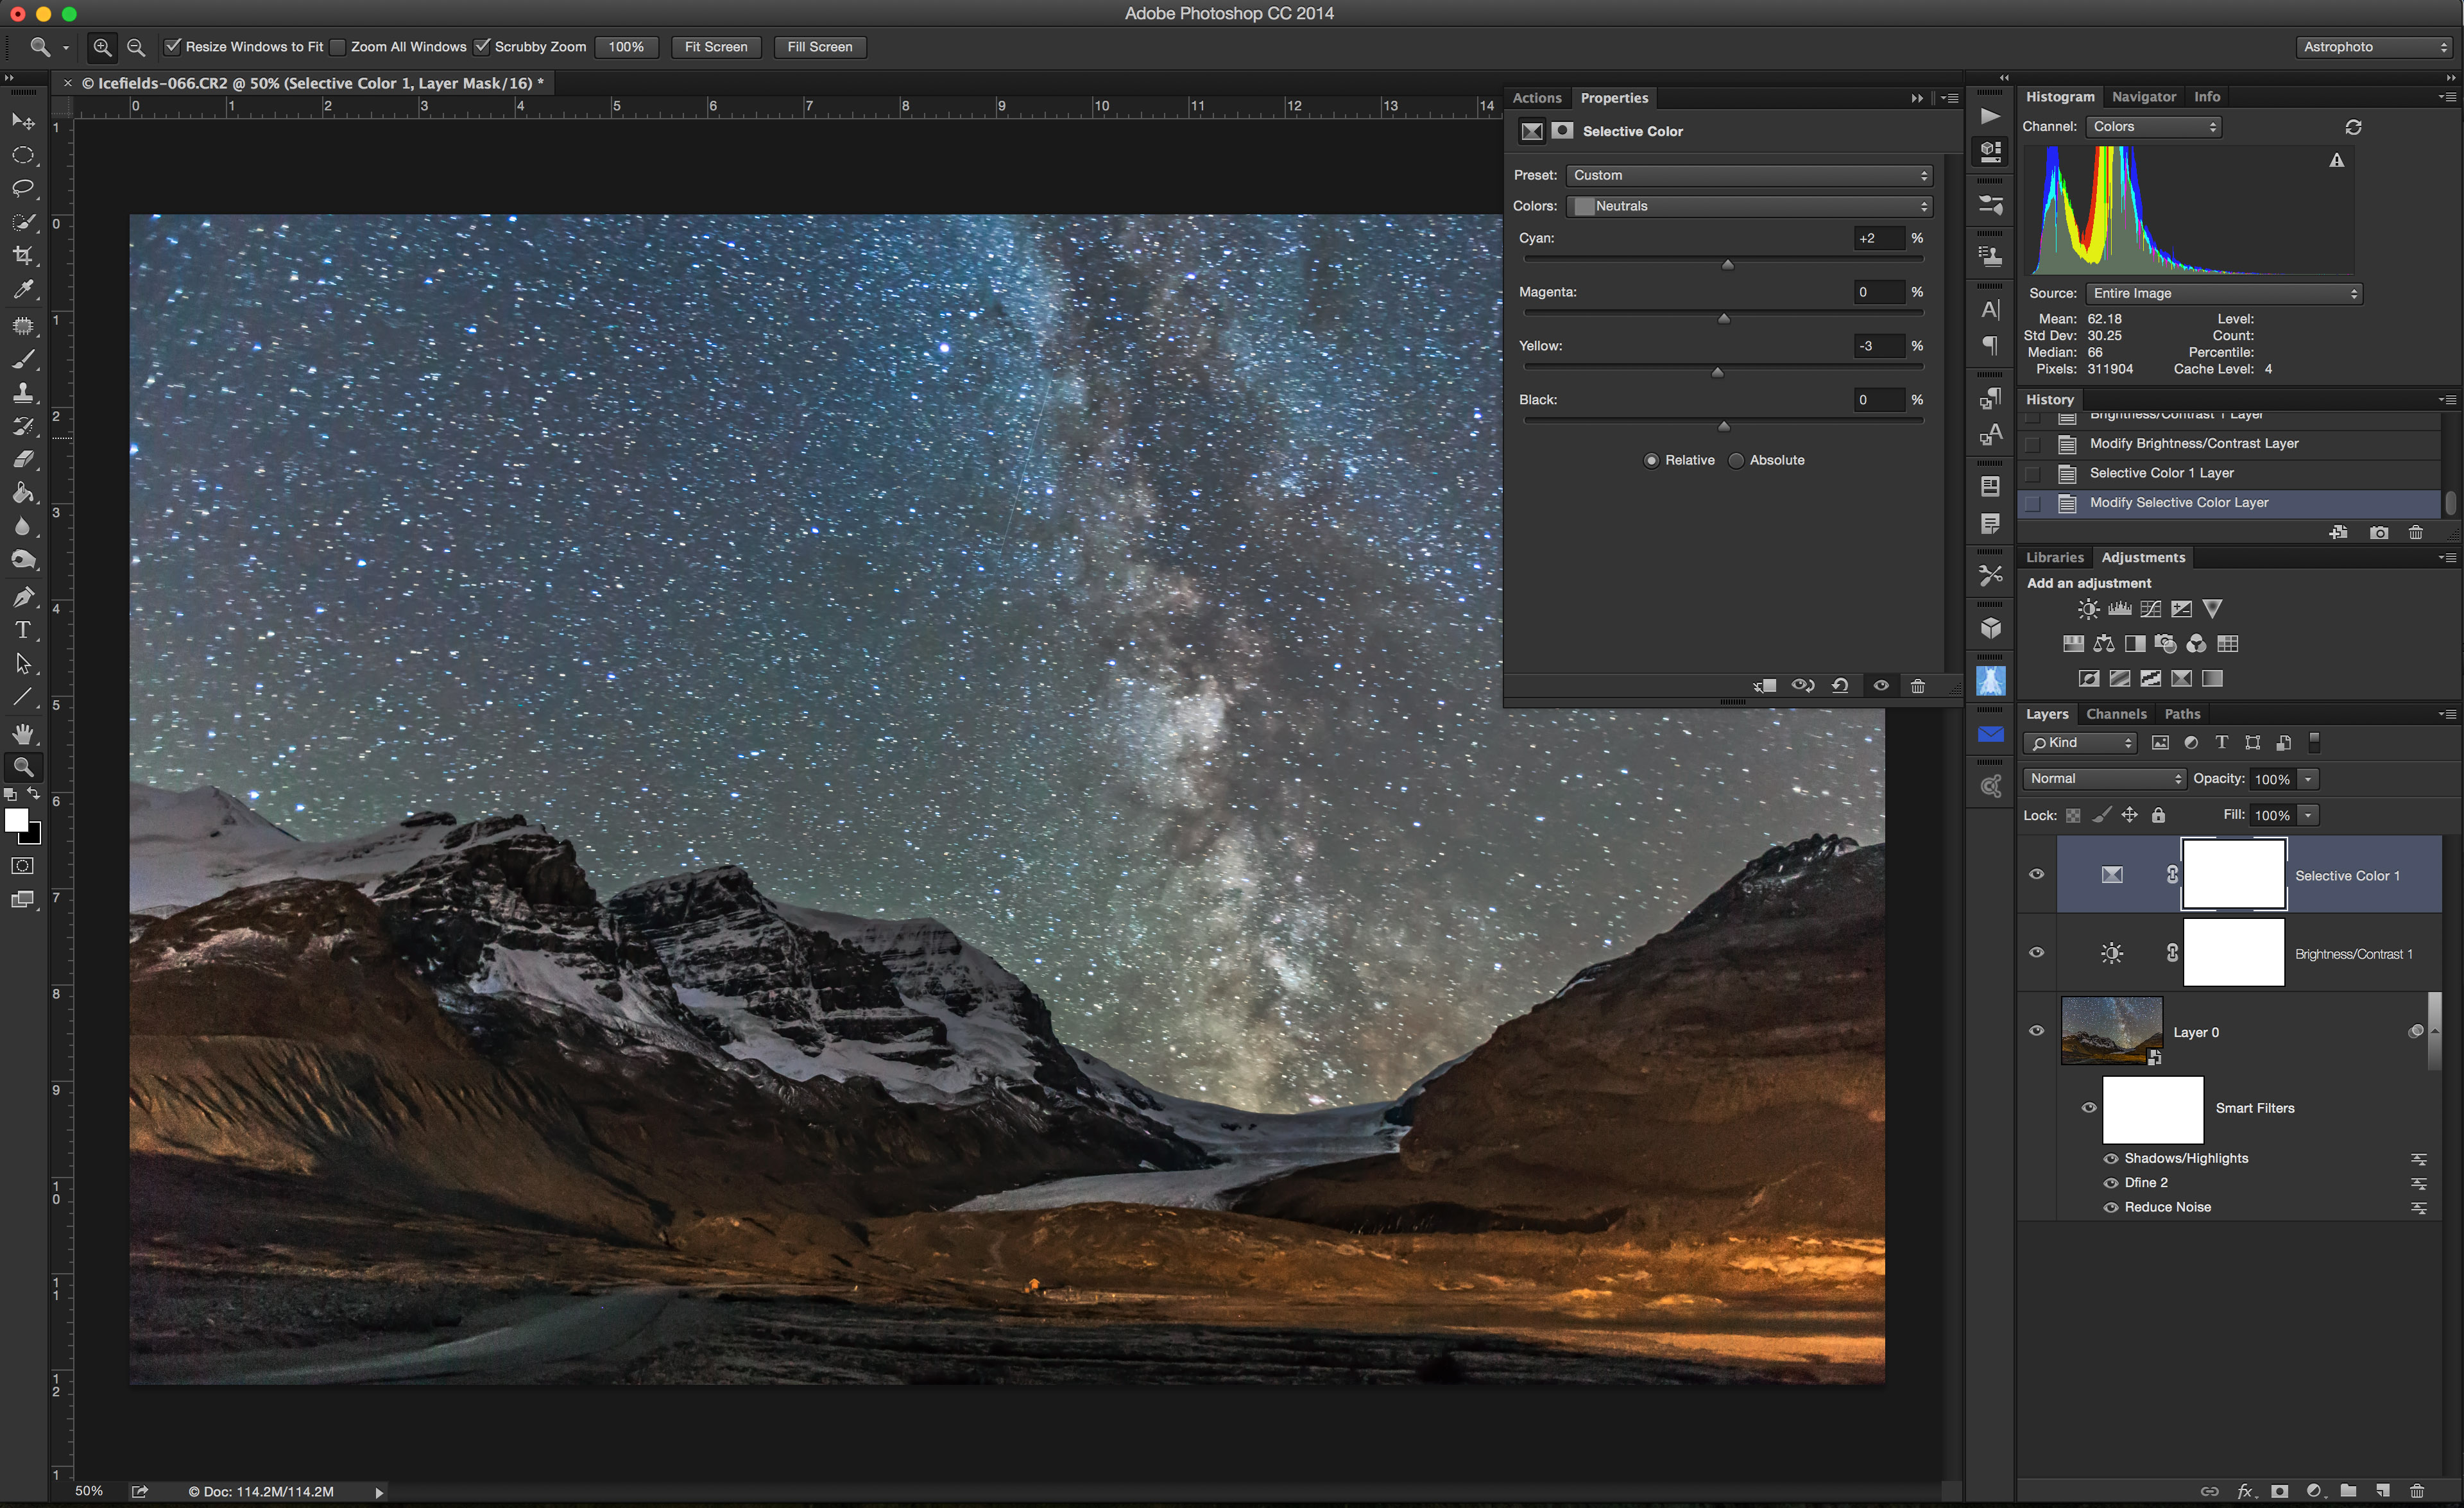
This panel is where you can alter the colour balance, the brightness and contrast, the vibrancy, and many other choices. I find Selective Color most useful for tweaking colour.
Curves allows you to bring up detail in dark areas. Levels allows setting the black and white points, and overall contrast.
The beauty of adjustment layers is that you can click on the layer’s little icon and bring up the dialog box for changing the setting at any time. You never permanently alter pixels.
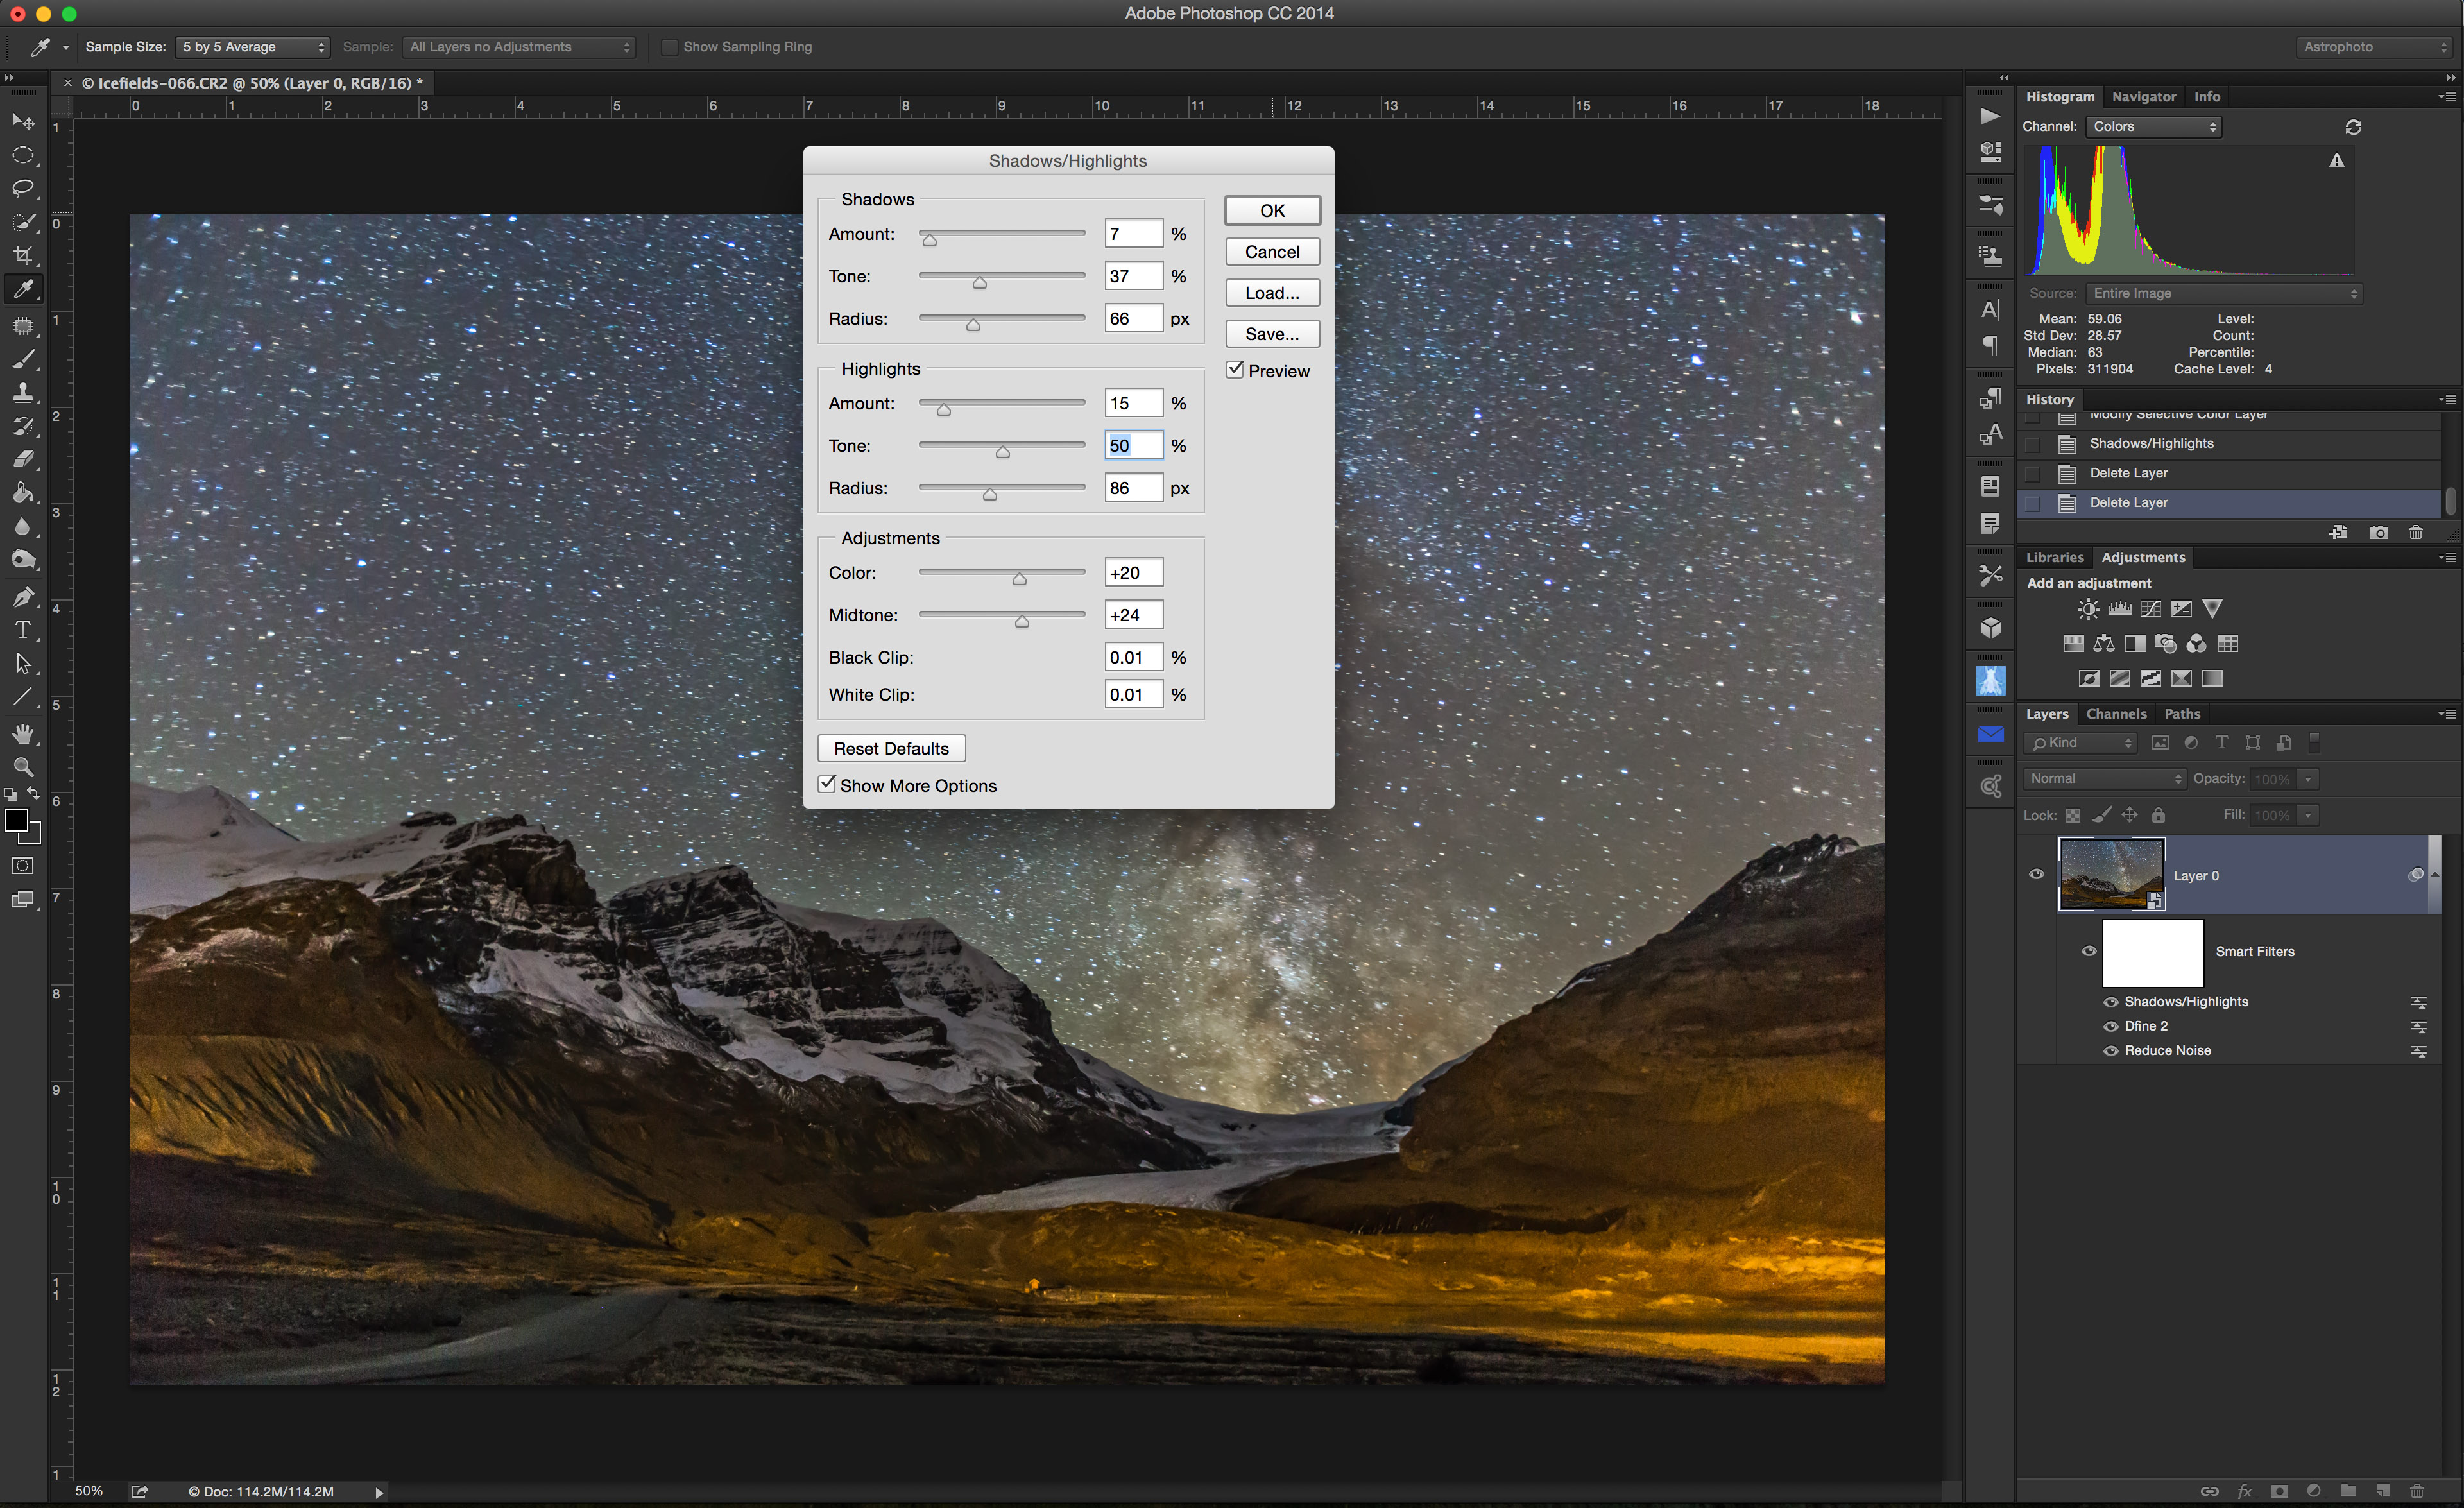
The image adjustment “Shadows & Highlights” is also immensely useful, but appears as a smart filter, not as an adjustment layer. It’s one of the prime tools for creating images with great detail in scenes lit only by starlight.
–
Step 9 – Photoshop – Masks
The power of adjustment layers is that you can apply them to just portions of an image. This is useful in nightscapes where the sky and ground often need different processing.
To create a mask first select the region you want to work on. Try the Quick Selection Tool (found near the top of the Tool palette at left). Use it to brush across the sky, or the ground, so that the entire area is outlined by “marching ants.”
Use the Refine Edge option to tweak the selection by brushing across intricate areas such as tree branches.
Once you have an area selected, hit one of the Adjustments to add an adjustment layer with the mask automatically applied. Double click on the mask to tweak it: hit Mask Edge to clean up the edge, or turn up the Feather to blur the edge.
To apply the same mask to another adjustment layer, drag the mask from one layer to another while holding down the Option/Alt key.
Invert the mask (or select it and hit Command/Control I) to apply it to the other half of the image. Paint the mask with black or white brushes if you need manually alter it. Remember – black “conceals,” while white “reveals.”
When done, be sure to always save the image as a layered “master” .PSD file.
Never, ever flatten and save – that will wipe out all your non-destructive filters and adjustment layers.
If you need to save the image as a JPG for social mediia or emailing, then Flatten and Save As … Or use Photoshop’s File>Export>Export As .. function.
–
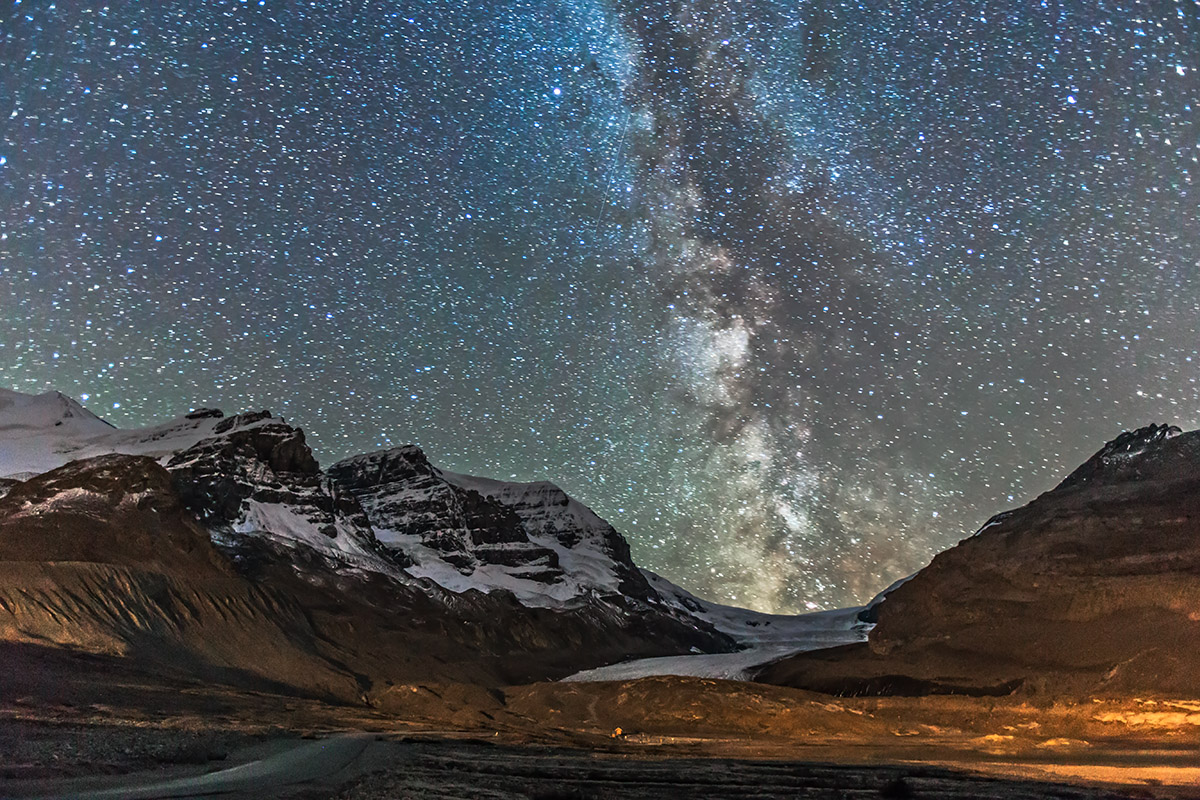
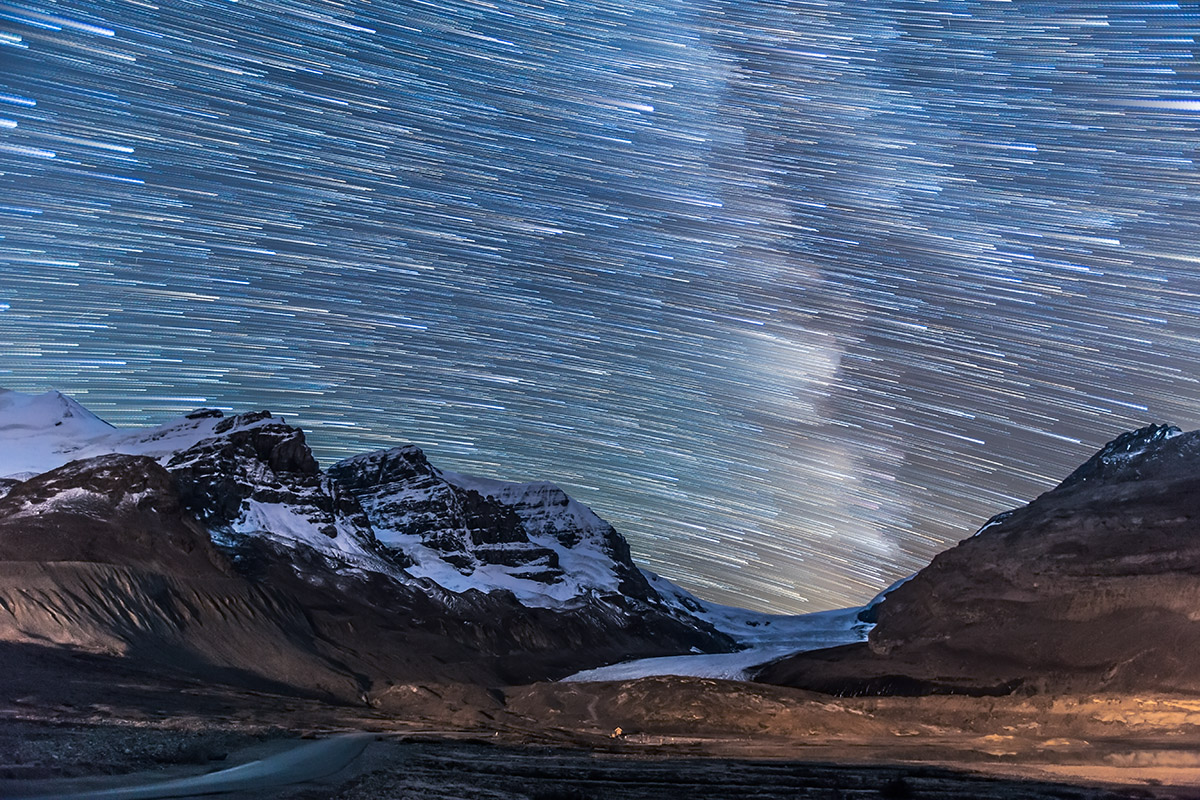
Stars setting in trails over the Athabasca Glacier and Columbia Icefields, Sept 14, 2014. The Milky Way is trailed at right. This is a stack of 100 exposures, composited with Advanced Stacker Plus actions in Photoshop, with the ground coming from a subset stack of 8 images to reduce noise. Each exposure, taken as part of a time-lapse sequence, was 45 seconds at f/2.8 with the 16-35mm lens at 23mm and Canon 6D at ISO 4000.
Step 10A – Photoshop or 3rd Party Programs – Stack for Star Trails
One popular way to shoot images of stars trailing in arcs across the sky is to shoot dozens or hundreds of well-exposed frames at a fairly high ISO and wide aperture, and at a shutter speed no longer than 30 to 60 seconds. You then “stack” the images to create the equivalent of one frame shot for many minutes, if not an hour or more. The image above is an example.
There are several ways to stack.
From within Photoshop CC (or using an Extended version of the older CS5 or CS6) one method is to go to File>Scripts>Statistics. In the dialog box, drill down to the images you wish to stack (put them all in one folder) and choose Stack Mode: Maximum, and uncheck “Attempt to Automatically Align.” The result is a huge (!) smart object. This method works best on just a few dozen images. In this case, you’ll need to use Layers>Flatten to reduce its size.
Other options for stacking hundreds of images include the free program StarStax (Windows and Mac), which requires a folder of “intermediate” TIFFs or JPGs. See Step 6 above.
The Advanced Stacker Actionsfrom Star Circle Academy are actions you install in Photoshop that work directly from Raw files to create some impressive effects. I use them and recommend them.
–
Step 10B – Photoshop or 3rd Party Programs – Assemble for Movies
The same folder of images taken for star trail stacking can also be turned into a time-lapse movie. Instead of stacking the images on top of one another in space, you string them together one after the other in time.
There are many methods for assembling movies. Free or low cost programs such as Quicktime 7 Pro, Time-Lapse Assembler, Sequence (a Mac program shown above), VirtualDub, or Time-Lapse Tool can do the job, all offering options for the final movie’s format.
Generally, an HD video of 1920×1080 pixels in the H264 format, or “codec,” is best, rendered at 15 to 30 frames per second.
Most movie assembly programs will need to work from a folder of JPGs of the right size, produced using one of the choices listed under Step 6: Export.
But … you can also use Photoshop to assemble a movie.
Choose the Window>Workspace>Motion to bring up a video timeline. Then File>Open to drill to your folder of processed and down-sized JPG files. Select one image, then check “Image Sequence.” Choose the frame rate (15 to 30 fps is best). Then go to File>Export>Render Video to turn the resulting file into a final H264 or Quicktime movie suitable for use in other movie editing programs.
–
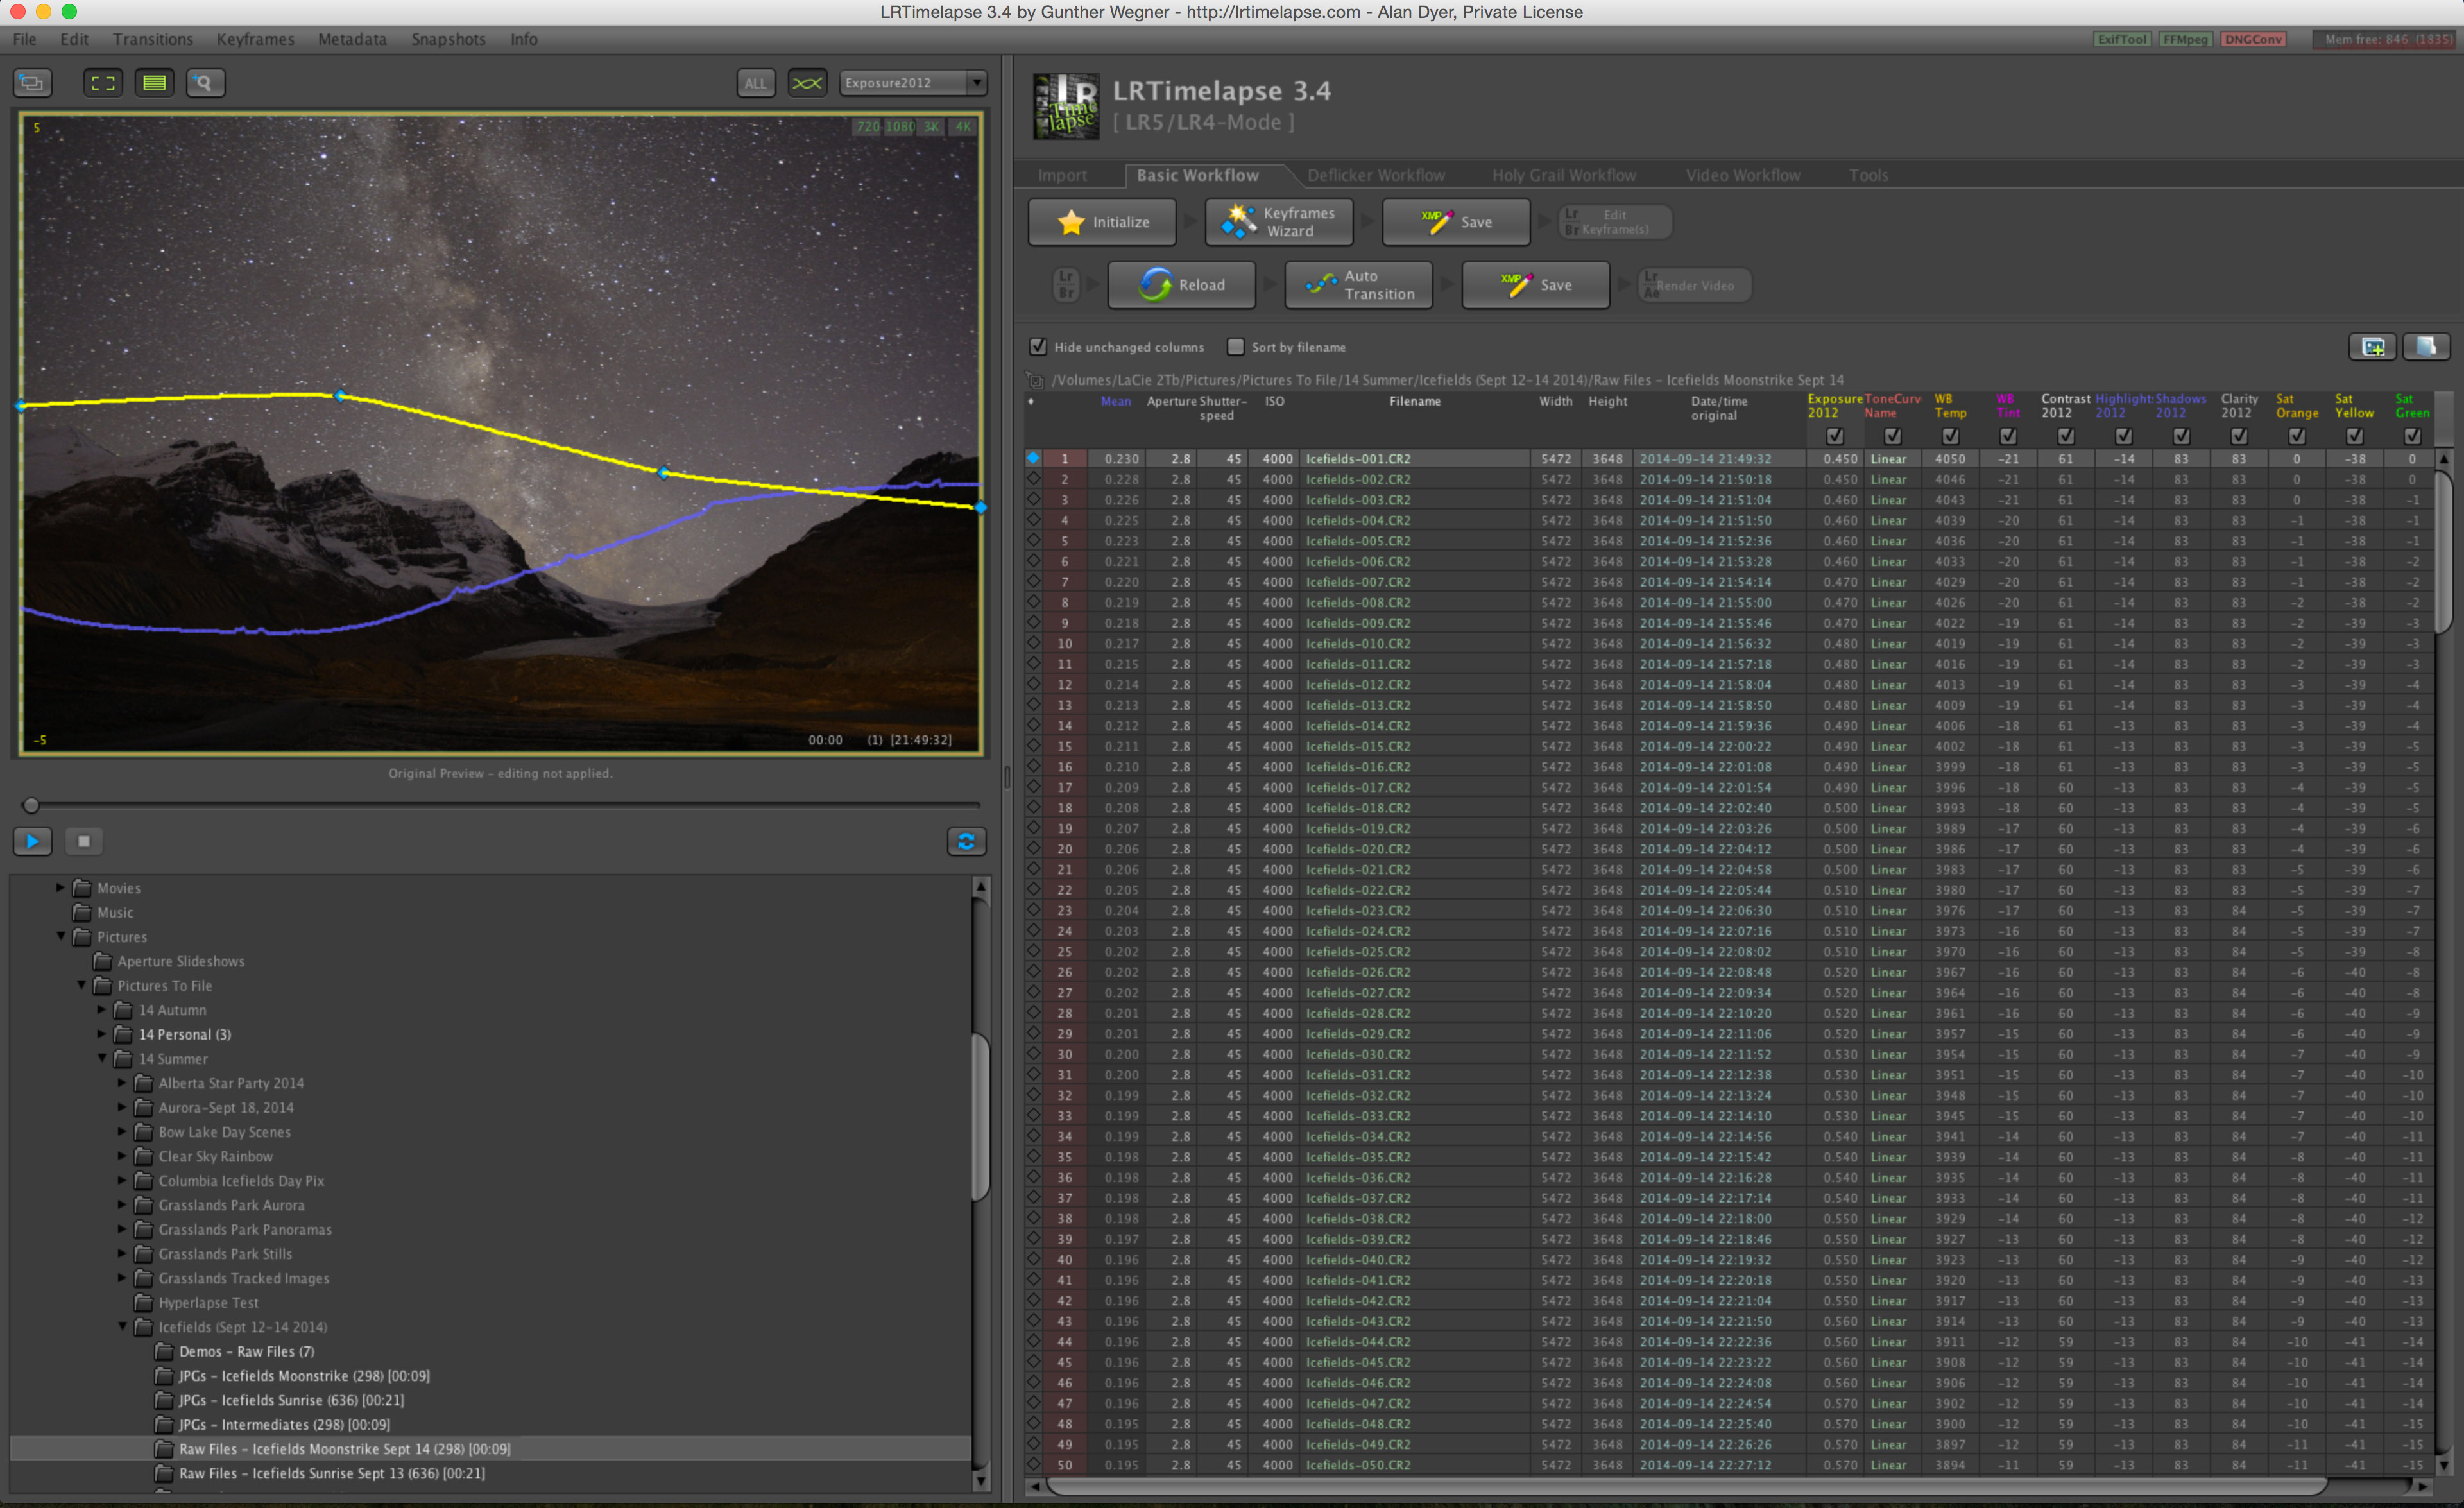
Advanced Techniques: Using LRTimelapse
The workflow I’ve outlined works great when you can apply the same development settings to all the images in a folder. For star trail and time-lapse sequences shot once it gets dark and under similar lighting conditions that will be the case.
But if the Moon rises or sets during the shoot, or if you are taking a much more demanding sequence that runs from sunset to night, the same settings won’t work for all frames.
The answer is to turn to the program LRTimelapse (100 Euros for the standard version, and available in a free but limited trial copy). LRTimelapse works with either Lightroom or Bridge/Adobe Camera Raw.
To use it you process just a few selected “keyframes” – at least two, at the start and end of the sequence, and perhaps other frames throughout the sequence, processing them so each frame looks great. You read that processing data into LRTimelapse and, like magic, it interpolates your settings, creating a folder of images with every setting changing incrementally from frame to frame, something you could never do by hand.
It can then work with Lightroom to export the frames out to a video in formats from HD up to 4K in size. For serious time-lapse work, LRTimelapse is an essential tool.
–
Much, much more information and tutorials are included in my multimedia Apple eBook, linked to below.
But I hope this quick tutorial helps in providing you with tips to make your images and movies even better! If you found it useful, please feel free to share a link to this blog page through your social media channels. Thanks!
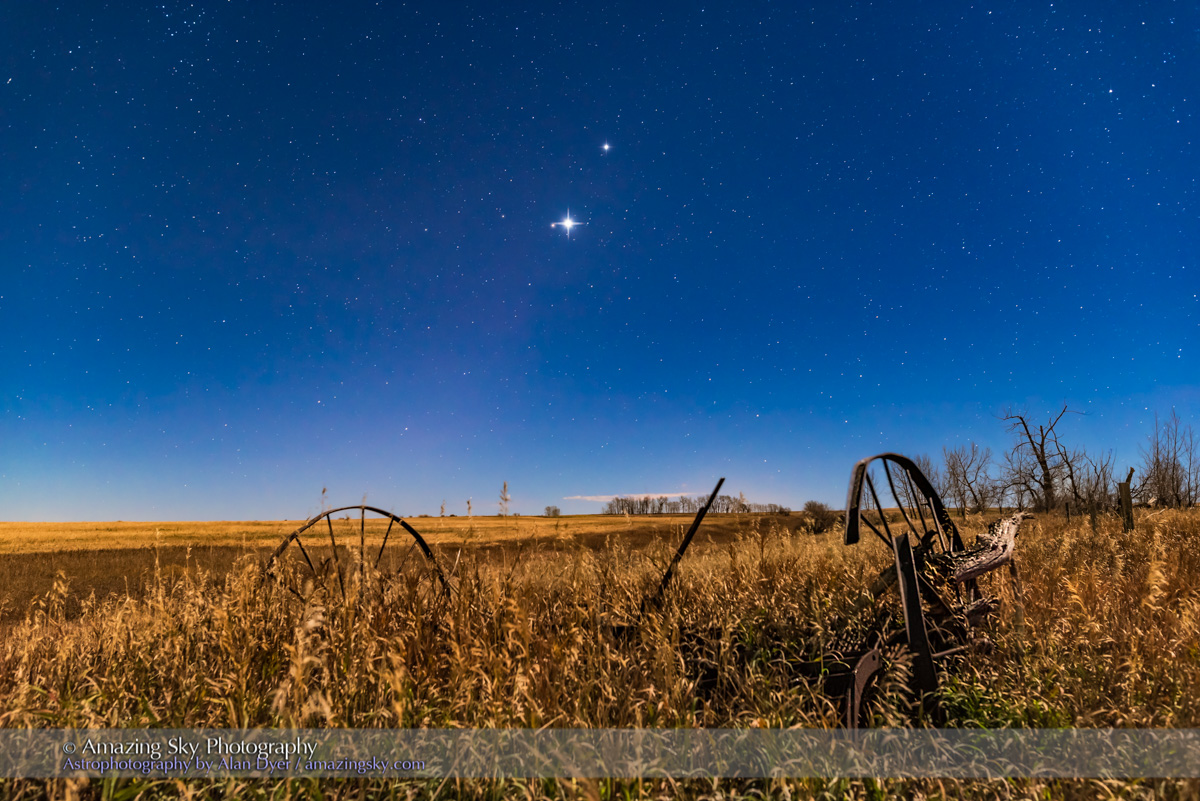
The waning crescent Moon joined the planet trio this morning for a fine sight in the dawn.
This was the scene on November 6 with the waning crescent Moon just below Jupiter, and those two worlds just above the pairing of bright Venus with dim red Mars.
On Saturday, November 7, the waning Moon will sit beside Venus for an even more striking conjunction.
The waning crescent Moon below Jupiter, with that pair of worlds above the pairing of Venus (bright) and red Mars (just above Venus), all in the dawn sky in Leo, November 6, 2015. The stars of Leo are above, including Regulus. This is a composite of 4 exposures: 15 seconds for the ground (to bring out detail there), 4 seconds for the sky (short enough to prevent star trailing), and 1 and 1/4 seconds for the Moon itself to prevent it from being totally blown out as a bright blob. All with the Nikon D750 at ISO 2000 and Sigma 24mm Art lens at f/4.5. Taken from home.
This meeting of the Moon with the planet trio more or less concludes the superb series of dawn sky conjunctions we’ve been enjoying over the last month.
The planets remain in the morning sky but now go their own ways as Mars and Jupiter climb higher, while Venus drops lower.
The gathering of planets at dawn is coming to an end as Venus meets Mars.
This was the view this morning from home in southern Alberta of the trio of planets in the moonlit morning sky.
Venus is the brightest, while dim red Mars shines just to the left of Venus. Jupiter is above the Venus & Mars pairing, with all the planets shining in Leo.
Mars and Venus will appear closest to each other on November 2 and 3. Then the group breaks apart as Venus descends but Mars and Jupiter climb higher.
But as they do so they are joined by the waning Moon, by then a thin crescent, on November 6, when the Moon shines near Jupiter, and November 7, when it joins Venus for a stunning dawn sky scene.
After that the morning planet dance comes to an end. But in two months, in early January, Venus will meet up with Saturn for a very close conjunction in the winter dawn sky on January 9.