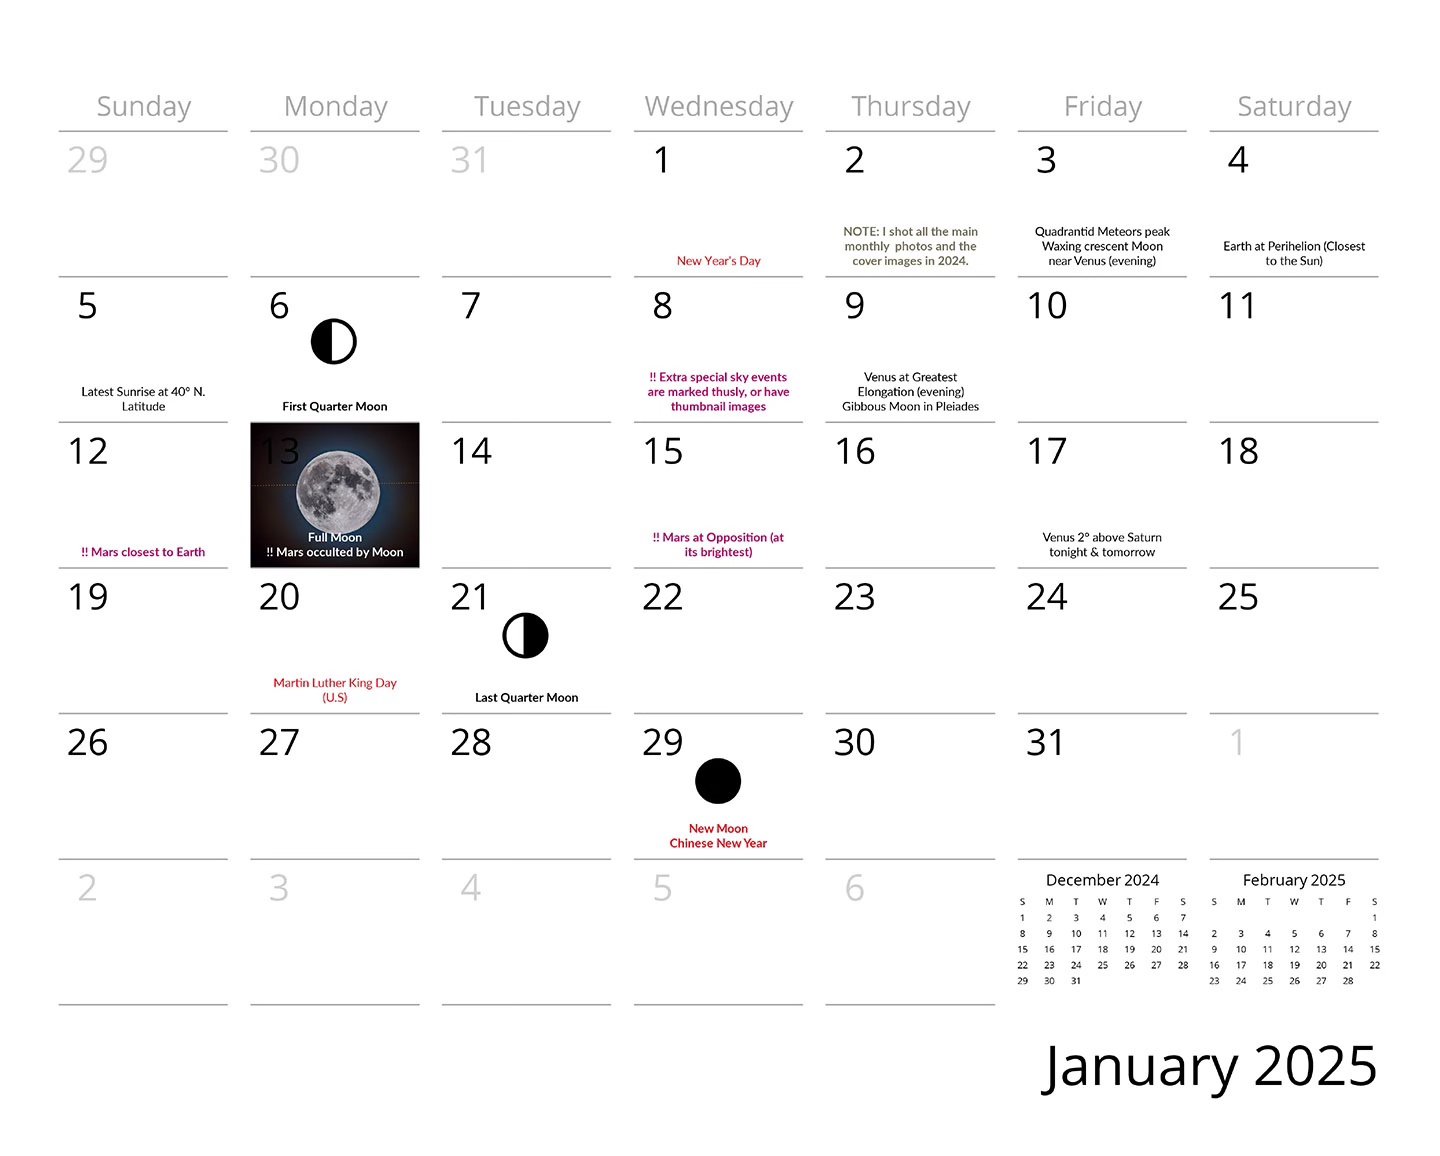
The PDF can be printed at home. It is designed to be printed landscape mode at 13×10-inches, but will work printed 11×8.5-inches. Office supply shops might be able to print it with mounting holes and a spiral binding.
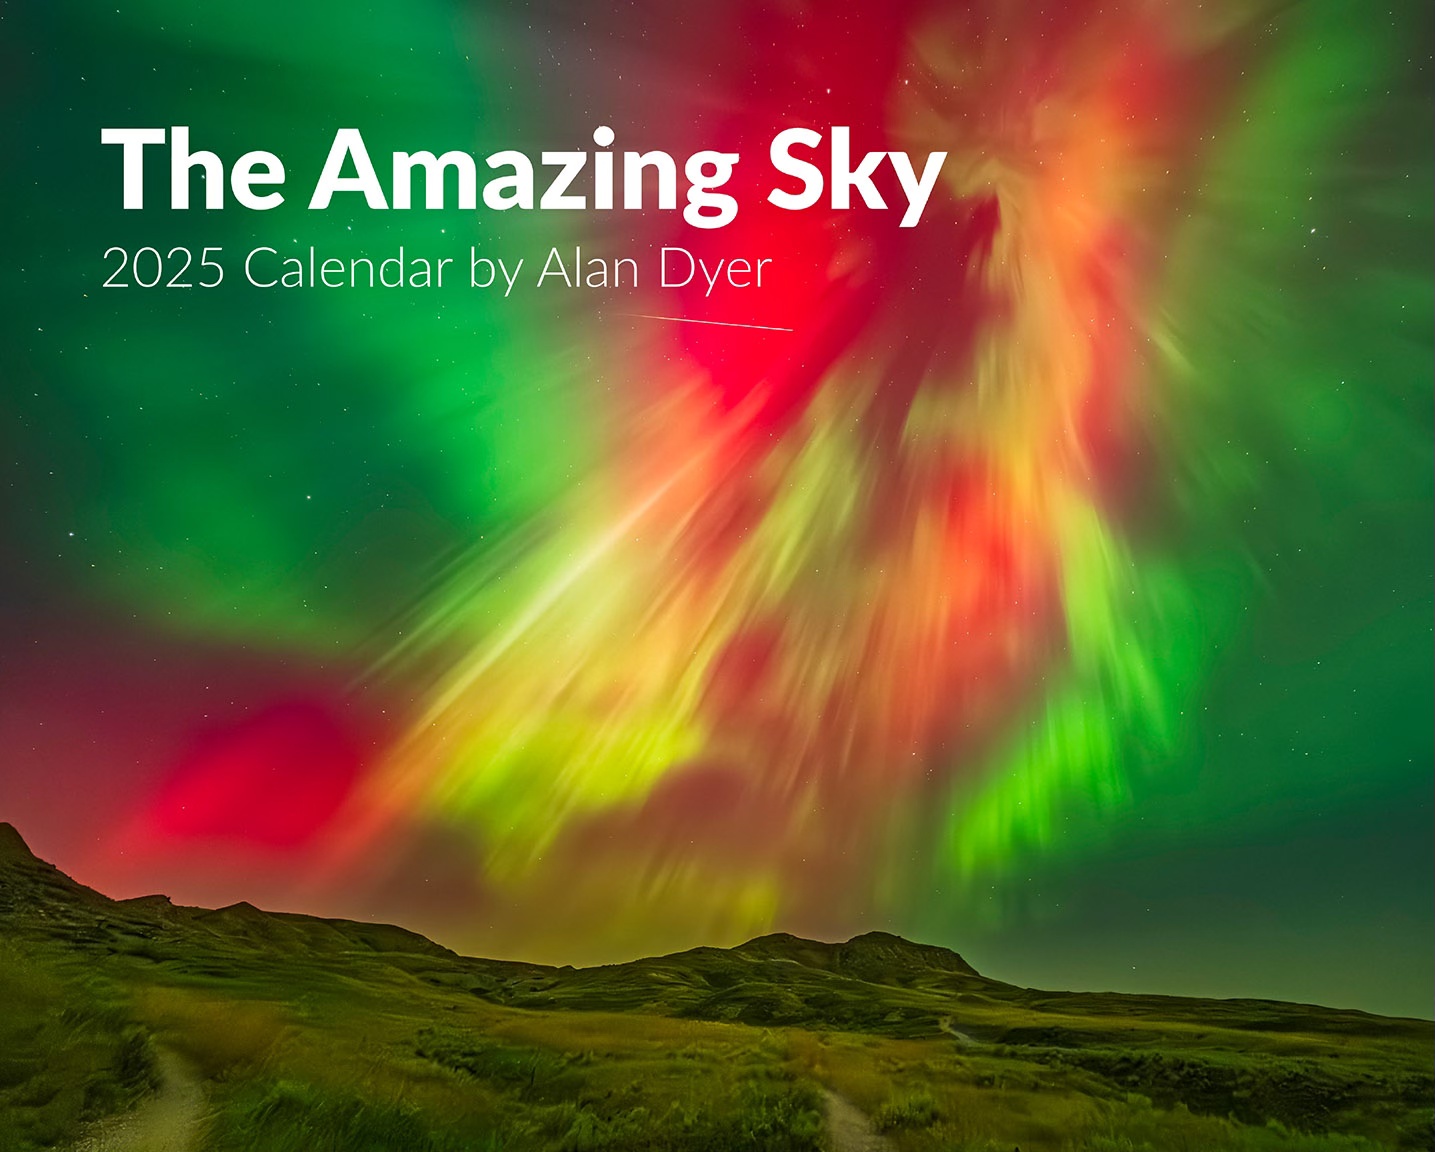
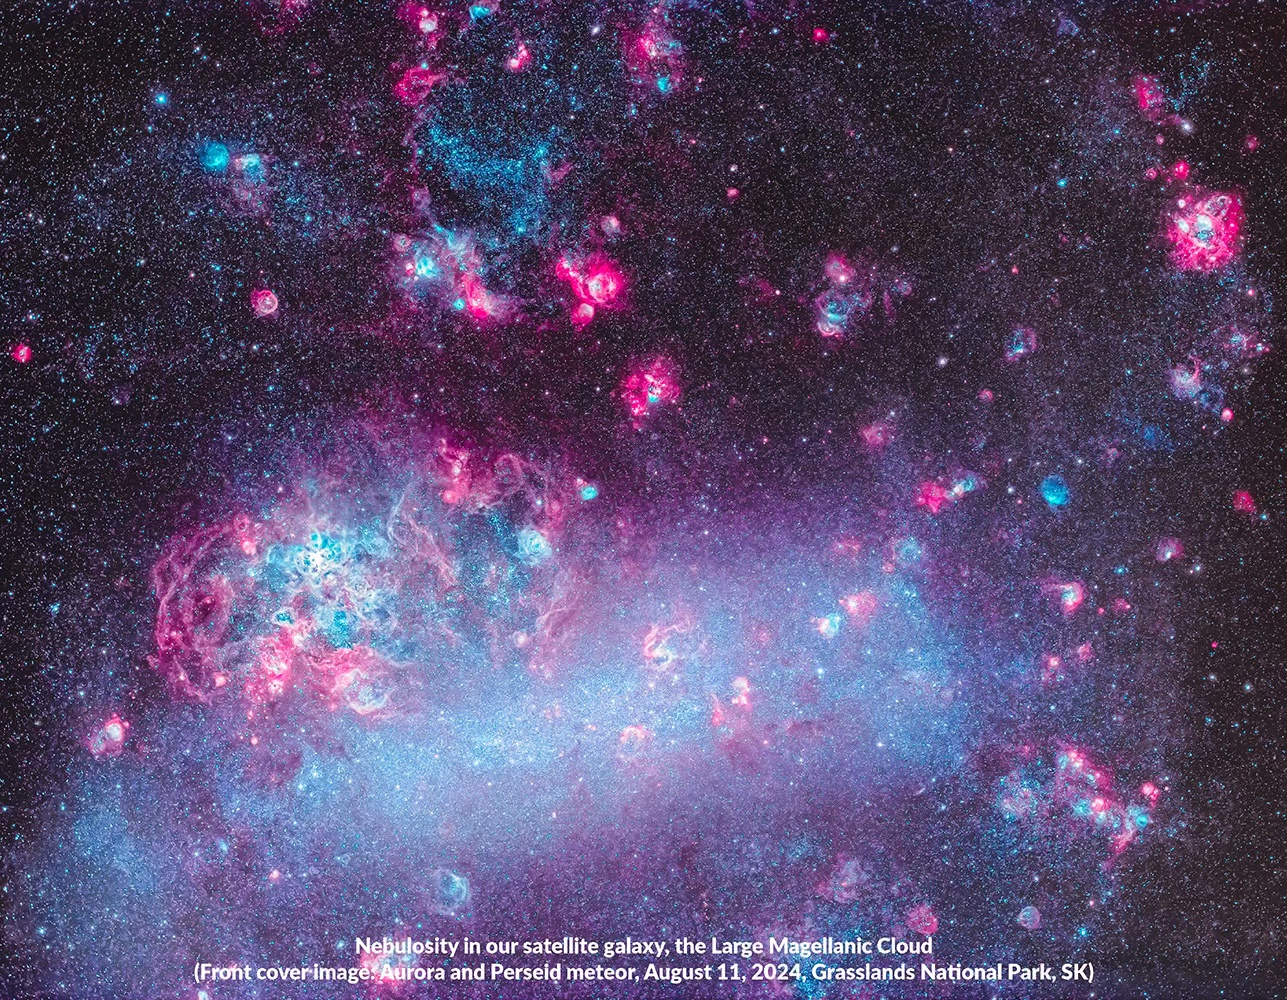
My 12-month Calendar is illustrated with a selection of 14 of my favourite astro-images from 2024, taken from Alberta, Australia, Utah, Norway, and Quebec.
Each month includes listings of the best sky events for the month, with an emphasis on naked-eye sights, and photogenic events. I’ve selected the Calendar events to be suitable for stargazers in North America.
In a detailed technical blog I compare six AI-based noise reduction programs for the demands of astrophotography. Some can work wonders. Others can ruin your image.
Over the last two years we have seen a spate of specialized programs introduced for removing digital noise from photos. The new generation of programs use artificial intelligence (AI), aka machine learning, trained on thousands of images to better distinguish unwanted noise from desirable image content.
At least that’s the promise – and for noisy but normal daytime images they do work very well.
But in astrophotography our main subjects – stars – can look a lot like specks of pixel-level noise. How well can each program reduce noise without eliminating stars or wanted details, or introducing odd artifacts, making images worse.
To find out, I tested six of the new AI-based programs on real-world – or rather “real-sky” – astrophotos. Does one program stand out from the rest for astrophotography?
NOTE: All the images are full-resolution JPGs you can tap or click on to download for detailed inspection. But that does make the blog page slow to load initially. Patience!
TL;DR SUMMARY
The new AI-trained noise reduction programs can indeed eliminate noise better than older non-AI programs, while leaving fine details untouched or even sharpening them.
Of the group tested, the winner for use on just star-filled images is a specialized program for astrophotography, NoiseXTerminator from RC-Astro.
For nightscapes and other images, Topaz DeNoise AI performed well, better than it did in earlier versions that left lots of patchy artifacts, something AI programs can be prone to.
While ON1’s new NoNoise AI 2023 performed fine, it proved slightly worse in some cases than its earlier 2022 version. Its new sharpening routine needs work.
Other new programs, notably Topaz Photo AI and Luminar’s Noiseless AI, also need improvement before they are ready to be used for the rigours of astrophotography.
For reasons explained below, I would not recommend DxO’s PureRAW2. [See below for comments on the newer DxO PureRaw3, which suffers from the same issues.]
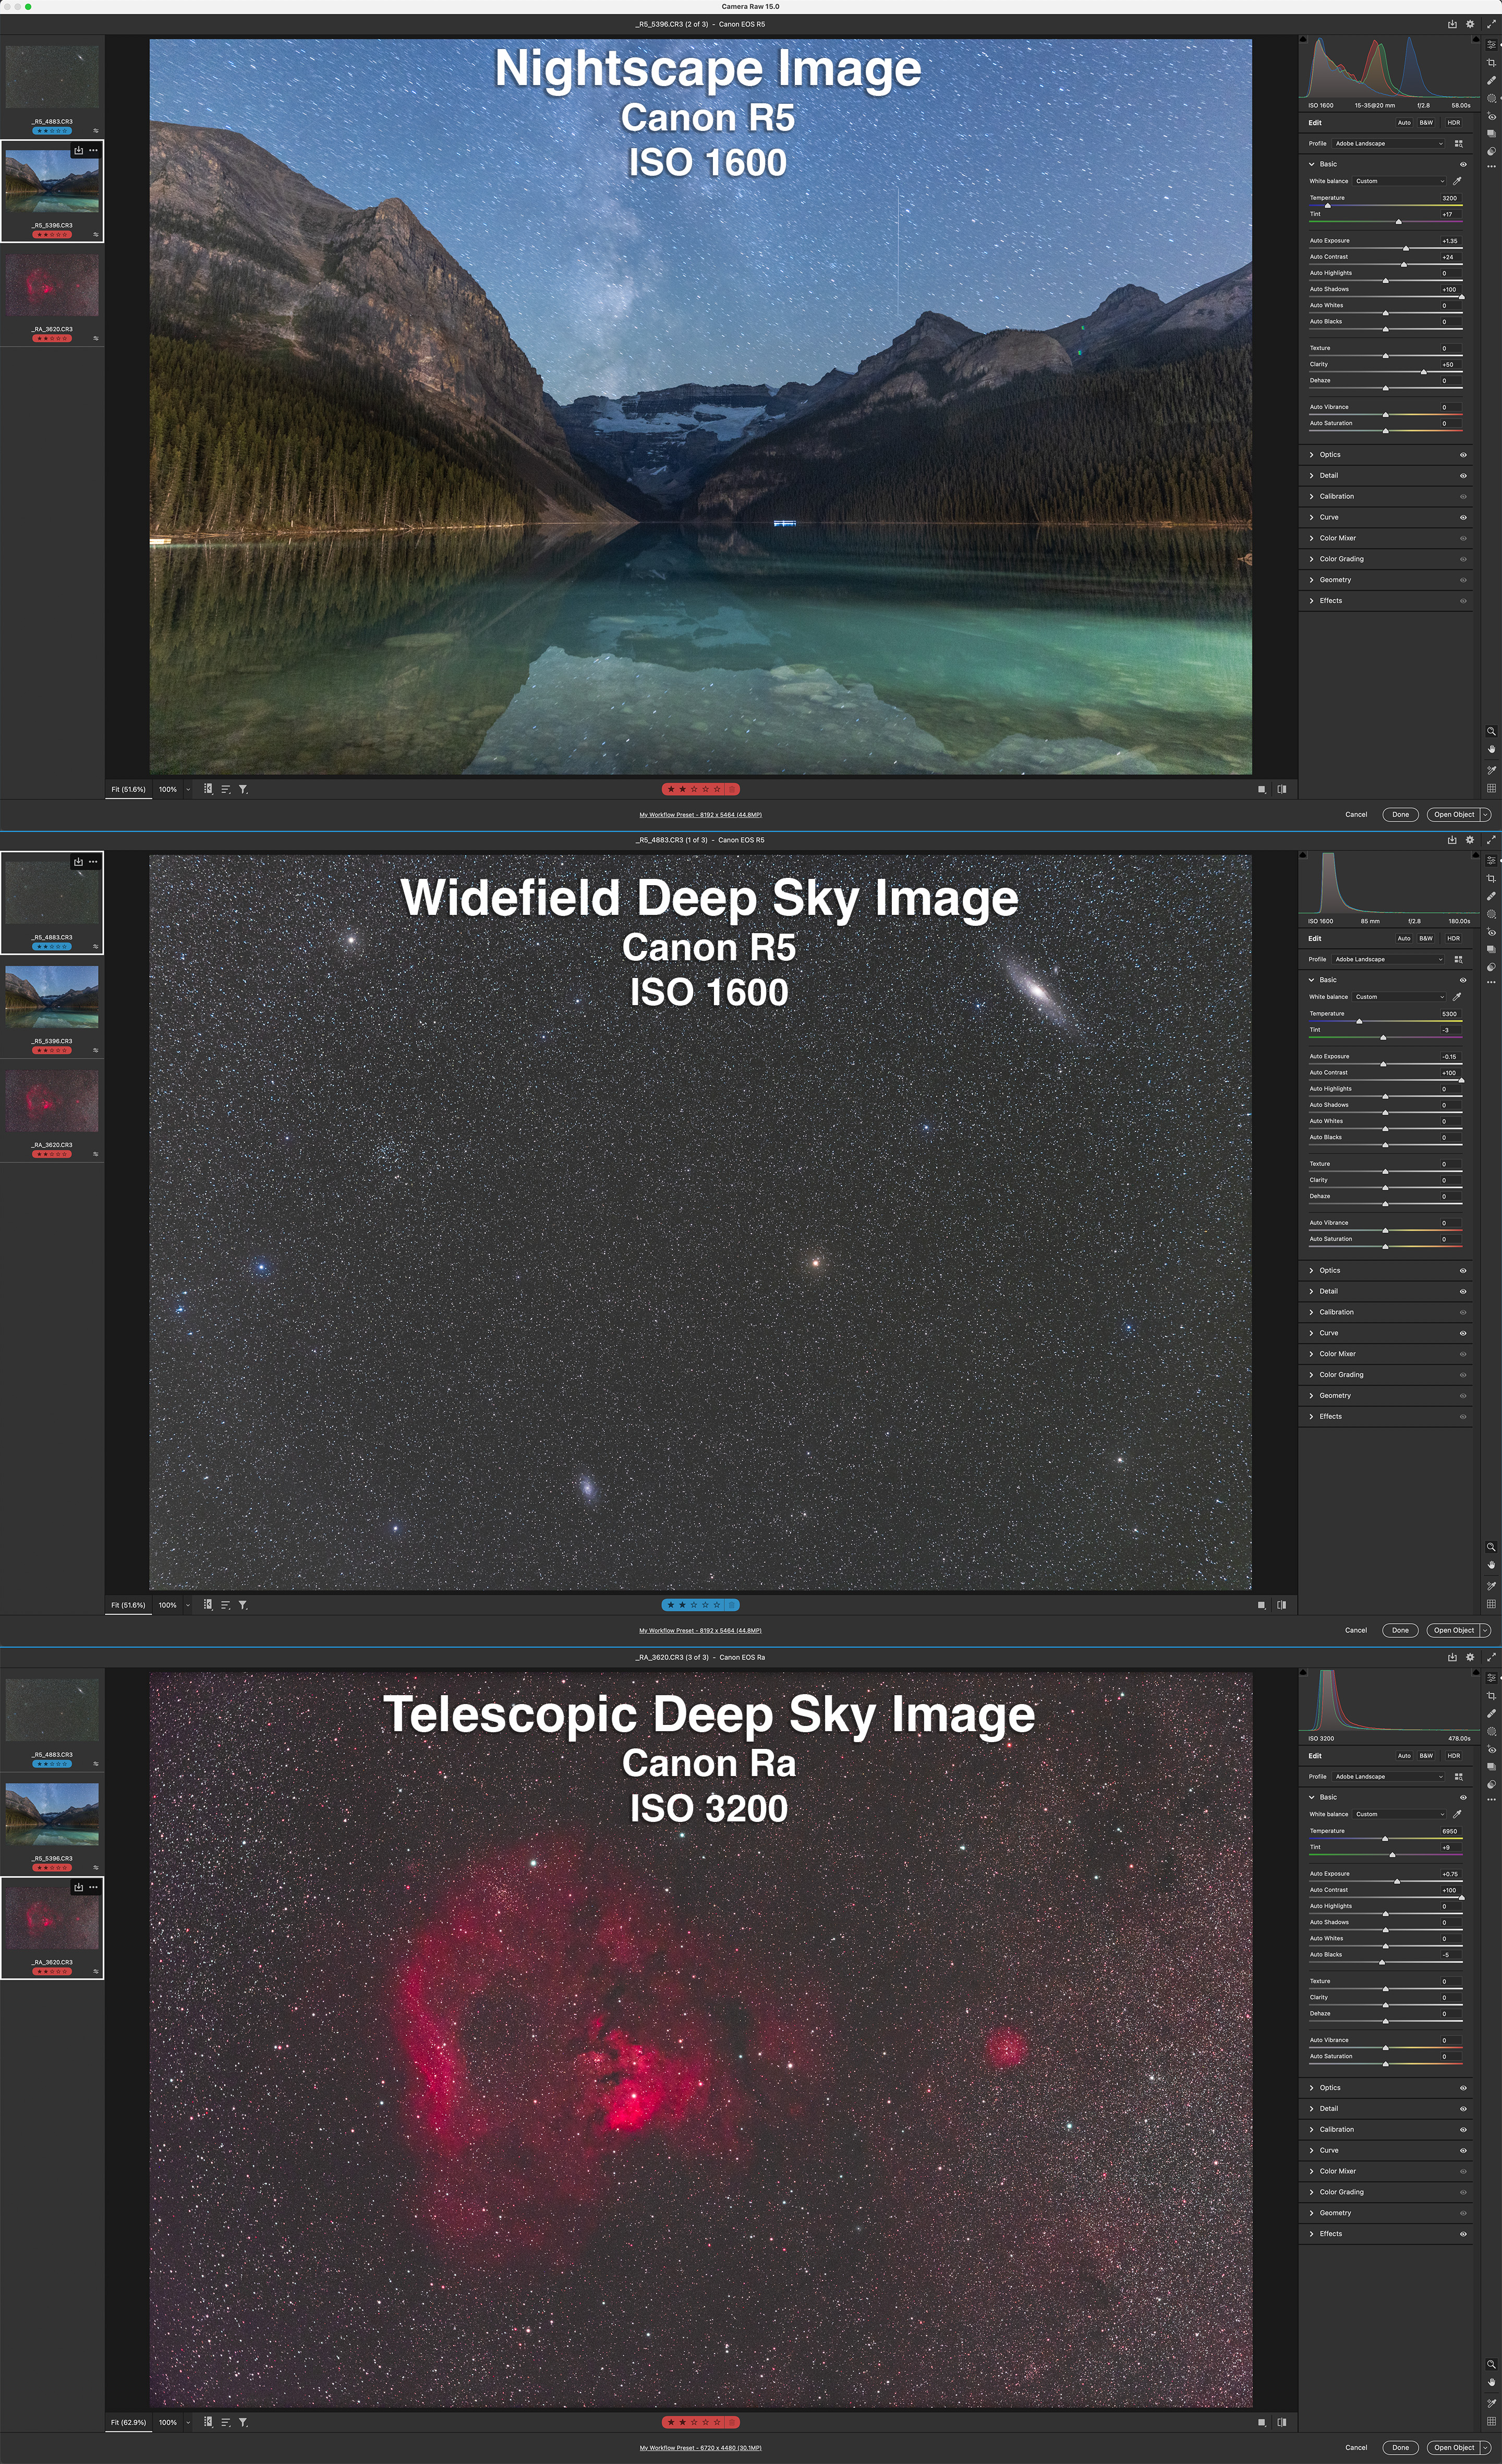
The three test images in Adobe Camera Raw showing the Basic settings applied.
METHODOLOGY
As described below, while some of the programs can be used as stand-alone applications, I tested them all as plug-ins for Photoshop, applying each as a smart filter applied to a developed raw file brought into Photoshop as a Camera Raw smart object.
Most of these programs state that better results might be obtainable by using the stand-alone app on original raw files. But for my personal workflow I prefer to develop the raw files with Adobe Camera Raw, then open those into Photoshop for stacking and layering, applying any further noise reduction or sharpening as non-destructive smart filters.
Many astrophotographers also choose to stack unedited original images with specialized stacking software, then apply further noise reduction and editing later in the workflow. So my workflow and test procedures reflect that.
However, the exception is DxO’s PureRAW2. It can work only on raw files as a stand-alone app, or as a plug-in from Adobe Lightroom. It does not work as a Photoshop plug-in. I tested PureRAW2 by dropping raw Canon .CR3 files onto the app, then exporting the results as raw DNG files, but with the same settings applied as with the other raw files. For the nightscape and wide-field images taken with lenses in DxO’s extensive database, I used PureRAW’s lens corrections, not Adobe’s.
As shown above, I chose three representative images:
A nightscape with star trails and a detailed foreground, at ISO 1600.
A wide-field deep-sky image at ISO 1600 with an 85mm lens, with very tiny stars.
A close-up deep-sky image taken with a telescope and at a high ISO of 3200, showing thermal noise hot pixels.
Each is a single image, not a stack of multiple images.
Before applying the noise reduction, the raw files received just basic color corrections and a contrast boost to emphasize noise all the more.
THE CONTENDERS
In the test results for the three images, I show the original raw image, plus a version with noise reduction and sharpening applied using Adobe Camera Raw’s own sliders, with luminance noise at 40, color noise at 25, and sharpening at 25.
I use this as a base comparison, as it has been the noise reduction I have long applied to images. However, ACR’s routine (also found in Adobe Lightroom) has not changed in years. It is good, but it is not AI.
[See below for an April 2023 update with a comparison of Adobe’s new AI Denoise with DxO DeepPrimeXD and Topaz PhotoAI.]
The new smart AI programs should improve upon this. But do they?
PLEASENOTE:
I have refrained from providing prices and explaining buying options, as frankly some can be complex!
For those details and for trial copies, go to the software’s website by clicking on the link in the header product names below.
All programs are available for Windows and MacOS. I tested the latter versions.
I have not provided tutorials on how to use the software; I have just reported on their results. For trouble-shooting their use, please consult the software company in question.
ON1’s main product is the Lightroom/Photoshop alternative program called ON1 Photo RAW, which is updated annually to major new versions. It has full cataloging options like Lightroom and image layering like Photoshop. Its Edit module contains the NoNoise AI routine. But NoNoise AI can be purchased as a stand-alone app that also installs as a plug-in for Lightroom and Photoshop. It’s what I tested here. The latest 2023 version of NoNoise AI added ON1’s new Tack Sharp AI sharpening routine.
Version tested: 17.0.1
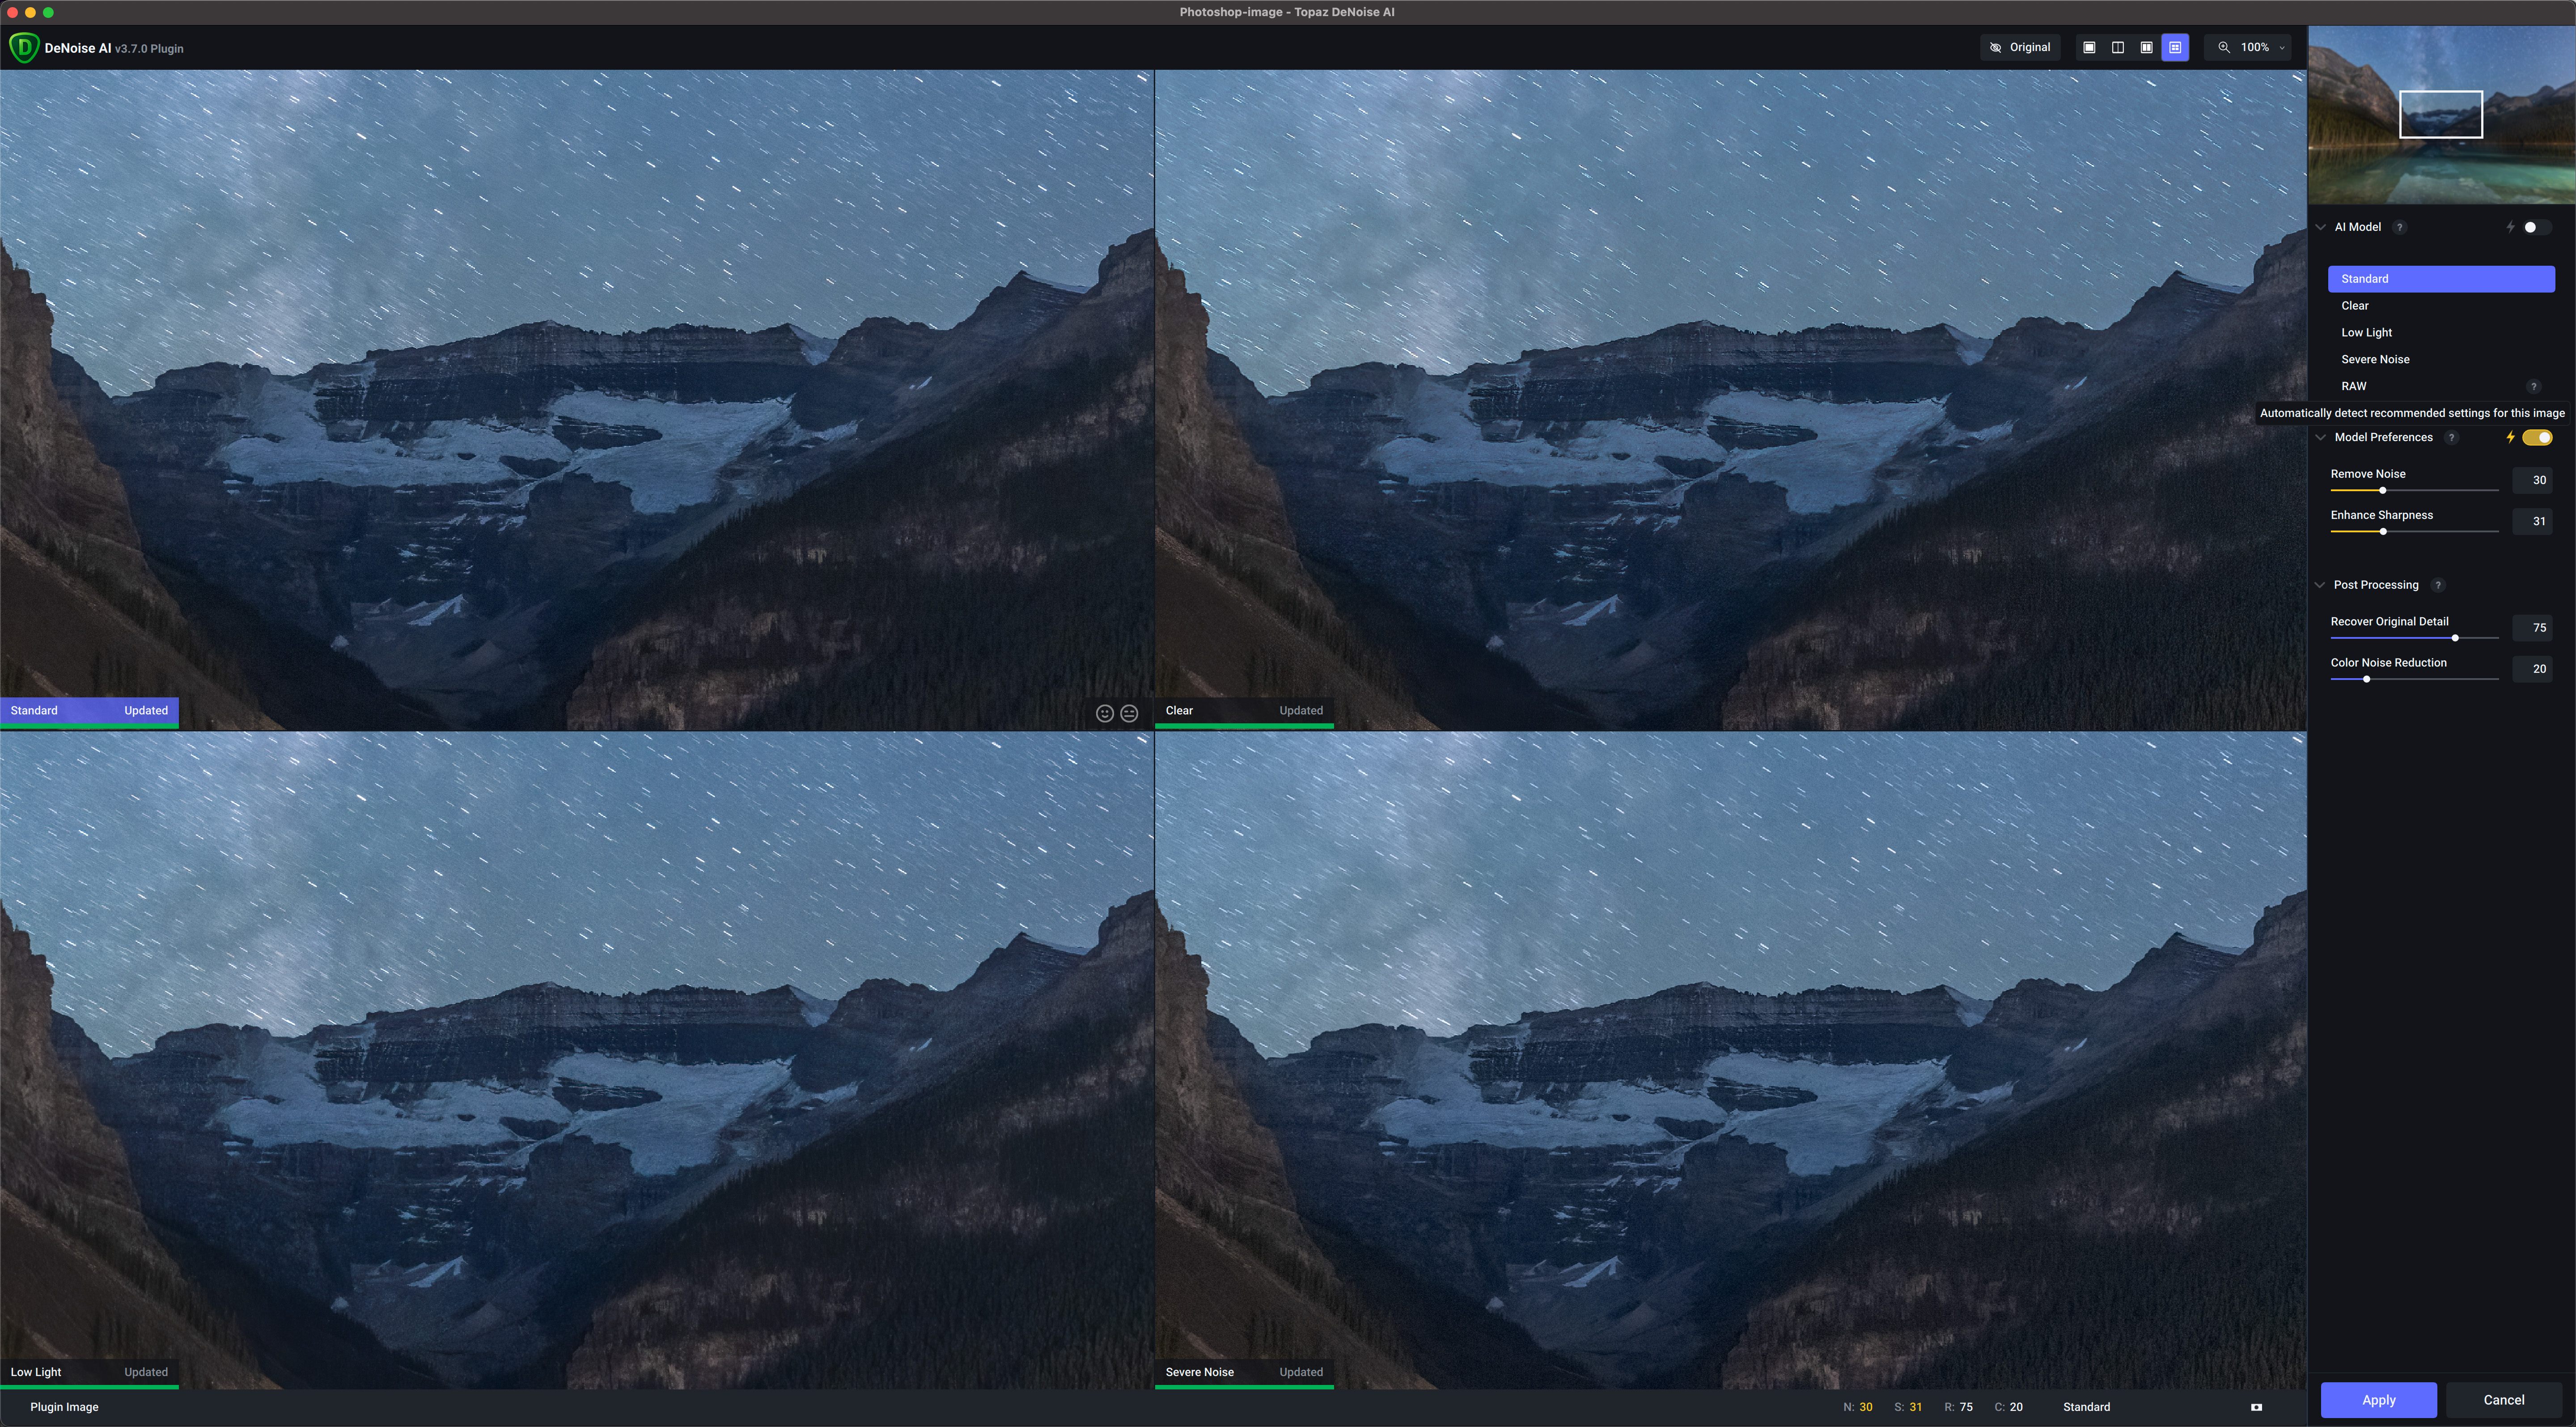
Topaz DeNoise AI’s four-pane view to select the best AI model.
This program has proven very popular and has been adopted by many photographers – and astrophotographers – as an essential part of an editing workflow. It performs noise reduction only, offering a choice of five AI models. Auto modes can choose the models and settings for you based on the image content, but you can override those by adjusting the strength, sharpness, and recovery of original detail as desired.
A separate program, Topaz Sharpen AI, is specifically for image sharpening, but I did not test it here. Topaz Gigapixel AI is for image resizing.
Version tested: 3.7.0
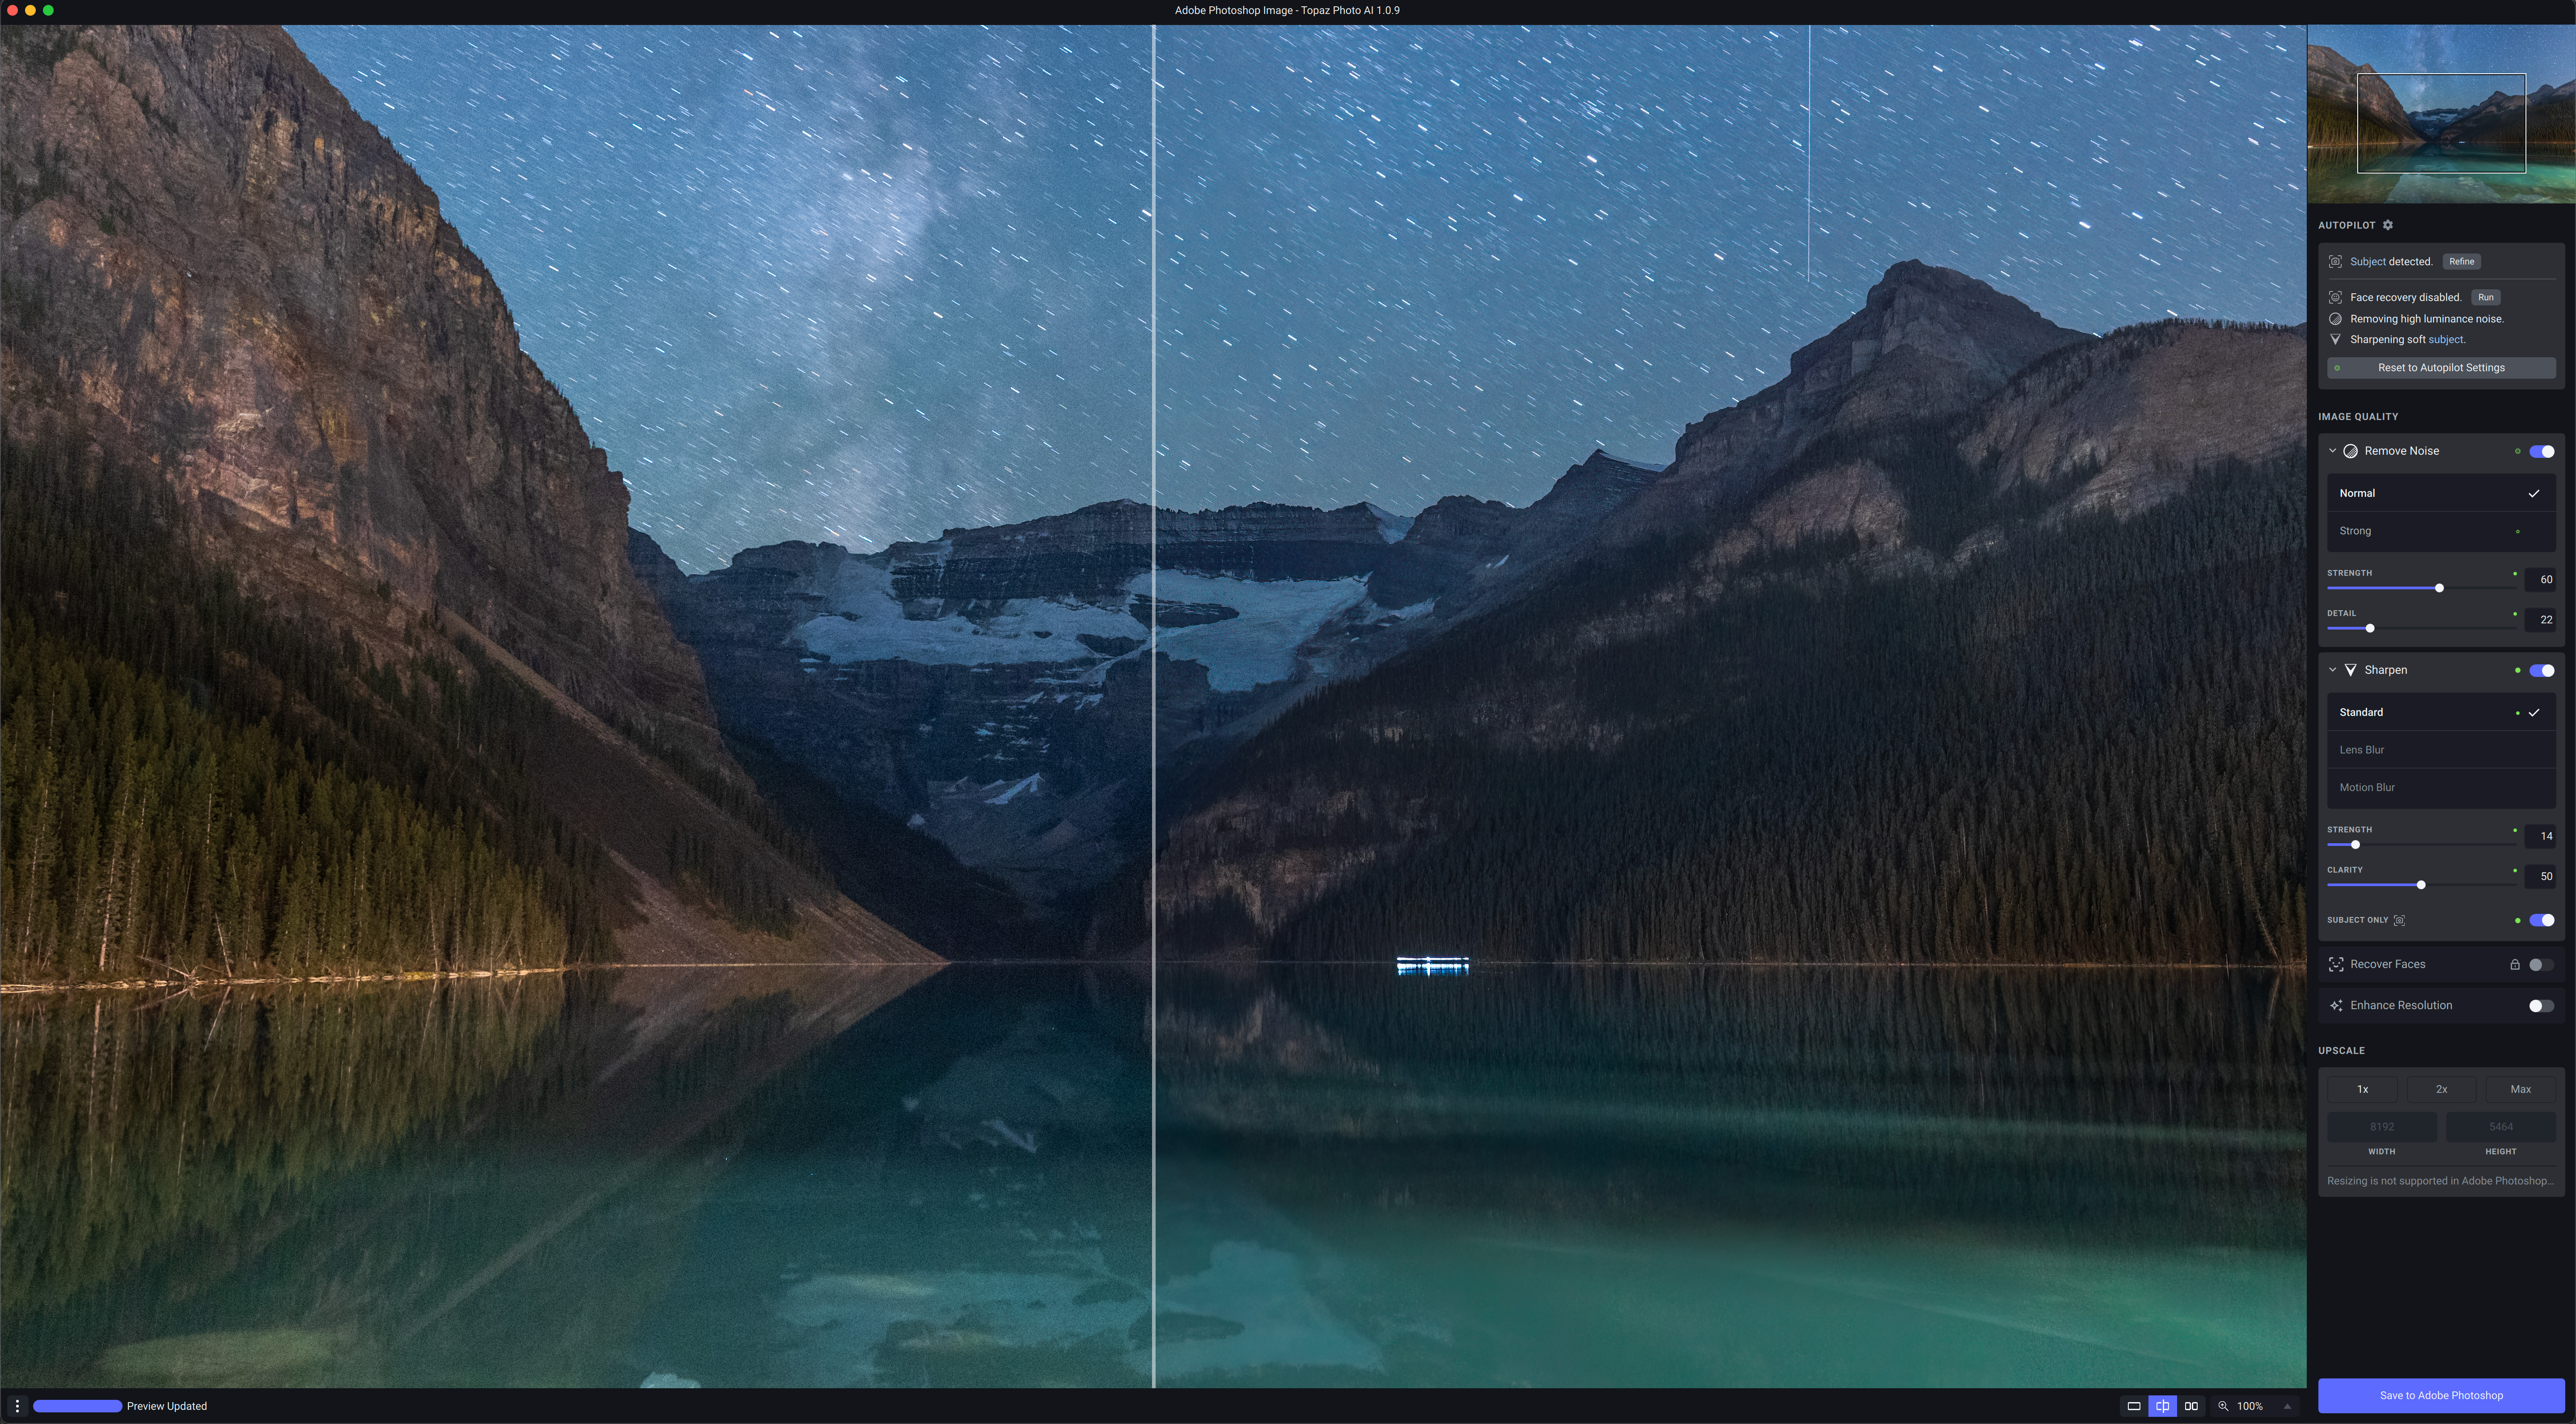
Topaz Photo AI’s control interface for its three main functions: noise, sharpening and upscaling.
In 2022 Topaz introduced this new program which incorporates the trio of noise reduction, sharpening and image resizing in one package. Like DeNoise, Sharpen and Gigapixel, Photo AI works as a stand-alone app or as a plug-in for Lightroom and Photoshop. Photo AI’s Autopilot automatically detects and applies what it thinks the image needs. While it is possible to adjust settings, Photo AI offers much less control than DeNoise AI and Topaz’s other single-purpose programs.
As of this writing in November 2022 Photo AI is enjoying almost weekly updates, and seems to be where Topaz is focusing its development and marketing effort. [See below for a test of PhotoAI v1.3.1, current as of April 2023.]
Version tested: 1.0.9
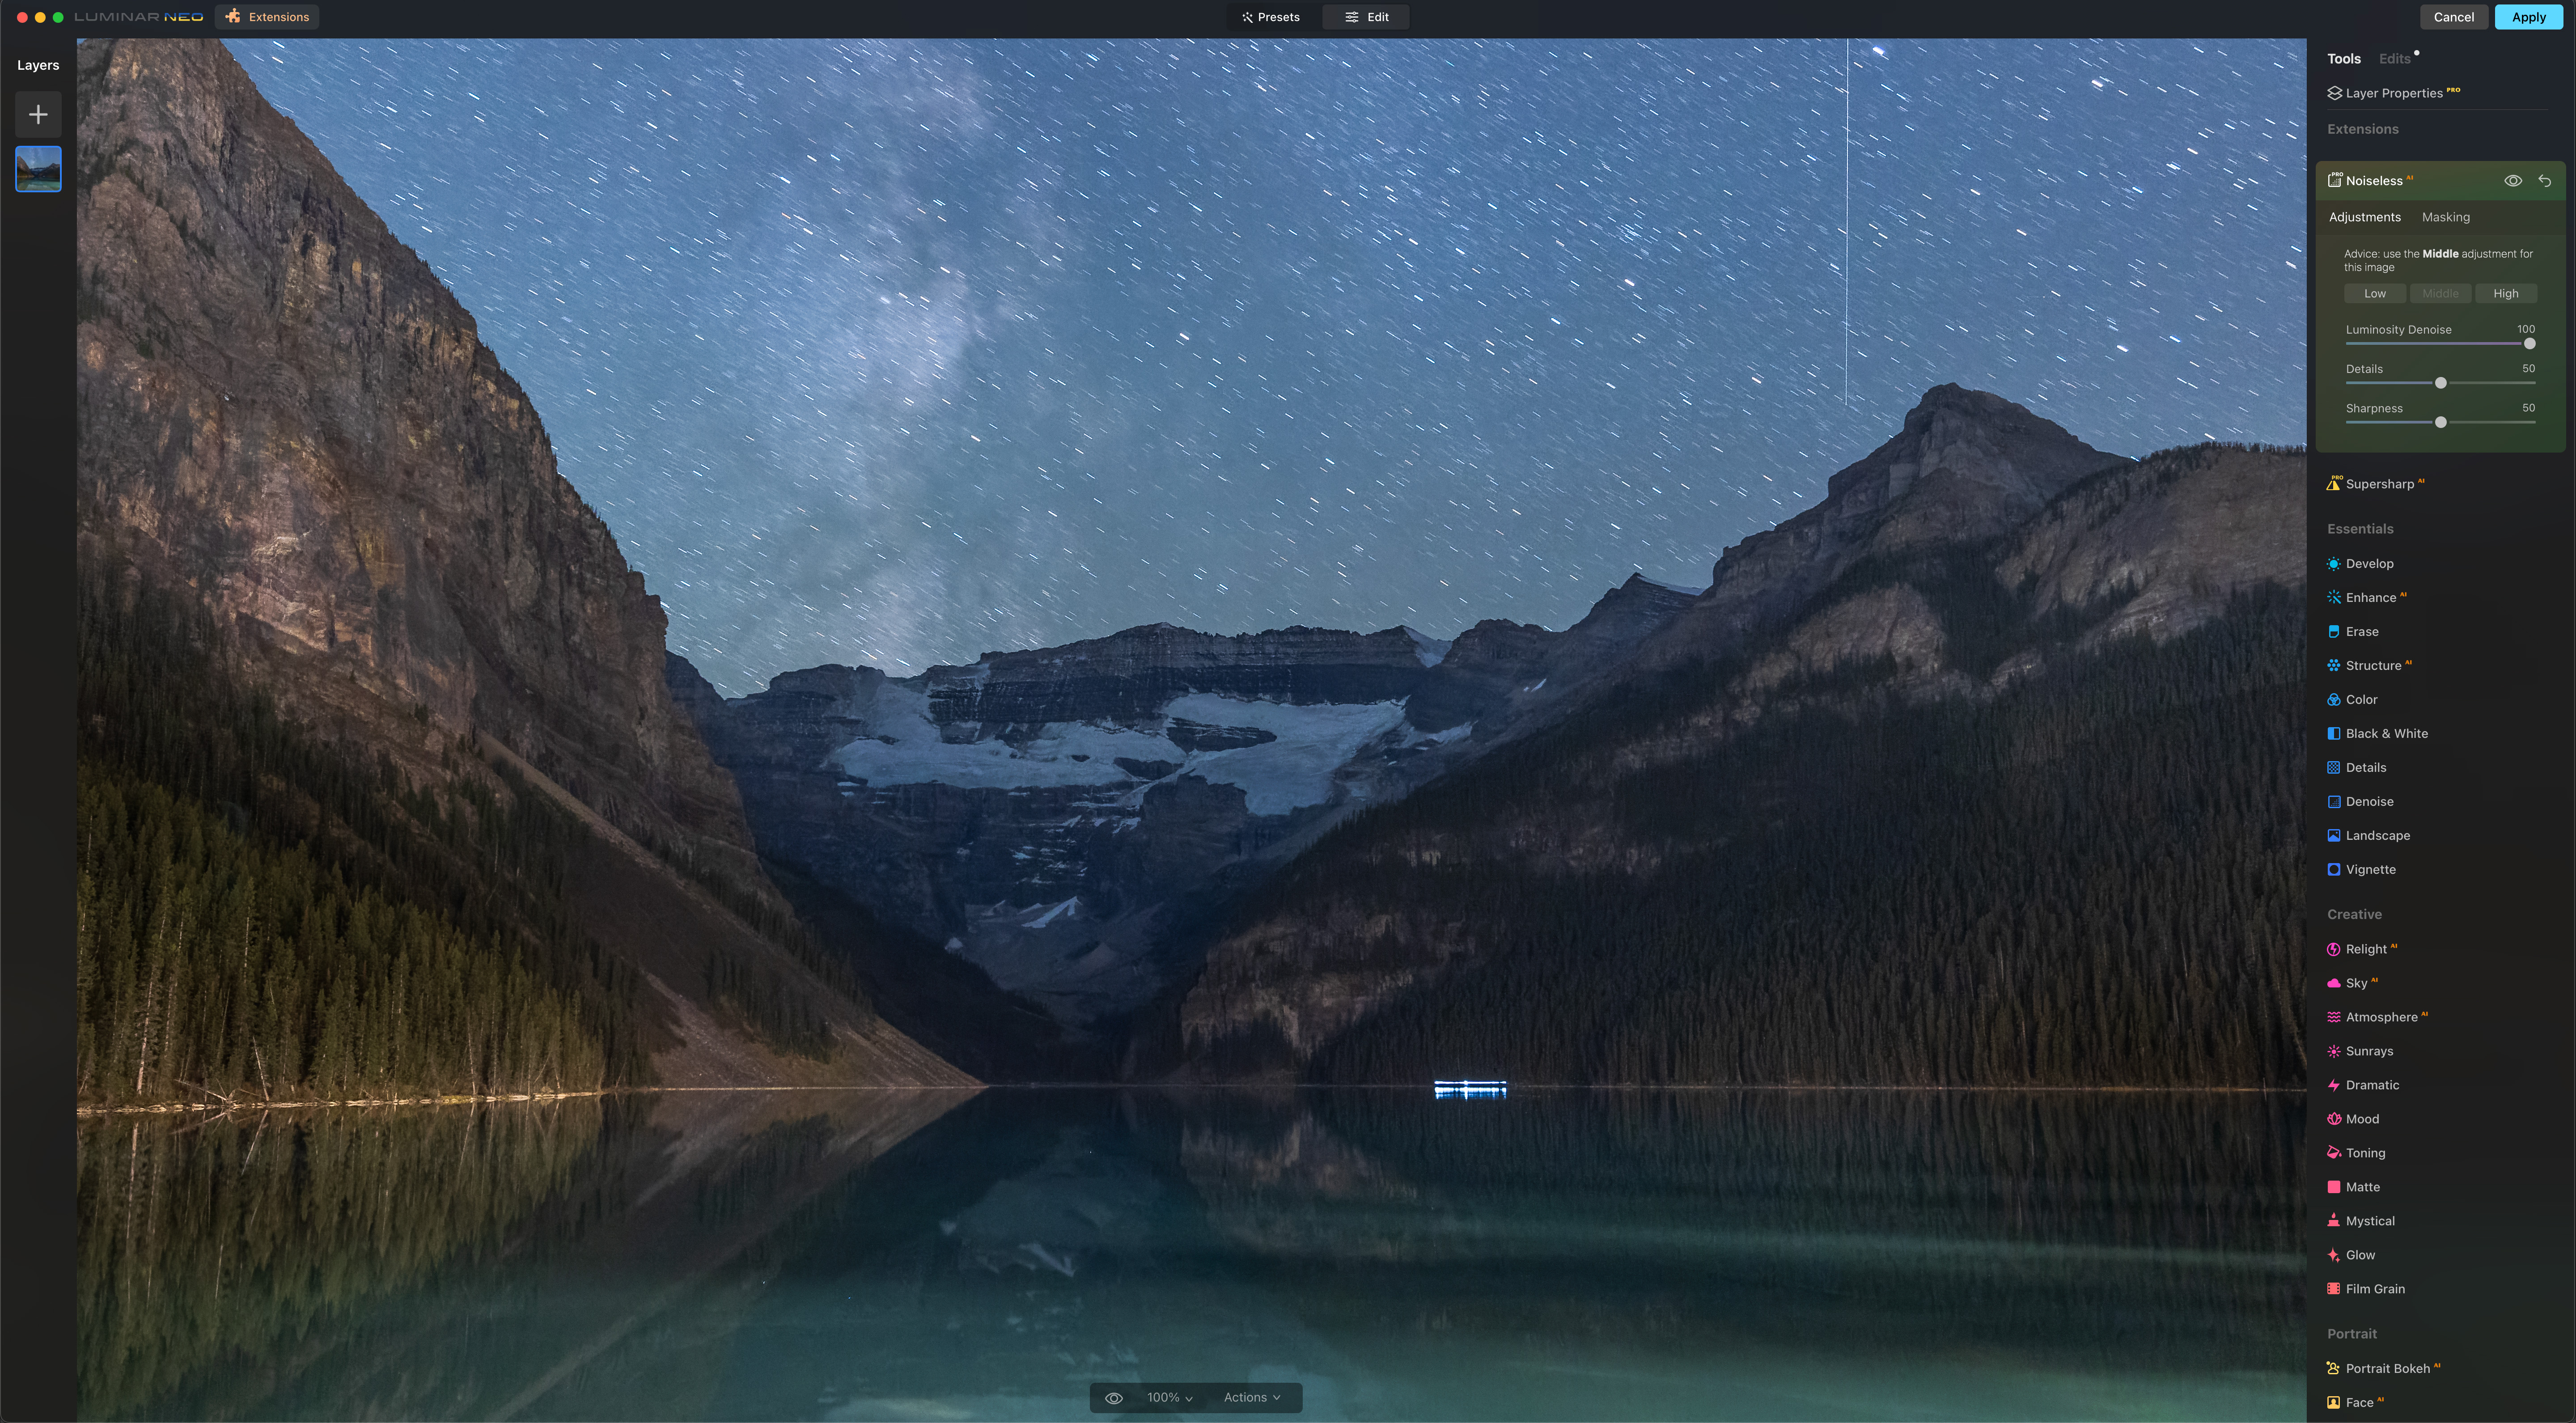
Luminar Neo’s Edit interface with choices of many filters and effects, including Noiseless AI.
Unlike the other noise reduction programs tested here, Luminar Neo from the software company Skylum is a full-featured image editing program, with an emphasis on one-click AI effects. One of those is the new Noiseless AI, available as an extra-cost extension to the main Neo program, either as a one-time purchase or by annual subscription. Noiseless AI cannot be purchased on its own. However, Neo with most of its extensions does work as a plug-in for Lightroom and Photoshop.
Being new, Luminar Neo is also updated frequently, with more extensions coming in the next few months.
Version tested: 1.5.0
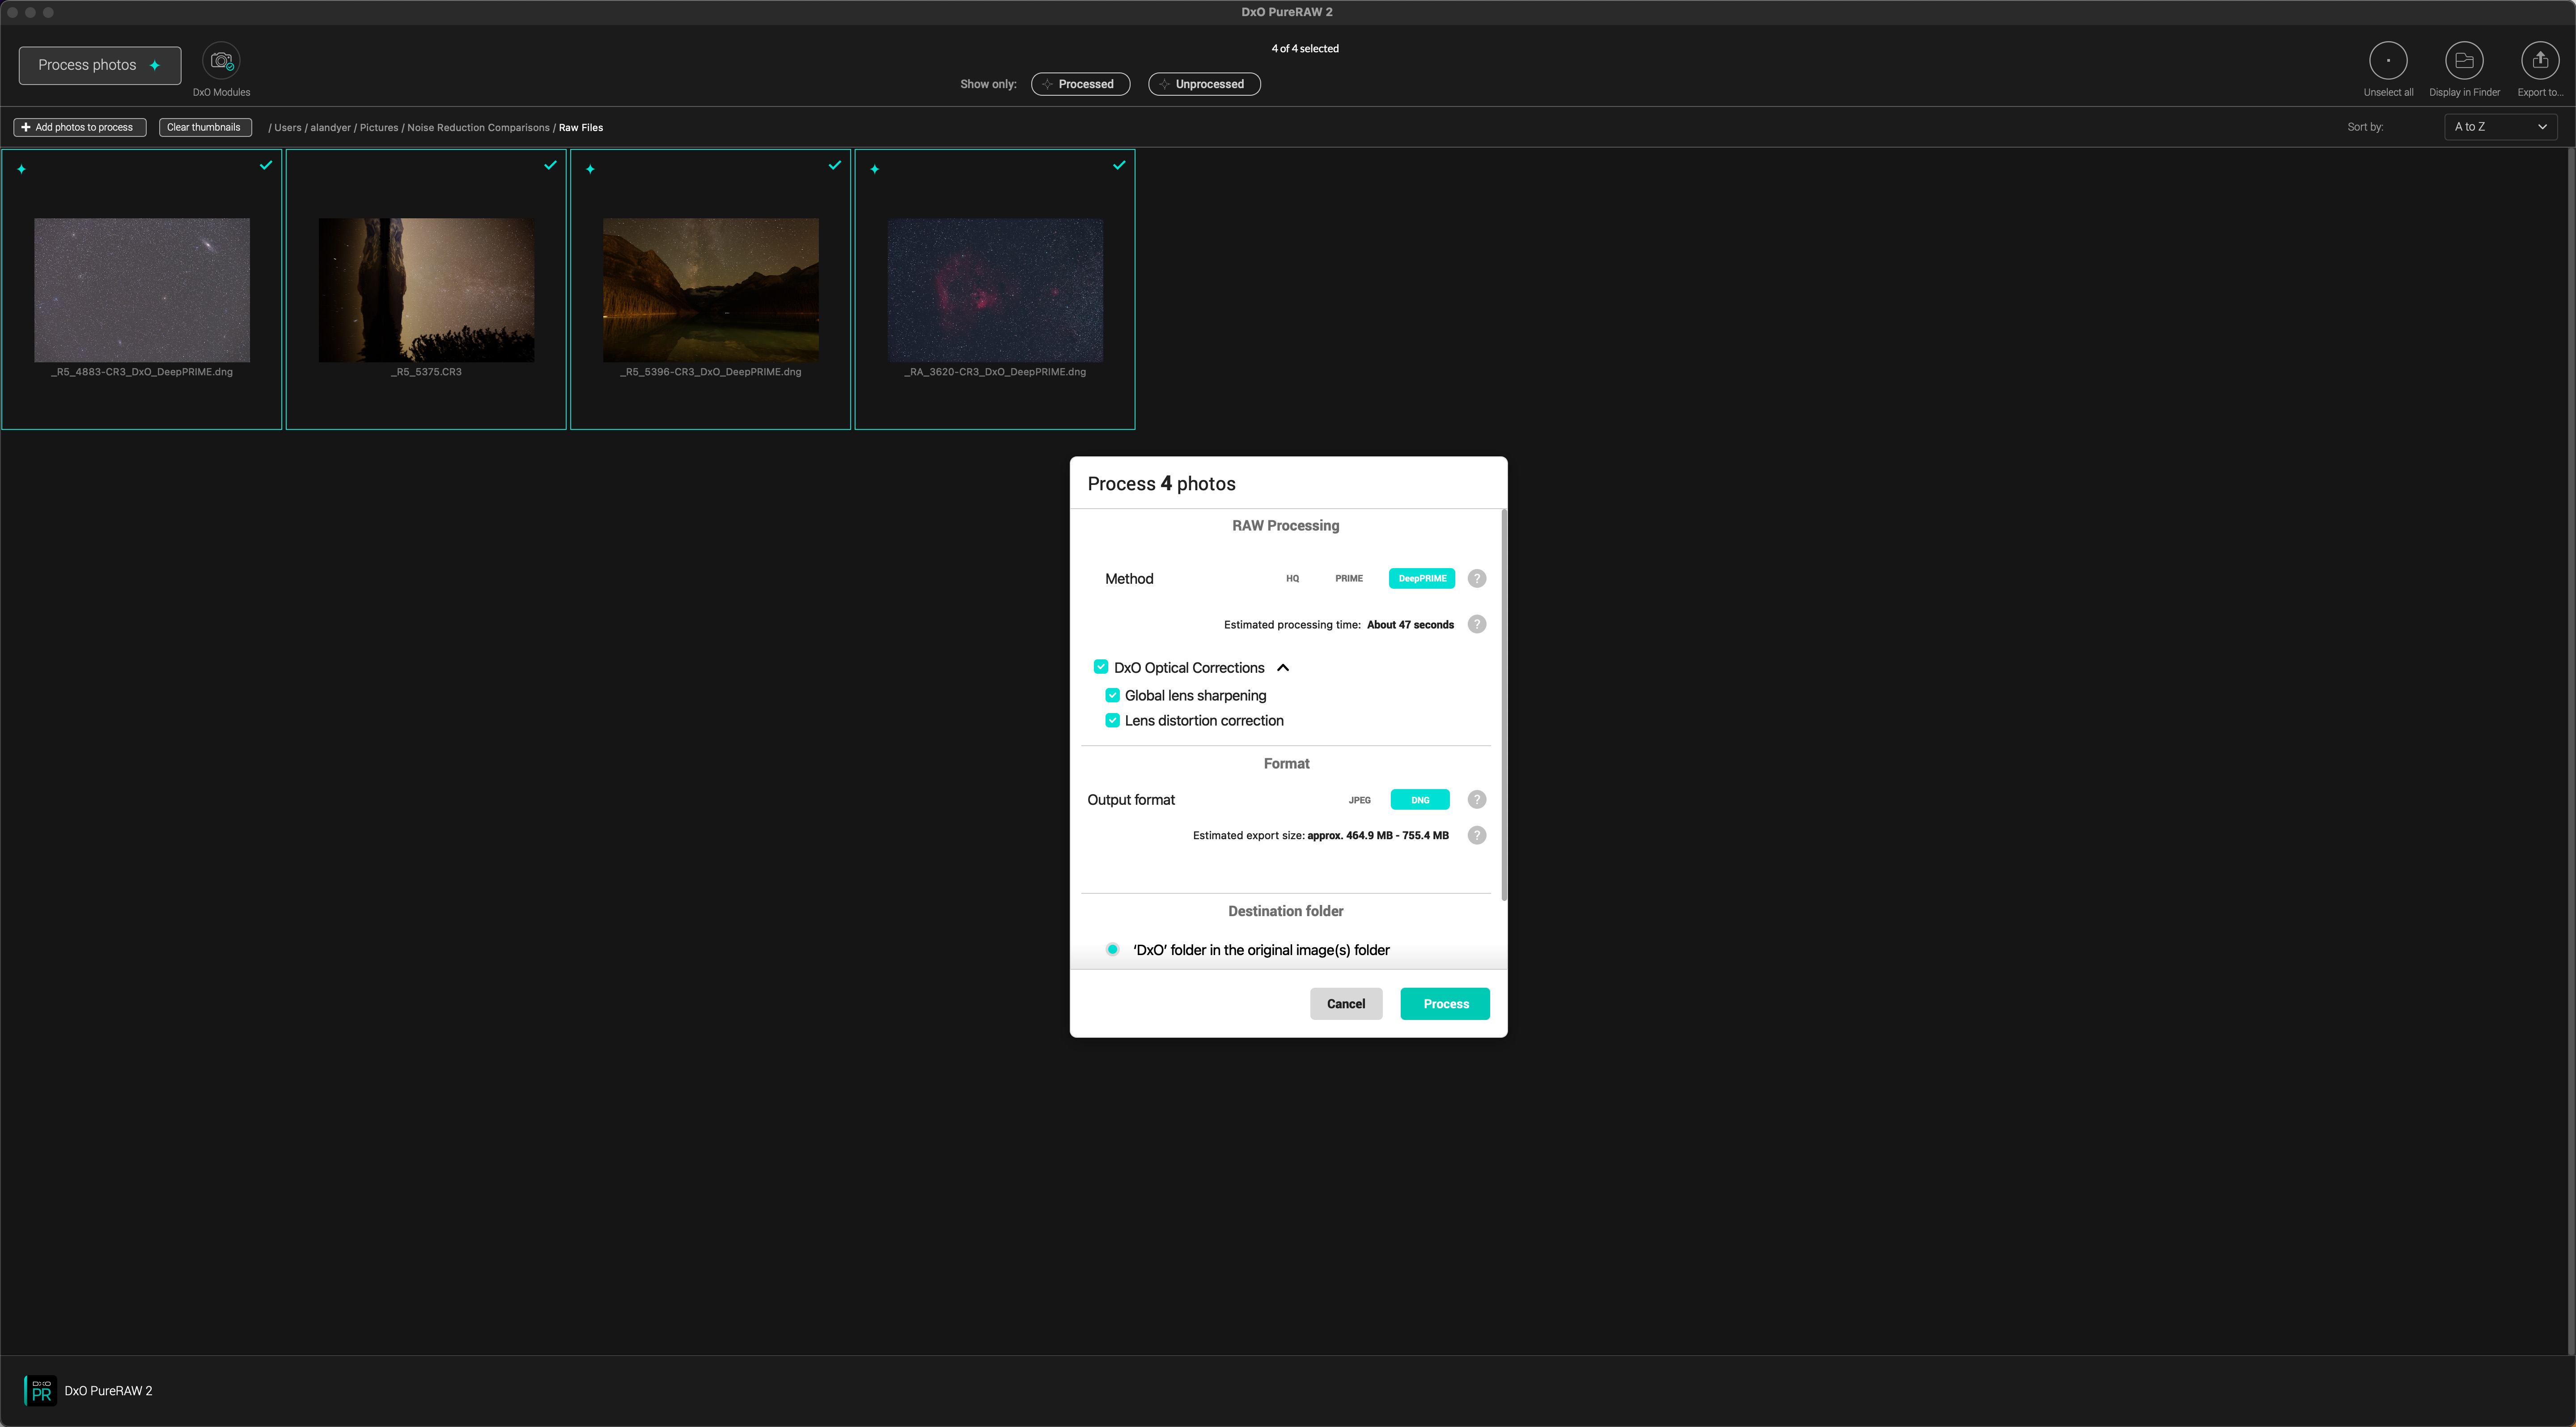
DxO PureRAW’s simple interface with few choices for Noise Reduction settings.
Like ON1, DxO makes a full-featured alternative to Adobe’s Lightroom for cataloging and raw developing called DxO PhotoLab, in version 6 as of late 2022. It contains DxO’s Prime and DeepPrime noise reduction routines. However, as with ON1, DxO has spun off just the noise reduction and lens correction parts of PhotoLab into a separate program, PureRAW2, which runs either as a stand-alone app or as a plug-in for Lightroom – but not Photoshop, as PureRAW works only on original raw files.
Unlike all the other programs, PureRAW2 offers essentially no options to adjust settings, just the option to apply, or not, lens corrections, and to choose the output format. For this testing I applied DeepPrime and exported out to DNG files. [See below for a test of DeepPrimeXD, now offered with PureRaw3.]
Version tested: 2.2
Noise Terminator’s controls allow adjusting strength and detail.
Unlike the other programs tested, NoiseXTerminator from astrophotographer Russell Croman is designed specifically for deep-sky astrophotography. It installs as a plug-in for Photoshop or Affinity Photo, but not Lightroom. It is also available under the same purchased licence as a “process” for PixInsight, an advanced program popular with astrophotographers, as it is designed just for editing deep-sky images.
I tested the Photoshop plug-in version of Noise XTerminator. It receives occasional updates to both the actual plug-in and separate updates to the AI module.
Version tested: 1.1.2, AI model 2
NIGHTSCAPE TEST
As with the other test images, the panels show a highly magnified section of the image, indicated in the inset. I shot the image of Lake Louise in Banff, Alberta with a Canon RF15-35mm lens on a 45-megapixel Canon R5 camera at ISO 1600.
The test results on a sample nightscape.
Adobe Camera Raw’s basic noise reduction did a good job, but like all general routines it does soften the image as a by-product of smoothing out high-ISO noise.
ON1 NoNoise 2023 retained landscape detail better than ACR but softened the star trails, despite me adding sharpening. It also produced a somewhat patchy noise smoothing in the sky. This was with Luminosity backed off to 75 from the auto setting (which always cranks up the level to 100 regardless of the image), and with the Tack Sharp routine set to 40 with Micro Contrast at 0. It left a uniform pixel-level mosaic effect in the shadow areas. Despite the new Tack Sharp option, the image was softer than with last year’s NoNoise 2022 version (not shown here as it is no longer available) which produced better shadow results.
Topaz DeNoise AI did a better job than NoNoise retaining the sharp ground detail while smoothing noise, always more obvious in the sky in such images. Even so, it also produced some patchiness, with some areas showing more noise than others. This was with the Standard model set to 40 for Noise and Sharpness, and Recover Details at 75. I show the other model variations below.
Topaz Photo AI did a poor job, producing lots of noisy artifacts in the sky and an over-sharpened foreground riddled with colorful speckling. It added noise. This was with the Normal setting and the default Autopilot settings.
Noiseless AI in Luminar Neo did a decent job smoothing noise while retaining, indeed sharpening ground detail without introducing ringing or colorful edge artifacts. The sky was left with some patchiness and uneven noise smoothing. This was with the suggested Middle setting (vs Low and High) and default levels for Noise, Detail and Sharpness. However, I do like Neo (and Skylum’s earlier Luminar AI) for adding other finishing effects to images such as Orton glows.
DxO PureRAW2 did smooth noise very well while enhancing sharpness quite a lot, almost too much, though it did not introduce obvious edge artifacts. Keep in mind it offers no chance to adjust settings, other than the mode – I used DeepPrime vs the normal Prime. Its main drawback is that in making the conversion back to a raw DNG image it altered the appearance of the image, in this case darkening the image slightly. It also made some faint star trails look wiggly!
Noise XTerminator really smoothed out the sky, and did so very uniformly without doing much harm to the star trails. However, it smoothed out ground detail unacceptably, not surprising given its specialized training on stars, not terrestrial content.
Conclusion: For this image, I’d say Topaz DeNoise AI did the best, though not perfect, job.
This was surprising, as tests I did with earlier versions of DeNoise AI showed it leaving many patchy artifacts and colored edges in places. Frankly, I was put off using it. However, Topaz has improved DeNoise AI a lot.
Why it works so well, when Topaz’s newer program Photo AI works so poorly is hard to understand. Surely they use the same AI code? Apparently not. Photo AI’s noise reduction is not the same as DeNoise AI.
Similarly, ON1’s NoNoise 2023 did a worse job than their older 2022 version. One can assume its performance will improve with updates. The issue seems to be with the new Tack Sharp addition.
NoiseXTerminator might be a good choice for reducing noise in just the sky of nightscape images. It is not suitable for foregrounds, though as of April 2023 its performance on landscapes has improved but is not ideal.
WIDE-FIELD IMAGE TEST
I shot this image of Andromeda and Triangulum with an 85mm Rokinon RF lens on the 45-megapixel Canon R5 on a star tracker. Stars are now points, with small ones easily mistaken for noise. Let’s see how the programs handle such an image, zooming into a tiny section showing the galaxy Messier 33.
The test results on a sample wide-field deep-sky image.
Adobe Camera Raw’s noise and sharpening routines do take care of the worst of the luminance and chrominance noise, but inevitably leave some graininess to the image. This is traditionally dealt with by stacking multiple sub-exposures.
ON1 NoNoise 2023 did a better job than ACR, smoothing the worst of the noise and uniformly, without leaving uneven patchiness. However, it did soften star images, almost like it was applying a 1- or 2-pixel gaussian blur, adding a slight hazy look to the image. And yet the faintest stars that appeared as just perceptible blurs in the original image were sharpened to one- or two-pixel points. This was with only NoNoise AI applied, and no Tack Sharp AI. And, as I show below, NoNoise’s default “High Detail” option introduced with the 2022 version and included in the 2023 edition absolutely destroys star fields. Avoid it.
ON1 NoNoise “High Detail” option ruins star fields, as shown at right. Use “Original” instead.
Topaz DeNoise AI did a better job than Camera Raw, though it wasn’t miles ahead. This was with the Standard setting. Its Low Light and Severe models were not as good, surprising as you might think one of those choices would be the best for such an image. It pays to inspect Topaz’s various models’ results. Standard didn’t erase stars; it actually sharpened the fainter ones, almost a little too much, making them look like specks of noise. Playing with Enhance Sharpness and Recover Detail didn’t make much difference to this behavior.
Topaz Photo AI again performed poorly. Its Normal mode left lots of noise and grainy artifacts. While its Strong mode shown here did smooth background noise better, it softened stars, wiping out the faint ones and leaving colored edges on the brighter ones.
Noiseless AI in Luminar Neo did smooth fine noise somewhat, better than Camera Raw, but still left a grainy background, though with the stars mostly untouched in size and color.
DxO PureRAW2did eliminate noise quite well, while leaving even the faintest stars intact, unlike with the deep-sky image below, which is odd. However, it added some dark halos to bright stars from over-sharpening. And, as with the nightscape example, PureRAW’s output DNG was darker than the raw that went in. I don’t want noise reduction programs altering the basic appearance of an image, even if that can be corrected later in the workflow.
Noise XTerminator performed superbly, as expected – after all, this is the subject matter it is trained to work on. It smoothed out random noise better than any of the other programs, while leaving even the faintest stars untouched, in fact sharpening them slightly. Details in the little galaxy were also unharmed.
Conclusion: The clear winner was NoiseXTerminator.
Topaz DeNoise was a respectable second place, performing better than it had done on such images in earlier versions. Even so, it did alter the appearance of faint stars which might not be desirable.
ON1 NoNoise 2023 also performed quite well, with its softening of brighter stars yet sharpening of fainter ones perhaps acceptable, even desirable for an effect.
TELESCOPIC DEEP-SKY TEST
I shot this image of the NGC 7822 complex of nebulosity with a SharpStar 61mm refractor, using the red-sensitive 30-megapixel Canon Ra and with a narrowband filter to isolate the red and green light of the nebulas.
Again, the test image is a single raw image developed only to re-balance the color and boost the contrast. No dark frames were applied, so the 8-minute exposure at ISO 3200 taken on a warm night shows thermal noise as single “hot pixel” white specks.
The test results on a sample deep-sky close-up.
Adobe Camera Raw did a good job smoothing the worst of the noise, suppressing the hot pixels but only by virtue of it softening all of the image slightly at the pixel level. However, it leaves most stars intact.
ON1 NoNoise 2023 also did a good job smoothing noise while also seeming to boost contrast and structure slightly. But as in the wide-field image, it did smooth out star images a little, though somewhat photogenically, while still emphasizing the faintest stars. This was with no sharpening applied and Luminosity at 60, down from the default 100 NoNoise applies without fail. One wonders if it really is analyzing images to produce optimum settings. With no Tack Sharp sharpening applied, the results on this image with NoNoise 2023 looked identical to NoNoise 2022.
Topaz DeNoise AI did another good job smoothing noise, while leaving most stars unaffected. However, the faintest stars and hot pixels were sharpened to be more visible tiny specks, perhaps too much, even with Sharpening at its lowest level of 1 in Standard mode. Low Light and Severe modes produced worse results, with lots of mottling and unevenness in the background. Unlike NoNoise, at least its Auto settings do vary from image to image, giving you some assurance it really is responding to the image content.
Topaz Photo AI again produced unusable results. Its Normal modes produced lots of mottled texture and haloed stars. Its Strong mode shown here did smooth noise better, but still left lots of uneven artifacts, like DeNoise AI did in its early days. It certainly seems like Photo AI is using old hand-me-down code from DeNoise AI.
Noiseless AI in Luminar Neo did smooth noise but unevenly, leaving lots of textured patches. Stars had grainy halos and the program increased contrast and saturation, adjustments usually best left for specific adjustment layers dedicated to the task.
DxO PureRAW2 did smooth noise very well, including wiping out the faintest specks from hot pixels, but it also wiped out the faintest stars, I think unacceptably and more than other programs like DeNoise AI. For this image it did leave basic brightness alone, likely because it could not apply lens corrections to an image taken with unknown optics. However, it added an odd pixel-level mosaic-like effect on the sky background, again unacceptable.
Noise XTerminator did a great job smoothing random noise without affecting any stars or the nebulosity. The Detail level of 20 I used actually emphasized the faintest stars, but also the hot pixel specks. NoiseXTerminator can’t be counted on to eliminate thermal noise; that demands the application of dark frames and/or using dithering routines to shift each sub-frame image by a few pixels when autoguiding the telescope mount. Even so, Noise XTerminator is so good users might not need to take and stack as many images.
Conclusion: Again, the winner was NoiseXTerminator.
Deep-sky photographers have praised “NoiseX” for its effectiveness, either when applied early on in a PixInsight workflow or, as I do in Photoshop, as a smart filter to the base stacked image underlying other adjustment layers.
Topaz DeNoise is also a good choice as it can work well on many other types of images. But again, play with its various models and settings. Pixel peep!
ON1 NoNoise 2023 did put in a respectable performance here, and it will no doubt improve – it had been out less than a month when I ran these tests.
Based on its odd behavior and results in all three test images I would not recommend DxO’s PureRAW2. Yes, it reduces noise quite well, but it can alter tone and color in the process, and add strange pixel-level mosaic artifacts.
COMPARING DxO and TOPAZ OPTIONS
DxO and Topaz DeNoise AI offer the most choices of AI models and strength of noise reduction. Here I compare:
Topaz DeNoise AI on the nightscape image using three of its models: Standard (which I used in the comparisons above), plus Low Light and Severe. These show how the other models didn’t do as good a job.
The set below also compares DeNoise AI to Topaz’s other program, Photo AI, to show how poor a job it is doing in its early form. Its Strong mode does smooth noise but over-sharpens and leaves edge artifacts. Yes, Photo AI is one-click easy to use, but produces bad results – at least on astrophotos.
Comparing DeNoise’s and Photo AI’s different model settings.
As of this writing DxO’s PureRAW2 offers the Prime and newer DeepPrime AI models – I used DeepPrime for my tests.
However, DxO’s more expensive and complete image processing program, PhotoLab 6, also offers the even newer DeepPrimeXD model, which promises to preserve or recover even more “Xtra Detail” over the DeepPrime model. As of this writing, the XD mode is not offered in PureRAW2. Perhaps that will wait for PureRAW3, no doubt a paid upgrade.
[UPDATE MARCH 2023: DxO has indeed brought out PureRaw3 as a paid upgrade that, as expected, offers the DeepPrimeXD. In testing the new version I found that, while it did not seem to alter an image’s exposure as PureRaw2 did, DeepPrime and DeepPrimeXD still unacceptably ruin starry skies, by either adding a fine-scale mosaic effect (DeepPrime) or weird wormy artifacts (DeepPrimeXD). Try it for yourself to see if you find the same.]
Comparing DxO’s various Prime model settings. DeepPrimeXD is only in PhotoLab 6.
The set above compares the three noise reduction models of DxO’s PhotoLab 6. DeepPrime does do a better job than Prime. DeepPrimeXD does indeed sharpen detail more, but in this example it is too sharp, showing artifacts, especially in the sky where it is adding structures and textures that are not real.
However, when used from within PhotoLab 6, the DeepPrime noise reduction becomes more usable. PhotoLab is then being used to perform all the raw image processing, so PureRAW’s alteration of color and tone is not a concern. Conversely, it can also output raw DNGs with only noise reduction and lens corrections applied, essentially performing the same tasks as PureRAW. If you have PhotoLab, you don’t need PureRAW.
APRIL 2023 UPDATE — TESTING ADOBE’S NEW AI Denoise
In April 2023 Adobe updated Lightroom Classic to v12.3 and the Camera Raw plug-in for Bridge and Photoshop to 15.3. The major new feature was a long-awaited AI noise reduction from Adobe called Denoise. It works only on raw files and generates a new raw DNG file to which all the raw develop settings, including AI masks, can be applied. But the DNG file is some four times larger than the original raw file from the camera.
Here’s a comparison of Camera Raw using the old noise reduction and the new AI option, with DxO’s DeepPrimeXD and Topaz’s PhotoAI, on an aurora image from April 23, 2023:
I used Topaz Photo AI as that’s the program Topaz is now putting all their development effort into, neglecting their other plug-ins such as DeNoise AI. I used DxO PhotoLab 6 with its DeepPrimeXD option to export a DNG with only noise reduction applied, for results identical to what is now offered with DxO’s separate PureRaw3 plug-in.
At 100% above, there’s very little obvious difference. They show up when pixel peeping.
400% blow-ups of the sky – Tap or click to download a full-res JPG
Above are 400% blow-ups of a section of the sky.
Compared to using Adobe’s old noise reduction sliders, their new AI Denoise did a far superior job at smoothing noise, and providing sharpening – almost too much, making even the smallest stars pop out more, perhaps a good thing. But there’s no control of that sharpening.
DxO’s DeepPrimeXD provides a similar, or perhaps more excessive level of AI sharpening. While it smooths noise, it introduces all manner of wormy AI artifacts. It is unacceptable.
Topaz PhotoAI’s noise reduction and sharpening, here both applied with their AutoPilot settings, smoothed noise, but created a patchy appearance. It also softened the stars, despite having sharpening turned on. It was the worst of the set.
400% blow-ups of a section of the ground y – Tap or click to download a full-res JPG
In a similar set of blow-ups of the ground, the old Adobe noise reduction did just that — it smoothed only some noise. The new AI Denoise not only smooths noise, it also applies AI-based sharpening, to the point of almost inventing detail. Here it looks believable, but in other tests I have seen it add content, such as structures in the aurora, that looked fake and out of place. Or just plain wrong!
DxO’s DeepPrimeXD’s main feature over the older DeepPrime is the “eXtra Detail” it finds. Here it produces a result similar to Adobe Denoise, though in some areas of this and other images, I find it is over-sharpening. As with Adobe, there is no option for backing off the sharpening. Other than using DeepPrime or Prime noise reduction.
Topaz PhotoAI didn’t do much to add sharpening. If anything, it made the image softer. While PhotoAI has improved with its weekly updates, it still falls far short of the competition, at least for astrophotos and nightscapes.
The bottom line — Adobe’s new AI Denoise can do a superb job on astrophotos, and will be particularly useful for high-ISO nightscapes, perhaps better than any of the competition. But watch what it does! It can invent details or create results that look artificial. Being able to adjust the sharpening would be helpful. Perhaps that will come in an update.
COMPARING AI TO OLDER NON-AI PROGRAMS
The new generation of AI-based programs have garnered all the attention, leaving older stalwart noise reduction programs looking a little forlorn and forgotten.
Here I compare Camera Raw and two of the best of the AI programs, Topaz DeNoise AI and NoiseXTerminator, with two of the most respected of the “old-school” non-AI programs:
Nik Dfine2’s control interface.
Dfine2, included with the Nik Collection of plug-ins sold by DxO (shown above), and
Reduce Noise v9 sold by Neat Image (shown below).
Neat Image’s Reduce Noise control interface – the simple panel.
I tested both by using them in their automatic modes, where they analyze a section or sections of the image and adjust the noise reduction accordingly, but then apply that setting uniformly across the entire image. However, both allow manual adjustments, with Neat Image’s Reduce Noise offering a bewildering array of technical adjustments.
How do these older programs stack up to the new AI generation? Here are comparisons using the same three test images.
Comparing results with Neat Image and Nik Dfine2 on the nightscape test image.
In the nightscape image, Nik Dfine2 and Neat Image’s Reduce Noise did well, producing uniform noise reduction with no patchiness. But the results weren’t significantly better than with Adobe Camera Raw’s built-in routine. Like ACR, both non-AI programs did smooth detail in the ground, compared to DeNoise AI which sharpened the mountain details.
Comparing results with Neat Image and Nik Dfine2 on the wide-field test image.
In the tracked wide-field image, the differences were harder to distinguish. None performed up to the standard of Noise XTerminator, with both Nik Dfine2 and Neat Image softening stars a little compared to DeNoise AI.
Comparing results with Neat Image and Nik Dfine2 on the deep-sky test image.
In the telescopic deep-sky image, all programs did well, though none matched NoiseXTerminator. None eliminated the hot pixels. But Nik Dfine2 and Neat Image did leave wanted details alone, and did not alter or eliminate desired content. However, they also did not eliminate noise as well as did Topaz DeNoise AI or NoiseXTerminator.
The AI technology does work!
YOUR RESULTS MAY VARY
I should add that the nature of AI means that the results will certainly vary from image to image.
In addition, with many of these programs offering multiple models and settings for strength and sharpening, results even from the same program can be quite different. In this testing I used either the program’s auto defaults or backed off those defaults where I thought the effect was too strong and detrimental to the image.
Software is also a constantly moving target. Updates will alter how these programs perform, we hope for the better. For example, two days after I published this test, ON1 updated NoNoise AI to v17.0.2 with minor fixes and improvements.
And do remember I’m testing on astrophotos, and pixel peeping to the extreme. Rave reviews claiming how well even the poor performers here work on “normal” images might well be valid.
This is all by way of saying, your mileage may vary!
So don’t take my word for it. Most programs (Luminar Neo is an exception) are available as free trial copies to test out on your astro-images and in your preferred workflow. Test for yourself. But do pixel peep. That’s where you’ll see the flaws.
WHAT ABOUT ADOBE?
As noted above, with v15.3 of Camera Raw and v12.3 of Lightroom Classic, Adobe finally introduced their contender into the AI noise reduction contest. And it is a very good entry at that.
But it works only on raw files early in the workflow, and it generates a new raw DNG file, one four times the size of the original. The suggestion is that this technology will expand so that the AI noise reduction can be applied later in the workflow to other file formats.
Indeed, in the last couple of years Adobe has introduced several amazing and powerful “Neural Filters” into Photoshop, which work wonders with one click.
Neural network Noise Reduction is coming to Photoshop. One day!
A neural filter for Noise Reduction is on Adobe’s Wait List for development, so perhaps we will see something in the next few months from Adobe, as a version of the AI noise reduction now offered in Lightroom and Camera Raw.
Until then we have lots of choices for third party programs that all improve with every update. I hope this review has helped you make a choice.
— Alan, November 15, 2022 / Revised April 27, 2023 / AmazingSky.com
Revised and expanded, the new Third Edition of my Nightscapes and Time-Lapses eBook provides one of the most comprehensive guides to the subject you’ll find!
The 2018 Third Edition of my ebook How to Photograph and Process Nightscapes and Time-Lapses is now available at the Apple iBooks Store.
Here’s a short promo video, one that also opens the ebook as one of the embedded videos.
I originally published this ebook in 2014, then revised it in late 2016. Here’s what’s new in this 2018 Third Edition:
Updated equipment (cameras, lenses, filters, time-lapse gear) to reflect what’s current as of mid-2018. For example I added: the Revolve Camera slider; functions from the Canon 6D MkII; and information about the Sony a7III Mirrorless.
Updated the processing tutorials with current software: Photoshop CC2018, Lightroom Classic CC, Starry Landscape Stacker, TLDF, Timelapse Workflow, and LRTimelapse version 5.
Added tutorials on selected non-Adobe programs: DxO PhotoLab, ON1 Photo RAW, Affinity Photo, and the extensions Raya Pro 3 and Dr. Brown’s Services.
Added some 50 new topic pages, such as on memory cards and exposure blending.
In addition I’ve performed “housekeeping chores” such as:
Removing some embedded movies to reduce the file size and
Converting interactive diagrams into labeled images and
Flattening some of the interactive image galleries, all for facilitating conversion to PDFs for non-Apple platforms.
Improving the resolution of most tutorial screenshot images.
Improving many diagrams and updating many images.
Merging the chapter on Intervalometers into Chapter 1.
Plus I’ve added a section on lunar eclipses back in. Yay!
Here are screen shots of sample chapter content pages, to provide an idea of what the ebook contains and looks like.
All current owners of the older editions get the Third Edition update for free through the iBooks app (Mac or iPad, and also iPhone).
I hope you enjoy the new edition. Tell your friends! And do leave a rating or review at the iBooks sales page. Thanks!
And yes, for non-Apple people, a non-interactive PDF version for all other platforms (Windows and Android) is in production for later this year.
I present my Top 10 Tips for photographing the August 21 total eclipse of the Sun.
If the August total eclipse will be your first, then you could heed the advice of many and simply follow “Tip #0:” Just don’t photograph it! Look up and around to take in the spectacle. Even then, you will not see it all.
However, you might see less if you are operating a camera.
But I know you want pictures! To help you be successful, here are my tips for taking great photos without sacrificing seeing the eclipse.
An iPhone in a tripod bracket and on a small tabletop tripod.
TIP #1: Keep It Simple
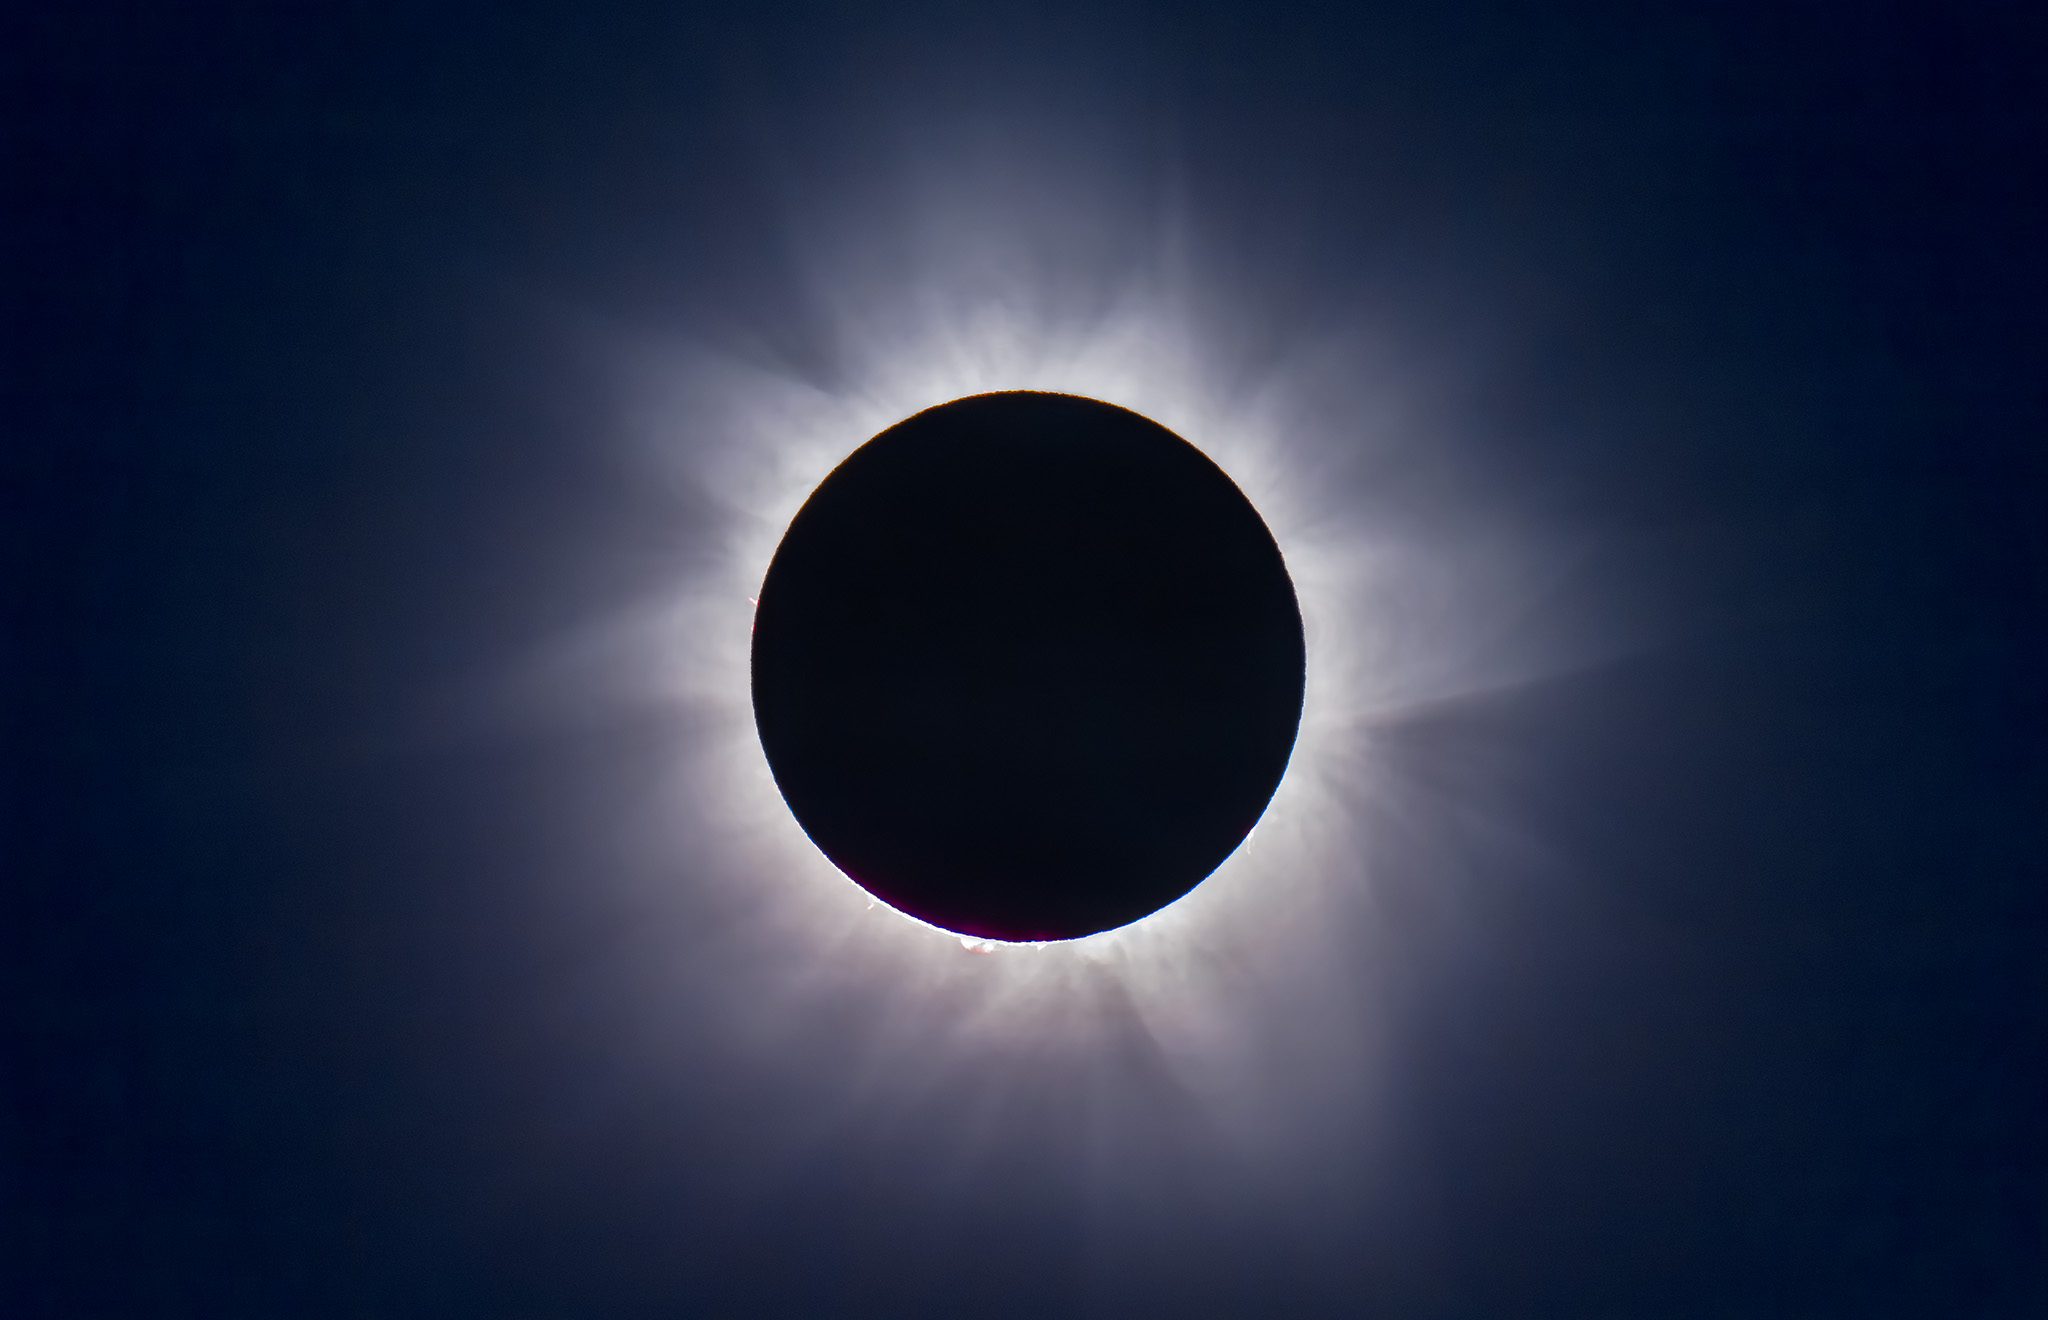
During the brief minutes of totality, the easiest way to record the scene is to simply hold your phone camera up to the sky and shoot. Zoom in if you wish, but a wide shot may capture more of the twilight effects and sky colors, which are as much a part of the experience as seeing the Sun’s gossamer corona around the dark disk of the Moon.
Better yet, use an adapter to clamp your phone to a tripod. Frame the scene as best you can (you might not be able to include both the ground and Sun) and shoot a time-lapse, or better yet, a video.
Start it 2 or 3 minutes before totality (if you can remember in the excitement!) and let the camera’s auto exposure take care of the rest. It’ll work fine.
That way you’ll also record the audio of your excited voices. The audio may serve as a better souvenir than the photos. Lots of people will have photos, but nobody else will record your reactions!
Just make sure your phone has enough free storage space to save several minutes of HD video or, if your camera has that feature, 4K video.
A wide shot of the 2006 eclipse in Libya with a high altitude Sun. 10mm lens on a cropped-frame Canon 20Da camera.
TIP #2: Shoot Wide With a DSLR
For better image quality, step up to this hands-off technique.
Use a tripod-mounted camera that accepts interchangeable lenses (a digital single lens reflex or a mirrorless camera) and use a lens wide enough to take in the ground below and Sun above.
Depending on where you are and the sensor size in your camera, that’ll likely mean a 10mm to 24mm lens.
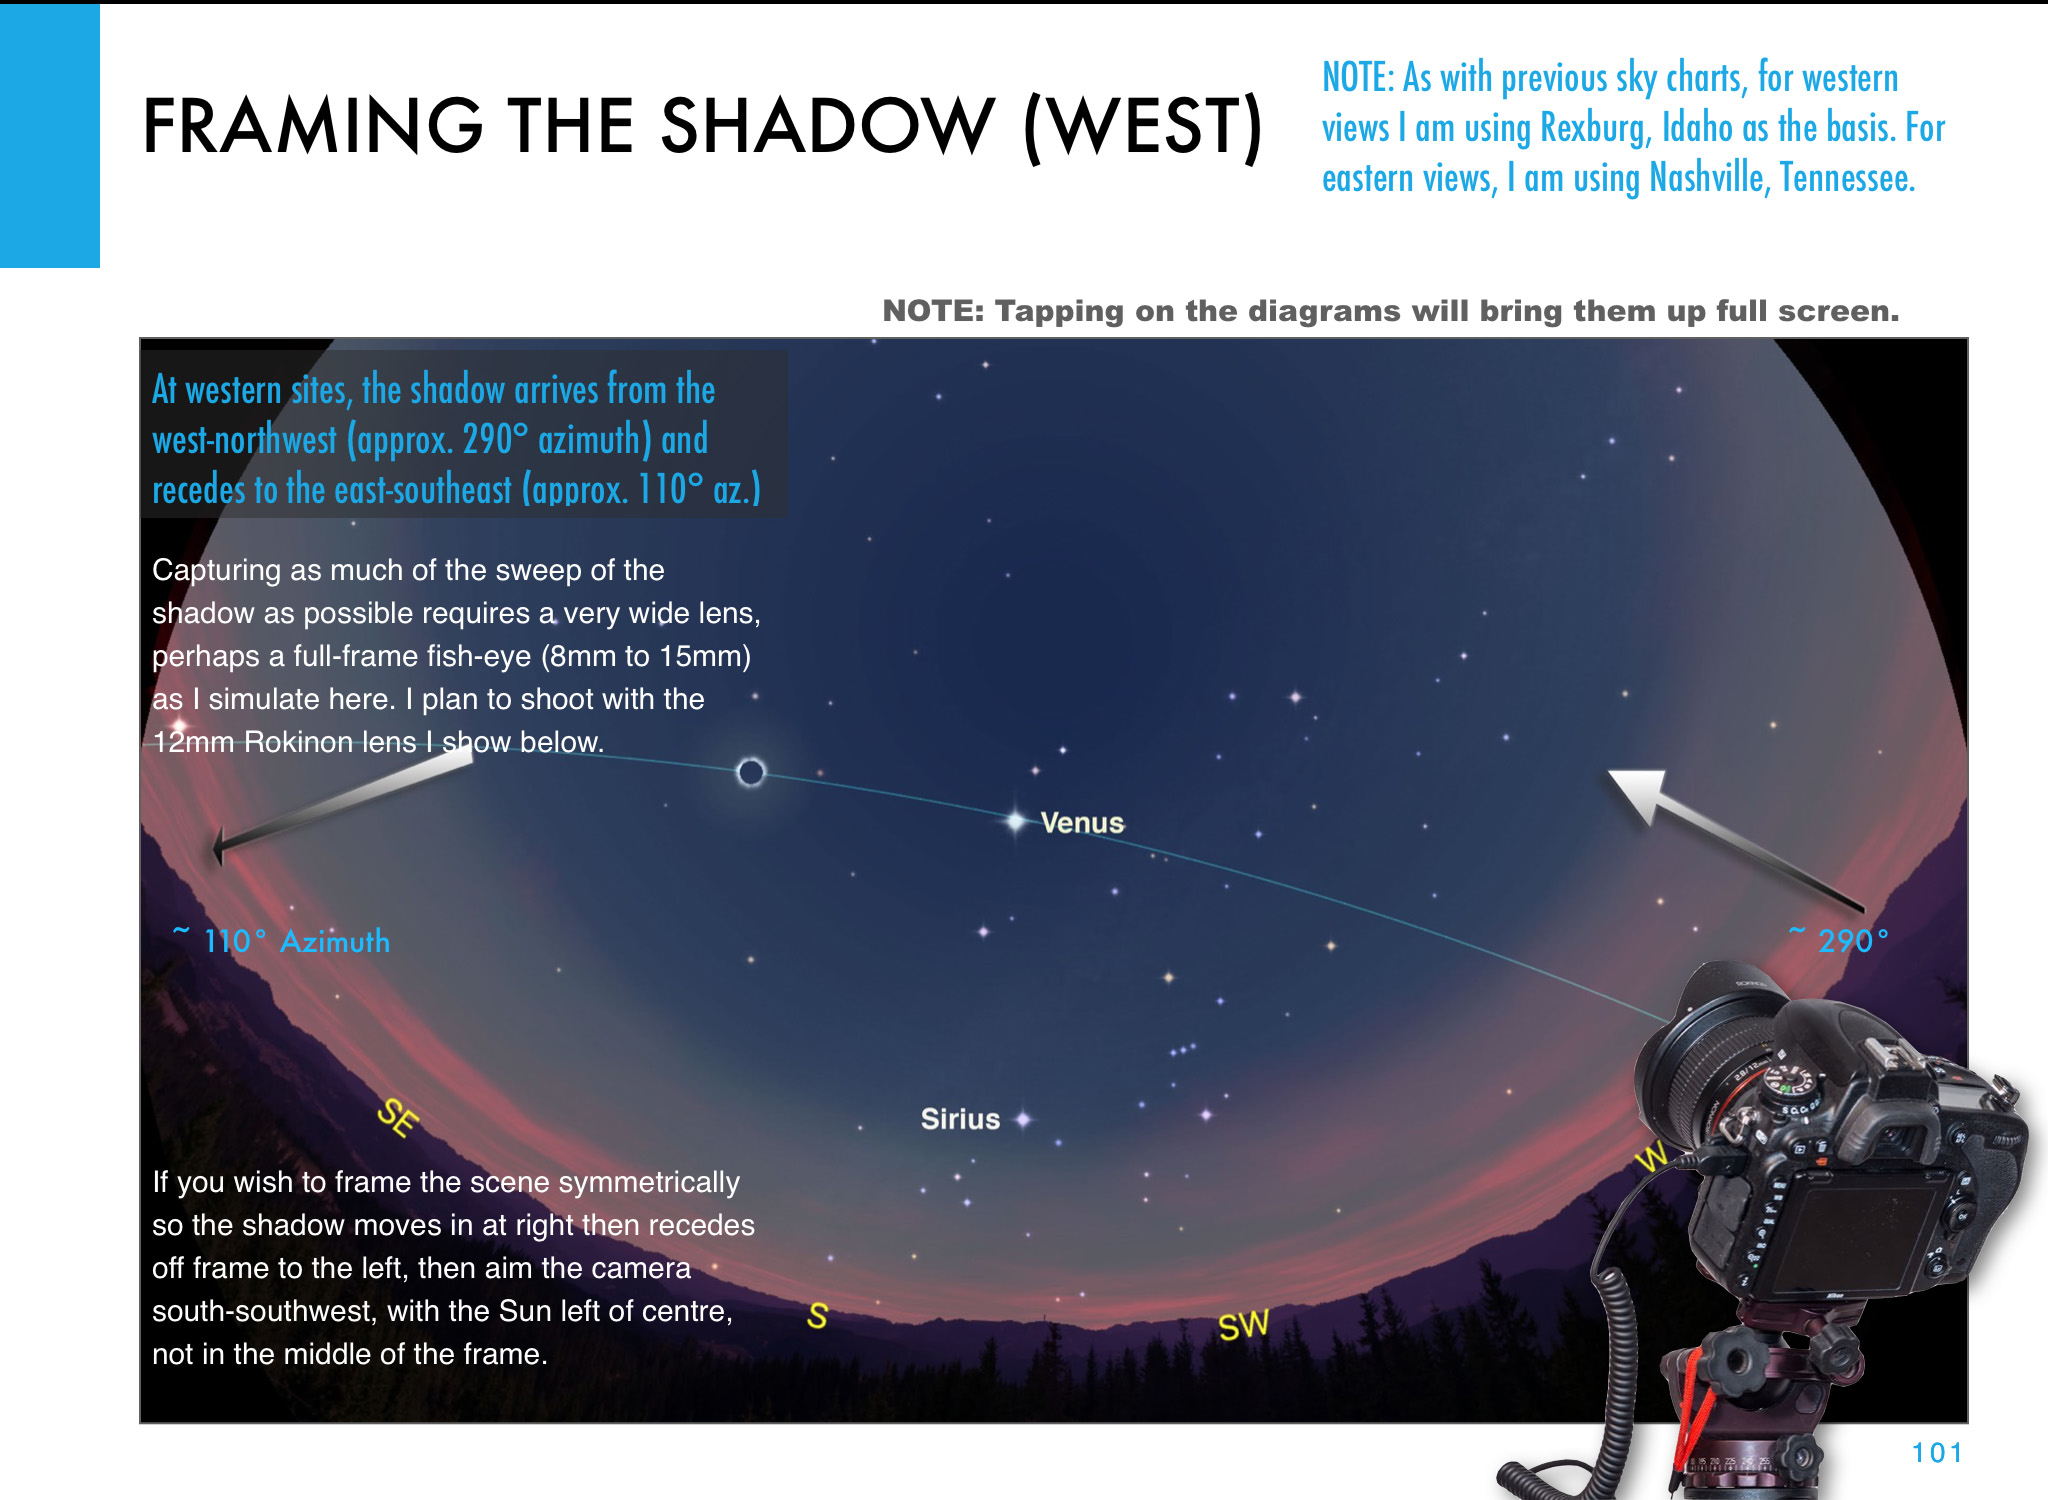
By going wide you won’t record details in the corona of the Sun or its fiery red prominences. But you can record the changing sky colors and perhaps the dark shadow of the Moon sweeping from right to left (west to east) across the sky. You can also include you and your eclipse group silhouetted in the foreground. Remember, no one else will record you at the eclipse.
A sequence of shots of the 2012 eclipse from Australia, with a wide 15mm lens and camera on Auto Exposure showing the change of sky color.
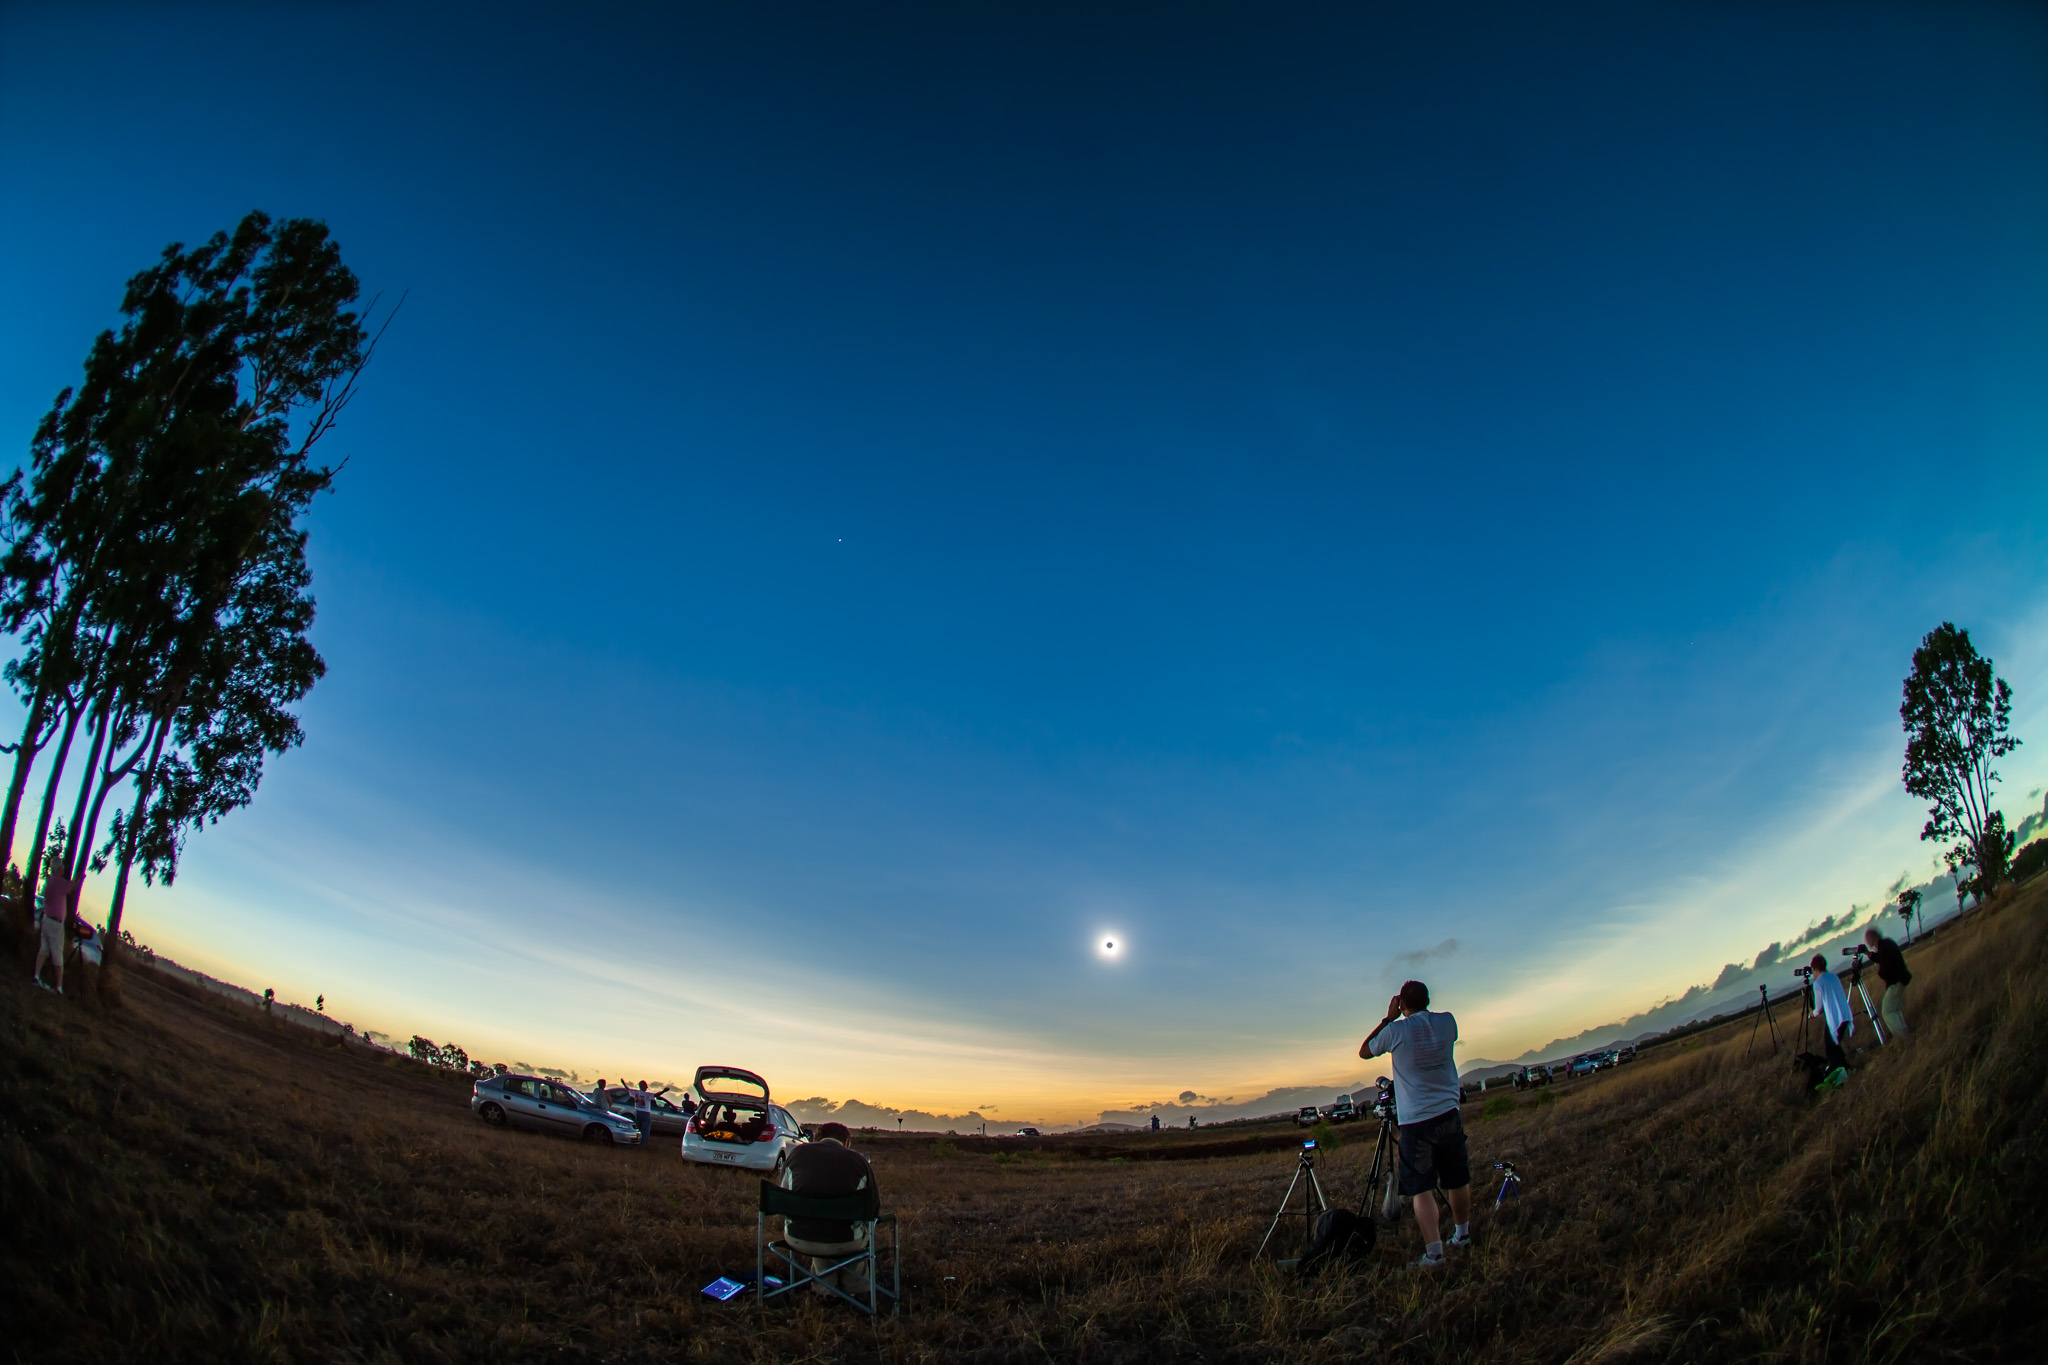
The total eclipse of the Sun, November 14, 2012, from a site near Lakeland Downs, Queensland, Australia. Shot with the Canon 5D Mark II and 15mm lens for a wide-angle view showing the Moon’s conical shadow darkening the sky and the twilight glow on the horizon. Taken near mid-eclipse.
TIP #3: Shoot on Auto Exposure
For wide shots, there’s no need to attend to the camera during the eclipse. Set the camera on Auto Exposure – Aperture Priority (Av), the camera ISO between 100 to 400, and your lens aperture to f/2.8 (fast) to f/5.6 (slow).
Use a higher ISO if you are using a slower lens such as a kit zoom. But shoot at ISO 100 and at f/2.8 if you have a wide lens that fast.
In Av mode the camera will decide what shutter speed to use as the lighting changes. I’ve used this technique at many eclipses and it works great.
An accessory intervalometer set for an interval of 1 second.
TIP #4: Let the Camera Do the Shooting
To make this wide-angle technique truly hands-off use an intervalometer (either built into your camera or a separate hardware unit) to fire the shutter automatically.
Once again, start the sequence going 3 to 5 minutes before totality, with the intervalometer set to fire the shutter once every second. Don’t shoot at longer intervals, or you’ll miss too much. Shutter speeds won’t likely exceed one second.
Again, be sure your camera’s memory card has enough free space for several hundred images. And don’t worry about a solar filter on your lens. It’ll be fine for the several minutes you’ll have it aimed up.
Out of the many images you’ll get, pick the best ones, or turn the entire set into a time-lapse movie.
A Nikon DSLR and lens set to Manual Focus.
TIP #5: Shoot on Manual Focus
Use Auto Exposure and an intervalometer. But … don’t use Auto Focus.
Switch your lens to Manual Focus (MF) and focus on a distant scene element using Live View.
Or use Auto Focus to first focus on something in the distance, then switch to Manual and don’t touch focus after that. If you leave your lens on Auto Focus the shutter might not fire if the camera decides it can’t focus on the blank sky.
A comparison of a Raw image as it came from the camera (left) and after developing in Lightroom (right).
TIP #6: Shoot Raw
For demanding subjects like a solar eclipse always shoot your images in the Raw file format. Look in your camera’s menus under Image Quality.
Shoot JPGs, too, if you like, but only Raw files record the widest range of colors and brightness levels the camera sensor is capable of detecting.
Later in processing you can extract amazing details from Raw files, both in the dark shadows of the foreground, and in the bright highlights of the distant twilight glows and corona around the Sun. Software to do so came with your camera. Put it to use.
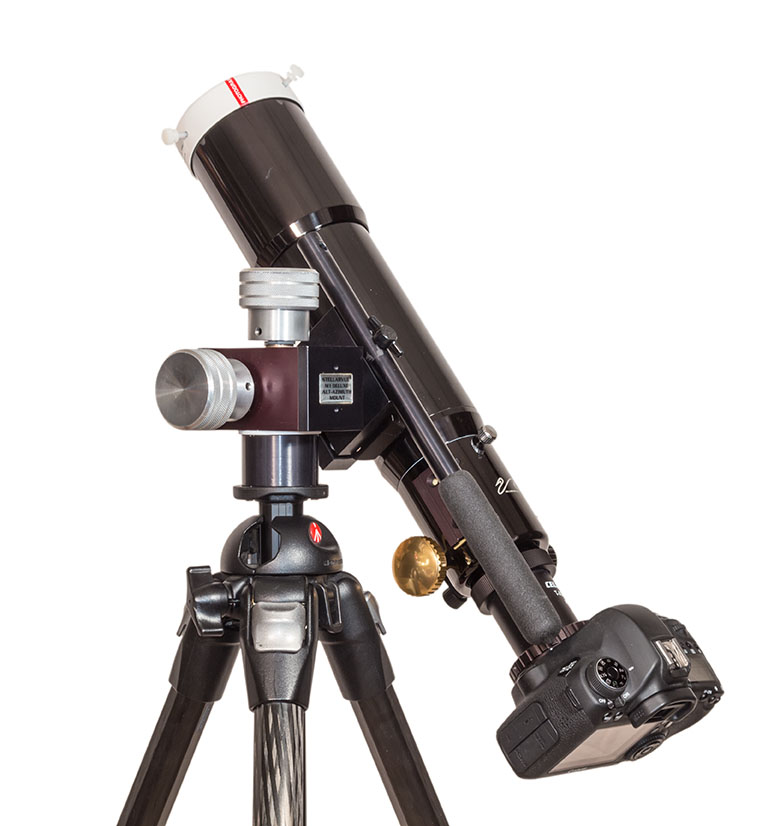
A 200mm telephoto and 1.4x Extender, with the camera on a sturdy and finely adjustable tripod head.
TIP #7: OK, Use a Telephoto Lens! But …
If you really want to shoot close-ups, great! But don’t go crazy with focal length. Yes, using a mere 135mm or 200mm lens will yield a rather small image of the eclipsed Sun. But you don’t need a monster 600mm lens or a telescope, which typically have focal lengths starting at 600mm. With long focal lengths come headaches like:
•Keeping the Sun centered. The Earth is turning! During the eclipse that motion will carry the Sun (and Moon) its own diameter across your frame from east to west during the roughly two minutes of totality. While a motorized tracking mount can compensate for this motion, they take more work to set up properly, and must be powered. And, if you are flying to the eclipse, they will be much more challenging to pack. I’m trying to keep things simple!
•Blurring from vibration. This can be an issue with any lens, but the longer your lens, the more your chances of getting fuzzy images because of camera shake, especially if you are touching the camera to alter settings.
An ideal focal length is 300mm to 500mm. But …
When using any telephoto lens, always use a sturdy tripod with a head that is easy to adjust for precise aiming, and that can aim up high without any mechanical issues. The Sun will be halfway, or more, up the sky, not a position some tripod heads can reach.
A re-processed version of a still frame of the total solar eclipse of November 14, 2012 taken from our site at Lakeland Downs, Queensland, Australia. This is a still frame shot during the shooting of an HD video of the eclipse, using the cropped-frame Canon 60Da and Astro-Physics Traveler 4-inch apo refractor telescope at f/5.8 (580mm focal length). The image is 1/60th second at ISO 100. This is a full-sized still not a frame grab taken from the movie.
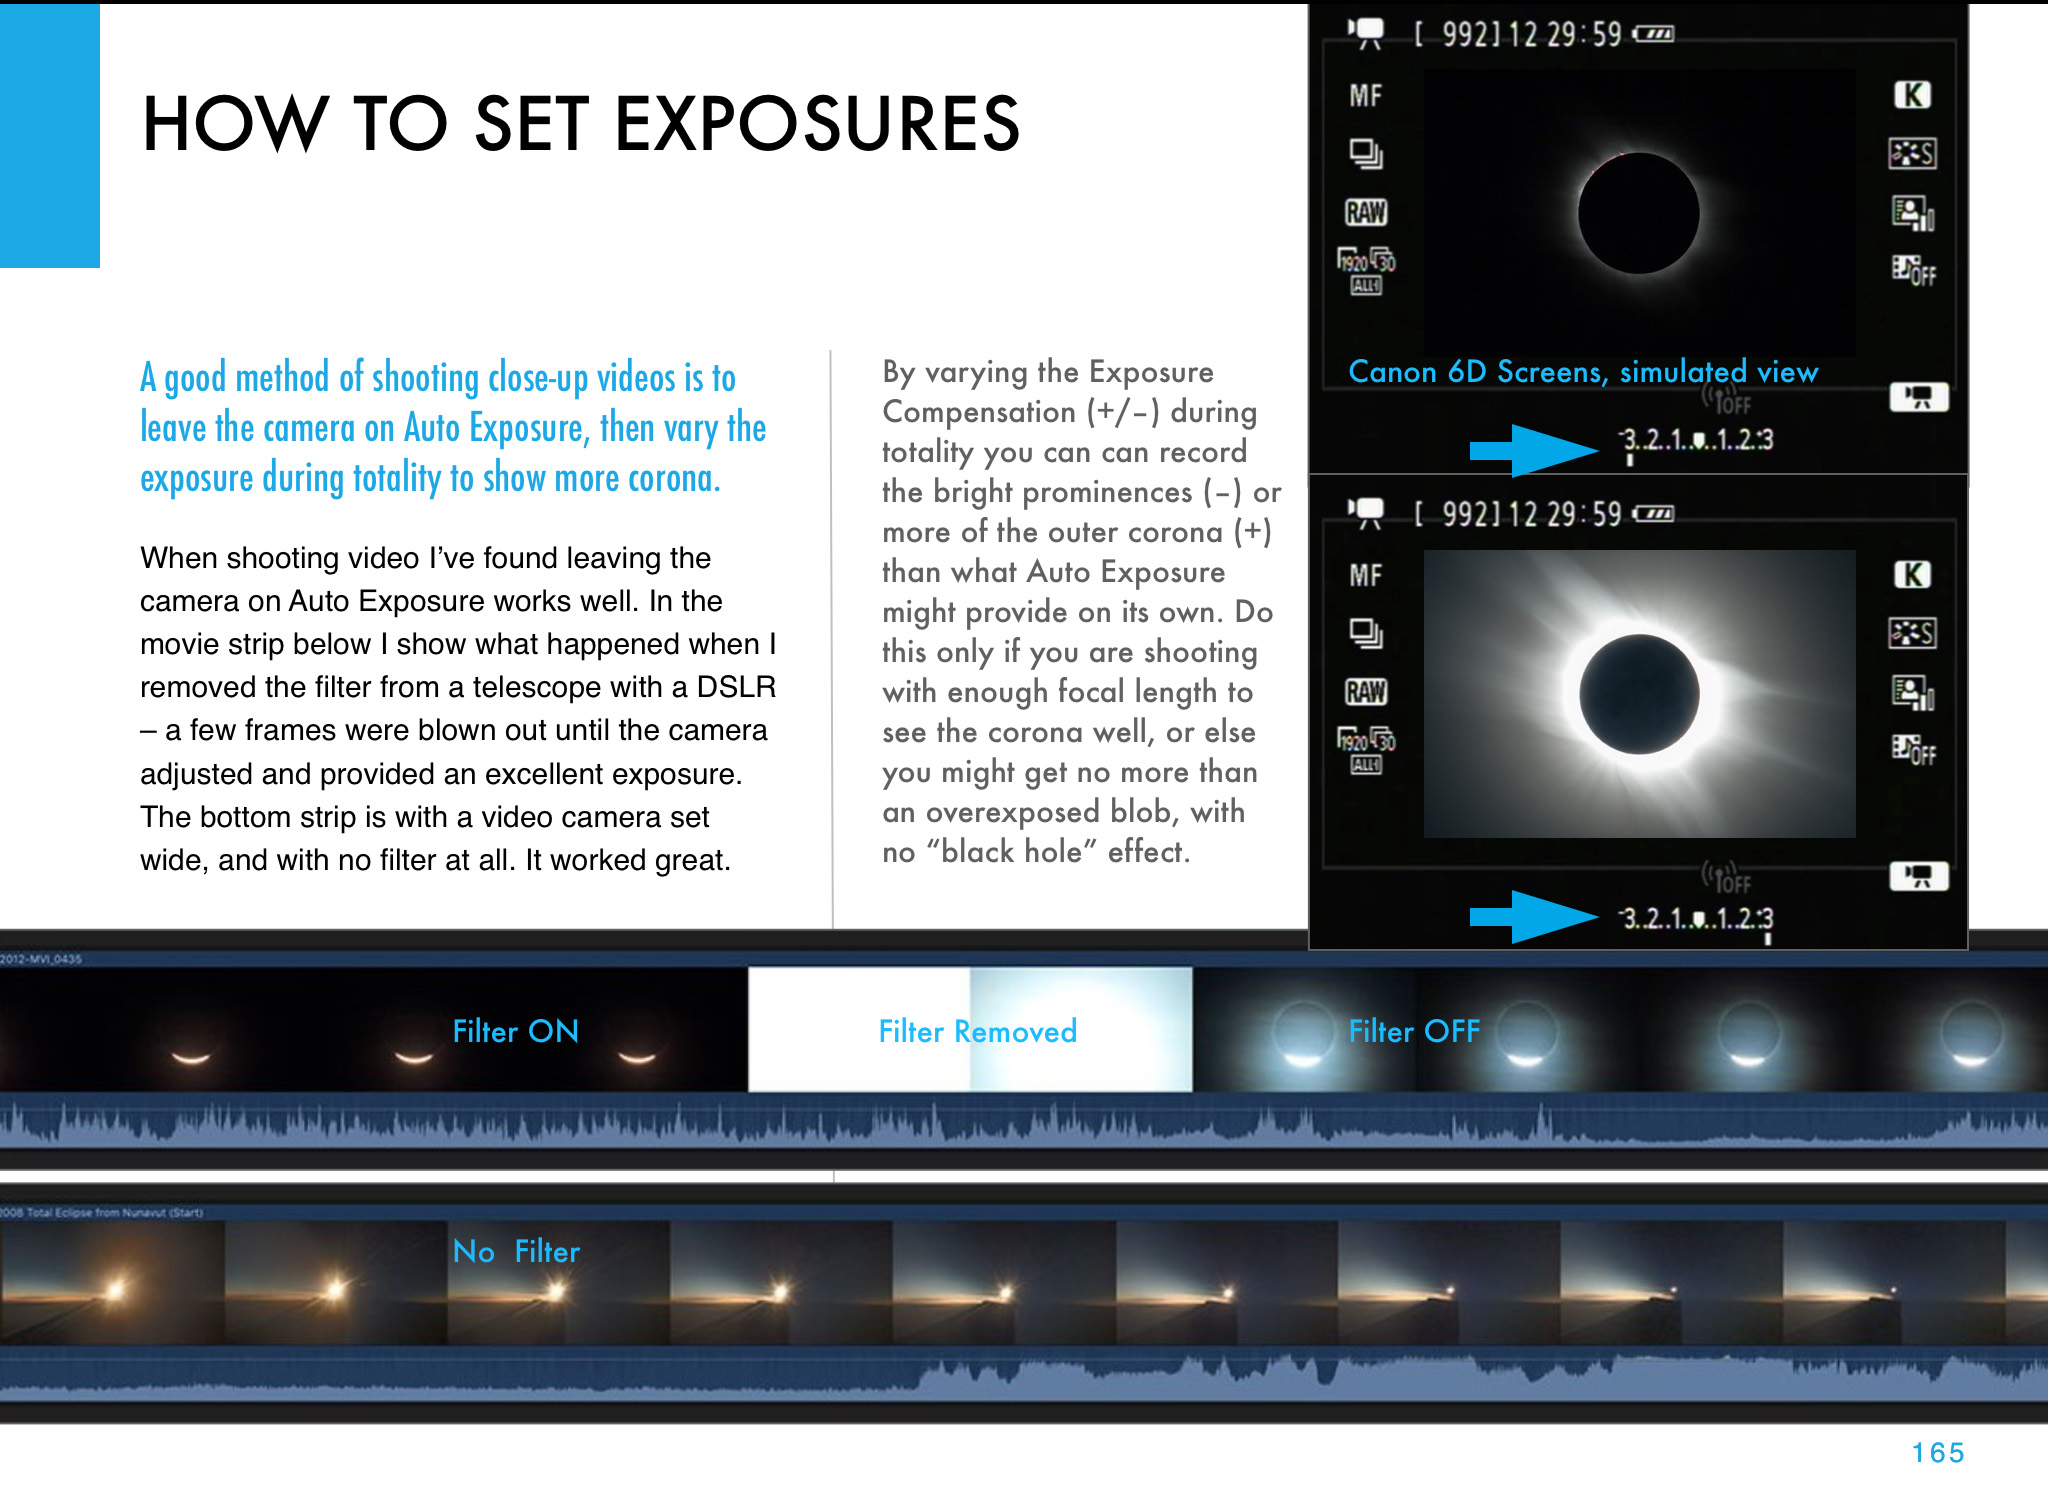
A sequence from a movie showing the camera adjusting the exposure automatically when going from a filtered view (left) to an unfiltered view of the diamond ring (right).
TIP #8: Use Auto Exposure, or … Shoot a Movie
During totality with your telephoto, you could manually step through a rehearsed set of exposures, from very short shutter speeds (as short as 1/4000 second) for the diamond rings at either end of totality, to as long as one or two seconds at mid-totality for the greatest extent of the corona’s outermost streamers.
But that takes a lot of time and attention away from looking. Yes, there are software programs for automating a camera, or techniques for auto bracketing. But if this is your first eclipse an easier option is to simply use Auto Exposure/Aperture Priority and let the camera set the shutter speed. Again, you could use an intervalometer to fire the shutter so you can just watch.
Don’t use high ISO speeds. A low ISO of 100 to 400 is all you need and will produce less noise. The eclipsed Sun is still bright. You don’t need ISO 800 to 3200.
Even on Auto Exposure, you’ll get good shots, just not of the whole range of phenomena an eclipsed Sun displays.
Or, once again and better yet – put your camera into video mode and shoot an HD or 4K movie. Auto Exposure will work just fine, allowing you to start the camera then forget it.
Place the Sun a solar diameter or two to the left of the frame and let the sky’s motion drift it across the frame for added effect. Start the sequence running a minute or two before totality with your solar filter on. Then just let the camera run … except …
A small refractor telescope with a solar filter over the front aperture. That filter has to be removed for totality.
TIP #9: Remember to Remove the Filter!
You will need a safe solar filter over your lens or telescope to shoot the partial phases of the eclipse, and to frame and focus the Sun. This cannot be a photo neutral density or polarizing filter. It must be a filter designed for observing and shooting the Sun, made of metal-coated glass or Mylar plastic. Anything else is not safe and likely far too bright.
But you do NOT need the filter for totality.
Remove it … when?
The answer: a minute or so before totality if you want to capture the first diamond ring just before totality officially starts. Set a timer to remind you, as visually it is very difficult to judge the right moment with your unaided eye. The eclipse will start sooner than you expect.
If you have your camera on Auto Exposure, it will compensate just fine for the change in brightness, from the filtered to the unfiltered view.
But don’t leave your unfiltered camera aimed at the Sun. Replace the filter no more than a minute or so after totality and the second diamond ring ends.
The partial eclipse of the Sun, October 23, 2014, shot through a mylar filter, on the front of the 66mm f/7 apo refractor shown above (450mm focal length), using a cropped-frame Canon 60Da camera for 1/8000 second exposure at ISO 100. Focus on the sharp tips of the crescent Sun or a sunspot if one is present.
TIP #10: Focus!
Everyone worries about getting the “best exposure.” Don’t! You’ll get great looking telephoto eclipse close-ups with any of a wide range of exposures.
What ruins most eclipse shots, other than filter forgetfulness, is fuzzy images, from either shaky tripods or poor focus.
Focus manually using Live View on the filtered partially eclipsed Sun. Zoom up on the edge of the Sun or sharp tip of the crescent. Re-focus a few minutes before totality, as the changing temperature can shift the focus of long lenses and telescopes.
But you needn’t worry about re-focusing after you remove the filter. The focus will not change with the filter off.
Me in Libya in 2006 with my eclipse setup: a small telescope on an alt-azimuth mount.
TIP #1 AGAIN: Keep It Simple!
I’ll remind you to keep things simple for a reason other than giving you time to enjoy the view, and that’s mobility.
You might have to move at the last minute to escape clouds. Complex photo gear can be just too much to take down and set up, often with minutes to spare, as many an eclipse chaser can attest is often necessary. Keep your gear light, easy to use, and mobile. Committing to an overly ambitious and inflexible photo plan and rig could be your undoing.
By following both my “Ten Tips” advice blogs you should be able to get great eclipse images to wow your friends and fans, all without missing the experience of actually seeing … and feeling … the eclipse.
However … may I recommend …
My 295-page ebook on photographing the August 21 total eclipse of the Sun is now available. See http://www.amazingsky.com/eclipsebook.html It covers all techniques, for both stills, time-lapses, and video, from basic to advanced, plus a chapter on image processing. And a chapter on What Can Go Wrong?! The web page has all the details on content, and links to order the book from Apple iBooks Store (for the best image quality and navigation) or as a PDF for all other devices and platforms. Thanks! Clear skies on eclipse day, August 21, 2017.
For much more detailed advice on shooting options and techniques, and for step-by-step tutorials on processing eclipse images, see my 295-page eBook on the subject, available as an iBook for Apple devices and as a PDF for all computers and tablets.
The most spectacular sight the universe has to offer is coming to a sky near you this summer.
On August 21 the Moon will eclipse the Sun, totally!, along a path that crosses the continental USA from coast to coast. All the details of where to go are at the excellent website GreatAmericanEclipse.com.
If this will be your first total solar eclipse, you might want to just watch it. But many will want to photograph or video it. It can be easy to do, or it can be very complex, for those who are after ambitious composites and time-lapses.
To tell you how to shoot the eclipse, with all types of cameras, from cell phones to DSLRs, with all types of techniques, from simple to advanced, I’ve prepared a comprehensive ebook, How to Photograph the Solar Eclipse.
It is 295 pages of sage advice, gathered over 38 years of shooting 15 total solar eclipses around the world.
The book is filled with illustrations designed specifically for the 2017 eclipse – where the Sun will be, how to frame the scene, what will be in the sky, how the shadow will move, where the diamond rings will be, what lenses to use, etc.
Here are a few sample pages:
I cover shooting with everything from wide-angle cameras for the entire scene, to close-ups with long telephotos and telescopes, both on tripods and on tracking mounts.
I cover all the details on exposures and camera settings, and on focusing and ensuring the sharpest images. Most bad eclipse pix are ruined not by poor exposure but poor focus and blurry images – the Sun is moving!
A big chapter covers processing of eclipse images, again, from simple images to complex stacks and composites.
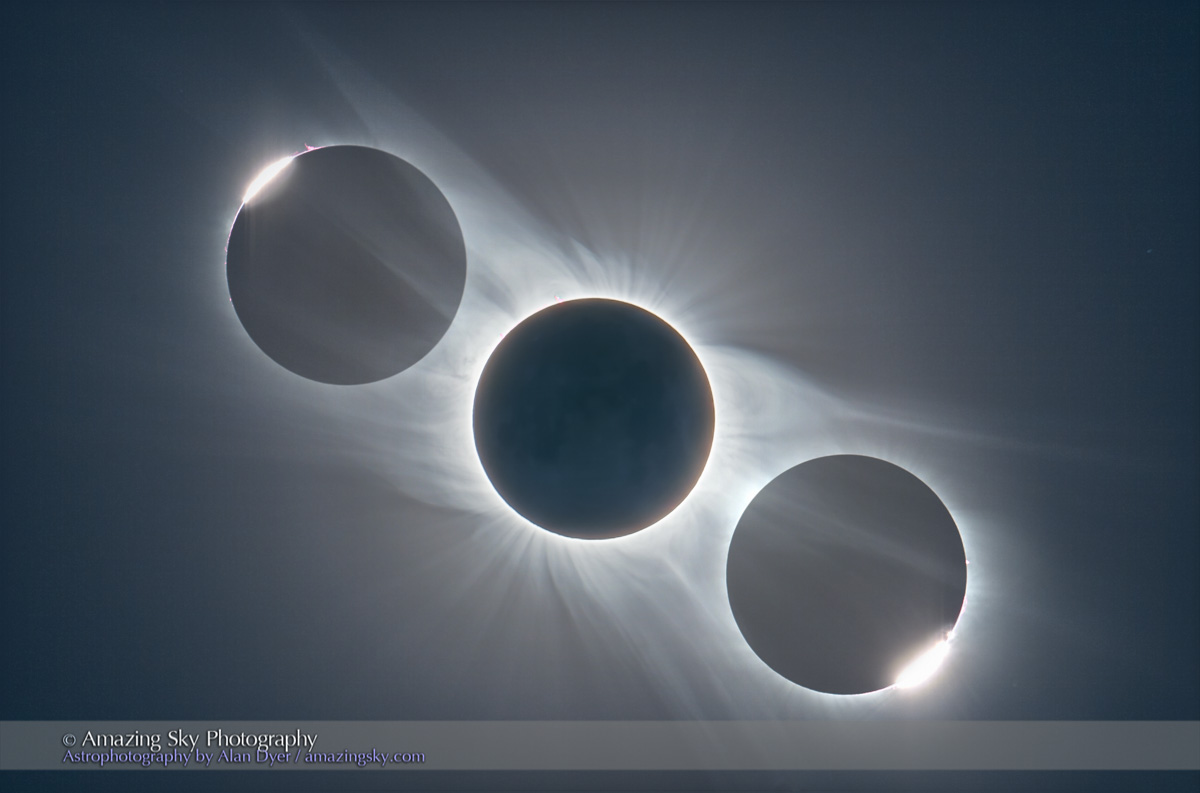
For example, I show how to produce a shot like this, from 2012, combining a short diamond ring image with a long-exposure image of the corona.
A final chapter covers “what can go wrong!” and how to avoid the common mistakes.
The ebook is available on the Apple iBooks Store for Mac and iOS devices. This version has the best interactivity (zoomable images), higher quality images (less compression), and easiest content navigation.
However, for non-Apple people and devices, the ebook can also be purchased directly from my website as a downloadable PDF, which has embedded hyperlinks to external sites.
I think you’ll find the ebook to be the most comprehensive guide to shooting solar eclipses you’ll find. It is up to date (as of last week!) and covers all the techniques for the digital age.
Many thanks, and clear skies on August 21, wherever you may be in the shadow of the Moon!
My free Amazing Sky Calendar for 2017 is now available for download! Plan your astronomical year!
Once again, I have prepared a free 12-month Calendar listing loads of celestial events, Moon phases, highlighted space events, and with small charts to show what’s happening in the sky for the coming year. Plus a set of my favourite images from 2016.
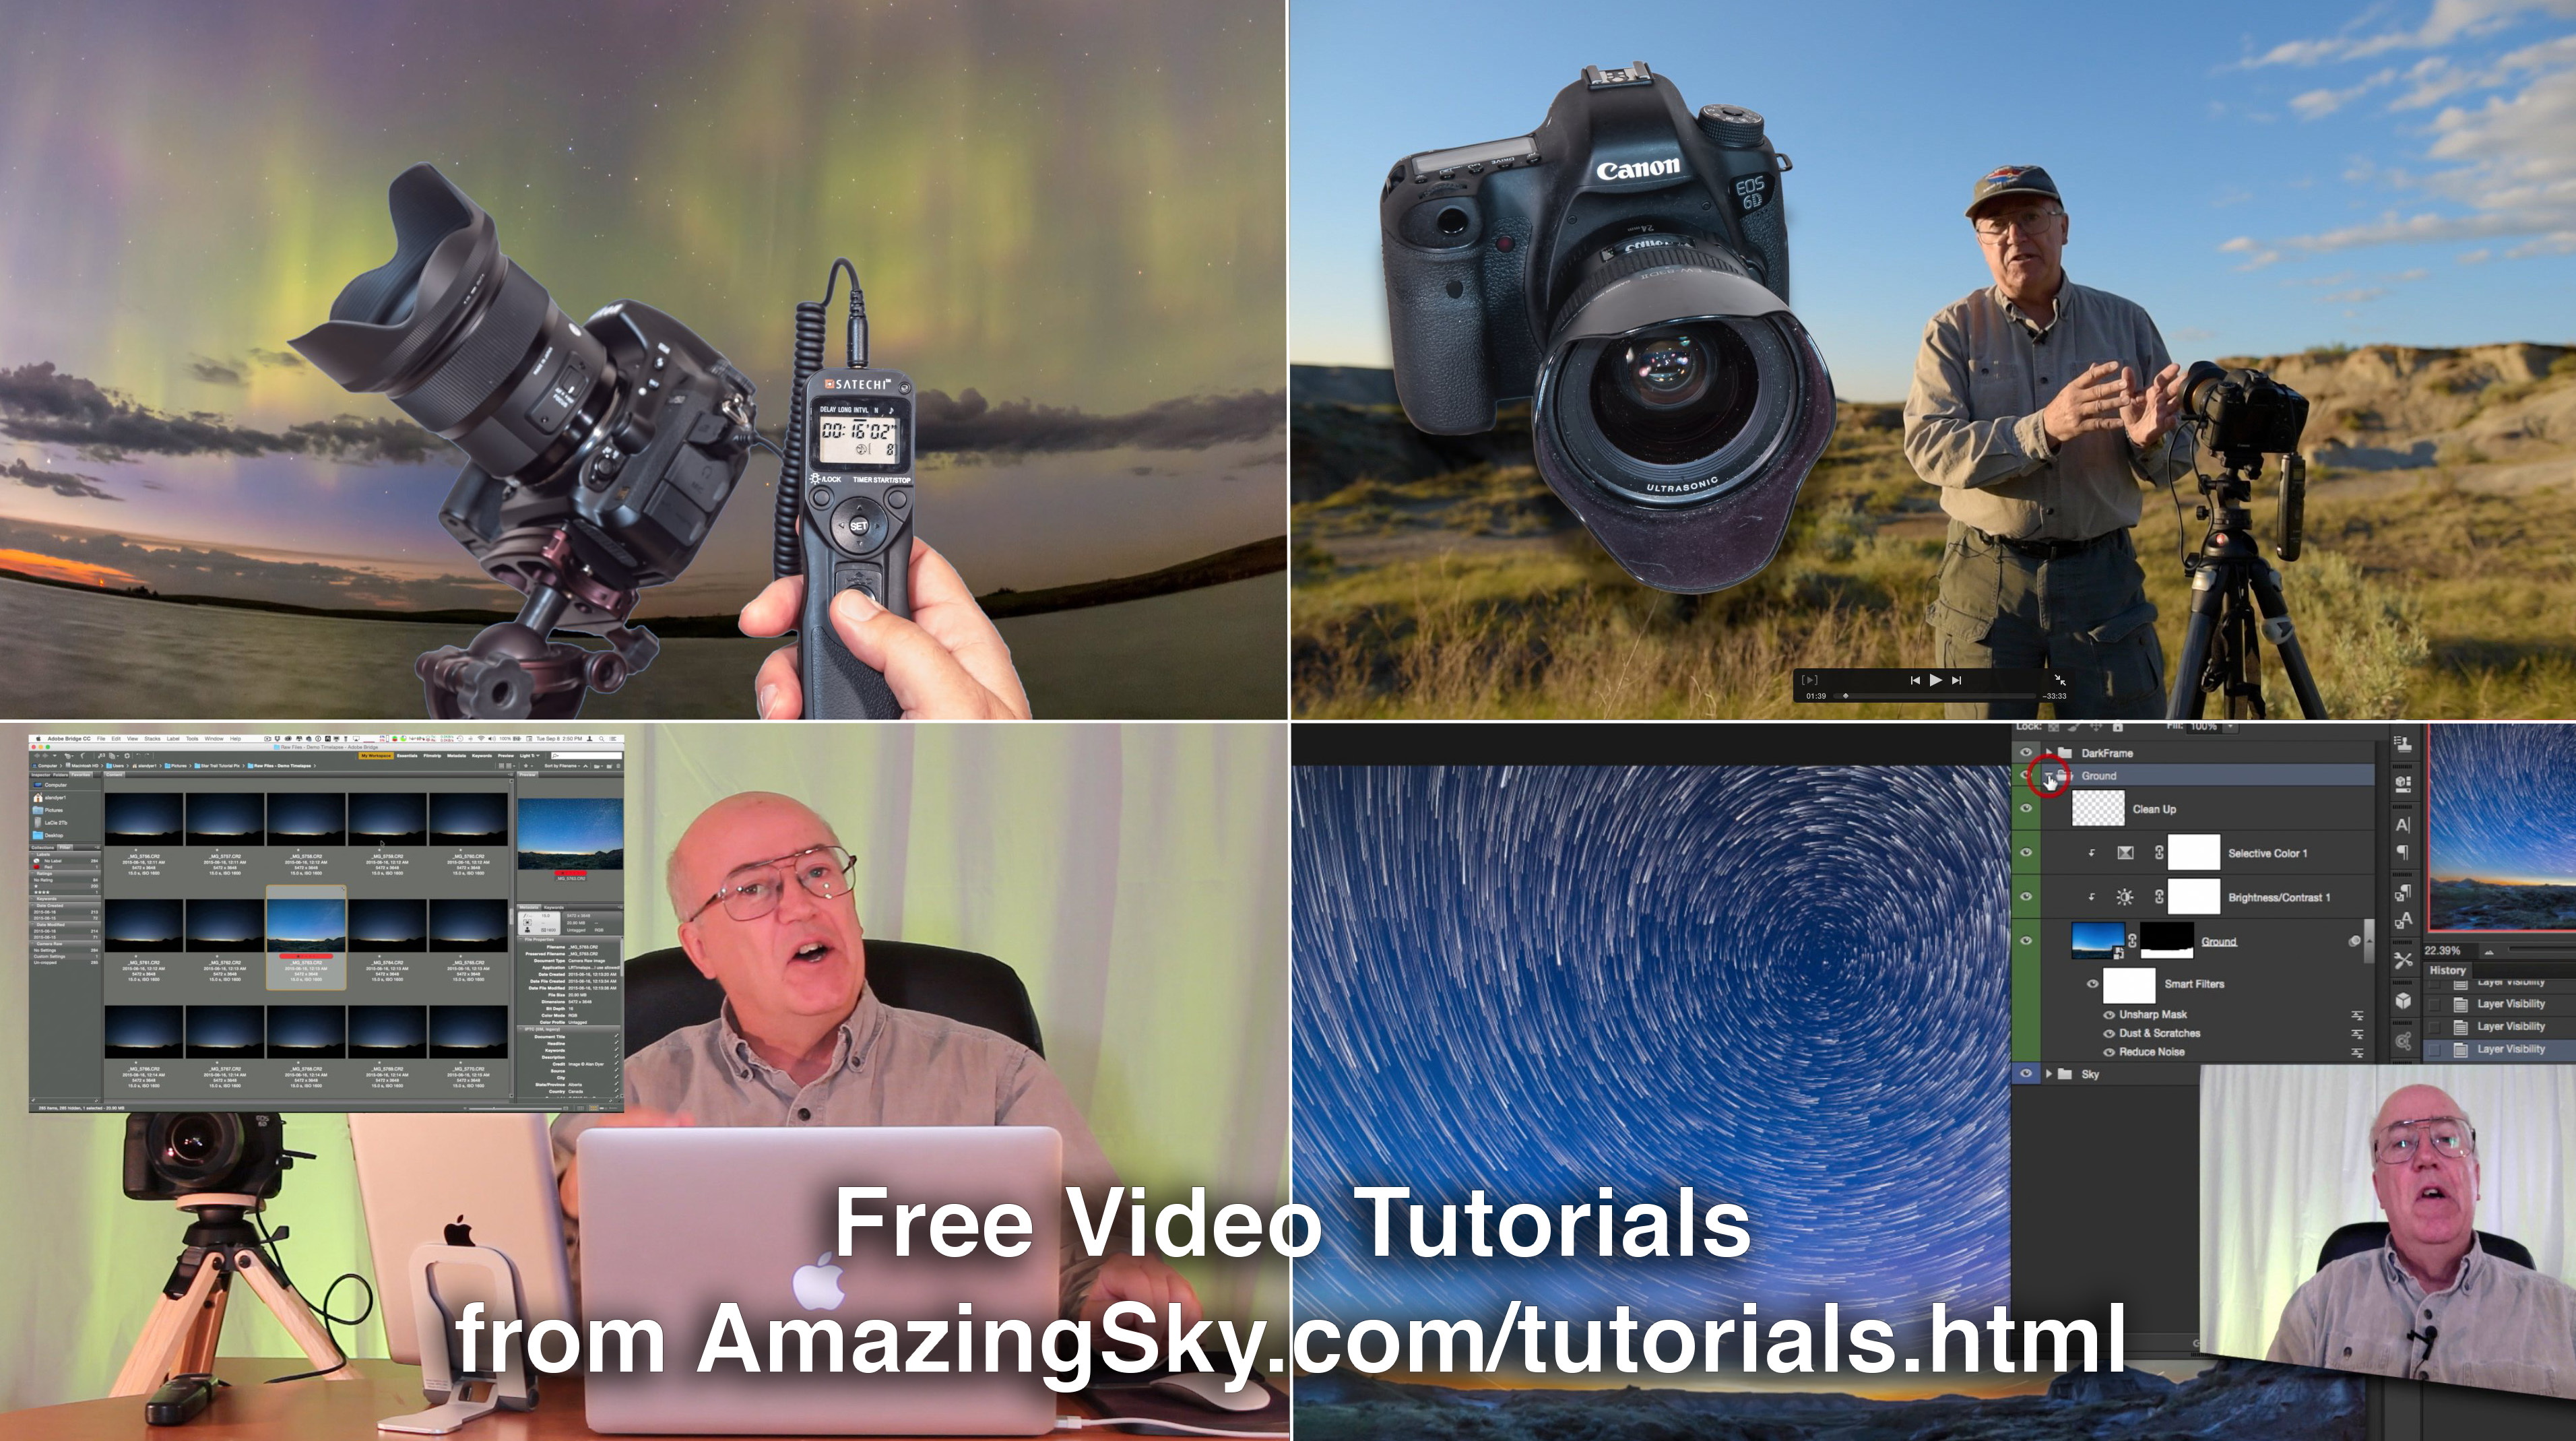
Learn the basics of shooting nightscape and time-lapse images with my three new video tutorials.
In these comprehensive and free tutorials I take you from “field to final,” to illustrate tips and techniques for shooting the sky at night.
At sites in southern Alberta I first explain how to shoot the images. Then back at the computer I step you through how to process non-destructively, using images I shot that night in the field.
Tutorial #1 – The Northern Lights
This 24-minute tutorial takes you from a shoot at a lakeside site in southern Alberta on a night with a fine aurora display, through to the steps to processing a still image and assembling a time-lapse movie.
Tutorial #2 – Moonlit Nightscapes
This 28-minute tutorial takes you from a shoot at Waterton Lakes National Park on a bright moonlit night, to the steps for processing nightscapes using Camera Raw and Photoshop, with smart filters, adjustment layers and masks.
Tutorial #3 – Star Trails
This 35-minute tutorial takes you from a shoot at summer solstice at Dinosaur Provincial Park, then through the steps for stacking star trail stills and assembling star trail time-lapse movies, using specialized programs such as StarStaX and the Advanced Stacker Plus actions for Photoshop.
As always, enlarge to full screen for the HD versions. These are also viewable at my Vimeo channel.
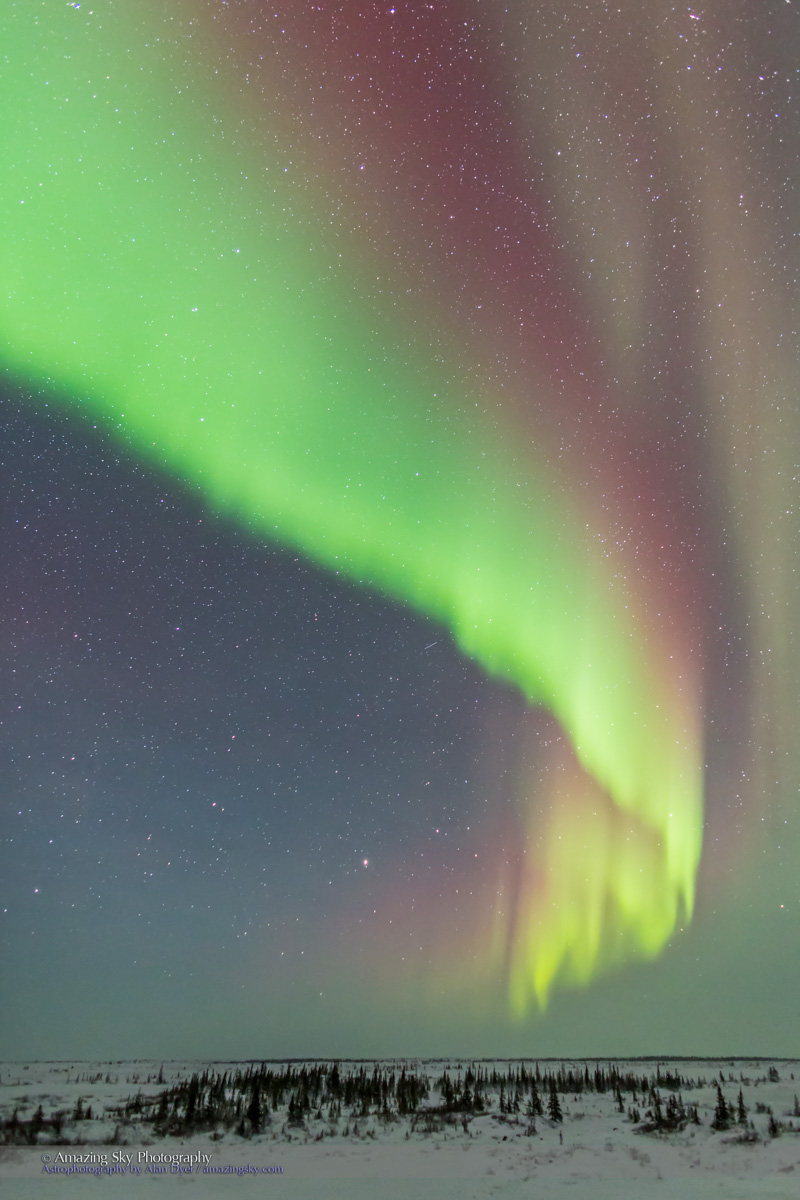
The Northern Lights dance overhead each night from Churchill, Manitoba.
If you really want to see the Northern Lights, don’t wait for them to come to you. Instead, you go to them.
For the second year in a row I’ve been able to participate as an instructor during week-long aurora courses and tours at the Churchill Northern Studies Centre on the shore of Hudson Bay. The site is at 58° latitude, far enough north to place us directly under the main auroral oval, the prime location for viewing the Northern Lights.
If it’s clear, a view of dancing arcs and curtains of aurora is almost guaranteed. Two nights ago we had a marvellous display, despite official indicators of aurora strength and geomagnetic activity all reading low or even zero.
Still, the Lights came out and danced across the sky.
The top photo is selfie of me standing the display in a 360° all-sky image shot for use in a planetarium. The research centre building is at left. The view is generally looking north.
This view is from the second floor deck of the centre, usually a bit more sheltered from the wind. It allows a good view to the north and east, where displays typically start, as they did this night. Feb. 13.
As the display developed the curtain rose up into the sky to arc from east to west across heavens.
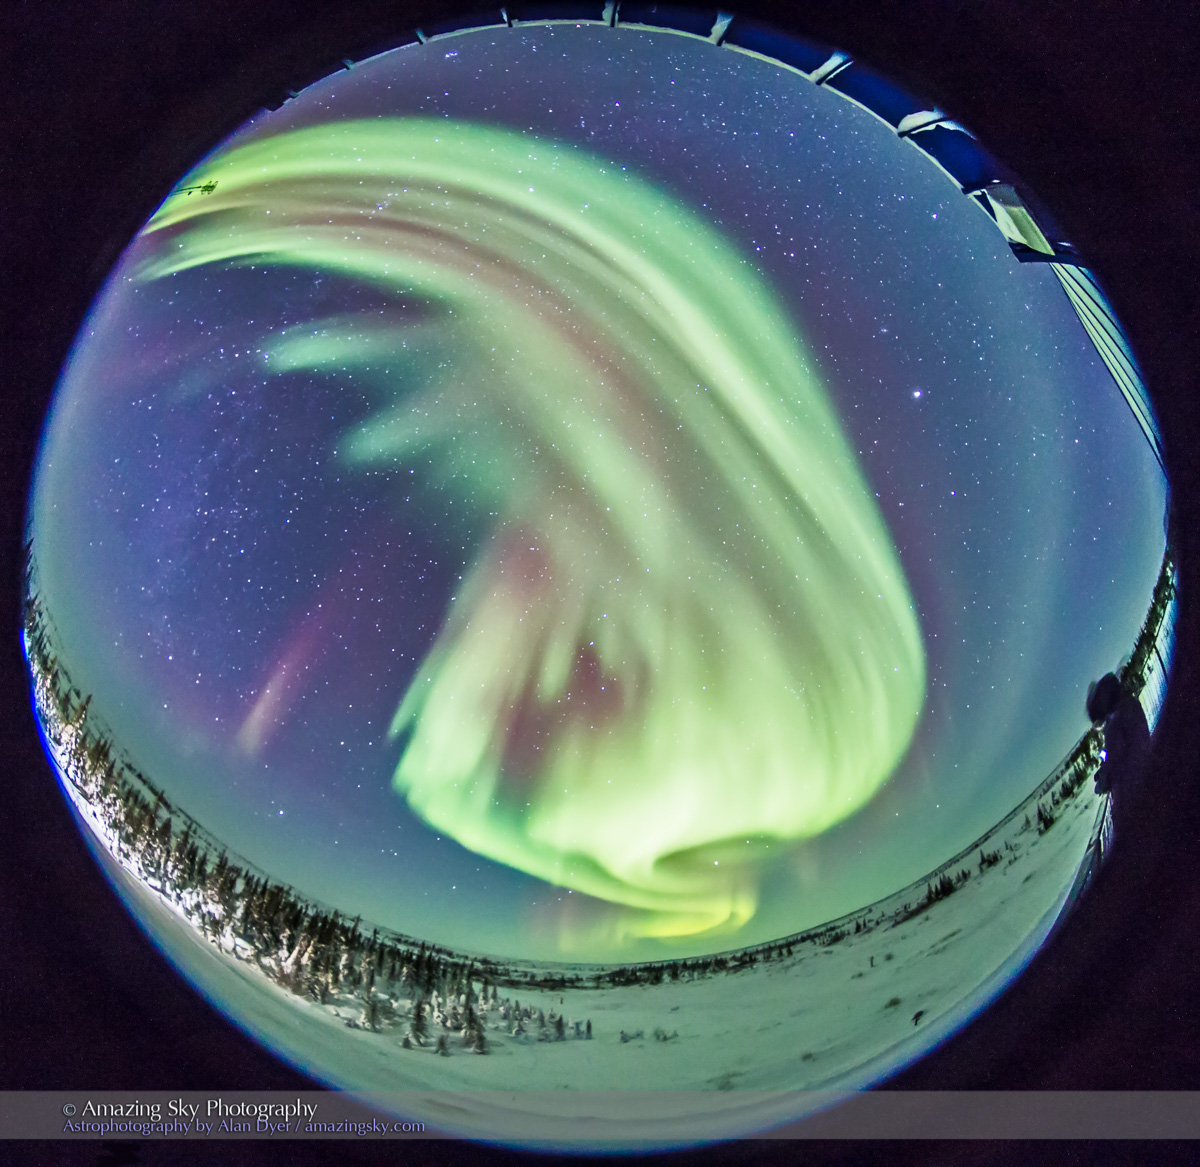
This image, also a 360° fish-eye image taken with an 8mm lens, shows the display at its best, with rippling curtains hanging overhead. It’s part of a time-lapse sequence.
The next night, February 14, was marked by fainter but an unusually red aurora, appropriate for Valentine’s Day perhaps. Or the 50th anniversary of our red and white Canadian flag.
The sky was a little hazier, but the aurora shone through, initially only with a red and orange tint, colours we could just see with the unaided eye – the long exposures of the camera really bring out the colours the eye can only just perceive when the aurora is dim.
The green curtains, seen here in the distance, did arrive a few minutes later, lighting up the curtains in the more usual green colour, with just upper fringes of red.
It seems the red is from low-energy electrons exciting oxygen only in the upper atmosphere. Only later did the more energetic electrons arrive to excite the green oxygen transition that occurs at lower altitudes.
With luck, I’ll have more nights to stand under the auroral oval and look up in wonder at the Northern Lights.
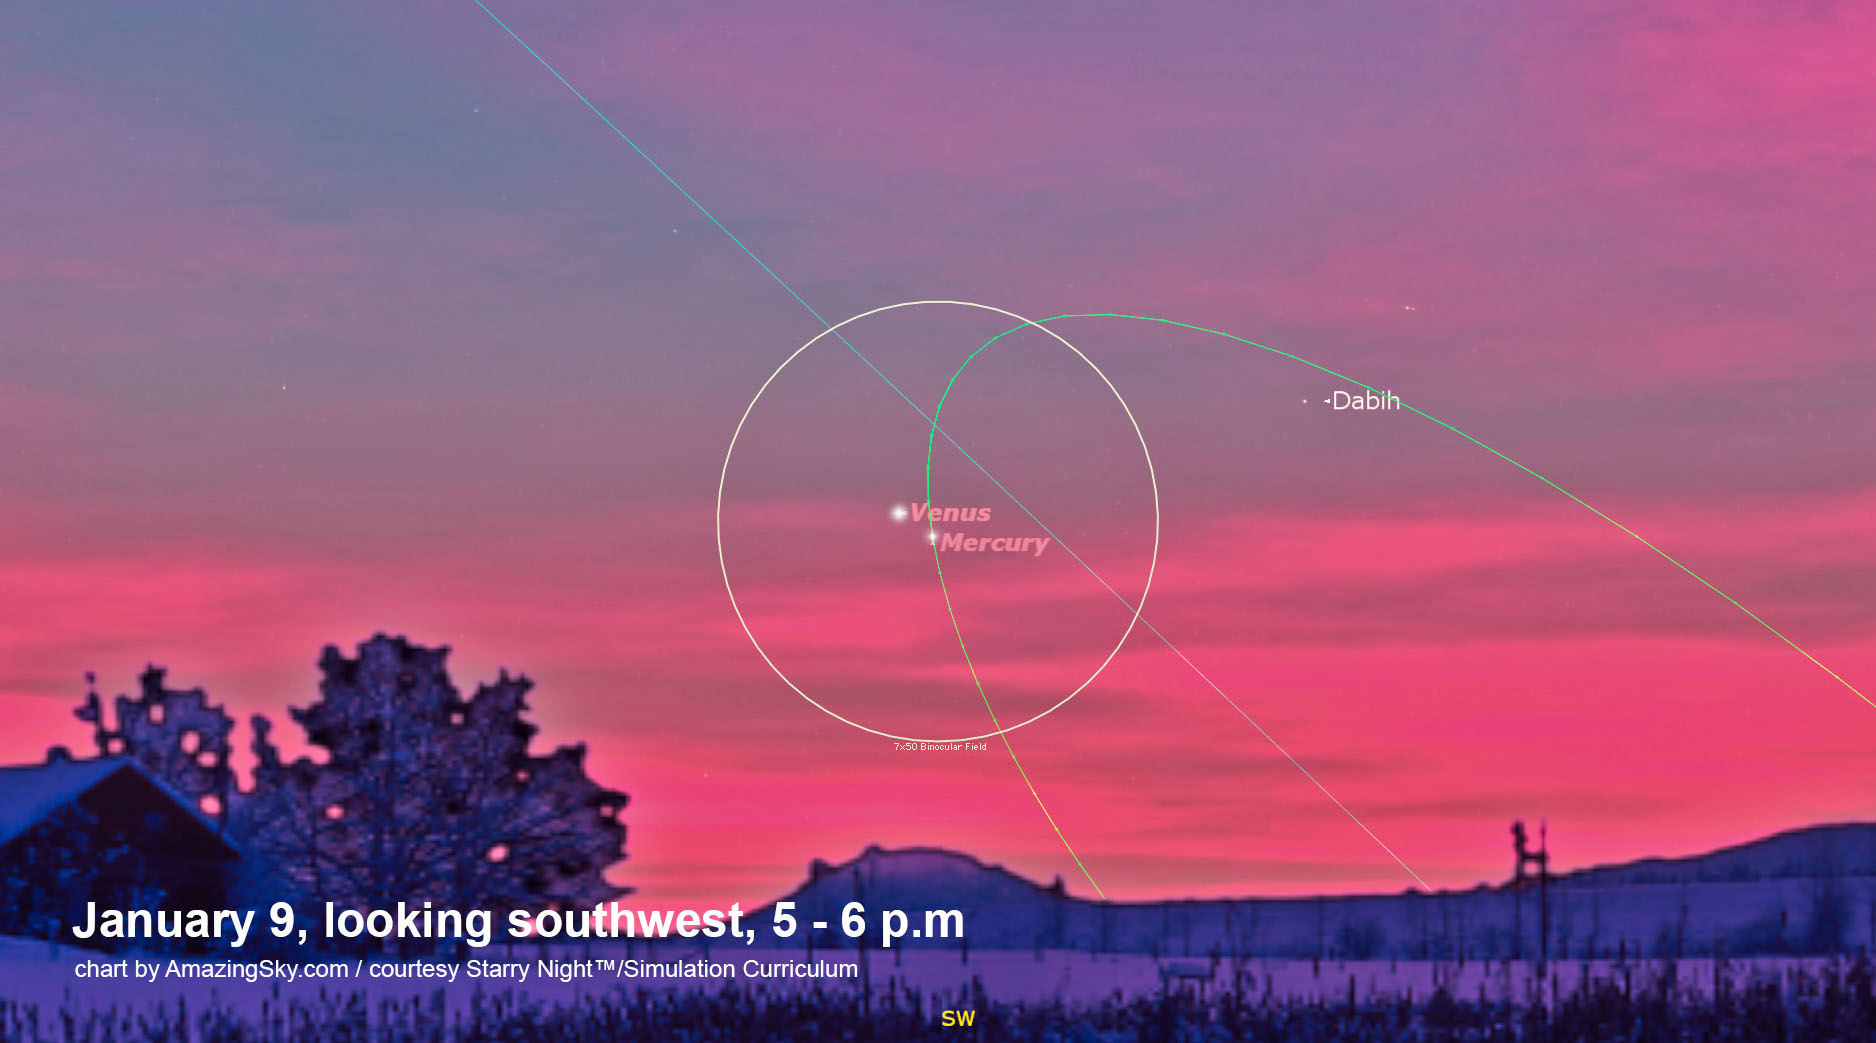
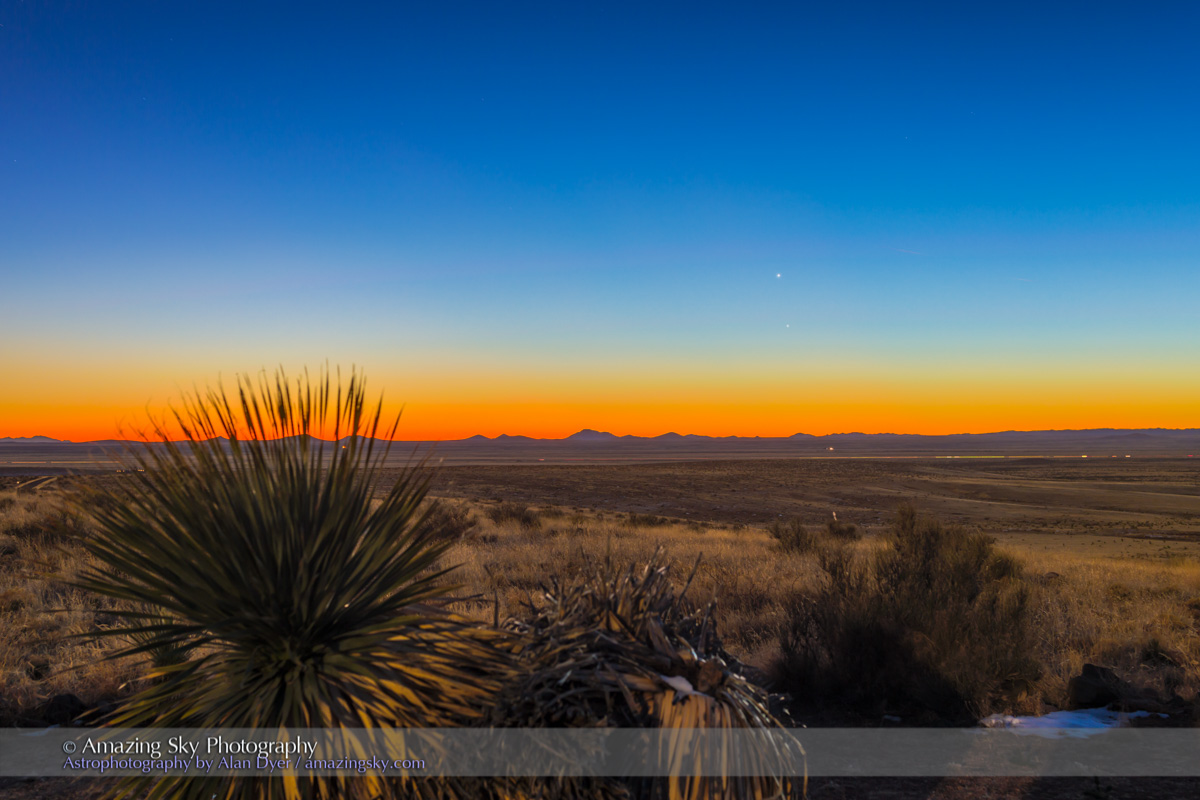
The two inner planets, Mercury and Venus, meet up in the dusk sky this weekend.
While I usually devote my blog to showcasing my photos of celestial events and wonders, a New Year’s resolution for me was to expand my blog to include alerts to what’s coming up in the sky. Here’s the first entry for 2015.
This weekend and for the following week (January 9 to 18) look southwest to see brilliant Venus accompanied in a close conjunction by elusive Mercury.
Look low in the southwest between 5 and 6 pm local time.
Venus is brilliant and hard to miss. Yes, that’s Venus not an aircraft!
But Mercury is fainter and is best seen at first in binoculars, as a dimmer star near Venus. Once you sight it, it’ll be easy to see naked eye, as long as your evening sky is clear.
Mercury passes less than a degree from Venus this weekend (the circle shows a typical 7° binocular field).
Here are the two planets as they appeared last Sunday night, when they were farther apart.
After Sunday, Mercury continues to climb higher, separating from Venus, as it moves along the green orbital path shown here. Mercury reaches its highest angle away from the Sun on Wednesday, January 14 – what we call “greatest elongation.”
It then drops back toward the Sun and horizon. We won’t be able to see Mercury well again in the west until early May,
Happy planet hunting!
P.S. Visit my webpage to download a PDF of a free 2015 Sky Calendar.
Happy New Year to all! To mark the first day of 2012 here is a view of the quarter Moon as it appeared in the early evening twilight on January 1, 2012.
The coming year promises to be a superb one for stargazing with:
• a wonderful evening appearance of Venus in March and April, including a rare passage through the Pleiades star cluster on April 3
• an array of 5 planets in the evening sky in March
• a partial eclipse of the Sun May 20 (annular if you travel to the SW United States)
• a partial eclipse of the Moon June 4 (at dawn for western North America)
• an amazingly rare transit of Venus on June 5 (North American time)
• a fine year for the Perseid meteors August 12/13
• a daytime occultation of Venus on August 13 (for North America)
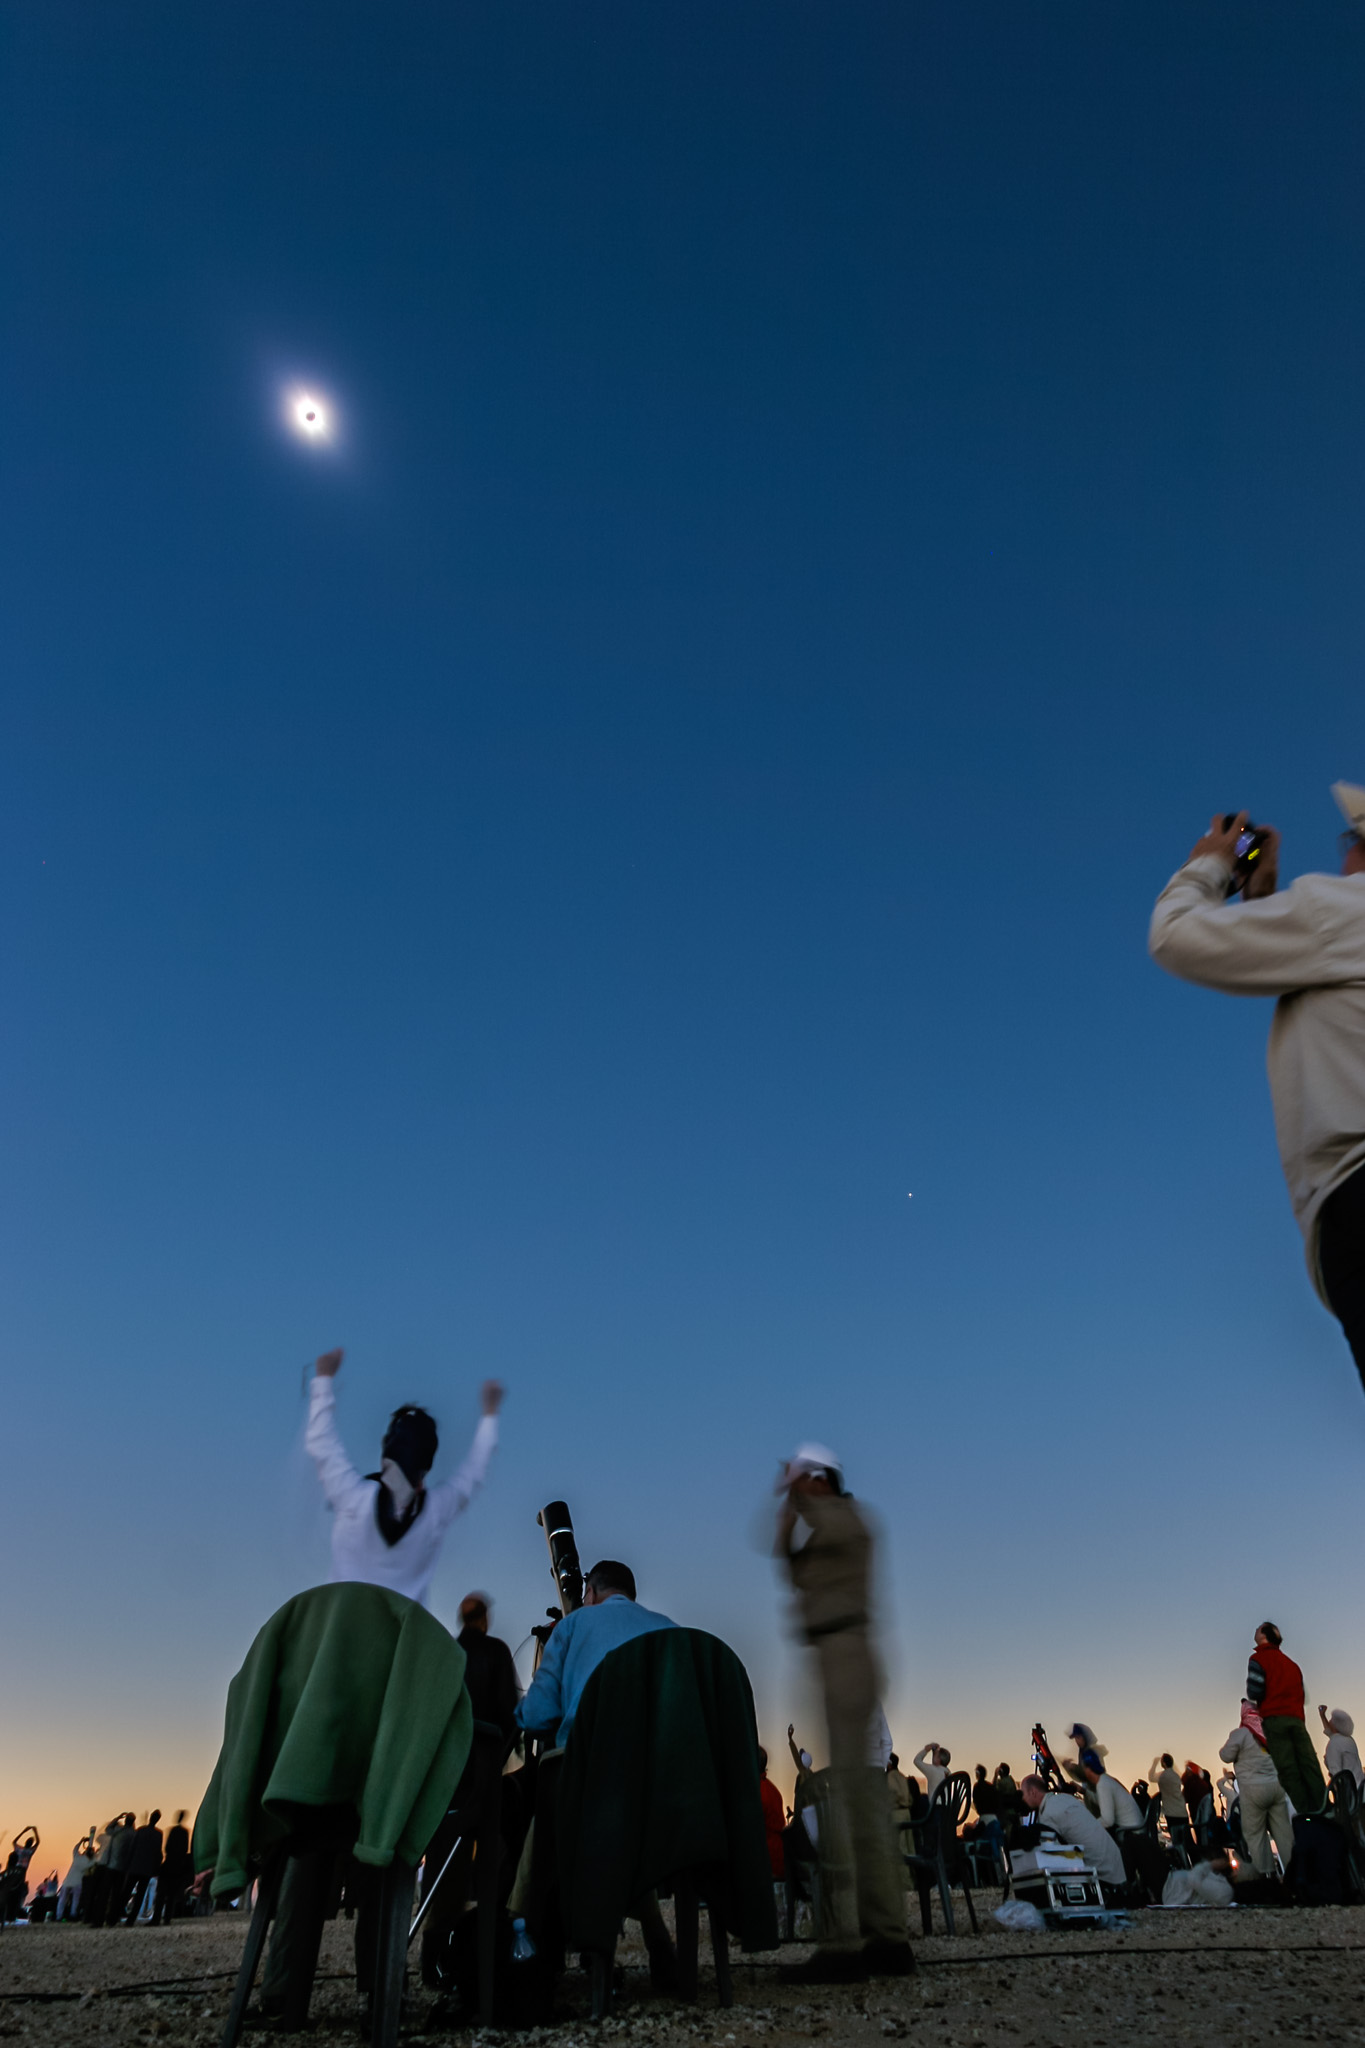
• a total eclipse of the Sun from Australia and the South Pacific
• a host of fine Moon and planet conjunctions throughout the year
• and no doubt some fine displays of Northern Lights as the Sun picks up in activity toward its predicted 2013 maximum.
So there should be lots to shoot and blog about in 2012. In 2011, since I started this blog in February, my Amazing Sky blog has served up 103 posts and 14,000 image views, seen by people on 6 continents — I have yet to break into Antarctica! Perhaps in 2012.