Tutorials and Tips for the Solar Eclipse


As eclipse day approaches here are some tips and video tutorials from me about how best to capture the total eclipse of April 8, 2024.

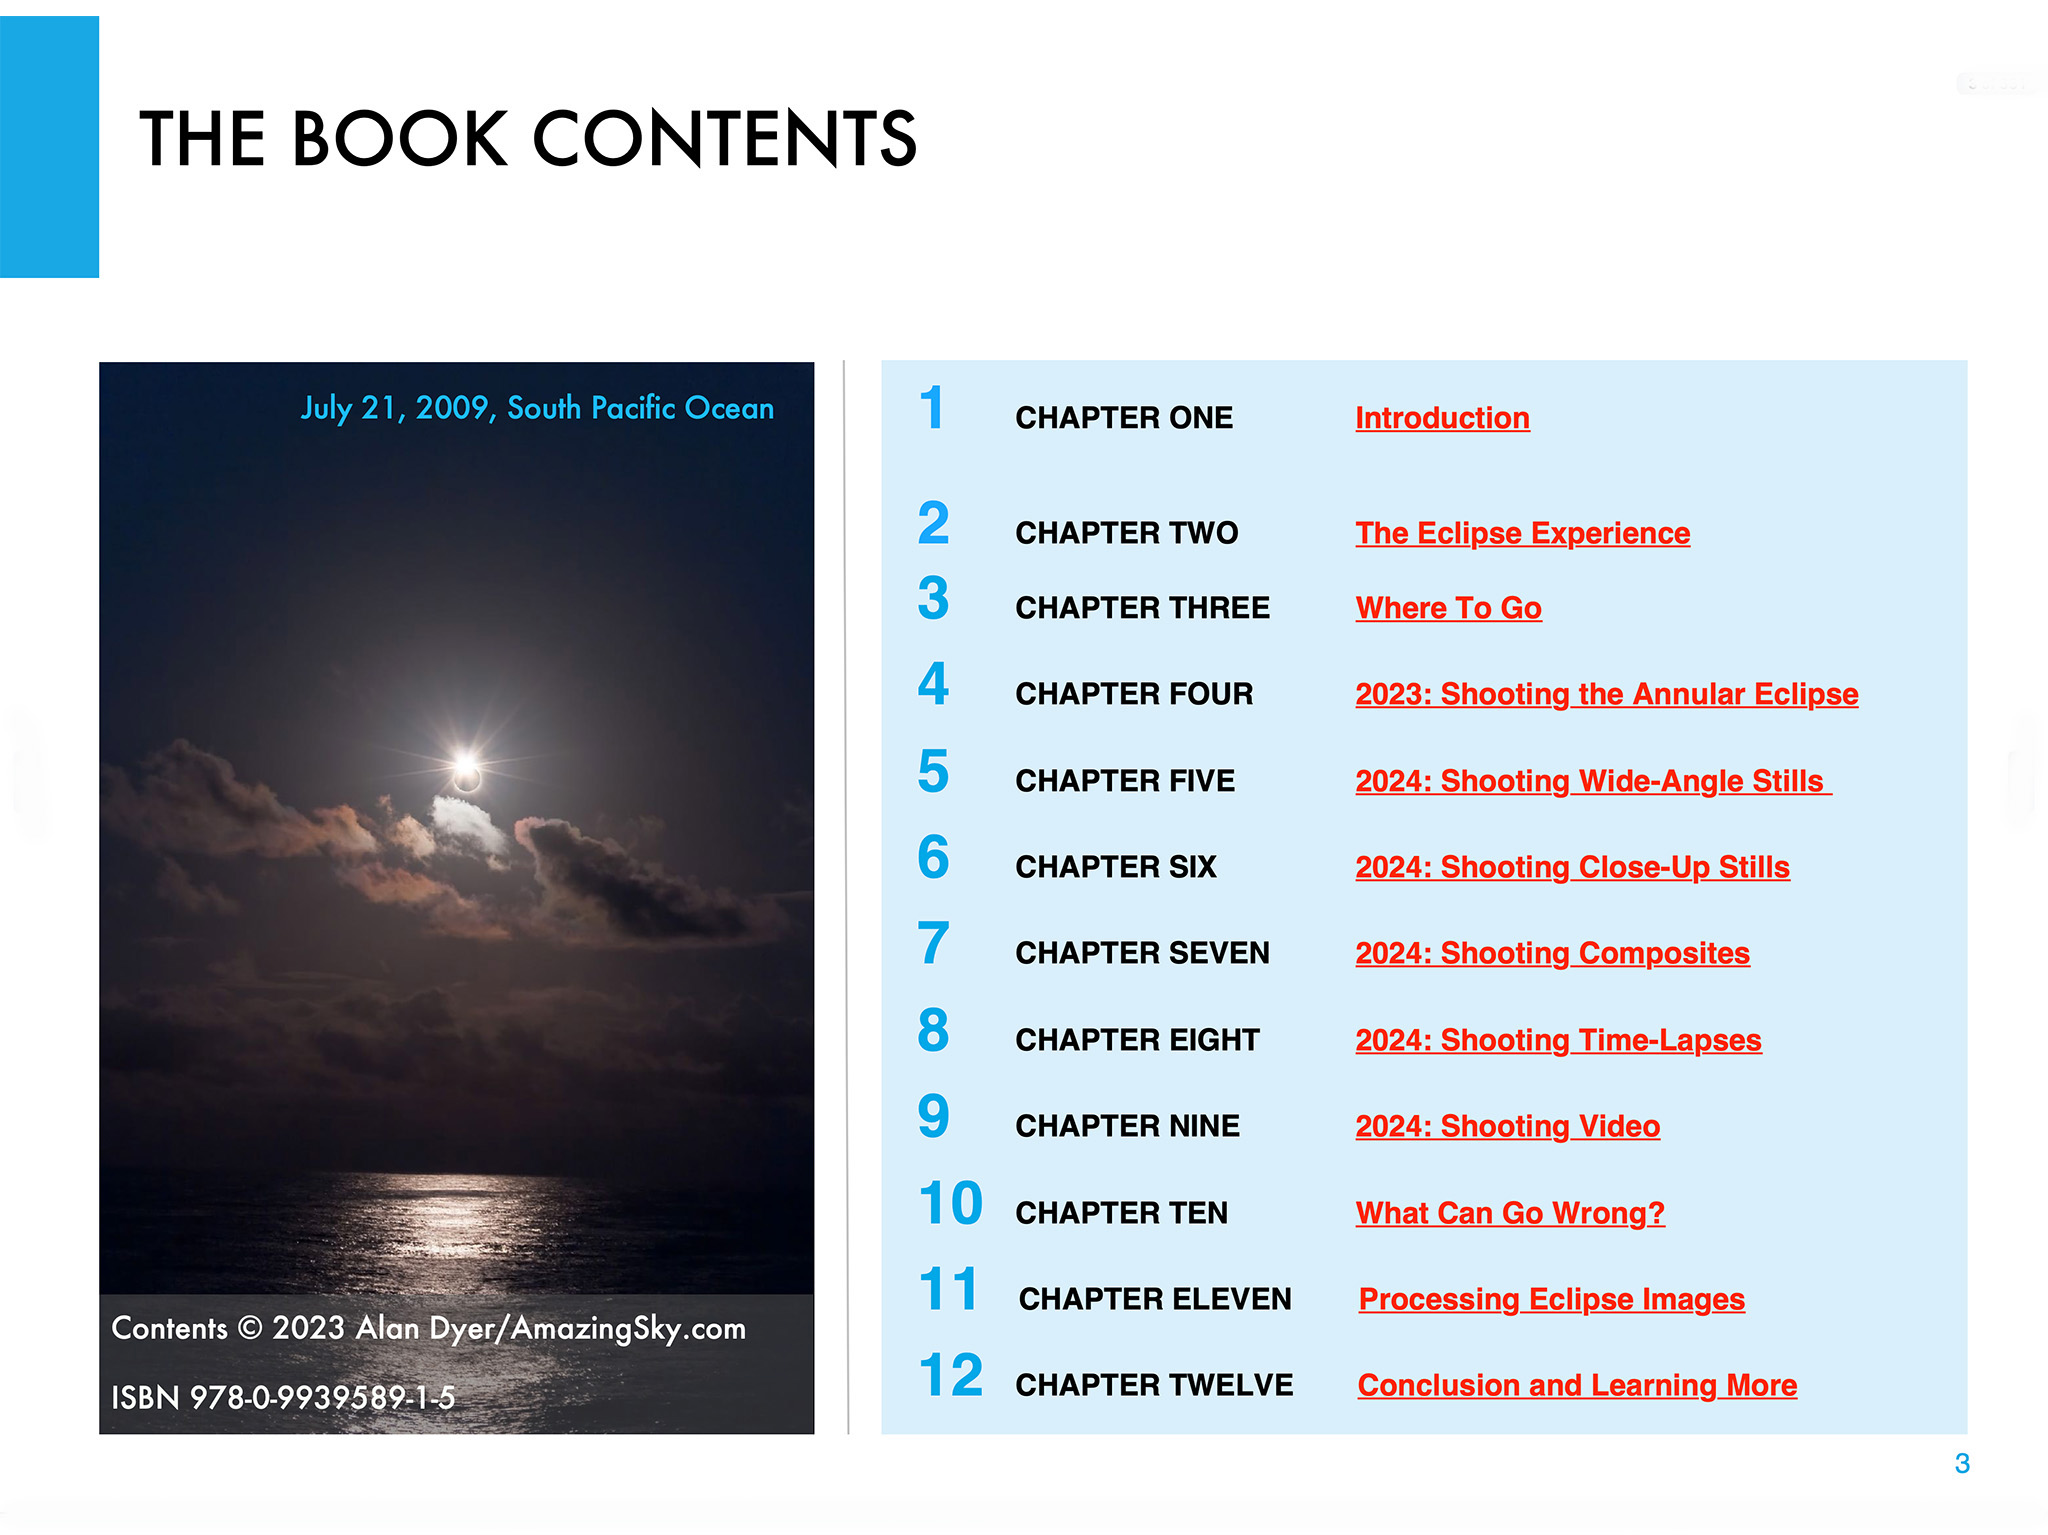
There are many ways to capture great images and movies of a total eclipse of the Sun. I outline them all in great detail in my 380-page ebook How to Capture the Solar Eclipses, linked to at right.

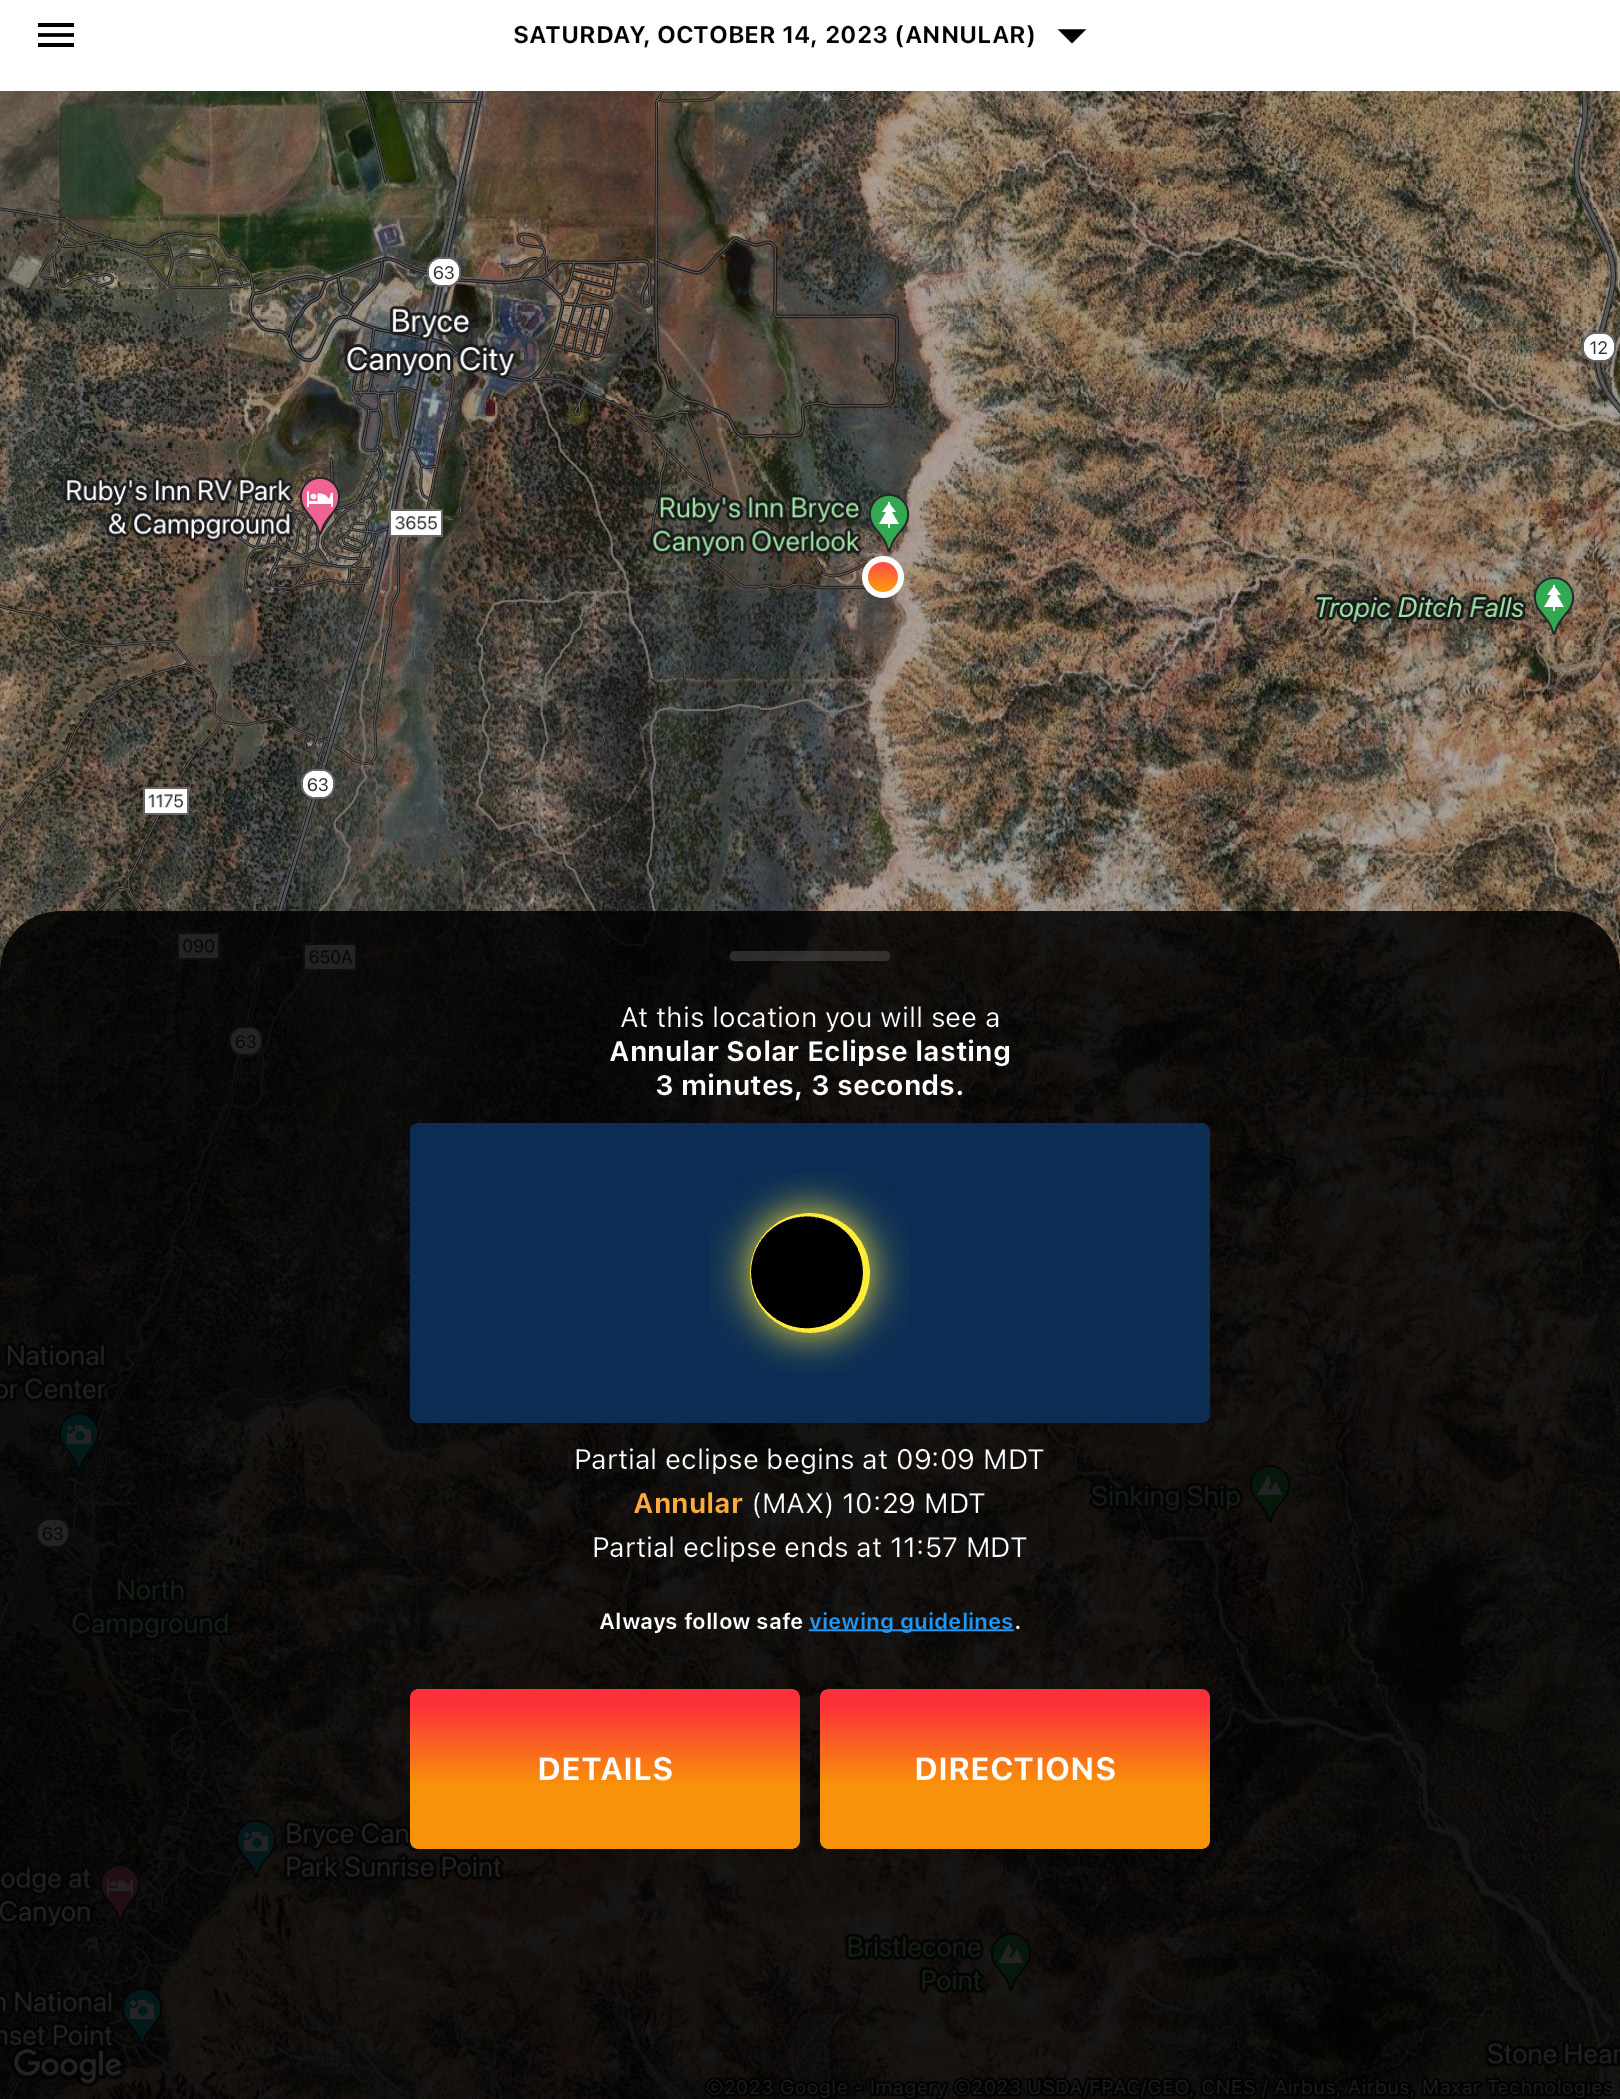
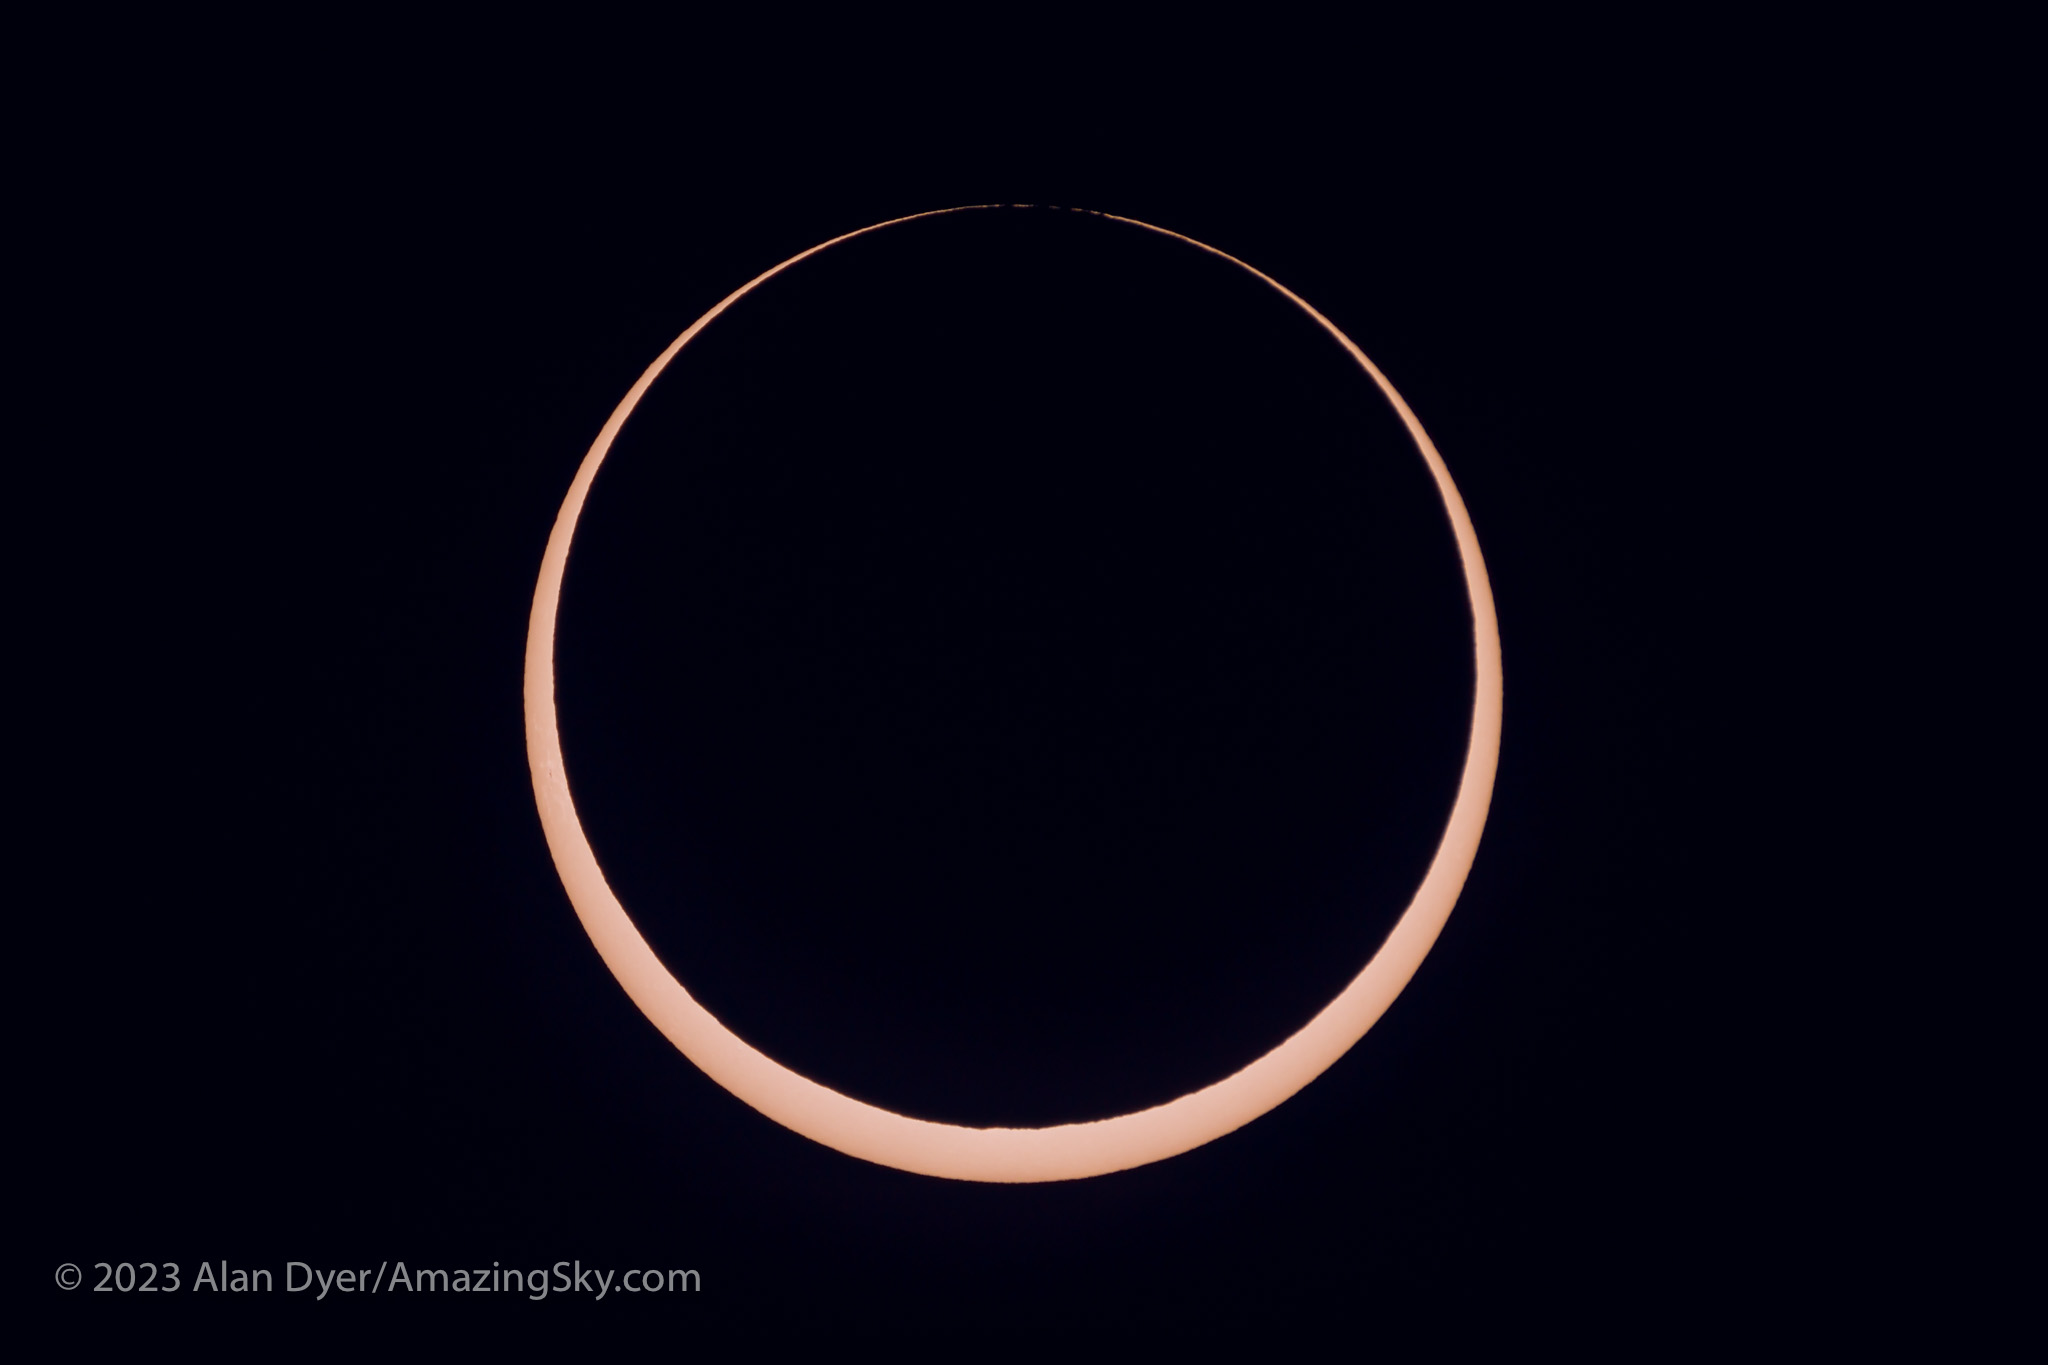
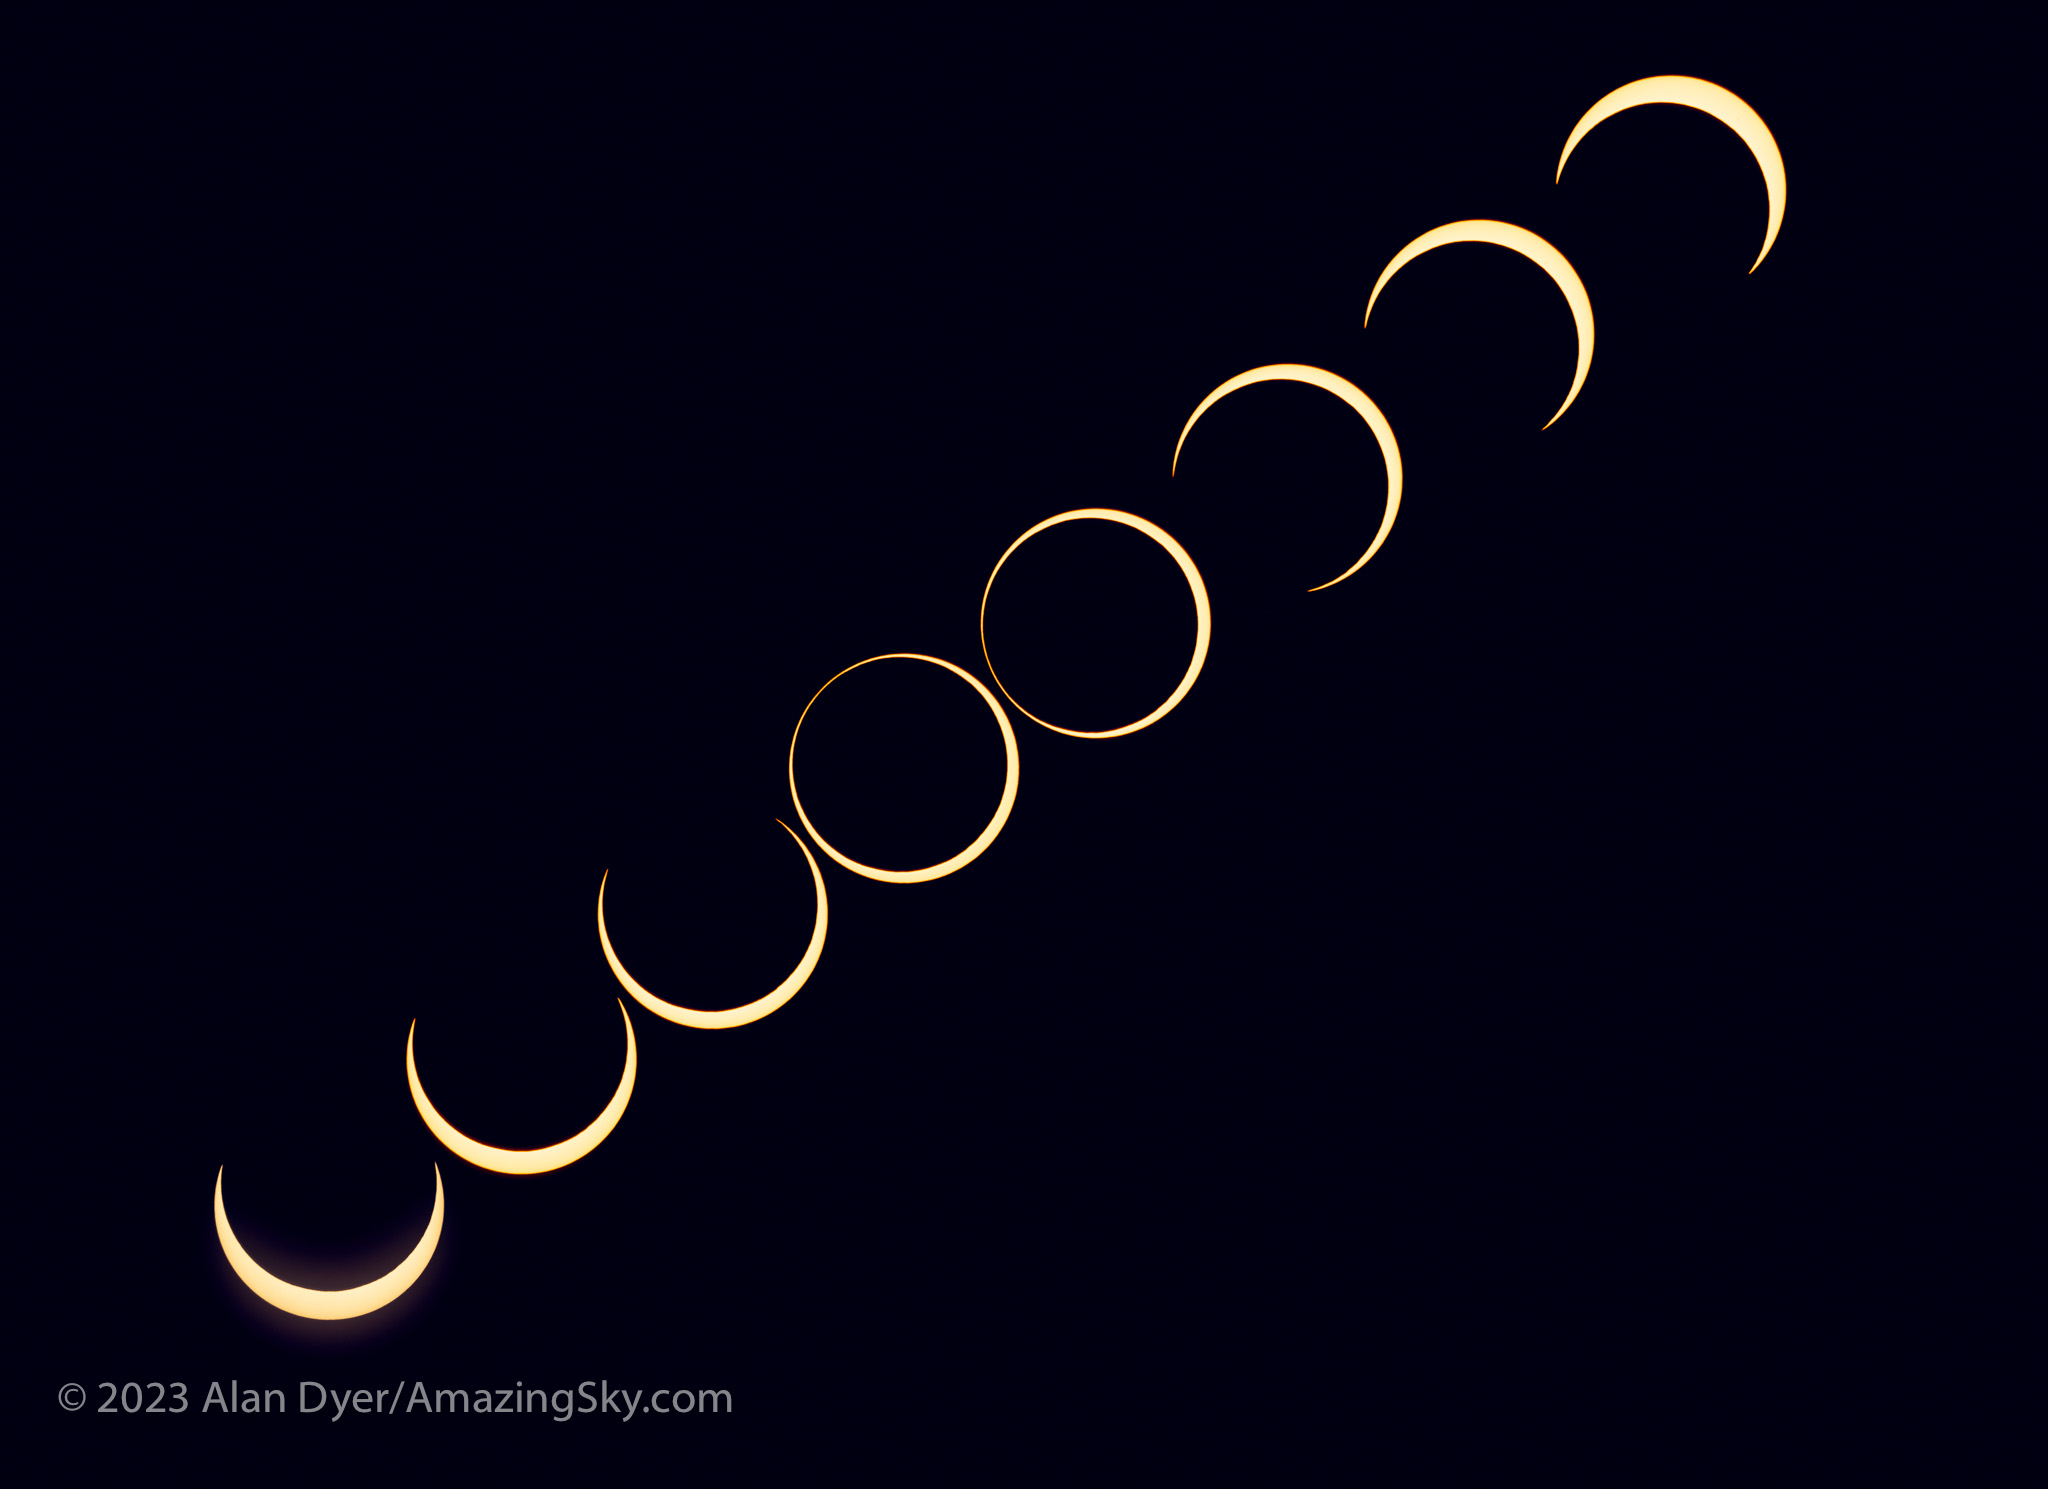
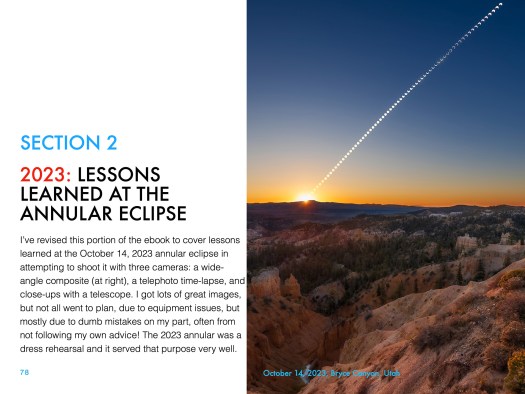
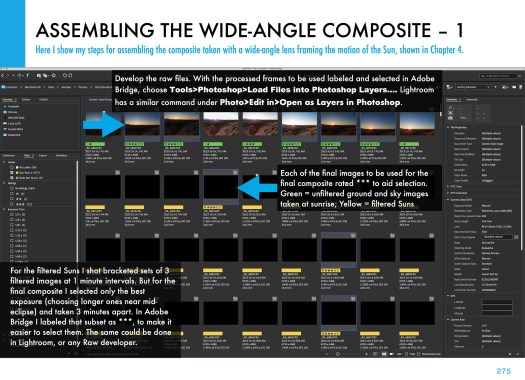
Originally published in June 2023, I revised the ebook following the October 14, 2023 annular eclipse of the Sun to include “lessons learned at the eclipse,” and some processing tutorials on assembling annular eclipse composites. I’ve also added new content on using software to control cameras and updated information about solar filters.

Brief Tips and Techniques

The August 21, 2017 total solar eclipse over the Grand Tetons as seen from the Teton Valley in Idaho, near Driggs. With the Canon 6D and 14mm SP Rokinon lens at f/2.5 for 1/10 second at ISO 100.

My breakdown of recommend methods, in order from simplest to most complex, and with increasing demands on your time, is generally this:

  1. Use a Phone Camera for a Movie. While they can be used for a quick handheld grab shot during totality, a better method is to place a phone on a tripod using a clamp of some kind. Then a few minutes before totality aim and frame the scene, with no filter over the camera lens. Start it in movie mode to record video of the eclipse and sky changes, and the excited sounds of your group! Just remember to stop the video shortly after the end of totality and aim the phone away from the Sun. Never leave any unfiltered camera aimed at the Sun for a long time.
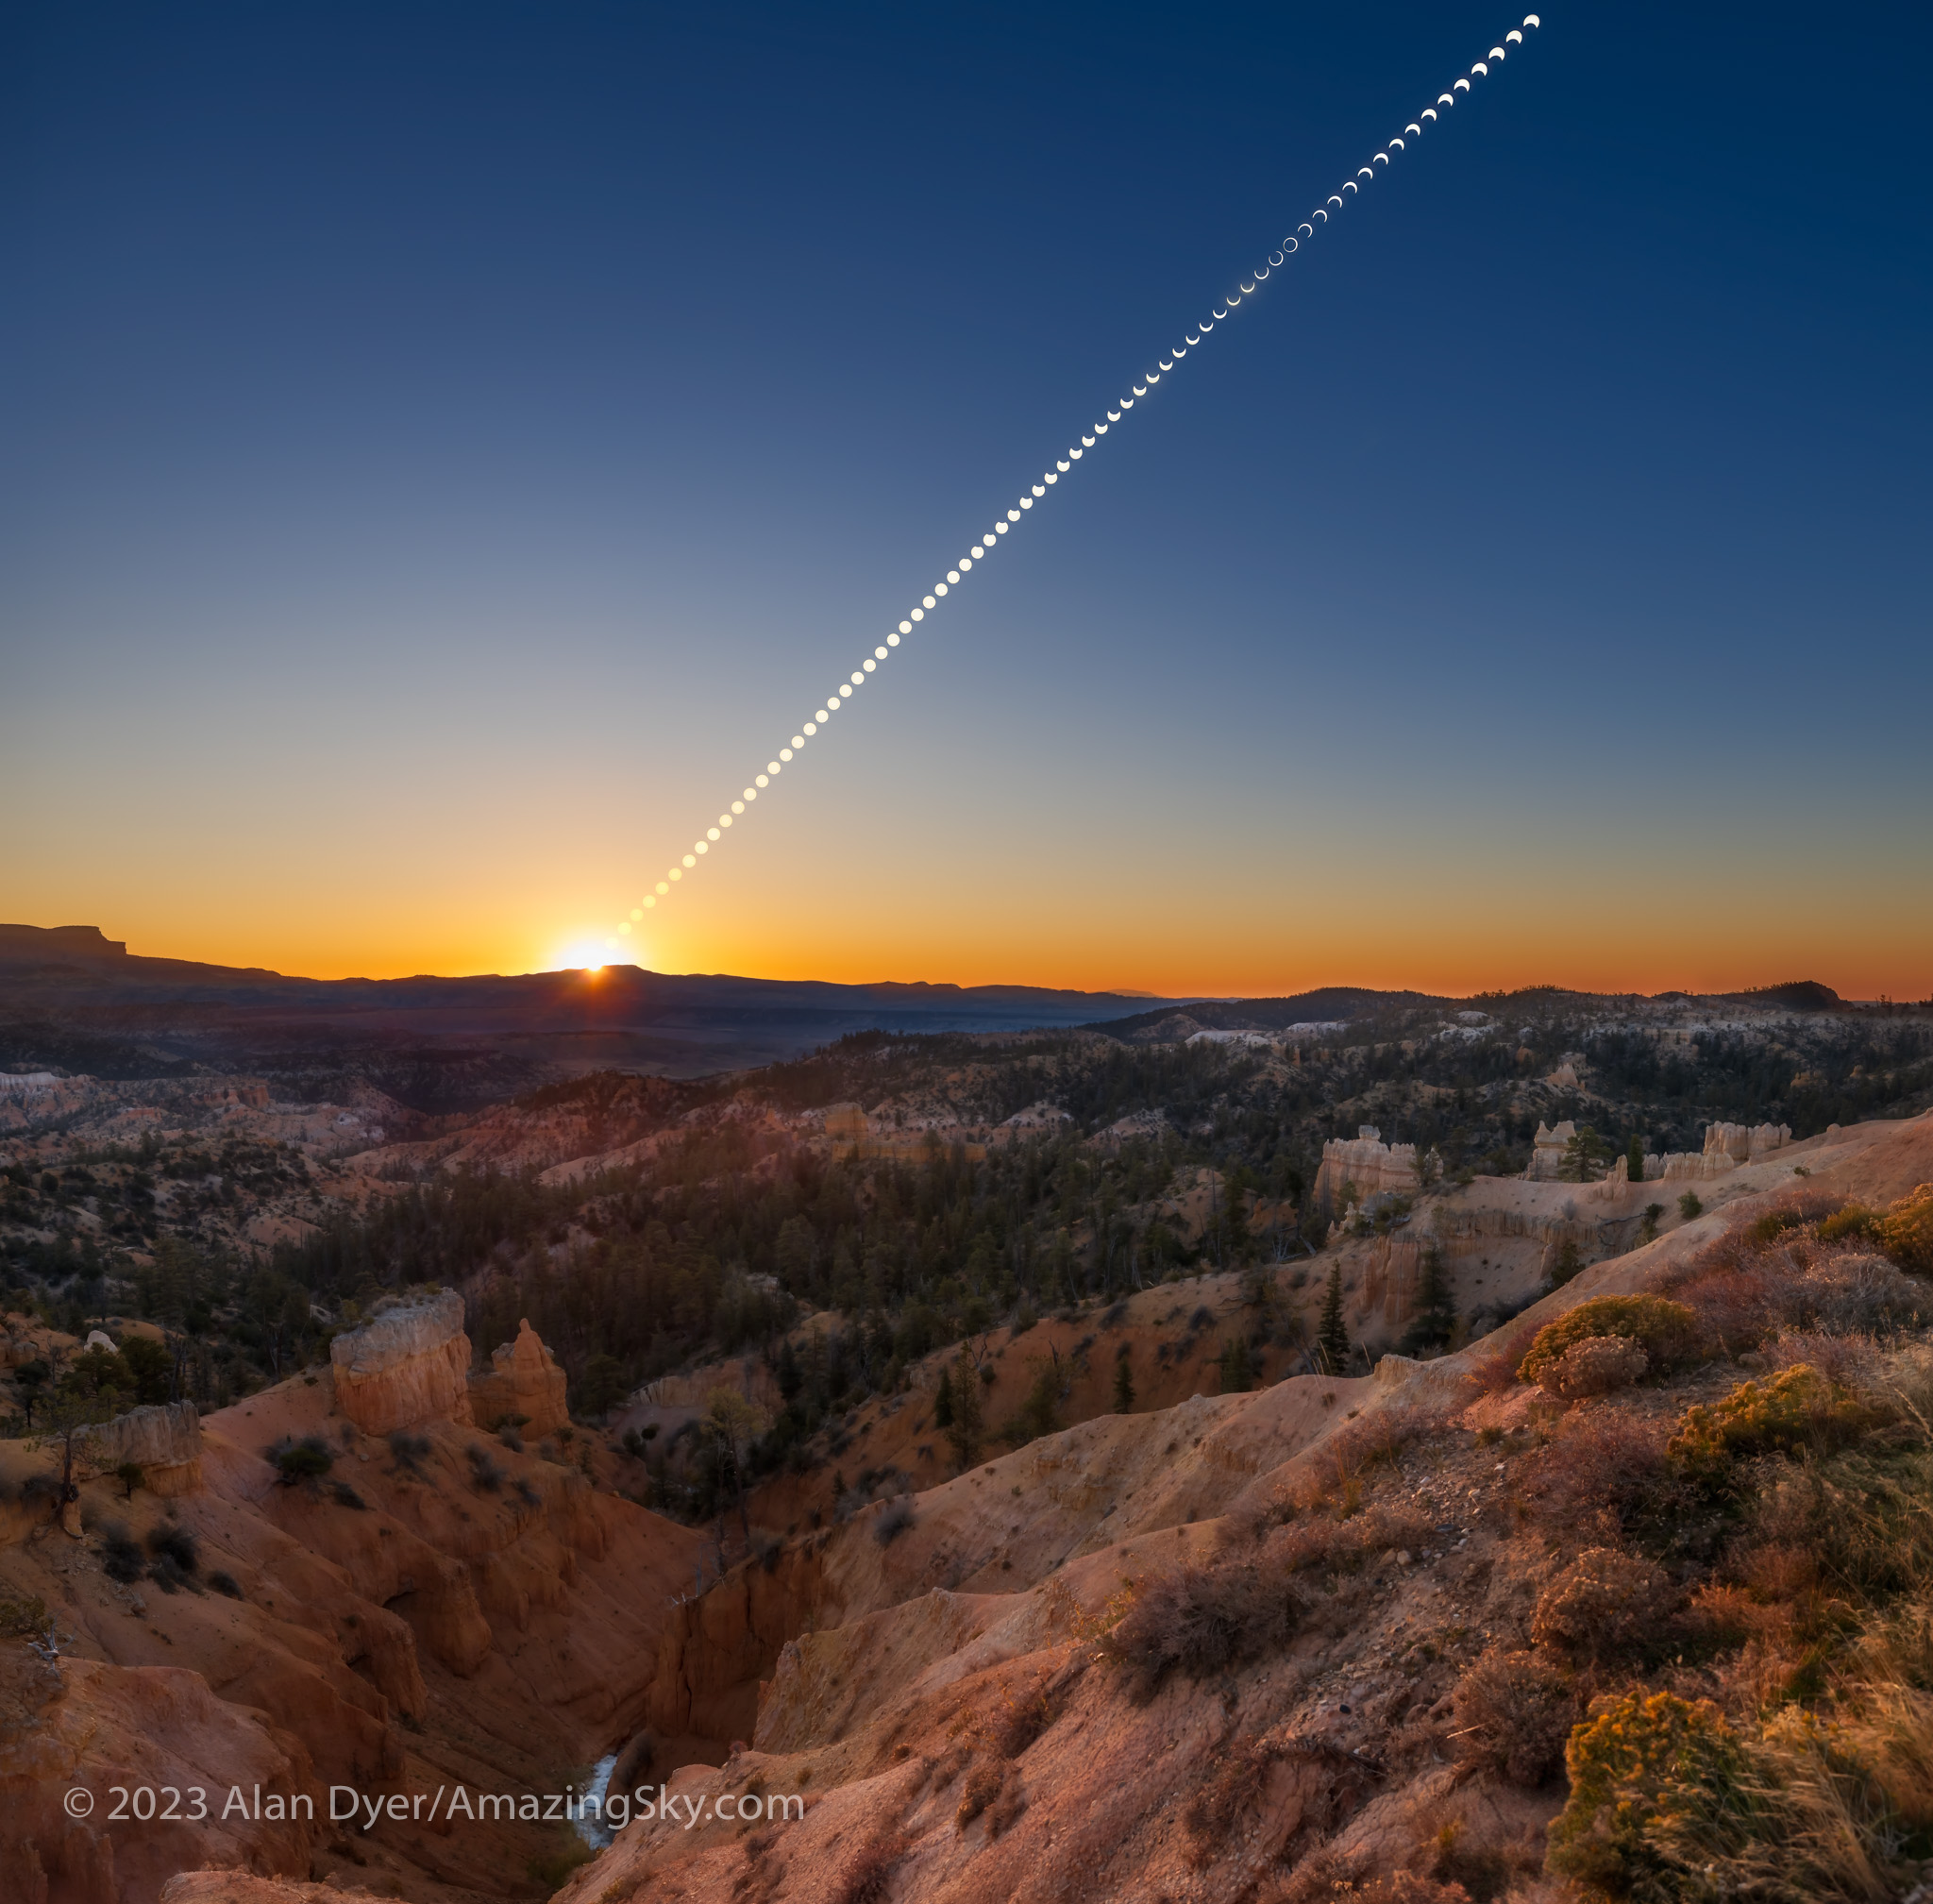
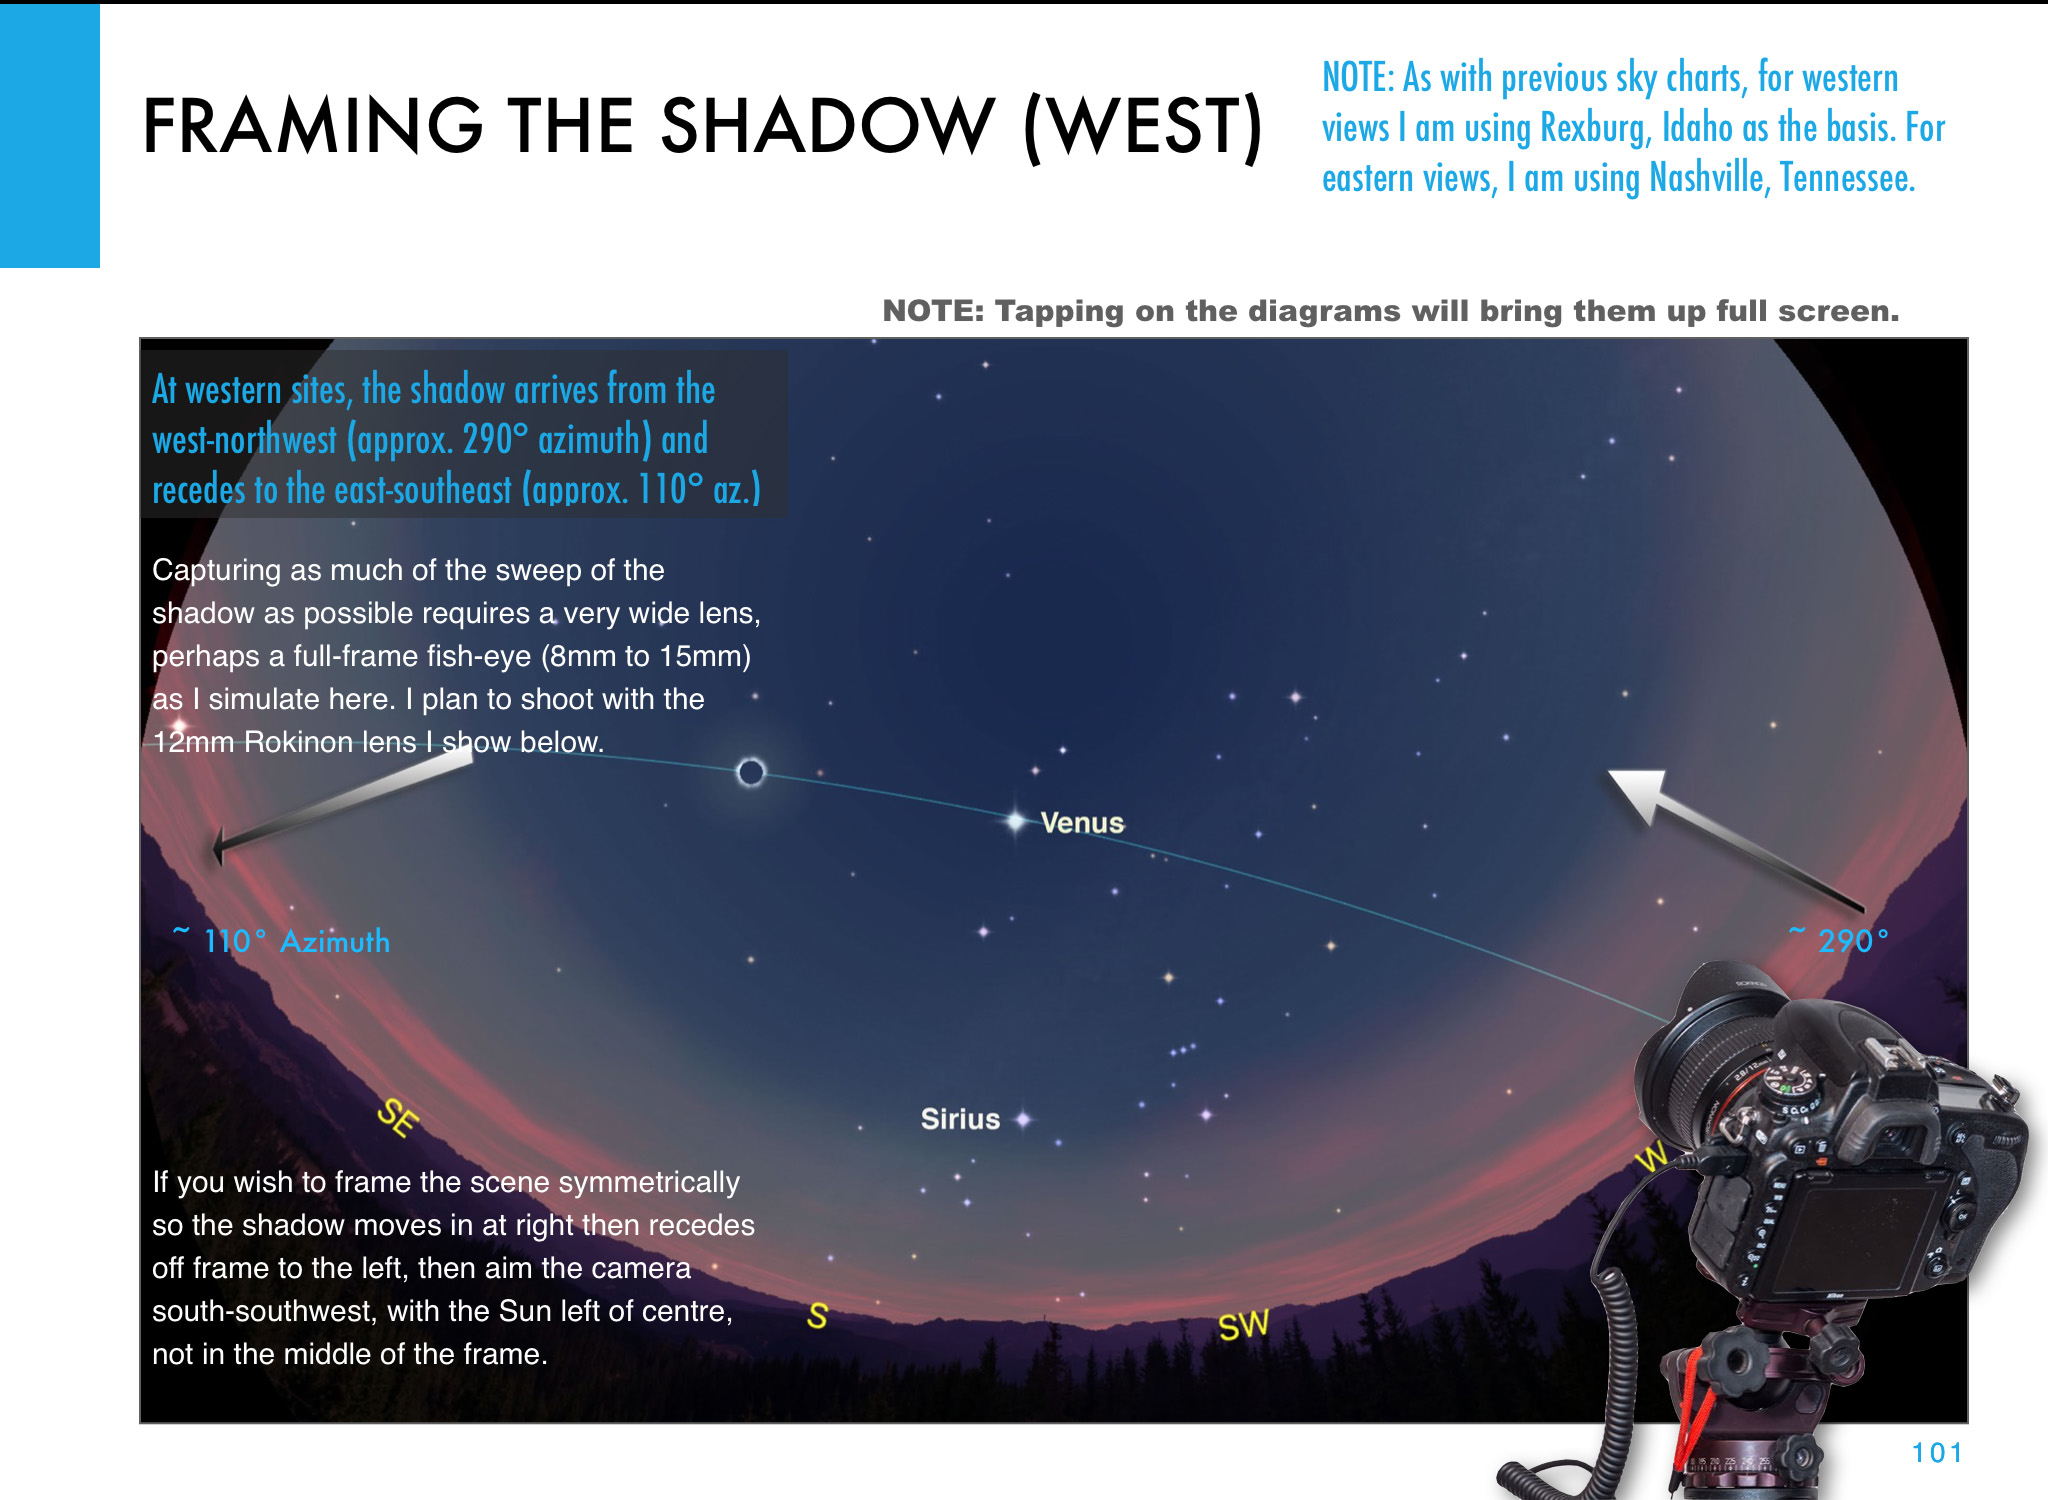
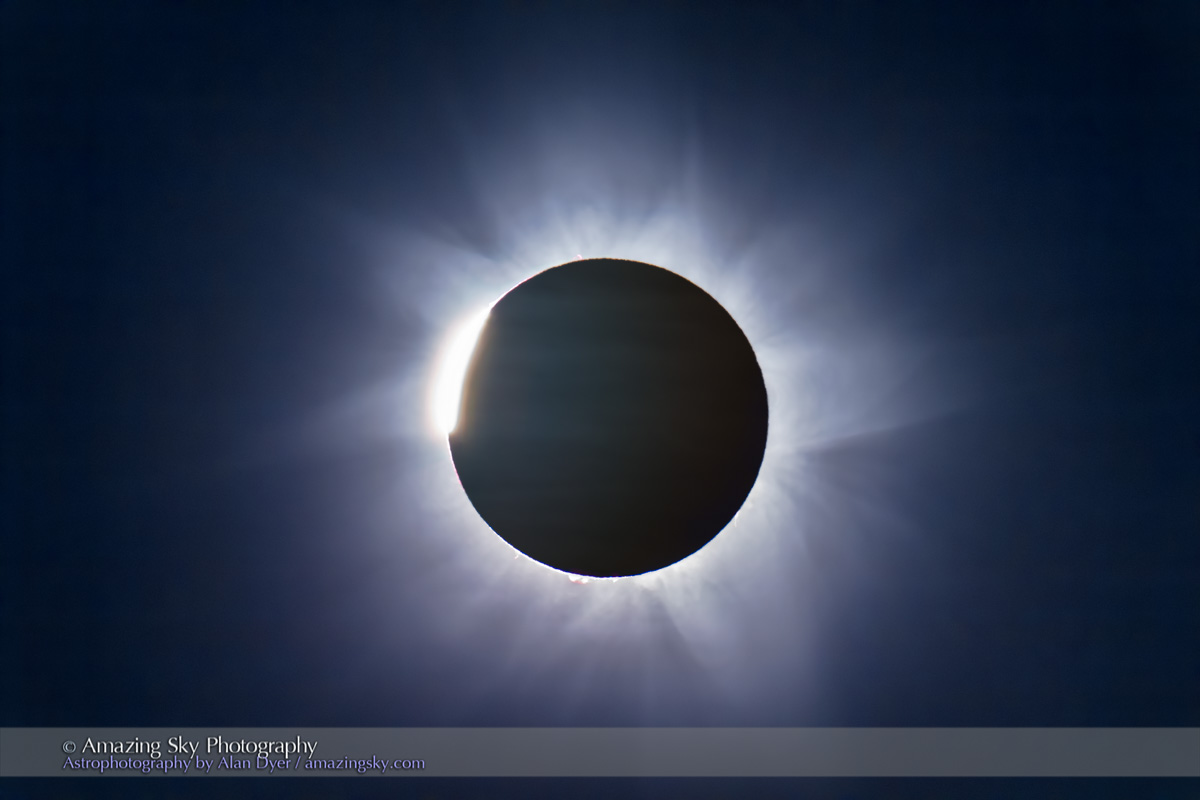
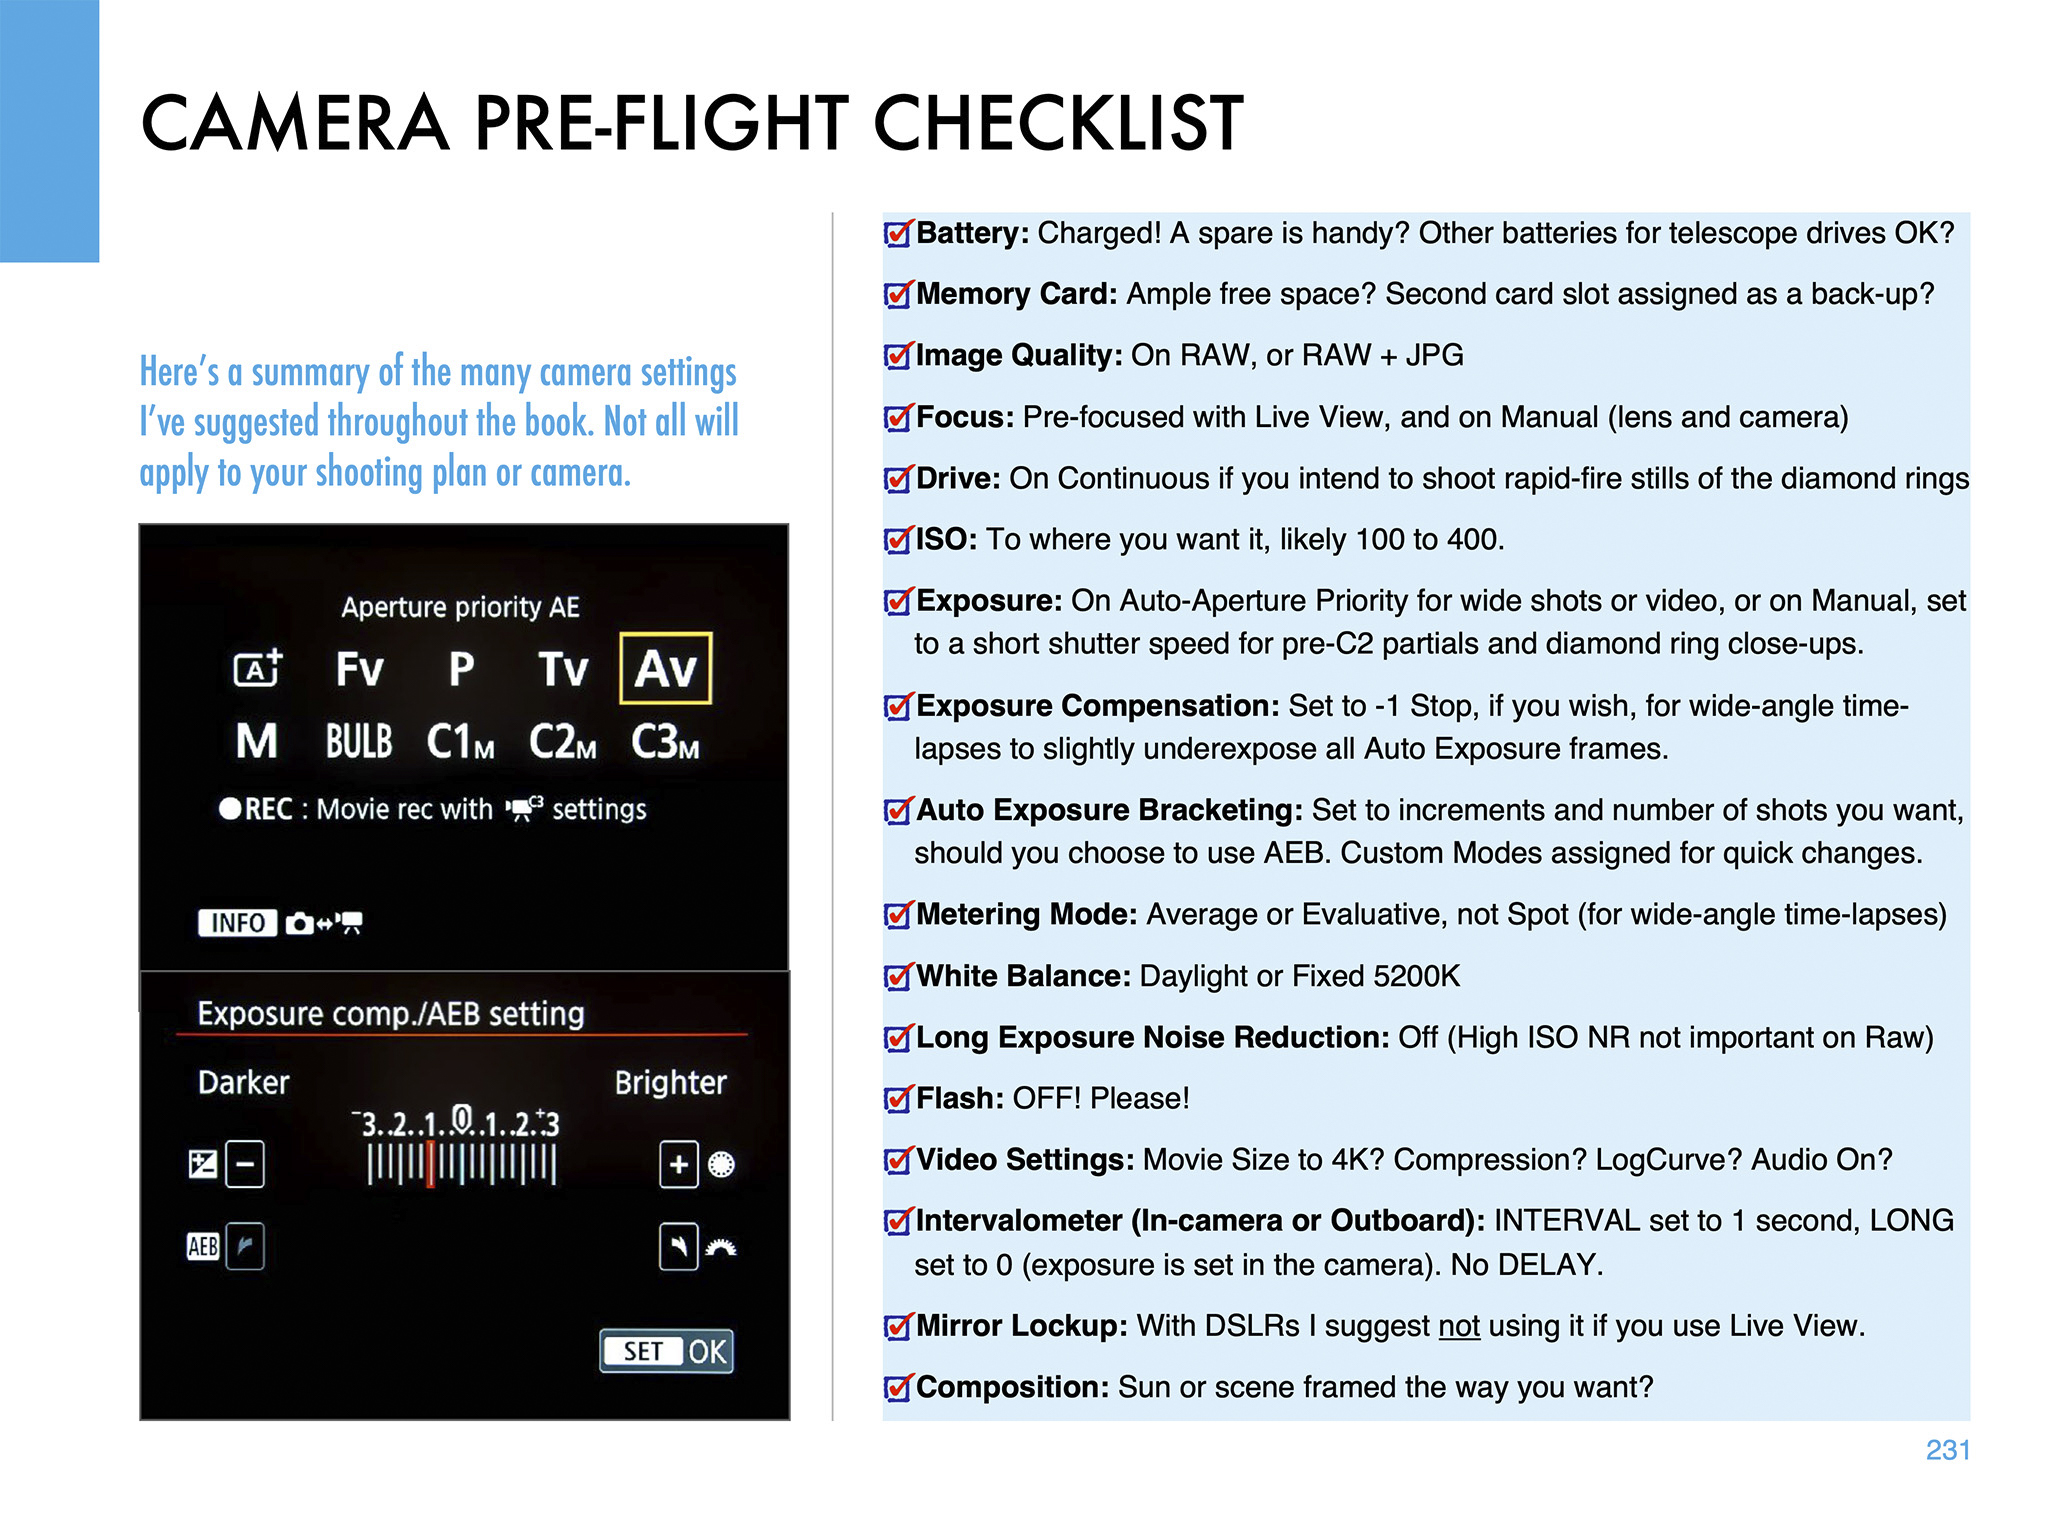
  2. Shoot a Wide-Angle Time-Lapse. Using a DSLR or mirrorless camera and a wide-angle lens (it might need to be as wide as a 14mm at sites in Mexico and the southern U.S.) aim and frame the camera to include the Sun and landscape below. Focus the lens! And leave it on manual focus. But put the camera into Auto-Exposure Aperture Priority (Av) with wide-area metering and with it set to underexpose by -1 EV Exposure Compensation. With the camera at ISO 100 or 200, use either its internal intervalometer (if it has one) or an external intervalometer to take frames once per second. Start the sequence with no filter on the lens a few minutes before totality. Let it run on its own until a few minutes after totality. The result is hundreds of frames you can turn into a time-lapse movie of the lunar shadow approaching and receding, and of the changes in sky colours. Or you can extract single frames at key points to process individually, as I did for the image above from August 2017. The advantage, as with the phone camera movie method, is that the camera, once going, requires no further attention. You can enjoy the eclipse!
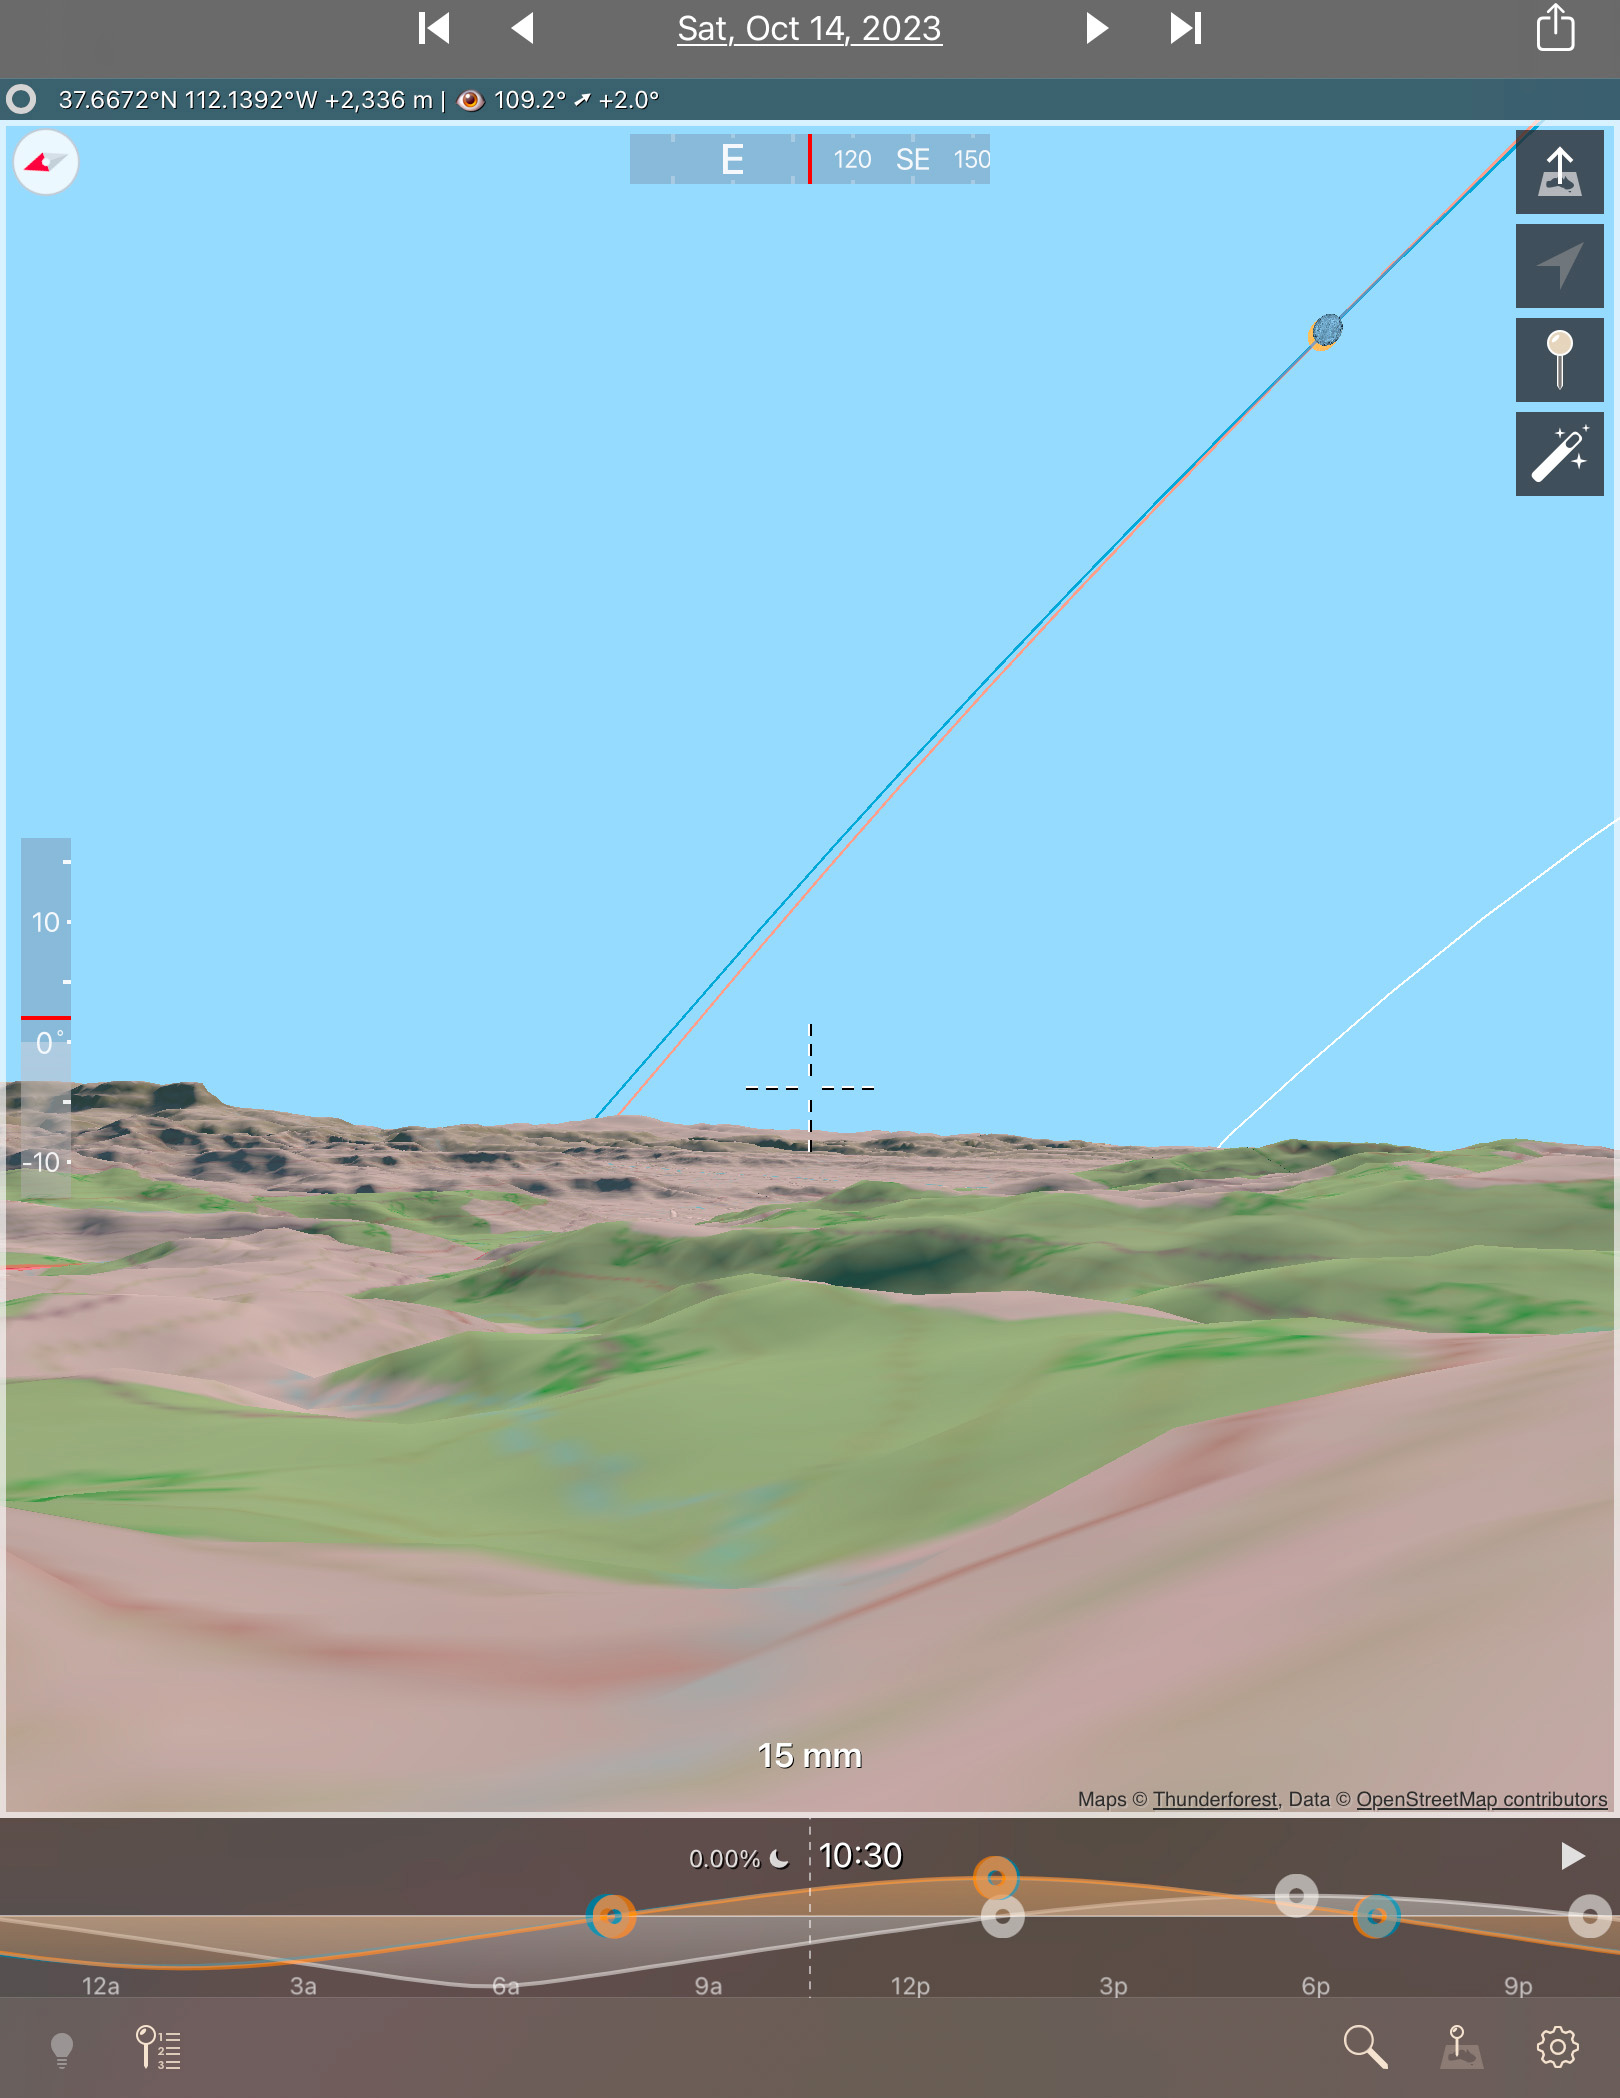
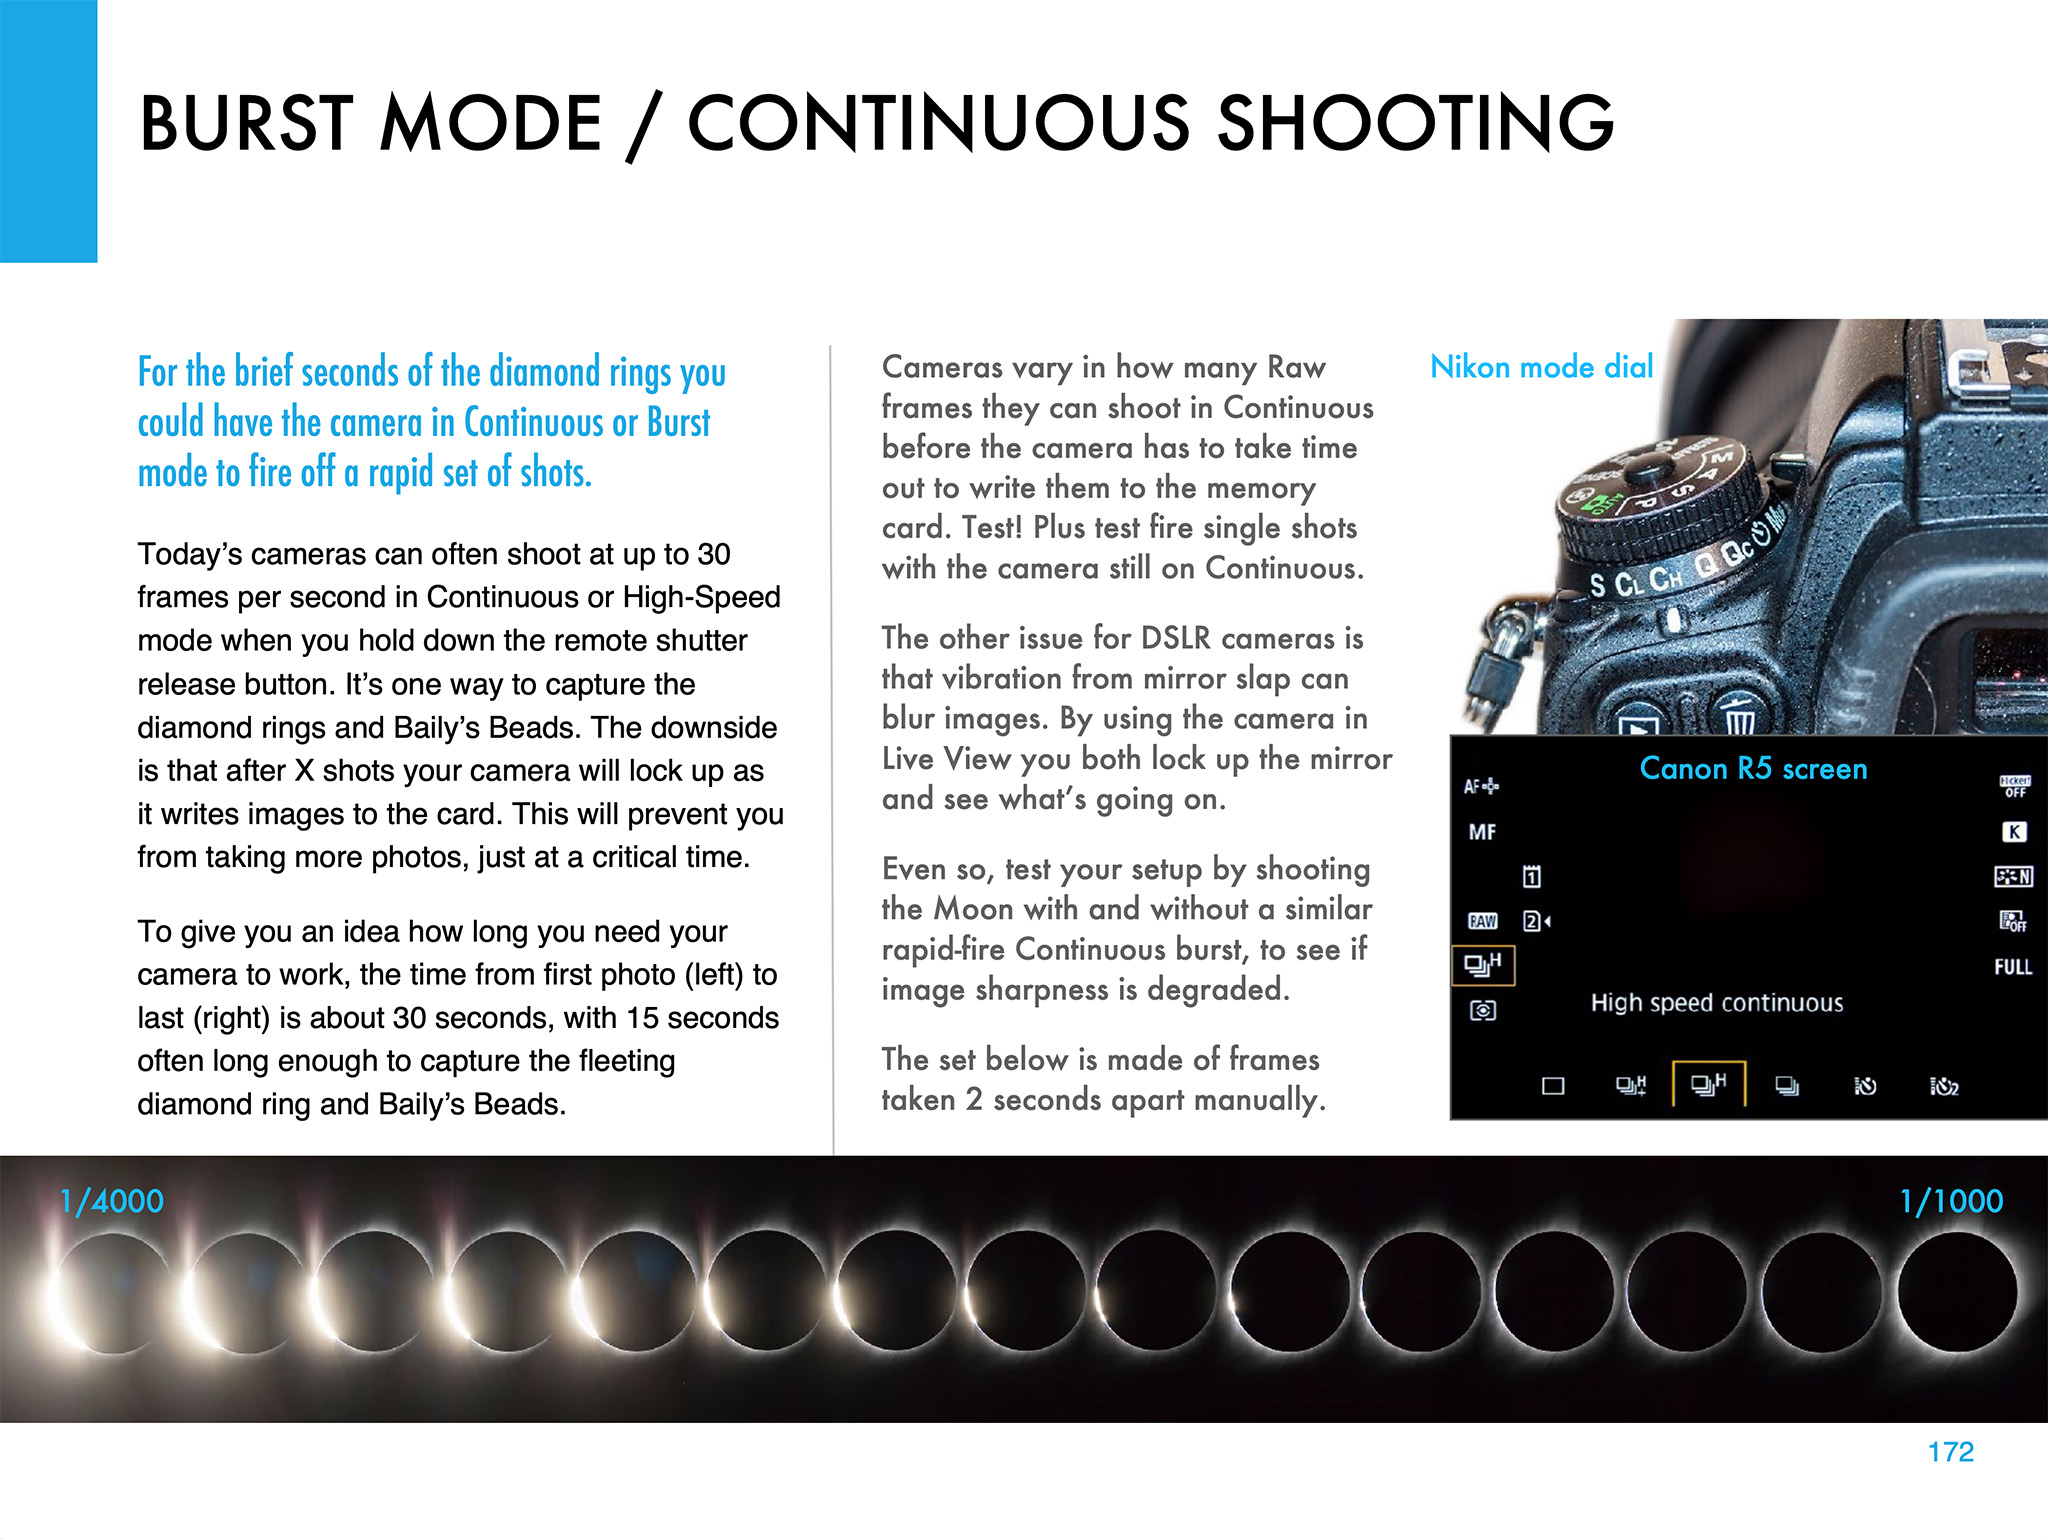
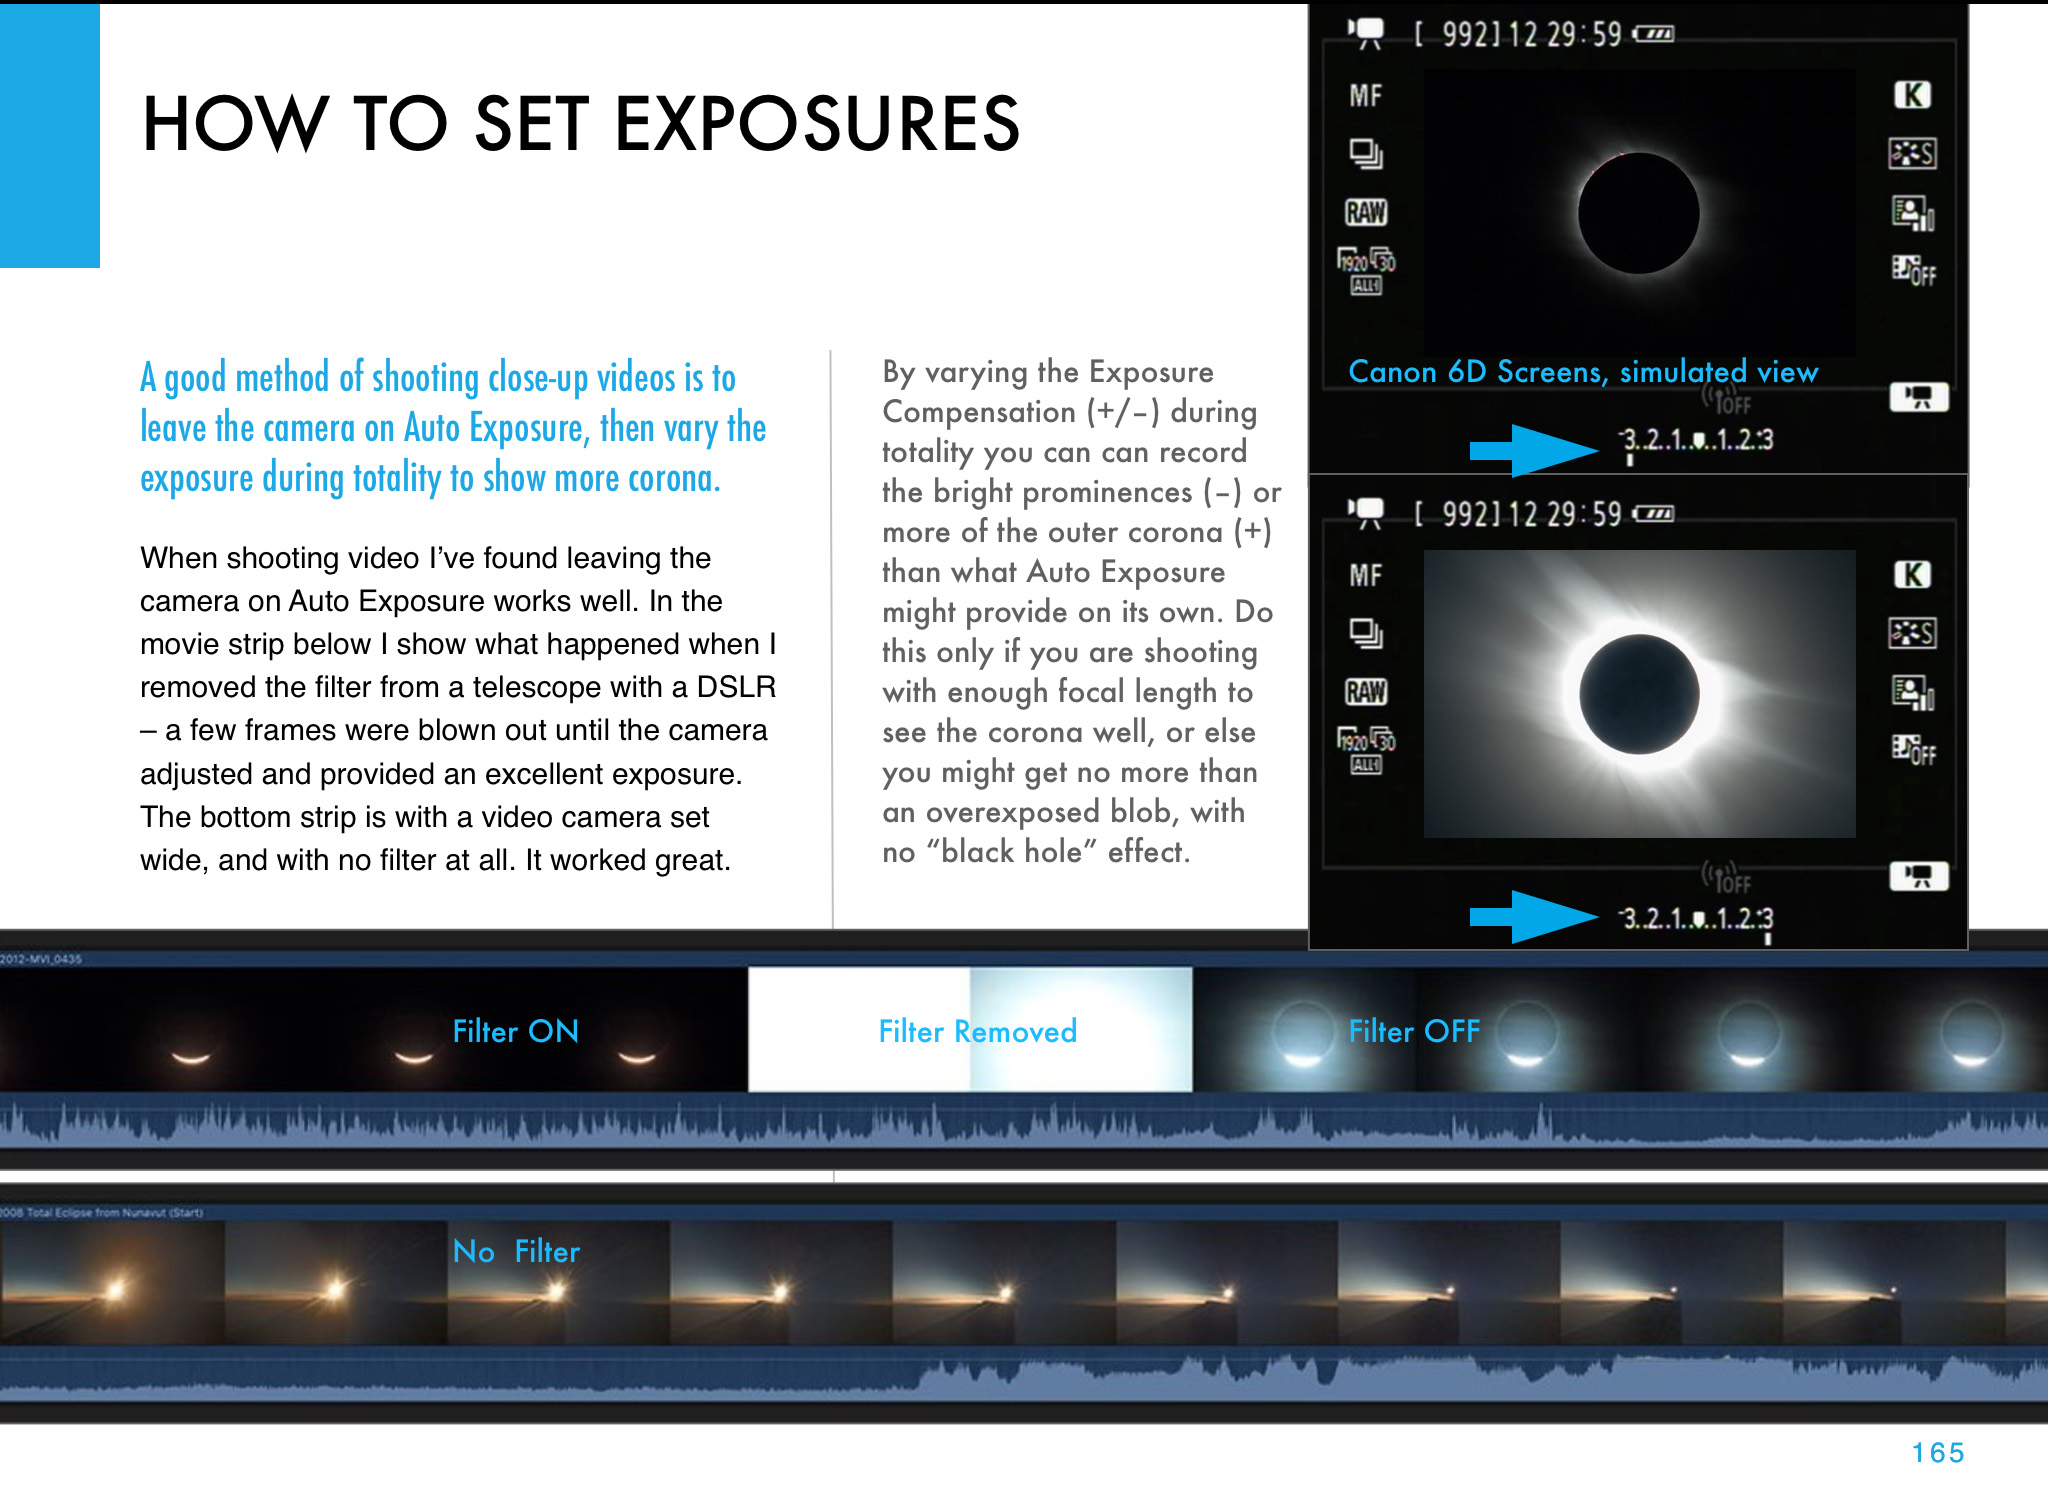
  3. Shoot a Telephoto Video. Use a 300mm to 500mm lens on a DSLR or mirrorless camera to shoot a real-time close-up video of the eclipse. Start the video a minute or two before totality with the Sun positioned to the left of frame centre and with a solar filter over the lens. Use a slow ISO, the lens wide open (typically f/4 to f/5.6) and the camera on Auto-Exposure Aperture Priority (Av). Just be careful to focus precisely on the filtered Sun before starting the video. Poor focus is what spoils most eclipse images, not poor exposure. Just before totality (about 30 seconds prior to Second Contact) remove the filter. The auto-exposure will compensate and provide a proper exposure for the rest of totality. Just let the camera run and the Sun drift across the frame from left to right. Just remember to replace the filter, or cap the lens, and stop the video shortly (~30 seconds) after totality and Third Contact. The video will capture the diamond rings and a well-exposed corona. Vary the exposure compensation during totality if you wish, but that involves more work at the camera. Otherwise, you can just let the camera run. But, as I illustrate in my ebook, it’s important to plan and place the Sun correctly to begin with (using a planetarium app to plan the sequence), so it does not drift off the frame or close to the edge.
  4. Shoot Telephoto Close-Up Stills. Use the same type of gear to shoot still images. While you could shoot stills on Auto-Exposure, it’s better to shoot still images over a range of exposures, from very short (~1/1000 second) for the diamond rings and prominences, to long (~1 second) for the outer corona. No one exposure can capture all that the eye can see during totality. This takes more work at the camera, and with the camera on a static tripod you might have to re-centre the Sun during totality, another thing to fuss with and where things can go wrong. Using the camera’s Auto-Bracketing mode can help automate the shooting, allowing the camera to automatically shoot a set of 7 to 9 exposures at say, one-stop increments in quick succession with just one press of the shutter button (by using the self-timer set to 2 seconds).
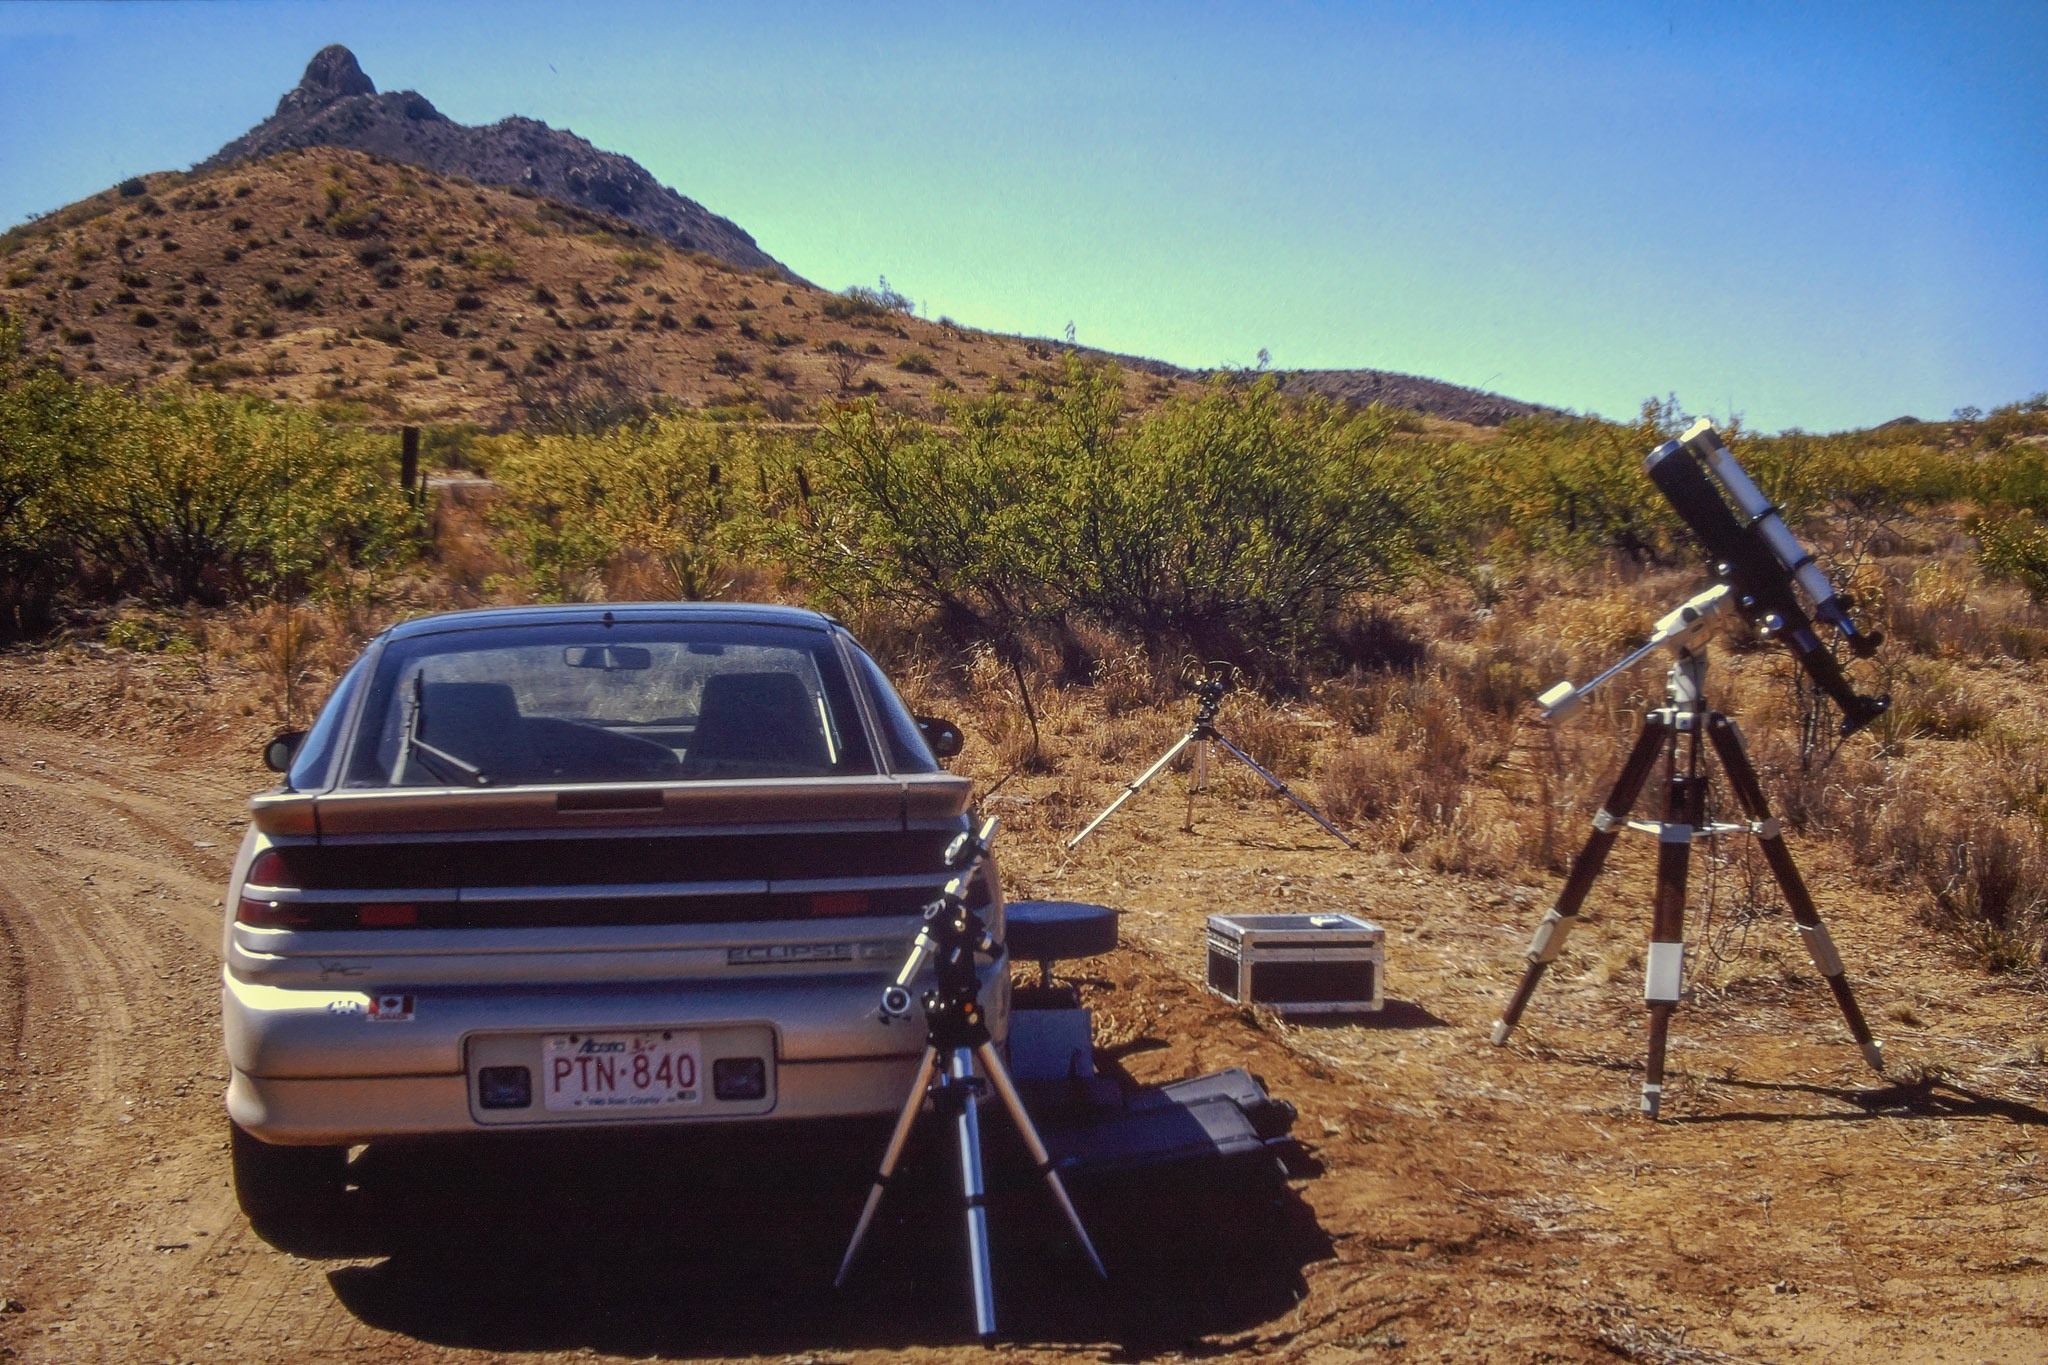
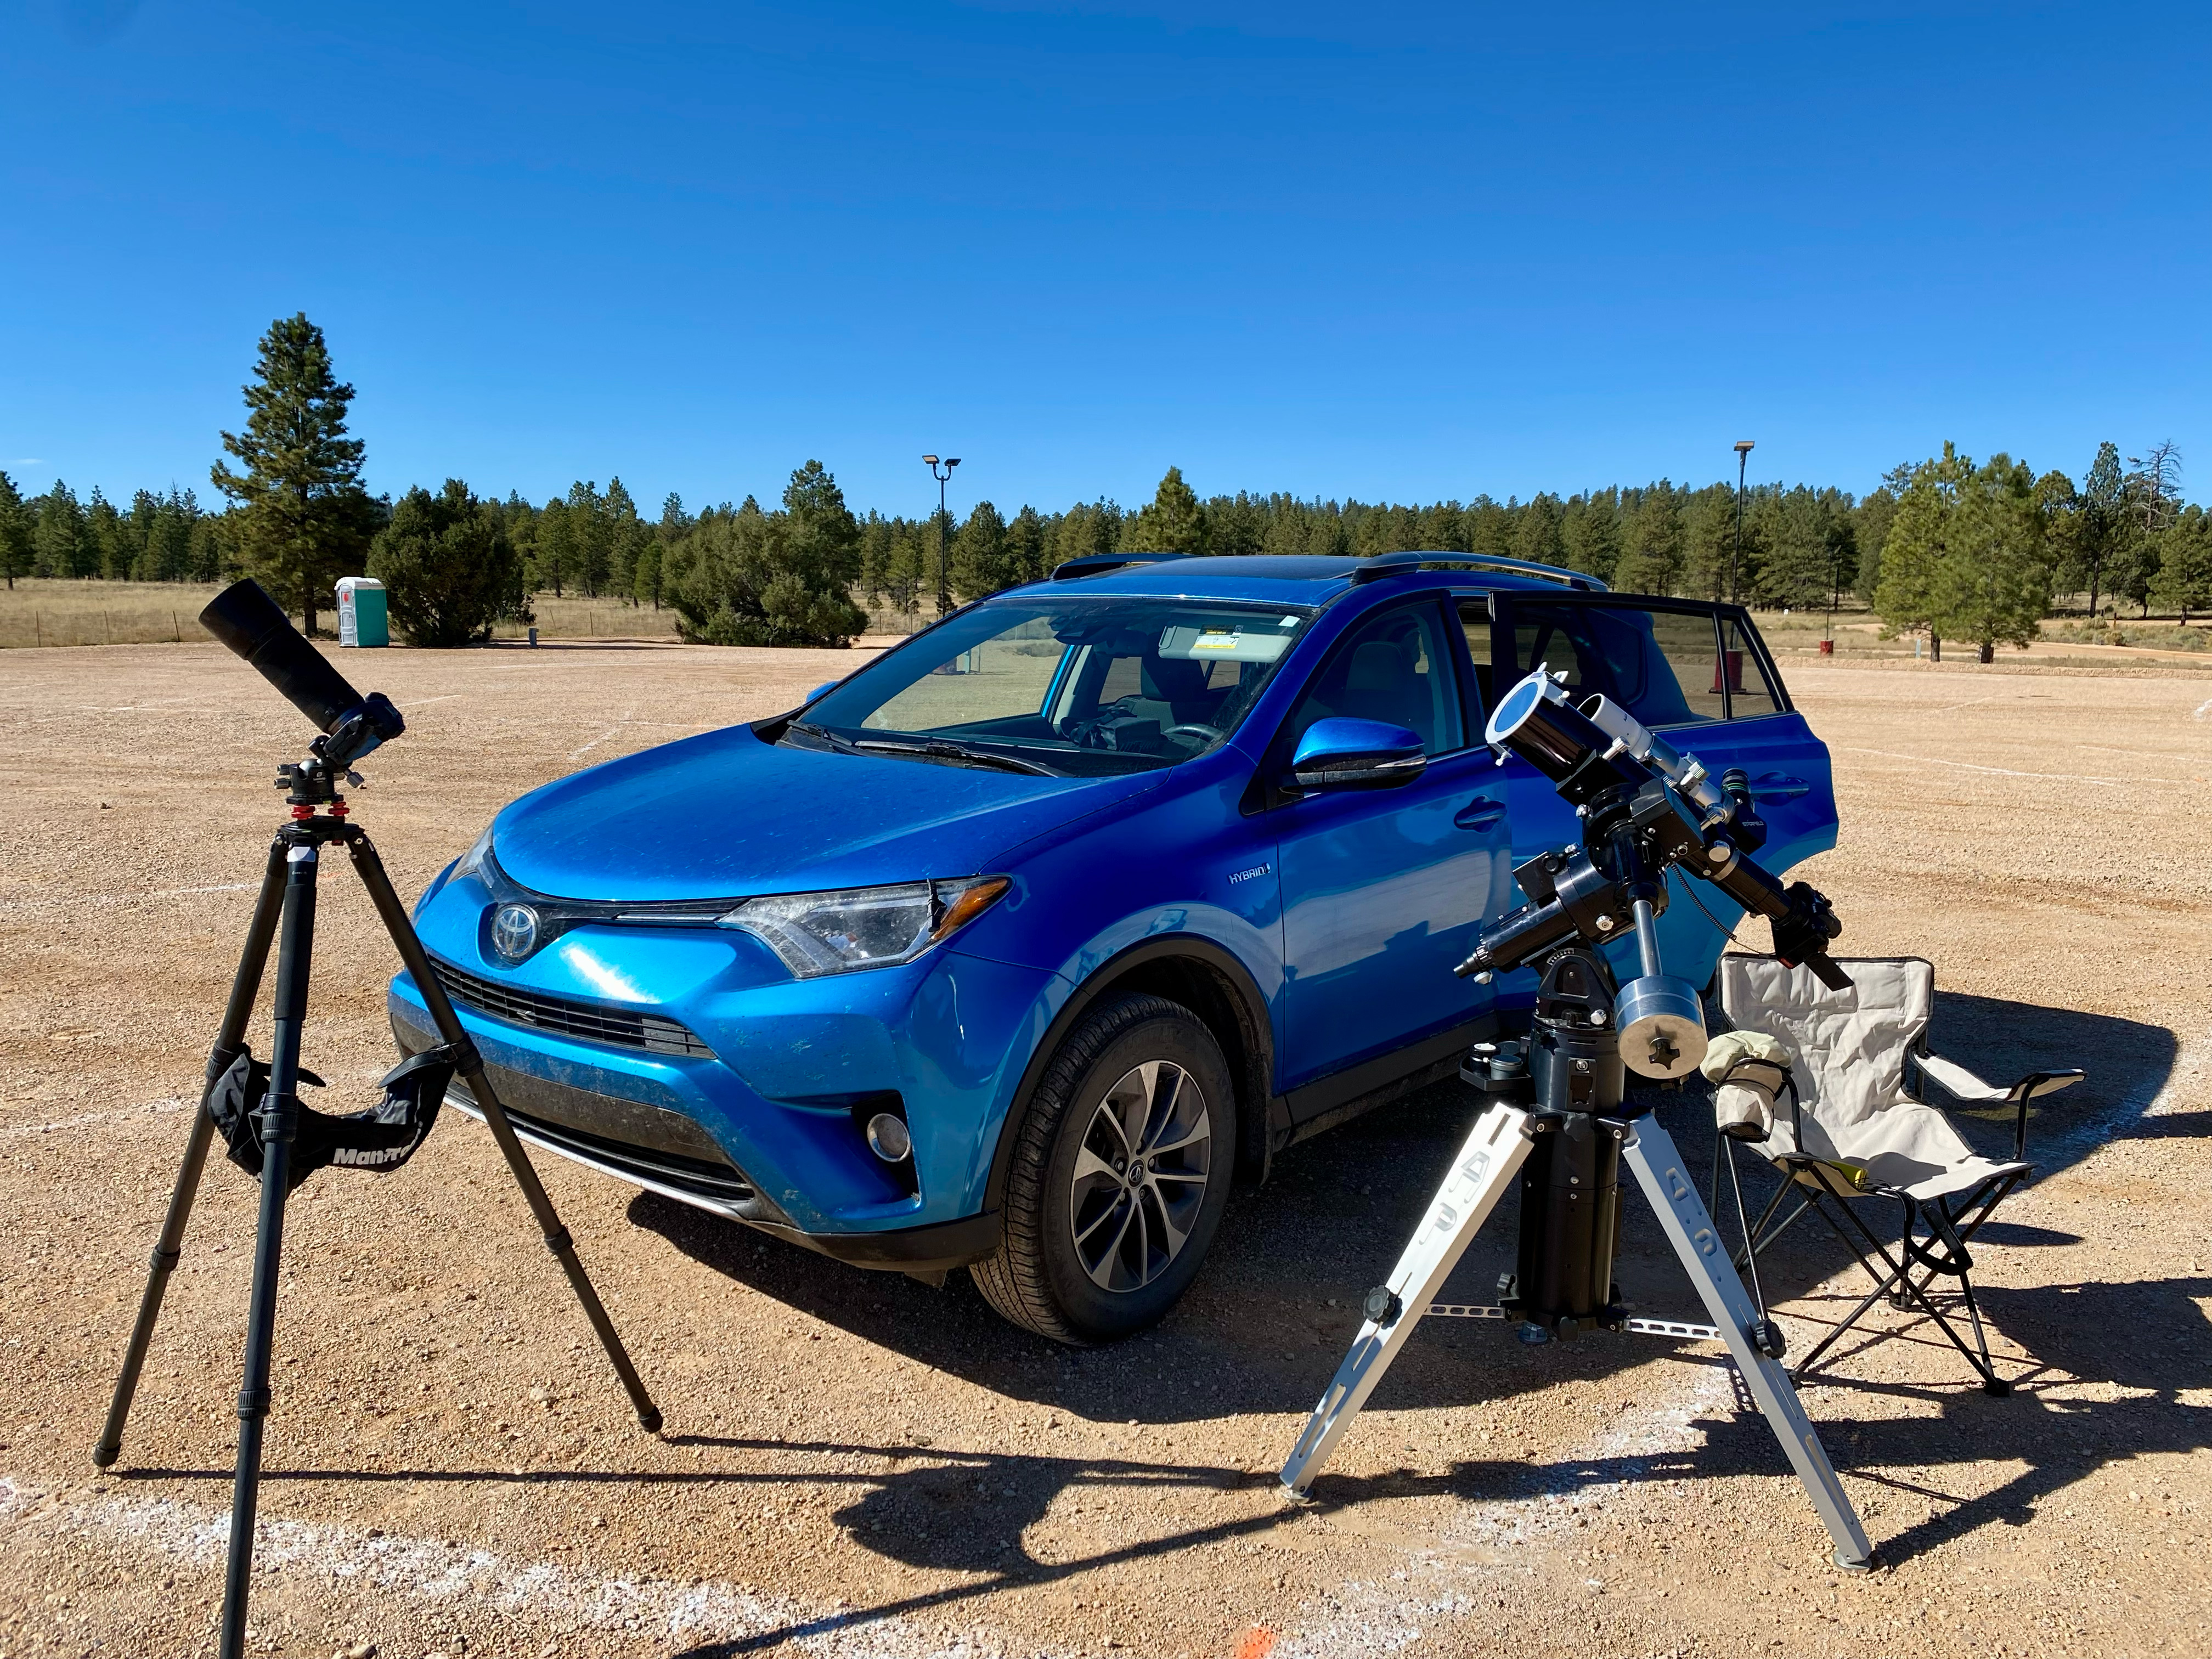
  5. Shoot with a Telescope on a Tracking Mount. Telescopes (I like 60mm- to 100mm-aperture apochromatic refractors) allow longer focal lengths, though I would advise against shooting with any optics longer than 600mm to 800mm, so the image frames the corona well. Use similar settings as above, but with the telescope (or a telephoto lens) on a tracking mount to turn from east to west at the same rate as the sky moves. That will ensure the Sun stays centred on its own, provided you have at least roughly polar aligned the mount. (Set it to your site’s latitude and aim the polar axis as due north as you can determine from compass apps.)

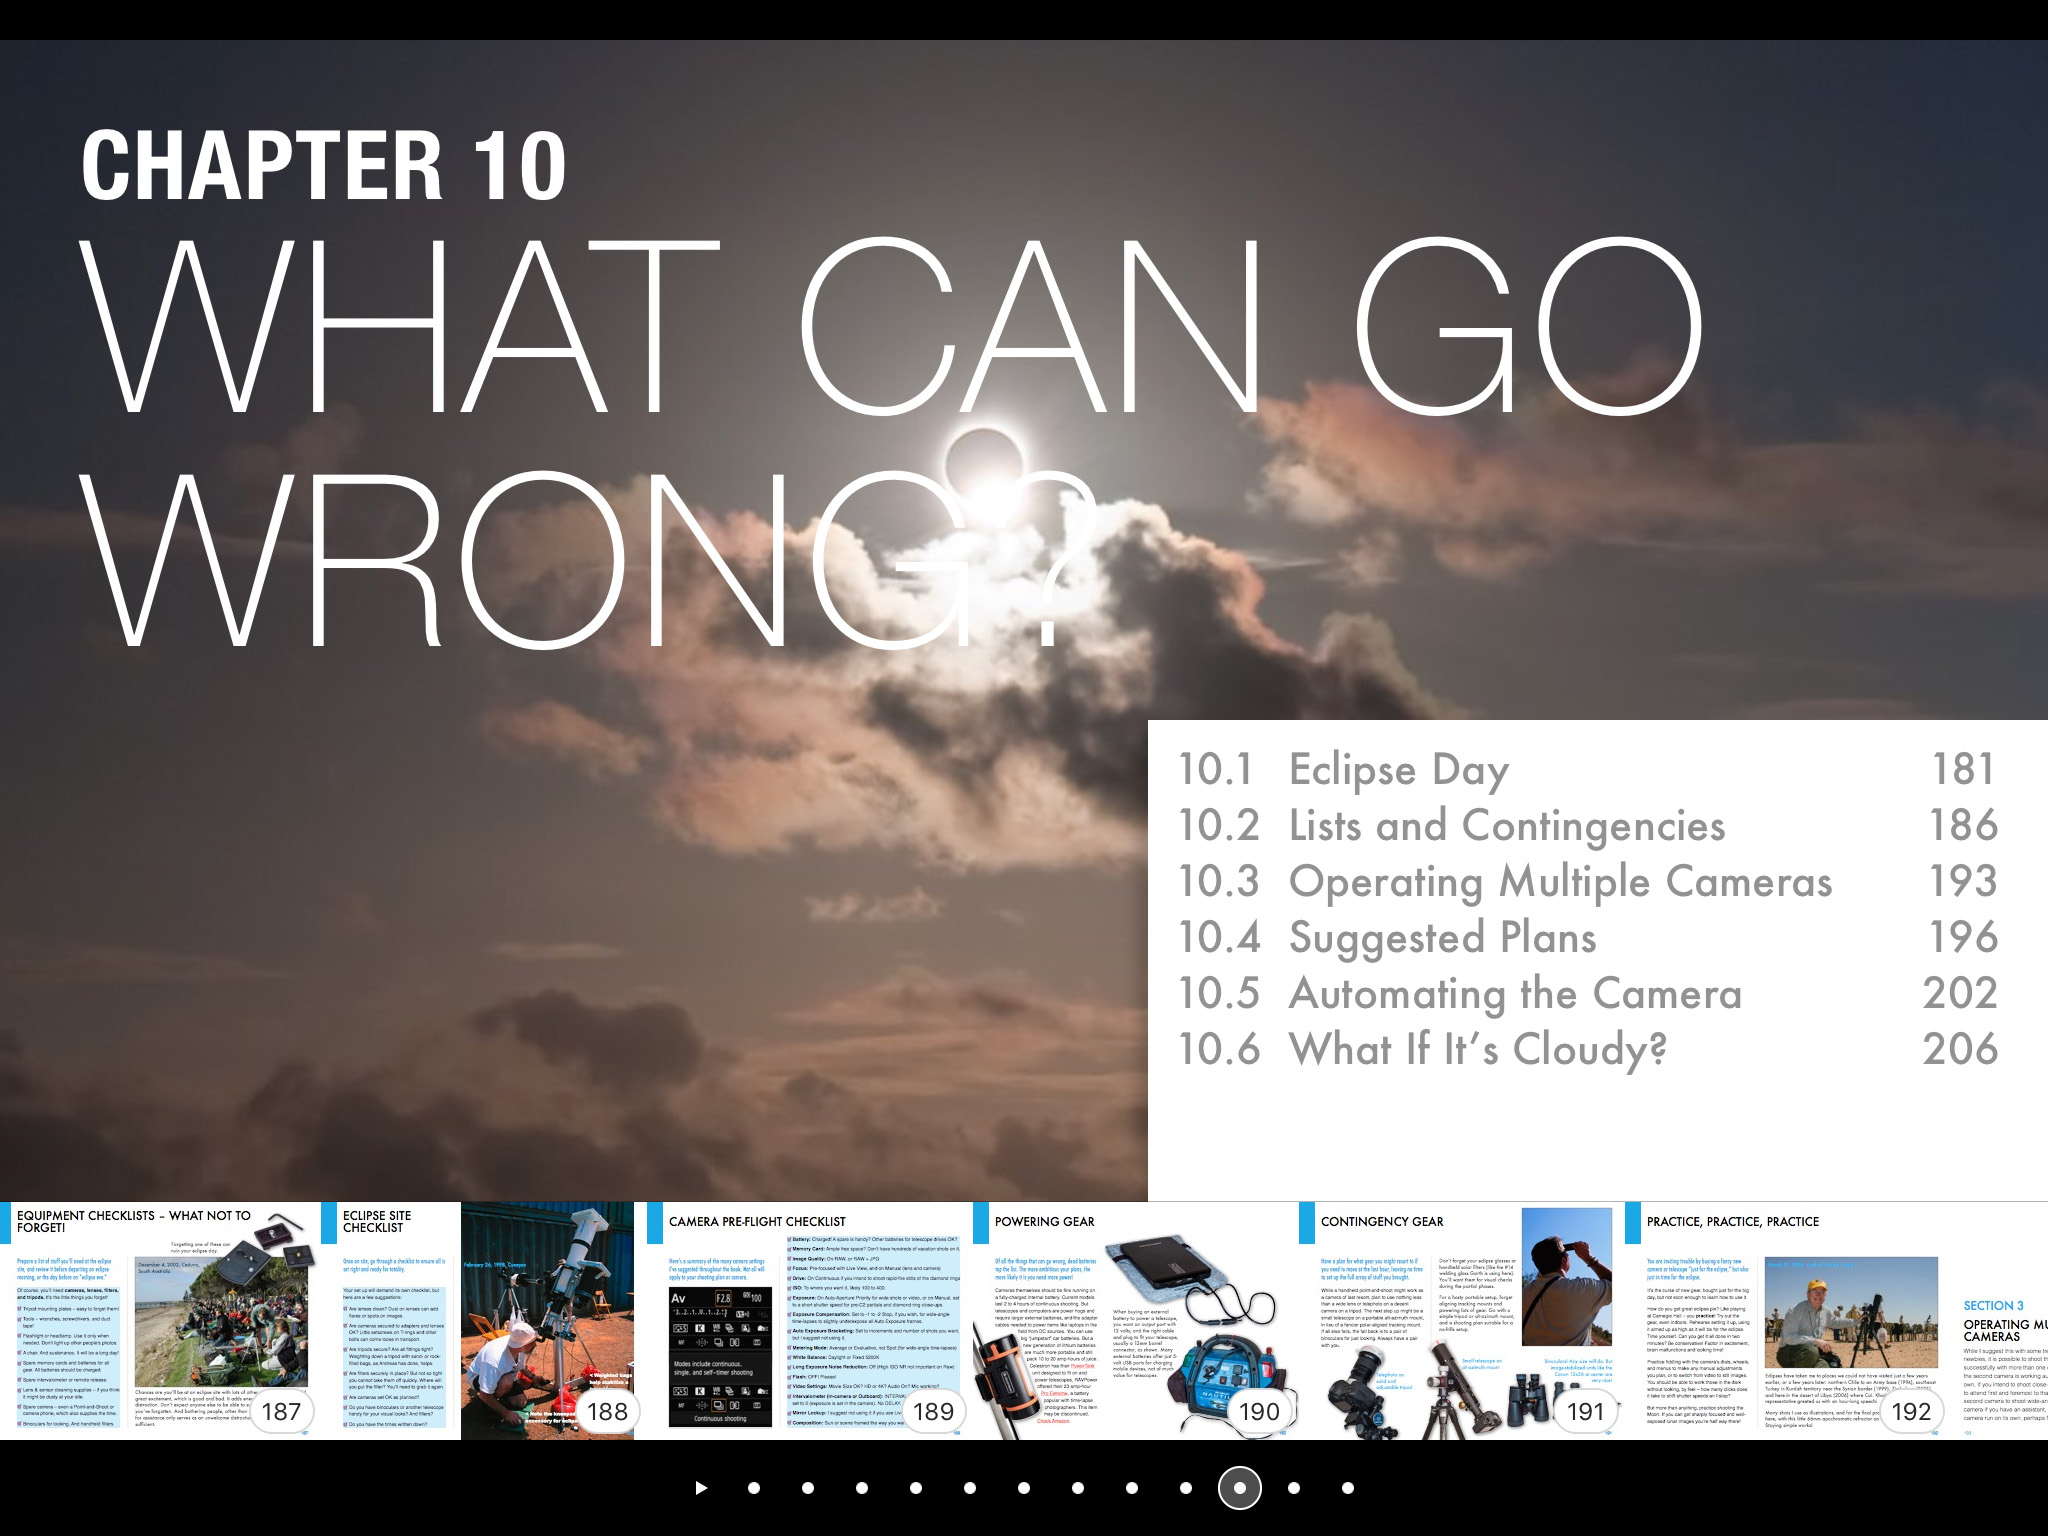
Those are brief summaries of the methods I recommend, as they are ones I’ve used with success in the past and plan to use on April 8. My ebook contains much more information, and answers to most of the “But what about using ….?” questions. And I provide lots of information on what can go wrong! Some learned the hard way over 16 previous total solar eclipses.

Video Tutorials

For a video tutorial, check out the webinar I conducted as part of the Kalamazoo Astronomical Society’s excellent Eclipse Series here on YouTube. It is about a 1-hour presentation, plus with lots of Q&A at the end.

KAS Eclipse Series — Part 1: Shooting

Of course, once you have all your images, you need to process them. My ebook’s biggest chapter (at 80 pages) is the one on processing still images and time-lapses.

So, a month after I presented the above webinar on Shooting, I was back on-line again for a follow-up webinar on Processing. You can view that KAS Eclipse Series tutorial here on YouTube.

KAS Eclipse Series — Part 2: Processing

I cover processing single wide-angle images, a wide-angle time-lapse series, single-image close-ups, and blending multiple exposure composites.

A month later, I presented a further webinar to the Astronomical League as part of their AL Live series, again on shooting the eclipse, but now with an emphasis on techniques amateur astronomers and astrophotographers with typical telescope gear might use.

You can view the AL Live webinar here. My presentation begins at the 44-minute mark.

AL Live Webinar — Scrub ahead to 44 minutes

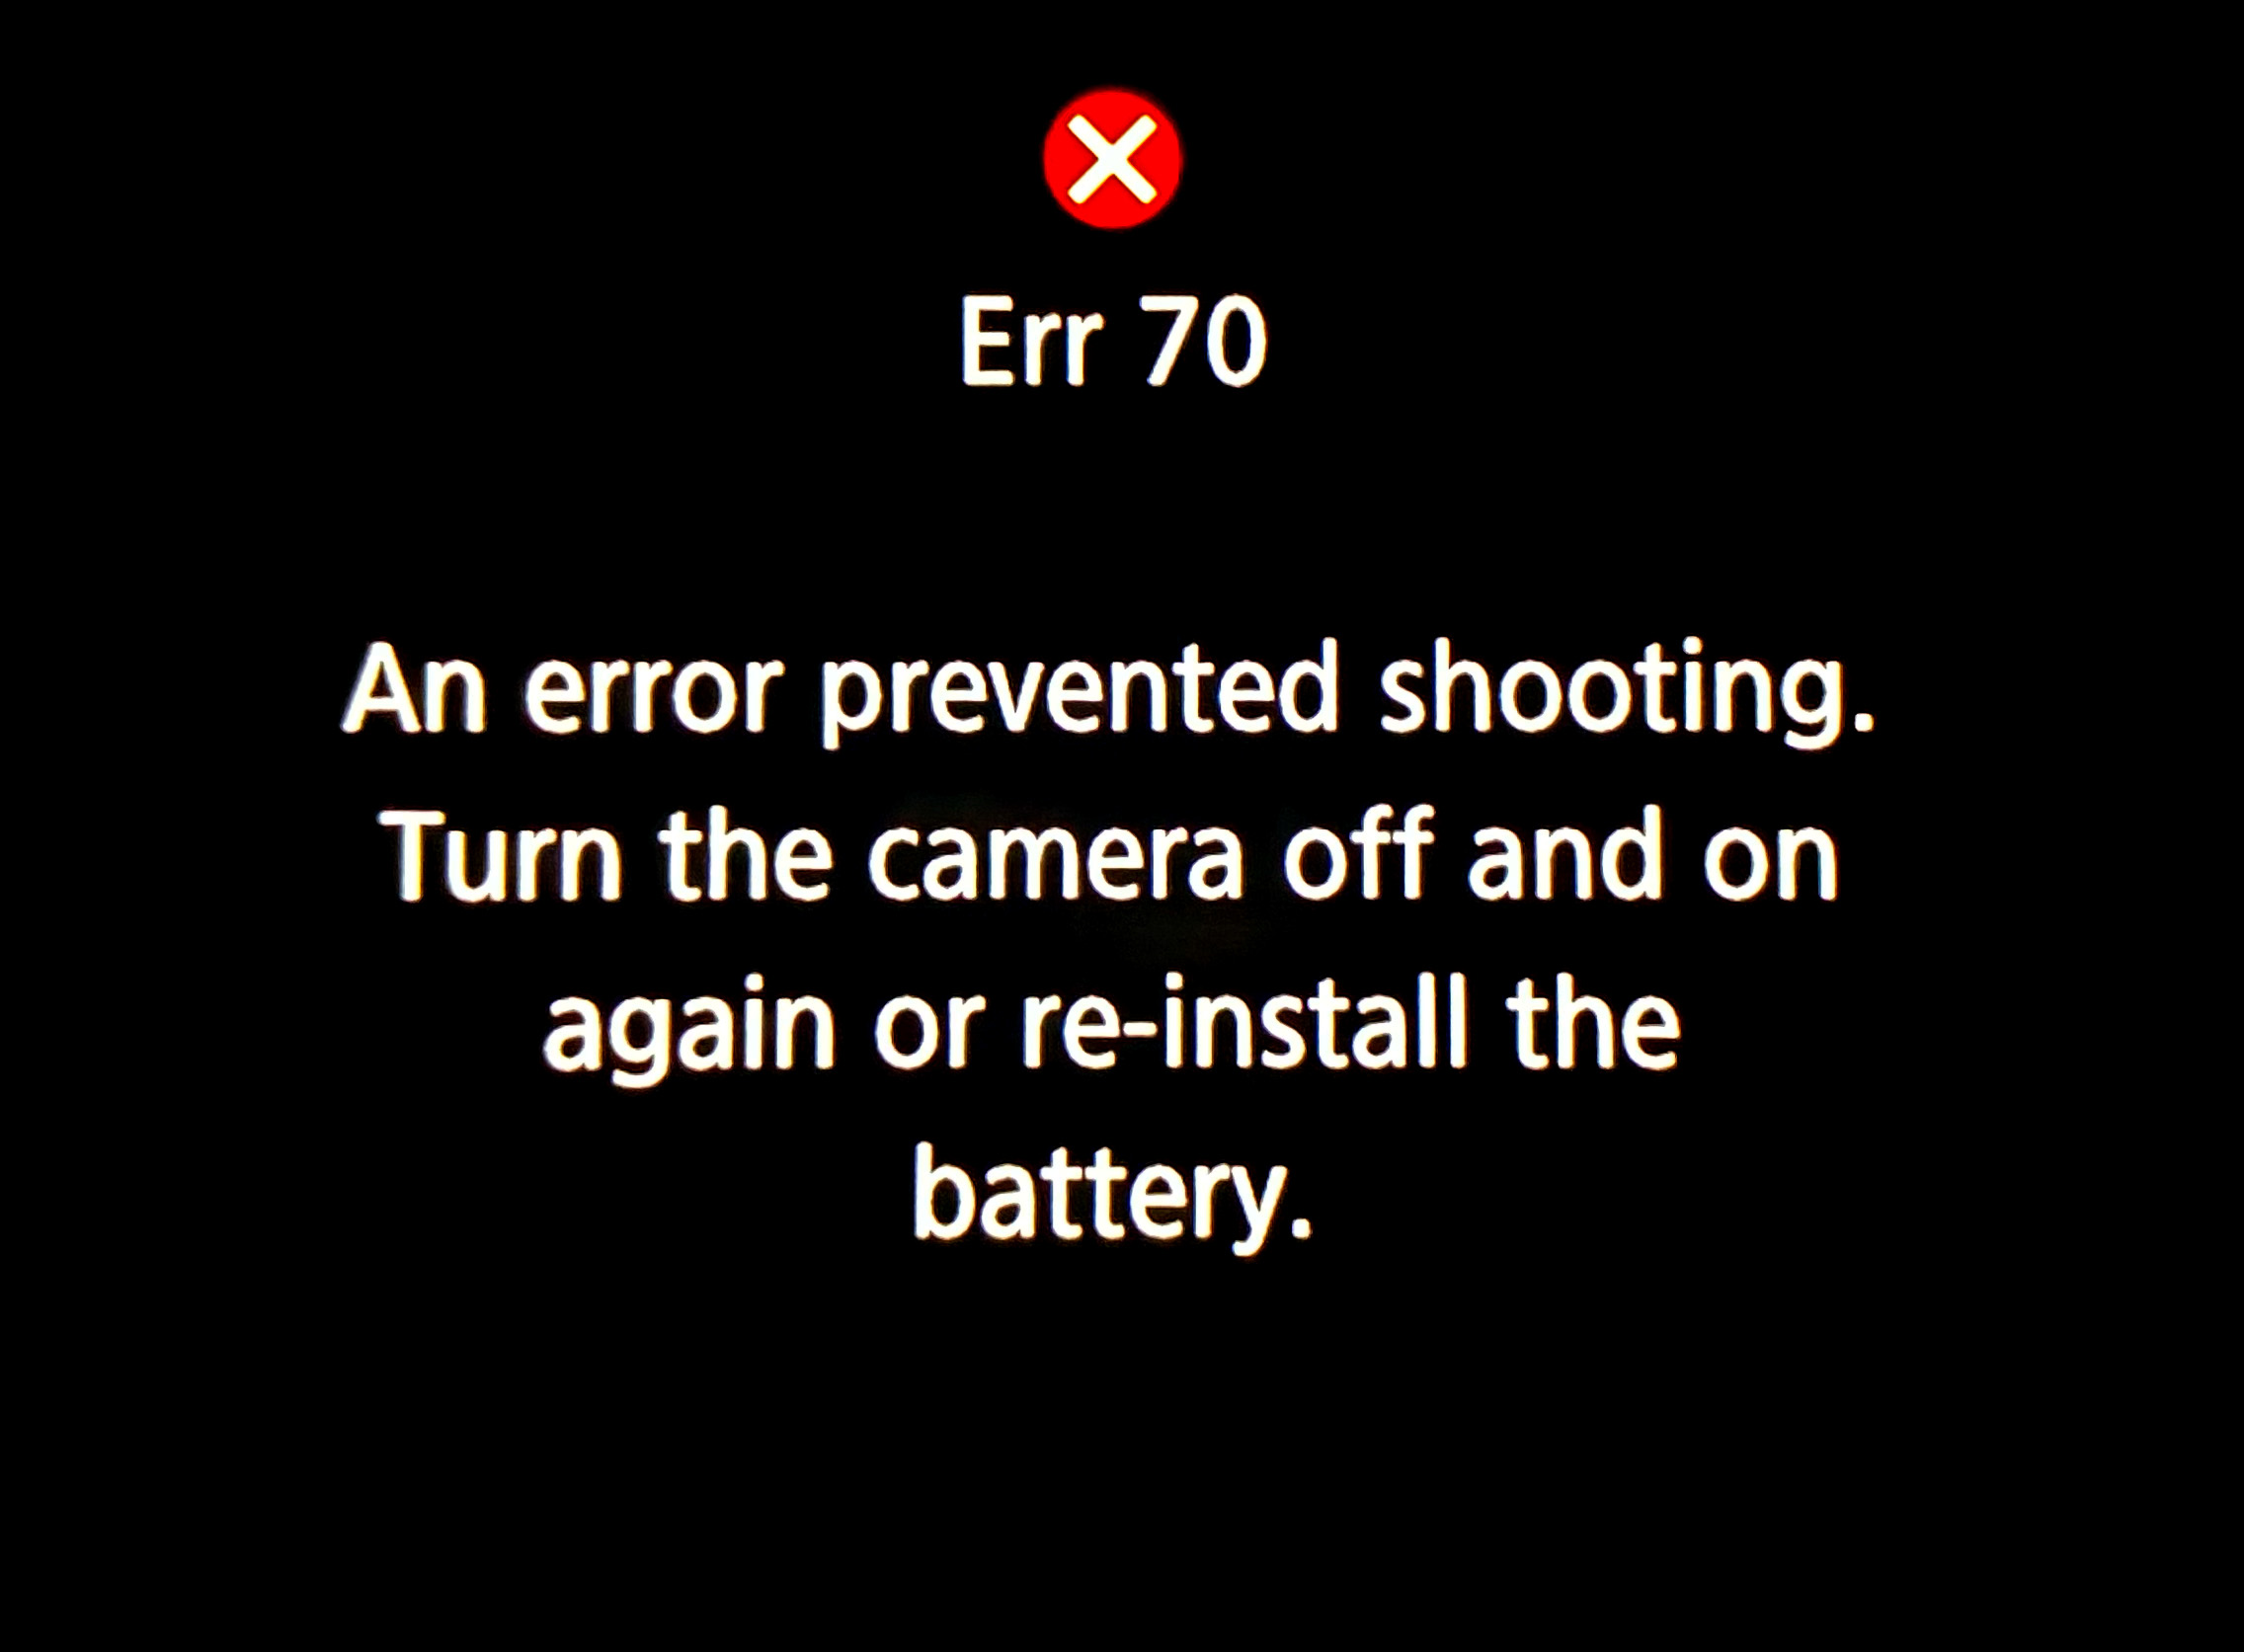
I emphasized that the kinds of gear astrophotographers use these days with great success on deep-sky objects might not work well for the eclipse. The specialized cameras, and software used to control them, are just not designed for the demands of a total eclipse, where exposures have to range over a wide array of settings and change very quickly. Images have to be taken and recorded in rapid succession.

I suspect a lot of ambitious and overly-confident astrophotographers will come away from the 2024 eclipse disappointed — and what’s worse, without having seen the eclipse because they were too wrapped up looking at laptop screens trying to get their high-tech gear working.

The Checklist page from my eBook

Practice, Practice, Practice

In these webinars and in my ebook, my common theme is the importance of practicing.

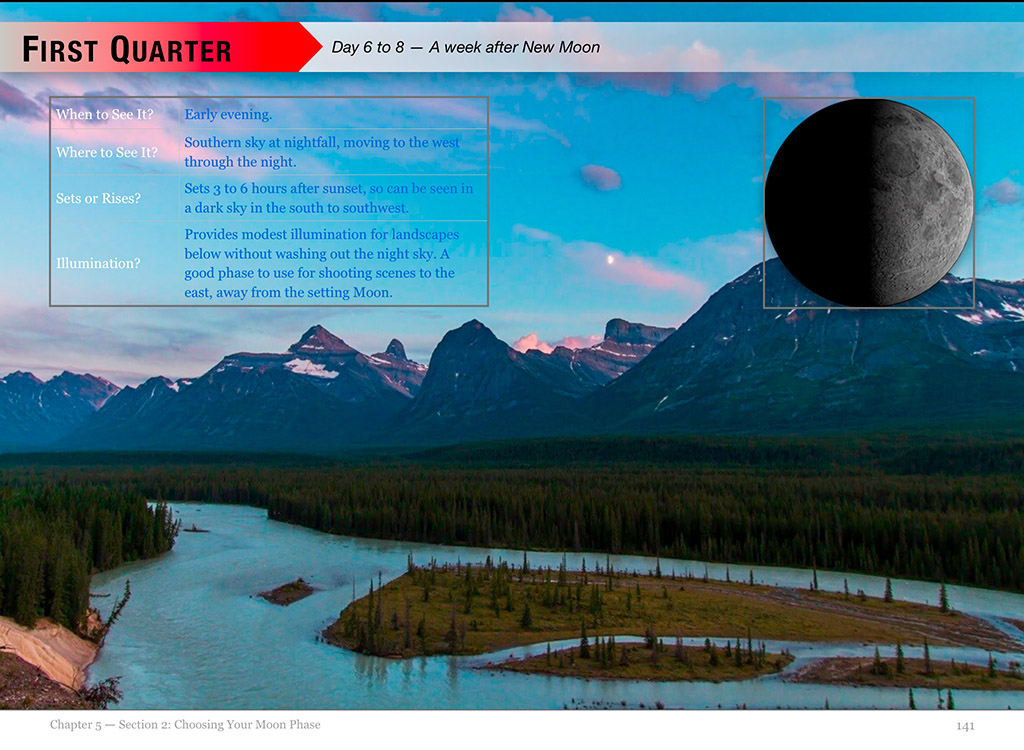
Don’t assume something will work. Practice with the gear you intend to use, on the Sun now (with proper filters) and on the Moon. The crescent Moon, with dim Earthshine lighting the lunar night side, is a great practice target because of its wide range of brightness. And it moves like the Sun will, to check maximum exposure times vs. image blurring from motion.

Practice with your tripod or mount aimed to the altitude and location in the sky where the Sun will be from the site you have chosen. Set a tracking mount to the latitude you will be at to be sure it will aim at and track the Sun without issues. Some telescope mounts stop tracking when they reach due south, exactly where the Sun will be at totality from southern sites. That’s a nasty surprise you do not want to encounter on eclipse day.

All this and much more is covered in my ebook, available for Apple Books and as a PDF for all platforms here from my website at https://www.amazingsky.com/EclipseBook

Good luck on eclipse day!

— Alan, February 21, 2024

Chasing the Annular Eclipse


Like all eclipses, seeing the October 14 annular eclipse of the Sun was not a certainty. As good luck and planning would have it, the sky and location could not have been better!

Annular eclipses of the Sun don’t present the spectacle of a total eclipse. Because the Moon is near its farthest point from Earth, its disk is not large enough to completely cover the Sun. At mid-eclipse, as I show below, a ring of sunlight (dubbed a “ring of fire”) remains, still too bright to view without a solar filter. 

The October 14, 2023 annular solar eclipse, in a single image captured at mid-eclipse, at 10:29 am MDT at the Ruby’s Inn Overlook on the rim of Bryce Canyon, Utah, a site well south of the centreline, with 3m03s of annularity.

While lacking the jaw-dropping beauty of a total, annular eclipses are rare and unique enough that every ardent skywatcher should make a point of seeing one. 

Prior to October 14, I had seen only one, on May 10, 1994, from southeast Arizona, an event I captured on film of course back then. 

A sunset annular on June 10, 2002 that I traveled to Puerto Vallarta, Mexico to see was mostly clouded out. The annular of May 20, 2012 traced a similar path across the U.S. Southwest as the 2023 eclipse. But work commitments at the science centre in Calgary kept me home for that one. A sunrise annular on June 10, 2021 in Northwestern Ontario was essentially out of reach due to COVID travel restrictions. 

With no other annular eclipses within easy reach in North America until 2039 and 2046, this was my next, and perhaps last, opportunity to see one, unless I chose to travel the world. 

I had planned for several months to watch the annular eclipse from southern Utah, ideally from Bryce Canyon National Park, shown above. (Clicking on the images brings them up full screen.) I booked accommodations in January 2023, finding even then that popular hotels in the area were already sold out. 

The final spot for the wide-angle composite shown below. The camera had to be next to that very fence post to frame the scene well.

The attraction was the landscape below the morning Sun, for a planned composite image of the eclipse over the hoodoos of Bryce. However, I had learned weeks earlier that traffic was going to be restricted to just park shuttle buses on eclipse day. Should Plan A not work out then Plan B was Kodachrome Basin, a state park nearby, which a park employee assured me would be open to cars well before sunrise on eclipse day. 

Seen on I-15 past Salt Lake City. Eclipse ahead!

So I made my plans to drive south, taking with me a carload of telescope and camera gear, an array I would never be able to take to an overseas eclipse. The centrepiece was my venerable Astro-Physics Traveler 105mm (4-inch) refractor, a telescope created for the 1991 total eclipse in Mexico. Since I bought mine in 1992 I’ve used it for five central solar eclipses, including now two annulars. It’s in the 1994 and 2023 site images above.

As per the instructions in my eclipse ebook, I practiced with the gear in the summer of 2023, documented here on my previous blog.

A week before the eclipse (as above at left), the weather prospects for the entire southwest looked poor. It was to be clouds everywhere. I even considered Plan S – Stay Home! And watch the 60% partial eclipse from Alberta where skies were to be clear. 

But undaunted, six days before the eclipse, I headed south on Interstate 15, checking the weather each day, and seeking out Plan C sites in New Mexico or Texas south of the projected mass of clouds. I checked where accommodation could be had at the last minute. 

At my stop in Richfield, Utah, four days before the eclipse, I had a crossroads turning point: either continue south to Bryce down US-89 (above), or head east on I-70, then south into New Mexico or Texas, with enough time to get there if needed. 

But by now the weather prospects were turning around. By three days out, and with the forecasts now much more reliable, it looked like southern Utah would be in the clear. I continued with my original plan to Bryce. But where exactly?

I had looked at possible sites on Google Earth and with the Sun-angle planning apps I use (such as The Photographer’s Ephemeris, or TPE) and found one just outside the Park that I hoped would be accessible to drive into. 

Upon arriving in the area three days early, the first priority was to inspect the site in person. It looked perfect! Almost too good to be true! 

A panorama of the Ruby’s Inn site with the eclipse in progress. My wide-angle camera is at left by that fencepost.

The site, known as the Ruby’s Inn Overlook, provided a great view toward the eclipse with a stunning landscape below, including a river! (Well, it was actually an irrigation channel called the Tropic Ditch.) And I could park right next to my wide-angle landscape camera, to keep an eye on it over the five hours of shooting, while setting up the scope gear next to my car. 

I stayed at the Bryce View Lodge on eclipse eve, a hotel just a few hundred metres from the site. So no long pre-dawn drive on eclipse morn. However, the gated site was not going to be open until 7 a.m. on eclipse day. And admission was $20 per car, a cash donation to the Bryce Canyon City school sports teams. Fine! 

As it turned out, by the time I got on site and setup the priority wide-angle camera for the base-image sunrise shots at 7:30 a.m., the sky was too bright to polar align the telescope mount on Polaris, for accurate tracking of the Sun across the sky. 

It turned out that was the least of my concerns. 

My three eclipse cameras: the wide-angle, the one on the 105mm refractor telescope (with a smaller 60mm scope on top for visual views with a Herschel Solar Wedge), and one with a 100-400mm lens on the tripod.

As I unpacked the carload of scope gear at 8 a.m. I realized I had forgotten a crucial cable to connect the mount to the drive electronics. So the mount was not going to be able to track anyway! 

So much for my plans for a time-lapse through the scope. I had to manually centre the Sun every minute or so. I took lots of photos, but gave up on any effort to take them at a regular cadence. But I had enough images for the singles and composites shown here.

This is a composite of the October 14, 2023 annular solar eclipse with a sequence of six images showing the Moon advancing across a sunspot, the largest one visible on the Sun that day. The images are placed for a photogenic spacing, with time running forward from lower left to upper right, to reflect the Sun’s motion up across the morning sky.

Of course, once I got home the first thing I did was look downstairs in my scope room. Sure enough there was the cable, mixed up with the similar electronics from another mount I have from the same company, as I had been testing both prior to the eclipse. So much for my checklists! They’re only good if they list every critical bit, and if you use them.

So that was one big user error. 

You don’t want to see this at an eclipse!

The other was a camera error, in fact Error70! I had set my main telescope camera to take rapid bursts of images (at up to 20 frames per second) at the crucial second and third contacts when annularity began and ended. With the Moon’s rough limb tangent to the inside edge of the Sun, you see beads of light rapidly form and disappear at the contacts. 

This is a composite of the October 14, 2023 annular solar eclipse at second contact. It illustrates the irregular edge of the Moon breaking up the rim of sunlight as the dark disk of the Moon became tangent to the inner edge of the Sun at second contact at the start of annularity. 15 exposures taken over 20 seconds at second contact are combined with a single exposure taken about 1.5 minutes later at mid-annularity.

The camera worked great at second contact, shooting 344 frames over 20 seconds. A composite of 15 of those frames is above, layered to exaggerate the rough lunar limb and its mountain peaks. A time-lapse from those frames is below.

A time-lapse of second contact from 344 frames over ~20 seconds.

And it appeared to be working at third contact three minutes later. Until I looked down and saw the dreaded error message. In checking the camera later, none of the third contact images had recorded to either memory card. 

It is a known but intermittent bug in Canon firmware that can happen when the camera is not connected to a Canon lens (it was on a telescope it cannot communicate with). I saw the error once in testing. And I had a hard time reproducing it to take the screen shot above once I got home. But if something can go wrong …! 

This is a portrait of the October 14, 2023 annular eclipse of the Sun, captured in a sequence of images taken from the rim of Bryce Canyon, Utah, from sunrise until nearly the end of the eclipse before noon local time. This is a composite blend of unfiltered exposures taken at sunrise for the landscape lit by the rising Sun, and for the dawn sky. Onto the base panorama of the ground and sky I layered in 66 filtered images of the Sun, as it rose into the morning sky, and with the Moon moving across its disk over nearly 3 hours, reaching mid-eclipse at about 10:29 local MDT at upper right. It then appears as a ring, or annulus of light for one frame.

Despite the errors both human and machine, I count eclipse day as successful, considering a week earlier prospects had looked so poor. As it was, apart from some thin but inconsequential cloud that drifted through before mid-eclipse, the sky was perfect.

As was the site. I enabled me to get the main shot I was after, the wide-angle composite, above. It’s a winner! And it accurately depicts the size of the Sun and its motion across the sky, albeit set into a twilight sky taken at sunrise.

As it had been 29 years since my last annular, I wasn’t sure what to expect. But the darkening of the sky and eerie level of sunlight, despite a blazing Sun in the day sky, were impressive. The morning just looked strange! It was a taste of the total to come.

Venus at its widest angle west of the Sun was easy to spot in the deep blue sky. I regret not thinking to shoot even a phone camera image of that sight. 

Projecting the solar crescents with a made-on-the-spot pinhole projection sign.

I had pleasant chats with other folks at the site, and enjoyed showing them telescopic views though the smaller visual scope I had piggybacked on the main scope, one that was just for looking through. Plus folks shot phone pix of my camera screen.

The October 14, 2023 annular solar eclipse, in a single image captured at second contact with the Moon tangent to the inside limb of the Sun, at 10:27 am MDT at the site I used.

But at the critical contacts, I was glued to that visual scope for the amazing sight of the horns of the crescent Sun rapidly wrapping around the Moon at second contact, then unwrapping at third contact. 

The October 14, 2023 annular solar eclipse, in a series of images captured at second contact with the Moon tangent to the inside limb of the Sun, at 10:27 am MDT at the site I used. The 7 frames here were selected from a set of 344 shot in high-speed continuous mode at 20 frames per second.

The breakup of the rim of sunlight into beads of light along the cratered and mountainous edge of the Moon was also impressive. I was not at the optimum site for seeing those beads, as the landscape dictated my choice of location. But those that I saw at each of the internal contacts were a fine bonus to a memorable morning. 

This is a composite that records the sequence around mid-eclipse of the October 14, 2023 annular eclipse of the Sun. This is a blend of 8 exposures each taken 2.25 minutes apart, about the minimum time to keep the disks separate and avoid them overlapping.

A third camera shooting a sequence with an untracked 400mm telephoto lens worked well. I used a subset of its images to create a still-image composite (above) and the full set for a time-lapse (below), with the position and motion of the Sun authentic, produced by the natural east-to-west motion of the sky. But against that you see the Moon’s orbital motion moving its dark disk down across the disk of the Sun. 

A time-lapse from 300 frames taken at 4-second intervals with the sky’s motion carrying the Sun across the frame.

As soon as annularity ended, everyone else started to pack up and leave. For them the show was over. Understandably. On many total eclipse tours I’ve been on we’ve been on the road back to the hotel after totality and the requisite happy group shot.

Eclipse success! The trophy shot after everyone else had left.

But at this eclipse my shooting plan dictated that I stick it out. By the end of the eclipse I was the last one standing, alone to enjoy last contact and then lunch, killing time for any road congestion to diminish, as I had to head to another motel for the post-eclipse night, in nearby Panguitch. 

I had a celebratory dinner and Moab-brewed beer that night at Cowboy’s, the best restaurant in Panguitch, sporting my Annular 2023 eclipse hat! 

But the next day I started the drive north again, for the three-day trek back up I-15 to the border, then home. 

Priority one upon getting home was to finish processing images, and to include them in a revised version of my ebook How to Photograph the Solar Eclipses. It is linked to above and here on the title. Images of some sample pages from the revised edition are in the slide show below.

Post-annular, the book’s title remains the same, but I revised the pages in Chapter 4 on planning for the 2023 eclipse with pages on “lessons learned!” And there were several! 

I expanded Chapter 11 on processing to include tutorials on assembling annular eclipse composites, now that I actually have some! 

Such as the composite of first- to last-contact telescopic close-ups below.

This is a composite of the various stages of the entire October 14, 2023 annular solar eclipse, from start (lower left) to end (upper right), with mid-eclipse at centre. So time runs forward from left to right, with the Suns positioned to reflect the approximate motion of the Sun in the morning sky when this eclipse occured at my site, with it rising higher through the progress of the eclipse. North is up in this image.

The new version of my ebook is 20 pages larger than the pre-annular edition. 

An email has gone out from eJunkie to all buyers of the earlier-edition PDF to alert them to the new version, and with a download link. Apple Books readers should get a notice when they open the book on their Mac or iPad in the Books app that a new version is available. 

I suspect that will be the last revision of my ebook before the big event – the total eclipse of the Sun on April 8, 2024. 

Here’s wishing us all clear skies for that one! That eclipse will indeed require a drive to Texas. This time I’ll remember that damned cable! 

— Alan Dyer, October 31, 2023

amazingsky.com 

How To Photograph the Solar Eclipses


My latest ebook describes in detail the many techniques we can use to capture great still images and movies of the 2023 and 2024 eclipses of the Sun.

In the next few months we have two major eclipses of the Sun visible from North America.

On October 14, 2023 the Moon will cross the disk of the Sun creating a partial eclipse. But from along a narrow path in the western U.S. the Moon’s disk will be centered on the Sun’s disk but not be large enough to completely cover it. For a few minutes, viewers will see an “annular” eclipse, as above, as what remains of the Sun forms a brilliant ring of light around the dark disk of the Moon.

Six lunar months later, the Moon again crosses the Sun but is now large enough to completely cover the Sun’s bright disk. The result is the most spectacular celestial sight, a total eclipse of the Sun, on April 8, 2024. The last such total solar eclipse (TSE) in North America was on August 21, 2017, shown above. After 2024, the next TSE in southern North America will not be until August 23, 2044. (There’s a TSE in northern Alaska on March 30, 2033.)

In 2017 I prepared an ebook about how to shoot that year’s total eclipse. This year I revised and expanded the book extensively to cover both the 2023 annular and 2024 total eclipses. The new 350-page ebook explains how to frame the eclipses depending on where you are along the paths. New information covers the advances in camera gear, with more details added on shooting video. Revised tutorials cover new software and processing techniques.

Above is the ebook’s Contents page, so you can see what topics it covers, over an extensive 350 pages. I provide not only advice on lots of techniques and gear, but also suggestions for what not to do, and what can go wrong!


The Fundamentals

I discuss the filters needed, comparing the various types available, and when to use them, and when to remove them. (A filter is always needed for the annular eclipse, but failing to remove the filter is a common failing at a total eclipse!)

For the 2023 annular eclipse I explain how to shoot close-ups, but also another type of image, the multiple exposure composite. Framing, timing and exposing correctly are crucial.

I do the same for the 2024 total eclipse, as a wide-angle shot of the eclipsed Sun over a landscape is one of the easiest ways to capture the event. It’s possible to set up a camera to take the images automatically, leaving you free to enjoy the view of the event without fussing with gear. I explain how best to do that.

For both eclipses, many people will want to shoot close-ups with telephoto lenses or telescopes. It takes more work and more can go wrong, but I show what’s required for equipment and exposures, and explain how to avoid the common flaws of fuzzy focus and trailed images.

But good exposure is also essential. However, for a total eclipse close-up, no one exposure is best. It takes a range of exposures to record the wide dynamic range of phenomena during totality. That demands work at the camera.


Setting Cameras

I show how we can use a camera’s auto-bracketing function to help automate the process of taking a set of exposures, from short exposures for the prominences, to long for the faint outer corona.

Another option is using a continuous burst mode to capture the fleeting moments of the diamond rings at the start and end of totality in 2024. But this can also be useful for capturing the “reverse Baily’s beads” that appear briefly as the Moon reaches the inner contact points at the start and end of the annular phase of the 2023 eclipse.

Using a tracking mount can help with shooting a set of images during totality. I describe the options for choosing the right mount and telescope, and how to set it up for accurate tracking. I discuss the advantages — and pitfalls — of using a tracking mount.


Shooting Video

Video is now an important feature of many cameras. But the choices of formats and settings can be daunting! 4K, 8K, 4K HQ — what to use? I illustrate the differences, using the best practice target, the crescent Moon.

Choosing the right contrast curve for your video — such as CLog3 here — can also make a big difference to the final video quality. It’s important to get that right. You have only one chance!

I also devote a chapter to shooting time-lapses, with wide-angle lenses and telescopes.


Image Processing

Chapter 11 is the biggest, with 68 pages of tutorials on how to process eclipse images, using the latest software. I show the benefit new AI tools can provide, but also the oddities they can impart to eclipse images.

I illustrate how to use HDR software (comparing sample results from several popular programs) to blend multiple exposures for greater dynamic range.

I illustrate other methods of stacking and blending exposure sets, such as luminosity masks and stack modes. Examples are all with Adobe products, but the methods are applicable to other layer-based programs such as Affinity Photo.

The processing chapter ends with illustrations on how to create layered composites from images taken at multiple stages of an eclipse.


What Can Go Wrong?

The ebook ends with advice for the ambitious (!) on how best to use several cameras to capture different aspects of the eclipse. And I includes lots of tips and checklists to ensure all goes well on eclipse day — or what to do for Plan B if all does not go well!

The ebook is available for Apple Books (for Macs and iPads) and as a PDF for all devices. Links to buy and more details on ebook content are at my website at www.amazingsky.com/EclipseBook.

I’ll be posting more eclipse “tips and techniques” blogs in the coming months, so be sure to subscribe.

Thanks and clear skies!

— Alan, June 2023

“Nightscapes & Time-Lapses” Goes Universal!


How to Photograph and Process Nightscapes and Time-Lapses

I’m pleased to announce that my “Nightscapes and Time-Lapses” eBook is now available for all devices as a “universal” PDF!

First published in 2014, and revised several times since then, my How to Photograph and Process Nightscapes and Time-Lapses eBook had been available only for Apple devices through the Apple iBooks Store. Not any more!

Over the years, many people have inquired about an edition for other devices, notably Android and Windows tablets. The only format that I can be sure the wide array of other devices can read and display as I intend it is PDF.

To convert the interactive Apple iBook into a PDF required splitting the content into two volumes:

Volume 1 deals just with Photography in 425 pages.

Cover-Volume1

Volume 2 deals just with Processing, also in 425 pages.

Cover-Volume2

Volume 2 includes all the same step-by-step tutorials as the Apple edition, but spread over many more pages. That’s because the Apple Edition allows “stacking” many processing steps into a one-page interactive gallery.

In the PDF version, however, those same steps are shown over several pages. And there are about 50 processing tutorials, including for selected non-Adobe programs such as Affinity Photo, ON1 Photo RAW, and DxO PhotoLab.

The other main difference is that, unlike the Apple version, I cannot embed videos. So all the videos are provided by links to Vimeo feeds, many “private” so only my ebook owners have access to those videos.

Otherwise, the combined content of the two PDFs is the same as the Apple iBooks edition.

Cover-Apple Edition

I’ve also updated the Apple iBooks version (to v3.1) to revise the content, and add a few new pages: on Luminosity Mask panel extensions, southern hemisphere Milky Way and Moon charts, and even the new Nikon Z6 camera. It is now 580 pages.

Owners of the previous Apple iBooks edition can get the updated version for free. In iBooks, check under Purchased>Updates.

Both Apple and PDF editions are now in sync and identical in content. I think you’ll find them the most comprehensive works on the subject in print and in digital.

To learn more and to buy, see my webpage at my AmazingSky site. 

Thanks!

— Alan, September 1, 2018 / © 2018 Alan Dyer / AmazingSky.com 


Milky Way Over the Icefields

The 2018 Edition of “Nightscapes and Time-Lapses”


Milky Way Over the Icefields

Revised and expanded, the new Third Edition of my Nightscapes and Time-Lapses eBook provides one of the most comprehensive guides to the subject you’ll find!

The 2018 Third Edition of my ebook How to Photograph and Process Nightscapes and Time-Lapses is now available at the Apple iBooks Store.

A detailed description and content listing is at my website at http://www.amazingsky.com/nightscapesbook.html where there is a link to the iBooks Store page.

Here’s a short promo video, one that also opens the ebook as one of the embedded videos.

I originally published this ebook in 2014, then revised it in late 2016. Here’s what’s new in this 2018 Third Edition:

  • Updated equipment (cameras, lenses, filters, time-lapse gear) to reflect what’s current as of mid-2018. For example I added: the Revolve Camera slider; functions from the Canon 6D MkII; and information about the Sony a7III Mirrorless. 
  • Updated the processing tutorials with current software: Photoshop CC2018, Lightroom Classic CC, Starry Landscape Stacker, TLDF, Timelapse Workflow, and LRTimelapse version 5.
  • Added tutorials on selected non-Adobe programs: DxO PhotoLab, ON1 Photo RAW, Affinity Photo, and the extensions Raya Pro 3 and Dr. Brown’s Services.
  • Added some 50 new topic pages, such as on memory cards and exposure blending.

In addition I’ve performed “housekeeping chores” such as:

  • Removing some embedded movies to reduce the file size and
  • Converting interactive diagrams into labeled images and
  • Flattening some of the interactive image galleries, all for facilitating conversion to PDFs for non-Apple platforms. 
  • Improving the resolution of most tutorial screenshot images.
  • Improving many diagrams and updating many images.
  • Merging the chapter on Intervalometers into Chapter 1.
  • Plus I’ve added a section on lunar eclipses back in. Yay!

Here are screen shots of sample chapter content pages, to provide an idea of what the ebook contains and looks like.

All current owners of the older editions get the Third Edition update for free through the iBooks app (Mac or iPad, and also iPhone).

I hope you enjoy the new edition. Tell your friends! And do leave a rating or review at the iBooks sales page. Thanks!

And yes, for non-Apple people, a non-interactive PDF version for all other platforms (Windows and Android) is in production for later this year.

Thanks!

— Alan, June 9, 2018 / © 2018 Alan Dyer / amazingsky.com


How to Shoot the Solar Eclipse


Total Eclipse of the Sun Composite (2006 Libya)

The most spectacular sight the universe has to offer is coming to a sky near you this summer. 

On August 21 the Moon will eclipse the Sun, totally!, along a path that crosses the continental USA from coast to coast. All the details of where to go are at the excellent website GreatAmericanEclipse.com

If this will be your first total solar eclipse, you might want to just watch it. But many will want to photograph or video it. It can be easy to do, or it can be very complex, for those who are after ambitious composites and time-lapses.

To tell you how to shoot the eclipse, with all types of cameras, from cell phones to DSLRs, with all types of techniques, from simple to advanced, I’ve prepared a comprehensive ebook, How to Photograph the Solar Eclipse.

eclipseebookcover

It is 295 pages of sage advice, gathered over 38 years of shooting 15 total solar eclipses around the world.

The book is filled with illustrations designed specifically for the 2017 eclipse – where the Sun will be, how to frame the scene, what will be in the sky, how the shadow will move, where the diamond rings will be, what lenses to use, etc.


Here are a few sample pages:

eclipseebook-1

I cover shooting with everything from wide-angle cameras for the entire scene, to close-ups with long telephotos and telescopes, both on tripods and on tracking mounts.


eclipseebook-5

I cover all the details on exposures and camera settings, and on focusing and ensuring the sharpest images. Most bad eclipse pix are ruined not by poor exposure but poor focus and blurry images – the Sun is moving!


eclipseebook-6

A big chapter covers processing of eclipse images, again, from simple images to complex stacks and composites.


Total Solar Eclipse C3 Diamond Ring and Totality (2012 Australia

For example, I show how to produce a shot like this, from 2012, combining a short diamond ring image with a long-exposure image of the corona.


chapter-10

A final chapter covers “what can go wrong!” and how to avoid the common mistakes.


For details on the ebook content, see my webpage for the book at http://www.amazingsky.com/eclipsebook.html 

The ebook is available on the Apple iBooks Store for Mac and iOS devices. This version has the best interactivity (zoomable images), higher quality images (less compression), and easiest content navigation.

However, for non-Apple people and devices, the ebook can also be purchased directly from my website as a downloadable PDF, which has embedded hyperlinks to external sites.

I think you’ll find the ebook to be the most comprehensive guide to shooting solar eclipses you’ll find. It is up to date (as of last week!) and covers all the techniques for the digital age.

Many thanks, and clear skies on August 21, wherever you may be in the shadow of the Moon!

— Alan, February 28, 2017 / © 2017 Alan Dyer / amazingsky.com


My new eBook on Nightscapes & Time-Lapse Photography


Nightscapes Book Cover

I’m pleased to announce my new ebook, How to Photograph and Process Nightscapes and Time-Lapses

The ebook describes —

How to shoot and process still image “nightscapes” – images of landscapes taken at night by the light of the Moon or stars … and …

How to shoot and assemble time-lapse movies of the stars and Milky Way turning above Earthly scenes, all using DSLR cameras.

Available worldwide only for MacOS and iPads through the Apple iBookstore.

See http://tiny.cc/urdoqx for more about the book at iTunes.

IMG_2108

The 400-page multi-touch book includes

50 embedded HD videos (no internet connection required) demonstrating time-lapse techniques.

60 multi-page tutorials with step-by-step instructions of how to use software: Adobe Bridge, Adobe Camera Raw, Photoshop, Lightroom, LRTimelapse, Advanced Stacker Actions, StarStaX, Panolapse, Sequence, GBTimelapse, and more.

Numerous Photo 101 sections explaining the basic concepts of photography and video production (f-stops, ISOs, file types, aspect ratios, frame rates, compression, etc.).

Numerous Astronomy 101 sections explaining the basics of how the sky works (how the sky moves, where the Moon can be found, when the Milky Way can be seen, when and where to see auroras).

Reviews of gear – I don’t just mention that specialized gear exists, I illustrate in detail how to use popular units such as the Time-Lapse+, Michron, and TriggerTrap intervalometers, and the All-View mount, Radian, Mindarin Astro, eMotimo, and Dynamic Perception motion-control units, with comments on what’s good – and not so good – to use.

IMG_2121

You’ll learn —

• What are the best cameras and lenses to buy (cropped vs. full-frame, Canon vs. Nikon, manual vs. automatic lenses, zooms vs. primes).

• How to set your cameras and lenses for maximum detail and minimum noise (following the mantra of “exposing to the right” and using dark frames).

IMG_2133

• How to shoot auroras, conjunctions, satellites, comets, and meteor showers.

• How to shoot nightscapes lit only by moonlit, and how to determine where the Moon will be to plan a shoot.

• How to shoot & stitch panoramas of the night sky and Milky Way, using Photoshop and PTGui software.

IMG_2137

• How to shoot tracked long exposures of the Milky Way using camera trackers such as the iOptron Star Tracker and Sky-Watcher Star Adventurer.

• How to develop Raw files, the essential first step to great images and movies.

• How to process nightscape stills using techniques such as compositing multiple exposures, masking ground and sky, and using non-destructive adjustment layers and smart filters.

• How to shoot and stack star trail images made of hundreds of frames.

IMG_2150

• How to assemble time-lapse movies from those same hundreds of frames.

• How to plan a time-lapse shoot and calculate the best balance of exposure time vs. frame count vs. length of shoot, and recommended apps to use.

• How to process hundreds of frames using Adobe Camera Raw, Bridge, Photoshop, and Lightroom.

IMG_2154

• How to shoot and process advanced “Holy Grail” time-lapse transitions from day to night.

• How to shoot motion-control sequences using specialized dolly and pan/tilt devices.

• How to use time-lapse processing tools such as LRTimelapse, Panolapse, Sequence, and Advanced Stacker Actions.

• What can go wrong and how best to avoid problems in the field.

IMG_2159

It’s a large, multi-media book available only for MacOS and iPads through the Apple iBookstore.

For technical and economic reasons, the book’s size and media content prevent it from being offered via other platforms such as Kindles and Android devices. It is not available as a static PDF or traditional print book. It’s subject makes use of an ebook’s ability to contain interactive and video content.

See http://tiny.cc/urdoqx for more about the book at iTunes. Available worldwide. It’s $24.95 in the U.S.