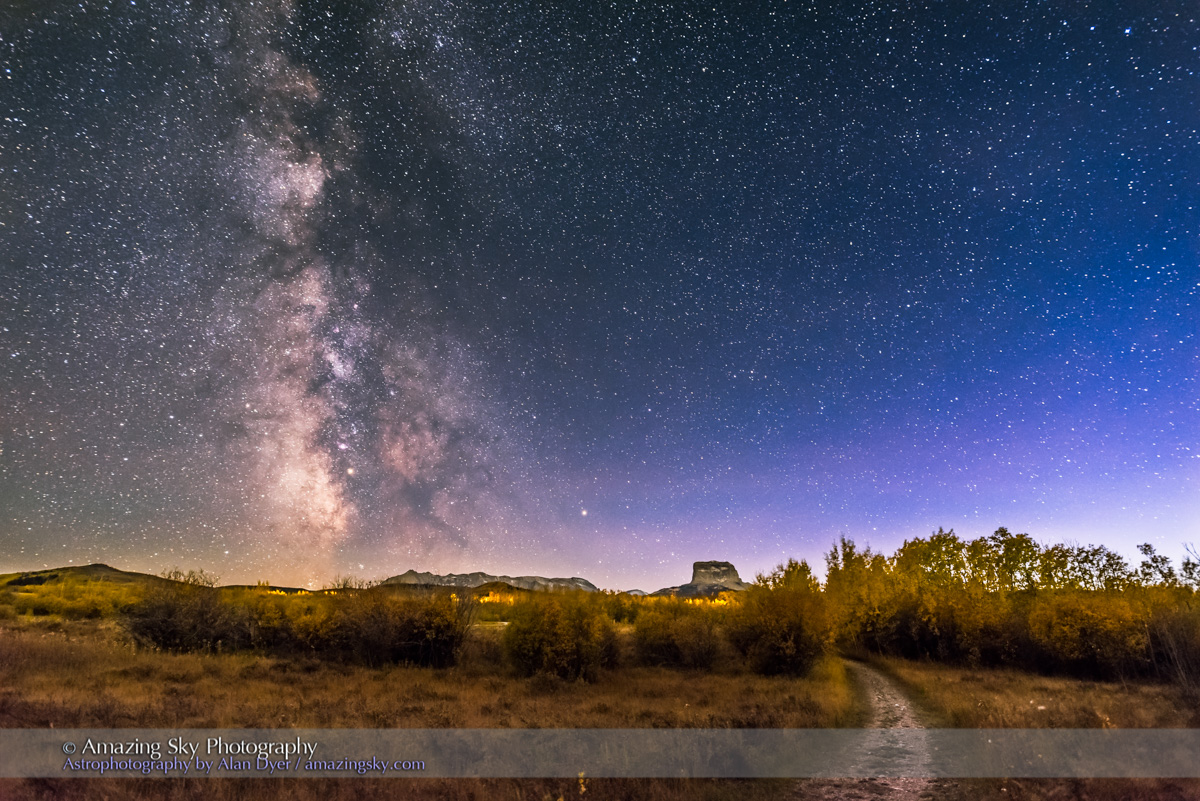
Southern Saskatchewan is a fine place to capture nightscapes of the Milky Way over the grand prairie landscape.
In late August 2025 I took a short road trip around southwest Saskatchewan, taking advantage of a run of wonderfully clear nights to shoot “nightscapes” at some of my favourite locations.
Southern Saskatchewan, and more specifically Southwest Saskatchewan, is a stargazing paradise. The skies are dark and there’s nothing to get in the way of seeing them! Yet, the landscapes have their unique beauty.
And in the case of Grasslands National Park the landscape preserves the endangered realm of original short-grass prairie. It is what the land was like long ago, even including some bison at large.
Grasslands National Park
Technical: This is a blend of tracked and stacked sky exposures with a single untracked ground exposure: – 7 x 60 seconds at f/2 tracked and focused for the sky, plus – 1 x 4 minutes at f/2.8 untracked and focused for the foreground to bring out the details lit only by starlight. No light painting was employed here. – All with the Nikon Z8 at ISO 800 and Nikkor 20mm S lens, on the MSM Nomad tracker. And all from the same tripod position. However, the camera was reframed upward for the sky shots.
In fact, my main destination on my visit to Grasslands this year was to revisit a site I had intended to shoot from in 2019 – the Bison Rubbing Stone overlooking the Frenchman Creek Valley, with the Milky Way as a backdrop.
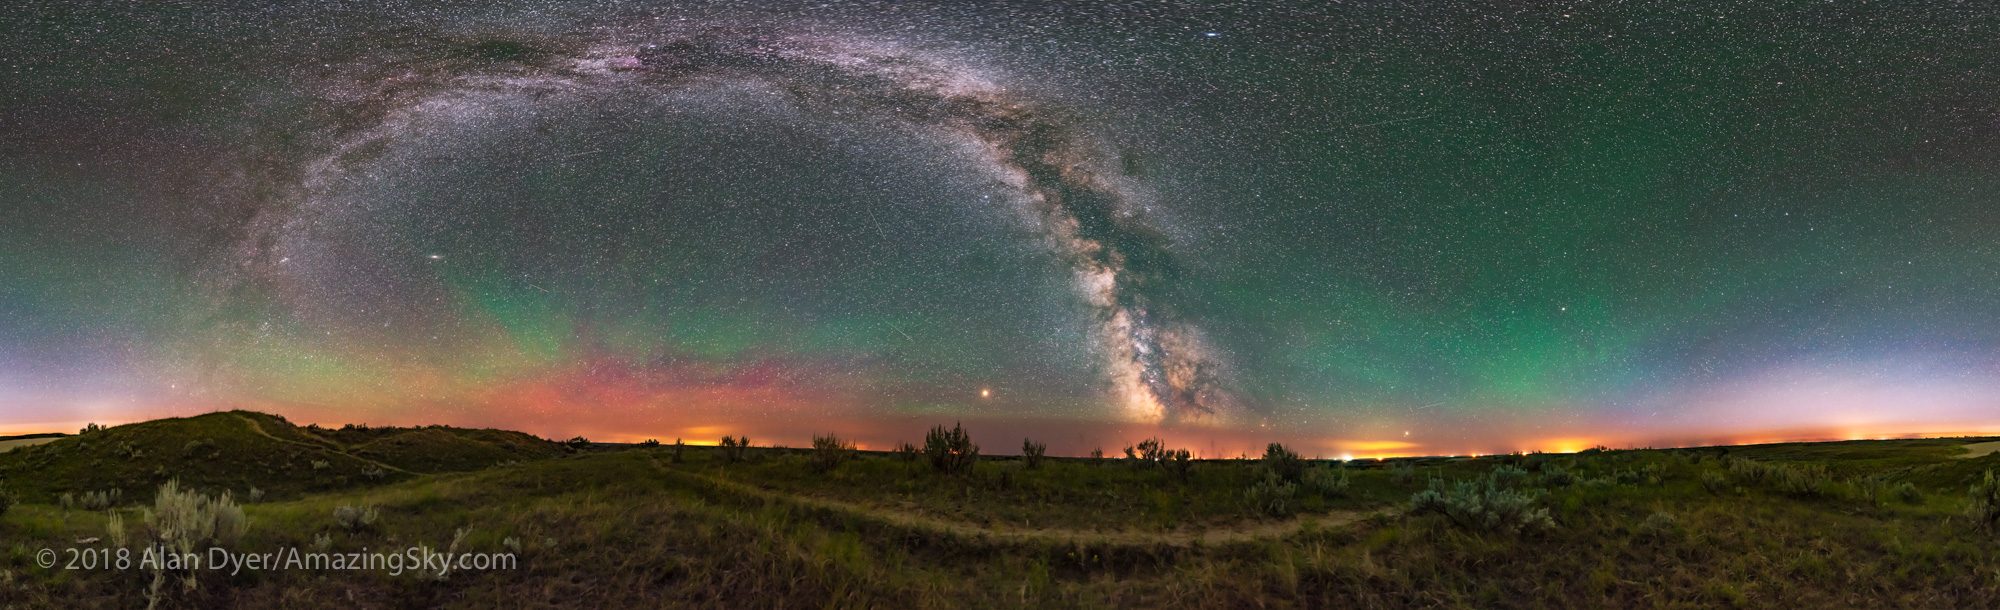
This year I was assured the bison were in the outback, so I set up at their rubbing stone. This is one of the many glacial erratic boulders the Ice Age left scattered across the prairies. With no trees about, the bison have long loved to use them to scratch an itch. But the connection with the stars is that one legend of the sky told by Blackfoot First Nations describes the Milky Way as the “Buffalo Trail,” the dust left by a cosmic herd of bison.
I got the shot! Then all I had to do was turn the camera around to face north to get this scene.
Technical: This is a panorama of 5 segments, each 30 seconds untracked at f/2 with the Nikkor 20mm S-Line lens and Nikon Z8 at ISO 1600. Stitched with Adobe Camera Raw. I removed aircraft trails, but at left I retained the many faint satellite trails in the northwest still lit by twilight, as this was early at about 10:30 pm CST. I did not focus stack these frames. Nor was the camera tracking the stars.
A mild aurora appeared in a classic arc across the north, and framed between the hiking trail, with the Big Dipper to the left and the Milky Way rising to the right. This is the wonderful sky that awaits in the “big sky” country of Grasslands. On the horizon only 3 distant lights could be seen. Grasslands is a Dark Sky Preserve. May it always be so!
Technical: This is a blend of tracked and stacked sky exposures with a single untracked ground exposure: – 4 x 30 seconds at f/2 tracked for the sky, plus – 1 x 2 minutes at f/2.8 untracked for the ground to bring out the details lit by starlight, plus – A single 30-second tracked exposure through a Tiffen Double Fog 3 filter layered in, to add the star glows. – All with the Nikon Z8 at ISO 800 and Nikkor 20mm S lens, on the MSM Nomad tracker. And all from the same tripod position. The camera was not moved for the sky photos.
The night before I headed south out of the little town of Val Marie to a favourite spot high on the hill overlooking the Park. It is called Two Trees, but now only one tree remains! It made a fine foreground for the classic “lone tree and Milky Way” nightscape.
In August the galactic centre lies in the southwest quickly setting in the early evening. But from this latitude of 49º N even with it at its highest, the Milky Way core lies low in the south, making for good compositions with foregrounds below.
Here I present a “landscape” version of the image above, in versions with and without labels to indicate all the rich nebulas and star clusters in this area of sky in Sagittarius the Archer, home of the Milky Way core. Tap on the images to bring them up full screen.
Similarly, below I present views looking east to the autumn constellations rising over the prairie. This was from the valley below Two Trees Hill, at the Riverwalk day use site. Here there were absolutely no lights visible, and hardly a sky glow on the horizon from towns and light pollution. This was paradise for a stargazing session.
The constellations in this area of sky are the ones made famous in the classic tale of the hero Perseus riding on Pegasus the Flying Horse to rescue the lovely Princess Andromeda from Cetus the Sea Monster, while vain Queen Cassiopeia looks on.
Here the sky was also tinted green, not with aurora but airglow, a natural effect caused by high-altitude oxygen fluorescing at night, giving off energy it has absorbed by day. It discolours the sky but it belongs there! It is visible only at dark sky sites.
The Great Sand Hills
From Grasslands I ventured north to the little town of Leader, Saskatchewan, one of the jumping off points to visit the Great Sand Hills nearby. You have to have a local map to find them, but the sand dunes are extensive, and an oddity on the prairie, another Ice Age relic.
They are not a Park but are an ecological reserve, with limited access. I shot from the main spot with parking for visitors and a trail off into the dunes.
Here is another pair of images with annotations, looking north from the main dune field toward Ursa Major and the Big Dipper.
An extensive display of airglow also tints the sky, at least I think that’s the source, and not aurora.
Technical: This is a blend of tracked and stacked sky exposures with a single untracked ground exposure: – A stack of 4 x 60 seconds at f/2 tracked for the sky, plus – 1 x 4 minutes at f/2.8 untracked for the ground, plus – A single 60-second tracked exposure through a Tiffen Double Fog 3 diffusion filter layered in, to add the star glows. – All with the Nikon Z8 at ISO 800 and Nikkor 20mm S lens, on the MSM Nomad tracker. And all from the same tripod position. However, the camera framing was changed for the sky and ground shots, tilting it up it to include more of the sky up the northern Milky Way.
Turning around to face south again frames the sweep of the summer Milky Way over the well-trodden dunes. Not quite the Saharan or Namibian scene you might want, but this is Saskatchewan and having even this scene on the prairies is unique. The only other dune fields are far up north and not readily accessible.
Technical: This is a blend of tracked and stacked sky exposures with a single untracked ground exposure: – A stack of 4 x 60 seconds at f/2 tracked for the sky, plus – 1 x 3 minutes at f/2.8 untracked for the ground to bring out the details lit only by starlight, plus – A single 60-second tracked exposure through a Tiffen Double Fog 3 diffusion filter layered in, to add the star glows. – All with the Nikon Z8 at ISO 800 and Nikkor 20mm S lens, on the MSM Nomad tracker. And all from the same tripod position. However, the camera framing was changed for the sky and ground shots, tilting it up it to include all the constellations in one frame but with just a sliver of ground in the frame.
Looking east from the dune again frames the mythological autumn constellations, with the “W” of Cassiopeia at top amid the Milky Way. The bright “star” at lower right is Saturn. The Pleiades are just rising at left.
The Cypress Hills
I had started my Saskatchewan journey in the Cypress Hills, another formation created by the Ice Age, or rather left untouched by the glaciers creating a high wooded oasis on the prairie. I was there for the annual Saskatchewan Summer Star Party, the subject of my previous blog here.
Technical: This is a blend of: – A stack of 4 x 1 minute exposures, tracked, for the sky with … – A stack of 2 x 1-minute exposures, untracked, for the ground, – All with the Canon RF 28-70mm lens at f/2 and set to 48mm, on the astro-modified Canon EOS R at ISO 1600, and on the MSM Nomad tracker. No filters were employed here. Masking and blending all the images, with the trees in the foreground was a challenge! The camera was not moved — all images were from the same tripod position.
But on the first couple of nights, with the entire four nights of the Party promising to be clear, I left the Party and headed off on my own to shoot some nightscapes over the pine trees at Lookout Point, to again catch the photogenic galactic core in its last appearance for the season.
For the image below, I employed a special filter that isolates the deep red light emitted by the many hydrogen-gas nebulas toward the Milky Way core.
Technical: This is a blend of: – A single 2-minute exposure, untracked, for the ground, blended with … – A stack of 5 x 1 minute exposures, tracked, for the sky, plus … – An additional tracked 2-minute exposure layered in, taken at the end of the set through an Astronomik “narrowband” H-Alpha clip-in filter, to add the red nebulas. – All with the Canon RF 28-70mm lens at f/2 and set to 35mm, on the astro-modified Canon EOS R at ISO 1600 (3200 for the Ha shot), and on the MSM Nomad tracker. Masking and blending all the images, with the trees in the foreground was a challenge! The camera was not moved — all images were from the same tripod position.
This is a technique borrowed from “deep-sky” imaging but now popular among nightscape photographers to create an even more enhanced night sky than a normal unfiltered view.
But even without the filter the long exposures used for the sky record far more detail and colours than even dark-adapted eyes could see. The filter takes that even further.
But those nebulas are there, and they do glow red. Just like the airglow that unaided eyes usually cannot see, the long exposures reveal the unseen, in this case some of the wonderful content of our Galaxy.
And that’s the attraction of astrophotography, to reveal the otherwise elusive or invisible structure of the sky, and in this case juxtaposed over familiar earthly landscapes below.
I can highly recommend Southwest Saskatchewan for anyone interested in stargazing and astrophotography. It’s always been one of my favourite destinations.
I present a selection of new images taken at local World Heritage Sites, along with some advanced nightscape shooting tips.
I’m fortunate in living near scenic landscapes here in southern Alberta. Many are part of UNESCO World Heritage Sites that preserve regions of unique scenic and cultural significance. In early June I visited several to shoot nightscapes of starry skies over the scenic landscapes.
I also took the opportunity to experiment with some new shooting techniques. So I’ve included some tips and techniques, most of the advanced variety.
First up was Dinosaur Provincial Park.
The Milky Way and its core region in Sagittarius and Scorpius is here low over the Badlands landscape of Dinosaur Provincial Park, Alberta.
After nearly a month of rain and clouds, the night of May 31/June 1 proved wonderfully clear at last. I headed to a favourite location in the Red Deer River valley, amid the eroded badlands formations of Dinosaur Provincial Park, site of late-Cretaceous fossil finds.
The bright core of the Milky Way in Sagittarius would be in the south. With the night only three weeks before summer solstice, from the Park’s latitude of 50.5° N the sky would not get astronomically dark. But it would be dark enough to show the Milky Way well, as above in this framing looking south on the Trail of the Fossil Hunters.
However, May and June are “Milky Way Arch” months, at least for the northern hemisphere. The full sweep of the northern Milky Way, from Perseus in the northeast to Sagittarius in the southeast, then stretches across the sky — high enough to be impressive, but low enough (unlike later in summer) to be framable in a horizontal panorama.
This is a 200° panorama of the arch of the northern Milky Way rising over the Badlands landscape of Dinosaur Provincial Park, Alberta.
To capture the arc of the Milky Way I shot a panorama — in fact three:
one exposed for the ground
one exposed for the sky, but with the camera now tracking the sky to keep stars pinpoint
and a final sky panorama but with a specialized filter installed in front of the camera sensor to let through only the deep red light emitted by nebulas along the Milky Way
Rig for tracked panoramas with the MSM Nomad tracker
The image above shows my rig for taking tracked panoramas. The rectangular box is the little Nomad sky tracker from Move-Shoot-Move (MSM), here equipped with its accessory laser pointer to aid the “polar alignment” that is needed for this or any tracker to follow the turning sky properly.
A review of the MSM Nomad will be forthcoming (subscribe to my blog!). However, I’ve found it works very well, much better than MSM’s original Rotator tracker, which was entirely unreliable!
On top of the little Nomad is an Acratech pano head, so I can turn the camera by a specific angle between each pano frame, both horizontally from segment to segment, and vertically if needed when raising the camera from the ground pano to the sky pano.
The pano head is on a “V-Plate” sold by MSM and designed by the late, great nightscape photographer (and engineer by trade), Alyn Wallace. The V-Plate allows the camera to turn parallel to the horizon when on a tipped-over tracker. The entire rig is on a Benro 3-Axis tripod head (also sold by MSM, but widely available) that makes it easy to precisely aim the tracker for polar alignment and then hold it rock steady.
The H-Alpha Panorama rendered in monochrome
I’d taken many panos before using sets of untracked ground and tracked sky panoramas. New this night was the use a “narrowband” Hydrogen-Alpha filter to take a final pano that brings out the red nebulas. I used a filter from Astronomik that clips into the camera in front of the sensor. Such a filter has to be used on a camera that has been modified to be more sensitive to deep red light, as the Canon Ra shown below is (or was, as Canon no longer makes it).
While a modded camera brings out the nebulas, using an H-Alpha filter as well really shows them off. But using one is not easy!
Astronomik clip-in filters, the 12nm H-a on the right
The clip-in placement (unlike a filter in front of a lens) requires that the lens be refocused — infinity focus now falls at the 3 to 6 metre point (the focus shift varies with the lens and focal length — the wider the lens the greater the shift). With the image so dark and deep red, seeing even a bright star to manually focus on is a challenge.
Shifting the lens focus also changes the overall image size (called “focus breathing”) and often introduces more off-axis lens aberrations, again depending on the lens.
So, blending the H-Alpha pano (which I rendered out in monochrome, above) into the final stack is tough, requiring lots of manual alignment, image warping, BlendIf adjustments, and masking. This is where I added in the red colouration to taste. Careful here, as the “Saturation Police” patrolling social media will issue tickets if they judge you have exceeded their “speed limit.”
The complete panorama with Photoshop layers and adjustments
The final pano required a complex blend of image and adjustment layers, all applied non-destructively, so the many elements of the scene can be individually tweaked at any time.
The work was worth it, as the final pano records the deep red nebulas contrasting with the deep blue of a sky still lit partly by twilight, a magenta aurora to the north, and bands of green and yellow airglow, all above the earth tones of the Badlands. It is one of my favourite nightscape panoramas.
As a further note on software: For stitching panos I try to use Adobe Camera Raw first. It can work very well. But complex panos, especially taken with very wide lenses, often require the specialized program PTGui, which offers more choice of pano projection methods, cleaner stitching, and control of panorama framing and levelling.
Next up was Writing-on-Stone Provincial Park.
A week later, with the waxing Moon beginning to appear in the western sky and the promise of clear nights, I headed south to the 49th parallel borderlands of the Milk River and Writing-on-Stone Provincial Park, known as Áísínai’pi to the Blackfoot First Nation who revere the site as sacred.
My plan was a framing of the galactic centre over the Milk River valley and distant Sweetgrass Hills in Montana, perhaps using the H-Alpha filter again. But clouds got in the way!
A 13-segment panorama of the landscape and sky just as the Sun sets over Writing-on-Stone Provincial Park (Áísínai’pi) in Alberta.
When you are faced with a cloudy sky, you make use of it for a colourful sunset. I like shooting panoramas at such sites as they capture the grand sweep of the “big sky” and prairie landscape. Above is the scene at sunset.
A 14-segment panorama of the landscape and sky at sunset at Writing-on-Stone Provincial Park.
Above is the same scene a few minutes later as the Sun, though now set, still lights the high clouds with its red light, mixing with the blue sky to make purples. On the hill at right, a couple admires the sunset, adding a human scale to the vast skyscape.
This pano was with the Canon RF15-35mm lens at 15mm and the camera in portrait orientation to capture as much of the sky and ground as possible in a single-row pano.
A 13-segment panorama of the sandstone landscape in blue-hour twilight at Writing-on-Stone Provincial Park.
I finished the evening with another panorama, but using a Canon RF70-200mm telephoto lens at 70mm to zoom in on the Sweetgrass Hills in the deepening twilight.
Rig for untracked panoramasPanorama head close-up
For these panoramas, exposures were short, so I didn’t need to track the sky. I used another combination of gear shown above. An Acratech ball head sits atop another style of panorama head that has adjustable click stops to make it easy to move the camera from segment to segment at set angles. When the lighting is changing by the second, it helps to be quick about shooting all the pano segments. Such pano heads are readily available on Amazon.
That pano head sits atop an Acratech levelling head (there are many similar units for sale), an essential addition that makes it easy to level the pano head so the camera turns parallel to the horizon. Any tilt will result in a panorama that waves up and down, likely requiring fussy warping or cropping to correct. Avoid that; get it right in-camera!
A single-image portrait of a sunset sky with the waxing two-day-old crescent Moon amid colourful clouds over the prairie.
As the sky lit up, I also shot the crescent Moon above the sunset clouds and prairie scene. While the clouds made for a fine sunset, they did not clear off, thwarting my Milky Way plans this night. I headed back to Milk River, to travel farther west the next day.
From Writing-on-Stone I drove along scenic Highways 501 and 5 to Waterton Lakes National Park.
A nightscape scene under a twilight “blue-hour” sky, on the Red Rock Canyon Parkway in Waterton Lakes National Park, Alberta, looking west toward the sunset with the four-day-old crescent Moon.
After an initial cloudy night, I made use of the (mostly) clear night on June 10 to shoot twilight scenes with the now four-day-old crescent Moon in the evening sky. Here I wanted to play with another technique I had not used much before: focus stacking.
To keep exposures short (here to minimize the blurring effects of the constant wind at Waterton) you have to shoot at wide apertures (f/2 in this case). But that produces a very shallow depth of field, where only a small area of the image is in focus.
So I shot a series of six images, shifting the focus from near (for the foreground flowers) to far (for the mountains and sky). Photoshop has an Auto Blend function that will merge the images into one with everything in focus. I also shot separate images exposed for the bright sky, shooting a vertical panorama — dubbed a “vertorama” — moving the camera up from frame to frame.
I shot an additional short exposure just for the Moon, to prevent its disk from overexposing too much, as it did in the twilight sky images.
Twilight sky assembly and layers in Photoshop
So what looks like a simple snapshot of a twilight scene is actually a complex blend of focus-stacked ground images, panoramic sky images, and a single short image of the Moon replacing its otherwise overly bright disk. But the result better resembles what the eye saw, as single exposures often cannot record the range of brightness the eye can take in.
A nightscape scene under a moonlit sky, on the Red Rock Canyon Parkway in Waterton Lakes National Park, Alberta, looking back along Pass Creek to the south, with the Milky Way rising at left.
About an hour later, from the same location, I shot the other way, toward the Milky Way rising over Vimy Peak, but the sky still lit blue by moonlight. This, too, is a blend of focus-stacked ground and panorama sky images. But the camera was on a fixed tripod for exposures no longer than 15 seconds. So I didn’t use the tracker.
And here the longer exposures do pick up more (colours, fainter stars, and brighter ground detail) than was visible to the eye. Revealing more than the eye can see is the essence and attraction of astrophotography.
A vertical panorama of the moonlit spring sky with the Big Dipper and Arcturus over the jagged outline of Anderson Peak at the Red Rock Canyon area of Waterton Lakes National Park, Alberta.
Heading down the Red Rock Canyon Parkway, I set up the tracker rig for the darker sky, now that the Moon was nearly setting. I shot a vertical panorama, with two untracked ground segments and four tracked sky segments, to capture Arcturus and the Big Dipper over the iconic Anderson Peak.
Comparing without and with LENR – Lots of coloured specks without LENR! Tap to zoom up.
For all the images at Waterton and Writing-on-Stone I used the 45-megapixel Canon R5 camera, great for high resolution, but prone to noise, especially colourful thermal hot pixels. (See my review here.)
For all the long exposures I turned on Long Exposure Noise Reduction, a feature most cameras have. LENR forces the camera to take a “dark frame,” a second exposure of equal length, but with the shutter closed. The camera subtracts the dark frame (which records only the hot pixels) from the previous light frame. The final image takes twice as long to appear, but is much cleaner, as I show above. So a two-minute exposure requires four minutes to complete.
While there are clever ways to eliminate hot pixels later in processing (using Photoshop’s Dust and Scratches filter), doing so can blur details. I’ve long found that doing it “in-camera” always produces better results.
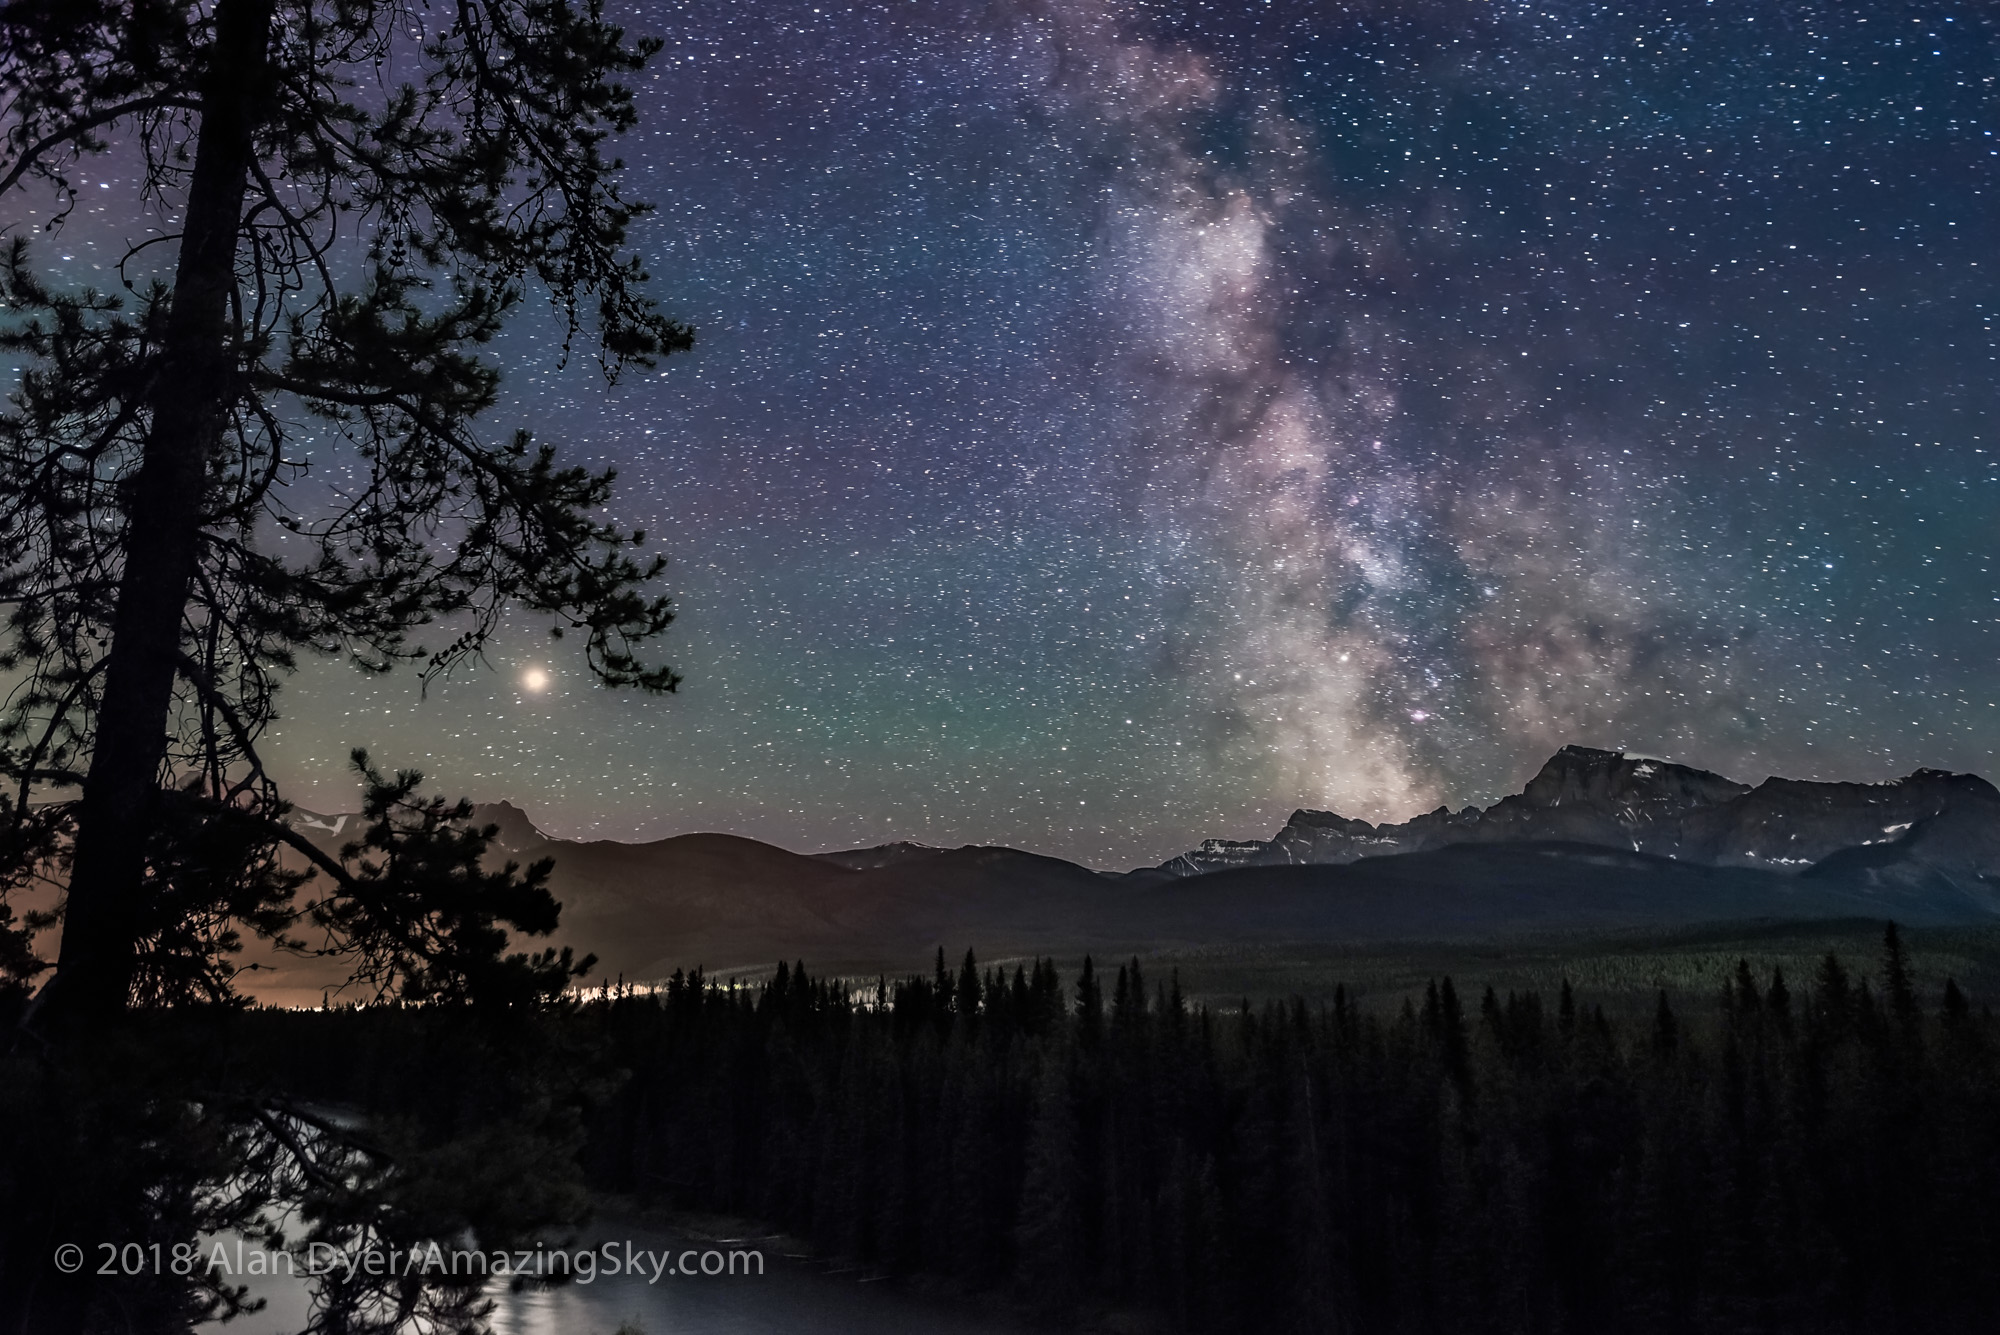
The Milky Way rising over the peak of Mt. Blakiston, in Waterton Lakes National Park, Alberta, Canada.
With the Moon now down, I turned the camera the other direction toward Mt. Blakiston, to capture the star clouds of the summer Milky Way rising behind the mountain, in an example of a “deepscape,” a nightscape with a telephoto lens. This is another technique I’ve not used very often, as the opportunities require good location planning and timing, transparent skies, and a tracker. Apps like ThePhotographersEphemeris coupled with TPE3D, and PlanItPro can help.
Deepscapes frame landscape fragments below some notable deep-sky objects and starfields, in this case a region with several “Messier objects” — nebulas and star clusters well-known to amateur astronomers.
This was a blend of one untracked and one tracked exposure, again on the Nomad. Taking more frames for stacking and noise reduction, while a common practice, was not practical here — at this focal length of 70mm the sky was moving enough that the mismatch between sky and ground would make blending tough to do.
And the reality is that today’s AI-trained noise reduction software (see my test report here) is so good, image stacking is not as essential as it once was.
For many of the Waterton images I used the Canon RF28-70mm lens, usually wide open at f/2. For the image below I used the RF15-35mm lens at its maximum aperture of f/2.8. (See my test report on these lenses here.)
The stars and clouds trail across the sky over Cameron Lake in Waterton Lakes National Park, Alberta, and Mt. Custer across the border in Glacier National Park in Montana.
On my final night in Waterton I drove the Akamina Parkway to Cameron Lake, located in extreme southwest Alberta on the borders with British Columbia and Montana. The glaciated peak to the south is Mt. Custer in Glacier National Park, Montana.
Again, I had hoped to get a deepscape of the photogenic starfields in Scorpius above Mt. Custer. But as is often the case at this site, clouds wafting over the Continental Divide defeated those plans. So Plan B was a set of long exposures of the clouds and stars trailing with the last light of the low Moon lighting parts of the scene. Chunks of ice still drift in the lake.
This is a blend of separate multi-minute exposures for the ground and sky, all at the slow ISO of just 100, and all untracked to purposely create the star trails, not avoid them.
So over a total of four nights at these wonderful World Heritage Sites, I was able to try out some new shooting techniques:
H-Alpha blending
Focus stacking
Deepscapes
As well as panoramas, both horizontal and vertical
Every nightscape outing is a learning process. And you have to be prepared to change plans as the clouds dictate. I didn’t get all the shots I had hoped to, but I still came away with images I was very pleased with.
It has been many years since we were treated to an aurora as widely seen as the show on May 10, 2024. Here’s my tale of the great display.
As the sky darkened around the world on May 10/11, 2024, sky watchers in both the northern and southern hemispheres were amazed to see the sky lit by the deep reds, greens and pinks of a massive display of aurora. For me, this was my first Kp8 to 9 show (to use one measure of aurora intensity) in more than 20 years, back in the film era!
Throughout the day, aurora chasers’ phones (mine included) had been beeping with alerts of the arrival of a major solar storm, with the usual indicators of auroral activity pinned to the top of the scale.
A NOAA satellite’s eye view of the ring of aurora May 10/11, showing it south of me in Alberta, and across the northern U.S. People in the southern U.S. saw it to their north.
As I show below, the graphic of the intensity of the band of aurora, the auroral oval, was lit up red and wide. This was a night we didn’t have to chase north to see the Northern Lights or aurora borealis — they were coming south to meet us (as I show above).
The Kp Index was reading 9 on SpaceWeatherLiveThe auroral oval was lit up red in the Ovation mapThe 3-hour predictions called for red and magenta alerts!
Observers in the southern hemisphere had the normally elusive aurora australis move much farther north than usual, bringing the Southern Lights even to tropical latitudes in Australia, South America and Africa.
The cause was a massive sunspot group on the Sun which had let off several intense solar flares.
Sunspot group 3664 was so big it could be seen with the naked eye, using solar eclipse glasses. Photo courtesy NASA.
The flares had in turn blown off parts of the Sun’s atmosphere, the corona, that anyone who saw the total eclipse a month earlier had admired so much. But a month later, the corona was being blown our way, in a series of Coronal Mass Ejections (CMEs), to collide with Earth.
A movie of six CMEs blasting toward Earth, captured by the SOHO satellite. Courtesy NASA/ESA.
As it happened I was scheduled to give a community talk in the nearby town early in the evening of May 10, on the topic of The Amazing Sky! Watching the indicators, I could more or less promise the audience that we would indeed see an amazing sky later that evening as it got dark.
Post talk, I hurried home to get the cameras ready, choosing to forgo more hurried driving out to a scenic site in southern Alberta, for the convenience of shooting from my rural backyard. As the sky darkened, the clouds were lit purple, and curtains of aurora appeared in the clear patches.
Clouds and aurora in twilight with the 11mm TTArtisan full-frame fish-eye lens.A bright arc of aurora shining through the purple clouds, with the 7.5mm TTArtisan circular fish-eye lens.
Something big was going on! This was promising to be the best show of Northern Lights I had seen from home in a year. (Spring 2023 had three great shows at monthly intervals, followed by an aurora drought for many months. See The Great April Aurora.)
A selfie at the start of the great aurora show of May 10, 2024.
I shot with four cameras (a Canon EOS R, Ra, R5 and R6) — two for time-lapses, one for real-time movies, and one for still images. I used the latter to take many multi-image panoramas, as they are often the best way to capture the wide extent of an aurora across the sky.
The arc of aurora in purple and white across the northern sky from home in Alberta at the start of the great display (about 11:30 p.m. MDT).
Early in the evening the arc of aurora wasn’t the usual green from oxygen, but shades of purple, pink, and even white, likely from sunlit nitrogen. The panorama above is looking north toward a strangely coloured arc of nitrogen (?) aurora.
Then after midnight a more normal curtain appeared suddenly, but toward the south, brightening and rising to engulf much of the southern sky and the sky overhead.
Looking south with the 15mm wide-angle lens.
It is at local midnight to 1 a.m. when substorms usually hit, as we are then looking straight down Earth’s magnetic tail, toward the rain of incoming aurora particles bombarding the Earth. During a substorm, the rain turns into a deluge — the intensity of the incoming electrons increases, sparking a sudden brightening of the aurora, making it dance all the more rapidly.
This is a 300° panorama of my home sky now filled with colourful curtains.
As the aurora explodes in brightness it often swirls up to the zenith (or more correctly, the magnetic zenith) to form one of the sky’s greatest sights, a coronal outburst. Rays and beams converge overhead to form a tunnel effect. It is jaw-dropping.
I’ve seen this many times from northern sites such as Churchill and Yellowknife, where the aurora often dances straight up. And from my latitude of 51° N in western Canada, the aurora does often come down to us.
But this night, people at latitudes where, at best, the aurora might be seen just as a glow on the horizon, saw it dance overhead in a corona show to rival the solar eclipse, and that other corona we saw on April 8!
This is a panorama of a substorm outburst creating an overhead corona with rays converging to the magnetic zenith (south of the true zenith), and amid clouds. The rays show a rich mix of oxygen greens and reds, as well as nitrogen blues blending to create purples. Some greens and reds are mixing to make yellows.
Yes, the long exposures of aurora photos (even those taken with phone cameras) show the colours better than your eye can see them (insensitive as our eyes are to colour in dim light). But this night portions of the arcs and rays were bright enough that greens and pinks were easily visible to the naked eye.
This is a single 9-second exposure of the peak of a bright outburst at 1 a.m. MDT. It was with the Laowa 7.5mm circular fish-eye lens at f/2 on the Canon R5 at ISO 800. It is one frame from a time-lapse sequence. A brief outburst of a substorm created an overhead corona with bright rays converging to the magnetic zenith (south of the true zenith).The corona shows a mix of oxygen greens and reds, as well as nitrogen blues blending to create purples. Some greens and reds mix to make yellows.
At its peak the show was changing rapidly enough, I couldn’t get to all the cameras to aim and frame them, especially the movie camera. The brightest outburst at 1 a.m. lasted just a minute — the time-lapse cameras caught it. The sequence below shows the view in 9-second exposures taken consecutively just 1 second apart.
This series shows a brief outburst of bright aurora at the magnetic zenith overhead. The time between these 7 consecutive 9-second exposures is only 1 second, so this bright outburst did not last long (little more than a minute). With the TTArtisan 7.5mm f/2 fish-eye lens on the Canon R5. Click or tap to enlarge to full screen.
Here’s another sequence of frames taken as part of a time-lapse sequence with the 11mm lens. It shows the change in the aurora over the 80 minutes or so that it was most active for me at my site.
The time between these 12 images is usually 8 minutes, though to include some interesting activity at a bright outburst, the interval is 5 minutes for three of the images around 1 a.m. Each is a 7- or 9-second exposure taken as part of a time-lapse sequence using the 11mm TTArtisan lens at f/2.8 on the Canon R at ISO 800 or 1600.
Shooting time-lapses with fish-eye lenses captures the show with a minimum of attention needed (except to adjust ISO or exposure times when the aurora brightens!). I could use the still camera (with the Laowa 15mm f/2 lens) to take individual shots, such as more selfies and home shots.
This is a single 6-second exposure with the Laowa 15mm lens at f/2 and Canon Ra at ISO 2000.This is a single 4-second exposure with the Laowa 15mm lens at f/2 and Canon Ra at ISO 1600. This is a single 8-second exposure with the Laowa 15mm lens at f/2 on the Canon Ra at ISO 800. Another camera taking a time-lapse is in the scene. I had four going this night.
As colourful as the aurora was at its best between midnight and 1:30 a.m., I think the most unique shots came after the show had subsided to appear just as faint rays across the north again, much as it had begun. To the eye it didn’t look like much, but even on the camera’s live screen I could see unusual colours.
I took more panoramas, to capture one of the most unusual auroral arcs I’ve even seen — a blue and magenta aurora across the north, similar to how the night started.
This a stitch of 11 segments, each 13-second exposures, with the Laowa 15mm lens at f/2 on the Canon Ra camera at ISO 800, and turned to portrait orientation. Processed in Camera Raw and stitched with PTGui.
The colours may be from nitrogen glowing, which tends to light up in blues and purples, especially when illuminated by sunlight at high altitudes. At 2 to 2:30 a.m. the Sun might have been illuminating the aurora at a height of 150 to 400 km, and far to the north.
I’d seen blue-topped green auroras before (and there’s a green aurora off to the west at left here). But this was the first time I’d seen an all-blue aurora, no doubt a product of the intense energy flowing in the upper atmosphere this night. And the season and my latitude.
The panorama is a spherical projection spanning 360º, and reaching to the zenith 90° high at centre. This a stitch of 20 segments, each 13-second exposures, with the Laowa 15mm lens at f/2 on the Canon Ra camera at ISO 800, and turned to portrait orientation. Processed in Camera Raw and stitched with PTGui.
The weirdest aurora was at 2:30 a.m., when in addition to the blue rays of nitrogen, an odd white and magenta patch appeared briefly to the south. What was that??
The lesson here? During a bright show do not go back to sleep when things seem to be dying down. Interesting phenomena can appear in the post-storm time, as we’ve learned with STEVE and other odd red arcs and green proton blobs that we aurora photographers have helped document.
I end with a finale music video, mostly made of the time-lapses I shot this night.
Enjoy!
Bring on more aurora shows as the Sun peaks in activity, perhaps this year. But the best shows often occur in the 2 or 3 years after solar max. So we have several more years to look forward to seeing the Lights dance in our skies.
Watch in full screen and in 4K if you can. For all the tech details click through to YouTube and check the description below the video.
On April 23, 2023 the sky erupted with a massive solar storm, bringing the aurora to millions of people around the word.
On April 23 warnings went out alerting aurora watchers that a solar storm was imminent. And as the sky darkened that night locations all across the Northern and Southern Hemispheres were treated to a great sky show.
This is what we want to see in our aurora apps! Code Red and a vast auroral oval.
When we see this on our phone apps, we know we’ll get a great show. This was the auroral oval, lit up red, as the display was underway at my location in Alberta, Canada.
All indicators were great!
The strength of the interplanetary field (Bt) was high and the direction of the field (Bz) was well south, all welcome indicators of a superb show.
Sure enough, as it got dark that night, and from my location after the clouds cleared, an aurora was underway covering much of the sky.
A fish-eye 360° view of the Great April Aurora of April 23, 2023, from home in southern Alberta, Canada. The Kp level reached 7 to 8 this day. The Big Dipper is above centre. This is looking north.
A single 5-second exposure with the TTArtisan 7.5mm circular fish-eye lens at f/2 and Canon R6 at ISO 3200.
The aurora moved south to occupy just the southern half of the sky, but with incredible ribbons crossing from east to west, rippling and pulsating off and on. Seeing patches of aurora pulse off and on and flaming up to the zenith is not uncommon toward the end of a substorm outburst. But this was the first time I can recall seeing pulsating ribbons.
At times, there was a dark ribbon across the sky, as the aurora formed a gap in its curtains, looking like a “dark aurora.”
A fish-eye 360° view of the Great April Aurora of April 23, 2023, from home in southern Alberta, Canada. The Kp level reached 7 to 8 this day. The Big Dipper is above centre. This is looking south.
A single 5-second exposure with the TTArtisan 7.5mm circular fish-eye lens at f/2 and Canon R6 at ISO 1600.A fish-eye 360° view of the Great April Aurora of April 23, 2023, from home in southern Alberta, Canada. The Kp level reached 7 to 8 this day. The Big Dipper is above centre. This is looking south.
A single 5-second exposure with the TTArtisan 7.5mm circular fish-eye lens at f/2 and Canon R6 at ISO 1600.A view of the great April aurora show of April 23, 2023, looking up to the zenith near the top, with a set of finely-structured parallel ribbons of aurora crossing the sky from east (left) to west (right). This is looking south. The Big Dipper is at top. Taken from home in southern Alberta, Canada.
This is a single 10-second exposure with the Canon Ra at ISO 1600 and 11mm TTArtisan full-frame fish-eye lens at f/2.8.A view of the great April aurora show of April 23, 2023, looking to the south, with diffuse curtains across the sky forming a dark gap at the zenith. Taken from home in southern Alberta, Canada.
This is a single 1.6-second exposure with the Canon Ra at ISO 5000 and 11mm TTArtisan full-frame fish-eye lens at f/2.8.
The view looking straight up is always the most jaw-dropping when an aurora fills the sky. Rays and curtains converge at the magnetic zenith to form a “corona.”
The aurora of April 23, 2023, looking straight up to the zenith to capture the converging curtains in a coronal display. The Big Dipper is at top.
A single 3.2-second exposure with the Canon R5 at ISO 800 and Laowa 15mm lens at f/2.
I shot with three cameras, taking stills, time-lapses, and real-time movies. I edited them together here in a music video. Enlarge to full screen to view it. I hope you enjoy it!
A 3-minute video of the April 23, 2023 aurora show from Alberta.An aurora selfie with the great all-sky Kp6 to 8 level aurora of April 23, 2023. This is looking south toward Arcturus and Spica. The Coma Berenices cluster is at top near the convergence point for the auroral curtains.
Shot from home with the Canon Ra and 11mm TTArtisan full-frame fish-eye lens at f/2.8.
With the Sun ramping up in activity, we should get more great shows of Northern – and Southern! – Lights around the world in the next few years,
In mid-October 2022 I enjoyed a rare run of five clear and mild nights in the Rocky Mountains for shooting nightscapes of the stars. Here’s a portfolio … and a behind-the-scenes look at its making.
Getting two perfectly clear nights in a row is unusual in the mountains. Being treated to five is a rare treat. Indeed, had I started my shooting run earlier in the week I could have enjoyed even more of the string of cloudless nights in October, though under a full Moon. But five was wonderful, allowing me to capture some of the scenes that had been on my shot list for the last few years.
Here is a portfolio of the results, from five marvelous nights in Banff and Jasper National Parks, in Alberta, Canada.
For the photographers, I also provide some behind-the-scenes looks at the planning and shooting techniques, and of my processing steps.
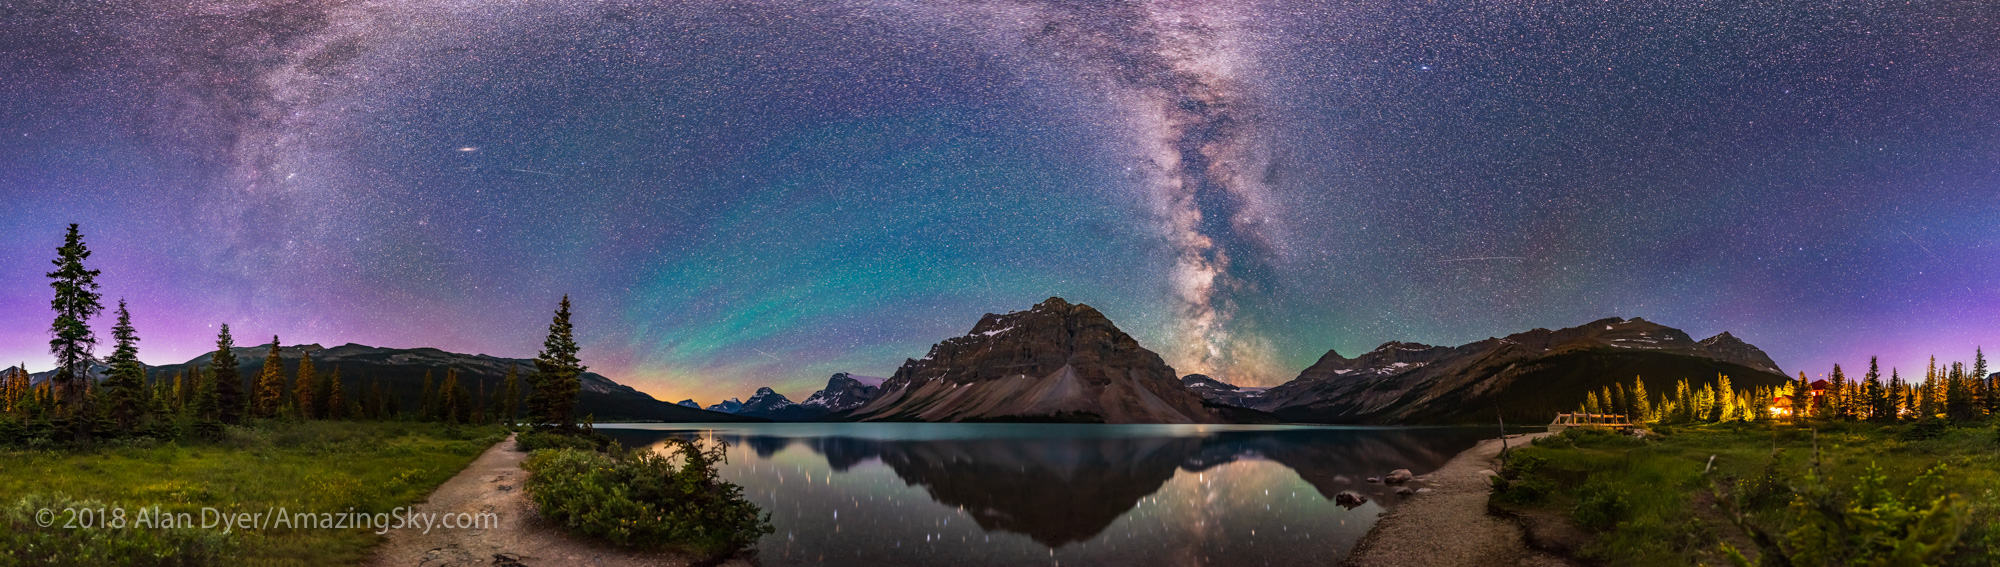
Night One — Peyto Lake, Banff National Park
Peyto Lake, named for pioneer settler and trail guide Bill Peyto who had a cabin by the lakeshore, is one of several iconic mountain lakes in Banff. Every tour bus heading along the Icefields Parkway between Banff and Jasper stops here. By day is it packed. By night I had the newly constructed viewpoint all to myself.
The stars of Ursa Major, the Great Bear, over the waters of Peyto Lake, Banff, in deep twilight. This is a stack of 6 x 30-second exposures for the ground and a single untracked 30-second exposure for the sky, all at f/2.8 with the Canon RF 15-35mm lens at 15mm, and Canon R5 at ISO 800.
I shot the classic view north in deep twilight, with the stars of Ursa Major and the Big Dipper low over the lake, as they are in autumn. A show of Northern Lights would have been ideal, but I was happy to settle for just the stars.
This is a blend of two panoramas: the first of the sky taken at or just before moonrise with the camera on a star tracker to keep the stars pinpoint, and the second taken for the ground about 20 minutes later with the tracker off, when the Moon was up high enough to light the peaks. Both pans were with the Canon RF15-35mm lens at 15mm and f/2.8, and Canon R5 at ISO 1600, with the sky pan being 7 segments for 1 minute each, and the untracked ground panorama being the same 7 segments for 2 minutes each.
The night was perfect, not just for the clarity of the sky but also the timing. The Moon was just past full, so was rising in late evening, leaving a window of time between the end of twilight and moonrise when the sky would be dark enough to capture the Milky Way. Then shortly after, the Moon would come up, lighting the peaks with golden moonlight — alpenglow, but from the Moon not Sun.
The above is blend of two panoramas, each of seven segments, the first for the sky taken when the sky was dark, using a star tracker to keep the stars pinpoints. The second for the ground I shot a few minutes later at moonrise with no tracking, to keep the ground sharp. I show below how I blended the two elements.
The Photographer’s Ephemeris
TPE 3D
To plan such shots I use the apps The Photographer’s Ephemeris (TPE) and its companion app TPE 3D. The screen shot above at left shows the scene in map view for the night in question, with the Big Dipper indicated north over the lake and the line of dots for the Milky Way showing it to the southwest over Peyto Glacier. Tap or click on the images for full-screen versions.
Switch to TPE 3D and its view at right above simulates the scene you’ll actually see, with the Milky Way over the mountain skyline just as it really appeared. The app even faithfully replicates the lighting on the peaks from the rising Moon. It is an amazing planning tool.
This is a blend of 5 x 20-second exposures stacked for the ground to smooth noise, and a single 20-second exposure for the sky, all with the Canon RF15-35mm lens at f/2.8 and Canon R5 at ISO 1600. All were untracked camera-on-tripod shots.
On the drive back from Peyto Lake to Saskatchewan River Crossing I stopped at another iconic spot, the roadside viewpoint for Mt. Cephren at Waterfowl Lakes. By this time, the Moon was well up and fully illuminating the peak and the sky, but still leaving the foreground dark. The sky is blue as it is by day because it is lit by moonlight, which is just sunlight reflecting off a perfectly neutral grey rock, the Moon!
This is from a set of untracked camera-on-tripod shots using short 30-second exposures.
Night Two — Pyramid Lake, Jasper National Park
By the next night I was up in Jasper, a destination I had been trying to revisit for some time. But poor weather prospects and forest fire smoke had kept me away in recent years.
The days and nights I was there coincided with the first weekend of the annual Jasper Dark Sky Festival. I attended one of the events, the very enjoyable Aurora Chaser’s Retreat, with talks and presentations by some well-known chasers of the Northern Lights. Attendees had come from around North America.
This is a blend of: a stack of 4 x 1-minute tracked exposures for the sky at ISO 1600 plus a stack of 7 x 2-minute untracked exposures at ISO 800 for the ground, plus an additional single 1-minute tracked exposure for the reflected stars and the foreground water. All were with the Canon RF15-35mm lens at 15mm and f/2.8 and Canon R5.
On my first night in Jasper I headed up to Pyramid Lake, a favorite local spot for stargazing and night sky photography, particularly from the little island connected to the “mainland” by a wooden boardwalk. Lots of people were there quietly enjoying the night. I shared one campfire spot with several other photographers also shooting the Milky Way over the calm lake before moonrise.
This is a blend of: a stack of 4 x 1-minute tracked exposures for the sky at ISO 1600 plus a stack of 6 x 3-minute untracked exposures at ISO 800 for the ground, all with the Canon RF15-35mm lens at 20mm and f/2.8 and Canon R5. The tracker was the Star Adventurer Mini.
A little later I moved to the north end of Pyramid Island for the view of the Big Dipper over Pyramid Mountain, now fully lit by the rising waning Moon, and with some aspens still in their autumn colours. A bright meteor added to the scene.
Night Three — Athabasca River Viewpoint, Jasper National Park
For my second night in Jasper, I ventured back down the Icefields Parkway to the “Goats and Glaciers” viewpoint overlooking the Athabasca River and the peaks of the Continental Divide.
This is a blend of three 3-section panoramas: the first taken with a Star Adventurer Mini for 3 x 2-minute tracked exposures for the sky at ISO 800; the second immediately afterward with the tracker off for 3 x 3-minutes at ISO 800 for the ground; and the third taken about an hour later as the Moon rose, lighting the peaks with warm light, for 3 x 2.5-minutes at ISO 1600. All with the Canon RF15-35mm lens at f/2.8 and 15mm and Canon R5,
As I did at Peyto Lake, I shot a panorama (this one in three sections) for the sky before moonrise with a tracker. I then immediately shot another three-section panorama, now untracked, for the ground while it was still lit just by starlight under a dark sky. I then waited an hour for moonrise and shot a third panorama to add in the golden alpenglow on the peaks. So this is a time-blend, bending reality a bit. See my comments below!
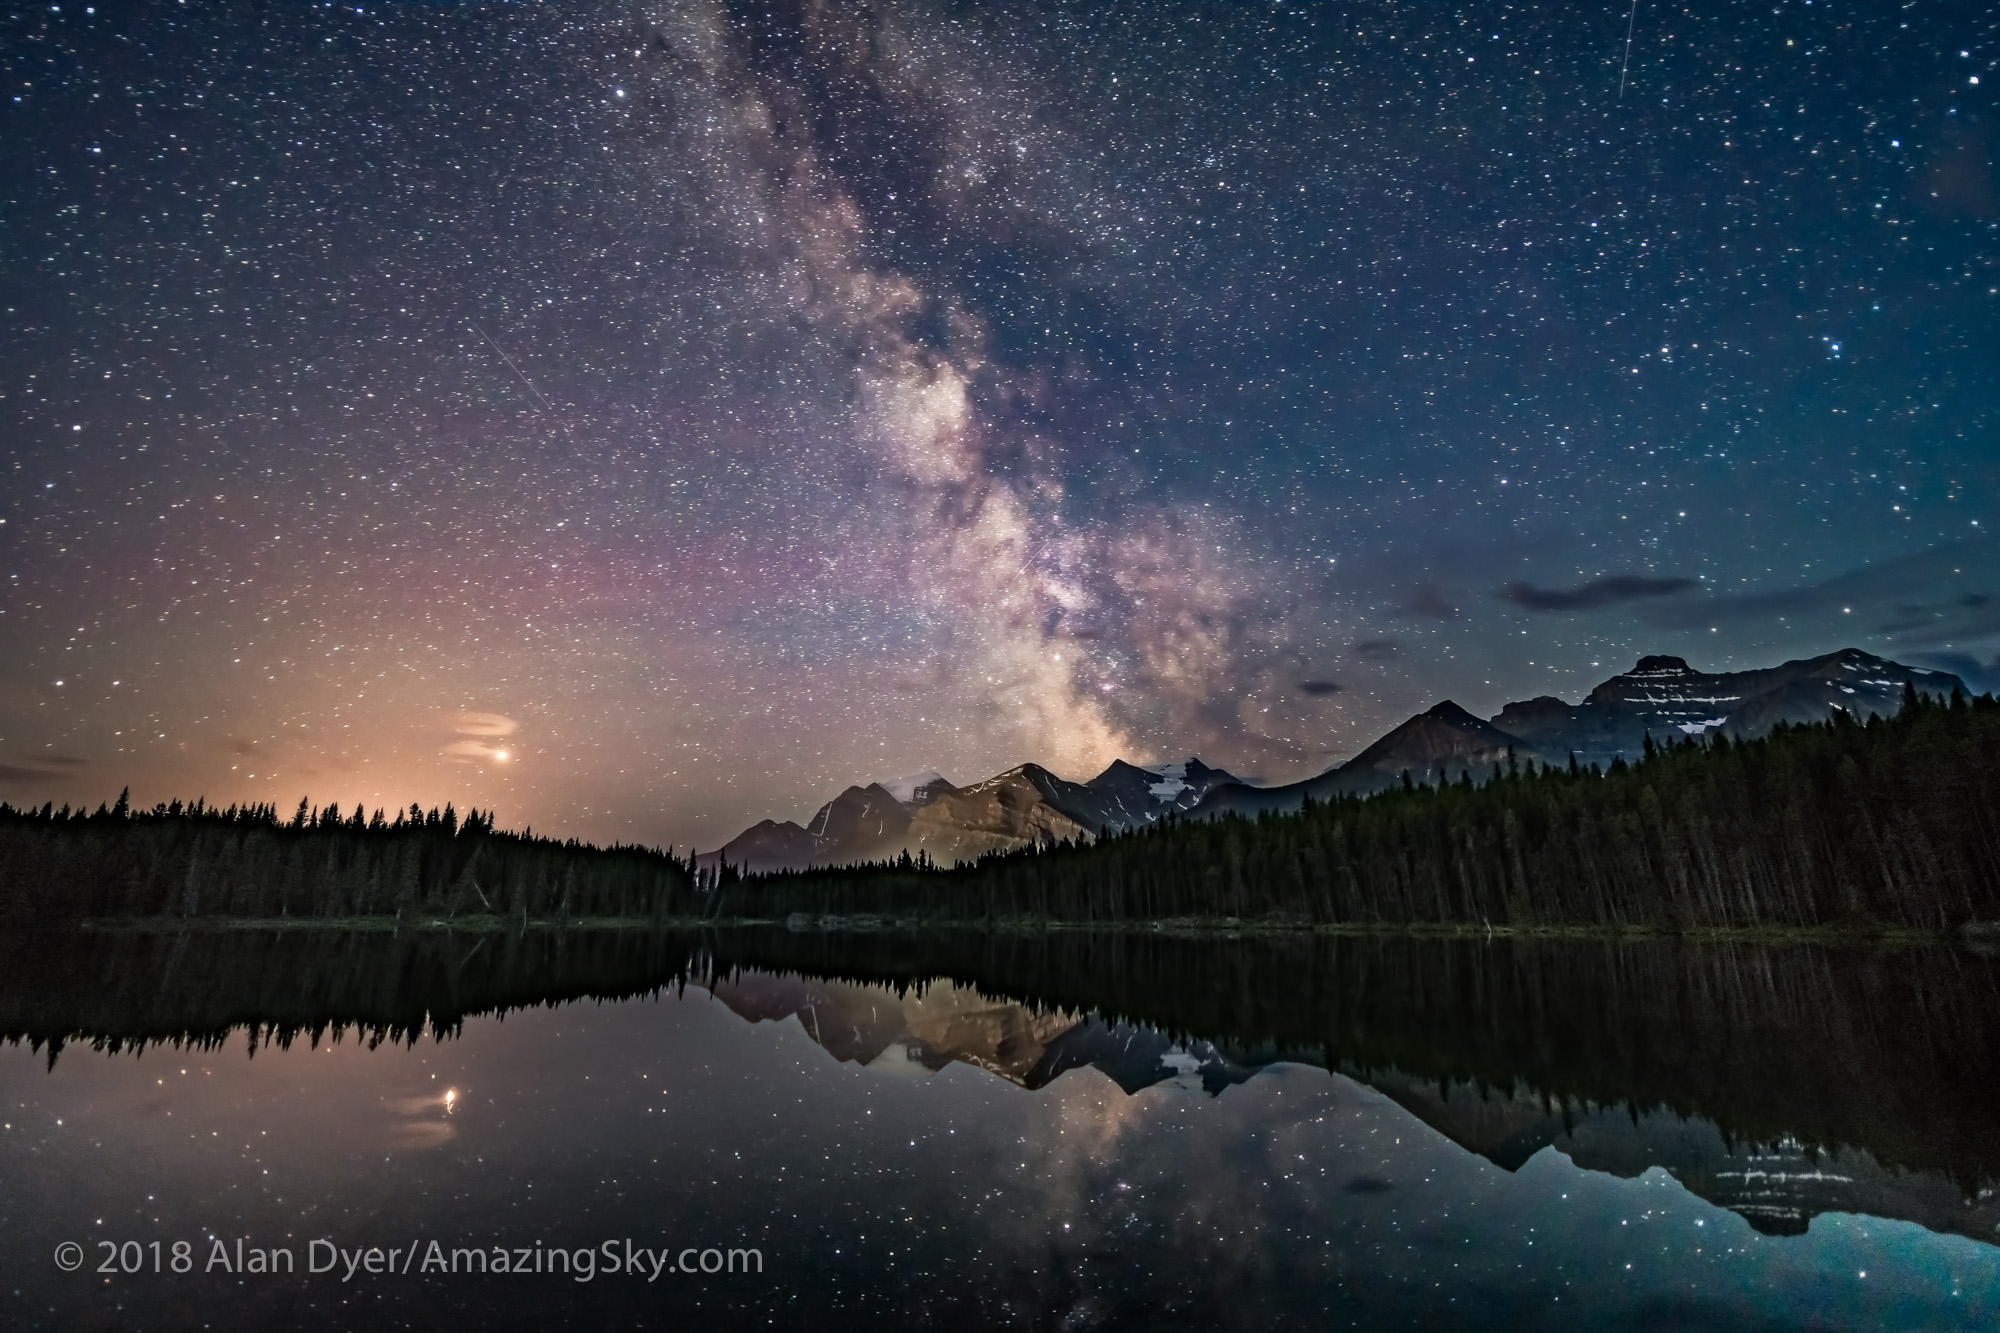
Night Four — Edith Lake, Jasper National Park
With a long drive back to Banff ahead of me the next day, for my last night in Jasper I stayed close to town for shots from the popular Edith Lake, just up the road from the posh Jasper Park Lodge. Unlike at Pyramid Lake, I had the lakeshore to myself.
This is a panorama of four segments, each 30 seconds untracked with the Canon RF15-35mm lens at 15mm and f/2.8 and Canon R5 at ISO 1000.
This would be a fabulous place to catch the Northern Lights, but none were out this night. Instead, I was content to shoot scenes of the northern stars over the calm lake and Pyramid Mountain.
This is a blend of a single tracked 2-minute exposure for the sky and water with the reflected stars, with a single untracked 4-minute exposure for the rest of the ground, both at f/2.8 with the Canon RF15-35mm lens at 17mm and Canon R5 at ISO 800.
This is a blend of a single tracked 2-minute exposure for the sky and water with the reflected stars, with a stack of two untracked 3-minute exposure for the rest of the ground, both at f/2.8 with the Canon RF15-35mm lens at 17mm and Canon R5 at ISO 1600. I shot this October 16, 2022.
The Moon was now coming up late, so the shots above are both in darkness with only starlight providing the illumination. Well, and also some annoying light pollution from town utility sites off the highway. Jasper is a Dark Sky Preserve, but a lot of the town’s street and utility lighting remains unshielded.
Night Five — Lake Louise, Banff National Park
On my last night I was at Lake Louise, as the placement of the Milky Way would be perfect.
This is a blend of two sets of exposures: – a stack of two untracked 2-minute exposures for the ground at ISO 800 – a stack of four tracked 1-minute exposures for the sky at ISO 1600 All with the Canon RF15-35mm lens at f/2.8 and 20mm and Canon R5, and with the camera and tripod not moving between image sets.
There’s no more famous view than this one, with Victoria Glacier at the end of the blue-green glacial lake. Again, by day the site is thronged with people and the parking lot full by early morning.
By night, there were just a handful of other photographers on the lakeshore, and the parking lot was nearly empty. I could park right by the walkway up to the lake.
The Photographer’s Ephemeris
TPE 3D
Again, TPE and TPE 3D told me when the Milky Way would be well-positioned over the lake and glacier, so I could complete the untracked ground shots first, to be ready to shoot the tracked sky segments by the time the Milky Way had turned into place over the glacier.
This is a blend of three vertical panoramas: the first is a set of three untracked 2-minute exposures for the ground at ISO 800 with the camera moved up by 15° from segment to segment; the second shot immediately afterward is made of 7 x 1-minute tracked exposures at ISO 1600 for the sky, also moved 15° vertically from segment to segment; elements of a third 3-section panorama taken about 90 minutes earlier during “blue hour” were blended in at a low level to provide better lighting on the distant peaks. All with the Canon RF15-35mm lens at f/2.8 and 20mm and Canon R5.
This image is also a panorama but a vertical one, made primarily of three untracked segments for the ground and seven tracked segments for the sky, panning up from the horizon to past the zenith overhead, taking in most of the summer and autumn Milky Way from Serpens up to Cassiopeia.
Nightscape Gear
As readers always want to know what gear I used, I shot all images on all nights with the 45-megapixel Canon R5 camera and Canon RF15-35mm lens, with exposures of typically 1 to 3 minutes each at ISOs of 800 to 1600. I had other cameras and lenses with me but never used them.
Star Adventurer Mini tracker with Alyn Wallace V-Plate and AcraTech Panorama Head
For a tracker for such images, I used the Sky-Watcher Star Adventurer Mini, a compact and lightweight unit that is easy to pack and carry to shooting sites. See my review of it here at AstroGearToday.
I use the Mini with a V-Plate designed by nightscape photographer Alyn Wallace and sold by Move-Shoot-Move. It is an essential aid to taking tracked panoramas, as it allows me to turn the camera horizontally manually from one pan segment to the next while the camera is tracking the stars. It’s easy to switch the tracker on (for the sky) and off (for the ground). The Mini tracks quite accurately and reliably. Turn it on and you can be sure it is tracking.
For those who are interested, here’s a look at how I processed and assembled the images, using the Peyto Lake panorama as an example. This is not a thorough tutorial, but shows the main steps involved. Tap or click on an image to download a full-size version.
I first develop all the raw files (seven here) in Adobe Camera Raw, applying identical settings to make them look best for what they are going to contribute to the final blend, in this case, for the tracked sky with pinpoint stars and the Milky Way.
Camera Raw (as does Adobe’s Lightroom) has an excellent Merge to Panorama function which usually works very well on such scenes. This shows the stitched sky panorama, created with one click.
I develop and stitch the untracked ground segments to look their best for revealing details in the landscape, overexposing the sky in the process. Stars are also trailed, from the long exposures needed for the dark ground. No matter – these will be masked out.
This shows the stack of images now in Adobe Photoshop, but here revealing just the layer for the sky panorama and its associated adjustment layers to further tweak color and contrast. I often add noise reduction as a non-destructive “smart filter” applied to the “smart object” image layer. See my review of noise reduction programs here.
This shows just the ground panorama layer, again with some adjustment and retouching layers dedicated to this portion of the image.
The sky has to be masked out of the ground panorama, to reveal the sky below. The Select Sky command in Photoshop usually works well, or I just use the Quick Selection tool and then Select and Mask to refine the edge. That method can be more accurate.
Aligning the two panoramas requires manually nudging the untracked ground, up in this case, to hide the blurred and dark horizon from the tracked sky panorama. Yes, we move the earth! The sky usually also requires some re-touching to clone out blurred horizon bits sticking up. Dealing with trees can be a bit messy!
The result is the scene above with both panorama layers and the masks turned on. While this now looks almost complete, we’re not done yet.
Local adjustments like Dodge and Burn (using a neutral grey layer with a Soft Light blend mode) and some luminosity masks tweak the brightness of portions of the scene for subtle improvements, to emphasize some areas while darkening others. It’s what film photographers did in the darkroom by waving physical dodging and burning tools under the enlarger.
I add finishing touches with some effect plug-ins: Radiant Photo added some pop to the ground, while Luminar Neo added a soft “Orton glow” effect to the sky and slightly to the ground.
All the adjustments, filters, and effects are non-destructive so they can be re-adjusted later, when upon further inspection with fresh eyes I realize something needs work.
Was It Photoshopped?
I hope my look behind the curtains was of interest. While these types of nightscapes taken with a tracker, and especially multi-segment panoramas, do produce dramatic images, they do require a lot of processing at the computer.
Was it “photoshopped?” Yes. Was it faked? No. The sky really was there over the scene you see in the image. However, the long exposures of the camera do reveal more details than the eye alone can see at night — that is the essence of astrophotography.
My one concession to warping reality is in the time-blending — the merging of panoramas taken 30 minutes to an hour apart. I’ll admit that does push my limits for preferring to record real scenes, and not fabricate them (i.e. “photoshop” them in common parlance).
But at this shoot on these marvelous nights, making use of the perfectly timed moonrises was hard to resist!
On the evening of January 20 for North America, the Full Moon passes through the umbral shadow of the Earth, creating a total eclipse of the Moon.
No, this isn’t a “blood,” “super,” nor “wolf” Moon. All those terms are internet fabrications designed to bait clicks.
It is a totallunareclipse — an event that doesn’t need sensational adjectives to hype, because they are always wonderful sights! And yes, the Full Moon does turn red.
As such, on January 20 the evening and midnight event provides many opportunities for great photos of a reddened Moon in the winter sky.
Here’s my survey of tips and techniques for capturing the eclipsed Moon.
First … What is a Lunar Eclipse?
As the animation below shows (courtesy NASA/Goddard Space Flight Center), an eclipse of the Moon occurs when the Full Moon (and they can happen only when the Moon is exactly full) travels through the shadow of the Earth.
The Moon does so at least two times each year, though often not as a total eclipse, one where the entire disk of the Moon enters the central umbral shadow. Many lunar eclipses are of the imperceptible penumbral variety, or are only partial eclipses.
Total eclipses of the Moon can often be years apart. The last two were just last year, on January 31 and July 27, 2018. However, the next is not until May 26, 2021.
At any lunar eclipse we see an obvious darkening of the lunar disk only when the Moon begins to enter the umbra. That’s when the partial eclipse begins, and we see a dark bite appear on the left edge of the Moon.
While it looks as if Earth’s shadow sweeps across the Moon, it is really the Moon moving into, then out of, our planet’s umbra that causes the eclipse. We are seeing the Moon’s revolution in its orbit around Earth.
At this eclipse the partial phases last 67 minutes before and after totality.
This shows the length of the eclipse phases relative to the start of the partial eclipse as the Moon begins to enter the umbra at right. The Moon’s orbital motion takes it through the umbra from right to left (west to east) relative to the background stars. The visible eclipse ends 196 minutes (3 hours and 16 minutes) after it began. Click or tap on the charts to download a high-res version.
Once the Moon is completely immersed in the umbra, totality begins and lasts 62 minutes at this eclipse, a generous length.
The Moon will appear darkest and reddest at mid-eclipse. During totality the lunar disk is illuminated only by red sunlight filtering through Earth’s atmosphere. It is the light of all the sunsets and sunrises going on around our planet.
And yes, it is perfectly safe to look at the eclipsed Moon with whatever optics you wish. Binoculars often provide the best view. Do have a pair handy!
Total eclipse of the Moon, December 20/21, 2010, taken from home with 130mm AP apo refractor at f/6 and Canon 7D at ISO 400 for 4 seconds, single exposure, shortly after totality began.
At this eclipse because the Moon passes across the north half of the umbra, the top edge of the Moon will always remain bright, as it did above in 2010, looking like a polar cap on the reddened Moon.
Near the bright edge of the umbra look for subtle green and blue tints the eye can see and that the camera can capture.
Where is the Eclipse?
As the chart below shows, all of the Americas can see the entire eclipse, with the Moon high in the evening or late-night sky. For the record, the Moon will be overhead at mid-eclipse at local midnight from Cuba!
All of the Americas can see this eclipse. The eclipse gets underway as the Moon sets at dawn over Europe. Diagram courtesy EclipseWise.com
I live in Alberta, Canada, at a latitude of 50 degrees North. And so, the sky charts I provide here are for my area, where the Moon enters the umbral shadow at 8:35 p.m. MST with the Moon high in the east. By the end of totality at 10:44 p.m. MST the Moon shines high in the southeast. This sample chart is for mid-eclipse at my site.
The sky at mid-eclipse from my Alberta site. Created with the planetarium software Starry Night, from Simulation Curriculum.
I offer them as examples of the kinds of planning you can do to ensure great photos. I can’t provide charts good for all the continent because exactly where the Moon will be during totality, and the path it will take across your sky will vary with your location.
In general, the farther east and south you live in North America the higher the Moon will appear. But from all sites in North America the Moon will always appear high and generally to the south.
To plan your local shoot, I suggest using planetarium software such as the free Stellarium or Starry Night (the software I used to prepare the sky charts in this post), and photo planning apps such as The Photographer’s Ephemeris or PhotoPills.
The latter two apps present the sightlines toward the Moon overlaid on a map of your location, to help you plan where to be to shoot the eclipsed Moon above a suitable foreground, if that’s your photographic goal.
When is the Eclipse?
While where the Moon is in your sky depends on your site, the various eclipse events happen at the same time for everyone, with differences in hour due only to the time zone you are in.
While all of North America can see the entirety of the partial and total phases of this eclipse (lasting 3 hours and 16 minutes from start to finish), the farther east you live the later the eclipse occurs, making for a long, late night for viewers on the east coast.
Those in western North America can enjoy all of totality and be in bed at or before midnight.
Here are the times for the start and end of the partial and total phases. Because the penumbral phases produce an almost imperceptible darkening, I don’t list the times below for the start and end of the penumbral eclipse.
PM times are on the evening of January 20.
AM times are after midnight on January 21.
Note that while some sources list this eclipse as occurring on January 21, that is true for Universal Time (Greenwich Time) and for sites in Europe where the eclipse occurs at dawn near moonset.
For North America, if you go out on the evening of January 21 expecting to see the eclipse you’ll be a day late and disappointed!
Picking a Photo Technique
Lunar eclipses lend themselves to a wide range of techniques, from a simple camera on a tripod, to a telescope on a tracking mount following the sky.
If this is your first lunar eclipse I suggest keeping it simple! Select just one technique, to focus your attention on only one camera on a cold and late winter night.
The total eclipse of the Moon of September 27, 2015, through a telescope, at mid-totality with the Moon at its darkest and deepest into the umbral shadow, in a long exposure to bring out the stars surrounding the dark red moon. This is a single exposure taken through a 92mm refractor at f/5.5 for 500mm focal length using the Canon 60Da at ISO 400 for 8 seconds. The telescope was on a SkyWatcher HEQ5 equatorial mount tracking at the lunar rate.
Then during the hour of totality take the time to enjoy the view through binoculars and with the unaided eye. No photo quite captures the glowing quality of an eclipsed Moon. But here’s how to try it.
Option 1: Simple — Camera-on-Tripod
The easiest method is to take single shots using a very wide-angle lens (assuming you also want to include the landscape below) with the camera on a fixed tripod. No fancy sky trackers are needed here.
During totality, with the Moon now dimmed and in a dark sky, use a good DSLR or mirrorless camera in Manual (M) mode (not an automatic exposure mode) for settings of 2 to 20 seconds at f/2.8 to f/4 at ISO 400 to 1600.
That’s a wide range, to be sure, but it will vary a lot depending on how bright the sky is at your site. Shoot at lots of different settings, as blending multiple exposures later in processing is often the best way to reproduce the scene as your eyes saw it.
Shoot at a high ISO if you must to prevent blurring from sky motion. However, lower ISOs, if you can use them by choosing a slower shutter speed or wider lens aperture, will yield less digital noise.
Focus carefully on a bright star, as per the advice below for telephoto lenses. Don’t just set the lens focus to infinity, as that might not produce the sharpest stars.
Total eclipse of the Moon, December 20/21, 2010, with 15mm lens at f/3.2 and Canon 5D MkII at ISO 1600 for a 1-minute tracked exposure. Without a tracker, use shorter exposures (less than 20 seconds) and higher ISOs or wider apertures to avoid trailing,
One scene to go for at this eclipse is similar to the above photo, with the reddened Moon above a winter landscape and shining east of Orion and the winter Milky Way. But that will require shooting from a dark site away from urban lights. But when the Moon is totally eclipsed, the sky will be dark enough for the Milky Way to appear.
Click or tap on any of the charts to download a high-resolution copy.
The high altitude of the Moon at mid-eclipse from North America (with it 40 to 70 degrees above the horizon) will also demand a lens as wide as 10mm to 24mm, depending whether you use portrait or landscape orientation, and if your camera uses a cropped frame or full frame sensor. The latter have the advantage in this category of wide-angle nightscape.
Alternatively, using a longer 14mm to 35mm lens allows you to frame the Moon beside Orion and the winter Milky Way, as above, but without the landscape. Again, this will require a dark rural site.
If you take this type of image with a camera on a fixed tripod, use high ISOs to keep exposures below 10 to 20 seconds to avoid star trailing. You have an hour of totality to shoot lots of exposures to make sure some will work best.
Total eclipse of the Moon, December 20/21, 2010, with Canon 5D MKII and 24mm lens at f2.8 for stack of four 2-minute exposures at ISO 800. Taken during totality using a motorized sky tracker. The eclipsed Moon is the red object above Orion, and the stars appear bloated due to high haze and fog rolling in.
If you have a sky tracker to follow the stars, as I did above, exposures can be much longer — perhaps a minute to pick up the Milky Way really well — and ISOs can be lower to avoid noise.
Option 1 Variation — Urban Eclipses
Unfortunately, point-and-shoot cameras and so-called “bridge” cameras, ones with non-interchangeable lenses, likely won’t have lenses wide enough to capture the whole scene, landscape and all. Plus their sensors will be noisy when used at high ISOs. Those cameras might be best used to capture moderate telephoto closeups at bright urban sites.
With any camera, at urban sites look for scenic opportunities to capture the eclipsed Moon above a skyline or behind a notable landmark. By looking up from below you might be able to frame the Moon beside a church spire, iconic building, or a famous statue using a normal or short telephoto lens, making this a good project for those without ultra-wide lenses.
Lunar eclipse, Feb 20, 2008 with a 135mm telephoto and Canon 20Da camera showing the Moon’s size with such a lens and cropped-frame camera. This is a blend of 8-second and 3-second exposures to bring out stars and retain the Moon. Both at ISO200 and f/2.8. Saturn is at lower left and Regulus at upper right.
Whatever your lens or subject, at urban sites expose as best you can for the foreground, trying to avoid any bright and bare lights in the frame that will flood the image with lens flares in long exposures.
Capturing such a scene during the deep partial phases might produce a brighter Moon that stands out better in an urban sky than will a photo taken at mid-totality when the Moon is darkest.
TIP: Practice, Practice, Practice!
With any camera, especially beginner point-and-shoots, ensure success on eclipse night by practicing shooting the Moon before the eclipse, during the two weeks of the waxing Moon leading up to Full Moon night and the eclipse.
The crescent Moon with Earthshine on the dark side of the Moon is a good stand-in for the eclipsed Moon. Set aside the nights of January 8 to 11 to shoot the crescent Moon. Check for exposure and focus. Can you record the faint Earthshine? It’s similar in brightness to the shadowed side of the eclipsed Full Moon.
The next week, on the nights of January 18 and 19, the waxing gibbous Moon will be closer to its position for eclipse night and almost as bright as the uneclipsed Full Moon, allowing some rehearsals for shooting it near a landmark.
Option 2: Advanced — Multiple Exposures
An advanced method is to compose the scene so the lens frames the entire path of the Moon for the 3 hours and 16 minutes from the start to the end of the partial eclipse.
This set of 3 charts shows the position of the Moon at the start, middle, and end of the eclipse, for planning lens choice and framing of the complete eclipse path. The location is Alberta, Canada.
As shown above, including the landscape will require at least a 20mm lens on a full frame camera, or 12mm lens on a cropped frame camera. However, these charts are for my site in western Canada. From sites to the east and south where the Moon is higher an even wider lens might be needed, making this a tough sequence to take.
With wide lenses, the Moon will appear quite small. The high altitude of the Moon and midnight timing won’t lend itself to this type of multiple image composite as well as it does for eclipses that happen near moonrise or moonset, as per the example below.
This is a multiple-exposure composite of the total lunar eclipse of Sunday, September 27, 2015, as shot from Writing-on-Stone Provincial Park, Alberta, Canada. For this still image composite of the eclipse from beginning to end, I selected just 40 frames taken at 5-minute intervals, out of 530 I shot in total, taken at 15- to 30-second intervals for the full time-lapse sequence included below.
A still-image composite with the lunar disks well separated will need shots only every 5 minutes, as I did above for the September 27, 2015 eclipse.
Exposures for any lunar eclipse are tricky, whether you are shooting close-ups or wide-angles, because the Moon and sky change so much in brightness.
As I did for the image below, for a still-image composite, you can expose just for the bright lunar disk and let the sky go dark.
Exposures for just the Moon will range from very short (about 1/500th second at f/8 and ISO 100) for the partials, to 1/2 to 2 seconds at f/2.8 to f/4 and ISO 400 for the totals, then shorter again (back to 1/500 at ISO 100) for the end shots when the Full Moon has returned to its normal brilliance.
That’ll take constant monitoring and adjusting throughout the shoot, stepping the shutter speed gradually longer thorough the initial partial phase, then shorter again during the post-totality partial phase.
You’d then composite and layer (using a Lighten blend mode) the well-exposed disks (surrounded by mostly black sky) into another background image exposed longer for 10 to 30 seconds at ISO 800 to 1600 for the sky and stars, shot at mid-totality.
To maintain the correct relative locations of the lunar disks and foreground, the camera cannot move.
The total lunar eclipse of April 4, 2015 taken from near Tear Drop Arch, in western Monument Valley, Utah. I shot the totality images during the short 4 minutes of totality. The mid-totality image is a composite of 2 exposures: 30 seconds at f/2.8 and ISO 1600 for the sky and landscape, with the sky brightening blue from dawn twilight, and 1.5 seconds at f/5.6 and ISO 400 for the disk of the Moon itself. Also, layered in are 26 short exposures for the partial phases, most being 1/125th sec at f/8 and ISO 400, with ones closer to totality being longer, of varying durations.
That technique works best if it’s just a still image you are after, such as above. This image is such a composite, of the April 4, 2015 total lunar eclipse from Monument Valley, Utah.
This type of composite takes good planning and proper exposures to pull off, but will be true to the scene, with the lunar disk and its motion shown to the correct scale and position as it was in the sky. It might be a composite, but it will be accurate.
My Rant!
That’s in stark contrast to the flurry of ugly “faked” composites that will appear on the web by the end of the day on January 21, ones with huge telephoto Moons pasted willy-nilly onto a wide-angle sky.
Rather than look artistic, most such attempts look comically cut-and-pasted. They are amateurish. Don’t do it!
Option 3: Advanced — Wide-Angle Time-Lapses
If it’s a time-lapse movie you want (see the video below), take exposures every 10 to 30 seconds, to ensure a final movie with smooth motion.
Unlike shooting for a still-image composite, for a time lapse each frame will have to be exposed well enough to show the Moon, sky, and landscape.
That will require exposures long enough to show the sky and foreground during the partial phases — likely about 1 to 4 seconds at f/2.8 and ISO 400. In this case, the disk of the partially-eclipsed Moon will greatly overexpose, as it does toward the end of the above time-lapse from September 27, 2015..
But the Moon will darken and become better exposed during the late stages of the partial eclipse and during totality when a long exposure — perhaps now 10 to 20 seconds at f/2.8 and ISO 800 to 1600 — will record the bright red Moon amid the stars and winter Milky Way.
Maintaining a steady cadence during the entire sequence requires using an interval long enough throughout to accommodate the expected length of the longest exposure at mid-totality, with similar camera settings to what you’ve used for other Milky Way nightscapes. If you’ve never taken those before, then don’t attempt this complex sequence.
After totality, as the Moon and sky re-brighten, exposures will have to shorten again, andsymmetrically in reverse fashion for the final partial phases.
Such a time-lapse requires consistently and incrementally adjusting the camera over the three or more hours of the eclipse on a cold winter night. The high altitude of the Moon and its small size on the required wide angle lenses will make any final time lapse less impressive than at eclipses that occur when the Moon is rising or setting.
But … the darkening of the sky and “turning on” of the Milky Way during totality will make for an interesting time-lapse effect. The sky and scene will be going from a bright fully moonlit night to effectively a dark moonless night, then back to moonlit. It’s a form of “holy grail” time lapse, requiring advanced processing with LRTimelapse software.
Again, do not move the camera. Choose your lens and frame your camera to include the entire path of the Moon for as long as you plan to shoot.
Even if the final movie looks flawed, individual frames should still produce good still images, or a composite built from a subset of the frames.
Option 4: Simple — Telephoto Close-Ups
The first thought of many photographers is to shoot the eclipse with as long a telephoto lens as possible. That can work, but …
The harsh reality is that the Moon is surprisingly small (only 1/2-degree across) and needs a lot of focal length to do it justice, if you want a lunar close-up.
You’ll need a 300mm to 800mm lens. Unfortunately, the Moon and sky are moving and any exposures over 1/4 to 2 seconds (required during totality) will blur the Moon badly if its disk is large on the frame and all you are using is a fixed tripod.
If you don’t have a tracking mount, one solution is to keep the Moon’s disk small (using no more than a fast f/2 or f/2.8 135mm to 200mm lens) and exposures short by using a high ISO speed of 1600 to 3200. Frame the Moon beside the Beehive star cluster as I show below.
Take a range of exposures. But … be sure to focus!
TIP: Focus! And Focus Again!
Take care to focus precisely on a bright star using Live View. That’s true of any lens but especially telephotos and telescopes.
Focus not just at the start of the night, but also more than once again later at night. Falling temperatures on a winter night will cause long lenses and telescopes to shift focus. What was sharp at the start of the eclipse won’t be by mid totality.
The catch is that if you are shooting for a time-lapse or composite you likely won’t be able to re-point the optics to re-focus on a star in mid-eclipse. In that case, be sure to set up the gear well before you want to start shooing to let it cool to ambient air temperature. Now focus on a star, then frame the scene. Then hope the lens doesn’t shift off focus. You might be able to focus on the bright limb of the Moon but it’s risky.
Fuzzy images, not bad exposures, are the ruin of most attempts to capture a lunar eclipse, especially with a telephoto lens. And the Moon itself, especially during totality, is not a good target to focus on. Use a bright star. The winter sky has lots!
Option 5: Advanced — Tracked Telescopic Close-Ups
If you have a mount that can be polar aligned to track the sky, then many more options are open to you.
You can use a telescope mount or one of the compact and portable trackers, such as the Sky-Watcher Star Adventurer (I show the Mini model above) or iOptron Sky Tracker units. While these latter units work great, you are best to keep the payload weight down and your lens size well under 300mm.
That’s just fine for this eclipse, as you really don’t need a frame-filling Moon. The reason is that the Moon will appear about 6 degrees west of the bright star cluster called the Beehive, or Messier 44, in Cancer.
As shown above, a 135mm to 200mm lens will frame this unique pairing well. For me, that will be the signature photo of this eclipse. The pairing can happen only at lunar eclipses that occur in late January, and there won’t be any more of those until 2037!
That’s the characteristic that makes this eclipse rare and unique, not that it’s a “super-duper, bloody, wolf Moon!” But it doesn’t make for a catchy headline.
A High Dynamic Range composite of 7 exposures of the Dec 20/21, 2010 total lunar eclipse, from 1/2 second to 30 seconds, to show the more normally exposed eclipsed Moon with the star cluster M35, at left, in Gemini, to show the scene as it appeared in binoculars. Each tracked photo taken with a 77mm Borg apo refractor at f/4.2 (300mm focal length) and Canon 5D MkII at ISO 1600.
Exposures to show the star cluster properly might have to be long enough (30 to 120 seconds) that the Moon overexposes, even at mid-totality. If so, take different exposures for the Moon and stars, then composite them later, as I did above for the December 20, 2010 eclipse near the Messier 35 star cluster in Gemini.
If really you want to shoot with even more focal length for framing just the Moon, a monster telephoto lens will work, but a small telescope such as an 80mm aperture f/6 to f/7 refractor will provide enough focal length and image size at much lower cost and lighter weight, and be easier to attach to a telescope mount.
But even with a 500mm to 800mm focal length telescope the Moon fills only a small portion of the frame, though cropped frame cameras have the advantage here. Use one if it’s a big Moon you’re after!
No matter the camera, the lens or telescope should be mounted on a solid equatorial telescope mount that you must polar align earlier in the night to track the sky.
Alternatively, a motorized Go To telescope on an alt-azimuth mount will work, but only for single shots. The rotation of the field with alt-az mounts will make a mess of any attempts to shoot multiple-exposure composites or time-lapses, described below.
Whatever the mount, for the sharpest lunar disks during totality, use the Lunar tracking rate for the motor.
This series shows the need to constantly shift exposure by lengthening the shutter speed as the eclipse progresses. Do the same to shorten the exposure after totality. The exposures shown here are typical.
Assuming an f-ratio of f/6 to f/8, exposures will vary from as short as 1/250th second at ISO 100 to 200 for the barely eclipsed Moon, to 4 to 20 seconds at ISO 400 to 1600 for the Moon at mid-totality.
It’s difficult to provide a precise exposure recommendation for totality because the brightness of the Moon within the umbra can vary by several stops from eclipse to eclipse, depending on how much red sunlight manages to make it through Earth’s atmospheric filter to light the Moon.
TIP: Shoot for HDR
Total eclipse of the Moon, December 20/21, 2010, with 5-inch refractor at f/6 (780mm focal length) and Canon 7D (cropped frame camera) at ISO 400. This is an HDR blend of 9 images from 1/125 second to 2 seconds, composited in Photoshop. Note the blue tint along the shadow edge.
As I did above, during the deep partial phases an option is to shoot both long, multi-second exposures for the red umbra and short, split-second exposures for the bright part of the Moon not yet in the umbra.
Take 5 to 7 shots in rapid succession, covering the range needed, perhaps at 1-stop increments. Merge those later with High Dynamic Range (HDR) techniques and software, or with luminosity masks.
Even if you’re not sure how to do HDR processing now, shoot all the required exposures anyway so you’ll have them when your processing skills improve.
Option 6: Advanced — Close-Up Composites and Time-Lapses
With a tracking telescope on an equatorial mount you could fire shots every 10 to 30 seconds, and then assemble them into a time-lapse movie, as below.
But as with wide-angle time-lapses, that will demand constant attention to gradually and smoothly shift exposures, ideally by 1/3rd-stop increments every few shots during the partial and total phases. Make lots of small adjustments, rather than fewer large ones.
If you track at the lunar rate, as I did above, the Moon should stay more or less centred while it drifts though the stars, assuming your mount is accurately polar aligned, an absolutely essential prerequisite here.
Composite image digitally created in Photoshop of images taken during October 27, 2004 total lunar eclipse, from Alberta Canada. Images taken through 5-inch apo refractor at f/6 with Canon Digital Rebel 300D camera at ISO 200.
Conversely, track at the sidereal rate and the stars will stay more or less fixed while the Moon drifts through the frame from right to left (west to east) as I show above in a composite of the October 27, 2004 eclipse.
But such a sequence takes even more careful planning to position the Moon correctly at the start of the sequence so it remains “in frame” for the duration of the eclipse, and ends up where you want at the end.
In the chart below, north toward Polaris is at the top of the frame. Position the Moon at the start of the eclipse so it ends up just above the centre of the frame at mid-eclipse. Tricky!
Repeated from earlier, this chart shows the path of the Moon through the north half of the umbra, a path that will be the same for any site, as will be the timing. North is up here.
As I show above, for this type of “Moon-thru-shadow” sequence a focal length of about 400mm is ideal on a full frame camera, or 300mm on a cropped frame camera.
From such a time-lapse set you could also use several frames selected from key stages of the eclipse, as I did in 2004, to make up a multiple-image composite showing the Moon moving through the Earth’s shadow.
Again, planetarium software such as Starry Night I used above, which can be set to display the field of view of the camera and lens of your choice, is essential to plan the shoot. Don’t attempt it without the right software to plan the framing.
I would consider the telescopic time-lapse method the most challenging of techniques. Considering the hour of the night and the likely cold temperatures, your best plan might be to keep it simple.
It’s what I plan to do.
I’ll be happy to get a tracked telephoto close-up of the Moon and Beehive cluster as my prime goal, with a wide-angle scene of the eclipsed Moon beside Orion and the Milky Way as a bonus. A few telescope close-ups will be even more of a bonus.
The Astrospheric website, with astronomy-oriented weather predictions. It’s also available as a great mobile app.
However, just finding clear skies might be the biggest challenge!
Try the Astrospheric app for astronomy-oriented weather predictions. The Environment Canada data it uses has led me to clear skies for several recent eclipses that other observers in my area missed.
It’ll be worth the effort to chase!
The next total eclipse of the Moon anywhere on Earth doesn’t occur until May 26, 2021 in an event visible at dawn from Western North America. The next total lunar eclipse visible from all of North America comes a lunar year later, on May 15, 2022.
Total Lunar Eclipse from Alan Dyer on Vimeo.
I leave you with a music video of the lunar eclipse of September 27, 2015 that incorporates still and time-lapse sequences shot using all of the above methods.
I spent a wonderful week touring the star-filled nightscapes of southwest Saskatchewan.
On their license plates Saskatchewan is billed as the Land of Living Skies. I like the moniker that Saskatchewan singer-songwriter Connie Kaldor gives it – the sky with nothing to get in the way.
Grasslands National Park should be a mecca for all stargazers. It is a Dark Sky Preserve. You can be at sites in the Park and not see a light anywhere, even in the far distance on the horizon, and barely any sky glows from manmade sources.
The lead image shows the potential for camping in the Park under an amazing sky, an attraction that is drawing more and more tourists to sites like Grasslands.
This is a multi- panel panorama of the Milky Way over the historic 76 Ranch Corral in the Frenchman River Valley, once part of the largest cattle ranch in Canada. Mars shines brightly to the east of the galactic core.
Mars and the Milky Way over the tipis at Two Trees area in Grasslands National Park, Saskatchewan on August 6, 2018. Some light cloud added the haze and glows to the planets and stars. Illumination is by starlight. No light painting was employed here. This is a stack of 8 exposures for the ground, mean combined to smooth noise, and a single untracked exposure for the sky, all 30 seconds at f/2.8 with the Sigma 20mm lens, and Nikon D750 at ISO 6400 with LENR on.
Mars (at left) and the Milky Way (at right) over a single tipi (with another under construction at back) at the Two Trees site at Grasslands National Park, Saskatchewan, August 6, 2018. I placed a low-level warm LED light inside the tipi for the illumination. This is a stack of 6 exposures, mean combined to smooth noise, for the ground, and one untracked exposure for the sky, all 30 seconds at f/2.2 with the 20mm Sigma lens and Nikon D750 at ISO 3200.
The Big Dipper and Arcturus (at left) over a single tipi at the Two Trees site at Grasslands National Park, Saskatchewan, August 6, 2018. This is a stack of 10 exposures, mean combined to smooth noise, for the ground, and one untracked exposure for the sky, all 30 seconds at f/2.8 with the 20mm Sigma lens and Nikon D750 at ISO 6400. Light cloud passing through added the natural star glows, enlarging the stars and making the pattern stand out. No soft focus filter was employed, and illumination is from starlight. No light painting was employed. Some airglow and aurora colour the sky. A Glow filter from ON1 Photo Raw applied to the sky to further soften the sky.
At the Two Trees site visitors can stay in the tipis and enjoy the night sky. No one was there the night I was shooting. The night was warm, windless, and bug-less. It was a perfect summer evening.
From Grasslands I headed west to the Cypress Hills along scenic backroads. The main Meadows Campground in Cypress Hills Interprovincial Park, another Dark Sky Preserve, is home every year to the Saskatchewan Summer Star Party. About 350 stargazers and lovers of the night gather to revel in starlight.
The Perseid meteor shower over the Saskatchewan Summer Star Party, on August 10, 2018, with an aurora as a bonus. The view is looking north with Polaris at top centre, and the Big Dipper at lower left. The radiant point in Perseus is at upper right. The sky also has bands of green airglow, which was more prominent in images taken earlier before the short-lived aurora kicked up. The aurora was not obvious to the naked eye. However, the northern sky was bright all night with the airglow and faint aurora. This is a composite of 10 images, one for the base sky with the aurora and two faint Perseids, and 9 other images, each with Perseids taken over a 3.3 hour period, being the best 9 frames with meteors out of 360. Each exposure was 30 seconds at f/2 with the 15mm Laoawa lens and Sony a7III at ISO 4000. I rotated all the additional meteor image frames around Polaris to align the frames to the base sky image, so that the added meteors appear in the sky in the correct place with respect to the background stars, retaining the proper perspective of the radiant point.
A Perseid meteor streaks down the Milky Way over the Saskatchewan Summer Star Party in the Cypress Hills of southwest Saskatchewan, at Cypress Hills Interprovincial Park, a Dark Sky Preserve. The Milky Way shines to the south. About 350 stargazers attend the SSSP every year. Observers enjoy their views of the sky at left while an astrophotographer attends to his camera control computer at right. This is a single exposure, 25 seconds, with the Laowa 15mm lens at f/2 and Sony a7III camera at ISO 3200.
This year coincided with the annual Perseid meteor shower and we saw lots!
Most nights were clear, and warmer than usual, allowing shirt-sleeve observing. It was a little bit of Arizona in Canada. Everyone enjoyed the experience. I know I did!
SSSP and Cypress Hills are stargazing heaven in Canada.
From Cypress Hills I drove due north to finally, after years of thinking about it, visit the Great Sandhills near Leader, Saskatchewan. Above is a panorama from the “Boot Hill” ridge at the main viewing area.
The Sandhills is not a provincial park but is a protected eco zone, though used by local ranchers for grazing. However, much of the land remains uniquely prairie but with exposed sand dunes among the rolling hills.
There are farm lights in the distance but the sky above is dark and, in the panorama above, colored by twilight and bands of red and green airglow visible to the camera. It’s dark!
In the twilight, from the top of one of the accessible sand dunes, I shot a panorama of the array of four planets currently across the sky, from Venus in the southwest to Mars in the southeast.
This is the kind of celestial scene you can see only where the sky has nothing to get in the way.
If you are looking for a stellar experience under their “living skies,” I recommend Saskatchewan.
Three perfect nights in July provided opportunities to capture the night sky at popular sites in Banff National Park.
When the weather forecast in mid-July looked so promising I made an impromptu trip to Banff to shoot nightscapes and time-lapses under unusually clear skies. Clouds are often the norm in the mountains or, increasingly these days, forest fire smoke in late summer.
But from July 15 to 17 the skies could not have been clearer, except for the clouds that rolled in late on my last night, when I was happy to pack up and get some sleep.
My first priority was to shoot the marvellous close conjunction of the Moon and Venus on July 15. I did so from the Storm Mountain viewpoint on the Bow Valley Parkway, with a cooperative train also coming through the scene at the right time.
This was the view later with the Milky Way and Mars over Bow Valley and Storm Mountain.
The next night, July 16, was one of the most perfect I had ever seen in the Rockies. Crystal clear skies, calm winds, and great lake reflections made for a picture-perfect night at Bow Lake on the Icefields Parkway. Above is a 360° panorama shot toward the end of the night when the galactic centre of the Milky Way was over Bow Glacier.
Streaks of green airglow arc across the south, while to the north the sky is purple from a faint display of aurora.
This is a rare appearance of the unusual STEVE auroral arc on the night of July 16-17, 2018, with a relatively low Kp Index of only 2 to 3. While the auroral arc was visible the ISS made a bright pass heading east. This is a blend of a single 15-second exposure for the sky and ground, with seven 15-second exposures for the ISS, but masked to reveal just the ISS trail and its reflection in the water. The ISS shots were taken at 3-second intervals, thus the gaps. All with the Sigma 20mm Art lens at f/2 and Nikon D750 at ISO 6400. Taken from Bow Lake, Banff National Park, Alberta.
The unusual STEVE auroral arc across the northern sky at Bow Lake, Banff National Park, Alberta on the night of July 16-17, 2018. The more normal green auroral arc is lower across the northern horizon. But STEVE here appears more pink. The STEVE aurora was colourless to the eye but did show faint fast-moving rays, here blurred by the long exposure. They were moving east to west. The Big Dipper is at left. The lights are from Num-Ti-Jah Lodge. This is a single exposure for the sky and a mean-stacked blend of 3 exposures for the ground to smooth noise. All 15 seconds at f/2 with the Sigma 20mm Art lens and Nikon D750 at ISO 6400.
Earlier that night the usual auroral arc known as Steve put in an unexpected appearance. It was just a grey band to the eye, but the camera picked up Steve’s usual pink colours. Another photographer from the U.S. who showed up had no idea there was an aurora happening until I pointed it out.
My last night was at Herbert Lake, a small pond great for capturing reflections of the mountains around Lake Louise, and the Milky Way. Here, brilliant Mars, so photogenic this summer, also reflects in the still waters.
A blend of images to show the stars of the southern sky moving from east to west (left to right) over the peaks of the Continental Divide at Herbert Lake near Lake Louise, in Banff, Alberta. The main peak at left is Mount Temple. A single static image shows the Milky Way and stars at the end of the motion sequence. The star trails and Milky Way reflect in the calm waters of the small Lake Herbert this night on July 17, 2018. This is a stack of 100 images for the star trails, stacked with the Long Streak function of Advanced Stacker Plus actions, plus a single exposure taken a minute or so after the last star trail image. The star trail stack is dropped back a lot in brightness, plus they are blurred slightly, so as to not overwhelm the fixed sky image. The sky images are blended with a stack of 8 images for the ground, mean combined to smooth noise in the ground. All are 30 seconds at f/2.8 with the 24mm Sigma lens and Nikon D750 at ISO 3200. All were taken as part of a time-lapse sequence. Clouds moving in added the odd dark patches in the Milky Way that look like out of place dark nebulas. The reflected star trails are really there in the water and have not be copied, pasted and inverted from the sky image. They look irregular because of rippling in the water.
A blend of images to show the stars of the southern sky moving from east to west (left to right) over the Rocky Mountains at Bow Lake, in Banff, Alberta. The main peak at centre is Bow Peak. Crowfoot Glacier is at far left; Bow Glacier is at right below the Milky Way. A single static image shows the Milky Way and stars at the end of the motion sequence. The star trails and Milky Way reflect in the calm waters of Bow Lake this night on July 16, 2018, though they appear large and out of focus. This is a stack of 300 images for the star trails, stacked with the Ultrastreak function of Advanced Stacker Plus actions, plus a single exposure taken a minute or so after the last star trail image. The star trail stack is dropped back a lot in brightness, plus they are blurred slightly, so as to not overwhelm the fixed sky image. The sky images are blended with a stack of 8 images for the ground, mean combined to smooth noise in the ground. All are 30 seconds at f/2 with the 15mm Laowa lens and Sony a7III at ISO 3200. All were taken as part of a time-lapse sequence. Bands of airglow add the green streaks to the sky.
The stars trailing as they move east to west (left to right), ending with the Milky Way and Galactic Centre (right) over Storm Mountain and the Vermilion Pass area of the Continental Divide in Banff National Park, Alberta. Mars is the bright trail at left. Saturn is amid the Milky Way at right. This was July 15, 2018. The lights at left are from the Castle Mountain interchange at Highways 1 and 93. This is a stack of 8 exposures, mean combined to smooth noise, for the ground, plus 200 exposures for the star trails, and one exposure, untracked, for the fixed sky taken about a minute after the last star trail image. All 30 seconds at f/2.8 with the 24mm Sigma lens, and Nikon D750 at ISO 6400. The frames were taken as part of a time-lapse sequence. Dynamic Contrast filter from ON1 applied to the ground, and Soft and Airy filter from Luminar applied to the sky for a soft Orton effect.
At each site I shot time-lapses, and used those frames to have some fun with star trail stacking, showing the stars turning from east to west and reflected in the lake waters, and with a single still image taken at the end of the sequence layered in to show the untrailed sky and Milky Way.
But I also turned those frames into time-lapse movies, and incorporated them into a new music video, along with some favourite older clips reprocessed for this new video.
Banff by Night (4K) from Alan Dyer on Vimeo.
Enjoy! And do enlarge to full screen. The video is also in 4K resolution.
One of my aurora images now appears on a new stamp issued by Canada Post to mark the 150th Anniversary of the Royal Astronomical Society of Canada.
It is always a treat to see one of your images in print, but this is a rare privilege indeed. On June 29 Canada Post unveiled a new set of astronomy stamps, one of which features an aurora image from me, shot March 14, 2016 from the Churchill Northern Studies Centre, in Churchill, Manitoba. I shot it from the second floor observing deck, looking east to the rising sky.
The other stamp features a Milky Way image shot by fellow RASC member Matt Quinn taken from the Bruce Peninsula, Ontario.
If you view the stamps under UV “black light” more image information is revealed!
The stamps were issued to mark the 150th Anniversary of the Royal Astronomical Society of Canada, which began as an exclusive “gentlemen’s club” in Toronto in 1868. It is much more inclusive today, as it should be, with a membership of 5500 people from across Canada.
The stamps were unveiled at a ceremony at the RASC’s annual General Assembly, this year held in Calgary where I live. Representatives from Canada Post, and of course the RASC executive were in attendance.
This shows (L to R): me, David Foote (author, eclipse chaser, and member of the Stamp Advisory Committee), Chris Gainor (incoming RASC President), and Colin Haig (outgoing RASC President) at the unveiling. Matt Quinn was not able to attend. All those present (including members of the local Philatelic Society) received first day covers which David and I autographed.
This was certainly a great honour, a once-a-lifetime event I’m sure. I am grateful to the RASC officials such as Randy Attwood who lobbied for the stamp issue, a process that began three years ago.
I was first contacted by Canada Post in October 2016 though the final image was not selected until October 2017. Since then, its use was to be kept secret until the “Big Reveal” unveiling at the General Assembly. For the most part, it was!
This is a shot I took of some of my fellow RASC members and friends from across Canada enjoying me taking a picture of them at the ceremony at the University of Calgary.
The clouds cleared to present a magical night under the Moon in the Badlands of southern Alberta.
At last, a break in the incessant clouds of November, to provide me with a fine night of photography at one of my favourite places, Dinosaur Provincial Park, declared a U.N. World Heritage Site for its deposits of late Cretaceous fossils.
I go there to shoot the night sky over the iconic hoodoos and bentonite clay hills.
November is a great time to capture the equally iconic constellation of Orion rising in the east in the early evening. The scene is even better if there’s a Moon to light the landscape.
November 27 presented the ideal combination of circumstances: clear skies (at least later at night), and a first quarter Moon to provide enough light without washing out the sky too much and positioned to the south and west away from the target of interest – Orion and the winter sky rising in the east.
Below is a slide show of some of the still images I shot, all with the Canon 6D MkII camera and fine Rokinon 14mm f/2.5 lens, used wide open. Most are 15-second exposures, untracked.
This slideshow requires JavaScript.
I kept another camera, the Nikon D750 and Sigma 24mm Art lens, busy all night shooting 1200 frames for a time-lapse of Orion rising, with clouds drifting through, then clearing.
Below is the resulting video, presented in two versions: first with the original but processed frames assembled into a movie, followed by a version where the movie frames show accumulating star trails to provide a better sense of sky motion.
To create the frames for this version I used the Photoshop actions Advanced Stacker Plus, from StarCircleAcademy. They can stack images then export a new set of frames each with the tapering trails, which you then assemble into a movie. I also used it to produce the lead image at top.
The techniques and steps are all outlined in my eBook, highlighted at top right.
The HD movie is just embedded here, and is not published on Vimeo or YouTube. Expand to fill your screen.
To help plan the shoot I used the astronomy software Starry Night, and the photo planning software The Photographer’s Ephemeris, or TPE. With it, you can place yourself at the exact spot to see how the Sun, Moon and stars will appear in sightlines to the horizon.
Here’s the example screen shot. The spheres across the sky represent the Milky Way.
Look east to see Orion now in the evening sky. Later this winter, Orion will be due south at nightfall.
It was a perfect night at a dark site in southern Alberta. The Milky Way shone to the south and aurora danced to the north.
I had scouted out this location in June and marked it on my calendar to return in the fall when the centre of the Milky Way would be well-placed to the southwest.
The site is Police Outpost Provincial Park, named for the North West Mounted Police fort that once occupied the site, guarding Canada’s sovereignty in the late 1800s.
One result from the night of shooting is the opening image, the first frame from a time-lapse taken while deep blue twilight still coloured the sky. The main peak is Chief Mountain in Montana.
A fairly mild dispay of aurora in the darkening deep blue twilight over the lake at Police Outpost Provincial Park, in southern Alberta, on September 26, 2016, with the stars of Perseus rising, and with Capella low in the northeast at centre. This is a stack of 4 x 20 second exposures for the dark ground and water to smooth noise and one 20-second exposure for the sky, all with the 25mm Canon lens at f/2.8 and Canon 6D at ISO 2000.
To the north an aurora display kicked up over the lake. While it never got very bright, it still provided a photogenic show over the still waters.
A fairly mild dispay of aurora over the lake at Police Outpost Provincial Park, in southern Alberta, on September 26, 2016, with the stars of Auriga and Taurus rising, including the Pleiades at upper right. The Hyades in Taurus are the most prominent stellar reflections at lower right, in the still water this evening. Capella is the bright star above centre; Aldebaran is at right. This is a stack of 4 x 20 second exposures for the dark ground to smooth noise and one 20-second exposure for the sky and water, all with the 25mm Canon lens at f/2.2 and Canon 6D at ISO 3200.
The waters were calm on this windless night (rare for southern Alberta), and so reflected the stars and Northern Lights beautifully.
The Big Dipper reflected in the still waters of the lake at Police Outpost Provincial Park, in southern Alberta, on September 26, 2016, with an aurora to the north at right. Only in autumn can one shoot the Dipper reflected in the water in the evening sky, as it is then riding low along the northern horizon. This is from a latitude of 49° N where the Dipper is circumpolar. This is a stack of 4 x 25 second exposures for the dark ground to smooth noise and one 25-second exposure for the sky and water, all with the 25mm Canon lens at f/2.2 and Canon 6D at ISO 3200.
Here, the Big Dipper reflects in the lake as we look north to the Lights. The movie below compiles still images and two time-lapse sequences, of the Lights and Milky Way. The sounds are the natural sounds I recorded on site, as flocks of geese were getting ready to migrate and the owls hooted.
Enjoy! — As always, for the best view, enlarge to full screen or click through to Vimeo with the V button.

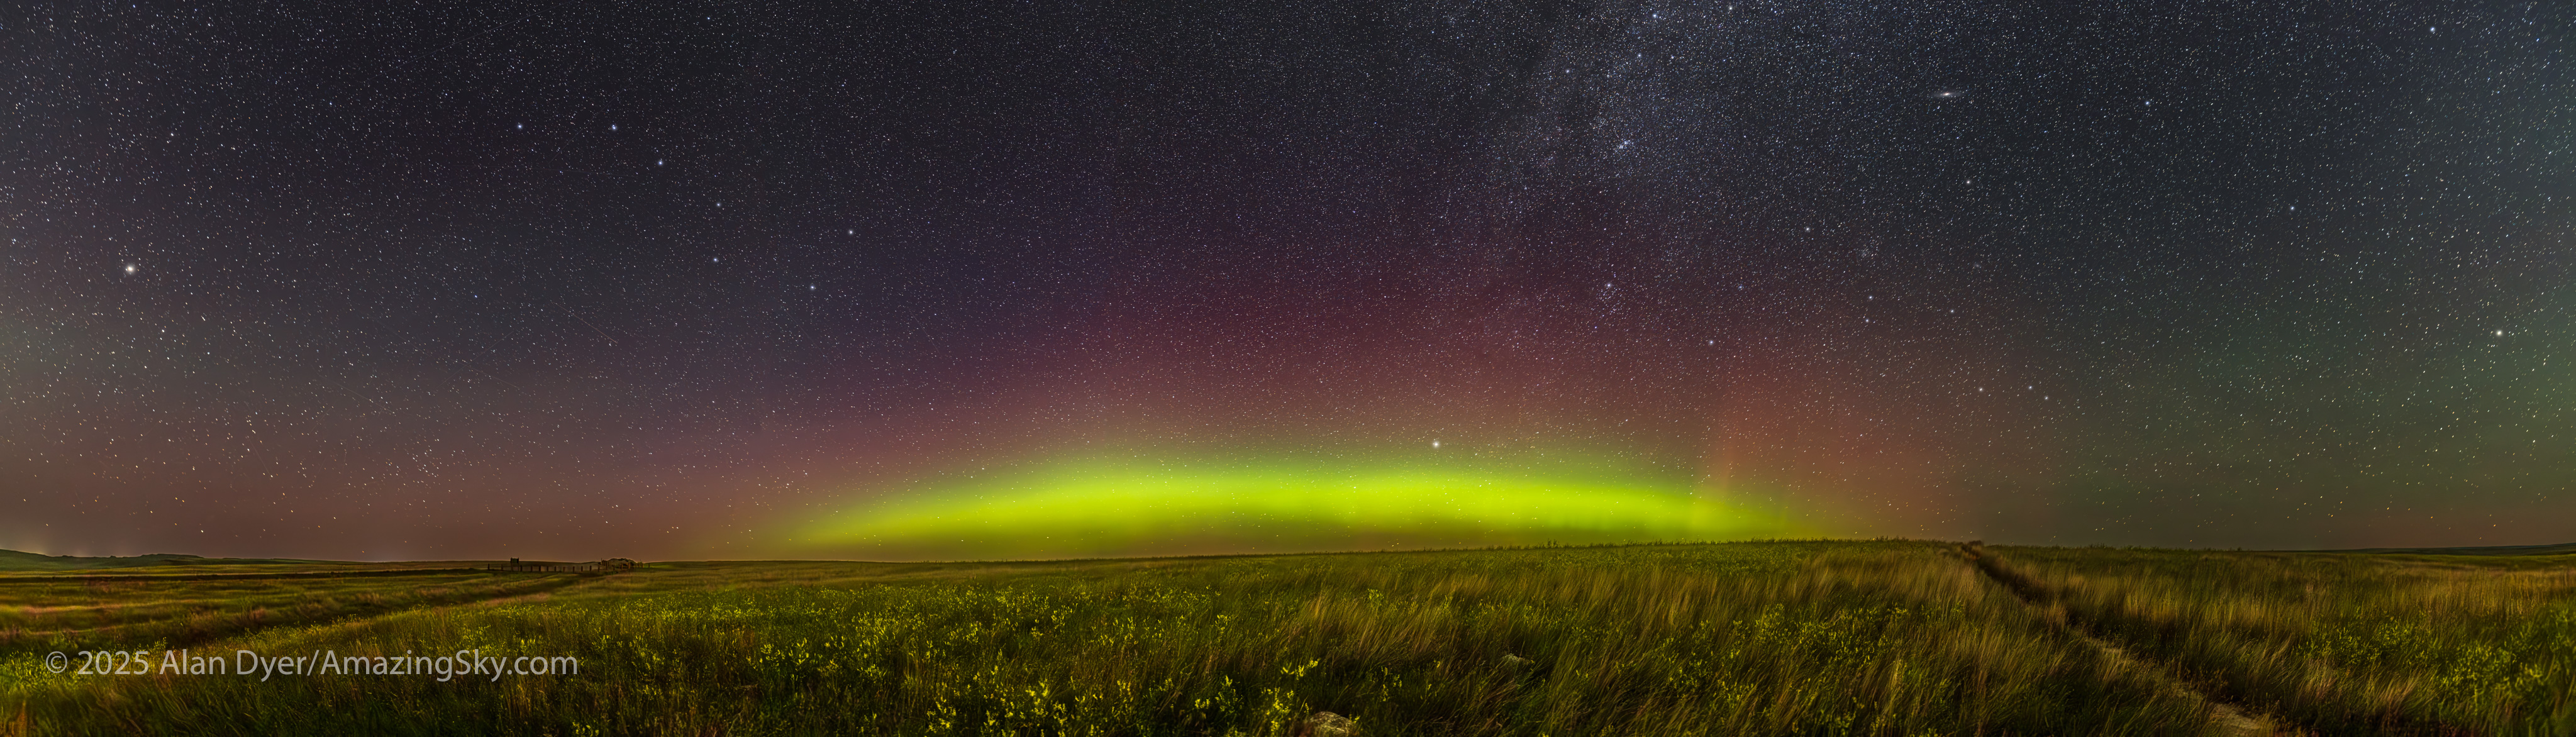
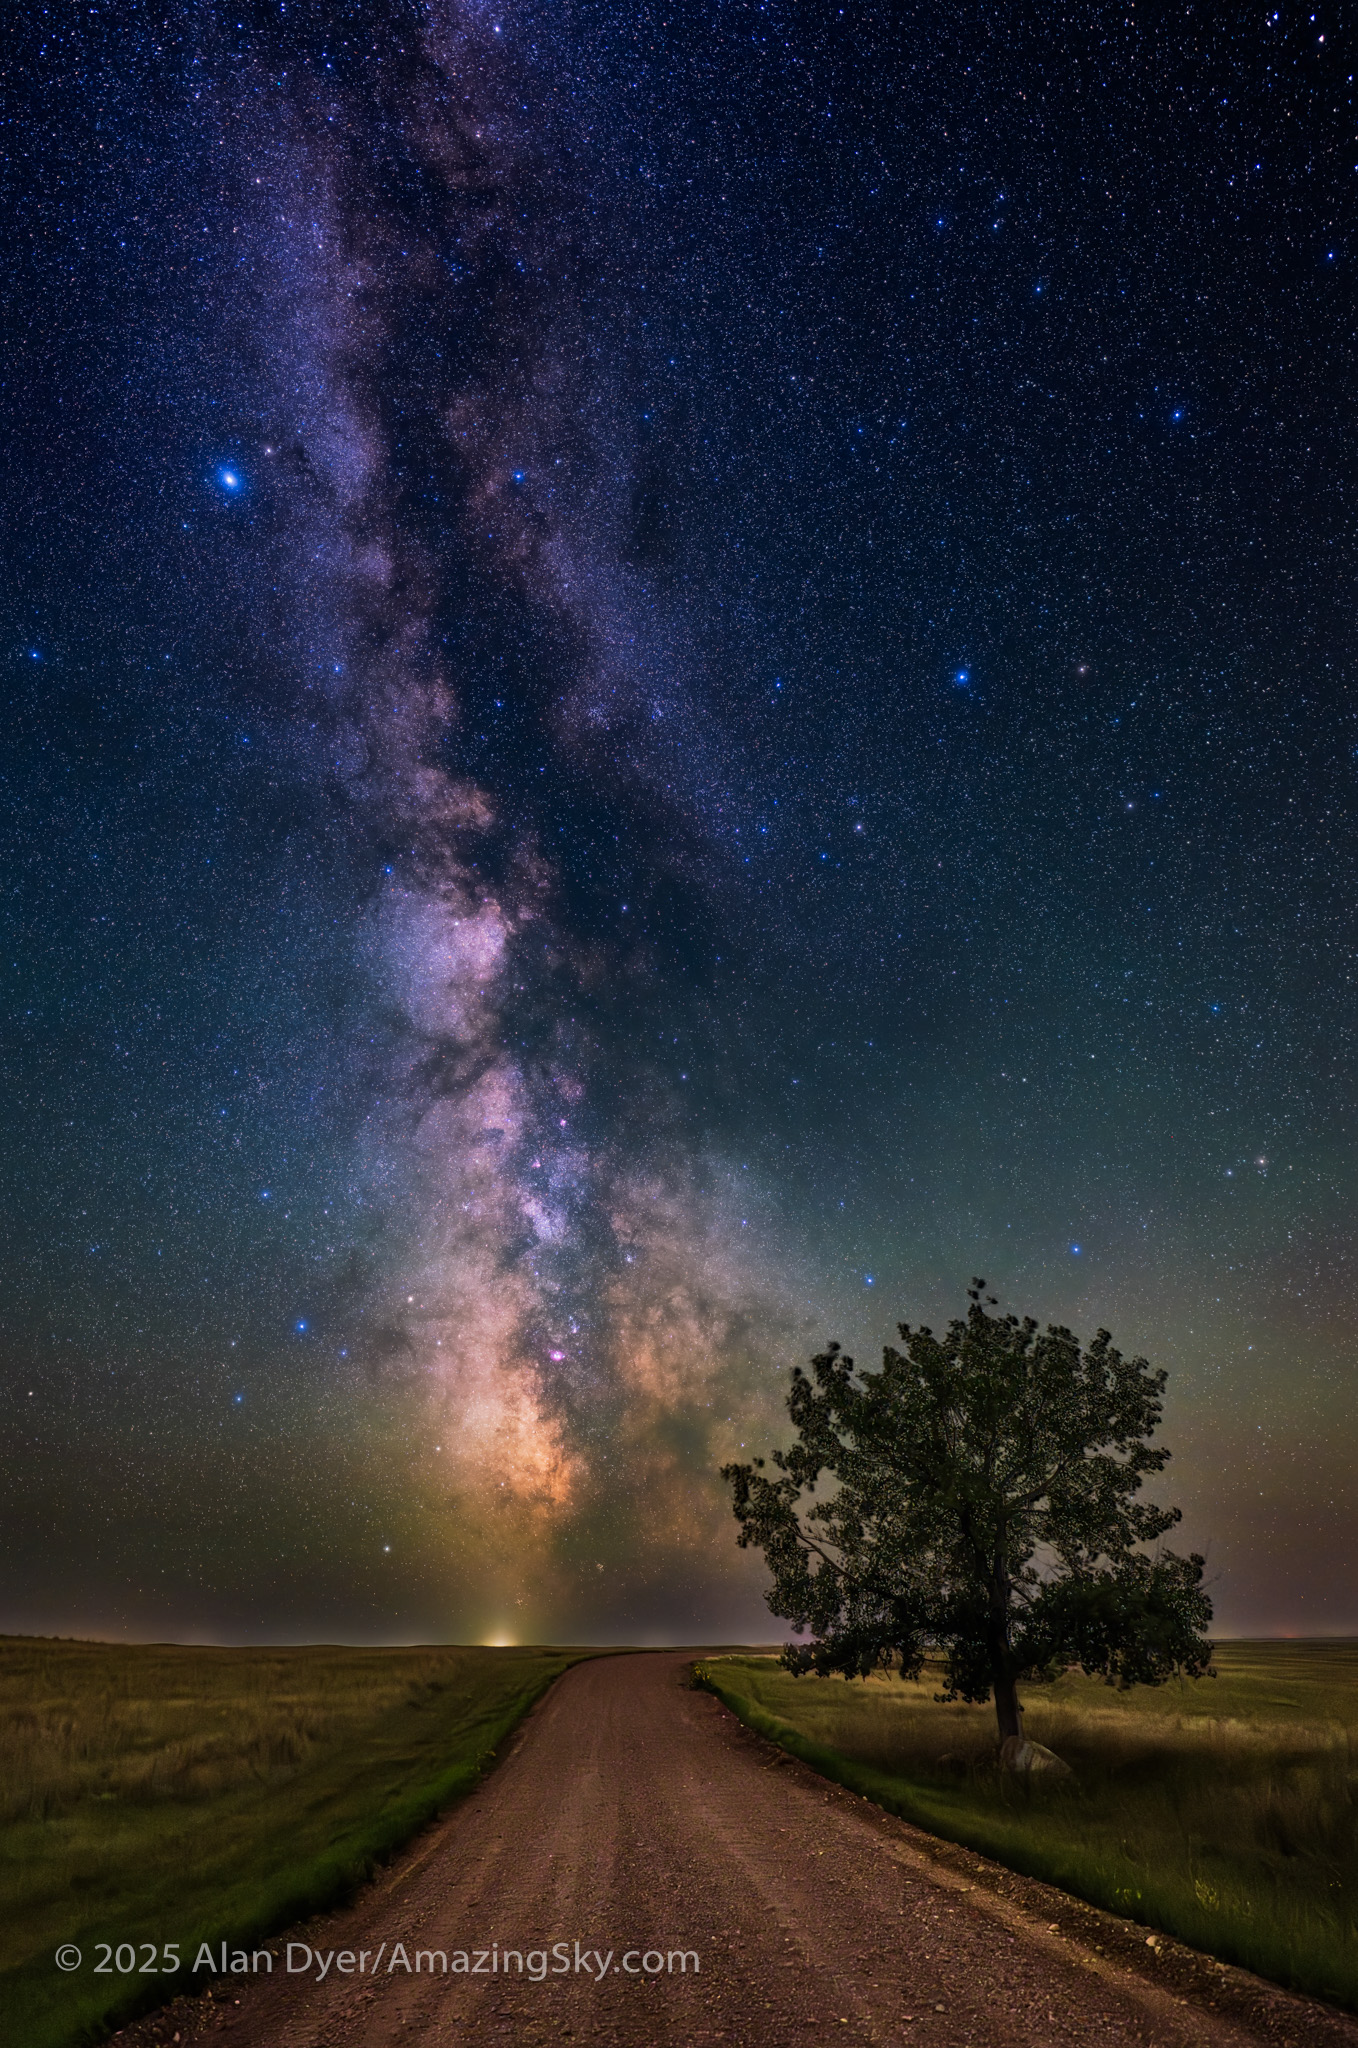
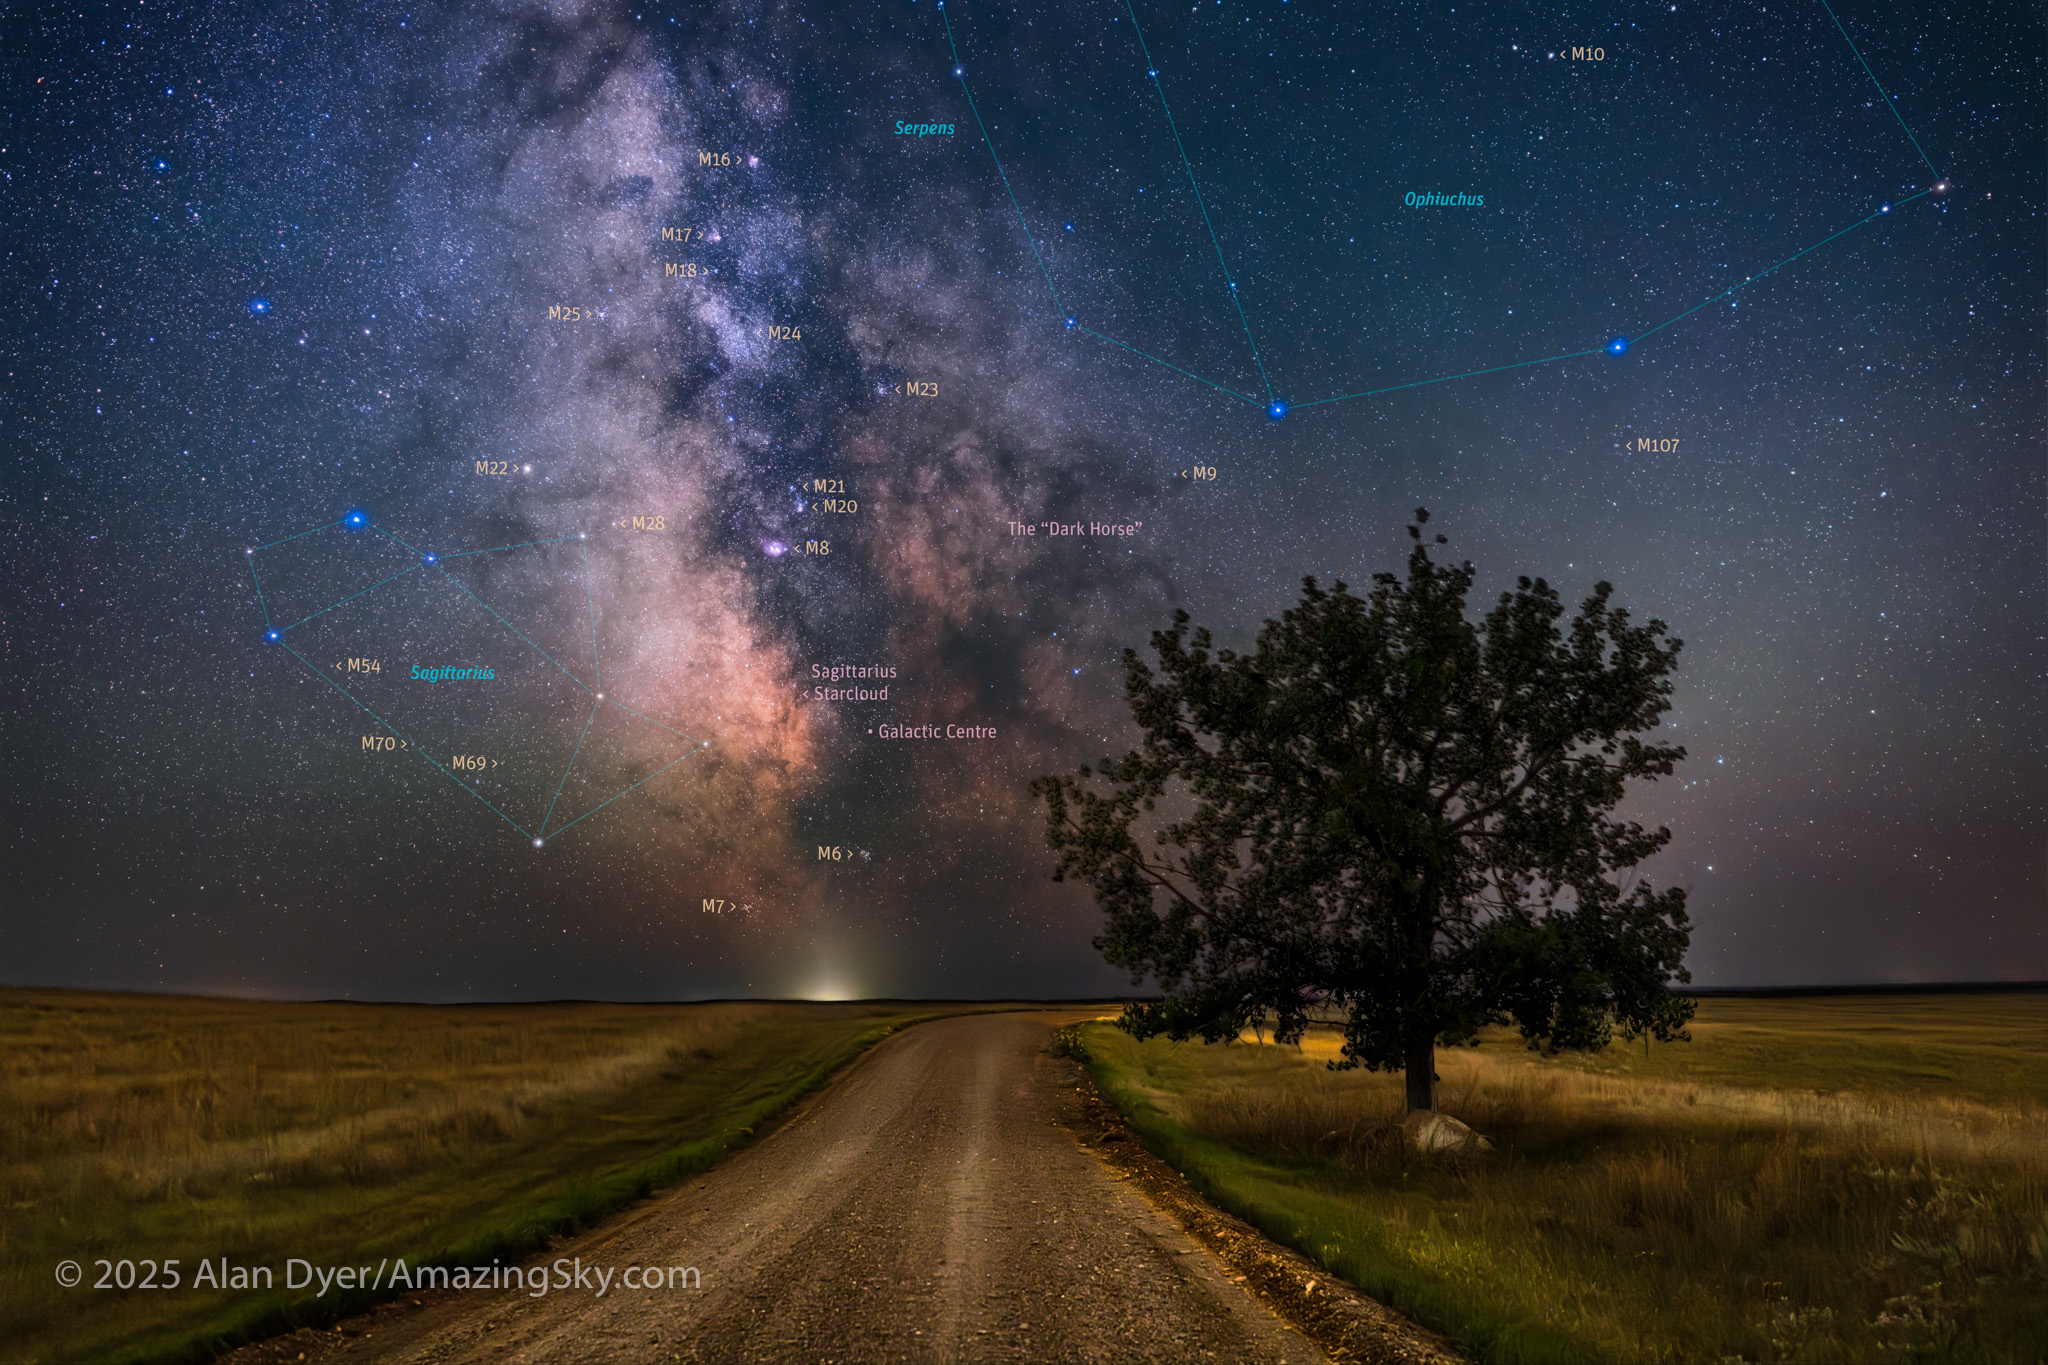
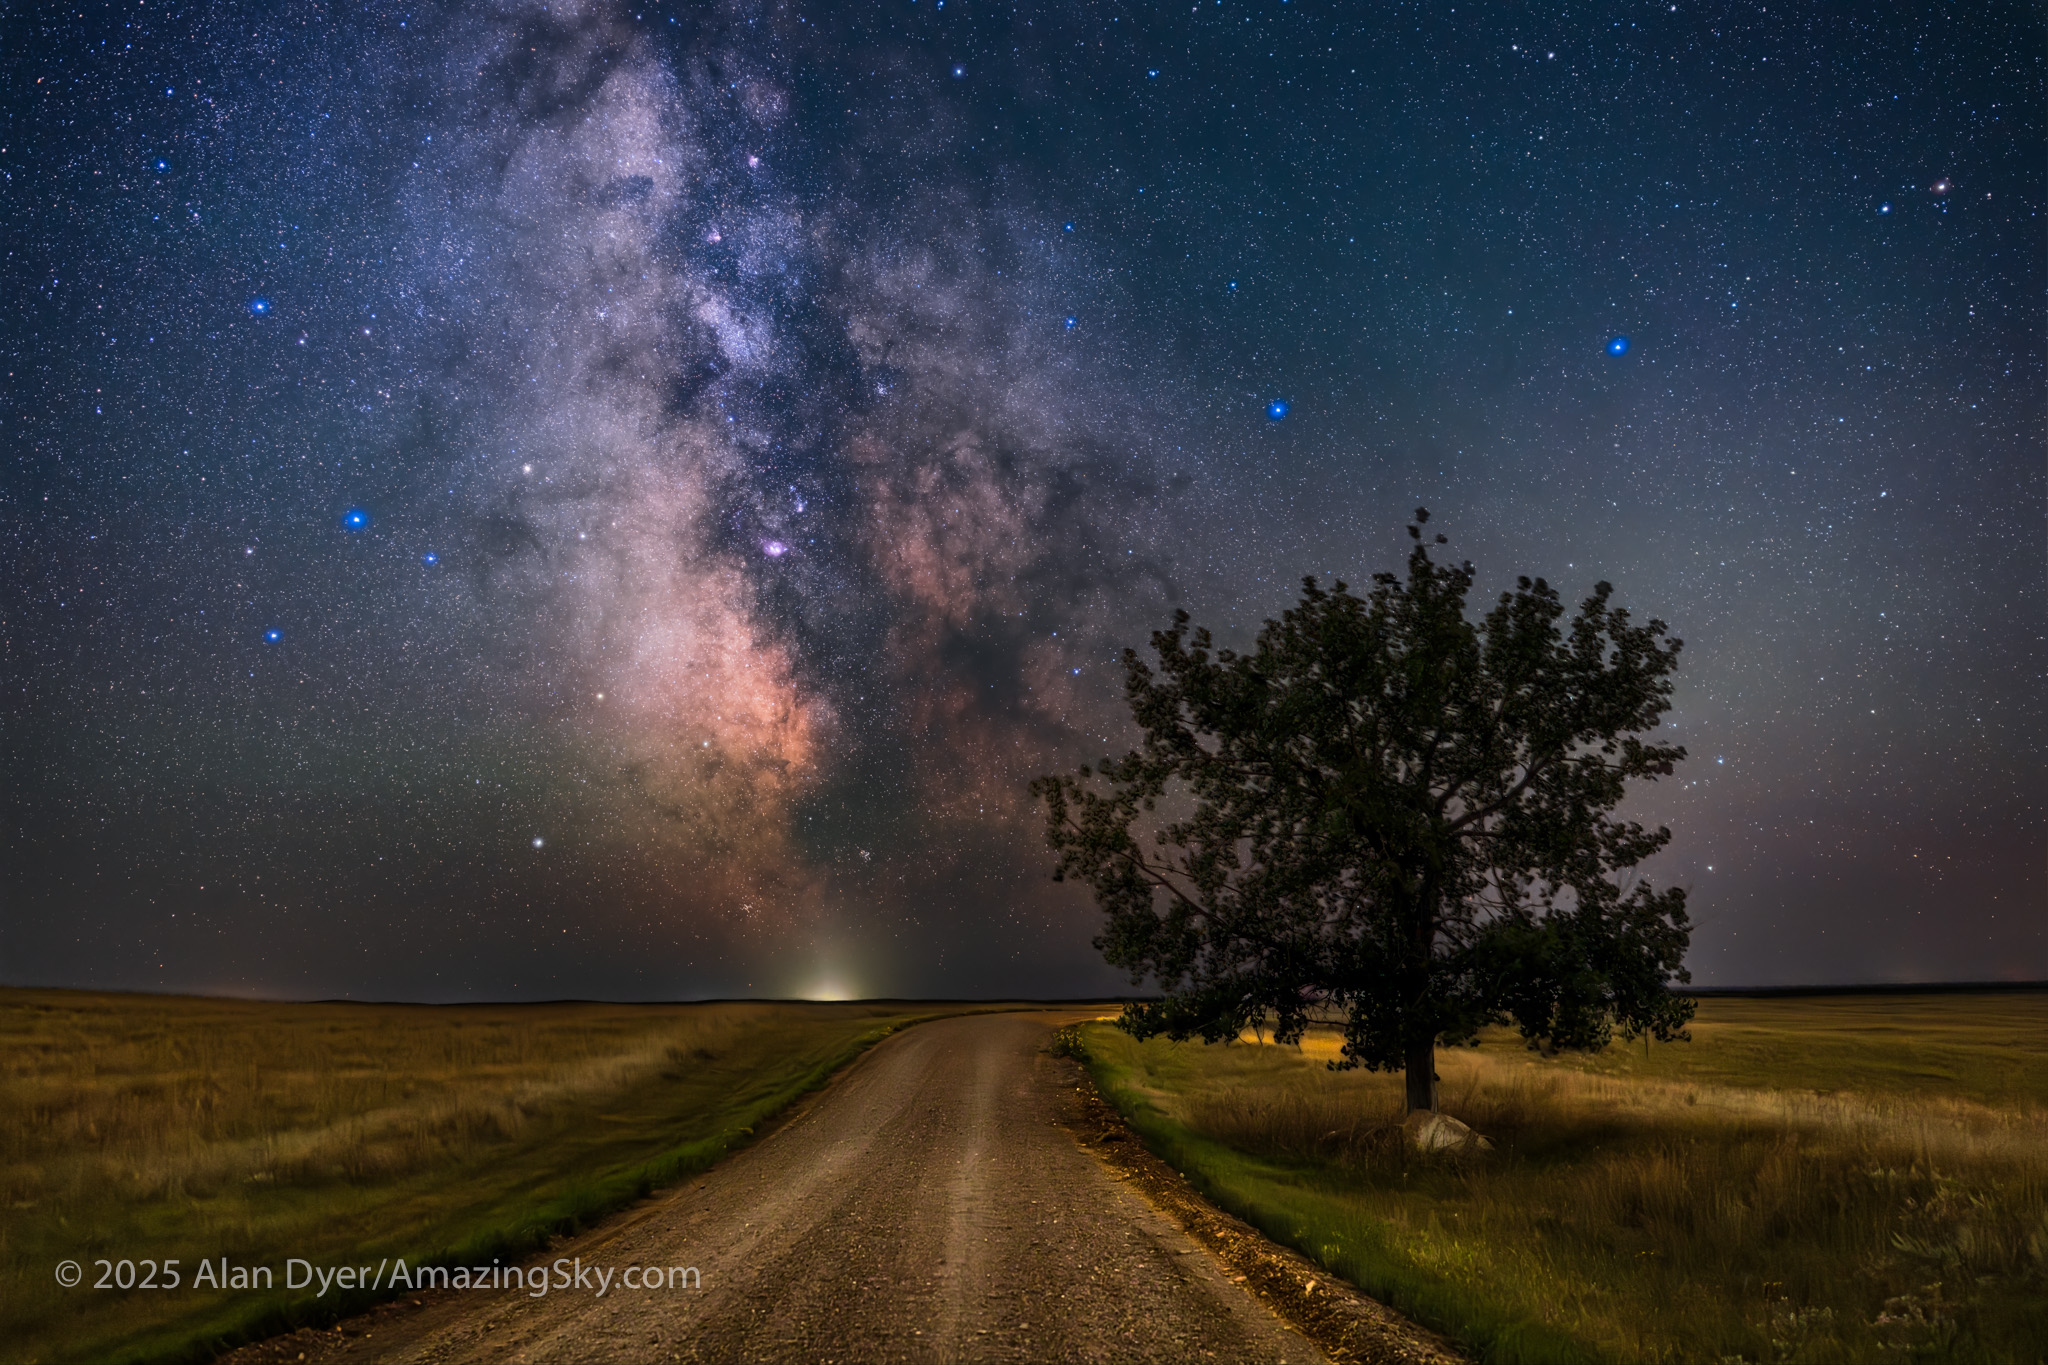
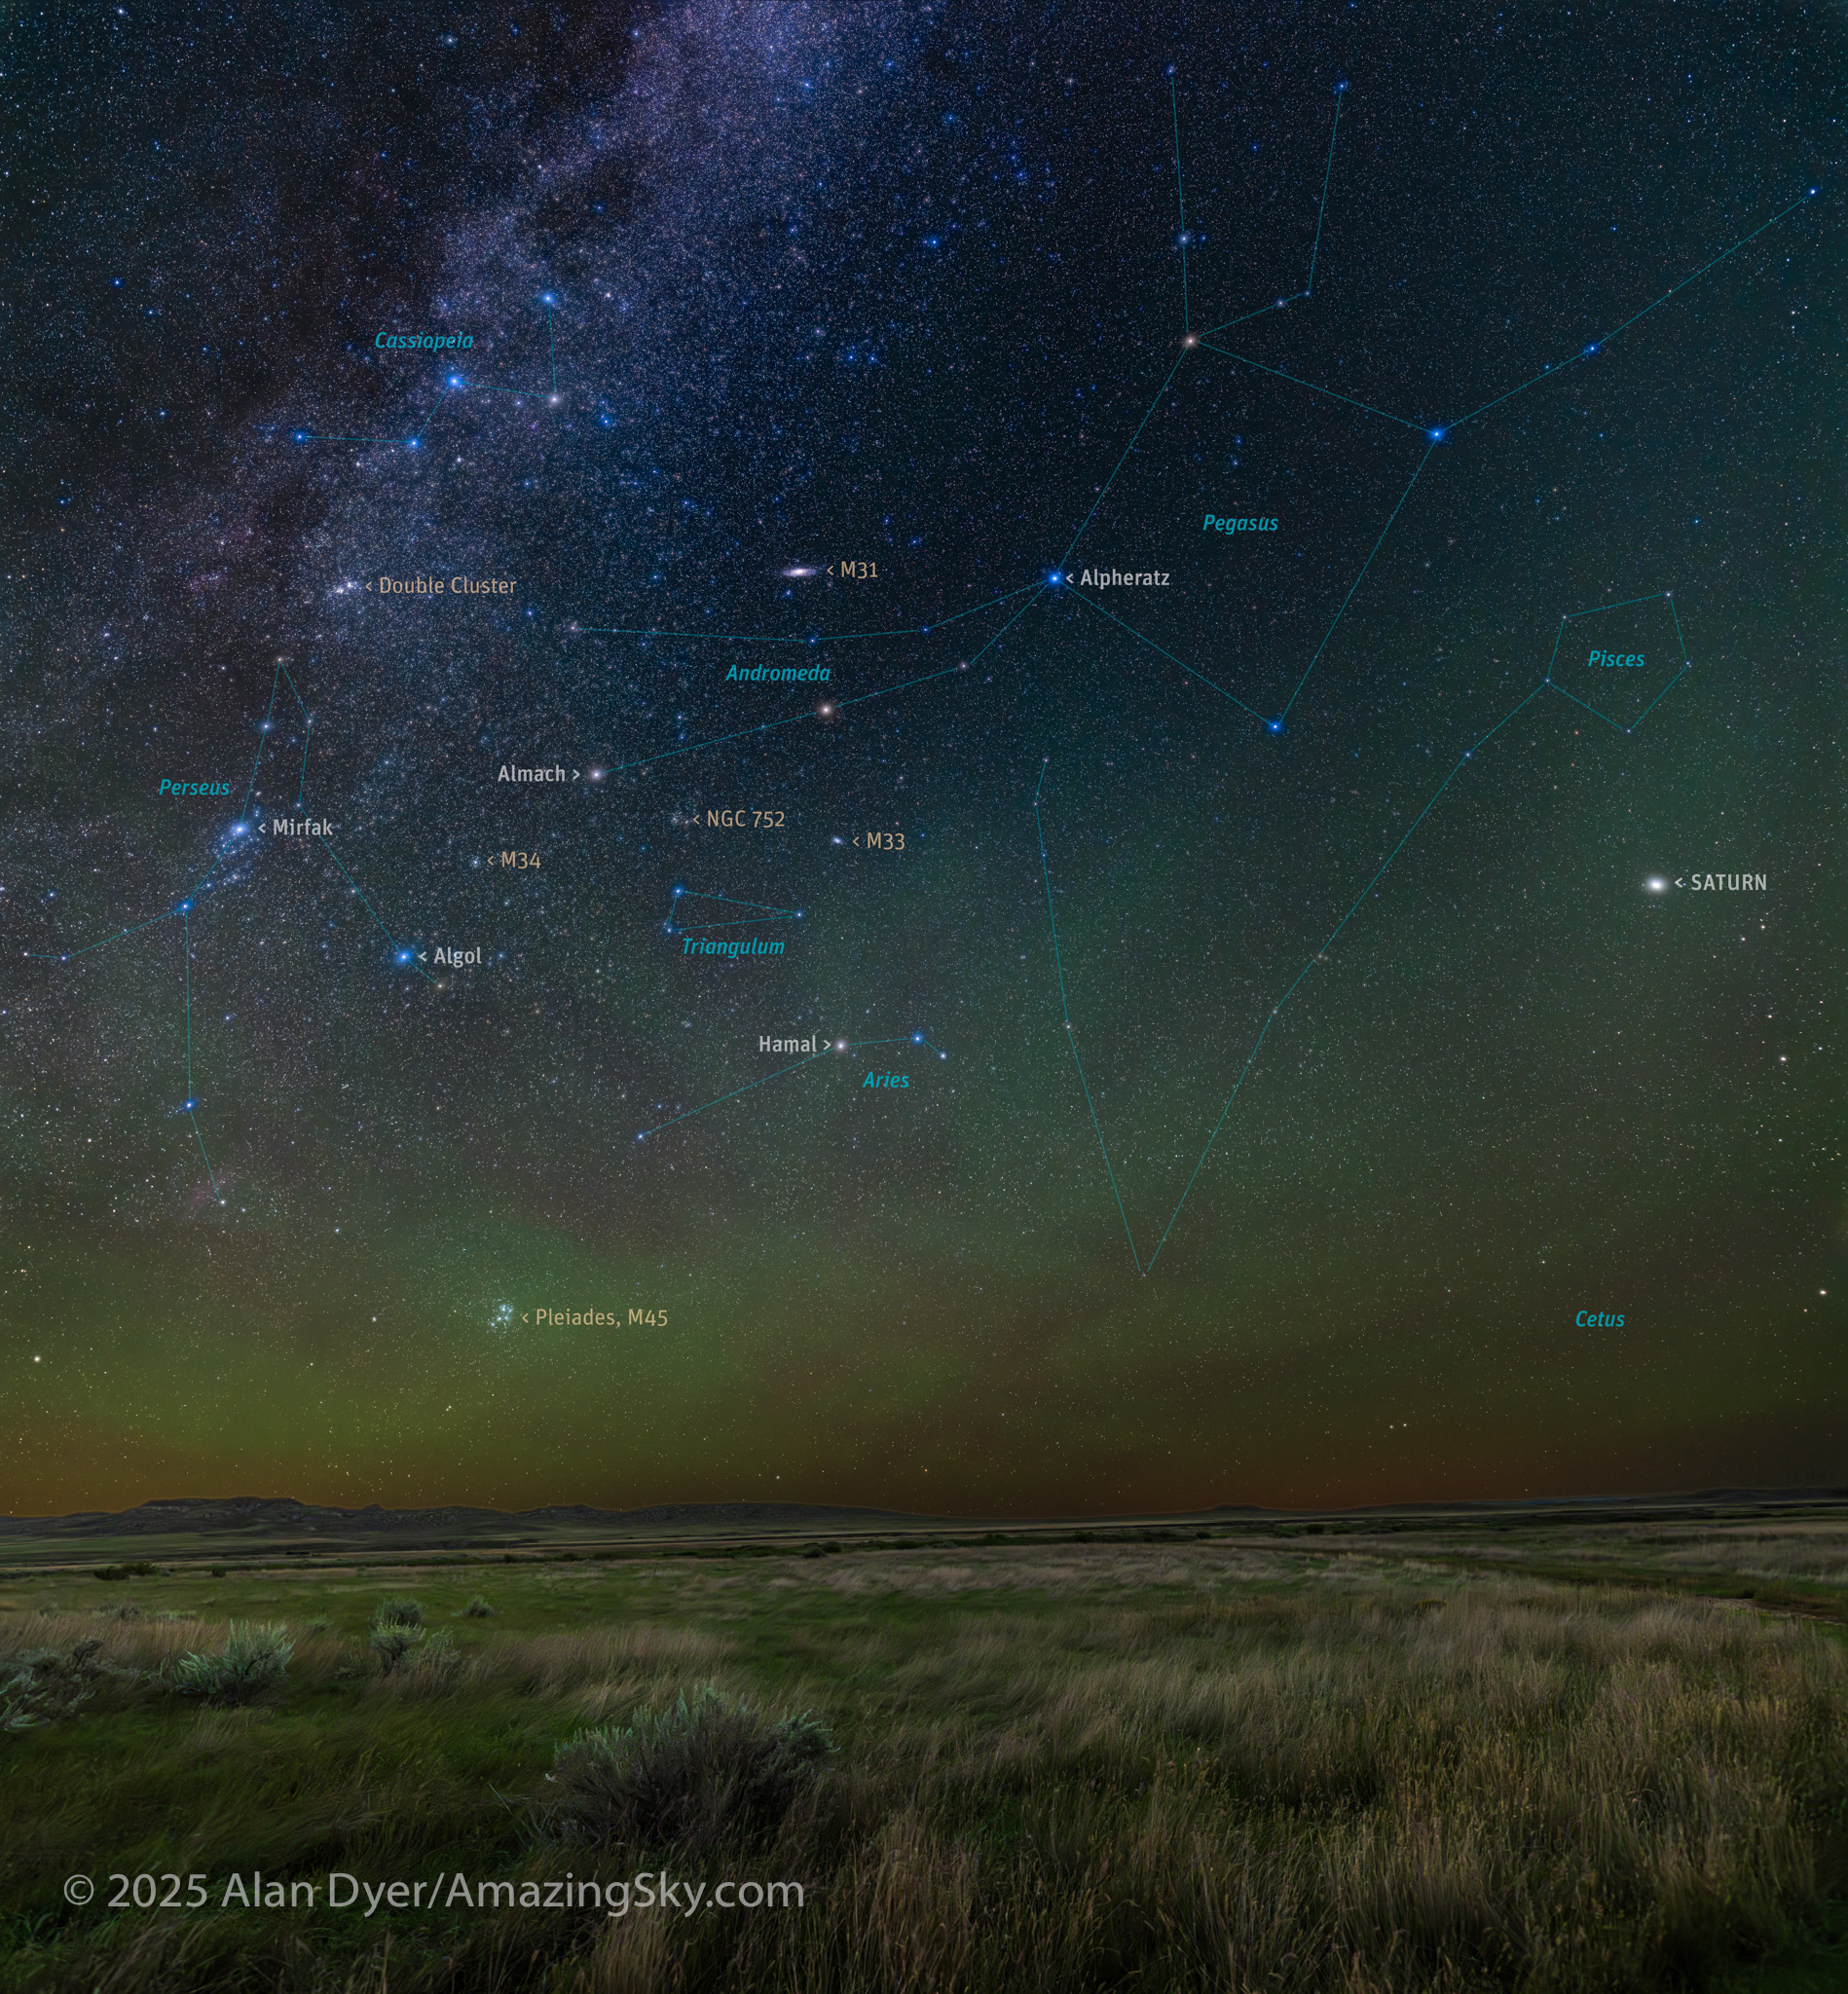

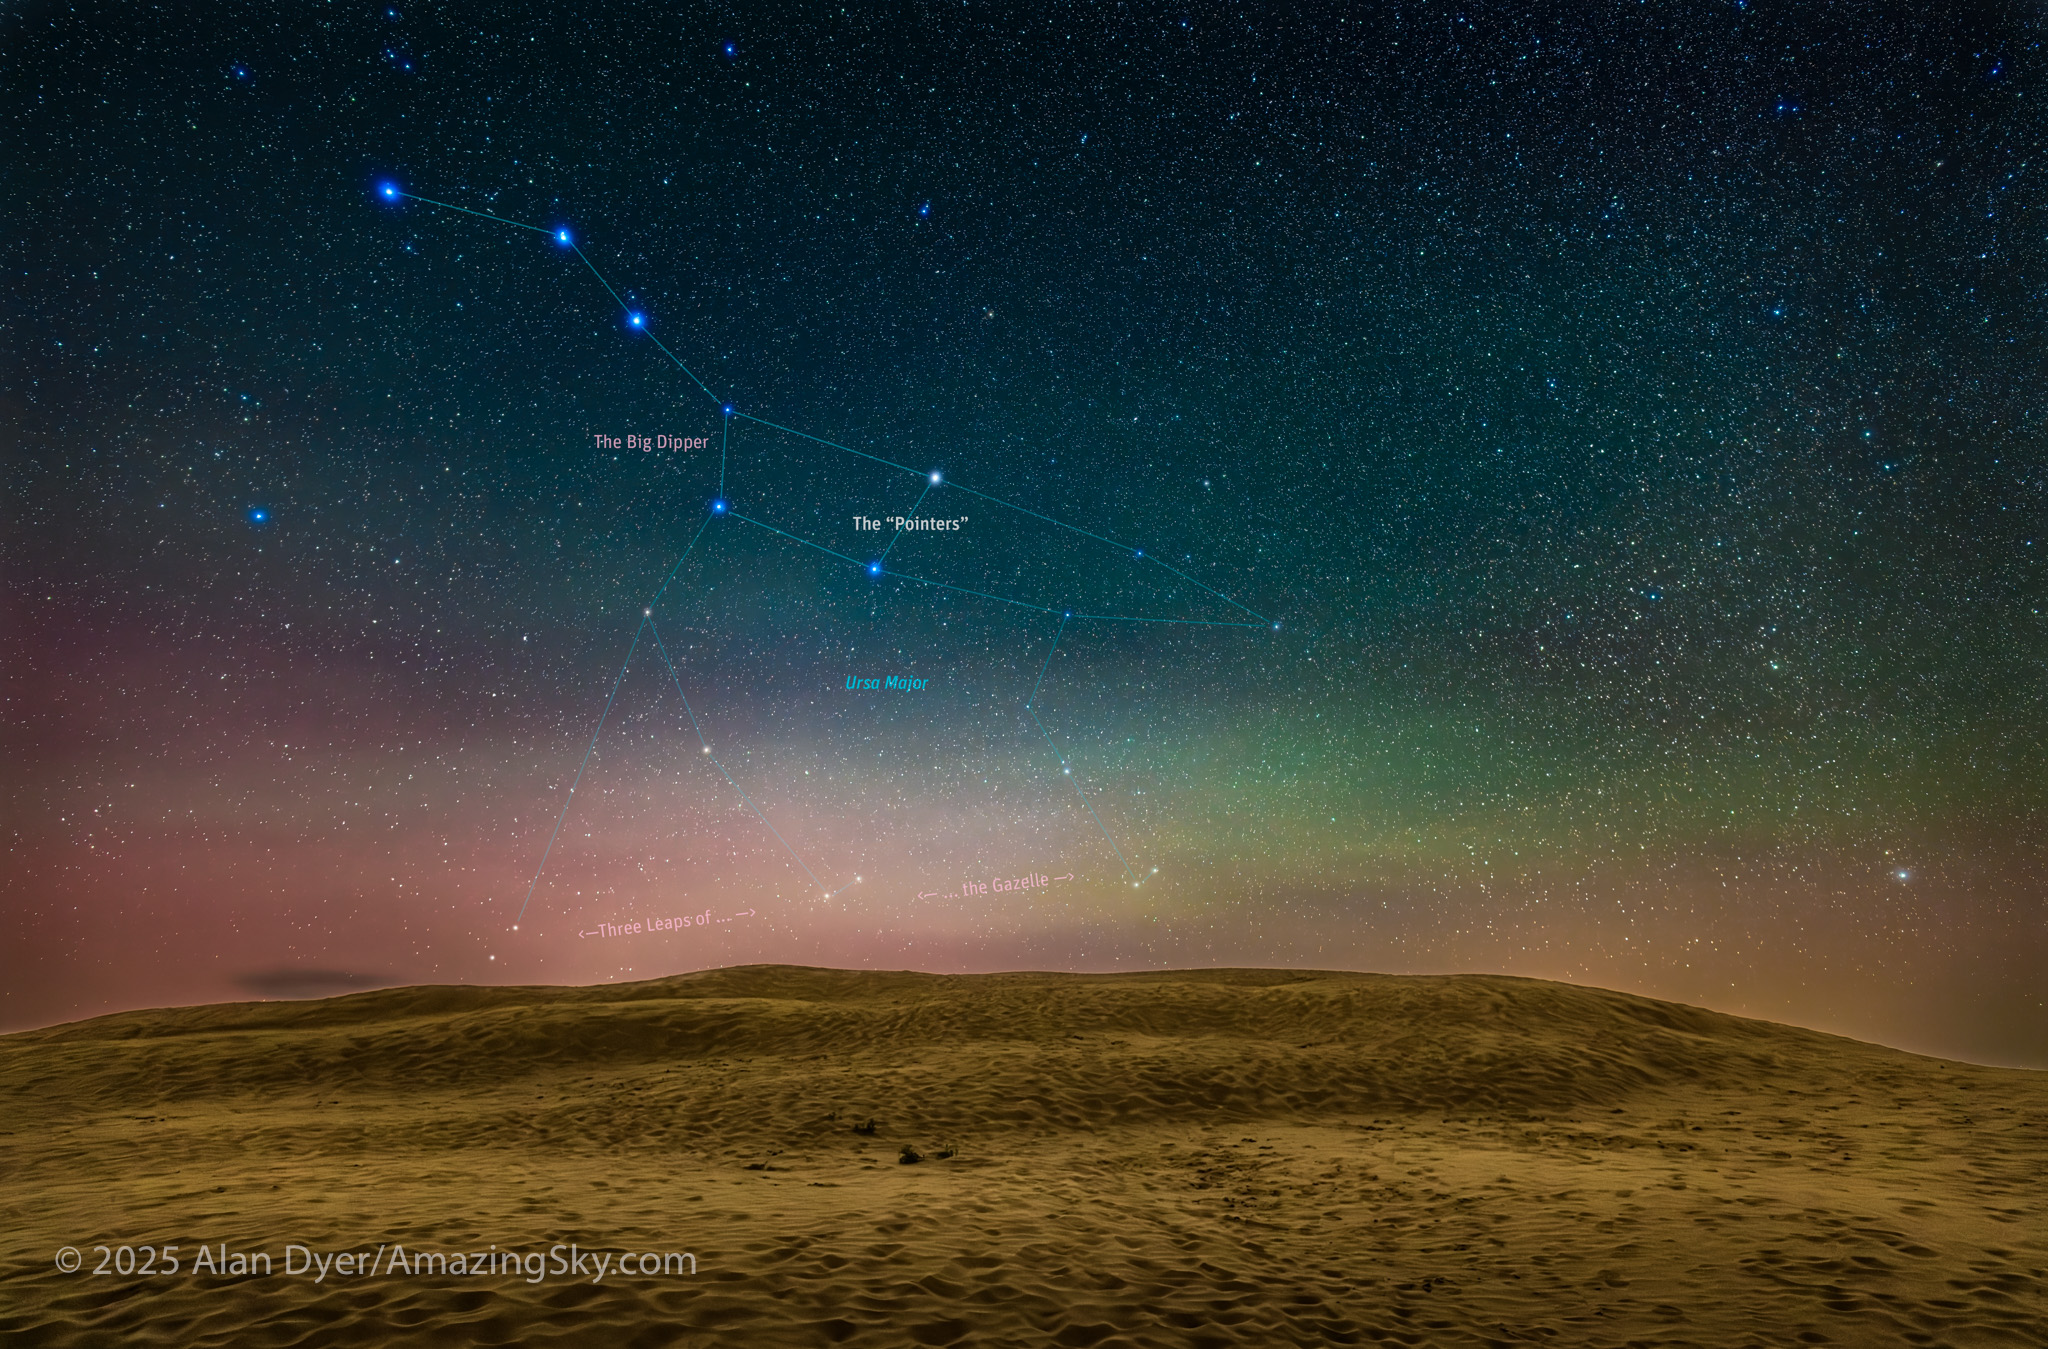
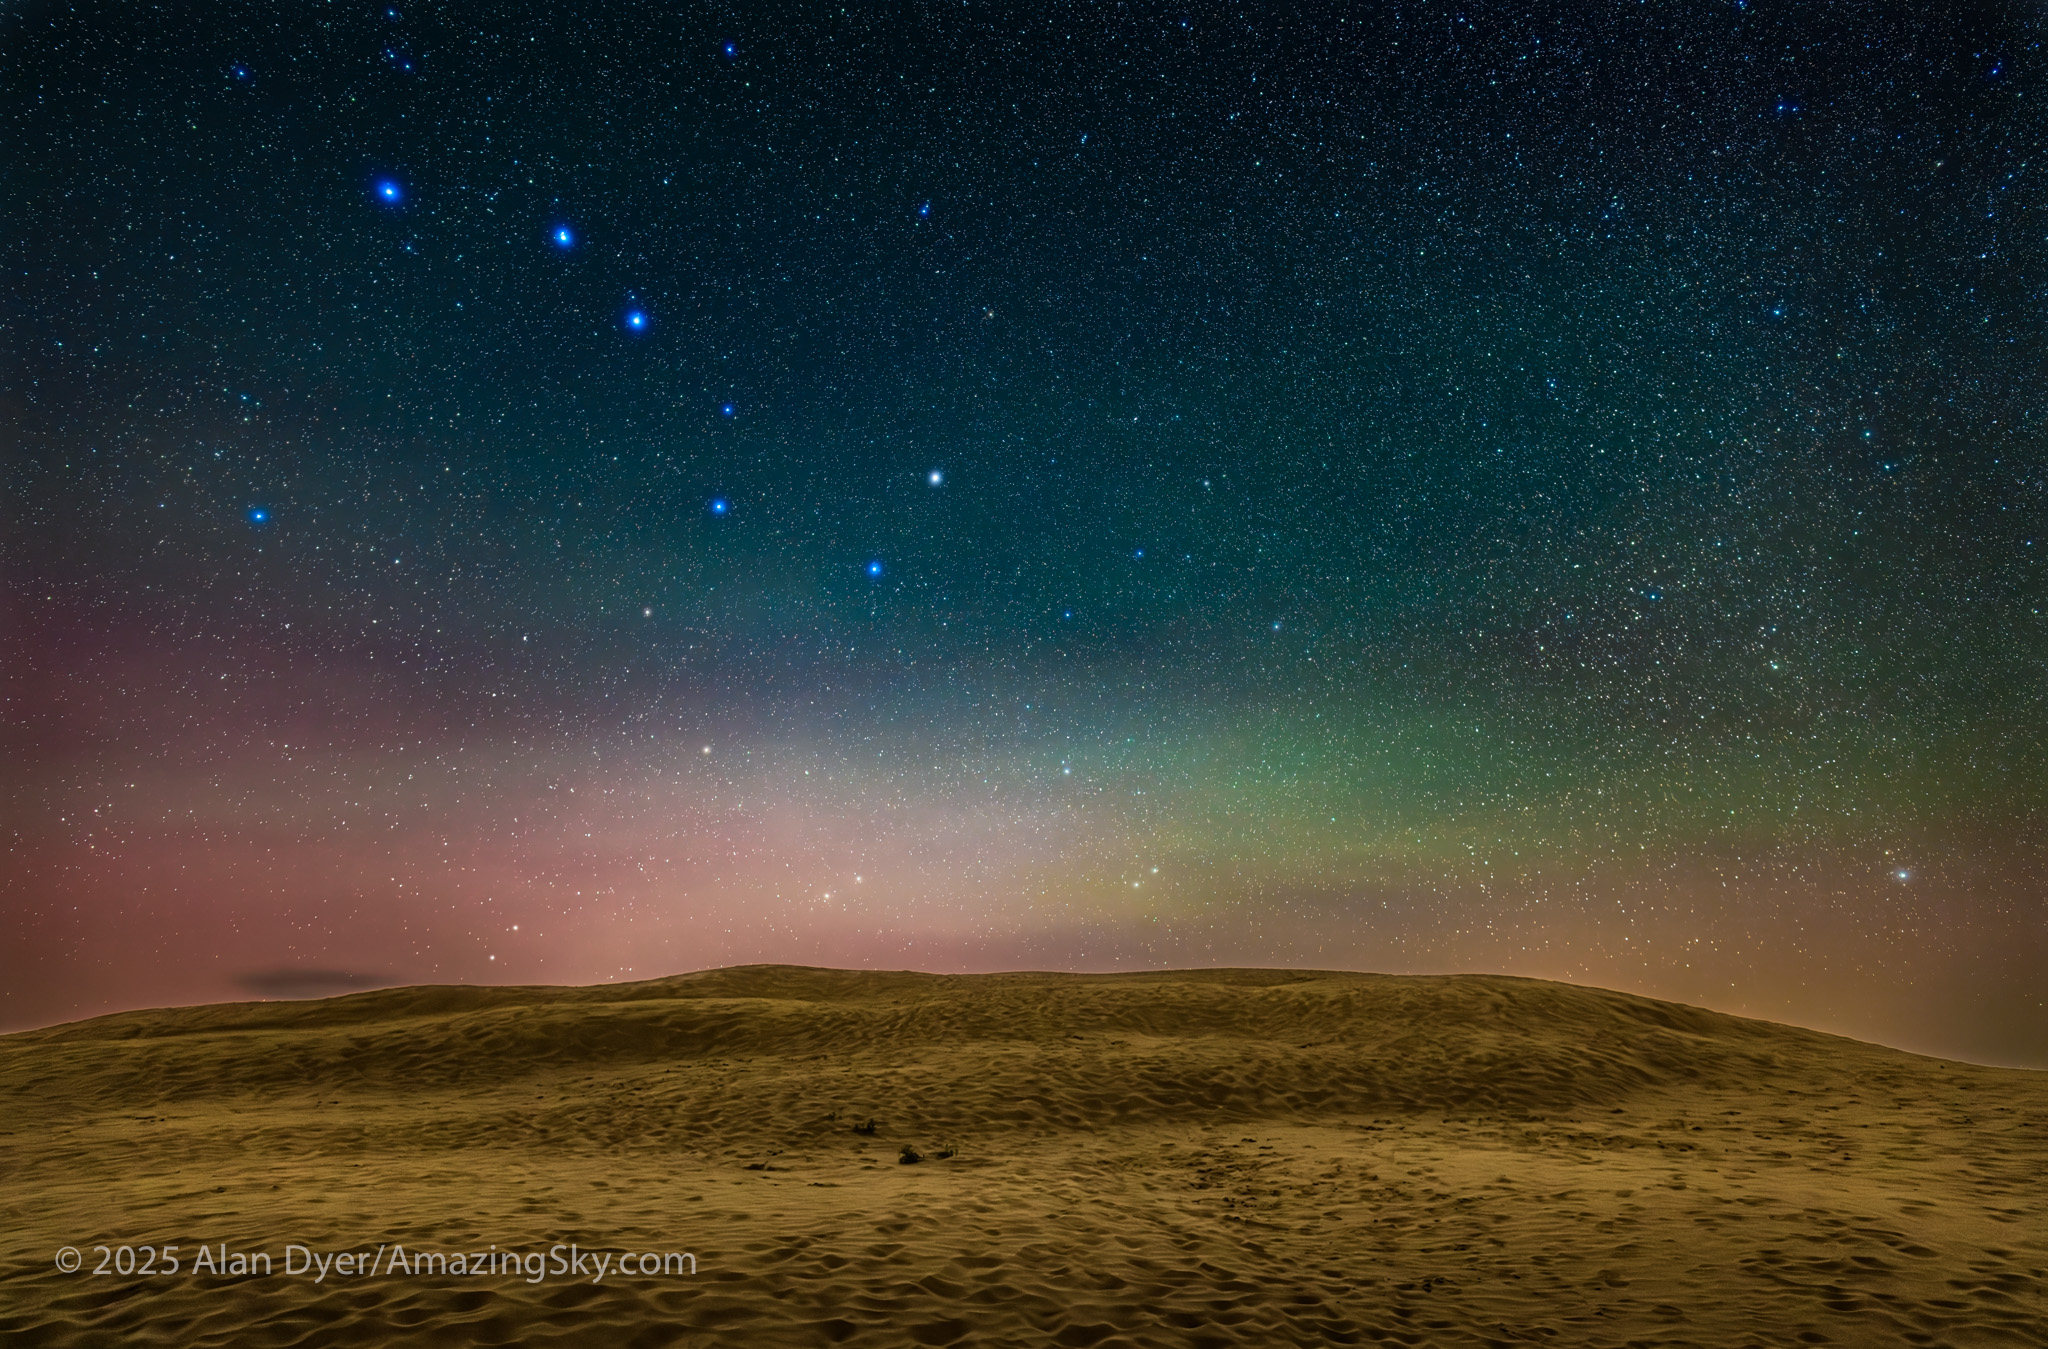
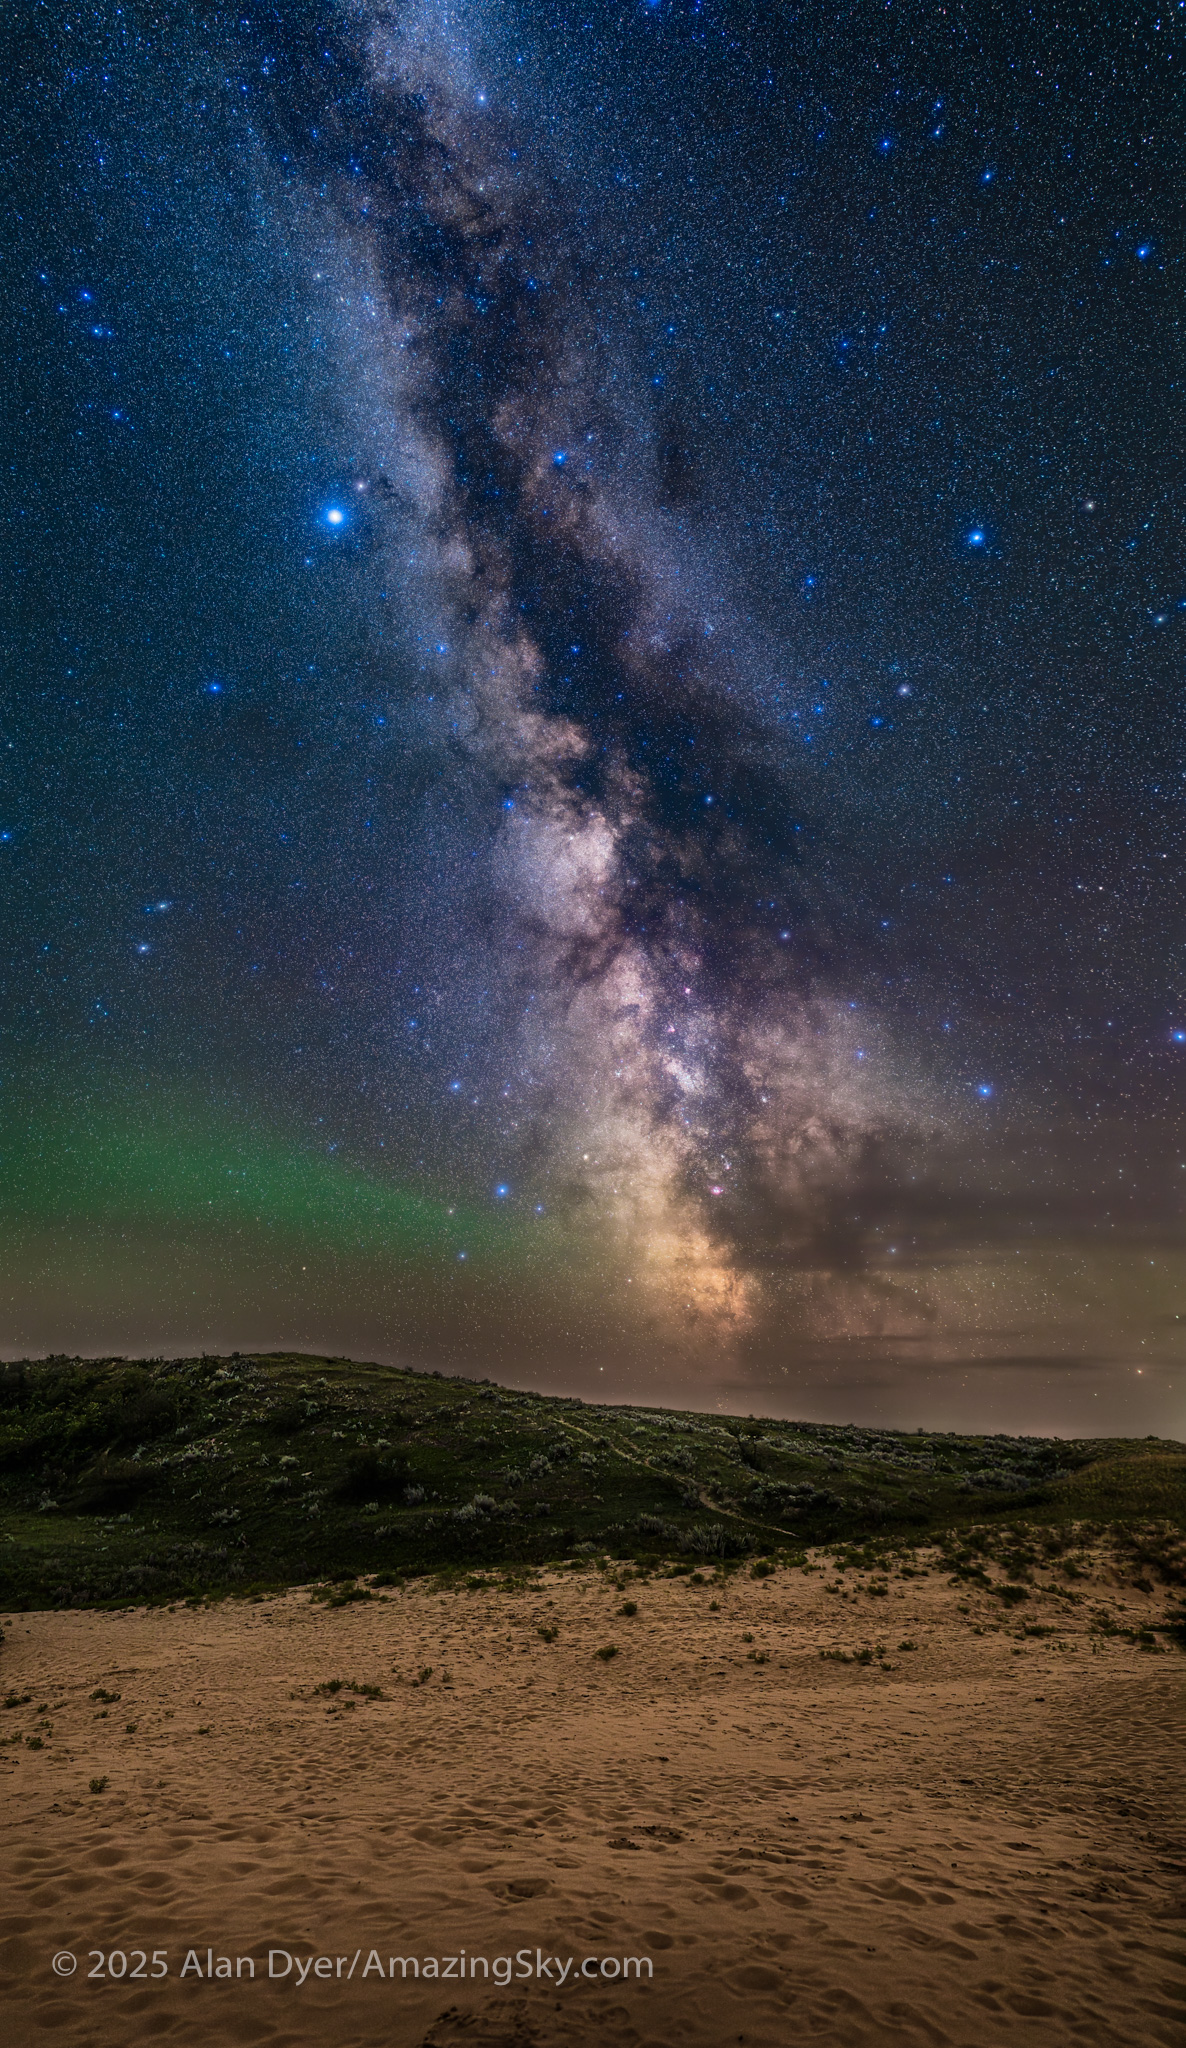
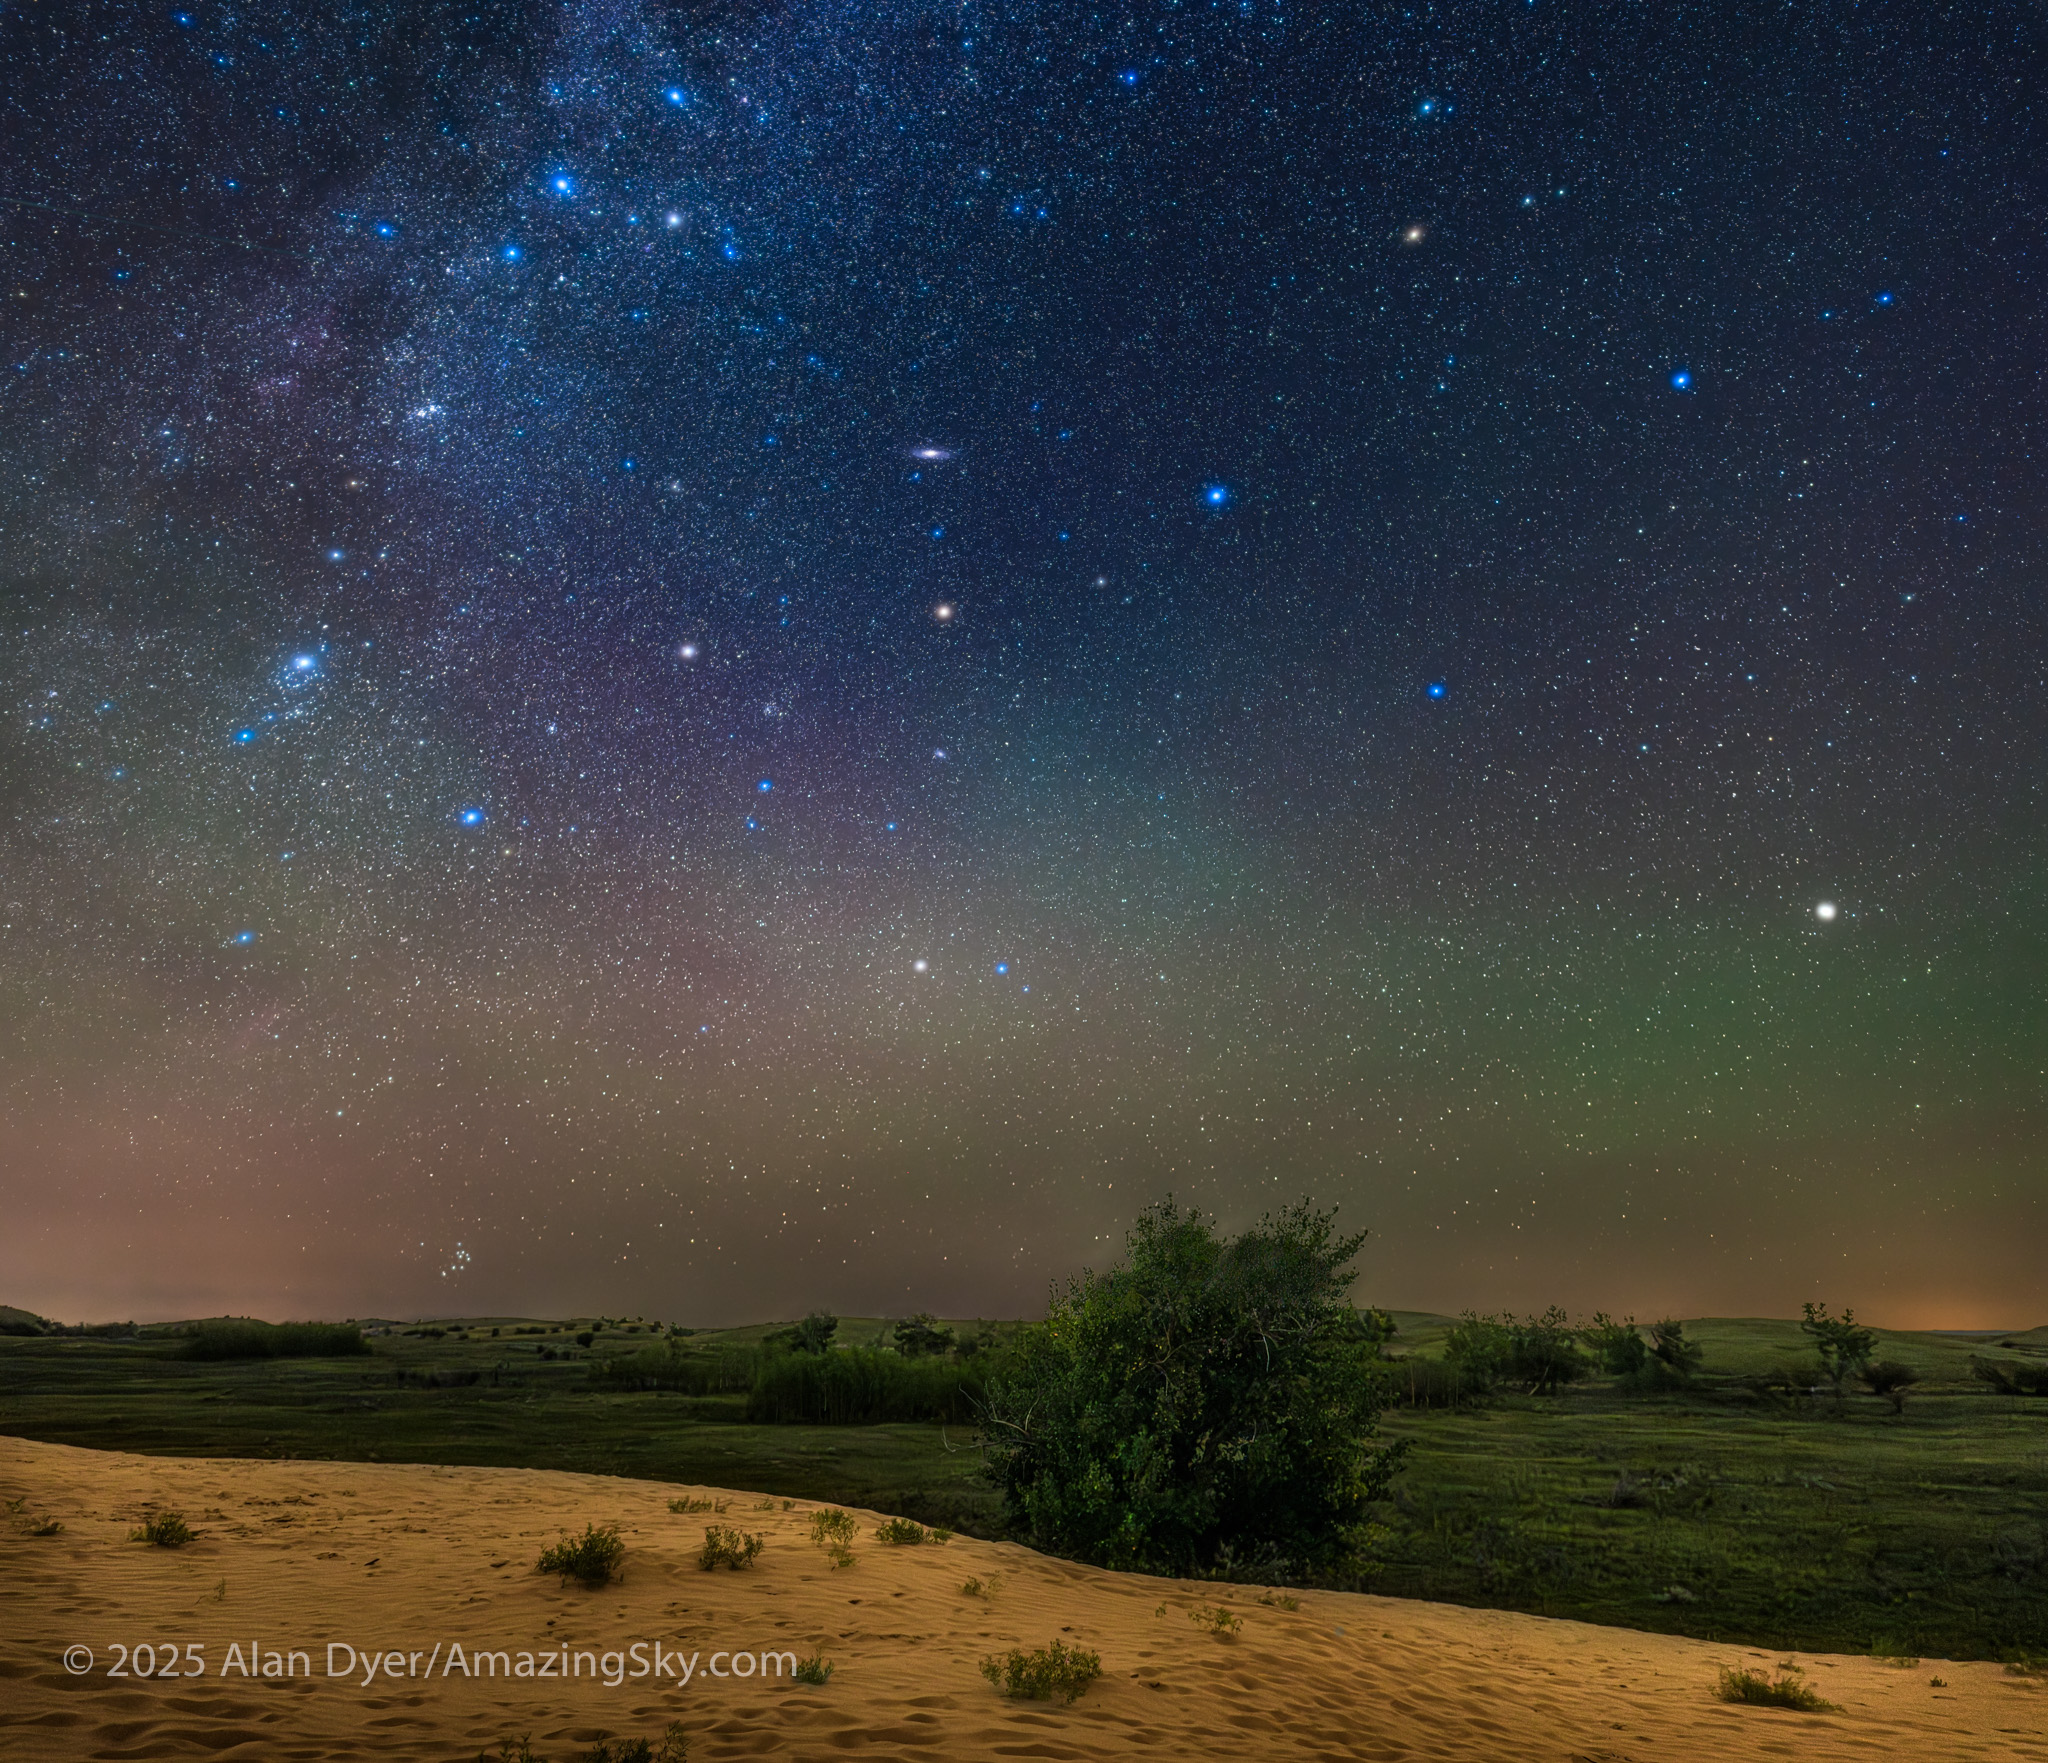
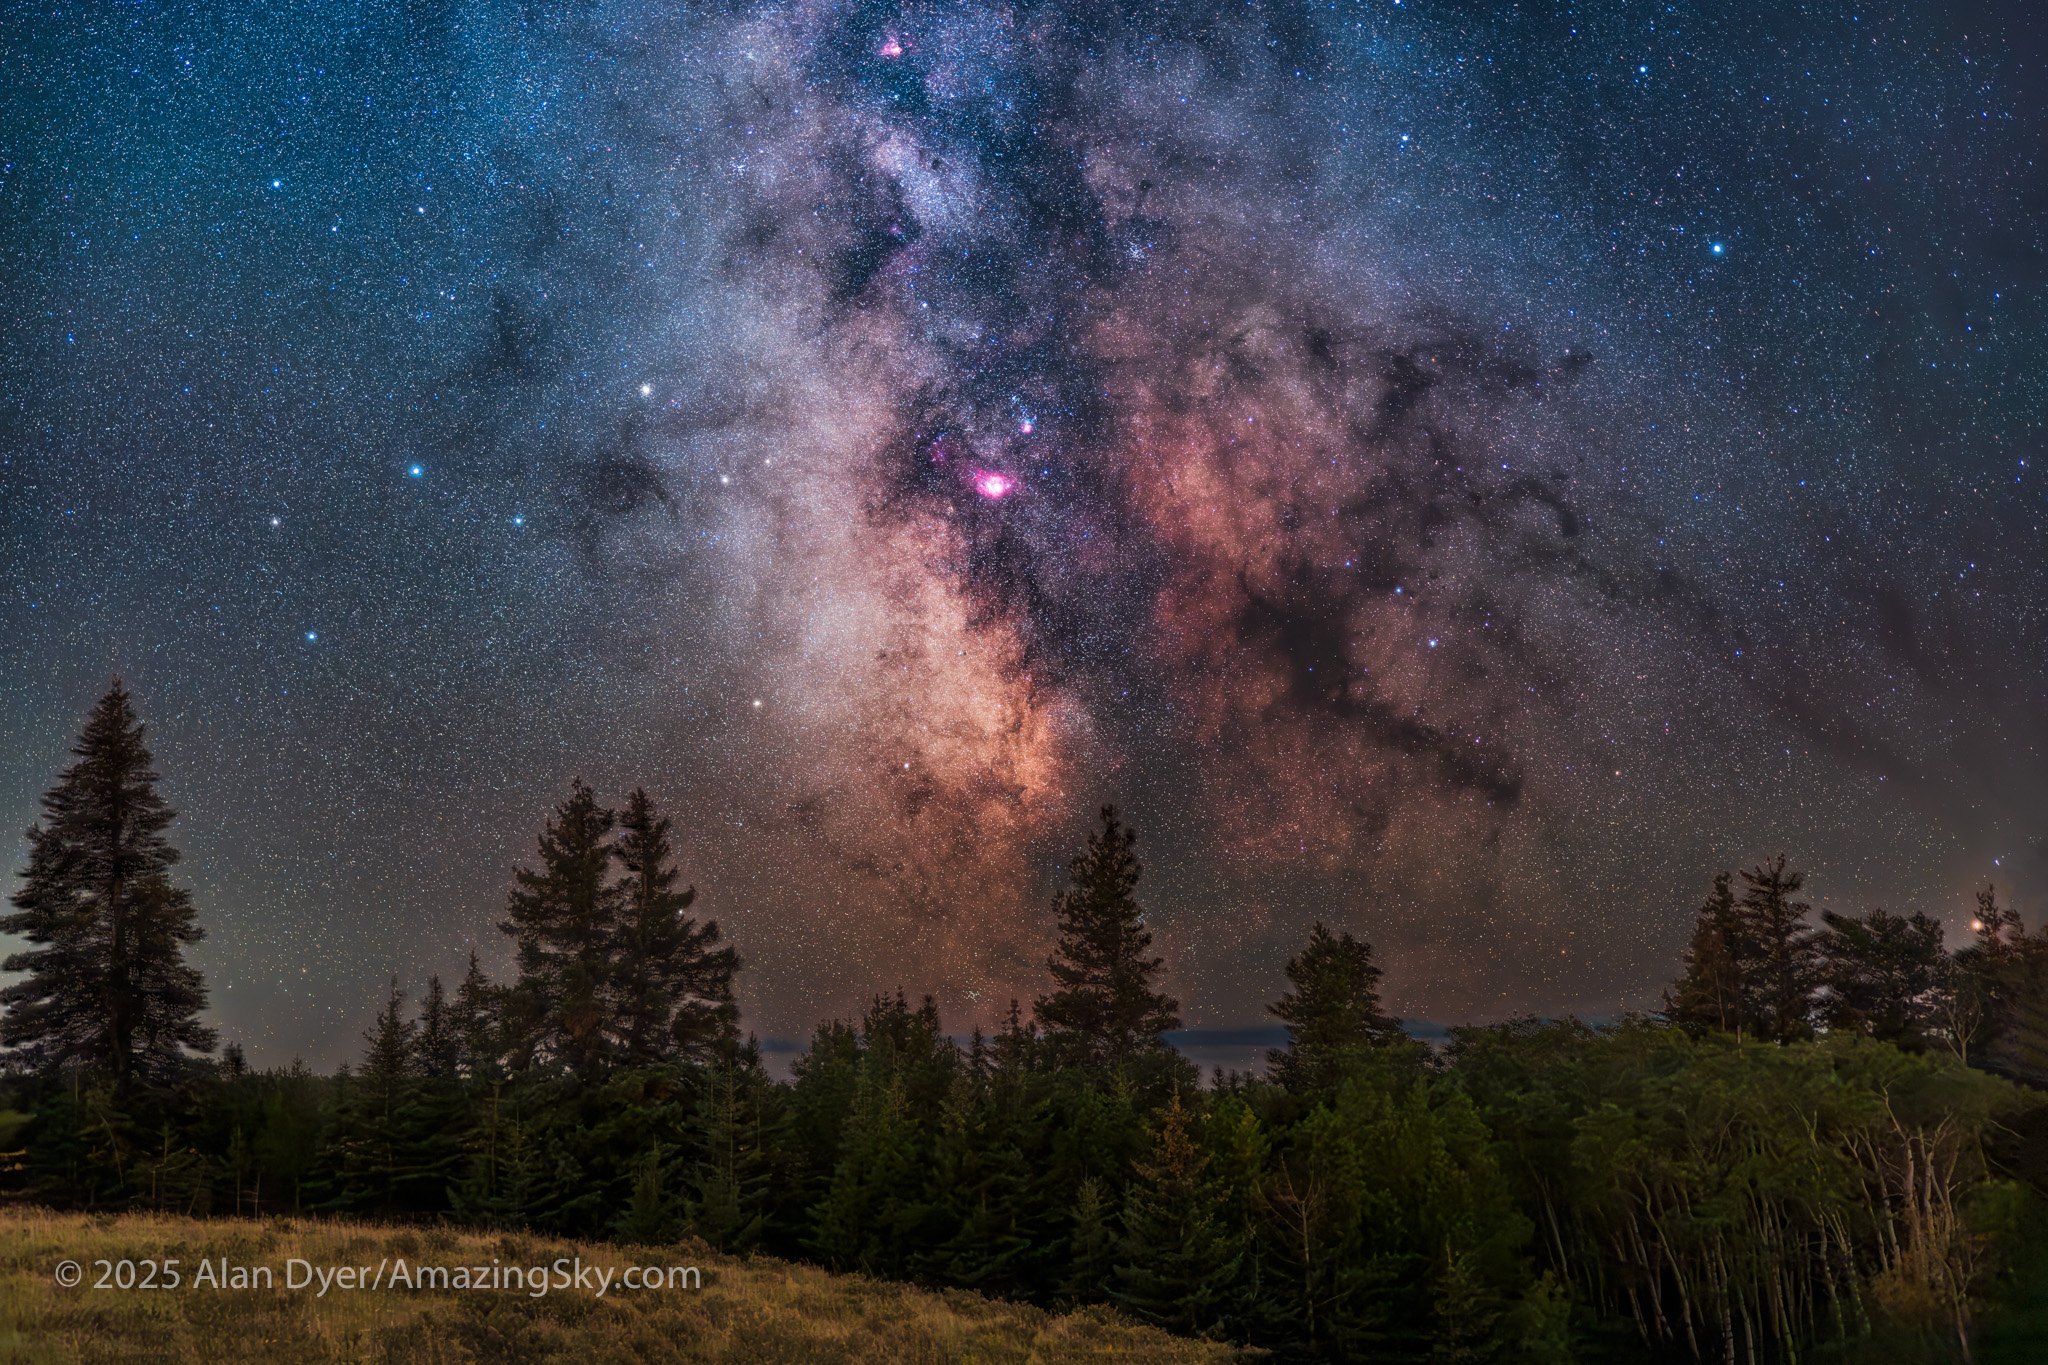
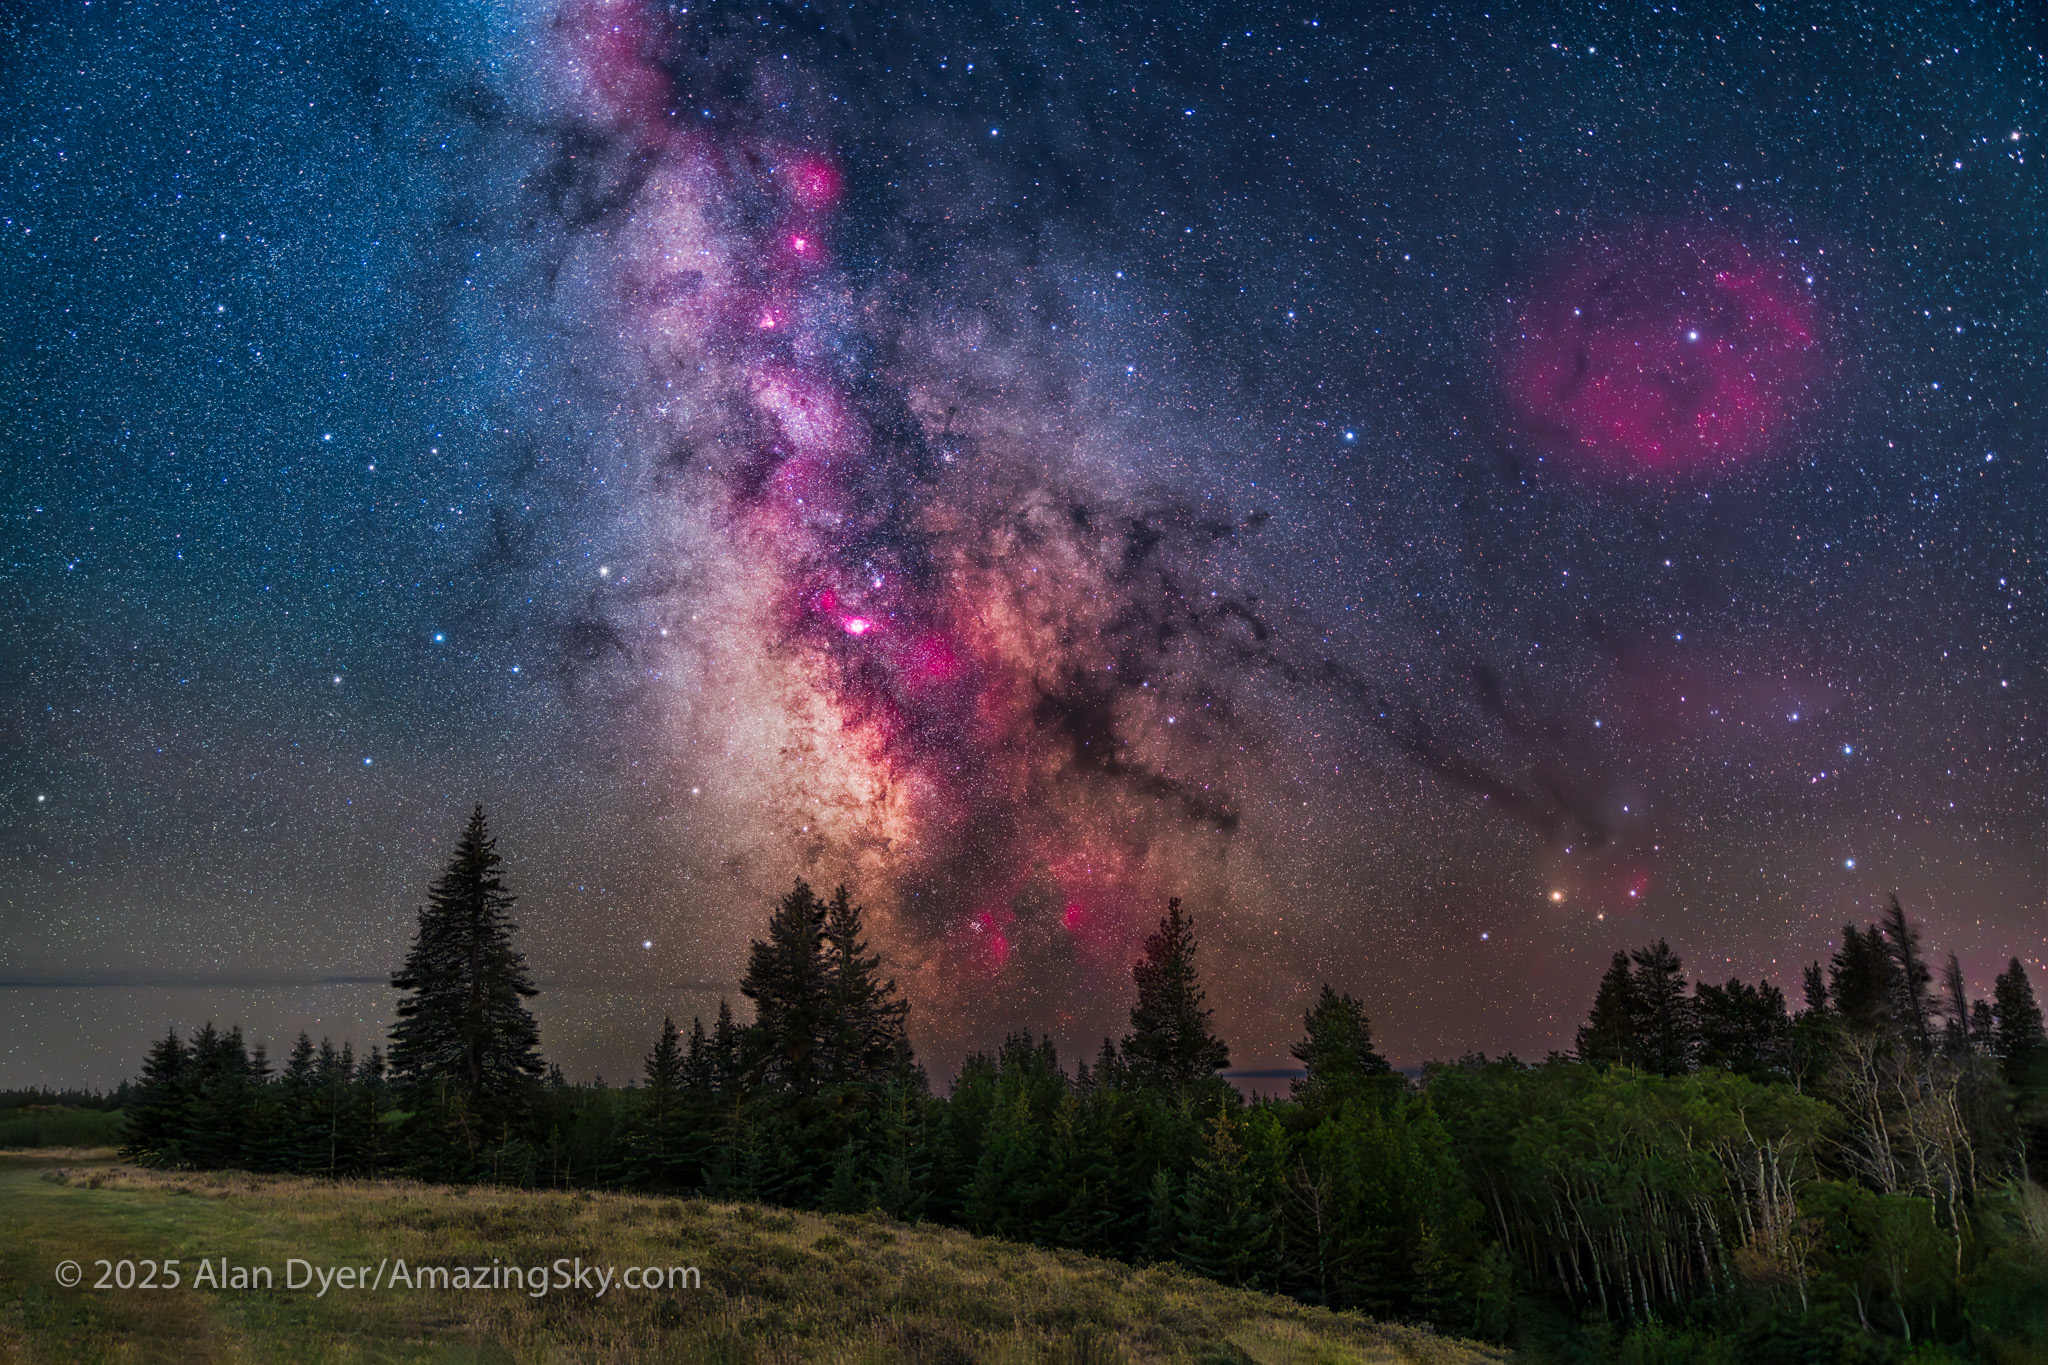
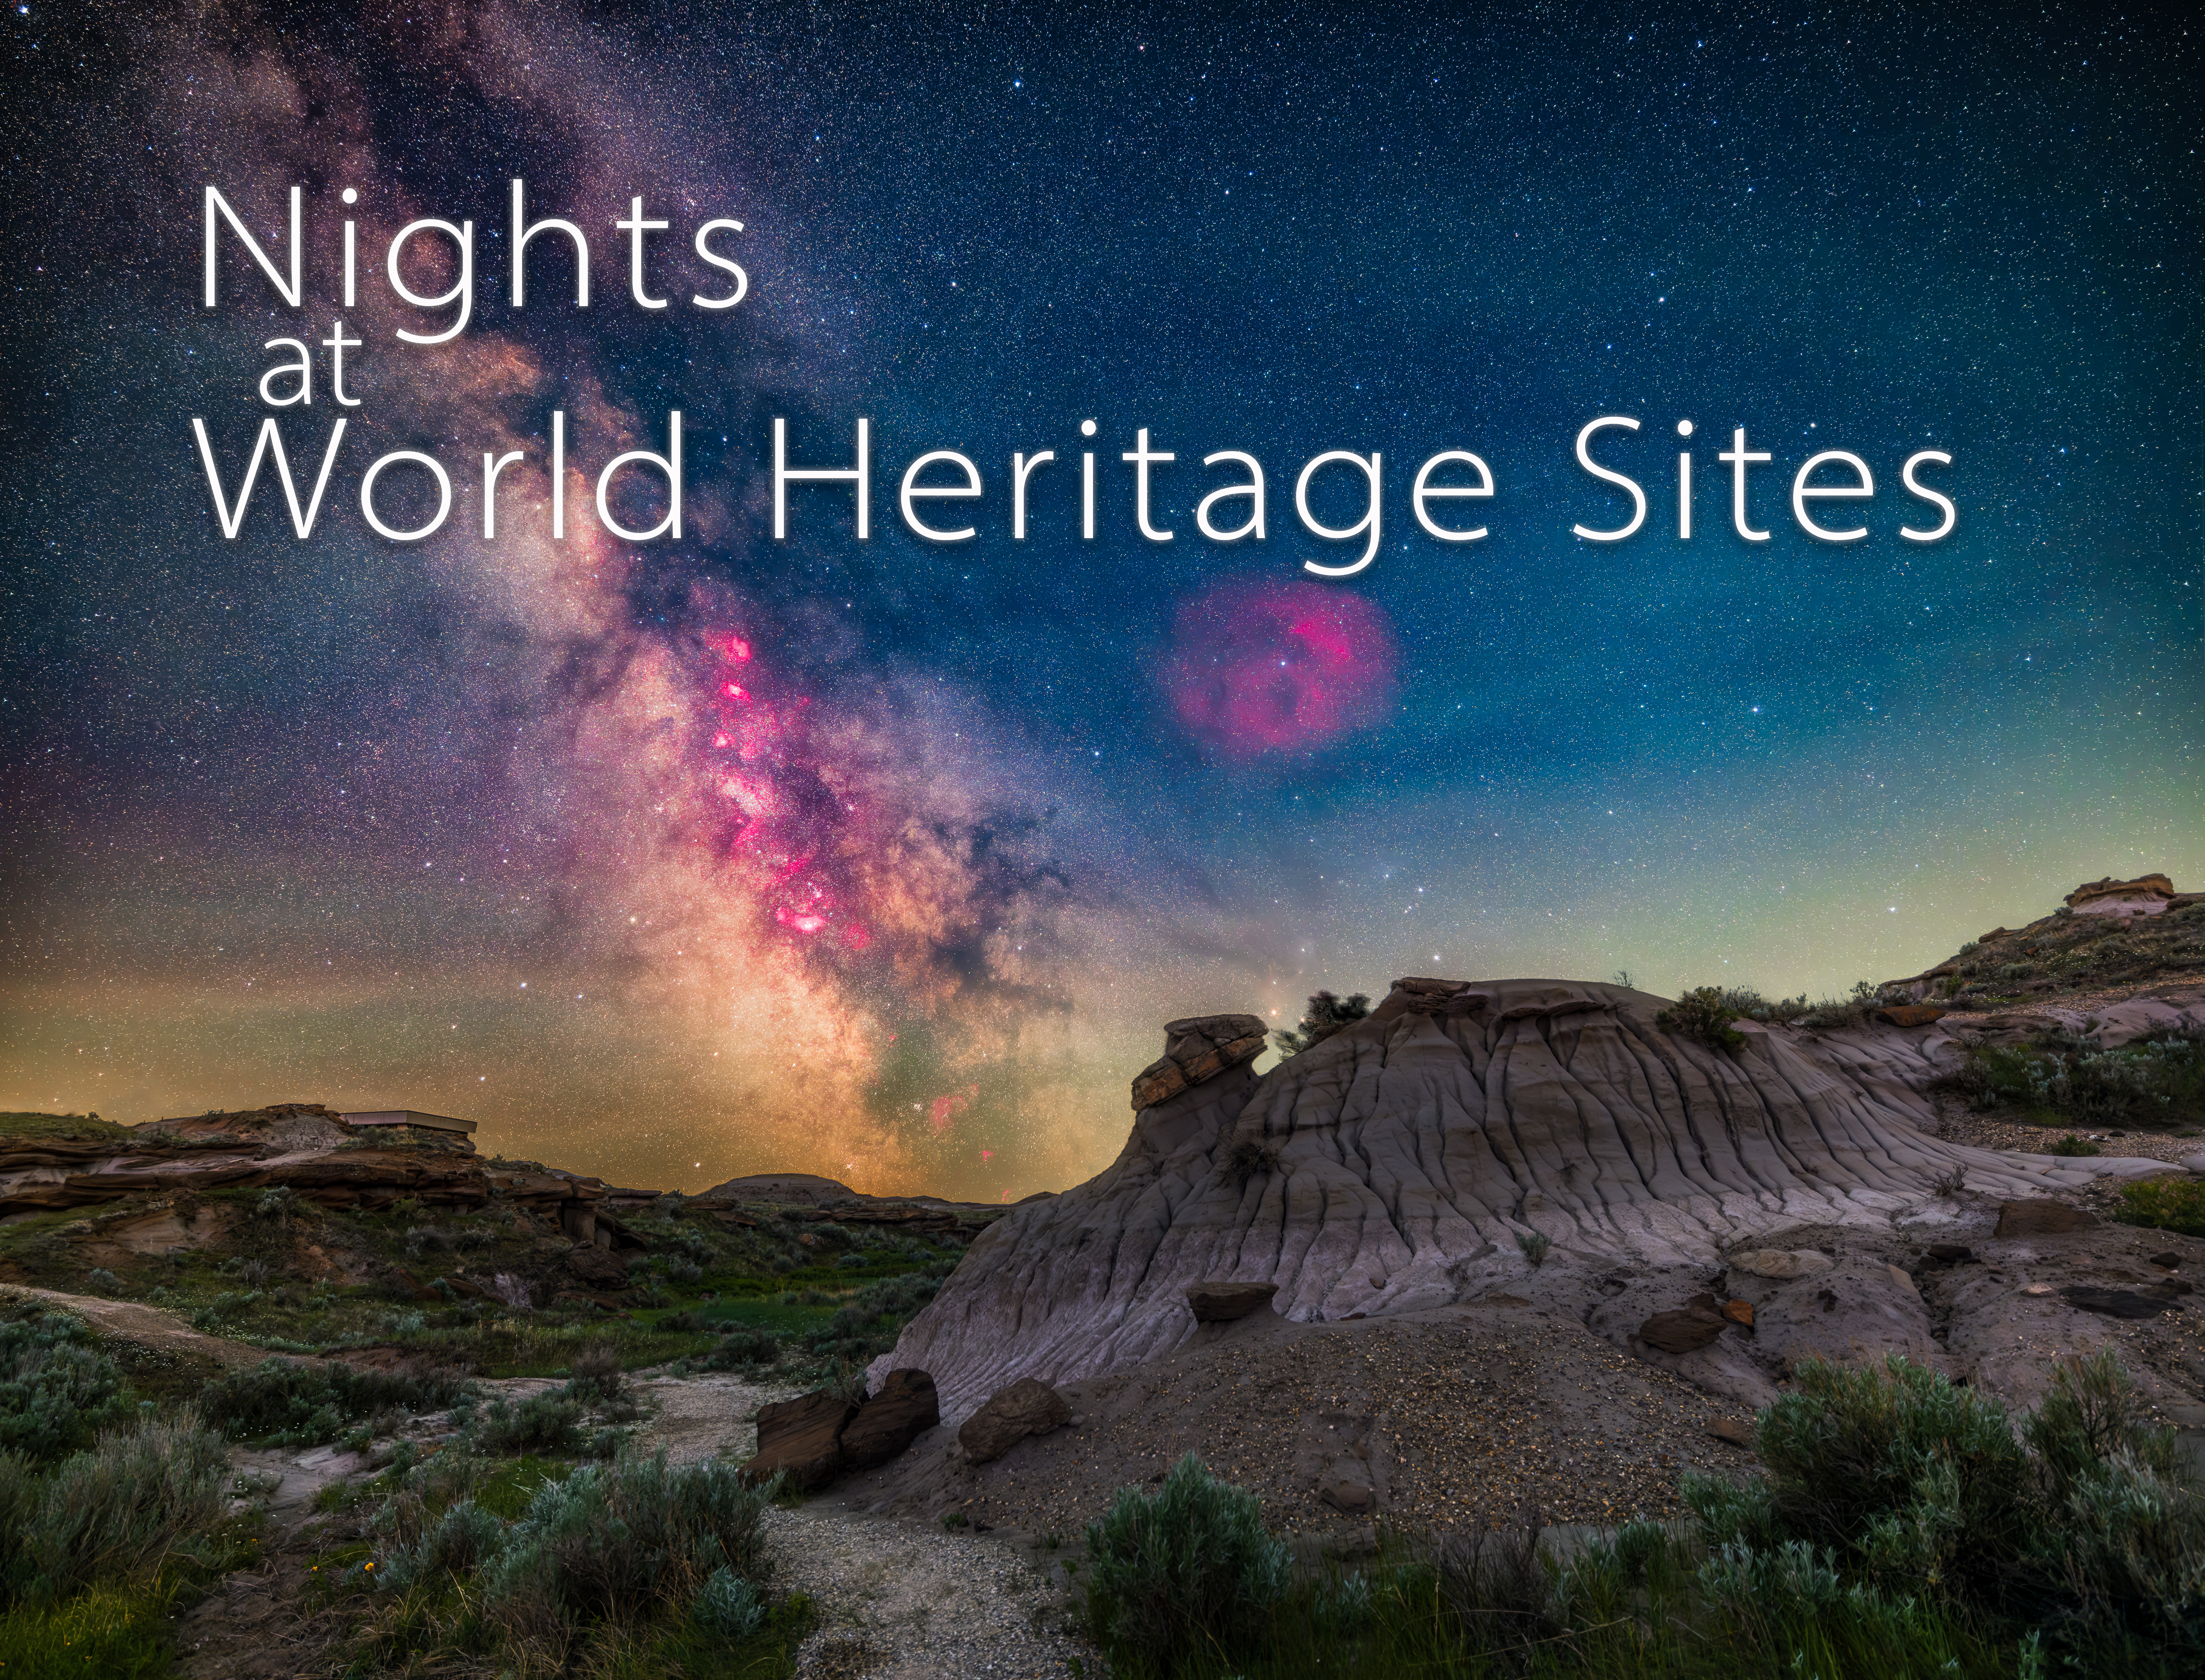
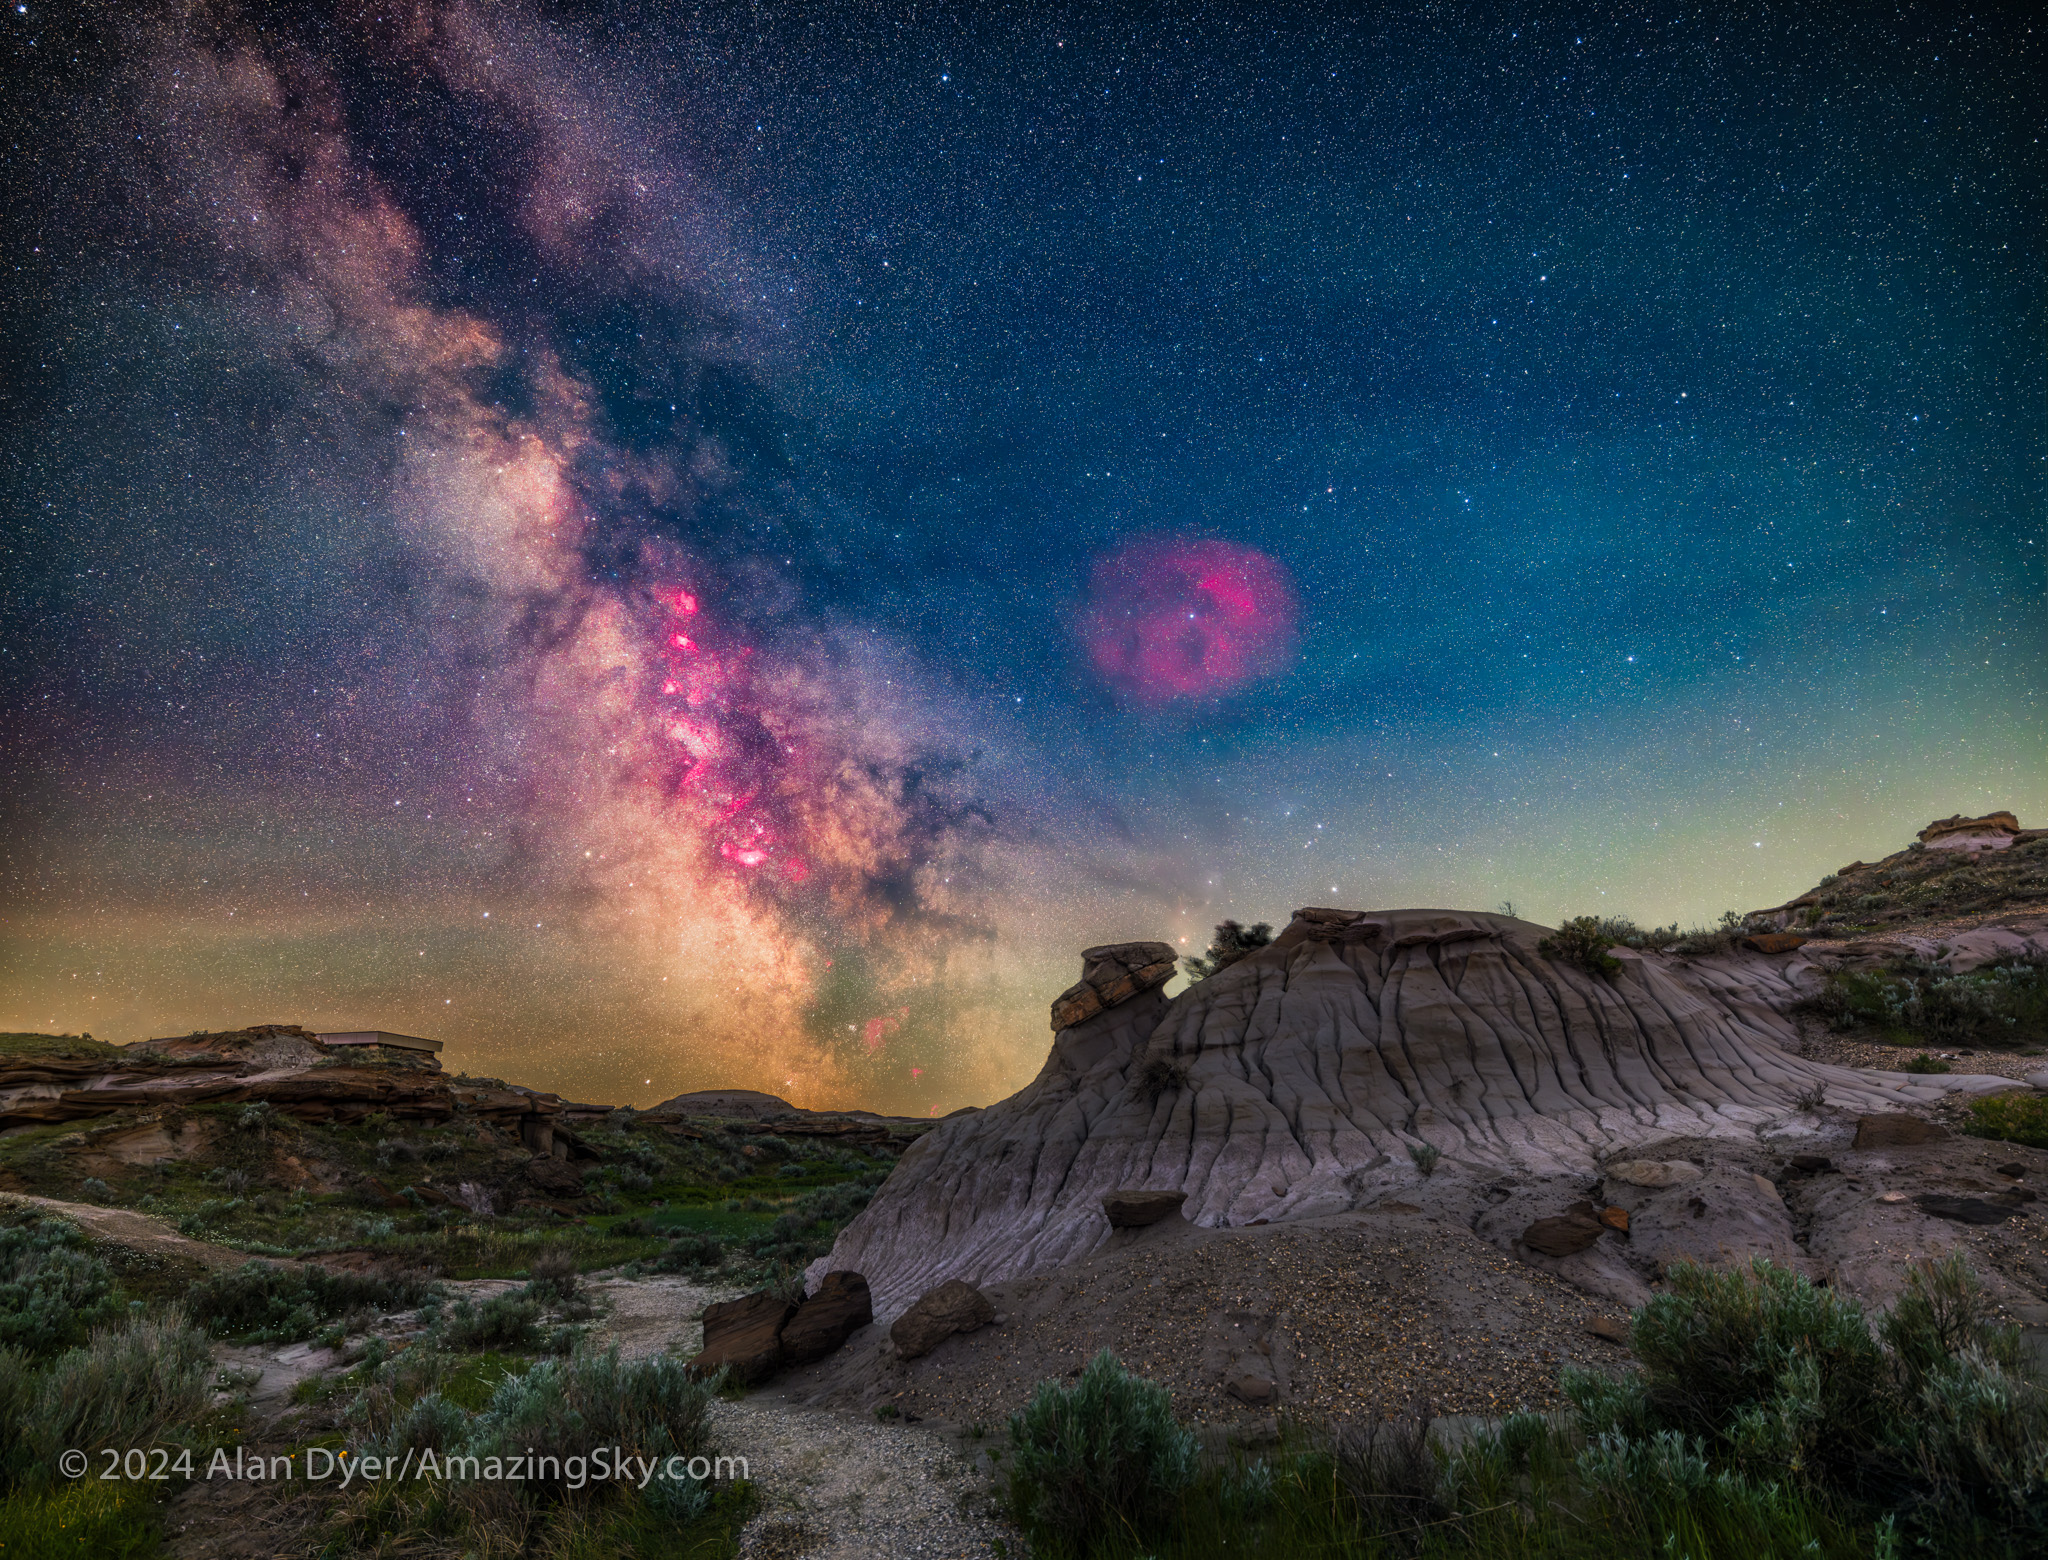
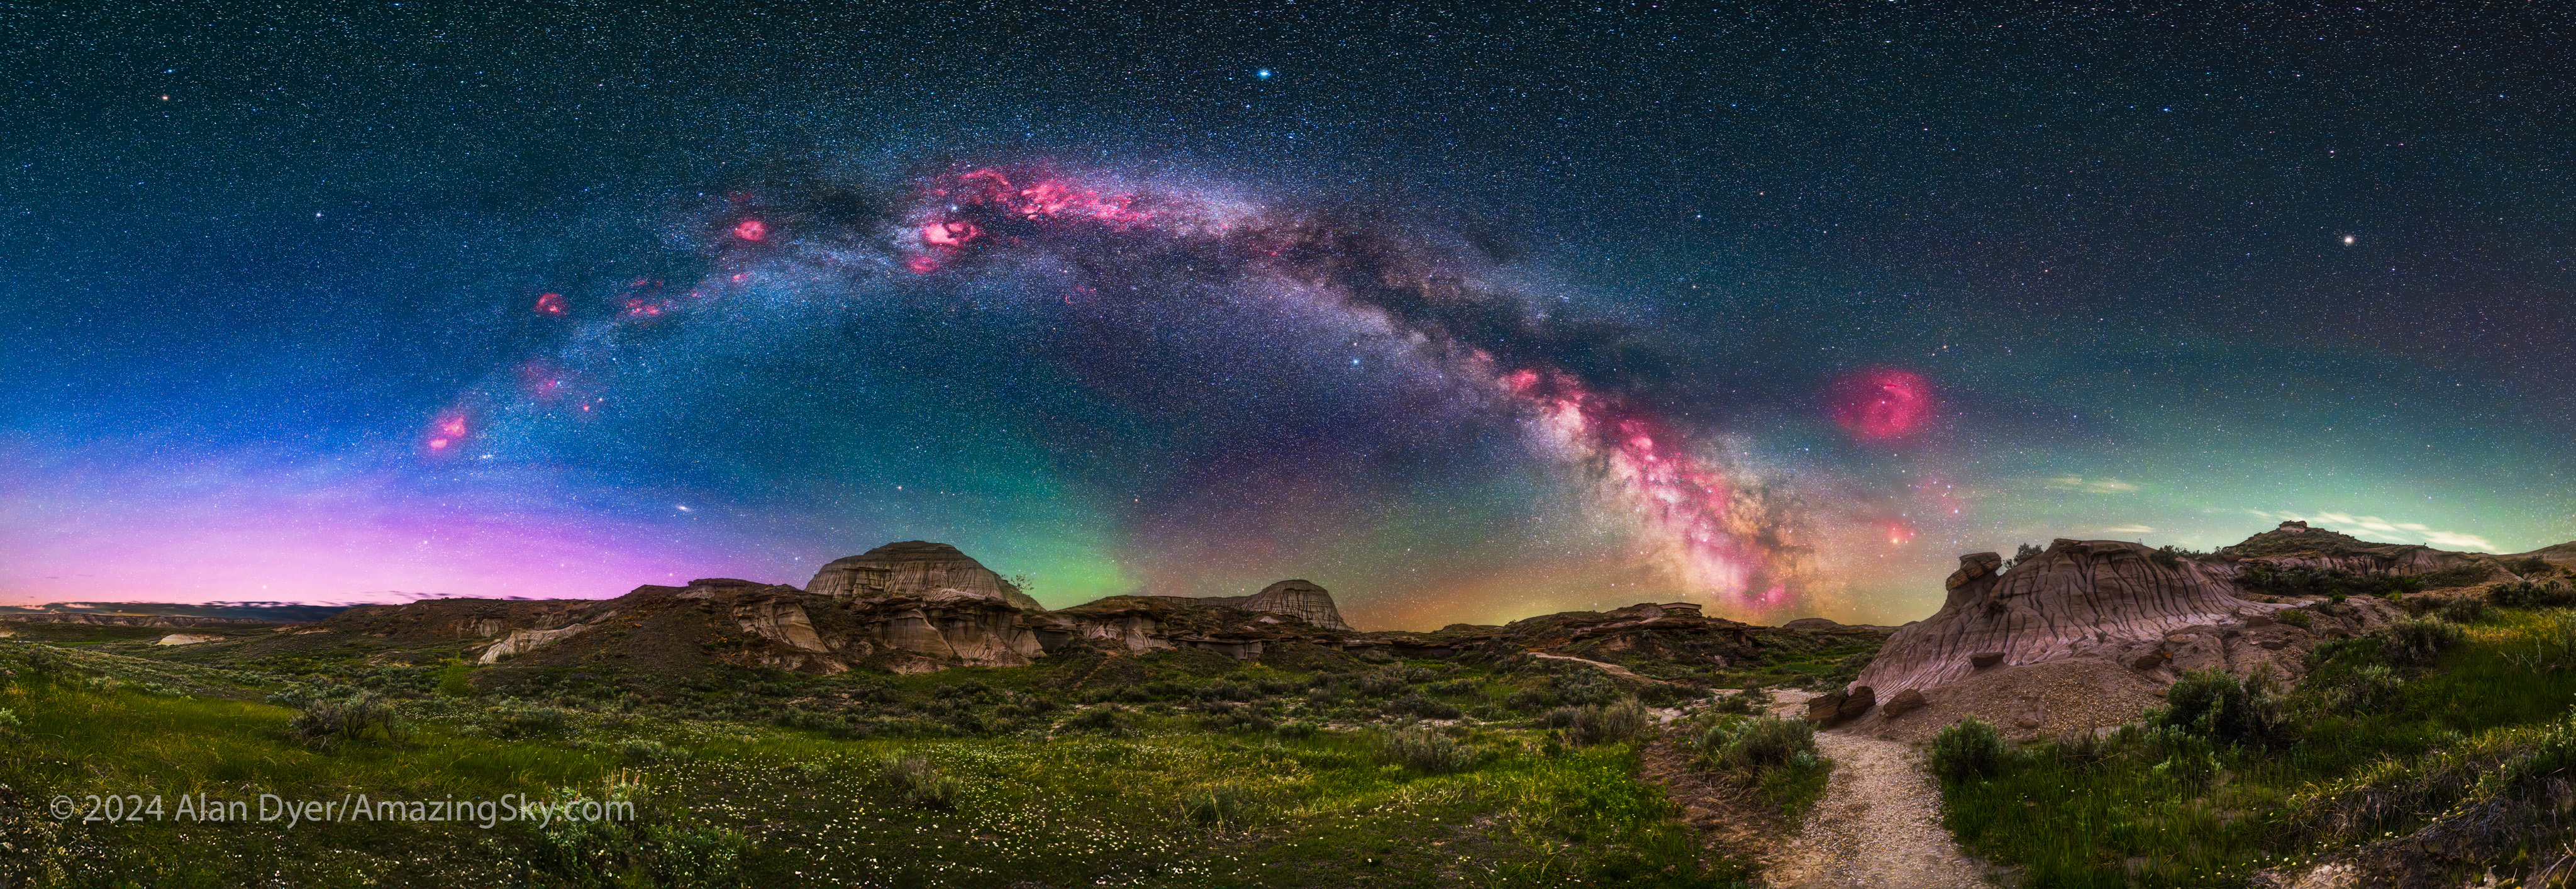

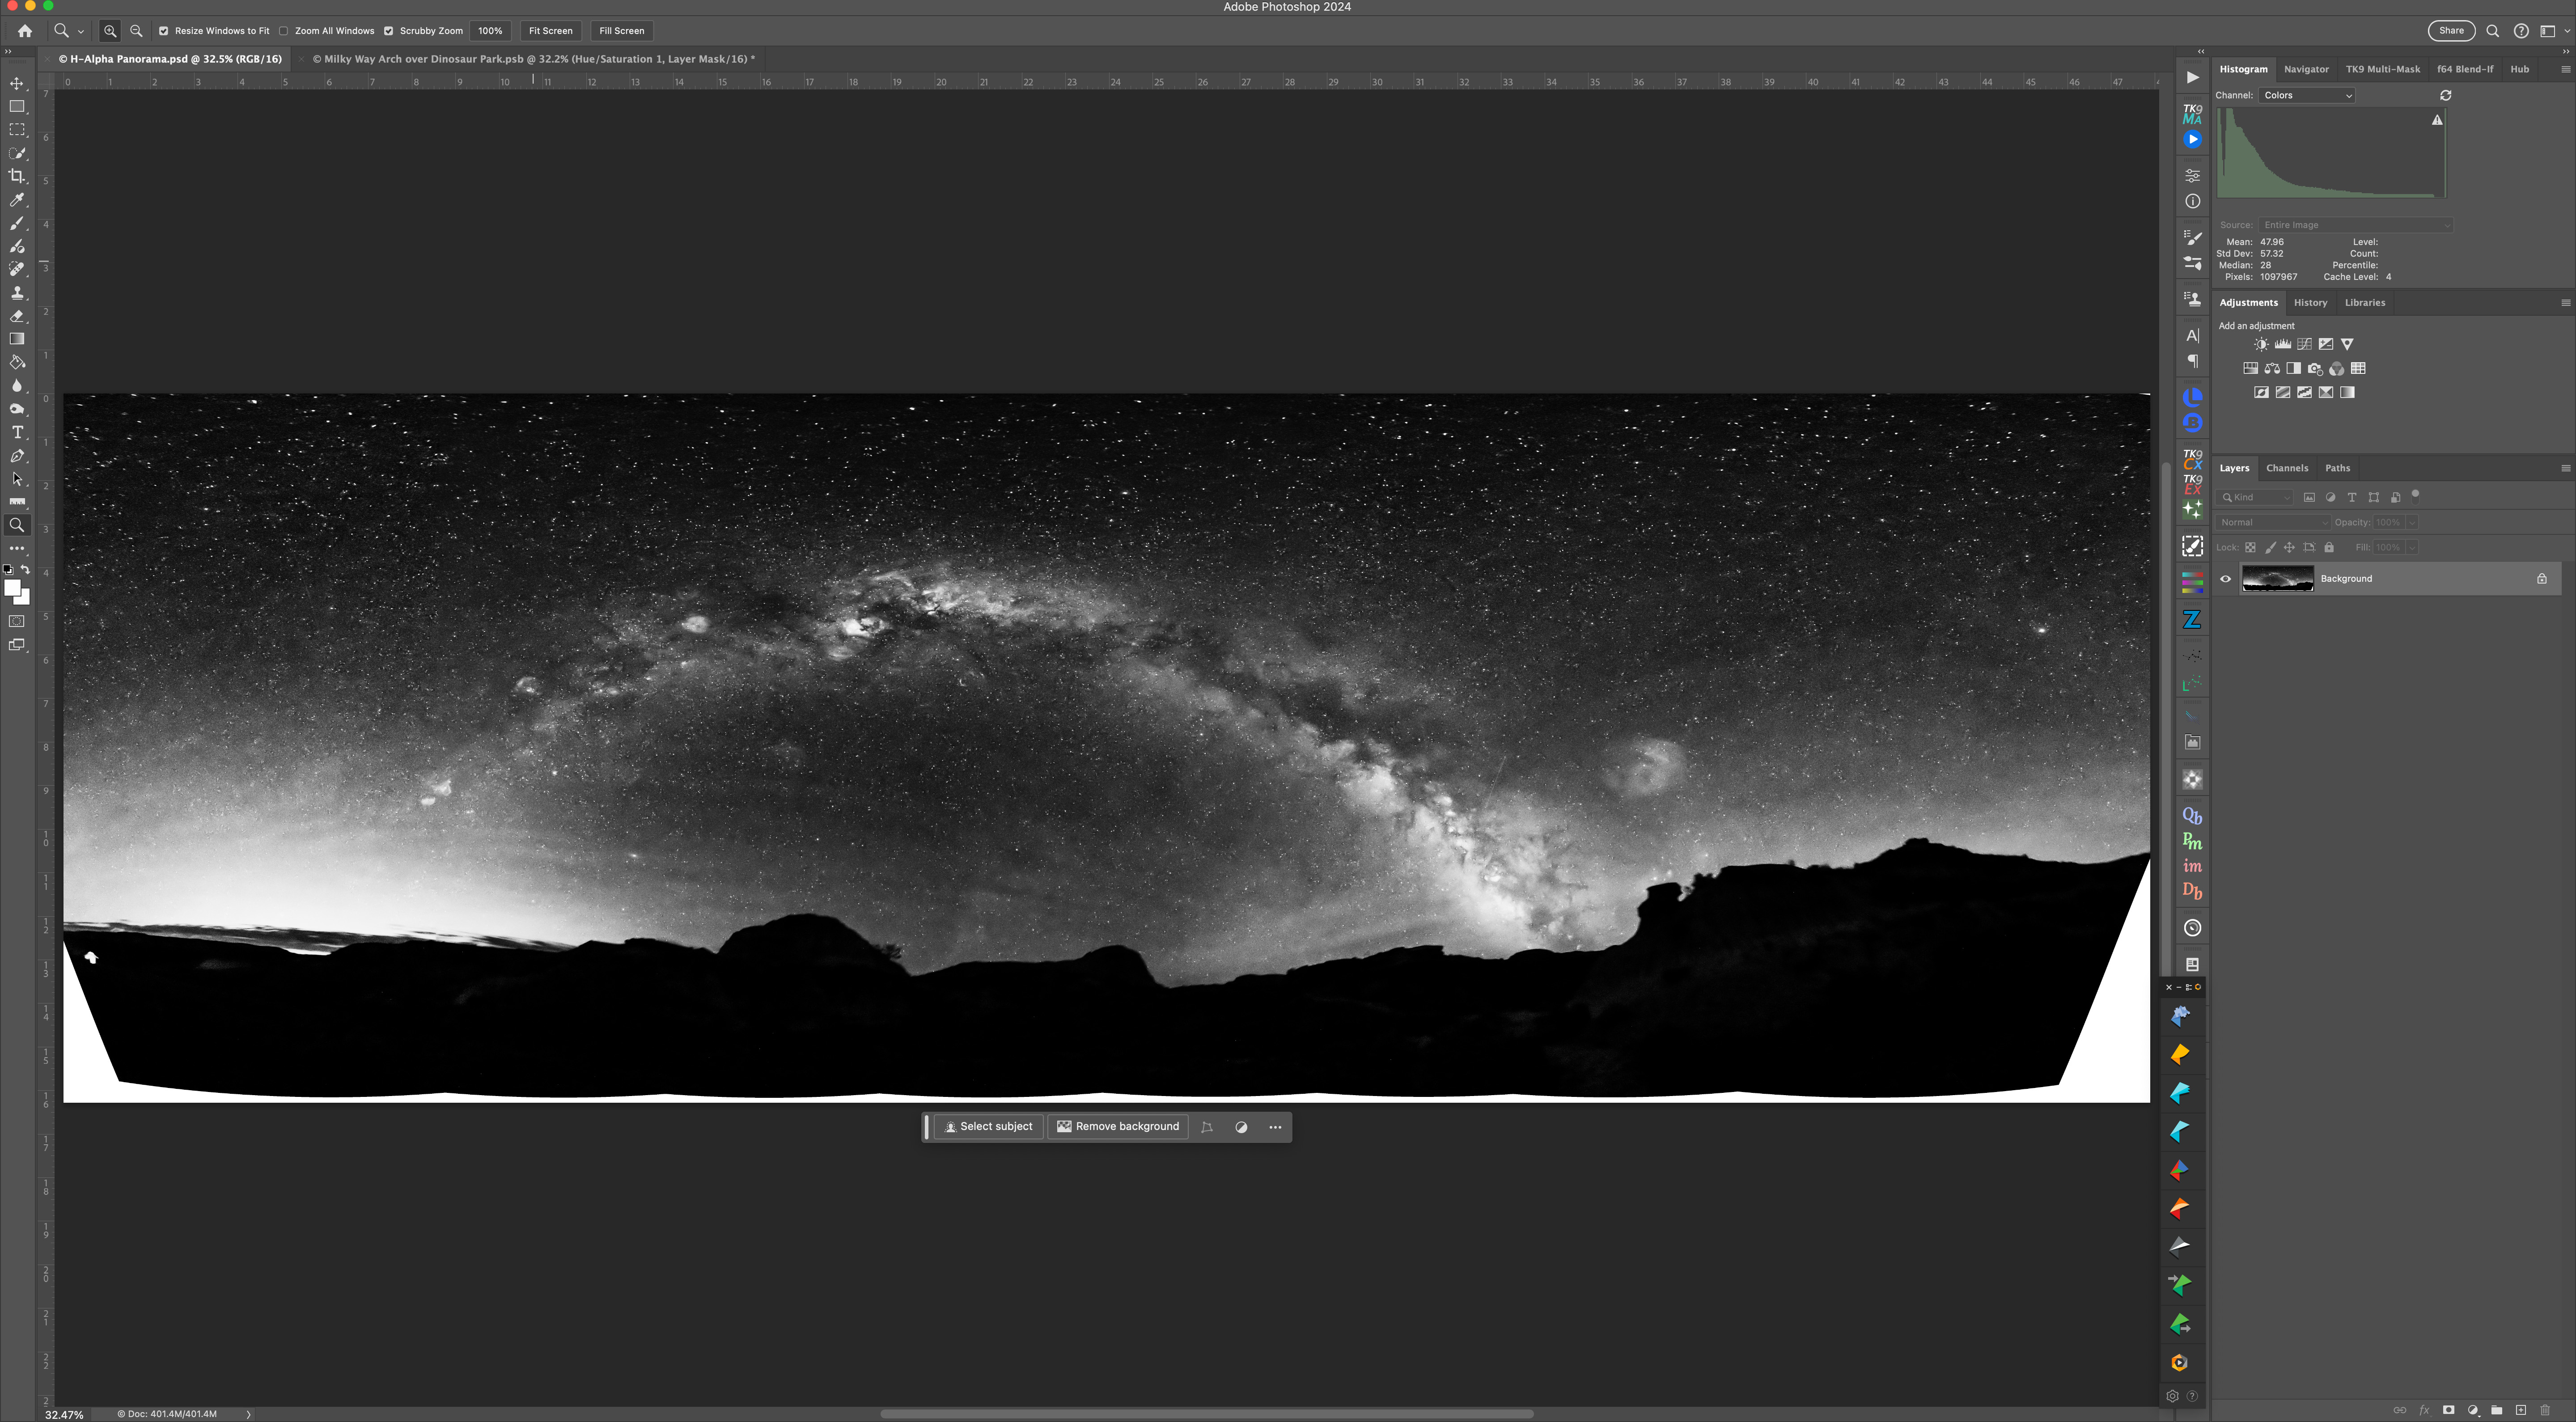
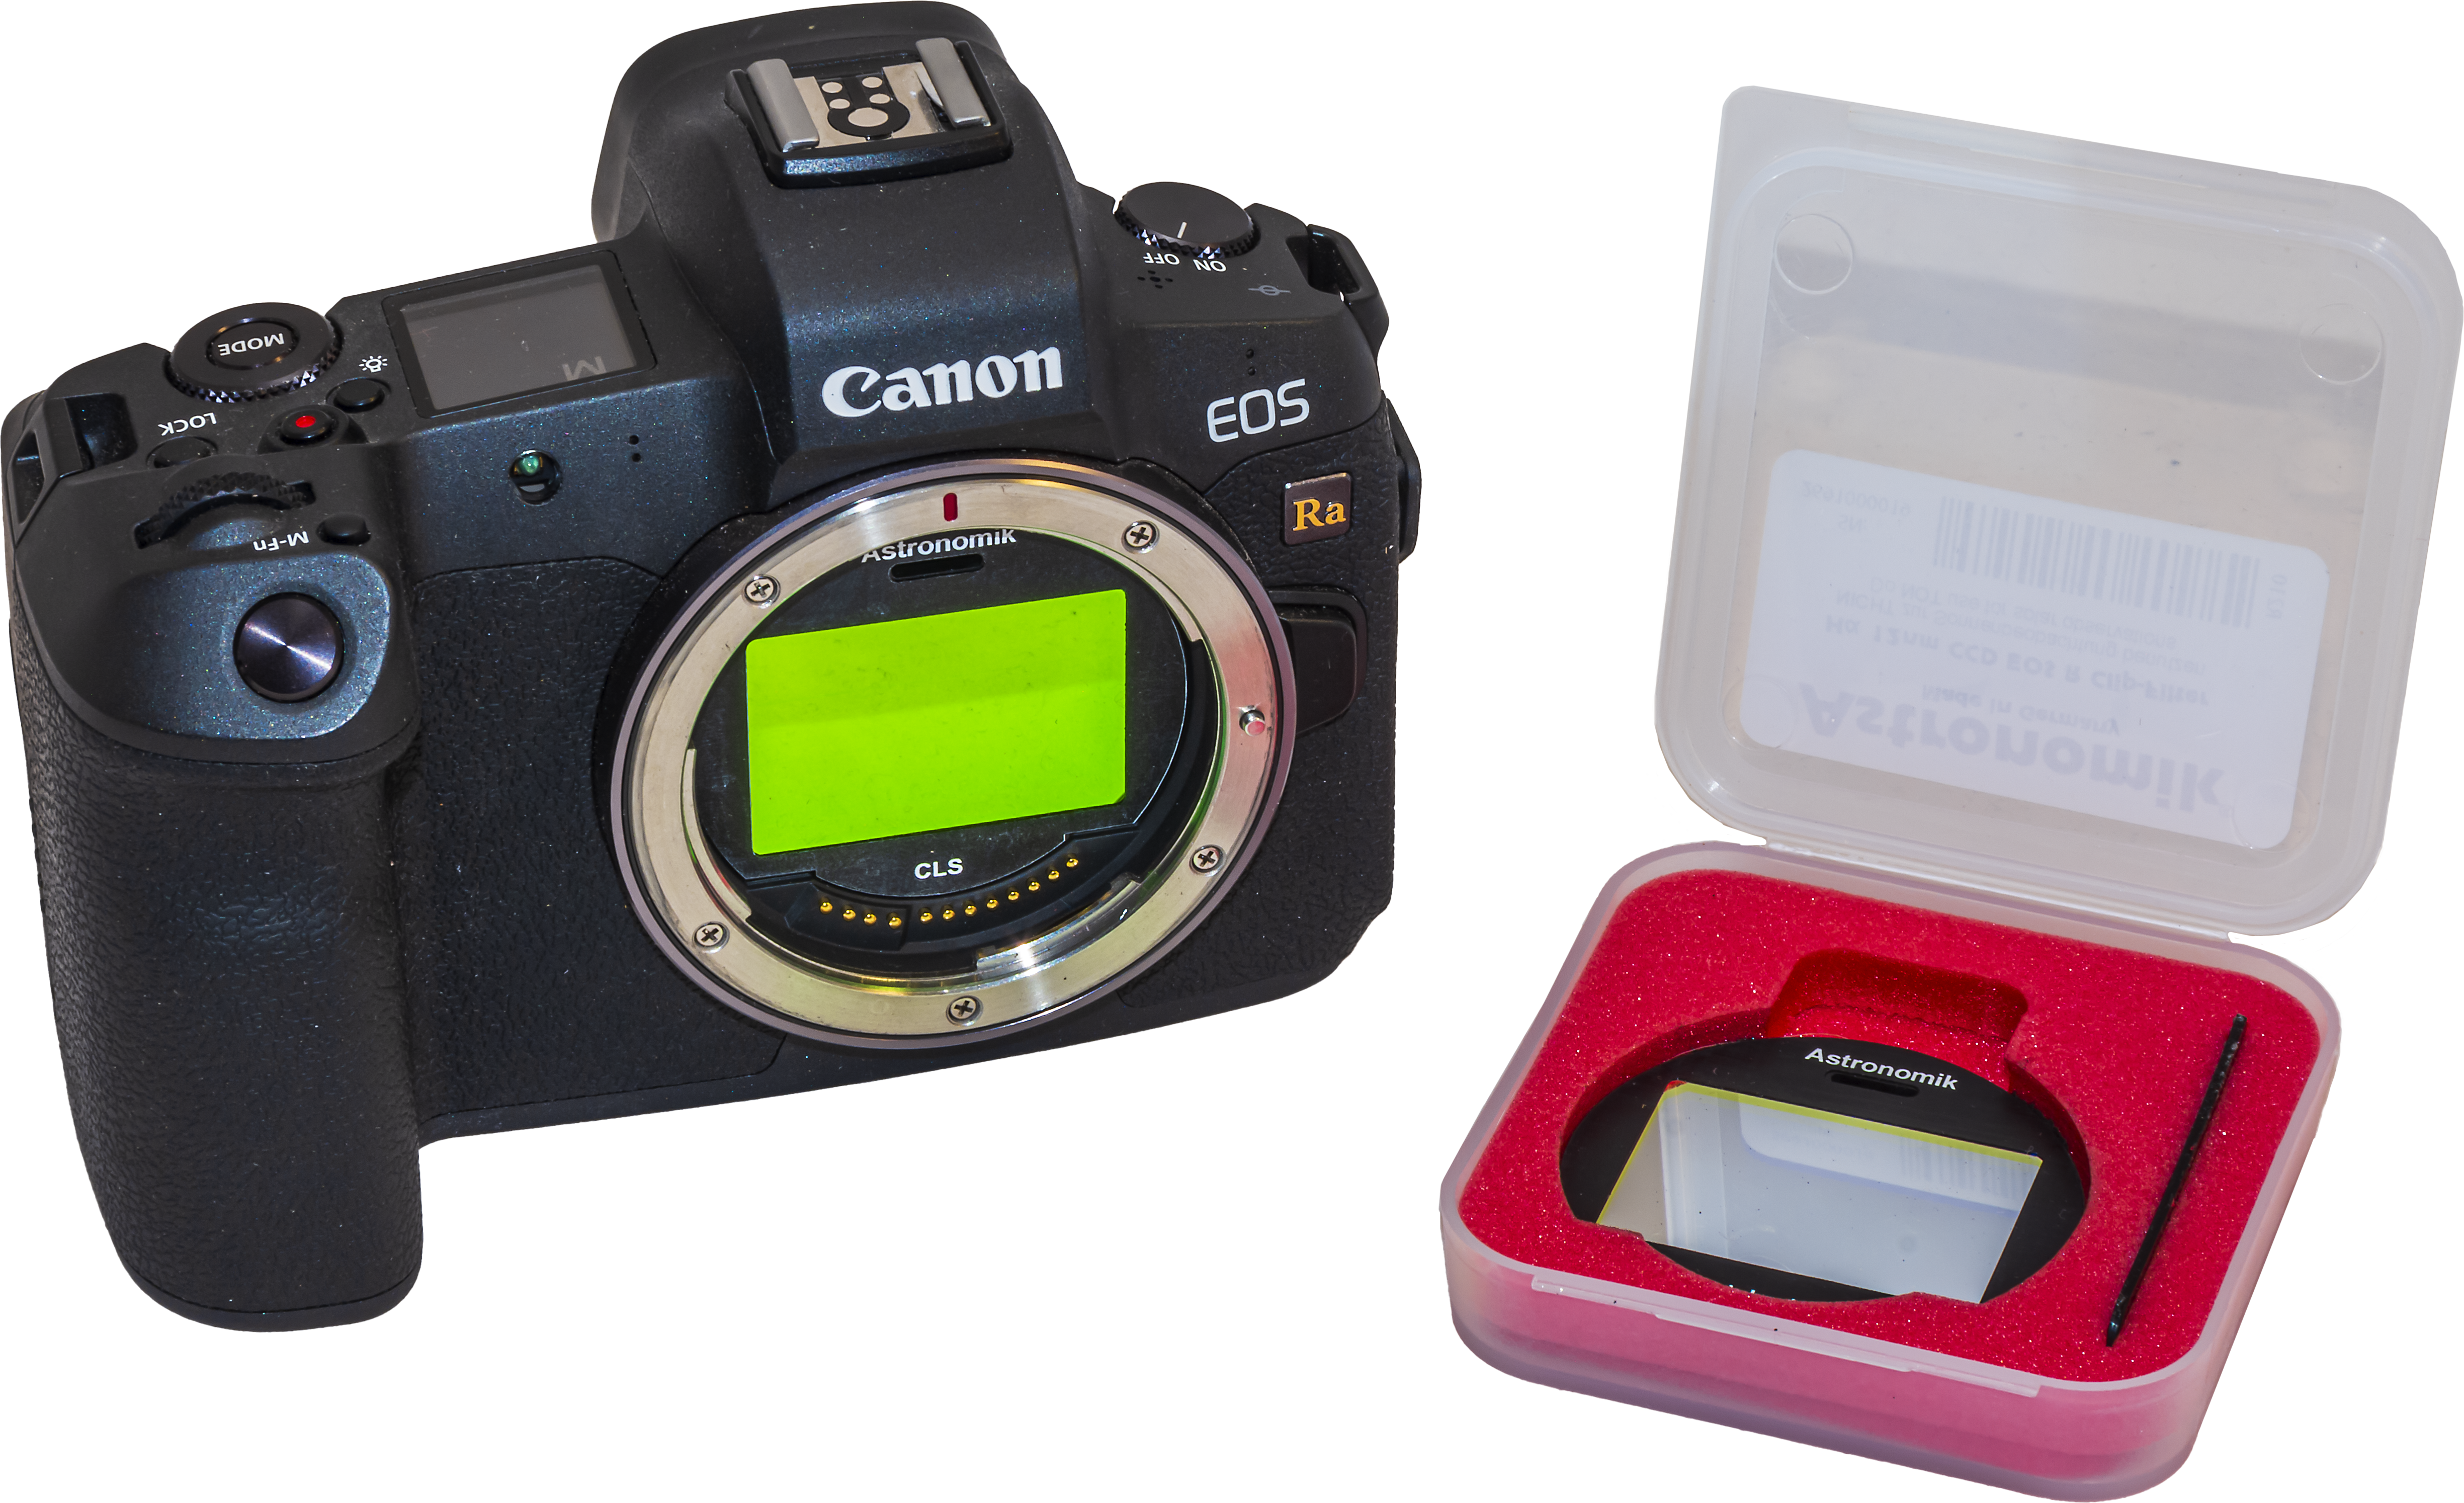
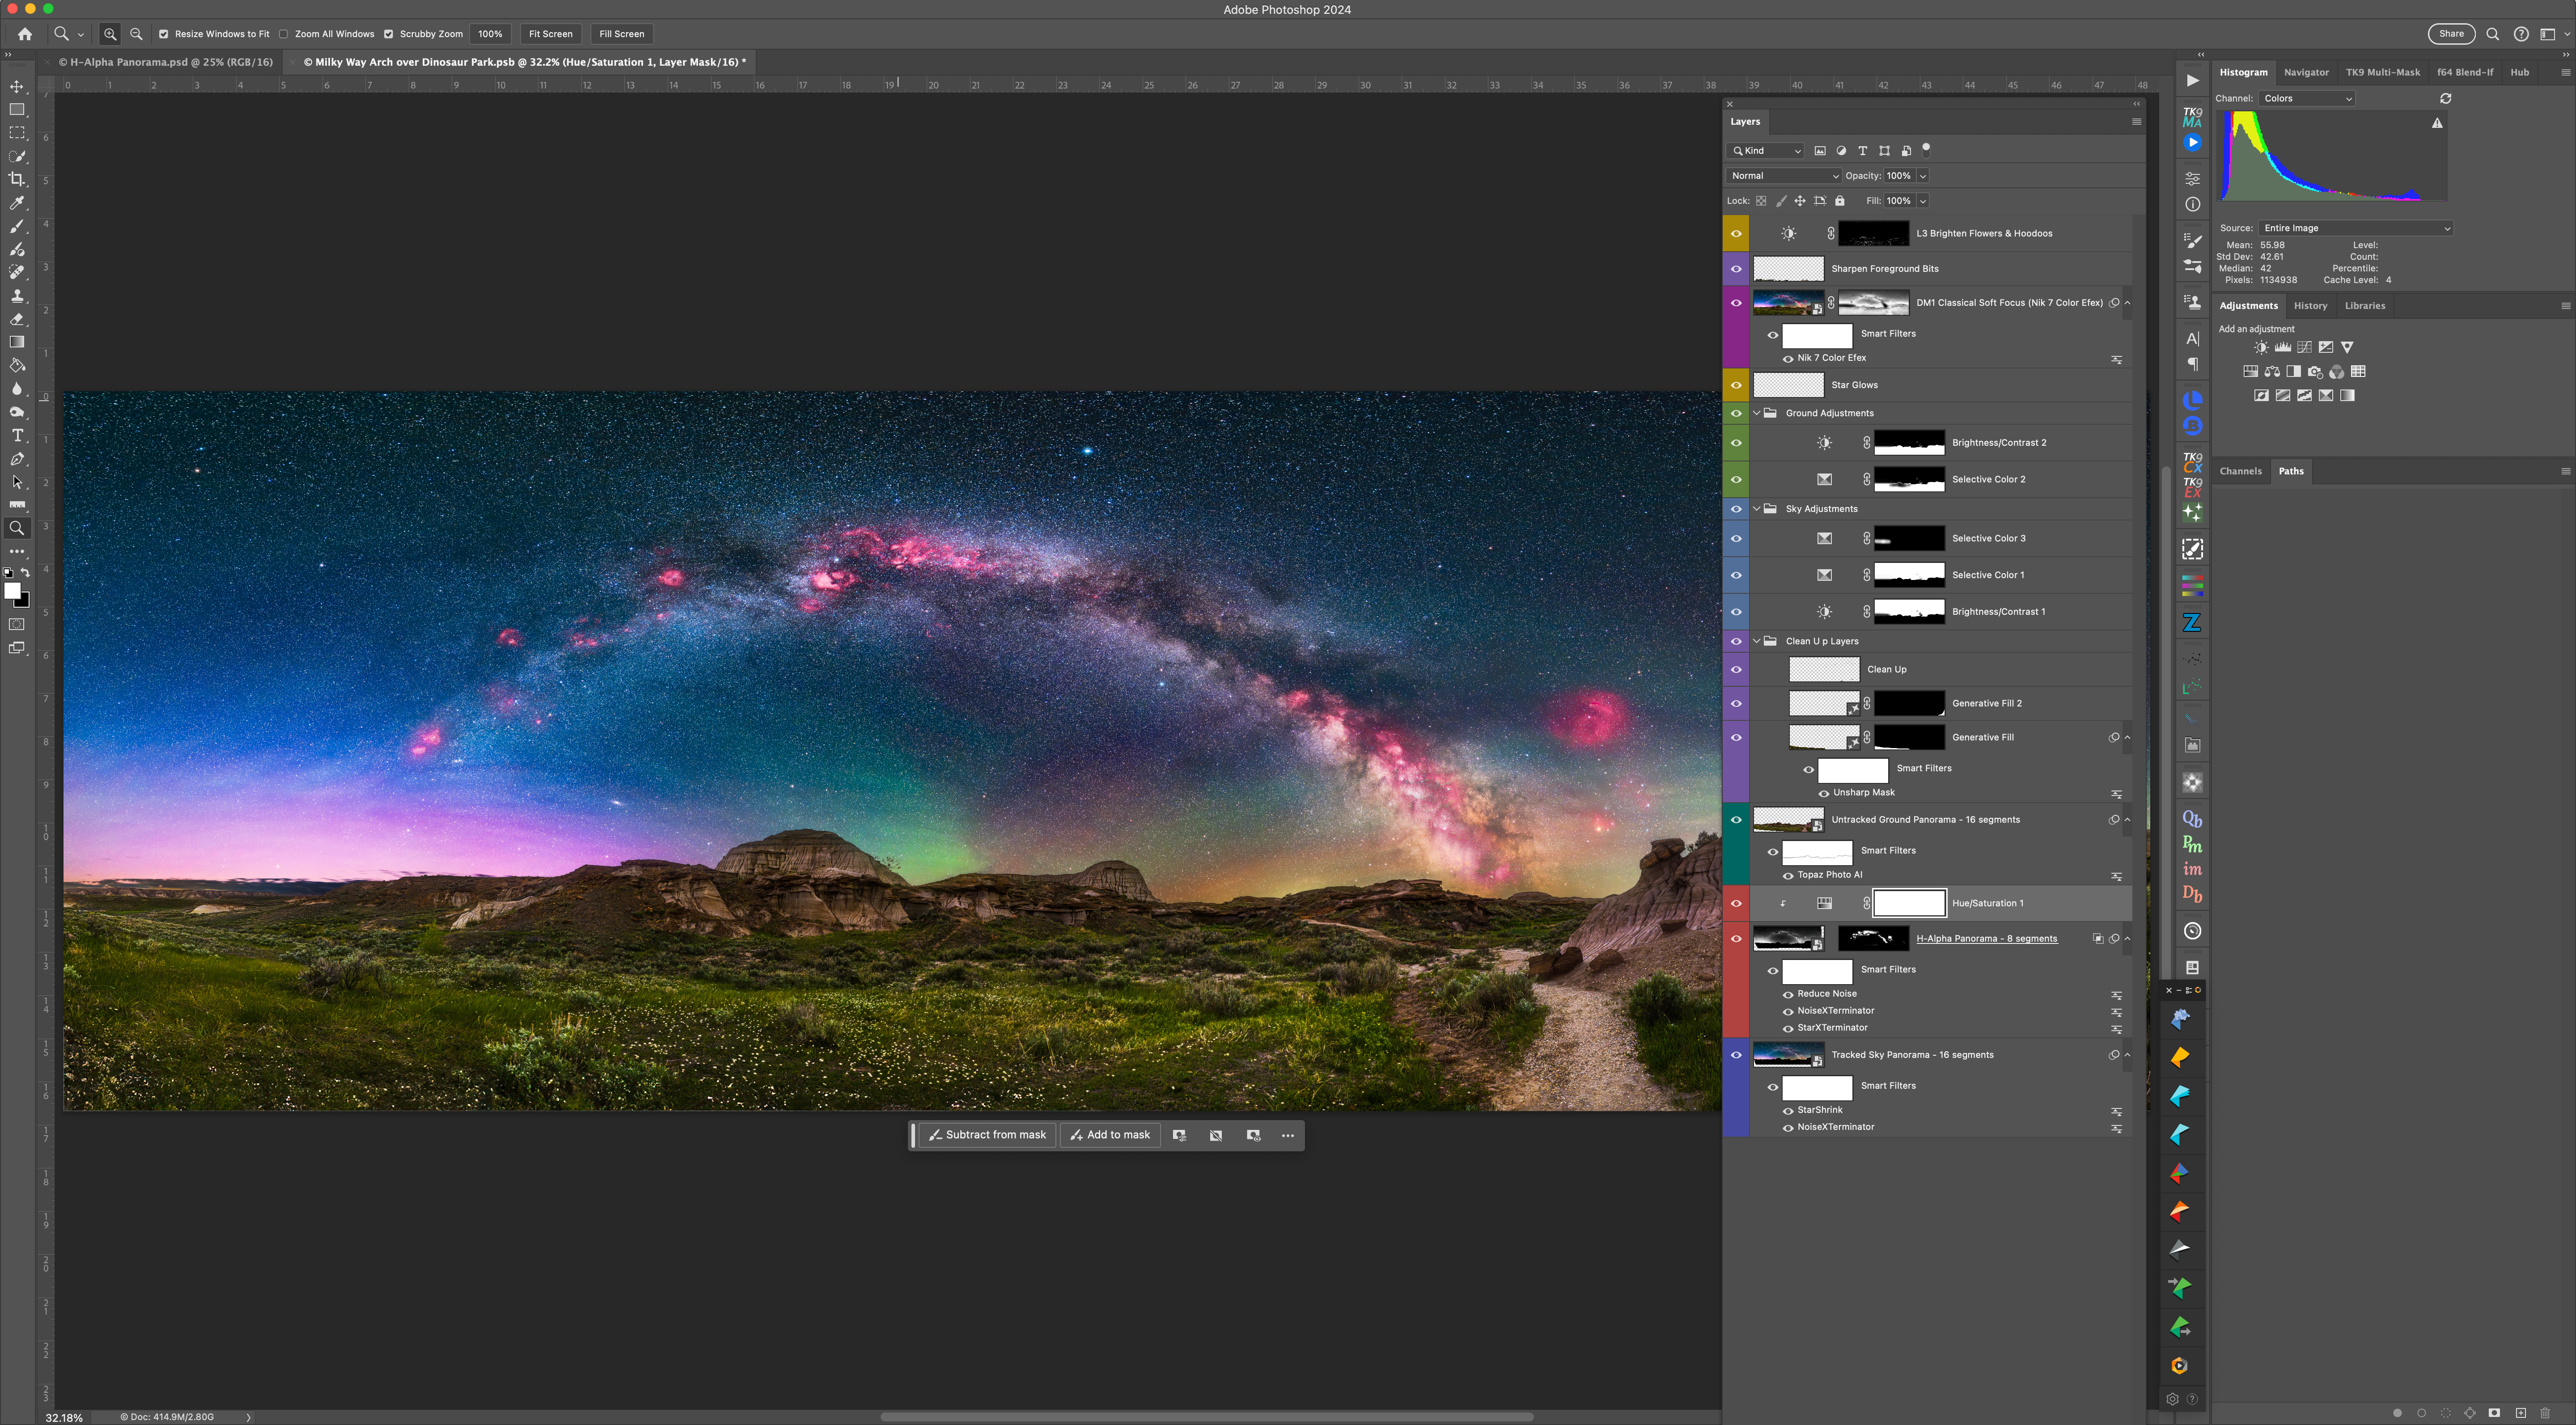

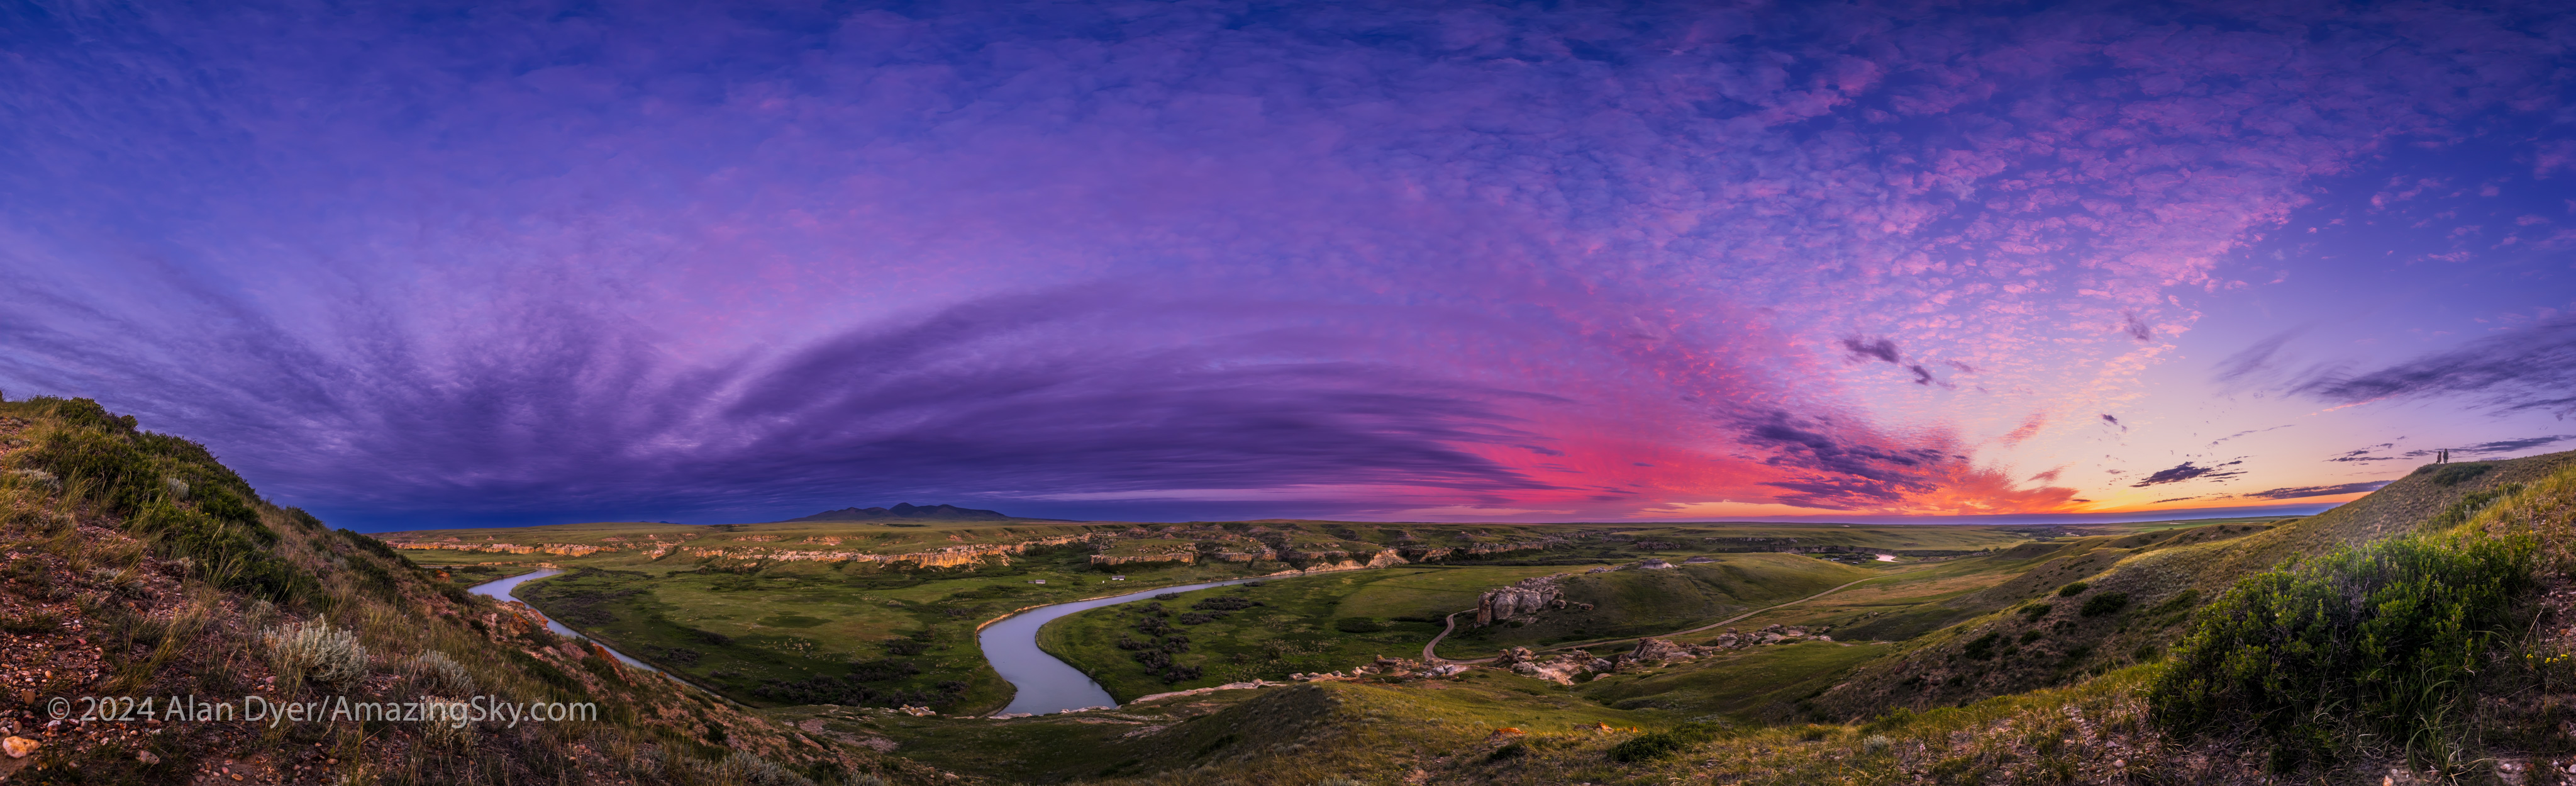

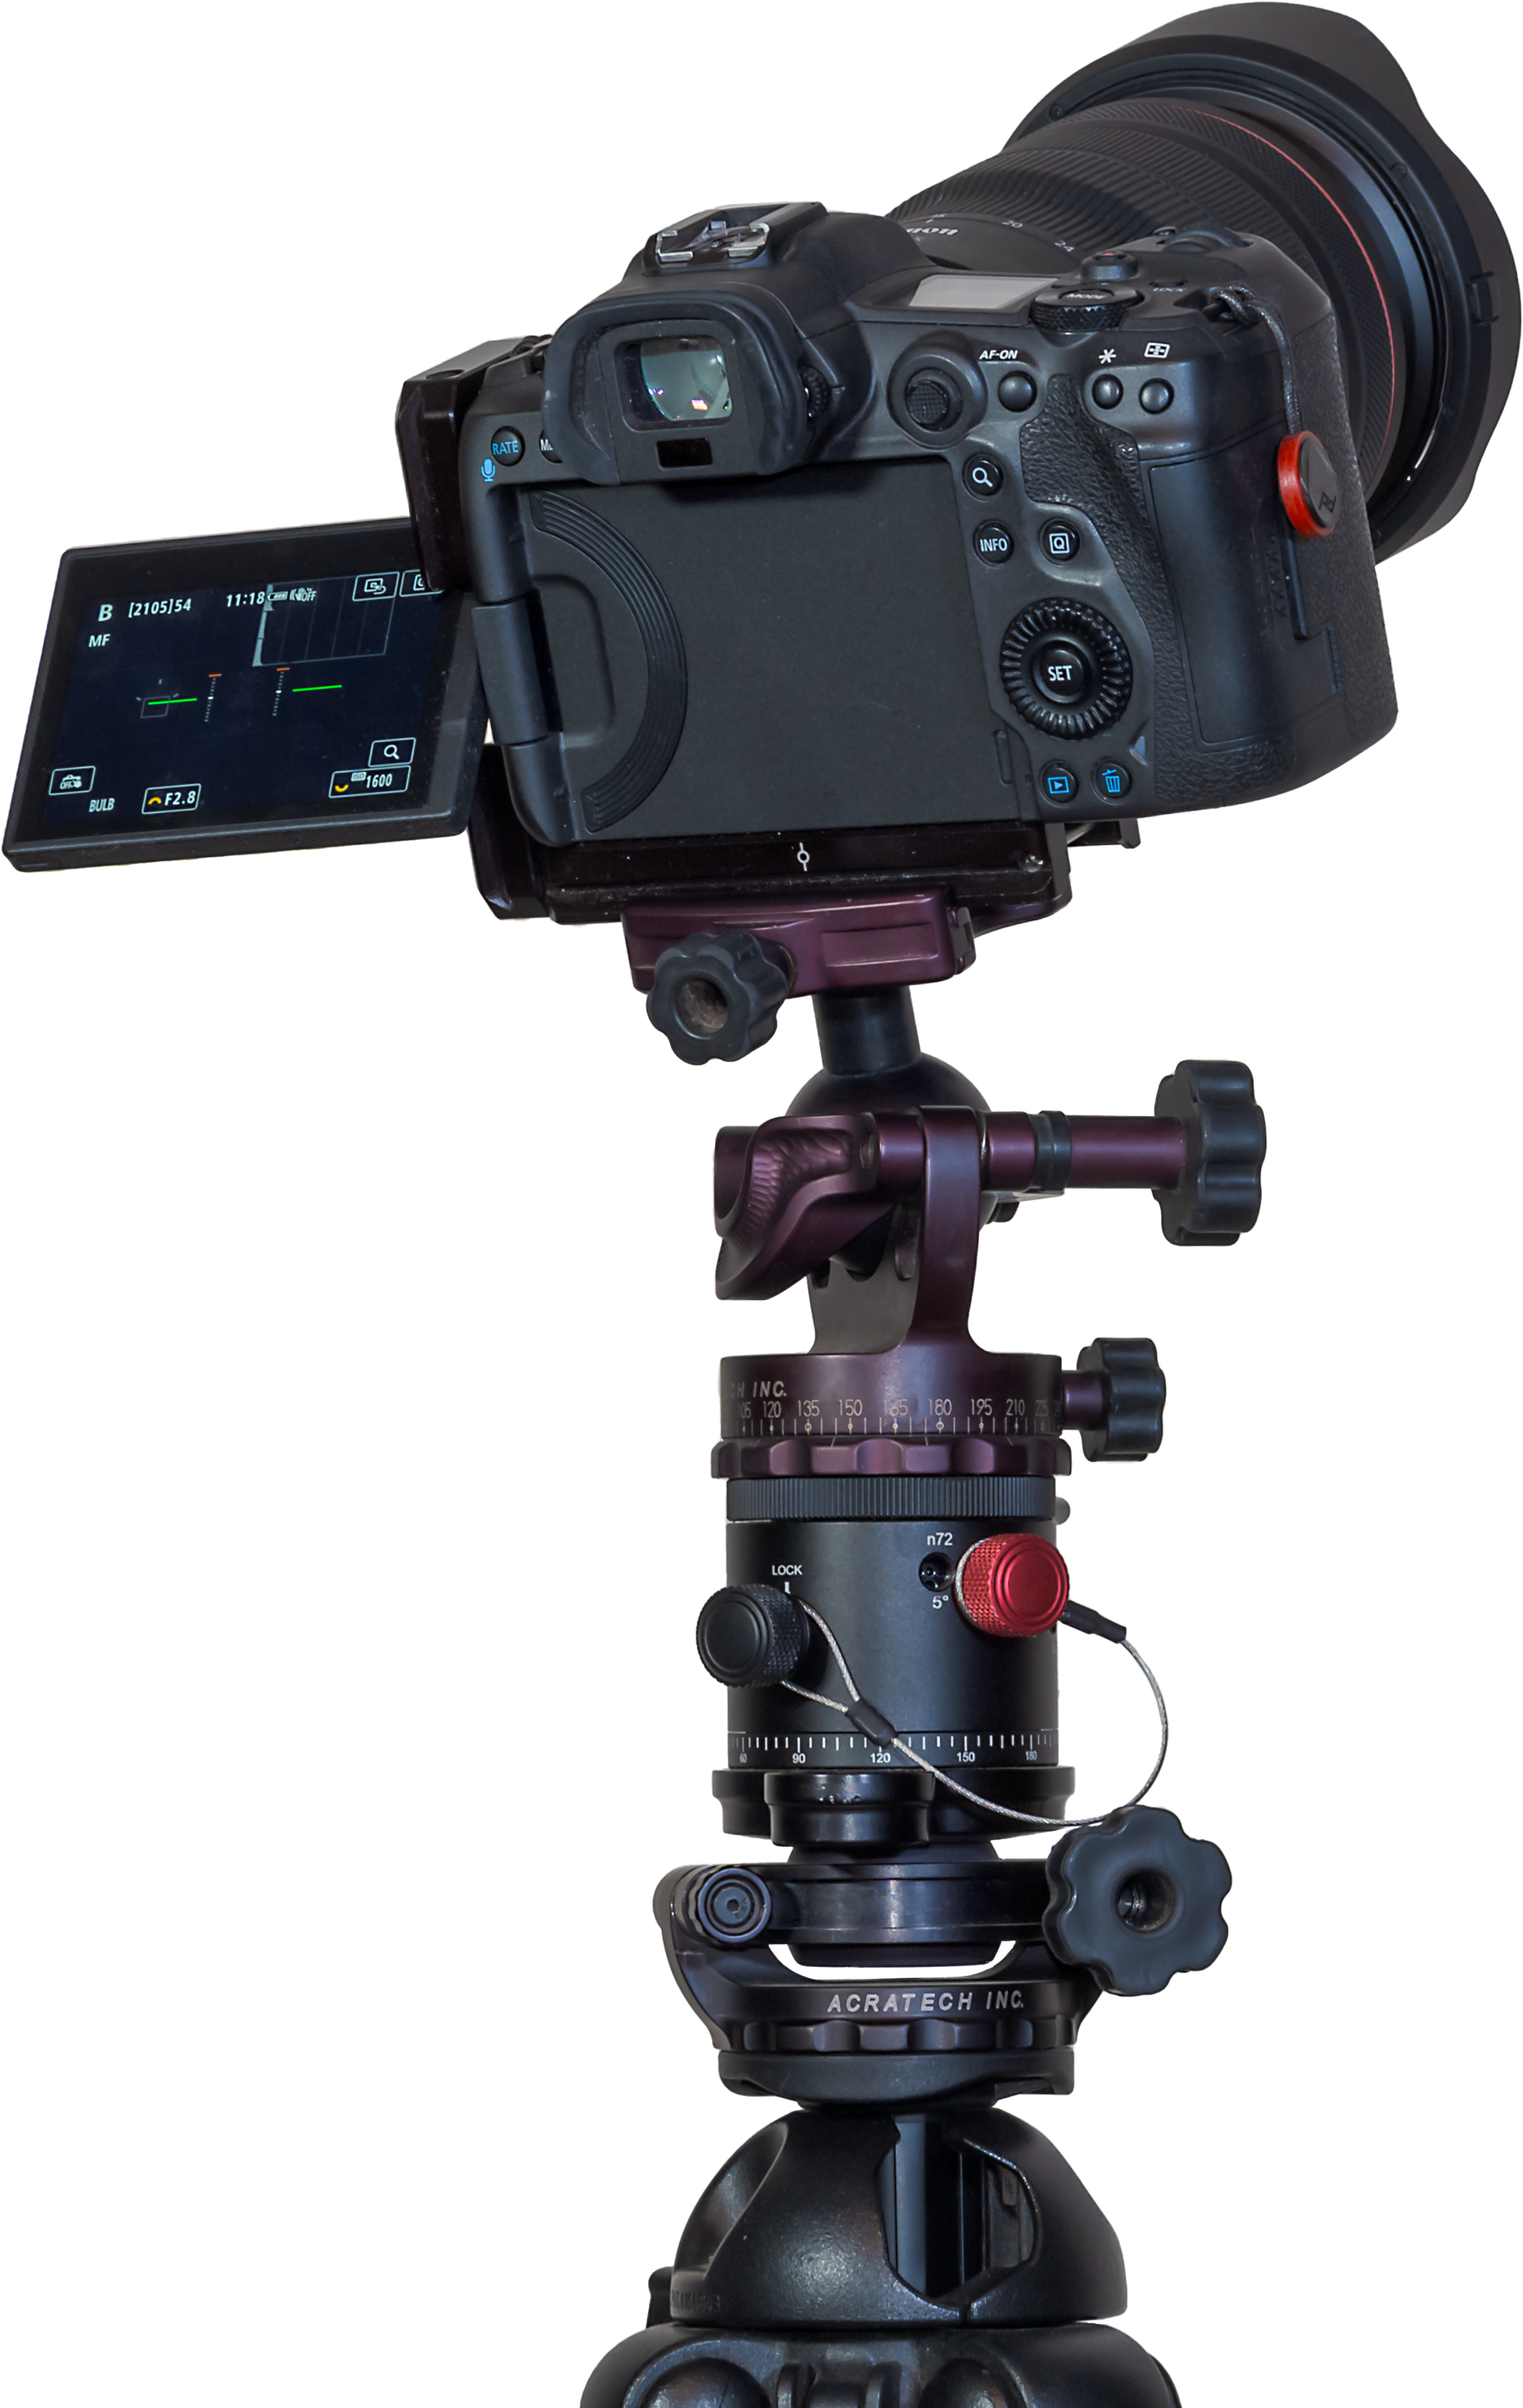
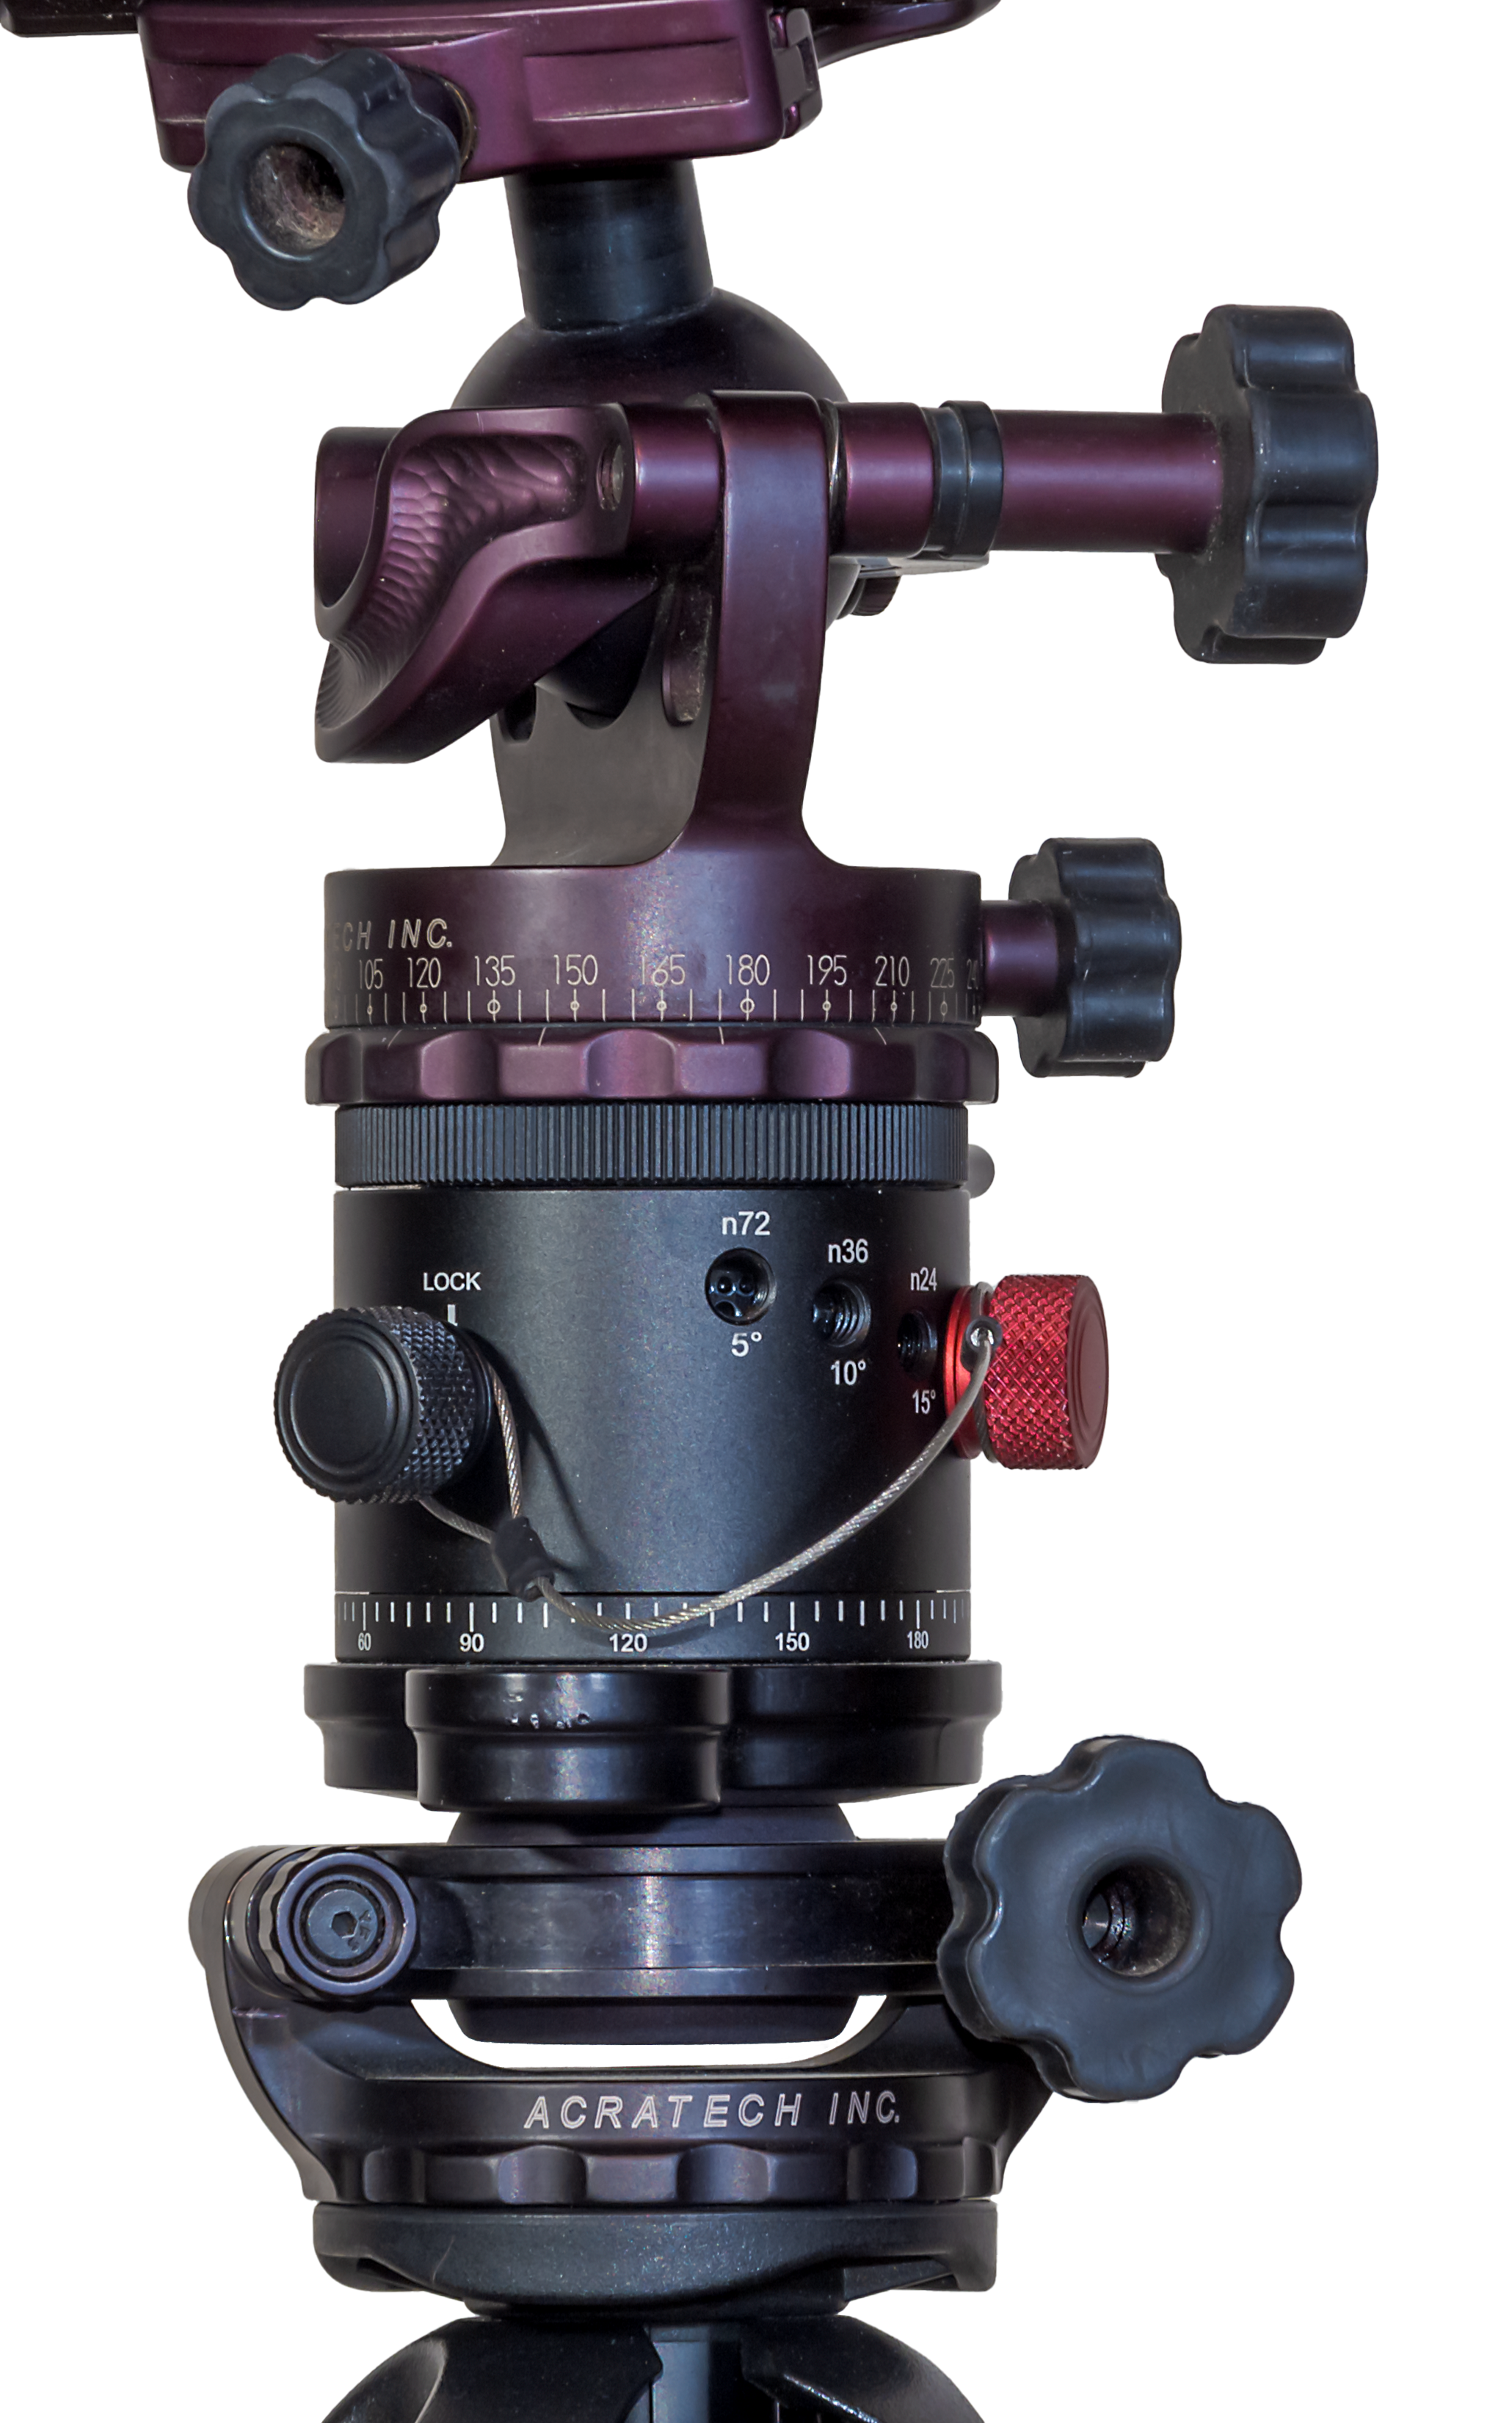
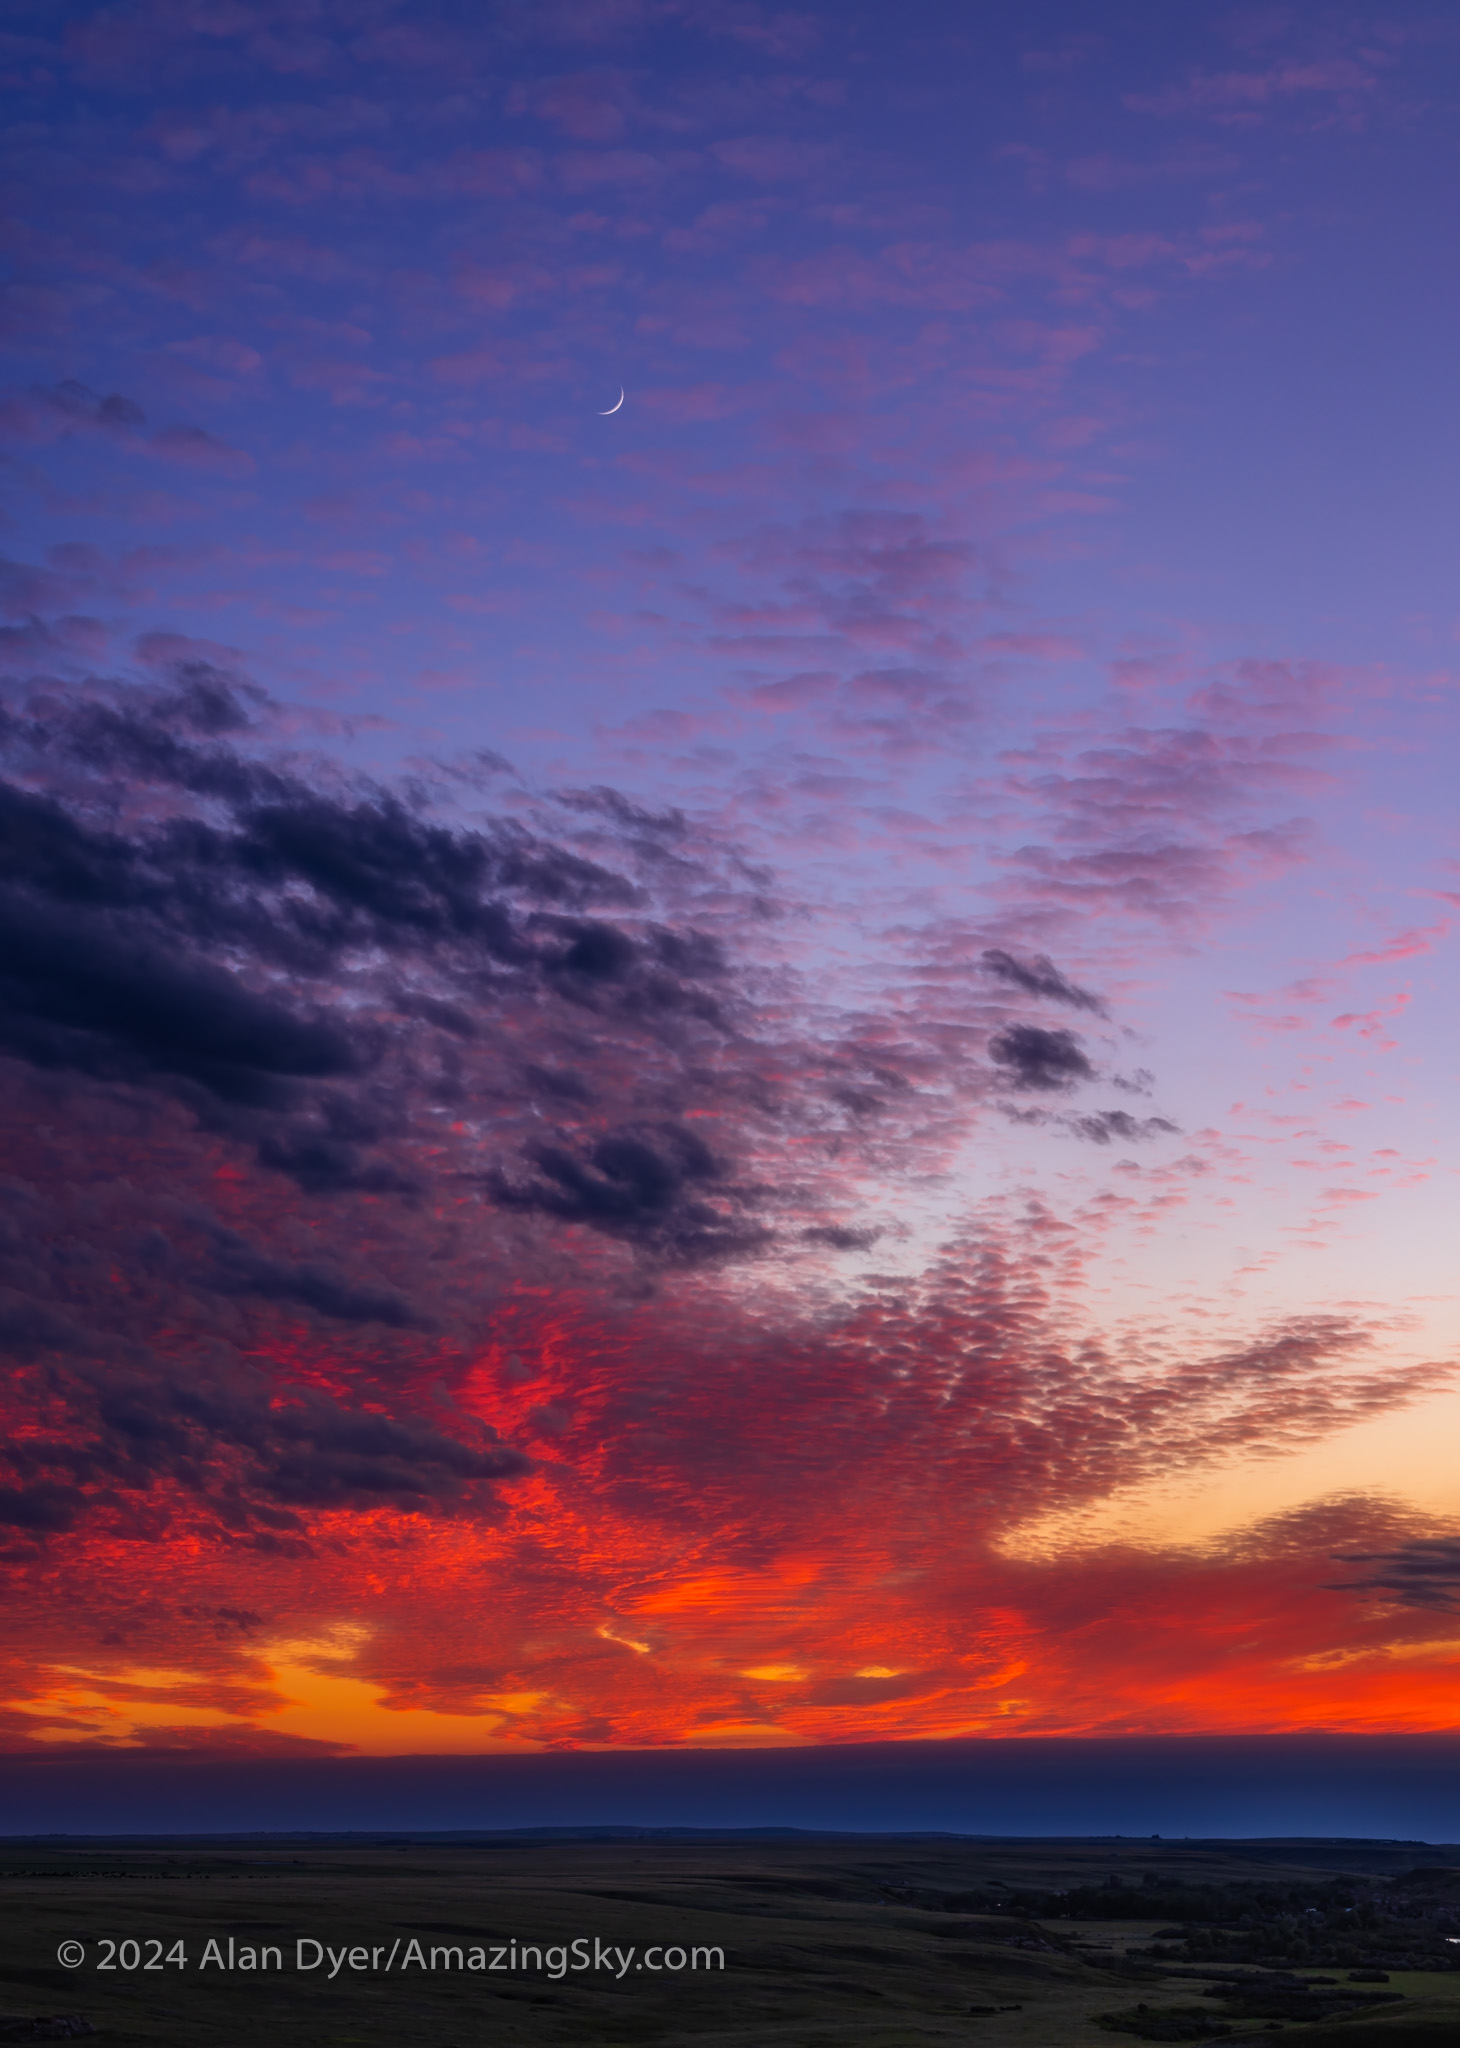
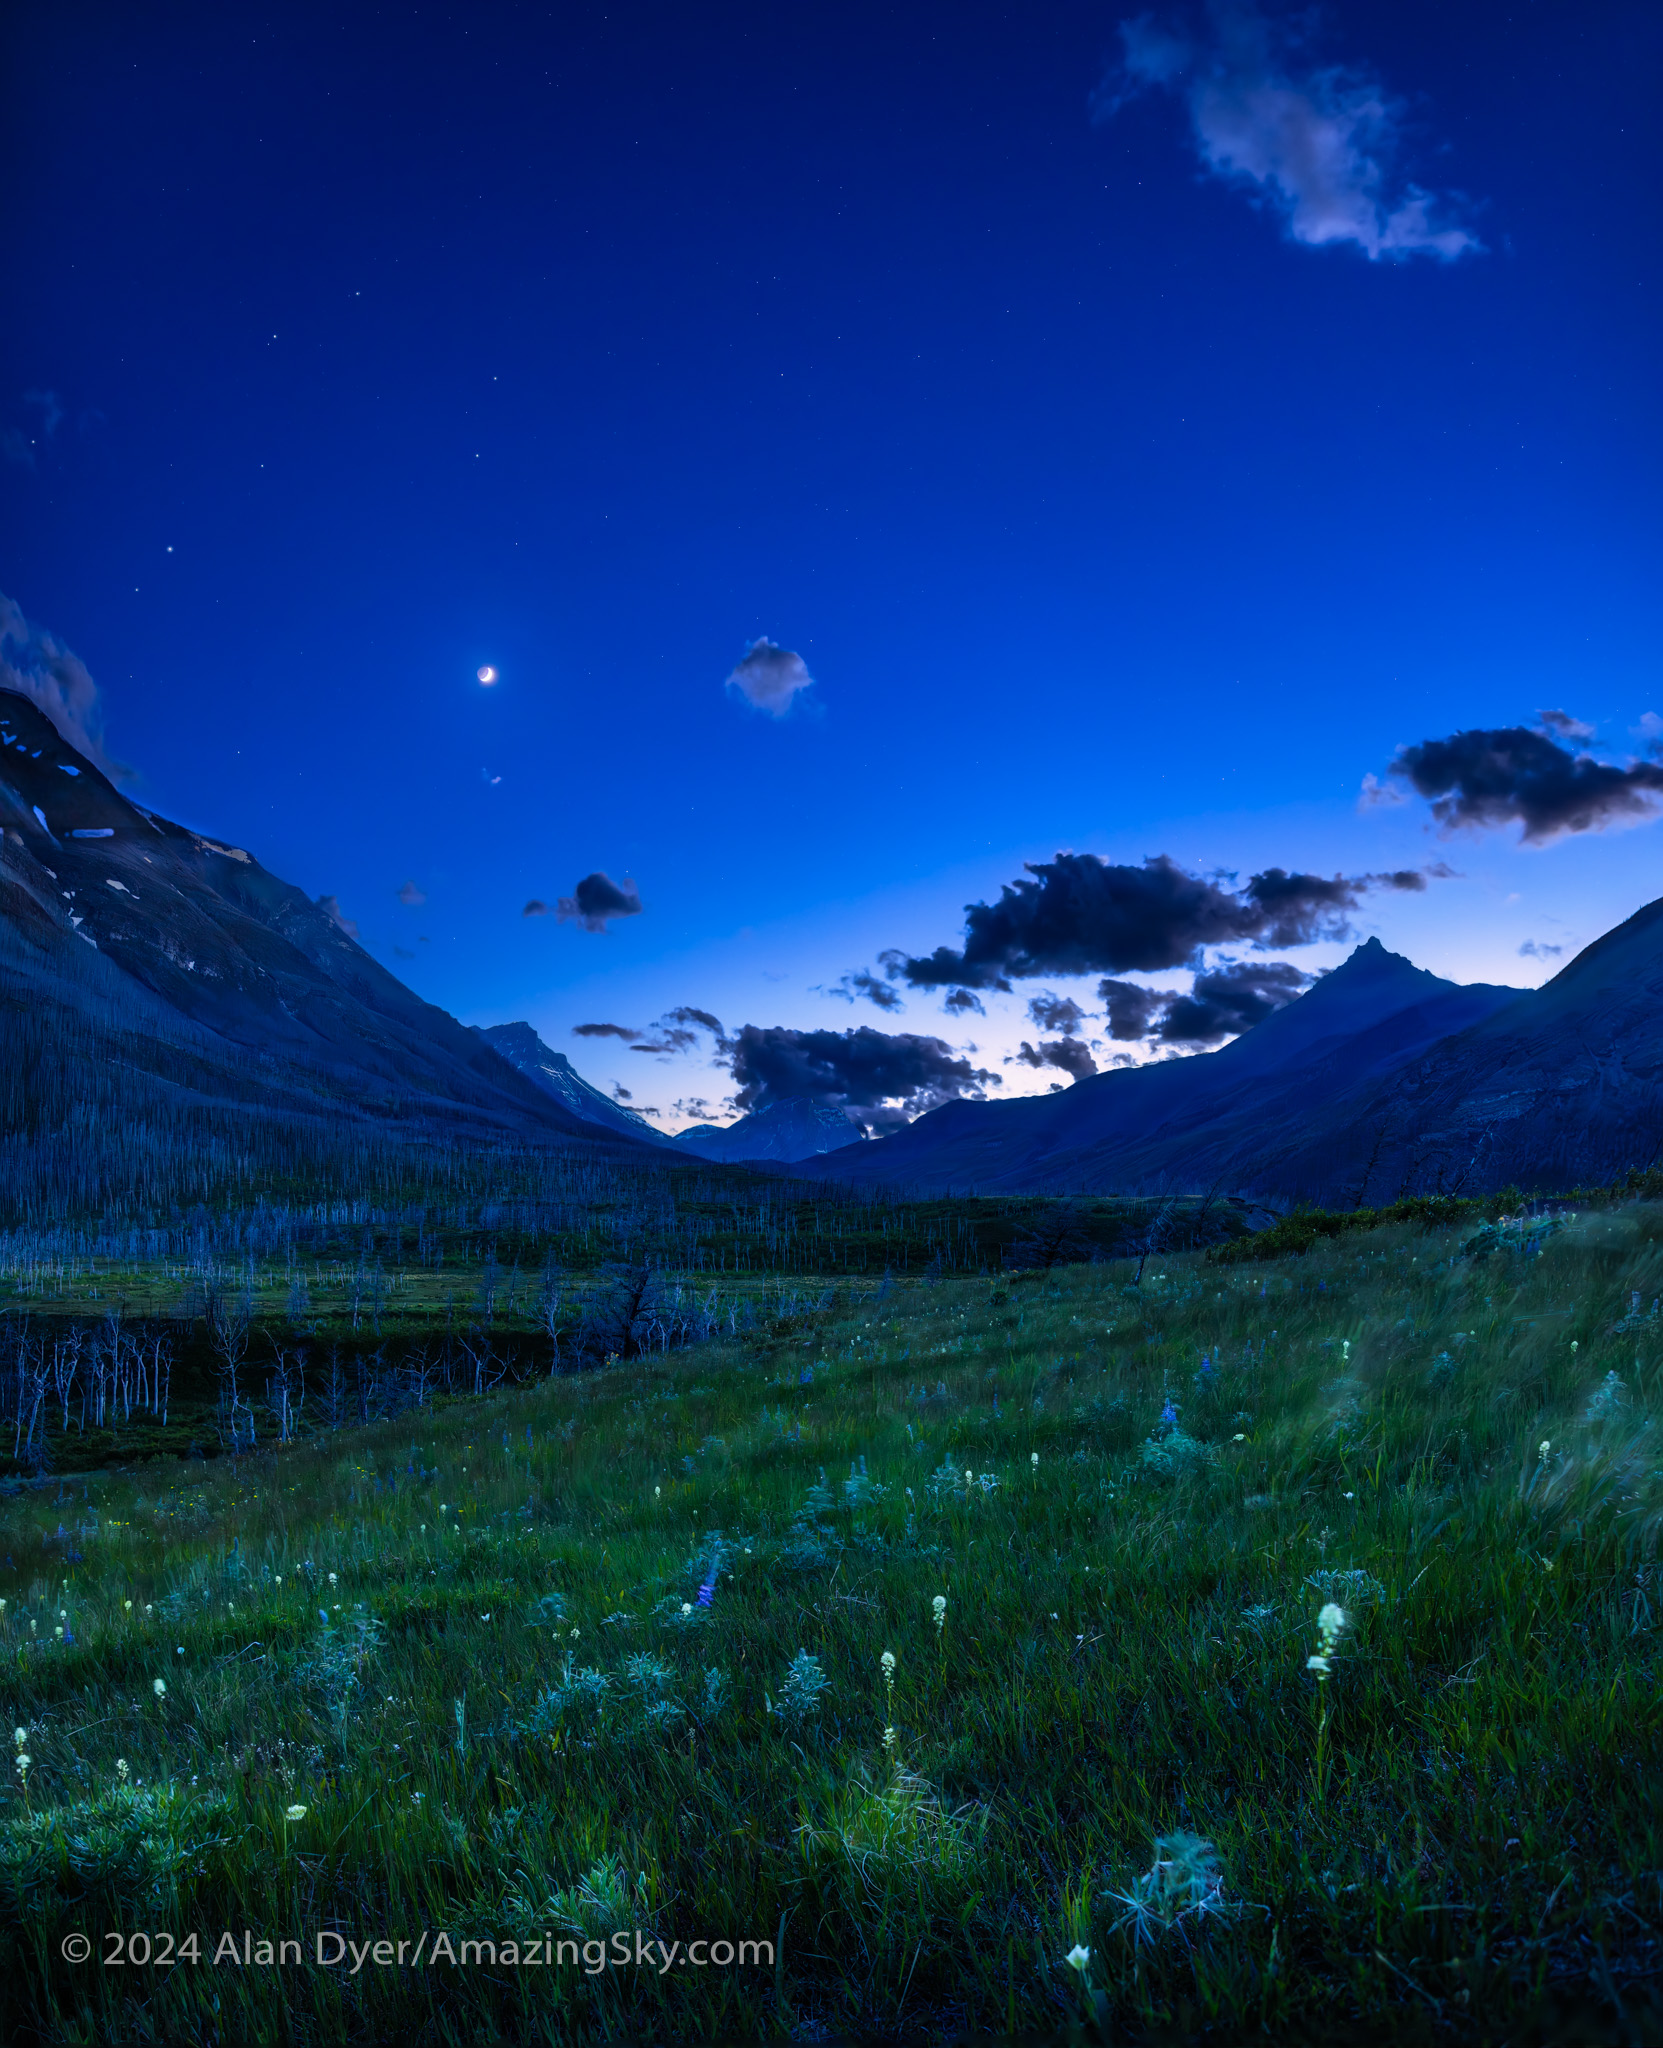
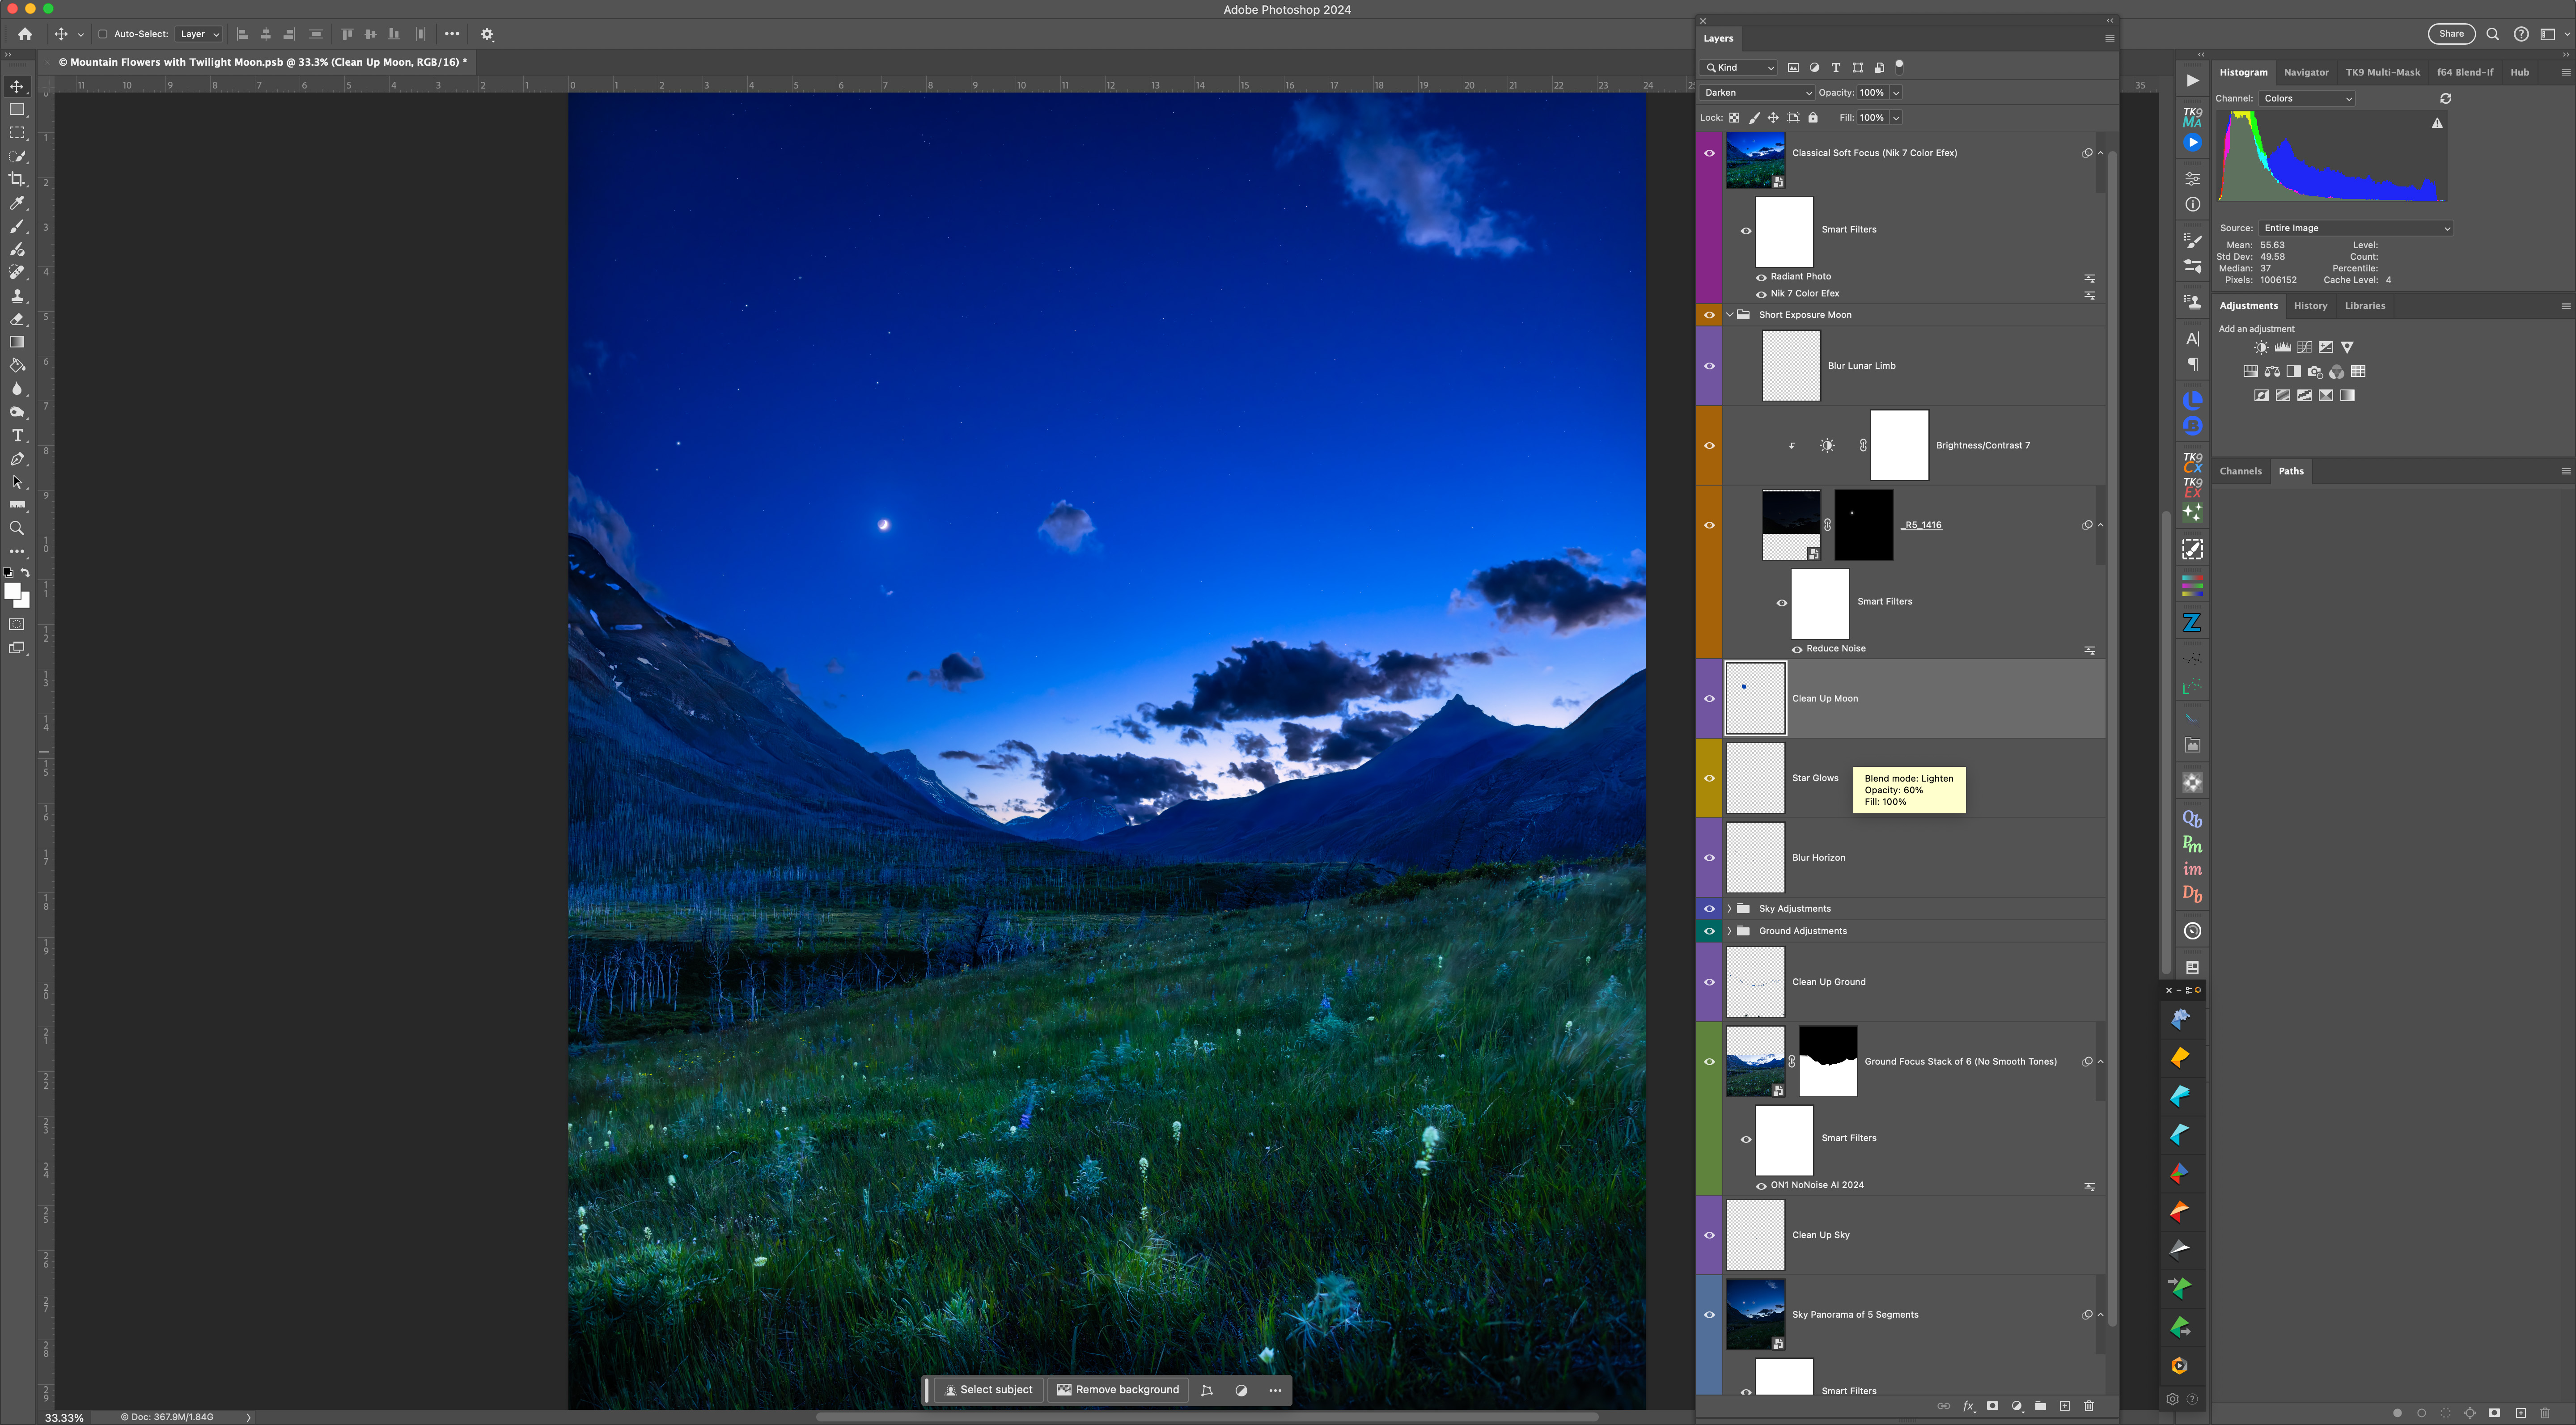
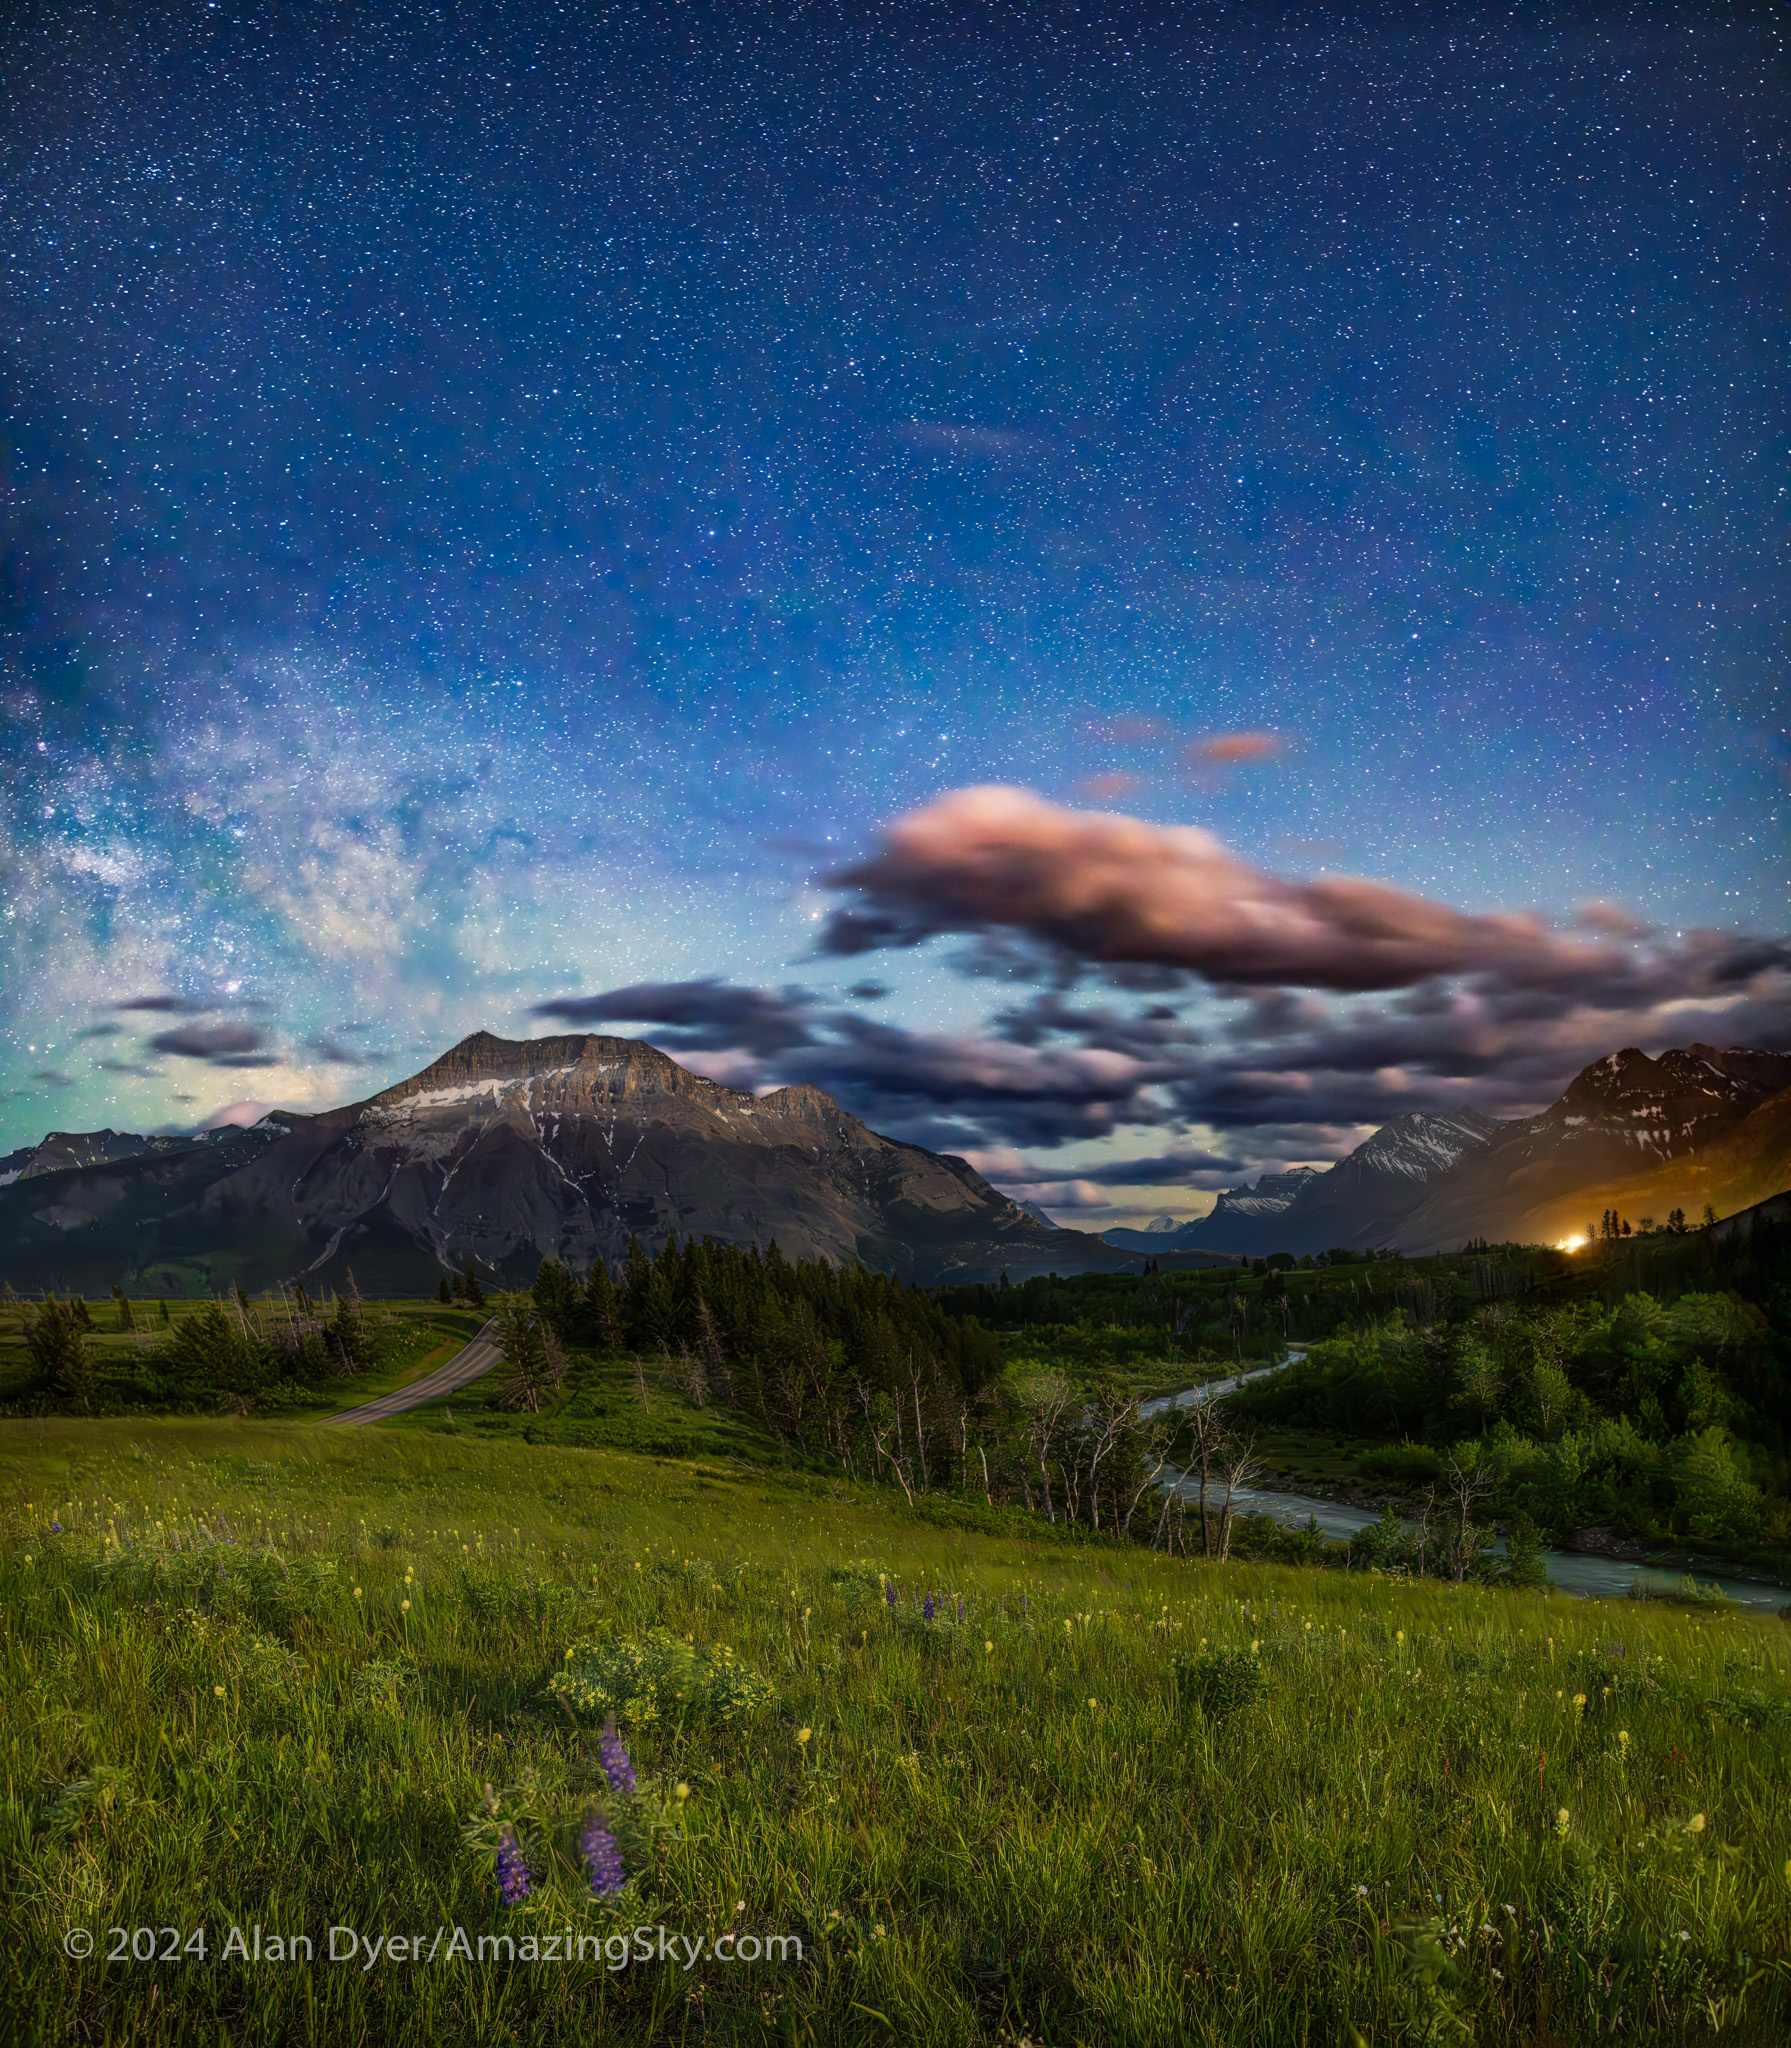
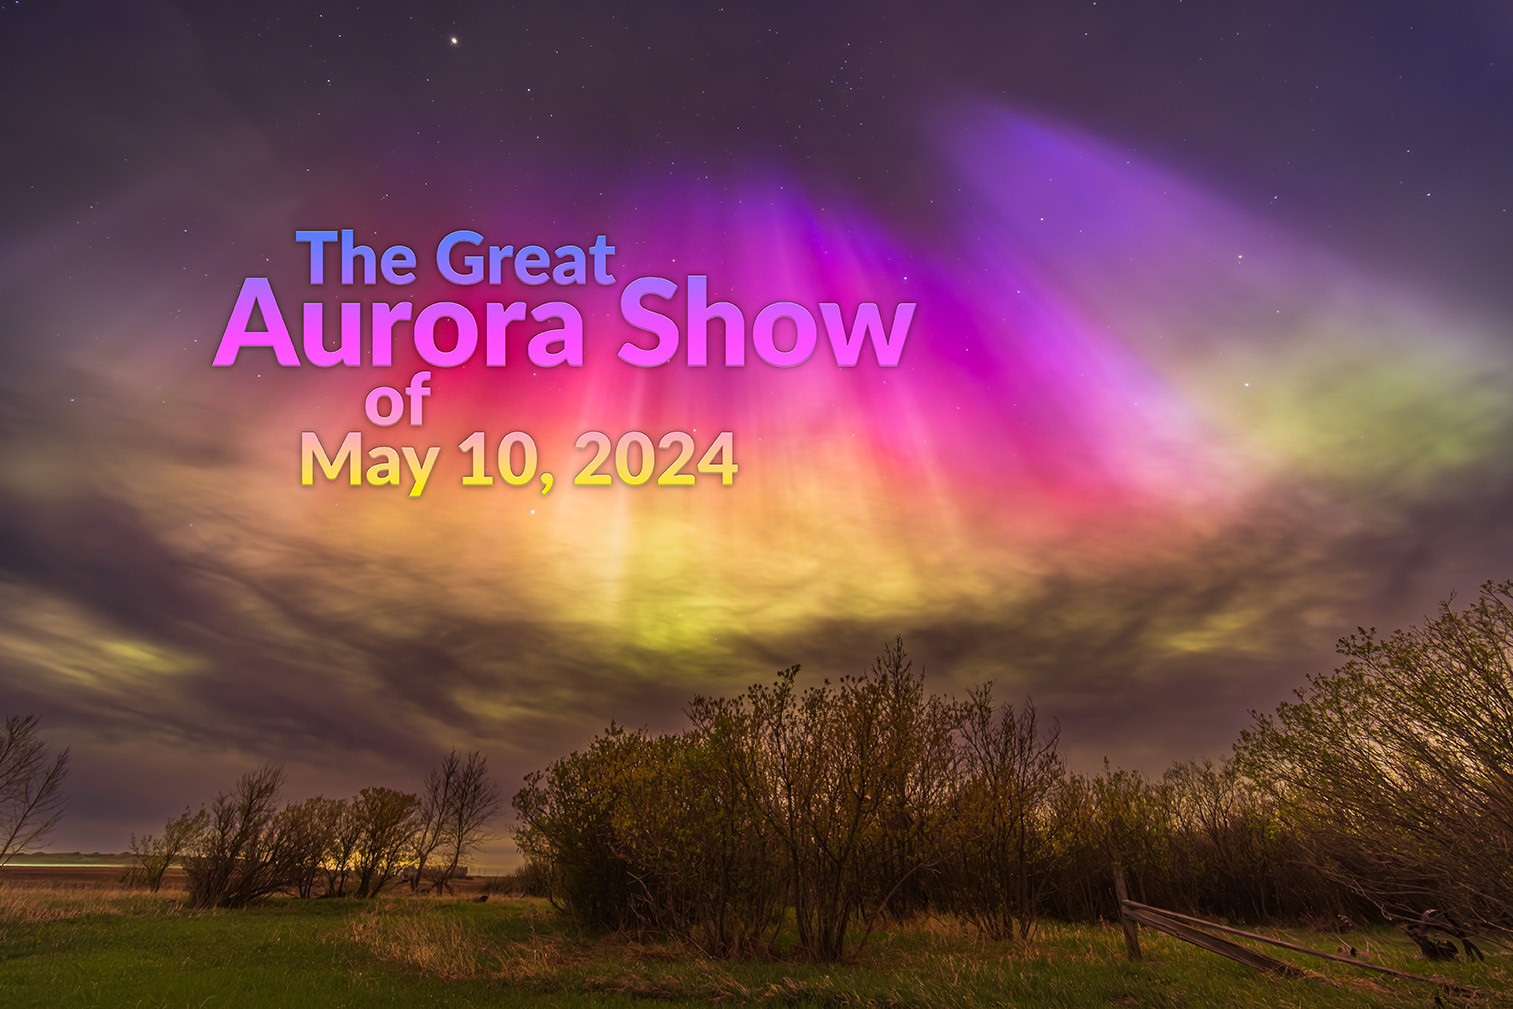
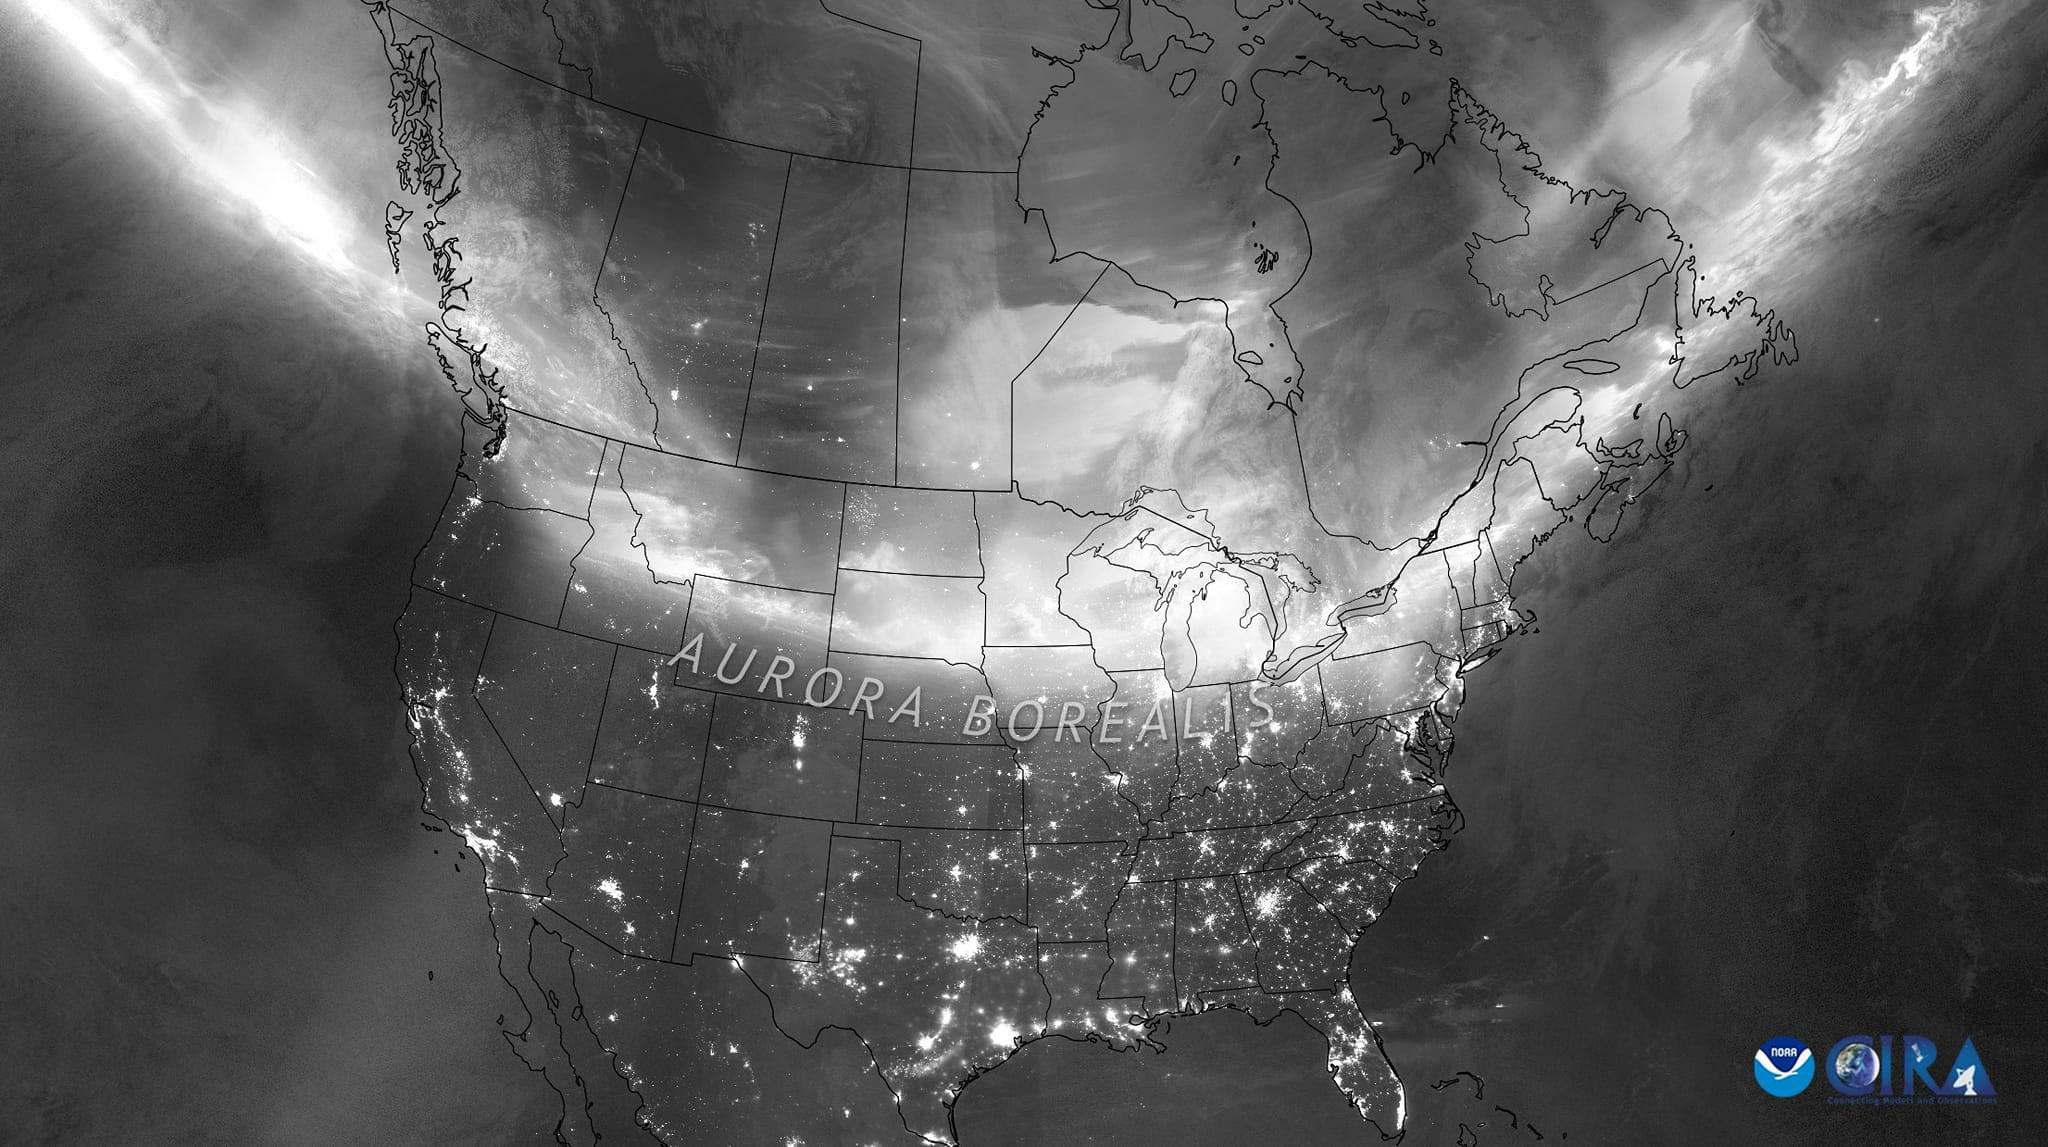
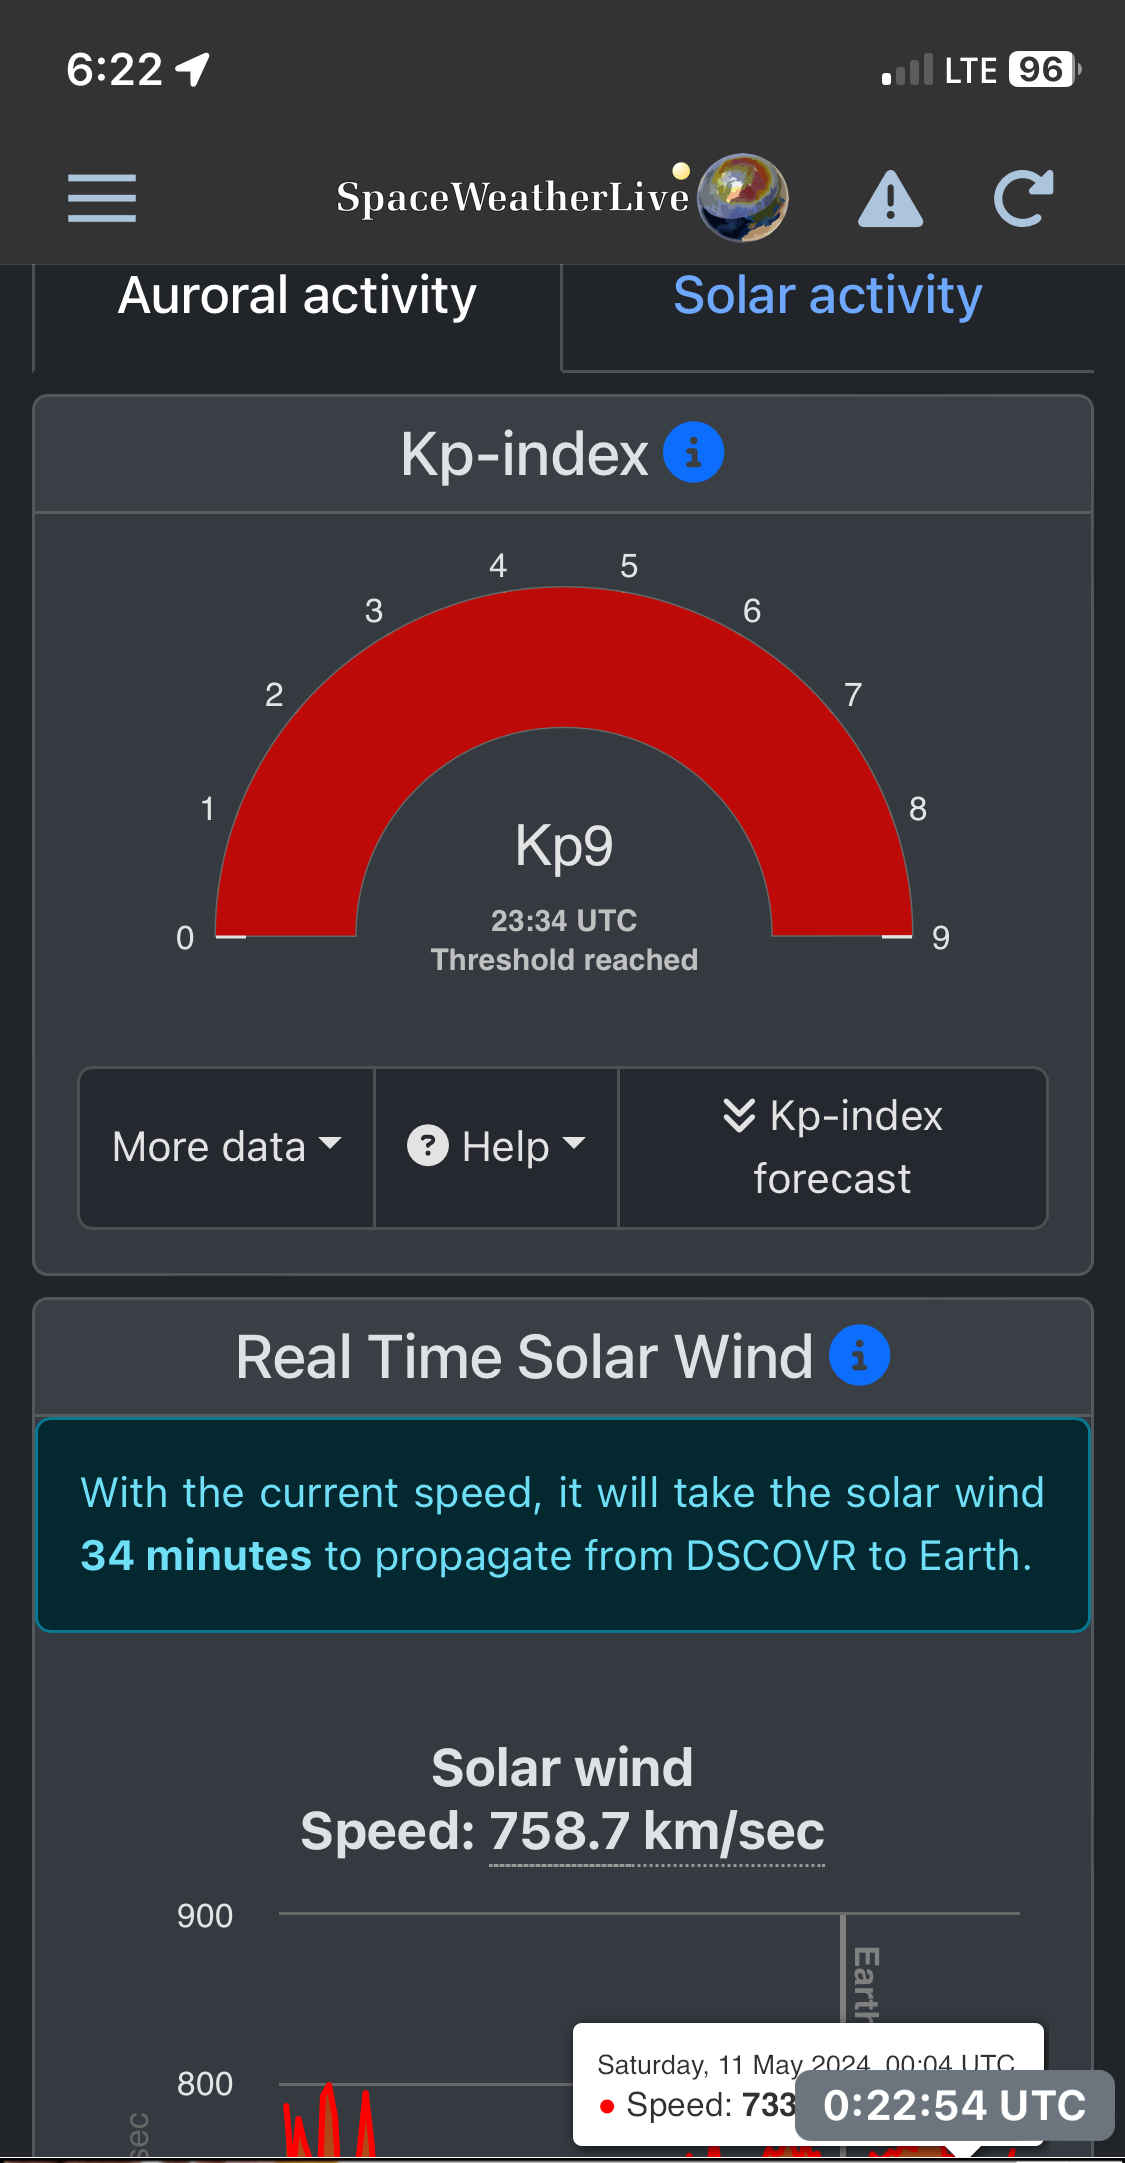

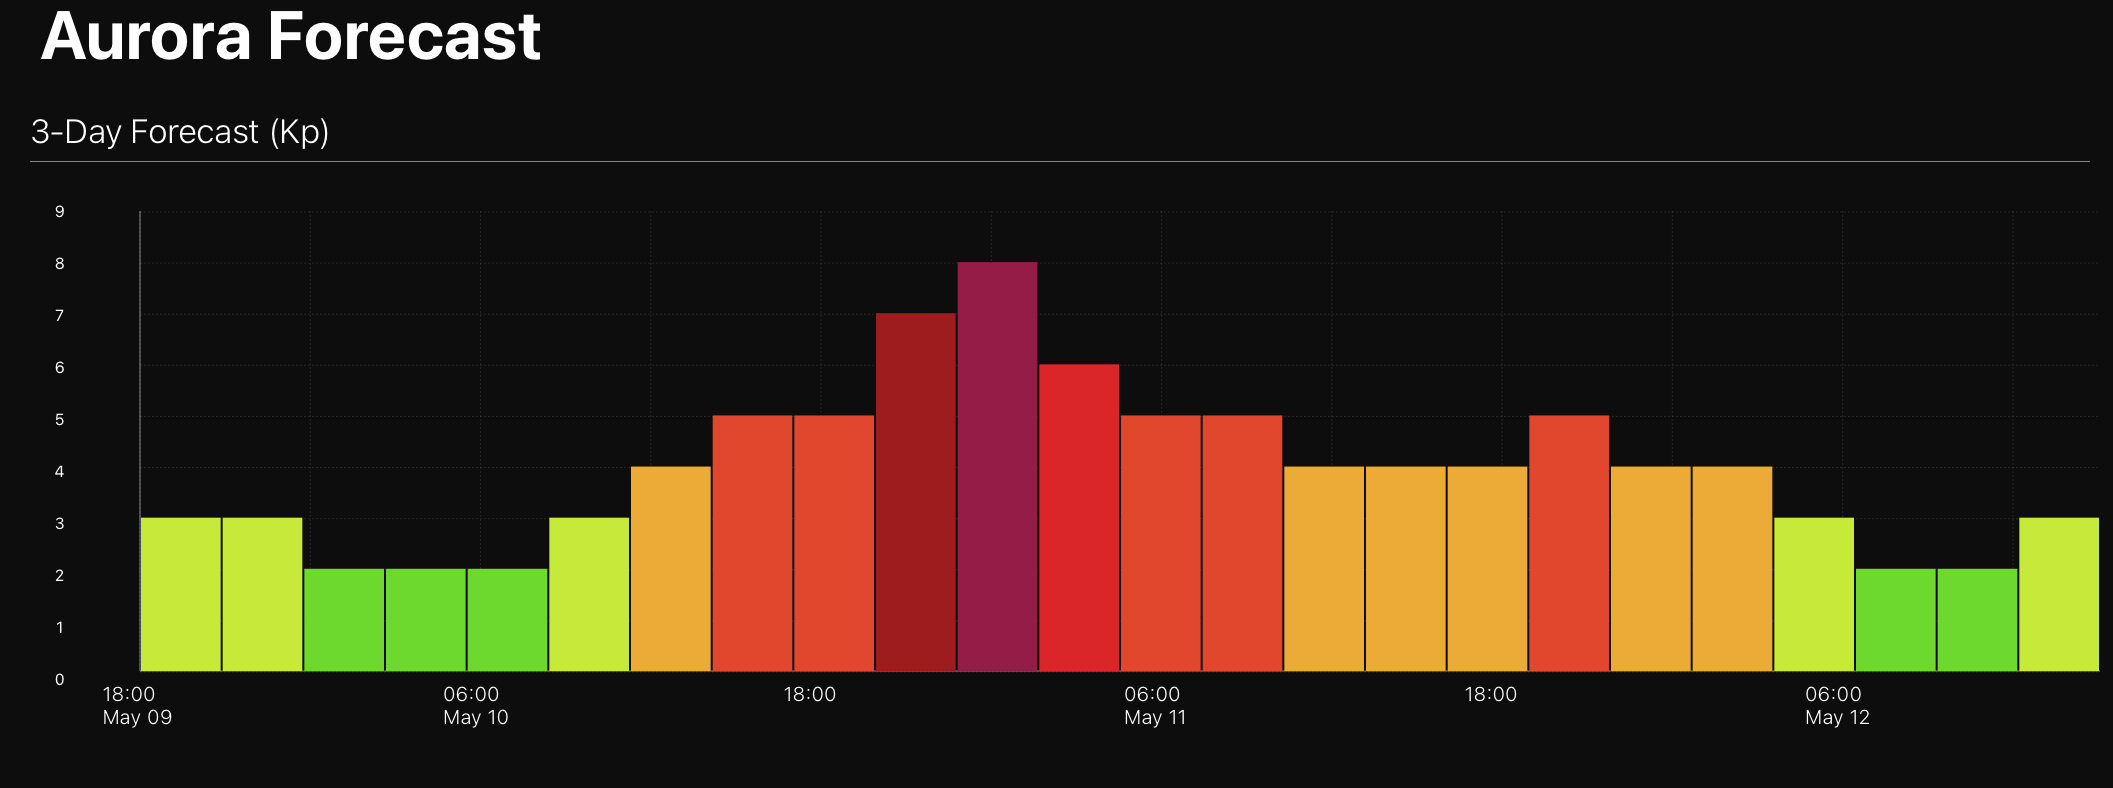
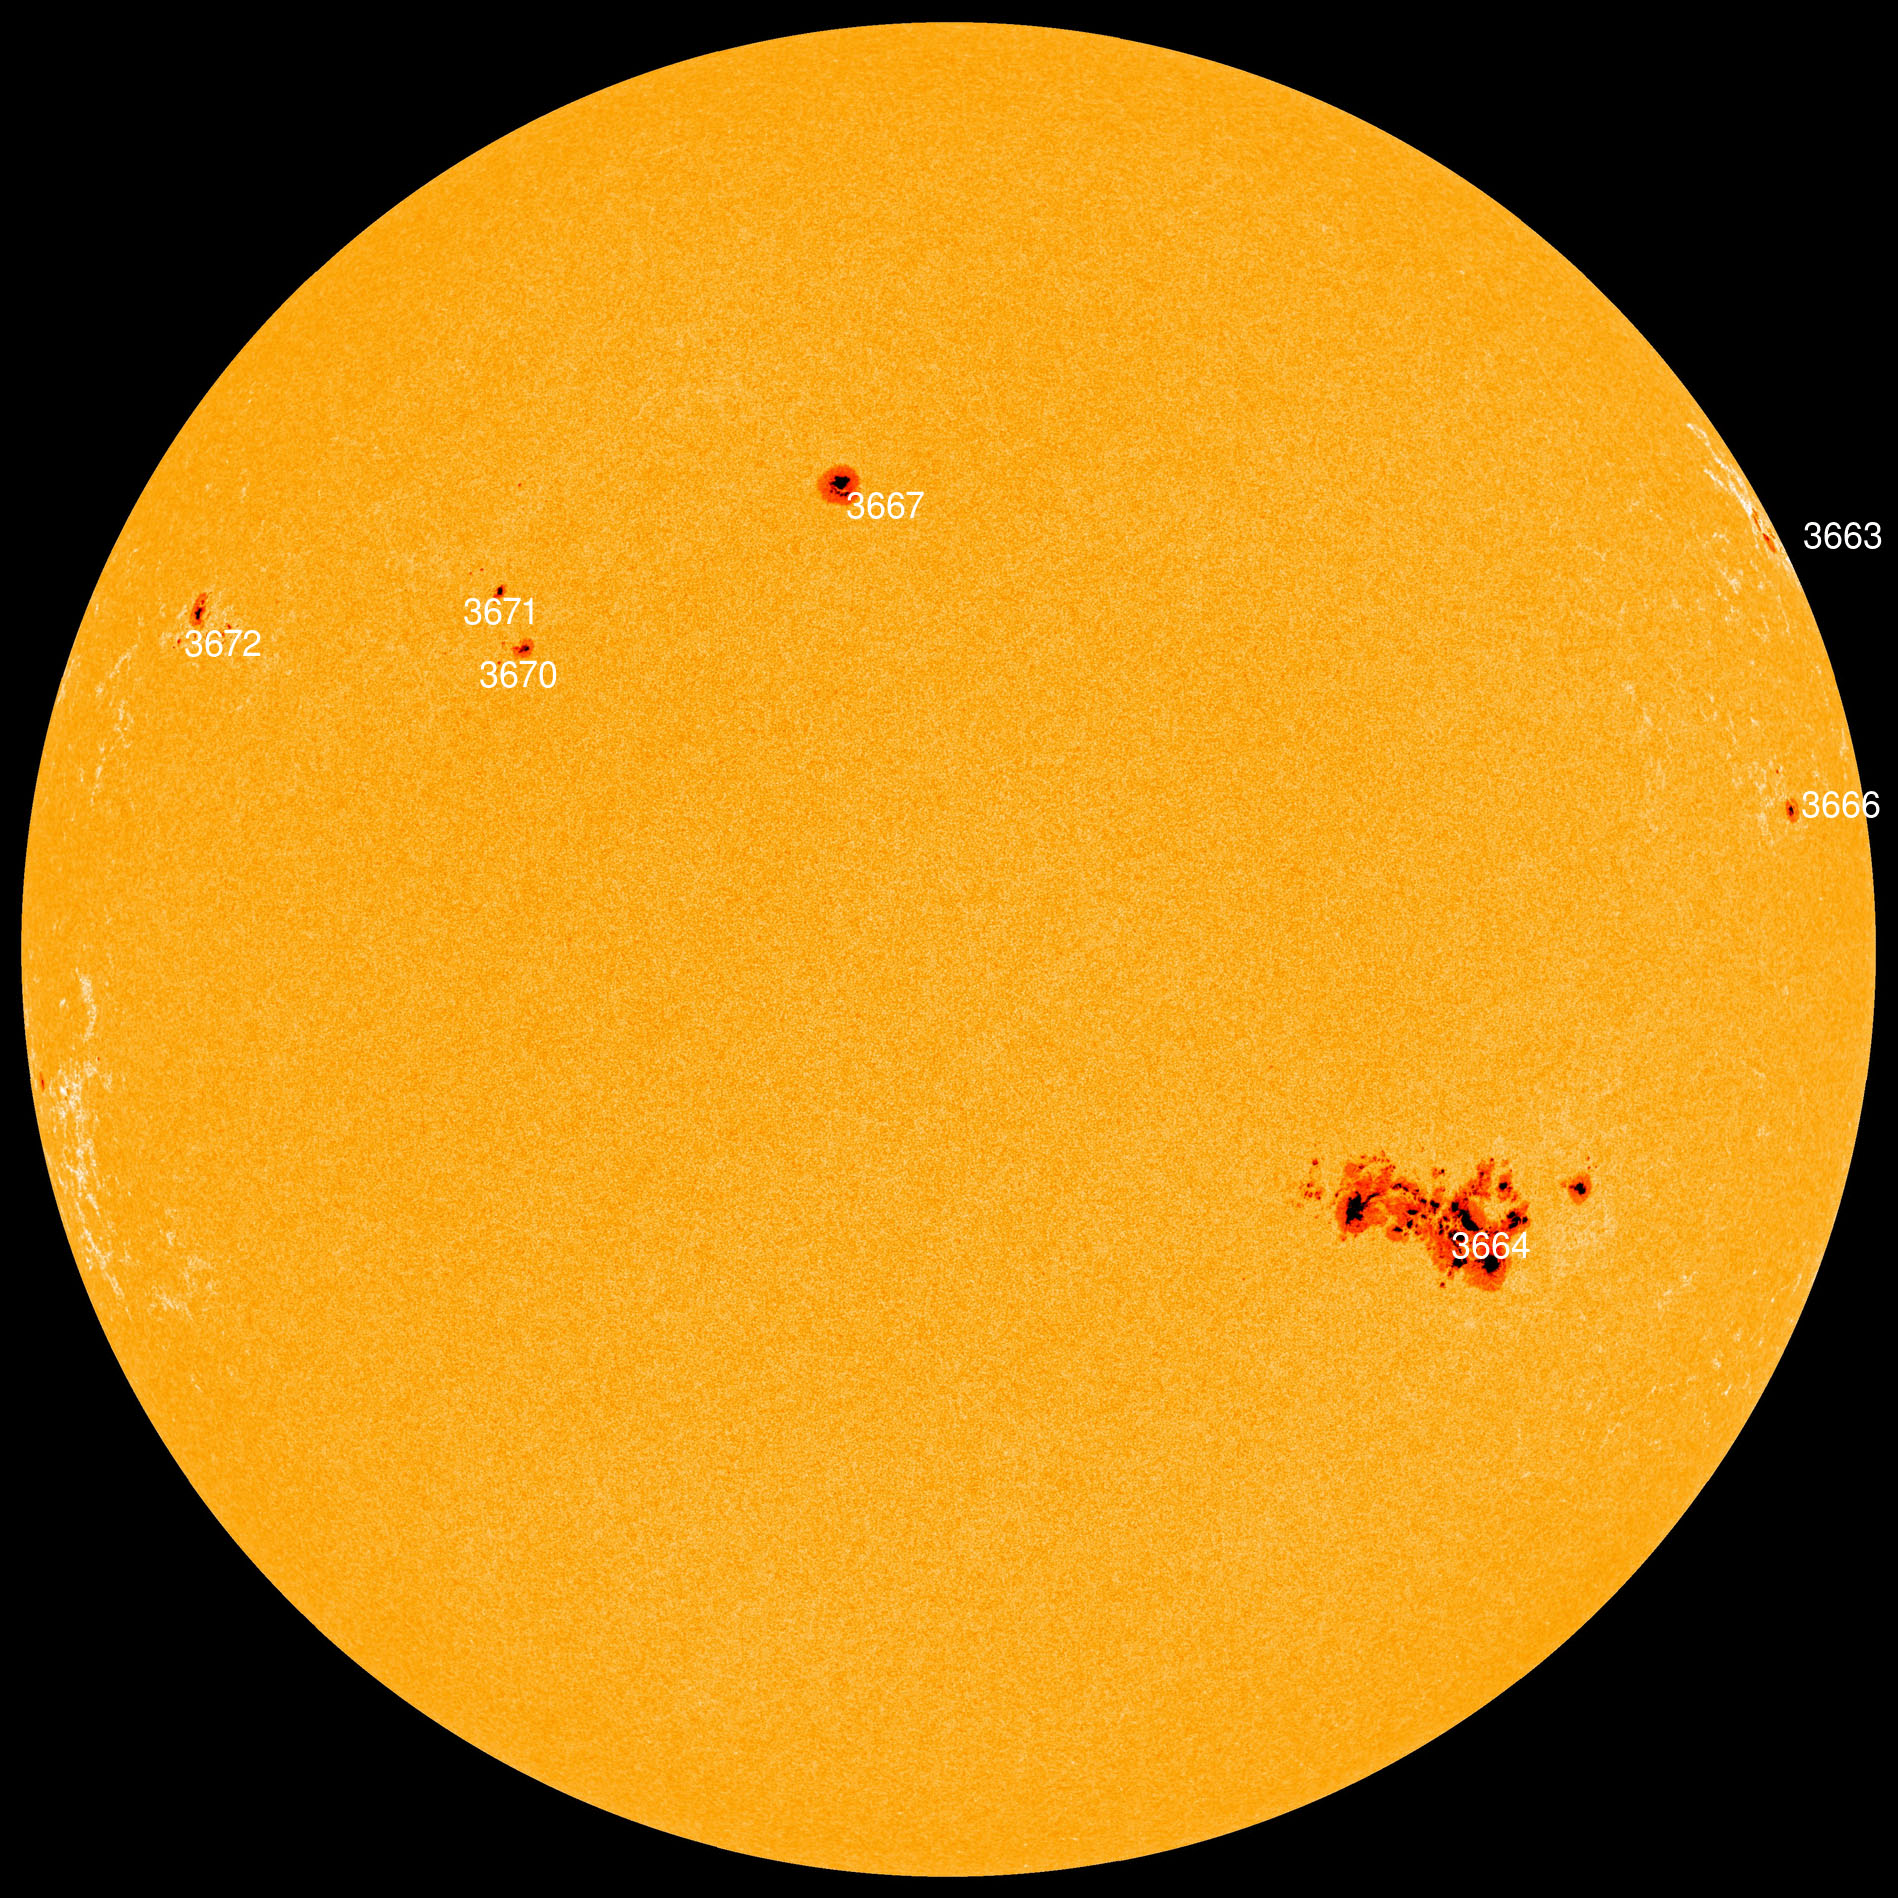
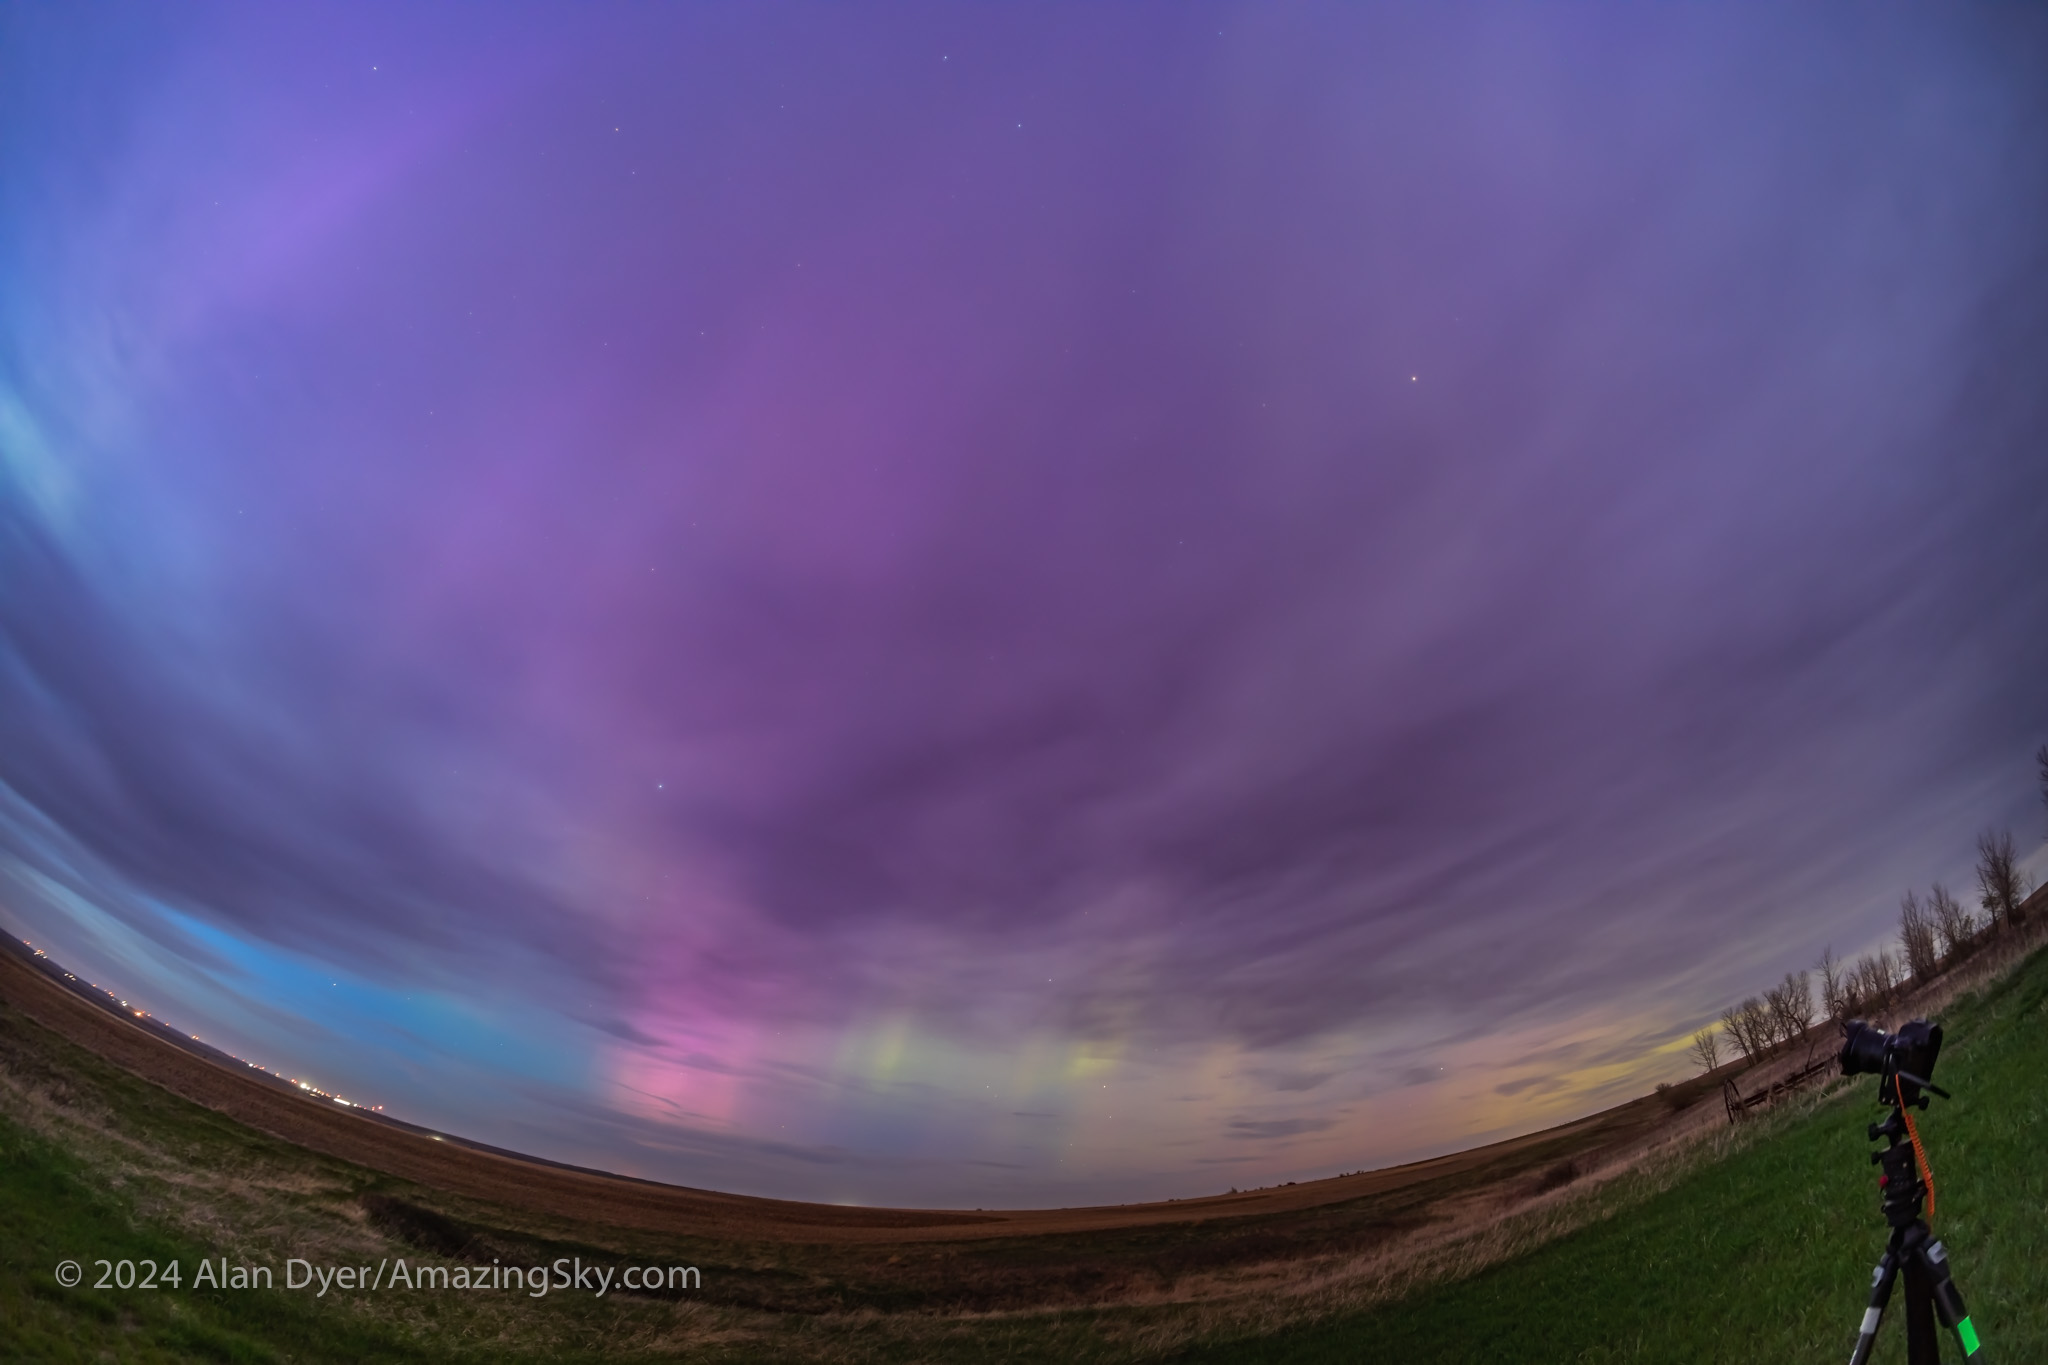


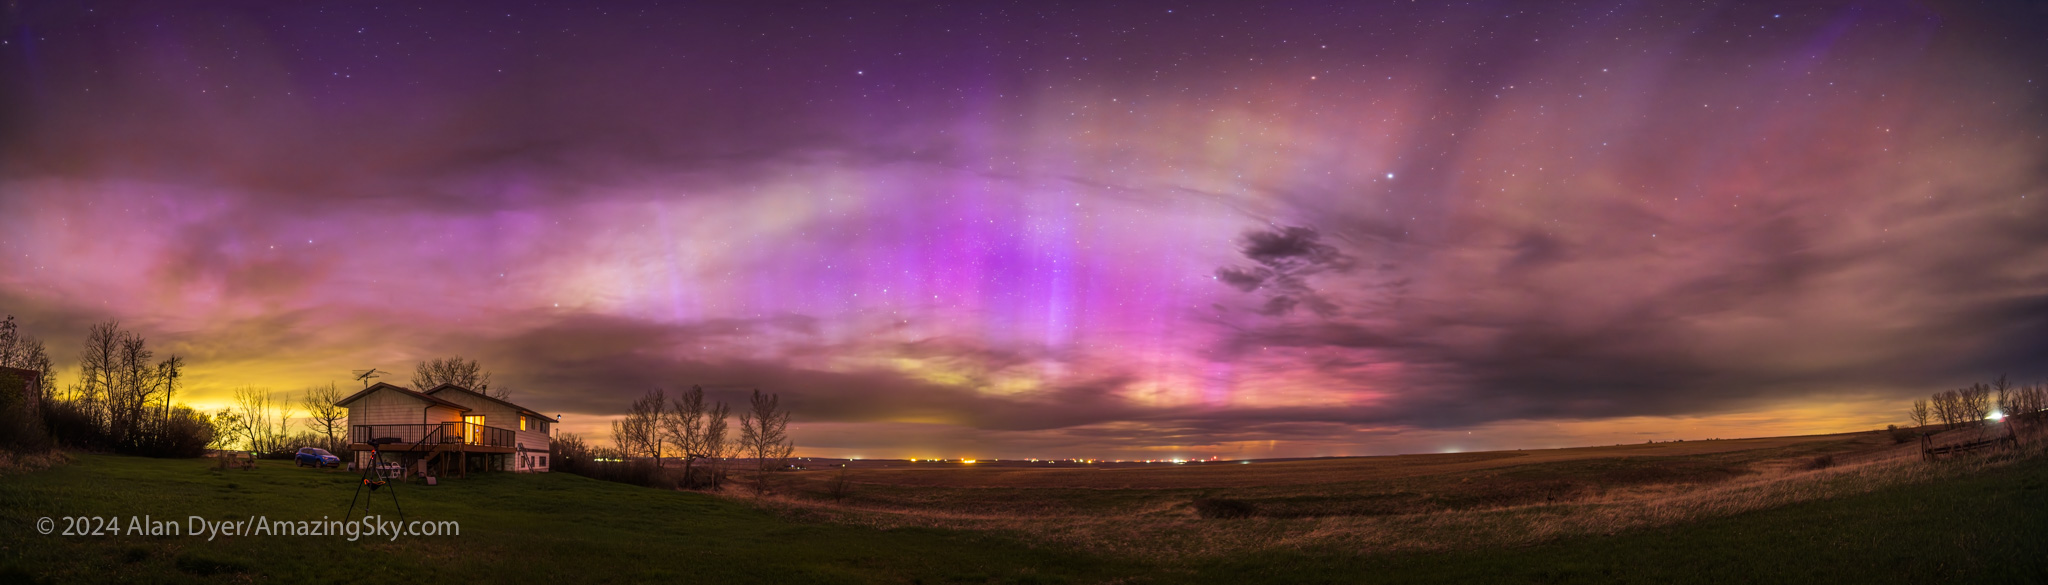

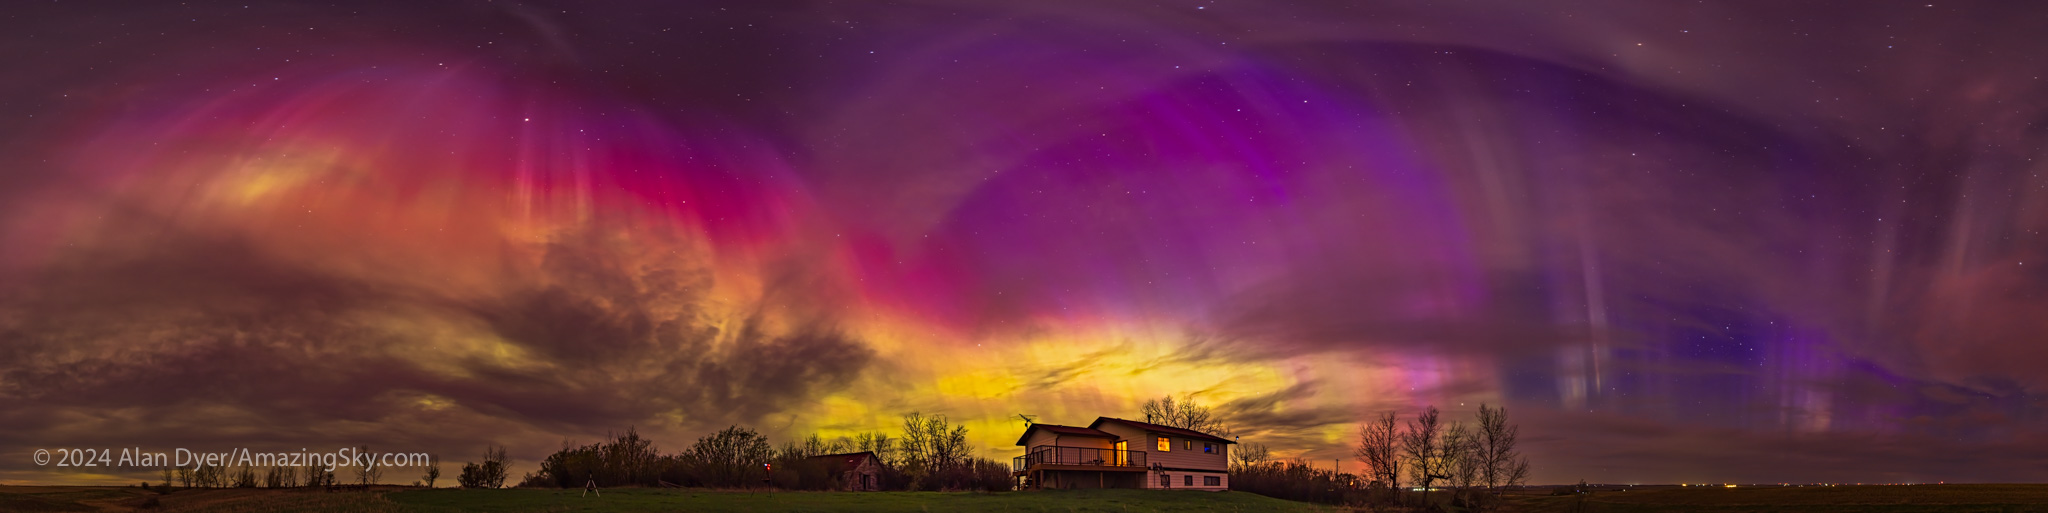
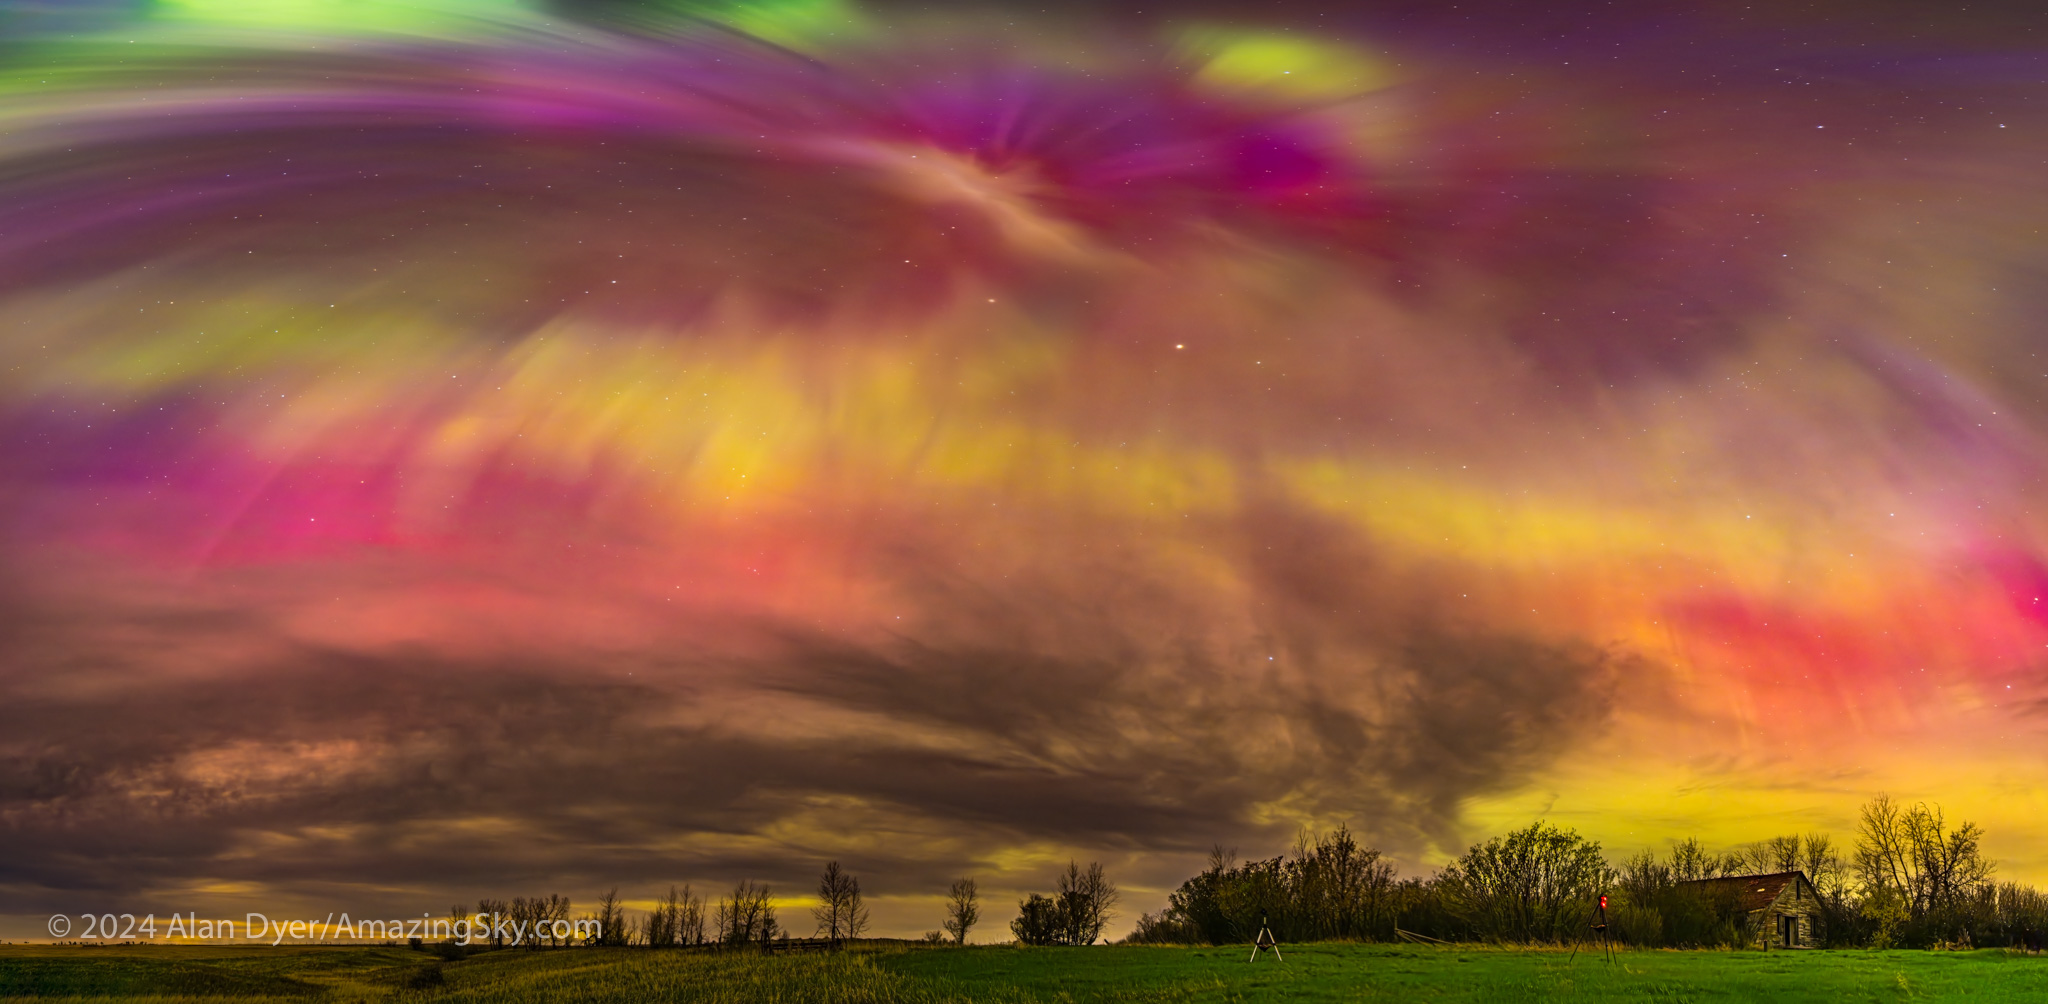
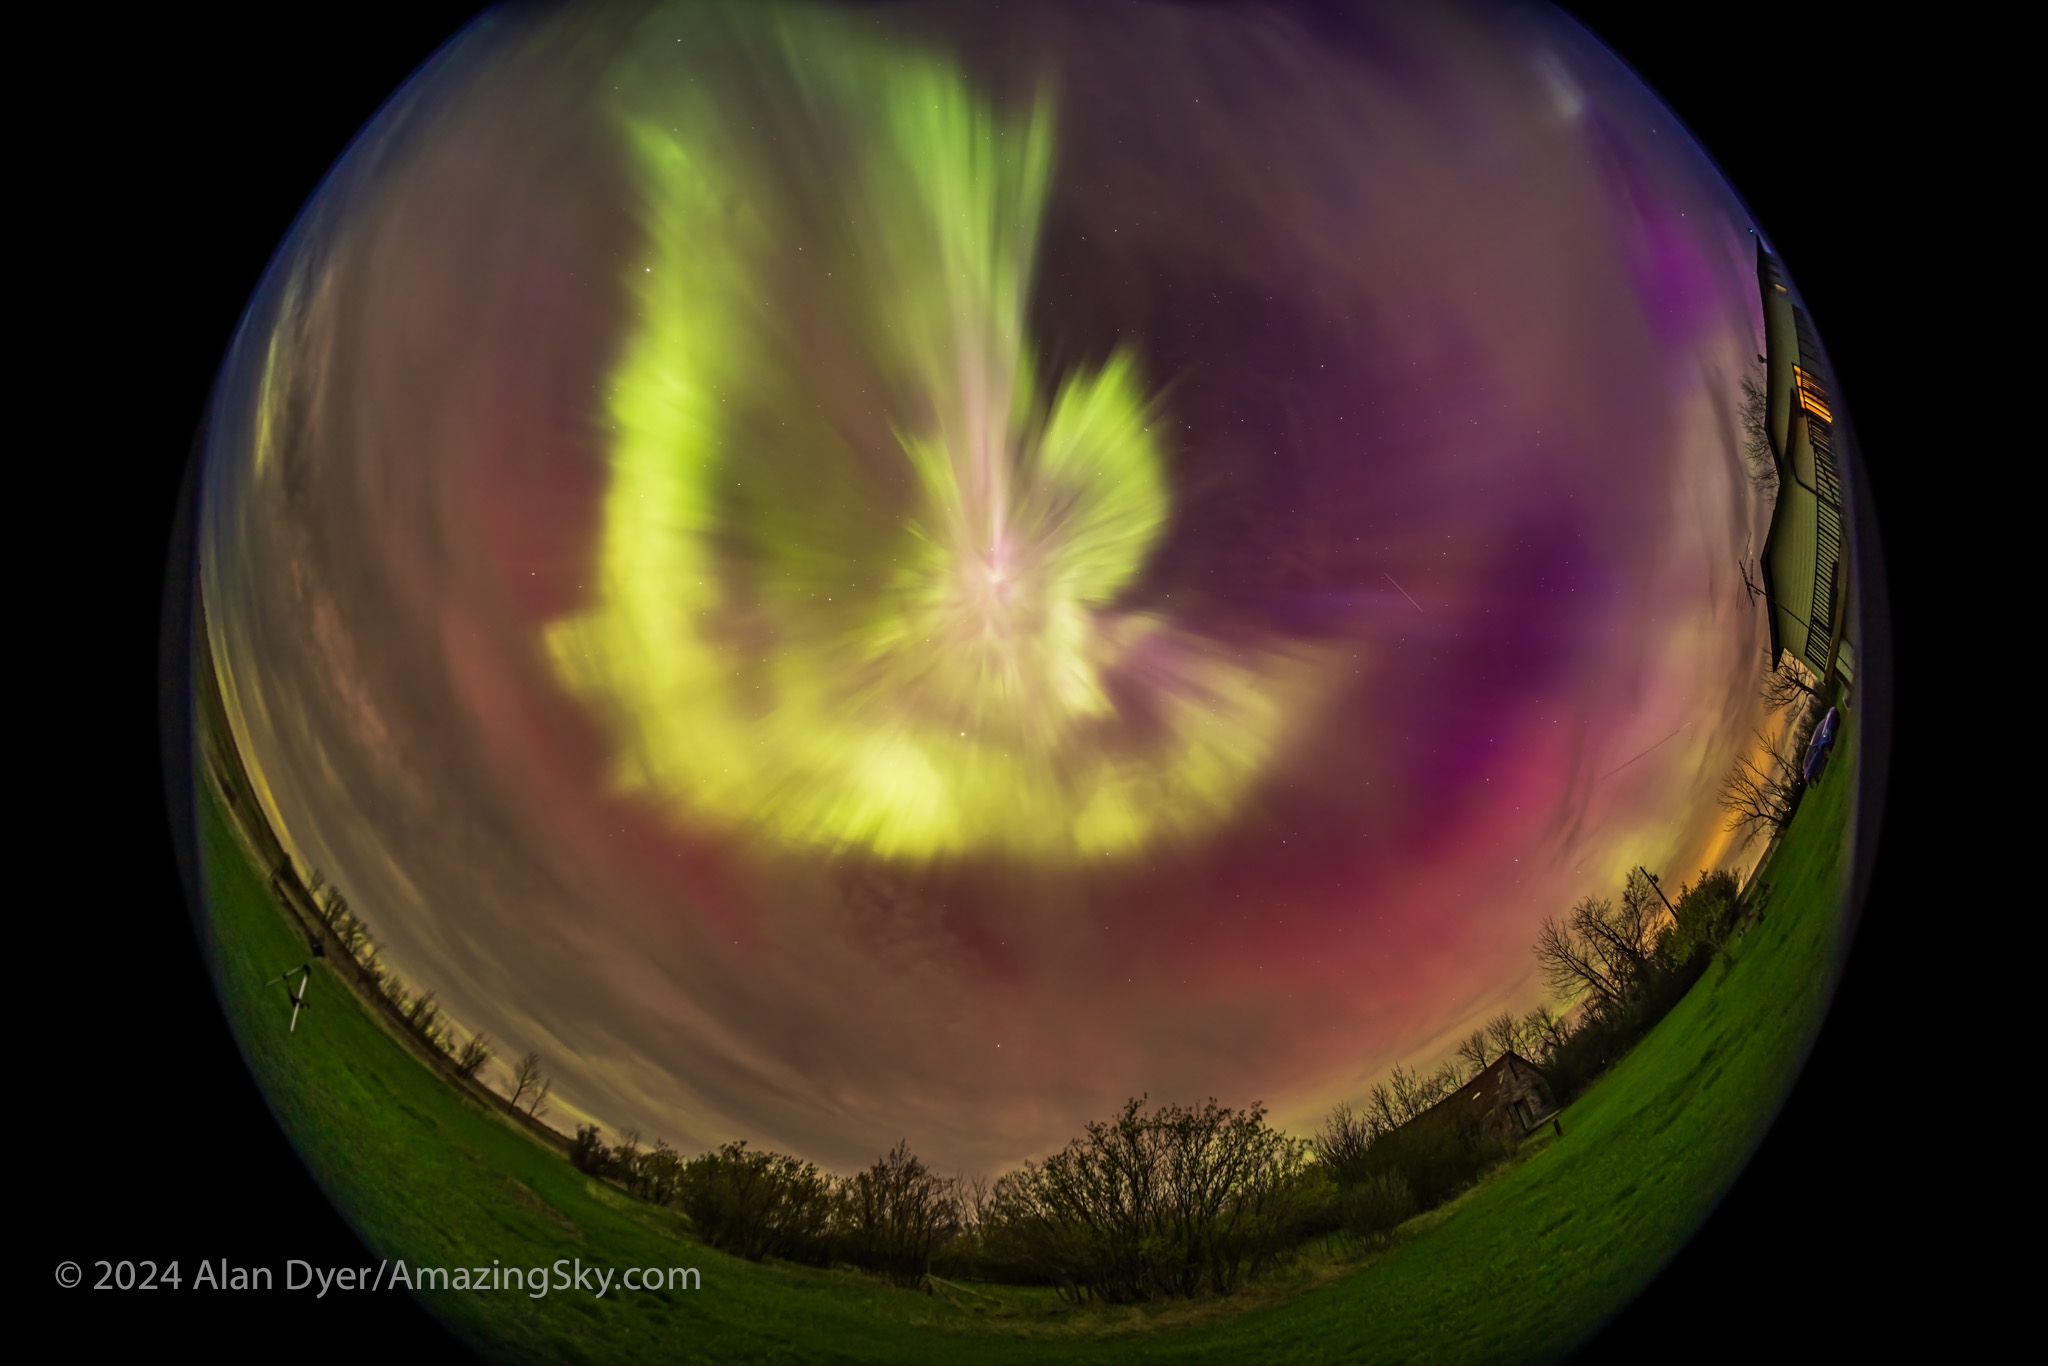


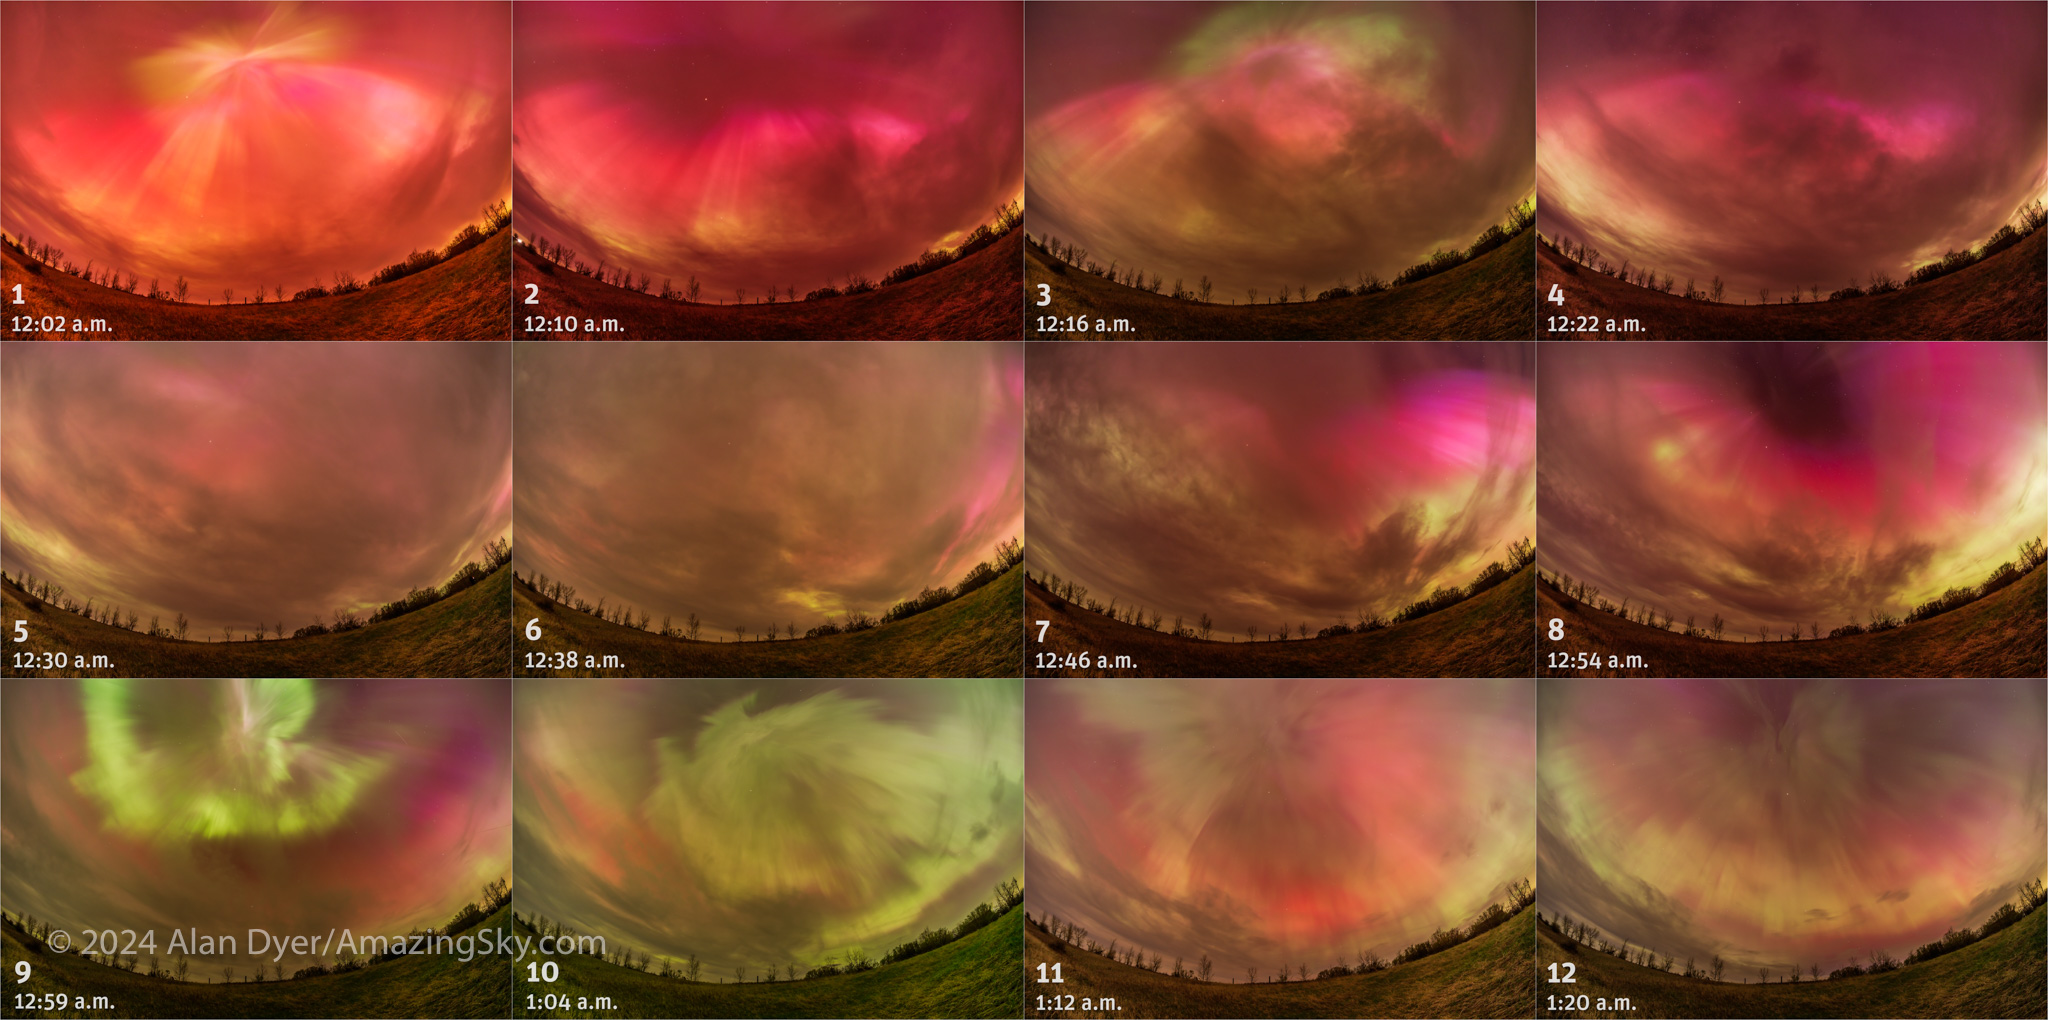
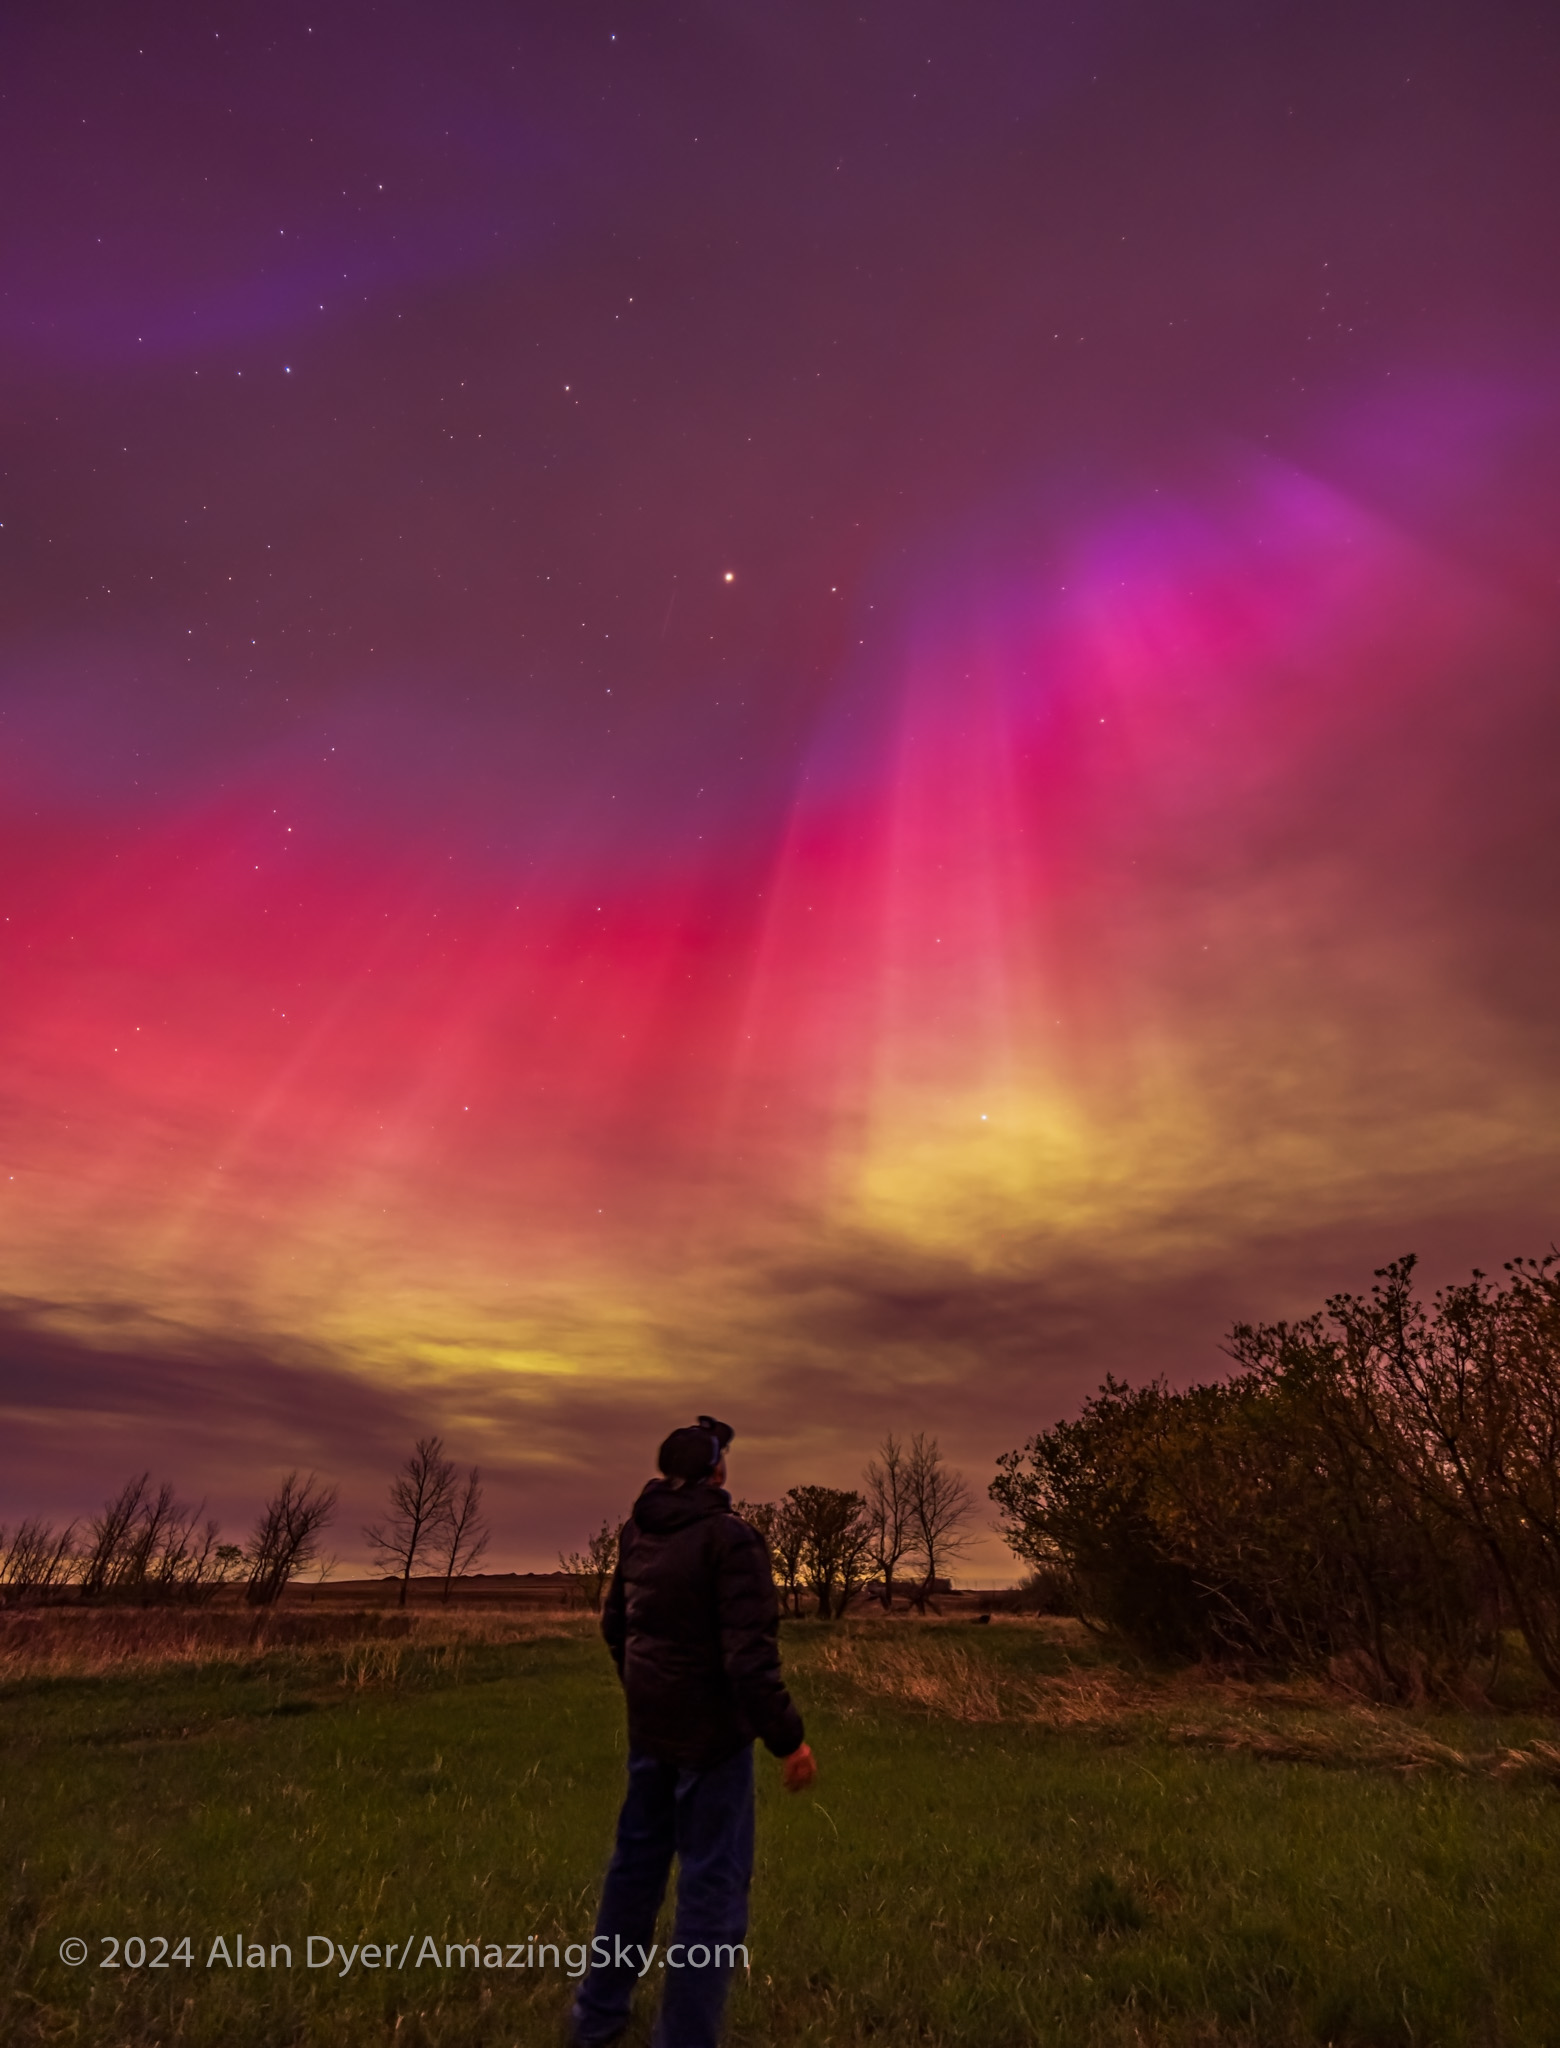
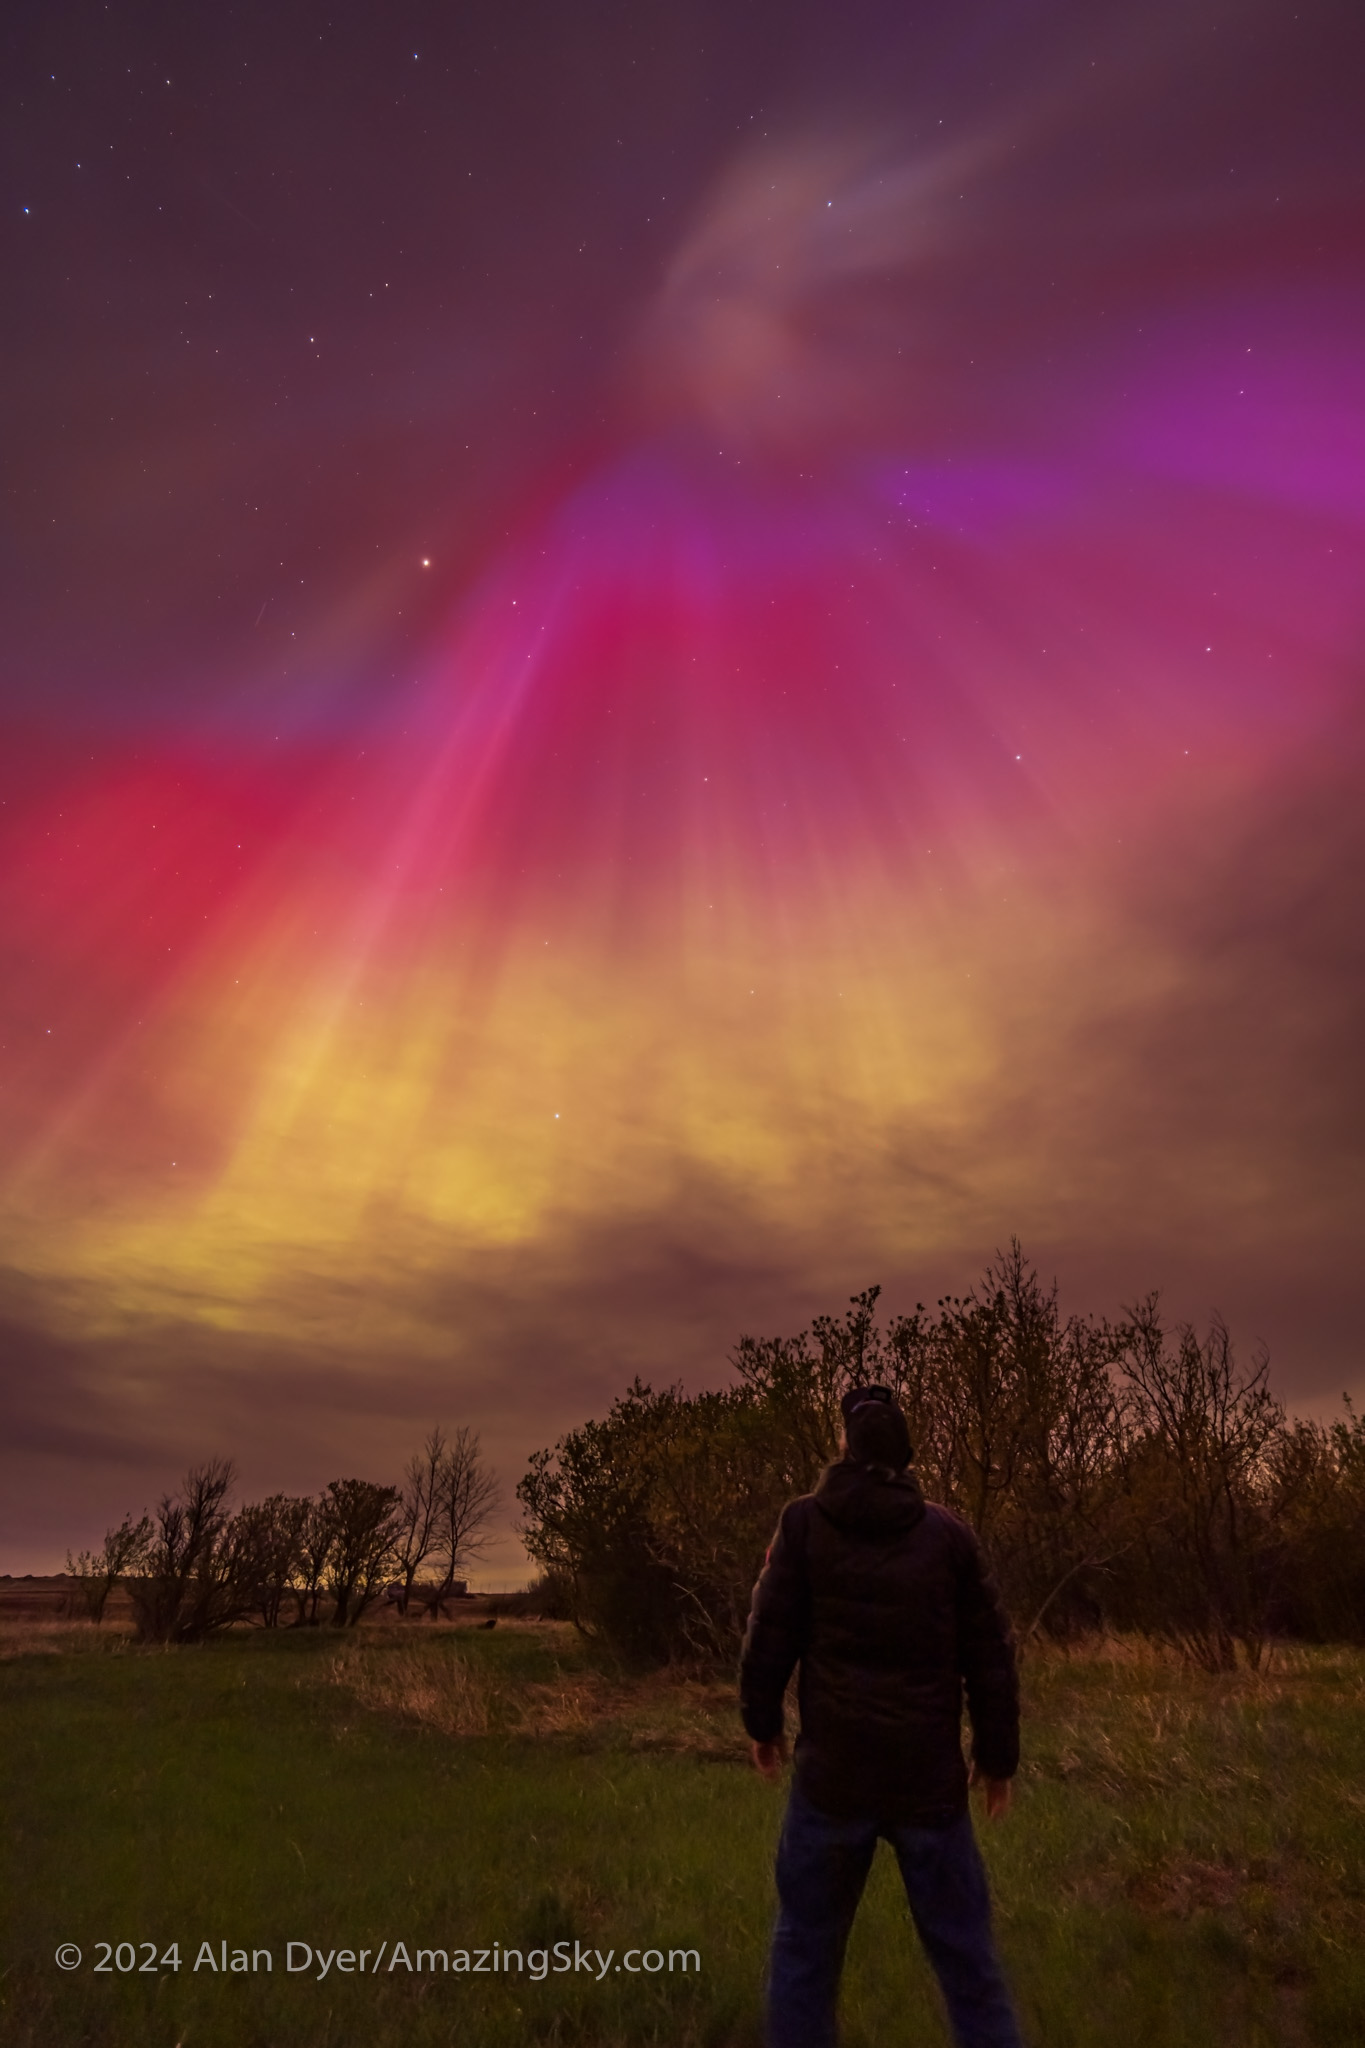

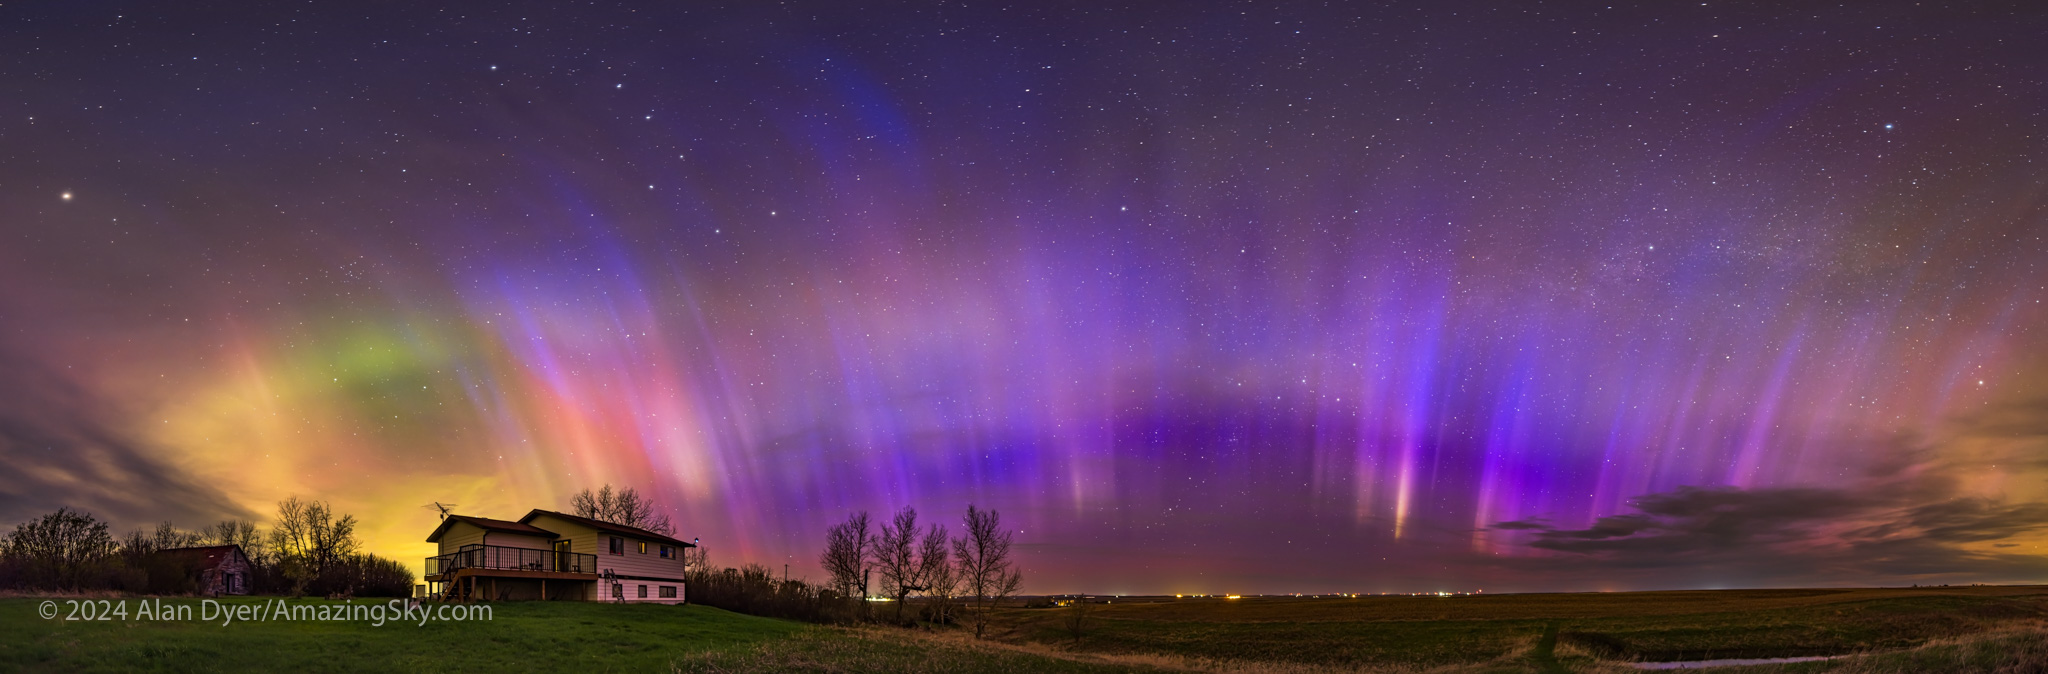
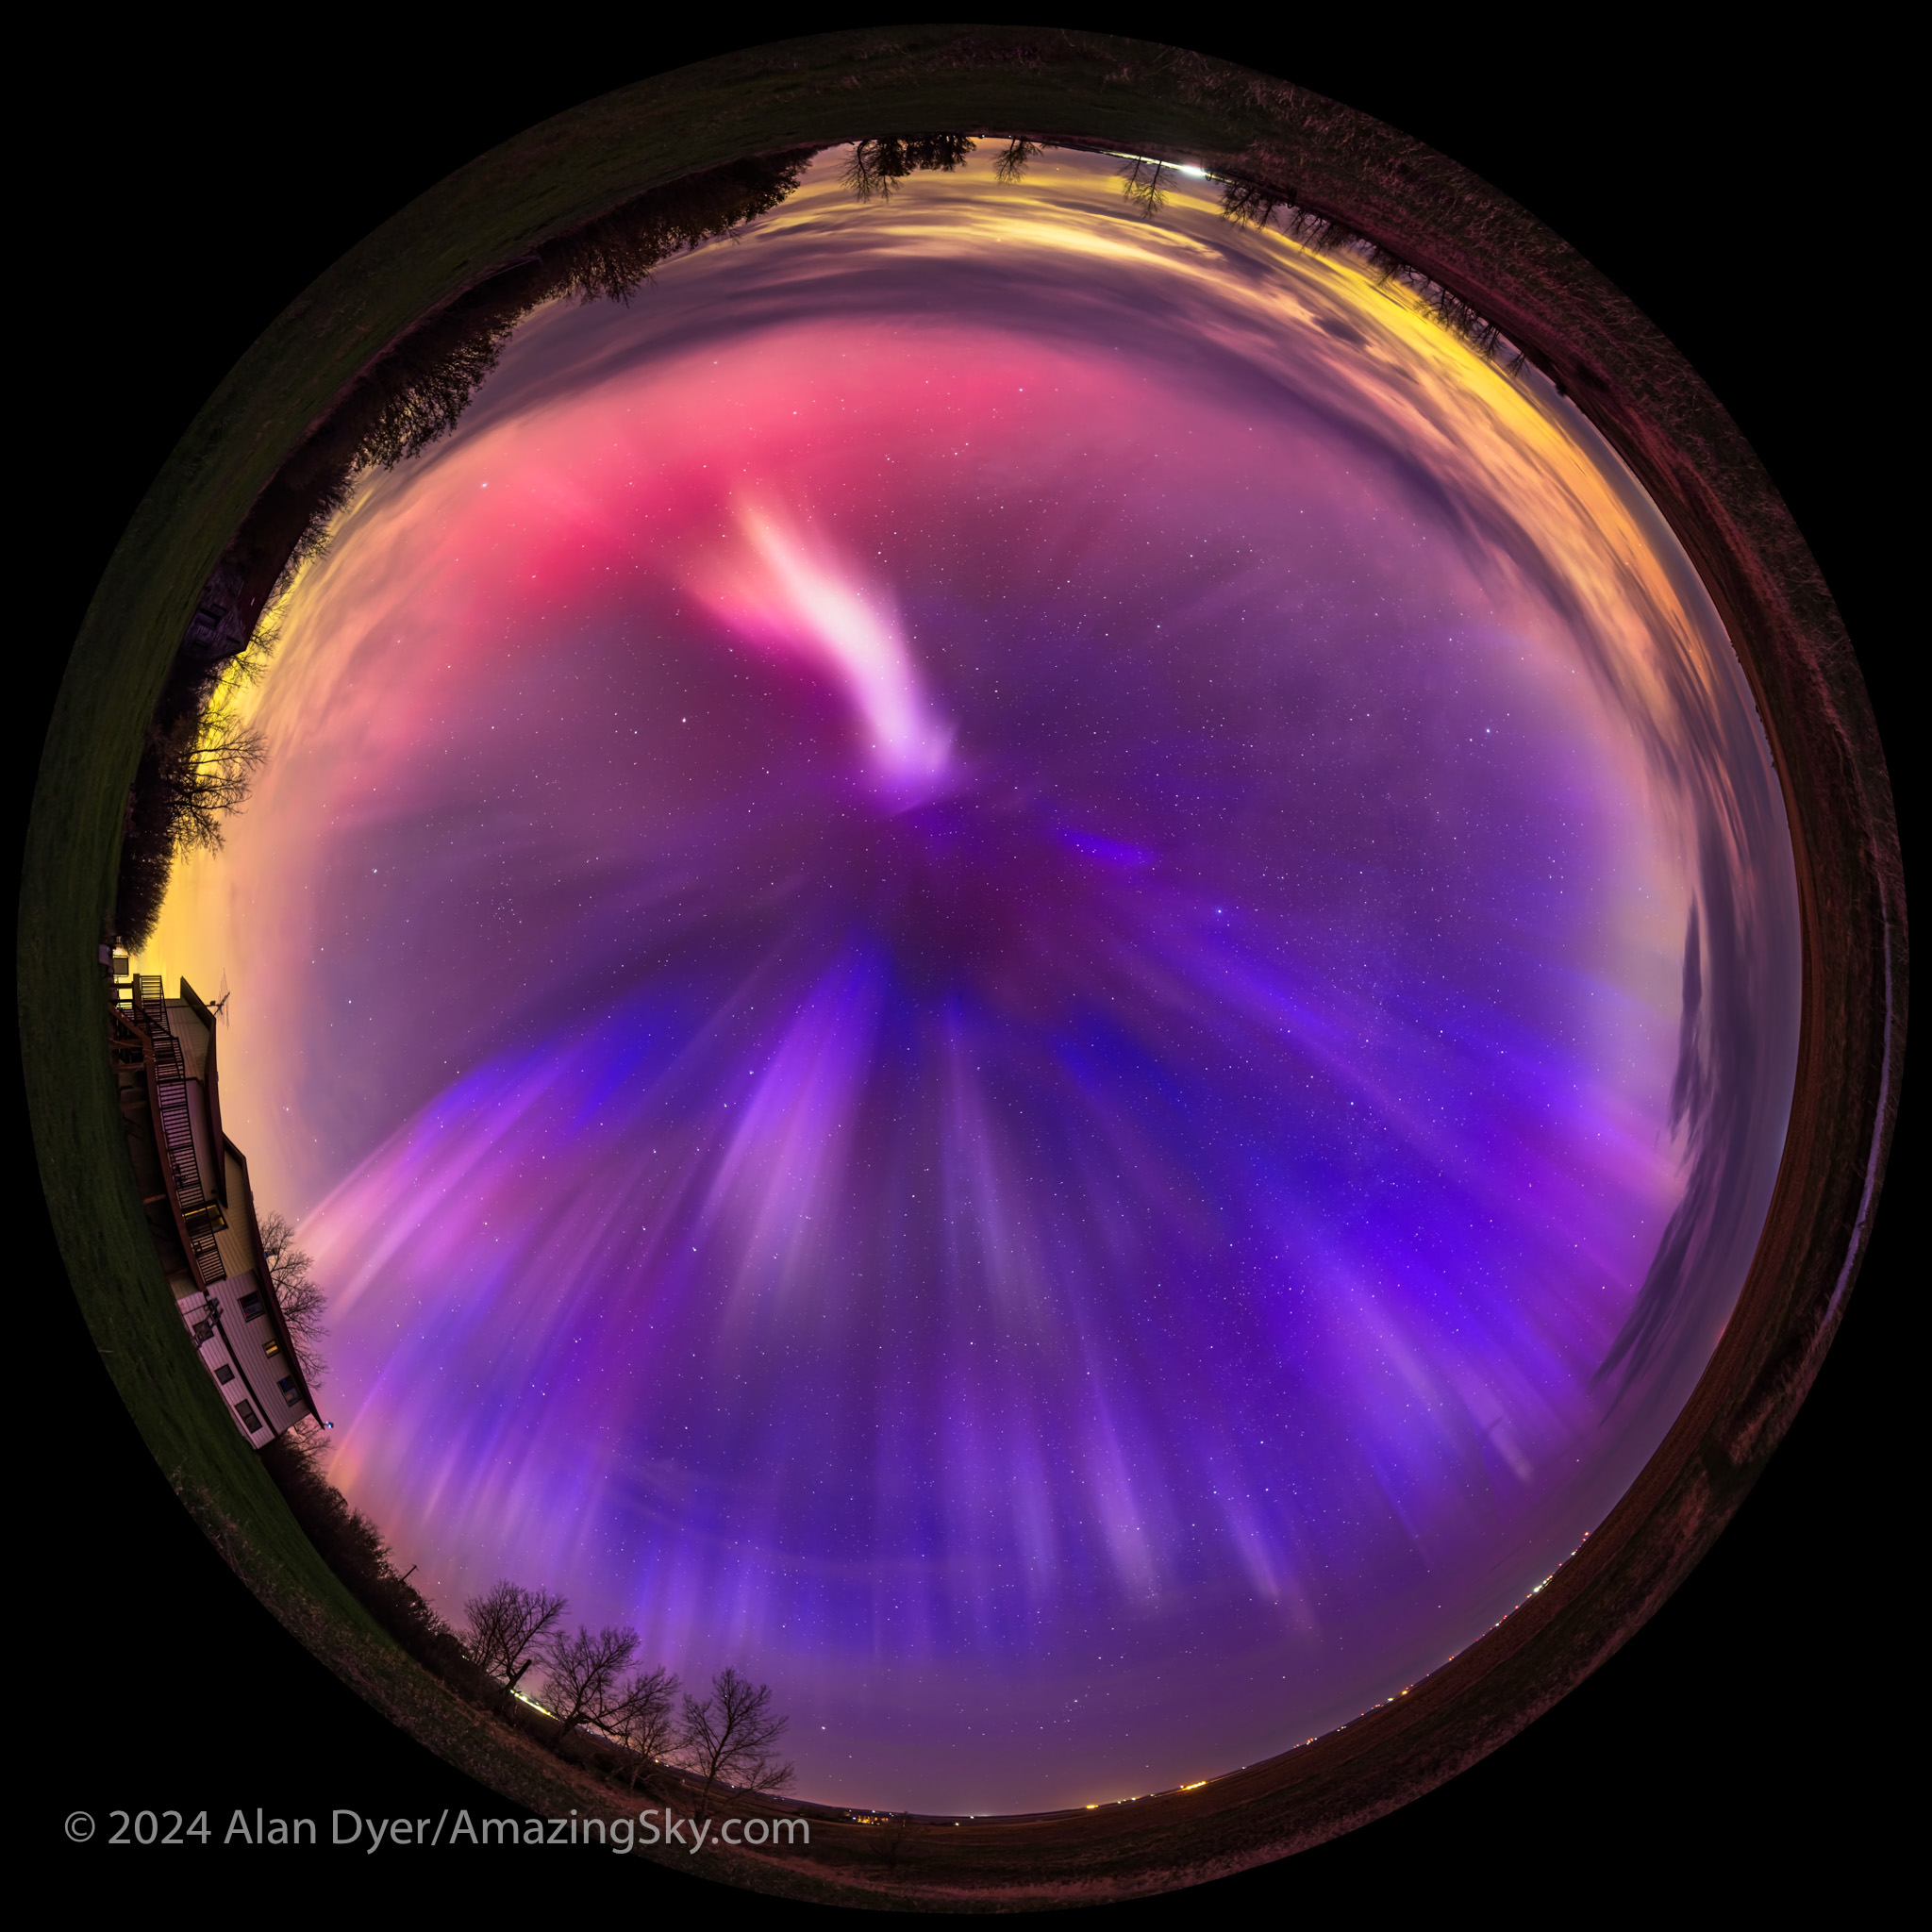


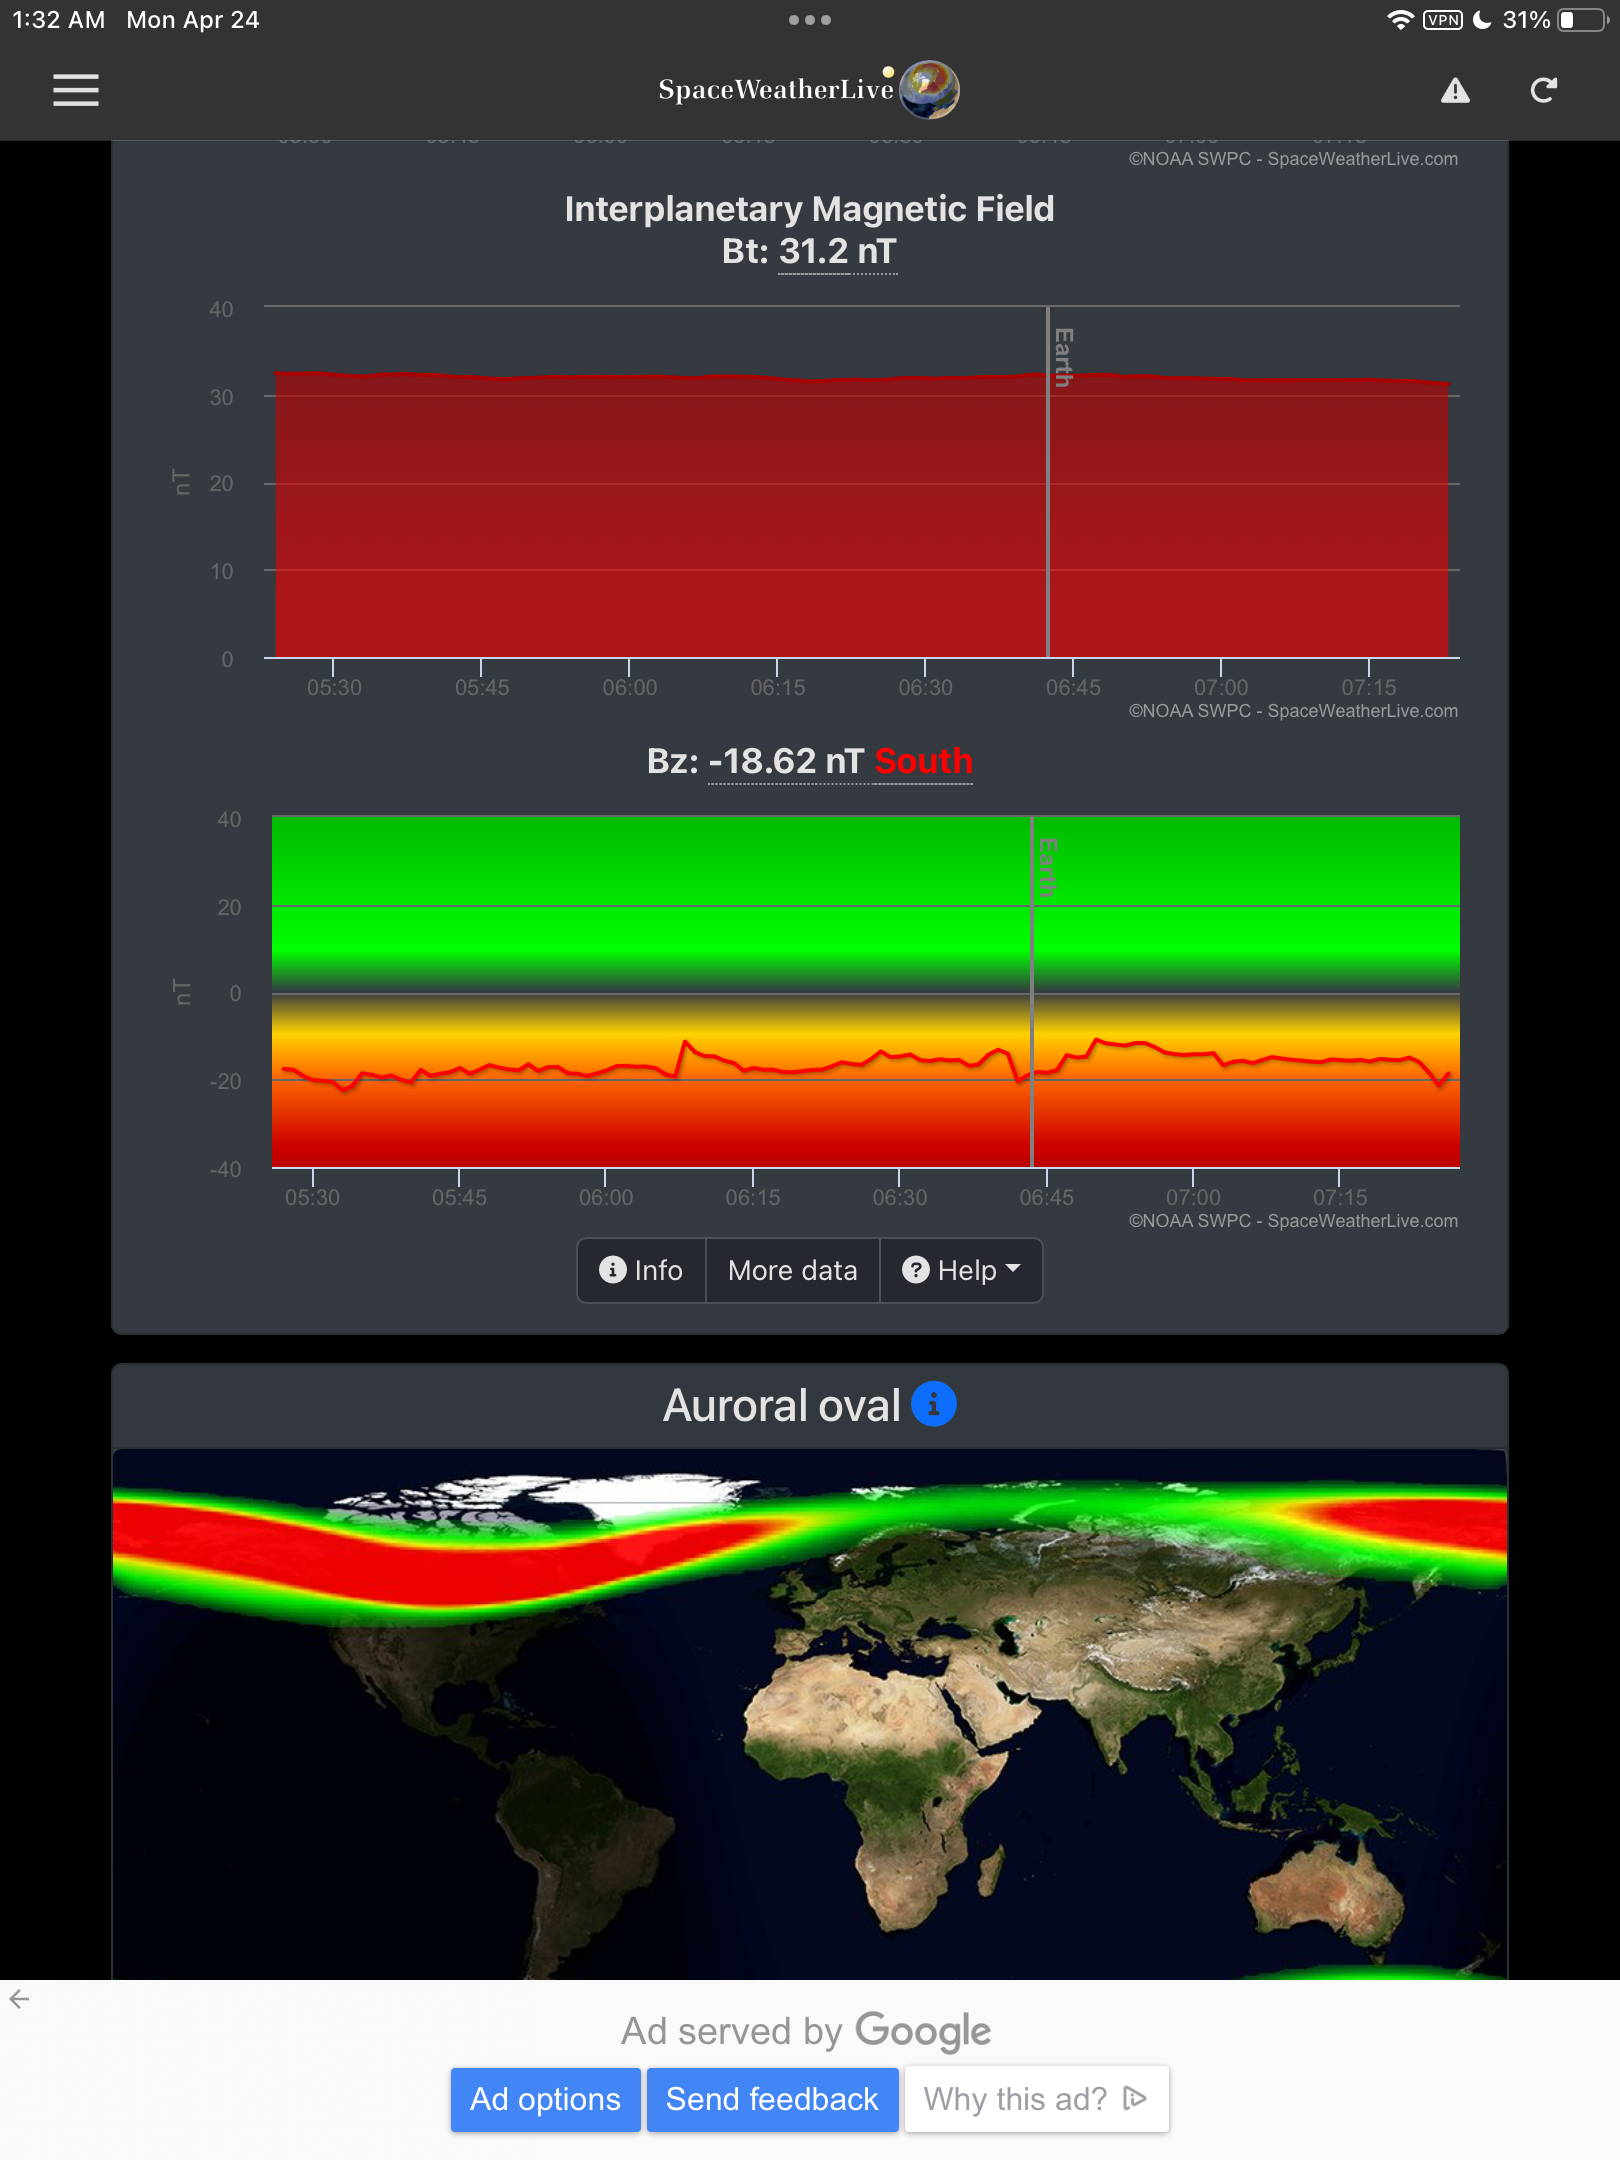
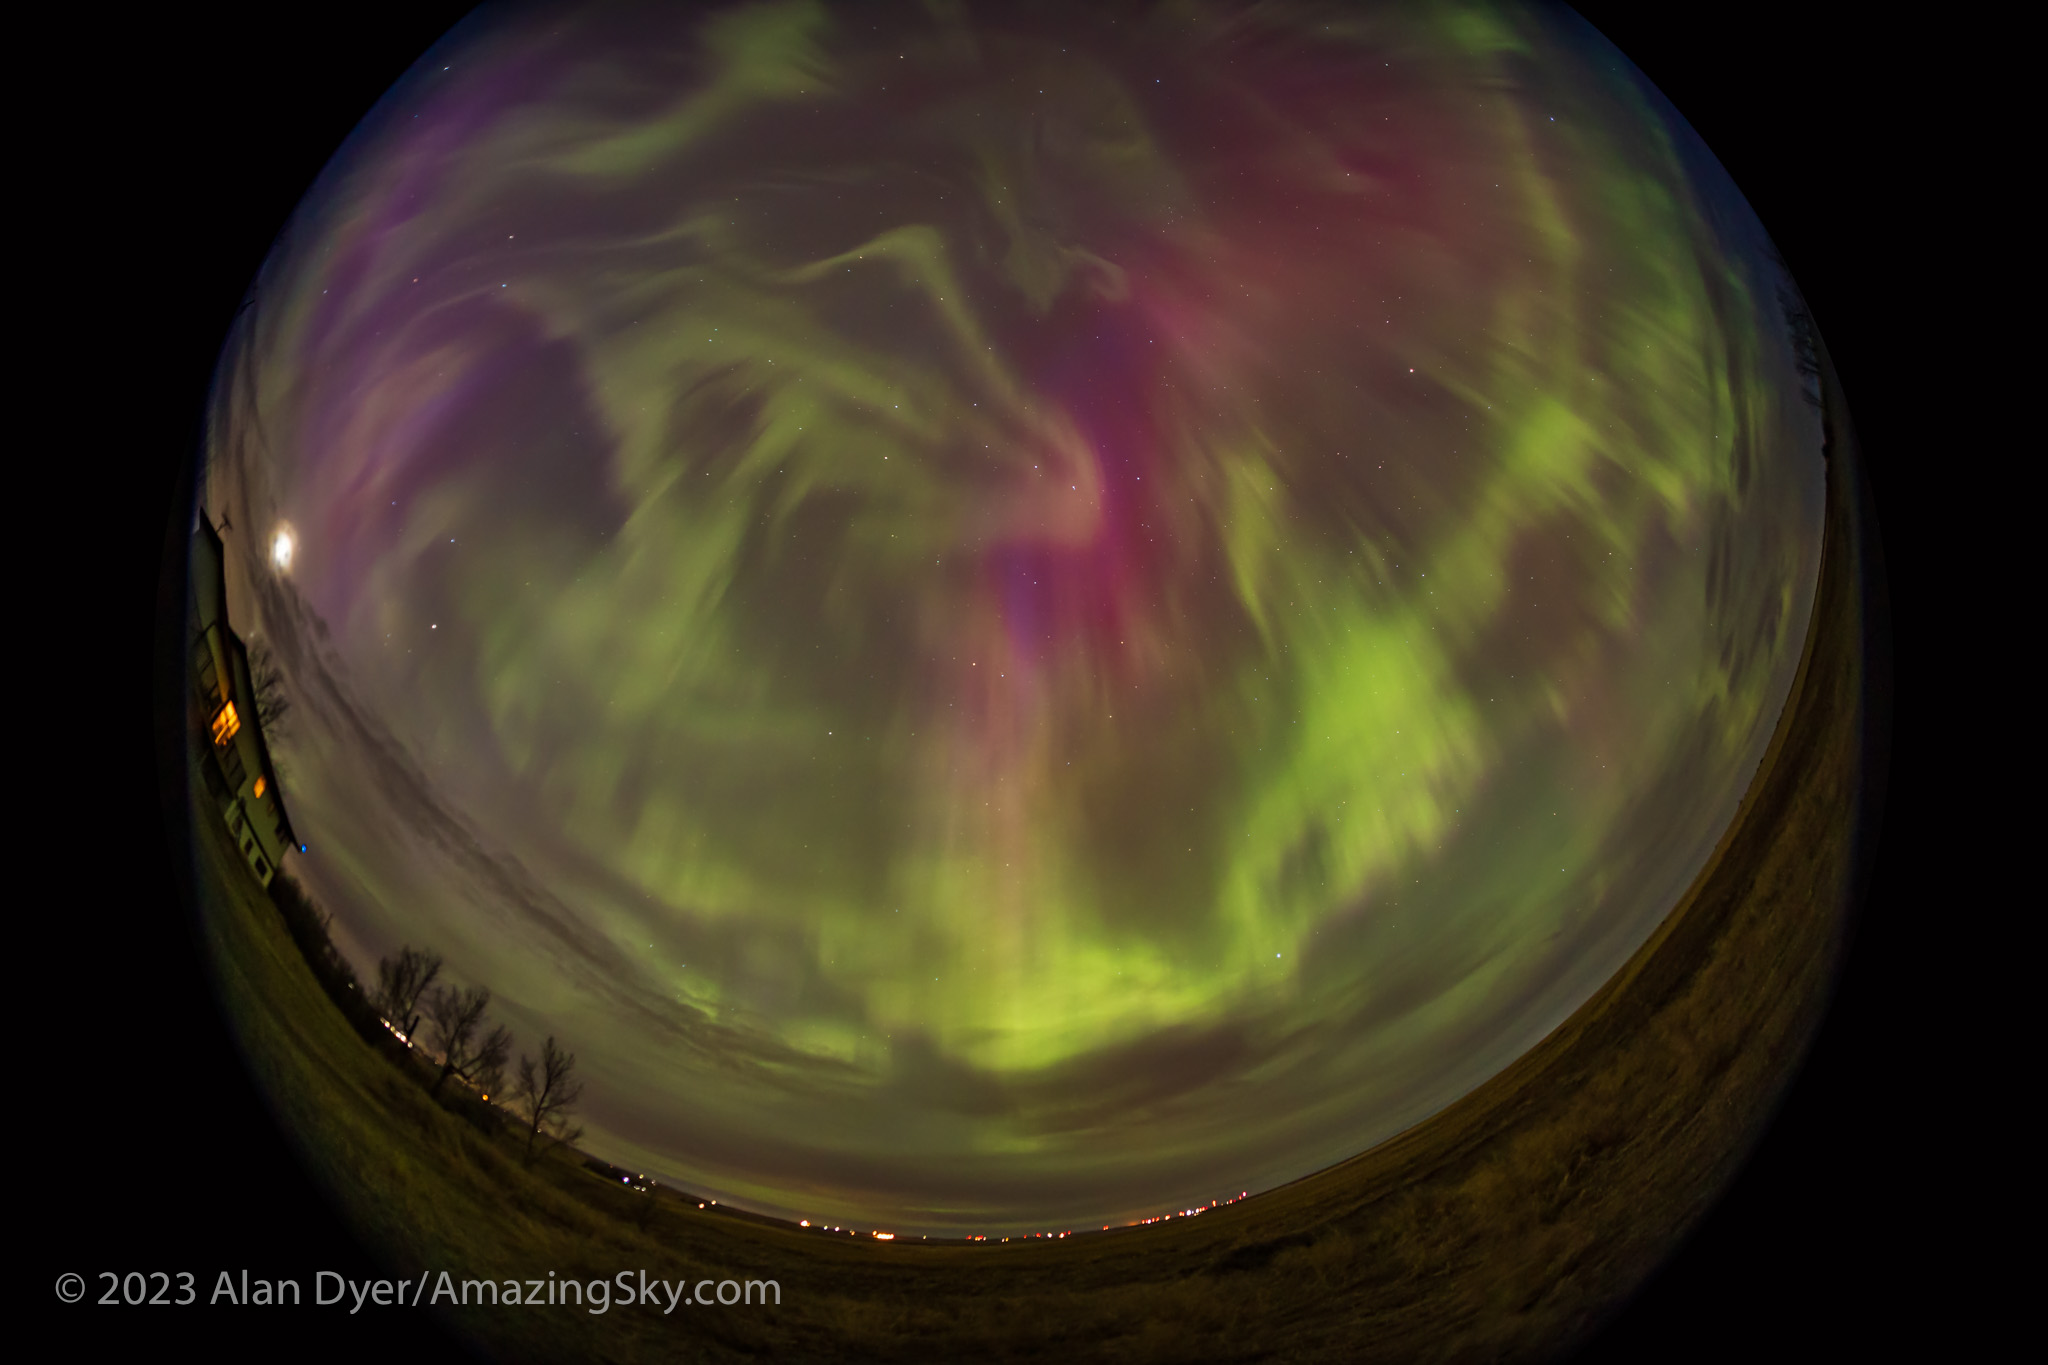
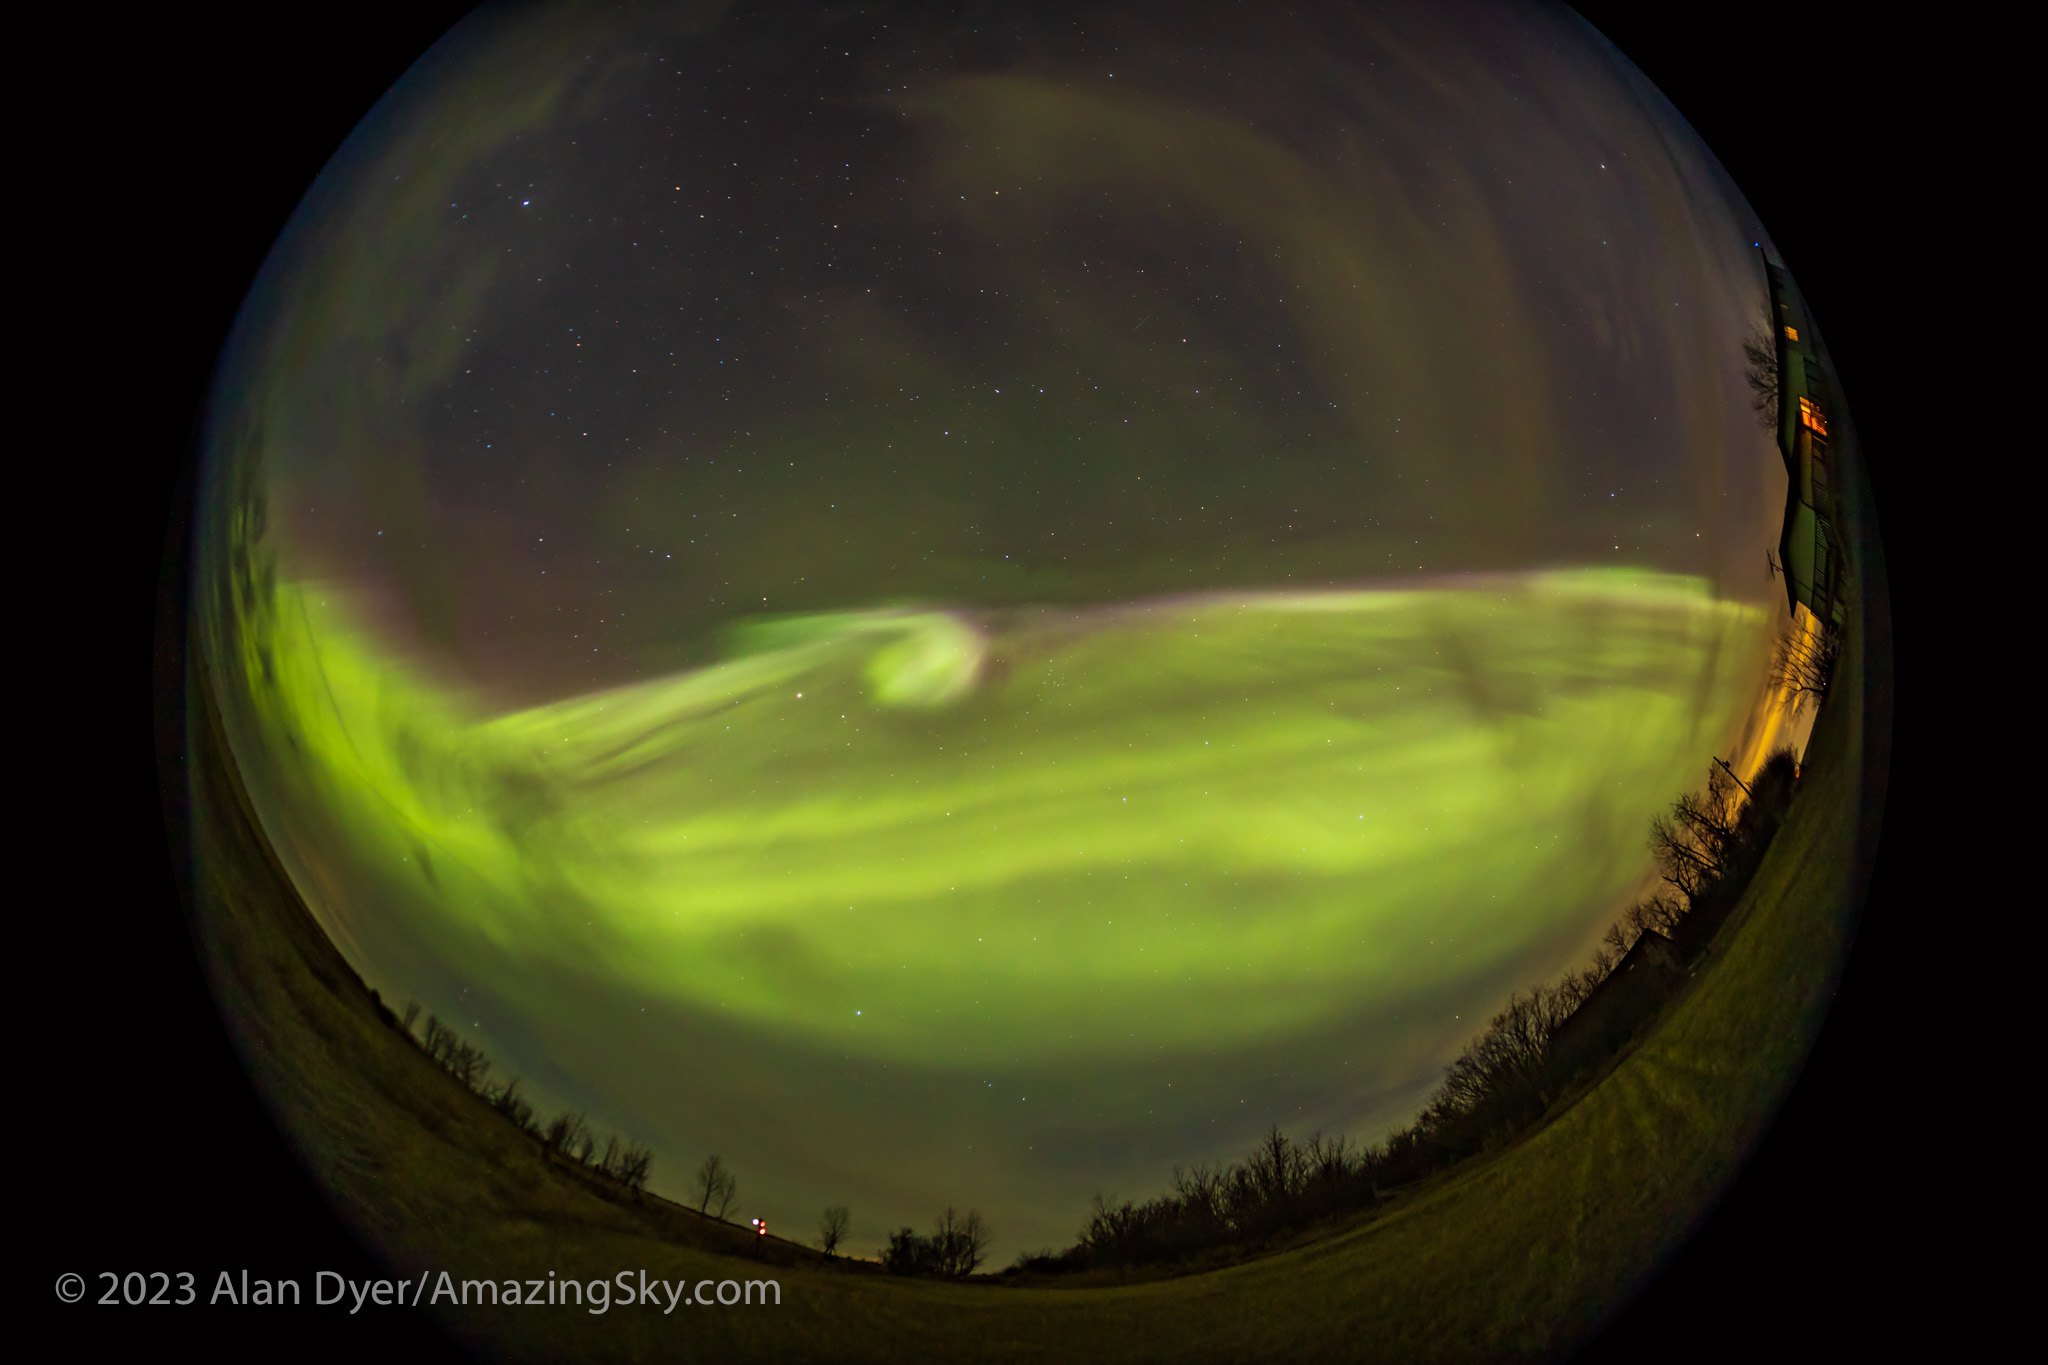
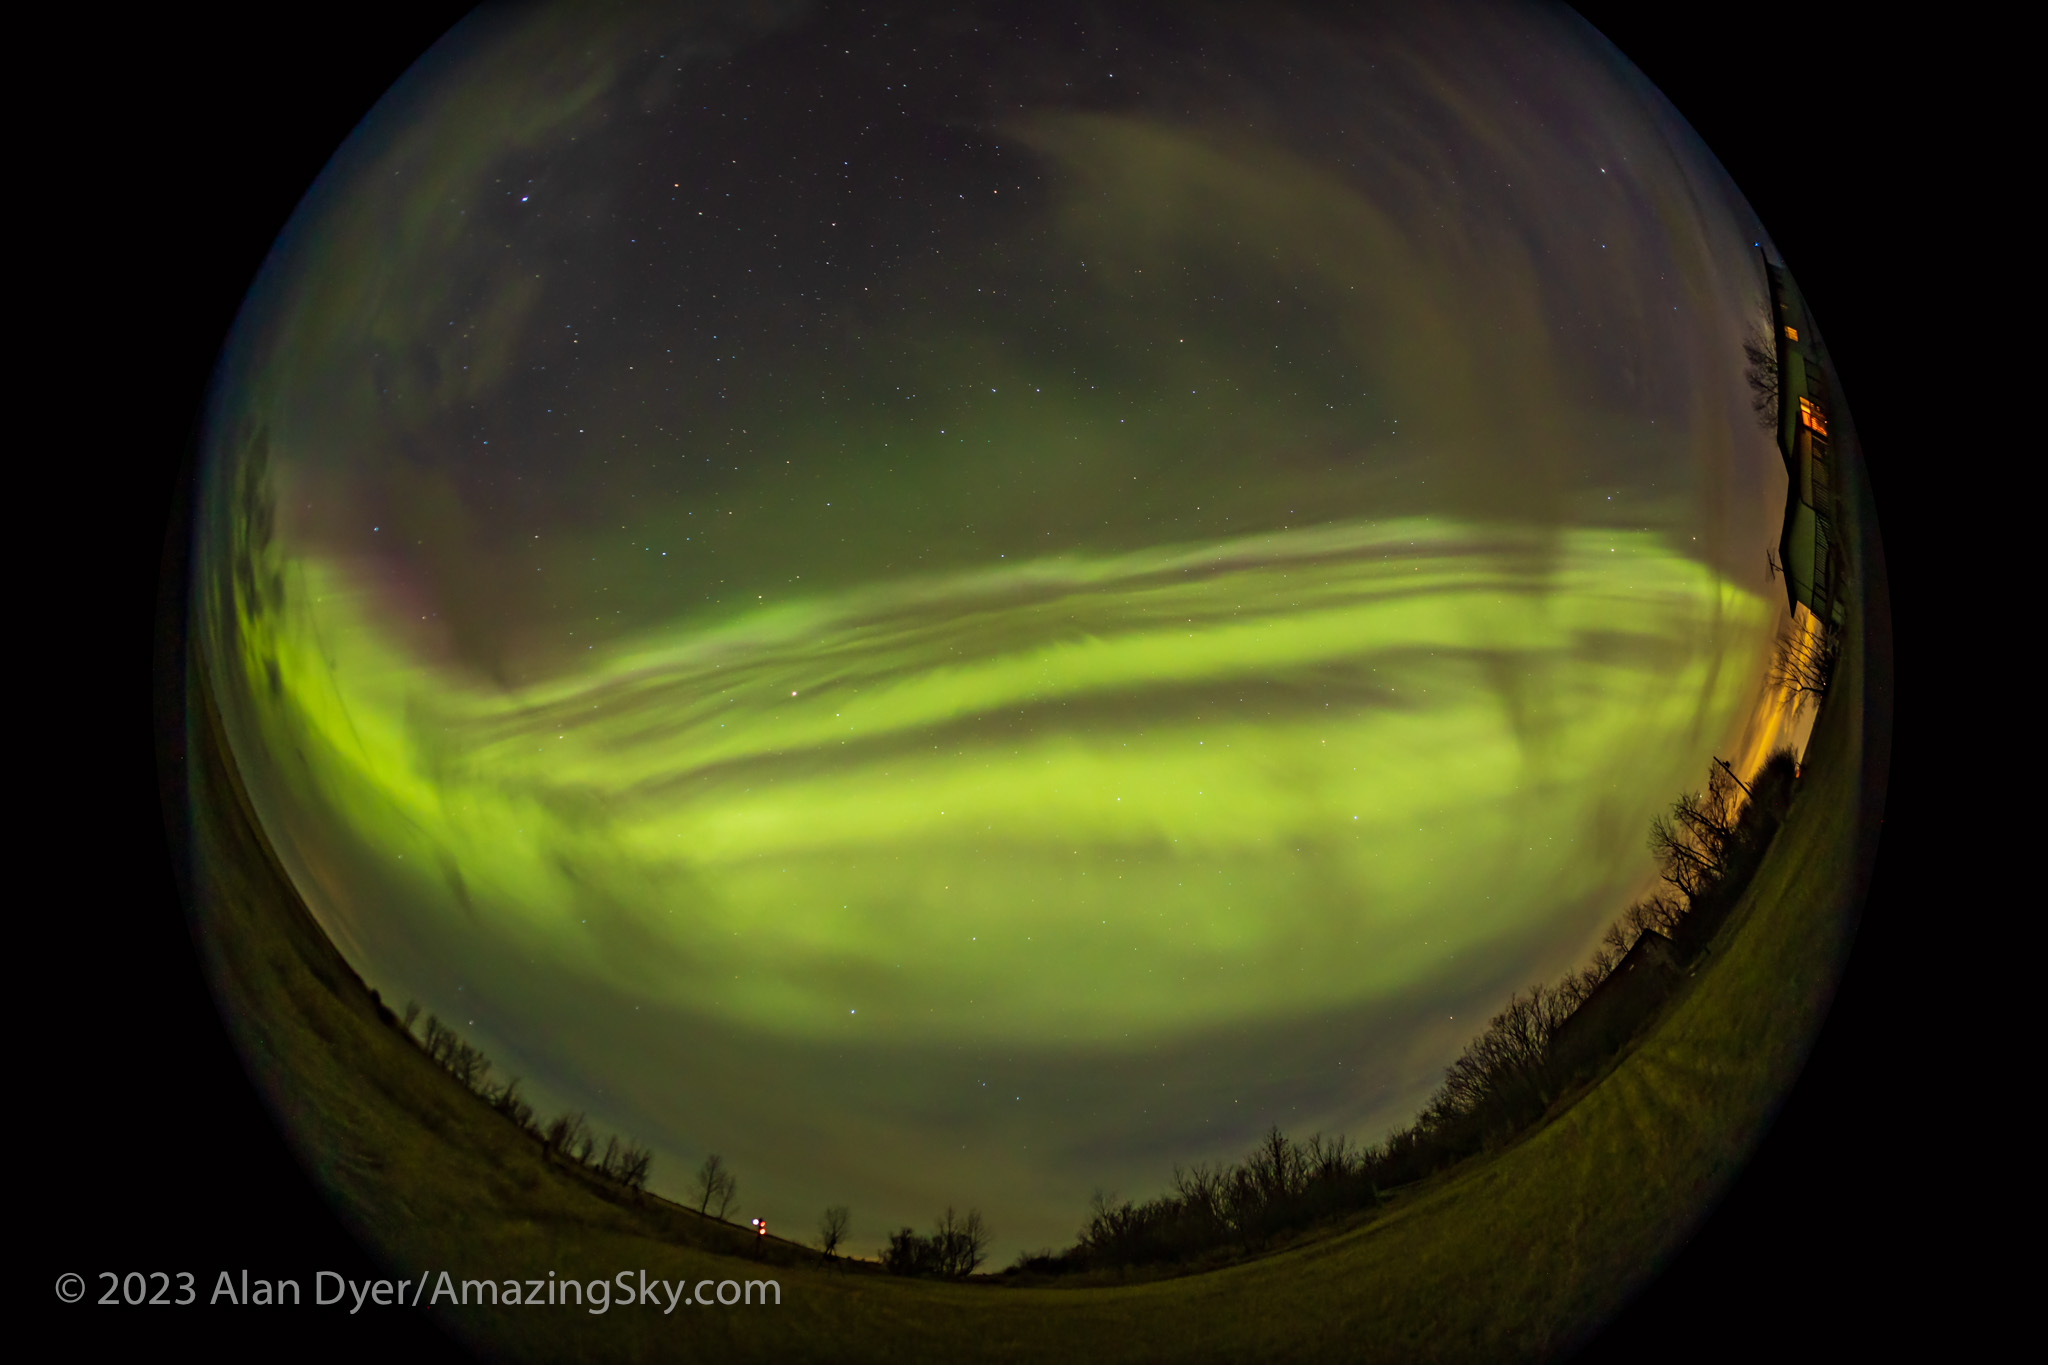
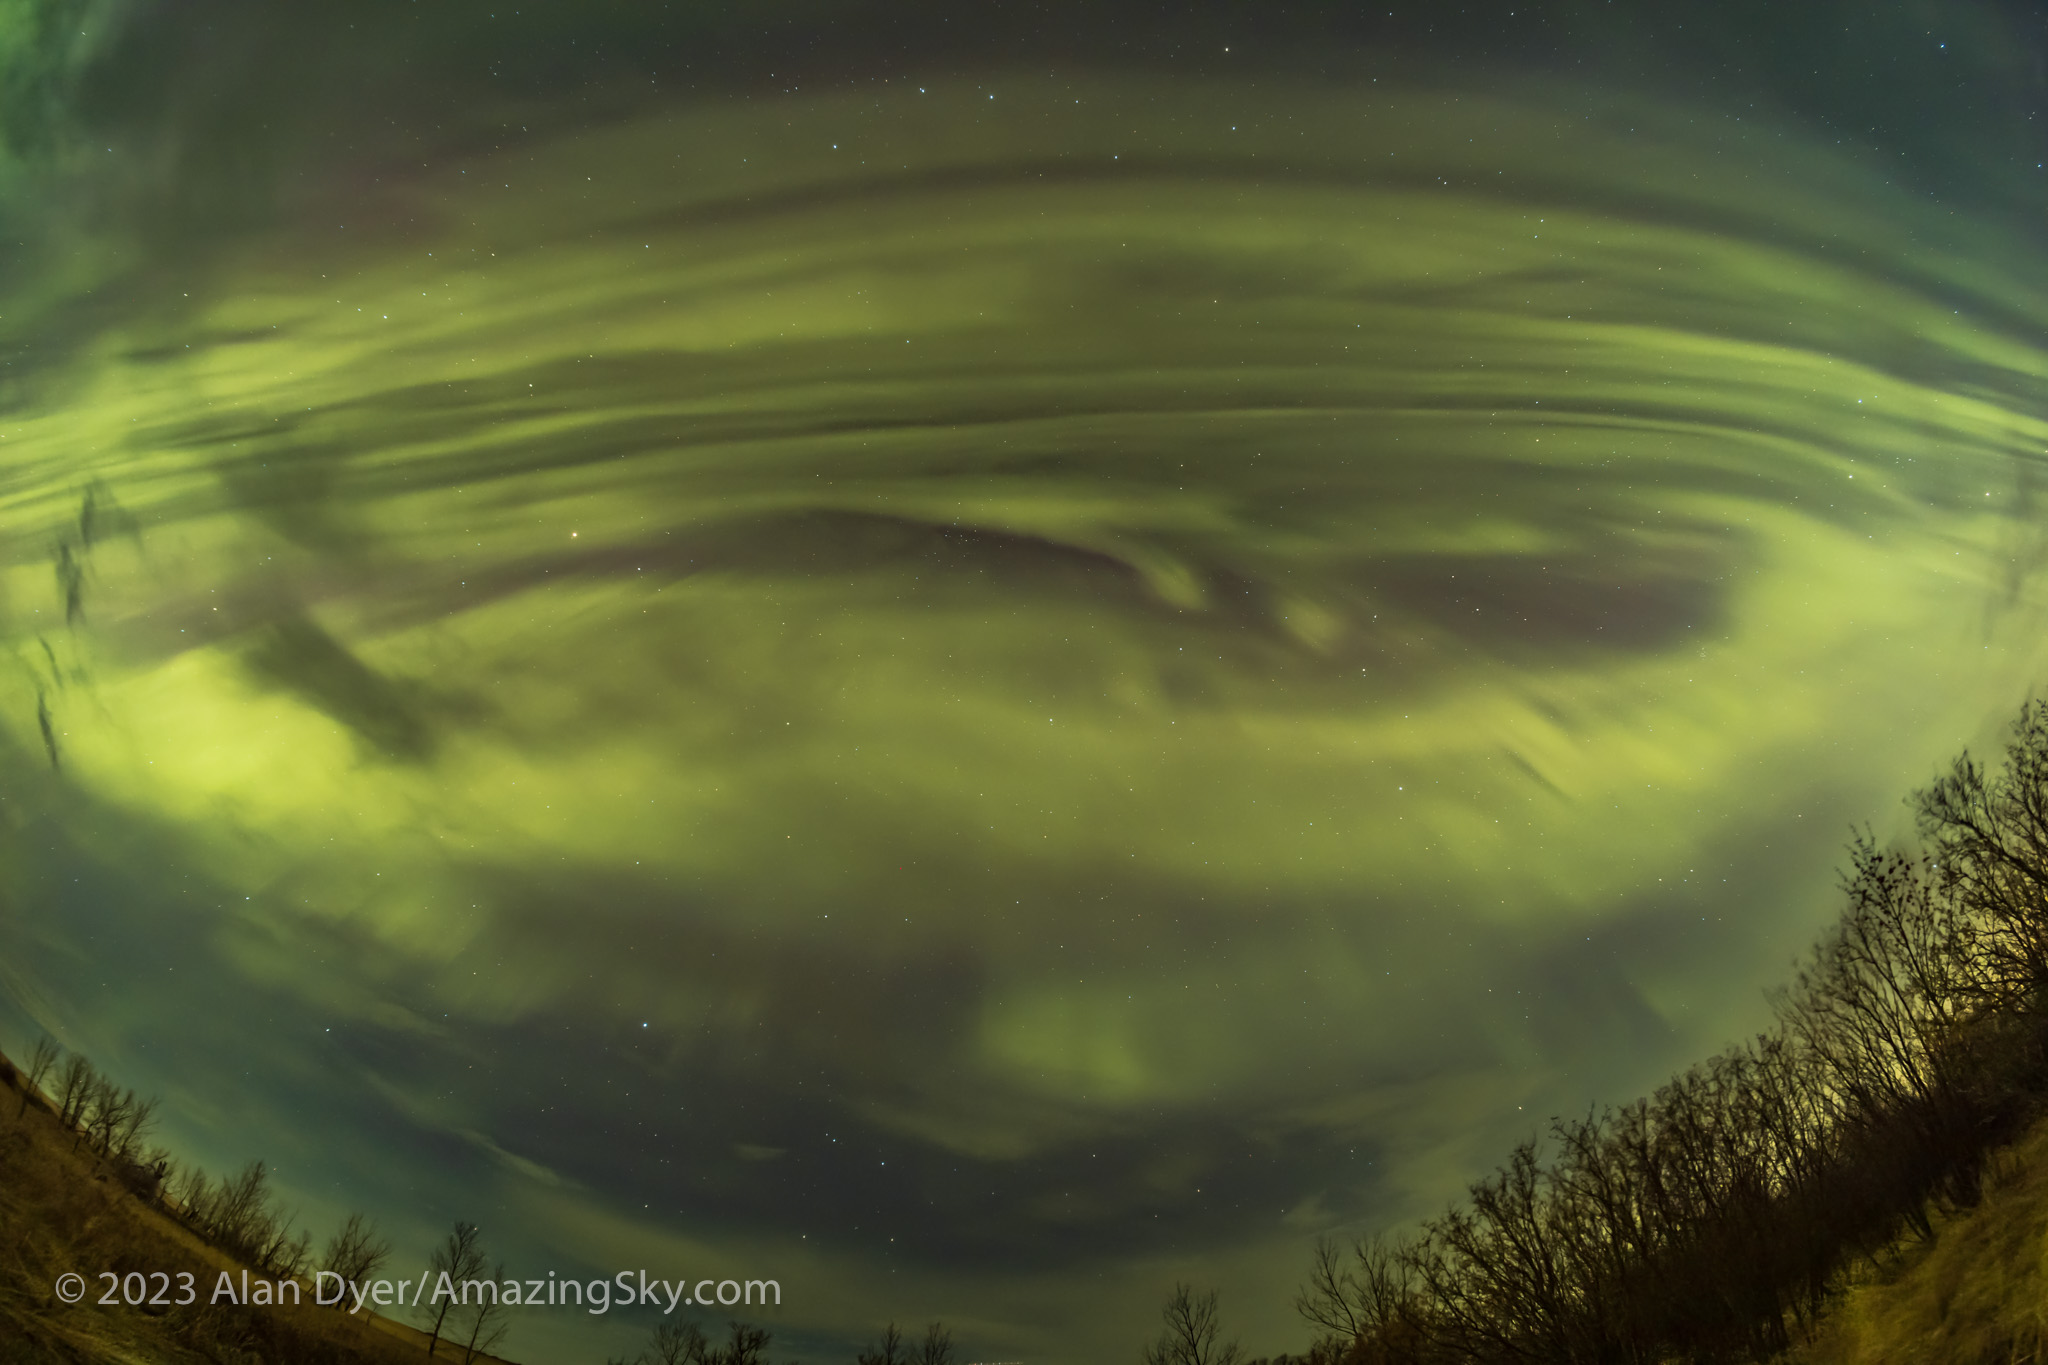
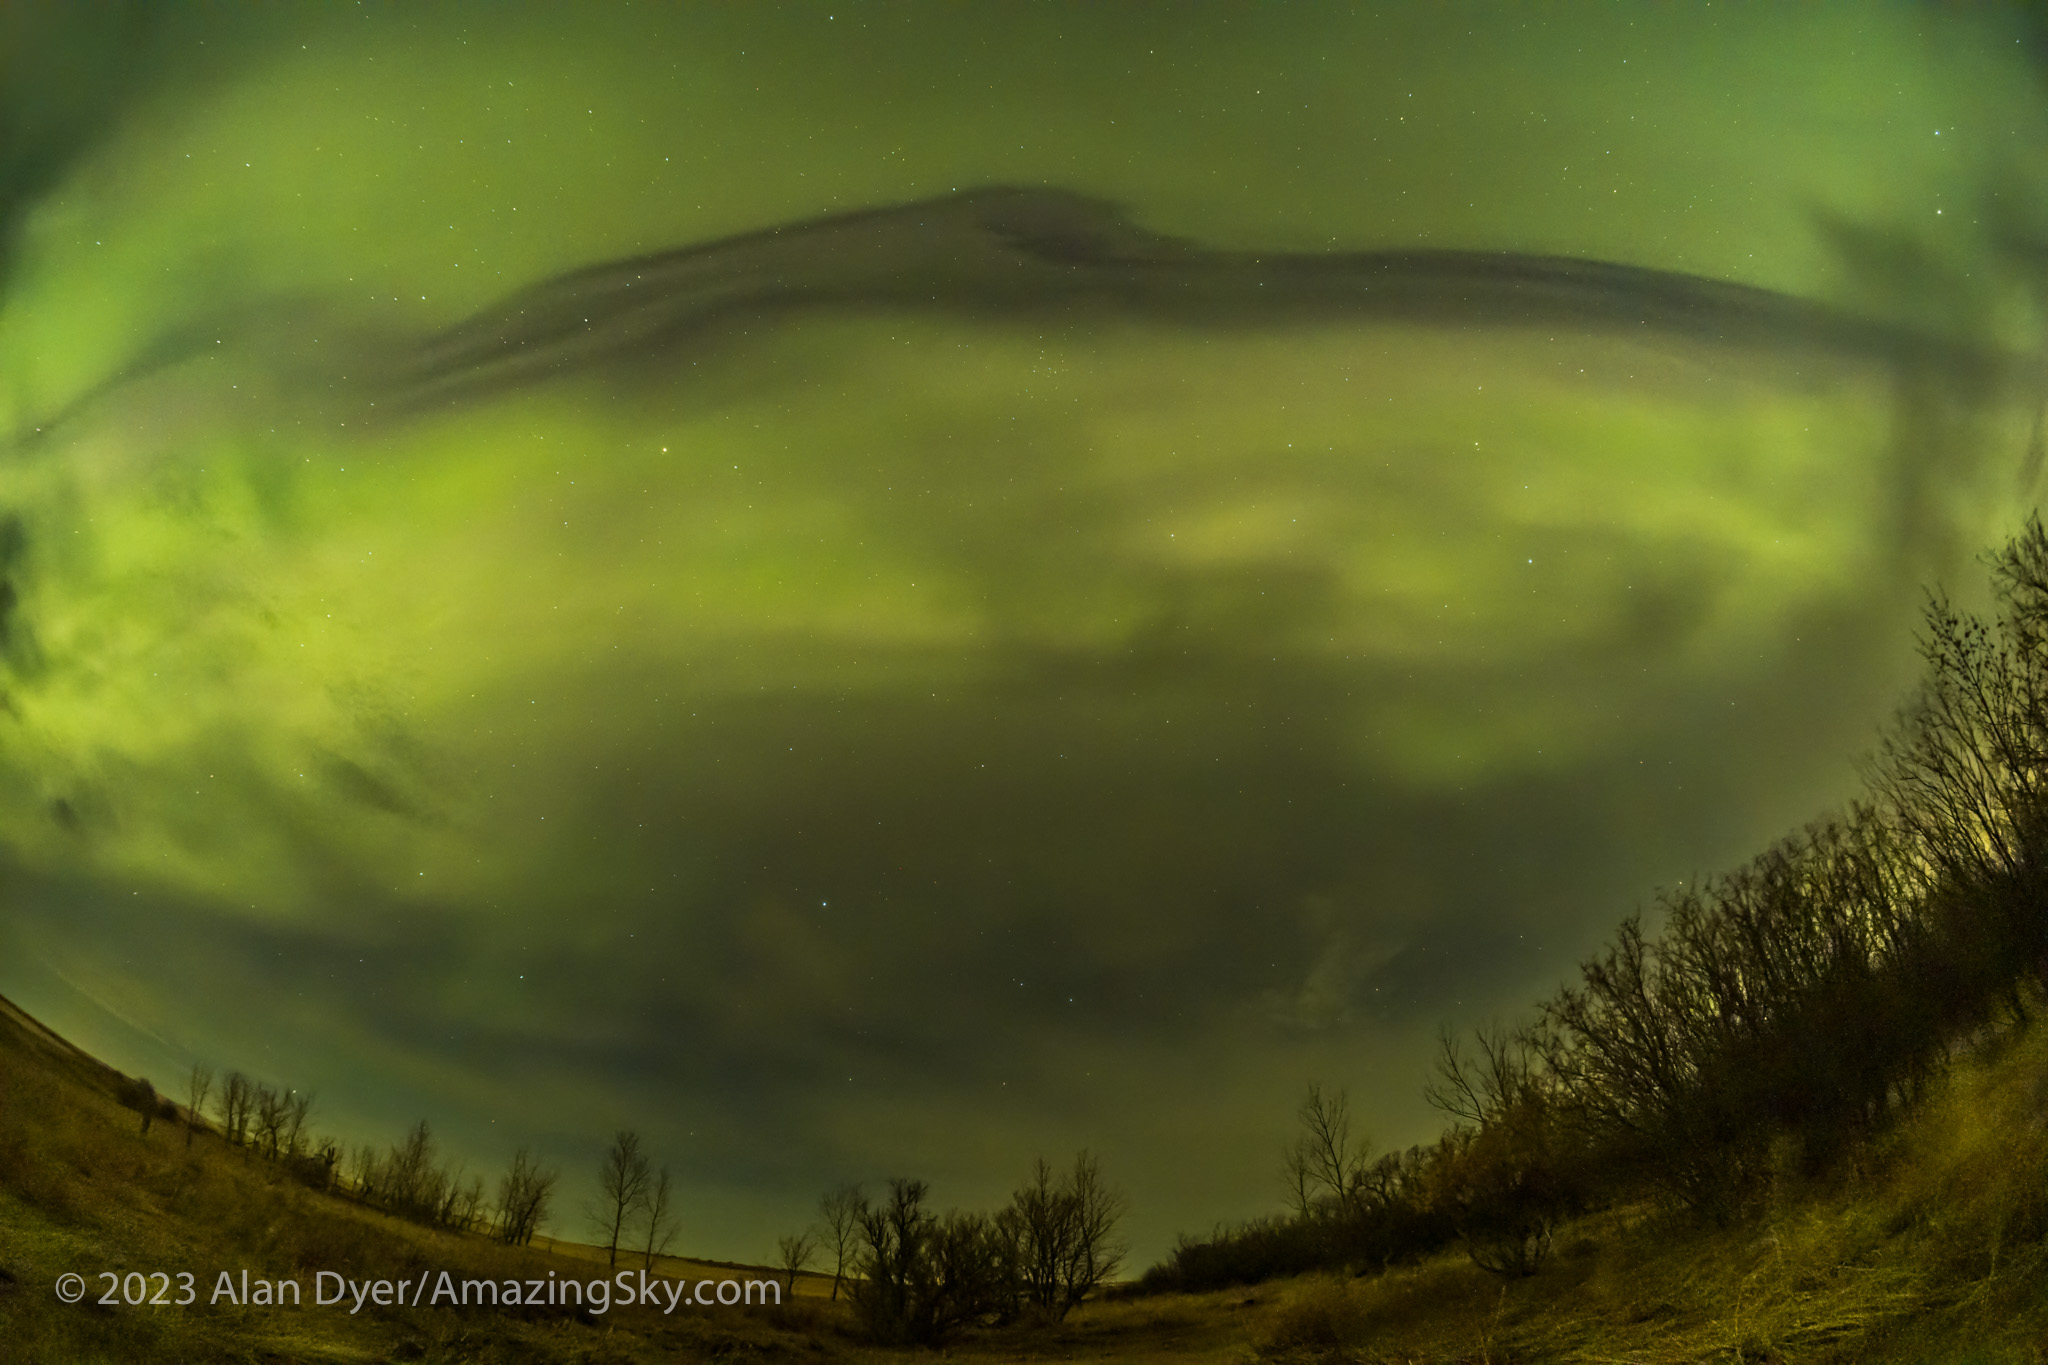
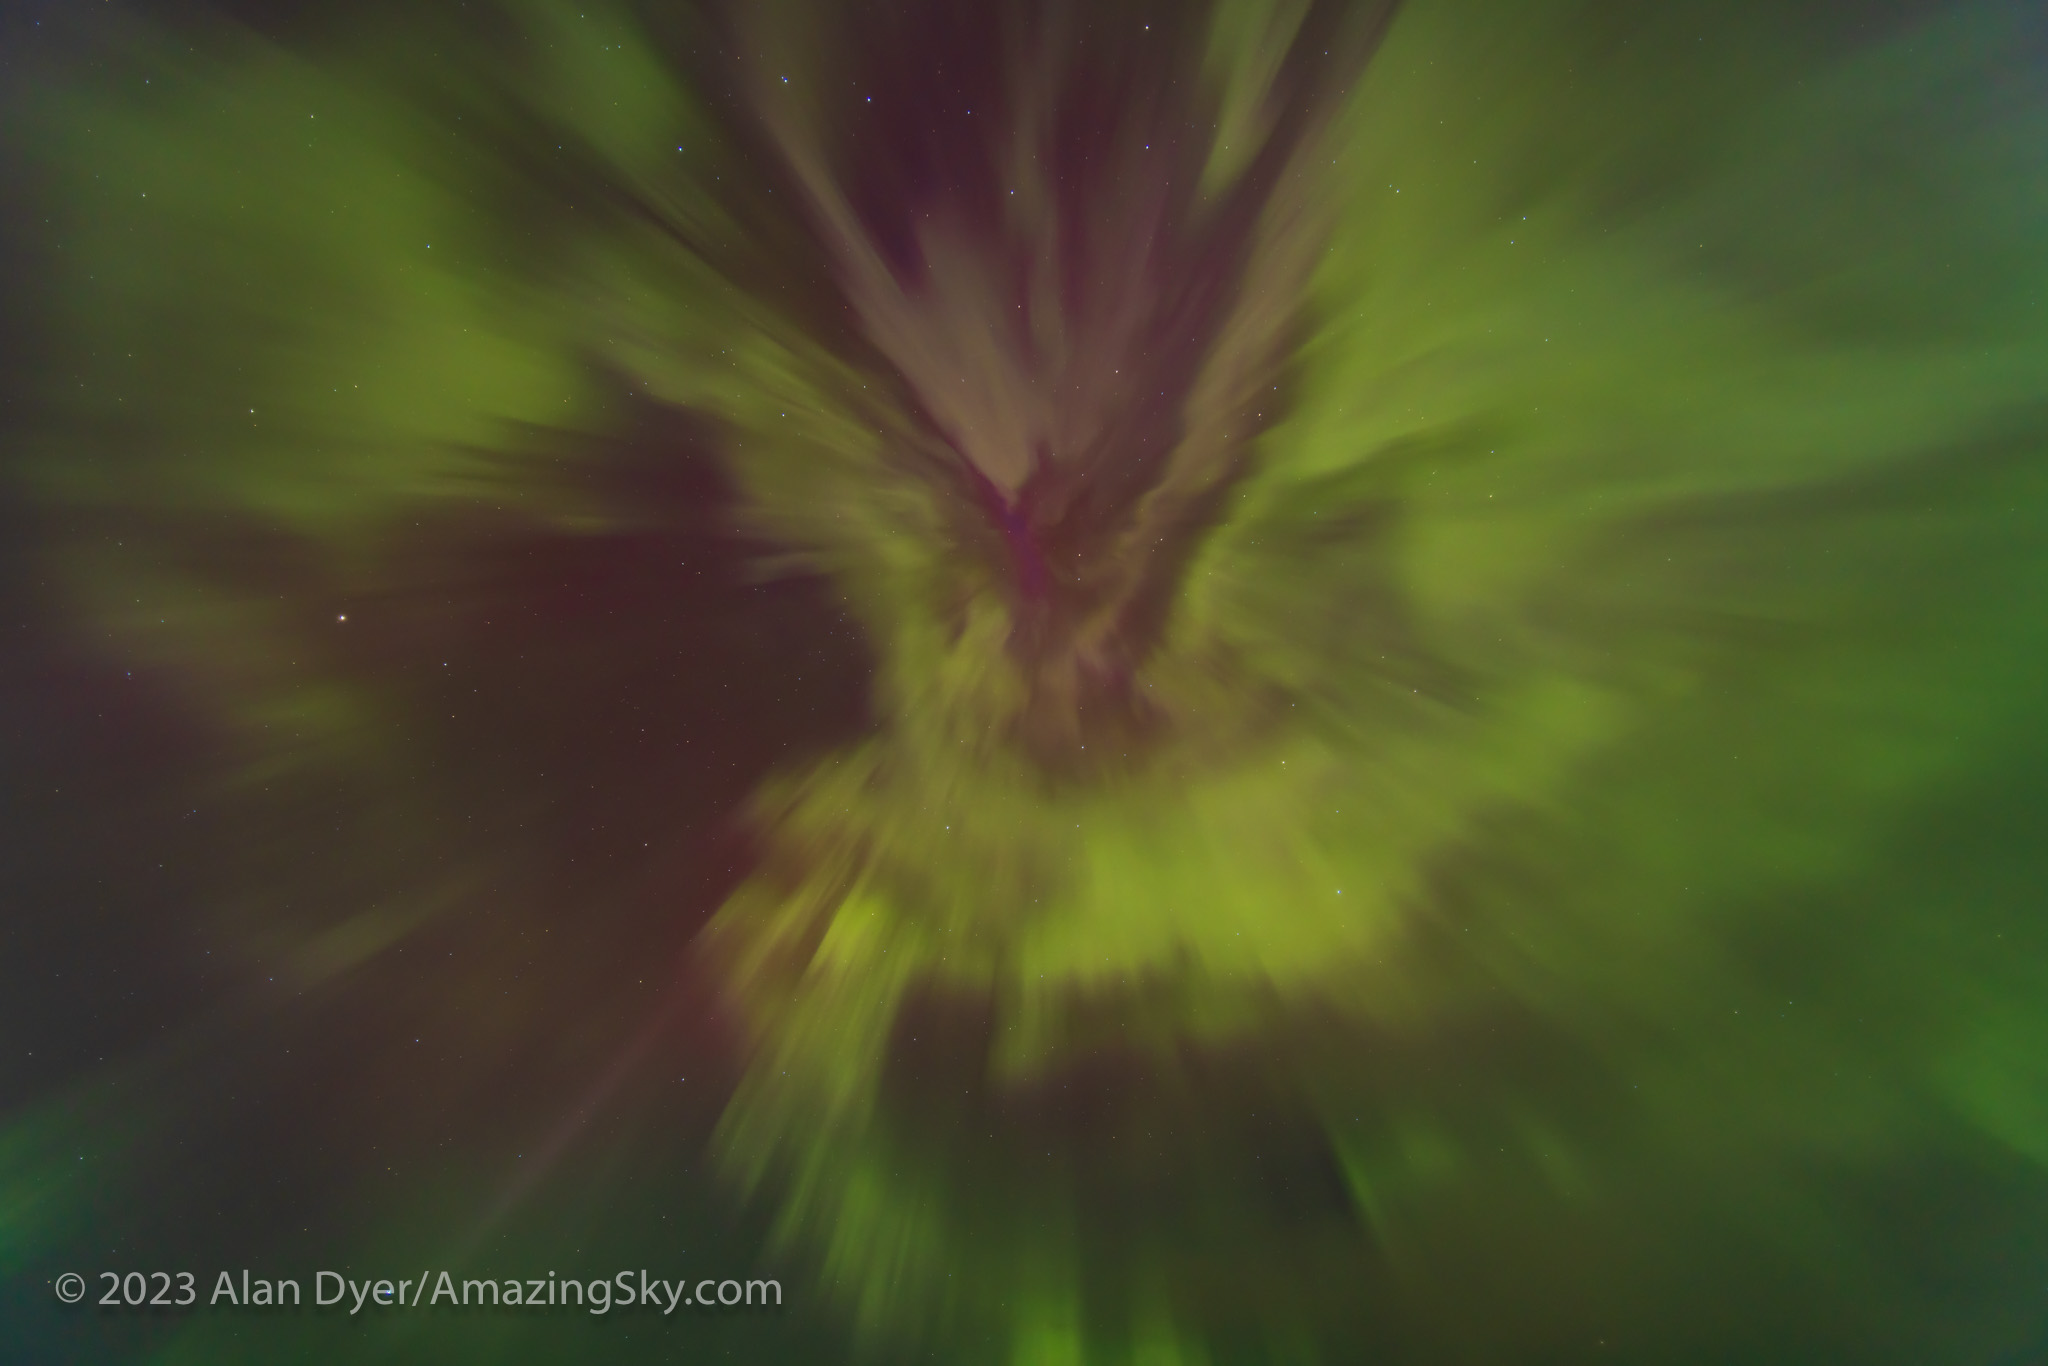
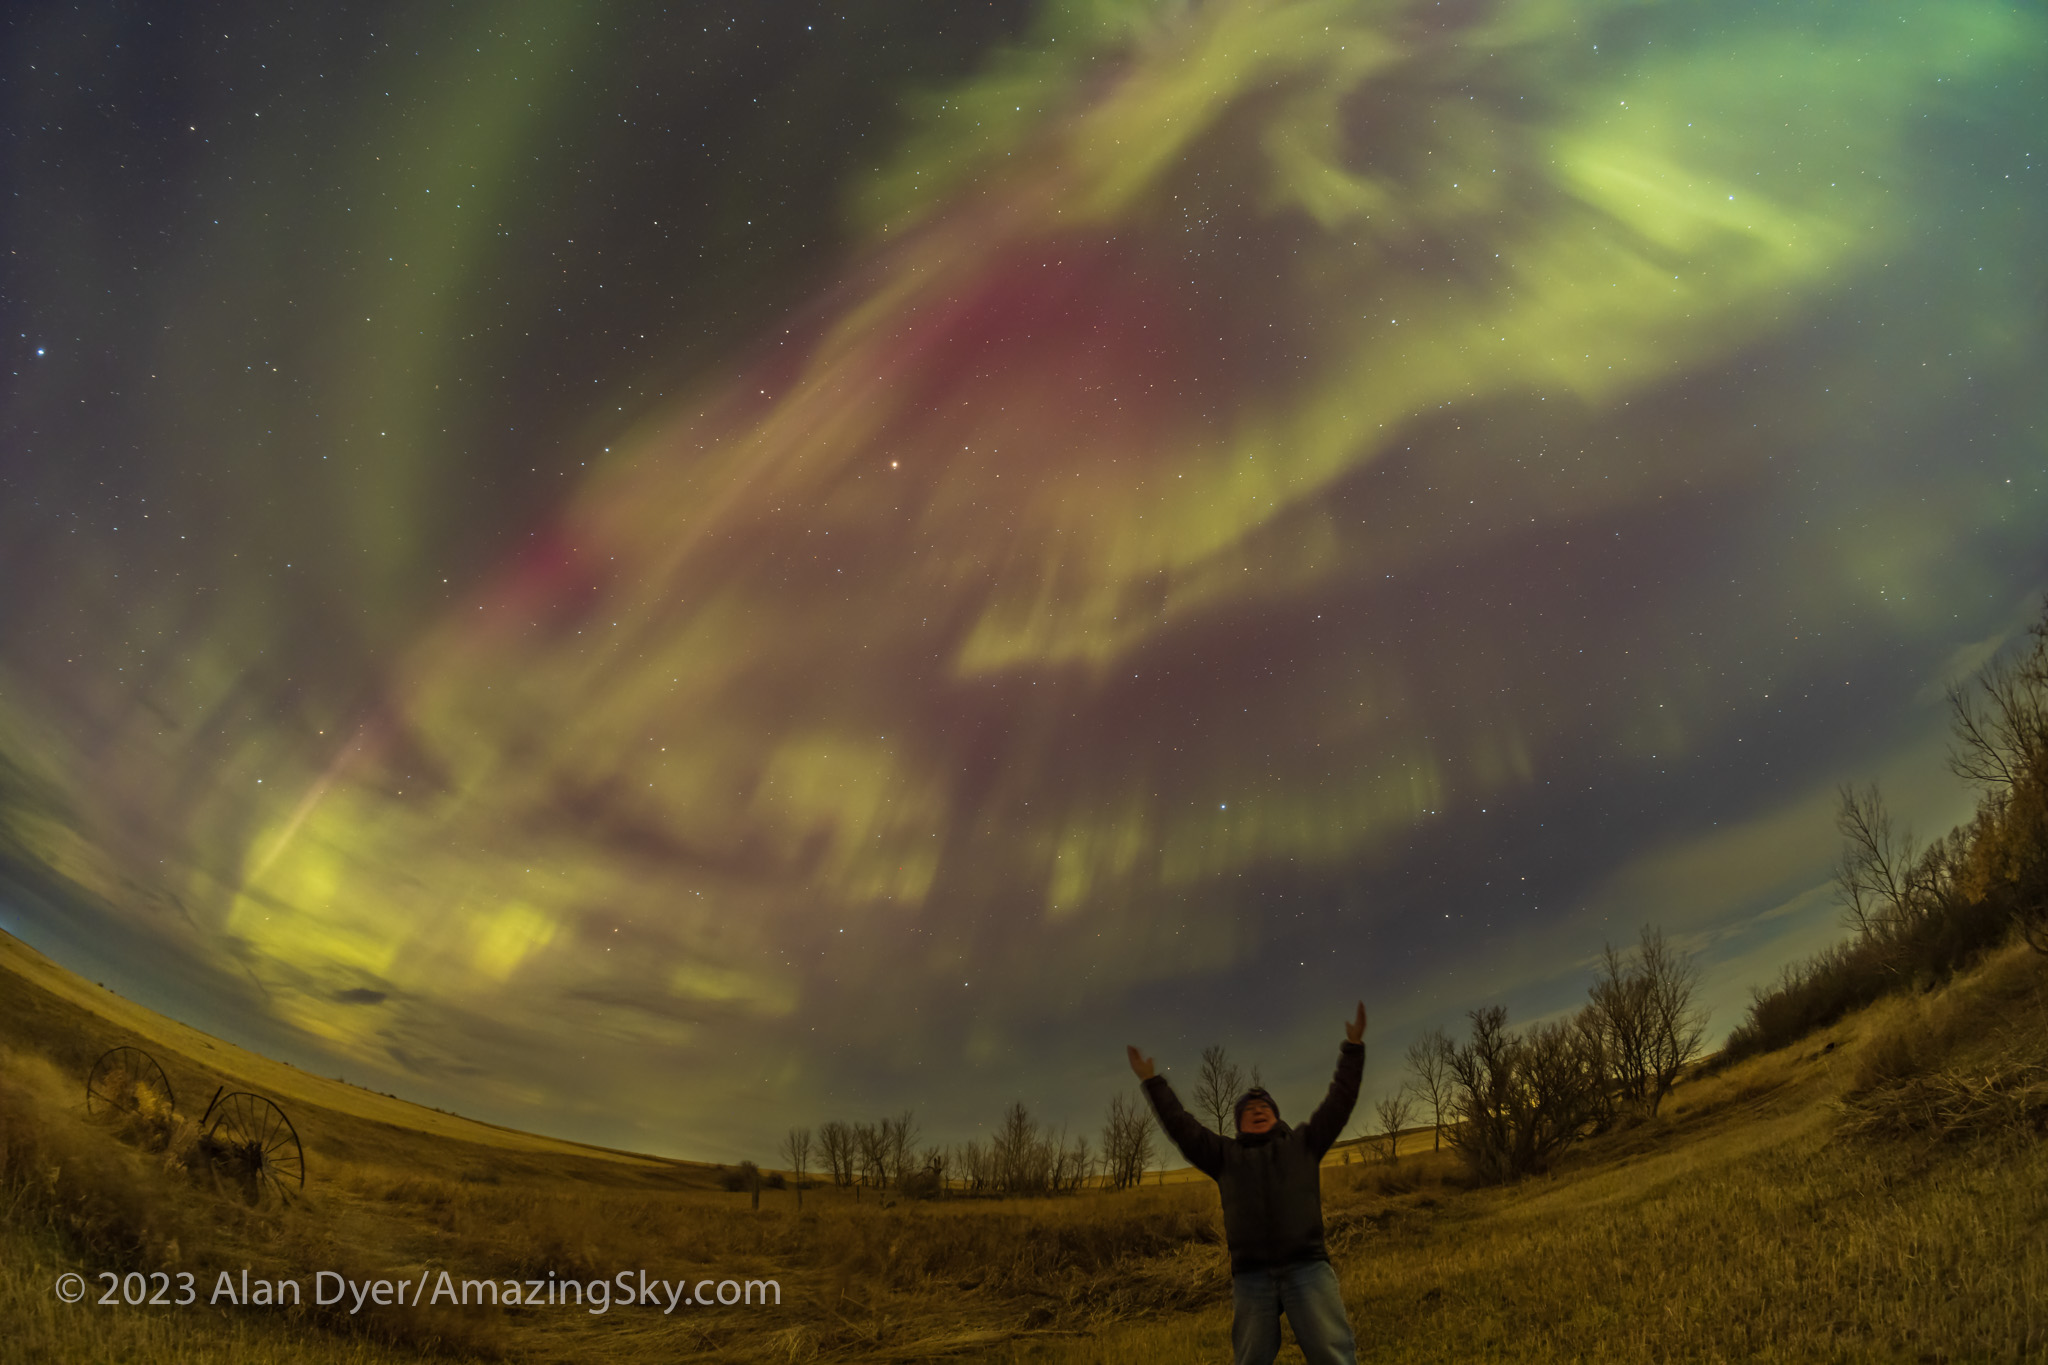


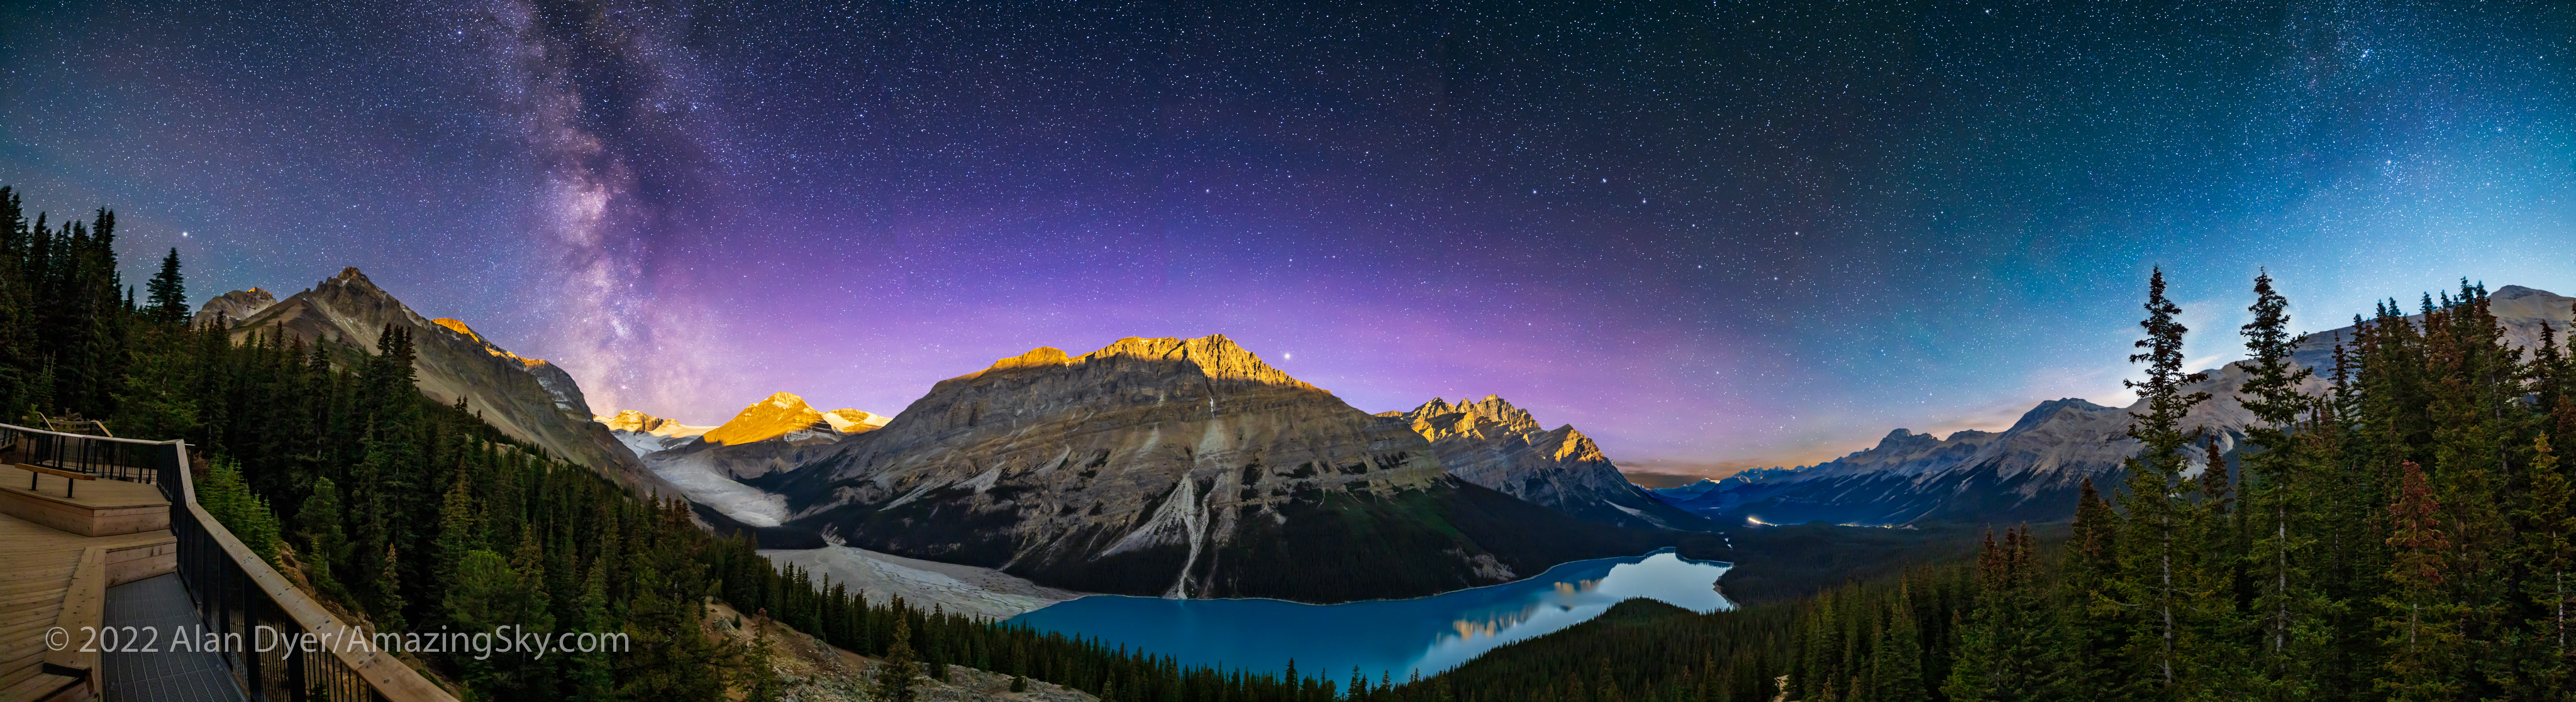
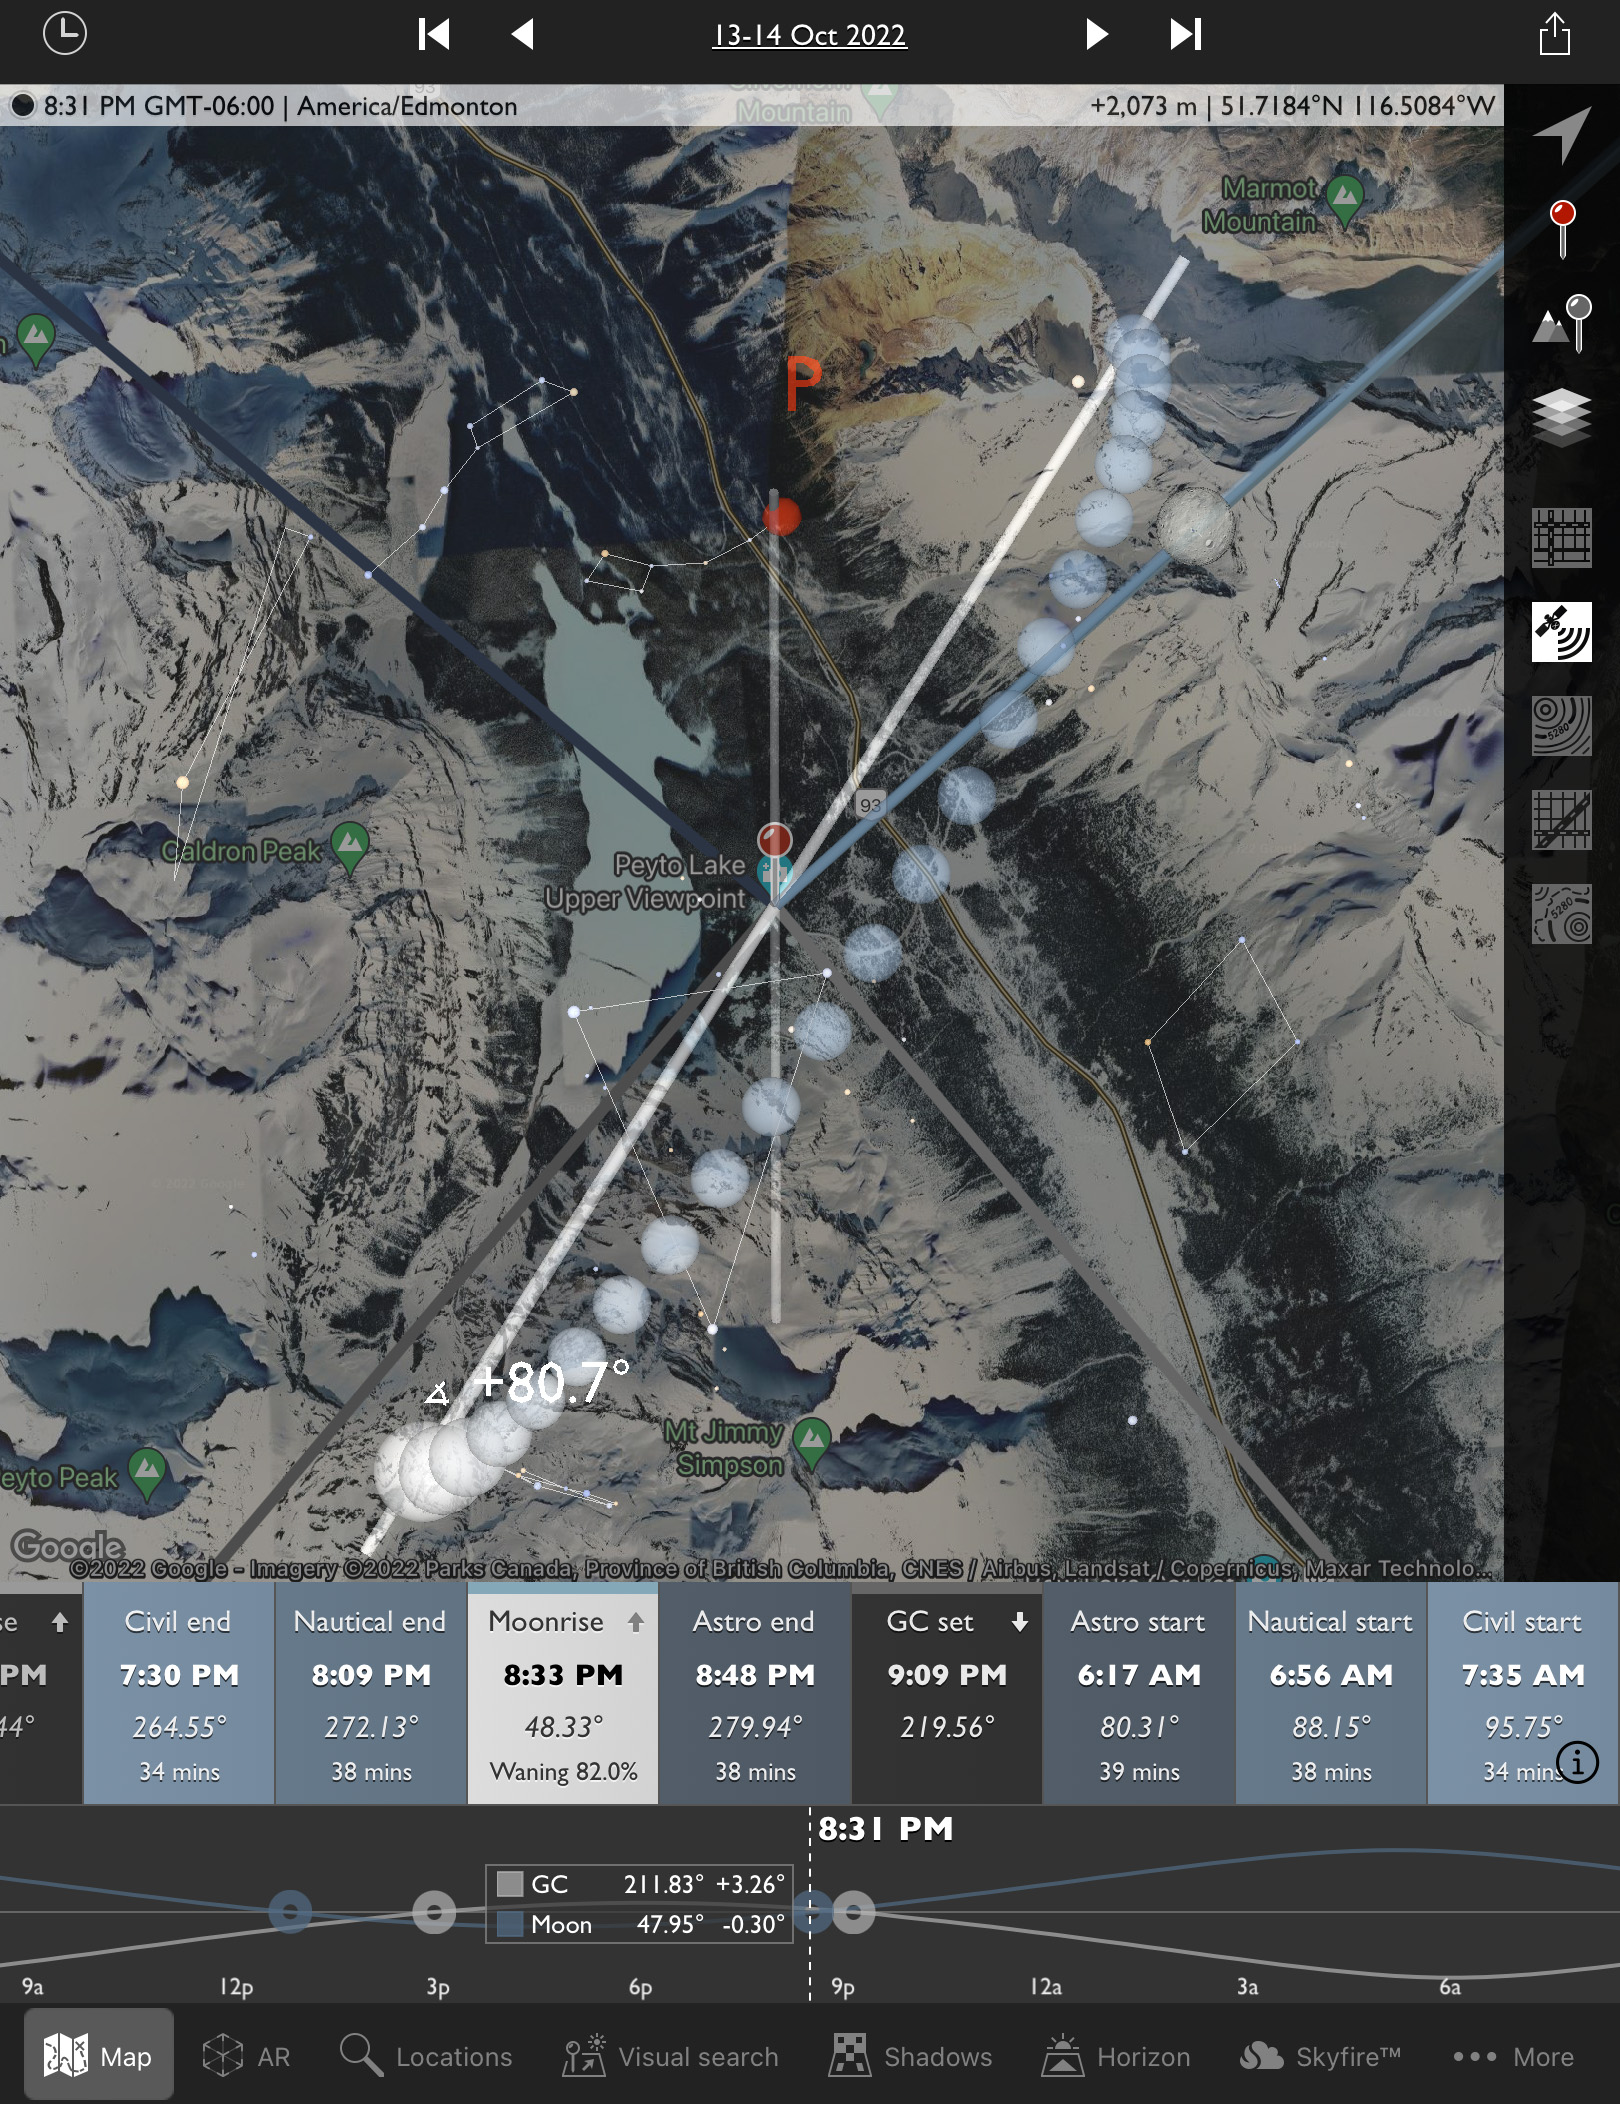

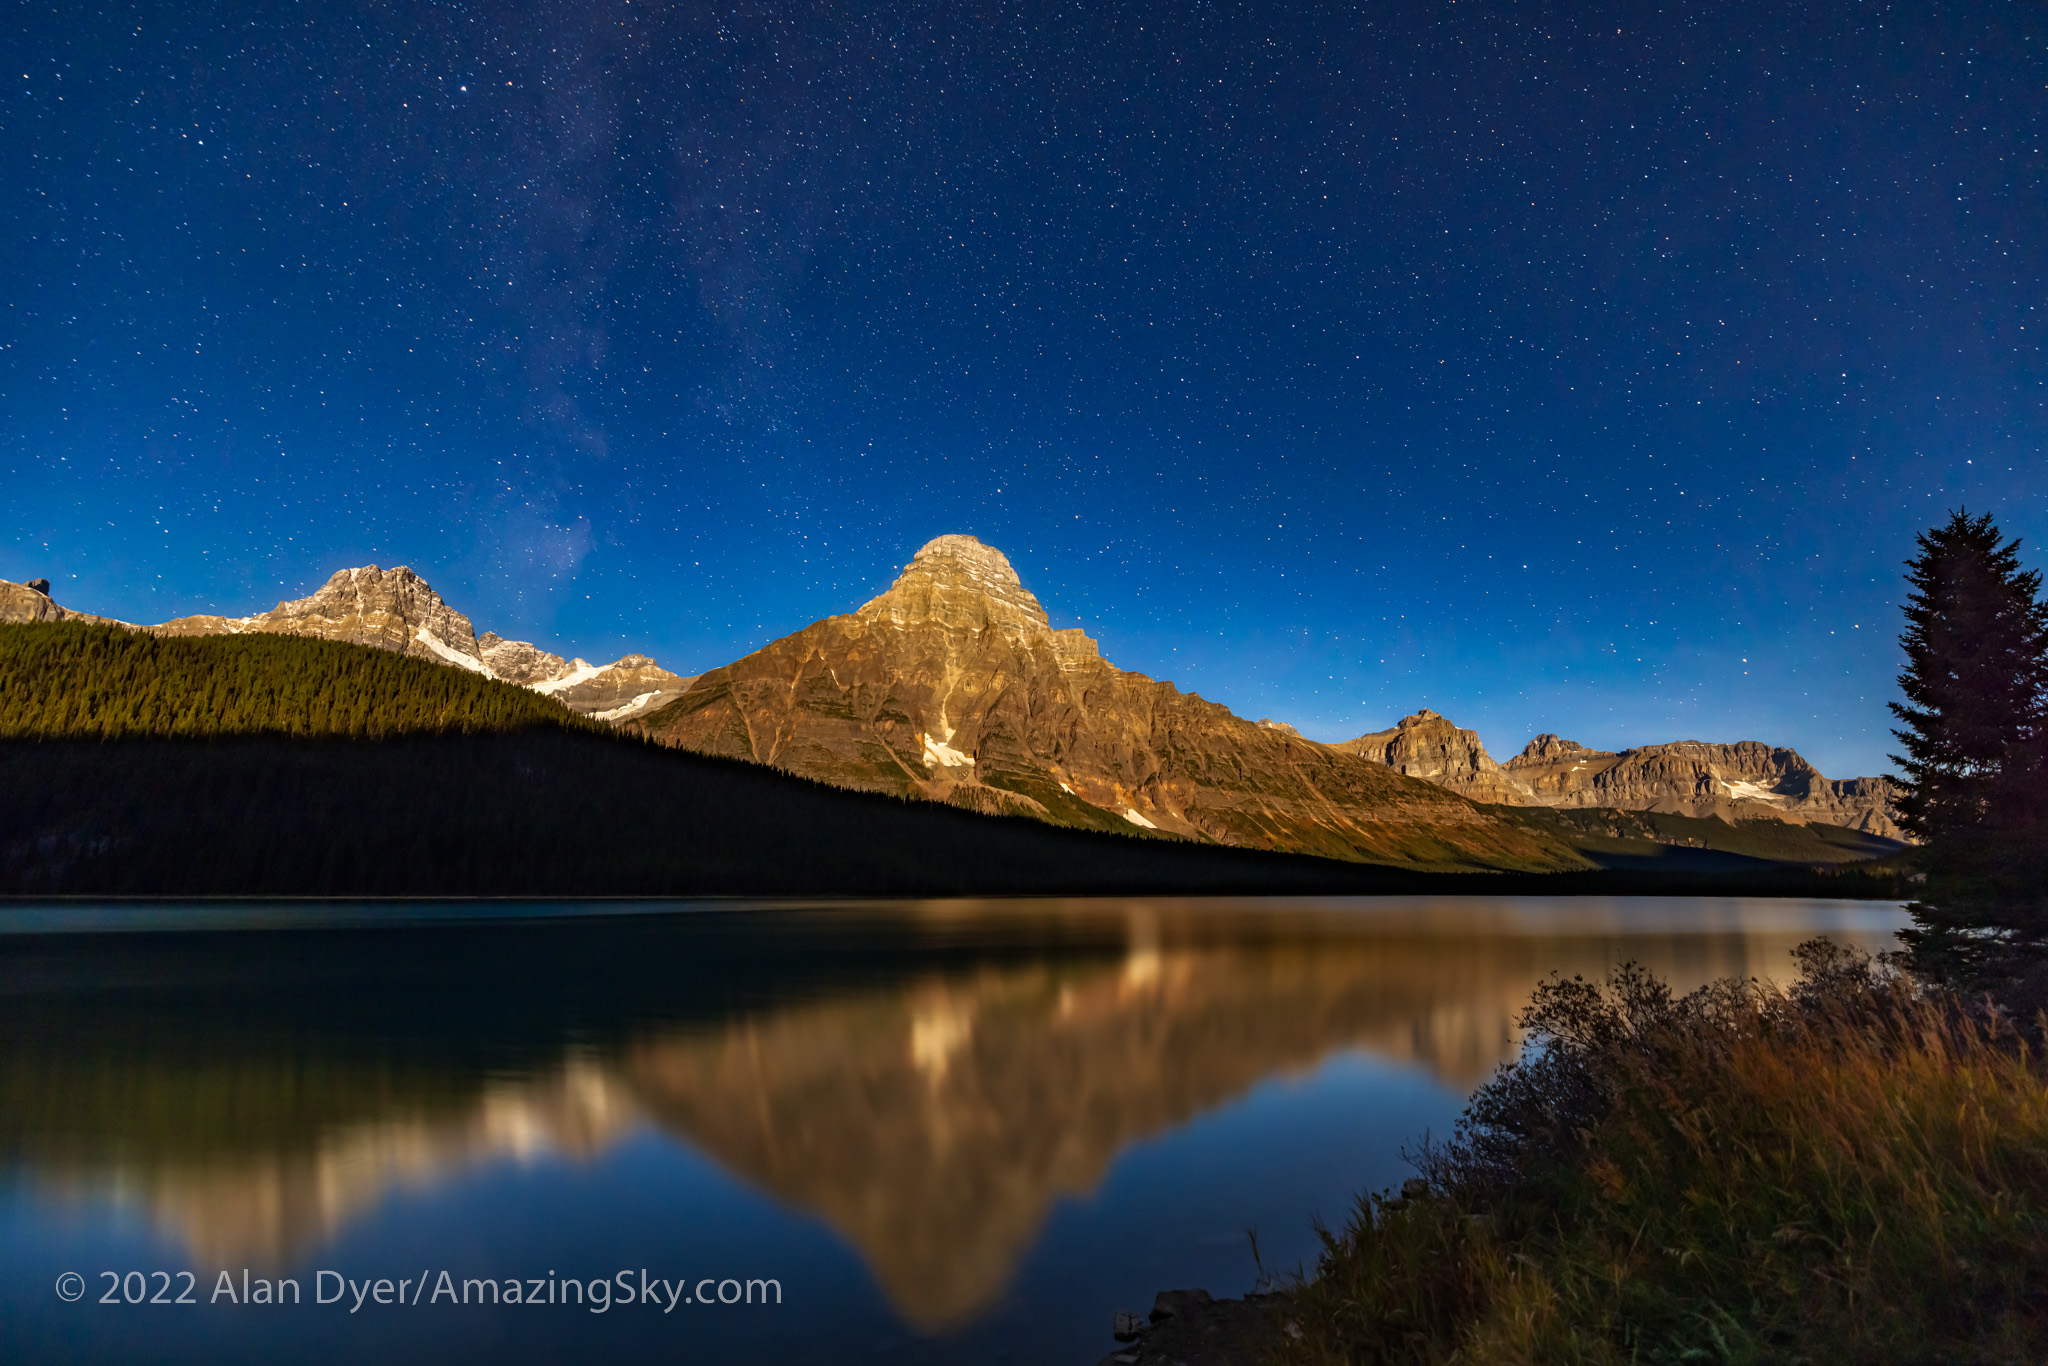
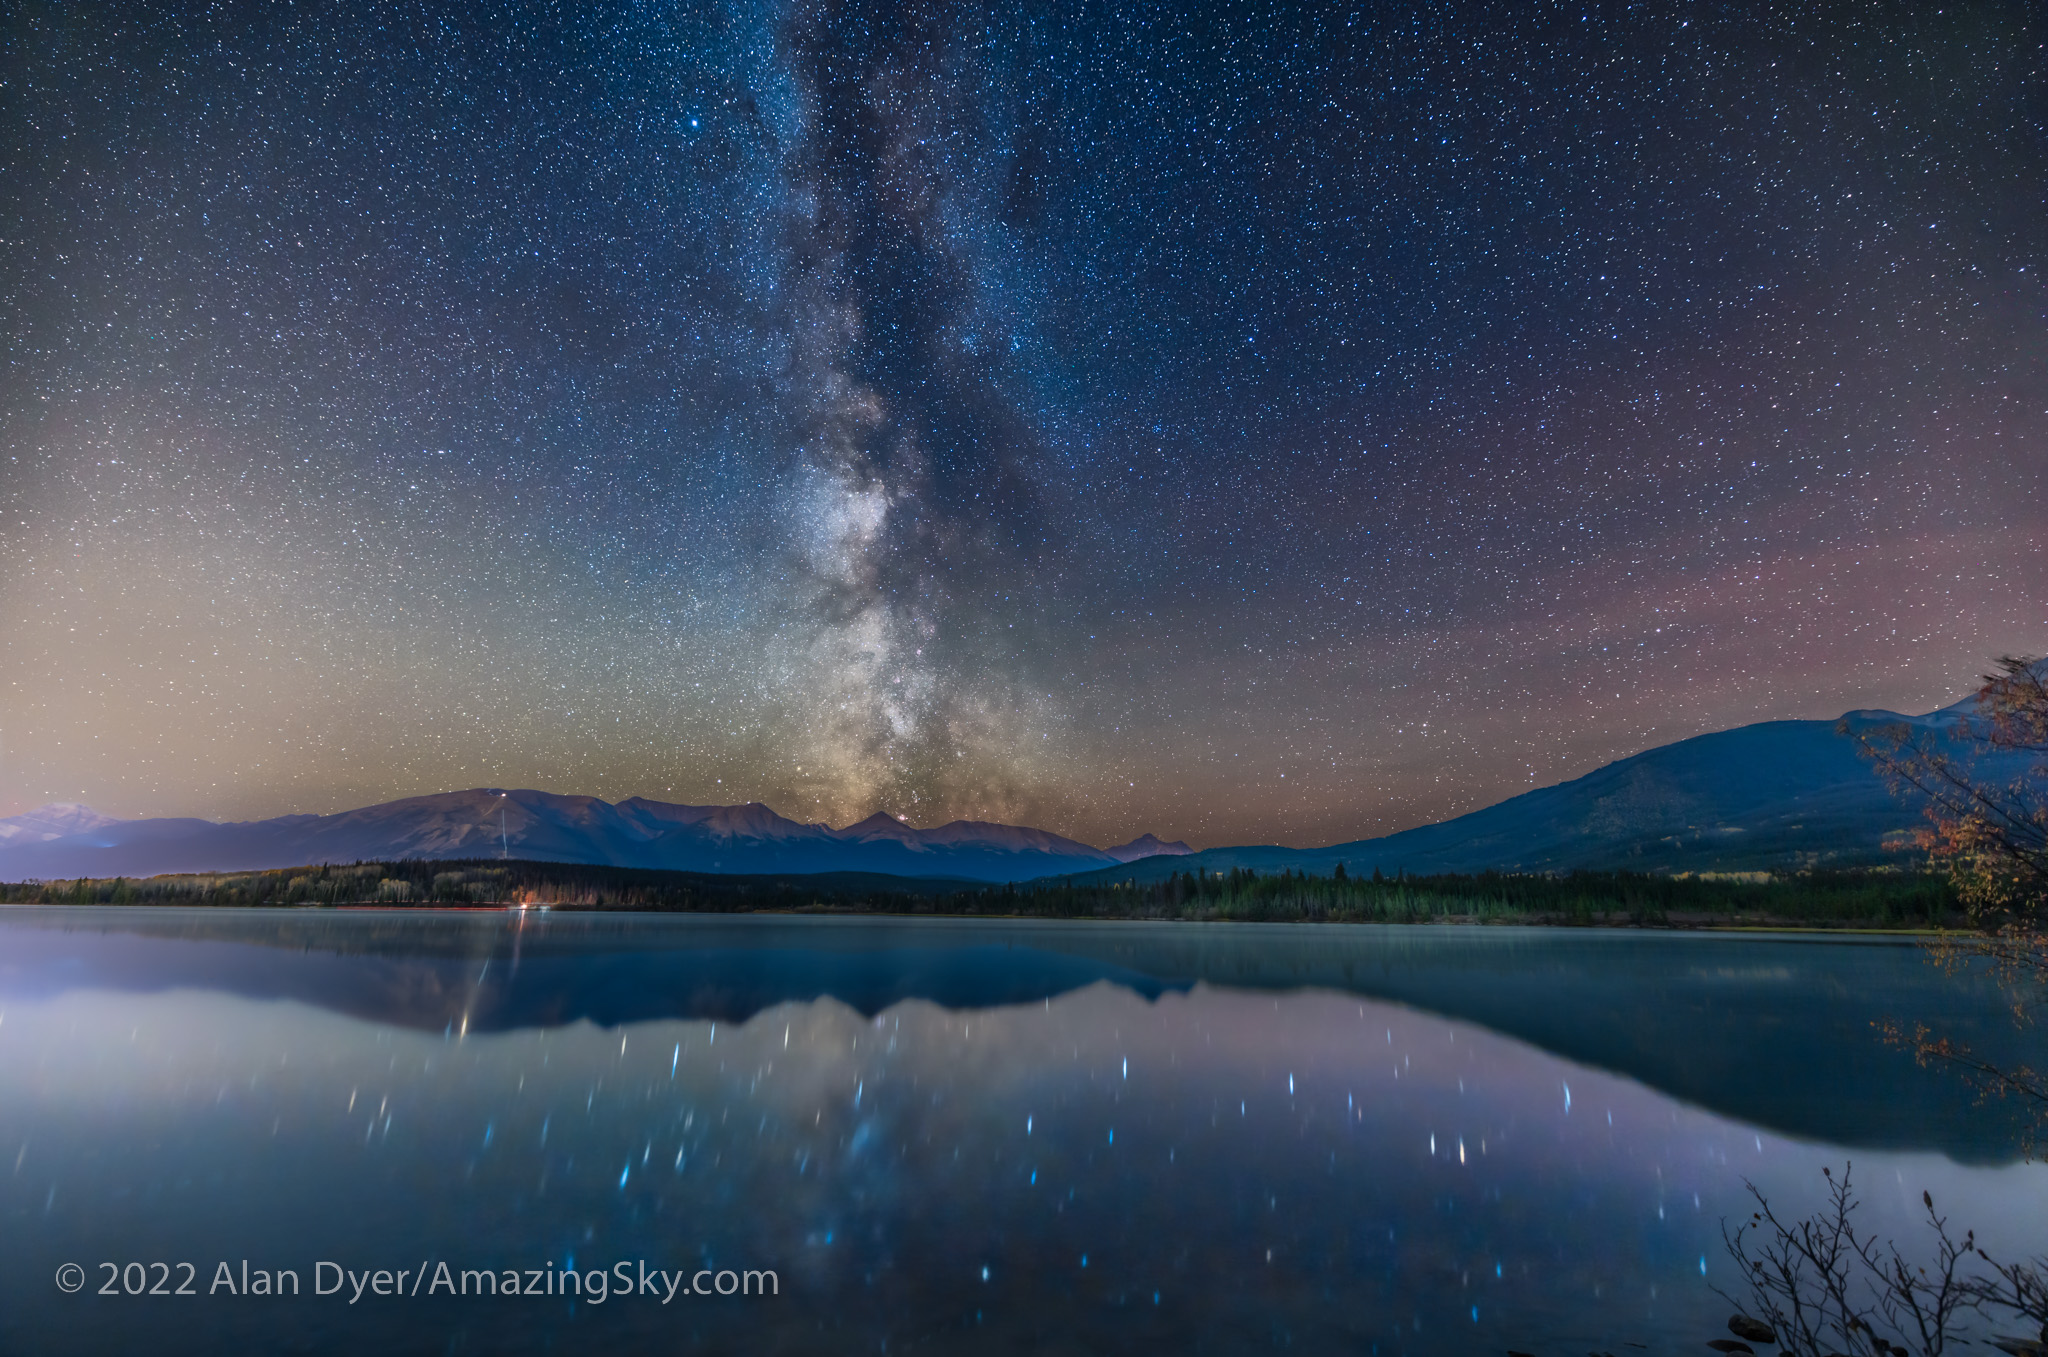
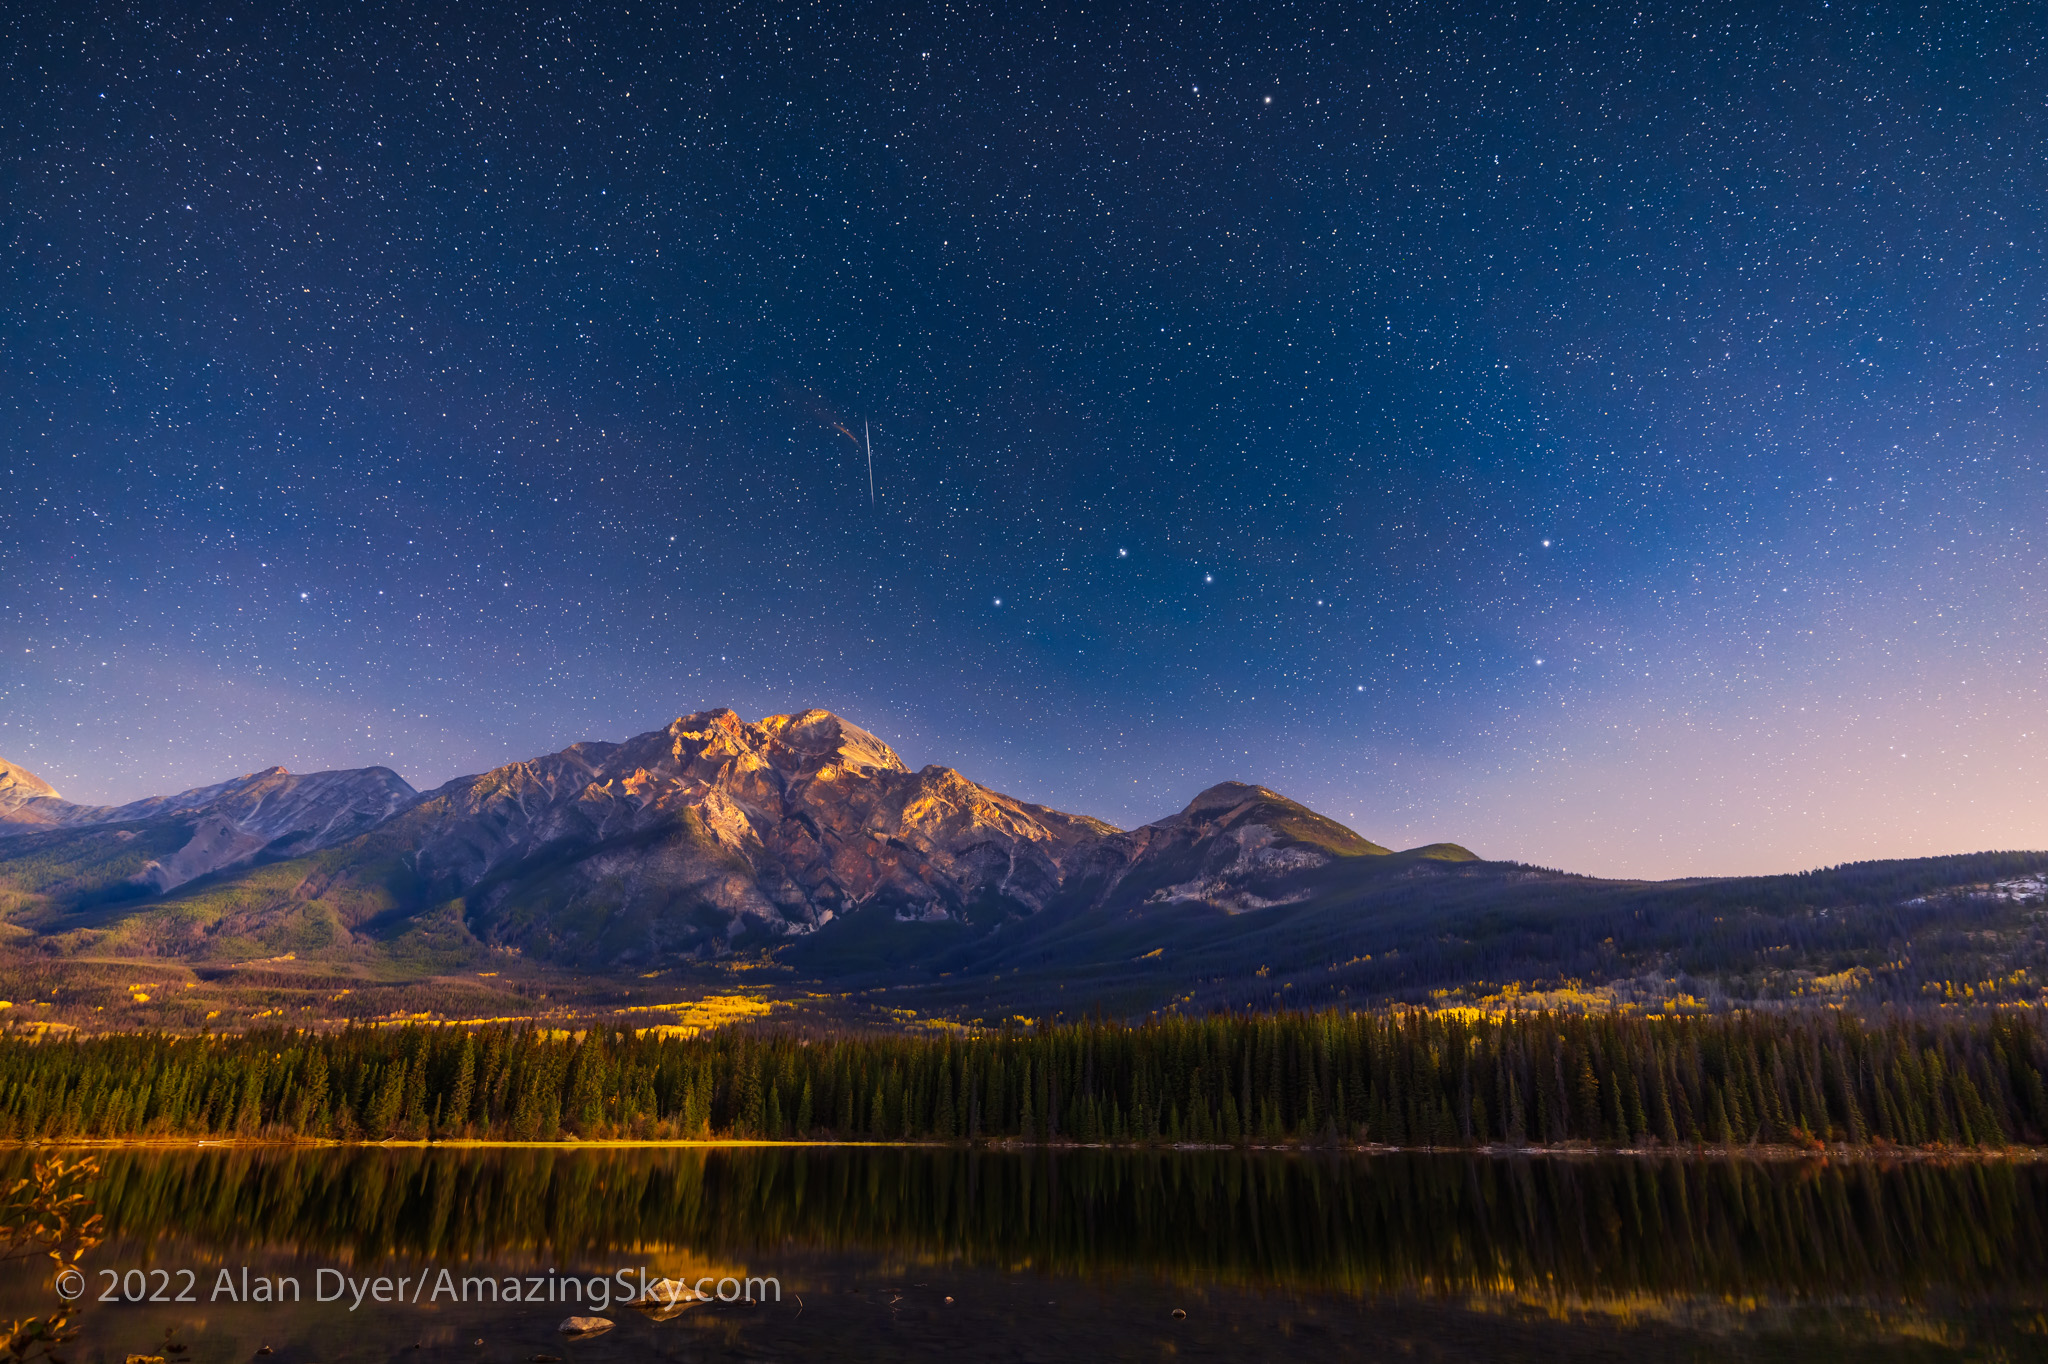
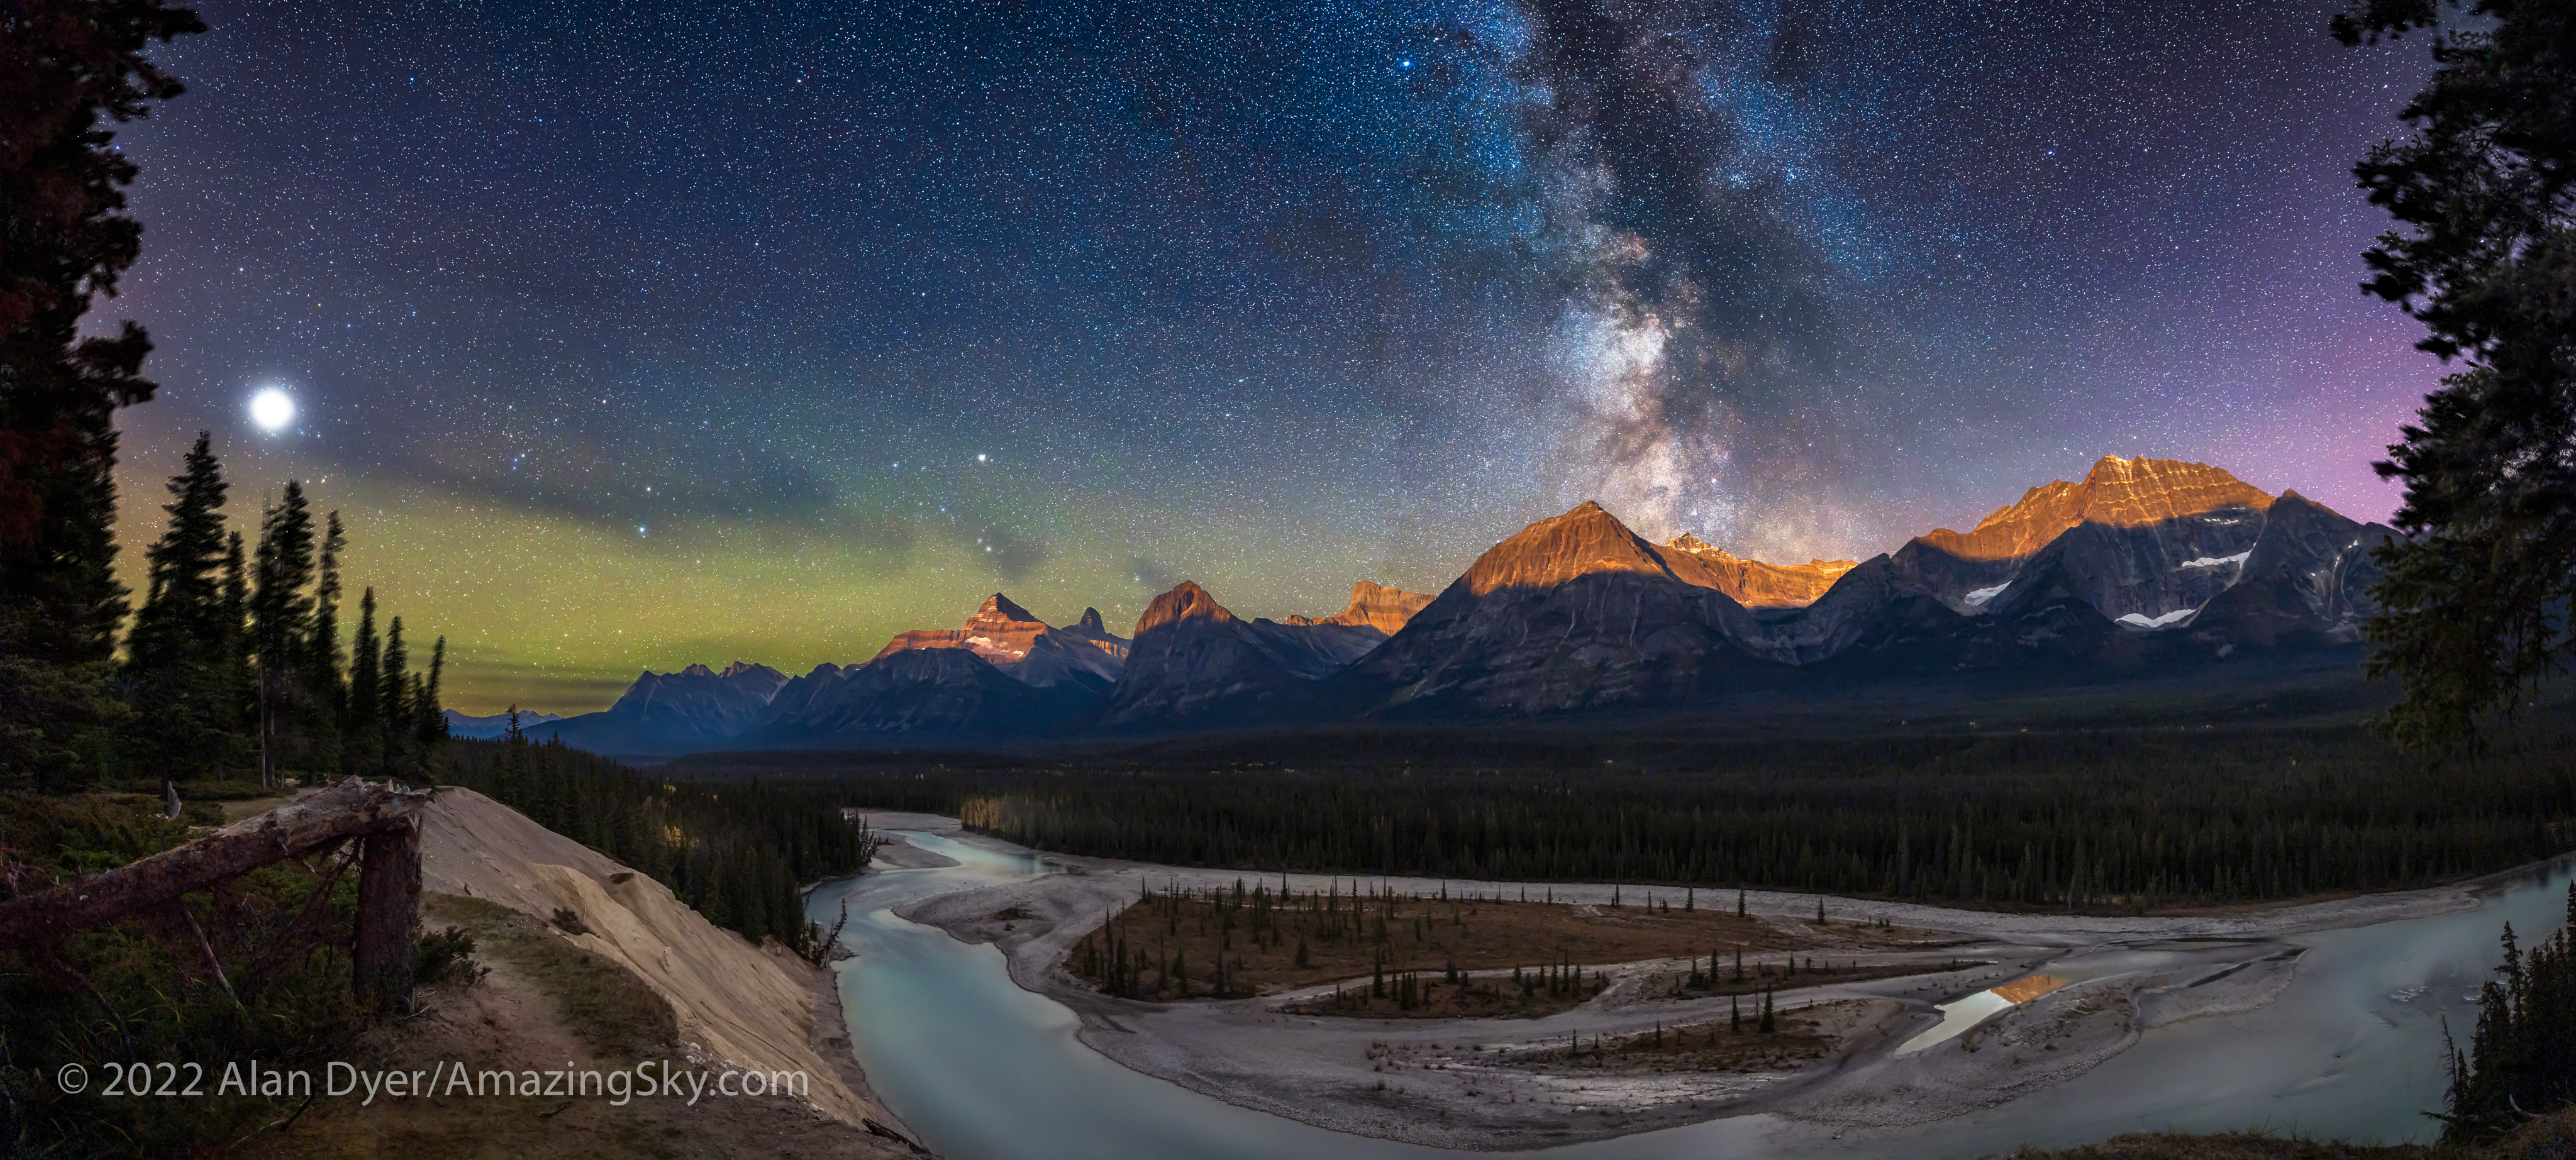
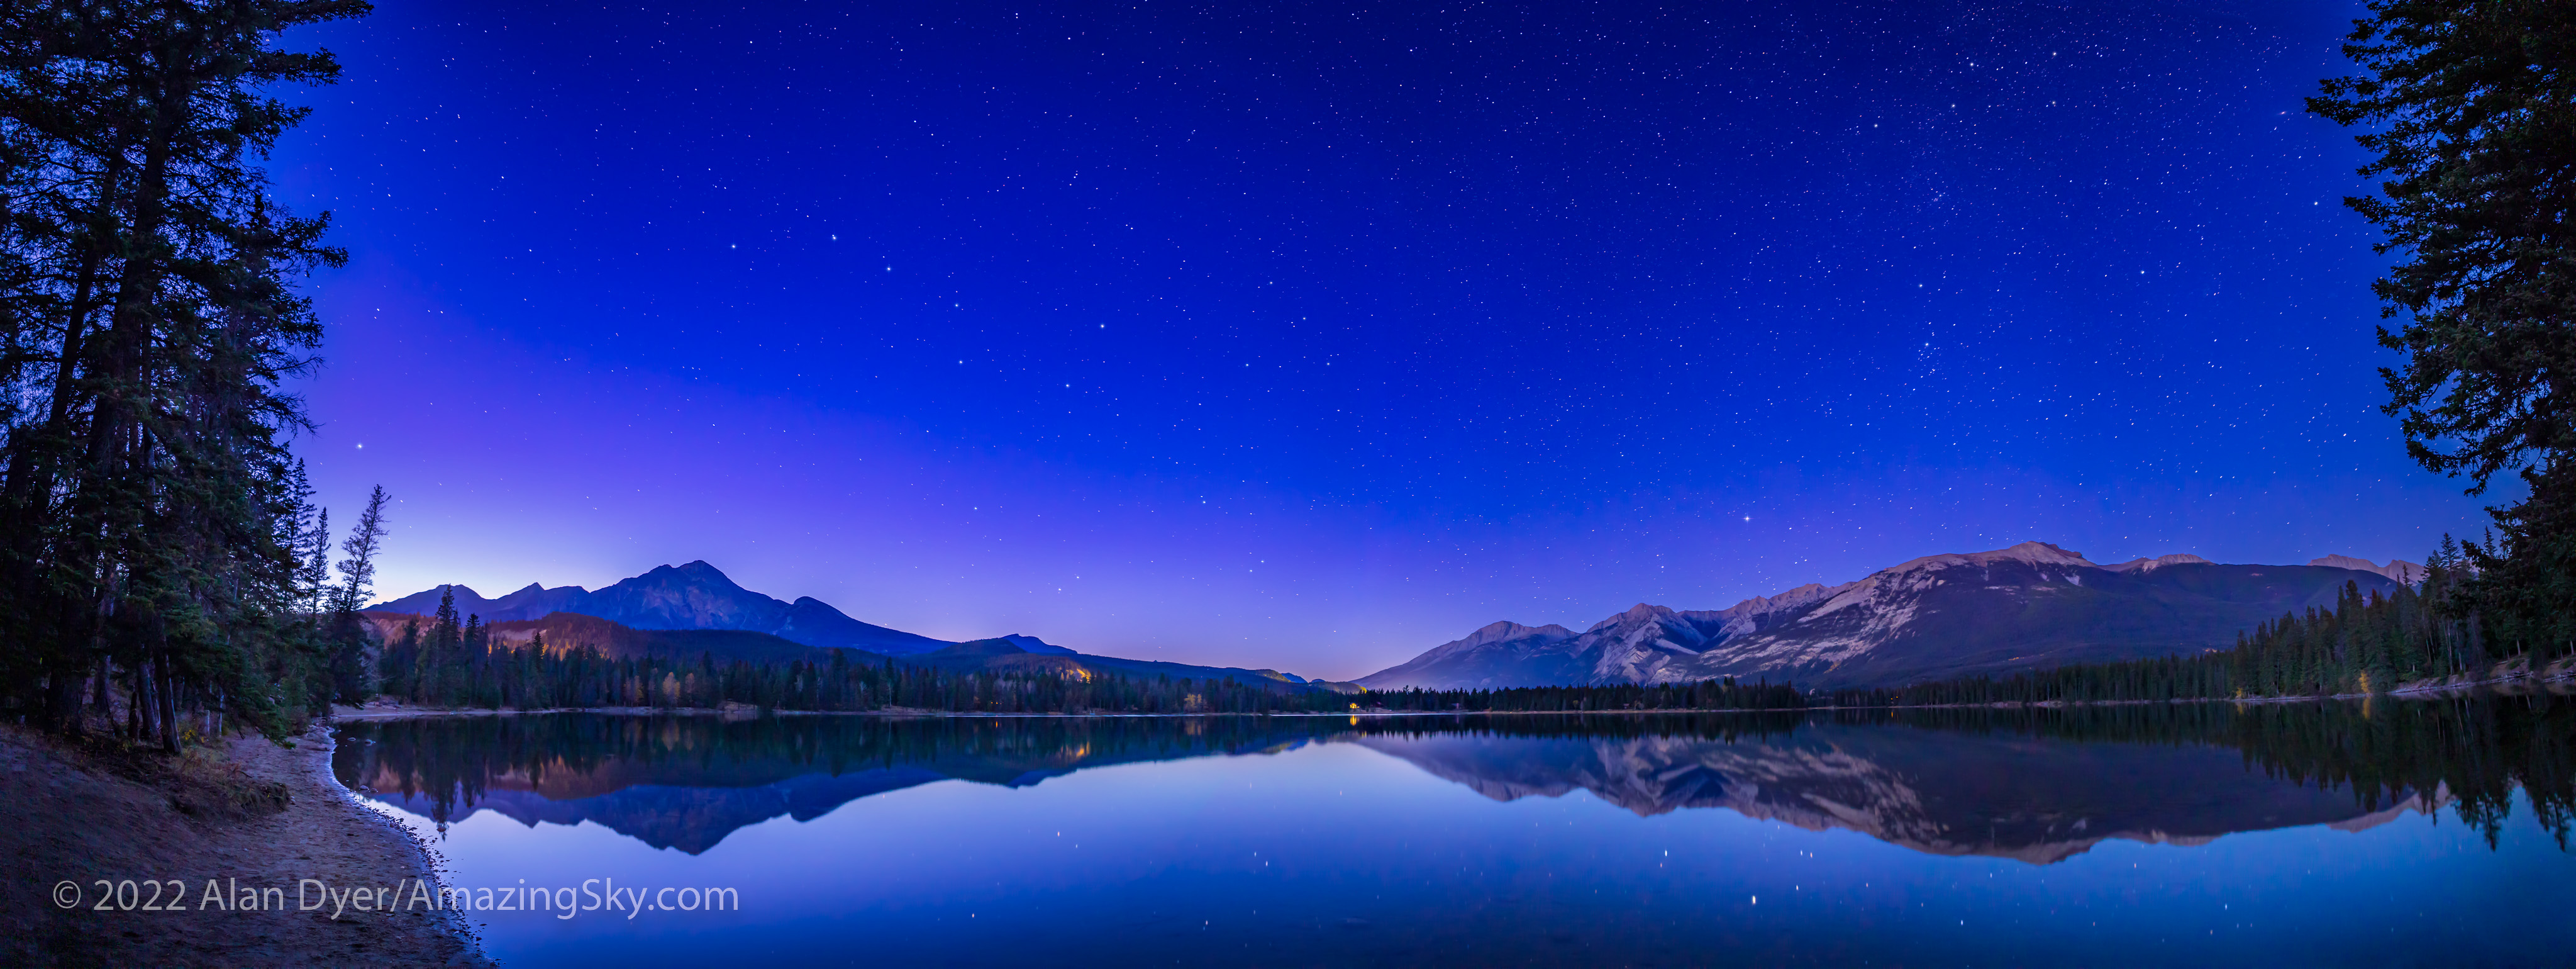
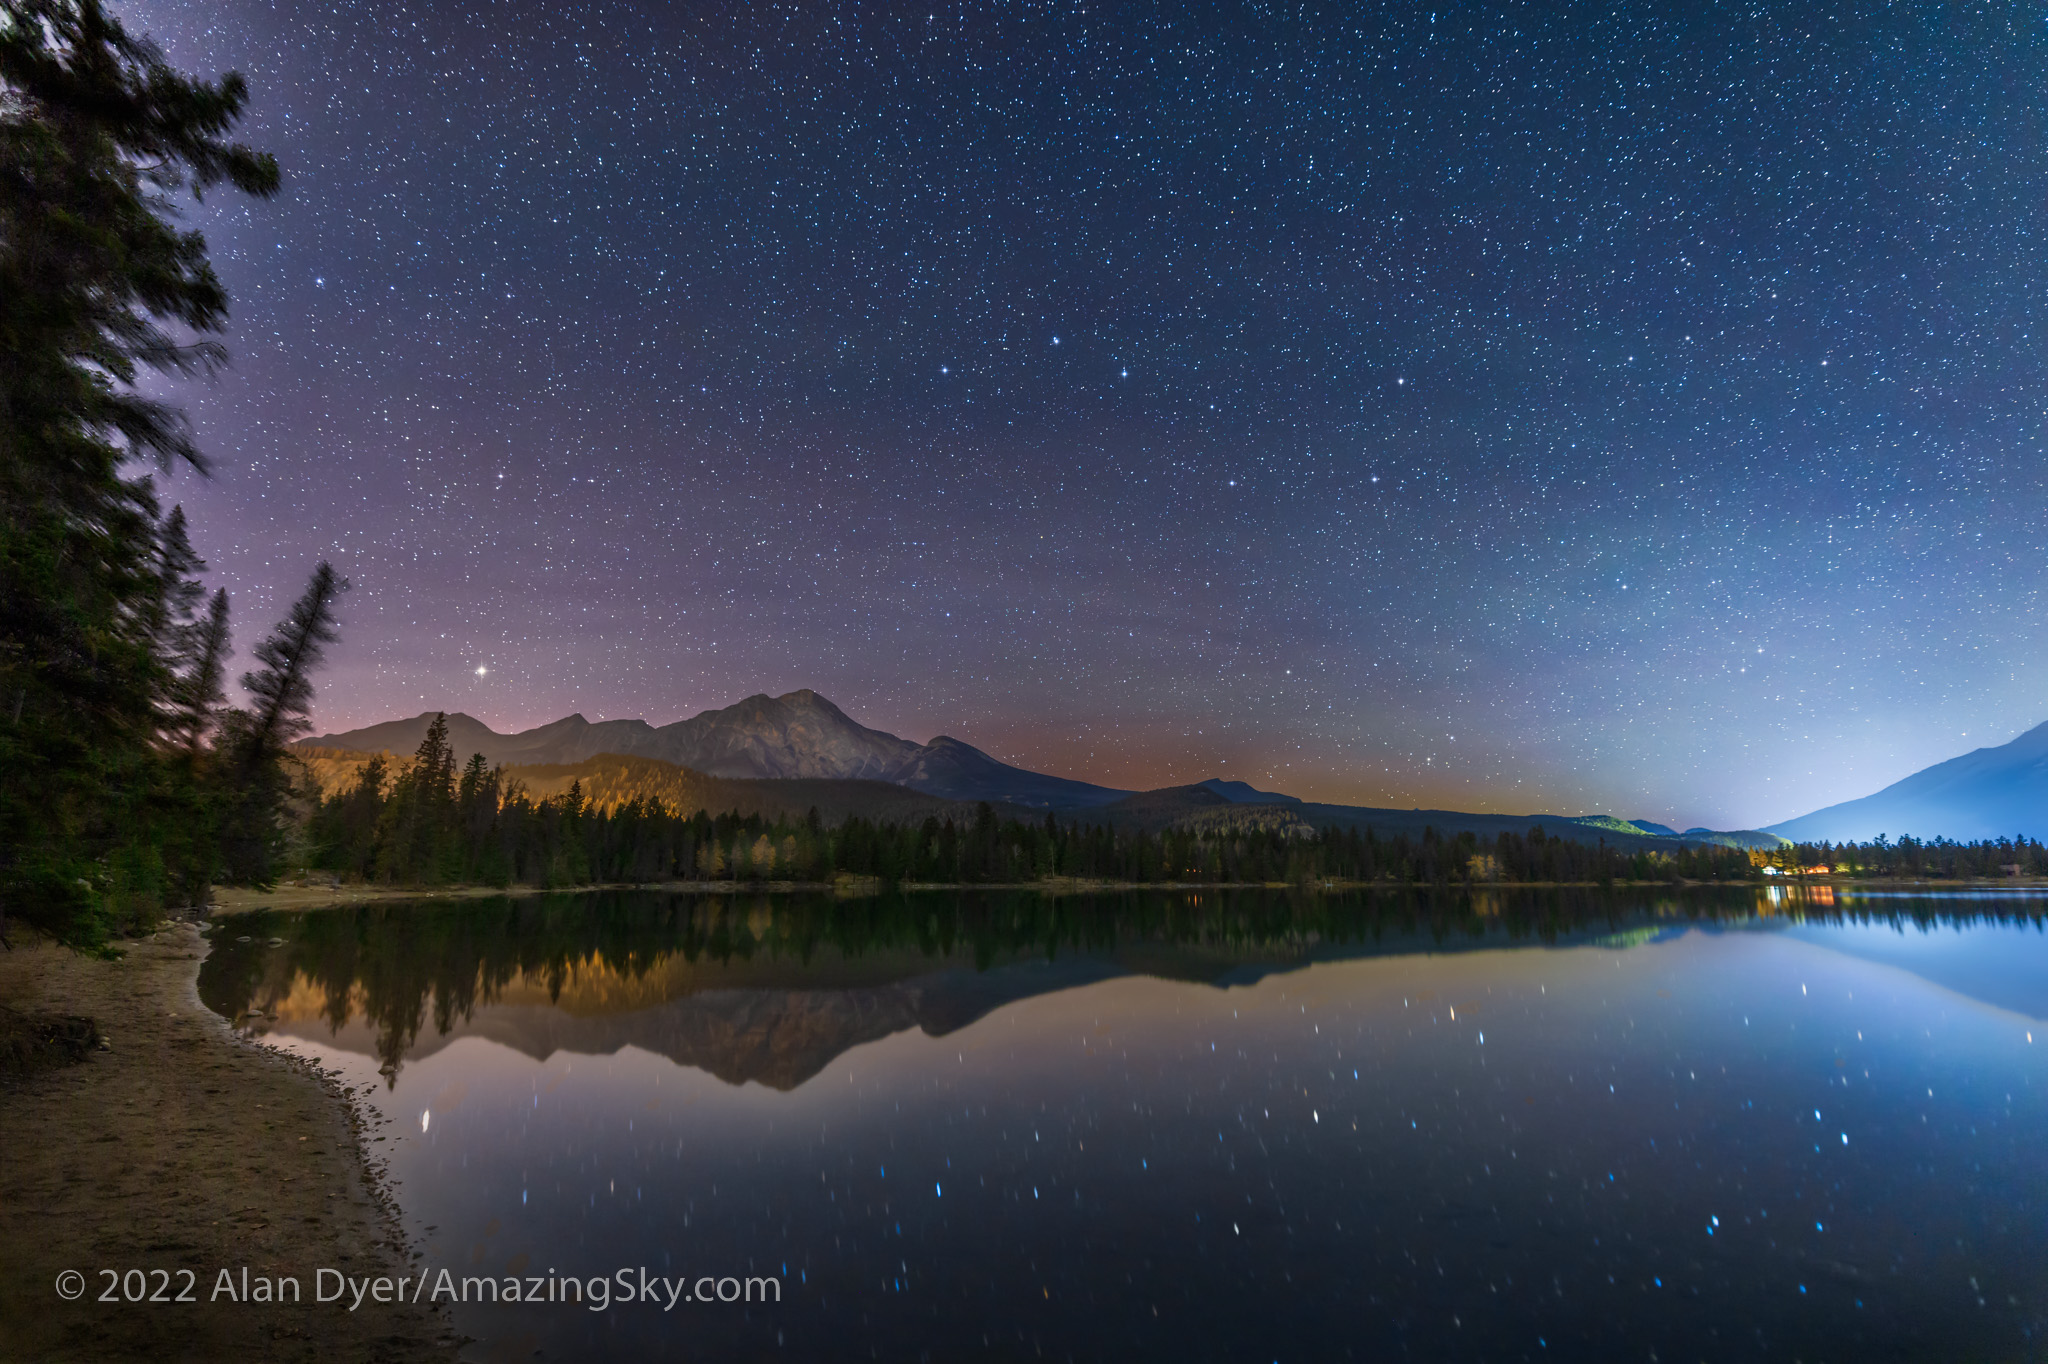

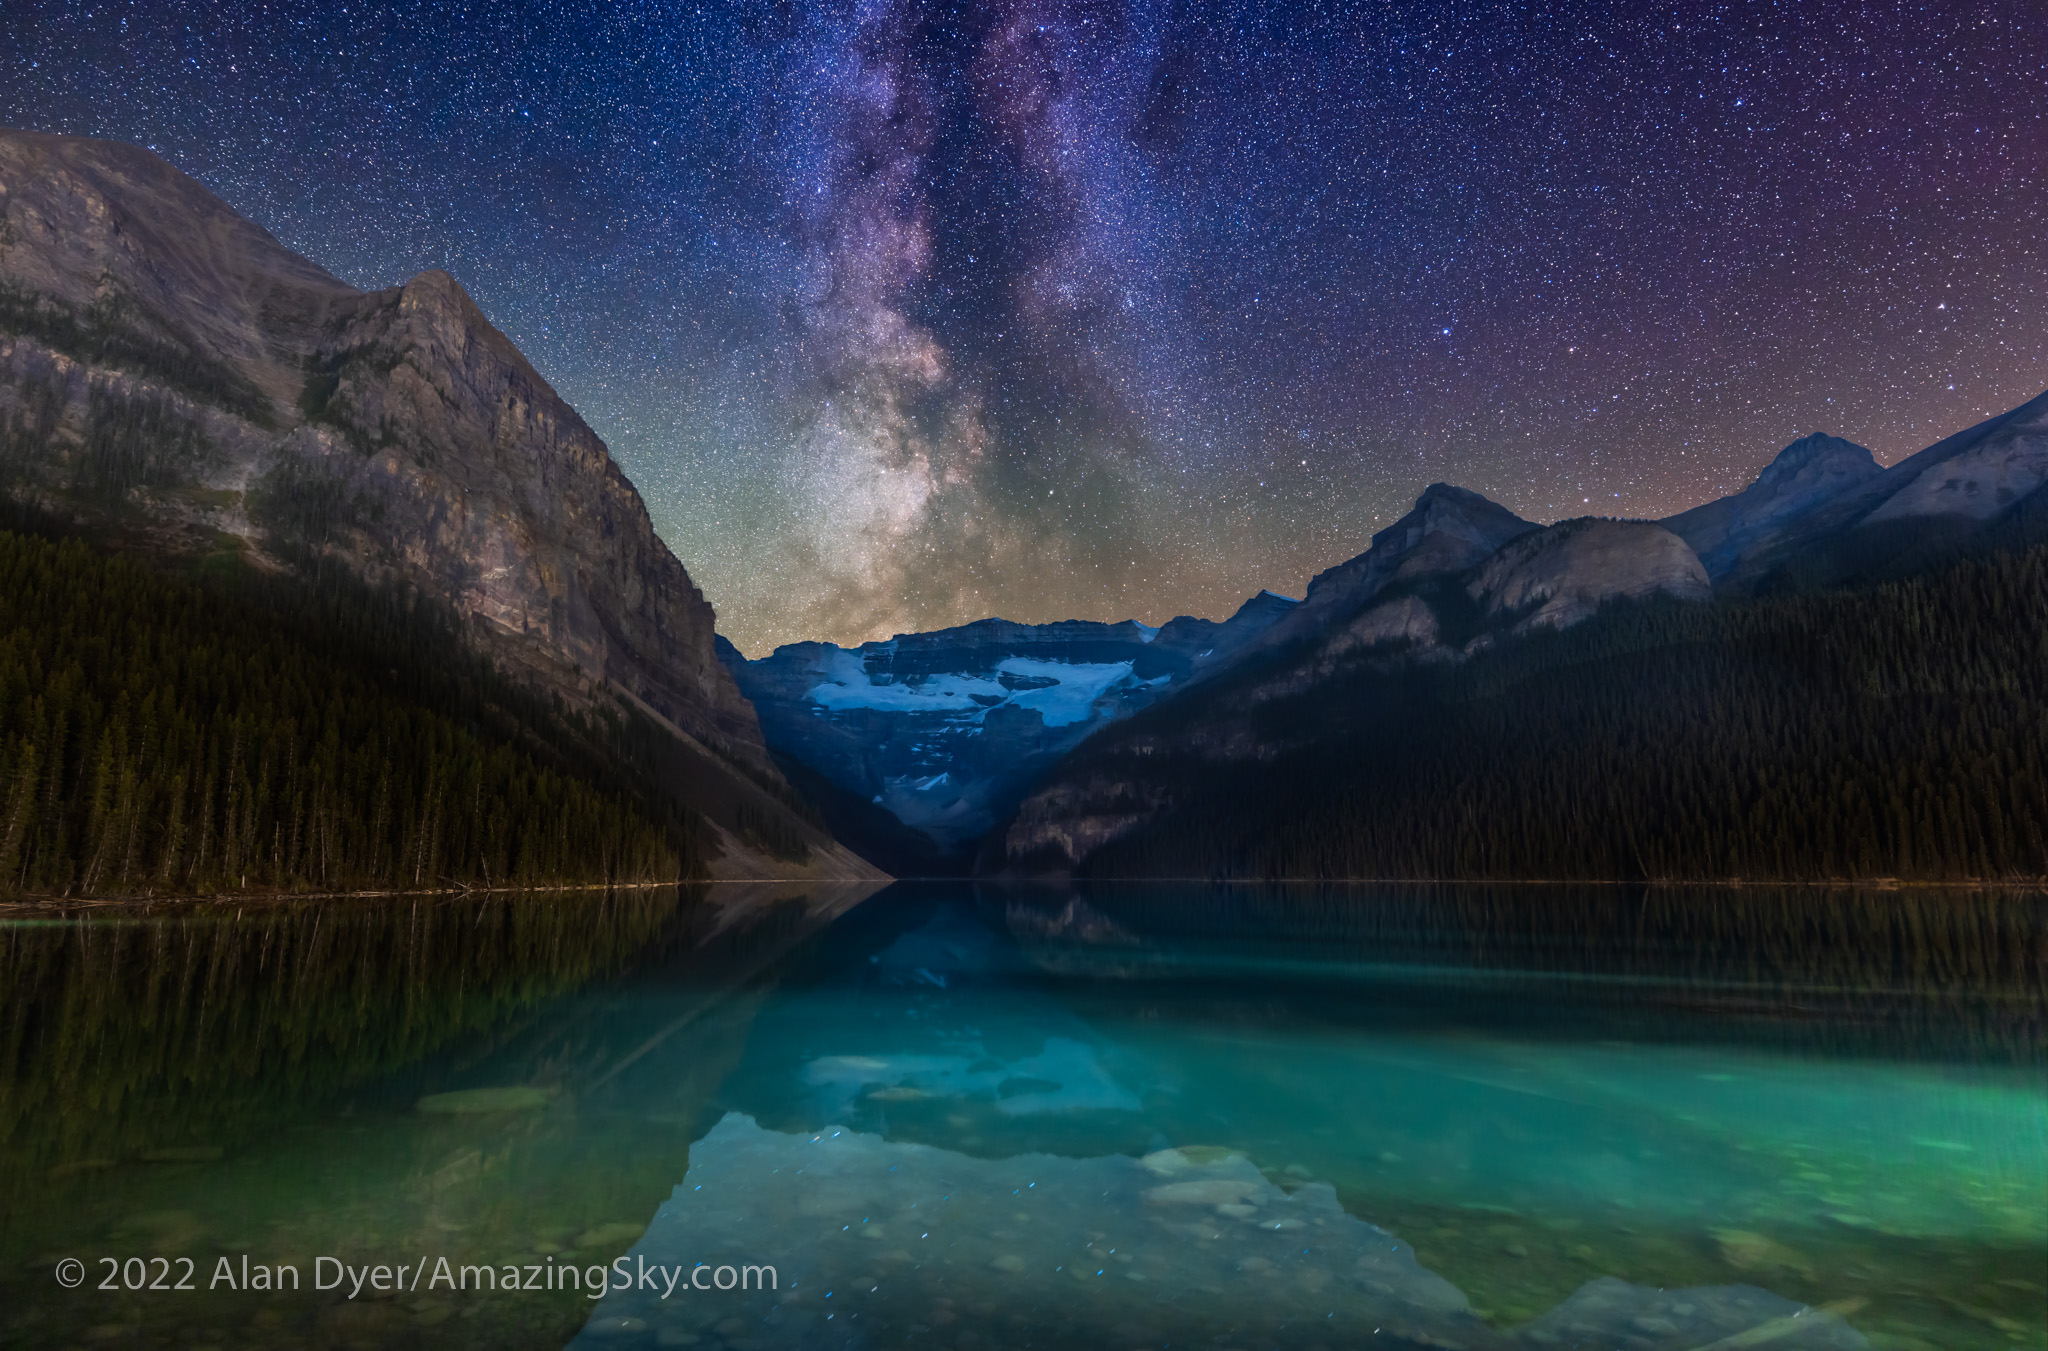
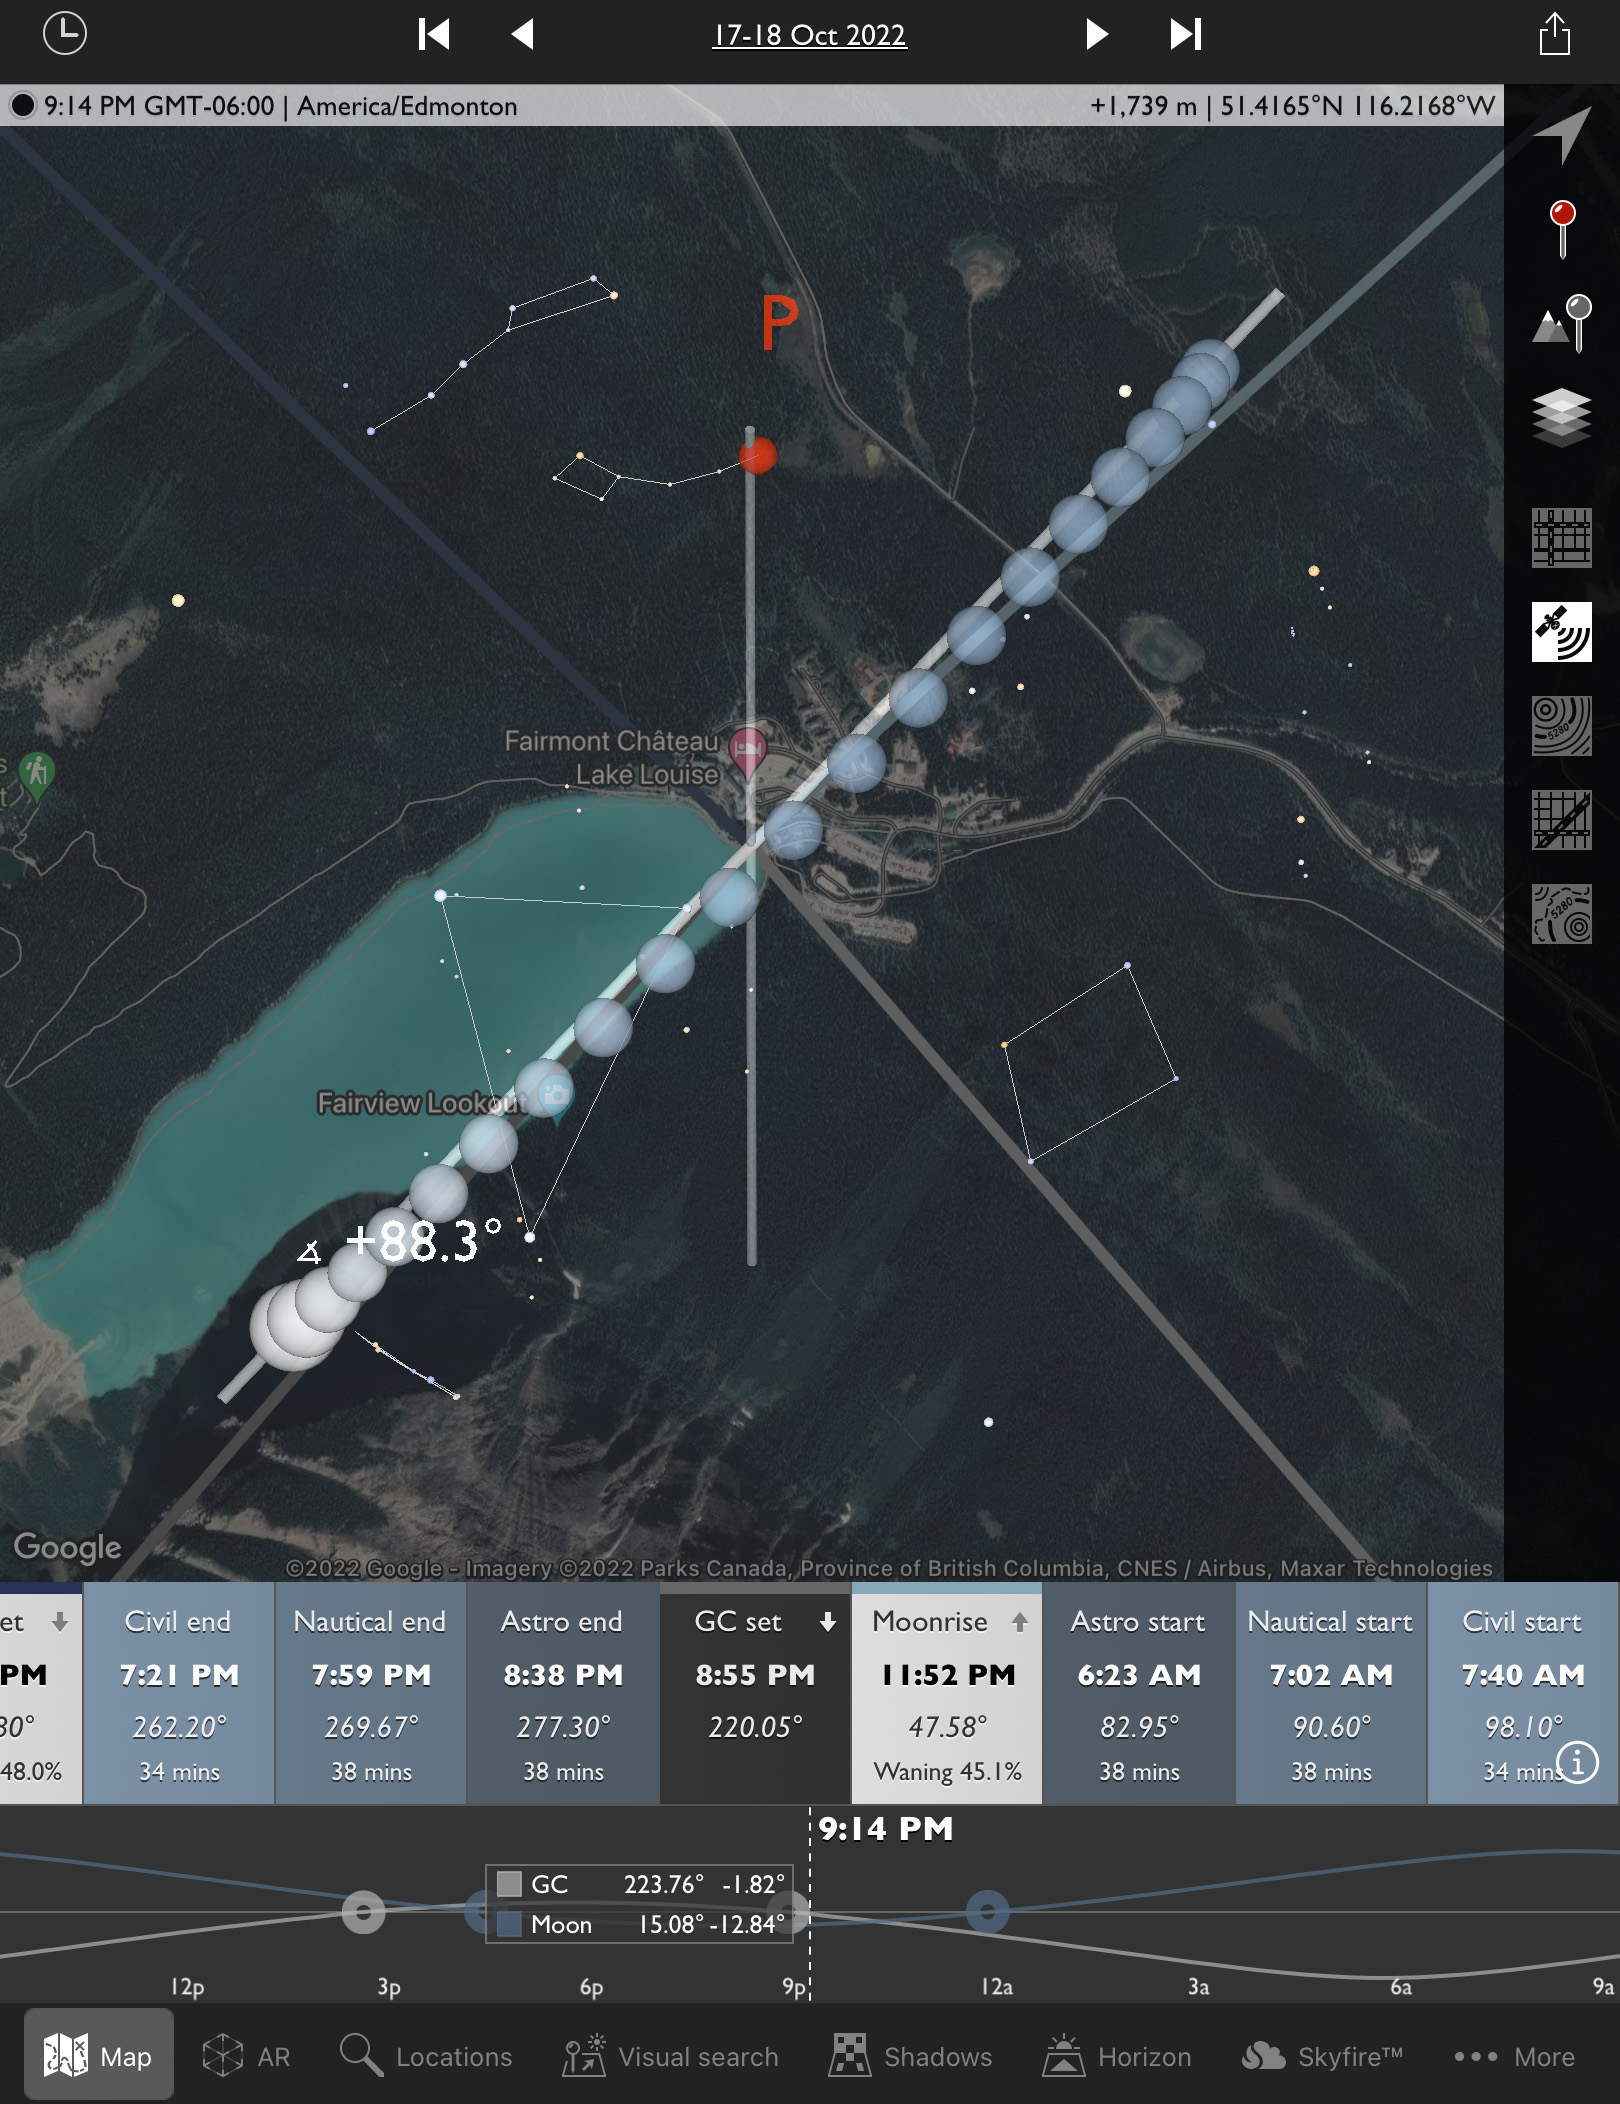
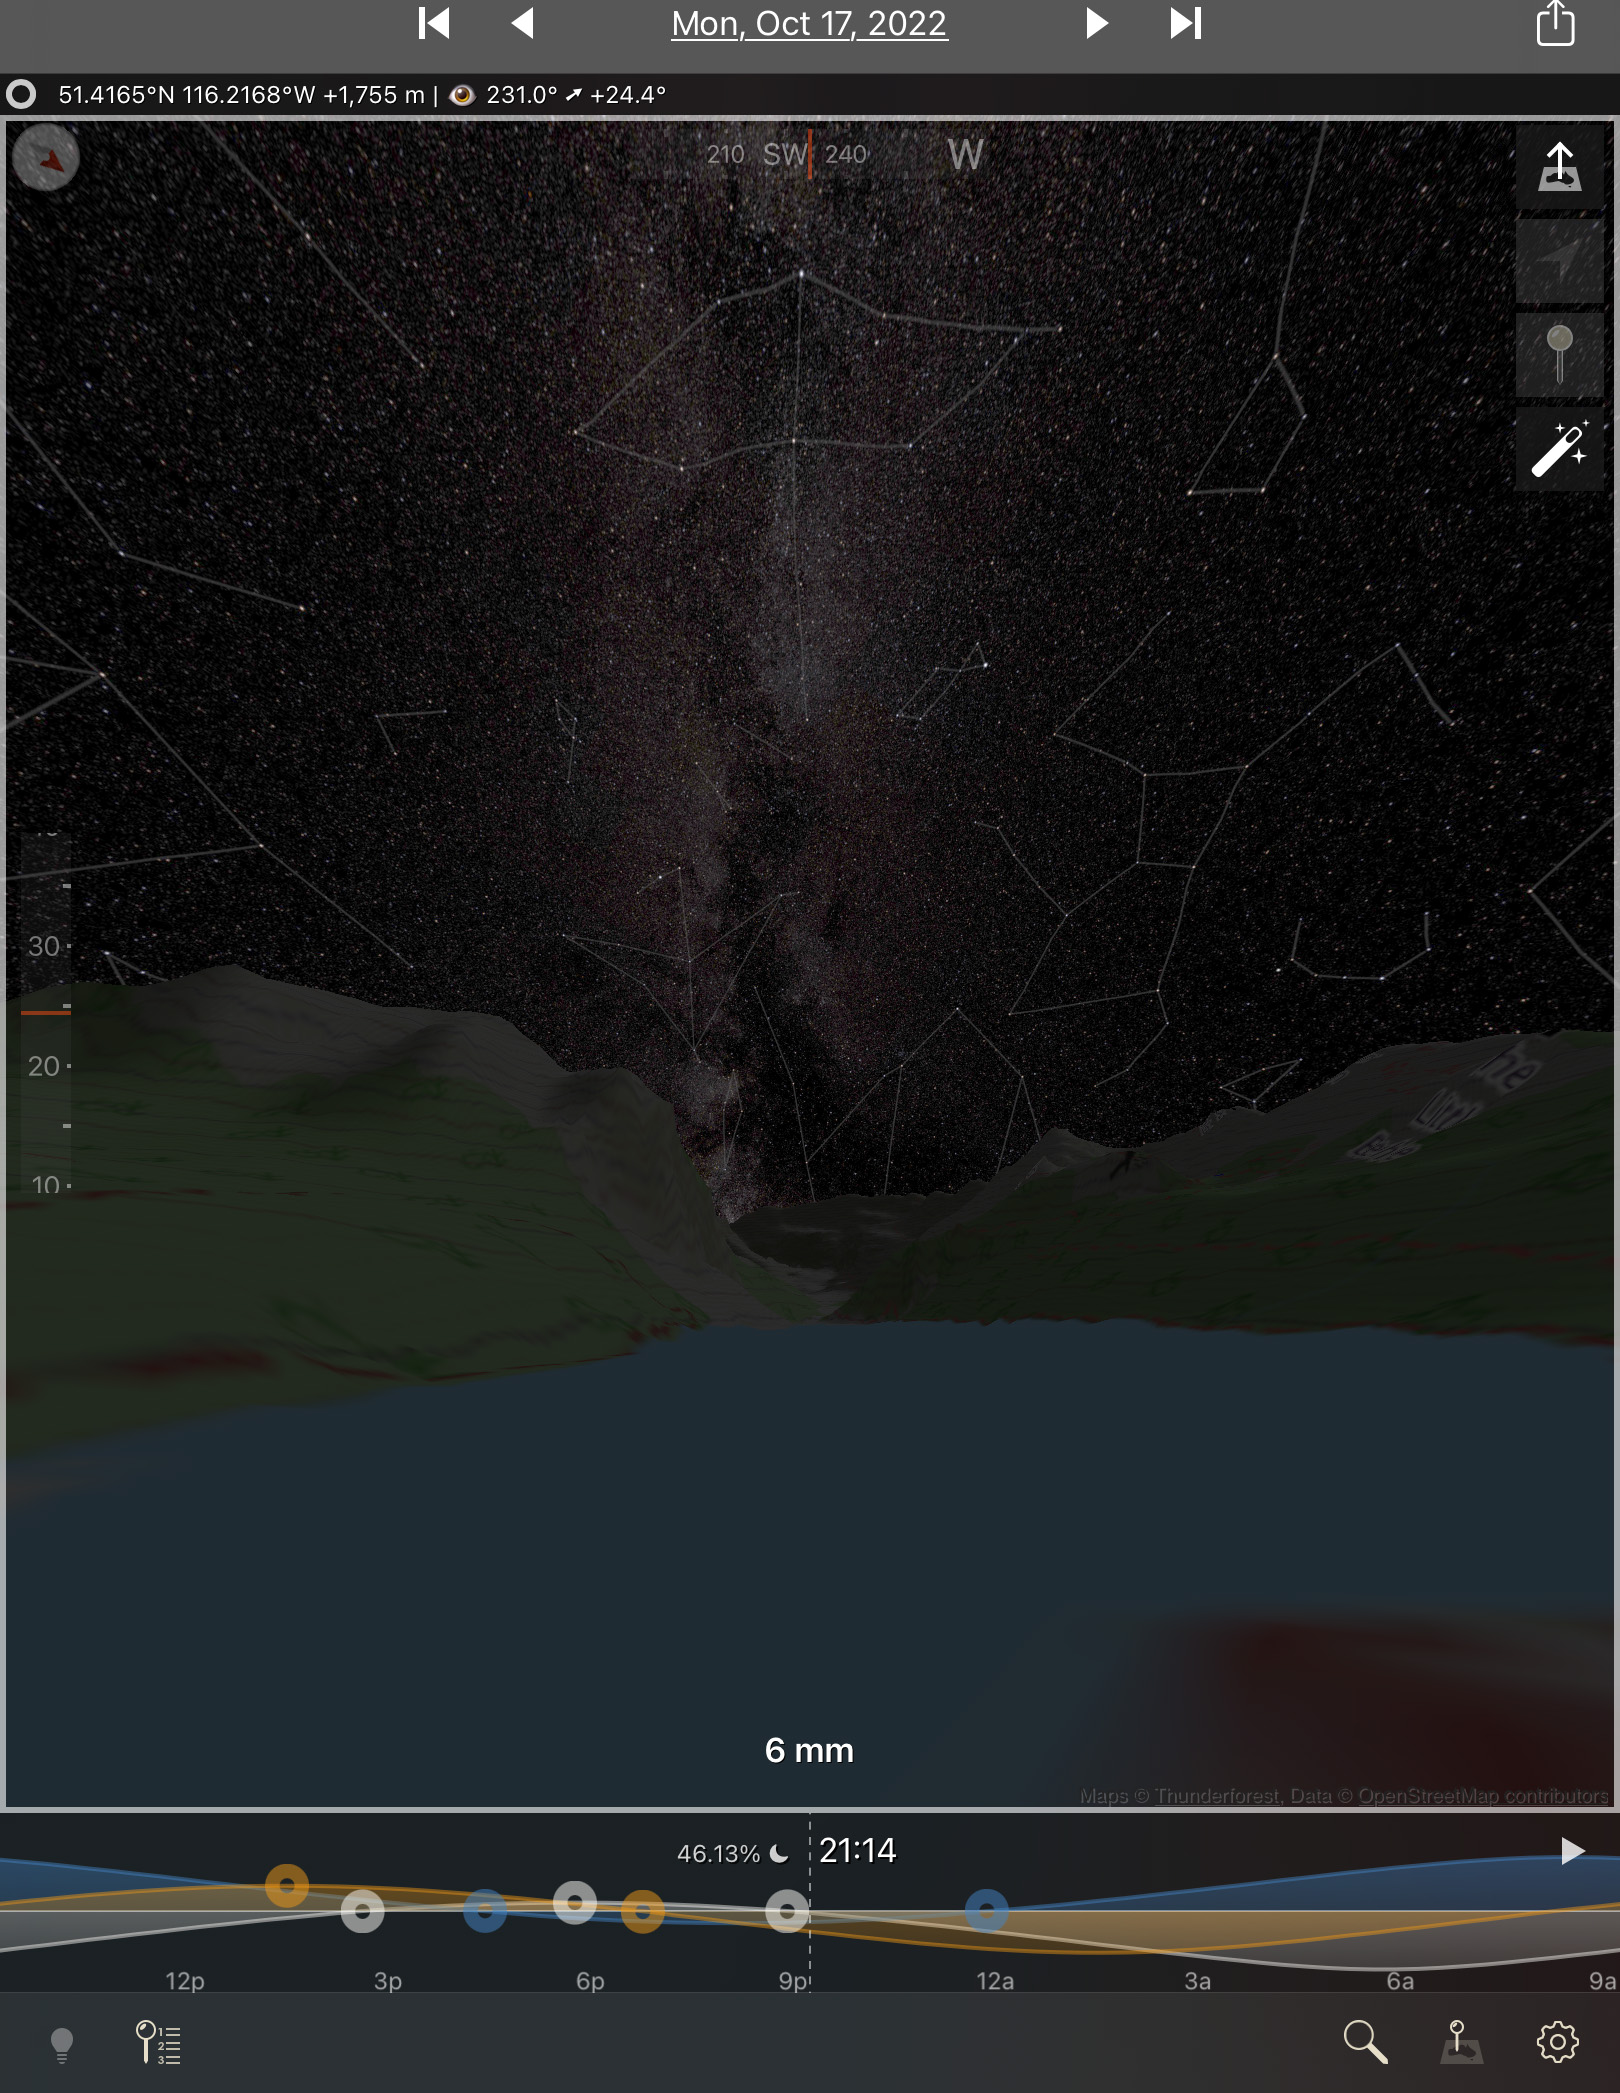

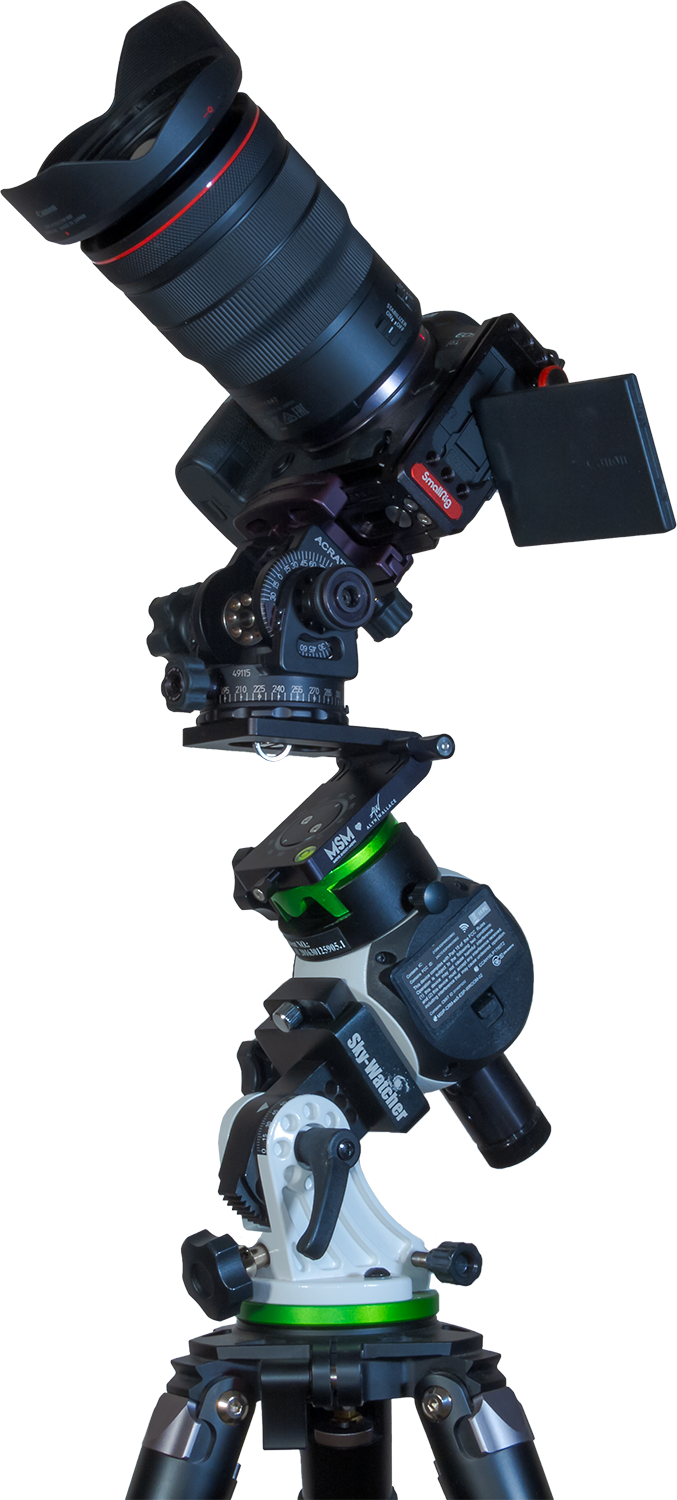
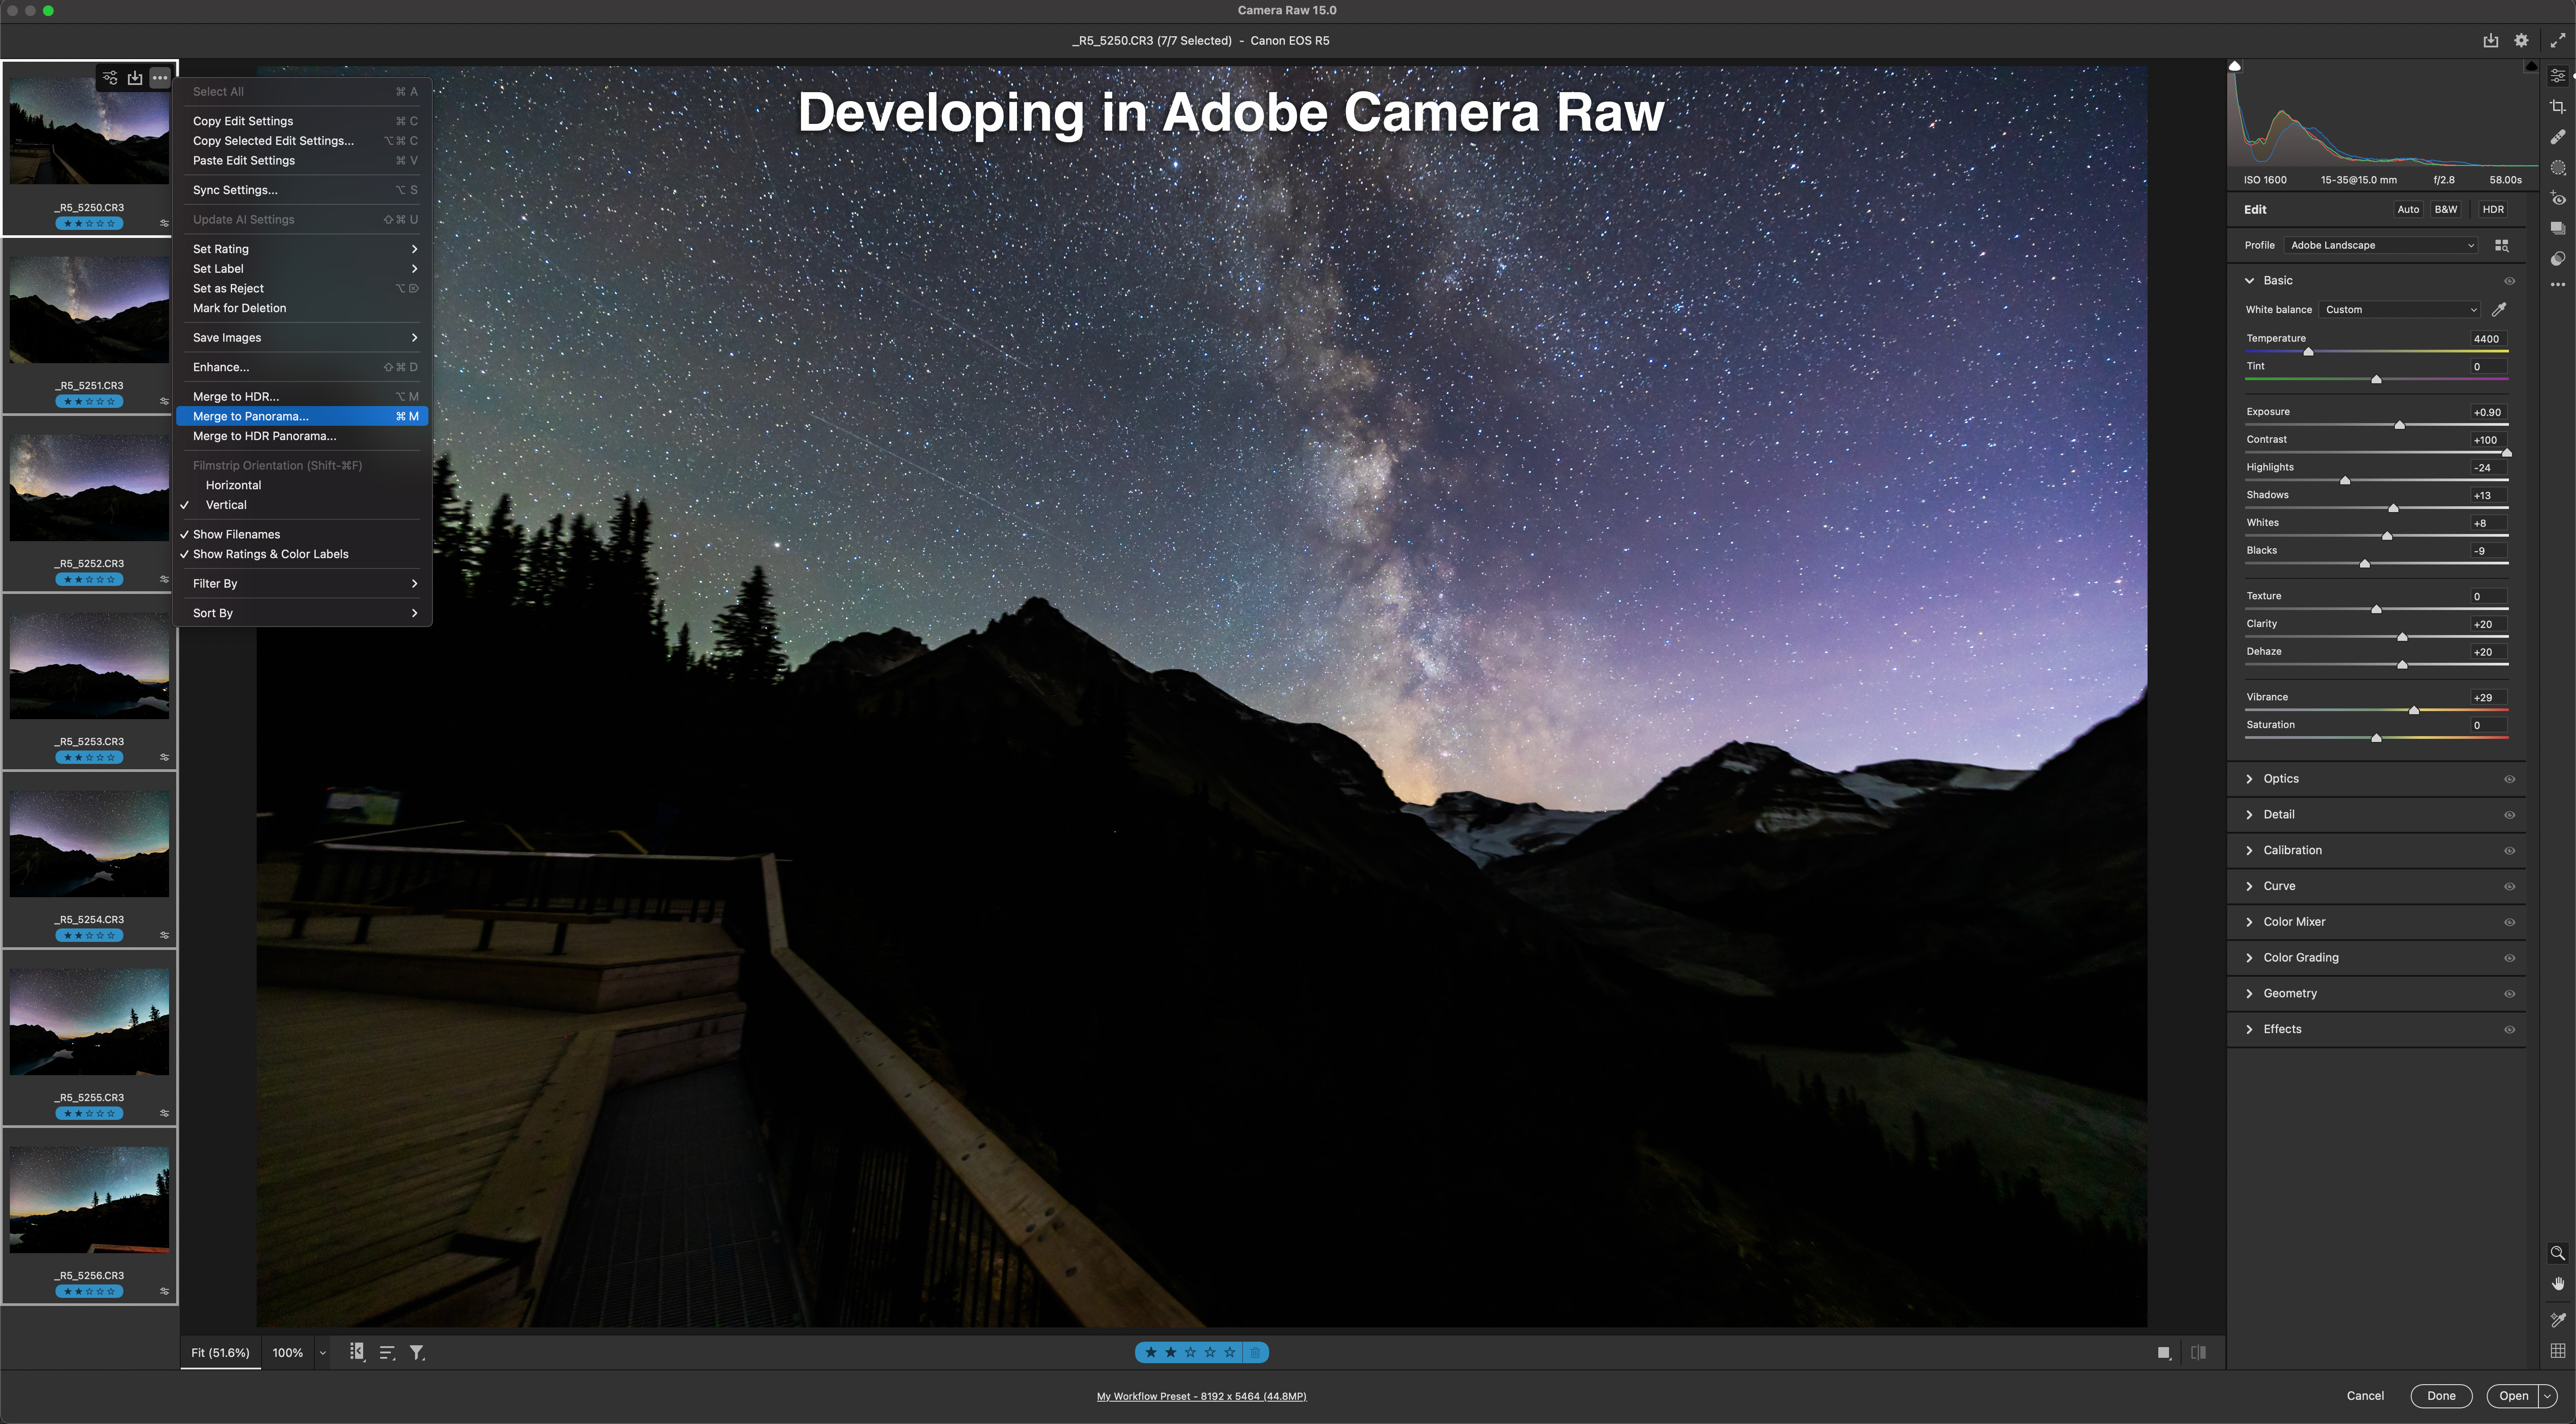

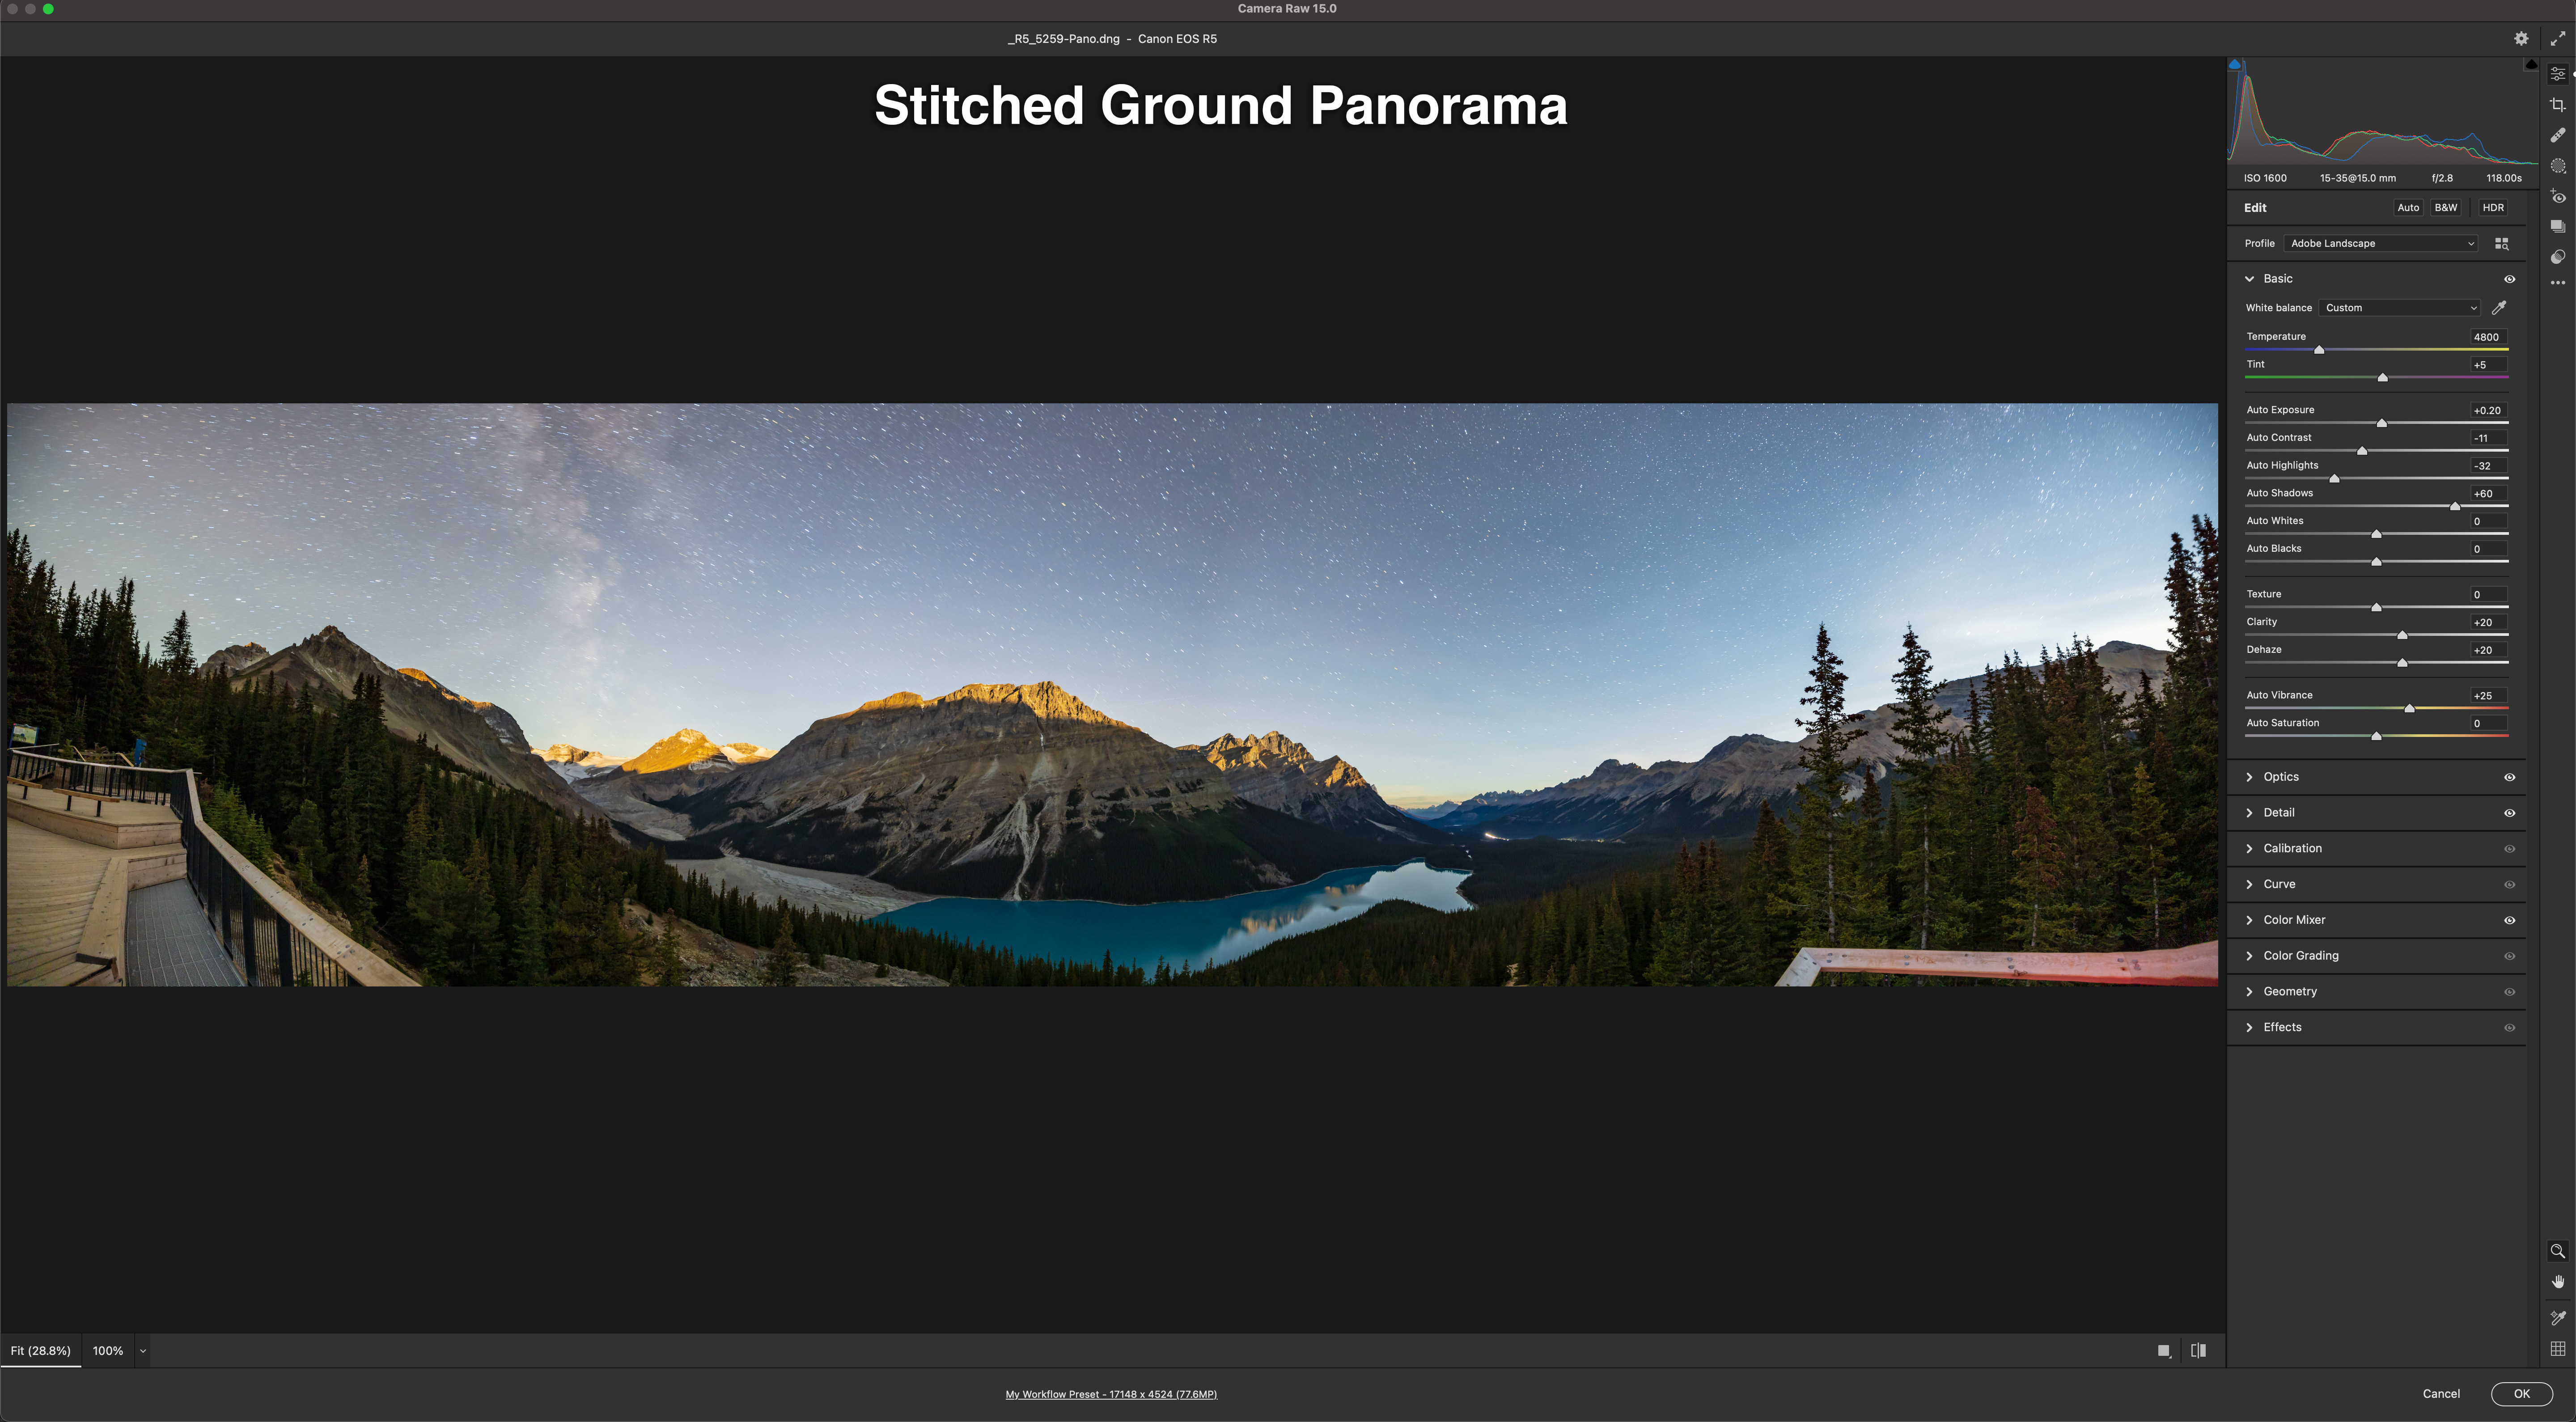

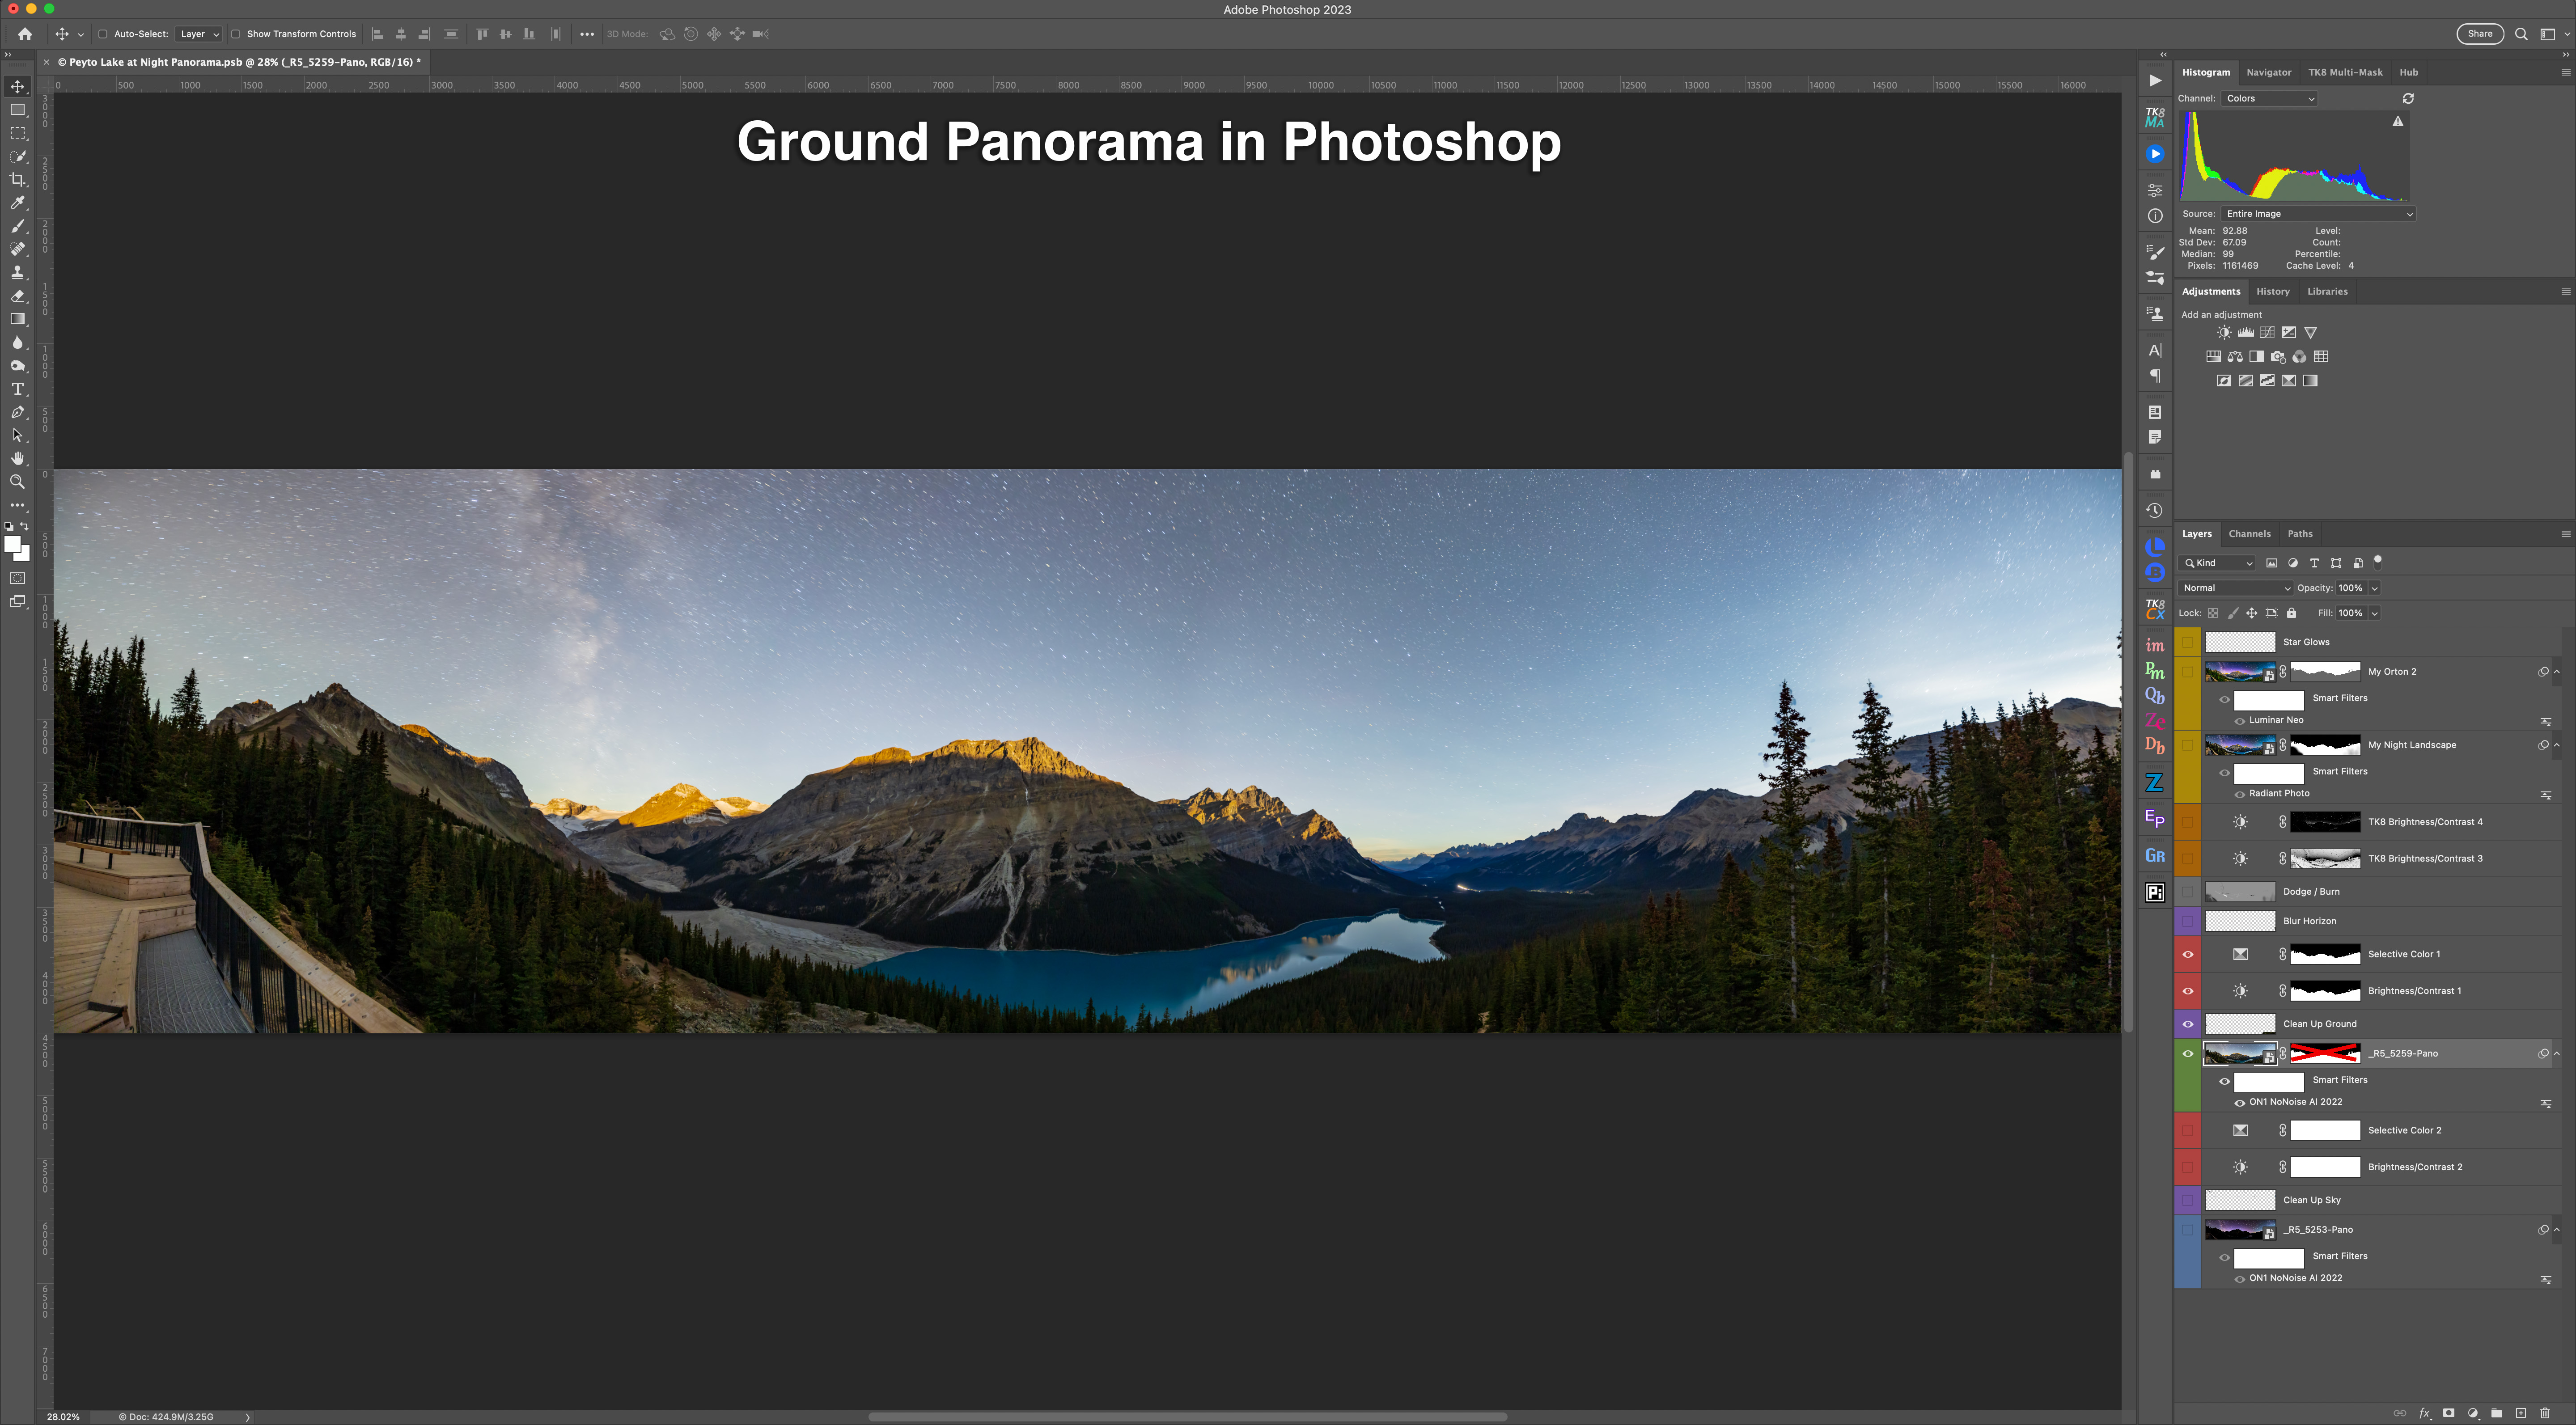

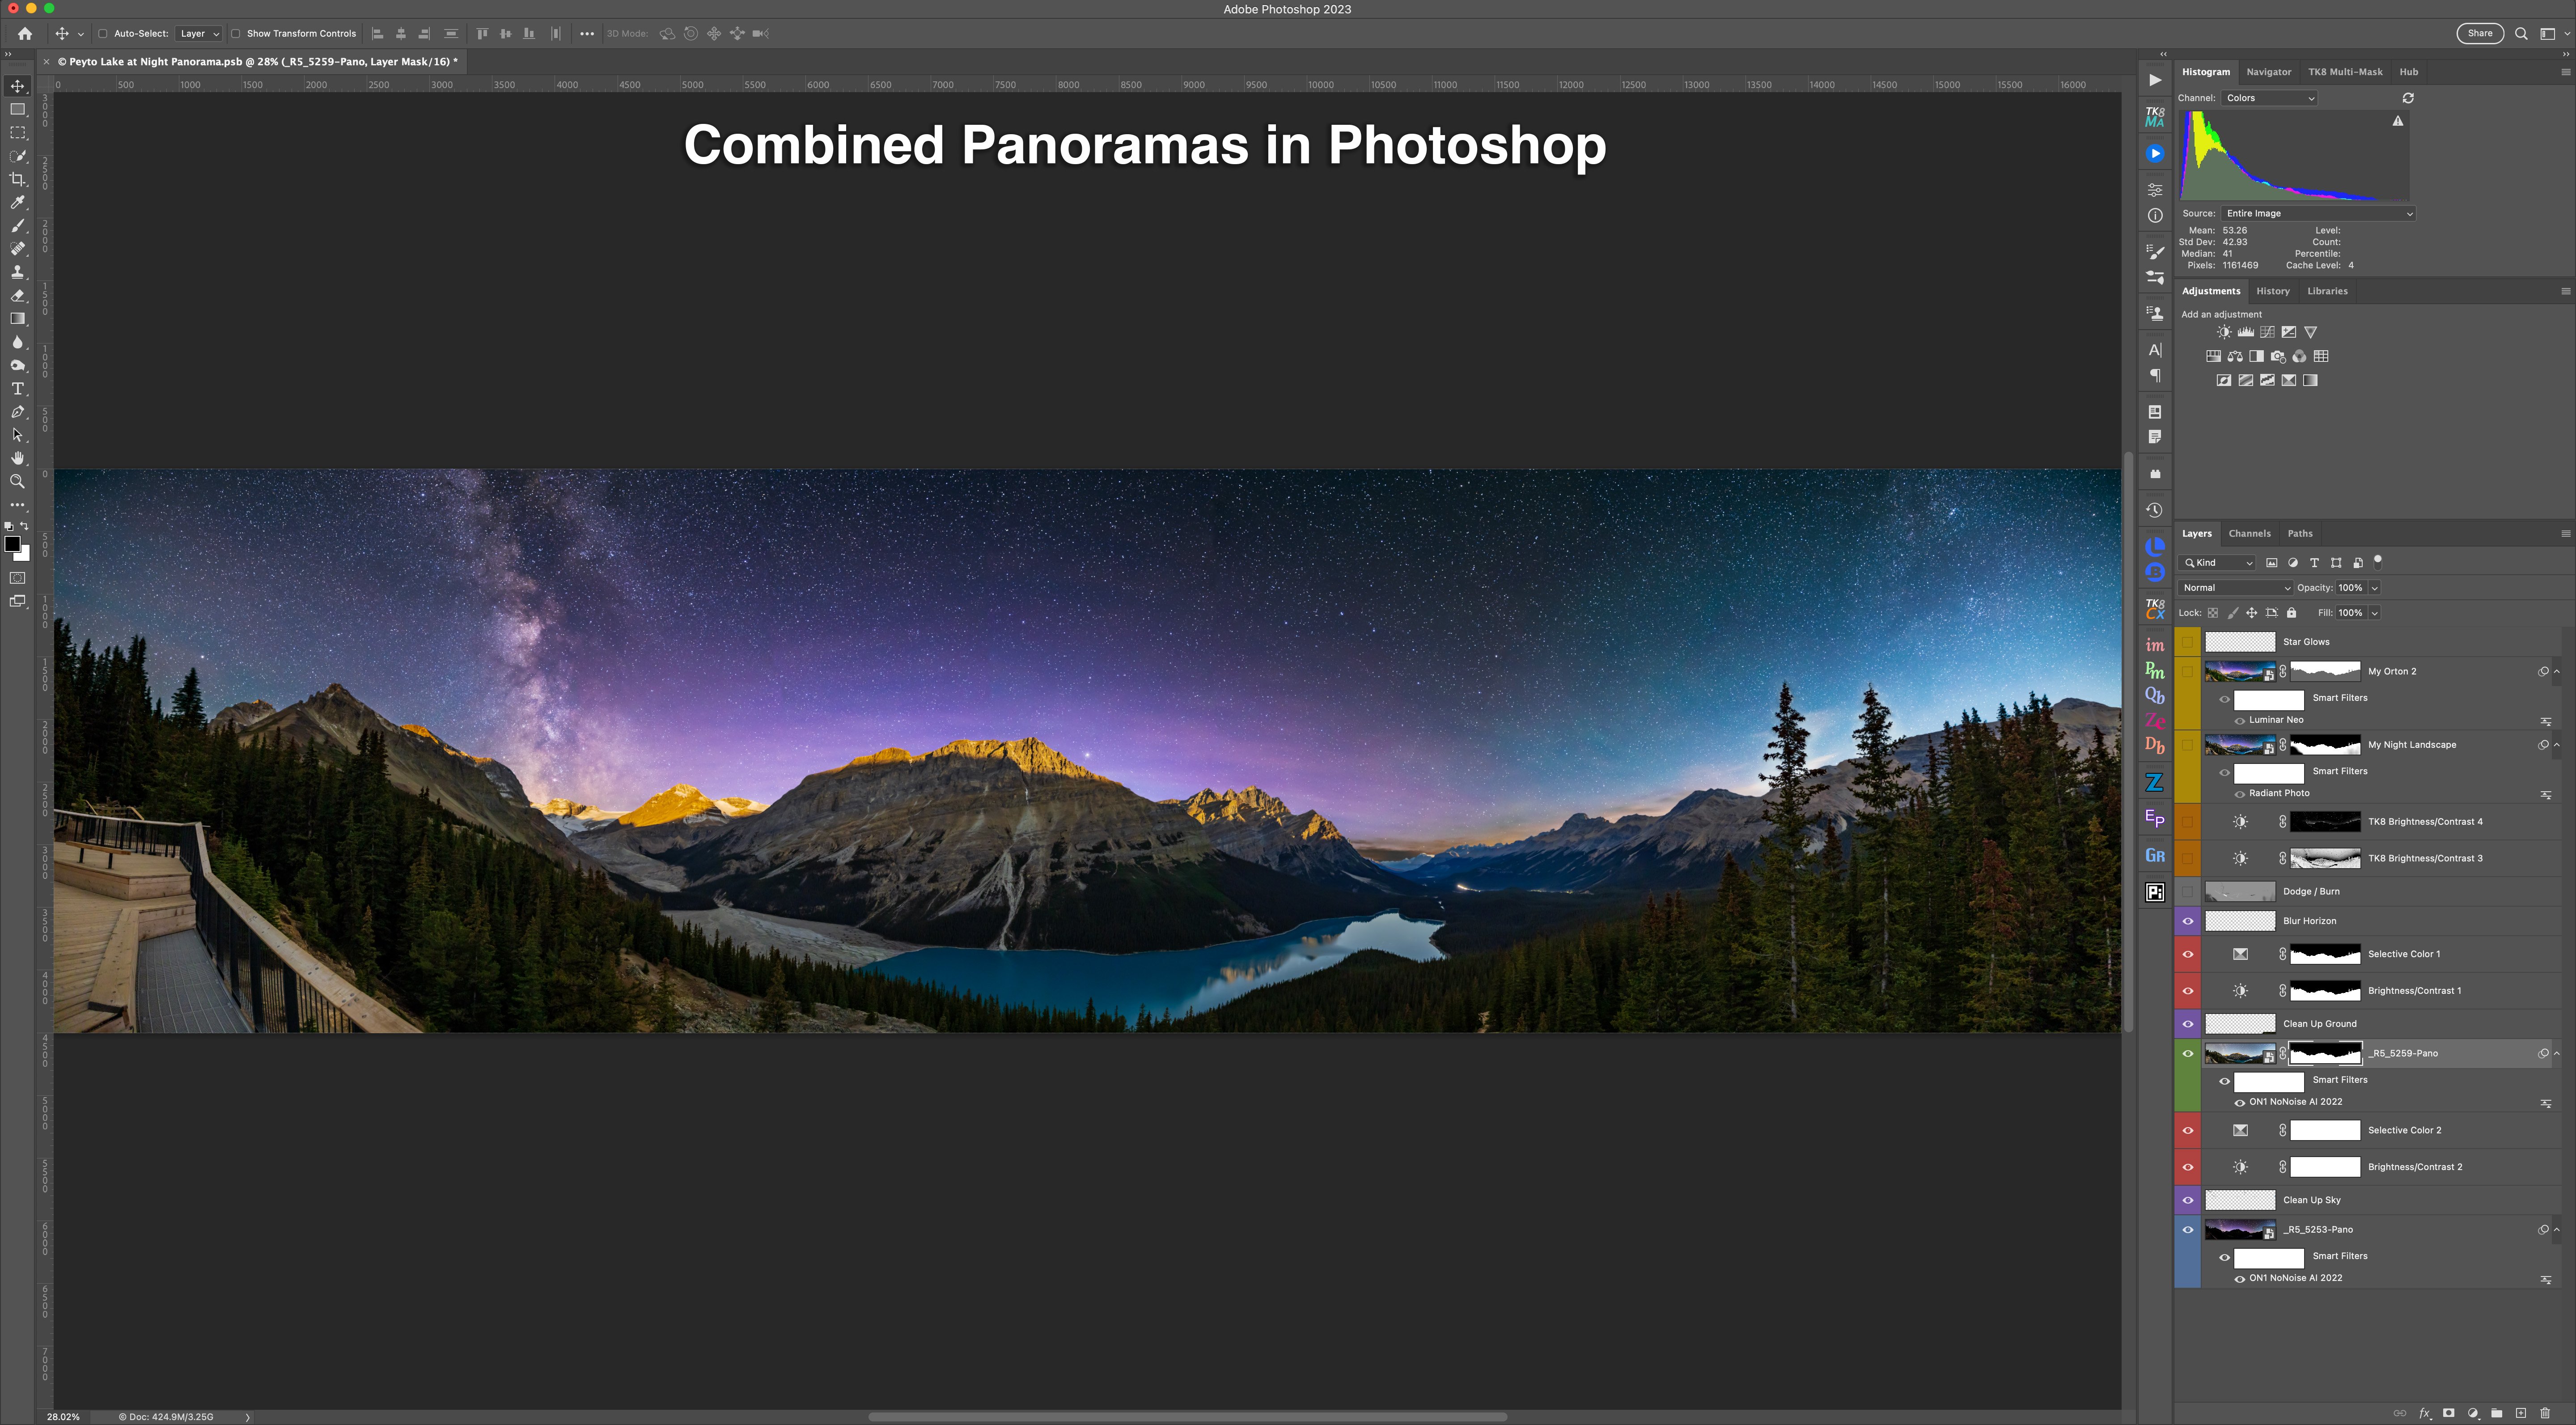


 On the evening of January 20 for North America, the Full Moon passes through the umbral shadow of the Earth, creating a total eclipse of the Moon.
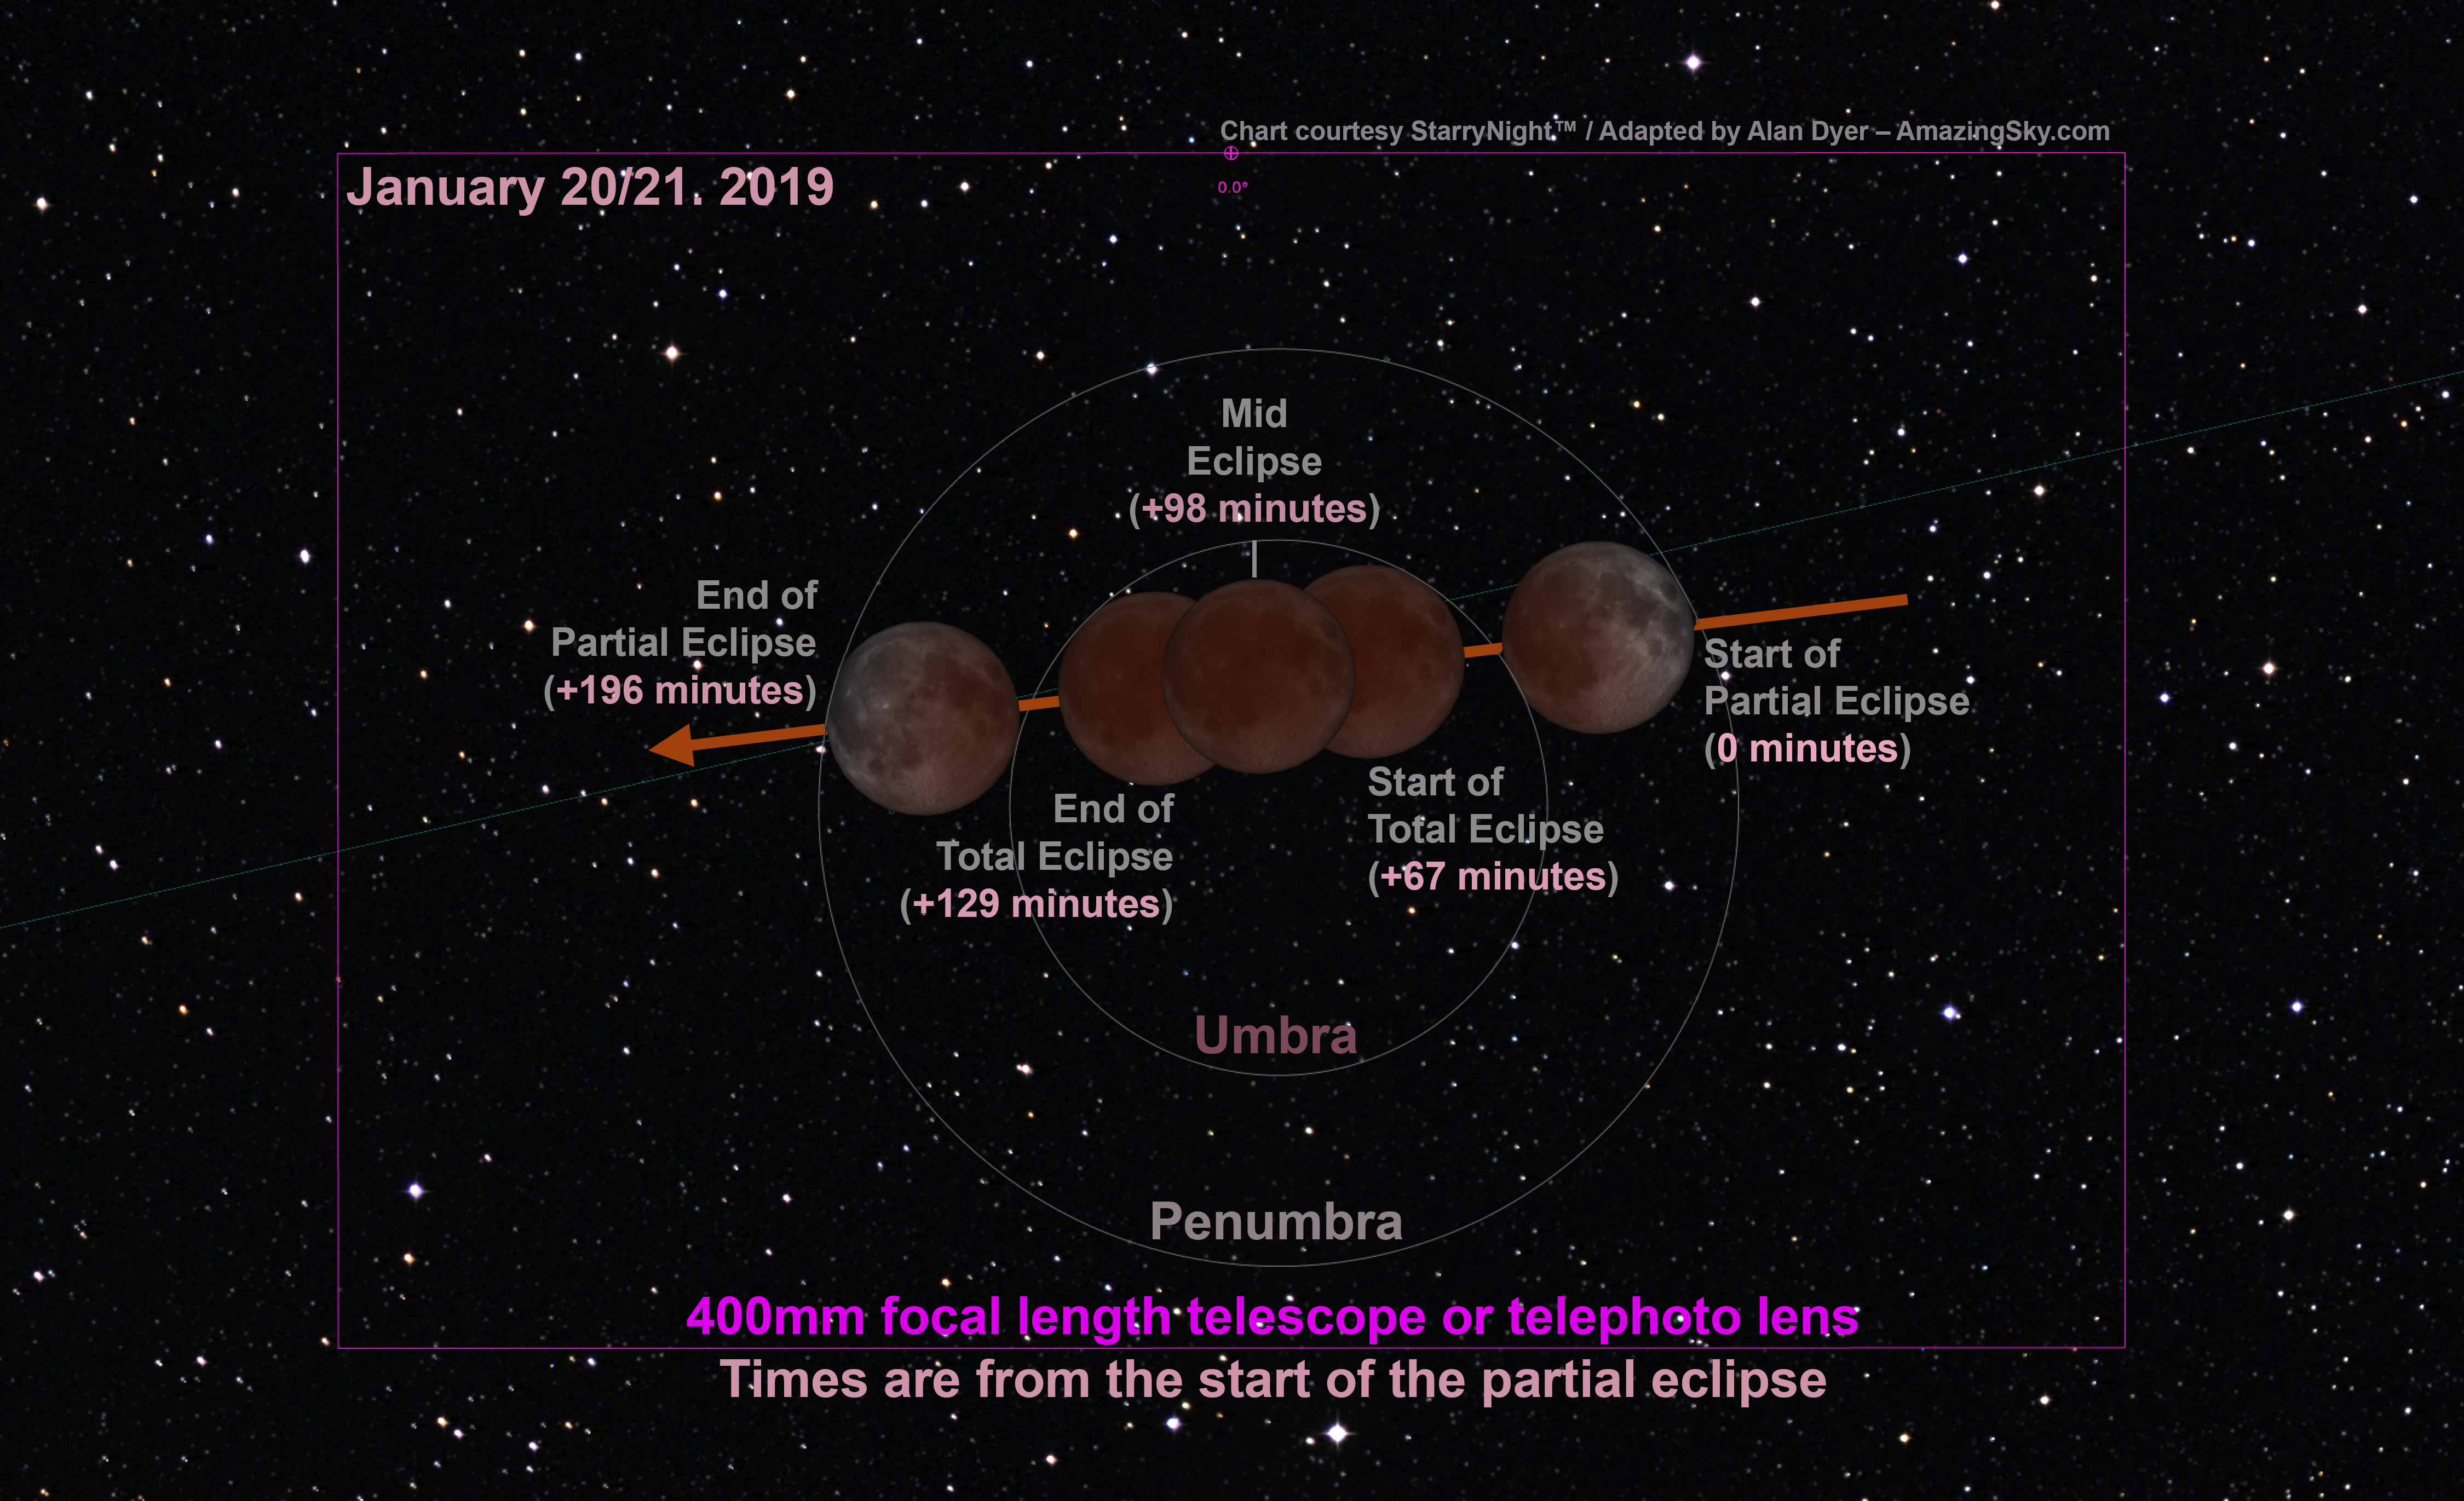
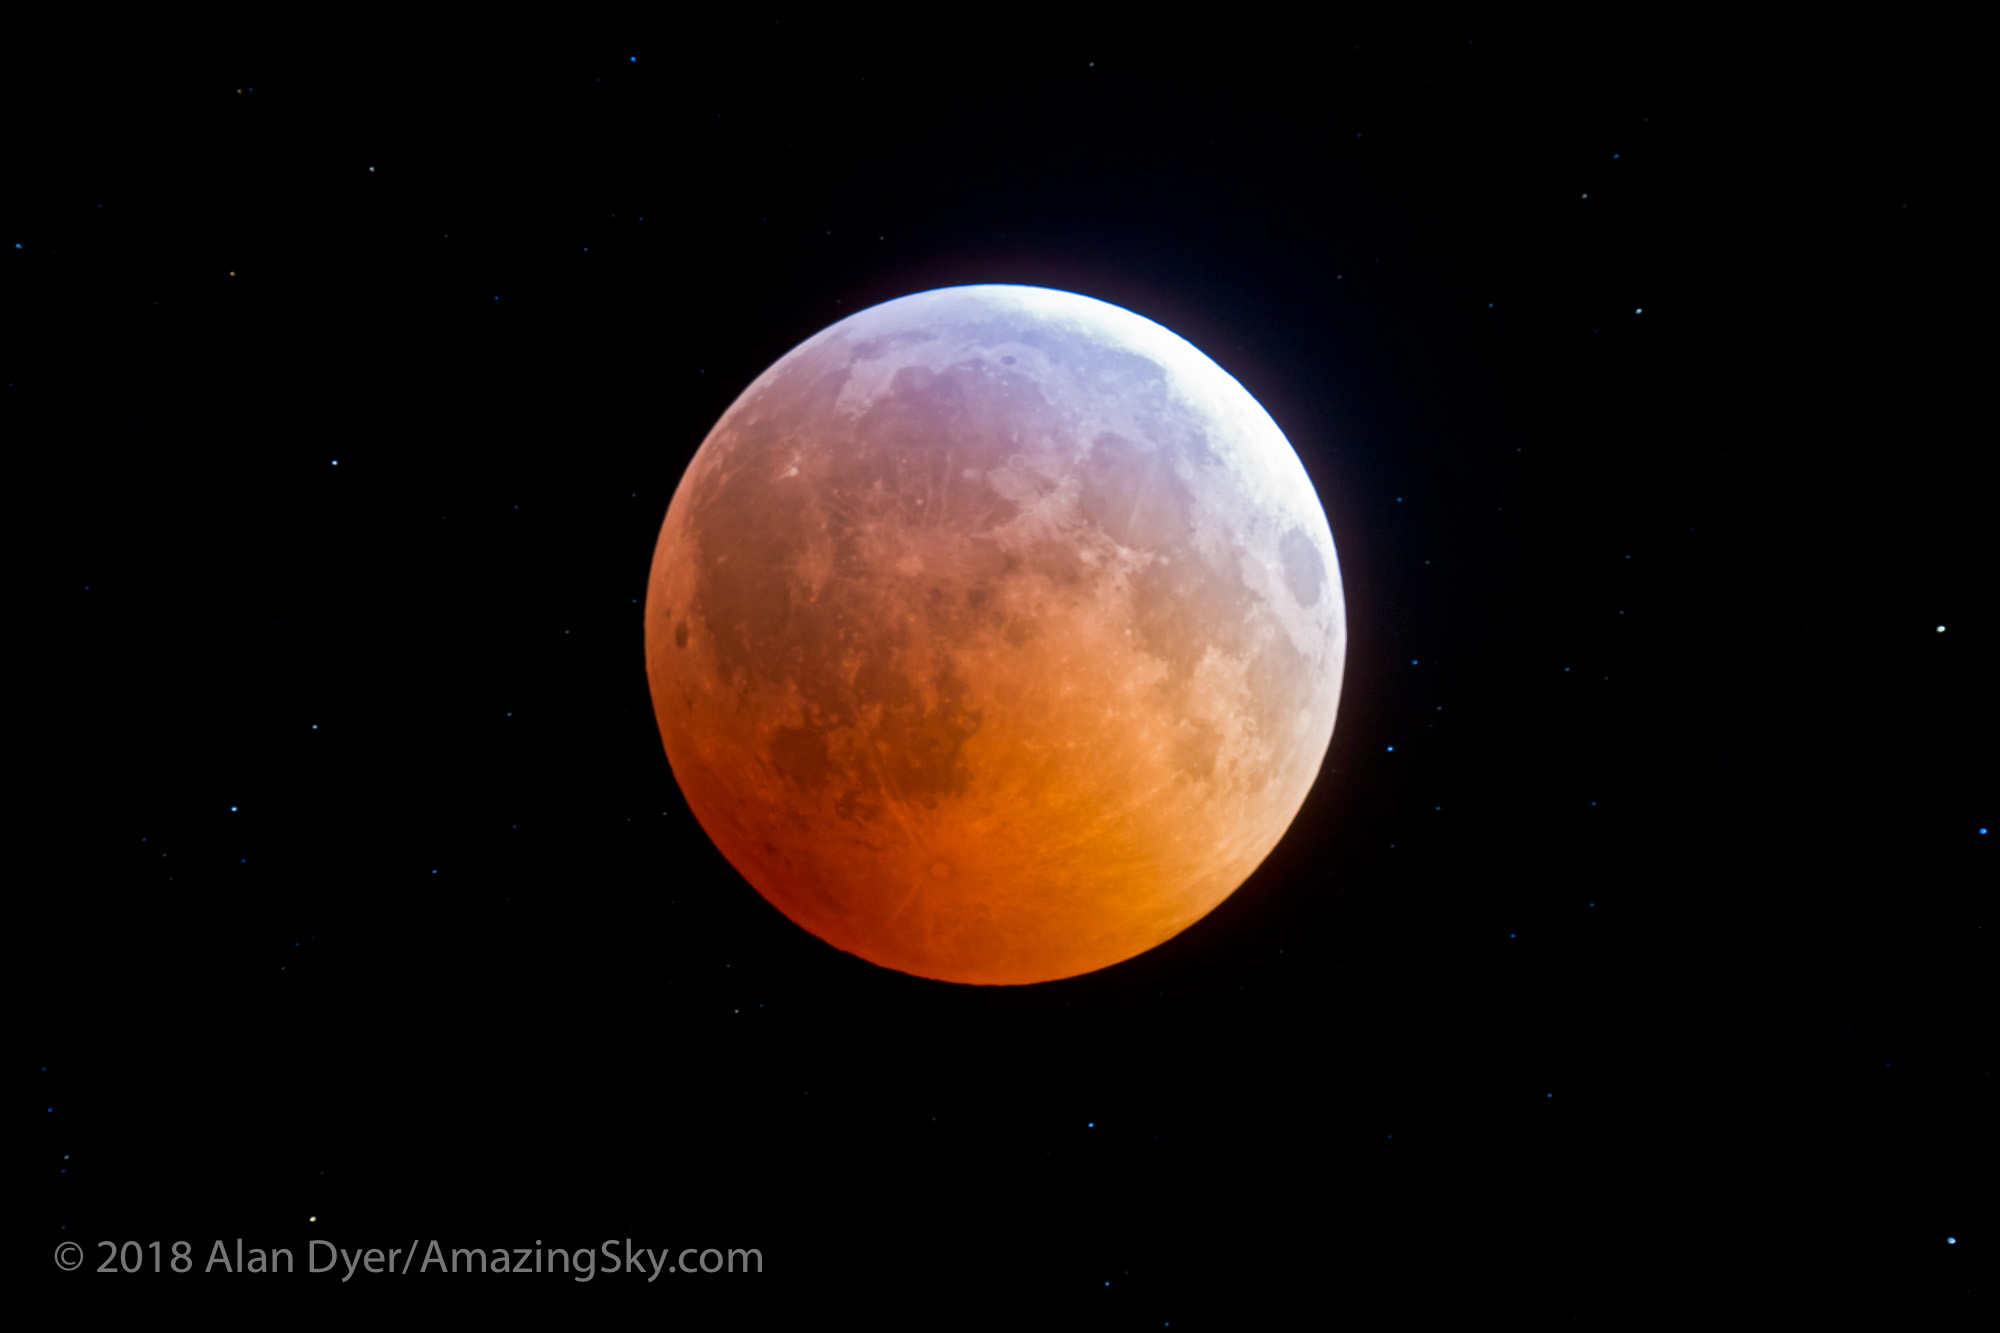
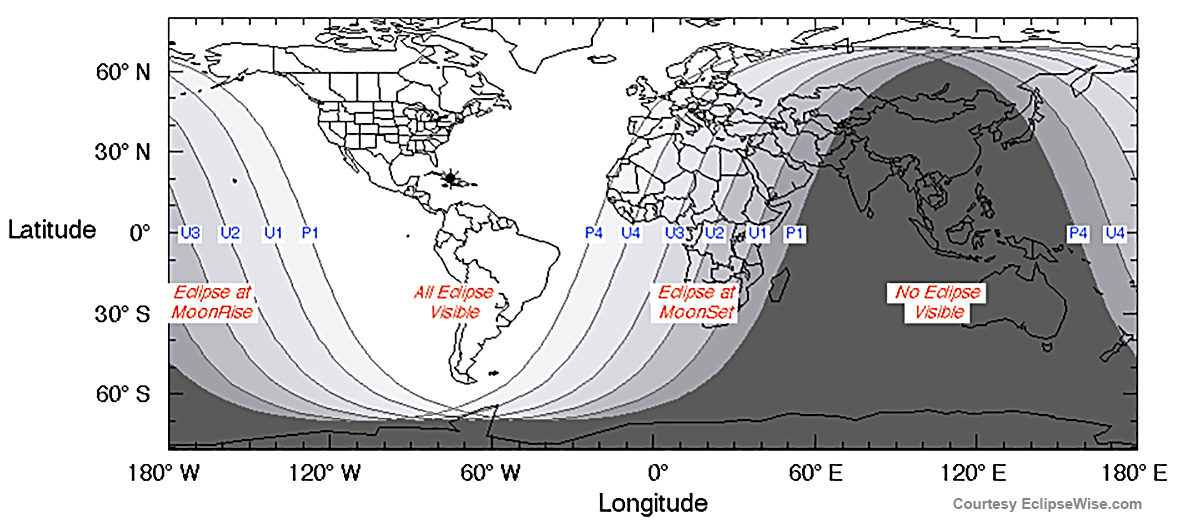


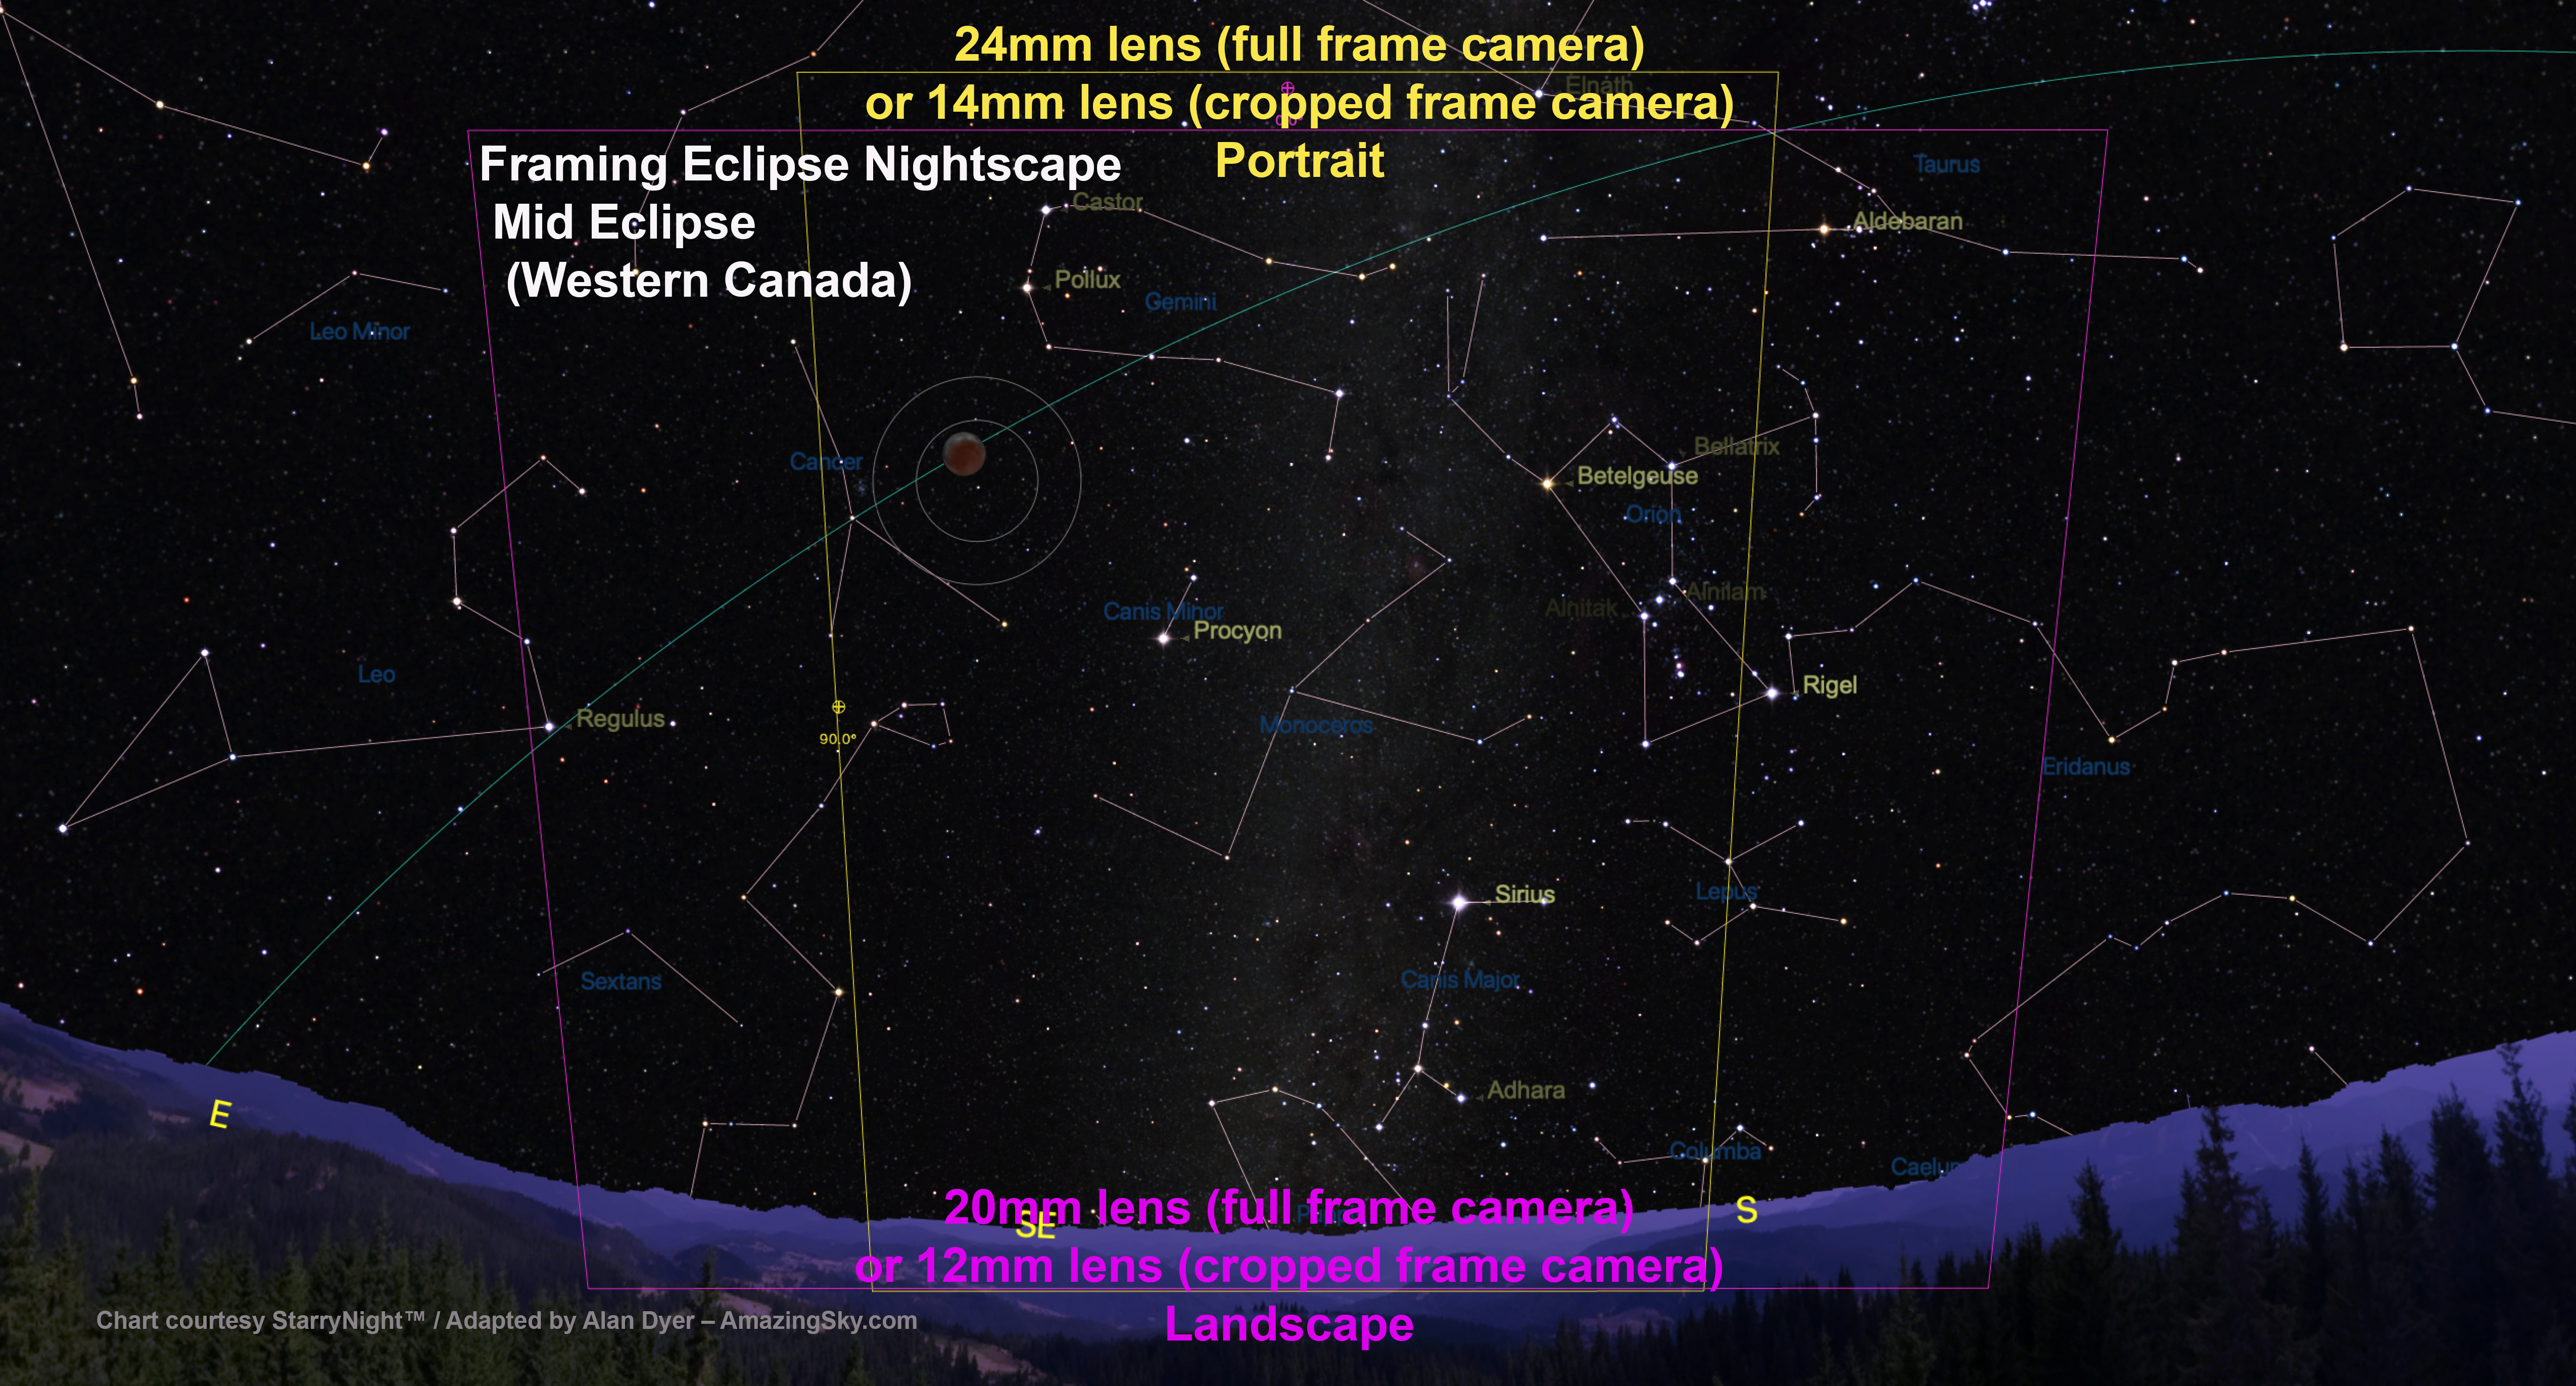
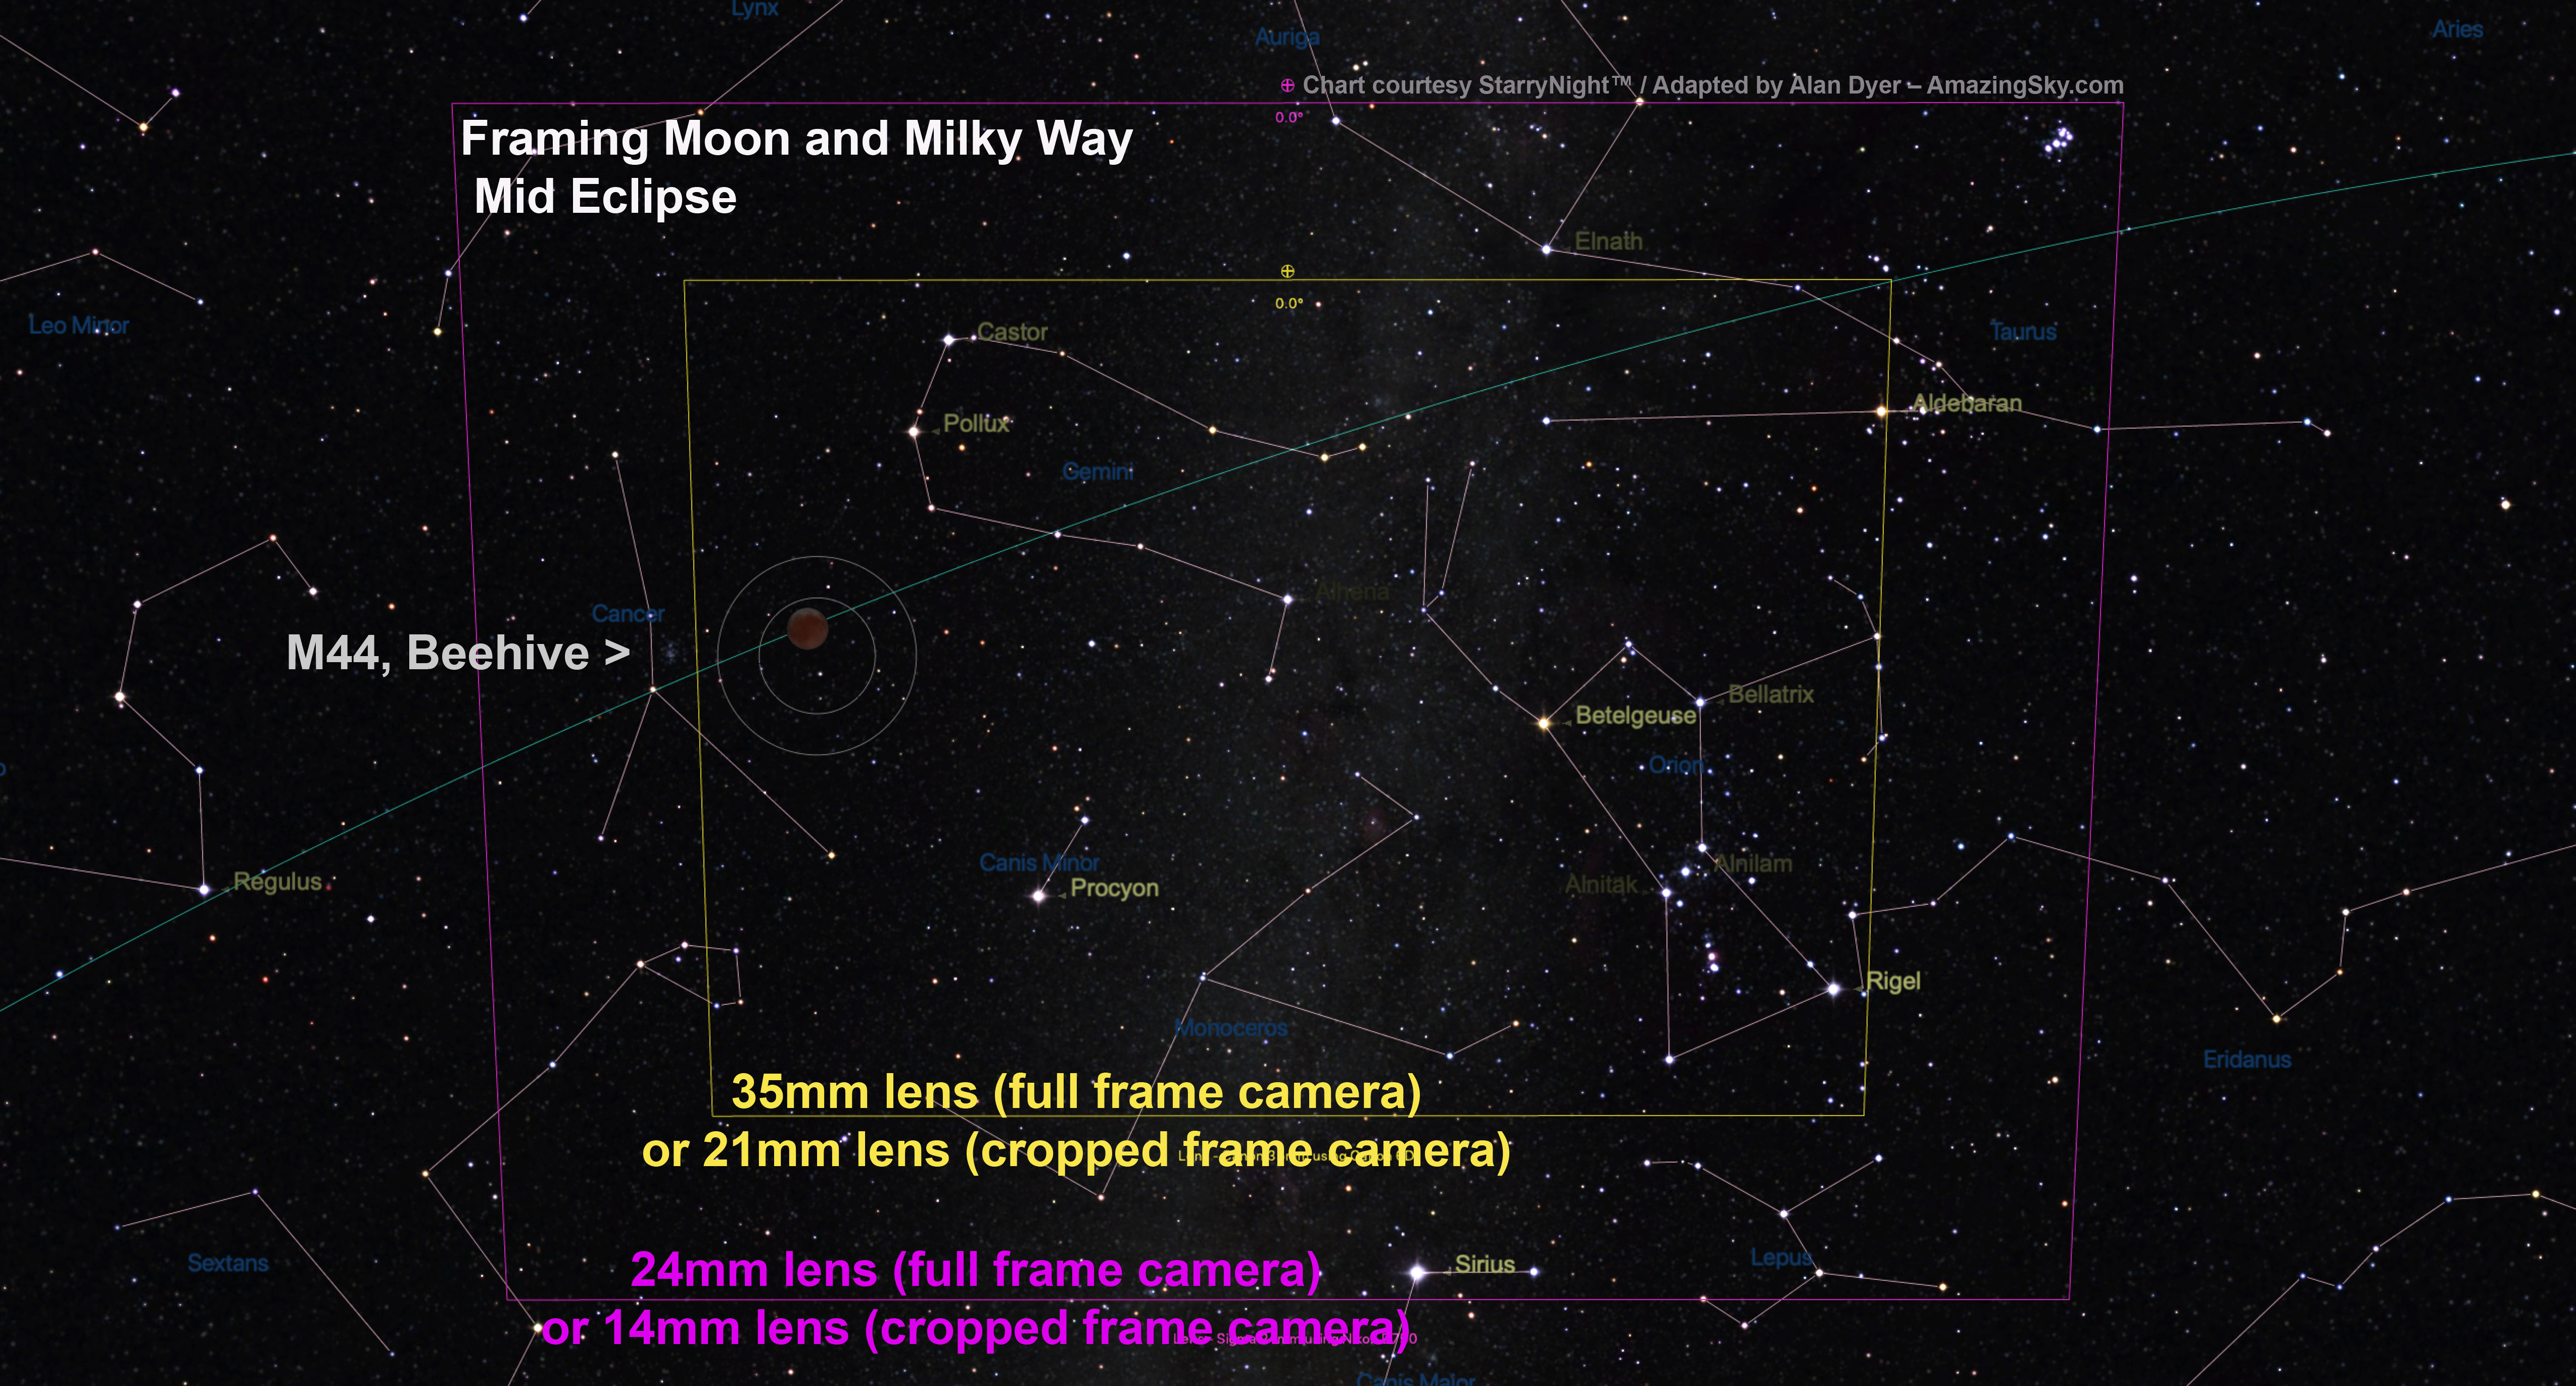
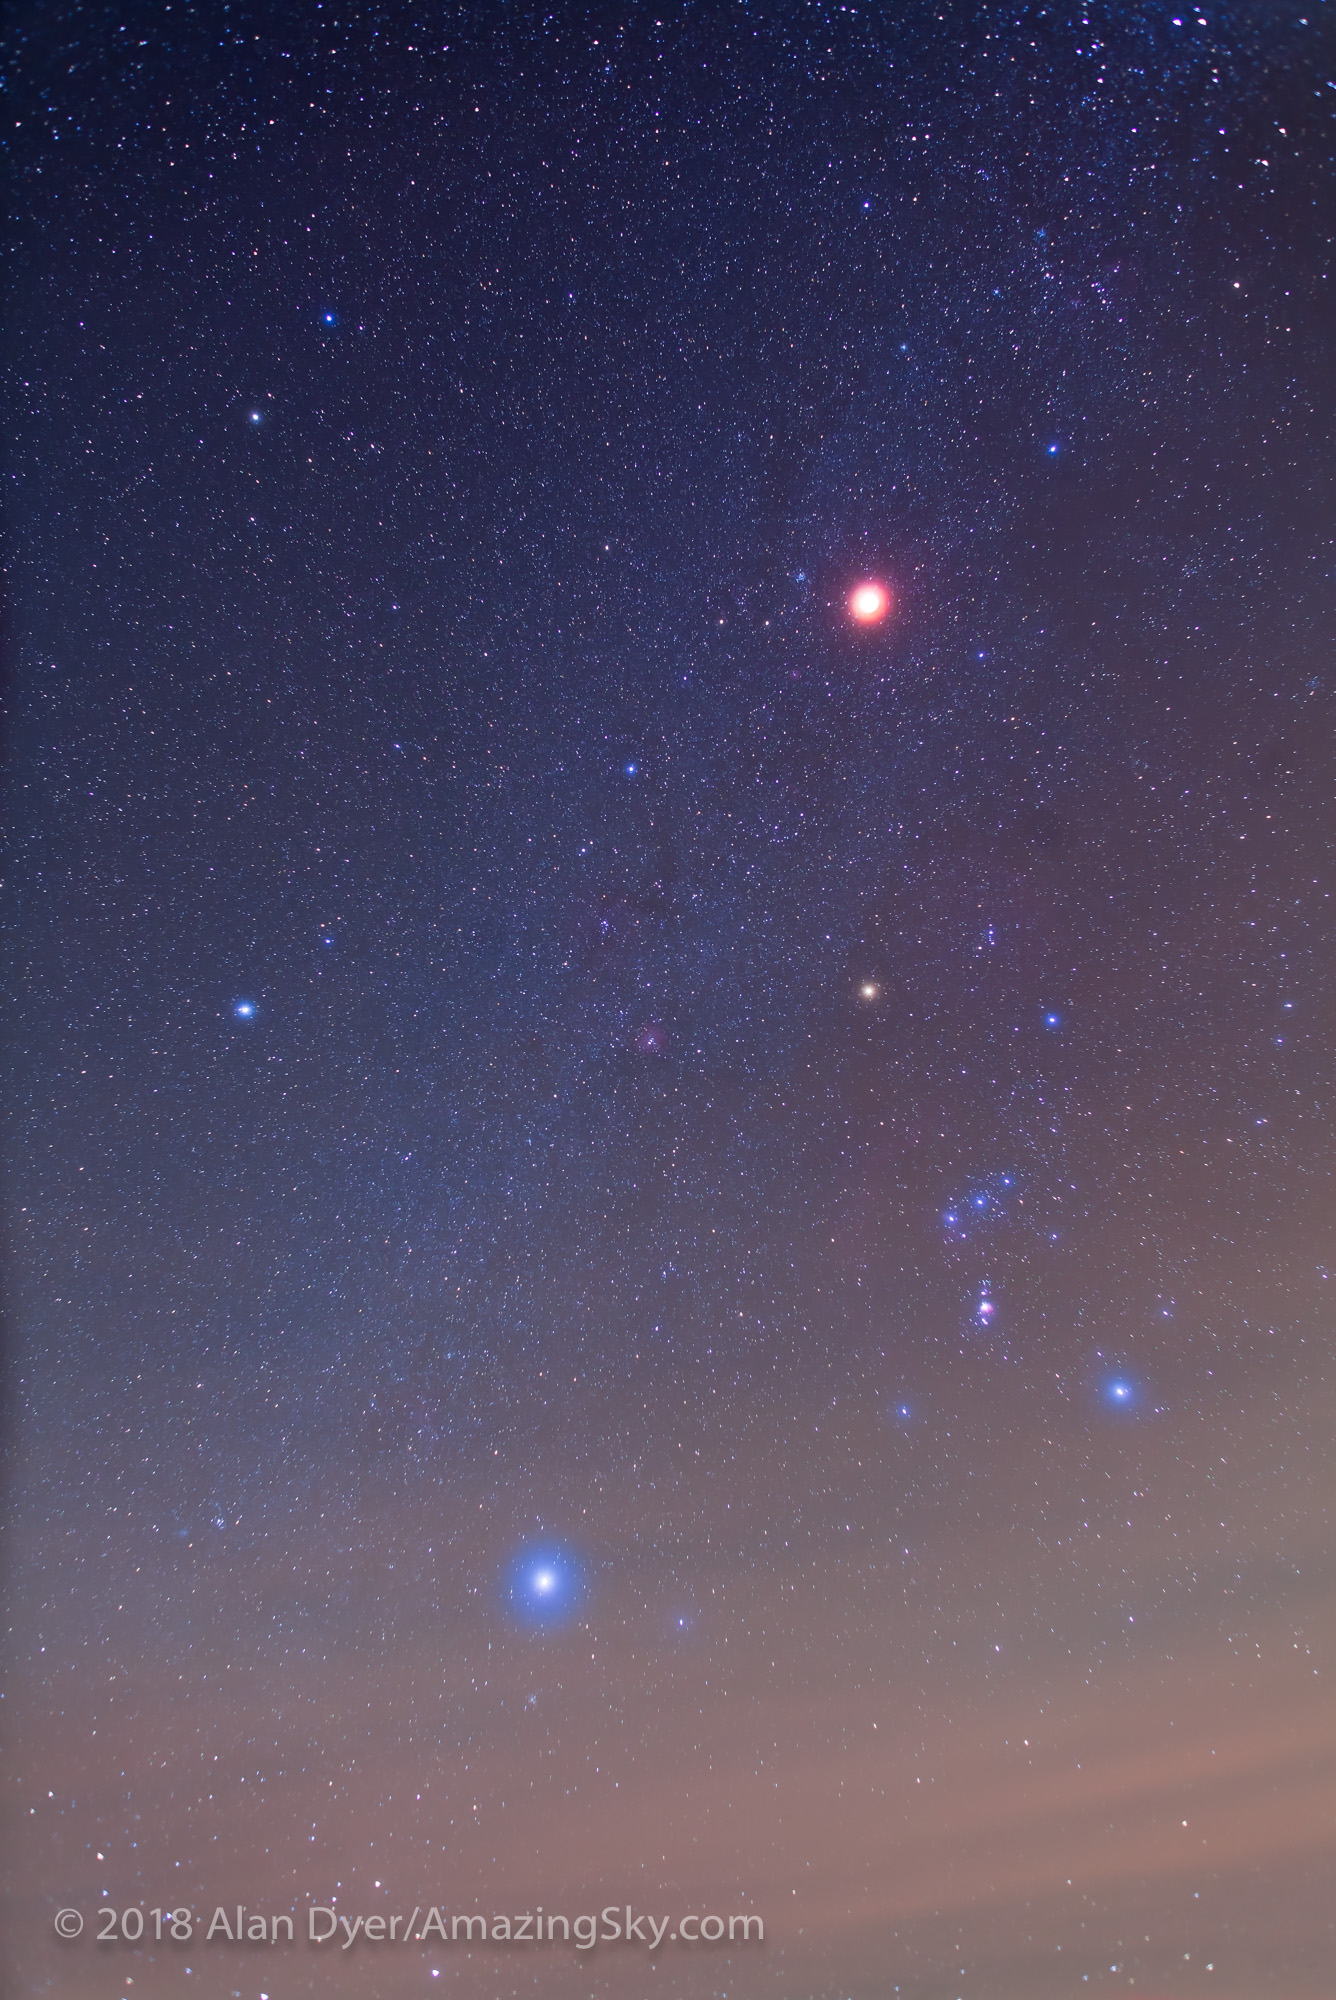
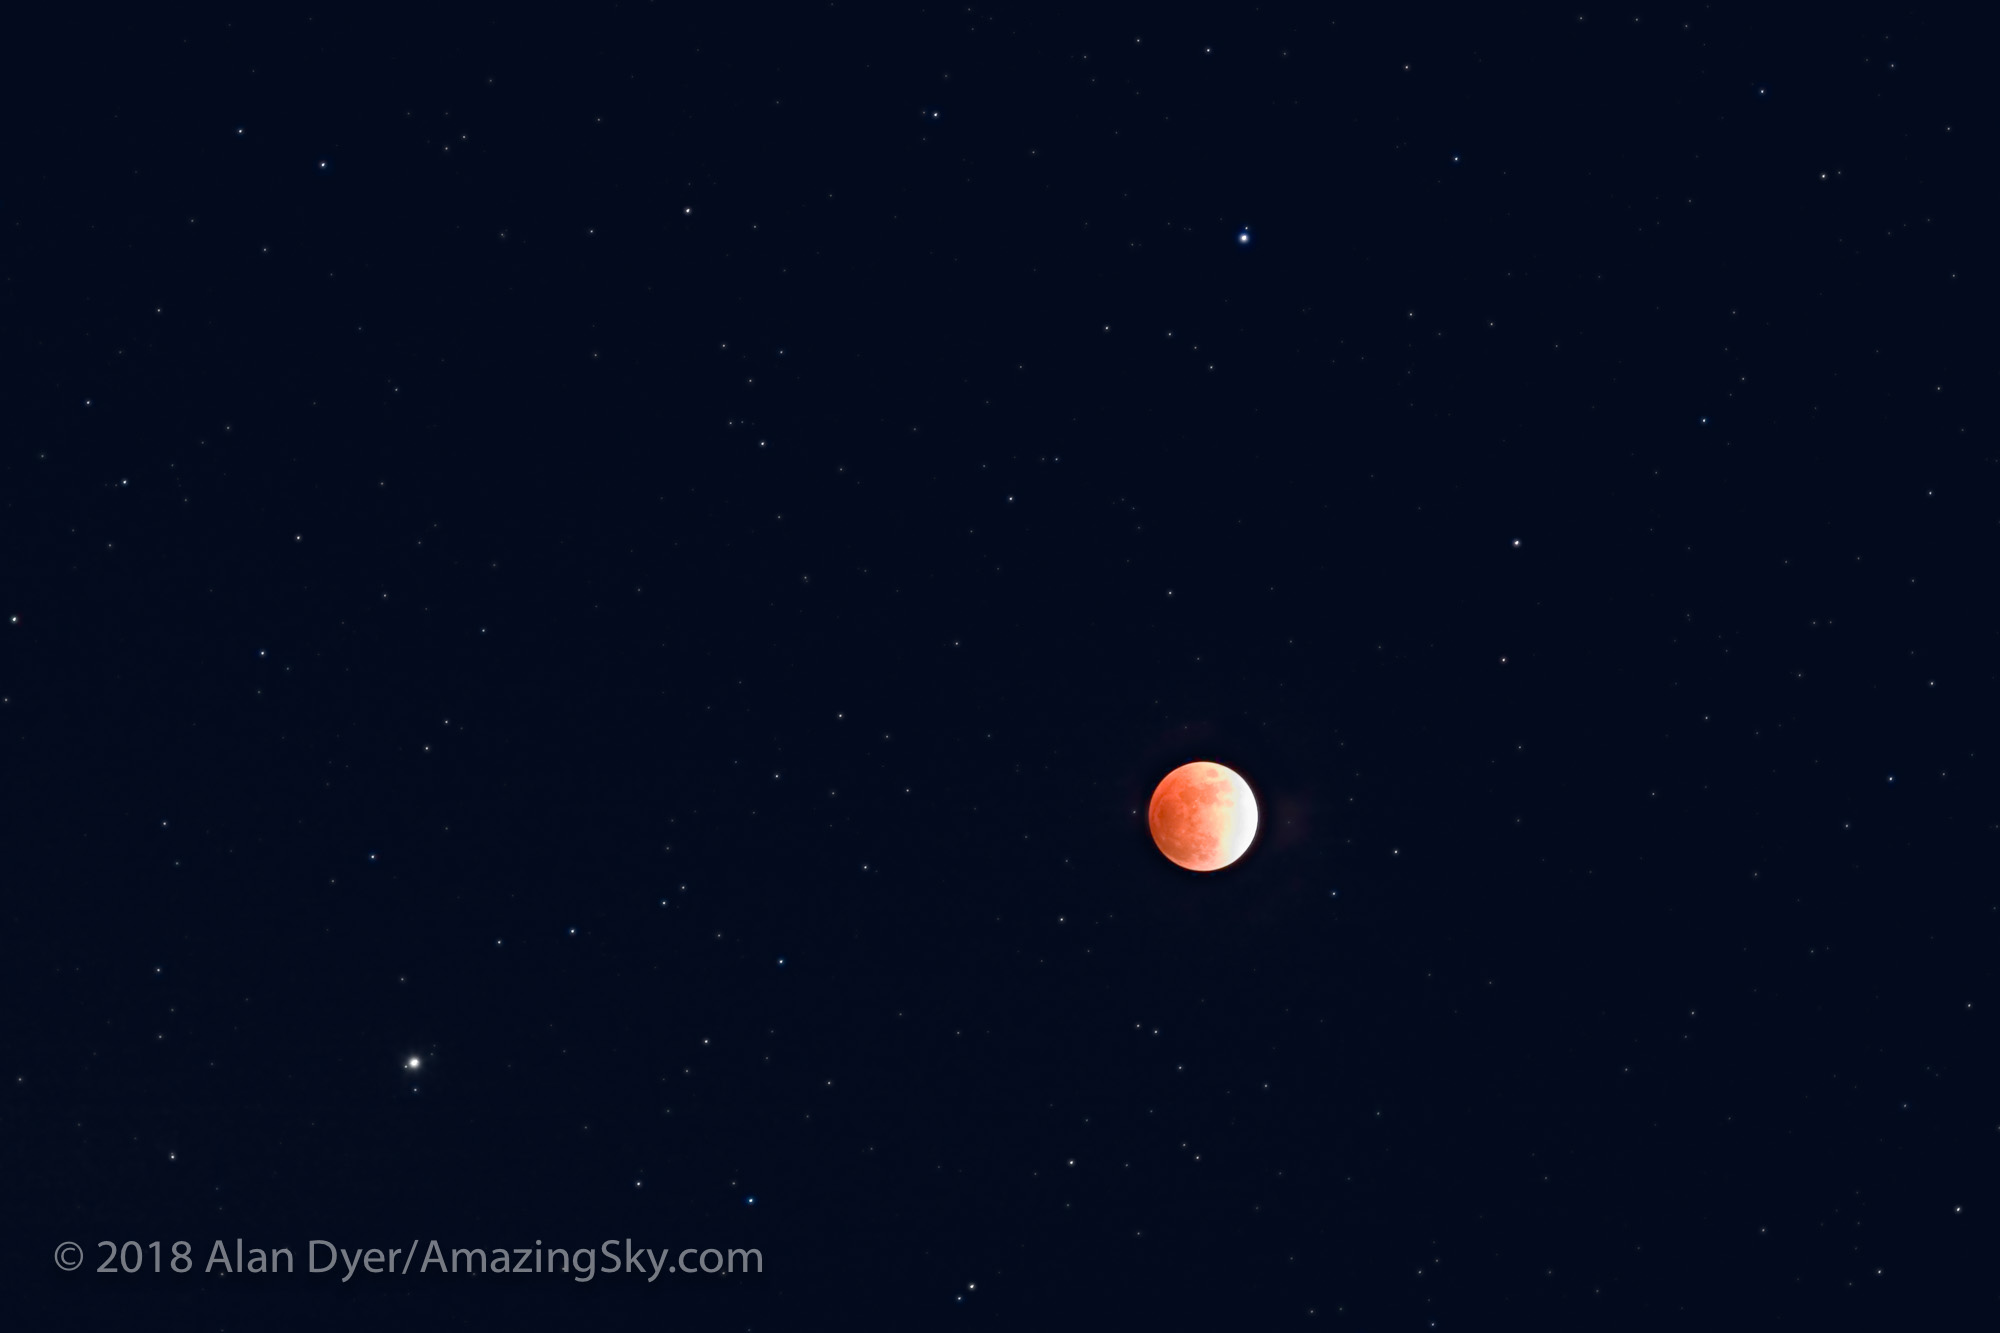
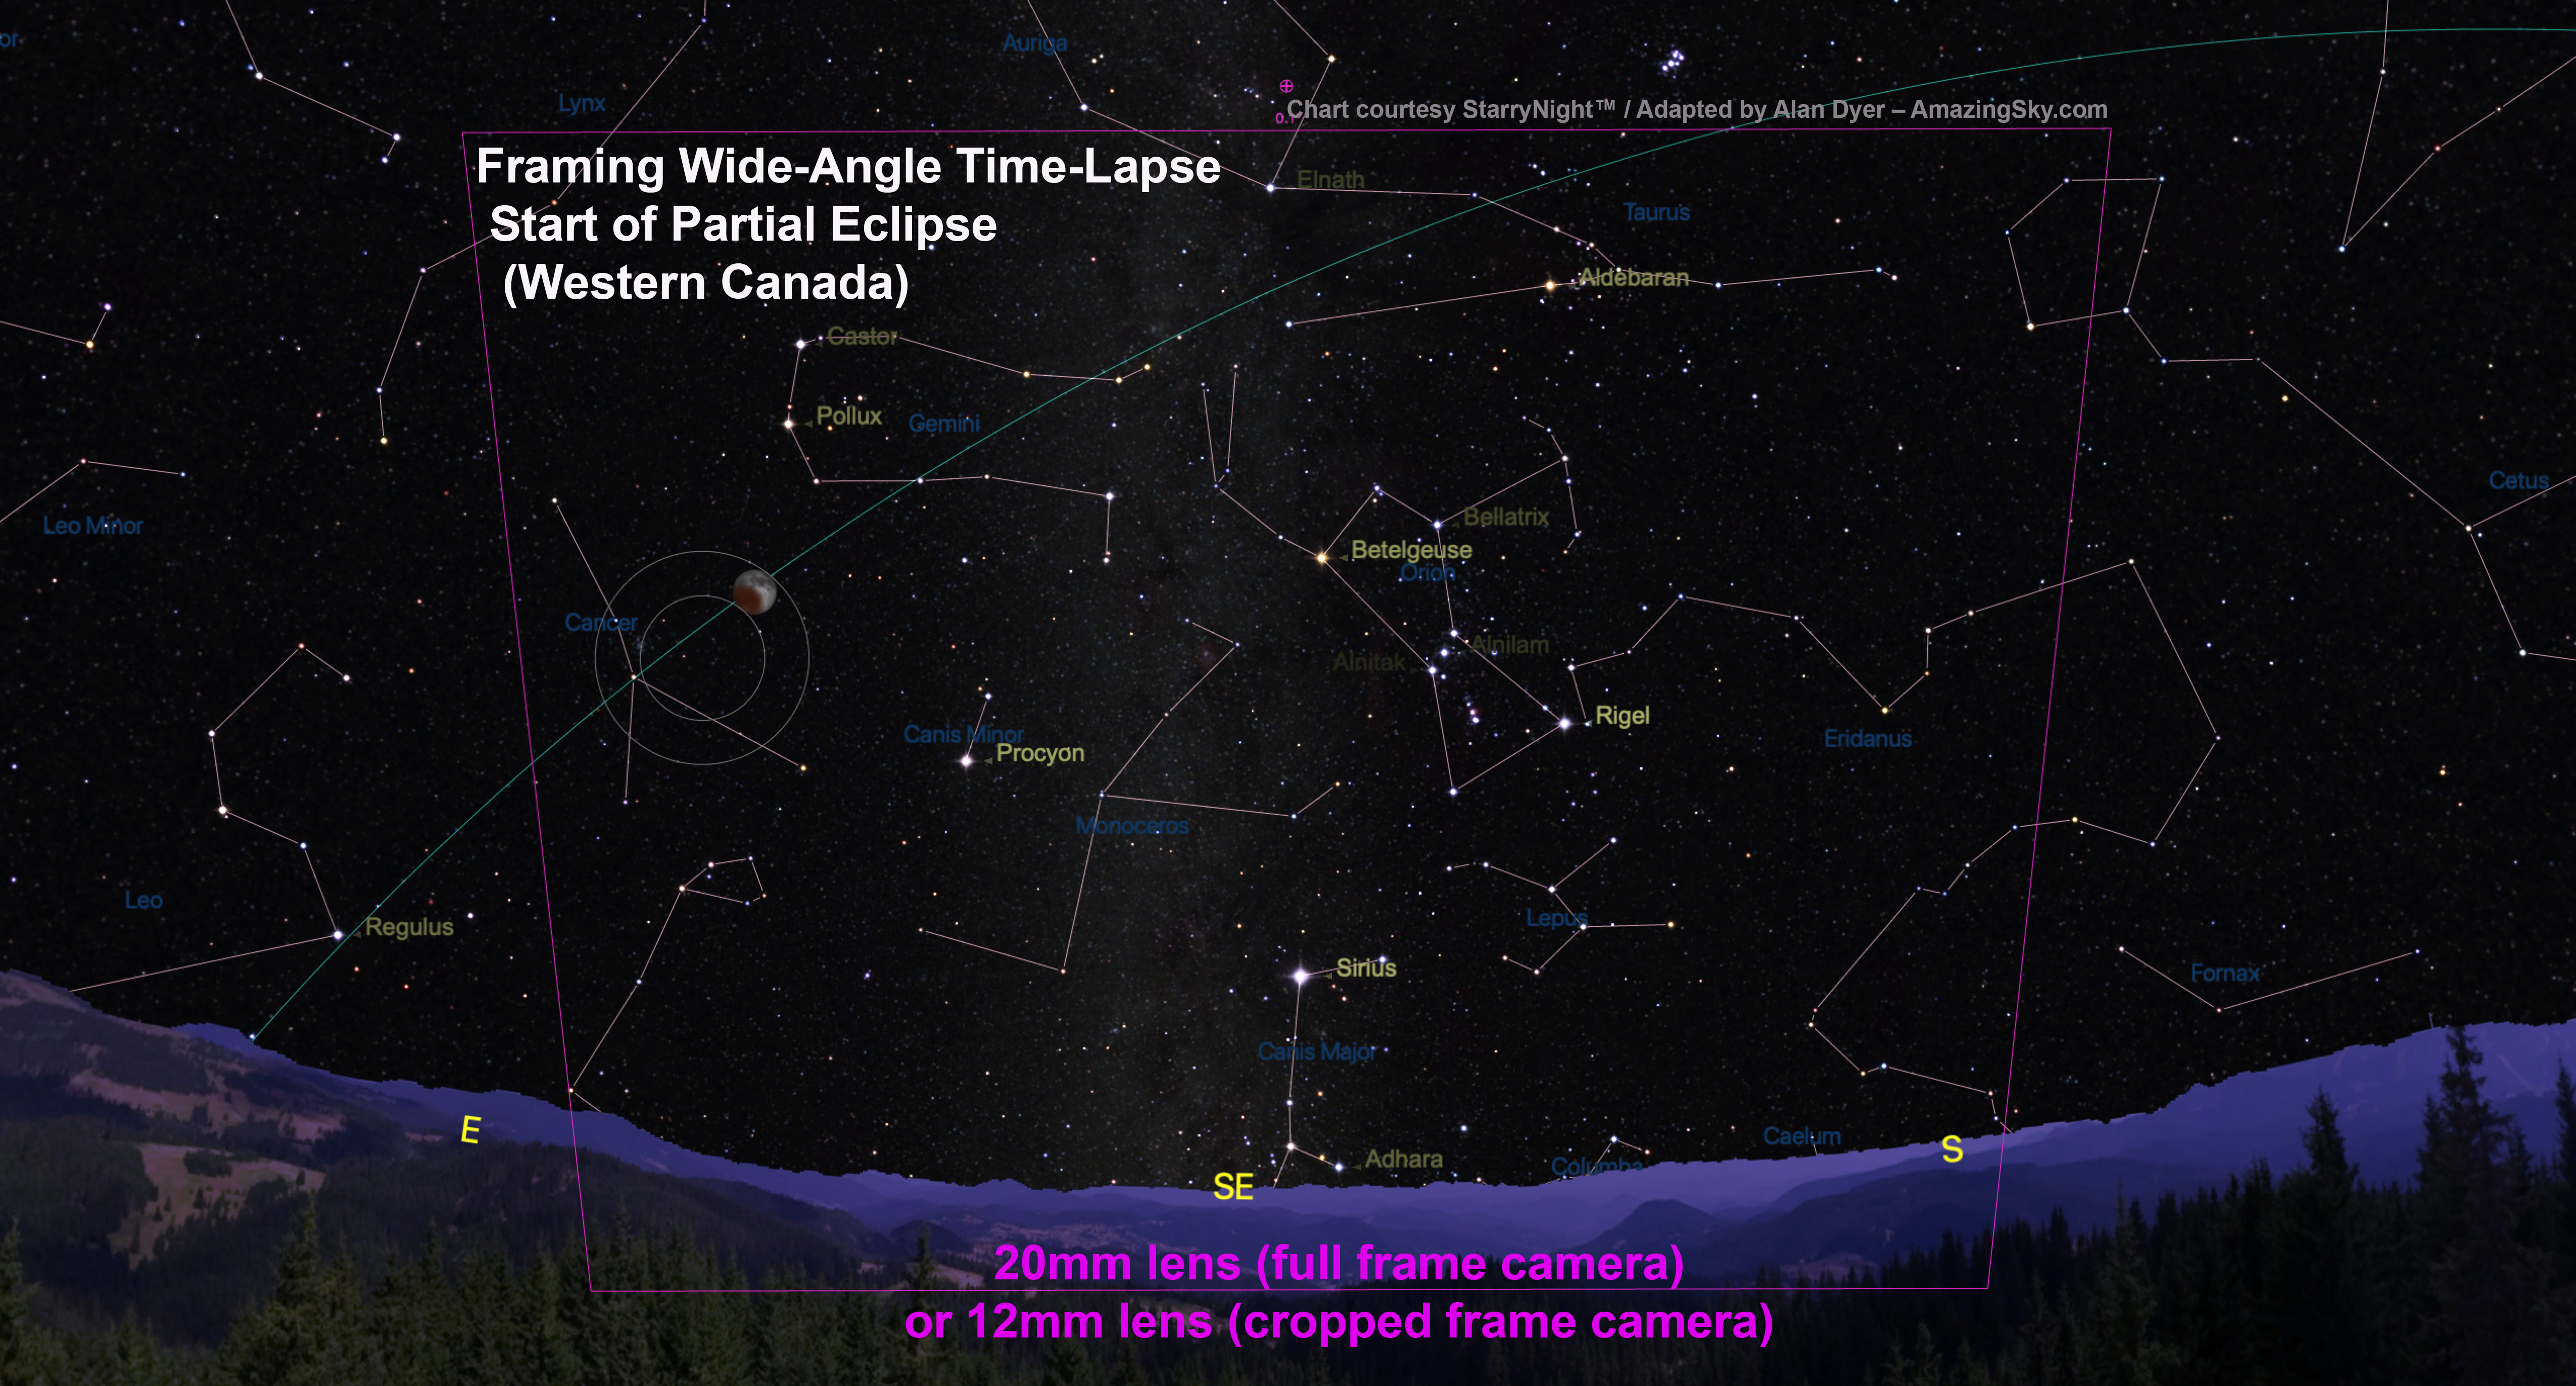
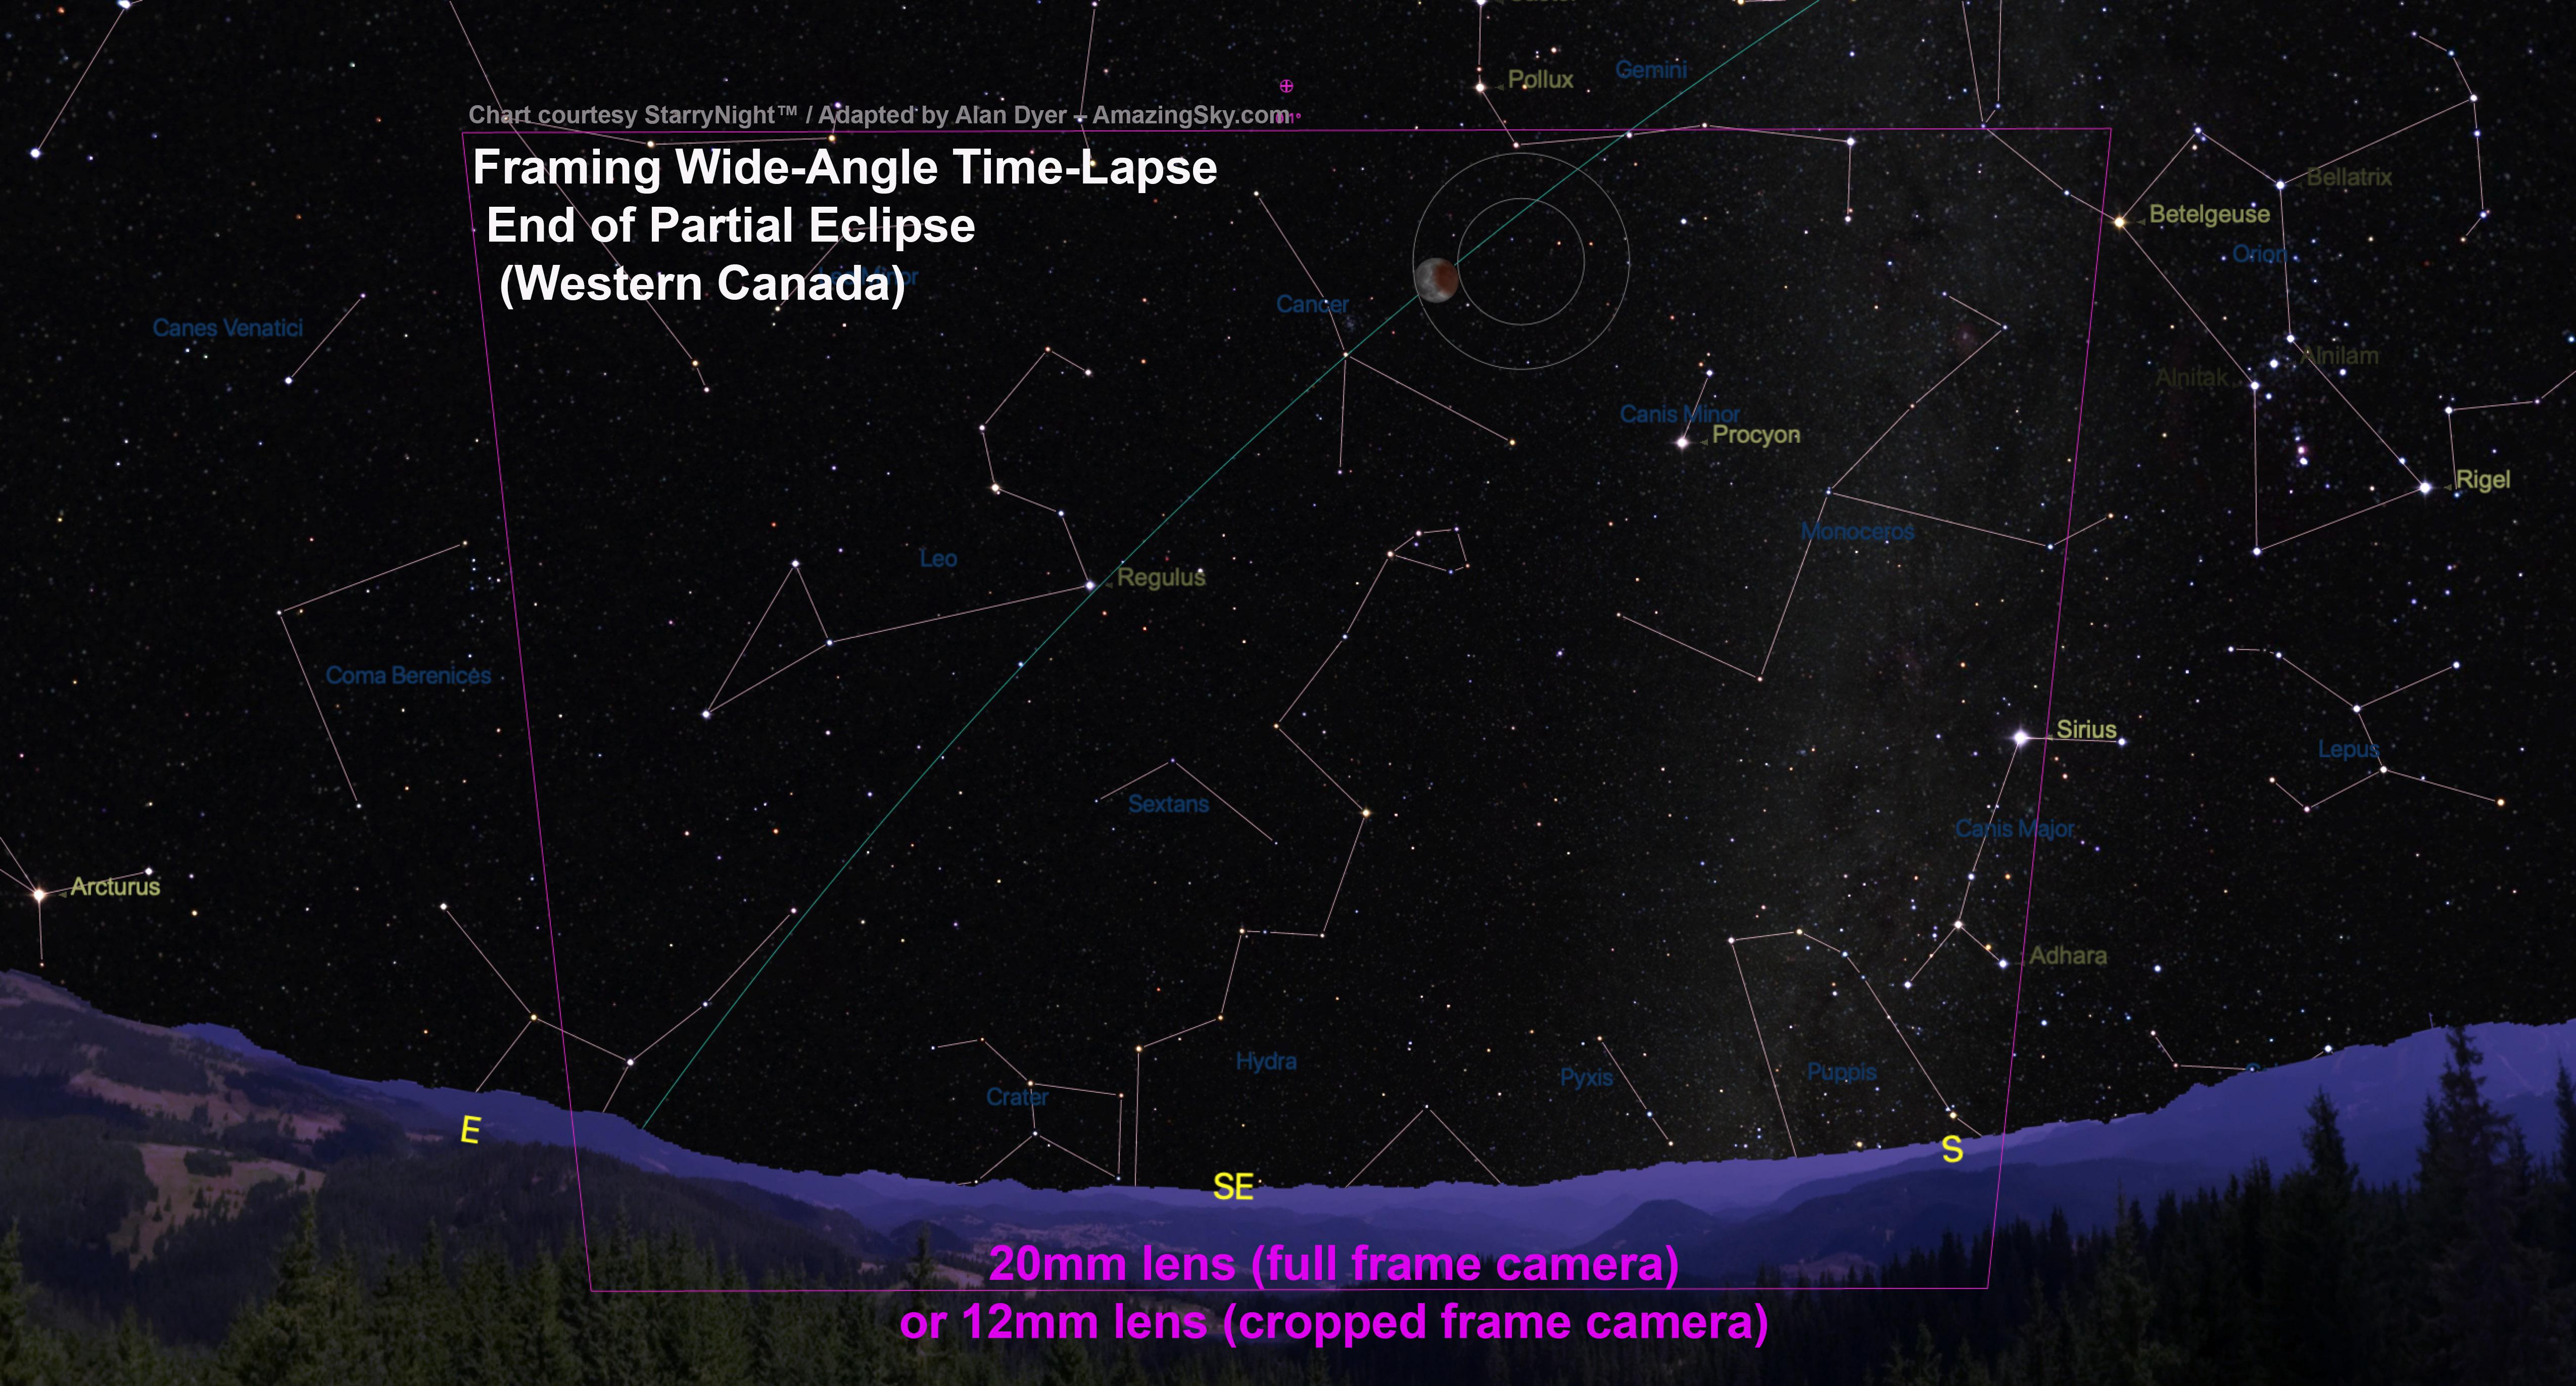


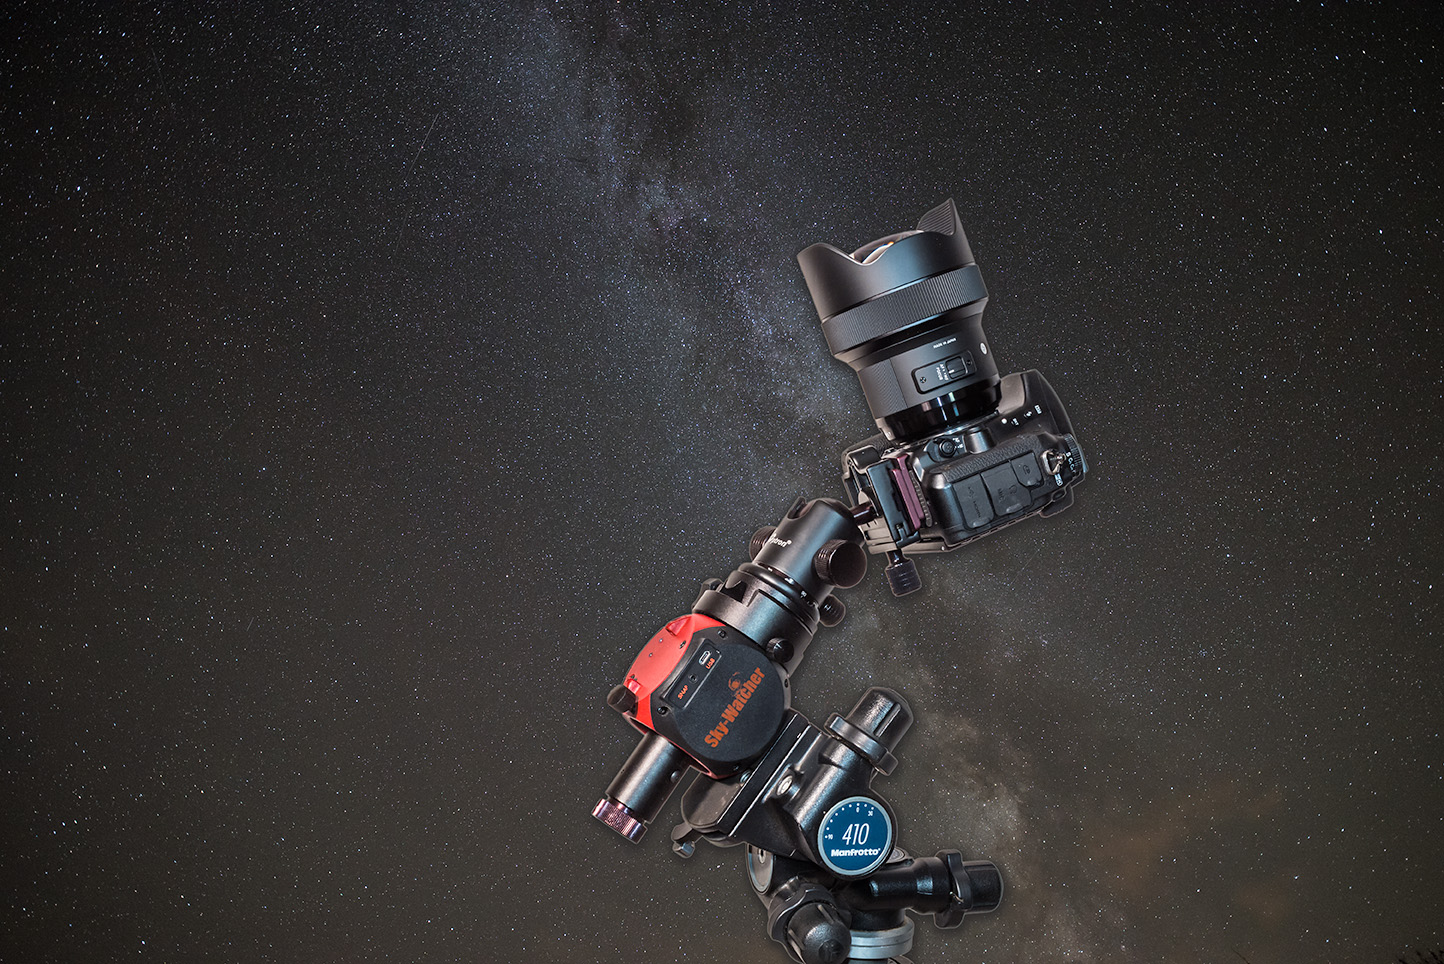

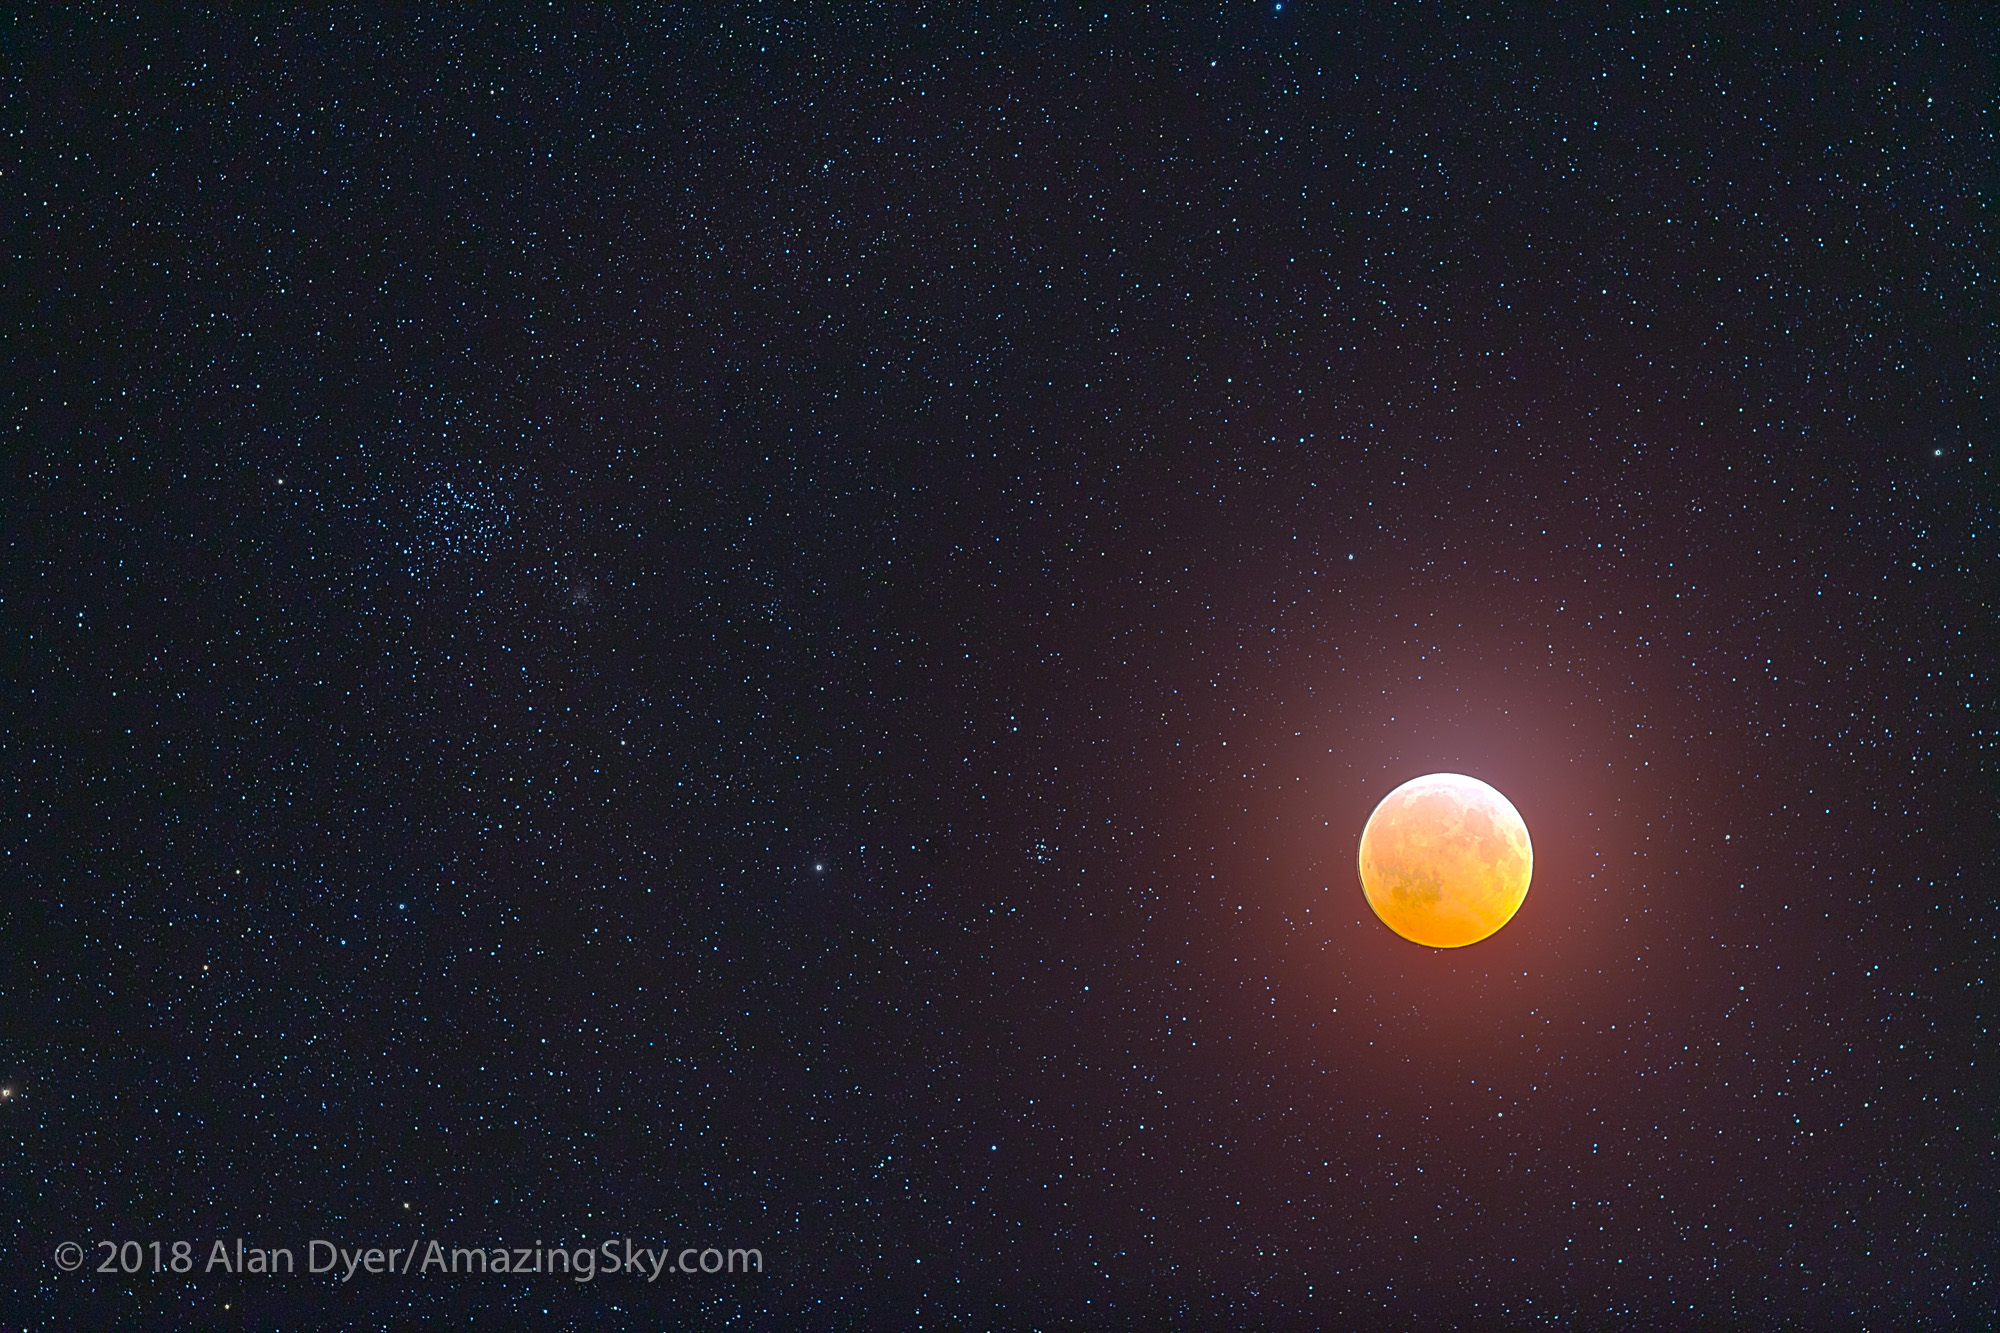
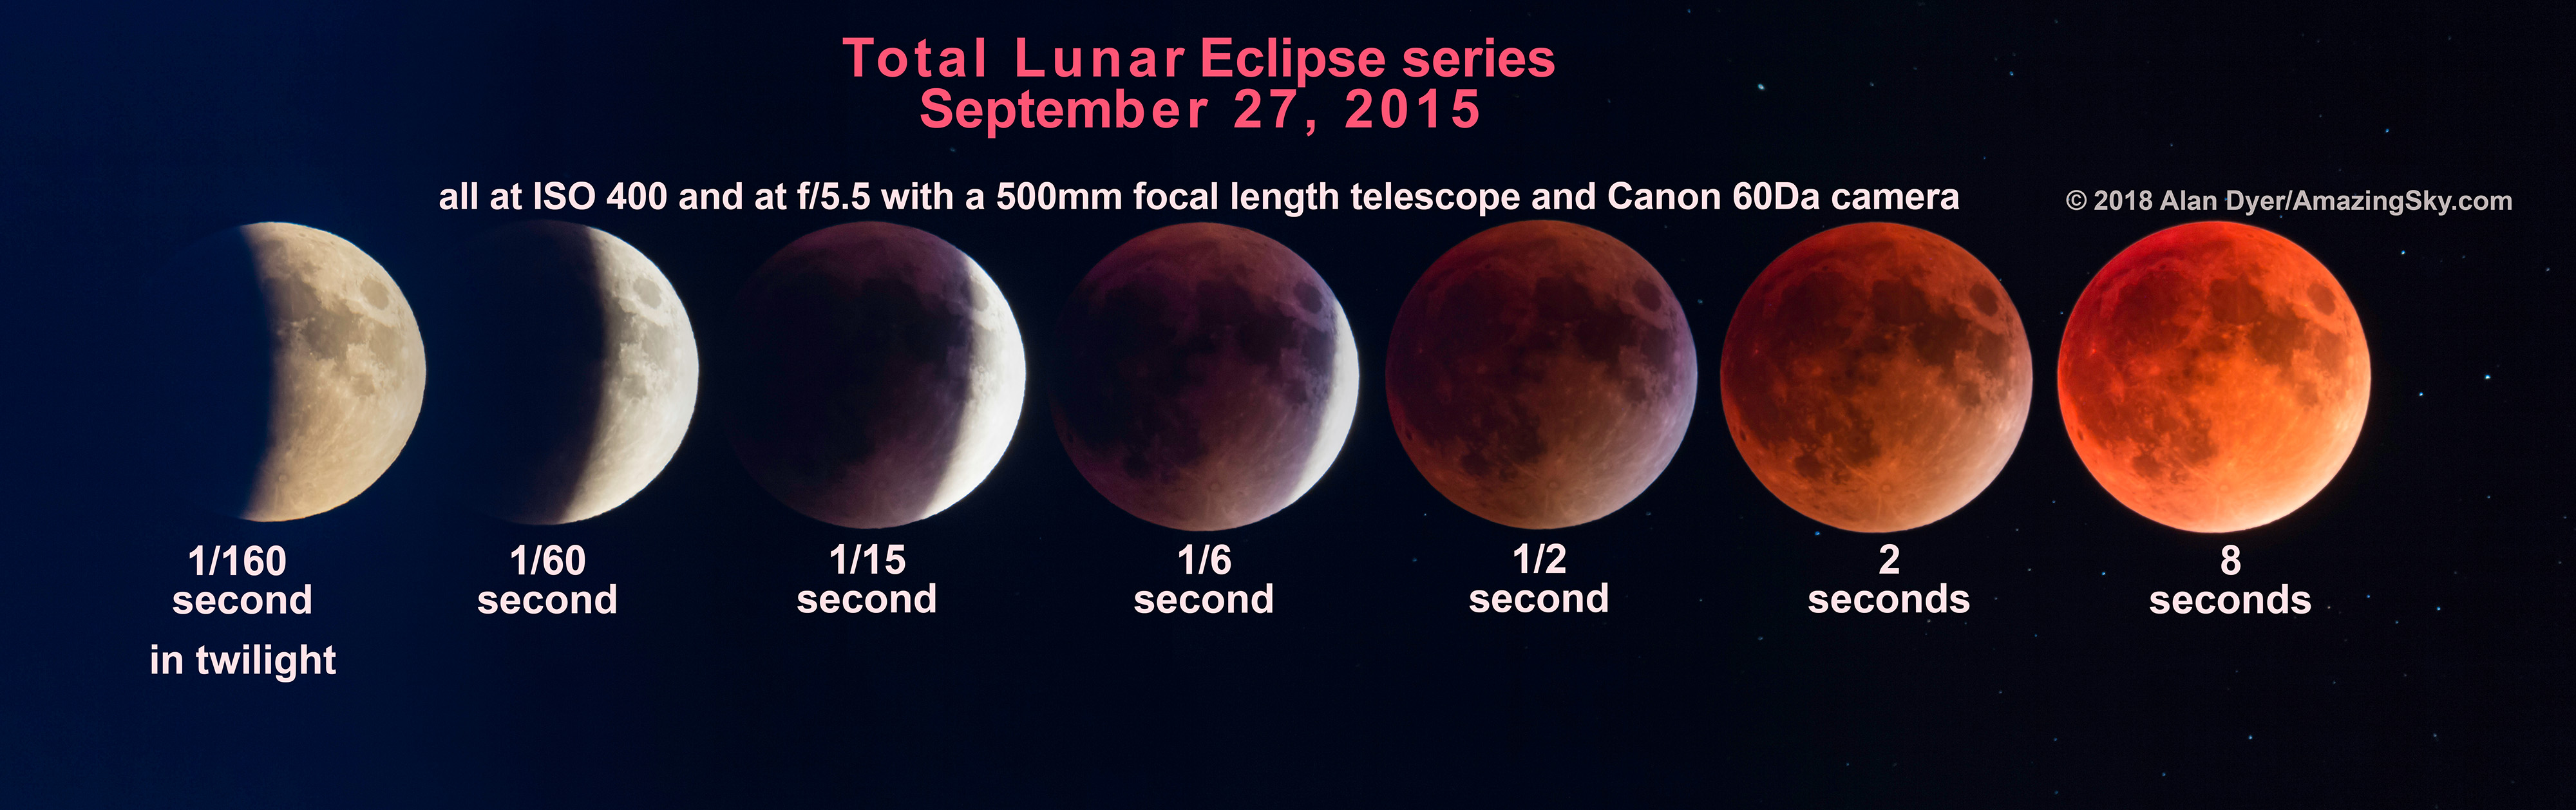

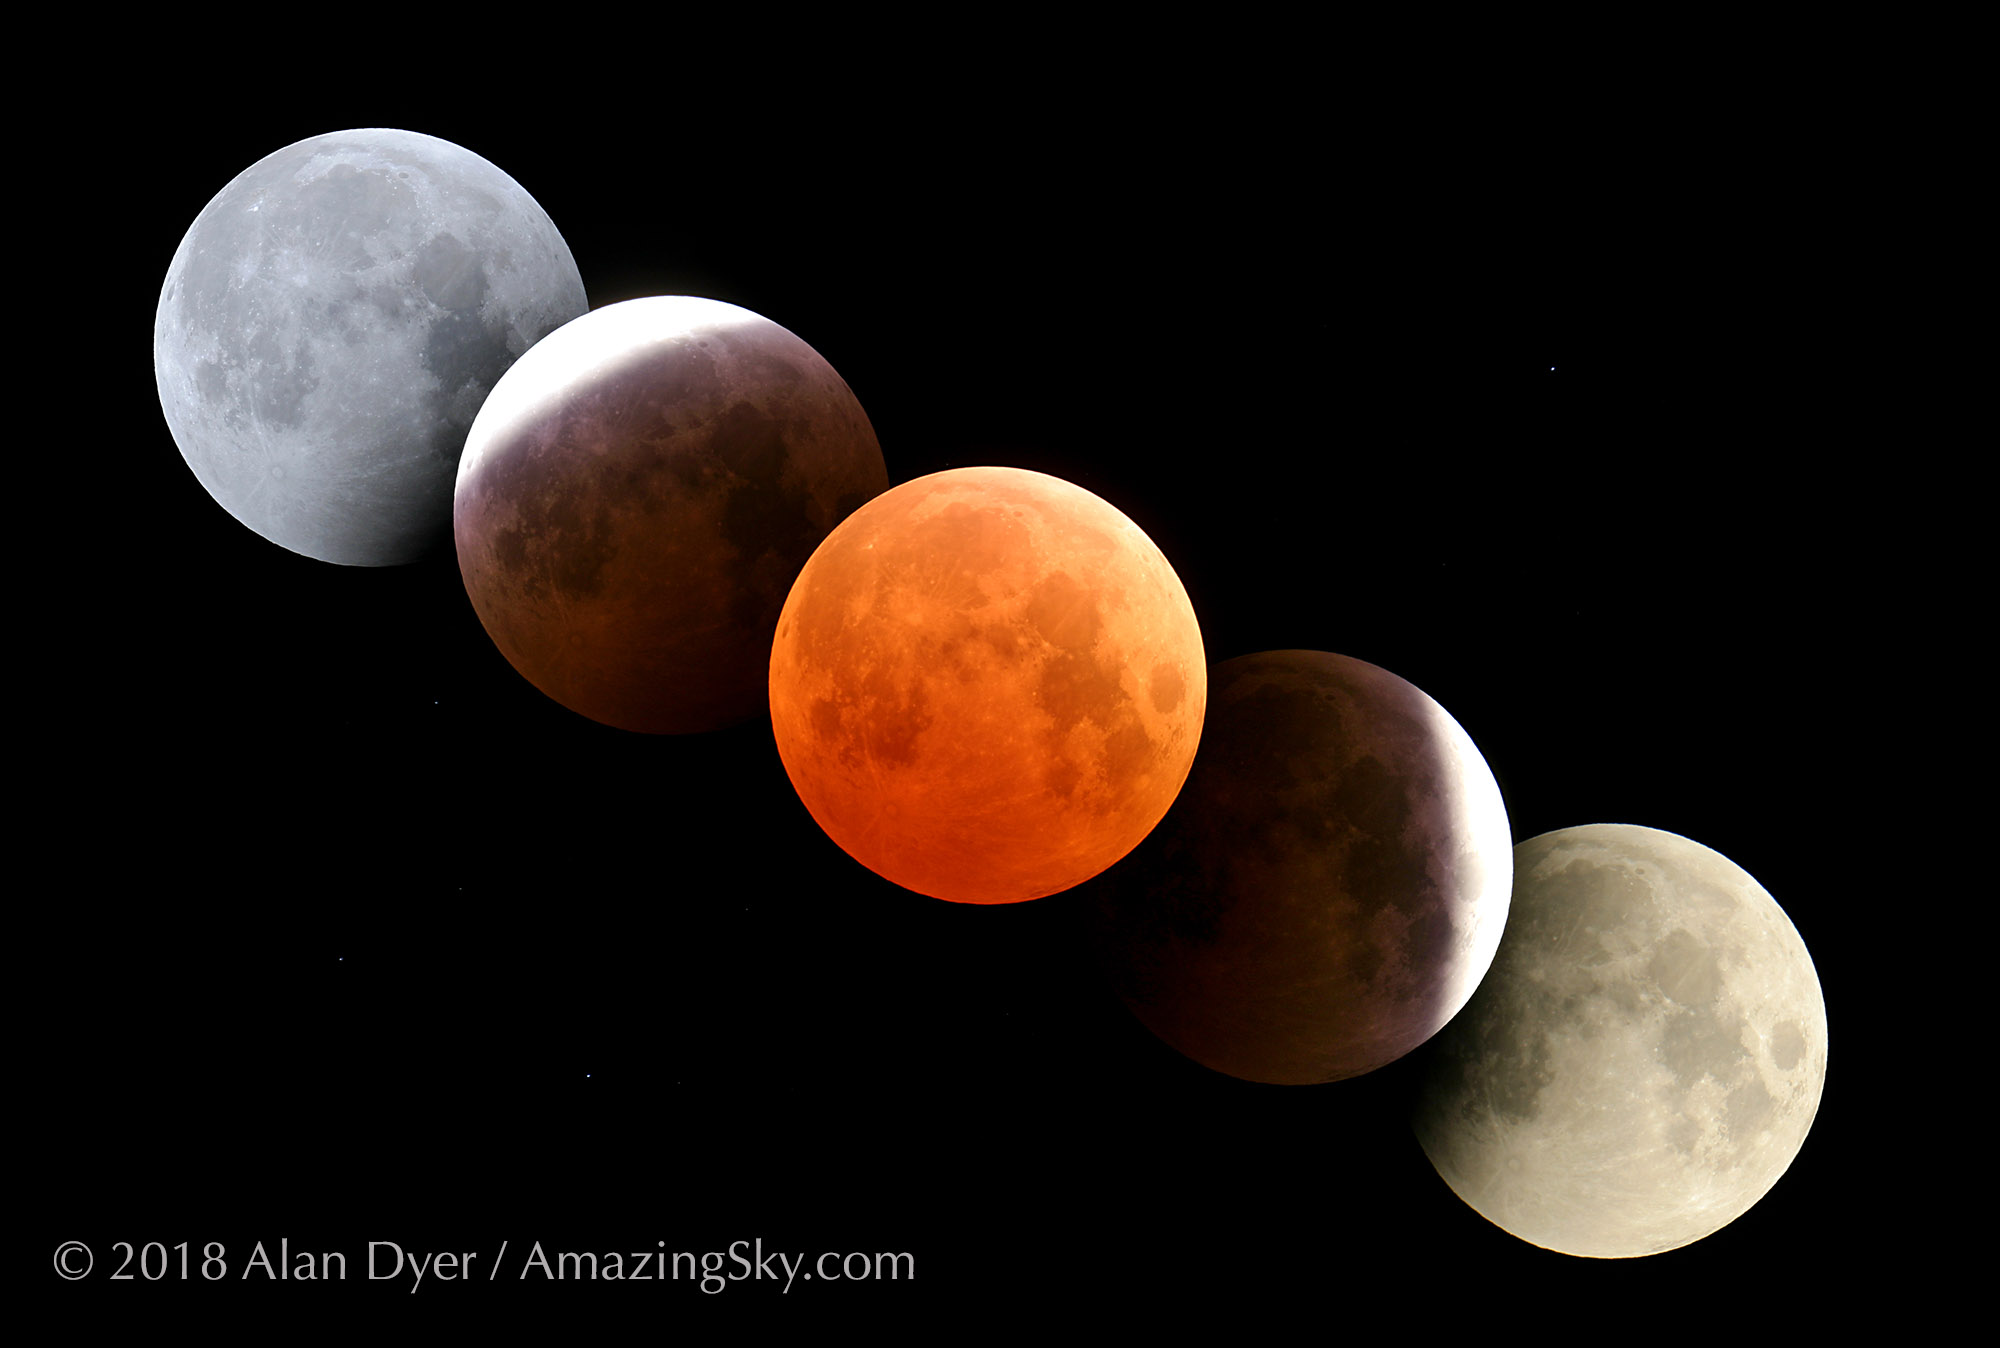

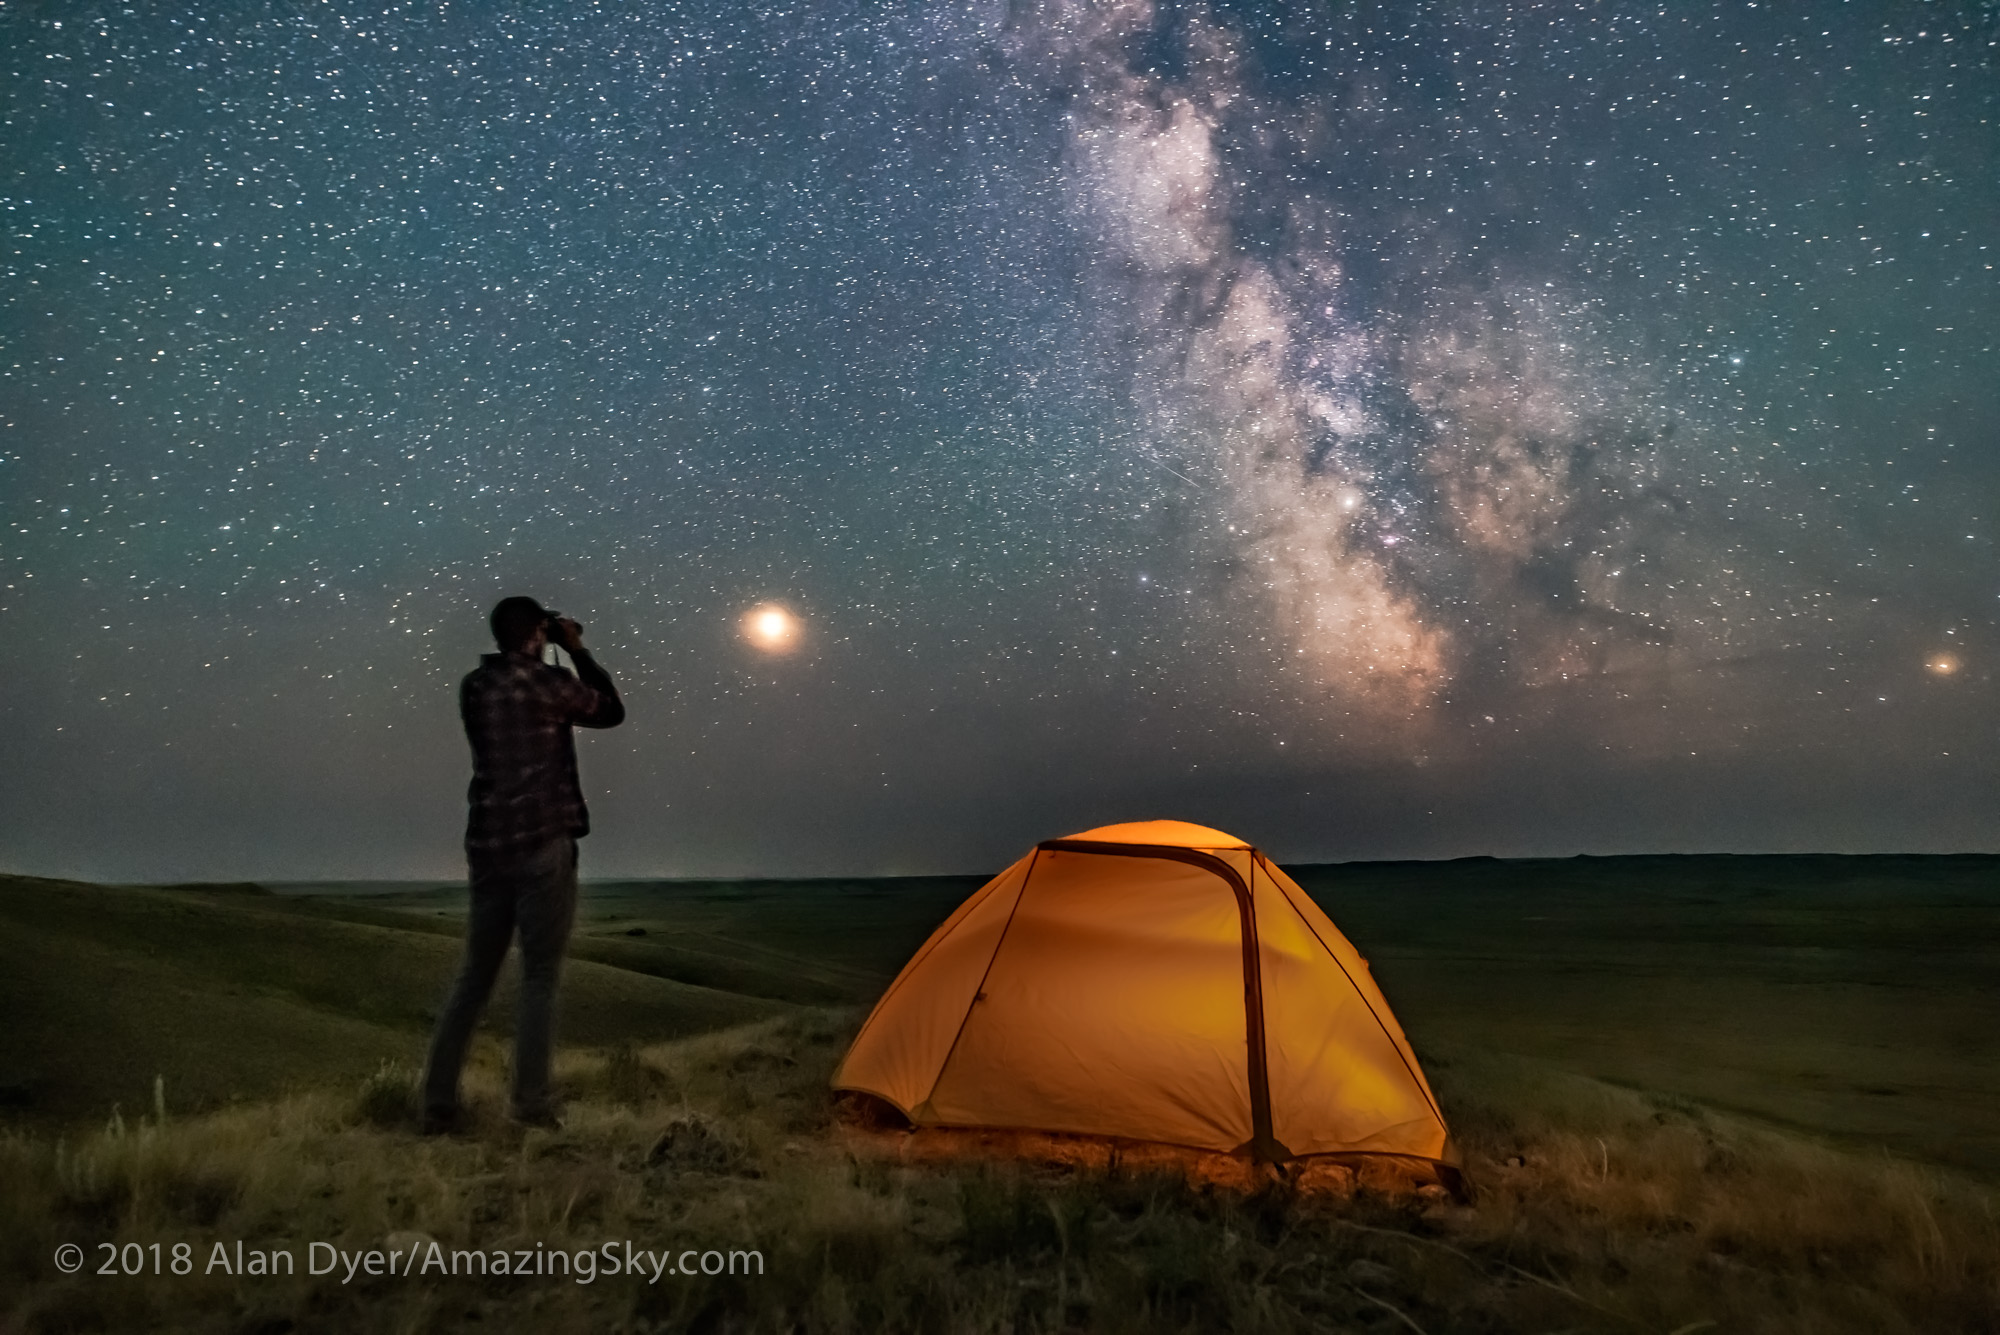
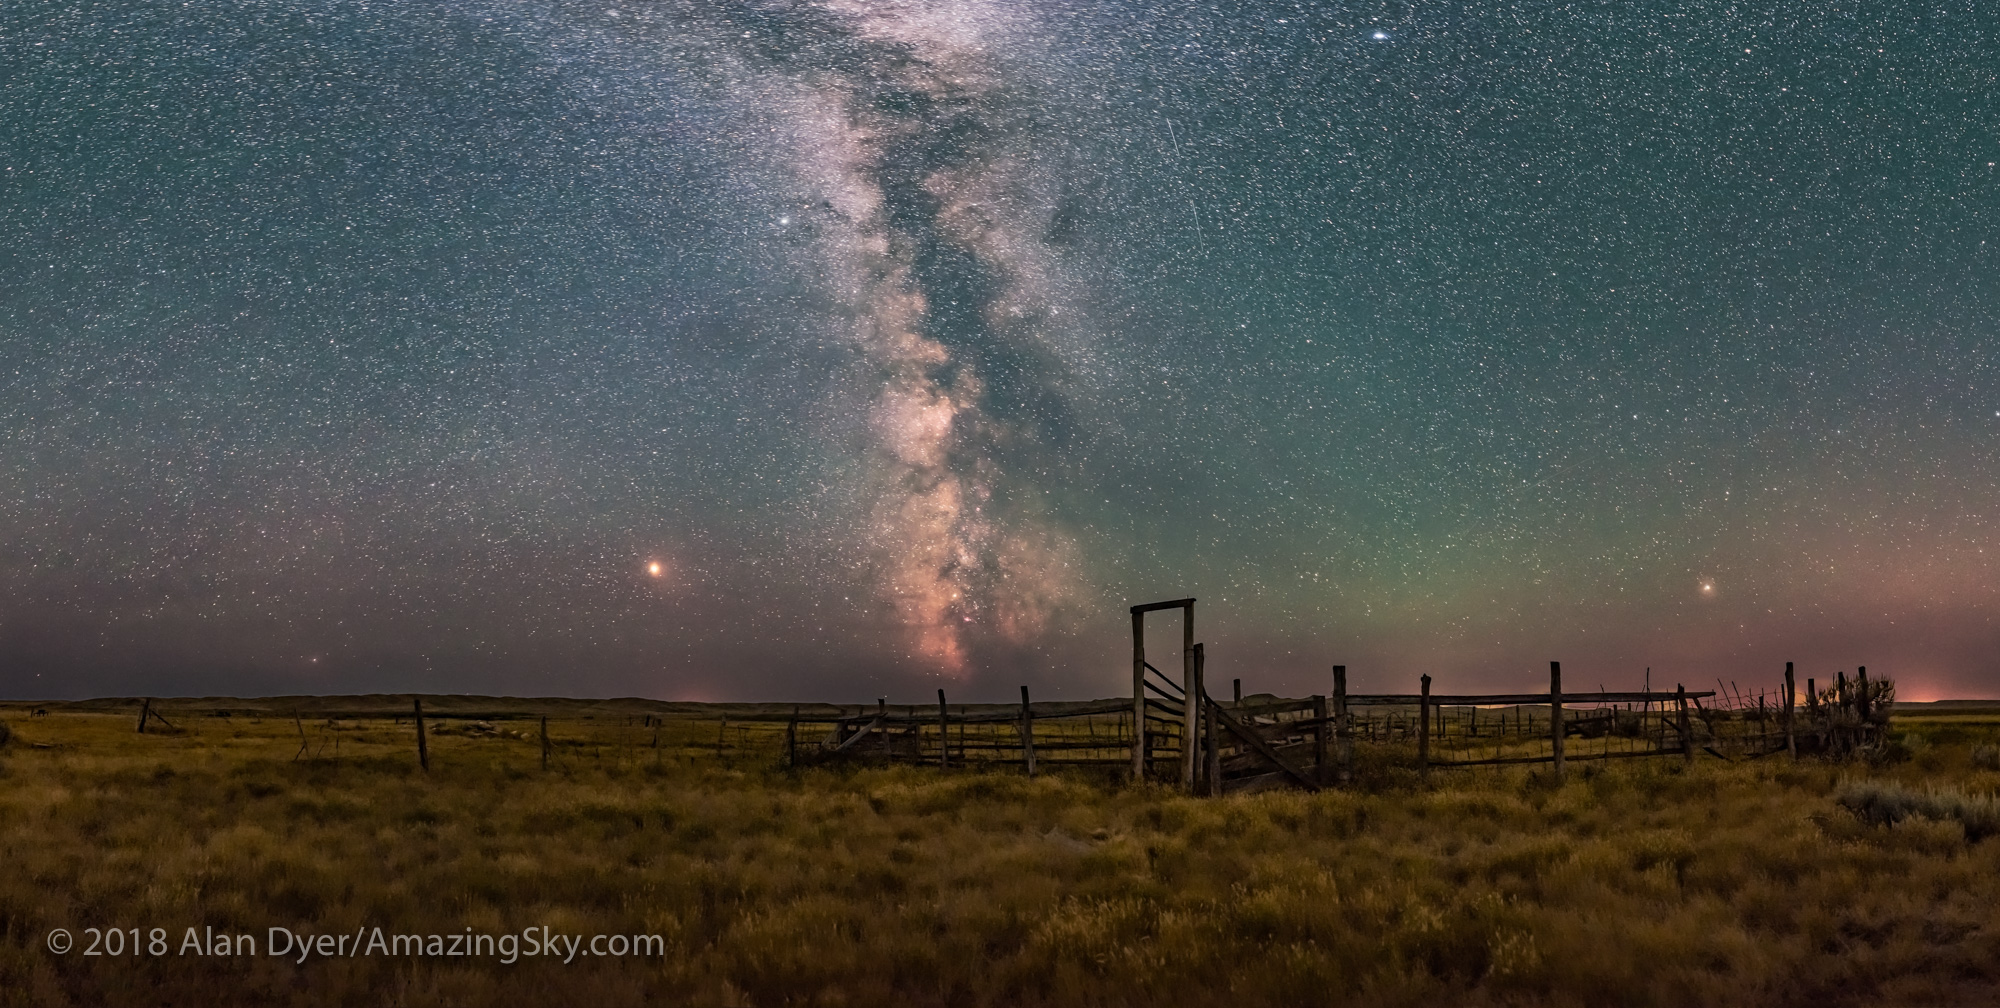


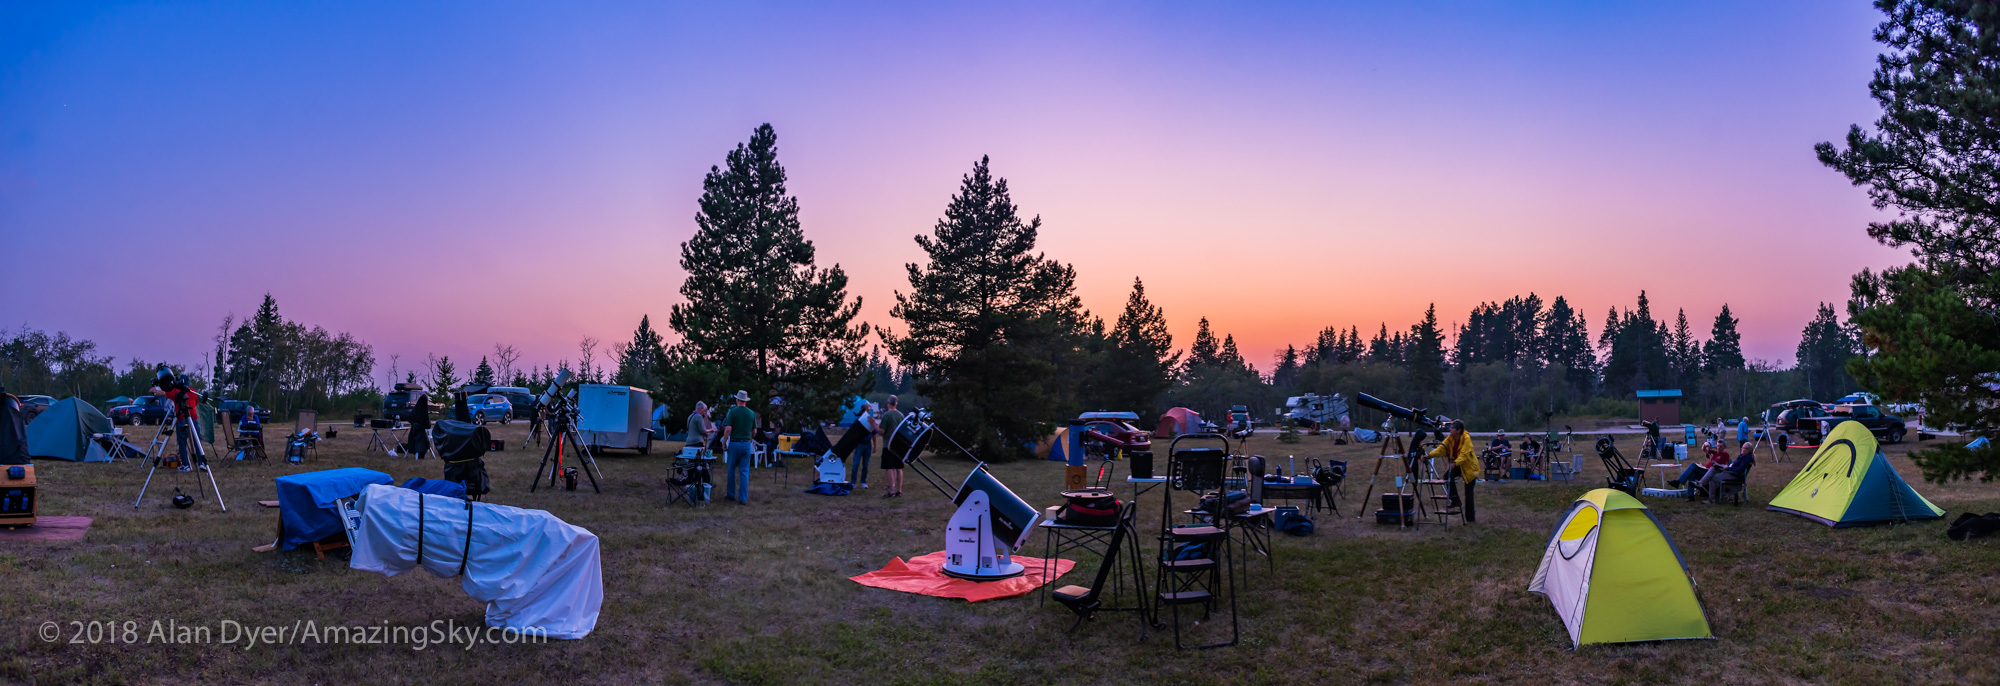
")