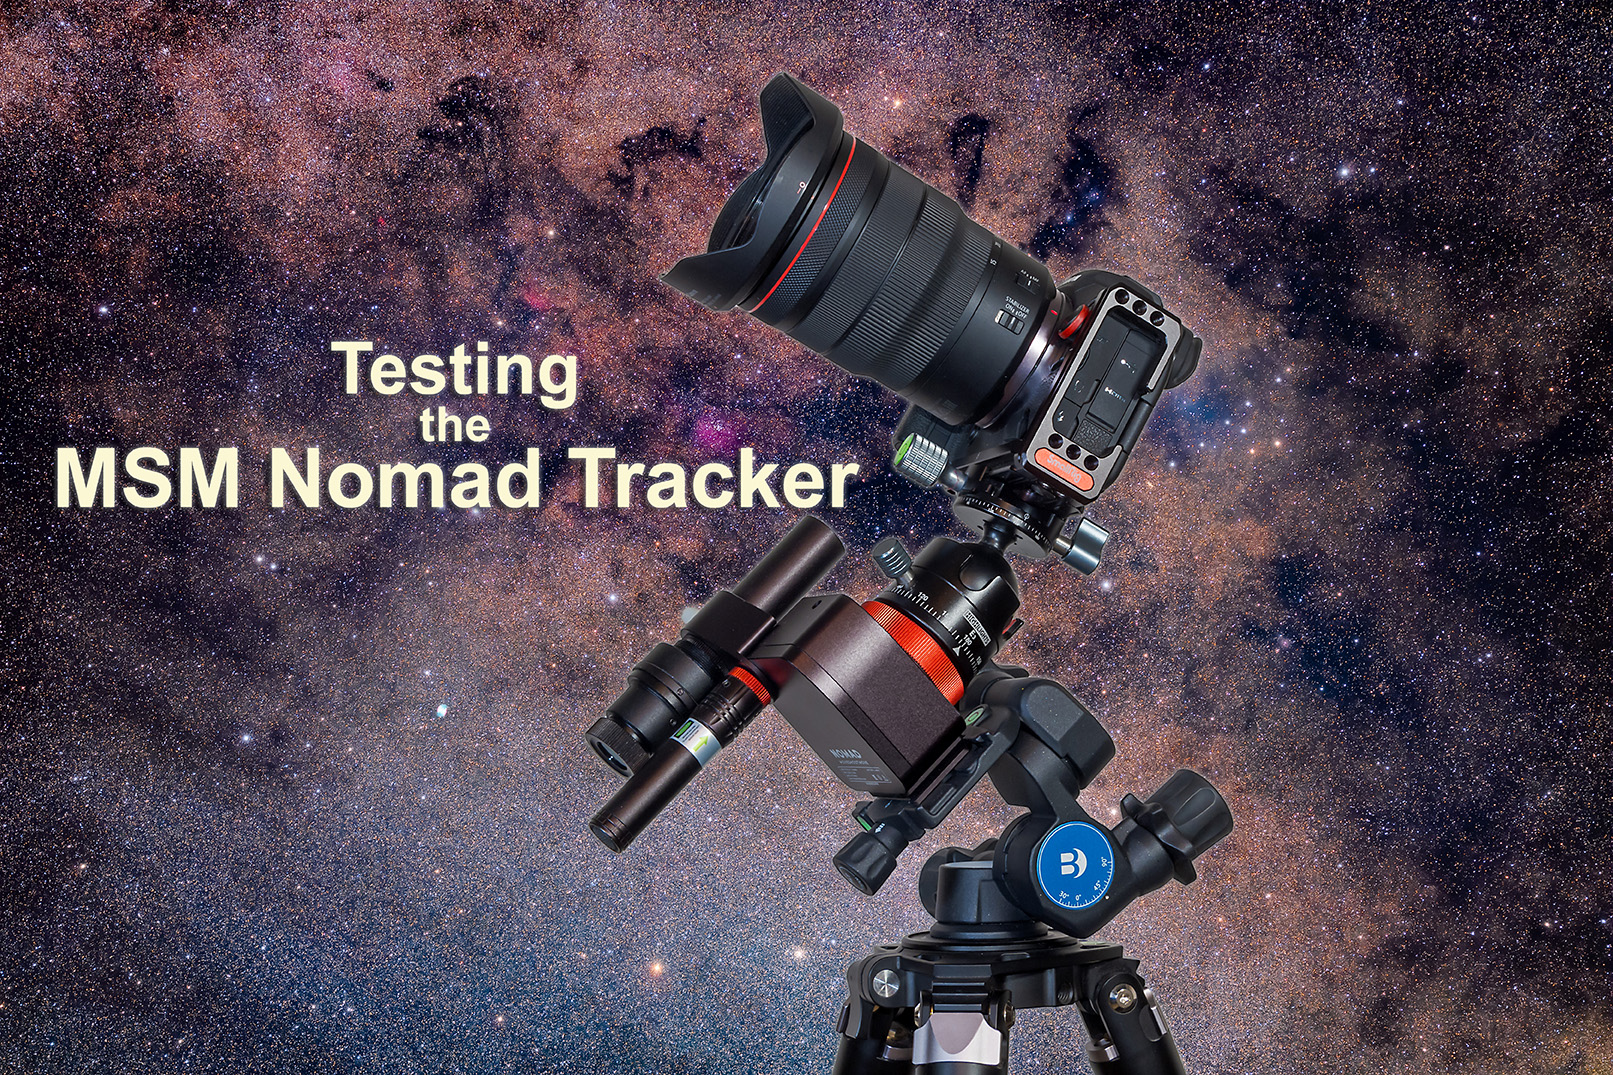
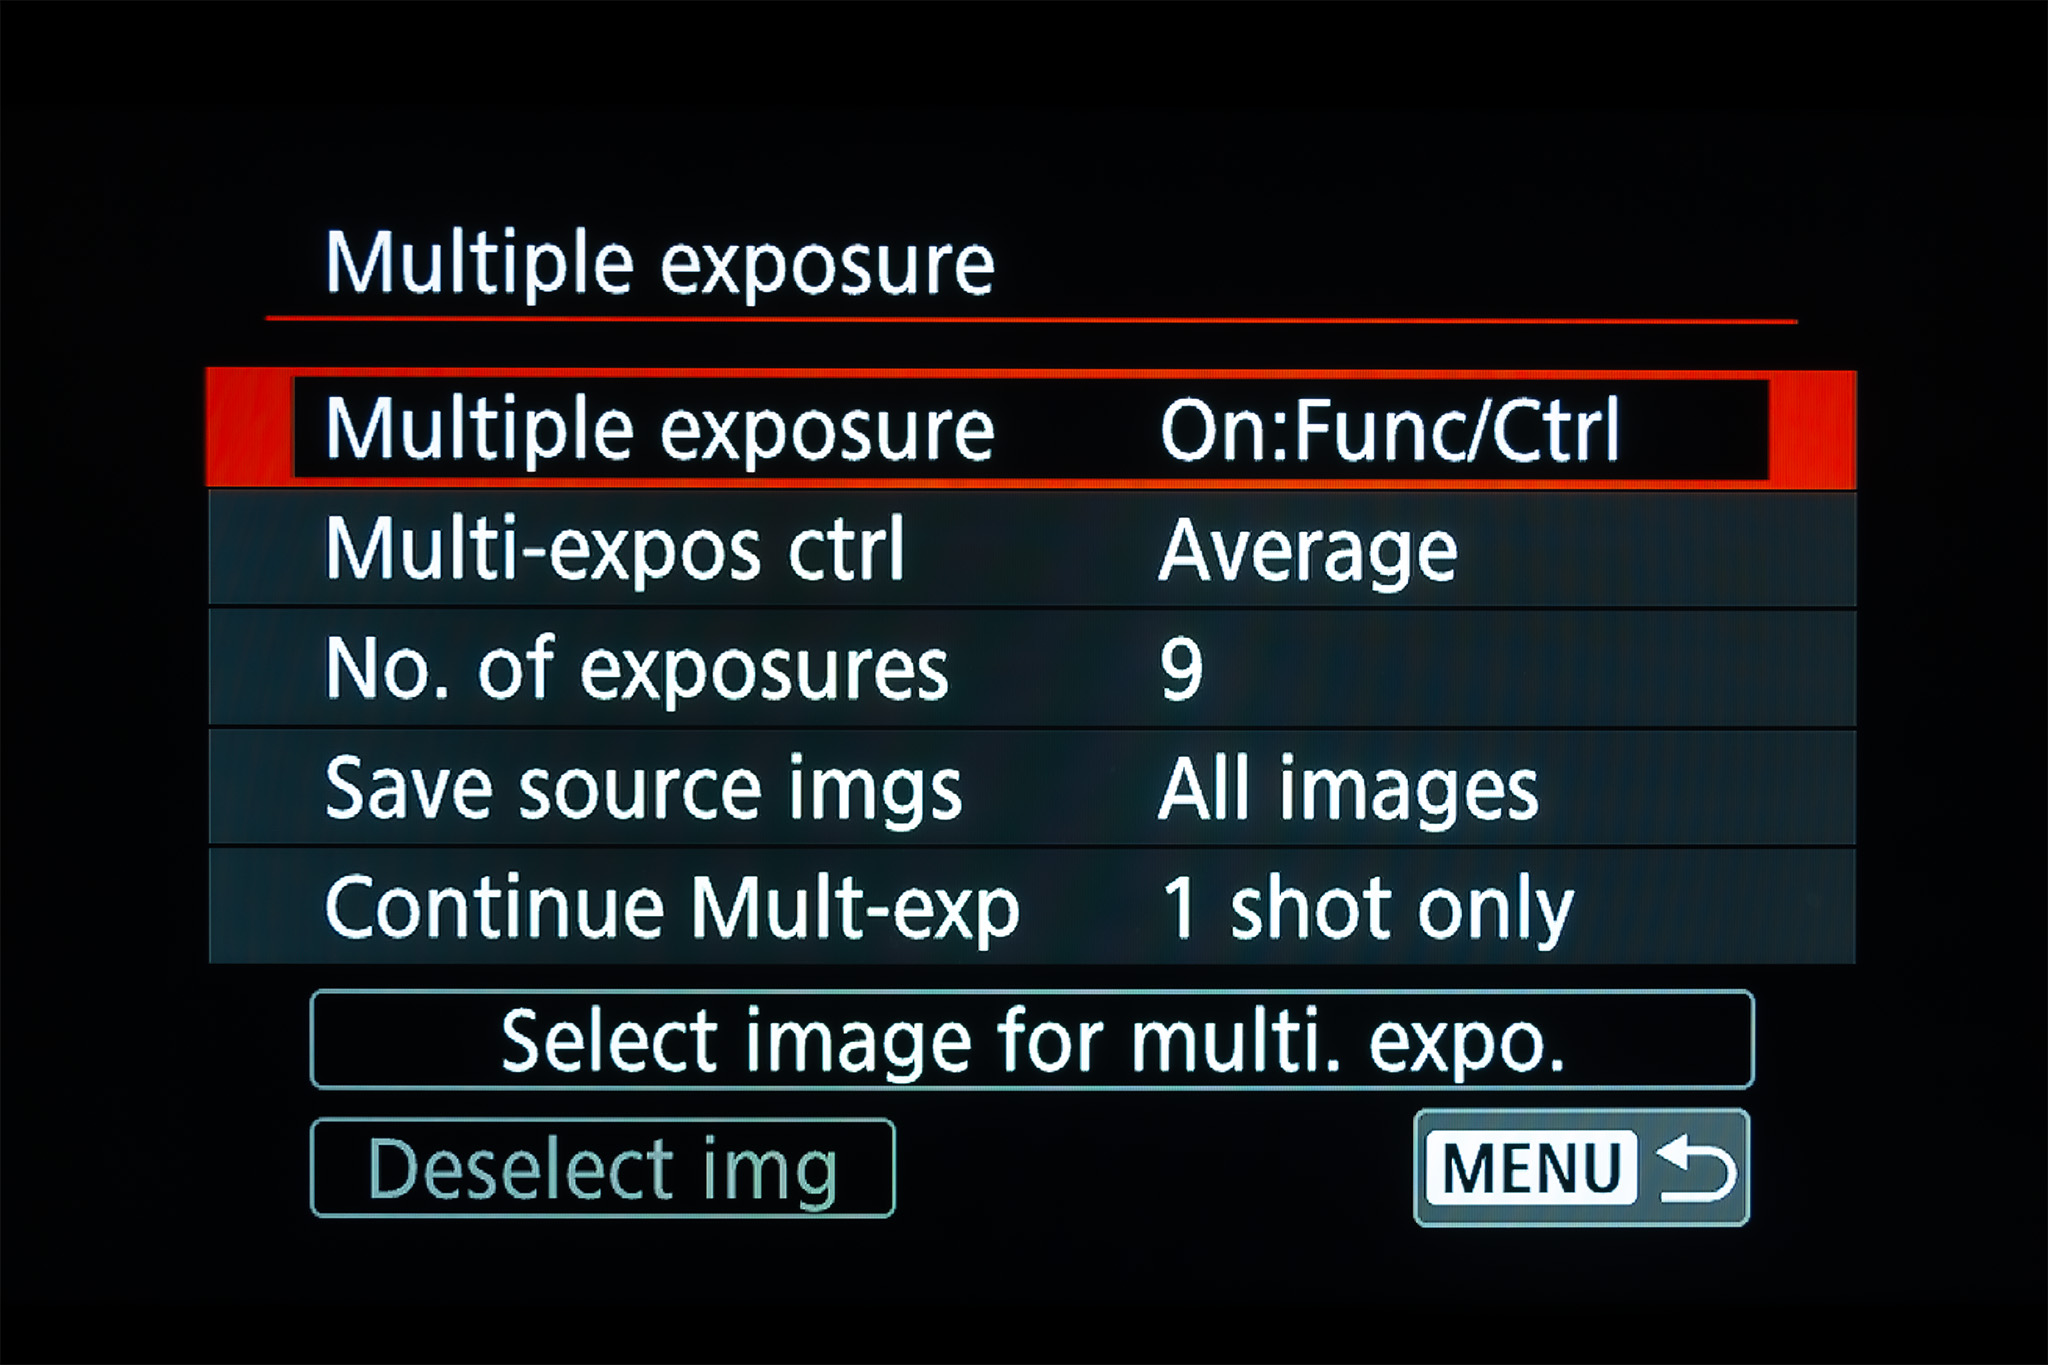
The new star tracker from Move Shoot Move improves upon their original model, eliminating its flaws to provide a reliable and compact tracker.
A few years ago the start-up company Move Shoot Move (MSM) introduced a low-cost (about $250), compact star tracker they called the Rotator. Like all other star trackers, the Rotator allowed a camera to follow the turning sky for untrailed, pinpoint stars in long exposures.
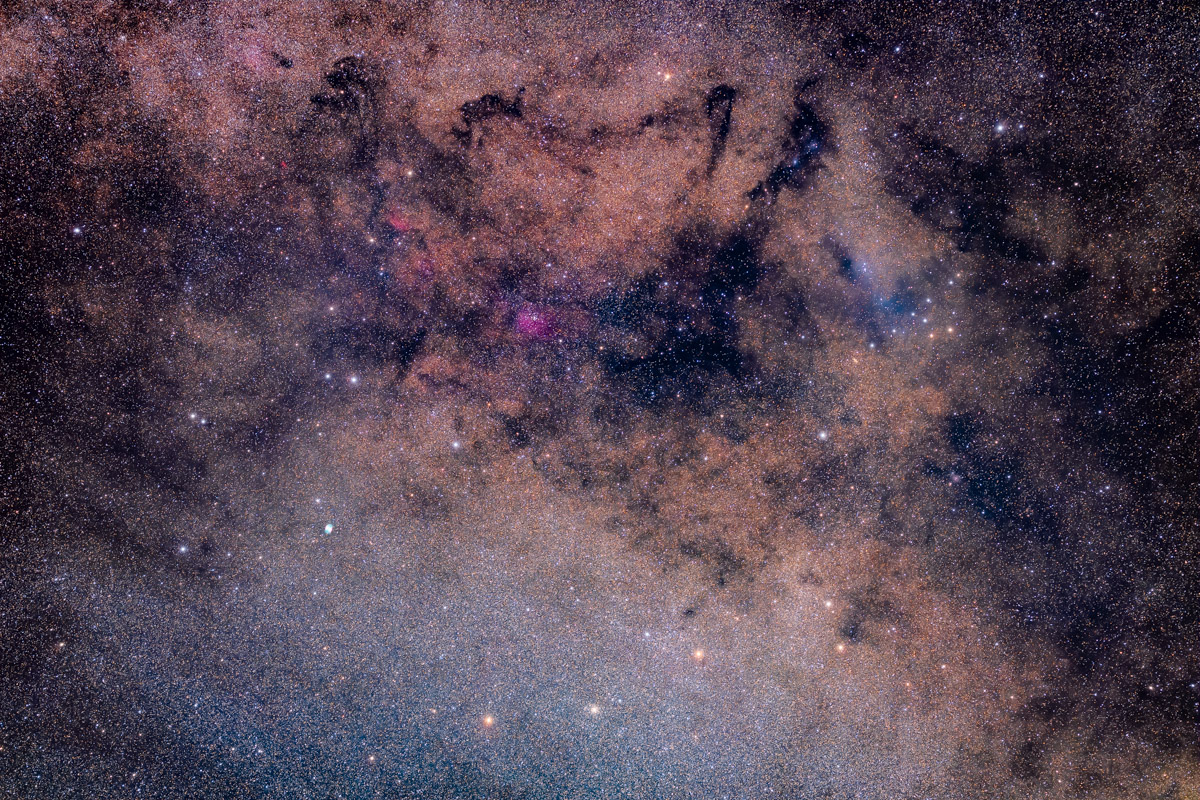
Trackers are essential for rich Milky Way images, and are great for nightscapes, for shooting the sky, blended with untracked shots of the ground, as I show in examples below.
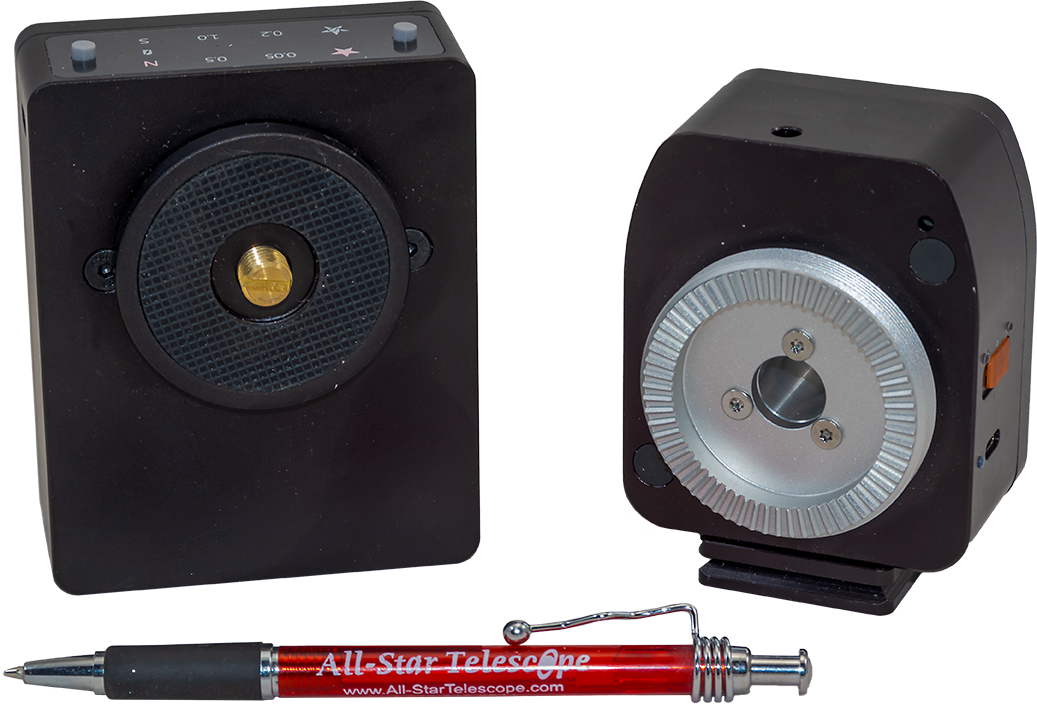
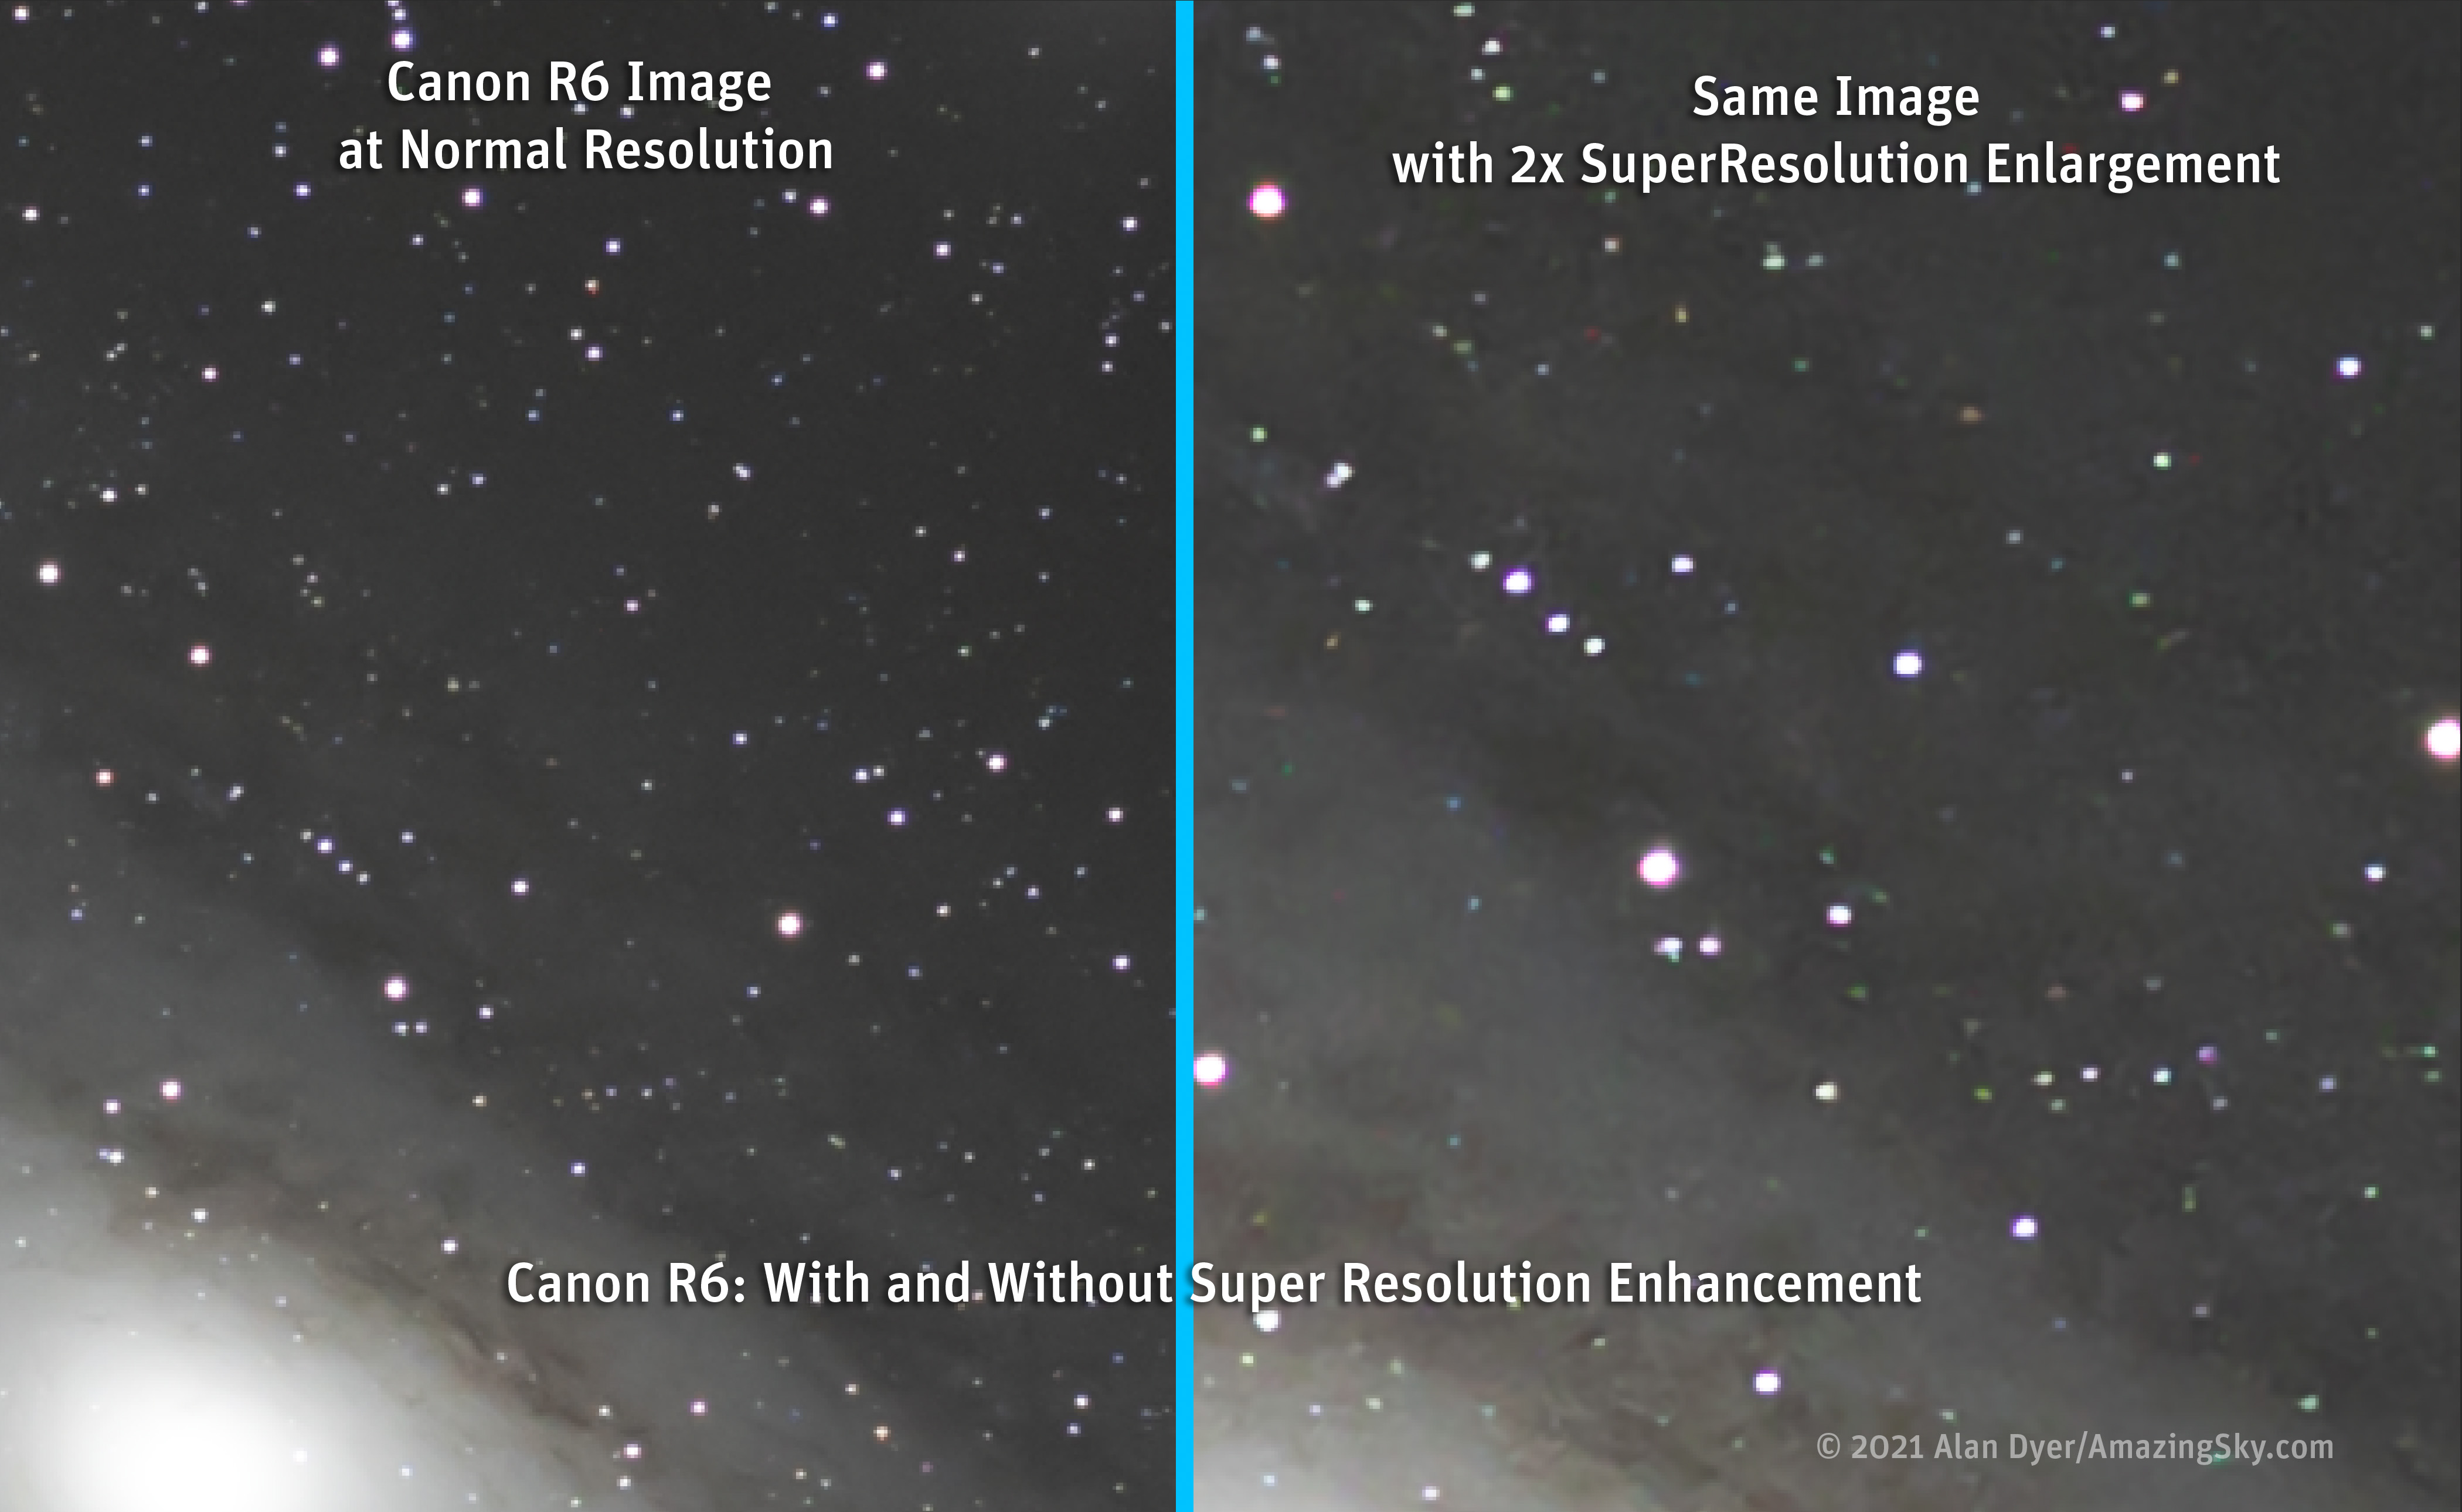
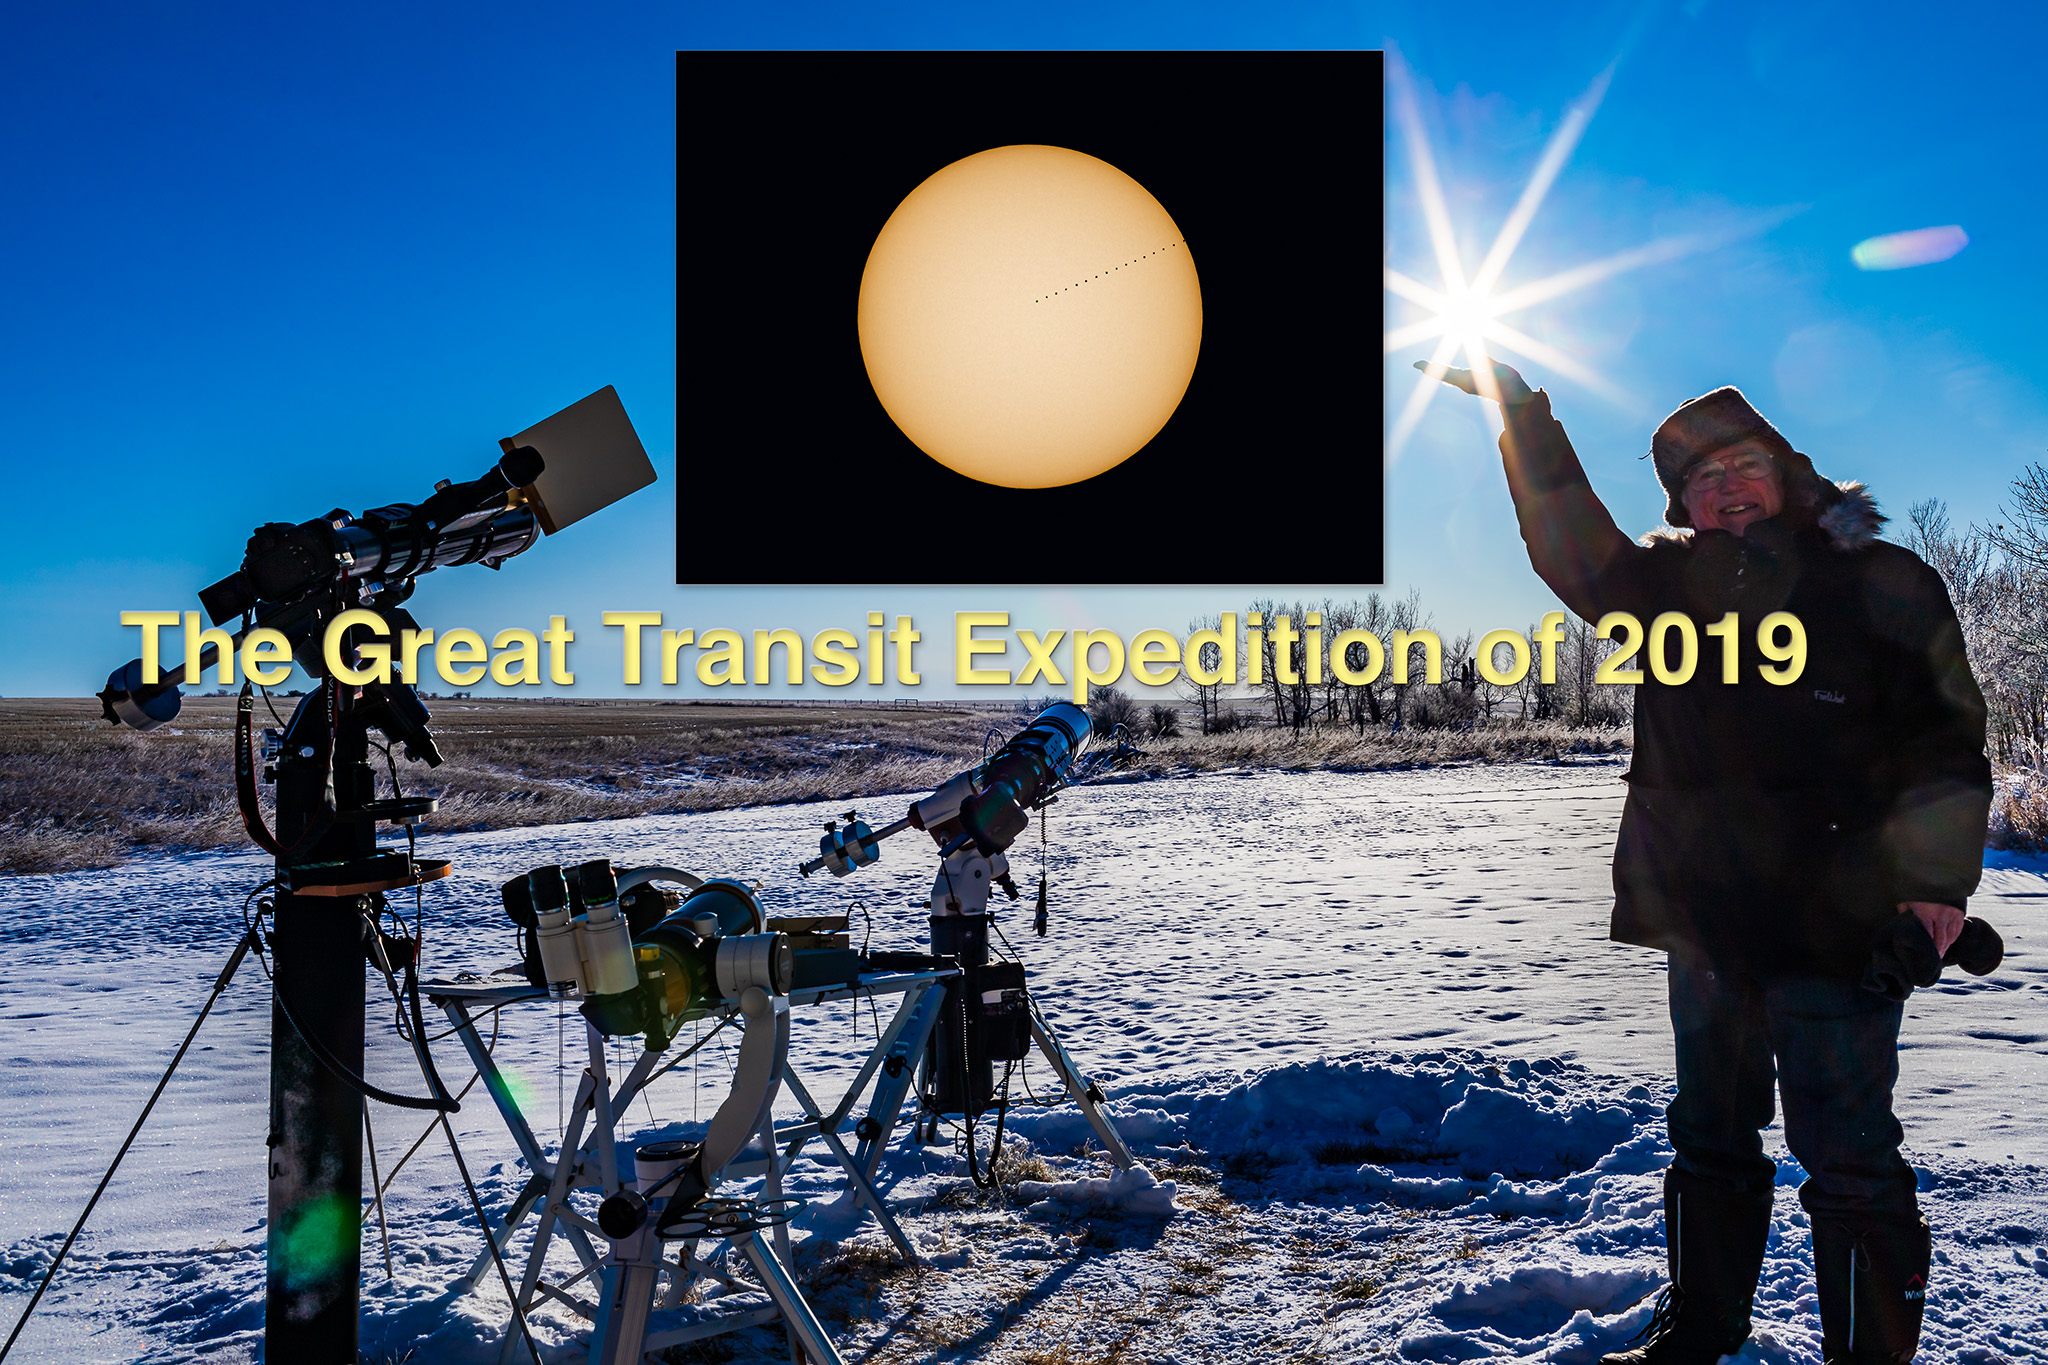
The original Rotator (L) and new Nomad (R). The Nomad is even smaller than the Rotator.
Out with the Old …
The original Rotator went through a couple of design changes during its lifetime. I tested the last versions to be marketed, using three different sample units I either purchased or were sent to me by MSM. (My reviews appeared in 2019 on my blog here, and in the June 2021 issue of Sky & Telescope magazine.)
The bottom line is that I found all the samples of the Rotator I tested to be unreliable for accurate tracking, indeed for tracking period, as units would sometimes not start tracking for a few minutes, or just stop tracking mid-shoot and then restart intermittently. Getting a set of untrailed exposures was a hit or miss affair.
But with a cost lower than most other trackers on the market (ostensibly, as explained below), a pocketable compact size, and with endorsements from notable nightscape photographers, the original Rotator garnered a loyal following of fans. I was not one of them.
MSM obviously recognized the design flaws of the Rotator, because in early 2024 they replaced it with an all-new model, dubbed the Nomad. It works!
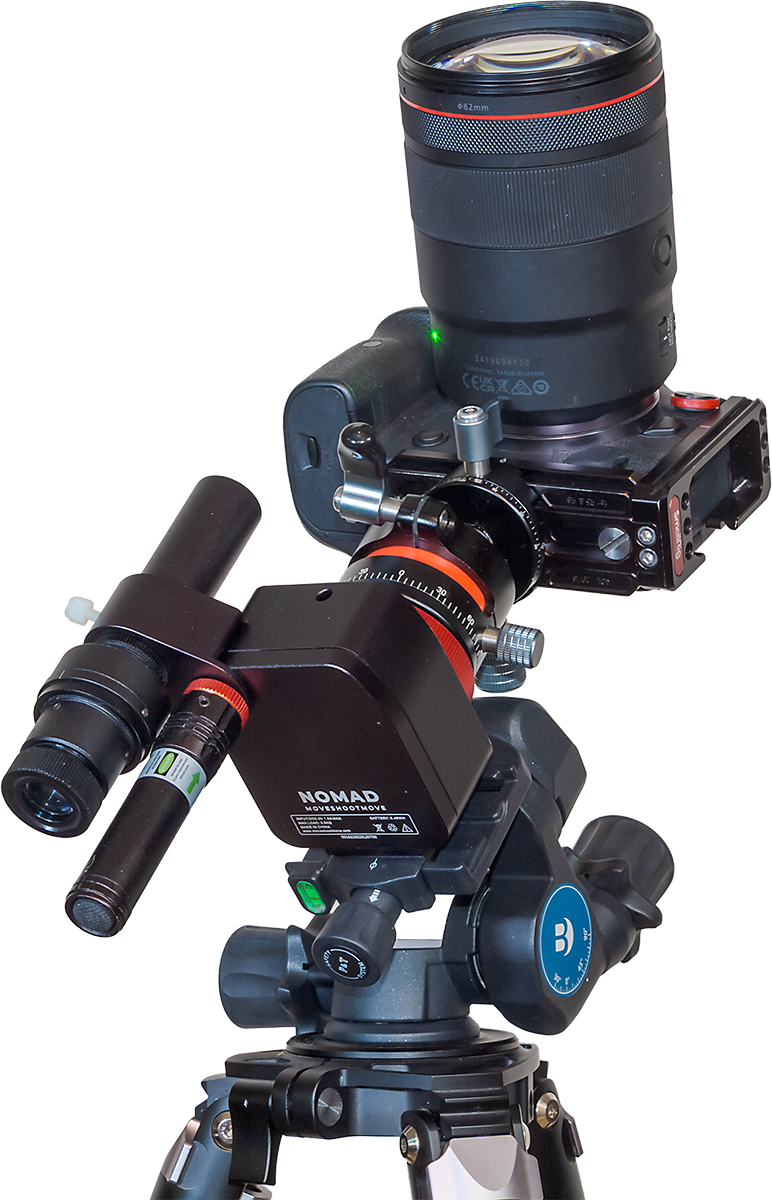
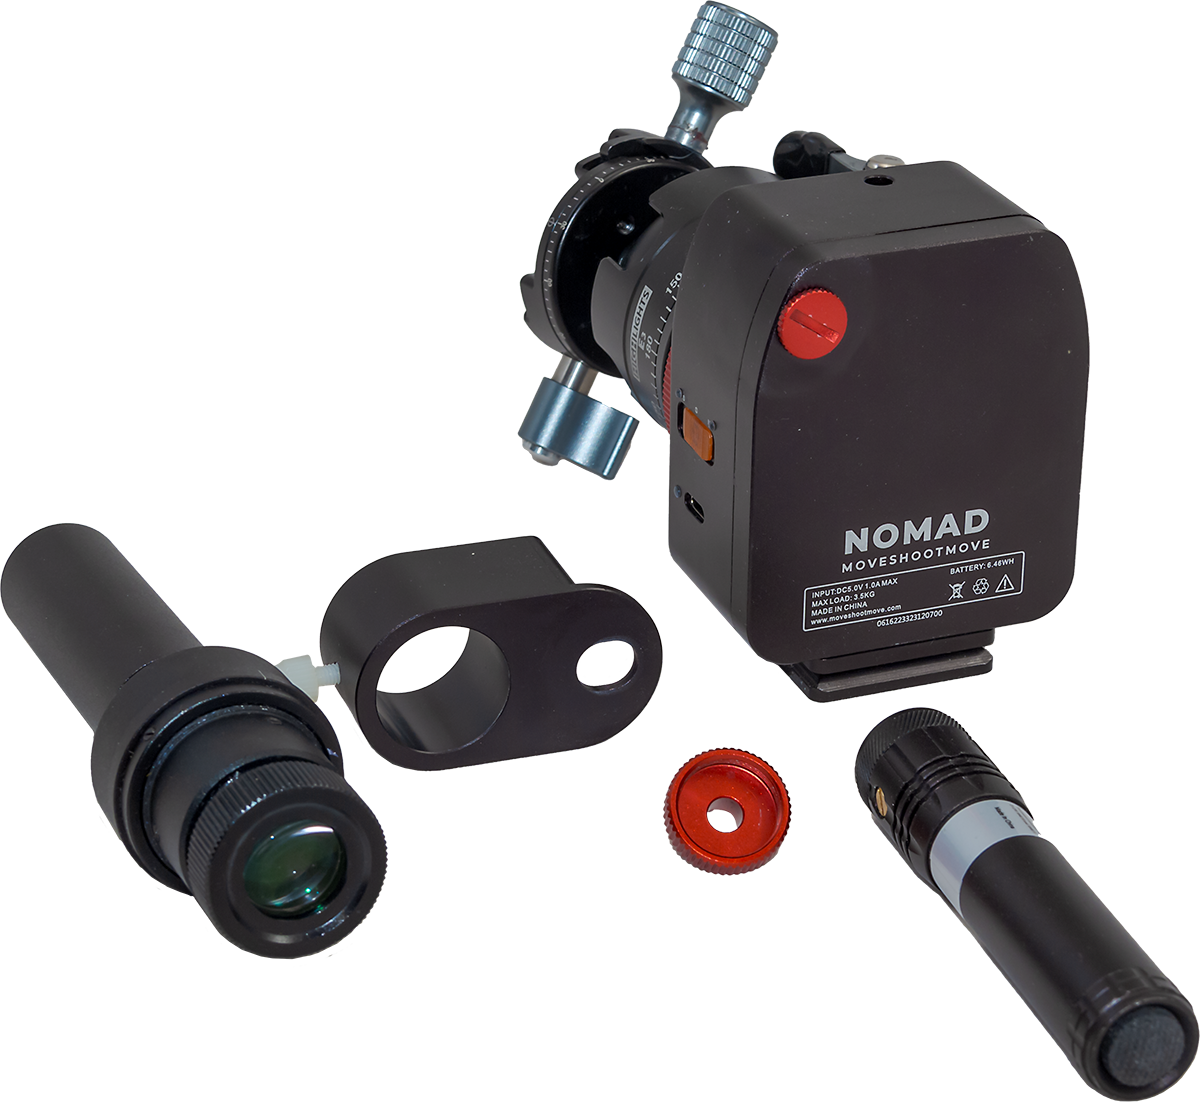
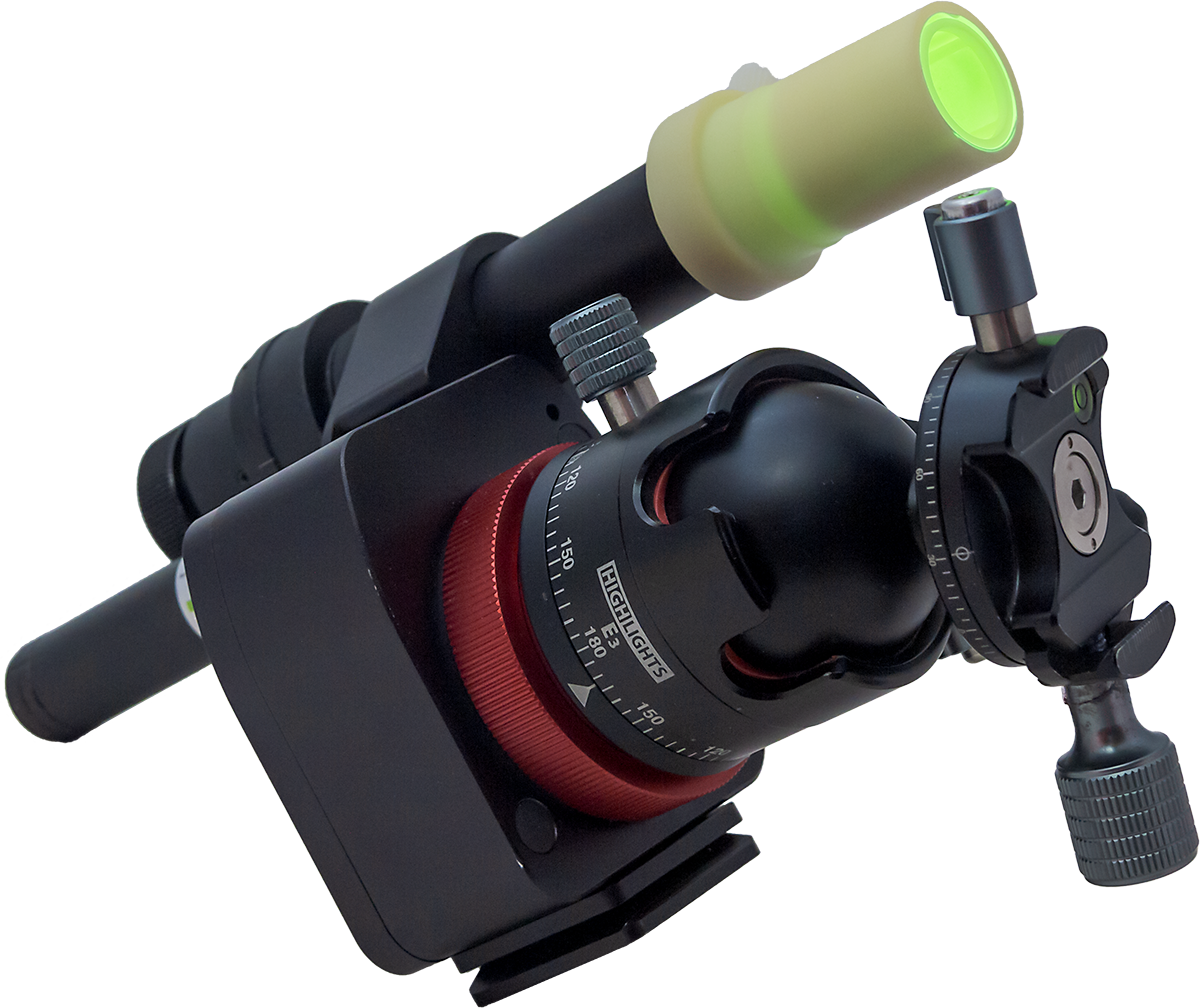
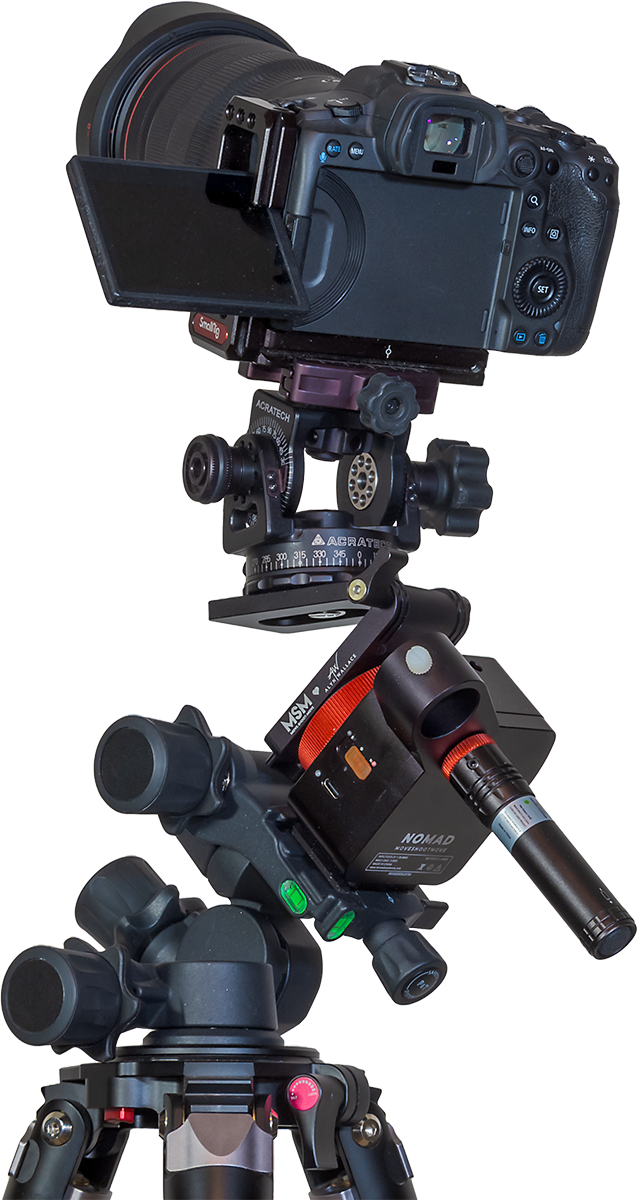
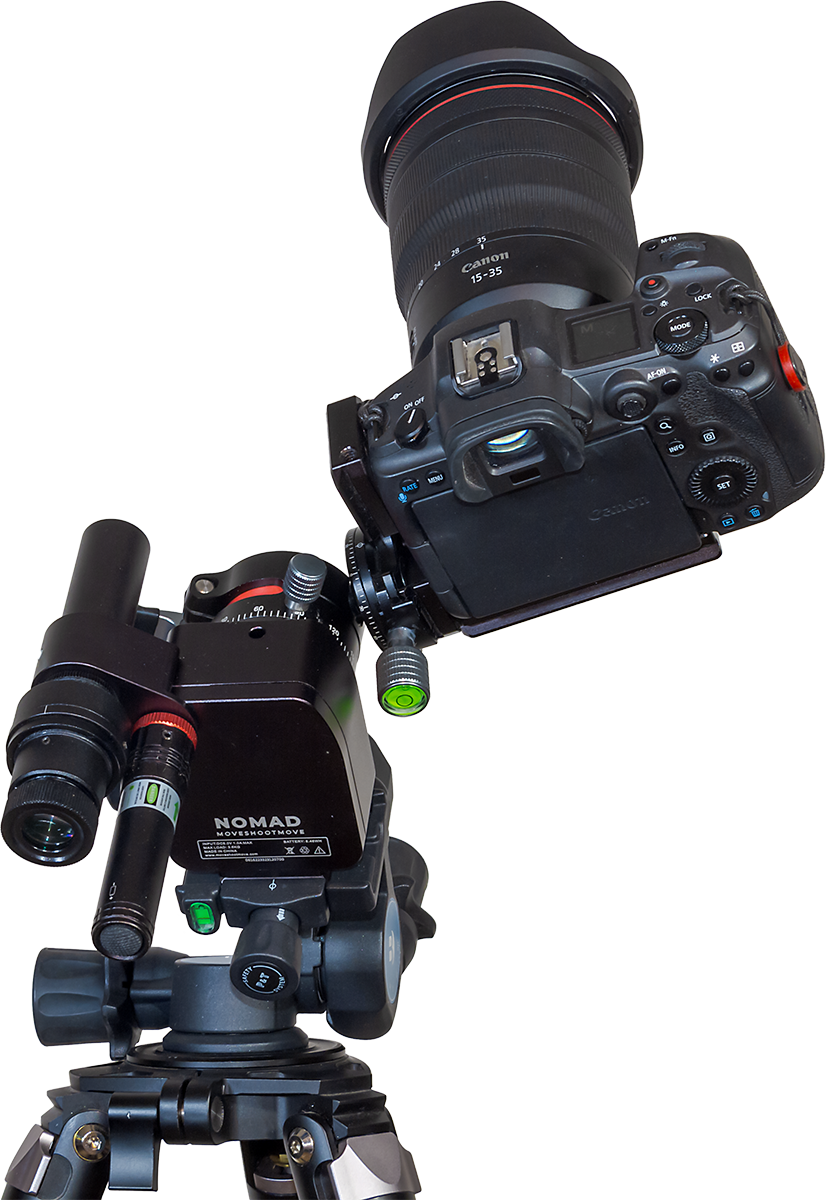
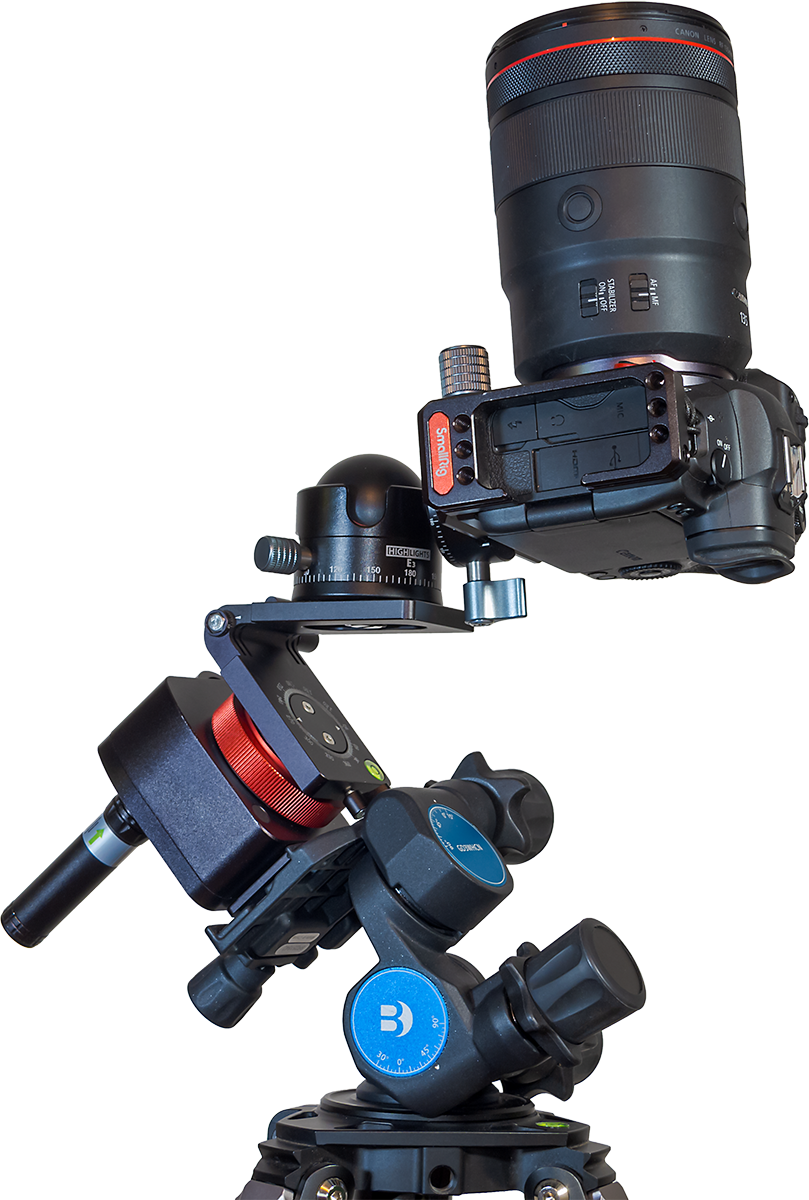
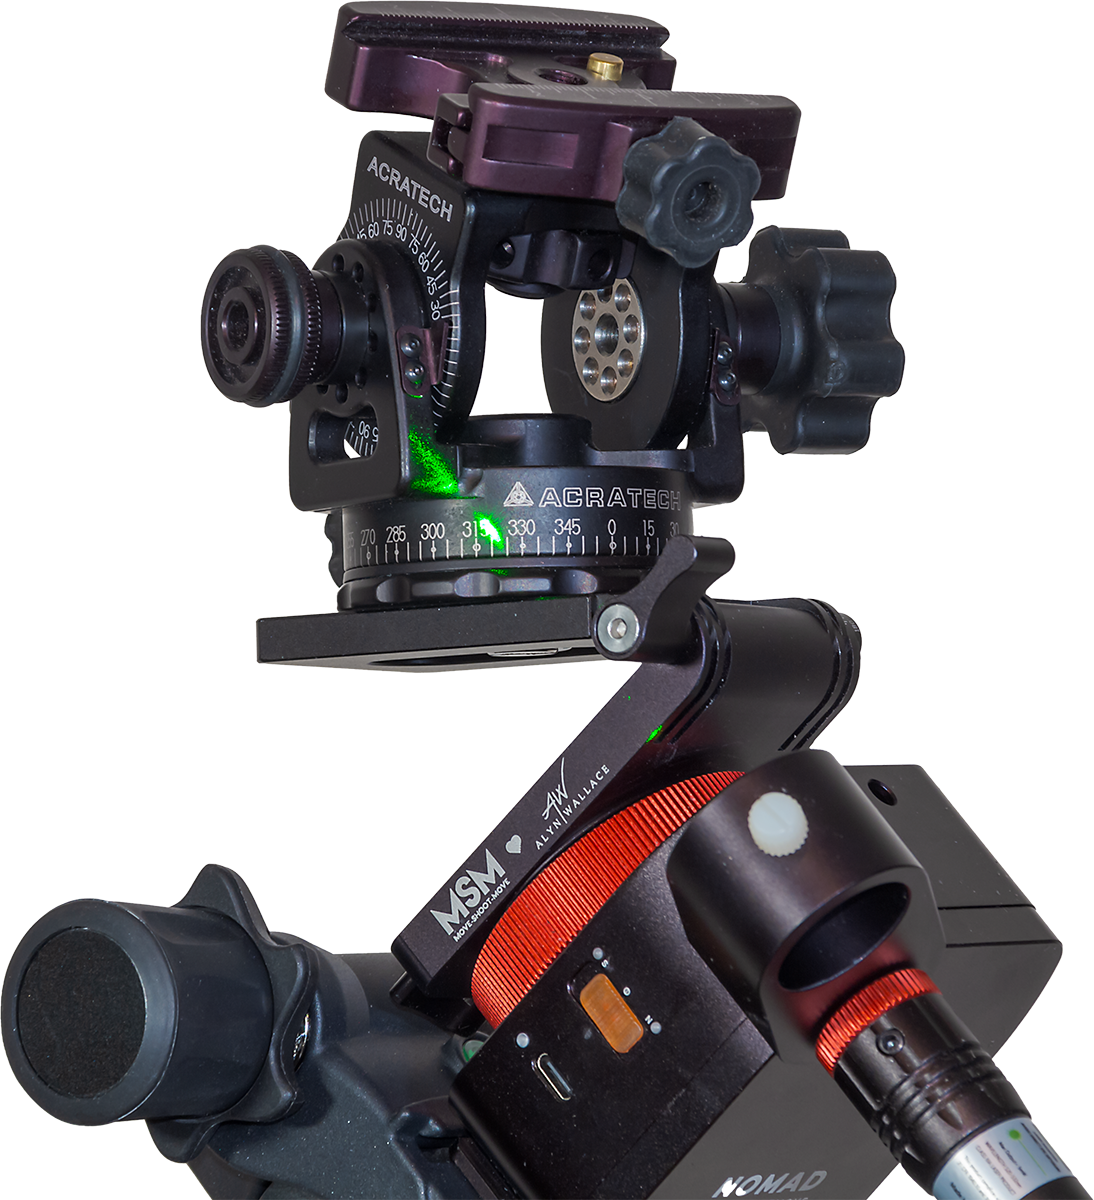
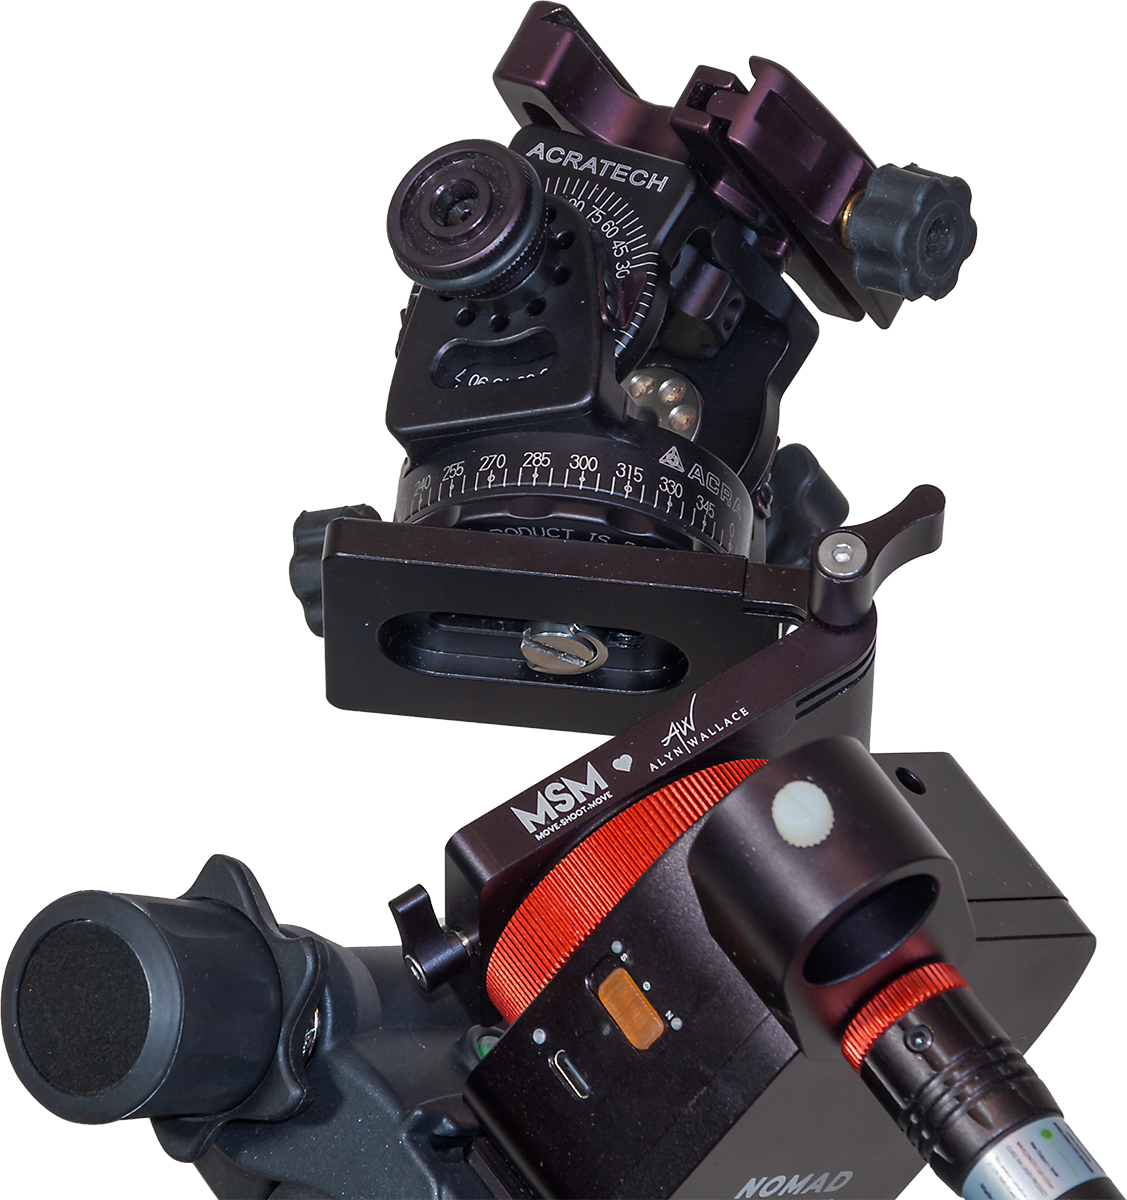
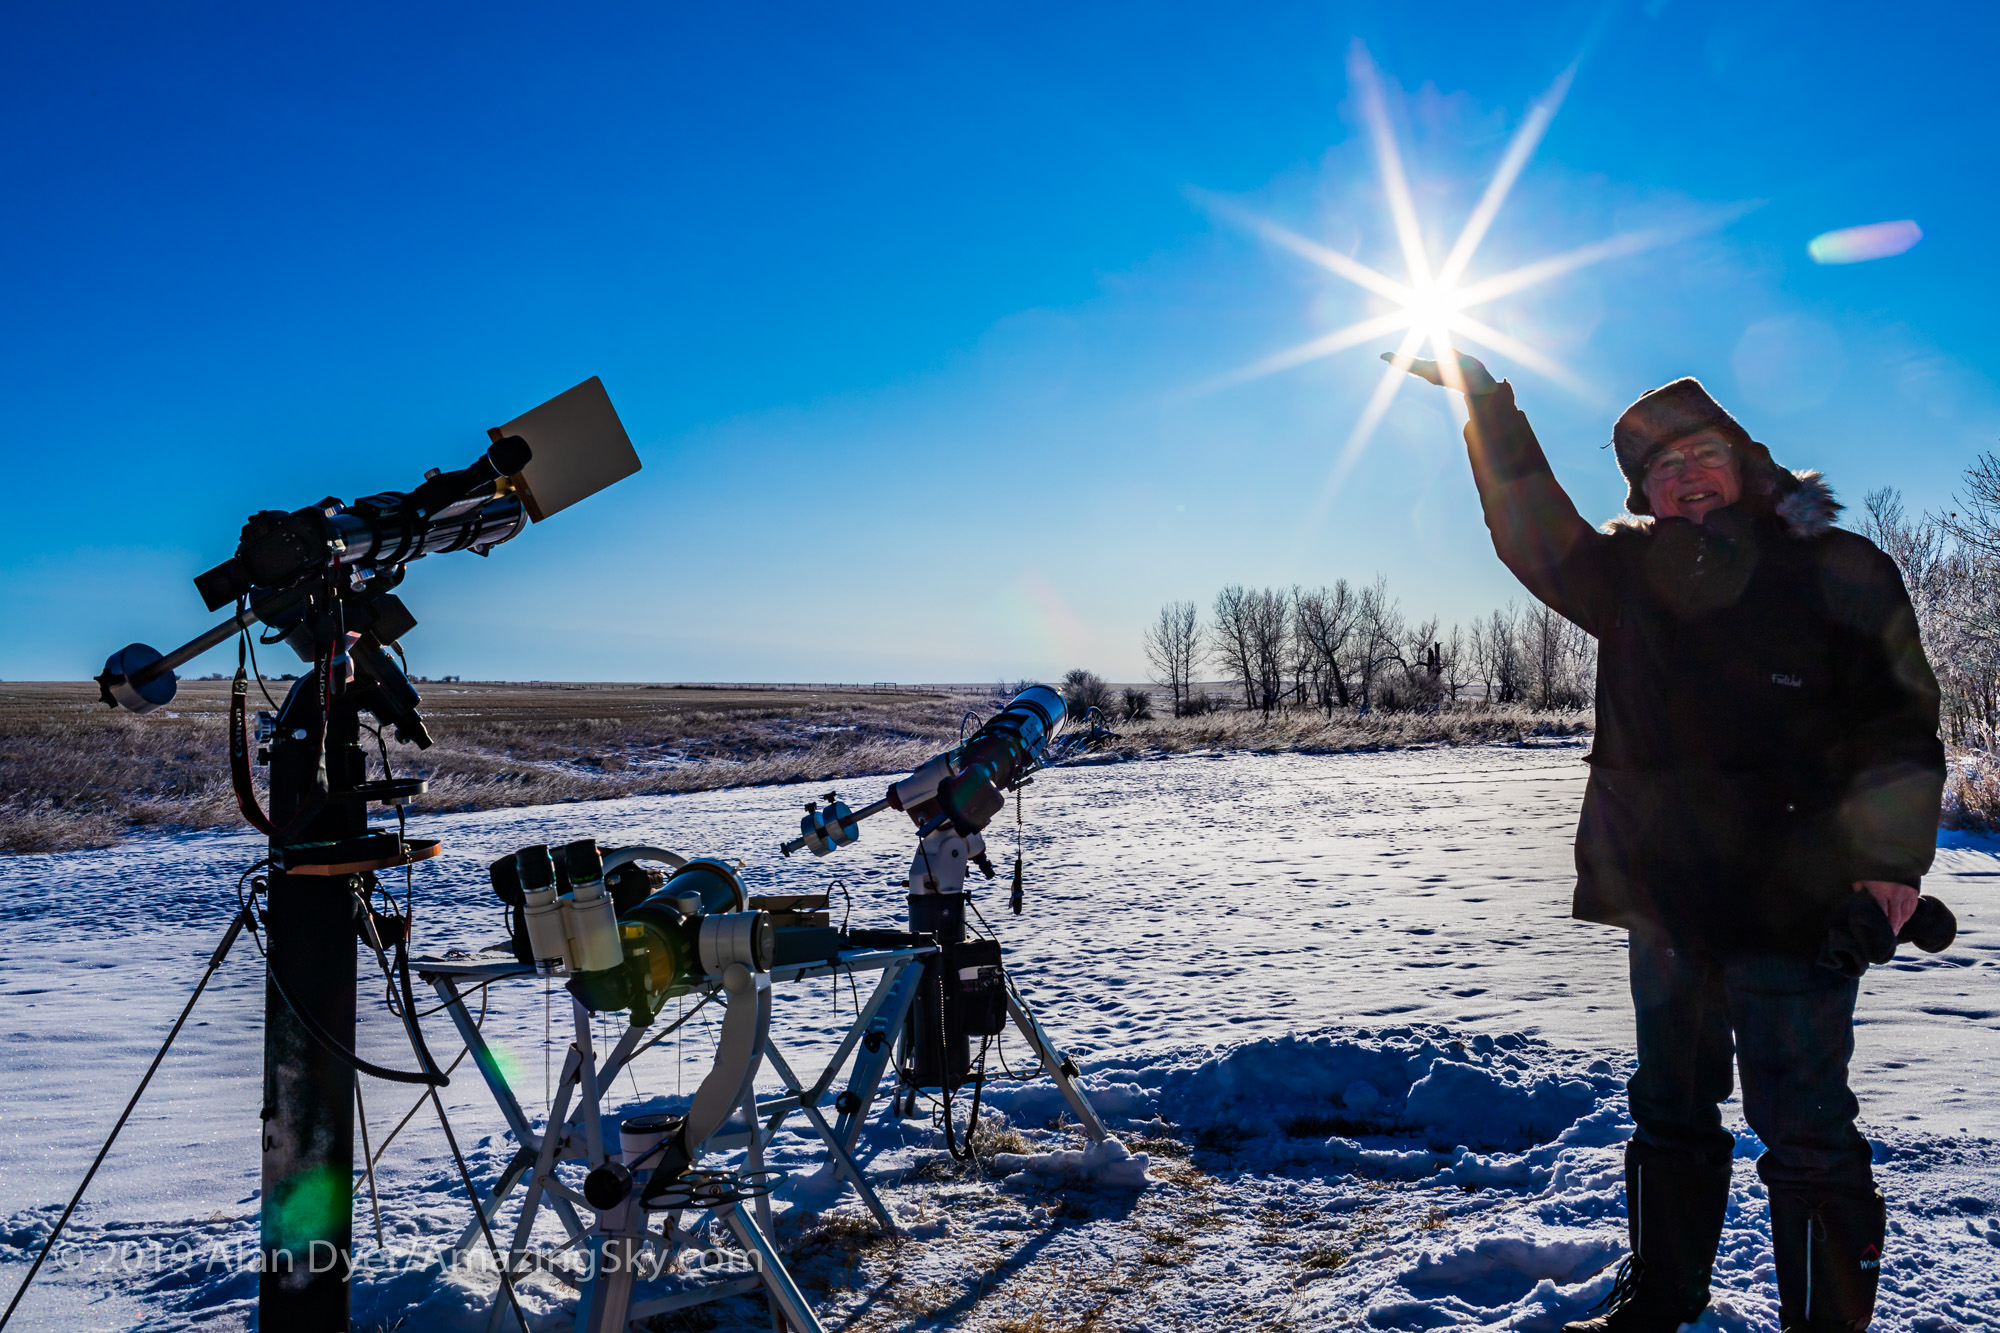
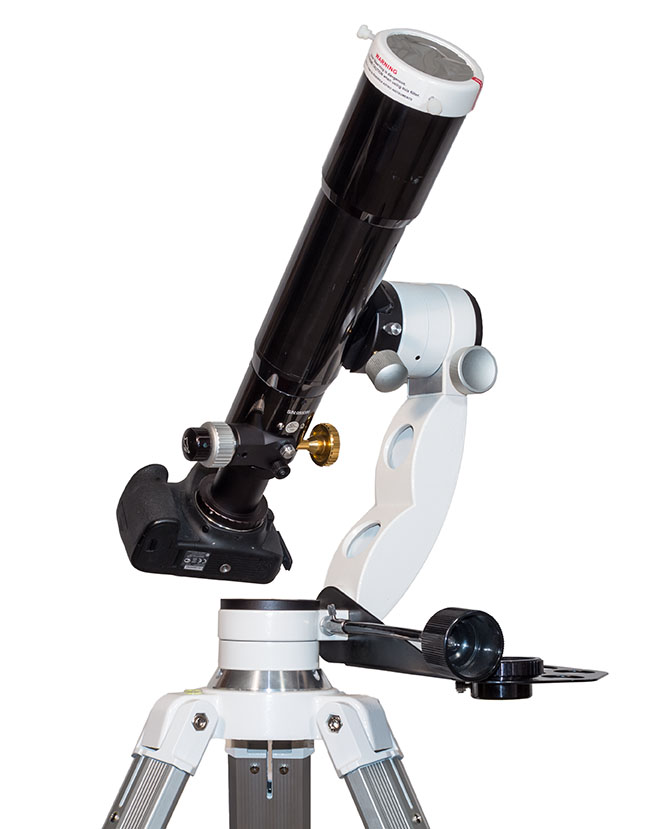
The Nomad on the Benro 3-Way Head, with Laser and Polar Scope, and with a camera and 135mm lens. The ball head is not one from MSM.
I purchased a unit in January 2024 when the Nomad came out, and have used it extensively and successfully over the last few months. I found it has addressed all the serious flaws of the Rotator.
Polar Alignment Accessories
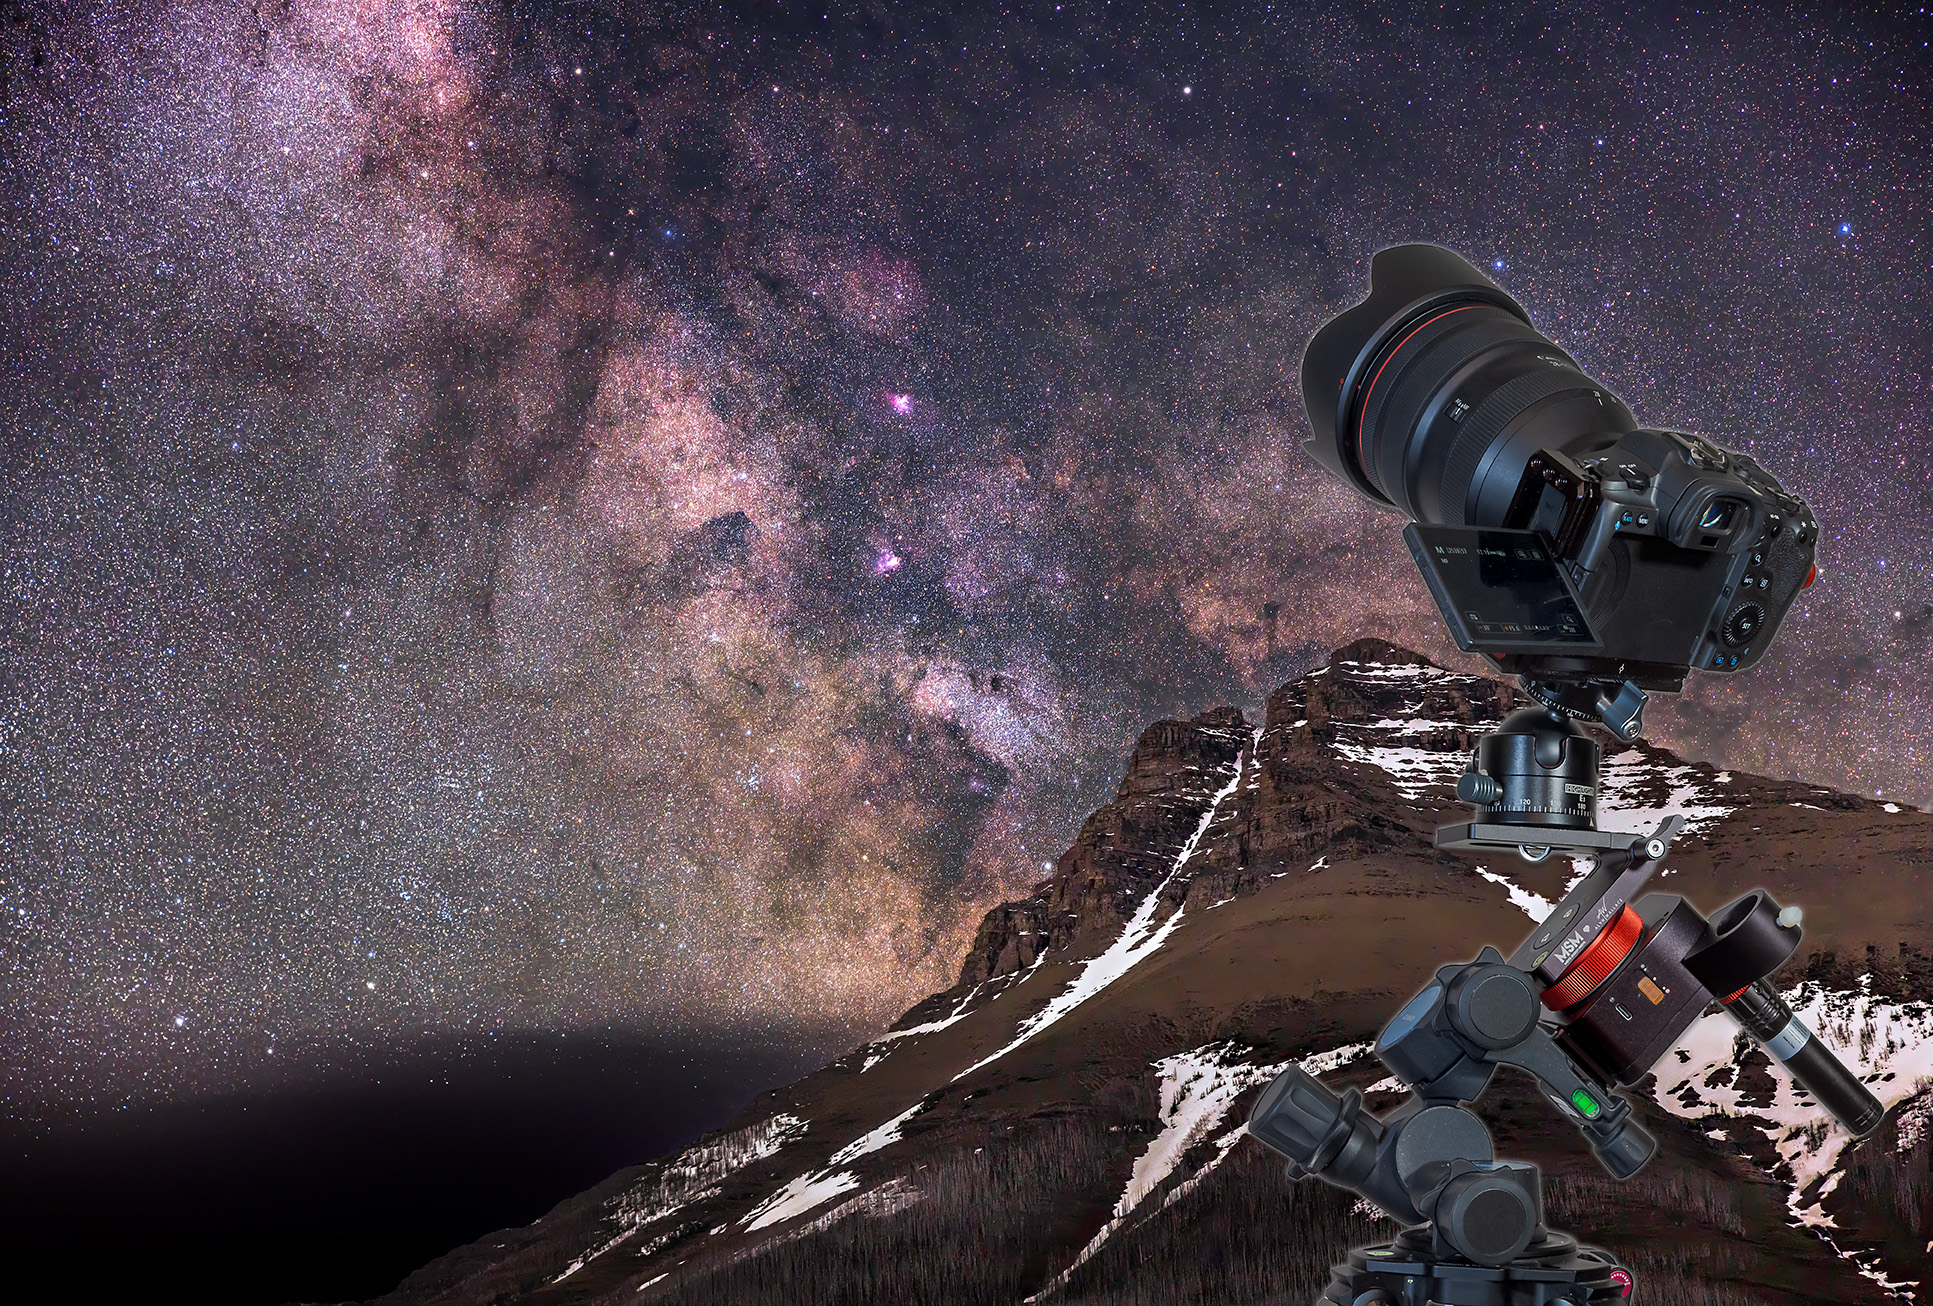
With a weight of about 400 grams, the Nomad is about 70 grams lighter than the old Rotator. It is one of the lightest and smallest trackers on the market, a benefit for those wanting to hike to remote nightscape sites, or pack gear for airline travel. (I took my Nomad to Australia this year; one result is below, shot with the Nomad.)
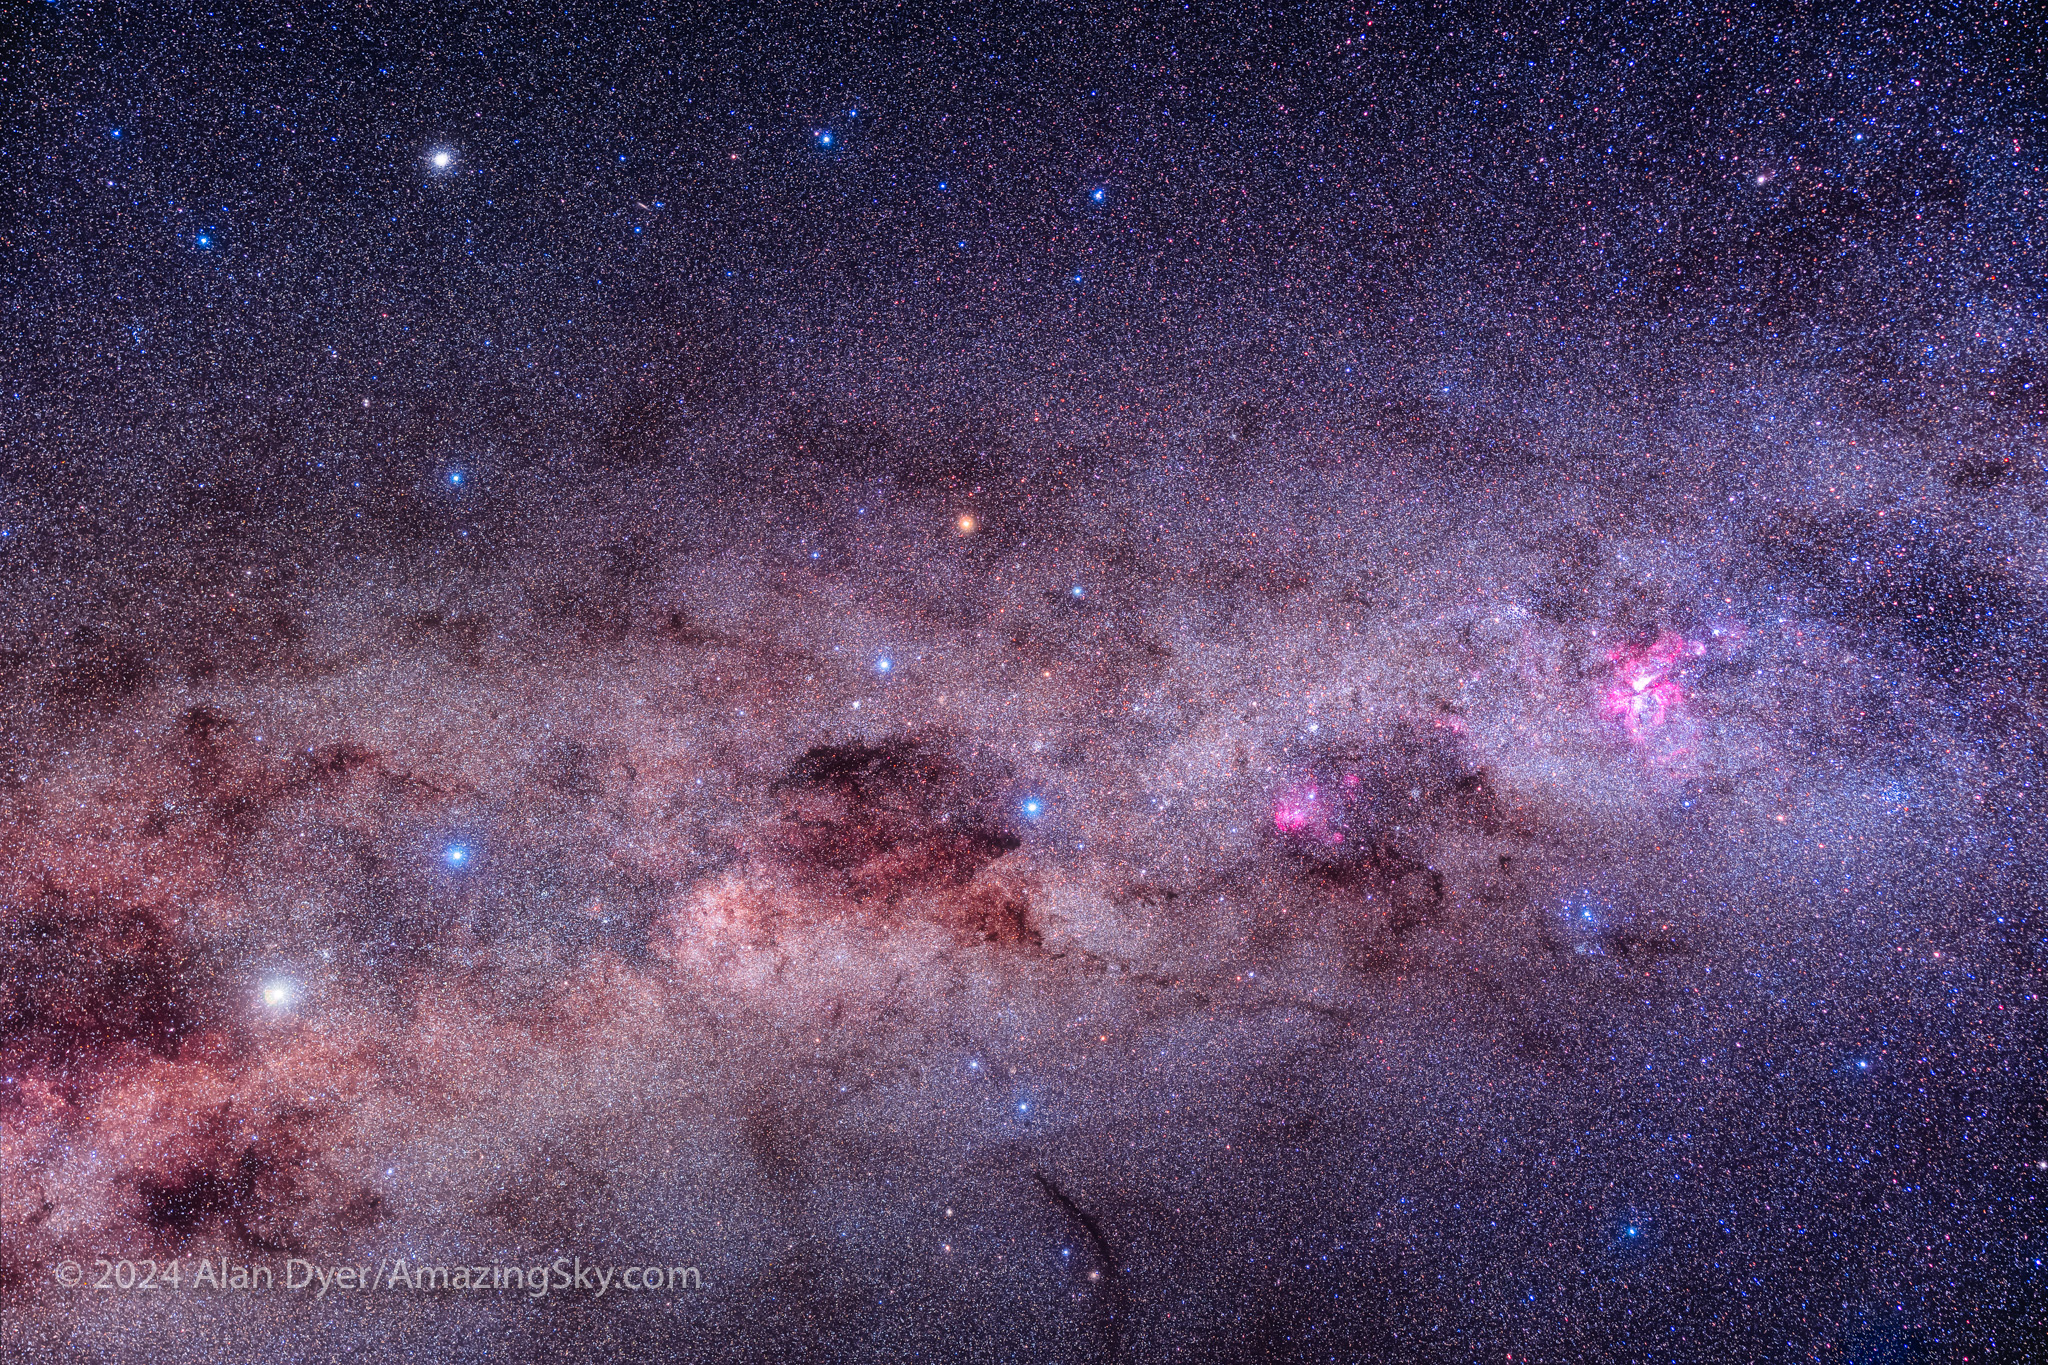
This frames the spectacular area of the southern Milky Way from Centaurus at left, to Carina at right, with Crux, the Southern Cross, at centre. This is a stack of 8 x 4-minute exposures with the Canon RF28-70mm lens at 48mm and f/2.8, on the Canon Ra at ISO 800. All on the MSM Nomad tracker.
However, unlike the popular Star Adventurer 2i and Mini trackers from Sky-Watcher, the Nomad, like MSM’s older Rotator, does not have a polar alignment scope built in, just a peep sight hole. That makes it easier for MSM to fit a tracker inside a compact box.
And yet, I feel some form of polar alignment aid (not just a peep sight) is essential if a tracker is to follow the sky accurately. Like the Rotator, the Nomad can be purchased with two add-on choices (shown below):
• a 5 mw green laser pointer,
• and an optical polar scope …
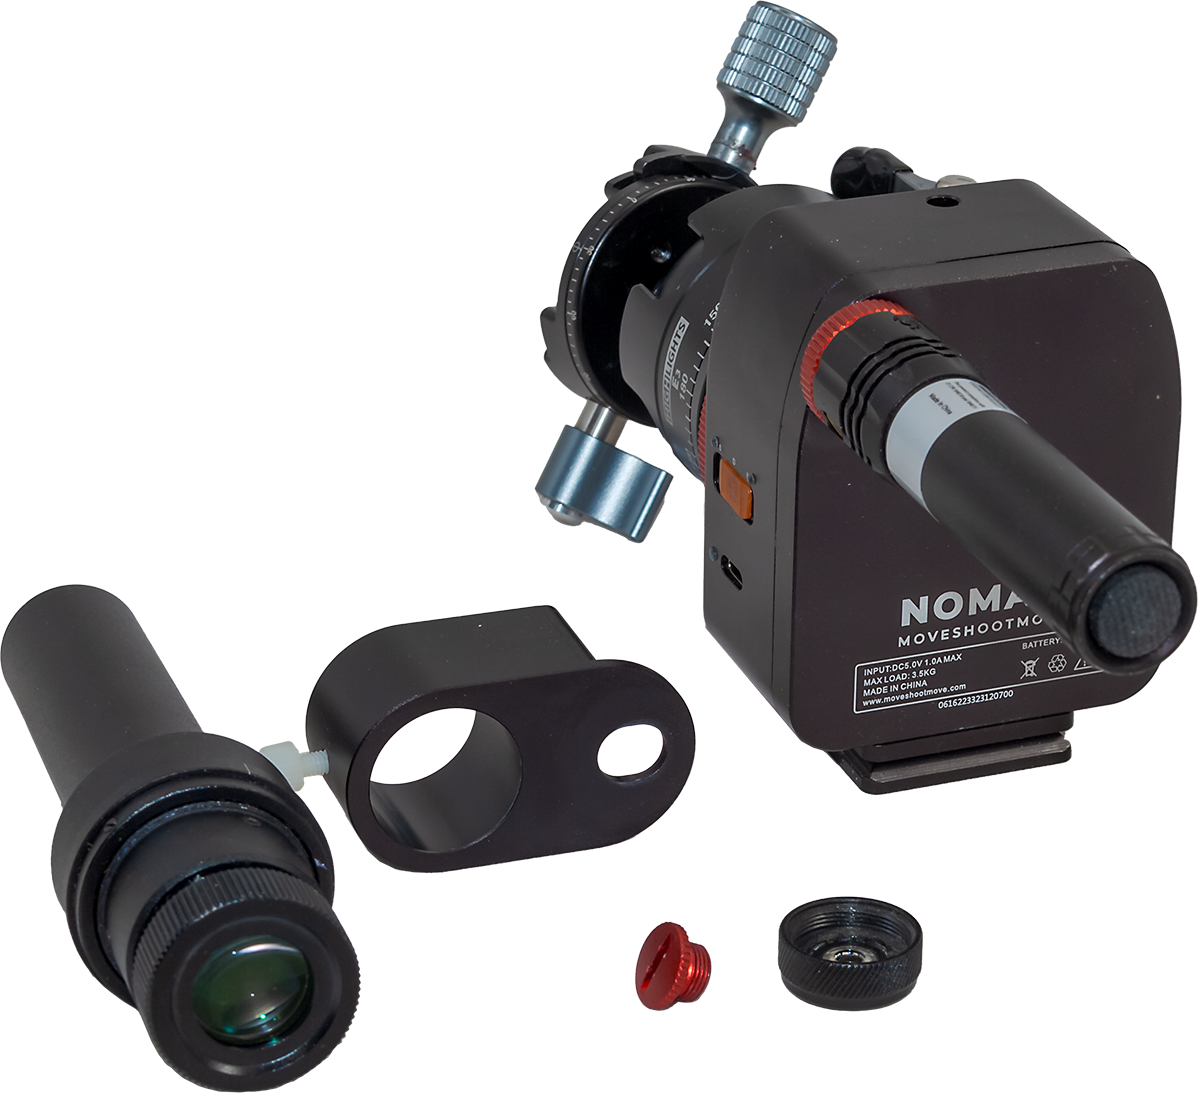
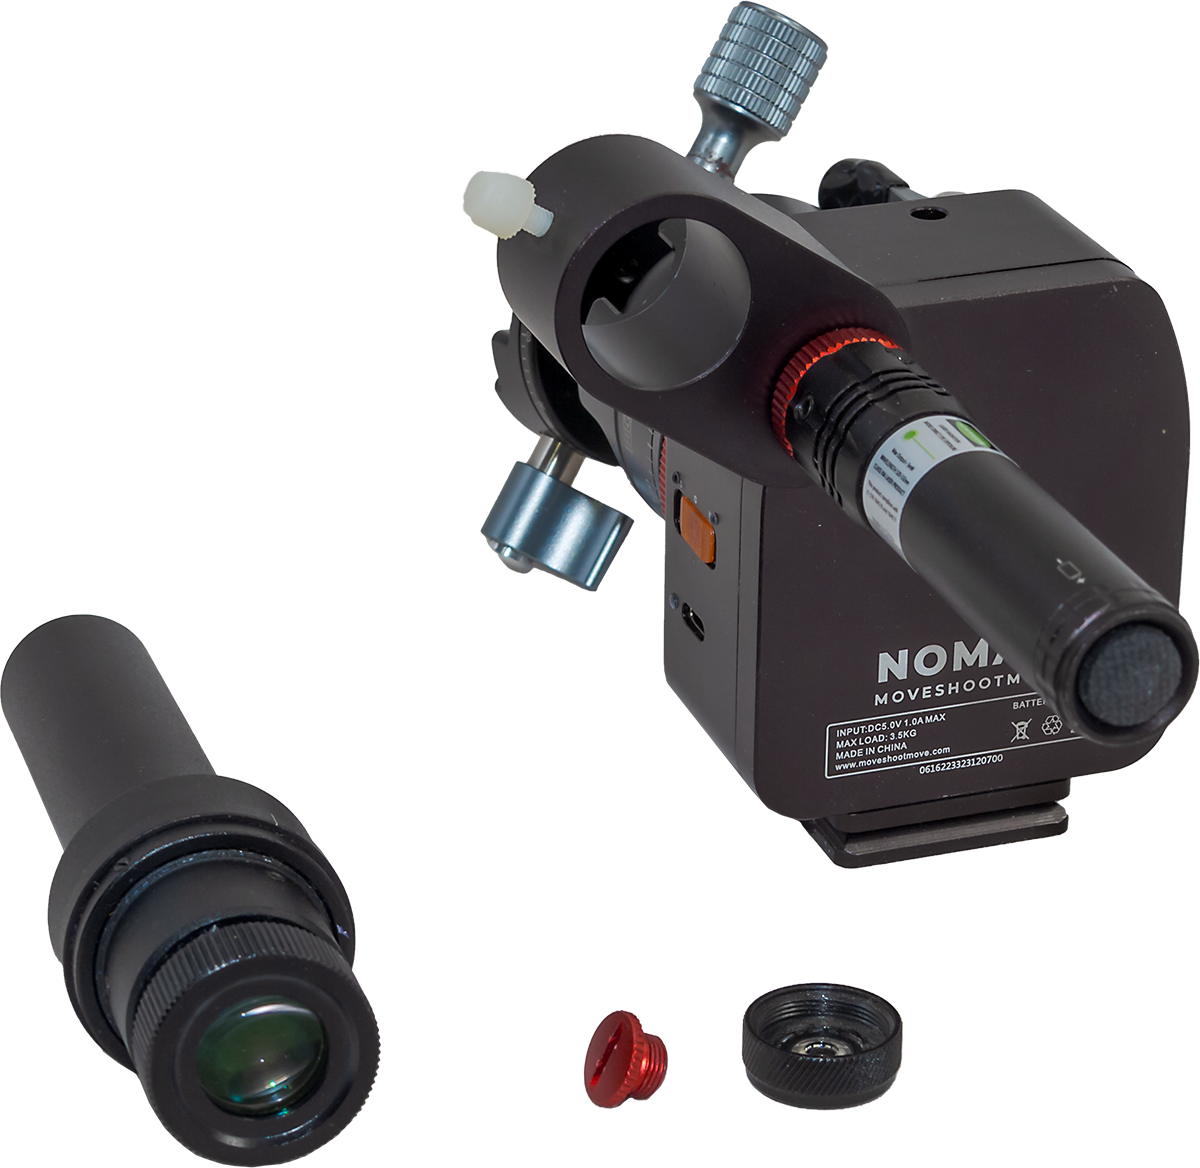
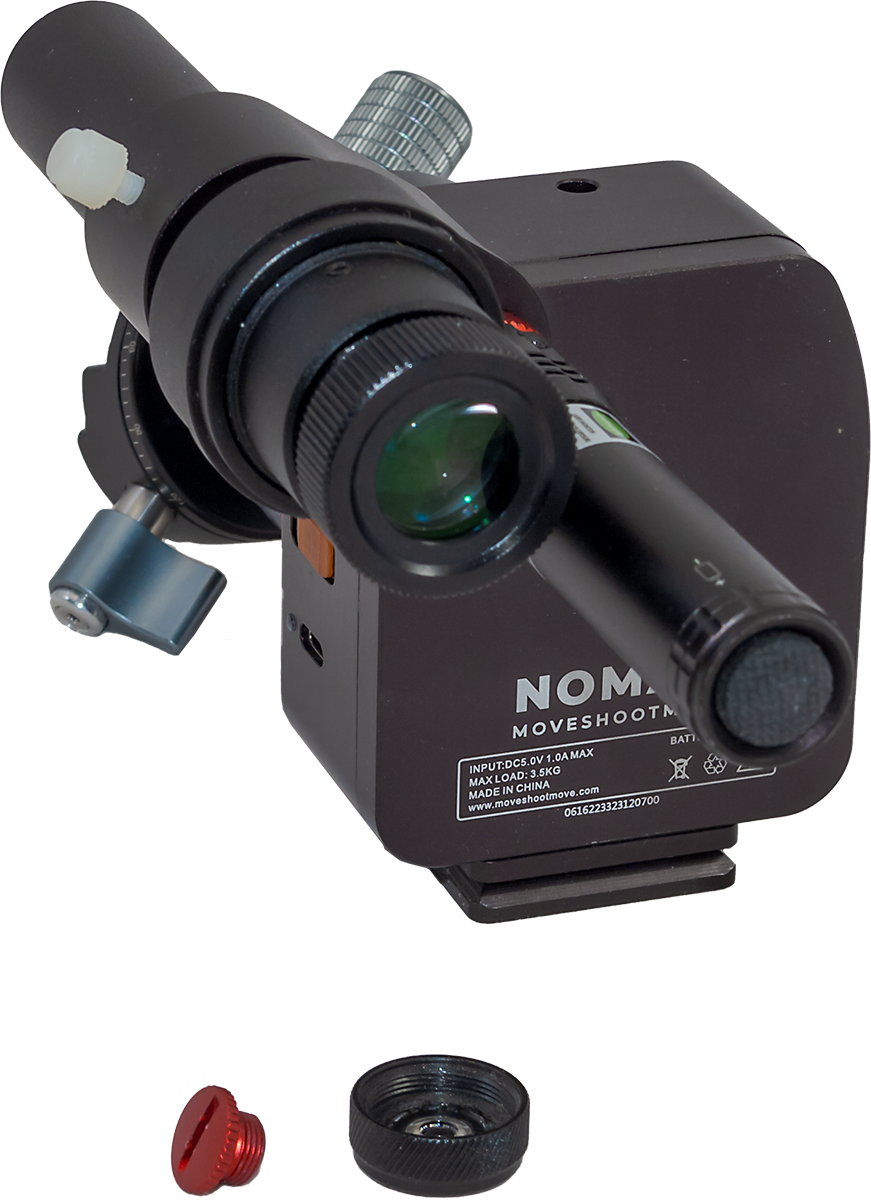
… each of which attaches to the side of the Nomad as outboard accessories. I purchased both, bundled with the Nomad as “Basic Kit C” for $309 U.S., and find both accessories useful.
NOTE: When shopping at the MSM website don’t be fooled by what looks like temporary sale prices. The prices are always marked down, though MSM does offer coupon codes now and then for genuine discounts. I’ve always found MSM’s delivery by parcel post prompt, and in my case, shipments came from a warehouse in Canada, not China.
The Laser and Polar Scope as they come suppliedWith the Laser threaded on using the red capWith the Polar Scope clamp attachedWith both the Polar Scope and Laser attached. Don’t lose the caps at bottom!
As with the Rotator, the need to add essential accessories makes the Nomad more expensive and more complex to pack than buyers might think. And it can be more complex to initially set up than imagined, not helped by the lack of any instructions. (I’m told by MSM that a downloadable PDF sheet is being prepared.) In place of factory-supplied instructions, MSM depends on its YouTuber fans to provide tutorials.
It took me a moment to figure out how the laser attaches to the Nomad — it does so by replacing the black cap that comes on the laser with a supplied threaded red cap, so the laser can screw into the peep hole on the Nomad’s body that is covered by yet another cap you remove — but don’t lose it, as you might need it.
The optical polar scope attaches by way of an included clamp held onto the Nomad by the laser, or by the removable threaded cap (so you will need it if you aren’t using the laser, but it is easily lost).
Out of the box I found I had to adjust the beam of the laser (using the two tiny set screws on the laser) so the beam exited straight out the laser and up the peep hole in the Nomad’s case.
Once collimated, the laser pointer has proved to be an accurate and convenient way to polar align, especially for shooting with wide-angle lenses. (Keep in mind, green laser pointers over 1 mw are illegal in some jurisdictions.)
The laser uses a removable and rechargeable 3.7-volt battery, and comes with a little USB-powered charger. The laser’s battery has lasted for months of momentary use. The laser works briefly in winter when it is warm, but as soon as it gets cold, as is true of most laser pointers, it refuses to lase!
This frames the small constellations of Sagitta the Arrow and Vulpecula the Fox. At lower left is the green planetary nebula Messier 27, aka the Dumbbell, shown in the close-up tracking test image below. This is a stack of 14 x 2-minute exposures with the Canon RF135mm lens on the Canon Ra, on the MSM Nomad tracker. The images were the best 14 out of a series shot to test the Nomad’s tracking.
However, for the more accurate polar alignment needed when shooting with telephoto lenses (an example is above), and for winter use, I prefer to use the optical polar scope, with the laser a handy complement just to get close to the pole.
The polar scope has a reticle etched with star patterns for both the North and South Celestial Poles. I found the latter worked well in Australia. The mounting clamp held the polar scope securely and consistently well centered, another welcome improvement over the polar scope clamp supplied with the Rotator, which could wiggle around.
Polar scope with its glow-in-the-dark Illuminator. The Nomad comes with an Arca-Swiss dovetail plate bolted onto the bottom edge, for attaching it to a tripod head or to the optional MSM Wedge.
The polar scope does not have an illuminator LED. Instead, it comes with a novel phosphorescent cap which you hit briefly with white light so it glows in the dark.
Placed over the front of the polar scope, it lights up the field allowing the reticle to be seen in silhouette. While it works fine for sighting Polaris, the bright field can make it hard to see the faint stars in Octans around the South Celestial Pole.
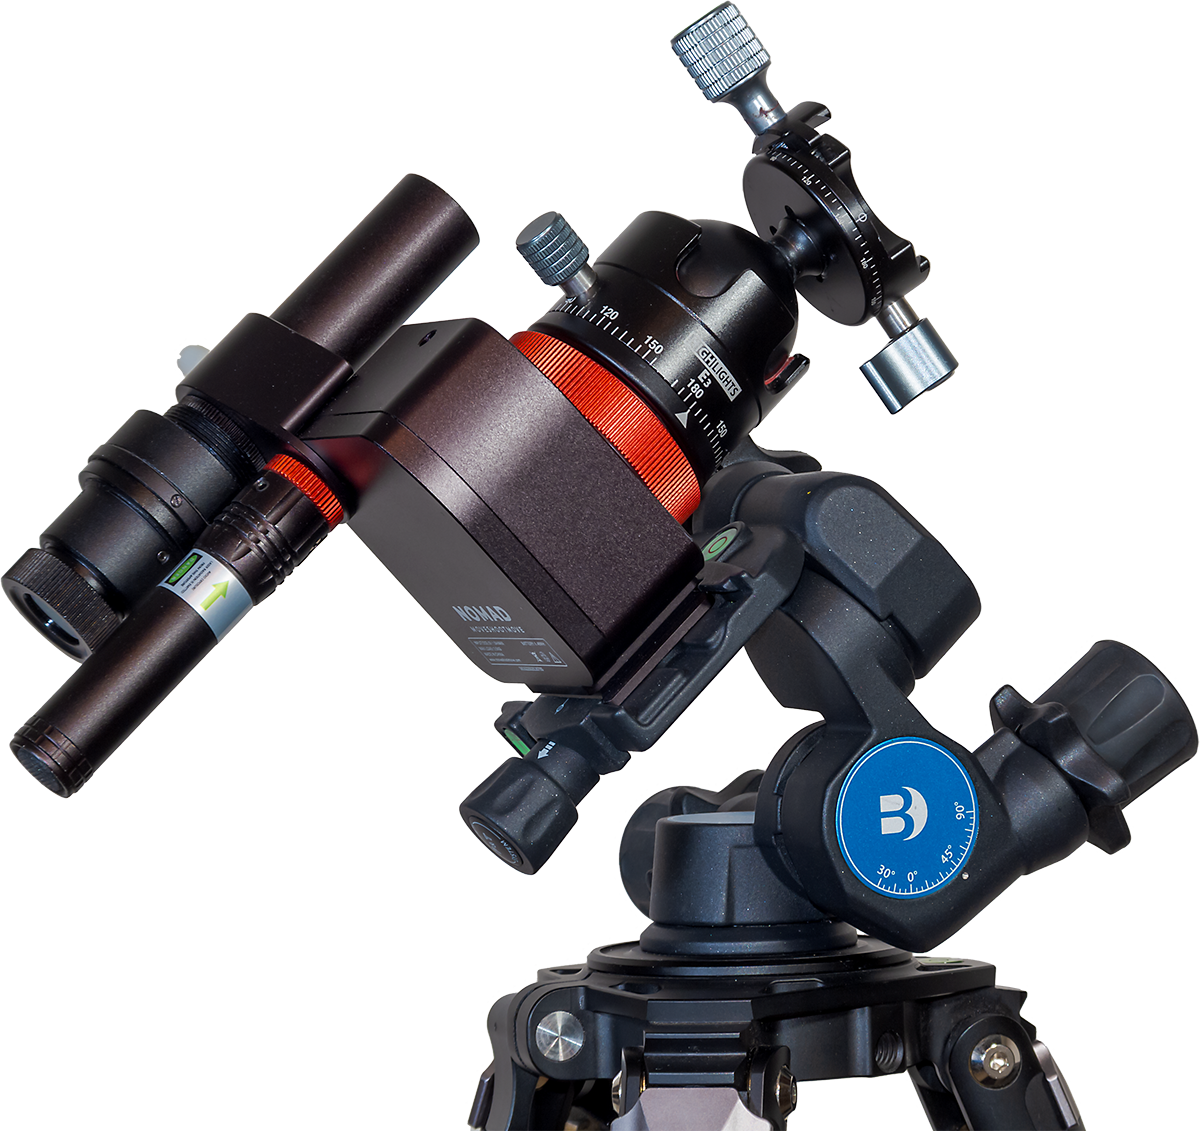
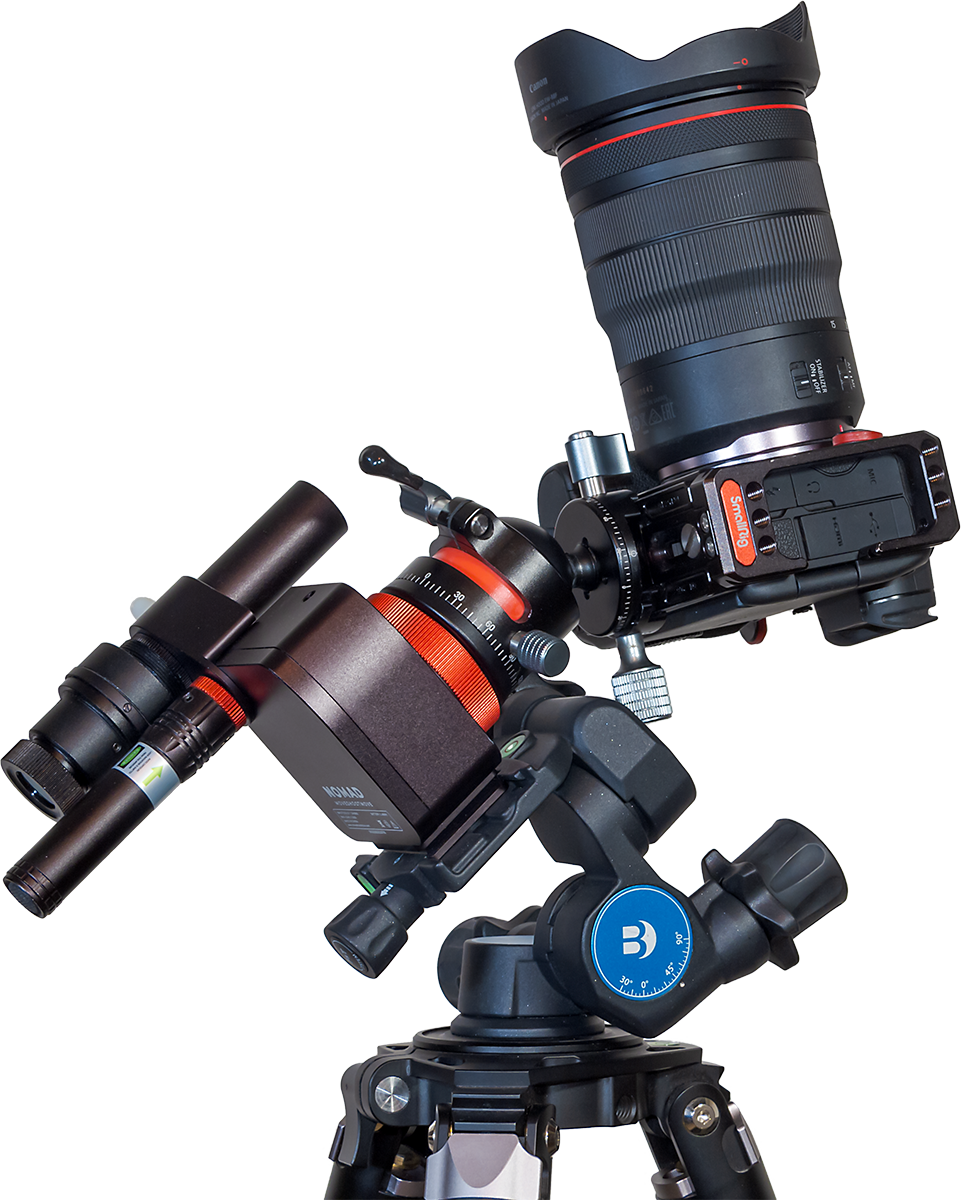
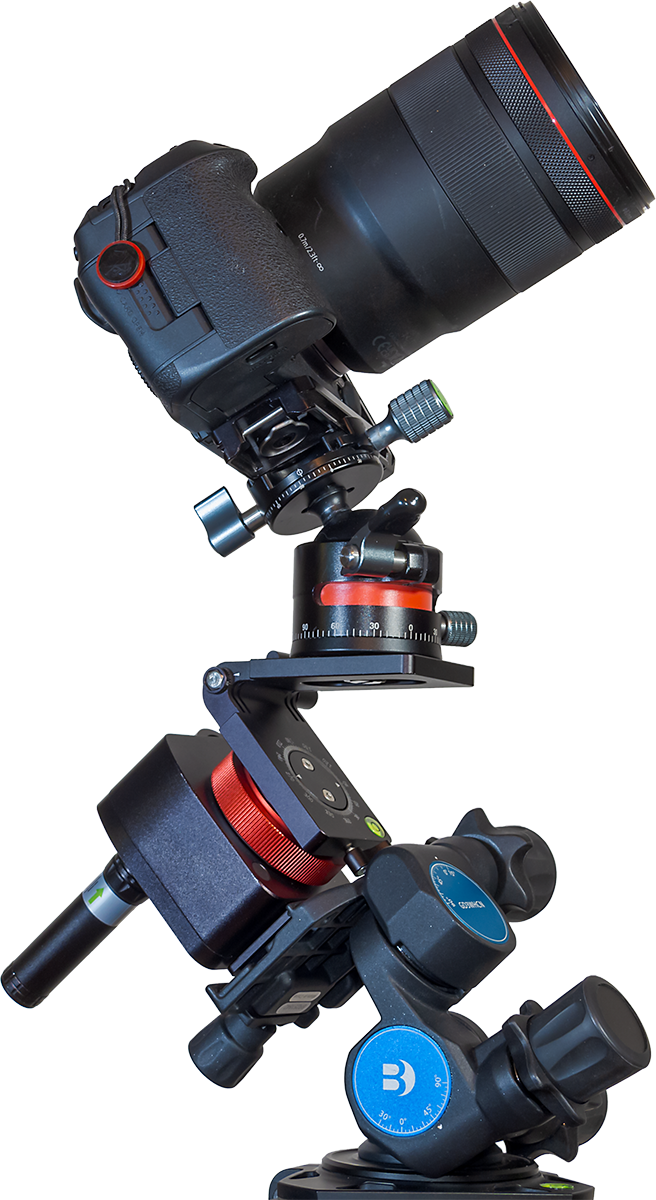
The Nomad on the Benro 3-Way Geared Head, using the Arca-Swiss attachment plate. Another method of mounting the Nomad to the Benro is shown below.
To aid polar alignment I purchased the Benro 3-Way Geared Head, also sold by MSM but available from many sources. Its geared motions make it easy to aim the tracker’s rotation axis precisely at the pole and hold it there solidly.
The Benro accepts standard Arca-Swiss mounting plates, so I’ve found it a useful head to have for other purposes and gear combinations. It has replaced my old Manfrotto 410 3-axis head which uses a proprietary mounting plate.
However, MSM also sells its own latitude adjustment Wedge which, at $90, is a cheaper alternative to the $200 Benro. I’ve not used the MSM Wedge, so I can’t say how solid and precise it is. But the Wedge is lighter than the Benro head, and so may be a better choice when weight is a prime consideration.
I would recommend either the Wedge or Benro for their fine adjustments of azimuth and altitude that are essential for easy, yet precise and stable polar alignment.
Tracking Accuracy
All-important is how well the Nomad tracks. When shooting with wide-angle lenses (14mm to 35mm) for nightscapes and wide Milky Way shots, the majority of images I’ve taken over the last few months, using exposures of 1 to 3 minutes, have been reliably well tracked, with pinpoint stars.
The Nomad begins tracking right away, with no wait for gear backlash to be taken up, or for the drive mechanism to settle in. I also found no tendency for tracking to be better or worse with camera position, unlike the Rotator that seemed to work better with the camera aimed at one area of sky vs another. And the Nomad didn’t suffer from any stalls or moments when it just stopped in its tracks, again unlike the problematic Rotator.
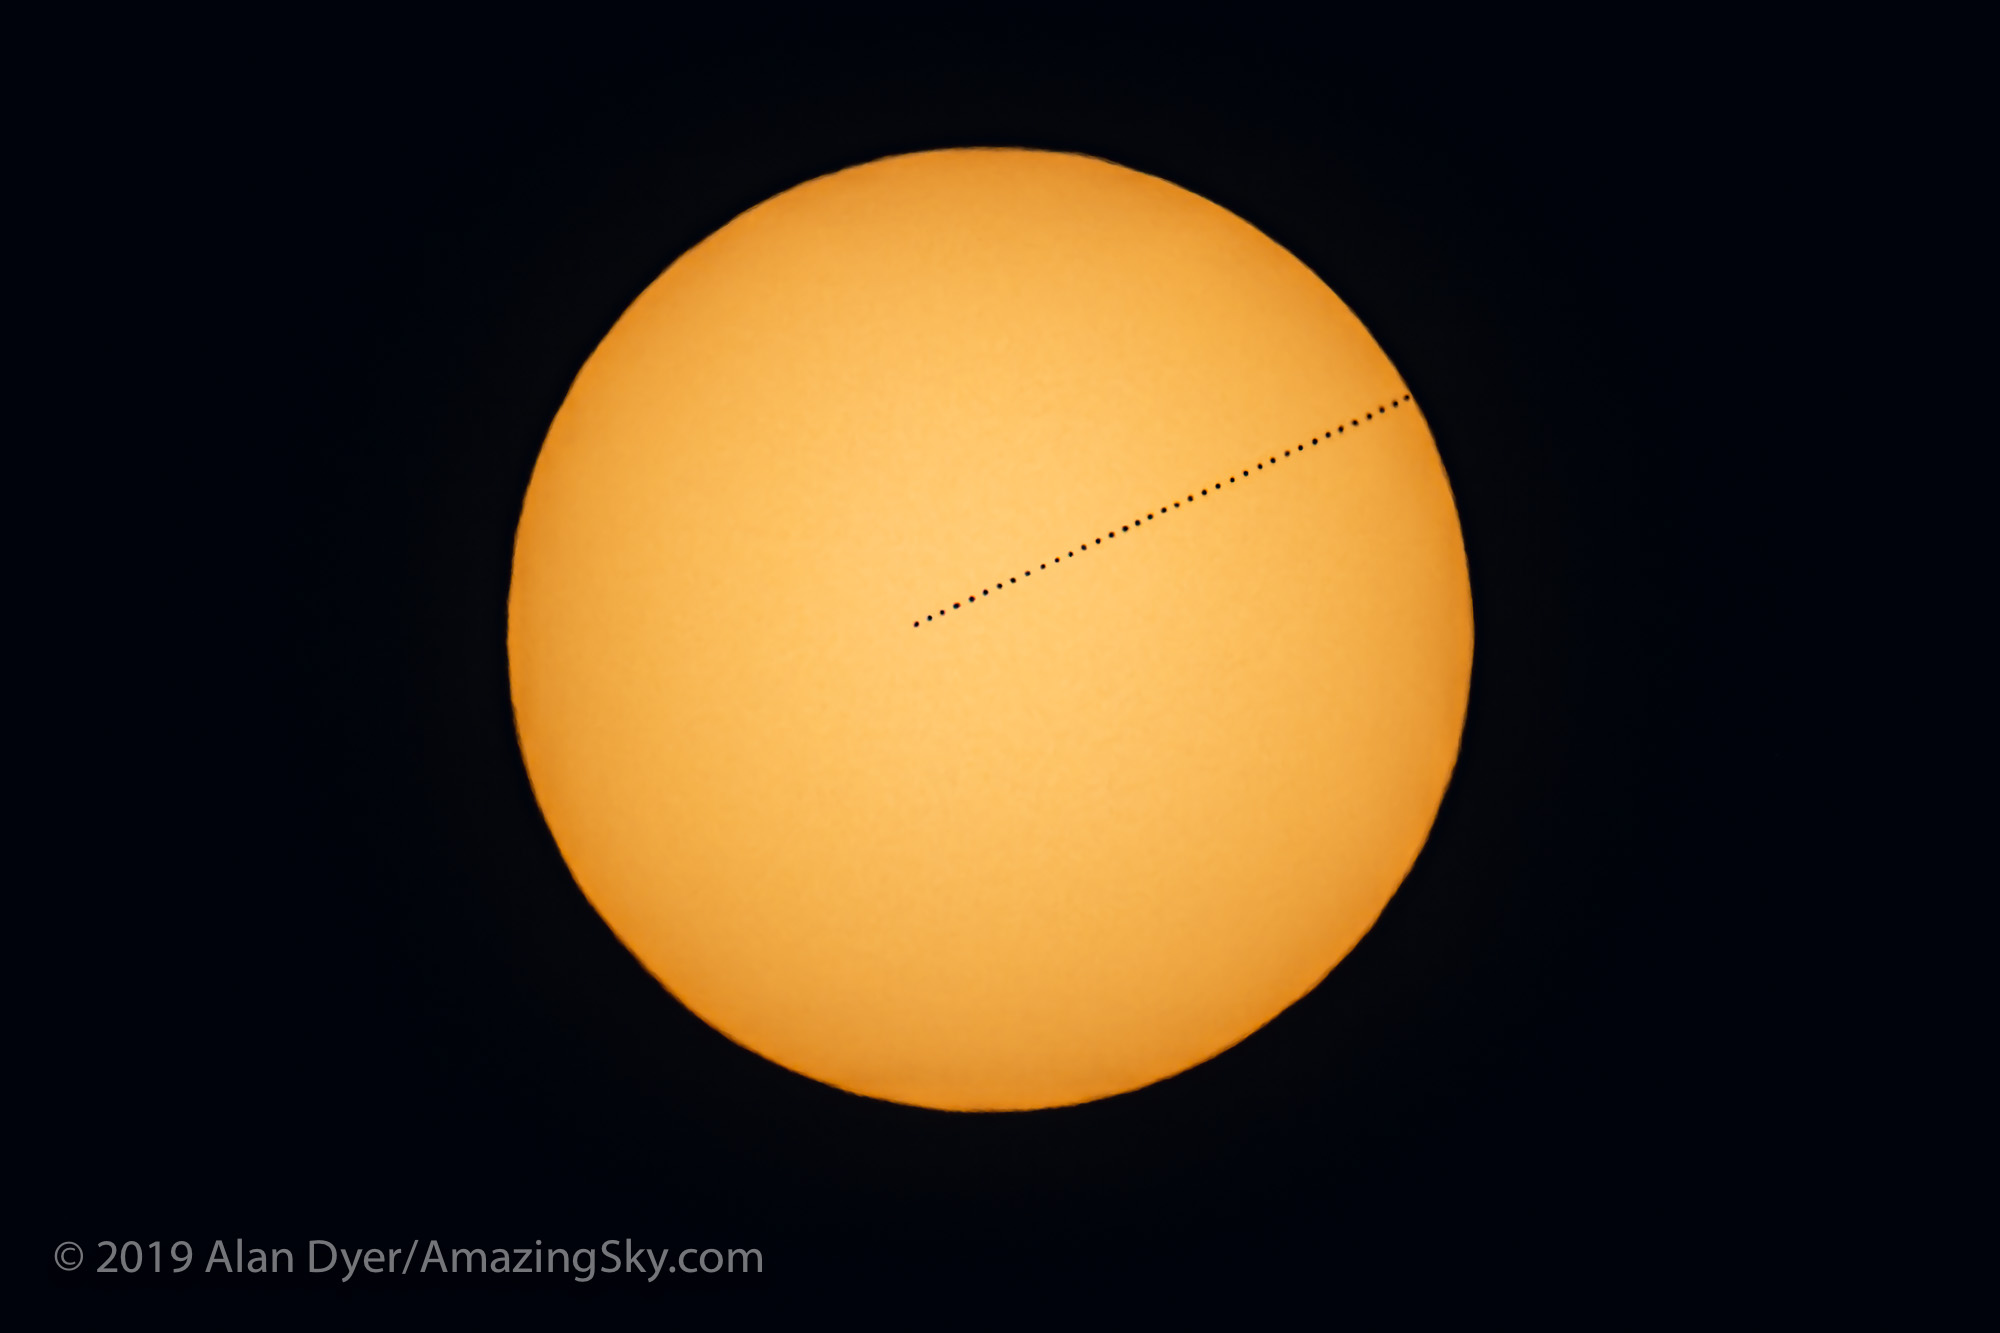
20 consecutive 2-minute exposures with a 135mm lens, to show the variations in tracking accuracy. Tap on the image to download it for closer inspection.
As with any tracker, where you do see mistracking is when using longer lenses. I tested, and indeed have used, the Nomad with 85mm and 135mm telephoto lenses, as many owners will want to do, for close-ups of Milky Way starfields and for so-called “deepscapes.” (An example of the latter is at the end.) The demo image above shows blow-ups of consecutive frames from the 135mm shoot of the Vulpecula/Sagitta starfield shown earlier.
In those more demanding tests, as I demonstrate here, I found that typically about 50% to 60% of images (taken with 1- to 2-minute exposures) were tracked well enough to be usable. The longer the focal length used, or the longer the exposures, the more frames will be trailed enough to be unusable in an image stack. And a well-tracked frame can be followed by a badly tracked one, then the next is fine again. That’s the nature of small drive gears.
As with other trackers, I would suggest that the Nomad is best used with lenses no longer than a fast 135mm. Even then, plan to shoot twice as many frames as you’ll need. Half may need to be discarded. While I know some users will want to push the Nomad beyond its limits, I would not recommend burdening it with monster telephoto lenses or small telescopes. Like all other trackers, that’s not its purpose.
When there was mistracking it was usually in the east-west direction, due to errors in the drive mechanism, and not north-south due to flexure. (If it occurs, north-south drift is likely due to poor polar alignment.)
I found the Nomad did indeed turn at the sidereal rate to follow the stars, something I was never confident the Rotator actually did.
While you might think a 50% success rate with telephotos is not good, in fact the Nomad’s tracking performance is on par with other competing trackers I’ve used, from Sky-Watcher and iOptron. At wide-angle focal lengths the success rate proved closer to 100%.
So for a tracker as compact as the Nomad to perform so well is very welcome indeed. It’s the main area where the Nomad beats the old Rotator by a long shot!
NOTE: While the MSM website mentions an “optional counterweight system,” as of my review’s publication date it is still being developed, MSM tells me. However, I don’t feel it will be necessary for the Nomad’s main purpose of wide-field imaging.
Mechanical Stability
Another flaw of the old Rotator was that it had several single-point attachments that, under the torque of a turning camera, could cause the camera to come loose and suddenly flop down.
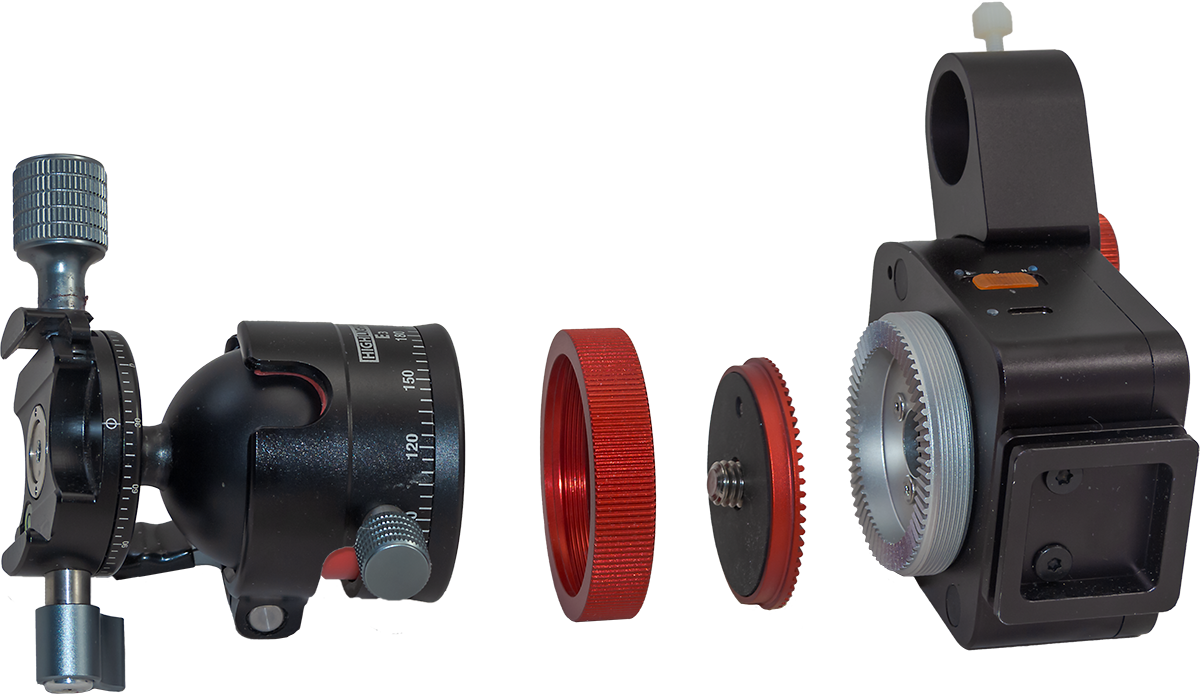
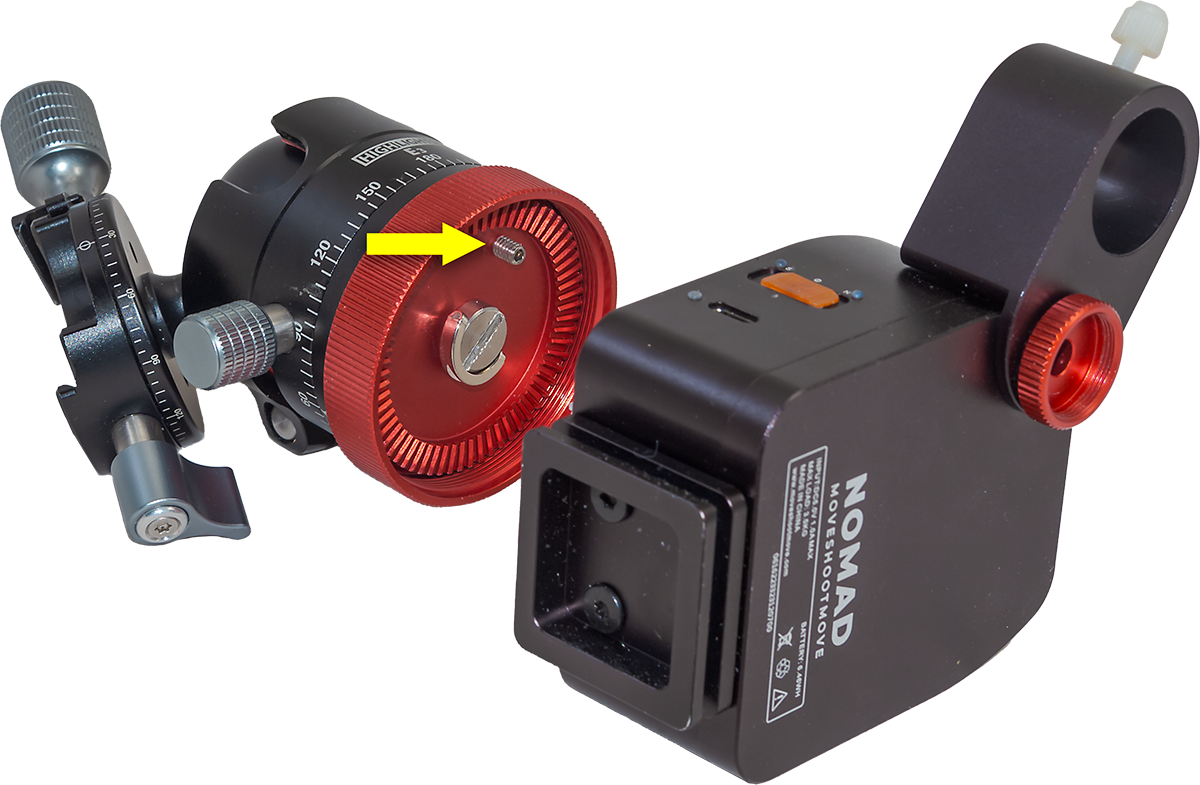
Exploded view of the ratcheted mounting plate to attach a ball head to the NomadShowing the set screw to prevent the ball head coming loose
The Nomad uses a ratcheted clamp to attach a user-supplied ball head to the tracker body, and that clamp has an additional safety set screw to help ensure the ball head does not unscrew itself as a camera turns.
I’ve had no issues with cameras coming loose. Of course, the solidness of the ball head used will be critical as well. A large ball head can be better, but introduce some of the issues I report on below.
While MSM offers its own ball head, I have not used it, preferring to use a couple of other ball and pano heads I like, and that I show in the images here.
Simplicity of Operation
The Nomad improves upon the old Rotator by doing away with all its time-lapse features. You might think that eliminating features can’t be an improvement, but in this case it is.
I suspect few owners used the Rotator’s preset functions for slowly turning a camera along the horizon while firing the camera shutter between each incremental time-lapse move (the very function that gave the company its name!). The Rotator’s options for creating time-lapses were confusing to set up and limited in their choice of speeds. A serious time-lapse photographer would never use it.
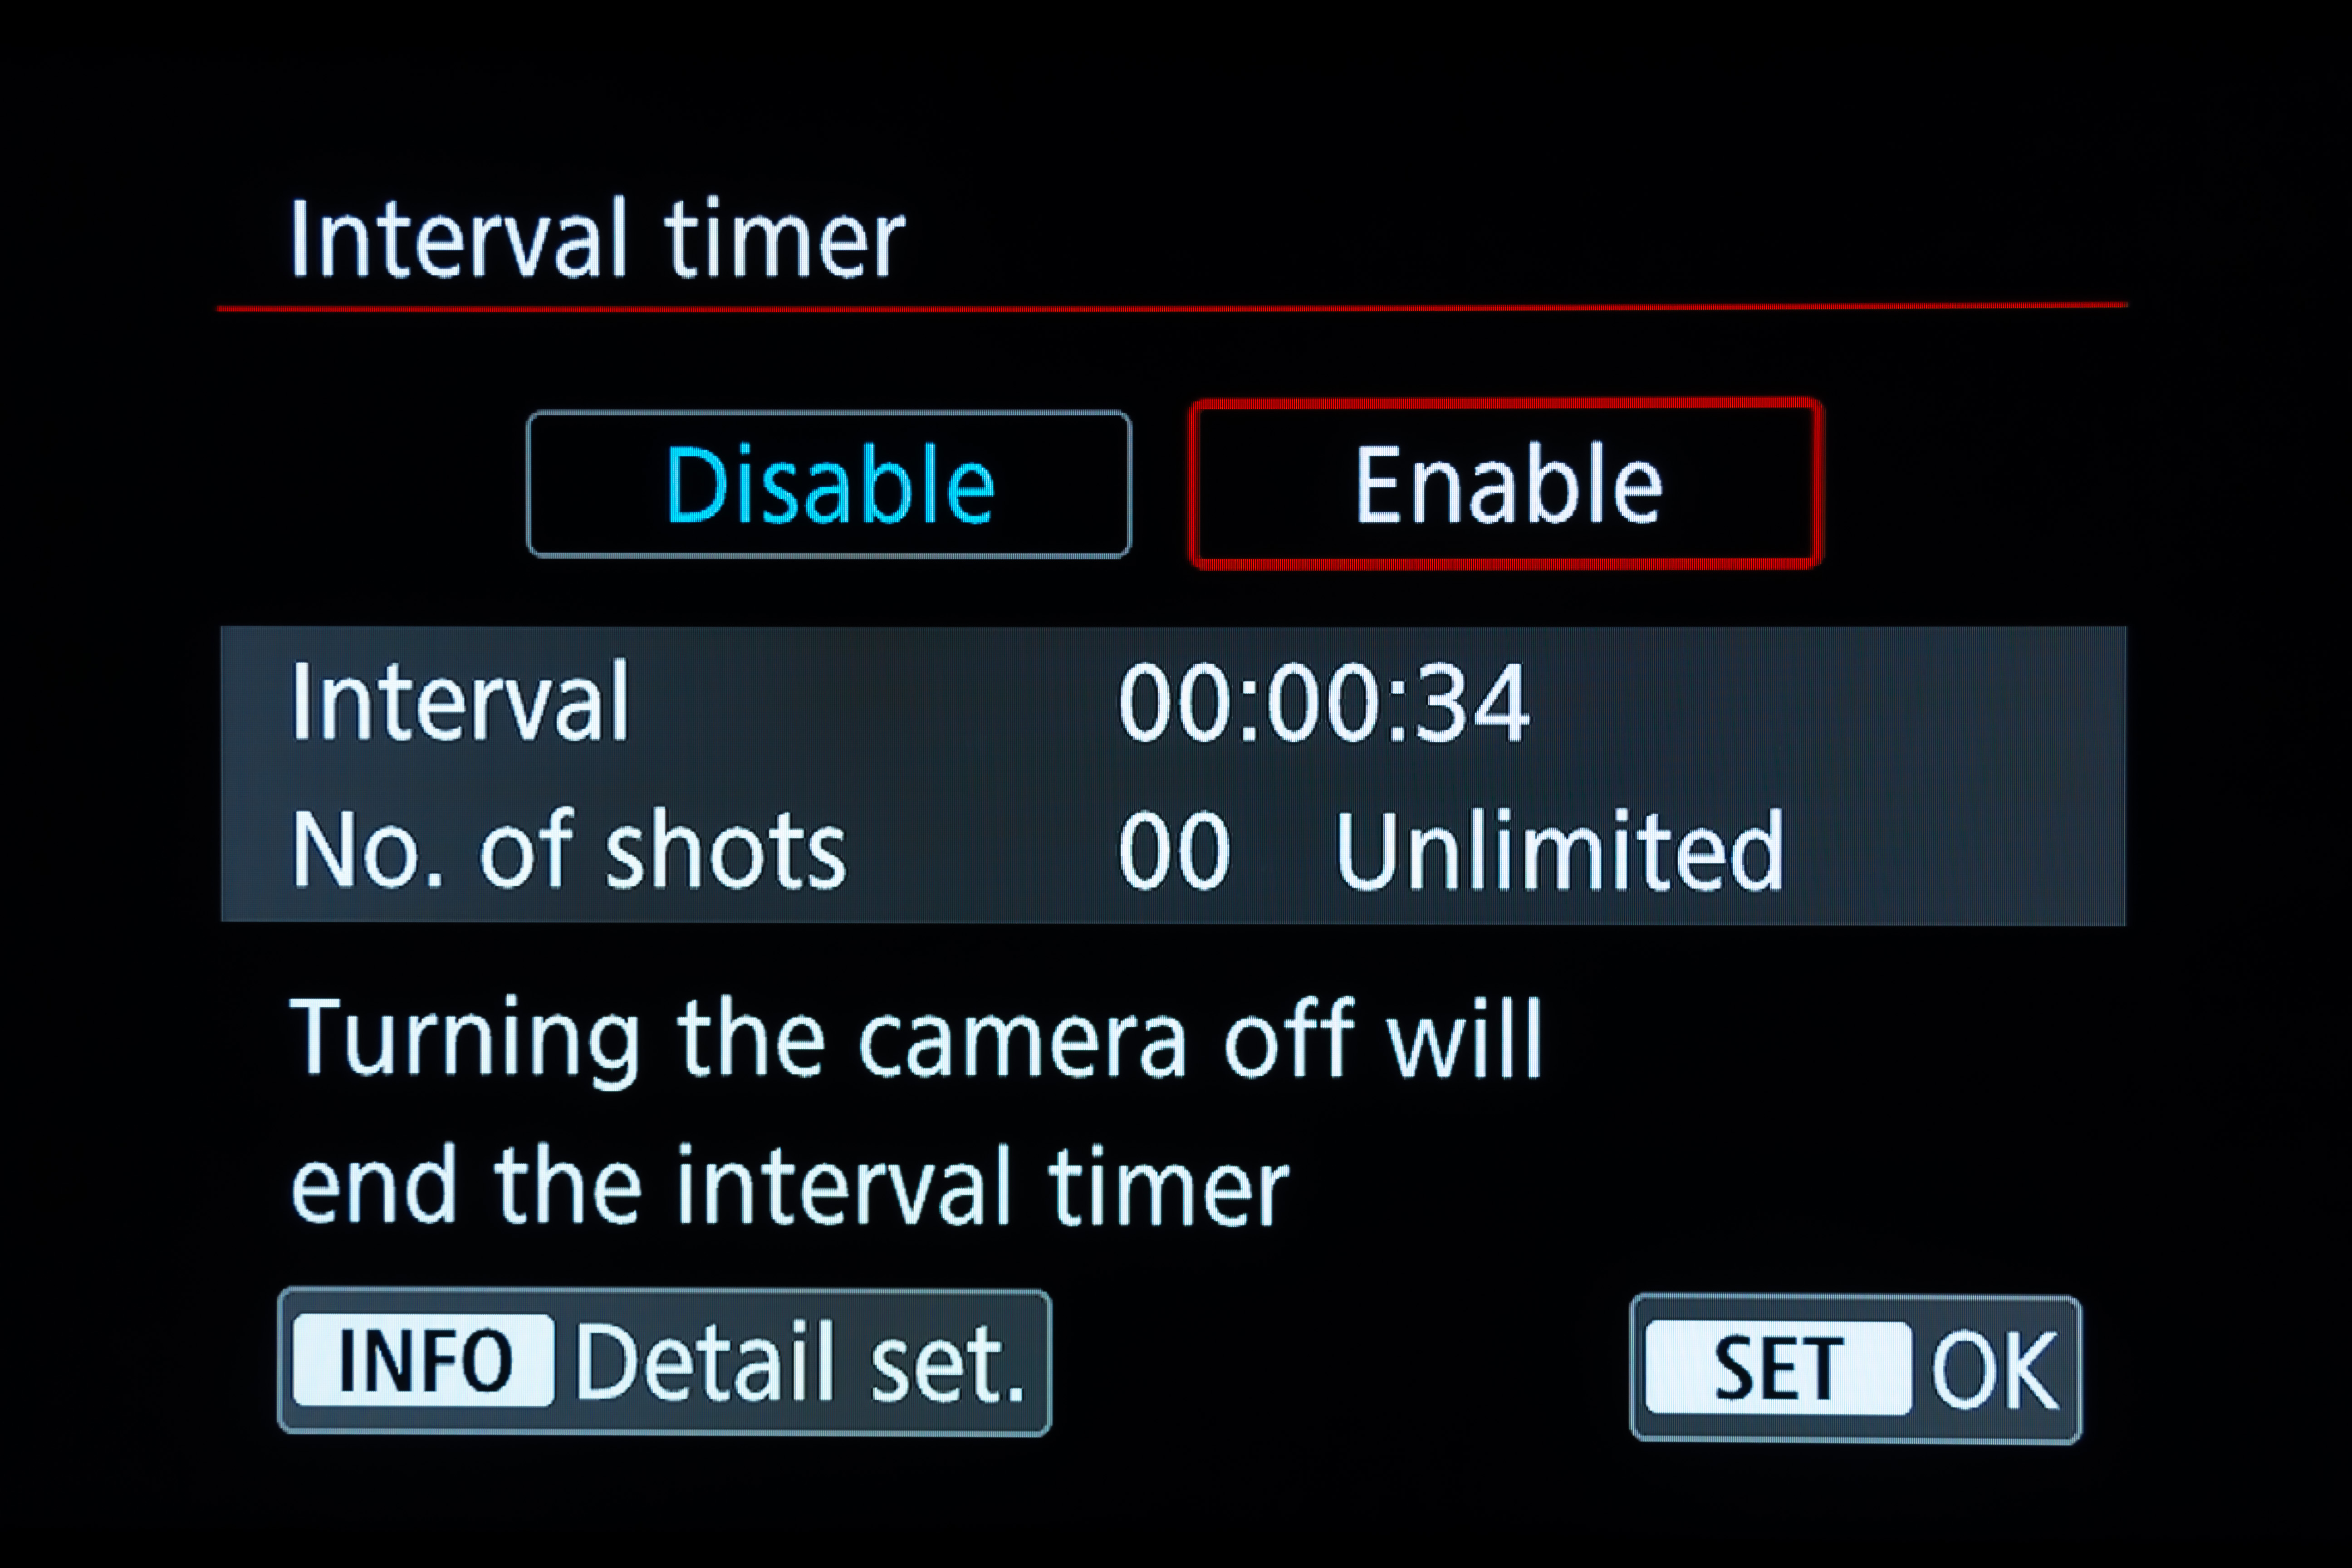
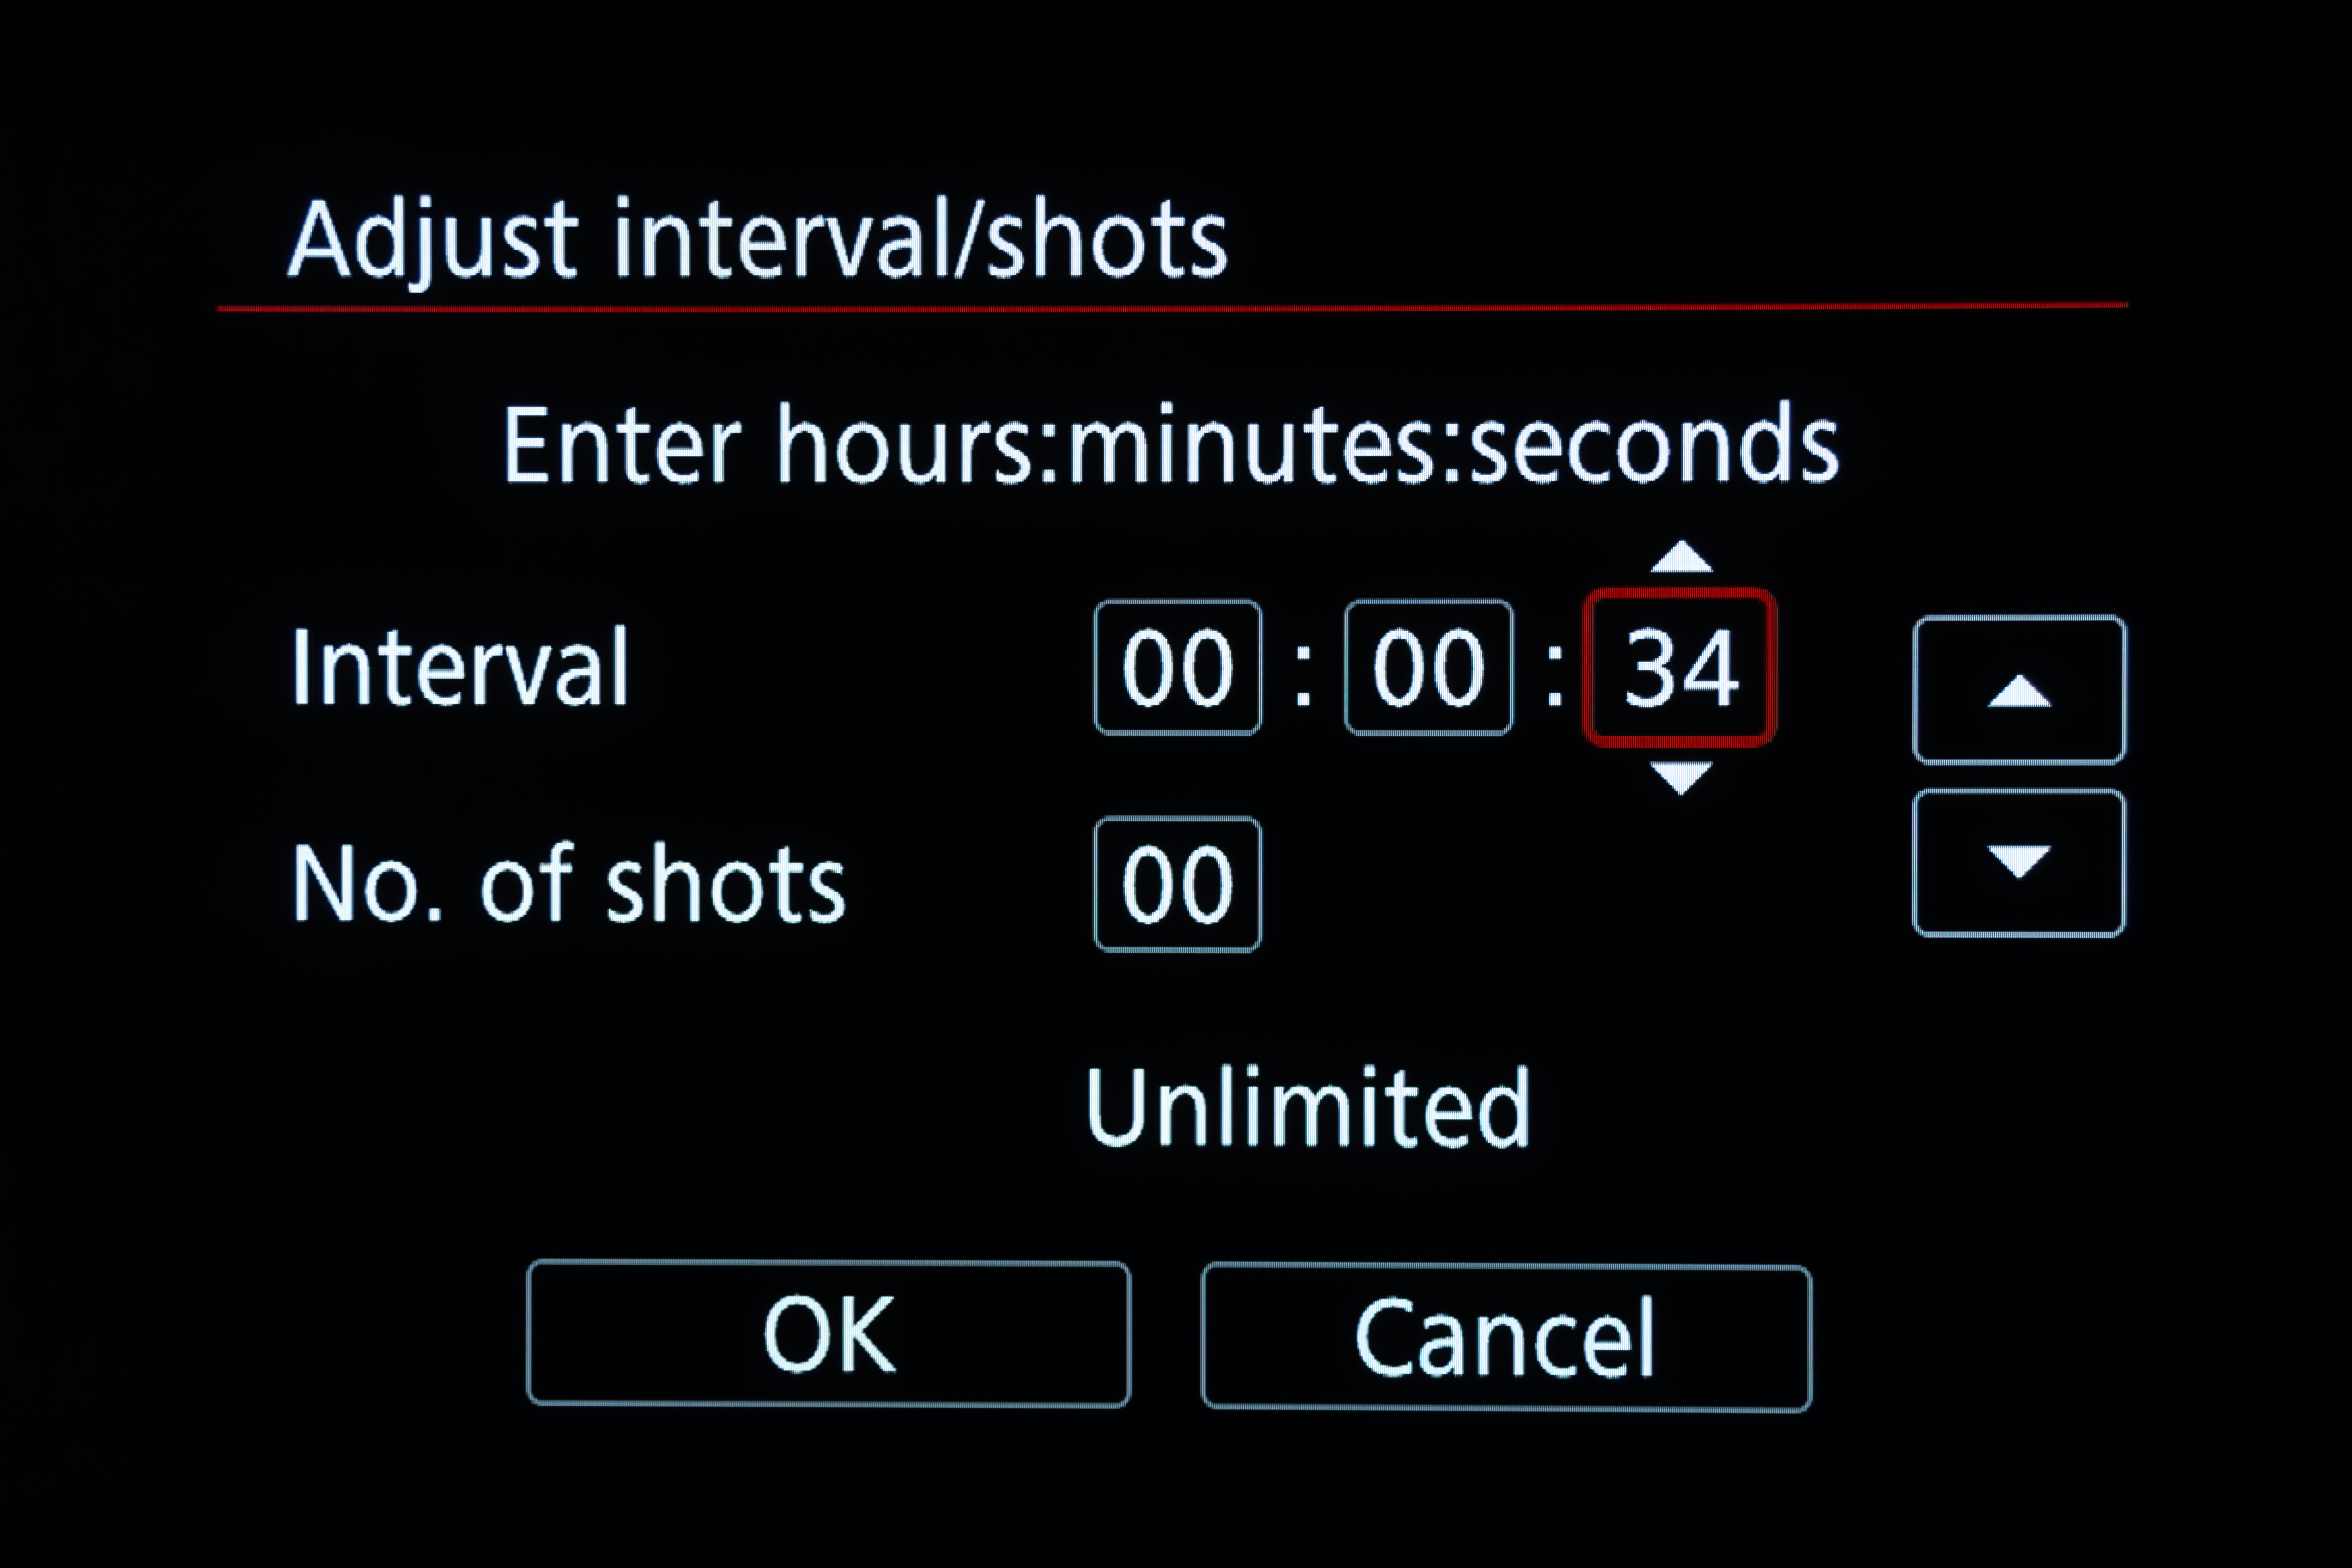
(If you do want a tracker with time-lapse motion-control capabilities the Star Adventurer Mini works well. Its WiFi connection and mobile app allows a user to set all the factors needed for a good time-lapse: interval, angle increment, number of frames, and length of shoot.)
Instead, MSM has focused the Nomad on being just a star tracker, and I think wisely so. Its only controls are a three-position S-OFF-N switch, for using the Nomad in either the southern or northern hemisphere. It worked very well “Down Under,” with the exception noted below.
There is no solar or lunar drive rate, unnecessary in a tracker, and also no half-speed rate for nightscapes, used to lessen star trailing while also minimizing ground blurring. I’ve never liked using trackers at such a compromise half-speed rate, so I don’t miss it.
Using the optional V-Plate described below, I have used the Nomad to take tracked Milky Way panoramas, as shown here. It has worked very well for that purpose, with it easy to switch the tracking on (for the sky) and off (for the ground).
This is a 200° panorama of the arch of the northern Milky Way rising over Dinosaur Provincial Park, Alberta. Shot with the Nomad, with a blend of an untracked panorama for the ground and tracked panos for the sky.The gear used to take the panorama above, including the Alyn Wallace V-Plate, supporting an Acratech 2-axis pan head. The Nomad is ON here, set to N. Below the power switch is the USB-C port for charging and external power.
My only criticism is that the power switch is a little mushy and perhaps easy to slide on by mistake when it is packed in a bag.
An LED for each of the N and S directions glows red to indicate the power is on and the direction chosen, handy to help prevent you from choosing the wrong direction by mistake.
The Nomad is powered by an internal lithium battery that charges from any 5-volt USB charger (the Nomad comes with a USB-C cord, but no charger). The Nomad takes about 2.5 hours to charge to full and runs for 6 to 7 hours of continuous tracking at room temperatures. A second LED by the USB port glows yellow when the Nomad is charging, and green when it has fully charged.
In practice the Nomad has lasted for several nights of shooting on one charge. When the battery level is low, the red LED for the other direction begins blinking. As a backup in the field, the Nomad can be powered via its USB-C port by any external 5-volt power bank.
Collisions
The Nomad hasn’t been without issues, though the main problem I’ve had I can’t, in fairness, blame on the Nomad.
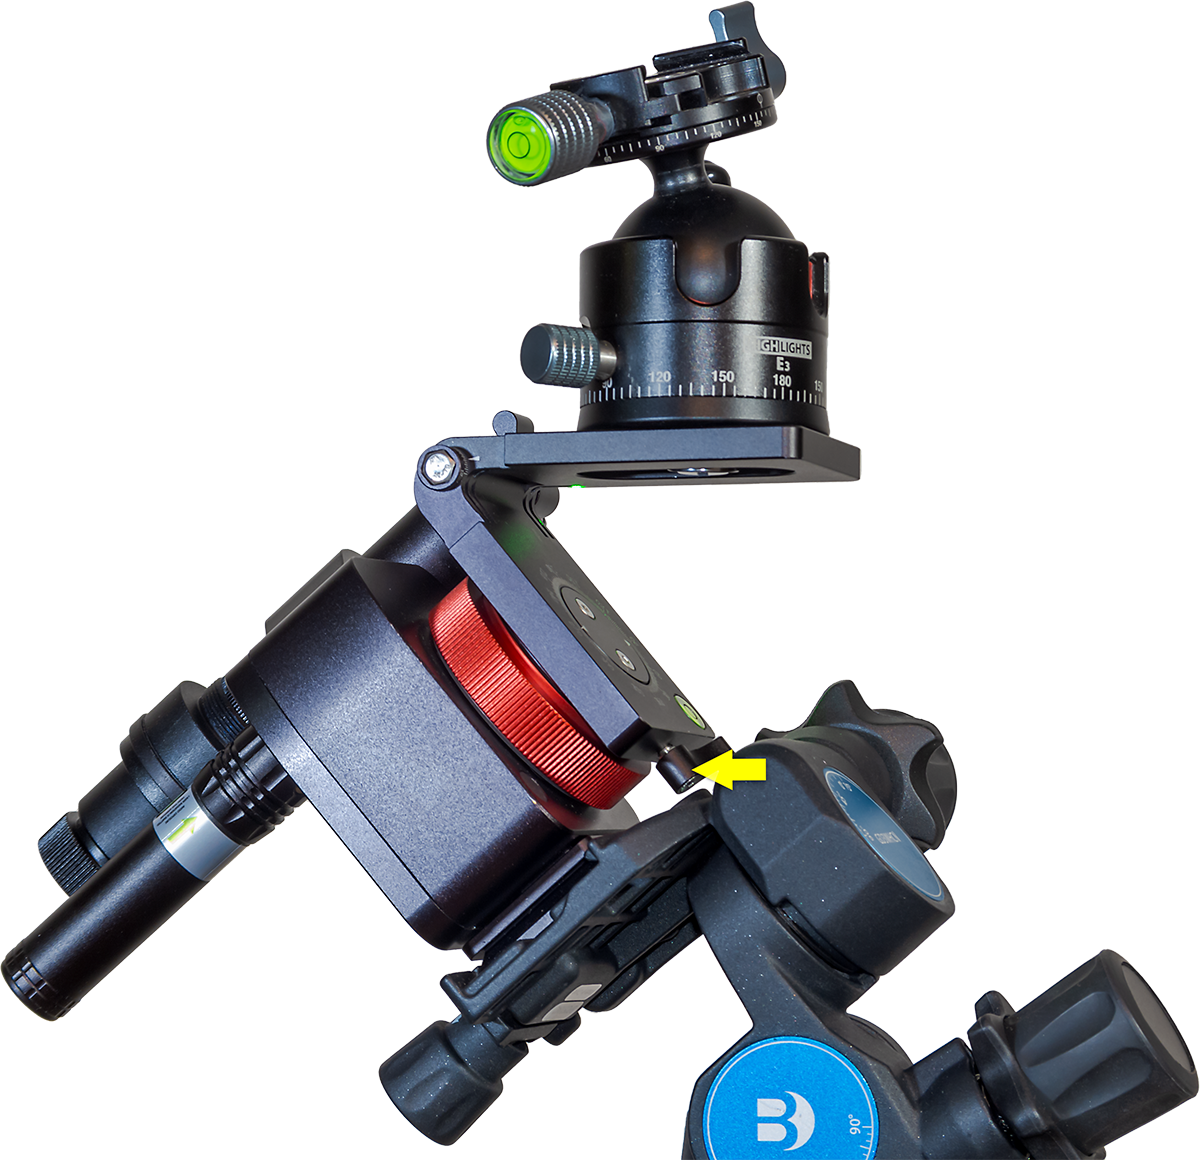
Due to the Nomad’s small size and shape, ball heads sit close to the Nomad body. Locks and clamps sticking out from ball heads can collide with the Nomad, or with the Benro head, as it rotates the ball head. Here I show how a collision can occur when aimed up at the zenith.
Showing the ball head colliding with the Benro when aimed high.
But collisions can also occur when aimed at the Celestial Pole. I ran into that issue in Australia, where many of the wide-field targets in the Milky Way (such as the field in Carina and Crux shown earlier) lie close to the South Celestial Pole.
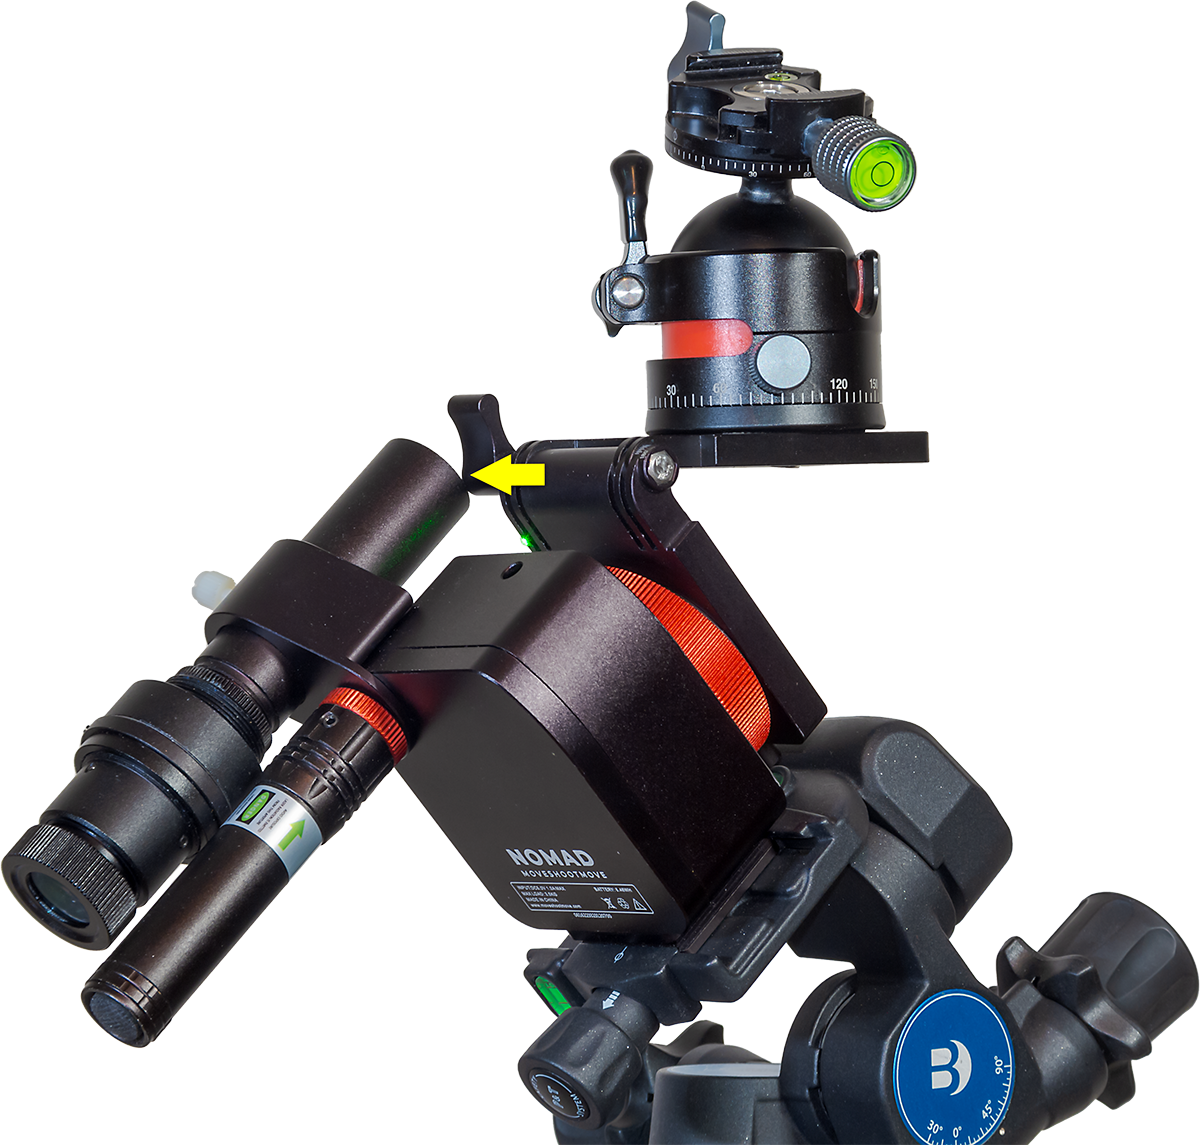
A camera aimed toward the Celestial Pole (either South or North) is more likely to collide with the Nomad than when a camera is aimed toward the sky opposite the Pole.
Aimed toward the Celestial PoleAs it turns, the ball head hits the Nomad
As I show above, one night when tracking targets in Carina I found the ball head had jammed against the Nomad, seizing its motion. As I feared, that caused something inside the Nomad to come loose.
After the collision incident no frame was well-tracked. The Nomad was wandering all over the place!
From then on it failed to track well for any shots. The drive was wobbling the stars in random directions. No frame was usable. The Nomad was now out of commission, not a welcome prospect when you have traveled to the other side of the world to shoot the sky.
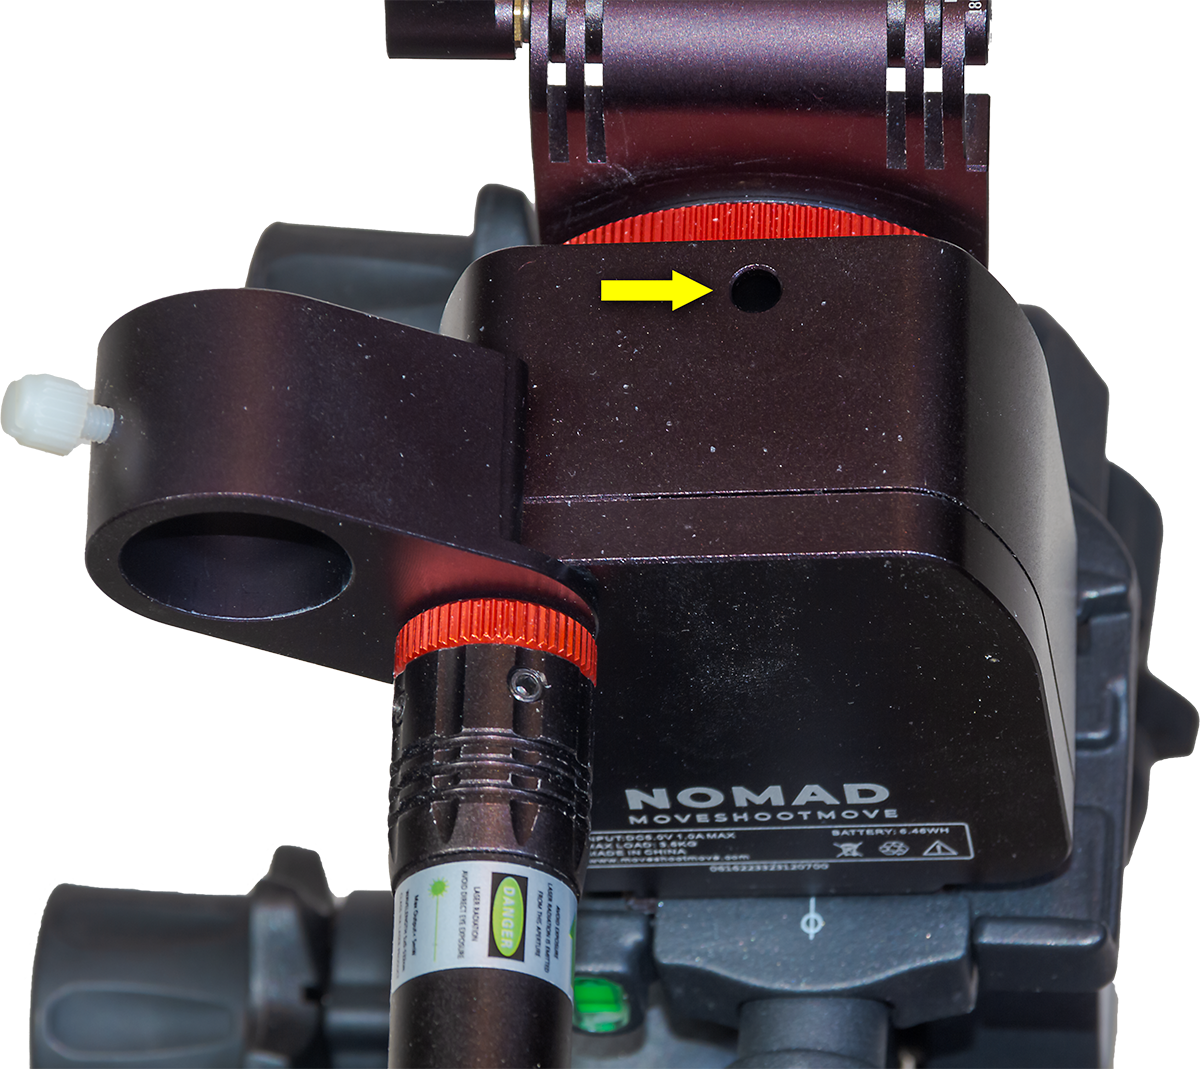
The access hole with a handy adjustment screw that fixed the issue.
What was the solution? There was only one point of adjustment accessible to users, a mysterious hole on the side of the tracker with a small hex screw at the bottom. This is normally covered by a rubber plug, though that was either missing on arrival or got lost along the way from my unit. Upon inquiry, MSM told me the screw is for use just at the factory, for a final adjustment of the gear and bearing distance.
But in my case, tightening it slightly seemed to do the trick, restoring normal tracking. However, my unit still tends to make intermittent clicking sounds now and then, though it seems to track well enough again.
The lesson here is don’t let gear collide with the Nomad. It likely has no internal clutch, making it unforgiving of being jammed.
Collision Avoidance
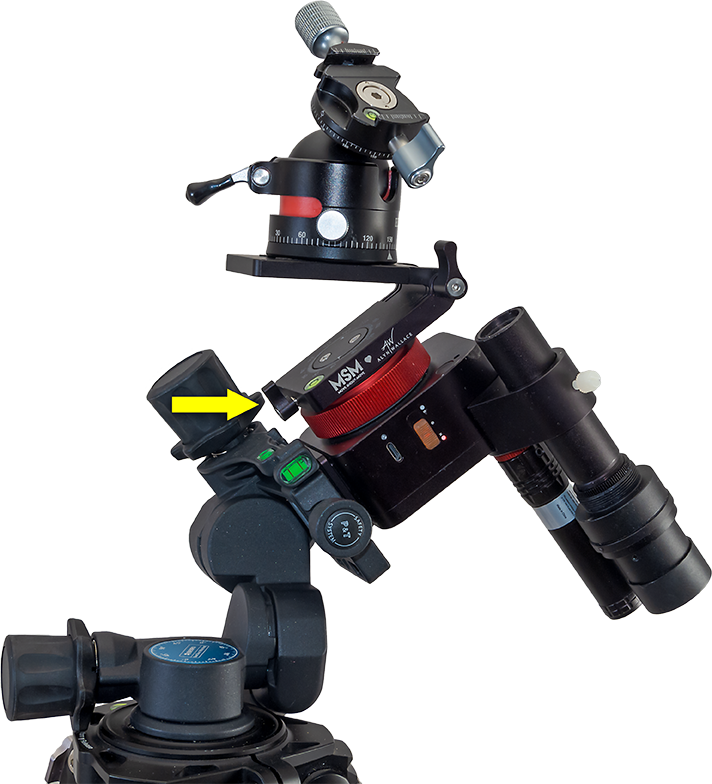
How do you avoid collisions? What I should have used in Australia was MSM’s optional V-Plate designed by the late and sadly missed Alyn Wallace.
Aimed toward the Celestial PoleAimed toward the zenith
I bought one a couple of years ago, but never thought to bring it with me on the Australia trip. As I show above, the V-Plate allows for much more freedom to aim a camera, either toward the Poles or straight up (as I show above), or low in the sky 180° away from the Pole, without fear of the ball head hitting other components.
The V-Plate’s shortcoming is that, despite cranking down the levers that hold it in position, it can still slip under the weight of a heavy camera sitting on the diving-board-like platform supported only on one end. The V-Plate’s locks are not as solid and secure as they should be. But with care it can work well. And you need buy only the V-Plate; not the Z-Plate.
I should note that since I got my V-Plate, it has been upgraded with a larger lever handle to aid tightening the tilt lock. However, it really needs another support point on the tilt adjustment, so it can’t move as readily under load.
V-Plate lock knob hard to get at and adjustV-Plate lock knob hitting the Polar Scope
In addition, MSM now offers a taller Arca-Swiss mounting block as an option, to replace the plate that comes bolted onto the Nomad with two Torx screws. That optional riser block moves the Nomad farther from the Wedge or Benro head, helping to prevent some collisions. By putting more space between the Nomad and the Benro head, the riser block makes it easier to get at the small locking clamp on the V-Plate’s rotation axis. But …
Shortly after I first published this review, a loyal reader (thanks, John!) pointed out his method of placing the Nomad on the Benro, with the Nomad turned 90° to the way I pictured it earlier. As I show below, this places the Benro’s lock knob on the side of the Nomad, not back. The benefit is that the V-Plate’s azimuth lock lever is now more accessible and well-separated from the Benro. That method makes the taller riser block unnecessary.
Here’s a reader-suggested alternative method for mounting the Nomad and orienting the Benro head that puts more space between the V-Plate and Benro, for ease of adjustment.
Even with this alternative method, the V-Plate tends to block the laser’s beam, as does a camera once it is mounted. The polar scope can also be blocked. It’s an example of how one MSM accessory can interfere with another accessory, perhaps requiring yet another accessory to solve!
Laser beam hitting the V-Plate with it horizontalV-Plate rotated out of the way of the laser
In practice, with the V-Plate installed, polar alignment often has to be done before attaching the camera or setting up the V-Plate to the desired orientation. When adding the camera, care has to be taken to then not bump the Nomad off alignment. That’s why I like the Benro head as a stable platform for the Nomad, despite its extra weight.
As I illustrated earlier, the V-Plate is also an essential accessory for shooting tracked-sky Milky Way panoramas, as it allows a camera to be turned parallel to the horizon from segment to segment while it also tracks the sky.
A “deepscape” of the Sagittarius starclouds over Mt. Blakiston, in Waterton Lakes National Park, Alberta. This is a blend of two exposures: a single untracked 2-minute exposure at ISO 1600 for the ground, and a single tracked 2-minute exposure at ISO 800 for the sky, taken immediately after, with the Nomad tracker motor now on. With a 28-70mm lens at 70mm, on the rig shown.
Recommendations
So, as with the Rotator, when buying a Nomad, plan on adding several “optional” accessories to your cart. They can, in fact, be essential.
However, they can add another $150 (for V-Plate + Wedge + riser block) to $250 (V-Plate + Benro head + riser block) to the total. These are in addition to the cost of the polar alignment aids offered in the various Basic bundles. I like having both the laser and polar scope, but for shooting just wide-angle nightscapes, the laser alone will do.
The cost of accessories makes the Nomad not quite the low-cost tracker you might have been sold on, nor as self-contained and compact as it first appears. Just choosing what combination of gear to buy can be daunting for beginners.
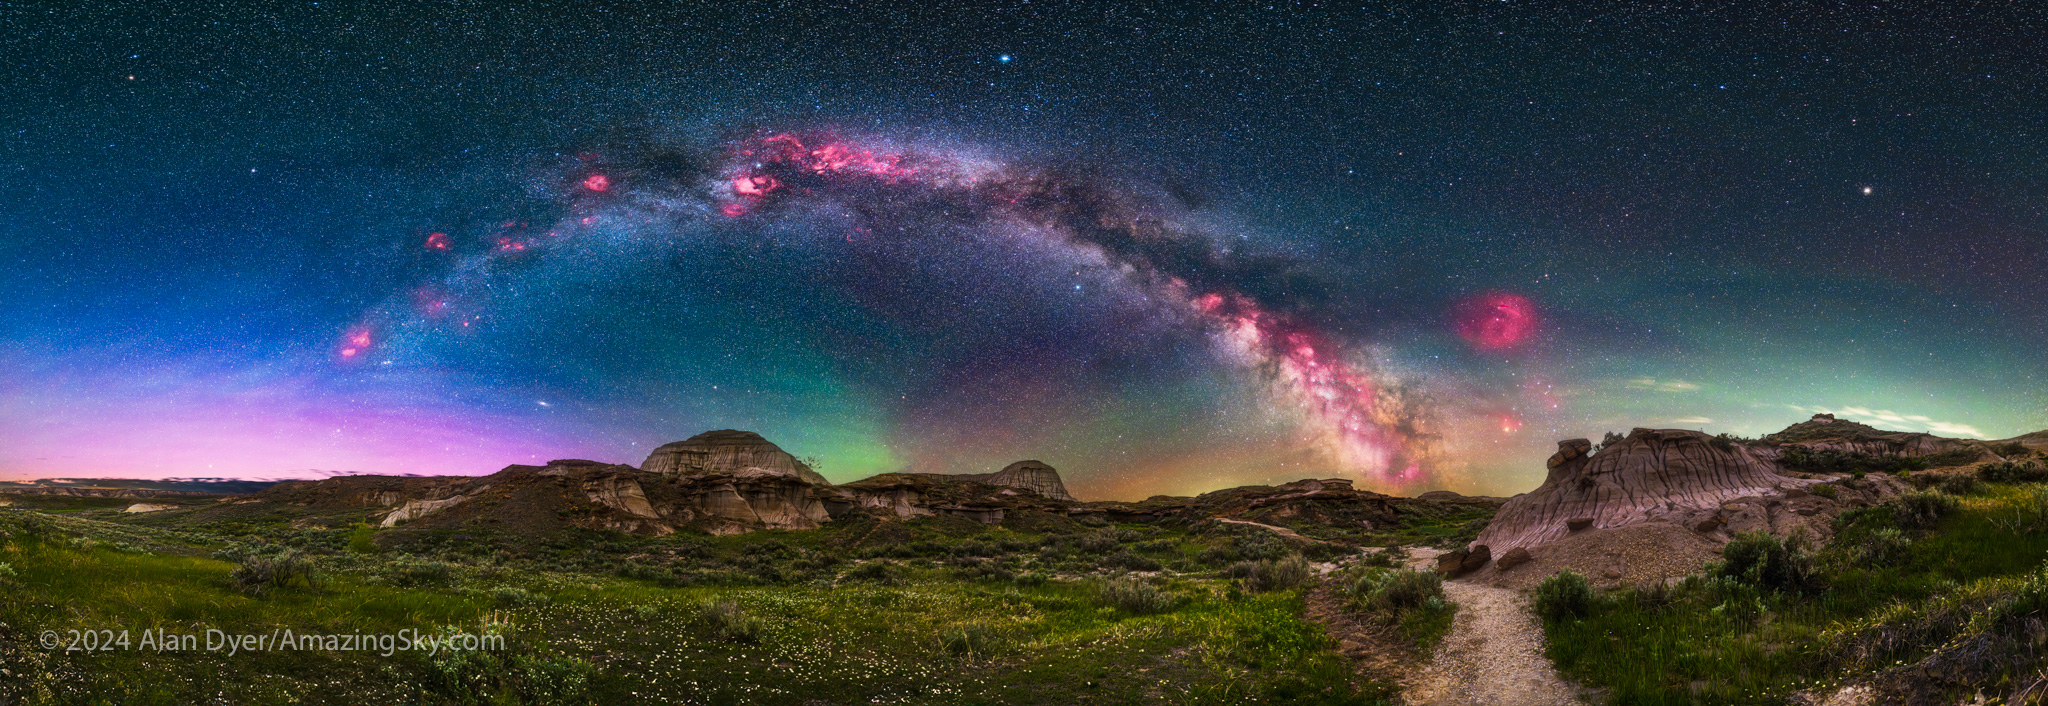
The Milky Way and its core region in Sagittarius and Scorpius over the Badlands of Dinosaur Provincial Park, Alberta. This is a blend of untracked exposures for the ground and tracked exposures for the sky, with the Canon Ra on the Nomad, with the Canon RF15-35mm lens at 20mm at f/2.8.
But when well-equipped, the little Nomad can work very well. Despite my run-in with a collision glitch, I can recommend the Nomad as a good choice for anyone looking for a solid, accurate, but portable tracker that can slip into any camera bag.
Just make room in your bag – and budget! – for polar alignment aids, V-Plates, wedges, and ball heads to complete your tracking kit.
And then don’t let anything collide with the Nomad!
— Alan, June 27, 2024 – Revised June 28 / AmazingSky.com
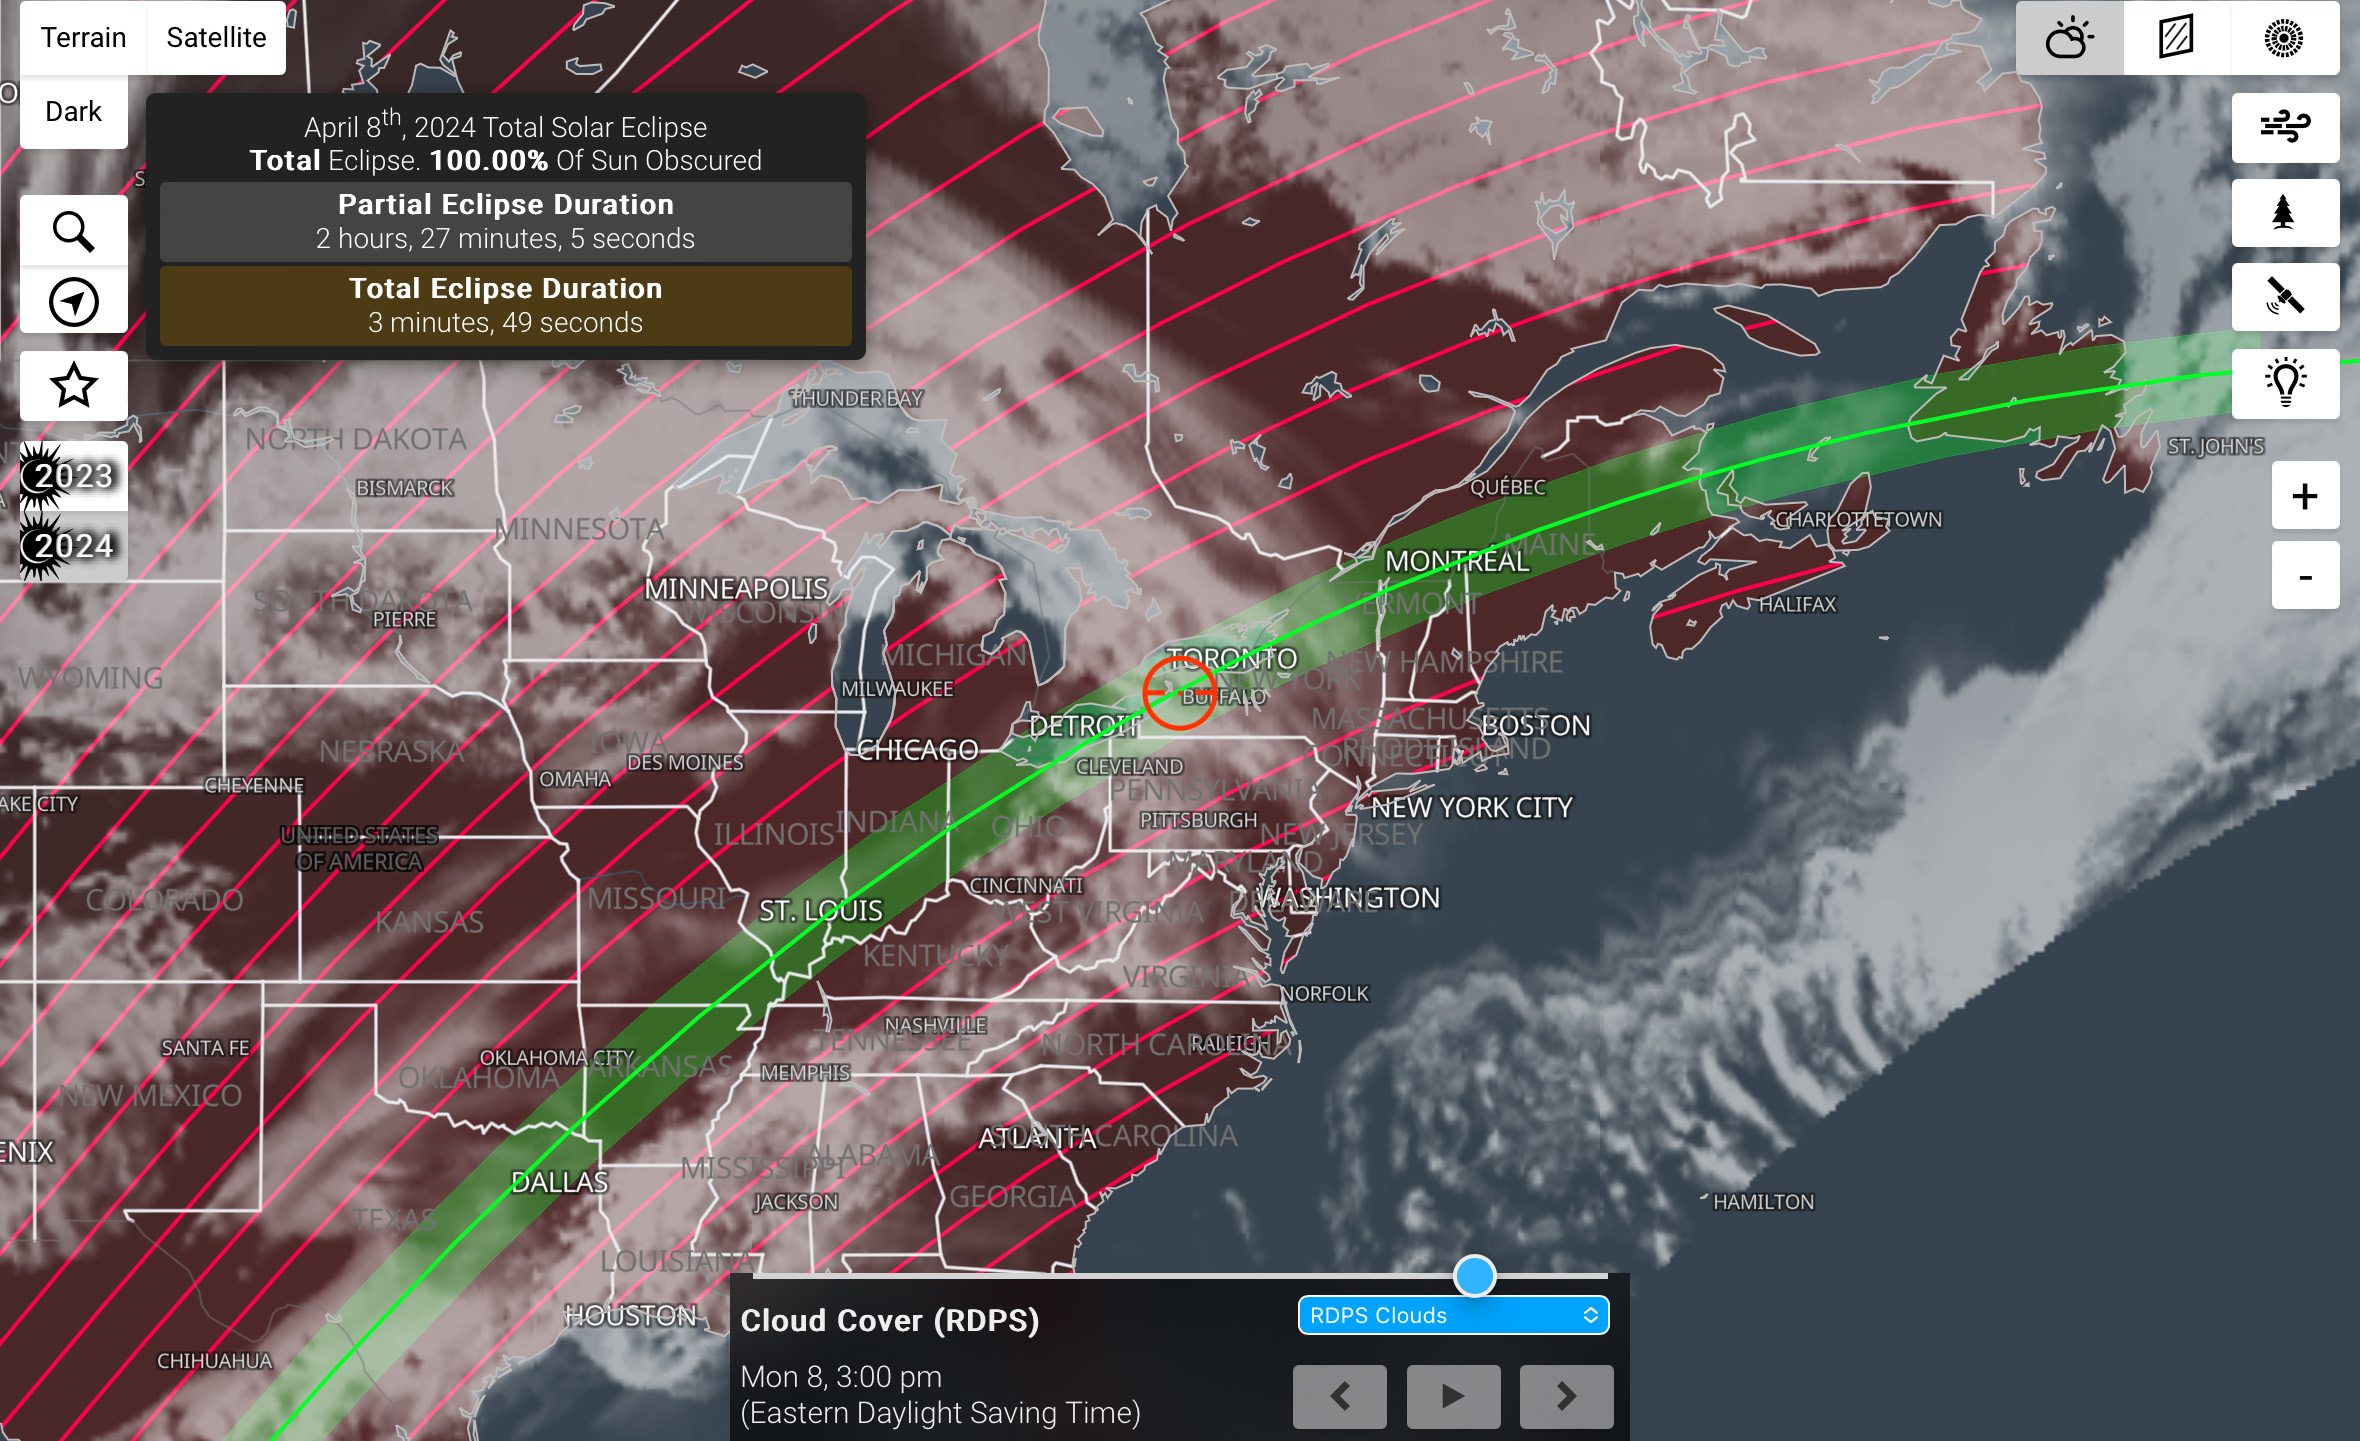
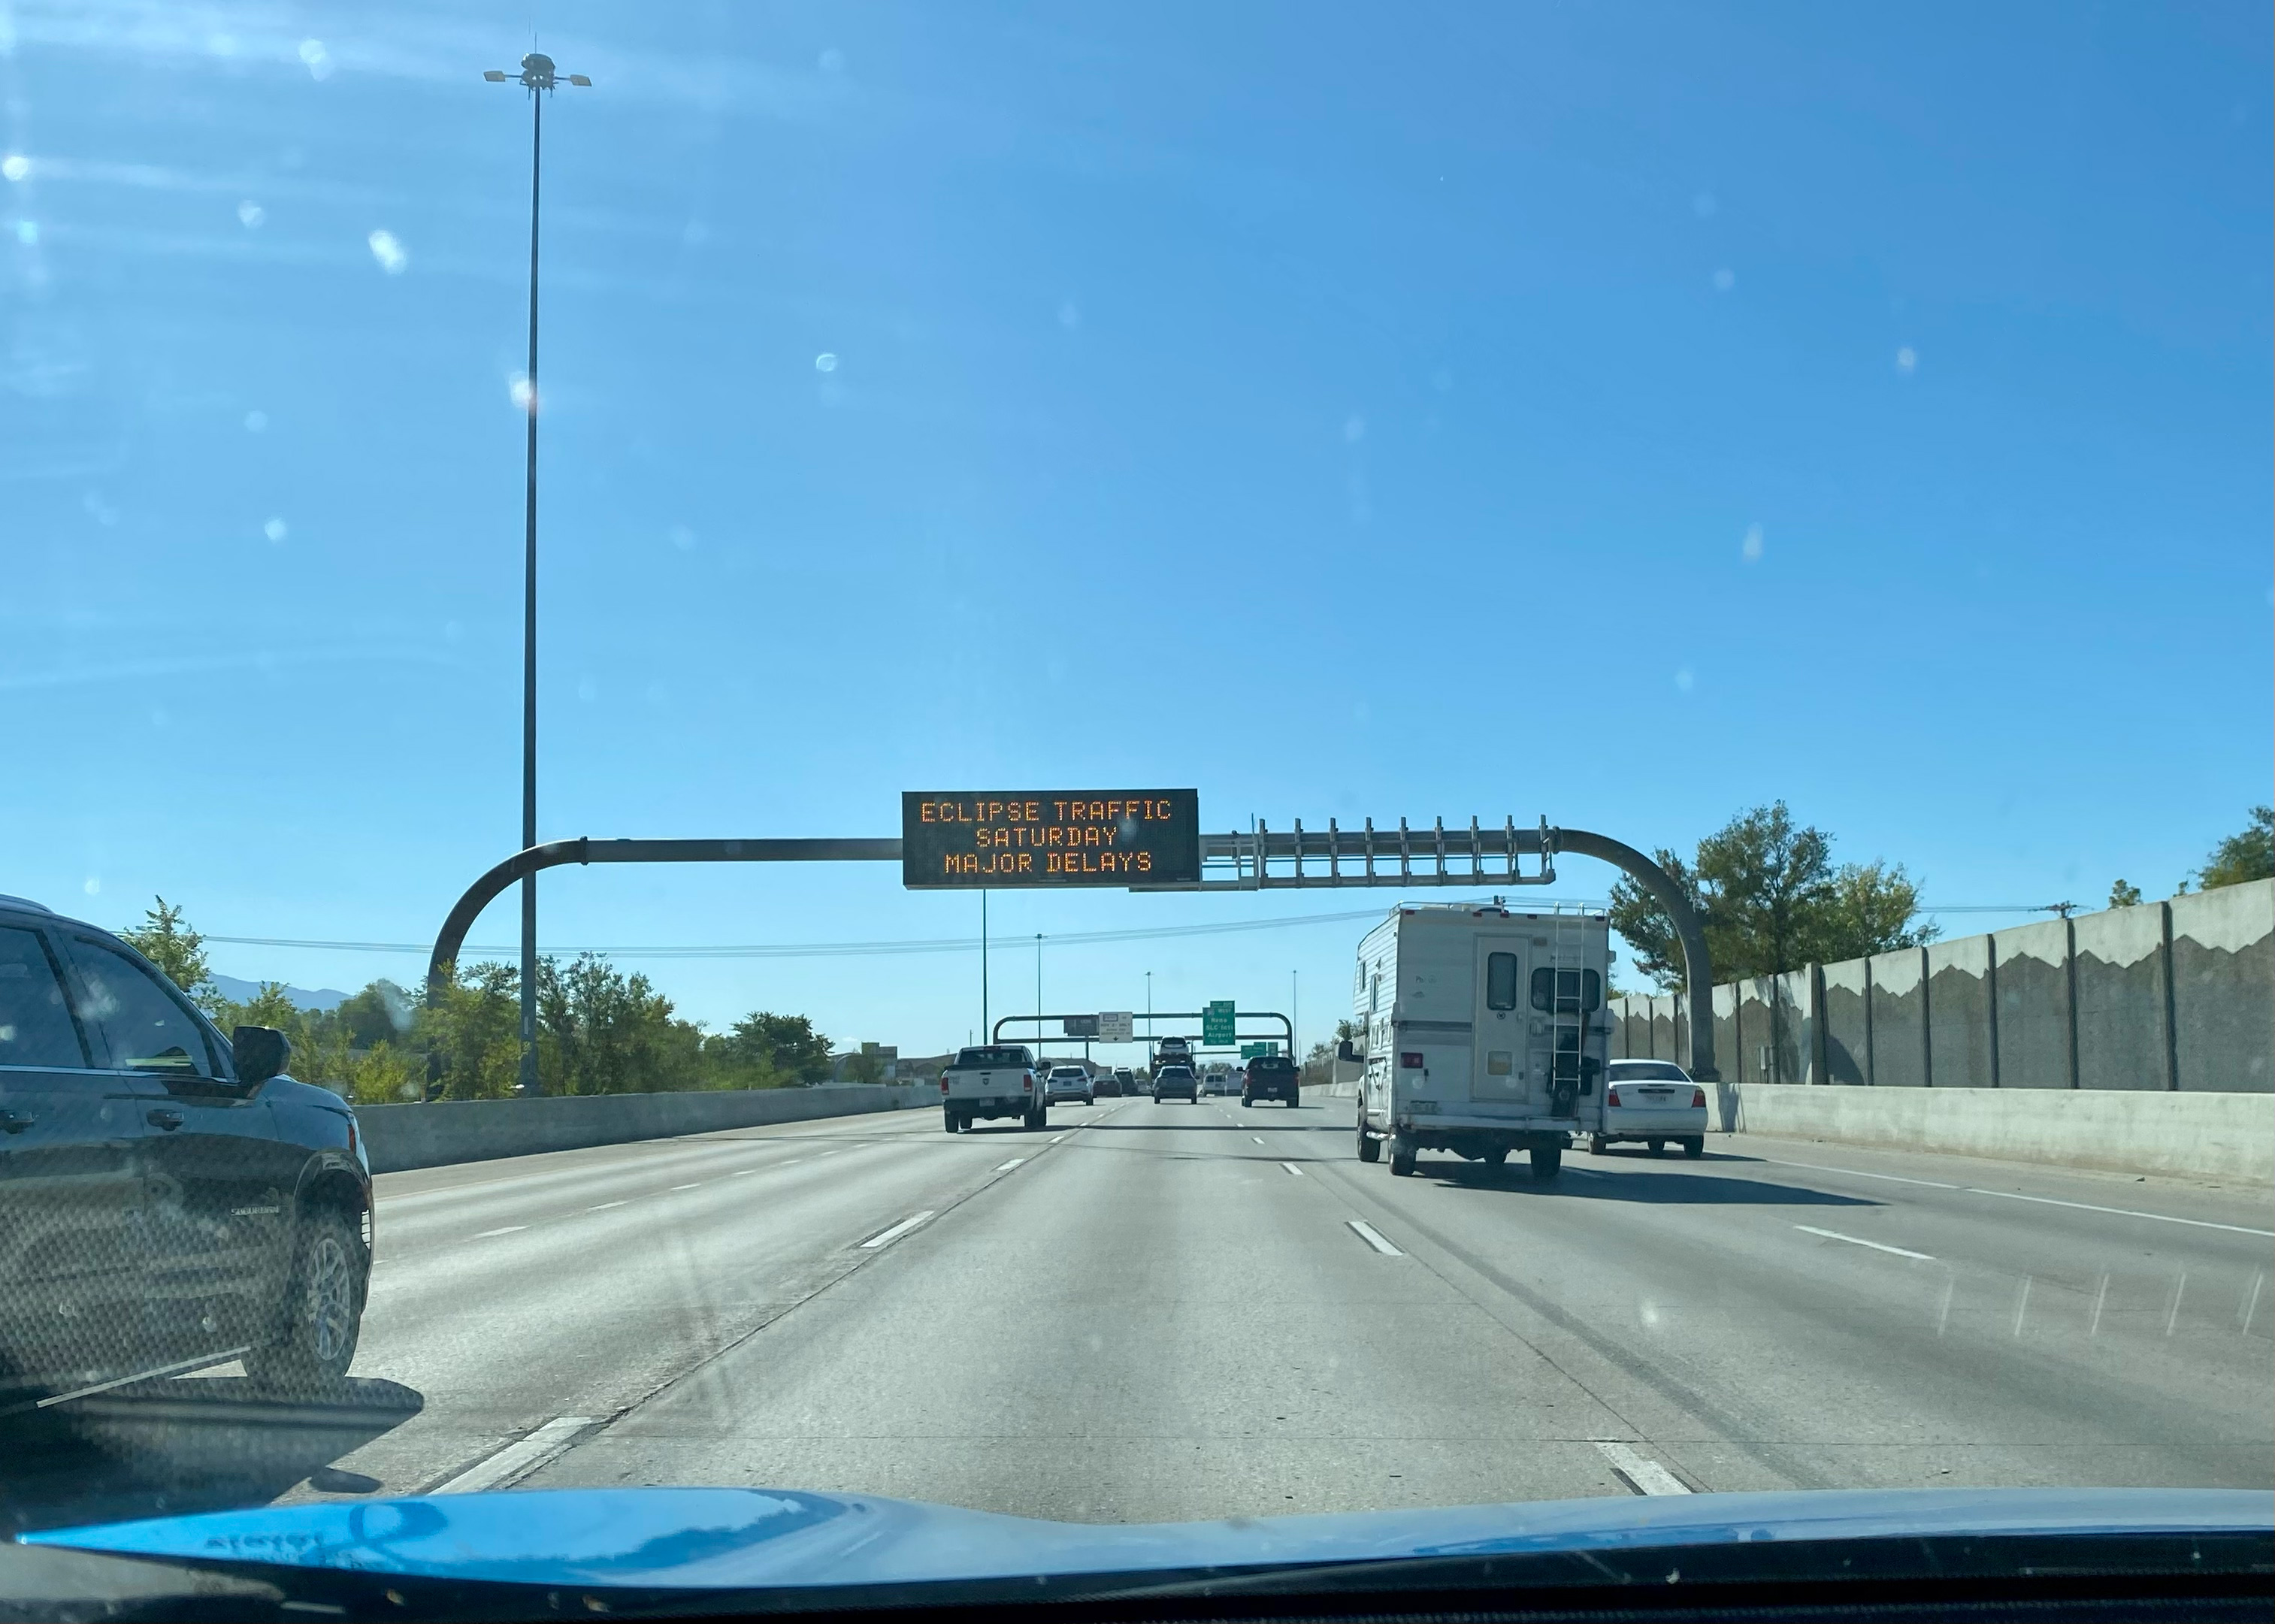
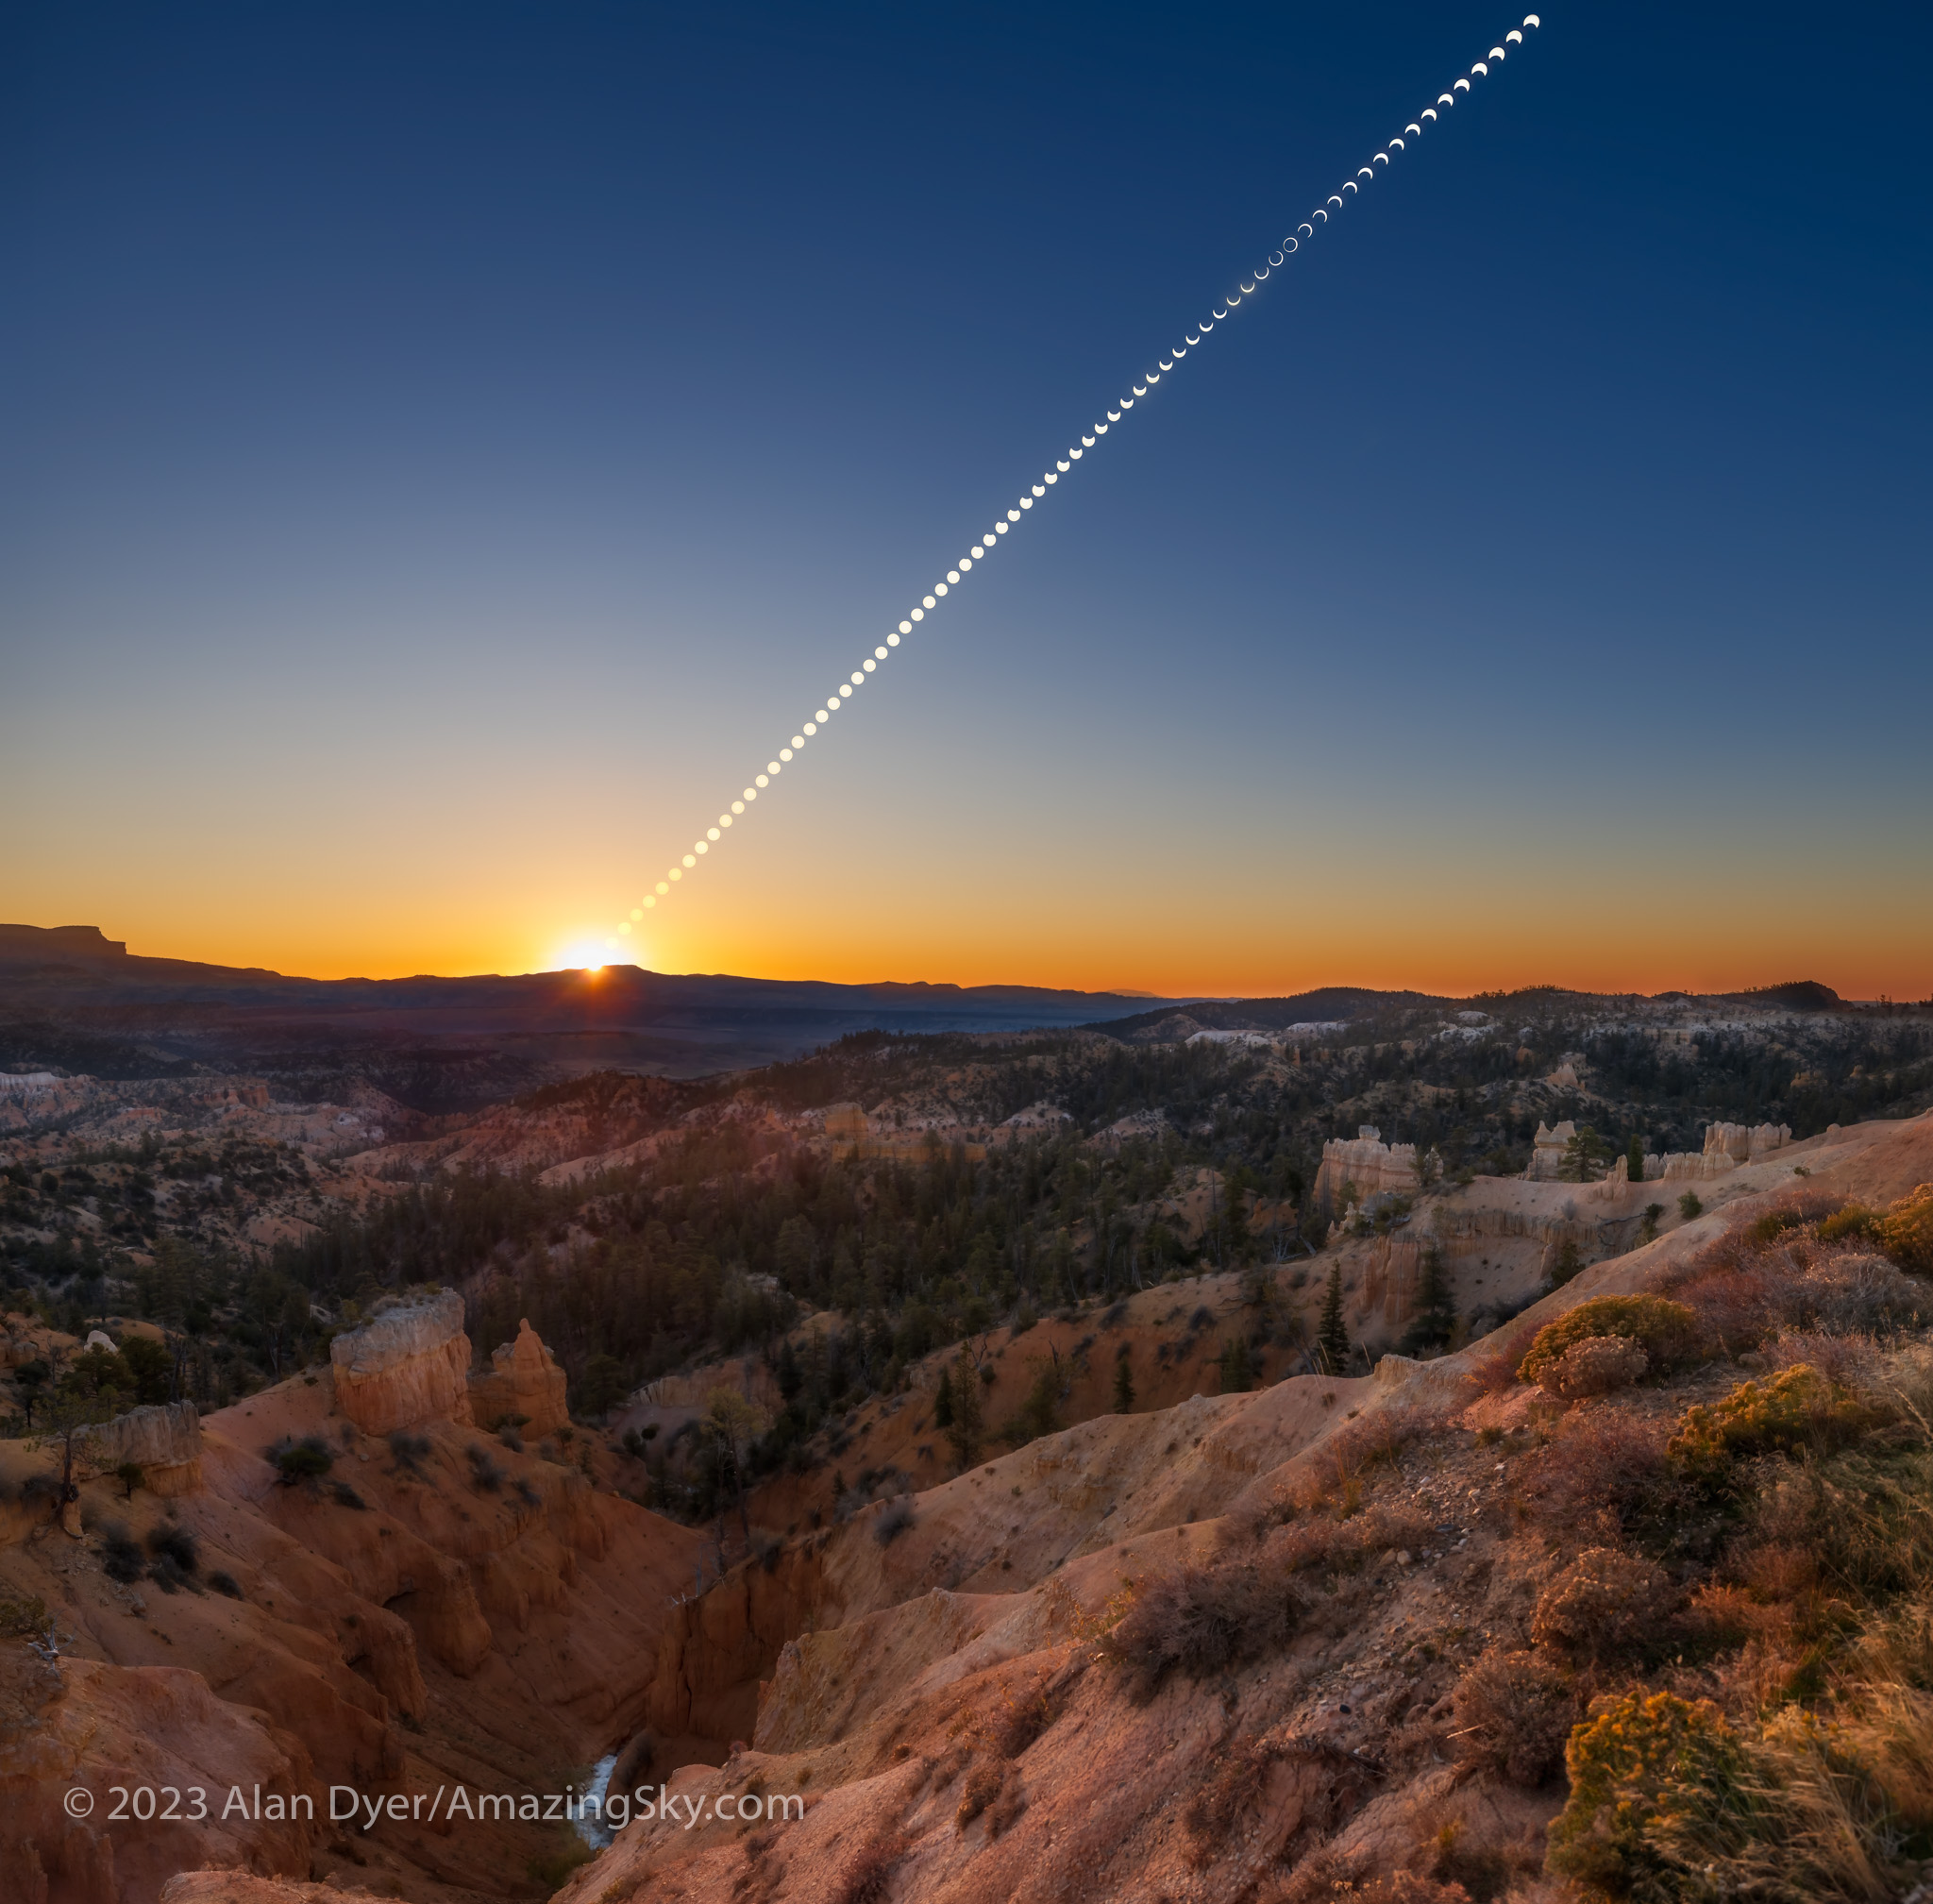
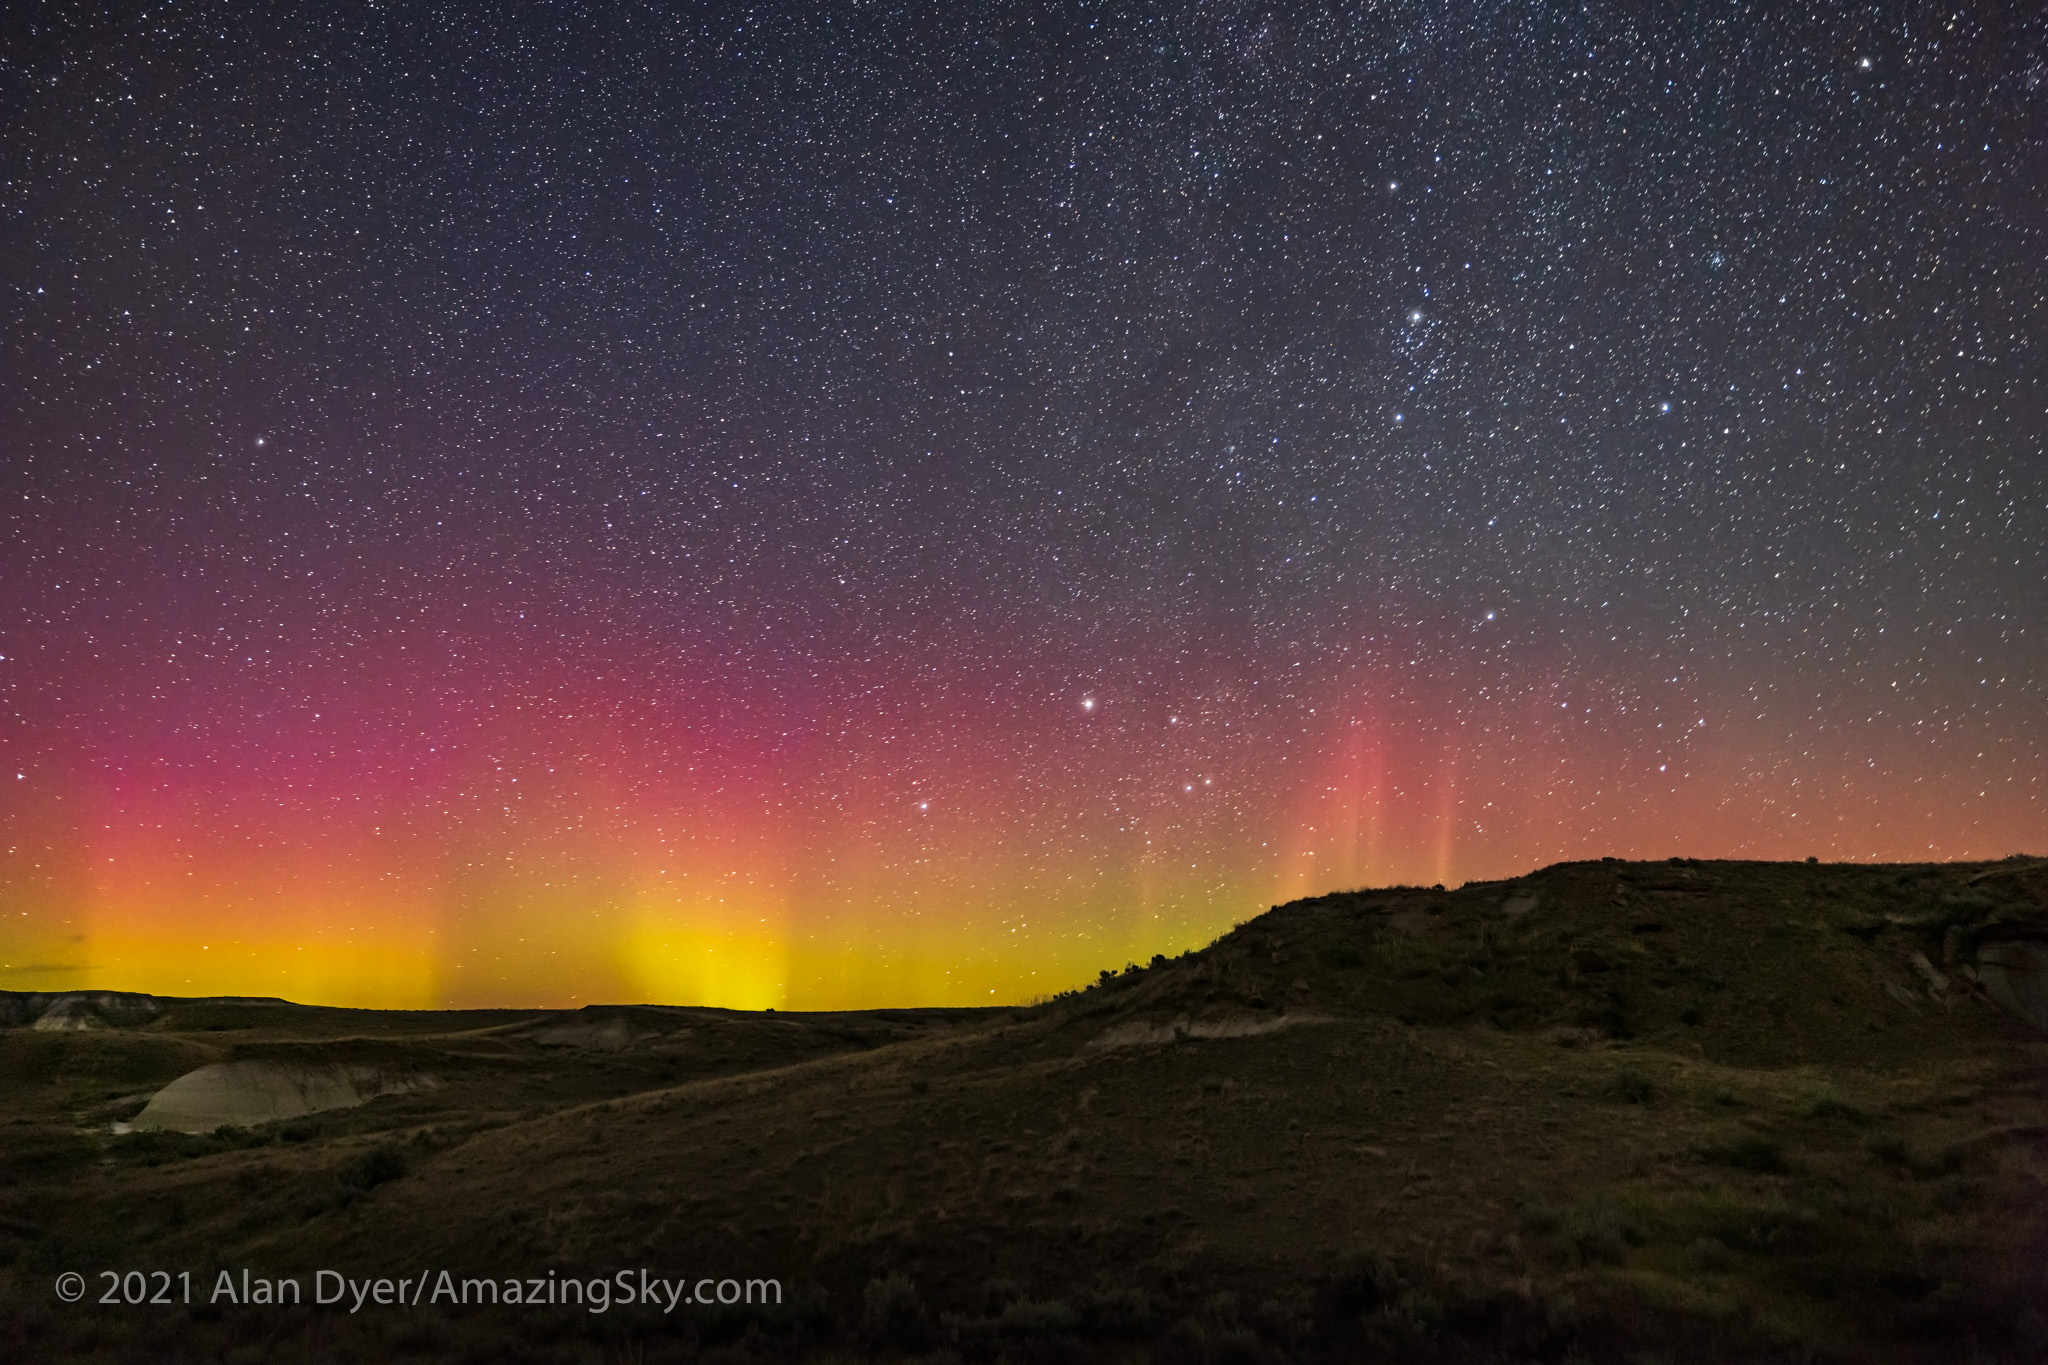
I had always planned to drive to the April 8, 2024 total eclipse of the Sun. But to where? I ended up on the other side of the continent than originally planned.
It is not often the path of the Moon’s shadow crosses your home country, let alone continent. Only once before in recent years, on August 21, 2017, did the narrow shadow path pass near enough to my home in Alberta to allow me to drive to a total eclipse. They almost always require flying.
Packed and ready to hit the highway for a long eclipse trip.
Yes, while I could drive to the April 8, 2024 eclipse, it was going to demand a much longer drive than in 2017. But driving allowed me to take a carload of telescope and camera gear. So that was the plan.
My destination was San Antonio, Texas. That’s where I had made a hotel booking more than a year earlier. The weather prospects in Texas were forecast to be best (at least according to the long-term averages) of any locations along the path in the U.S. or Canada. (I did not want to drive into Mexico.)
Where I was going! Where I ended up going!
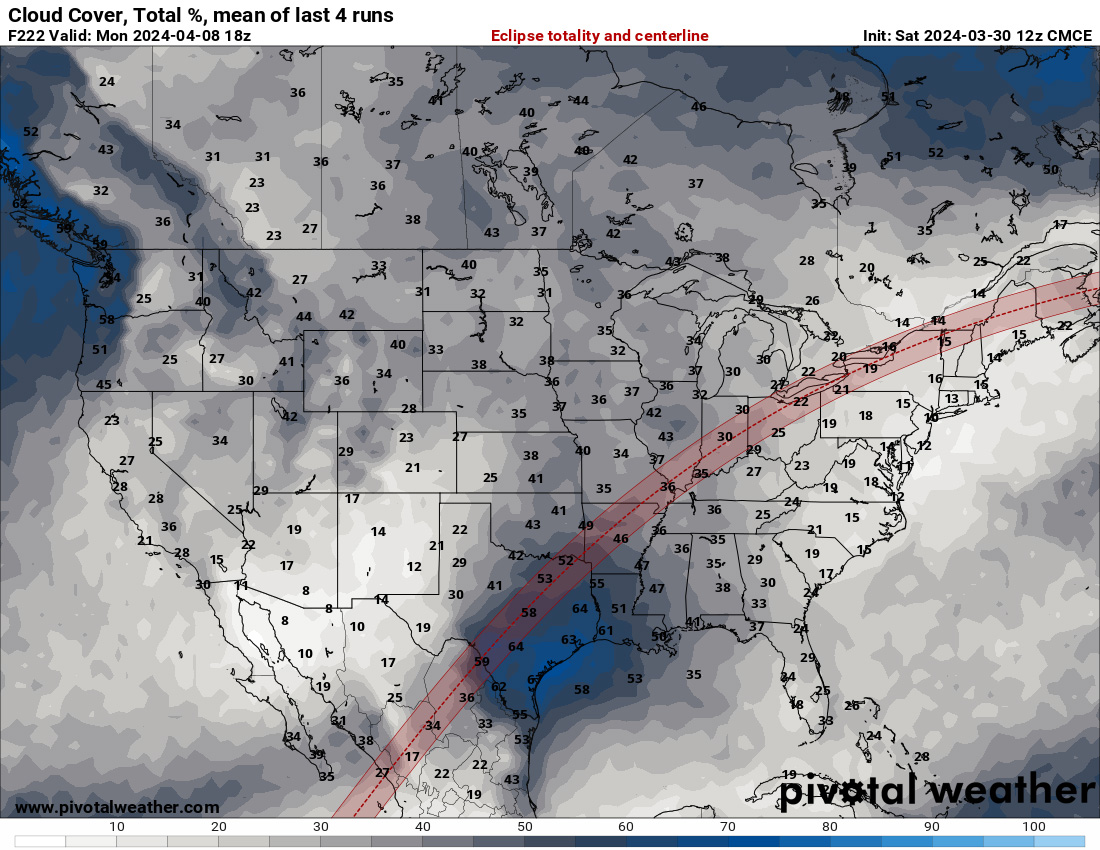
On March 30, with some trepidation, I set out down I-15 heading south. I got as far as Great Falls, Montana, my stop for night one. But it was to be a move in the wrong direction.
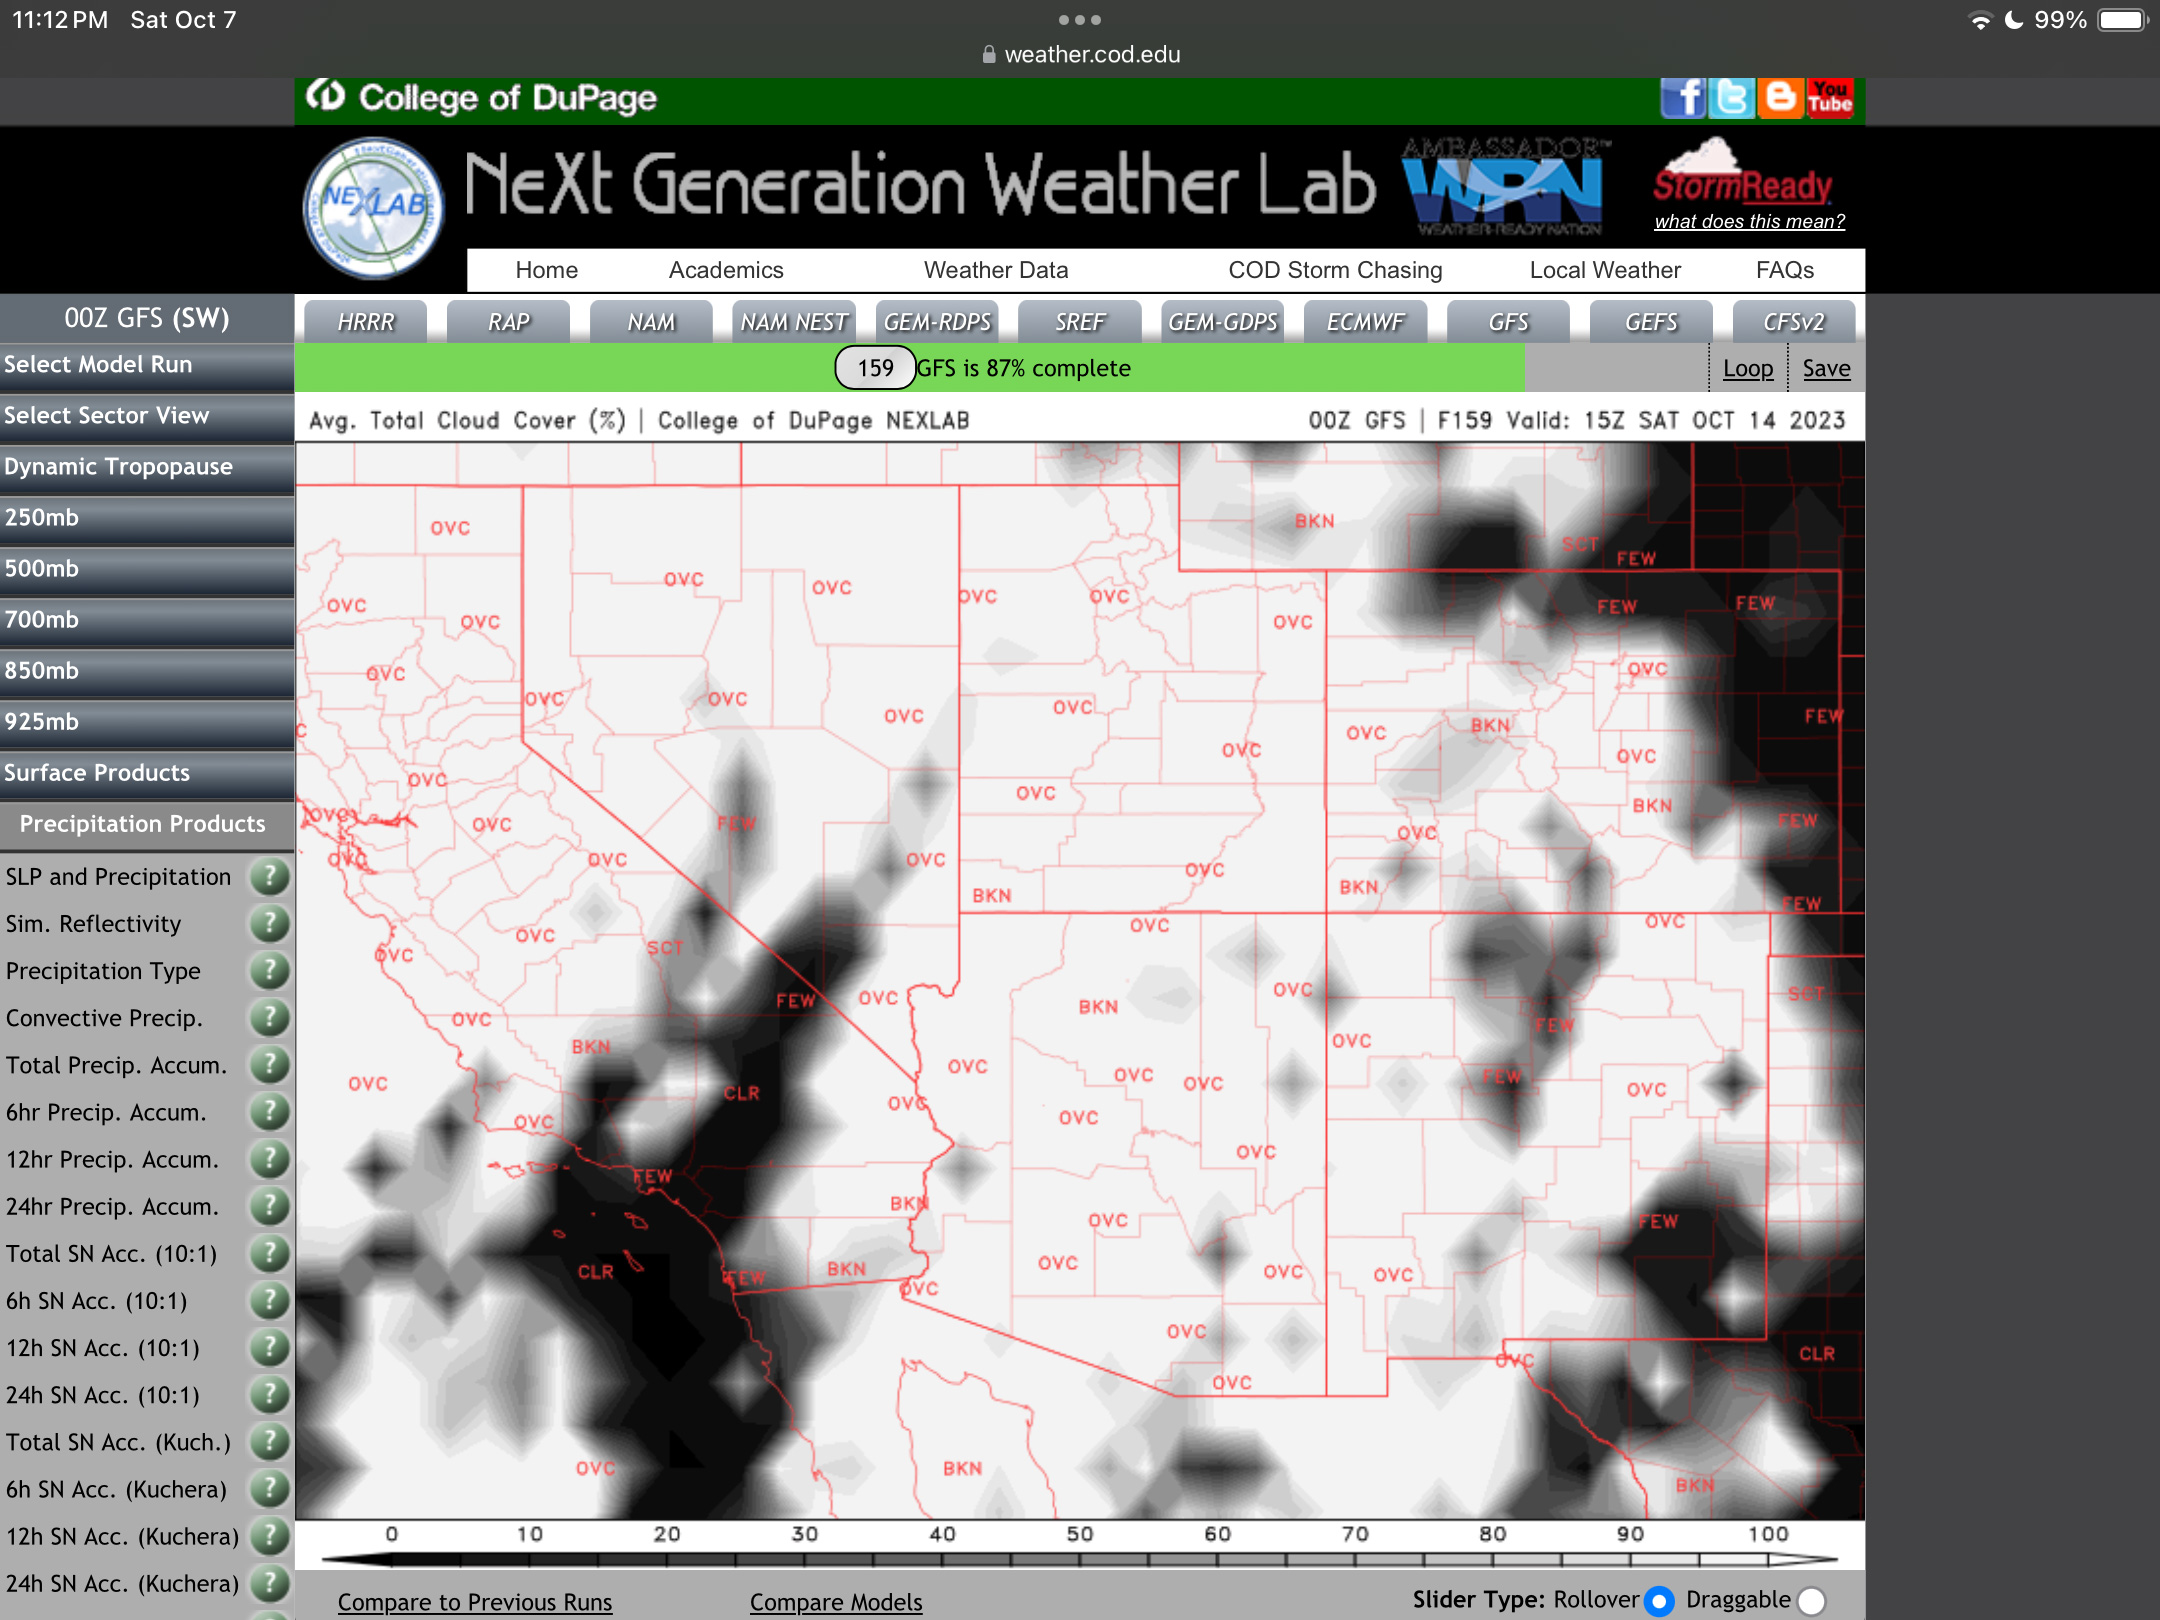
The forecast for Eclipse Day as of March 30. Blue is bad; white is good!
The various long-range weather models were all agreeing, even 10 days in advance, that Texas (covered in blue above) was looking poor for eclipse day. But eastern Canada looked good! That was the exact opposite of what had been expected.
So on Easter Sunday, I turned around and headed north, crossing back into Canada at a lonely border post in southwest Saskatchewan.
I proceeded east along the TransCanada, Highway 1. I decided against a route across the northern U.S. and around the southern end of Lake Michigan, to avoid severe weather forecast for the middle of the U.S.
One of my daily Facebook travelogue posts with a beer of the day.
Along the way I posted my beer-du-jour travel reports, as above from Day 8, that day from within the shadow path at last!
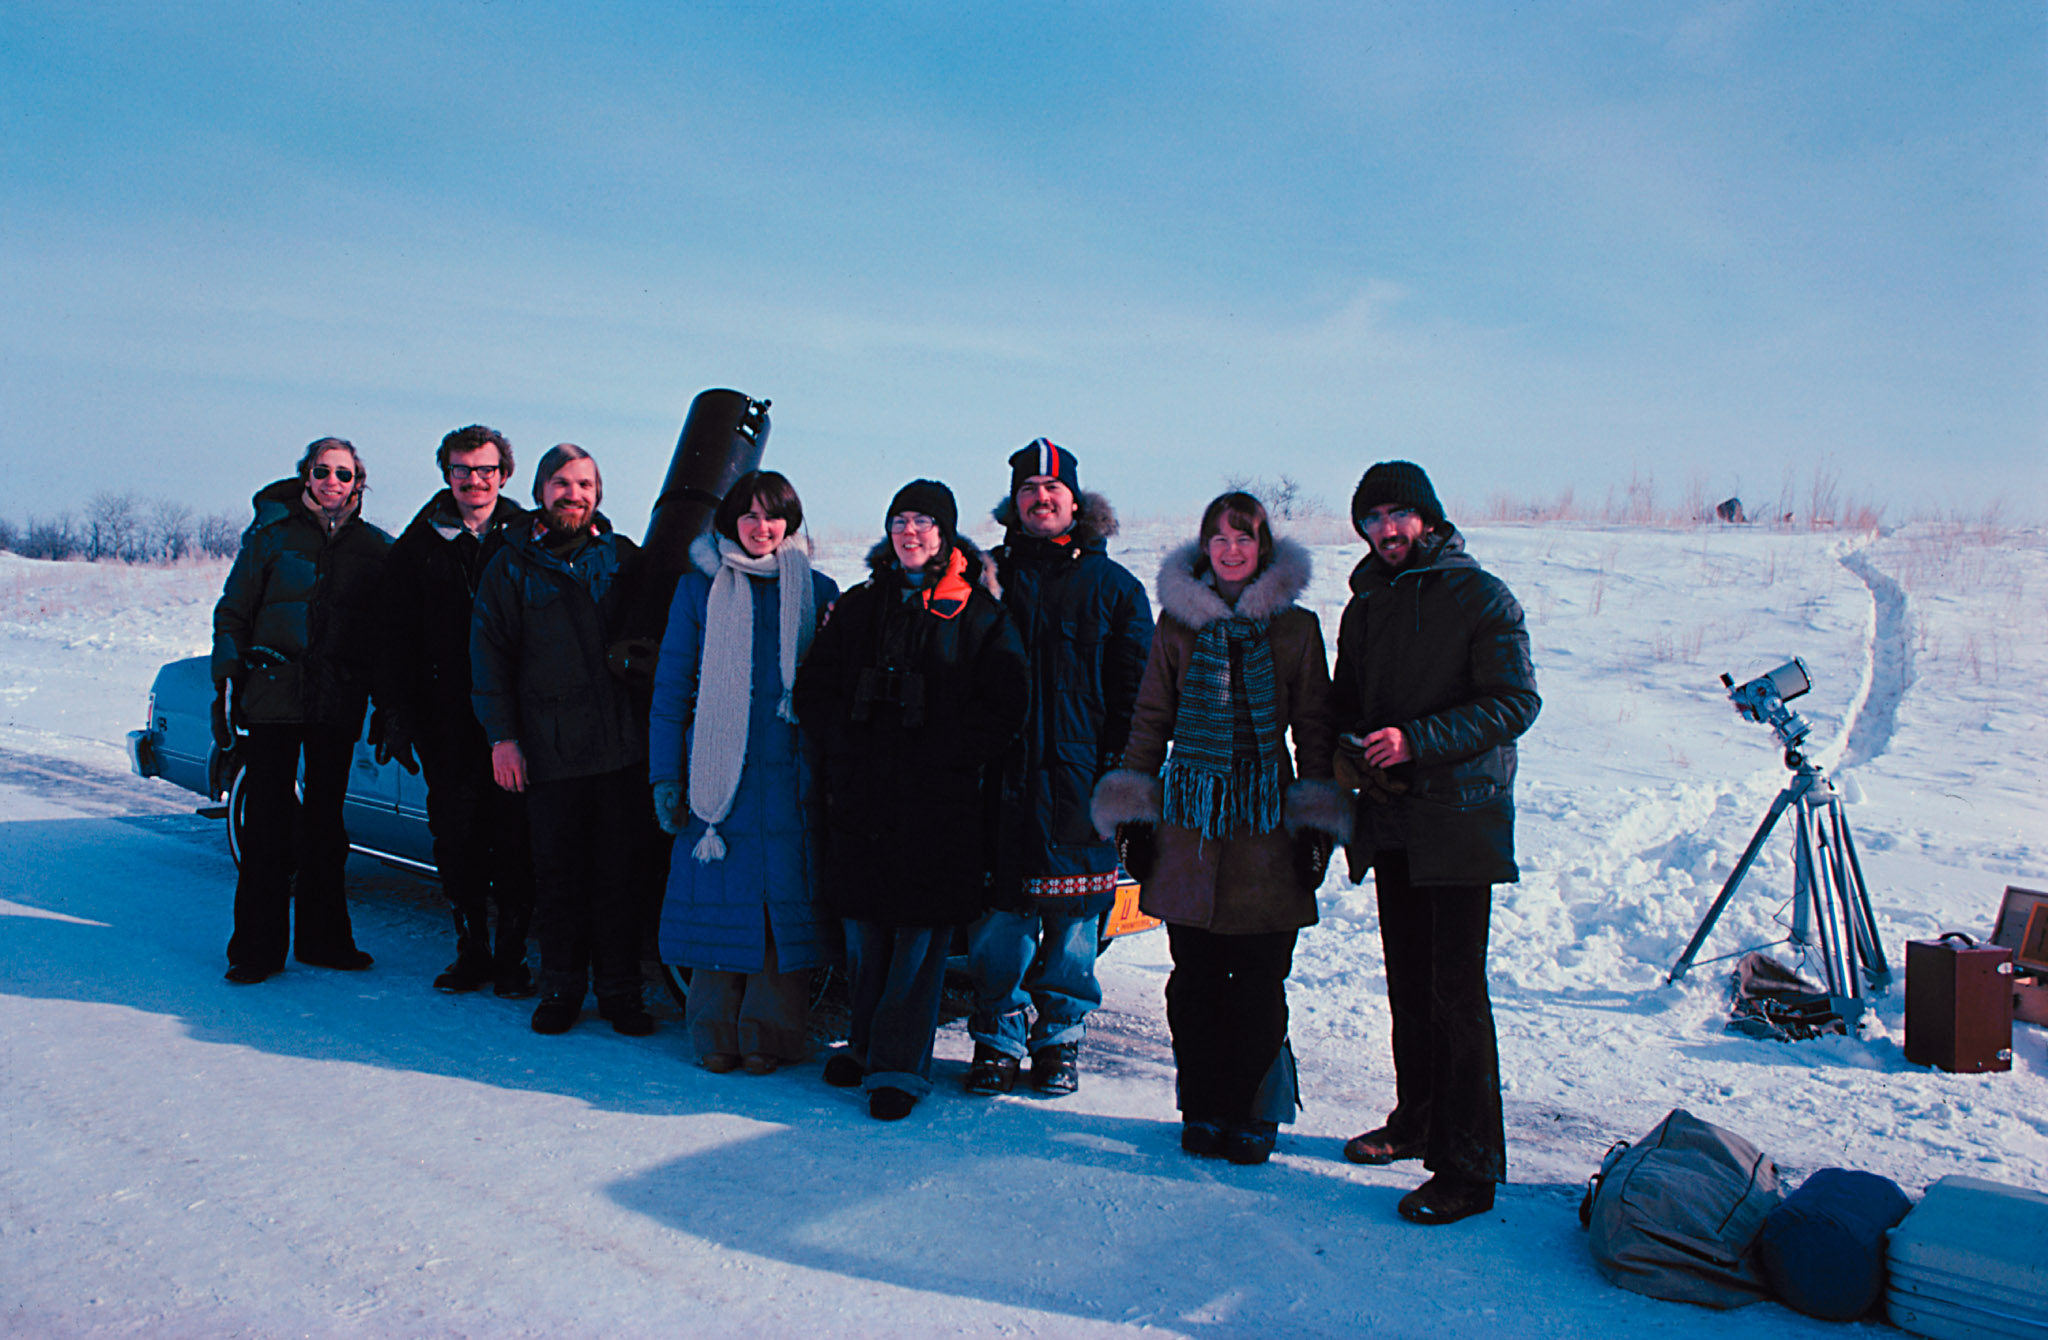
Our 1979 eclipse group in 1979.The 1979 eclipse site in 2024.The February 26, 1979 eclipse.
I also stopped at the only total eclipse site, of the 16 I had seen previously, I have ever been able to re-visit. On February 26, 1979 I and a small band of friends from Edmonton viewed the mid-winter eclipse (the last one visible from southern Canada) from a median road (Firdale Road as it is now called) on the TransCanada Highway near Carberry, Manitoba. I found the spot again, where I saw (and shot with my Questar telescope) my first total eclipse of the Sun.
However, a day after entering Ontario, the bad weather caught up with me, forcing an extra night north of Lake Superior while the only highway across the region, Highway 17, was cleared of snow and re-opened at Wawa, the usual cross-Canada choke point.
My new destination (after abandoning the site in the Texas Hill Country) was to be southern Ontario.
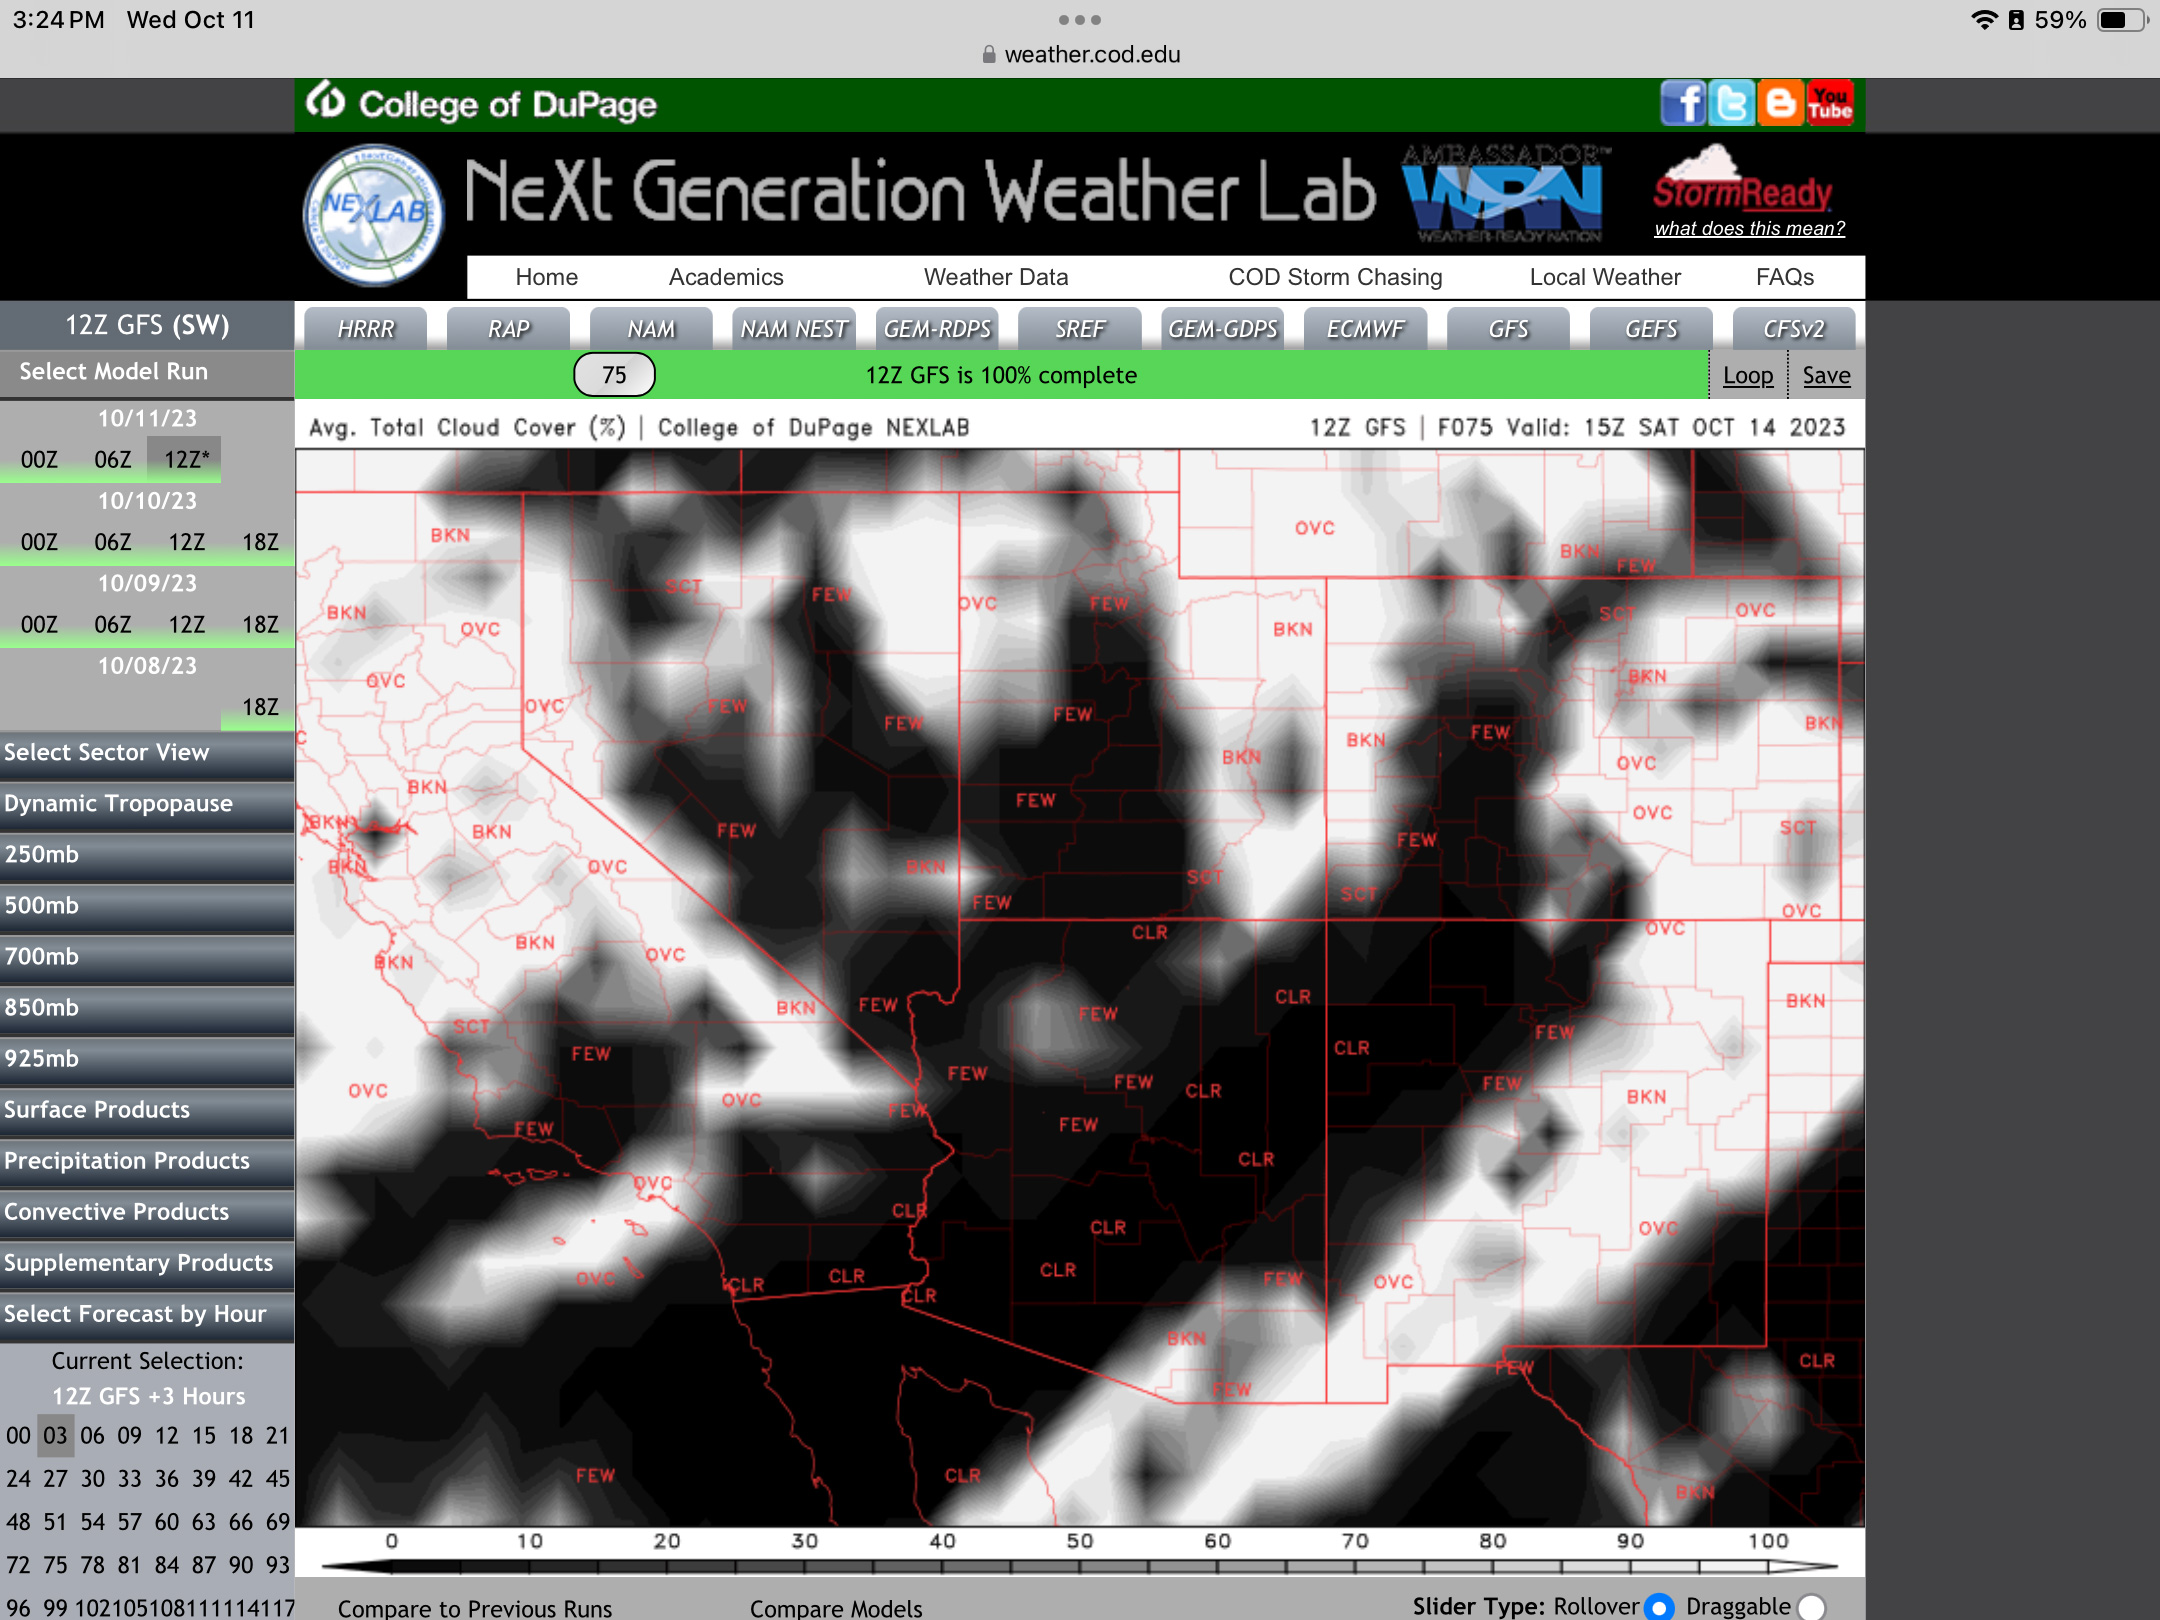
The weather prediction as of April 5.Southern Québec looking good!
However, as eclipse day approached and the weather predictions became more precise, it was apparent that Ontario would also be under some cloud. Southern Québec was looking better. So the Eastern Townships became my new Plan A site! I was running out of time!
Using the TPE app to check the Sun’s location once on site, the day before the eclipse.
I arrived on site in Québec with only a day to spare to check out the location I had found by exploring Google maps.
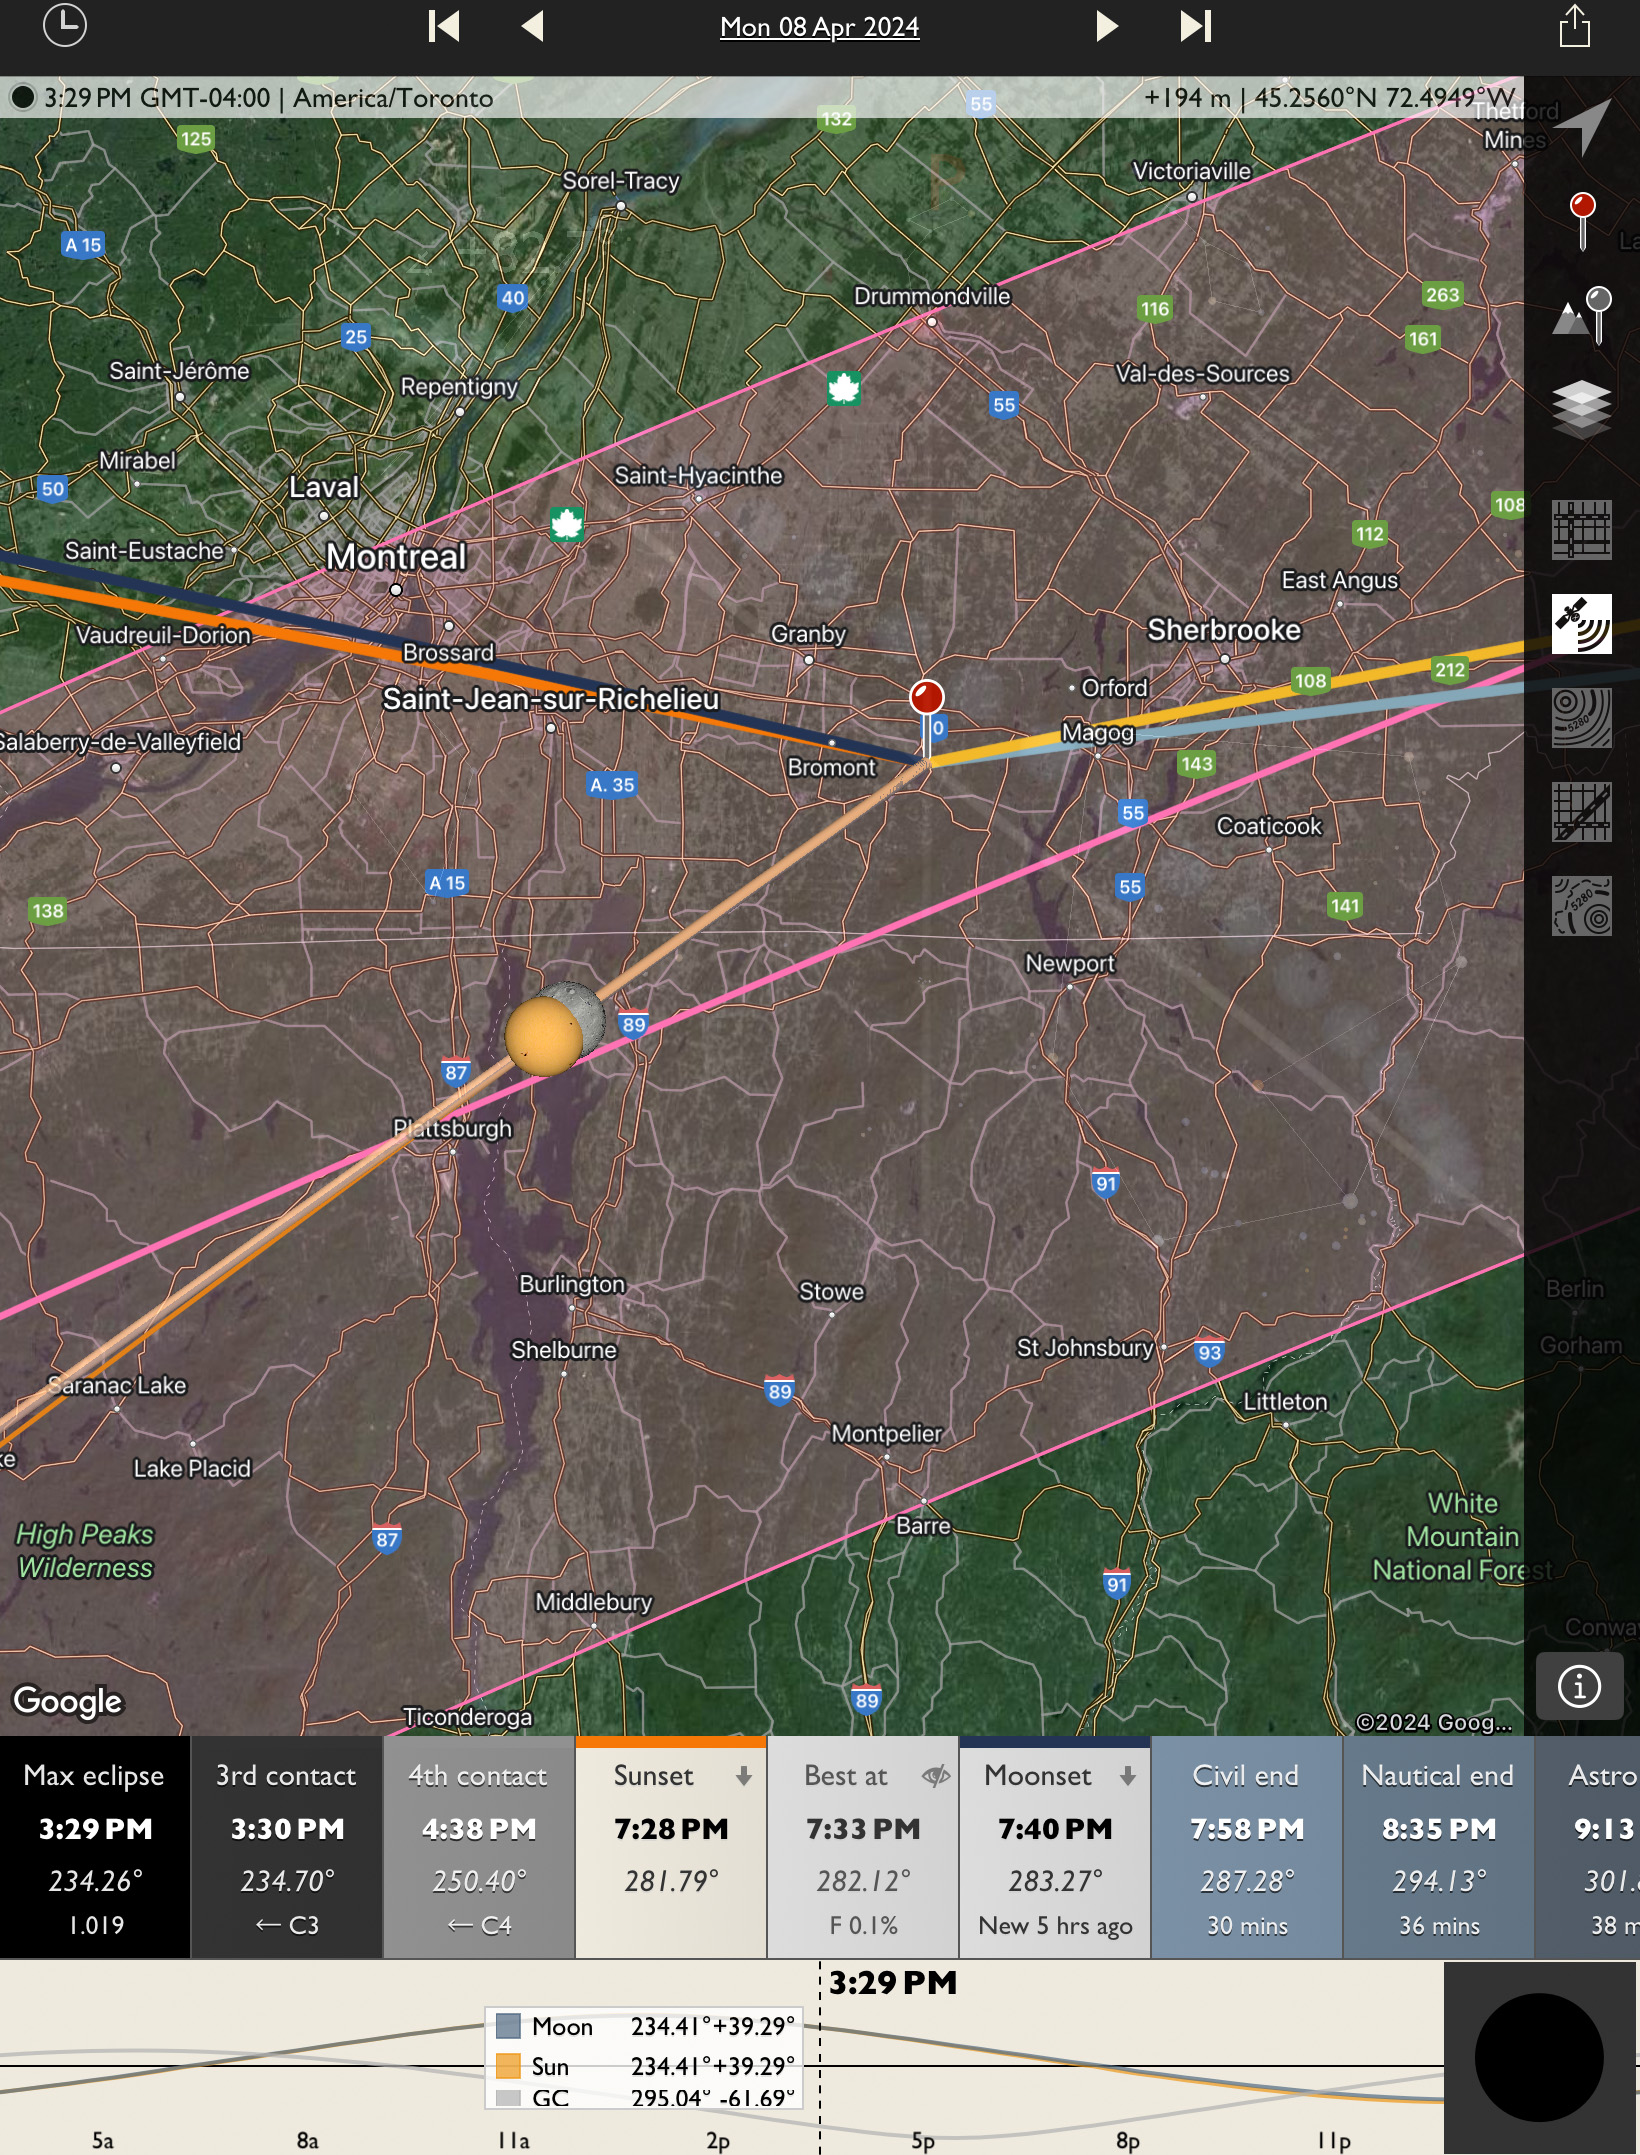
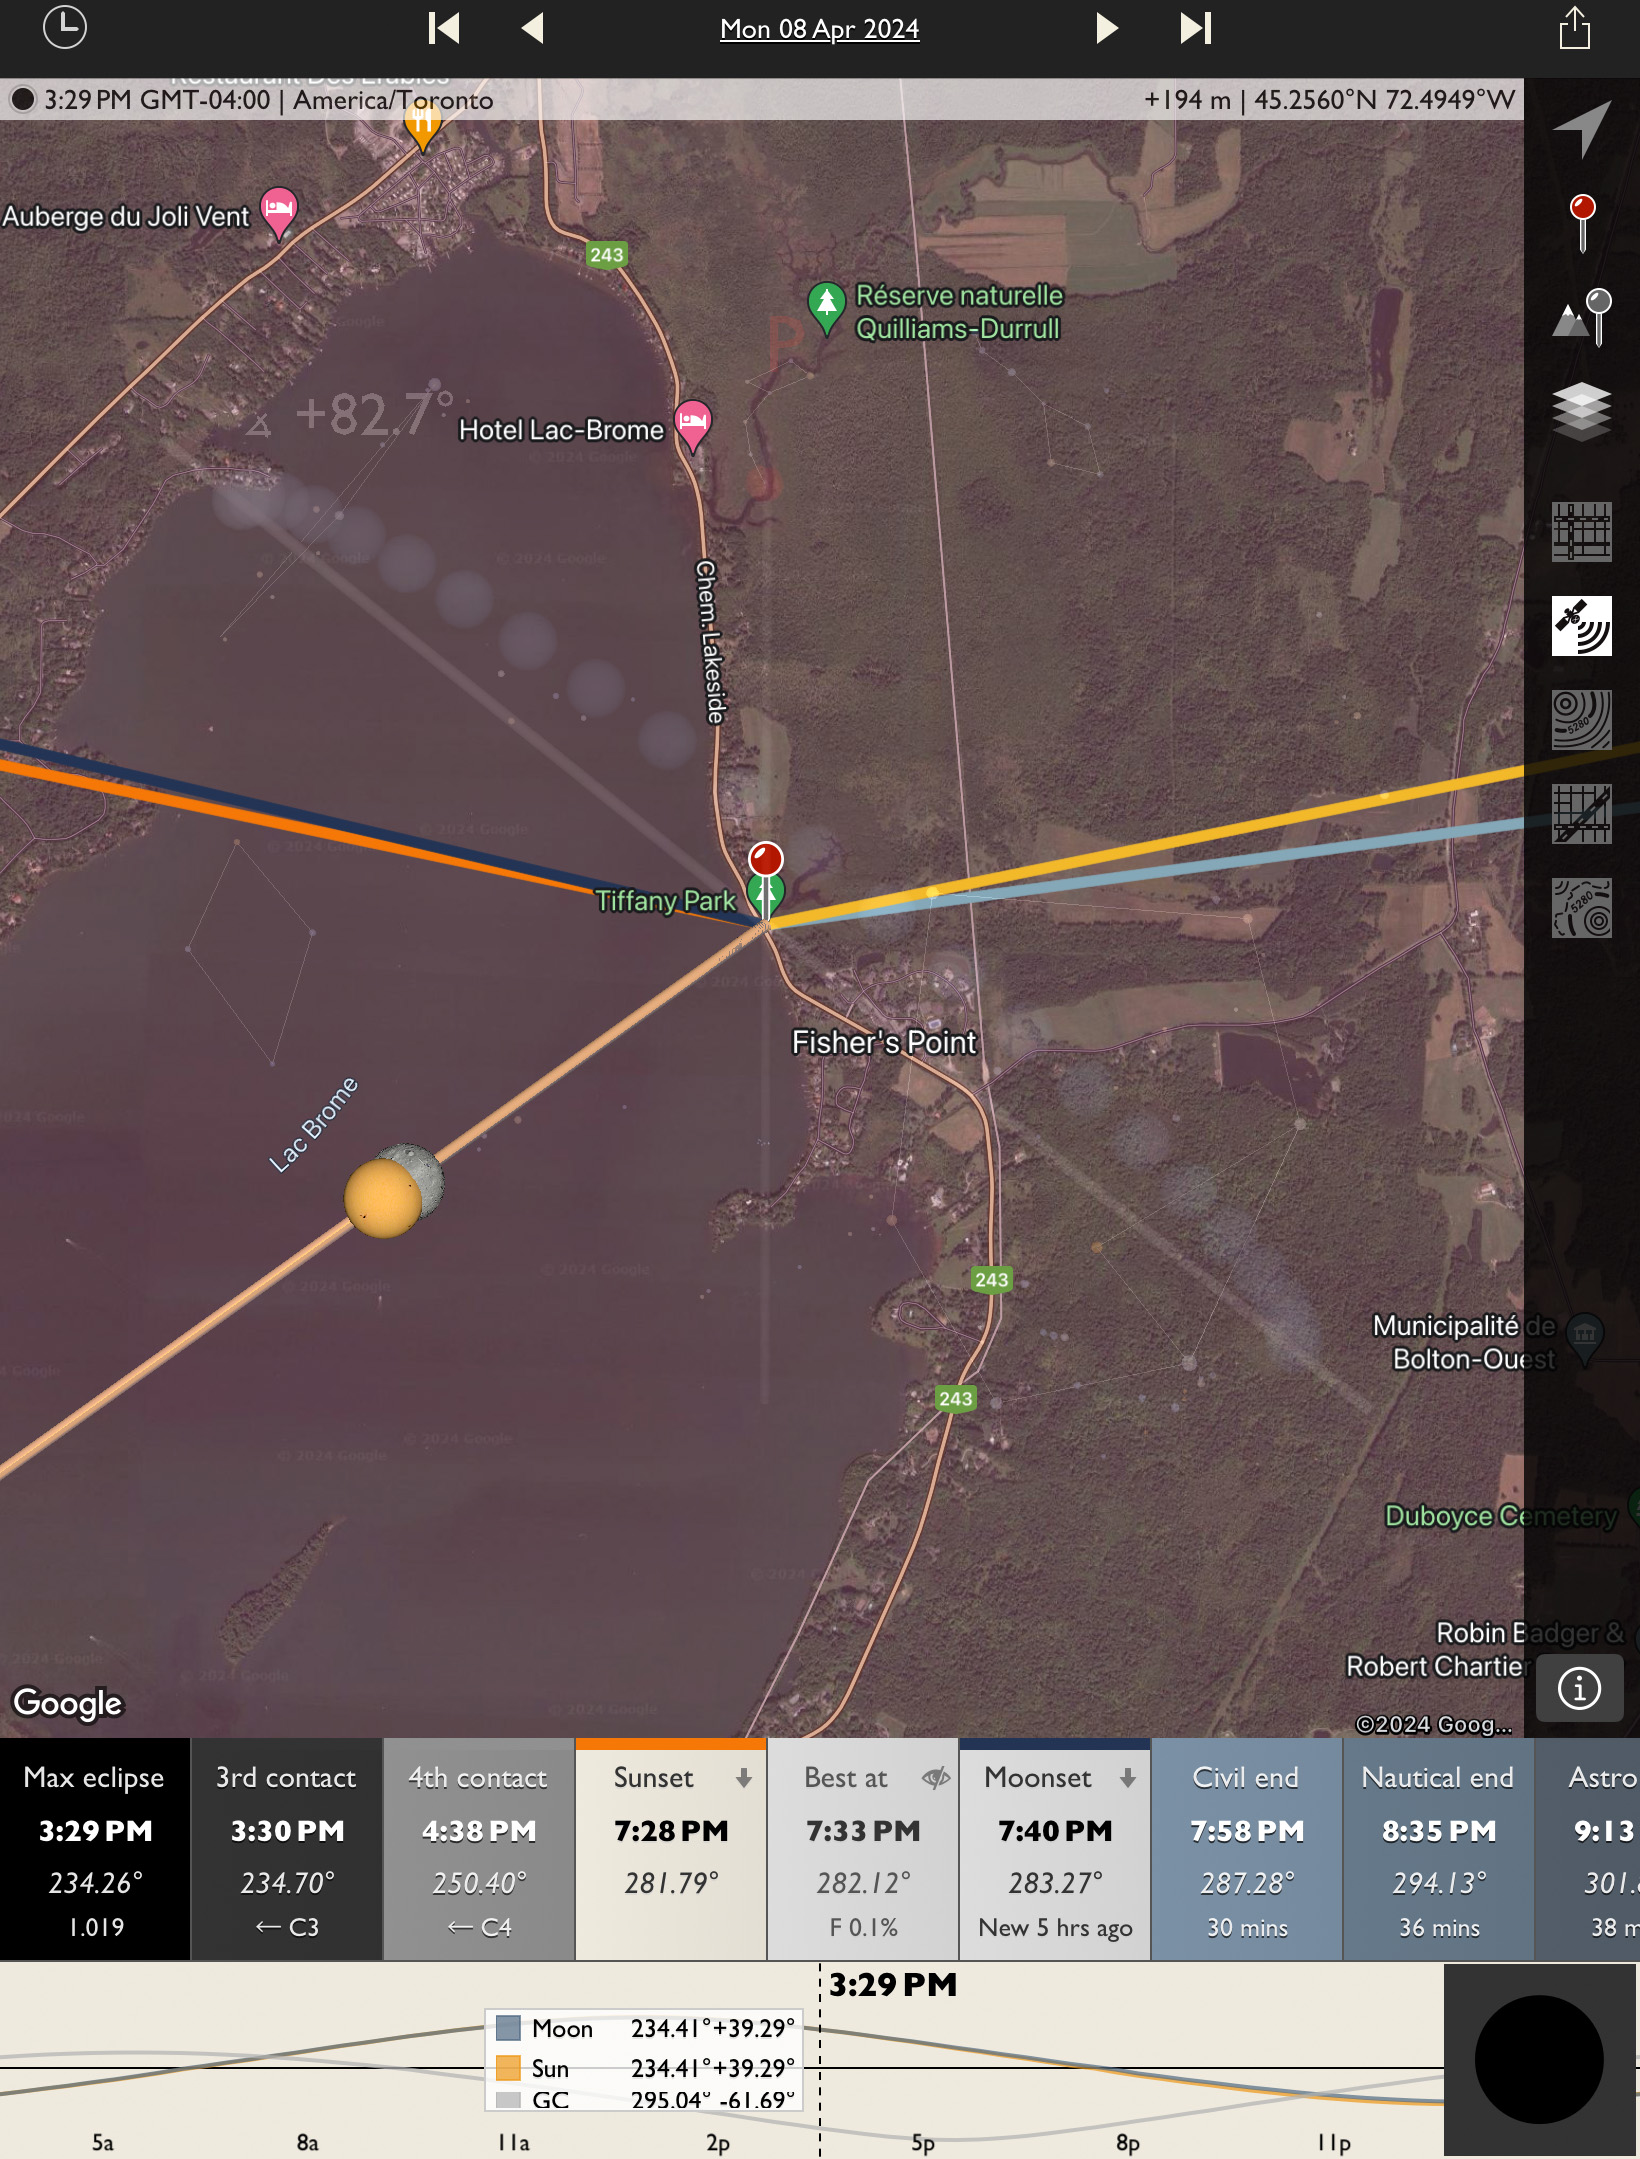
With the Sun lower in the mid-afternoon sky in Québec compared to the high-noon Sun in Texas, I decided to shoot a wide-angle scene of the eclipse over a lake, preferably with open water, not ice! That required a site with public parking on an eastern lakeshore.
The Photographer’s Ephemeris (TPE) app to check Sun angles.Zooming in with TPE app for my chosen Lac Brome site. .
The site I found, then checked out on April 7, was on Lac Brome. It proved ideal — except for the thin cloud that was now predicted to drift through during the eclipse.
Sure enough, that’s just what happened. The cloud detracted from the eclipse only in preventing long-exposure images recording the outermost streamers in the Sun’s atmosphere.
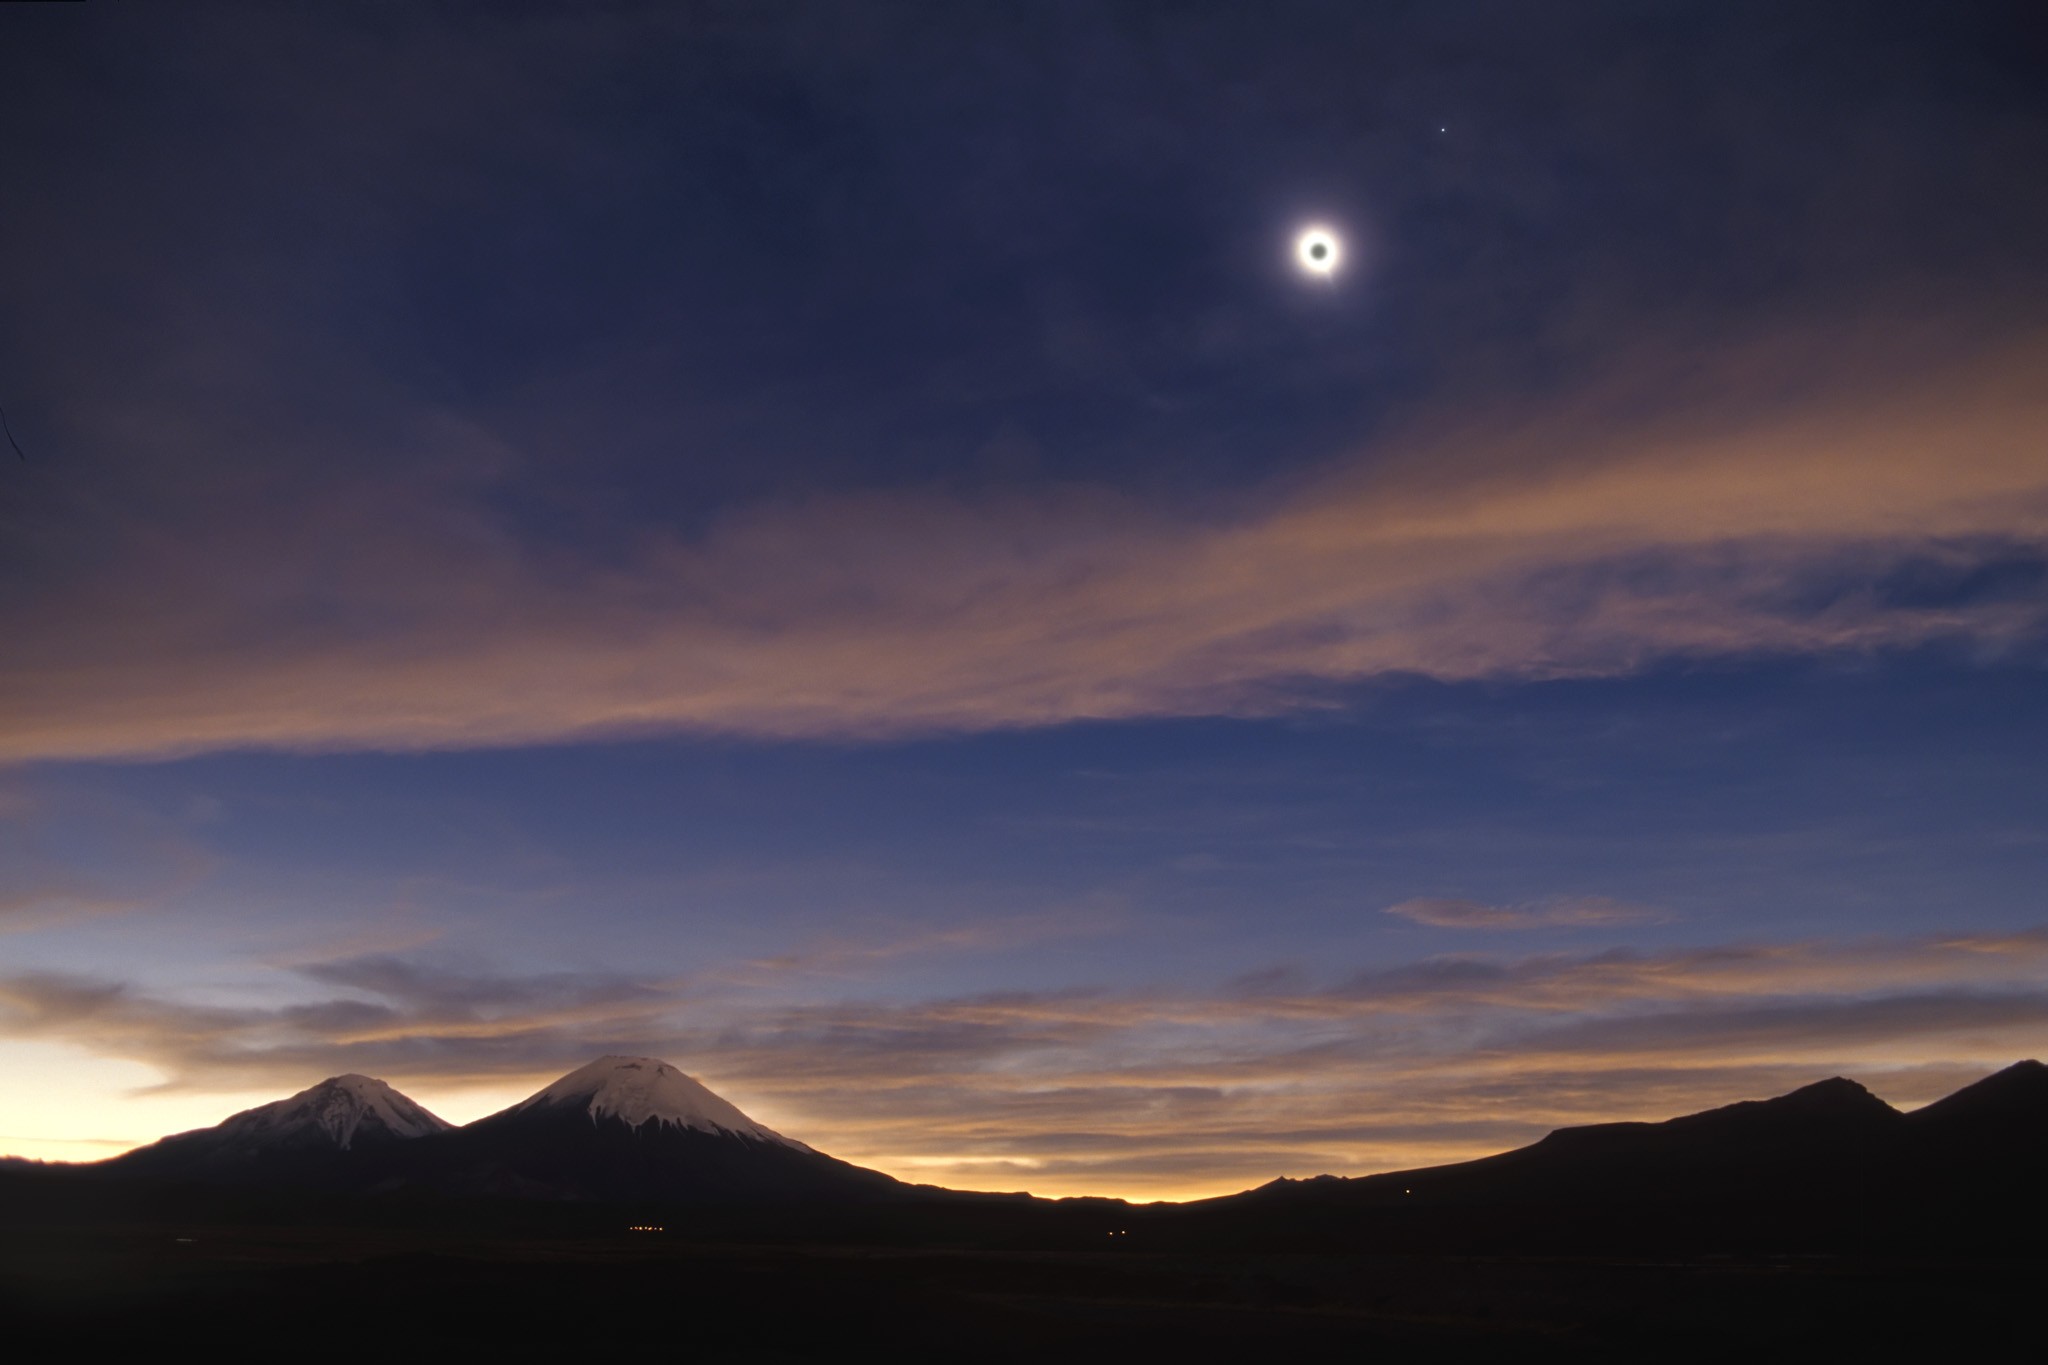
A wide-field view of the eclipse of the Sun, taking in the bright planets Jupiter (at top) and Venus (below) that were easily visible to the unaided eye during totality.
I could have sought out clearer skies by going even farther east, but I was in a crunch for time and hotel rooms! As it was I was able to get rooms everywhere I wanted and at normal “non-eclipse” rates!
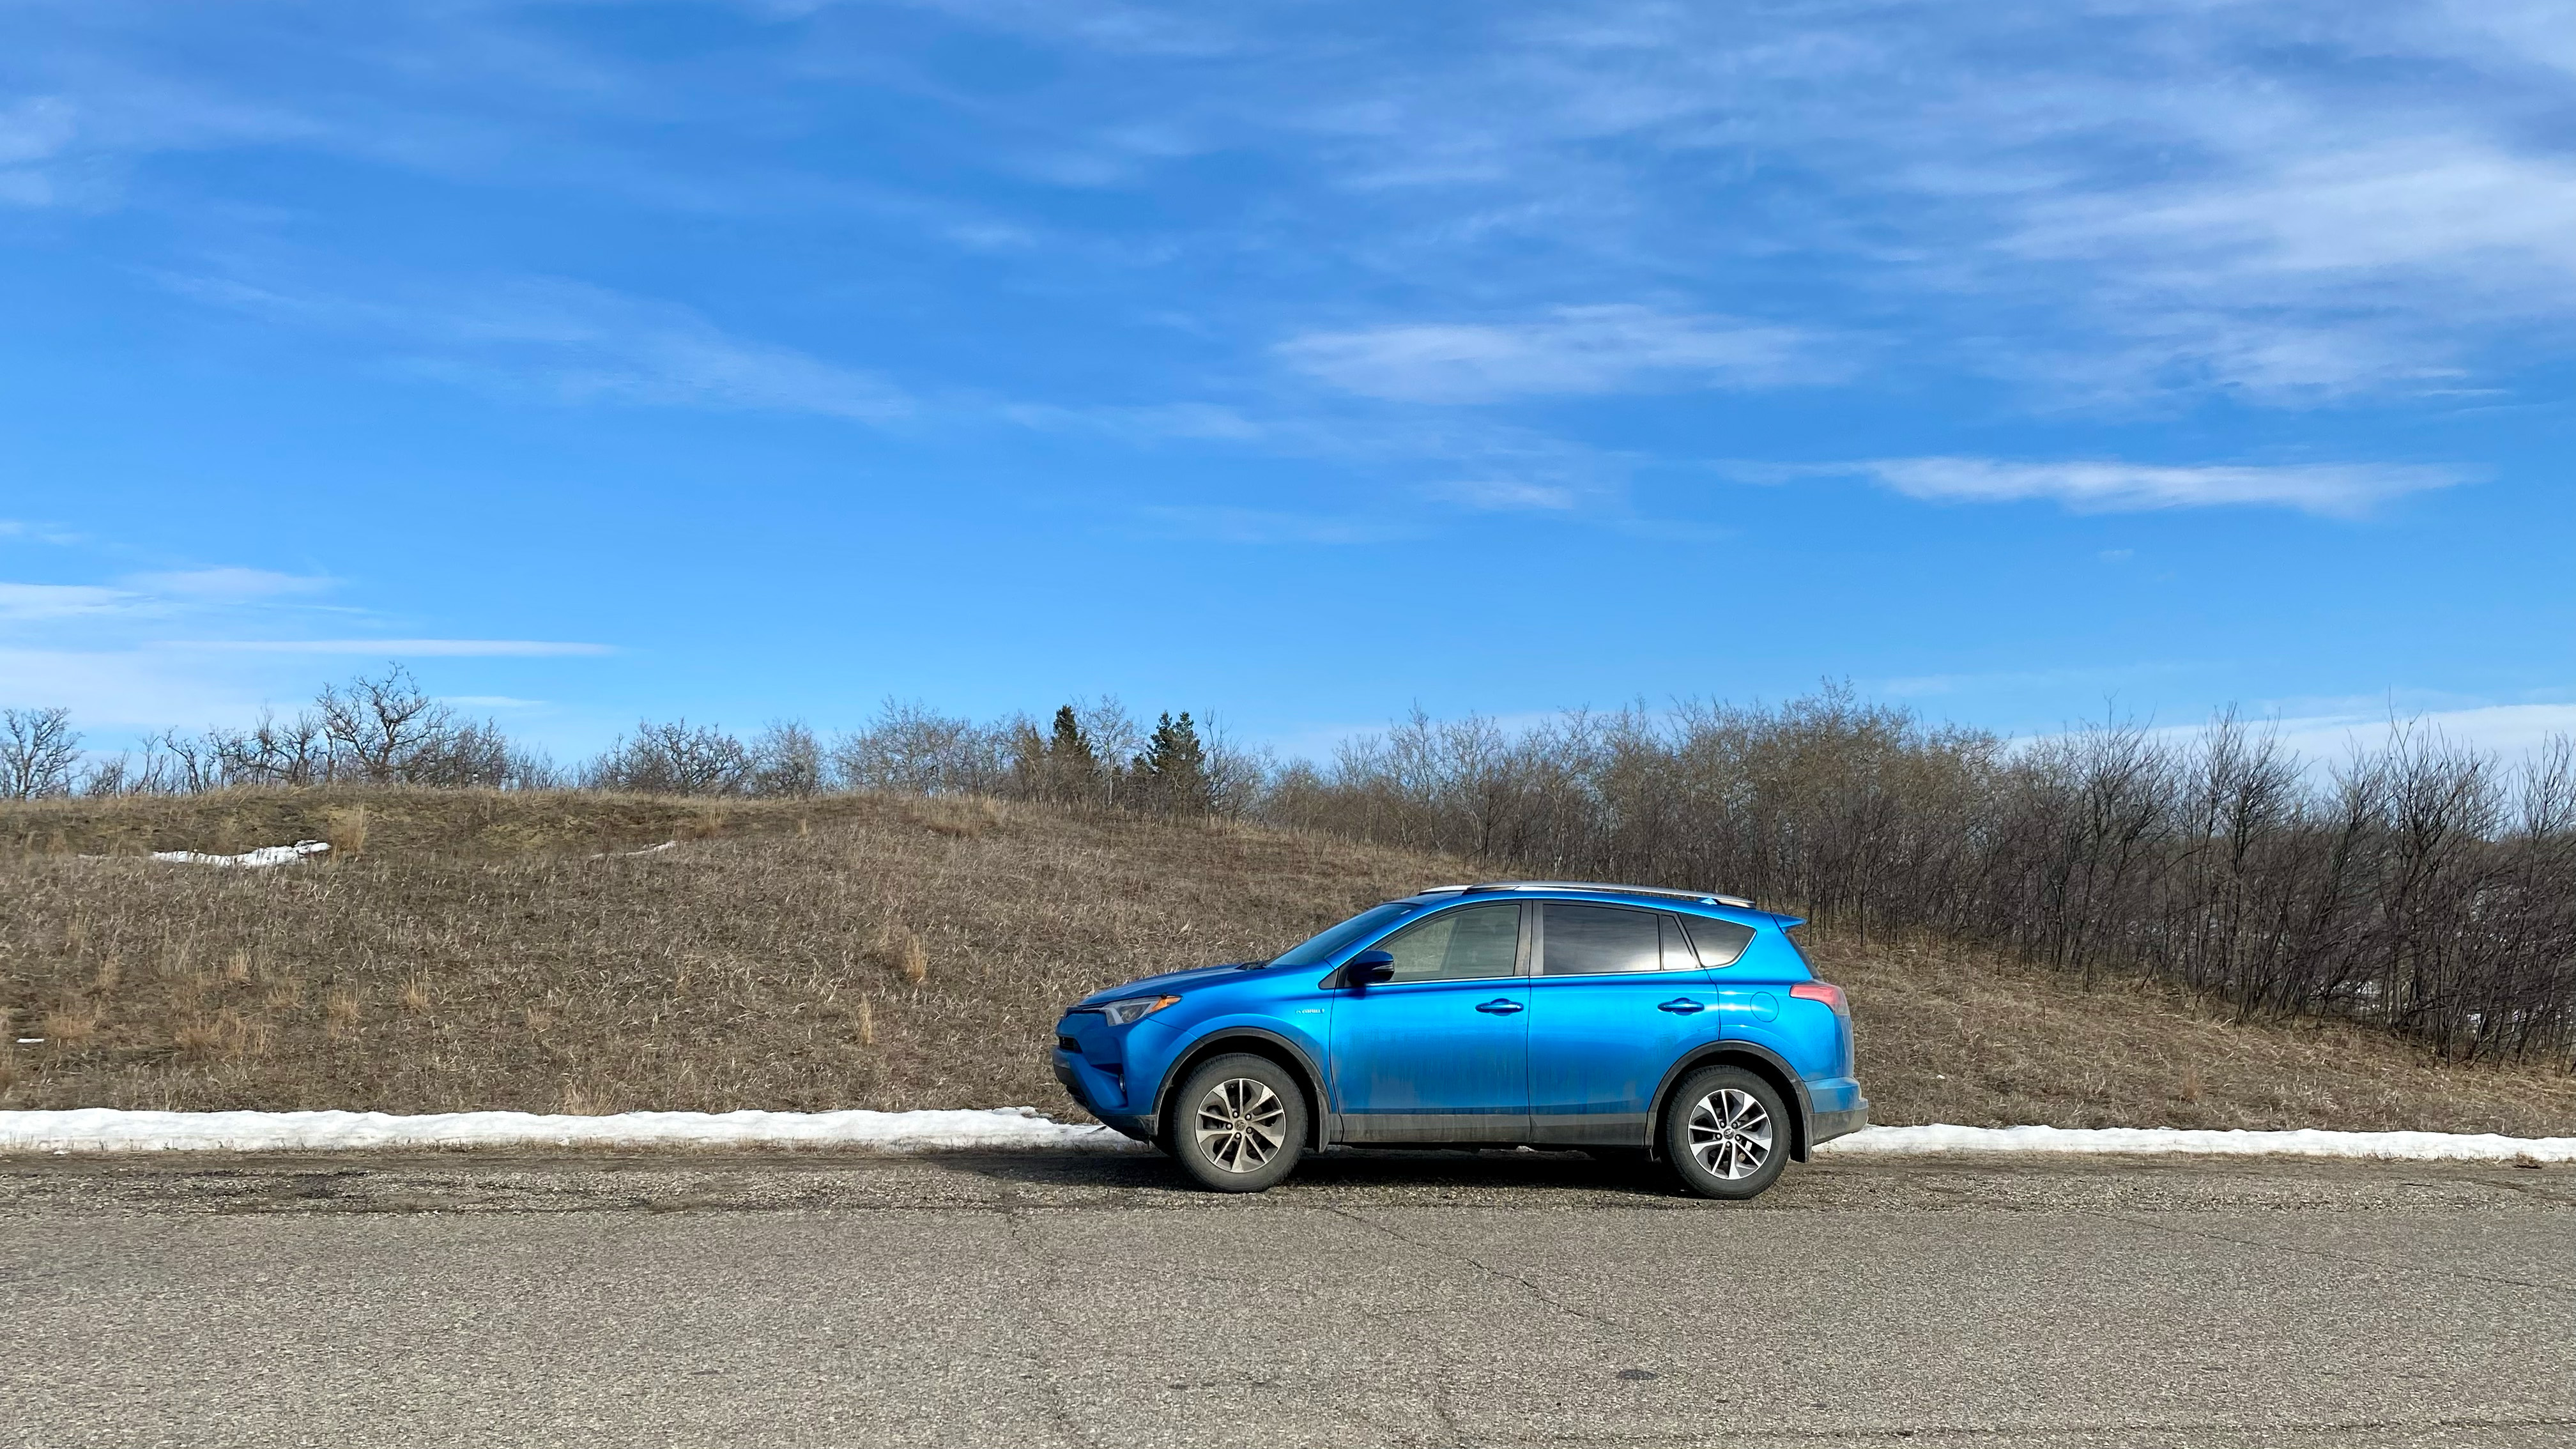
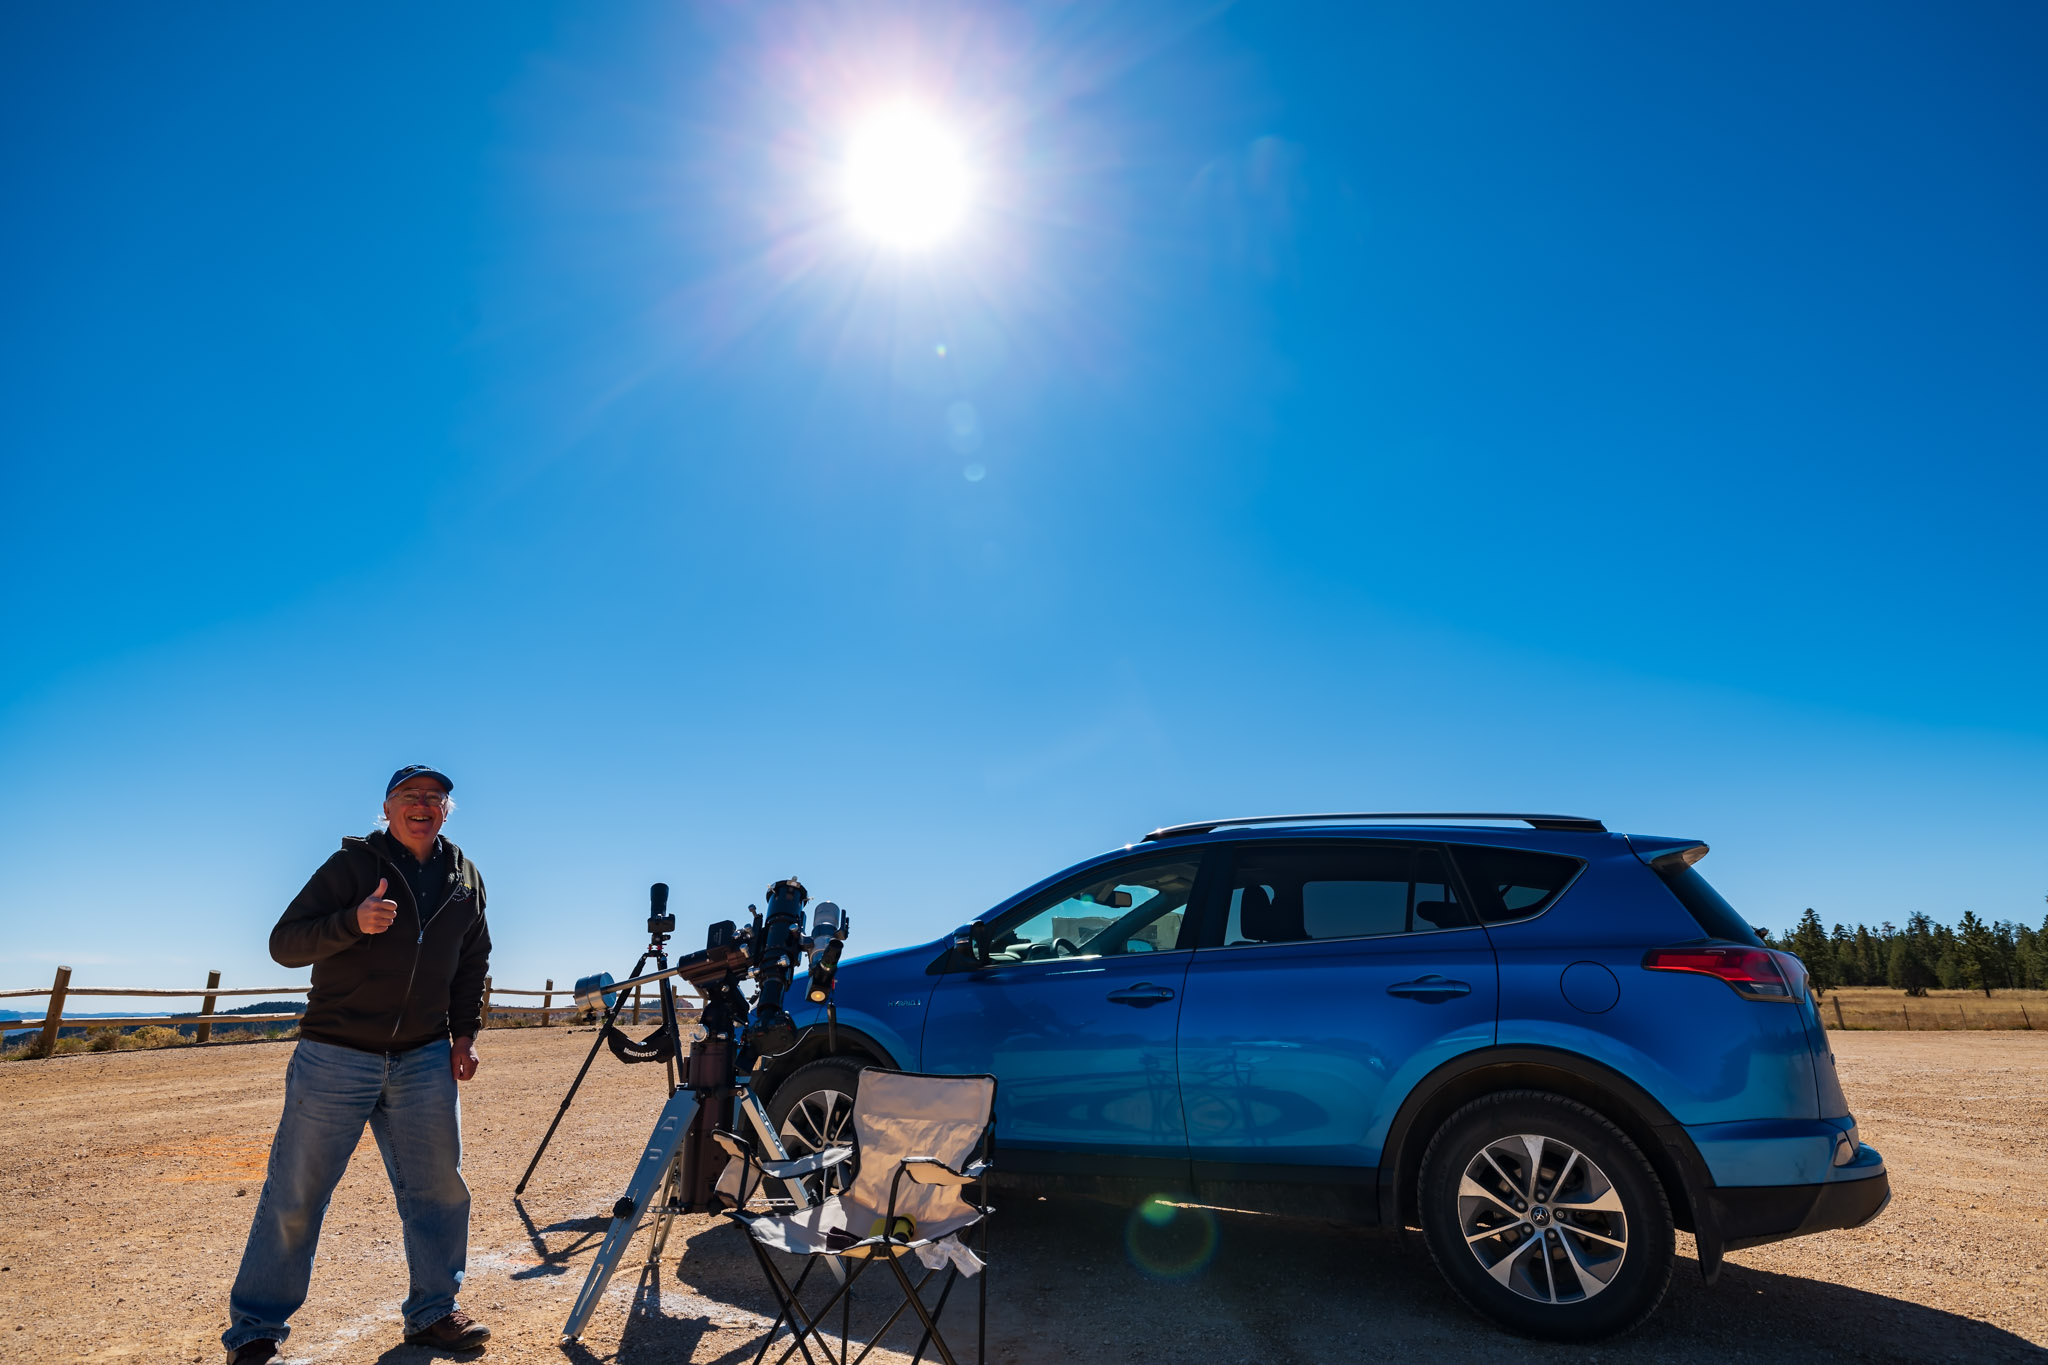
A panorama of the lakeside parking area at Lac Brome prior to the eclipse. My RAV4 and camera array, pre-eclipse.I shot with 4 cameras at the car and one set up lakeside.
The Lac Brome site filled with cars during the day, with people from Québec and Ontario, but also from Alberta, and from Pennsylvania, Massachusetts and Maine – at least those were the homes of the folks I enjoyed meeting on eclipse day.
Everyone had a great time and had a superb eclipse experience.
The total eclipse of the Sun over the waters of Lac Brome, in the Eastern Townships of Quebec, Canada. The twilight colours come from sunlight from outside the shadow path.
The lunar shadow arrived from the southwest, from the direction of the Sun, appearing as a dark cloud racing toward us. At the end of the eclipse the sky brightened first in that same direction, as the trailing edge of the shadow shot up across the sky. The clouds helped make the shadow edge more visible.
A time-lapse of the arrival and departure of the lunar shadow, made of 1200 frames each 1 second apart.
I shot with five cameras, just as I had done in 2017, possible only because I drove.
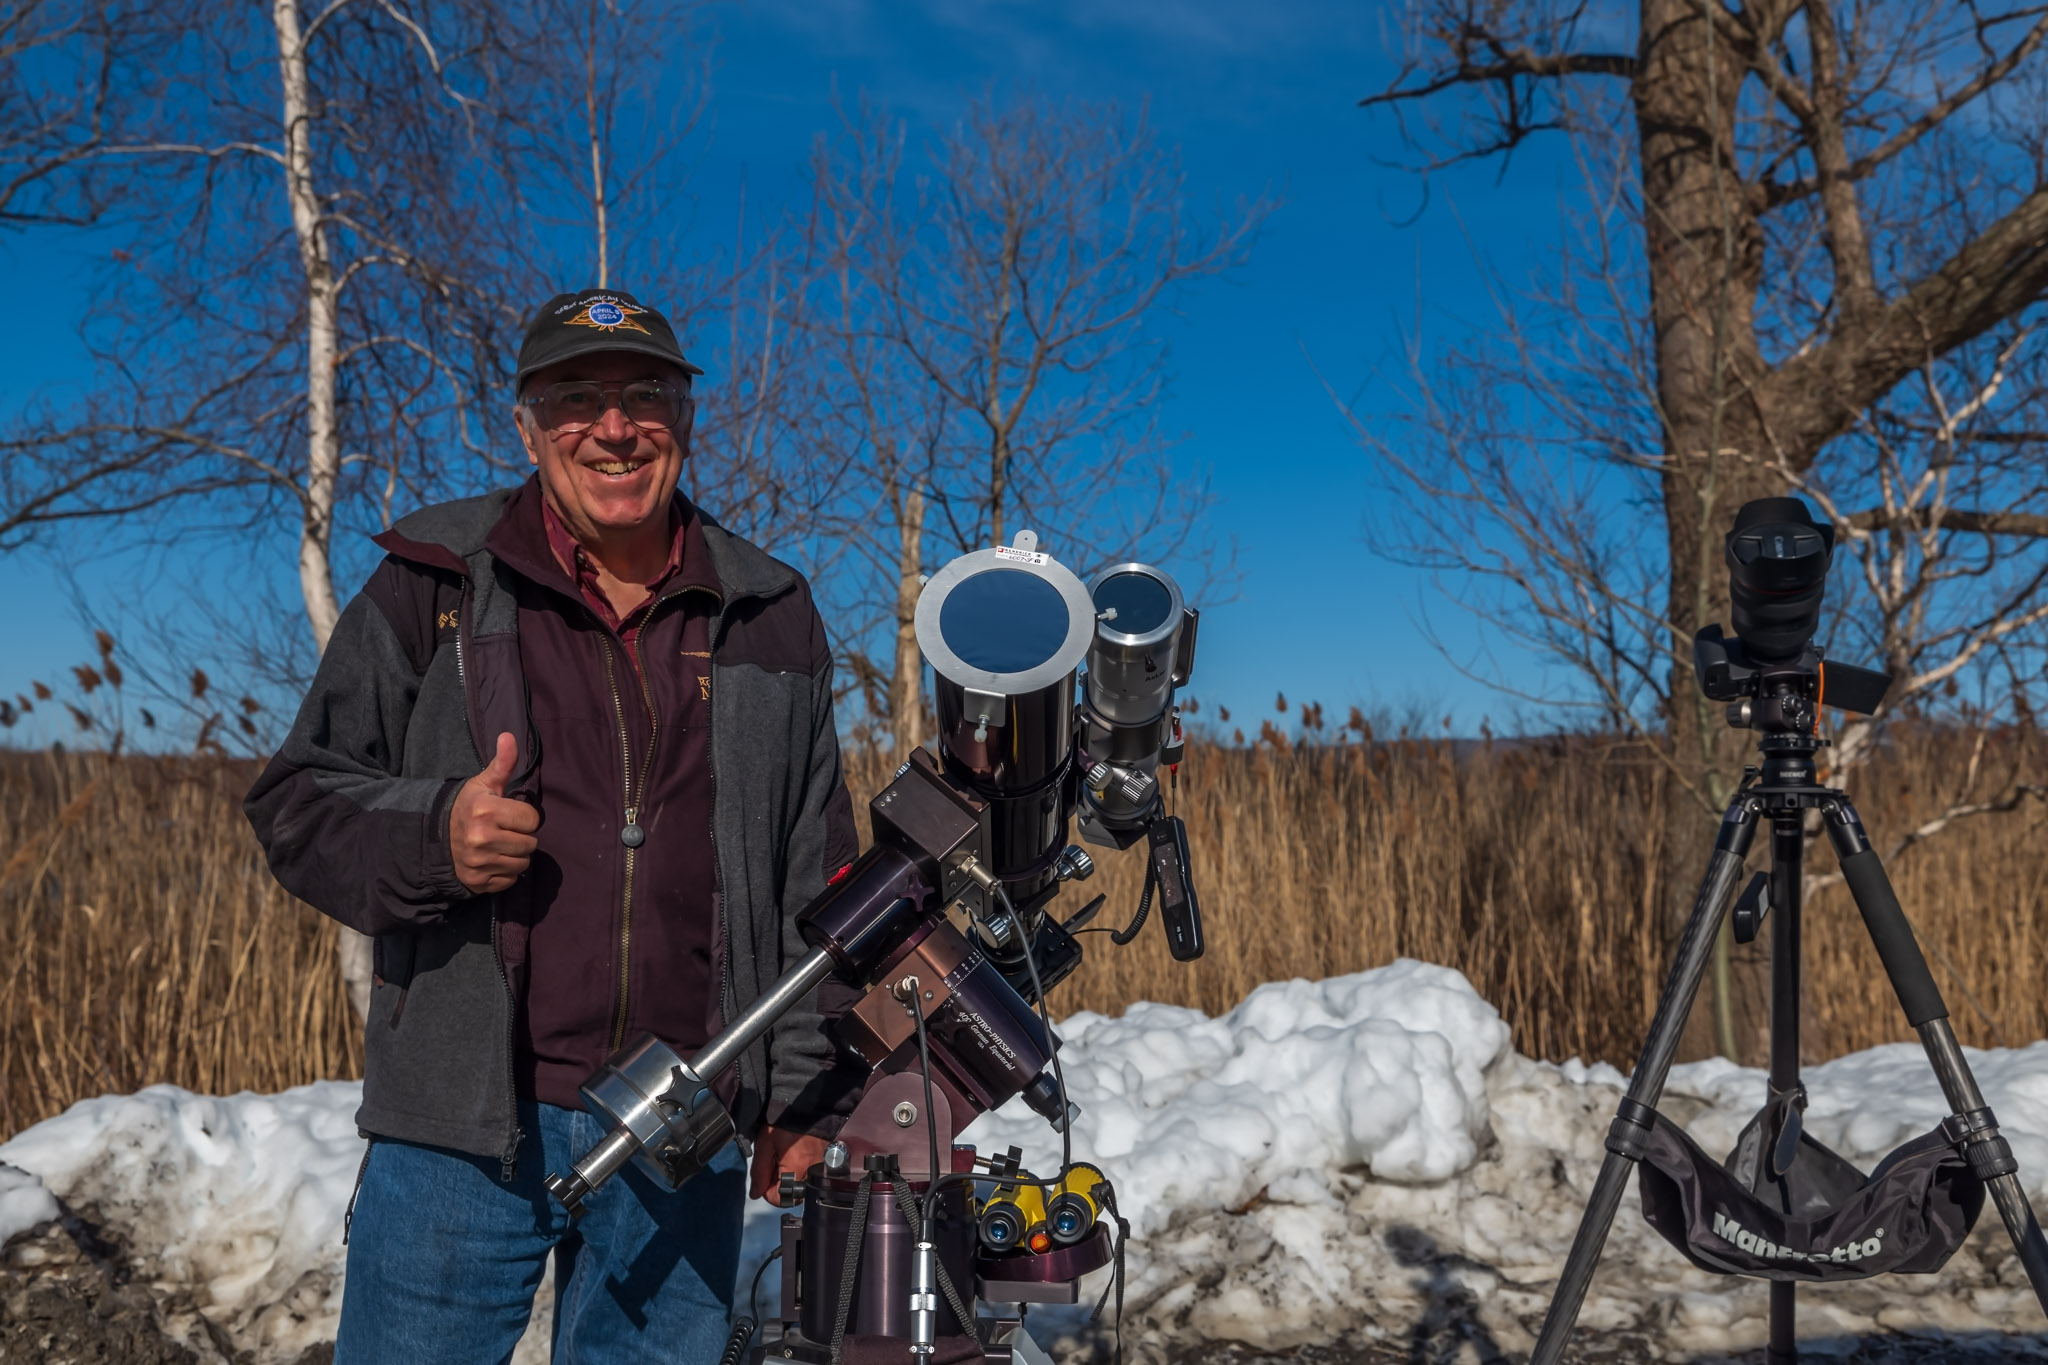
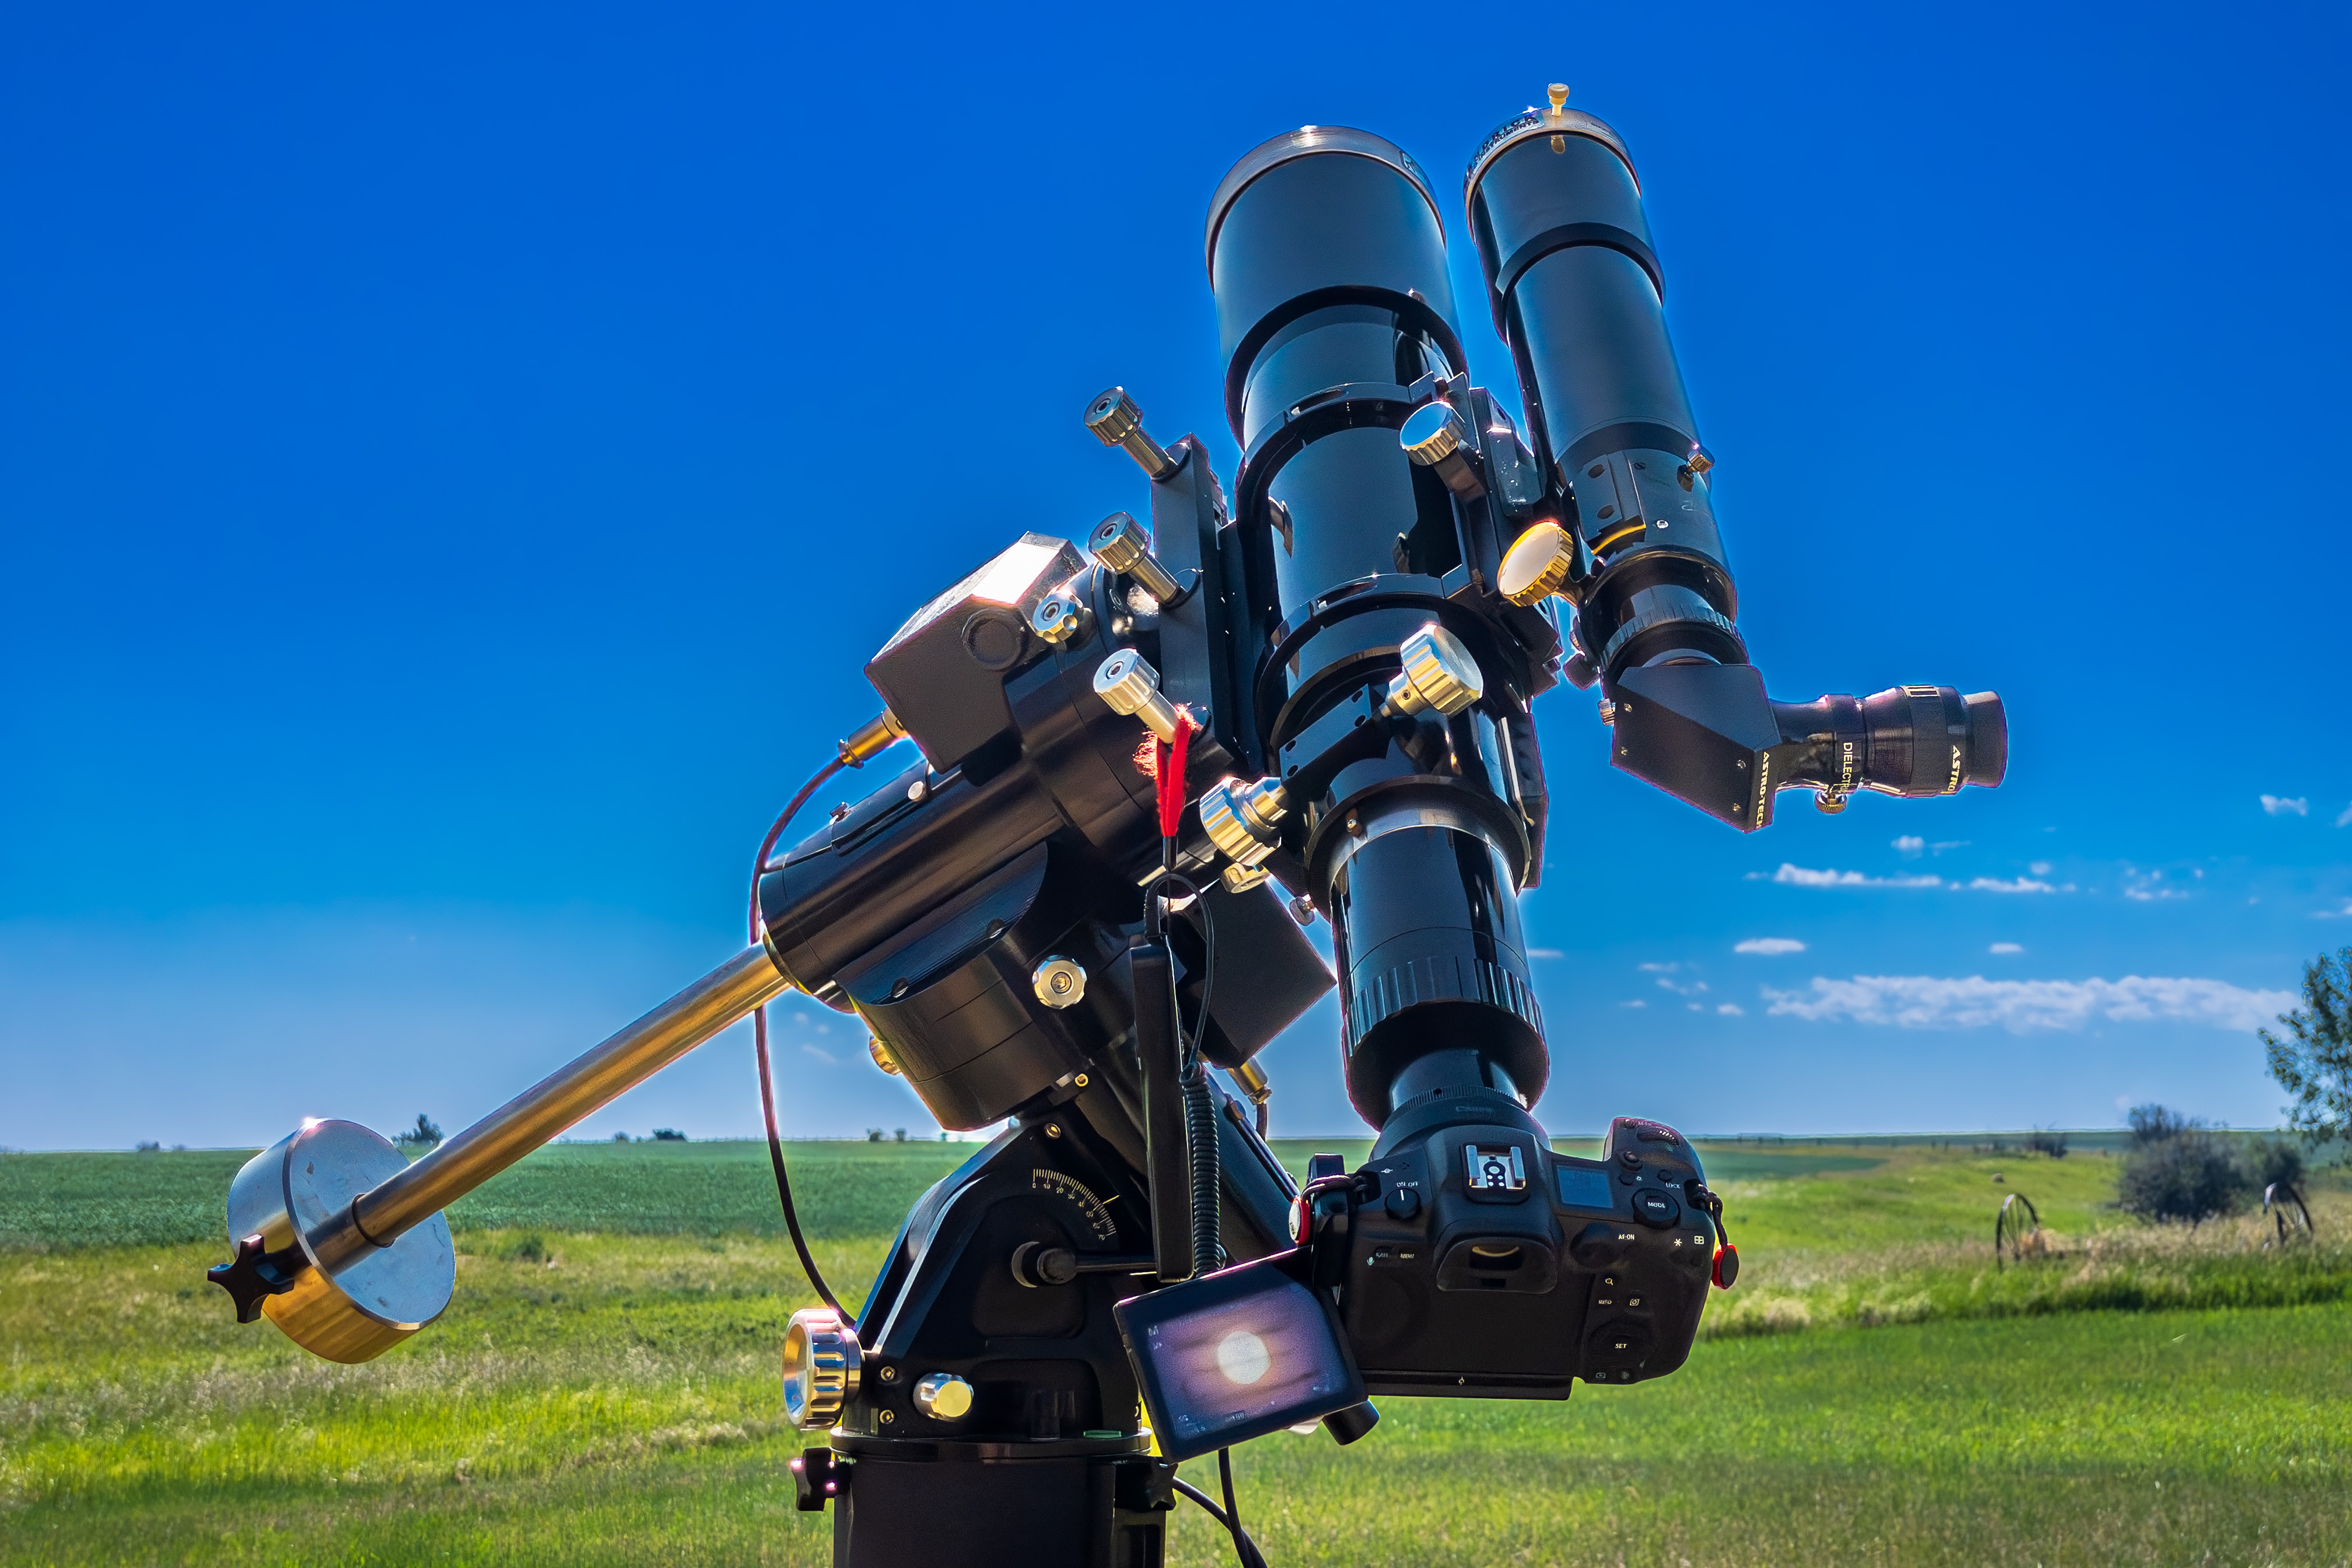
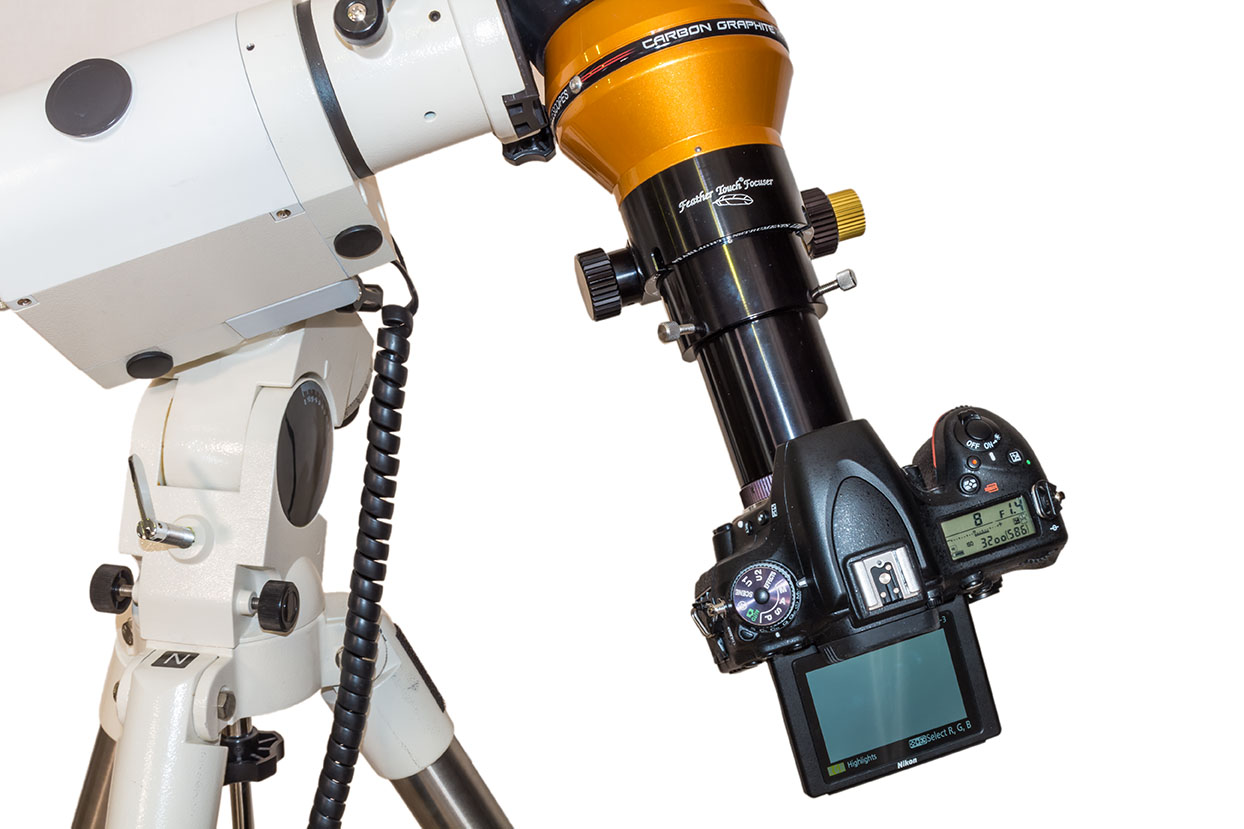
The main rig was my faithful Astro-Physics Traveler, a 105mm refractor telescope the company owner designed for his personal use at the 1991 eclipse in Mexico.
My main eclipse rig, with a 60mm visual scope on the 105mm photo scope, on an equatorial tracking mount.
My Traveler, bought in 1992, has lived up to its name, having now been to six central solar eclipses: the annular eclipses of 1994 (Arizona) and 2023 (Utah), and the total eclipses of 1998 (Curaçao), 2012 (Queensland, Australia), 2017 (Idaho), and now 2024 in Québec, Canada. I paired it with the wonderful matching AP400 mount, which I had only just brought back with me the month before from Australia, where it had spent the last two decades.
All the gear worked great. Unlike six months earlier for the October 14, 2023 annular eclipse in Utah, this time I remembered all the cables needed to have the telescope mount track the Sun.
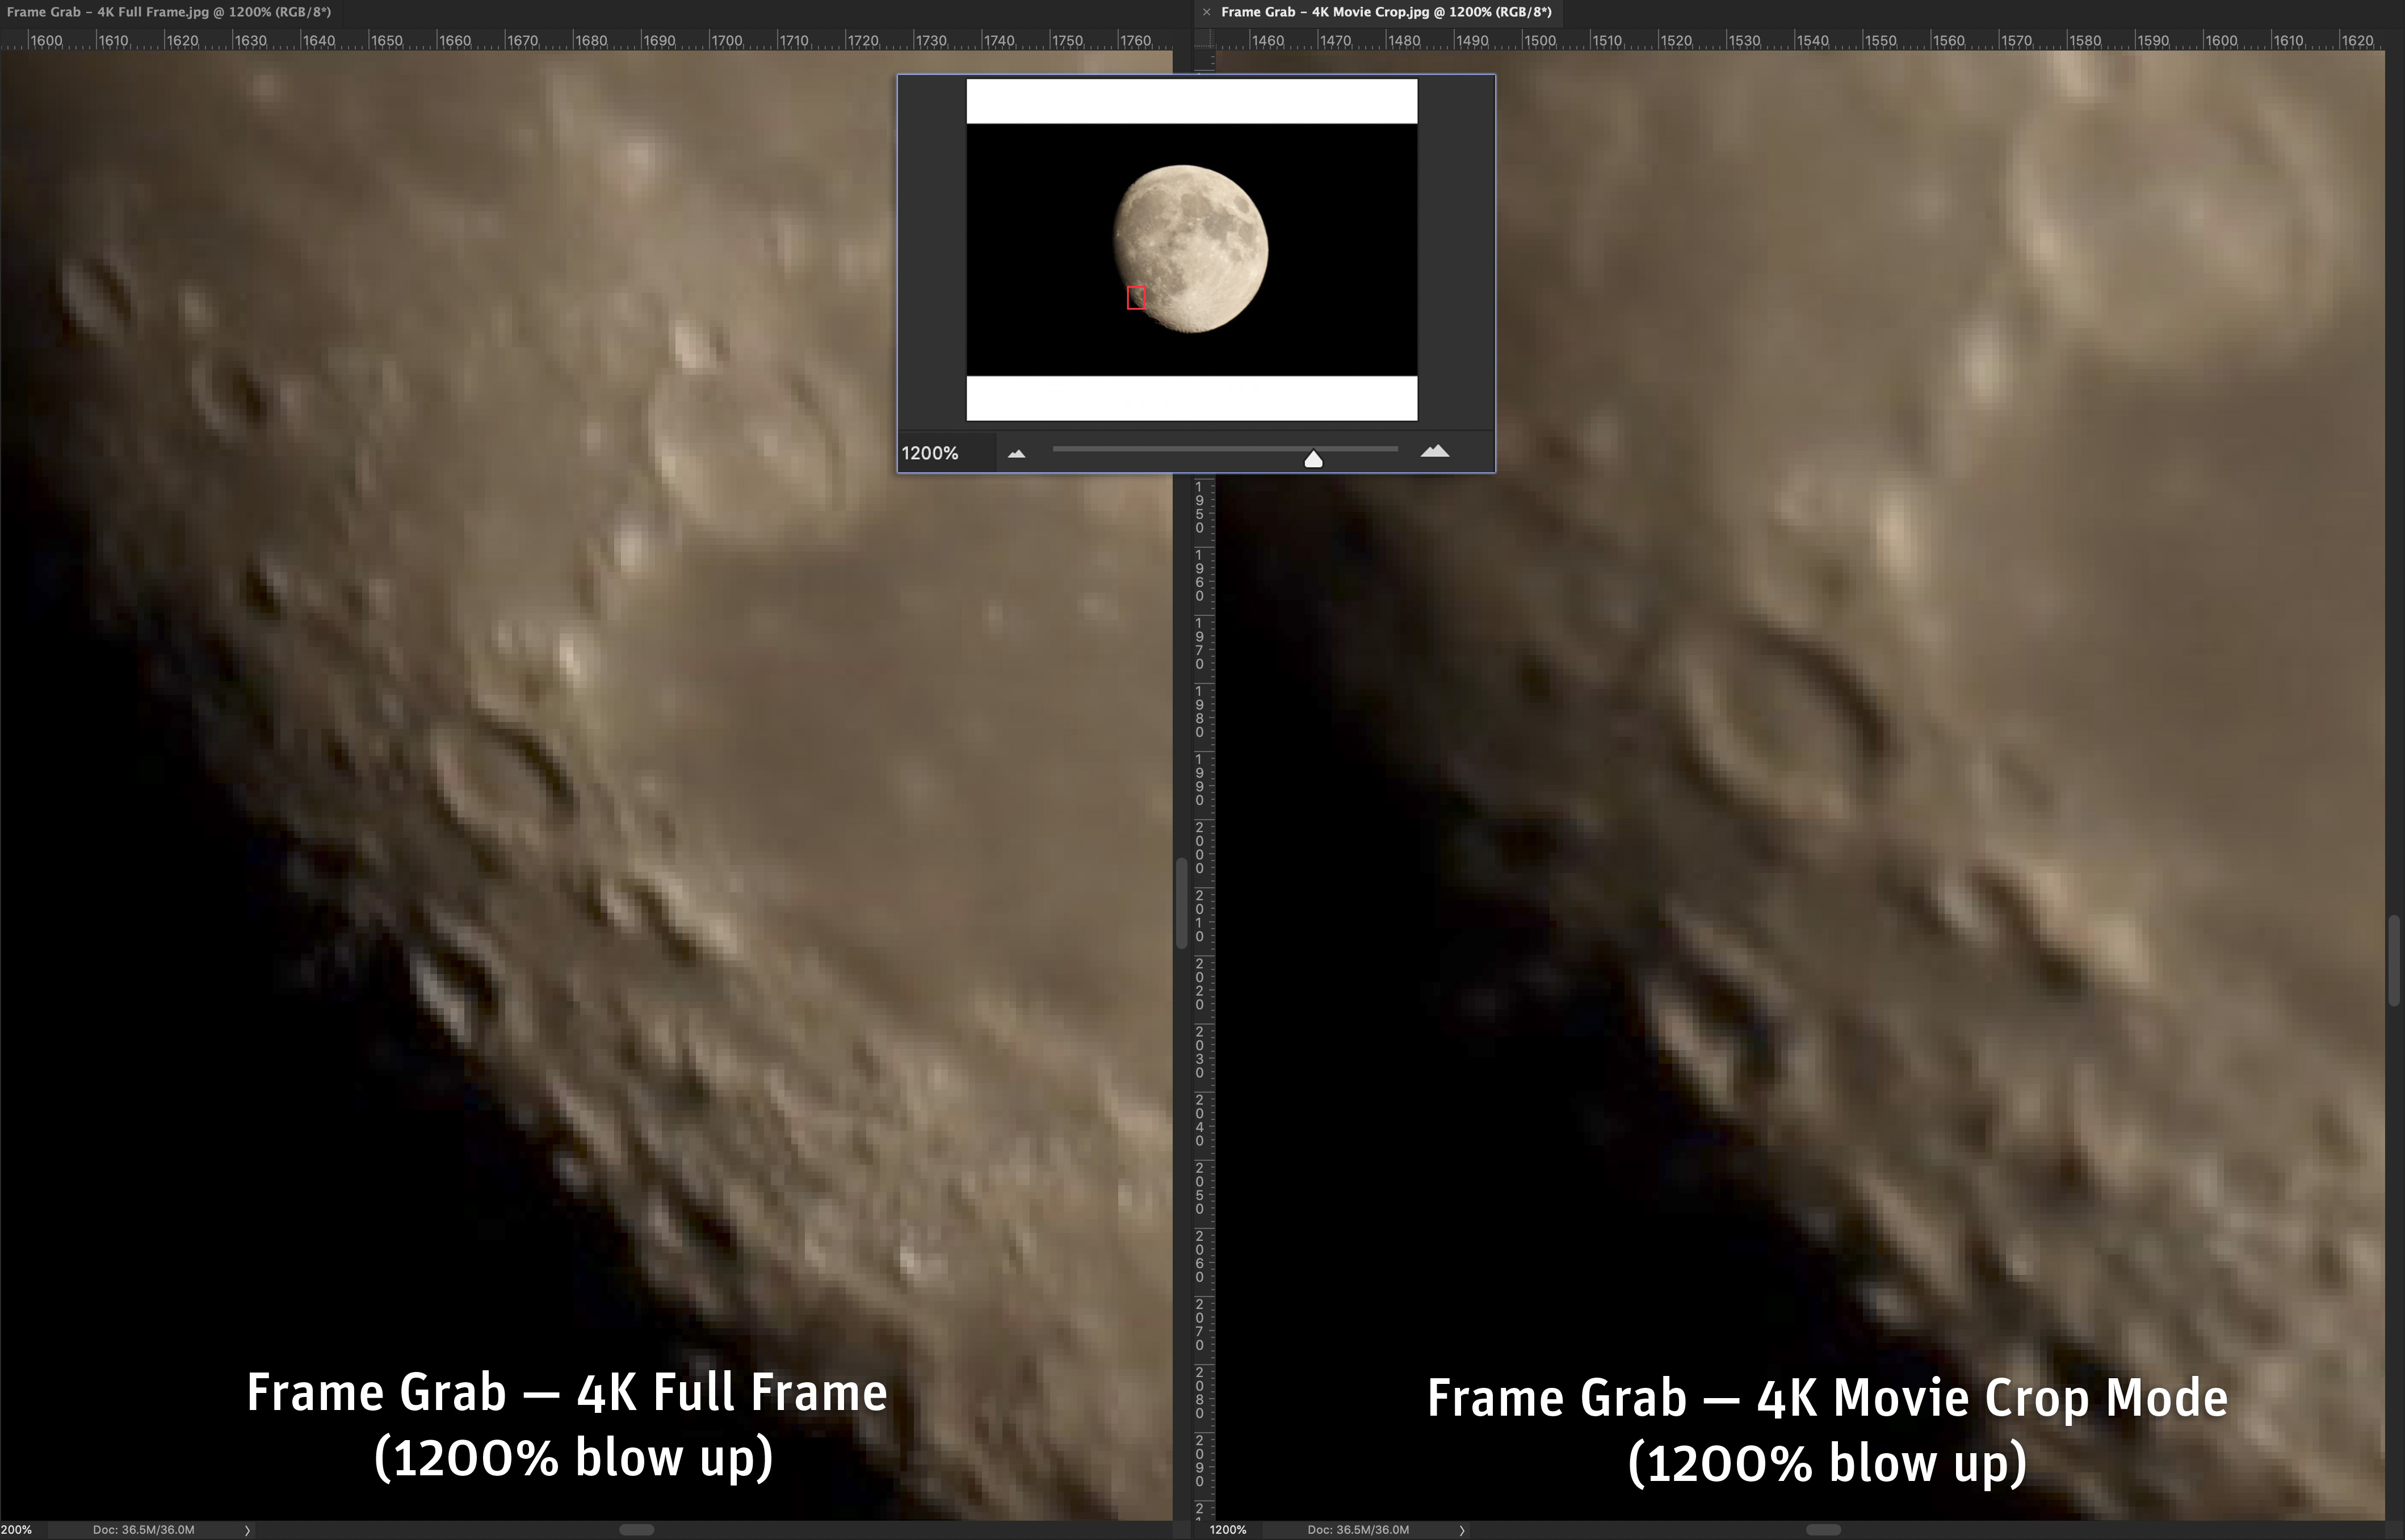
I did mess up on a couple of settings (such as not framing the 4K movie camera as I should have – in pre-eclipse excitement I just forgot to check my chart). But none of the errors were serious.
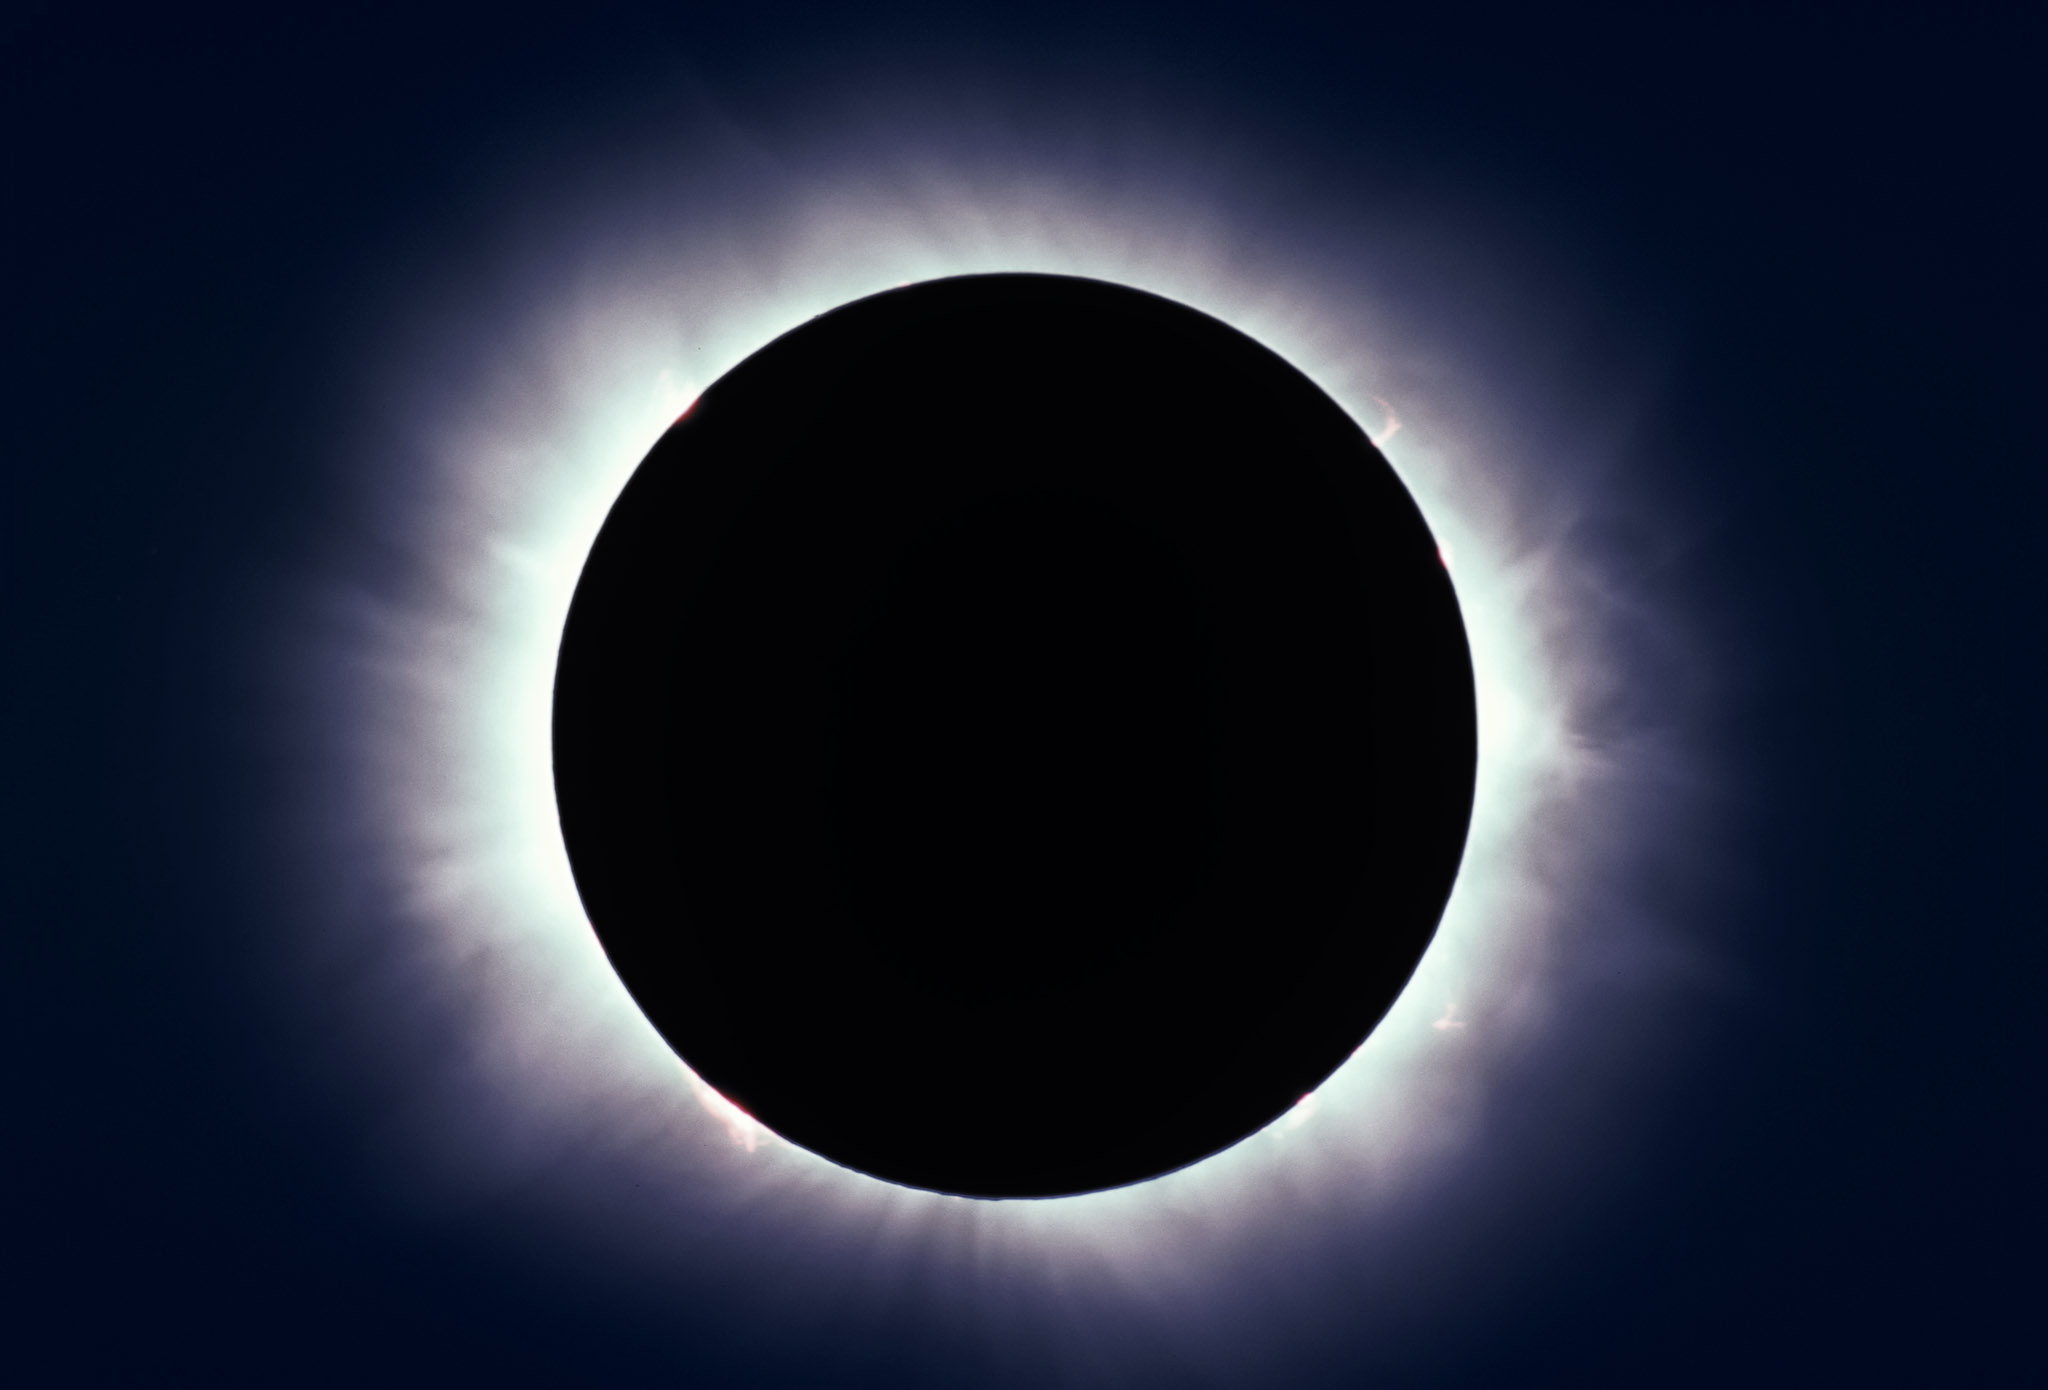
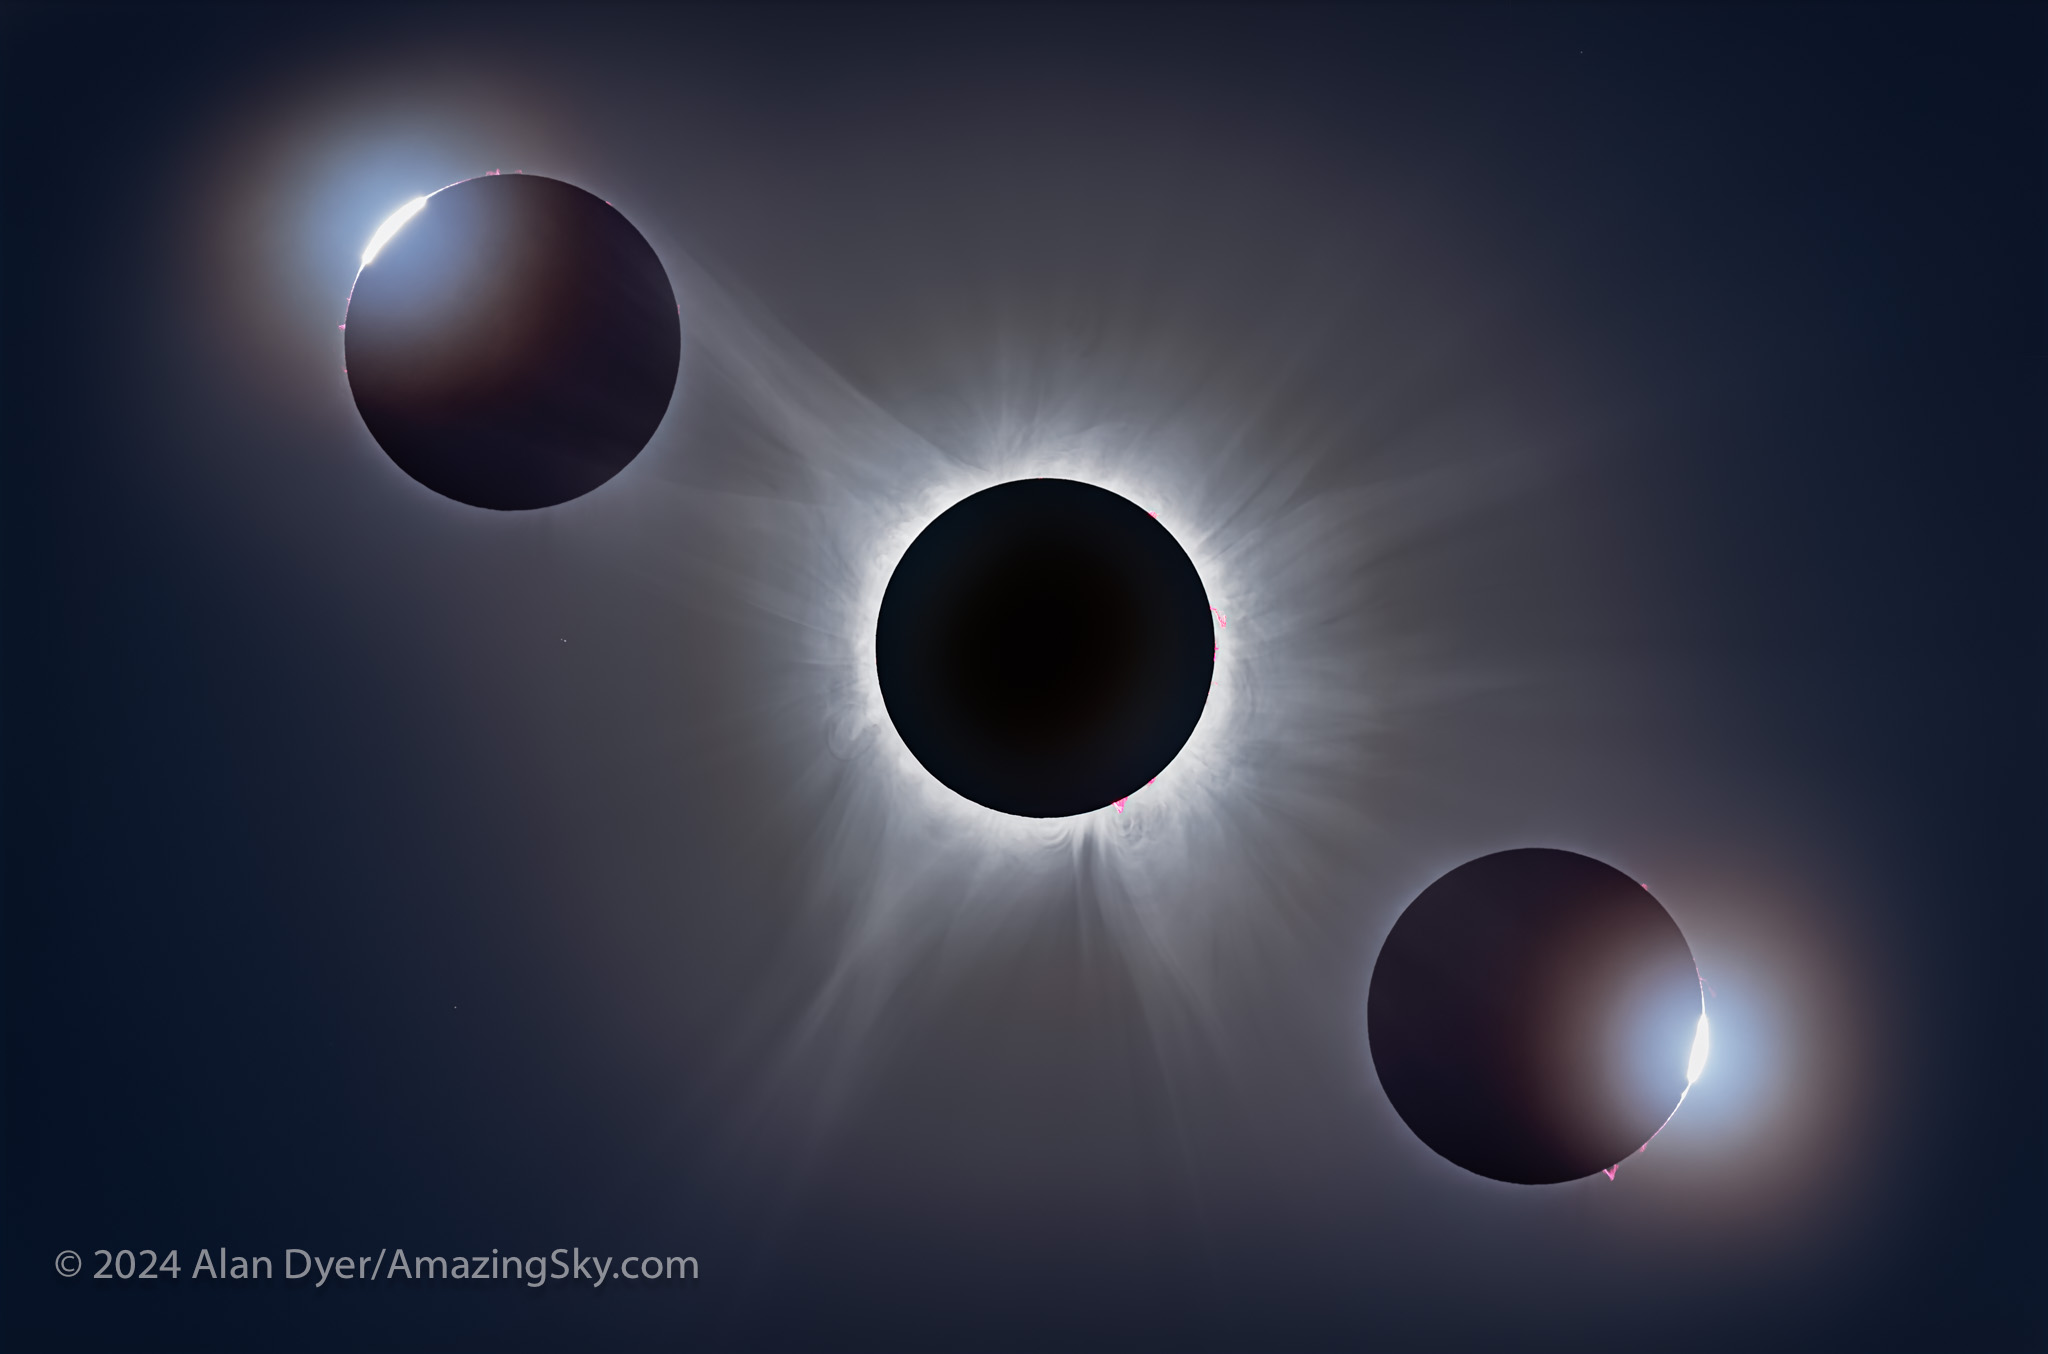
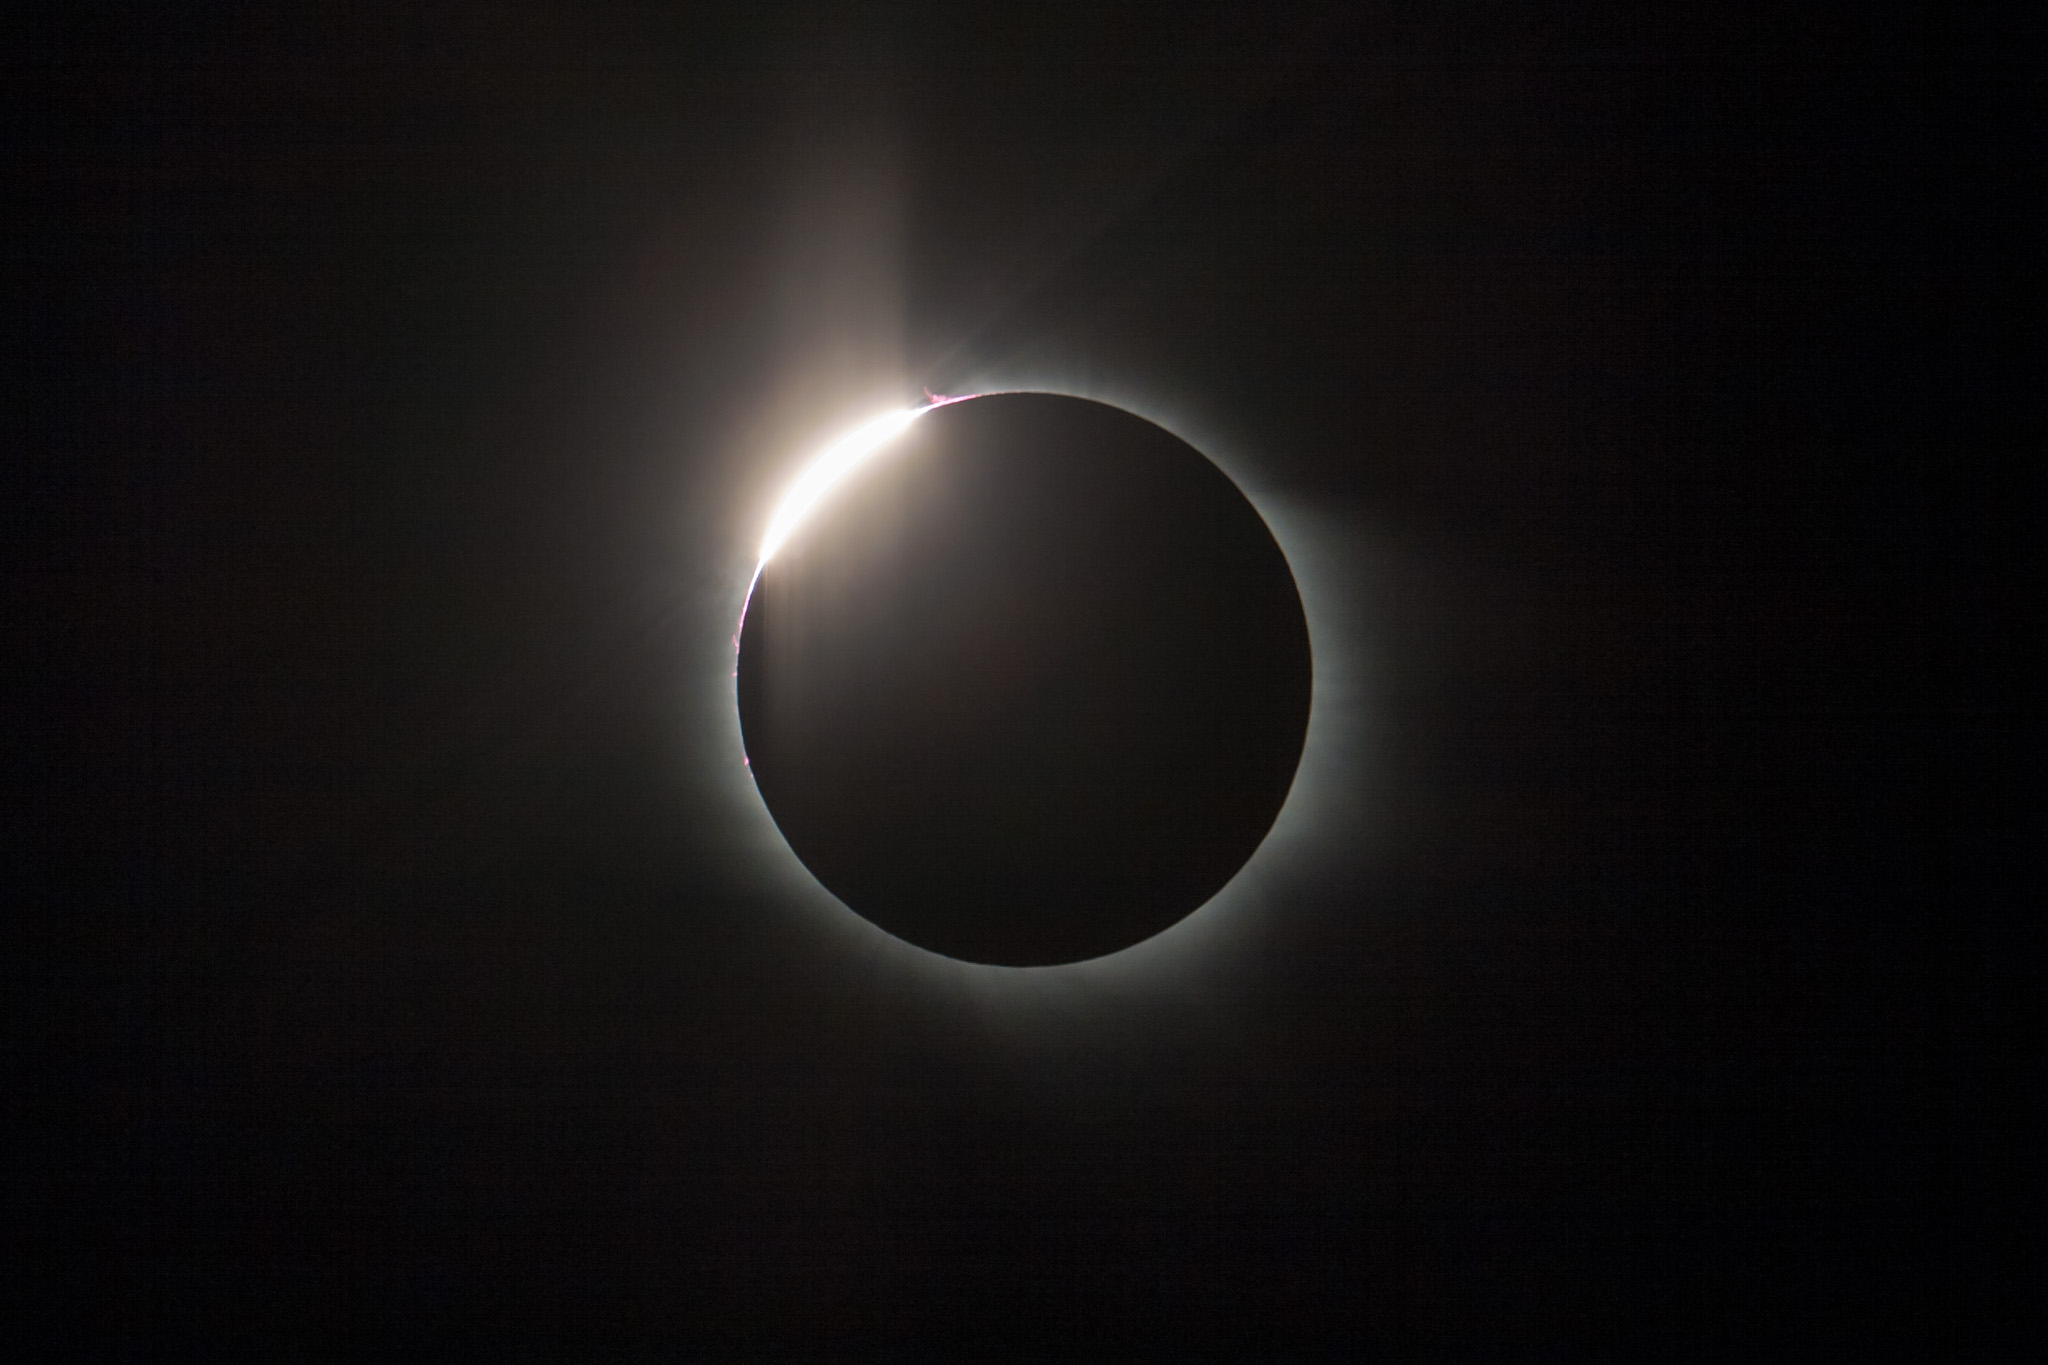
The eclipse in a blend of two exposures to display all the fiery pink prominences that were visible during totality around the lunar disk in one image, set against the bright inner corona of the Sun with the dark disk of the Moon in silhouette in front of the Sun.
Once started all my cameras, except for the one on the Traveler, ran unattended.
At this eclipse I was determined to get a good look at it through the small visual scope I had piggybacked onto the Traveler photo scope. While I had used a similar rig in 2017, I only thought to look through the visual scope 20 seconds before totality ended.
Not this year.
A telescopic close-up of the eclipsed Sun. Onto the central blend of images for totality I layered in single images of each of the diamond rings before and after totality. They are when the last or first burst of sunlight shines through lunar valleys. The first diamond ring is at top left, the last at bottom right, so time runs from left to right.
I got a great look at the eclipsed Sun, its corona structures, flaming pink prominences, and breakout of the red chromosphere layer just as totality ended. (You can’t easily see the chromosphere at the start of totality as it can be risky looking too soon through optics when the Sun’s blindingly bright photosphere is still in view.)
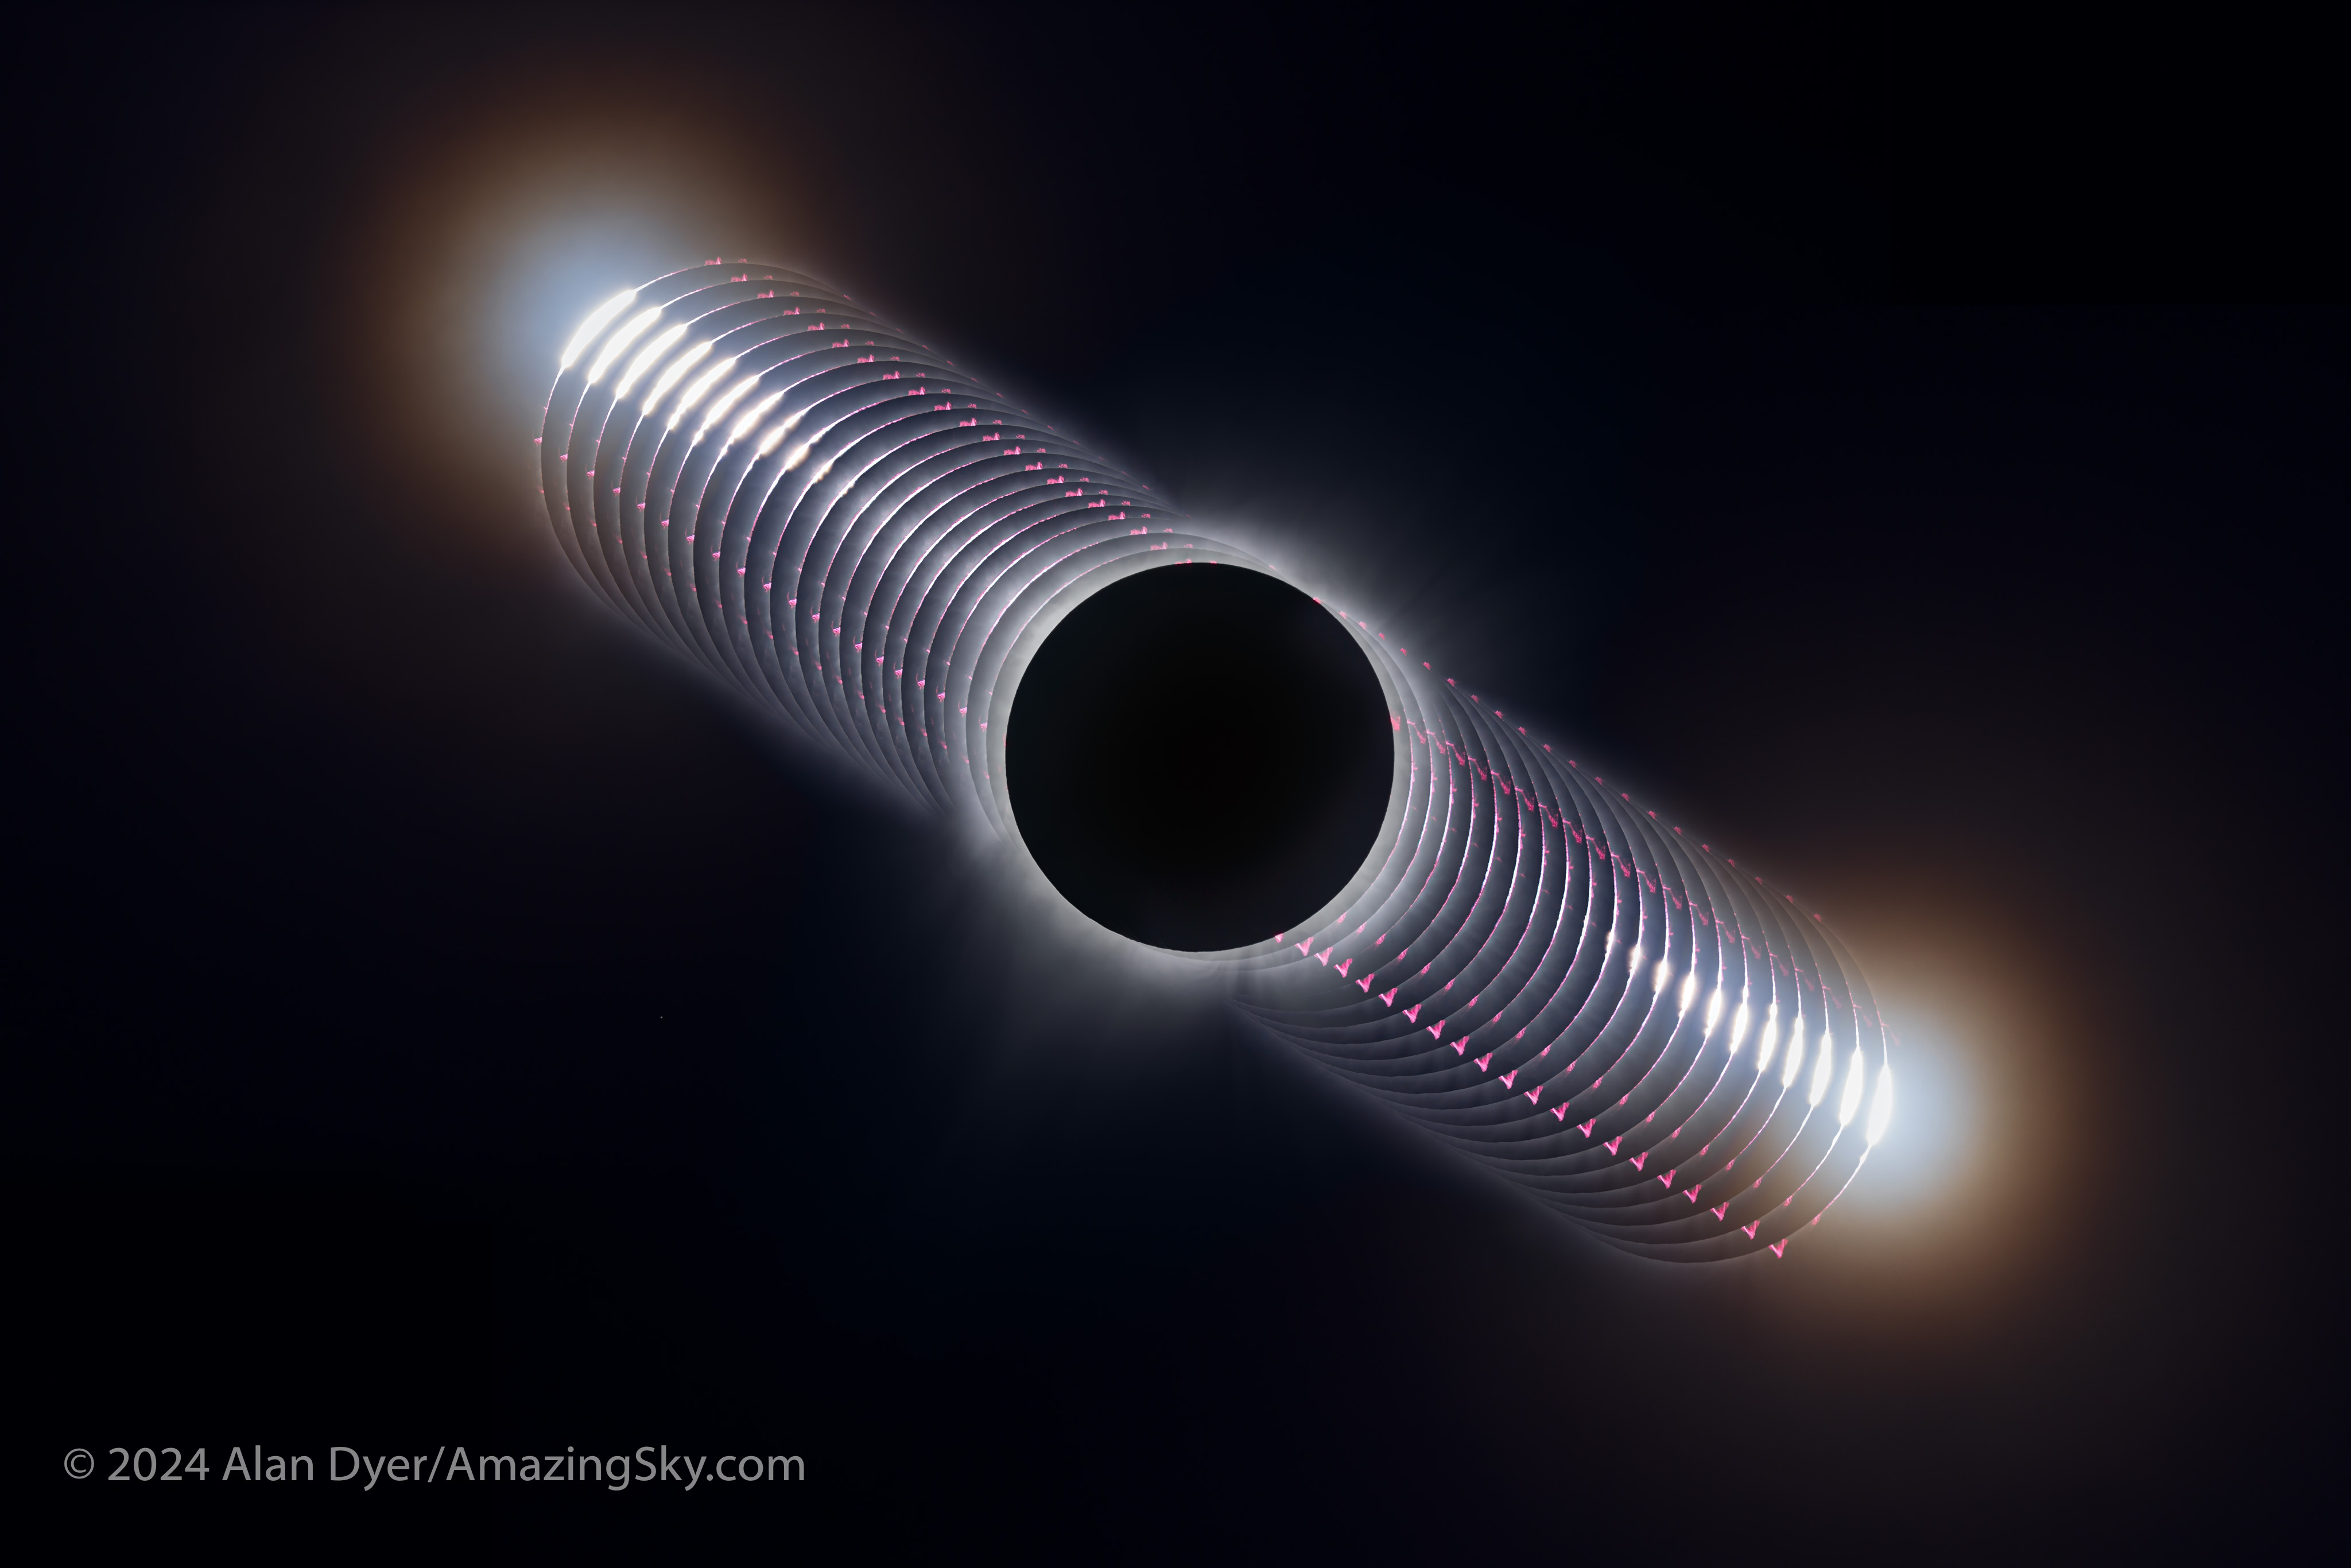
This is a composite showing the sequence of events surrounding totality, from just before totality (at upper left) to just after totality (at lower right), with totality in the middle. The contact images were taken 0.6 seconds apart.
And yet, as at all eclipses, I found the naked eye view the most compelling. The “black hole” Sun looked huge and unearthly. While I had binoculars handy, the same 12×36 image-stabilized binoculars I bring to most eclipses, I completely forgot to look though them, just as I forget at most eclipses!
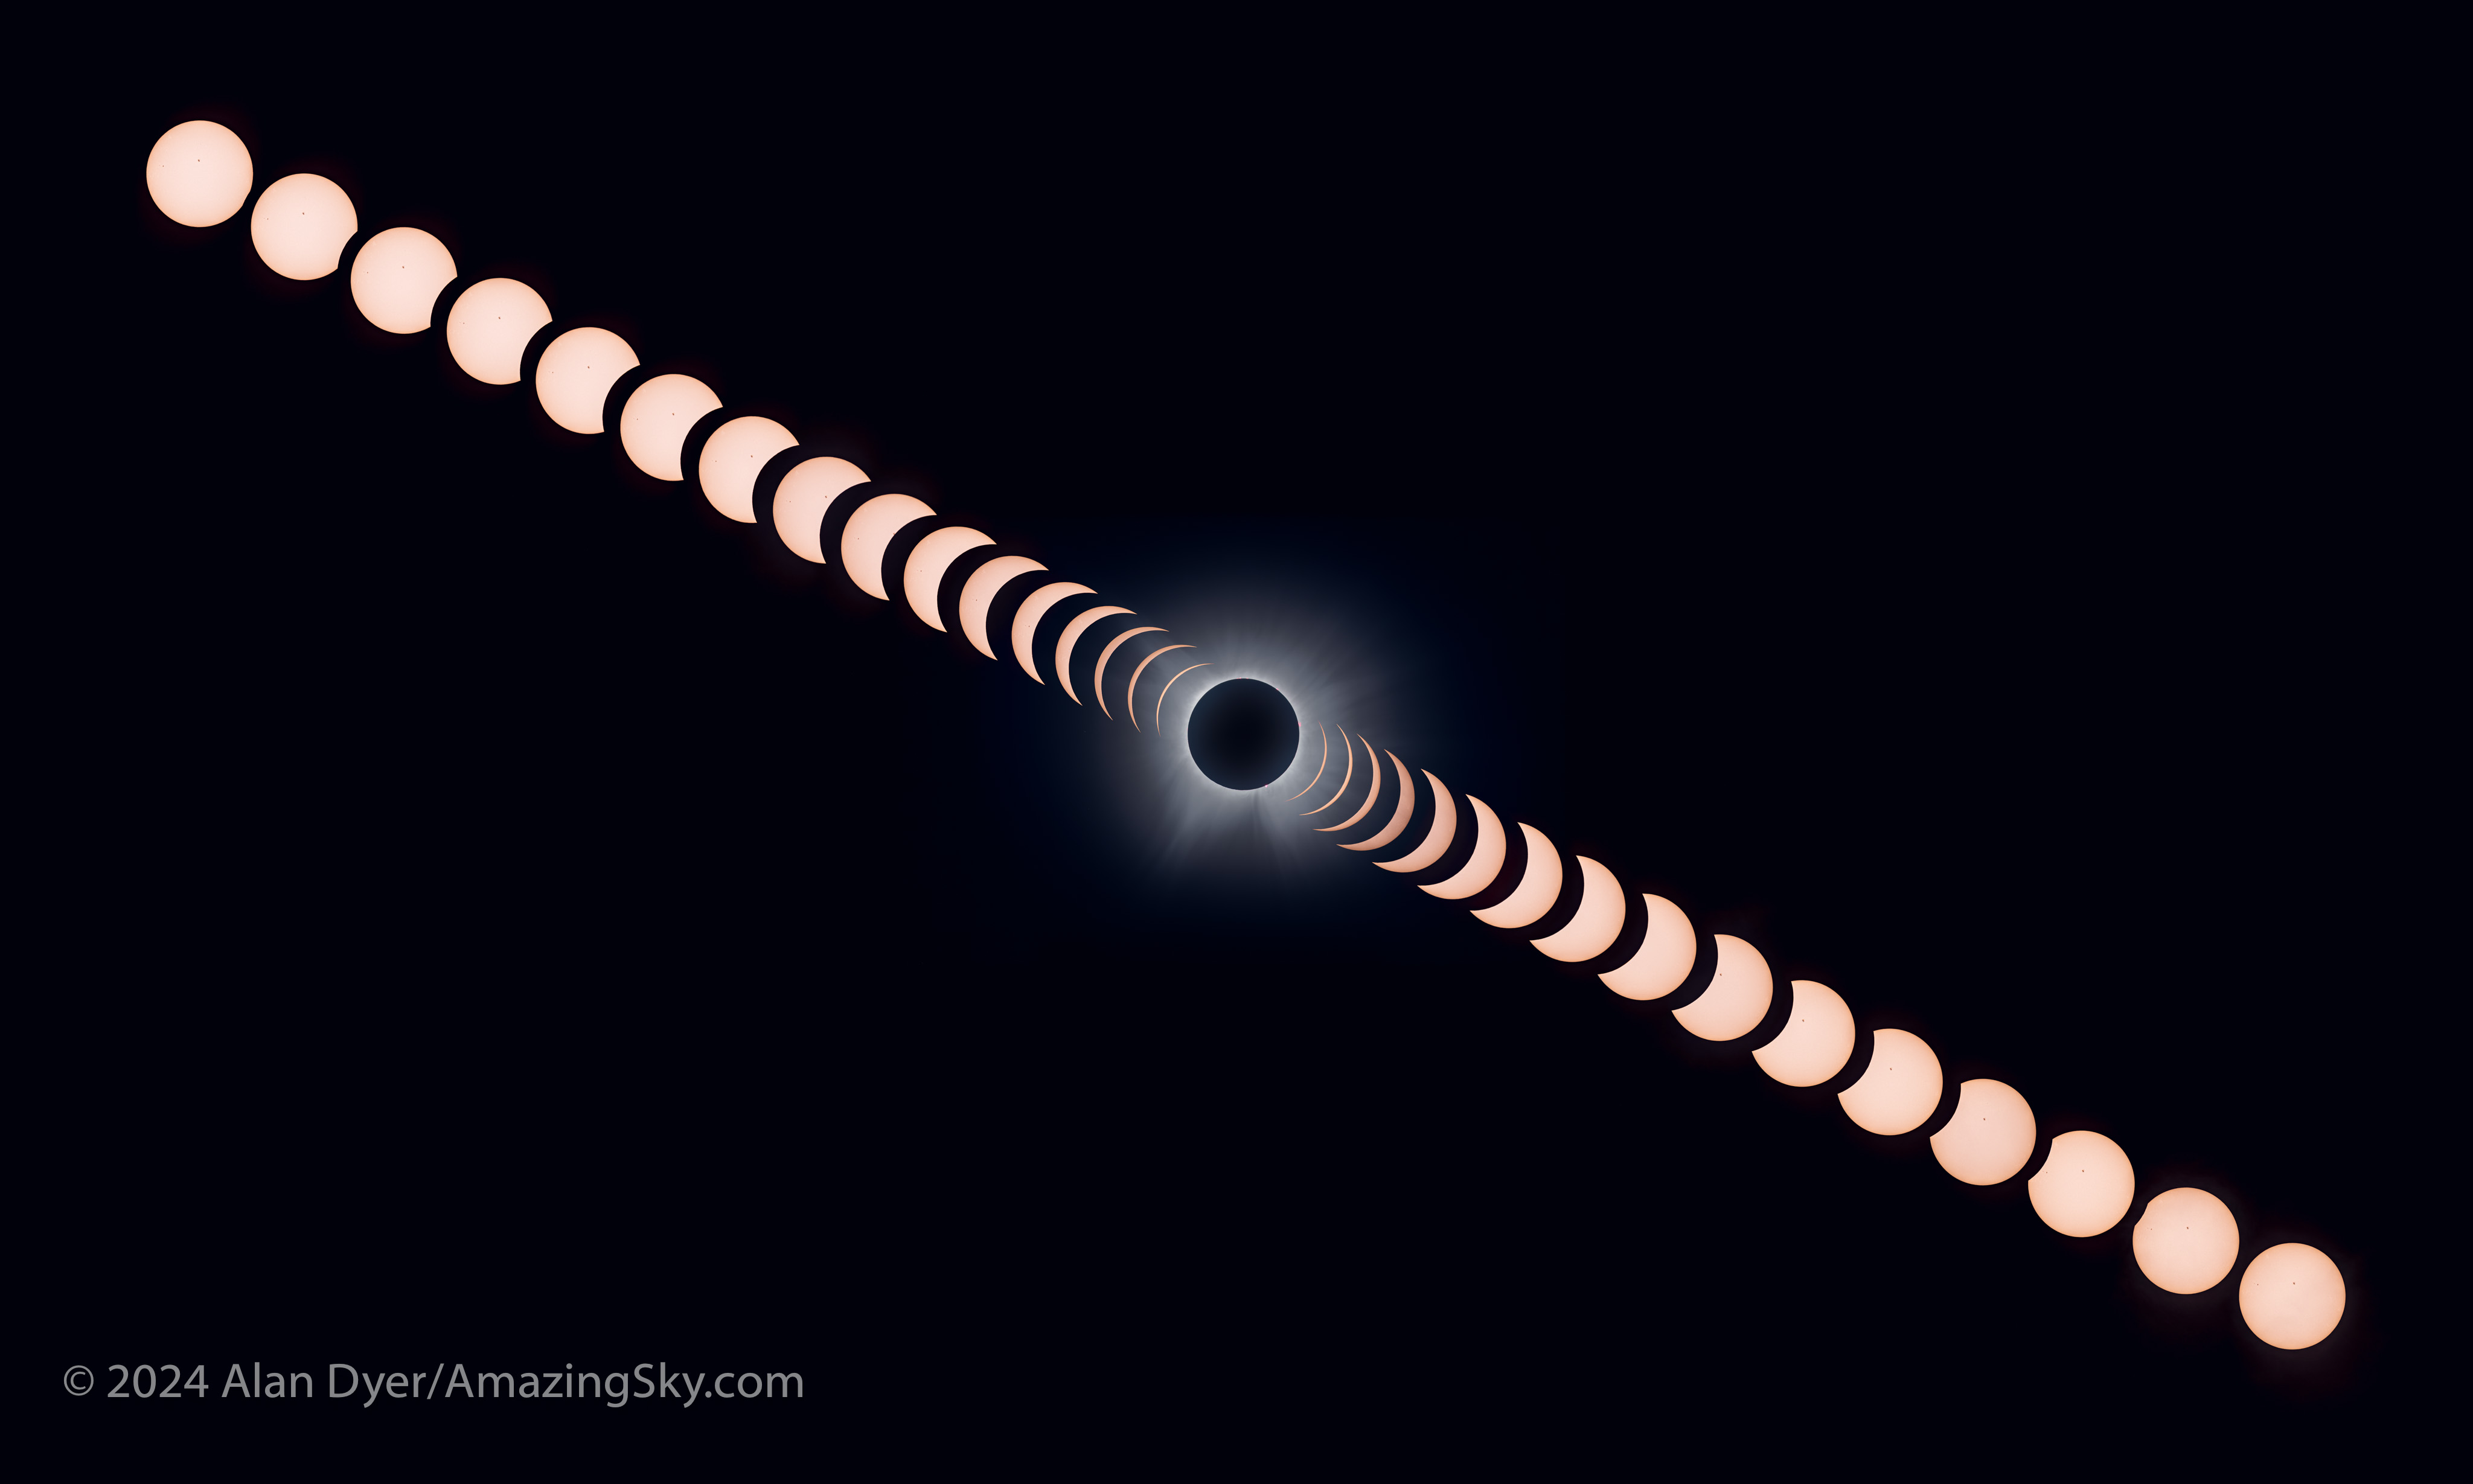
This is a composite showing the complete sequence of the April 8, 2024 eclipse of the Sun, from first contact (at upper left) to last contact (at lower right), with totality at mid-eclipse in the middle.
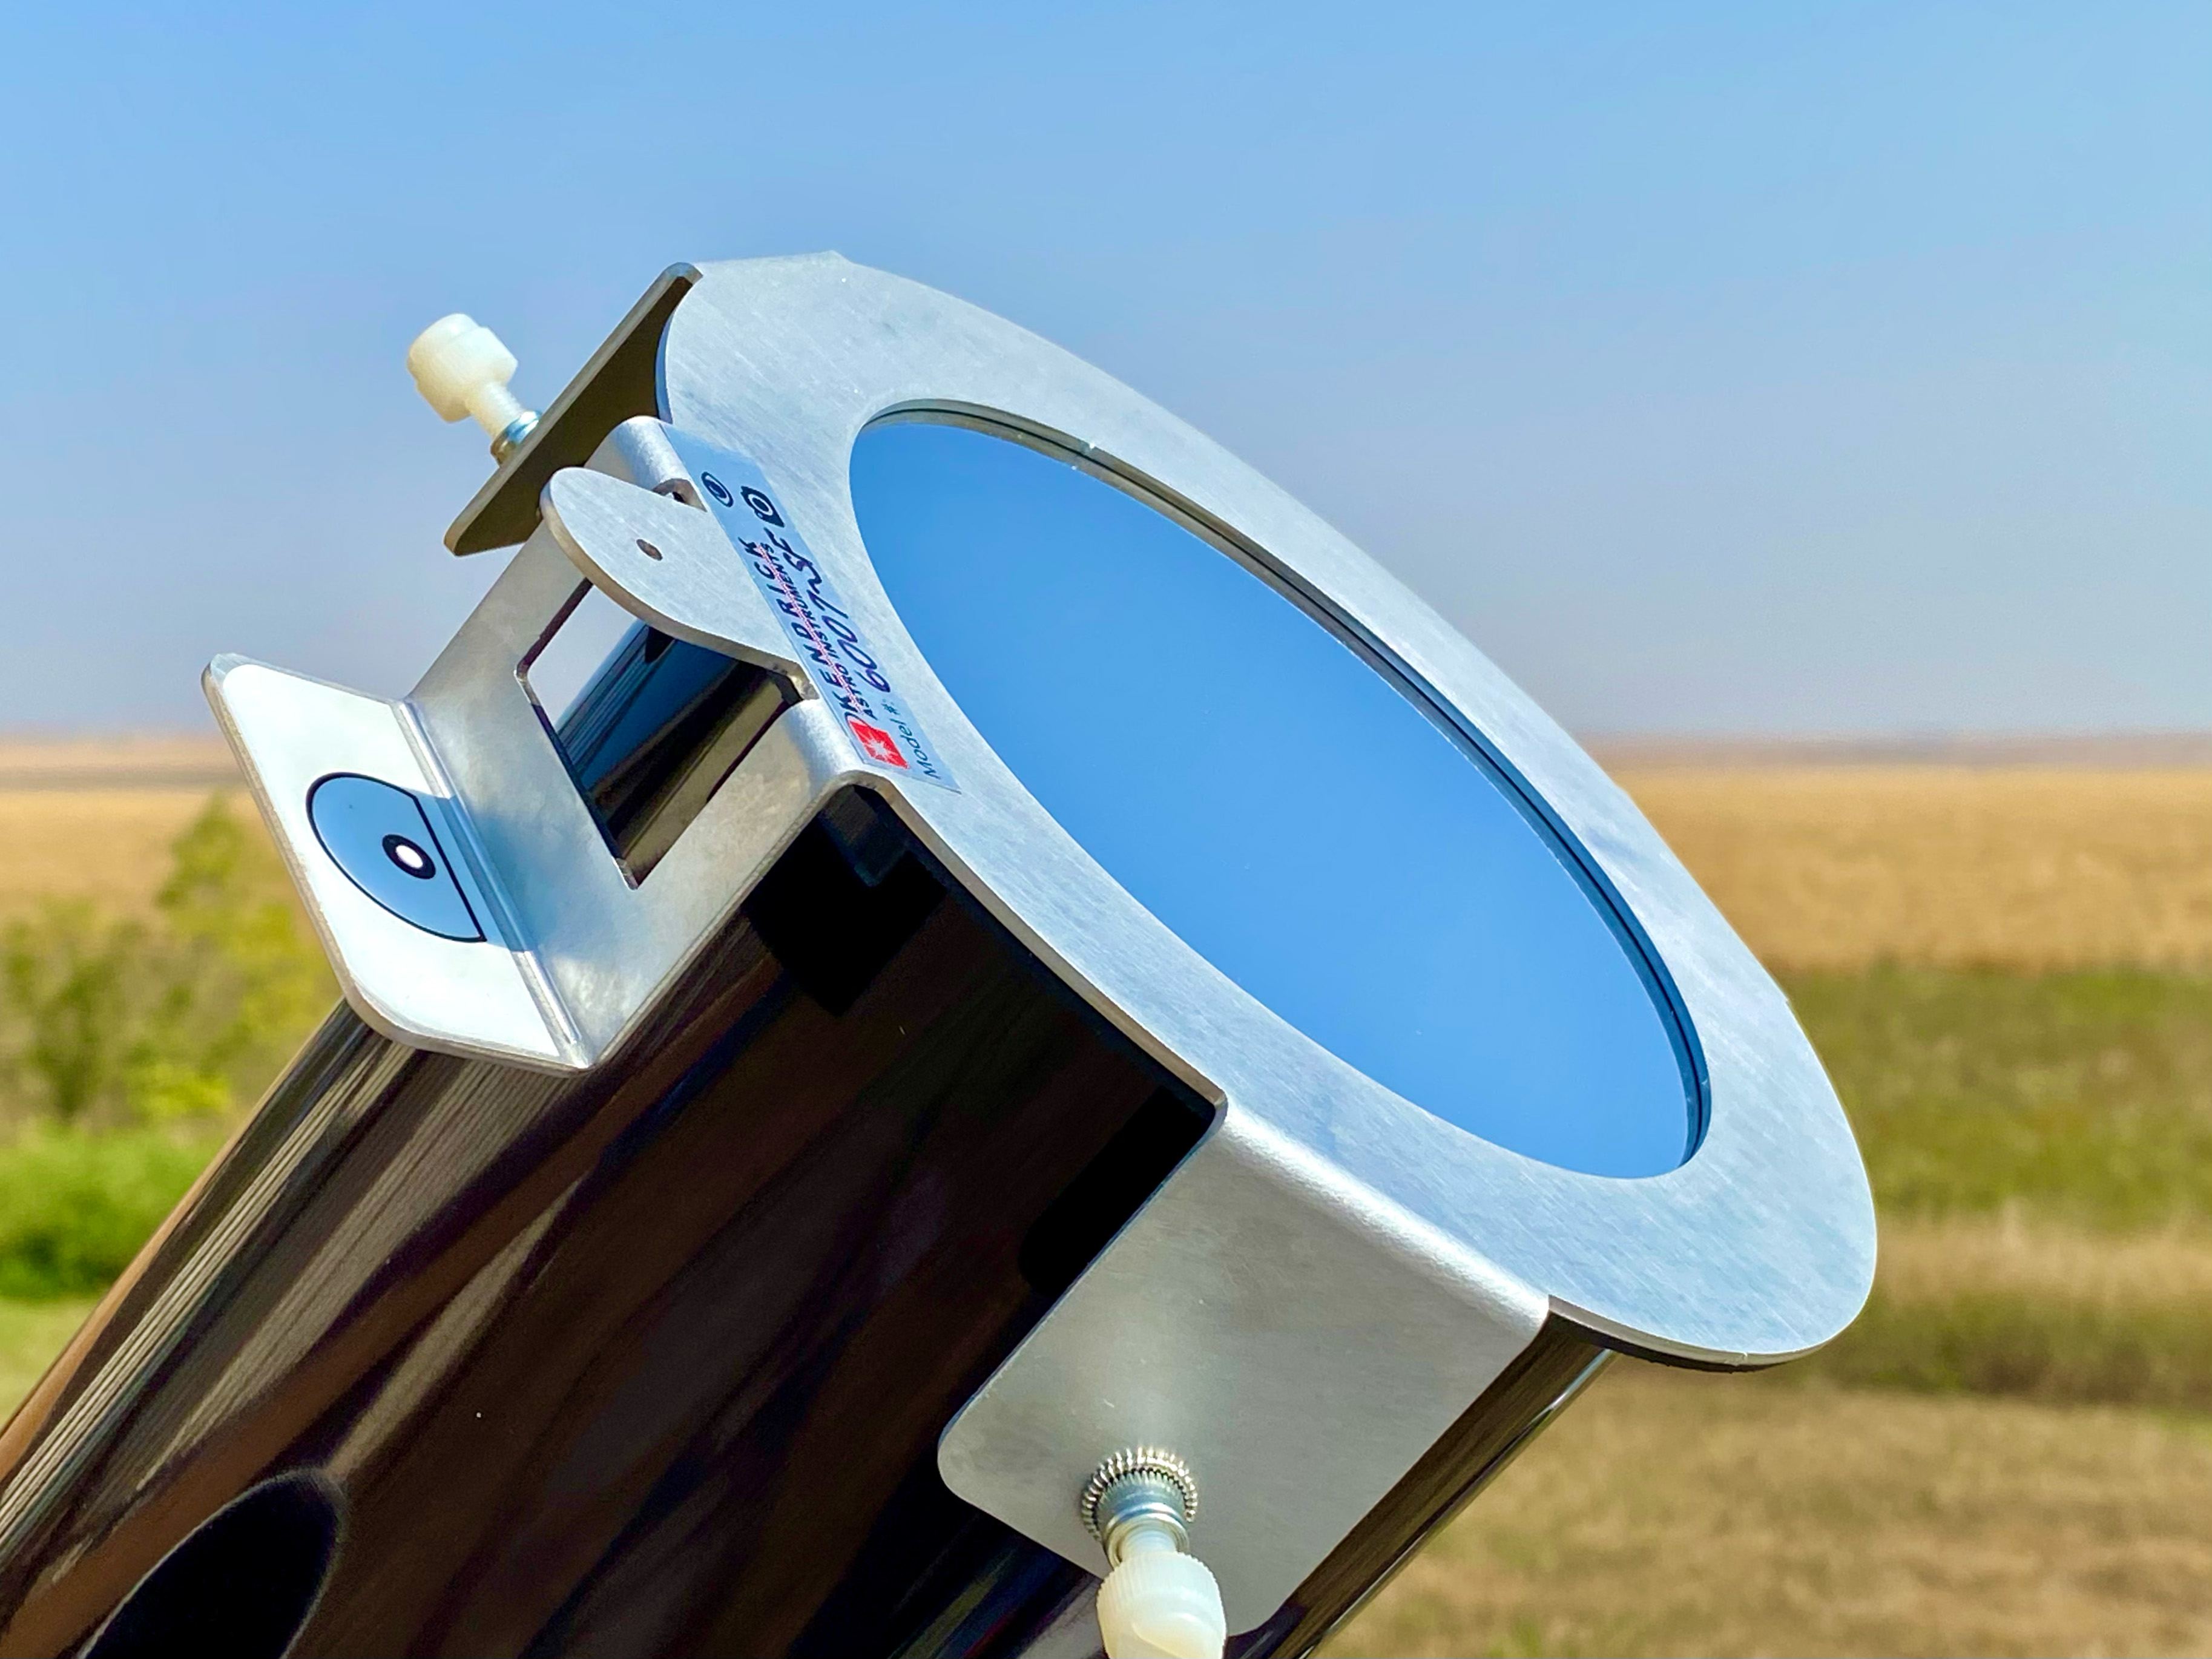
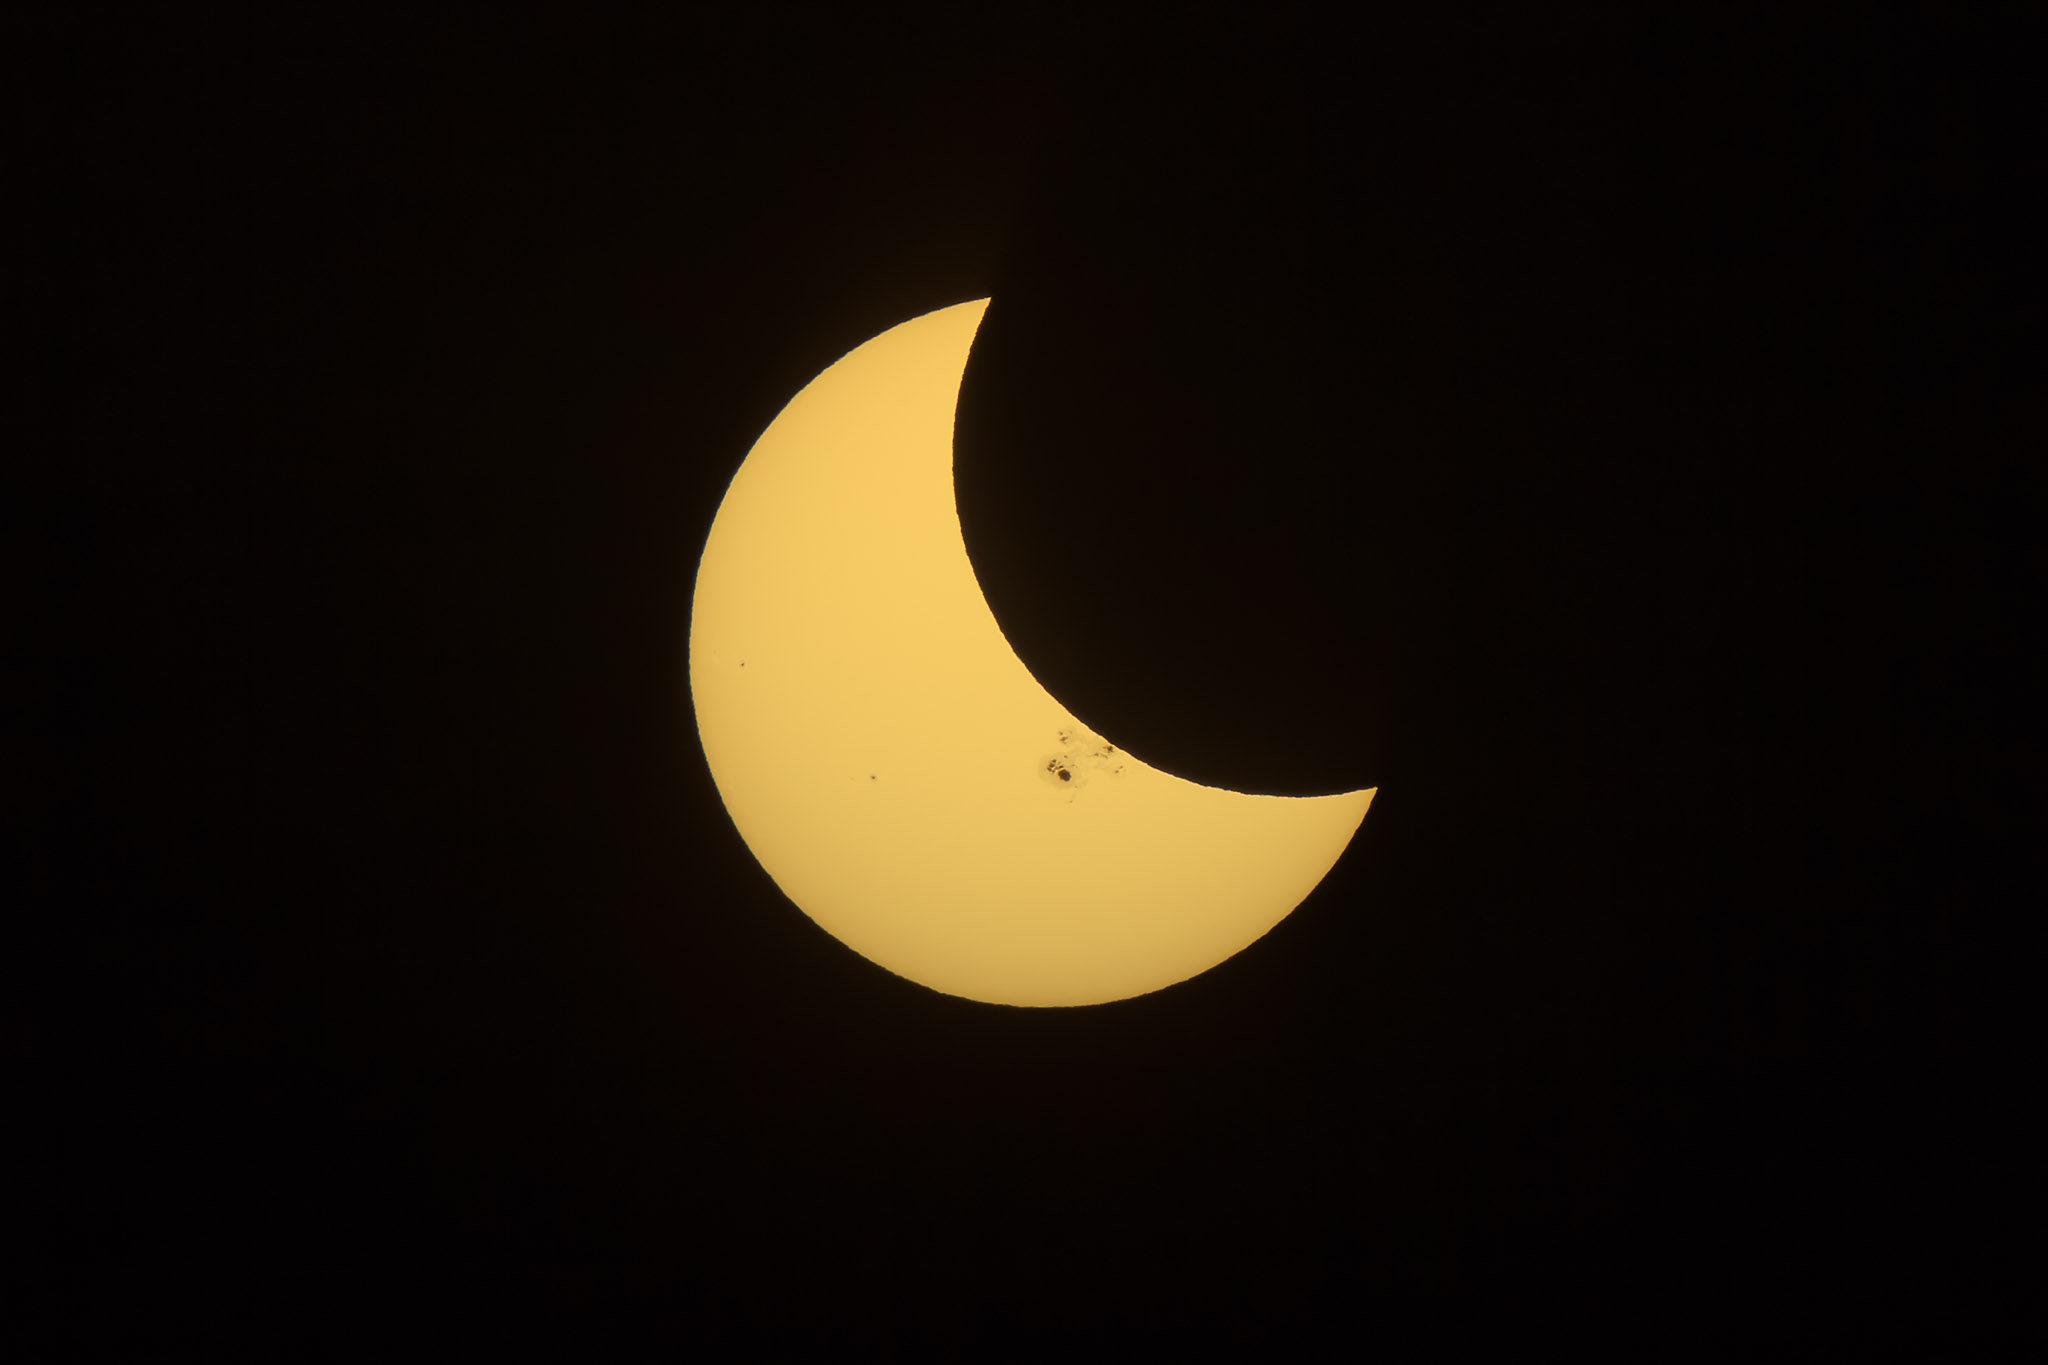
I shot all the images with the Astro-Physics Traveler 105mm refractor at 630mm focal length and f/6, with the Canon R5 at ISO 100. The partial phases are 1/800 or 1/400 second exposures through a Kendrick/Baader solar filter.
Wanting to record the full sequence, I shot the partial phases until the bitter end. But post-eclipse, people came over and had a look through my scope (I think mine was the only telescope on site). We had a great time exchanging impressions. The hand-held phone camera photos people showed me looked fabulous!
I looked for fleeting shadow bands just before and after totality (I laid out a white sheet on the ground for the purpose) but saw none, a negative observation confirmed by a fellow eclipse chaser at the site.
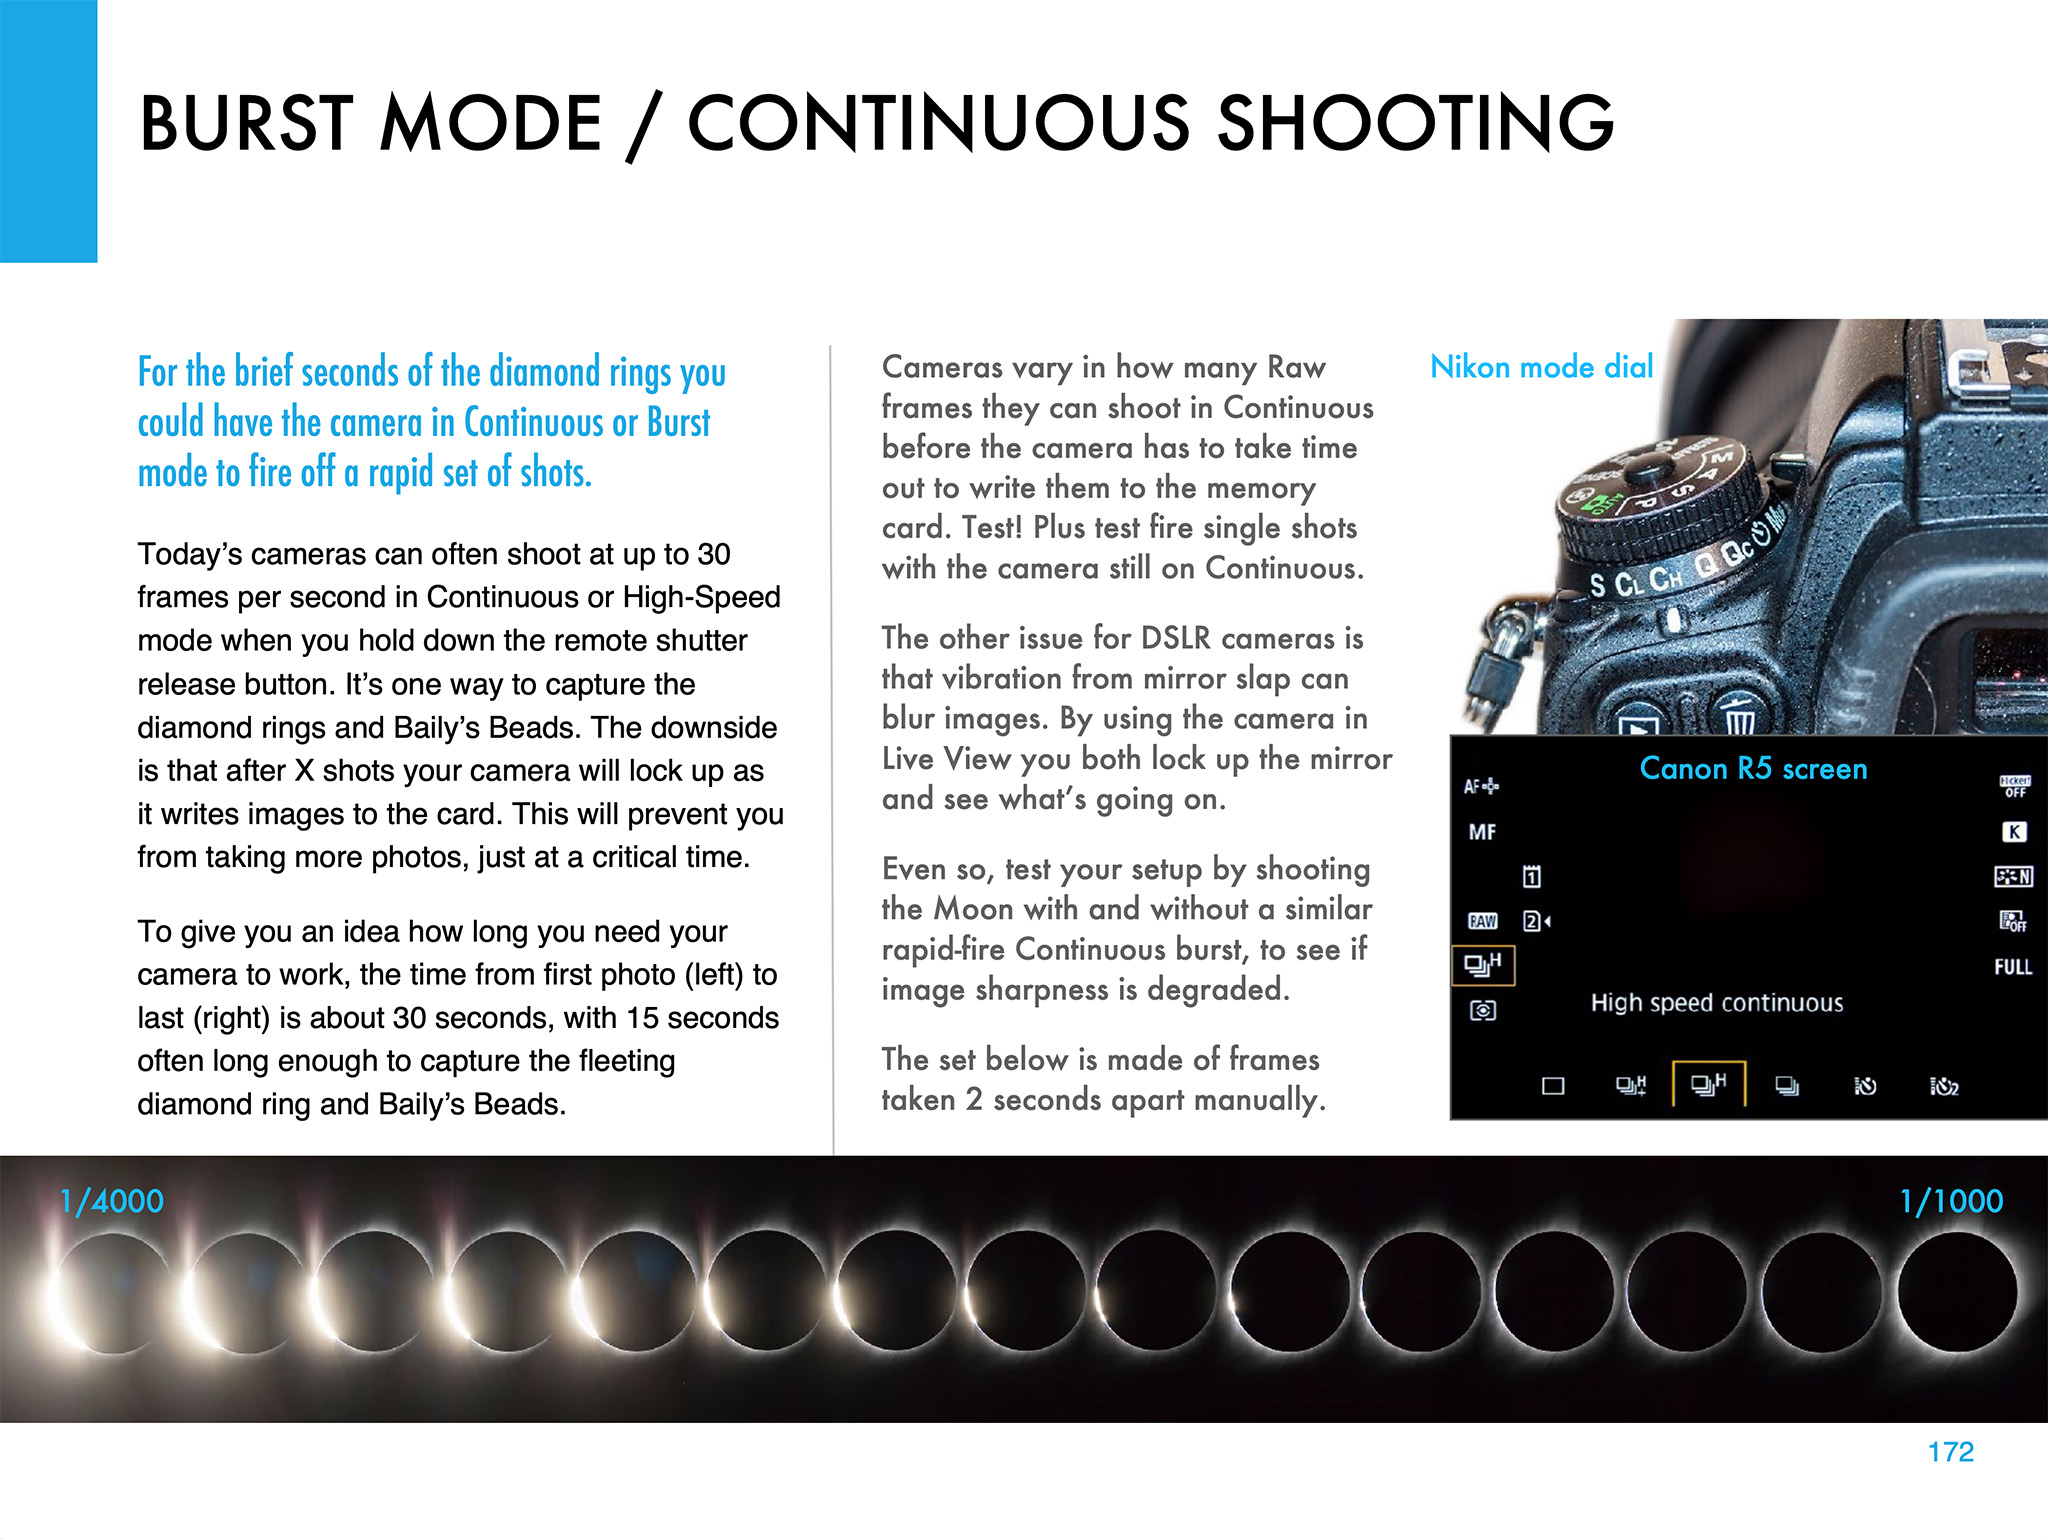
Time-lapse movies of the second and third contact (start and end of totality) diamond rings, shot through the telescope with the Canon R5 in continuous burst mode for hundreds of frames each.
I did two live interviews for CBC Radio, for the Edmonton and Calgary stations, but not until after the eclipse ended. By the time I did those and finished packing away my carload of gear, it was 6:30 p.m., three hours after totality.
I was the last to leave the site, with fishermen now arriving for an evening’s catch.
I was in that shadow as the Space Station flew over. Astronauts saw the elliptical shadow moving over eastern Canada.
The passage of the lunar shadow across the continent, showing where the clouds were. I was under the wispy clouds at upper right in Québec.
I faced no traffic jams heading back to the hotel at Ste. Helen-de-Bagot. I processed and posted one eclipse image that night. And I revised the price (down to $2.99 U.S.) and description of my How to Photograph the Solar Eclipses ebook, as now only the big processing chapter is of any value, post-eclipse. It continues to sell.
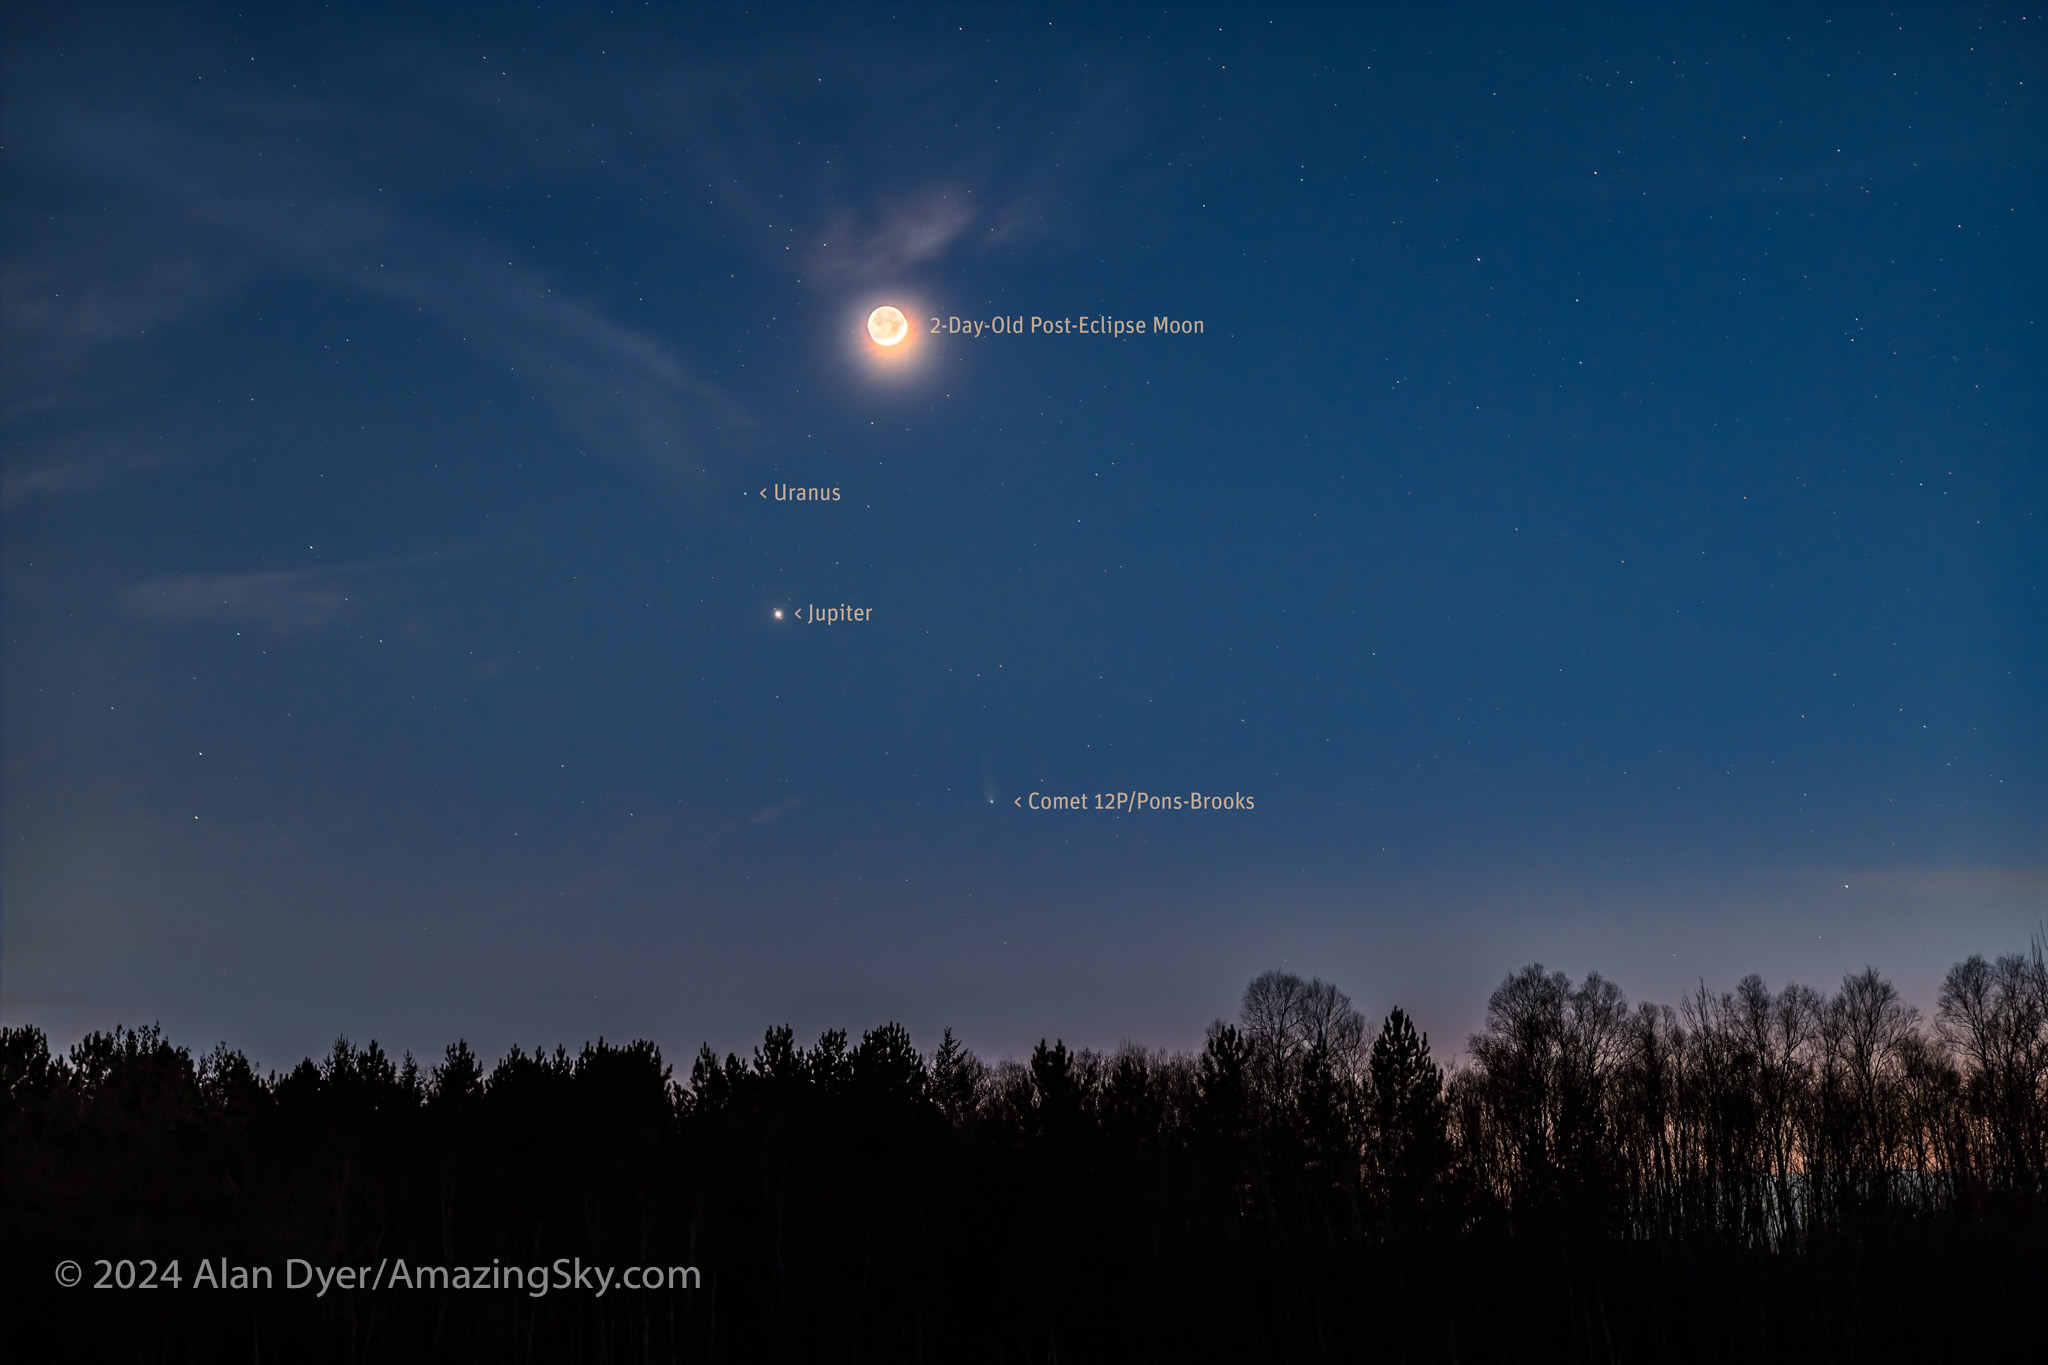
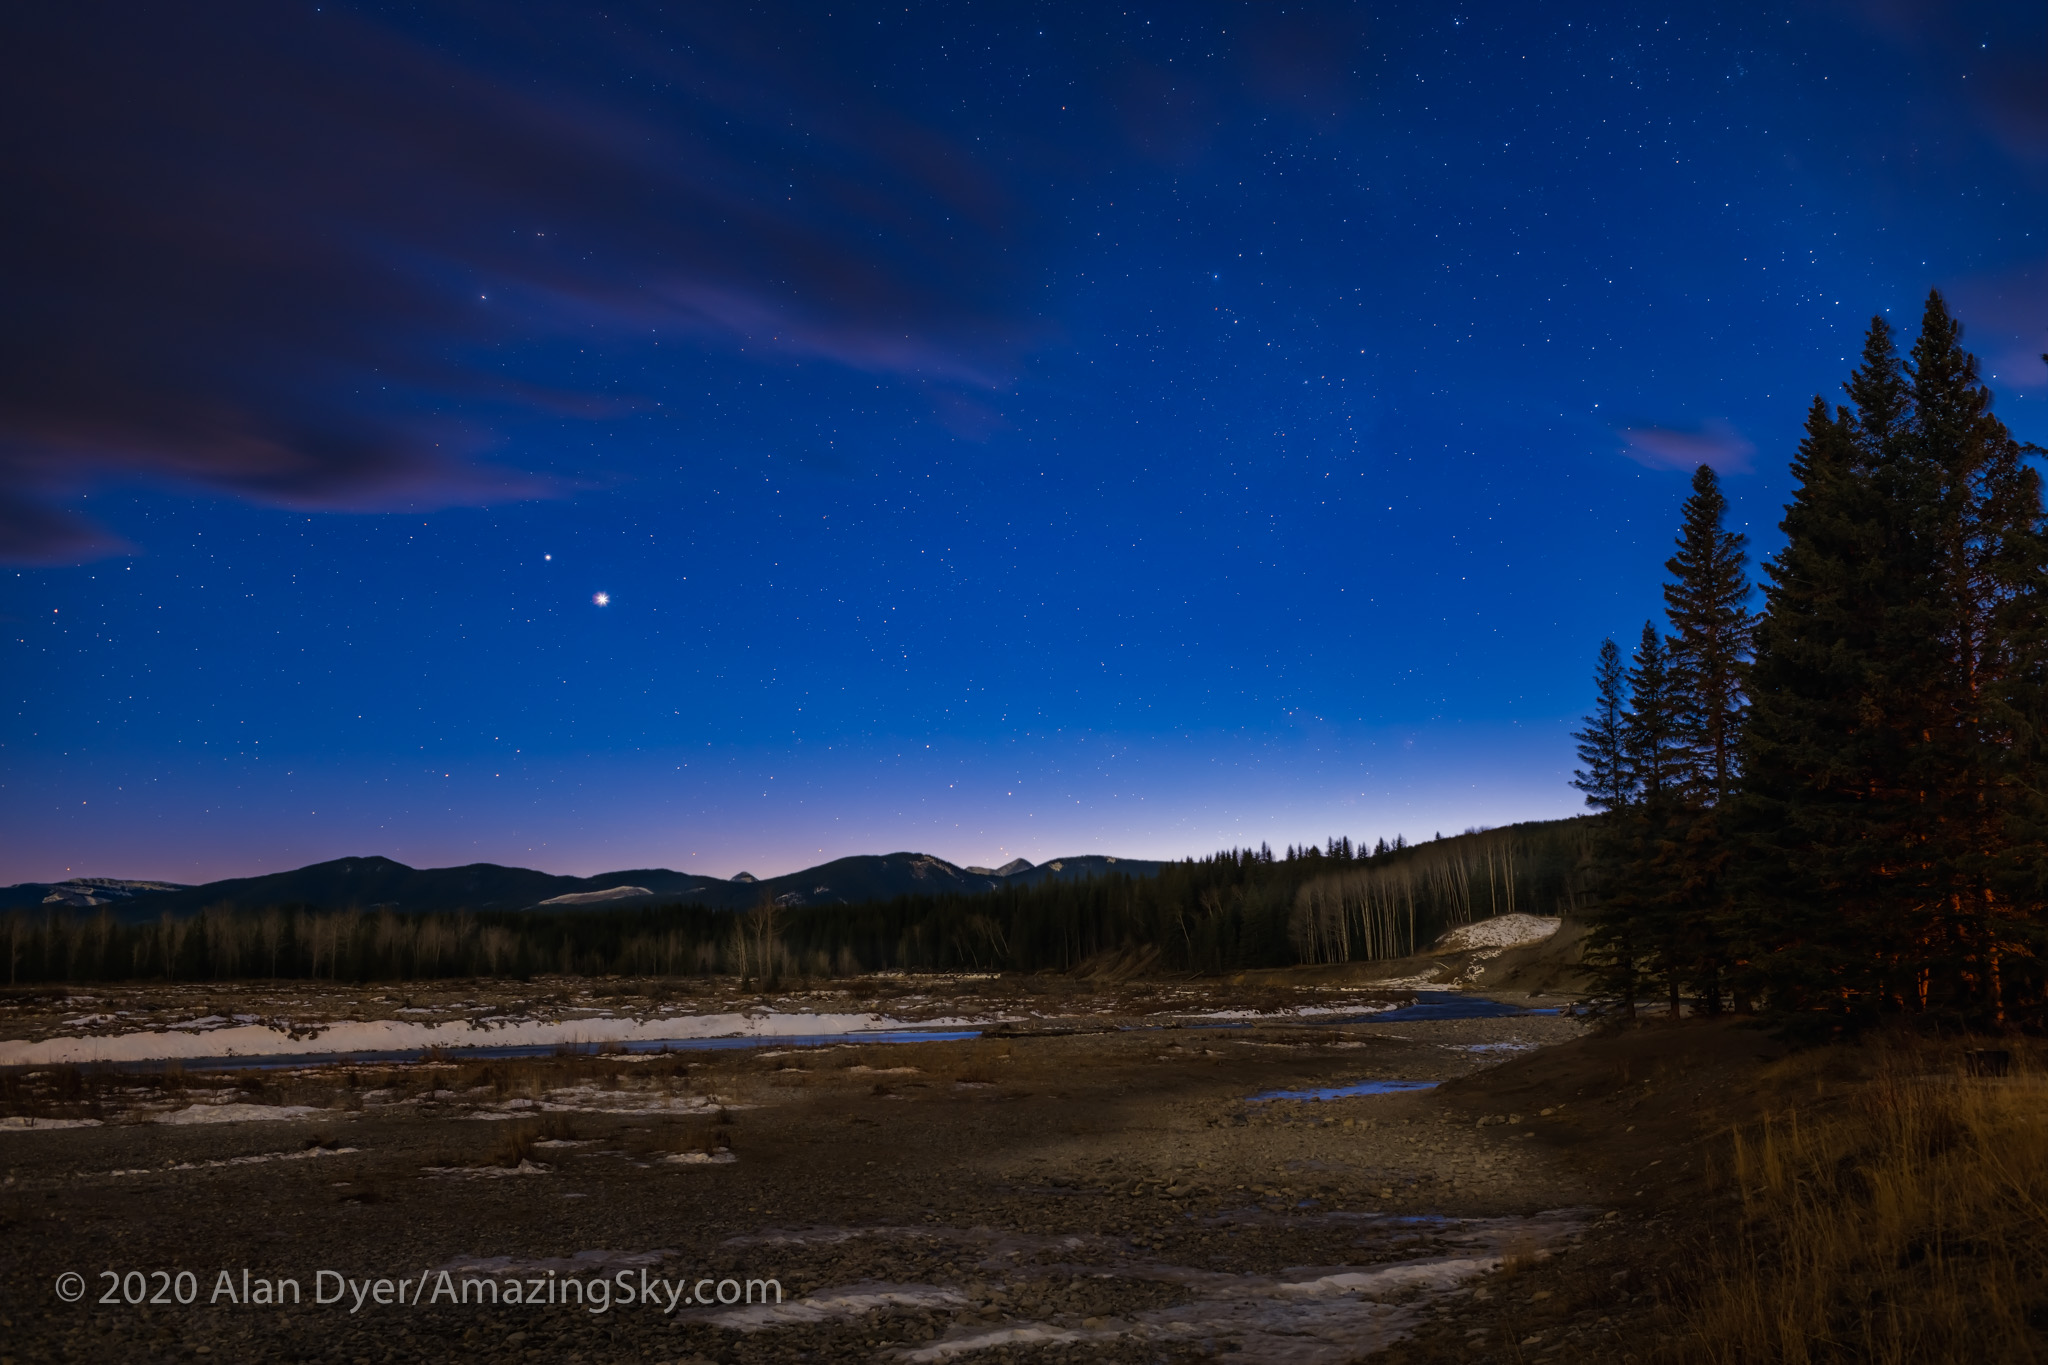
This is the waxing crescent Moon on April 10, 2024, two days after it eclipsed the Sun, and with it above the bright planet Jupiter, with it also near Uranus. Below the solar system worlds is the faint Comet 12P/Pons-Brooks, visible here as a fuzzy star with a stubby tail..
On the long drive back to Alberta, with the pressure of having to make time now gone, I spent pleasant evenings stopping to see friends and family on the road home. So I didn’t start work on the complex blends and composite images I show here until I got home a week after the eclipse.
The happy eclipse chaser having bagged his game!
The 17-day-long drive was nearly 9,000 km over 100 hours behind the wheel. Was it worth it? Of course!
Would I do it again? It’s a moot question as none of the upcoming eclipses allows for a cross-continent drive. Except perhaps in July 2028 in Australia. But I suspect just heading inland a day or two over the Great Dividing Range will be enough to get away from winter coastal cloud in New South Wales. (Sydney is in the path, but so is a cottage I rented last month near Coonabarabran for my superb March stay under the southern skies!)
The next total eclipse of the Sun visible from anywhere in Canada will be August 22, 2044. I won’t have to drive anywhere, as it passes right over my house! But I will have to live that long to enjoy a eclipse from my own backyard.
I suspect this was my last chance to see – and drive to – a total eclipse in Canada.
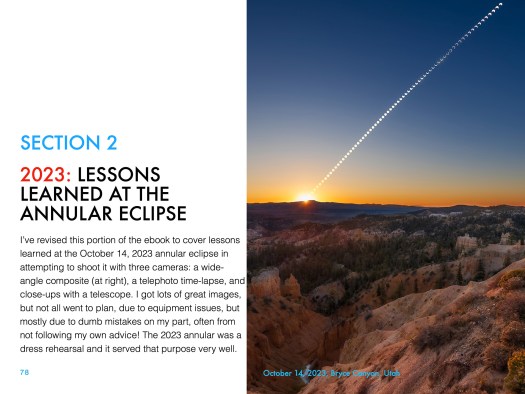
Like all eclipses, seeing the October 14 annular eclipse of the Sun was not a certainty. As good luck and planning would have it, the sky and location could not have been better!
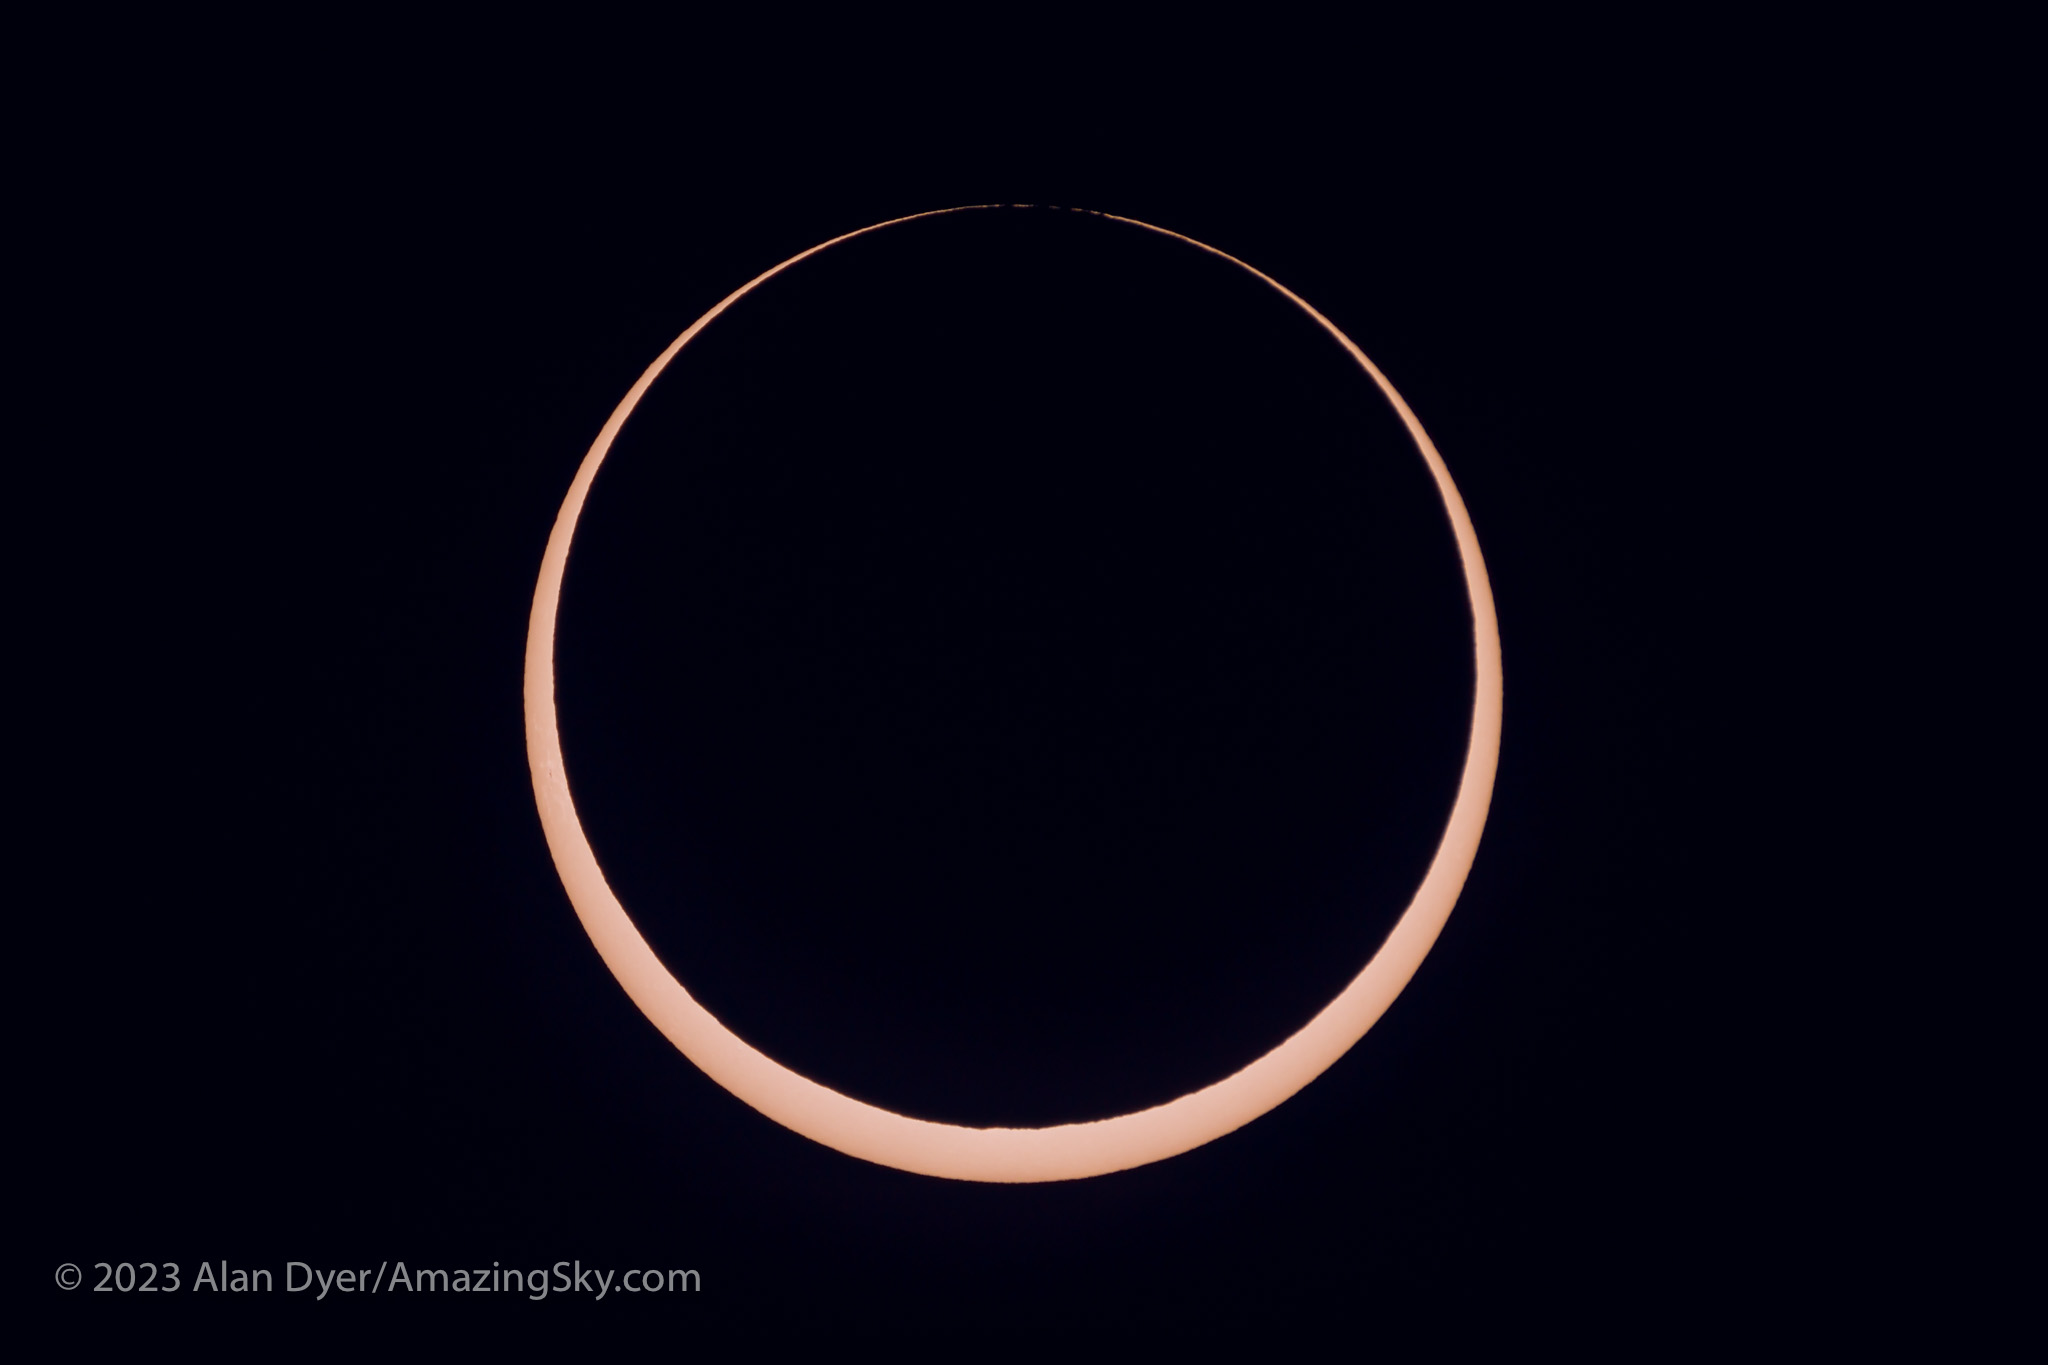
Annular eclipses of the Sun don’t present the spectacle of a total eclipse. Because the Moon is near its farthest point from Earth, its disk is not large enough to completely cover the Sun. At mid-eclipse, as I show below, a ring of sunlight (dubbed a “ring of fire”) remains, still too bright to view without a solar filter.
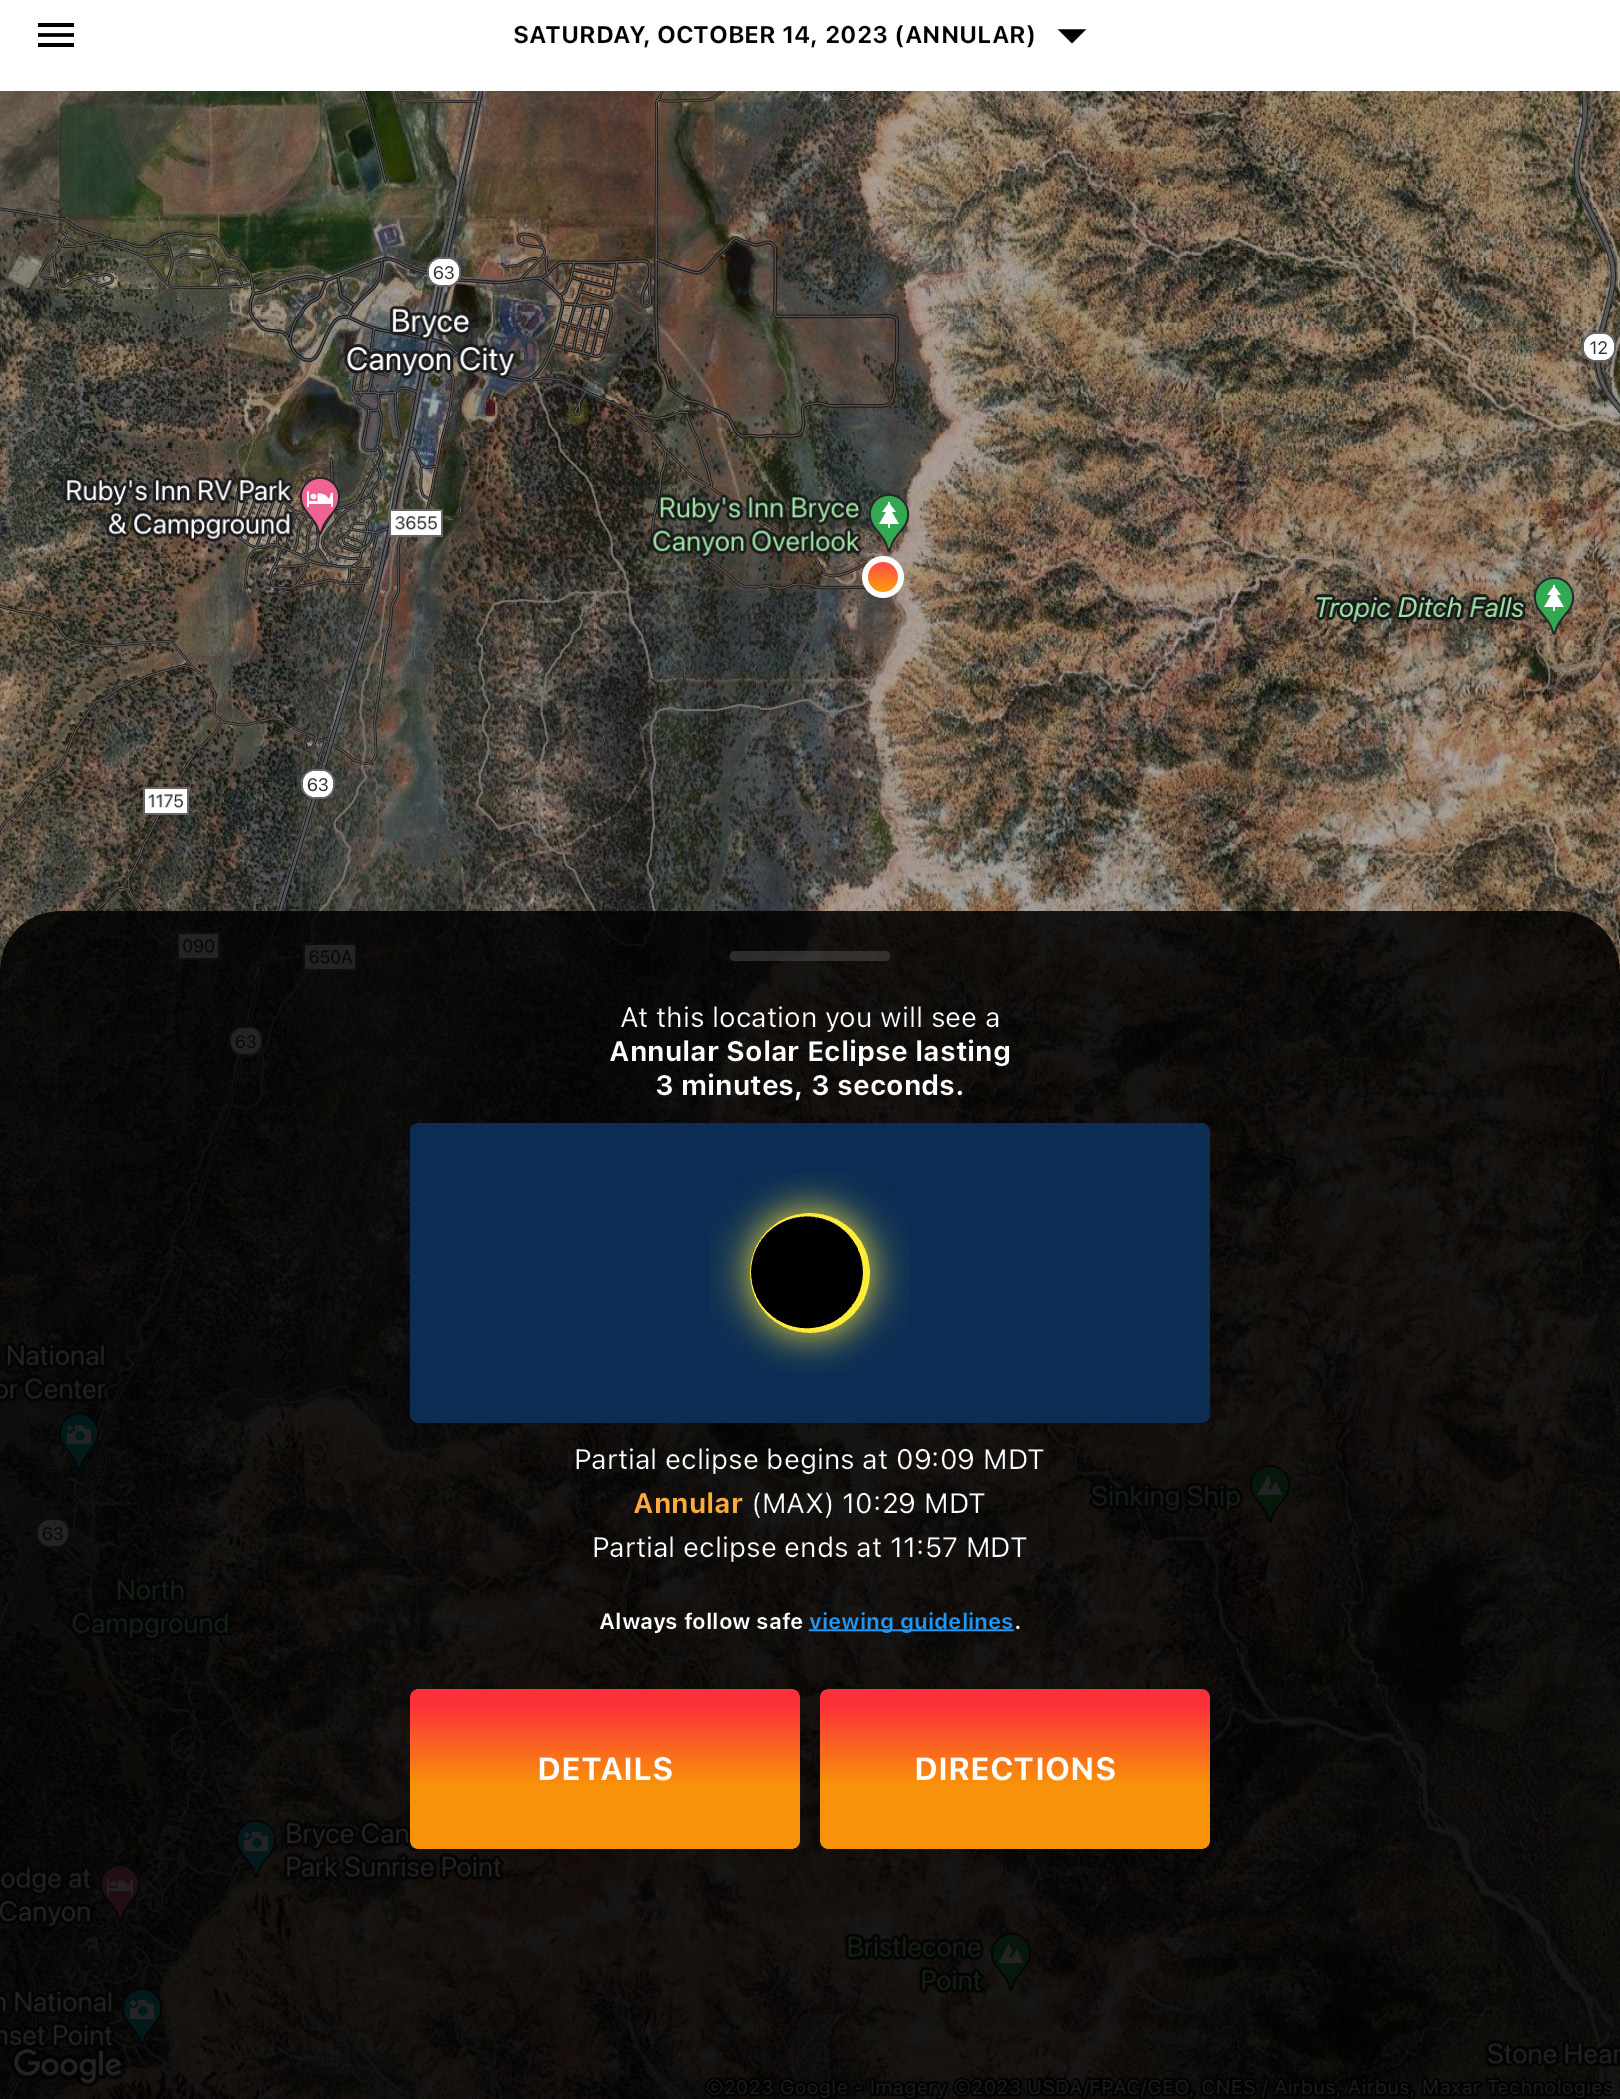
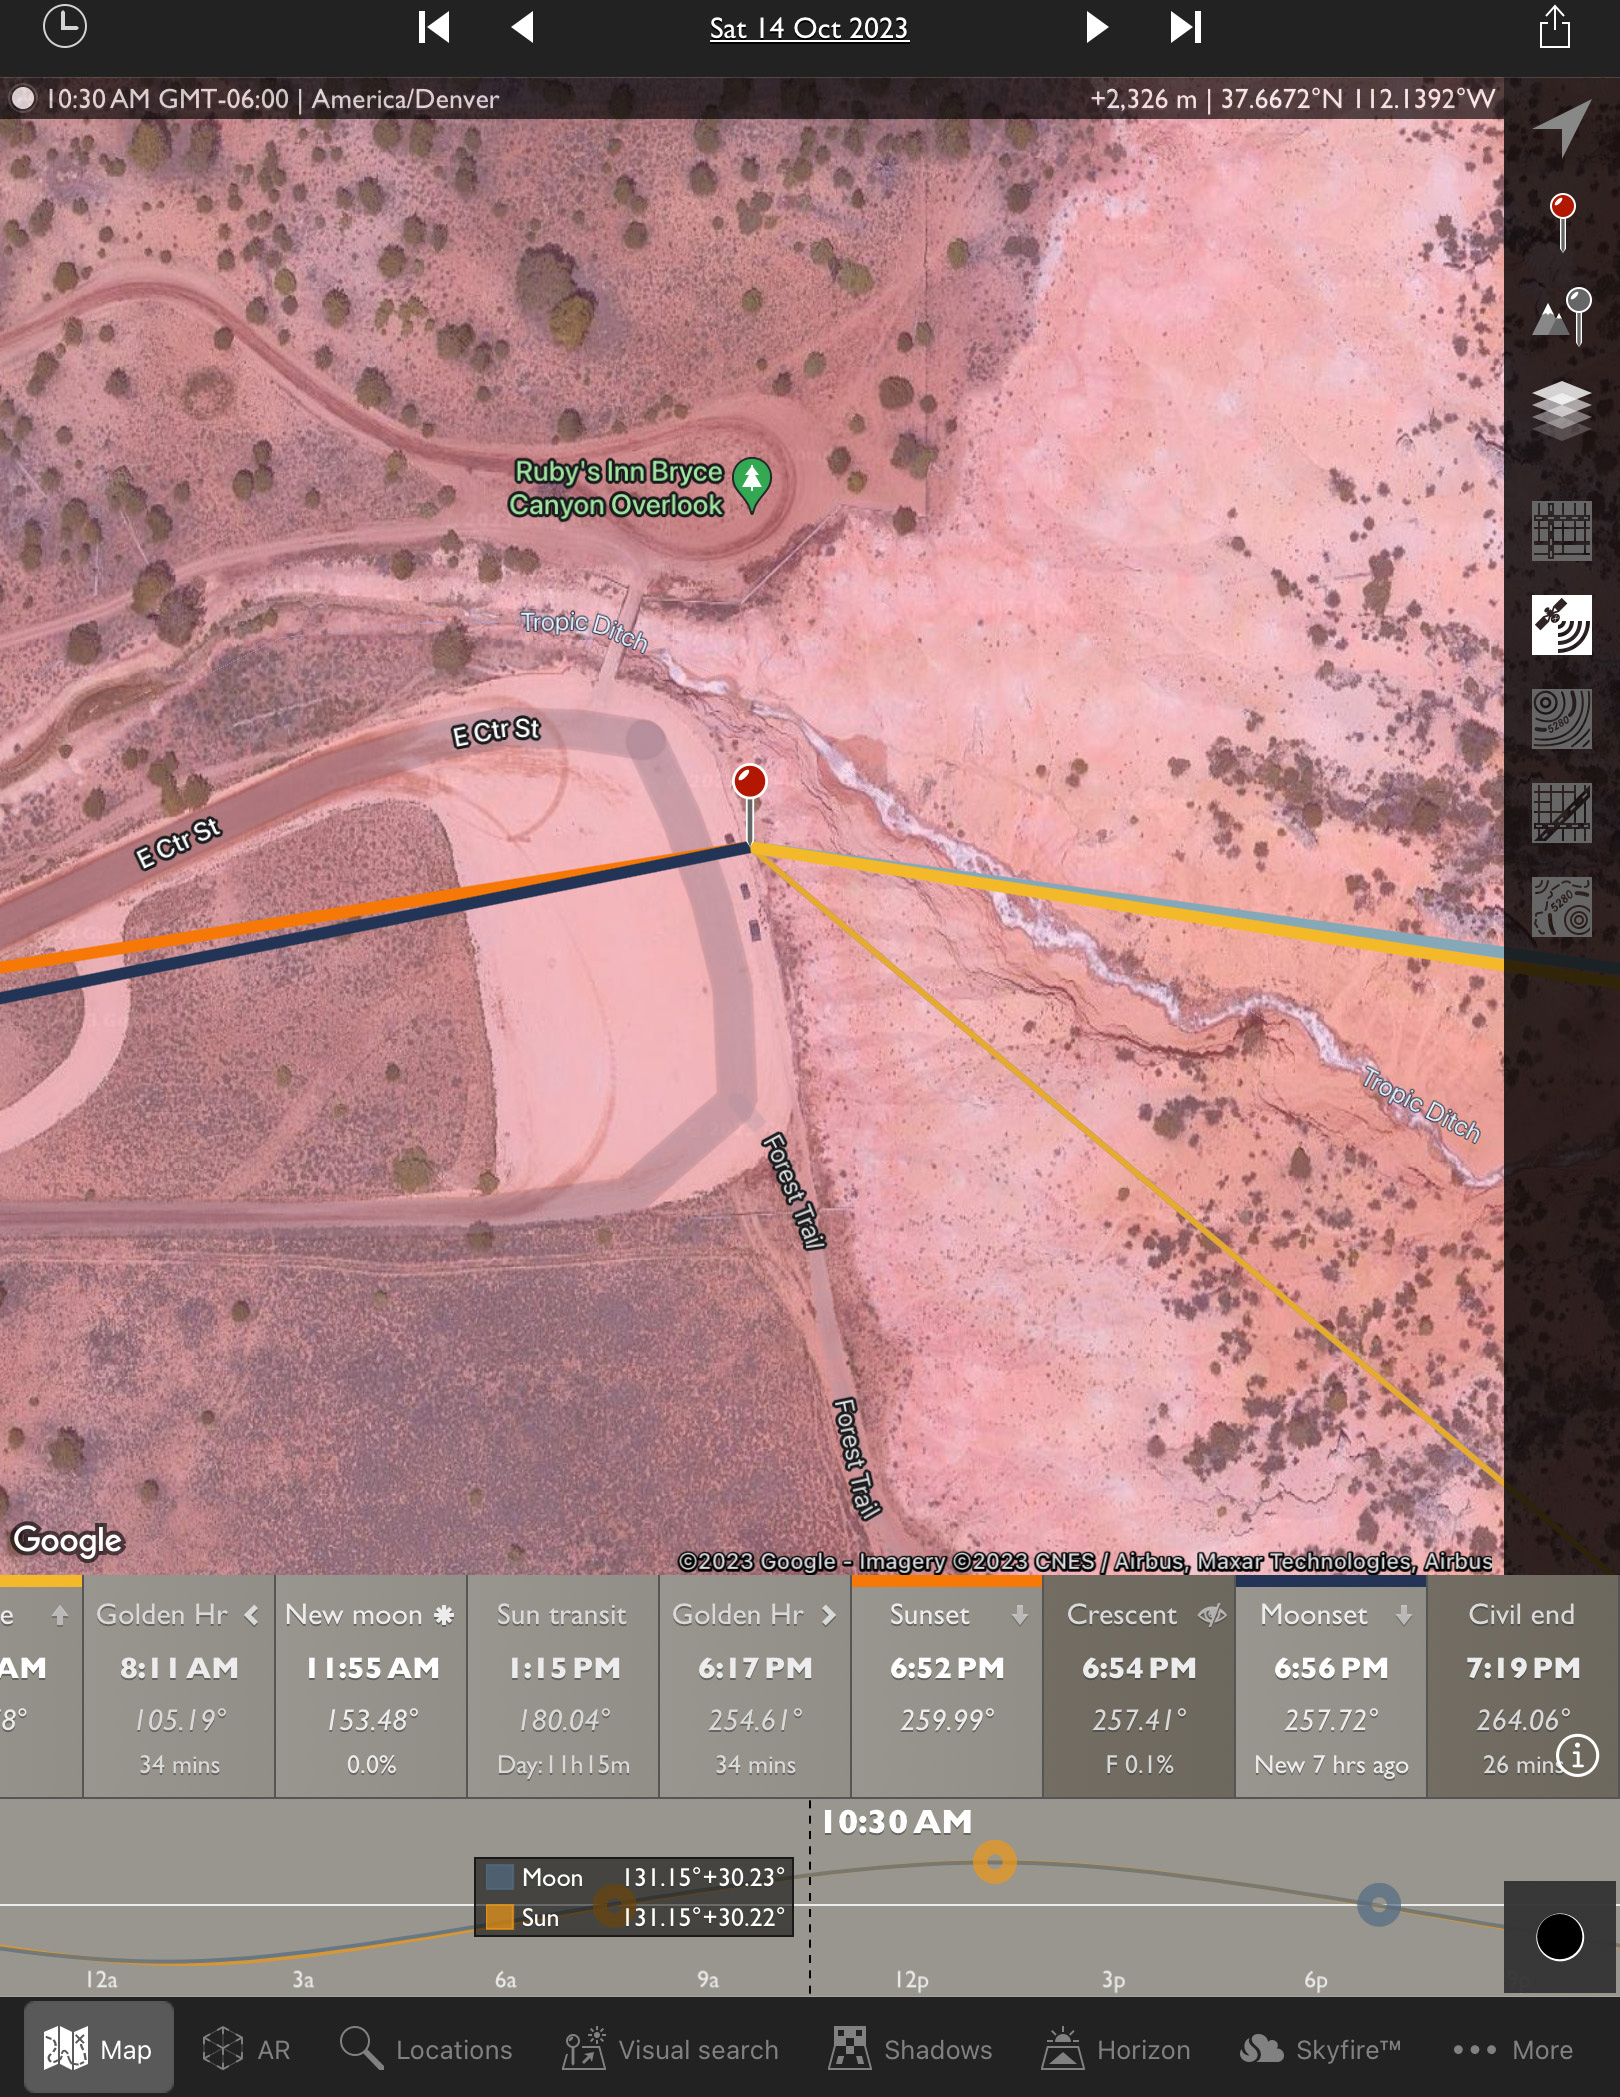
The October 14, 2023 annular solar eclipse, in a single image captured at mid-eclipse, at 10:29 am MDT at the Ruby’s Inn Overlook on the rim of Bryce Canyon, Utah, a site well south of the centreline, with 3m03s of annularity.
While lacking the jaw-dropping beauty of a total, annular eclipses are rare and unique enough that every ardent skywatcher should make a point of seeing one.
Prior to October 14, I had seen only one, on May 10, 1994, from southeast Arizona, an event I captured on film of course back then.
My 1994 annular eclipse setup in ArizonaMy 2023 annular eclipse setup in Utah
A sunset annular on June 10, 2002 that I traveled to Puerto Vallarta, Mexico to see was mostly clouded out. The annular of May 20, 2012 traced a similar path across the U.S. Southwest as the 2023 eclipse. But work commitments at the science centre in Calgary kept me home for that one. A sunrise annular on June 10, 2021 in Northwestern Ontario was essentially out of reach due to COVID travel restrictions.
With no other annular eclipses within easy reach in North America until 2039 and 2046, this was my next, and perhaps last, opportunity to see one, unless I chose to travel the world.
Eclipse site and pathSite close upEclipse details at my final site
I had planned for several months to watch the annular eclipse from southern Utah, ideally from Bryce Canyon National Park, shown above. (Clicking on the images brings them up full screen.) I booked accommodations in January 2023, finding even then that popular hotels in the area were already sold out.
The final spot for the wide-angle composite shown below. The camera had to be next to that very fence post to frame the scene well.
The attraction was the landscape below the morning Sun, for a planned composite image of the eclipse over the hoodoos of Bryce. However, I had learned weeks earlier that traffic was going to be restricted to just park shuttle buses on eclipse day. Should Plan A not work out then Plan B was Kodachrome Basin, a state park nearby, which a park employee assured me would be open to cars well before sunrise on eclipse day.
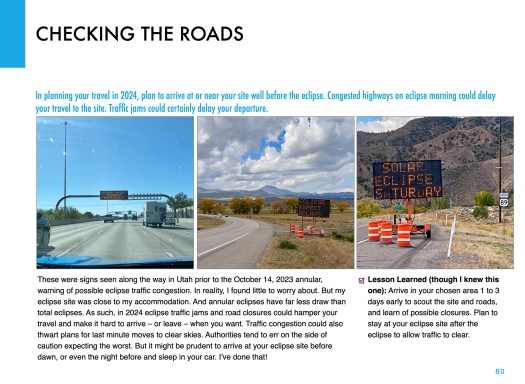
Seen on I-15 past Salt Lake City. Eclipse ahead!
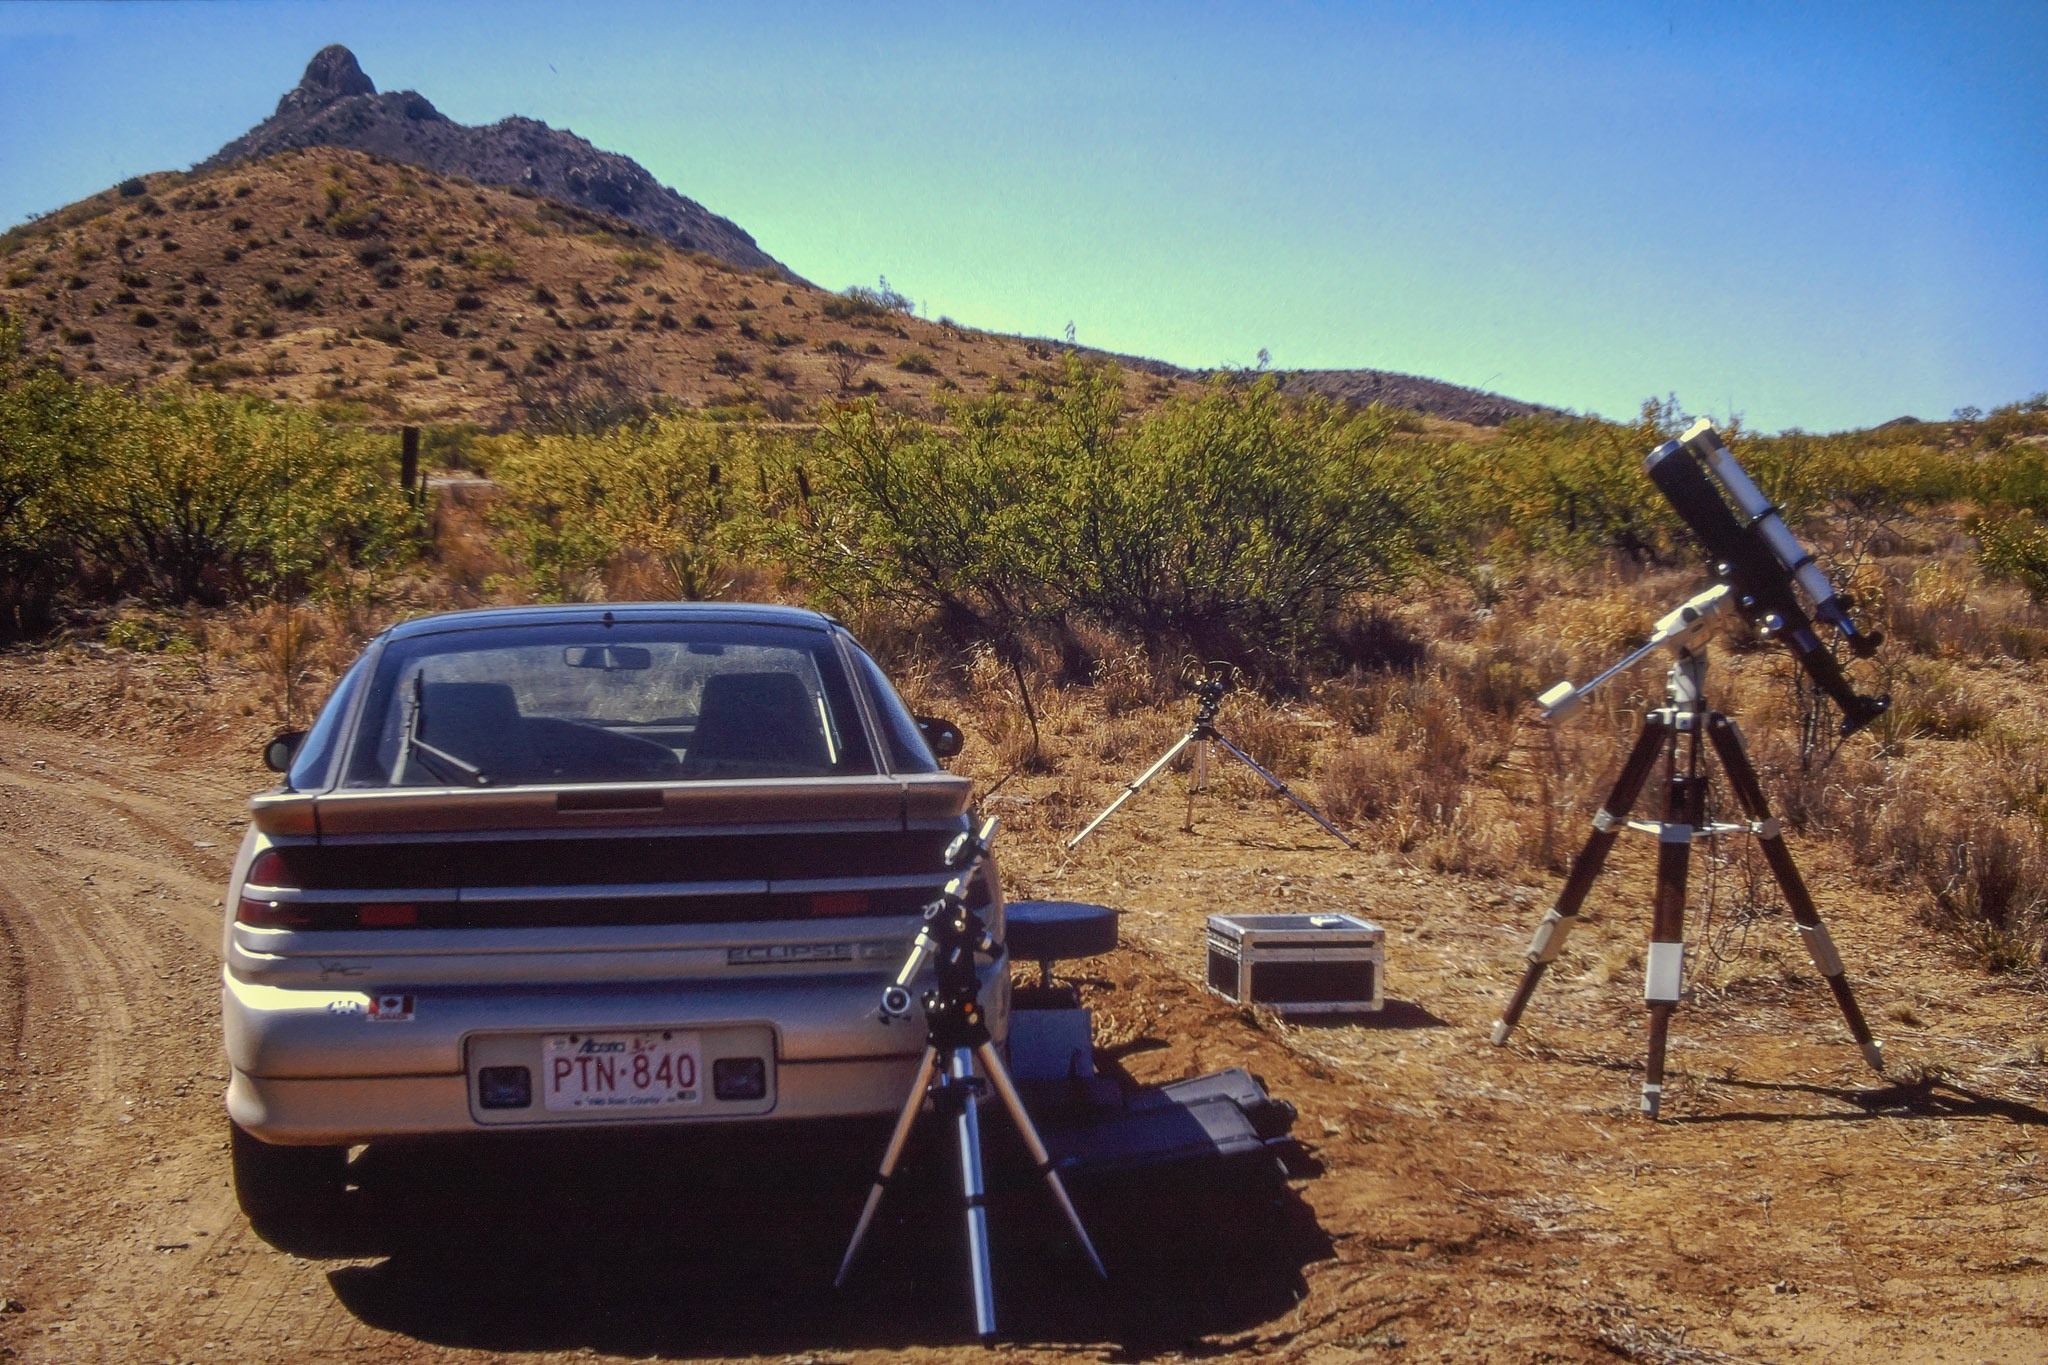
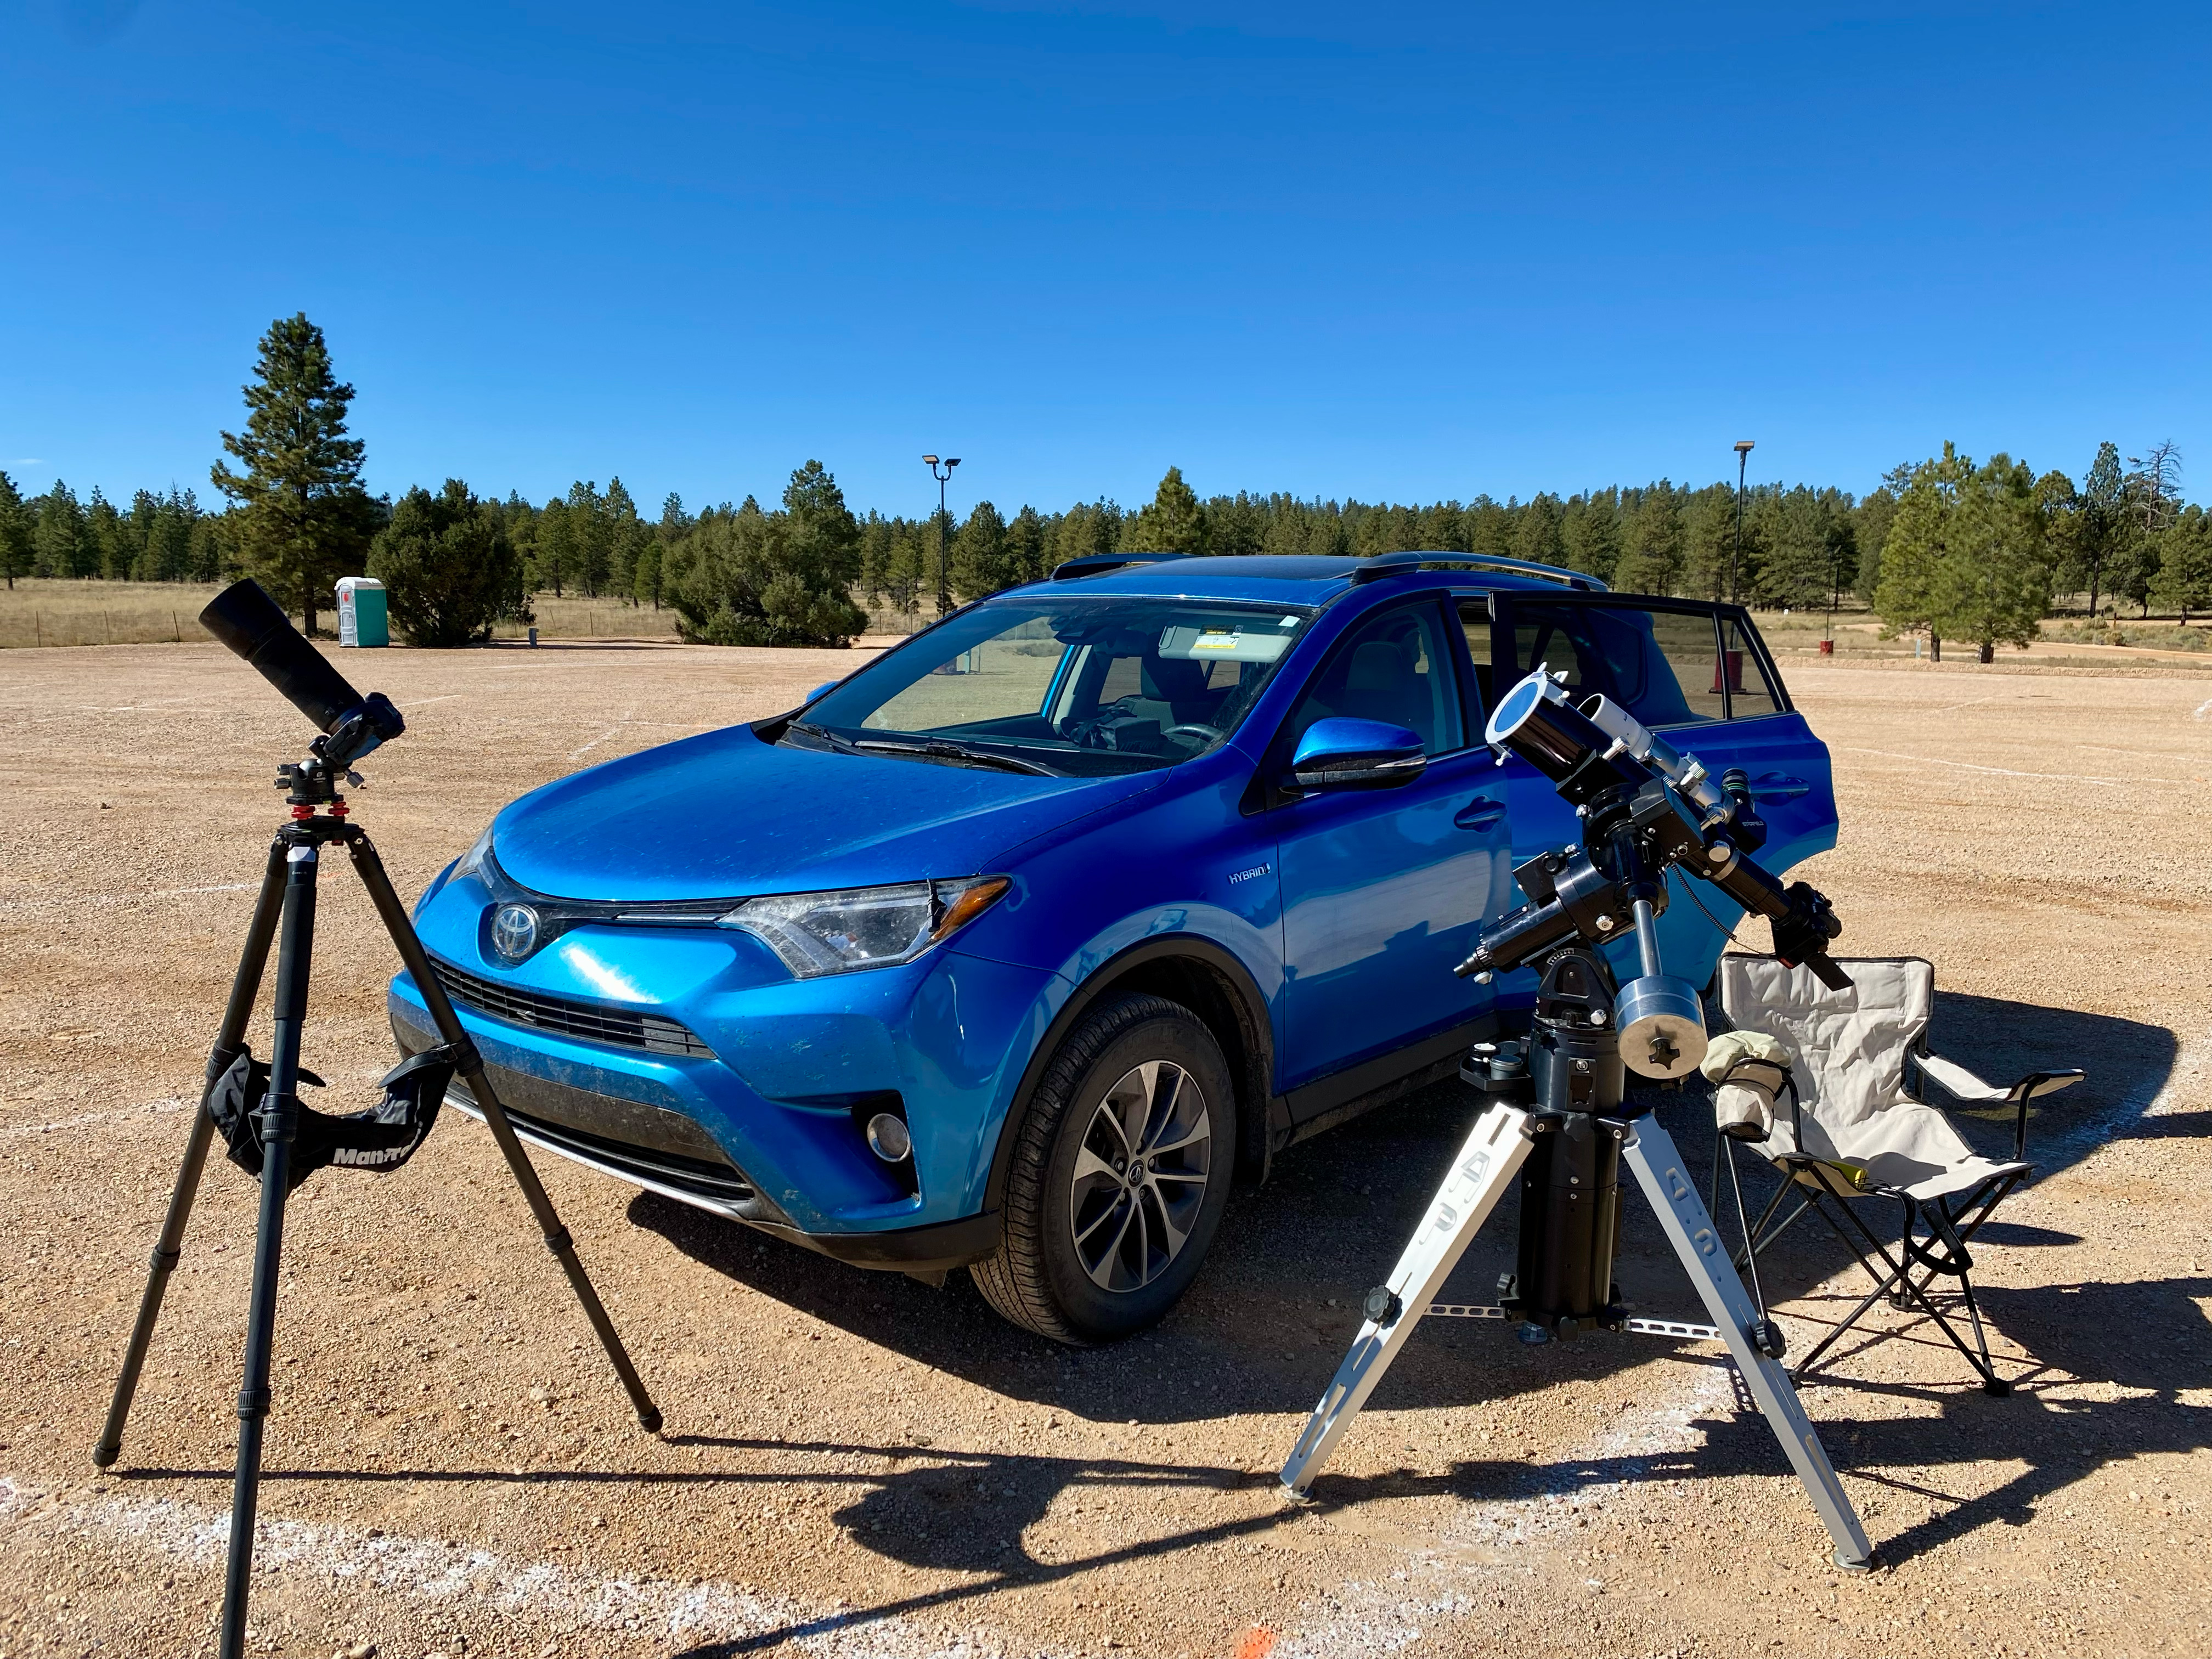
So I made my plans to drive south, taking with me a carload of telescope and camera gear, an array I would never be able to take to an overseas eclipse. The centrepiece was my venerable Astro-Physics Traveler 105mm (4-inch) refractor, a telescope created for the 1991 total eclipse in Mexico. Since I bought mine in 1992 I’ve used it for five central solar eclipses, including now two annulars. It’s in the 1994 and 2023 site images above.
A week before the eclipse (as above at left), the weather prospects for the entire southwest looked poor. It was to be clouds everywhere. I even considered Plan S – Stay Home! And watch the 60% partial eclipse from Alberta where skies were to be clear.
But undaunted, six days before the eclipse, I headed south on Interstate 15, checking the weather each day, and seeking out Plan C sites in New Mexico or Texas south of the projected mass of clouds. I checked where accommodation could be had at the last minute.
At my stop in Richfield, Utah, four days before the eclipse, I had a crossroads turning point: either continue south to Bryce down US-89 (above), or head east on I-70, then south into New Mexico or Texas, with enough time to get there if needed.
But by now the weather prospects were turning around. By three days out, and with the forecasts now much more reliable, it looked like southern Utah would be in the clear. I continued with my original plan to Bryce. But where exactly?
TPE site overview with anglesTPE 3D showing Sun pathGoogle Earth 3D
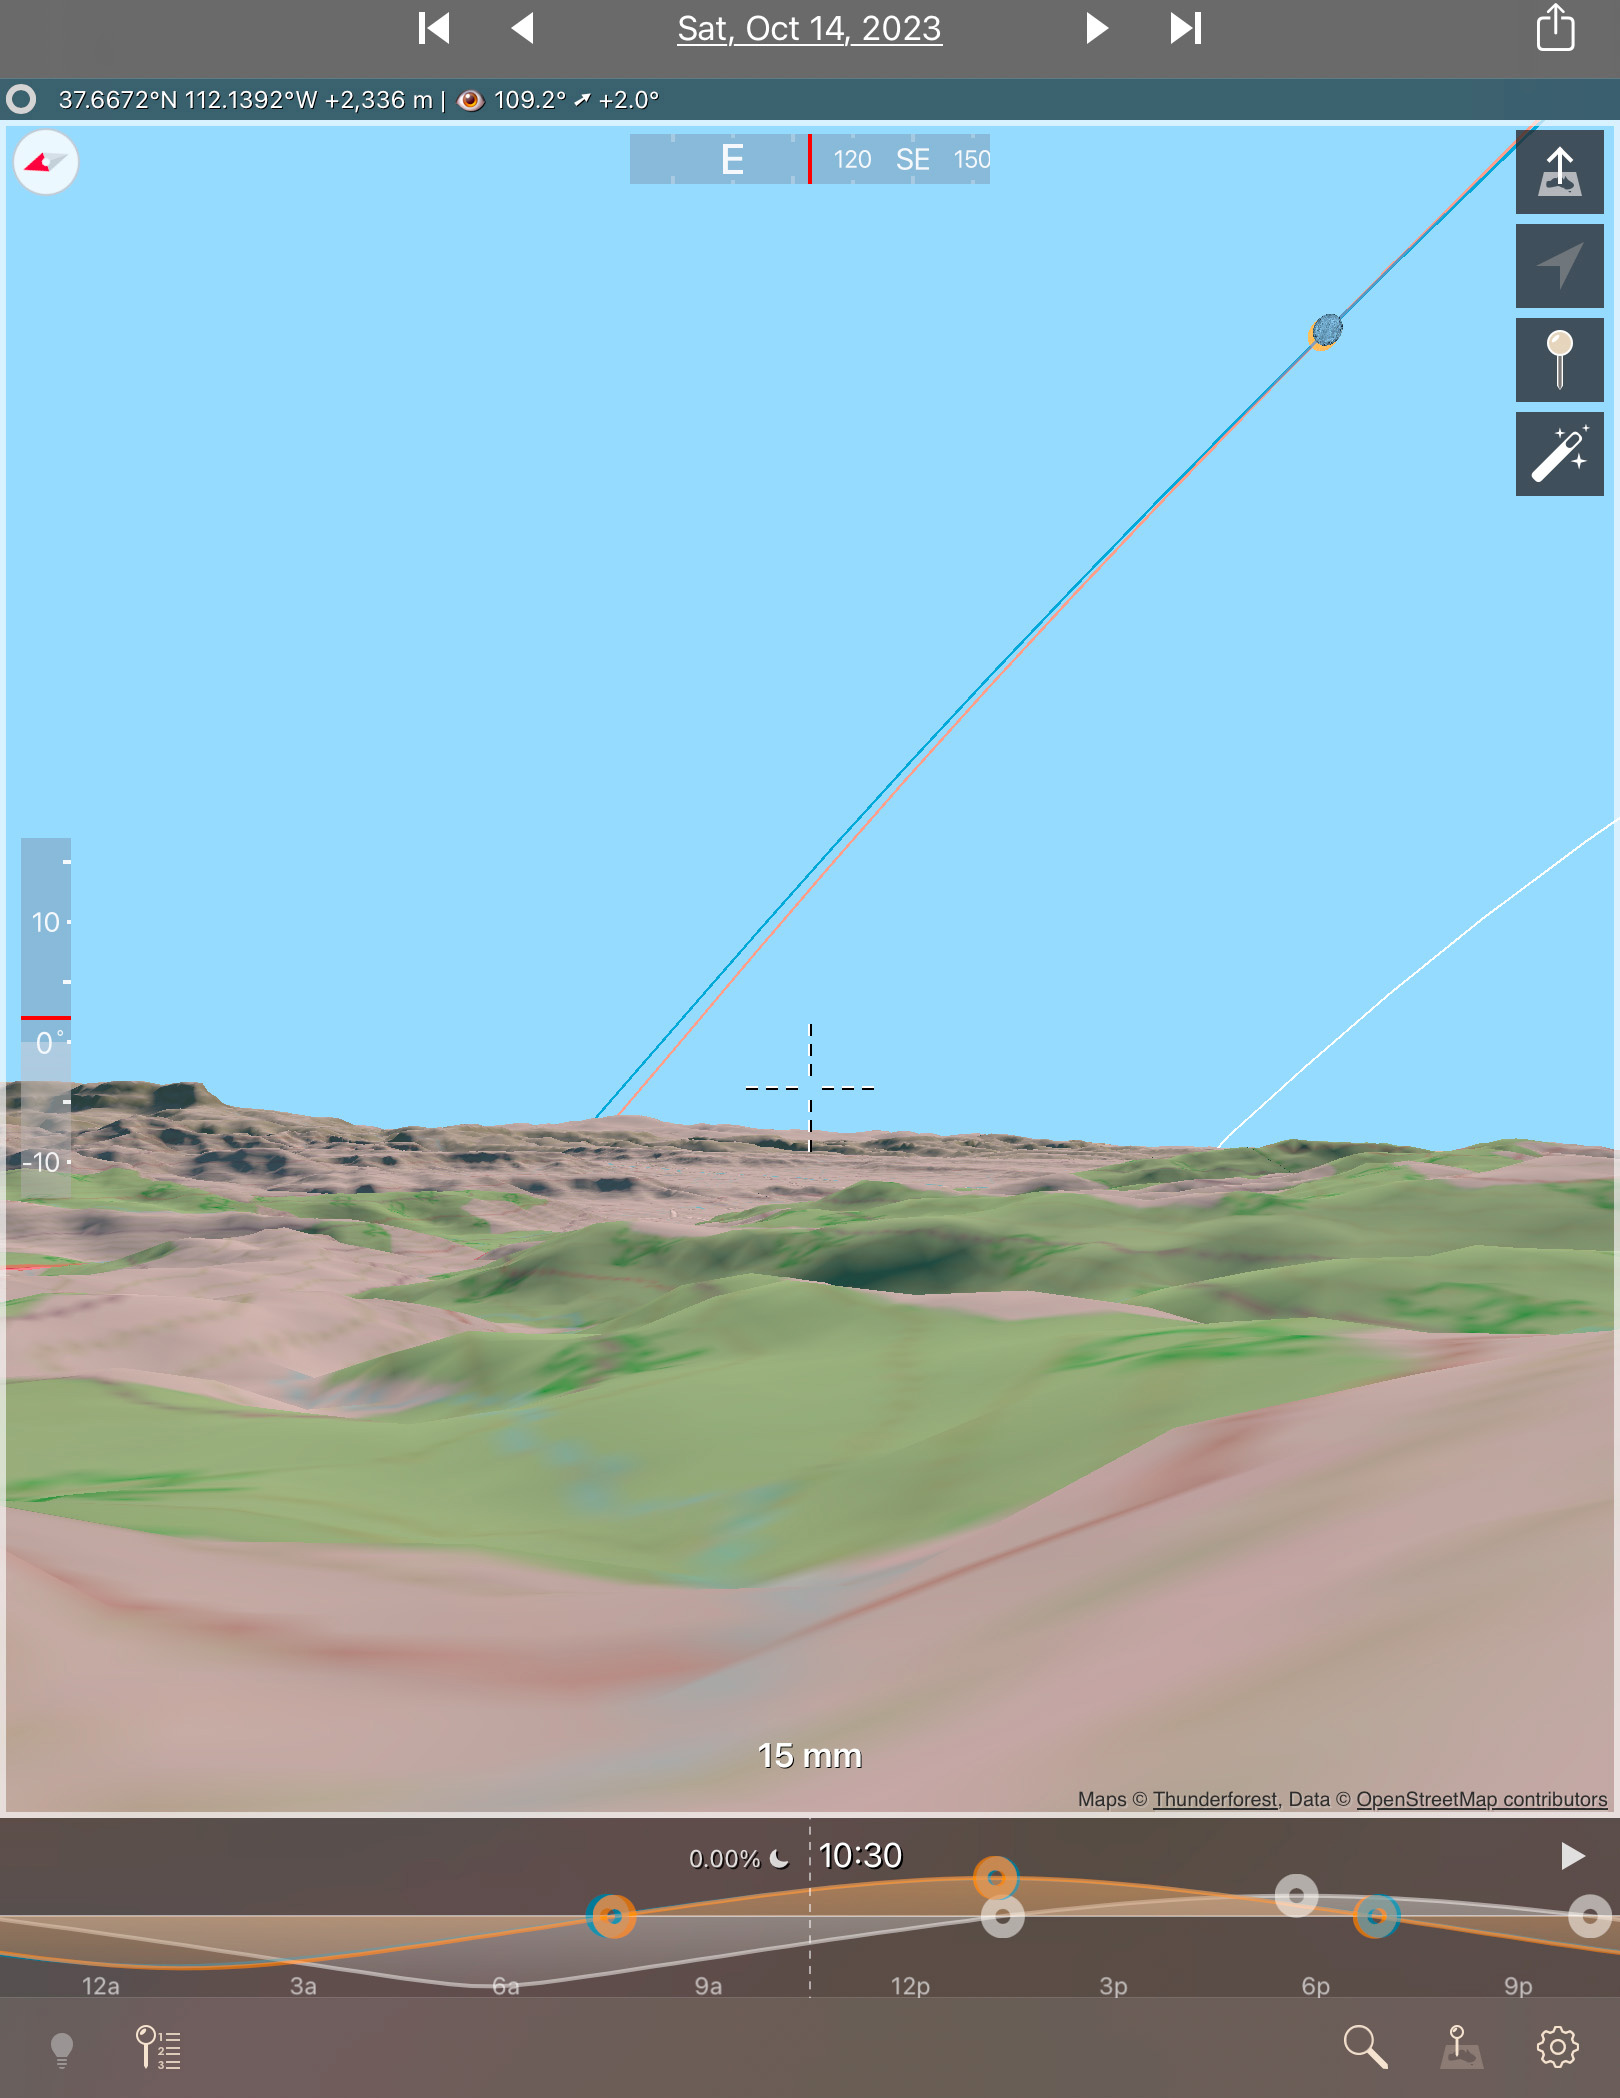
I had looked at possible sites on Google Earth and with the Sun-angle planning apps I use (such as The Photographer’s Ephemeris, or TPE) and found one just outside the Park that I hoped would be accessible to drive into.
Upon arriving in the area three days early, the first priority was to inspect the site in person. It looked perfect! Almost too good to be true!
A panorama of the Ruby’s Inn site with the eclipse in progress. My wide-angle camera is at left by that fencepost.
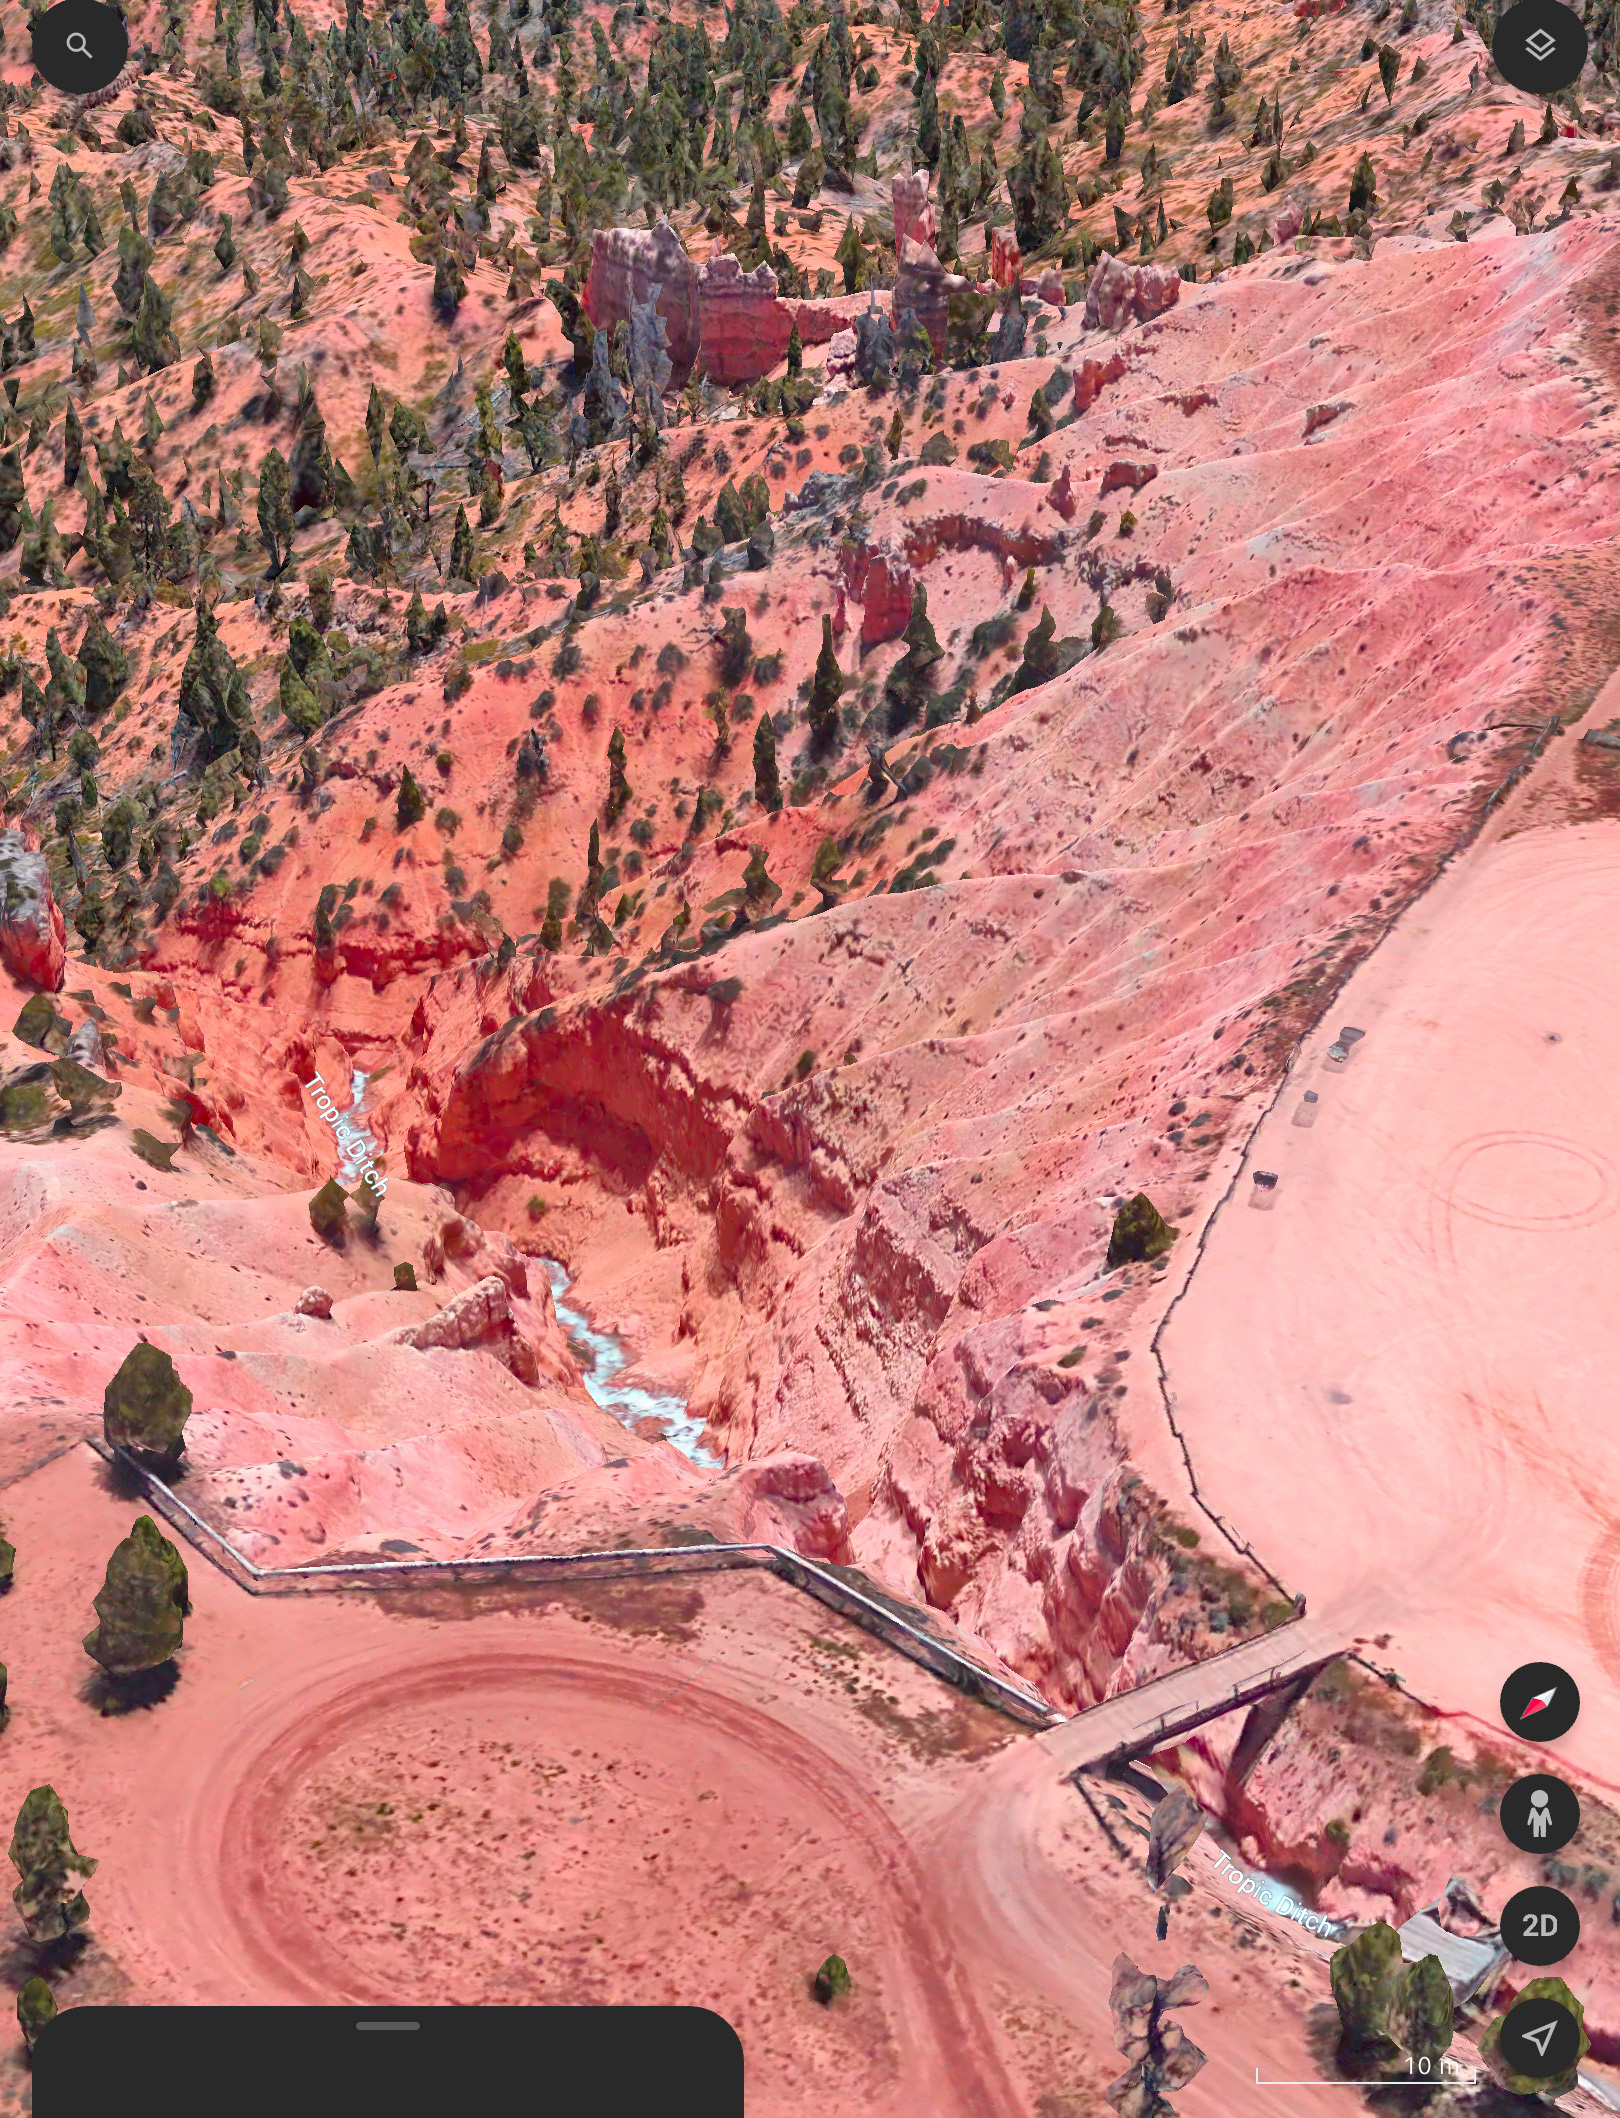
The site, known as the Ruby’s Inn Overlook, provided a great view toward the eclipse with a stunning landscape below, including a river! (Well, it was actually an irrigation channel called the Tropic Ditch.) And I could park right next to my wide-angle landscape camera, to keep an eye on it over the five hours of shooting, while setting up the scope gear next to my car.
I stayed at the Bryce View Lodge on eclipse eve, a hotel just a few hundred metres from the site. So no long pre-dawn drive on eclipse morn. However, the gated site was not going to be open until 7 a.m. on eclipse day. And admission was $20 per car, a cash donation to the Bryce Canyon City school sports teams. Fine!
As it turned out, by the time I got on site and setup the priority wide-angle camera for the base-image sunrise shots at 7:30 a.m., the sky was too bright to polar align the telescope mount on Polaris, for accurate tracking of the Sun across the sky.
It turned out that was the least of my concerns.
My three eclipse cameras: the wide-angle, the one on the 105mm refractor telescope (with a smaller 60mm scope on top for visual views with a Herschel Solar Wedge), and one with a 100-400mm lens on the tripod.
As I unpacked the carload of scope gear at 8 a.m. I realized I had forgotten a crucial cable to connect the mount to the drive electronics. So the mount was not going to be able to track anyway!
So much for my plans for a time-lapse through the scope. I had to manually centre the Sun every minute or so. I took lots of photos, but gave up on any effort to take them at a regular cadence. But I had enough images for the singles and composites shown here.
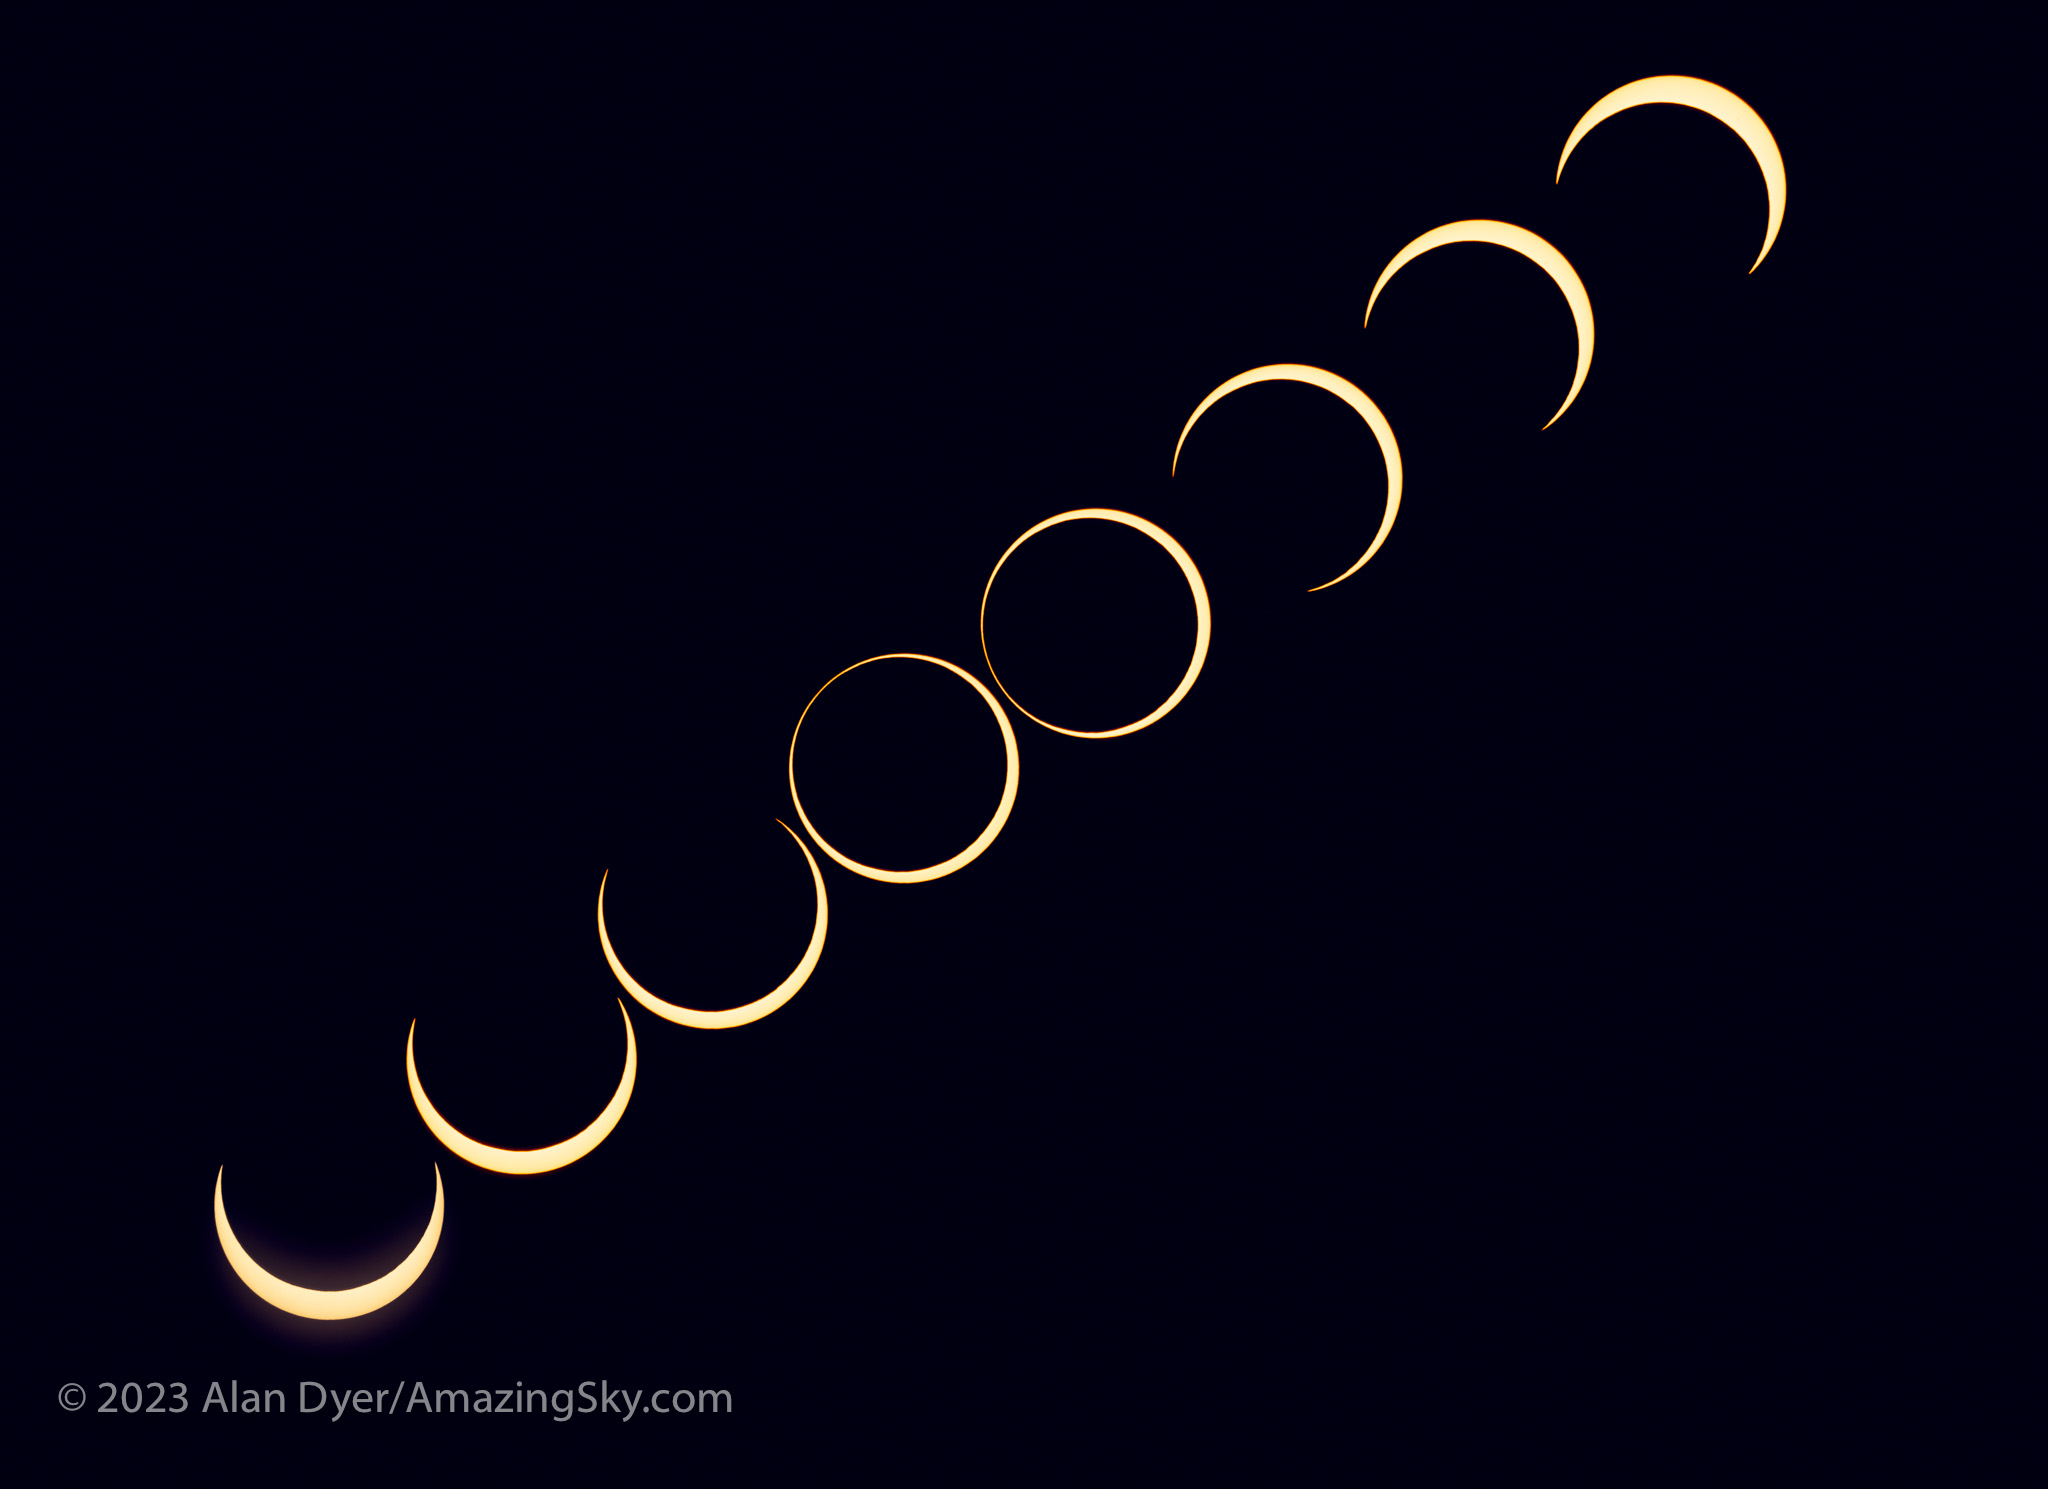
This is a composite of the October 14, 2023 annular solar eclipse with a sequence of six images showing the Moon advancing across a sunspot, the largest one visible on the Sun that day. The images are placed for a photogenic spacing, with time running forward from lower left to upper right, to reflect the Sun’s motion up across the morning sky.
Of course, once I got home the first thing I did was look downstairs in my scope room. Sure enough there was the cable, mixed up with the similar electronics from another mount I have from the same company, as I had been testing both prior to the eclipse. So much for my checklists! They’re only good if they list every critical bit, and if you use them.
So that was one big user error.
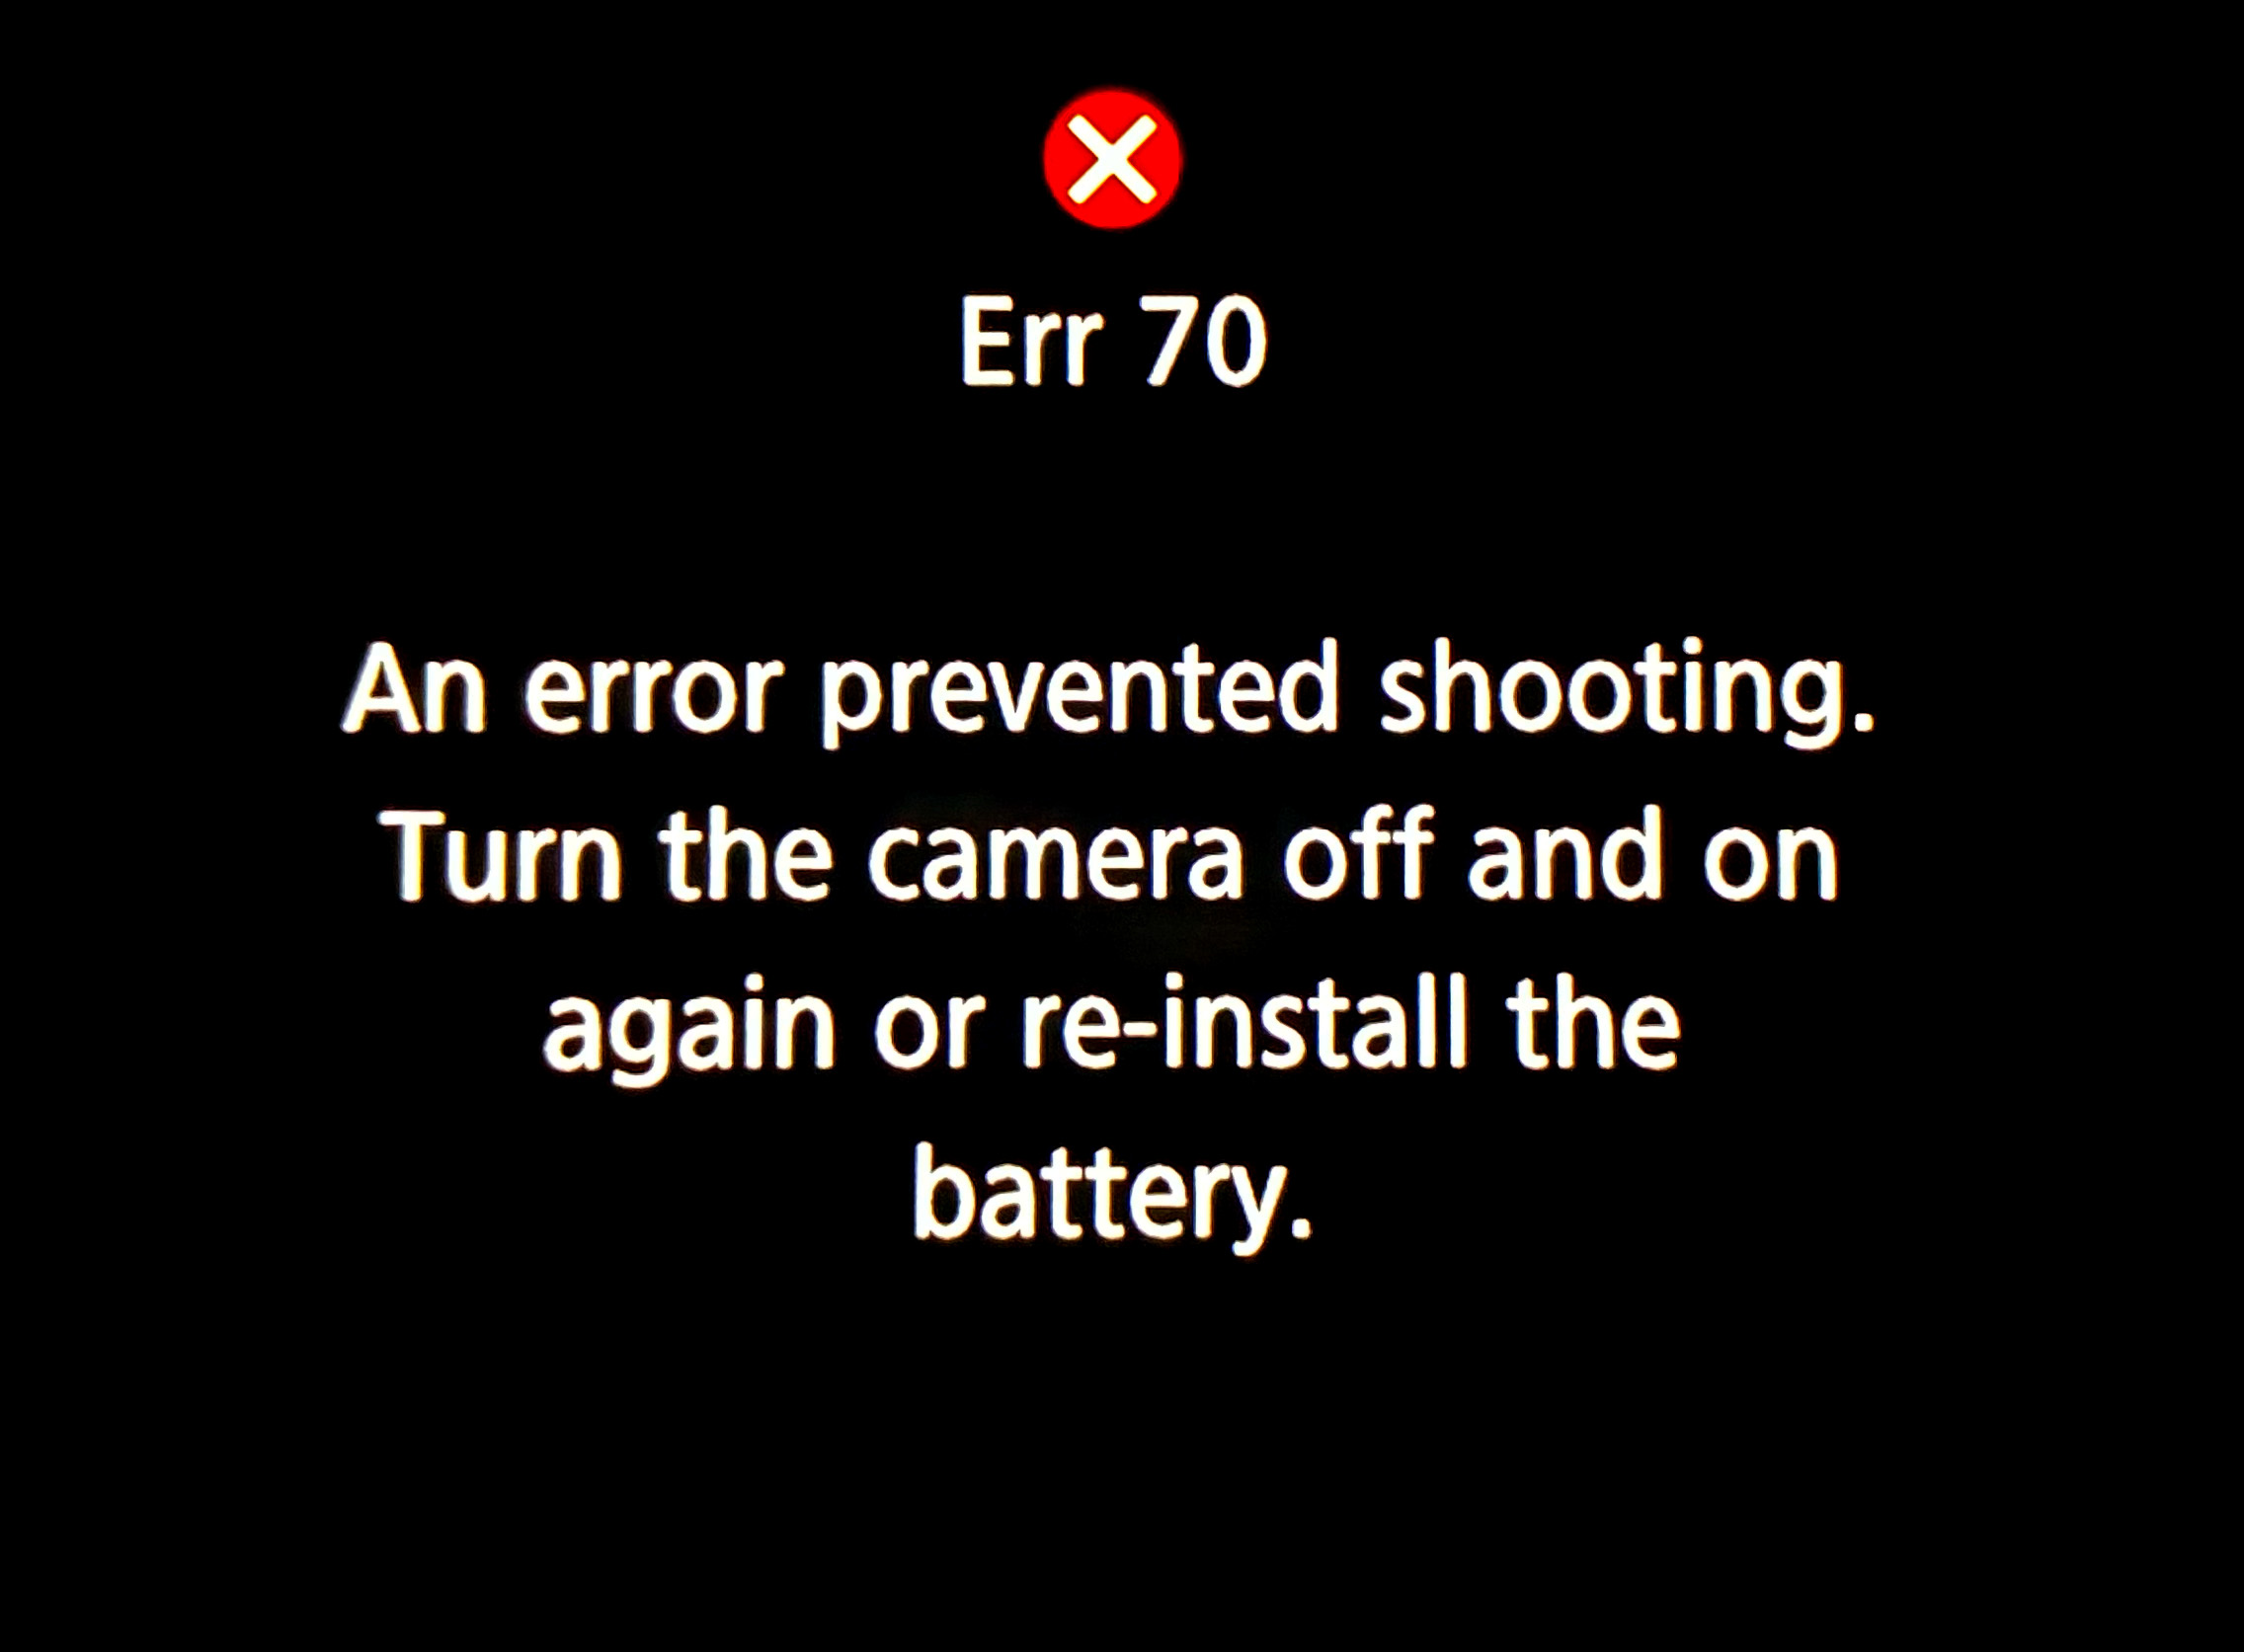
You don’t want to see this at an eclipse!
The other was a camera error, in fact Error70! I had set my main telescope camera to take rapid bursts of images (at up to 20 frames per second) at the crucial second and third contacts when annularity began and ended. With the Moon’s rough limb tangent to the inside edge of the Sun, you see beads of light rapidly form and disappear at the contacts.
This is a composite of the October 14, 2023 annular solar eclipse at second contact. It illustrates the irregular edge of the Moon breaking up the rim of sunlight as the dark disk of the Moon became tangent to the inner edge of the Sun at second contact at the start of annularity. 15 exposures taken over 20 seconds at second contact are combined with a single exposure taken about 1.5 minutes later at mid-annularity.
The camera worked great at second contact, shooting 344 frames over 20 seconds. A composite of 15 of those frames is above, layered to exaggerate the rough lunar limb and its mountain peaks. A time-lapse from those frames is below.
A time-lapse of second contact from 344 frames over ~20 seconds.
And it appeared to be working at third contact three minutes later. Until I looked down and saw the dreaded error message. In checking the camera later, none of the third contact images had recorded to either memory card.
It is a known but intermittent bug in Canon firmware that can happen when the camera is not connected to a Canon lens (it was on a telescope it cannot communicate with). I saw the error once in testing. And I had a hard time reproducing it to take the screen shot above once I got home. But if something can go wrong …!
This is a portrait of the October 14, 2023 annular eclipse of the Sun, captured in a sequence of images taken from the rim of Bryce Canyon, Utah, from sunrise until nearly the end of the eclipse before noon local time. This is a composite blend of unfiltered exposures taken at sunrise for the landscape lit by the rising Sun, and for the dawn sky. Onto the base panorama of the ground and sky I layered in 66 filtered images of the Sun, as it rose into the morning sky, and with the Moon moving across its disk over nearly 3 hours, reaching mid-eclipse at about 10:29 local MDT at upper right. It then appears as a ring, or annulus of light for one frame.
Despite the errors both human and machine, I count eclipse day as successful, considering a week earlier prospects had looked so poor. As it was, apart from some thin but inconsequential cloud that drifted through before mid-eclipse, the sky was perfect.
As was the site. I enabled me to get the main shot I was after, the wide-angle composite, above. It’s a winner! And it accurately depicts the size of the Sun and its motion across the sky, albeit set into a twilight sky taken at sunrise.
As it had been 29 years since my last annular, I wasn’t sure what to expect. But the darkening of the sky and eerie level of sunlight, despite a blazing Sun in the day sky, were impressive. The morning just looked strange! It was a taste of the total to come.
Venus at its widest angle west of the Sun was easy to spot in the deep blue sky. I regret not thinking to shoot even a phone camera image of that sight.
Projecting the solar crescents with a made-on-the-spot pinhole projection sign.
I had pleasant chats with other folks at the site, and enjoyed showing them telescopic views though the smaller visual scope I had piggybacked on the main scope, one that was just for looking through. Plus folks shot phone pix of my camera screen.
The October 14, 2023 annular solar eclipse, in a single image captured at second contact with the Moon tangent to the inside limb of the Sun, at 10:27 am MDT at the site I used.
But at the critical contacts, I was glued to that visual scope for the amazing sight of the horns of the crescent Sun rapidly wrapping around the Moon at second contact, then unwrapping at third contact.
The October 14, 2023 annular solar eclipse, in a series of images captured at second contact with the Moon tangent to the inside limb of the Sun, at 10:27 am MDT at the site I used. The 7 frames here were selected from a set of 344 shot in high-speed continuous mode at 20 frames per second.
The breakup of the rim of sunlight into beads of light along the cratered and mountainous edge of the Moon was also impressive. I was not at the optimum site for seeing those beads, as the landscape dictated my choice of location. But those that I saw at each of the internal contacts were a fine bonus to a memorable morning.
This is a composite that records the sequence around mid-eclipse of the October 14, 2023 annular eclipse of the Sun. This is a blend of 8 exposures each taken 2.25 minutes apart, about the minimum time to keep the disks separate and avoid them overlapping.
A third camera shooting a sequence with an untracked 400mm telephoto lens worked well. I used a subset of its images to create a still-image composite (above) and the full set for a time-lapse (below), with the position and motion of the Sun authentic, produced by the natural east-to-west motion of the sky. But against that you see the Moon’s orbital motion moving its dark disk down across the disk of the Sun.
A time-lapse from 300 frames taken at 4-second intervals with the sky’s motion carrying the Sun across the frame.
As soon as annularity ended, everyone else started to pack up and leave. For them the show was over. Understandably. On many total eclipse tours I’ve been on we’ve been on the road back to the hotel after totality and the requisite happy group shot.
Eclipse success! The trophy shot after everyone else had left.
But at this eclipse my shooting plan dictated that I stick it out. By the end of the eclipse I was the last one standing, alone to enjoy last contact and then lunch, killing time for any road congestion to diminish, as I had to head to another motel for the post-eclipse night, in nearby Panguitch.
I had a celebratory dinner and Moab-brewed beer that night at Cowboy’s, the best restaurant in Panguitch, sporting my Annular 2023 eclipse hat!
But the next day I started the drive north again, for the three-day trek back up I-15 to the border, then home.
Priority one upon getting home was to finish processing images, and to include them in a revised version of my ebook How to Photograph the Solar Eclipses. It is linked to above and here on the title. Images of some sample pages from the revised edition are in the slide show below.
Post-annular, the book’s title remains the same, but I revised the pages in Chapter 4 on planning for the 2023 eclipse with pages on “lessons learned!” And there were several!
I expanded Chapter 11 on processing to include tutorials on assembling annular eclipse composites, now that I actually have some!
Such as the composite of first- to last-contact telescopic close-ups below.
This is a composite of the various stages of the entire October 14, 2023 annular solar eclipse, from start (lower left) to end (upper right), with mid-eclipse at centre. So time runs forward from left to right, with the Suns positioned to reflect the approximate motion of the Sun in the morning sky when this eclipse occured at my site, with it rising higher through the progress of the eclipse. North is up in this image.
The new version of my ebook is 20 pages larger than the pre-annular edition.
An email has gone out from eJunkie to all buyers of the earlier-edition PDF to alert them to the new version, and with a download link. Apple Books readers should get a notice when they open the book on their Mac or iPad in the Books app that a new version is available.
I suspect that will be the last revision of my ebook before the big event – the total eclipse of the Sun on April 8, 2024.
Here’s wishing us all clear skies for that one! That eclipse will indeed require a drive to Texas. This time I’ll remember that damned cable!
With the October 14, 2023 annular eclipse of the Sun only weeks or days away, it’s time to test your equipment, to ensure success on eclipse day.
On October 14 everyone in North America, Central America, and much of South America can see an eclipse of the Sun, as shown in the map below, courtesy GreatAmericanEclipse.com. The closer you are to the “path of annularity” drawn in yellow here, the more of the Sun you see covered by the Moon.
Eclipse map showing area of visibility of the October 14 eclipse courtesy GreatAmericanEclipse.com
However, for the best experience, plan to be in the central path of the Moon’s shadow. In North America, as shown in the map below, that path crosses the western states, passing over the scenic landscapes of the American southwest.
Courtesy GreatAmericanEclipse.com
Those in the main path will see an annular eclipse – the Moon will travel across the center of the Sun’s disk, but won’t be large enough to completely cover the Sun. The result, as shown below, is that the Sun will be reduced to a thin ring or “annulus” of light at mid-eclipse, but only for a few minutes.
The May 10, 1994 annular eclipse of the Sun, with a trio of eclipse rigs.
To view or photograph the annular eclipse well, you need to use a long telephoto lens or a telescope. A focal length of 400mm or longer is required to make the Sun’s and Moon’s disks large enough to show detail well.
As I show above, the lens or telescope can be on a solid tripod, or on an untracked alt-azimuth telescope mount, or on a mount that can track the sky, such as the equatorial mount on the right above. All will work fine, as exposures will always be short, just a fraction of a second.
I go into the many options for photographing the eclipse in my ebook, linked to at right. It contains thorough tutorials on how to shoot the eclipses in 2023 and 2024. In this blog I’m focusing on extolling the need to practice now, with whatever gear you own and intend to use for the eclipse.
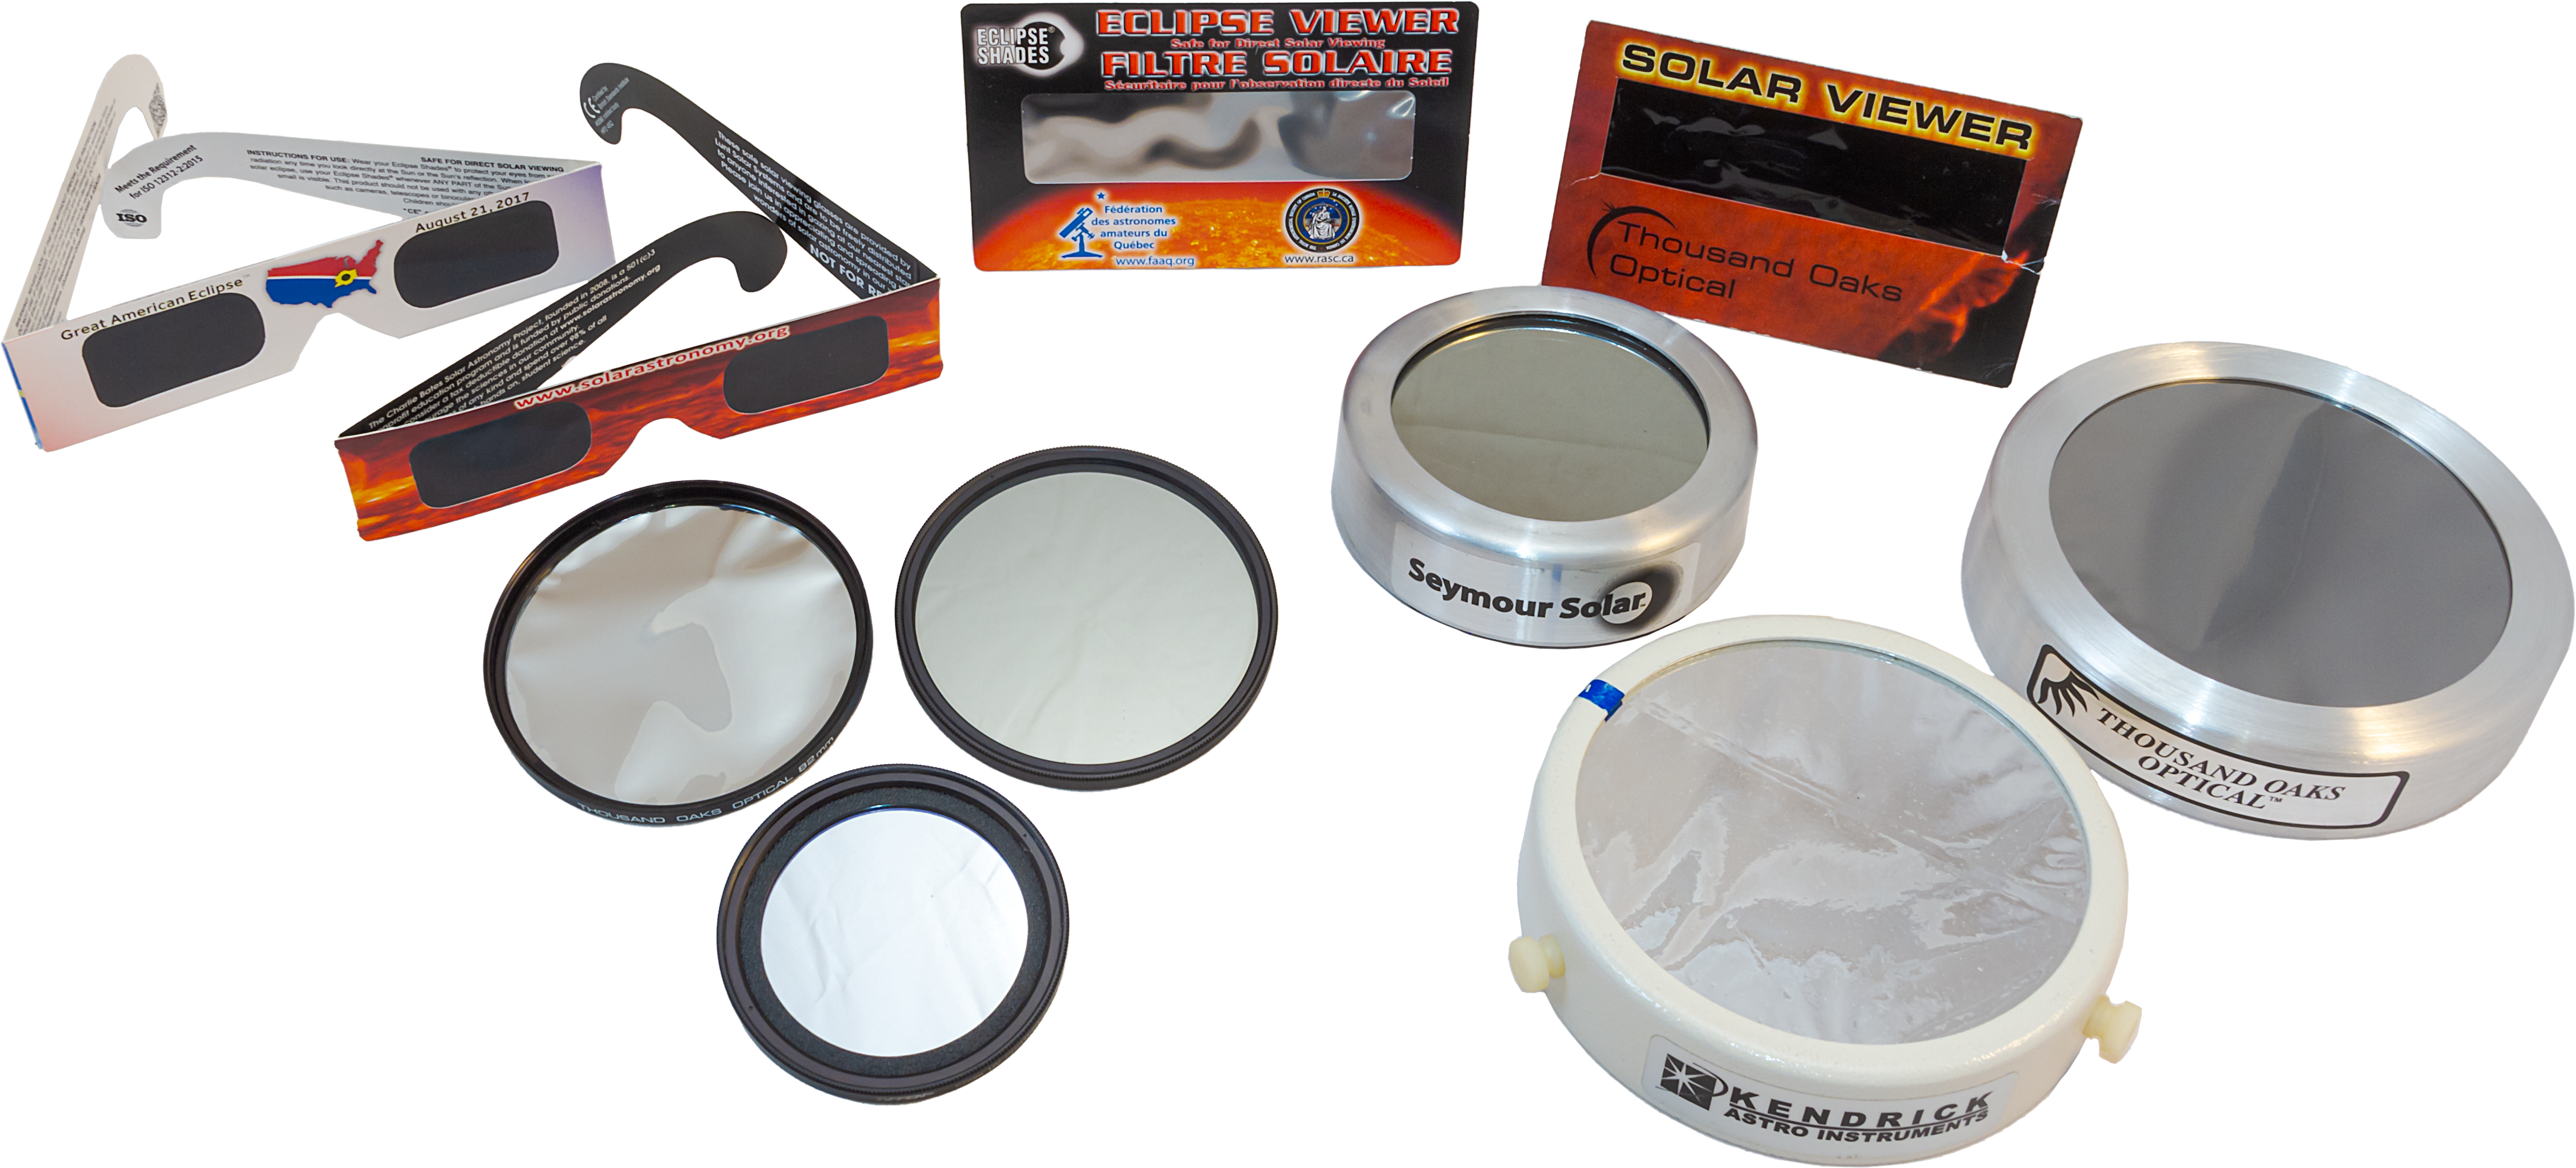
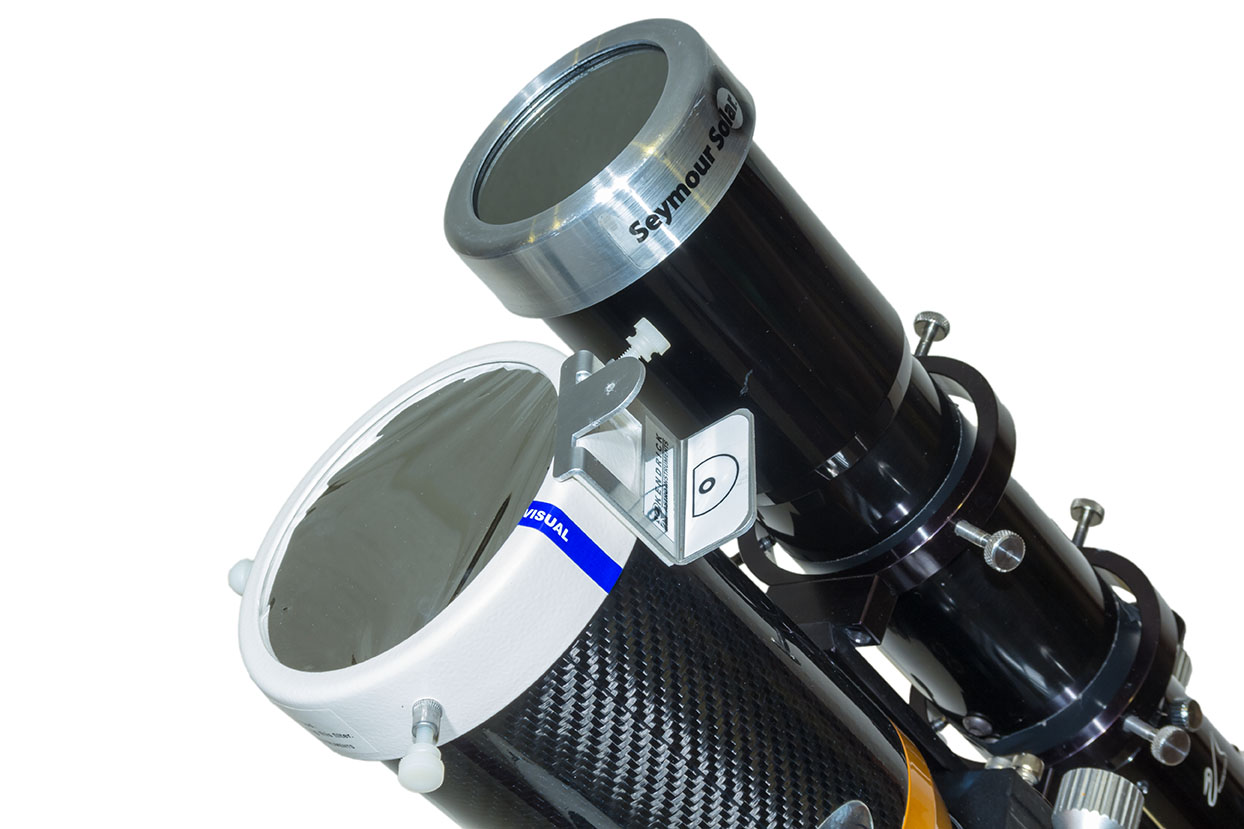
An array of solar filers, for unaided eyes, lenses and telescopes
No matter what optics you plan to use, they must be equipped with a safe solar filter mounted over the front of the optics. For the October 14 eclipse, even from sites in the path of annularity, a filter must be used at all times. It will never be safe to look at or shoot the Sun without a filter.
And it must be a filter dense enough and designed for the purpose of aiming at the Sun. Do not use stacked neutral density filters or other jury-rigged arrangements, as other filters can transmit ultraviolet or infrared light that can still damage eyes and cameras.
The eyeglass or handheld style of solar filters are good for unaided eye views, and most are made by American Paper Optics or Rainbow Symphony. A list of recommended filter suppliers is available at the American Astronomical Society’s eclipse website at https://eclipse.aas.org/eye-safety. In addition, many astronomy clubs, planetariums and science centers will offer safe eyeglass-style filters they purchased in bulk from one of the suppliers above.
However, for photography through a lens or telescope you need a filter that either screws onto the lens or clamps over the telescope, as I show below.
Comparing different types of telescope filters – the Baader Mylar worked best in this test.
In my testing, I’ve found that the aluminized Mylar® (or polyethylene) type of filter – one that looks like a silvery sheet – provides the best sharpness and contrast, despite the wrinkles. The most popular type is made by Baader Planetarium, and sold by them or by other dealers and resellers.
While metal-coated glass filters also work very well, in recent years they have become hard to find, with past suppliers of glass filters switching to black polymer plastic material. While safe and good for naked-eye views, I’ve found the image through black polymer filters can be soft and surrounded by lots of light scatter when used for photography at long focal lengths.
TESTING, TESTING!
An eclipse rig under test, with dual scopes for shooting and looking
Once properly equipped, test your setup as soon as possible on the Sun. In the rig above I have piggybacked a smaller telescope onto the larger telescope, both with filters, the latter to shoot through while I look through the smaller scope, good for watching the few minutes of annularity.
The key things to test for are:
Finding the Sun (not as easy as you might think!)
Focusing on the Sun (also critical and can be tough – focus on the edge or on sunspots)
Checking for any focus shift over a couple of hours time
Determining the correct exposures with your filter
Checking for any vibration that can blur the image
Operating your camera to change settings, without vibration
Checking to see how long batteries will last
Seeing how much the Sun moves across the frame during a few minutes time
Following the Sun or keeping it centered
Making a checklist of the gear you need on eclipse day, plus any backups such as a spare battery, and tools for last-minute fixes or adjustments.
The filters from Kendrick Astro Instruments have a handy Sun finder attachment.
You want to test how solid your setup is when aimed up. Your super-telephoto lens and tripod that work great for birds and wildlife might not be as well-suited as you thought when aimed high at the Sun. Best to find out now about any shortcomings in your gear.
A series of images with an 80mm refractor and Kendrick Mylar filter shows a range from under to over-exposed.
Run through a set of exposures to see what produces the best result with your optics and filter. Even with the October 14 eclipse underway, the Sun will be a similar brightness as it is on any normal day.
At best, on eclipse day you might wish to shoot a bracketed set of exposures throughout the eclipse, perhaps a frame taken at your pre-determined “best” exposure, and two others: at one stop and two stops overexposed, to account for the slightly dimmer solar disk when it is mostly covered by the Moon in a deep partial or annular phase.
Alter exposures by changing shutter speeds, not aperture or ISO. Keep the ISO speed low, and the aperture either wide open or at some middle setting such as f/5.6 for the sharpest images.
But also check what exposures might be needed when shooting the Sun through thin clouds. Any cloud or haze will require longer exposures. And you might need to change shutter speeds quickly if the Sun goes into and out of clouds. Practice that – without introducing vibration from handling the camera.
Leave the rig for a couple of hours to test how the focus might shift, as it is certain to do, as the temperature changes through the morning or afternoon. Practice touching up the focus. People fuss over the “best” exposure, when it is poor focus that is the common spoiler of eclipse photos.
You can find more tips for practicing for eclipse close-ups at a blog I wrote for AstronomyByNight.ca.
WIDE-FIELD OPTIONS
May 10, 1994 annular eclipse in a series of multiple exposures every 10 minutes.
An alternative way to shoot the eclipse is with a wide-angle lens, but also equipped with a solar filter, as shown above. Frame the scene to include the expected path of the Sun, determined by using planetarium software such as SkySafari or Stellarium (my ebook also has charts). Take images every minute or so, then layer those onto an unfiltered image of the sky and foreground taken either before the Sun enters the frame or after it leaves it.
A test set for a composite image.
Practice that method now, to shoot images for a test composition as I show above. It layers filtered images taken at 5-minute intervals onto an unfiltered background sky image taken after the Sun left the frame.
However, composite images can be complex to plan and execute.
The partial solar eclipse of October 23, 2014 as seen from Jasper, Alberta, at a public event in Centennial Park as part of the annual Dark Sky Festival. This is a single-exposure image showing the scene near mid-eclipse with telescopes from volunteers from the Royal Astronomical Society of Canada, and the mostly clear skies above with the crescent Sun visible through the handheld polymer solar filter.
A simpler method for grabbing a souvenir eclipse photo is to simply hold a handheld solar filter in front of the lens to dim the Sun but leave the rest of the scene visible.
Again, you can practice that now to see what exposure might be best. For this type of shot I find black polymer filters best as they are less reflective than the Mylar type.
That method, or using a long lens or telescope will work well on eclipse day no matter where you are, either in the path or elsewhere enjoying the partial eclipse, as in the example image below, also from October 23, 2014, shot with my small scope at lower left in the image above.
The partial eclipse of the Sun, October 23, 2014, as seen from Jasper, Alberta, shot under clear skies through a Mylar filter, on the front of a 66mm f/6 apo refractor.
No matter the method and gear you use, success on eclipse day will require practicing beforehand to learn what can go wrong, and what works best for the setup you plan to use. Never assume something will work!
Clear skies on October 14! The annular eclipse that day will serve as a great dress rehearsal for the big eclipse to come – the total eclipse of the Sun on April 8, 2024. That’s the event you really want to get right!
My latest ebook describes in detail the many techniques we can use to capture great still images and movies of the 2023 and 2024 eclipses of the Sun.
In the next few months we have two major eclipses of the Sun visible from North America.
On October 14, 2023 the Moon will cross the disk of the Sun creating a partial eclipse. But from along a narrow path in the western U.S. the Moon’s disk will be centered on the Sun’s disk but not be large enough to completely cover it. For a few minutes, viewers will see an “annular” eclipse, as above, as what remains of the Sun forms a brilliant ring of light around the dark disk of the Moon.
Six lunar months later, the Moon again crosses the Sun but is now large enough to completely cover the Sun’s bright disk. The result is the most spectacular celestial sight, a total eclipse of the Sun, on April 8, 2024. The last such total solar eclipse (TSE) in North America was on August 21, 2017, shown above. After 2024, the next TSE in southern North America will not be until August 23, 2044. (There’s a TSE in northern Alaska on March 30, 2033.)
In 2017 I prepared an ebook about how to shoot that year’s total eclipse. This year I revised and expanded the book extensively to cover both the 2023 annular and 2024 total eclipses. The new 350-page ebook explains how to frame the eclipses depending on where you are along the paths. New information covers the advances in camera gear, with more details added on shooting video. Revised tutorials cover new software and processing techniques.
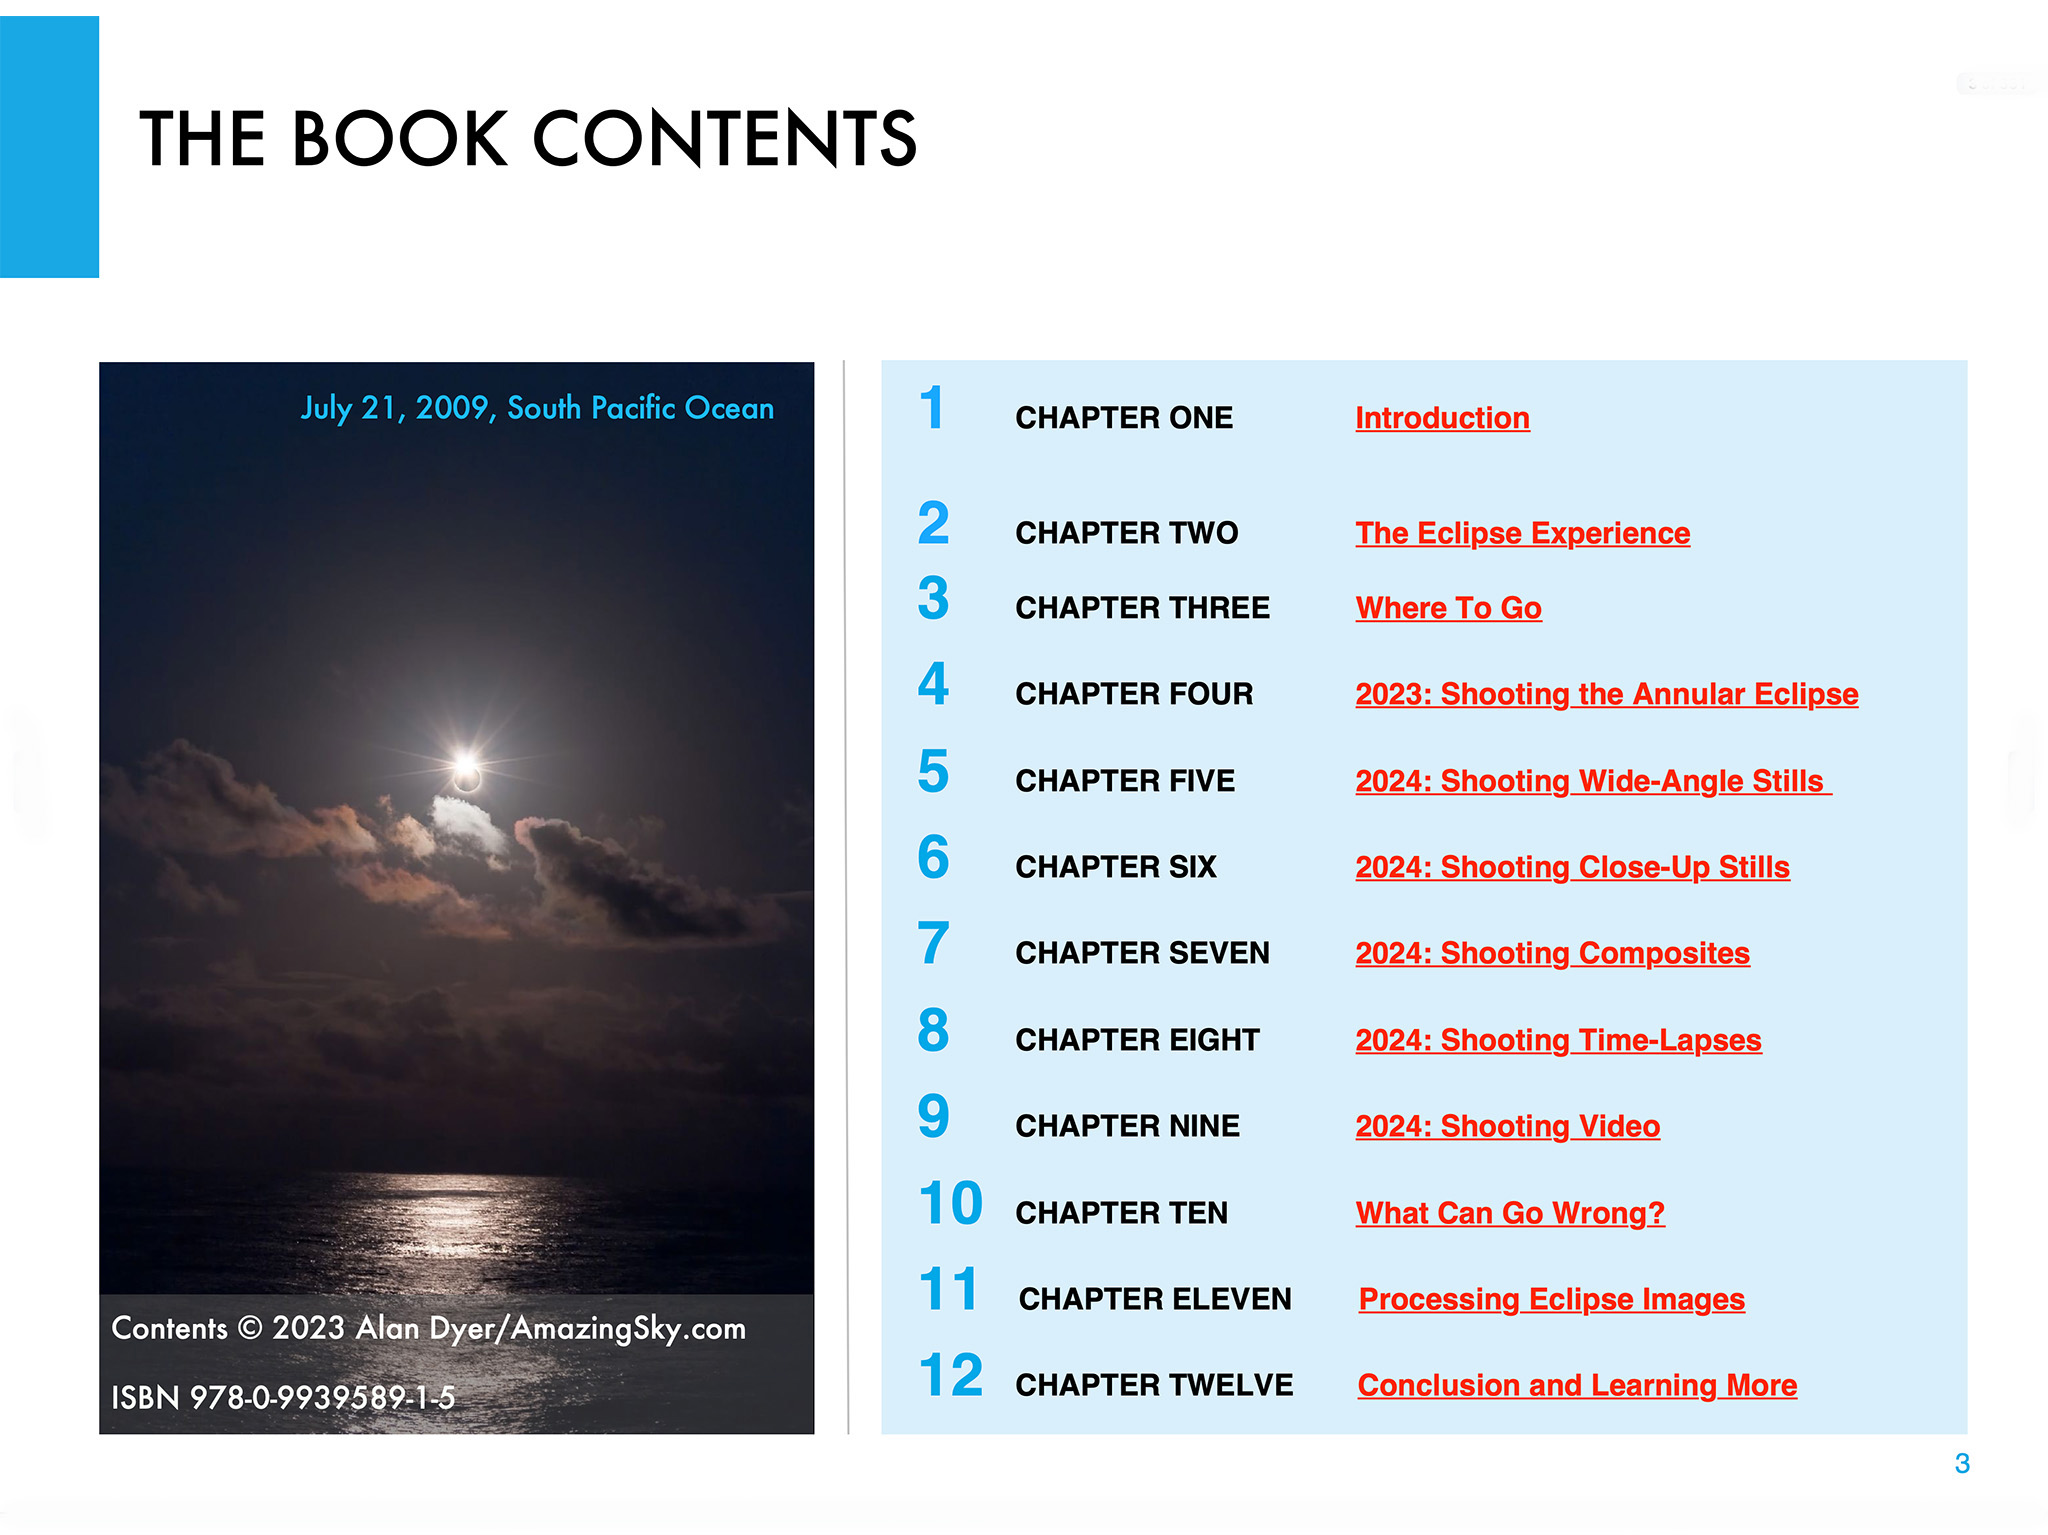
Above is the ebook’s Contents page, so you can see what topics it covers, over an extensive 350 pages. I provide not only advice on lots of techniques and gear, but also suggestions for what not to do, and what can go wrong!
The Fundamentals
I discuss the filters needed, comparing the various types available, and when to use them, and when to remove them. (A filter is always needed for the annular eclipse, but failing to remove the filter is a common failing at a total eclipse!)
For the 2023 annular eclipse I explain how to shoot close-ups, but also another type of image, the multiple exposure composite. Framing, timing and exposing correctly are crucial.
I do the same for the 2024 total eclipse, as a wide-angle shot of the eclipsed Sun over a landscape is one of the easiest ways to capture the event. It’s possible to set up a camera to take the images automatically, leaving you free to enjoy the view of the event without fussing with gear. I explain how best to do that.
For both eclipses, many people will want to shoot close-ups with telephoto lenses or telescopes. It takes more work and more can go wrong, but I show what’s required for equipment and exposures, and explain how to avoid the common flaws of fuzzy focus and trailed images.
But good exposure is also essential. However, for a total eclipse close-up, no one exposure is best. It takes a range of exposures to record the wide dynamic range of phenomena during totality. That demands work at the camera.
Setting Cameras
I show how we can use a camera’s auto-bracketing function to help automate the process of taking a set of exposures, from short exposures for the prominences, to long for the faint outer corona.
Another option is using a continuous burst mode to capture the fleeting moments of the diamond rings at the start and end of totality in 2024. But this can also be useful for capturing the “reverse Baily’s beads” that appear briefly as the Moon reaches the inner contact points at the start and end of the annular phase of the 2023 eclipse.
Using a tracking mount can help with shooting a set of images during totality. I describe the options for choosing the right mount and telescope, and how to set it up for accurate tracking. I discuss the advantages — and pitfalls — of using a tracking mount.
Shooting Video
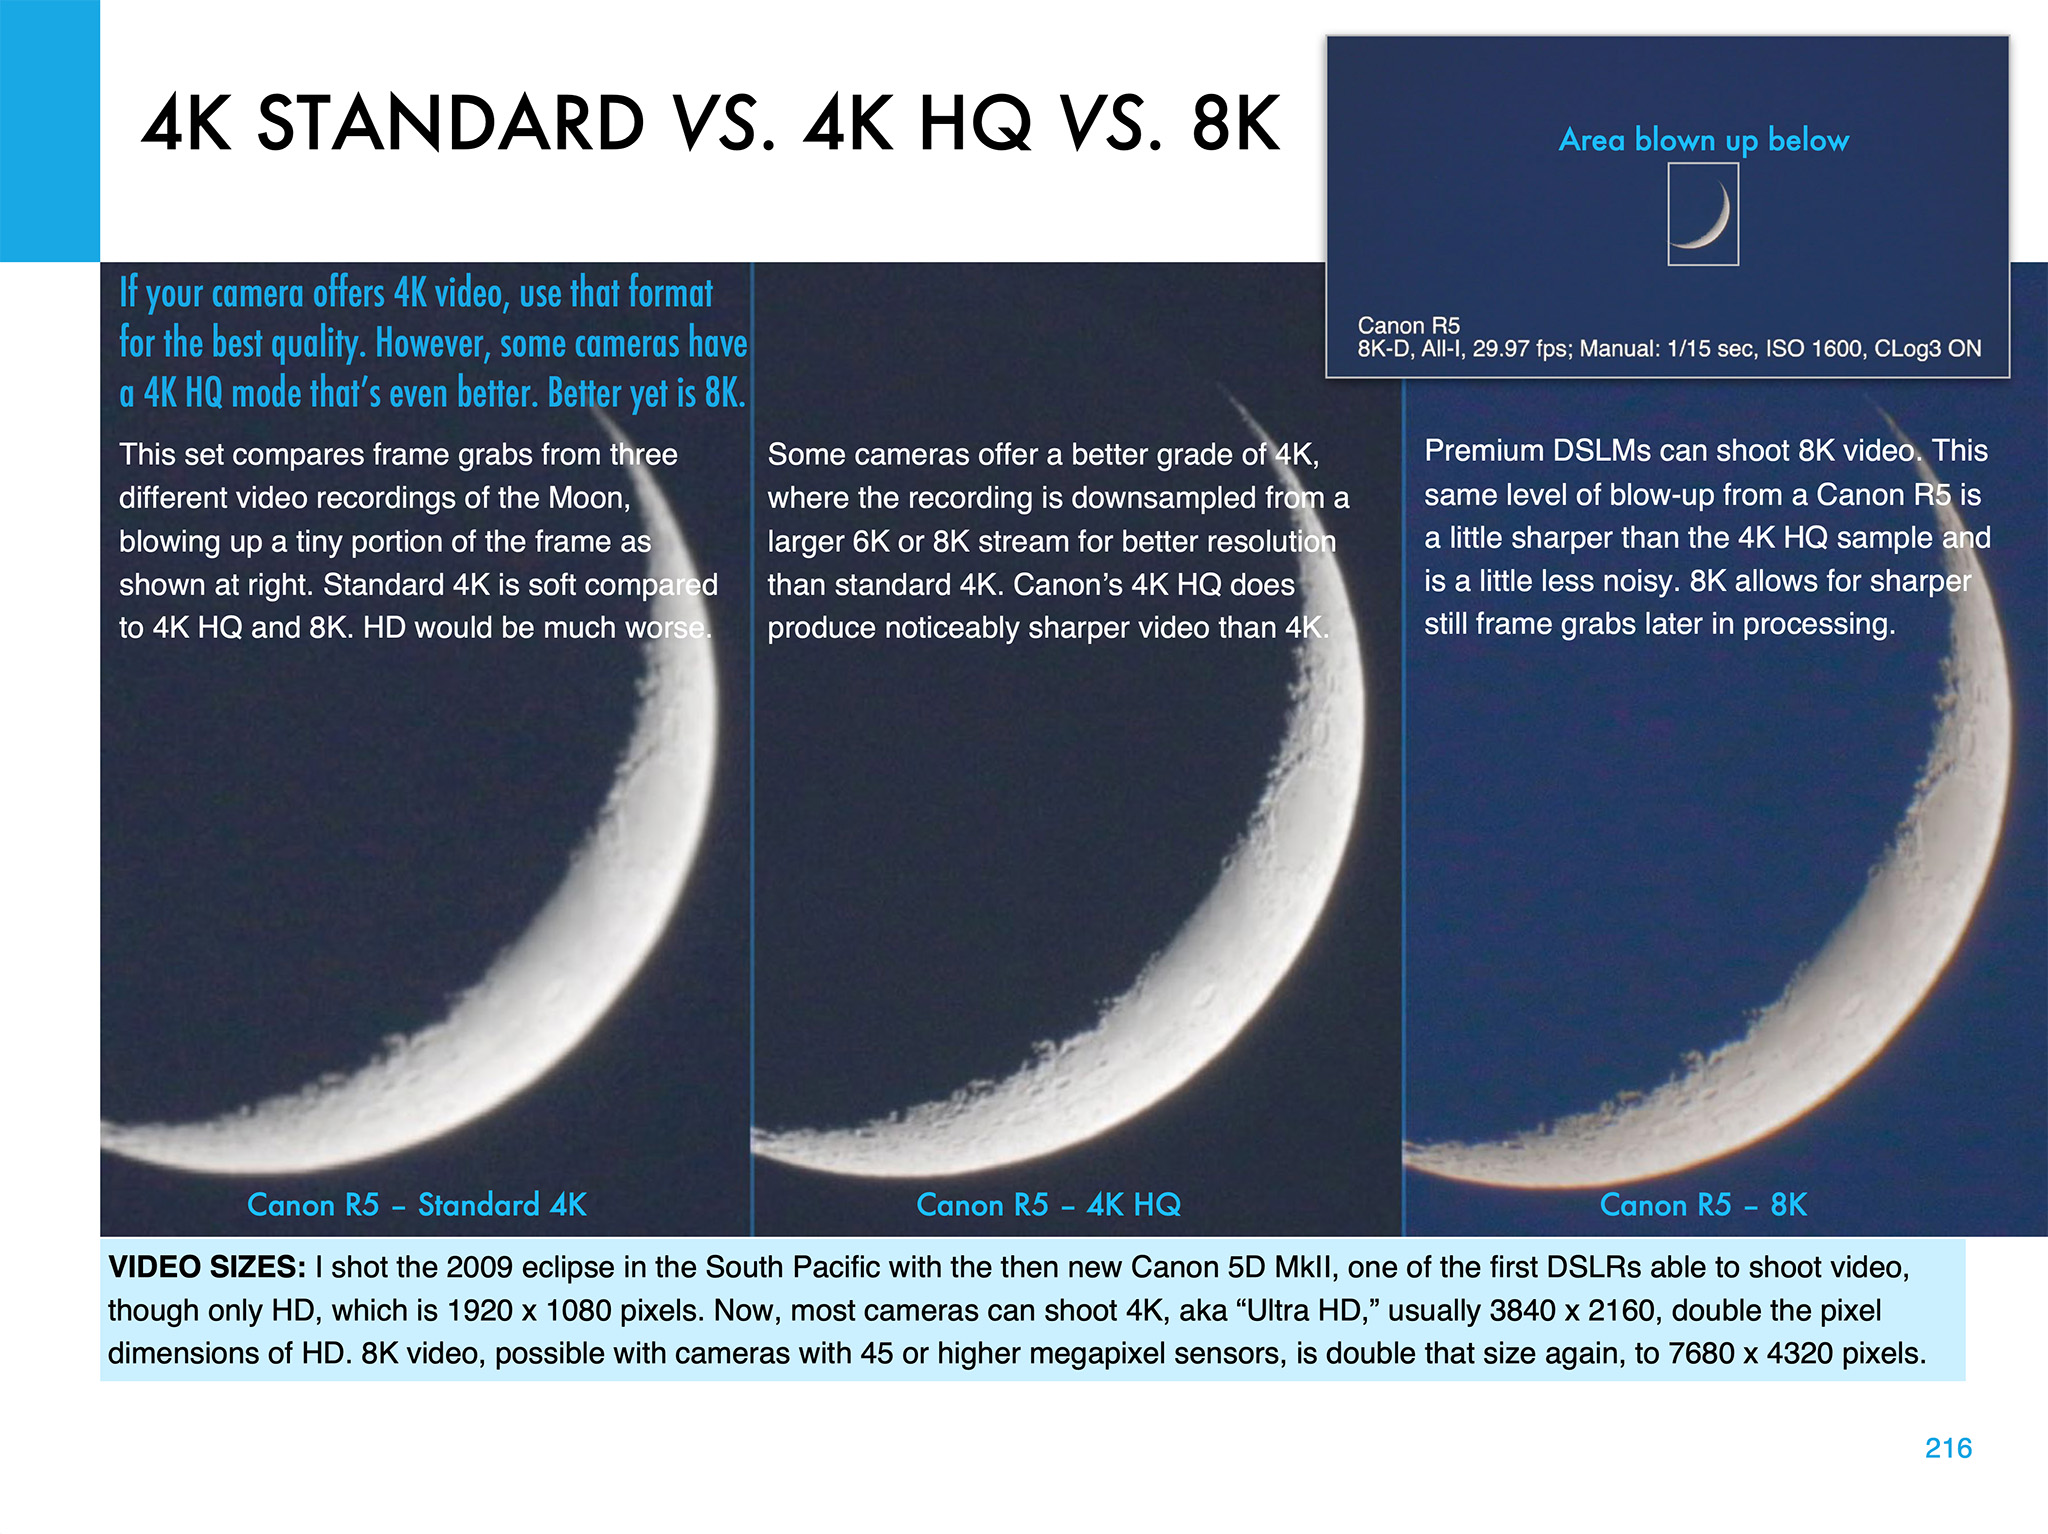
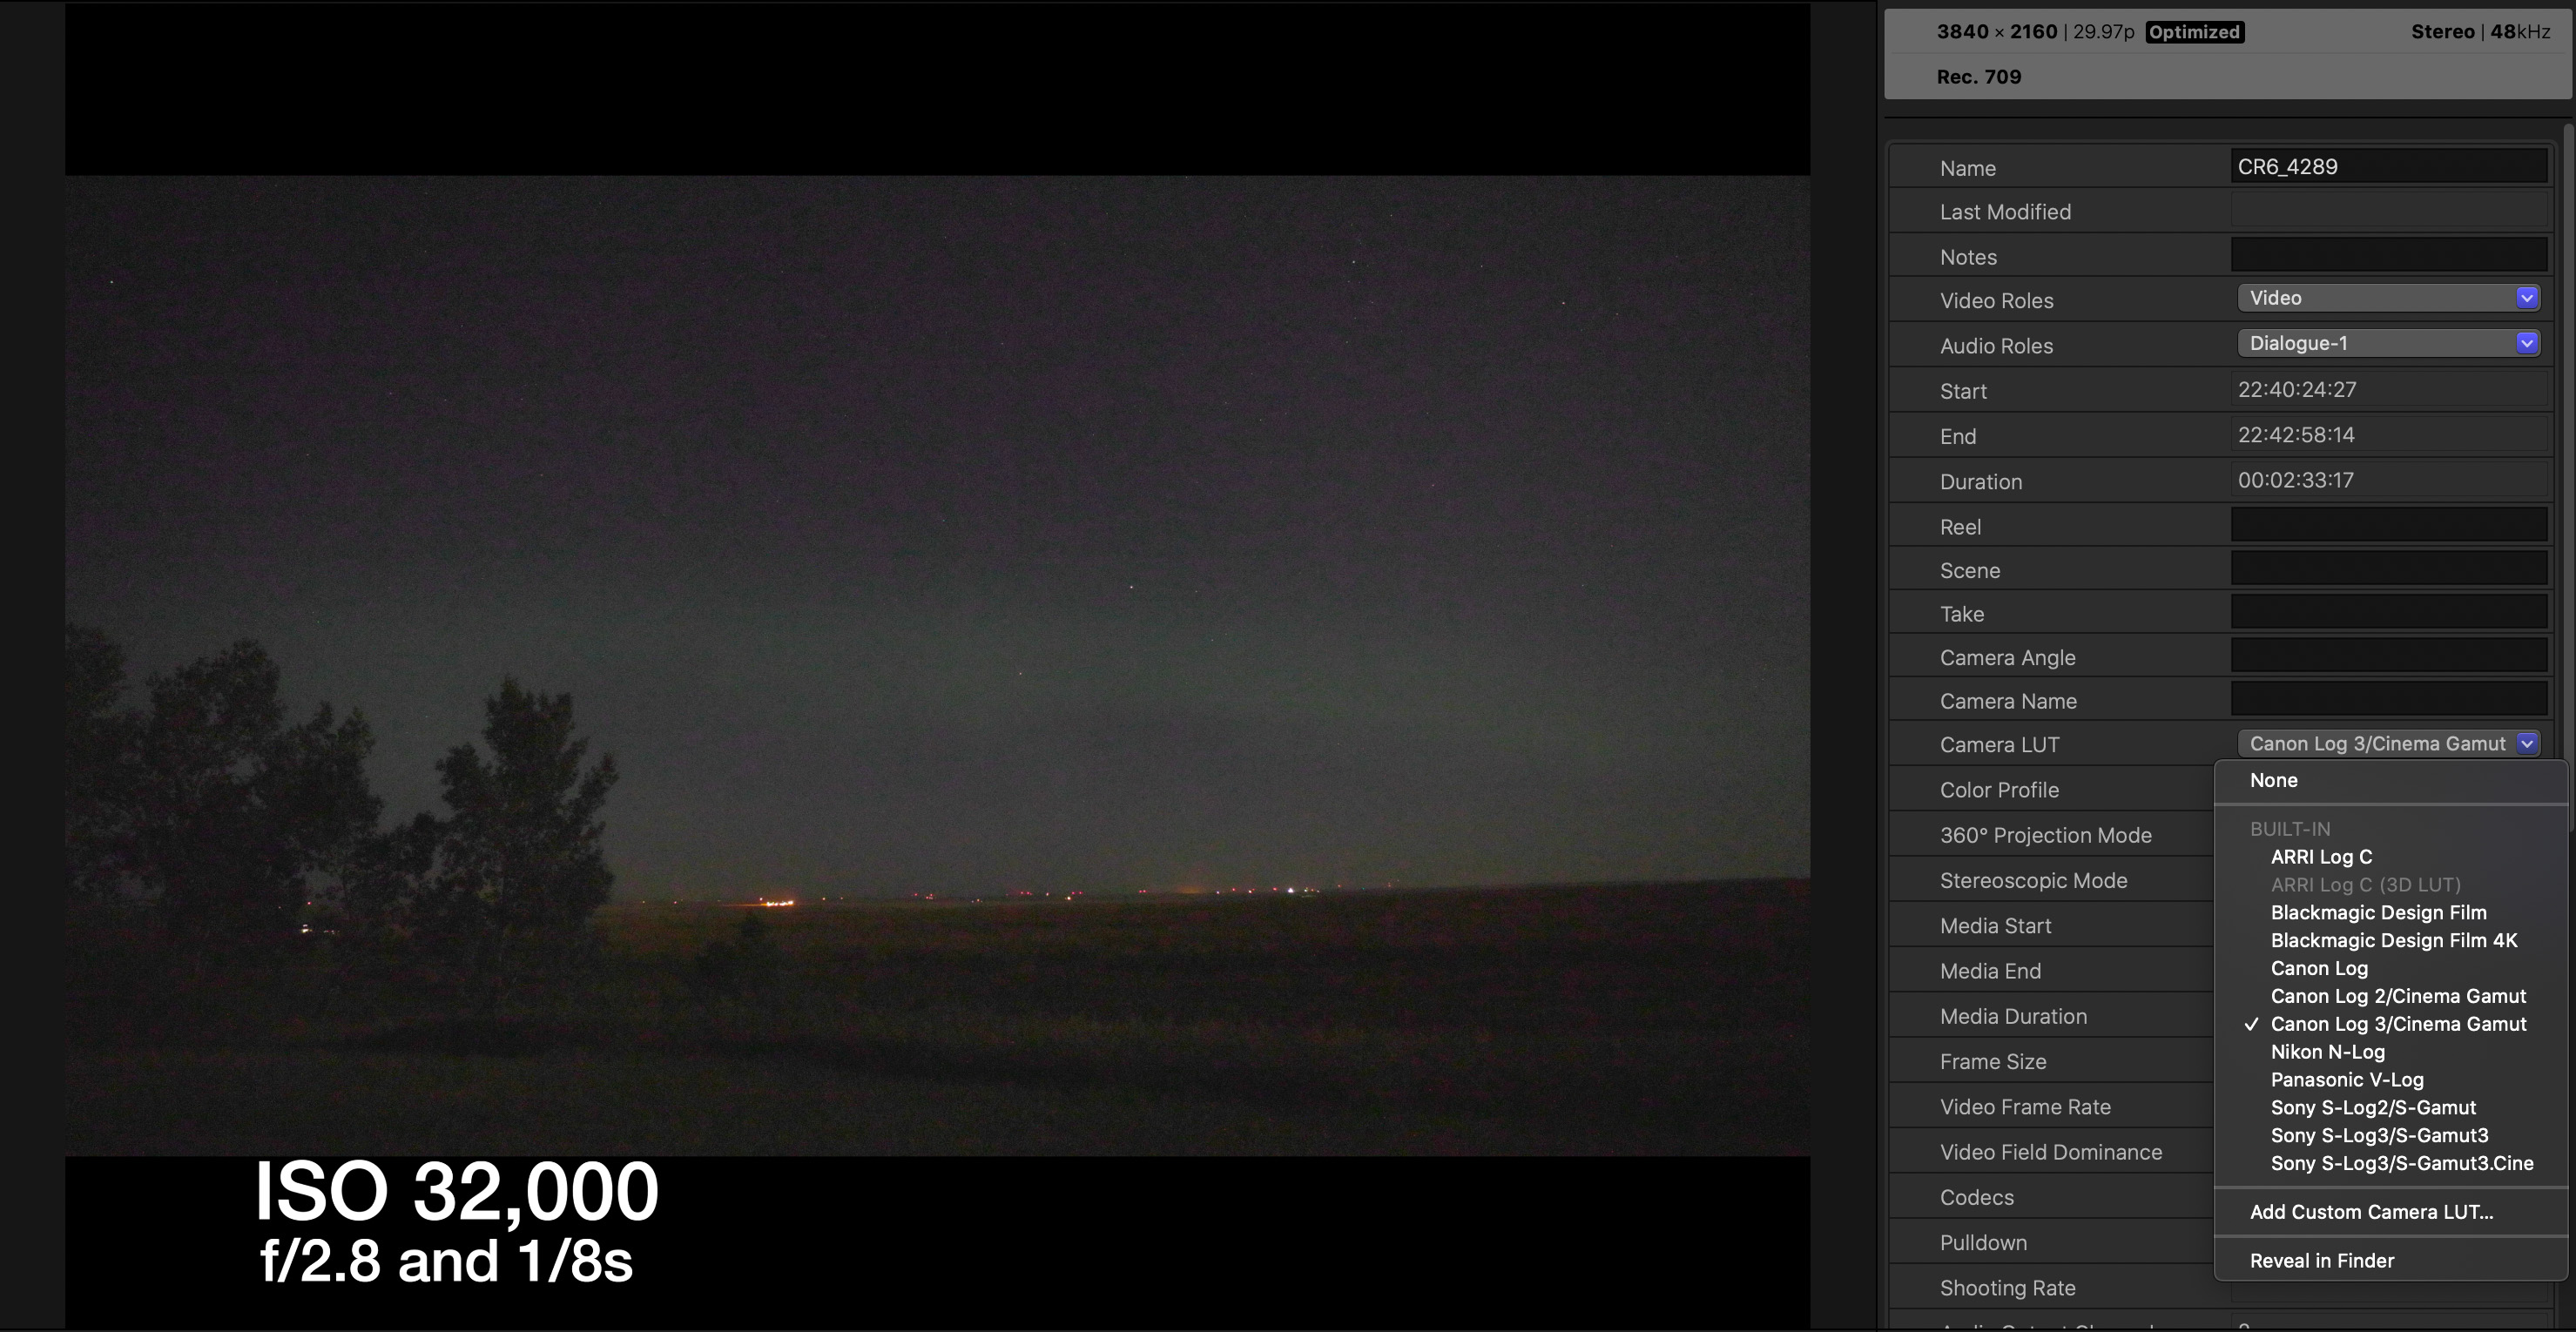
Video is now an important feature of many cameras. But the choices of formats and settings can be daunting! 4K, 8K, 4K HQ — what to use? I illustrate the differences, using the best practice target, the crescent Moon.
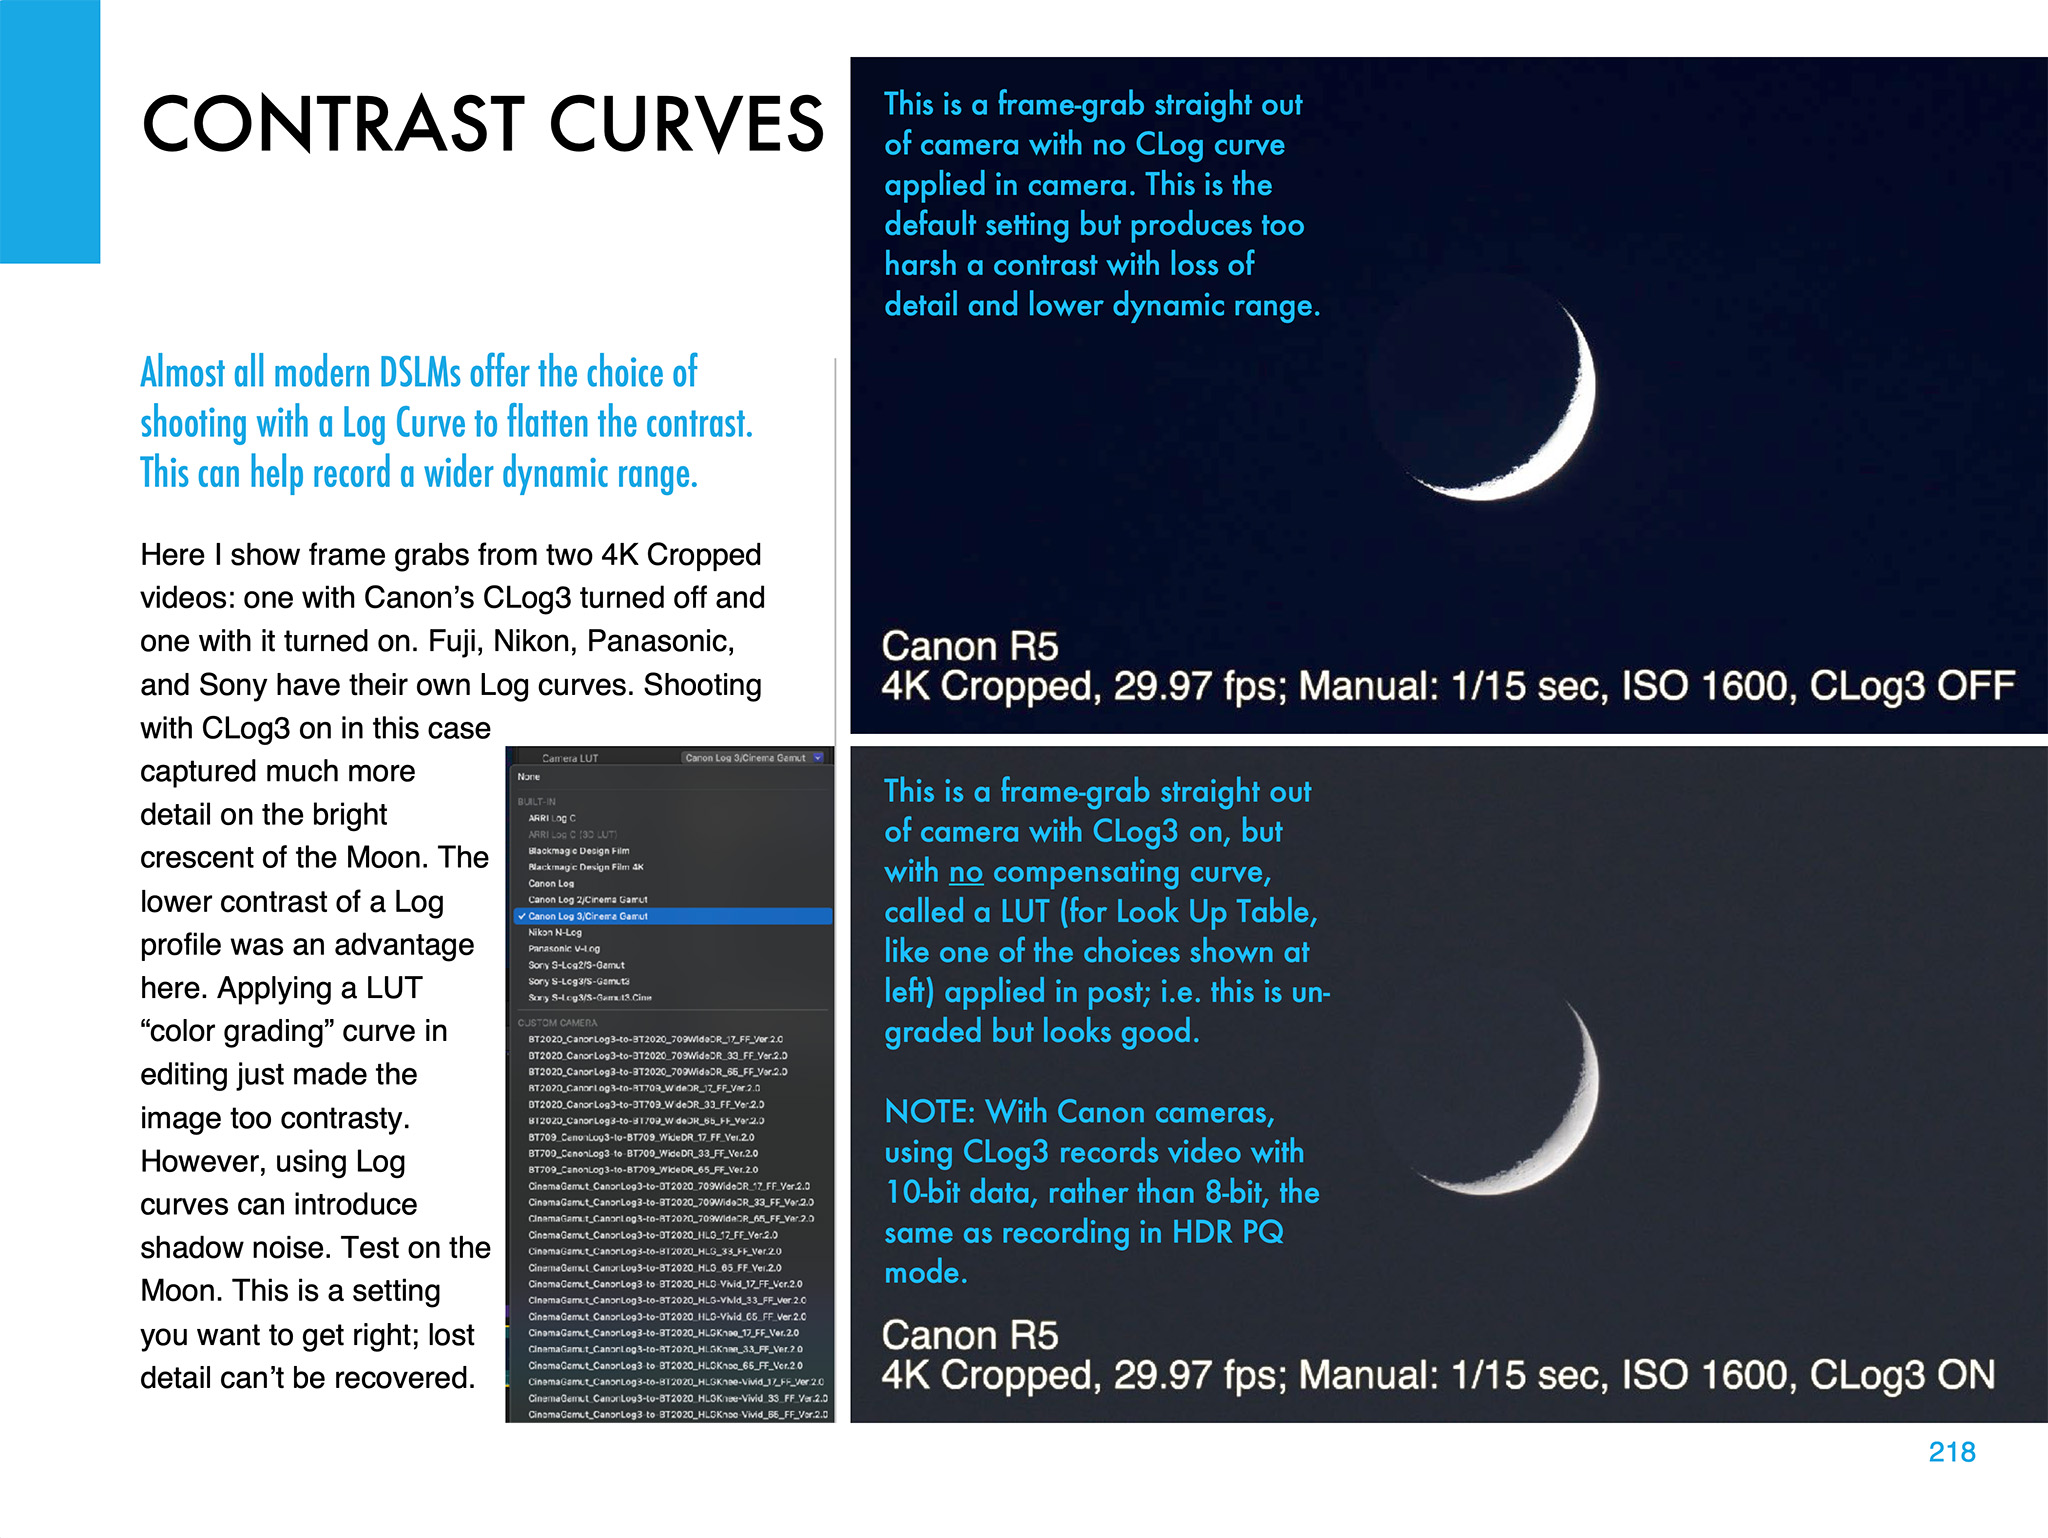
Choosing the right contrast curve for your video — such as CLog3 here — can also make a big difference to the final video quality. It’s important to get that right. You have only one chance!
I also devote a chapter to shooting time-lapses, with wide-angle lenses and telescopes.
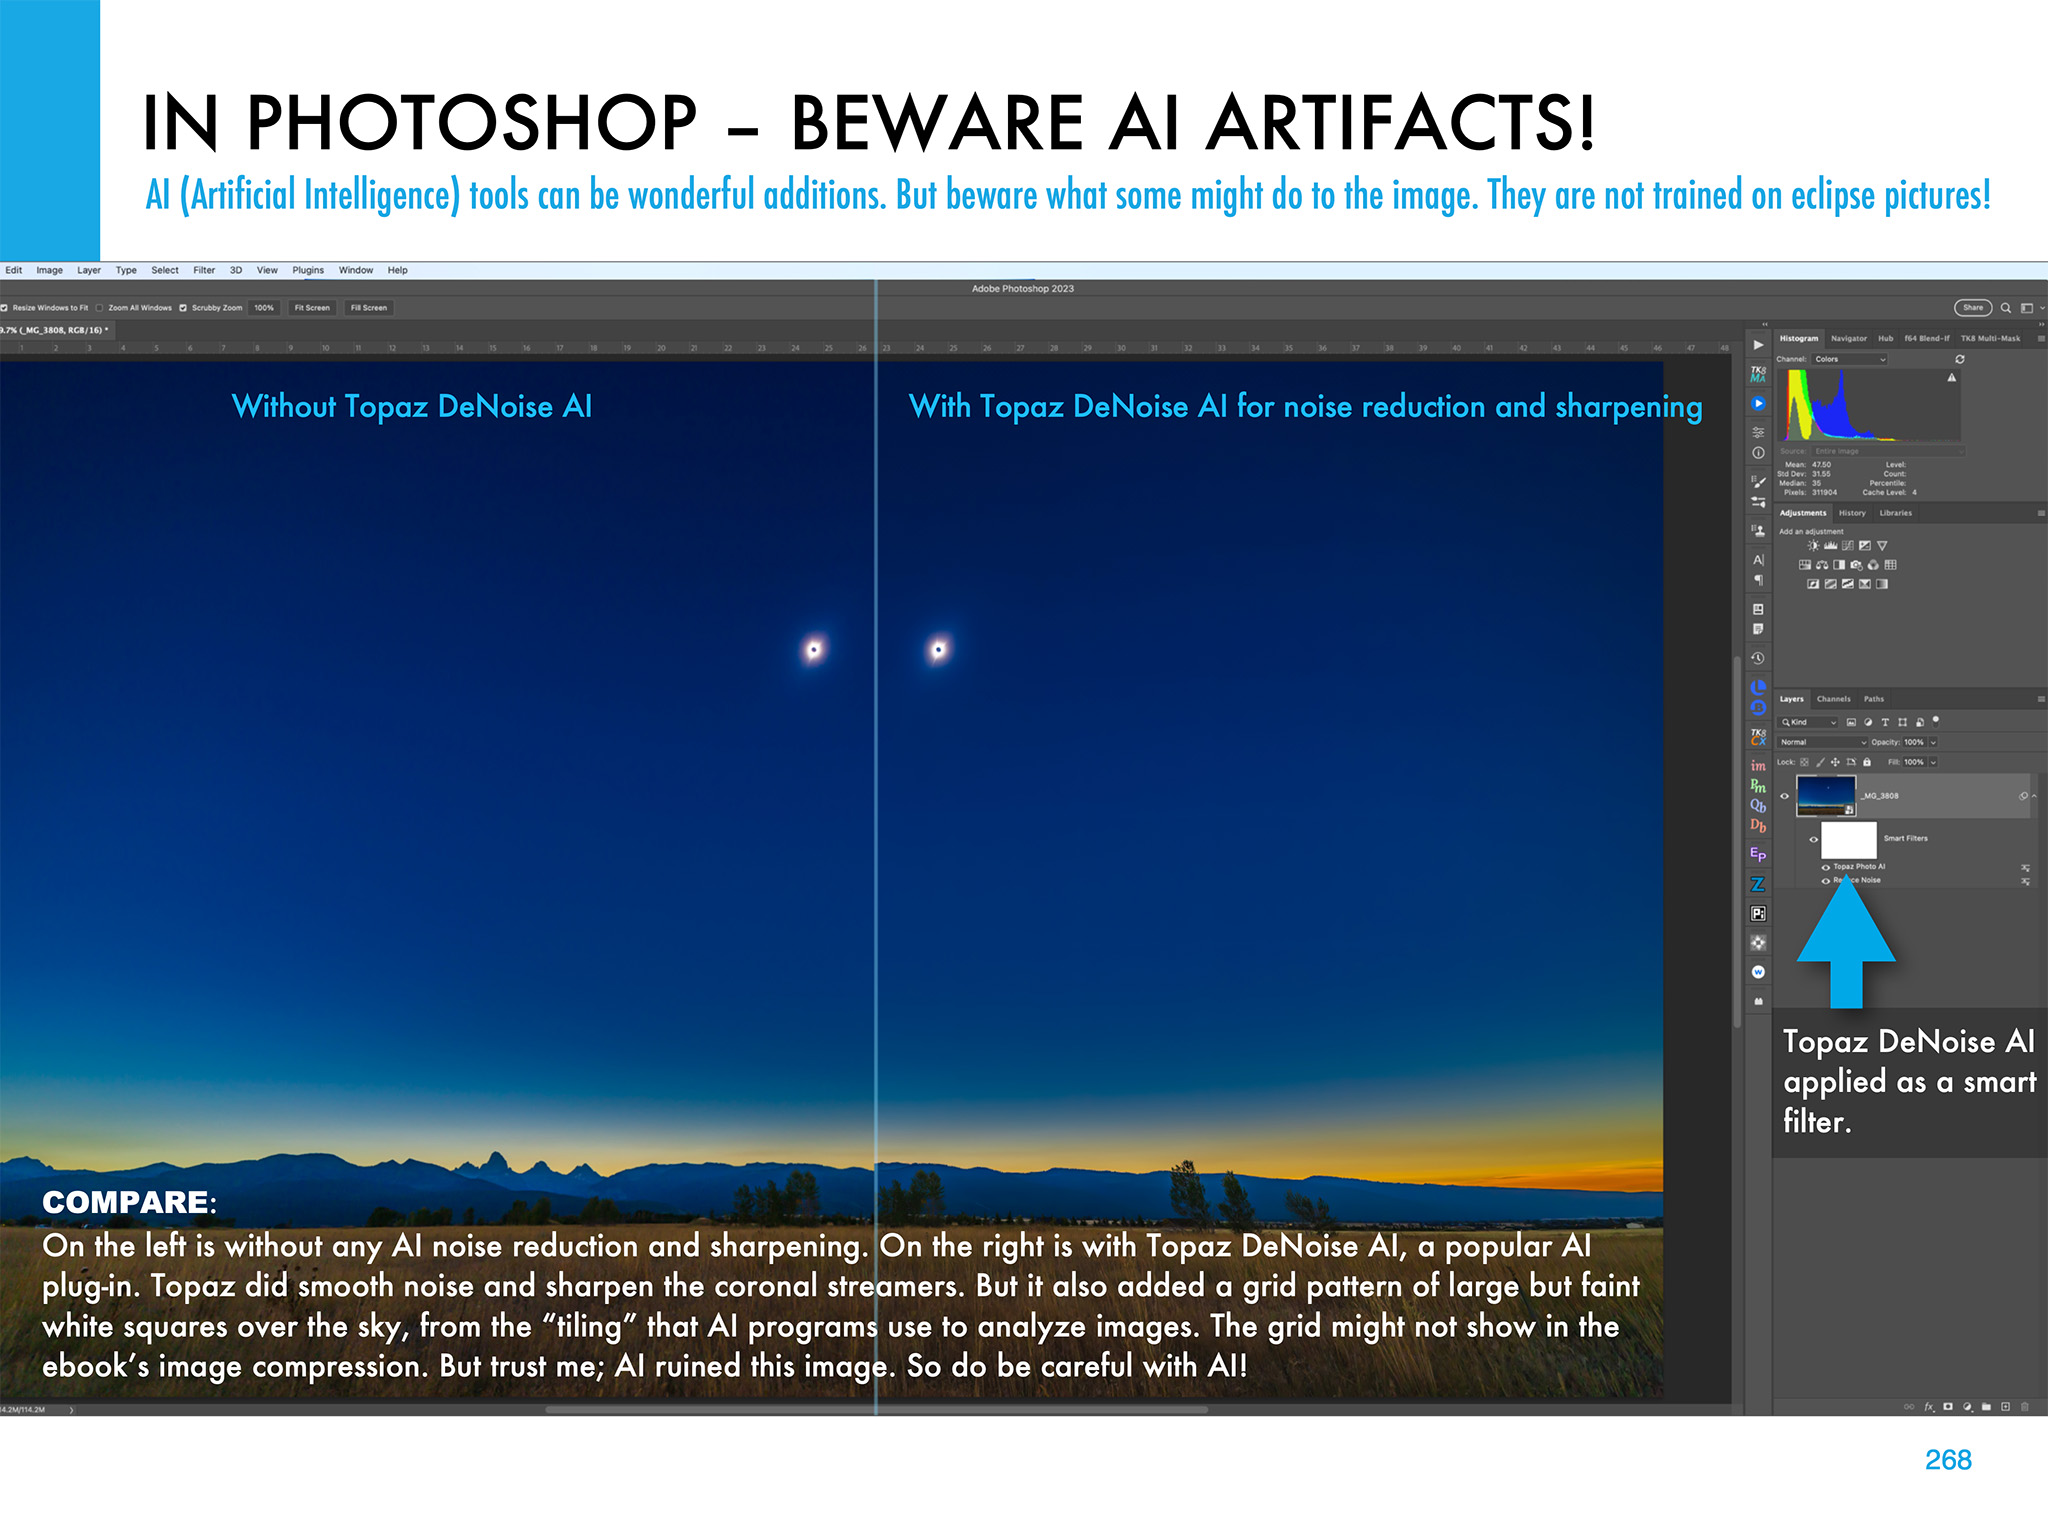
Image Processing
Chapter 11 is the biggest, with 68 pages of tutorials on how to process eclipse images, using the latest software. I show the benefit new AI tools can provide, but also the oddities they can impart to eclipse images.
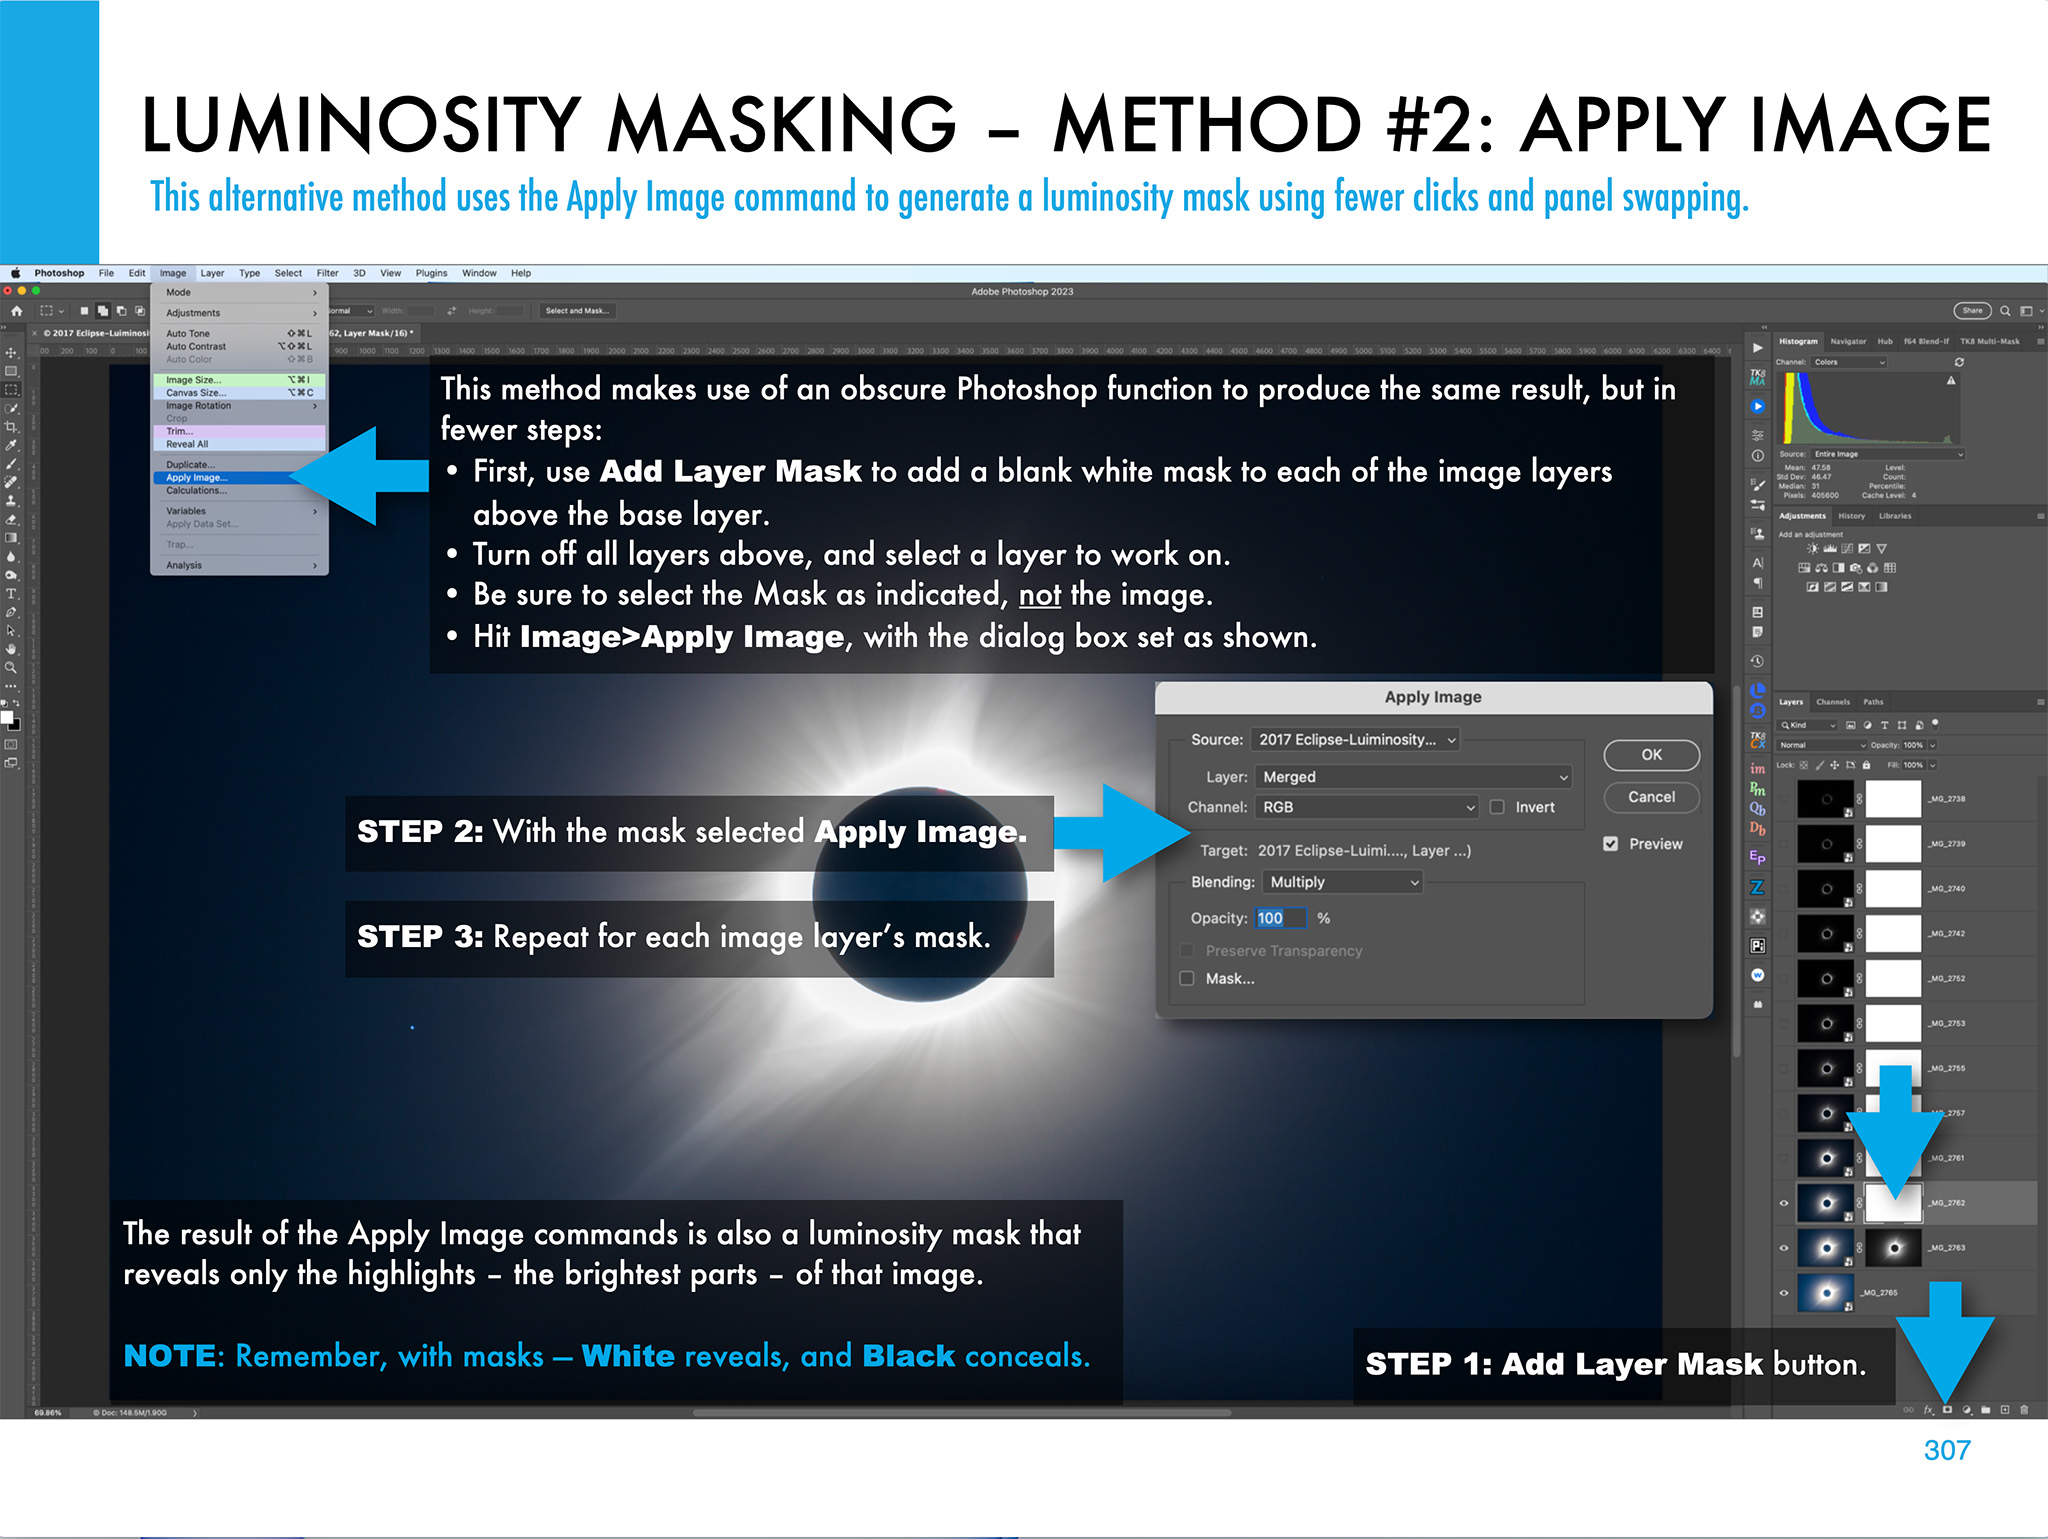
I illustrate how to use HDR software (comparing sample results from several popular programs) to blend multiple exposures for greater dynamic range.
I illustrate other methods of stacking and blending exposure sets, such as luminosity masks and stack modes. Examples are all with Adobe products, but the methods are applicable to other layer-based programs such as Affinity Photo.
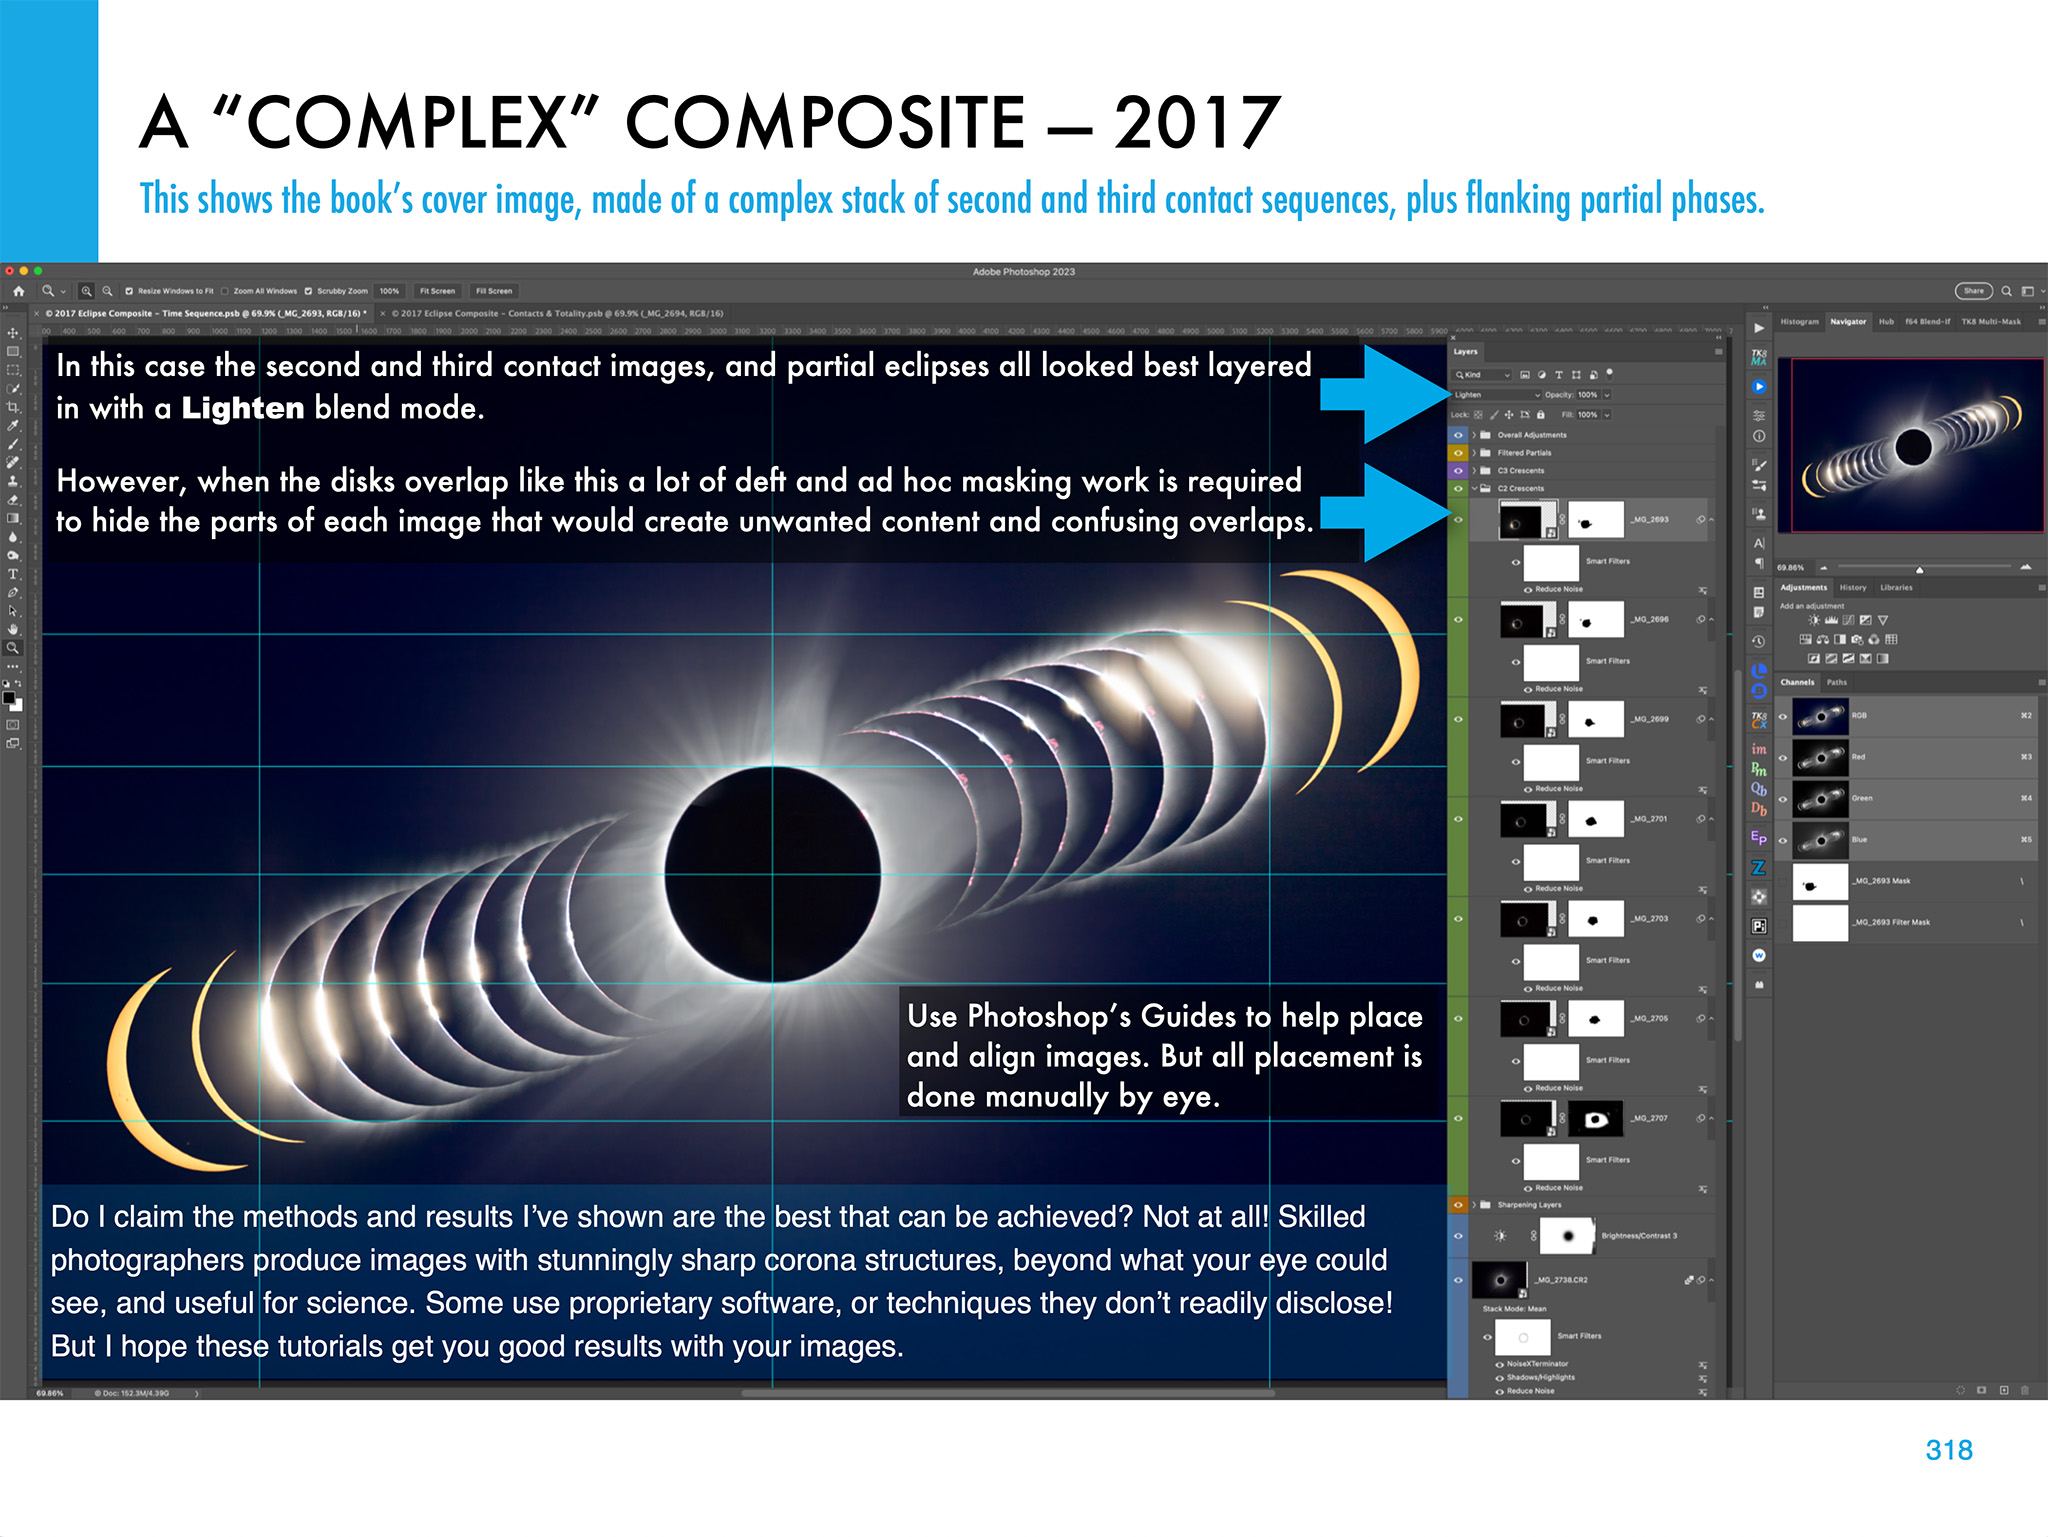
The processing chapter ends with illustrations on how to create layered composites from images taken at multiple stages of an eclipse.
What Can Go Wrong?
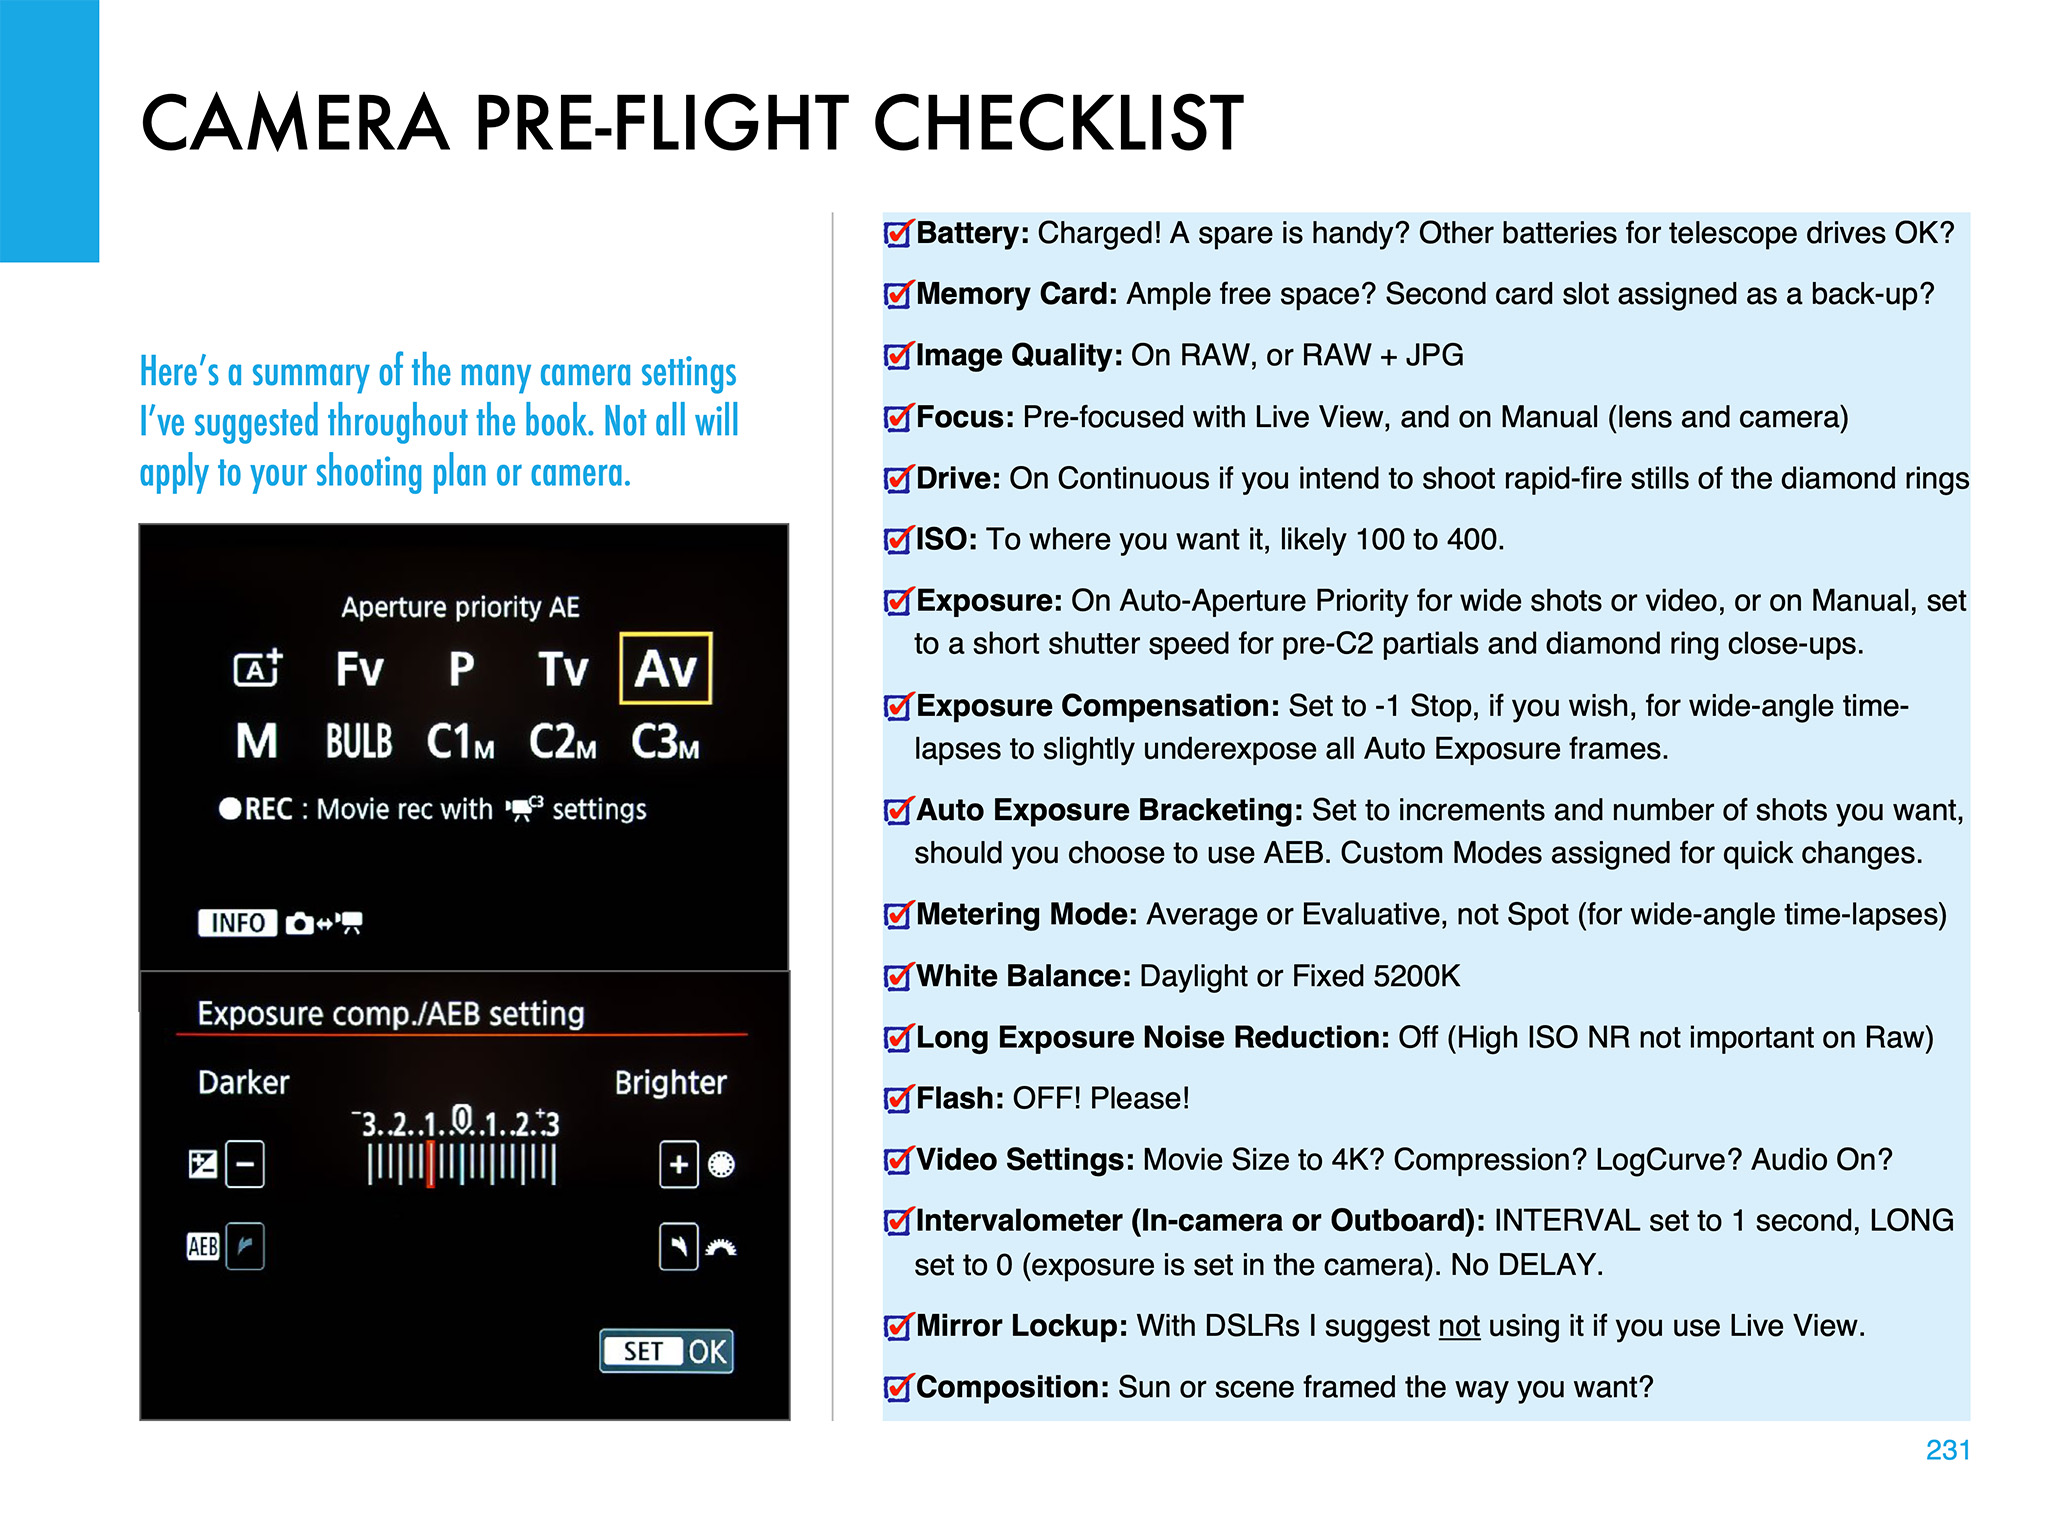
The ebook ends with advice for the ambitious (!) on how best to use several cameras to capture different aspects of the eclipse. And I includes lots of tips and checklists to ensure all goes well on eclipse day — or what to do for Plan B if all does not go well!
The ebook is available for Apple Books (for Macs and iPads) and as a PDF for all devices. Links to buy and more details on ebook content are at my website at www.amazingsky.com/EclipseBook.
I’ll be posting more eclipse “tips and techniques” blogs in the coming months, so be sure to subscribe.
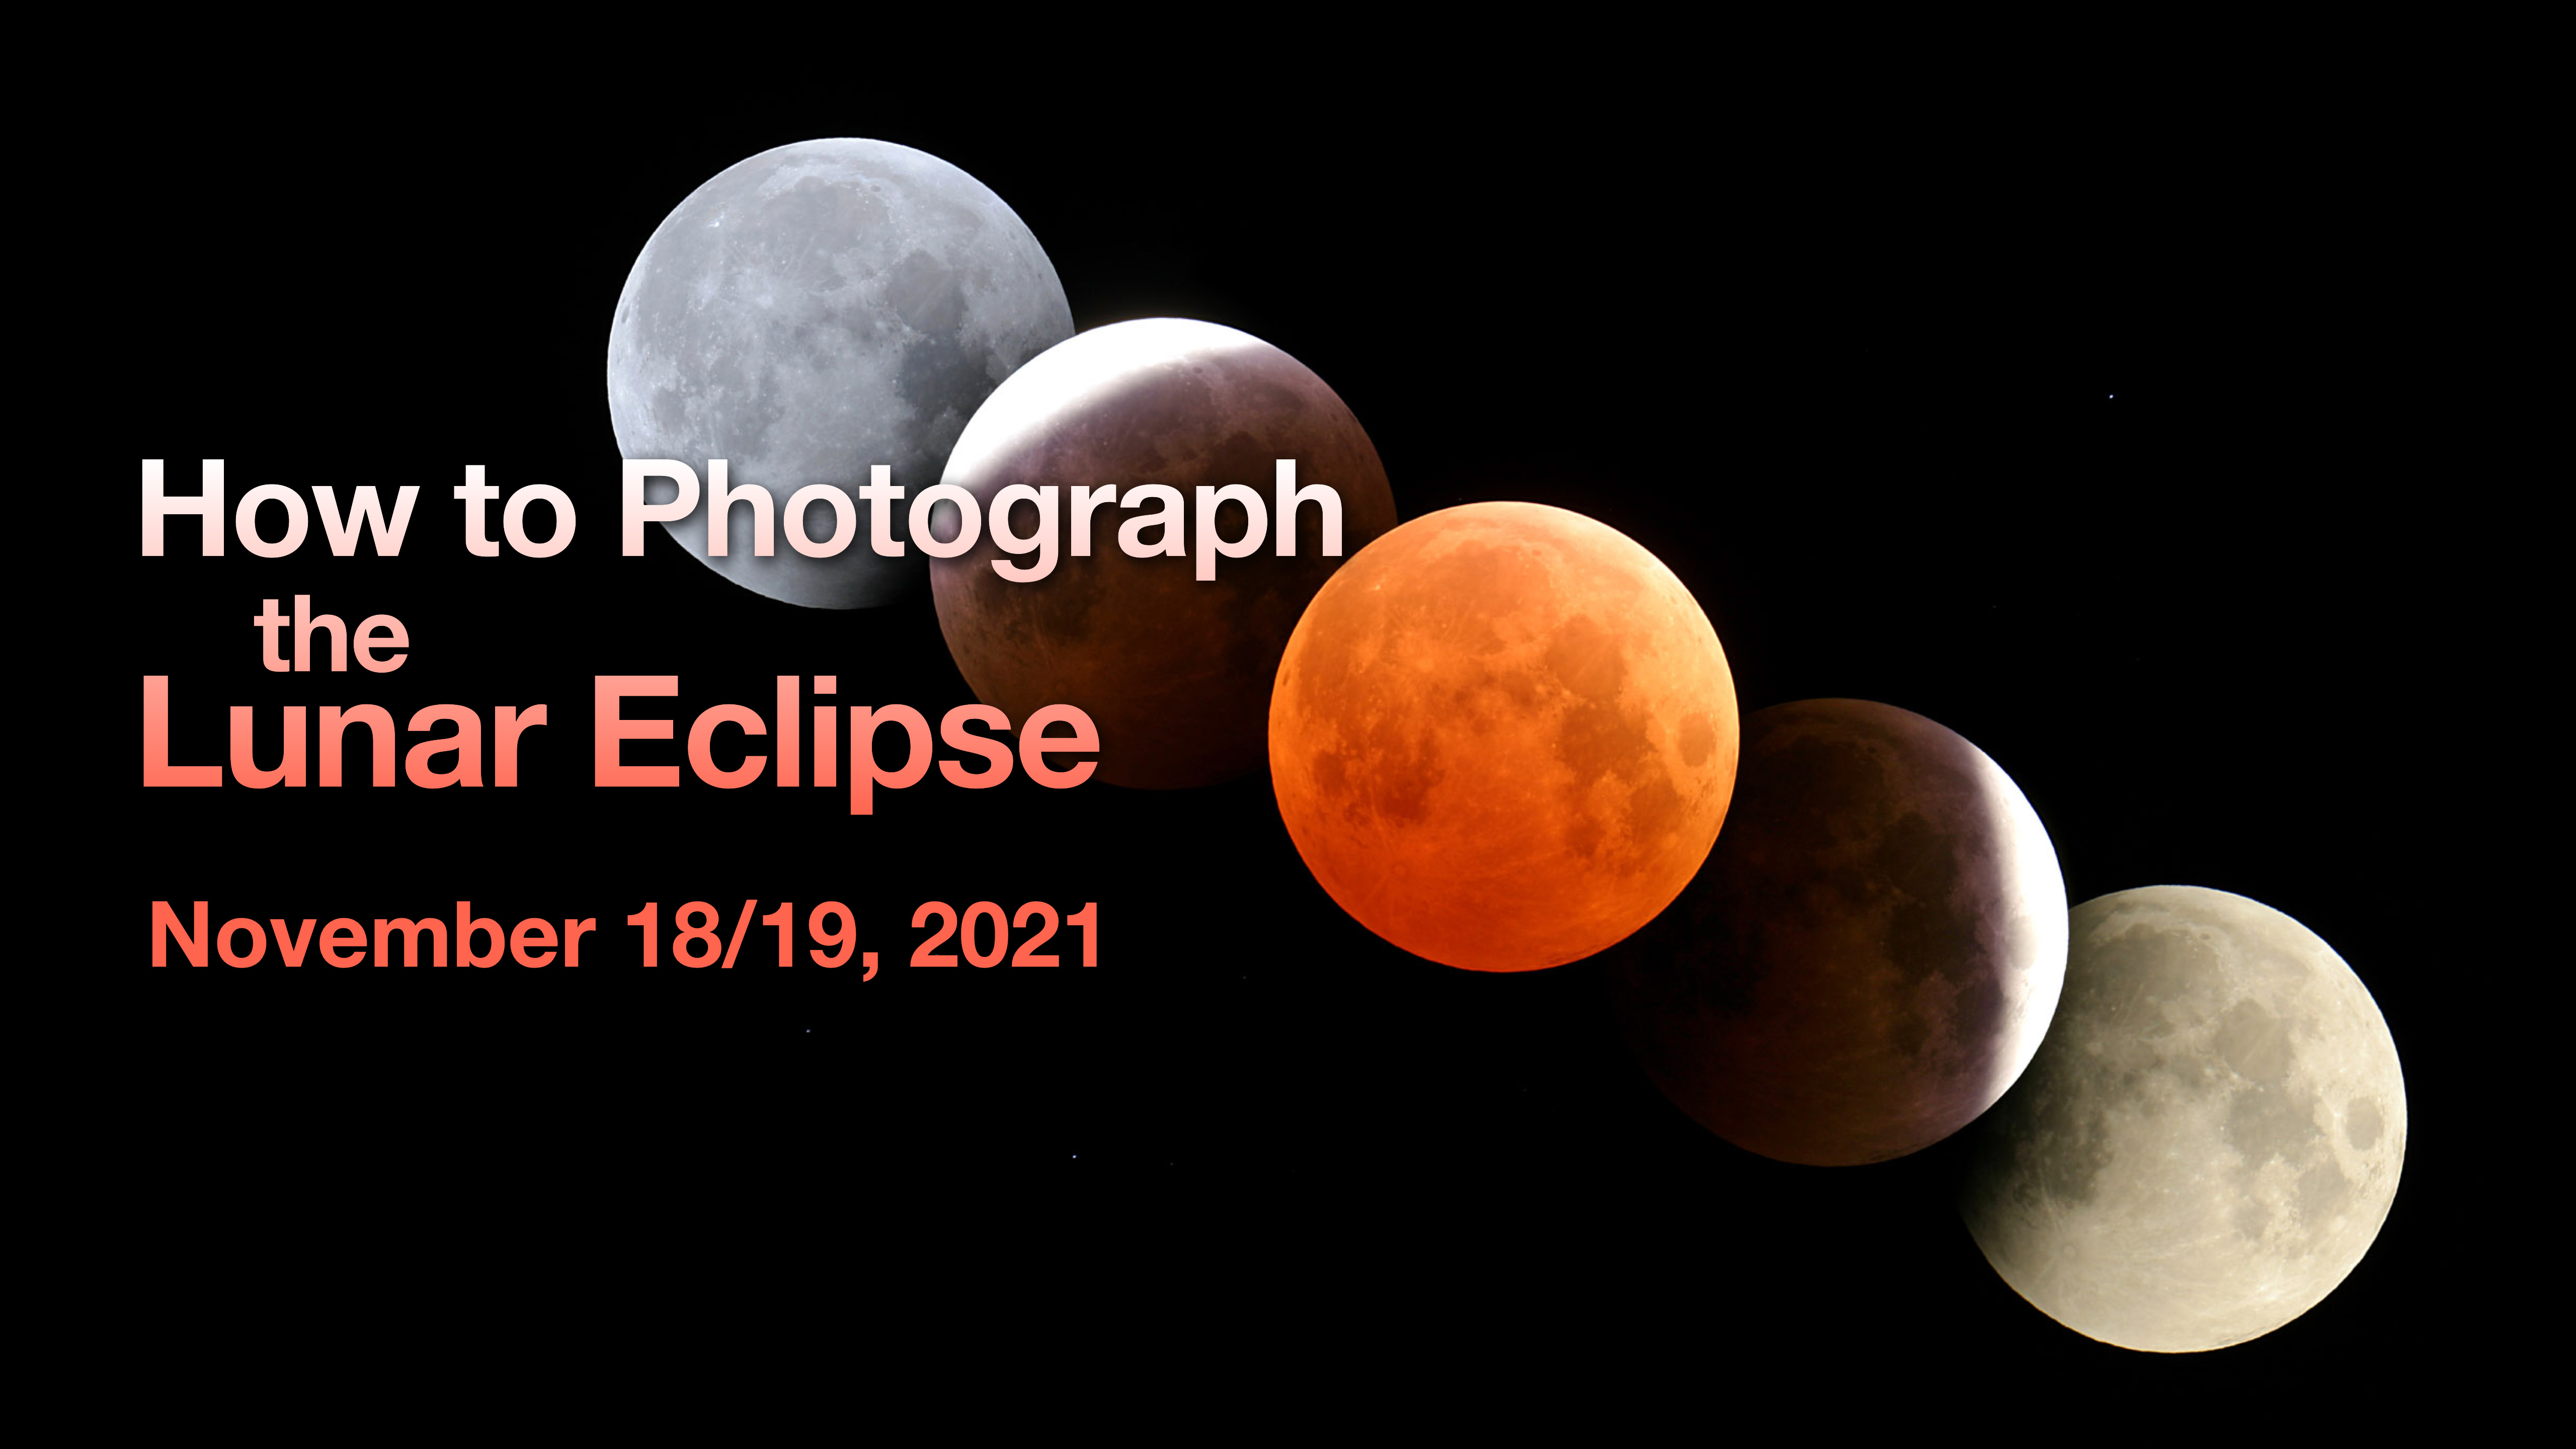
On the night of November 18/19 eclipse fans across North America can enjoy the sight of the Moon turning deep red. Here’s how to capture the scene.
Seeing and shooting this eclipse will demand staying up late or getting up very early. That’s the price to pay for an eclipse everyone on the continent can see.
Also, this is not a total eclipse of the Moon. But it’s the next best thing, a 97% partial eclipse – almost total! So the main attraction — a red Moon — will still be front and centre.
CLICK ON AN IMAGE to bring it up full screen for closer inspection.
NOT QUITE TOTAL
At mid-eclipse 97% of the disk of the Full Moon will be within Earth’s dark umbral shadow, and should appear a bright red colour to the eye and even more so to the camera. A sliver of the southern edge of the Moon will remain outside the umbra and will appear bright white, like a southern polar cap on the Moon.
While some references will say the eclipse begins at 1:01 am EST, that’s when the Moon first enters the outer lighter penumbral shadow. Nothing unusual can be seen at that point, as the darkening of the Moon’s disk by the penumbra is so slight, you won’t notice any difference over the normally bright Full Moon.
The extent of the umbra and penumbra at the October 2004 total lunar eclipse.
It isn’t until the Moon begins to enter the umbra that you can see a dark bite being taken out of the edge of the Moon.
WHAT TO SEE
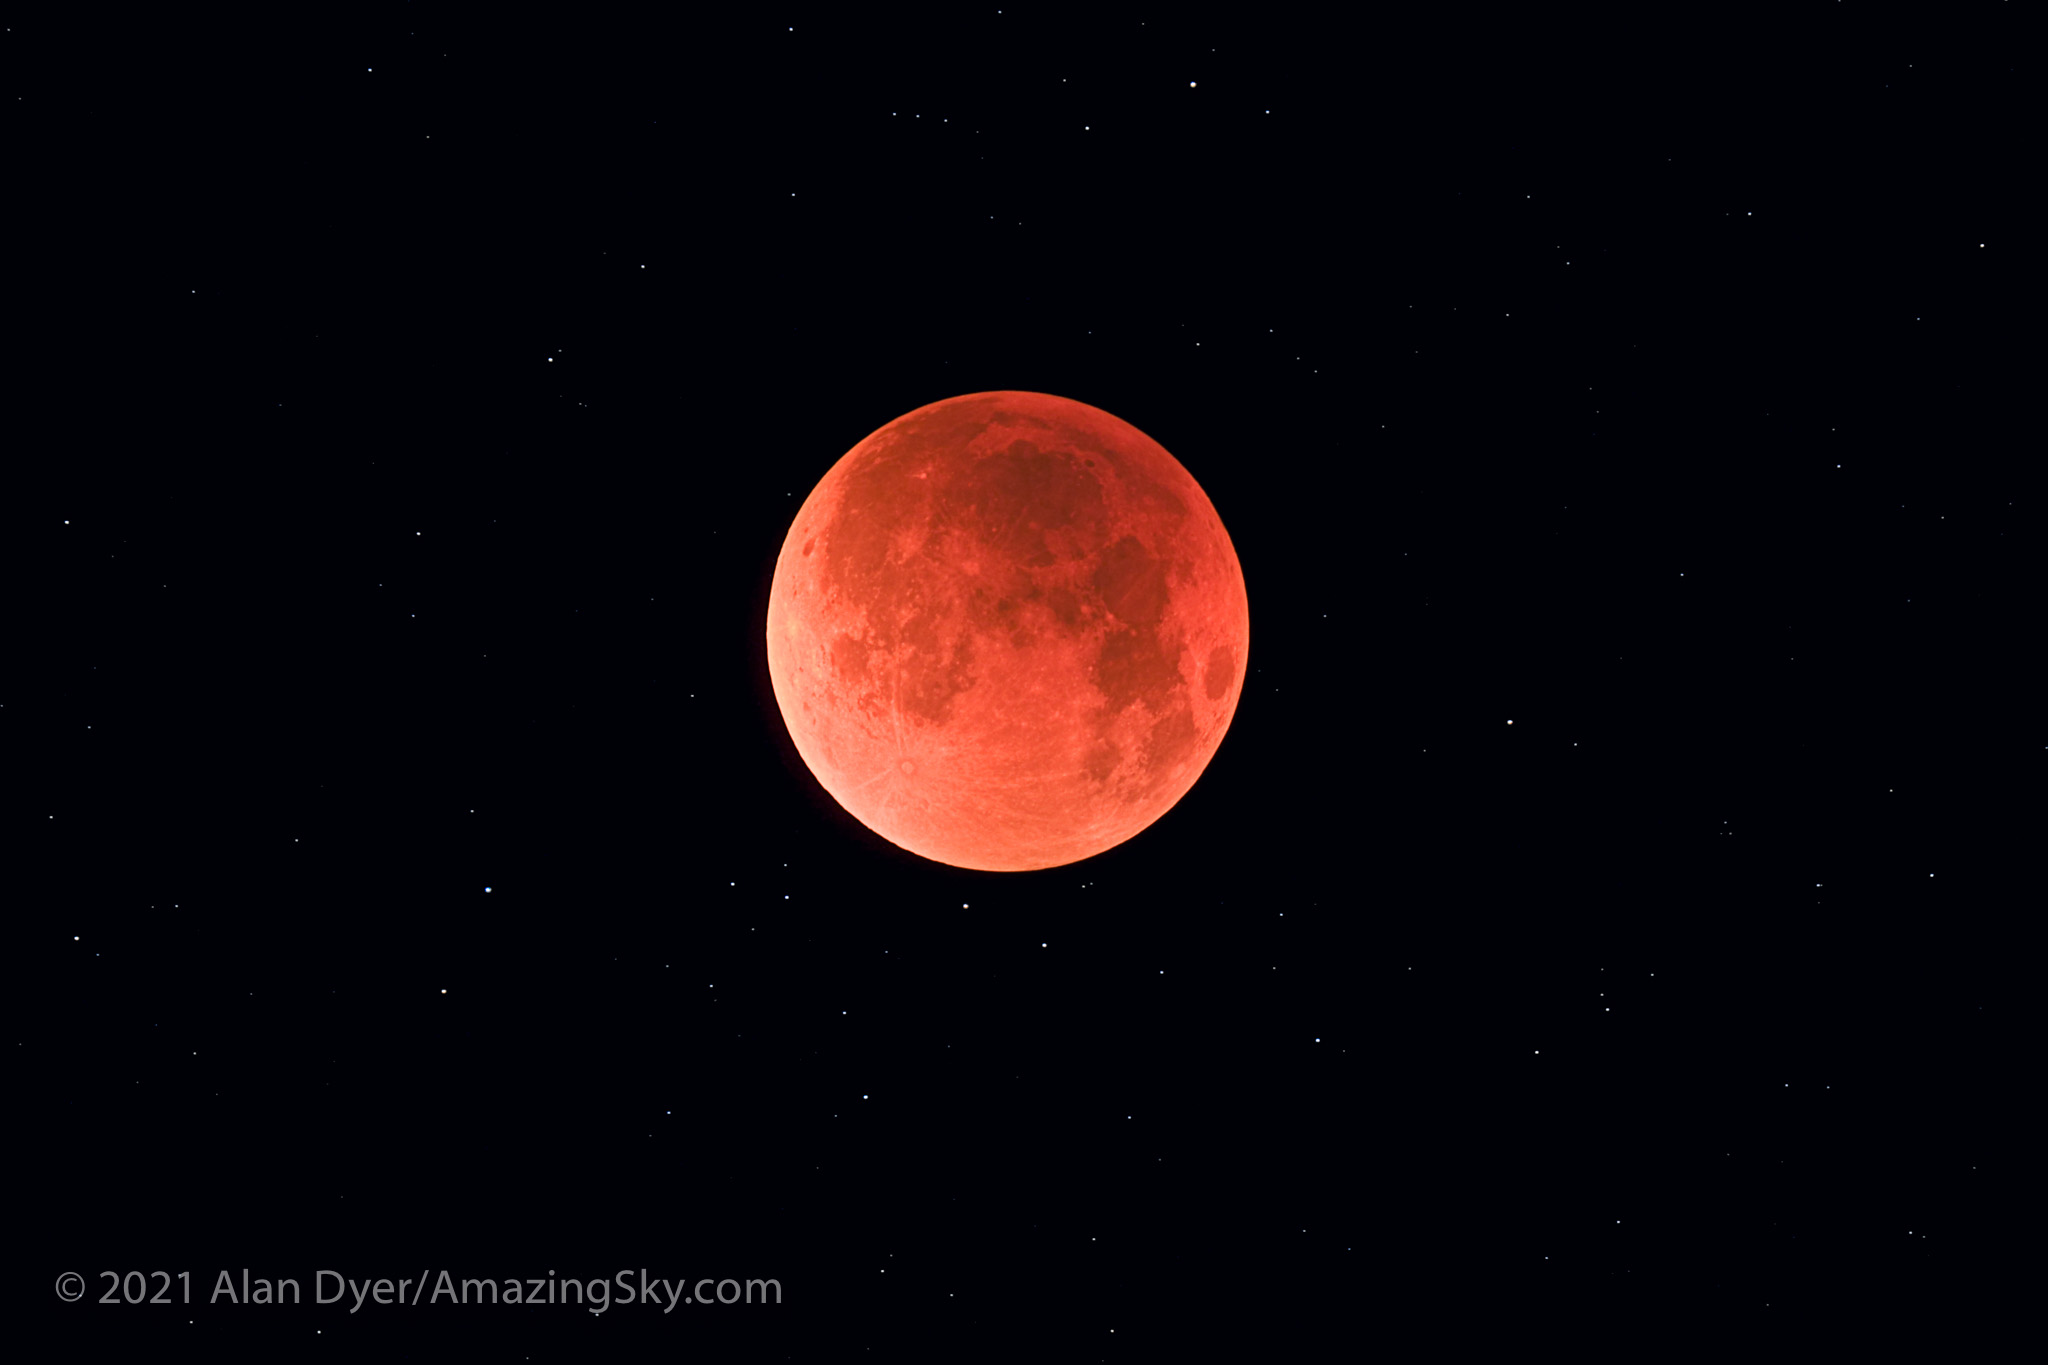
At mid-eclipse the Full Moon will look deep red or perhaps bright orange — the colours can vary from eclipse to eclipse, depending on the clarity of the Earth’s atmosphere through which the sunlight is passing to light the Moon. The red is the colour of all the sunsets and sunrises going on around the Earth during the eclipse.
The total lunar eclipse of August 2007. At the November 18 eclipse the bottom edge of the Moon, as it did here, will be bright, but brighter than it appears here.
The unique aspect of this eclipse is that for the 15 to 30 minutes around mid-eclipse we might see some unusual colour gradations at the edge of the umbral shadow, from sunlight passing through Earth’s upper atmosphere and ozone layer. This can tint the shadow edge blue or even green.
The last lunar eclipse six months ago on the morning of May 26, 2021 (see my blog here) was visible during its total phase only from western North America, and then only just. However, this eclipse can be seen from coast to coast.
Only from the very easternmost points in North America does the Moon set with the eclipse in progress, but during the inconsequential penumbral phase. All of the umbral phase is visible from the Eastern Seaboard, though the last stages will be in progress with the Moon low in the west in the pre-dawn hours. But that positioning can make for photogenic sight.
The start, middle and end times of the umbral eclipse for Eastern and Pacific time zones. The background image is a simulation of the path of the November 18/19, 2021 eclipse when the Moon travels through the southern part of the umbra.
WHEN IS THE ECLIPSE?
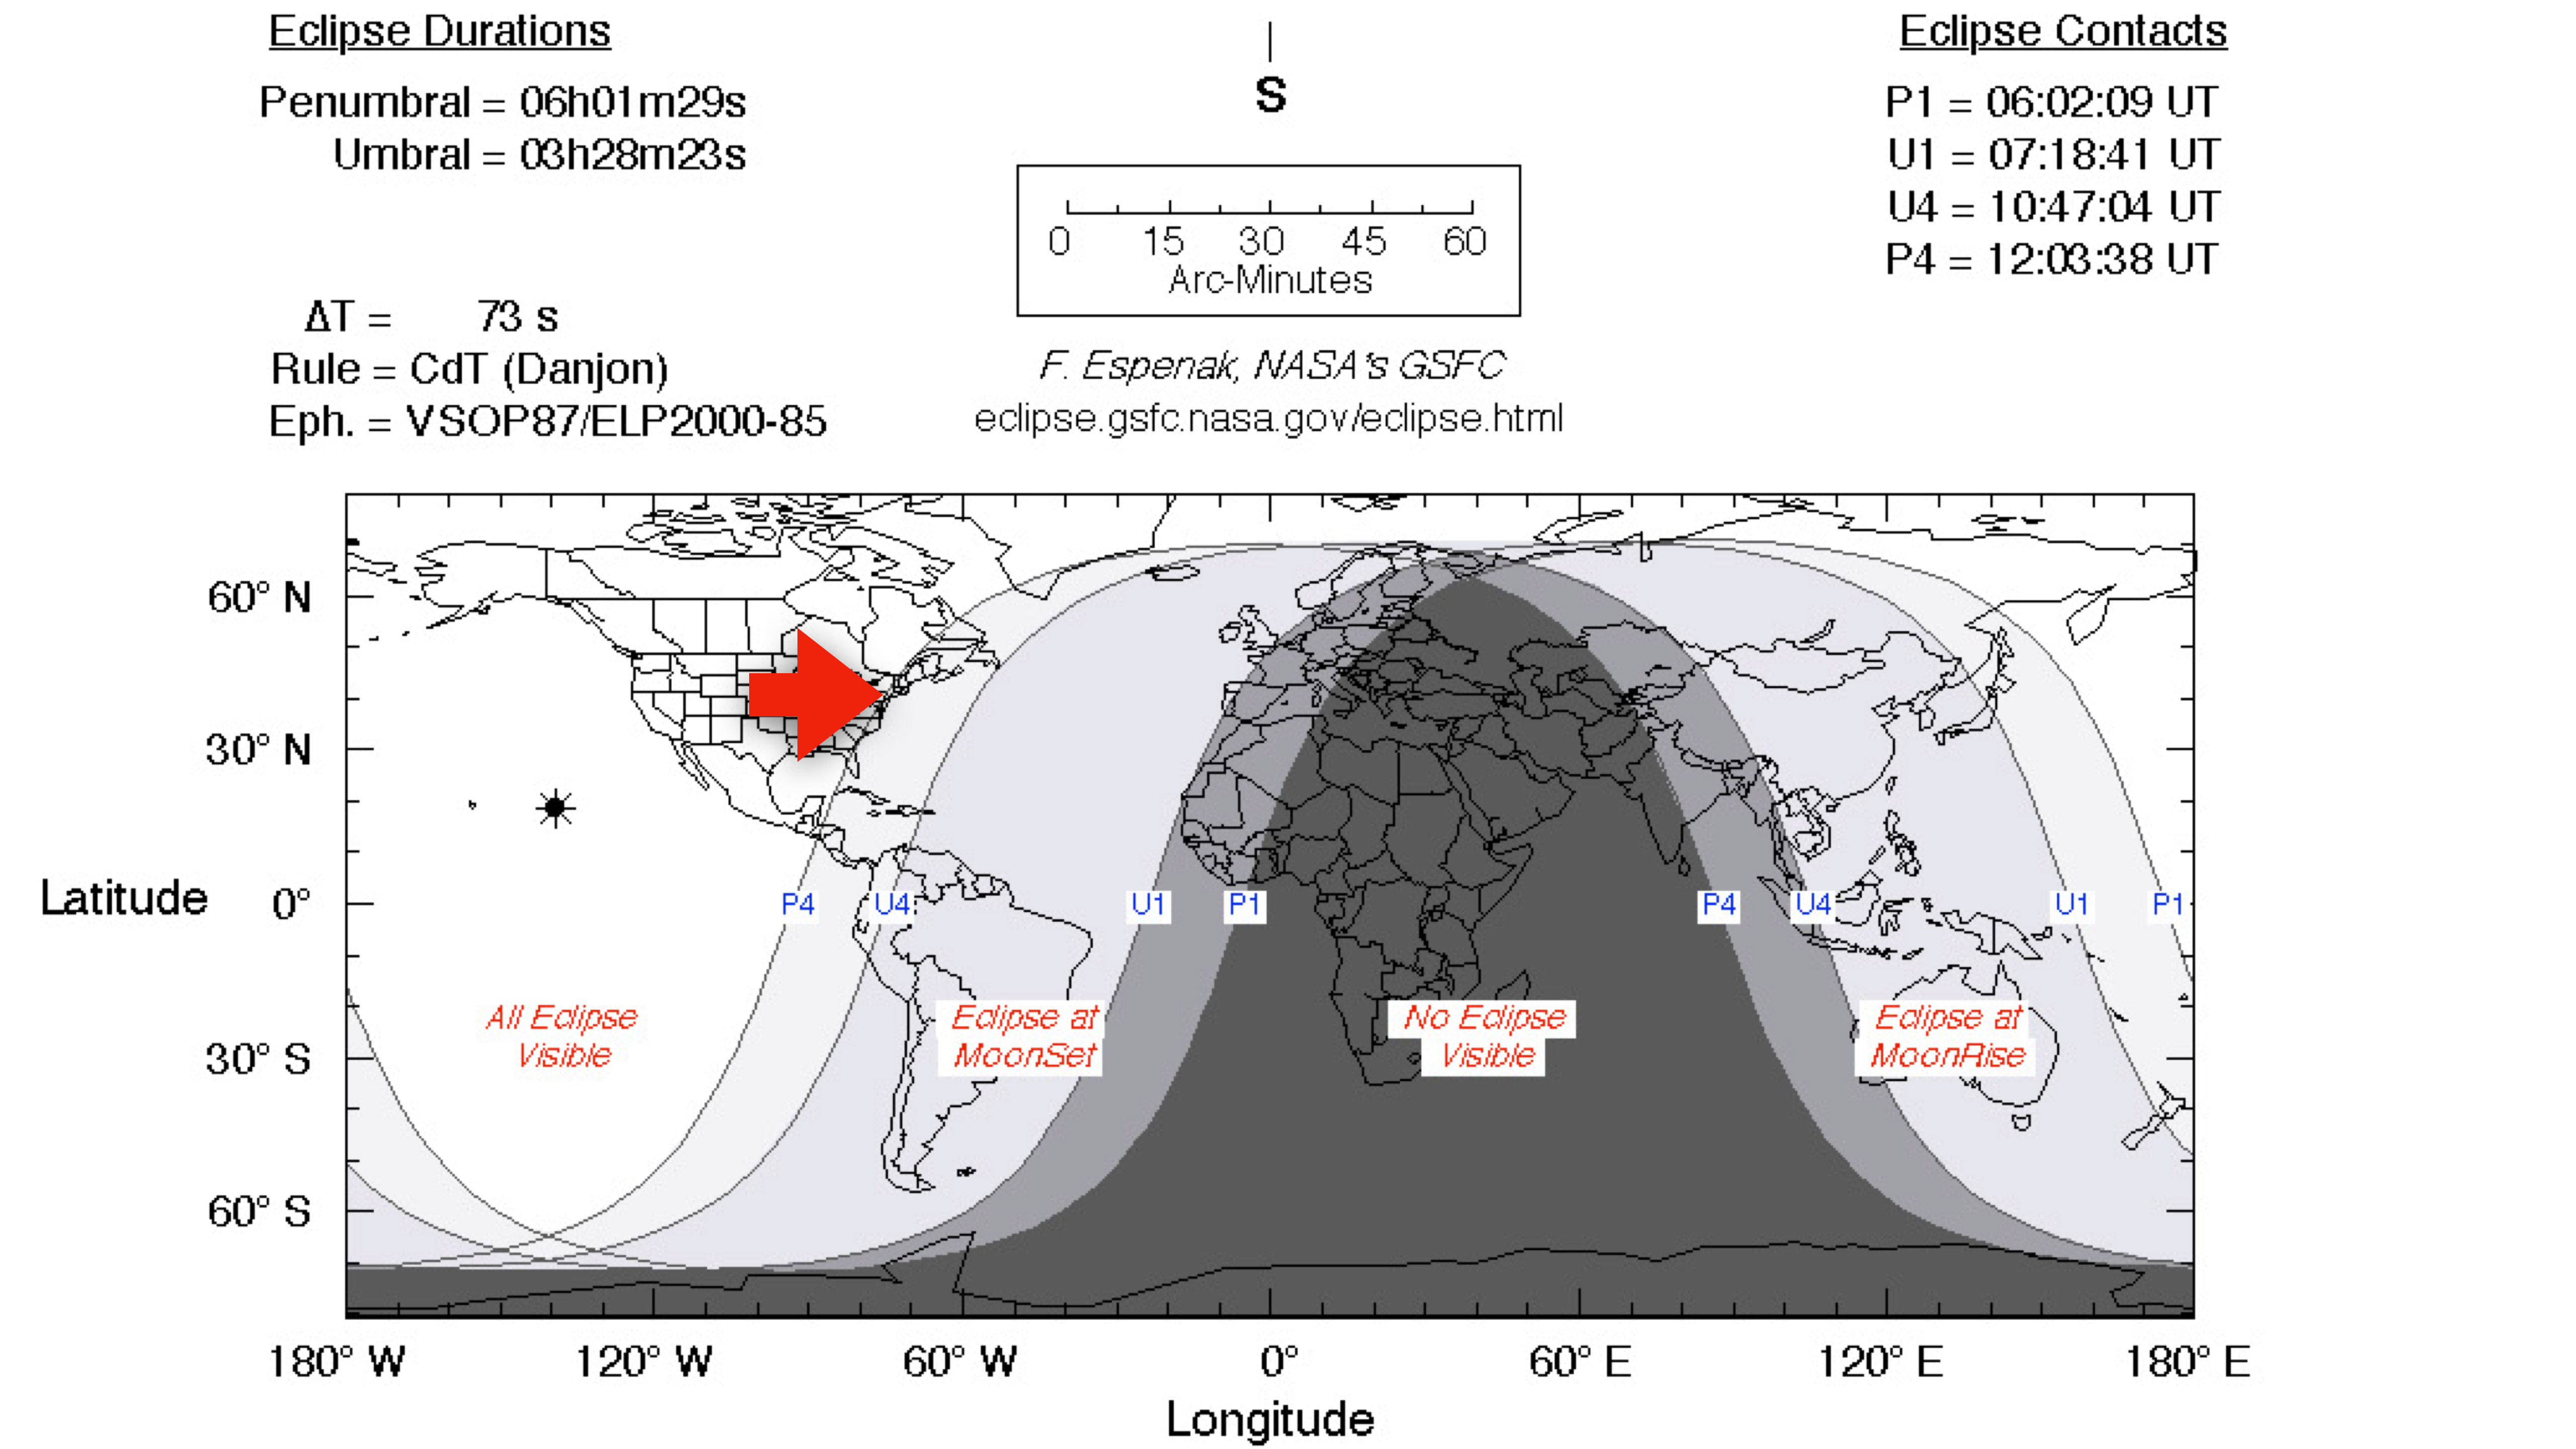
The show really begins when the Moon begins to enter the umbra at 2:18 am EST (1:18 am CST, 12:18 am MST, 11:18 pm PST).
But note,these times are for the night of November 18/19. If you go out on the evening of November 19 expecting to see the eclipse, you’ll be sadly disappointed as you will have missed it. It’s the night before!
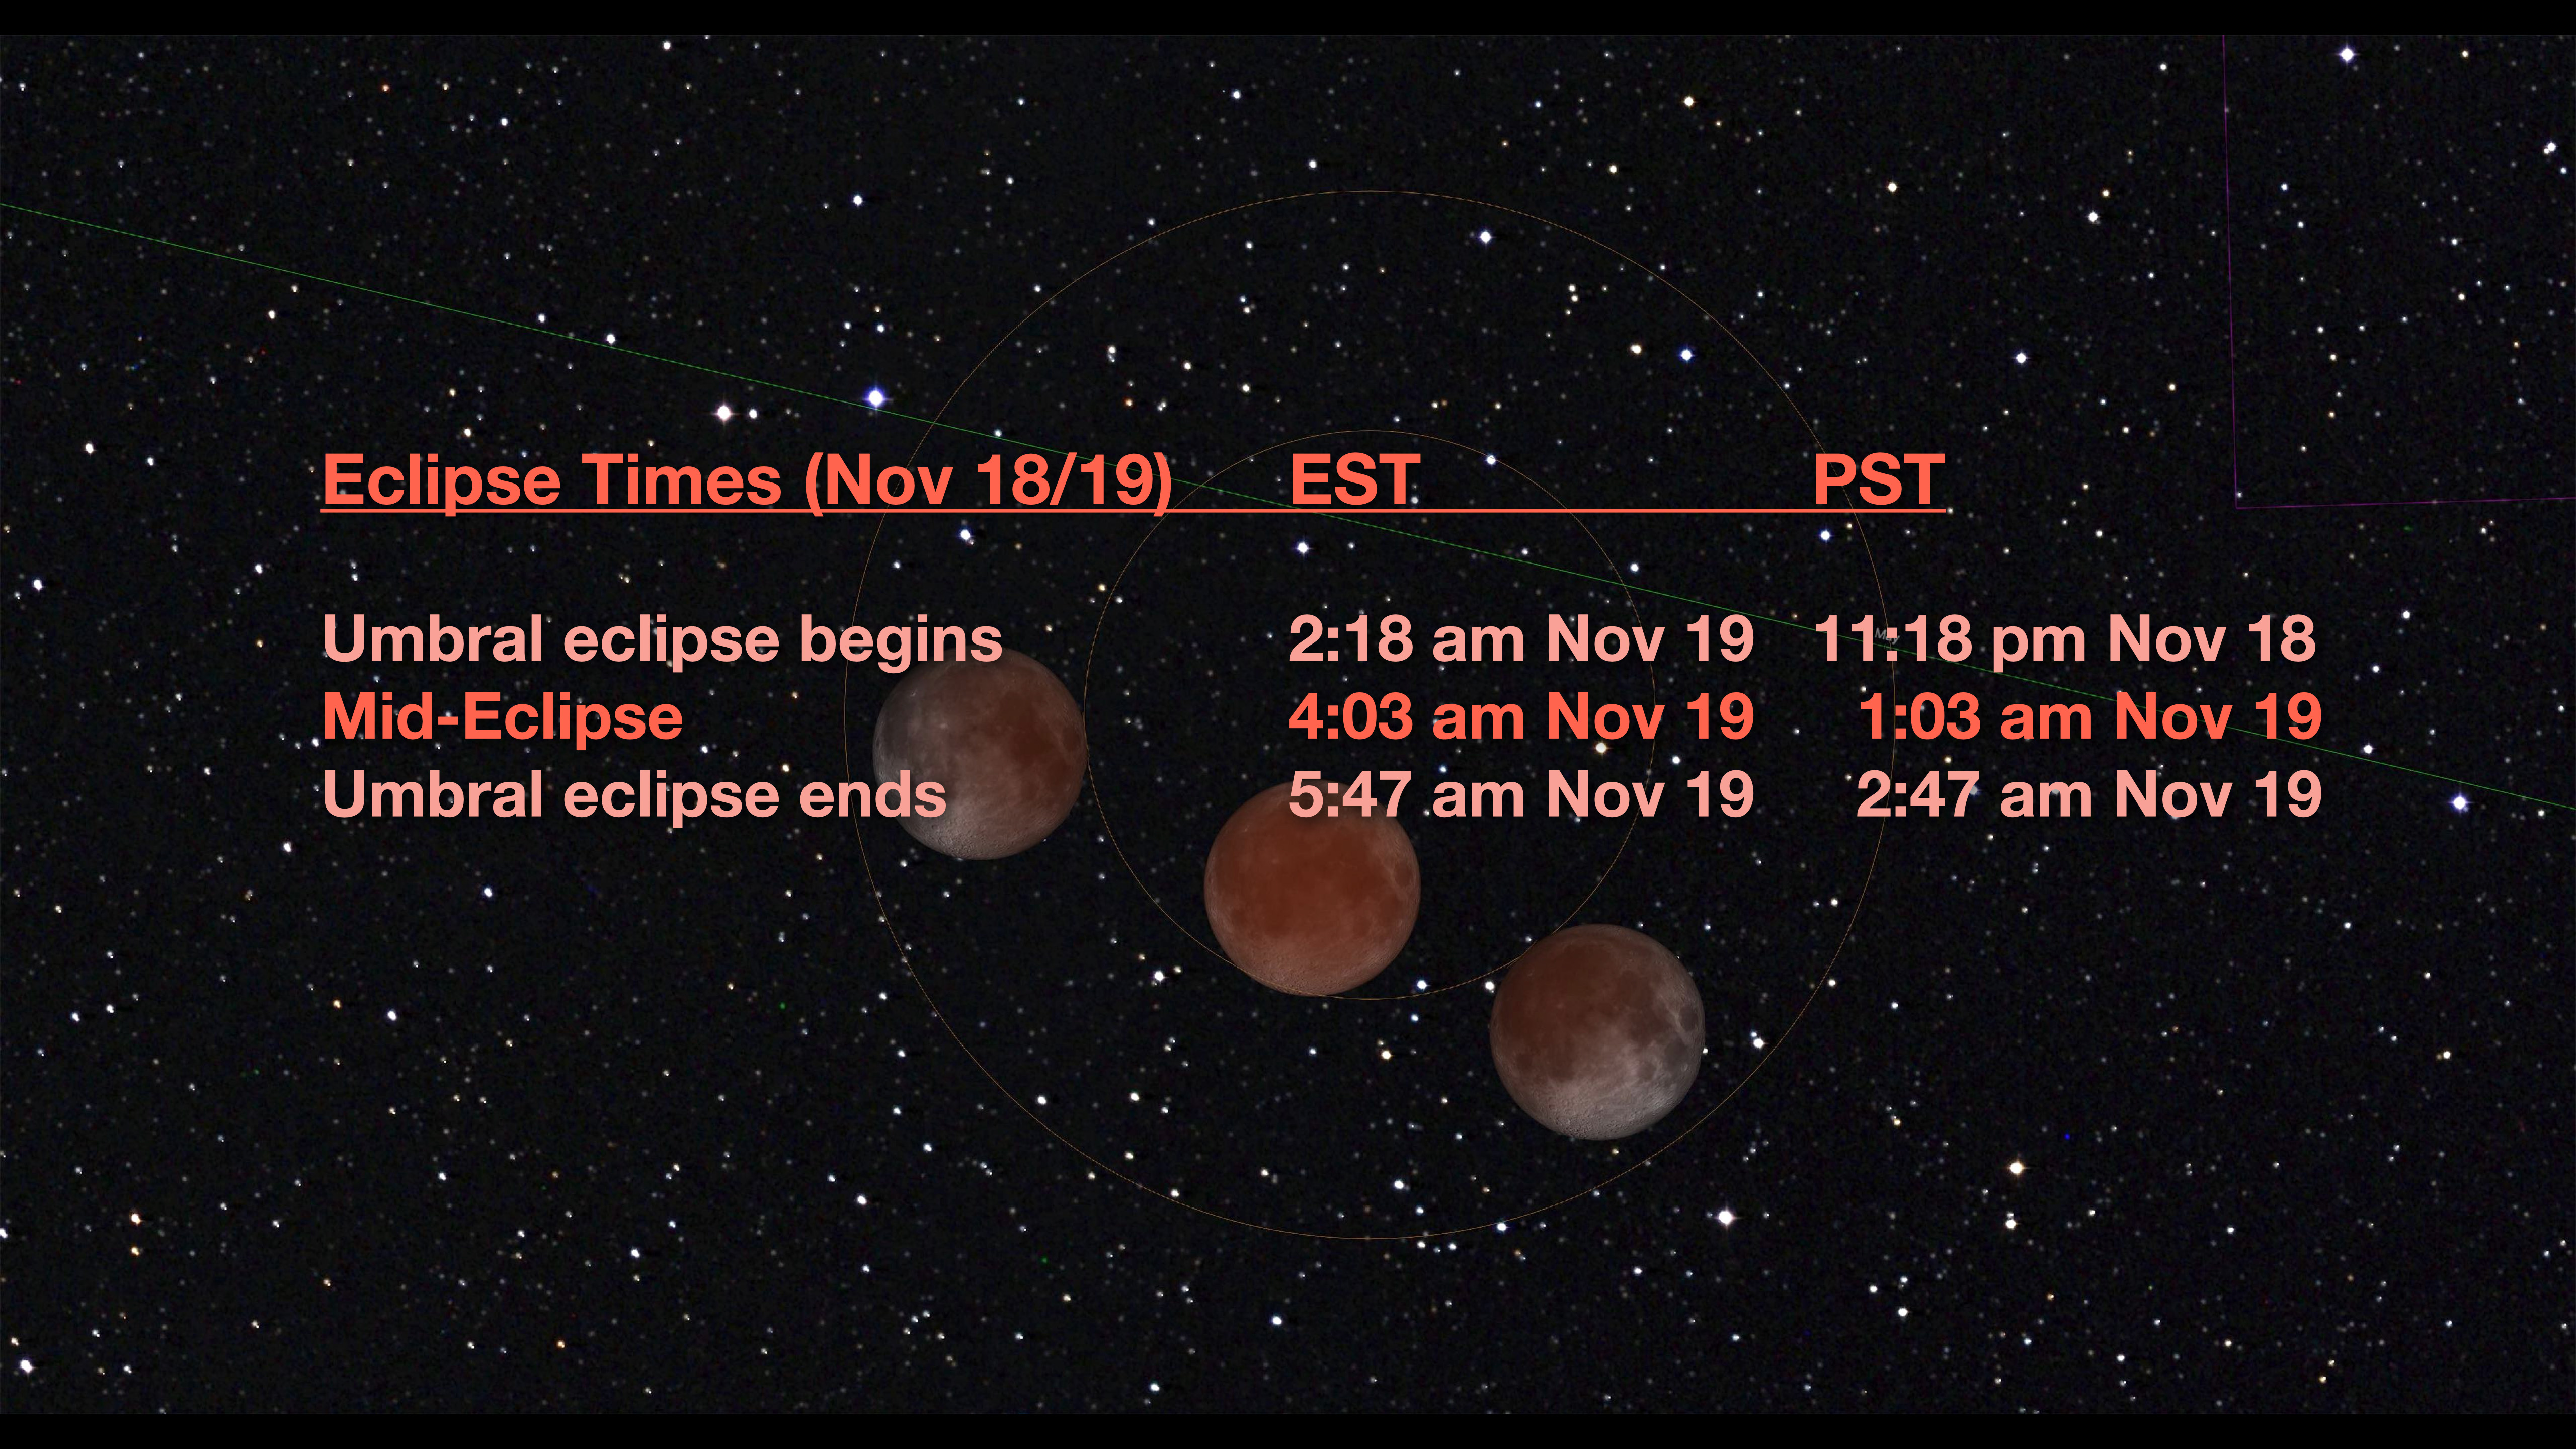
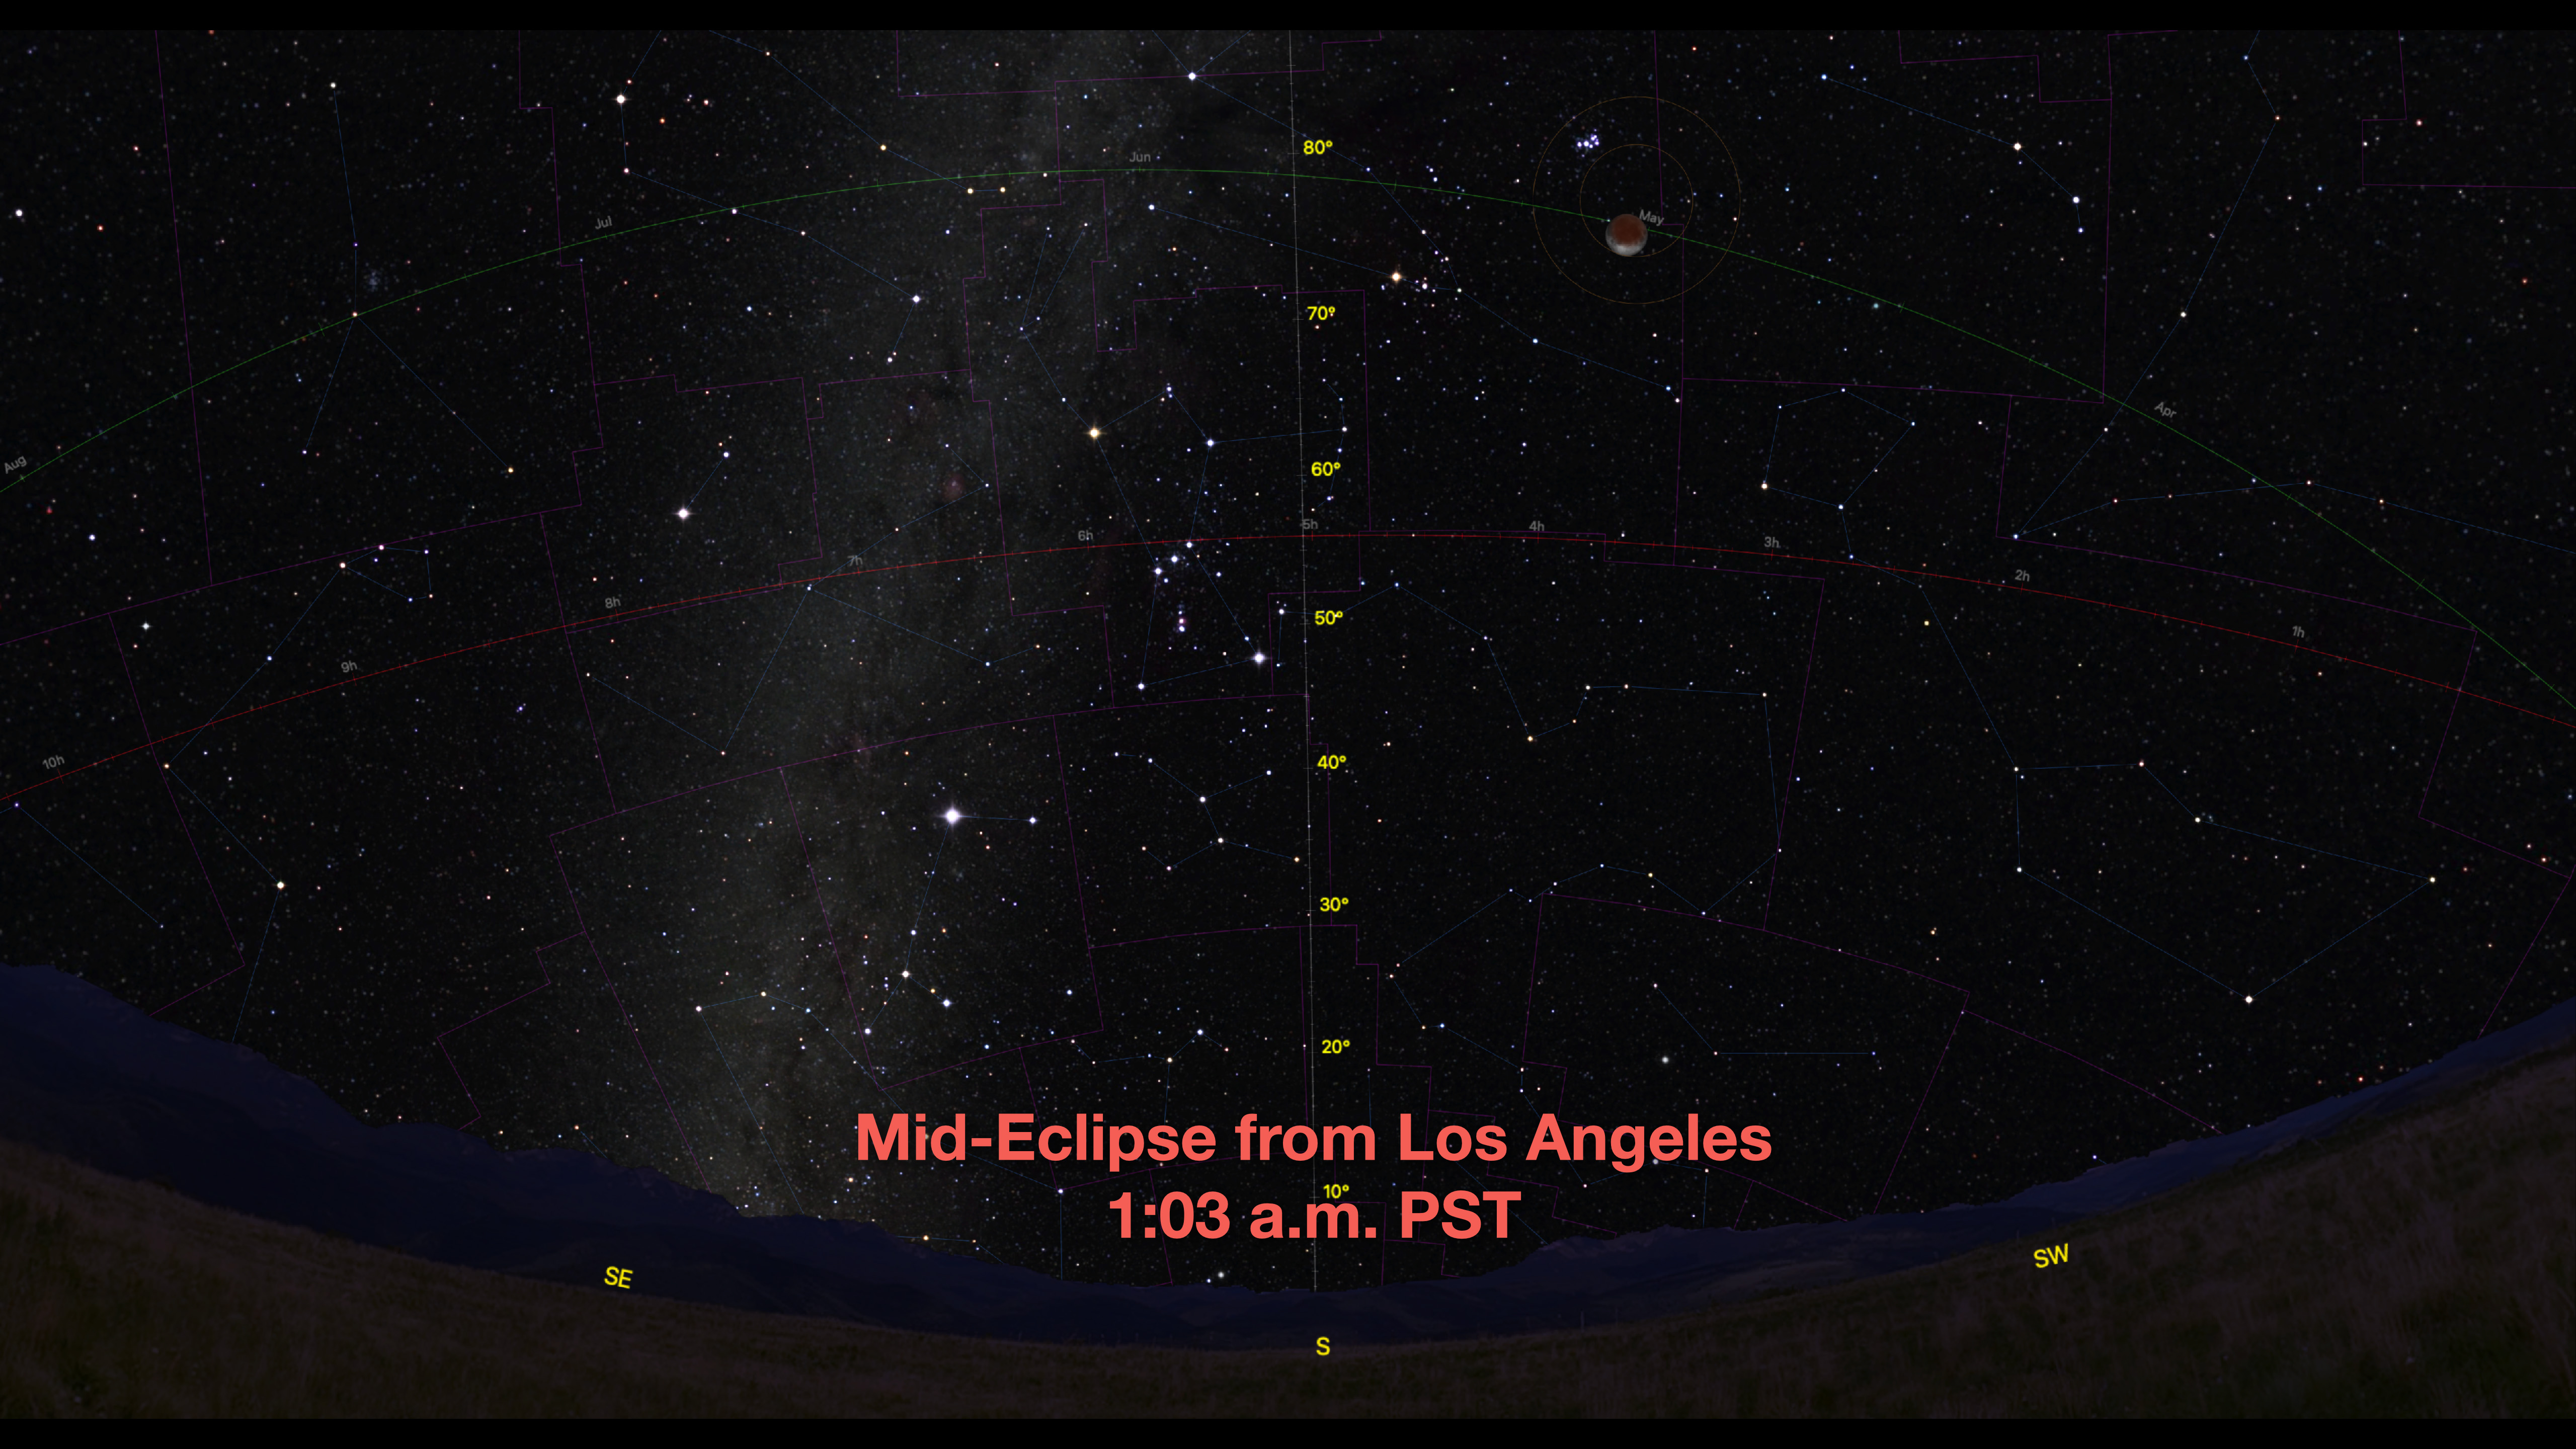
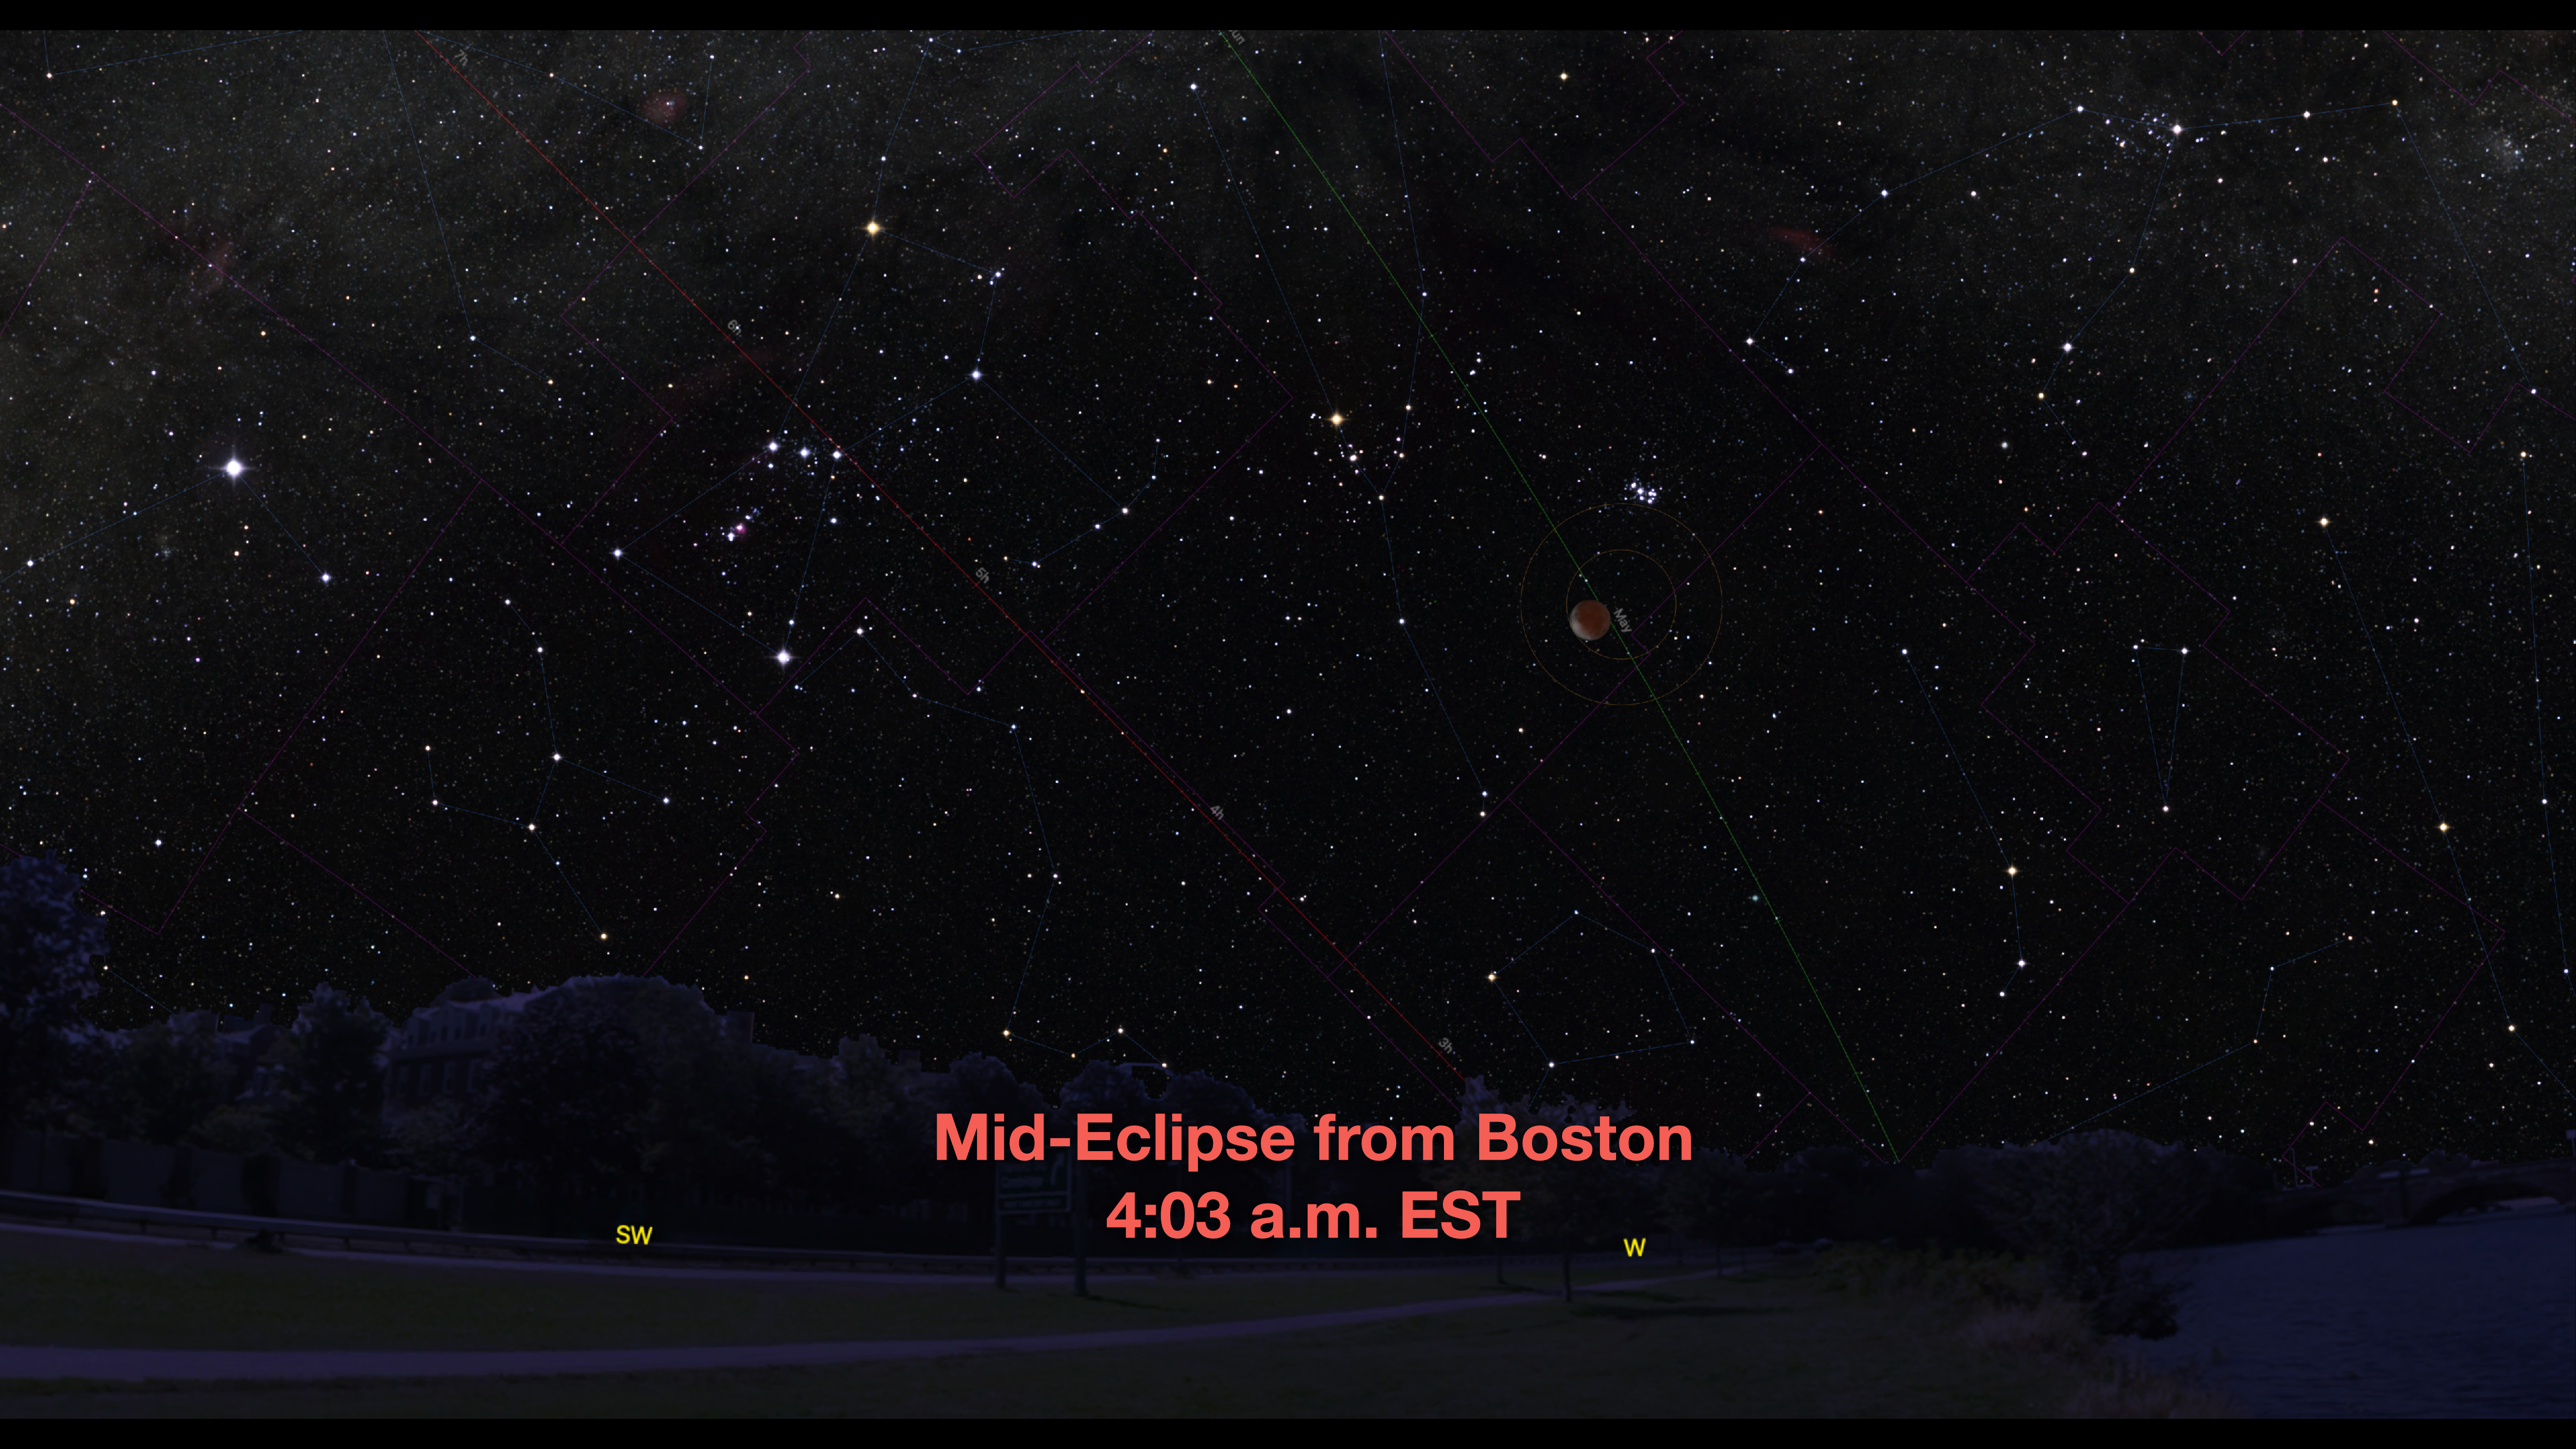
The eclipse effectively ends at 5:47 am EST (4:47 am CST, 3:47 am MST, 2:47 am PST) when the Moon leaves the umbra. That makes the eclipse 3 1/2 hours long, though the most photogenic part will be for the 15 to 30 minutes centred on mid-eclipse at 4:03 am EST (3:03 am CST, 2:03 am MST, 1:03 am PST).
The sky at mid-eclipse from my home on Alberta, Canada (51° N)
WHERE WILL THE MOON BE?
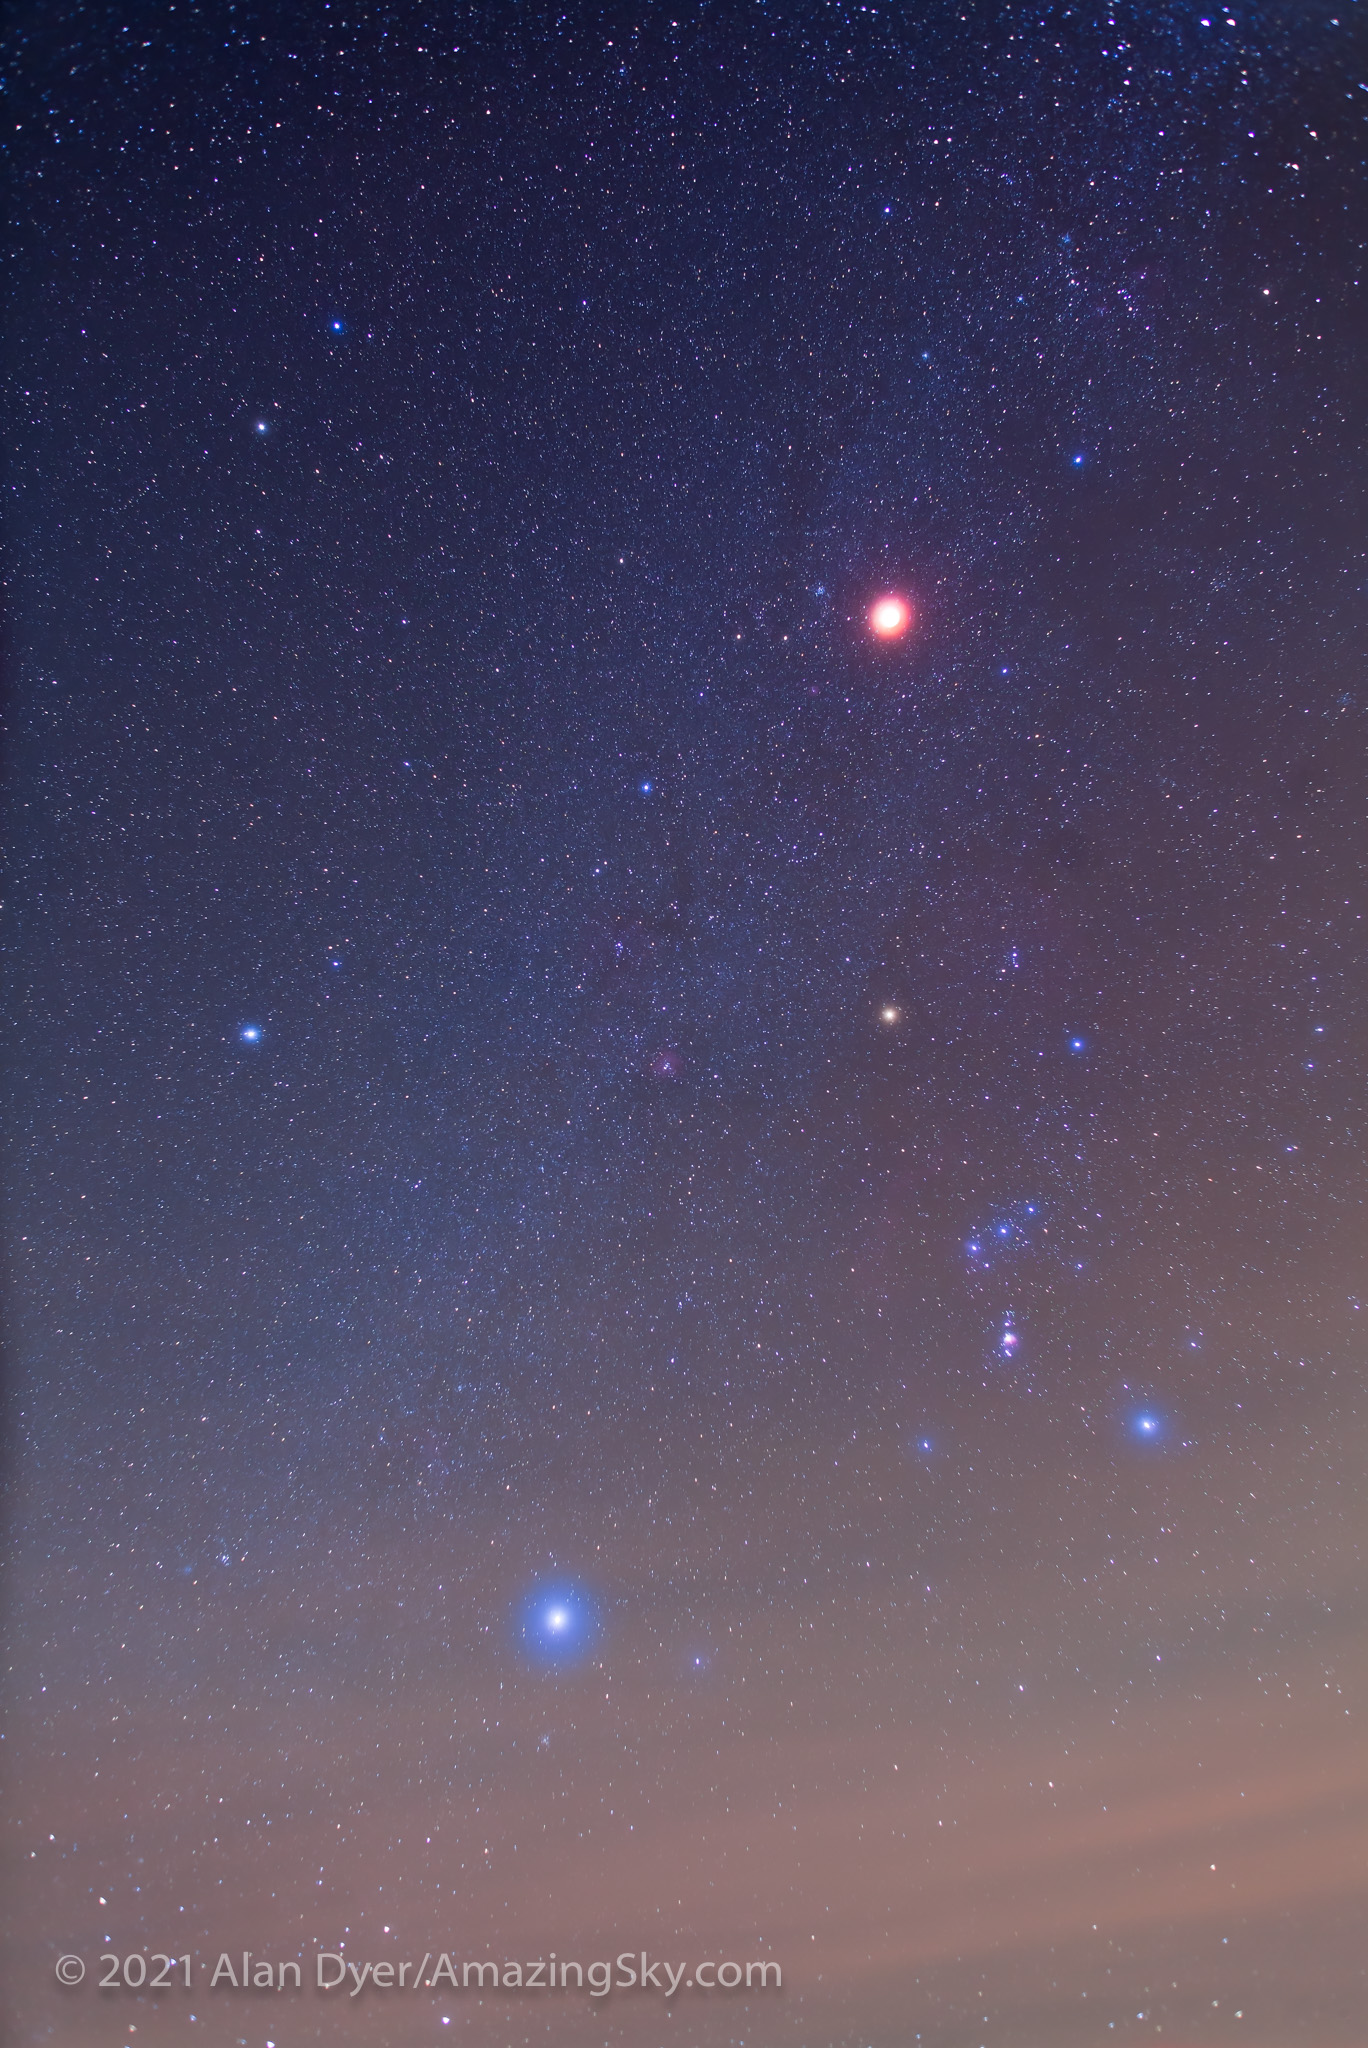
The post-midnight timing places the Moon at mid-eclipse high in the south to southwest for most of North America, just west (right) of the winter Milky Way and below the distinctive Pleiades star cluster.
The view from the West Coast.
The high altitude of the Moon (some 60º to 70º above the horizon) puts it well above haze and murk low in the sky, but makes it a challenge to capture in a frame that includes the landscape below for an eclipse nightscape.
ASTRONOMY 101: The high altitude of the Moon is a function of both the eclipse timing in the middle of the night and its place on the ecliptic. The Full Moon is always 180° away from the Sun. So it sits where the Sun was six months earlier, in this case back in May, when the high Sun was bringing us warmer and longer days. Winter lunar eclipses are always high; summer lunar eclipses are always low, the opposite of what the Sun does.
The view from the East Coast.
From eastern North America the Moon appears lower in the west at mid-eclipse, making it easier to frame above a landscape. For example from Boston the Moon is 30º up, lending itself to nightscape scenes.
However, the sky will still be dark. To make use of the darkness to capture scenes which include the Milky Way, I suggest making the effort to travel away from urban light pollution to a dark sky site. That applies to all locations. Yes, that means a very long night!
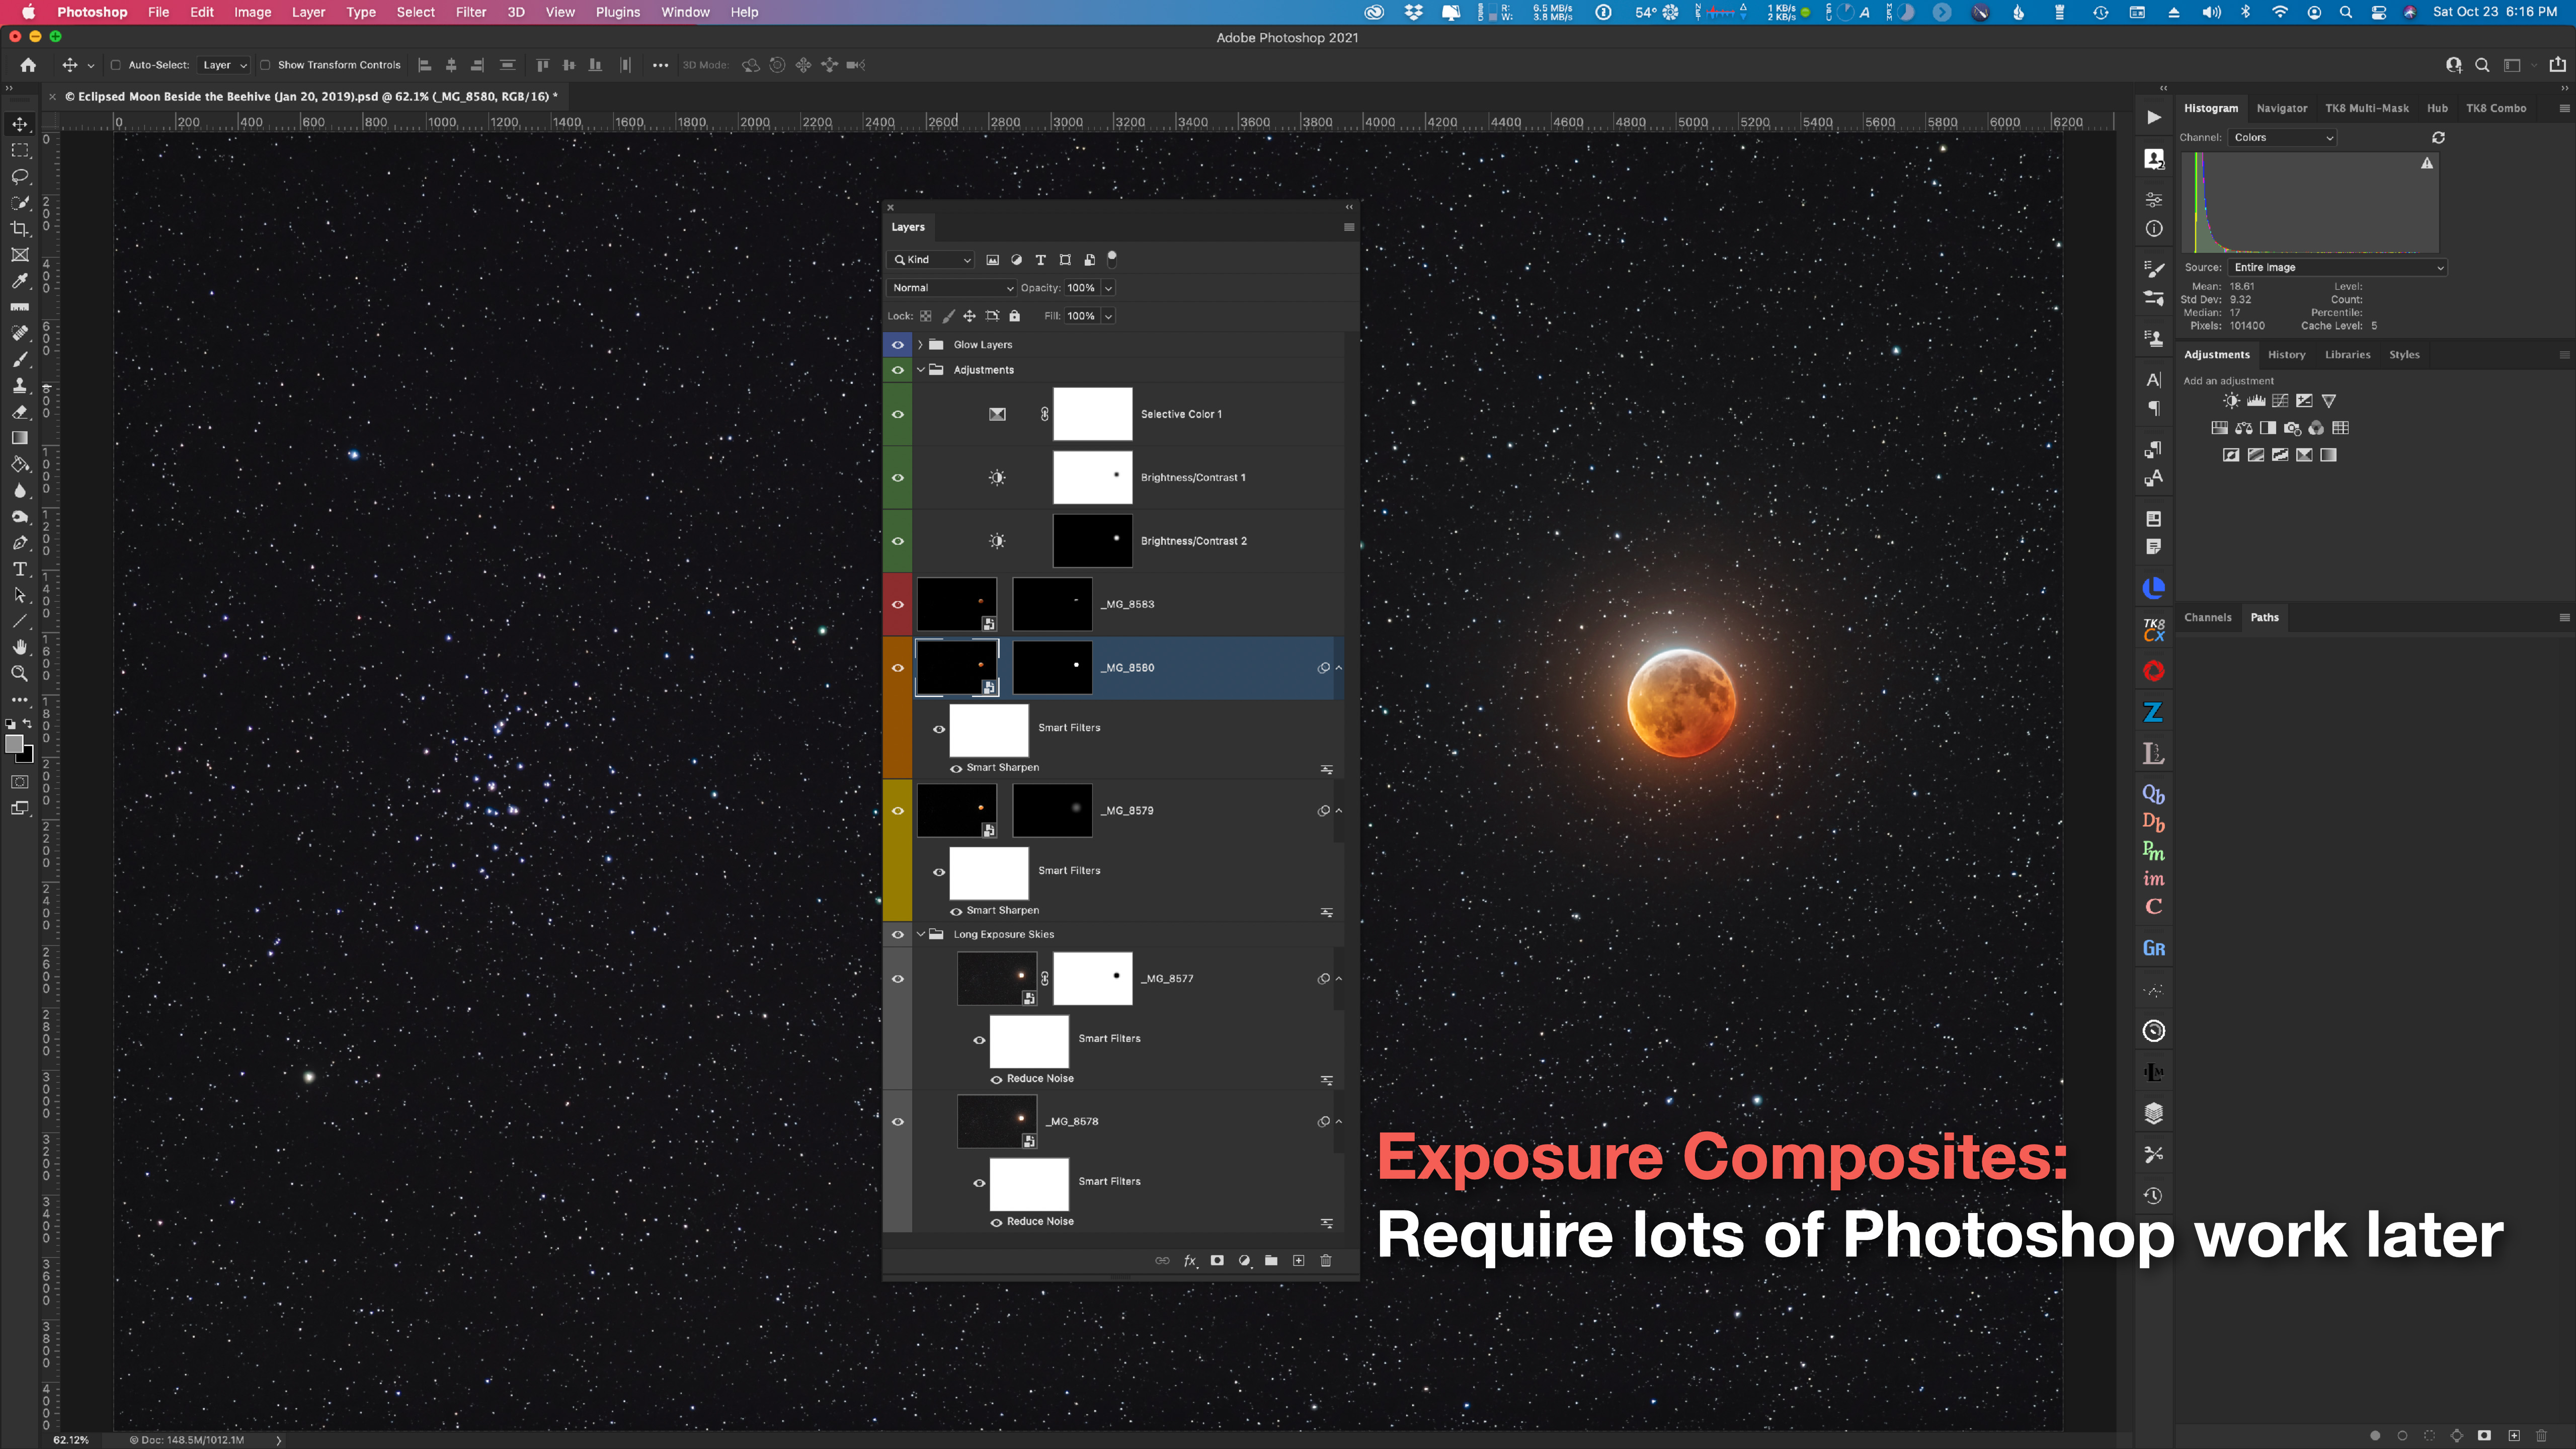
PHOTO OPTIONS 1 — CAMERA ON A FIXED TRIPOD
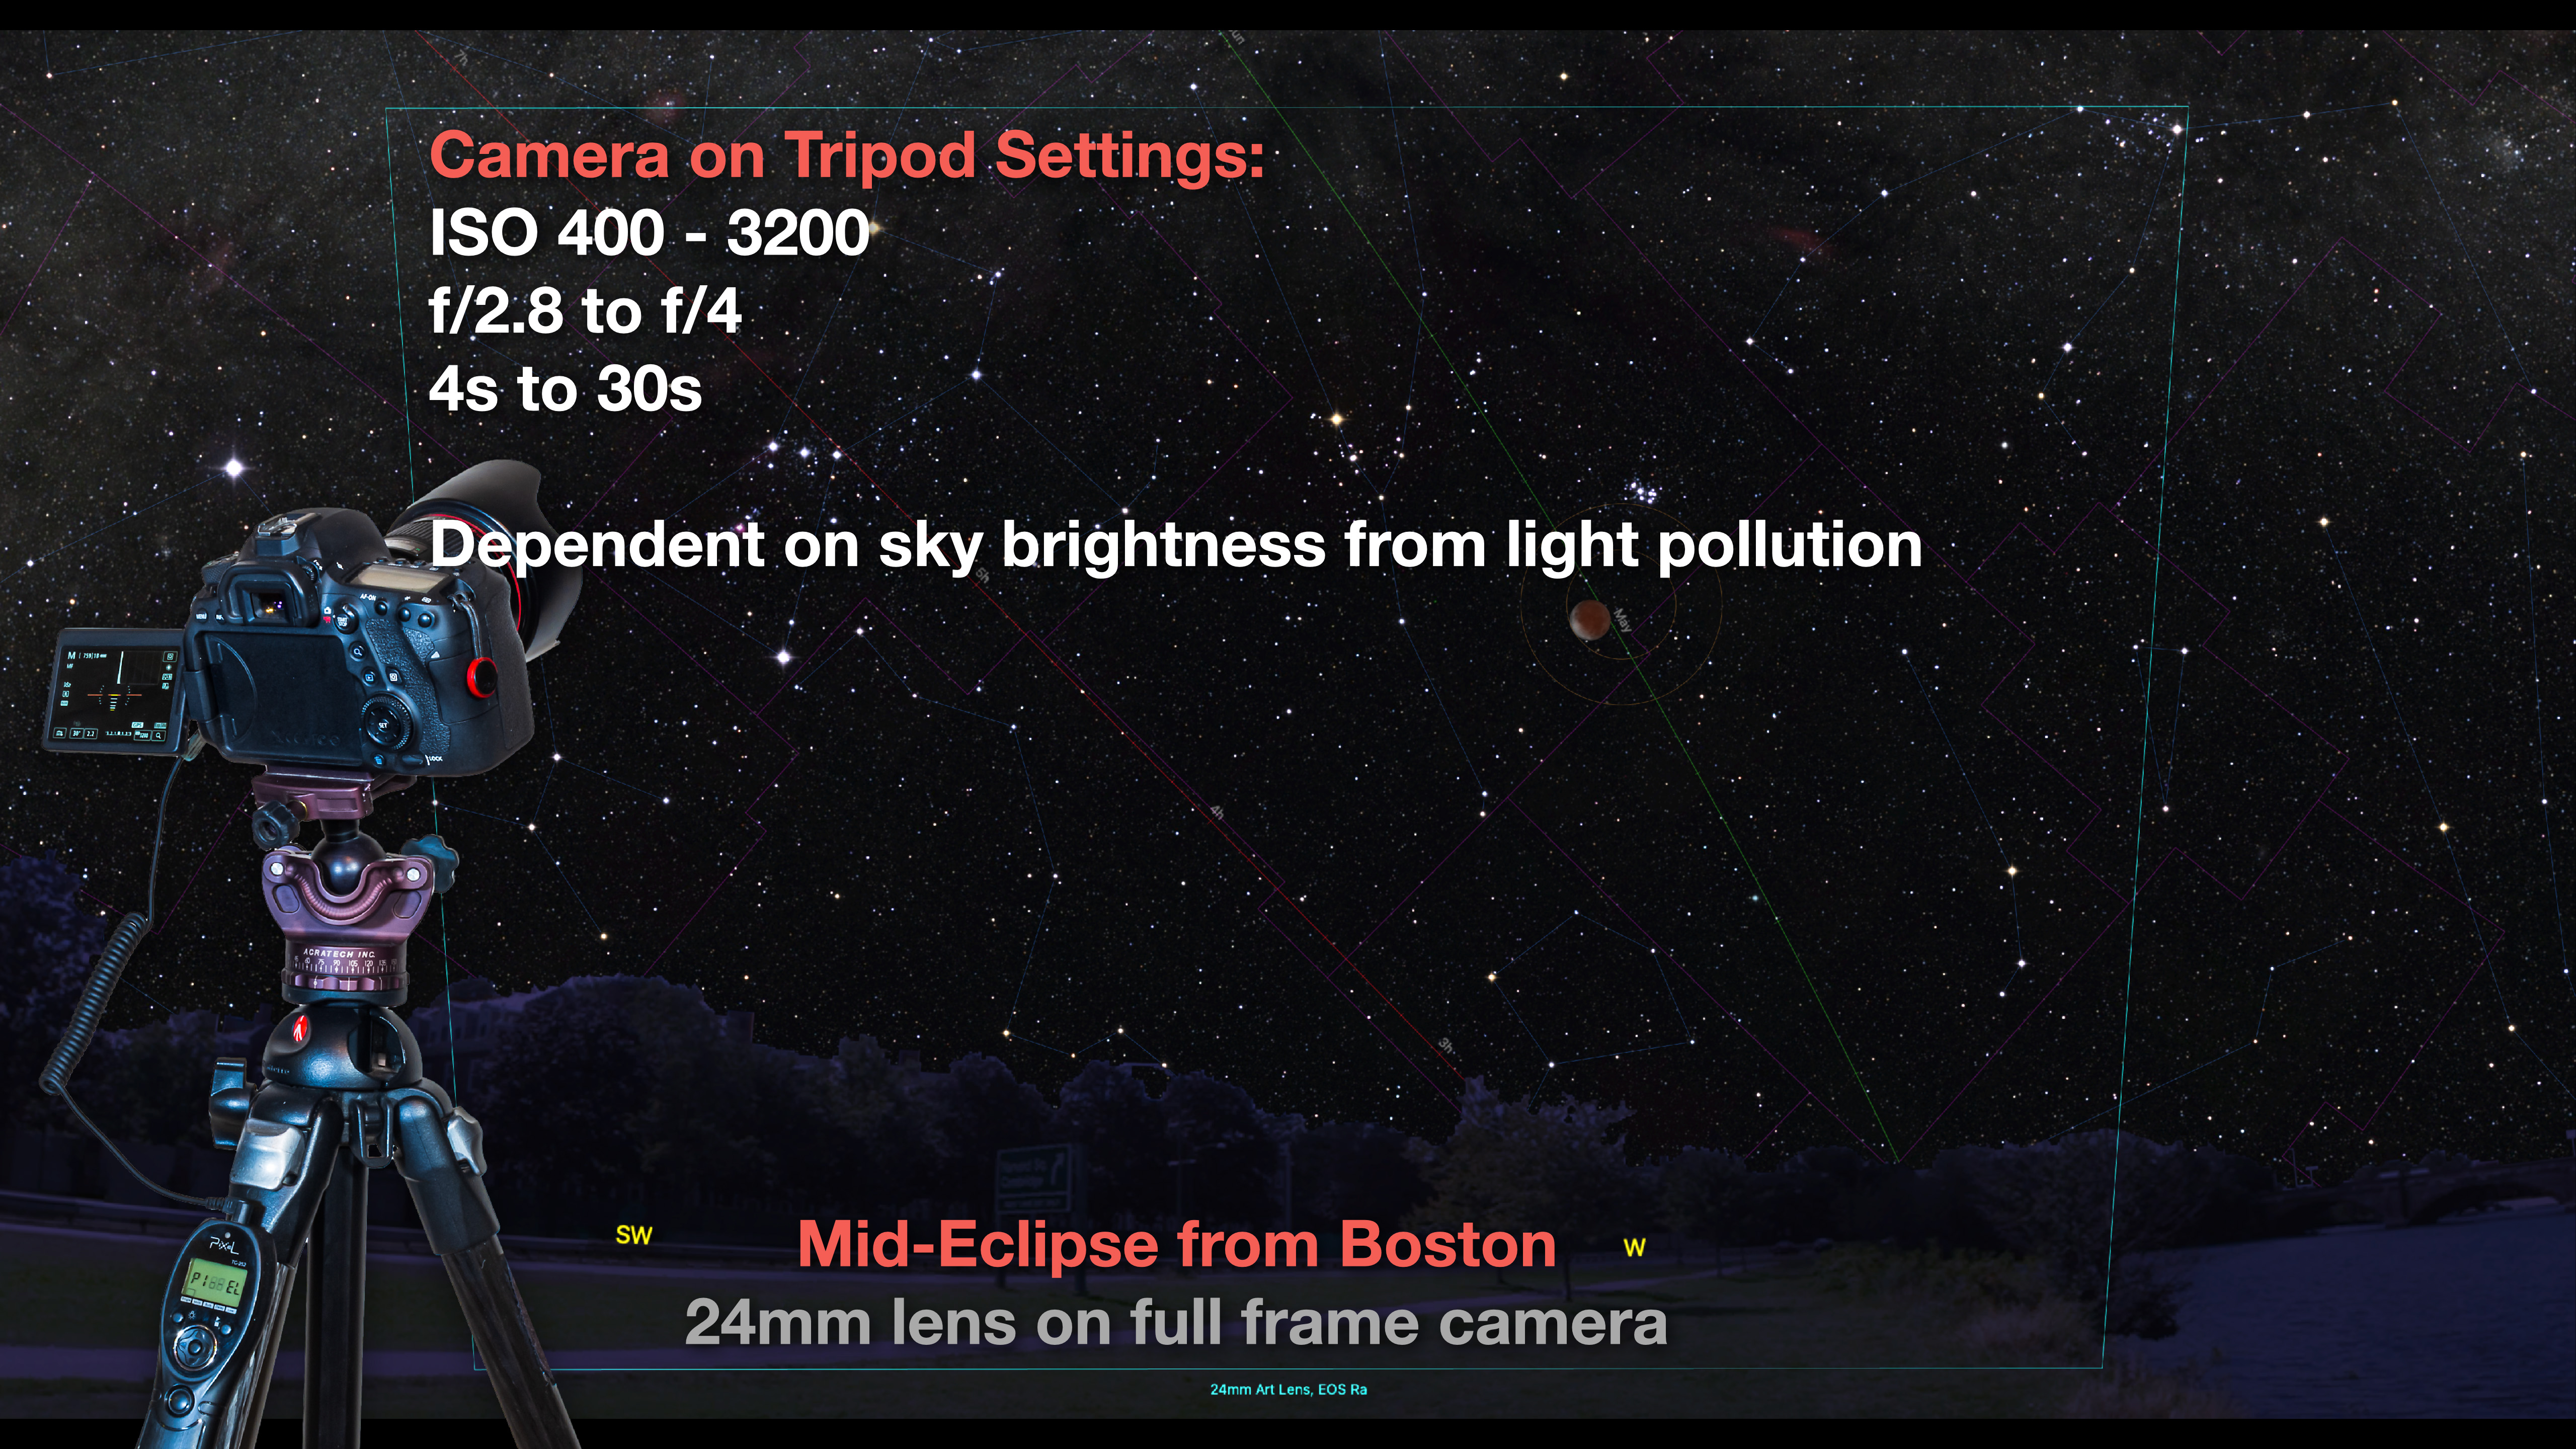
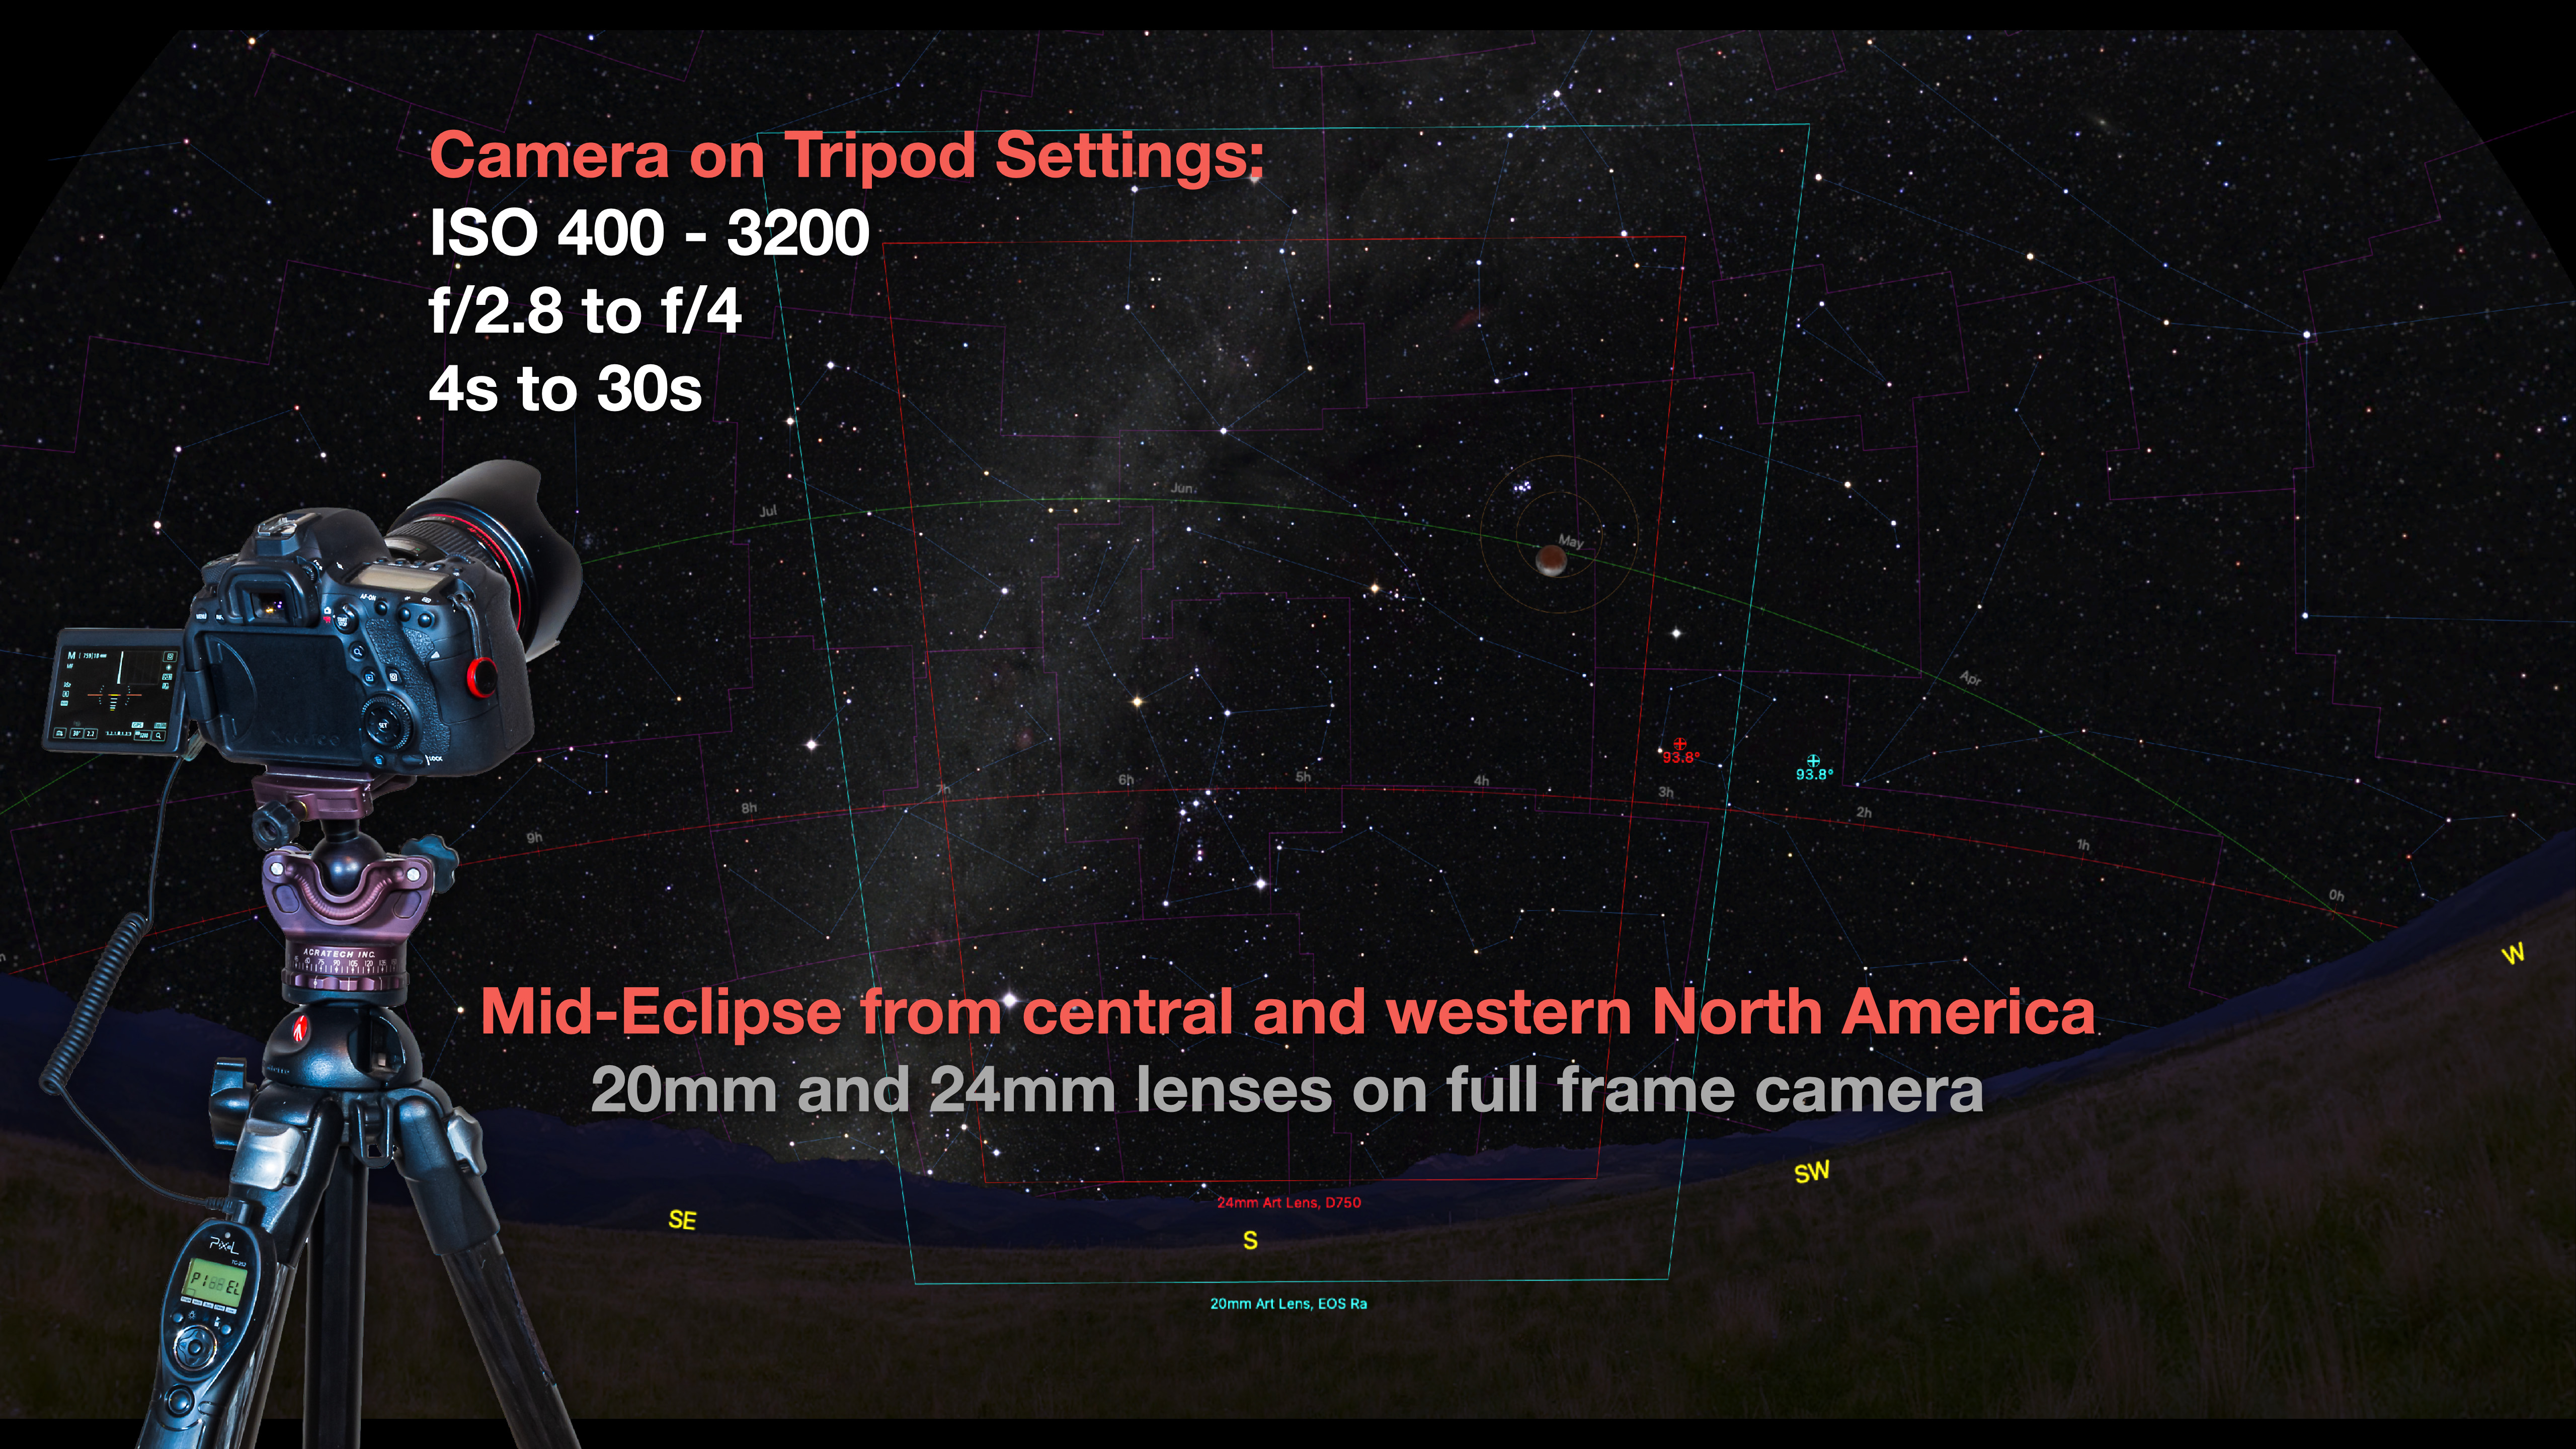
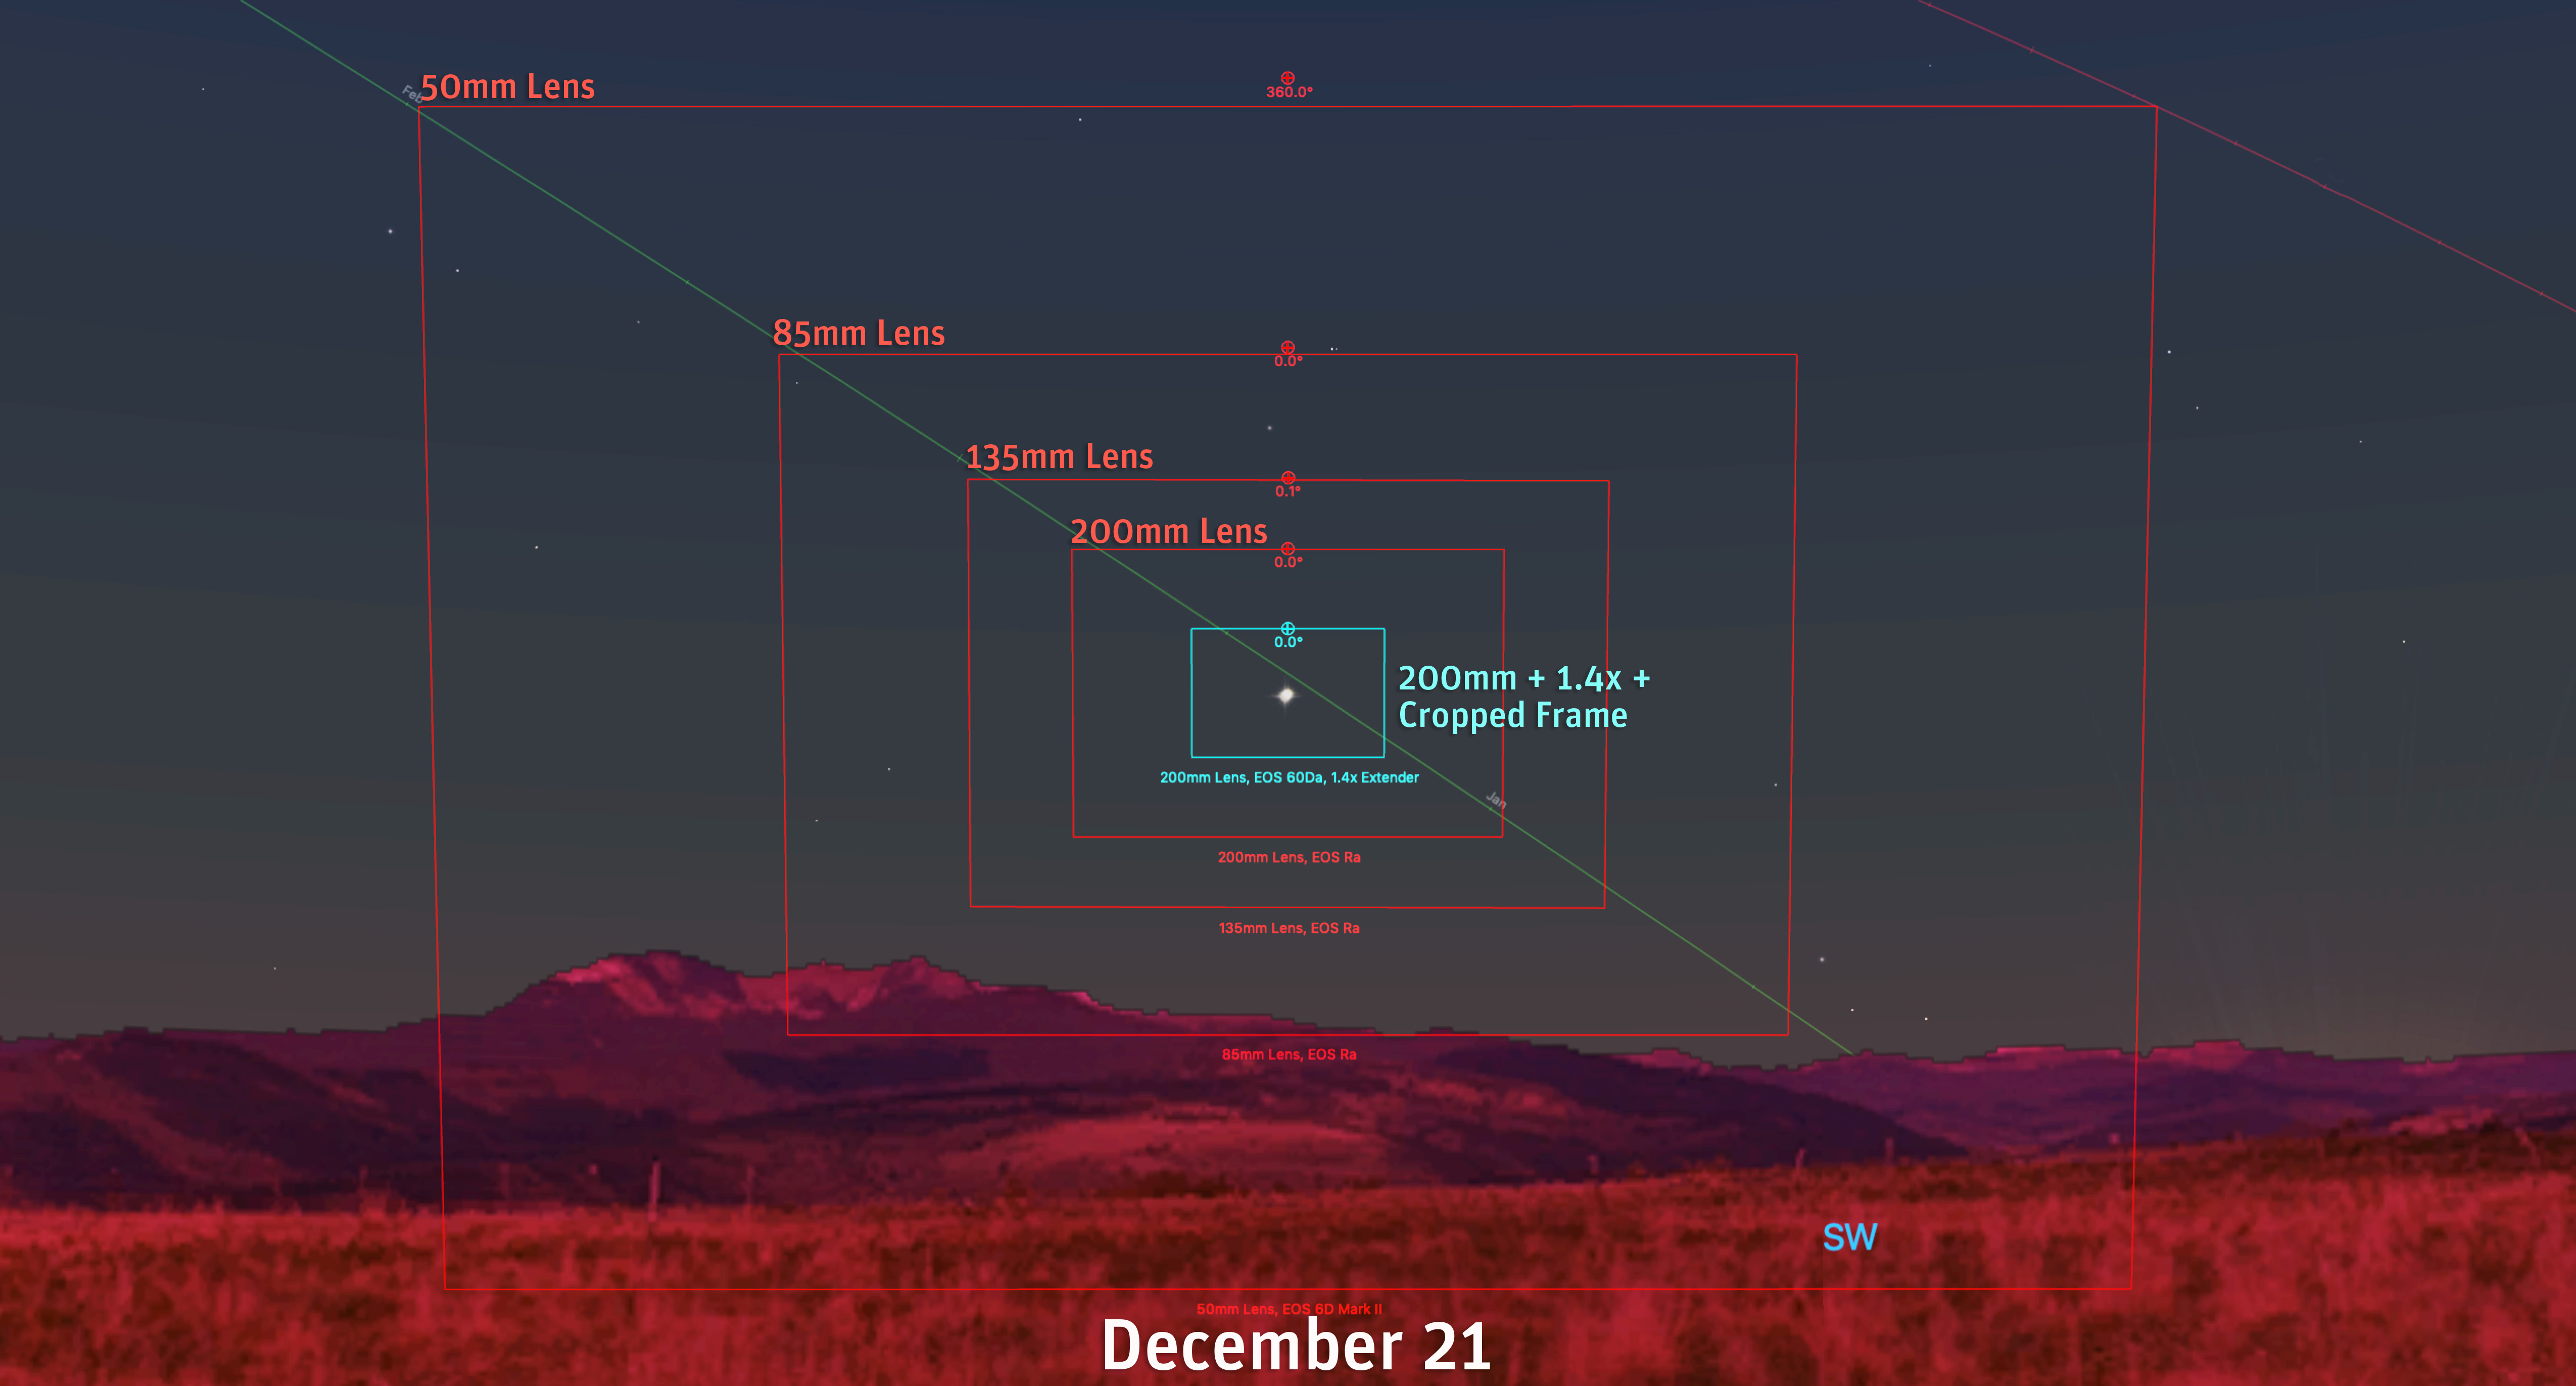
With just a camera on a tripod, if you are on the East Coast (I show Boston here) it will be possible to frame the eclipsed Moon above a landscape with a 24mm lens (assuming a full frame camera; a cropped frame camera will require a 16mm lens).
Framing the scene from the East Coast.
What exposure will be best will depend on the level of local light pollution at your site. But from a dark site, 30 seconds at ISO 1600 and f/2.8 should work well. But without tracking, you will see some star trailing at 30 seconds. Also try shorter exposures at a higher ISO.
There’s lots of time, so take lots of shots. Include some short shots of just the Moon to blend in later, as the exposures best for picking up the Milky Way will still overexpose the Moon, even when it is darkest at mid-eclipse.
Framing the scene from the West.
From western North America, including the landscape below will require wide lenses and a vertical format, with the Moon appearing quite small. But from a photogenic site, it might be worth the effort.
Total eclipse of the Moon, December 20/21, 2010, taken from home with 15mm lens at f/3.2 and Canon 5D MkII at ISO 1600 for 1 minute single exposure, toward the end of totality.
Total eclipse of the Moon, December 20/21, 2010, taken from home with Canon 5D MKII and 24mm lens at f2.8 for stack of 4 x 2 minutes at ISO 800. Taken during totality..
However, as my images above from the December 2010 eclipse show, if there’s any haze, the Moon could turn into a reddish blob.
You might be tempted to shoot with a long telephoto lens, but unless the camera is on a tracker, as below, the result will likely be a blurry mess. The sky moves enough during the long (over 1 second) exposures needed to pick up the reddened portion of the Moon that the image will smear when shot with long focal lengths. The solution is to use a sky tracker.
PHOTO OPTIONS 2 — CAMERA ON A TRACKER
Placing the camera on a motorized tracker that has been polar aligned to follow the motion of the stars opens up many more possibilities.
Camera on a Star Adventurer tracker showing the field of a 24mm lens.
From a dark site, make use of the Moon’s position near the Milky Way to frame it and Orion and his fellow winter constellations. A 24mm lens will do the job nicely, in exposures up to 2 to 4 minutes long. But take short ones for just the Moon to layer in later.
Showing the field of a 50mm lens.
A 50mm lens (again assuming a full frame camera) frames the Moon with the Pleiades and Hyades star clusters in Taurus.
Showing the field of an 85mm lens,
Switching to an 85mm lens frames the clusters more tightly and makes the Moon’s disk a little larger. For me, this is the best shot to go for at this eclipse, as it tells the story of the eclipse and its unique position near the two star clusters.
Showing the field of 200mm and 250mm lenses.
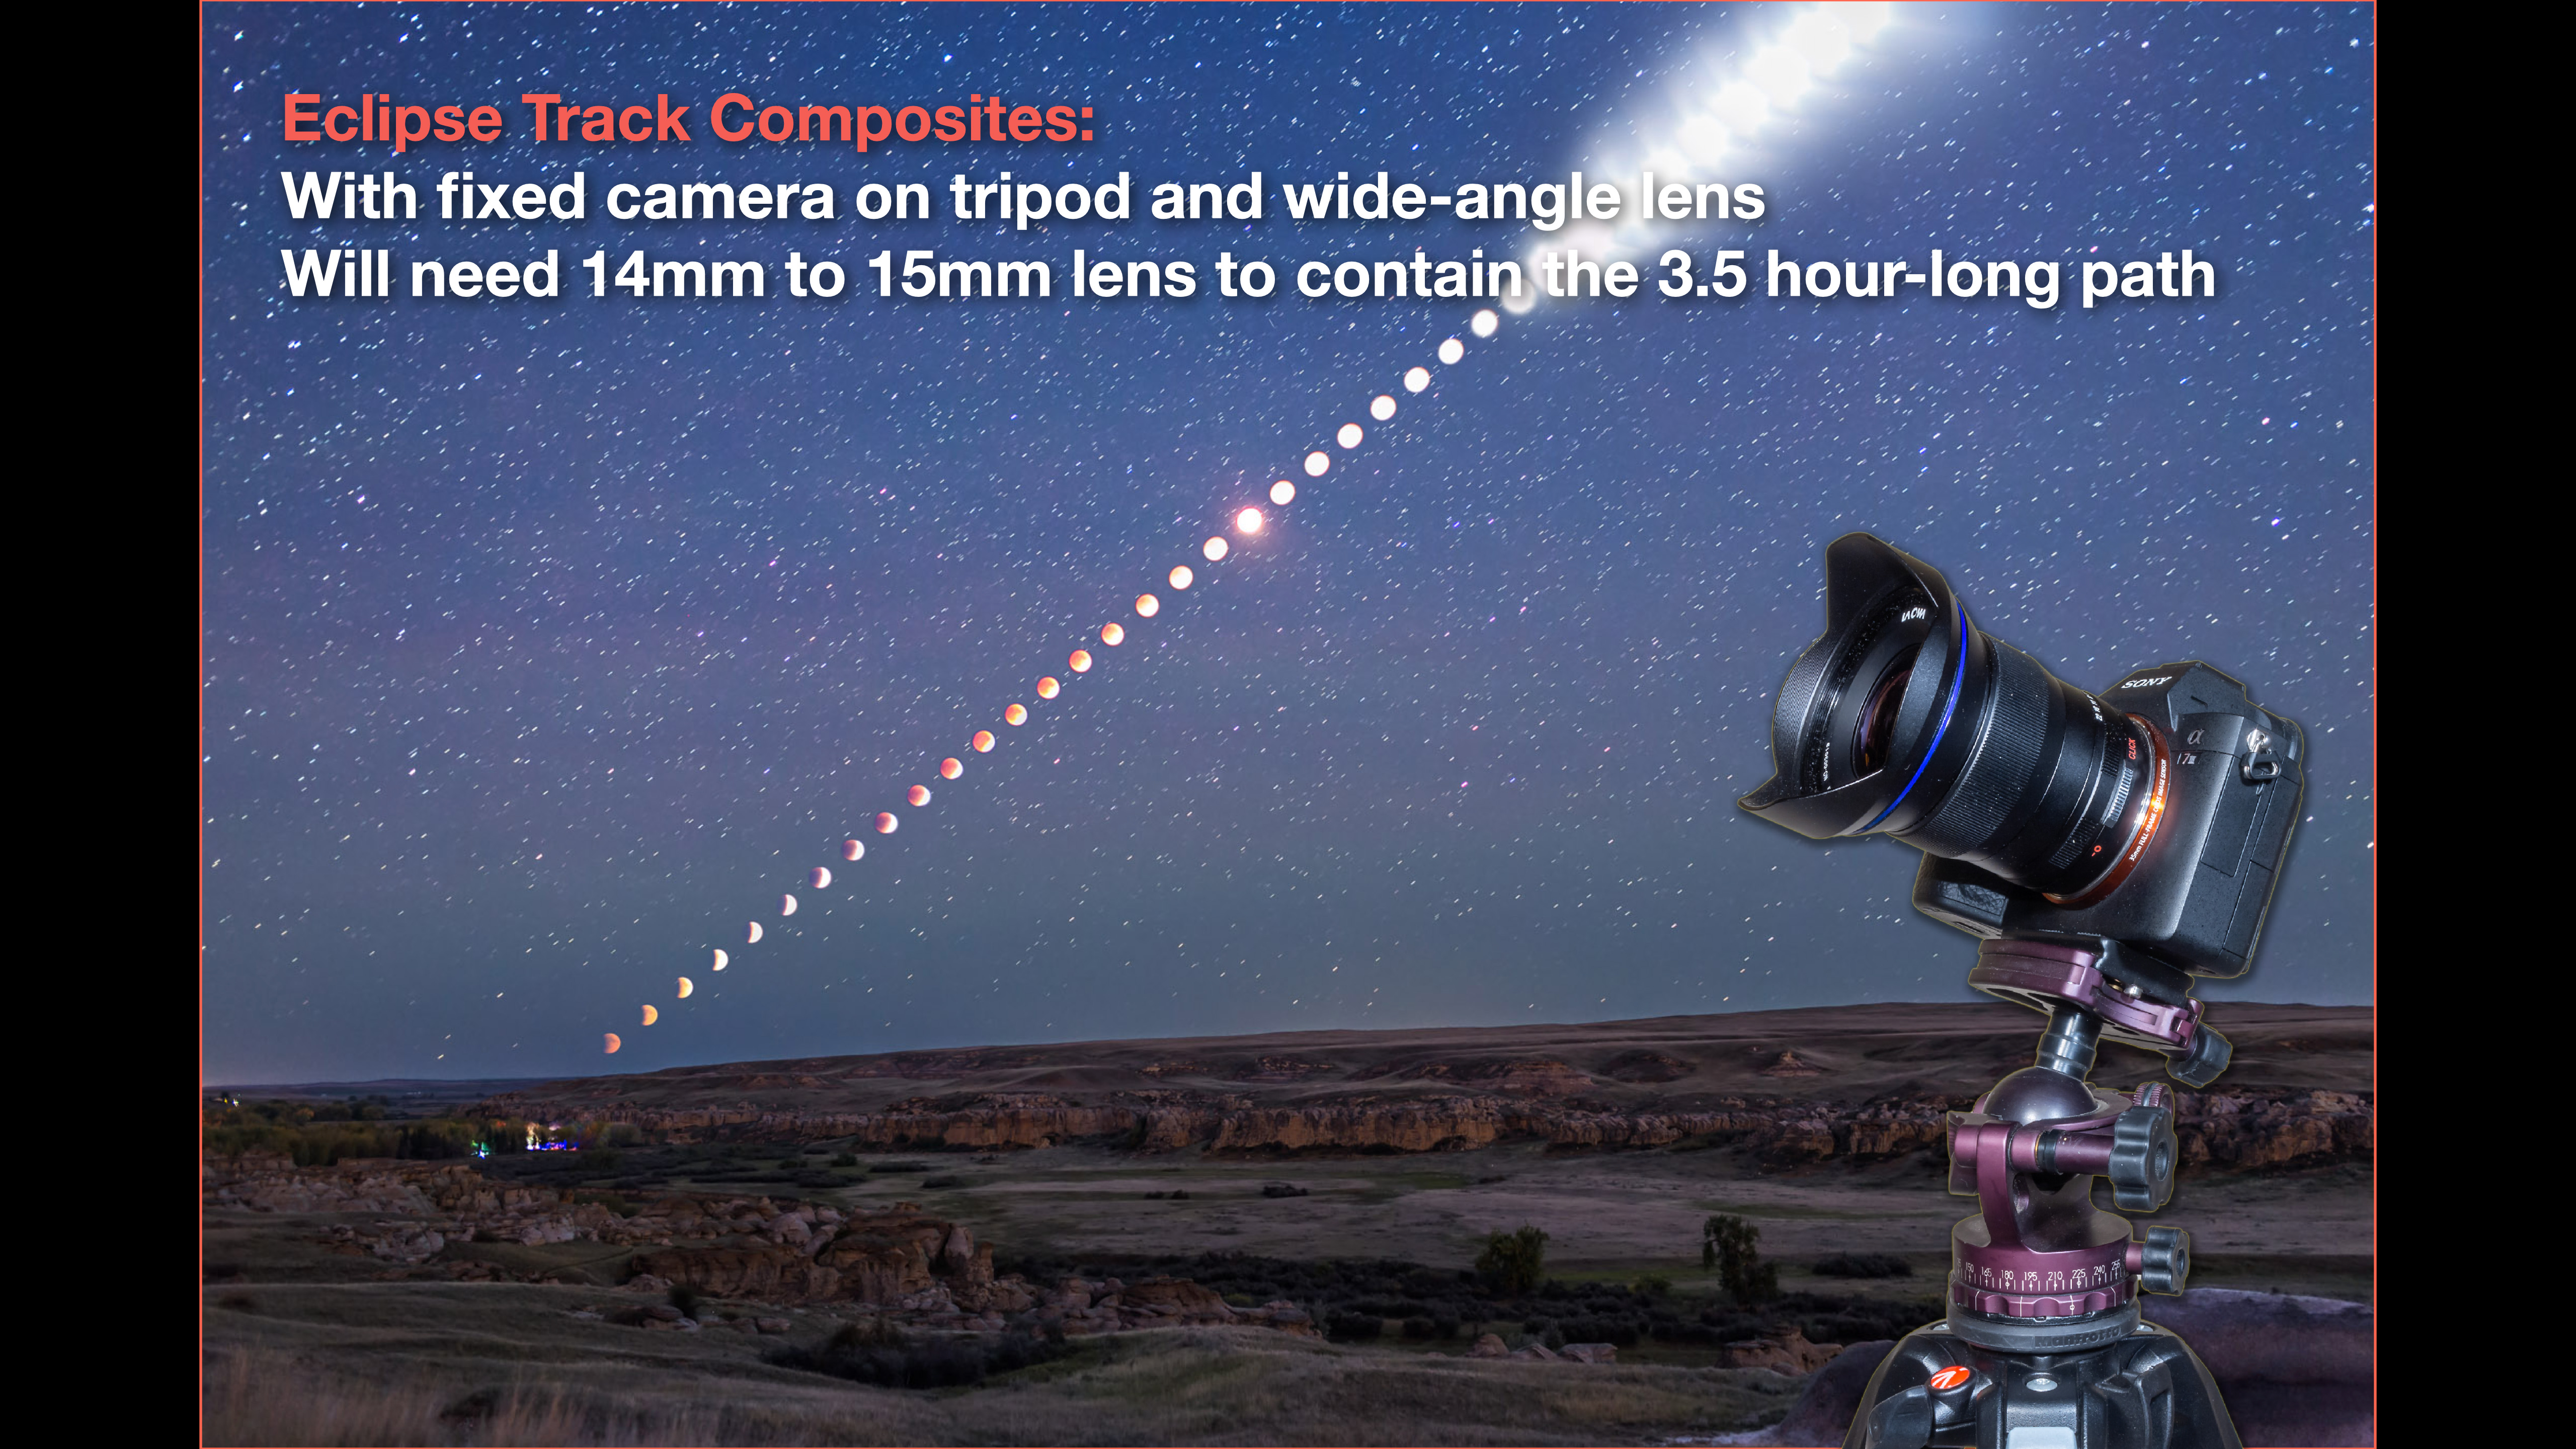
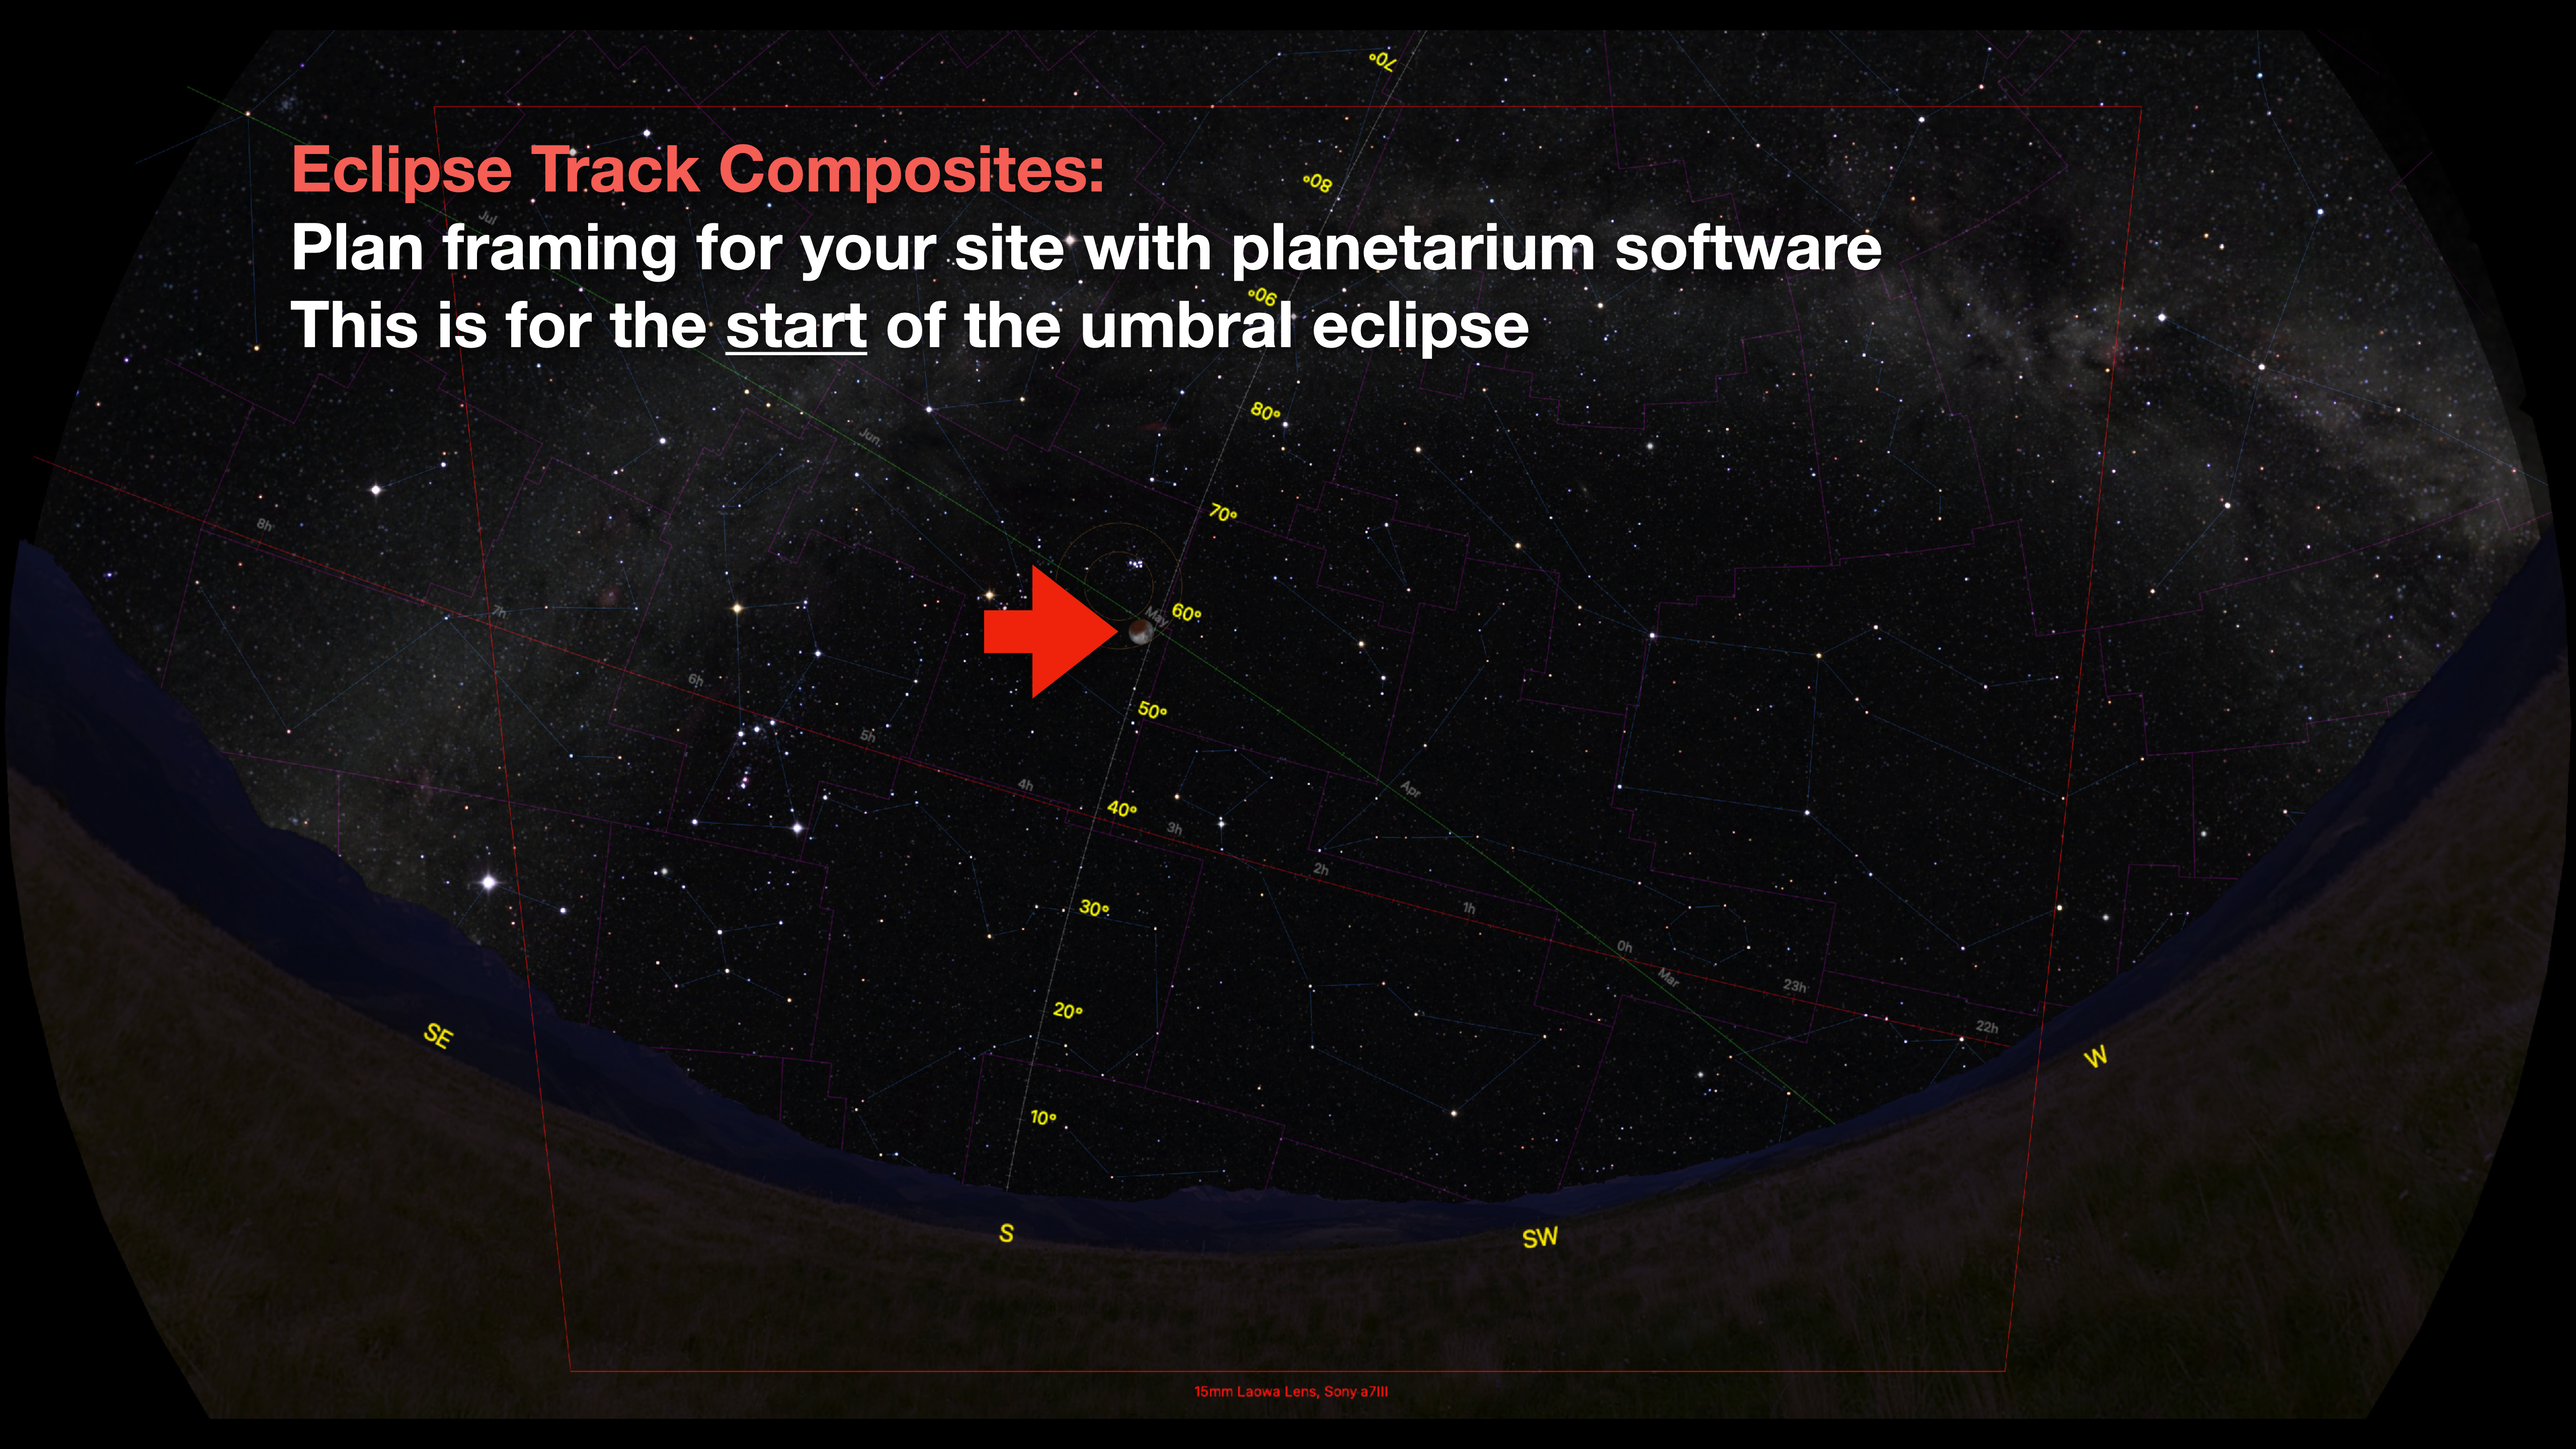
But going with a longer lens allows framing the red eclipsed Moon below the blue Pleiades cluster, a fine colour contrast. A 200mm lens will do the job nicely (or a 135mm on a cropped frame camera).
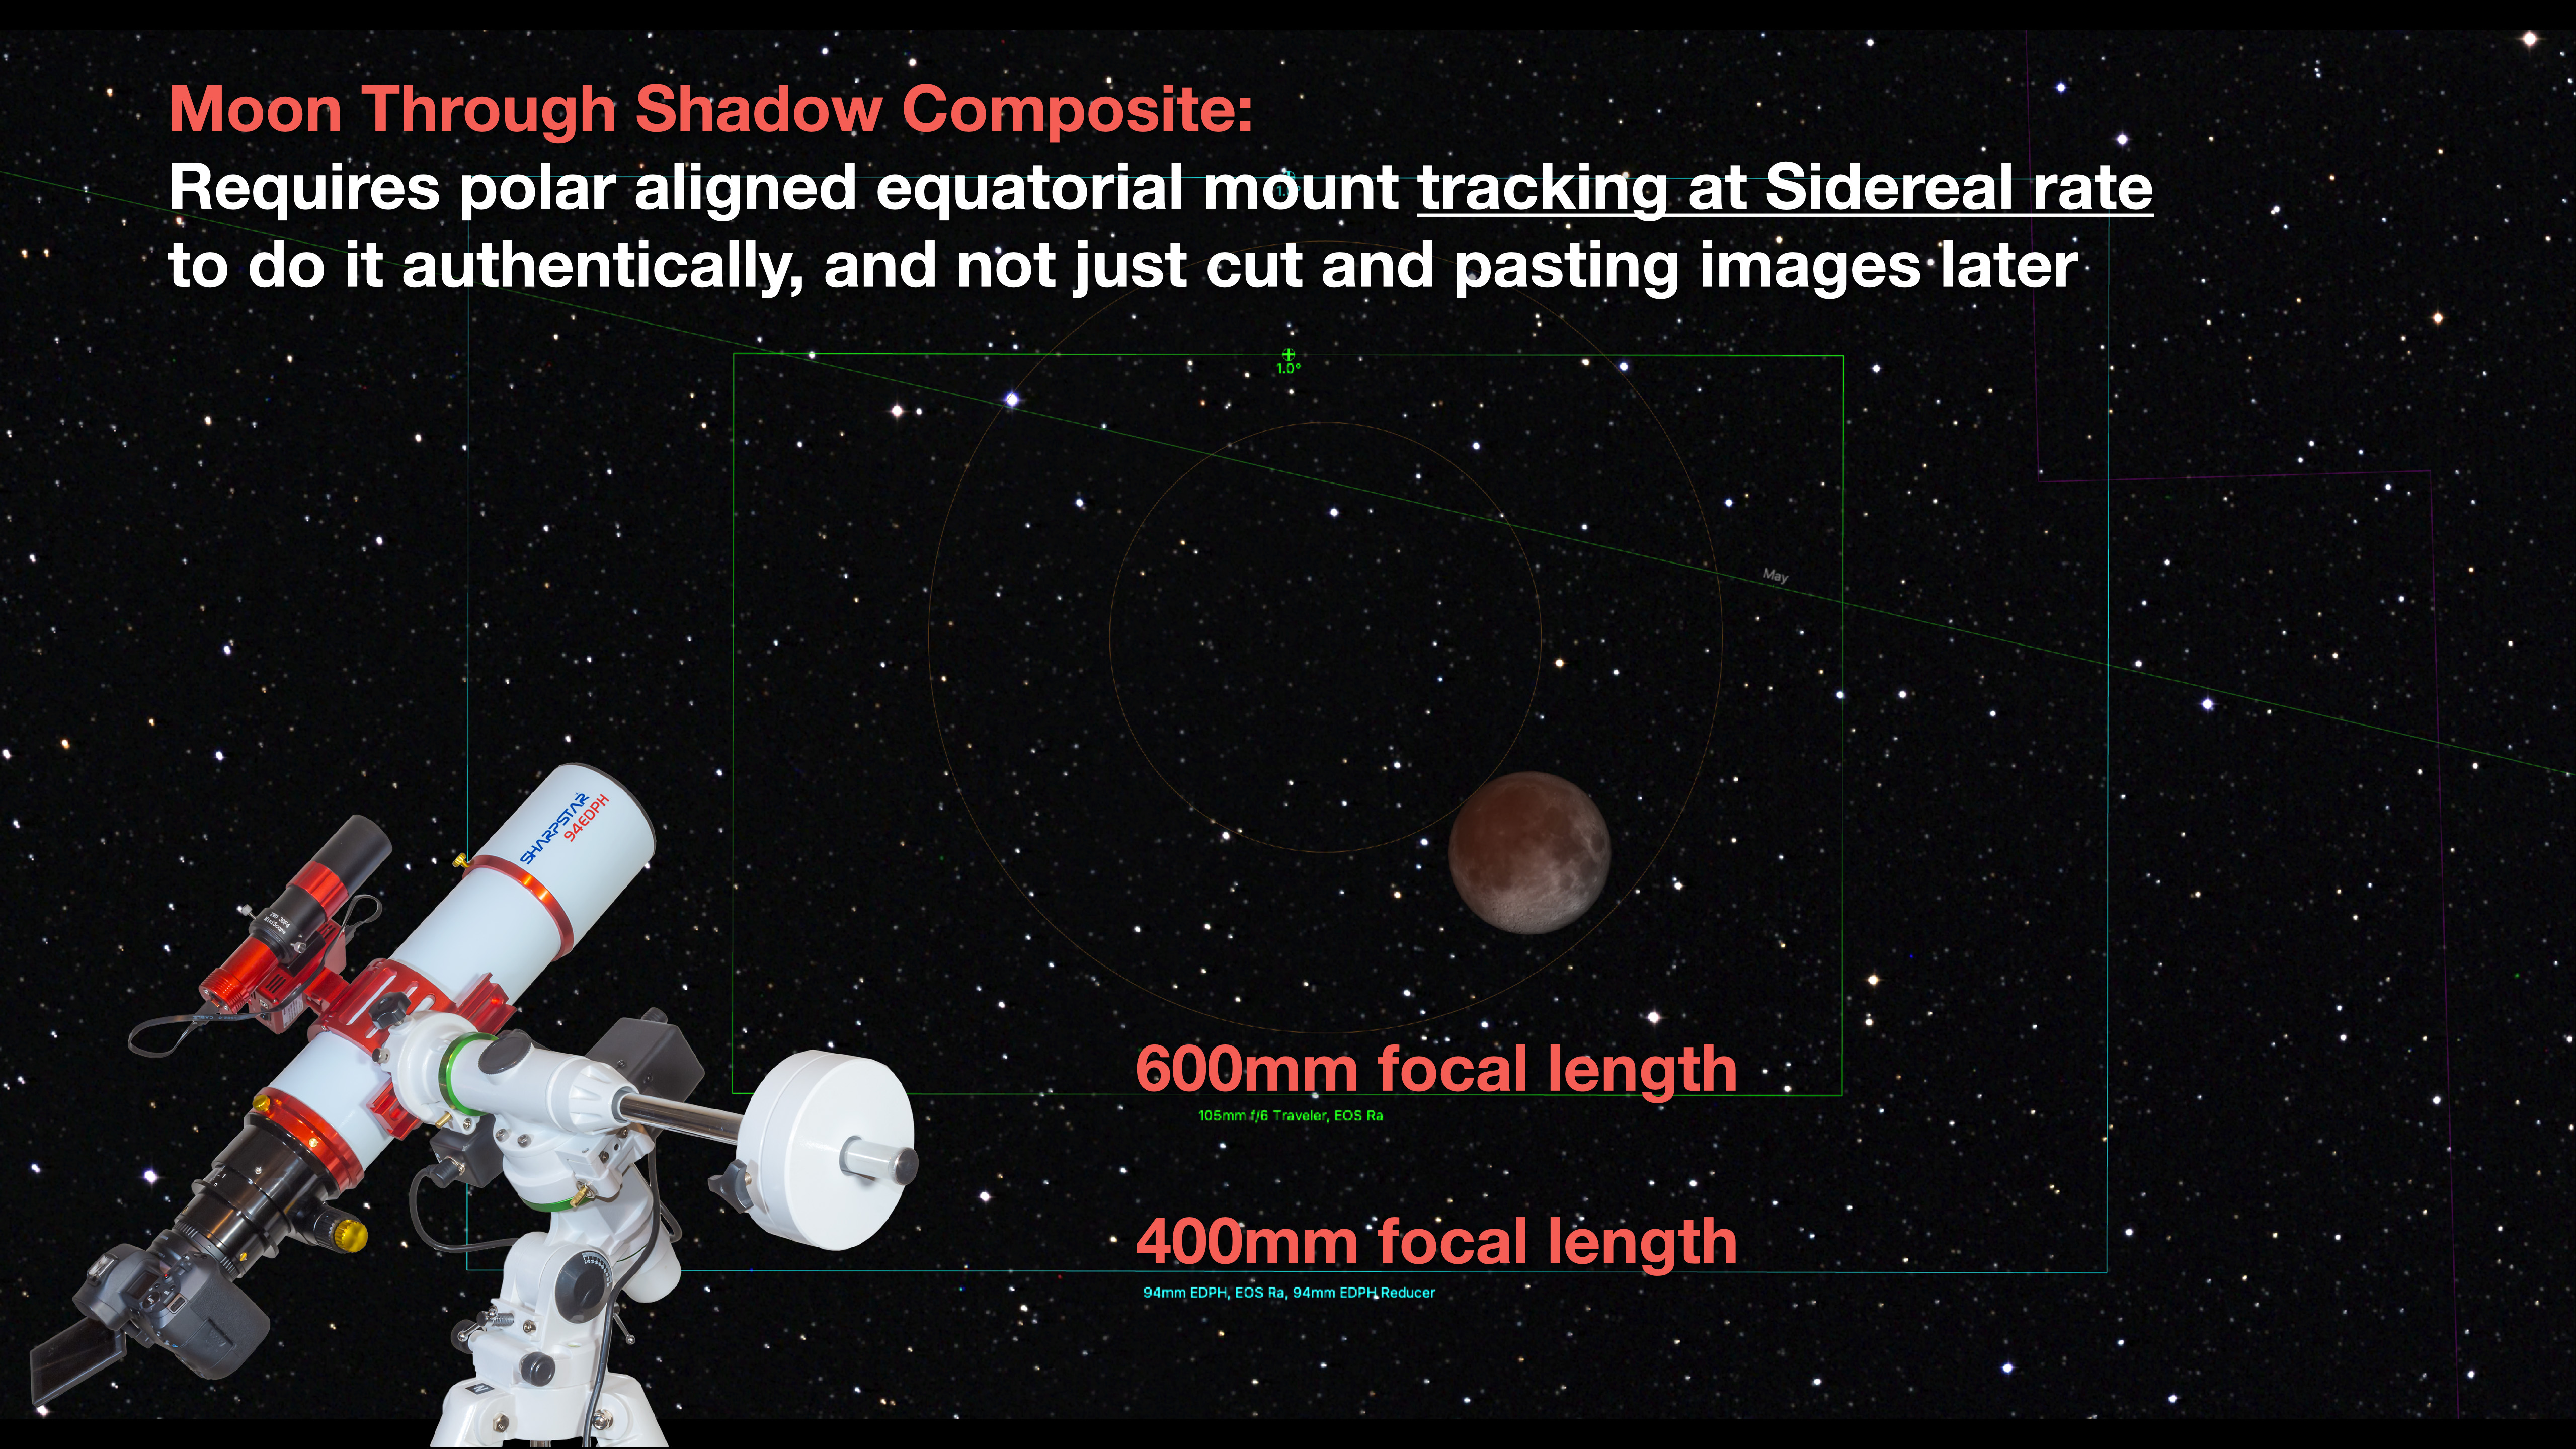
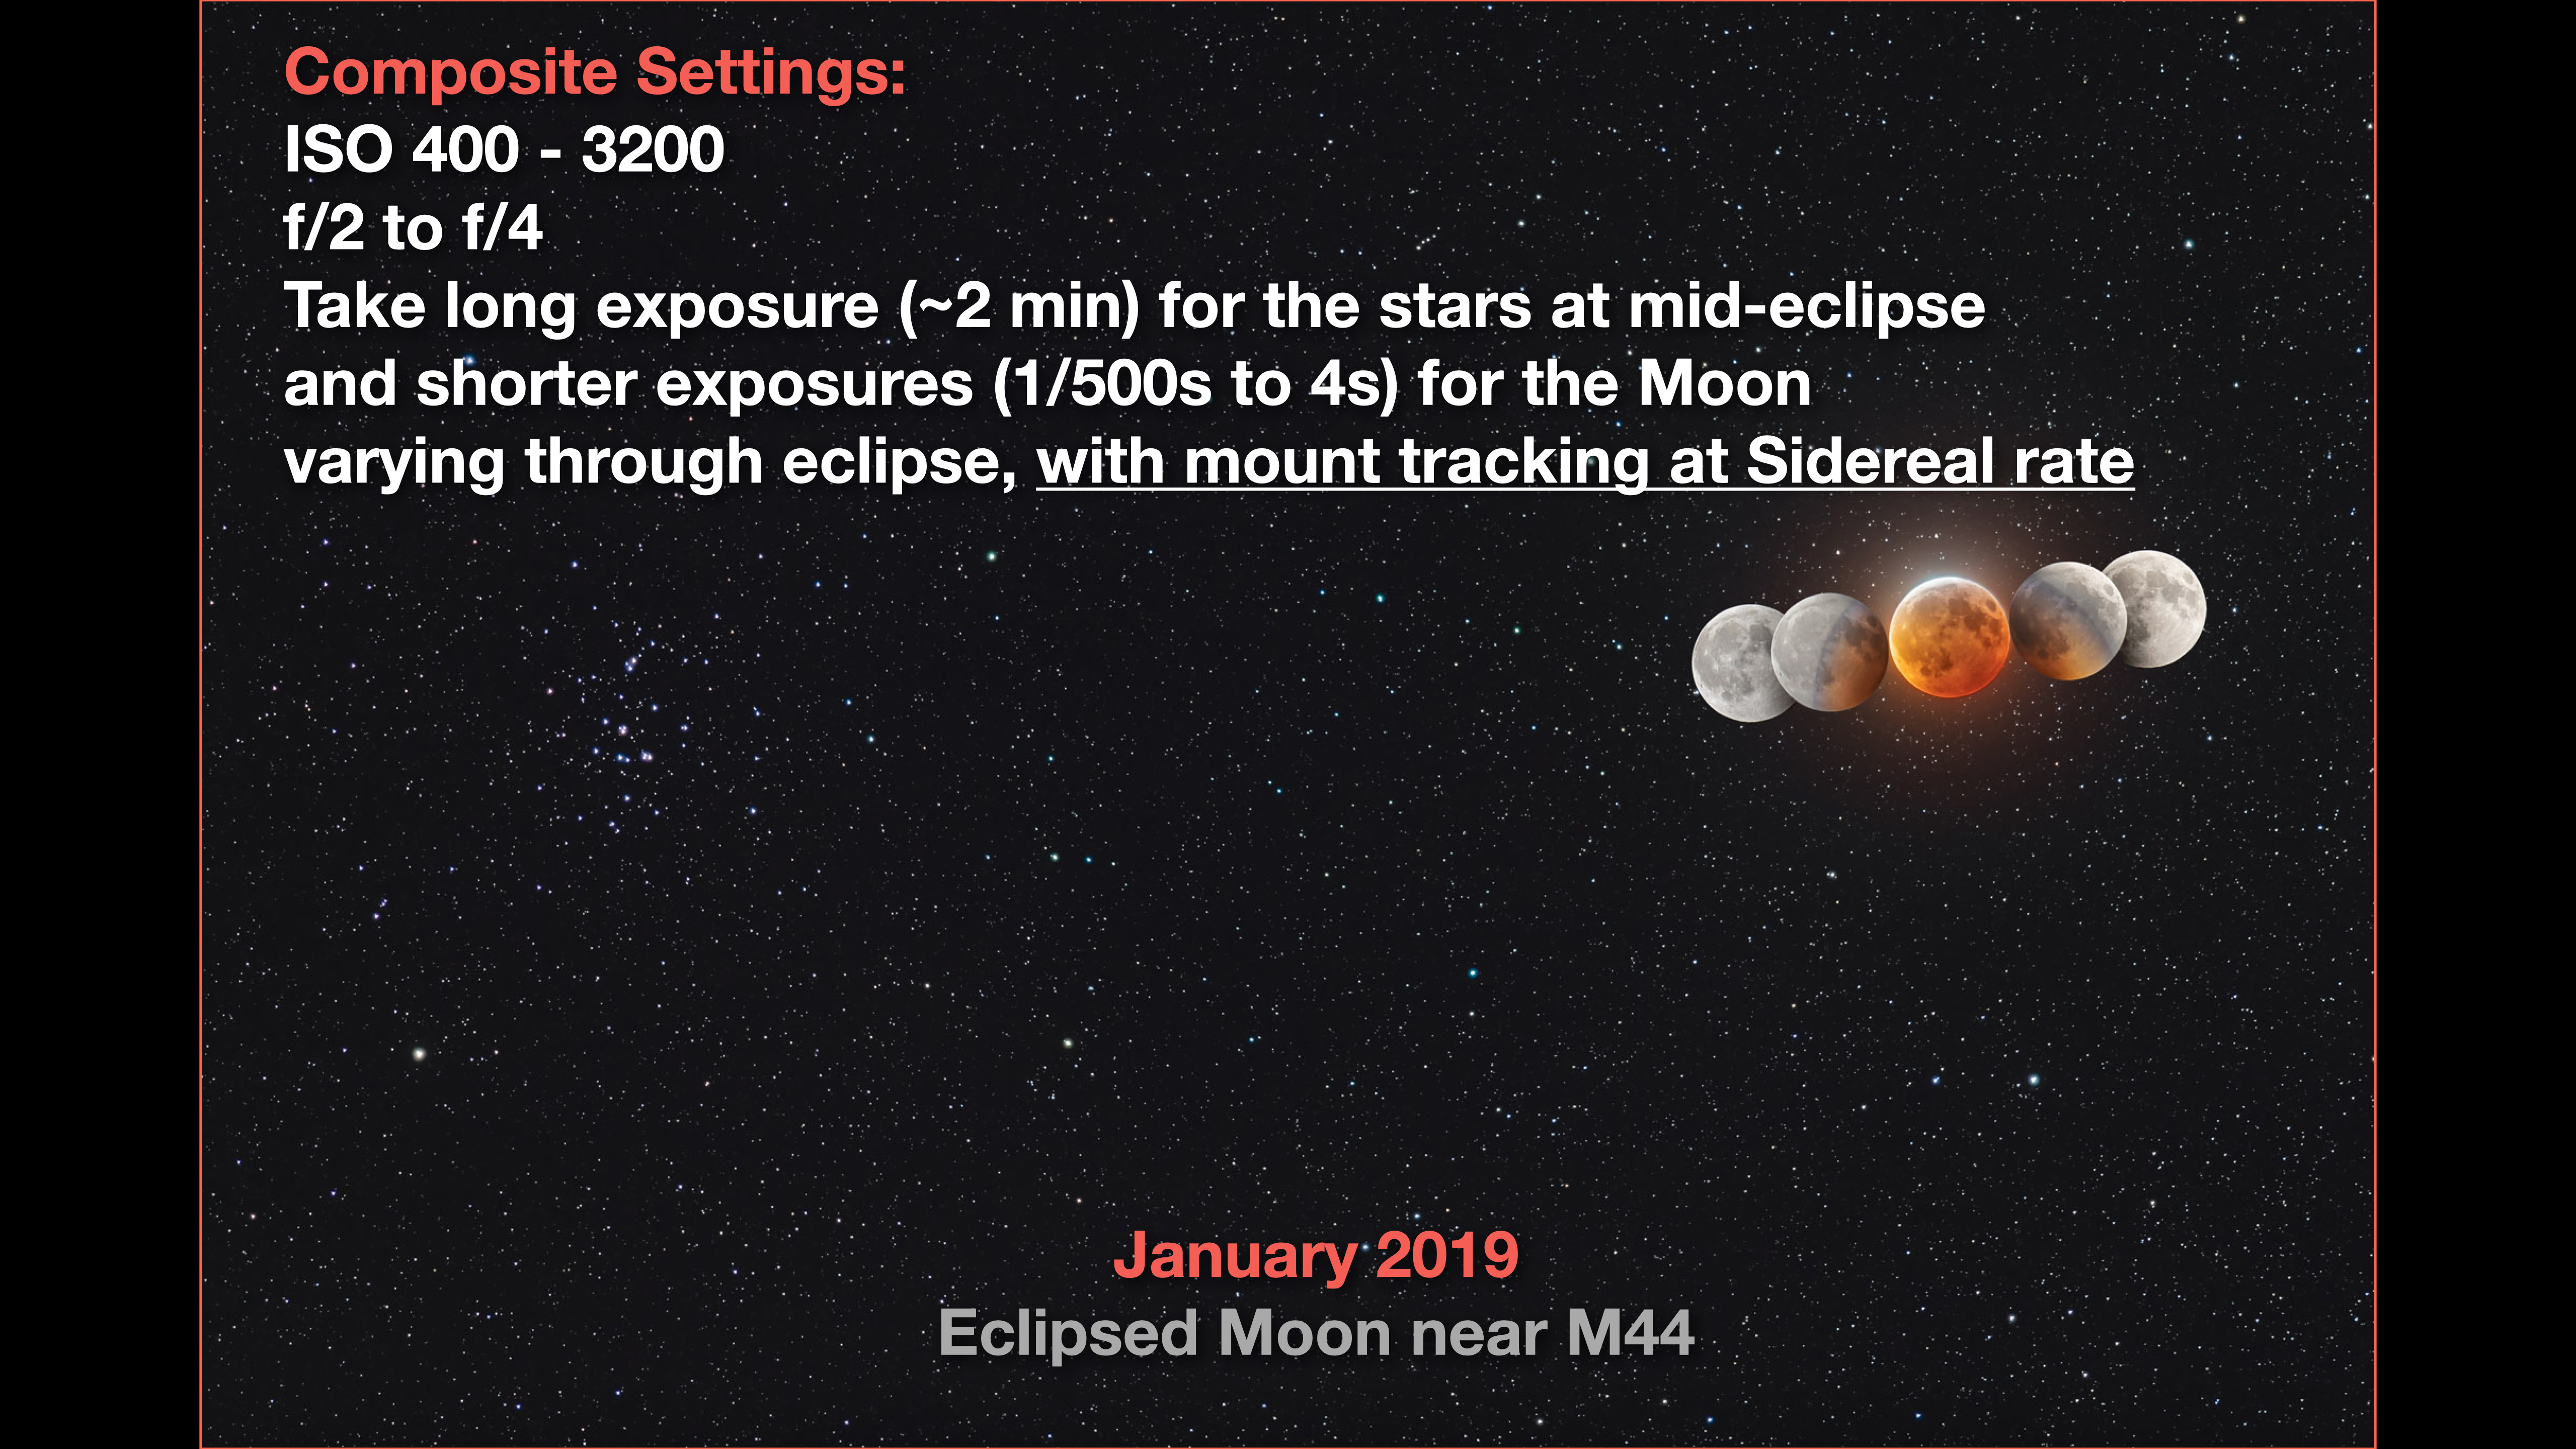
Or, as I show here, the popular William Optics RedCat with its 250mm focal length will also work well. But such a lens must be on a polar-aligned tracker to get sharp shots. Use the Sidereal rate drive speed to ensure the sharpest stars over the 1 to 4 minutes needed to record lots of stars.
Typical settings for tracker images, with an image of the January 2019 eclipse.
Take lots of exposures over a range of settings — long to bring out the deep sky detail and shorter to preserve detail in the reddened lunar disk. These can be layered and blended later in Photoshop, or in the layer-based image editing program of your choice, such as Affinity Photo or ON1 Photo RAW.
PHOTO OPTIONS 3 — THROUGH A TELESCOPE
While I think the tracked wide-field options are some of the best for this eclipse, many photographers will want frame-filling close-ups of the red Moon. While a telescope will do the job, unless it has motors to track the sky, your options are limited.
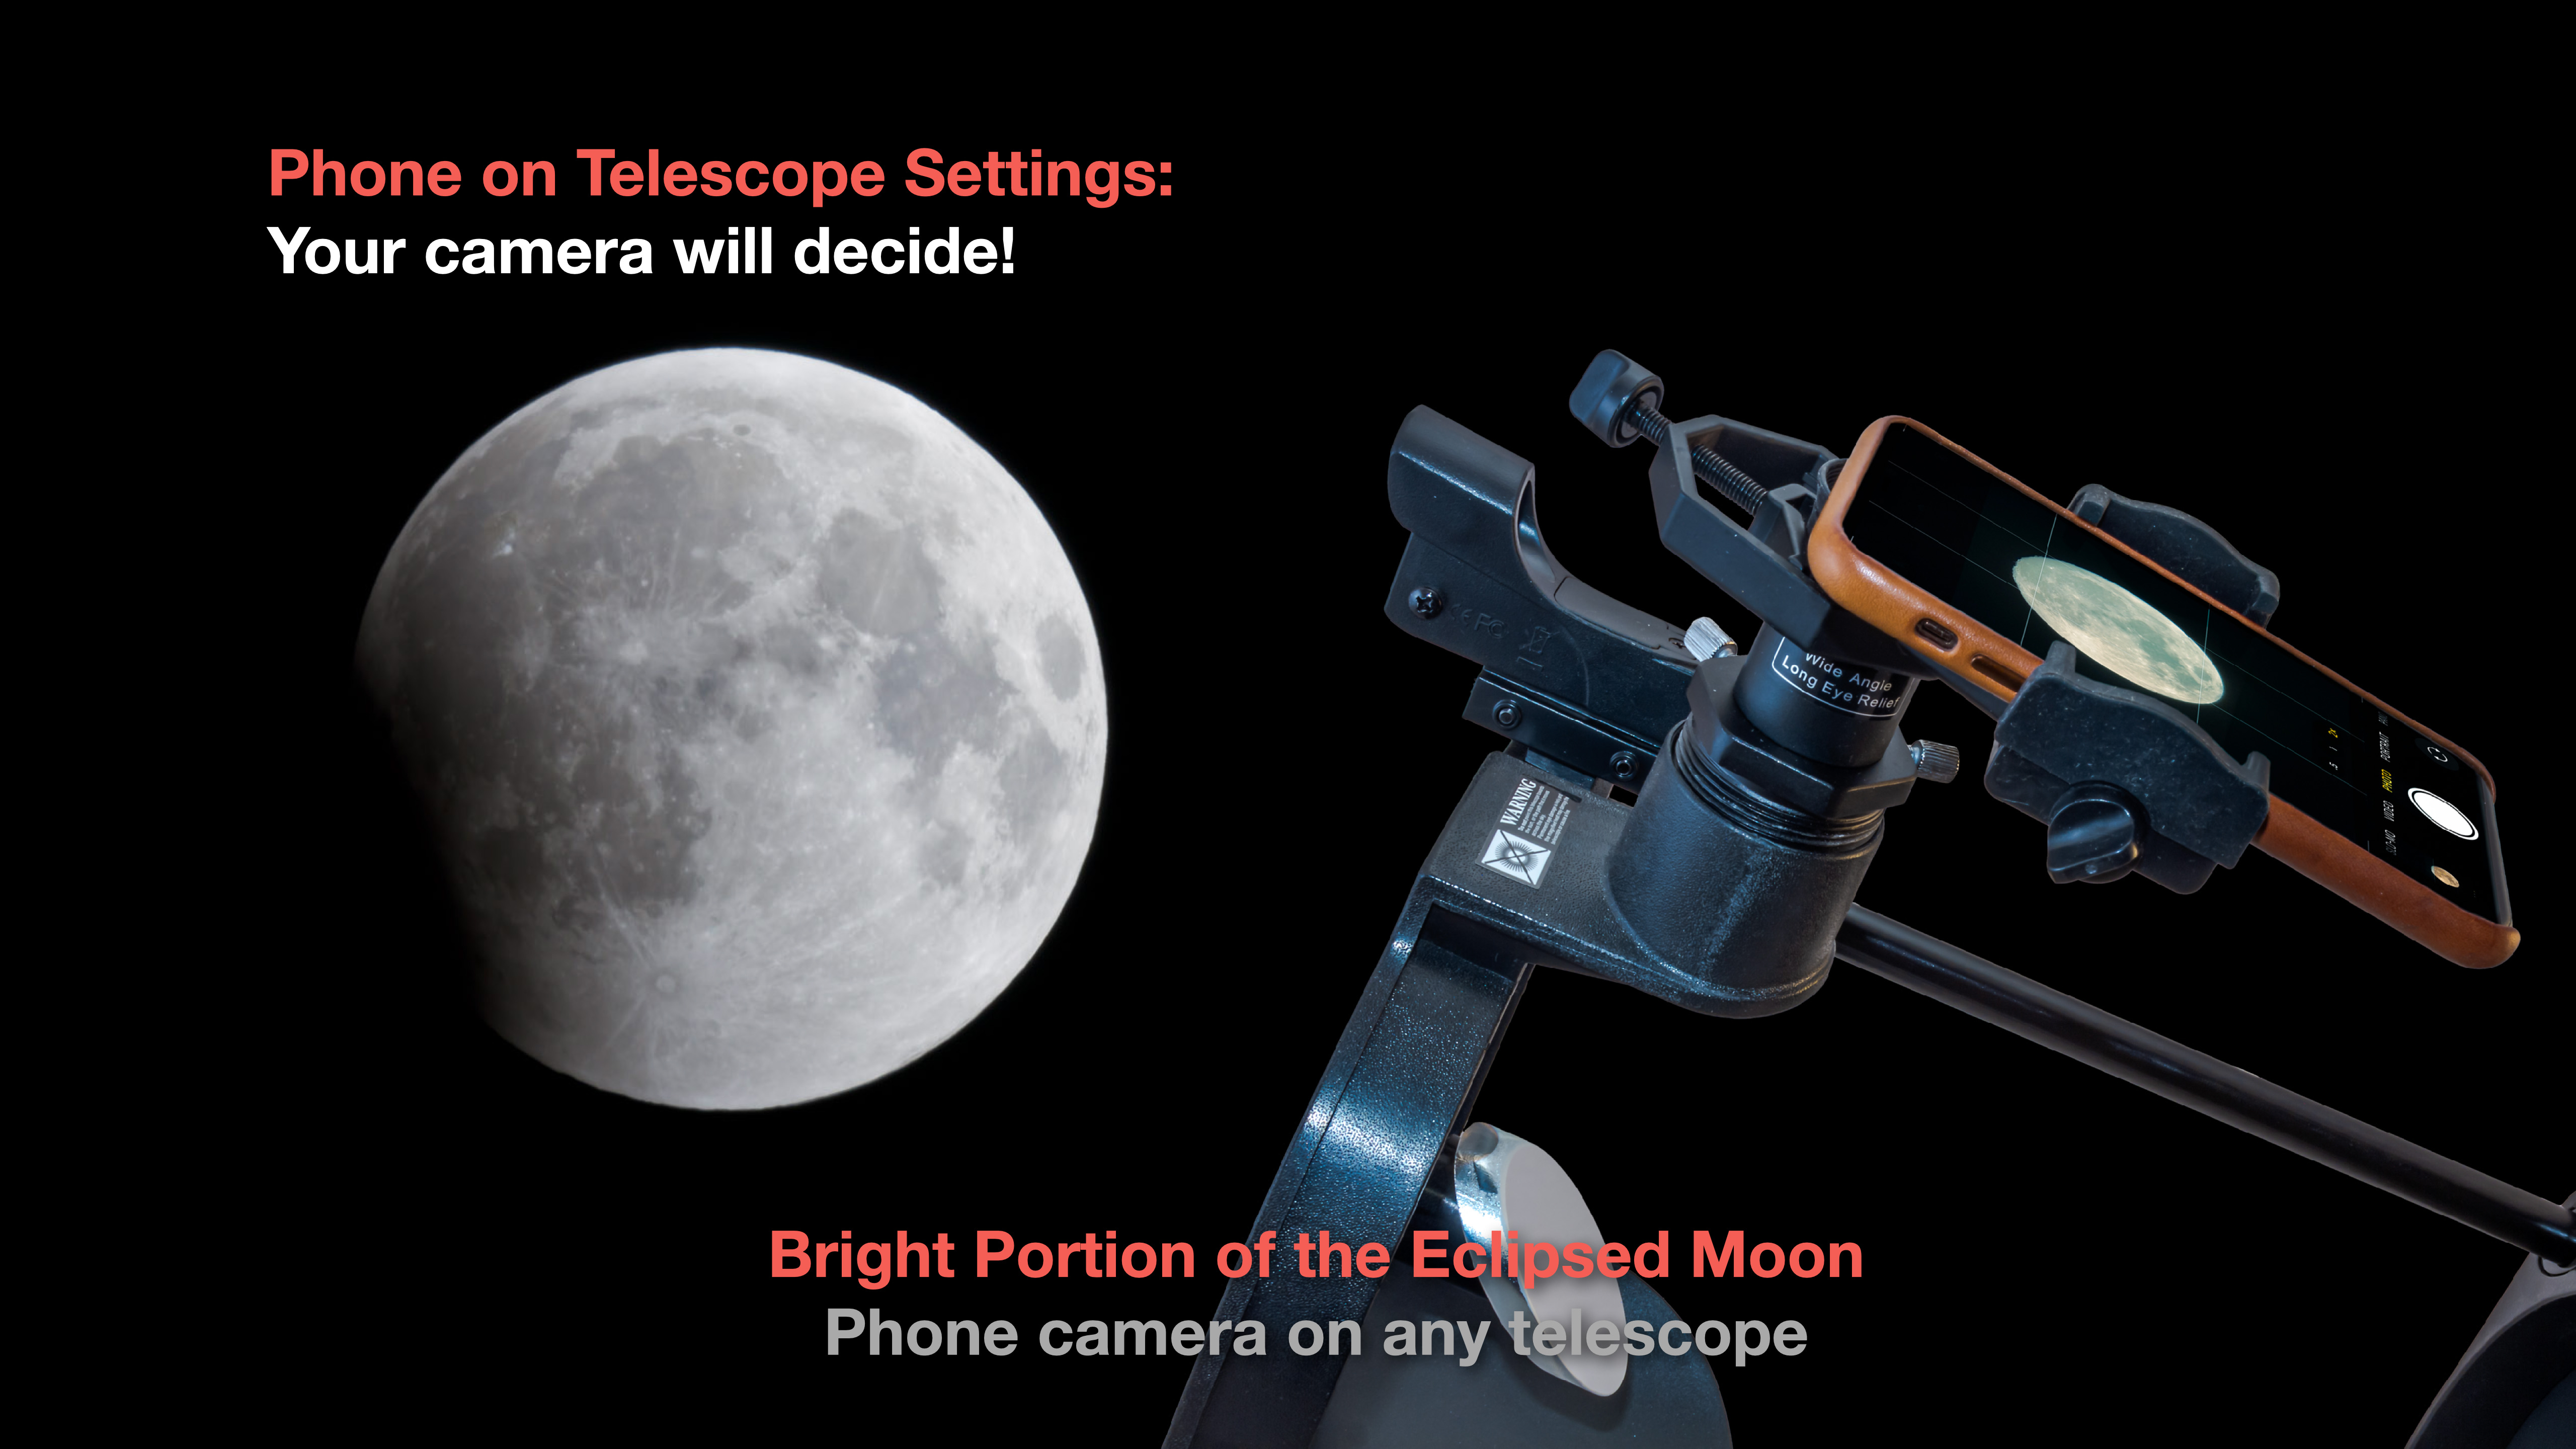
Phone on a simple Dobsonian reflector.
A phone clamped to the eyepiece of a telescope can capture the shrinking bright part of the eclipsed Moon as the Moon enters more deeply into the umbra. Exposures for the bright part of the Moon are short enough a motor drive on the telescope is not essential.
But if you haven’t shot the Moon with this gear before, eclipse night is not the time to learn. Practice on the Moon before the eclipse.
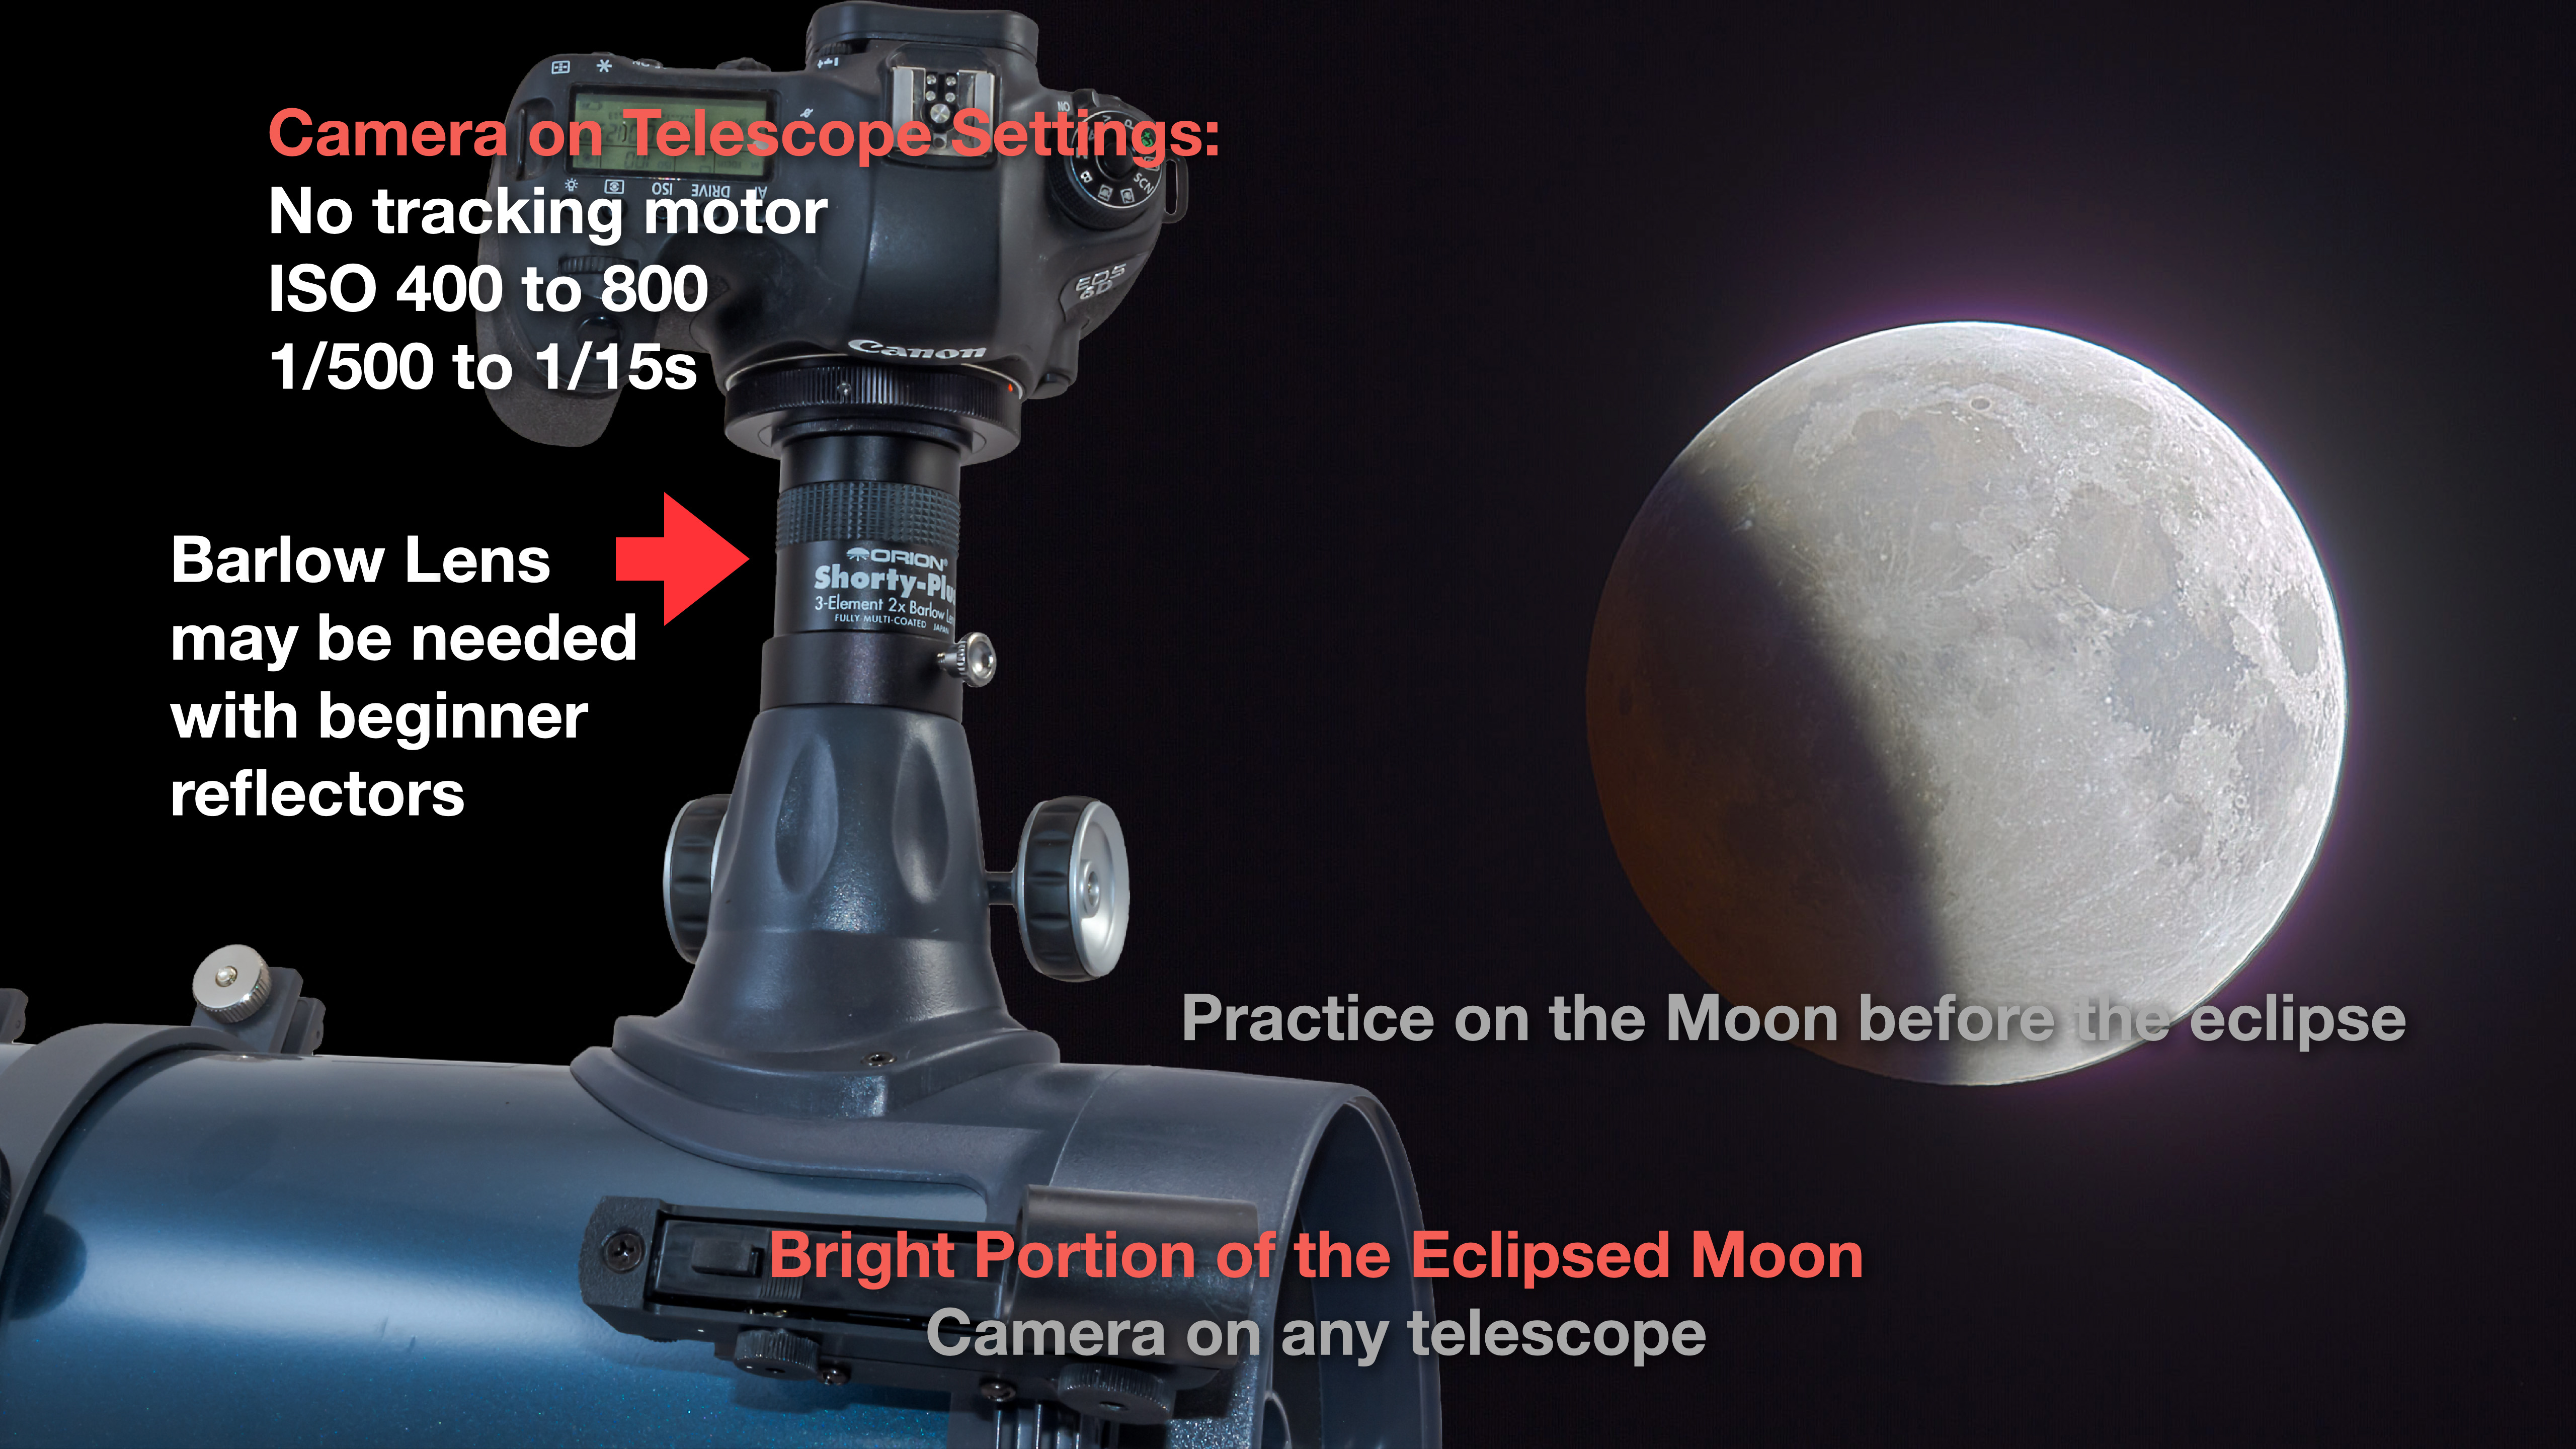
DSLR on a beginner refractor telescope showing the adapter.
For shooting with a DSLR camera through a telescope you’ll need a special camera adapter nosepiece and T-ring for your camera. Again, if you don’t have the gear and the experience doing this, I would suggest not making the attempt at two in the morning on eclipse night!
DSLR on a beginner reflector with an often necessary Barlow lens.
For example, owners of typical beginner reflectors are often surprised to find their cameras won’t even reach focus on their telescope. Many are simply not designed for photography. Adding a Barlow lens is required for the camera to reach focus, though without a drive, exposures will be limited to short (under 1/15s) shots of the bright part of the Moon.
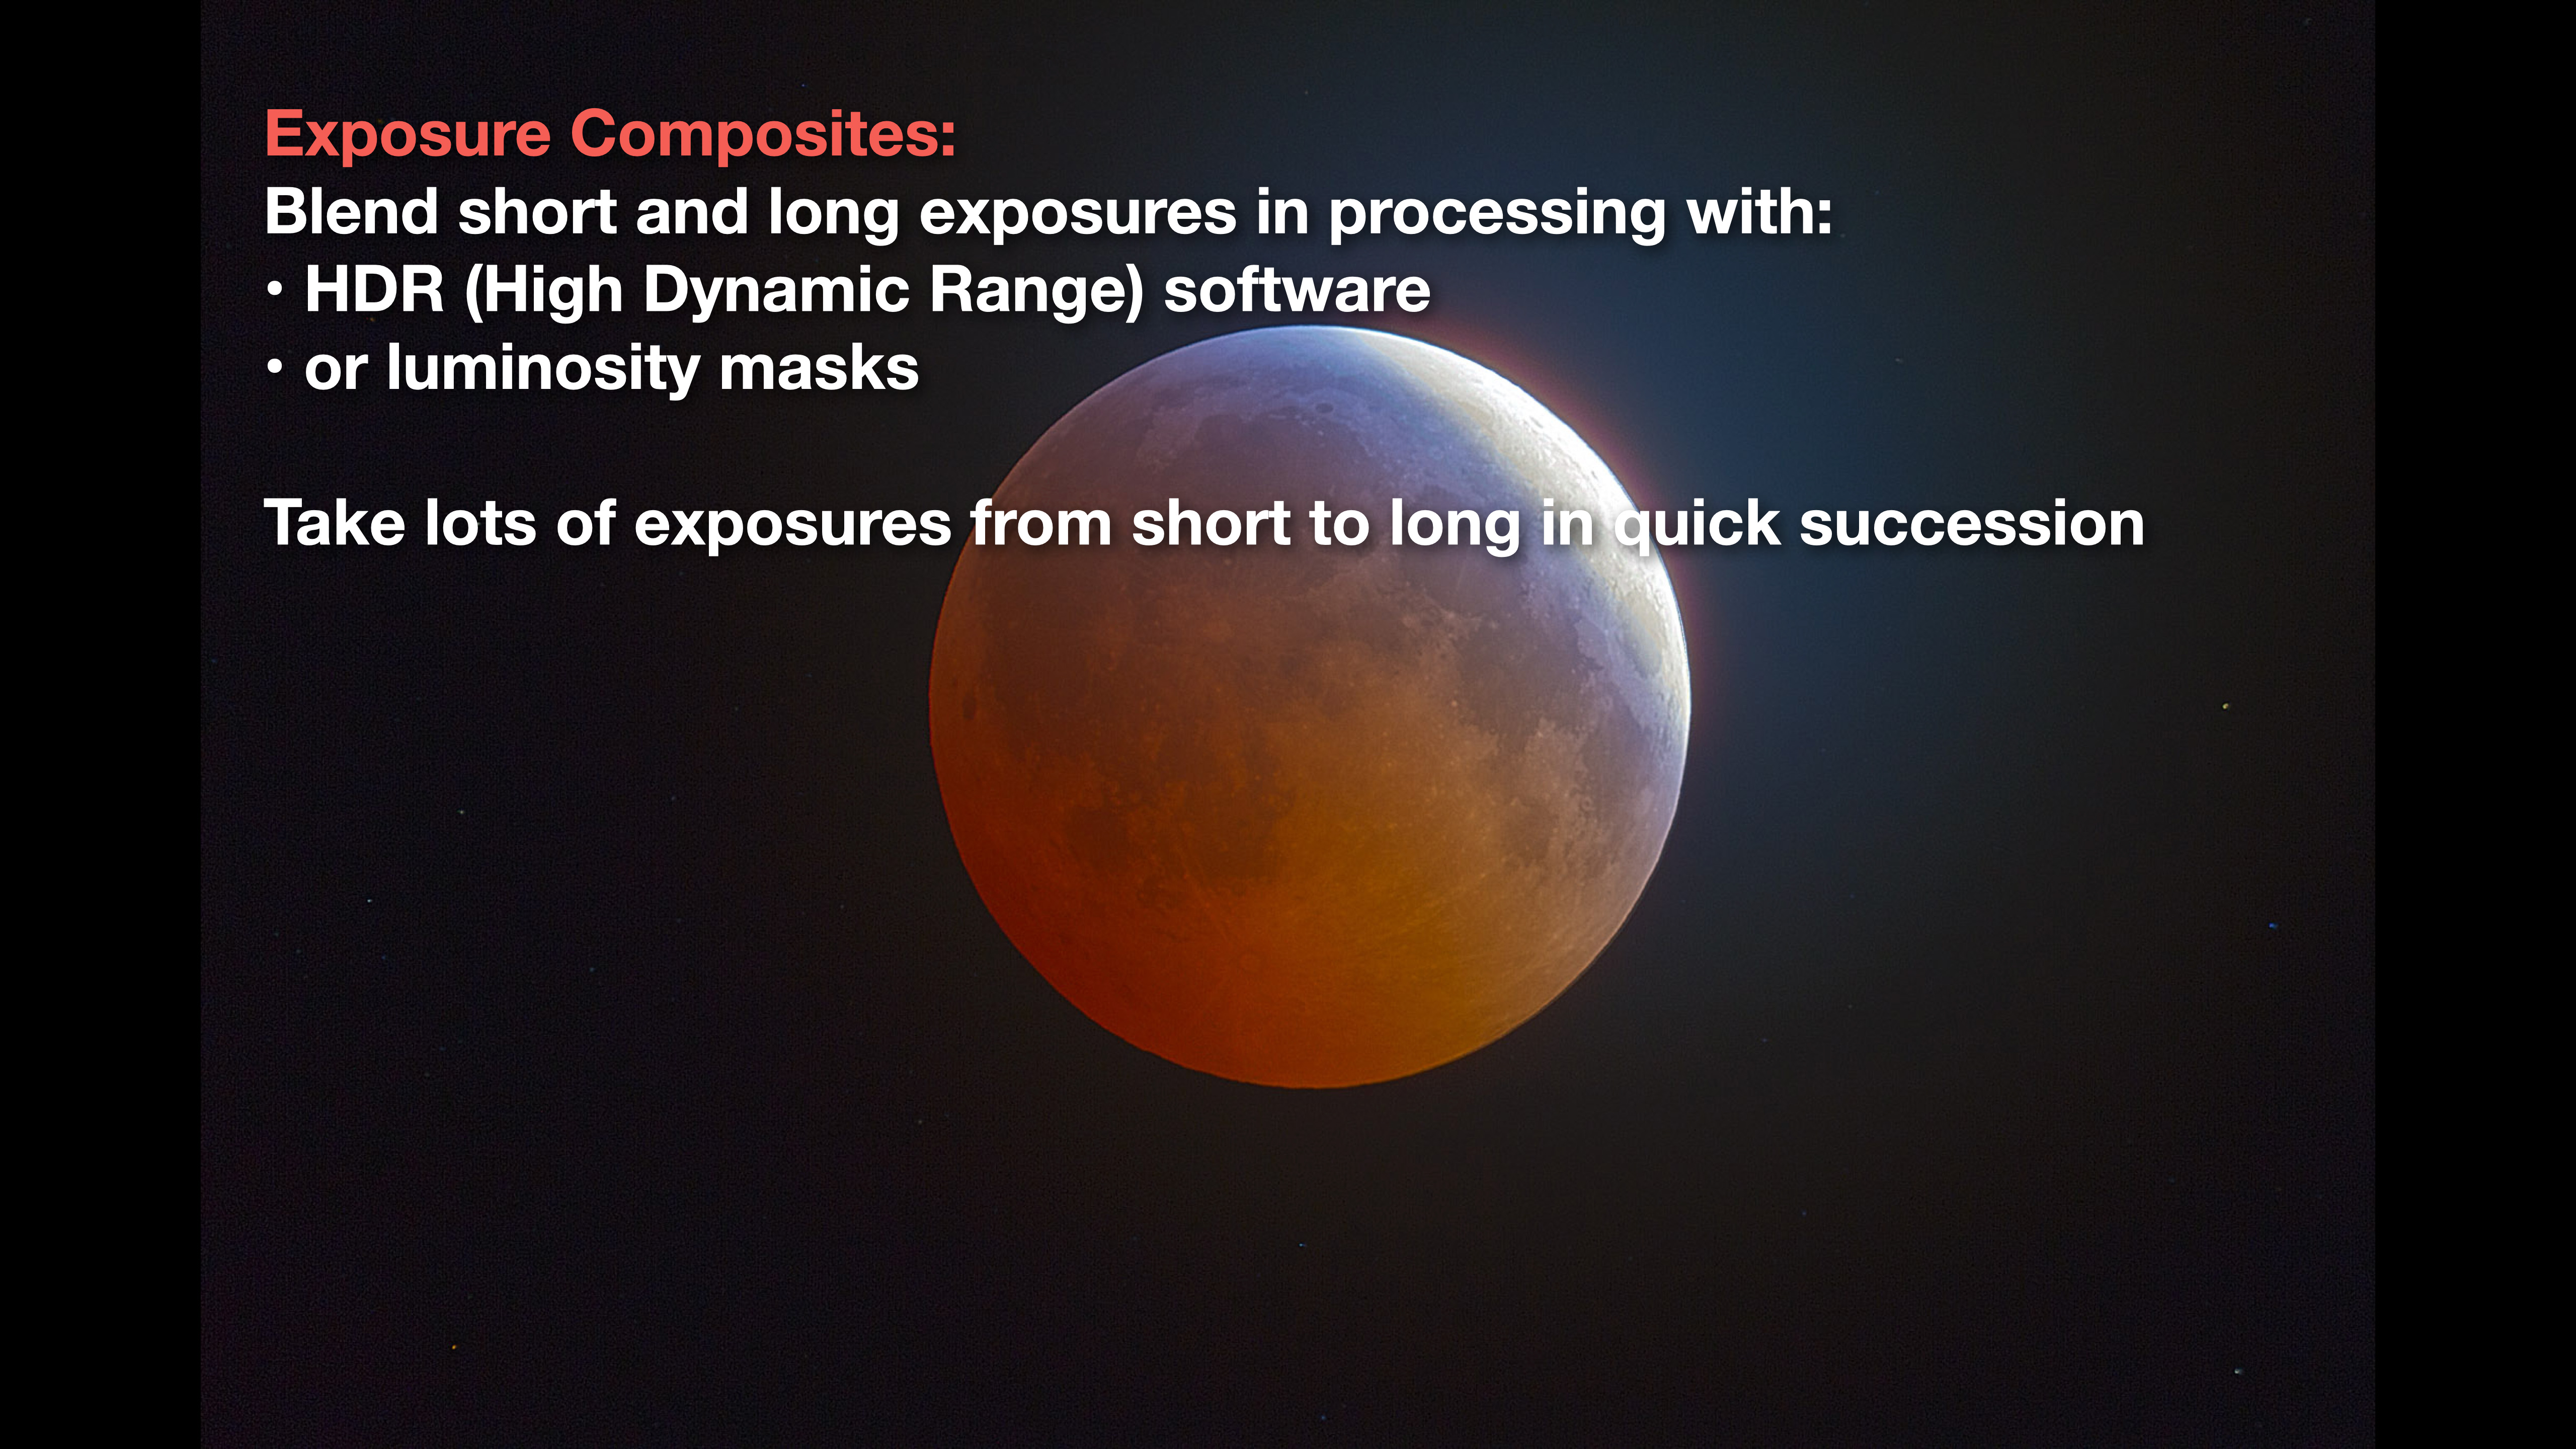
An exposure composite of short and long exposures.
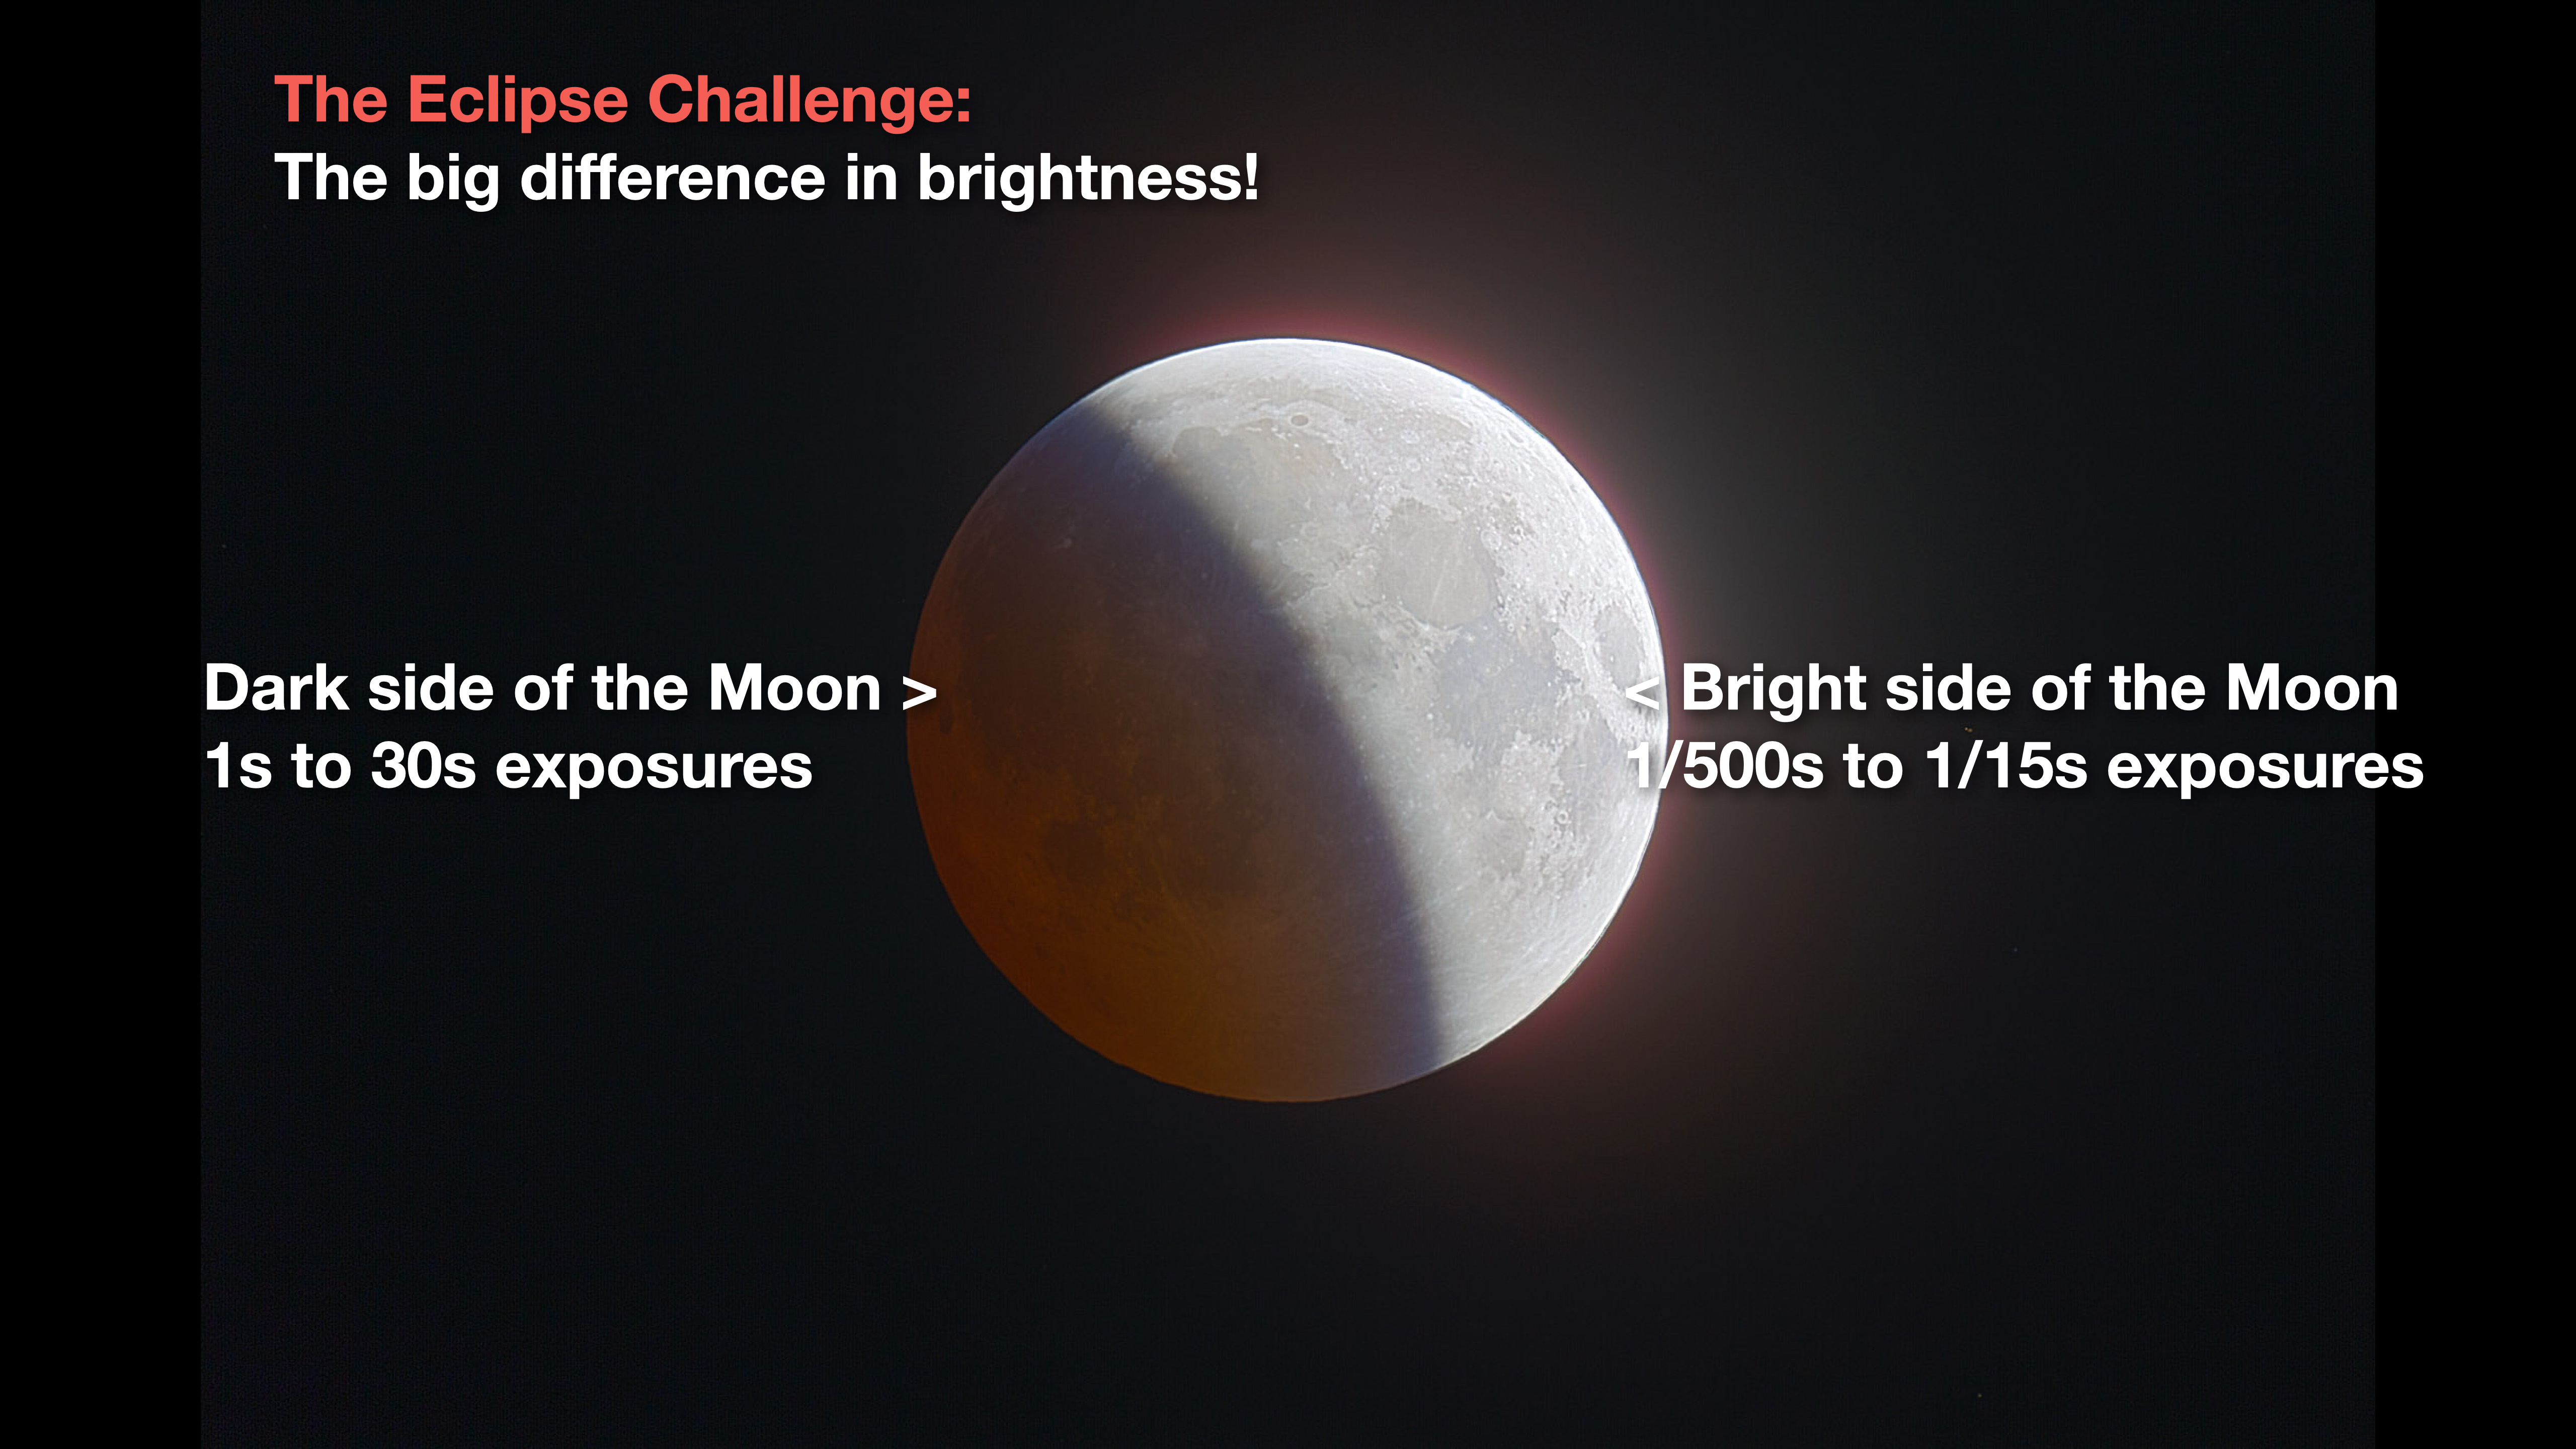
The challenge with this and all lunar eclipses is that the Moon presents a huge range of brightness. Short snapshots can capture the bright part of the Moon not in the umbra, but the dark umbral-shaded portion requires much longer exposures, usually over one second.
Your eye can see the whole scene (as depicted above) but the camera cannot, not in one exposure. This example is a “high dynamic range” blend of several exposures.
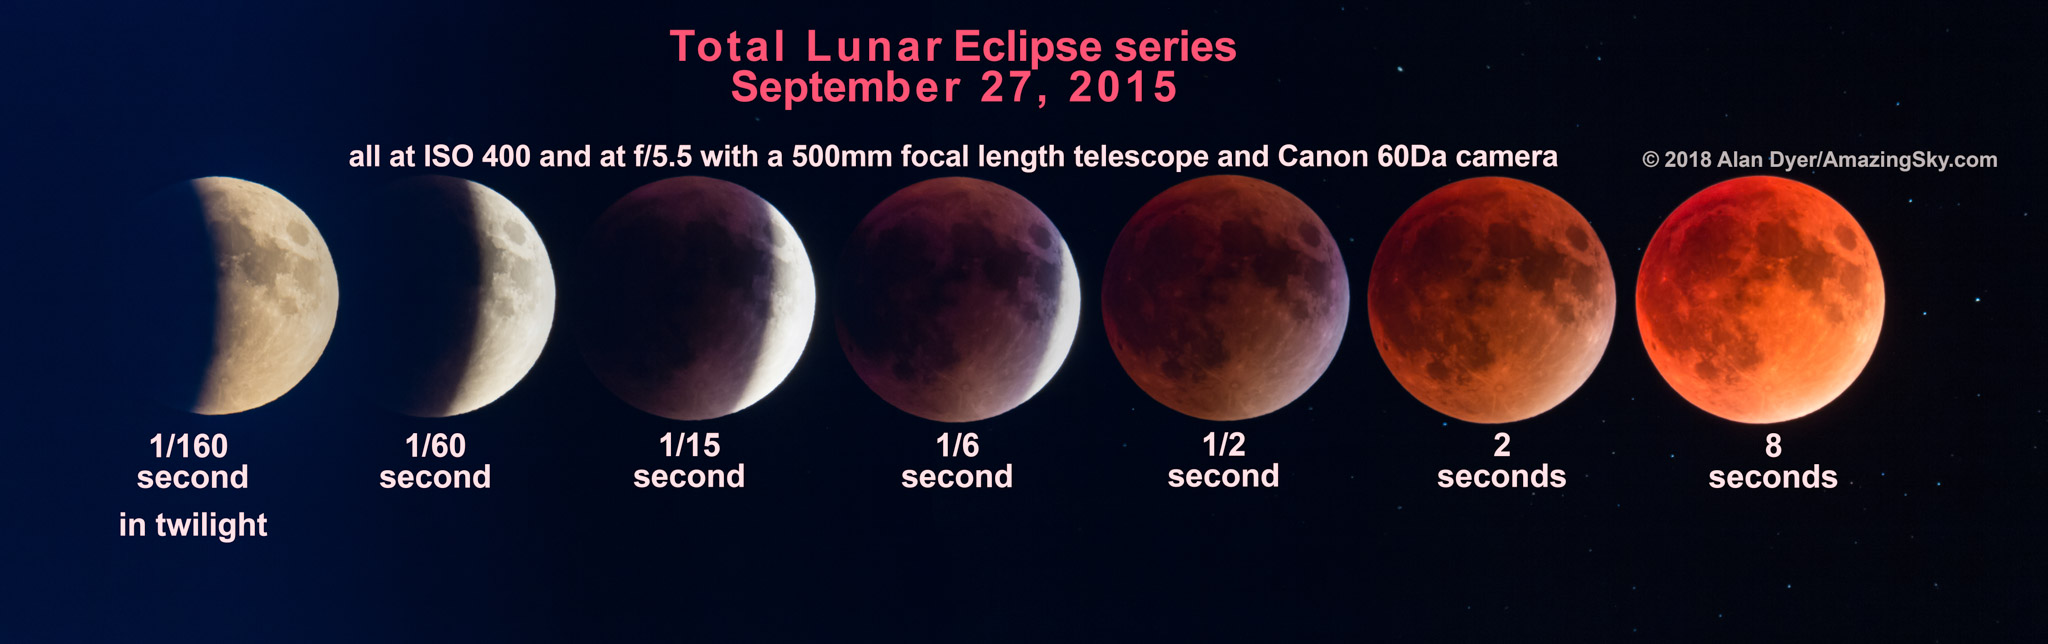
A series of the September 27, 2015 total lunar eclipse to demonstrate an exposure sequence from partial to total phase.
Plus as the eclipse progresses, longer and longer exposures are needed to capture the sequence as the Moon is engulfed by more of the umbra.
After mid-eclipse, the exposures must get progressively shorter again in reverse order. So attempting to capture an entire sequence requires a lot of exposure adjustments.
TIP: Bracket a lot! Take lots of frames at each burst of images shot every minute, or however often you wish to capture the progress of the eclipse for a final set. Unlike total solar eclipses, lunar eclipses provide lots of time to take lots of images.
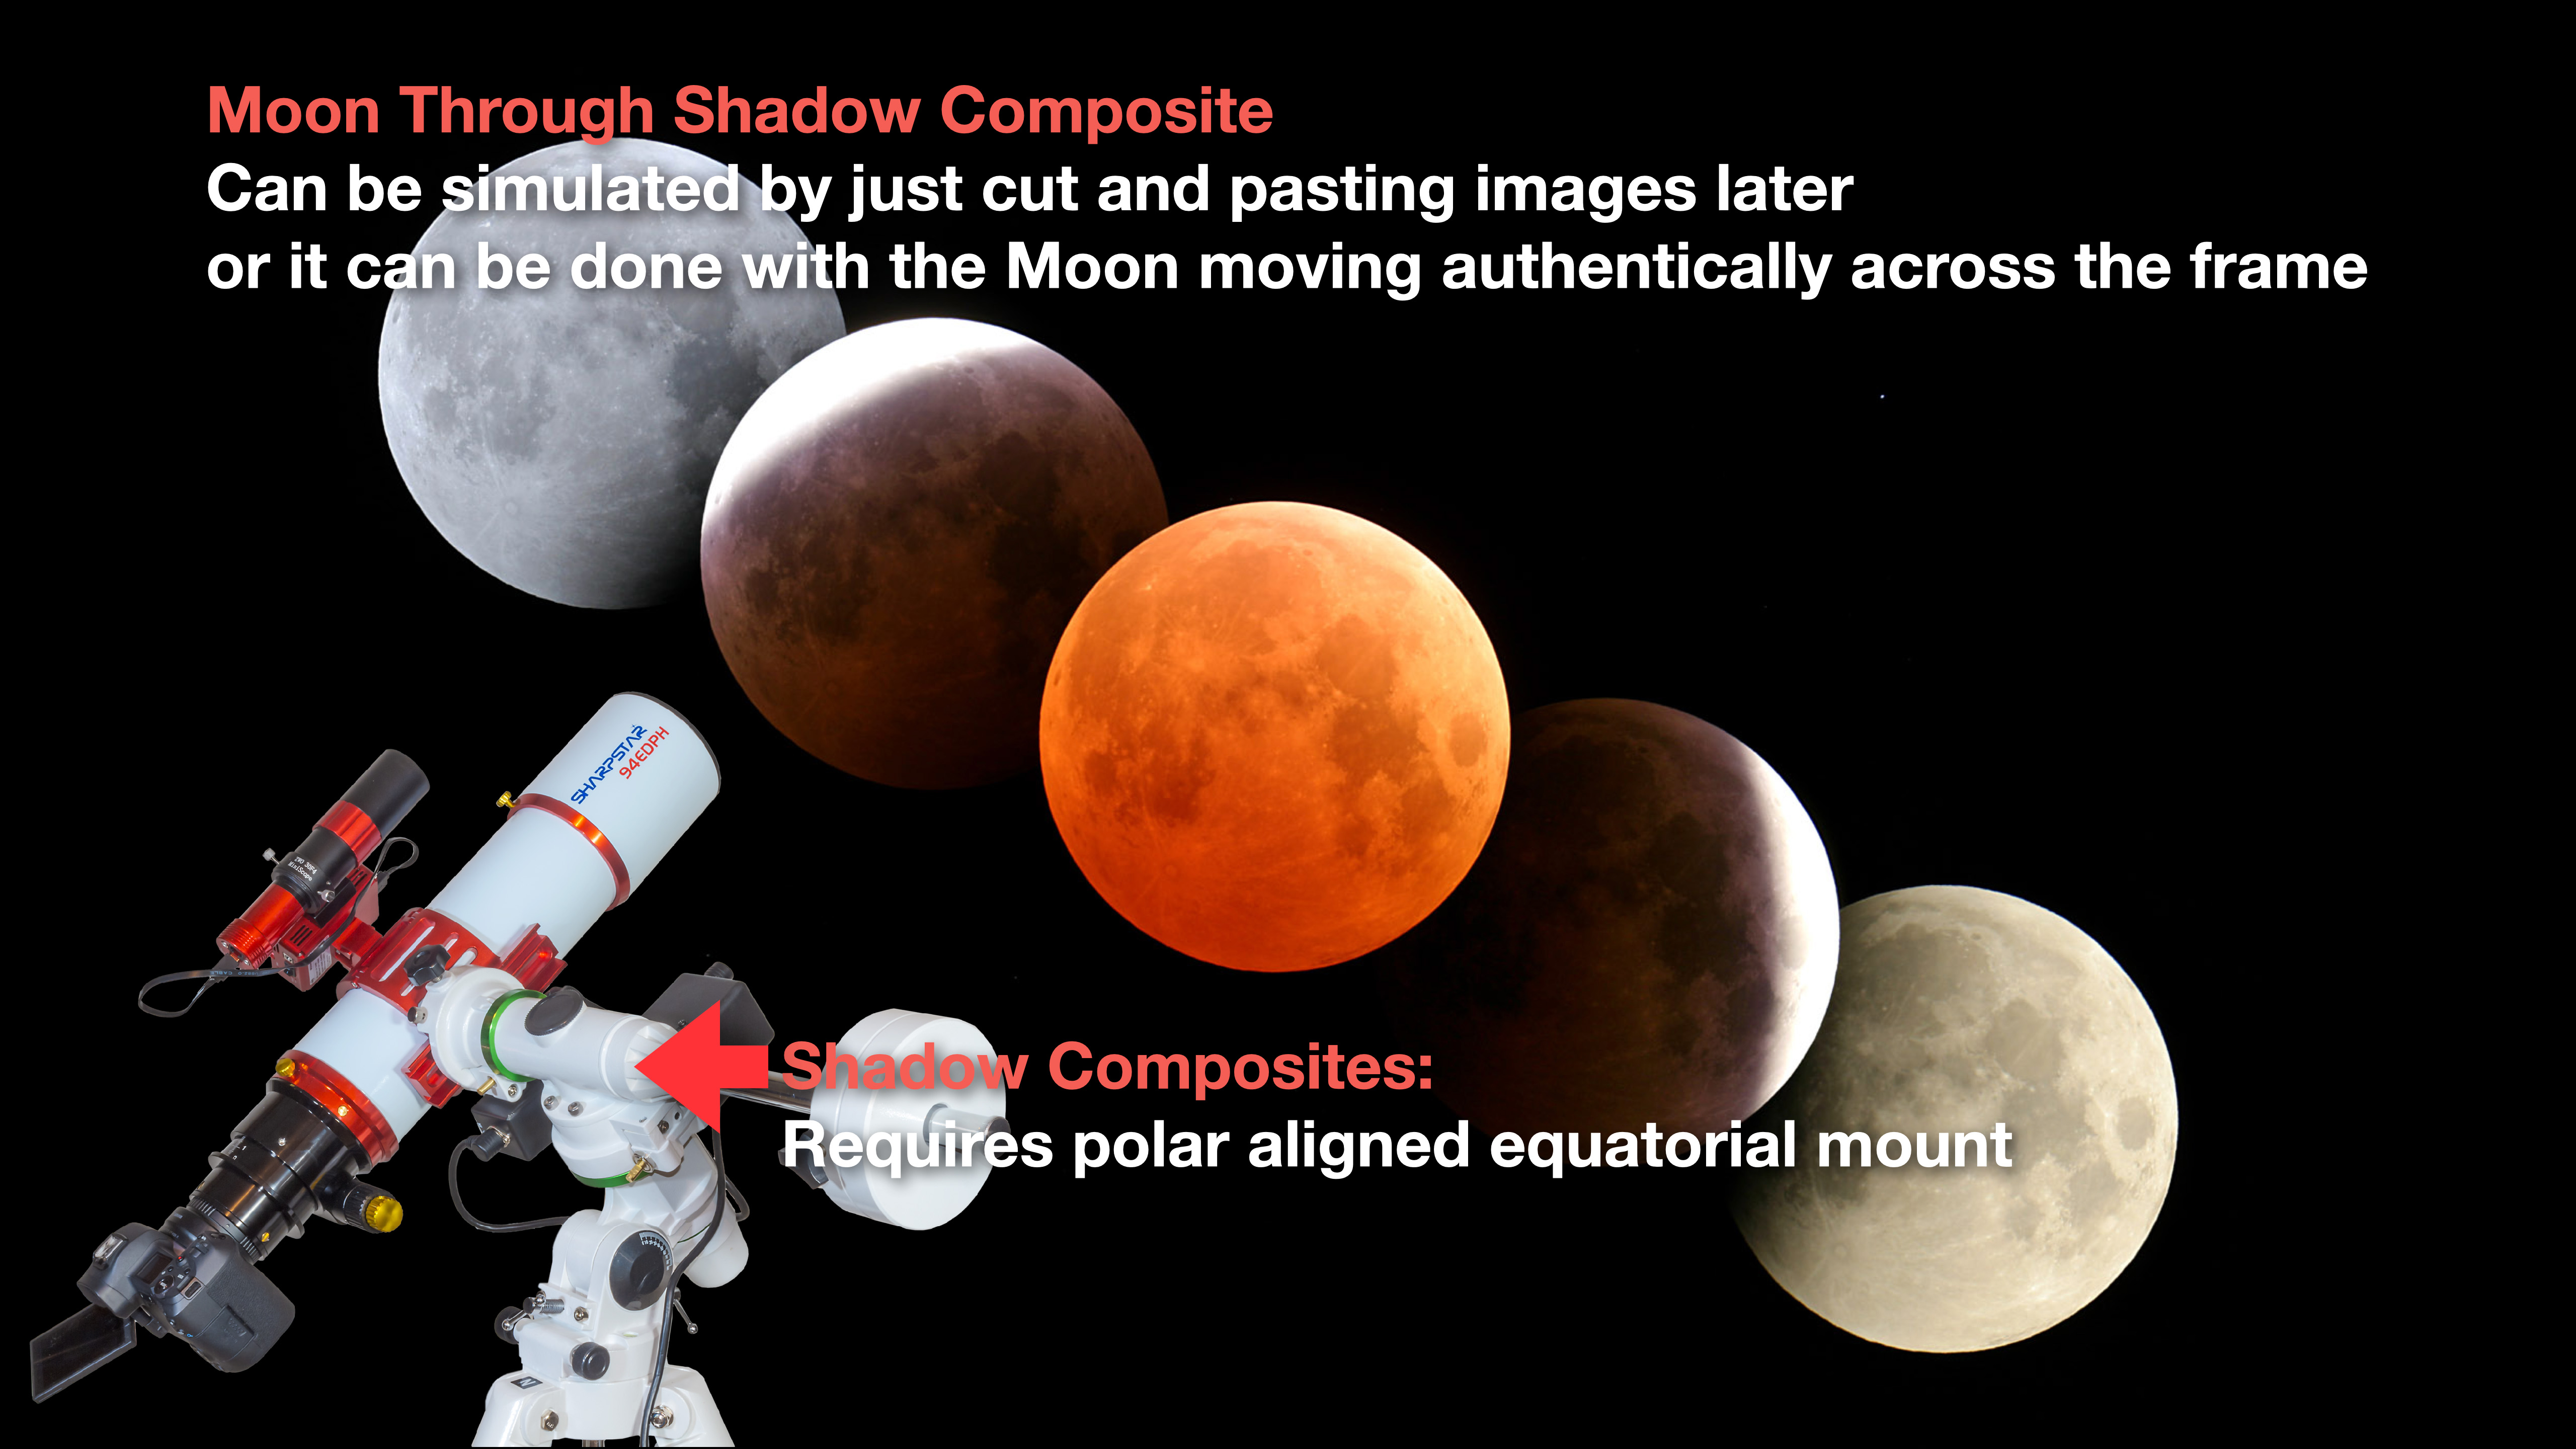
PHOTO OPTIONS 4 — THROUGH A TRACKING TELESCOPE
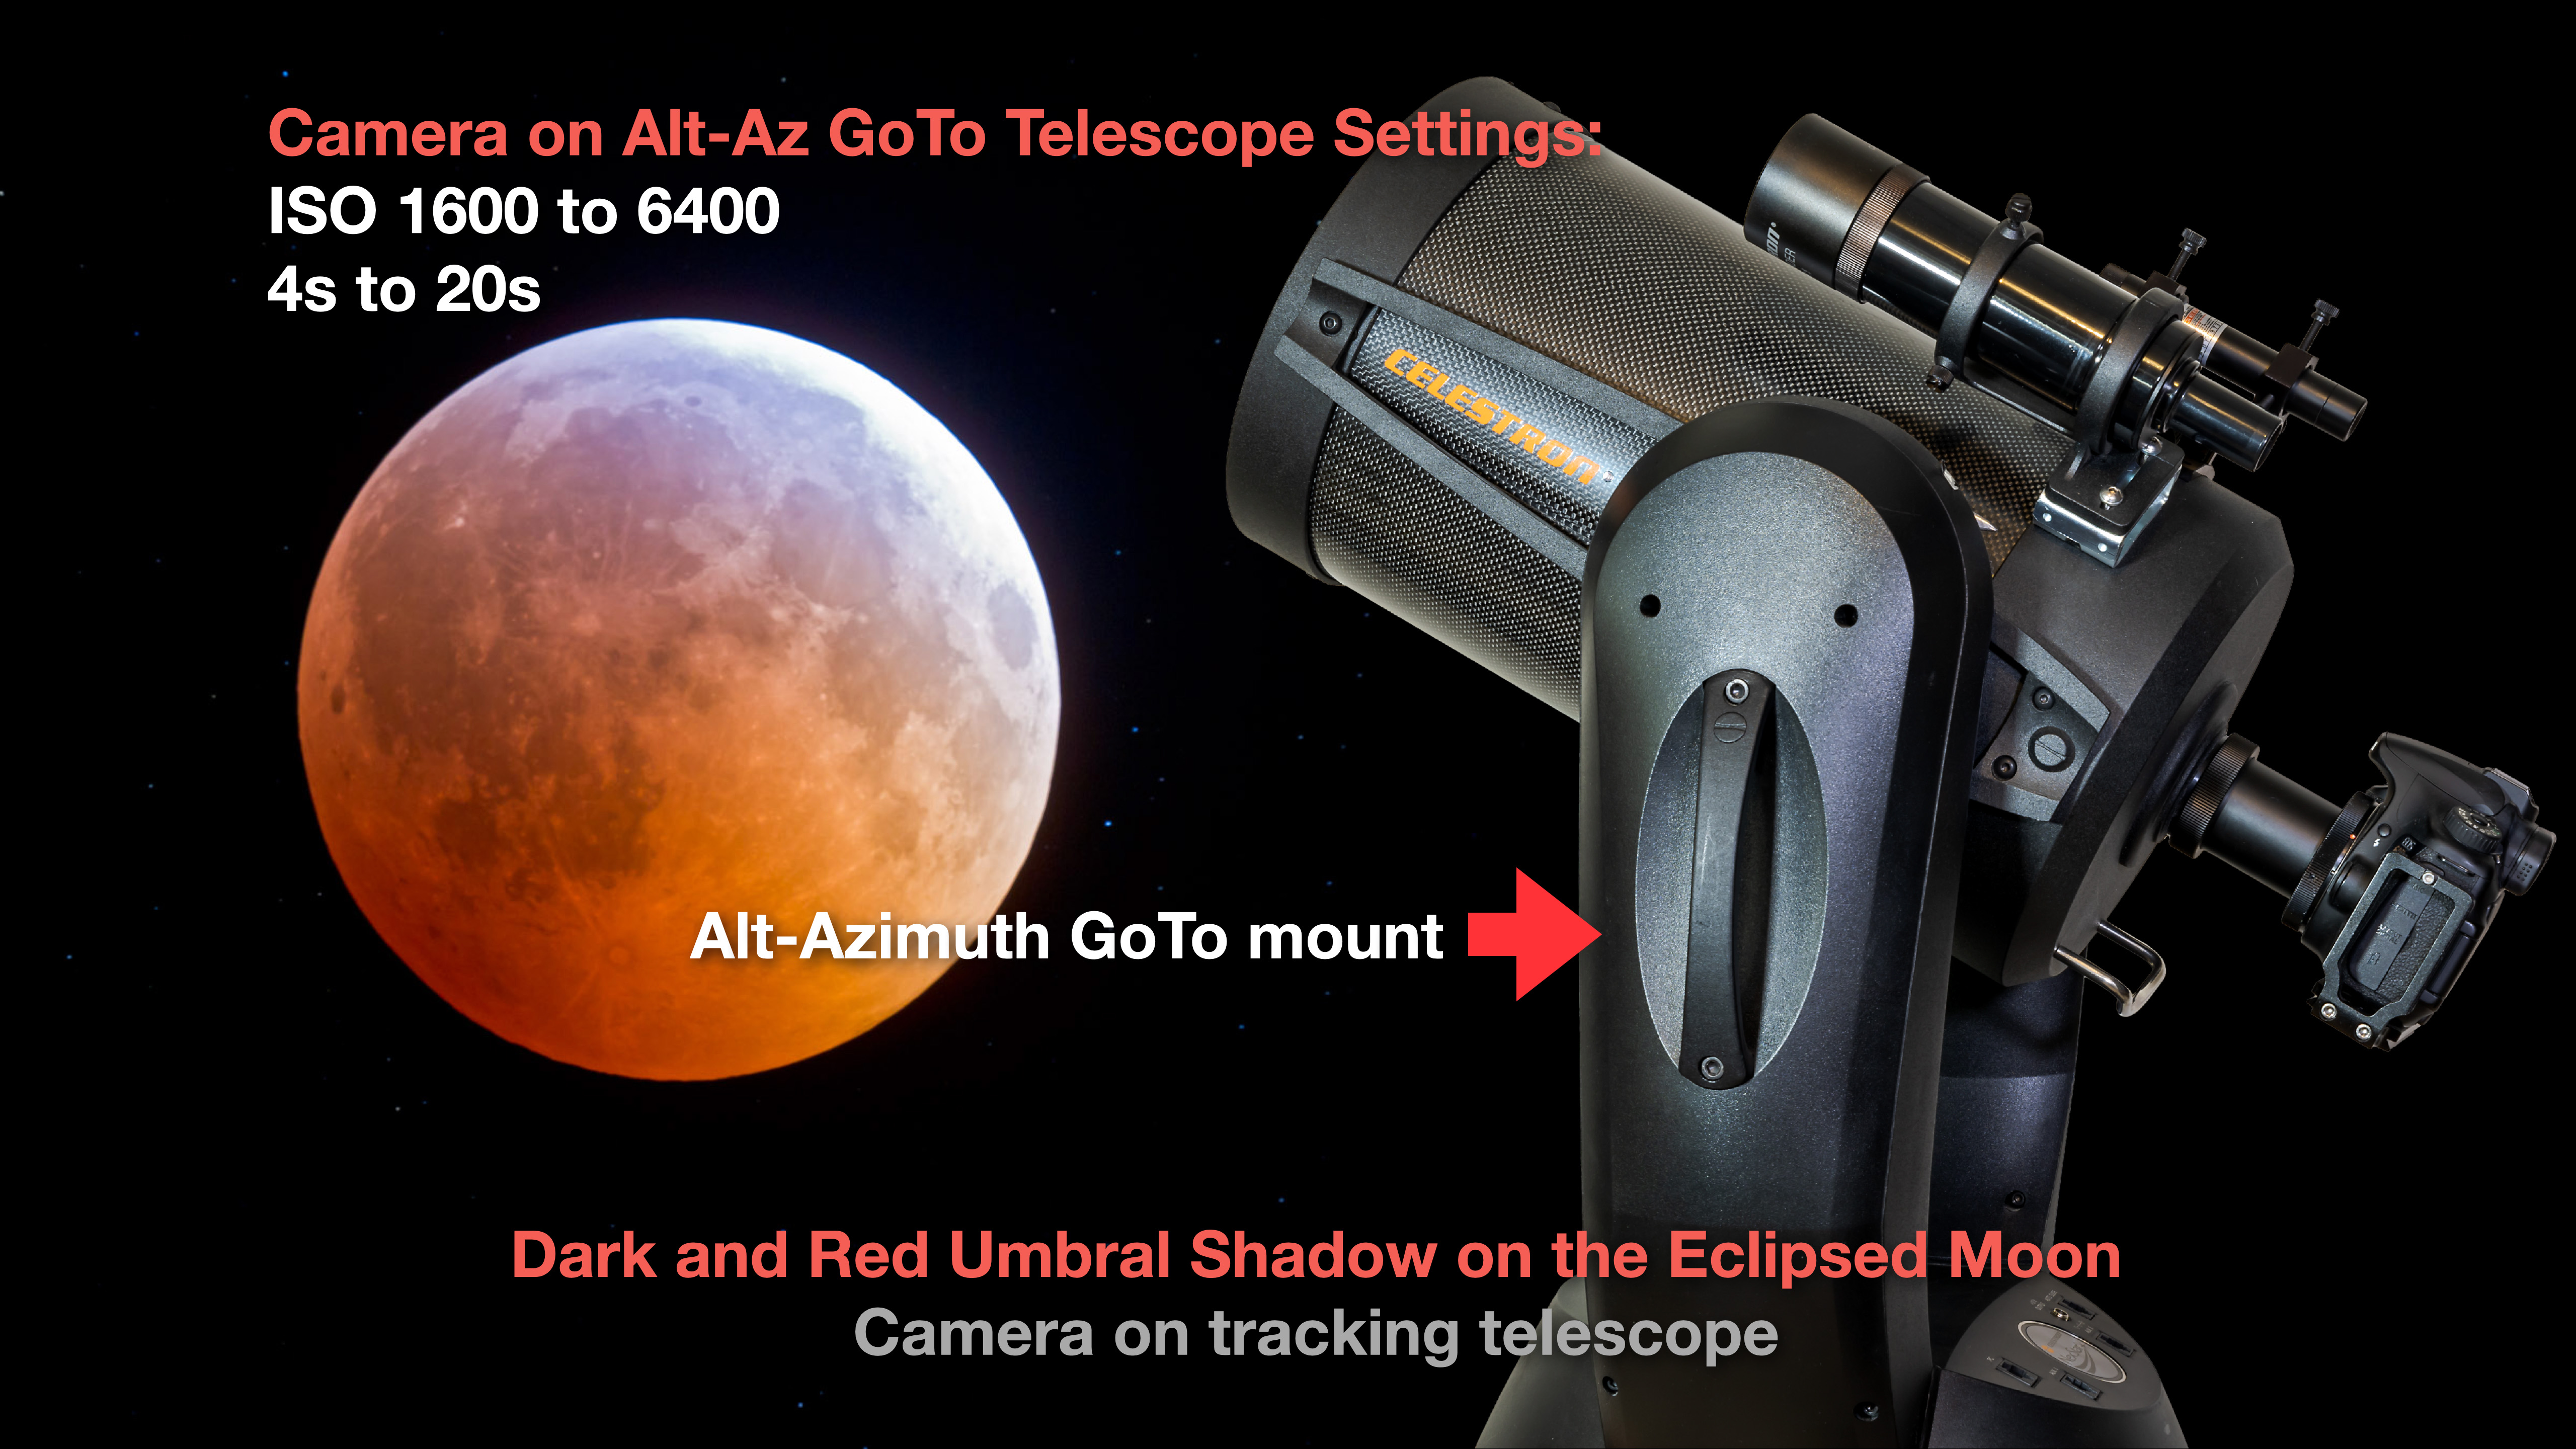
If you want close-ups of the eclipsed red Moon, you will need to use a mount equipped with a tracking motor, such as an equatorial mount shown here. But for use with telephoto lenses and short telescopes, a polar-aligned sky tracker, as above, will work.
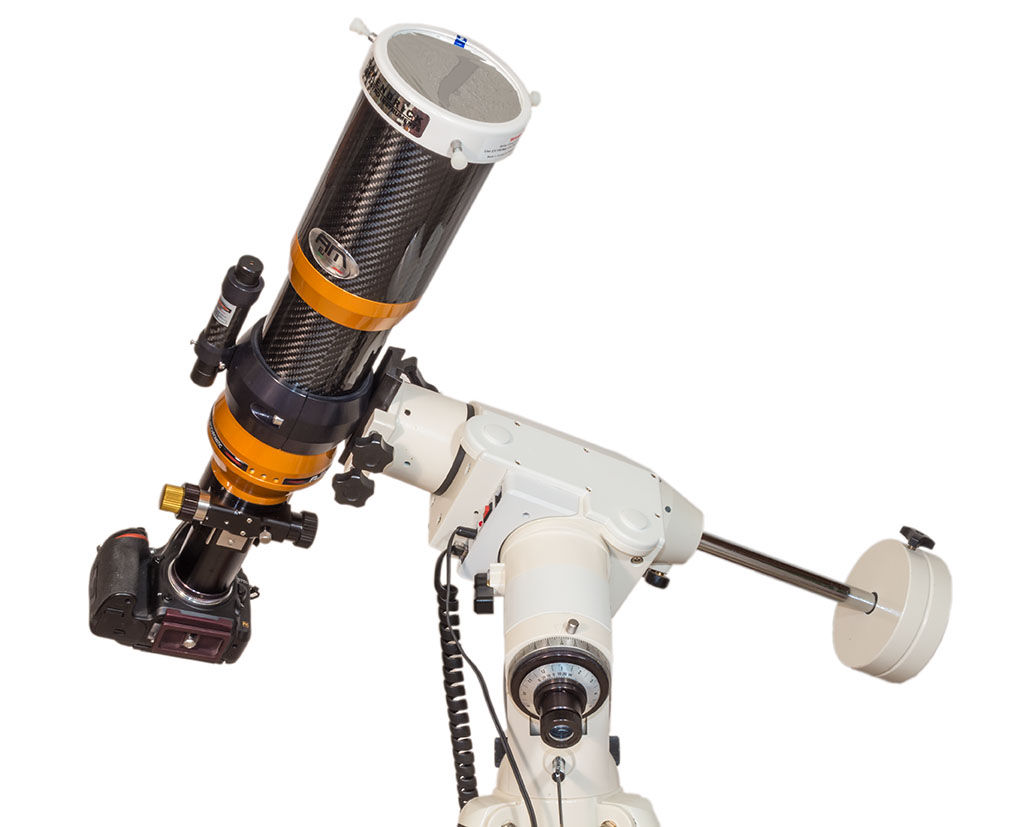
A small apo refractor on an equatorial mount with typical settings for mid-eclipse.
Exposures can now be several seconds long, and at a lower ISO speed for less noise, allowing the Moon to be captured in sharp detail and with great colour. Long exposures will even pick up stars near the Moon.
However, when shooting close-ups, use the Lunar drive rate (if your mount offers that choice) to follow the Moon itself, as it has a motion of its own against the background stars. It’s that orbital motion that takes it from west to east (right to left) through the Earth’s shadow.
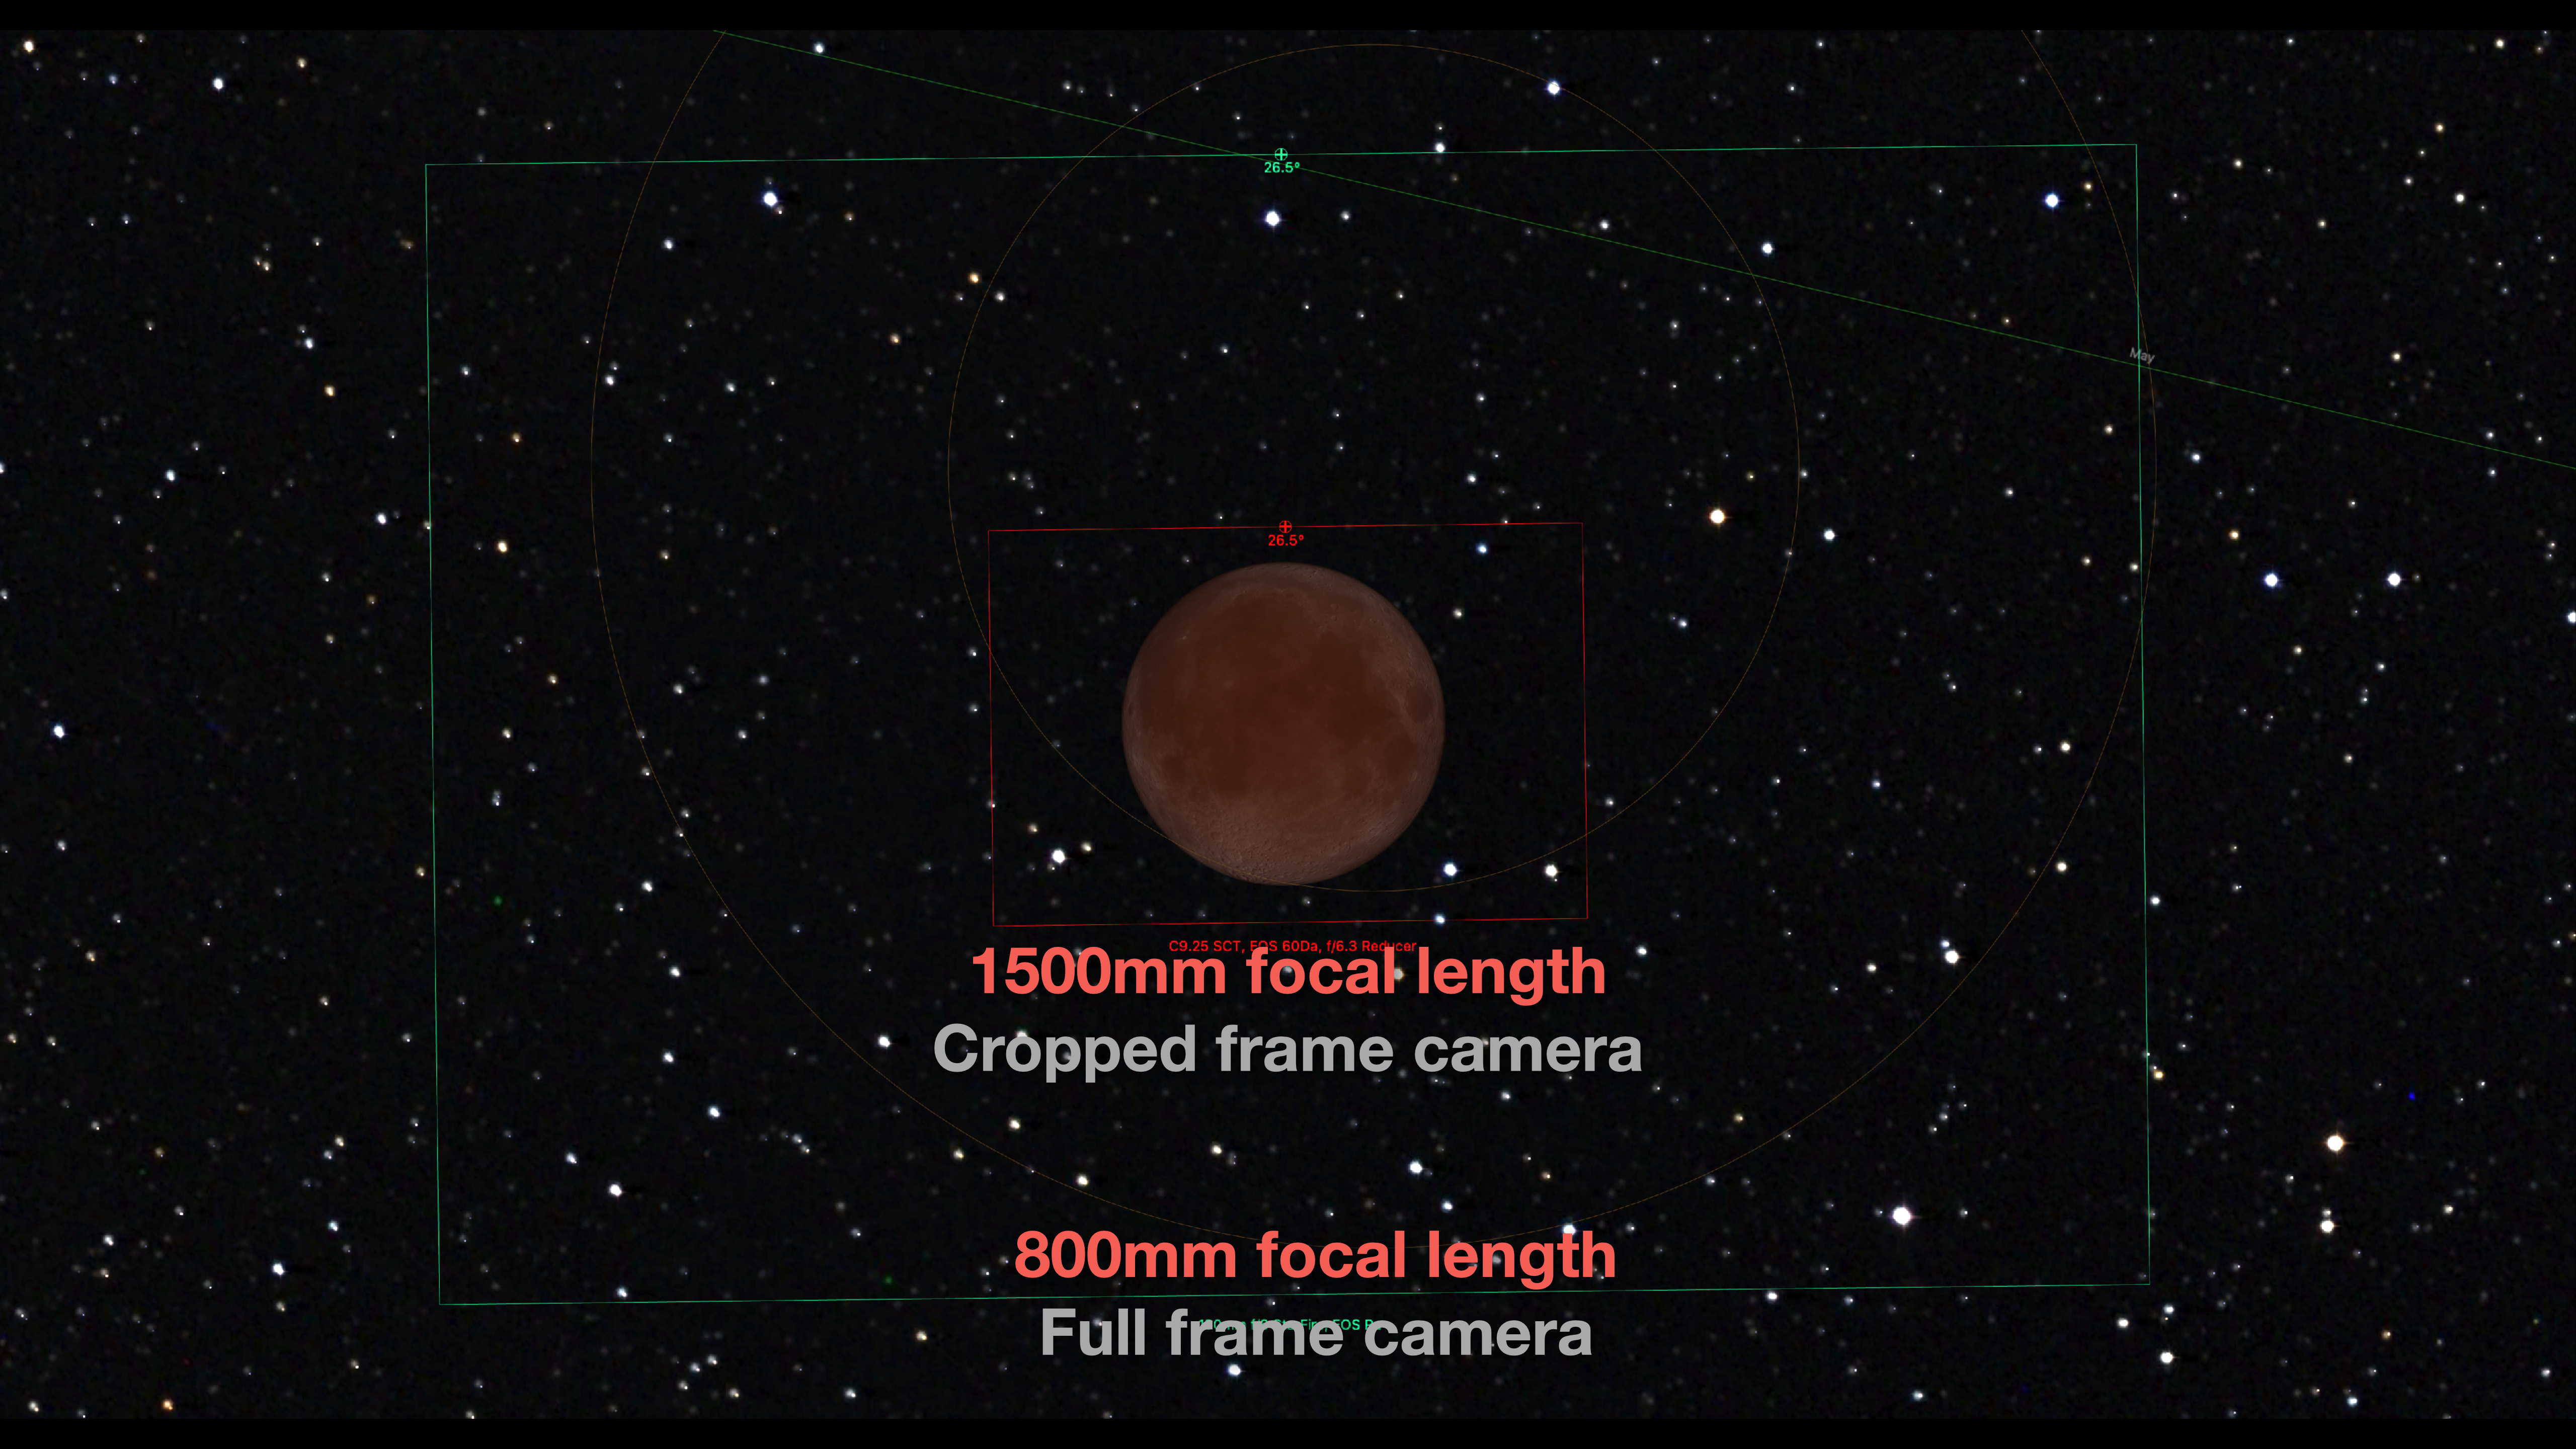
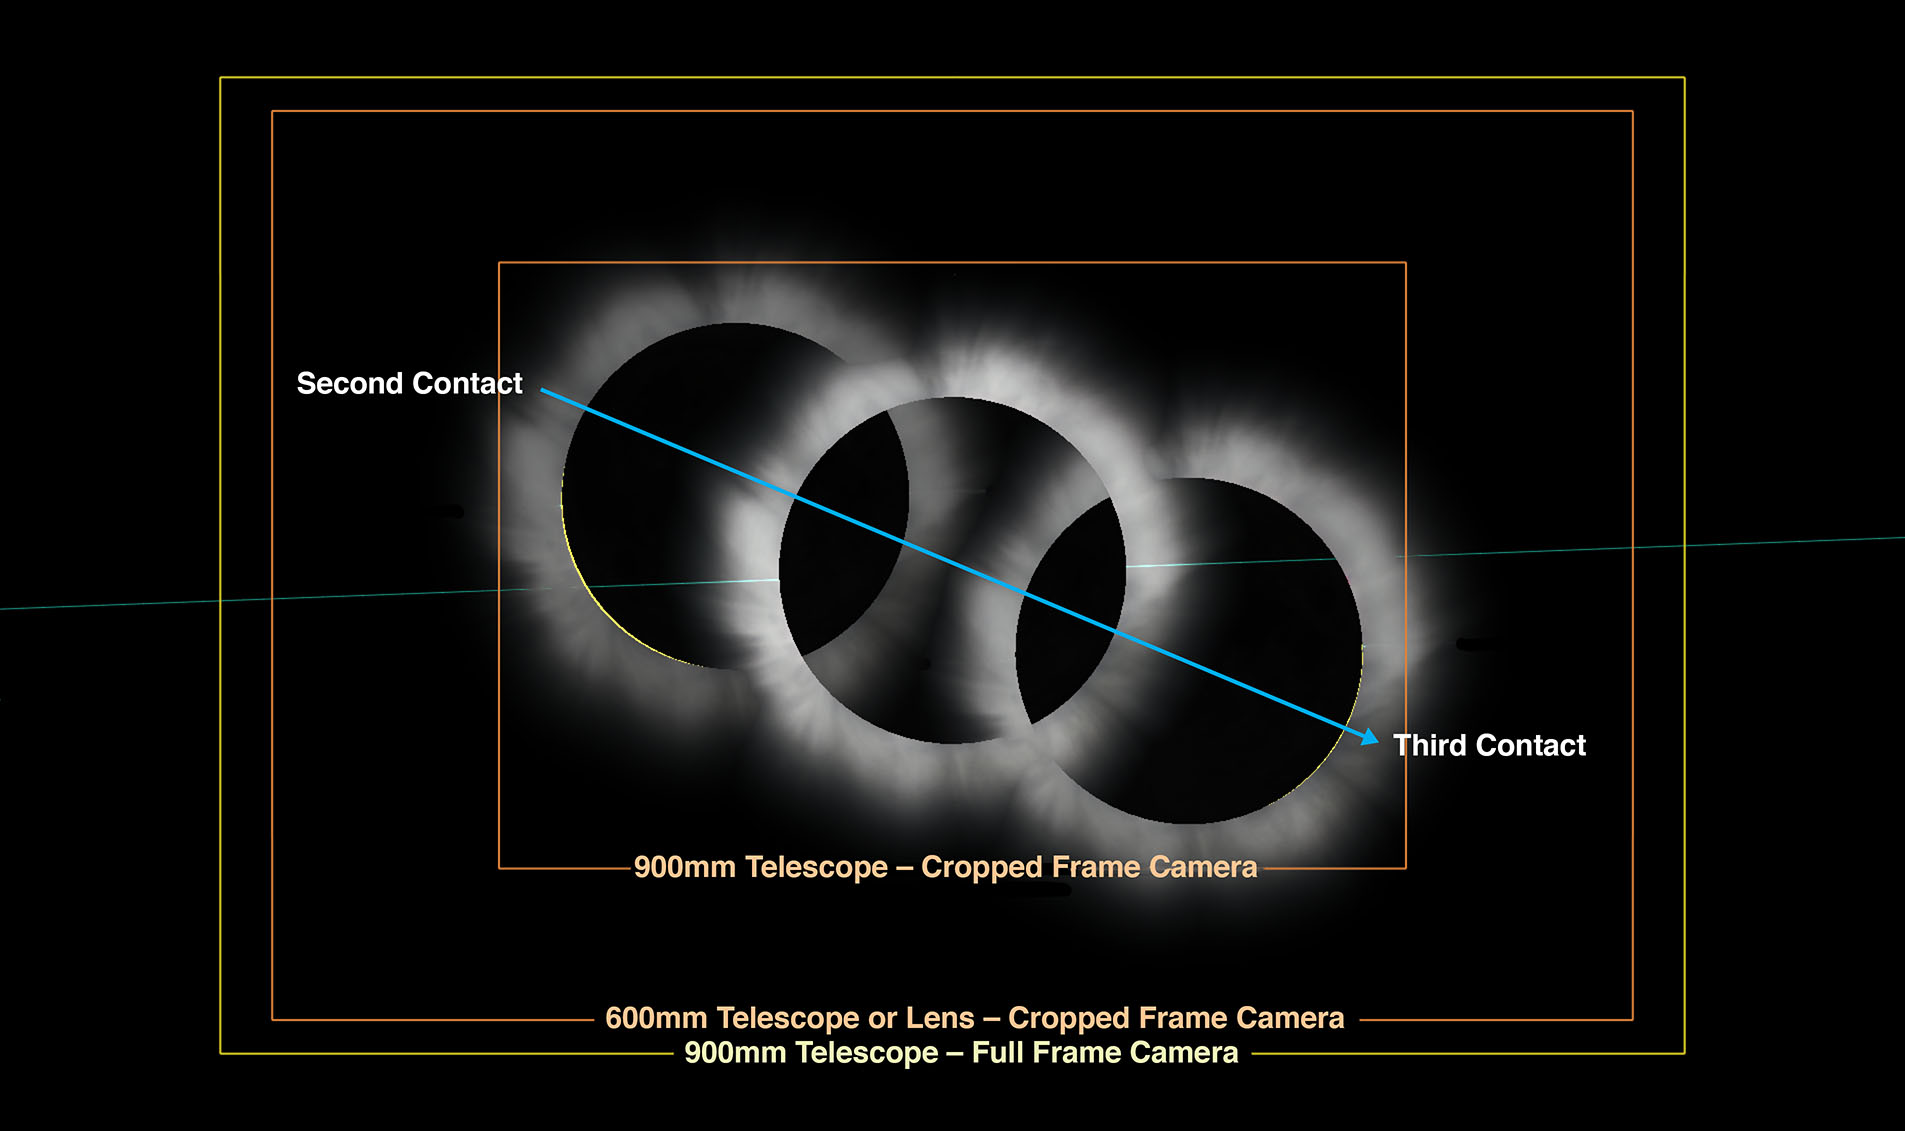
The fields of view and size of the Moon’s disk with typical telescope focal lengths.
Filling the camera frame with the Moon requires a surprising amount of focal length. The Moon appears big to our eyes, but is only 1/2º across.
Even with 800mm of focal length, the Moon fills only a third of a full frame camera field. Using a cropped frame camera has the advantage of tightening the field of view, but it still takes 1200mm to 1500mm of focal length to fill the frame.
But I wouldn’t worry about doing so, as longer focal lengths typically also come with slower f-ratios, requiring longer exposure times or higher ISOs, both of which can blur detail.
A camera on an alt-azimuth GoTo Schmidt-Cassegrain.
For close-ups, a polar-aligned equatorial mount is best. But if your telescope is a GoTo telescope on an alt-azimuth mount (such as a Schmidt-Cassegrain shown here), you should be able to get good shots.
The field of view will slowly rotate during the eclipse, making it more difficult to later accurately assemble a series of shots documenting the entire sequence.
But any one shot should be fine, though it might be best to keep exposures shorter by using a higher ISO speed. As always, take lots of shots at different settings.
You won’t be able to tell which is sharpest until you inspect them later at the computer.
TIP: People worry about exposures, but the flaw that ruins many eclipse shots is poor focus. Use Live View to focus carefully on the sharp edge of the bright part of the Moon. Or better yet, focus on a bright star nearby. Zoom up to 10x to make it easier to see when the star is in sharpest focus. It can be a good idea to refocus through the night as the changing temperature can shift the focus point of long lenses and telescopes. That might take moving the scope over to a bright star, which won’t be possible if you need to preserve the framing for a composite.
PHOTO OPTIONS 5 — HDR COMPOSITES
Using an equatorial mount tracking at the lunar rate keeps the Moon stationary. This opens up the possibility of taking a series of shots over the wide range of exposures needed to capture the Moon from bright to dark, to assemble later in processing. Take 5 to 7 shots in quick succession.
An HDR composite from the December 2010 eclipse.
High dynamic range software can blend the images, or use luminosity masks created by extension panels for Photoshop such as Lumenzia, TK8 or Raya Pro. Either technique can create a final image that looks like what your eye saw. The key is making sure all the images are aligned. HDR software likely won’t align them for you very well.
The January 2019 eclipse layered and blended in Photoshop.
Blending multiple exposures will also be needed to properly capture the eclipsed Moon below the Pleiades, similar to what I show here (and below) from the January 2019 eclipse when the Moon appeared near the Beehive star cluster.
PHOTO OPTIONS 6 — ECLIPSE TRACK COMPOSITES
Another popular form of eclipse image (though also one rife for laughably inaccurate fakes) is capturing the entire path of the Moon across the sky over the duration of the eclipse from start to end.
The track of the September 2015 eclipse, accurately assembled to correct scale.
It can be done with a fixed camera on a tripod but requires a wide (14mm to 20mm) and properly framed lens, to capture the sequence as it actually appeared to proper scale, and not created by just pasting over-sized moons onto a sky to “simulate” the scene, usually badly. By the end of the day on November 19 the internet will be filled with such ugly fakes.
You could set the camera at one exposure setting (one best for when the Moon and sky are darkest at mid-eclipse) and let the camera run, shooting frames every 5 seconds or so. The result might work well as a time-lapse sequence, showing the bright sky darkening, then brightening again.
But chances are the frames taken at the start and end when the sky is lit by full moonlight will be blown out. It will still take some manual camera adjustments through the eclipse.
For a still-image composite, you should instead expose properly for the Moon’s disk at all times, a setting that will change every few minutes, then take a long exposure at mid-eclipse to pick up the stars and Milky Way. The short Moon shots are then blended into the base-layer sky image later in processing.
Framing the eclipse path for the start of the sequence. Framing the path so the Moon ends up at a desired location on the frame.
If the camera has been well-framed and was not moved over the 3.5 hours of the eclipse, the result is an accurate and authentic record of the Moon’s path and passage into the shadow, and not a faked atrocity!
But creating a real image requires a lot of work at the camera, and at the computer.
TIP: Shooting for composites is not work I would recommend attempting while also running other cameras. Focus on one type of image and get it right, rather than trying to do too many and doing them all poorly.
PHOTO OPTION 7 — ECLIPSE SHADOW COMPOSITE
One of the most striking types of lunar eclipse images is a close-up composite showing the Moon passing through the Earth’s umbral shadow, with the arc of the shadow edge on the Moon defining the extent of the shadow, which is about three times larger than the Moon.
Such a composite can be re-created later by placing individual exposures accurately on a wider canvas, using screen shots from planetarium software as a template guide.
A composite of the Moon moving through the umbra.
But to create an image that is more accurate, it is possible to do it “in camera.” Unlike in the film days, we don’t have to do it with multiple exposures onto one piece of film.
We take lots of separate frames with a telescope or lens wide enough to contain the entire path of the Moon through the umbra. A polar-aligned equatorial mount tracking at the sidereal rate is essential. That way the scope follows the stars, not the Moon, and so the Moon travels across the frame from right to left.
Framing for a shadow composite.
Start such a sequence with the Moon at lower right if you are framing just the path through the shadow. Use planetarium software (I used Starry Night™ to create the star charts for this blog) to plan the framing for your camera, lens and site, so the Moon ends up in the middle of the frame at mid-eclipse. This is not a technique for the faint of heart!
A shadow-defining composite from January 2019, with the Moon near the Beehive cluster.
An interesting variation would be using a 200mm to 250mm lens to frame the Moon’s shadow passage below the Pleiades, to create an image as above. That will be unique. Again, an accurately aligned tracker turning at the sidereal rate will be essential.
Acquiring the frames for any composite takes constantly adjusting the exposure during the length of eclipse, which can try your patience and gear during the wee hours of the morning.
I’ll be happy just to get a good set of images at mid-eclipse to make a single composite of the red Moon below the Pleiades.
TIP: It could be cold and lenses can frost over. A battery-powered heater coil on the optics might be essential. And spare warm batteries.
The 4-day-old waxing crescent Moon on April 8, 2019 in a blend of 7 exposures from 1/30 second to 2 seconds, blended with luminosity masks in Photoshop.
PRACTICE!
To test your equipment and your skills at focusing, you can use the waning crescent Moon in the dawn hours on the mornings of October 29 to November 2 or, after New Moon on November 4, the waxing crescent Moon on the evenings of November 6 to 10. While the crescent Moon isn’t as bright as the Full Moon, it will be a good stand in for the bright part of the eclipsed Moon when it is deep in the umbra.
Even better, the dark part of the crescent Moon lit by Earthshine is a good stand-in for the part of the Moon in the umbra. Like the eclipsed Moon, the crescent Moon’s bright and dark parts can’t be captured in one exposure. So it’s a good test for the range of exposures you’ll need for the eclipse, for practising changing settings on your camera, and for checking your tracking system.
The crescent Moon is also useful to test your manual focusing, though the sharp detail along the terminator (the line dividing the bright crescent from the earthlit dark part of the Moon) is much easier to focus on than the flat, low contrast Full Moon.
A selfie of me looking up at the total eclipse of the Moon on January 20, 2019, using binoculars to enjoy the view.
DON’T FORGET TO LOOK!
Amid all the effort needed to shoot this or any eclipse, lunar or solar, don’t forget to just look at it. No photo can ever quite capture the glowing nature of the eclipsed Moon set against the stars.
A selfie of the successful eclipse chaser bagging his trophy, the total lunar eclipse of January 20, 2019.
I wish you clear skies and good luck with your lunar eclipse photography. If you miss it, we have two more visible from North America next year, both total eclipses, on May 15/16 and November 8, 2022.
In an extensive technical blog, I put the Canon R6 mirrorless camera through its paces for the demands of astrophotography.
Every major camera manufacturer, with the lone exception of stalwart Pentax, has moved from producing digital lens reflex (DSLR) cameras, to digital single lens mirrorless (DSLM) cameras. The reflex mirror is gone, allowing for a more compact camera, better movie capabilities, and enhanced auto-focus functions, among other benefits.
But what about for astrophotography? I reviewed the Sony a7III and Nikon Z6 mirrorless cameras here on my blog and, except for a couple of points, found them excellent for the demands of most astrophotography.
For the last two years I’ve primarily used Canon’s astro-friendly and red-sensitive EOS Ra mirrorless, a model sadly discontinued in September 2021 after just two years on the market. I reviewed that camera in the April 2020 issue of Sky & Telescope magazine, with a quick first look here on my blog.
The superb performance of the Ra has prompted me to stay with the Canon mirrorless R system for future camera purchases. Here I test the mid-priced R6, introduced in August 2020.
NOTE: In early November 2022 Canon announced the EOS R6 MkII, which one assumes will eventually replace the original R6 once stock of that camera runs out. The MkII has a 24 Mp sensor for slightly better resolution, and offers longer battery life. But the main improvements over the R6 is to autofocus accuracy, a function of little use to astrophotographers. Only real-world testing will tell if the R6 MkII has better or worse noise levels than the R6, or has eliminated the R6’s amp glow, reported on below.
M31, the spiral galaxy in Andromeda, with the Canon R6 mirrorless camera. It is a stack of 8 x 8-minute exposures at ISO 800, blended with a stack of 8 x 2-minute exposures at ISO 400 for the core, to prevent it from overexposing too much, all with a SharpStar 76mm apo refractor at f/4.5 with its field flattener/reducer.
TL;DR SUMMARY
The Canon R6 has proven excellent for astrophotography, exhibiting better dynamic range and shadow recovery than most Canon DSLRs, due to the ISO invariant design of the R6 sensor. It is on par with the low-light performance of Nikon and Sony mirrorless cameras.
The preview image is sensitive enough to allow easy framing and focusing at night. The movie mode produces usable quality up to ISO 51,200, making 4K movies of auroras possible. Canon DSLRs cannot do this.
Marring the superb performance are annoying deficiencies in the design, and one flaw in the image quality – an amp glow – that particularly impacts deep-sky imaging.
R6 pros
The Canon R6 is superb for its:
Low noise, though not exceptionally so
ISO invariant sensor performance for good shadow recovery
Sensitive live view display with ultra-high ISO boost in Movie mode
Relatively low noise Movie mode with full frame 4K video
Low light auto focus and accurate manual focus assist
Good battery life
R6 cons
The Canon R6 is not so superb for its:
Design Deficiencies
Lack of a top LCD screen
Bright timer display in Bulb on the rear screen
No battery level indication when shooting
Low grade R3-style remote jack, same as on entry-level Canon DSLRs
Image Quality Flaw
Magenta edge “amp glow” in long exposures
The Canon Ra on the left with the 28-70mm f/2 RF lens and the Canon R6 on the right with the 70-200mm f/2/8 RF lens, two superb but costly zooms for the R system cameras.
CHOOSING THE R6
Canon’s first full-frame mirrorless camera, the 30-megapixel EOS R, was introduced in late 2018 to compete with Sony. As of late-2021 the main choices in a Canon DSLM for astrophotography are either the original R, the 20-megapixel R6, the 26-megapixel Rp, or the 45-megapixel R5.
The new 24-megapixel Canon R3, while it has impressive low-noise performance, is designed primarily for high-speed sports and news photography. It is difficult to justify its $6,000 cost for astro work.
I have not tested Canon’s entry-level, but full-frame Rp. While the Rp’s image quality is likely quite good, its small battery and short lifetime on a single charge will be limiting factors for astrophotography.
Nor have I tested the higher-end R5. Friends who use the R5 for nightscape work love it, but with smaller pixels the R5 will be noisier than the R6, which lab tests at sites such as DPReview.com seem to confirm.
Meanwhile, the original EOS R, while having excellent image quality and features, is surely destined for replacement in the near future – with a Canon EOS R Mark II? The R’s successor might be a great astrophoto camera, but with the Ra gone, I feel the R6 is currently the prime choice from Canon, especially for nightscapes.
I tested an R6 purchased in June 2021 and updated in August with firmware v1.4. I’ll go through its performance and functions with astrophotography in mind. I’ve ignored praised R6 features such as eye tracking autofocus, in-body image stabilization, and high speed burst rates. They are of limited or no value for astrophotography.
Along the way, I also offer a selection of user tips, some of which are applicable to other cameras.
LIVE VIEW FOCUSING AND FRAMING
“Back-of-the-camera” views of the R6 in its normal Live View mode (upper left) and its highly-sensitive Movie Mode (upper right), compared to views with four other cameras. Note the Milky Way visible with the R6 in its Movie mode, similar to the Sony in Bright Monitoring mode.
The first difference you will see when using any new mirrorless camera, compared to even a high-end DSLR, is how much brighter the “Live View” image is when shooting at night. DSLM cameras are always in Live View – even the eye-level viewfinder presents a digital image supplied by the sensor.
As such, whether on the rear screen on in the viewfinder, you see an image that closely matches the photo you are about to take, because it is the image you are about to take.
To a limit. DSLMs can do only so much to simulate what a long 30-second exposure will look like. But the R6, like many DSLMs, goes a long way in providing a preview image bright enough to frame a dark scene and focus on bright stars. Turn on Exposure Simulation to brighten the live image, and open the lens as wide as possible.
The Canon R6 in its Movie Mode at ISO 204,800 and with a lens wide open.
But the R6 has a trick up its sleeve for framing nightscapes. Switch the Mode dial to Movie, and set the ISO up to 204,800 (or at night just dial in Auto ISO), and with the lens wide open and shutter on 1/8 second (as above), the preview image will brighten enough to show the Milky Way and dark foreground, albeit in a noisy image. But it’s just for aiming and framing.
This is similar to the excellent, but well-hidden Bright Monitoring mode on Sony Alphas. This high-ISO Movie mode makes it a pleasure using the R6 for nightscapes. The EOS R and Ra do not have this ability. While their live view screens are good, they are not as sensitive as the R6’s, with the R and Ra’s Movie modes able to go up to only ISO 12,800. The R5 can go up to “only” ISO 51,200 in its Movie mode, good but not quite high enough for live framing on dark nights.
Comparing Manual vs. Auto Focus results with the R6.
The R6 will also autofocus down to a claimed EV -6.5, allowing it to focus in dim light for nightscapes, a feat impossible in most cameras. In practice with the Canon RF 15-35mm lens at f/2.8, I found the R6 can’t autofocus on the actual dark landscape, but it can autofocus on bright stars and planets (provided, of course, the camera is fitted with an autofocus lens).
Autofocusing on bright stars proved very accurate. By comparison, while the Ra can autofocus on distant bright lights, it fails on bright stars or planets.
Turning on Focus Peaking makes stars turn red, yellow or blue (your choice of colours) when they are in focus, as a reassuring confirmation.
The Focus Peaking and Focus Guide menu.The R6 live view display with Focus Guide arrows on and focused on a star, Antares.
In manual focus, an additional Focus Aid overlay provides arrows that close up and turn green when in focus on a bright star or planet. Or you can zoom in by 5x or 10x to focus by eye the old way by examining the star image. I wish the R6 had a 15x or 20x magnification; 5x and 10x have long been the Canon standards. Only the Ra offered 30x for ultra-precise focusing on stars.
In all, the ease of framing and focusing will be the major improvement you’ll enjoy by moving to any mirrorless, especially if your old camera is a cropped-frame Canon Rebel or T3i! But the R6 particularly excels at ease of focusing and framing.
NOISE PERFORMANCE
The key camera characteristic for astrophoto use is noise. I feel it is more important than resolution. There’s little point in having lots of fine detail if it is lost in a blizzard of high-ISO noise. And for astro work, we are almost always shooting at high ISOs.
Comparing the R6’s noise at increasingly higher ISO speeds on a starlit nightscape.
With just 20 megapixels, low by today’s standards, the R6 has individual pixels, or more correctly “photosites,” that are each 6.6 microns in size, the “pixel pitch.”
By comparison, the 30-megapixel R (and Ra) has a pixel pitch of 5.4 microns, the 45-megapixel R5’s pixel pitch is 4.4 microns, while the acclaimed low-light champion in the camera world, the 12-megapixel Sony a7sIII, has large 8.5-micron photosites.
The bigger the photosites (i.e. the larger the pixel pitch), the more photons each photosite can collect in a given amount of time – and the more photons they can collect, period, before they overfill and clip highlights. More photons equals more signal, and therefore a better signal-to-noise ratio, while the greater “full-well depth” yields higher dynamic range.
Each generation of camera also improves the signal-to-noise ratio by suppressing noise via its sensor design and improved signal processing hardware and firmware. The R6 uses Canon’s latest DIGIC X processor shared by the company’s other mirrorless cameras.
Comparing the R6noise with the 6D MkII and EOS Ra on a deep-sky subject, galaxies.
In noise tests comparing the R6 against the Ra and Canon 6D Mark II, all three cameras showed a similar level of noise at ISO settings from 400 up to 12,800. But the 6D Mark II performed well only when properly exposed. Both the R6 and Ra performed much better for shadow recovery in underexposed scenes.
Comparing the R6noise with with the 6D MkII and EOS Ra on a shadowed nightscape.Comparing the R6 noise with the EOS Ra on the Andromeda Galaxy at typical deep-sky ISO speeds.
In nightscapes and deep-sky images the R6 and Ra looked nearly identical at each of their ISO settings. This was surprising considering the Ra’s smaller photosites, which perhaps attests to the low noise of the astronomical “a” model.
Or it could be that the R6 isn’t as low noise as it should be for a 20 megapixel camera. But it is as good as it gets for Canon cameras, and that’s very good indeed.
I saw no “magic ISO” setting where the R6 performed better than at other settings. Noise increased in proportion to the ISO speed. It proved perfectly usable up to ISO 6400, with ISO 12,800 acceptable for stills when necessary.
ISO INVARIANCY
The flaw in many Canon DSLRs, one documented in my 2017 review of the 6D Mark II, was their poor dynamic range due to the lack of an ISO invariant sensor design.
The R6, as with Canon’s other R-series cameras, has largely addressed this weakness. The sensor in the R6 appears to be nicely ISO invariant and performs as well as the Sony and Nikon cameras I have used and tested, models praised for their ISO invariant behaviour.
Where this trait shows itself to advantage is on nightscapes where the starlit foreground is often dark and underexposed. Bringing out detail in the shadows in raw files requires a lot of Shadow Recovery or increasing the Exposure slider. Images from an ISO invariant sensor can withstand the brightening “in post” far better, with minimal noise increase or degradations such as a loss of contrast, added banding, or horrible discolourations.
Comparing the R6 for ISO Invariancy on a starlit nightscape.
To test the R6, I shot sets of images at the same shutter speed, one well-exposed at a high ISO, then several at successively lower ISOs to underexpose by 1 to 5 stops. I then brightened the underexposed images by increasing the Exposure in Camera Raw by the same 1 to 5 stops. In an ideal ISO invariant sensor, all the images should look the same.
The R6 did very well in images underexposed by up to 4 stops. Images underexposed by 5 stops started to fall apart, but I’ve seen that in Sony and Nikon images as well.
Comparing the R6 for ISO Invariancy on a moonlit nightscape.
This behaviour applies to images underexposed by using lower ISOs than what a “normal” exposure might require. Underexposing with lower ISOs can help maintain dynamic range and avoid highlight clipping. But with nightscapes, foregrounds can often be too dark even when shot at an ISO high enough to be suitable for the sky. Foregrounds are almost always underexposed, so good shadow recovery is essential for nightscapes, and especially time-lapses, when blending in separate longer exposures for the ground is not practical.
With its improved ISO invariant sensor, the R6 will be a fine camera for nightscape and time-lapse use, which was not true of the 6D Mark II.
Comparing R6 images underexposed in 1-stop increments by using shorter shutter speeds.Comparing R6 images underexposed in 1-stop increments by using smaller apertures.
However, to be clear, ISO invariant behaviour doesn’t help you as much if you underexpose by using too short a shutter speed or too small a lens aperture. I tested the R6 in series of images underexposed by keeping ISO the same but decreasing the shutter speed then the aperture in one-stop increments.
The underexposed images fell apart in quality much sooner, when underexposed more than 3 stops. Again, this is behaviour similar to what I’ve seen in Sonys and Nikons. For the best image quality I feel it is always a best practice to expose well at the camera. Don’t count on saving images in post.
An in-camera image fairly well exposed with an ETTR histogram.
TIP: Underexposing by using too short an exposure time is the major mistake astrophotographers make, who then wonder why their images are riddled with odd artifacts and patten noise. Always Expose to the Right (ETTR), even with ISO invariant cameras. The best way to avoid noise is to give your sensor more signal, by using longer exposures or wider apertures. Use settings that push the histogram to the right.
LONG EXPOSURE NOISE REDUCTION
All cameras will exhibit thermal noise in long exposures, especially on warm nights. This form of noise peppers the shadows with hot pixels, often brightly coloured.
This is not the same as the shot and read noise that adds graininess to high-ISO images and that noise reduction software can smooth out. This is a common misunderstanding, even among professional photographers who should know better!
Long Exposure Noise Reduction (LENR) eliminates this thermal noise by taking a “dark frame” and subtracting it in-camera to yield a raw file free of hot pixels.
And yes, LENR does apply to raw files, another fact even many professional photographers don’t realize. It is High ISO Noise Reduction that applies only to JPGs, along with Color Space and Picture Styles.
Comparing a dark nightscape without and with LENR on a warm night. Hot pixels are mostly gone at right.
The LENR option on the R6 did eliminate most hot pixels, though sometimes still left, or added, a few. LENR is needed more on warm nights, and with longer exposures at higher ISOs. So the extent of thermal noise in any camera can vary a lot from shoot to shoot.
When LENR is active, the R6’s rear screen lights up with “Busy,” which is annoyingly bright. To hide this display, the only option is to close the screen.
As with the EOS Ra, and all mirrorless cameras, the R6 has no “dark frame buffer” that allows several exposures to be taken in quick succession even with LENR on. Canon’s full-frame DSLRs have this little-known buffer that allows 3, 4, or 5 “light frames” to be taken in a row before the LENR dark frame kicks in a locks up the camera on Busy.
Comparing long exposure images with the lens cap on (dark frames), to show just thermal noise. The right edge of the frame is shown, blown up, to reveal the amp glow, which LENR removes.
With all Canon R cameras, and most other DSLRs, turning on LENR forces the camera to take a dark frame after every light frame, doubling the time it takes to finish every exposure. That’s a price many photographers aren’t willing to pay, but on warm nights it can be necessary, and a best practice, for the reward of cleaner images.
The standard Canon Sensor Cleaning menu.
TIP: If you find hot pixels are becoming more obvious over time, try this trick: turn on the Clean Manually routine for 30 seconds to a minute. In some cameras this can remap the hot pixels so the camera can better eliminate them.
STAR QUALITY
Using LENR with the R6 did not introduce any oddities such as oddly-coloured, green or wiped-out stars. Even without LENR I saw no evidence of green stars, a flaw that plagues some Sony cameras at all times, or Nikons when using LENR.
Comparing the R6 for noise and star colours at typical deep-sky ISOs and exposure times.
Canons have always been known for their good star colours, and the R6 is no exception. According to DPReview the R6 has a low-pass anti-alias filter in front of its sensor. Cameras which lack such a sensor filter do produce sharper images, but stars that occupy only one or two pixels might not de-Bayer properly into the correct colours. That’s not an issue with the R6.
I also saw no “star-eating,” a flaw Nikons and Sonys have been accused of over the years, due to aggressive in-camera noise reduction even on raw files. Canons have always escaped charges of star-eating.
VIGNETTING/SHADOWING
DSLRs are prone to vignetting along the top and bottom of the frame from shadowing by the upraised mirror and mirror box. Not having a mirror, and a sensor not deeply recessed in the body, largely eliminates this edge vignetting in mirrorless cameras.
This illustrates the lack of edge shadows but magenta edge glows in a single Raw file boosted for contrast.
That is certainly true of the R6. Images boosted a lot in contrast, as we do with deep-sky photos, show not the slightest trace of vignetting along the top or bottom edges There were no odd clips or metal bits intruding into the light path, unlike in the Sony a7III I tested in 2018.
The full frame of the R6 can be used without need for cropping or ad hoc edge brightening in post. Except …
EDGE ARTIFACTS/AMP GLOWS
The R6 did exhibit one serious and annoying flaw in long-exposure high-ISO images – a magenta glow along the edges, especially the right edge and lower right corner.
Comparing a close-up of a nightscape, without and with LENR, to show the edge glow gone with LENR on.
Whether this is the true cause or not, it looks like “amplifier glow,” an effect caused by heat from circuitry illuminating the sensor with infra-red light. It shows itself when images are boosted in contrast and brightness in processing. It’s the sort of flaw revealed only when testing for the demands of astrophotography. It was present in images I took through a telescope, so it is not IR leakage from an auto-focus lens.
I saw this type of amp glow with the Sony a7III, a flaw eventually eliminated in a firmware update that, I presume, turned off unneeded electronics in long exposures.
Amp glow is something I have not seen in Canon cameras for many years. In a premium camera like the R6 it should not be there. Period. Canon needs to fix this with a firmware update.
UPDATE AUGUST 1, 2022: As of v1.6 of the R6 firmware, released in July 2022, the amp glow issue remains and has not been fixed. It may never be at this point.
It is the R6’s only serious image flaw, but it’s surprising to see it at all. Turning on LENR eliminates the amp glow, as it should, but using LENR is not always practical, such as in time-lapses and star trails.
For deep-sky photography high-ISO images are pushed to extremes of contrast, revealing any non-uniform illumination or colour. The usual practice of taking and applying calibration dark frames should also eliminate the amp glow. But I’d rather it not be there in the first place!
RED SENSITIVITY
The R6 I bought was a stock “off-the-shelf” model. It is Canon’s now-discontinued EOS Ra model that is (or was) “filter-modified” to record a greater level of the deep red wavelength from red nebulas in the Milky Way. Compared to the Ra, the R6 did well, but could not record the depth of nebulosity the Ra can, to be expected for a stock camera.
Comparing the stock R6 with the filter-modified Ra on Cygnus nebulosity.
In wide-field images of the Milky Way, the R6 picked up a respectable level of red nebulosity, especially when shooting through a broadband light pollution reduction filter, and with careful processing.
Comparing the stock R6 with the filter-modified Ra on the Swan Nebula with a telescope with minimal processing to the Raw images.Comparing the stock R6 with the filter-modified Ra on the Swan Nebula with a telescope with a dual narrowband filter and with colour correction applied to the single Raw images.
However, when going after faint nebulas through a telescope, even the use of a narrowband filter did not help bring out the target. Indeed, attempting to correct the extreme colour shift introduced by such a filter resulted in a muddy mess and accentuated edge glows with the R6, but worked well with the Ra.
While the R6 could be modified by a third party, the edge amp glow might spoil images, as a filter modification can make a sensor even more sensitive to IR light, potentially flooding the image with unwanted glows.
TIP: Buying a used Canon Ra (if you can find one) might be one choice for a filter-modified mirrorless camera, one much cheaper than a full frame cooled CMOS camera such as a ZWO ASI2400MC. Or Spencer’s Camera sells modified versions of all the R series cameras with a choice of sensor filters. But I have not used any of their modded cameras.
RESOLUTION
A concern of prospective buyers is whether the R6’s relatively low 20-megapixel sensor will be sharp enough for their purposes. R6 images are 5472 by 3648 pixels, much less than the 8000+ pixel-wide images from high-resolution cameras like the Canon R5, Nikon Z7II or Sony a1.
Unless you sell your astrophotos as very large prints, I’d say don’t worry. In comparisons with the 30-megapixel Ra I found it difficult to see a difference in resolution between the two cameras. Stars were nearly as well resolved in the R6, and only under the highest pixel-peeping magnification did stars look a bit more pixelated in the R6 than in the Ra. Faint stars were equally well recorded.
Comparing resolution of the R6 vs. Ra with a blow-up of wide-field 85mm imagesComparing resolution of the R6 vs. Ra on blow-ups of the Andromeda Galaxy with a 76mm apo refractor. The R6 is more pixellated but it takes pixel peeping to see it!
The difference between 20 and 30 megapixels is not as great as you might think for arc-second-per-pixel plate scale. I think it would take going to the R5 with its 45 megapixel sensor to provide enough of a difference in resolution over the R6 to be obvious in nightscape scenes, or when shooting small, detailed deep-sky subjects such as globular clusters.
If landscape or wildlife photography by day is your passion, with astrophotography a secondary purpose, then the more costly but highly regarded R5 might be the better choice.
Super Resolution menu in Adobe Lightroom.
TIP: Adobe now offers (in Lightroom and in Camera Raw) a Super Resolution option, that users might think (judging by the rave reviews on-line) would be the answer to adding resolution to astro images from “low-res” cameras like the R6.
Comparing a normal R6 image with the same image upscaled with Super Resolution.
Sorry! In my tests on astrophotos I’ve found Super Resolution results unsatisfactory. Yes, stars were less pixelated, but they became oddly coloured in the AI-driven up-scaling. Green stars appeared! The sky background also became mottled and uneven.
I would not count on such “smart upscaling” options to add more pixels to astro-images from the R6. Then again, I don’t think there’s a need to.
RAW vs. cRAW
Canon now offers the option of shooting either RAW or cRAW files, the latter being the same megapixel count but compressed in file size by almost a factor of two. This allows shooting twice as many images before card space runs out, perhaps useful for shooting lots of time-lapses on extended trips away from a computer.
The R6 Image Quality menu with the cRAW Option.Comparing an R6 cRAW with a RAW image.
However, the compression is not lossless. In high-ISO test images purposely underexposed, then brightened in post, I could see a slight degradation in cRAW images – the noise background looked less uniform and exhibited a blocky look, like JPG artifacts.
The R6’s dual SD card slots.
TIP: With two SD card slots in the R6 (the second card can be set to record either a backup of images on card one, or serve as an overflow card) and the economy of large SD cards, there’s not the need to conserve card space as there once was. I would suggest always shooting in the full RAW format. Why accept any compression and loss of image quality?
BATTERY LIFE
The R6 uses a new version of Canon’s standard LP-E6 battery, the LP-E6NH, that supports charging through the USB-C port and has a higher 2130mAh capacity than the 1800mAh LP-E6 batteries. However, the R6 is compatible with older batteries.
On warm nights, I found the R6 ran fine on one battery for the 3 to 4 hours needed to shoot a time-lapse sequence, with power to spare. However, as noted below, the lack of a top LCD screen means there’s no ongoing display of battery level, a deficiency for time-lapse and deep-sky work.
For demanding applications, especially in winter, the R6 can be powered by an outboard USB power bank that has “Power Delivery” capability. That’s a handy feature. There’s no need to install a dummy battery leading out to a specialized power source.
The R6’s Connection menu with Airplane mode to turn off battery-eating WiFi and Bluetooth.
TIP: Putting the camera into Airplane mode (to turn off WiFi and Bluetooth), turning off the viewfinder, and either switching off or closing the rear screen all helps conserve power. The R6 does not have GPS built in. Tagging images with location data requires connecting to your phone.
VIDEO USE
A major selling point for me was the R6’s low-light video capability. It replaces my Sony A7III, which had been my “go to” camera for real-time 4K movies of auroras.
As best I can tell (from the dimmer auroras I’ve shot to date), the R6 performs equally as well as the Sony. It is able to record good quality (i.e. acceptably noise-free) 4K movies at ISO 25,600 to ISO 51,200. While it can shoot at up to ISO 204,800, the excessive noise makes the top ISO an emergency-use only setting.
The R6’s Movie size and quality options, with 4K and Full HD formats and frame rates.
Comparing the R6 on a dim aurora at various high ISO speeds. Narrated at the camera — excuse the wind noise! Switch to HD mode for the best video playback quality. This was shot in 4K but WordPress plays back only in HD.
The R6 can shoot at a dragged shutter speed as slow as 1/8-second – good, though not as slow as the Sony’s 1/4-second slowest shutter speed in movie mode. That 1/8-second shutter speed and a fast f/1.4 to f/2 lens are the keys to shooting movies of the night sky. Only when auroras get shadow-casting bright can we shoot at the normal 1/30-second shutter speed and at lower ISOs.
As with Nikons (but not Sonys), the Canon R6 saves its movie settings separately from its still settings. When switching to Movie mode you don’t have to re-adjust the ISO, for example, to set it higher than it might have been for stills, very handy for taking both stills and movies of an active aurora, where quick switching is often required.
Unlike the R and Rp, the R6 captures 4K movies from the full width of the sensor, preserving the field of view of wide-angle lenses. This is excellent for aurora shooting.
The R6’s Movie Cropping menu option
A 4K movie of the Moon in full-frame and copped-frame modes, narrated at the camera. Again, this was shot in 4K but WordPress plays back only in HD.Comparing blow-ups of frame-grabbed stills from a full-frame 4K vs. Cropped frame 4K. The latter is less pixellated.
However, the R6 offers the option of a “Movie Crop” mode. Rather than taking the 4K movie downsampled from the entire sensor, this crop mode records from a central 1:1 sampled area of the sensor. That mode can be useful for high-magnification lunar and planetary imaging, for ensuring no loss of resolution. It worked well, producing videos with less pixelated fine details in test movies of the Moon.
Though of course I have yet to test it on one, the R6 should be excellent for movies of total solar eclipses. It can shoot 4K up to 60 frames per second in both full frame and cropped frame. It cannot shoot 6K (buy the R3!) or 8K (buy the R5!).
The R6’s Canon Log settings menu for video files.
Shooting in the R6’s Canon cLog3 profile records internally in 10-bit, preserving more dynamic range in movies, up to 12 stops. During eclipses, that will be a benefit for recording totality, with the vast range of brightness in the Sun’s corona. It should also aid in shooting auroras which can vary over a huge range in brightness.
Grading a cLog format movie in Final Cut under Camera LUT.
TIP: Processing cLog movies, which look flat out of camera, requires applying a cLog3 Look Up Table, or LUT, to the movie clips in editing, a step called “colour grading.” This is available from Canon, from third-party vendors or, as it was with my copy of Final Cut Pro, might be already installed in your video editing software. When shooting, turn on View Assist so the preview looks close to what the final graded movie will look like.
EXPOSURE TRACKING IN TIME-LAPSES
In one test, I shot a time-lapse from twilight to darkness with the R6 in Aperture Priority auto-exposure mode, of a fading display of noctilucent clouds. I just let the camera lengthen the shutter speed on its own. It tracked the darkening sky very well, right down to the camera’s maximum exposure time of 30 seconds, using a fish-eye lens at f/2.8. This demonstrated that the light meter in the R6 was sensitive enough to work well in dim light.
Other cameras I have used cannot do this. The meter fails at some point and the exposure stalls at 5 or 6 seconds long, resulting in most frames after that being underexposed. By contrast, the R6 showed excellent performance, negating the need for special bulb ramping intervalometers for some “holy grail” scenes. Here’s the resulting movie.
A time-lapse of 450 frames from 0.4 seconds to 30 seconds, with the R6 in Av mode. Set to 1080P for the best view! A screenshot from LRTimelapse showing the smoothness of the exposure tracking (the blue line) through the sequence,
In addition, the R6’s exposure meter tracked the darkening sky superbly, with nary a flicker or variation. Again, few cameras can do this. Nikons have an Exposure Smoothing option in their Interval Timers which works well.
The R6 has no such option but doesn’t seem to need it. The exposure did fail at the very end, when the shutter reached its maximum of 30 seconds. If I had the camera on Auto ISO, it might have started to ramp up the ISO to compensate, a test I have yet to try. Even so, this is impressive time-lapse performance in auto-exposure.
MISSING FEATURES
The R6, like the low-end Rp, lacks a top LCD screen for display of camera settings and battery level. In its place we get a traditional Mode dial, which some daytime photographers will prefer. But for astrophotography, a backlit top LCD screen provides useful information during long exposures.
The R6 top and back of camera view.
Without it, the R6 provides no indication of battery level while a shoot is in progress, for example, during a time-lapse. A top screen is also useful for checking ISO and other settings by looking down at the camera, as is usually the case when it’s on a tripod or telescope.
The lack of a top screen is an inconvenience for astrophotography. We are forced to rely on looking at the brighter rear screen for all information. It is a flip-out screen, so can be angled up for convenient viewing on a telescope.
The R6’s flip screen, similar to most other new Canon cameras.
The R6 has a remote shutter port for an external intervalometer, or control via a time-lapse motion controller. That’s good!
However, the port is Canon’s low-grade 2.5mm jack. It works, and is a standard connector, but is not as sturdy as the three-pronged N3-style jack used on Canon’s 5D and 6D DSLRs, and on the R3 and R5. Considering the cost of the R6, I would have expected a better, more durable port. The On/Off switch also seems a bit flimsy and easily breakable under hard use.
The R6’s side ports, including the remote shutter/intervalometer port.
These deficiencies provide the impression of Canon unnecessarily “cheaping out” on the R6. You can forgive them with the Rp, but not with a semi-professional camera like the R6.
INTERVAL TIMER
Unlike the Canon R and Ra (which still mysteriously lack a built-in interval timer, despite firmware updates), the R6 has one in its firmware. Hurray! This can be used to set up a time-lapse sequence, but on exposures only up to the maximum of 30 seconds allowed by the camera’s shutter speed settings, true of most in-camera intervalometers.
The Interval Timer menu page.
For 30-second exposures taken in succession as quickly as possible the interval on the R6 has to be set to 34 seconds. The reason is that the 30-second exposure is actually 32 seconds, true of all cameras. With the R6, having a minimum gap in time between shots requires an Interval not of 33 seconds as with some cameras, but 34 seconds. Until you realize this, setting the intervalometer correctly can be confusing.
Like all Canon cameras, the R6 can be set to take only up to 99 frames, not 999. That seems a dumb deficiency. Almost all time-lapse sequences require at least 200 to 300 frames. What could it possibly take in the firmware to add an extra digit to the menu box? It’s there at in the Time-lapse Movie function that assembles a movie in camera, but not here where the camera shoots and saves individual frames. It’s another example where you just can’t fathom Canon’s software decisions.
Setting the Interval Timer for rapid sequence shots with a 30-second exposure.
TIP: If you want to shoot 100 or more frames, set the Number of Frames to 00, so it will shoot until you tell the camera to stop. But awkwardly, Canon says the way to stop an interval shoot is to turn off the camera! That’s crude, as doing so can force you to refocus if you are using a Canon RF lens. Switching the Mode dial to Bulb will stop an interval shoot, an undocumented feature.
BULB TIMER
As with most recent Canon DSLRs and DSLMs, the menu also includes a Bulb Timer. This allows setting an exposure of any length (many minutes or hours) when the camera is in Bulb mode. This is handy for single long shots at night.
The Bulb Timer menu page. Bulb Timer only becomes an active choice when the camera is on Bulb.
However, it cannot be used in conjunction with the Interval Timer to program a series of multi-minute exposures, a pity. Instead, a separate outboard intervalometer has to be used for taking an automatic set of any exposures longer than 30 seconds, true of all Canons.
In Bulb and Bulb Timer mode, the R6’s rear screen lights up with a bright Timer readout. While the information is useful, the display is too bright at night and cannot be dimmed, nor turned red for night use, exactly when you are likely to use Bulb. The power-saving Eco mode has no effect on this display, precisely when you would want it to dim or turn off displays to prolong battery life, another odd deficiency in Canon’s firmware.
The Bulb Timer screen active during a Bulb exposure. At night it is bright!
The Timer display can only be turned off by closing the flip-out screen, but now the viewfinder activates with the same display. Either way, a display is on draining power during long exposures. And the Timer readout lacks any indication of battery level, a vital piece of information during long shoots. The Canon R, R3 and R5, with their top LCD screens, do not have this annoying “feature.”
TIP: End a Bulb Timer shoot prematurely by hitting the Shutter button. That feature is documented.
IN-CAMERA IMAGE STACKING
The R6 offers a menu option present on many recent Canon cameras: Multiple Exposure. The camera can take and internally stack up to 9 images, stacking them by using either Average (best for reducing noise) or Bright mode (best for star trails). An Additive mode also works for star trails, but stacking 9 images requires reducing the exposure of each image by 3 stops, say from ISO 1600 to ISO 200, as I did in the example below.
The Multiple Exposure menu page.
The result of the internal stacking is a raw file, with the option of also saving the component raws. While the options work very well, in all the cameras I’ve owned that offer such functions, I’ve never used them. I prefer to do any stacking needed later at the computer.
Comparing a single image with a stack of 9 exposures with 3 in-camera stacking methods.
TIP: The in-camera image stacking options are good for beginners wanting to get advanced stacking results with a minimum of processing fuss later. Use Average to stack ground images for smoother noise. Use Bright for stacking sky images for star trails. Activate one of those modes, then control the camera with a separate intervalometer to automatically shoot and internally stack several multi-minute exposures.
SHUTTER OPERATION
Being a mirrorless camera, there is no reflex mirror to introduce vibration, and so no need for a mirror lockup function. The shutter can operate purely mechanically, with physical metal curtains opening and closing to start and end the exposure.
However, the default “out of the box” setting is Electronic First Curtain, where the actual exposure, even when on Bulb, is initiated electronically, but ended by the mechanical shutter. That’s good for reducing vibration, perhaps when shooting the Moon or planets through a telescope at high magnification.
R6 Shutter Mode options.
In Mechanical, the physical curtains both start and end the exposure. It’s the mode I usually prefer, as I like to hear the reassuring click of the shutter opening. I’ve never found shutter vibration a problem when shooting deep sky images on a telescope mount of any quality.
In Mechanical mode the shutter can fire at up to 12 frames a second, or up to 20 frames a second in Electronic mode where both the start and end of the exposure happen without the mechanical shutter. That makes for very quiet operation, good for weddings and golf tournaments!
Electronic Shutter Mode is for fastest burst rates but has limitations.
Being vibration free, Electronic shutter might be great during total solar eclipses for rapid-fire bursts at second and third contacts when shooting through telescopes. Maximum exposure time is 1/2 second in this mode, more than long enough for capturing fleeting diamond rings.
Longer exposures needed for the corona will require Mechanical or Electronic First Curtain shutter. Combinations of shutter modes, drive rates (single or continuous), and exposure bracketing can all be programmed into the three Custom Function settings (C1, C2 and C3) on the Mode dial, for quick switching at an eclipse. It might not be until April 8, 2024 until I have a chance to test these features. And by then the R6 Mark II will be out!
TIP: While the R6’s manual doesn’t state it, some reviews mention (including at DPReview) that when the shutter is in fully Electronic mode the R6’s image quality drops from 14-bit to 12-bit, true of most other mirrorless cameras. This reduces dynamic range. I would suggest not using Electronic shutter for most astrophotography, even for exposures under 1/2 second. For longer exposures, it’s a moot point as it cannot be used.
The menu option that fouls up all astrophotographers using an R-series camera.
TIP: The R6 has the same odd menu item that befuddles many a new R-series owner, found on Camera Settings: Page 4. “Release Shutter w/o Lens” defaults to OFF, which means the camera will not work if it is attached to a manual lens or telescope it cannot connect to electronically. Turn it ON and all will be solved. This is a troublesome menu option that Canon should eliminate or default to ON.
OTHER MENU FEATURES
The rear screen is fully touch sensitive, allowing all settings to be changed on-screen if desired, as well as by scrolling with the joystick and scroll wheels. I find going back to an older camera without a touchscreen annoying – I keep tapping the screen expecting it to do something!
The Multi-Function Button brings up an array of 5 settings to adjust. This is ISO.
The little Multi-Function (M-Fn) button is a worth getting used to, as it allows quick access to a choice of five important functions such as ISO, drive mode and exposure compensation. However, the ISO, aperture and shutter speed are all changeable by the three scroll wheels.
The Q button brings up the Quick Menu for displaying and adjusting key functions.
There’s also the Quick menu activated by the Q button. While the content of the Quick menu screen can’t be edited, it does contain a good array of useful functions, adjustable with a few taps.
Under Custom settings, the Dials and Buttons can be re-assigned to other functions.
Unlike Sonys, the R6 has no dedicated Custom buttons per se. However, it does offer a good degree of customization of its buttons, by allowing users to re-assign them to other functions they might find more useful than the defaults. For example ….
This shows the AF Point button being re-assigned to the Maximize Screen Brightness (Temporary) command.
I’ve taken the AF Point button and assigned it to the Maximize Screen Brightness function, to temporarily boost the rear screen to full brightness for ease of framing.
The AE Lock button I assigned to switch the Focus Peaking indicators on and off, to aid manual focusing when needed.
The Depth of Field Preview button I assigned to switching between the rear screen and viewfinder, through that switch does happen automatically as you put your eye to the viewfinder.
The Set button I assigned to turning off the Rear Display, though that doesn’t have any effect when the Bulb Timer readout is running, a nuisance.
While the physical buttons are not illuminated, having a touch screen makes it less necessary to access buttons in the dark. It’s a pity the conveniently positioned but mostly unused Rate button can’t be re-programmed to more useful functions. It’s a waste of a button.
Set up the Screen Info as you like it by turning on and off screen pages and deciding what each should show.
TIP: The shooting screens, accessed by the Info button (one you do need to find in the dark!), can be customized to show a little, a lot, or no information, as you prefer. Take the time to set them up to show just the information you need over a minimum of screen pages.
LENS AND FILTER COMPATIBILITY
The new wider RF mount accepts only Canon and third-party RF lenses. However, all Canon and third-party EF mount lenses (those made for DSLRs) will fit on RF-mount bodies with the aid of the $100 Canon EF-to-RF lens adapter.
The Canon ER-to-RF lens adapter will be needed to attach R cameras to most telescope camera adapters and Canon T-rings made for older DSLR cameras.
This adapter will be necessary to attach any Canon R camera to a telescope equipped with a standard Canon T-ring. That’s especially true for telescopes with field flatterers where maintaining the standard 55mm distance between the flattener and sensor is critical for optimum optical performance.
The shallower “flange distance” between lens and sensor in all mirrorless cameras means an additional adapter is needed not just for the mechanical connection to the new style of lens mount, but also for the correct scope-to-sensor spacing.
The extra spacing provided by a mirrorless camera has the benefit of allowing a filter drawer to be inserted into the light path. Canon offers a $300 lens adapter with slide-in filters, though the choice of filters useful for astronomy that fit Canon’s adapter is limited. AstroHutech offers a few IDAS nebula filters.
Clip-in filters made for the EOS R, such as those offered by Astronomik, will also fit the R6. Though, again, most narrowband filters will not work well with an unmodified camera.
The AstroHutech adapter allows inserting filters into the light path on telescopes.
TIP: Alternatively, AstroHutech also offers its own lens adapter/filter drawer that goes from a Canon EF mount to the RF mount, and accepts standard 52mm or 48mm filters. It is a great way to add interchangeable filters to any telescope when using an R-series camera, while maintaining the correct back-focus spacing. I use an AstroHutech drawer with my Ra, where the modified camera works very well with narrowband filters. Using such filters with a stock R6 won’t be as worthwhile, as I showed above.
A trio of Canon RF zooms — all superb but quite costly.
As of this writing, the selection of third-party lenses for the Canon RF mount is limited, as neither Canon or Nikon have “opened up” their system to other lens makers, unlike Sony with their E-mount system. For example, we have yet to see much-anticipated RF-mount lenses from Sigma, Tamron and Tokina.
A trio of third party RF lenses — L to R: the TTArtisan 7.5mm f/2 and 11mm f/2.8 fish-eyes and the Samyang/Rokinon AF 85mm f/1.4.
The few third-party lenses that are available, from TTArtisan, Venus Optics and other boutique Chinese lens companies, are usually manual focus lenses with reverse-engineered RF mounts offering no electrical contact with the camera. Some of these wide-angle lenses are quite good and affordable. (I tested the TTArtisan 11mm fish-eye here.)
Until other lens makers are “allowed in,” if you want lenses with auto-focus and camera metadata connections, you almost have to buy Canon. Their RF lenses are superb, surpassing the quality of their older EF-mount equivalents. But they are costly. I sold off a lot of my older lenses and cameras to help pay for the new Canon glass!
Astrophotographers often like to operate their cameras at the telescope using computers running specialized control software. I tested the R6 with two popular Windows programs for controlling DSLR and now mirrorless cameras, BackyardEOS (v3.2.2) and AstroPhotographyTool (v3.88). Both recognized and connected to the R6 via its USB port.
Both programs recognized the Canon R6.
Another popular option is the ASIair WiFi controller from ZWO. It controls cameras via one of the ASIair’s USB ports, and not (confusingly) through the Air’s remote shutter jack marked DSLR. Under version 1.7 of its mobile app, the ASIair now controls Canon R cameras and connected to the R6 just fine, allowing images to be saved both to the camera and to the Air’s own MicroSD card.
With an update in 2021, the ZWOASIair now operates Canon R-series cameras.
The ASIair is an excellent solution for both camera control and autoguiding, with operation via a mobile device that is easier to use and power in the field than a laptop. I’ve not tried other hardware and software controllers with the R6.
TIP: While the R6, like many Canon cameras, can be controlled remotely with a smartphone via the CanonConnect mobile app, the connection process is complex and the connection can be unreliable. The Canon app offers no redeeming features for astrophotography, and maintaining the connection via WiFi or Bluetooth consumes battery power.
A dim red and green aurora from Dinosaur Provincial Park, Alberta, on August 29/30, 2021. This is a stack of 4 exposures for the ground to smooth noise and one exposure for the sky, all 30 seconds at f/2.8 with the Canon 15-35mm RF lens at 25mm and the Canon R6 at ISO 4000.
SUGGESTIONS TO CANON
To summarize, in firmware updates, Canon should:
Fix the low-level amp glow. No camera should have amp glow.
Allow either dimming the Timer readout, turning it red, or just turning it off!
Add a battery display to the Timer readout.
Expand the Interval Timer to allow up to 999 frames, as in the Time-Lapse Movie.
Allow the Rate button to be re-assigned to more functions.
Default the Release Shutter w/o Lens function to ON.
Revise the manual to correctly describe how to stop an Interval Timer shoot.
Allow programming multiple long exposures by combining Interval and Bulb Timer, or by expanding the shutter speed range to longer than 30 seconds, as some Nikons can do.
The Zodiacal Light in the dawn sky, September 14, 2021, from home in Alberta, with the winter sky rising. This is a stack of 4 x 30-second exposures for the ground to smooth noise, and a single 30-second exposure for the sky, all with the TTArtisan 7.5mm fish-eye lens at f/2 and on the Canon R6 at ISO 1600.
CONCLUSION
The extended red sensitivity of the Canon EOS Ra makes it better suited for deep-sky imaging. But with it now out of production (Canon traditionally never kept its astronomical “a” cameras in production for more than two years), I think the R6 is now Canon’s best camera (mirrorless or DSLR) for all types of astrophotography, both stills and movies.
However, I cannot say how well it will work when filter-modified by a third-party. But such a modification is necessary only for recording red nebulas in the Milky Way. It is not needed for other celestial targets and forms of astrophotography.
A composite showing about three dozen Perseid meteors accumulated over 3 hours of time, compressed into one image showing the radiant point of the meteor shower in Perseus. All frames were with the Canon R6 at ISO 6400 and with the TTArtisan 11mm fish-eye lens at f/2.8.
The low noise and ISO invariant sensor of the R6 makes it superb for nightscapes, apart from the nagging amp glow. That glow will also add an annoying edge gradient to deep-sky images, best dealt with when shooting by the use of LENR or dark frames.
As the image of the Andromeda Galaxy, M31, at the top of the blog attests, with careful processing it is certainly possible to get fine deep-sky images with the R6.
For low-light movies the R6 is Canon’s answer to the Sony alphas. No other Canon camera can do night sky movies as well as the R6. For me, it was the prime feature that made the R6 the camera of choice to complement the Ra.
This short video, below, captures time-lapses of the trails of geostationary satellites through southern Orion. It demonstrates the “crowded sky” we now have above us.
If you have tried photographing the Orion Nebula and Sword of Orion area with long tracked exposures you have no doubt seen these trails in your photos. Here I shot to purposely capture them in a time-lapse, for demonstration purposes.
Please note, these are not Starlink satellites. So do not blame Elon Musk for these!
These are the much more established geostationary or “geosynchronous” satellites that orbit 35,785 kilometres above Earth and so take 24 hours to orbit the planet. As such they remain apparently motionless over the same spot on Earth, allowing fixed dish antennas to aim at them.
The camera is on a mount that is tracking the sky as it turns from east to west, so the stars are staying still. What would normally be satellites fixed in one spot in the sky (after all, they are called “geostationary” for a reason) instead trail into short streaks traveling from west to east (right to left) in the frame. But in reality, it is the stars that are in motion behind the satellites.
The region of sky in Orion below the Orion Nebula (the object at top) lies south of the line that bisects the sky into northern and southern halves called the “celestial equator.” Most geostationary satellites also orbit in Earth’s equatorial plane and so appear along a belt near the celestial equator in the sky.
This chart from SkySafari shows the belt of geosats through southern Orion with the satellites identified. The green box is the field of view of the telescope (shown below) that I used to take the time-lapses.
In this video, however, they appear about 5° to 7° south of the celestial equator (which runs through the famous Belt of Orion off frame at top). That’s because I live north of the equator of the Earth, at a latitude of 51° north. So parallax makes the geosat belt appears south of the celestial equator in my sky. From a site in the southern hemisphere the geosat belt would appear north of the celestial equator.
You’ll notice some satellites travelling diagonally — they are not geosats. You’ll also see some flashing or pulsing satellites — they are likely tumbling objects, perhaps spent rocket boosters.
The satellites are visible because they are high enough to reflect sunlight even in the middle of the night, as the sequences each end about 11:30 to midnight local time.
But in this video the satellites are not flaring — this is their normal brightness. During flare season around the two equinoxes geosats can become bright enough to be seen with the unaided eye. For a video of that phenomenon see my video shot in October 2020, below.
TECH DETAILS FOR “TRACKS OF THE GEOSATS” VIDEO:
The video at top contains time-lapses shot on two nights: January 18 and 20, 2021. Both are made from hundreds of frames taken through a William Optics RedCat astrograph at f/5 with a 250mm focal length. The field of view is 8° by 5.5°.
The William Optics RedCat 51mm f/5 astrographic refactor.
Each exposure is 30 seconds long, taken at a one second interval. The camera was a Canon 6D MkII at ISO 3200 on January 18 and ISO 1600 on January 20 in the brighter moonlight that night.
In the first sequence from January 18 the equatorial mount, an Astro-Physics Mach1, is left to track on its own and is unguided. So the stars wobble back and forth slightly due to periodic error in the mount. The field also drifts north due to slight misalignment on the pole. Clouds pass through the field during the shoot.
In the second clip from January 20, taken with a quarter Moon lighting the sky, the mount was autoguided, using an MGEN3 auto-guider. So the stars remained better fixed over the 5.5 hours of shooting. A slight glitch appears near the end where I swapped camera batteries, and the camera turned ever so slightly causing the stars to enlarge a bit for a moment.
LRTimelapse at work processing the second sequence, deflickering some of the oddly exposed frames.
The frames were processed in Adobe Camera Raw and LRTimelapse
TimeLapse DeFlicker at work assembling the video, showing its All Frames + Lighten blend mode for the Accumulating version of clip #2.
I then assembled exported JPGs with TimeLapseDeFlicker, using a 3-frame Lighten blend mode to lengthen the trails. The final version was assembled with TLDF’s All Frames mode (shown above) where every frame gets stacked for an accumulated total, to show the busy sky traffic!
On December 21 we have a chance to see and shoot a celestial event that no one has seen since the year 1226.
As Jupiter and Saturn each orbit the Sun, Jupiter catches up to slower moving Saturn and passes it every 20 years. For a few days the two giant planets appear close together in our sky. The last time this happened was in 2000, but with the planets too close to the Sun to see.
Back on February 18, 1961 the two planets appeared within 14 arc minutes or 0.23° (degrees) of each other low in the dawn sky.
But on December 21 they will pass each other only 6 arc minutes apart. To find a conjunction that close and visible in a darkened sky you have to go all the way back to March 5, 1226 when Jupiter passed only 3 arc minutes above Saturn at dawn. Thus the media headlines of a “Christmas Star” no one has seen for 800 years!
Photographing the conjunction will be a challenge precisely because the planets will be so close to each other. Here are several methods I can suggest, in order of increasing complexity and demands for specialized gear.
Easy — Shooting Nightscapes with Wide Lenses
This shows the field of view of various lenses on full-frame cameras (red outlines) and a 200mm lens with 1.4x tele-extender on a cropped frame camera (blue outline). The date is December 17 when the waxing crescent Moon also appears near the planet pair for a bonus element in a nightscape image.
Conjunctions of planets in the dusk or dawn twilight are usually easy to capture. Use a wide-angle (24mm) to short telephoto (85mm) lens to frame the scene and exposures of no more than a few seconds at ISO 200 to 400 with the lens at f/2.8 to f/4.
The sky and horizon might be bright enough to allow a camera’s autoexposure and autofocus systems to work.
Indeed, in the evenings leading up to and following the closest approach date of December 21 that’s a good method to use. Capture the planet pair over a scenic landscape or urban skyline to place them in context.
For most locations the planets will appear no higher than about 15° to 20° above the southwestern horizon as it gets dark enough to see and shoot them, at about 5 p.m. local time. A 50mm lens on a full-frame camera (or a 35mm lens on a cropped frame camera) will frame the scene well.
This was Jupiter and Saturn on December 3, 2020 from the Elbow Falls area on the Elbow River in the Kananaskis Country southwest of Calgary. This is a blend of 4 untracked images for the dark ground, stacked to smooth noise, for 30 seconds each, and one untracked image for the bright sky for 15 seconds to preserve colours and highlights, all with the 24mm Sigma lens and Canon EOS Ra at ISO 200.
NIGHTSCAPE TIP — Use planetarium software such as Stellarium (free), SkySafari, or StarryNight (what I used here) to simulate the framing with your lens and camera. Use that software to determine where the planets will be in azimuth, then use a photo planning app such as PhotoPills or The Photographer’s Ephemeris to plan where to be to place the planets over the scene you want at that azimuth (they’ll be at about 220° to 230° — in the southwest — for northern latitude sites).
This was Jupiter and Saturn on December 10, 2020 from Red Deer River valley, north of Drumheller, Alberta. This is a blend of 4 images for the dark ground, stacked to smooth noise, for 20 seconds each at f/5.6, and a single image for the sky for 5 seconds at f/2.8, all with the 35mm Canon lens and Canon EOS Ra at ISO 400. All untracked.
Harder — Shooting With Longer Lenses
The planet pair will sink lower and closer to the horizon, to set about 7:00 to 7:30 p.m. local time each night.
As the sky darkens and the planet altitude decreases you can switch to ever-longer lenses to zoom in on the scene and still frame the planets above a carefully-chosen horizon, assuming you have very clear skies free of haze and cloud.
For example, by 6 p.m. they will be low enough to allow a 135mm telephoto to frame the planets and still have the horizon in the frame. Using a longer lens has the benefit or resolving the two planets better, showing them as two distinct objects, which will become more of a challenge the closer you are to December 21.
On December 21 wide-angle and even short telephoto lenses will likely show the two planets as an unresolved point of light, no brighter than Jupiter on its own.
On closest approach day the planets will be so close that using a wide-angle or even a normal lens might only show them as an unresolved blob of light. You’ll need more focal length to split the planets well into two objects.
However, using longer focal lengths introduces a challenge — the motion of the sky will cause the planets to trail during long exposures, turning them from points into streaks. That trailing will get more noticeable more quickly the longer the lens you use.
A rule-of-thumb says the longest exposure you can employ before trailing becomes apparent is 500 / the focal length of the lens. So for a 200mm lens, maximum exposure is 500 / 200 = 2.5 seconds.
To be conservative, a “300 Rule” might be better, restricting exposures with a 200mm telephoto to 300 / 200 = 1.5 seconds. Now, 1.5 seconds might be long enough for the scene, especially if you use a fast lens wide open at f/2.8 or f/2 and a faster ISO such as 400 or 800.
This shows the motion of Jupiter relative to Saturn from December 17 to 25, with the outer frame representing the field of view of a 200mm lens and 1.4x tele-extender on a cropped frame camera. The smaller frame shows the field of a telescope with an effective focal length of 1,200mm.
TELEPHOTO TIP — Be sure to focus carefully using Live View to manually focus on a magnified image of the planets. And refocus through an evening of shooting. While people fuss about getting the one “correct” exposure, it is poor focus that ruins more astrophotos.
Even More Demanding — Tracking Longer Lenses
This one popular sky tracker, the iOptron SkyGuider Pro, here with a telephoto lens. It and other trackers such as the Sky-Watcher Star Adventurer seen in the opening image, can be used with lenses and telescopes up to about 300mm focal length, if they are balanced well. Even longer lenses might work for the short exposures needed for the planets, but vibration and wind can blur images.
However, longer exposures might be needed later in the evening when the sky is darker, to set the planets into a starry background. After December 17 we will have a waxing Moon in the evening sky to light the sky and foreground, so the sky will not be dark, even from a rural site.
Even so, to ensure untrailed images with long telephotos — and certainly with telescopes — you will need to employ a sky tracker, a device to automatically turn the camera to follow the sky. If you don’t have one, it’s probably too late to get one and learn how to use it! But if you have one, here’s a great opportunity to put it to use.
Polar align it (you’ll have to wait for it to get dark enough to see the North Star) and then use it to take telephoto close-up images of the planets with exposure times that can now be as long as you like, though they likely won’t need to be more than 10 to 20 seconds.
You can now also use a slower ISO speed for less noise.
TRACKER TIP — Use a telephoto to frame just the planets, or include some foreground content such as a hilltop, if it can be made to fit in the frame. Keep in mind that the foreground will now blur from the tracking, which might not be an issue. If it is, take exposures of the foreground with the tracker motor off, to blend in later in processing.
The Most Difficult Method — Using a Telescope
An alt-azimuth mounted GoTo scope like this Celestron SE6 can work for short exposures of the planets, provided it is aligned and is tracking properly. Good focus will be critical.
Capturing the rare sight of the planets as two distinct disks (not just dots of light) accompanied by their moons, all together in the same frame, is possible anytime between now and the end of the year.
But … resolving the disks of the planets takes focal length — a lot of focal length! And that means using a telescope on a mount that can track the stars.
While a sky tracker might work, they are not designed to handle long and heavy lenses and telescopes. You’d need a telescope on a solid mount, though it could be a “GoTo” telescope on an alt-azimuth mount. Such a mount, while normally not suited for long-exposure deep-sky imaging, will be fine for the short exposures needed for the planets.
You will need to attach your camera to the telescope using a camera adapter, so the scope becomes the lens. If you have never done this, to shoot closeups of the Moon for example, and don’t have the right adapters and T-rings, then this isn’t the time to learn how to do it.
A simulation of the view with a 1,200mm focal length telescope on December 21. Even with such a focal length the planet disks still appear small.
TELESCOPE TIP — As an alternative, it might be possible to shoot the planets using a phone camera clamped to the low-power eyepiece of a telescope, but focusing and setting the exposure can be tough. It might not be worth the fuss in the brief time you have in twilight, perhaps on the one clear night you get! Just use your telescope to look and enjoy the view!
But if you have experience shooting the Moon through your telescope with your DSLR or mirrorless camera, then you should be all set, as the gear and techniques to shoot the planets are the same.
This is the setup I might use for a portable rig best for a last-minute chase to clear skies. It’s a Sky-Watcher EQM-35 mount with a 105mm apo refractor (the long-discontinued Astro-Physics Traveler), and here with a 2x Barlow to double the effective focal length to 1,200mm.
However, once again the challenge is just how close the planets are going to get to each other. Even a telescope with a focal length of 1200mm (typical for a small scope) still gives a field of view 1° wide using a cropped frame camera. That’s 60 arc minutes, ten times the 6 arc minute separation of Jupiter and Saturn on December 21!
TELESCOPE TIP — Use a 2x or 3x Barlow lens if needed to increase the effective focal length of the scope. Beware that introducing a Barlow into the light path usually requires racking the focus out and/or adding extension tubes to reach focus. Test your configuration as soon as possible to make sure you can focus it.
TELESCOPE TIP — With such long focal lengths shoot lots of exposures. Some will be sharper than others.
TELESCOPE TIP — But be sure to focus precisely, and refocus over the hour or so you might be shooting, as changing temperatures will shift the focus. You can’t fix bad focus!
Jupiter and Saturn in the same telescope field on December 5, 2020. Some of the moons are visible in this exposure taken in twilight before the planets got too low in the southwest. This is a single exposure with a 130mm Astro-Physics apo refractor at f/6 (so 780mm focal length) for 4 seconds at ISO 200 with the Canon 6D MkII. The disks of the planets are overexposed to bring out the moons.
Short exposures under one second might be needed to keep the planet disks from overexposing. Capturing the moons of Jupiter (it has four bright moons) and Saturn (it has two, Titan and Rhea, that are bright) will require exposures of several seconds. Going even longer will pick up background stars.
Or … with DSLRs and mirrorless cameras, try shooting HD or 4K movies. They will likely demand a high and noisy ISO, but might capture the view more like you saw and remember it.
FINAL TIP — Whatever combination of gear you decide to use, test it! Don’t wait until December 21 to see if it works, nor ask me if I think such-and-such a mount, telescope or technique will work. Test for yourself to find out.
Jupiter and Saturn taken in the deep twilight on December 3, 2020 from the Allen Bill flats area on the Elbow River in the Kananaskis Country southwest of Calgary, Alberta. This is a blend of 4 untracked images for the dark ground, stacked to smooth noise, for 2 minutes each at ISO 400, and two tracked images for the sky (and untrailed stars) for 30 seconds each at ISO 400, all with the 35mm Canon lens at f/2.8 and Canon EOS Ra. The tracker was the Sky-Watcher Star Adventurer 2i.
Don’t Fret or Compete. Enjoy!
The finest images will come from experienced planetary imagers using high-frame-rate video cameras to shoot movies, from which software extracts and stacks the sharpest frames. Again, if you have no experience with doing that (I don’t!), this is not the time to learn!
And even the pros will have a tough time getting sharp images due to the planets’ low altitude, even from the southern hemisphere, where some pro imagers have big telescopes at their disposal, to get images no one else in the world can compete with!
In short, use the gear you have and techniques you know to capture this unique event as best you can. And if stuff fails, just enjoy the view!
Jupiter and Saturn taken December 3, 2020 from the Allen Bill flats area on the Elbow River in the Kananaskis Country southwest of Calgary, Alberta. This is a blend of 4 untracked images for the dark ground, stacked to smooth noise, for 2 minutes each at ISO 400, and two tracked images for the sky for 30 seconds at ISO 1600, all with the 35mm Canon lens at f/2.8 and Canon EOS Ra. The tracker was the Sky-Watcher Star Adventurer 2i.
If you miss closest approach day due to cloud, don’t worry.
Even when shooting with telephoto lenses the photo ops will be better in the week leading up to and following December 21, when the greater separation of the planets will make it easier to capture a dramatic image of the strikingly close pairing of planets over an Earthly scene.
On two clear evenings the Harvest Moon rose red and and large over the Alberta prairie.
I present a short music video (linked to below) of time-lapse sequences of the Harvest Moon of 2020 rising. I shot the sequences through a small telescope to zoom in on the Moon’s disk as it rose over the flat horizon of the prairie near where I live. I love being able to see the horizon!
Note the effects of atmospheric refraction squishing the Moon’s disk close to the horizon. The Moon becomes more normal and spherical as it rose higher.
People sometimes think the refraction effect is responsible for making the Full Moon appear large on the horizon, but the atmosphere has nothing to do with it. The effect is strictly an optical illusion. The Moon is no bigger on the horizon than when it is higher in the sky.
The photo below shows a composite of images taken September 30, 2020.
The rising of the nearly Full Moon, the Harvest Moon of 2020, on September 30, from a site near home in Alberta, looking just south of due east this night. Refraction distorts the disk and atmospheric absorption reddens the disk toward the horizon.
This is a multiple exposure composite of 6 images with the Canon 6D MkII through the 80mm A&M apo refractor at f/6 without field flattener. Taken as part of a time-lapse sequence with images every 2 seconds. The frames for this blend were taken 2 minutes apart, so selected from every 60 frames out of the sequence. All were at 1/8 second at ISO 100. Images stacked in Photoshop and blended with Lighten mode. The ground comes from the first image.
Note in the image below, from October 1, how much redder the Moon appears. That’s the effect of atmospheric absorption, in this case from dust and smoke in the air dimming and reddening the Moon (the same happens to the rising or setting Sun). At times this evening it looked like the Moon was in a total eclipse.
The Harvest Moon (the Full Moon of October 1, 2020) rising almost due east at the end of a country road in southern Alberta, near home. The horizon was smoky or dusty, so the Moon was very red as it rose, and looking almost like a totally eclipsed Moon.
This is a blend of 6 exposures, all 1/2-second with the A&M 80mm f/6 apo refractor (for 480mm focal length) and Canon 6D MkII at ISO 400, taken as part of a 460-frame time-lapse sequence, with shots every 2 seconds. For this composite I choose 6 images at 2-minute intervals, so the Moon rose its own diameter between frames. The ground comes from the first image in the sequence when the lighting was brightest. The Moon rose at 7:35 pm this night, about 30 minutes after sunset. A mild Orton glow effect added to the ground with Luminar 4.
Below is the link to the time-lapse music video on Vimeo. It is in 4K. I used Adobe Camera Raw, Adobe Bridge, and LRTimelapse to process the component images as raw files for the time-lapse sequences, as per tutorials in my Nightscape and Time-Lapse ebook, above.
On November 11, I traveled to the near-flung corners of my backyard to observe the rare transit of Mercury across the Sun.
History is replete with tales of astronomers traveling to the far corners of the Earth to watch dark objects pass in front of the Sun — the Moon in eclipses, and Mercury and Venus in transits.
On November 11, to take in the last transit of Mercury until 2032, I had planned a trip to a location more likely to have clear skies in November than at home. A 3-day drive to southern Arizona was the plan.
But to attend to work and priorities at home I cancelled my plans. Instead, I decided to stay home and take my chances with the Alberta weather, perhaps making a run for it a day’s drive away if needed to chase into clear skies.
As it turned out, none of that was necessary. The forecast for clear, if cold, skies held true and we could not have had a finer day for the transit. Even the -20° C temperatures were no problem, with no wind, and of course sunshine!
Plus being only steps from home and a warming coffee helped!
As it turned out, the site in Arizona I had booked to stay was clouded out for the entire event. So I was happy with my decision!
For my site in Alberta, as for all of western North America, the Sun rose with the transit in progress. But as soon as the Sun cleared the horizon there was Mercury, as a small, if fuzzy, black dot on the Sun.
As the Sun rose the view became sharper, and was remarkable indeed — of a jet black dot of a tiny planet silhouetted on the Sun.
I shot through two telescopes, my 4-inch and 5-inch refractors, both equipped with solar filters of course. I viewed through two other telescopes, for white-light and hydrogen-alpha filtered views.
I was able to follow the transit for three hours, for a little more than half the transit, until Mercury exited the Sun just after 11 a.m. MST. The view below is from moments before Mercury’s exit, or “egress.”
I shot still frames every 15 seconds with each of the two cameras and telescopes, for a time-lapse, plus I shot real-time videos.
At this transit Mercury passed closer to the centre of the Sun’s disk than it will for any other transit in the 21st century, making this event all the more remarkable. That point is recorded above, from a shot taken at 8:19 a.m. MST.
Stacking a selection of the time-lapse frames, ones taken 1-minute intervals, produced this composite of the transit, from just before mid-transit until Mercury’s egress.
I assembled all the best images and 4K videos together into a movie, which I narrated live at the telescope as the transit was happening. I hope this provides a sense of what it was like to view this rare event.
The Transit of Mercury from Alan Dyer on Vimeo.
We won’t see another until 2032, but not from North America. The next transit of Mercury viewable from here at home is not until 2049! This was likely my last transit, certainly for a while!
P.P.S.: And for tech details on the images and videos in this blog, please click through to Vimeo and the video description I have there of cameras, scopes, and settings.
I present suggestions for how to ensure everything under your control will go well on eclipse day. The secret is: Practice, Practice, Practice!
The techniques I suggest practicing are outlined in my previous blog, Ten Tips for the Solar Eclipse. It’s prerequisite reading.
However, while you can read all about how to shoot the eclipse, nothing beats actually shooting to ensure success. But how do you do that, when there’s only one eclipse?
Here are my “Top 10” suggestions:
Total eclipse of the Sun, November 3, 2013 as seen from the middle of the Atlantic Ocean, from the Star Flyer sailing ship. I took this with a Canon 5D MkII and 16-35mm lens at 19mm for 1/40s at f/2.8 and ISO 800 on a heavily rolling ship.
Wide-Angle Shots – Shoot a Twilight Scene
The simplest way to shoot the eclipse is to employ a camera with a wide lens running on auto exposure to capture the changing sky colors and scene brightness.
Auto Exposure Check in Twilight
If you intend to shoot wide-angle shots of the eclipse sky and scene below, with anything from a mobile phone to a DSLR, practice shooting a time-lapse sequence or a movie under twilight lighting. Does your camera expose properly when set to Auto Exposure? If you are using a phone camera, does it have any issues focusing on the sky? How big a file does a movie create?
With Telephotos and Telescopes – Shoot the Filtered Sun
The toughest techniques involve using long lenses and telescopes to frame the eclipsed Sun up close. They need lots of practice.
Framing and Focusing
You’ll need to have your safe and approved solar filter purchased (don’t wait!) that you intend to use over your lens or telescope. With the filter in place, simply practice aiming your lens or telescope at the Sun at midday. It’s not as easy as you think! Then practice using Live View to manually focus on the edge of the Sun or on a sunspot. Can you get consistently sharp images?
The partial eclipse of the Sun, October 23, 2014, shot through thin cloud, but that makes for a more interesting photo than one in a clear sky. Despite the cloud, this was still shot through a Mylar filter, on the front of telescope with 450mm focal length, using the Canon 60Da for 1/25 sec exposure at ISO 100.
Exposure Times
Exposures of the filtered Sun will be the same as during the partial phases, barring cloud or haze, as above, that can lengthen exposure times. Otherwise, only during the thin crescent phases will shutter speeds need to be 2 to 3 stops (or EV steps) longer than for a normal Sun.
Solar filters that clamp around the front of lenses are easier to remove than ones that screw onto lenses. They will bind and get stuck!
Filter Removal
With the camera aimed away from the Sun (very important!), perhaps at a distant landscape feature, practice removing the filter quickly. Can you do it without jarring the camera and bumping it off target? Perhaps try this on the Moon at night as well, as it’s important to also test this with the camera and tripod aimed up high.
Articulated LCD screens are a great aid for framing and viewing the eclipse in Live View when the camera is aimed up high, as it will be!
Ease of Use
With the Sun up high at midday (as it will be during the eclipse from most sites), check that you can still look through, focus, and operate the camera easily. Can you read screens in the bright daylight? What about once it gets darker, as in twilight, which is how dark it will get during totality.
The east-to-west motion of the sky will carry the Sun its own diameter across the frame during totality, making consistent framing an issue with very long lenses and telescopes.
Sun Motion
If you are using an untracked tripod, check how much the Sun moves across your camera frame during several minutes. For videos you might make use of that motion. For still shots, you’ll want to ensure the Sun doesn’t move too far off center.
An equatorial mount like this is great but needs to be at least roughly polar aligned to be useful.
Aligning Tracking Mounts
If you plan to use a motorized equatorial mount capable of tracking the sky, “Plan A” might be to set it up the night before so it can be precisely polar aligned. But the reality is that you might need to move on eclipse morning. To prepare for that prospect, practice roughly polar aligning your mount during the day to see how accurate its tracking is over several minutes. Do that by leveling the mount, setting it to your site’s latitude, and aiming the polar axis as close as you can to due and true north. You don’t need precise polar alignment to gain the benefits of a tracking mount – it keeps the Sun centered – for the few minutes of totality.
The Full Moon is the same brightness as the Sun’s inner corona.
Telephotos and Telescopes – Shoot Full Moon Closeups
Exposure Check
Shoot the Full Moon around July 8 or August 7. If you intend to use Auto Exposure during totality, check how well it works on the Full Moon. It’s the same brightness as the inner corona of the Sun, though the Moon occupies a larger portion of the frame and covers more metering sensor points. This is another chance to check your focusing skill.
The crescent Moon has a huge range in brightness and serves as a good test object. Remember, the Moon is the same size as the Sun. That’s why we get eclipses!
Telescopes and Telescopes – Shoot Crescent Moon Closeups
Exposure Check
Shoot the waxing crescent moon in the evening sky during the last week of June and again in the last week of July. Again, test Auto Exposure with your camera in still or movie mode (if you intend to shoot video) to see how well the camera behaves on a subject with a large range in brightness. Or step through a range of exposures manually, from short for the bright sunlit crescent, to long for the dark portion of the Moon lit by Earthshine. It’s important to run through your range of settings quickly, just as you would during the two minutes of totality. But not too quickly, as you might introduce vibration. So …
Good focus matters for recording the fine prominences and sharp edge of the Moon.
Sharpness Check
In the resulting images, check for blurring from vibration (from you handling the camera), from wind, and from the sky’s east-to-west motion moving the Moon across the frame, during typical exposures of 1 second or less.
By practicing, you’ll be much better prepared for the surprises that eclipse day inevitably bring. Always have a less ambitious “Plan B” for shooting the eclipse simply and quickly should a last-minute move be needed.
However, may I recommend …
My 295-page ebook on photographing the August 21 total eclipse of the Sun is now available. See http://www.amazingsky.com/eclipsebook.html It covers all techniques, for both stills, time-lapses, and video, from basic to advanced, plus a chapter on image processing. And a chapter on What Can Go Wrong?! The web page has all the details on content, and links to order the book from Apple iBooks Store (for the best image quality and navigation) or as a PDF for all other devices and platforms.
For much more detailed advice on shooting options and techniques, and for step-by-step tutorials on processing eclipse images, see my 295-page eBook on the subject, available as an iBook for Apple devices and as a PDF for all computers and tablets.
On May 9, a last-minute chase into clear skies netted me a view of the rare transit of Mercury across the Sun.
The forecast called for typical transit weather – clear the day before, and clear the day after. But the day of the transit of Mercury? Hopeless at home in Alberta, unless I chanced the prospects of some clearing forecast for central Alberta.
As the satellite image below, for 8:30 a.m. MDT on May 9, shows, that clearing did materialize. But I headed west, as far west as I needed to go to be assured of clear skies – to central BC. Kamloops in fact.
I stayed at the Alpine Motel, got a great room as the end, and set up in the parking lot away from traffic. Not the most photogenic of observing sites, but I was happy! I had my clear skies!
I set up two telescopes, above: a 130mm refractor to shoot through, and an 80mm refractor to look through. Both with dense solar filters!
Both worked great. However, low cloud prevented me seeing the Sun as soon as it cleared the eastern hills. So this was my first good look, below, at the transit as the Sun rose above the clouds.
The May 9, 2016 transit of Mercury taken about half an hour after sunrise, as the Sun emerged from low horizon cloud. Taken from Kamloops, British Columbia, where the transit was well underway at sunrise. Mercury appears as the circular dot at lower left, with a sunpot group above centre. I shot this with the 130mm Astro-Physics refractor at f/6 prime focus with the Canon 60Da camera at ISO 100. Shot through a Kendrick white light solar filter. The low atltitude added much of the yellow colouration.
There it was – the fabled “little black spot on the Sun today.” Mercury is the dot at lower left, with a sunspot group at upper right. This was the first transit of Mercury since November 8, 2006. We see only about 13 Mercury transits a century, so in a lifetime of stargazing (the Sun is a star!) even the most avid amateur astronomer might see only a handful. This was only my third transit of Mercury.
The May 9, 2016 transit of Mercury taken about 45 minutes after sunrise, as the Sun emerged from low horizon cloud. I shot this with the 130mm Astro-Physics refractor at f/6 prime focus with the Canon 60Da camera at ISO 100. Shot through a Kendrick white light solar filter.
This was the view, above, a little later, as the Sun entered more assuredly clear skies. From about 7 a.m. PDT on, the Sun was in the clear most of the morning, with just occasional puffy clouds intervening now and then.
I shot still images every 30 seconds, to eventually turn into a time-lapse movie (after a ton of work hand registering hundreds of frames!).
But for now, I’ll be content with this composite of 40 frames, below, taken at 7-minute intervals. It shows the progress of Mercury across the Sun over the last 4.5 hours or so of the event, until egress at 11:38 a.m. PDT.
This motion is due to Mercury’s movement around the Sun. A transit is one of the few times you can easily see a planet actually orbiting the Sun.
For all images I used the 130mm f/6 Astro-Physics refractor with a 2X Barlow for an effective focal length of 1560mm and the Canon 60Da camera (at ISO 100) to yield an image size with the Sun just filling the frame. Exposures were 1/250th second through a Kendrick white light Mylar filter. Yellow colouration of the solar disk added in processing.
In this composite, the disks of Mercury are not all perfect dots. The wobbly seeing conditions distorted the images from frame to frame. But I used the actual images taken at that moment, rather than clone some perfect image across the disk to simulate the path.
To wrap up, here’s Mercury Transit: The Movie! I shot several HD and zoomed-in “crop mode” movies at the beginning of the transit and again at the final egress. Commentary is from me talking live into the camera mic as I was shooting the clips. Background noise is courtesy Pacific Drive and the Trans-Canada Highway!
Enjoy, and do enlarge to HD and full-screen for the best look.
The next transit of Mercury is November 11, 2019. If you are hoping for a transit of Venus, good luck. The next is not until December 10, 2117!
Barbados is soon to have a new state-of-the-art public observatory for promoting astronomy.
On Saturday night, November 16, I was fortunate and privileged to be the guest speaker at the first event at the newly refurbished Harry Bayley Observatory in Bridgetown, Barbados. A grant from an educational foundation in the UK has allowed the Barbados Astronomical Society to renew the aging 50-year-old facility with a fresh new interior, and all the high-tech fittings of a modern public observatory.
A new dome was lifted into place on top of the 3-storey structure earlier in the week, and the painting and interior finishing was completed just a day or two before my talk, in time for a public RSVP event Saturday night.
I gave a talk on The Amazing Sky, showing images and movies from the November 3 total eclipse, among many other photos of the sights anyone can see in the day and night sky. I gave the same talk twice, to two packed houses of 40 people per session in the main floor meeting room/lecture hall. A wonderful spread of local food and drink was served upstairs.
Lots of work remains to complete the refurbishment but the facility was in good enough shape to host a public event. The official opening is in January.
A new Meade 16-inch telescope on a Software Bisque MX2 mount is on its way for installation later this year, equipped with the latest robotic control and digital cameras for public viewing. A hydrogen-alpha solar telescope will also be part of the arsenal of equipment.
This night, members set up a portable Celestron 8-inch telescope outside for viewing the Moon and Jupiter. In contrast to viewing at home at this time of year, observing from 13° North latitude was in shorts and shirt-sleeves.
It was a terrific evening and I’m pleased to have been part of the relaunching of the Observatory and astronomy activities on the island. Many thanks go to my host on the island, Greg Merrick, for making the evening – and my stay this week – possible.
A low aurora appears in the city skyglow and bright moonlight at the local observatory.
After several days of rain, skies cleared beautifully for a Saturday night star party for the public at the local university observatory, the Rothney Astrophysical Observatory, southwest of Calgary.
The evening was capped off by the appearance, as expected, of an auroral arc to the north. Despite the light from the nearly Full Moon and urban sky glow to the north, the aurora managed to compete and put on a show for a few minutes before fading.
About 100 people attended the evening, and were treated to views of Saturn, shining in the south near Spica. Unfortunately, clouds to the west over the mountains never cleared away enough to allow us views, and me photos, of the triple-planet conjunction of Mercury, Venus and Jupiter. Still, a good time was had by all.