Chasing the Cross-Continental Eclipse


I had always planned to drive to the April 8, 2024 total eclipse of the Sun. But to where? I ended up on the other side of the continent than originally planned.

It is not often the path of the Moon’s shadow crosses your home country, let alone continent. Only once before in recent years, on August 21, 2017, did the narrow shadow path pass near enough to my home in Alberta to allow me to drive to a total eclipse. They almost always require flying. 

Packed and ready to hit the highway for a long eclipse trip.

Yes, while I could drive to the April 8, 2024 eclipse, it was going to demand a much longer drive than in 2017. But driving allowed me to take a carload of telescope and camera gear. So that was the plan. 

My destination was San Antonio, Texas. That’s where I had made a hotel booking more than a year earlier. The weather prospects in Texas were forecast to be best (at least according to the long-term averages) of any locations along the path in the U.S. or Canada. (I did not want to drive into Mexico.) 

On March 30, with some trepidation, I set out down I-15 heading south. I got as far as Great Falls, Montana, my stop for night one. But it was to be a move in the wrong direction.

The forecast for Eclipse Day as of March 30. Blue is bad; white is good!

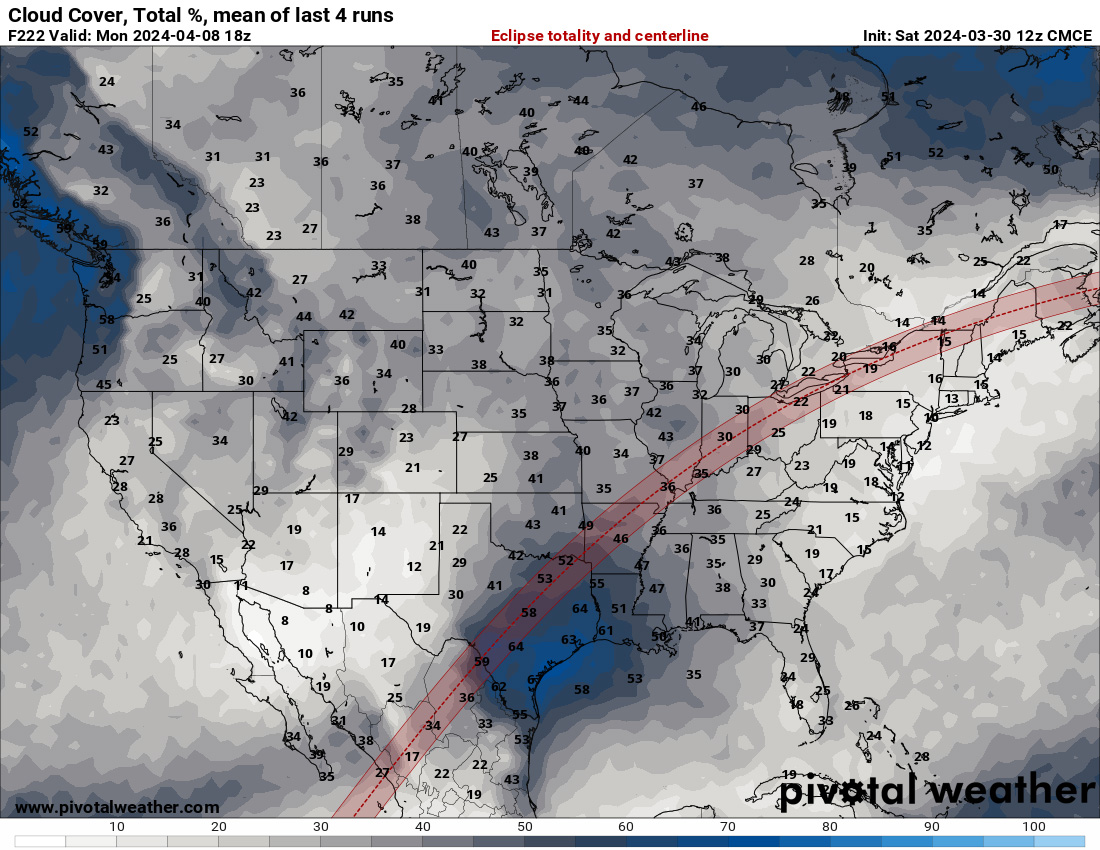
The various long-range weather models were all agreeing, even 10 days in advance, that Texas (covered in blue above) was looking poor for eclipse day. But eastern Canada looked good! That was the exact opposite of what had been expected. 

So on Easter Sunday, I turned around and headed north, crossing back into Canada at a lonely border post in southwest Saskatchewan. 

I proceeded east along the TransCanada, Highway 1. I decided against a route across the northern U.S. and around the southern end of Lake Michigan, to avoid severe weather forecast for the middle of the U.S. 

One of my daily Facebook travelogue posts with a beer of the day.

Along the way I posted my beer-du-jour travel reports, as above from Day 8, that day from within the shadow path at last!

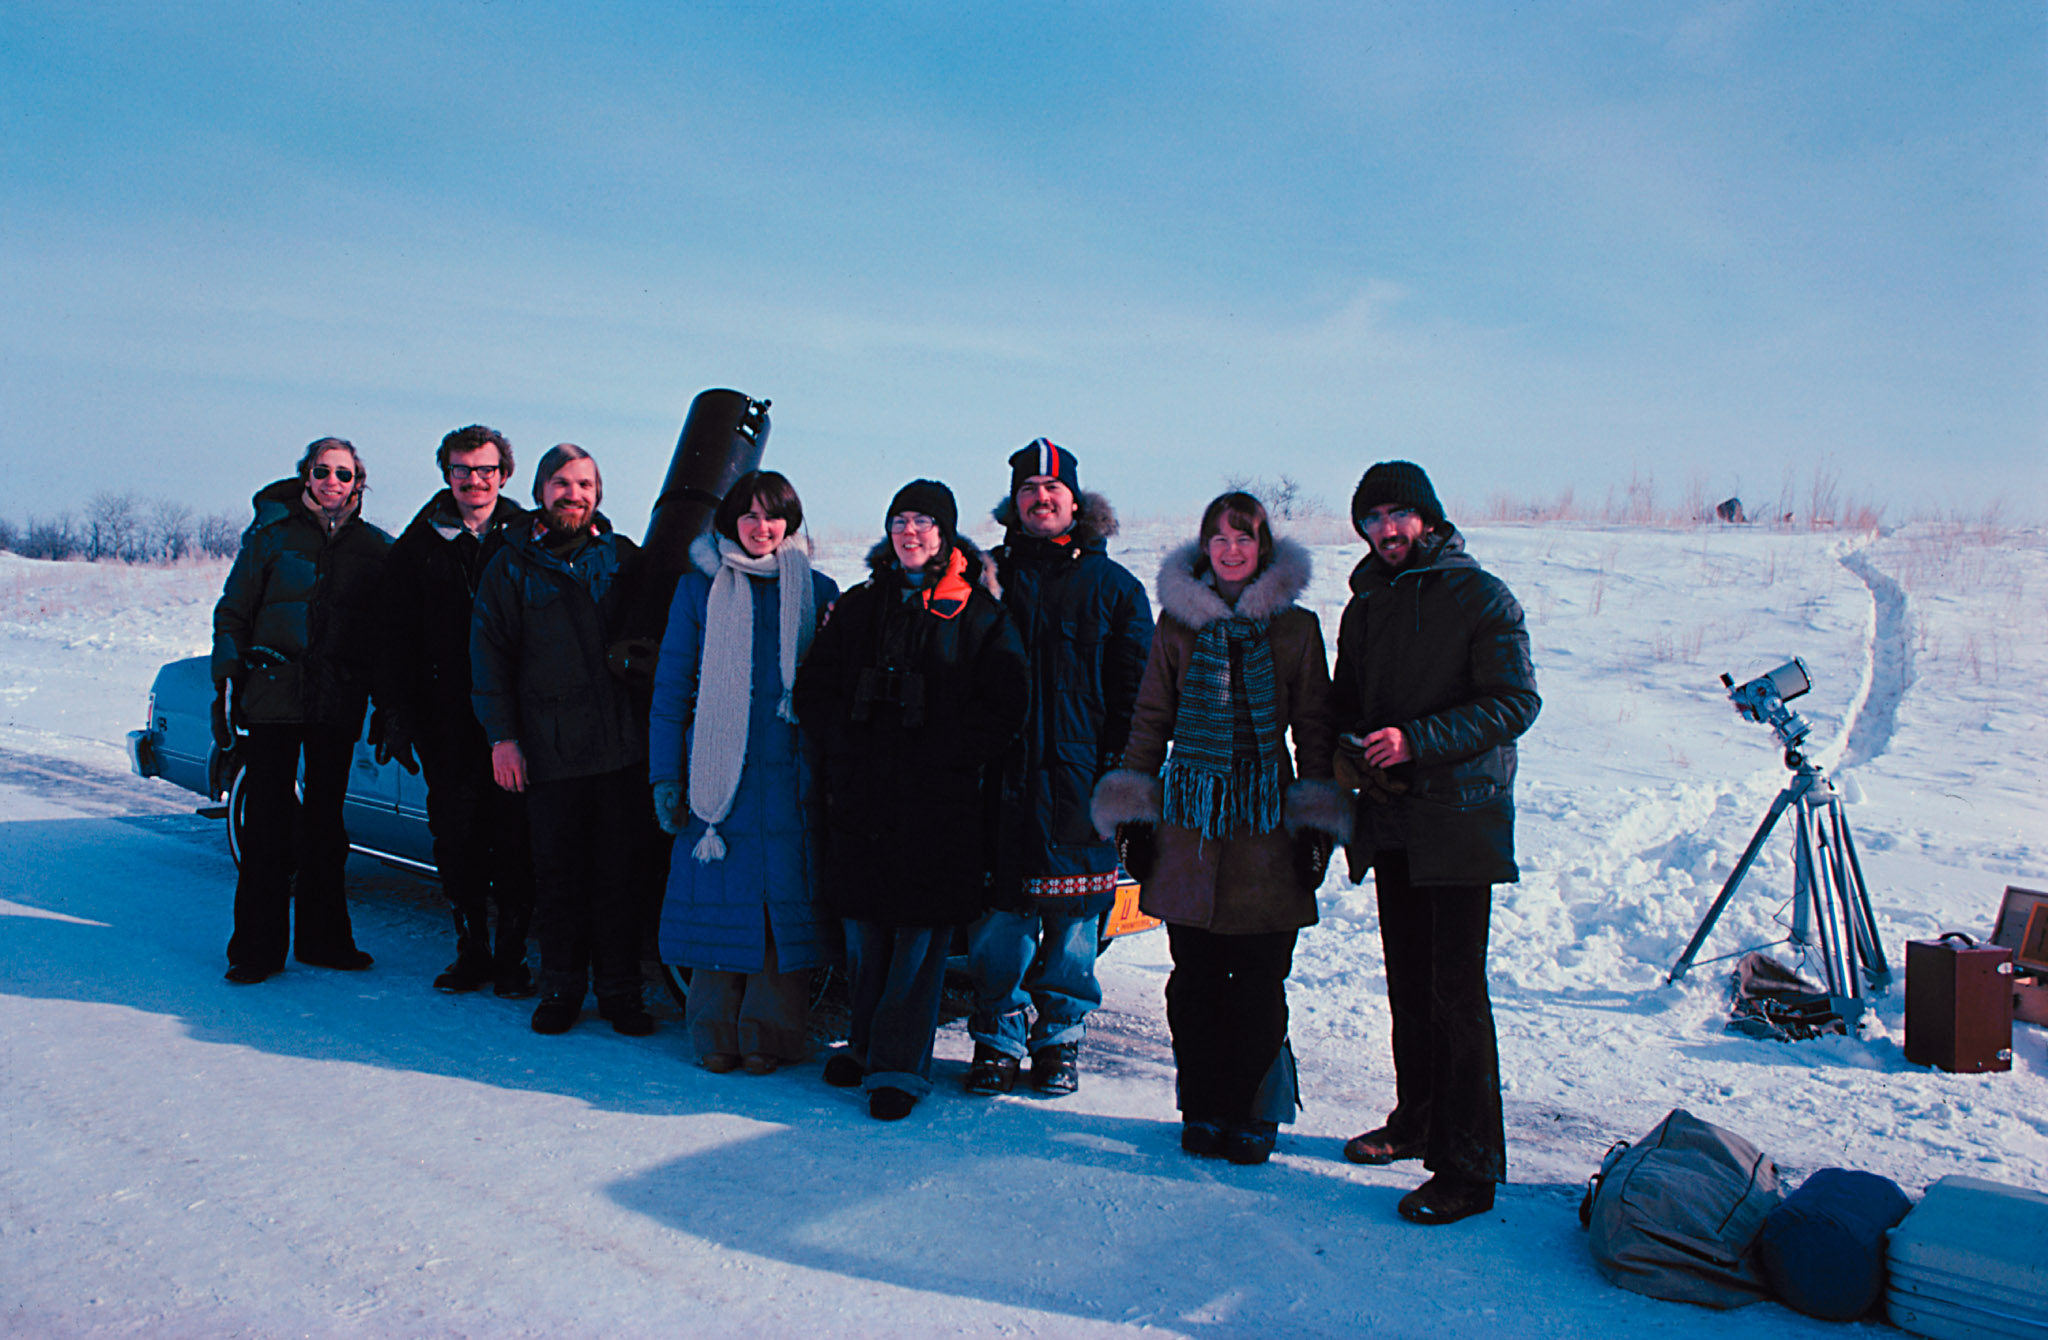
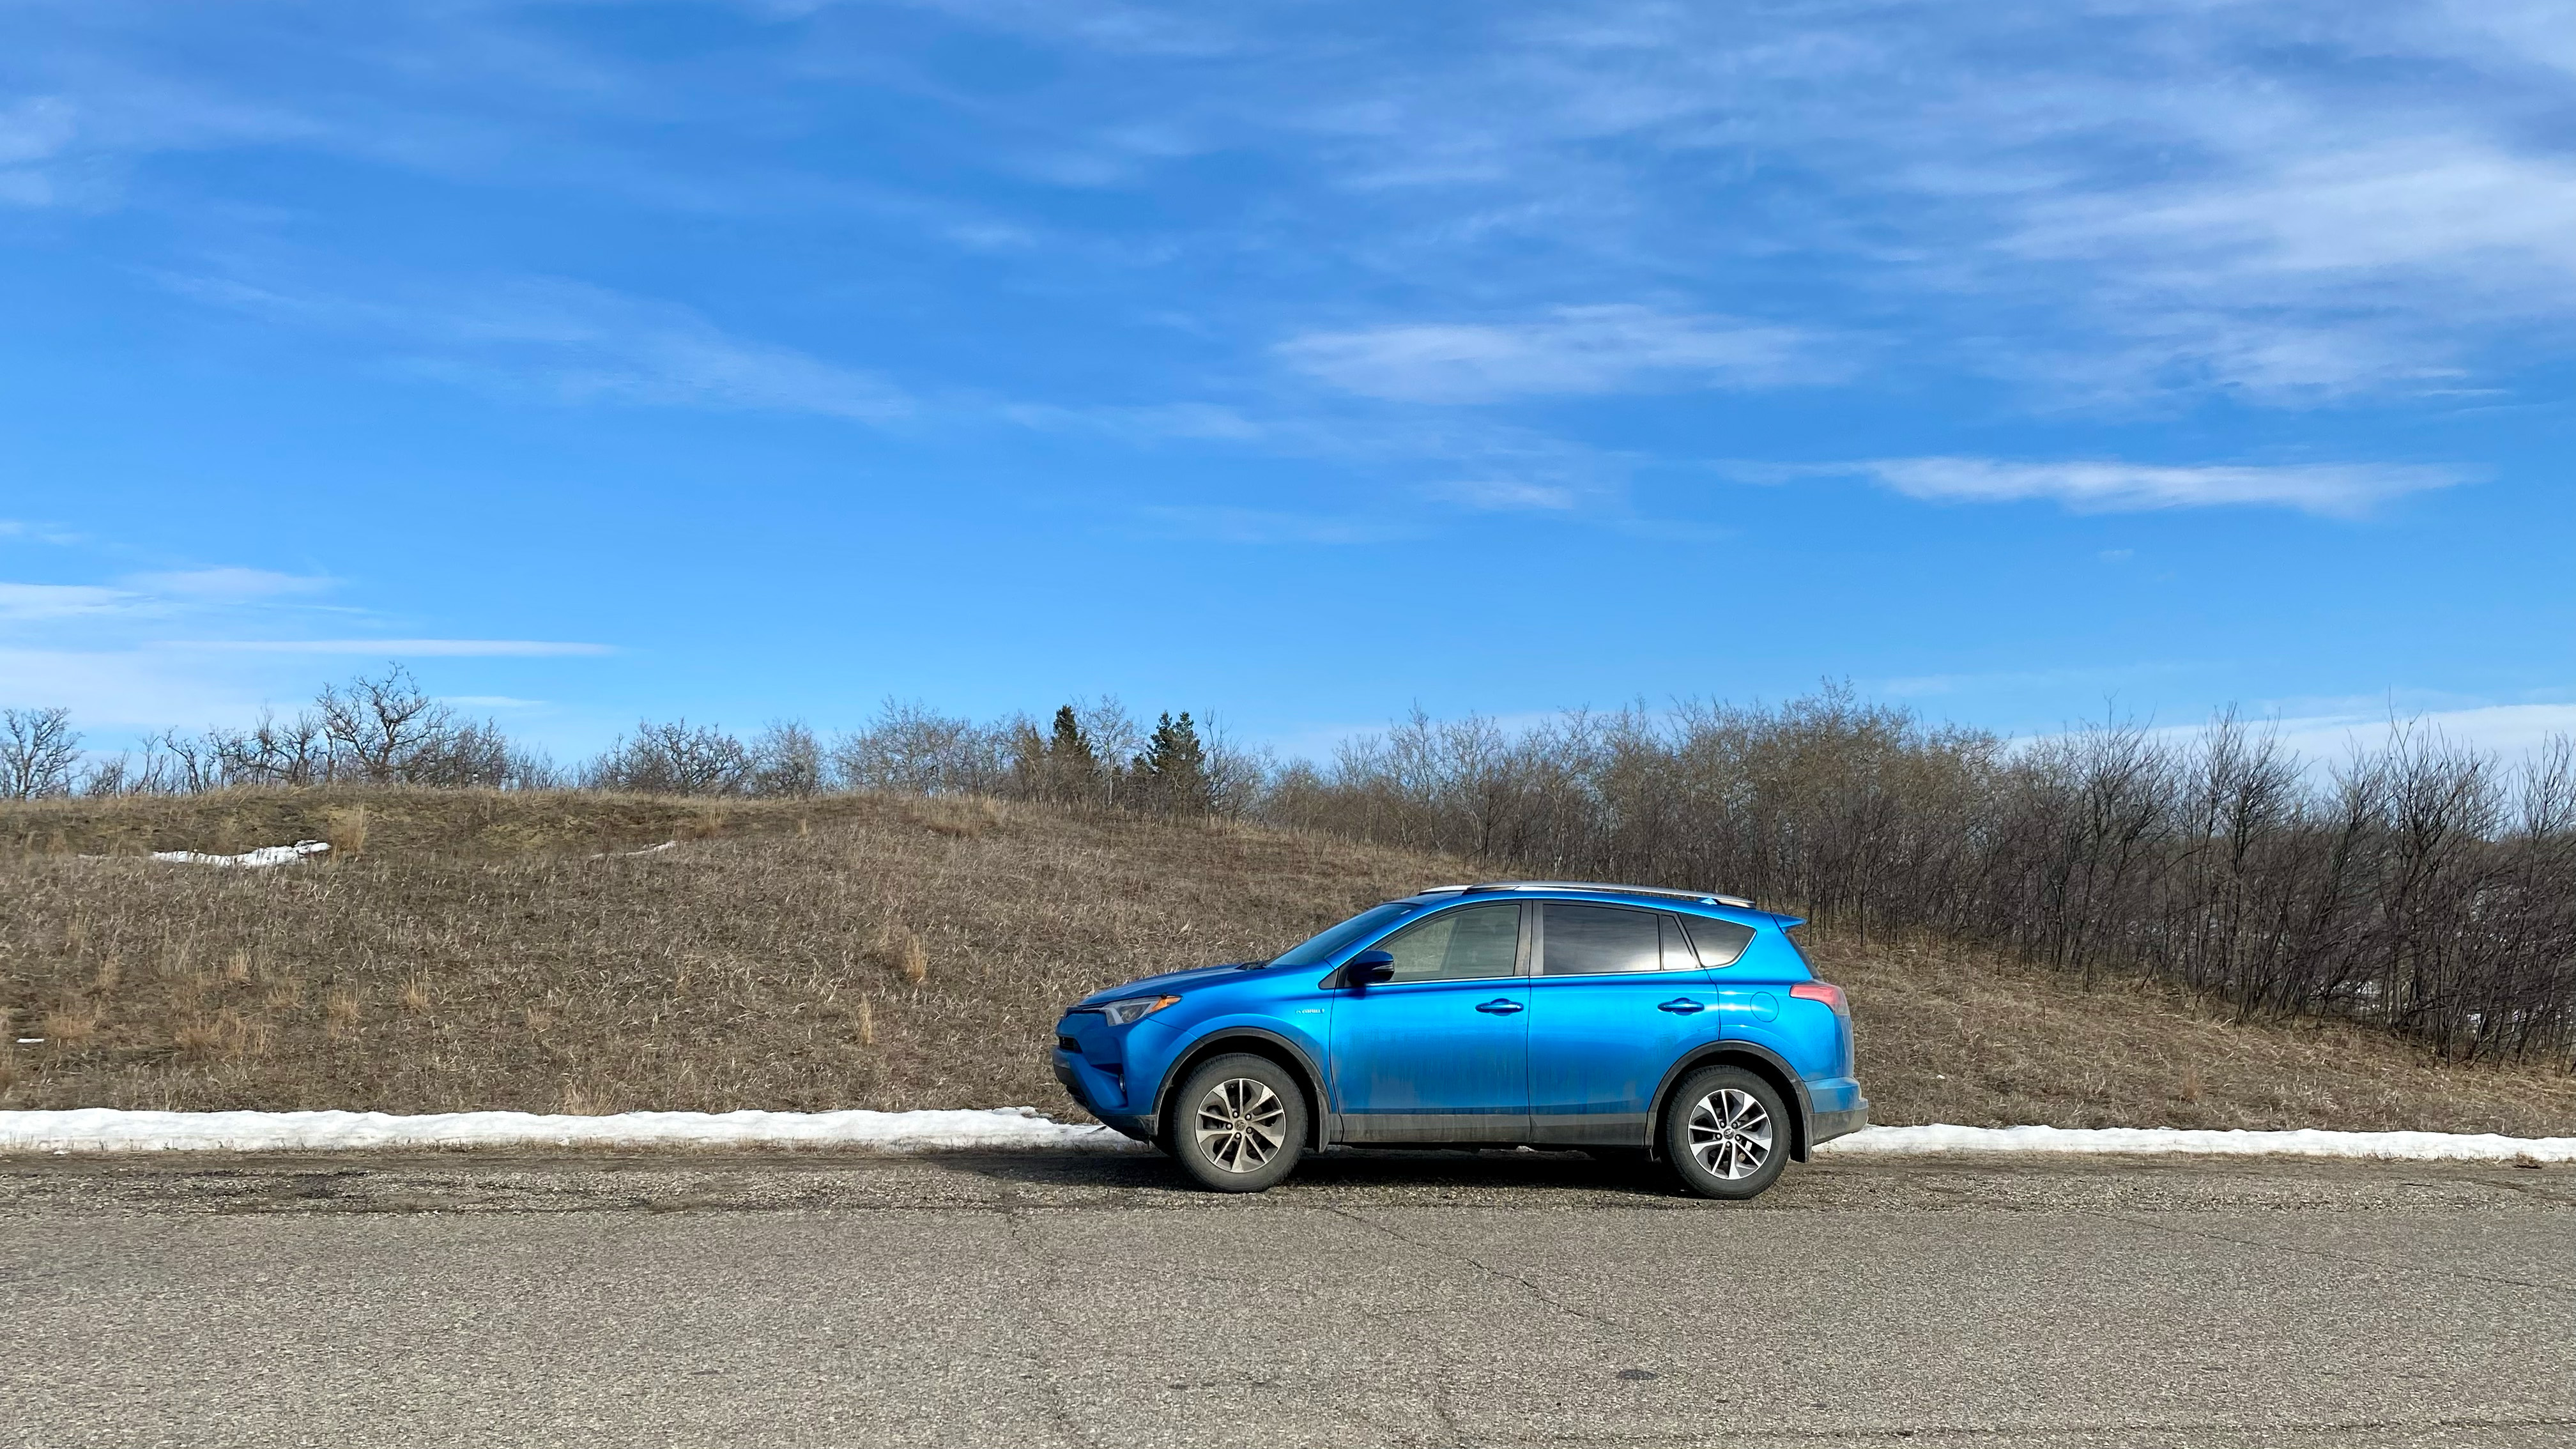
I also stopped at the only total eclipse site, of the 16 I had seen previously, I have ever been able to re-visit. On February 26, 1979 I and a small band of friends from Edmonton viewed the mid-winter eclipse (the last one visible from southern Canada) from a median road (Firdale Road as it is now called) on the TransCanada Highway near Carberry, Manitoba. I found the spot again, where I saw (and shot with my Questar telescope) my first total eclipse of the Sun. 

However, a day after entering Ontario, the bad weather caught up with me, forcing an extra night north of Lake Superior while the only highway across the region, Highway 17, was cleared of snow and re-opened at Wawa, the usual cross-Canada choke point. 

My new destination (after abandoning the site in the Texas Hill Country) was to be southern Ontario. 

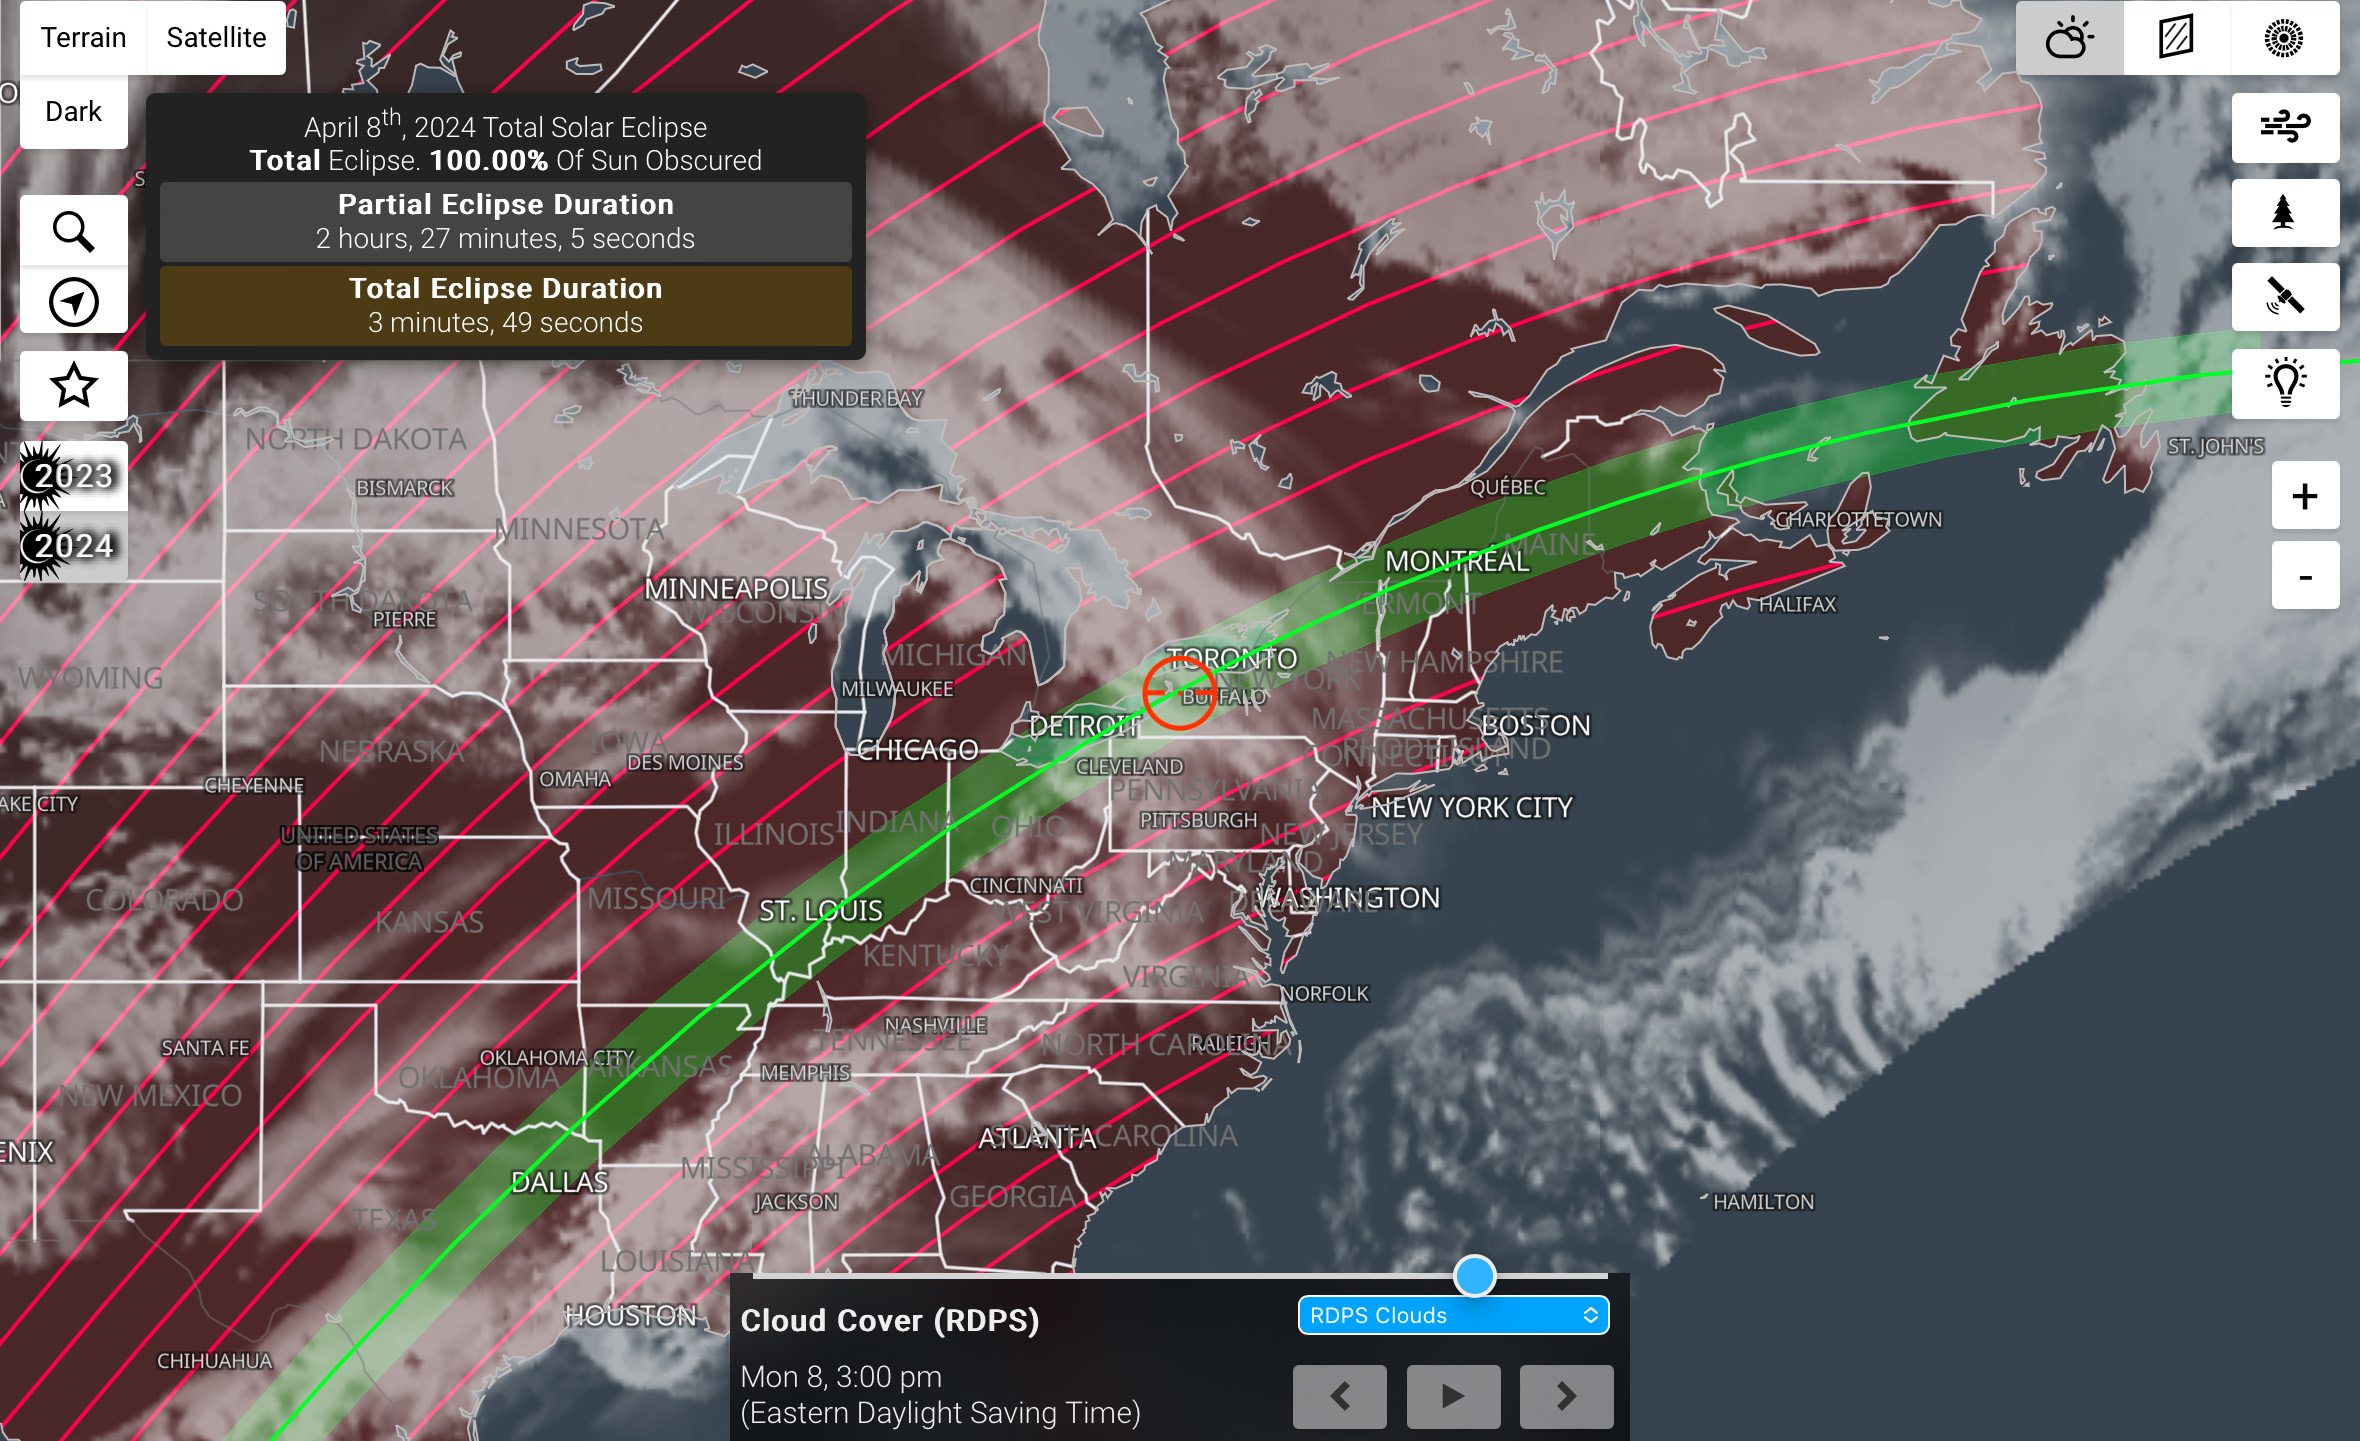
However, as eclipse day approached and the weather predictions became more precise, it was apparent that Ontario would also be under some cloud. Southern Québec was looking better. So the Eastern Townships became my new Plan A site! I was running out of time!

Using the TPE app to check the Sun’s location once on site, the day before the eclipse.

I arrived on site in Québec with only a day to spare to check out the location I had found by exploring Google maps. 

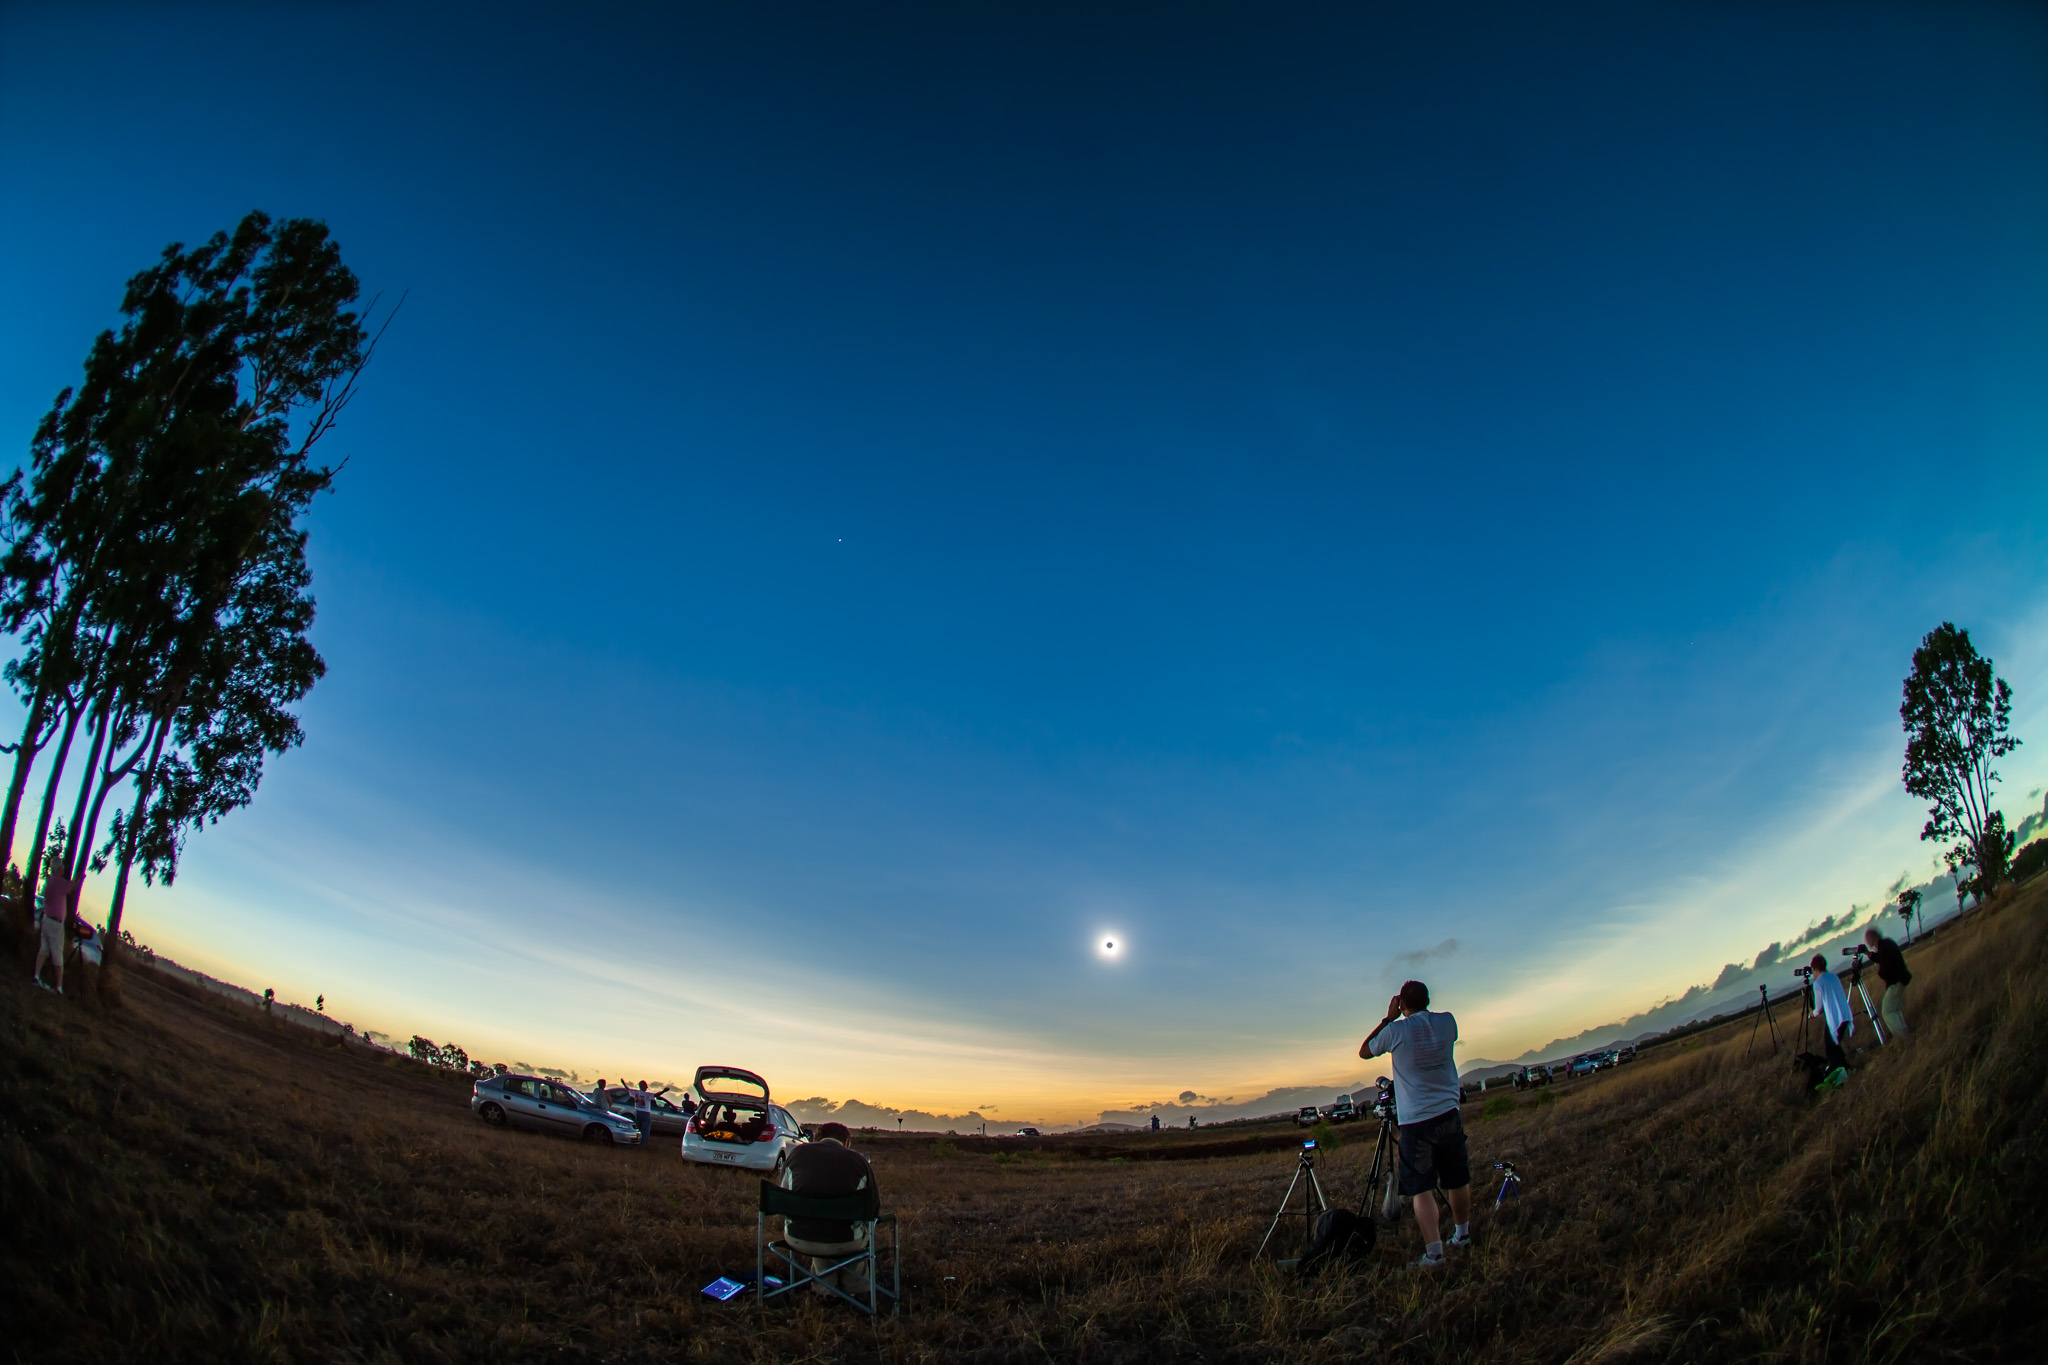
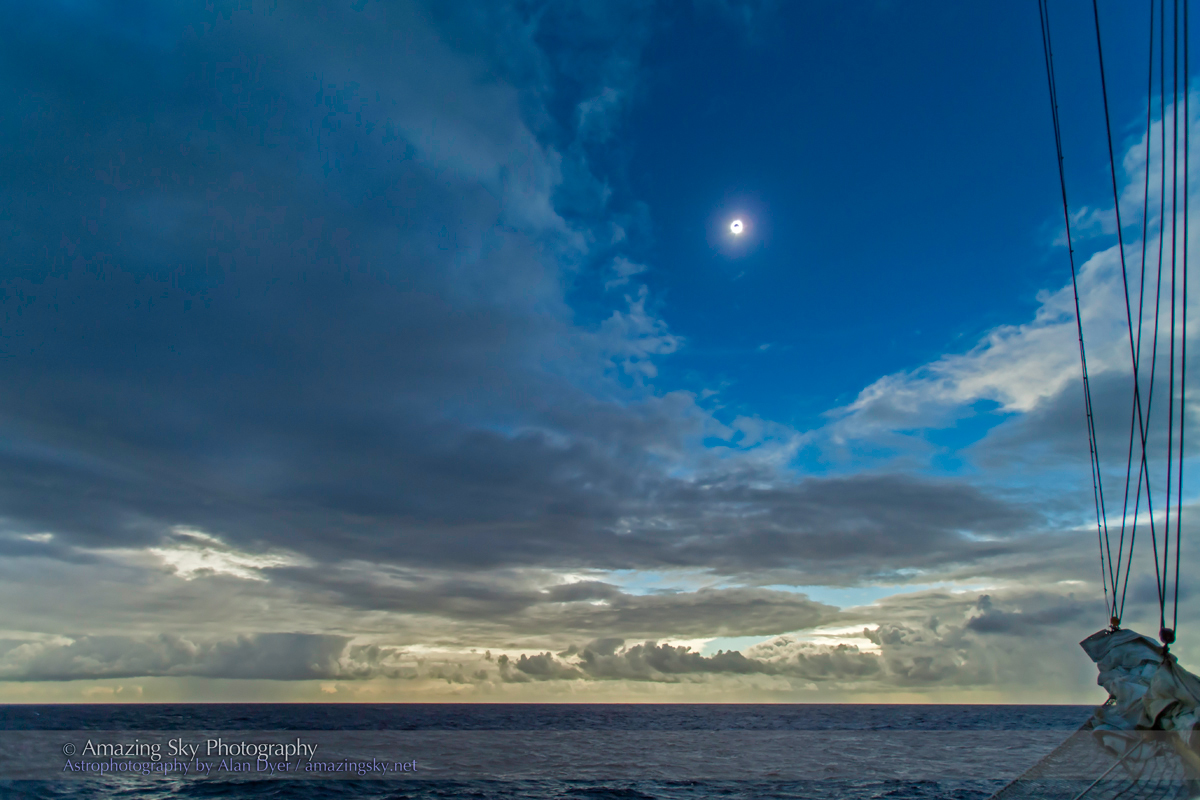
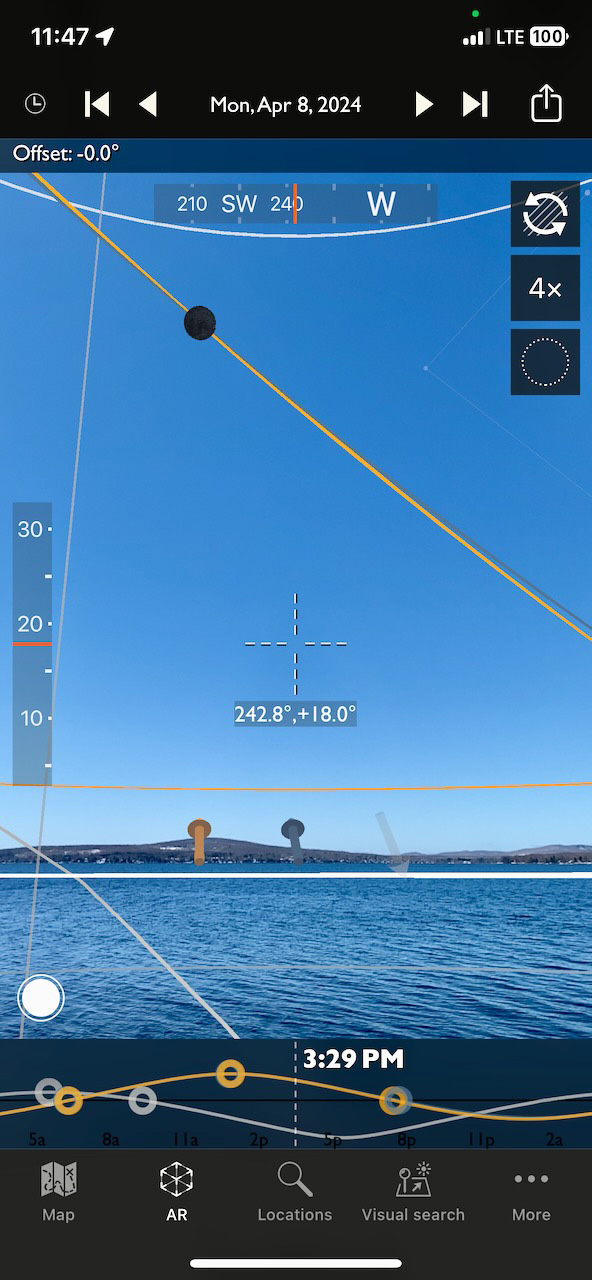
With the Sun lower in the mid-afternoon sky in Québec compared to the high-noon Sun in Texas, I decided to shoot a wide-angle scene of the eclipse over a lake, preferably with open water, not ice! That required a site with public parking on an eastern lakeshore.

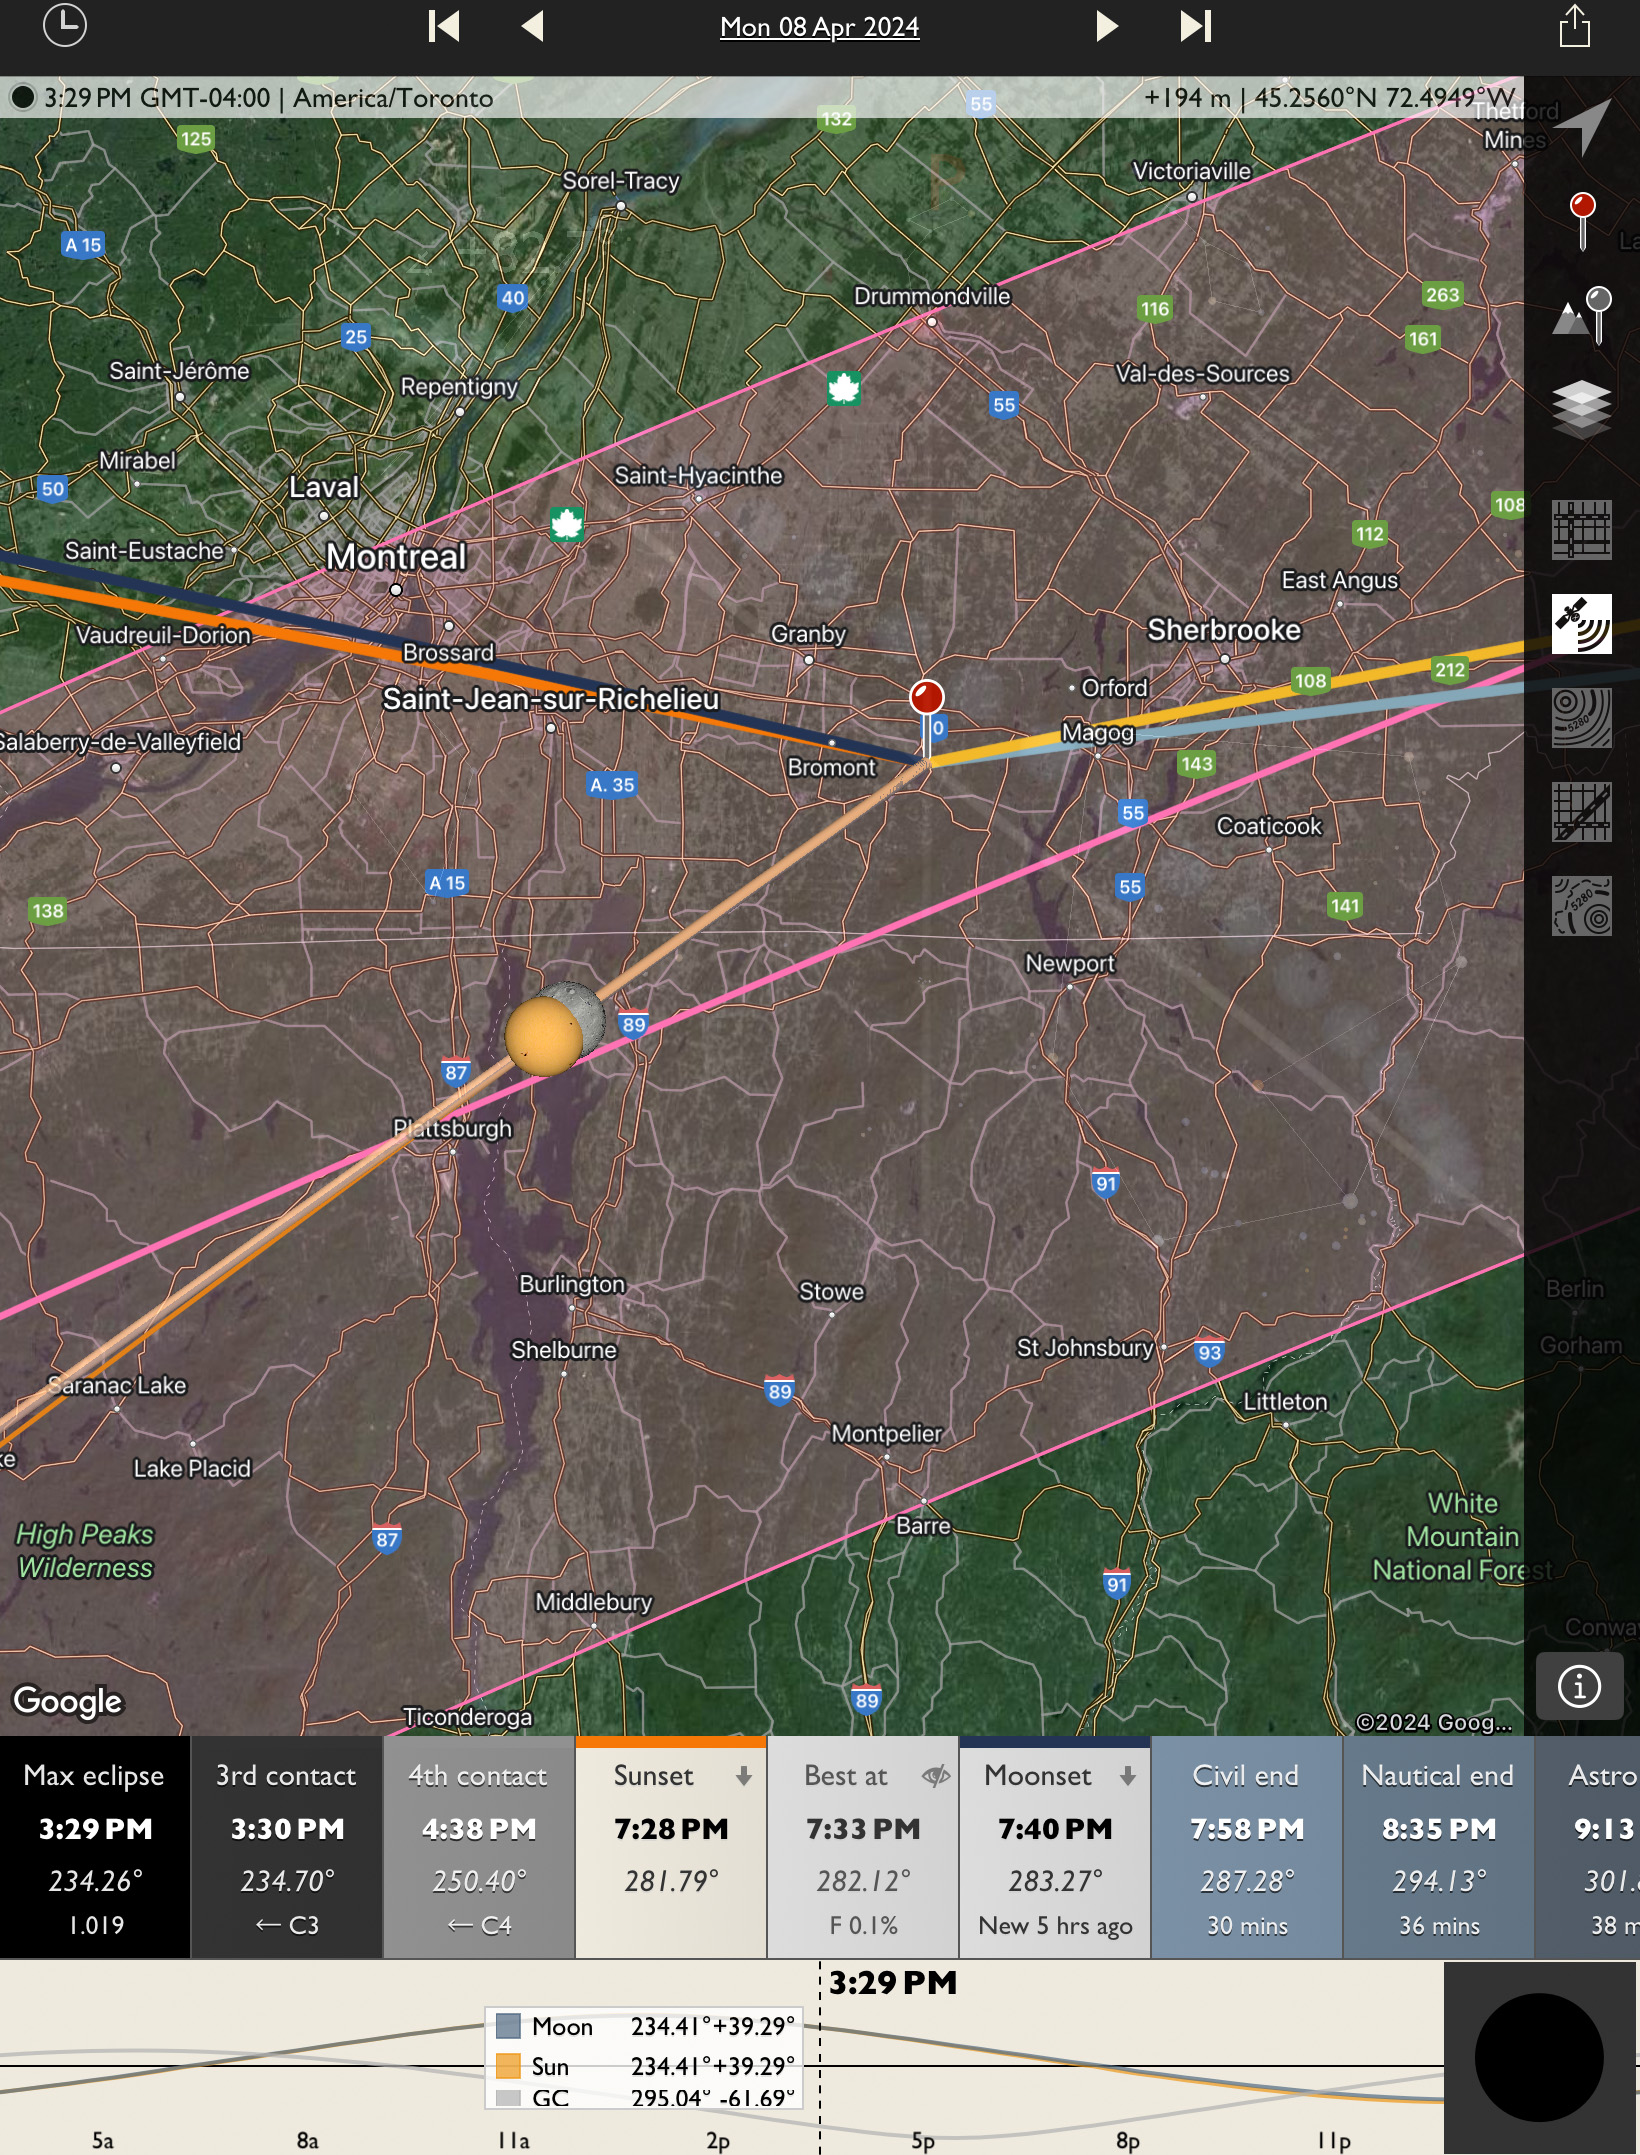
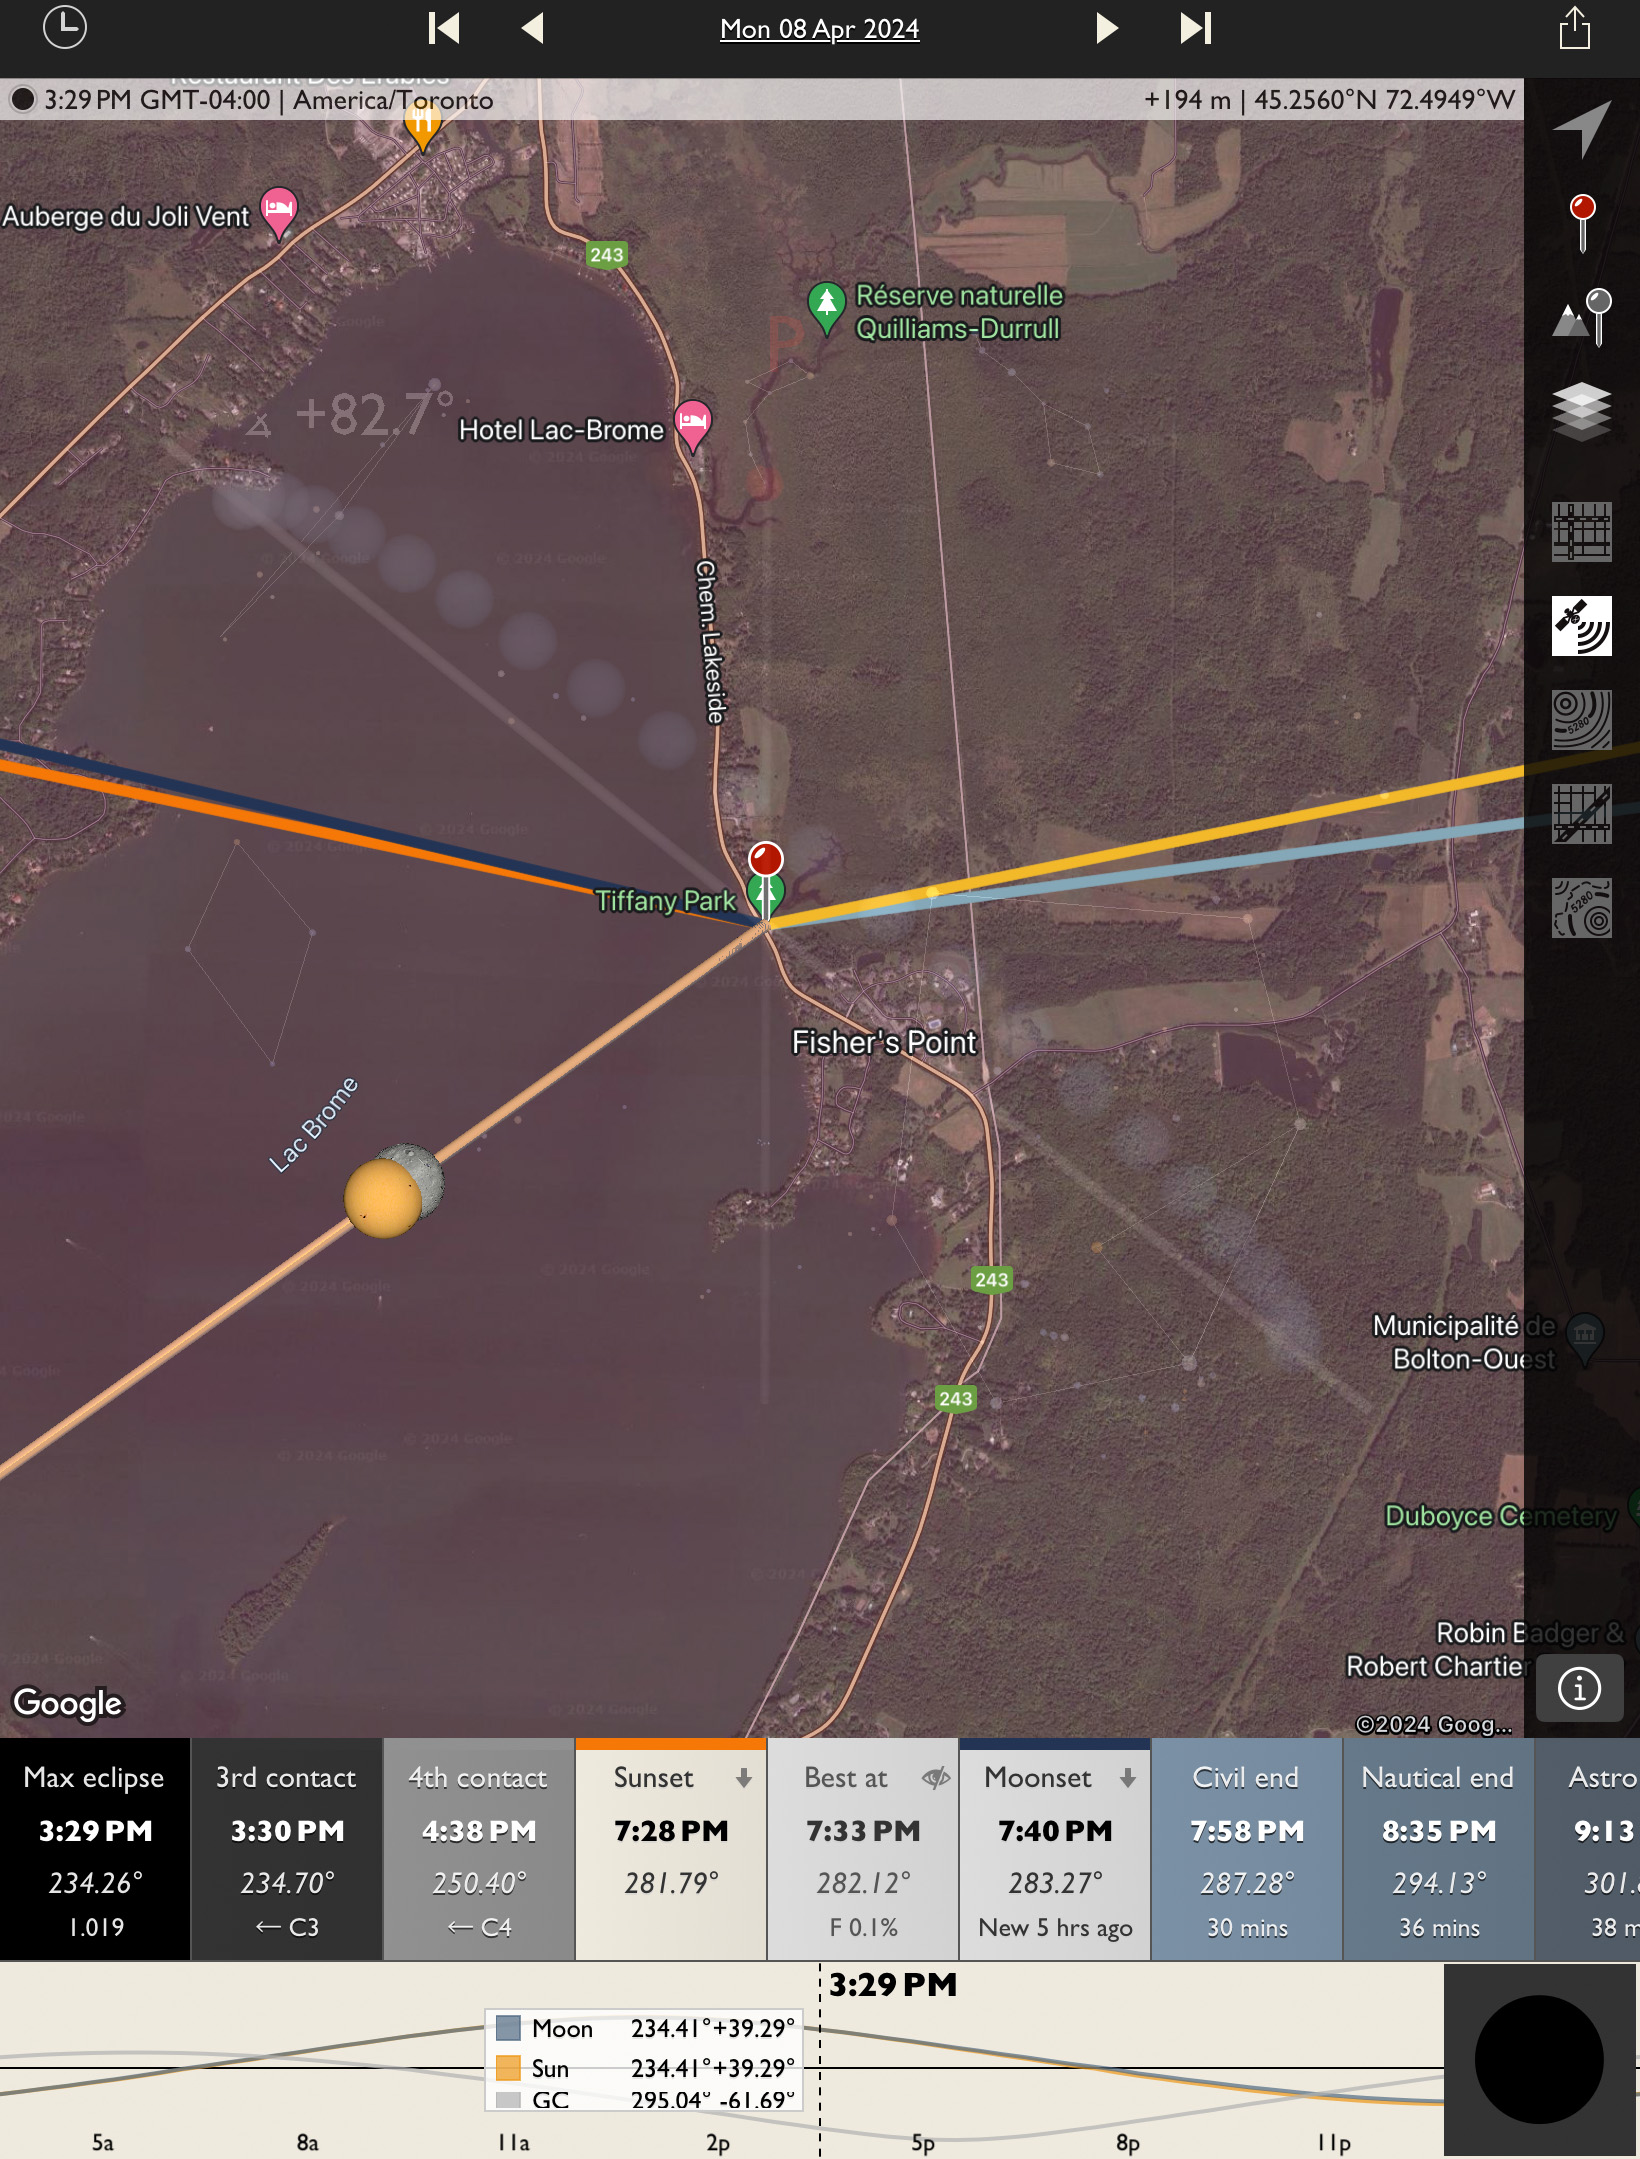
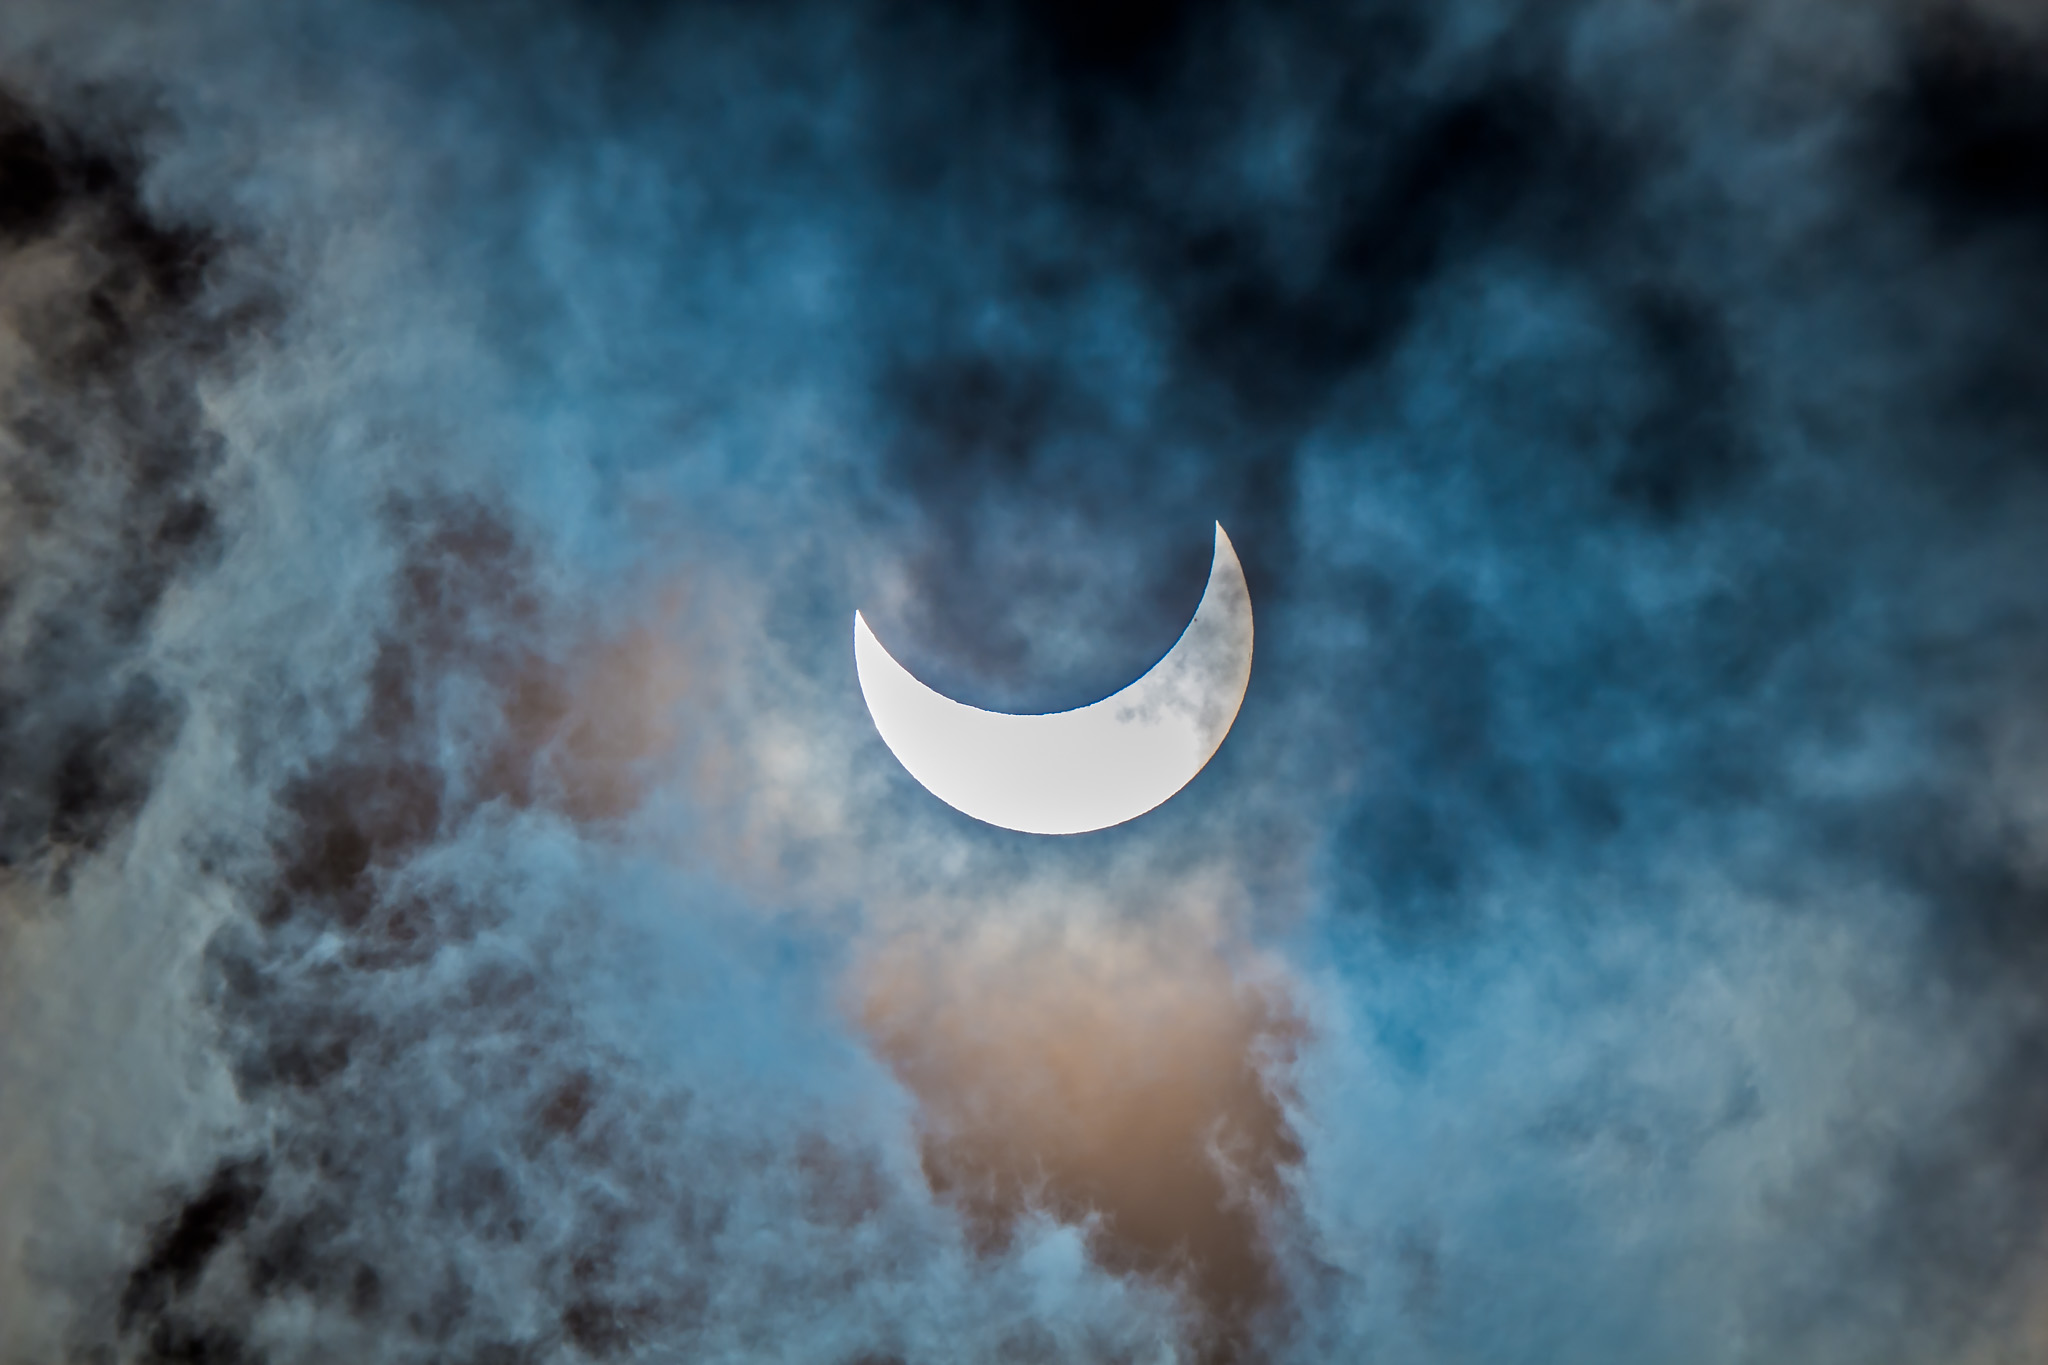
The site I found, then checked out on April 7, was on Lac Brome. It proved ideal — except for the thin cloud that was now predicted to drift through during the eclipse. 

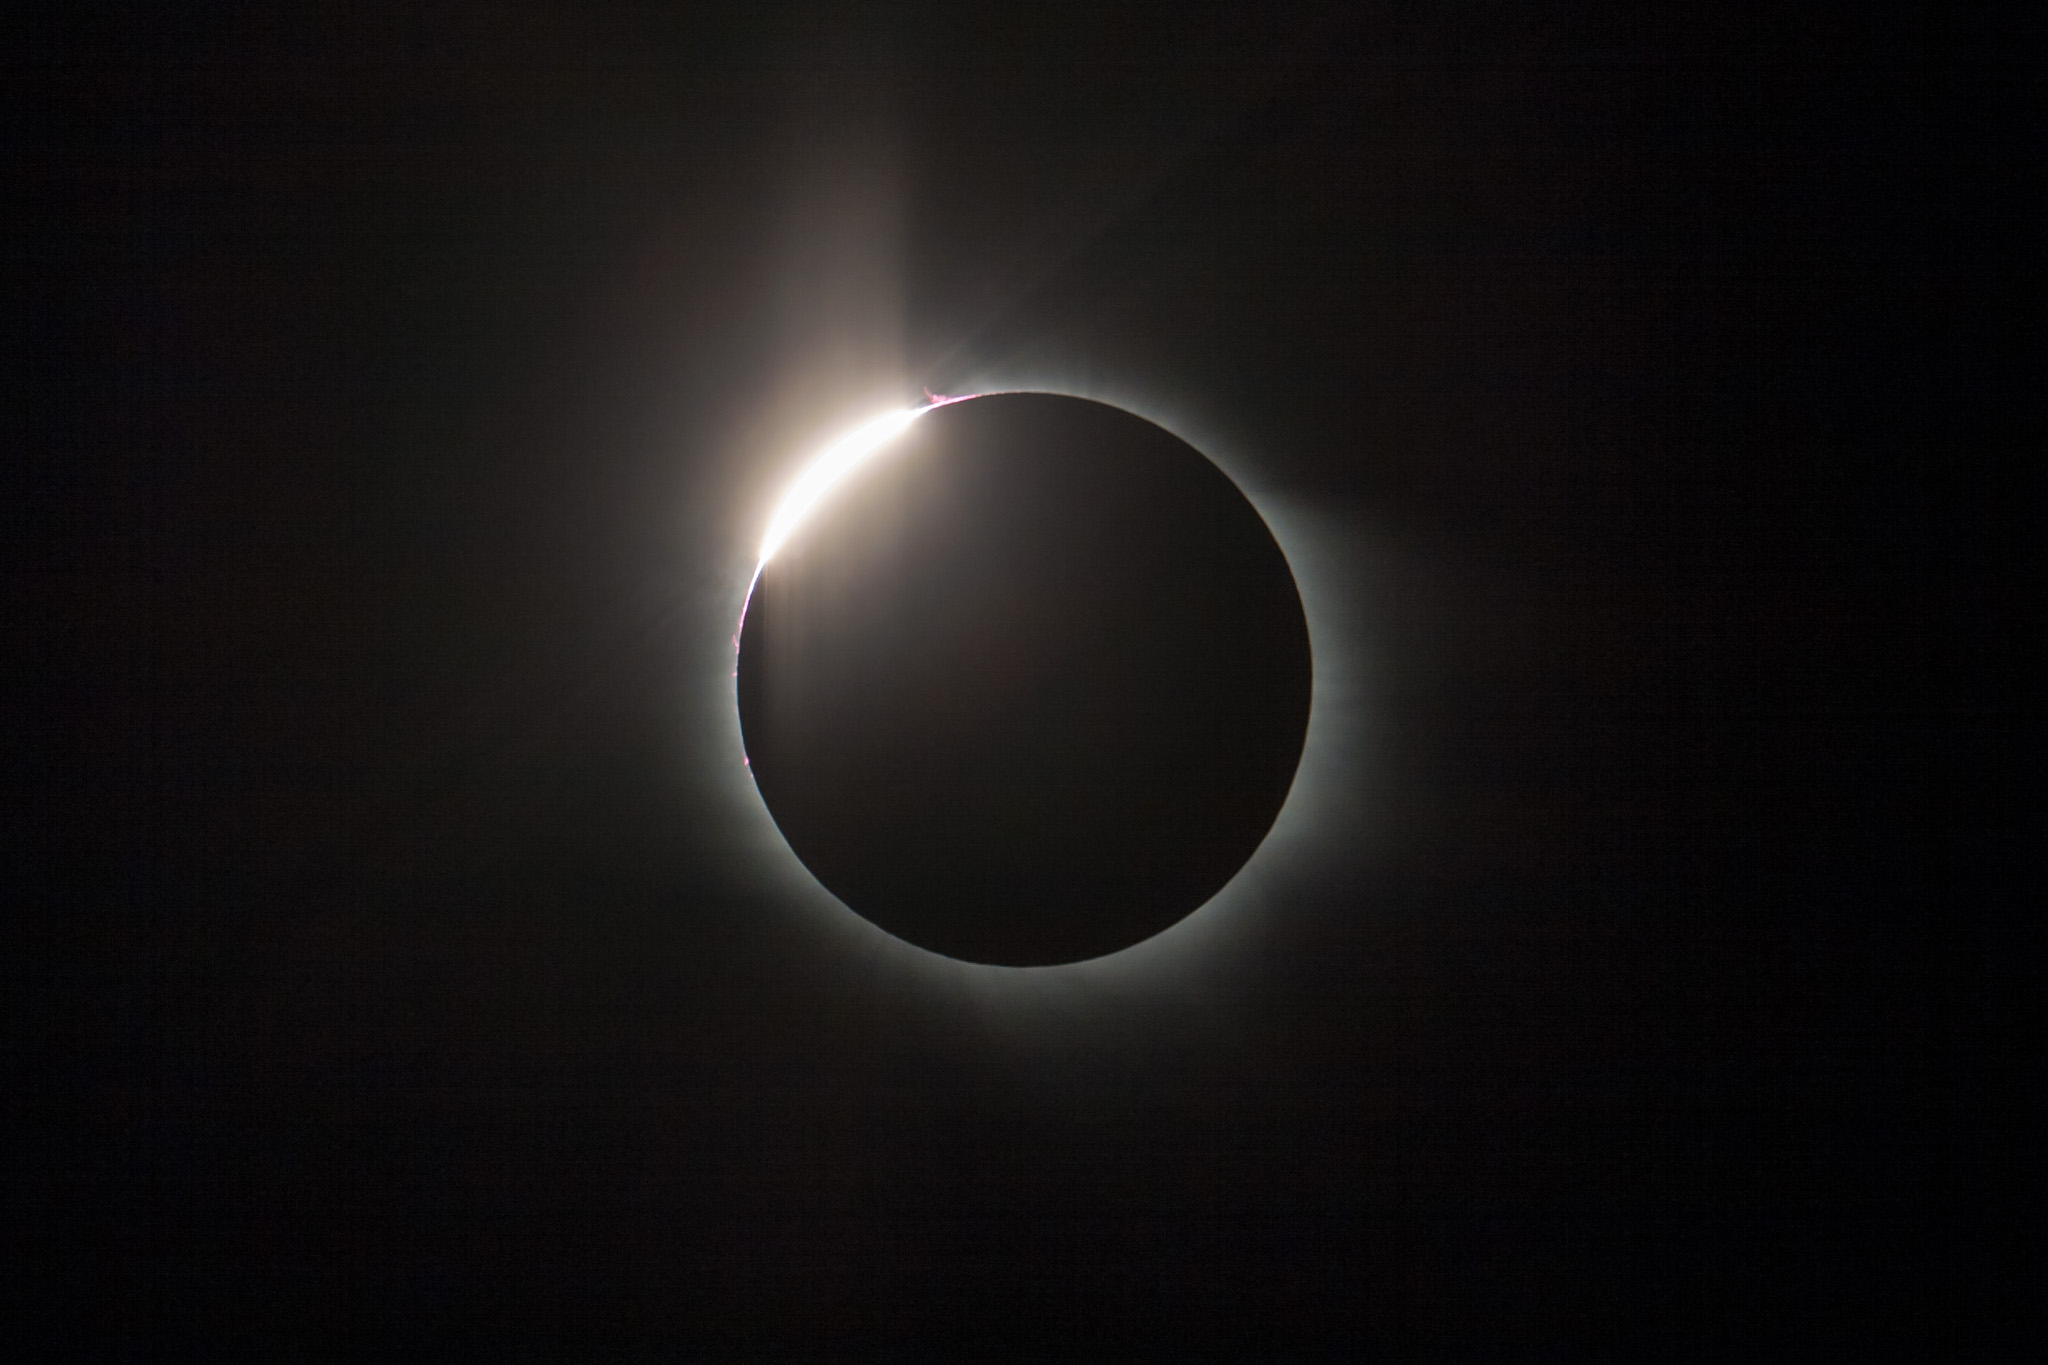
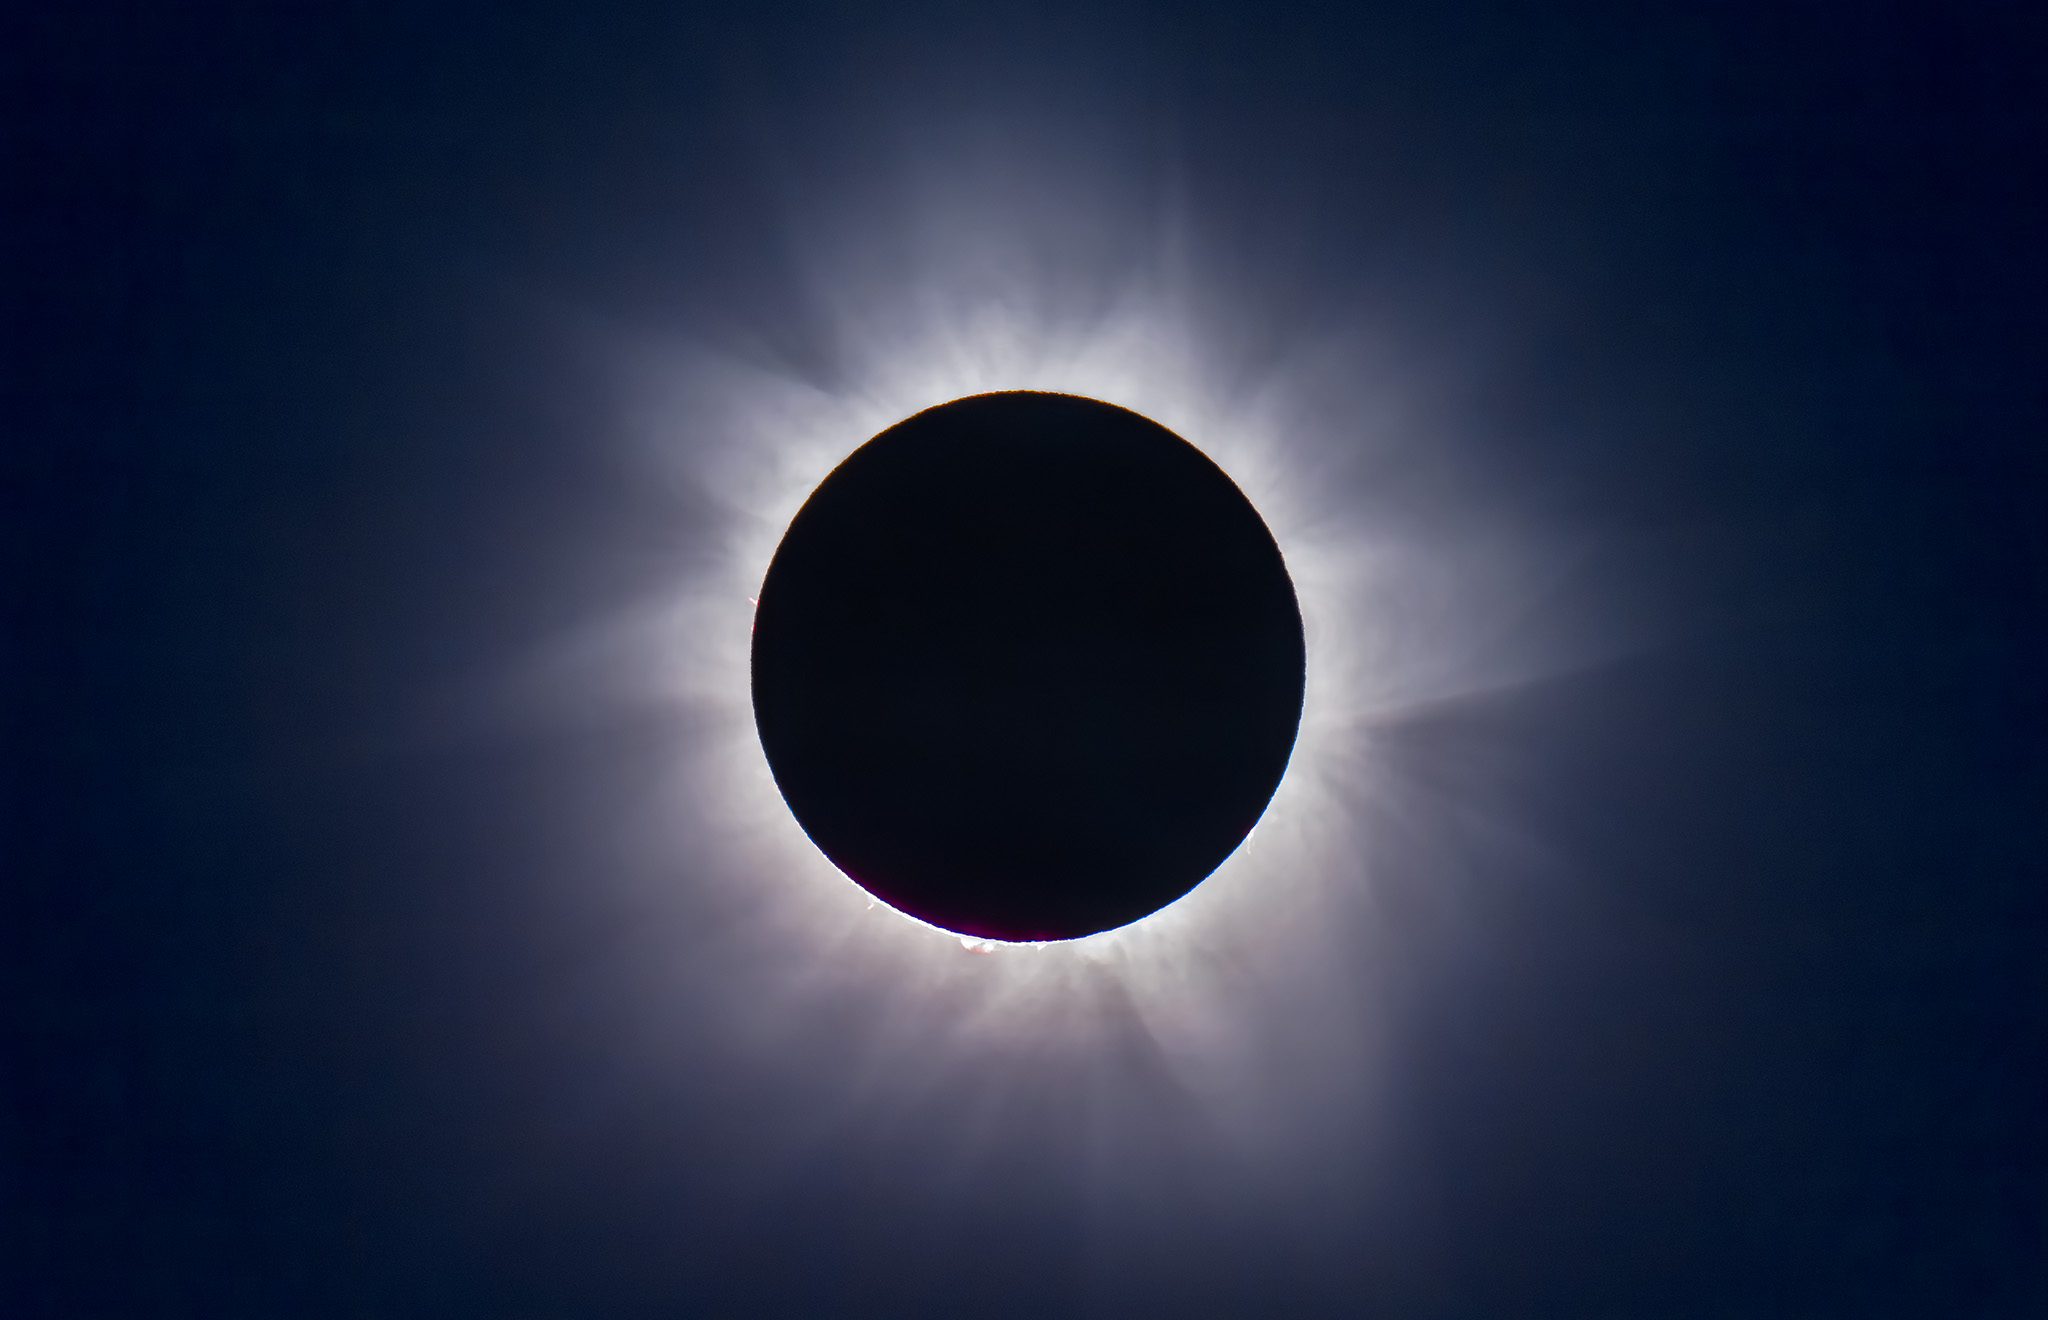
Sure enough, that’s just what happened. The cloud detracted from the eclipse only in preventing long-exposure images recording the outermost streamers in the Sun’s atmosphere. 

A wide-field view of the eclipse of the Sun, taking in the bright planets Jupiter (at top) and Venus (below) that were easily visible to the unaided eye during totality.

I could have sought out clearer skies by going even farther east, but I was in a crunch for time and hotel rooms! As it was I was able to get rooms everywhere I wanted and at normal “non-eclipse” rates! 

A panorama of the lakeside parking area at Lac Brome prior to the eclipse.

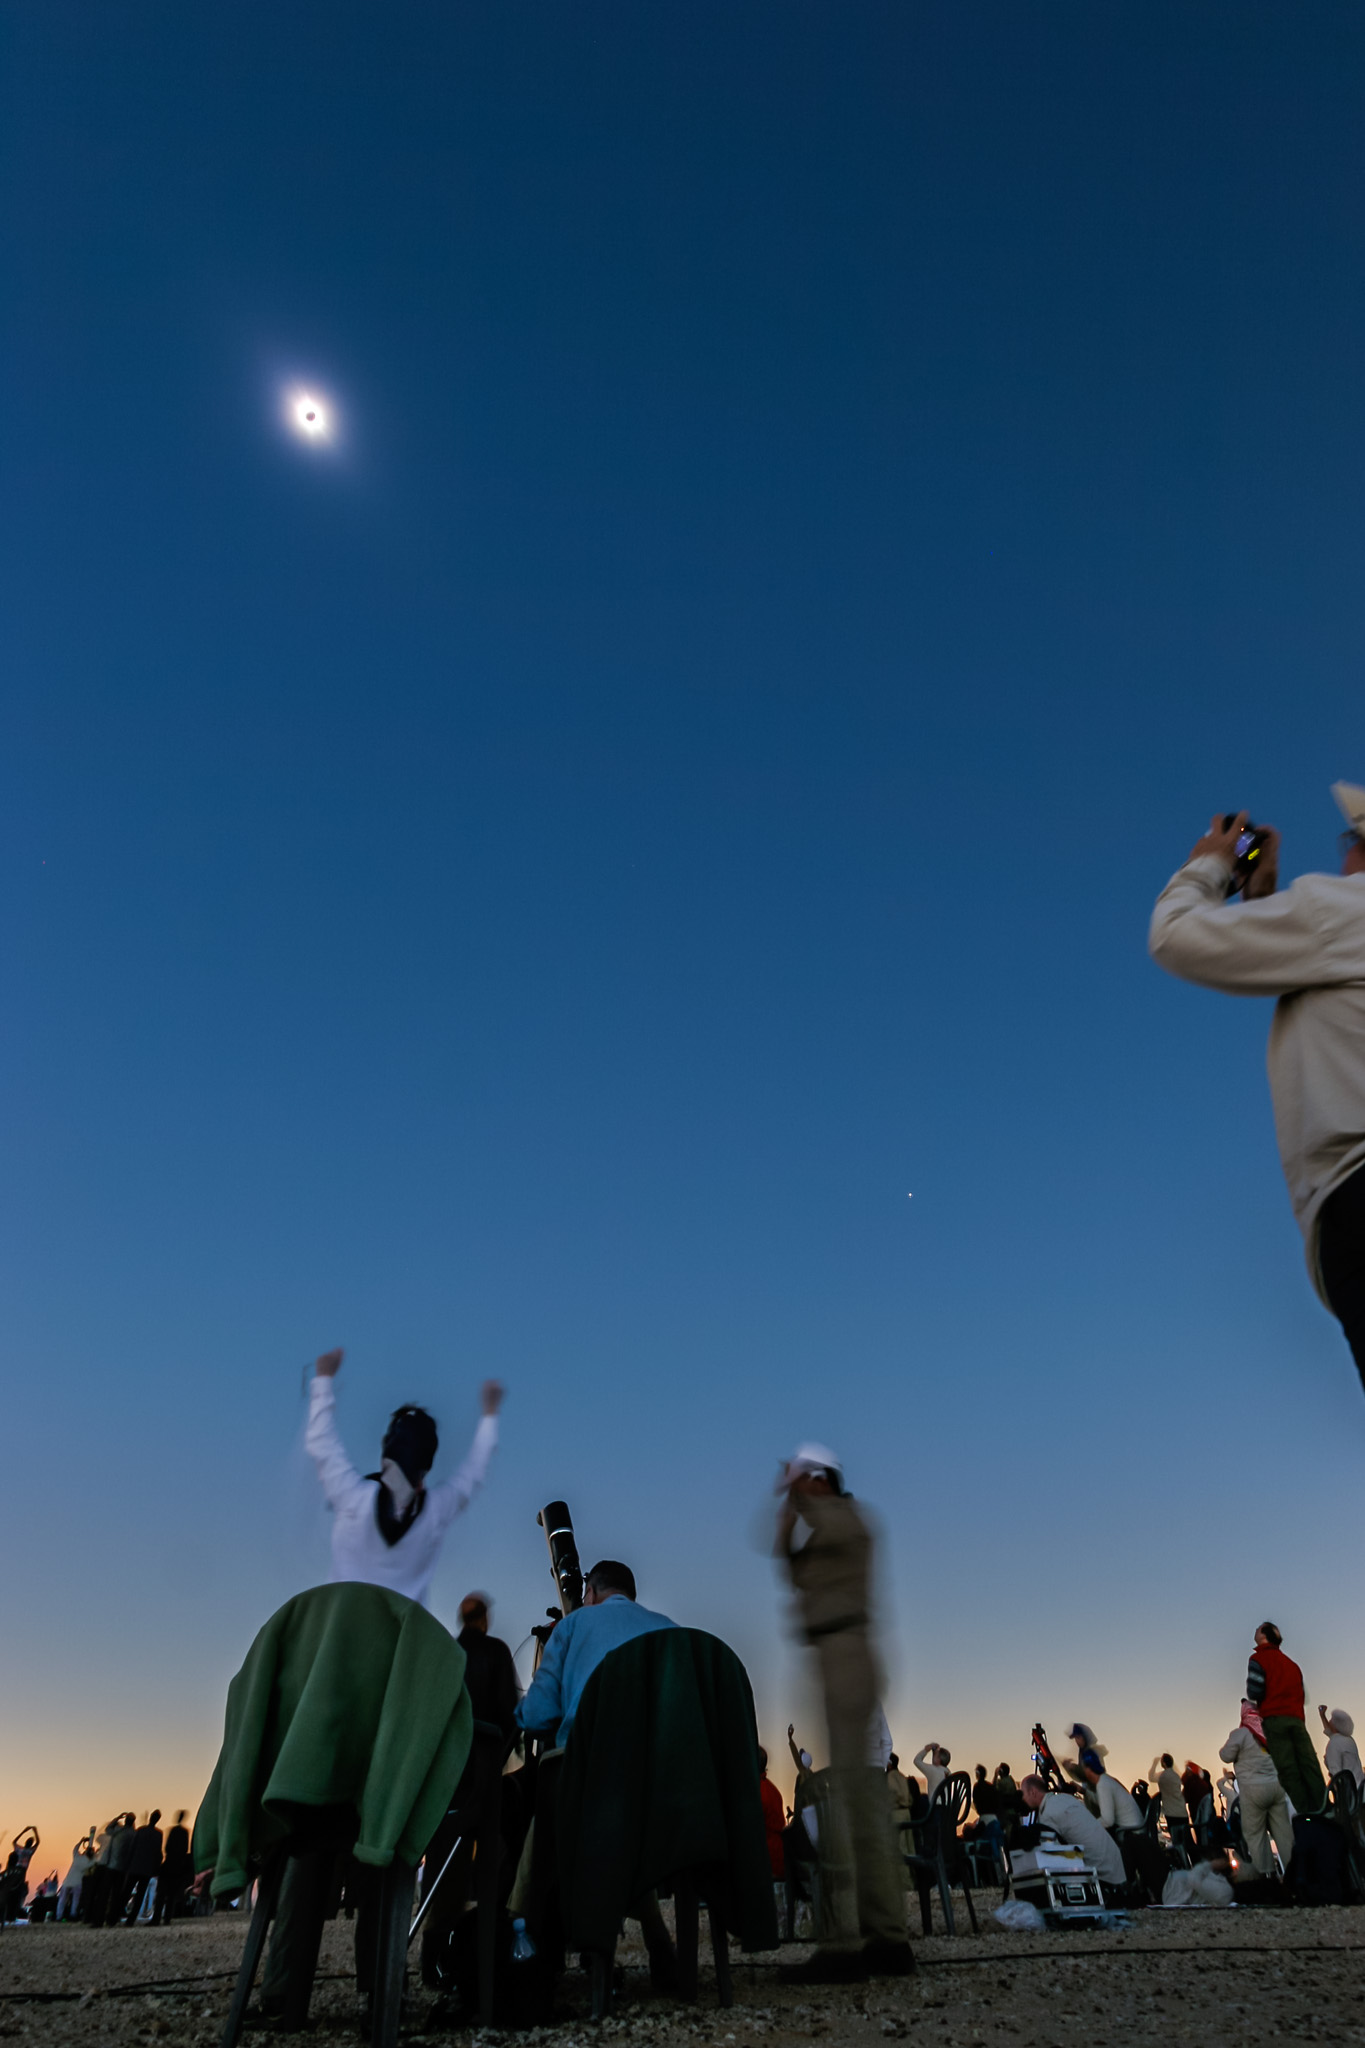
The Lac Brome site filled with cars during the day, with people from Québec and Ontario, but also from Alberta, and from Pennsylvania, Massachusetts and Maine – at least those were the homes of the folks I enjoyed meeting on eclipse day. 

Everyone had a great time and had a superb eclipse experience. 

The total eclipse of the Sun over the waters of Lac Brome, in the Eastern Townships of Quebec, Canada. The twilight colours come from sunlight from outside the shadow path.

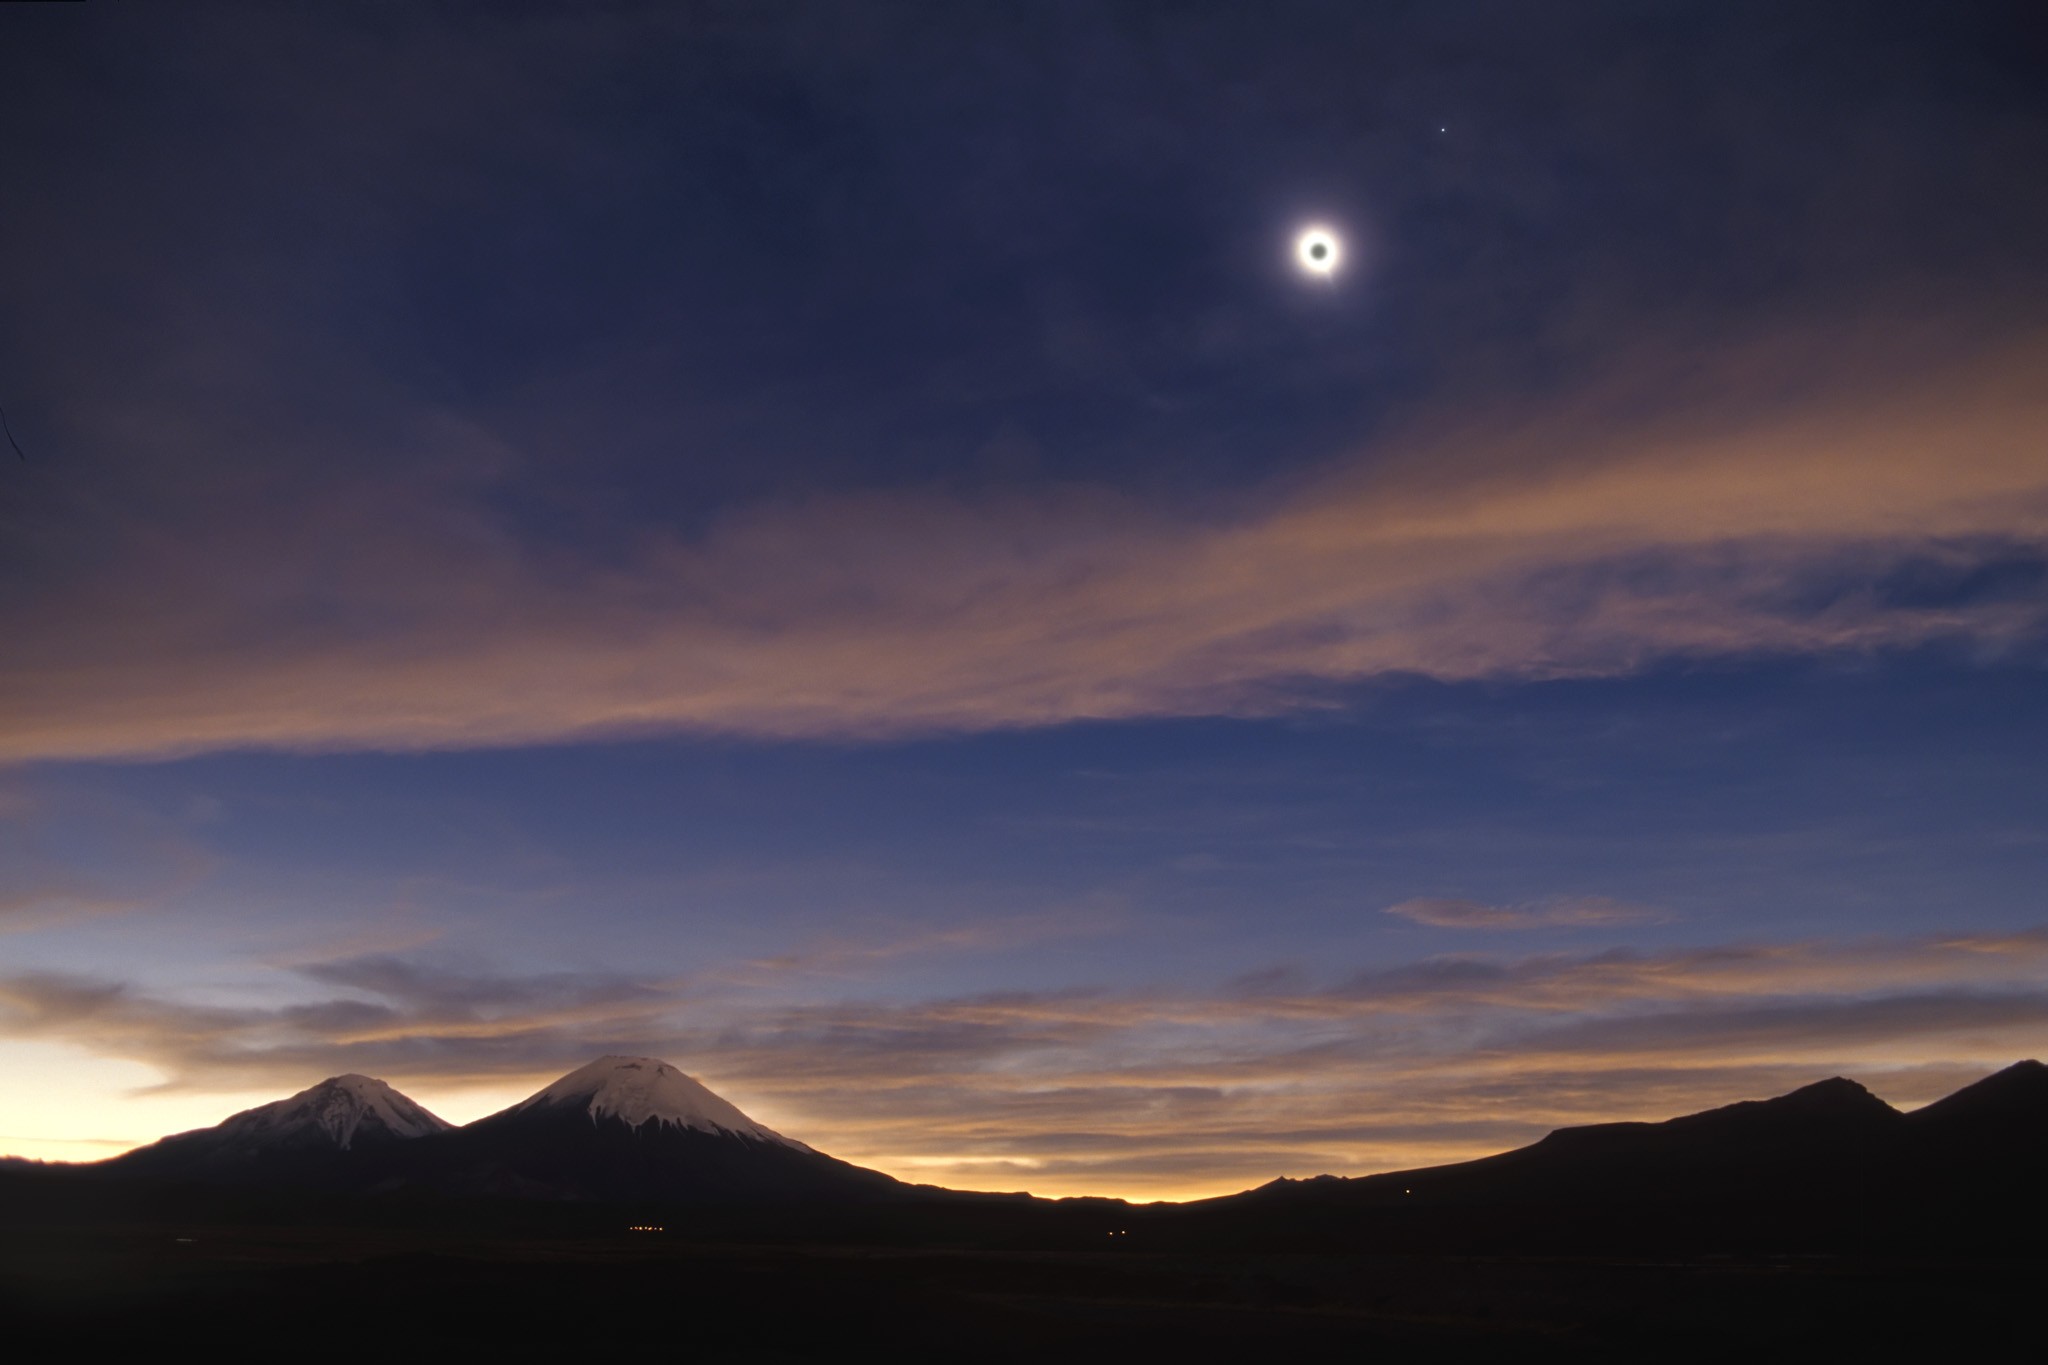
The lunar shadow arrived from the southwest, from the direction of the Sun, appearing as a dark cloud racing toward us. At the end of the eclipse the sky brightened first in that same direction, as the trailing edge of the shadow shot up across the sky. The clouds helped make the shadow edge more visible. 

A time-lapse of the arrival and departure of the lunar shadow, made of 1200 frames each 1 second apart.

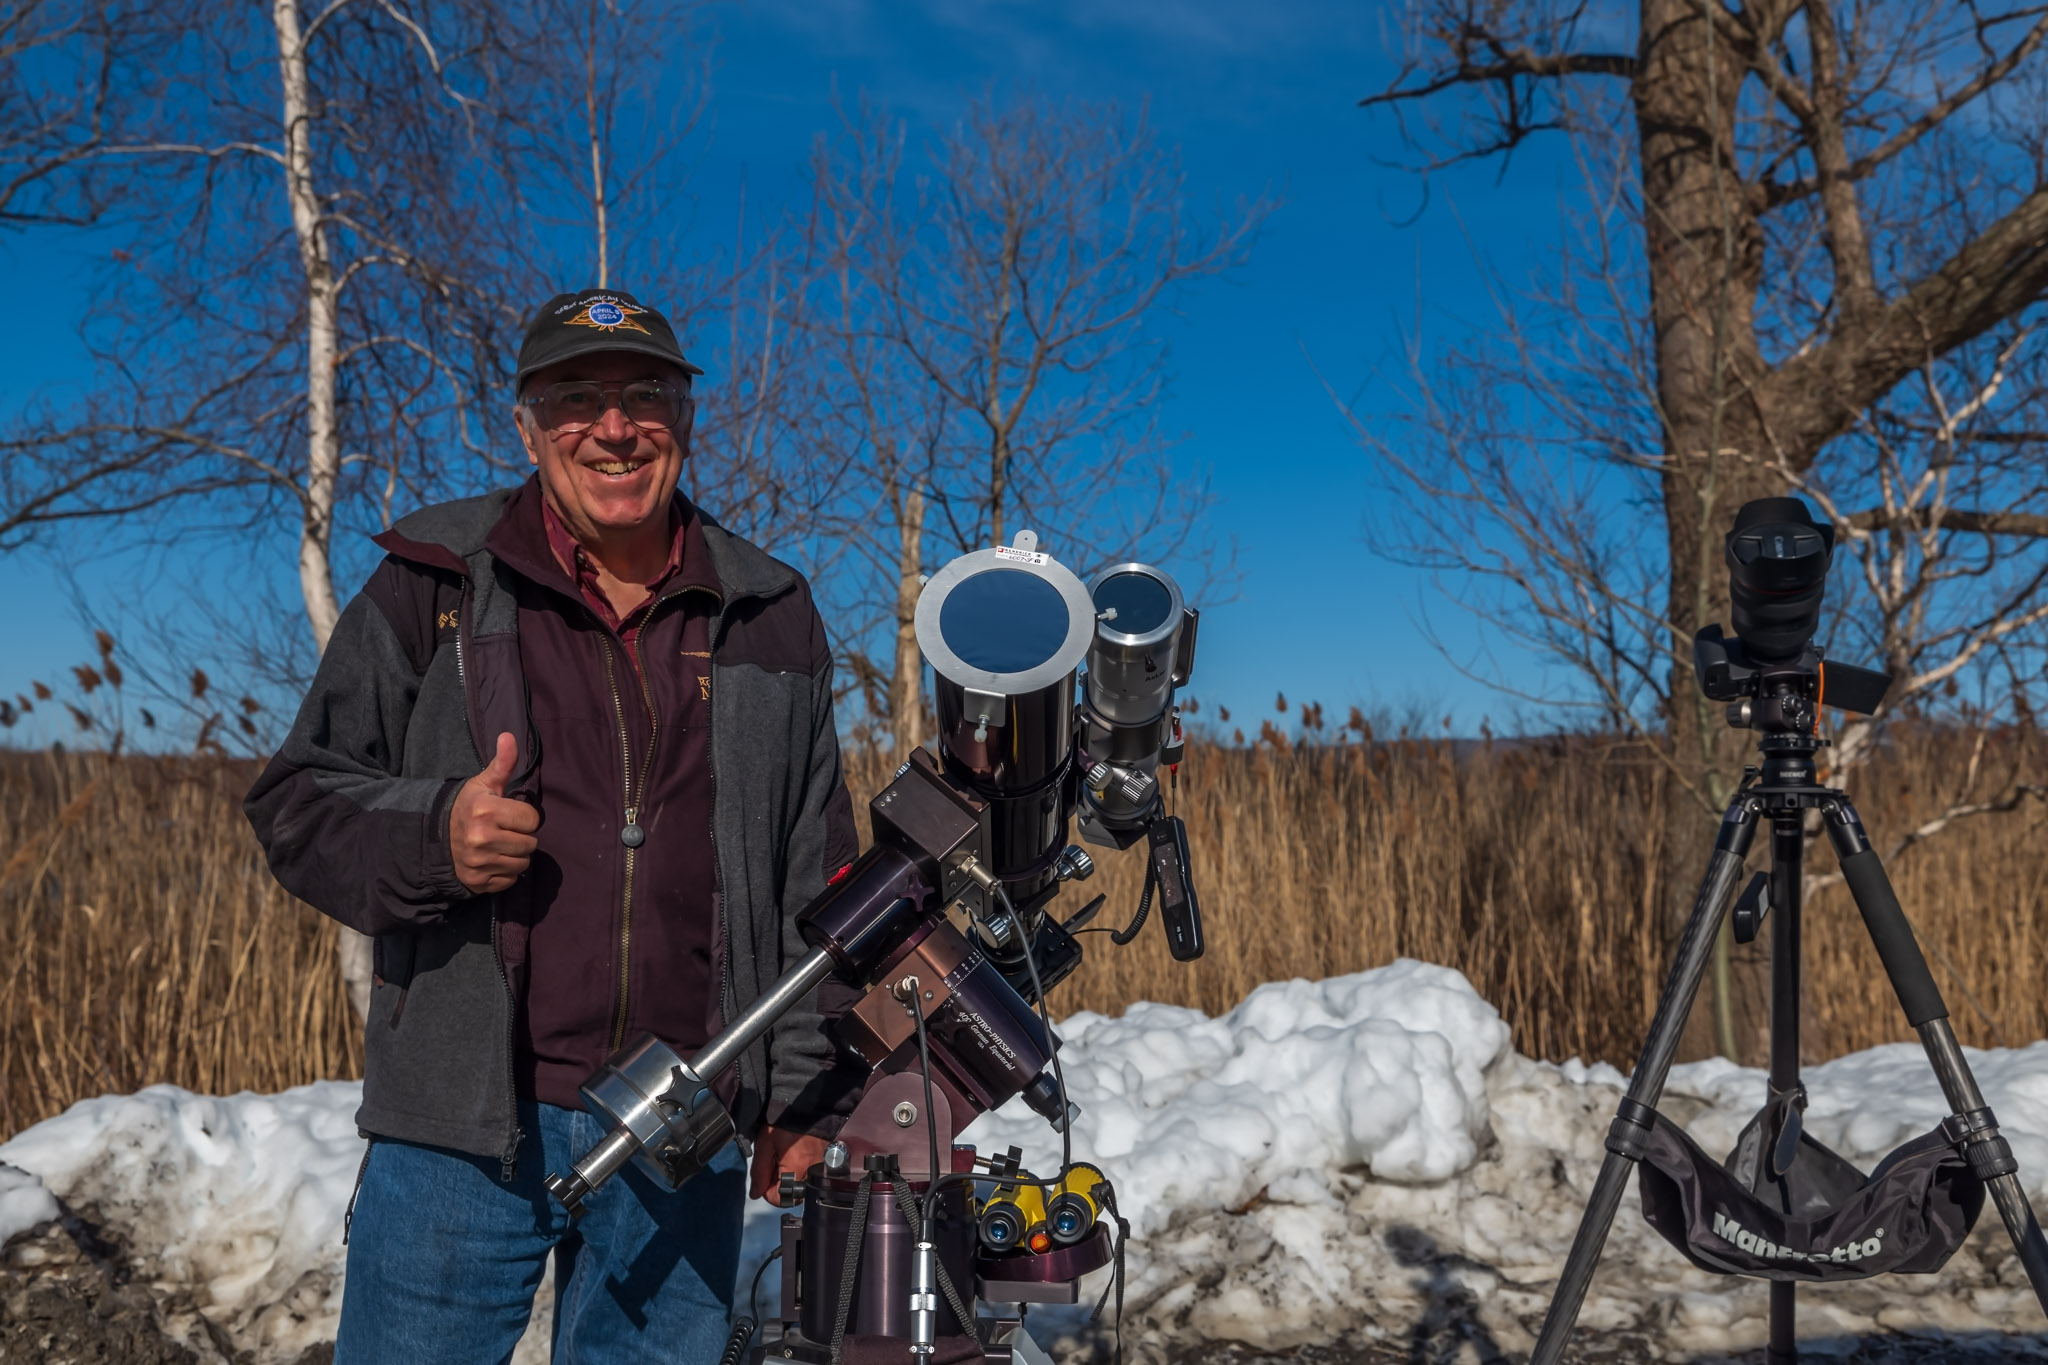
I shot with five cameras, just as I had done in 2017, possible only because I drove. 

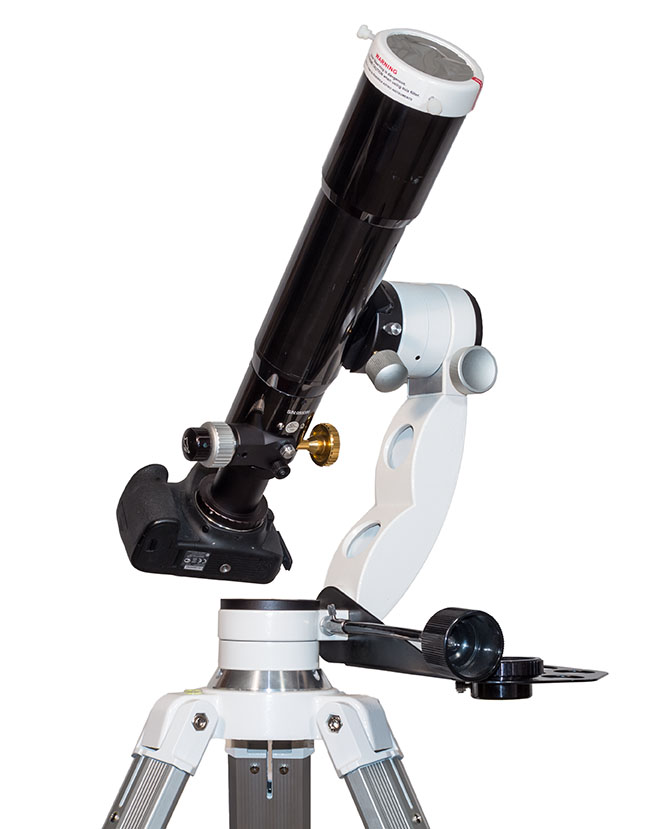
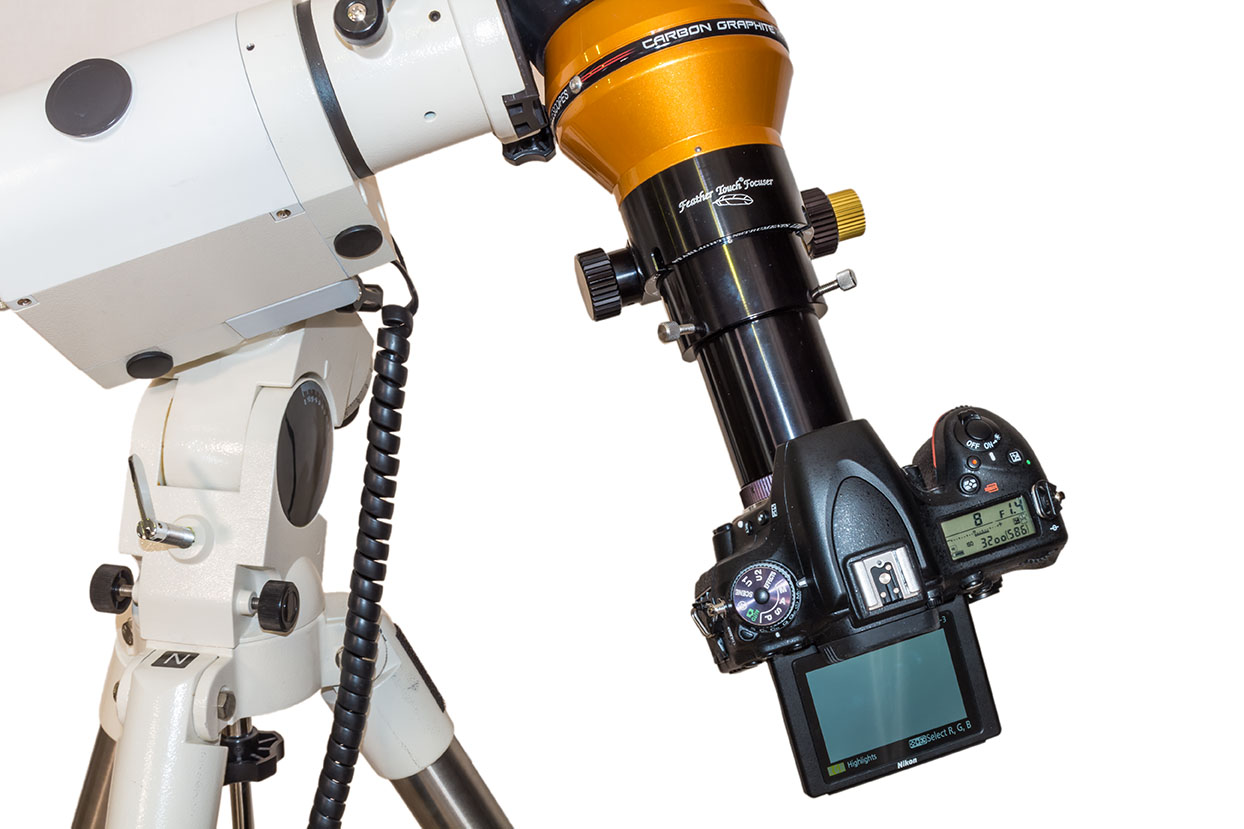
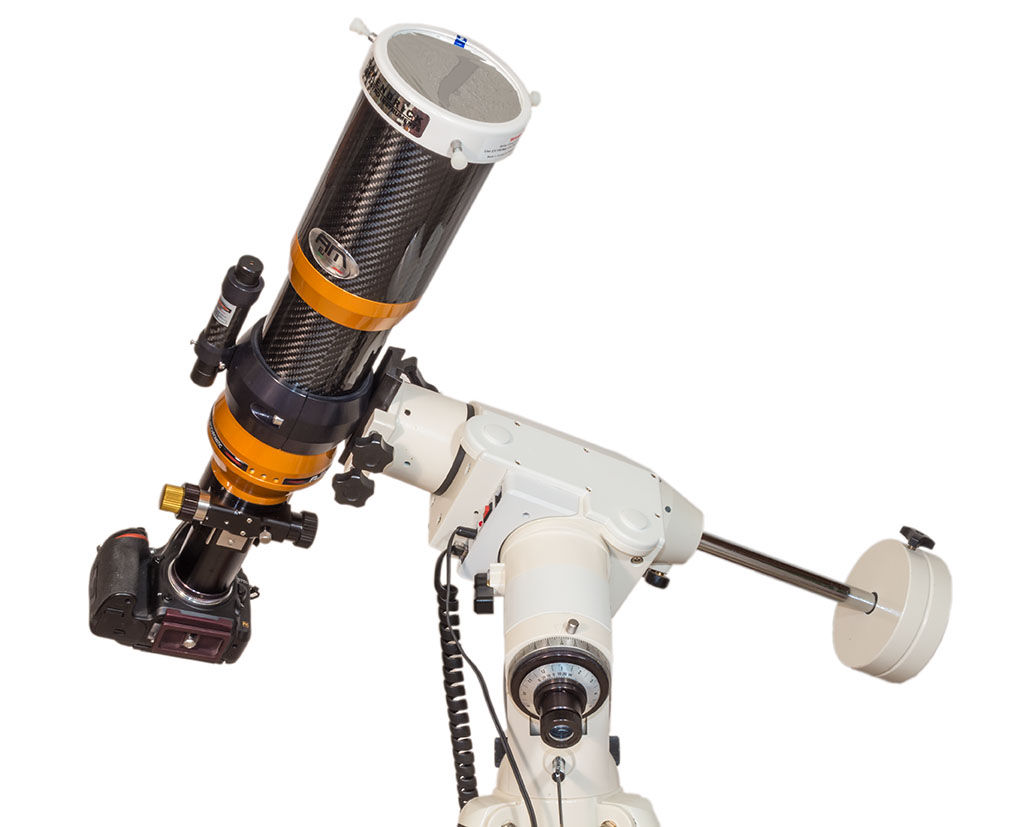
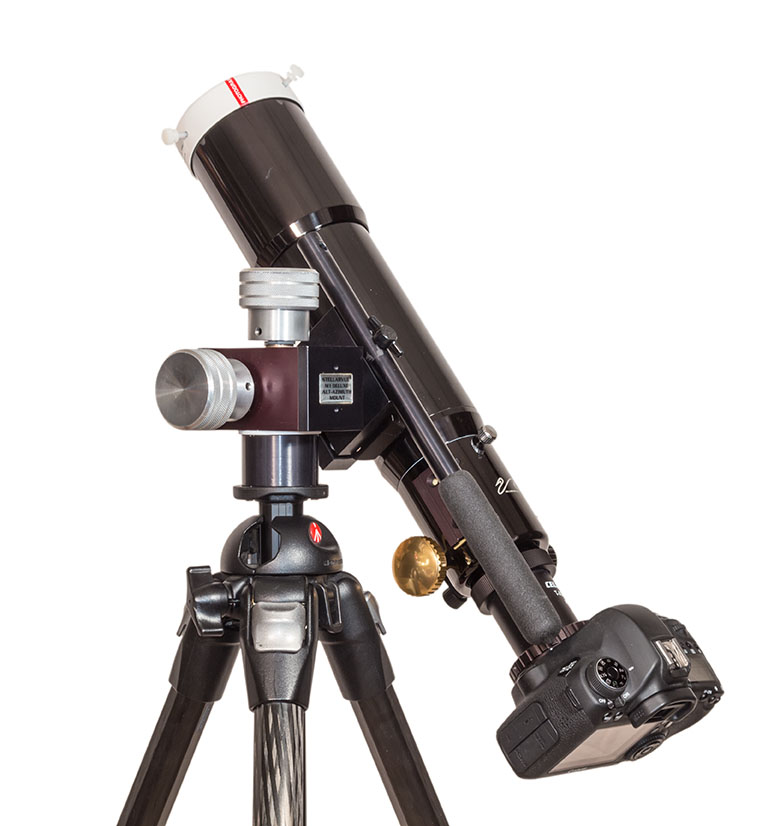
The main rig was my faithful Astro-Physics Traveler, a 105mm refractor telescope the company owner designed for his personal use at the 1991 eclipse in Mexico. 

My main eclipse rig, with a 60mm visual scope on the 105mm photo scope, on an equatorial tracking mount.

My Traveler, bought in 1992, has lived up to its name, having now been to six central solar eclipses: the annular eclipses of 1994 (Arizona) and 2023 (Utah), and the total eclipses of 1998 (Curaçao), 2012 (Queensland, Australia), 2017 (Idaho), and now 2024 in Québec, Canada. I paired it with the wonderful matching AP400 mount, which I had only just brought back with me the month before from Australia, where it had spent the last two decades. 

All the gear worked great. Unlike six months earlier for the October 14, 2023 annular eclipse in Utah, this time I remembered all the cables needed to have the telescope mount track the Sun.

I did mess up on a couple of settings (such as not framing the 4K movie camera as I should have – in pre-eclipse excitement I just forgot to check my chart). But none of the errors were serious. 

The eclipse in a blend of two exposures to display all the fiery pink prominences that were visible during totality around the lunar disk in one image, set against the bright inner corona of the Sun with the dark disk of the Moon in silhouette in front of the Sun.

Once started all my cameras, except for the one on the Traveler, ran unattended. 

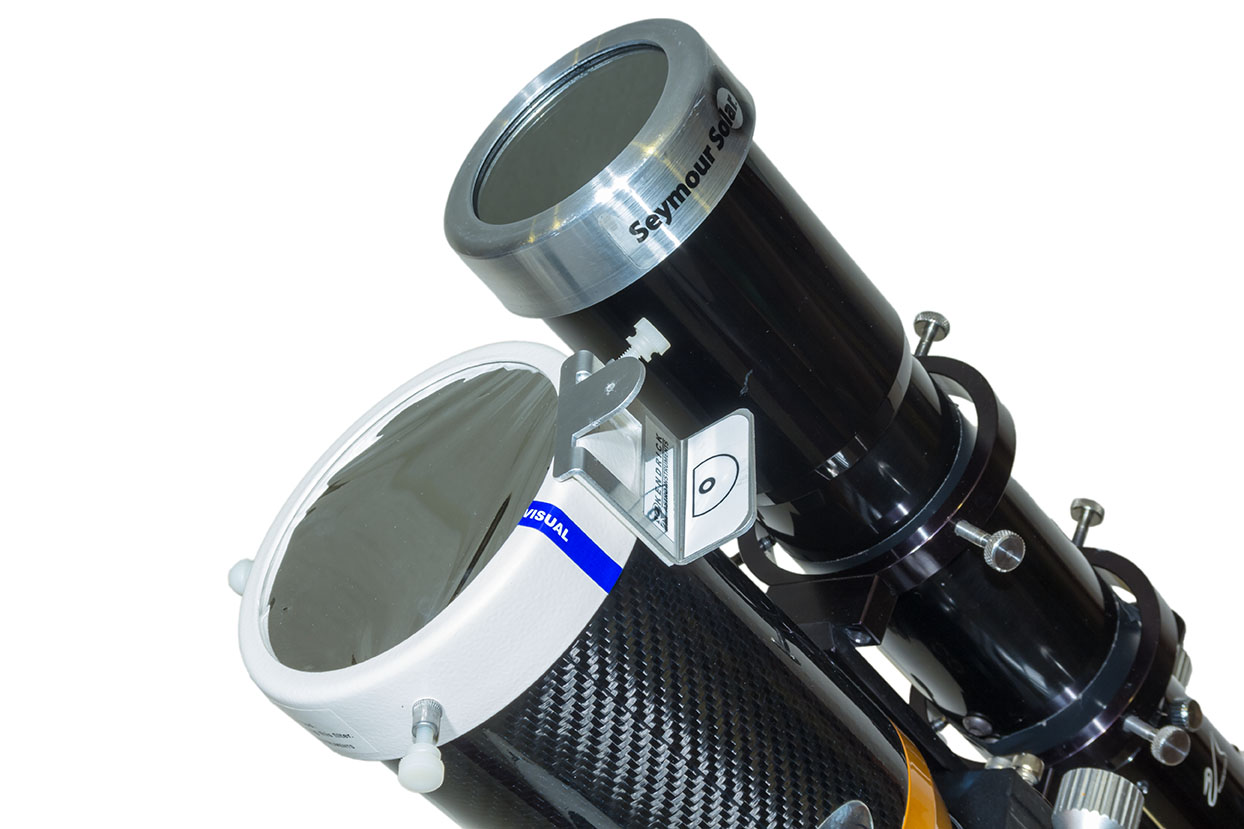
At this eclipse I was determined to get a good look at it through the small visual scope I had piggybacked onto the Traveler photo scope. While I had used a similar rig in 2017, I only thought to look through the visual scope 20 seconds before totality ended. 

Not this year. 

A telescopic close-up of the eclipsed Sun. Onto the central blend of images for totality I layered in single images of each of the diamond rings before and after totality. They are when the last or first burst of sunlight shines through lunar valleys. The first diamond ring is at top left, the last at bottom right, so time runs from left to right.

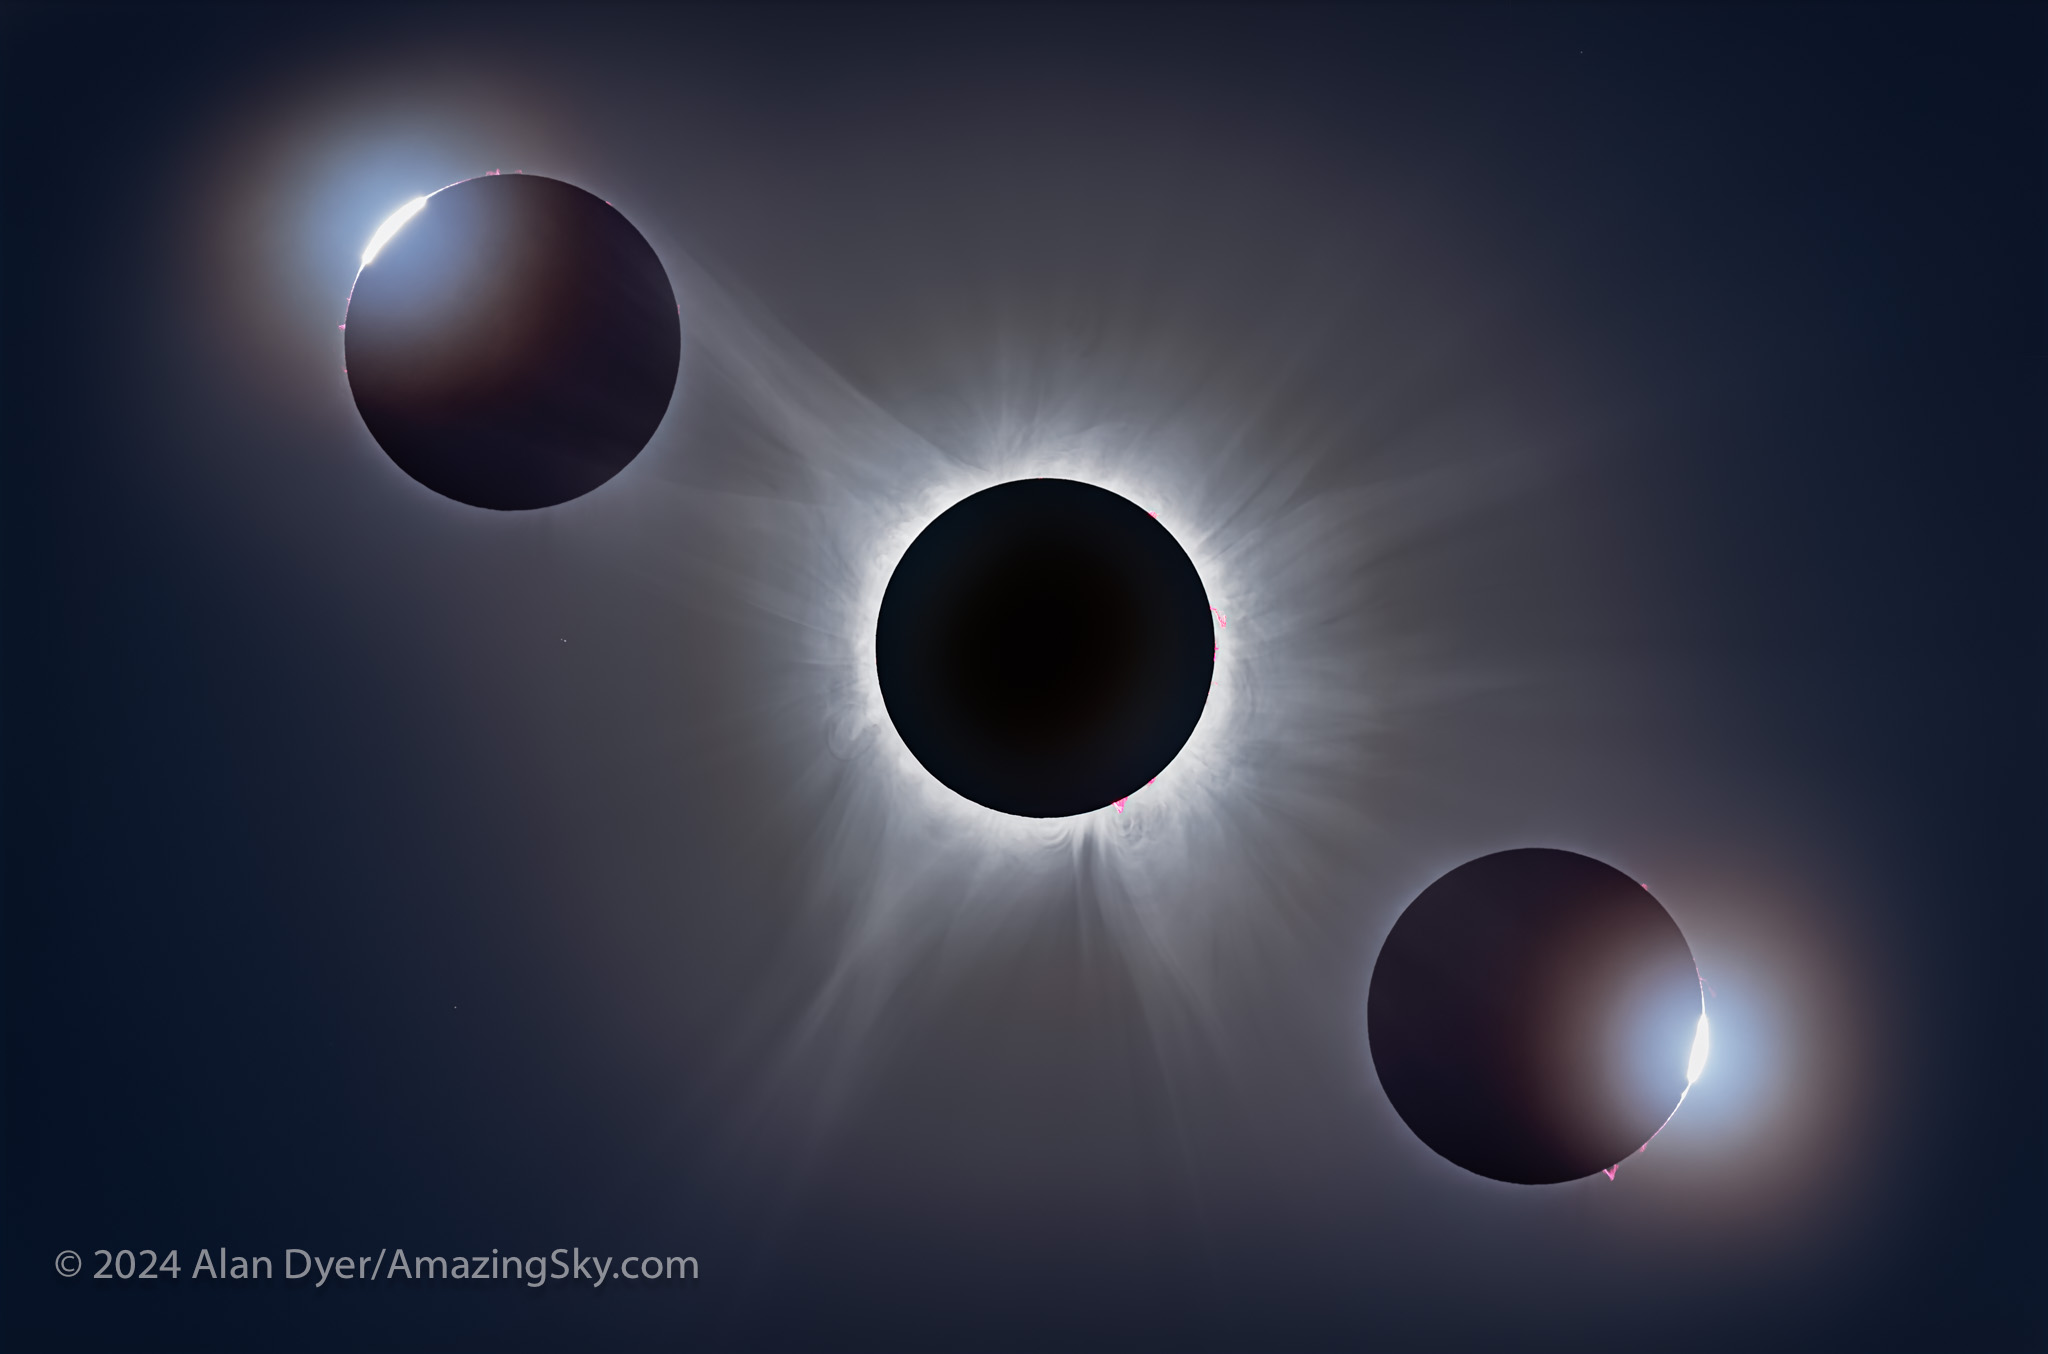
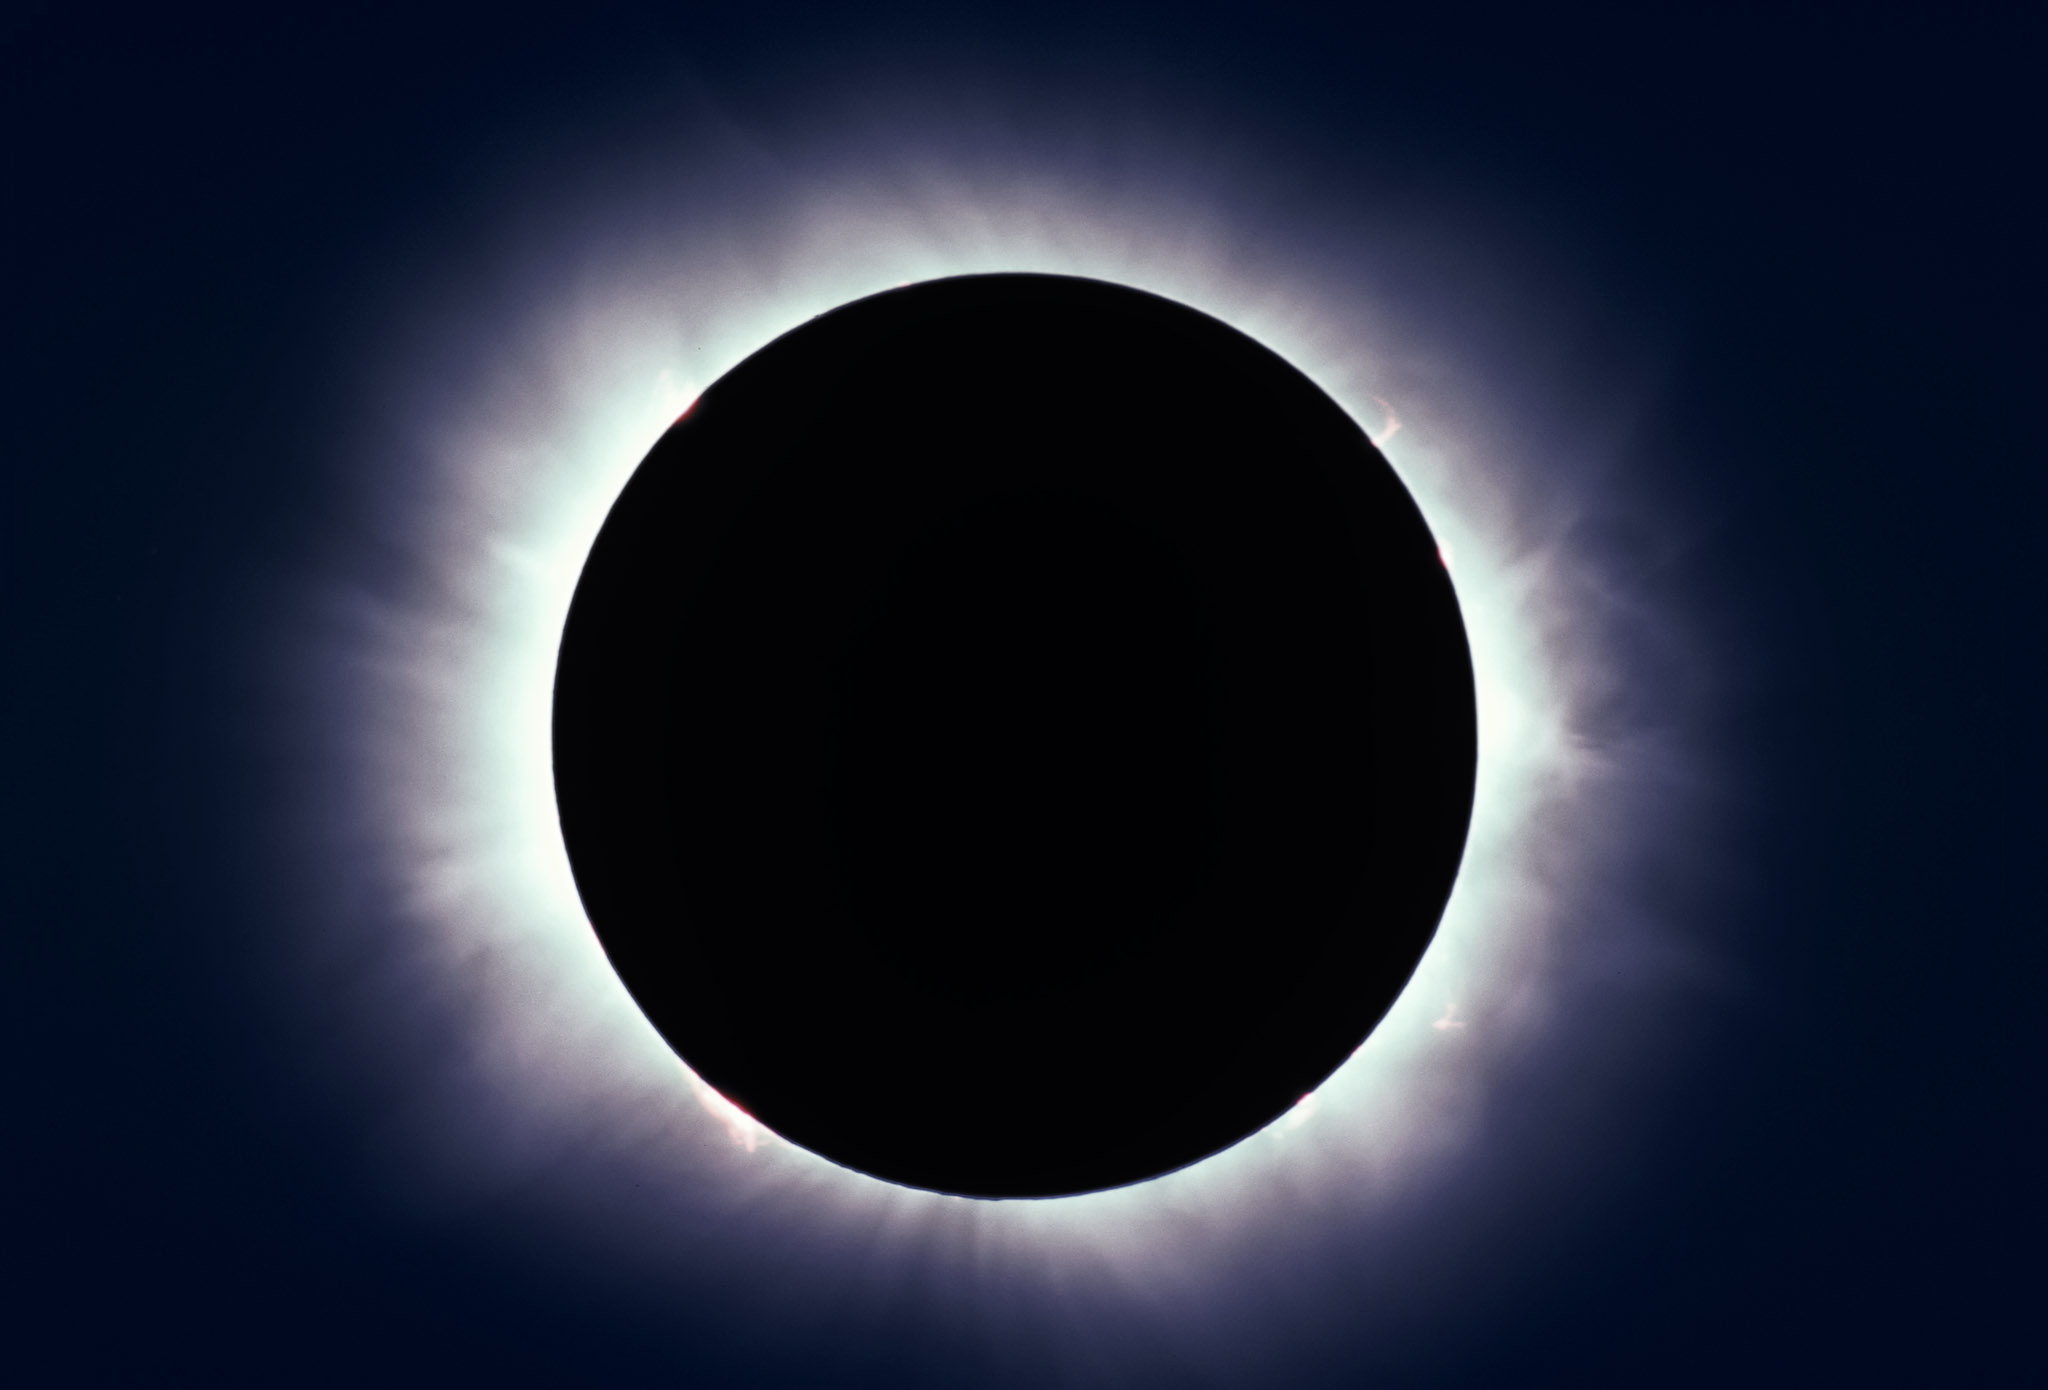
I got a great look at the eclipsed Sun, its corona structures, flaming pink prominences, and breakout of the red chromosphere layer just as totality ended. (You can’t easily see the chromosphere at the start of totality as it can be risky looking too soon through optics when the Sun’s blindingly bright photosphere is still in view.) 

This is a composite showing the sequence of events surrounding totality, from just before totality (at upper left) to just after totality (at lower right), with totality in the middle. The contact images were taken 0.6 seconds apart.

And yet, as at all eclipses, I found the naked eye view the most compelling. The “black hole” Sun looked huge and unearthly. While I had binoculars handy, the same 12×36 image-stabilized binoculars I bring to most eclipses, I completely forgot to look though them, just as I forget at most eclipses! 

This is a composite showing the complete sequence of the April 8, 2024 eclipse of the Sun, from first contact (at upper left) to last contact (at lower right), with totality at mid-eclipse in the middle.

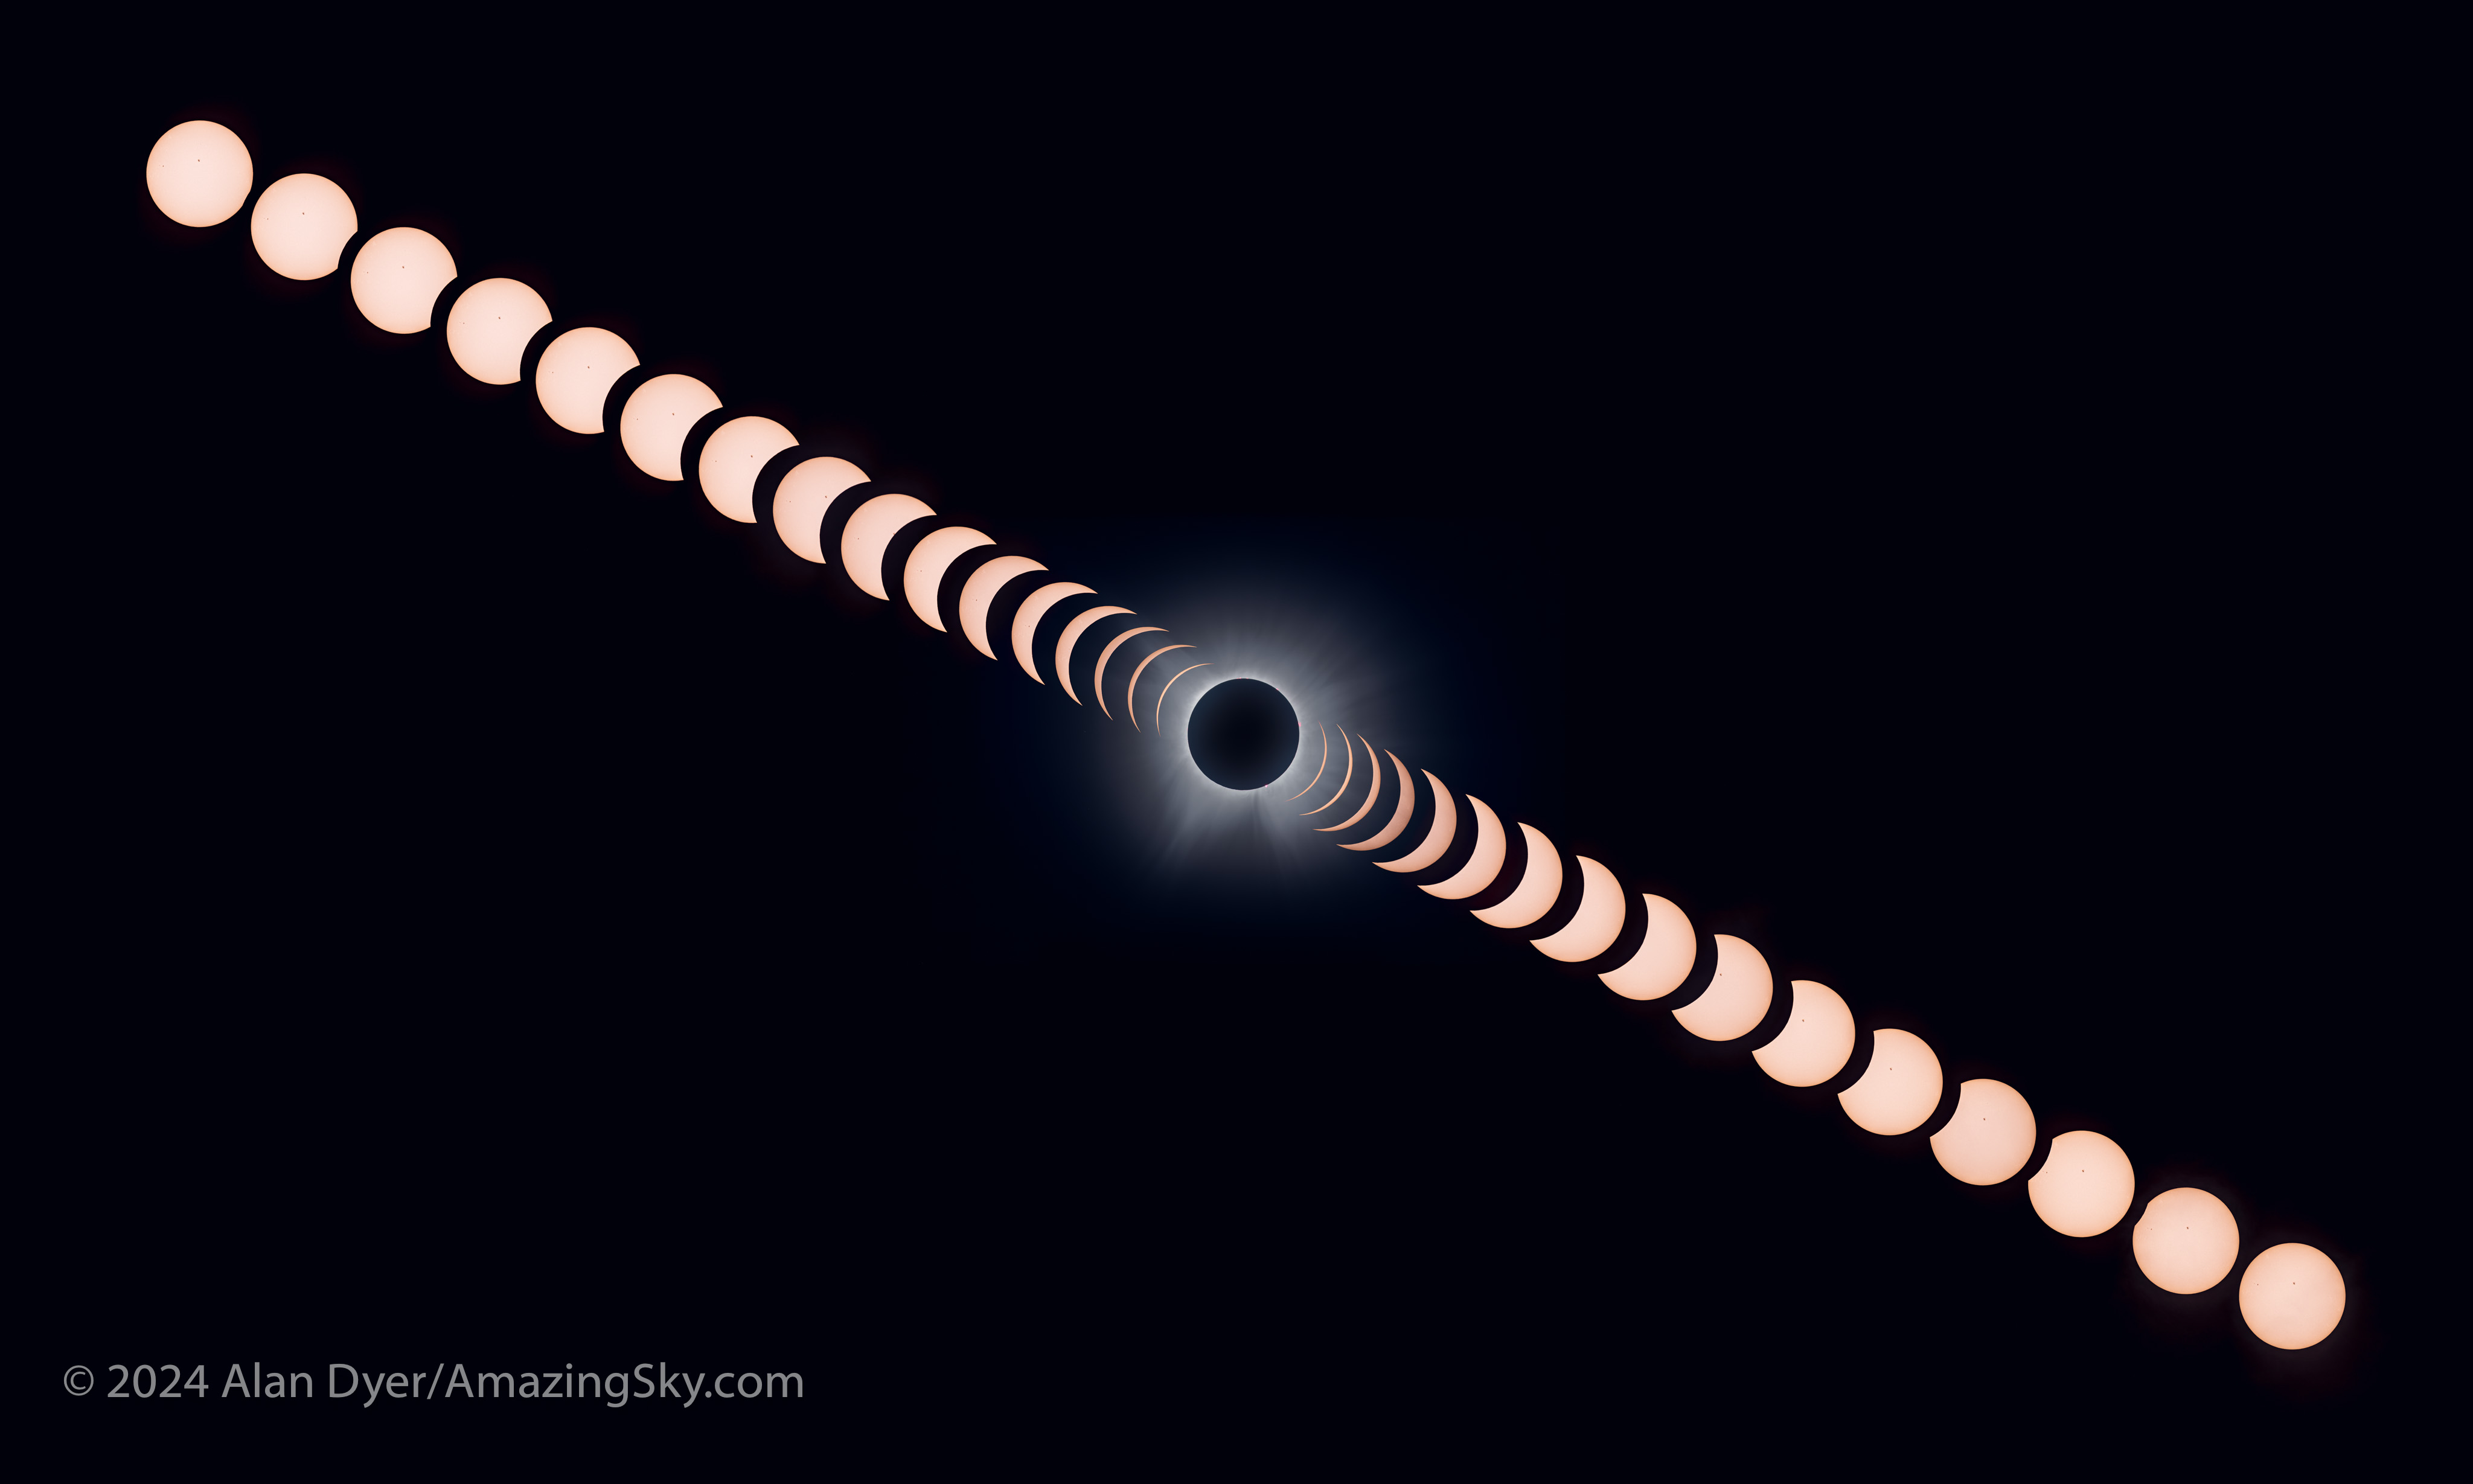
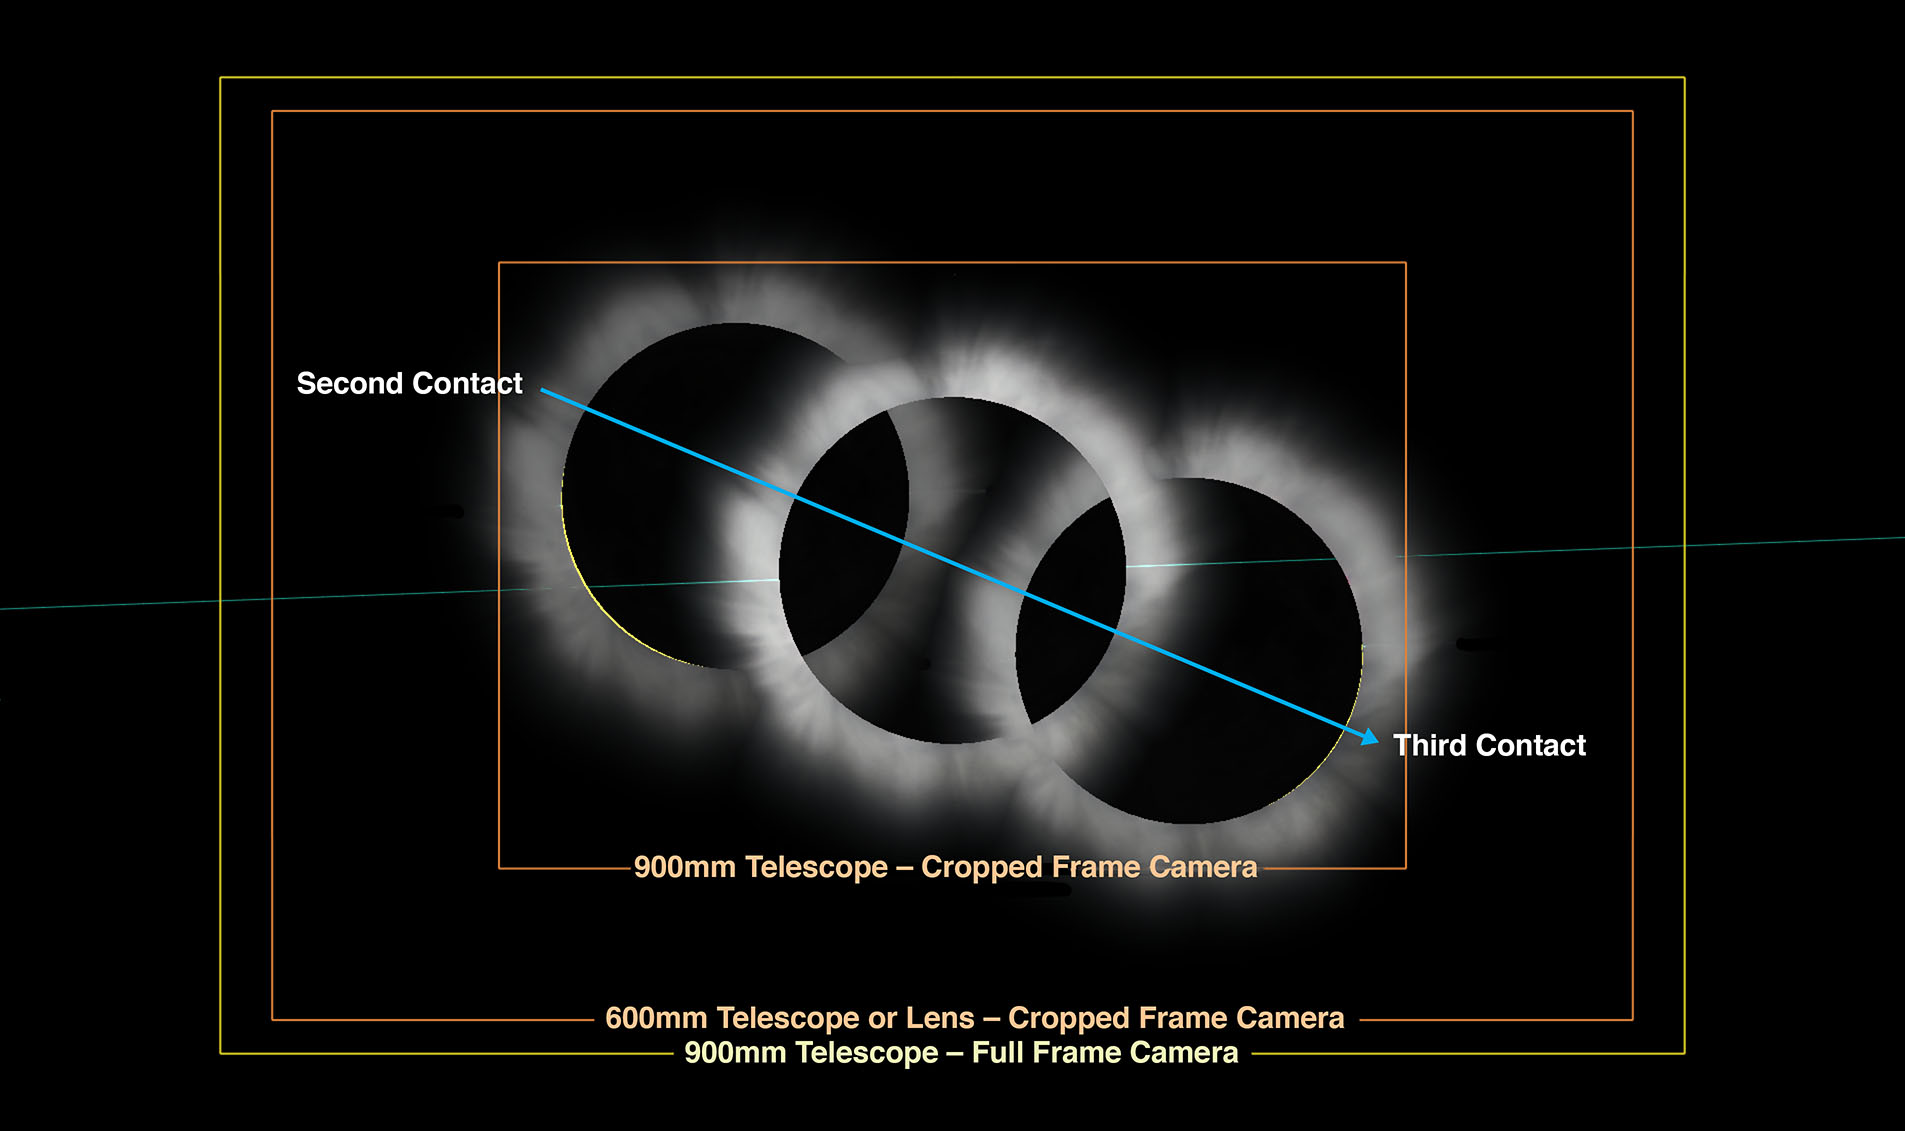
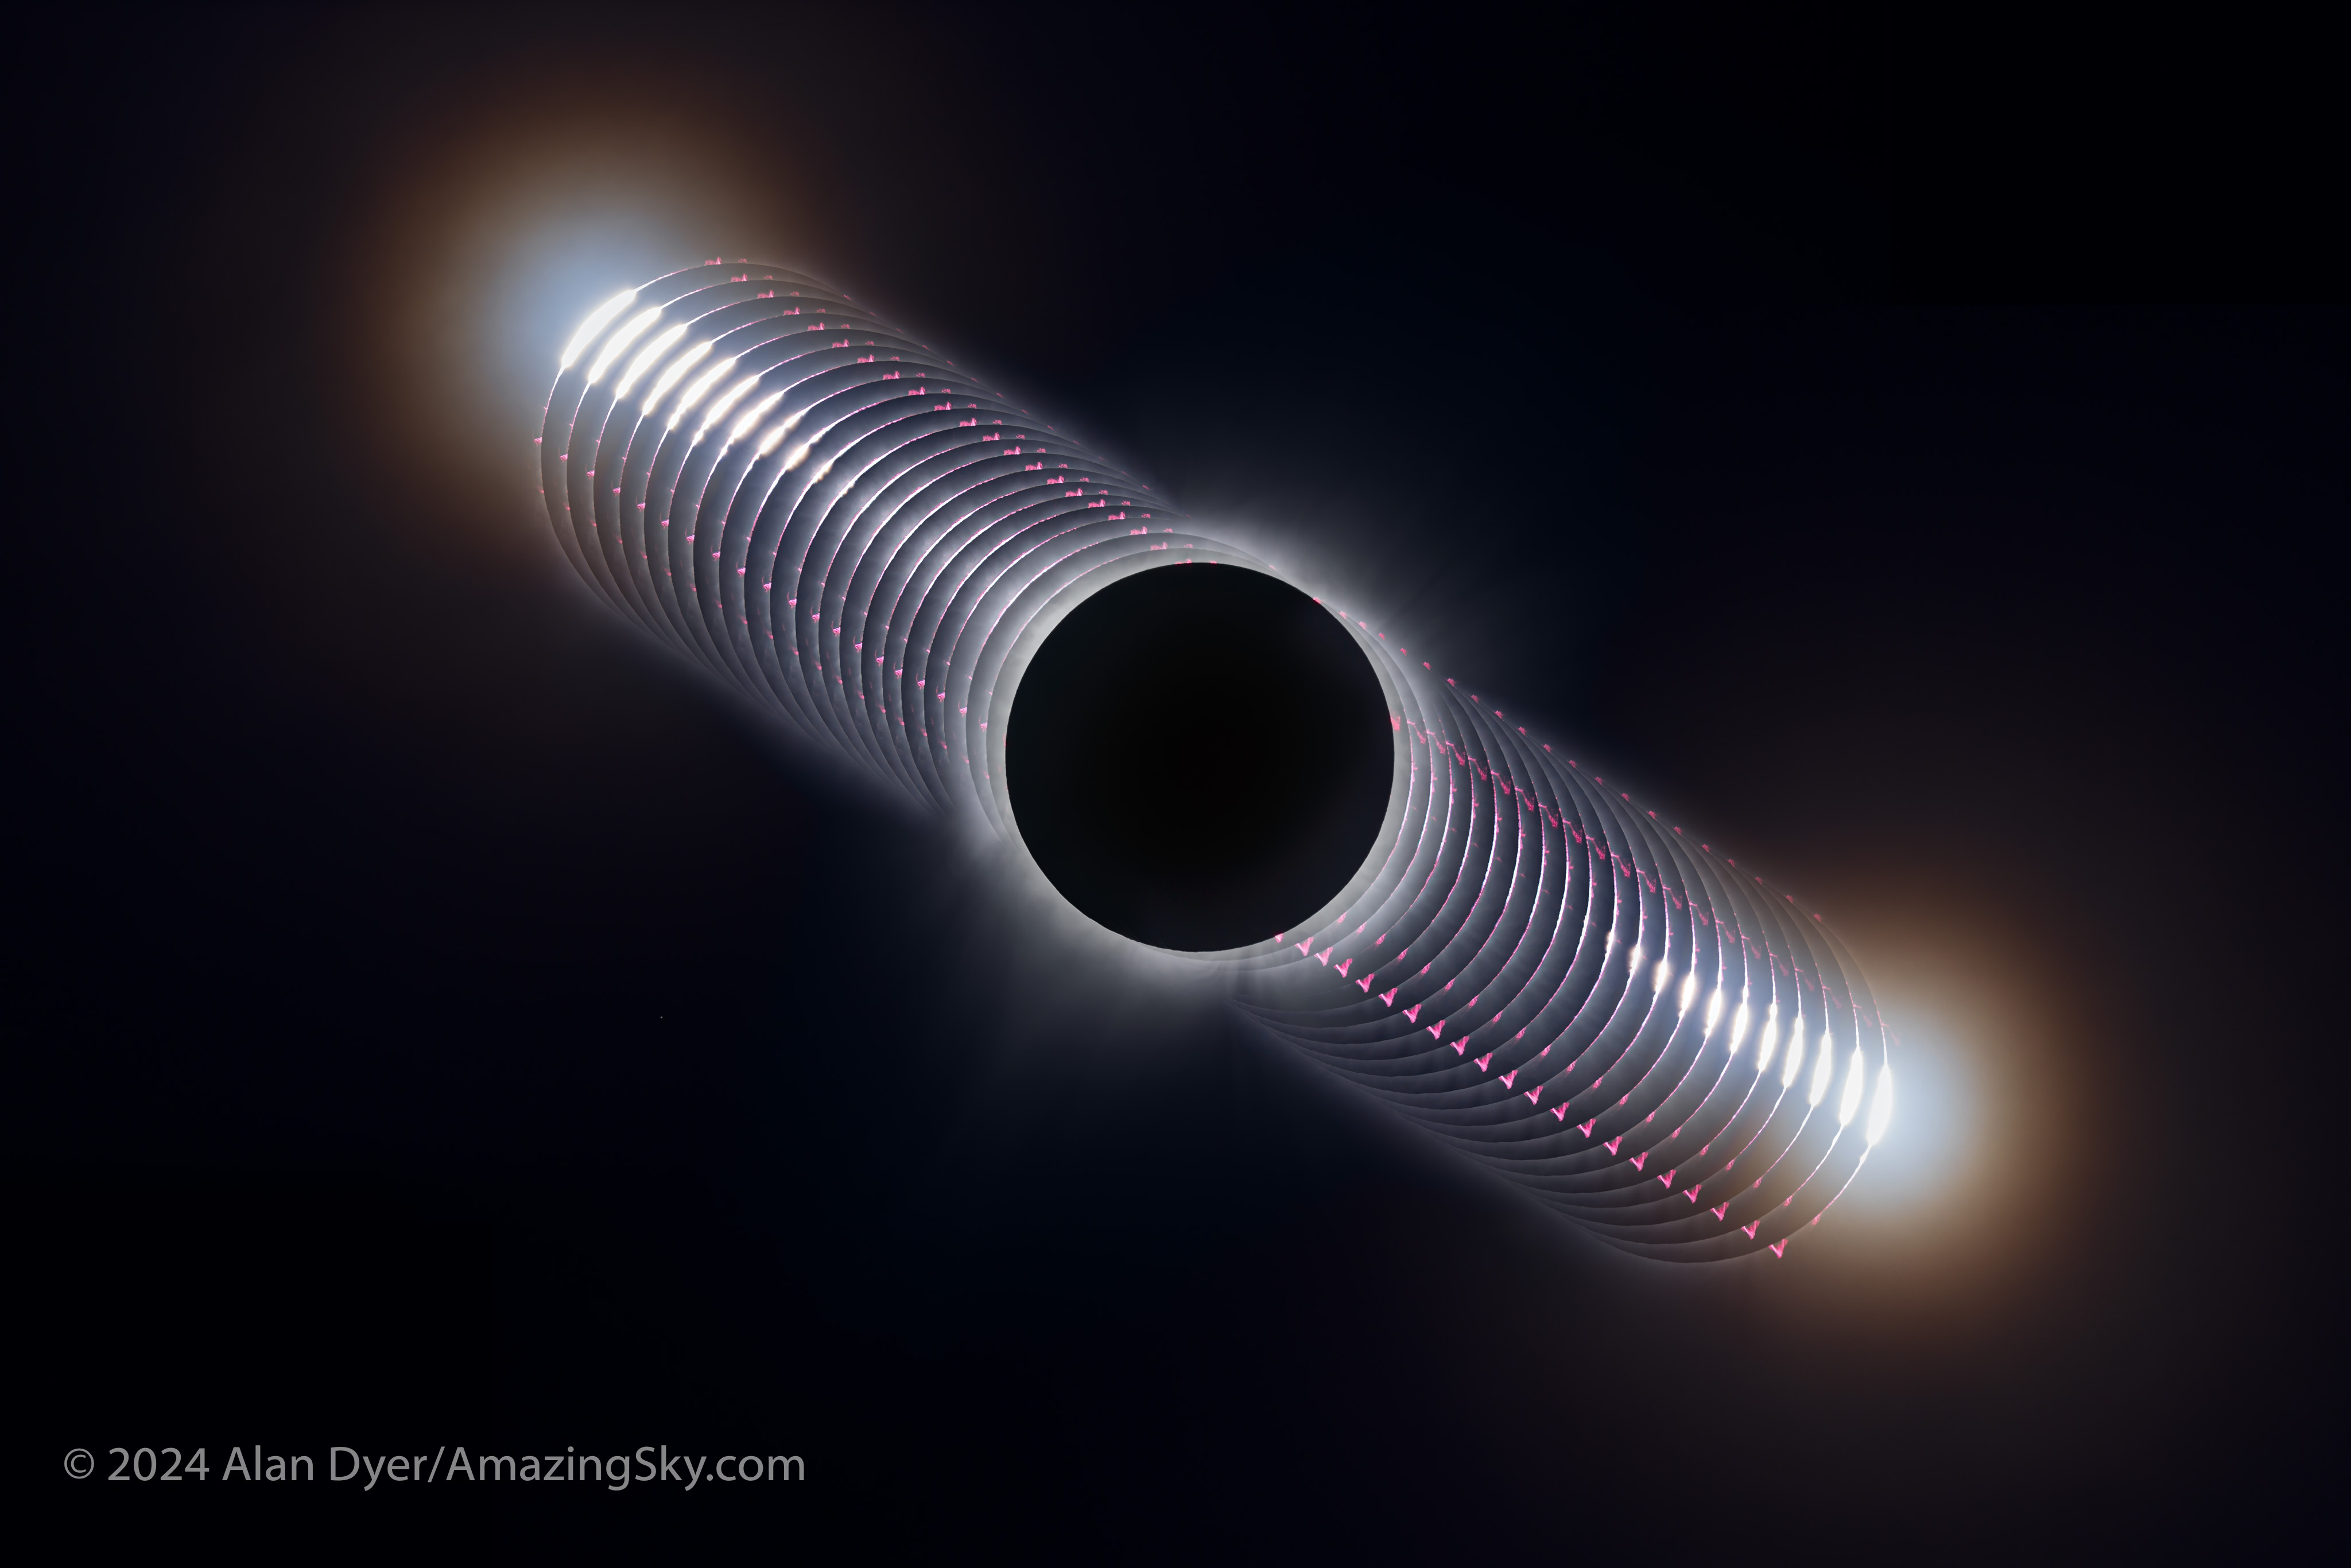
I shot all the images with the Astro-Physics Traveler 105mm refractor at 630mm focal length and f/6, with the Canon R5 at ISO 100. The partial phases are 1/800 or 1/400 second exposures through a Kendrick/Baader solar filter.

Wanting to record the full sequence, I shot the partial phases until the bitter end. But post-eclipse, people came over and had a look through my scope (I think mine was the only telescope on site). We had a great time exchanging impressions. The hand-held phone camera photos people showed me looked fabulous! 

I looked for fleeting shadow bands just before and after totality (I laid out a white sheet on the ground for the purpose) but saw none, a negative observation confirmed by a fellow eclipse chaser at the site. 

Time-lapse movies of the second and third contact (start and end of totality) diamond rings, shot through the telescope with the Canon R5 in continuous burst mode for hundreds of frames each.

I did two live interviews for CBC Radio, for the Edmonton and Calgary stations, but not until after the eclipse ended. By the time I did those and finished packing away my carload of gear, it was 6:30 p.m., three hours after totality. 

I was the last to leave the site, with fishermen now arriving for an evening’s catch.

I was in that shadow as the Space Station flew over. Astronauts saw the elliptical shadow moving over eastern Canada.
The passage of the lunar shadow across the continent, showing where the clouds were. I was under the wispy clouds at upper right in Québec.

I faced no traffic jams heading back to the hotel at Ste. Helen-de-Bagot. I processed and posted one eclipse image that night. And I revised the price (down to $2.99 U.S.) and description of my How to Photograph the Solar Eclipses ebook, as now only the big processing chapter is of any value, post-eclipse. It continues to sell. 

This is the waxing crescent Moon on April 10, 2024, two days after it eclipsed the Sun, and with it above the bright planet Jupiter, with it also near Uranus. Below the solar system worlds is the faint Comet 12P/Pons-Brooks, visible here as a fuzzy star with a stubby tail..

On the long drive back to Alberta, with the pressure of having to make time now gone, I spent pleasant evenings stopping to see friends and family on the road home. So I didn’t start work on the complex blends and composite images I show here until I got home a week after the eclipse. 

The happy eclipse chaser having bagged his game!

The 17-day-long drive was nearly 9,000 km over 100 hours behind the wheel. Was it worth it? Of course! 

Would I do it again? It’s a moot question as none of the upcoming eclipses allows for a cross-continent drive. Except perhaps in July 2028 in Australia. But I suspect just heading inland a day or two over the Great Dividing Range will be enough to get away from winter coastal cloud in New South Wales. (Sydney is in the path, but so is a cottage I rented last month near Coonabarabran for my superb March stay under the southern skies!)

The next total eclipse of the Sun visible from anywhere in Canada will be August 22, 2044. I won’t have to drive anywhere, as it passes right over my house! But I will have to live that long to enjoy a eclipse from my own backyard. 

I suspect this was my last chance to see – and drive to – a total eclipse in Canada.

— Alan, © 2024 amazingsky.com 

Top 10 Tips for Practicing for the Eclipse


Total Eclipse from Chile

I present suggestions for how to ensure everything under your control will go well on eclipse day. The secret is: Practice, Practice, Practice!

The techniques I suggest practicing are outlined in my previous blog, Ten Tips for the Solar Eclipse. It’s prerequisite reading.

However, while you can read all about how to shoot the eclipse, nothing beats actually shooting to ensure success. But how do you do that, when there’s only one eclipse?

Here are my “Top 10” suggestions:

Total Eclipse of the Sun from the Atlantic (Nov 3, 2013)
Total eclipse of the Sun, November 3, 2013 as seen from the middle of the Atlantic Ocean, from the Star Flyer sailing ship. I took this with a Canon 5D MkII and 16-35mm lens at 19mm for 1/40s at f/2.8 and ISO 800 on a heavily rolling ship.

Wide-Angle Shots – Shoot a Twilight Scene

The simplest way to shoot the eclipse is to employ a camera with a wide lens running on auto exposure to capture the changing sky colors and scene brightness.

  1. Auto Exposure Check in Twilight

    If you intend to shoot wide-angle shots of the eclipse sky and scene below, with anything from a mobile phone to a DSLR, practice shooting a time-lapse sequence or a movie under twilight lighting. Does your camera expose properly when set to Auto Exposure? If you are using a phone camera, does it have any issues focusing on the sky? How big a file does a movie create? 


PRACTICE2-Voyager Alt-Az Mount

With Telephotos and Telescopes – Shoot the Filtered Sun

The toughest techniques involve using long lenses and telescopes to frame the eclipsed Sun up close. They need lots of practice. 

  1. Framing and Focusing

    You’ll need to have your safe and approved solar filter purchased (don’t wait!) that you intend to use over your lens or telescope. With the filter in place, simply practice aiming your lens or telescope at the Sun at midday. It’s not as easy as you think! Then practice using Live View to manually focus on the edge of the Sun or on a sunspot. Can you get consistently sharp images?


Partial Solar Eclipse in Cloud #1 (Oct 23, 2014)
The partial eclipse of the Sun, October 23, 2014, shot through thin cloud, but that makes for a more interesting photo than one in a clear sky. Despite the cloud, this was still shot through a Mylar filter, on the front of telescope with 450mm focal length, using the Canon 60Da for 1/25 sec exposure at ISO 100.

  1. Exposure Times

Exposures of the filtered Sun will be the same as during the partial phases, barring cloud or haze, as above, that can lengthen exposure times. Otherwise, only during the thin crescent phases will shutter speeds need to be 2 to 3 stops (or EV steps) longer than for a normal Sun.


PRACTICE4-Kendrick and Seymour Filters
Solar filters that clamp around the front of lenses are easier to remove than ones that screw onto lenses. They will bind and get stuck!

  1. Filter Removal

With the camera aimed away from the Sun (very important!), perhaps at a distant landscape feature, practice removing the filter quickly. Can you do it without jarring the camera and bumping it off target? Perhaps try this on the Moon at night as well, as it’s important to also test this with the camera and tripod aimed up high.


PRACTICE5-Nikon Screens on 80mm
Articulated LCD screens are a great aid for framing and viewing the eclipse in Live View when the camera is aimed up high, as it will be!

  1. Ease of Use

With the Sun up high at midday (as it will be during the eclipse from most sites), check that you can still look through, focus, and operate the camera easily. Can you read screens in the bright daylight? What about once it gets darker, as in twilight, which is how dark it will get during totality.


PRACTICE6-Sun Motion Composite
The east-to-west motion of the sky will carry the Sun its own diameter across the frame during totality, making consistent framing an issue with very long lenses and telescopes.

  1. Sun Motion

If you are using an untracked tripod, check how much the Sun moves across your camera frame during several minutes. For videos you might make use of that motion. For still shots, you’ll want to ensure the Sun doesn’t move too far off center.


PRACTICE7-HEQ5 with 80mm Mount N
An equatorial mount like this is great but needs to be at least roughly polar aligned to be useful.

  1. Aligning Tracking Mounts

If you plan to use a motorized equatorial mount capable of tracking the sky, “Plan A” might be to set it up the night before so it can be precisely polar aligned. But the reality is that you might need to move on eclipse morning. To prepare for that prospect, practice roughly polar aligning your mount during the day to see how accurate its tracking is over several minutes. Do that by leveling the mount, setting it to your site’s latitude, and aiming the polar axis as close as you can to due and true north. You don’t need precise polar alignment to gain the benefits of a tracking mount – it keeps the Sun centered – for the few minutes of totality.


The March Mini-Moon
The Full Moon is the same brightness as the Sun’s inner corona.

Telephotos and Telescopes – Shoot Full Moon Closeups 

  1. Exposure Check

Shoot the Full Moon around July 8 or August 7. If you intend to use Auto Exposure during totality, check how well it works on the Full Moon. It’s the same brightness as the inner corona of the Sun, though the Moon occupies a larger portion of the frame and covers more metering sensor points. This is another chance to check your focusing skill.


Impending Occultation of Beta Capricorni
The crescent Moon has a huge range in brightness and serves as a good test object. Remember, the Moon is the same size as the Sun. That’s why we get eclipses!

Telescopes and Telescopes – Shoot Crescent Moon Closeups

  1. Exposure Check

Shoot the waxing crescent moon in the evening sky during the last week of June and again in the last week of July. Again, test Auto Exposure with your camera in still or movie mode (if you intend to shoot video) to see how well the camera behaves on a subject with a large range in brightness. Or step through a range of exposures manually, from short for the bright sunlit crescent, to long for the dark portion of the Moon lit by Earthshine. It’s important to run through your range of settings quickly, just as you would during the two minutes of totality. But not too quickly, as you might introduce vibration. So …


PRACTICE10-2006 Libya-Short
Good focus matters for recording the fine prominences and sharp edge of the Moon.

  1. Sharpness Check

In the resulting images, check for blurring from vibration (from you handling the camera), from wind, and from the sky’s east-to-west motion moving the Moon across the frame, during typical exposures of 1 second or less.


By practicing, you’ll be much better prepared for the surprises that eclipse day inevitably bring. Always have a less ambitious “Plan B” for shooting the eclipse simply and quickly should a last-minute move be needed.

However, may I recommend …

How to Photograph the Solar Eclipse
My 295-page ebook on photographing the August 21 total eclipse of the Sun is now available. See http://www.amazingsky.com/eclipsebook.html It covers all techniques, for both stills, time-lapses, and video, from basic to advanced, plus a chapter on image processing. And a chapter on What Can Go Wrong?! The web page has all the details on content, and links to order the book from Apple iBooks Store (for the best image quality and navigation) or as a PDF for all other devices and platforms.

For much more detailed advice on shooting options and techniques, and for step-by-step tutorials on processing eclipse images, see my 295-page eBook on the subject, available as an iBook for Apple devices and as a PDF for all computers and tablets.

Check it out at my website page

Thanks and clear skies on August 21!

— Alan, June 24, 2017 / © 2017 Alan Dyer / amazingsky.com


Ten Tips for the Solar Eclipse


Total Eclipse from Libya 2006I present my Top 10 Tips for photographing the August 21 total eclipse of the Sun.

If the August total eclipse will be your first, then you could heed the advice of many and simply follow “Tip #0:” Just don’t photograph it! Look up and around to take in the spectacle. Even then, you will not see it all.

However, you might see less if you are operating a camera.

But I know you want pictures! To help you be successful, here are my tips for taking great photos without sacrificing seeing the eclipse.


TIP1-iPhone on Siriu Tripod
An iPhone in a tripod bracket and on a small tabletop tripod.

TIP #1: Keep It Simple

During the brief minutes of totality, the easiest way to record the scene is to simply hold your phone camera up to the sky and shoot. Zoom in if you wish, but a wide shot may capture more of the twilight effects and sky colors, which are as much a part of the experience as seeing the Sun’s gossamer corona around the dark disk of the Moon.

Better yet, use an adapter to clamp your phone to a tripod. Frame the scene as best you can (you might not be able to include both the ground and Sun) and shoot a time-lapse, or better yet, a video.

Start it 2 or 3 minutes before totality (if you can remember in the excitement!) and let the camera’s auto exposure take care of the rest. It’ll work fine.

That way you’ll also record the audio of your excited voices. The audio may serve as a better souvenir than the photos. Lots of people will have photos, but nobody else will record your reactions!

Just make sure your phone has enough free storage space to save several minutes of HD video or, if your camera has that feature, 4K video.


TIP2-2006 Libya Wide-Angle
A wide shot of the 2006 eclipse in Libya with a high altitude Sun. 10mm lens on a cropped-frame Canon 20Da camera.

TIP #2: Shoot Wide With a DSLR

For better image quality, step up to this hands-off technique.

Use a tripod-mounted camera that accepts interchangeable lenses (a digital single lens reflex or a mirrorless camera) and use a lens wide enough to take in the ground below and Sun above.

Depending on where you are and the sensor size in your camera, that’ll likely mean a 10mm to 24mm lens.

By going wide you won’t record details in the corona of the Sun or its fiery red prominences. But you can record the changing sky colors and perhaps the dark shadow of the Moon sweeping from right to left (west to east) across the sky. You can also include you and your eclipse group silhouetted in the foreground. Remember, no one else will record you at the eclipse.


TIP3-2012 Eclipse Movie Clip
A sequence of shots of the 2012 eclipse from Australia, with a wide 15mm lens and camera on Auto Exposure showing the change of sky color.

Total Eclipse of the Sun, Mid-Eclipse (Wide-Angle)
The total eclipse of the Sun, November 14, 2012, from a site near Lakeland Downs, Queensland, Australia. Shot with the Canon 5D Mark II and 15mm lens for a wide-angle view showing the Moon’s conical shadow darkening the sky and the twilight glow on the horizon. Taken near mid-eclipse.

TIP #3: Shoot on Auto Exposure

For wide shots, there’s no need to attend to the camera during the eclipse. Set the camera on Auto Exposure – Aperture Priority (Av), the camera ISO between 100 to 400, and your lens aperture to f/2.8 (fast) to f/5.6 (slow).

Use a higher ISO if you are using a slower lens such as a kit zoom. But shoot at ISO 100 and at f/2.8 if you have a wide lens that fast.

In Av mode the camera will decide what shutter speed to use as the lighting changes. I’ve used this technique at many eclipses and it works great.


TIP4-Pixel Intervalometer CU
An accessory intervalometer set for an interval of 1 second.

TIP #4: Let the Camera Do the Shooting

To make this wide-angle technique truly hands-off use an intervalometer (either built into your camera or a separate hardware unit) to fire the shutter automatically.

Once again, start the sequence going 3 to 5 minutes before totality, with the intervalometer set to fire the shutter once every second. Don’t shoot at longer intervals, or you’ll miss too much. Shutter speeds won’t likely exceed one second.

Again, be sure your camera’s memory card has enough free space for several hundred images. And don’t worry about a solar filter on your lens. It’ll be fine for the several minutes you’ll have it aimed up.

Out of the many images you’ll get, pick the best ones, or turn the entire set into a time-lapse movie.


TIP5-Manual Focus Switches Nikon
A Nikon DSLR and lens set to Manual Focus.

TIP #5: Shoot on Manual Focus

Use Auto Exposure and an intervalometer. But … don’t use Auto Focus.

Switch your lens to Manual Focus (MF) and focus on a distant scene element using Live View.

Or use Auto Focus to first focus on something in the distance, then switch to Manual and don’t touch focus after that. If you leave your lens on Auto Focus the shutter might not fire if the camera decides it can’t focus on the blank sky.


TIP6-Lightoom Wide-Angle
A comparison of a Raw image as it came from the camera (left) and after developing in Lightroom (right).

TIP #6: Shoot Raw

For demanding subjects like a solar eclipse always shoot your images in the Raw file format. Look in your camera’s menus under Image Quality.

Shoot JPGs, too, if you like, but only Raw files record the widest range of colors and brightness levels the camera sensor is capable of detecting.

Later in processing you can extract amazing details from Raw files, both in the dark shadows of the foreground, and in the bright highlights of the distant twilight glows and corona around the Sun. Software to do so came with your camera. Put it to use.


TIP7-200mm Lens on Tripod
A 200mm telephoto and 1.4x Extender, with the camera on a sturdy and finely adjustable tripod head.

TIP #7: OK, Use a Telephoto Lens! But …

If you really want to shoot close-ups, great! But don’t go crazy with focal length. Yes, using a mere 135mm or 200mm lens will yield a rather small image of the eclipsed Sun. But you don’t need a monster 600mm lens or a telescope, which typically have focal lengths starting at 600mm. With long focal lengths come headaches like:

 Keeping the Sun centered. The Earth is turning! During the eclipse that motion will carry the Sun (and Moon) its own diameter across your frame from east to west during the roughly two minutes of totality. While a motorized tracking mount can compensate for this motion, they take more work to set up properly, and must be powered. And, if you are flying to the eclipse, they will be much more challenging to pack. I’m trying to keep things simple!

 Blurring from vibration. This can be an issue with any lens, but the longer your lens, the more your chances of getting fuzzy images because of camera shake, especially if you are touching the camera to alter settings.

An ideal focal length is 300mm to 500mm. But …

When using any telephoto lens, always use a sturdy tripod with a head that is easy to adjust for precise aiming, and that can aim up high without any mechanical issues. The Sun will be halfway, or more, up the sky, not a position some tripod heads can reach.


Total Solar Eclipse (2012 from Australia)
A re-processed version of a still frame of the total solar eclipse of November 14, 2012 taken from our site at Lakeland Downs, Queensland, Australia. This is a still frame shot during the shooting of an HD video of the eclipse, using the cropped-frame Canon 60Da and Astro-Physics Traveler 4-inch apo refractor telescope at f/5.8 (580mm focal length). The image is 1/60th second at ISO 100. This is a full-sized still not a frame grab taken from the movie.

TIP8-Eclipse Movie Clip 2012
A sequence from a movie showing the camera adjusting the exposure automatically when going from a filtered view (left) to an unfiltered view of the diamond ring (right).

TIP #8: Use Auto Exposure, or … Shoot a Movie

During totality with your telephoto, you could manually step through a rehearsed set of exposures, from very short shutter speeds (as short as 1/4000 second) for the diamond rings at either end of totality, to as long as one or two seconds at mid-totality for the greatest extent of the corona’s outermost streamers.

But that takes a lot of time and attention away from looking. Yes, there are software programs for automating a camera, or techniques for auto bracketing. But if this is your first eclipse an easier option is to simply use Auto Exposure/Aperture Priority and let the camera set the shutter speed. Again, you could use an intervalometer to fire the shutter so you can just watch.

Don’t use high ISO speeds. A low ISO of 100 to 400 is all you need and will produce less noise. The eclipsed Sun is still bright. You don’t need ISO 800 to 3200.

Even on Auto Exposure, you’ll get good shots, just not of the whole range of phenomena an eclipsed Sun displays.

Or, once again and better yet – put your camera into video mode and shoot an HD or 4K movie. Auto Exposure will work just fine, allowing you to start the camera then forget it.

Place the Sun a solar diameter or two to the left of the frame and let the sky’s motion drift it across the frame for added effect. Start the sequence running a minute or two before totality with your solar filter on. Then just let the camera run … except …


TIP9-66mm on Stellarvue
A small refractor telescope with a solar filter over the front aperture. That filter has to be removed for totality.

TIP #9: Remember to Remove the Filter!

You will need a safe solar filter over your lens or telescope to shoot the partial phases of the eclipse, and to frame and focus the Sun. This cannot be a photo neutral density or polarizing filter. It must be a filter designed for observing and shooting the Sun, made of metal-coated glass or Mylar plastic. Anything else is not safe and likely far too bright.

But you do NOT need the filter for totality.

Remove it … when?

The answer: a minute or so before totality if you want to capture the first diamond ring just before totality officially starts. Set a timer to remind you, as visually it is very difficult to judge the right moment with your unaided eye. The eclipse will start sooner than you expect.

If you have your camera on Auto Exposure, it will compensate just fine for the change in brightness, from the filtered to the unfiltered view.

But don’t leave your unfiltered camera aimed at the Sun. Replace the filter no more than a minute or so after totality and the second diamond ring ends.


Partial Solar Eclipse and Sunspot #2
The partial eclipse of the Sun, October 23, 2014, shot through a mylar filter, on the front of the 66mm f/7 apo refractor shown above (450mm focal length), using a cropped-frame Canon 60Da camera for 1/8000 second exposure at ISO 100. Focus on the sharp tips of the crescent Sun or a sunspot if one is present.

TIP #10: Focus!

Everyone worries about getting the “best exposure.” Don’t! You’ll get great looking telephoto eclipse close-ups with any of a wide range of exposures.

What ruins most eclipse shots, other than filter forgetfulness, is fuzzy images, from either shaky tripods or poor focus.

Focus manually using Live View on the filtered partially eclipsed Sun. Zoom up on the edge of the Sun or sharp tip of the crescent. Re-focus a few minutes before totality, as the changing temperature can shift the focus of long lenses and telescopes.

But you needn’t worry about re-focusing after you remove the filter. The focus will not change with the filter off.


Me at 2006 Eclipse
Me in Libya in 2006 with my eclipse setup: a small telescope on an alt-azimuth mount.

TIP #1 AGAIN: Keep It Simple!

I’ll remind you to keep things simple for a reason other than giving you time to enjoy the view, and that’s mobility.

You might have to move at the last minute to escape clouds. Complex photo gear can be just too much to take down and set up, often with minutes to spare, as many an eclipse chaser can attest is often necessary. Keep your gear light, easy to use, and mobile. Committing to an overly ambitious and inflexible photo plan and rig could be your undoing.

To help ensure success, check out my next blog entry, Top 10 Tips for Practicing for the Eclipse.

By following both my “Ten Tips” advice blogs you should be able to get great eclipse images to wow your friends and fans, all without missing the experience of actually seeing … and feeling … the eclipse.

However … may I recommend …


How to Photograph the Solar Eclipse
My 295-page ebook on photographing the August 21 total eclipse of the Sun is now available. See http://www.amazingsky.com/eclipsebook.html  It covers all techniques, for both stills, time-lapses, and video, from basic to advanced, plus a chapter on image processing. And a chapter on What Can Go Wrong?! The web page has all the details on content, and links to order the book from Apple iBooks Store (for the best image quality and navigation) or as a PDF for all other devices and platforms. Thanks! Clear skies on eclipse day, August 21, 2017.

For much more detailed advice on shooting options and techniques, and for step-by-step tutorials on processing eclipse images, see my 295-page eBook on the subject, available as an iBook for Apple devices and as a PDF for all computers and tablets.

Check it out at my website page

Thanks and clear skies on August 21!

— Alan, June 23, 2017 / © 2017 Alan Dyer / amazingsky.com


The Beauty of Solar Eclipses


Beauty of Solar Eclipses Title

This is a video 37 years in the making, compiling images and videos I’ve shot of total solar eclipses since my first in 1979.

Though I’ve “sat out” on the last couple of total eclipses of the Sun in 2015 and 2016, I’m looking forward to once again standing in the shadow of the Moon in 2017 – on August 21.

If you have not yet seen a total eclipse of the Sun, and you live in North America, next year is your chance to. It is the most spectacular and awe-inspiring event you can witness in nature.

I hope my video montage relays some of the excitement of being there, as the Moon eclipses the Sun.

As always, click HD and enlarge to full screen.

My montage features images and movies shot in:

• Manitoba (1979)

• Chile (1994)

• Curaçao (1998)

• Turkey (1999)

• Zimbabwe (2001)

• Australia (2002)

• Over Antarctica (2003)

• South Pacific near Pitcairn Island (2005)

• Libya (2006)

• Over Arctic Canada (2008)

• South Pacific near the Cook Islands (2009)

• Australia (2012)

• Mid-Atlantic Ocean (2013)

Out of the 15 total solar eclipses I have been to, only the 1991 and 2010 eclipses that I did go to are not represented in the video, due to cloud. Though we did see much of the 1991 eclipse from Baja, clouds intervened part way through, thwarting my photo efforts.

And I only just missed the 2010 eclipse from Hikueru Atoll in the South Pacific as clouds came in moments before totality. Of course, it was clear following totality.

Cameras varied a lot over those years, from Kodachrome film with my old Nikon F, to digital SLRs; from 640×480 video with a Sony point-and-shoot camera, to HD with a DSLR.

I shot images through telescopes to capture the corona and prominences, and with wide-angle lenses to capture the landscape and lunar shadow. I rarely shot two eclipses the same way or with the same gear.

I hope you enjoy the video and will be inspired to see the August 21, 2017 eclipse. For more information about that eclipse, visit:

GreatAmericanEclipse.com

EclipseWise.com

eclipse2017.org

In addition, meteorologist and eclipse chaser Jay Anderson has the first and last words on eclipse weather prospects at:

eclipseophile.com

Clear skies in 2017!

— Alan, May 25, 2016 / © 2016 Alan Dyer / www.amazingsky.com


The Eclipse in Time-Lapse


Total Solar Eclipse - 2nd Contact Diamond Ring (Nov 3 2013)

Here’s the Atlantic Crossing eclipse in time-lapse from the deck of the spv Star Flyer.

The above image is a still frame from the time-lapse movie I took on November 3, 2013 of the 44-second-long total eclipse of the Sun from the mid-Atlantic Ocean. It shows the first diamond ring (second contact) as totality began.

Below is the full time-lapse.

The movie is from 385 frames shot from before totality until well after. It shows just how lucky were were at seeing this eclipse, with the Sun coming out into a deep blue sky moments before totality and going back into thin cloud just as the total eclipse ends.

You’ll also appreciate the rolling of the ship, sped up here in the time-lapse, with frames taken one second apart.

Below is a still frame of the final diamond ring (third contact). Notice the difference in the brightness of the distant clouds in this image versus the one above. In the main image at top the clouds below the Sun had not yet entered the Moon’s umbral shadow.

But in the image below, the clouds are immersed in the lunar shadow and are about to be lit up again as the shadow races away from us in the direction toward the Sun.

Total Solar Eclipse - 3rd Contact Diamond Ring (Nov 3 2013)

In the time-lapse you can see the shadow enter the scene at top, then depart at the bottom of the frame below the Sun. As it shoots away from us, the shadow darkens the horizon far in the distance further down the path, bringing totality to those on the path to the east.

– Alan, November 11, 2013 / © 2013 Alan Dyer

Red Sky at Night … Sailor’s Delight


Sunset over the Atlantic (Nov 8, 2013) #2

We saw many wonderful sunsets on our sail across the Atlantic, but this was one of the finest.

This was the sky two nights ago, on the evening of November 8, as the Sun, now below the horizon, lit up the clouds to the west. You can see a few people out in the netting of the bow sprit taking in the view.

Sunset and Sails (Nov 8, 2013)

Here was the view looking up into the square rigged sails on the foremast. “The sky is on fire” was the comment I heard from folks on deck.

Red Rainbow over the Atlantic (Nov 8, 2013)

Contributing to our theme of a rainbow eclipse trip, a red rainbow appeared to the east, lit by the light of the setting Sun. What a wonderful sky this was!

Indeed, one of the other astronomers on board tallied up the number of naked eye sky sights he had seen on the voyage. It was an impressive list, equalling what had previously taken him over 30 years of sky gazing to accumulate.

I’m writing this post from back on land, now in Barbados at a latitude of 13° north. However, now that I have high-speed connectivity I can get caught up with posts from the sea voyage, with a couple of more to come from at sea.

– Alan, November 10, 2013 / © 2013 Alan Dyer