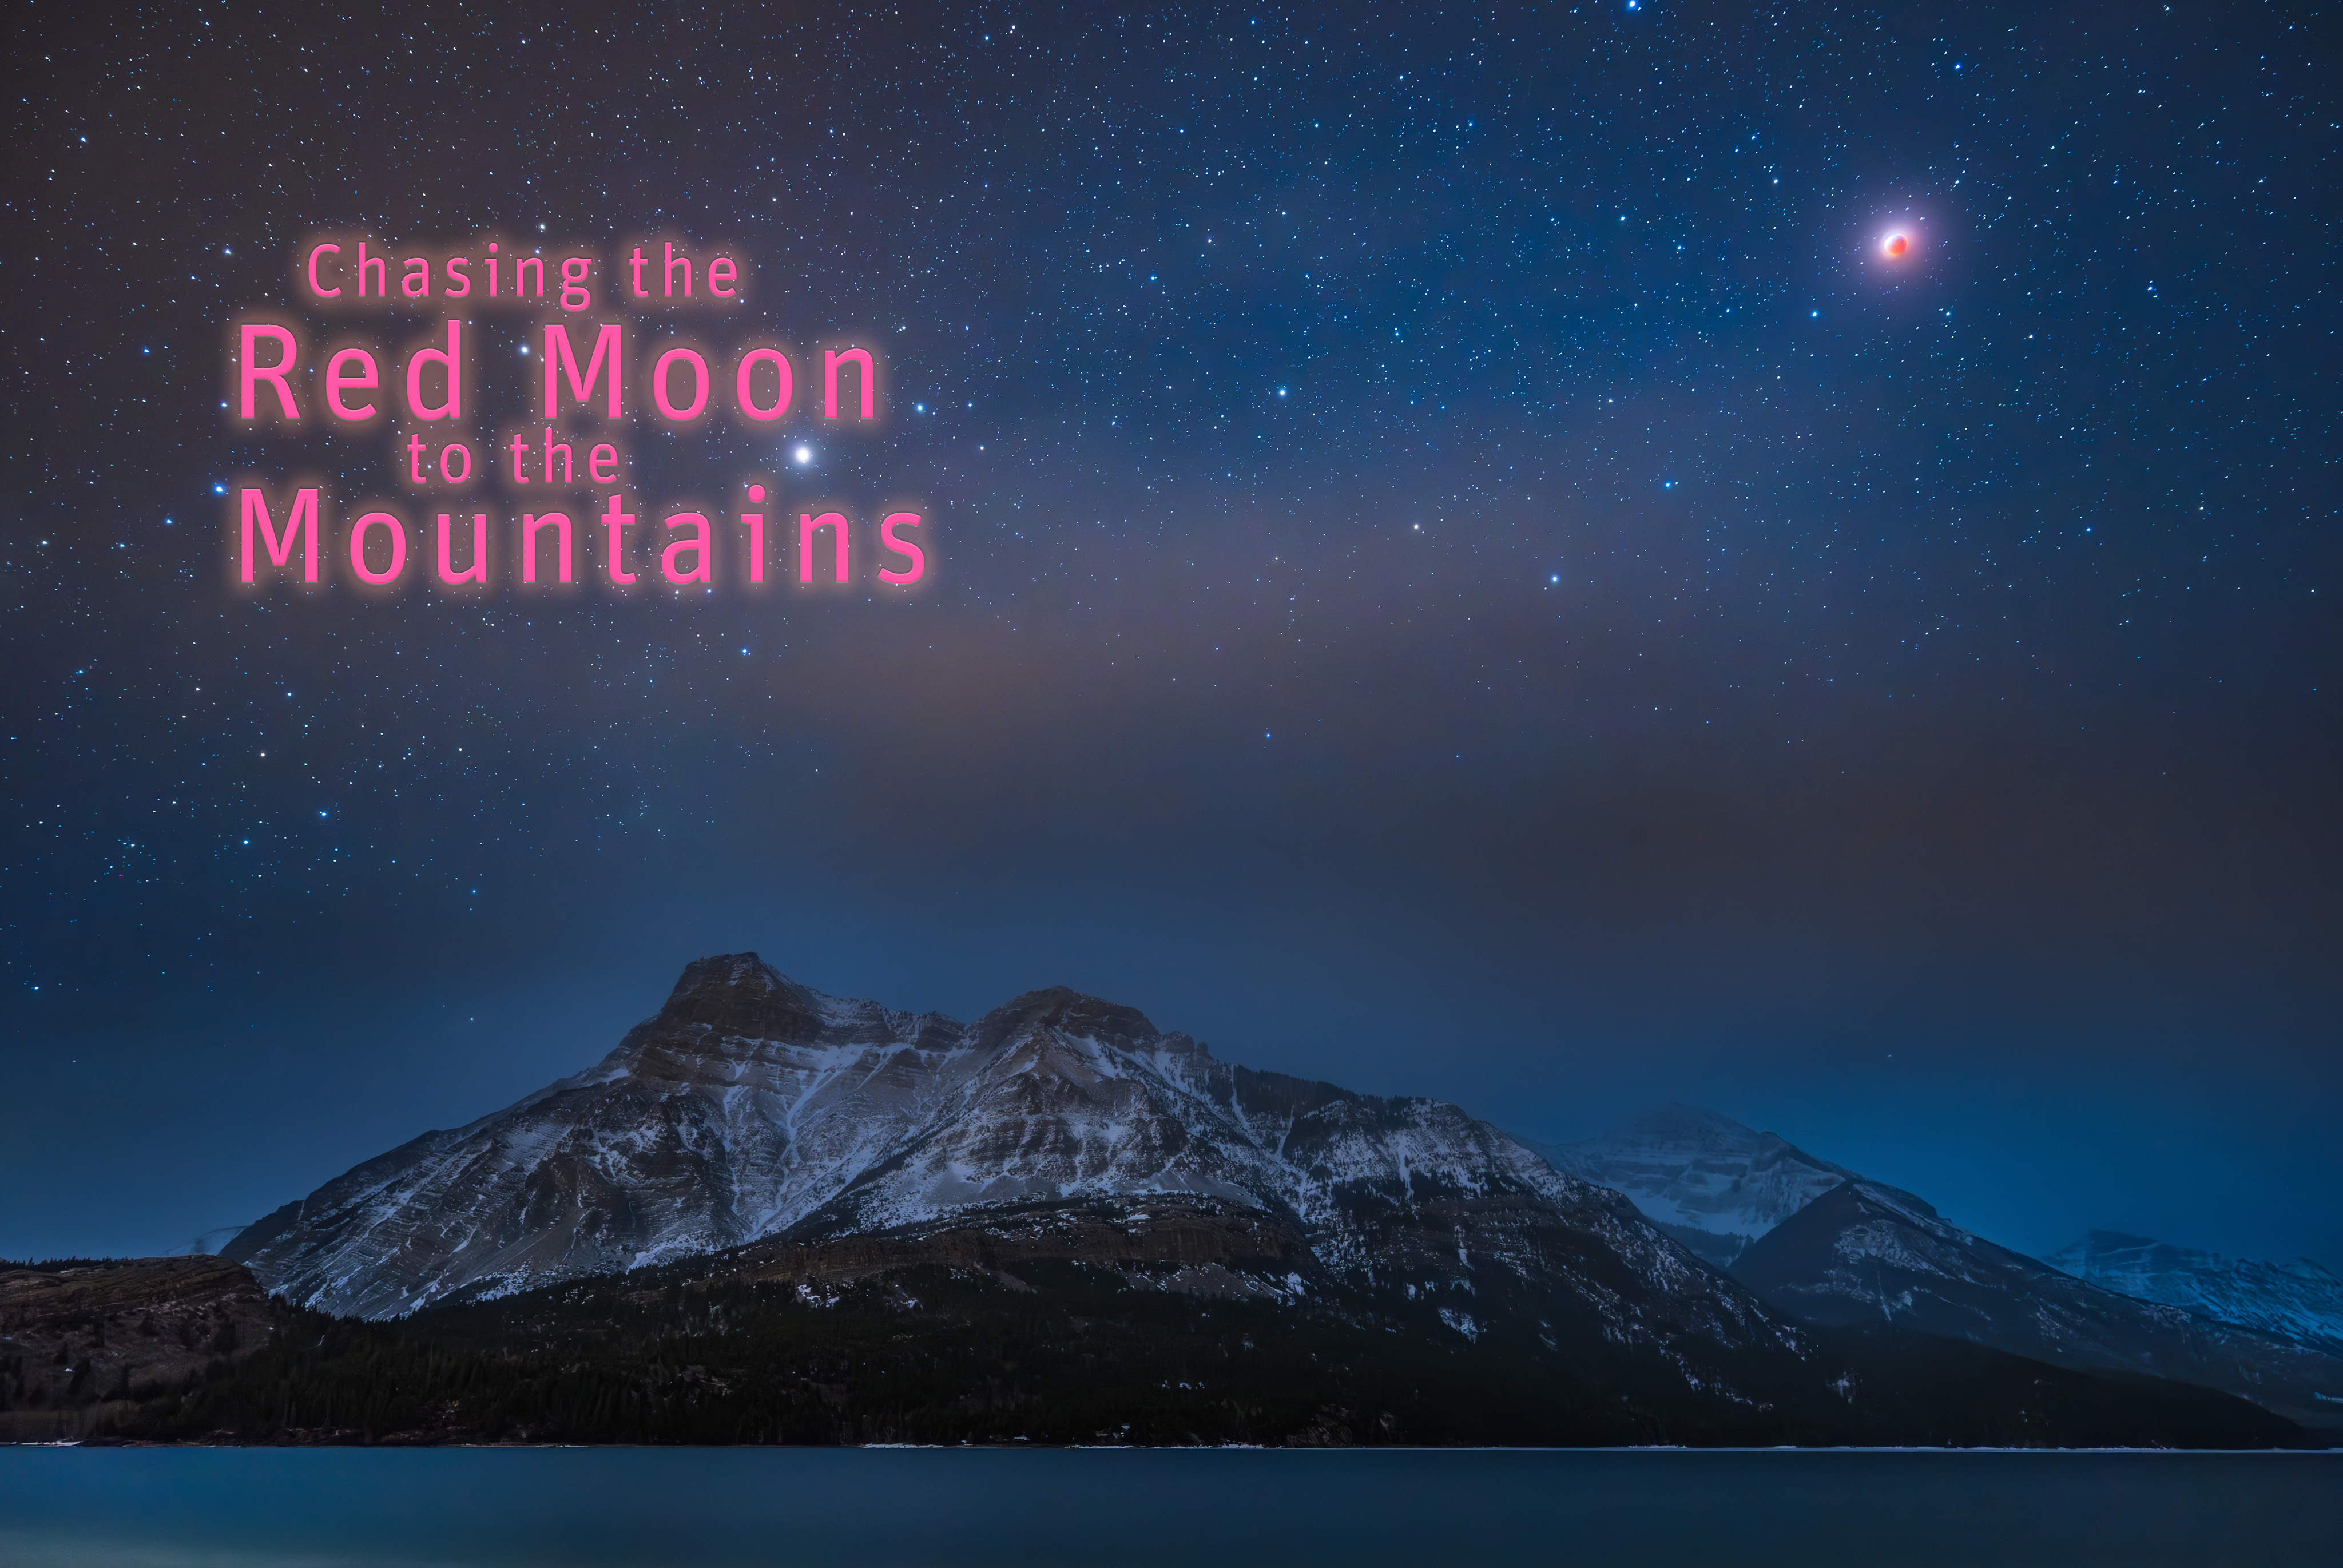
It took a last-minute chase, but I managed to capture the total eclipse of the Moon on March 14, 2025.
It would not be an eclipse without a chase. Solar eclipses of the total kind almost always involve travel, often to exotic locales around the world. But total lunar eclipses come to you, as they can be seen from an entire hemisphere of the planet.
Except there’s one problem — clouds! Over the last decade since 2014, of the eight total lunar eclipses (TLEs) I was home in Alberta for, I had to chase into clear skies for all but one. A recounting of one such chase from January 2019 is here.
Only for the TLE before this most recent (on November 8, 2022) was I able to stay home to watch it. Though in that case a snowstorm the day before made the roads and travel poor, so I had to stay home. I recounted that eclipse story here. You’ll find links to my other lunar eclipse stories below.
Once again, for the March 13/14, 2025 TLE, weather prospects looked poor. Not just in my area but in many regions of the continent. But there was hope!
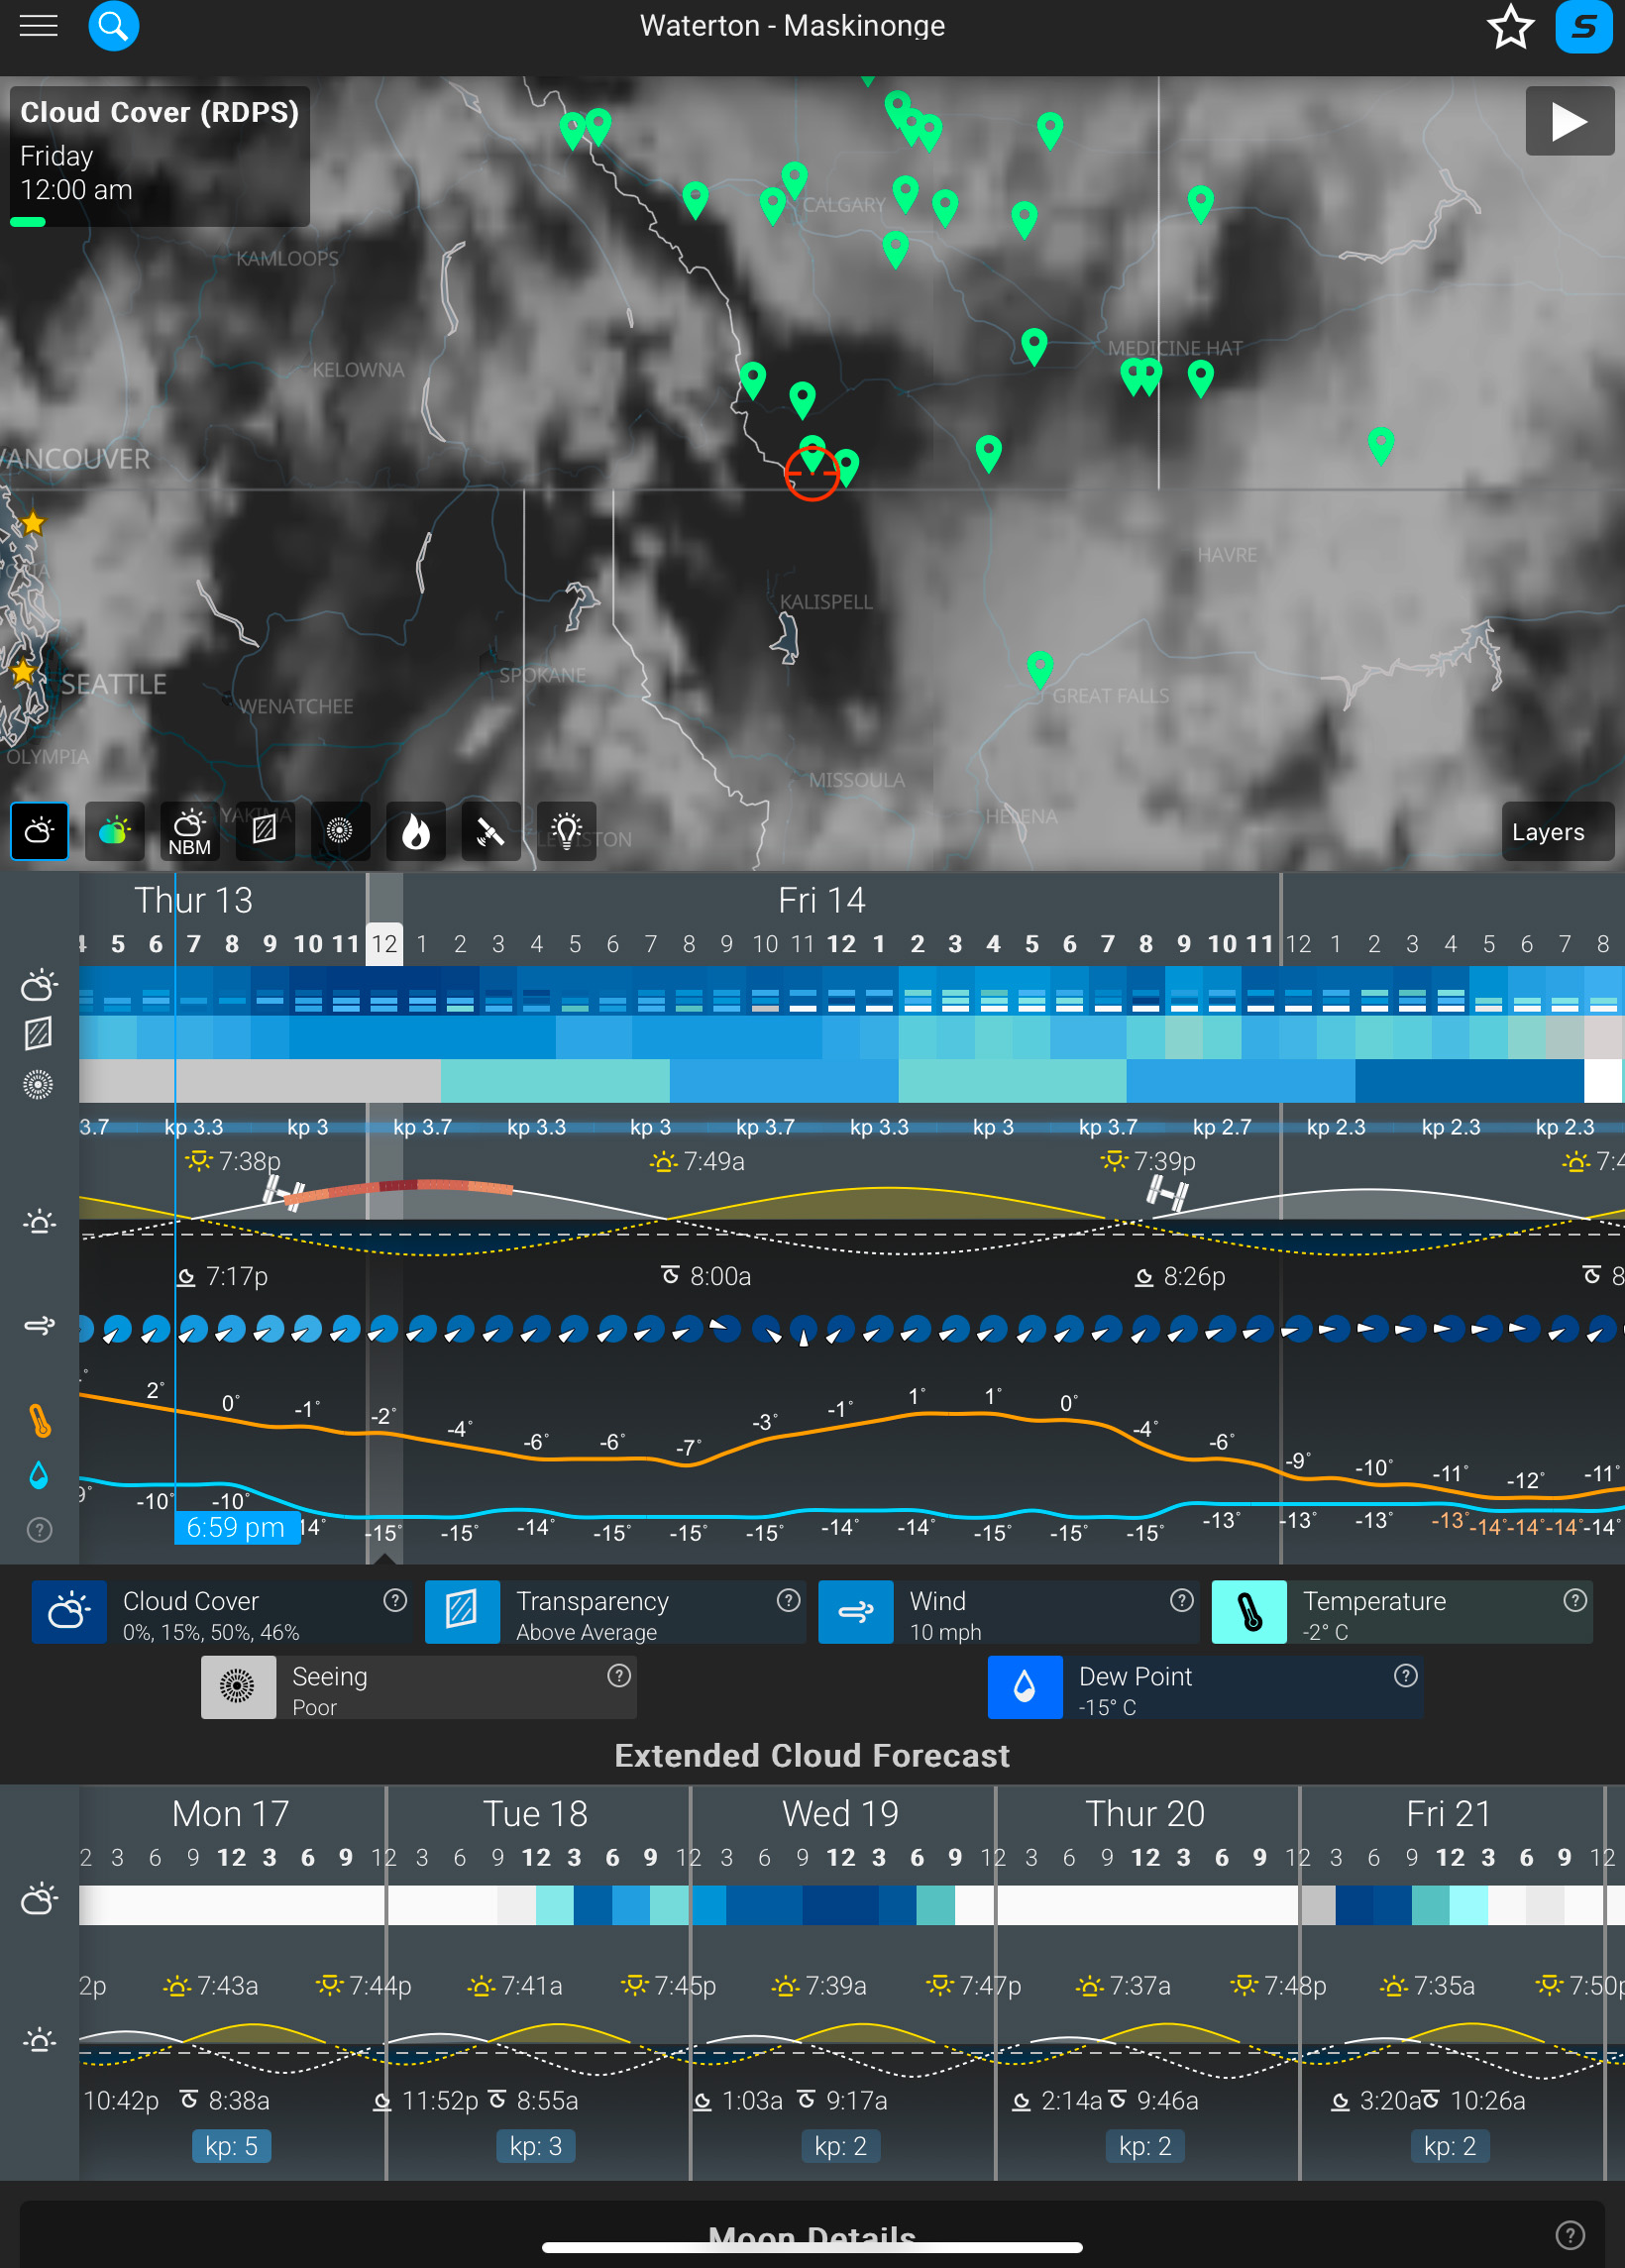
Astrospheric and Environment Canada cloud forecast + Moon information
The forecast cloud cover showed home to be hopeless. But a clear area was supposed to be open in southwestern Alberta, marked by the red circle above. That’s Waterton Lakes National Park, just on the US border. It’s a favourite place of mine for nightscape photography anyway (see my blog from this past summer here).
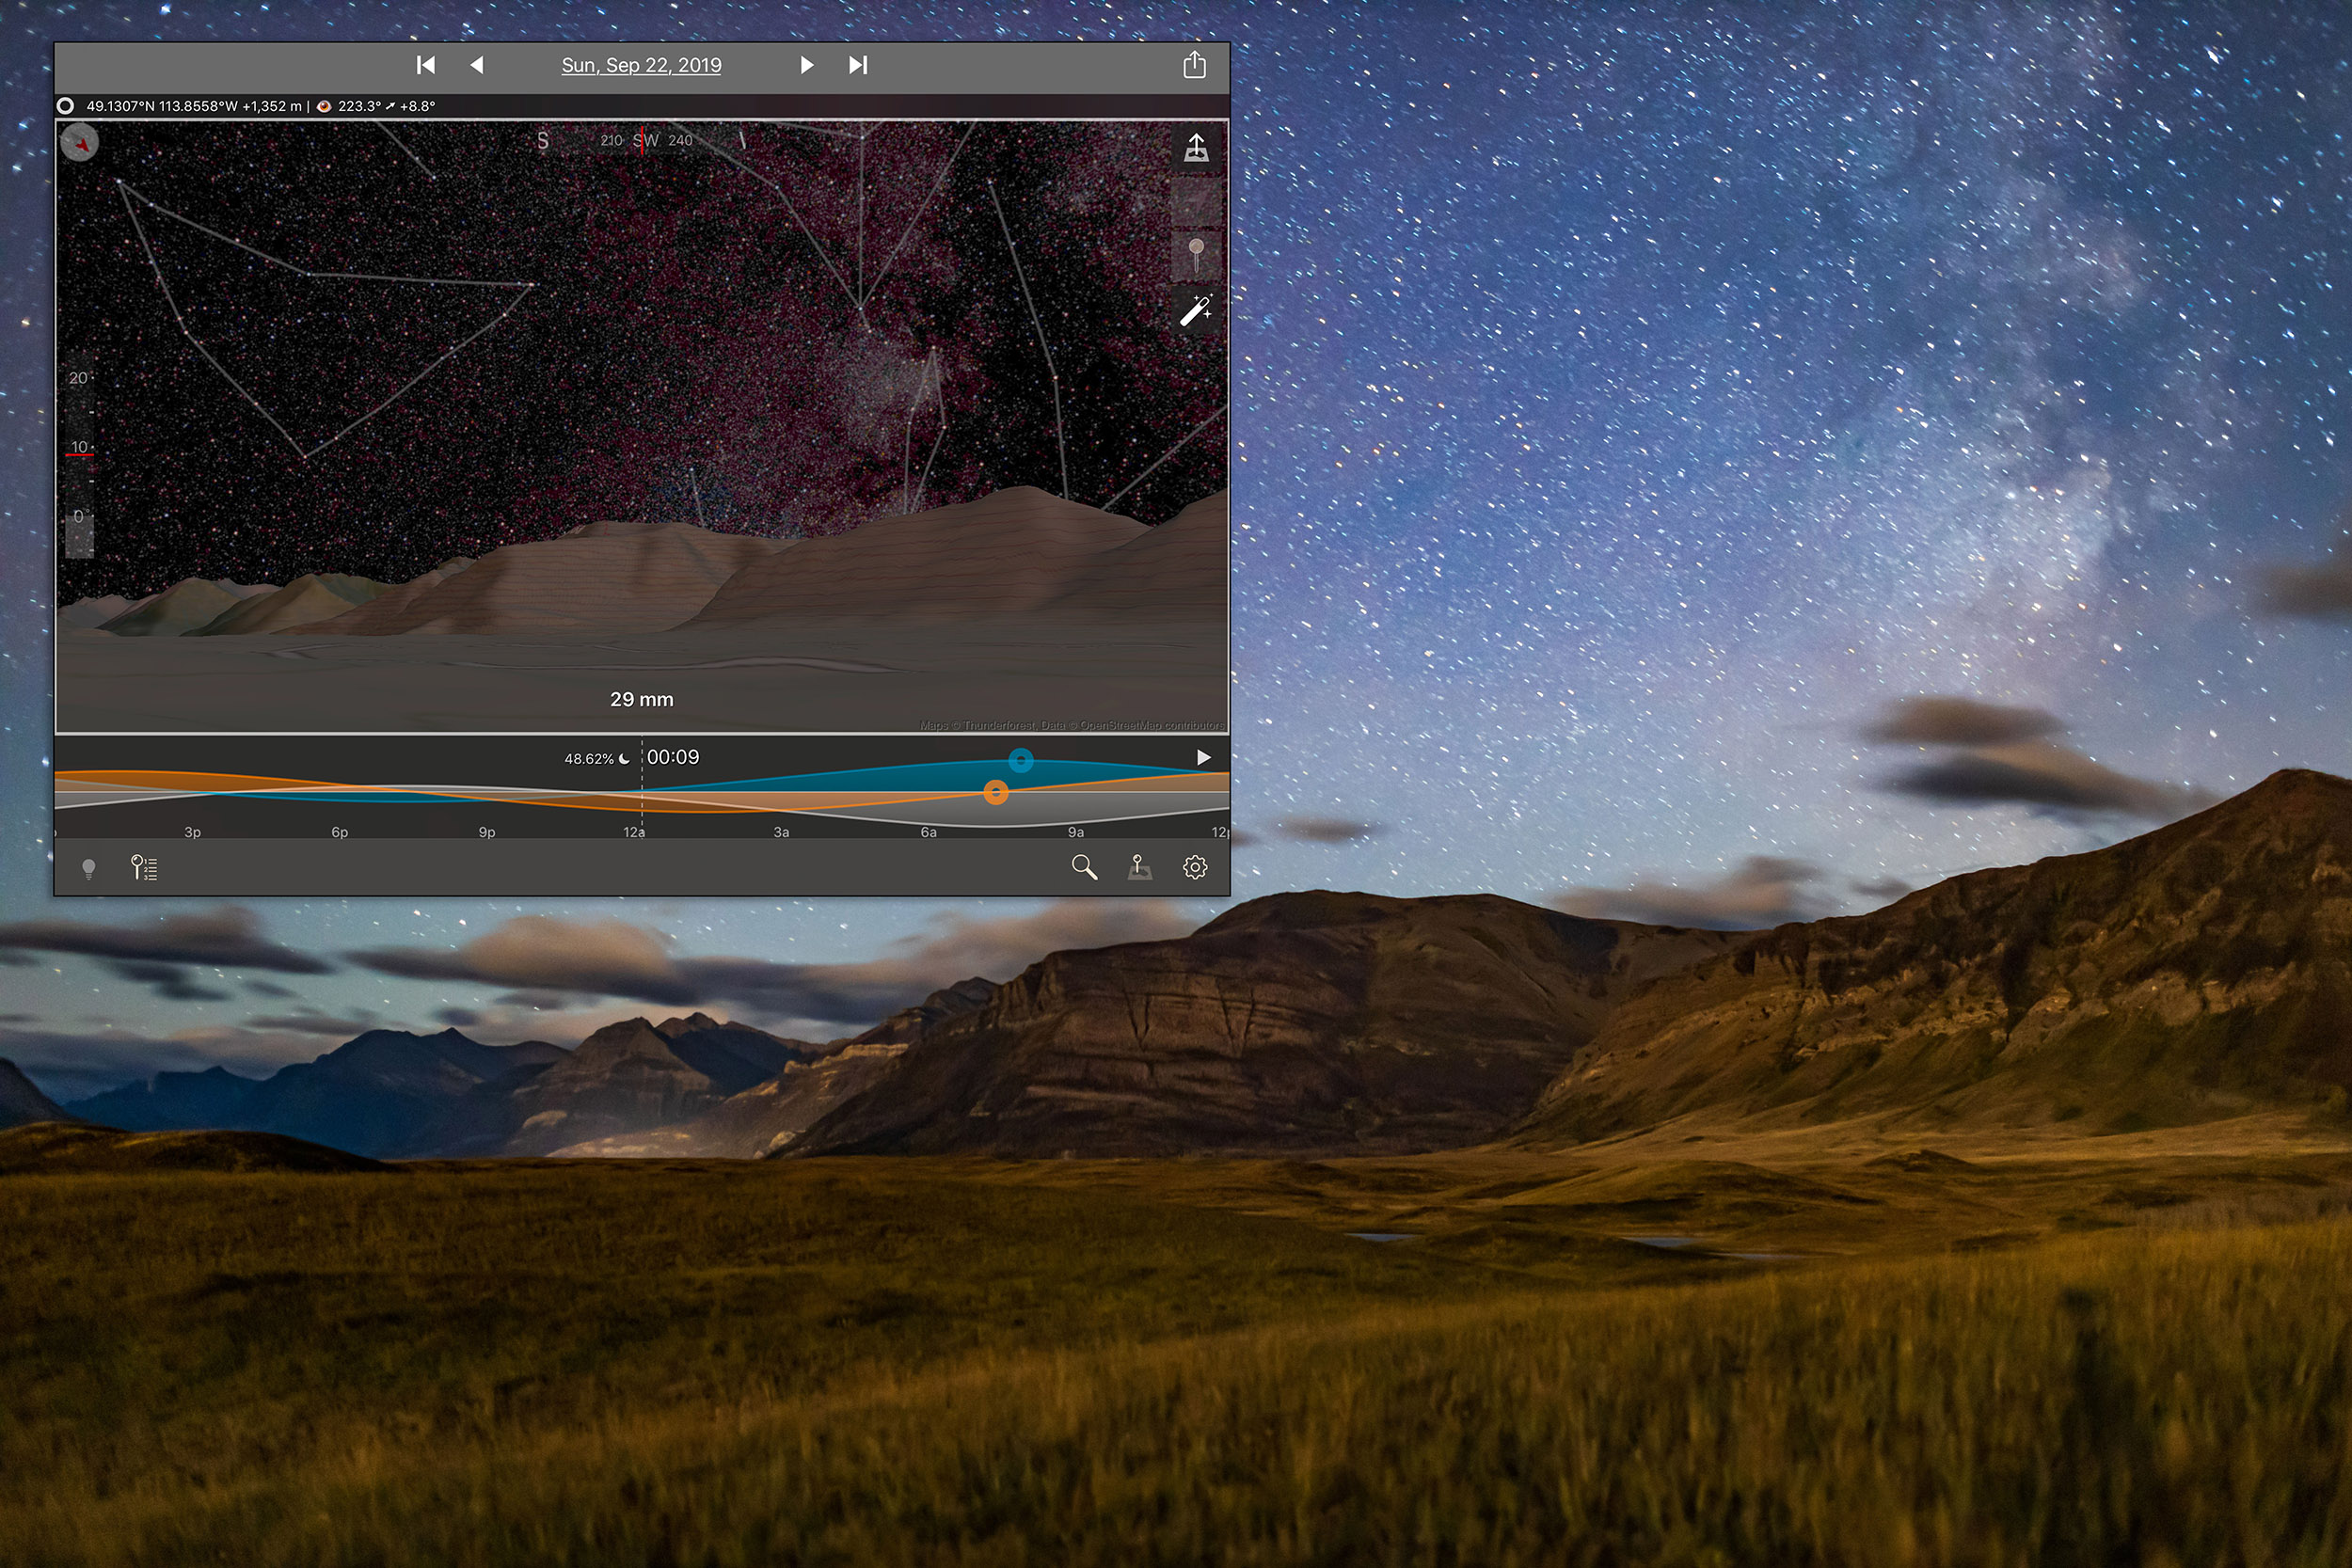
The chart above from the app Astrospheric shows the clear hole, and the dark blue on the time-line indicates the period with no clouds. Note how it coincides with the wavy line below which shows Moon altitude, with the orange and red regions indicating when the eclipse would take place. Looks good! So I made my plan to chase.
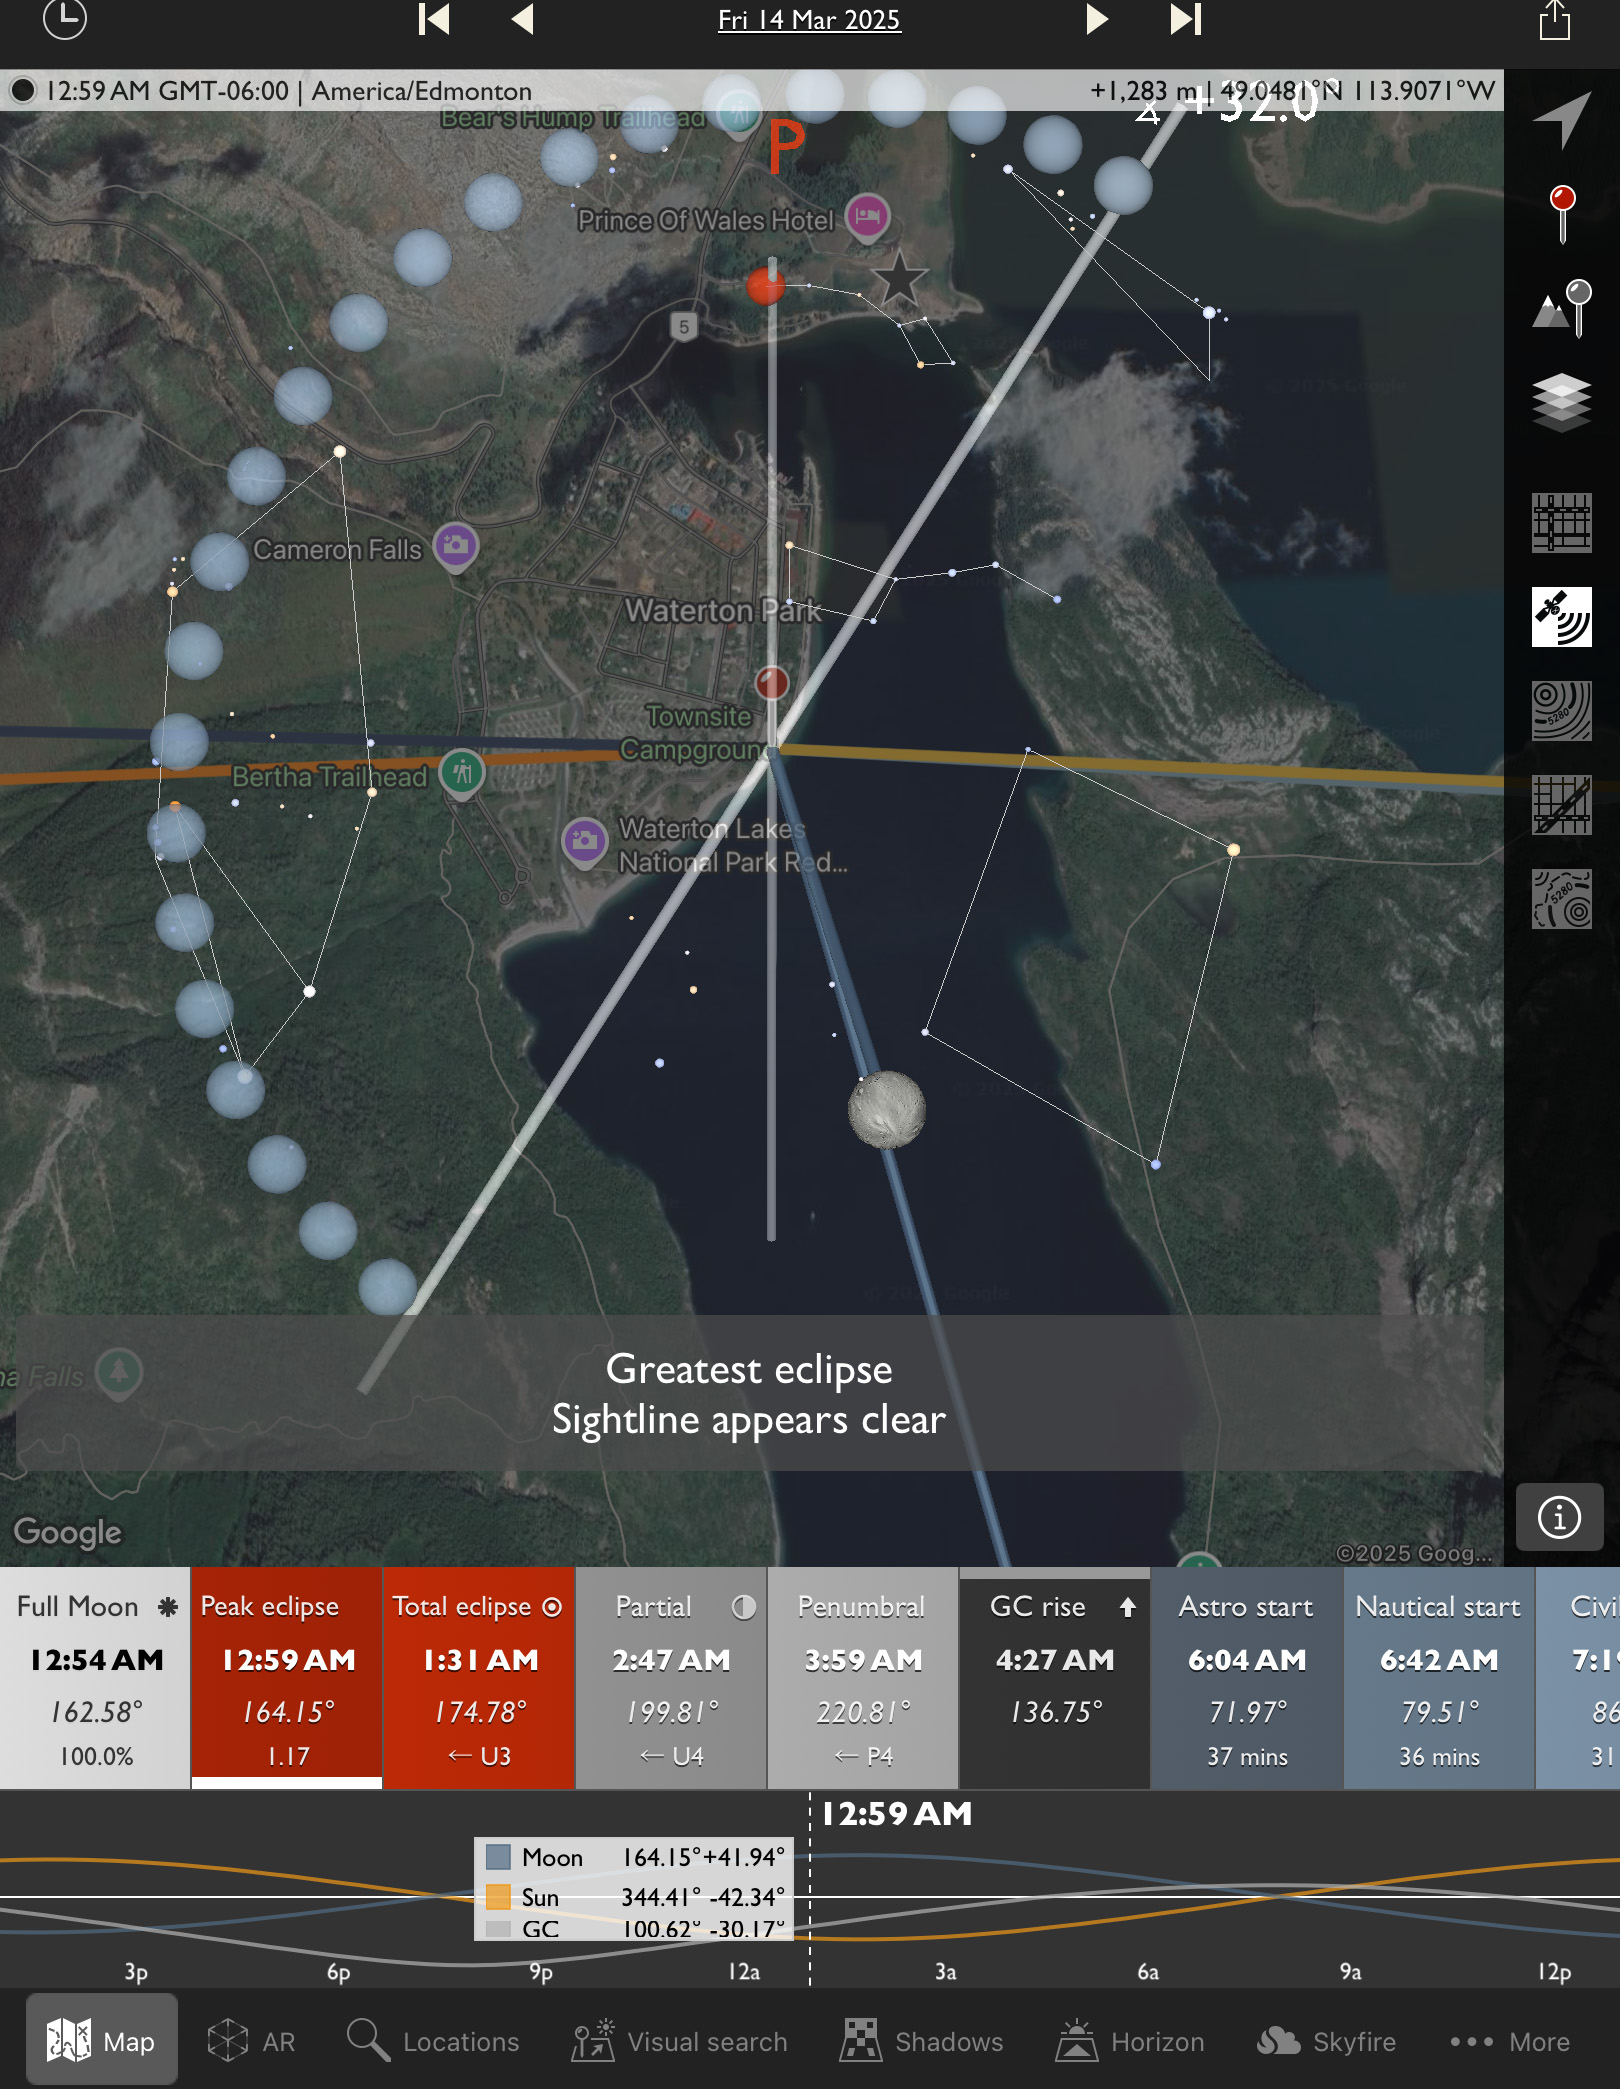
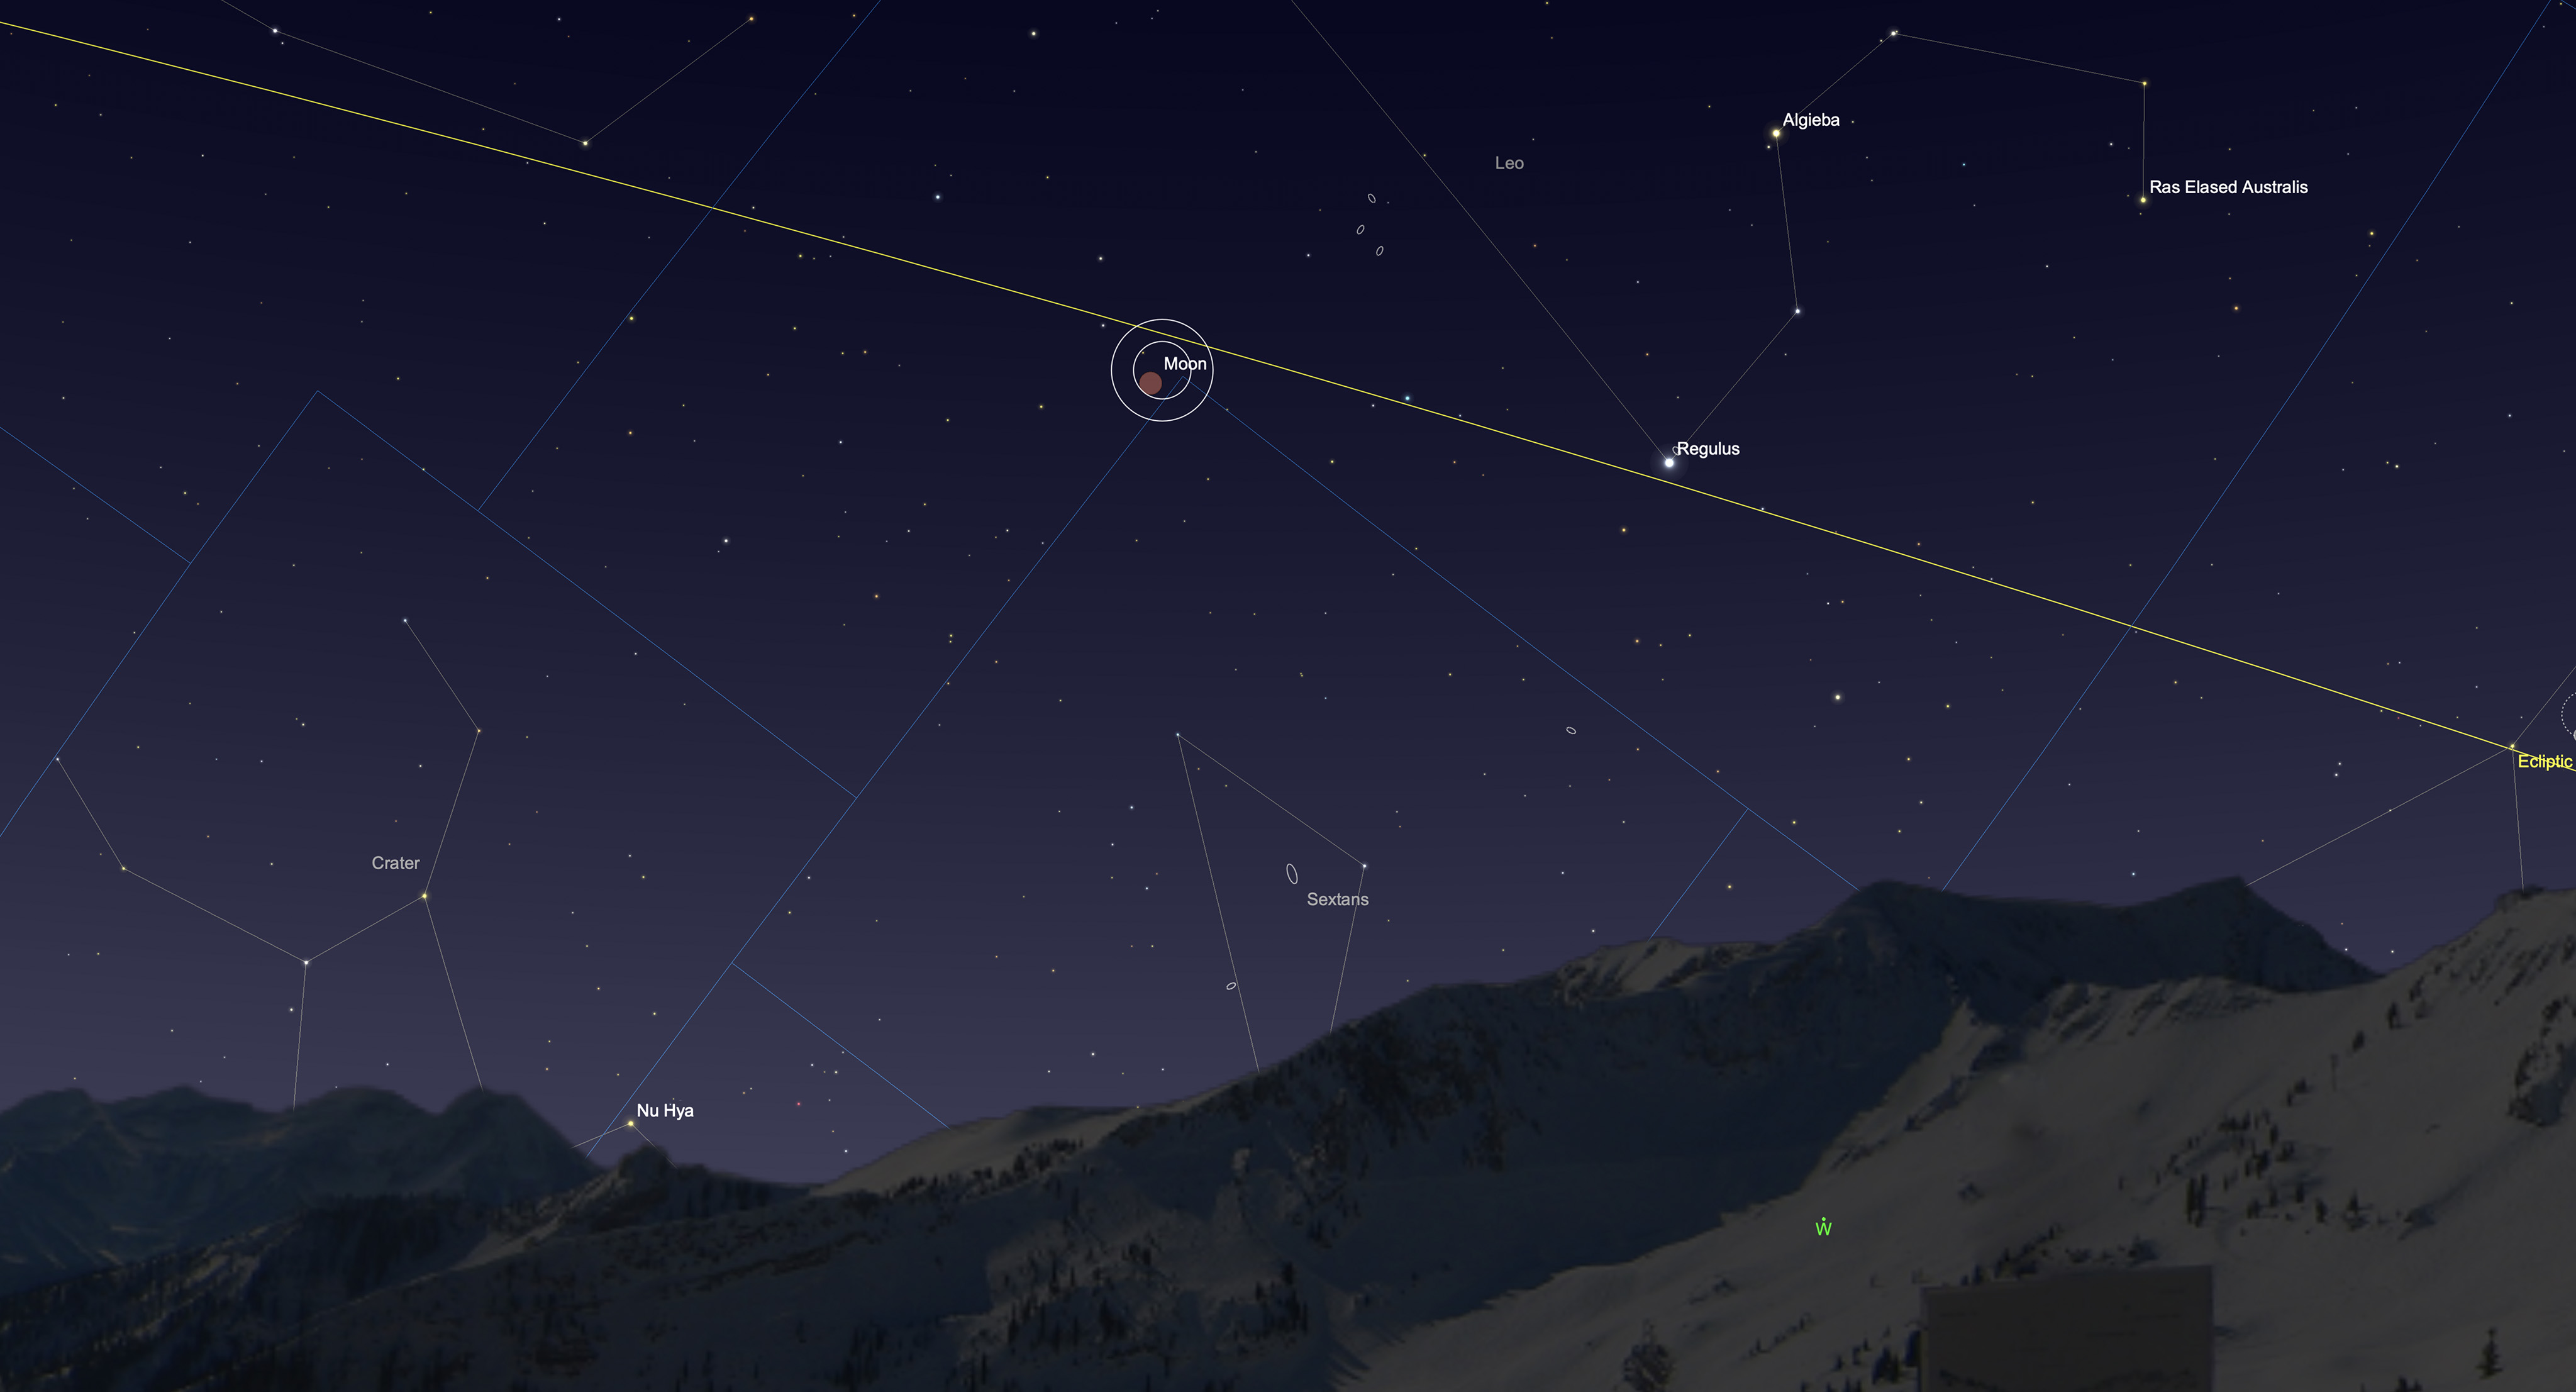
I knew the area well enough to know the site would be a good one for the eclipse, and the Moon’s location to the south. But it pays to check. I use The Photographer’s Ephemeris as my main photo planning app.
TPE Plot of Sightlines
It showed the sightline toward the Moon during the eclipse as straight down Upper Waterton Lake. My chosen spot was on the lakeside Waterton Avenue, where I could set up both the wide-angle camera and a telescope without having to heft gear any distance. Winter road closures also limited my site choices. Indeed, in winter the Park is quiet, with only a few hotels and restaurants open, and many businesses boarded up.
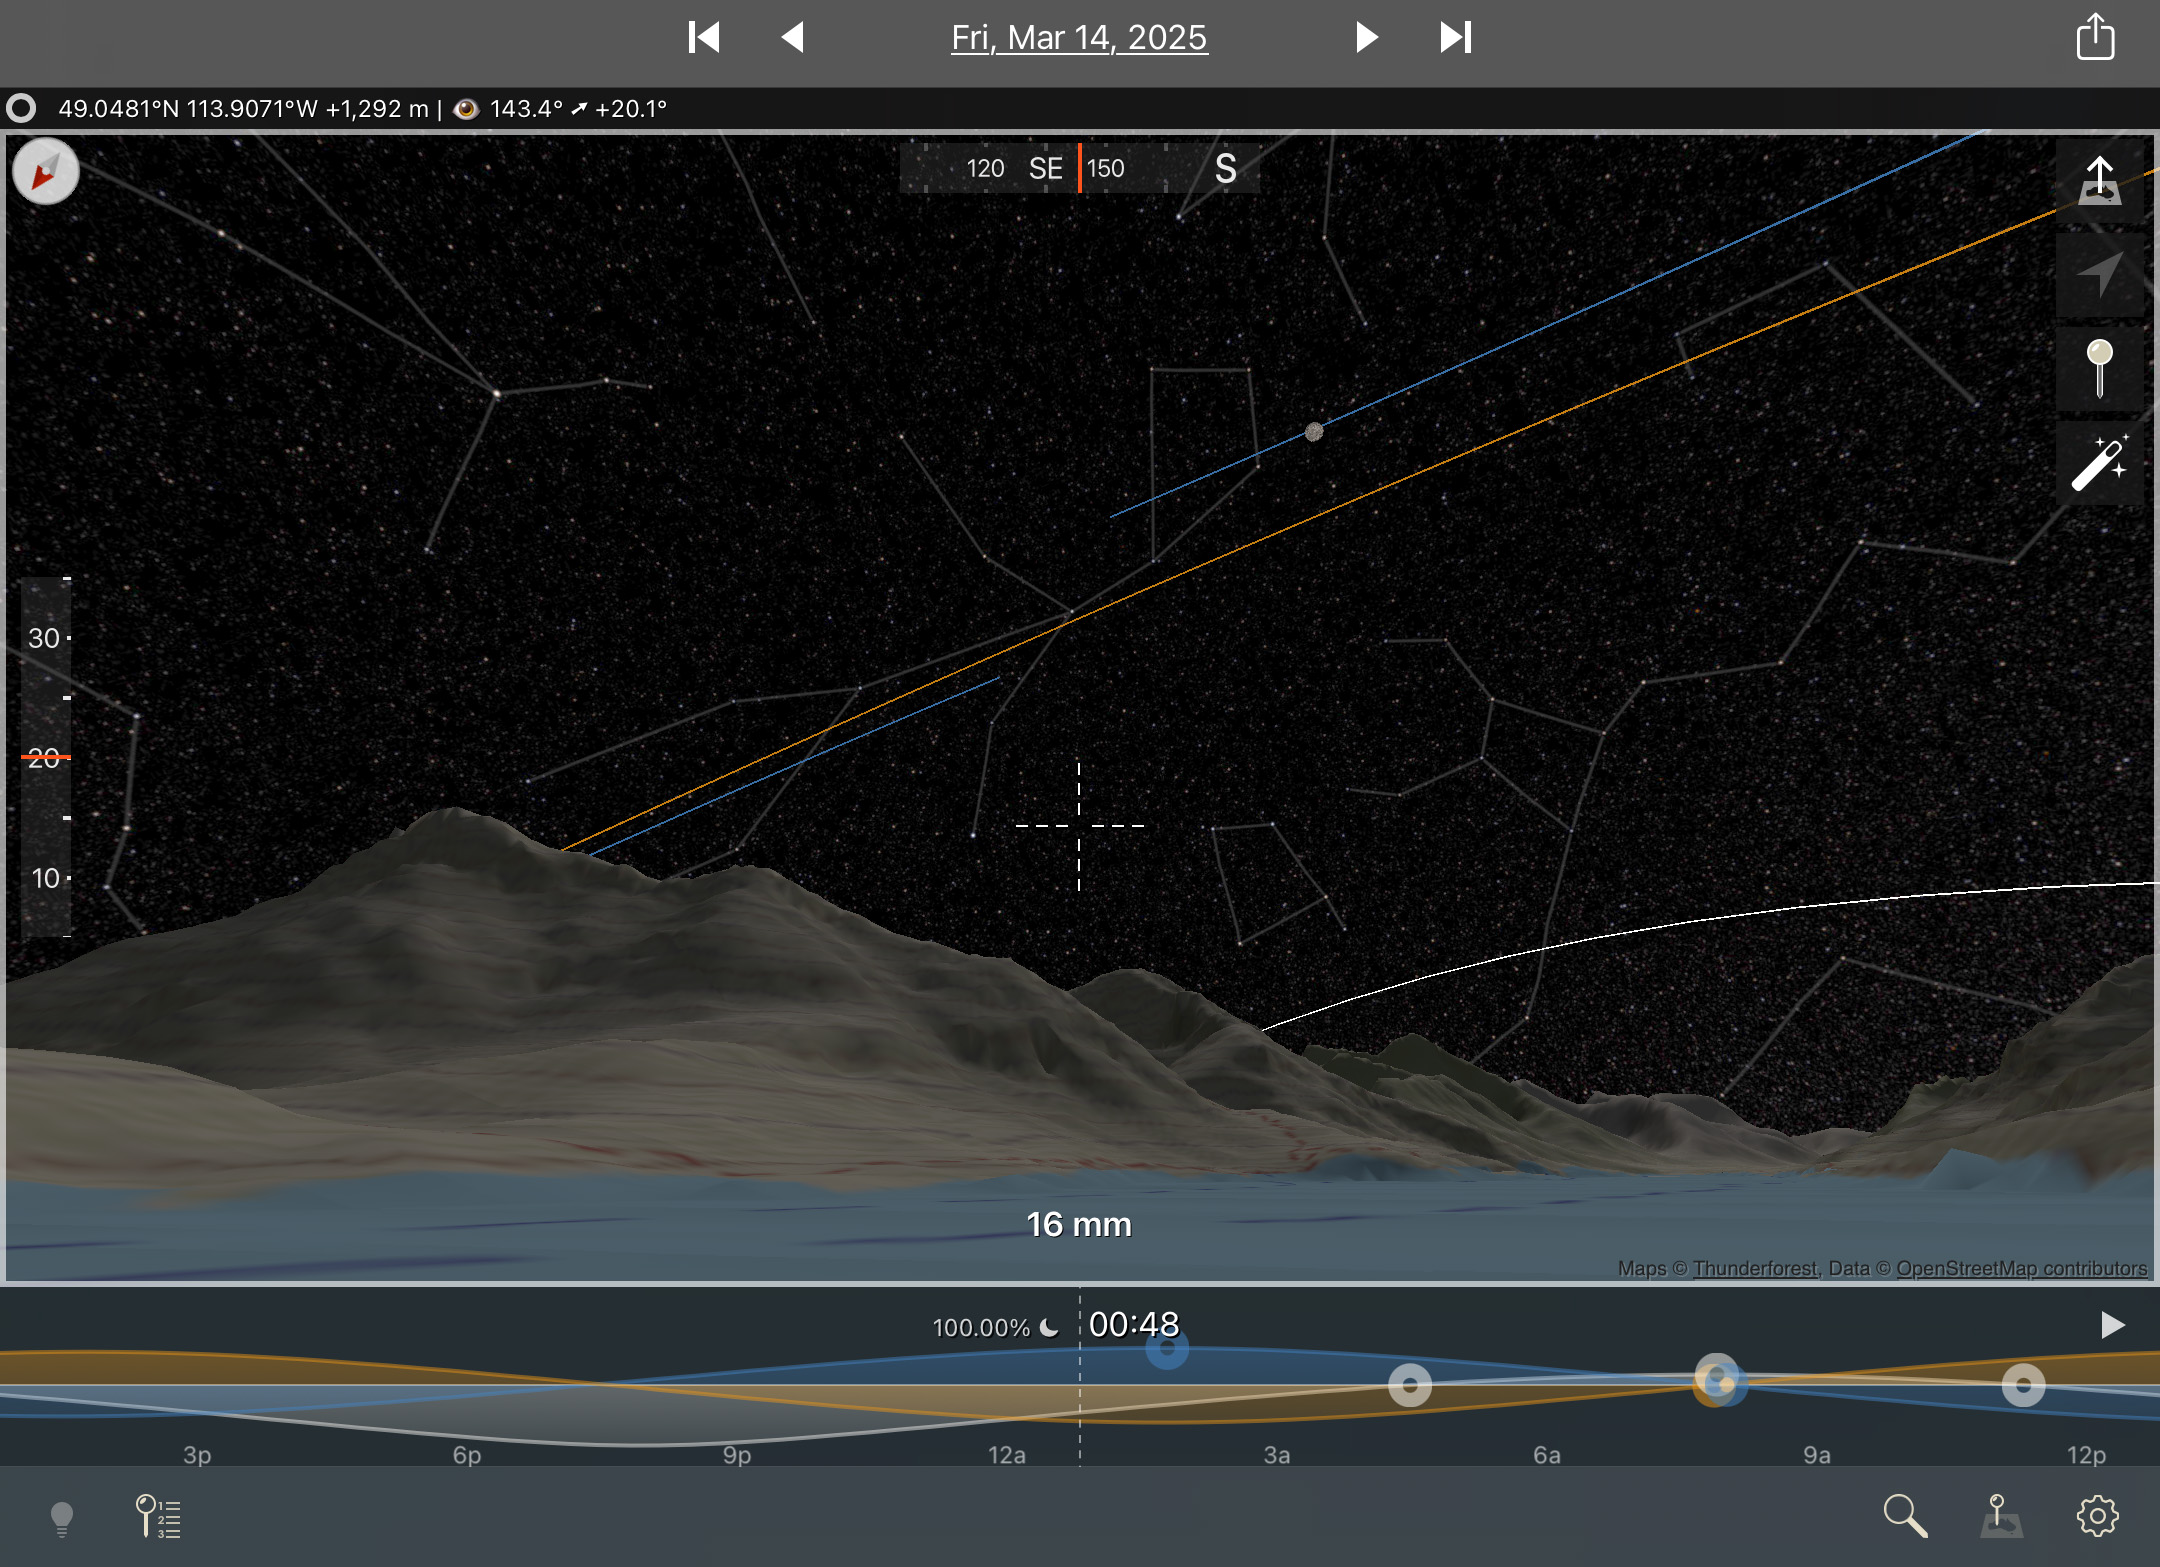
TPE 3D Simulation
Switching to the companion app TPE 3D (above) showed a preview of the landscape and the Moon’s position in the sky relative to the scene below.
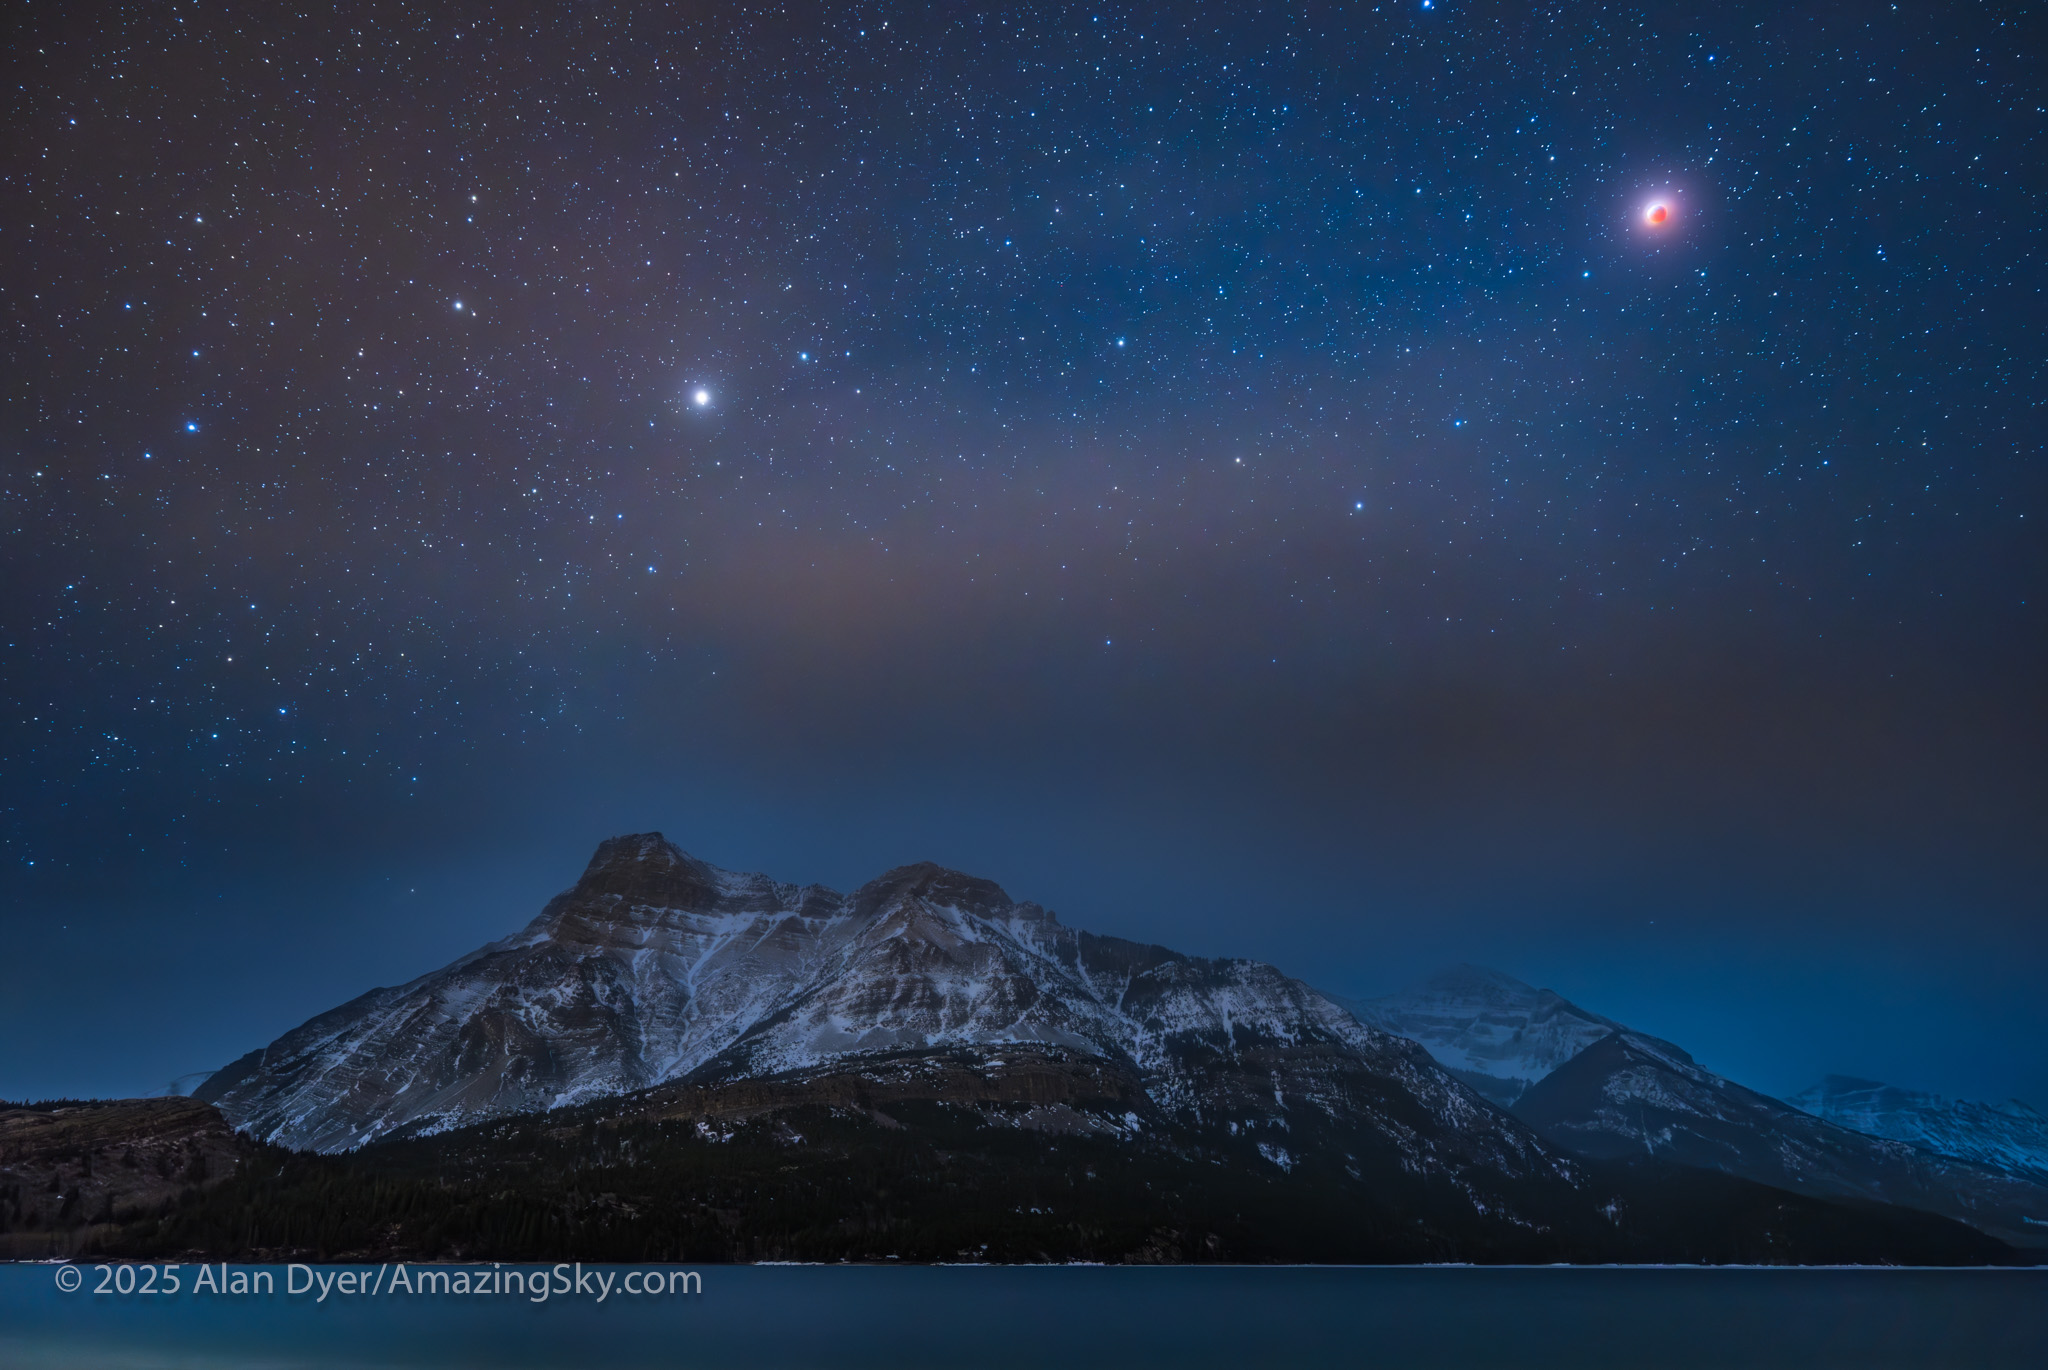
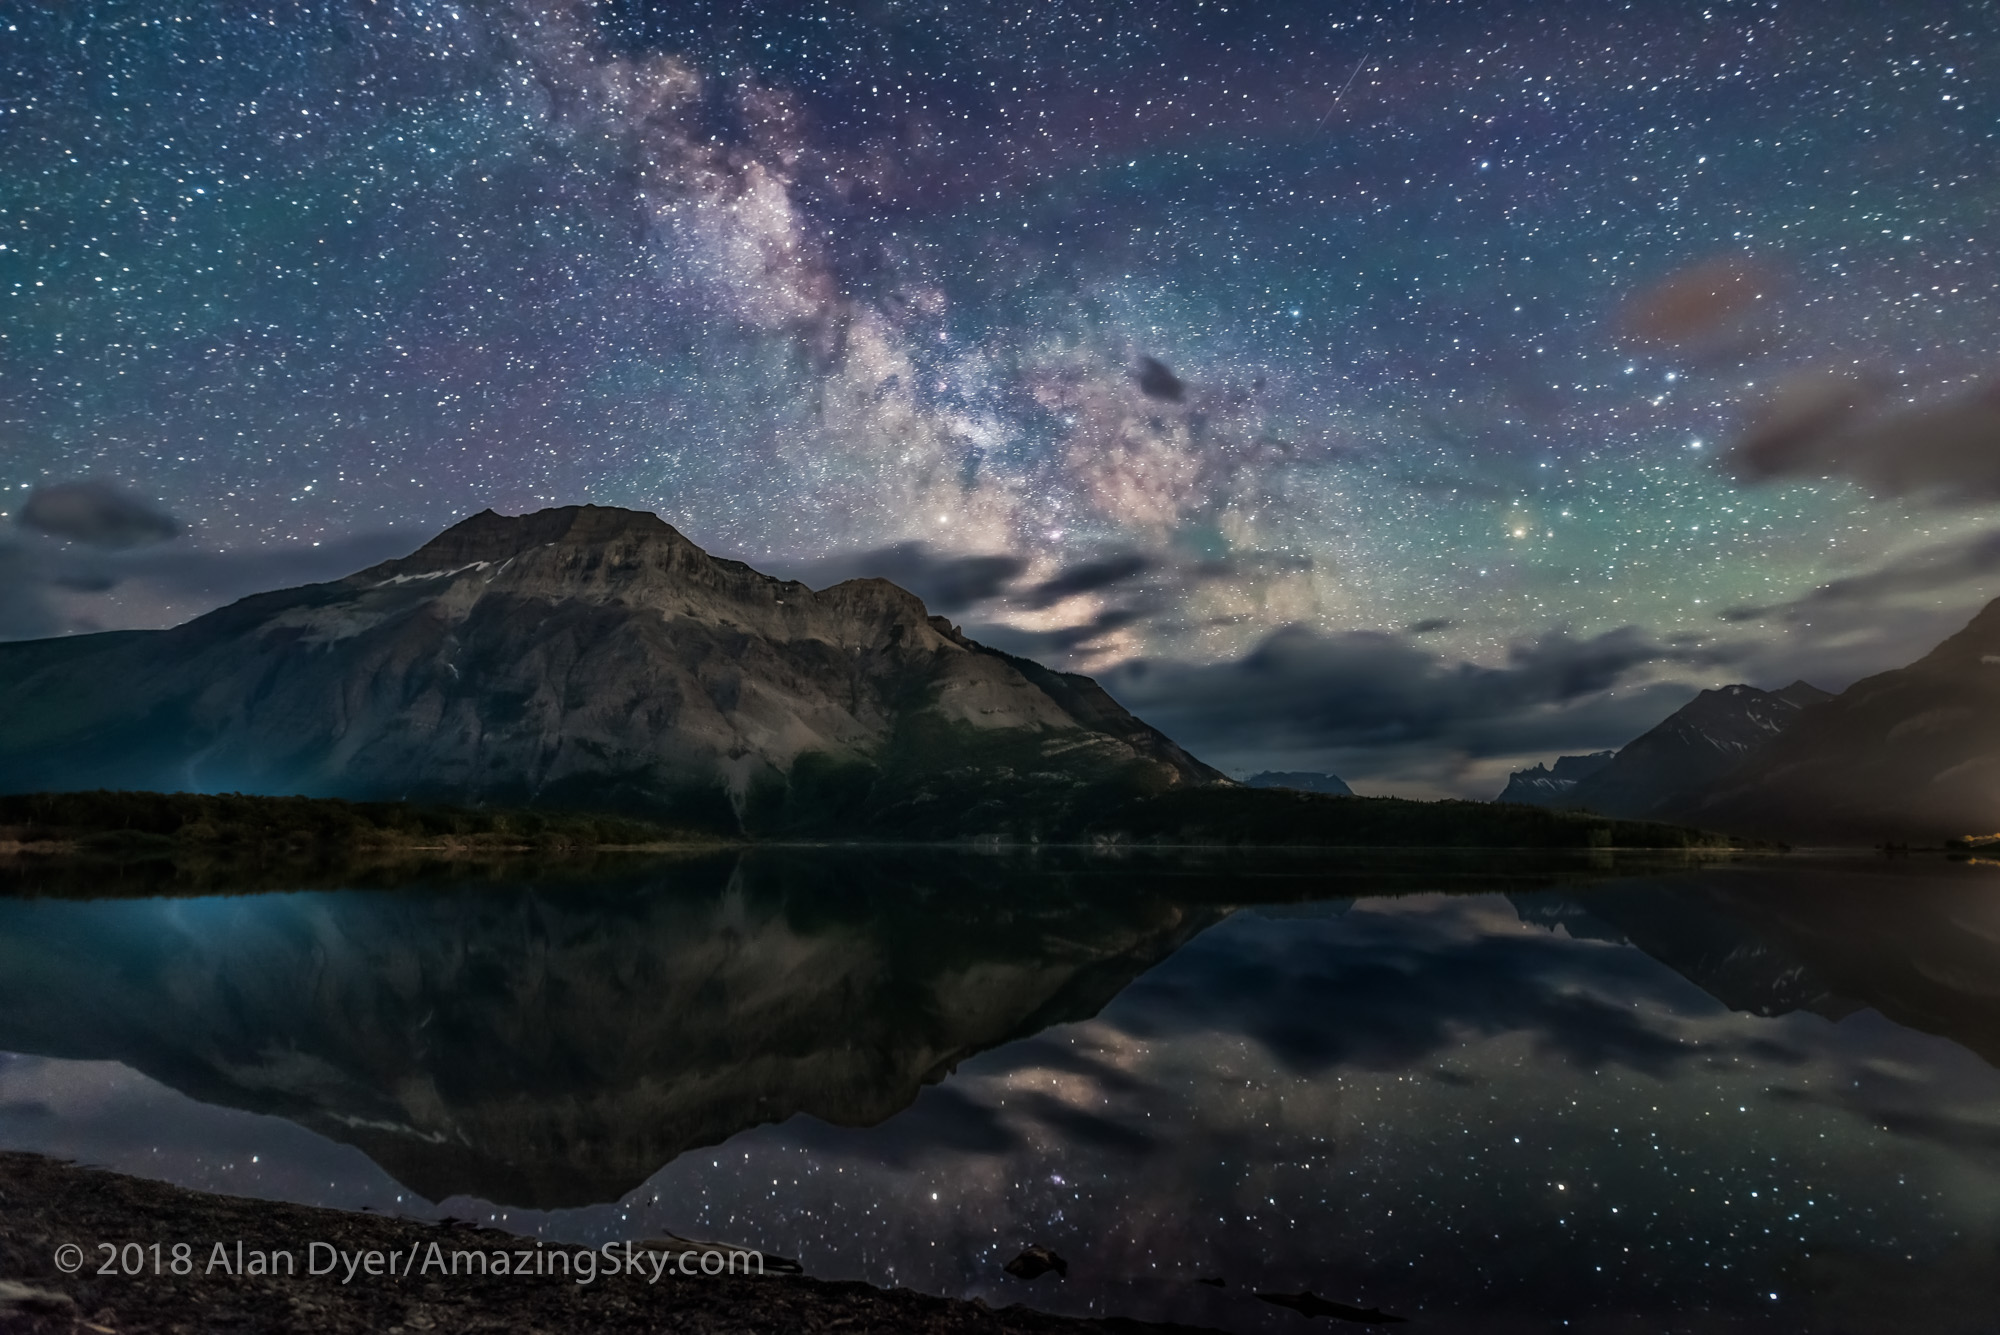
Compare the simulation to the real thing below! Pretty accurate, except for the scattered clouds that drifted through.
This is a blend of separate images for the sky and ground: a stack of two untracked images for 60 seconds each for the ground, then a third exposure for the sky and untrailed stars, taken immediately afterwards with the tracker motor on, for 30 seconds, all with the Canon RF15-35mm lens wide-open at f/2.8 and at 20mm, on the Canon R5 at ISO 1600. Separate shorter tracked exposures of 15, 8 and 4 seconds blended in kept the lunar disk from overexposing, showing it more as the eye saw it.
The above image is a blend of tracked exposures for the Moon and sky, with untracked exposures for the ground. I shot them just before mid-totality at 1 am MDT. That image was second in priority. First, was a panorama. That result is below.
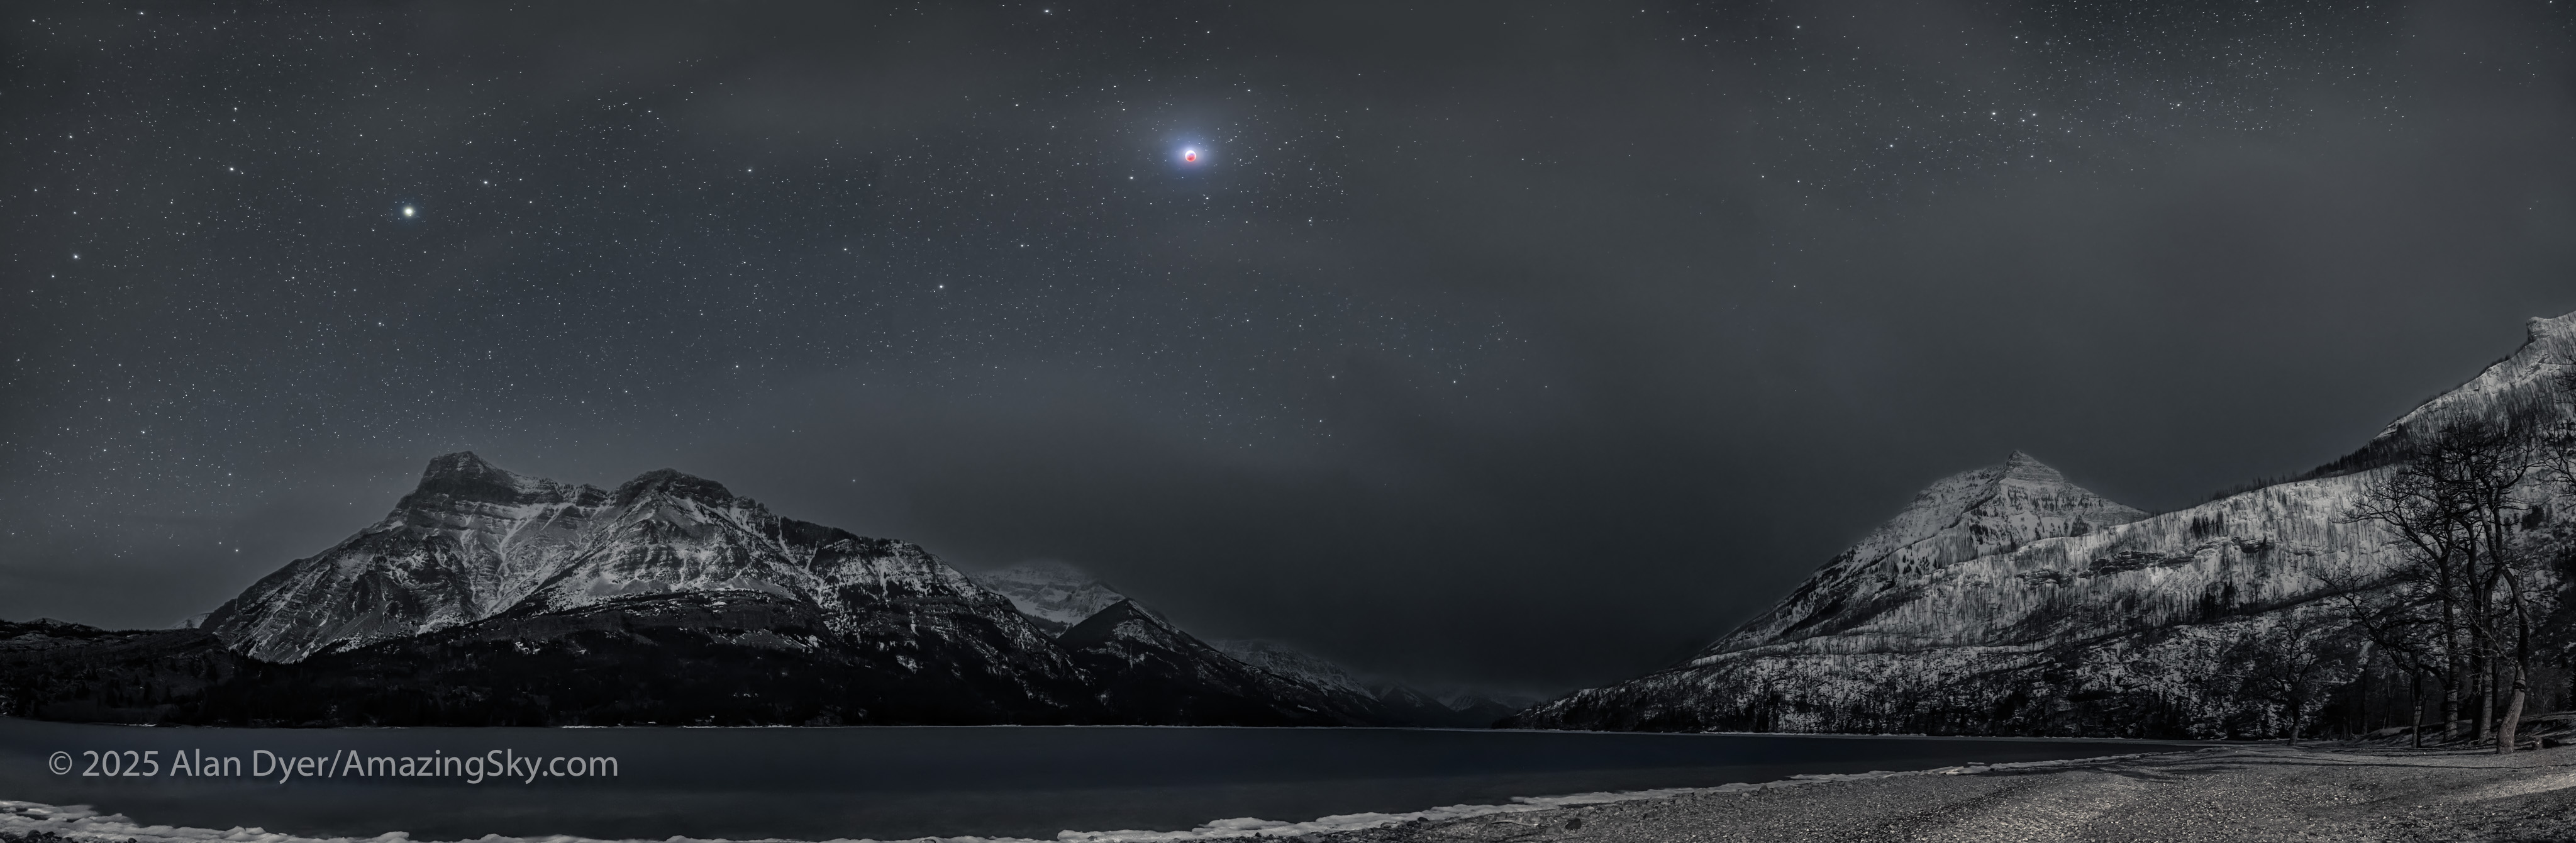
This is a panorama of four segments at 30º spacing, taken in two passes: first untracked for 30 seconds each, then a second pass immediately afterwards with the tracker motor on, also for 30 seconds each, all with the Canon RF15-35mm lens wide-open at f/2.8 and at 20mm, on the Canon R5 at ISO 1600, with the camera in landscape orientation. Separate shorter exposures of 15s, 10s, 5s and 2.5s at ISO 400 were blended in to preserve the lunar disk more as the eye saw it.
I shot this scene just as totality began, to ensure I got it. While the Moon was in clear sky before totality during the partial phase, sure enough as the Moon became fully eclipsed, the clouds wafting over the mountains threatened to move in and obscure the view.
Luckily, while they did hide the Moon now and then, they opened up enough for good views and images for a few minutes at a time throughout the eclipse.
For the panorama I processed the image for a more monochromatic look, to resemble the naked-eye view, but with the Moon appearing as a red globe in the sky, the only colour in the scene. (I shot the tracked shots with the MSM Nomad tracker I reviewed here.)
The site proved excellent, but it was a cold night! While the temperature was only just below freezing, the brisk Waterton wind off the lake made it a chilly experience watching the eclipse for two hours. I was actually being hit by ice pellets blowing off the lake.
I decided not to set up the telescope for close-ups; the wide-angle images were the priority anyway from such a scenic spot.
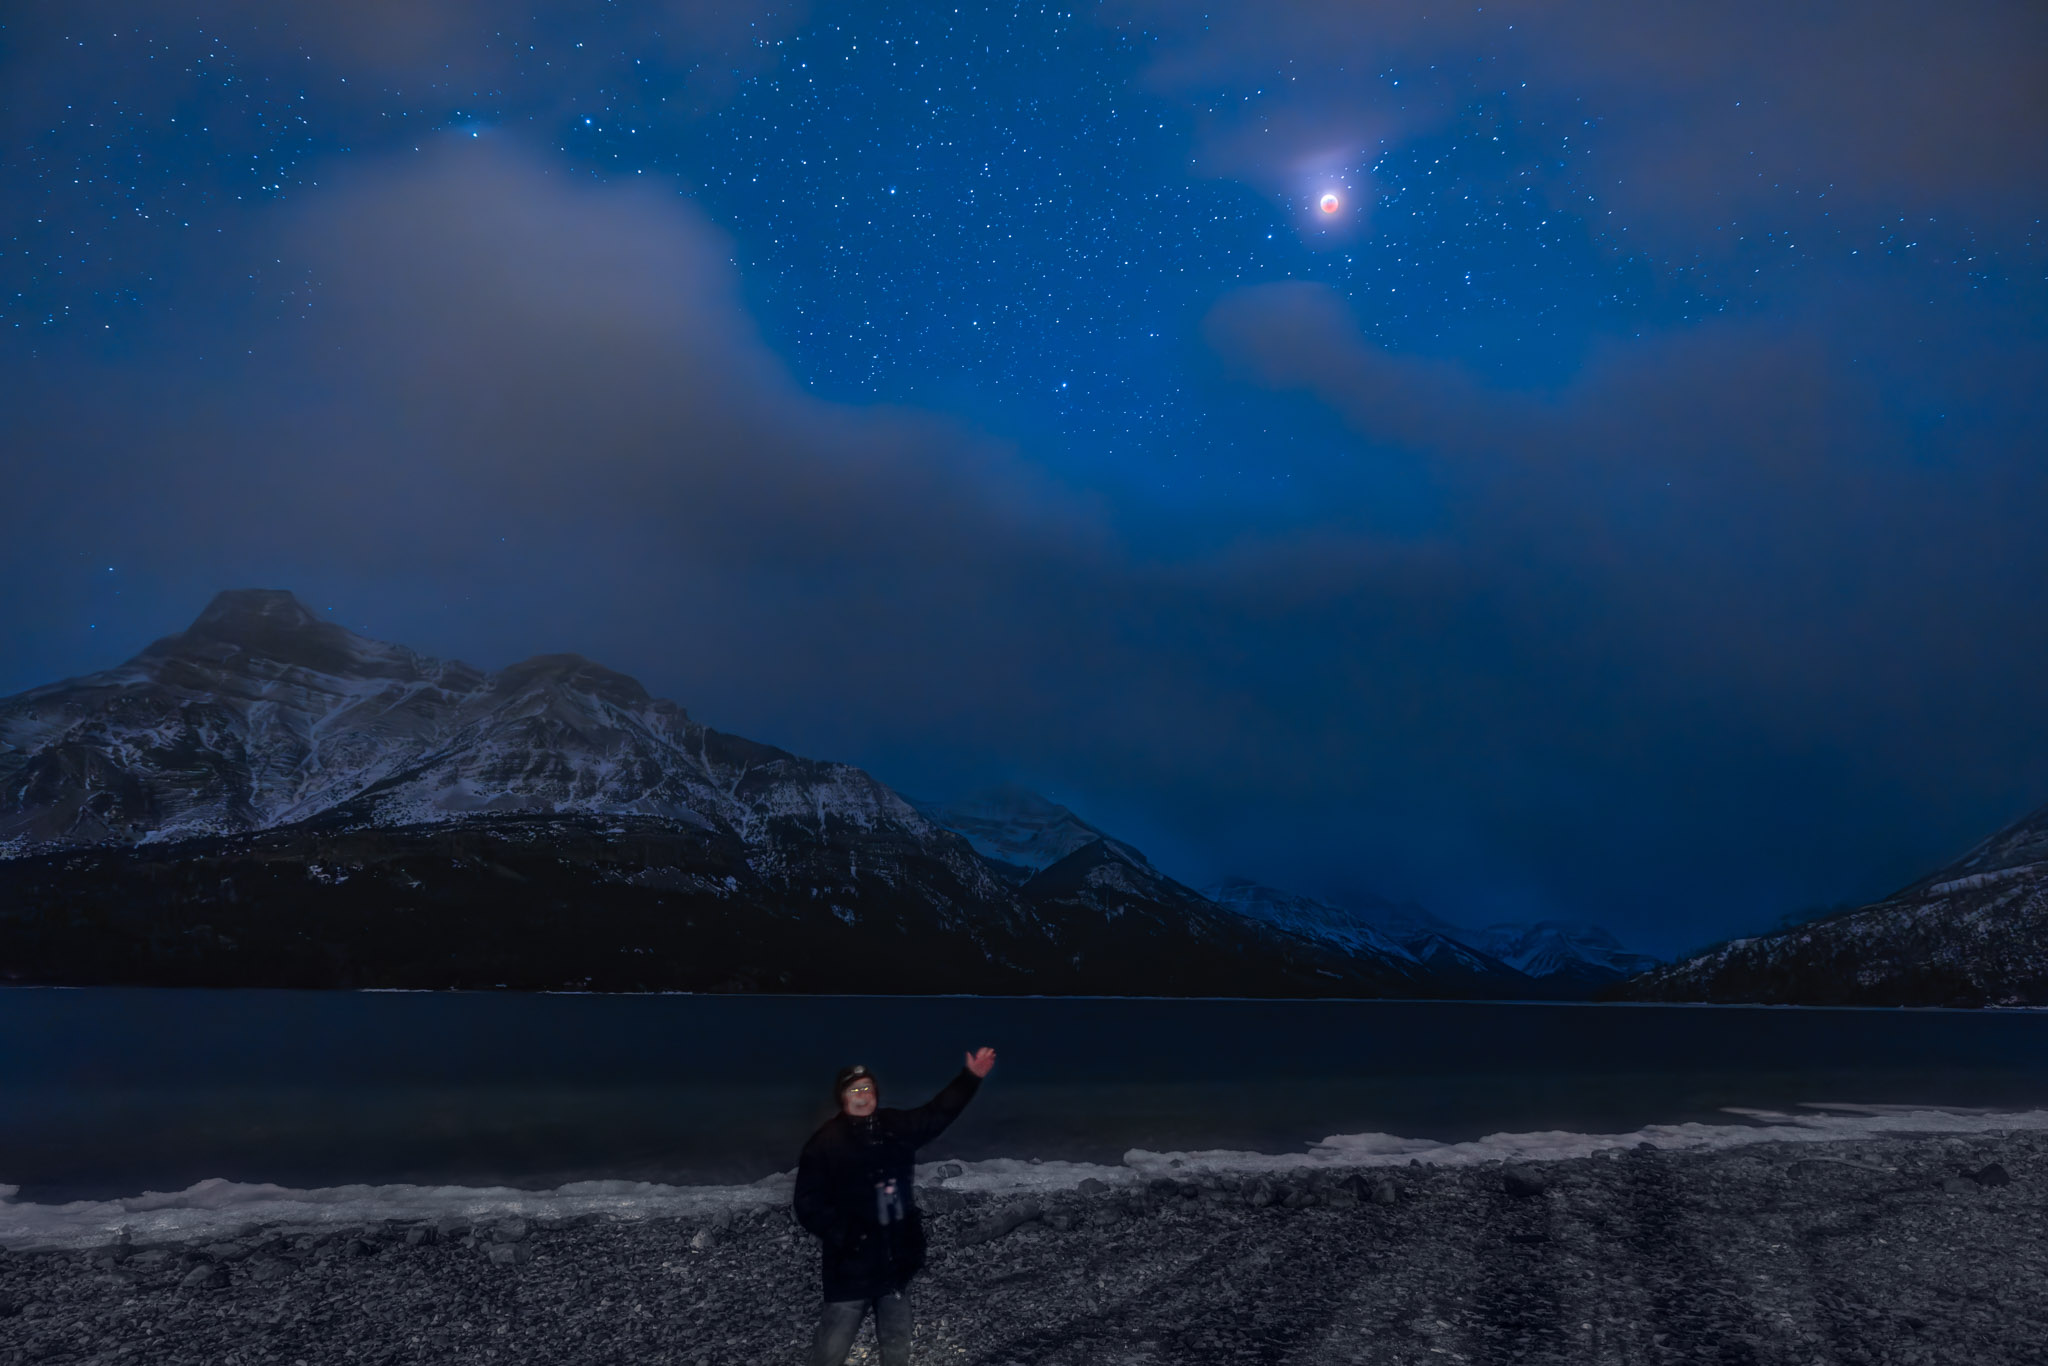
A single untracked 15-second exposure with the RF15-35mm lens at f/2.8 and 17mm on the Canon R5 at ISO 3200.
But I am not complaining. I got the eclipse, once again by chasing to where the weather predictions said it would be clear. The above is my requisite trophy shot.
Had I stayed home I would have been clouded out. Had predictions called for clear skies at home, I would not have made the trip to Waterton to enjoy the eclipse over its wonderful scenery.
The next total lunar eclipse is September 7, 2025, six months after this eclipse. But it is visible from the opposite hemisphere to this one, with no part of that eclipse visible from North America. I will not chase that far for a TLE!
The March 3, 2026 TLE from Alberta
After that, and after a passage of one lunar year (355 days or 12 lunar cycles) since the March 14, 2025 TLE, I have a chance for another total lunar eclipse from home, with western North America favoured. As I preview above, it’ll be an early morning event on March 3, 2026, with the eclipsed Moon setting in the west in the pre-dawn hours.
Sounds like another chase to a mountain site with the red Moon over the Rockies. That’ll be the plan!
2024 brought us a total eclipse of the Sun, superb auroras, and a naked-eye comet, three top highlights of a wonderful year of celestial attractions. Maybe the best!
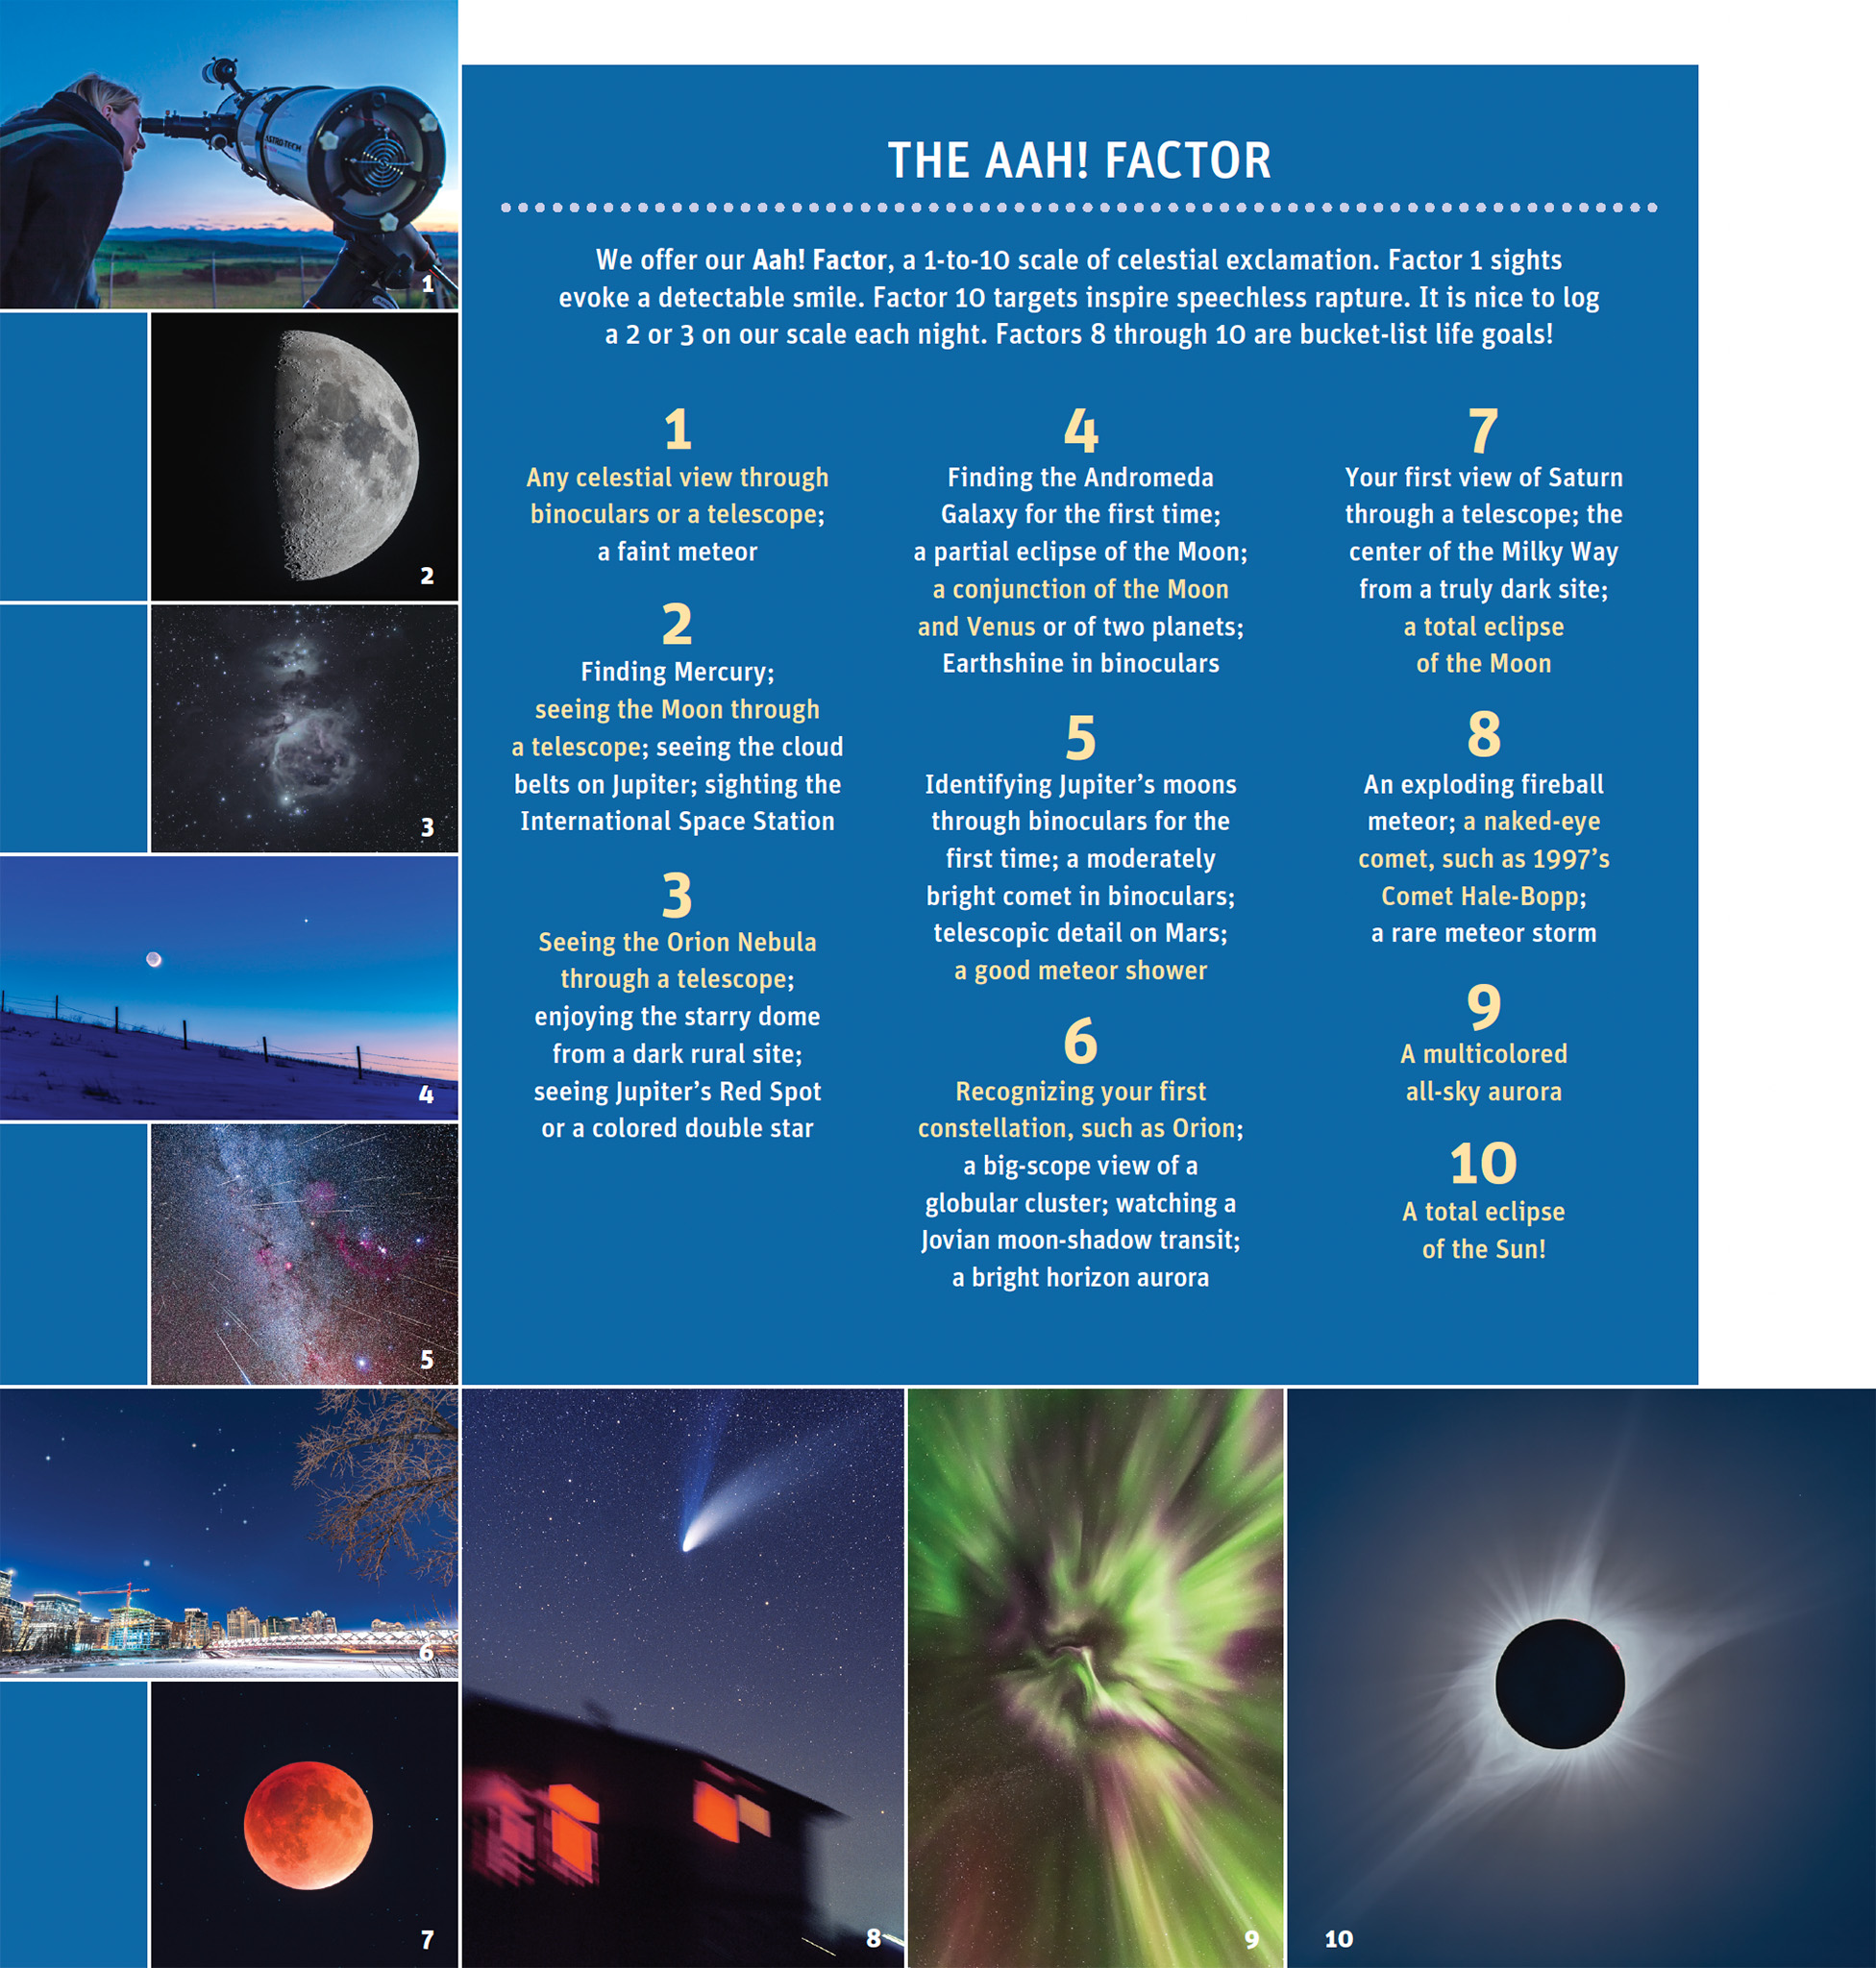
In our book The Backyard Astronomer’s Guide (which we revised this year), Terence Dickinson and I created an Aah! Factor scale with various celestial sights ranked from:
• 1, evoking just a smile, to …
• 10, a life-changing event!
Our book’s Aah! Factor Scale in Chapter 1
Coming in at an 8 is a naked-eye comet. Deserving a 9 is an all-sky display of an aurora. The only sight to rate a top 10 is a total eclipse of the Sun.
2024 brought all three, and more!
Here’s my look back at what I think was one of the greatest years of stargazing.
NOTE: The images might take a while to all load. All can be enlarged to full screen. Just click or tap on them.
January
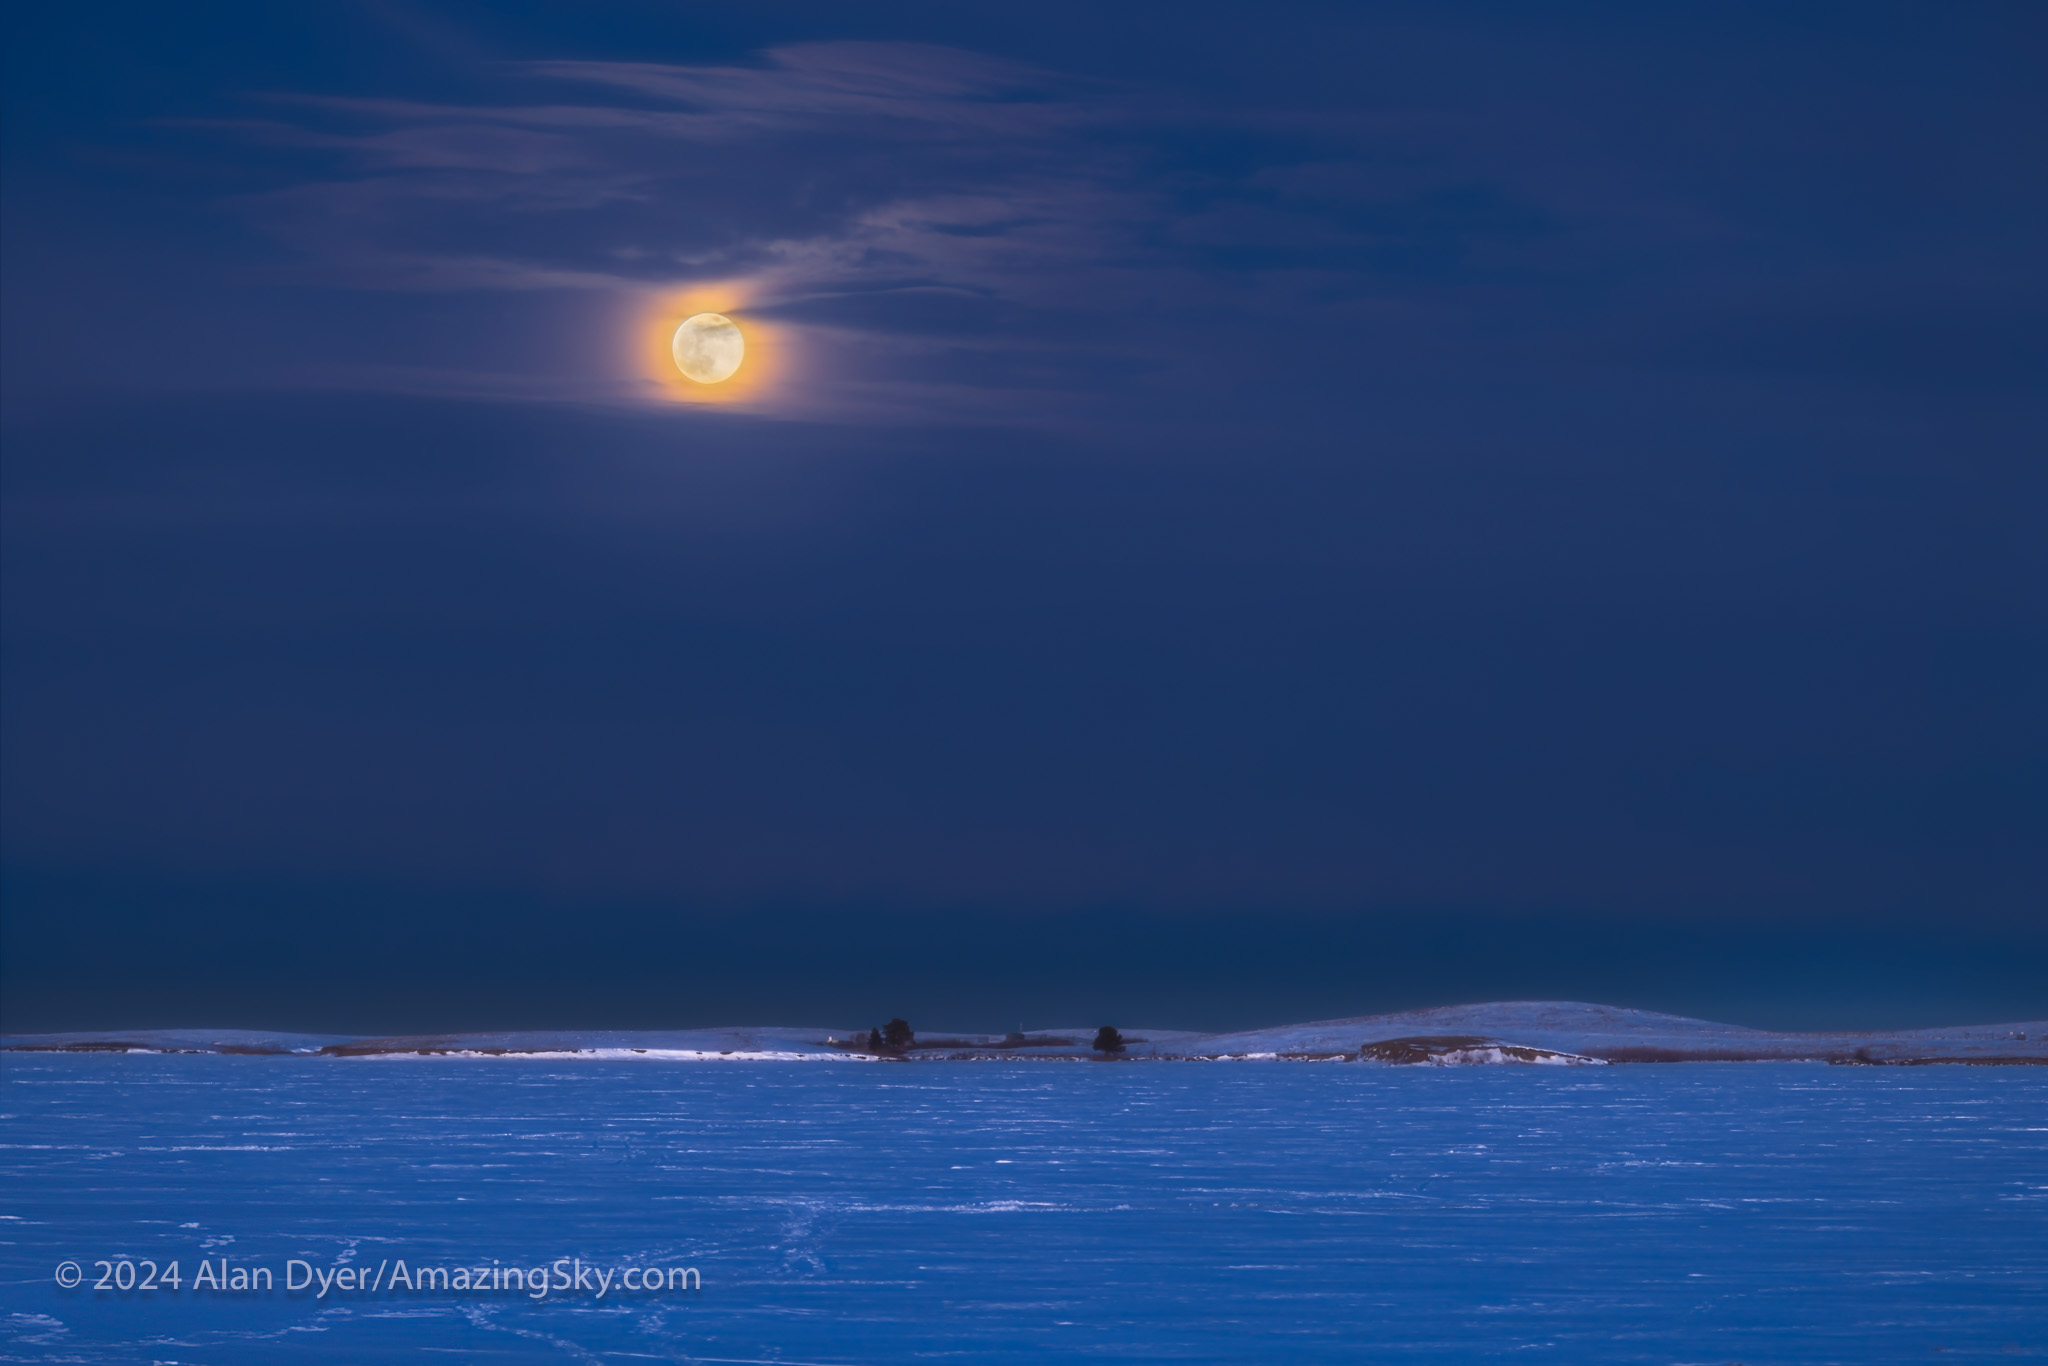
A Winter Moonrise to Begin the Year
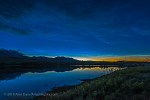
The rising of the winter “Wolf” Moon, the Full Moon of January, over the frozen Crawling Lake Reservoir, in southern Alberta.
Now, this was not any form of rare event. But seeing and shooting any sky sight in the middle of a Canadian winter is an accomplishment. This is the rising of the Full Moon of January, popularly called the Wolf Moon, over a frozen lake near home in Alberta, Canada 🇨🇦.
It serves to bookend the collection with a Full Moon I captured eleven months later in December.
February
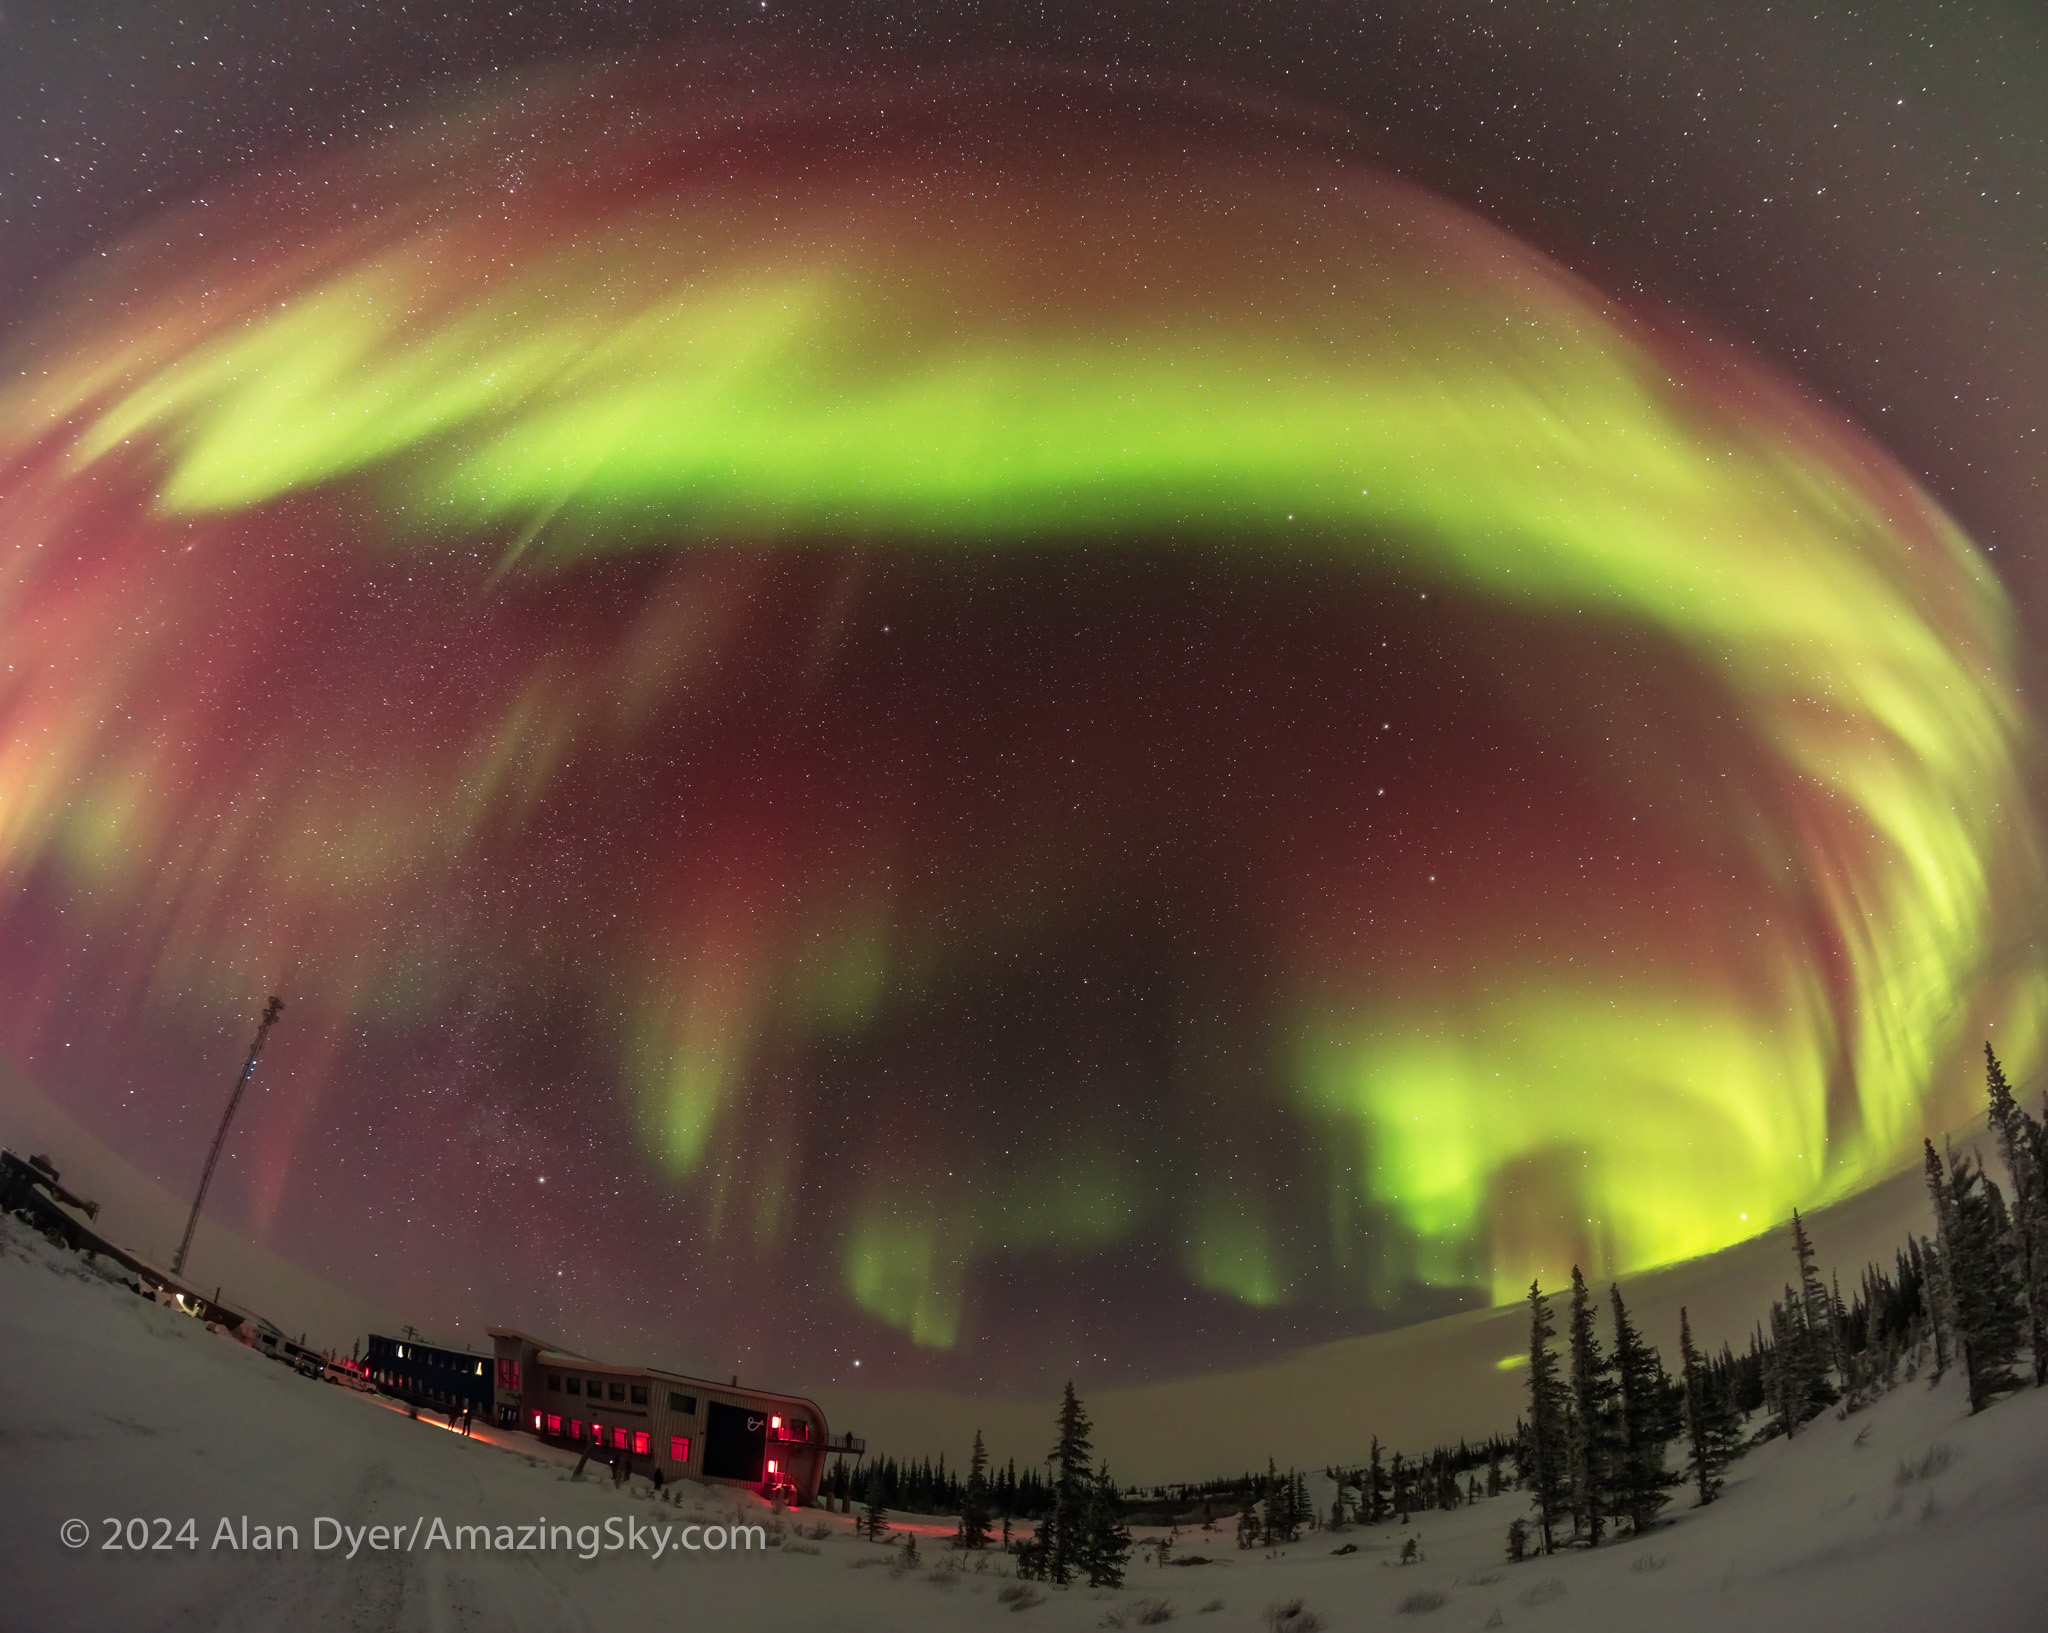
Auroras from Churchill, Manitoba
Had this been my only chance to see the Northern Lights fill the sky this year, I would have been happy. As we often see in Churchill, the aurora covered the sky on several nights, a common sight when you are underneath the main band of aurora borealis that arcs across the northern part of the globe.
This is a vertical panorama of the sky-filling aurora of February 10, 2024, as seen from the Churchill Northern Studies Centre, in Churchill, Manitoba.
I attended to two aurora tour groups at the Churchill Northern Studies Centre who both got good displays to check “seeing the Northern Lights” off their bucket list. Join me in 2025!
March
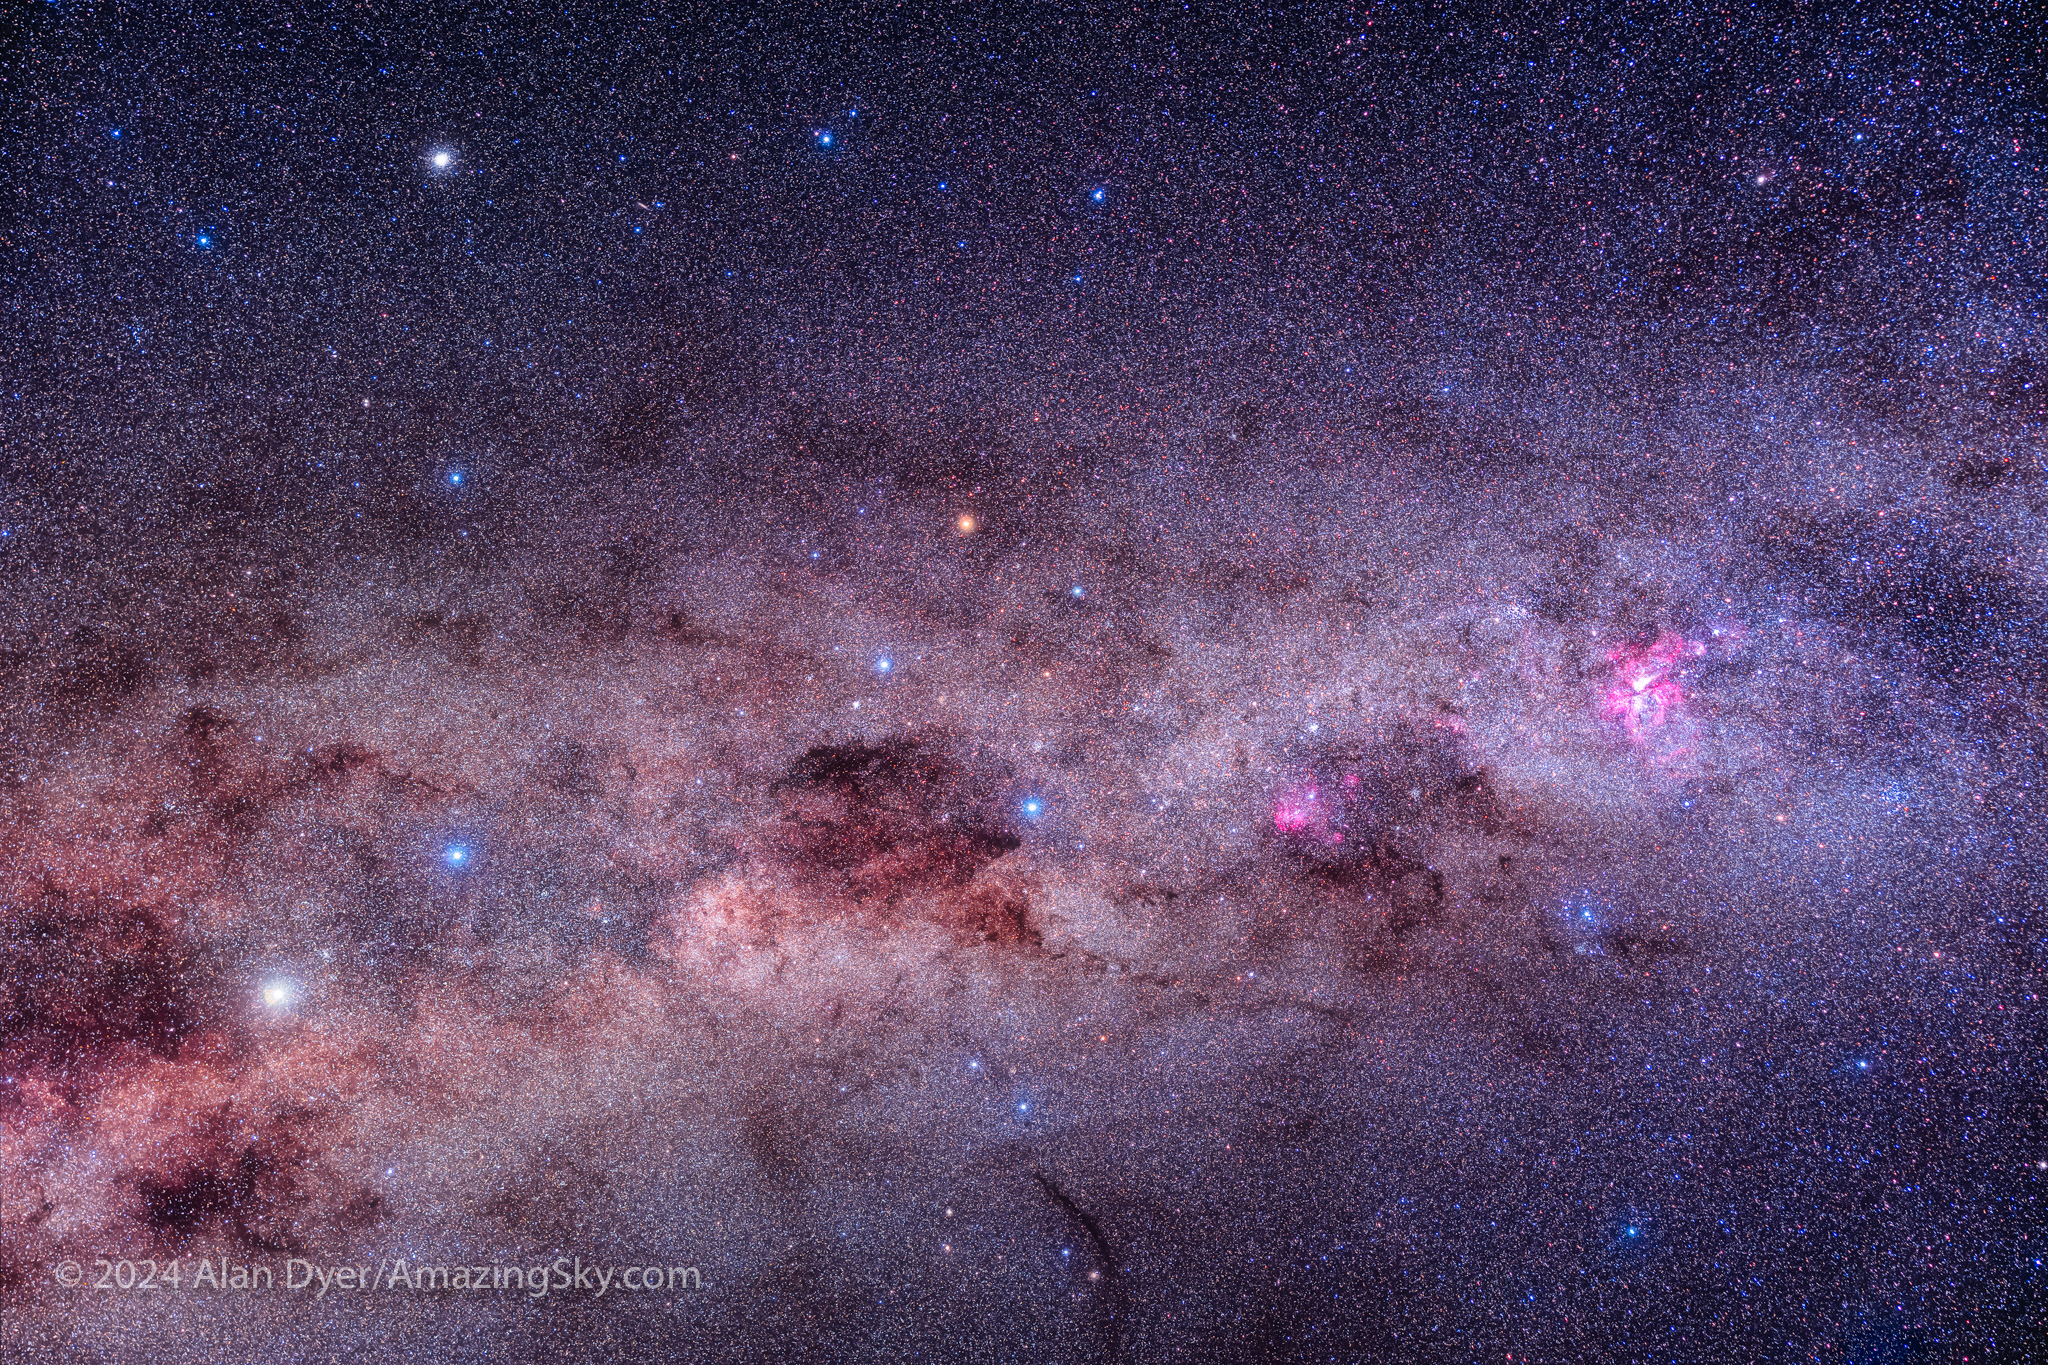
Under the Austral Sky
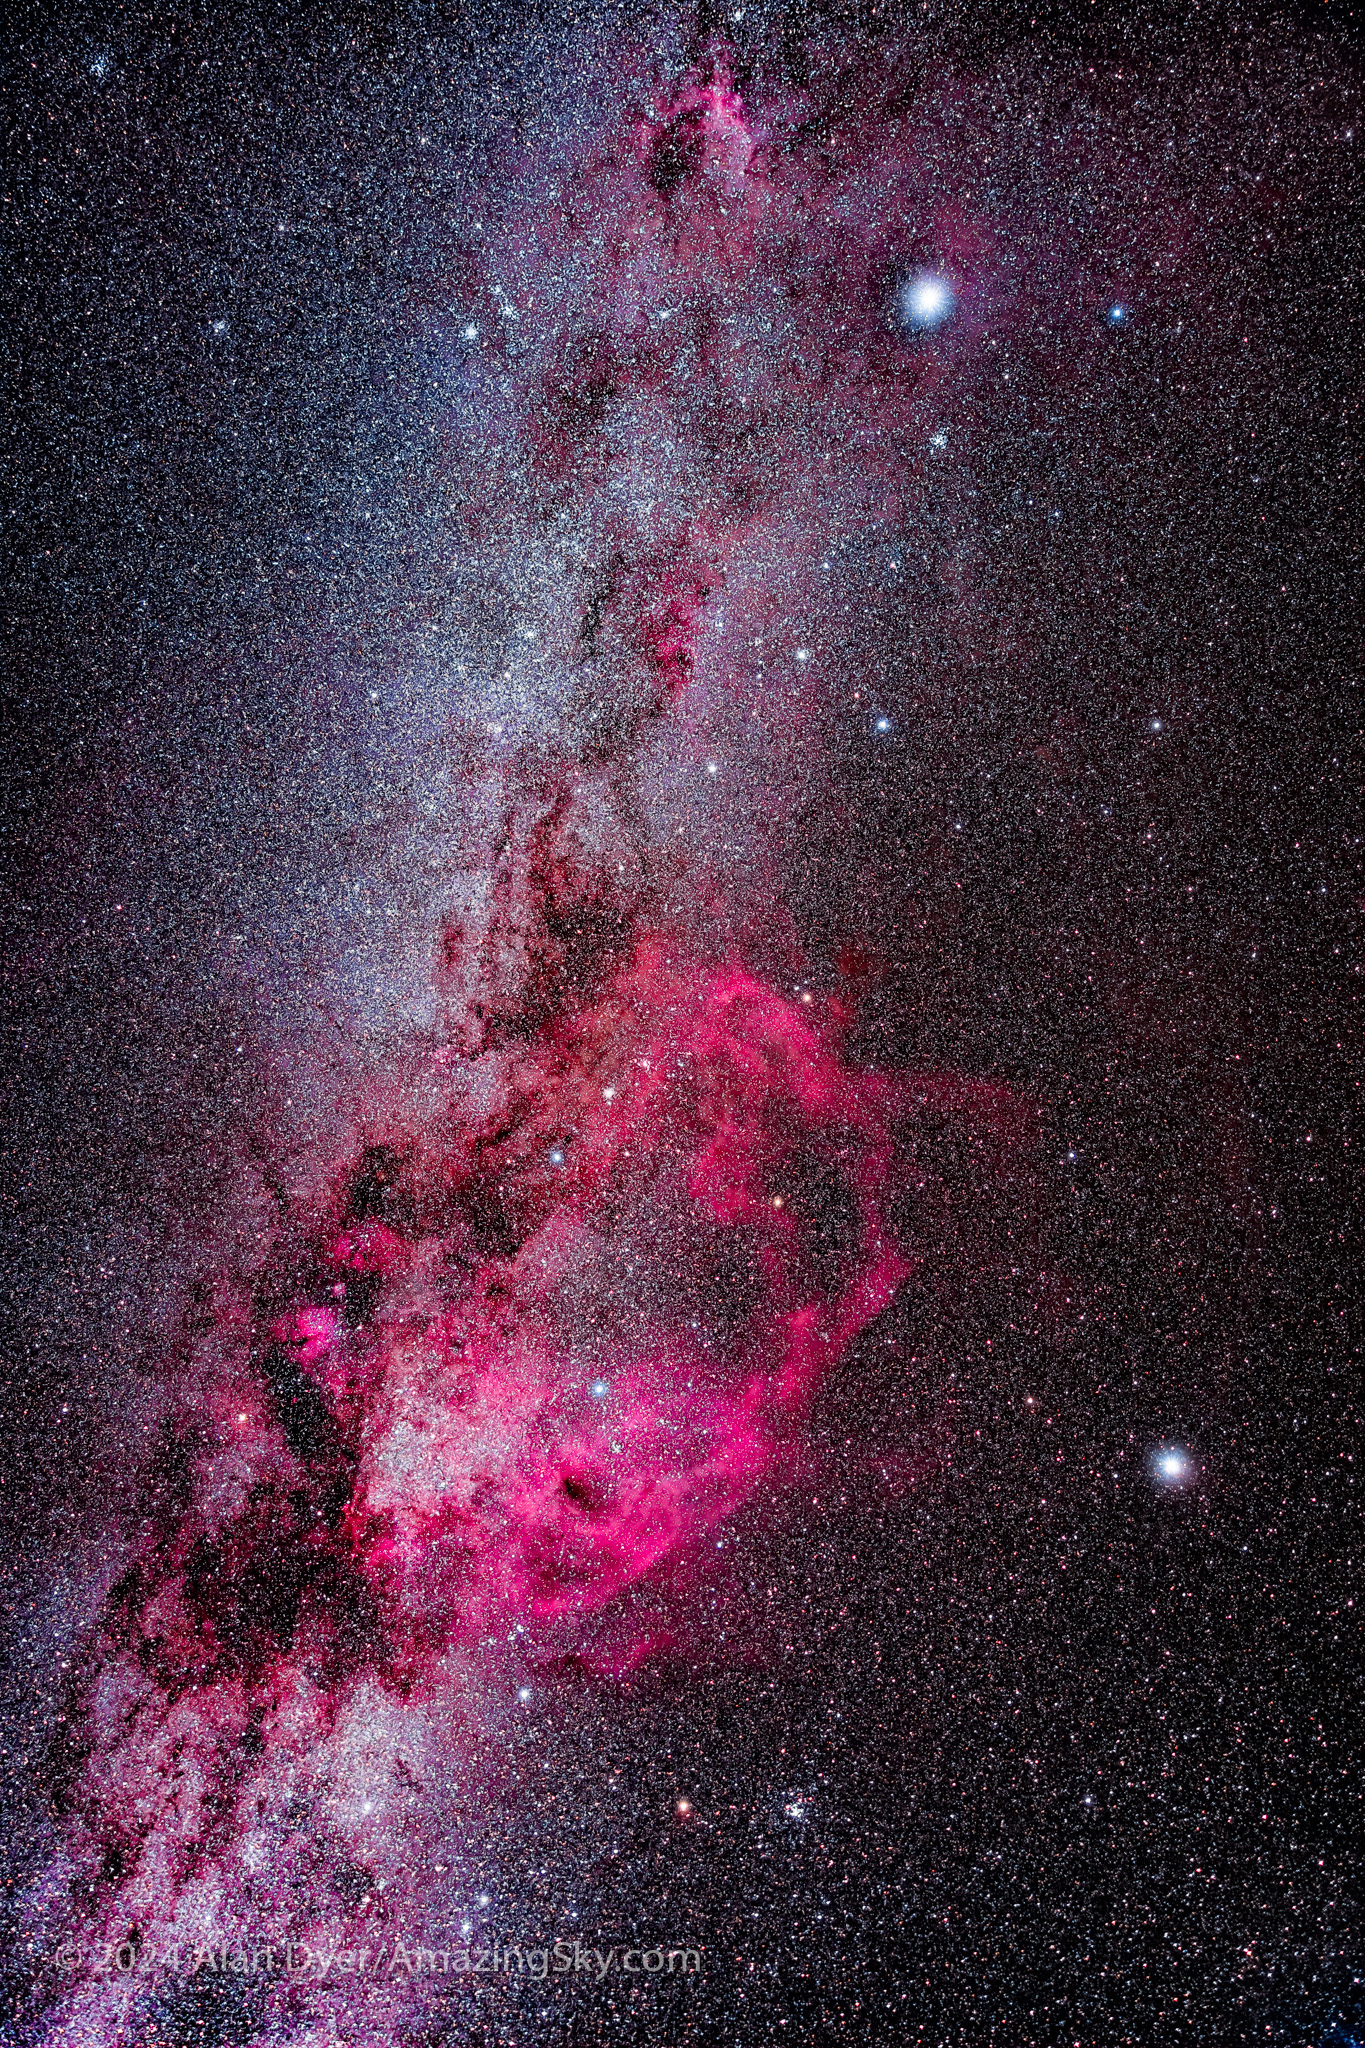
Ranking a respectable 7 on our Aah! Factor scale is the naked-eye sight of the galactic centre overhead, with the Milky Way arcing across the sky. That’s possible from a latitude of about 30° South. That’s where I went in March, back to Australia 🇦🇺 for the first time since 2017.
This is a framing of the most spectacular area of the southern Milky Way, from Centaurus at left, to Carina at right, with Crux, the Southern Cross, at centre.
I wrote about it in my previous blog, where I present a tour along the southern Milky Way, and wide-angle views of the Milky Way (the images here are framings of choice regions).
This frames the southern Milky Way from Canis Major and its bright star Sirius at top, to Carina and its bright star Canopus at bottom, the two brightest stars in the night sky. The large red complex is the Gum Nebula.
It is a magical latitude that all northern astronomers should make a pilgrimage to, if only to just lie back and enjoy the view of our place in the outskirts of the Galaxy. I was glad to be back Down Under, to check this top sky sight off my bucket list for 2024.
April
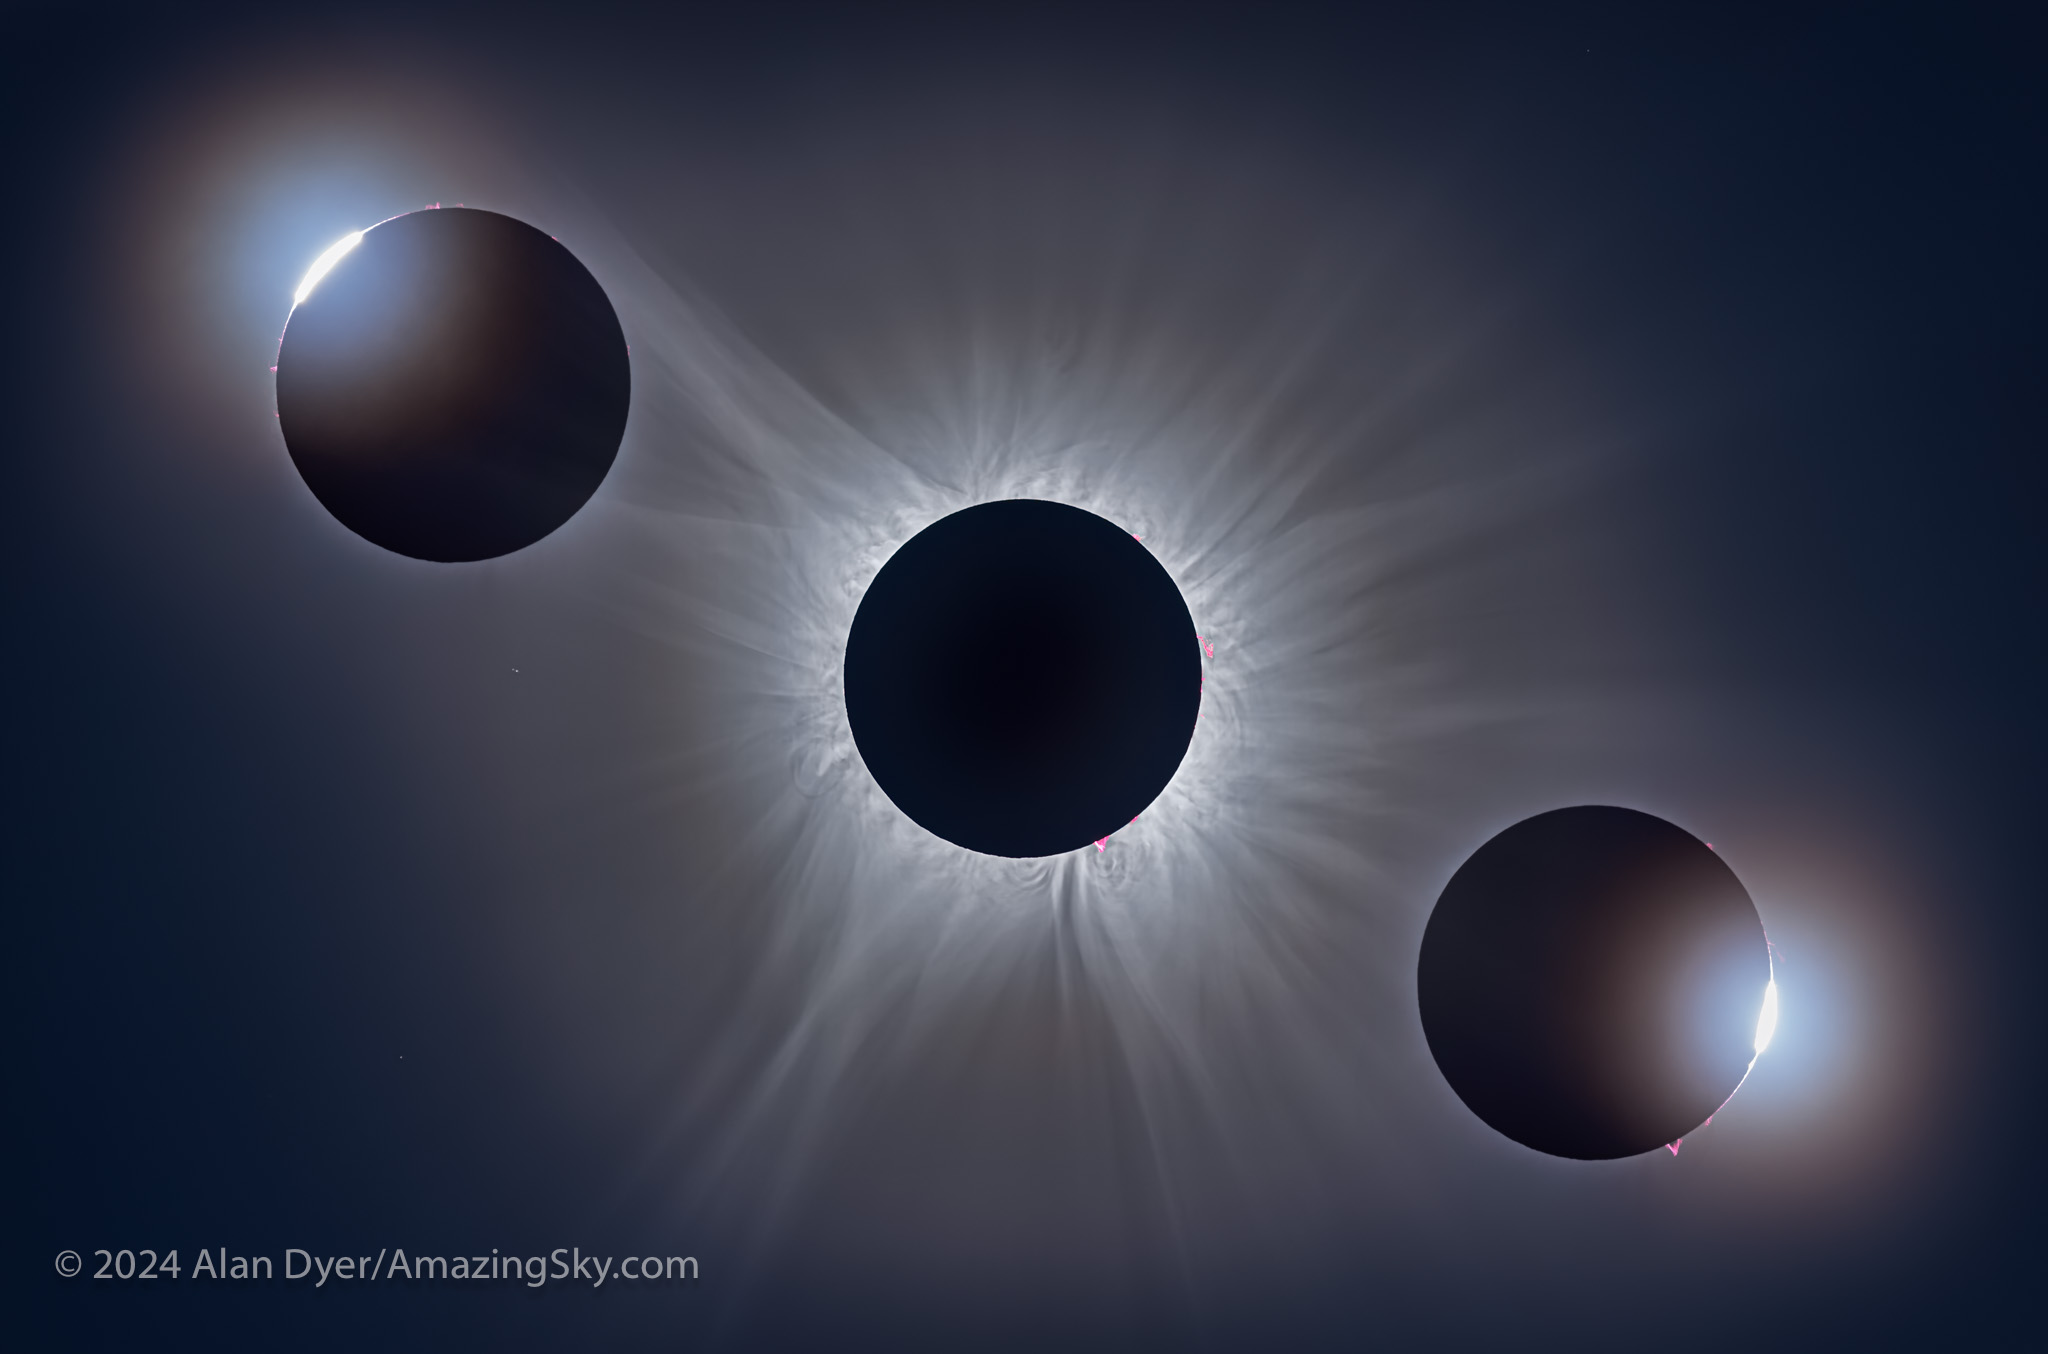
A Total Eclipse of the Sun
No sooner had I returned home from Oz, when it was time to load up the car with telescope gear and drive to the path of the April 8 total solar eclipse, the first “TSE” in North America since 2017, which was the last total eclipse I had seen, in a trip to Idaho.
This is a composite of telescopic close-ups of the April 8, 2024 total eclipse, with a multi-exposure blend for the corona at centre, flanked by the diamond rings.
But where? I started south to Texas, my Plan A. Poor weather forecasts there prompted a hasty return to Canada, to drive east across the country to … I ended up in Québec. My blog about my cross-continental chase is here. My final edited music video is linked to below.
It was gratifying to see a total eclipse from “home” in Canada, only the third time I’ve been able to do that (previously in 1979 – Manitoba, and 2008 – Nunavut). If the rest of the year had been cloudy except for this day I wouldn’t have complained. Much.
This definitely earned a 10 on the Aah! Factor scale. Total eclipses are overwhelming and addictive. I’ve made my bookings for 2026 in Spain 🇪🇸 and 2027 in Tunisia 🇹🇳.
May
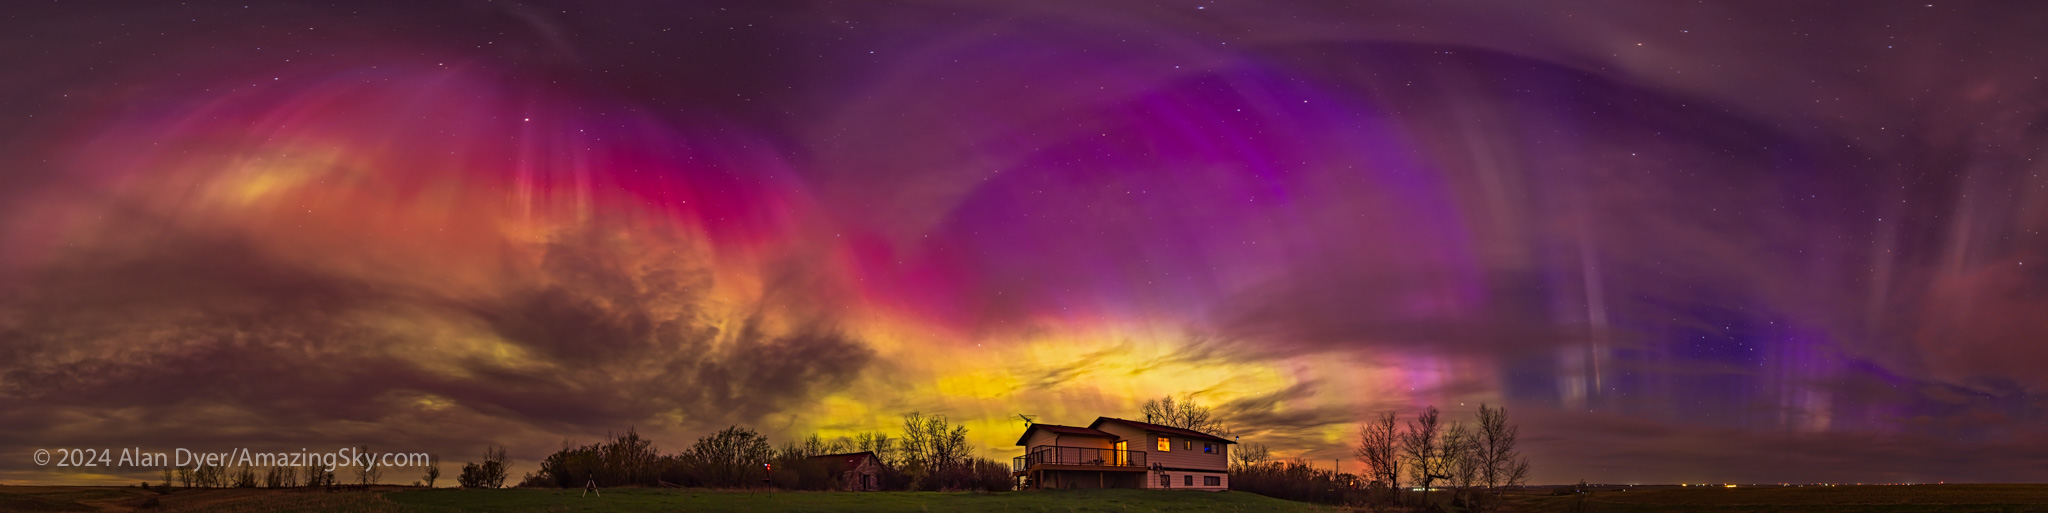
The Sky’s On Fire
It had been several years since I had seen an aurora from my backyard with colours as vivid and obvious as they were this night. But on May 10, the sky erupted with a fabulous display of aurora that much of the world saw, as aurora borealis in the north and aurora australis in the south.
This is a 300º panorama of the May 10, 2024 Northern Lights display, when the Kp Index reached 8 (out of 9), bringing aurora to the southern U.S.
This was the first of several all-sky shows this year. I blogged about the year’s great auroras here, where there are links to the movies I produced that capture the Northern Lights as only movies can, recording changes so rapid it can be hard to take it all in. Check off a 9 here!
So not even half way through the year, I had seen three of the top sky sights: the Milky Way core overhead (7), an all-sky aurora (9), and a total eclipse of the Sun (10).
But there was more to come! Including an Aah! Factor 8.
June
World Heritage Nightscape Treks
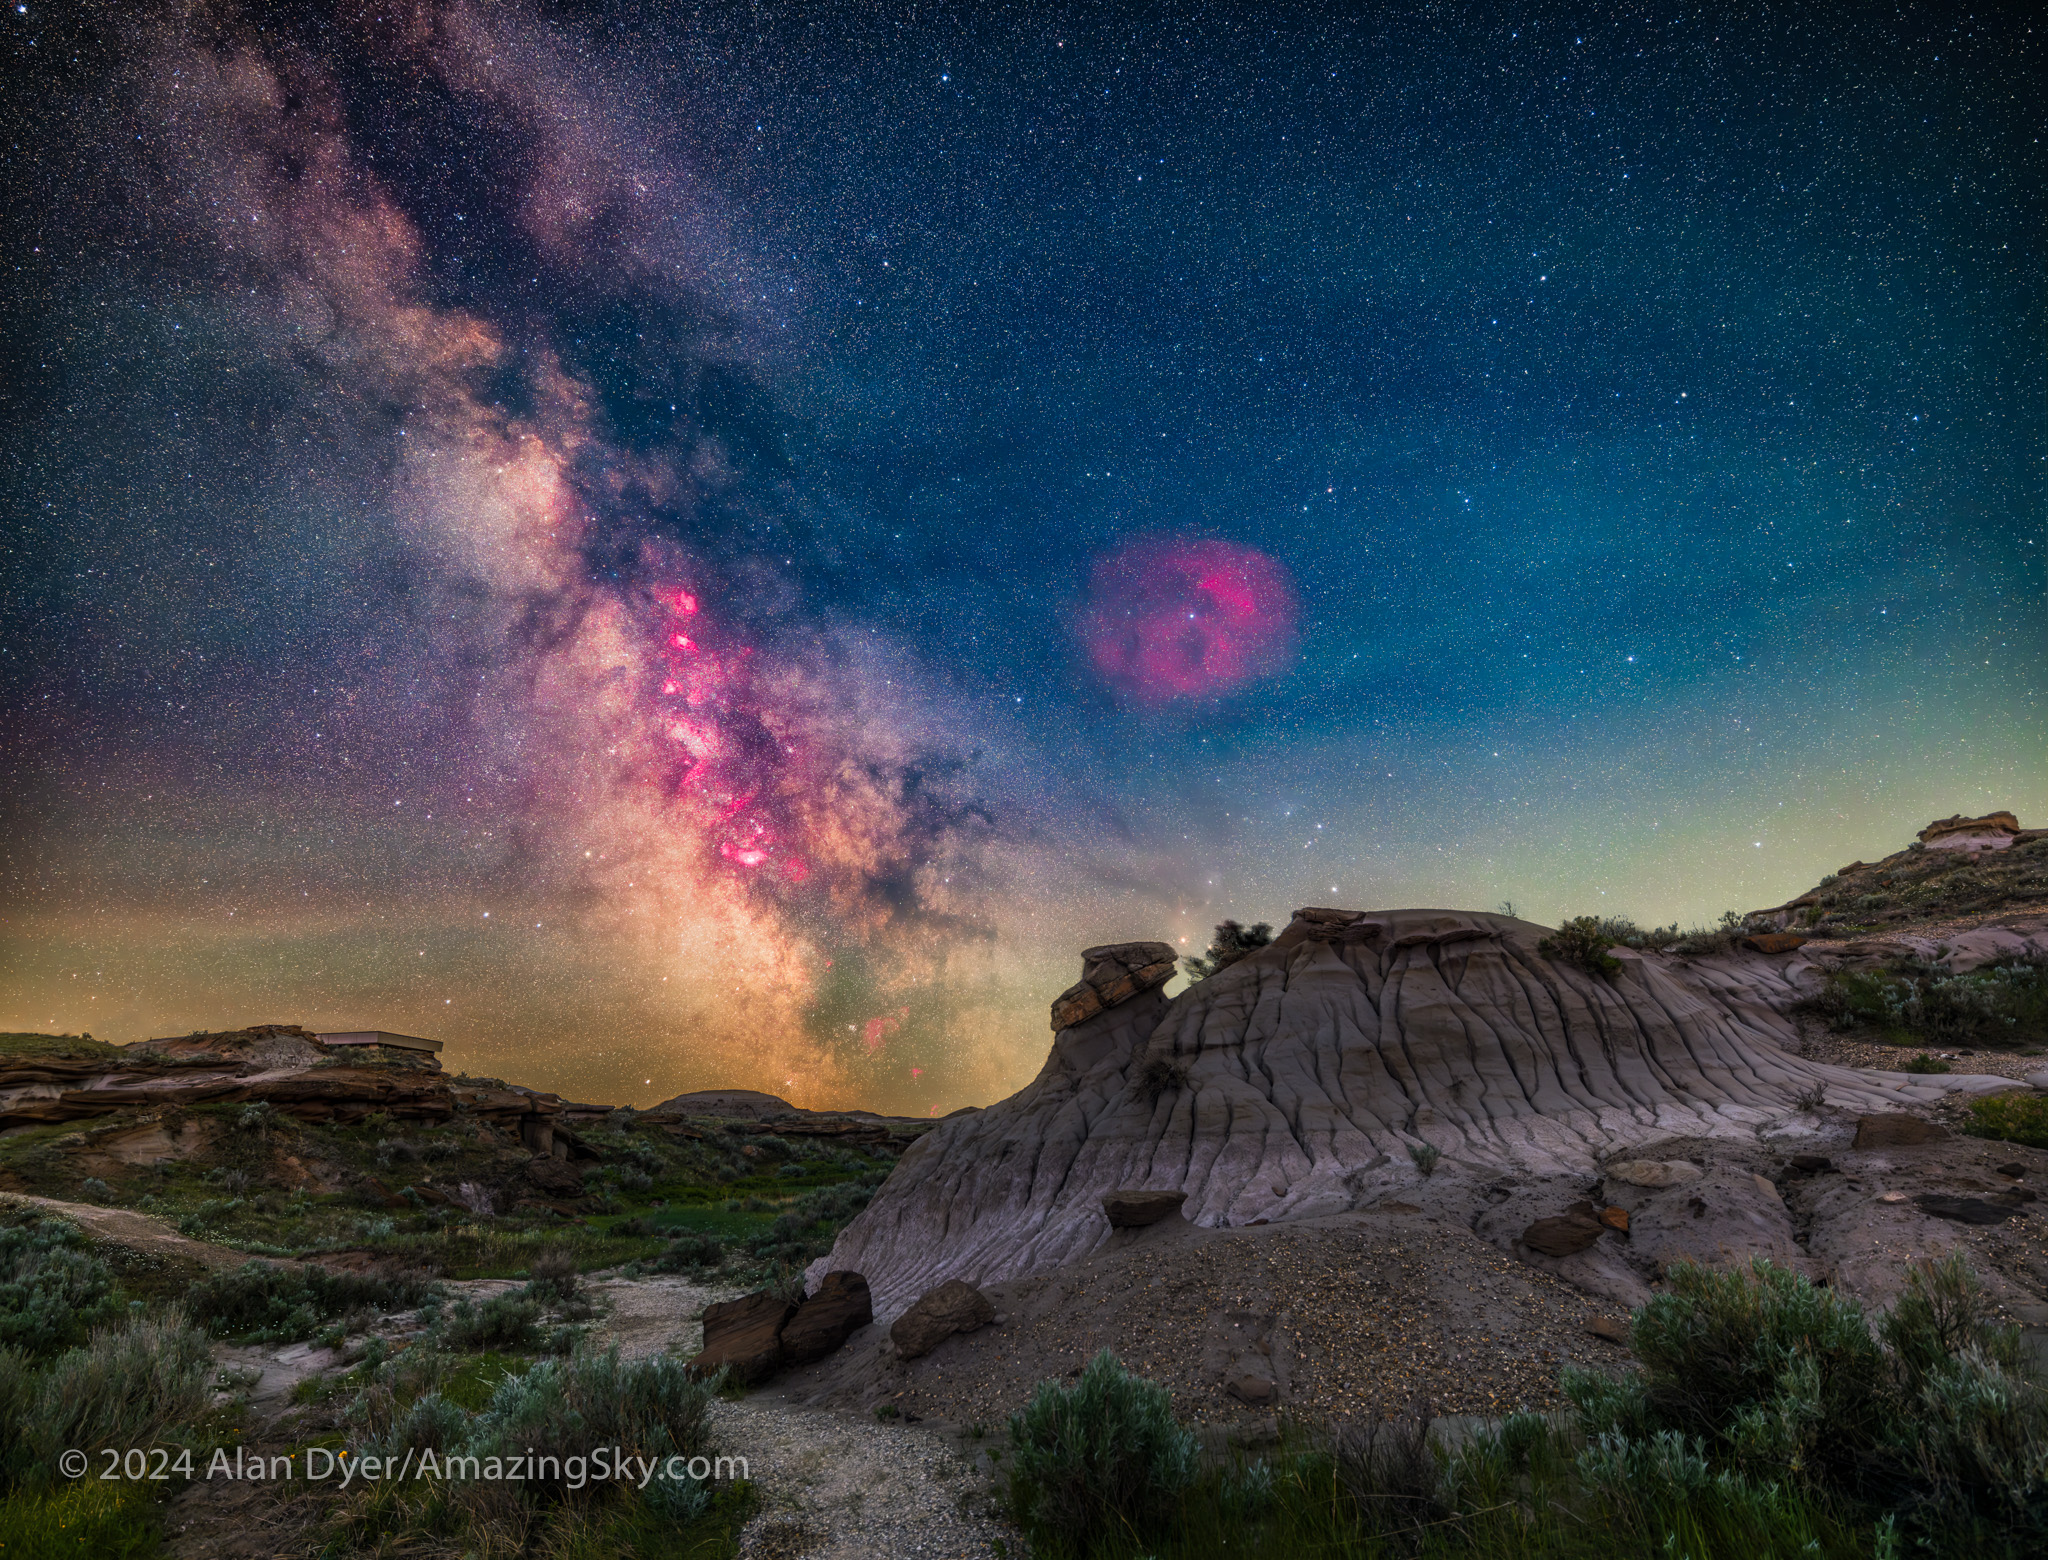
This is a panorama of the arch of the Milky Way rising over the Badlands of Dinosaur Provincial Park, Alberta, with a sky tinted with twilight and airglow.
The sky took a break from presenting spectacles, allowing me to head off on short local trips, to favourite nightscape sites in southern Alberta, which we have in abundance. The Badlands of Dinosaur Provincial Park are just an hour away, the site for the scene above.
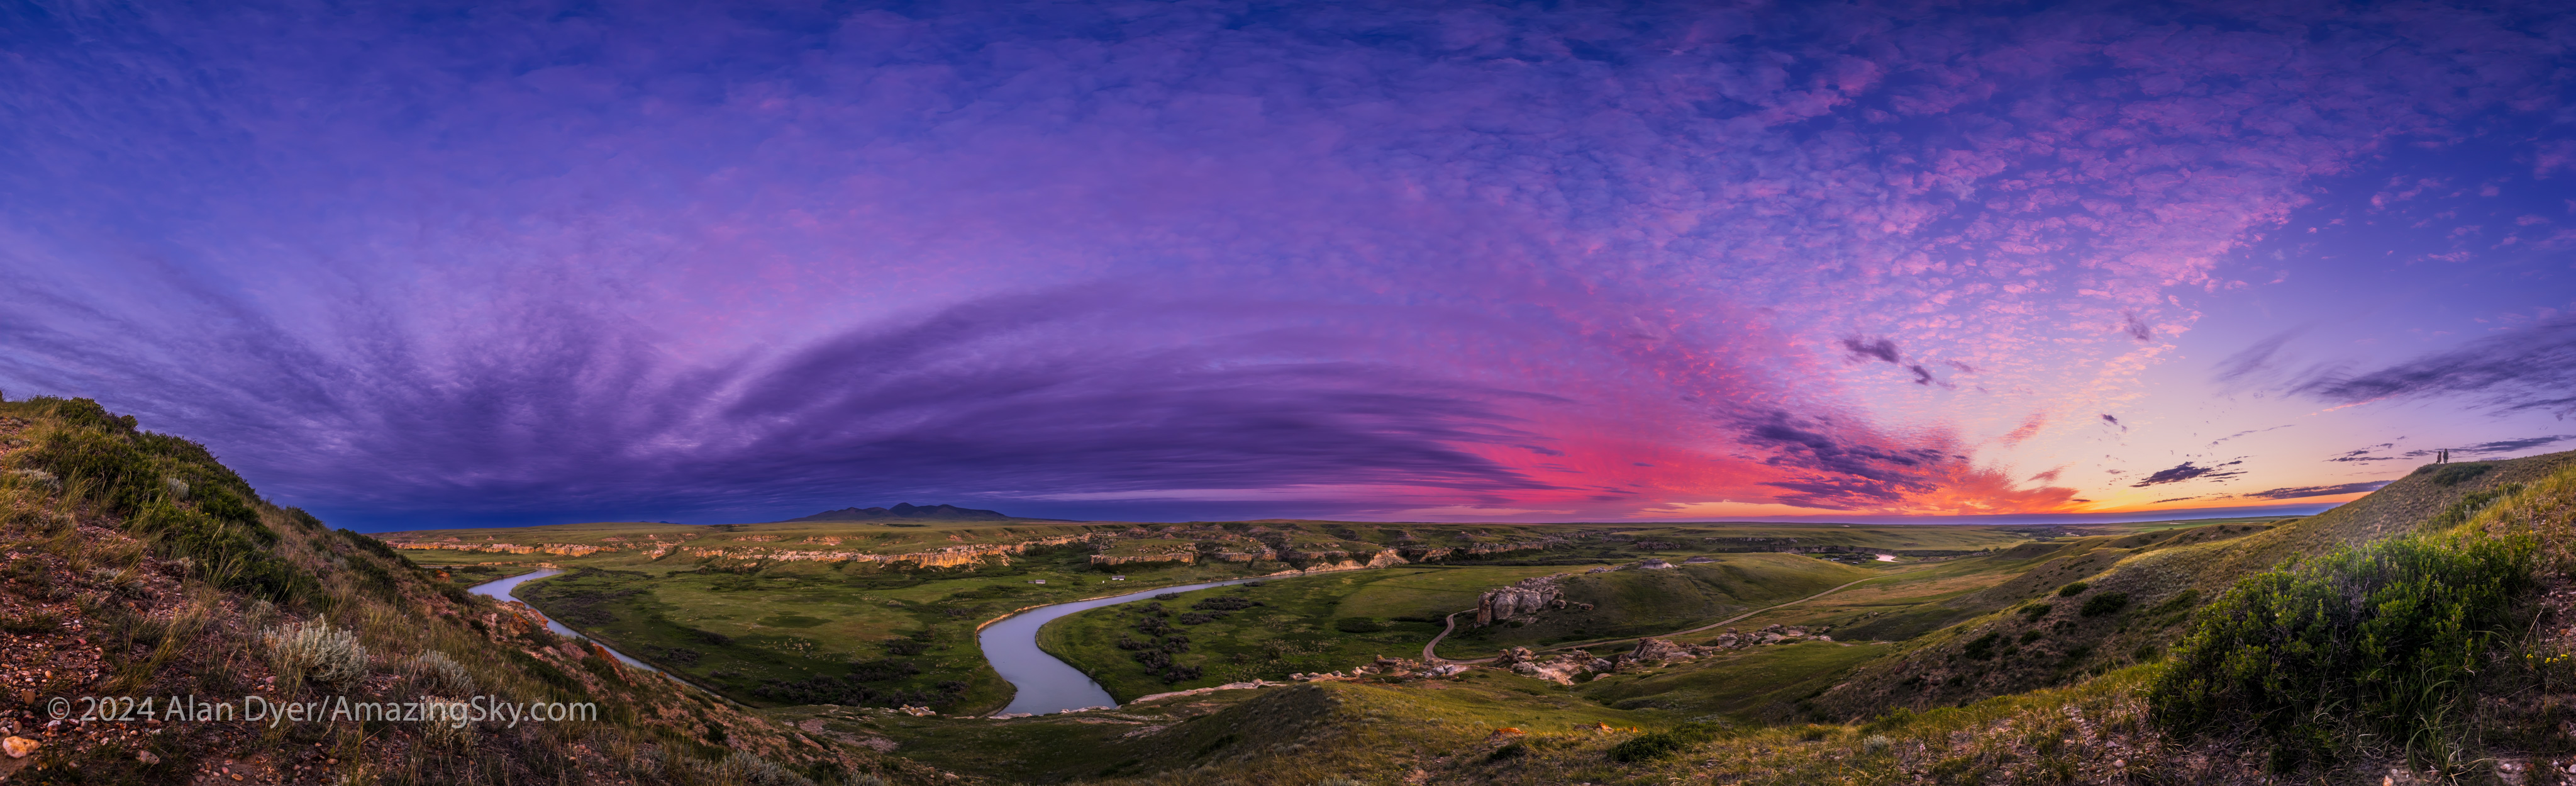
A panorama at sunset at Writing-on-Stone Provincial Park (Áísínai’pi) in Alberta, with the Milk River below and the Sweetgrass Hills in the distance in Montana. Note the people at far right.
The rock formations of Writing-on-Stone Provincial Park are a bit farther, requiring a couple of days commitment to shoot. Clouds hid the main attraction, the Milky Way, this night, but did provide a fine sunset.
The Milky Way rises over Mt. Blakiston, in Waterton Lakes National Park, Alberta. This was June 10, 2024, so snow remains at high altitudes.
A little further west down the highway is Waterton Lakes National Park, another great spot I try to visit at least once each year.
All locations I hit this month are U.N. World Heritage Sites, thus the theme of my blog from June. People travel from all over the world to come here, to sites I can visit in a few hours drive.
July
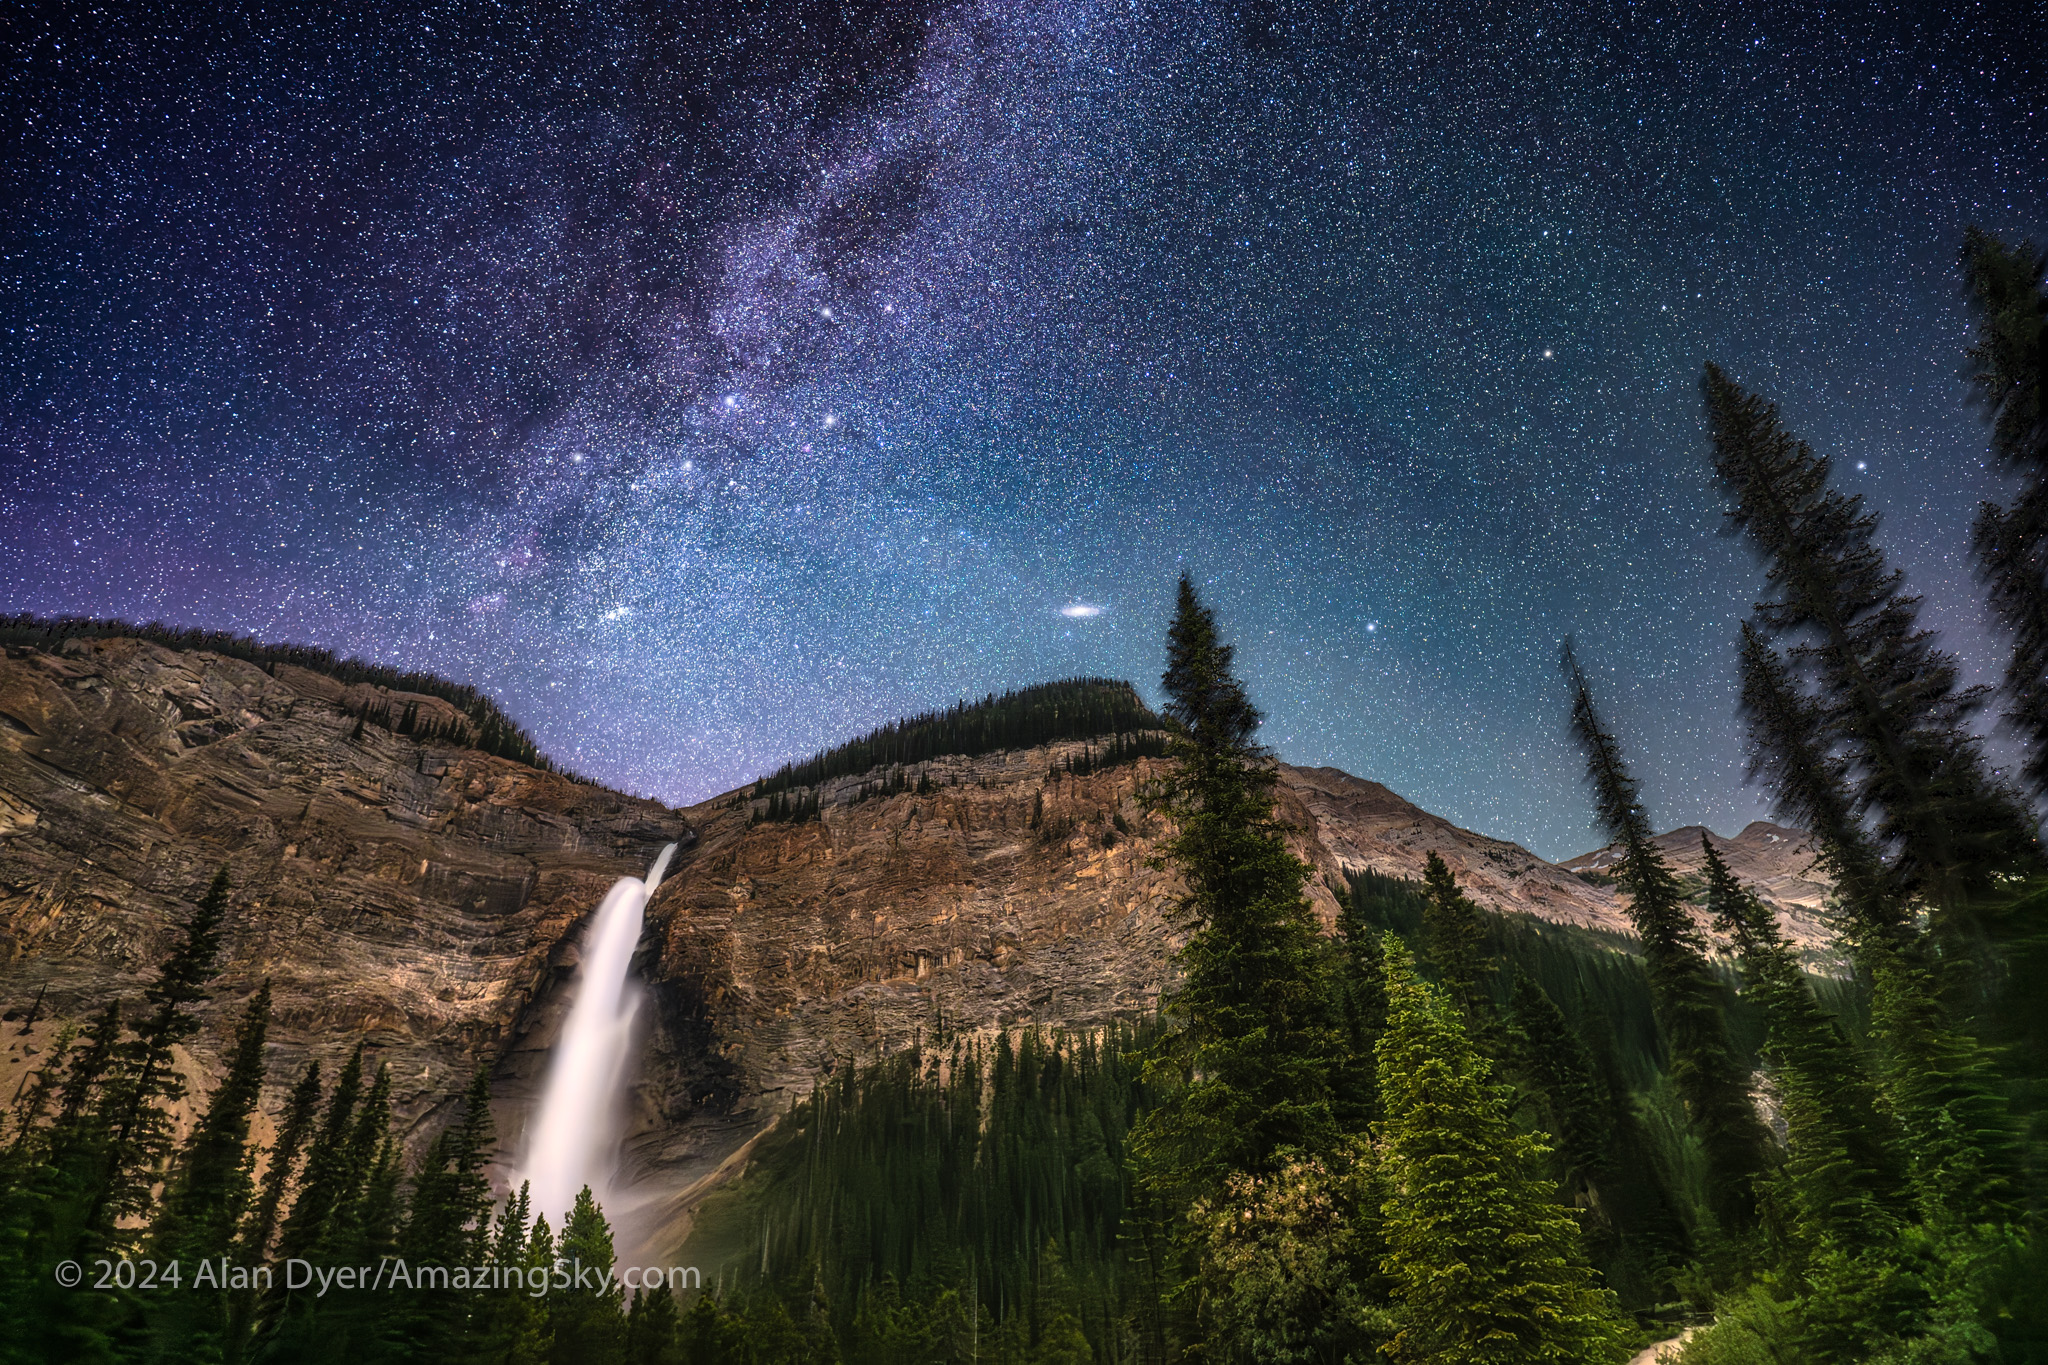
Mountains by Starlight
In summer we now often contend with smoke from forest fires blanketing the sky, hiding not just the stars by night, but even the Sun by day.
The Andromeda Galaxy at centre is rising above Takakkaw Falls, in Yoho National Park. Above is the W of stars marking Cassiopeia.
But before the smoke rolled in this past summer I was able to visit a spot, Yoho National Park in British Columbia, that had been on my shot list for several years. The timing with clear nights at the right season and Moon phase has to work out. In July it did, for a shoot by starlight at Takakkaw Falls, among the tallest in Canada.
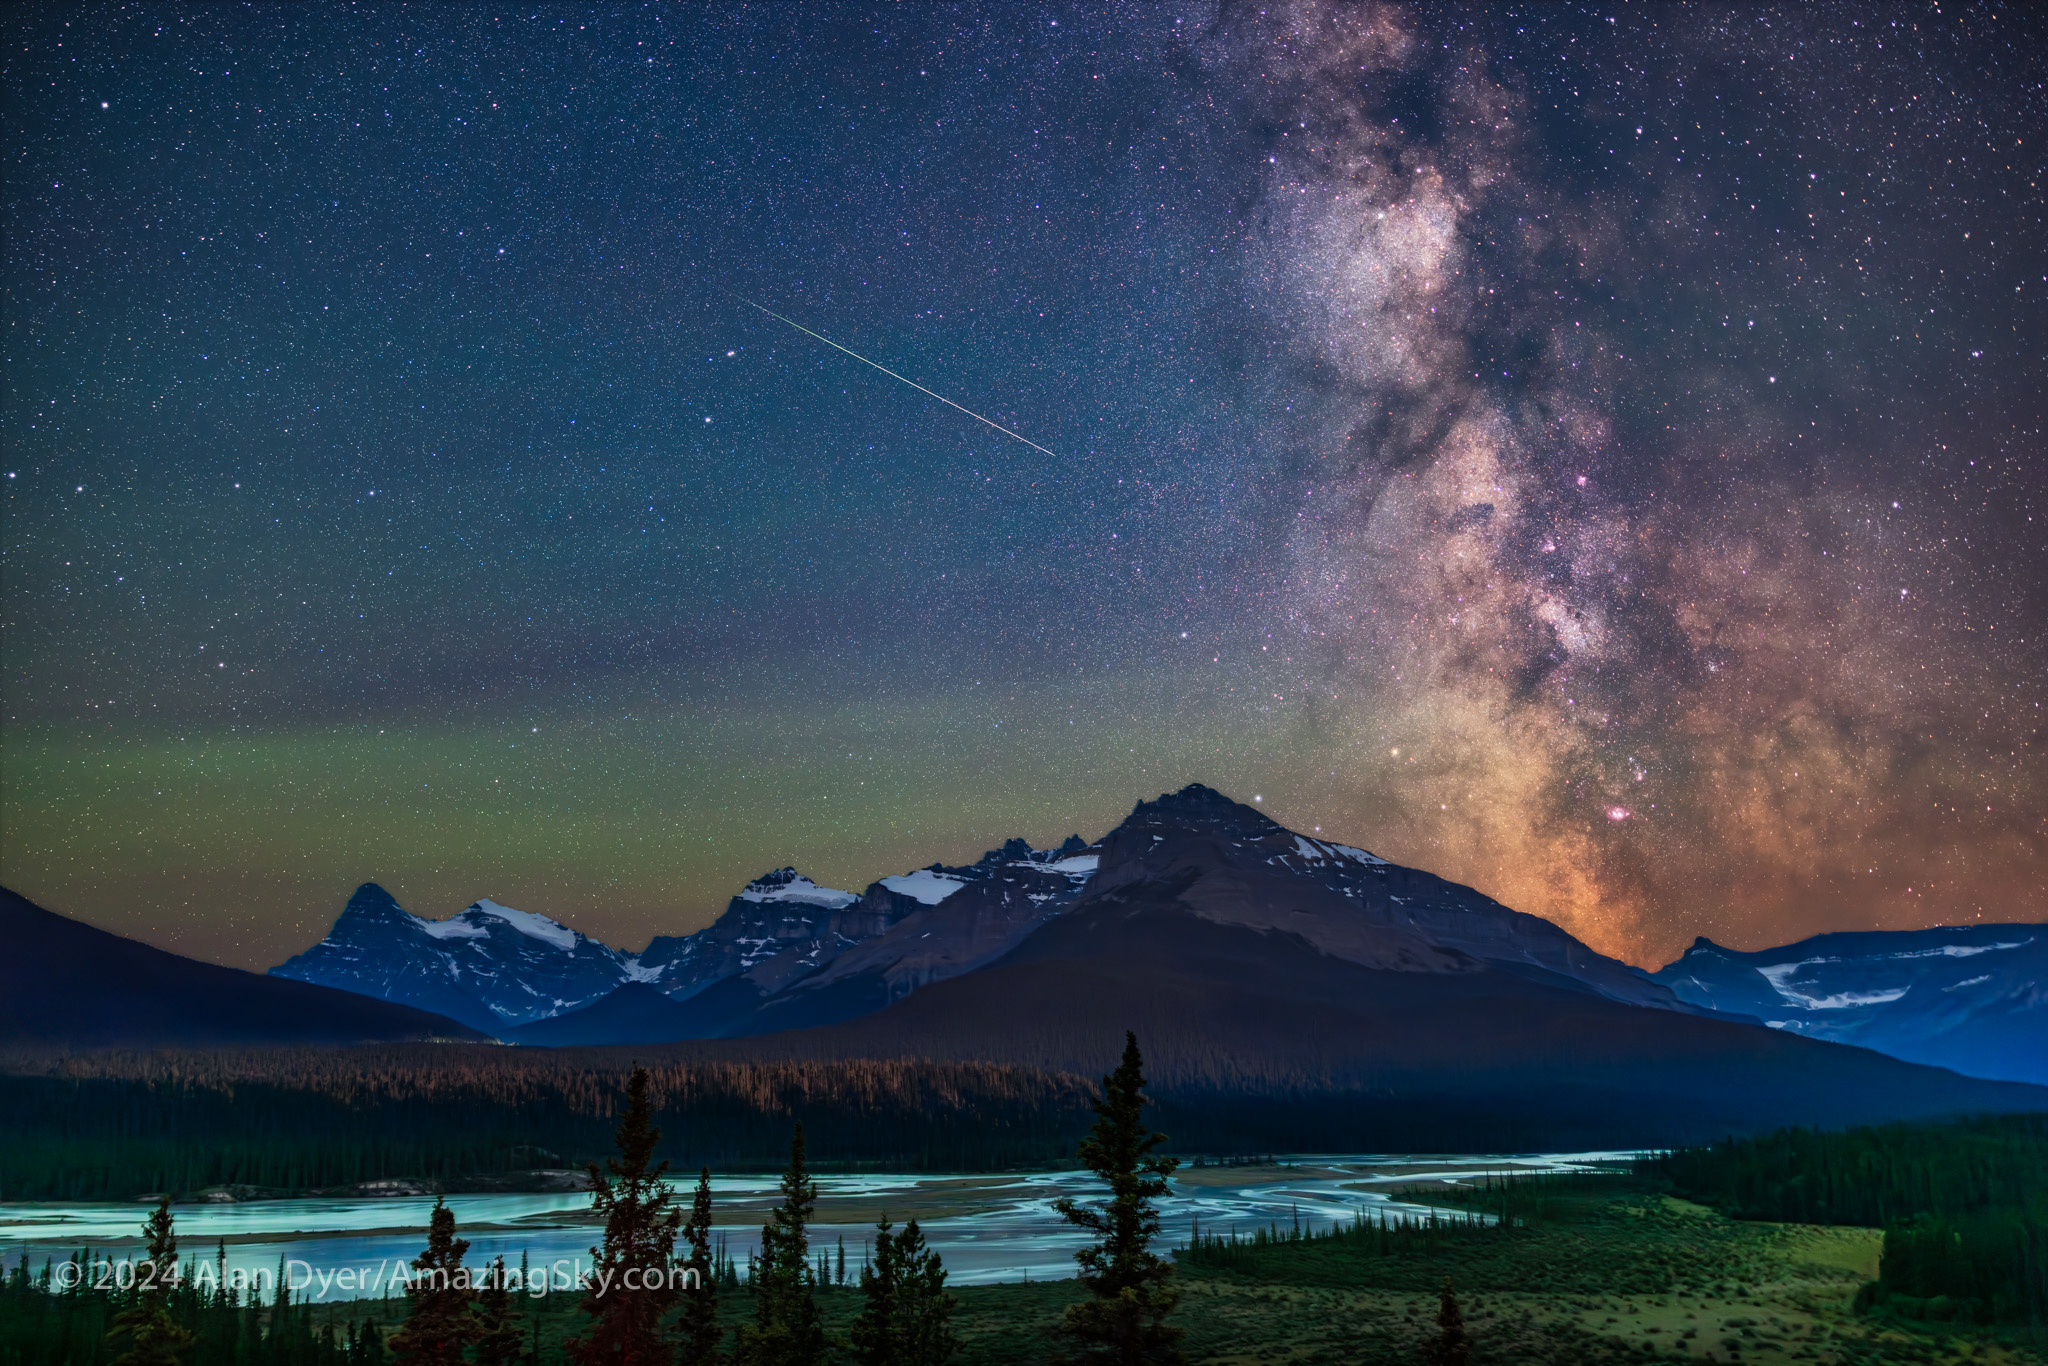
This is the Milky Way core and a bonus meteor over the peaks and valleys at Saskatchewan River Crossing, in Banff National Park, Alberta.
The following nights I was in Banff National Park, at familiar spots on the tourist trail, but uncrowded and quiet at night. It was a pleasure to enjoy the world-class Rocky Mountain scenery under the stars on perfect nights.
August
The All-Sky Auroras Return
In August I headed east to Saskatchewan and the annual Summer Star Party staged by the astronomy clubs in Regina and Saskatoon. It is always a pleasure to attend the SSSP in the beautiful Cypress Hills. The sky remained clear post-party for a trip farther east to the little town of Val Marie, where I stayed at a former convent, and had a night to remember out in Grasslands National Park, one of Canada’s first, and finest, dark sky preserves.
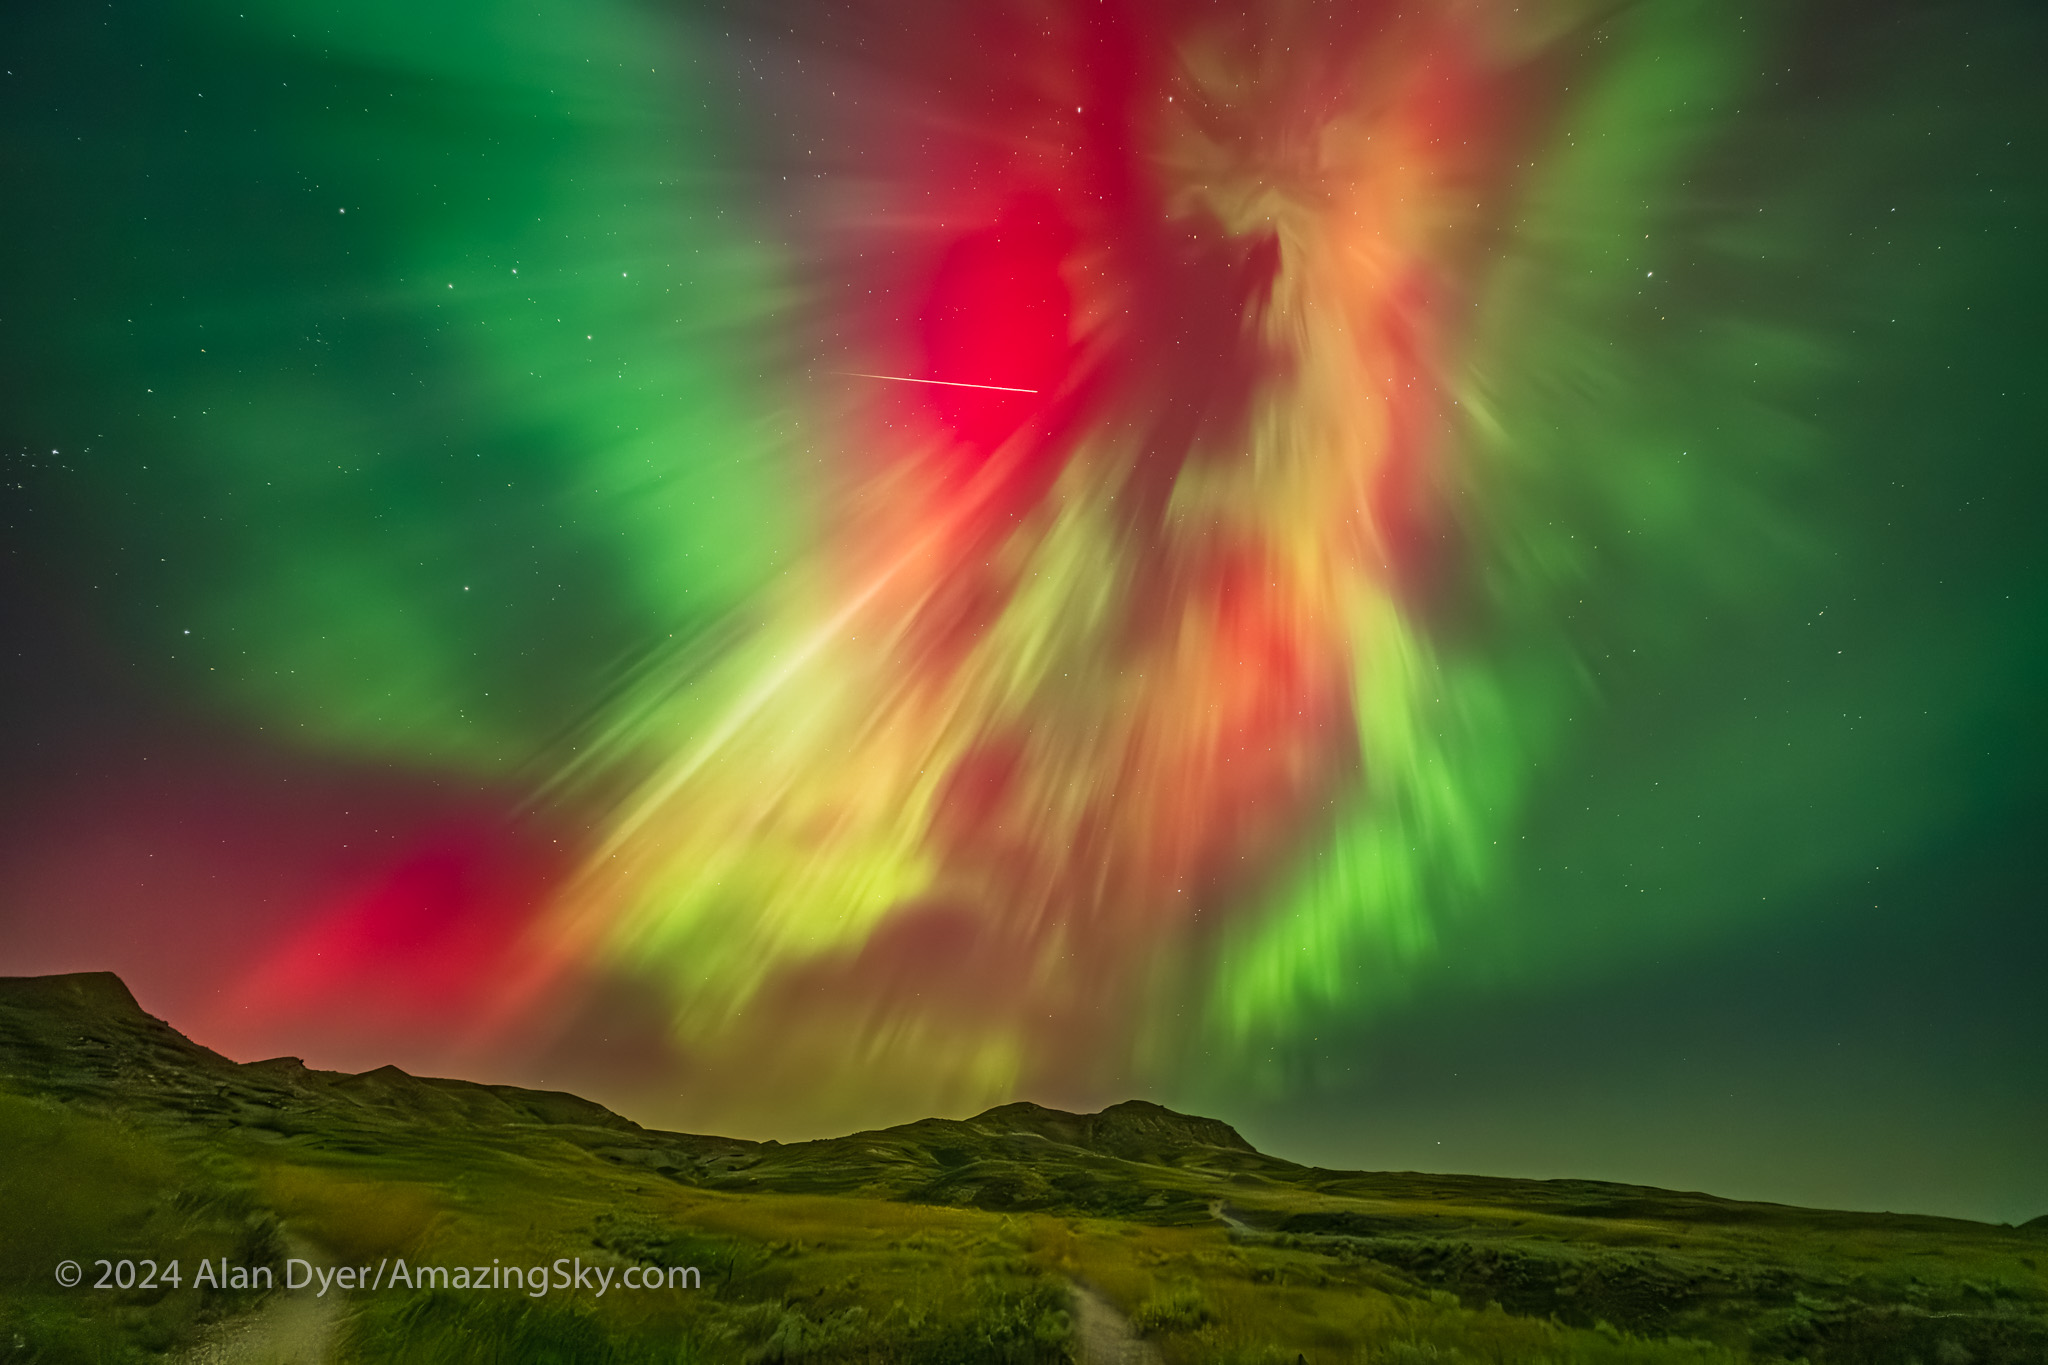
The Northern Lights in a superb all-sky Kp6 to 7 display on August 11-12, 2024, in Grasslands National Park, Saskatchewan.
The plan was to shoot the August 11 Perseid meteor shower, but the aurora let loose again for a stunning show over 70 Mile Butte. My earlier blog has more images and movies from this wonderful month of summertime Northern Lights.
We are fortunate in western Canada 🇨🇦 to be able to see auroras year-round, even in summer. Farther north at the usual Northern Lights destinations, the sky is too bright at night in summer.
September
Back to Deep Sky Wonders …
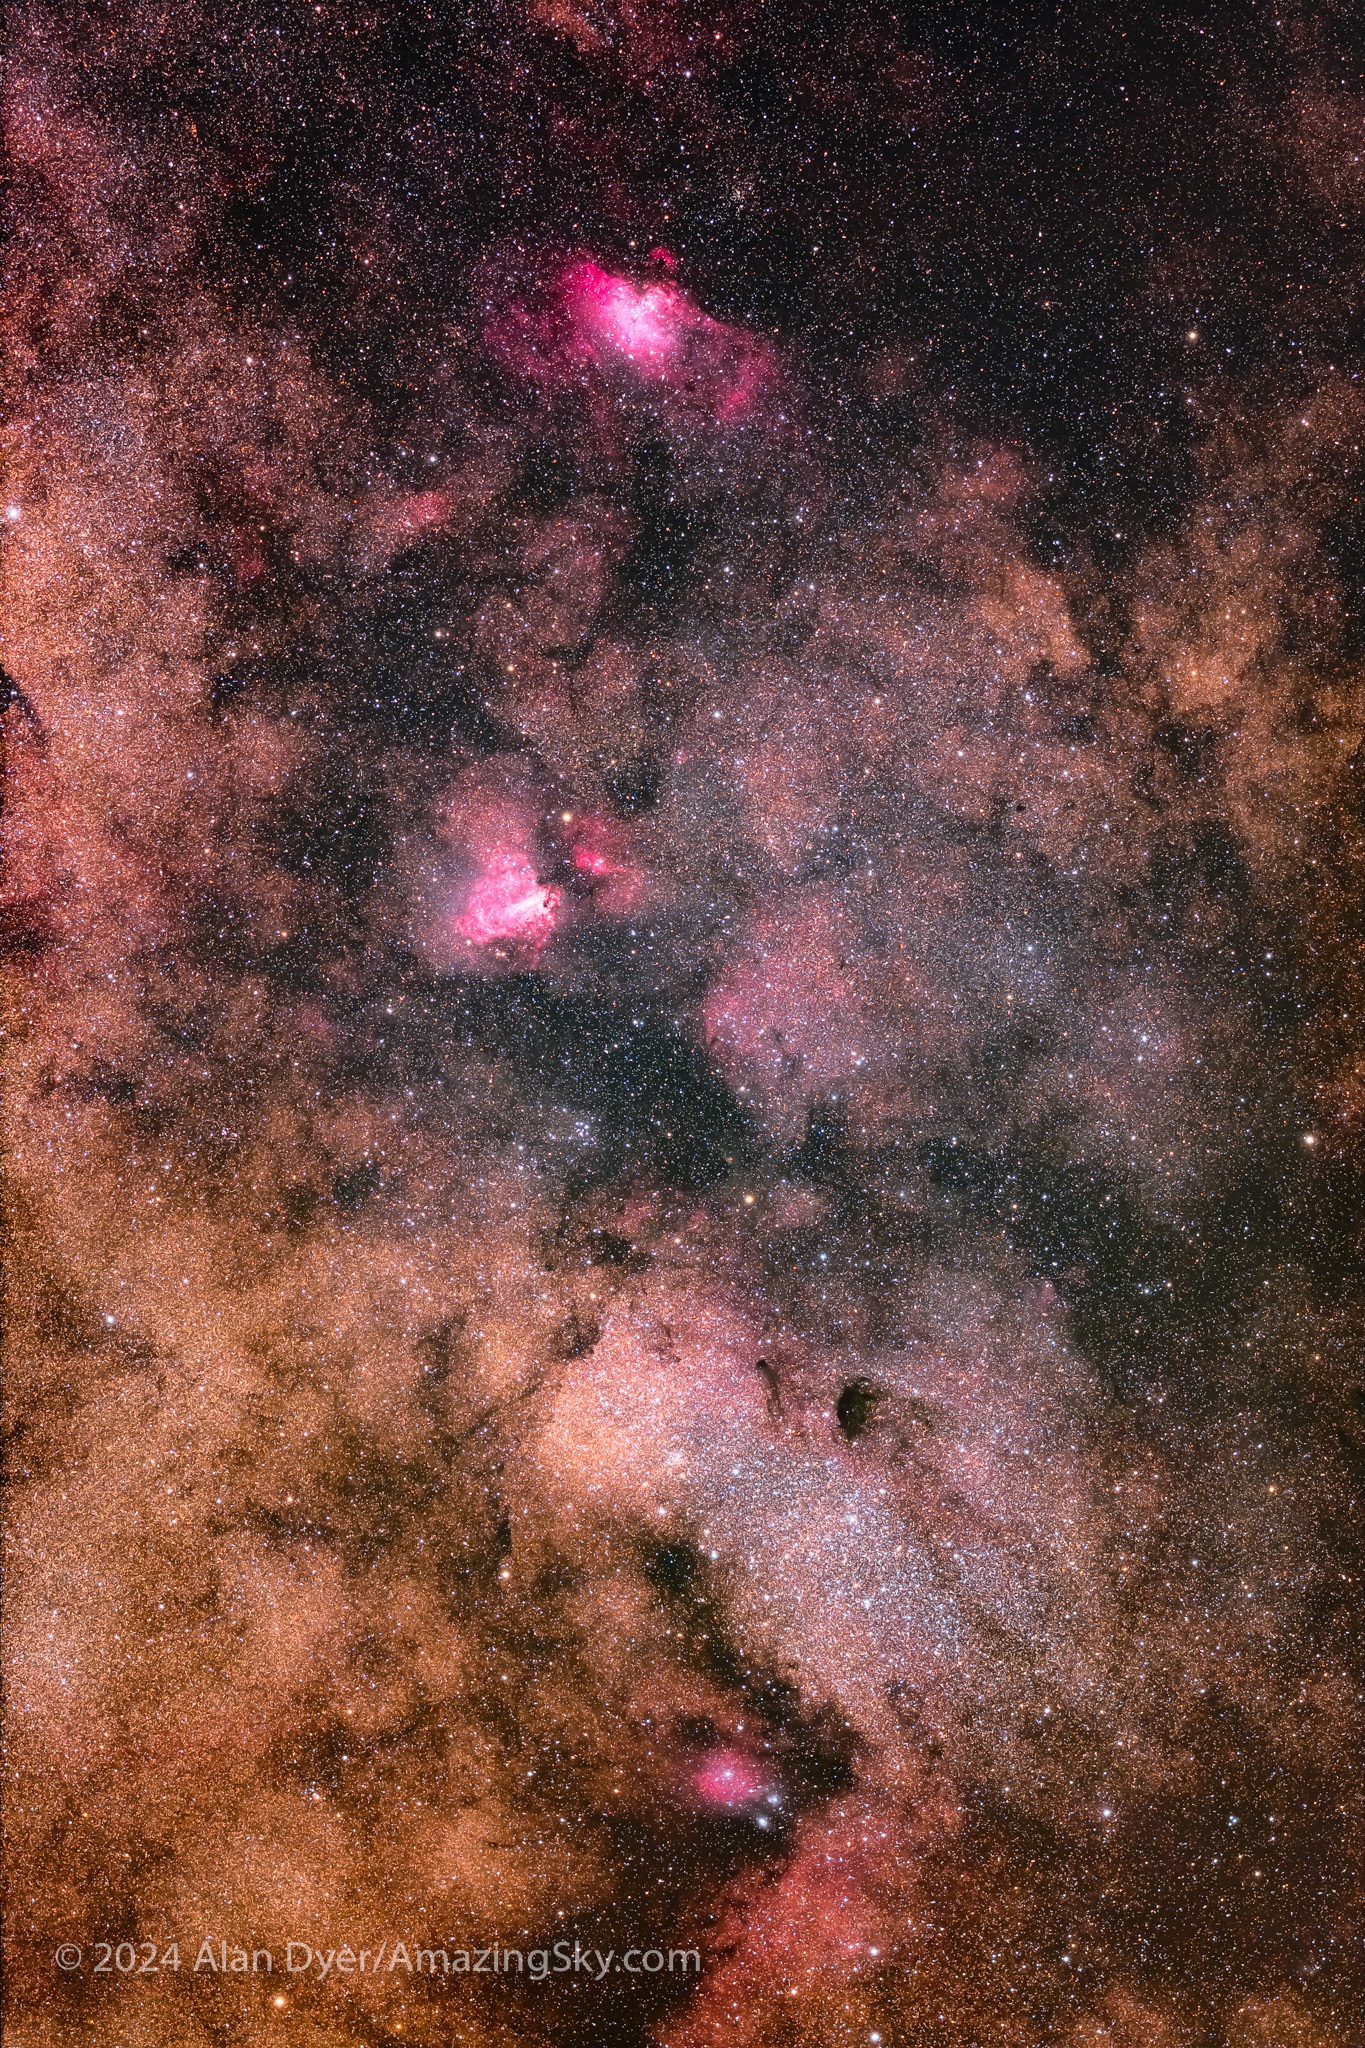
This is a framing of the rich starfield in Sagittarius and Serpens containing a mix of bright star clouds, glowing nebulas, and dark dust in the Milky Way.
September is the month for another astronomical party in the Cypress Hills, but on the Alberta side. At the wonderful Southern Alberta Star Party under its very dark skies, I was able to shoot some favourite deep-sky fields along the Milky Way with new gear I was testing at the time.
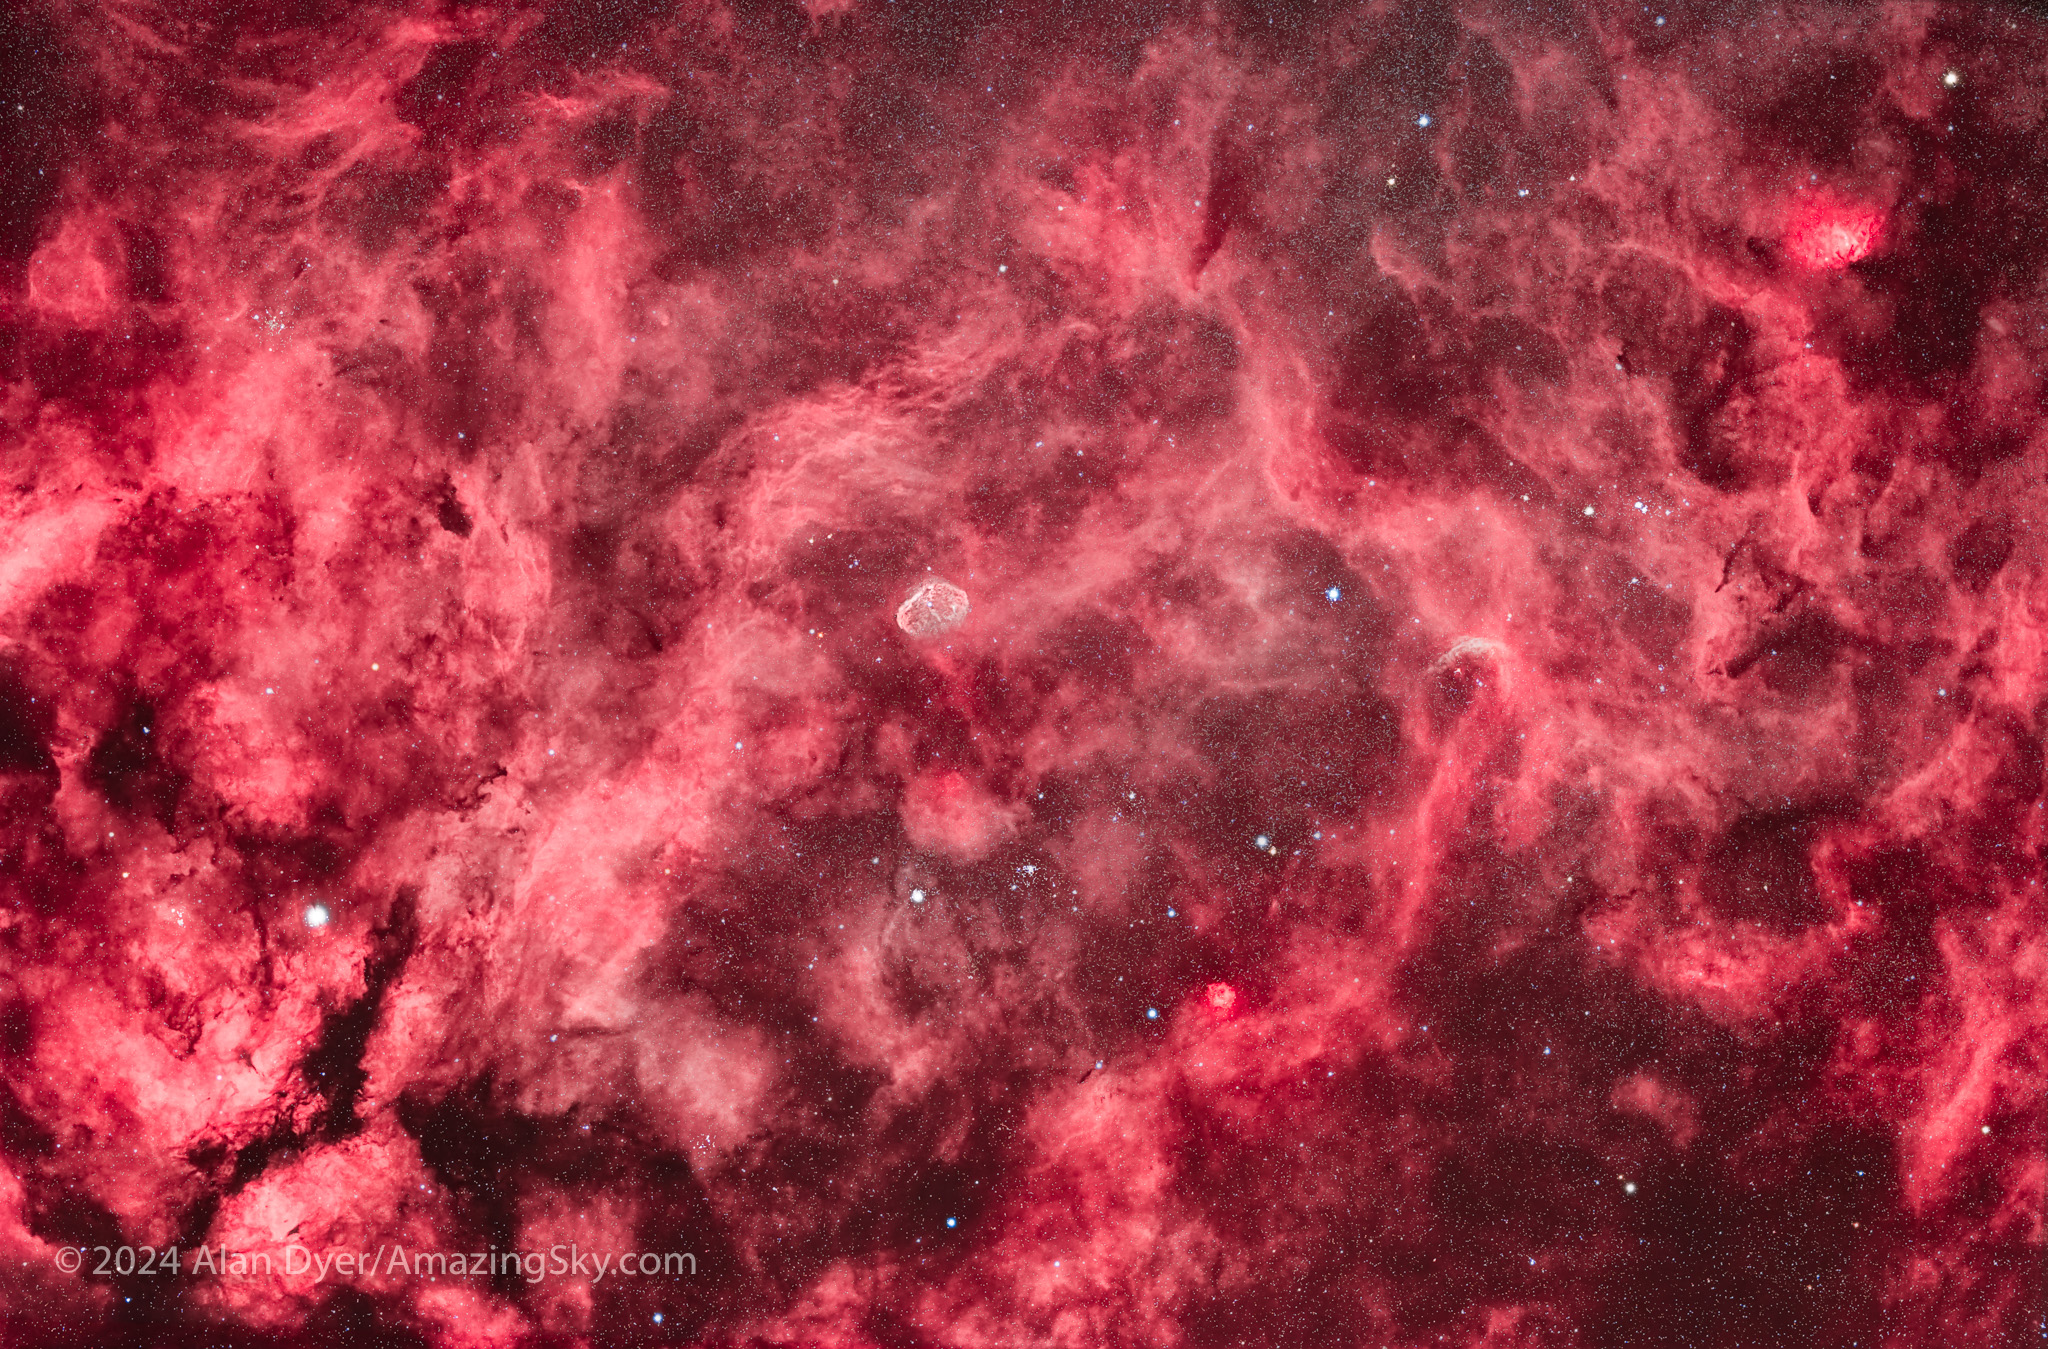
This frames the complex region of emission nebulas in central Cygnus near the star Gamma Cygni, at lower left. The Crescent Nebula is at centre.
And from home, September brought skies dark and clear enough (at least when there was no aurora!) for more captures of colourful nebulas (above and below) along the summer Milky Way.
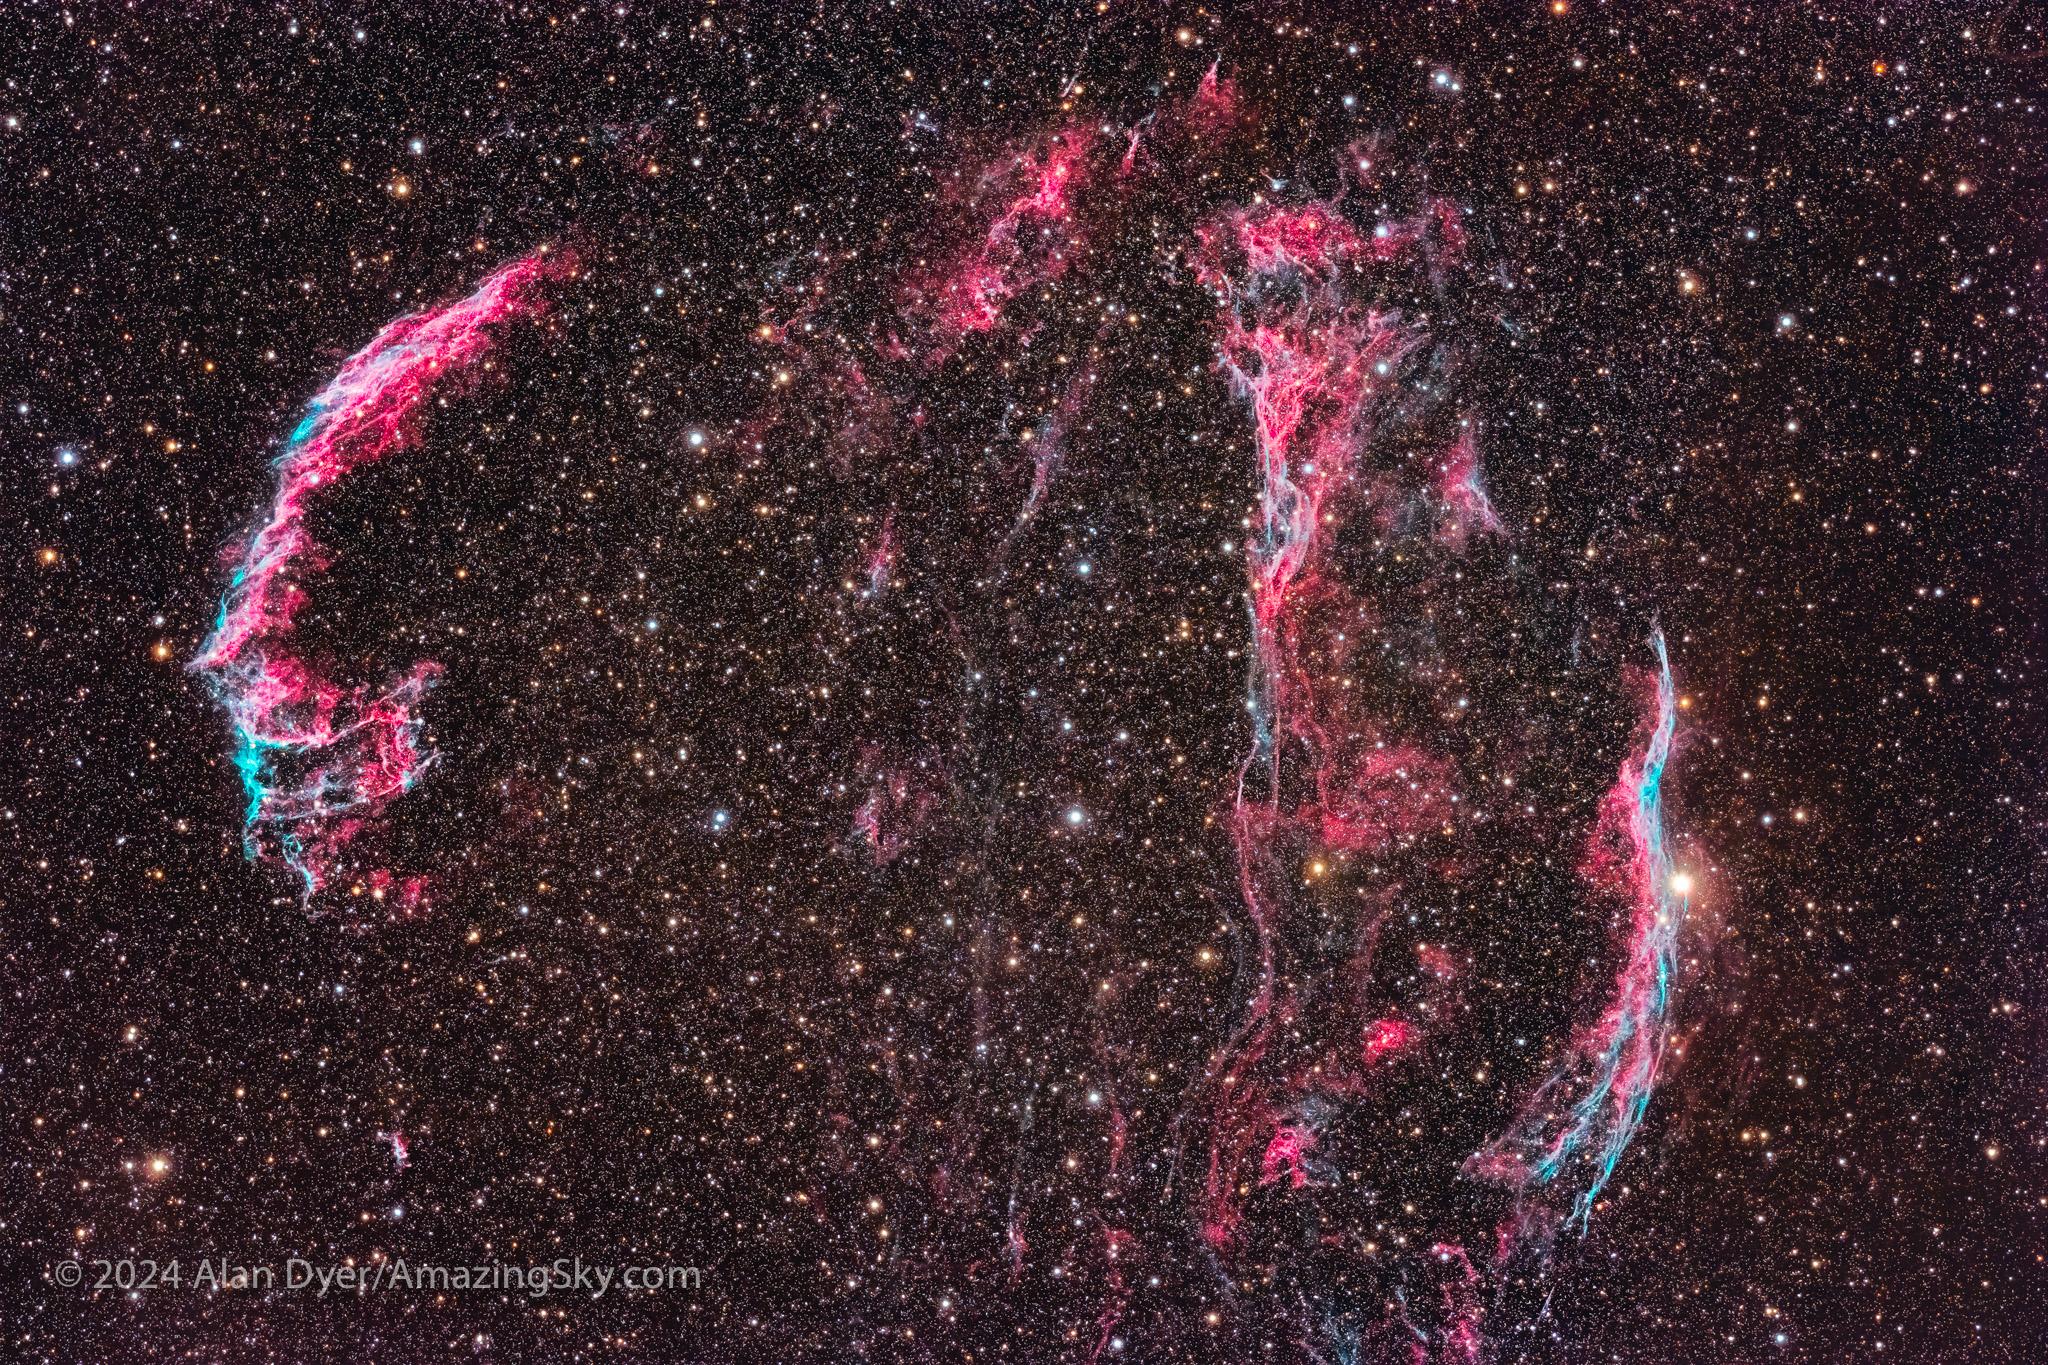
This frames all the photogenic components of the bright Veil Nebula in Cygnus, a several-thousand-year-old supernova remnant.
We invest a lot of money into the kind of specialized gear needed to shoot these targets (and I’m not nearly as “committed” as some are, believe me!), only to find the nights when it all comes together can be few and far between.
… Plus, A Very Minor Eclipse of the Moon
I had to include this, if only for stark contrast with the spectacular solar eclipse six months earlier.
We had an example of the most minor of lunar eclipses on March 24, 2024, with a so-called “penumbral” eclipse of the Moon, an eclipse so slight it’s hard to tell anything unusual is happening. (So I’ve not even included an image here, though I was able to shoot it.)
Me at another successful eclipse chase … to my backyard to capture the partial lunar eclipse on September 17, 2024. The Moon is rising in the southeast.
On September 17, we had our second eclipse of the Moon in 2024. This time the Earth’s umbral shadow managed to take a tiny bite out of the Full Moon. Nothing spectacular to be sure. But at least this eclipse expedition was to no farther away than my rural backyard. A clear eclipse of any kind, even a partial eclipse, especially one seen from home, is reason to celebrate. I did!
Of course, a total eclipse of the Moon, when the Full Moon is completely engulfed in Earth’s umbra and turns red, is what we really want to see. They rate a 7 on our Aah! Factor scale. We haven’t had a “TLE” since November 8, 2022, blogged about here.
We knew early in 2024 that the then newly-discovered Comet Tsuchinshan-ATLAS had the potential to perform this month. I planned a trip south to favourite spots in Utah and Arizona to take advantage of what we hoped would be a fine autumn comet.
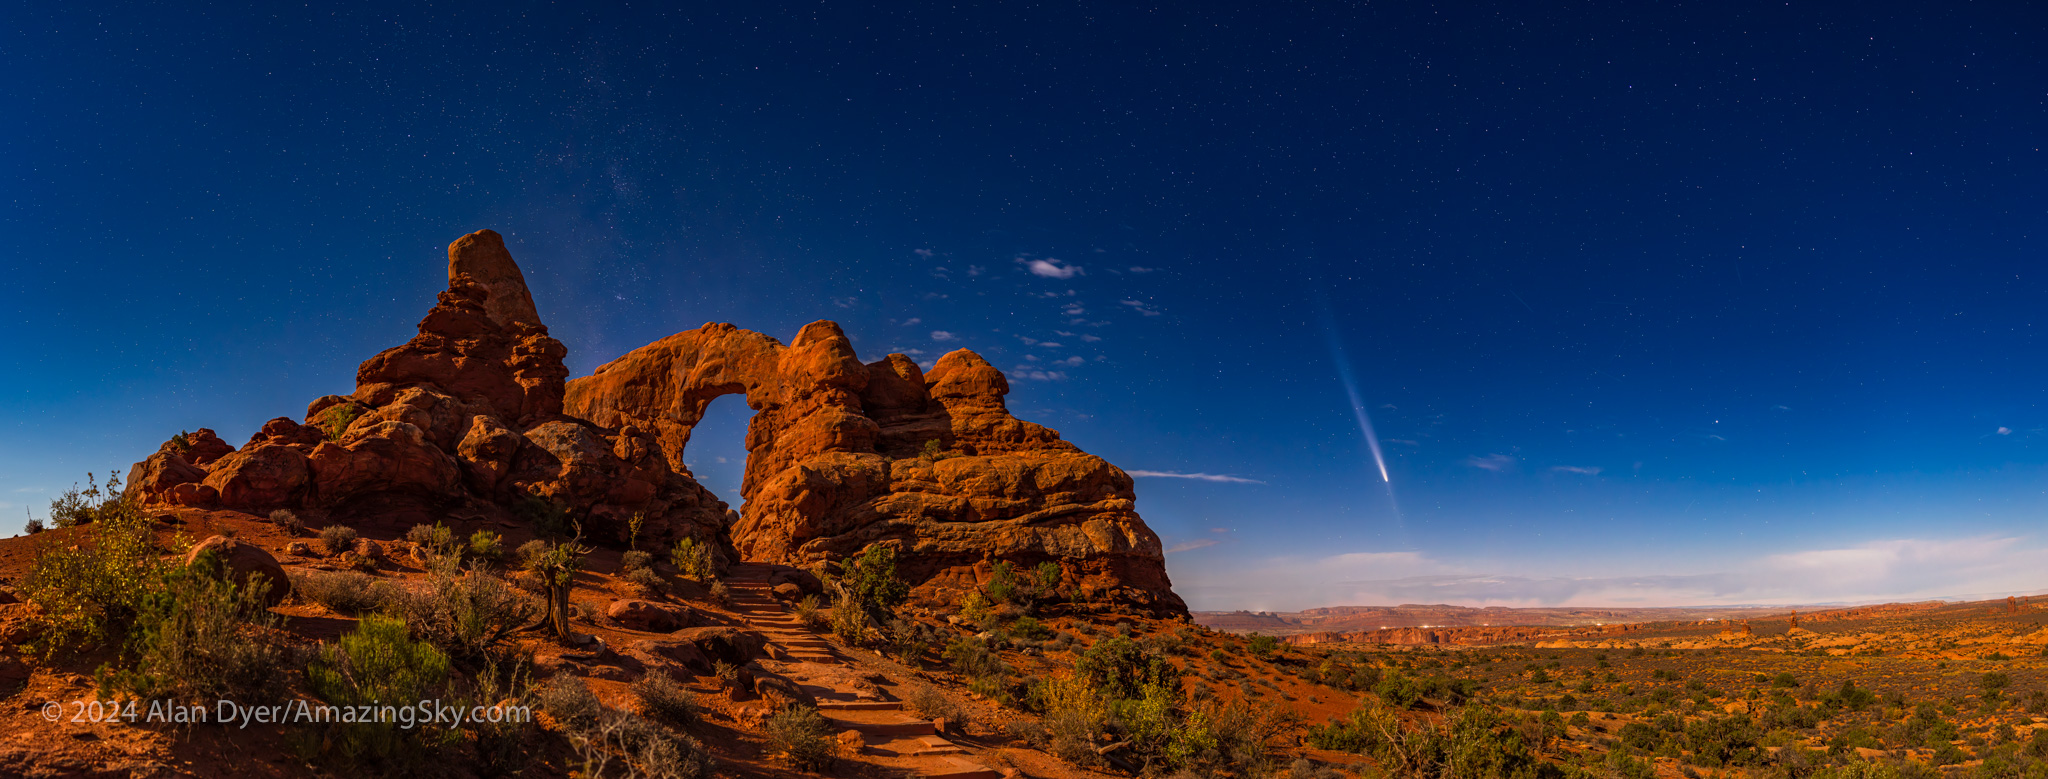
This is Comet Tsuchinshan-ATLAS (C/2023 A3) at its finest in the evening sky, on October 14, two days after its closest approach to Earth, and with it sporting a 10º- to 15º-long dust tail, and a short narrow anti-tail pointed toward the horizon. The location was Turret Arch in the Windows area of Arches National Park, Utah.
It blossomed nicely, especially as it entered into the evening sky in mid-October, as above. Despite the bright moonlight, it was easy to see with the unaided eye, a celestial rarity we get only once a decade, on average, if we are lucky. My blog of my comet chase is here.
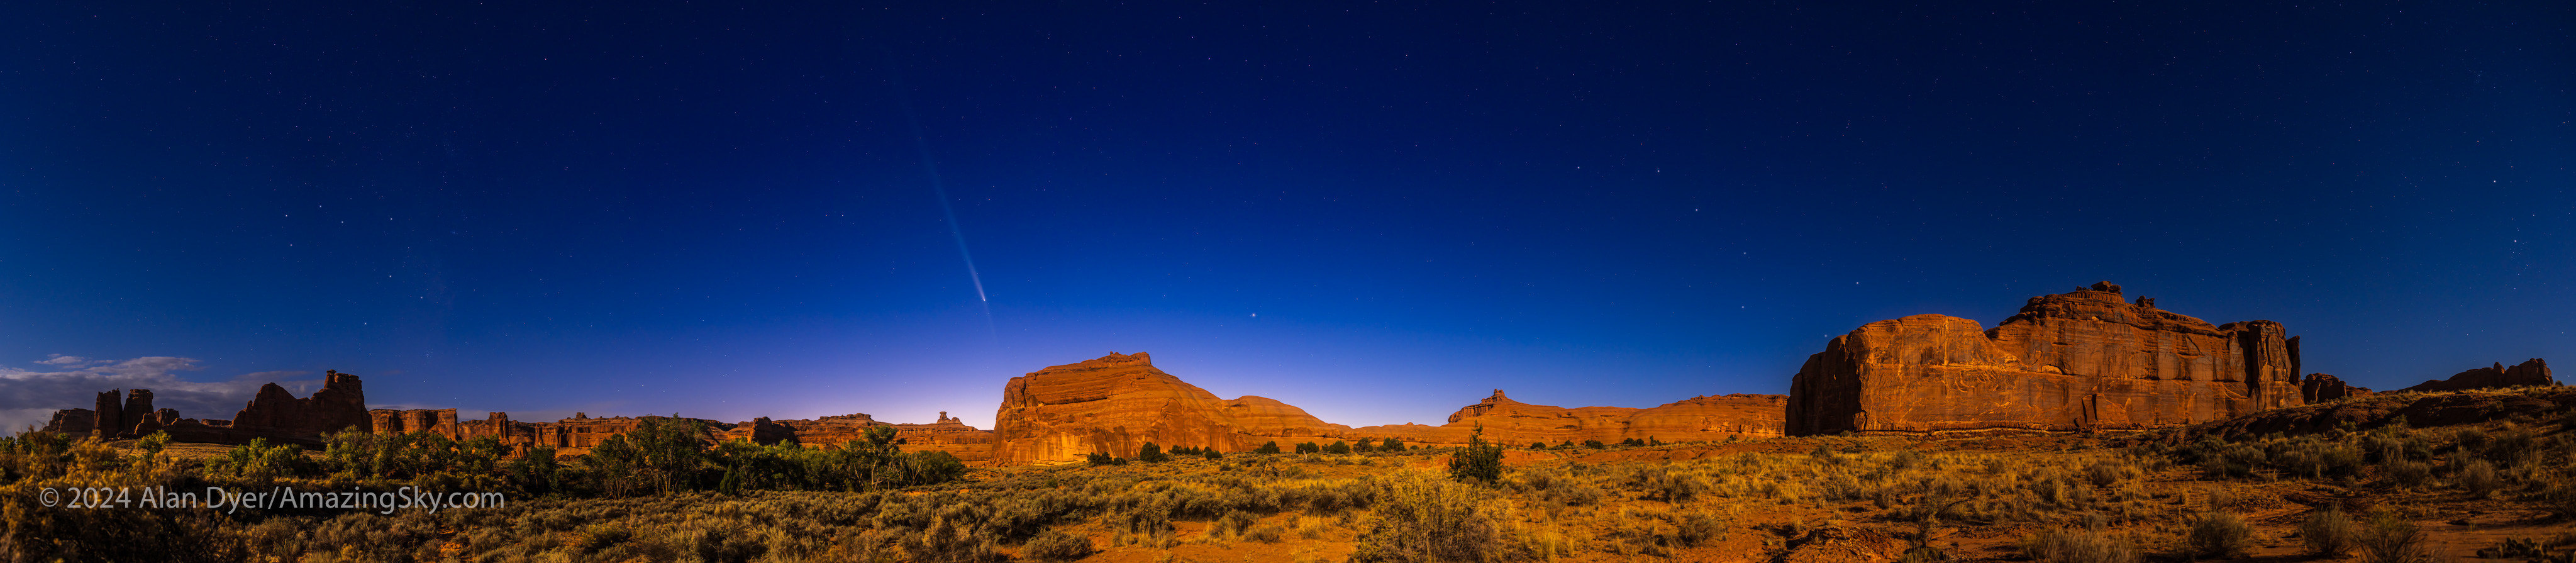
This is a panorama of Comet Tsuchinshan-ATLAS over Arches National Park, Utah, on a moonlit night, October 15, 2024, with the comet easy to see with the unaided eye.
A naked-eye comet ranks an 8 on our Aah! Factor scale. So now 2024 had delivered all four of our Top 4 sky sights.
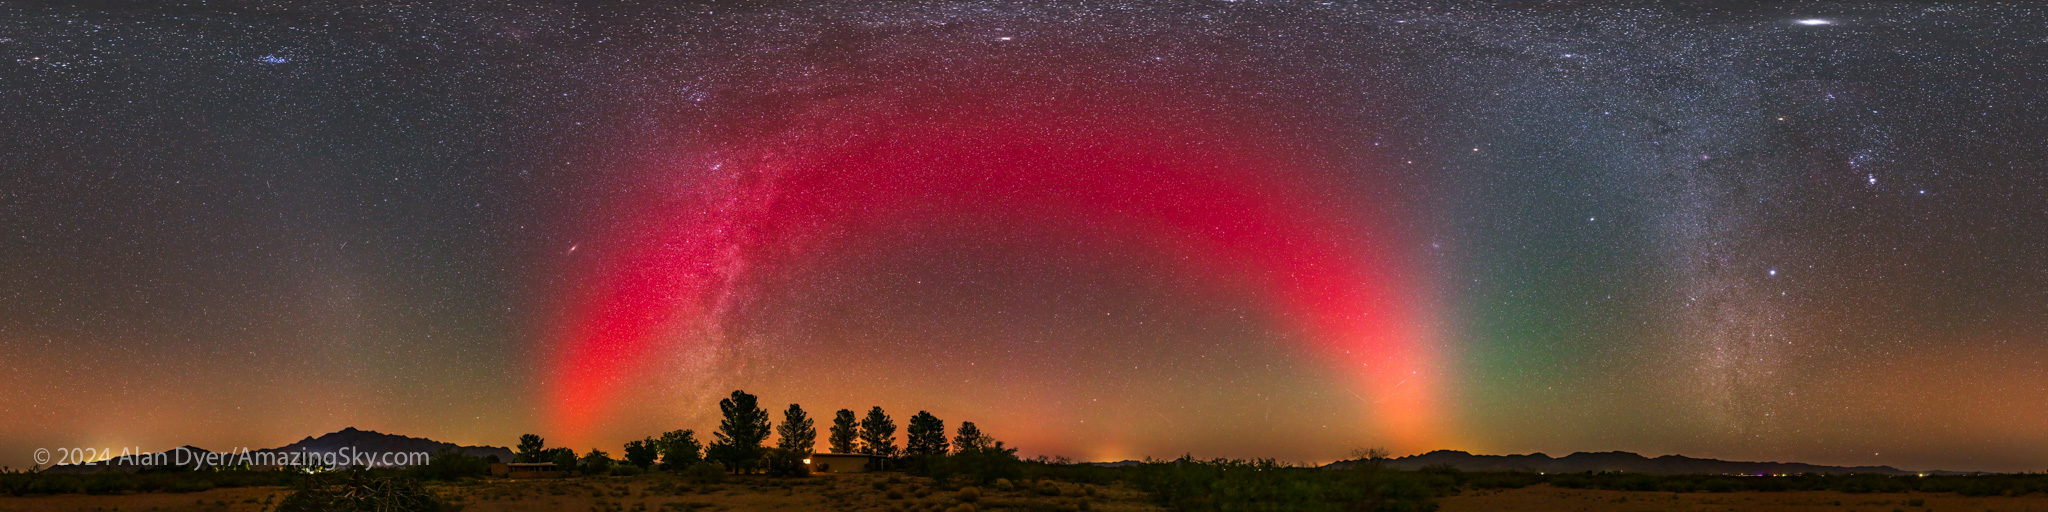
This 360° panorama captures a rare SAR (Stable Auroral Red) arc across the Arizona sky in the pre-dawn hours of October 11, 2024. The SAR arc was generated in the high atmosphere as part of the global geomagnetic storm of October 10/11, 2024, with a Kp8 rating that night.
But … just as a bonus, there was another fabulous aurora on October 10, seen in my case from the unique perspective of southern Arizona, with an appearance of a bright “SAR” arc more prominent than I had ever seen before. So that view was a rarity, too, so unusual it doesn’t even make our Aah! list, as SARs are typically not visible to the eye.
November
Back to Norway for Northern Lights
2024 was notable for travel getting “back to normal,” at least for me, with two long-distance drives, and now my second overseas trip. This one took me north to Norway 🇳🇴, which I had been visiting twice a year as an enrichment lecturer during pre-pandemic years.
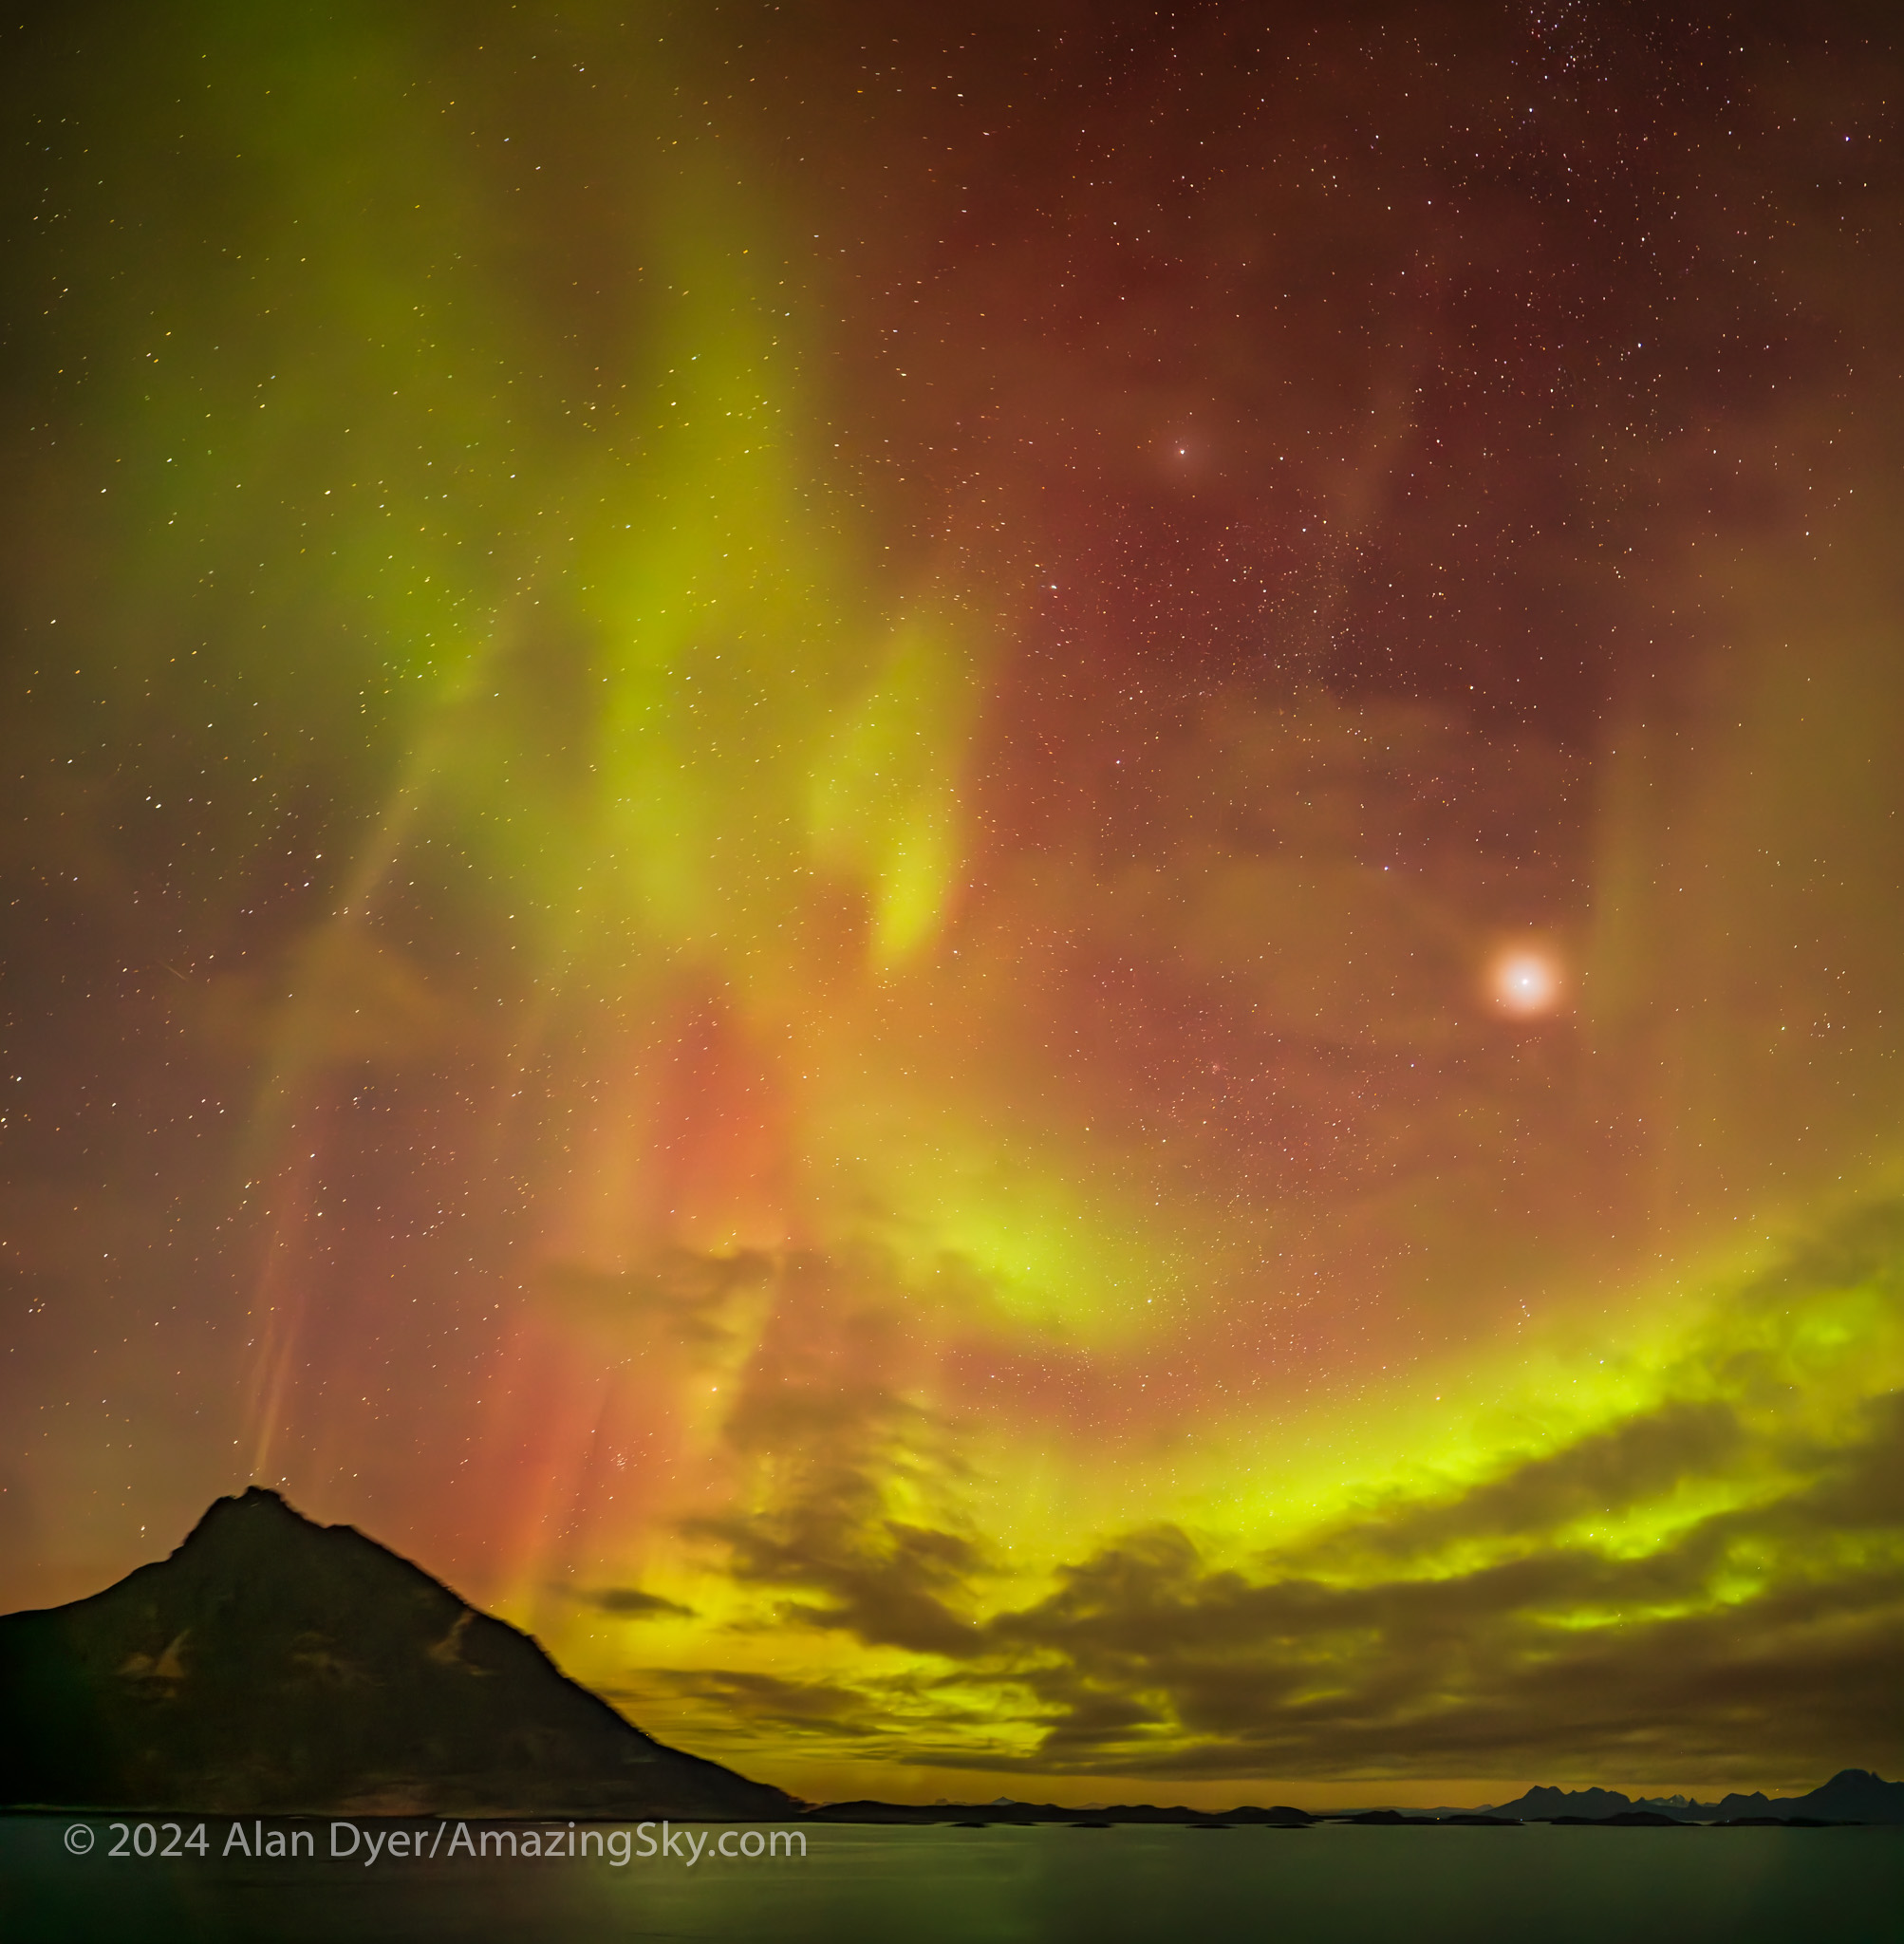
A green and red aurora appears over the coast of Norway, with Jupiter bright at right. This was from the Hurtigruten ship m/s Nordkapp on November 10, 2024, on a coastal cruise with a Road Scholar tour group.
The auroras were excellent, though nothing like the great shows of May and October. But the location sailing along the scenic coast and fjords makes up for any shortfall in the Lights. It was good to be back. I plan to return in 2025 for two cruises in October. Join me there, too!
December
A Winter Moonrise to End the Year
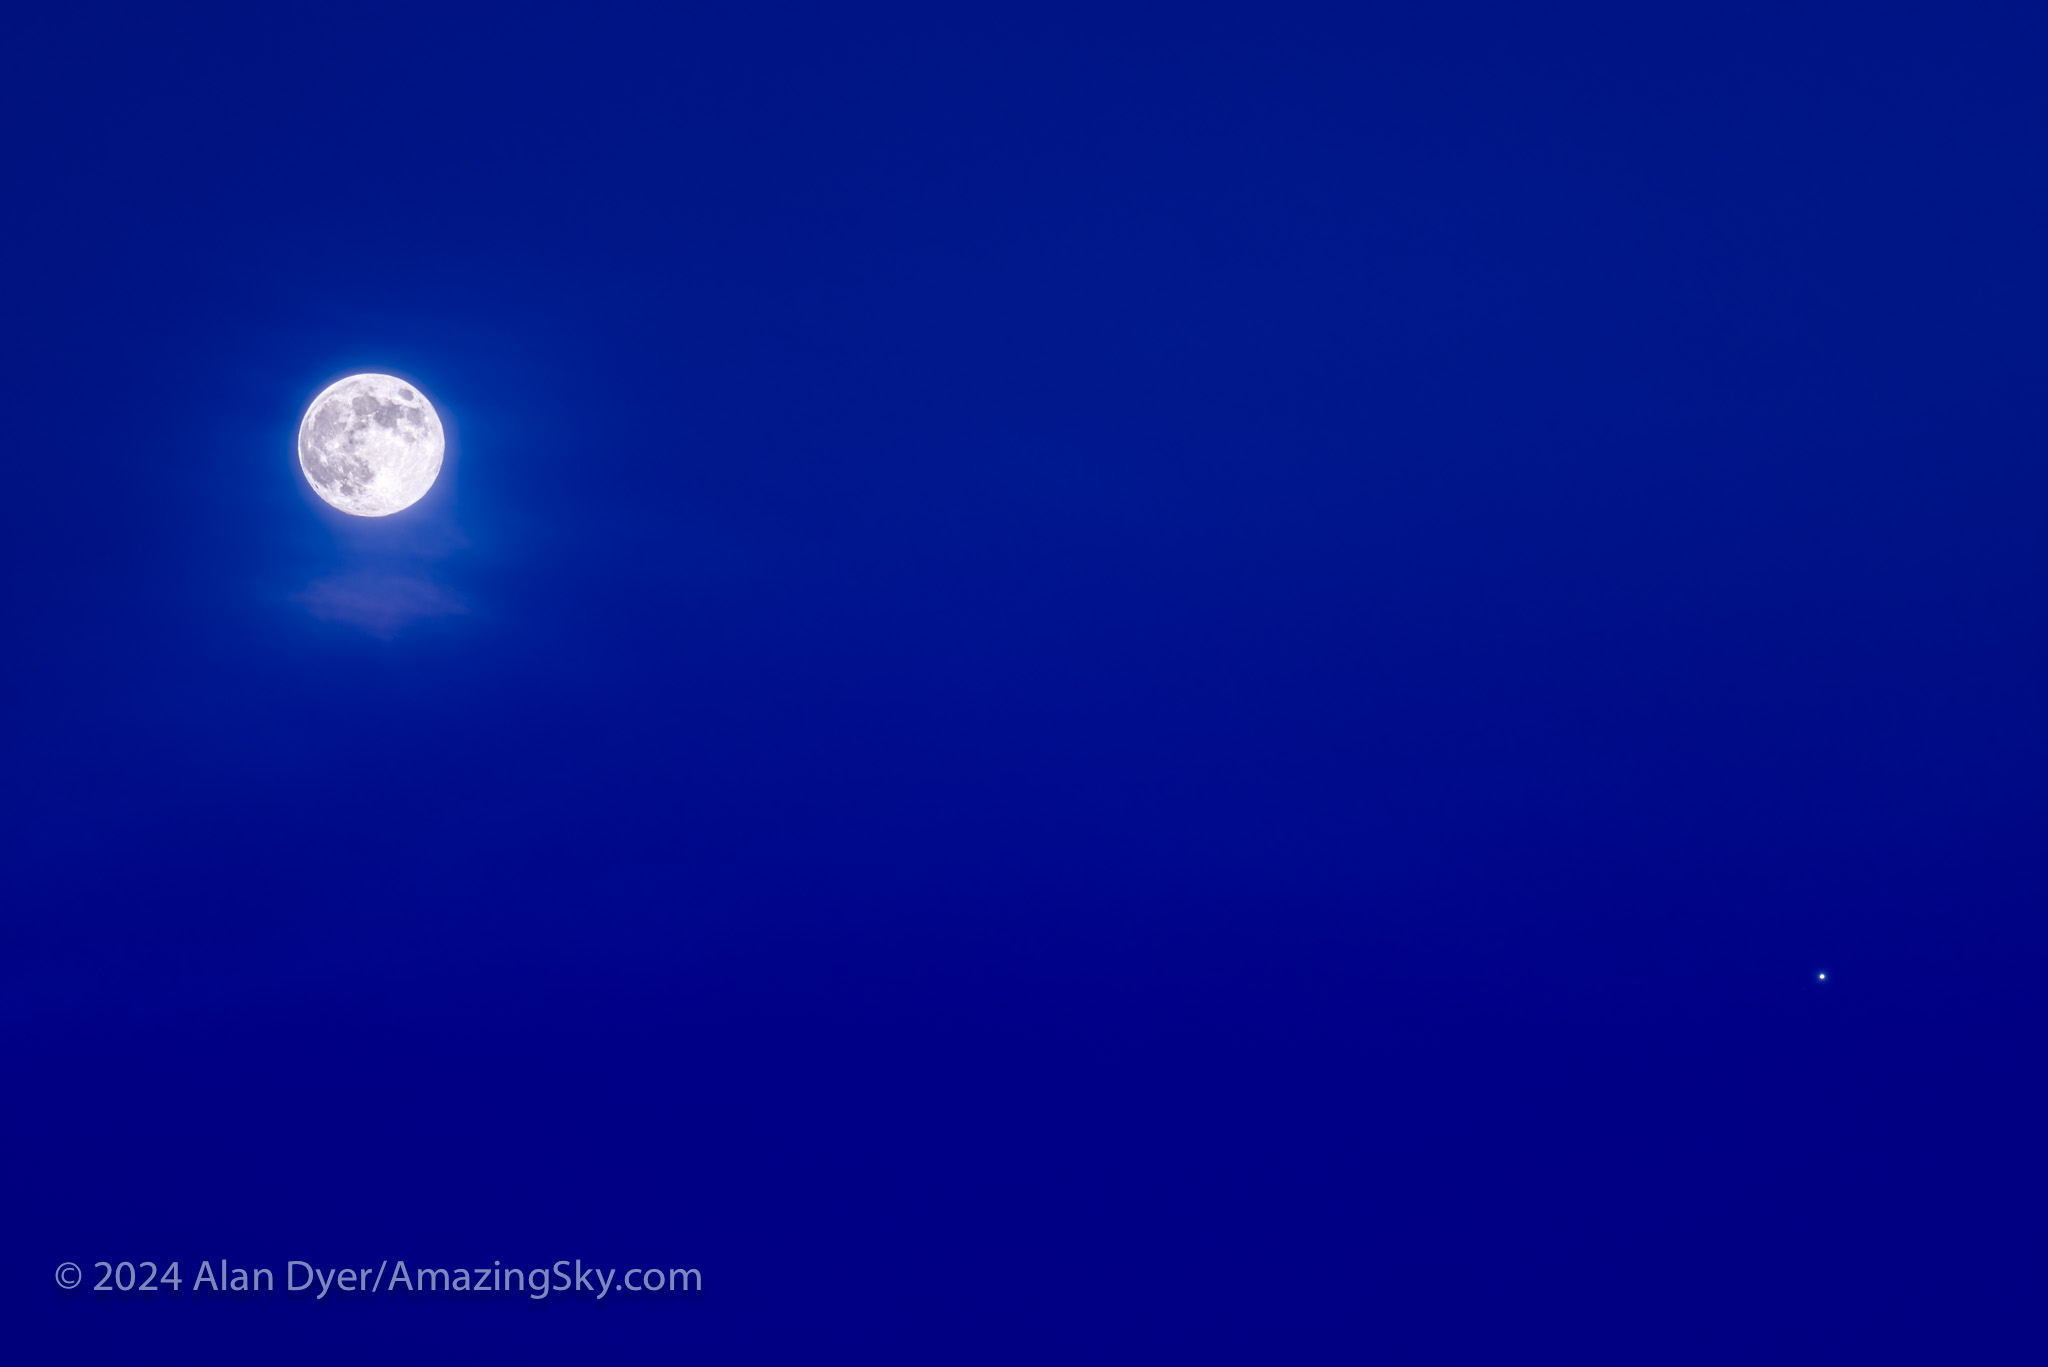
As I write this, December has been nothing but cloud. Almost. A clear hour on Full Moon night allowed a capture of the “Cold Moon,” with the Moon near Jupiter, then at its brightest for the year. So that’s the other lunar bookend to the year, shot from the snowy backyard.
This is the Full Moon of December 14, 2024, near the planet Jupiter at lower right. Both were rising into the eastern sky in the early evening.
However, I did say after the clear total eclipse in April that if the rest of 2024 had been cloudy I wouldn’t complain. So I’m not.
And there’s no reason to, as 2024 did deliver the best year of stargazing I can remember. 2017 had a total solar eclipse. 2020 had a great comet. But we have to go back to 2003 for aurora shows as widespread and as a brilliant as we’ve seen this year. 2024 had them all. And more!
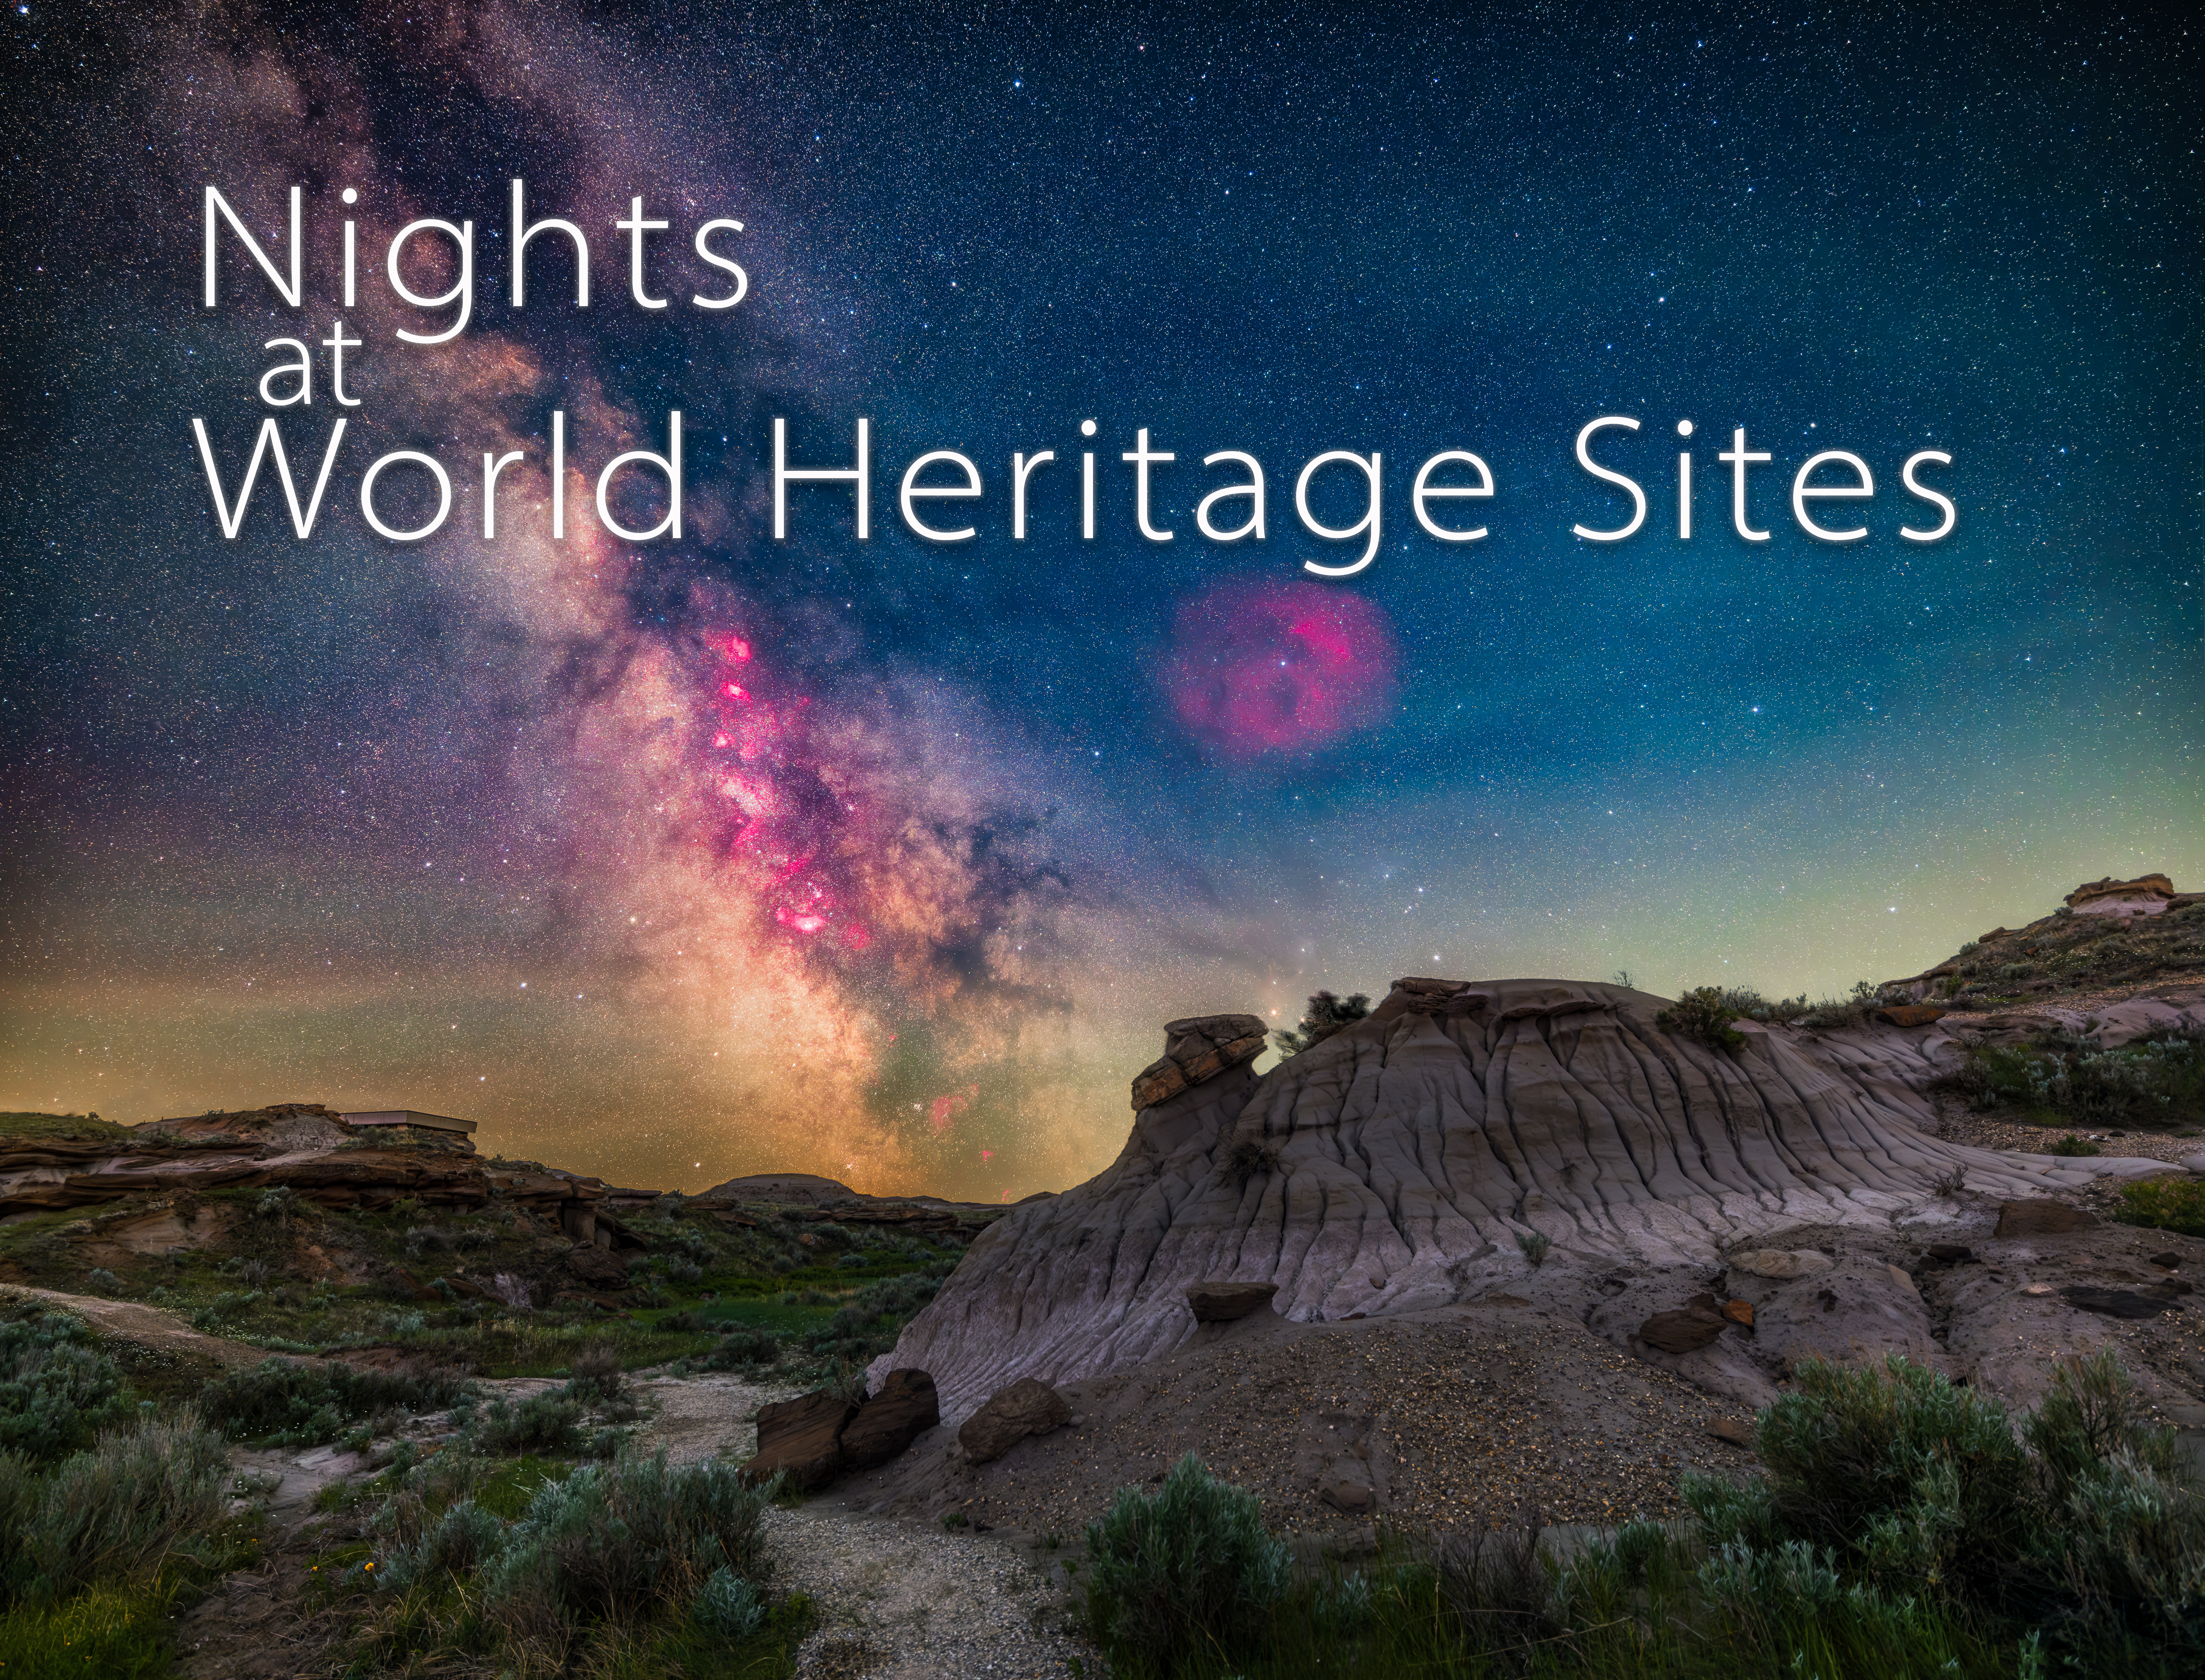
I present a selection of new images taken at local World Heritage Sites, along with some advanced nightscape shooting tips.
I’m fortunate in living near scenic landscapes here in southern Alberta. Many are part of UNESCO World Heritage Sites that preserve regions of unique scenic and cultural significance. In early June I visited several to shoot nightscapes of starry skies over the scenic landscapes.
I also took the opportunity to experiment with some new shooting techniques. So I’ve included some tips and techniques, most of the advanced variety.
First up was Dinosaur Provincial Park.
The Milky Way and its core region in Sagittarius and Scorpius is here low over the Badlands landscape of Dinosaur Provincial Park, Alberta.
After nearly a month of rain and clouds, the night of May 31/June 1 proved wonderfully clear at last. I headed to a favourite location in the Red Deer River valley, amid the eroded badlands formations of Dinosaur Provincial Park, site of late-Cretaceous fossil finds.
The bright core of the Milky Way in Sagittarius would be in the south. With the night only three weeks before summer solstice, from the Park’s latitude of 50.5° N the sky would not get astronomically dark. But it would be dark enough to show the Milky Way well, as above in this framing looking south on the Trail of the Fossil Hunters.
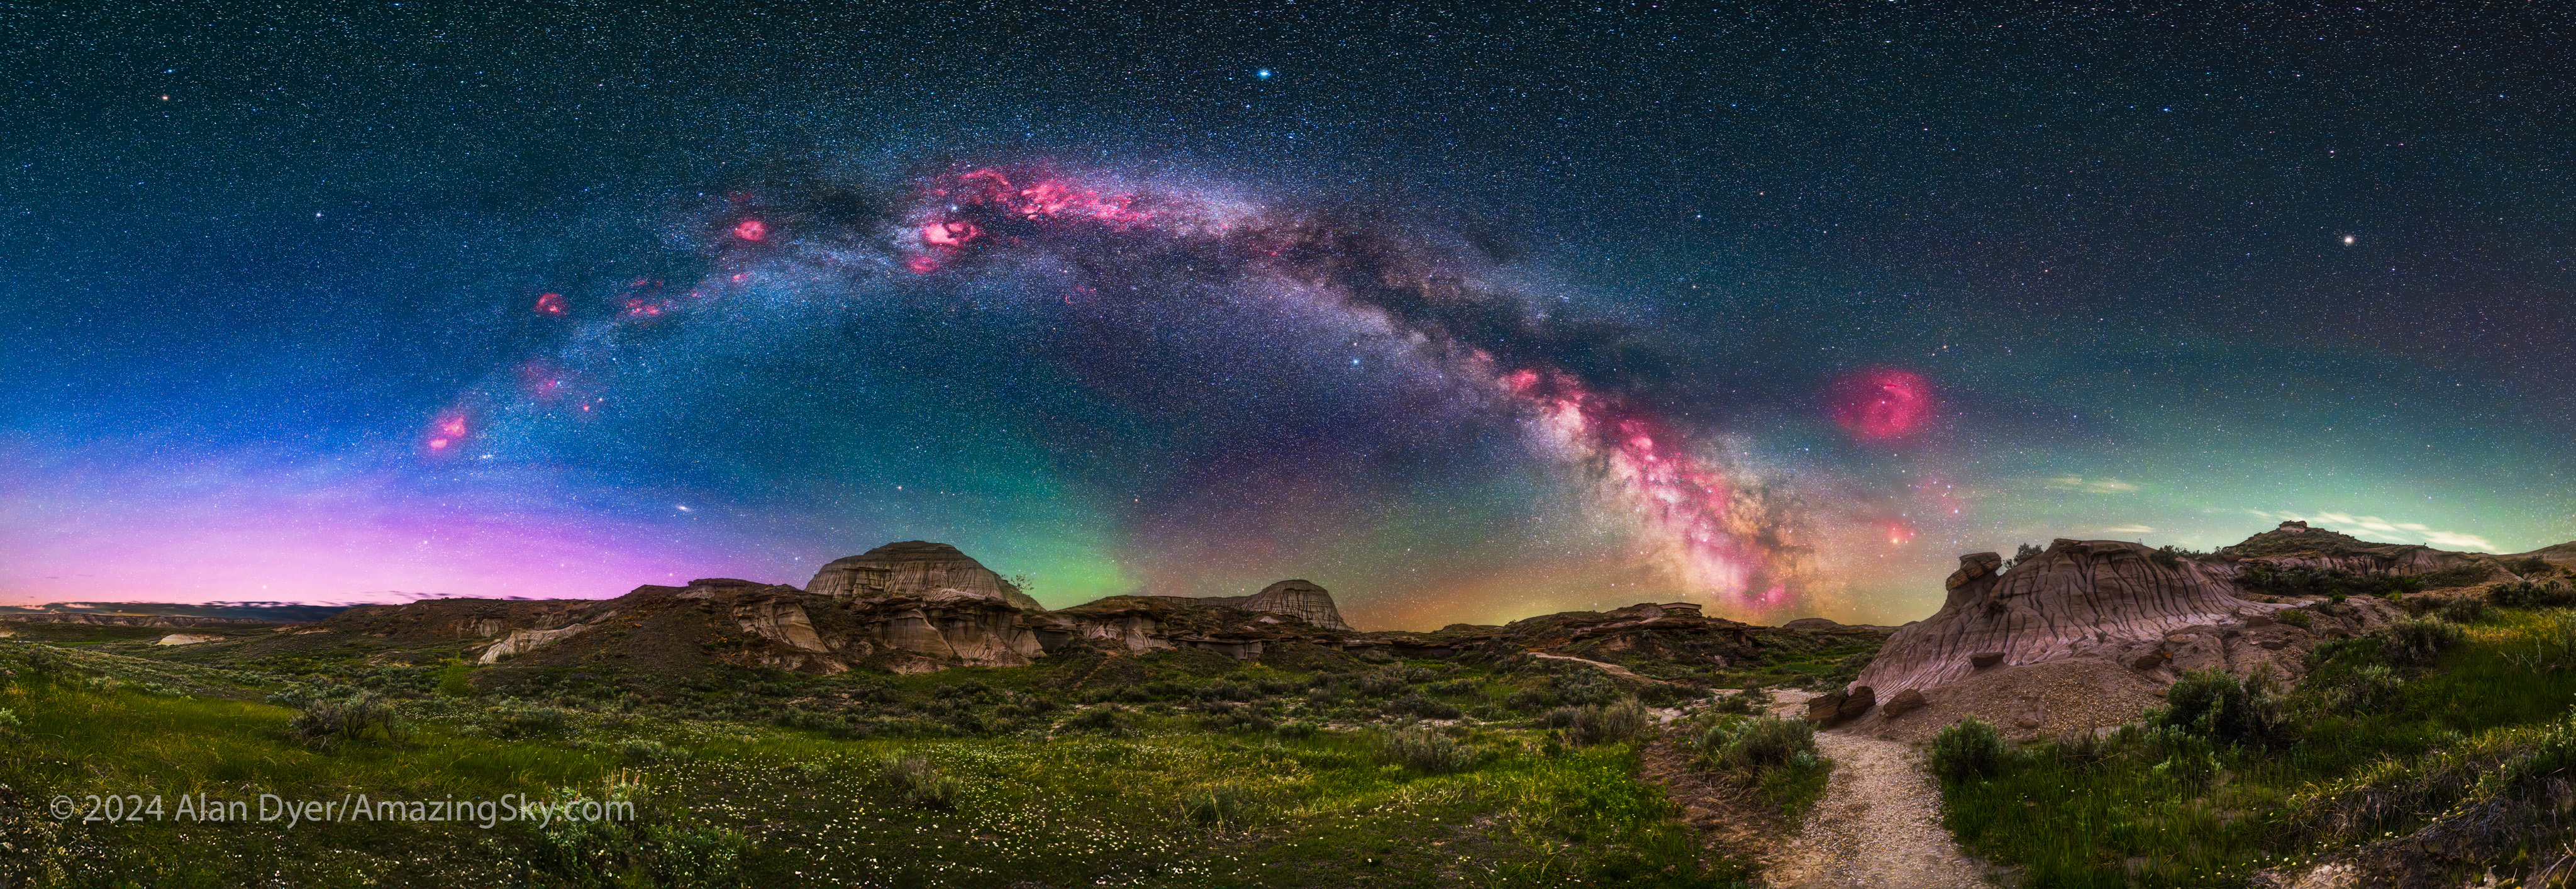
However, May and June are “Milky Way Arch” months, at least for the northern hemisphere. The full sweep of the northern Milky Way, from Perseus in the northeast to Sagittarius in the southeast, then stretches across the sky — high enough to be impressive, but low enough (unlike later in summer) to be framable in a horizontal panorama.
This is a 200° panorama of the arch of the northern Milky Way rising over the Badlands landscape of Dinosaur Provincial Park, Alberta.
To capture the arc of the Milky Way I shot a panorama — in fact three:
one exposed for the ground
one exposed for the sky, but with the camera now tracking the sky to keep stars pinpoint
and a final sky panorama but with a specialized filter installed in front of the camera sensor to let through only the deep red light emitted by nebulas along the Milky Way
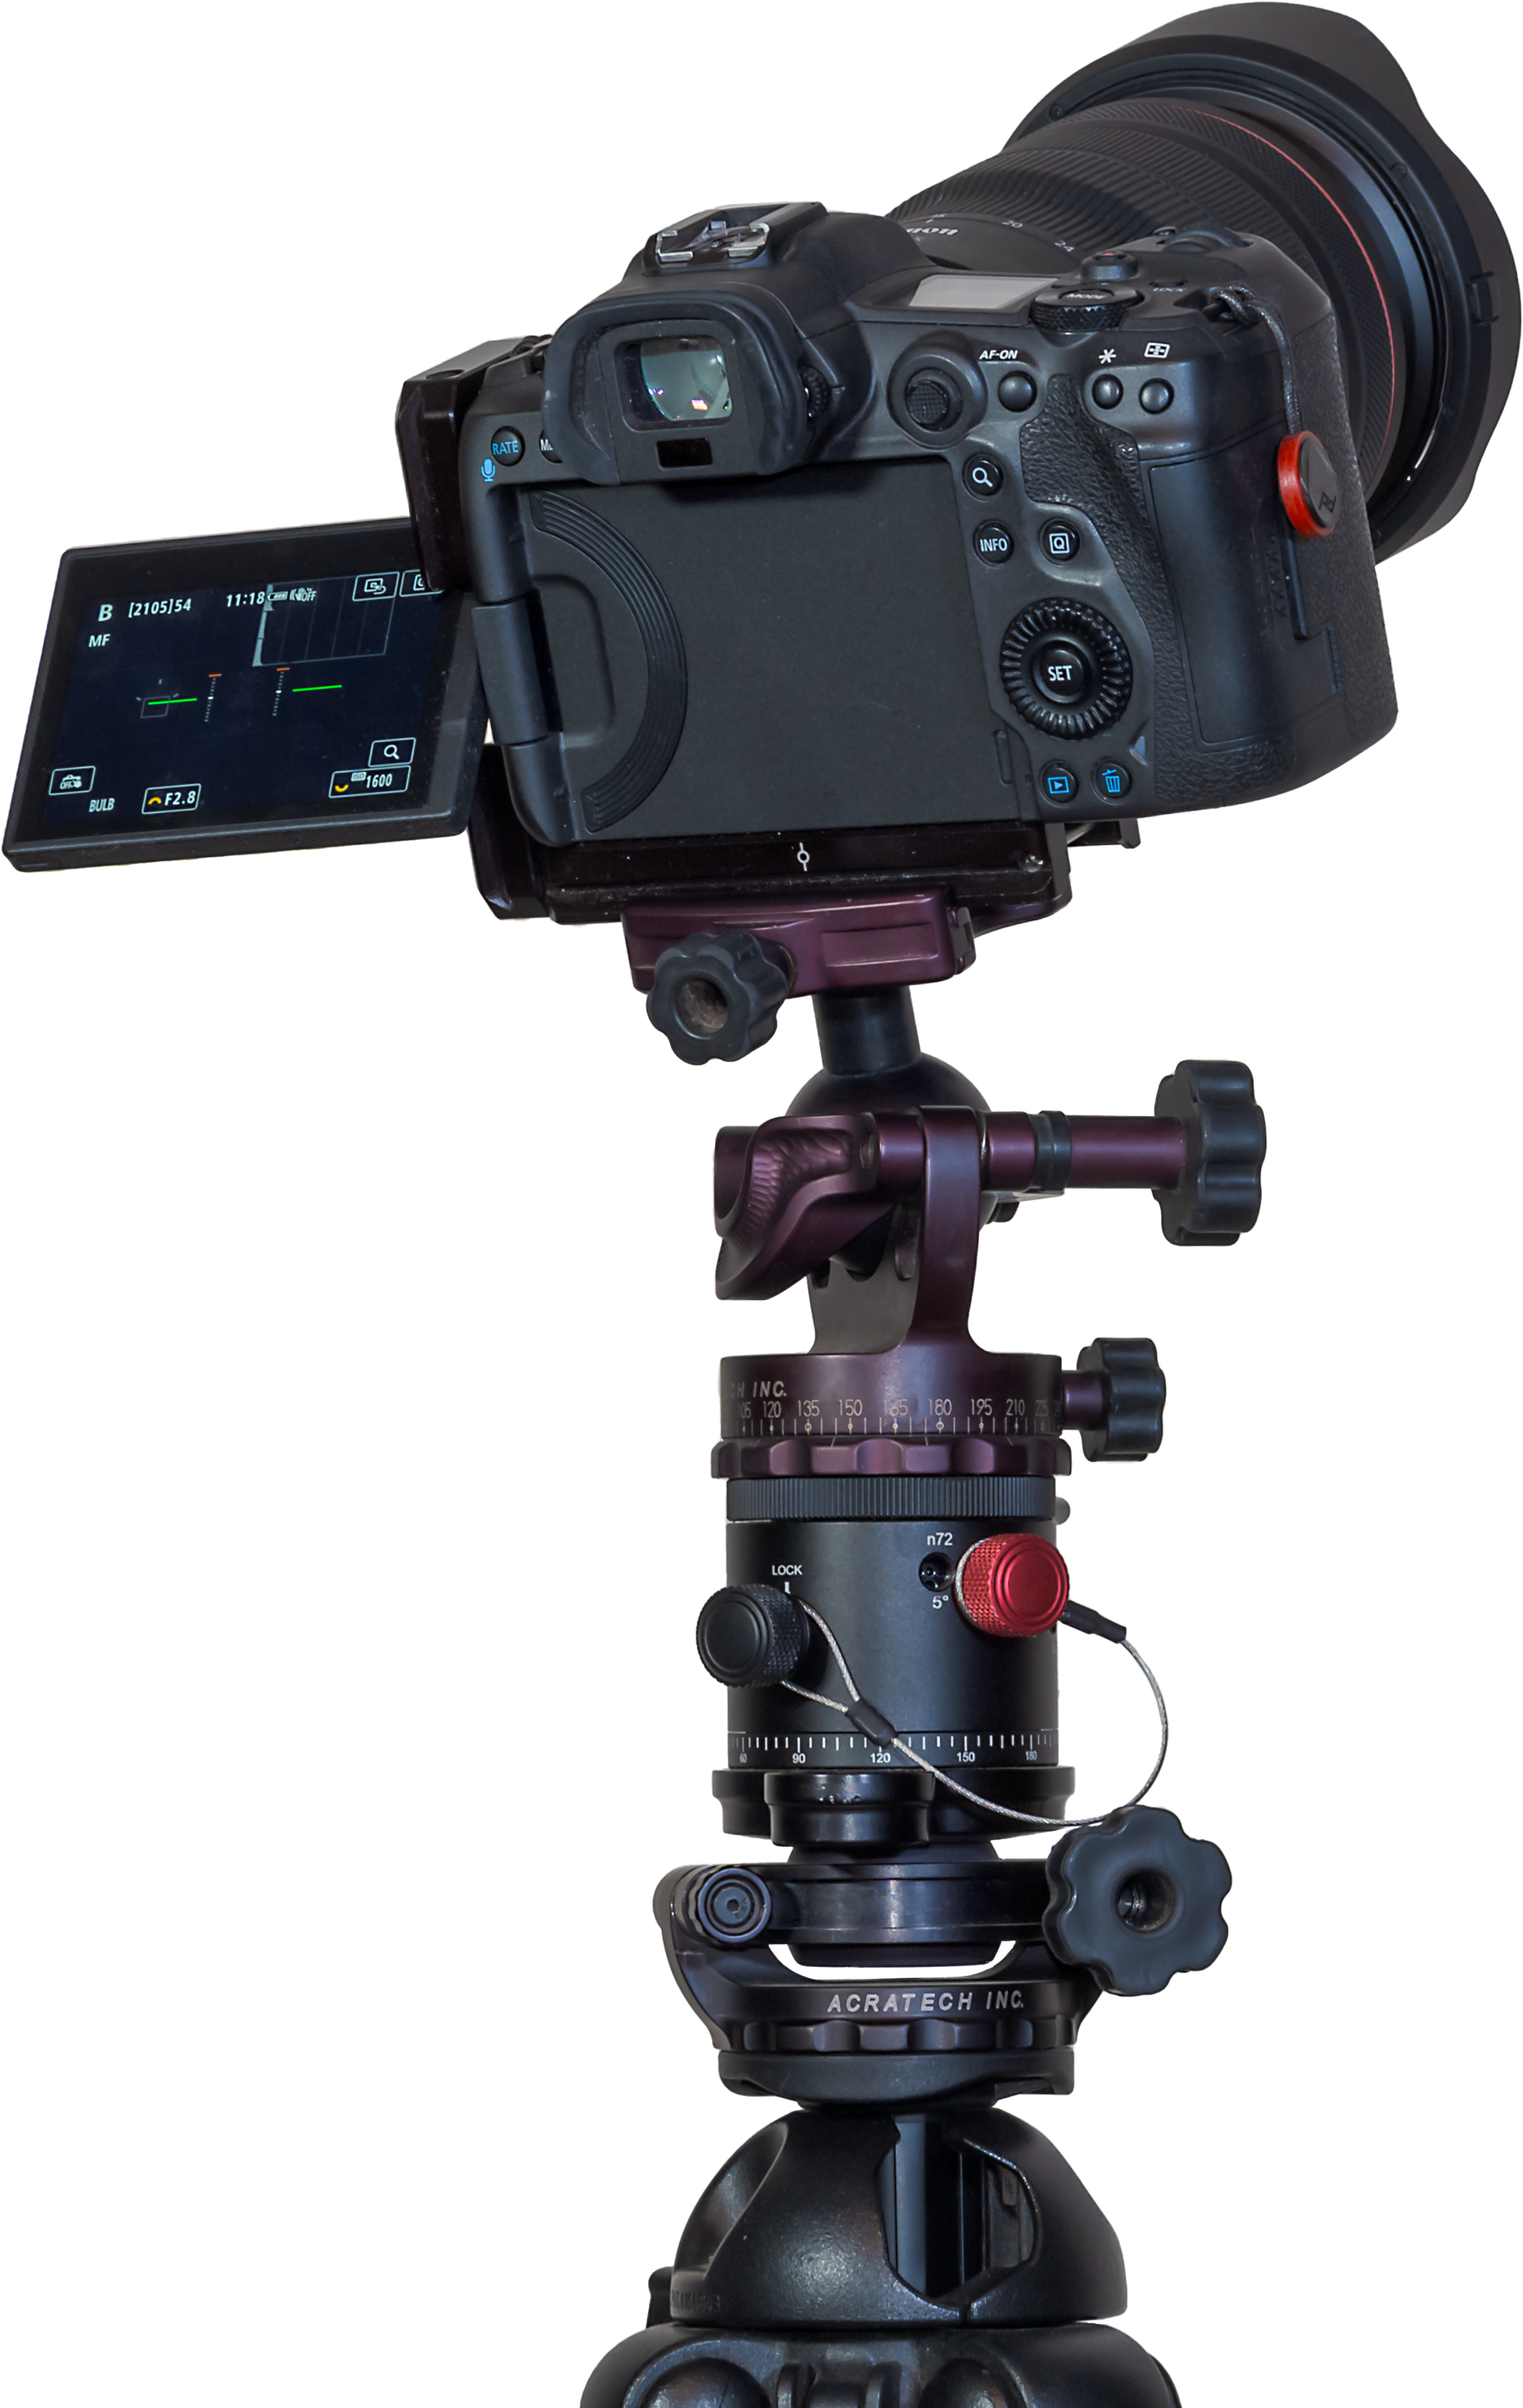
Rig for tracked panoramas with the MSM Nomad tracker
The image above shows my rig for taking tracked panoramas. The rectangular box is the little Nomad sky tracker from Move-Shoot-Move (MSM), here equipped with its accessory laser pointer to aid the “polar alignment” that is needed for this or any tracker to follow the turning sky properly.
A review of the MSM Nomad will be forthcoming (subscribe to my blog!). However, I’ve found it works very well, much better than MSM’s original Rotator tracker, which was entirely unreliable!
On top of the little Nomad is an Acratech pano head, so I can turn the camera by a specific angle between each pano frame, both horizontally from segment to segment, and vertically if needed when raising the camera from the ground pano to the sky pano.
The pano head is on a “V-Plate” sold by MSM and designed by the late, great nightscape photographer (and engineer by trade), Alyn Wallace. The V-Plate allows the camera to turn parallel to the horizon when on a tipped-over tracker. The entire rig is on a Benro 3-Axis tripod head (also sold by MSM, but widely available) that makes it easy to precisely aim the tracker for polar alignment and then hold it rock steady.
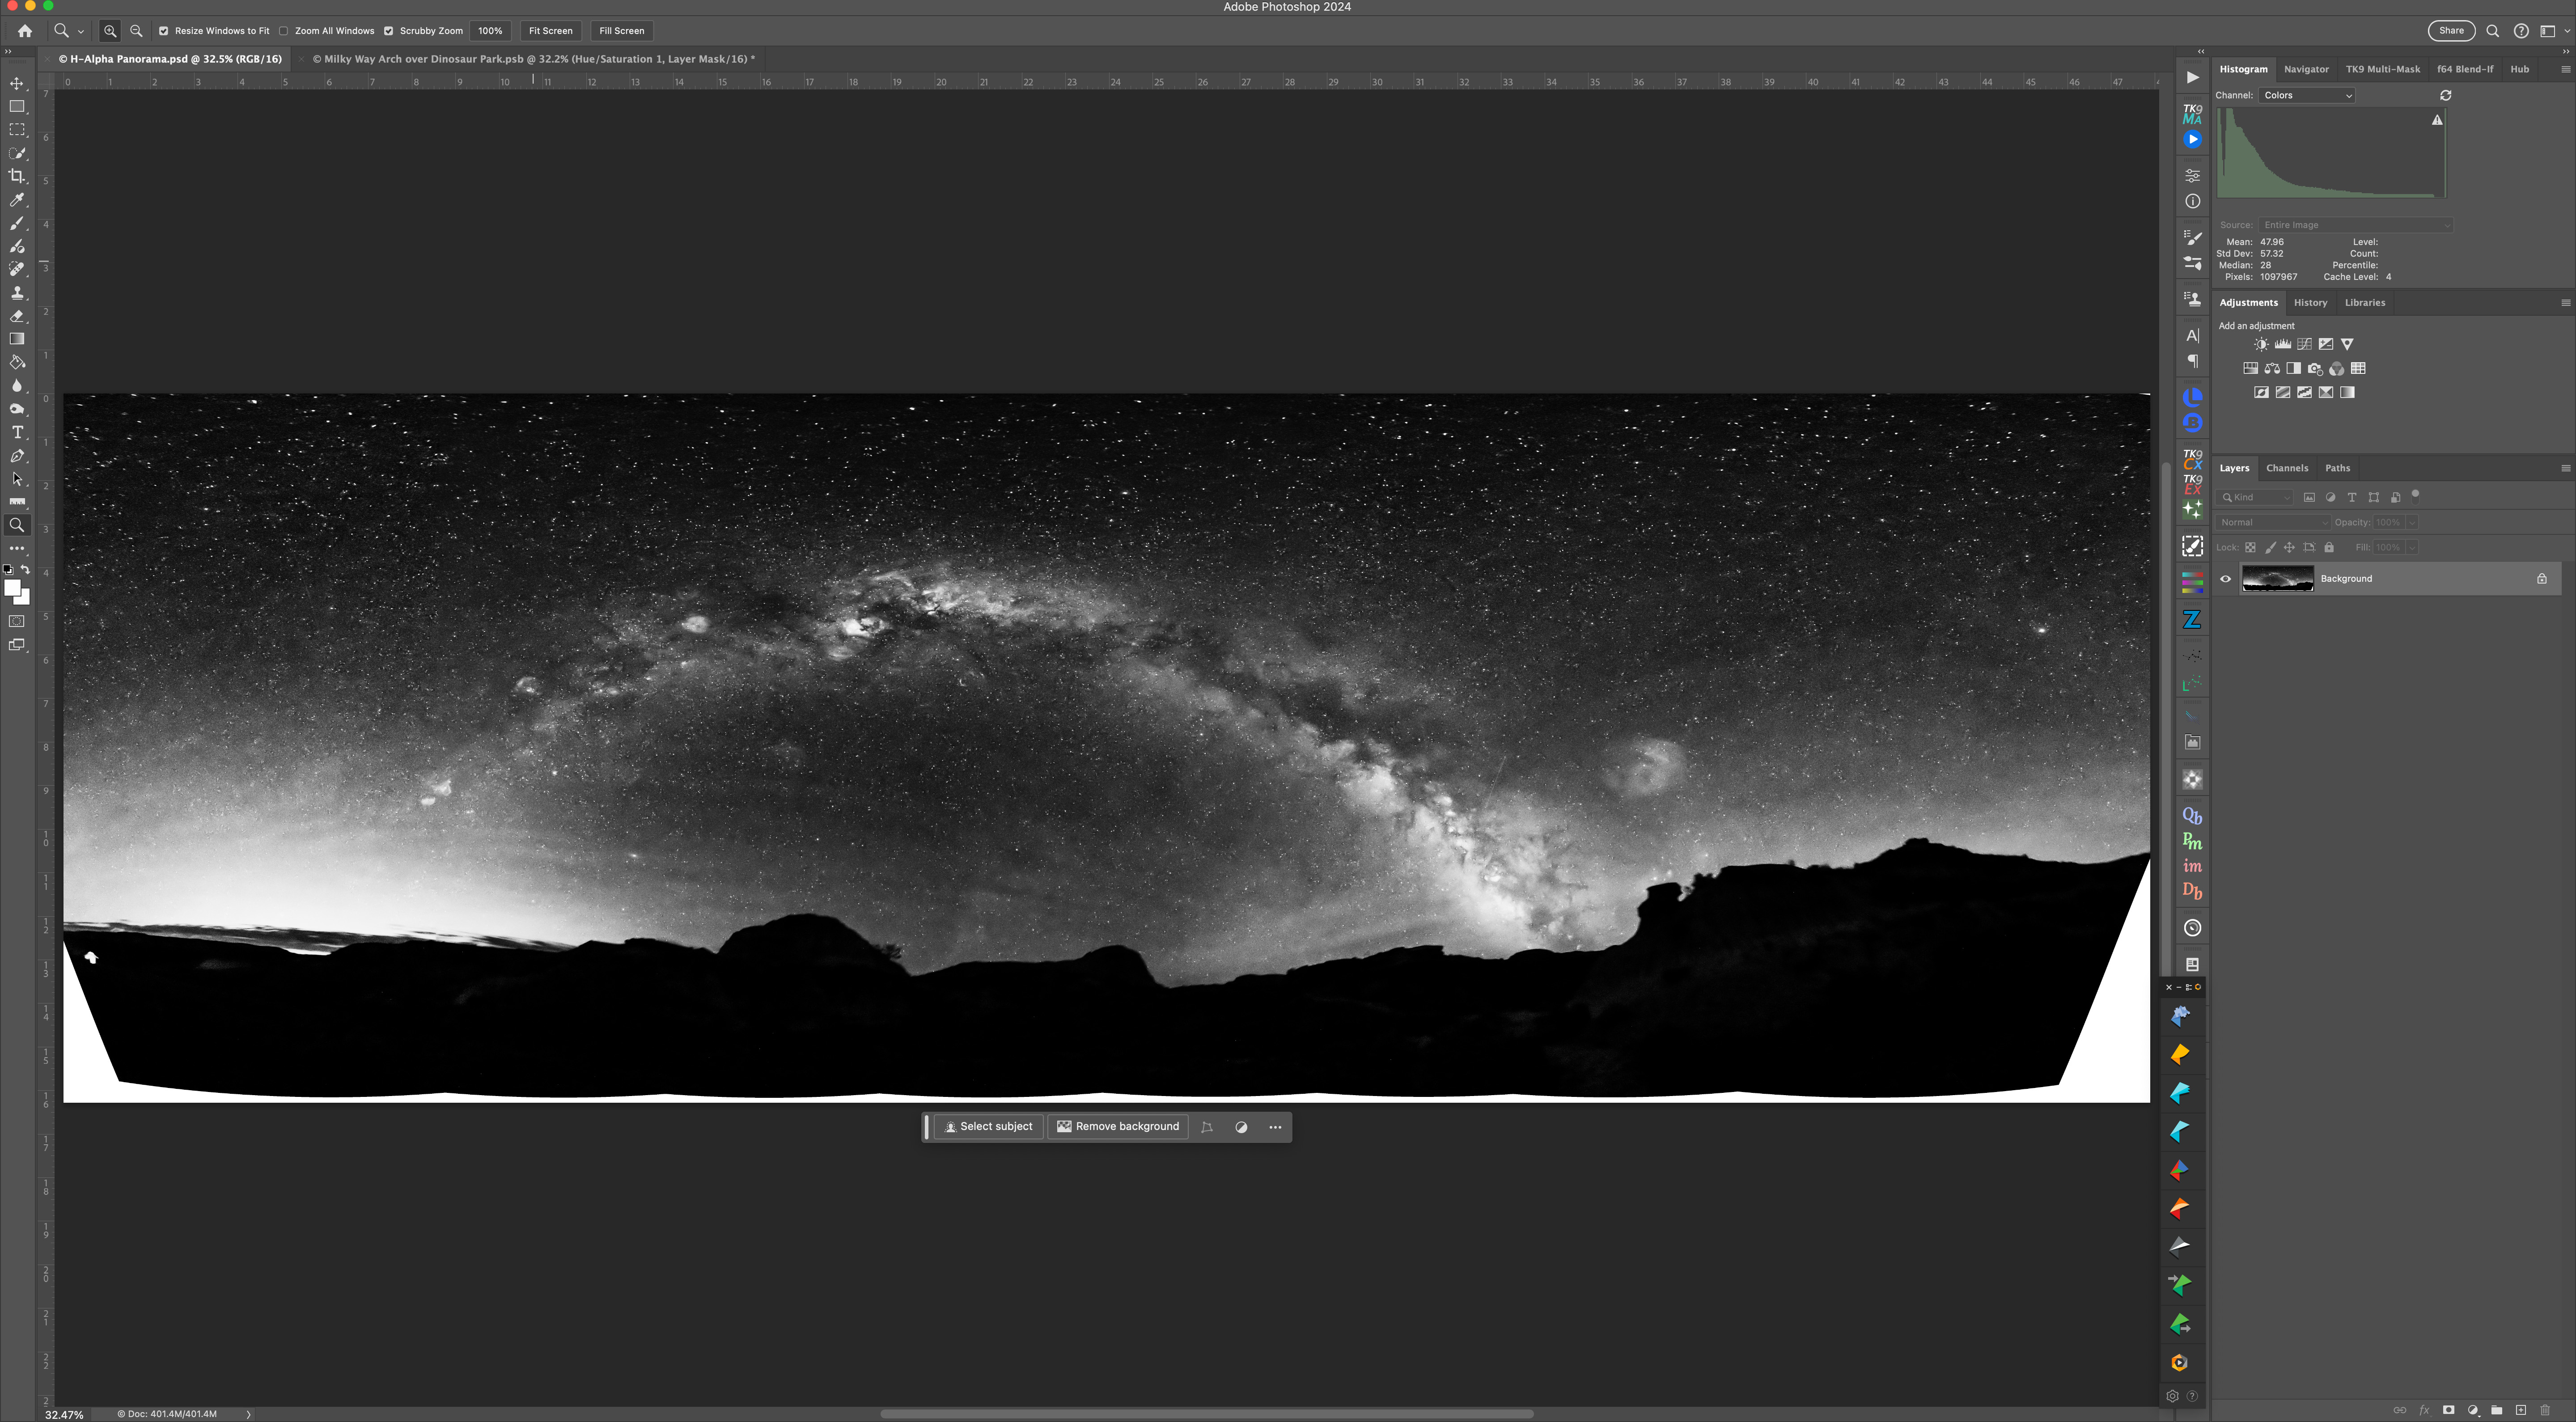
The H-Alpha Panorama rendered in monochrome
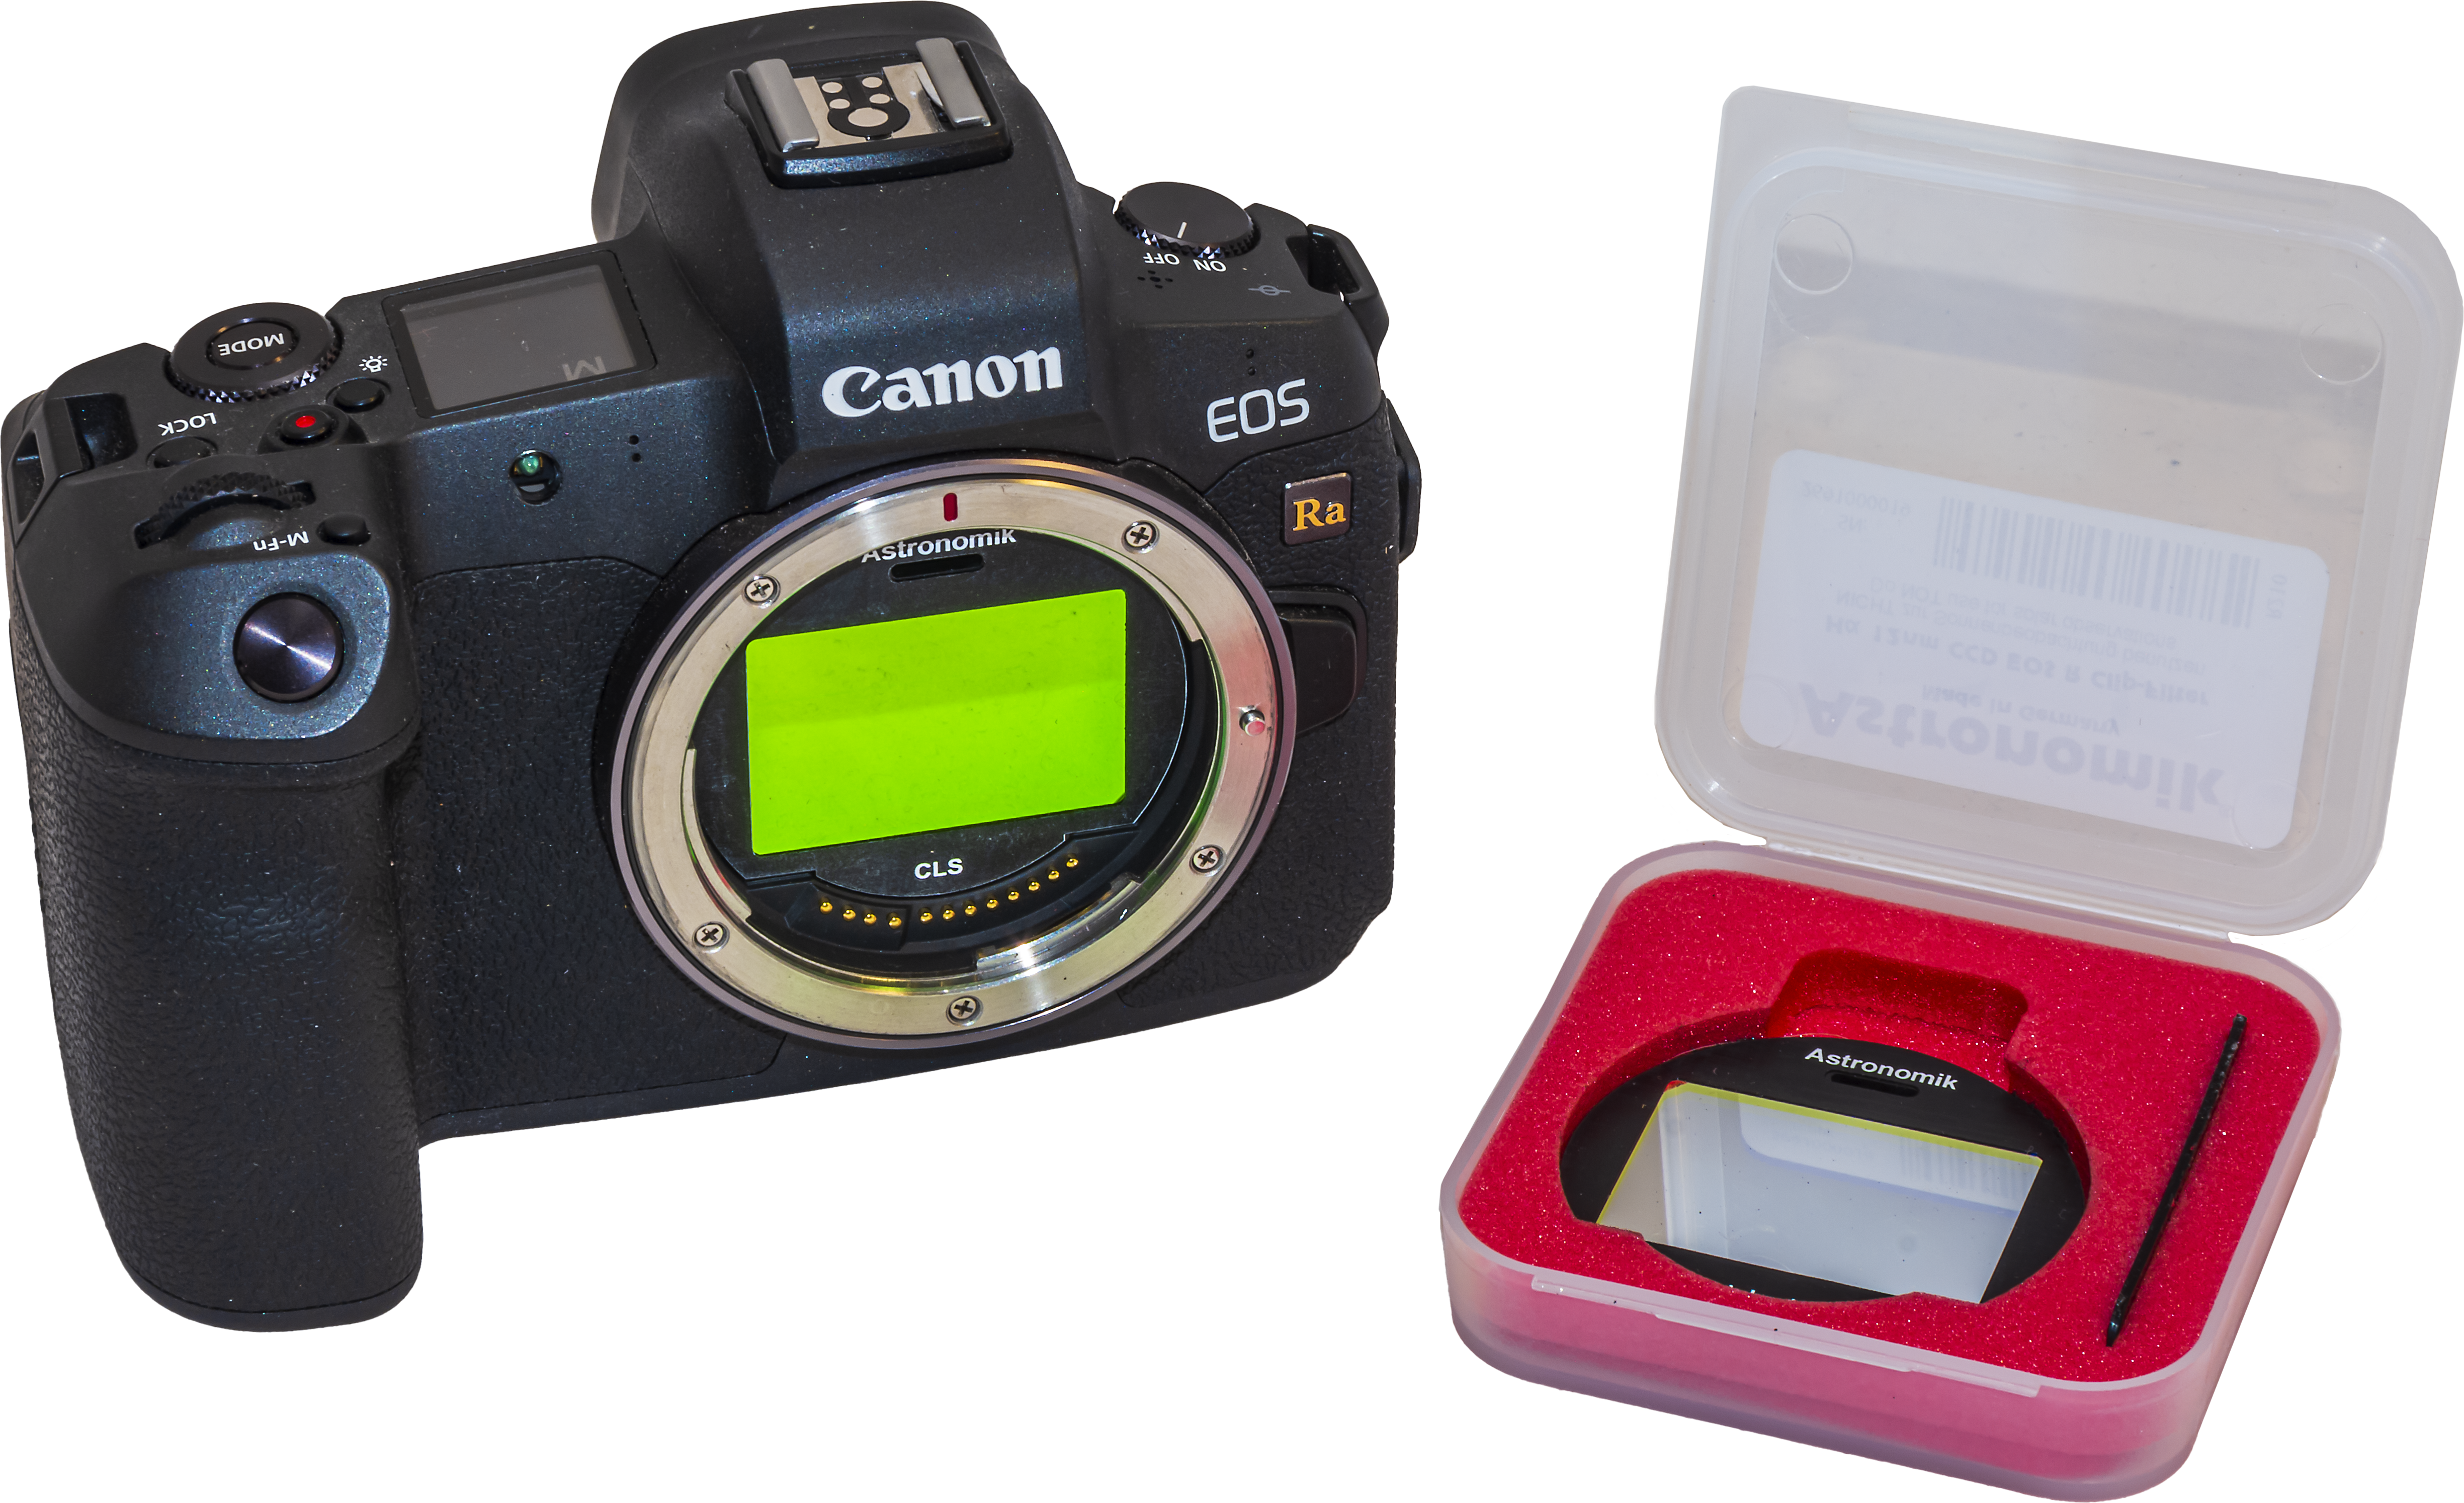
I’d taken many panos before using sets of untracked ground and tracked sky panoramas. New this night was the use a “narrowband” Hydrogen-Alpha filter to take a final pano that brings out the red nebulas. I used a filter from Astronomik that clips into the camera in front of the sensor. Such a filter has to be used on a camera that has been modified to be more sensitive to deep red light, as the Canon Ra shown below is (or was, as Canon no longer makes it).
While a modded camera brings out the nebulas, using an H-Alpha filter as well really shows them off. But using one is not easy!
Astronomik clip-in filters, the 12nm H-a on the right
The clip-in placement (unlike a filter in front of a lens) requires that the lens be refocused — infinity focus now falls at the 3 to 6 metre point (the focus shift varies with the lens and focal length — the wider the lens the greater the shift). With the image so dark and deep red, seeing even a bright star to manually focus on is a challenge.
Shifting the lens focus also changes the overall image size (called “focus breathing”) and often introduces more off-axis lens aberrations, again depending on the lens.
So, blending the H-Alpha pano (which I rendered out in monochrome, above) into the final stack is tough, requiring lots of manual alignment, image warping, BlendIf adjustments, and masking. This is where I added in the red colouration to taste. Careful here, as the “Saturation Police” patrolling social media will issue tickets if they judge you have exceeded their “speed limit.”
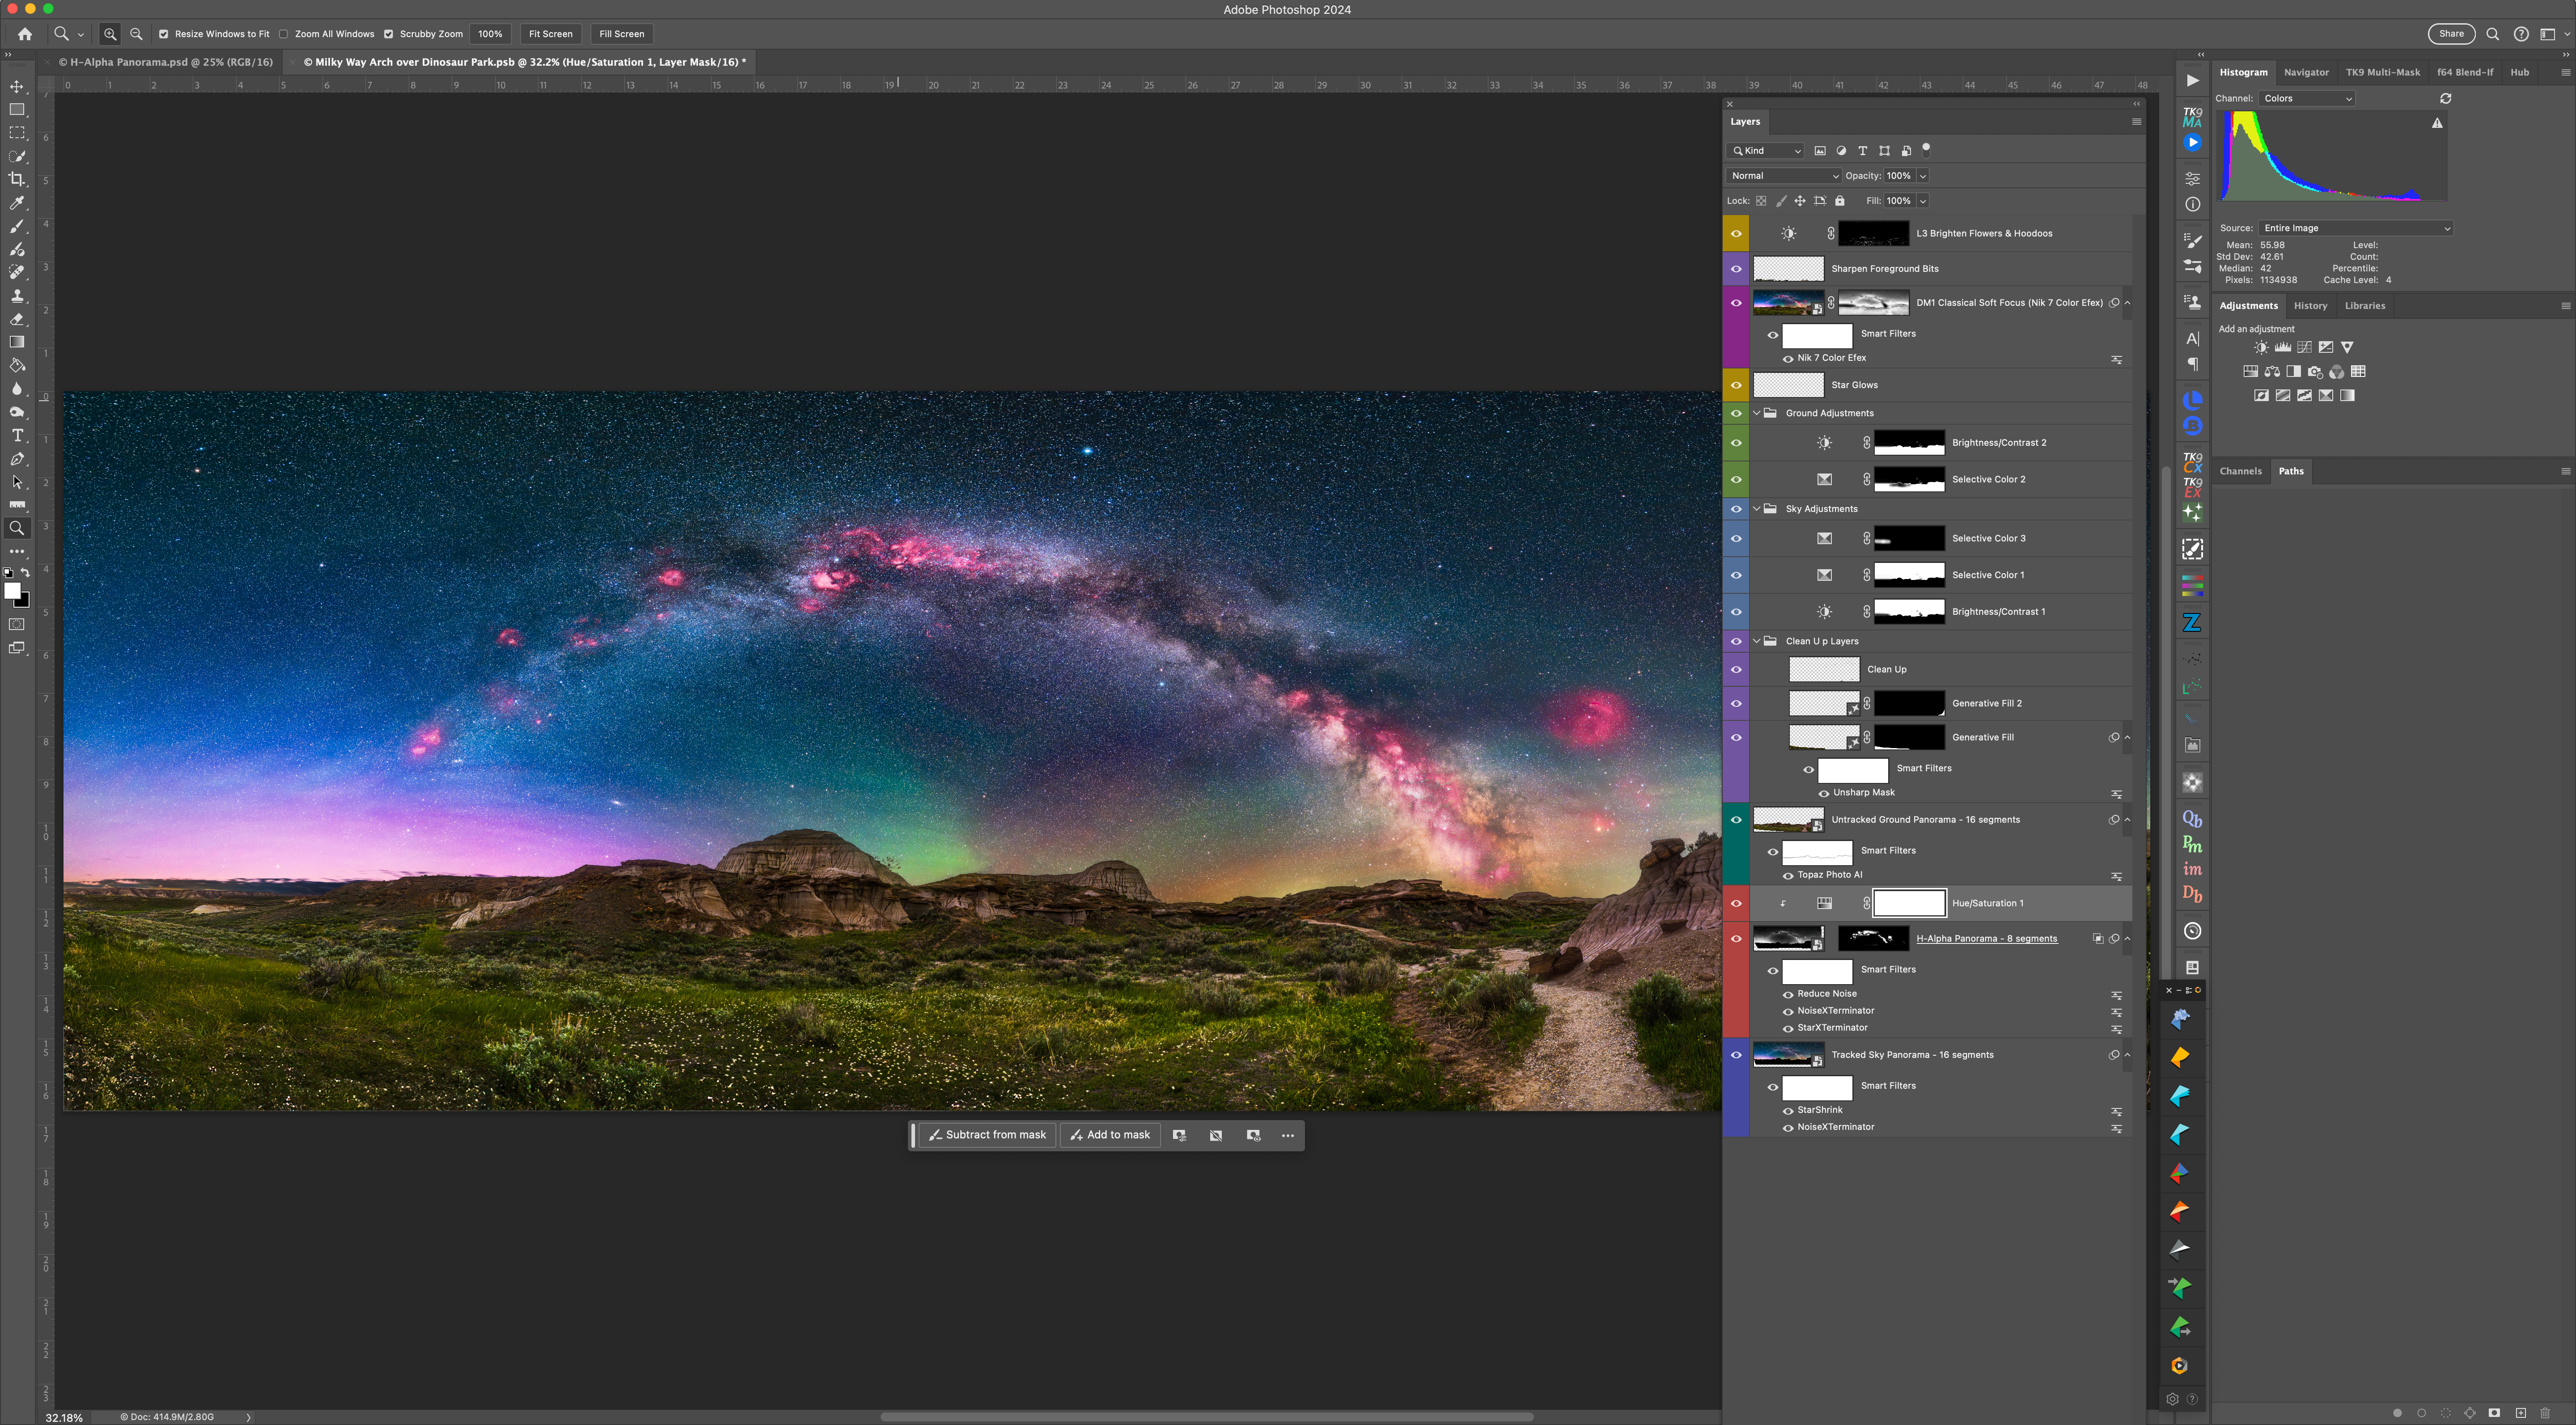
The complete panorama with Photoshop layers and adjustments
The final pano required a complex blend of image and adjustment layers, all applied non-destructively, so the many elements of the scene can be individually tweaked at any time.
The work was worth it, as the final pano records the deep red nebulas contrasting with the deep blue of a sky still lit partly by twilight, a magenta aurora to the north, and bands of green and yellow airglow, all above the earth tones of the Badlands. It is one of my favourite nightscape panoramas.
As a further note on software: For stitching panos I try to use Adobe Camera Raw first. It can work very well. But complex panos, especially taken with very wide lenses, often require the specialized program PTGui, which offers more choice of pano projection methods, cleaner stitching, and control of panorama framing and levelling.
Next up was Writing-on-Stone Provincial Park.
A week later, with the waxing Moon beginning to appear in the western sky and the promise of clear nights, I headed south to the 49th parallel borderlands of the Milk River and Writing-on-Stone Provincial Park, known as Áísínai’pi to the Blackfoot First Nation who revere the site as sacred.
My plan was a framing of the galactic centre over the Milk River valley and distant Sweetgrass Hills in Montana, perhaps using the H-Alpha filter again. But clouds got in the way!
A 13-segment panorama of the landscape and sky just as the Sun sets over Writing-on-Stone Provincial Park (Áísínai’pi) in Alberta.
When you are faced with a cloudy sky, you make use of it for a colourful sunset. I like shooting panoramas at such sites as they capture the grand sweep of the “big sky” and prairie landscape. Above is the scene at sunset.
A 14-segment panorama of the landscape and sky at sunset at Writing-on-Stone Provincial Park.
Above is the same scene a few minutes later as the Sun, though now set, still lights the high clouds with its red light, mixing with the blue sky to make purples. On the hill at right, a couple admires the sunset, adding a human scale to the vast skyscape.
This pano was with the Canon RF15-35mm lens at 15mm and the camera in portrait orientation to capture as much of the sky and ground as possible in a single-row pano.
A 13-segment panorama of the sandstone landscape in blue-hour twilight at Writing-on-Stone Provincial Park.
I finished the evening with another panorama, but using a Canon RF70-200mm telephoto lens at 70mm to zoom in on the Sweetgrass Hills in the deepening twilight.
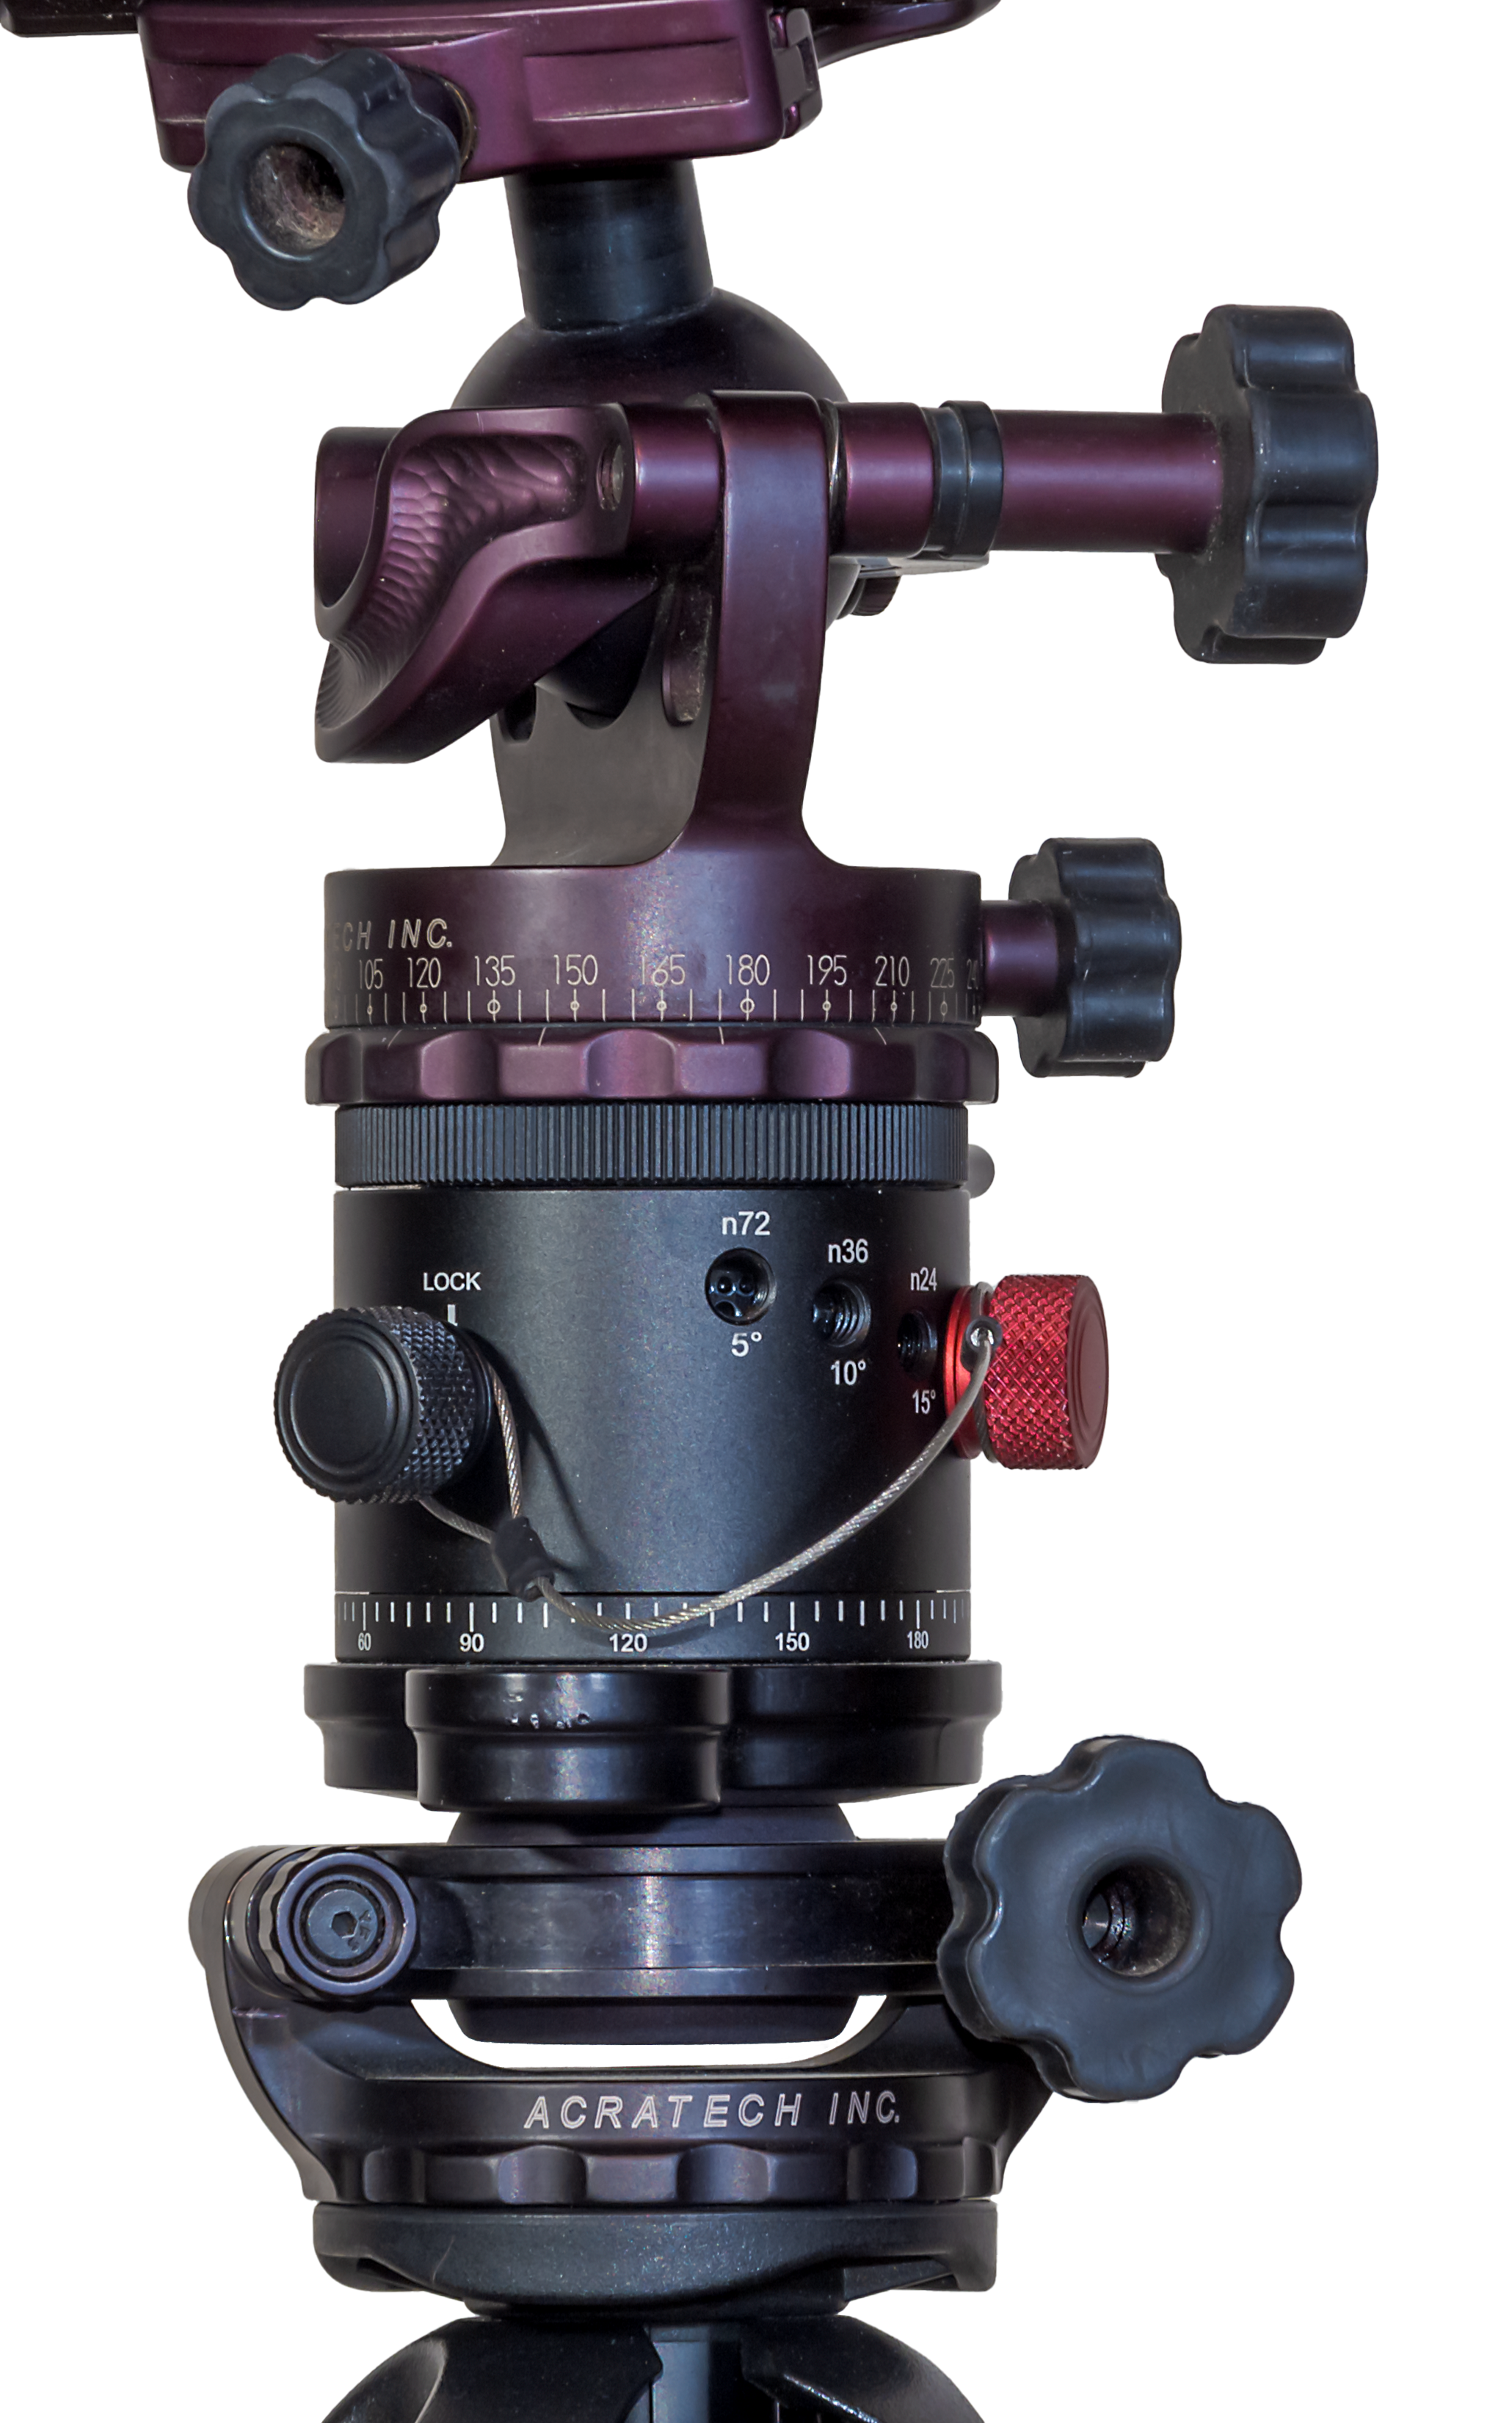
Rig for untracked panoramasPanorama head close-up
For these panoramas, exposures were short, so I didn’t need to track the sky. I used another combination of gear shown above. An Acratech ball head sits atop another style of panorama head that has adjustable click stops to make it easy to move the camera from segment to segment at set angles. When the lighting is changing by the second, it helps to be quick about shooting all the pano segments. Such pano heads are readily available on Amazon.
That pano head sits atop an Acratech levelling head (there are many similar units for sale), an essential addition that makes it easy to level the pano head so the camera turns parallel to the horizon. Any tilt will result in a panorama that waves up and down, likely requiring fussy warping or cropping to correct. Avoid that; get it right in-camera!
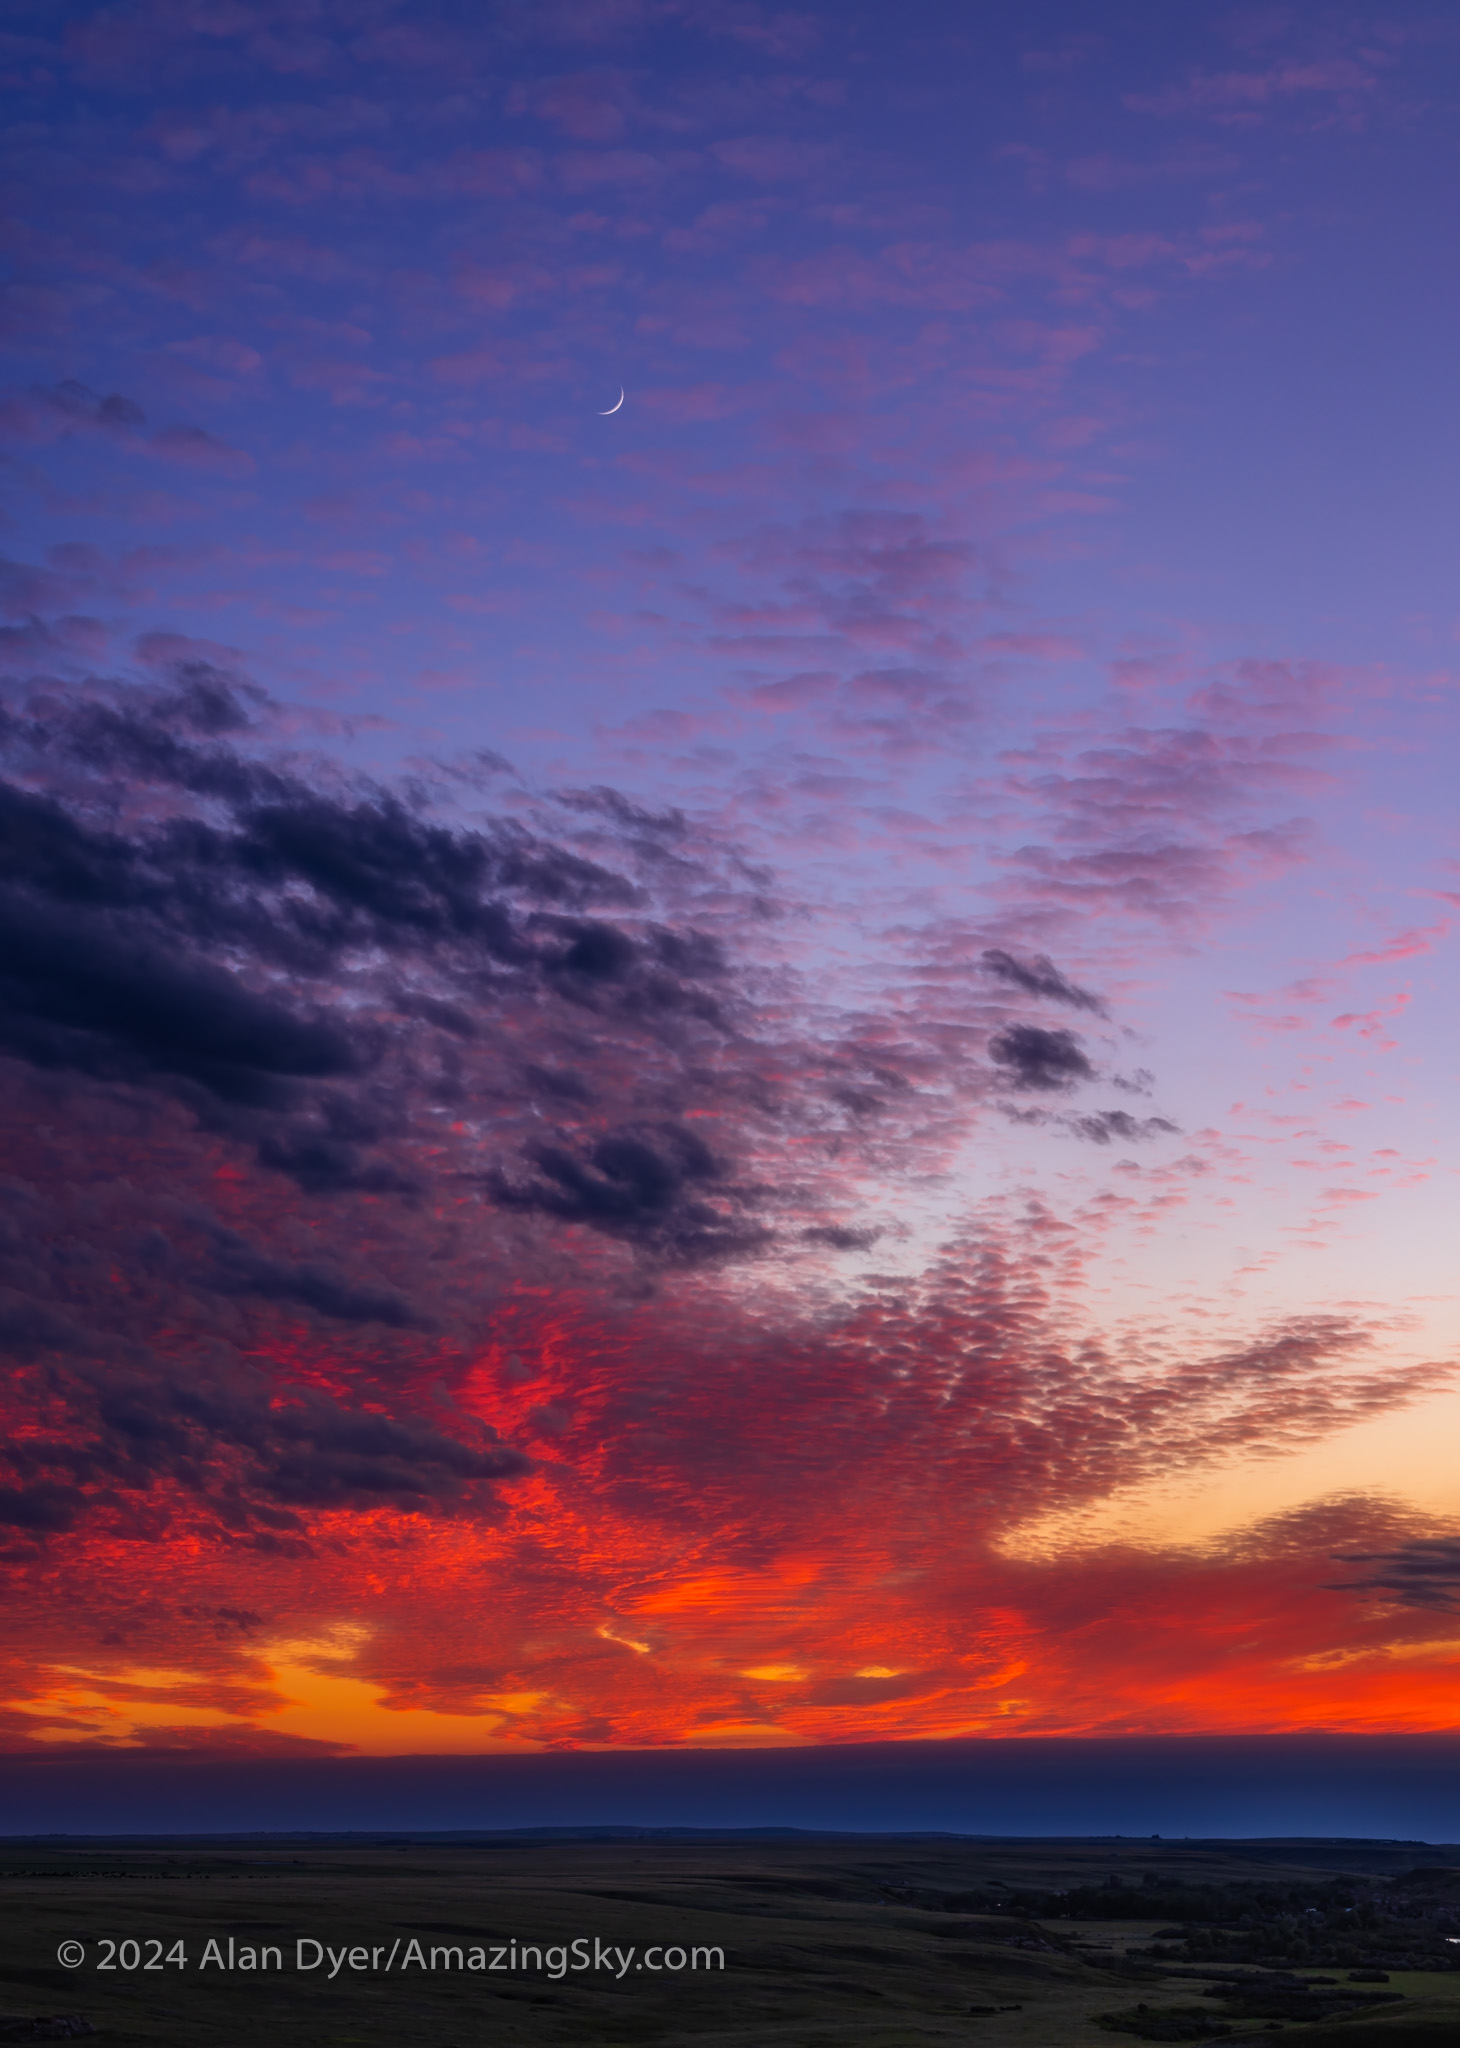
A single-image portrait of a sunset sky with the waxing two-day-old crescent Moon amid colourful clouds over the prairie.
As the sky lit up, I also shot the crescent Moon above the sunset clouds and prairie scene. While the clouds made for a fine sunset, they did not clear off, thwarting my Milky Way plans this night. I headed back to Milk River, to travel farther west the next day.
From Writing-on-Stone I drove along scenic Highways 501 and 5 to Waterton Lakes National Park.
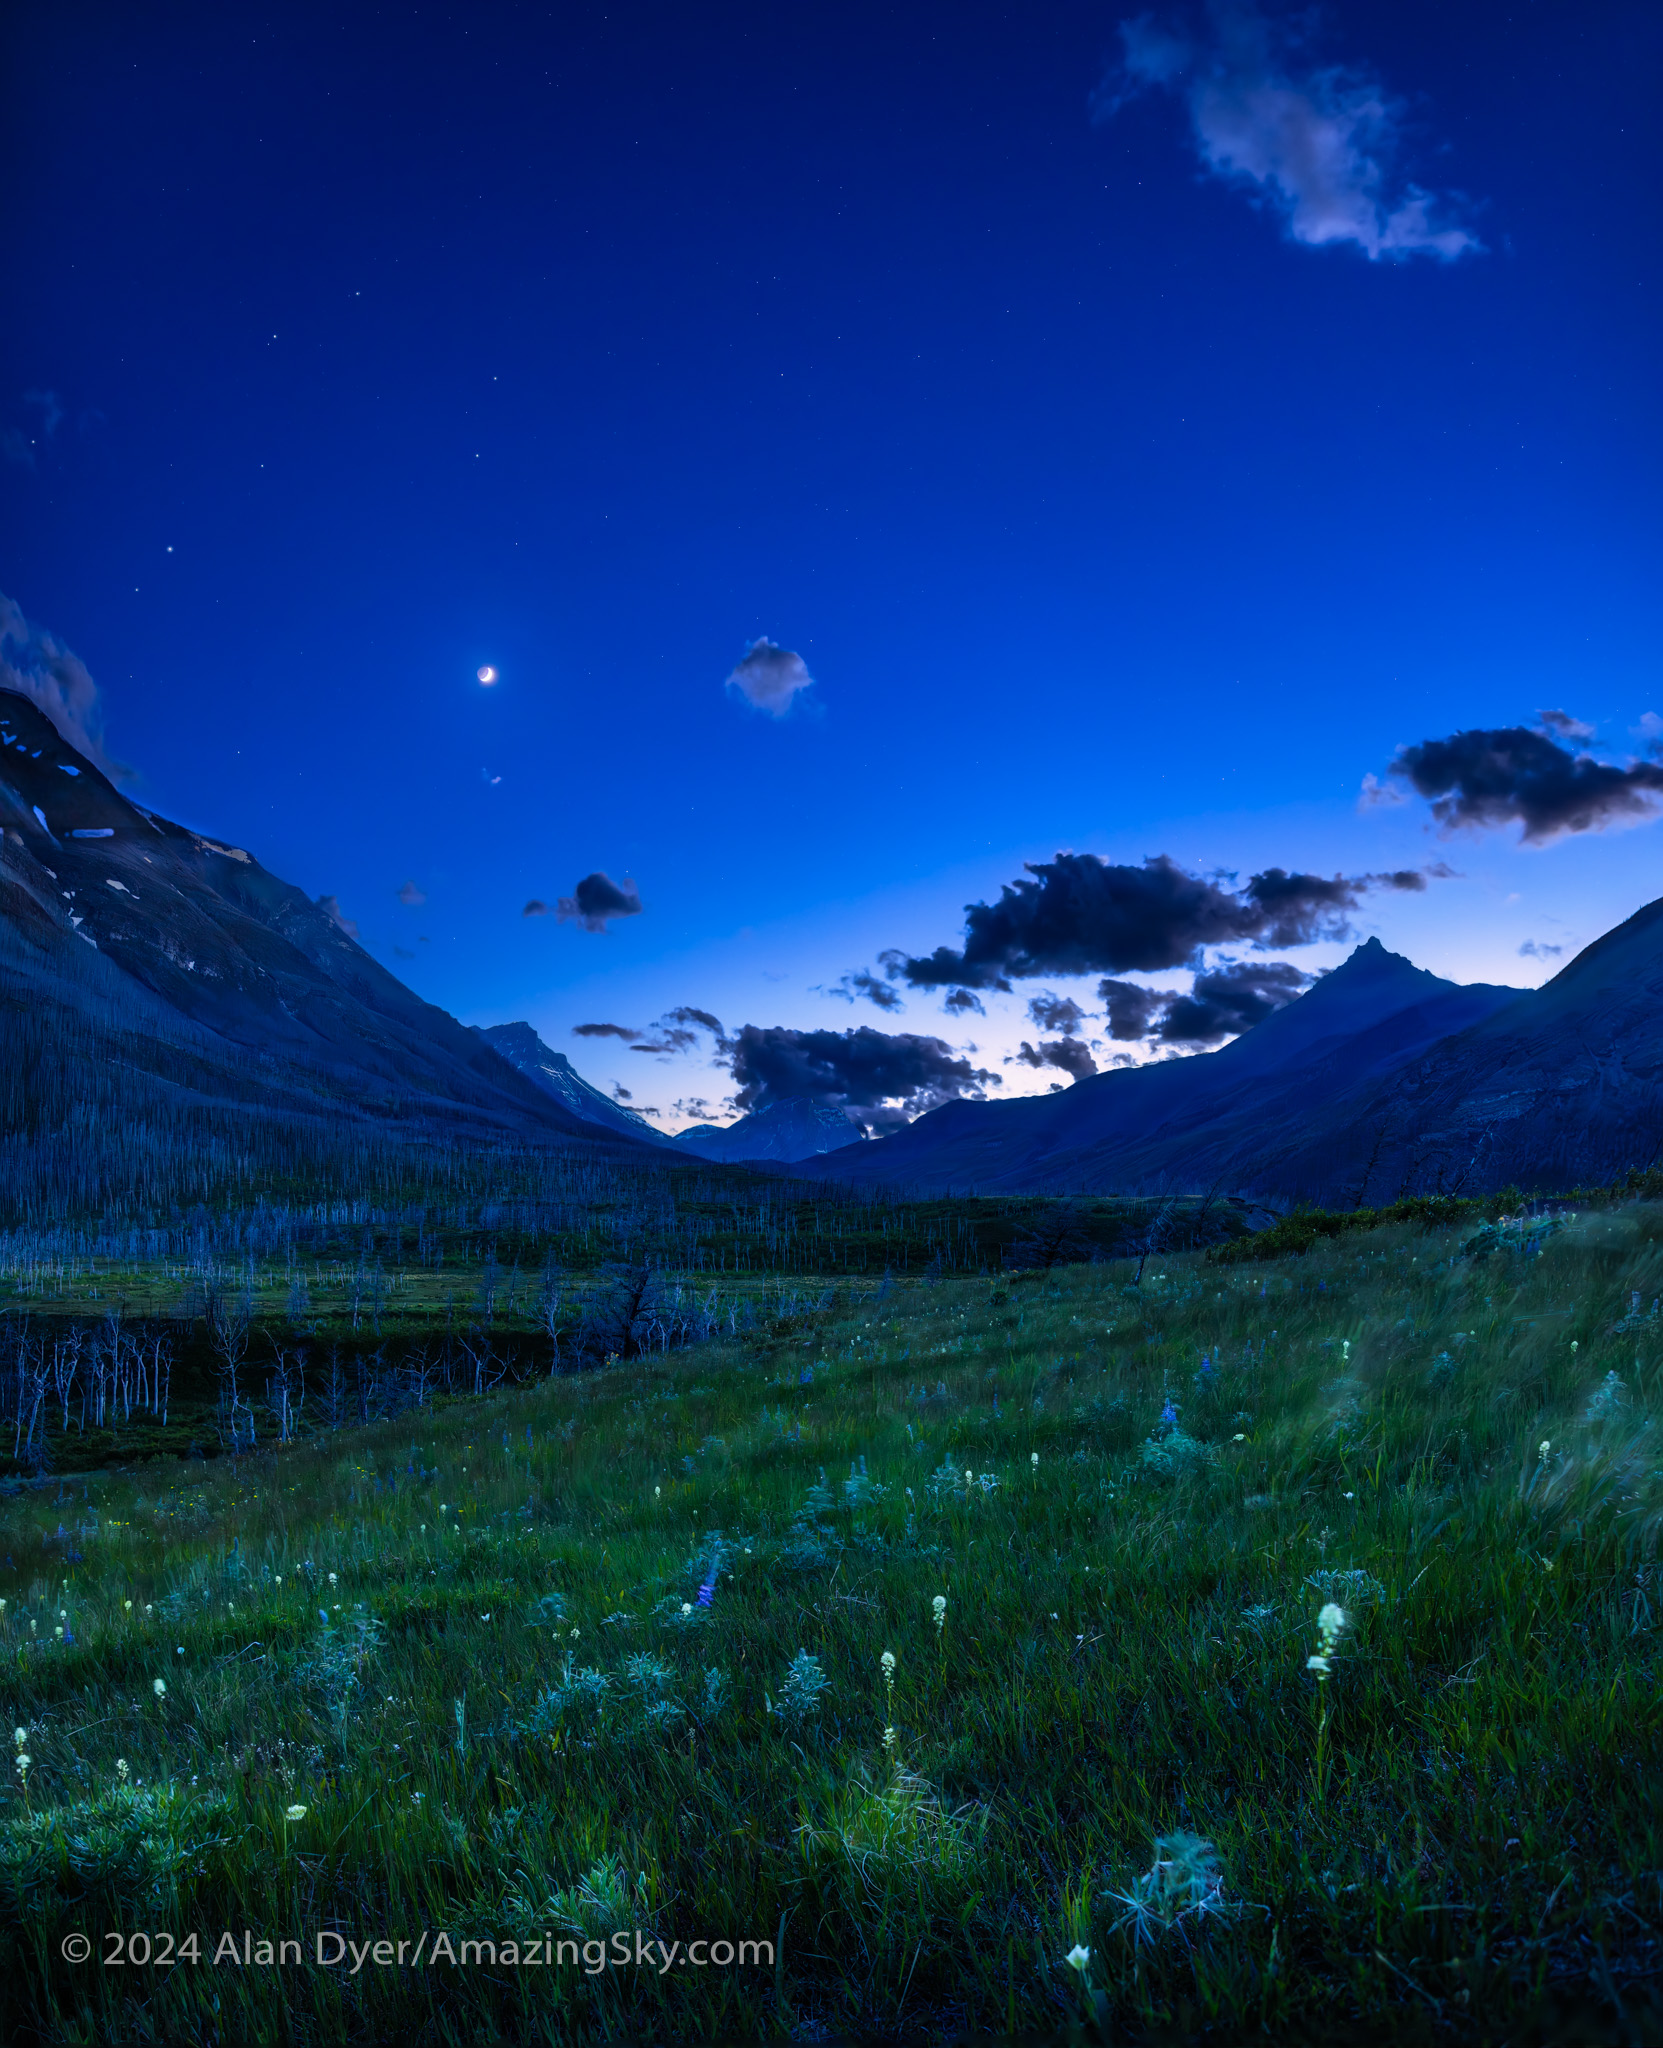
A nightscape scene under a twilight “blue-hour” sky, on the Red Rock Canyon Parkway in Waterton Lakes National Park, Alberta, looking west toward the sunset with the four-day-old crescent Moon.
After an initial cloudy night, I made use of the (mostly) clear night on June 10 to shoot twilight scenes with the now four-day-old crescent Moon in the evening sky. Here I wanted to play with another technique I had not used much before: focus stacking.
To keep exposures short (here to minimize the blurring effects of the constant wind at Waterton) you have to shoot at wide apertures (f/2 in this case). But that produces a very shallow depth of field, where only a small area of the image is in focus.
So I shot a series of six images, shifting the focus from near (for the foreground flowers) to far (for the mountains and sky). Photoshop has an Auto Blend function that will merge the images into one with everything in focus. I also shot separate images exposed for the bright sky, shooting a vertical panorama — dubbed a “vertorama” — moving the camera up from frame to frame.
I shot an additional short exposure just for the Moon, to prevent its disk from overexposing too much, as it did in the twilight sky images.
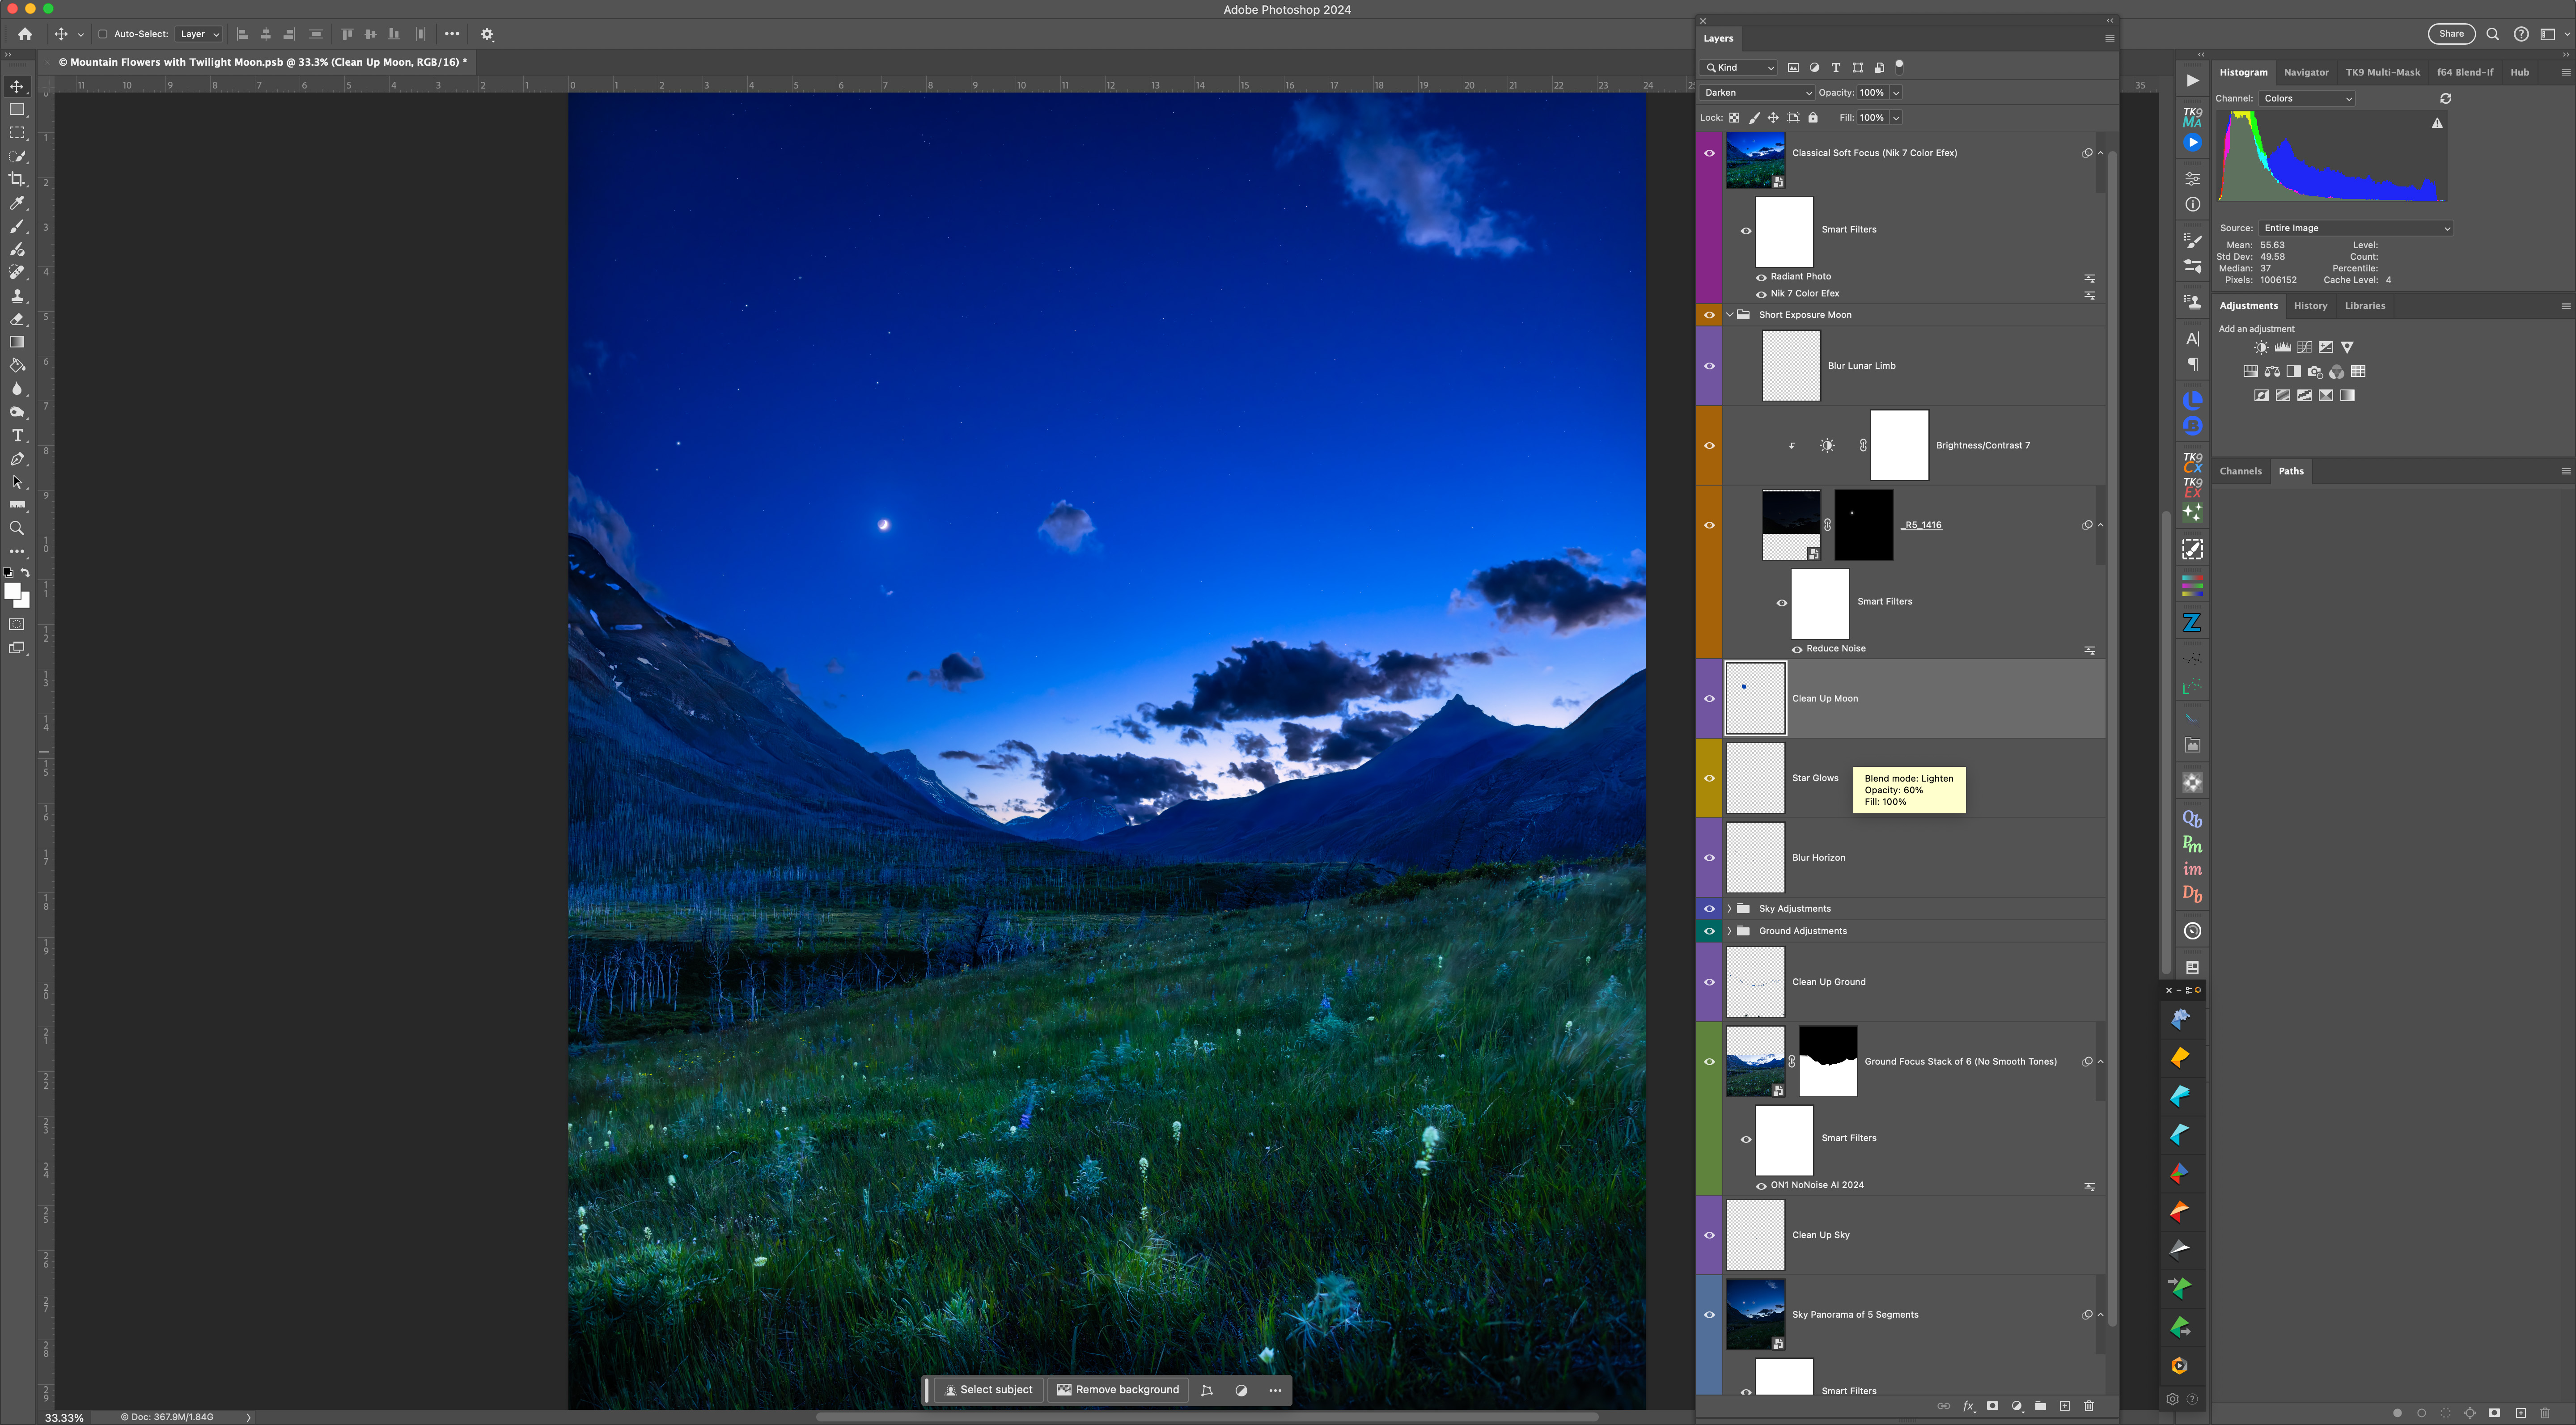
Twilight sky assembly and layers in Photoshop
So what looks like a simple snapshot of a twilight scene is actually a complex blend of focus-stacked ground images, panoramic sky images, and a single short image of the Moon replacing its otherwise overly bright disk. But the result better resembles what the eye saw, as single exposures often cannot record the range of brightness the eye can take in.
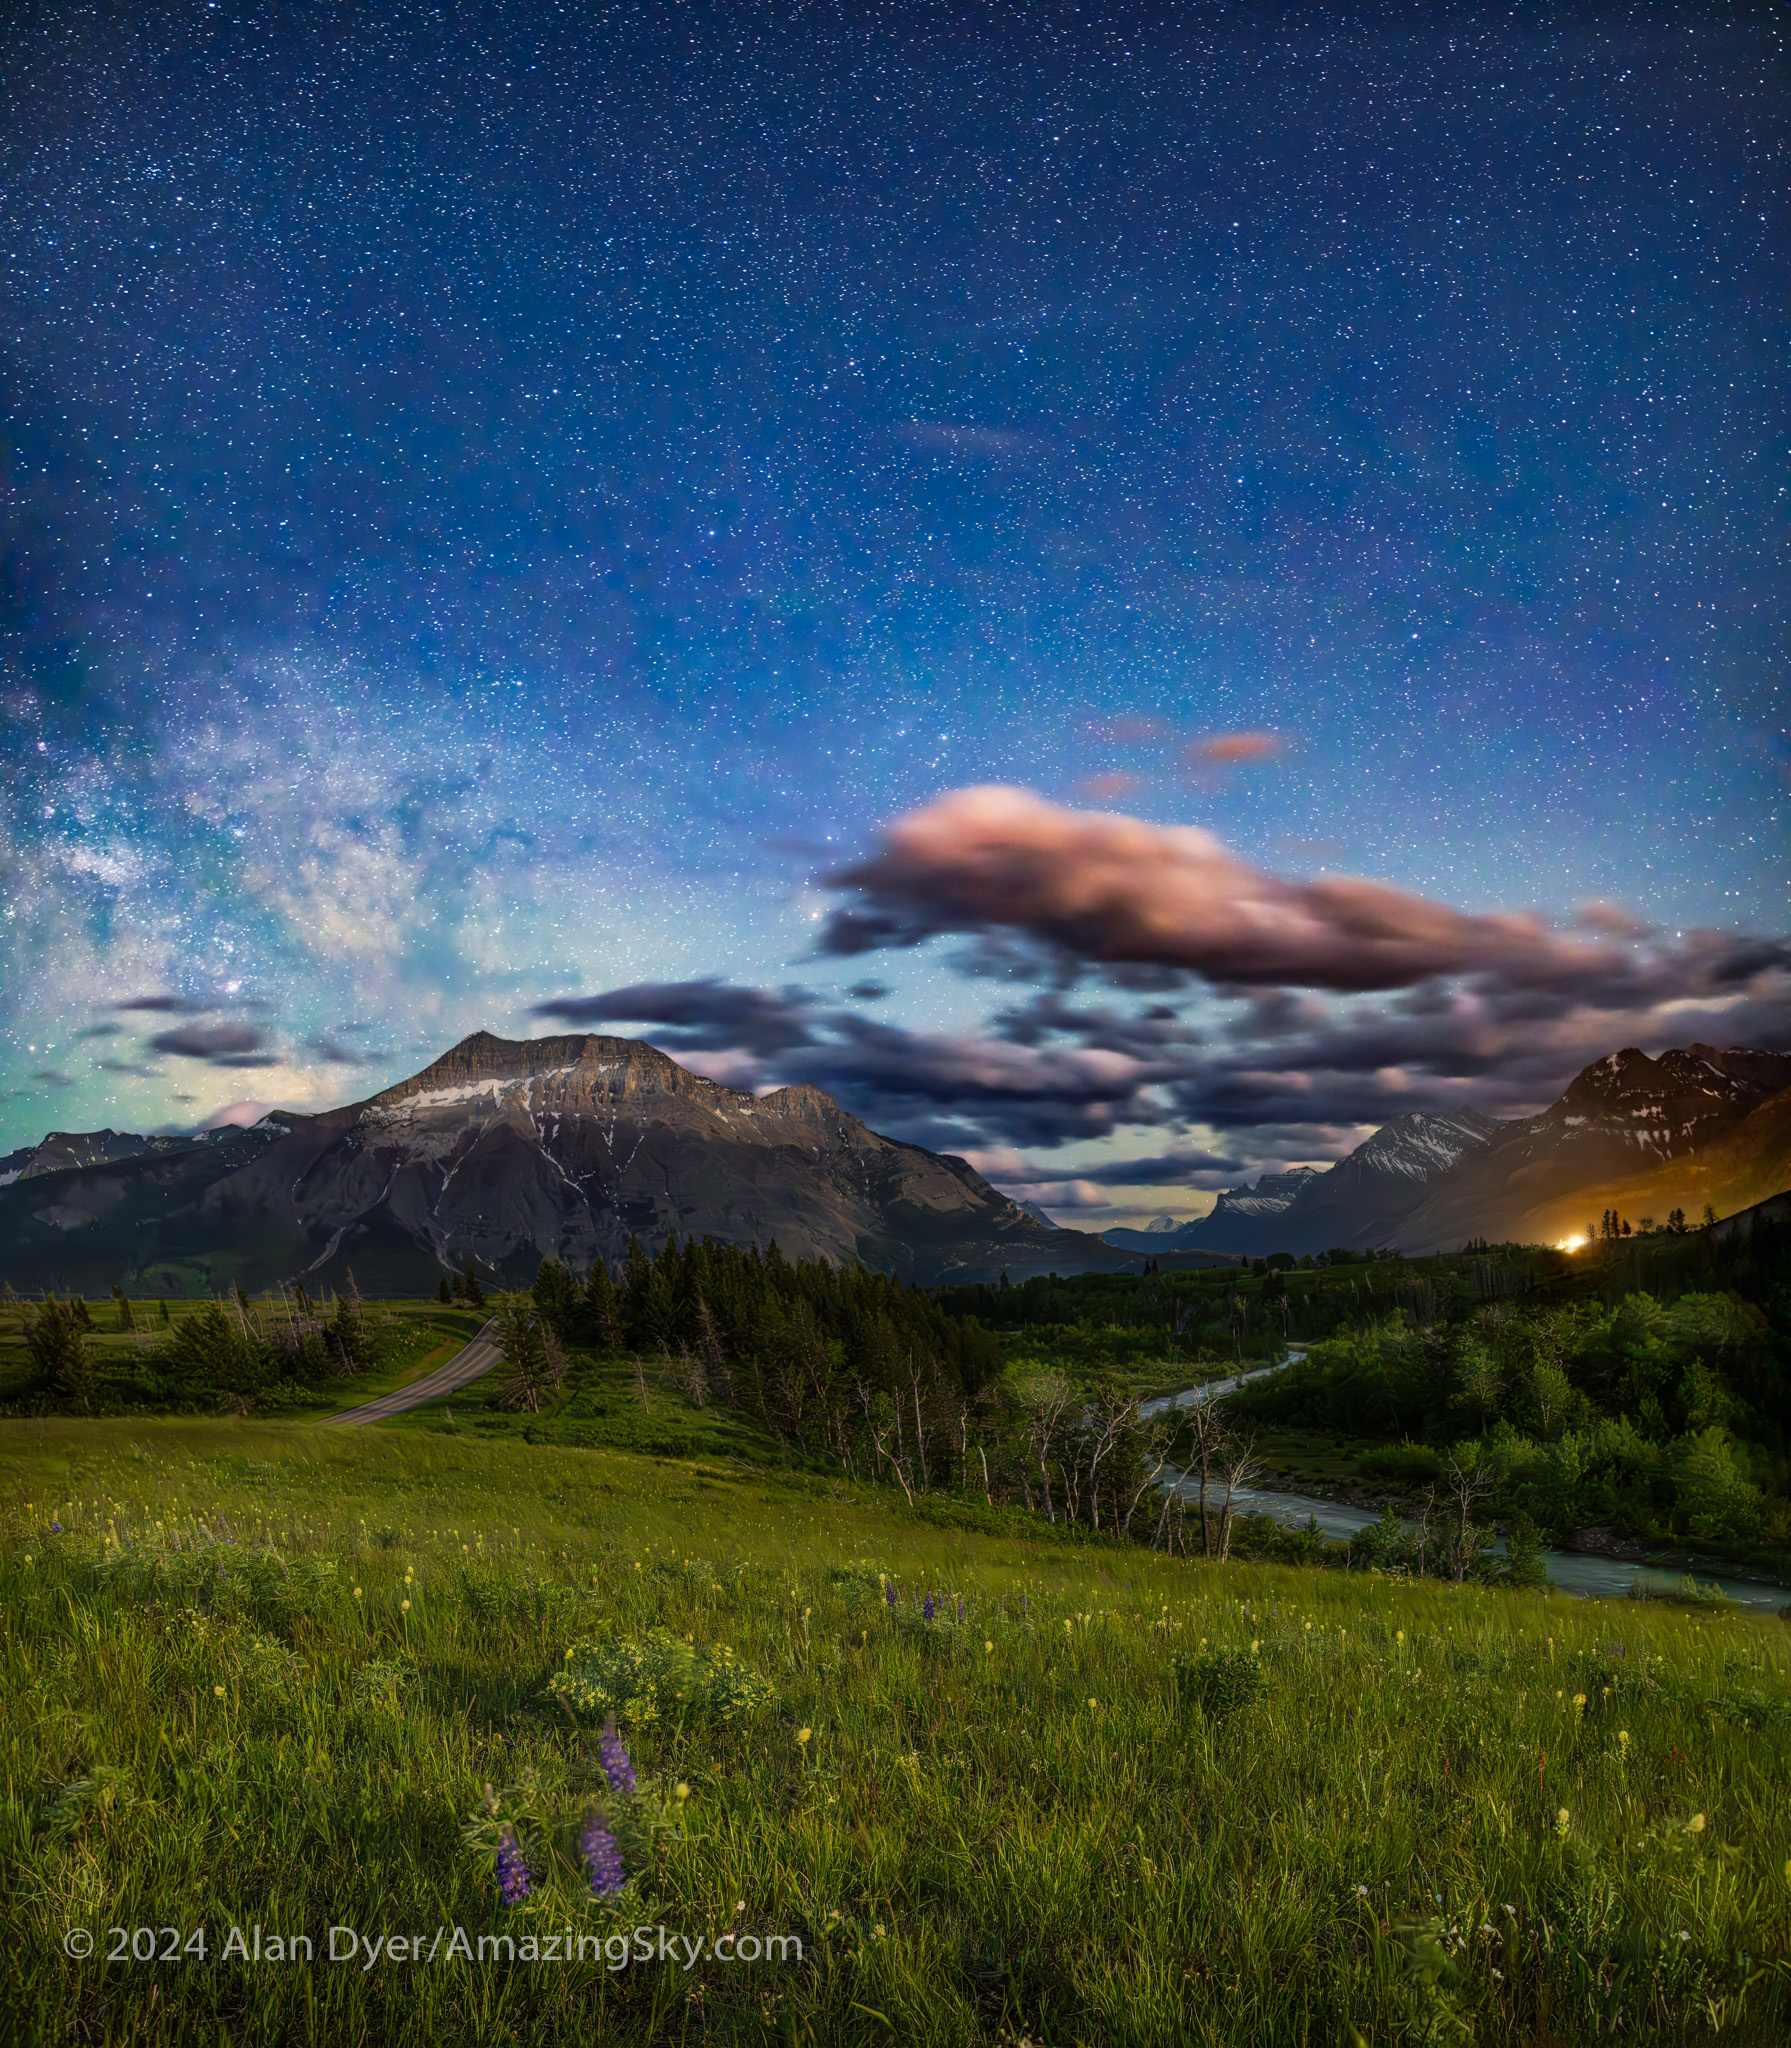
A nightscape scene under a moonlit sky, on the Red Rock Canyon Parkway in Waterton Lakes National Park, Alberta, looking back along Pass Creek to the south, with the Milky Way rising at left.
About an hour later, from the same location, I shot the other way, toward the Milky Way rising over Vimy Peak, but the sky still lit blue by moonlight. This, too, is a blend of focus-stacked ground and panorama sky images. But the camera was on a fixed tripod for exposures no longer than 15 seconds. So I didn’t use the tracker.
And here the longer exposures do pick up more (colours, fainter stars, and brighter ground detail) than was visible to the eye. Revealing more than the eye can see is the essence and attraction of astrophotography.
A vertical panorama of the moonlit spring sky with the Big Dipper and Arcturus over the jagged outline of Anderson Peak at the Red Rock Canyon area of Waterton Lakes National Park, Alberta.
Heading down the Red Rock Canyon Parkway, I set up the tracker rig for the darker sky, now that the Moon was nearly setting. I shot a vertical panorama, with two untracked ground segments and four tracked sky segments, to capture Arcturus and the Big Dipper over the iconic Anderson Peak.
Comparing without and with LENR – Lots of coloured specks without LENR! Tap to zoom up.
For all the images at Waterton and Writing-on-Stone I used the 45-megapixel Canon R5 camera, great for high resolution, but prone to noise, especially colourful thermal hot pixels. (See my review here.)
For all the long exposures I turned on Long Exposure Noise Reduction, a feature most cameras have. LENR forces the camera to take a “dark frame,” a second exposure of equal length, but with the shutter closed. The camera subtracts the dark frame (which records only the hot pixels) from the previous light frame. The final image takes twice as long to appear, but is much cleaner, as I show above. So a two-minute exposure requires four minutes to complete.
While there are clever ways to eliminate hot pixels later in processing (using Photoshop’s Dust and Scratches filter), doing so can blur details. I’ve long found that doing it “in-camera” always produces better results.
The Milky Way rising over the peak of Mt. Blakiston, in Waterton Lakes National Park, Alberta, Canada.
With the Moon now down, I turned the camera the other direction toward Mt. Blakiston, to capture the star clouds of the summer Milky Way rising behind the mountain, in an example of a “deepscape,” a nightscape with a telephoto lens. This is another technique I’ve not used very often, as the opportunities require good location planning and timing, transparent skies, and a tracker. Apps like ThePhotographersEphemeris coupled with TPE3D, and PlanItPro can help.
Deepscapes frame landscape fragments below some notable deep-sky objects and starfields, in this case a region with several “Messier objects” — nebulas and star clusters well-known to amateur astronomers.
This was a blend of one untracked and one tracked exposure, again on the Nomad. Taking more frames for stacking and noise reduction, while a common practice, was not practical here — at this focal length of 70mm the sky was moving enough that the mismatch between sky and ground would make blending tough to do.
And the reality is that today’s AI-trained noise reduction software (see my test report here) is so good, image stacking is not as essential as it once was.
For many of the Waterton images I used the Canon RF28-70mm lens, usually wide open at f/2. For the image below I used the RF15-35mm lens at its maximum aperture of f/2.8. (See my test report on these lenses here.)
The stars and clouds trail across the sky over Cameron Lake in Waterton Lakes National Park, Alberta, and Mt. Custer across the border in Glacier National Park in Montana.
On my final night in Waterton I drove the Akamina Parkway to Cameron Lake, located in extreme southwest Alberta on the borders with British Columbia and Montana. The glaciated peak to the south is Mt. Custer in Glacier National Park, Montana.
Again, I had hoped to get a deepscape of the photogenic starfields in Scorpius above Mt. Custer. But as is often the case at this site, clouds wafting over the Continental Divide defeated those plans. So Plan B was a set of long exposures of the clouds and stars trailing with the last light of the low Moon lighting parts of the scene. Chunks of ice still drift in the lake.
This is a blend of separate multi-minute exposures for the ground and sky, all at the slow ISO of just 100, and all untracked to purposely create the star trails, not avoid them.
So over a total of four nights at these wonderful World Heritage Sites, I was able to try out some new shooting techniques:
H-Alpha blending
Focus stacking
Deepscapes
As well as panoramas, both horizontal and vertical
Every nightscape outing is a learning process. And you have to be prepared to change plans as the clouds dictate. I didn’t get all the shots I had hoped to, but I still came away with images I was very pleased with.
I present my top 10 tips for capturing time-lapses of the moving sky.
If you can take one well-exposed image of a nightscape, you can take 300. There’s little extra work required, just your time. But if you have the patience, the result can be an impressive time-lapse movie of the night sky sweeping over a scenic landscape. It’s that simple.
Or is it?
Here are my tips for taking time-lapses, in a series of “Do’s” and “Don’ts” that I’ve found effective for ensuring great results.
But before you attempt a time-lapse, be sure you can first capture well-exposed and sharply focused still shots. Shooting hundreds of frames for a time-lapse will be a disappointing waste of your time if all the images are dark and blurry.
For that reason many of my tips apply equally well to shooting still images. But taking time-lapses does require some specialized gear, techniques, planning, and software. First, the equipment.
NOTE: This article appeared originally in Issue #9 of Dark Sky Travels e-magazine.
SELECTING EQUIPMENT
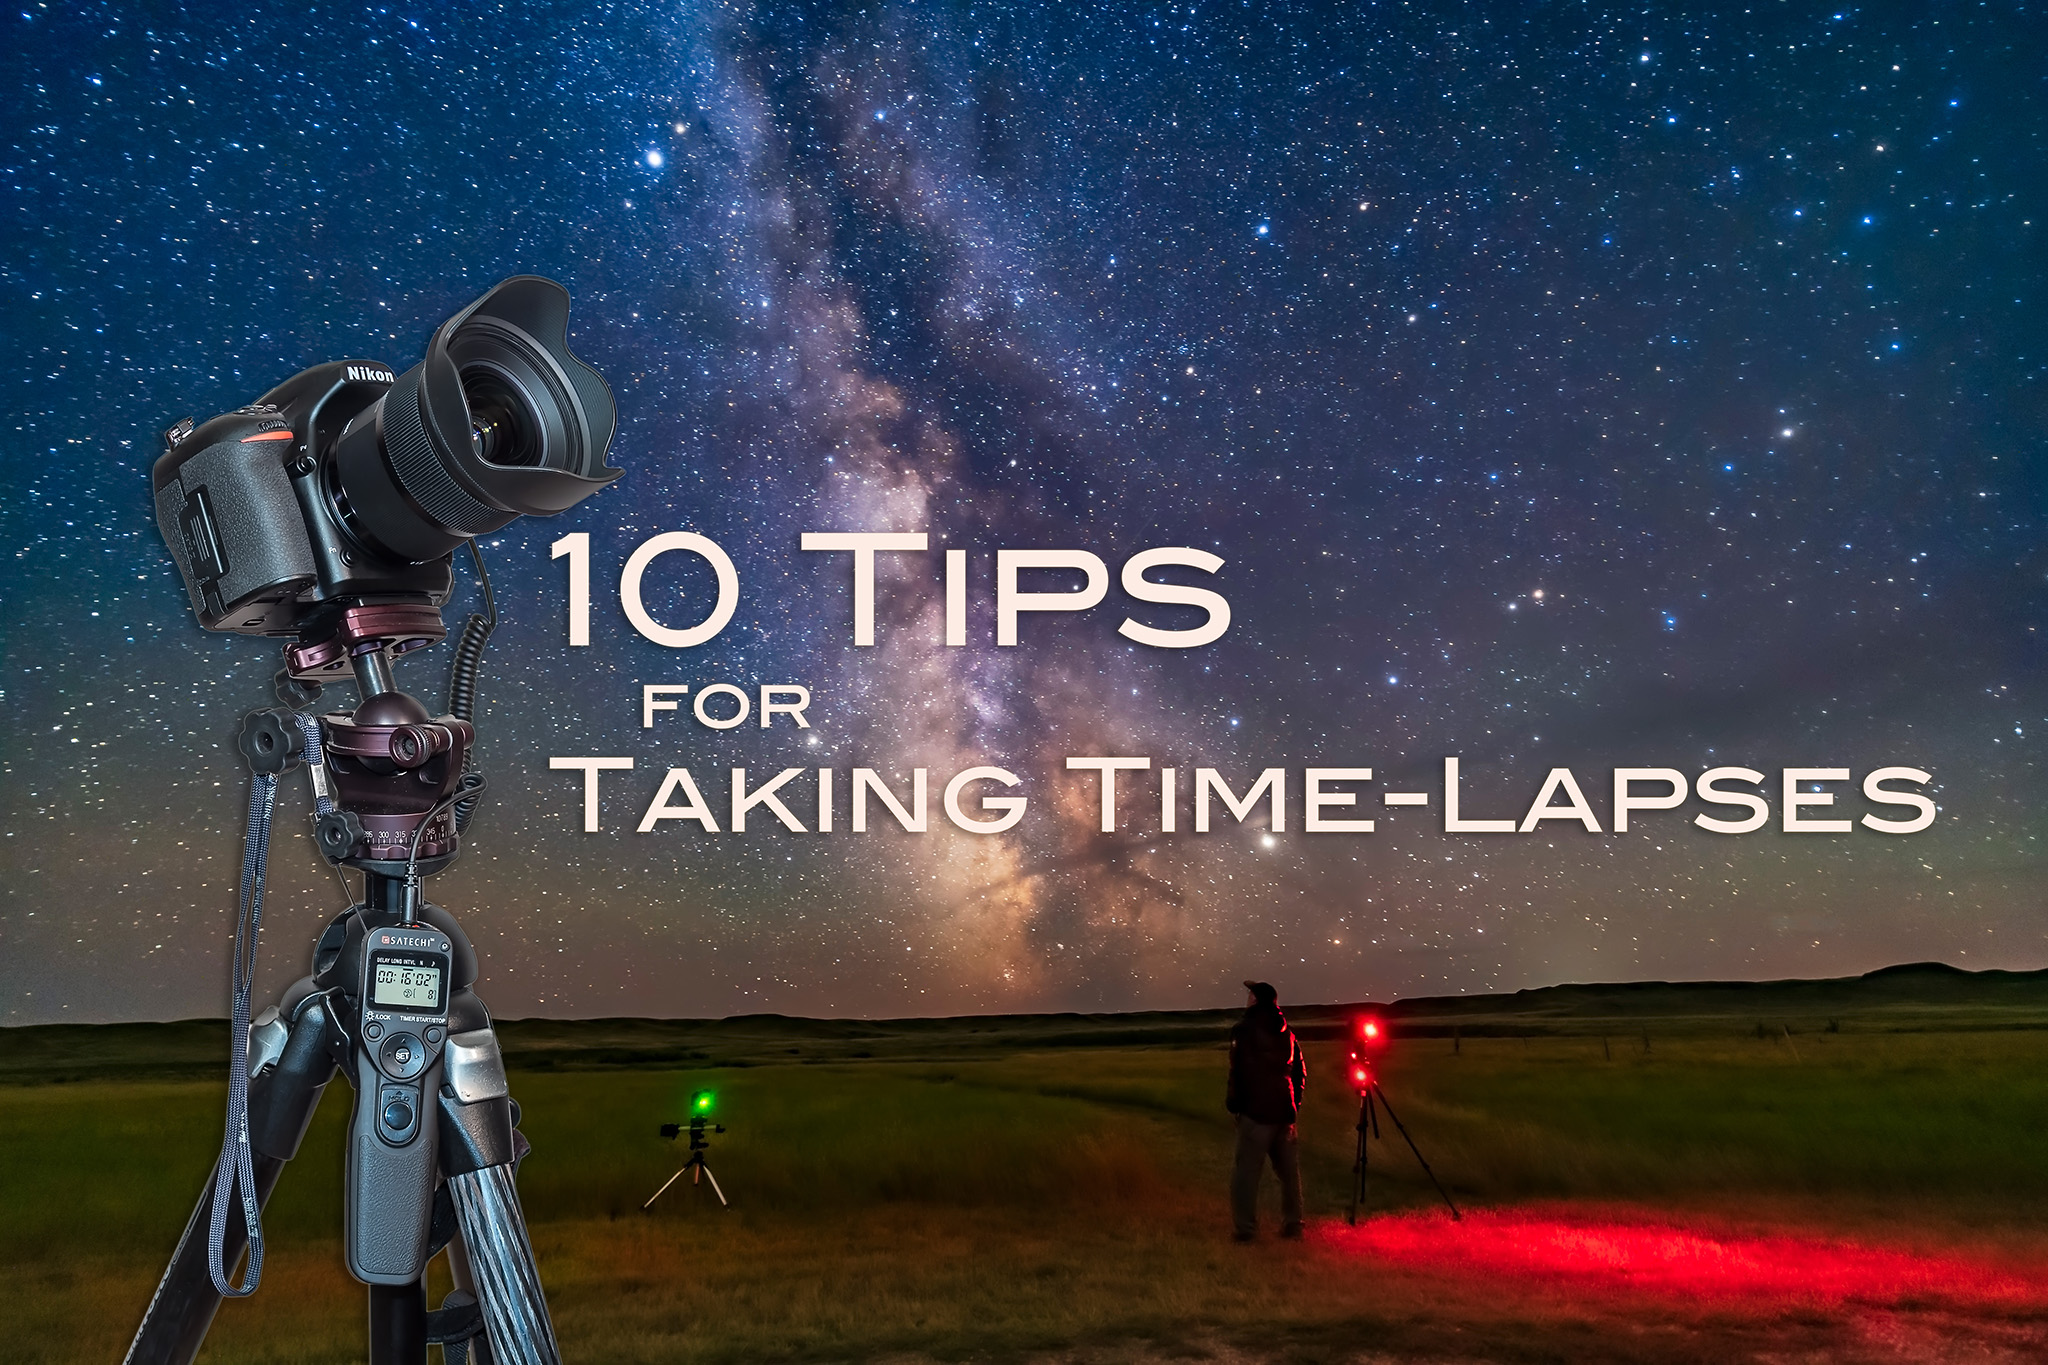
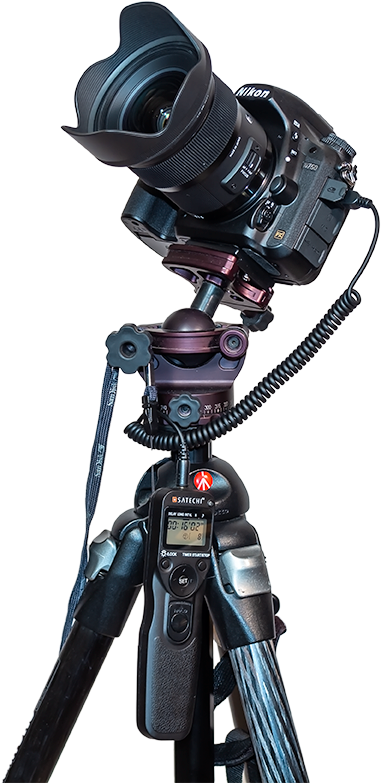
Essential Gear Time-lapse photography requires just the camera and lens you might already own, but on a solid tripod (a carbon-fibre Manfrotto with an Acratech ball-head is shown here), and with an intervalometer.
TIP 1 — DO: Use a solid tripod
A lightweight travel tripod that might suffice for still images on the road will likely be insufficient for time-lapses. Not only does the camera have to remain rock steady for the length of the exposure, it has to do so for the length of the entire shoot, which could be several hours. Wind can’t move it, nor any camera handling you might need to do mid-shoot, such as swapping out a battery.
The tripod needn’t be massive. For hiking into scenic sites you’ll want a lightweight but sturdy tripod. While a carbon fibre unit is costly, you’ll appreciate its low weight and good strength every night in the field. Similarly, don’t scrimp on the tripod head.
TIP 2 — DO: Use a fast lens
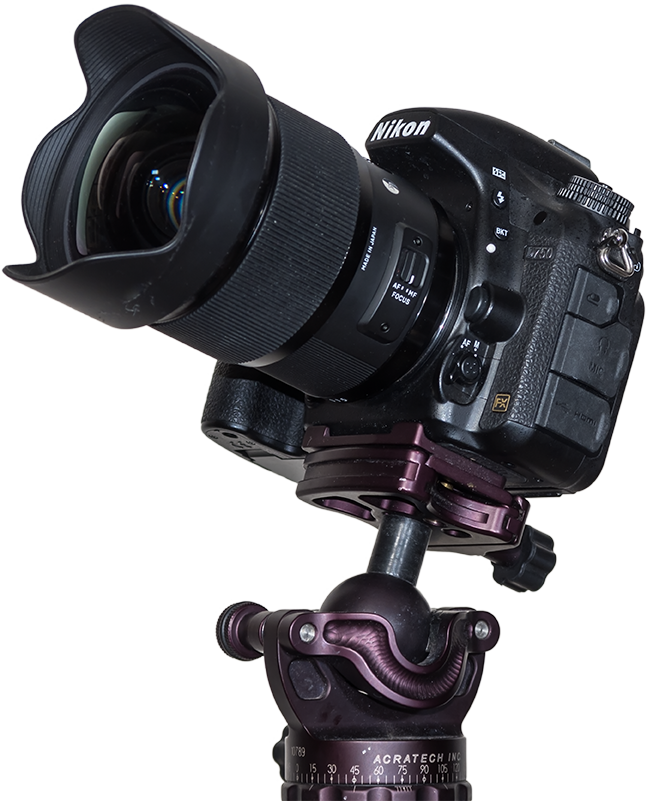
The All-Important Lens A fast lens is especially critical for time-lapses to allow capturing good sky and ground detail in each exposure, as compositing later won’t be feasible. This is the Sigma 20mm f/1.4 Art lens.
As with nightscape stills, the single best purchase you can make to improve your images of dark sky scenes is not buying a new camera (at least not at first), but buying a fast, wide-angle lens.
Ditch the slow kit zoom and go for at least an f/2.8, if not f/2, lens with 10mm to 24mm focal length. This becomes especially critical for time-lapses, as the fast aperture allows using short shutter speeds, which in turn allows capturing more frames in a given period of time. That makes for a smoother, slower time-lapse, and a shoot you can finish sooner if desired.
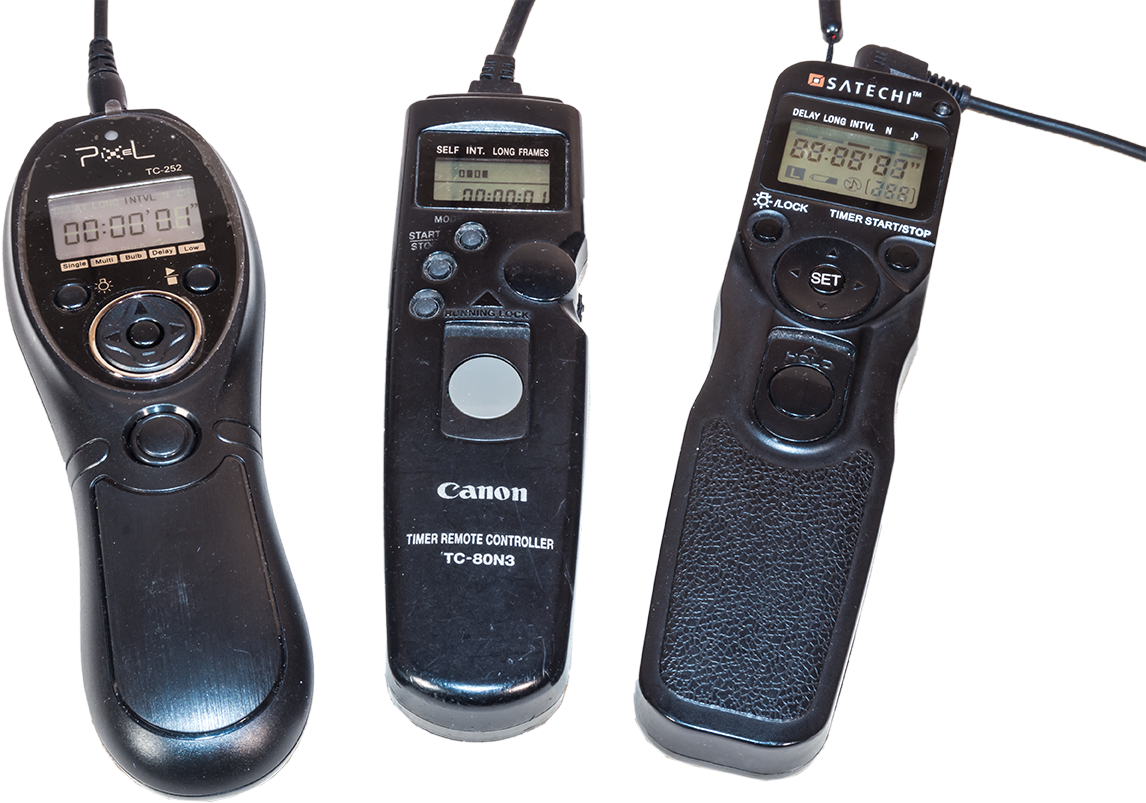
TIP 3 — DO: Use an intervalometer
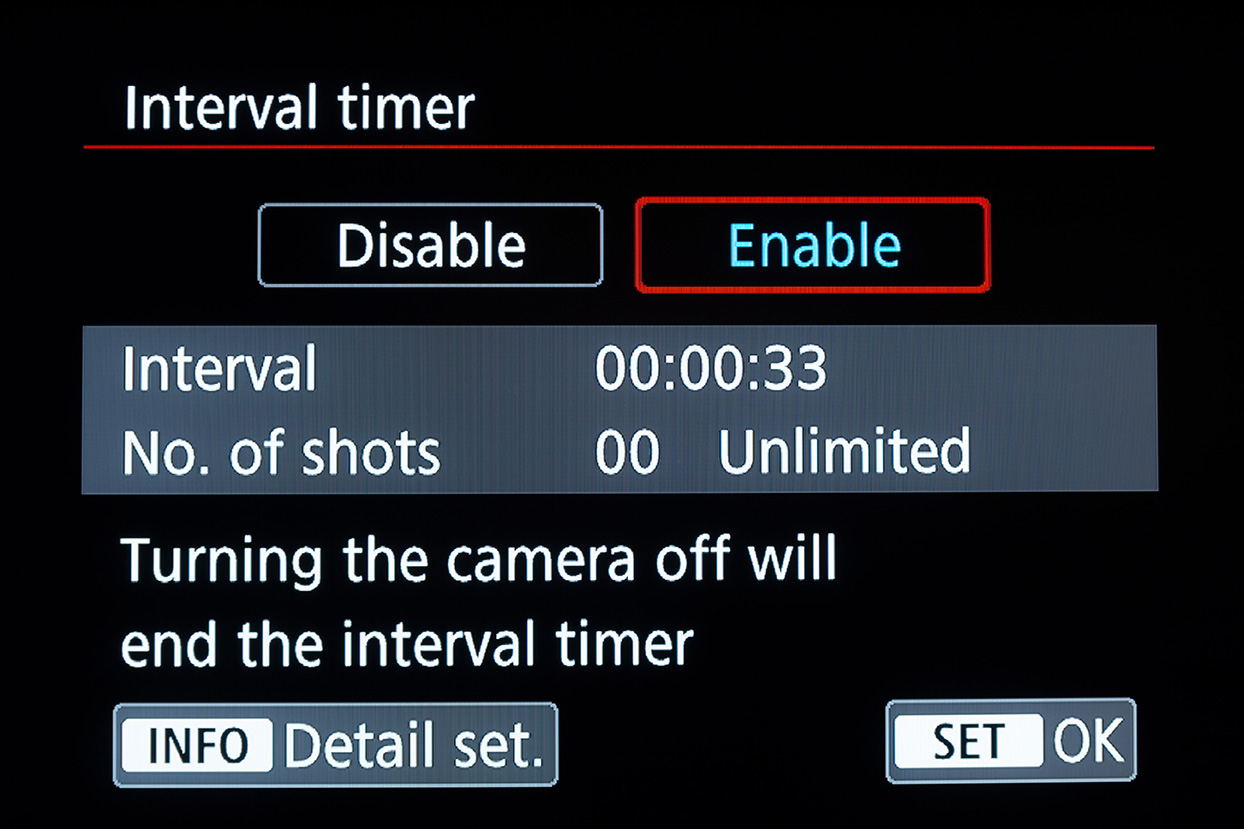
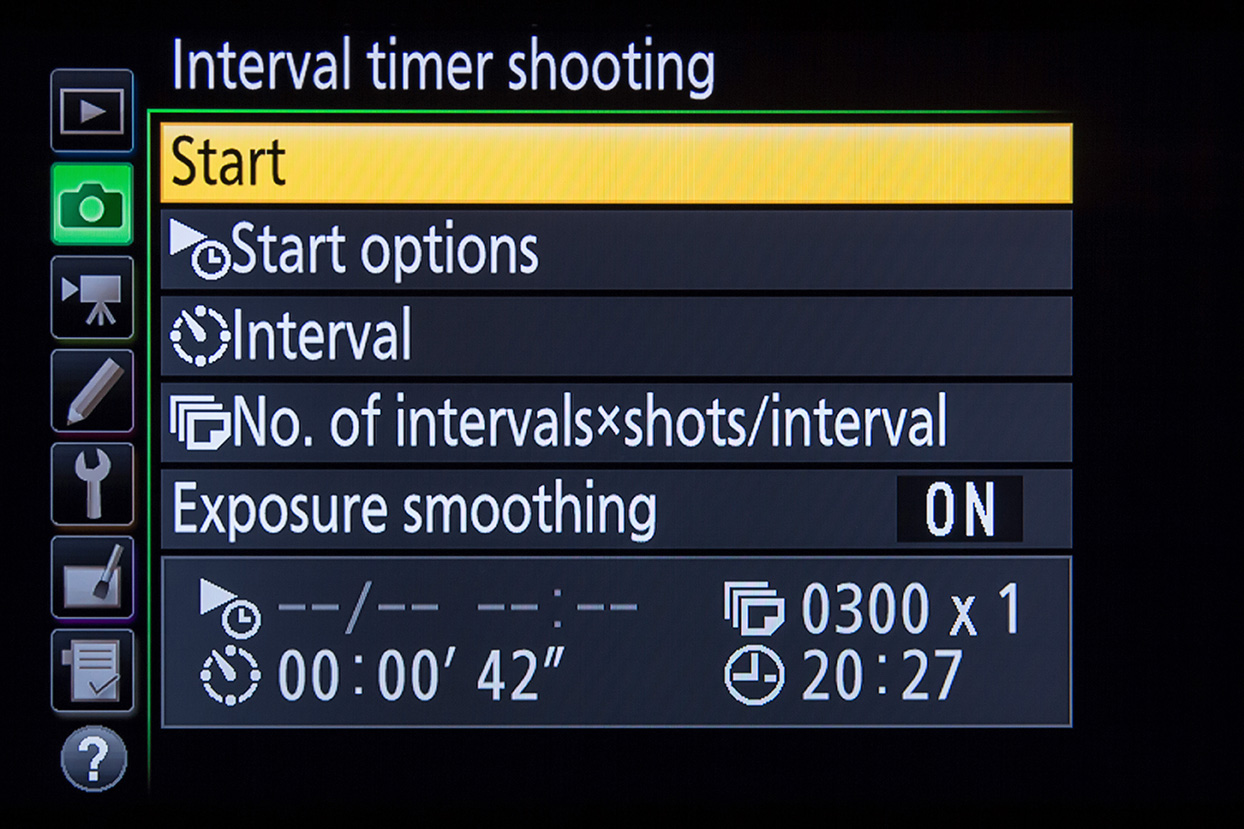
Canon intervalometer functions
Nikon intervalometer functions
Automating the Camera The intervalometer is also key. For cameras without an internal intervalometer (screens from a Canon and a Nikon are shown above), an outboard unit like one of these, is essential. Be sure to get the model that fits your camera’s remote control jack.
Time-lapses demand the use of an intervalometer to automatically fire the shutter for at least 200 to 300 images for a typical time-lapse. Many cameras have an intervalometer function built into their firmware. The shutter speed is set by using the camera in Manual mode.
Just be aware that a camera’s 15-second exposure really lasts 16 seconds, while a 30-second shot set in Manual is really a 32-second exposure.
So in setting the interval to provide one second between shots, as I advise below, you have to set the camera’s internal intervalometer for an interval of 17 seconds (for a shutter speed of 15 seconds) or 33 seconds (for a shutter speed of 30 seconds). It’s an odd quirk I’ve found true of every brand of camera I use or have tested.
Alternatively, you can set the camera to Bulb and then use an outboard hardware intervalometer (they sell for $60 on up) to control the exposure and fire the shutter. Test your unit. Its interval might need to be set to only one second, or to the exposure time + one second.
How intervalometers define “Interval” varies annoyingly from brand to brand. Setting the interval incorrectly can result in every other frame being missed and a ruined sequence.
SETTING YOUR CAMERA
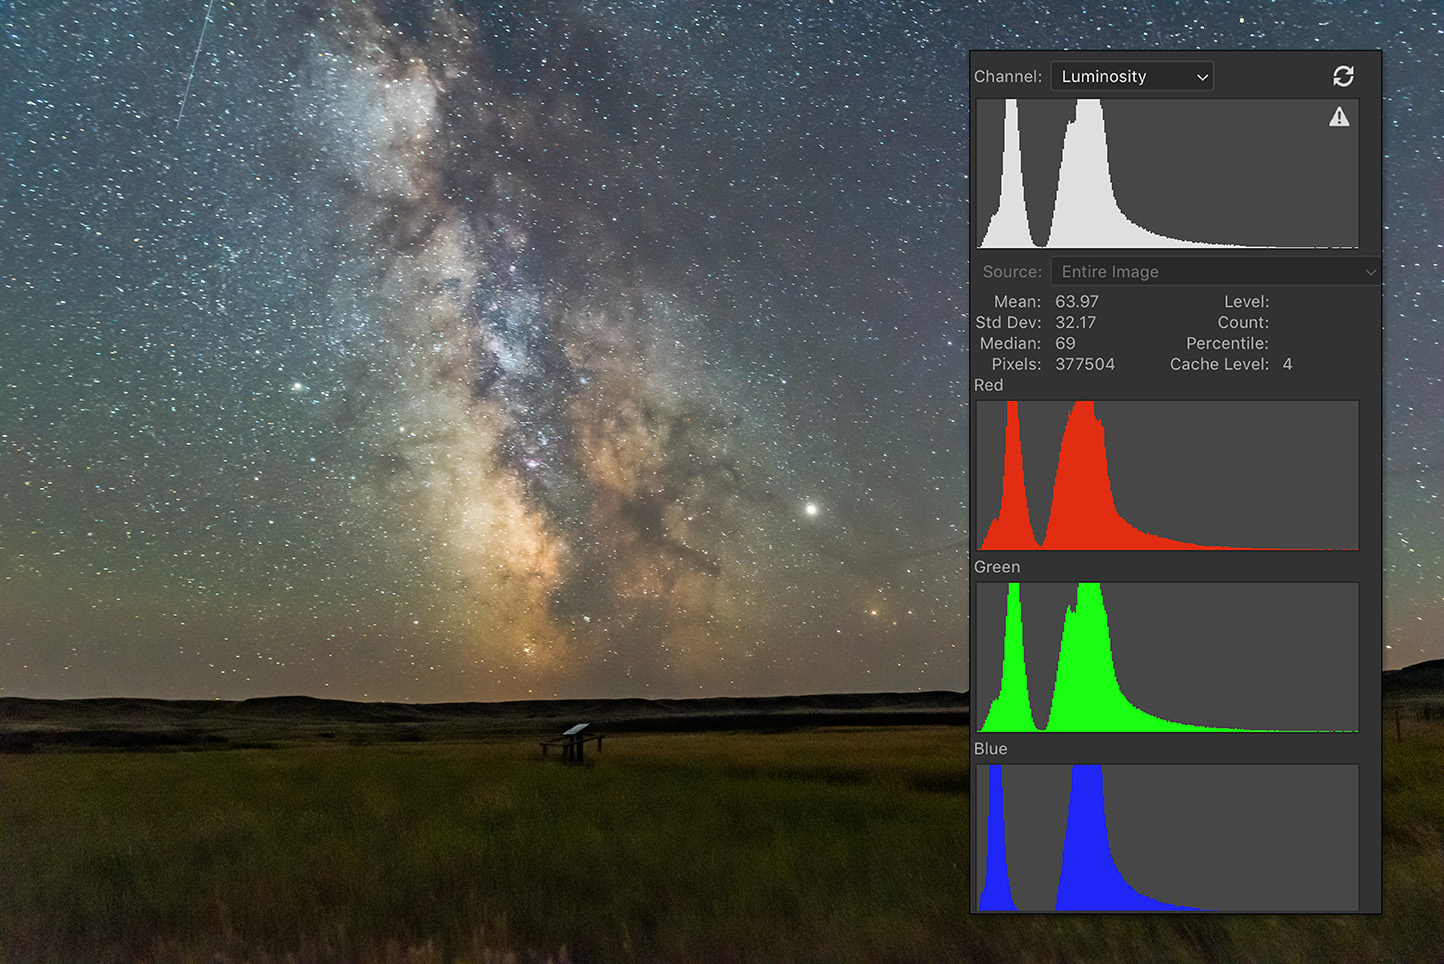
TIP 4 — DON’T: Underexpose
Expose to the Right When shooting, choose settings that will yield a histogram that is not slammed to the left, but is shifted to the right to minimize noise and lift details in the shadows.
As with still images, the best way to beat noise is to give the camera signal. Use a wider aperture, a longer shutter speed, or a higher ISO (or all of the above) to ensure the image is well exposed with a histogram pushed to the right.
If you try to boost the image brightness later in processing you’ll introduce not only the very noise you were trying to avoid, but also odd artifacts in the shadows such as banding and purple discolouration.
With still images we have the option of taking shorter, untrailed images for the sky, and longer exposures for the dark ground to reveal details in the landscape, to composite later. With time-lapses we don’t have that luxury. Each and every frame has to capture the entire scene well.
At dark sky sites, expose for the dark ground as much as you can, even if that makes the sky overly bright. Unless you outright clip the highlights in the Milky Way or in light polluted horizon glows, you’ll be able to recover highlight details later in processing.
After poor focus, underexposure, resulting in overly noisy images, is the single biggest mistake I see beginners make.
TIP 5 — DON’T: Worry about 500 or “NPF” Exposure Rules
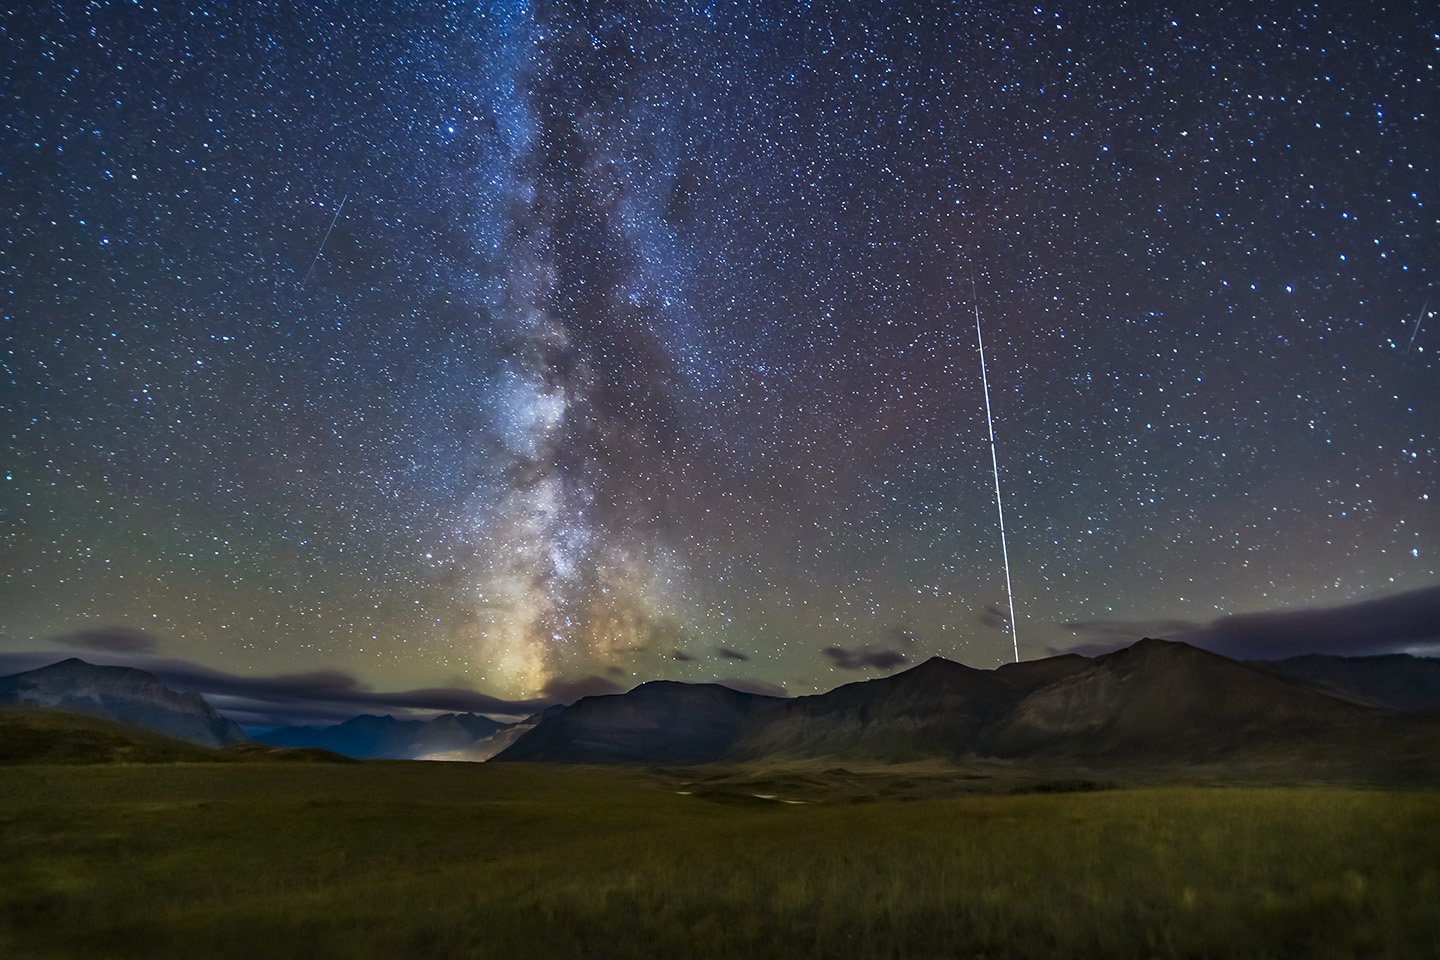
Stills from a Sequence A stack of single frames from a time-lapse sequence can often make a good still image, such as this scene of the Space Station rising over Waterton Lakes National Park. The 30-second exposures were just within the “500 Rule” for the 15mm lens used here, but minor star trailing won’t be that noticeable in a final movie.
While still images might have to adhere to the “500 Rule” or the stricter “NPF Rule” to avoid star trailing, time-lapses are not so critical. Slight trailing of stars in each frame won’t be noticeable in the final movie when the stars are moving anyway.
So go for rule-breaking, longer exposures if needed, for example if the aperture needs to be stopped down for increased depth of field and foreground focus. Again, with time-lapses we can’t shoot separate exposures for focus stacking later.
Just be aware that the longer each exposure is, the longer it will take to shoot 300 of them.
Why 300? I find 300 frames is a good number to aim for. When assembled into a movie at 30 frames per second (a typical frame rate) your 300-frame clip will last 10 seconds, a decent length of time in a final movie.
You can use a slower frame rate (24 fps works fine), but below 24 the movie will look jerky unless you employ advanced frame blending techniques. I do that for auroras.
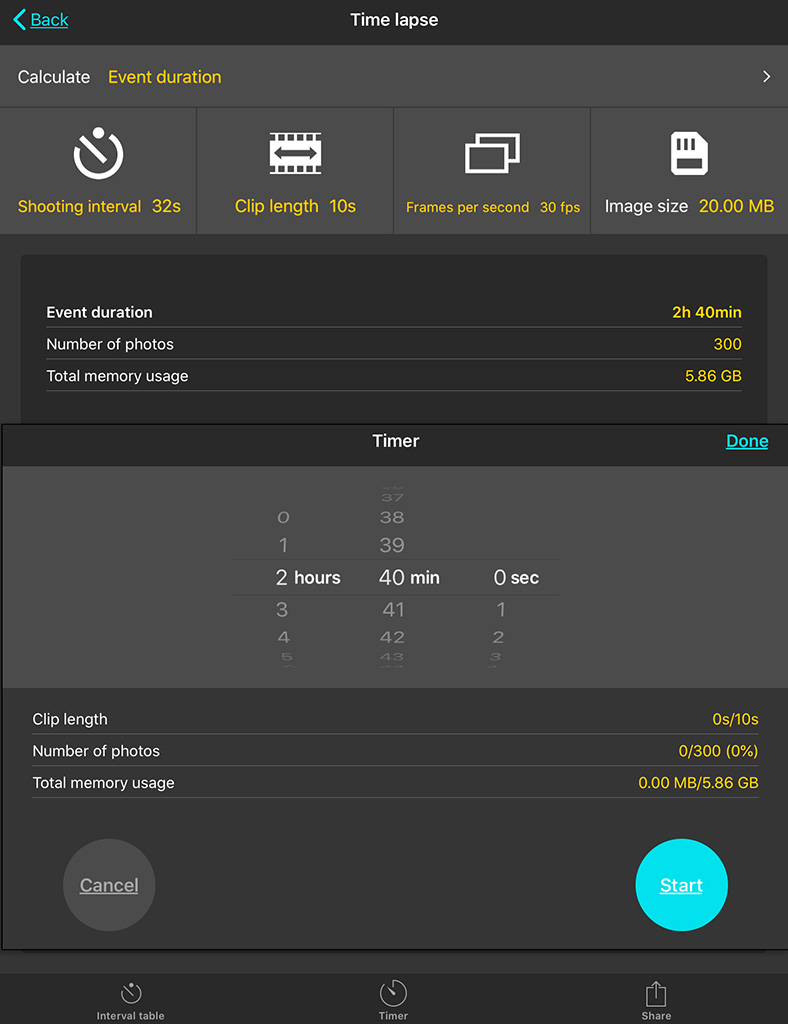
PhotoPills Calculator Apps such as PhotoPills offer handy calculators for juggling exposure time vs. the number of frames to yield the length of the time-lapse shoot.
Bonus Tip
How long it will take to acquire the needed 300 frames will depend on how long each exposure is and the interval between them. An app such as PhotoPills (via its Time lapse function) is handy in the field for calculating exposure time vs. frame count vs. shoot length, and providing a timer to let you know when the shoot is done.
TIP 6 — DO: Use short intervals
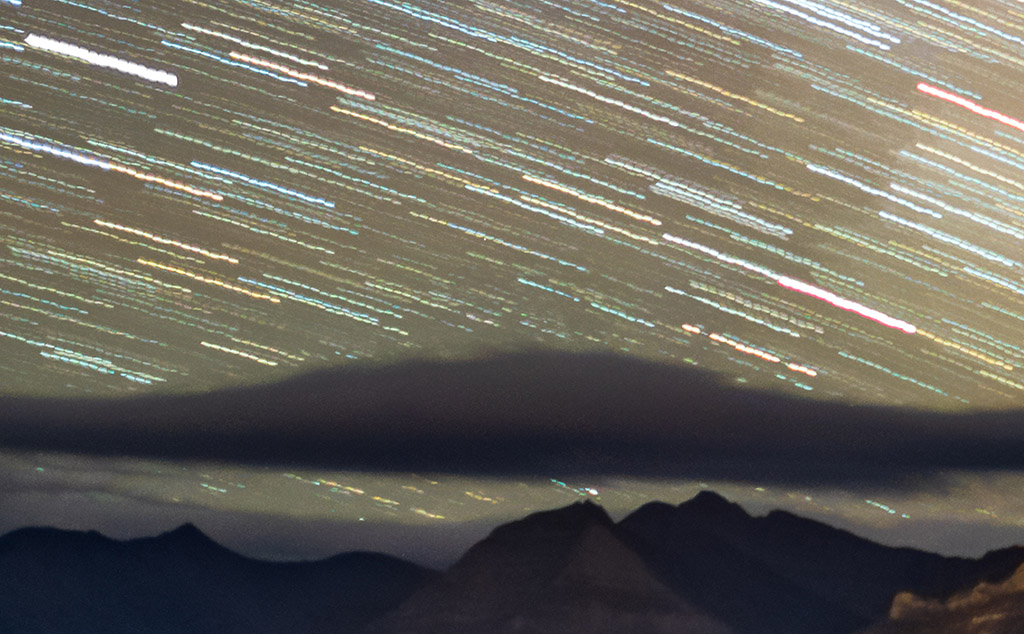
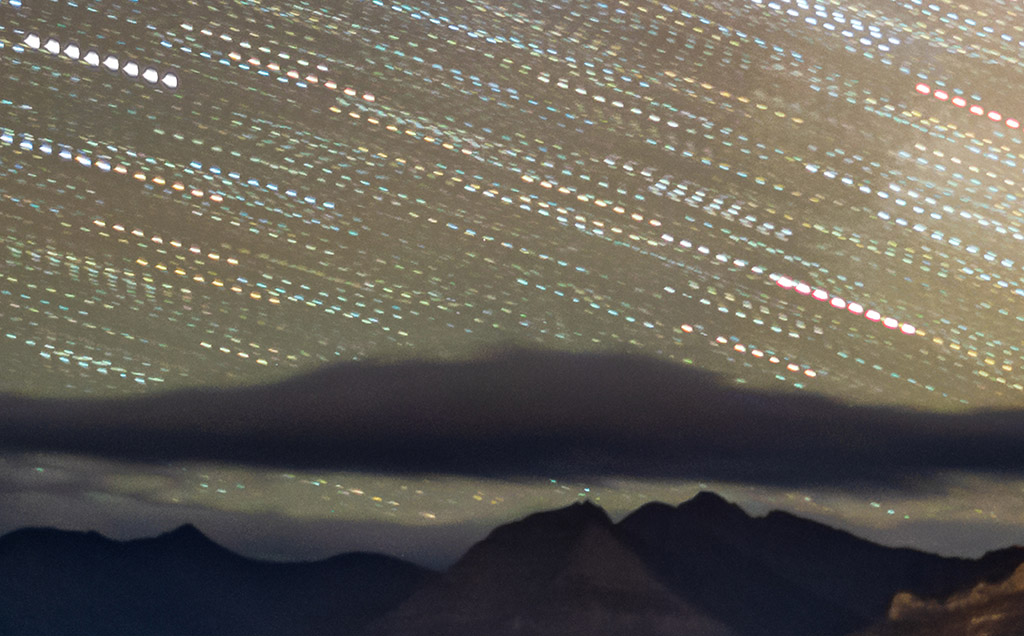
Mind the Gap! At night use intervals as short as possible to avoid gaps in time, simulated here (at top) by stacking several time-lapse frames taken at a one-second interval into one image. Using too long an interval, as demonstrated just above, yields gaps in time and jumps in the star motion, simulated here by stacking only every other frame in a sequence.
At night, the interval between exposures should be no more than one or two seconds. By “interval,” I mean the time between when the shutter closes and when it opens again for the next frame.
Not all intervalometers define “Interval” that way. But it’s what you expect it means. If you use too long an interval then the stars will appear to jump across the sky, ruining the smooth motion you are after.
In practice, intervals of four to five seconds are sometimes needed to accommodate the movement of motorized “motion control” devices that turn or slide the camera between each shot. But I’m not covering the use of those advanced units here. I cover those options and much, much more in 400 pages of tips, techniques and tutorials in my Nightscapes ebook, linked to above.
However, during the day or in twilight, intervals can be, and indeed need to be, much longer than the exposures. It’s at night with stars in the sky that you want the shutter to be closed as little as possible.
TIP 7 — DO: Shoot Raw
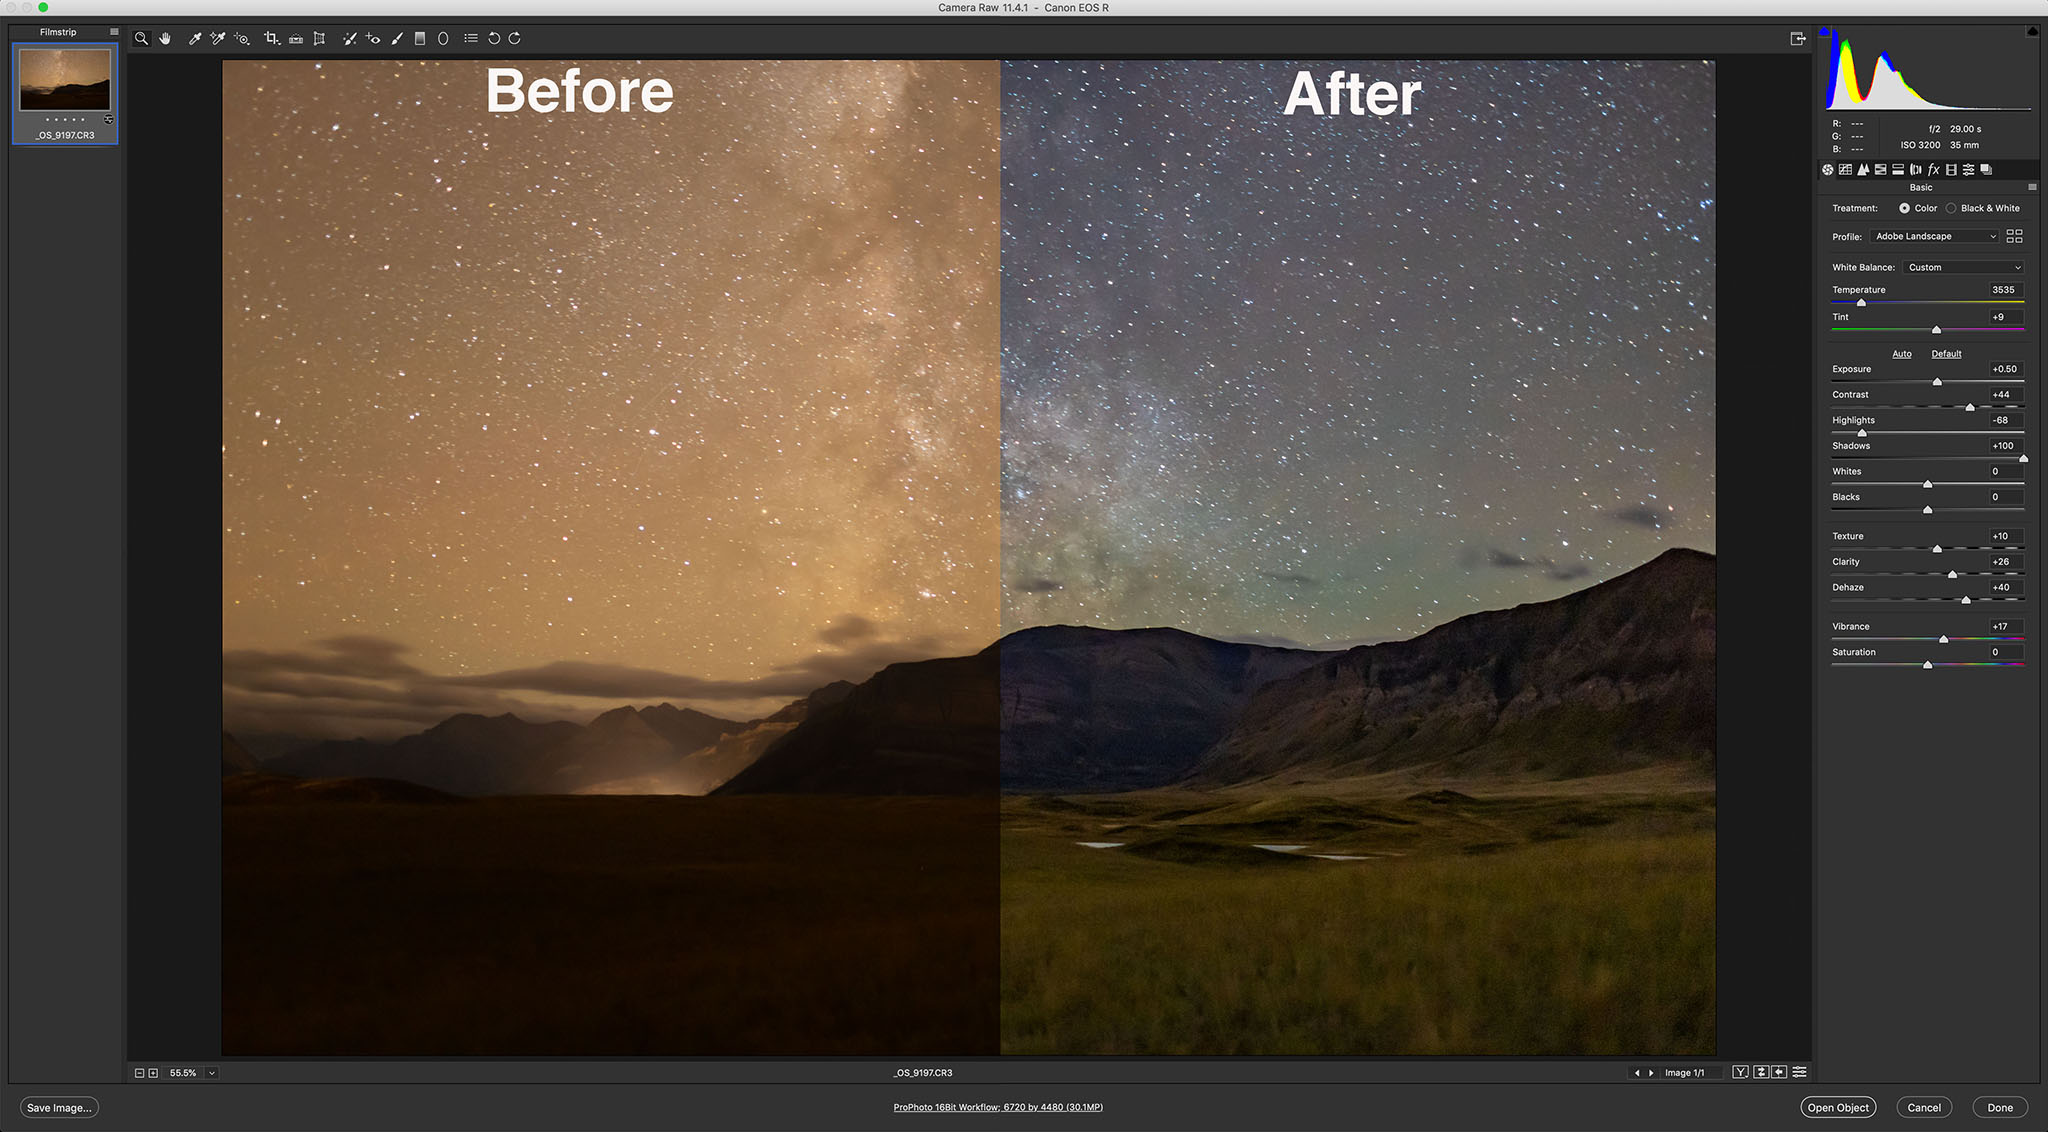
The Power of Raw Shooting raw, even for time-lapse frames that will eventually be turned into JPGs, allows for maximum control of shadows, highlights, colour balance, and noise reduction. “Before” is what came out of the camera; “After” is with the development settings shown applied in Camera Raw.
This advice also applies to still images where shooting raw files is essential for professional results. But you likely knew that.
However, with time-lapses some cameras offer a mode that will shoot time-lapse frames and assemble them into a movie right in the camera. Don’t use it. It gives you a finished, pre-baked movie with no ability to process each frame later, an essential step for good night time-lapses. And raw files provide the most data to work with.
So even with time-lapses, shoot raw not JPGs.
If you are confident the frames will be used only for a time-lapse, you might choose to shoot in a smaller S-Raw or compressed C-Raw mode, for smaller files, in order to fit more frames onto a card.
But I prefer not to shrink or compress the original raw files in the camera, as some of them might make for an excellent stacked and layered still image where I want the best quality originals (such as for the ISS over Waterton Lakes example above).
To get you through a long field shoot away from your computer buy more and larger memory cards. You don’t need costly, superfast cards for most time-lapse work.
PLANNING AND COMPOSITION
TIP 8 — DO: Use planning apps to frame
Planning the Shoot Apps such as The Photographer’s Ephemeris (shown here set for the author’s Waterton Lakes site for moonrise) help in planning where the Sun, Moon and Milky Way will be from your site during the shoot.
Simulating the Shoot The companion app to The Photographer’s Ephemeris, TPE 3D, shown above in the inset, exactly matches the real scene for the mountain skyline, placement of the Milky Way, and lighting from the rising Moon.
All nightscape photography benefits from using one of the excellent apps we now have to assist us in planning a shoot. They are particularly useful for time-lapses.
Apps such as PhotoPills and The Photographer’s Ephemeris are great. I like the latter as it links to its companion TPE 3D app to preview what the sky and lighting will look like over the actual topographic horizon from your site. You can scrub through time to see the motion of the Milky Way over the scenery. The Augmented Reality “AR” modes of these apps are also useful, but only once you are on site during the day.
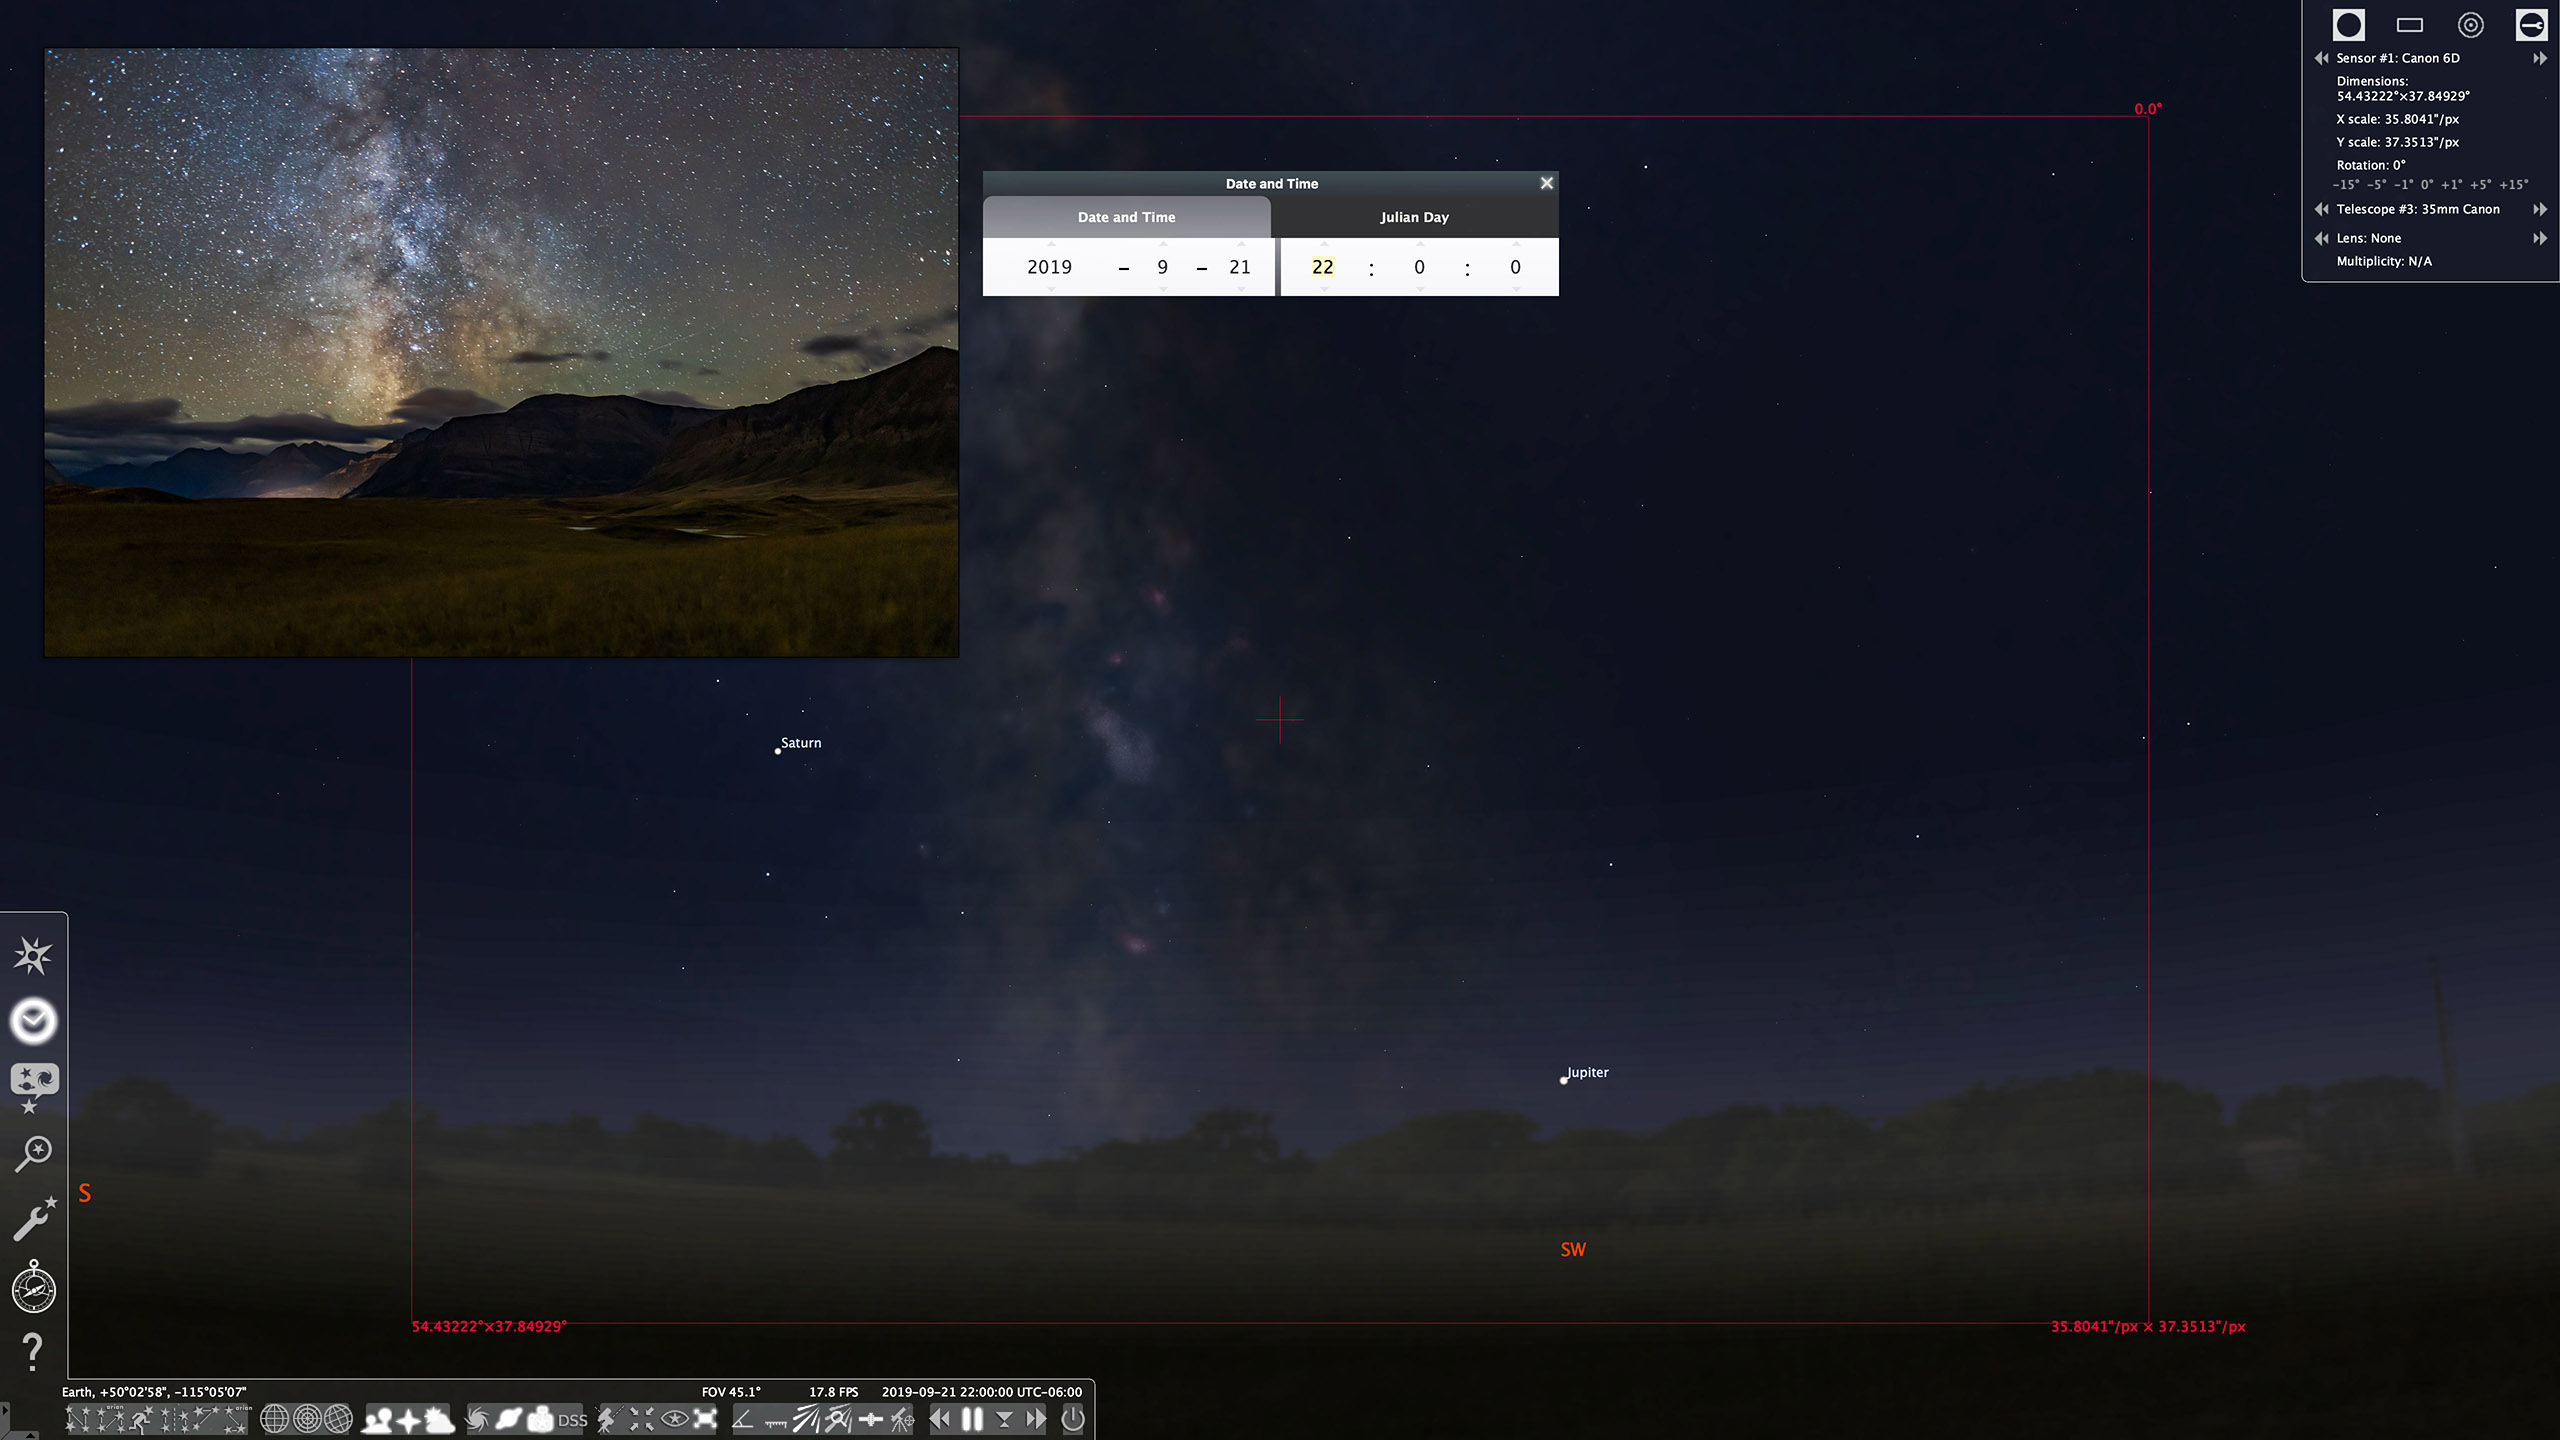
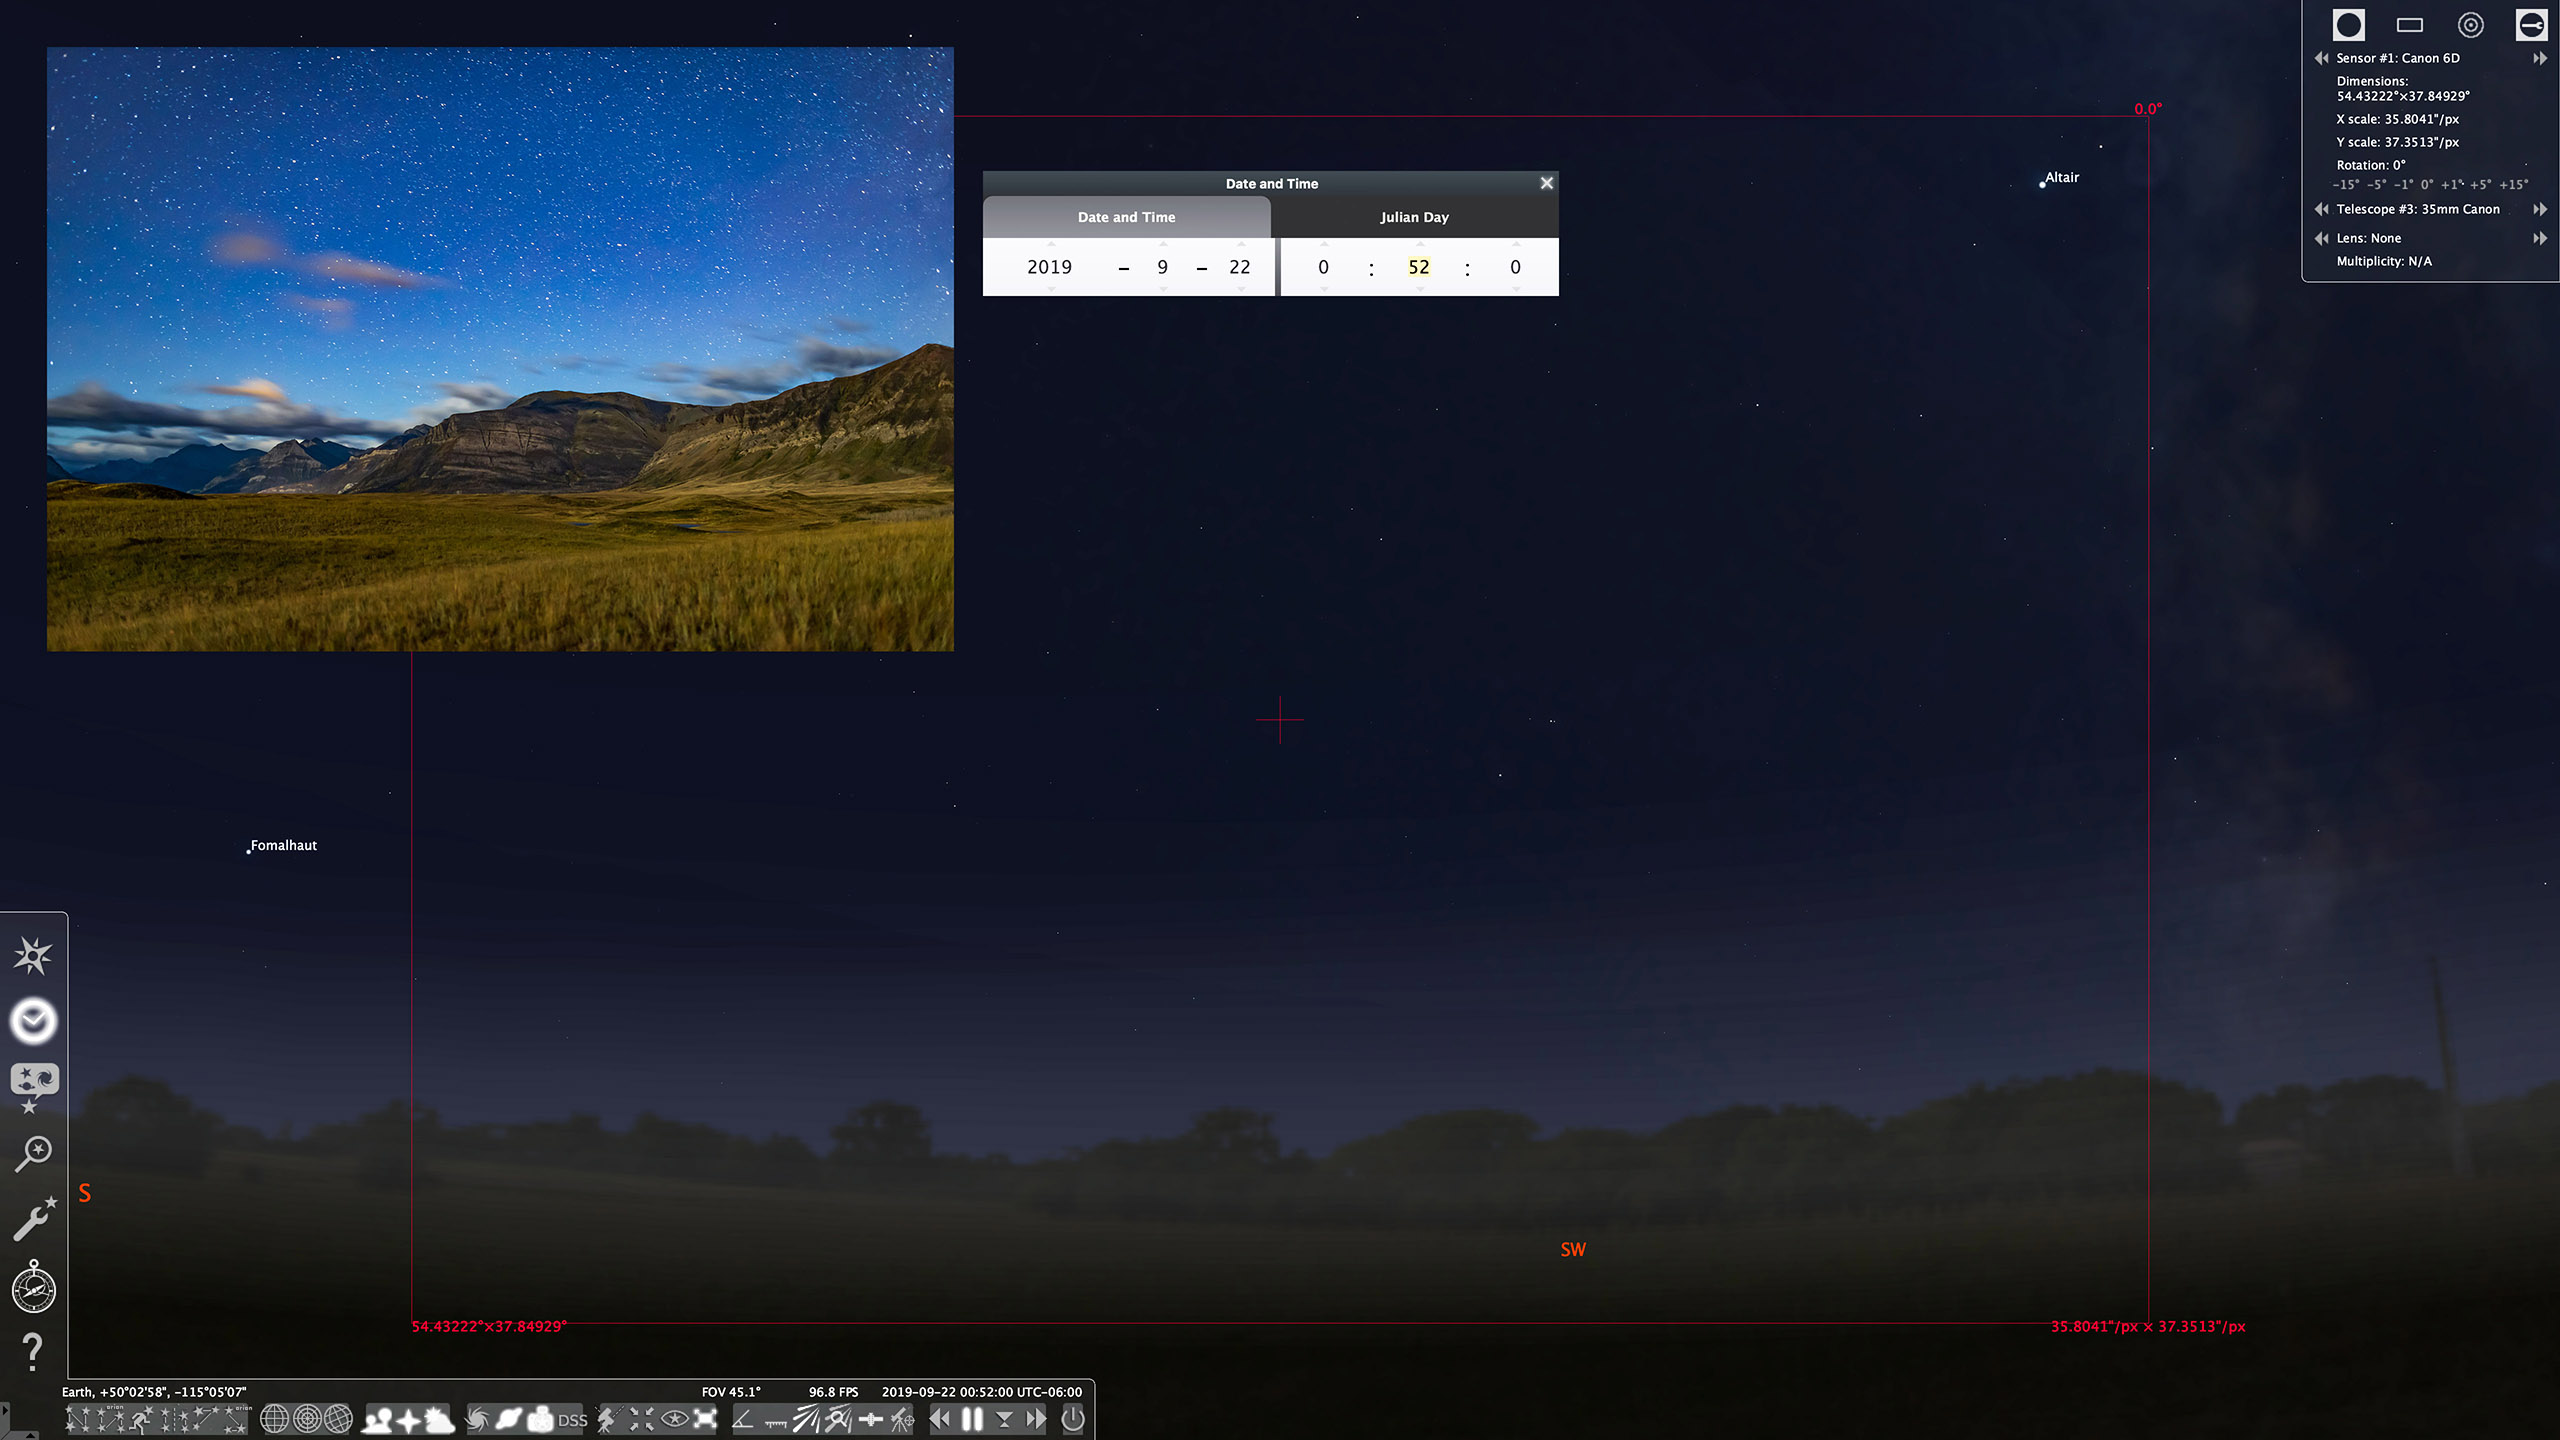
For planning a time-lapse at home I always turn to a “planetarium” program to simulate the motion of the sky (albeit over a generic landscape), with the ability to add in “field of view” indicators to show the view your lens will capture.
You can step ahead in time to see how the sky will move across your camera frame during the length of the shoot. Indeed, such simulations help you plan how long the shoot needs to last until, for example, the galactic core or Orion sets.
Planetarium software helps ensure you frame the scene properly, not only for the beginning of the shoot (that’s easy — you can see that!), but also for the end of the shoot, which you can only predict.
Planetarium Planning An alternative is to use a planetarium program such as the free Stellarium, shown above, which can display lens fields of view. These scenes show the simulated vs. real images (insets) for the start (top) and end (bottom) of the Waterton Lakes time-lapse with a 35mm lens frame, outlined in red.
If your shoot will last as long as three hours, do plan to check the battery level and swap batteries before three hours is up. Most cameras, even new mirrorless models, will now last for three hours on a full battery, but likely not any longer. If it’s a cold winter night, expect only one or two hours of life from a single battery.
PROCESSING
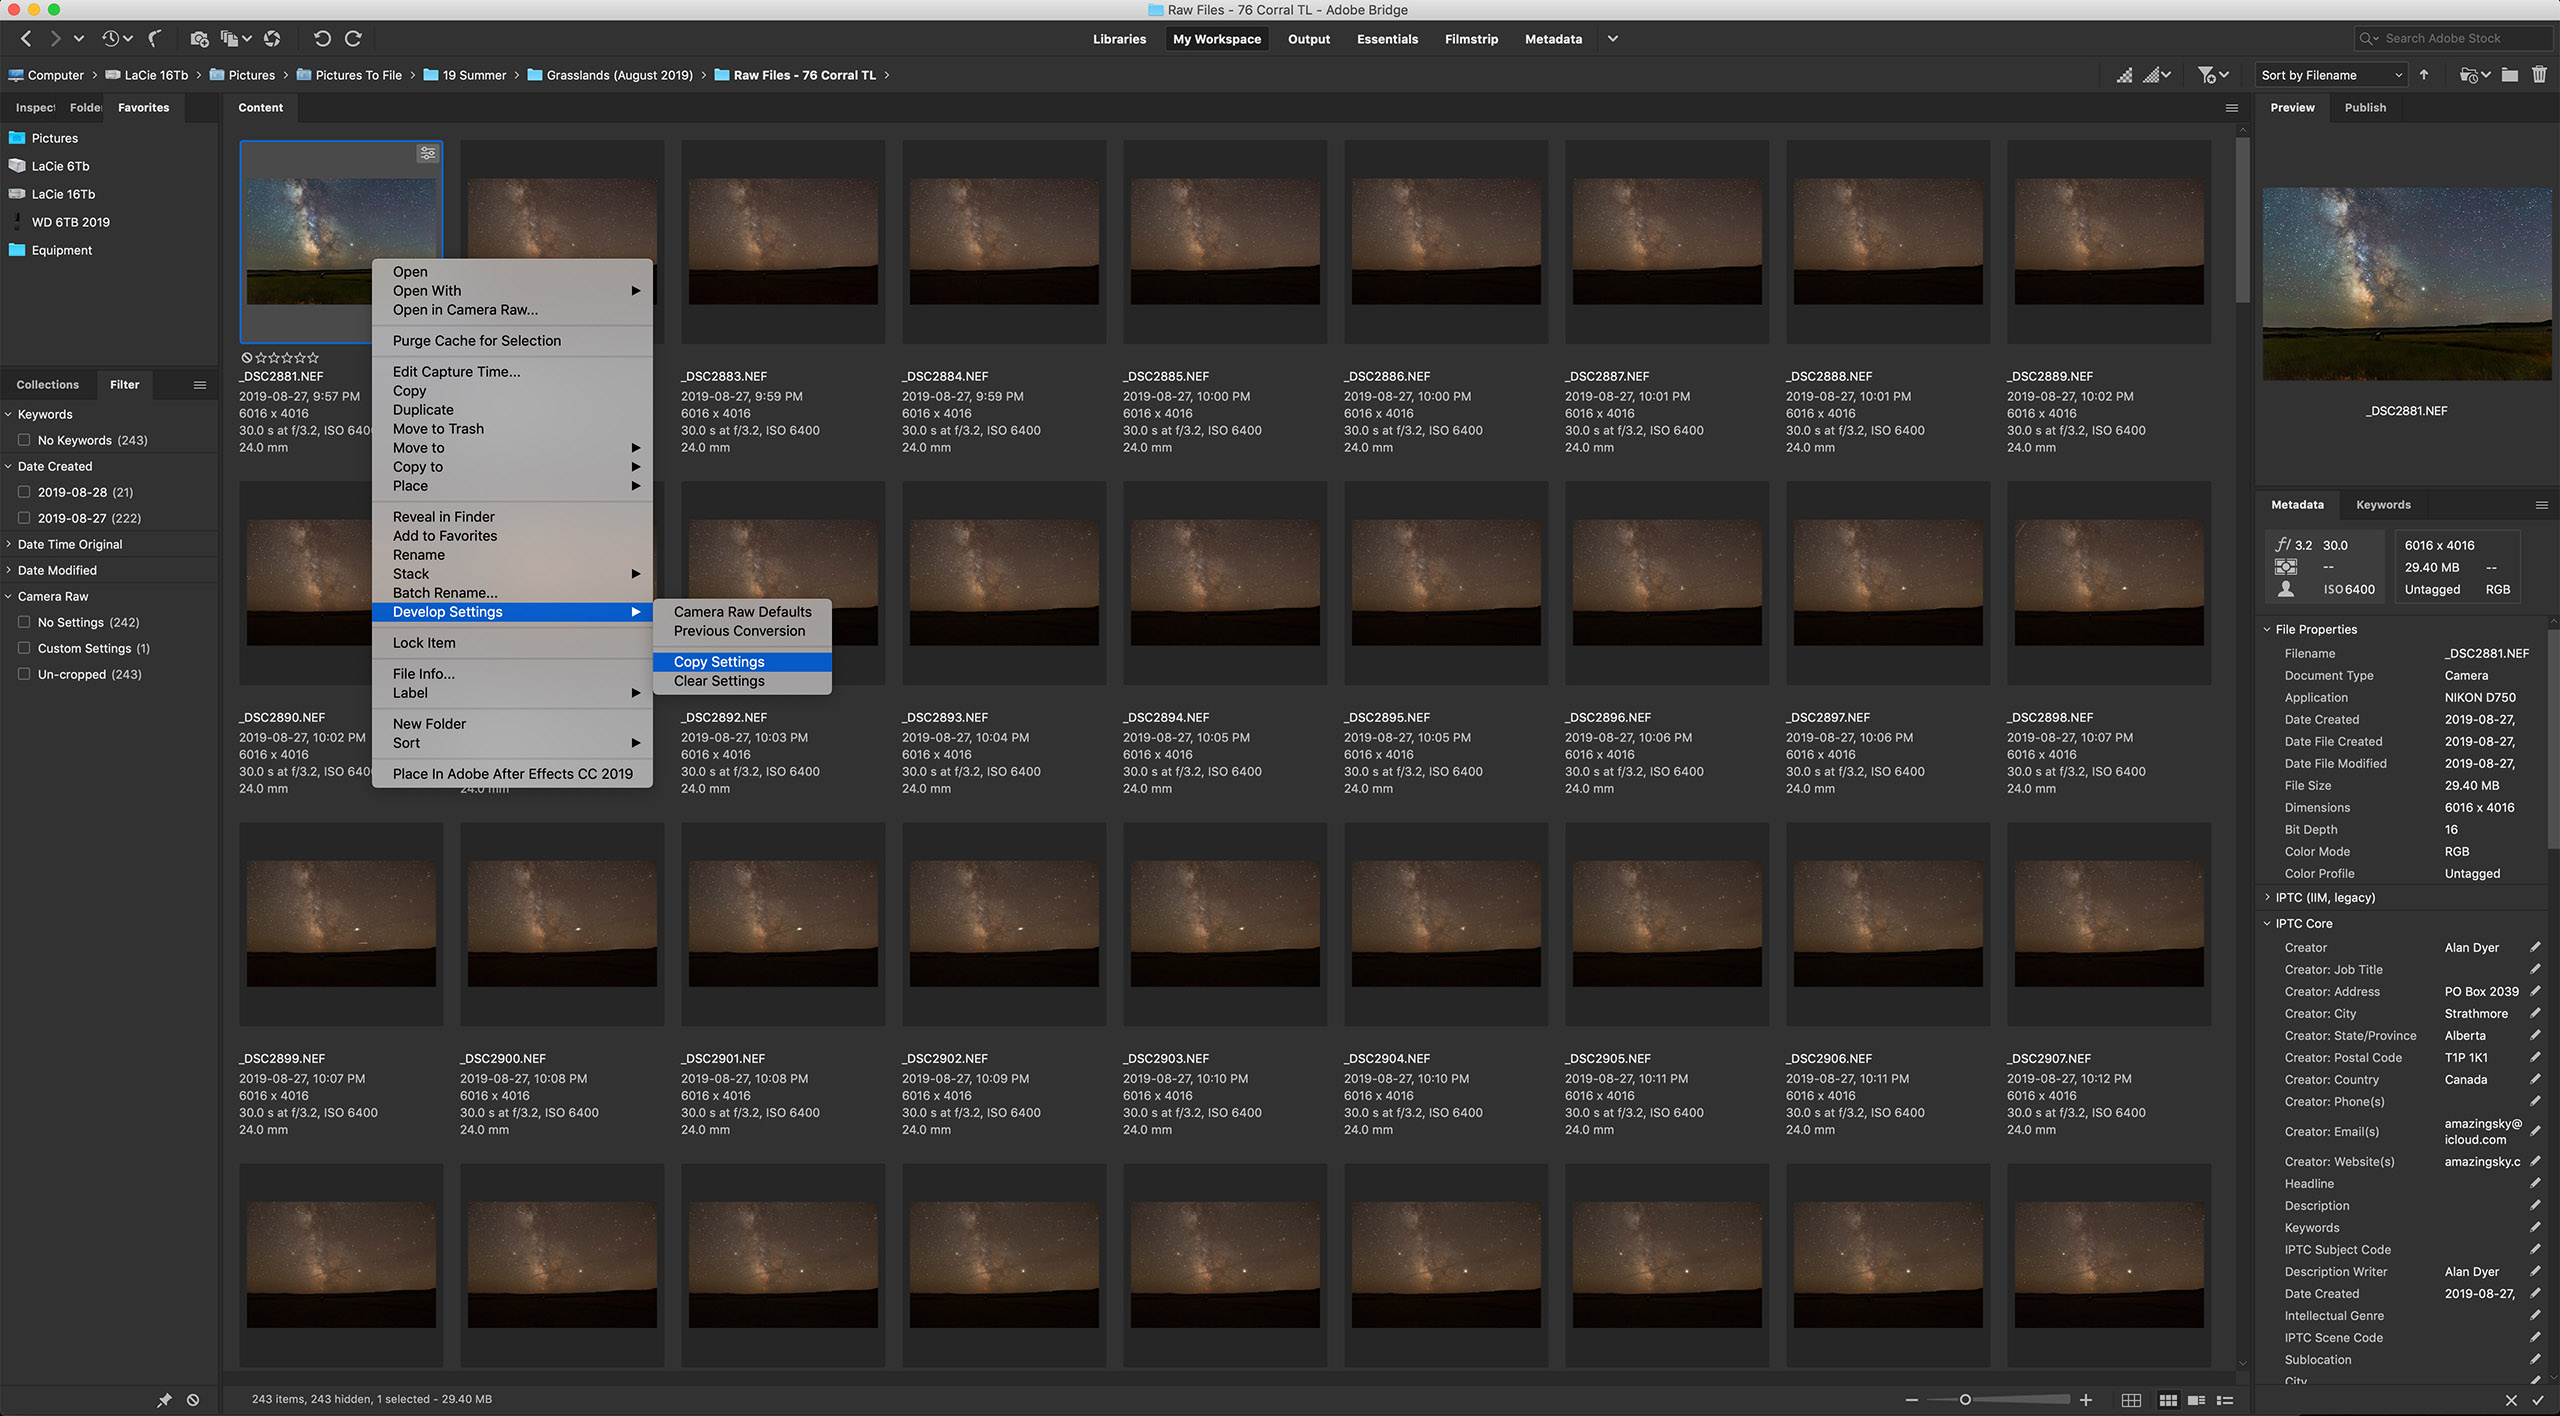
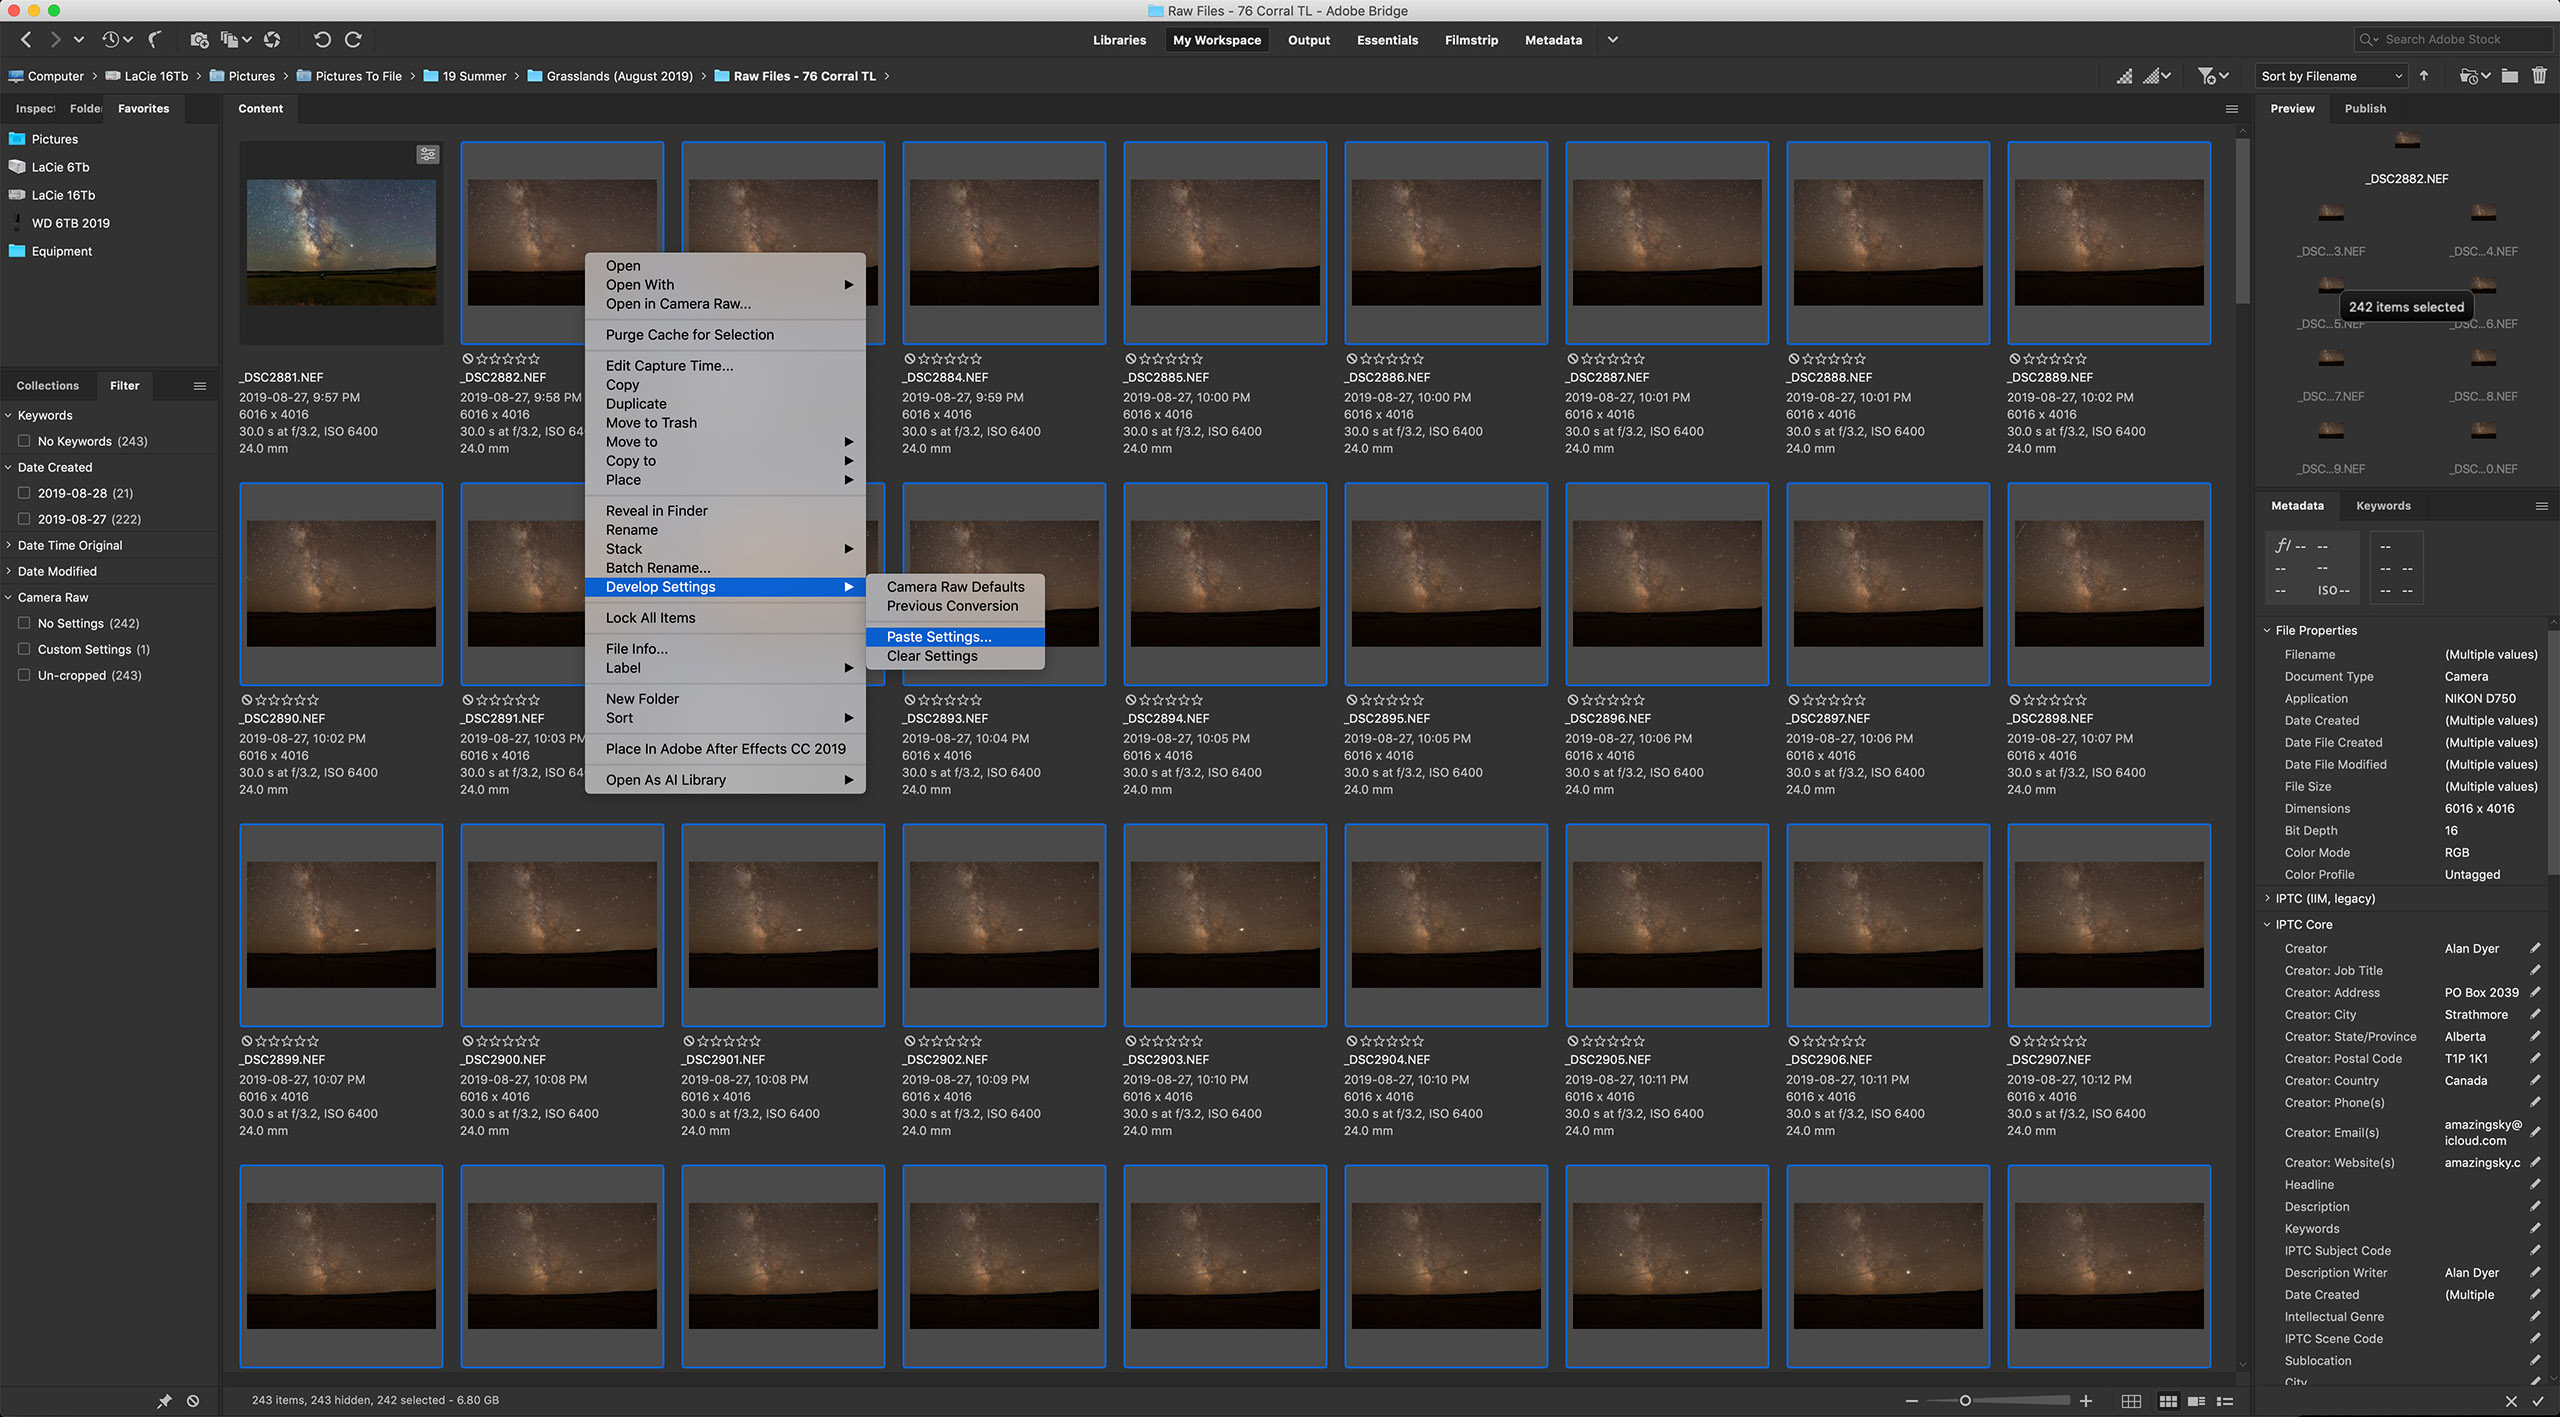
TIP 9 — DO: Develop one raw frame and apply settings to all
Copy and Paste Settings Most raw developers or photo library programs (Adobe Bridge is shown here) offer the essential ability to copy settings from one image and paste them onto hundreds of others in a folder, developing all the time-lapse frames in a snap.
Processing the raw files takes the same steps and settings as you would use to process still images.
With time-lapses, however, you have to do all the processing required within your favourite raw developer software. You can’t count on bringing multiple exposures into a layer-based processor such as Photoshop to stack and blend images. That works for a single image, but not for 300.
I use Adobe Camera Raw out of Adobe Bridge to do all my time-lapse processing. But many photographers use Lightroom, which offers all the same settings and non-destructive functions as Adobe Camera Raw.
For those who wish to “avoid Adobe” there are other choices, but for time-lapse work an essential feature is the ability to develop one frame, then copy and paste its settings (or “sync” settings) to all the other frames in the set.
Not all programs allow that. Affinity Photo does not. Luminar doesn’t do it very well. DxO PhotoLab, ON1 Photo RAW, and the free Raw Therapee, among others, all work fine.
HOW TO ASSEMBLE A TIME-LAPSE
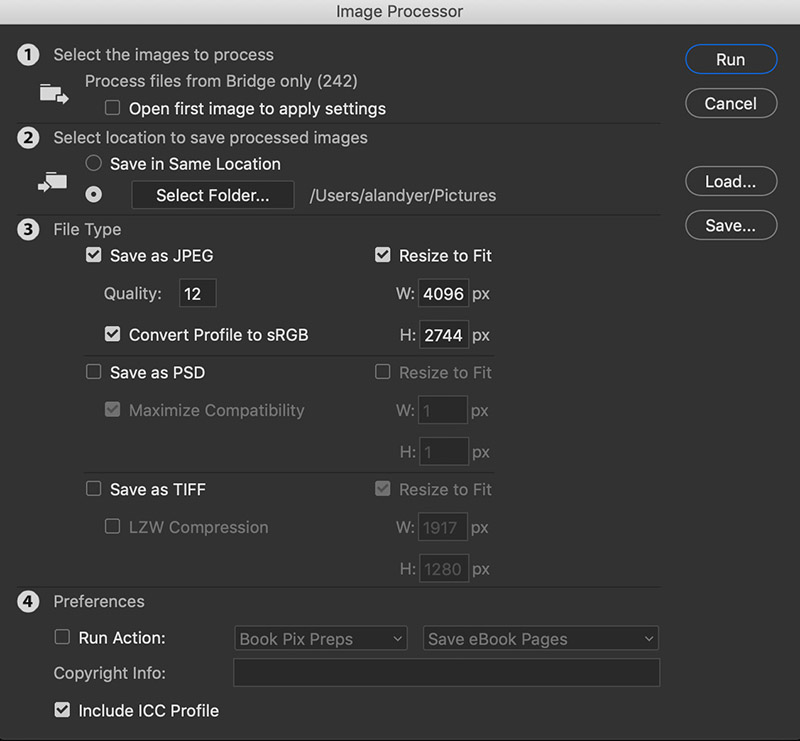
Once you have a set of raws all developed, the usual workflow is to export all those frames out as high-quality JPGs which is what movie assembly programs need. Your raw developing software has to allow batch exporting to JPGs — most do.
Photoshop Batch Export Raw developers usually have a batch export function. So does Photoshop, via its Image Processor utility, shown here (found under File>Scripts>Image Processor) that can export a folder of raws into JPGs or TIFFs, and re-size them, often needed for final 4K or HD movies.
However, none of the programs above (except Photoshop and Adobe’s After Effects) will create the final movie, whether it be from those JPGs or from the raws.
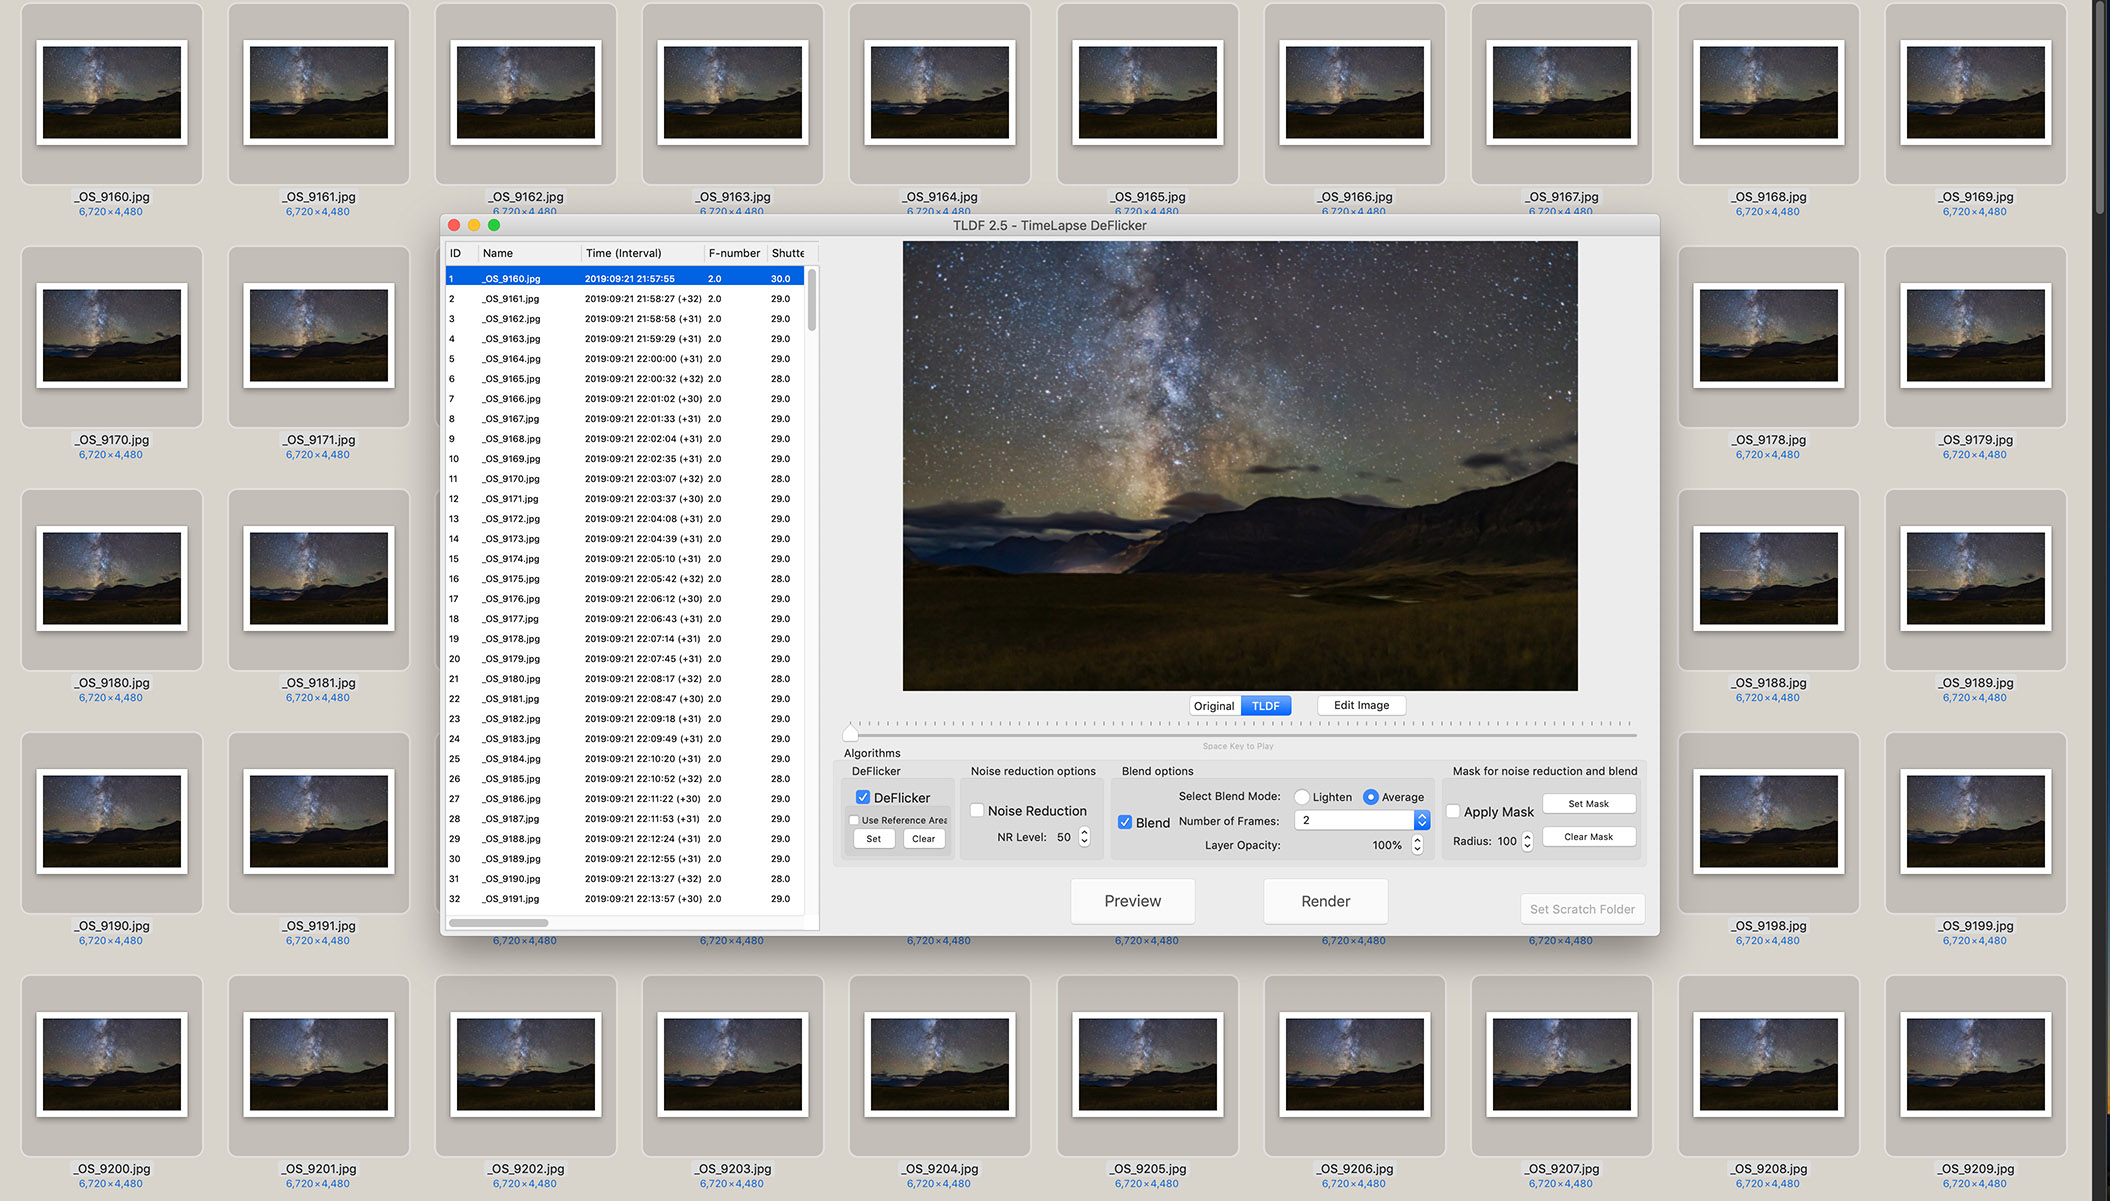
Assembling JPGs The author’s favourite assembly program is TimeLapse DeFlicker (TLDF). It can turn a folder of JPGs into movies as large as 8K and with ProRes codecs for the highest quality.
So for assembling the intermediate JPGs into a movie, I often use a low-cost program called TLDF (TimeLapse DeFlicker) available for MacOS and Windows (timelapsedeflicker.com). It offers advanced functions such as deflickering (i.e. smoothing slight frame-to-frame brightness fluctuations) and frame blending (useful to smooth aurora motions or to purposely add star trails).
While there are many choices for time-lapse assembly, I suggest using a program dedicated to the task and not, as many do, a movie editing program. For most sequences, the latter makes assembly unnecessarily difficult and harder to set key parameters such as frame rates.
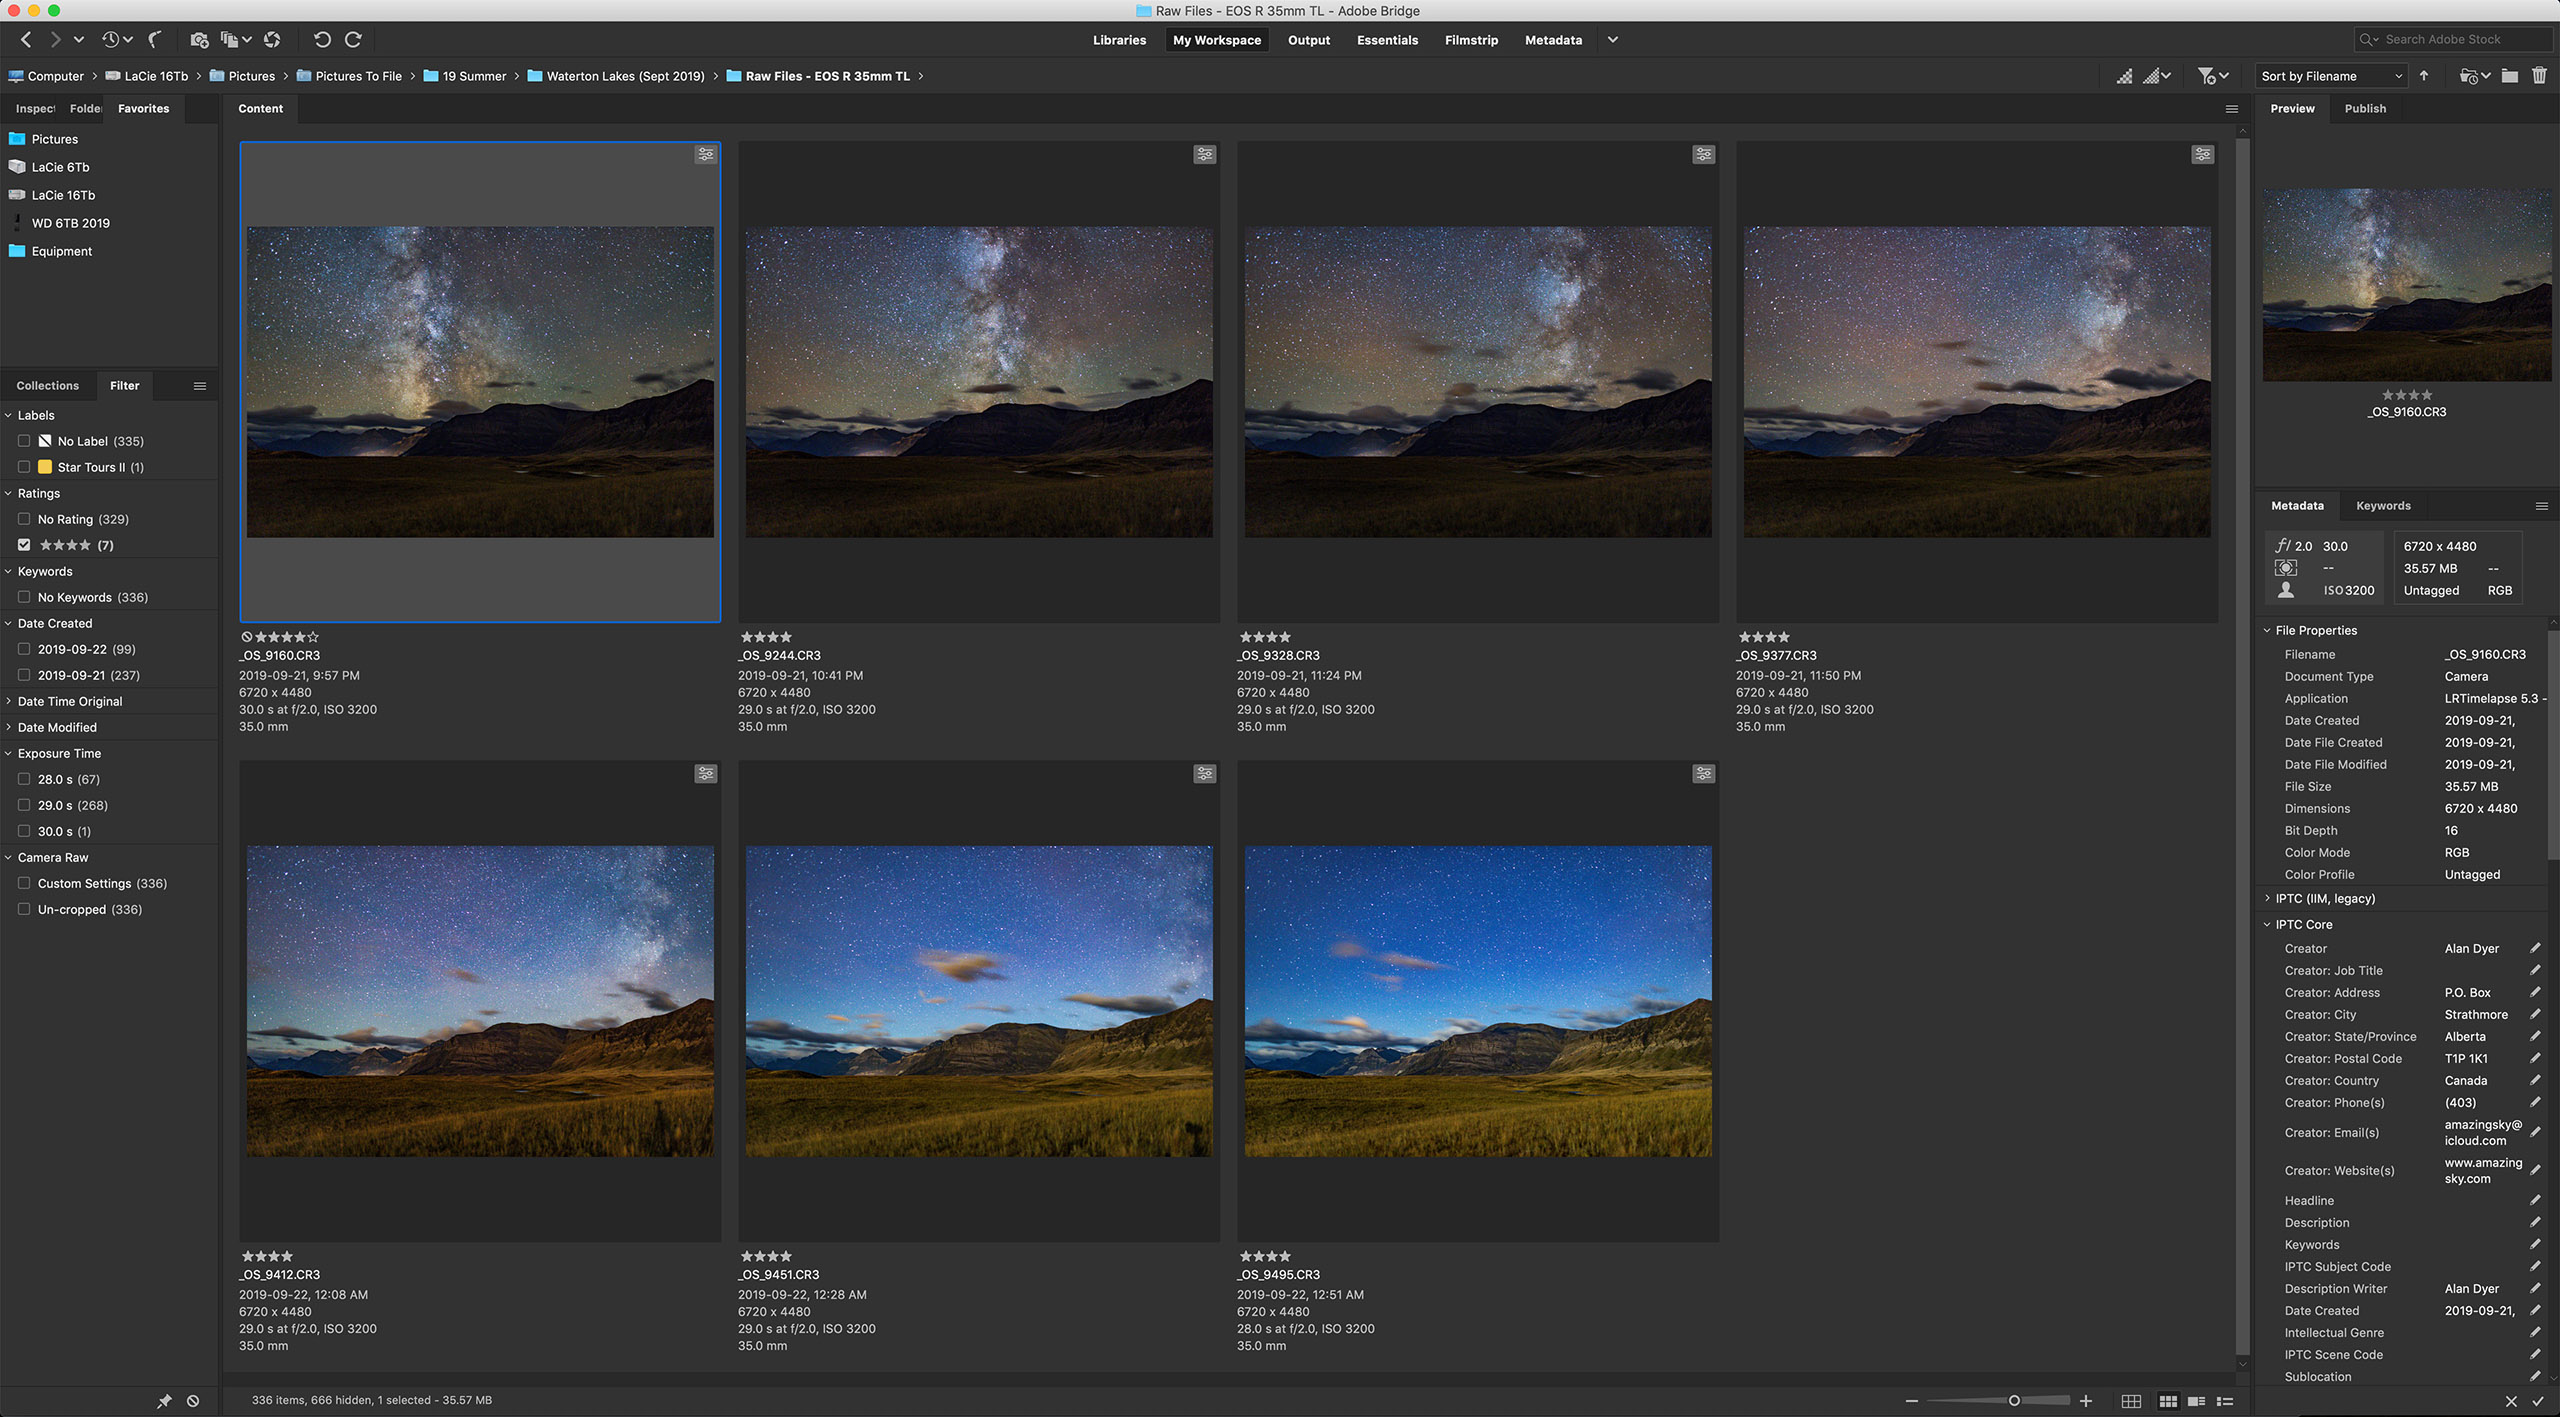
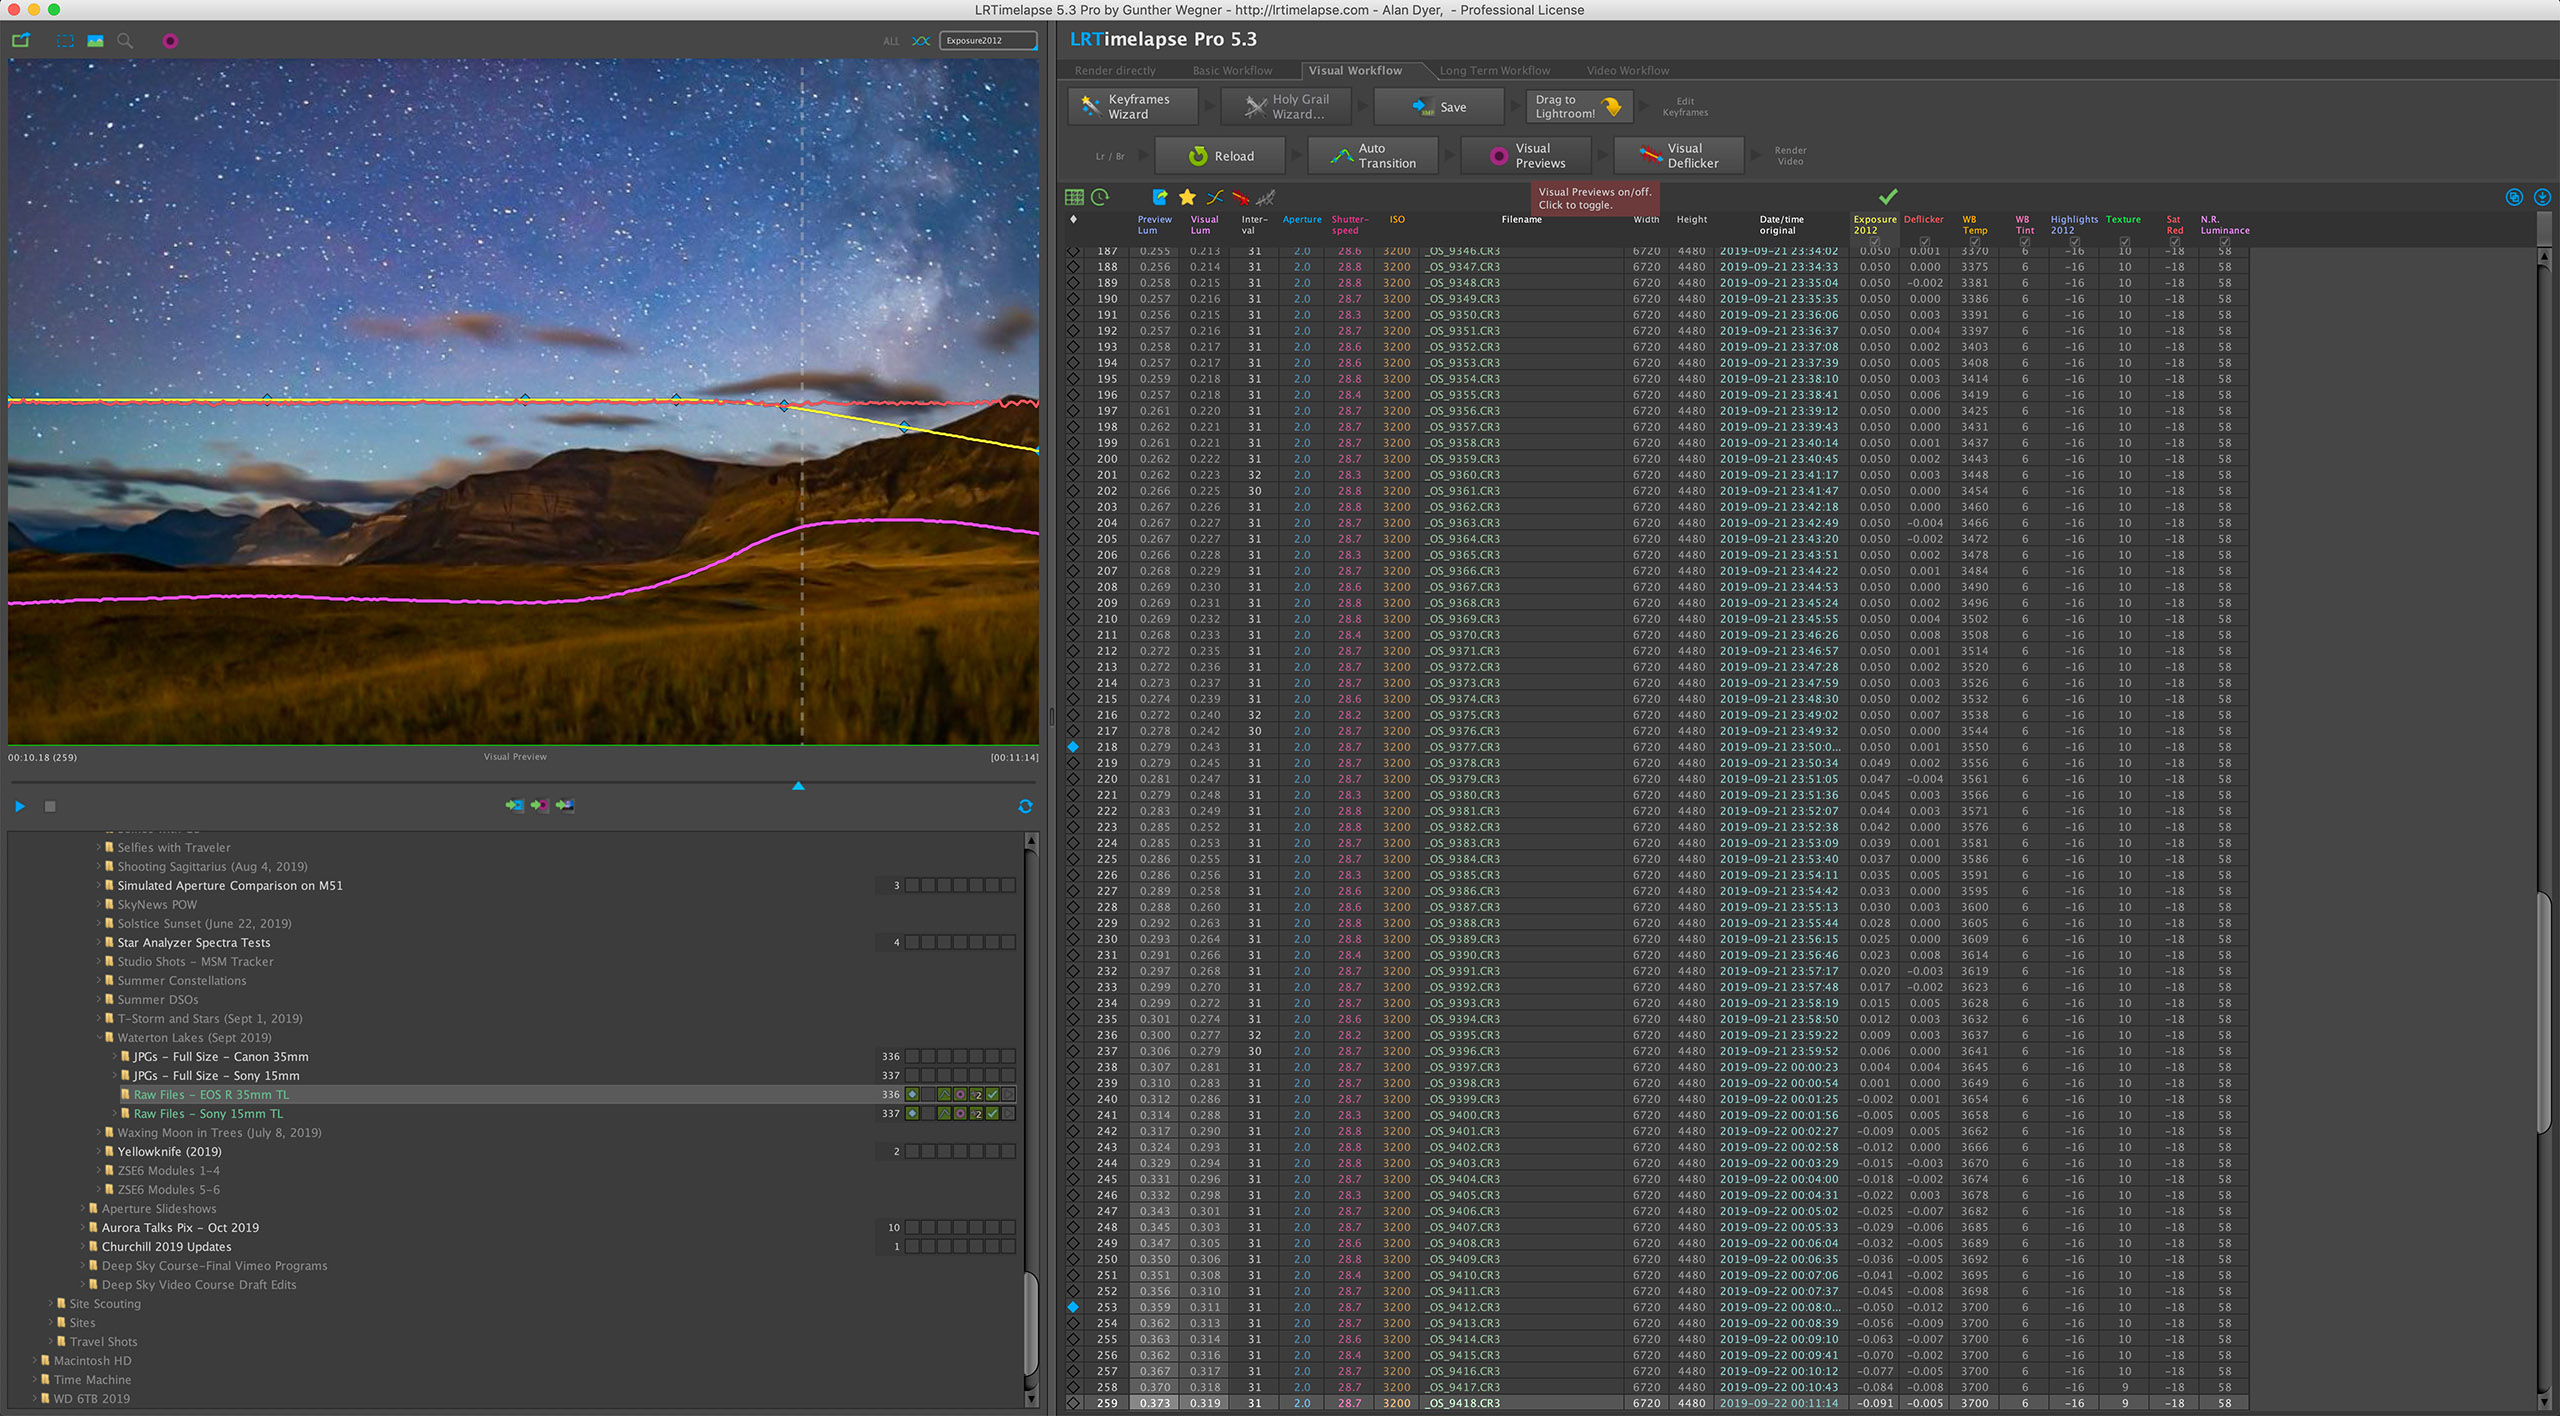
TIP 10 — DO: Try LRTimelapse for more advanced processing
Working on Keyframes The advanced processing program LRTimelapse creates several keyframes through the sequence (seven are shown here in Adobe Bridge) which you develop so each looks its best. During this sequence, the Moon rose changing the lighting toward the end of the shoot (in the last three keyfames).
Get serious about time-lapse shooting and you will want — indeed, you will need — the program LRTimelapse (LRTimelapse.com). A free but limited trial version is available.
This powerful program is for sequences where one setting will not work for all the frames. One size does not fit all.
Instead, LRTimelapse allows you to process a few keyframes throughout a sequence, say at the start, middle, and end. It then interpolates all the settings between those keyframes to automatically process the entire set of images to smooth (or “ramp”) and deflicker the transitions from frame to frame.
LRTimelapse Ramping LRTimelapse reads your developed keyframe data and applies smooth transitions of all settings to each of the raw files between the keyframes. The result is a seamless and smooth final movie. The pink curve shows how the scene brightened at moonrise. The blue diamonds on the yellow line mark the seven keyframes.
This is essential for sequences where the lighting changes during the shoot (say, the Moon rises or sets), and for so-called “holy grails.” Those are advanced sequences that track from daylight or twilight to darkness, or vice versa, over a wide range of camera settings.
However, LRTimelapse works only with Adobe Lightroom or the Adobe Camera Raw/Bridge combination. So for advanced time-lapse work Adobe software is essential.
A Final Bonus Tip
Keep it simple. You might aspire to emulate the advanced sequences you see on the web, where the camera pans and dollies during the movie. I suggest avoiding complex motion control gear at first to concentrate on getting well-exposed time-lapses with just a static camera. That alone is a rewarding achievement.
But before that, first learn to shoot still images successfully. All the settings and skills you need for a great looking still image are needed for a time-lapse. Then move onto capturing the moving sky.
I end with a link to an example music video, shot using the techniques I’ve outlined. Thanks for reading and watching. Clear skies!
The Beauty of the Milky Way from Alan Dyer on Vimeo.
A clear break between storms provided a marvellous night in the mountains to shoot nightscapes.
Every year I travel to Waterton Lakes National Park in southwest Alberta to deliver public talks and photo workshops, usually as part of one of the festivals held each year. I was there June 15 to 17 to participate in the annual Wildflower Festival.
Two photographers and participants at my June 17, 2018 Night Photography Workshop in Waterton Lakes National Park, at Maskinonge, in the evening twilight, with the twilight colours over the lake. Two swans are in the distance. This was a magical evening.
A single exposure with the Sigma 20mm lens and Nikon D750.
A photographer and participant at my June 17, 2018 Night Photography Workshop in Waterton Lakes National Park, at Maskinonge, in the evening twilight, with the clouds lit by the setting Sun.
A single exposure with the Sigma 20mm lens and Nikon D750.
On Sunday, June 17 skies cleared to allow my workshop group to travel to one of my favourite spots, Maskinonge, to practice nightscape shooting techniques. The sunset was stunning, then as skies darkened the Moon and Venus over Waterton River provided the scene.
Two photographers and participants at my June 17 Night Photography Workshop in Waterton Lakes National Park, at Maskinonge, in the evening twilight, with the waxing crescent Moon (at centre) and noctilucent clouds (at right).
A single exposure with the Sigma 20mm lens and Nikon D750.
The waxing crescent Moon, and Venus (just above the mountain ridge) and, to the right, noctilucent clouds glowing low in the north over the Waterton River at the Maskinonge picnic area in Waterton Lakes National Park, Alberta on June 17, 2018. The Moon is beside Regulus in Leo.
There was no wind this night, rare for Waterton.
This is a high dynamic range stack of 5 exposures from dark to light, blended with Adobe Camera Raw. Taken with the Nikon D750 and Sigma 20mm lens. Additional contrast enhancement applied using Zone System Express 5 Photoshop extension and “Enhanced Contrast” function.
As twilight deepened, a display of noctilucent clouds appeared to the north, my first sighting of the season for this unusual northern sky phenomenon. These clouds at the edge of space are lit by sunlight even at local midnight and form only around summer solstice over the Arctic.
Noctilucent clouds glowing low in the north over the Waterton River at the Maskinonge picnic area in Waterton Lakes National Park, Alberta on June 17, 2018. Cassiopeia (the “W”) is at right.
This is a high dynamic range stack of 5 exposures from dark to light, blended with Adobe Camera Raw. Taken with the Nikon D750 and Sigma 20mm lens. Additional contrast enhancement applied using Zone System Express 5 Photoshop extension and “Enhanced Contrast” function.
Noctilucent clouds glowing low in the north and reflected in unsually calm waters of the Waterton River at the Maskinonge picnic area in Waterton Lakes National Park, Alberta on June 17, 2018. There was no wind this night, rare for Waterton.
This is a high dynamic range stack of 5 exposures from dark to light, blended with Adobe Camera Raw. Taken with the Nikon D750 and Sigma 20mm lens. Additional contrast enhancement applied using Zone System Express 5 Photoshop extension and “Enhanced Contrast” function.
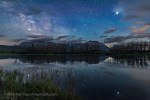
As the sky slowly darkened and the Moon set, the Milky Way appeared arching across the east and down into the south. The sky was never “astronomically dark,” but even with perpetual twilight illuminating the sky, the Milky Way still made a superb subject, especially this night with it reflected in the calm waters on this unusually windless night for Waterton.
The Milky Way over Maskinonge Lake at Waterton Lakes National Park, Alberta, Canada, on June 17/18, 2018. This was an unusually calm night, allowing the reflections of the stars in the lake waters. Jupiter is in Libra at far right. Saturn is Sagittarius in the Milky Way at left of centre. Scorpius is in between. The sky is deep blue from solstice twilight.
The Maskinonge area is a sacred site to the Blackfoot Nation.
This is a two-section panorama, with the ground a stack of 5 exposures for each section to smooth noise, with the sky and stellar reflections coming from one exposure for each segment to minimize trailing. All 25 seconds at f/2.2 with the 20mm Sigma Art lens and Nikon D750 at ISO 3200. Stiching with Photoshop Photomerge.
Jupiter (at right) and Saturn (at left) shining brightly in the sky and reflected in the still waters of Maskinonge Lake at Waterton Lakes National Park, Alberta, on June 17/18, 2018. The Milky Way is at left, Scorpius is at centre, and two satellite trails are at top. The sky is blue with solstice twilight. The trees on the opposite shore are charred from the Kenow Fire in September 2017. In the distance are Sofa Mountain and Viny Peak.
This is a stack of 10 exposures for the ground, mean combined to smooth noise, and one exposure for the sky and stellar reflections. All 20 seconds at f/2.2 with the Sigma 20mm Art lens and Nikon D750 at ISO 3200.
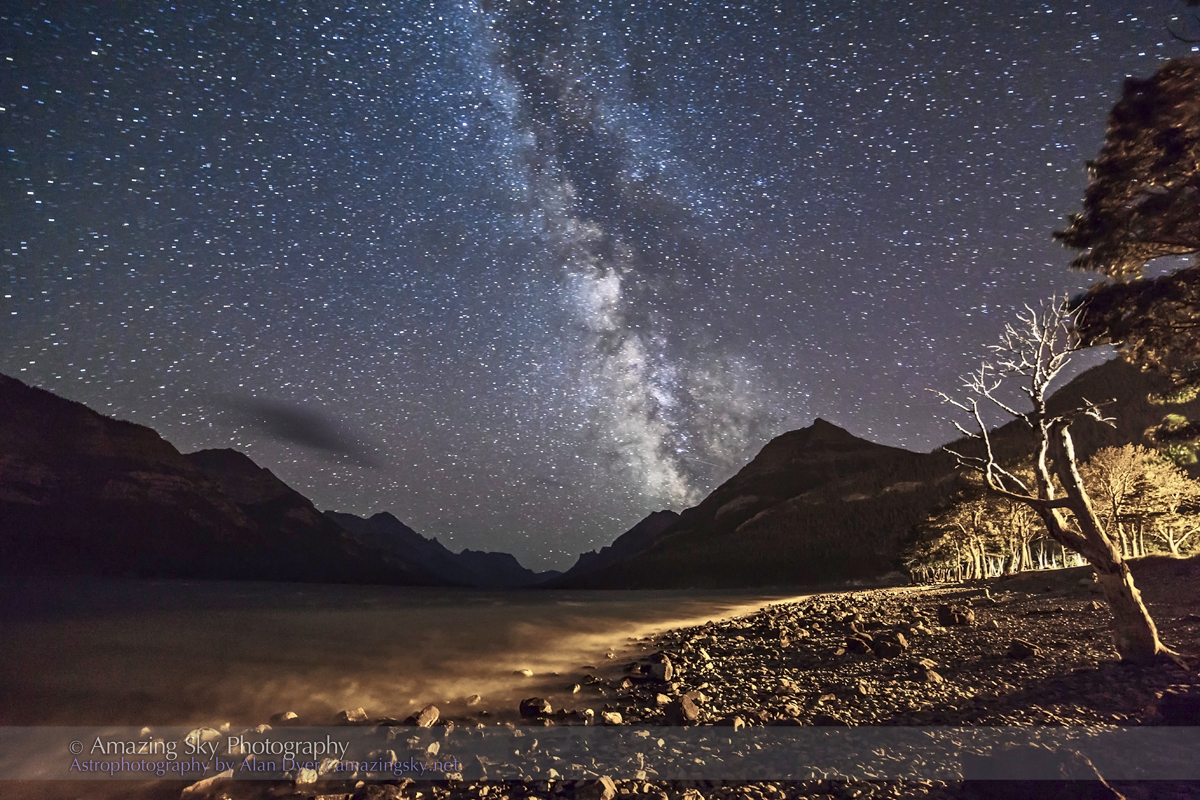
On the way back to town, I stopped at another favourite spot, Driftwood Beach on Middle Waterton Lake, to take more images of the Milky Way over Waterton, including the lead image at top.
It was a perfect night in Waterton for shooting the stars and enjoying the night sky. By morning it was raining again!
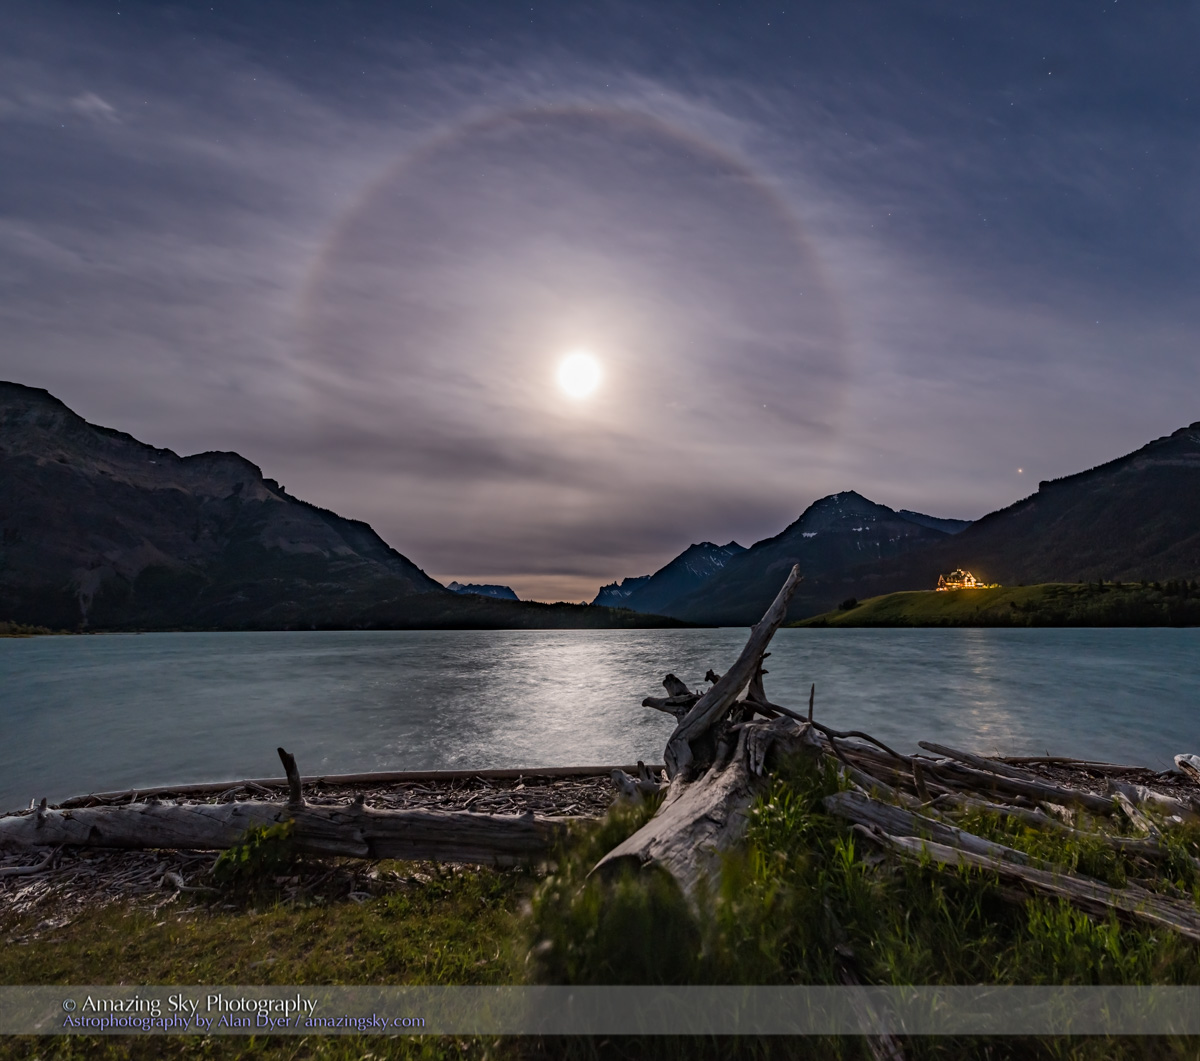
On the night before the solstice Full Moon, the sky added a coloured halo around the Moon.
On June 19 I was at Waterton Lakes National Park, Alberta to teach a workshop on night photography, as one of the programs of the Park’s annual Wildflower Festival. The night proved hazy, but that added the attraction of an ice crystal halo around the Moon.
The lead image above is from Driftwood Beach, looking south across Middle Waterton Lake. Note Mars shining above the mountains at right.
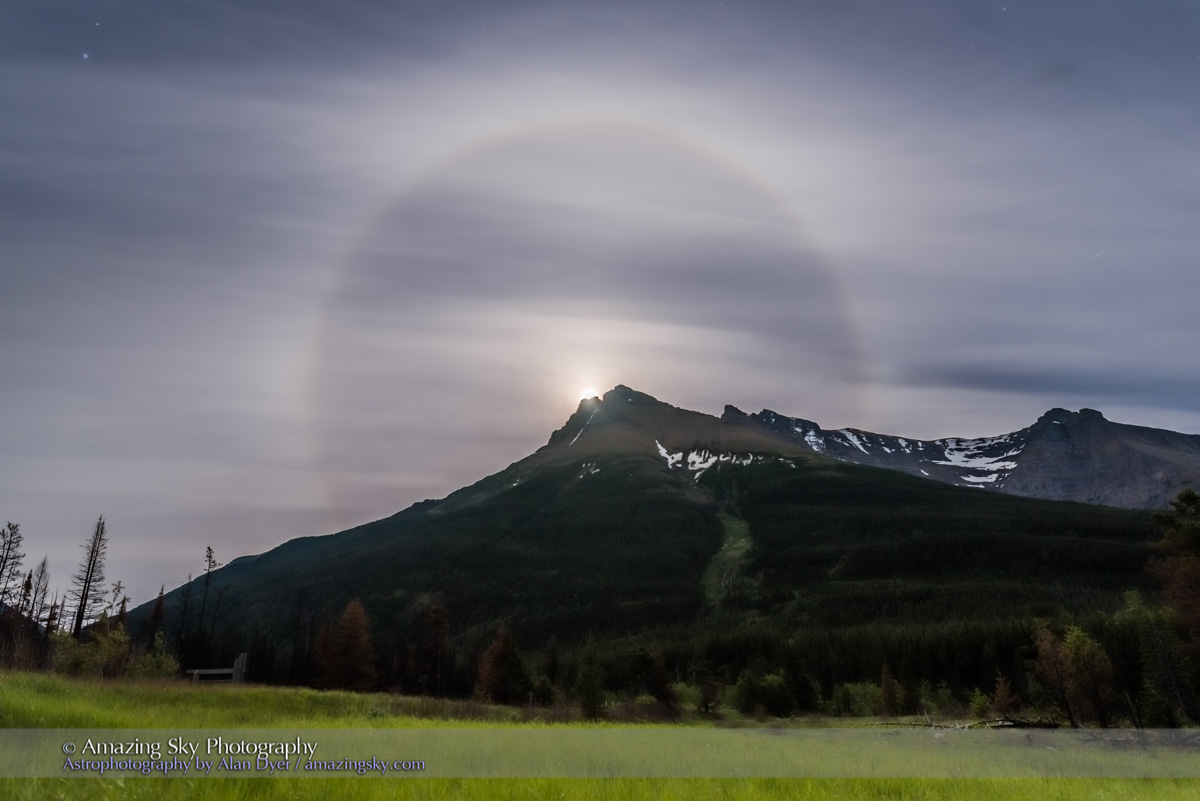
Earlier in the night, at Red Rock Canyon, we watched the Moon rise in the twilight, then climb up the side of Mt. Blakiston. Here (below) it shines above the summit, surrounded by its hazy halo.
Lunar halo in a hazy sky at Red Rock Canyon, Waterton Lakes National Park, Alberta, with the Full Moon over Mt. Blakiston. This is a high-dynamic range stack of 6 exposures, to avoid the area around the Moon from blowing out too much while recorded detail in the dark foreground. All with the 20mm lens and Nikon D750.
The workshop participants made the best of the night, shooting the moonlit scene down the canyon, toward the north and Cassiopeia.
Nightscape photographer at a workshop I was presenting, shooting Red Rock Canyon in the moonlight at Waterton Lakes National Park, June 19, 2016. Cassiopeia is in the sky to the north. This is a single exposure for 13 seconds at f/2.8 and ISO 800 with the 20mm lens and Nikon D750.
And as here, shooting from the canyon footbridge, toward the very photogenic Anderson Peak, with Jupiter just above the peak.
A workshop group of photographers at Red Rock Canyon at Waterton Lakes National Park, Alberta, during the 2016 Wildflower Festival, June 19, 2016. Taken by the light of the Full Moon at solstice. Jupiter is the bright object behind Anderson Peak.
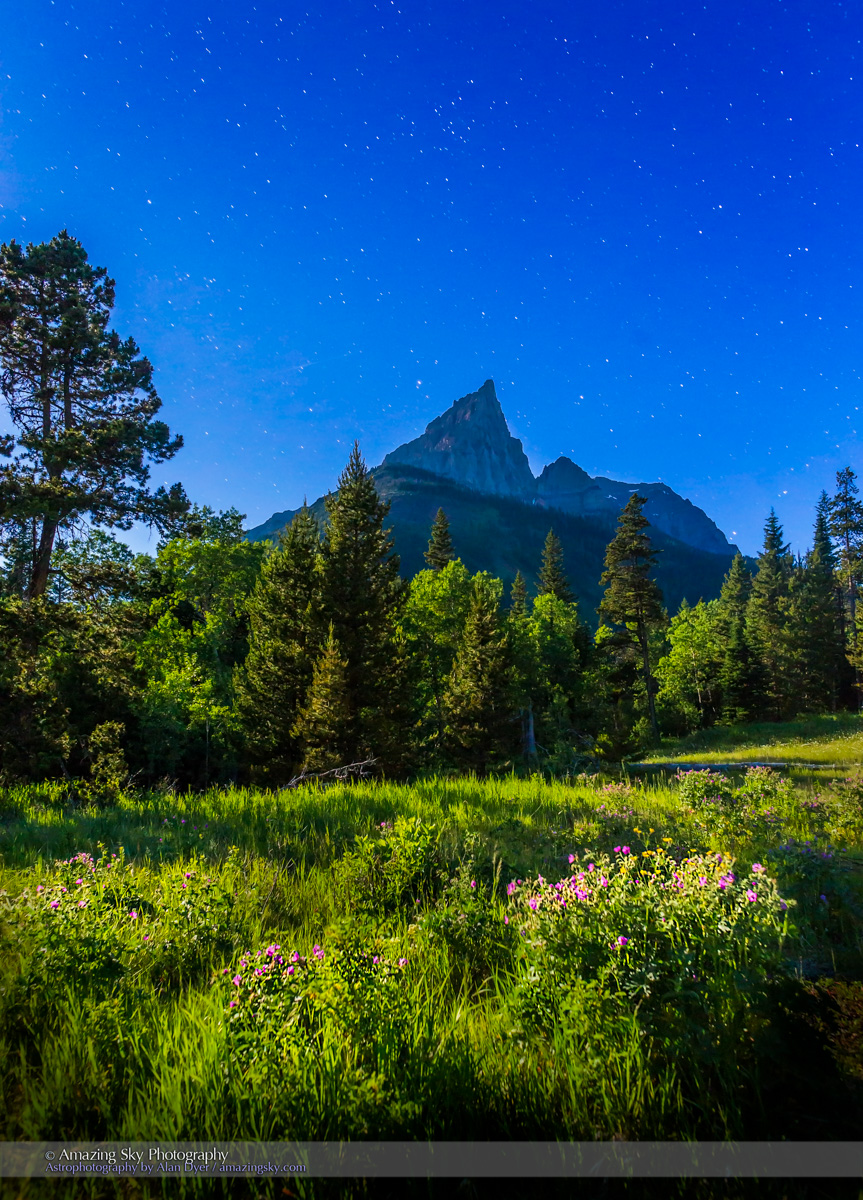
In keeping with the wildflower theme, I shot wild roses, Alberta’s provincial flower, in the moonlight, with Anderson Peak and stars in the distance.
Alberta wild roses in the moonlight with Anderson Peak in the background, at Red Rock Canyon, Waterton Lakes National Park, Alberta. Taken on Full Moon night June 19, 2016, at a workshop on nightscape imaging I was teaching as part of the Waterton Wildflower Festival. This is a single exposure at f/8 for 20 seconds at ISO 3200 with the 20mm lens and Nikon D750.
While we might like dark skies when going to places like Waterton, there are many magical options for photography when the Moon is shining.
Mountain scenes take on a new look when photographed by moonlight.
Last week I spent four wonderful nights shooting the landscapes of Waterton Lakes National Park under the light of the waxing Moon. For two of the evenings I taught small groups of photographers eager to learn how to extend their photo skills into the night.
We shot at Red Rock Canyon both nights, an ideal spot for its many composition options for shooting both toward and away from the Moon.
The lead image is a view looking up the canyon, with Cassiopeia in view. Always nice to have a recognizable constellation so well positioned.
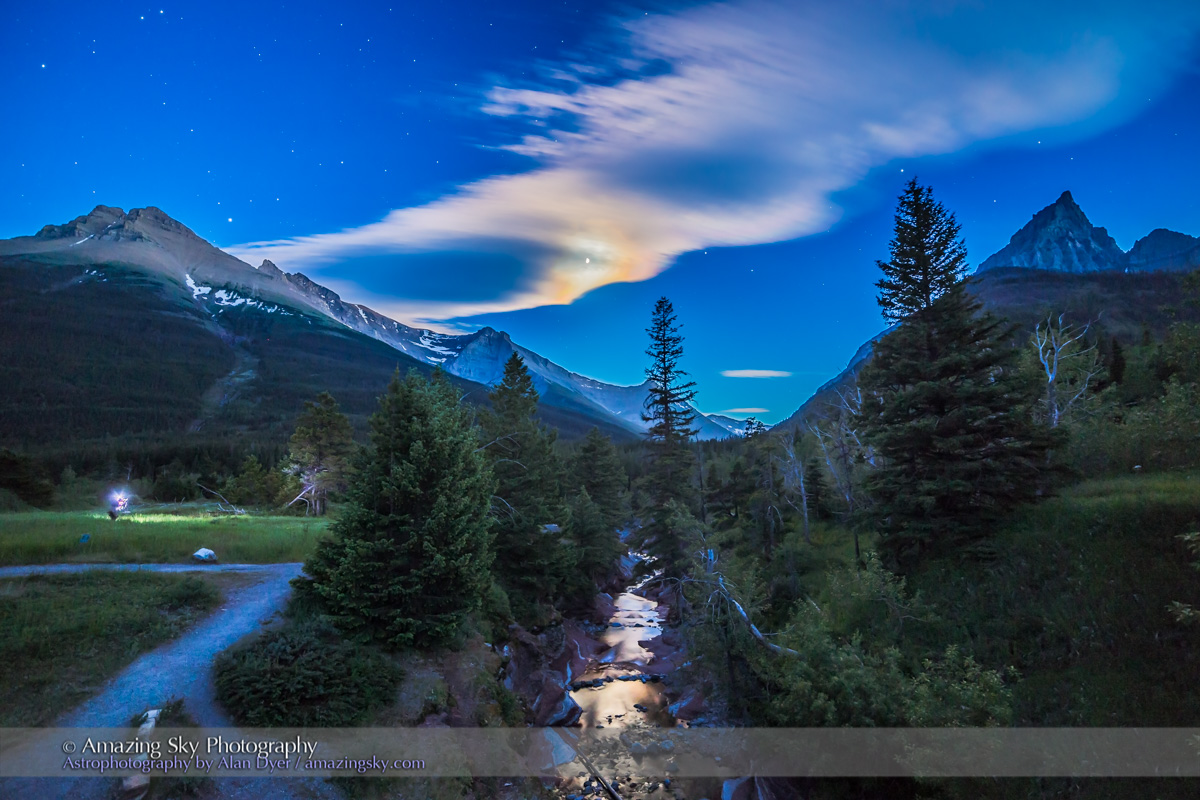
The image just above looks toward the Moon, partly hidden by colourful clouds diffracting the moonlight. A student is at left trying out a composition.
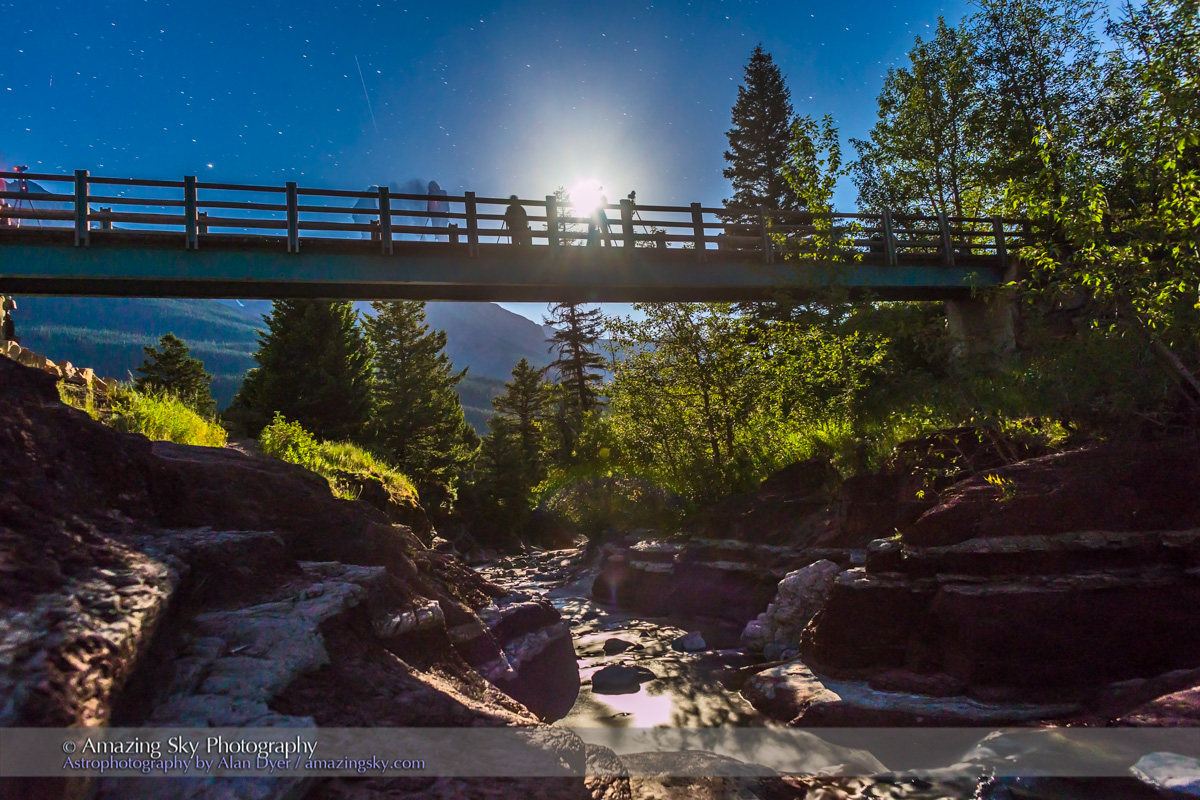
Here, students, silhouetted by the Moon, use the footbridge as their vantage point to photograph moonlight on the canyon waters and walls.
My workshops were part of the annual Waterton Wildflower Festival. So, a number of us tried to shoot flowers by moonlight, no easy task considering the wide apertures and shallow depth of field usually required, even under bright moonlight.
But the photo above is my take on summer alpine flowers in a meadow with the iconic Anderson Peak in the distance.
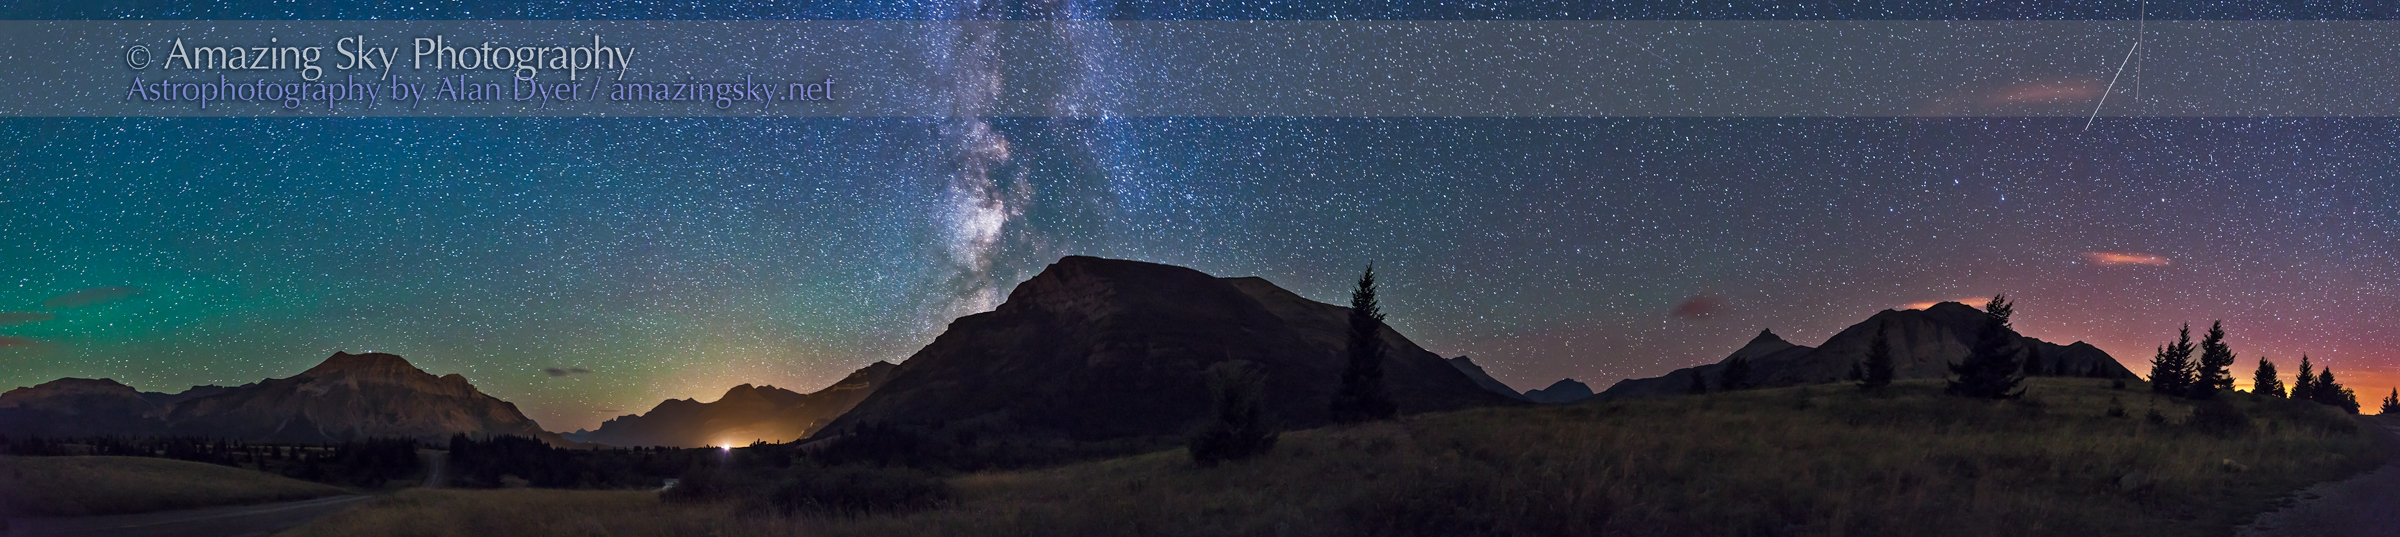
Three nights were wonderfully clear. But my first night, set aside for scouting locations for the Workshops, was beset by some clouds. However, I made use of them to create a moody moonlit cloudscape panorama of the Big Dipper over Blakiston Valley.
I’ll be back in Waterton in September for the Wildlife Festival. We won’t try to shoot bears by moonlight! One did wander by at the start of our Saturday Workshop!
Instead, we’ll concentrate on photographing the Milky Way. That’s Friday, September 18.
Happy Canada Day! From one of the most scenic places in the country.
I spent a wonderful four days and nights last week at Waterton Lakes National Park, Alberta, with near perfect weather conditions.
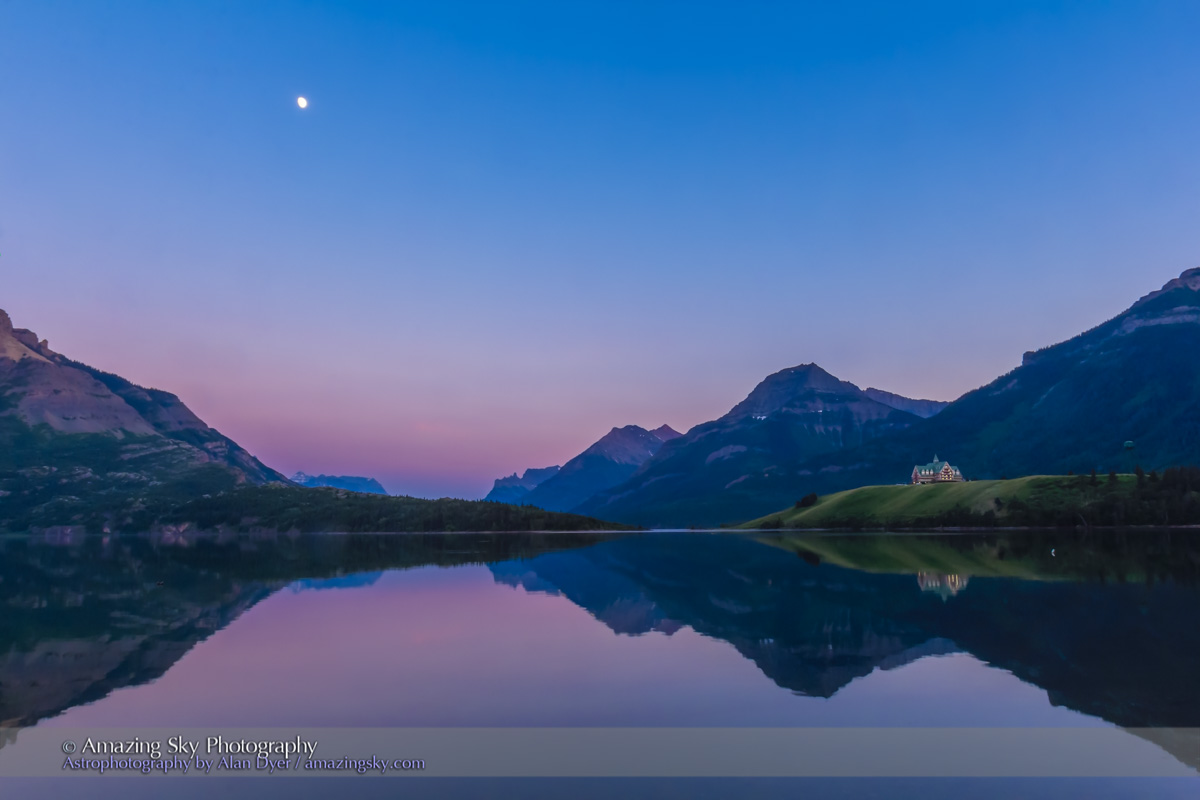
For one, the infamous winds of Waterton weren’t blowing, allowing me to shoot the iconic Prince of Wales Hotel reflected in the calm waters of Middle Waterton Lake at Driftwood Beach, with the waxing Moon above in the twilight sky.
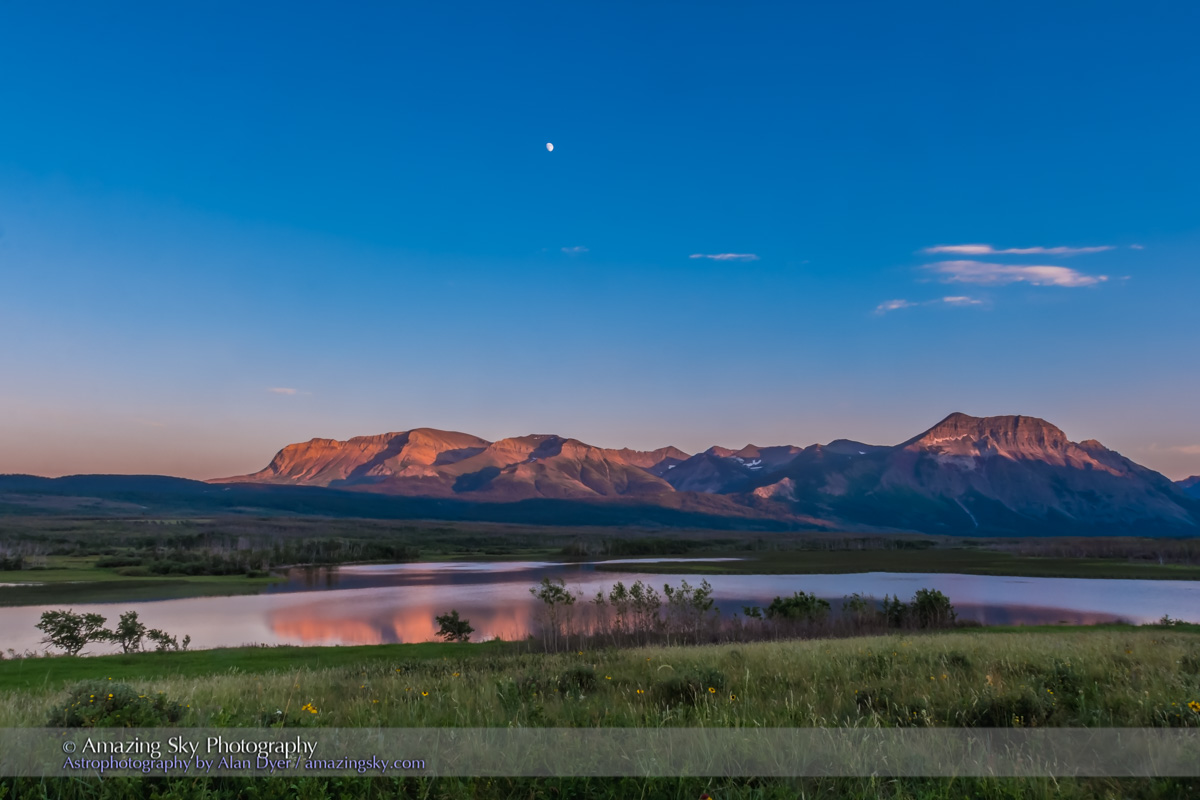
Earlier in the evening, I was at the Maskinonge Overlook shooting some video for upcoming tutorials. At sunset I shot this image, below, of the Moon above the alpenglow of the last rays of sunlight.
The rising waxing gibbous Moon in the sunset sky over Maskinonge Wetlands at Waterton Lakes National Park, Alberta, June 2015. The last rays of sunset are illuminating the peaks in alpen glow. This is an HDR stack of 3 exposures with the Canon 60Da and 16-35mm lens.
Happy Canada Day!
And don’t forget to look west for the ongoing Venus-Jupiter conjunction. I missed the best night last night, June 30 – clouds! But here’s hoping for tonight.
Aurora watchers were on alert! Look up after sunset on June 22 and the sky should be alive with dancing lights.
And the predictions were right.
I headed out to a nearby lake in preparation for seeing and shooting the show. And as soon as the sky got dark enough the Lights were there, despite the bright solstice twilight.
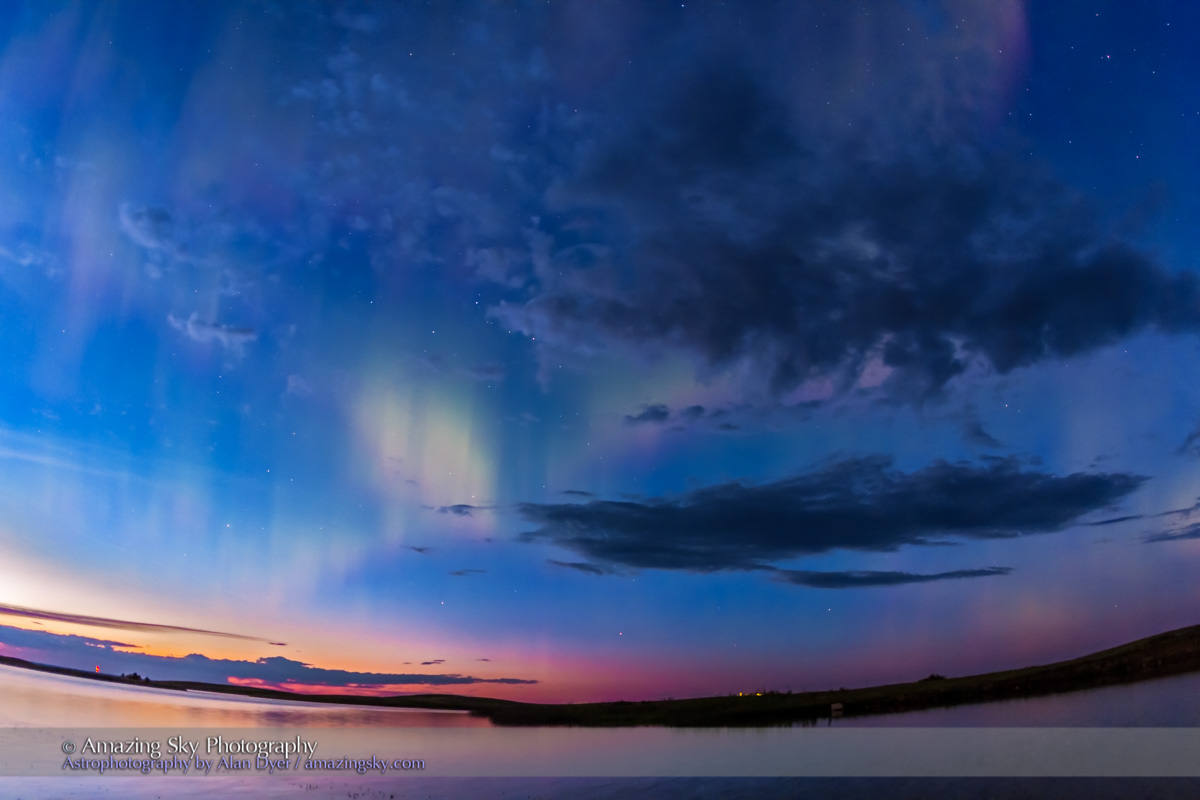
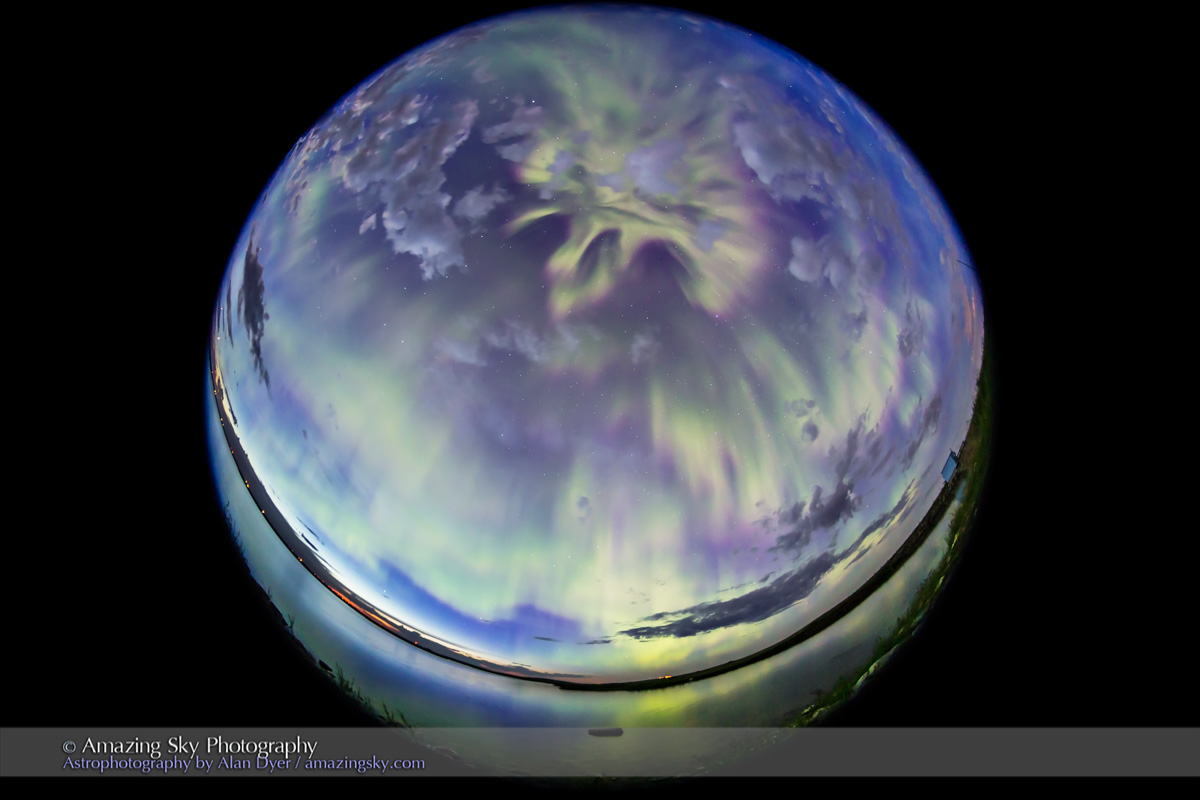
The display reached up to the zenith, as seen in my fish-eye images, like the one below. I shot with three cameras, all shooting time-lapses, with the fish-eye camera recording the scene suitable for projection in a digital planetarium.
However, it was apparent we here in western Canada were seeing the end of the display that had been going on for hours during an intense geomagnetic storm. The aurora was most intense early in the evening, with a minor outburst about 11:30 to 11:45 pm MDT.
The aurora then subsided in structure and turned into a more chaotic pulsating display, typical of the end of a sub-storm.
However, an attraction of this display was its juxtaposition over another storm, an earthly one, flashing lightning to the northwest of me.
By 1 a.m. MDT the display, while still widespread over a large area of the northern sky, had turned into a diffuse glow.
But 60 gigabytes of images later, I headed home. The time-lapse compilation will come later!
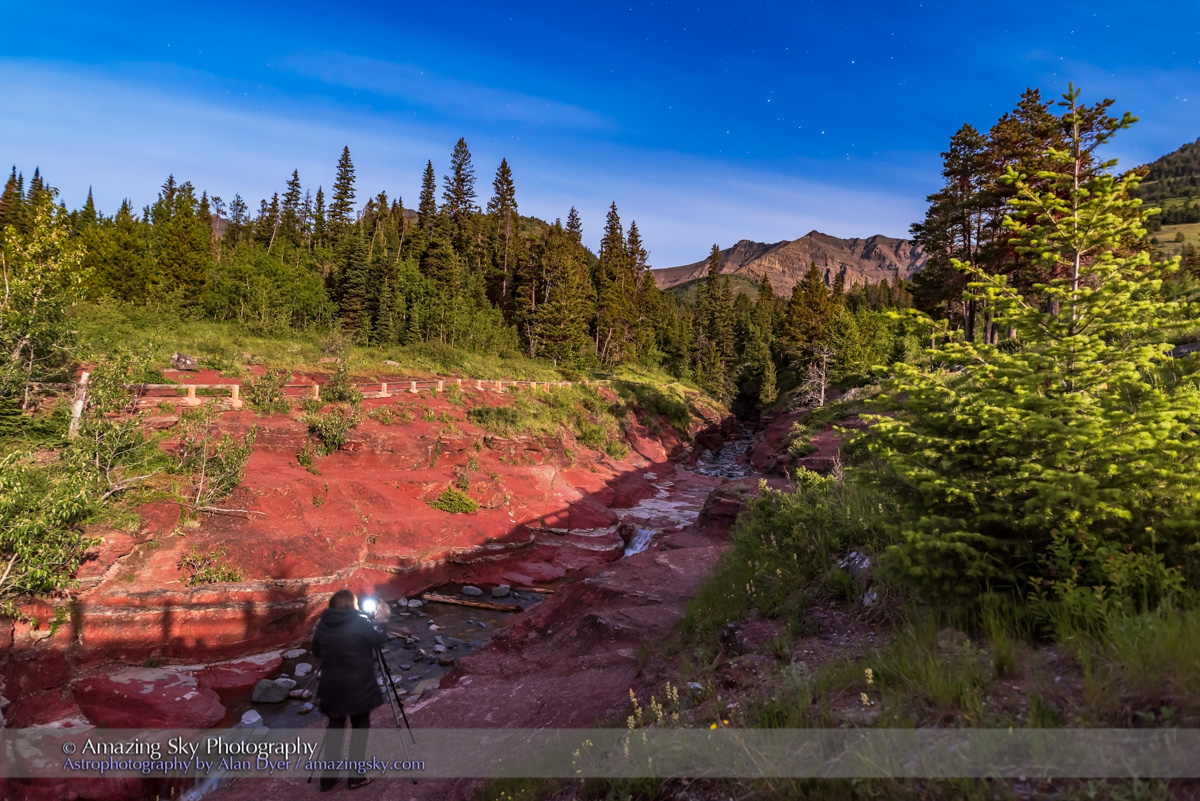
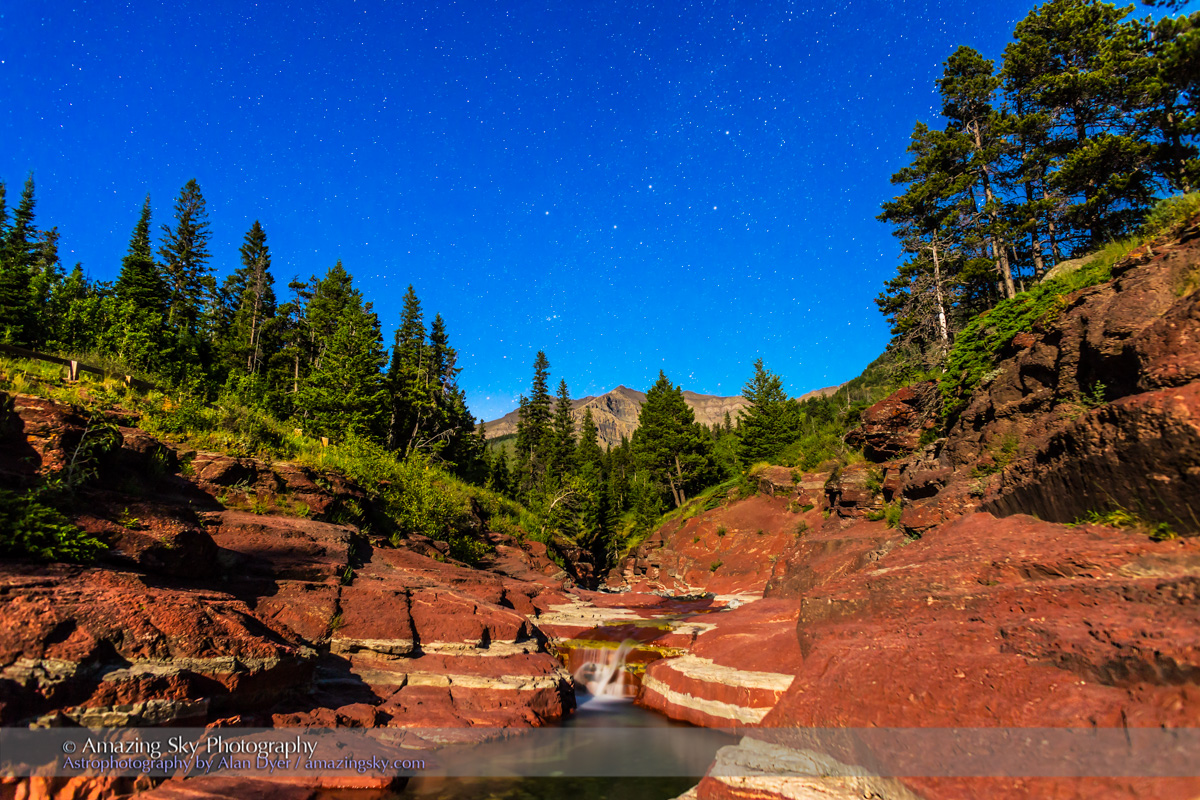
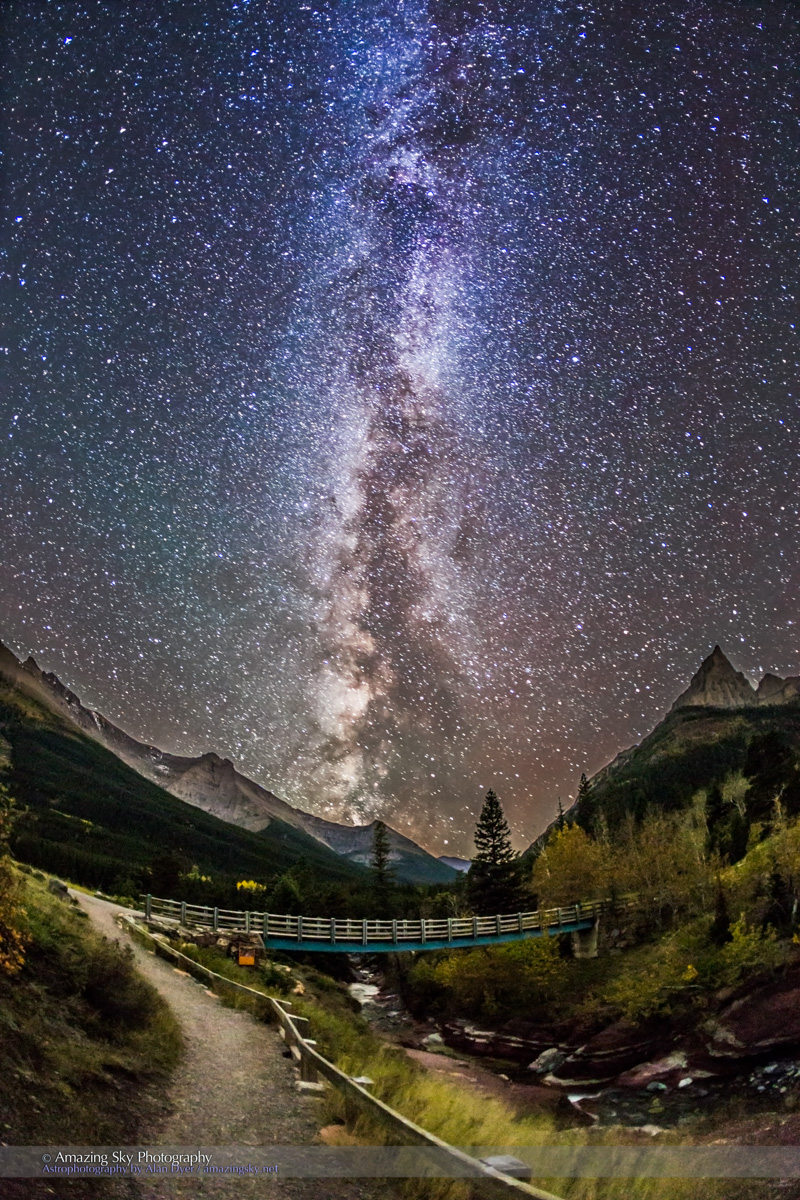
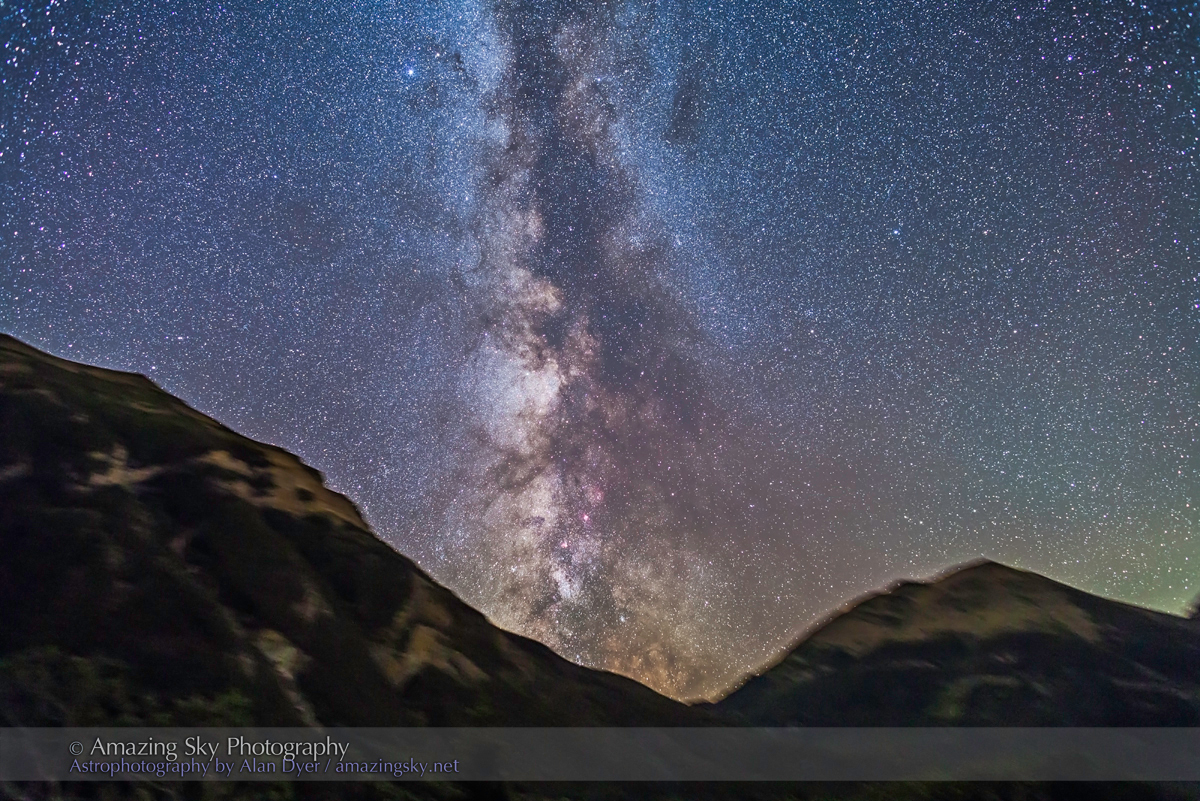
The Milky Way illuminates the trail at Red Rock Canyon, in Waterton Lakes National Park.
Last Sunday night was incredibly clear. I trekked around Waterton Lakes National Park, taking panoramas at various sites. This is Red Rock Canyon, a popular spot by day.
By night it is one of the darkest accessible places in the Park. Here the landscape is lit only by the light of the stars and Milky Way.
This is a composite of two exposures, both on a tripod with no tracking of the sky motion:
– one exposure was 60 seconds for the sky to minimize star trailing.
– the other exposure, taken immediately following, was 3 minutes for the ground, to bring out detail in the dark, starlit landscape.
I blended the two exposures in Photoshop, creating a single image with the best of both worlds, earth and sky.
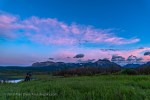
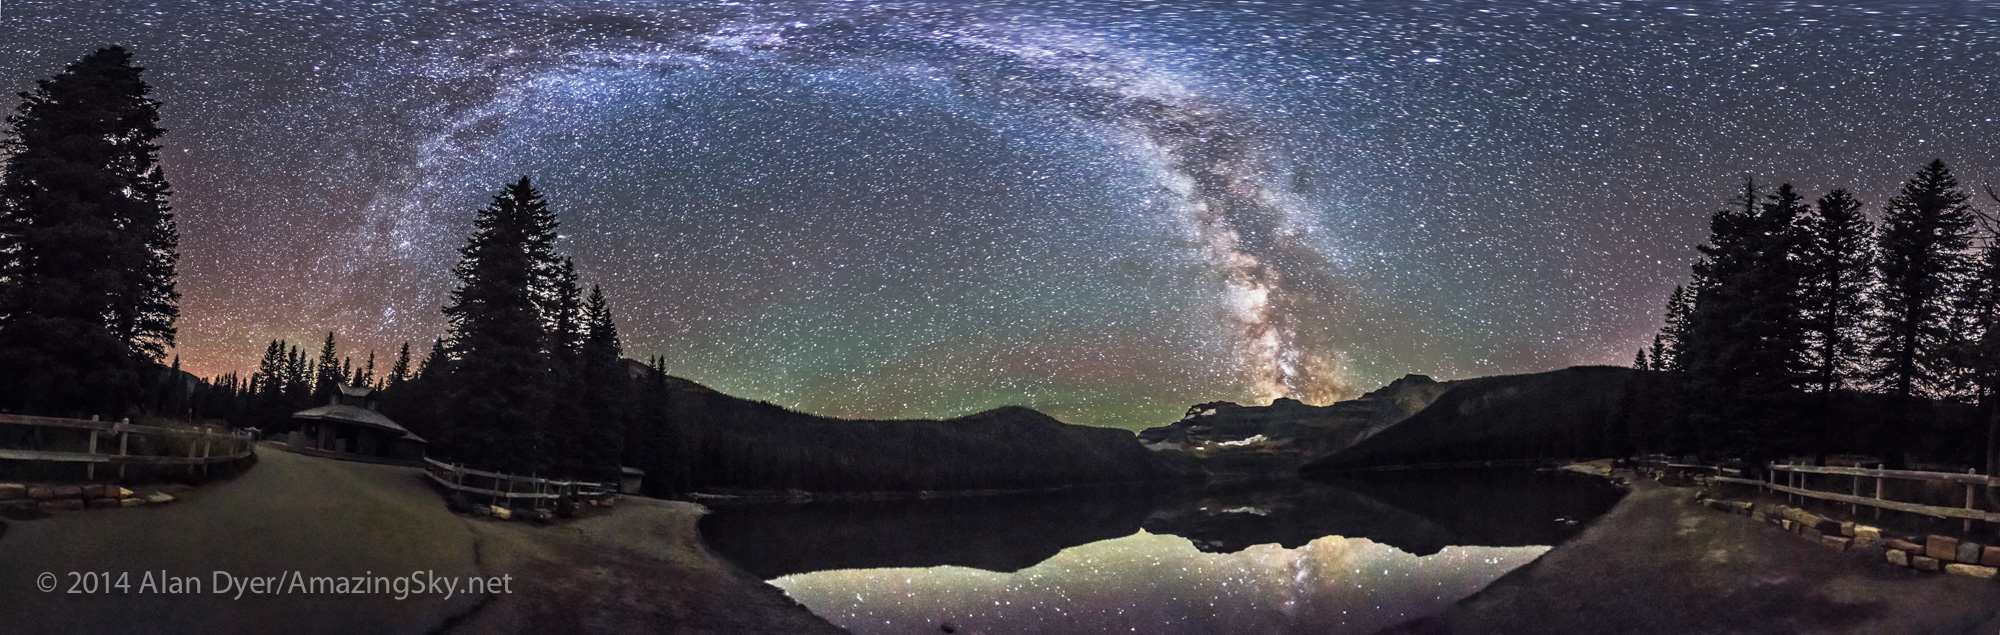
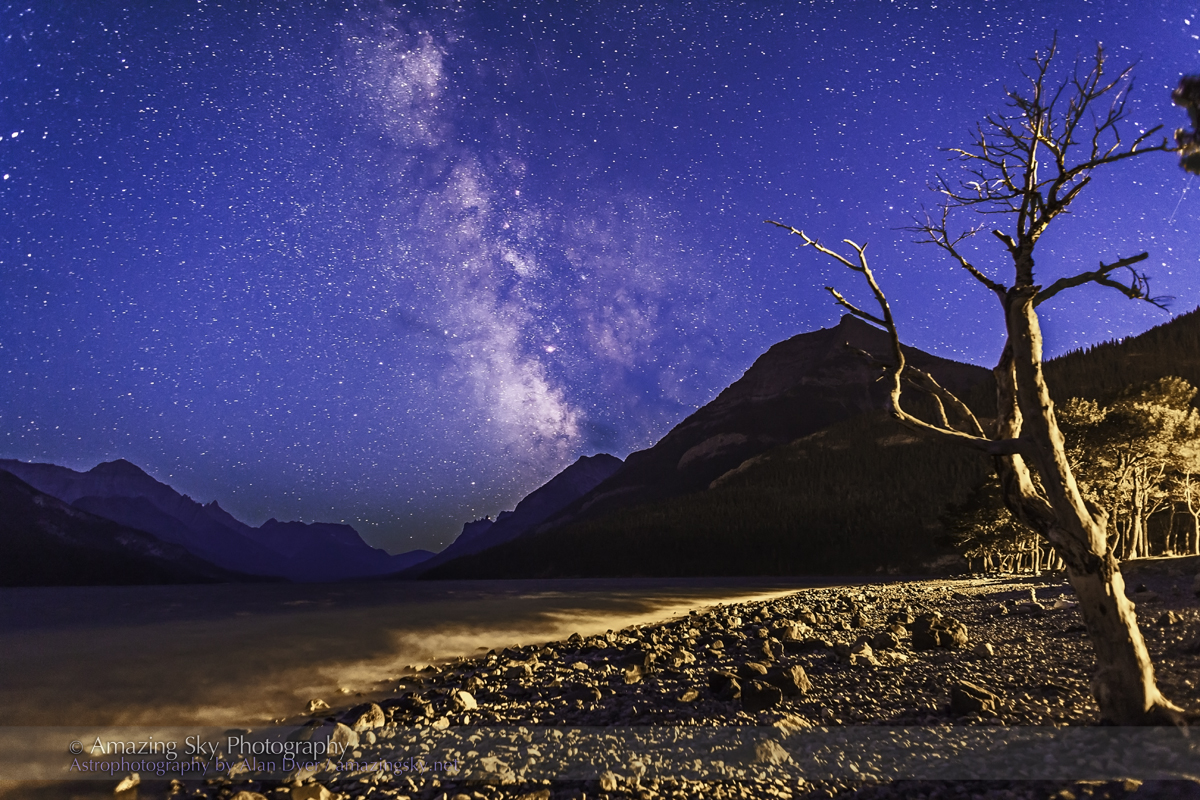
The Milky Way spans the sky and reflects in the calm waters of Cameron Lake, in Waterton Lakes National Park.
This week I’m spending a few nights, at dark-of-the-Moon, back at Waterton Lakes, at a stunning time of year. The aspens are golden, the sky is blue, and the nights are even warm.
Though it is officially autumn, the weather is better now than we had it some weeks in summer. Plus, the Park is now quiet as businesses wind down, preparing to close up for the winter.
I’m shooting night sky panoramas in Waterton, with Cameron Lake one of the wonderful sites I visited last night in a whirlwind tour around the Park to take advantage of a stunningly clear night.
In summer, Cameron Lake is home to docks for canoes and paddle boats. But all are gone now. By winter this lake is home to huge snowfalls, as its location in extreme southwestern Alberta catches the full onslaught of moist Pacific air.
But now, with the early onset of darkness and fine weather, the lake and the Park are superb places for nightscape photography.
I shot this Sunday night, September 21. This is a stitch of 8 segments, each shot with a 15mm lens at f/2.8 for 1 minute at ISO 4000 with the Canon 6D. I used PTGui to stitch the panorama.
My new 4-minute video presents time-lapse and still images shot in the Rockies this past summer.
It’s been a busy summer for shooting. Since July I’ve spent a week each in Banff, Jasper and Waterton Lakes National Parks shooting nightscape stills and time-lapse videos of Alberta’s famous Rocky Mountain landscapes by night.
This compilation includes some of the best footage, plus some panned still images, set to a wonderful piece of royalty-free (i.e. legal!) music by Adi Goldstein.
For many of the sequences I employed “motion control” (MoCo) devices that incrementally move the cameras during the one to three hours that they are taking the 200 to 450 frames needed for a time-lapse sequence.
I used the compact single-axis Radian, the 2-axis eMotimo, and the Dynamic Perception Stage Zero dolly, now equipped with their new Stage R single-axis panning unit. This was the first summer with the eMotimo and Stage R, so I’m still learning their best settings for speed, angles, and ramping rates.
In recent blogs you’ve seen many still images shot as part of these sequences, or with other cameras dedicated to shooting stills. Now you get to see some of the time-lapse videos that represent many nights of shooting, and many hours sitting in the car waiting for the automated camera gear to finish its shooting task.
Time-lapse shooting is an exercise in dedication and self-denial!
I hope you enjoy the result. Do click on the Enlarge button to go full-screen. Or visit my Vimeo site to watch the video, and others, there.
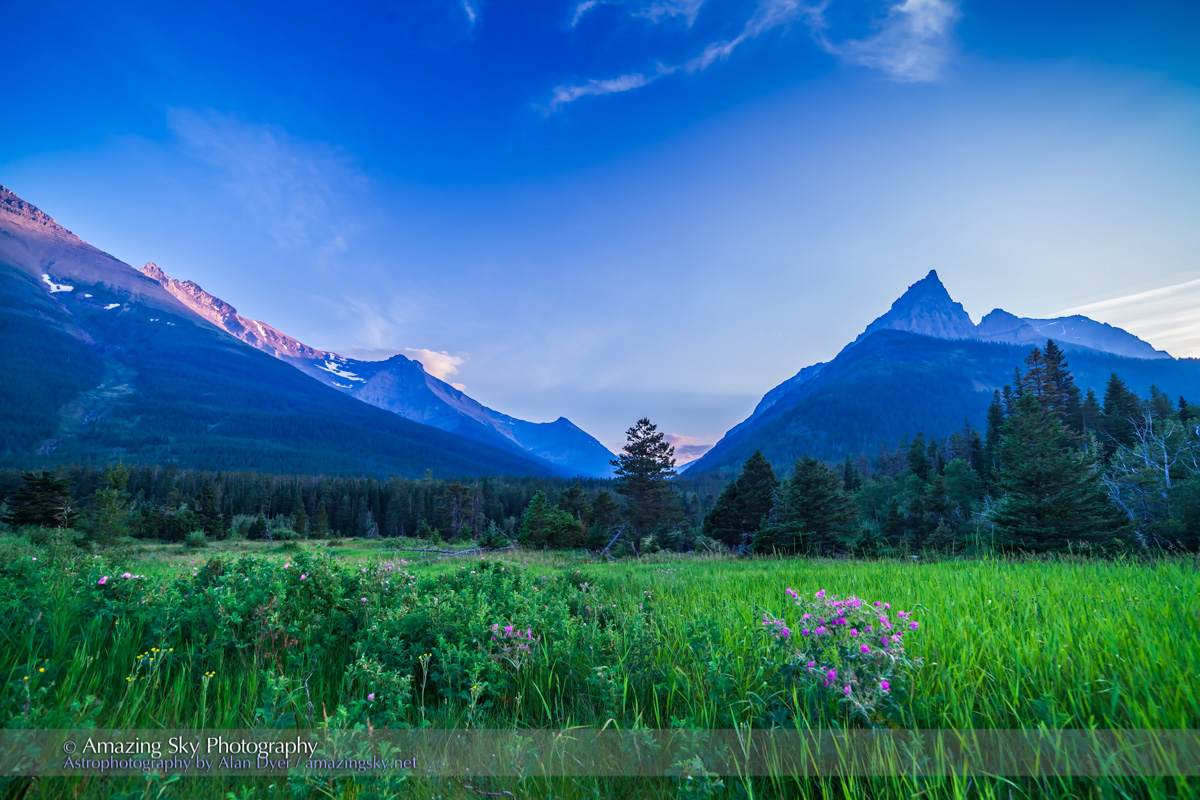
Evening light illuminates the peaks around Red Rock Canyon in Waterton Lakes National Park.
I took this image last evening as part of a time-lapse sequence, framing the wild roses in the foreground and the peaks of Mount Blakiston (at left) and Mount Anderson (at right) in the distance. The site is the popular Red Rock Canyon area of the Park.
The last rays of sunlight are hitting Blakiston.
That peak is named for Thomas Blakiston, the first scientific explorer to map the area of Waterton and the passes of the southern Canadian Rockies. Although at the time he was here in 1858, this was still British colonial territory separated from the United States by an ill-defined border running along the 49th parallel just south of this spot.
Blakiston was part of the British Palliser Expedition, led by John Palliser, whose mission was to survey the little-known region south of the South Saskatchewan River to assess its suitability for settlement.
Palliser concluded that the parched rain-shadow area of what is now southern Saskatchewan and Alberta was “desert, or semi-desert in character, which can never be expected to become occupied by settlers.” That area became known as the Palliser Triangle. Only extensive irrigation made settlement possible.
Blakiston was the expedition’s magnetical observer, taking readings of the Earth’s magnetic field strength and direction throughout the region. He disputed Palliser’s leadership and soon broke away from the expedition to conduct his own treks and compile his own reports. It was Blakiston who named the area after Charles Waterton, a famous British naturalist of the time. The region became a nationally-recognized park in 1895.
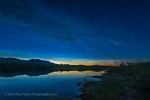
The setting Sun lights the clouds over Upper Waterton Lake, Alberta.
Waterton Lakes National Park is certainly one of my favourite places. The scenery is wonderful and the town small and quiet. It has all the beauty of Banff with none of the retail sprawl and traffic jams.
I shot the scene above two evenings ago, July 15, from the viewpoint at the Prince of Wales Hotel. It overlooks Middle and Upper Waterton Lakes, the latter lighting up as it reflects the sunset clouds. This is a frame from a motion-control time-lapse.
Last night I shot a time-lapse from the lakeshore, looking through the windswept trees toward the south end of the Upper Lake, as the Milky Way begins to appear in the darkening twilight.
Lights from the campground illuminate the trees with just enough light to balance the foreground and sky. Sometimes you can make use of man-made light.
I’m here at Waterton to conduct some public programs Friday and Saturday night. Skies are clear but hazy with smoke and cirrus clouds. But the days and nights are warm and aren’t windy, a welcome treat in Waterton!
It was a good year for time-lapse photography at home. Here’s my compilation of Alberta time-lapses in a 3-minute music video.
For a year-end look back at 2013 I assembled these highlights of my year of shooting time-lapse movies of the Alberta sky, by day and night.
I’ve included clips shot around home in rural southern Alberta, and further afield at popular photo spots around the province such as Waterton Lakes National Park, Banff, Writing-on-Stone Provincial Park, and Cypress Hills Provincial Park.
I hope you enjoy it! Be sure to maximize the video screen and select HD. Or for a better grade version check out my Vimeo channel.
________________________________________________
Some technical background:
I shot all the frames for the movies (150 to 300 frames for each clip) with either a Canon 5D MkII or a Canon 60Da camera, equipped with various lenses from 8mm to 200mm. For many of the clips the cameras were on motion control devices: the Radian azimuth panning unit, an Orion TeleTrack mount, or aDynamic Perception Stage Zerodolly unit. You see the latter in action behind the credits.
The summer Milky Way sets behind the peaks of Waterton Lakes National Park, signalling an end to summer.
This was the scene last Saturday night, on a perfect summer night in the Rockies. The glorious starfields of the summer Milky Way are setting behind the mountains.
The Small Sagittarius Starcloud is just above the mountain ridge while above it are the red patches of the Swan and Eagle Nebulas.
Farther up the Milky Way, stars brighten into another starcloud, the Scutum cloud, flanked by two dark lanes of dust. Above it shine the stars of Aquila, Ophiuchus, Lyra, and southern Cygnus. The two bright stars are Altair (below) and Vega (top right).
This is an alternative view of the same scene, with the camera in “landscape” orientation.
I took both from a pull-off on the Red Rock Canyon road in Waterton. Each image is a stack of four 3-minute exposures, each tracking the stars with the camera on an iOptron SkyTracker.
The Milky Way from Canada just doesn’t get any clearer or the skies any darker.
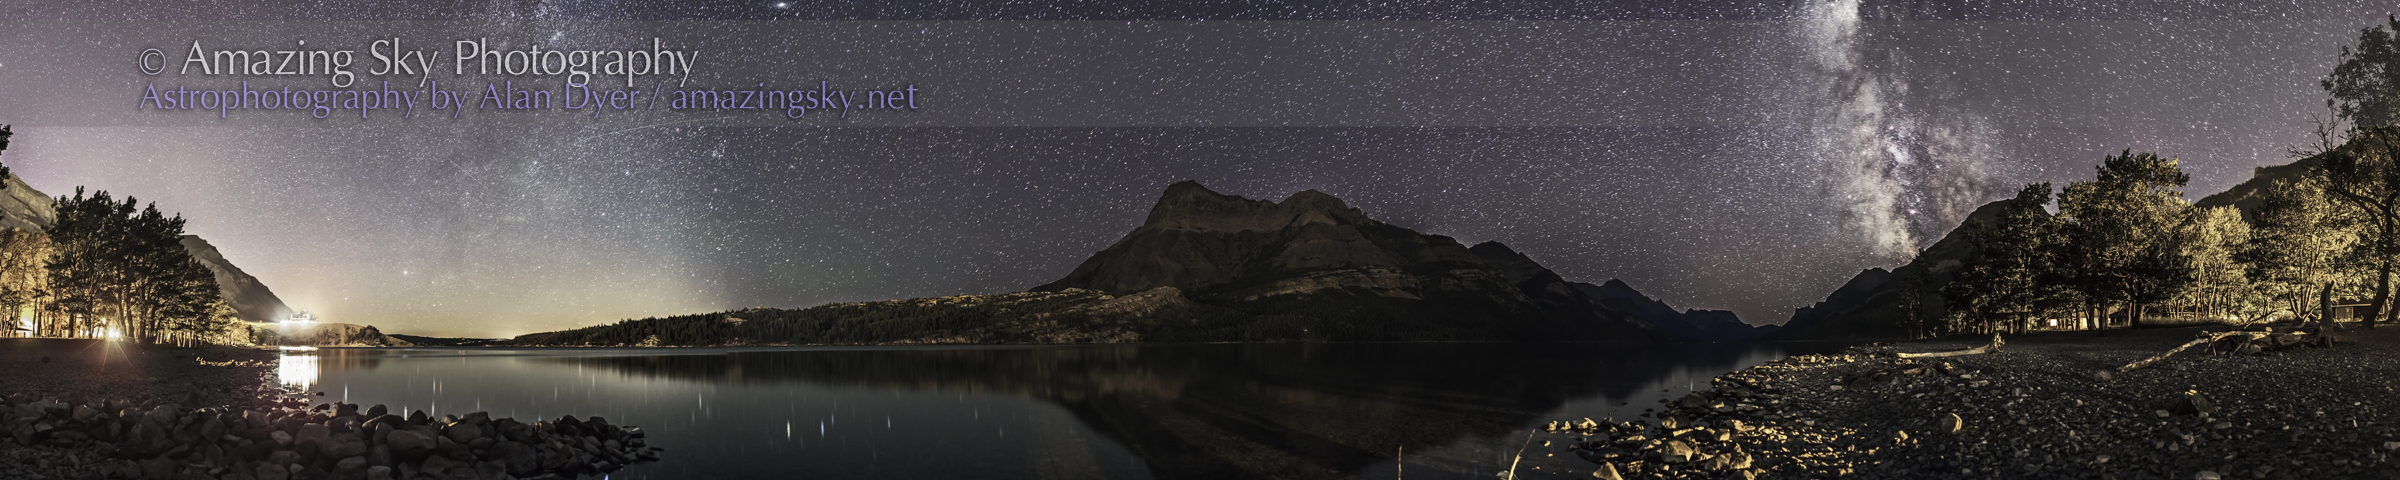
Two panoramas compare the view of Waterton Lakes National Park by night and by day.
Last night was as perfect as it gets here in the southwest corner of Alberta. The sky was crystal clear and the wind was calm, unusual for Waterton Lakes.
I spend the night travelling around the Park shooting nightscapes, including this night pan taken from the shoreline in the townsite, again contending with the light pollution of unshielded town streetlights, and the glare from lights on the Prince of Wales Hotel. But even they can’t wash out the marvellous Milky Way.
Just after taking this I went up to the Hotel to shoot scenes from its overlook, back toward the town. As I walked up to the Hotel, a guest was getting out of her car and waving an iPhone around with an astronomy app, hoping to see the stars. I overheard her saying, “I guess we won’t see a lot of stars from here,” referring to the glare of the lights of the Hotel.
The night panorama sweeps from northwest to southwest over 270°. At left we’re looking north toward the prairies. An aurora there would have been well-placed and timed. As it is, there is just the faintest hint of Northern Lights. At right, is the centre of the Galaxy area of the Milky Way.
Stars shine reflected in the unusually clam waters of Upper Waterton Lake.
This day panorama takes in a smaller angular sweep. I took it from a similar shoreline location just at sunset, as the last rays of the Sun lit Vimy Peak in alpenglow. Returning to dock on the last voyage of the day is the historic tour boat, The International, a wood-hulled ship built in 1927, the same year the Prince of Wales Hotel opened. It plies these waters every summer and by winter is stored in a dry dock down the lake on the U.S. side.
It’s been a wonderful weekend here. More photos are in the processing pipeline. But for now, it’s off to Writing-on-Stone Provincial Park.
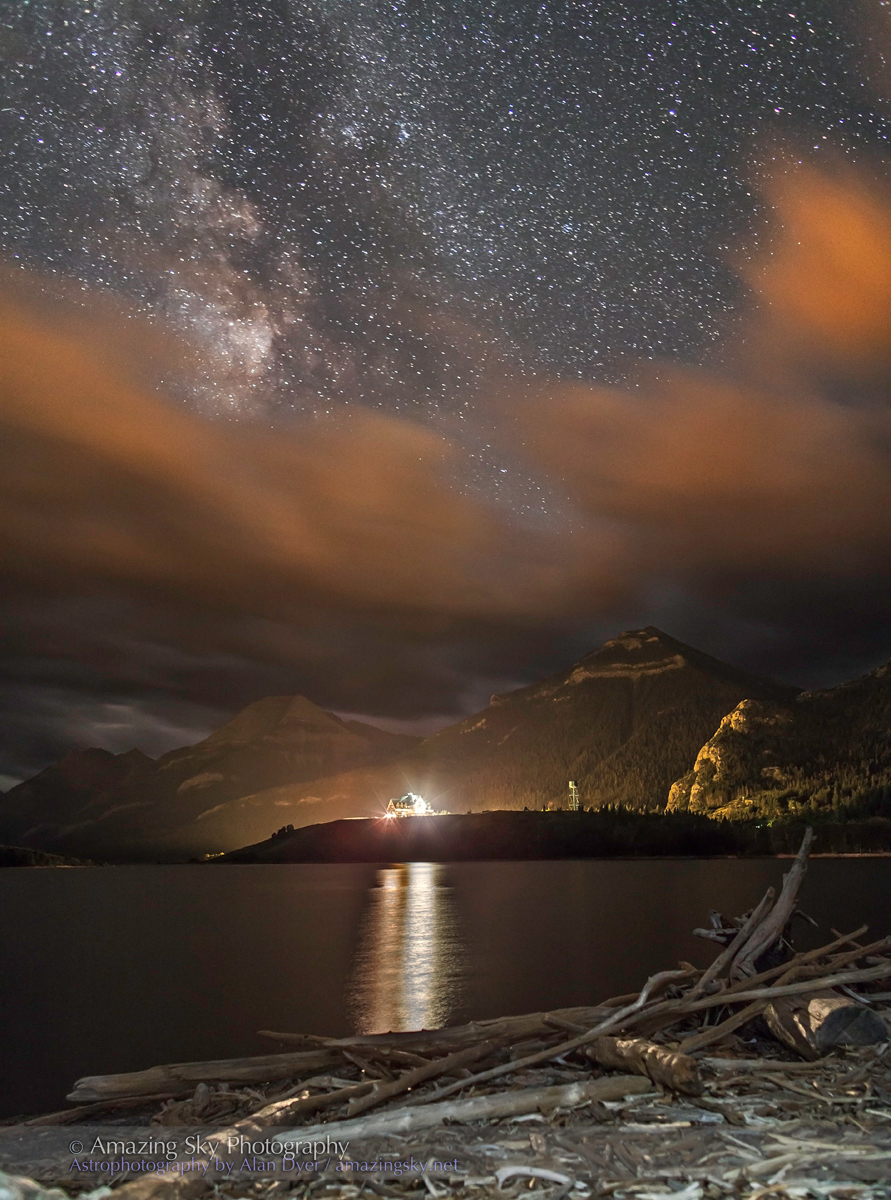
The stars and fleeting clouds appear over the grand Prince of Wales Hotel in Waterton Lakes National Park.
This was the scene last night, Friday, August 30, on a less than ideal night for nightscape shooting. But I made the best of it with some still shots in and around the Waterton townsite.
This is a view from Driftwood Beach on Middle Lake, looking south toward the Prince of Wales Hotel, the Park’s famous landmark, and a well-illuminated one at that. It shines beneath the Milky Way and clouds lit yellow from the town’s streetlights. It would take some work converting this site into a Dark Sky Preserve!
Built in 1927, the Hotel is a large log structure that has miraculously survived fire, and the howling winds that can blow at gale force down the lake. It was built by the American Great Northern Railway to lure American tourists north from Montana’s Glacier National Park.
The Milky Way glows bright in the twilight of a summer evening at Waterton Lakes National Park.
It’s been a marvellous weekend so far at Waterton Lakes, with another fine night ahead it appears, on a warm weekend to end the summer. Two nights ago I set up cameras on the shore of the main lake, shooting south to the Milky Way. The main photo above shows the Milky Way while the sky was still deep blue with evening twilight.
Light from the campground streetlights illuminates the old tree and foreground. It is light pollution to be sure, but sometimes added lighting can help, especially on a dark moonless night.
This shot comes from later in the evening with a wider angle lens and shows the Milky Way under dark sky conditions at the end of the long Upper Waterton Lake that extends south into Montana and Glacier National Park.
By stacking about 35 images taken in quick succession, each 1-minute exposures, I created this star trail effect. I used the new version of StarStaX, a free program that does a great job stacking star trails. Its latest version offers this neat “comet trails” effect as an easy-to-apply stacking option.
The Milky Way shines over the peaks of Waterton Lakes National Park on a clear summer night.
This was the view last night, August 29, under very clear skies, on the Red Rock Canyon Road in Waterton Lakes National Park, a UN World Heritage Site and a beautiful place for day and nighttime photography.
This is a 7-frame panorama sweeping over about 180° from the southeast at left and into the northwest at right, taking in the autumn constellations rising at left, over to the Milky Way in the south and to the Big Dipper skimming across the northwest horizon at right. Each frame was a 30-second exposure at f/2.2 and ISO 1600.
The green glow at left is from airglow, while the yellow and magenta colours at right are from low-level aurora and from the lights of Pincher Creek and the Crowsnest Pass communities. The bright light at left of centre is from the lights adorning the Prince of Wales Hotel, set amid the general glow of streetlights from the townsite of Waterton Lakes.
When I’m doing time-lapse sequences I often run two cameras, one with a wide-angle lens for a frame-filling rectangular view for “normal” HD movies (that’s what’s in the previous blog post), and another camera with a fish-eye lens for a circular format “all-sky” view. These scenes are for projection in full-dome digital planetariums.
This still image is one frame of 470 that I took over four hours on the night of July 20/21, showing the stars and clouds moving in the sky over Waterton Lakes National Park and the stately Prince of Wales Hotel on the bluff across the bay. North is at the bottom of the frame in this shot.
I took this image about 11:30 pm when the sky still had some twilight glow in it and just before the waning Moon was about to rise at right. So the eastern sky has a glow from the impending moonrise. However, the sky is dark enough that the Milky Way shows up running across the sky and down toward the hotel.
You can also see the Big Dipper at left and Cassiopeia at right. The Summer Triangle stars are at top right, in the south. Polaris, the North Star, is dead centre.
One of my favourite places is Waterton Lakes National Park. Even now, in 2011, the little town seems like Banff was back in the 1960s, before huge developments, resort hotels and endless shopping malls. Even at peak season the town is quiet and laid back.
It’s been a while since I had visited Waterton but was determined to this summer. A couple of days here yielded one clear night and a couple of 4-hour time-lapse sequences of stars turning over Waterton’s landmark, the Prince of Wales Hotel.
The hotel is a wood chalet-like structure built in 1927 by the Great Northern Railway as one in a chain of grand railway hotels. It sits on a bluff overlooking Waterton Lakes and remains the elegant place to stay or dine while in Waterton.
For this shot I set up at the end of the marina dock, looking north toward Polaris, the Big Dipper and Cassiopeia. This is a single 30-second exposure taken in deep twilight at the beginning of the night with the 10-22mm lens and Canon 7D camera. It’s one of 400+ frames taken for a time-lapse sequence. While lights from the hotel interior are somewhat picturesque and inviting it’s a pity that national parks still employ unshielded sodium vapour lights on roads. The streetlights are so bright and glaring they actually illuminate the mountainsides.