Nights at World Heritage Sites


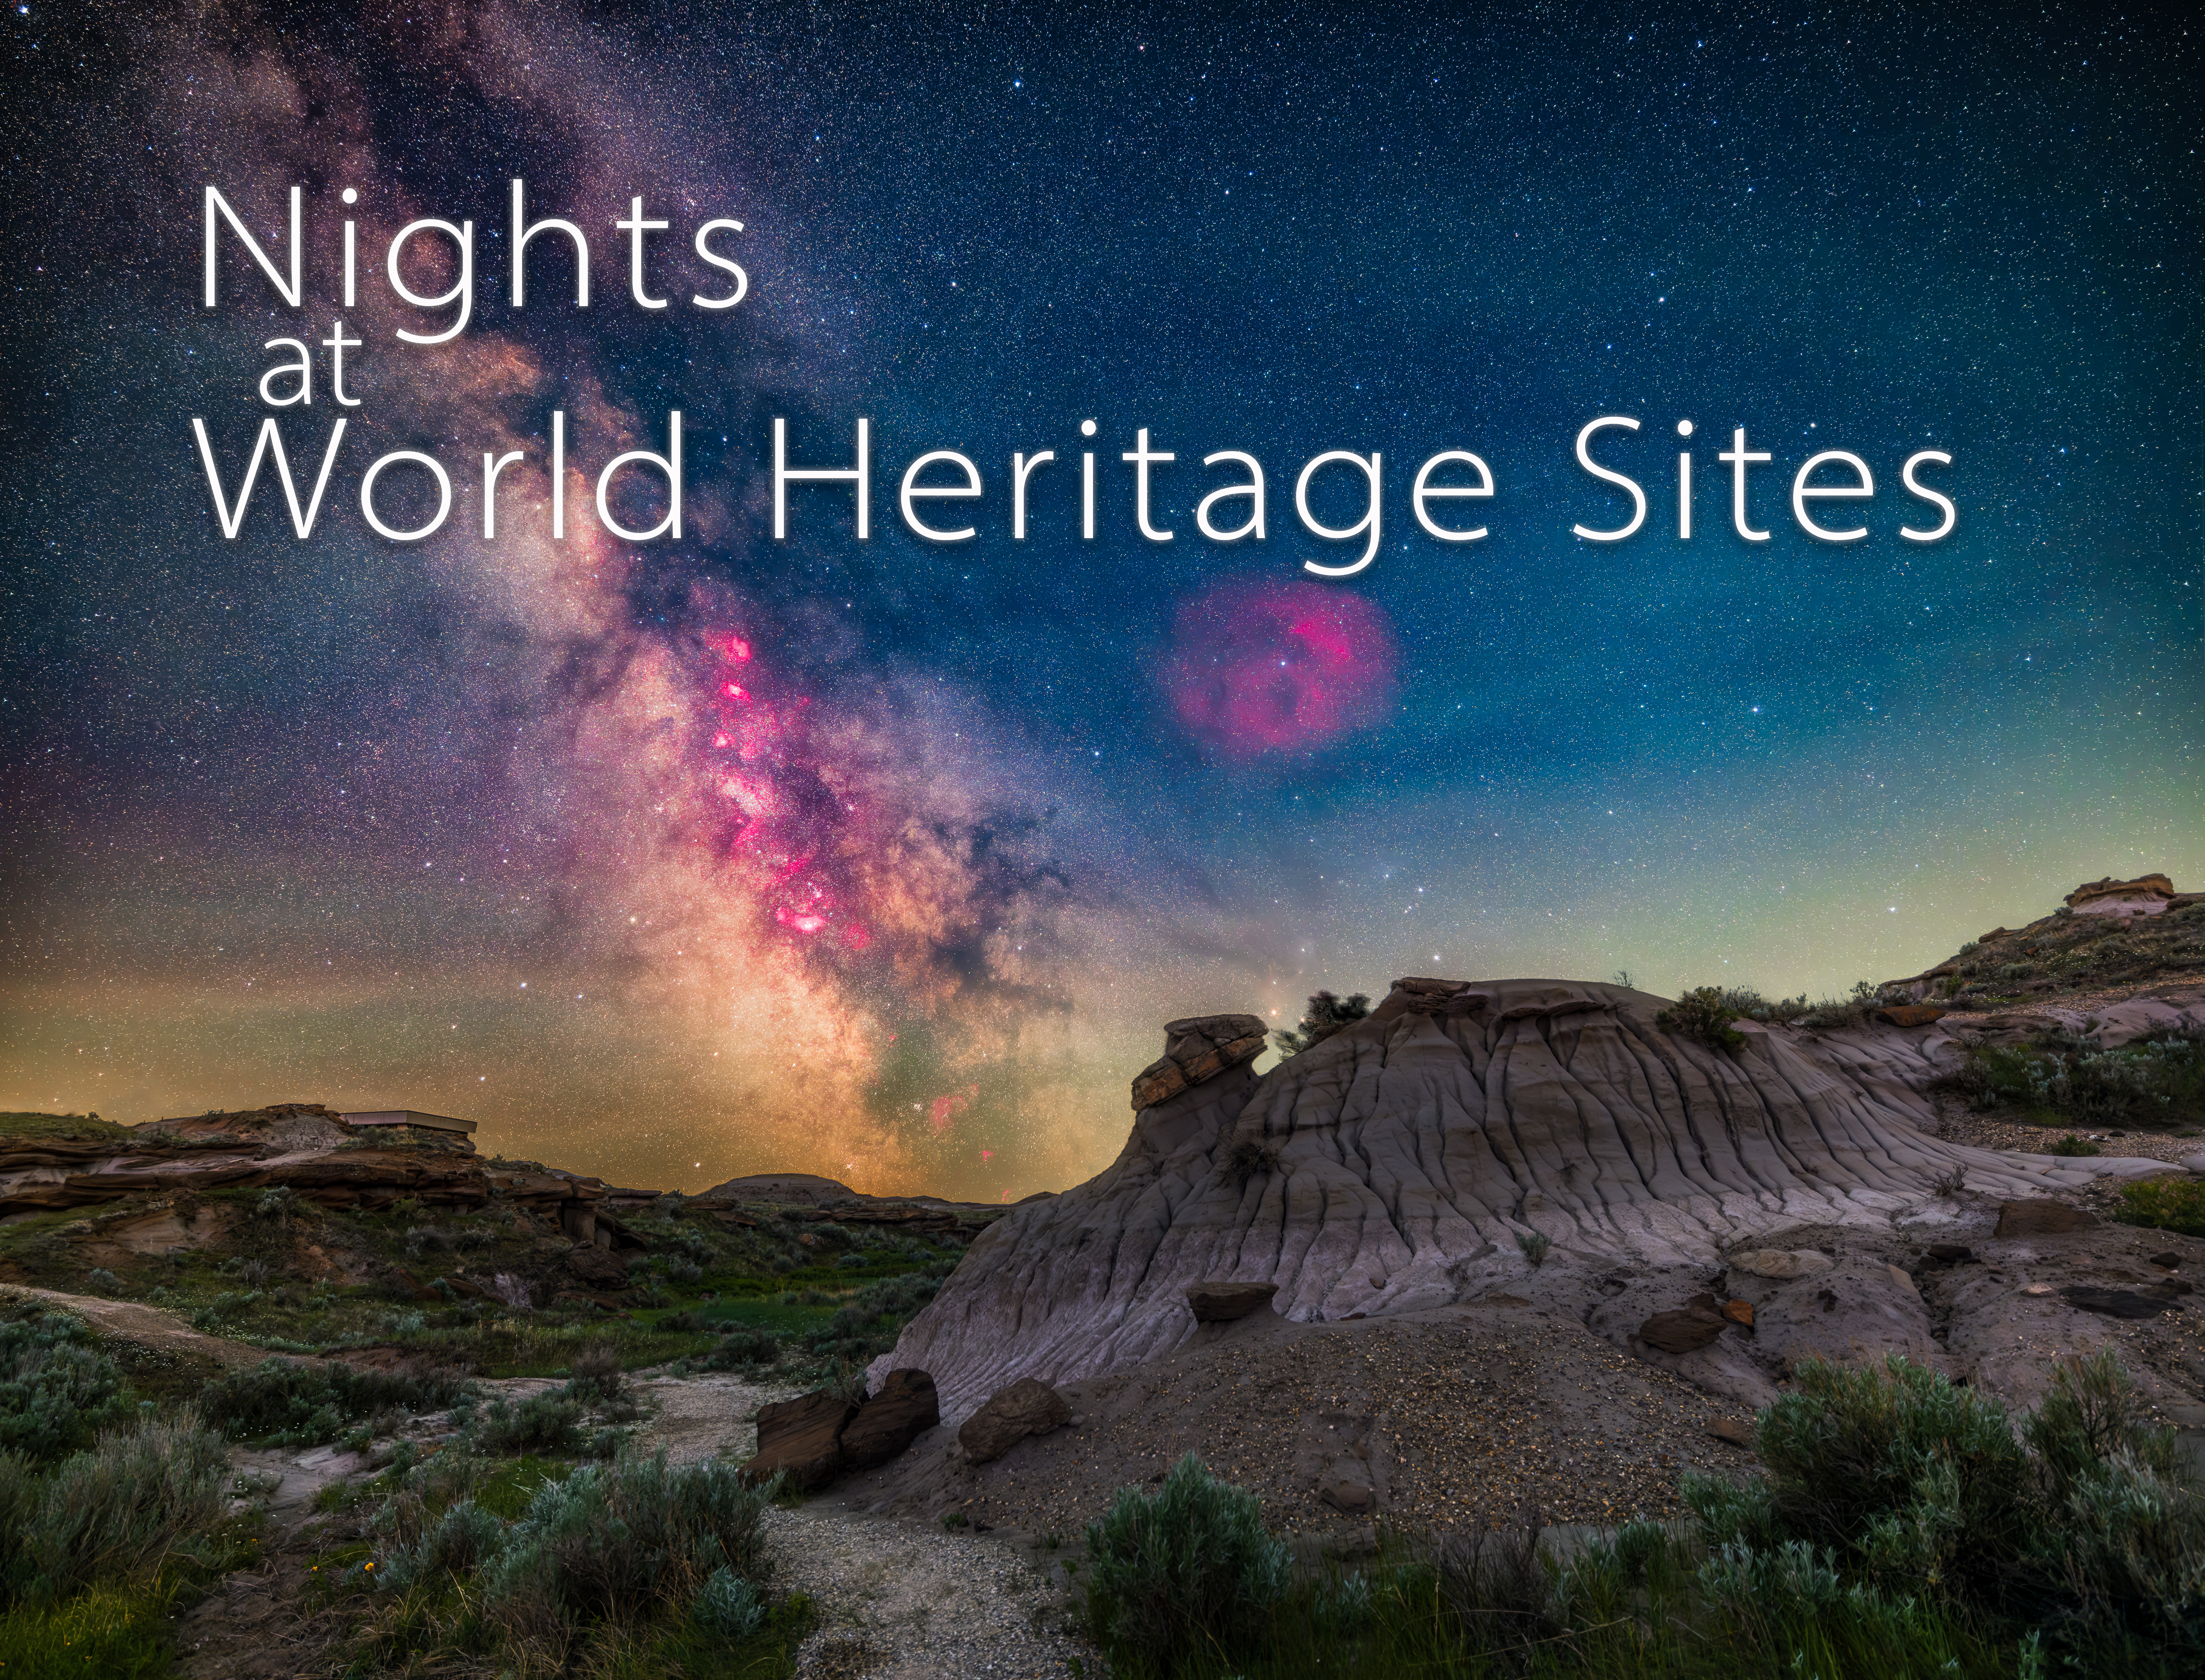
I present a selection of new images taken at local World Heritage Sites, along with some advanced nightscape shooting tips.

I’m fortunate in living near scenic landscapes here in southern Alberta. Many are part of UNESCO World Heritage Sites that preserve regions of unique scenic and cultural significance. In early June I visited several to shoot nightscapes of starry skies over the scenic landscapes.

I also took the opportunity to experiment with some new shooting techniques. So I’ve included some tips and techniques, most of the advanced variety.


First up was Dinosaur Provincial Park.

The Milky Way and its core region in Sagittarius and Scorpius is here low over the Badlands landscape of Dinosaur Provincial Park, Alberta.

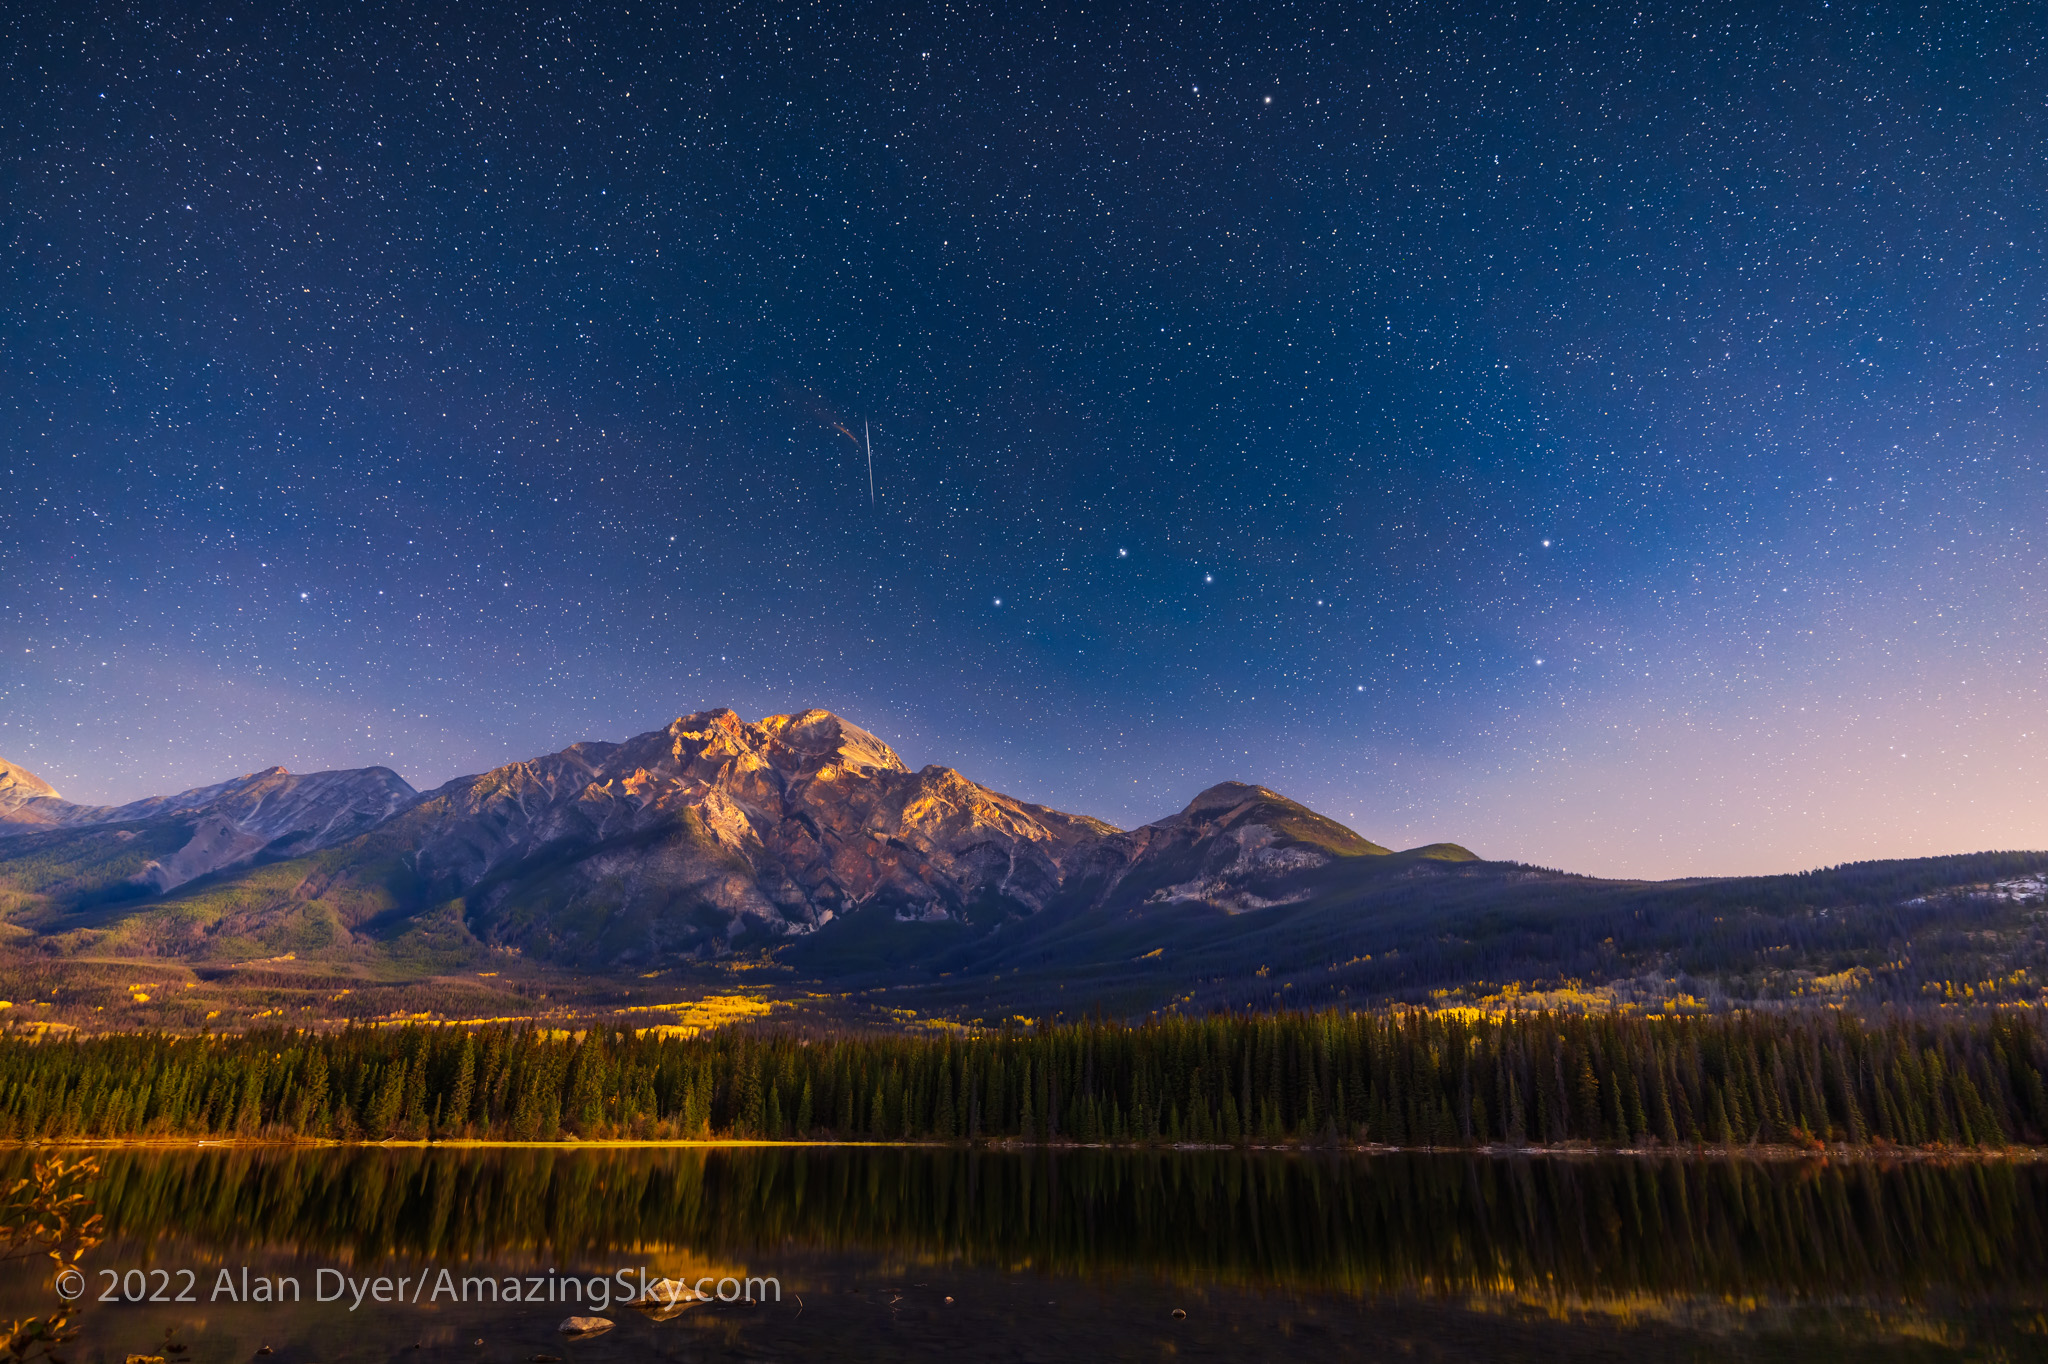
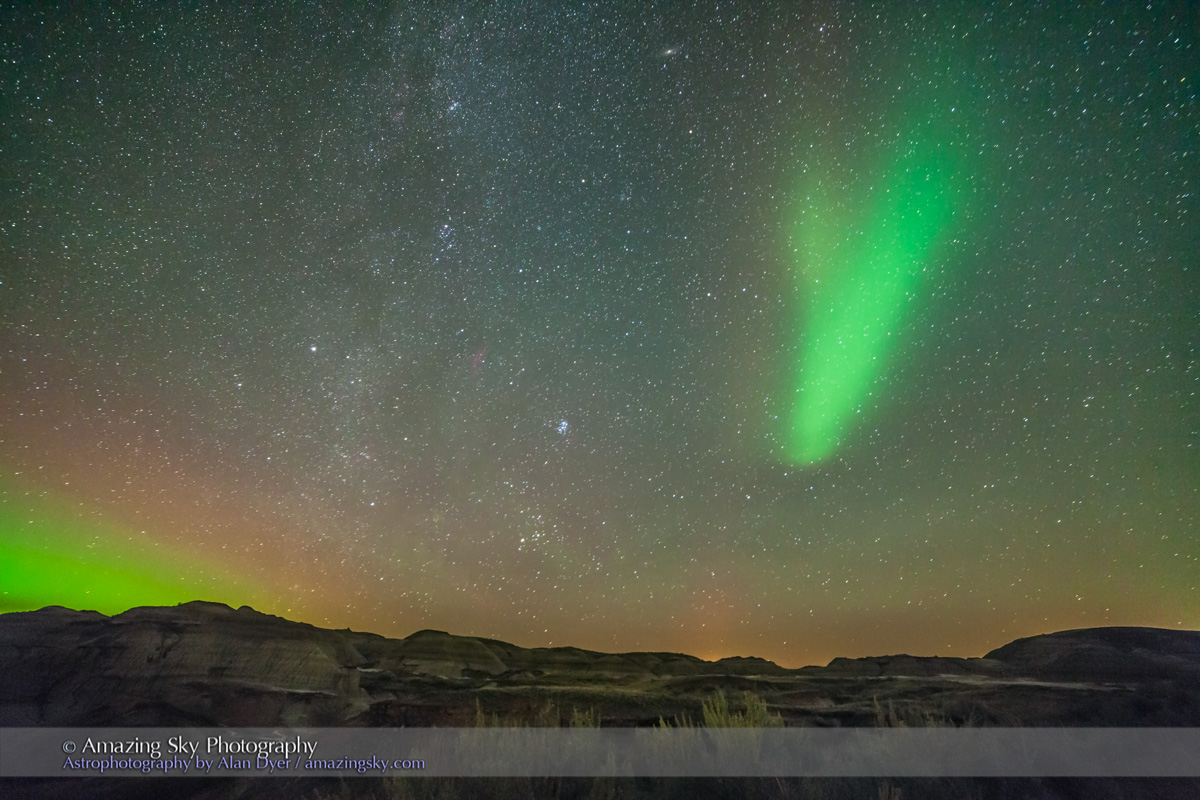
After nearly a month of rain and clouds, the night of May 31/June 1 proved wonderfully clear at last. I headed to a favourite location in the Red Deer River valley, amid the eroded badlands formations of Dinosaur Provincial Park, site of late-Cretaceous fossil finds.

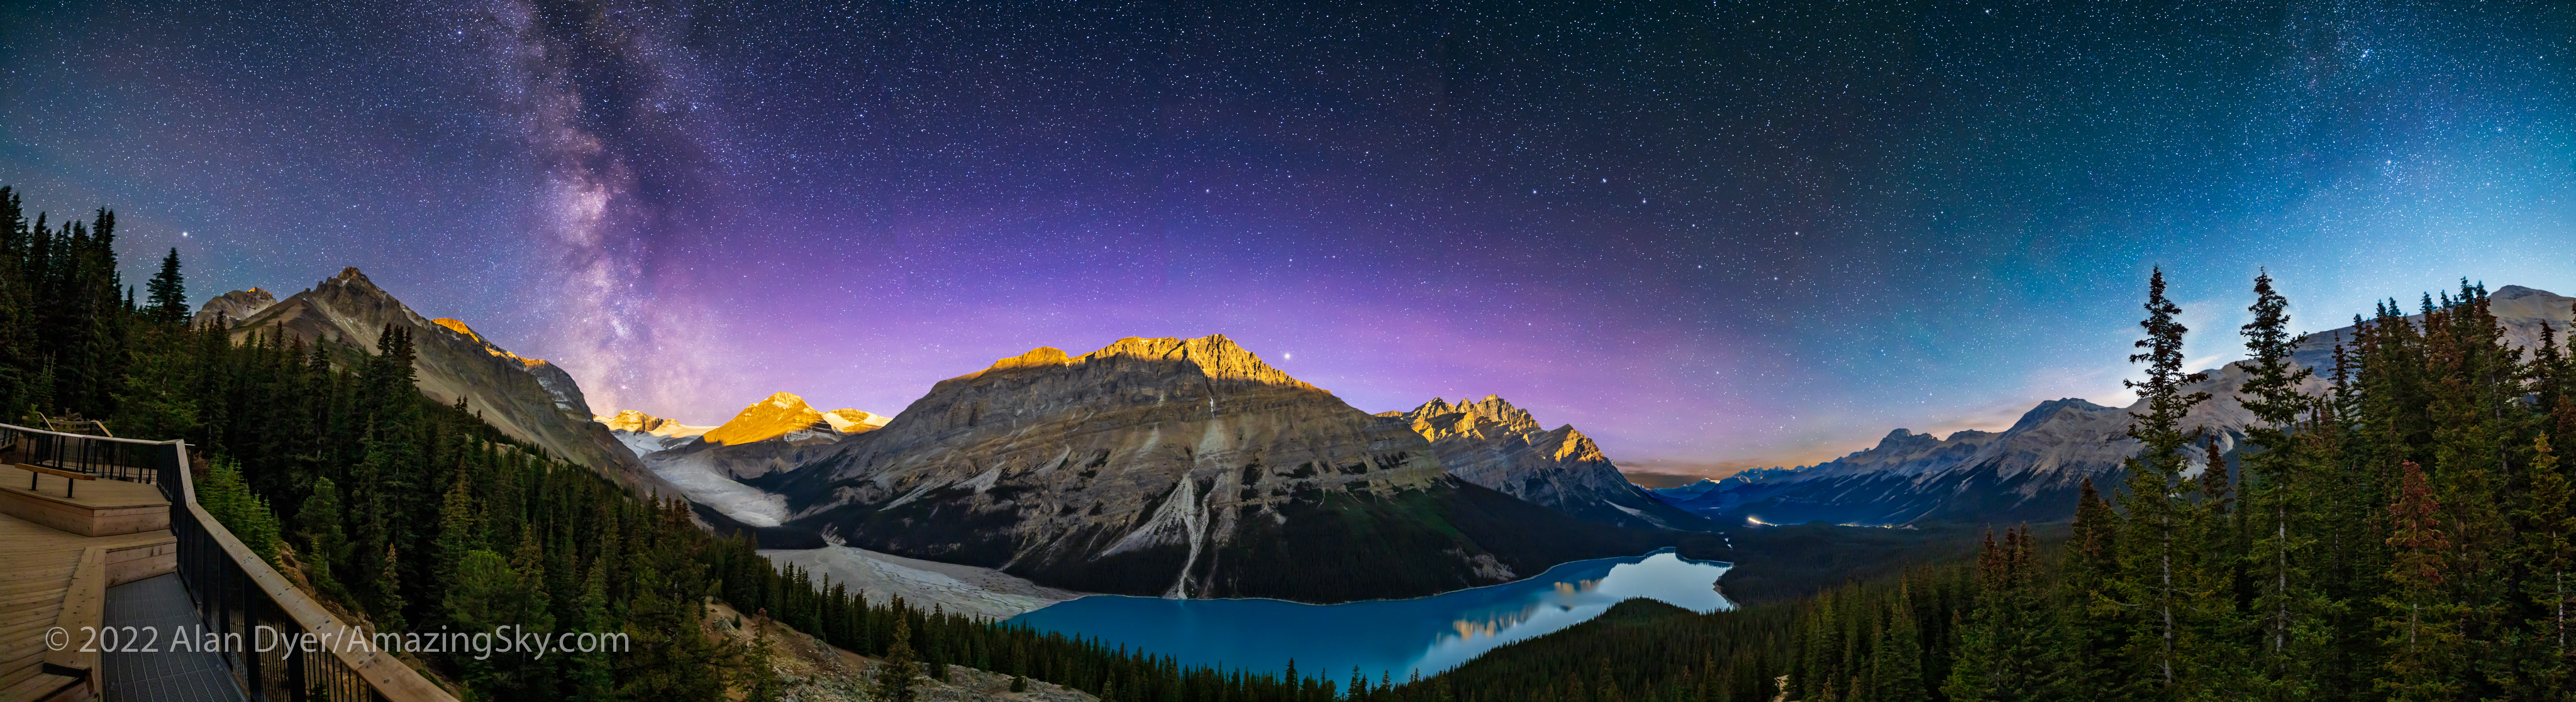
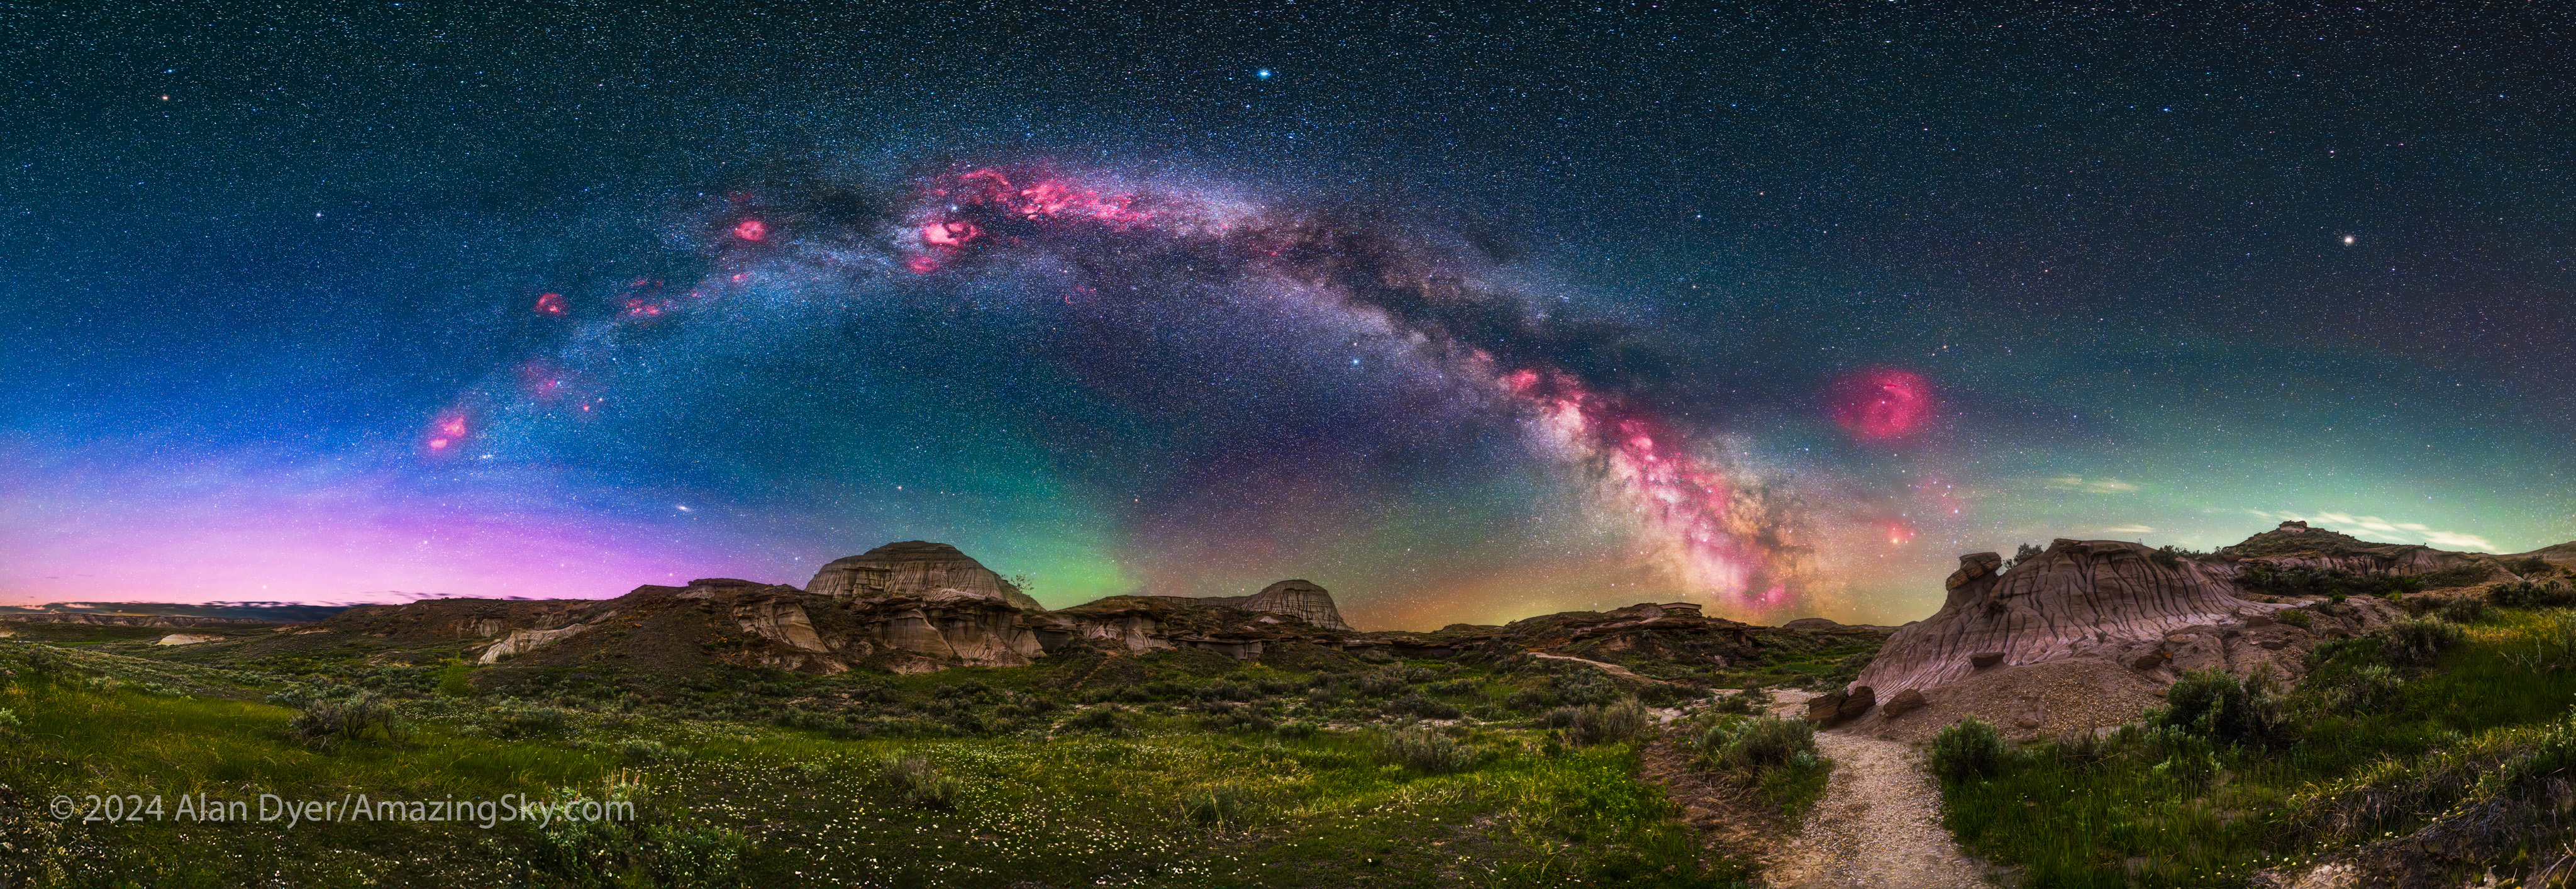
The bright core of the Milky Way in Sagittarius would be in the south. With the night only three weeks before summer solstice, from the Park’s latitude of 50.5ยฐ N the sky would not get astronomically dark. But it would be dark enough to show the Milky Way well, as above in this framing looking south on the Trail of the Fossil Hunters.

However, May and June are “Milky Way Arch” months, at least for the northern hemisphere. The full sweep of the northern Milky Way, from Perseus in the northeast to Sagittarius in the southeast, then stretches across the sky โ€” high enough to be impressive, but low enough (unlike later in summer) to be framable in a horizontal panorama.

This is a 200ยฐ panorama of the arch of the northern Milky Way rising over the Badlands landscape of Dinosaur Provincial Park, Alberta.

To capture the arc of the Milky Way I shot a panorama โ€” in fact three:

  • one exposed for the ground
  • one exposed for the sky, but with the camera now tracking the sky to keep stars pinpoint
  • and a final sky panorama but with a specialized filter installed in front of the camera sensor to let through only the deep red light emitted by nebulas along the Milky Way
Rig for tracked panoramas with the MSM Nomad tracker

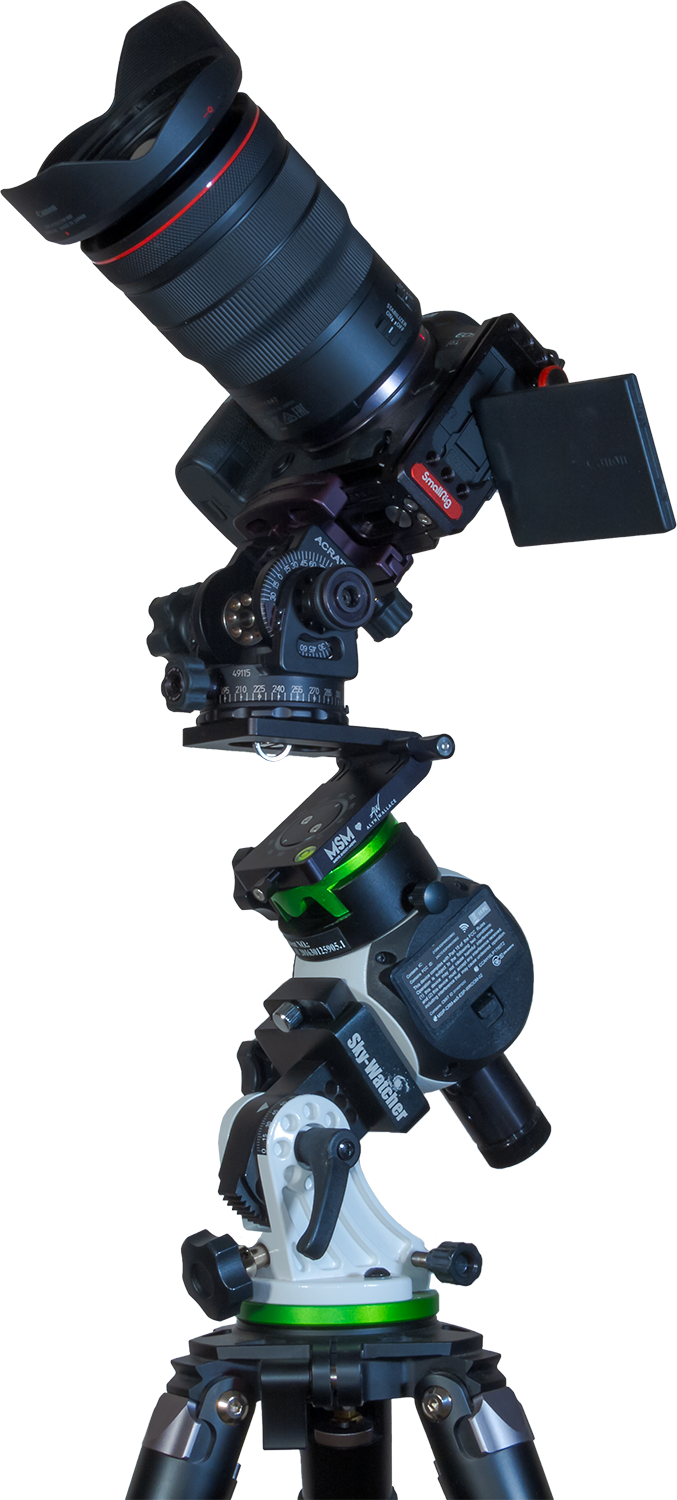
The image above shows my rig for taking tracked panoramas. The rectangular box is the little Nomad sky tracker from Move-Shoot-Move (MSM), here equipped with its accessory laser pointer to aid the “polar alignment” that is needed for this or any tracker to follow the turning sky properly.

A review of the MSM Nomad will be forthcoming (subscribe to my blog!). However, I’ve found it works very well, much better than MSM’s original Rotator tracker, which was entirely unreliable!

On top of the little Nomad is an Acratech pano head, so I can turn the camera by a specific angle between each pano frame, both horizontally from segment to segment, and vertically if needed when raising the camera from the ground pano to the sky pano.

The pano head is on a “V-Plate” sold by MSM and designed by the late, great nightscape photographer (and engineer by trade), Alyn Wallace. The V-Plate allows the camera to turn parallel to the horizon when on a tipped-over tracker. The entire rig is on a Benro 3-Axis tripod head (also sold by MSM, but widely available) that makes it easy to precisely aim the tracker for polar alignment and then hold it rock steady.

The H-Alpha Panorama rendered in monochrome

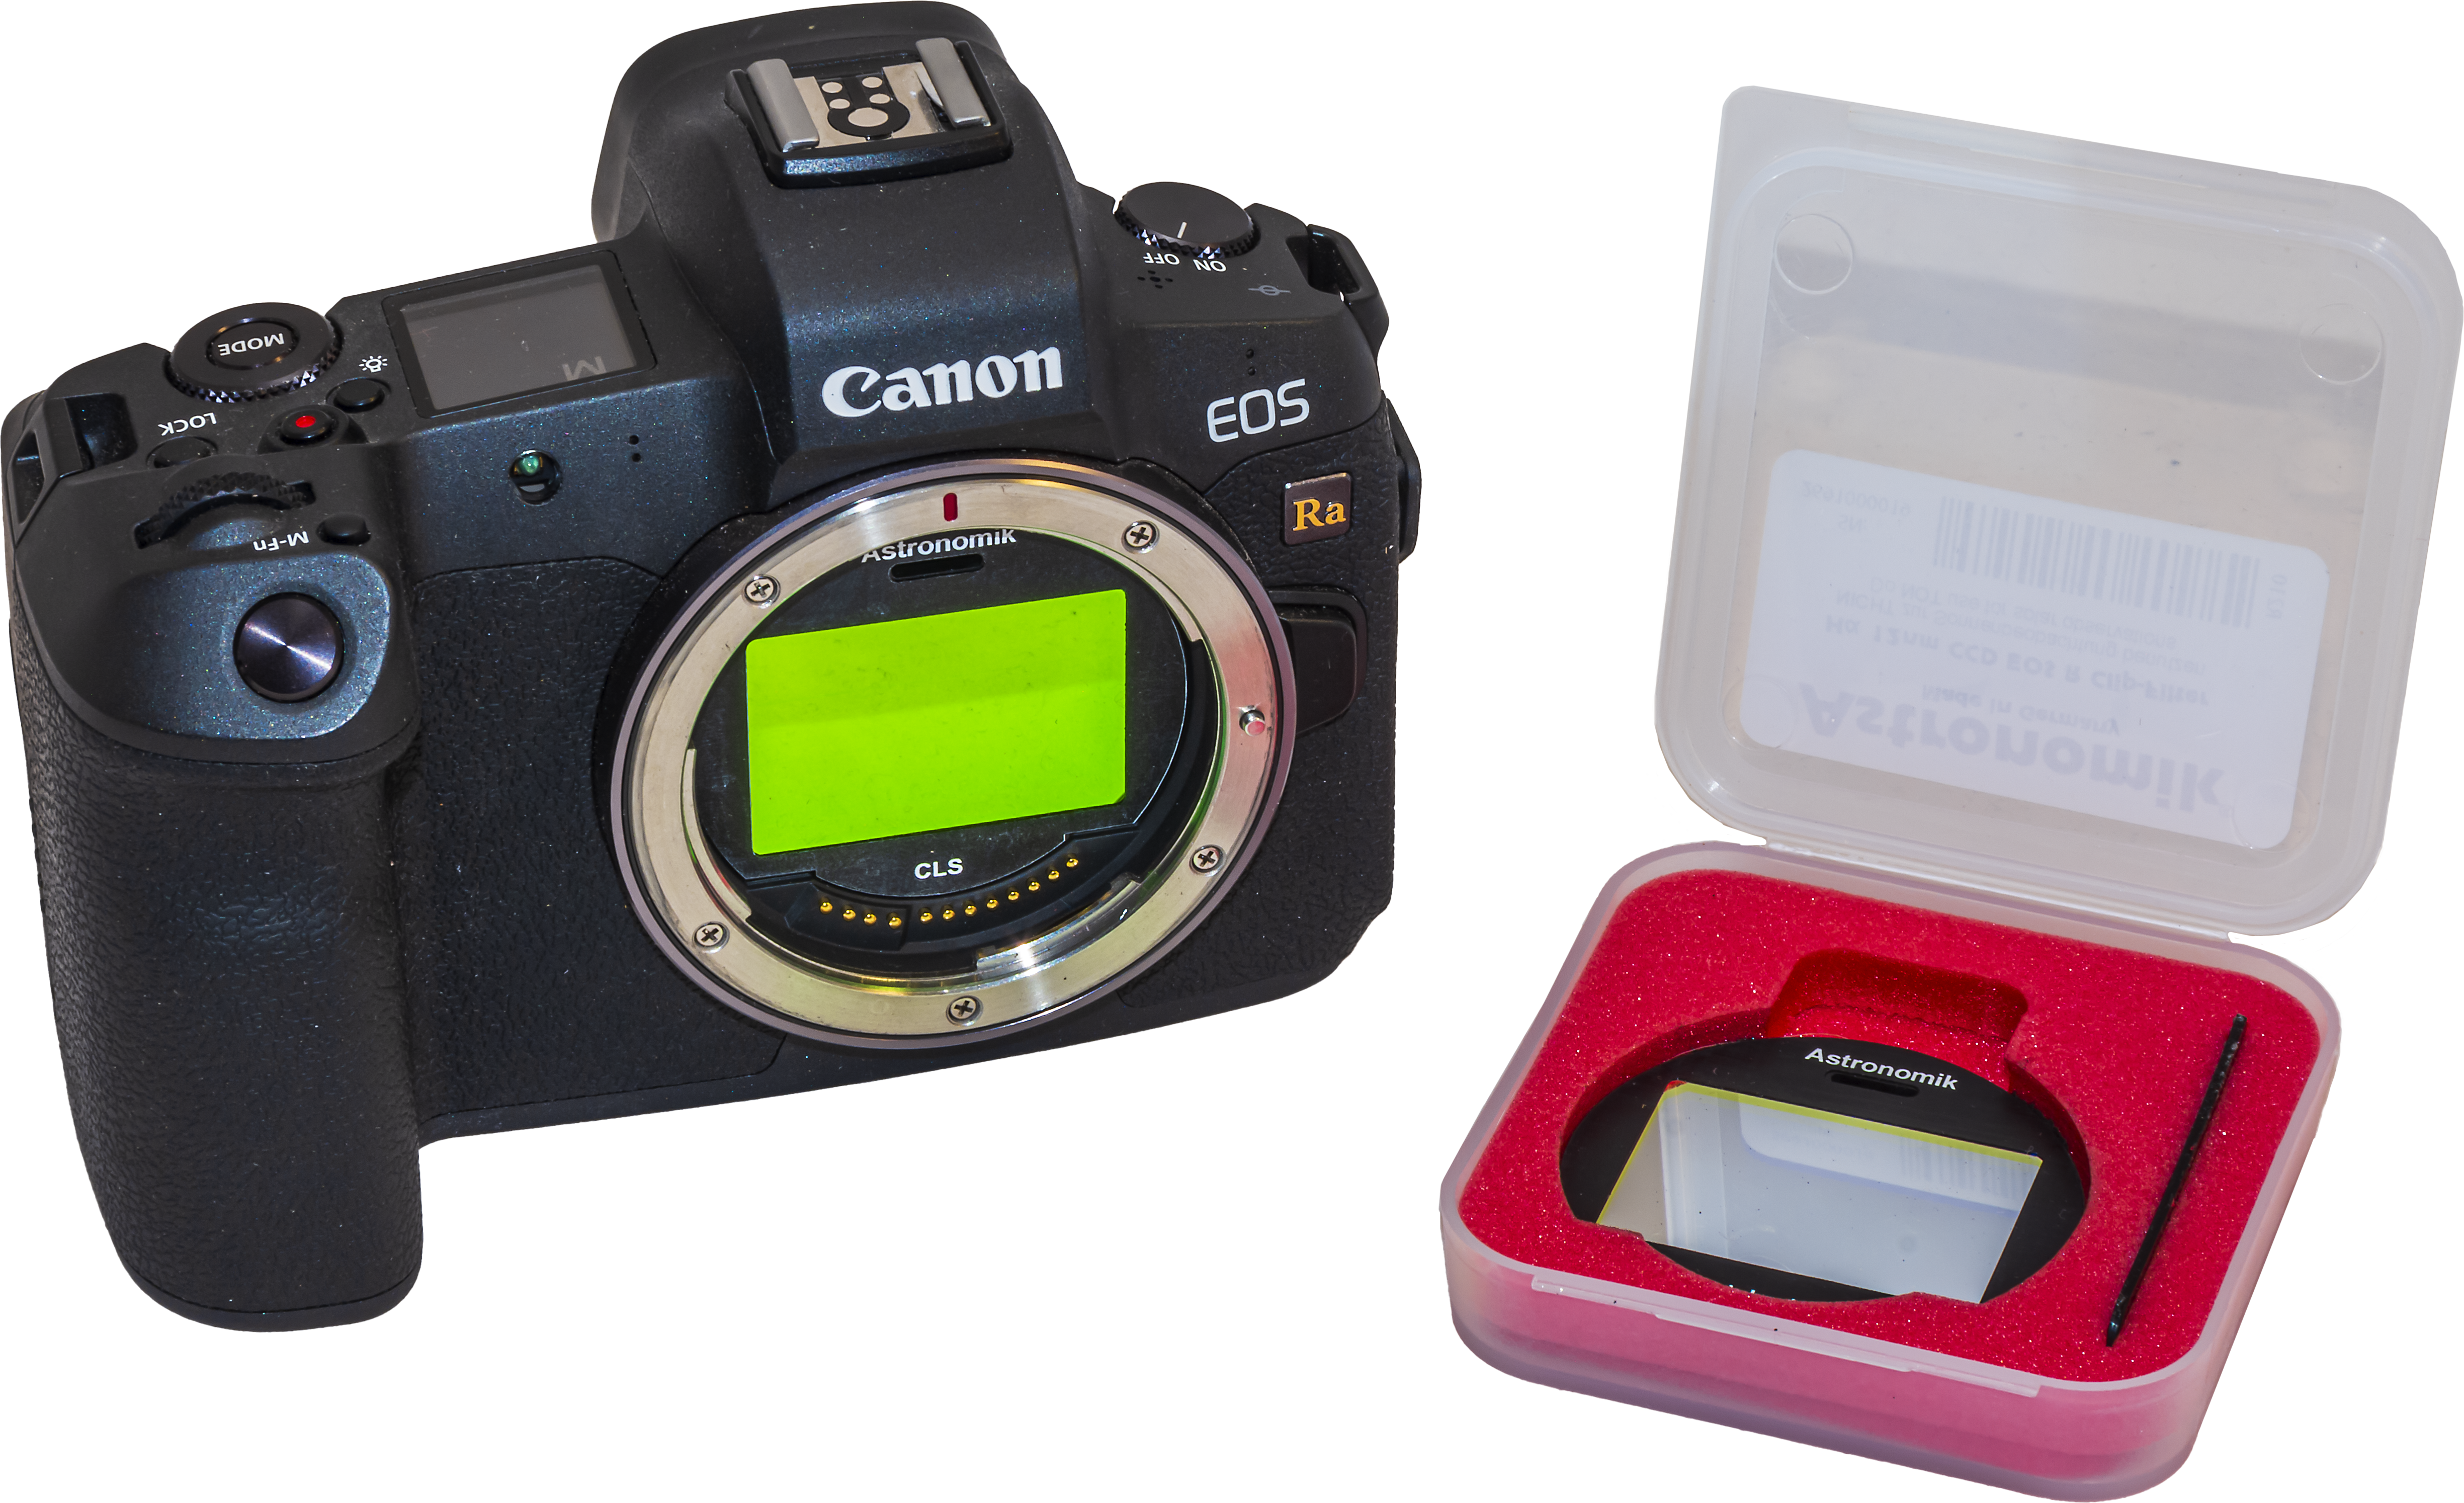
I’d taken many panos before using sets of untracked ground and tracked sky panoramas. New this night was the use a “narrowband” Hydrogen-Alpha filter to take a final pano that brings out the red nebulas. I used a filter from Astronomik that clips into the camera in front of the sensor. Such a filter has to be used on a camera that has been modified to be more sensitive to deep red light, as the Canon Ra shown below is (or was, as Canon no longer makes it).

While a modded camera brings out the nebulas, using an H-Alpha filter as well really shows them off. But using one is not easy!

Astronomik clip-in filters, the 12nm H-a on the right

The clip-in placement (unlike a filter in front of a lens) requires that the lens be refocused โ€” infinity focus now falls at the 3 to 6 metre point (the focus shift varies with the lens and focal length โ€” the wider the lens the greater the shift). With the image so dark and deep red, seeing even a bright star to manually focus on is a challenge.

Shifting the lens focus also changes the overall image size (called “focus breathing”) and often introduces more off-axis lens aberrations, again depending on the lens.

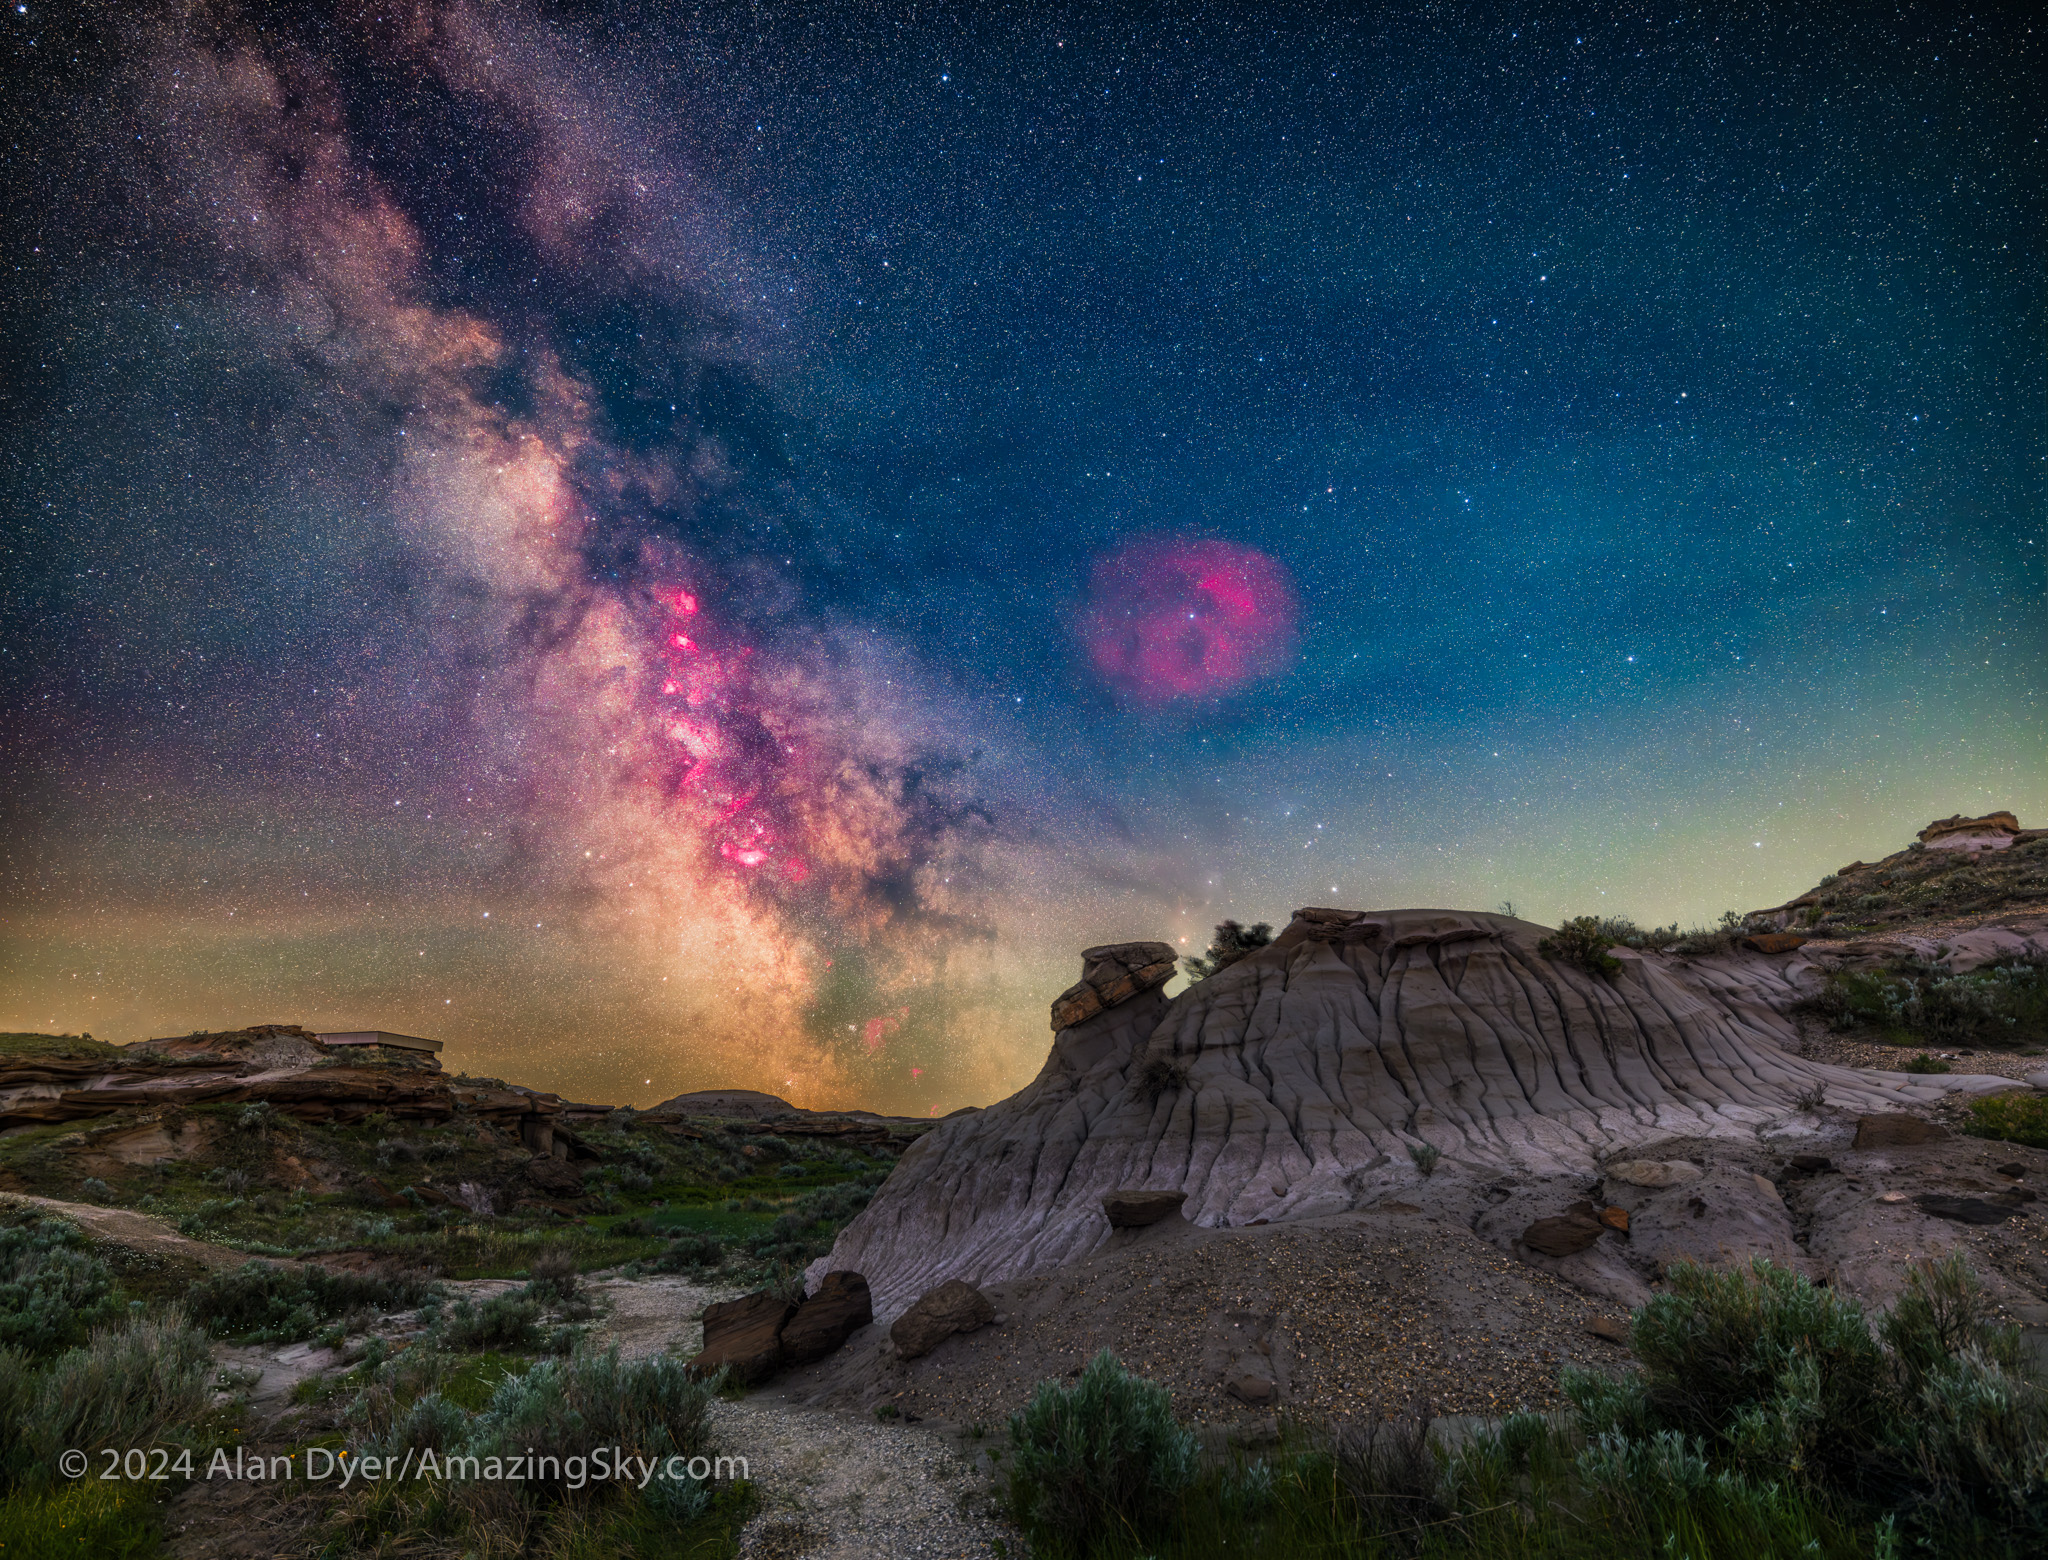
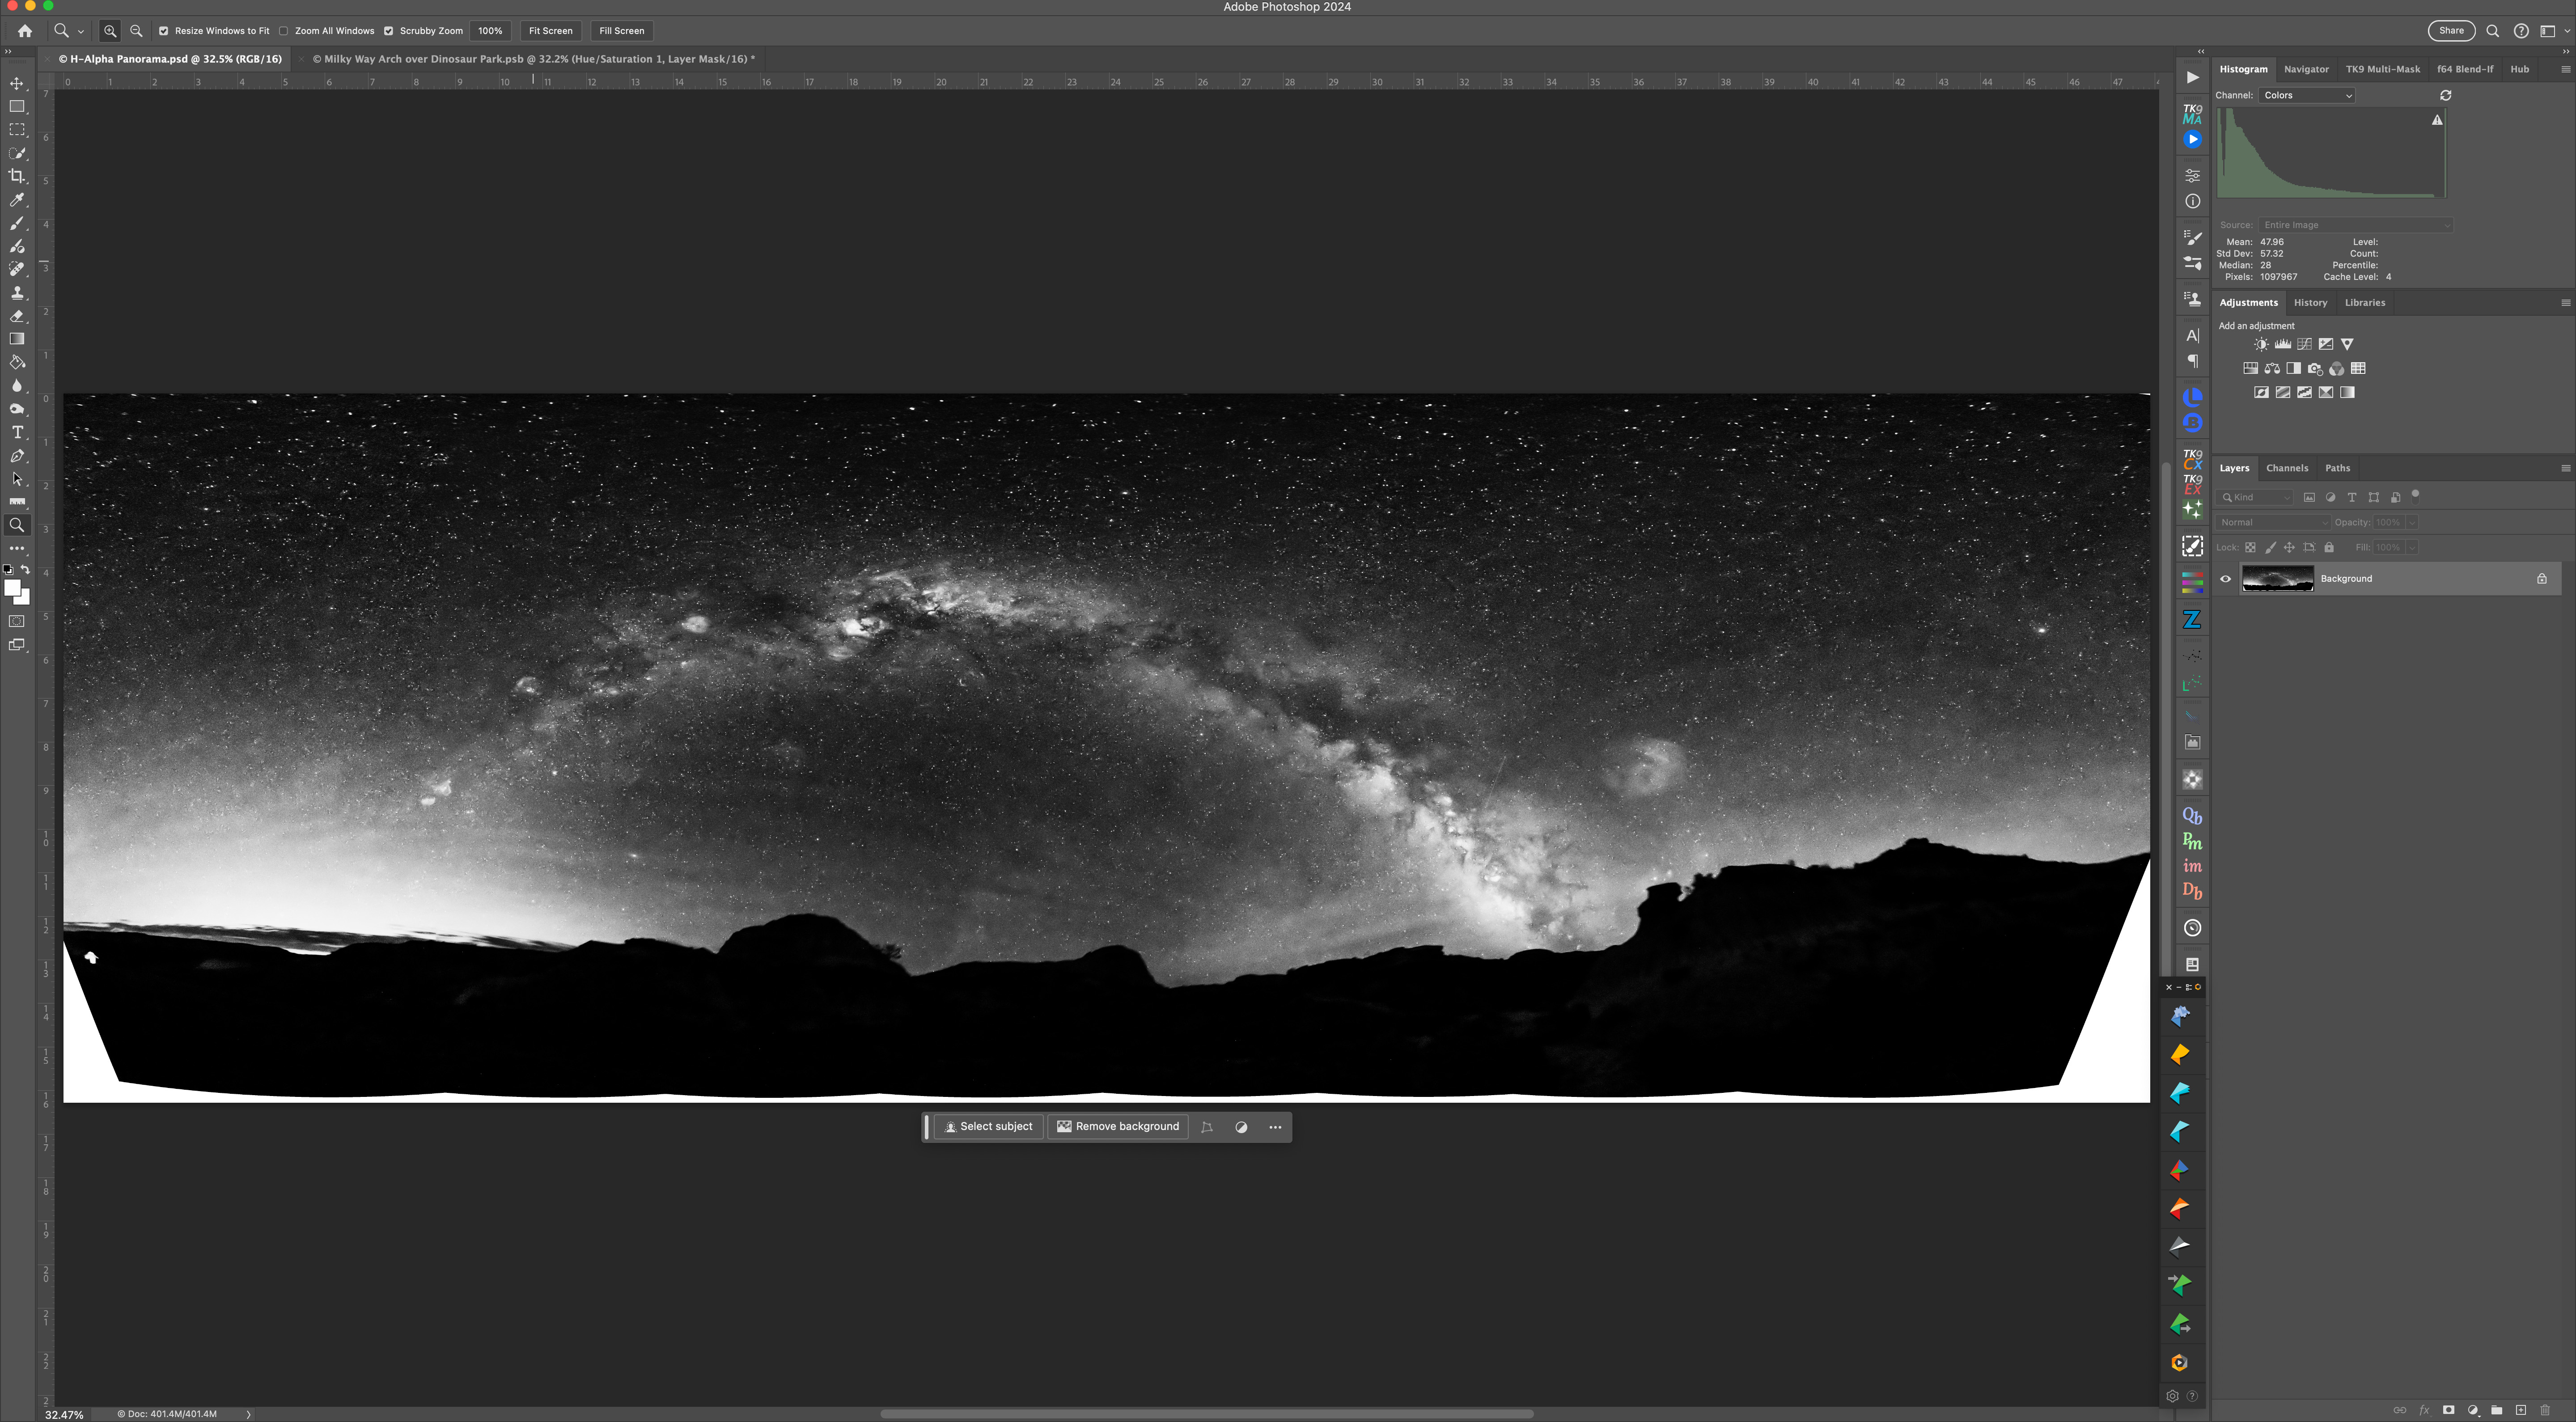
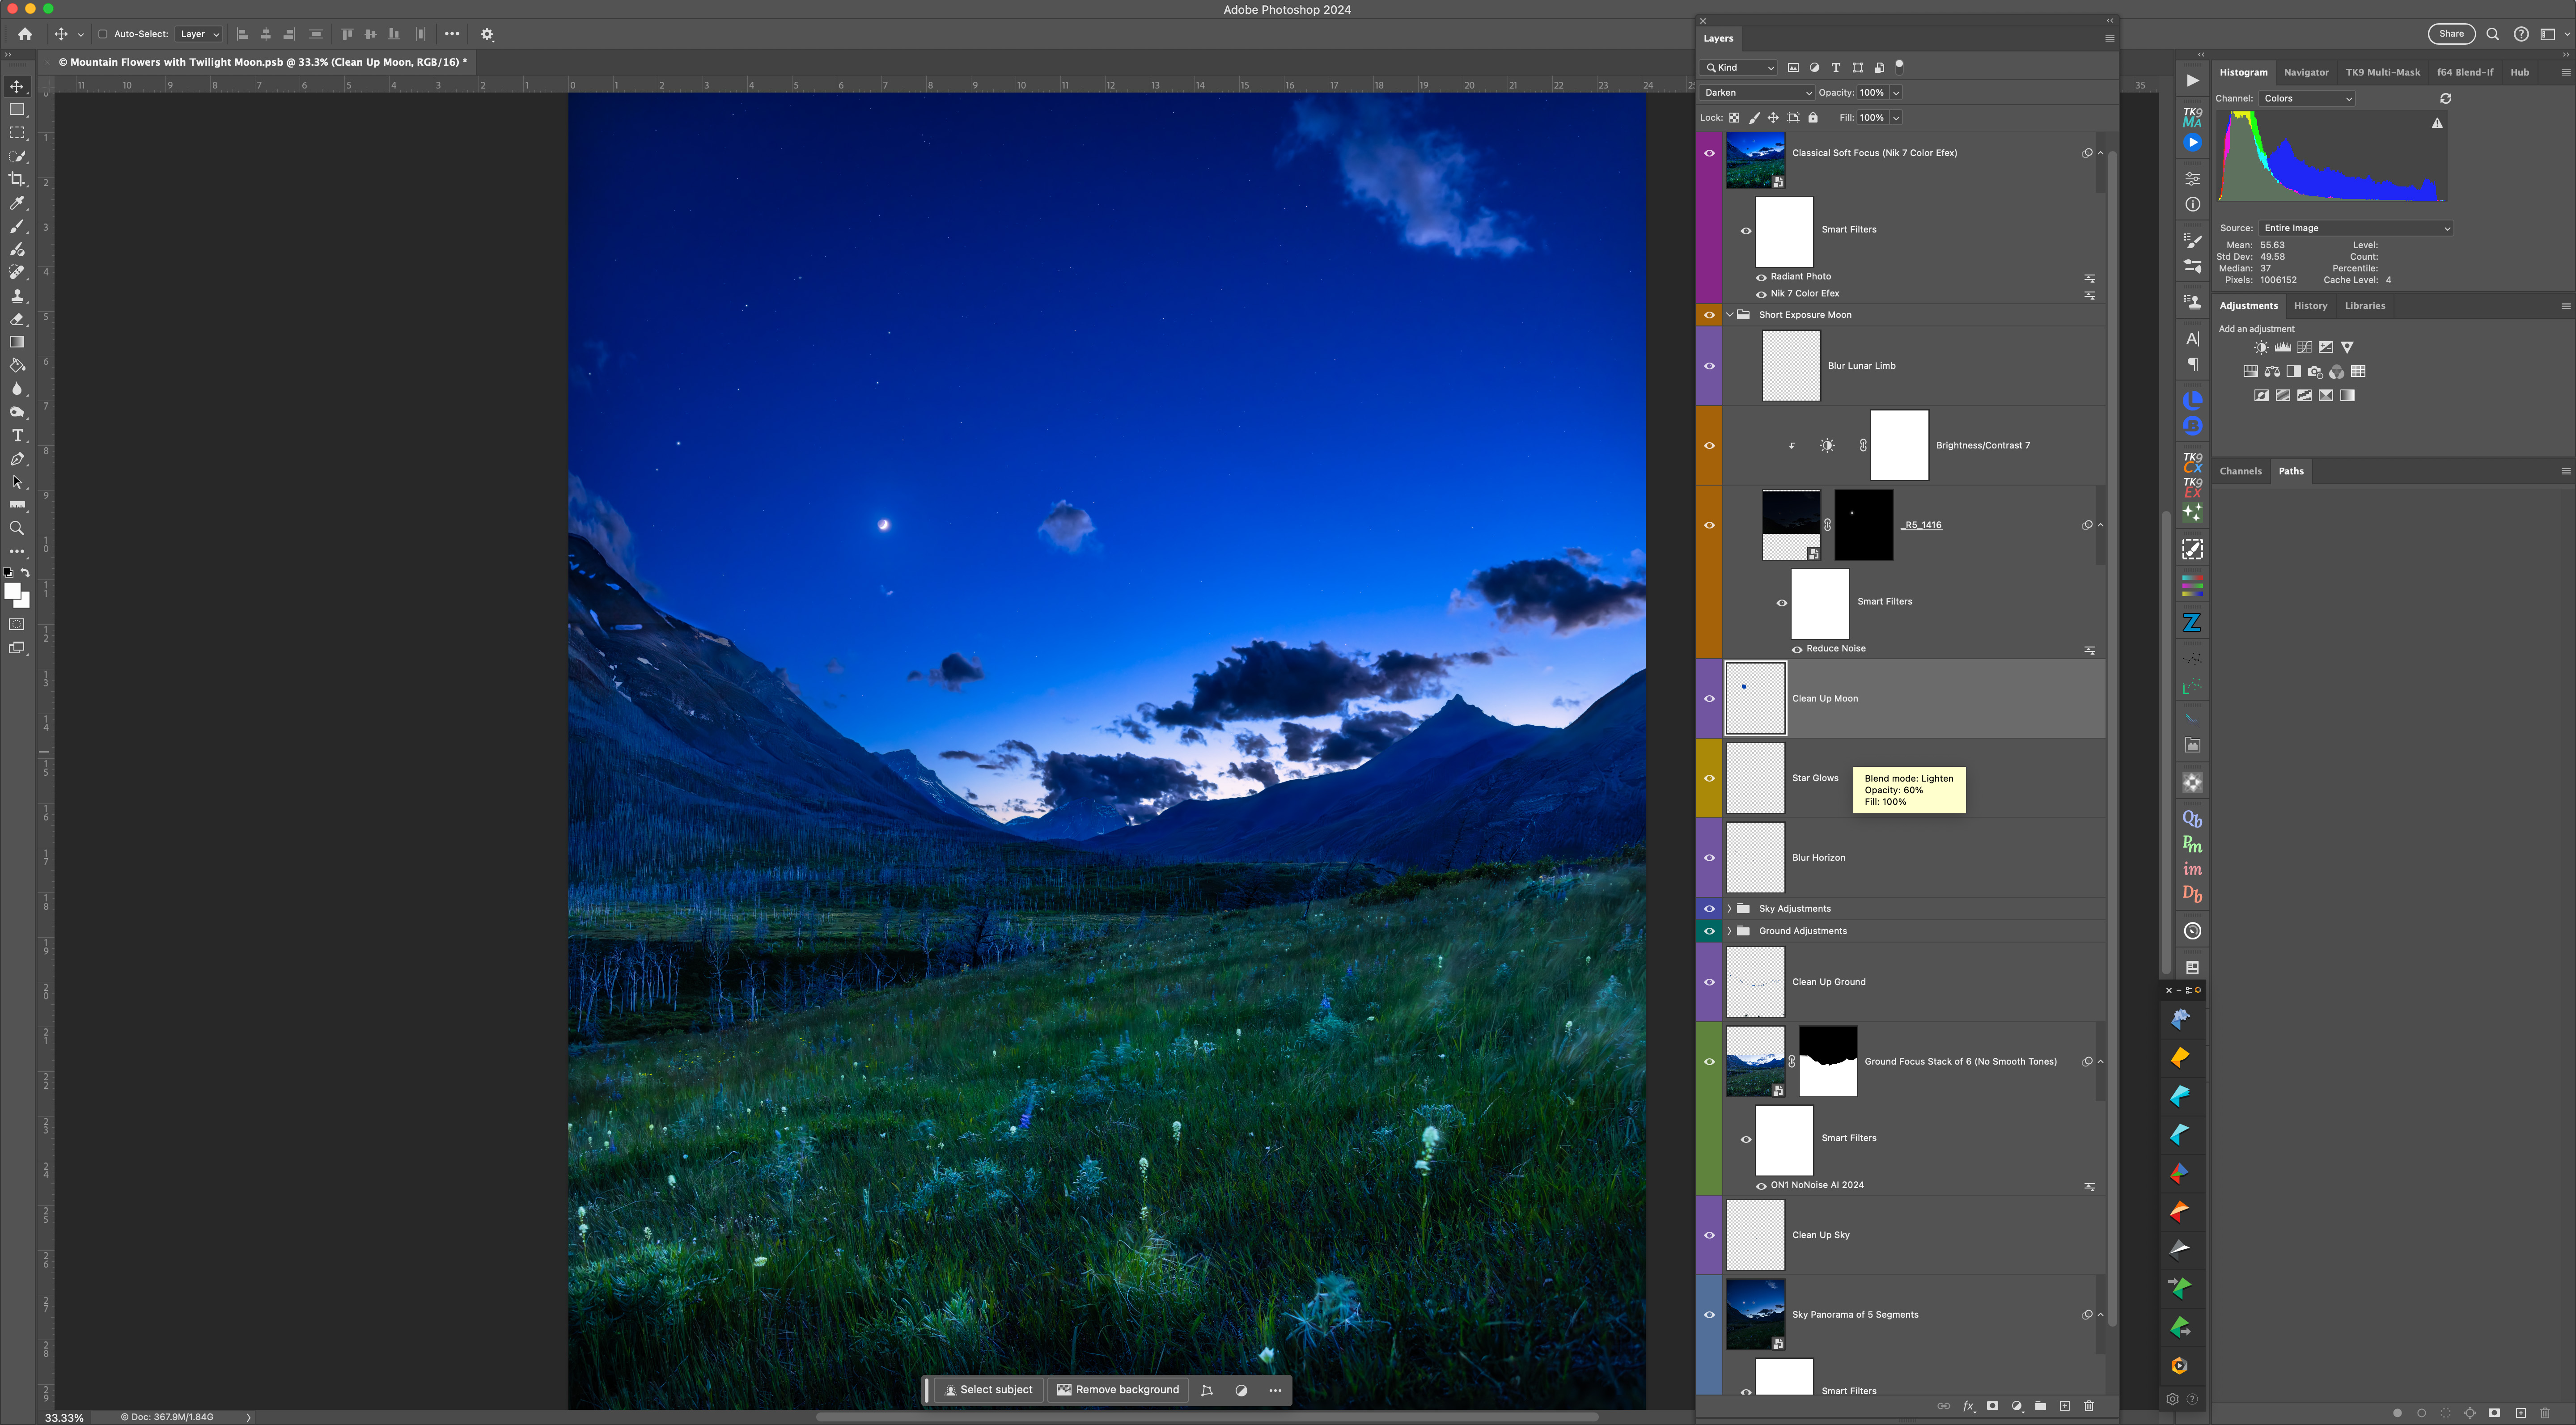
So, blending the H-Alpha pano (which I rendered out in monochrome, above) into the final stack is tough, requiring lots of manual alignment, image warping, BlendIf adjustments, and masking. This is where I added in the red colouration to taste. Careful here, as the “Saturation Police” patrolling social media will issue tickets if they judge you have exceeded their “speed limit.”

The complete panorama with Photoshop layers and adjustments

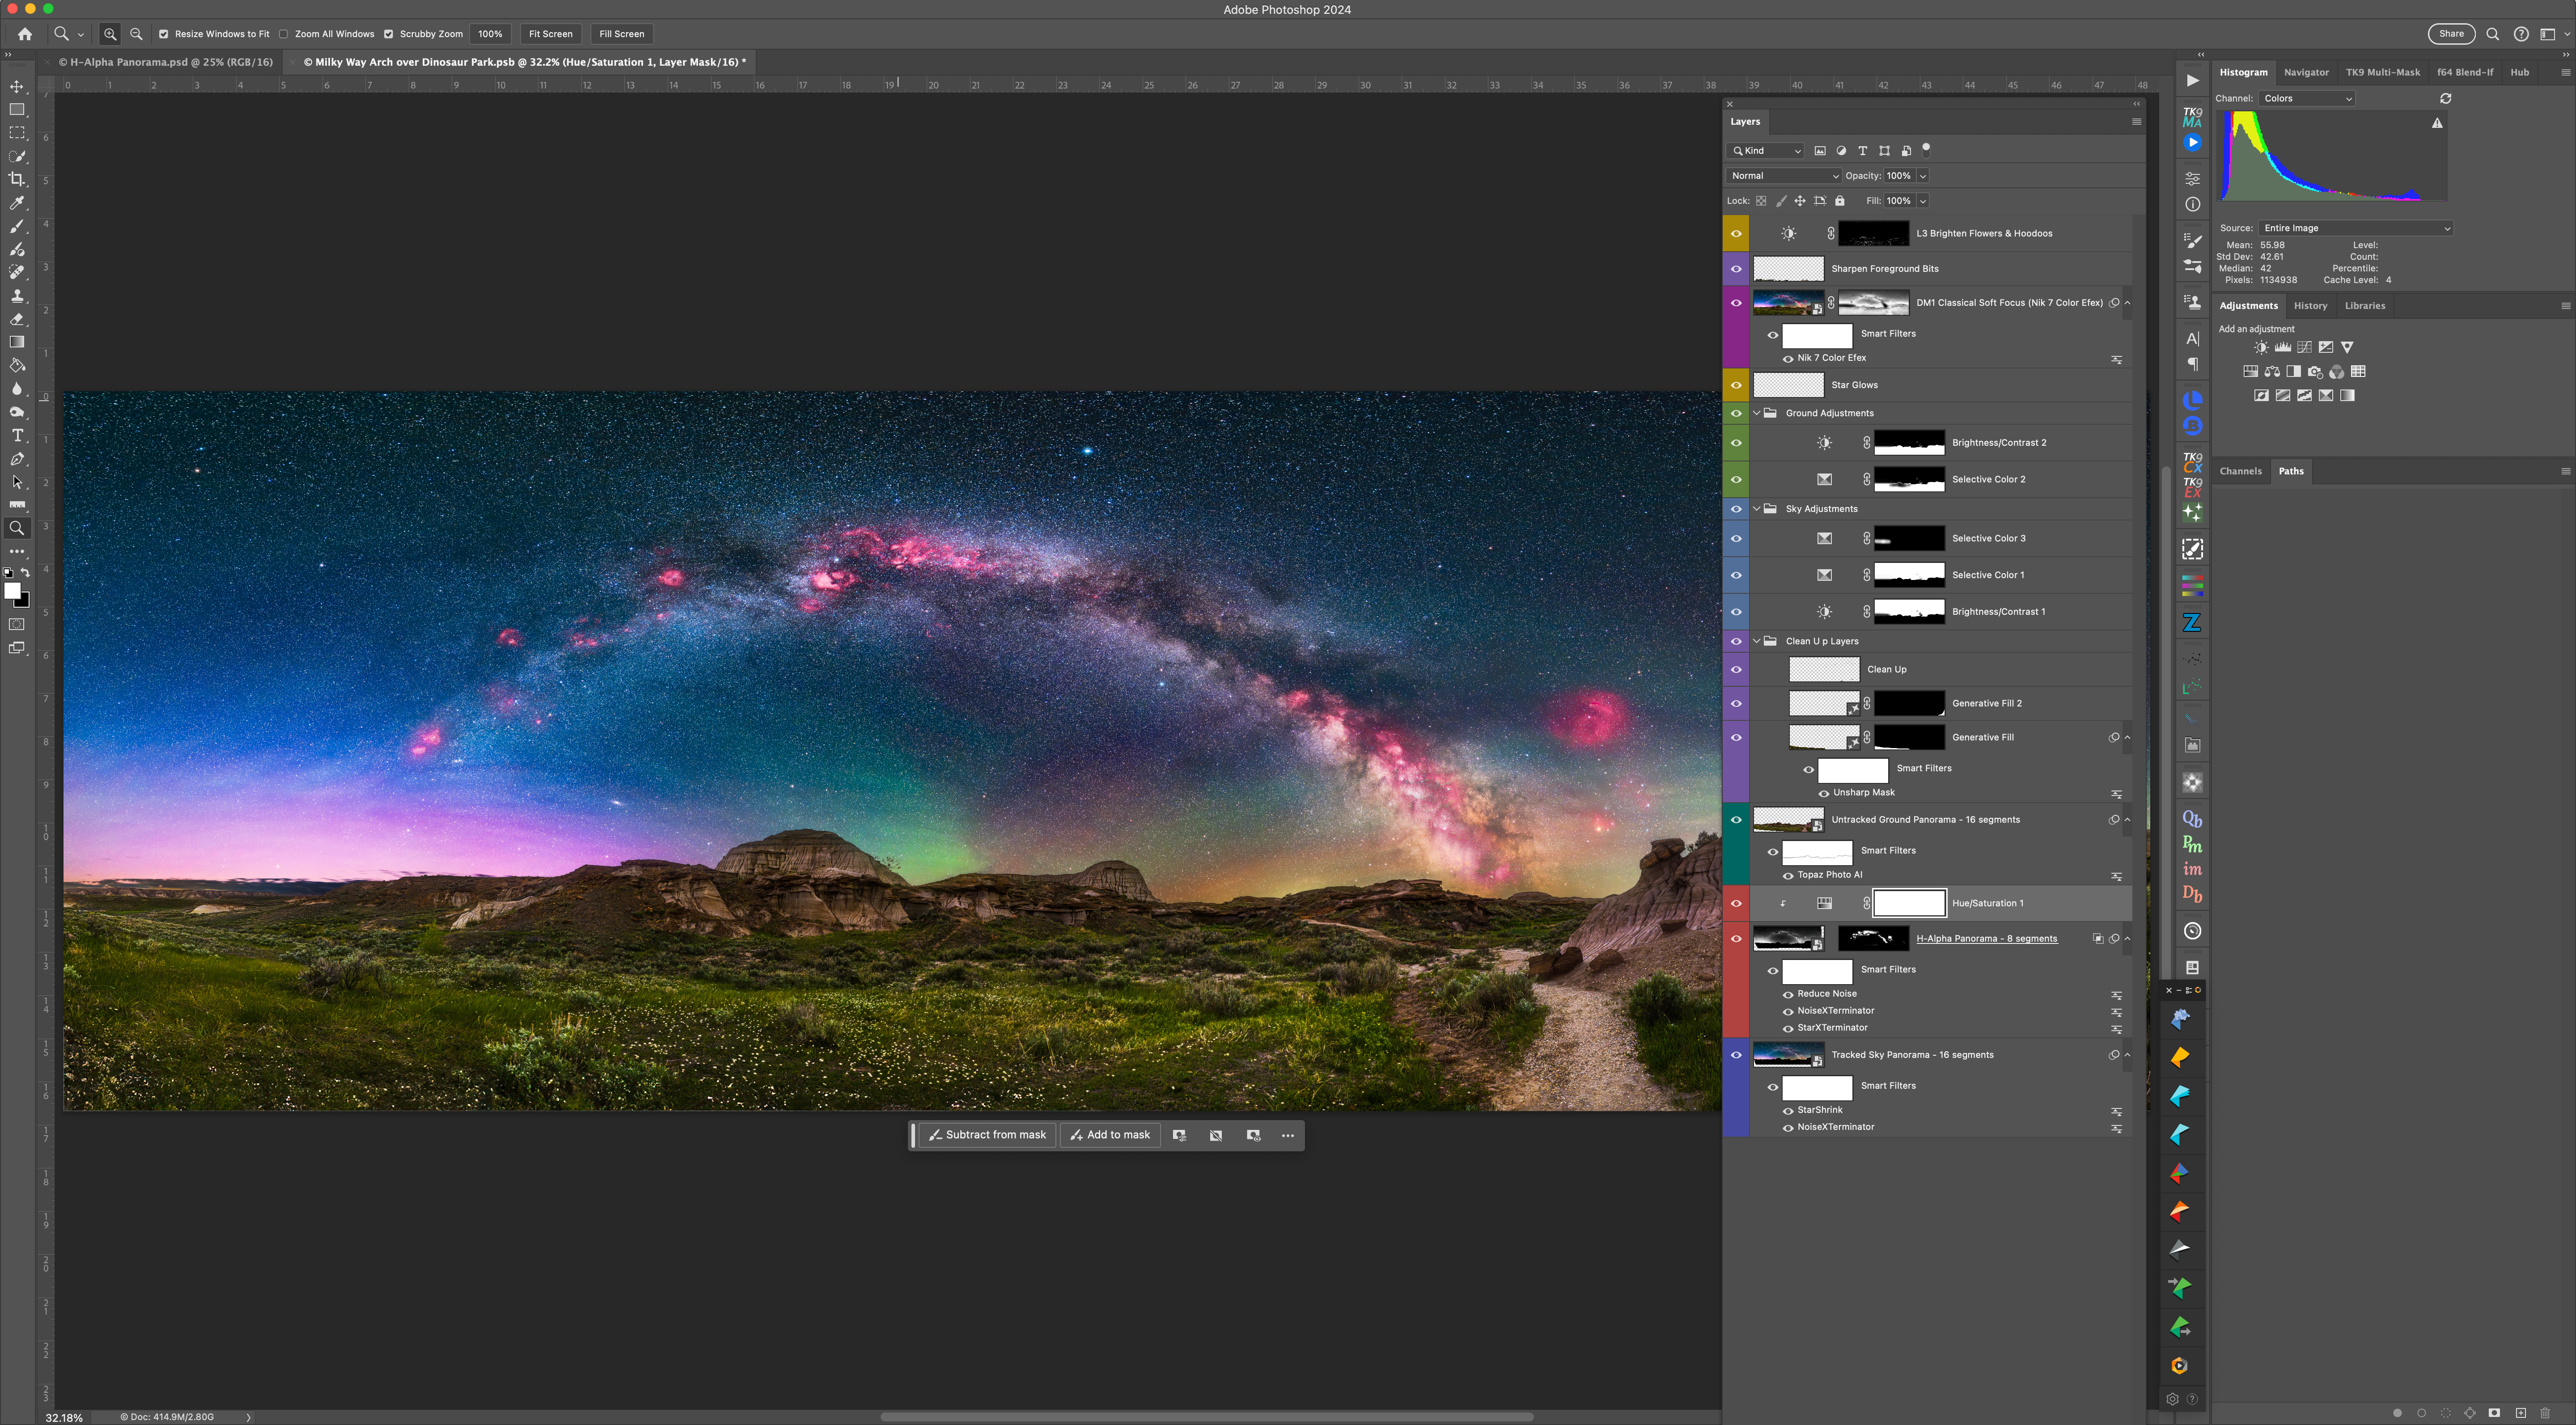
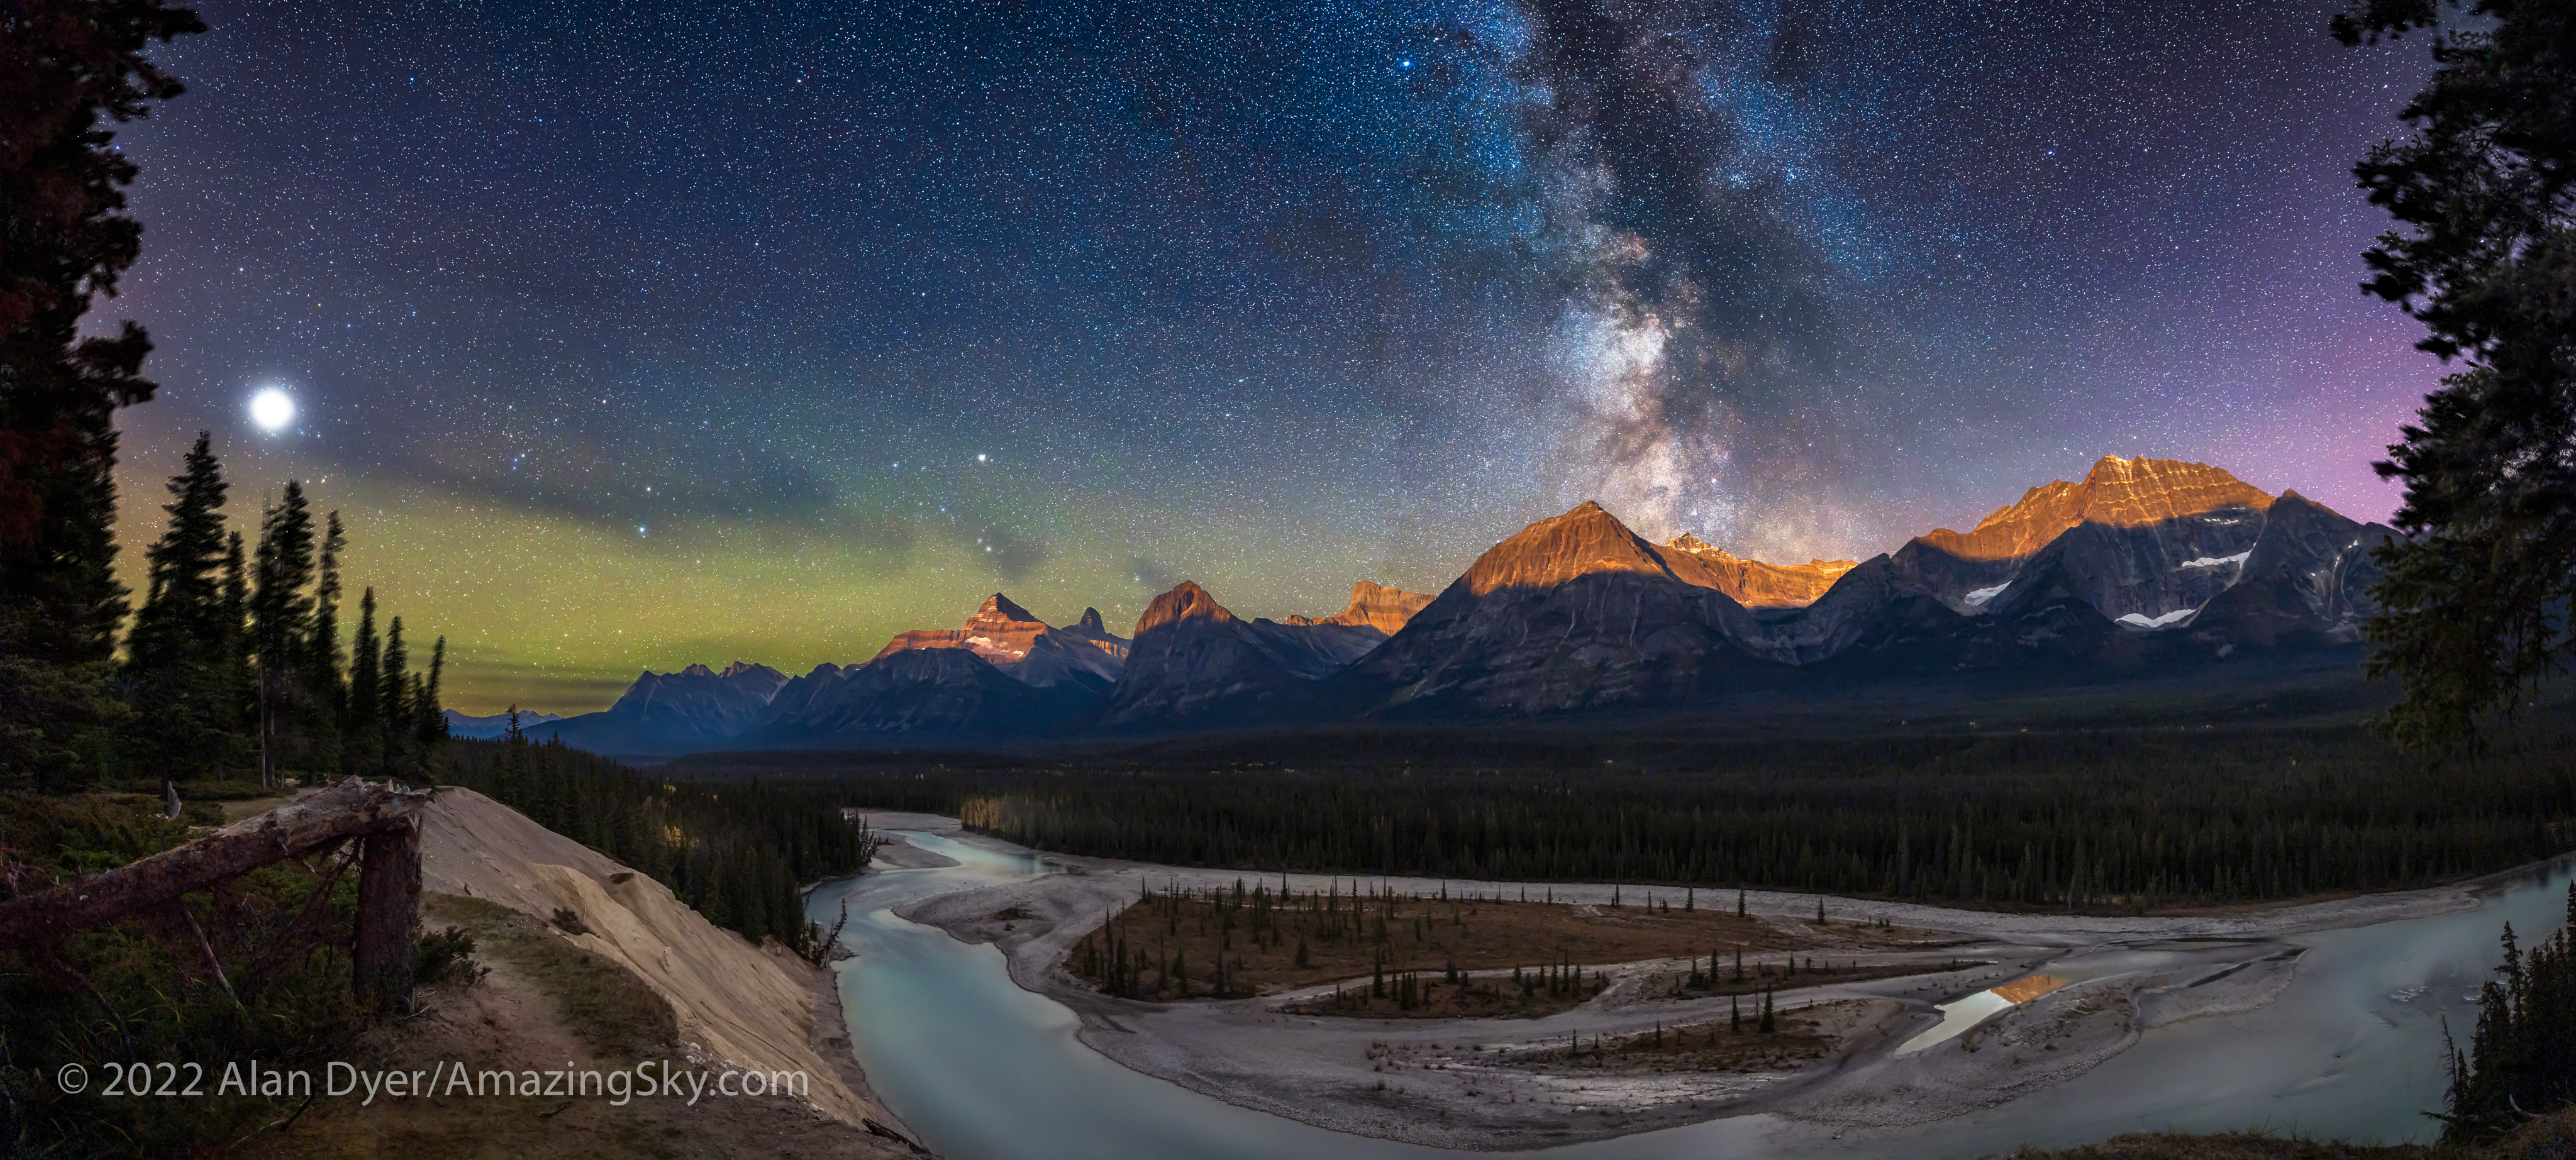
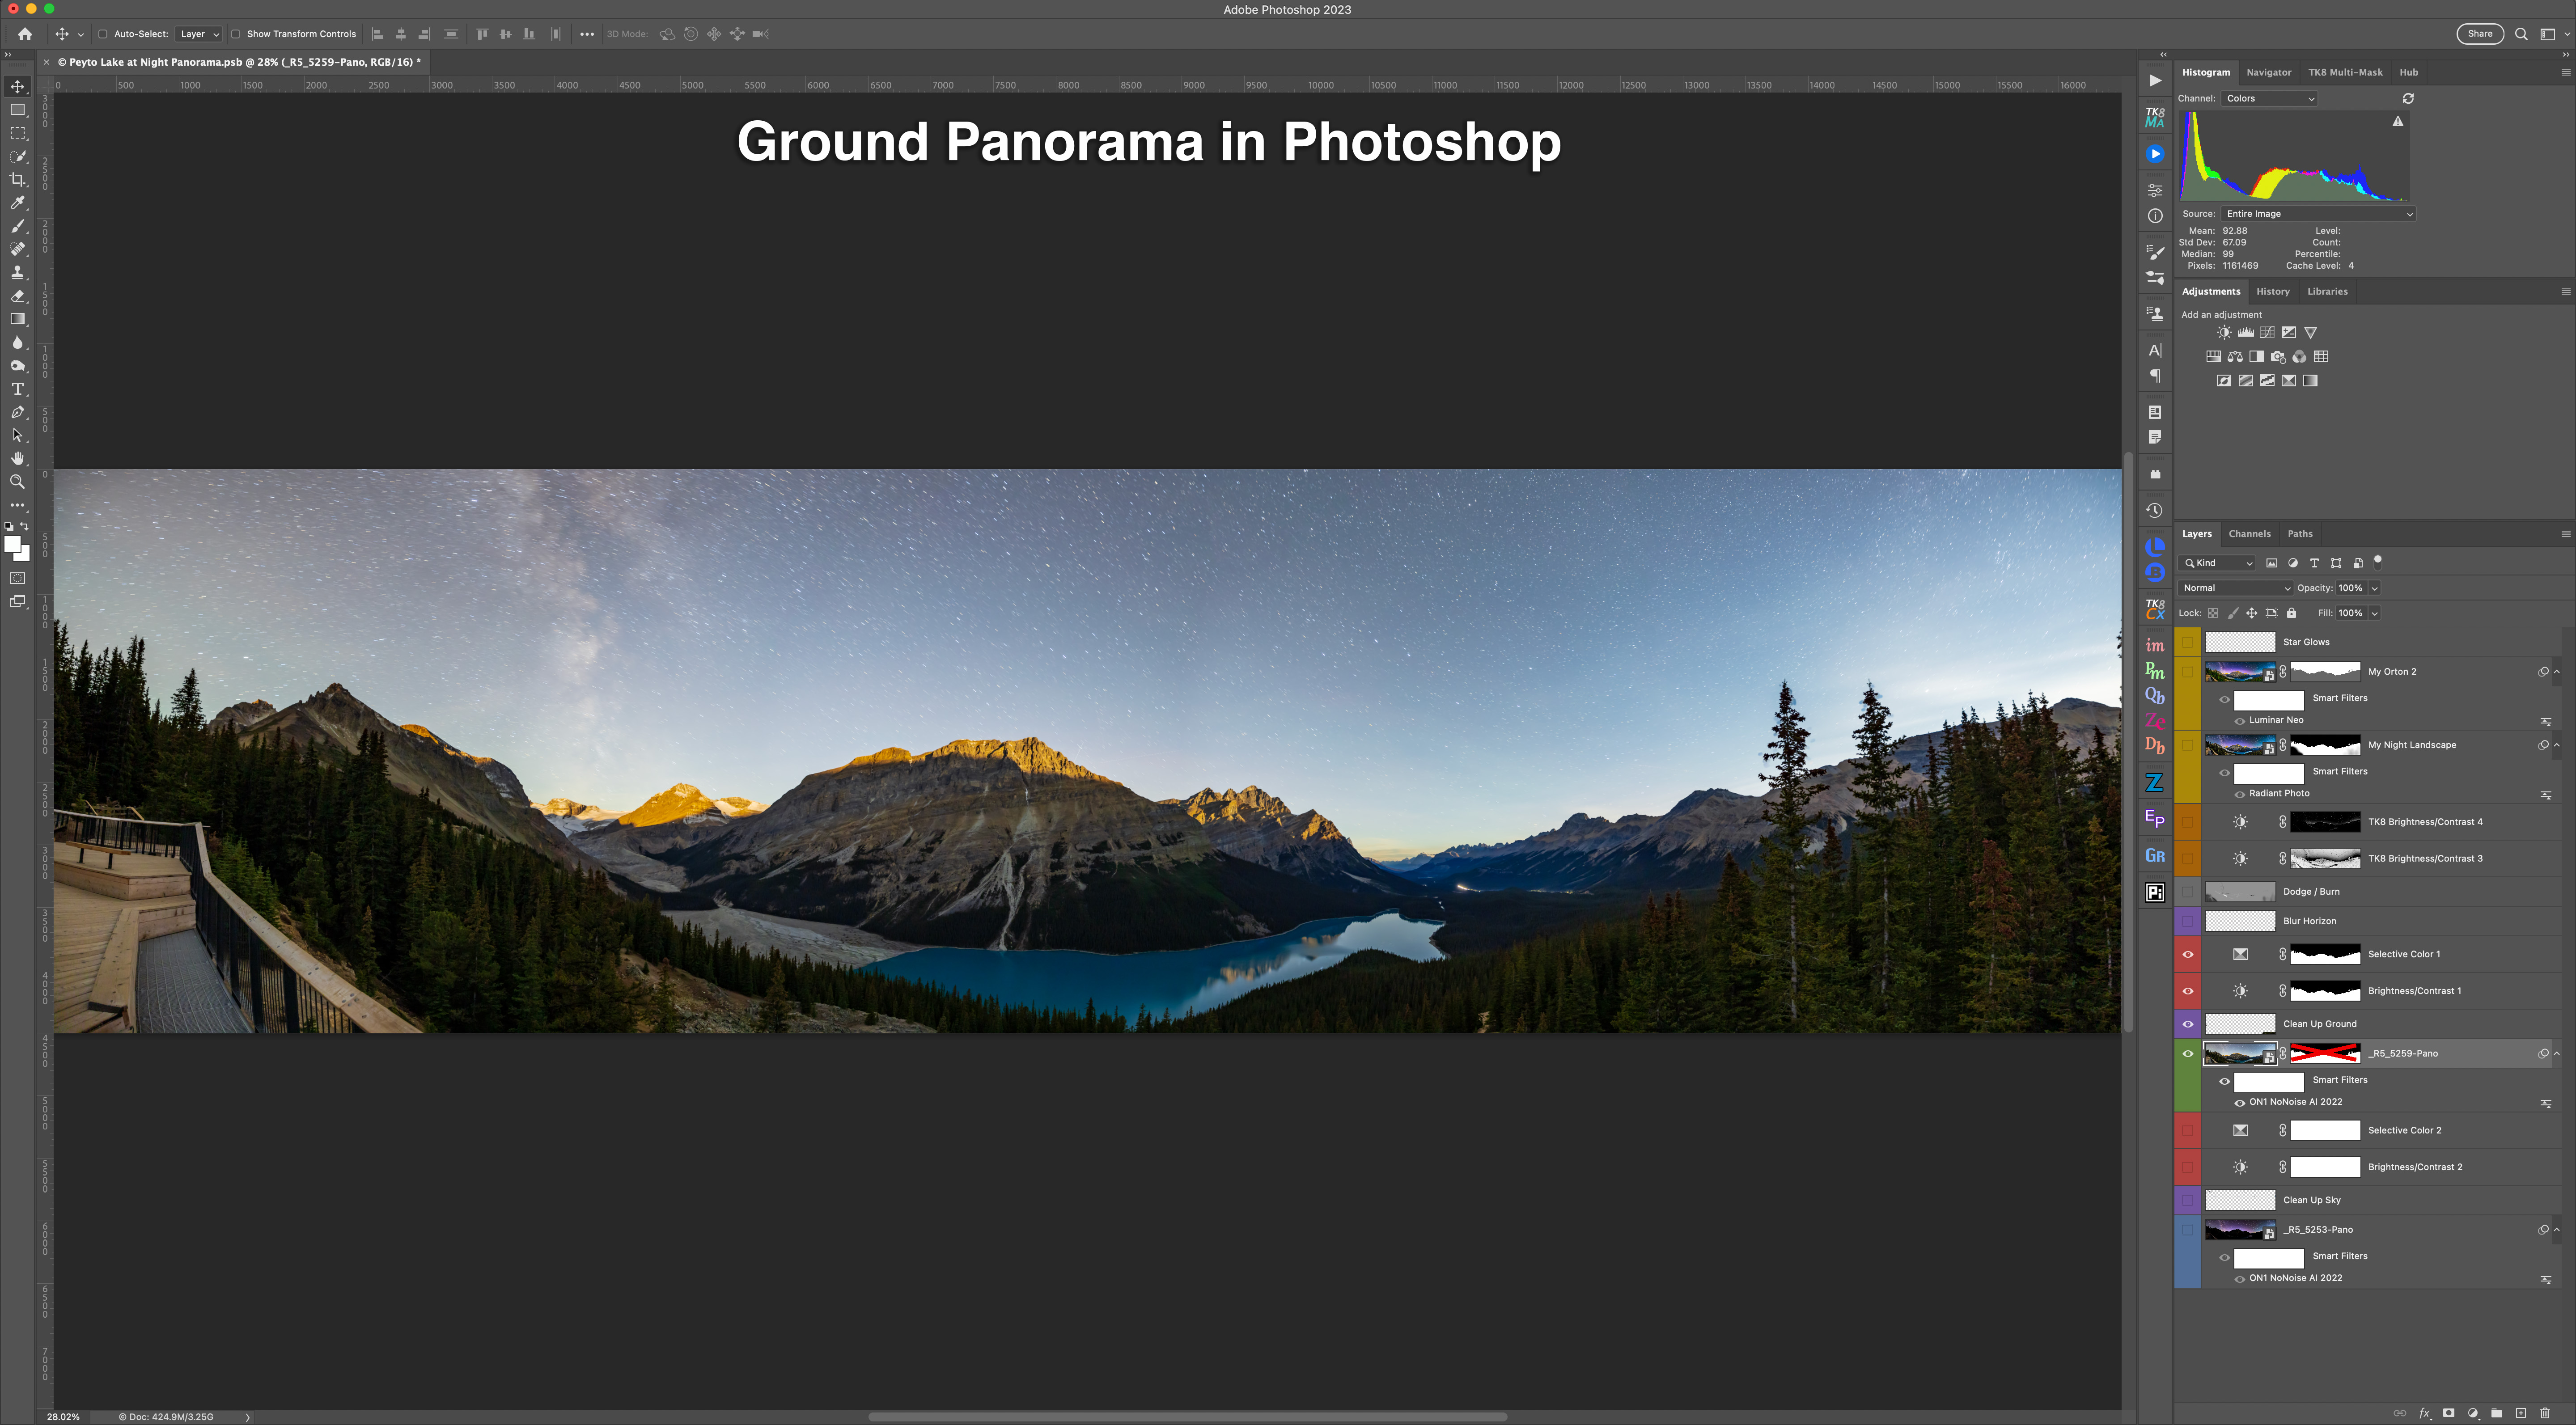
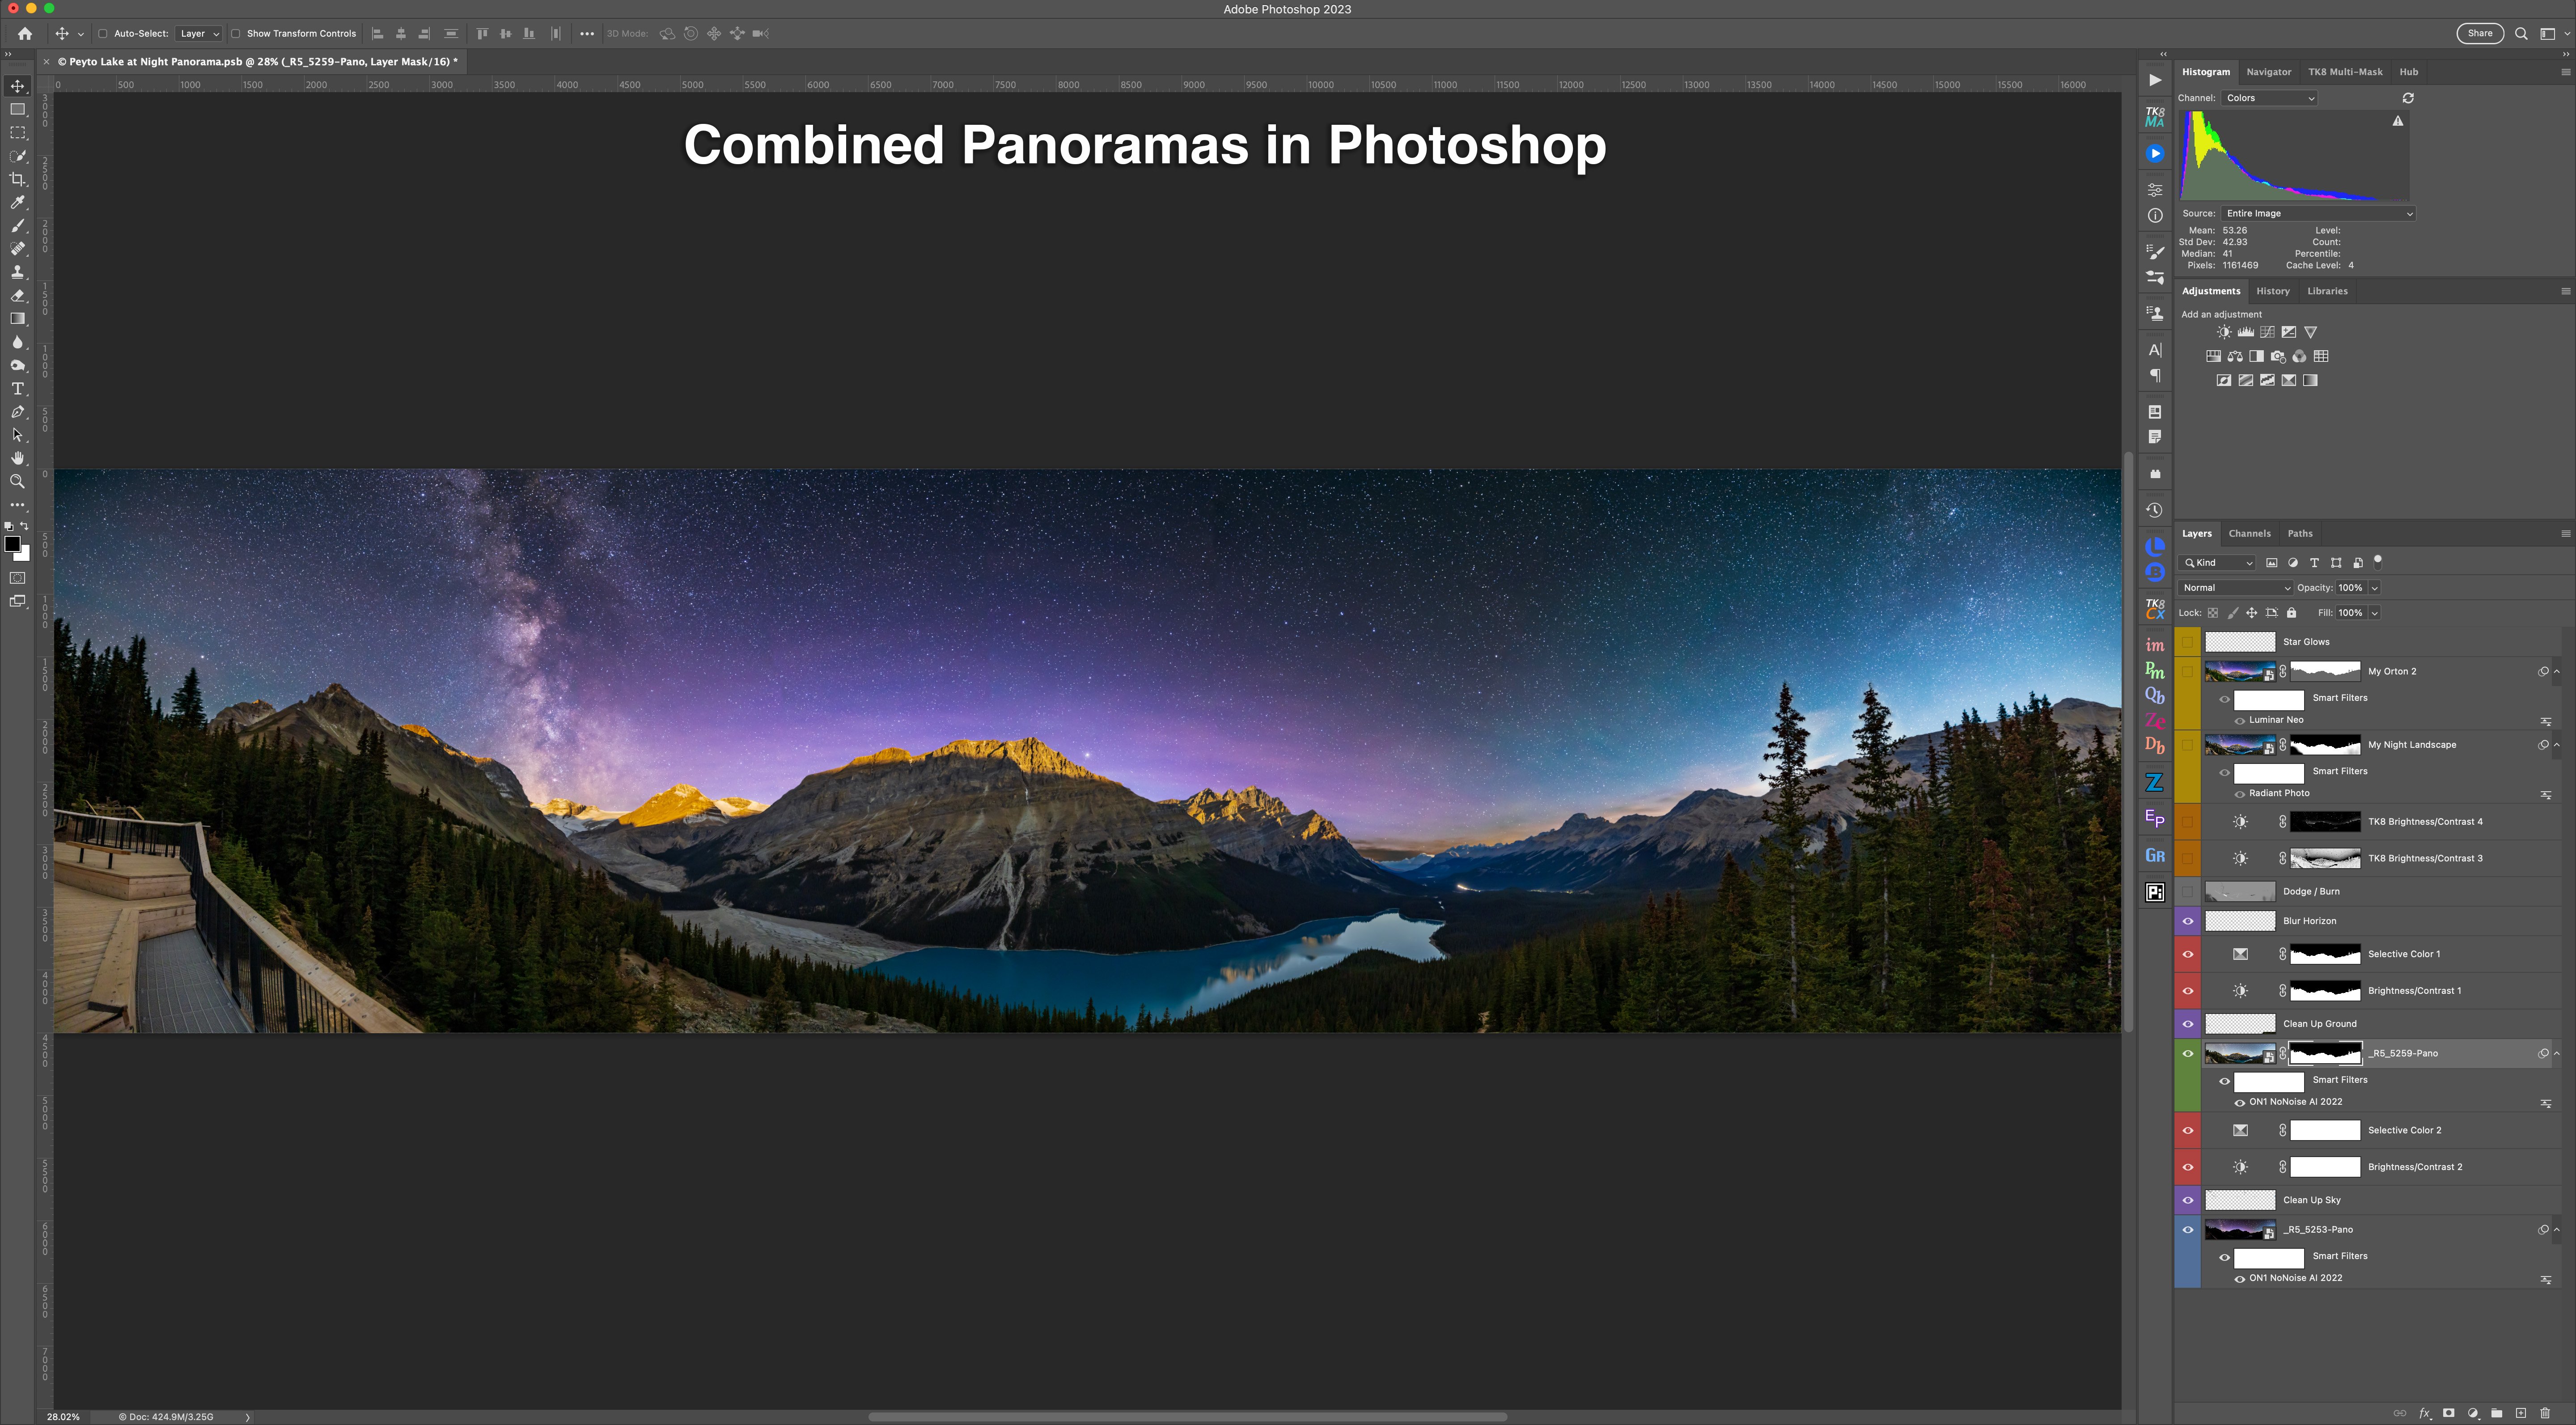
The final pano required a complex blend of image and adjustment layers, all applied non-destructively, so the many elements of the scene can be individually tweaked at any time.

The work was worth it, as the final pano records the deep red nebulas contrasting with the deep blue of a sky still lit partly by twilight, a magenta aurora to the north, and bands of green and yellow airglow, all above the earth tones of the Badlands. It is one of my favourite nightscape panoramas.

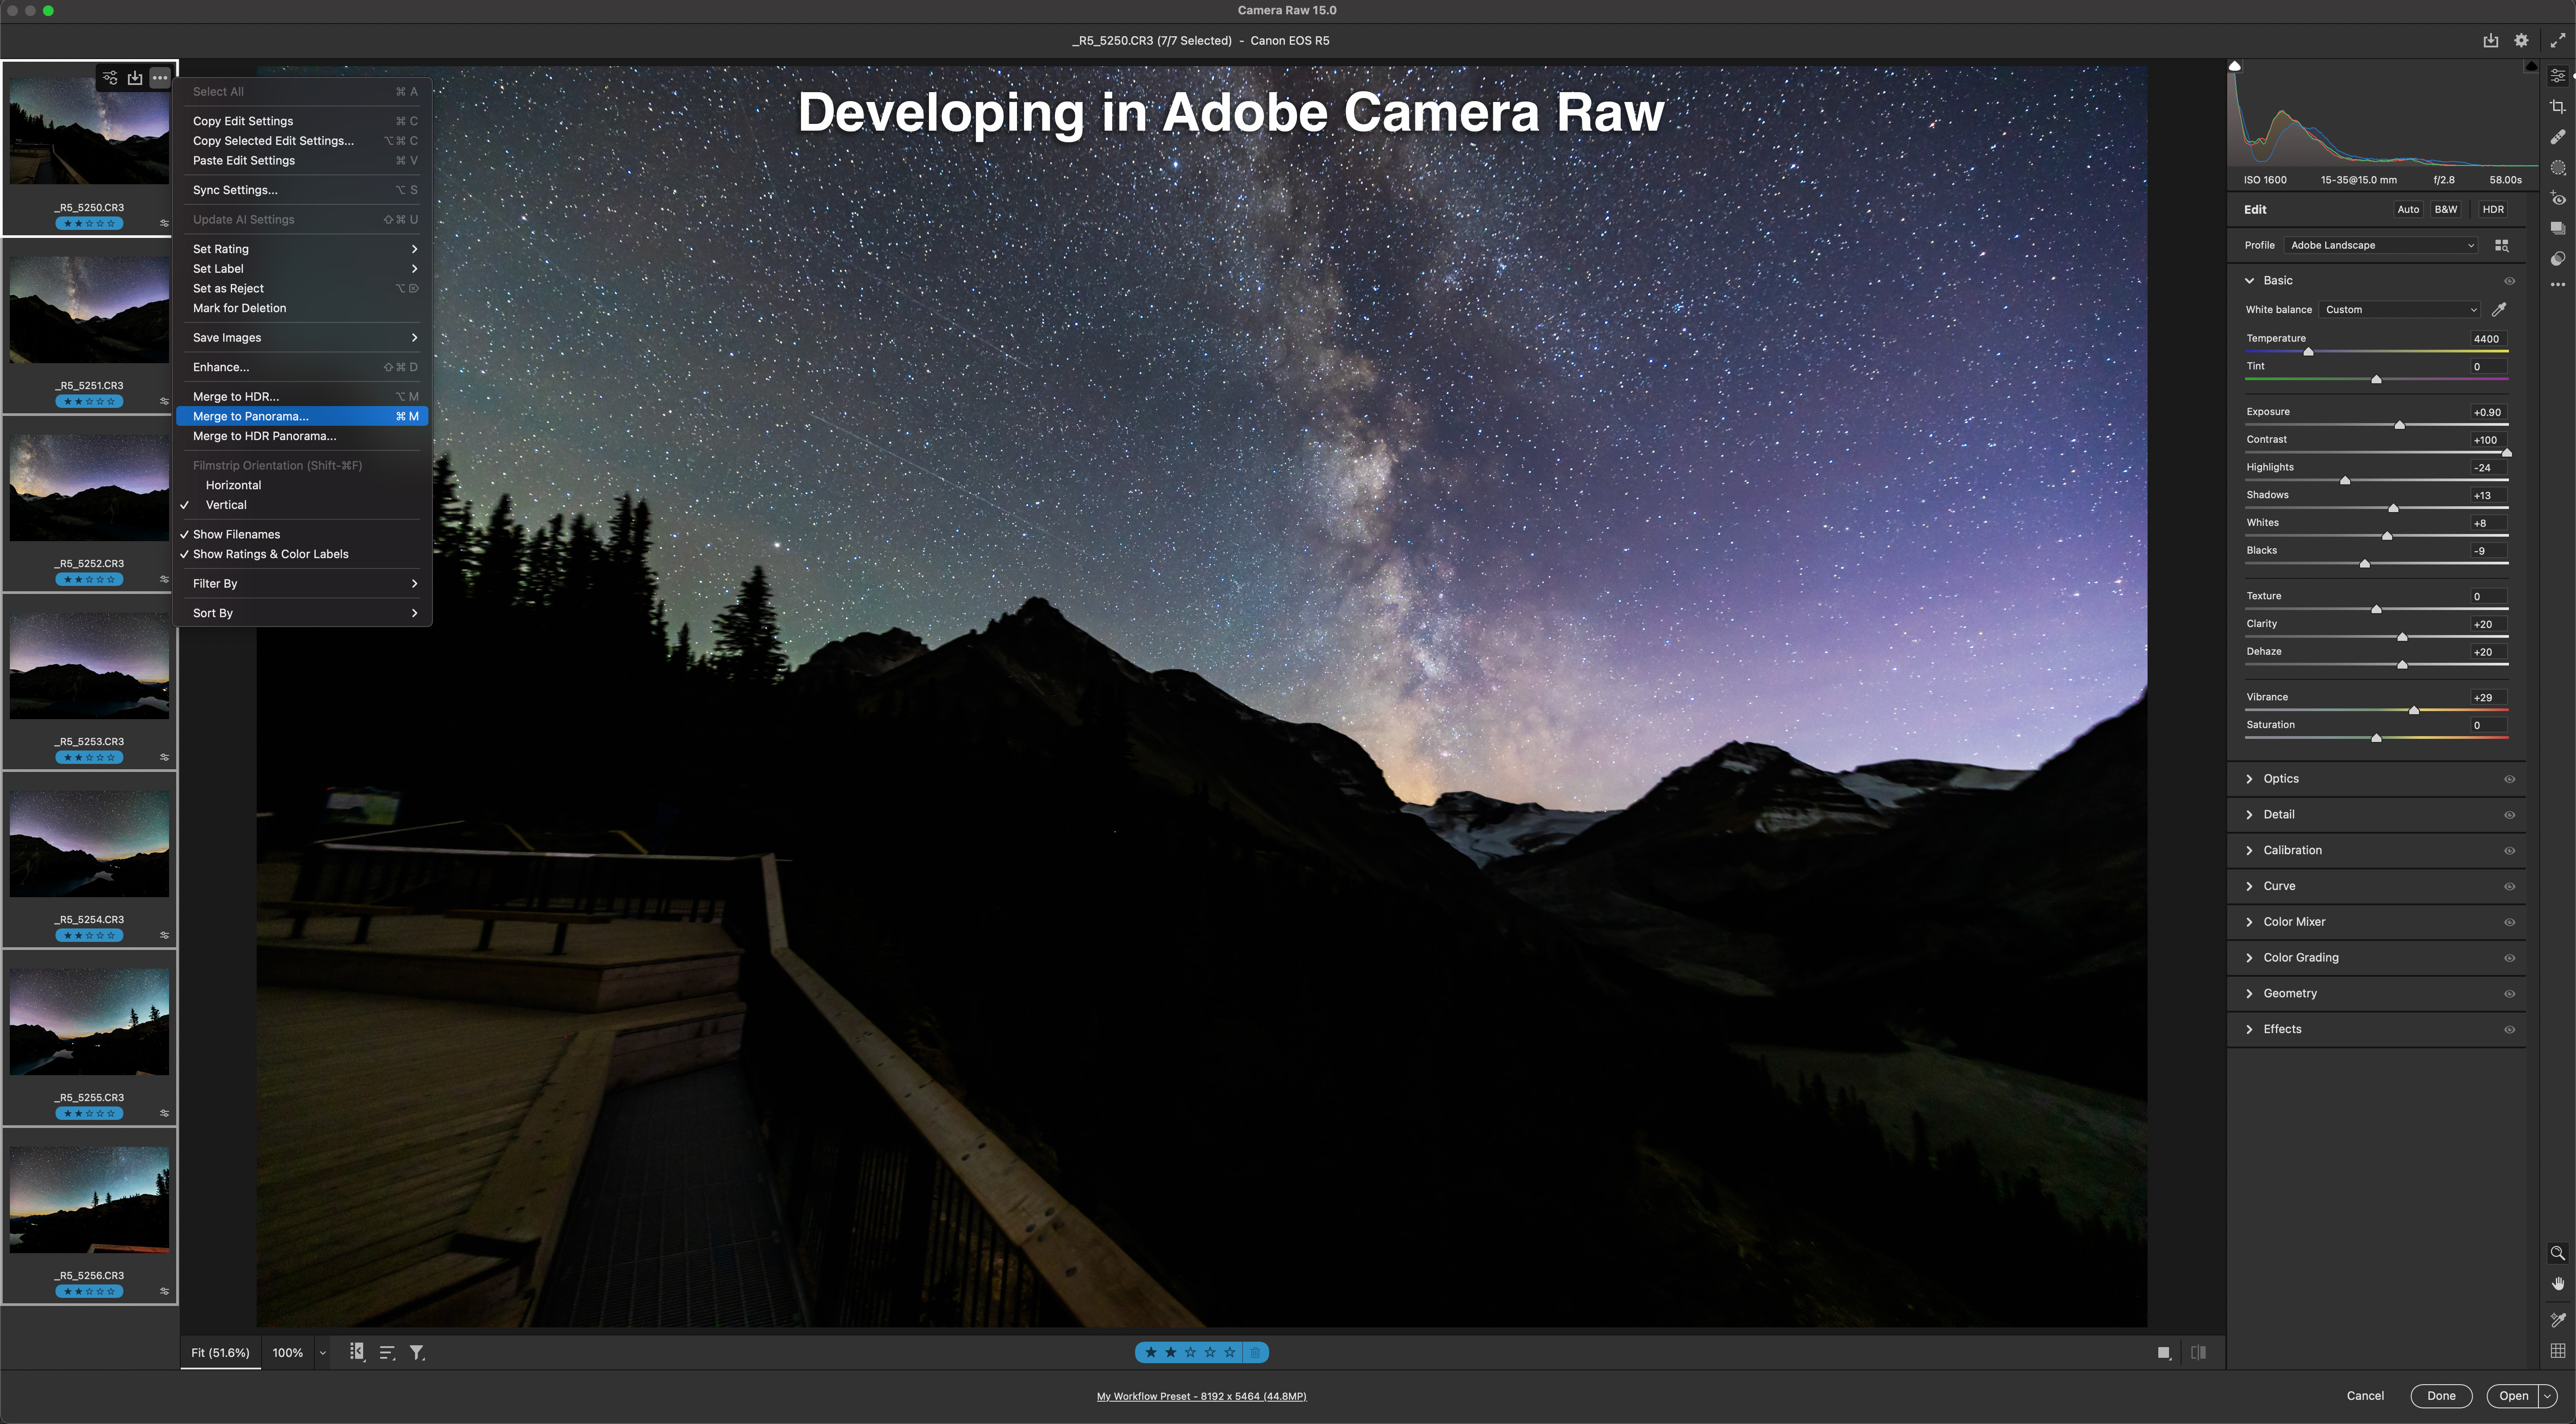
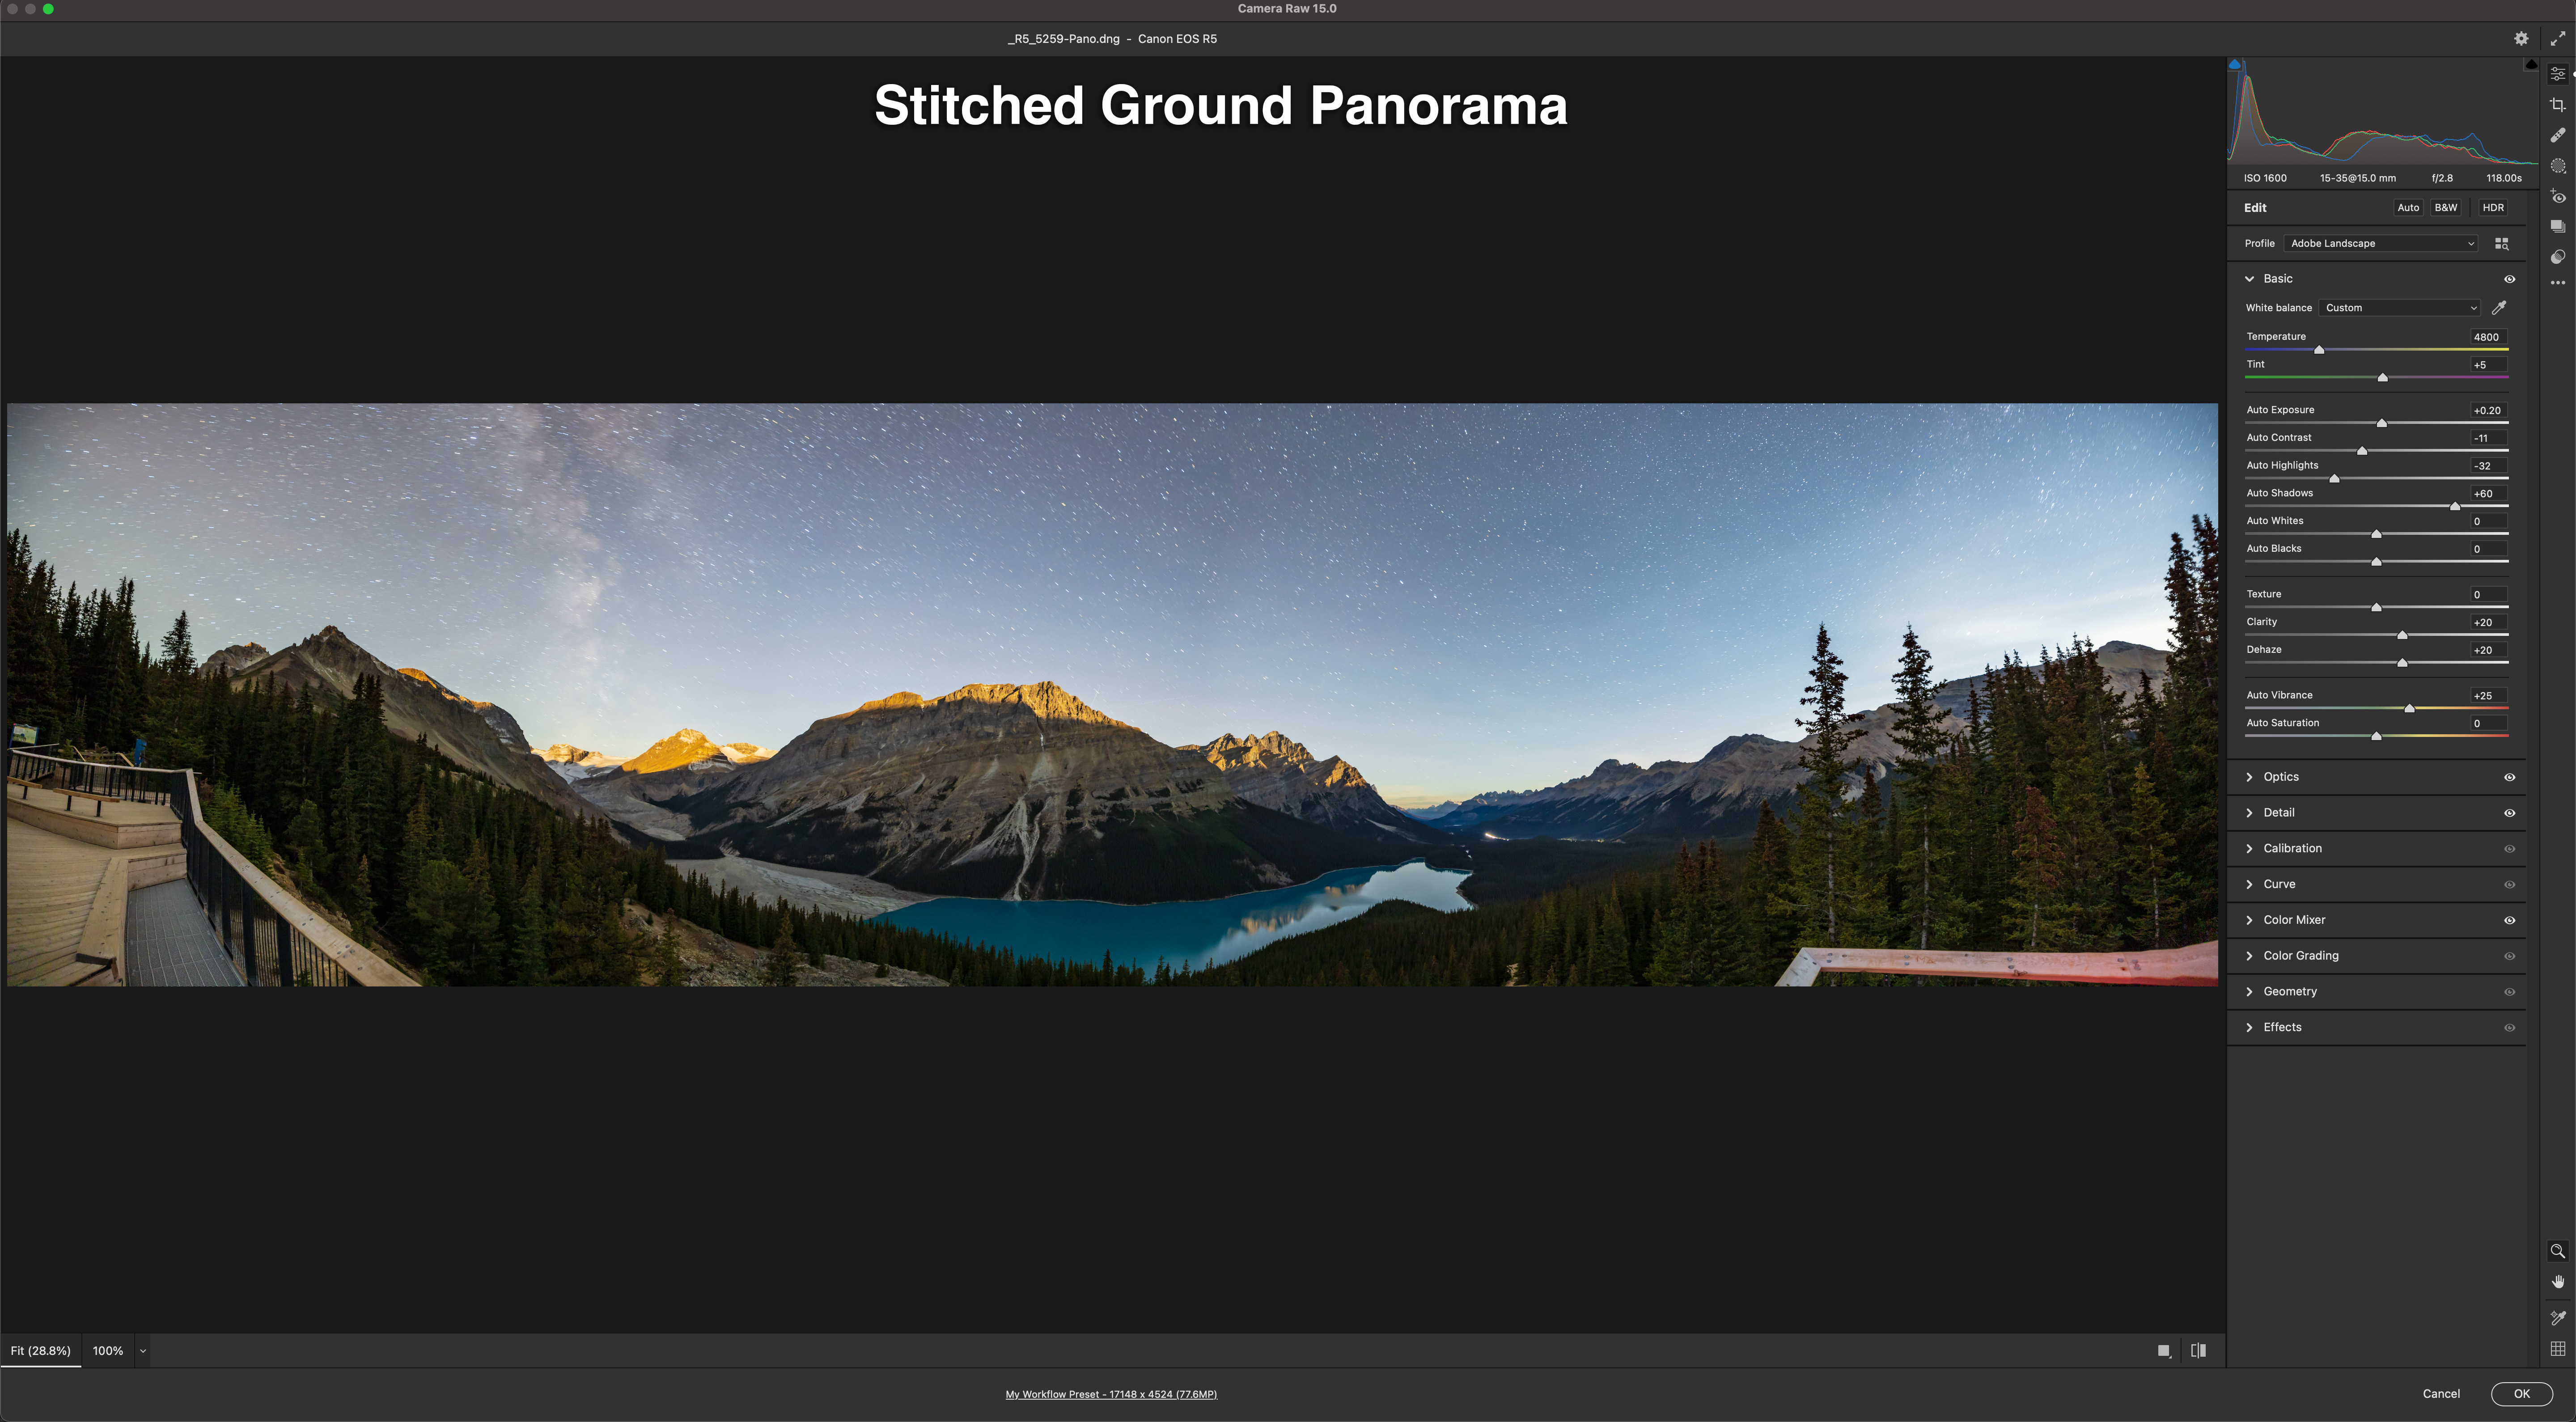
As a further note on software: For stitching panos I try to use Adobe Camera Raw first. It can work very well. But complex panos, especially taken with very wide lenses, often require the specialized program PTGui, which offers more choice of pano projection methods, cleaner stitching, and control of panorama framing and levelling.


Next up was Writing-on-Stone Provincial Park.

A week later, with the waxing Moon beginning to appear in the western sky and the promise of clear nights, I headed south to the 49th parallel borderlands of the Milk River and Writing-on-Stone Provincial Park, known as รรญsรญnai’pi to the Blackfoot First Nation who revere the site as sacred.

My plan was a framing of the galactic centre over the Milk River valley and distant Sweetgrass Hills in Montana, perhaps using the H-Alpha filter again. But clouds got in the way!

A 13-segment panorama of the landscape and sky just as the Sun sets over Writing-on-Stone Provincial Park (รรญsรญnai’pi) in Alberta.

When you are faced with a cloudy sky, you make use of it for a colourful sunset. I like shooting panoramas at such sites as they capture the grand sweep of the “big sky” and prairie landscape. Above is the scene at sunset.

A 14-segment panorama of the landscape and sky at sunset at Writing-on-Stone Provincial Park.

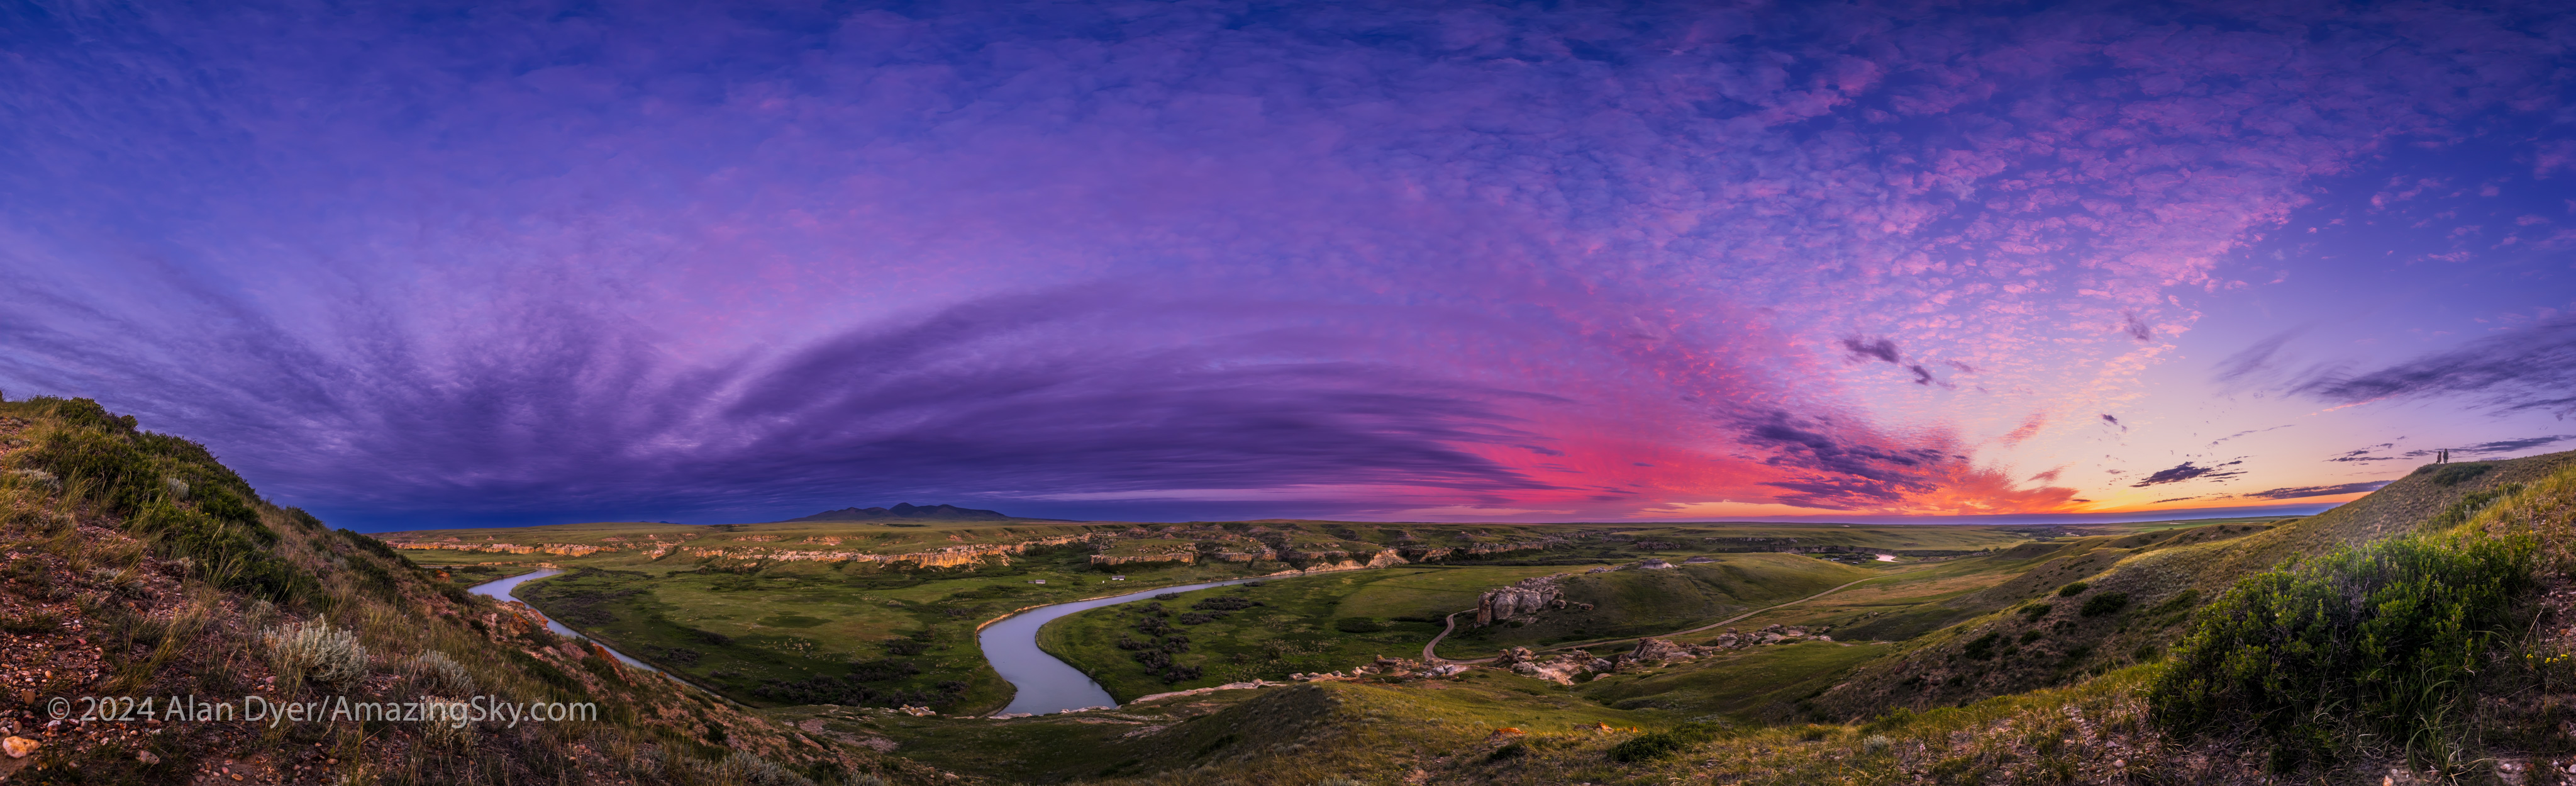
Above is the same scene a few minutes later as the Sun, though now set, still lights the high clouds with its red light, mixing with the blue sky to make purples. On the hill at right, a couple admires the sunset, adding a human scale to the vast skyscape.

This pano was with the Canon RF15-35mm lens at 15mm and the camera in portrait orientation to capture as much of the sky and ground as possible in a single-row pano.

A 13-segment panorama of the sandstone landscape in blue-hour twilight at Writing-on-Stone Provincial Park.

I finished the evening with another panorama, but using a Canon RF70-200mm telephoto lens at 70mm to zoom in on the Sweetgrass Hills in the deepening twilight.

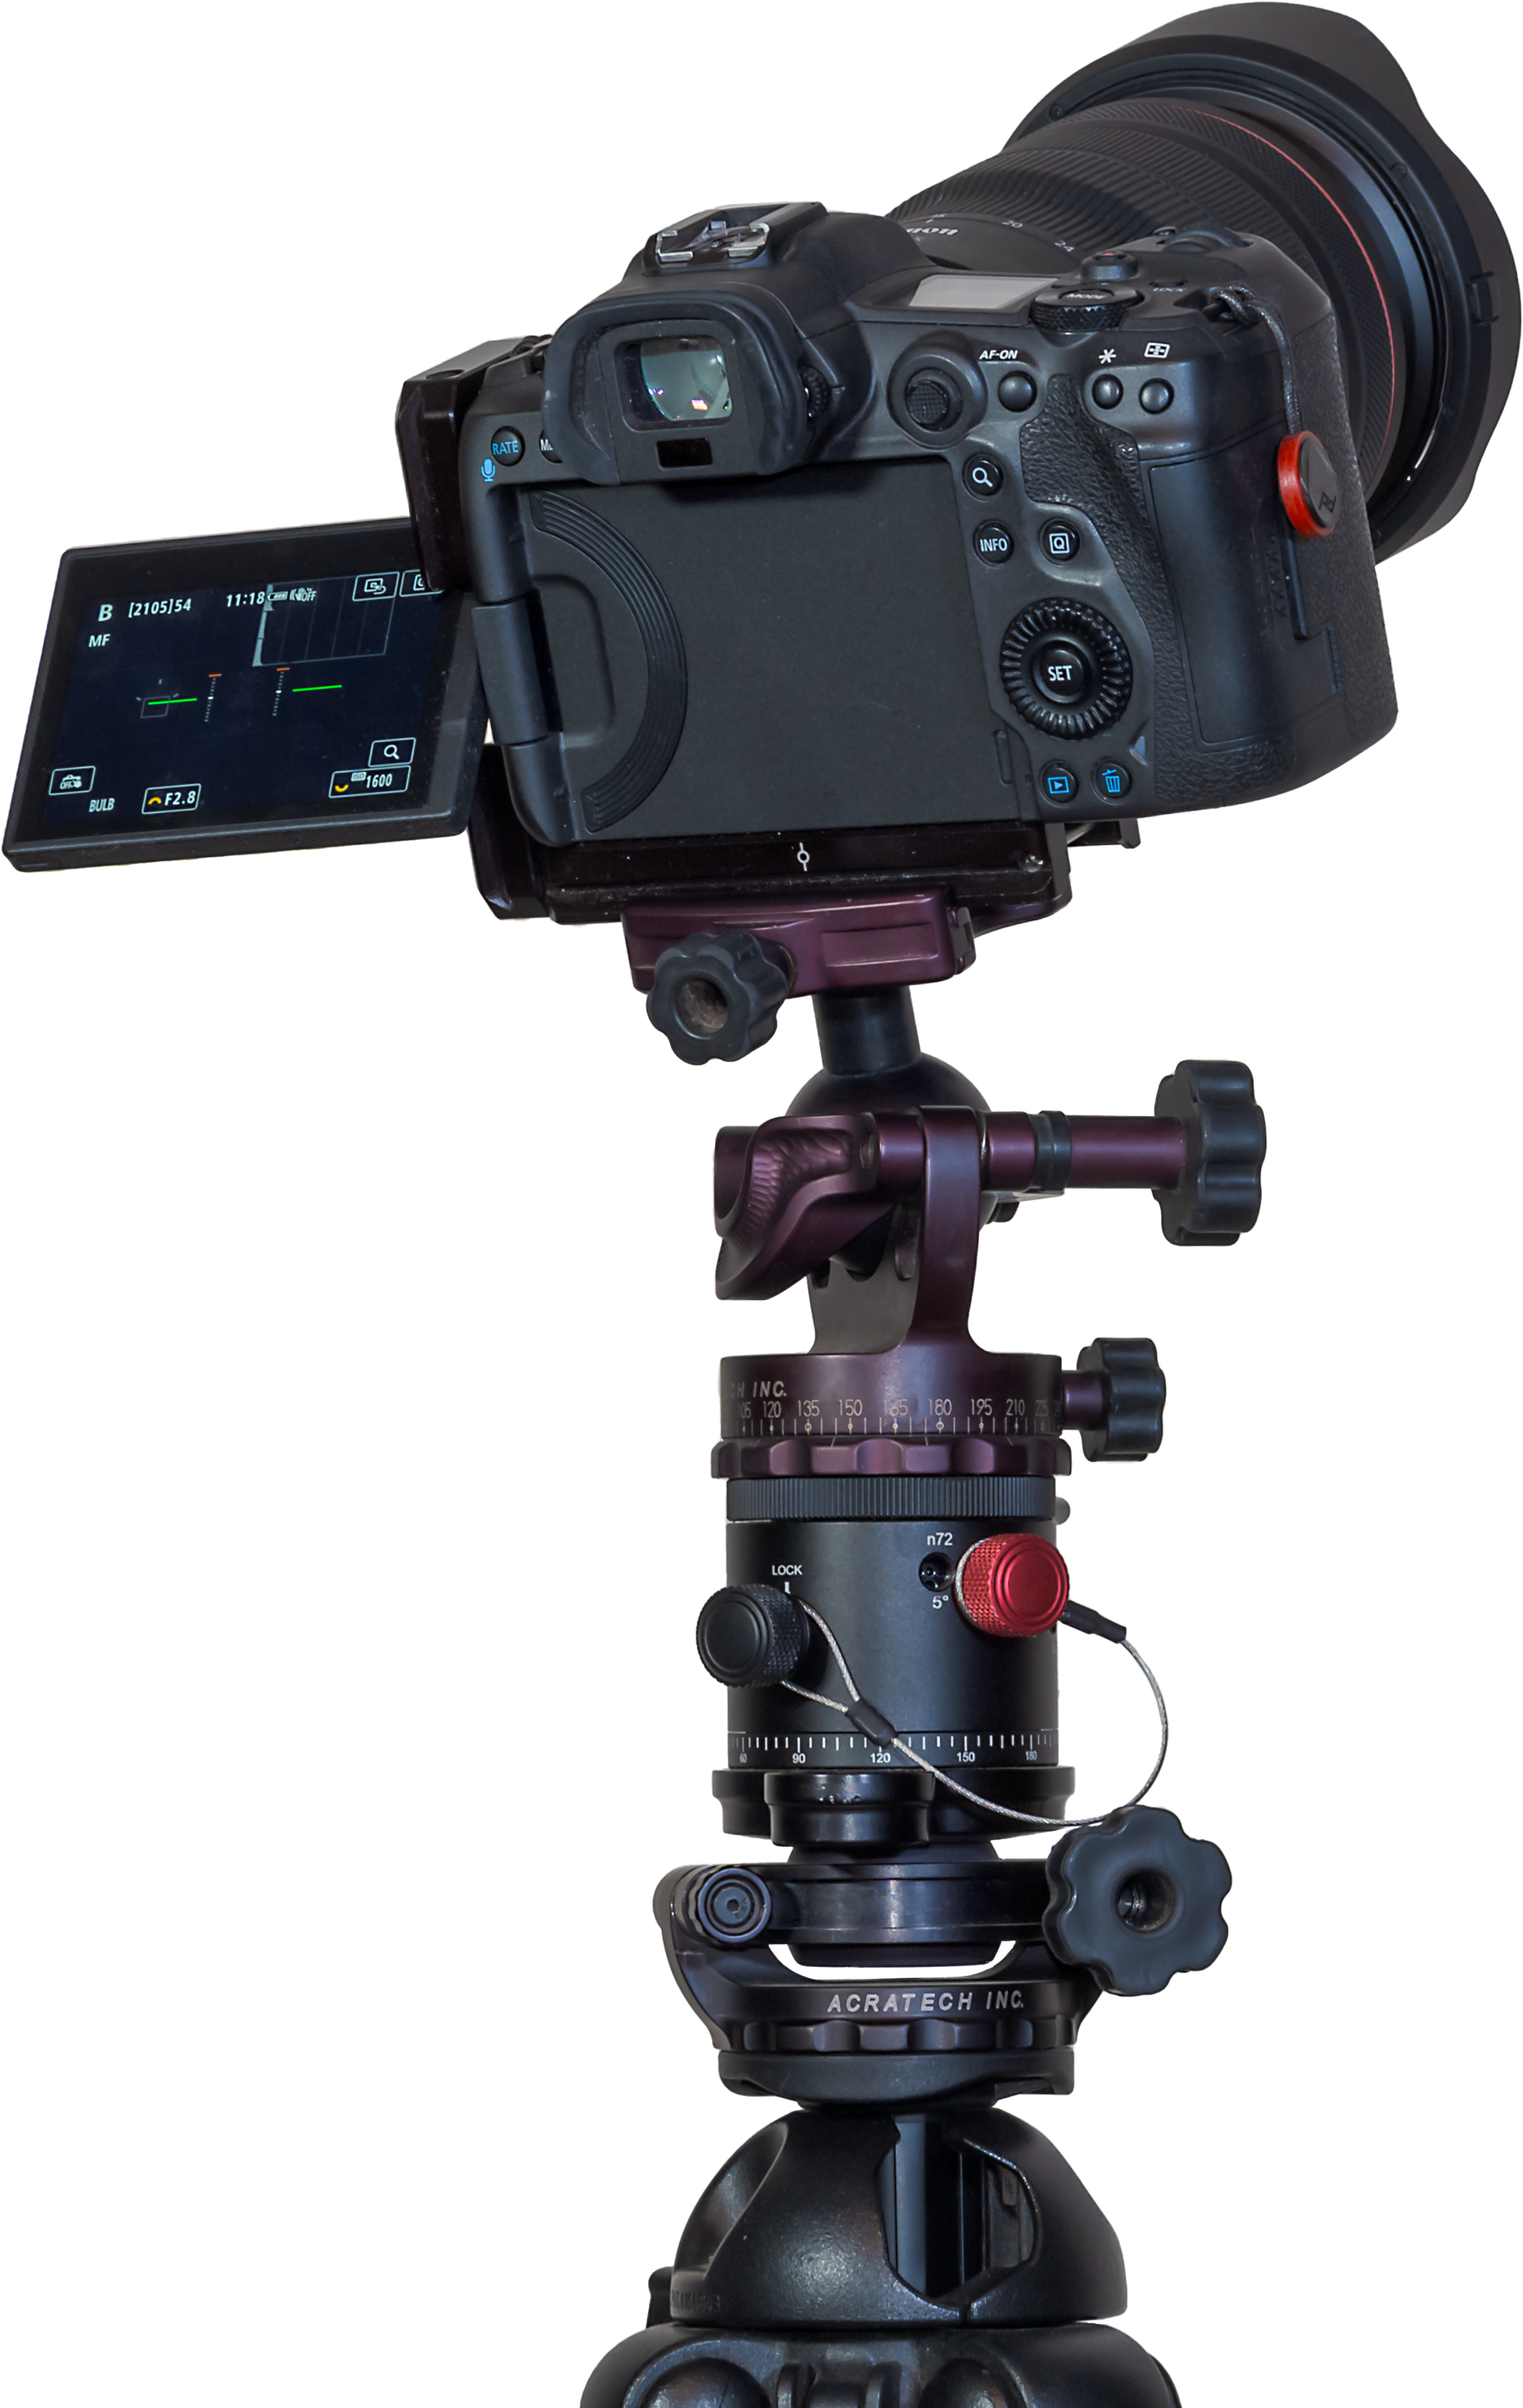
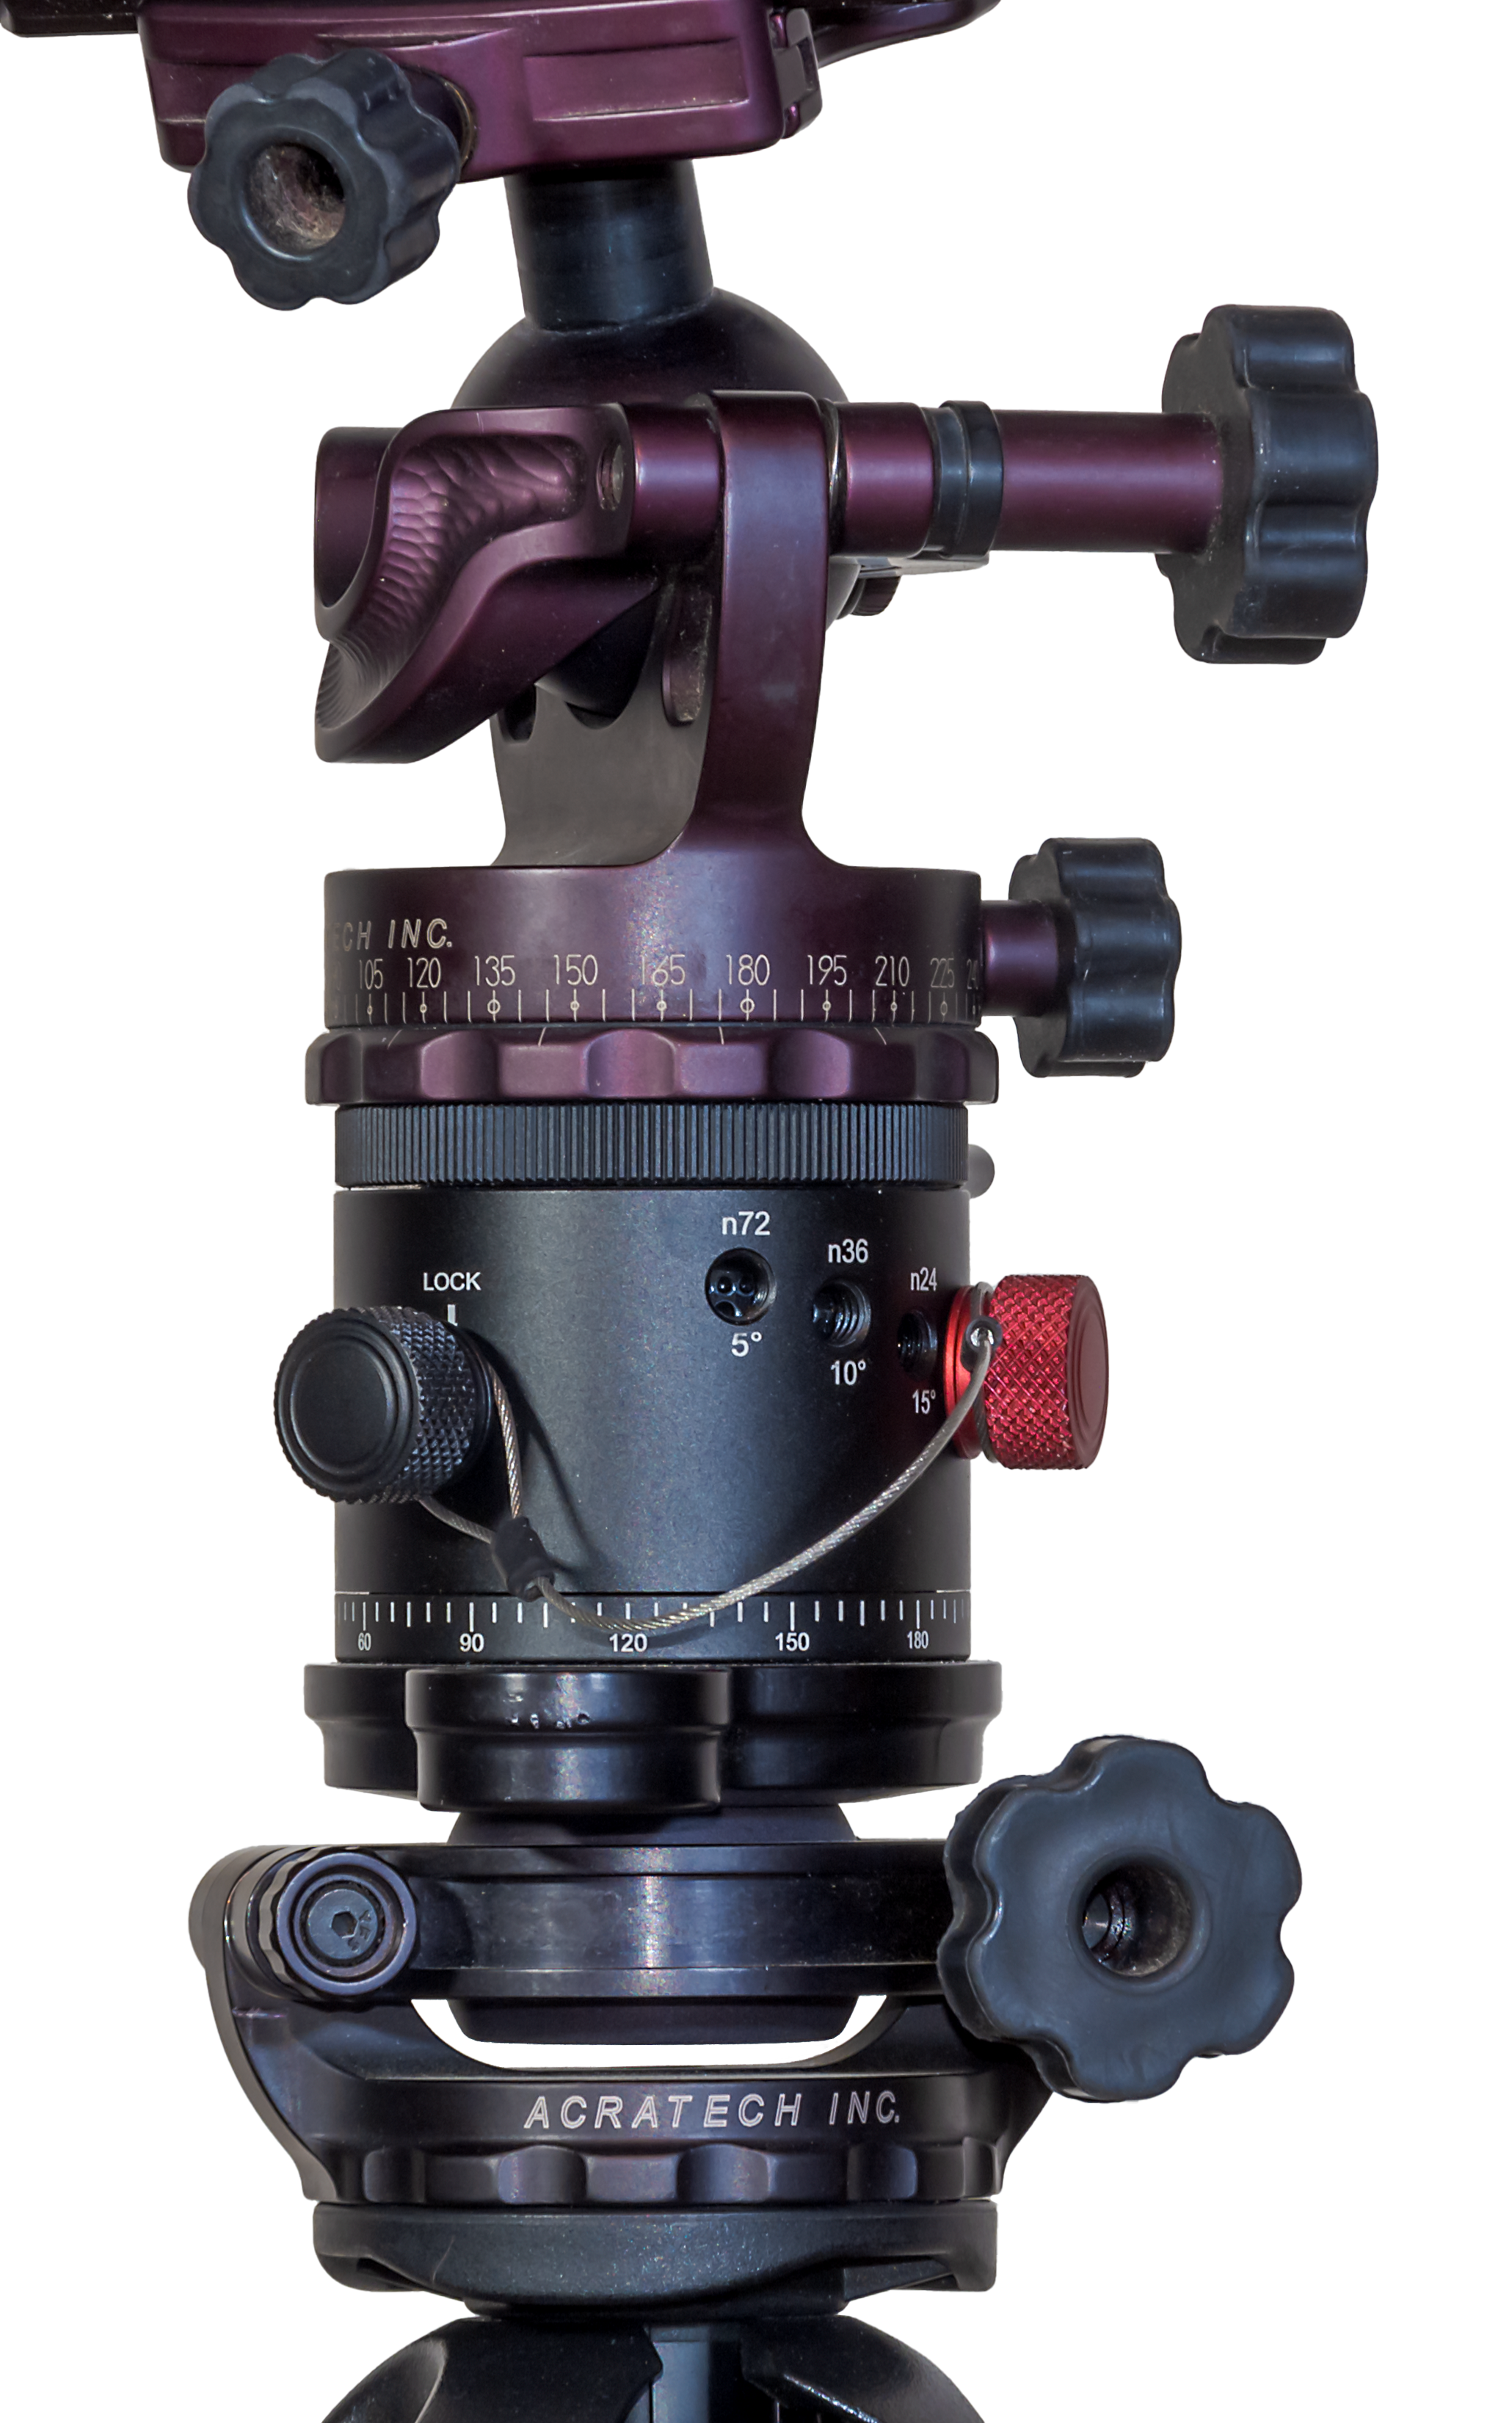
For these panoramas, exposures were short, so I didn’t need to track the sky. I used another combination of gear shown above. An Acratech ball head sits atop another style of panorama head that has adjustable click stops to make it easy to move the camera from segment to segment at set angles. When the lighting is changing by the second, it helps to be quick about shooting all the pano segments. Such pano heads are readily available on Amazon.

That pano head sits atop an Acratech levelling head (there are many similar units for sale), an essential addition that makes it easy to level the pano head so the camera turns parallel to the horizon. Any tilt will result in a panorama that waves up and down, likely requiring fussy warping or cropping to correct. Avoid that; get it right in-camera!

A single-image portrait of a sunset sky with the waxing two-day-old crescent Moon amid colourful clouds over the prairie.

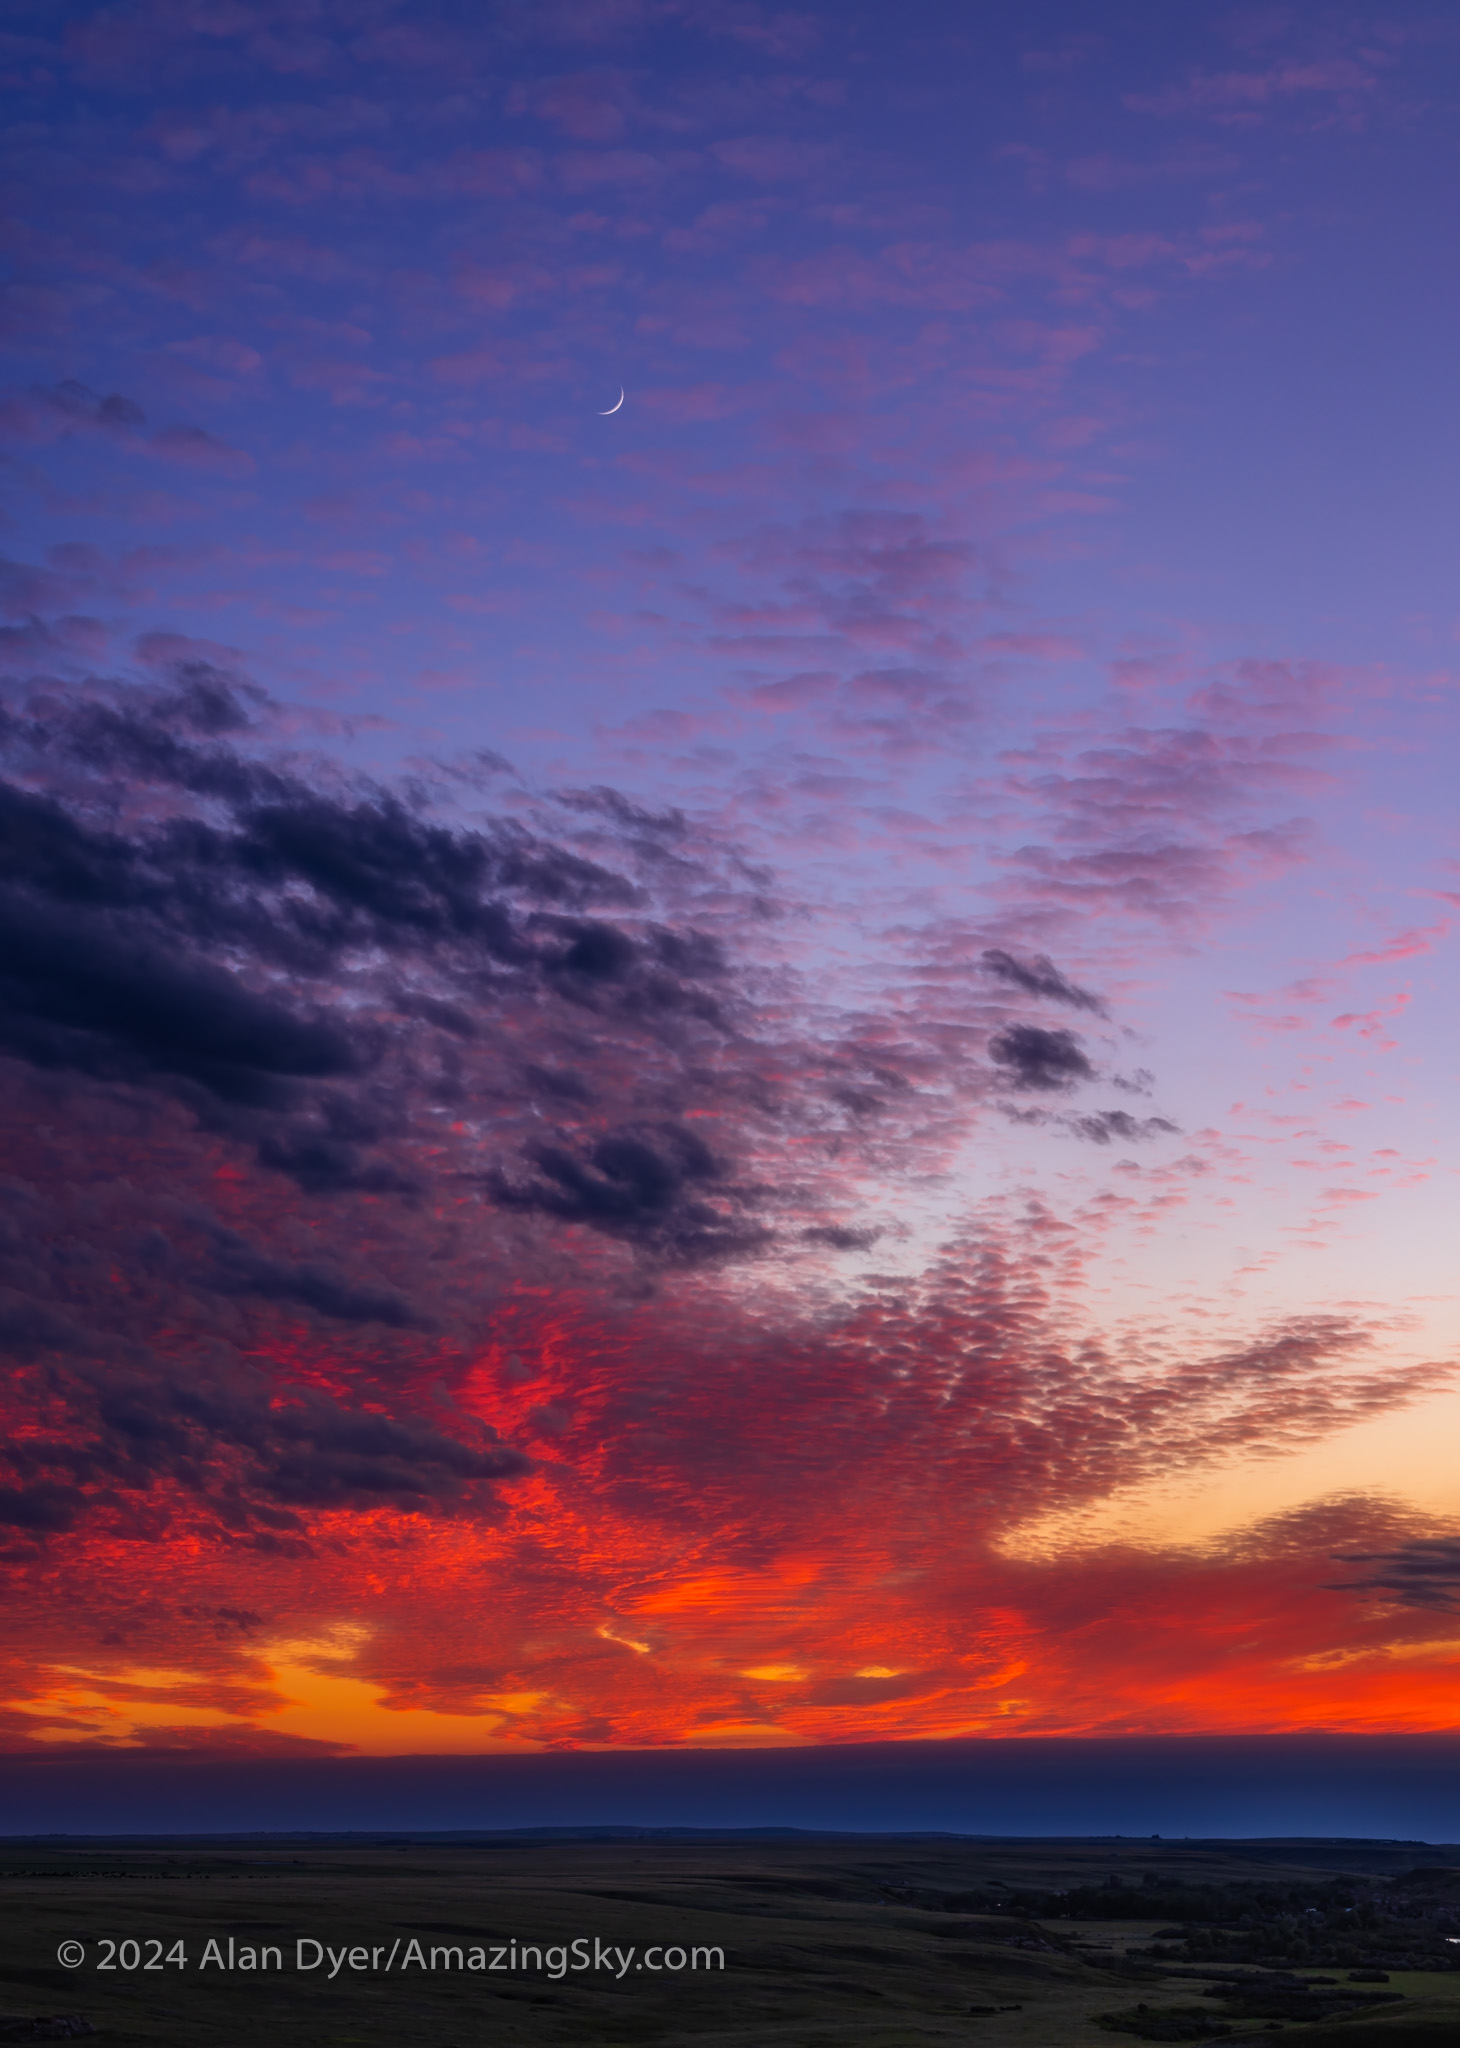
As the sky lit up, I also shot the crescent Moon above the sunset clouds and prairie scene. While the clouds made for a fine sunset, they did not clear off, thwarting my Milky Way plans this night. I headed back to Milk River, to travel farther west the next day.


From Writing-on-Stone I drove along scenic Highways 501 and 5 to Waterton Lakes National Park.

A nightscape scene under a twilight “blue-hour” sky, on the Red Rock Canyon Parkway in Waterton Lakes National Park, Alberta, looking west toward the sunset with the four-day-old crescent Moon.

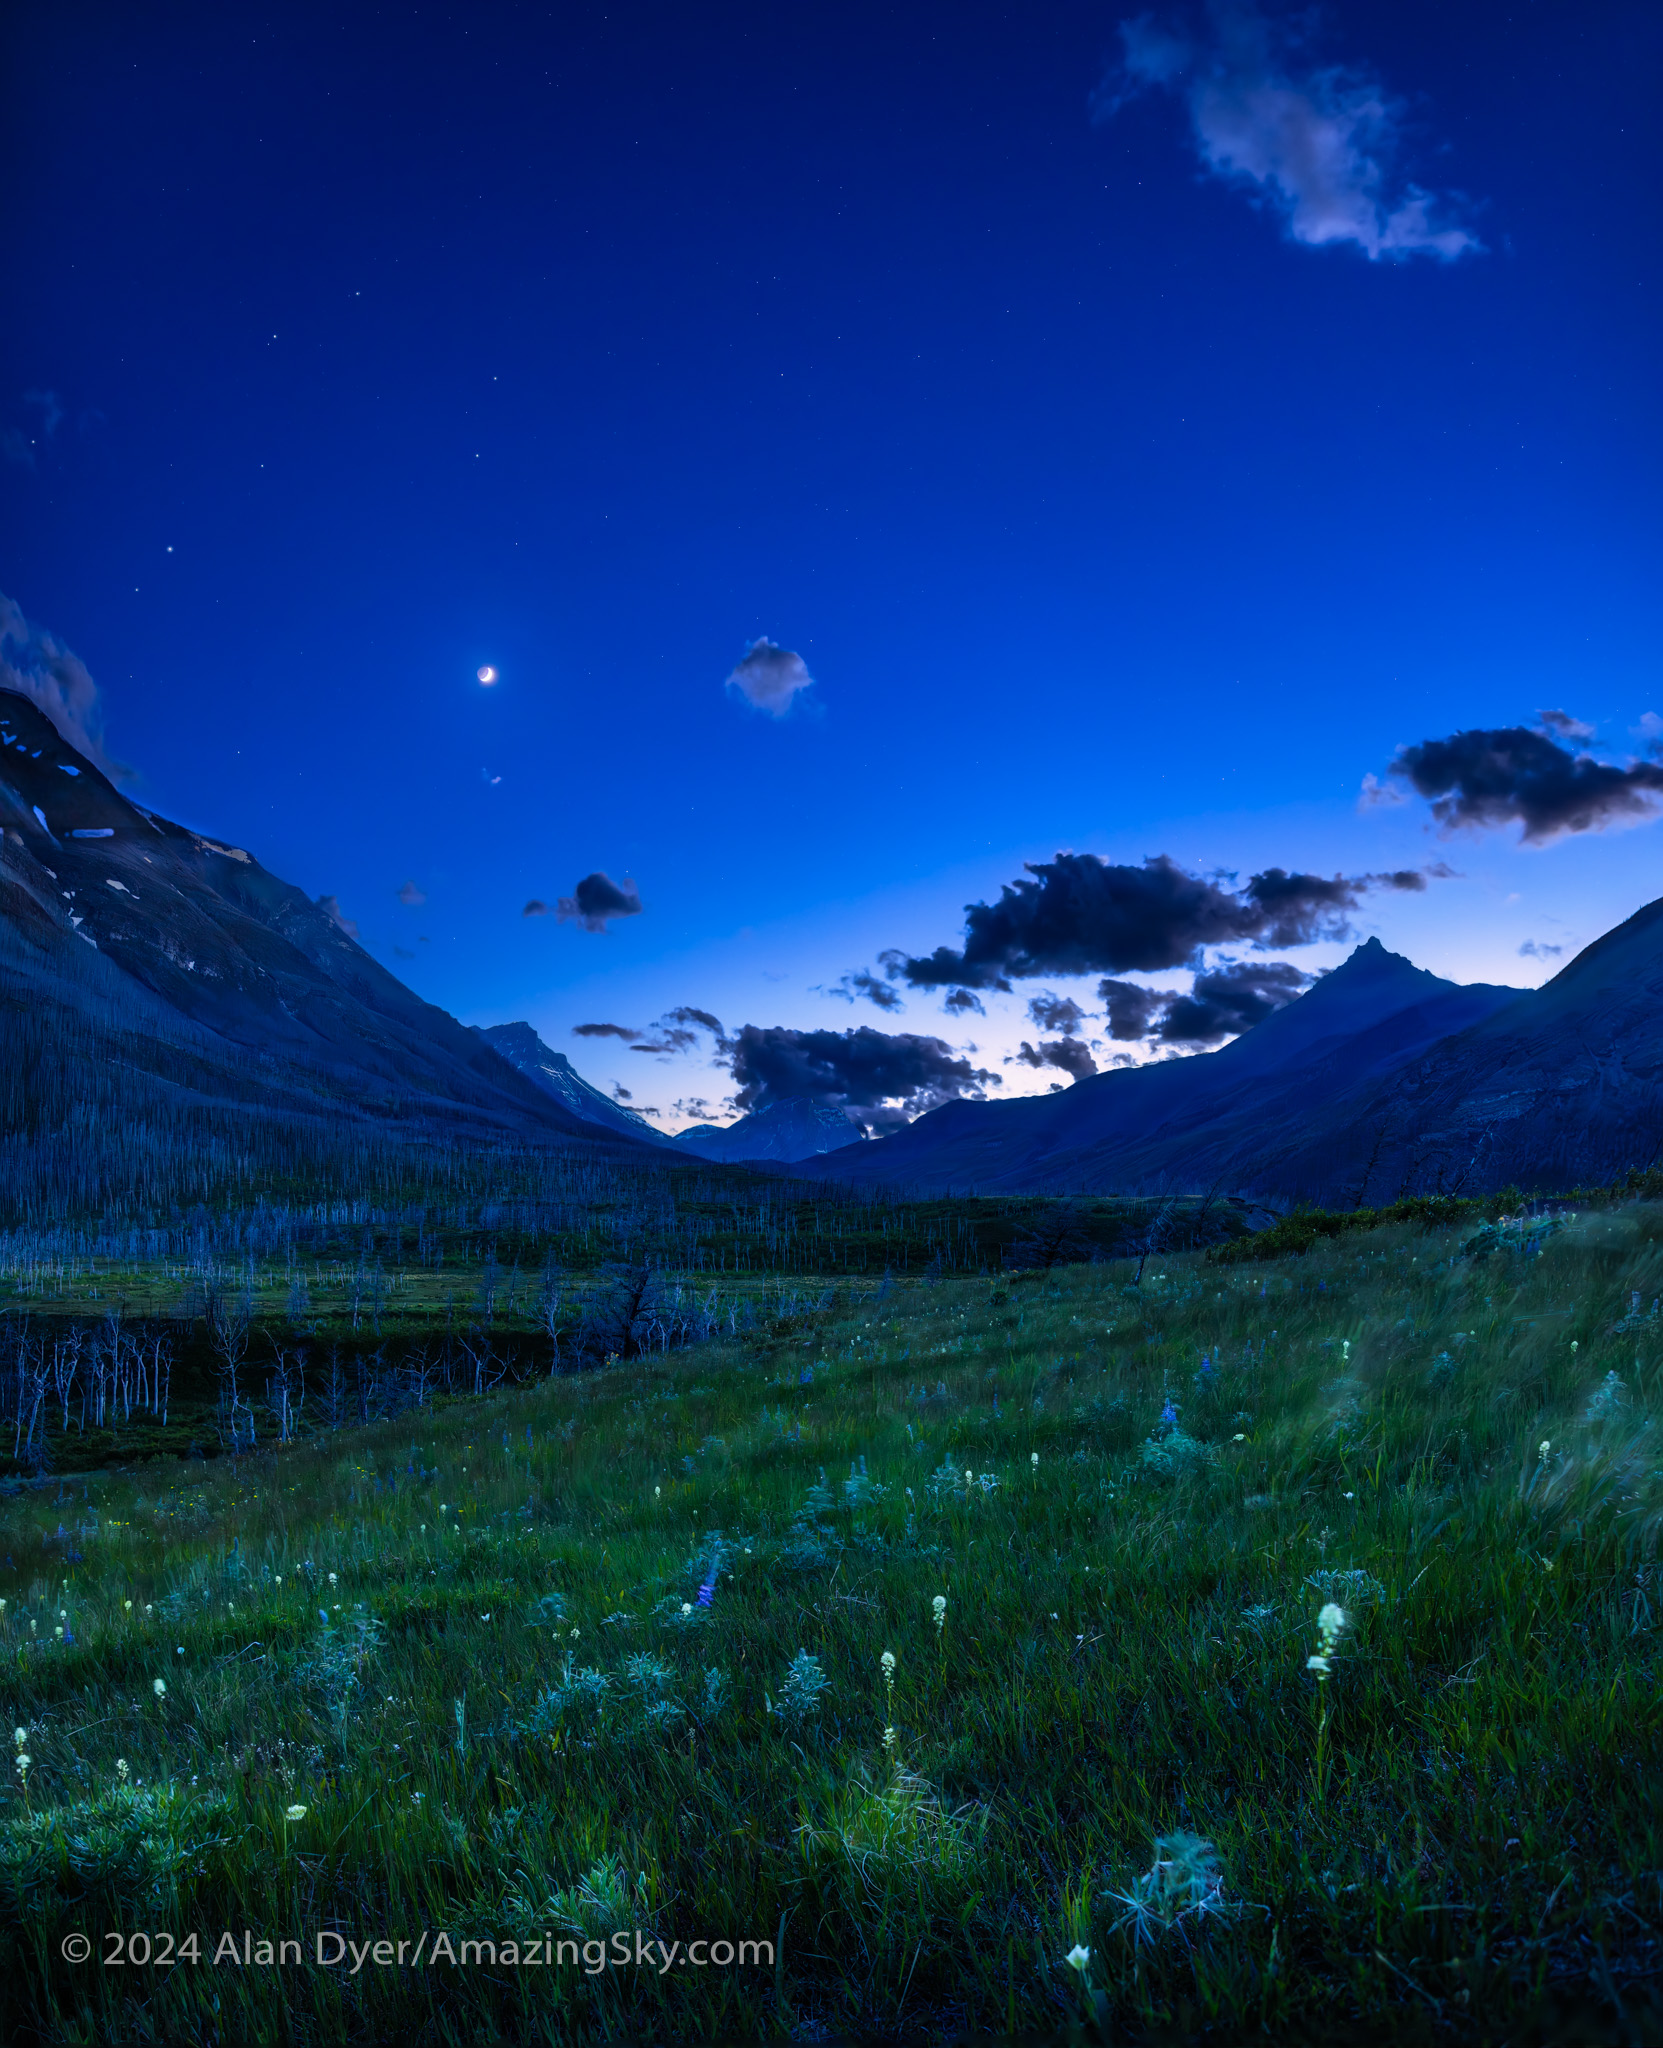
After an initial cloudy night, I made use of the (mostly) clear night on June 10 to shoot twilight scenes with the now four-day-old crescent Moon in the evening sky. Here I wanted to play with another technique I had not used much before: focus stacking.

To keep exposures short (here to minimize the blurring effects of the constant wind at Waterton) you have to shoot at wide apertures (f/2 in this case). But that produces a very shallow depth of field, where only a small area of the image is in focus.

So I shot a series of six images, shifting the focus from near (for the foreground flowers) to far (for the mountains and sky). Photoshop has an Auto Blend function that will merge the images into one with everything in focus. I also shot separate images exposed for the bright sky, shooting a vertical panorama โ€” dubbed a “vertorama” โ€” moving the camera up from frame to frame.

I shot an additional short exposure just for the Moon, to prevent its disk from overexposing too much, as it did in the twilight sky images.

Twilight sky assembly and layers in Photoshop

So what looks like a simple snapshot of a twilight scene is actually a complex blend of focus-stacked ground images, panoramic sky images, and a single short image of the Moon replacing its otherwise overly bright disk. But the result better resembles what the eye saw, as single exposures often cannot record the range of brightness the eye can take in.

A nightscape scene under a moonlit sky, on the Red Rock Canyon Parkway in Waterton Lakes National Park, Alberta, looking back along Pass Creek to the south, with the Milky Way rising at left.

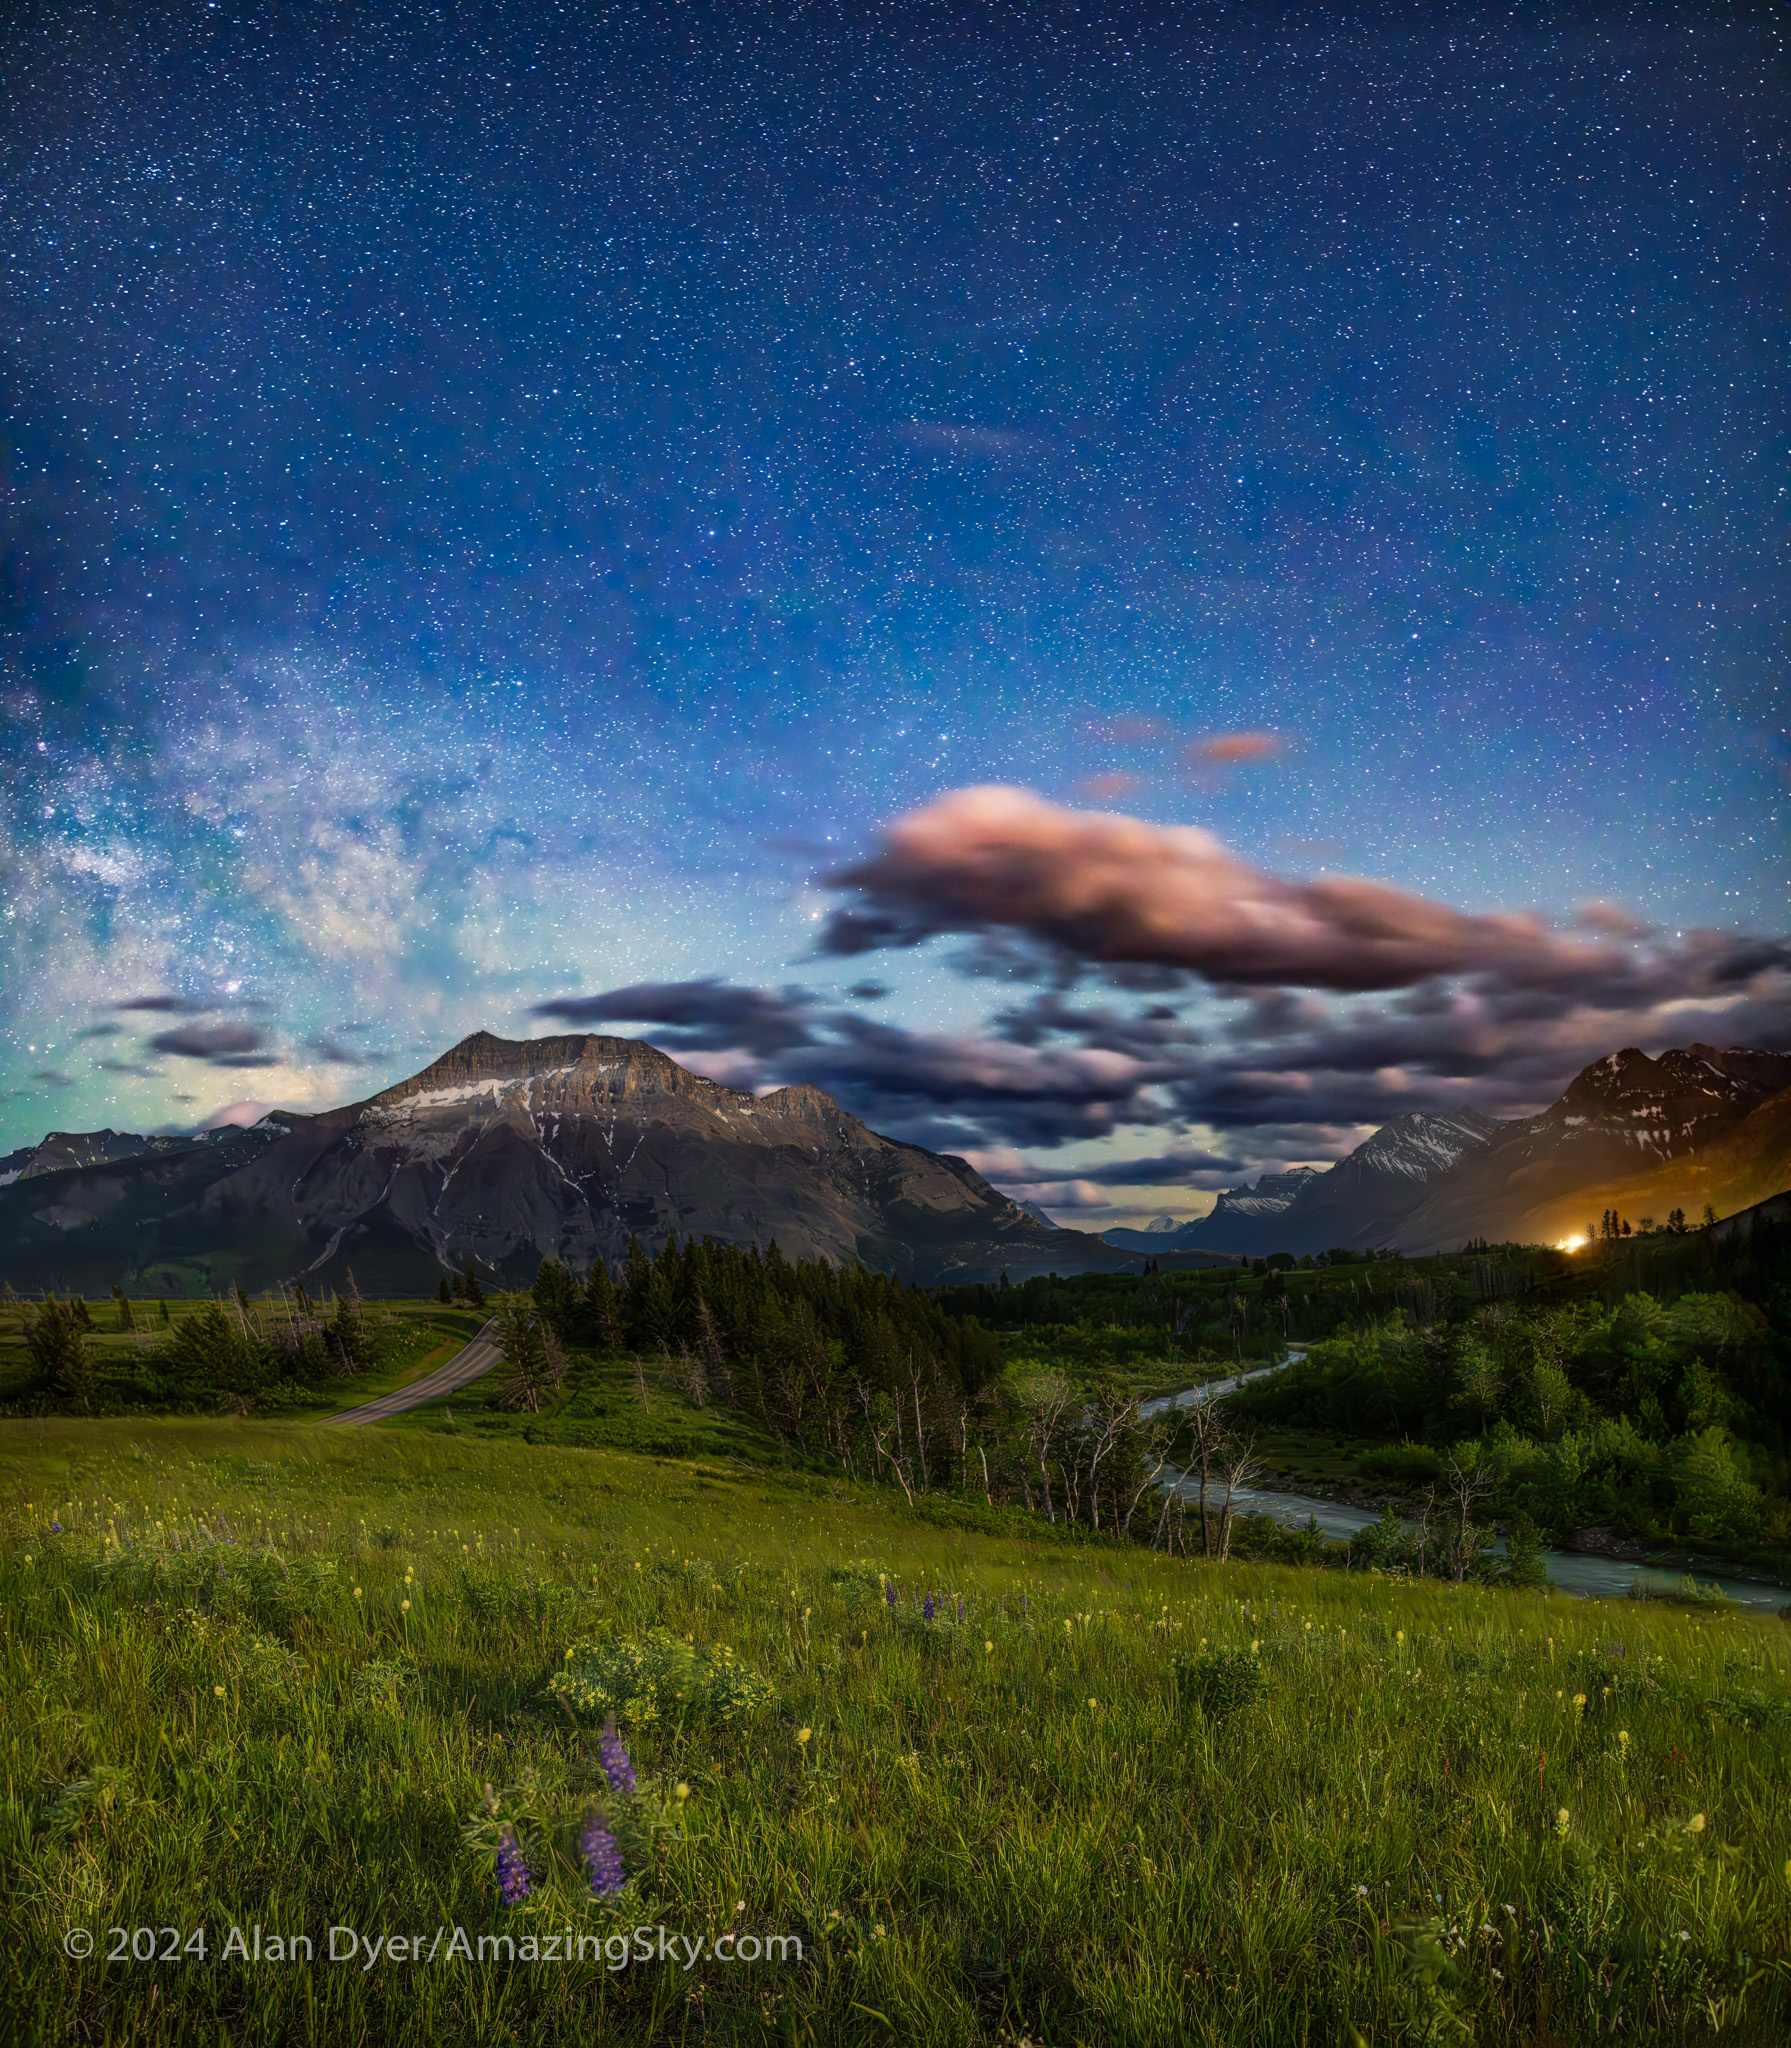
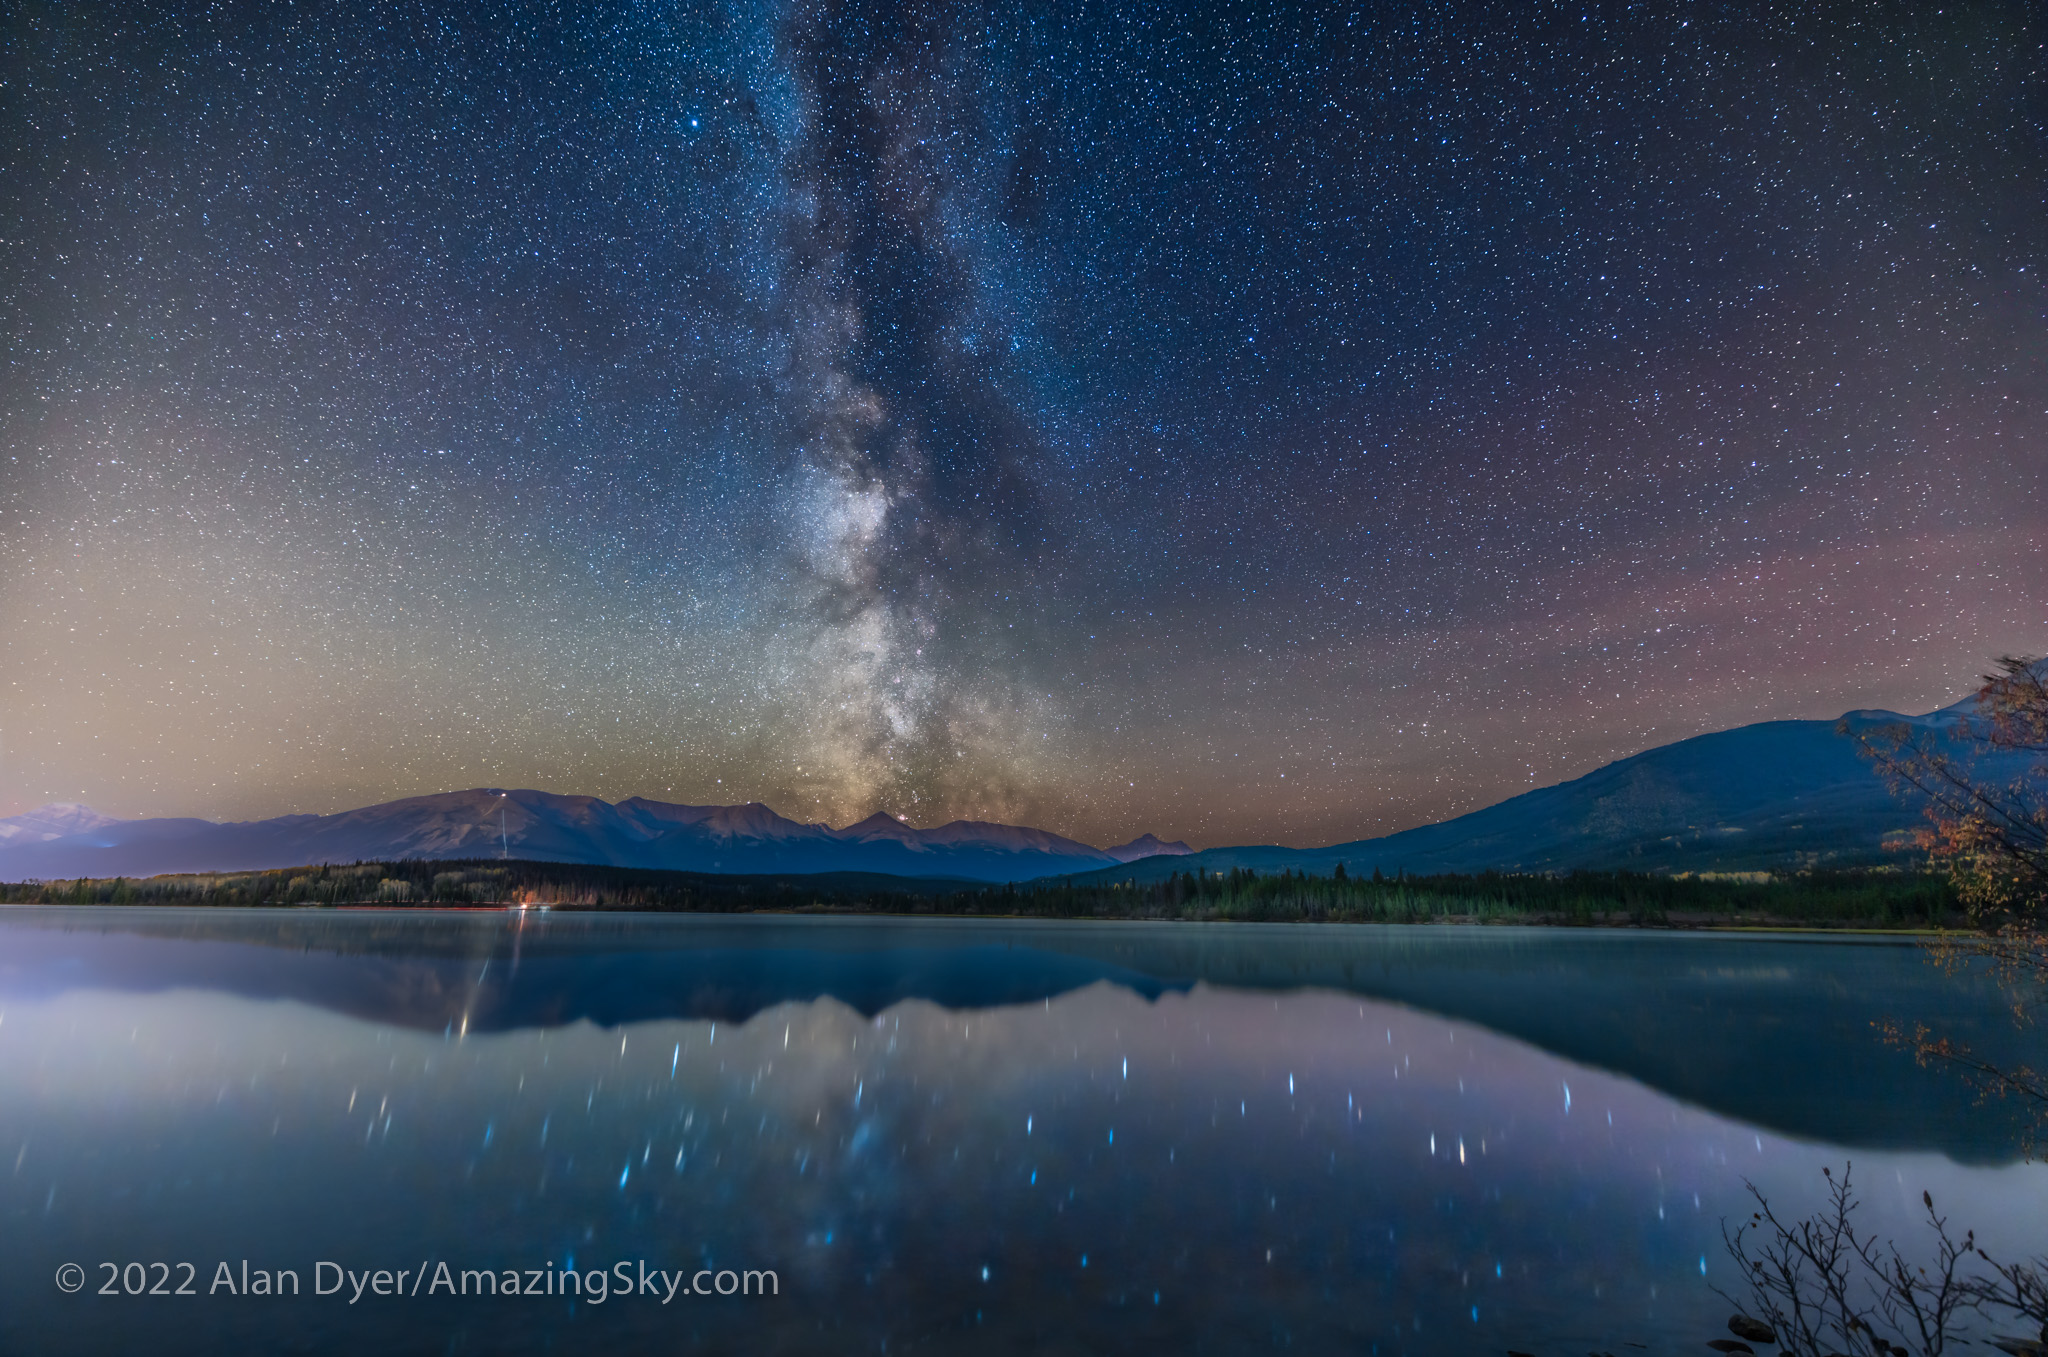
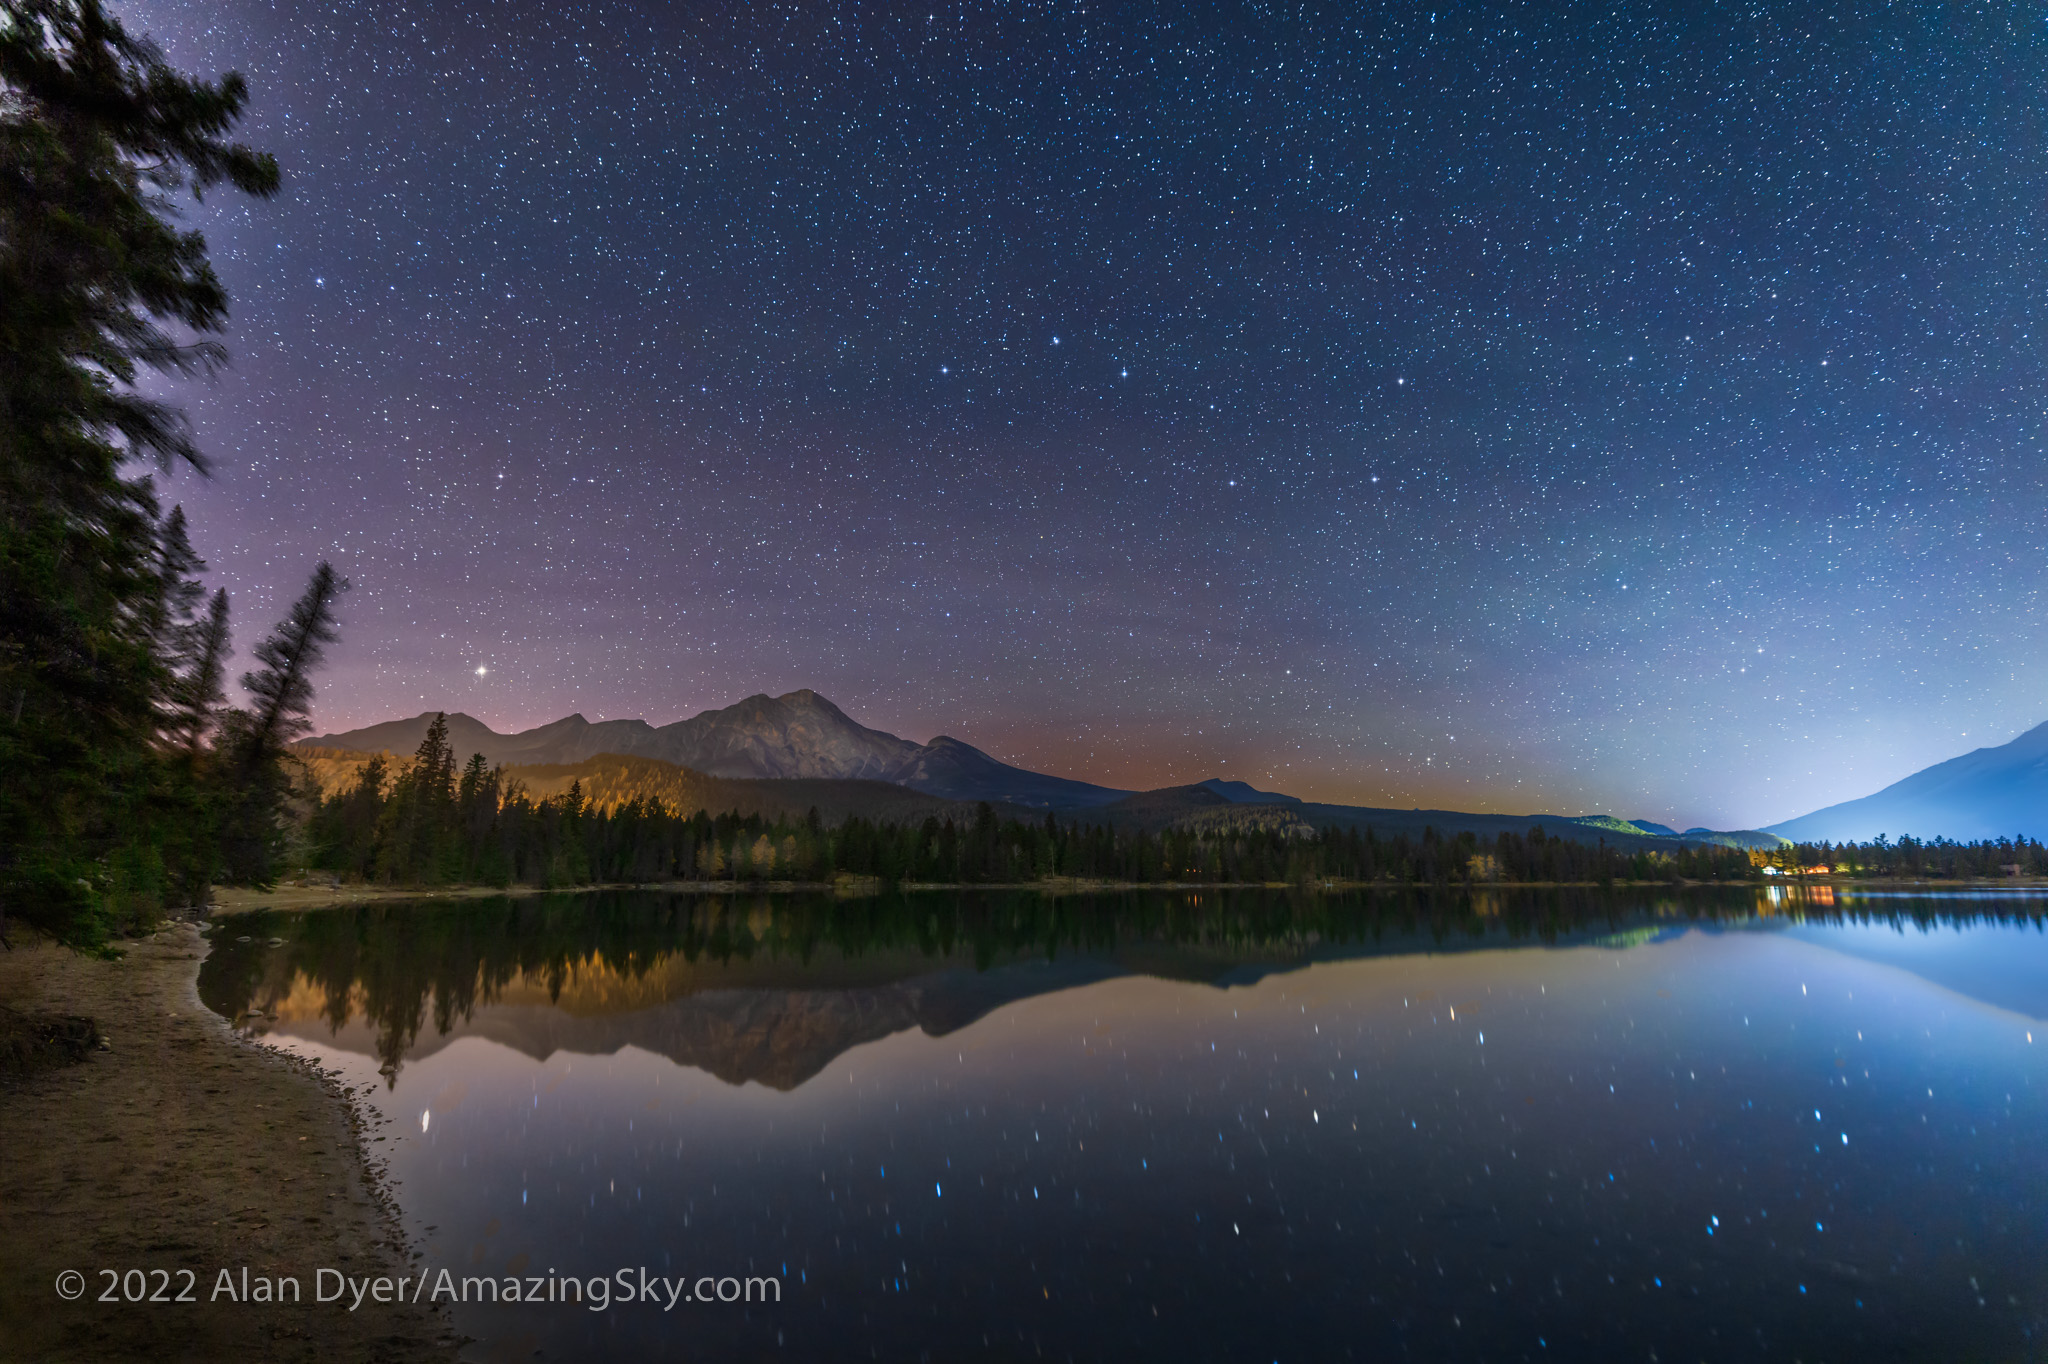
About an hour later, from the same location, I shot the other way, toward the Milky Way rising over Vimy Peak, but the sky still lit blue by moonlight. This, too, is a blend of focus-stacked ground and panorama sky images. But the camera was on a fixed tripod for exposures no longer than 15 seconds. So I didn’t use the tracker.

And here the longer exposures do pick up more (colours, fainter stars, and brighter ground detail) than was visible to the eye. Revealing more than the eye can see is the essence and attraction of astrophotography.

A vertical panorama of the moonlit spring sky with the Big Dipper and Arcturus over the jagged outline of Anderson Peak at the Red Rock Canyon area of Waterton Lakes National Park, Alberta.

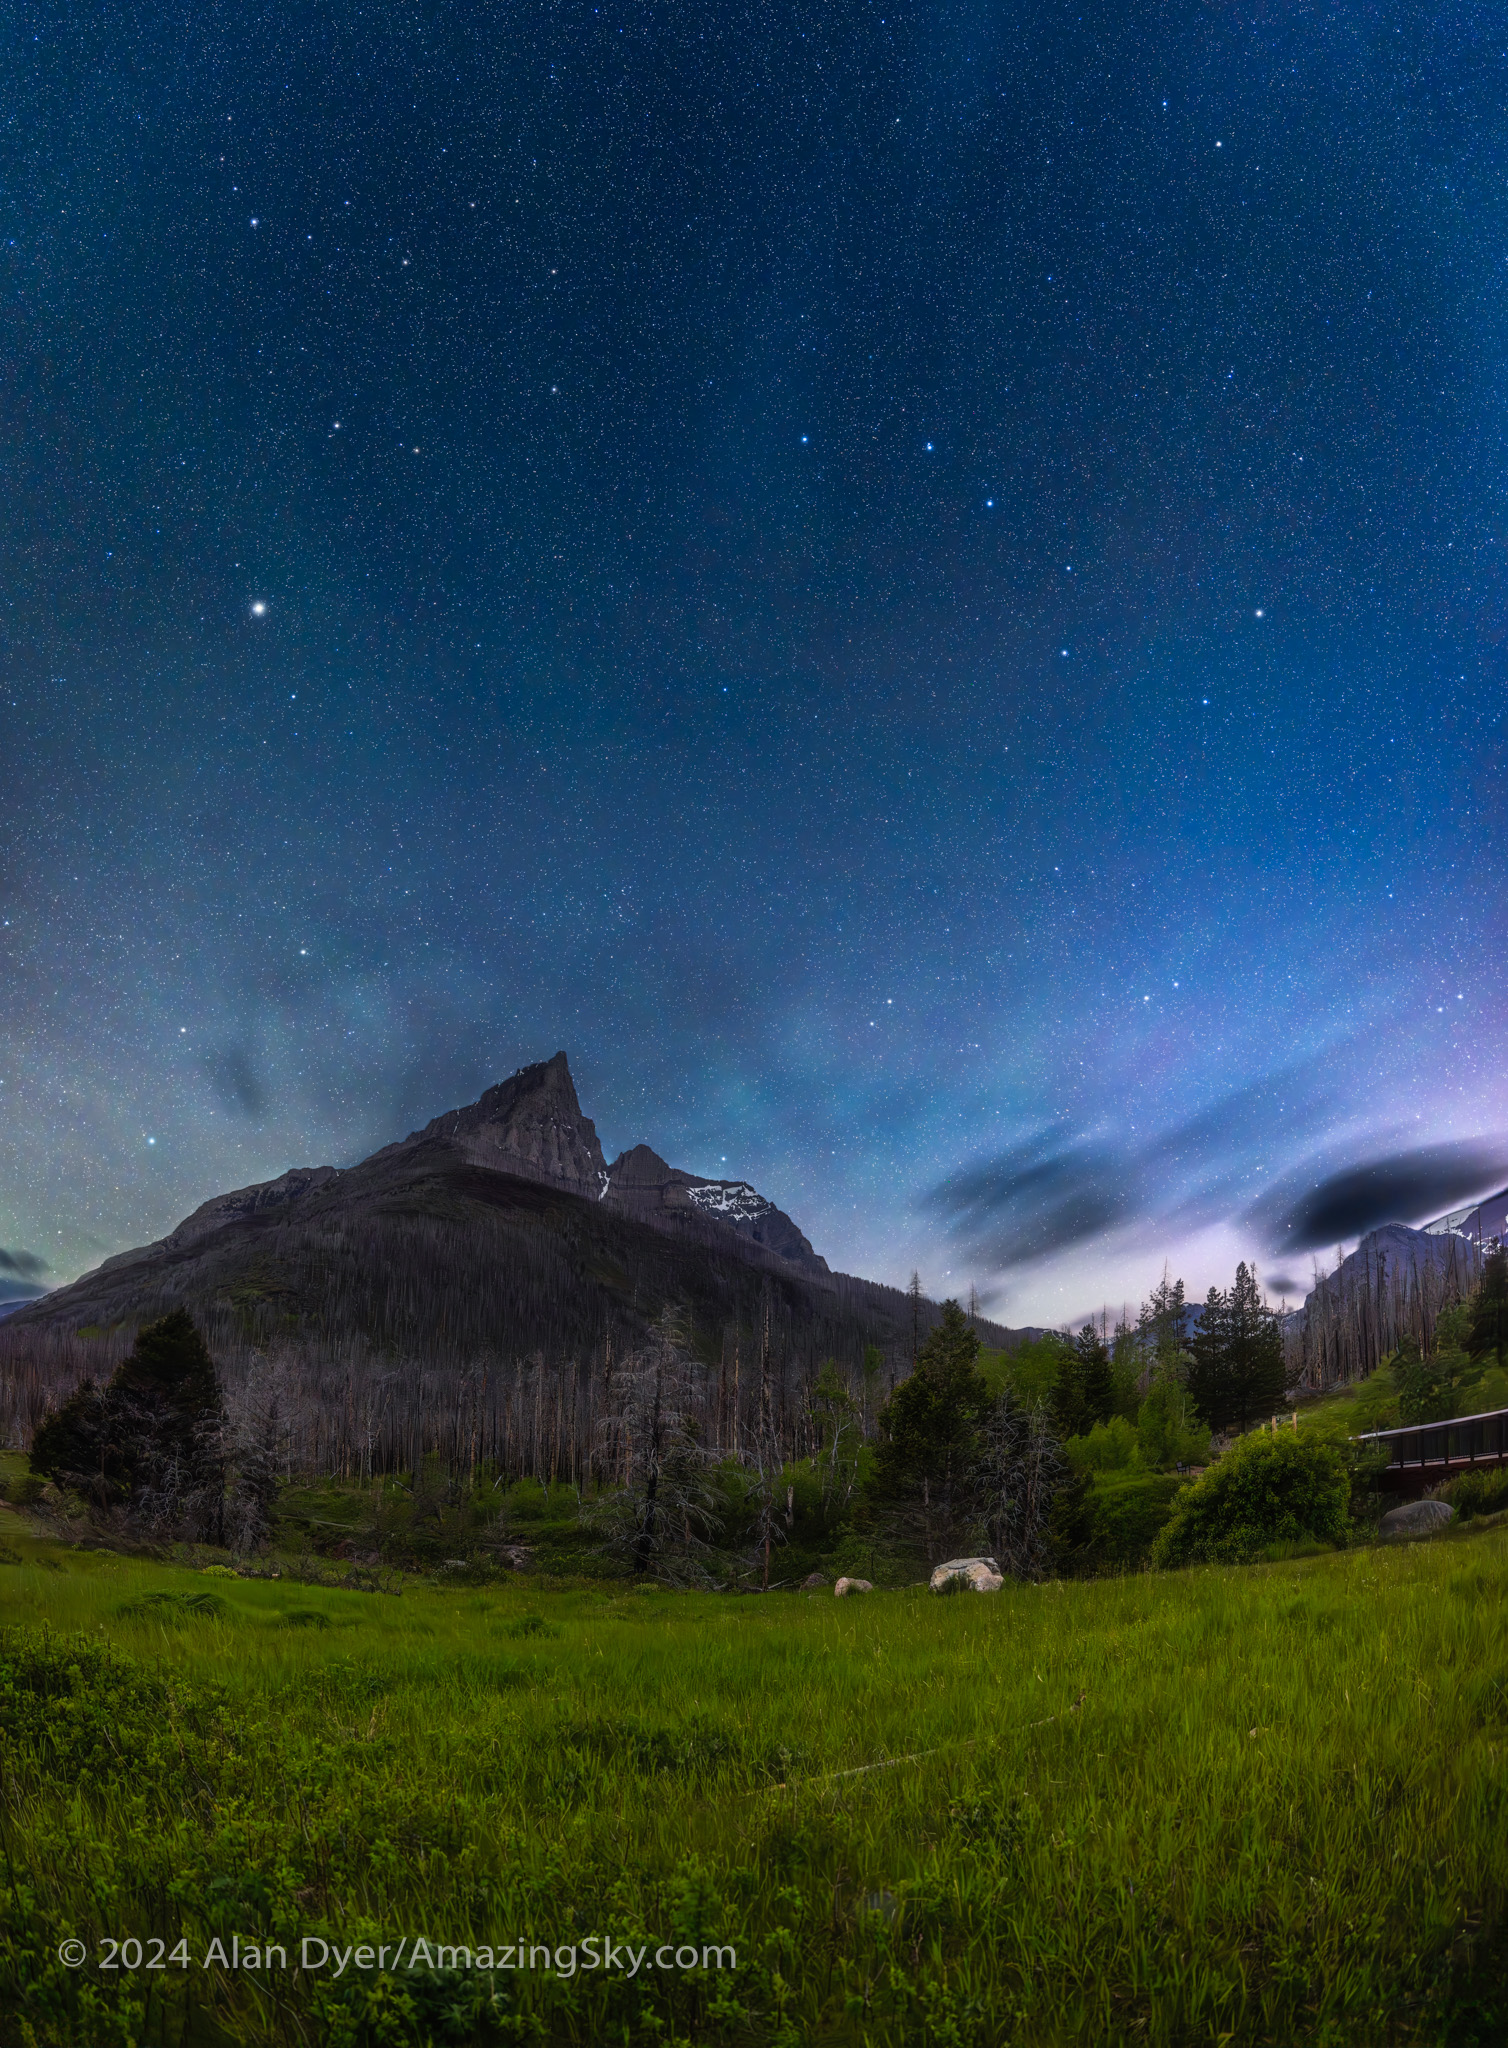
Heading down the Red Rock Canyon Parkway, I set up the tracker rig for the darker sky, now that the Moon was nearly setting. I shot a vertical panorama, with two untracked ground segments and four tracked sky segments, to capture Arcturus and the Big Dipper over the iconic Anderson Peak.

Comparing without and with LENR โ€“ Lots of coloured specks without LENR! Tap to zoom up.

For all the images at Waterton and Writing-on-Stone I used the 45-megapixel Canon R5 camera, great for high resolution, but prone to noise, especially colourful thermal hot pixels. (See my review here.)

For all the long exposures I turned on Long Exposure Noise Reduction, a feature most cameras have. LENR forces the camera to take a “dark frame,” a second exposure of equal length, but with the shutter closed. The camera subtracts the dark frame (which records only the hot pixels) from the previous light frame. The final image takes twice as long to appear, but is much cleaner, as I show above. So a two-minute exposure requires four minutes to complete.

While there are clever ways to eliminate hot pixels later in processing (using Photoshop’s Dust and Scratches filter), doing so can blur details. I’ve long found that doing it “in-camera” always produces better results.

The Milky Way rising over the peak of Mt. Blakiston, in Waterton Lakes National Park, Alberta, Canada.

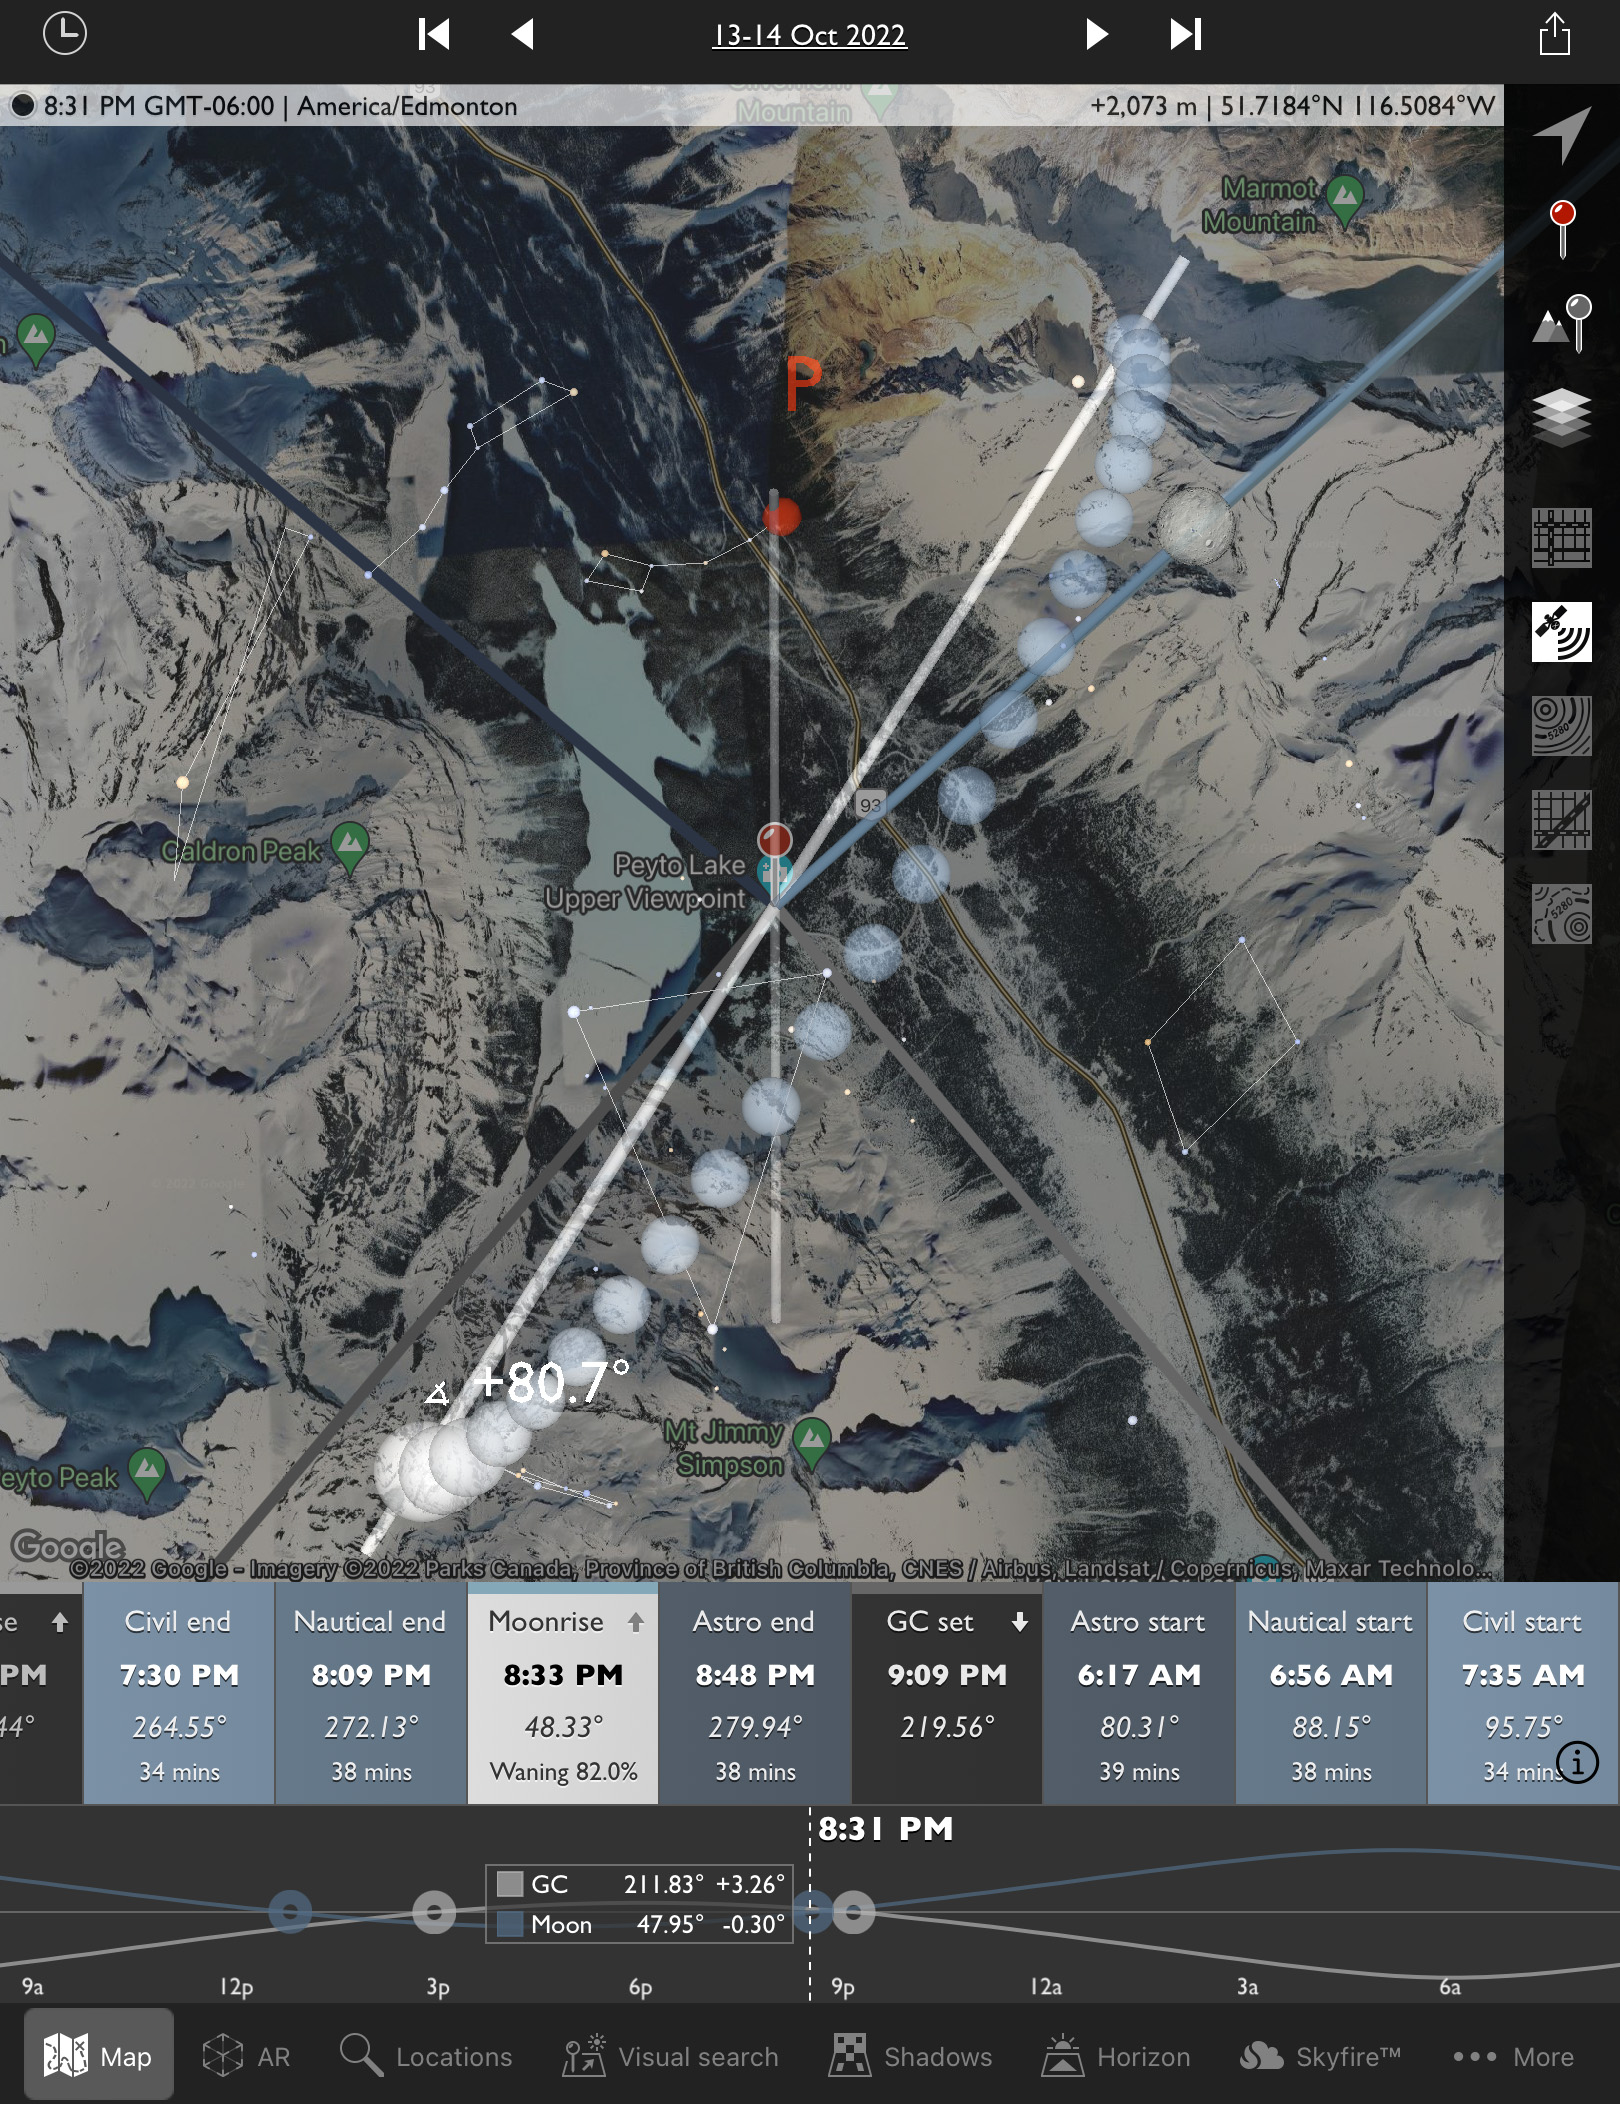
With the Moon now down, I turned the camera the other direction toward Mt. Blakiston, to capture the star clouds of the summer Milky Way rising behind the mountain, in an example of a “deepscape,” a nightscape with a telephoto lens. This is another technique I’ve not used very often, as the opportunities require good location planning and timing, transparent skies, and a tracker. Apps like ThePhotographersEphemeris coupled with TPE3D, and PlanItPro can help.

Deepscapes frame landscape fragments below some notable deep-sky objects and starfields, in this case a region with several “Messier objects” โ€” nebulas and star clusters well-known to amateur astronomers.

This was a blend of one untracked and one tracked exposure, again on the Nomad. Taking more frames for stacking and noise reduction, while a common practice, was not practical here โ€” at this focal length of 70mm the sky was moving enough that the mismatch between sky and ground would make blending tough to do.

And the reality is that today’s AI-trained noise reduction software (see my test report here) is so good, image stacking is not as essential as it once was.

For many of the Waterton images I used the Canon RF28-70mm lens, usually wide open at f/2. For the image below I used the RF15-35mm lens at its maximum aperture of f/2.8. (See my test report on these lenses here.)

The stars and clouds trail across the sky over Cameron Lake in Waterton Lakes National Park, Alberta, and Mt. Custer across the border in Glacier National Park in Montana.

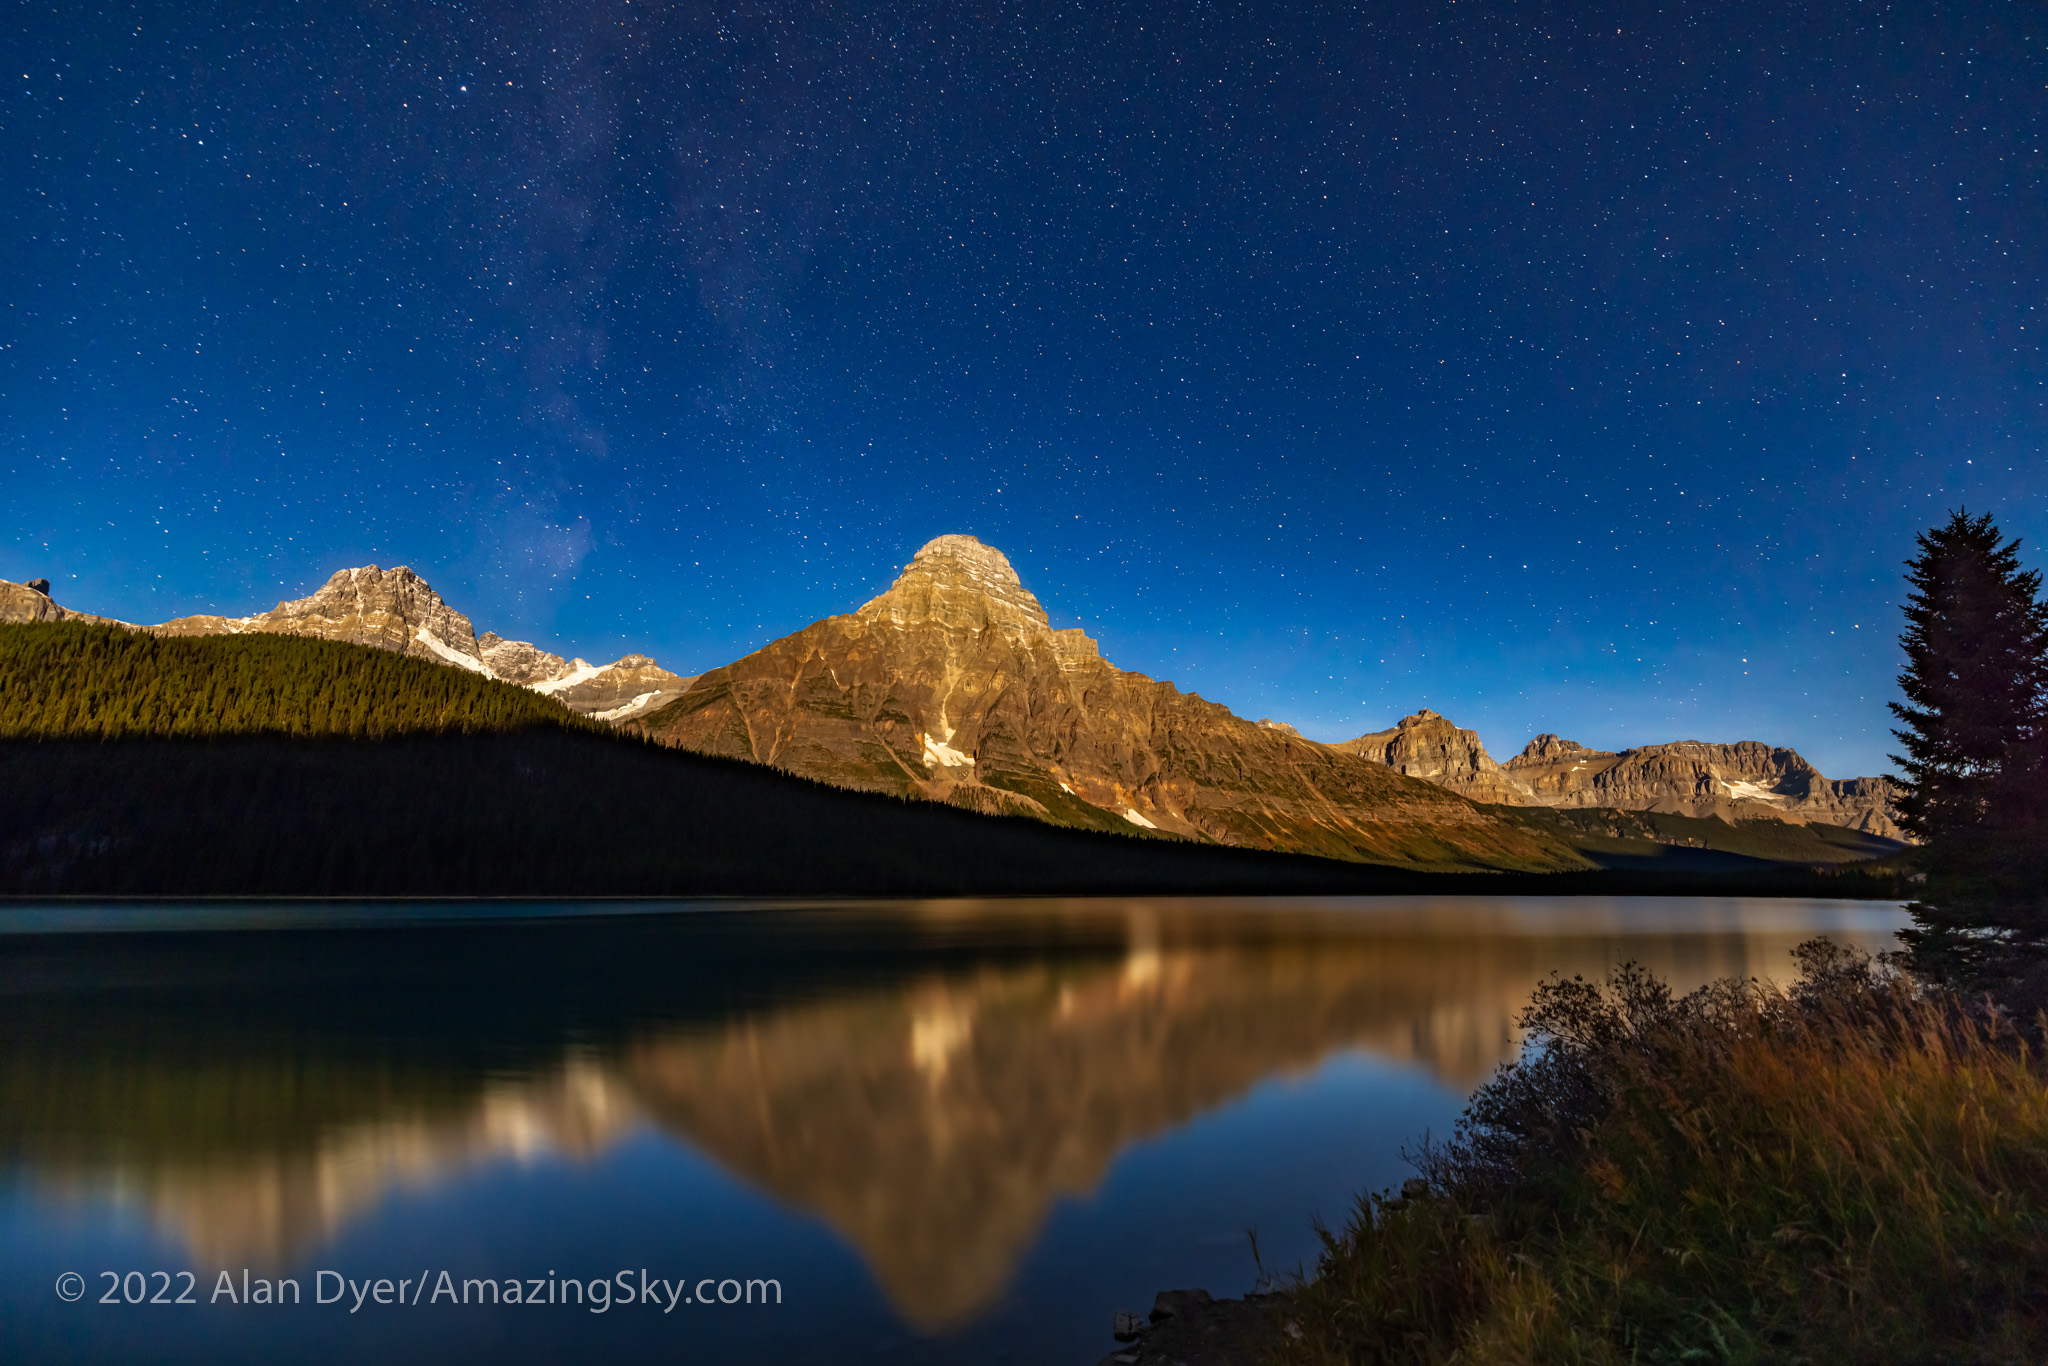
On my final night in Waterton I drove the Akamina Parkway to Cameron Lake, located in extreme southwest Alberta on the borders with British Columbia and Montana. The glaciated peak to the south is Mt. Custer in Glacier National Park, Montana.

Again, I had hoped to get a deepscape of the photogenic starfields in Scorpius above Mt. Custer. But as is often the case at this site, clouds wafting over the Continental Divide defeated those plans. So Plan B was a set of long exposures of the clouds and stars trailing with the last light of the low Moon lighting parts of the scene. Chunks of ice still drift in the lake.

This is a blend of separate multi-minute exposures for the ground and sky, all at the slow ISO of just 100, and all untracked to purposely create the star trails, not avoid them.

So over a total of four nights at these wonderful World Heritage Sites, I was able to try out some new shooting techniques:

  • H-Alpha blending
  • Focus stacking
  • Deepscapes
  • As well as panoramas, both horizontal and vertical

Every nightscape outing is a learning process. And you have to be prepared to change plans as the clouds dictate. I didn’t get all the shots I had hoped to, but I still came away with images I was very pleased with.

I hope you enjoyed them. Clear skies!

โ€” Alan Dyer / AmazingSky.com

Marvelous Nights in the Mountains


In mid-October 2022 I enjoyed a rare run of five clear and mild nights in the Rocky Mountains for shooting nightscapes of the stars. Hereโ€™s a portfolio โ€ฆ and a behind-the-scenes look at its making.

Getting two perfectly clear nights in a row is unusual in the mountains. Being treated to five is a rare treat. Indeed, had I started my shooting run earlier in the week I could have enjoyed even more of the string of cloudless nights in October, though under a full Moon. But five was wonderful, allowing me to capture some of the scenes that had been on my shot list for the last few years.

Here is a portfolio of the results, from five marvelous nights in Banff and Jasper National Parks, in Alberta, Canada. 

For the photographers, I also provide some behind-the-scenes looks at the planning and shooting techniques, and of my processing steps. 


Night One โ€” Peyto Lake, Banff National Park

Peyto Lake, named for pioneer settler and trail guide Bill Peyto who had a cabin by the lakeshore, is one of several iconic mountain lakes in Banff. Every tour bus heading along the Icefields Parkway between Banff and Jasper stops here. By day is it packed. By night I had the newly constructed viewpoint all to myself. 

The stars of Ursa Major, the Great Bear, over the waters of Peyto Lake, Banff, in deep twilight. This is a stack of 6 x 30-second exposures for the ground and a single untracked 30-second exposure for the sky, all at f/2.8 with the Canon RF 15-35mm lens at 15mm, and Canon R5 at ISO 800.

I shot the classic view north in deep twilight, with the stars of Ursa Major and the Big Dipper low over the lake, as they are in autumn. A show of Northern Lights would have been ideal, but I was happy to settle for just the stars. 

This is a blend of two panoramas: the first of the sky taken at or just before moonrise with the camera on a star tracker to keep the stars pinpoint, and the second taken for the ground about 20 minutes later with the tracker off, when the Moon was up high enough to light the peaks. Both pans were with the Canon RF15-35mm lens at 15mm and f/2.8, and Canon R5 at ISO 1600, with the sky pan being 7 segments for 1 minute each, and the untracked ground panorama being the same 7 segments for 2 minutes each.

The night was perfect, not just for the clarity of the sky but also the timing. The Moon was just past full, so was rising in late evening, leaving a window of time between the end of twilight and moonrise when the sky would be dark enough to capture the Milky Way. Then shortly after, the Moon would come up, lighting the peaks with golden moonlight โ€” alpenglow, but from the Moon not Sun. 

The above is blend of two panoramas, each of seven segments, the first for the sky taken when the sky was dark, using a star tracker to keep the stars pinpoints. The second for the ground I shot a few minutes later at moonrise with no tracking, to keep the ground sharp. I show below how I blended the two elements. 

The Photographer’s Ephemeris
TPE 3D

To plan such shots I use the apps The Photographerโ€™s Ephemeris (TPE) and its companion app TPE 3D. The screen shot above at left shows the scene in map view for the night in question, with the Big Dipper indicated north over the lake and the line of dots for the Milky Way showing it to the southwest over Peyto Glacier. Tap or click on the images for full-screen versions.

Switch to TPE 3D and its view at right above simulates the scene youโ€™ll actually see, with the Milky Way over the mountain skyline just as it really appeared. The app even faithfully replicates the lighting on the peaks from the rising Moon. It is an amazing planning tool.

This is a blend of 5 x 20-second exposures stacked for the ground to smooth noise, and a single 20-second exposure for the sky, all with the Canon RF15-35mm lens at f/2.8 and Canon R5 at ISO 1600. All were untracked camera-on-tripod shots.

On the drive back from Peyto Lake to Saskatchewan River Crossing I stopped at another iconic spot, the roadside viewpoint for Mt. Cephren at Waterfowl Lakes. By this time, the Moon was well up and fully illuminating the peak and the sky, but still leaving the foreground dark. The sky is blue as it is by day because it is lit by moonlight, which is just sunlight reflecting off a perfectly neutral grey rock, the Moon! 

This is from a set of untracked camera-on-tripod shots using short 30-second exposures. 


Night Two โ€” Pyramid Lake, Jasper National Park 

By the next night I was up in Jasper, a destination I had been trying to revisit for some time. But poor weather prospects and forest fire smoke had kept me away in recent years. 

The days and nights I was there coincided with the first weekend of the annual Jasper Dark Sky Festival. I attended one of the events, the very enjoyable Aurora Chaserโ€™s Retreat, with talks and presentations by some well-known chasers of the Northern Lights. Attendees had come from around North America. 

This is a blend of: a stack of 4 x 1-minute tracked exposures for the sky at ISO 1600 plus a stack of 7 x 2-minute untracked exposures at ISO 800 for the ground, plus an additional single 1-minute tracked exposure for the reflected stars and the foreground water. All were with the Canon RF15-35mm lens at 15mm and f/2.8 and Canon R5.

On my first night in Jasper I headed up to Pyramid Lake, a favorite local spot for stargazing and night sky photography, particularly from the little island connected to the โ€œmainlandโ€ by a wooden boardwalk. Lots of people were there quietly enjoying the night. I shared one campfire spot with several other photographers also shooting the Milky Way over the calm lake before moonrise.

This is a blend of: a stack of 4 x 1-minute tracked exposures for the sky at ISO 1600 plus a stack of 6 x 3-minute untracked exposures at ISO 800 for the ground, all with the Canon RF15-35mm lens at 20mm and f/2.8 and Canon R5. The tracker was the Star Adventurer Mini.

A little later I moved to the north end of Pyramid Island for the view of the Big Dipper over Pyramid Mountain, now fully lit by the rising waning Moon, and with some aspens still in their autumn colours. A bright meteor added to the scene.


Night Three โ€” Athabasca River Viewpoint, Jasper National Park

For my second night in Jasper, I ventured back down the Icefields Parkway to the โ€œGoats and Glaciersโ€ viewpoint overlooking the Athabasca River and the peaks of the Continental Divide. 

This is a blend of three 3-section panoramas: the first taken with a Star Adventurer Mini for 3 x 2-minute tracked exposures for the sky at ISO 800; the second immediately afterward with the tracker off for 3 x 3-minutes at ISO 800 for the ground; and the third taken about an hour later as the Moon rose, lighting the peaks with warm light, for 3 x 2.5-minutes at ISO 1600. All with the Canon RF15-35mm lens at f/2.8 and 15mm and Canon R5,

As I did at Peyto Lake, I shot a panorama (this one in three sections) for the sky before moonrise with a tracker. I then immediately shot another three-section panorama, now untracked, for the ground while it was still lit just by starlight under a dark sky. I then waited an hour for moonrise and shot a third panorama to add in the golden alpenglow on the peaks. So this is a time-blend, bending reality a bit. See my comments below! 


Night Four โ€” Edith Lake, Jasper National Park

With a long drive back to Banff ahead of me the next day, for my last night in Jasper I stayed close to town for shots from the popular Edith Lake, just up the road from the posh Jasper Park Lodge. Unlike at Pyramid Lake, I had the lakeshore to myself. 

This is a panorama of four segments, each 30 seconds untracked with the Canon RF15-35mm lens at 15mm and f/2.8 and Canon R5 at ISO 1000.

This would be a fabulous place to catch the Northern Lights, but none were out this night. Instead, I was content to shoot scenes of the northern stars over the calm lake and Pyramid Mountain. 

This is a blend of a single tracked 2-minute exposure for the sky and water with the reflected stars, with a single untracked 4-minute exposure for the rest of the ground, both at f/2.8 with the Canon RF15-35mm lens at 17mm and Canon R5 at ISO 800.
This is a blend of a single tracked 2-minute exposure for the sky and water with the reflected stars, with a stack of two untracked 3-minute exposure for the rest of the ground, both at f/2.8 with the Canon RF15-35mm lens at 17mm and Canon R5 at ISO 1600. I shot this October 16, 2022.

The Moon was now coming up late, so the shots above are both in darkness with only starlight providing the illumination. Well, and also some annoying light pollution from town utility sites off the highway. Jasper is a Dark Sky Preserve, but a lot of the townโ€™s street and utility lighting remains unshielded. 


Night Five โ€” Lake Louise, Banff National Park

On my last night I was at Lake Louise, as the placement of the Milky Way would be perfect. 

This is a blend of two sets of exposures: – a stack of two untracked 2-minute exposures for the ground at ISO 800 – a stack of four tracked 1-minute exposures for the sky at ISO 1600 All with the Canon RF15-35mm lens at f/2.8 and 20mm and Canon R5, and with the camera and tripod not moving between image sets.

Thereโ€™s no more famous view than this one, with Victoria Glacier at the end of the blue-green glacial lake. Again, by day the site is thronged with people and the parking lot full by early morning. 

By night, there were just a handful of other photographers on the lakeshore, and the parking lot was nearly empty. I could park right by the walkway up to the lake. 

The Photographer’s Ephemeris
TPE 3D

Again, TPE and TPE 3D told me when the Milky Way would be well-positioned over the lake and glacier, so I could complete the untracked ground shots first, to be ready to shoot the tracked sky segments by the time the Milky Way had turned into place over the glacier. 

This is a blend of three vertical panoramas: the first is a set of three untracked 2-minute exposures for the ground at ISO 800 with the camera moved up by 15ยฐ from segment to segment; the second shot immediately afterward is made of 7 x 1-minute tracked exposures at ISO 1600 for the sky, also moved 15ยฐ vertically from segment to segment; elements of a third 3-section panorama taken about 90 minutes earlier during “blue hour” were blended in at a low level to provide better lighting on the distant peaks. All with the Canon RF15-35mm lens at f/2.8 and 20mm and Canon R5.

This image is also a panorama but a vertical one, made primarily of three untracked segments for the ground and seven tracked segments for the sky, panning up from the horizon to past the zenith overhead, taking in most of the summer and autumn Milky Way from Serpens up to Cassiopeia.


Nightscape Gear 

As readers always want to know what gear I used, I shot all images on all nights with the 45-megapixel Canon R5 camera and Canon RF15-35mm lens, with exposures of typically 1 to 3 minutes each at ISOs of 800 to 1600. I had other cameras and lenses with me but never used them. 

The R5 works very well for nightscapes, despite its small pixels. See my review of it here on my blog, and of a holy trinity of Canon RF lenses including the RF15-35mm here

Star Adventurer Mini tracker with Alyn Wallace V-Plate and AcraTech Panorama Head

For a tracker for such images, I used the Sky-Watcher Star Adventurer Mini, a compact and lightweight unit that is easy to pack and carry to shooting sites. See my review of it here at AstroGearToday. 

I use the Mini with a V-Plate designed by nightscape photographer Alyn Wallace and sold by Move-Shoot-Move. It is an essential aid to taking tracked panoramas, as it allows me to turn the camera horizontally manually from one pan segment to the next while the camera is tracking the stars. Itโ€™s easy to switch the tracker on (for the sky) and off (for the ground). The Mini tracks quite accurately and reliably. Turn it on and you can be sure it is tracking. 

For more tips on shooting panoramas, see my blog post from 2019.


Behind-the-Scenes Processing

For those who are interested, hereโ€™s a look at how I processed and assembled the images, using the Peyto Lake panorama as an example. This is not a thorough tutorial, but shows the main steps involved. Tap or click on an image to download a full-size version.

  • I first develop all the raw files (seven here) in Adobe Camera Raw, applying identical settings to make them look best for what they are going to contribute to the final blend, in this case, for the tracked sky with pinpoint stars and the Milky Way. 
  • Camera Raw (as does Adobeโ€™s Lightroom) has an excellent Merge to Panorama function which usually works very well on such scenes. This shows the stitched sky panorama, created with one click.
  • I develop and stitch the untracked ground segments to look their best for revealing details in the landscape, overexposing the sky in the process. Stars are also trailed, from the long exposures needed for the dark ground. No matter โ€“ these will be masked out.
  • This shows the stack of images now in Adobe Photoshop, but here revealing just the layer for the sky panorama and its associated adjustment layers to further tweak color and contrast. I often add noise reduction as a non-destructive โ€œsmart filterโ€ applied to the โ€œsmart objectโ€ image layer. See my review of noise reduction programs here
  • This shows just the ground panorama layer, again with some adjustment and retouching layers dedicated to this portion of the image. 
  • The sky has to be masked out of the ground panorama, to reveal the sky below. The Select Sky command in Photoshop usually works well, or I just use the Quick Selection tool and then Select and Mask to refine the edge. That method can be more accurate. 
  • Aligning the two panoramas requires manually nudging the untracked ground, up in this case, to hide the blurred and dark horizon from the tracked sky panorama. Yes, we move the earth! The sky usually also requires some re-touching to clone out blurred horizon bits sticking up. Dealing with trees can be a bit messy! 

The result is the scene above with both panorama layers and the masks turned on. While this now looks almost complete, weโ€™re not done yet. 

  • Local adjustments like Dodge and Burn (using a neutral grey layer with a Soft Light blend mode) and some luminosity masks tweak the brightness of portions of the scene for subtle improvements, to emphasize some areas while darkening others. Itโ€™s what film photographers did in the darkroom by waving physical dodging and burning tools under the enlarger. 
  • I add finishing touches with some effect plug-ins: Radiant Photo added some pop to the ground, while Luminar Neo added a soft โ€œOrton glowโ€ effect to the sky and slightly to the ground. 

All the adjustments, filters, and effects are non-destructive so they can be re-adjusted later, when upon further inspection with fresh eyes I realize something needs work.  


Was It Photoshopped?

I hope my look behind the curtains was of interest. While these types of nightscapes taken with a tracker, and especially multi-segment panoramas, do produce dramatic images, they do require a lot of processing at the computer. 

Was it โ€œphotoshopped?โ€ Yes. Was it faked? No. The sky really was there over the scene you see in the image. However, the long exposures of the camera do reveal more details than the eye alone can see at night โ€” that is the essence of astrophotography. 

My one concession to warping reality is in the time-blending โ€” the merging of panoramas taken 30 minutes to an hour apart. Iโ€™ll admit that does push my limits for preferring to record real scenes, and not fabricate them (i.e. โ€œphotoshopโ€ them in common parlance).

But at this shoot on these marvelous nights, making use of the perfectly timed moonrises was hard to resist!

โ€” Alan, November 17, 2022 / AmazingSky.com 

The Dancing Lights over Dinosaur Park


The Northern Lights over the badlands of Dinosaur Provincial Park, Alberta, on September 11, 2015. This is one frame from a 280-frame time-lapse sequence. Although, in this image the ground came from a later exposure in the sequence when passing car headlights lit the ground briefly on an otherwise dark, moonless night, to help sculpt the ground. This was with the Nikon D750 and 24mm lens for 15 seconds at f/2.8 and ISO 6400.

The Northern Lights dance over the badlands of Dinosaur Provincial Park, a World Heritage Site.

Aurora alerts called for a fine display on Friday, September 11. Forewarned, I headed to one of my favourite shooting spots at Dinosaur Provincial Park, and aimed three cameras at the sky. It didn’t take long before the lights appeared, right on cue.

An aurora and the autymn Milky Way over the Badlands of Dinosaur Provincial Park, Alberta, on September 11, 2015. The stars, constellations and Milky Way of the autumn and early winter sky are rising in the northeast, including the objects: the Andromeda Galaxy at top, and the Pleiades at bottom.  This is one frame from a 200-frame time-lapse sequence, though in this image the ground comes from a Mean Combine stack of 7 images to smooth noise but the sky is from one image, each 30 seconds at f/2.8 with the Rokinon 14mm lens and Canon 5D MkII at ISO 3200 on a dark moonless night.

The display started out with lots of promise, but did fade after 12:30 a.m., just when it was supposed to be peaking in intensity. I let the cameras run for a while but eventually stopped the shutters and packed it in…

…But not before I captured this odd bit of aurora in the east, shown below, that appearedย as an isolated and stationary band pulsing up and down in brightness, but with little movement.

An odd isolated arc of aurora in the eastern sky over the badlands of Dinosaur Provincial Park, Alberta, on September 11, 2015. This arc sat stationary and pulsed up and down in brightness over a few seconds. It was in some frames but not others. The winter stars of Taurus, including the Pleiades cluster, and Auriga are rising in the east.  The sky here is from a single exposure but the ground came from a Mean Combine stack of 8 exposures to smooth noise. Each was 40 seconds at f/2.8 with the 14mm Rokinon lens and Canon 5D MkII at ISO 3200 on a moonless night.

I’ve seen these before and have never heardย a good explanation of what process creates such an effect, with a patch of sky appearing to “turn on” and off.

You can see the effect at the end of the time-lapse compilation, linked below from Vimeo.

As usual, please enlarge to full-screen and watch in HD for the best quality.

Unfortunately, a patrolling park official checking on things, spoiled some frames with her truck’sย headlights. It’s one of the hazards of time-lapse imaging.

As a final image, here are all the fish-eye lens framesย stacked into one image, to create a single star trail showing the sky rotating about the celestial pole.

A composite stack of 198 images creating a circumpolar star trail image of the entire sky, with the motion of the stars and the Northern Lights over an hour recorded onto one frame.  The 8mm fish-eye lens take in almost all the sky, with the camera aimed northeast to the centre of the auroral arc, with Polaris, the centre of the skyโ€™s rotation, at left. The scene is at Dinosaur Provincial Park in Alberta, from September 11, 2015.  Each exposure was 20 seconds at f/3.5 with the Sigma 8mm lens and at ISO 6400 with the Canon 6D. The ground comes from a stack of 16 images taken early in the sequence turned into a smart object and mean combined with Mean stack mode, to average out and smooth noise. The sky comes from 198 exposures, Lighten stacked using the Advanced Stacker Actions from StarCircleAcademy.com.
Each exposure was 20 seconds at f/3.5 with the Sigma 8mm lens and at ISO 6400 with the Canon 6D. The ground comes from a stack of 16 images taken early in the sequence turned into a smart object and mean combined with Mean stack mode, to average out and smooth noise. The sky comes from 198 exposures, Lighten stacked using the Advanced Stacker Actions from StarCircleAcademy.com.

It’s been a good week for auroras, with a promise of more to come perhaps, as we approach equinox, traditionally a good time for magnetic field lines to align, funnellingย solar storm particles into our magnetosphere.

Keep looking up!

โ€” Alan, September 13, 2015 / ยฉ 2015 Alan Dyer / www.amazingsky.comย 

Ancient Solar Observatory at Fajada Butte


Sun over Fajada Butte at Chaco Canyon

Sunlight and shadows at Fajada Butte served to mark the seasons a thousand years ago.

In the distance is Fajada Butte at Chaco Canyon, New Mexico. It is one of the most famous sites in archaeoastronomy. A thousand years ago, people of the Chaco Culture used it to observe the Sun.

Fajada Butte at Chaco Canyon

At a site now off limits to preserve its integrity, a set of three rocks cast shadows and daggers of sunlight onto a carved spiral petroglyph.

Fajada Butte Sign At Chaco Canyon

People used the position of the projected beams of light as a calendar to mark time through the year. In truth, simply watching the changing position of the rising and setting Sun along the horizon, which was also done here at Chaco Canyon, would have worked just as well.

Fajada Butte Viewpoint at Chaco Canyon

I visited the site today, as part of a trek north through New Mexico, Arizona and into Utah. Chaco Canyon is one of the preeminent sites for archaeoastronomy, demonstrating how well people a thousand years ago (the site was occupied from the mid 800s to the mid 1100s) observed the sky.

For example, a half-day hike takes you to a famous pictograph on a rock face showing a bright star near the crescent Moon, a drawing some haveย interpreted as beingย an observation of the supernova of 1054 AD.

Grand Kiva at Chetro Ketl, Chaco Canyon

In its height, thousands of people lived in the pueblos at Chaco Canyon and surrounding area. This is the Great Kiva at the Chetro Ketl pueblo. Wood columns used to hold a wood roof over this structure to make a space for ceremony and ritual.

Iridescent Clouds at Chaco Canyon

I did a little solar observing myself while there. While walking through the maze of rooms at Pueblo Bonito I looked up to see iridescent clouds near the Sun, created by diffraction of sunlight from fine ice crystals.

Public Observatory at Chaco Canyon, New Mexico

In keeping with the site’s astronomical heritage, the Visitor Centre at the Chaco Culture Historical Park has a well-equipped observatory with several top-class telescopes (a 25-inch Obsession Dobsonian among them) and an outdoor theatre for regular stargazing sessions each weekend. This is a world-class Dark Sky Preserve and a World Heritage Site.

โ€“ Alan, April 2, 2015 / ยฉ 2015 Alan Dyer ย / www.amazingsky.com