If you saw the total eclipse in 2024 (or you missed it!) you have three chances in the next three years to see another. But you will have to travel.
Typically, total eclipses of the Sun occur about 18 to 24 months apart. Unusually, in the next three years, we have a trio of total eclipses each only a year apart. Or to be precise, a lunar year — 12 lunar phase cycles — apart.
The map above (courtesy EclipseAtlas.com) plots the paths of all central solar eclipses (annulars, totals and hybrids) from 2021 to 2030. Included are the paths of the 2023 annular and 2024 total in North America you might have seen.
But the next total eclipse in populated North America is not until August 2044, then again in August 2045. To see a total eclipse in the next few years, those of us in the Americas will have to travel.
However, those in Europe can drive to the next eclipse, to their first total eclipse at home since August 1999.
A year from now as I write this, the Moon’s umbral shadow will intercept the Earth for the first time since April 8, 2024. The path of this next total eclipse is unusual in that it starts in northern Russia, travels north over the North Pole, then sweeps down from the north to cross eastern Greenland, nipping the west coast of Iceland, then crossing Spain, to end at sunset over the Balearic Islands of Spain.
Weather prospects are surprisingly good for the several cruise ships planning to be in a Greenland fjord. Iceland is iffy, but had the eclipse been this year (on August 12, 2025) many people would have seen it. Spain was the opposite — statistically it has the best weather prospects along the 2026 path, but on August 12, 2025 most of the country was beset by storms.
From northern Spain, where I intend to be and as I show above, the Sun will be low in the west in the early evening sky, for a relatively short 1m40s of totality. A low eclipse can be spectacular, but riskier as there’s a greater chance of clouds hiding a low Sun.
This and the other images of the Sun’s position at each eclipse are pages from my eclipse ebook, described below.
Twelve new Moons later, the lunar shadow again crosses the Earth, this time passing over North Africa where skies are almost always clear in summer. But the days are hot! The shadow crosses the Strait of Gibraltar and passes over Morocco, Algeria, Tunisia, Libya, Egypt, and Saudi Arabia. In addition to the good weather, the attraction is that this is the longest total eclipse for the rest of the 21st century.
The spectacular temples of Luxor, Egypt are at the point of maximum eclipse, with an unusual 6m23s of totality with the Sun high overhead. Even at Gibraltar, totality is 4m35s, seven seconds longer than the maximum in Mexico in 2024.
From Tunisia, as I show above, the Sun is 55º high over the Mediterranean, and totality is a generous 5m44s.
Another 12 lunar months later, the Moon shadow sweeps across the southern hemisphere, for another generously long eclipse. Remote Western Australia enjoys 5m10s of totality on a winter’s day.
But millions lie in the path in New South Wales, where Sydneysiders can watch a total eclipse over Sydney Harbour lasting 3m48s. The sky scene is below, with a late afternoon winter Sun heading down in the west. From Farm Cove, the eclipsed Sun will be over the Opera House and Harbour Bridge, for a never-to-be-repeated photo op.
The South Island of New Zealand sees a sunset eclipse (the shadow passes over Milford Sound) that lasts 2m55s, longer than the 2017 eclipse in the United States.
Coincidentally, Australia also hosts the next total eclipse to follow, after a gap of 28 months, on November 25, 2030. And the lunar shadow crosses Australia on July 13, 2037 and December 26, 2038 — a Boxing Day eclipse down under. So Australia is the place to be for the next decade or so.
But between 2026 and 2028, Spain is host to three eclipses, as the 2027 total crosses Spanish territory, and the January 26, 2028 annular eclipse ends at sunset in western Spain. At this eclipse the Moon is not large enough to completely hide the Sun, so at mid-eclipse we see a bright ring of light, similar to the annular eclipse here in North America on October 14, 2023.
My Plans
Where will I be? For 2026 I have signed onto a trip to Spain with the well-travelled photo tour company CaptureTheAtlas.com.
They are planning a very photo-centric tour to Spain for viewing the eclipse from a winery near Burgos. I’ll be one of the instructors, among a stellar line-up of eclipse veterans and astrophoto experts. I invite you to check out the details of the tour here at its webpage. We’d love to have you join us!
For 2027 I am planning to be in Tunisia, on the Mediterranean coast, with a tour group from Astro-Trails.com.
The path of totality passes just a few kilometres from Coonabarabran, the “Astronomy Capital of Australia,” as the Siding Spring Observatory is just down the Timor Road in the path. In July the Milky Way is at its best, with the centre of the Galaxy high overhead at nightfall. That’s a sight equal to an eclipse for bucket-list spectacle.
My EBook
The cover of my new 400-page ebook
For 2017’s eclipse I prepared an ebook on how to photograph it. It proved popular, and so for the 2023 and 2024 eclipses I revised it to cover both the annular and total eclipses.
Its popularity prompted me to revise it again, this time to cover the coming trio of eclipses, plus I included pages on the January 2028 annular, as many who visit Spain for the totals may plan to return for the sunset annular (low annulars are also the most spectacular!).
My new ebook is 40 pages larger than the previous edition, with most of the added content in the 100-page chapter on processing eclipse images, from wide-angles, to time-lapses, and to blended exposures of totality close-ups. I include lots of information on choosing the right gear — filters, camera, lenses, telescopes, and tracking mounts.
The slide show above presents images of sample pages. Do page through the gallery for a look at the content.
But for all the details and links to buy the book (from Apple Books or as a PDF for all platforms) see its webpage at my website.
It will be a busy three years for eclipse chasers, as rarely do we get three-in-a-row like this. The diversity of locations and eclipse circumstances make this an exciting trio to chase. But you can just go back to Spain to see most of them!
It took a last-minute chase, but I managed to capture the total eclipse of the Moon on March 14, 2025.
It would not be an eclipse without a chase. Solar eclipses of the total kind almost always involve travel, often to exotic locales around the world. But total lunar eclipses come to you, as they can be seen from an entire hemisphere of the planet.
Except there’s one problem — clouds! Over the last decade since 2014, of the eight total lunar eclipses (TLEs) I was home in Alberta for, I had to chase into clear skies for all but one. A recounting of one such chase from January 2019 is here.
Only for the TLE before this most recent (on November 8, 2022) was I able to stay home to watch it. Though in that case a snowstorm the day before made the roads and travel poor, so I had to stay home. I recounted that eclipse story here. You’ll find links to my other lunar eclipse stories below.
Once again, for the March 13/14, 2025 TLE, weather prospects looked poor. Not just in my area but in many regions of the continent. But there was hope!
Astrospheric and Environment Canada cloud forecast + Moon information
The forecast cloud cover showed home to be hopeless. But a clear area was supposed to be open in southwestern Alberta, marked by the red circle above. That’s Waterton Lakes National Park, just on the US border. It’s a favourite place of mine for nightscape photography anyway (see my blog from this past summer here).
The chart above from the app Astrospheric shows the clear hole, and the dark blue on the time-line indicates the period with no clouds. Note how it coincides with the wavy line below which shows Moon altitude, with the orange and red regions indicating when the eclipse would take place. Looks good! So I made my plan to chase.
I knew the area well enough to know the site would be a good one for the eclipse, and the Moon’s location to the south. But it pays to check. I use The Photographer’s Ephemeris as my main photo planning app.
TPE Plot of Sightlines
It showed the sightline toward the Moon during the eclipse as straight down Upper Waterton Lake. My chosen spot was on the lakeside Waterton Avenue, where I could set up both the wide-angle camera and a telescope without having to heft gear any distance. Winter road closures also limited my site choices. Indeed, in winter the Park is quiet, with only a few hotels and restaurants open, and many businesses boarded up.
TPE 3D Simulation
Switching to the companion app TPE 3D (above) showed a preview of the landscape and the Moon’s position in the sky relative to the scene below.
Compare the simulation to the real thing below! Pretty accurate, except for the scattered clouds that drifted through.
This is a blend of separate images for the sky and ground: a stack of two untracked images for 60 seconds each for the ground, then a third exposure for the sky and untrailed stars, taken immediately afterwards with the tracker motor on, for 30 seconds, all with the Canon RF15-35mm lens wide-open at f/2.8 and at 20mm, on the Canon R5 at ISO 1600. Separate shorter tracked exposures of 15, 8 and 4 seconds blended in kept the lunar disk from overexposing, showing it more as the eye saw it.
The above image is a blend of tracked exposures for the Moon and sky, with untracked exposures for the ground. I shot them just before mid-totality at 1 am MDT. That image was second in priority. First, was a panorama. That result is below.
This is a panorama of four segments at 30º spacing, taken in two passes: first untracked for 30 seconds each, then a second pass immediately afterwards with the tracker motor on, also for 30 seconds each, all with the Canon RF15-35mm lens wide-open at f/2.8 and at 20mm, on the Canon R5 at ISO 1600, with the camera in landscape orientation. Separate shorter exposures of 15s, 10s, 5s and 2.5s at ISO 400 were blended in to preserve the lunar disk more as the eye saw it.
I shot this scene just as totality began, to ensure I got it. While the Moon was in clear sky before totality during the partial phase, sure enough as the Moon became fully eclipsed, the clouds wafting over the mountains threatened to move in and obscure the view.
Luckily, while they did hide the Moon now and then, they opened up enough for good views and images for a few minutes at a time throughout the eclipse.
For the panorama I processed the image for a more monochromatic look, to resemble the naked-eye view, but with the Moon appearing as a red globe in the sky, the only colour in the scene. (I shot the tracked shots with the MSM Nomad tracker I reviewed here.)
The site proved excellent, but it was a cold night! While the temperature was only just below freezing, the brisk Waterton wind off the lake made it a chilly experience watching the eclipse for two hours. I was actually being hit by ice pellets blowing off the lake.
I decided not to set up the telescope for close-ups; the wide-angle images were the priority anyway from such a scenic spot.
A single untracked 15-second exposure with the RF15-35mm lens at f/2.8 and 17mm on the Canon R5 at ISO 3200.
But I am not complaining. I got the eclipse, once again by chasing to where the weather predictions said it would be clear. The above is my requisite trophy shot.
Had I stayed home I would have been clouded out. Had predictions called for clear skies at home, I would not have made the trip to Waterton to enjoy the eclipse over its wonderful scenery.
The next total lunar eclipse is September 7, 2025, six months after this eclipse. But it is visible from the opposite hemisphere to this one, with no part of that eclipse visible from North America. I will not chase that far for a TLE!
The March 3, 2026 TLE from Alberta
After that, and after a passage of one lunar year (355 days or 12 lunar cycles) since the March 14, 2025 TLE, I have a chance for another total lunar eclipse from home, with western North America favoured. As I preview above, it’ll be an early morning event on March 3, 2026, with the eclipsed Moon setting in the west in the pre-dawn hours.
Sounds like another chase to a mountain site with the red Moon over the Rockies. That’ll be the plan!
I present a two-minute video set to music of the April 8, 2024 total solar eclipse.
In my previous blog Chasing the Cross Continental Eclipse I told the tale of my chase to see the total eclipse of the Sun. I ended up under mostly clear skies in the Eastern Townships of Québec, Canada, not Texas, my original destination.
Here I present the result of shooting with four cameras that afternoon, taking still images, time-lapses, and a 4K movie.
Be sure to watch in 4K!
The site worked out very well, as the lower Sun in eastern Canada lent itself to views framing the eclipse over a landscape below, in this case a very wavy lake. But I was lucky to have open water as other lakes in the area were still frozen.
My post-eclipse selfie at the Lac Brome site in Quebec for the April 8, 2024 total eclipse of the Sun.
As it was, a snow storm a few days earlier left lots of snow in the area to be included in my post-eclipse selfie.
This was only the third total solar eclipse I’ve seen from Canada, after February 26, 1979 from Manitoba, and August 1, 2008 from the air out of Cambridge Bay, Nunavut in the Canadian Arctic. The next total eclipse from Canada passes over my home in Alberta. But it is not until August 22, 2044!
As eclipse day approaches here are some tips and video tutorials from me about how best to capture the total eclipse of April 8, 2024.
There are many ways to capture great images and movies of a total eclipse of the Sun. I outline them all in great detail in my 380-page ebook How to Capture the Solar Eclipses, linked to at right.
Originally published in June 2023, I revised the ebook following the October 14, 2023 annular eclipse of the Sun to include “lessons learned at the eclipse,” and some processing tutorials on assembling annular eclipse composites. I’ve also added new content on using software to control cameras and updated information about solar filters.
Brief Tips and Techniques
The August 21, 2017 total solar eclipse over the Grand Tetons as seen from the Teton Valley in Idaho, near Driggs. With the Canon 6D and 14mm SP Rokinon lens at f/2.5 for 1/10 second at ISO 100.
My breakdown of recommend methods, in order from simplest to most complex, and with increasing demands on your time, is generally this:
Use a Phone Camera for a Movie. While they can be used for a quick handheld grab shot during totality, a better method is to place a phone on a tripod using a clamp of some kind. Then a few minutes before totality aim and frame the scene, with no filter over the camera lens. Start it in movie mode to record video of the eclipse and sky changes, and the excited sounds of your group! Just remember to stop the video shortly after the end of totality and aim the phone away from the Sun. Never leave any unfiltered camera aimed at the Sun for a long time.
Shoot a Wide-Angle Time-Lapse. Using a DSLR or mirrorless camera and a wide-angle lens (it might need to be as wide as a 14mm at sites in Mexico and the southern U.S.) aim and frame the camera to include the Sun and landscape below. Focus the lens! And leave it on manual focus. But put the camera into Auto-Exposure Aperture Priority (Av) with wide-area metering and with it set to underexpose by -1 EV Exposure Compensation. With the camera at ISO 100 or 200, use either its internal intervalometer (if it has one) or an external intervalometer to take frames once per second. Start the sequence with no filter on the lens a few minutes before totality. Let it run on its own until a few minutes after totality. The result is hundreds of frames you can turn into a time-lapse movie of the lunar shadow approaching and receding, and of the changes in sky colours. Or you can extract single frames at key points to process individually, as I did for the image above from August 2017. The advantage, as with the phone camera movie method, is that the camera, once going, requires no further attention. You can enjoy the eclipse!
Shoot a Telephoto Video. Use a 300mm to 500mm lens on a DSLR or mirrorless camera to shoot a real-time close-up video of the eclipse. Start the video a minute or two before totality with the Sun positioned to the left of frame centre and with a solar filter over the lens. Use a slow ISO, the lens wide open (typically f/4 to f/5.6) and the camera on Auto-Exposure Aperture Priority (Av). Just be careful to focus precisely on the filtered Sun before starting the video. Poor focus is what spoils most eclipse images, not poor exposure. Just before totality (about 30 seconds prior to Second Contact) remove the filter. The auto-exposure will compensate and provide a proper exposure for the rest of totality. Just let the camera run and the Sun drift across the frame from left to right. Just remember to replace the filter, or cap the lens, and stop the video shortly (~30 seconds) after totality and Third Contact. The video will capture the diamond rings and a well-exposed corona. Vary the exposure compensation during totality if you wish, but that involves more work at the camera. Otherwise, you can just let the camera run. But, as I illustrate in my ebook, it’s important to plan and place the Sun correctly to begin with (using a planetarium app to plan the sequence), so it does not drift off the frame or close to the edge.
Shoot Telephoto Close-Up Stills. Use the same type of gear to shoot still images. While you could shoot stills on Auto-Exposure, it’s better to shoot still images over a range of exposures, from very short (~1/1000 second) for the diamond rings and prominences, to long (~1 second) for the outer corona. No one exposure can capture all that the eye can see during totality. This takes more work at the camera, and with the camera on a static tripod you might have to re-centre the Sun during totality, another thing to fuss with and where things can go wrong. Using the camera’s Auto-Bracketing mode can help automate the shooting, allowing the camera to automatically shoot a set of 7 to 9 exposures at say, one-stop increments in quick succession with just one press of the shutter button (by using the self-timer set to 2 seconds).
Shoot with a Telescope on a Tracking Mount. Telescopes (I like 60mm- to 100mm-aperture apochromatic refractors) allow longer focal lengths, though I would advise against shooting with any optics longer than 600mm to 800mm, so the image frames the corona well. Use similar settings as above, but with the telescope (or a telephoto lens) on a tracking mount to turn from east to west at the same rate as the sky moves. That will ensure the Sun stays centred on its own, provided you have at least roughly polar aligned the mount. (Set it to your site’s latitude and aim the polar axis as due north as you can determine from compass apps.)
Those are brief summaries of the methods I recommend, as they are ones I’ve used with success in the past and plan to use on April 8. My ebook contains much more information, and answers to most of the “But what about using ….?” questions. And I provide lots of information on what can go wrong! Some learned the hard way over 16 previous total solar eclipses.
Video Tutorials
For a video tutorial, check out the webinar I conducted as part of the Kalamazoo Astronomical Society’s excellent Eclipse Series here on YouTube. It is about a 1-hour presentation, plus with lots of Q&A at the end.
KAS Eclipse Series — Part 1: Shooting
Of course, once you have all your images, you need to process them. My ebook’s biggest chapter (at 80 pages) is the one on processing still images and time-lapses.
So, a month after I presented the above webinar on Shooting, I was back on-line again for a follow-up webinar on Processing. You can view that KAS Eclipse Series tutorial here on YouTube.
KAS Eclipse Series — Part 2: Processing
I cover processing single wide-angle images, a wide-angle time-lapse series, single-image close-ups, and blending multiple exposure composites.
A month later, I presented a further webinar to the Astronomical League as part of their AL Live series, again on shooting the eclipse, but now with an emphasis on techniques amateur astronomers and astrophotographers with typical telescope gear might use.
You can view the AL Live webinar here. My presentation begins at the 44-minute mark.
AL Live Webinar — Scrub ahead to 44 minutes
I emphasized that the kinds of gear astrophotographers use these days with great success on deep-sky objects might not work well for the eclipse. The specialized cameras, and software used to control them, are just not designed for the demands of a total eclipse, where exposures have to range over a wide array of settings and change very quickly. Images have to be taken and recorded in rapid succession.
I suspect a lot of ambitious and overly-confident astrophotographers will come away from the 2024 eclipse disappointed — and what’s worse, without having seen the eclipse because they were too wrapped up looking at laptop screens trying to get their high-tech gear working.
The Checklist page from my eBook
Practice, Practice, Practice
In these webinars and in my ebook, my common theme is the importance of practicing.
Don’t assume something will work. Practice with the gear you intend to use, on the Sun now (with proper filters) and on the Moon. The crescent Moon, with dim Earthshine lighting the lunar night side, is a great practice target because of its wide range of brightness. And it moves like the Sun will, to check maximum exposure times vs. image blurring from motion.
Practice with your tripod or mount aimed to the altitude and location in the sky where the Sun will be from the site you have chosen. Set a tracking mount to the latitude you will be at to be sure it will aim at and track the Sun without issues. Some telescope mounts stop tracking when they reach due south, exactly where the Sun will be at totality from southern sites. That’s a nasty surprise you do not want to encounter on eclipse day.
All this and much more is covered in my ebook, available for Apple Books and as a PDF for all platforms here from my website at https://www.amazingsky.com/EclipseBook
My latest ebook describes in detail the many techniques we can use to capture great still images and movies of the 2023 and 2024 eclipses of the Sun.
In the next few months we have two major eclipses of the Sun visible from North America.
On October 14, 2023 the Moon will cross the disk of the Sun creating a partial eclipse. But from along a narrow path in the western U.S. the Moon’s disk will be centered on the Sun’s disk but not be large enough to completely cover it. For a few minutes, viewers will see an “annular” eclipse, as above, as what remains of the Sun forms a brilliant ring of light around the dark disk of the Moon.
Six lunar months later, the Moon again crosses the Sun but is now large enough to completely cover the Sun’s bright disk. The result is the most spectacular celestial sight, a total eclipse of the Sun, on April 8, 2024. The last such total solar eclipse (TSE) in North America was on August 21, 2017, shown above. After 2024, the next TSE in southern North America will not be until August 23, 2044. (There’s a TSE in northern Alaska on March 30, 2033.)
In 2017 I prepared an ebook about how to shoot that year’s total eclipse. This year I revised and expanded the book extensively to cover both the 2023 annular and 2024 total eclipses. The new 350-page ebook explains how to frame the eclipses depending on where you are along the paths. New information covers the advances in camera gear, with more details added on shooting video. Revised tutorials cover new software and processing techniques.
Above is the ebook’s Contents page, so you can see what topics it covers, over an extensive 350 pages. I provide not only advice on lots of techniques and gear, but also suggestions for what not to do, and what can go wrong!
The Fundamentals
I discuss the filters needed, comparing the various types available, and when to use them, and when to remove them. (A filter is always needed for the annular eclipse, but failing to remove the filter is a common failing at a total eclipse!)
For the 2023 annular eclipse I explain how to shoot close-ups, but also another type of image, the multiple exposure composite. Framing, timing and exposing correctly are crucial.
I do the same for the 2024 total eclipse, as a wide-angle shot of the eclipsed Sun over a landscape is one of the easiest ways to capture the event. It’s possible to set up a camera to take the images automatically, leaving you free to enjoy the view of the event without fussing with gear. I explain how best to do that.
For both eclipses, many people will want to shoot close-ups with telephoto lenses or telescopes. It takes more work and more can go wrong, but I show what’s required for equipment and exposures, and explain how to avoid the common flaws of fuzzy focus and trailed images.
But good exposure is also essential. However, for a total eclipse close-up, no one exposure is best. It takes a range of exposures to record the wide dynamic range of phenomena during totality. That demands work at the camera.
Setting Cameras
I show how we can use a camera’s auto-bracketing function to help automate the process of taking a set of exposures, from short exposures for the prominences, to long for the faint outer corona.
Another option is using a continuous burst mode to capture the fleeting moments of the diamond rings at the start and end of totality in 2024. But this can also be useful for capturing the “reverse Baily’s beads” that appear briefly as the Moon reaches the inner contact points at the start and end of the annular phase of the 2023 eclipse.
Using a tracking mount can help with shooting a set of images during totality. I describe the options for choosing the right mount and telescope, and how to set it up for accurate tracking. I discuss the advantages — and pitfalls — of using a tracking mount.
Shooting Video
Video is now an important feature of many cameras. But the choices of formats and settings can be daunting! 4K, 8K, 4K HQ — what to use? I illustrate the differences, using the best practice target, the crescent Moon.
Choosing the right contrast curve for your video — such as CLog3 here — can also make a big difference to the final video quality. It’s important to get that right. You have only one chance!
I also devote a chapter to shooting time-lapses, with wide-angle lenses and telescopes.
Image Processing
Chapter 11 is the biggest, with 68 pages of tutorials on how to process eclipse images, using the latest software. I show the benefit new AI tools can provide, but also the oddities they can impart to eclipse images.
I illustrate how to use HDR software (comparing sample results from several popular programs) to blend multiple exposures for greater dynamic range.
I illustrate other methods of stacking and blending exposure sets, such as luminosity masks and stack modes. Examples are all with Adobe products, but the methods are applicable to other layer-based programs such as Affinity Photo.
The processing chapter ends with illustrations on how to create layered composites from images taken at multiple stages of an eclipse.
What Can Go Wrong?
The ebook ends with advice for the ambitious (!) on how best to use several cameras to capture different aspects of the eclipse. And I includes lots of tips and checklists to ensure all goes well on eclipse day — or what to do for Plan B if all does not go well!
The ebook is available for Apple Books (for Macs and iPads) and as a PDF for all devices. Links to buy and more details on ebook content are at my website at www.amazingsky.com/EclipseBook.
I’ll be posting more eclipse “tips and techniques” blogs in the coming months, so be sure to subscribe.
For once I was able to watch a total eclipse of the Moon under clear skies from home. Good thing, as a snowstorm would have made travel a challenge.
On November 8, 2022 the Full Moon once again passed through the umbral shadow of the Earth, as it has done at six-month intervals for the last two years. The Moon turned deep red for almost an hour and a half.
This is the totally eclipsed Moon of November 8, 2022 set in the stars of Aries, with the planet Uranus nearby, visible as the greenish star about three Moon diameters away from the Moon at the 10 o’clock position.
This was to be the last total eclipse of the Moon visible from anywhere in the world until March 14, 2025.
However, in the days leading up to the eclipse weather prospects looked poor. The worse snowstorm — indeed the first major snowstorm for my area — was forecast for the day before the eclipse, November 7. Of course!
Weather prospects for eclipse time from the Astrospheric app.
For all the lunar eclipses in the last decade visible from my area, I have had to chase to find clear skies, perhaps a couple of hours away or a half day’s drive away. I documented those expeditions in previous posts, the latest of which is here for the May 15, 2022 total eclipse. In all cases I was successful.
However, just once it would be nice to be able to stay home. The last “TLE” I was able to watch from home was on December 21, 2010. It had been a long decade of lunar eclipse chasing!
But, it looked like another chase might be needed. Weather maps showed possible clear skies to the west and south of me on eclipse night. But cloud over me.
Other forecast models were a bit more optimistic.
The problem was with six inches of new snow having fallen and temperatures forecast to be in the minus 20s Celsius, any drive to a remote site was going to be unwise, especially at 3 am for the start of the eclipse in my time zone in Alberta.
I decided to — indeed was more or less forced to — stay put at home and hope for the best. So this was the “snowbound eclipse!”
Luckily, as the snowstorm receded east, clear skies followed, providing better conditions than I had expected. What a pleasure it was watching this eclipse from the comfort of home. While operating camera gear at -25° C was still a challenge, at least I could retreat inside to warm up.
A wide-angle view of the total eclipse of the Moon of November 8, 2022, with the red Moon at right amid the stars of the northern winter sky, plus with bright red Mars at top. Above and left of the Moon is the blue Pleiades star cluster, while below it and to the left is the larger Hyades cluster with reddish Aldebaran in Taurus. The stars of Orion are left of centre, including reddish Betelgeuse, while at far left are the two Dog Stars: Procyon, at top, in Canis Minor, and Sirius, at bottom, in Canis Major.
The view with the naked eye of the red Moon set in the winter sky was unforgettable. And the views though binoculars were, as always, the best for showing off the subtle colour gradations across the lunar disk.
A self-portrait of me observing the total eclipse of the Moon on November 8, 2022, on a very cold (-25° C) morning at 4 am.
As has been the tradition at the last few eclipses, I shot a souvenir selfie to show I was really there enjoying the eclipse.
A view of the aurora that appeared during the November 8, 2022 total eclipse of the Moon, as the sky darkened to reveal a show of Northern Lights on this very cold and icy night at 4 am.
A bonus was the appearance of some Northern Lights during totality. As the bright Moon dimmed during its passage into Earth’s umbral shadow, darkening the sky, the aurora began to appear to the north, opposite the eclipsed Moon.
Not a great display, but it was the first time I can recall seeing aurora during a lunar eclipse.
A parting shot of the now partially eclipsed Moon setting in the west down my driveway, early in the morning of November 8, 2022. With the Canon R6 and TTArtisan 21mm lens at f/2.8.
My parting view and photo was of the now partially eclipsed (and here overexposed) Moon emerging from the shadow and shining right down my rural snowbound driveway.
It was a perfect last look from home of a sight we won’t see again for two and half years.
On the night of November 18/19 eclipse fans across North America can enjoy the sight of the Moon turning deep red. Here’s how to capture the scene.
Seeing and shooting this eclipse will demand staying up late or getting up very early. That’s the price to pay for an eclipse everyone on the continent can see.
Also, this is not a total eclipse of the Moon. But it’s the next best thing, a 97% partial eclipse – almost total! So the main attraction — a red Moon — will still be front and centre.
CLICK ON AN IMAGE to bring it up full screen for closer inspection.
NOT QUITE TOTAL
At mid-eclipse 97% of the disk of the Full Moon will be within Earth’s dark umbral shadow, and should appear a bright red colour to the eye and even more so to the camera. A sliver of the southern edge of the Moon will remain outside the umbra and will appear bright white, like a southern polar cap on the Moon.
While some references will say the eclipse begins at 1:01 am EST, that’s when the Moon first enters the outer lighter penumbral shadow. Nothing unusual can be seen at that point, as the darkening of the Moon’s disk by the penumbra is so slight, you won’t notice any difference over the normally bright Full Moon.
The extent of the umbra and penumbra at the October 2004 total lunar eclipse.
It isn’t until the Moon begins to enter the umbra that you can see a dark bite being taken out of the edge of the Moon.
WHAT TO SEE
At mid-eclipse the Full Moon will look deep red or perhaps bright orange — the colours can vary from eclipse to eclipse, depending on the clarity of the Earth’s atmosphere through which the sunlight is passing to light the Moon. The red is the colour of all the sunsets and sunrises going on around the Earth during the eclipse.
The total lunar eclipse of August 2007. At the November 18 eclipse the bottom edge of the Moon, as it did here, will be bright, but brighter than it appears here.
The unique aspect of this eclipse is that for the 15 to 30 minutes around mid-eclipse we might see some unusual colour gradations at the edge of the umbral shadow, from sunlight passing through Earth’s upper atmosphere and ozone layer. This can tint the shadow edge blue or even green.
The last lunar eclipse six months ago on the morning of May 26, 2021 (see my blog here) was visible during its total phase only from western North America, and then only just. However, this eclipse can be seen from coast to coast.
Only from the very easternmost points in North America does the Moon set with the eclipse in progress, but during the inconsequential penumbral phase. All of the umbral phase is visible from the Eastern Seaboard, though the last stages will be in progress with the Moon low in the west in the pre-dawn hours. But that positioning can make for photogenic sight.
The start, middle and end times of the umbral eclipse for Eastern and Pacific time zones. The background image is a simulation of the path of the November 18/19, 2021 eclipse when the Moon travels through the southern part of the umbra.
WHEN IS THE ECLIPSE?
The show really begins when the Moon begins to enter the umbra at 2:18 am EST (1:18 am CST, 12:18 am MST, 11:18 pm PST).
But note,these times are for the night of November 18/19. If you go out on the evening of November 19 expecting to see the eclipse, you’ll be sadly disappointed as you will have missed it. It’s the night before!
The eclipse effectively ends at 5:47 am EST (4:47 am CST, 3:47 am MST, 2:47 am PST) when the Moon leaves the umbra. That makes the eclipse 3 1/2 hours long, though the most photogenic part will be for the 15 to 30 minutes centred on mid-eclipse at 4:03 am EST (3:03 am CST, 2:03 am MST, 1:03 am PST).
The sky at mid-eclipse from my home on Alberta, Canada (51° N)
WHERE WILL THE MOON BE?
The post-midnight timing places the Moon at mid-eclipse high in the south to southwest for most of North America, just west (right) of the winter Milky Way and below the distinctive Pleiades star cluster.
The view from the West Coast.
The high altitude of the Moon (some 60º to 70º above the horizon) puts it well above haze and murk low in the sky, but makes it a challenge to capture in a frame that includes the landscape below for an eclipse nightscape.
ASTRONOMY 101: The high altitude of the Moon is a function of both the eclipse timing in the middle of the night and its place on the ecliptic. The Full Moon is always 180° away from the Sun. So it sits where the Sun was six months earlier, in this case back in May, when the high Sun was bringing us warmer and longer days. Winter lunar eclipses are always high; summer lunar eclipses are always low, the opposite of what the Sun does.
The view from the East Coast.
From eastern North America the Moon appears lower in the west at mid-eclipse, making it easier to frame above a landscape. For example from Boston the Moon is 30º up, lending itself to nightscape scenes.
However, the sky will still be dark. To make use of the darkness to capture scenes which include the Milky Way, I suggest making the effort to travel away from urban light pollution to a dark sky site. That applies to all locations. Yes, that means a very long night!
PHOTO OPTIONS 1 — CAMERA ON A FIXED TRIPOD
With just a camera on a tripod, if you are on the East Coast (I show Boston here) it will be possible to frame the eclipsed Moon above a landscape with a 24mm lens (assuming a full frame camera; a cropped frame camera will require a 16mm lens).
Framing the scene from the East Coast.
What exposure will be best will depend on the level of local light pollution at your site. But from a dark site, 30 seconds at ISO 1600 and f/2.8 should work well. But without tracking, you will see some star trailing at 30 seconds. Also try shorter exposures at a higher ISO.
There’s lots of time, so take lots of shots. Include some short shots of just the Moon to blend in later, as the exposures best for picking up the Milky Way will still overexpose the Moon, even when it is darkest at mid-eclipse.
Framing the scene from the West.
From western North America, including the landscape below will require wide lenses and a vertical format, with the Moon appearing quite small. But from a photogenic site, it might be worth the effort.
Total eclipse of the Moon, December 20/21, 2010, taken from home with 15mm lens at f/3.2 and Canon 5D MkII at ISO 1600 for 1 minute single exposure, toward the end of totality.
Total eclipse of the Moon, December 20/21, 2010, taken from home with Canon 5D MKII and 24mm lens at f2.8 for stack of 4 x 2 minutes at ISO 800. Taken during totality..
However, as my images above from the December 2010 eclipse show, if there’s any haze, the Moon could turn into a reddish blob.
You might be tempted to shoot with a long telephoto lens, but unless the camera is on a tracker, as below, the result will likely be a blurry mess. The sky moves enough during the long (over 1 second) exposures needed to pick up the reddened portion of the Moon that the image will smear when shot with long focal lengths. The solution is to use a sky tracker.
PHOTO OPTIONS 2 — CAMERA ON A TRACKER
Placing the camera on a motorized tracker that has been polar aligned to follow the motion of the stars opens up many more possibilities.
Camera on a Star Adventurer tracker showing the field of a 24mm lens.
From a dark site, make use of the Moon’s position near the Milky Way to frame it and Orion and his fellow winter constellations. A 24mm lens will do the job nicely, in exposures up to 2 to 4 minutes long. But take short ones for just the Moon to layer in later.
Showing the field of a 50mm lens.
A 50mm lens (again assuming a full frame camera) frames the Moon with the Pleiades and Hyades star clusters in Taurus.
Showing the field of an 85mm lens,
Switching to an 85mm lens frames the clusters more tightly and makes the Moon’s disk a little larger. For me, this is the best shot to go for at this eclipse, as it tells the story of the eclipse and its unique position near the two star clusters.
Showing the field of 200mm and 250mm lenses.
But going with a longer lens allows framing the red eclipsed Moon below the blue Pleiades cluster, a fine colour contrast. A 200mm lens will do the job nicely (or a 135mm on a cropped frame camera).
Or, as I show here, the popular William Optics RedCat with its 250mm focal length will also work well. But such a lens must be on a polar-aligned tracker to get sharp shots. Use the Sidereal rate drive speed to ensure the sharpest stars over the 1 to 4 minutes needed to record lots of stars.
Typical settings for tracker images, with an image of the January 2019 eclipse.
Take lots of exposures over a range of settings — long to bring out the deep sky detail and shorter to preserve detail in the reddened lunar disk. These can be layered and blended later in Photoshop, or in the layer-based image editing program of your choice, such as Affinity Photo or ON1 Photo RAW.
PHOTO OPTIONS 3 — THROUGH A TELESCOPE
While I think the tracked wide-field options are some of the best for this eclipse, many photographers will want frame-filling close-ups of the red Moon. While a telescope will do the job, unless it has motors to track the sky, your options are limited.
Phone on a simple Dobsonian reflector.
A phone clamped to the eyepiece of a telescope can capture the shrinking bright part of the eclipsed Moon as the Moon enters more deeply into the umbra. Exposures for the bright part of the Moon are short enough a motor drive on the telescope is not essential.
But if you haven’t shot the Moon with this gear before, eclipse night is not the time to learn. Practice on the Moon before the eclipse.
DSLR on a beginner refractor telescope showing the adapter.
For shooting with a DSLR camera through a telescope you’ll need a special camera adapter nosepiece and T-ring for your camera. Again, if you don’t have the gear and the experience doing this, I would suggest not making the attempt at two in the morning on eclipse night!
DSLR on a beginner reflector with an often necessary Barlow lens.
For example, owners of typical beginner reflectors are often surprised to find their cameras won’t even reach focus on their telescope. Many are simply not designed for photography. Adding a Barlow lens is required for the camera to reach focus, though without a drive, exposures will be limited to short (under 1/15s) shots of the bright part of the Moon.
An exposure composite of short and long exposures.
The challenge with this and all lunar eclipses is that the Moon presents a huge range of brightness. Short snapshots can capture the bright part of the Moon not in the umbra, but the dark umbral-shaded portion requires much longer exposures, usually over one second.
Your eye can see the whole scene (as depicted above) but the camera cannot, not in one exposure. This example is a “high dynamic range” blend of several exposures.
A series of the September 27, 2015 total lunar eclipse to demonstrate an exposure sequence from partial to total phase.
Plus as the eclipse progresses, longer and longer exposures are needed to capture the sequence as the Moon is engulfed by more of the umbra.
After mid-eclipse, the exposures must get progressively shorter again in reverse order. So attempting to capture an entire sequence requires a lot of exposure adjustments.
TIP: Bracket a lot! Take lots of frames at each burst of images shot every minute, or however often you wish to capture the progress of the eclipse for a final set. Unlike total solar eclipses, lunar eclipses provide lots of time to take lots of images.
PHOTO OPTIONS 4 — THROUGH A TRACKING TELESCOPE
If you want close-ups of the eclipsed red Moon, you will need to use a mount equipped with a tracking motor, such as an equatorial mount shown here. But for use with telephoto lenses and short telescopes, a polar-aligned sky tracker, as above, will work.
A small apo refractor on an equatorial mount with typical settings for mid-eclipse.
Exposures can now be several seconds long, and at a lower ISO speed for less noise, allowing the Moon to be captured in sharp detail and with great colour. Long exposures will even pick up stars near the Moon.
However, when shooting close-ups, use the Lunar drive rate (if your mount offers that choice) to follow the Moon itself, as it has a motion of its own against the background stars. It’s that orbital motion that takes it from west to east (right to left) through the Earth’s shadow.
The fields of view and size of the Moon’s disk with typical telescope focal lengths.
Filling the camera frame with the Moon requires a surprising amount of focal length. The Moon appears big to our eyes, but is only 1/2º across.
Even with 800mm of focal length, the Moon fills only a third of a full frame camera field. Using a cropped frame camera has the advantage of tightening the field of view, but it still takes 1200mm to 1500mm of focal length to fill the frame.
But I wouldn’t worry about doing so, as longer focal lengths typically also come with slower f-ratios, requiring longer exposure times or higher ISOs, both of which can blur detail.
A camera on an alt-azimuth GoTo Schmidt-Cassegrain.
For close-ups, a polar-aligned equatorial mount is best. But if your telescope is a GoTo telescope on an alt-azimuth mount (such as a Schmidt-Cassegrain shown here), you should be able to get good shots.
The field of view will slowly rotate during the eclipse, making it more difficult to later accurately assemble a series of shots documenting the entire sequence.
But any one shot should be fine, though it might be best to keep exposures shorter by using a higher ISO speed. As always, take lots of shots at different settings.
You won’t be able to tell which is sharpest until you inspect them later at the computer.
TIP: People worry about exposures, but the flaw that ruins many eclipse shots is poor focus. Use Live View to focus carefully on the sharp edge of the bright part of the Moon. Or better yet, focus on a bright star nearby. Zoom up to 10x to make it easier to see when the star is in sharpest focus. It can be a good idea to refocus through the night as the changing temperature can shift the focus point of long lenses and telescopes. That might take moving the scope over to a bright star, which won’t be possible if you need to preserve the framing for a composite.
PHOTO OPTIONS 5 — HDR COMPOSITES
Using an equatorial mount tracking at the lunar rate keeps the Moon stationary. This opens up the possibility of taking a series of shots over the wide range of exposures needed to capture the Moon from bright to dark, to assemble later in processing. Take 5 to 7 shots in quick succession.
An HDR composite from the December 2010 eclipse.
High dynamic range software can blend the images, or use luminosity masks created by extension panels for Photoshop such as Lumenzia, TK8 or Raya Pro. Either technique can create a final image that looks like what your eye saw. The key is making sure all the images are aligned. HDR software likely won’t align them for you very well.
The January 2019 eclipse layered and blended in Photoshop.
Blending multiple exposures will also be needed to properly capture the eclipsed Moon below the Pleiades, similar to what I show here (and below) from the January 2019 eclipse when the Moon appeared near the Beehive star cluster.
PHOTO OPTIONS 6 — ECLIPSE TRACK COMPOSITES
Another popular form of eclipse image (though also one rife for laughably inaccurate fakes) is capturing the entire path of the Moon across the sky over the duration of the eclipse from start to end.
The track of the September 2015 eclipse, accurately assembled to correct scale.
It can be done with a fixed camera on a tripod but requires a wide (14mm to 20mm) and properly framed lens, to capture the sequence as it actually appeared to proper scale, and not created by just pasting over-sized moons onto a sky to “simulate” the scene, usually badly. By the end of the day on November 19 the internet will be filled with such ugly fakes.
You could set the camera at one exposure setting (one best for when the Moon and sky are darkest at mid-eclipse) and let the camera run, shooting frames every 5 seconds or so. The result might work well as a time-lapse sequence, showing the bright sky darkening, then brightening again.
But chances are the frames taken at the start and end when the sky is lit by full moonlight will be blown out. It will still take some manual camera adjustments through the eclipse.
For a still-image composite, you should instead expose properly for the Moon’s disk at all times, a setting that will change every few minutes, then take a long exposure at mid-eclipse to pick up the stars and Milky Way. The short Moon shots are then blended into the base-layer sky image later in processing.
Framing the eclipse path for the start of the sequence. Framing the path so the Moon ends up at a desired location on the frame.
If the camera has been well-framed and was not moved over the 3.5 hours of the eclipse, the result is an accurate and authentic record of the Moon’s path and passage into the shadow, and not a faked atrocity!
But creating a real image requires a lot of work at the camera, and at the computer.
TIP: Shooting for composites is not work I would recommend attempting while also running other cameras. Focus on one type of image and get it right, rather than trying to do too many and doing them all poorly.
PHOTO OPTION 7 — ECLIPSE SHADOW COMPOSITE
One of the most striking types of lunar eclipse images is a close-up composite showing the Moon passing through the Earth’s umbral shadow, with the arc of the shadow edge on the Moon defining the extent of the shadow, which is about three times larger than the Moon.
Such a composite can be re-created later by placing individual exposures accurately on a wider canvas, using screen shots from planetarium software as a template guide.
A composite of the Moon moving through the umbra.
But to create an image that is more accurate, it is possible to do it “in camera.” Unlike in the film days, we don’t have to do it with multiple exposures onto one piece of film.
We take lots of separate frames with a telescope or lens wide enough to contain the entire path of the Moon through the umbra. A polar-aligned equatorial mount tracking at the sidereal rate is essential. That way the scope follows the stars, not the Moon, and so the Moon travels across the frame from right to left.
Framing for a shadow composite.
Start such a sequence with the Moon at lower right if you are framing just the path through the shadow. Use planetarium software (I used Starry Night™ to create the star charts for this blog) to plan the framing for your camera, lens and site, so the Moon ends up in the middle of the frame at mid-eclipse. This is not a technique for the faint of heart!
A shadow-defining composite from January 2019, with the Moon near the Beehive cluster.
An interesting variation would be using a 200mm to 250mm lens to frame the Moon’s shadow passage below the Pleiades, to create an image as above. That will be unique. Again, an accurately aligned tracker turning at the sidereal rate will be essential.
Acquiring the frames for any composite takes constantly adjusting the exposure during the length of eclipse, which can try your patience and gear during the wee hours of the morning.
I’ll be happy just to get a good set of images at mid-eclipse to make a single composite of the red Moon below the Pleiades.
TIP: It could be cold and lenses can frost over. A battery-powered heater coil on the optics might be essential. And spare warm batteries.
The 4-day-old waxing crescent Moon on April 8, 2019 in a blend of 7 exposures from 1/30 second to 2 seconds, blended with luminosity masks in Photoshop.
PRACTICE!
To test your equipment and your skills at focusing, you can use the waning crescent Moon in the dawn hours on the mornings of October 29 to November 2 or, after New Moon on November 4, the waxing crescent Moon on the evenings of November 6 to 10. While the crescent Moon isn’t as bright as the Full Moon, it will be a good stand in for the bright part of the eclipsed Moon when it is deep in the umbra.
Even better, the dark part of the crescent Moon lit by Earthshine is a good stand-in for the part of the Moon in the umbra. Like the eclipsed Moon, the crescent Moon’s bright and dark parts can’t be captured in one exposure. So it’s a good test for the range of exposures you’ll need for the eclipse, for practising changing settings on your camera, and for checking your tracking system.
The crescent Moon is also useful to test your manual focusing, though the sharp detail along the terminator (the line dividing the bright crescent from the earthlit dark part of the Moon) is much easier to focus on than the flat, low contrast Full Moon.
A selfie of me looking up at the total eclipse of the Moon on January 20, 2019, using binoculars to enjoy the view.
DON’T FORGET TO LOOK!
Amid all the effort needed to shoot this or any eclipse, lunar or solar, don’t forget to just look at it. No photo can ever quite capture the glowing nature of the eclipsed Moon set against the stars.
A selfie of the successful eclipse chaser bagging his trophy, the total lunar eclipse of January 20, 2019.
I wish you clear skies and good luck with your lunar eclipse photography. If you miss it, we have two more visible from North America next year, both total eclipses, on May 15/16 and November 8, 2022.
I present the final cut of my eclipse music video, from the Teton Valley, Idaho.
I’ve edited my images and videos into a music video that I hope captures some of the awe and excitement of standing in the shadow of the Moon and gazing skyward at a total eclipse.
Totality over the Tetons from Alan Dyer on Vimeo.
The video can be viewed in up to 4K resolution. Music is by the Hollywood session group and movie soundtrack masters, Audiomachine. It is used under license.
Me at the 2017 total solar eclipse celebrating post-eclipse with four of the camera systems I used, for close-up stills through a telescope, for 4K video through a telephoto lens, and two wide-angle time-lapse DSLRs. A fifth camera used to take this image shot an HD video selfie.Never before have I been able to shoot a total eclipse with so many cameras to capture the scene from wide-angles to close-ups, in stills, time-lapses, and videos, including 4K. Details on the setup are in the caption for the video on Vimeo. Click through to Vimeo.
I scouted this site north of Driggs, Idaho two years earlier, in April 2015. It was perfect for me. I could easily set up lots of gear, it had a great sightline to the Grand Tetons, and a clear horizon for the twilight effects. And I had the site almost to myself. Observing with a crowd adds lots of energy and excitement, but also distraction and stress. I had five cameras to operate. It was an eclipse experience I’ll likely never duplicate.
If you missed this eclipse, you missed the event of a lifetime. Sorry. Plain and simple.
A composite of the 2017 eclipse with time running from left to right, depicting the onset of totality at left, then reappearance of the Sun at right. Taken with the 4-inch telescope shown above.If you saw the eclipse, and want to see more, then over the next few years you will have to travel far and wide, mostly to the southern hemisphere between now and 2024.
But on April 8, 2024 the umbral shadow of the Moon once again sweeps across North America, bringing a generous four minutes of totality to a narrow path from Mexico, across the U.S., and up into eastern Canada.
It will be the Great North American Eclipse. Seven years to go!
The most spectacular sight the universe has to offer is coming to a sky near you this summer.
On August 21 the Moon will eclipse the Sun, totally!, along a path that crosses the continental USA from coast to coast. All the details of where to go are at the excellent website GreatAmericanEclipse.com.
If this will be your first total solar eclipse, you might want to just watch it. But many will want to photograph or video it. It can be easy to do, or it can be very complex, for those who are after ambitious composites and time-lapses.
To tell you how to shoot the eclipse, with all types of cameras, from cell phones to DSLRs, with all types of techniques, from simple to advanced, I’ve prepared a comprehensive ebook, How to Photograph the Solar Eclipse.
It is 295 pages of sage advice, gathered over 38 years of shooting 15 total solar eclipses around the world.
The book is filled with illustrations designed specifically for the 2017 eclipse – where the Sun will be, how to frame the scene, what will be in the sky, how the shadow will move, where the diamond rings will be, what lenses to use, etc.
Here are a few sample pages:
I cover shooting with everything from wide-angle cameras for the entire scene, to close-ups with long telephotos and telescopes, both on tripods and on tracking mounts.
I cover all the details on exposures and camera settings, and on focusing and ensuring the sharpest images. Most bad eclipse pix are ruined not by poor exposure but poor focus and blurry images – the Sun is moving!
A big chapter covers processing of eclipse images, again, from simple images to complex stacks and composites.
For example, I show how to produce a shot like this, from 2012, combining a short diamond ring image with a long-exposure image of the corona.
A final chapter covers “what can go wrong!” and how to avoid the common mistakes.
The ebook is available on the Apple iBooks Store for Mac and iOS devices. This version has the best interactivity (zoomable images), higher quality images (less compression), and easiest content navigation.
However, for non-Apple people and devices, the ebook can also be purchased directly from my website as a downloadable PDF, which has embedded hyperlinks to external sites.
I think you’ll find the ebook to be the most comprehensive guide to shooting solar eclipses you’ll find. It is up to date (as of last week!) and covers all the techniques for the digital age.
Many thanks, and clear skies on August 21, wherever you may be in the shadow of the Moon!
My multiple-exposure composite shows the complete September 27, 2015 total lunar eclipse to true scale, with the Moon accurately depicted in size and position in the sky.
From my location at Writing-on-Stone Provincial Park in southern Alberta, Canada, the Moon rose in the east at lower left already in partial eclipse.
As it rose it moved into Earth’s shadow and became more red, while the sky darkened from twilight to night, bringing out the stars.
Then, as the Moon continued to rise higher it emerged from Earth’s shadow, at upper right, and returned to a brilliant Full Moon again, here overexposed and now illuminating the landscape with moonlight.
TECHNICAL
The disks of the Moon become overexposed in my composite as the sky darkened because I was setting exposures to show the sky and landscape well, not just the Moon itself. That’s because I shot these frames – and many more! – primarily for use as a time-lapse movie where I wanted the entire scene well exposed in each frame.
Indeed, for this still-image composite of the eclipse from beginning to end, I used just 40 frames taken at 5-minute intervals, selected from 530 I shot, taken at 15- to 30-second intervals for the full time-lapse sequence.
All were taken with a fixed camera, a Canon 6D, with a 35mm lens, to nicely frame the entire path of the Moon, from moonrise at lower left, until it exited the frame at top right, as the partial eclipse was ending.
In the interest of full disclosure, the ground comes from a blend of three frames taken at the beginning, middle, and end of the sequence, and so is partly lit by twilight and moonlight, to reveal the ground detail better than in the single starlit frame from mid-eclipse. Lights at lower left are from the Park’s campground.
The background sky comes from a blend of two exposures: one from the middle of the eclipse when the sky was darkest, and one from the end of the eclipse when the sky was now lit deep blue. The stars come from the mid-eclipse frame, a 30-second exposure.
MY RANT FOR REALITY
So, yes, this is certainly a composite assembled in Photoshop – a contrast to the old days of film where one might attempt such an image just by exposing the same piece of film multiple times, usually with little success.
However … the difference between this image and most you’ve seen on the web of this and other eclipses, is that the size of the Moon and its path across the sky are accurate, because all the images for this composite were taken with the same lens using a camera that did not move during the 3-hour eclipse.
This is how big the Moon actually appeared in the sky in relation to the ground and how it moved across the sky during the eclipse, in what is essentially a straight line, not a giant curving arc as in many viral eclipse images.
And, sorry if the size of the Moon seems disappointingly small, but it is small! This is what a lunar eclipse really looks like to correct scale.
By comparison, many lunar eclipse composites you’ve seen are made of giant moons shot with a telephoto lens that the photographer then pasted into a wide-angle sky scene, often badly, and pasted in locations on the frame that usually bear no resemblance to where the Moon actually was in the sky, but are just placed where the photographer thought would look the nicest.
You would never, ever do that for any other form of landscape photography, at least not without having your reputation tarnished. But with the Moon it seems anything is permitted, even amongst professional landscape photographers.
No, you cannot just place a Moon anywhere you like in your image, eclipse or no eclipse, then pass it off as a real image. Fantasy art perhaps. Fine. But not a photograph of nature.
Sorry for the rant, but I prefer accuracy over fantasy in such lunar eclipse scenes, which means NOT having monster-sized red Moons looming out of proportion and in the wrong place over a landscape. Use Photoshop to inform, not deceive.
I could not have asked for a more perfect night for a lunar eclipse. It doesn’t get any better!
On Sunday, September 27, the Moon was eclipsed for the fourth time in two years, the last in a “tetrad” of total lunar eclipses that we’ve enjoyed at six-month intervals since April 2014. This was the best one by far.
This is through the TMB 92mm refractor for a focal length of 500mm using the Canon 60Da at ISO 400 for 1/250 second.
The timing was perfect for me in Alberta, with the Moon rising in partial eclipse (above), itself a fine photogenic site.
In the top image you can see the rising Moon embedded in the blue band of Earth’s shadow on our atmosphere, and also entering Earth’s shadow on its lunar disk. This was a perfect alignment, as lunar eclipses must be.
For my earthly location I drove south to near the Montana border, to a favourite location, Writing-on-Stone Provincial Park, to view the eclipse over the sandstone formations of the Milk River.
More importantly, weather forecasts for the area called for perfectly clear skies, a relief from the clouds forecast – and which did materialize – at home to the north, and would have been a frustration to say the least. Better to drive 3 hours!
This was the second lunar eclipse I viewed from Writing-on-Stone, having chased clear skies to here in the middle of the night for the October 8, 2014 eclipse.
I shot with three cameras: one doing a time-lapse through the telescope, one doing a wide-angle time-lapse of the Moon rising, and the third for long-exposure tracked shots during totality, of the Moon and Milky Way.
This is a stack of 5 x 2-minute tracked exposures for the sky and 5 x 4-minute untracked exposures for the ground to smooth noise. The Moon itself comes from a short 30-second exposure to avoid overexposing the lunar disk. Illumination of the ground is from starlight. All exposures with the 15mm lens at f/2.8 and Canon 5D MkII at ISO 1600. The camera was on the iOptron Sky-Tracker.
That image is above. It shows the eclipsed Moon at left, with the Milky Way at right, over the Milk River valley and with the Sweetgrass Hills in the distance.
The sky was dark only during the time of totality. As the Moon emerged from Earth’s shadow the sky and landscape lit up again, a wonderful feature of lunar eclipses.
While in the above shot I did layer in a short exposure of the eclipsed Moon into the long exposure of the sky, it is still to accurate scale, unlike many dubious eclipse images I see where giant moons have been pasted into photos, sometimes at least in the right place, but often not.
Lunar eclipses bring out the worst in Photoshop techniques.
This is a single exposure taken through the TMB 92mm refractor at f/5.5 for 500 mm focal length using the Canon 60Da at ISO 400 for 8 seconds, the longest I shot during totality. The telescope was on the SkyWatcher HEQ5 mount tracking at the lunar rate.
Above is a single closeup image taken through the telescope at mid-totality. I exposed for 8 seconds to bring out the colours of the shadow and the background stars, as faint as they were with the Moon in star-poor Pisces.
I shot a couple of thousand frames and processing of those into time-lapses will take a while longer, in particular registering and aligning the 700 I shot at 15-second intervals through the telescope. They show the Moon entering, passing through, then exiting the umbra, while it moves against the background stars.
With the latest success, I’ve had my fill of lunar eclipses for a while. Good thing, as the next one is not until January 31, 2018, before dawn in the dead of winter.
With the mild night, great setting, and crystal clear skies, this “supermoon” eclipse could not have been better. It was a super eclipse.
On Sunday, September 27 the Moon undergoes a total eclipse, the last we’ll see until January 2018.
This is a sky event you don’t want to miss. Whether you photograph it or just enjoy the view, it will be a night to remember, as the Full Moon turns deep red during a total eclipse.
Note — For this article I’m giving times and sky directions for North America. For Europe the eclipse occurs early in the morning of September 28, as the Moon sets into the west. But for here in North America the timing could not be better. Totality occurs in the evening of Sunday, September 27 as the Moon rises into the east.
Courtesy Wikimedia Commons
ECLIPSE BASICS
A total lunar eclipse occurs when the Moon — and it can only be Full — passes through the shadow cast into space by Earth. The Sun, Earth and Moon are in near-perfect alignment.
All total eclipses of the Moon consist of 3 main parts:
• The initial partial eclipse occurs as the Moon slowly enters the dark central portion of our planet’s shadow, the umbra. This lasts about an hour.
• Totality begins as the entire disk of the Moon is within the umbra. For this eclipse, totality lasts a generous 72 minutes.
• Totality ends as the Moon emerges from the umbra to begin the final partial eclipse lasting another hour.
Courtesy Fred Espenak/EclipseWise.com – All times are Eastern Daylight. Subtract 1 hour for Central Daylight, 2 hours for Mountain Daylight, 3 hours for Pacific Daylight Time. Times apply for anywhere in that time zone.
WHERE TO SEE IT
All of North America, indeed most of the western hemisphere, can see this eclipse. In North America, the farther east you live on the continent the later in your evening the eclipse occurs and the higher the Moon appears in the southeast.
For example, in the Eastern time zone, totality begins at 10:11 p.m. EDT and ends at 11:23 p.m. EDT, with mid-totality is at 10:47 p.m. EDT with the Moon about 35 degrees up, placing it high in the southeast sky for southern Ontario, for example.
For me in the Mountain time zone, the total eclipse begins at 8:11 p.m. MDT and ends at 9:23 p.m. MDT, with mid-totality is at 8:47 p.m. MDT, with the Moon just 13 degrees up in the east from here in southern Alberta. From my time zone, and from most location in the Rocky Mountain regions, the Moon rises with the initial partial phases in progress.
This is the total eclipse of the Moon, December 10, 2011, taken from the grounds of the Rothney Astrophysical Observatory, near Priddis Alberta, and looking west to the Rockies. This is a 2 second exposure at ISO 800 with the Canon 5DMkII and Canon 200mm lens at f/4.
For locations on the west coast viewers miss most of the partial eclipse phase before totality. Instead, the Moon rises as totality begins, making for a more challenging observation. Viewers on the coast will need clear skies and a low horizon to the east, but the reward could be a beautiful sight and images of a red Moon rising.
Total eclipse of the Moon, December 20/21, 2010, taken from home with 130mm AP apo refractor at f/6 and Canon 7D at ISO 400. An HDR composite of 9 images from 1/125 second to 2 seconds, composited in Photoshop CS5. Taken at about 12:21 am MST on Dec 21, about 20 minutes before totality began, during the partial phase.
“SUPERMOON” ECLIPSE
This eclipse of the Moon is the last in a series of four total lunar eclipses that occurred at six-month intervals over the last two years. We won’t enjoy another such “tetrad” of total lunar eclipses until 2032-33.
But this eclipse is unique in that it also coincides with the annual Harvest Moon, the Full Moon closest to the autumnal equinox. Harvest Moons are known for their orange tint as they rise into what is sometimes a dusty autumn evening.
But what is making internet headlines is that this Full Moon is also the year’s “supermoon,” the Full Moon of 2015 that comes closest to Earth. In recent years these “perigee” Full Moons have been dubbed “supermoons.”
Call it what you will, it does make this Full Moon a little larger than usual, though the difference is virtually impossible to detect by eye. And it makes little difference to the circumstances or appearance of the eclipse itself.
Partial eclipse of the Moon at moonset, morning of June 26, 2010, at about 5:00 am. Shot with 200mm telephoto and 1.4x teleconvertor, for 1/15th sec at f/5 and ISO 100, using Canon 7D. From western North America the Moon will rise in partial eclipse like this on September 27.
HOW TO SEE IT
Just look up! You can enjoy the eclipse with the unaided eye, and even from within city limits.
Unlike eclipses of the Sun, the eclipsed Moon is perfectly safe to look at with whatever you wish to use to enhance the view. The best views are with binoculars or a telescope at low power.
Look for subtle variations in the red colouring across the disk of the Moon, and even tints of green or blue along the dark edge of the Earth’s advancing or retreating shadow during the partial phases.
If you can, travel to a dark site to enjoy the view of the stars and Milky Way brightening into view as the Full Moon reddens and the night turns dark.
HOW TO SHOOT IT
The total eclipse of the Moon, April 15, 2014 local time just after sunset from Australia. This is an 8-second exposure at f/2.8 with the 50mm lens on the Canon 60Da at ISO 800.
1. On A Tripod
The easiest method is to use a camera on a tripod, with a remote release to fire the shutter and prevent vibration from blurring the image. What lens you use will depend on how you wish to frame the scene and how high the Moon is in your sky.
Lens Choice
From eastern North America you’ll need a wide-angle lens (14mm to 24mm) to frame the eclipsed Moon and the ground below. The Moon will appear as a small red dot.
While you can shoot the Moon with longer focal lengths it takes quite a long lens (>300mm) to really make it worthwhile shooting just the Moon itself isolated in empty sky. Better to include a landscape to put the Moon in context, even if the Moon is small.
From western North America the lower altitude of the Moon allows it to be framed above a scenic landscape with a longer 35mm to 50mm lens, yielding a larger lunar disk.
From the west coast you could use a telephoto lens (135mm to 200mm) to frame the horizon and the eclipsed Moon as it rises for a dramatic photo.
Focusing
Use Live View (and zoom in at 10x magnification) to manually focus on the horizon, distant lights, or bright stars. The Moon itself my be tough to focus on.
Exposure Times
Exposures will depend on how bright your sky is. Use ISO 400 to 800 and try metering the scene as a starting point if your sky is still lit by twilight. Use wide lens apertures (f/4 to f/2) if you can, to keep exposures times as a short as possible.
The apparent motion of the Moon as the sky turns from east to west will blur the image of the Moon in exposures lasting more than a few seconds, especially ones taken with telephoto lenses.
The maximum exposure you can use before trailing sets in is roughly 500 / lens focal length.
Total eclipse of the Moon, December 20/21, 2010, taken with Canon 5D MKII and 24mm lens at f2.8 for stack of 4 x 2 minutes at ISO 800. Taken during totality using a camera tracker.
2. On a Tracker or Equatorial Mount
If you can track the sky using a motorized tracker or telescope mount, you can take exposures up to a minute or more, to record the red Moon amid a starry sky.
For this type of shot, you’ll need to be at a dark site away from urban light pollution. But during totality the sky will be dark enough that the Milky Way will appear overhead. Use a wide-angle lens to capture the red Moon to the east of the summer Milky Way.
The total eclipse of the Moon, October 8, 2014, the Hunter’s Moon, as seen and shot from Writing-on-Stone Provincial Park, Alberta. I shot this just after mid-totality in a single 15-second exposure at ISO 400 with the Canon 60Da, and with the 80mm apo refractor at f/6. It was mounted on the Sky-Watcher HEQ5 mount tracking at the lunar rate.
3. Through a Telescope
The most dramatic closeups of the eclipsed red Moon require attaching your camera body (with its lens removed) to a telescope. The telescope becomes the lens, providing a focal length of 600mm or more, far longer than any telephoto lens most of us own.
You’ll need the appropriate “prime focus” camera adapter and, to be blunt, if you don’t have one now, and have never shot the Moon though your telescope then plan on shooting with another method.
But even if you have experience shooting the Moon through your telescope, capturing sharp images of the dim red Moon demand special attention.
The telescope must be on a motorized mount tracking the sky, preferably at the “lunar,” not sidereal, drive rate. Focus on the Moon during the partial phases when it is easier to focus on the bright edge of the Moon.
Exposures during totality typically need to be 5 to 30 seconds at ISO 800 to 3200, depending on the focal ratio of your telescope. Take lots of exposures at various shutter speeds. You have over an hour to get it right!
The total lunar eclipse of April 4, 2015 taken from near Tear Drop Arch, in western Monument Valley, Utah. The mid-totality image is a composite of 2 exposures: 30 seconds at f/2.8 and ISO 1600 for the sky and landscape, with the sky brightening blue from dawn twilight, and 1.5 seconds at f/5.6 and ISO 400 for the disk of the Moon itself. Also, layered in are 26 short exposures for the partial phases, most being 1/125th sec at f/8 and ISO 400, with ones closer to totality being longer, of varying durations. All are with the 24mm lens and Canon 6D on a static tripod.
4. Time-Lapses
I’d suggest attempting time-lapses only if you have lots of experience with lunar eclipses.
Exposures can vary tremendously over the partial phases and then into totality. Any time-lapse taken through a telescope, or even with a wide-angle lens, will require a lot of manual attention to ensure each frame is well-exposed as the sky and Moon darken.
However, even if you do not get a complete set of frames suitable for a smooth, continuous time-lapse, selected frames taken every 5 to 10 minutes may work well in creating a multiple-exposure composite (as above), by layering exposures later in Photoshop.
Whatever method – or methods — you use, don’t get so wrapped up in fussing with cameras you forget to simply enjoy the eclipse for the beautiful sight it is.
This is the last total eclipse of the Moon anyone on Earth will see until January 31, 2018. So enjoy the view of the deep red Moon in the autumn sky.
What a great site to watch the Moon turn red in a total eclipse.
I can’t recall a more scenic total eclipse of the Moon. I planned this site as best I could from Google maps and other apps, and the location proved ideal.
As the Moon went into the Earth’s shadow it set into the notch between the two peaks of this mesa at Monument Valley, Utah. It was a stunning celestial sight seen from one of the most dramatic scenic sites on the planet.
This was the total lunar eclipse on the morning of April 4, 2015, an eclipse that was barely total with just 4 minutes of totality with the Moon within Earth’s umbral shadow. The top of the Moon, grazing the edge of our planet’s shadow, always appeared bright white, as expected.
The lead image is a composite of many exposures: short ones for the partial phases that flank a longer exposure for the single image of totality and and even longer exposure for the sky and landscape, all taken over the course of 2.5 hours with a fixed camera – don’t bump the tripod!
I shot this image with the second camera riding on a tracking platform. It is a bend of three exposures: two long ones for the sky and ground and a short exposure to retain the Moon and avoid it turning into a white overexposed blob.
The long sky exposure was taken with the tracker on, to keep the stars as pinpoints, while for the ground exposure I turned the tracker motor off to keep the ground sharp. I layered and masked these with Photoshop.
The last image is a single image only, just one exposure, taken a few minutes after the end of totality as the sky was quickly brightening with the blue of dawn. It captures the naked-eye scene.
I shot all these from my B&B for the weekend, the Tear Drop Arch B&B, named for the arch on the mesa at left in these images. I chose the spot to provide a scenic foreground to the western-sky eclipse without having to drive miles in the pre-dawn hours. I was moments away from bed as the sun rose and the eclipsed Moon set.
Next lunar eclipse: September 27, 2015, in the evening for North America.
On the morning of April 4 (for North America) the Moon turns bright red in the third of four lunar eclipses in a row.
We’ve been enjoying a spate of total lunar eclipses over the last year. We had one a year ago on April 15 and again on October 8, 2014. This weekend, we can enjoy the third lunar eclipse in a year.
This Saturday, the Moon undergoes a total eclipse lasting just 4 minutes, making this the shortest total lunar eclipse since the year 1529. Typically, lunar eclipses last 30 to 60 minutes for the total phase, when the Full Moon is completely within Earth’s shadow.
But this eclipse is barely total, with the Moon grazing across the northern edge of the umbral shadow, as this diagram courtesy of SkyNews magazine illustrates. (Click on the image to enlarge it.)
• The partial eclipse begins at 4:15 a.m. Mountain Daylight Time on the morning of Saturday, April 4 for North America.
• Totality (when the Moon is reddest and darkest) is from 5:58 to 6:02 a.m. MDT.
• The partial eclipse ends at 7:44 a.m. MDT.
Add one hour for Central time, and subtract one hour for Pacific time.
This lunar eclipse is best from western North America where totality can be seen. From eastern North America, in the grey zones here, the Moon sets while in the initial partial phase and before totality begins. Those in Australia and New Zealand can also see the eclipse, but late on the night of April 4 into April 5. Europe and Africa miss out.
Even from western North America, the Moon will be eclipsed while it is setting into the west, and the sky is brightening with dawn twilight, presenting a view such as in the above photo, which I took in December 2011.
This eclipse occurs over the Easter and Passover weekend – and actually on Easter for some time zones. The last time we had a total lunar eclipse on Easter Sunday was March 23, 1913. The next to occur on Easter won’t be until April 14, 2340.
If you miss this eclipse, you have one more chance this year. On Sunday, September 27, conveniently timed for the evening in North America, we have the last in a “tetrad” series of four total lunar eclipses. After that, we wait until January 31, 2018.
The Hunter’s Moon of 2014 turned deep red during a total lunar eclipse.
It wouldn’t be an eclipse without a chase!
To see and shoot this total eclipse of the Hunter’s Moon I had to chase clear skies, seeking out the only clear area for hundreds of miles around, requiring a 3-hour drive to the south of me in Alberta, to near the Canada-US border, at Writing-on-Stone Provincial Park.
It was worth the midnight trek, though I arrived on site and got set up with just 10 minutes to go before the start of totality.
But I was very pleased to see the sky remain mostly clear for all of totality, with only some light haze adding the glow around the eclipsed Moon. Remarkably, the clouds closed in and hid the Moon just after totality ended.
This is a single 15-second exposure at ISO 400 with a Canon 60Da, shooting through an 80mm apo refractor at f/6 and on an equatorial mount tracking the sky at the lunar rate. I shot this shortly after mid-totality. It shows how the Moon’s northern limb, closest to the edge of the umbral shadow, remained bright throughout totality.
It shows lots of stars, with the brightest being greenish Uranus at the 8 o’clock position left of the Moon, itself shining in opposition and at a remarkably close conjunction with the Moon at eclipse time.
More images are to come! But this is the result of fast processing after a dawn drive back home and an all-nighter chasing and shooting an eclipse.
Here’s the Atlantic Crossing eclipse in time-lapse from the deck of the spv Star Flyer.
The above image is a still frame from the time-lapse movie I took on November 3, 2013 of the 44-second-long total eclipse of the Sun from the mid-Atlantic Ocean. It shows the first diamond ring (second contact) as totality began.
Below is the full time-lapse.
The movie is from 385 frames shot from before totality until well after. It shows just how lucky were were at seeing this eclipse, with the Sun coming out into a deep blue sky moments before totality and going back into thin cloud just as the total eclipse ends.
You’ll also appreciate the rolling of the ship, sped up here in the time-lapse, with frames taken one second apart.
Below is a still frame of the final diamond ring (third contact). Notice the difference in the brightness of the distant clouds in this image versus the one above. In the main image at top the clouds below the Sun had not yet entered the Moon’s umbral shadow.
But in the image below, the clouds are immersed in the lunar shadow and are about to be lit up again as the shadow races away from us in the direction toward the Sun.
In the time-lapse you can see the shadow enter the scene at top, then depart at the bottom of the frame below the Sun. As it shoots away from us, the shadow darkens the horizon far in the distance further down the path, bringing totality to those on the path to the east.
Following any total solar eclipse it’s traditional to look for the crescent Moon as it returns to the evening sky.
This was the view on November 6, three days after Sunday’s total solar eclipse when the waxing Moon was near Venus, with both high in our tropical sky as we finish our sail across the Atlantic. As I write this, we have just sighted the lights of Barbados off the port side as we round the north end of the island. It’s our first sighting of any other sign of civilization in two weeks, since we left the Canary Islands.
This view is from the next night, November 7, with the Moon higher and well above Venus, set amid the square rigged sails of the Star Flyer clipper ship.
It’s been a fabulous voyage across the Atlantic, with largely calm seas and beautiful weather on most days.
With minutes to go until totality it was unclear – literally! – if we were going to see the eclipse.
We have a happy ship of 150 eclipse chasers. On Sunday, November 3 a morning of gloomy faces gave way to smiles and exclamations of joy as the captain of spv Star Flyer piloted our ship into a clear hole in the clouds. We enjoyed a stunningly clear view of totality – all 49 seconds of it – with the eclipsed Sun set in a deep blue sky.
My image above captures some aspects of the scene as it appeared off the port bow of the ship.
But it fails to show just how colourful this eclipse was. Because it was a short eclipse, with the Moon’s disk barely large enough to cover the Sun, the hallmark of this eclipse was the brilliant pink chromosphere that was visible all around the Sun during the entire eclipse, with bits of prominences sticking out.
The pink ring was set amid the silvery-white and symmetrical corona, which in turn was set in a dark blue sky, above the yellow twilit horizon. The naked eye view and the view through binoculars was stunning. It was the most colourful eclipse I can recall, and this was total eclipse #15 for me.
This was also the first eclipse where we had the ability to adjust its time to suit our schedule. We should have been in the -3h GMT time zone at our longitude in the mid-Atlantic. But in a pre-eclipse planning meeting we decided to keep the ship’s clocks on -1 GMT until after the eclipse. This put totality at 10:30 a.m. our time, making it convenient for everyone to have breakfast before the eclipse and not interfere with lunch! That’s the luxury of being on a small ship dedicated to seeing the eclipse. The captain and crew have been fantastic.
The second contact diamond ring was prolonged, with the last bits of the Sun breaking up into beads of light as the Sun disappeared behind valleys and craters on the Moon. The third contact diamond ring appeared as a sharp, tiny but brilliant point of light exploding off the top edge of the Moon. It happened all too soon.
In the days leading up to the eclipse we worked with Captain Yuriy Slastenin to choose a new intercept point 160 nautical miles east of our original site, one that would give us another 6 seconds of totality but still allow us to maintain our schedule of reaching Barbados on Sunday, November 10.
Our new site was 17° 0’ 0” North and 37° 11’ 56” West, smack on the centreline. The captain got us to that precise spot about an hour before sunrise, exactly when planned.
But after a week of beautifully clear skies on the sail down from the Canary Islands, the sky on eclipse morning was filled with cloud and unsettled weather. We had rain showers and rainbows Sunday morning, but with tantalizing clear holes coming and going all morning and dappling the ocean with spots of sunlight in the distance.
I shot this view during one of the clear breaks leading to totality when the Sun and spirits brightened, only to be dashed again as clouds rolled in. The weather took us on an emotional roller coaster all morning.
In the minutes leading up to totality the captain was at the helm and propelled us under full engine power into a clear hole that opened up just before totality. We ended up 1.7 nautical miles east of our choice position and slightly south of the centre line, but with the same 49 seconds of totality.
The image above shows our ship’s track during the eclipse, from the intended site, first drifting around the intercept point, then heading southeast toward clear skies. The track then heads straight west, as we set sail again toward Barbados soon after totality while the champagne was being served.
Our success speaks to the maneuvering advantage of a ship in tropical climates. I’ve now seen three total eclipses from ships at sea at tropical latitudes, and we’ve always had to move at the last minute to get into clear holes.
Of course, the worst weather we’ve encountered so far on the voyage was on eclipse day and the day after, yesterday. As I write this, on Tuesday, November 5, the day is hot and sunny, and the ocean as calm as we’ve seen it. (I’ve not been able to post anything until now as our ship’s connection to the internet via the Inmarsat satellite has been off-line for the last few days.)
As totality ended the Sun went into thin cloud again. From then on that morning we saw the Sun only briefly during the final partial phases.
But no one cared. We saw what we had sailed across the Atlantic to see. It is a happy ship of shadow chasers.
The trip was organized by Betchart Expeditions who chartered the Star Flyer, a 4-masted sailing ship, one of three sailing ships in the Star Clipper line. I’m serving as one of the guest speakers on a program packed with speakers and great talks. After all, we are at sea for two full weeks, crossing the Atlantic from the Canaries to Barbados, with nothing but a limitless horizon in view for all that time. And the eclipse!
This is the “director’s cut” movie of the November 14 total eclipse of the Sun in Australia, unabridged and unedited.
I shot this movie of the eclipse through a telescope to provide a frame-filling closeup view of totality. This is the entire eclipse, from just before totality until well after. So it includes both diamond rings: at the onset of totality and as totality ends.
A few seconds into the movie I remove the solar filter which produces a flash of light until the camera readjusts to the new exposure. Then you really see the eclipsed Sun!
We got 1m28s of totality from our viewing site near Lakeland Downs, Queensland. But the movie times out at slightly less, because at several points where you hear a shutter click, I took a still frame which interrupts the movie. You can see some of those still images in earlier blog posts.
My timing was a little off, as I opened up the exposure to reveal more of the outer corona only moments before the end of totality, so the first moment of the final diamond ring is a little overexposed. During totality I was looking with binoculars, and made the mistake of going over and checking on my other wide-angle time-lapse camera. That wasted time needlessly. I should have spent more time attending to the movie camera and taking more stills at various exposures. No eclipse every goes quite as planned. Losing 30 seconds of totality in order to seek out clearer skies did cost me some images and enjoyment time in the umbra. But our experience was far less stressful than those who dodged clouds (or failed to miss the clouds, in some cases) at sites closer to or at the coast.
The original of this movie is in full 1920 x 1080 HD, shot with the Canon 60Da through the 105mm f/5.8 Astro-Physics apo refractor, on an equatorial mount tracking the Sun. I rarely have the luxury of shooting an eclipse through such extravagant gear, as I would never haul that type of hefty gear now on an aircraft to remote sites. But this equipment emigrated to Australia in 2002 for the total eclipse in South Australia and has been here down under ever since. So this is its second Australian eclipse. Mine, too!
During last week’s total eclipse, Venus was obvious above the Sun well before the shadow descended and the sky darkened. But during totality other stars and planets appeared.
But I suspect few noticed! During an eclipse your eyes are transfixed on the Sun and its corona. And on the other phenomena of light and shadow happening around you. However, I inspected my wide-angle frames and found faint images of Saturn and the stars Spica, Alpha and Beta Centauri, and three stars of the Southern Cross. I’ve labeled them here but you might not be able to pick them out on screen in the reduced resolution that appears in the blog. Similarly, I doubt anyone saw them visually. If you did you were wasting your time looking at the wrong stuff!
This is 6 minutes of pre- and post-eclipse – and the all too short eclipse itself – compressed into 30 seconds. You can see the dark blue shadow of the Moon sweeping across the sky.
The long oval shadow comes in from behind us from the west and comes down to meet the Sun which is rising in the east. That moment when the shadow edge meets the Sun is second contact when totality begins in a diamond ring effect, and the Sun is entirely hidden behind the Moon.
The shadow then moves off to the right. As its left edge hits the Sun, the Sun emerges in another diamond ring and the eclipse is over. All too soon. Even at mid-eclipse the Sun is not centred in the oval shadow because we were not centred in the path of the shadow but instead drive well north of the centreline, to avoid cloud farther south. We saw 1m28s of totality, 30 seconds less than people at the centreline or on the coast. But we had no annoying clouds to worry about.
Also note Venus at upper left. And the hugs and kisses at the end!
OK, one last eclipse post! Here’s our happy band of Canadian chasers, post-eclipse.
Some were seeing their first eclipse. A few others, myself included, were chalking up eclipse #14. Eclipse virgin or veteran, the experience is always breathtaking and unbelievable. Moments after the eclipse ends you cannot believe you saw what you did – the sight is so unearthly. And you want to see another. The next total eclipse of the Sun is November 3, 2013, in the mid-Atlantic and over central Africa.
This is the sight eclipse chasers hate to see, yet celebrate the most! It is the diamond ring that ends totality.
This was the “third contact” diamond ring when the Sun returned in an explosion of light from behind the edge of the Moon.
Compare this view to my earlier blog, and you’ll see that the second diamond ring at the end of totality did not happen opposite the first diamond ring. That’s because we were well off the centreline of the Moon’s shadow, so from our perspective the Moon travelled across the Sun’s disk slightly off-centre.
From where we ended up in our chase for clear skies, we experienced 1m28s of totality, well under the 2 minutes maximum that others saw near the centreline. But we felt 1m28s of clear skies was better than 2 minutes under partly cloudy skies. Indeed, some on the coast saw the Sun only briefly during totality, or not at all.
Instead, while the last minute move was stressing, once we were set up, we had relaxed assurance we were going to see the whole show!
For this shot I overexposed the inner corona on purpose to reveal more of the extent of the streamers in the Sun’s outer corona.
The pink at left is the chromosphere layer shining from behind the Moon just before the Moon uncovered the blindingly bright photosphere with a burst of light, the diamond ring.
It takes a lot of specialized processing, far beyond what I’ve done here, and stacking of multiple exposures to reveal the delicacy of structures that you can see with your aided eyes during a total eclipse. There is nothing more astonishing in the sky for its complexity and yet subtleness than the Sun’s corona. It is the main attraction at any total solar eclipse. You have not lived astronomically until you have seen the corona of the Sun with your own eyes.
Taken shortly into totality, this shot shows some of the complex structure of the Sun’s corona, and a cluster of red prominences peaking out from behind the bottom edge of the Moon.
For the November 14, 2012 eclipse I shot two cameras. One, with a wide-angle lens, was automatically taking a frame every second. Three of those frames are in a previous blog. For this shot I used a second camera looking through a 4-inch refractor telescope I keep stored in Australia. It worked great! I seldom get to shoot an eclipse through a telescope, as so many eclipses are in remote locations where carting a telescope and mount are impractical. But for an Oz eclipse (I’ve seen two from Australia now, in 2002 and now in 2012) I get to use my Oz gear.
Because the Sun is nearing solar maximum its corona appeared evenly distributed around the Sun, with streamers reaching out in all directions. At solar minima eclipses the corona extends just east-west with little over the poles.
This image, like the other closeups I’m posting, are still frames shot while the camera was taking an HD movie. Firing the shutter while the movie is recording interrupts the movie but records a full-resolution still frame, a very nice way to get two forms of media with one camera.
The last bit of the Sun shines from behind the ragged edge of the Moon as the total eclipse begins in Australia.
This is “second contact,” and the first diamond ring effect that heralds the start of totality. The Moon (the dark disk) is just about to completely cover the Sun. You can see the pink chromosphere layer of the Sun’s surface and a flame-like prominence at 4 o’clock position. The Sun’s atmosphere, the corona, is just beginning to show.
I took this November 14, 2012 from a site near Lakeland Downs, Queensland, Australia. While we did look through some thin cirrus clouds, they didn’t hamper viewing at all, and were not the concern that the thicker clouds were at other sites, especially at the beaches.
It wouldn’t be an eclipse without a chase. But in the end we had a nearly perfect and cloudless view of the entire eclipse — the Great Australian Eclipse. We were ecstatic!
This collage of wide-angle shots shows the motion of the Moon’s conical shadow. At top, you can see the bottom edge of the shadow just touching the Sun. This was second contact and the diamond ring that begins totality. The middle frame was taken near mid-eclipse and shows the bright horizon beyond the Moon’s shadow. However, the Sun is not centred on the shadow because we ended up well north of the centreline, sacrificing as much as 30+ seconds of totality to get assured clear skies. The bottom frame was taken at the end of totality as the first bit of sunlight bursts out from behind the Moon at third contact and the final diamond ring. Notice the Sun sitting at the well-defined left edge of the Moon’s shadow. The shadow moved off to the right.
Why did we end up off-centre? Clouds! The day before, at our 11 am weather briefing meeting, we decided not to stay on the beach but to move inland to one of the sites we selected from the previous day’s reconnaissance. The forecast was not even accurately “predicting” the current conditions at the time, saying the sky should then have been clear. It was raining. We did not trust the predictions that skies would clear by eclipse time on Wednesday morning.
We drove inland on Tuesday afternoon, getting to our choice site at the James Earl Lookout on the Development Road about 4 pm, to avoid driving in the dark and to get there before the parking area filled up. It was a good plan. We arrived to find a few people there but with room for all our cars filled with 20+ Canadians. We staked our ground with tripods, did a little stargazing after dark, then settled in to spend the night in our cars.
At dawn we got everything ready to go, only to see puffs of orographic clouds forming over the hills in the direction of the Sun. I did not like it. So with an hour to go before totality we packed up and moved down onto the plains away from the hills to a site near Lakeland Downs, the site you see here. Apart from some high cirrus clouds, skies were superb.
As it turned out, folks a few miles away at the Lookout did see it, but by the skin of their teeth. Clouds obscured the Sun just before and just after totality. That’s too nerve-wracking for me. And from the beaches, some people were clouded out, others saw all of totality, others saw just a portion of the main event. It was hit and miss. From home at Oak Beach we might have seen it but only just. We were very happy with our decisions to move and flexibility to be able to do so.
I’ll post some close-up shots of the eclipse shortly.
I’m in eclipse country here, as the sign proclaims, just about on the centreline of the coming Moon’s shadow.
Today we drove 3 to 4 hours out onto what is called the Development Road or the Mulligan Highway, inland from the beaches where we are staying. This is the road that goes up to Cooktown (where Captain James Cook beached the Endeavour in 1770) from Port Douglas, but via the inland route. As you can see it is dry! That’s a good thing. While the coast was cloudy and rainy today, Monday, the inland sites we inspected were sunny, with word from the locals that the morning at eclipse time was perfectly clear. As it always is they promised us!
So we have some Plan B sites selected, and checked out with the local Queensland Police to make sure we’re OK to use them. However, weather forecasts for Wednesday morning at eclipse time are promising clear skies on the coast where we would prefer to stay in convenient comfort.
Not far from here, near the Palmer River Roadhouse, some 8,000 people have gathered in the dusty Outback for a festival of music and “new age healing.” We’re seeing lots of the participants on the road (often driving beat-up vans) looking like they’ve been transported by time machine from the 1960s and Woodstock. Eclipses attract many people of all interests to the track of the Moon’s shadow. Good luck to them … and us, two days from now.
This was the sky at eclipse time, two days prior to the total eclipse of the Sun.
Had the eclipse been today we likely would have missed it. The Sun broke through briefly but minutes later the rain seen here off shore was over us. But a few minutes later it was clear and sunny again. It will be a game of chance to be sure.
Today, we travel inland to scout out viewing sites 3 hours away over the Dividing Range on the Development Road as a Plan B.

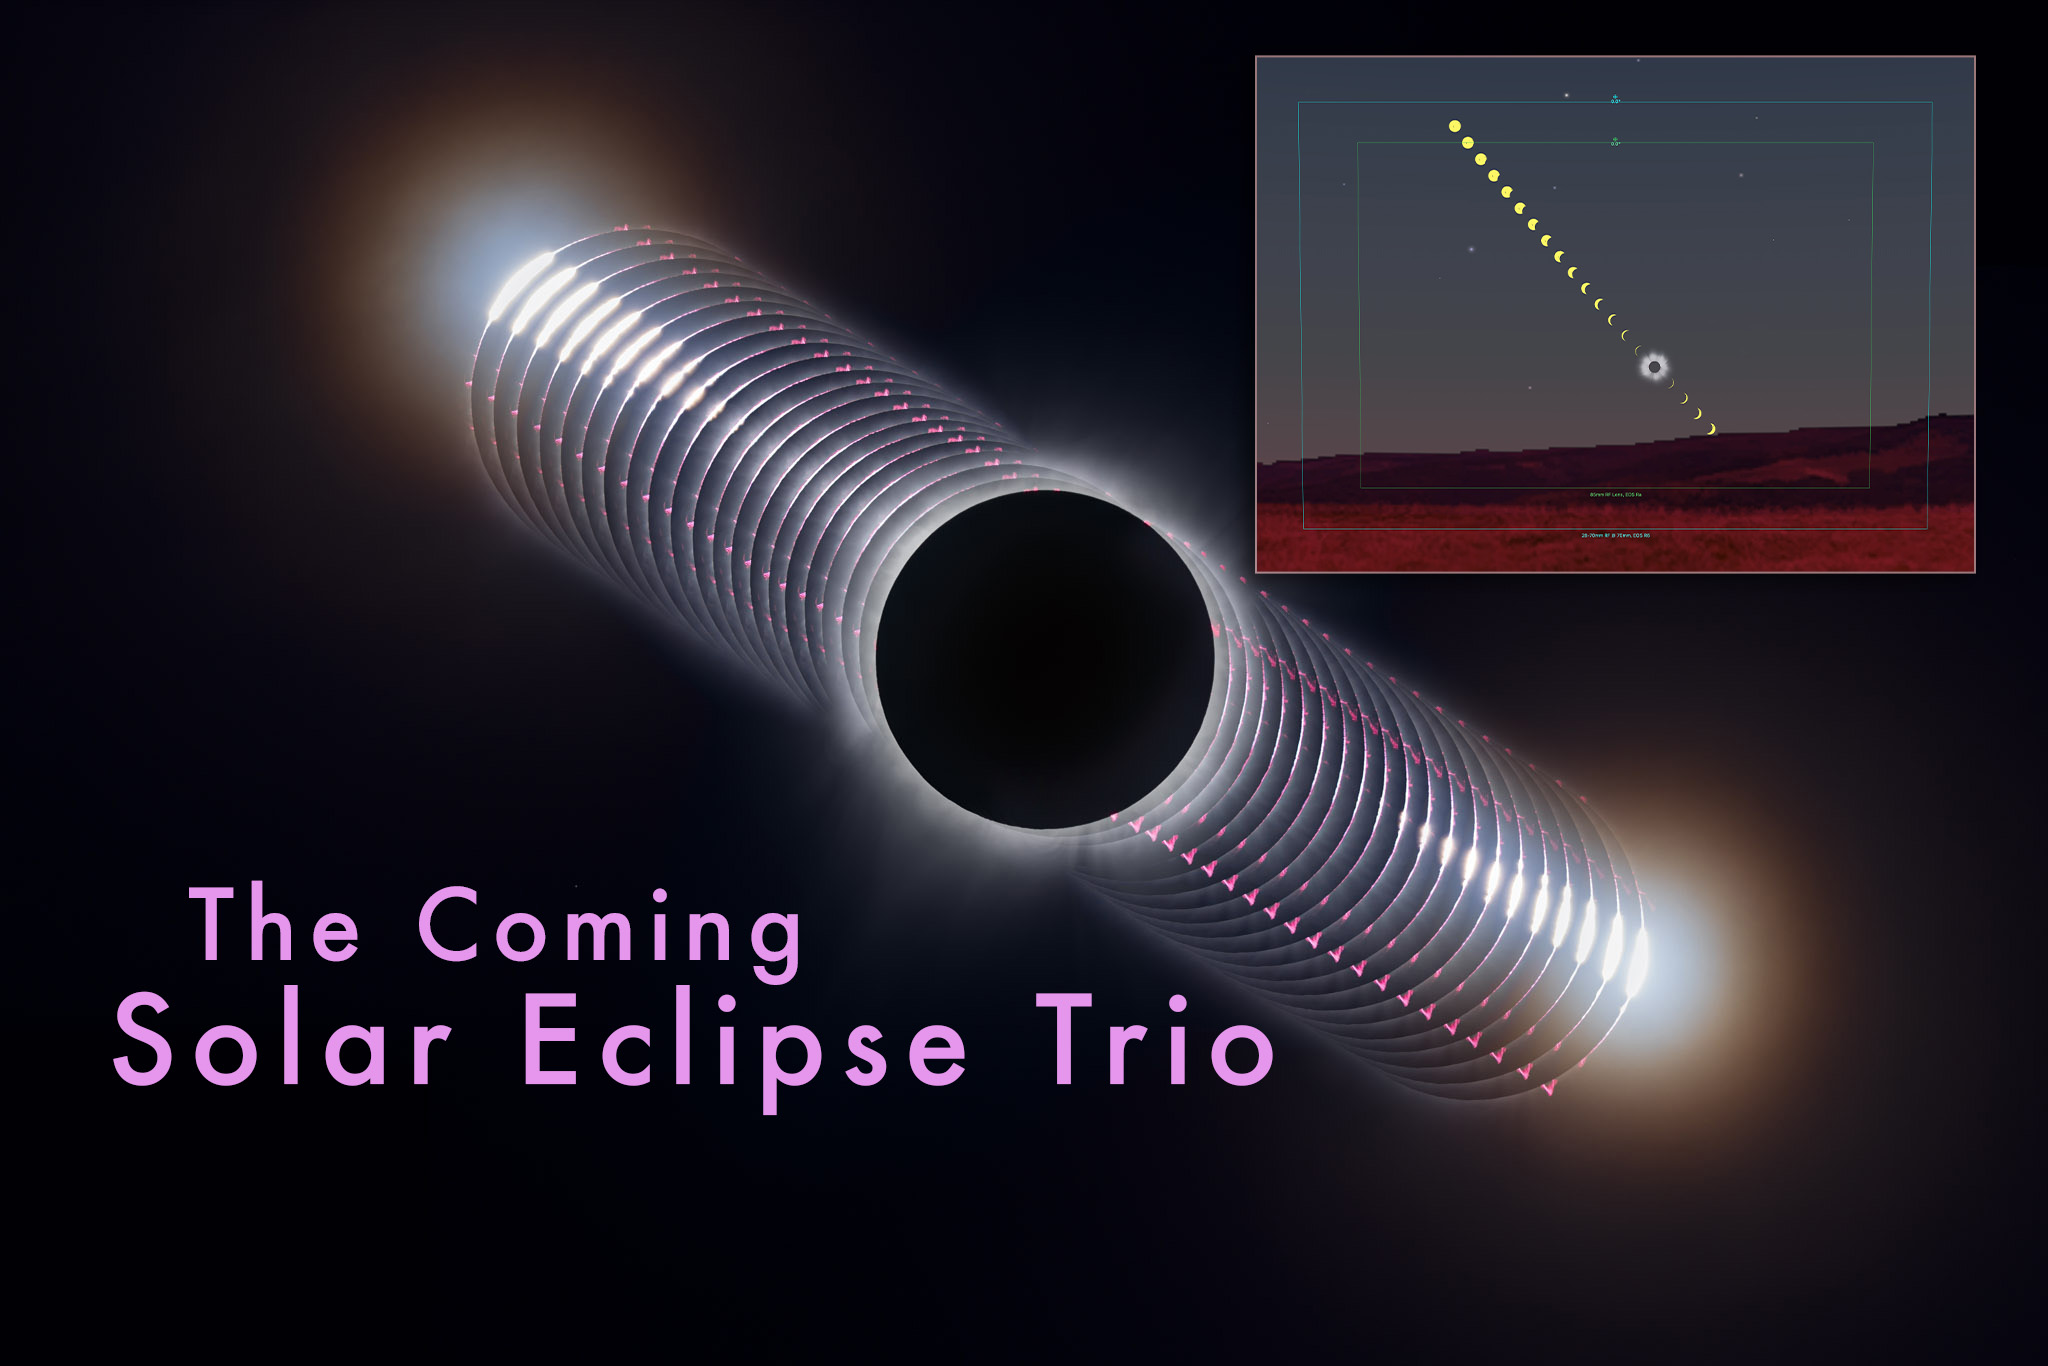
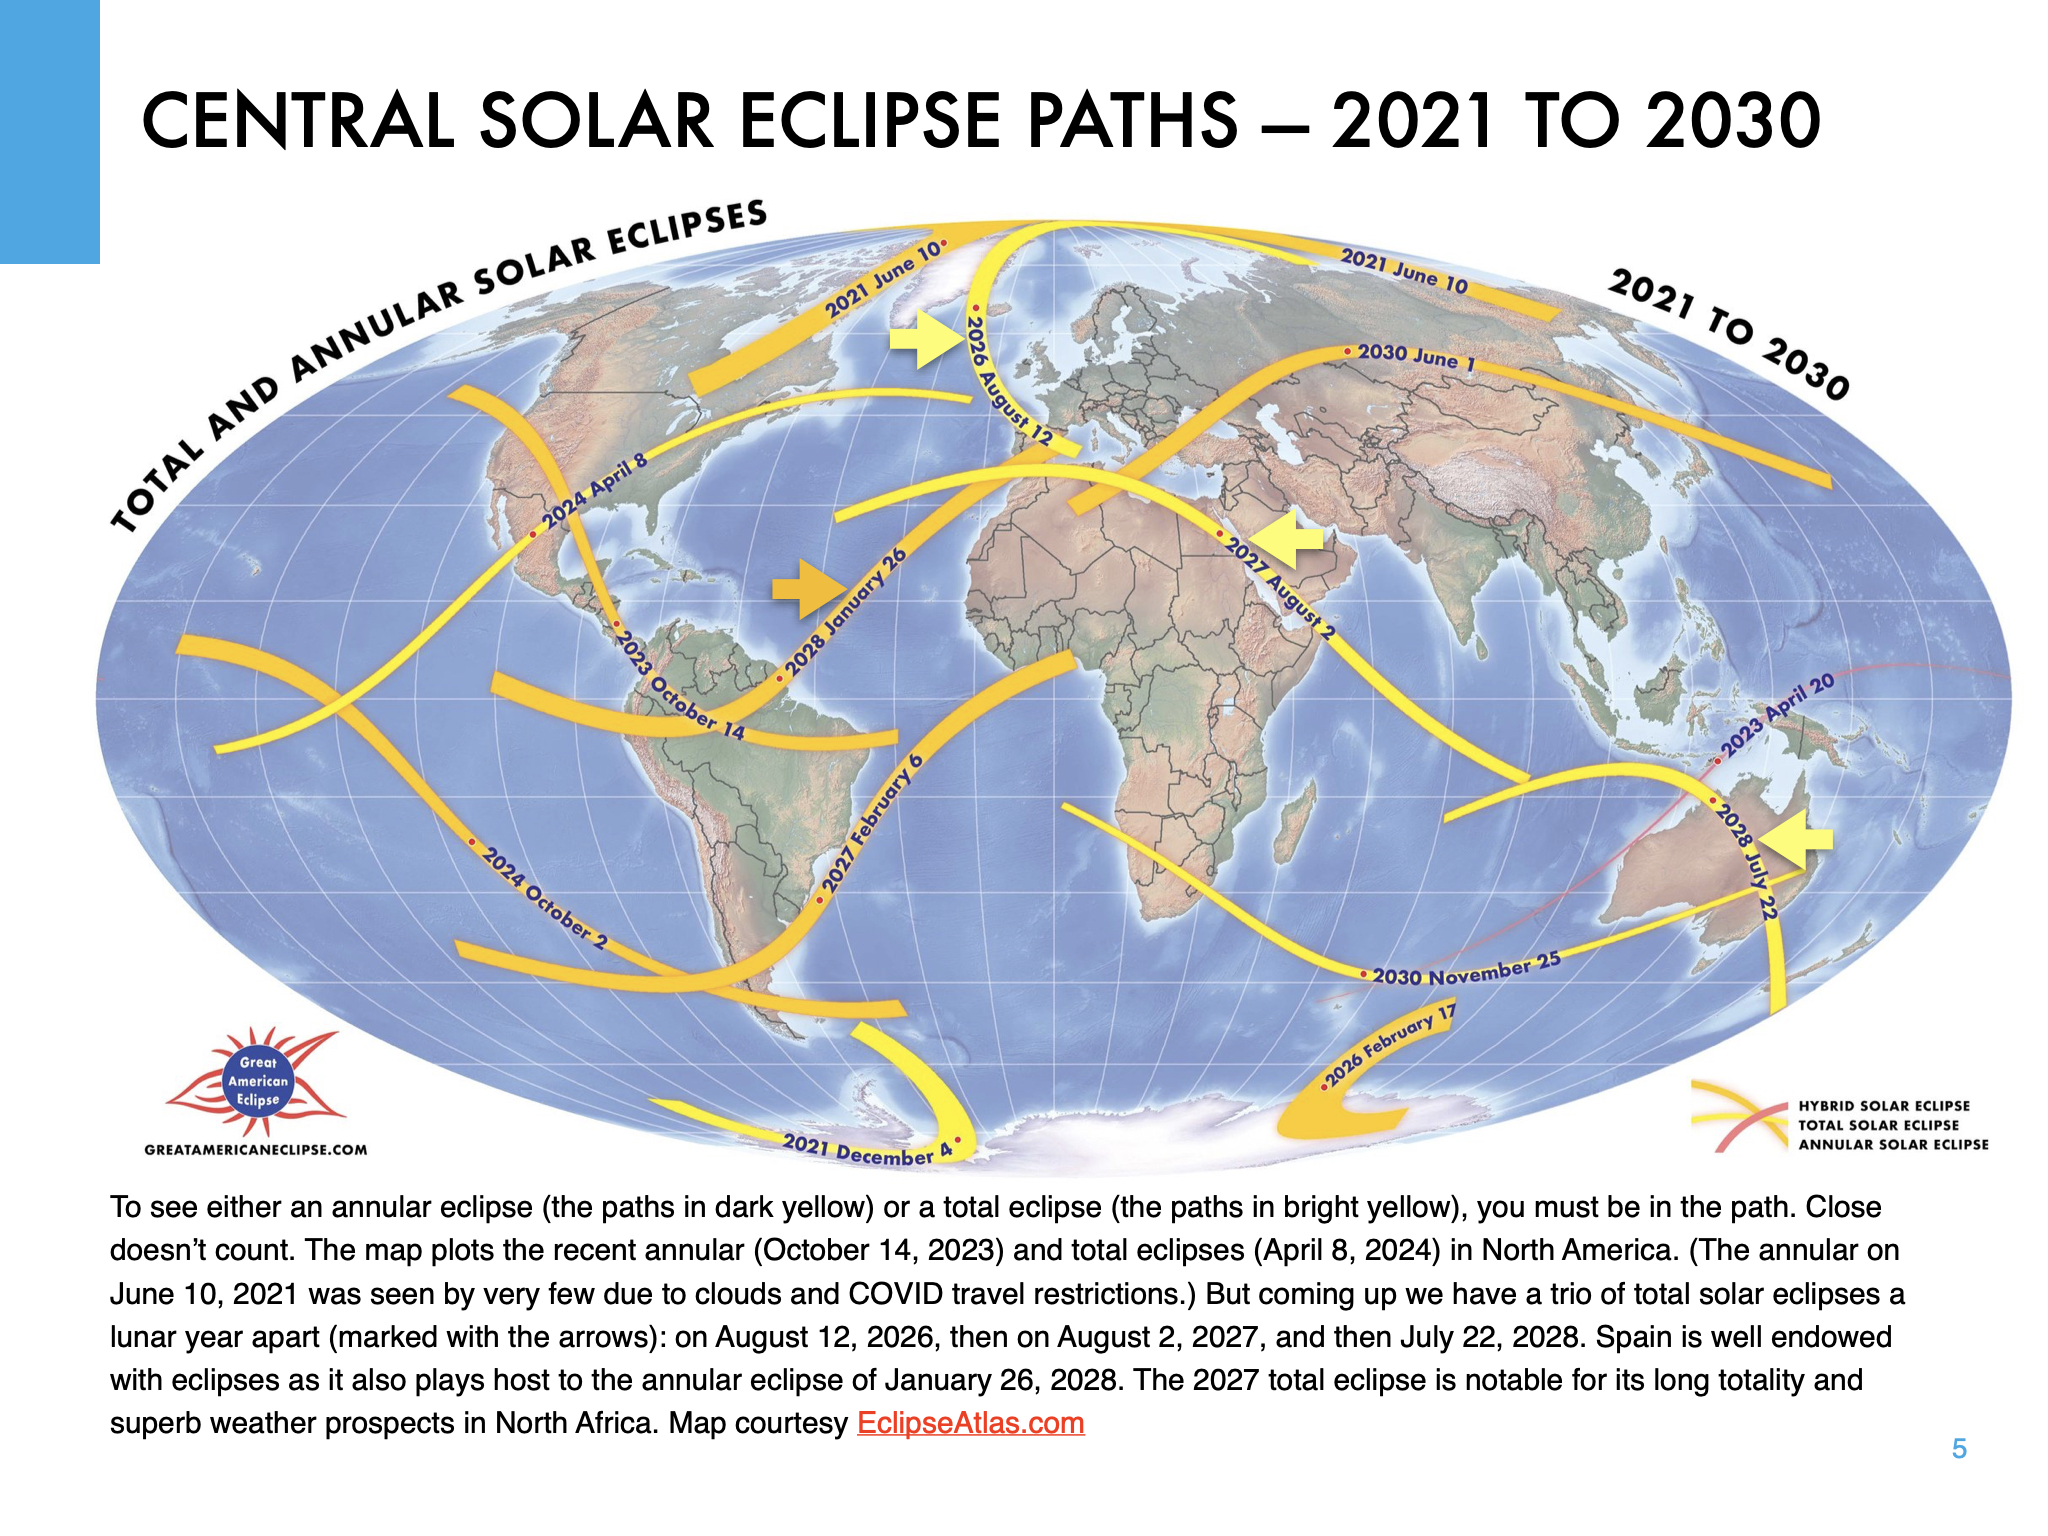
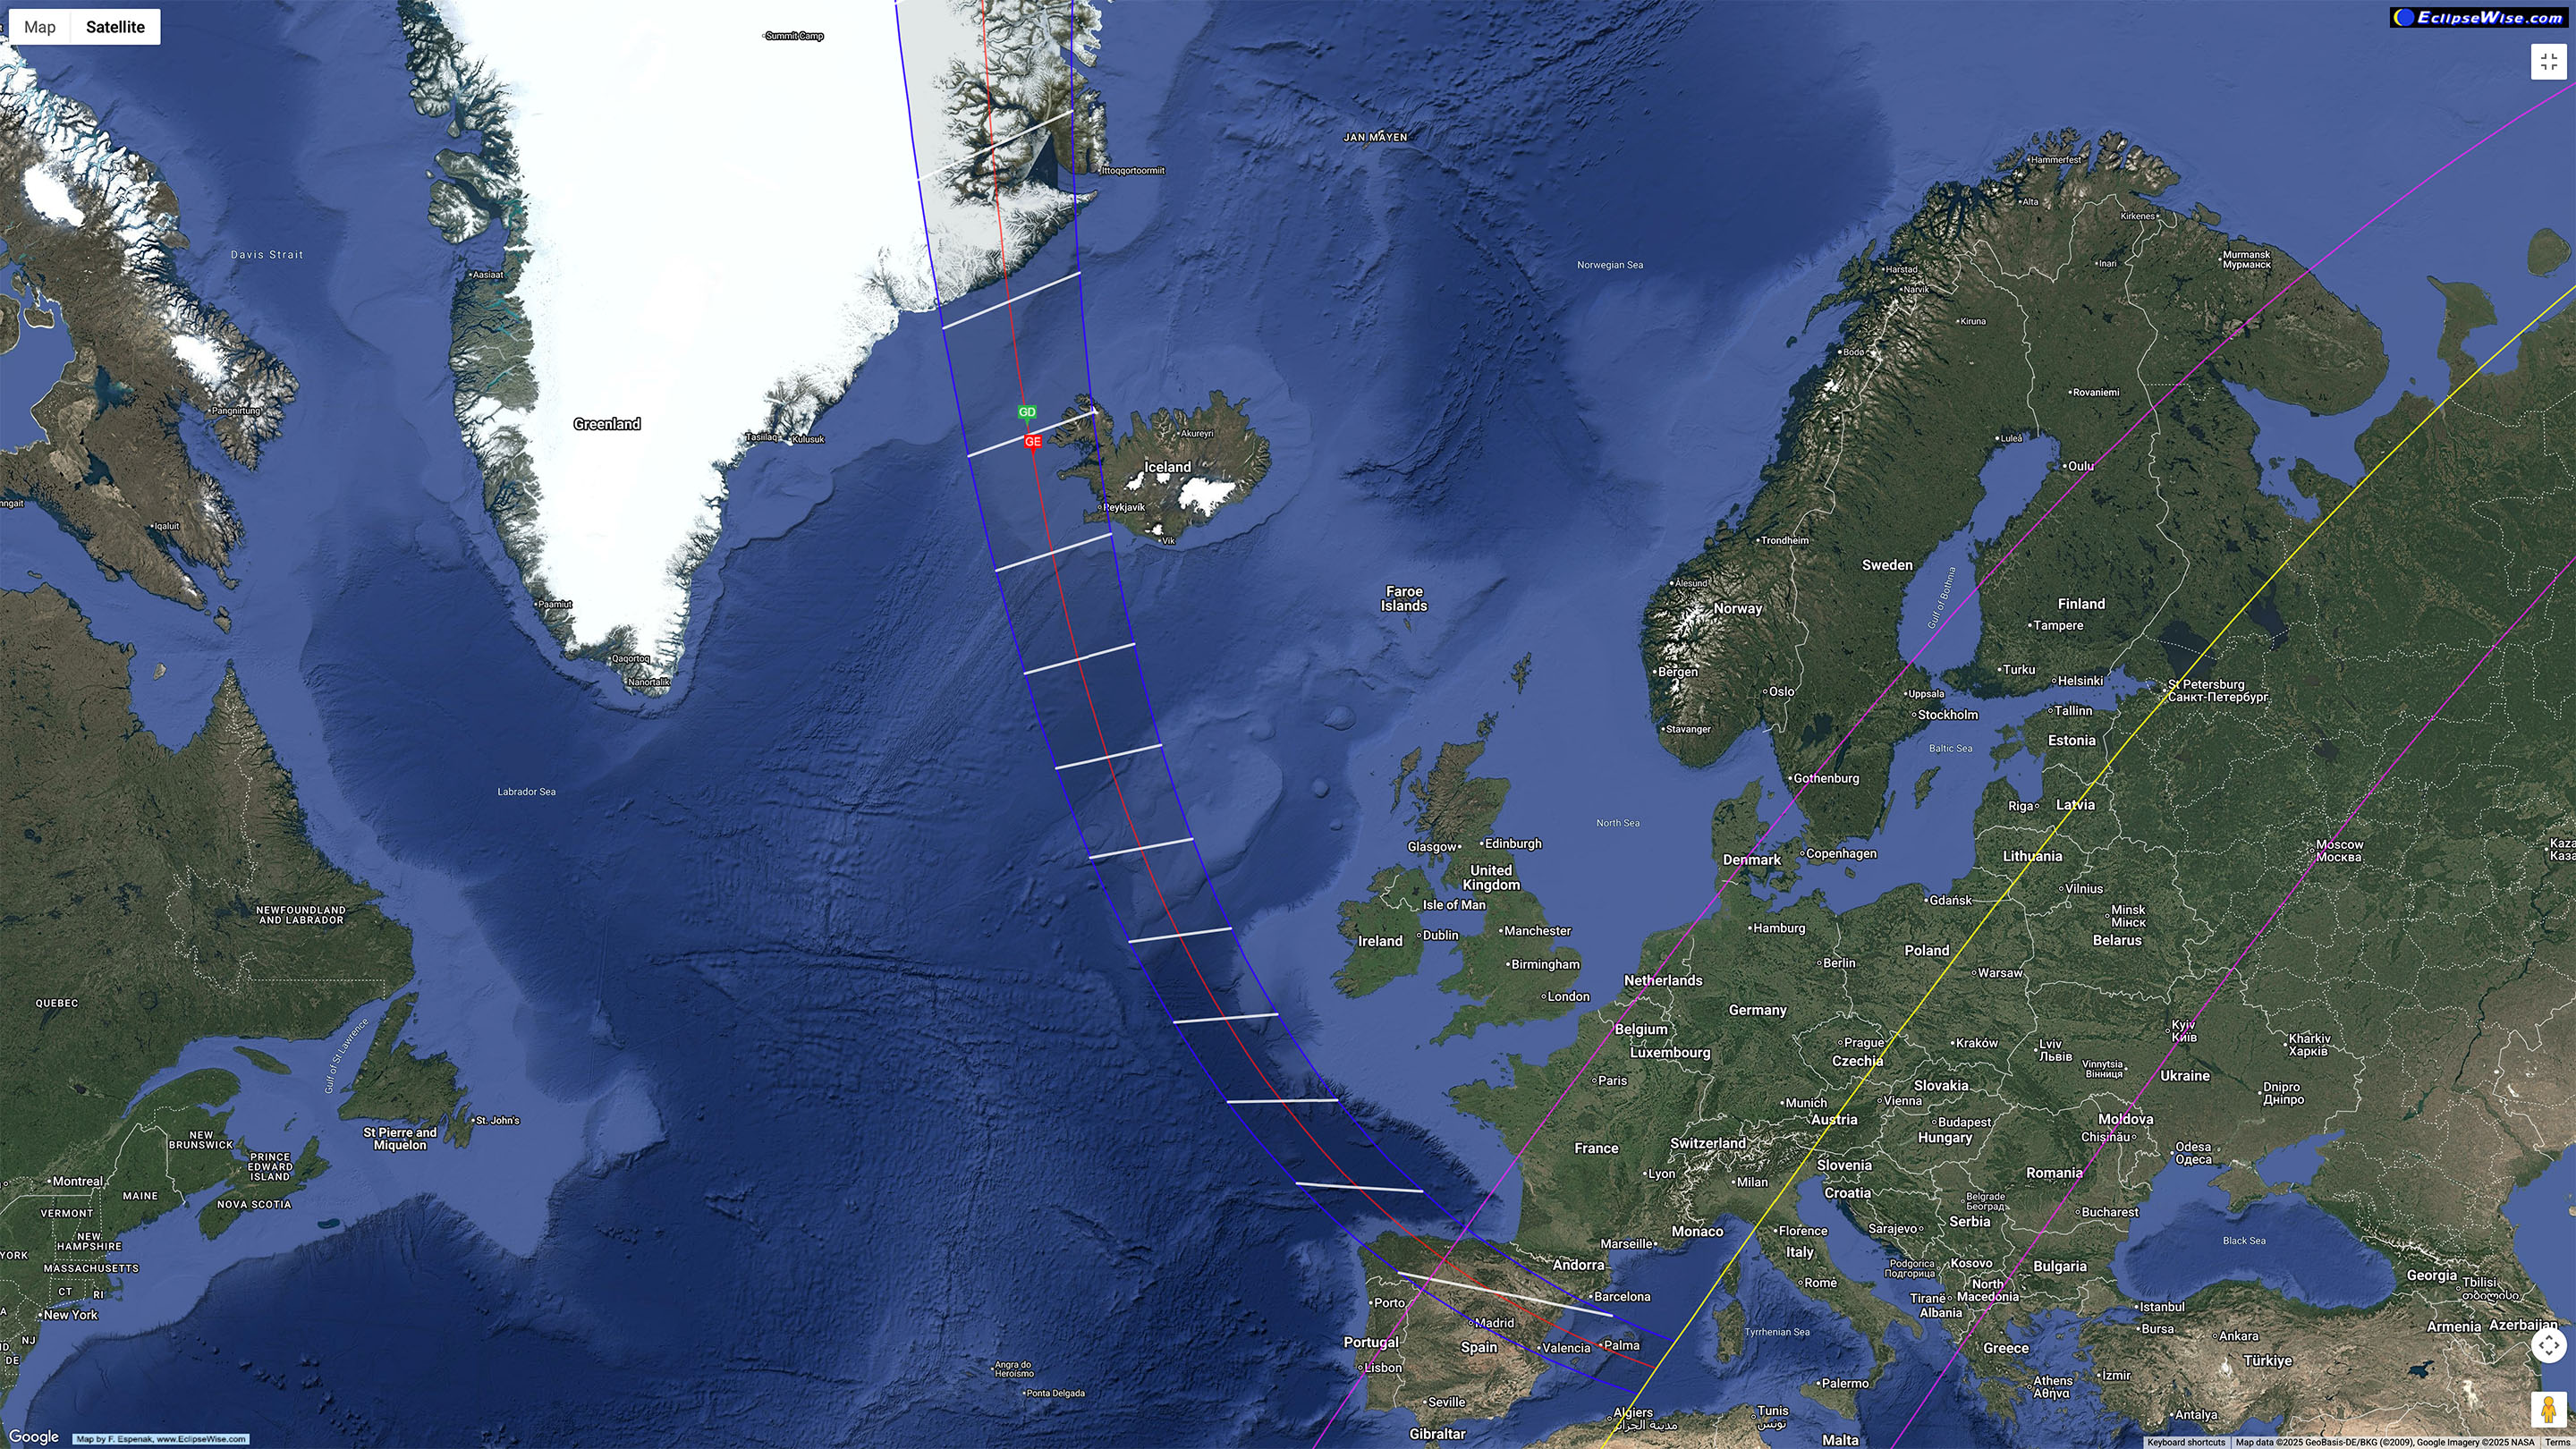
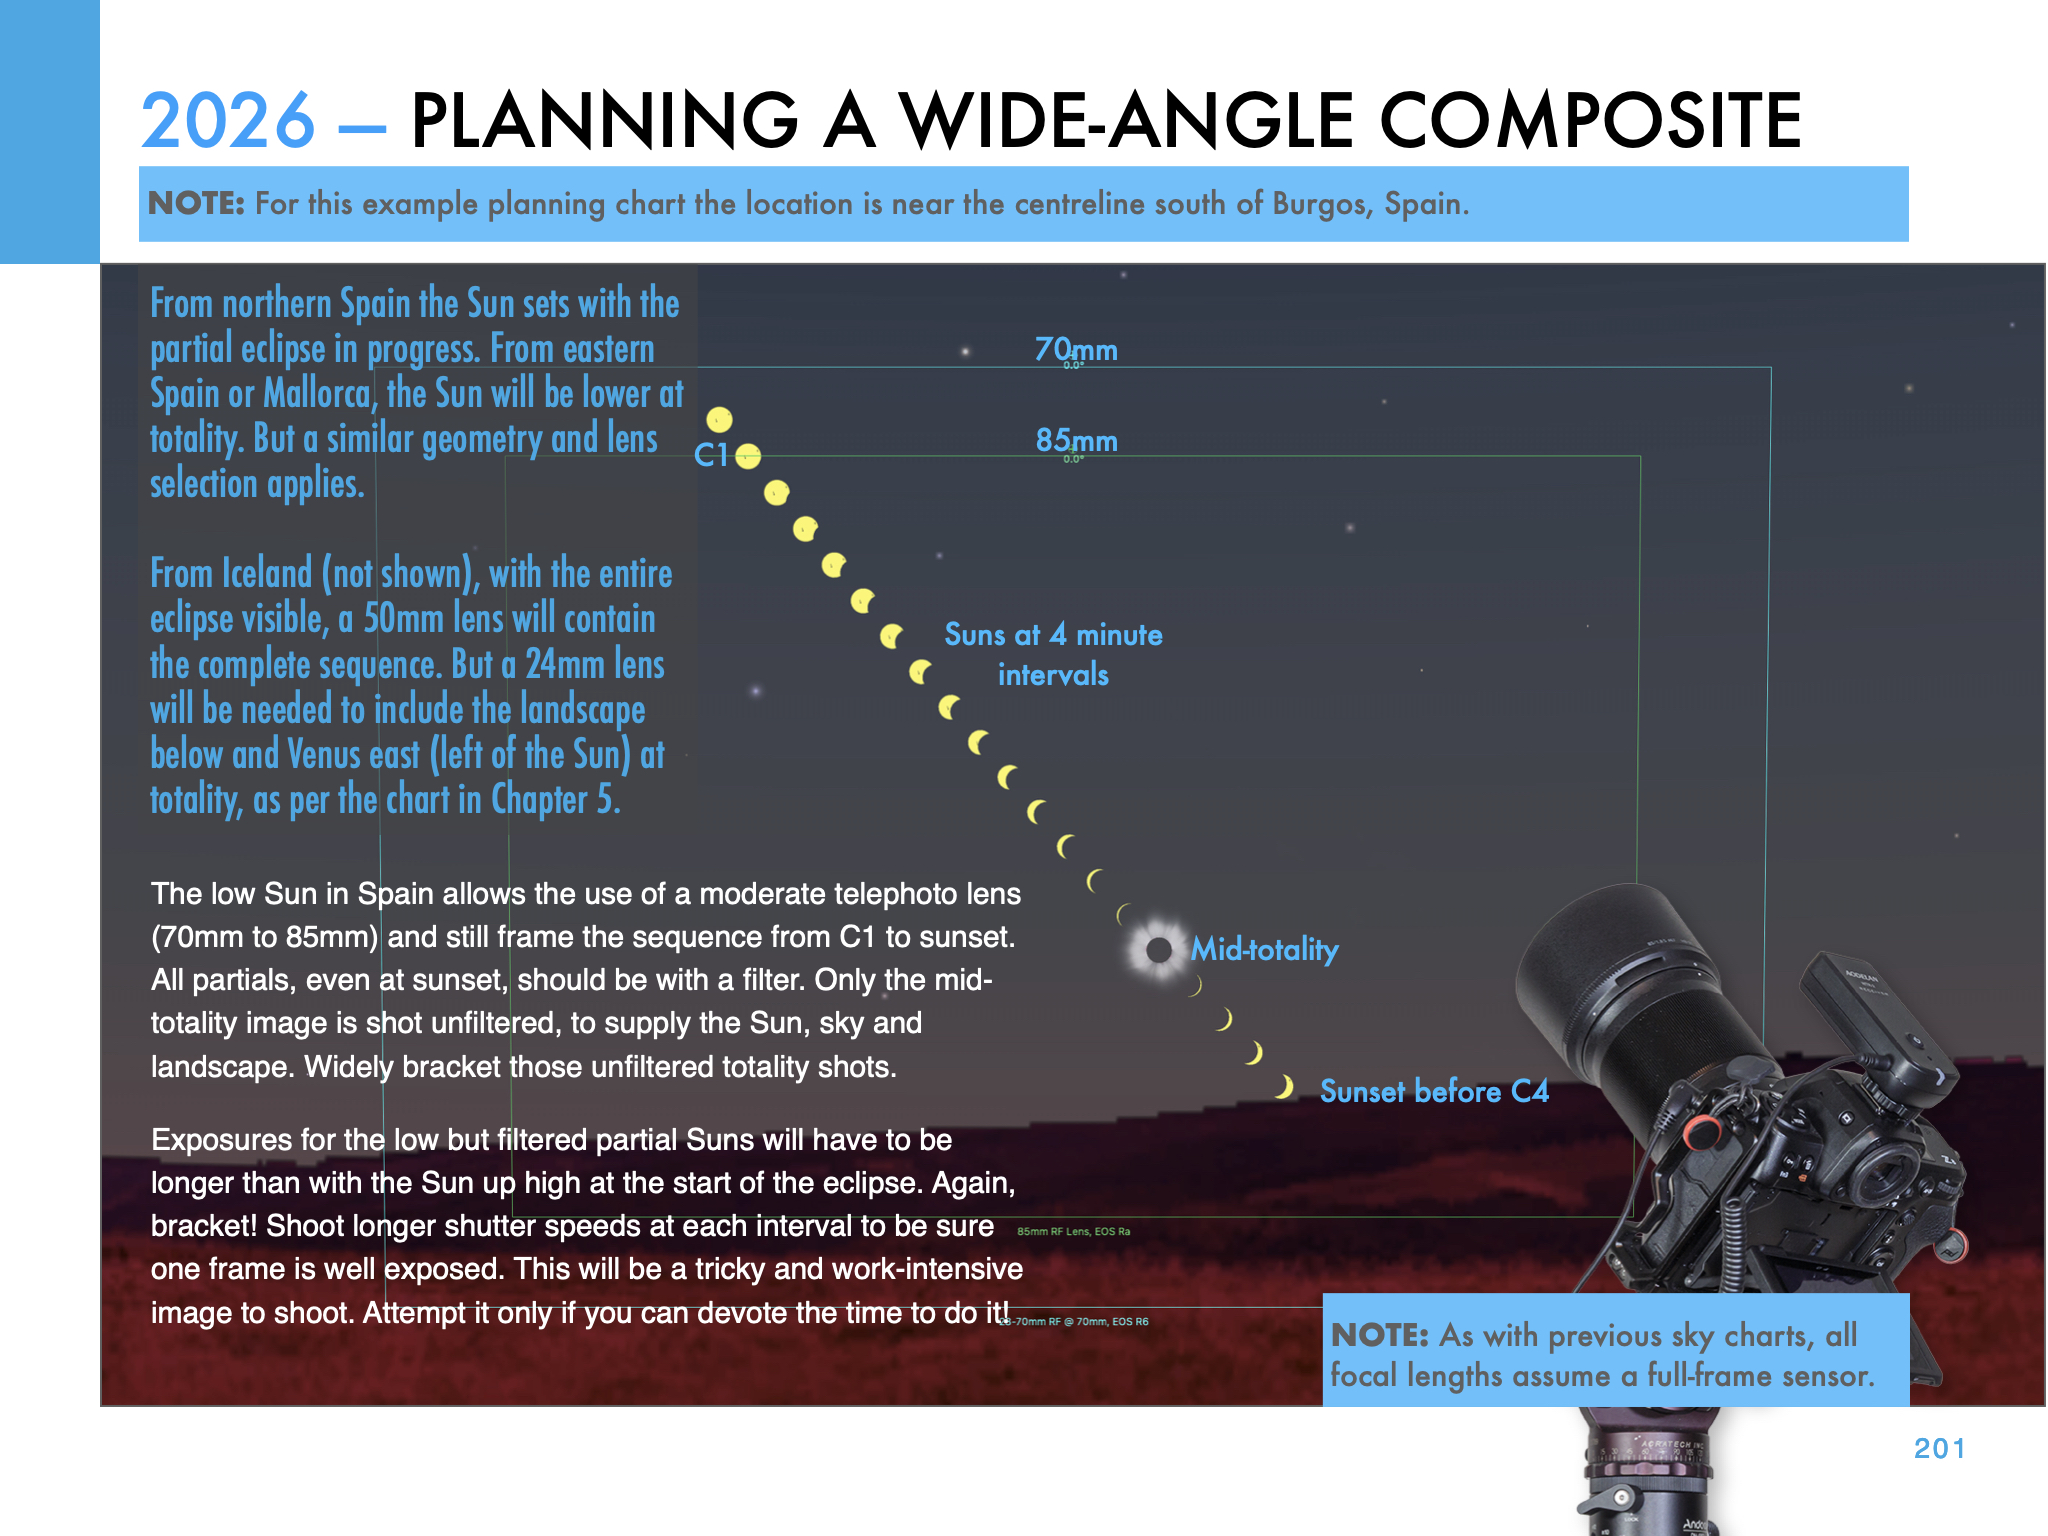
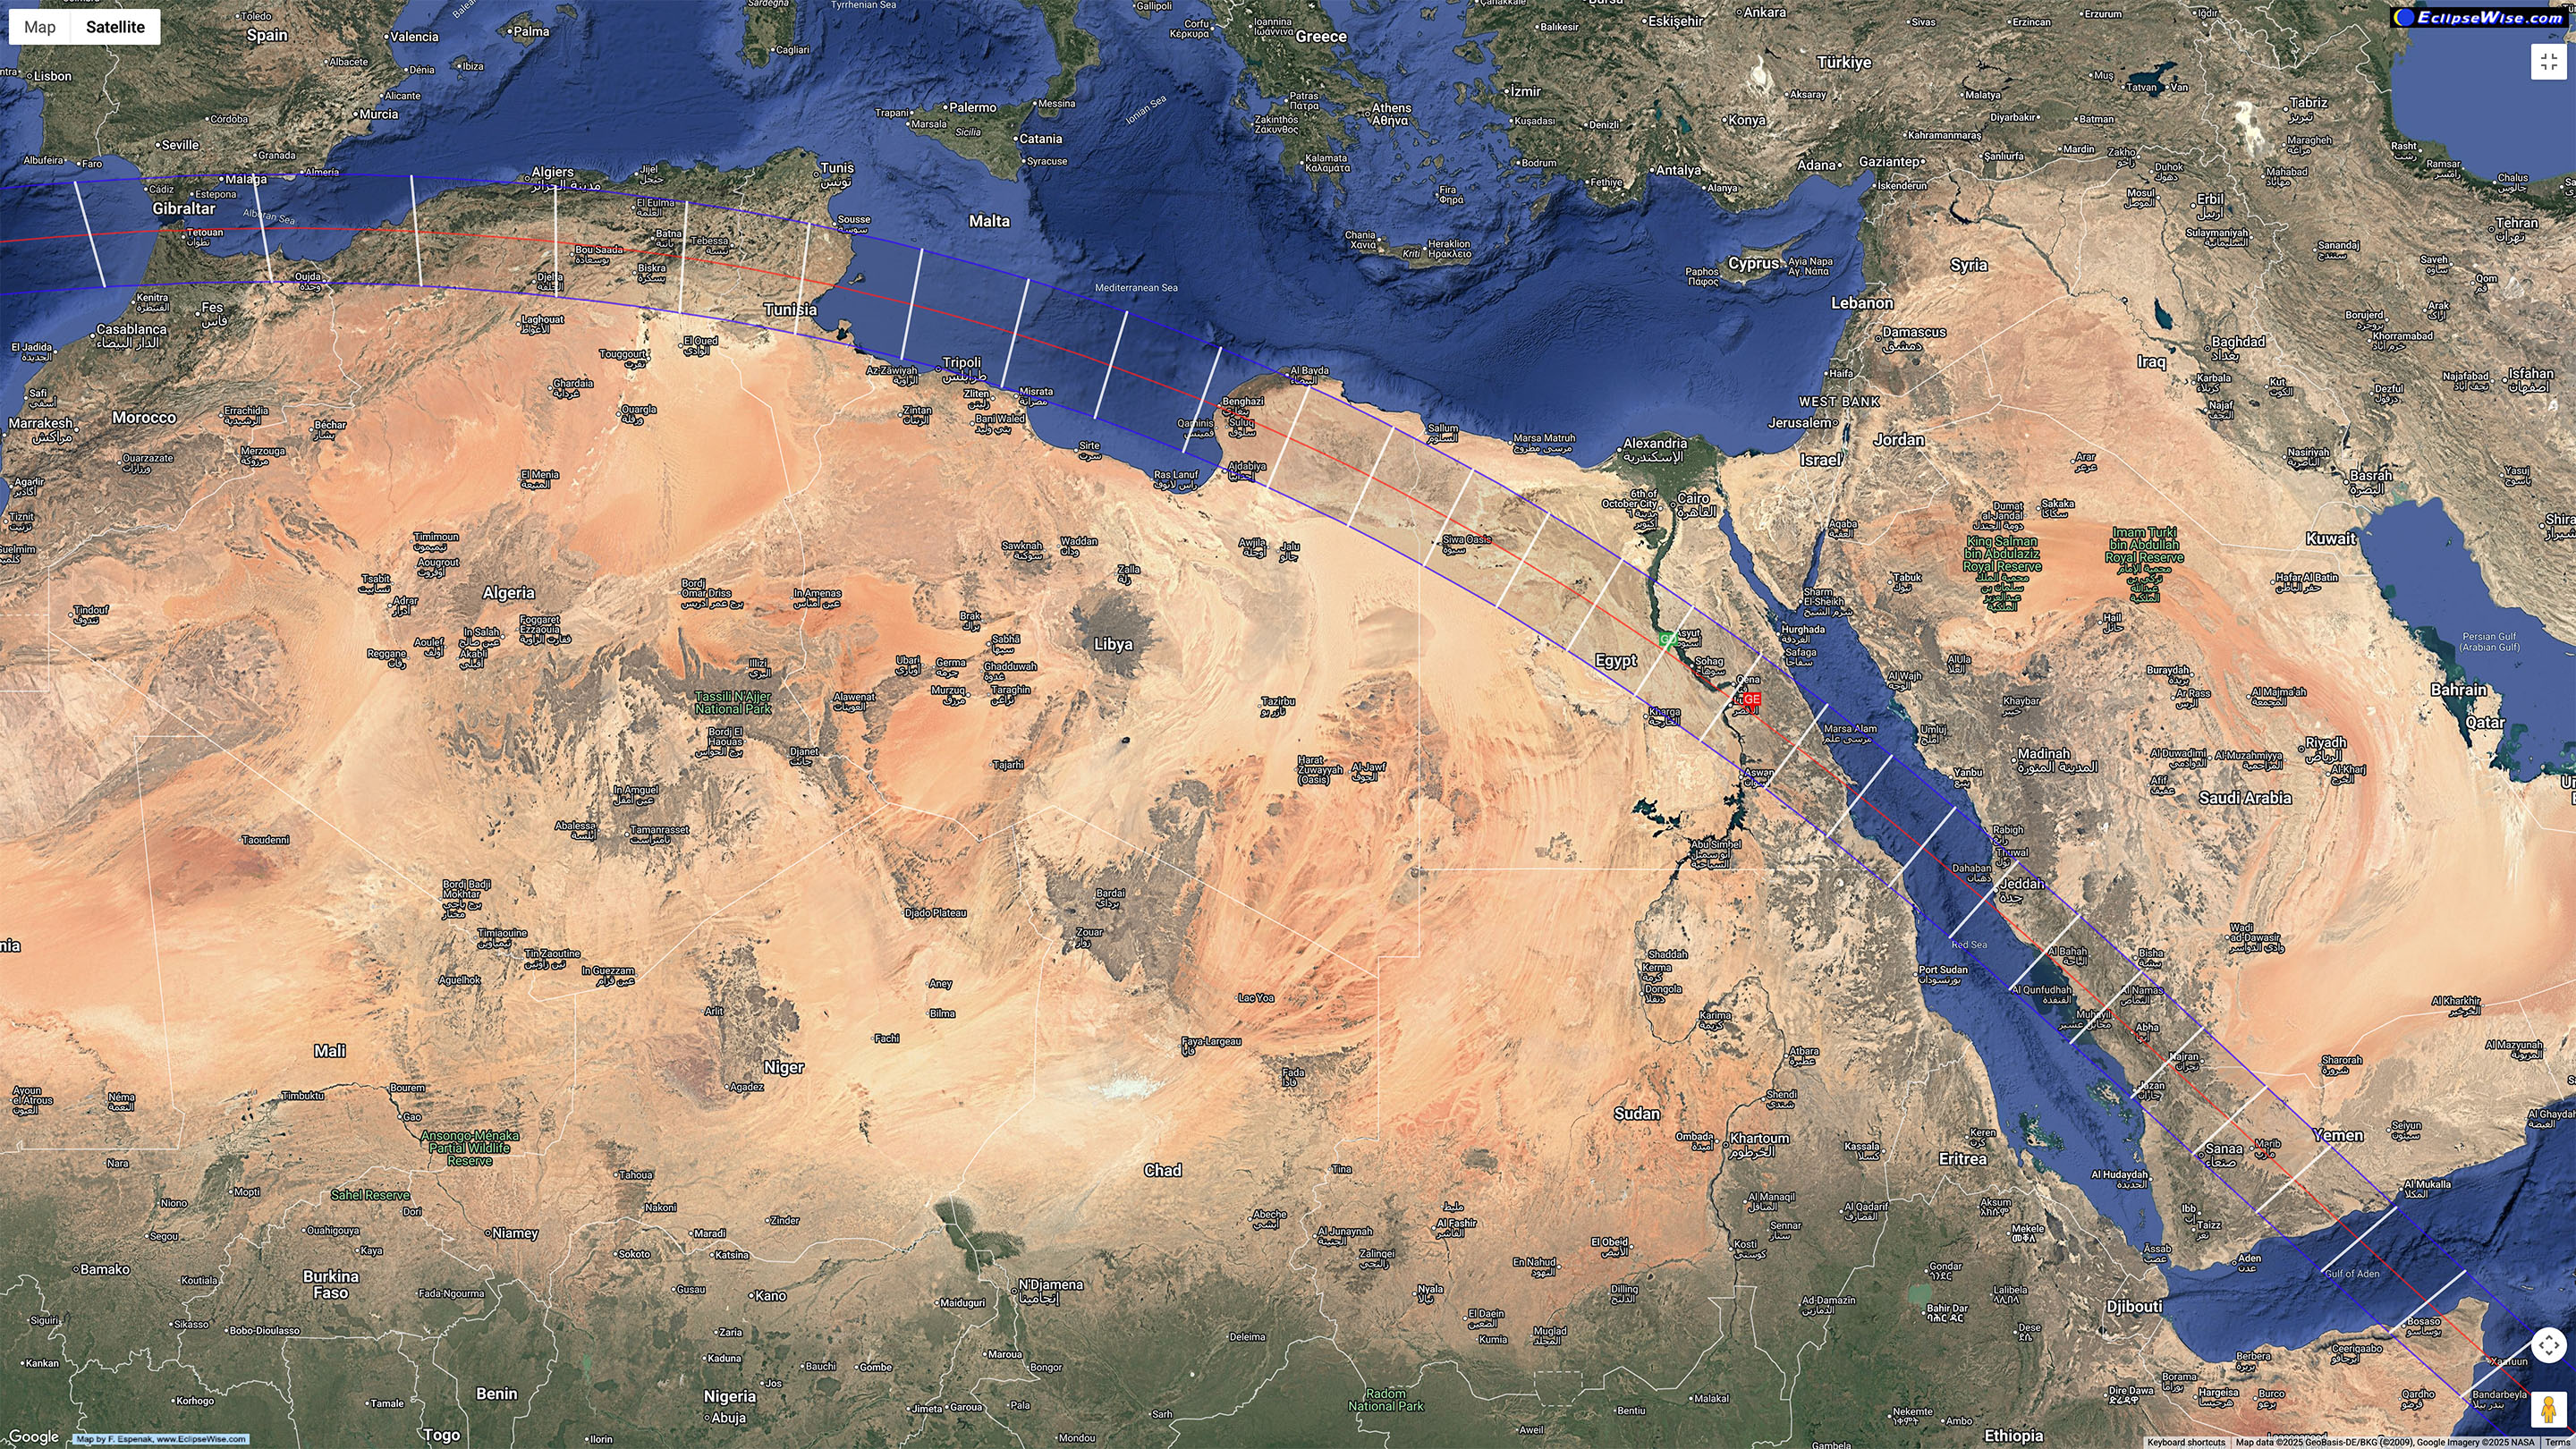
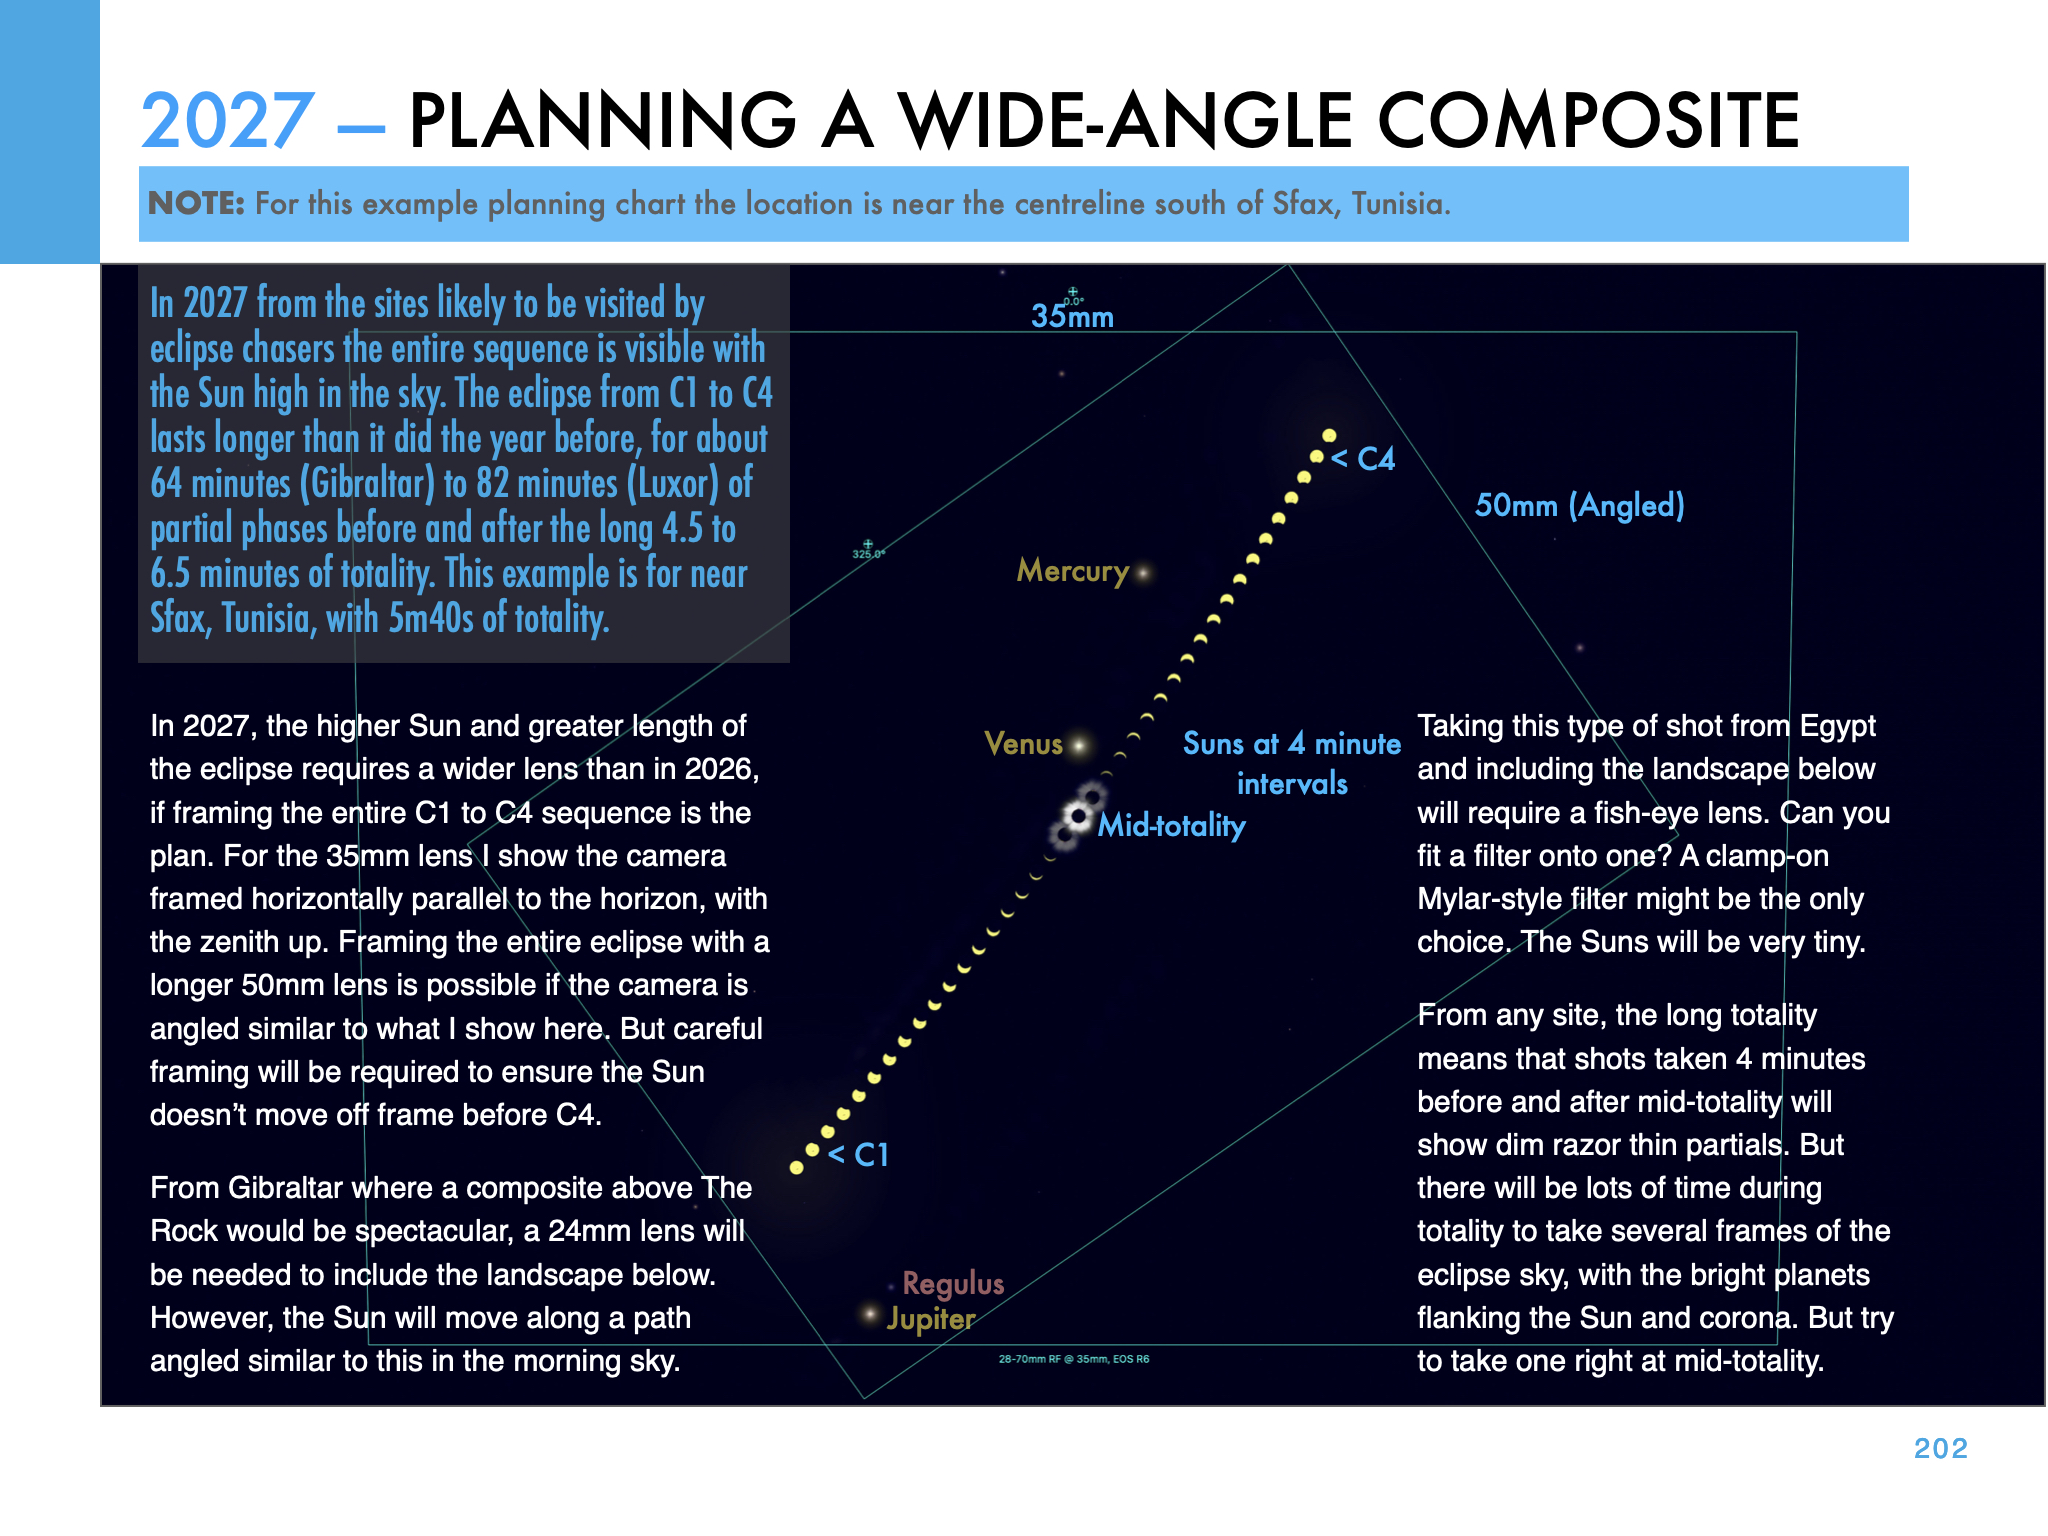
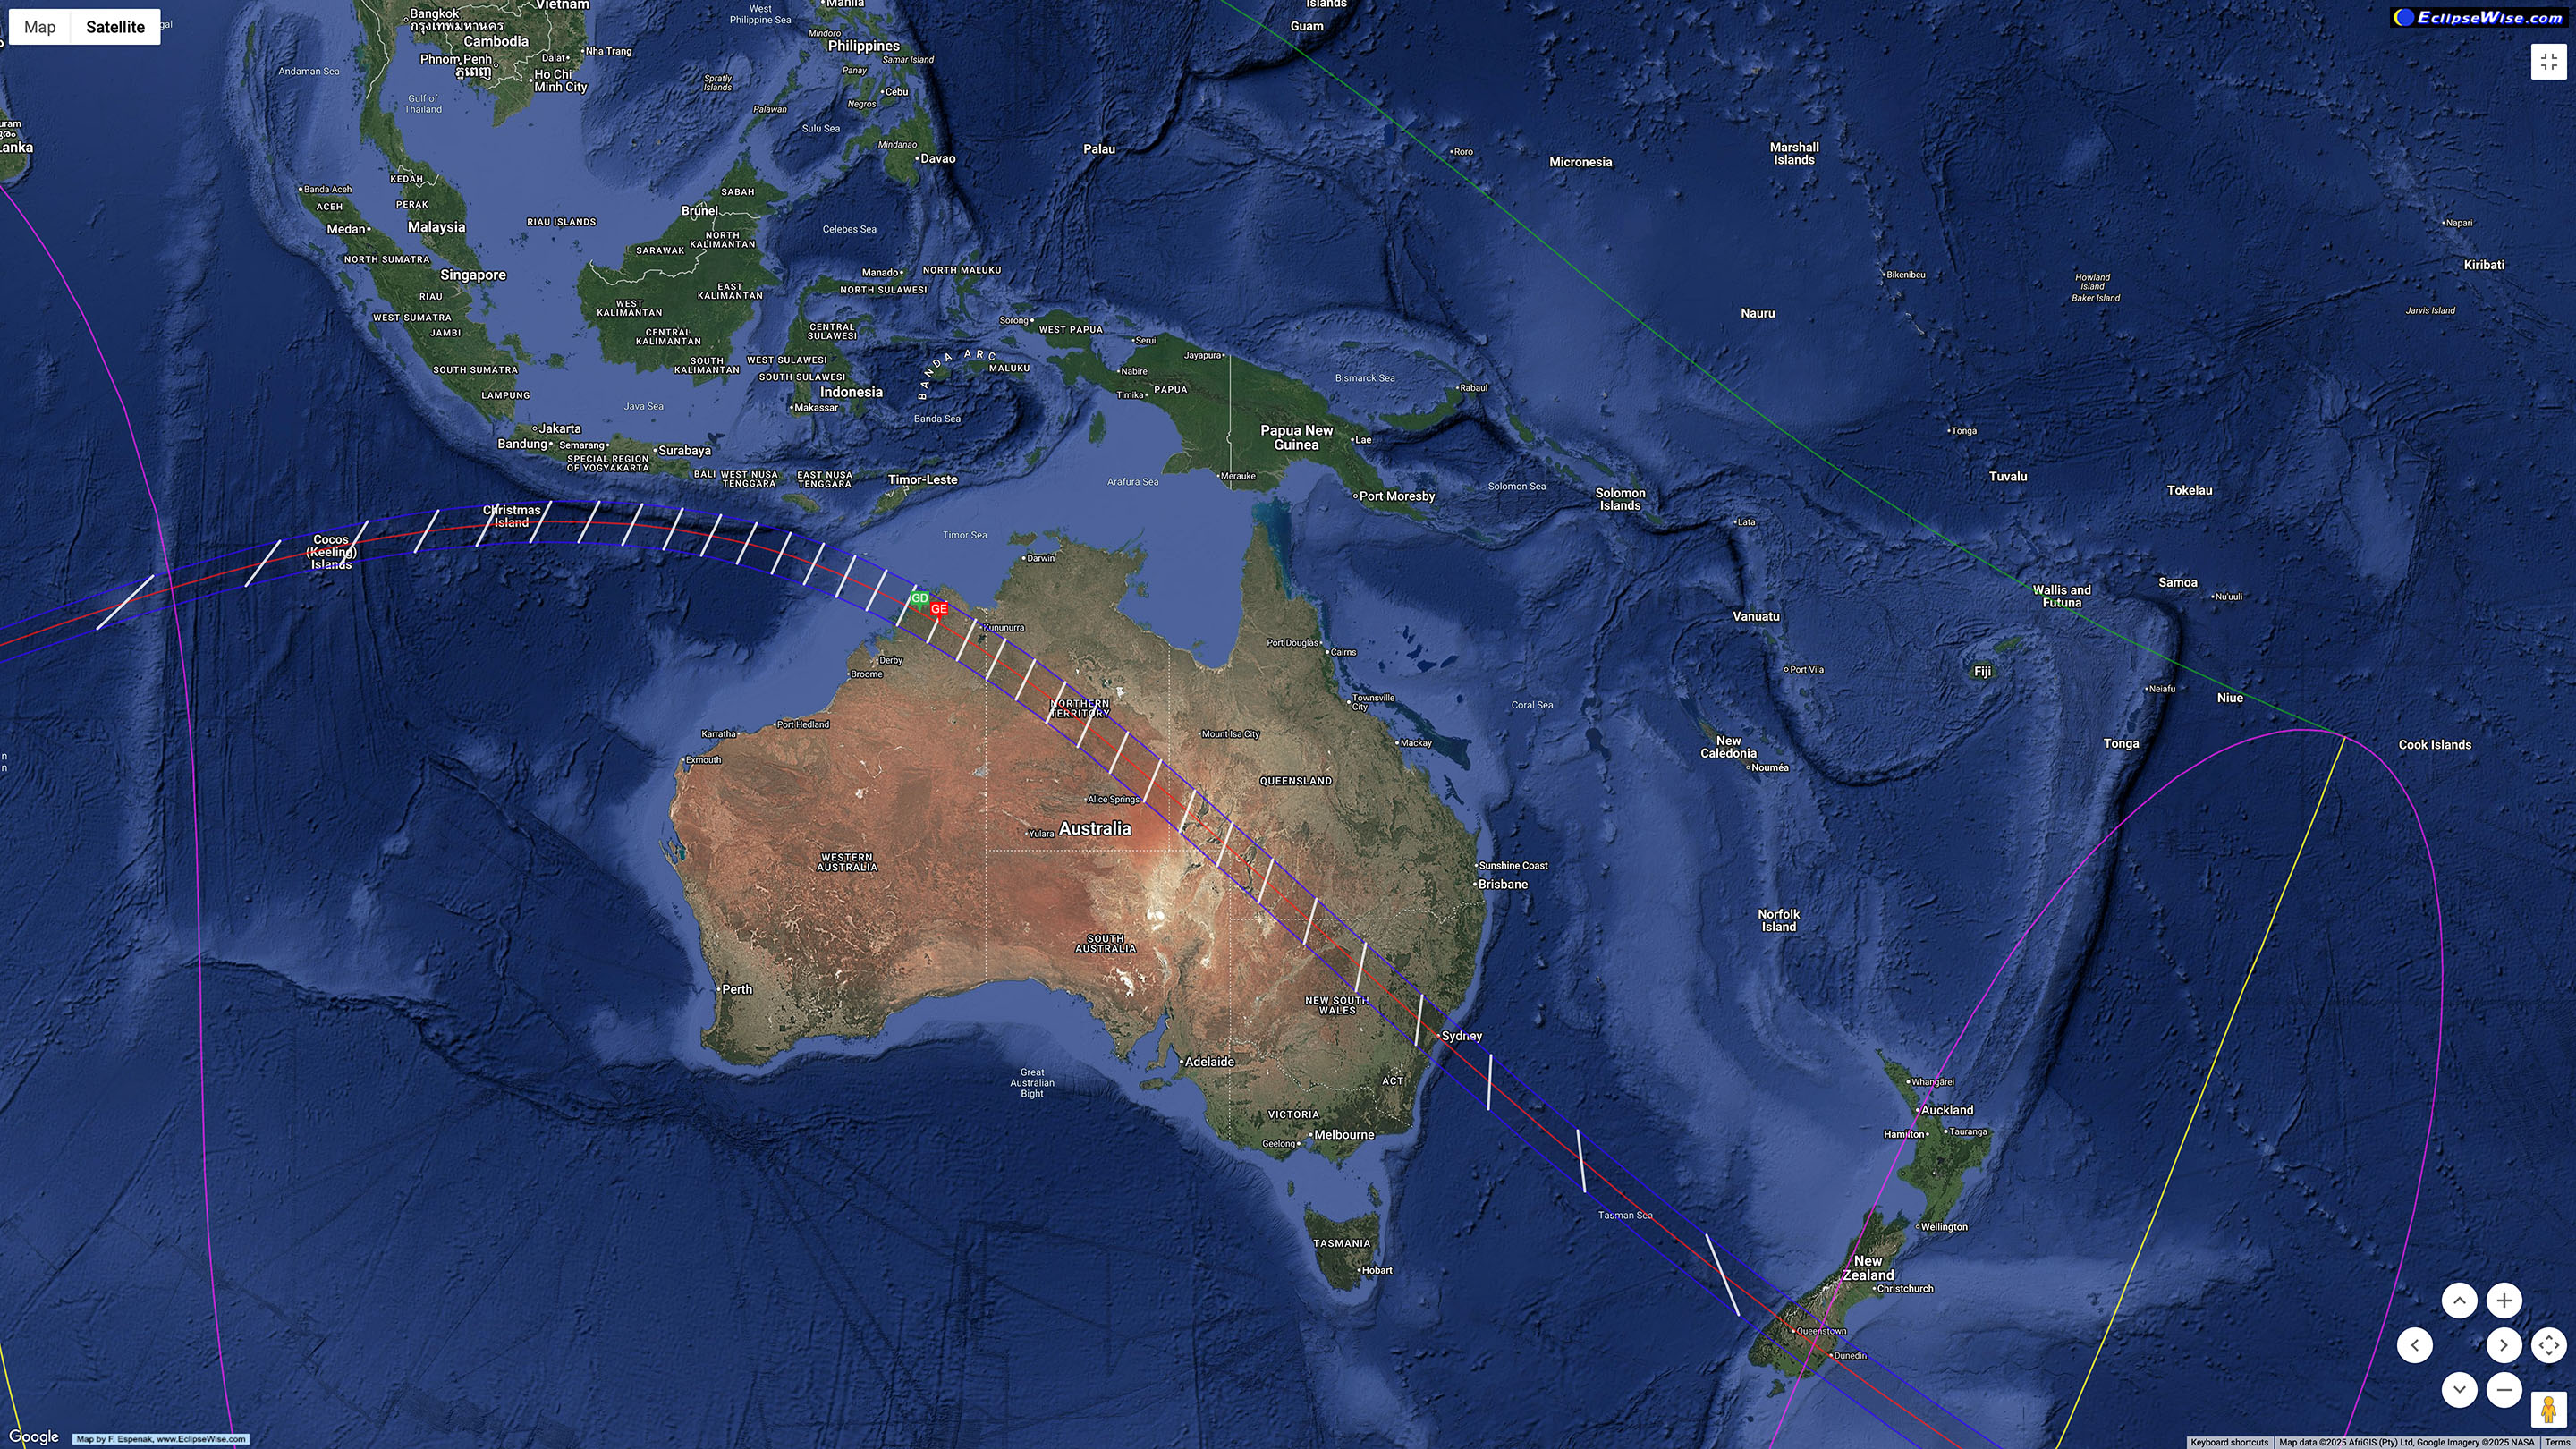
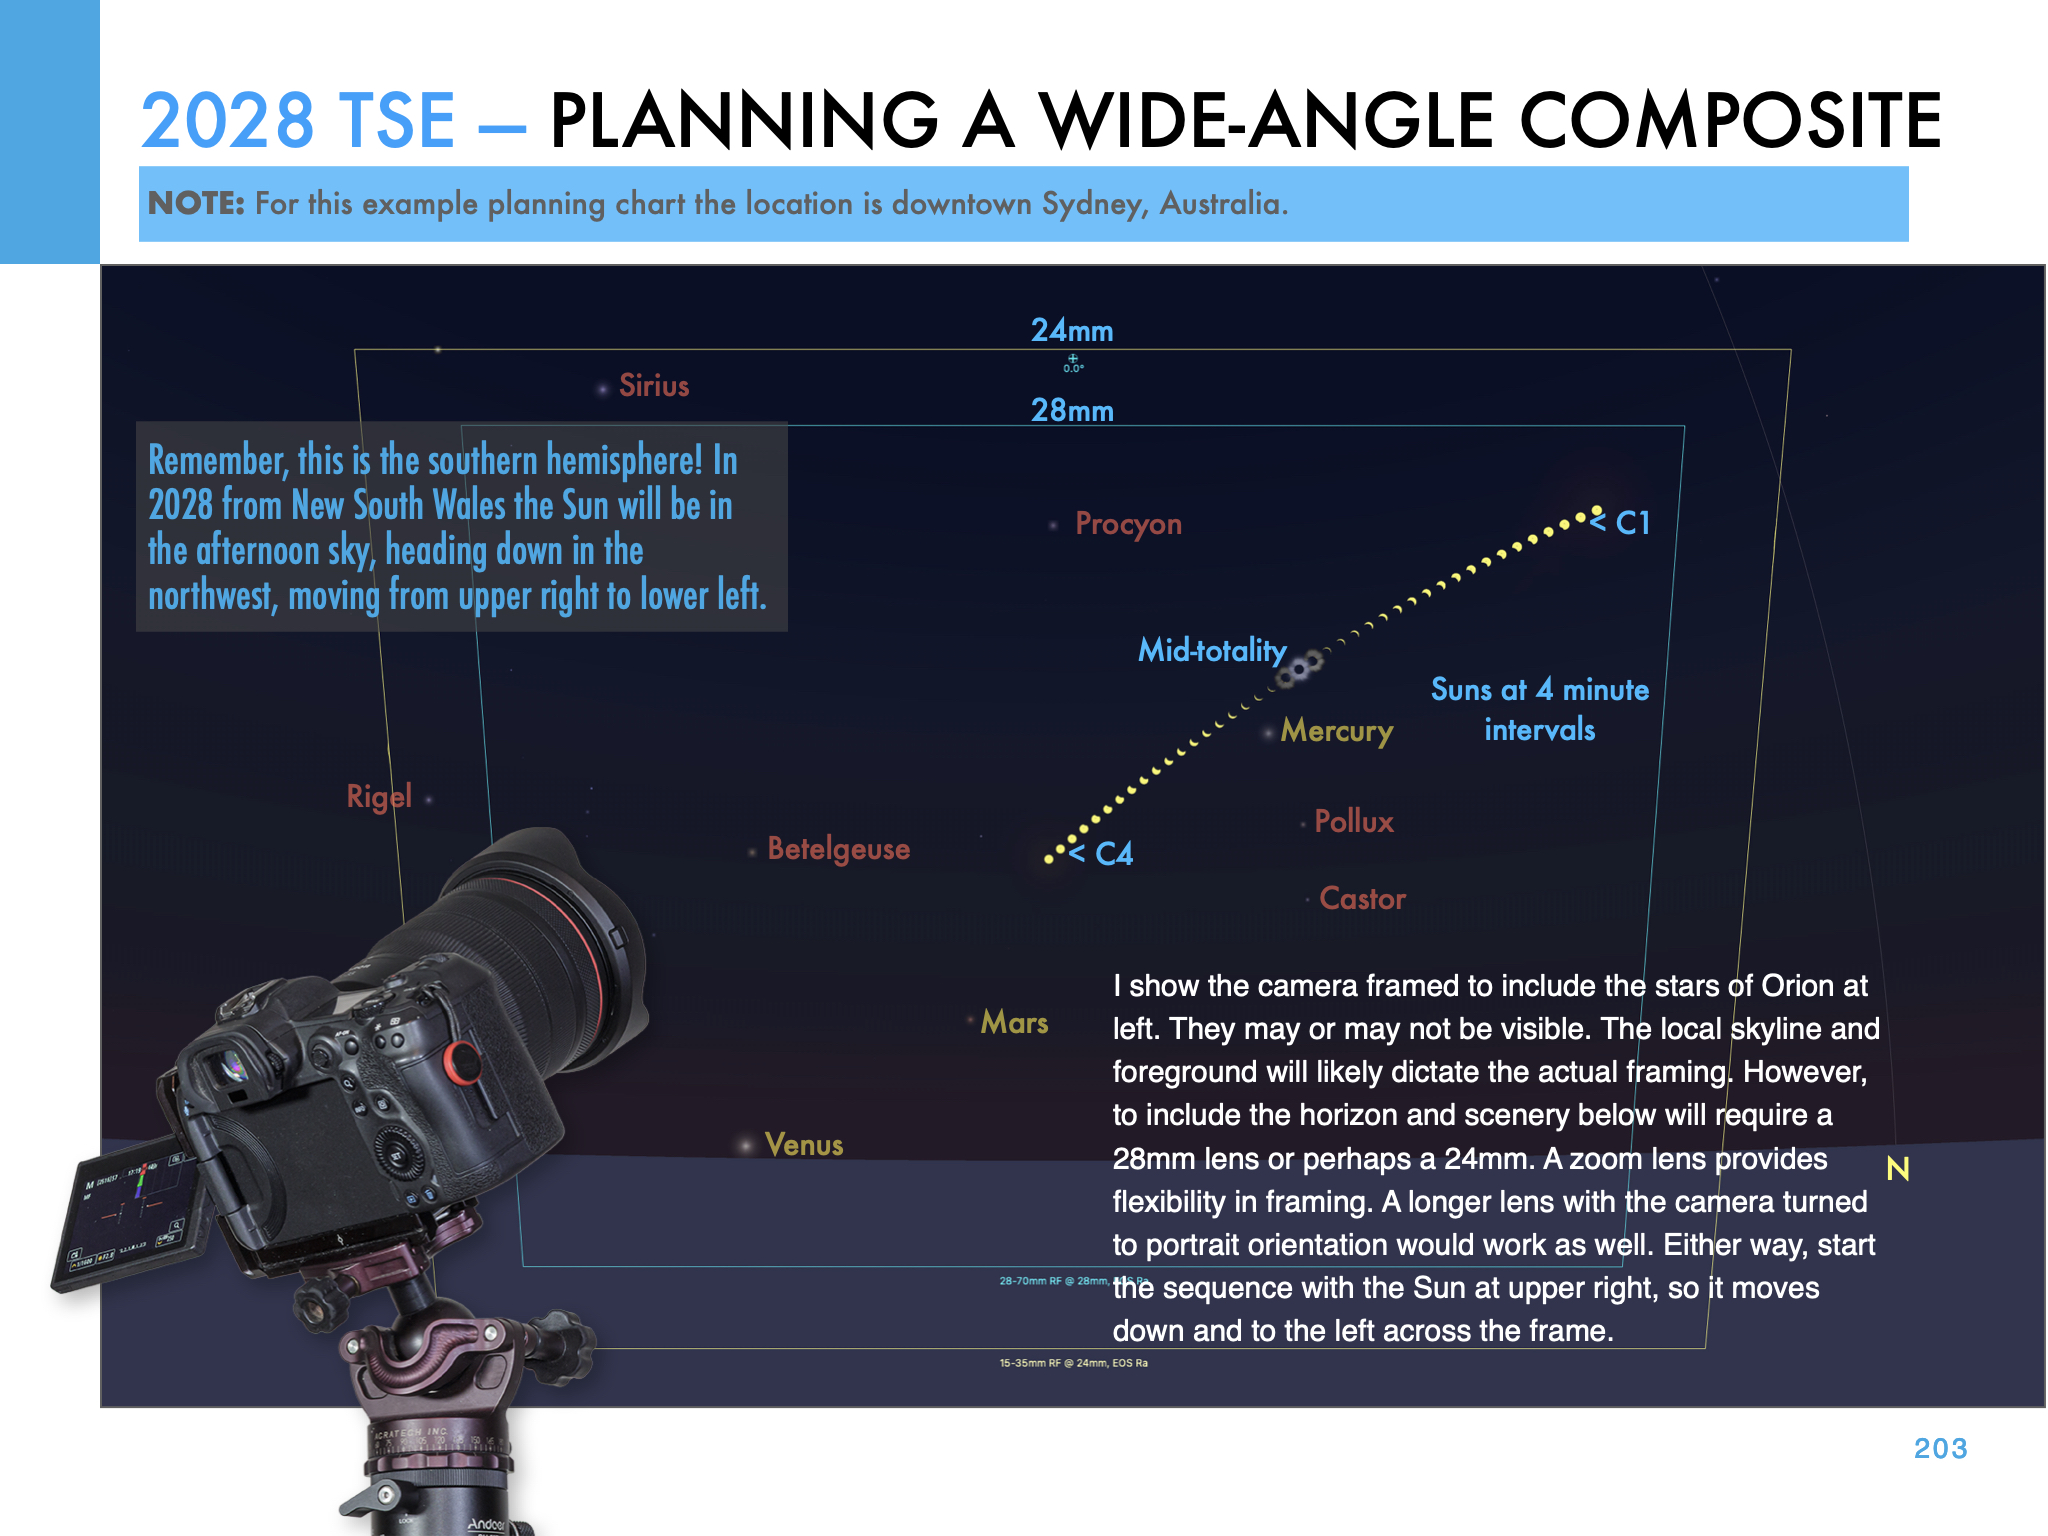
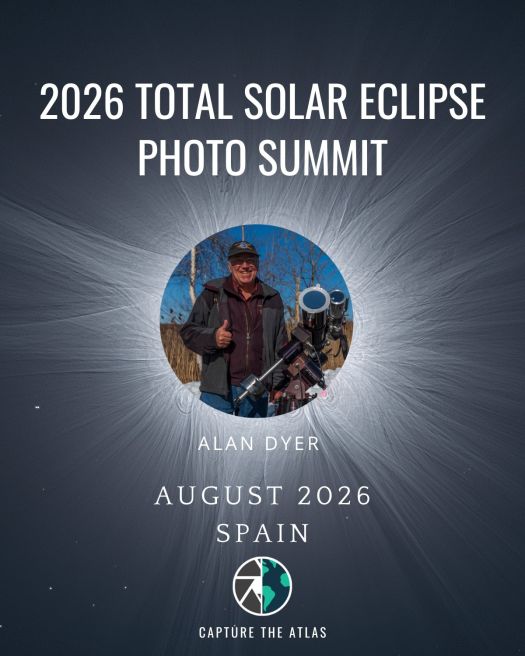
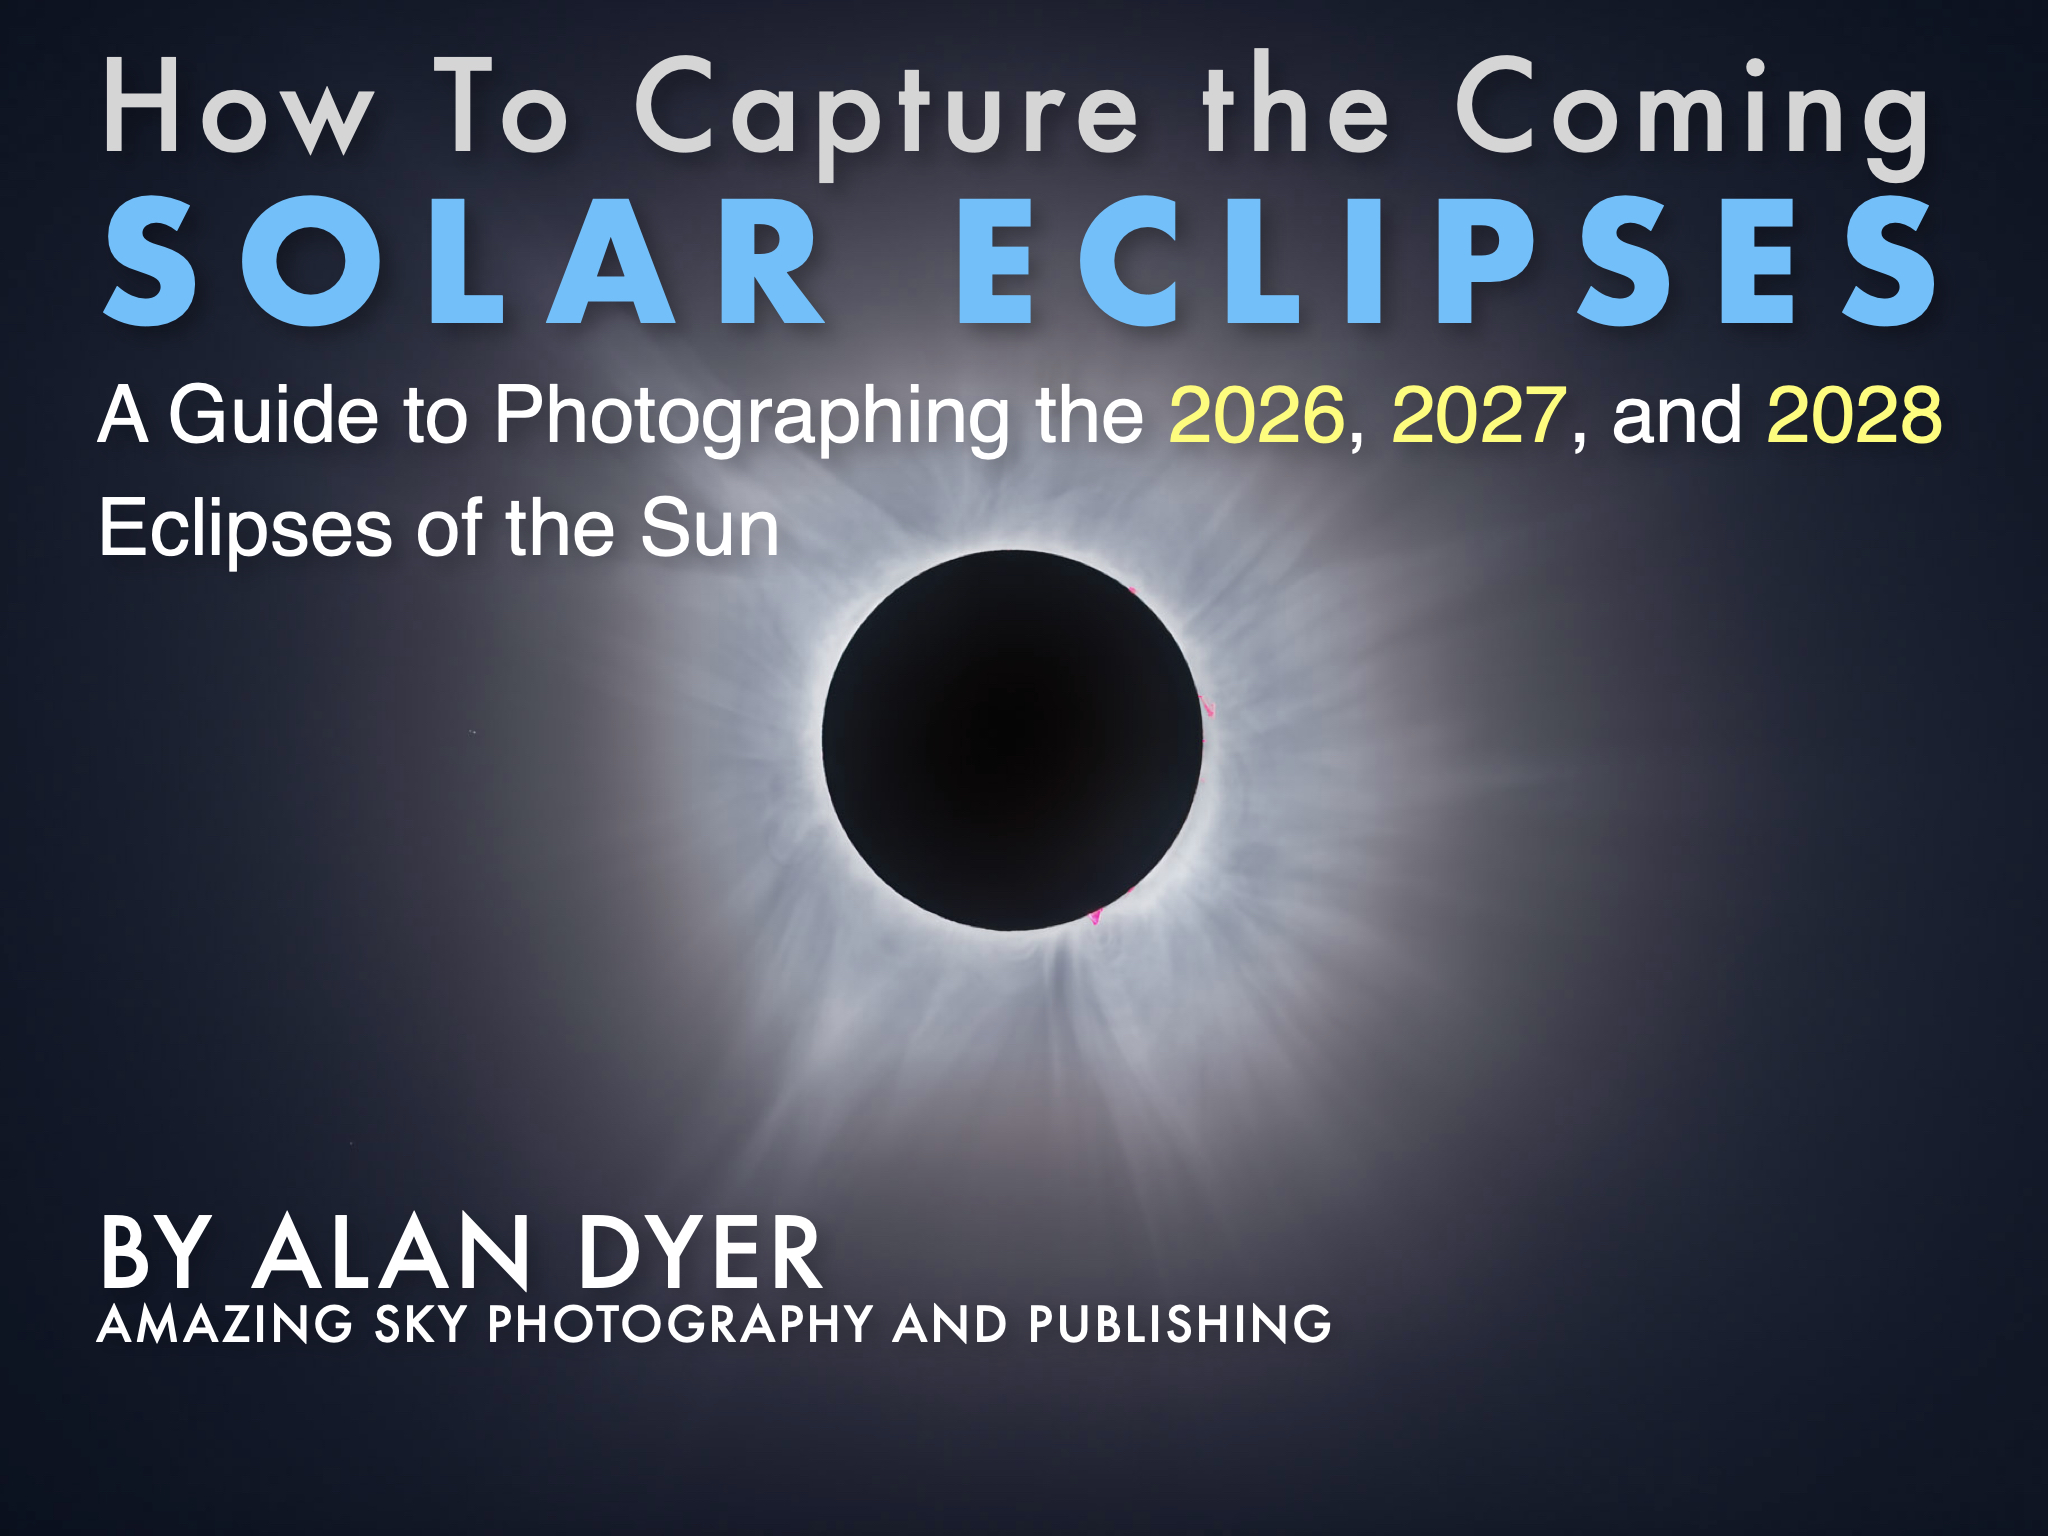
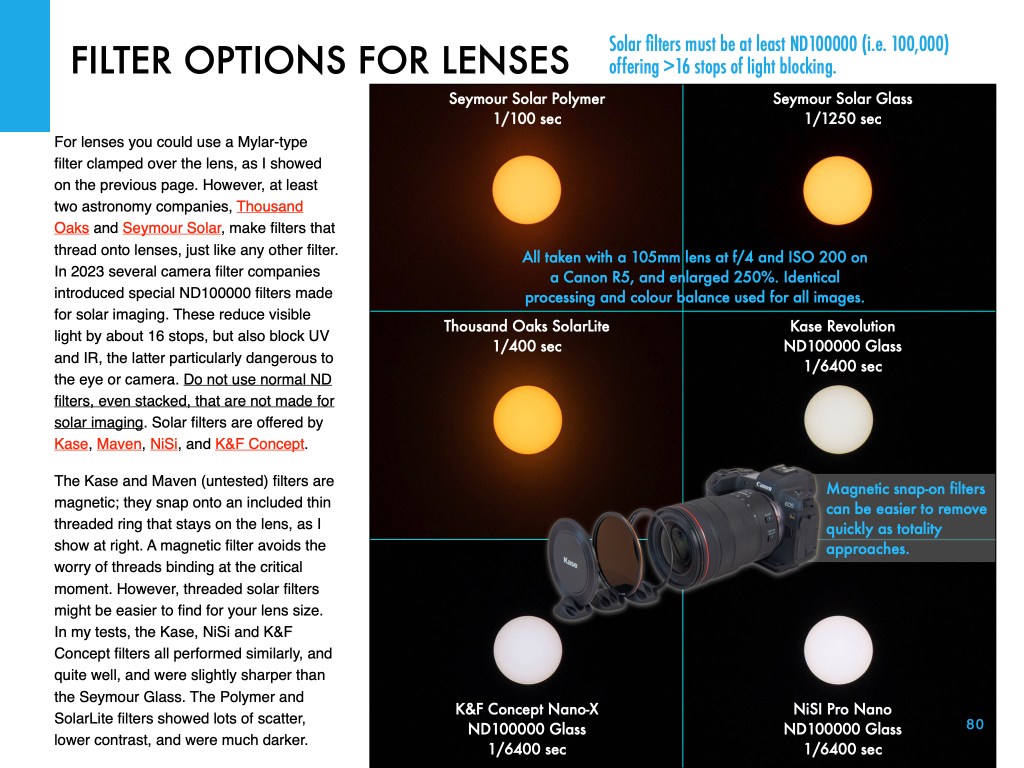
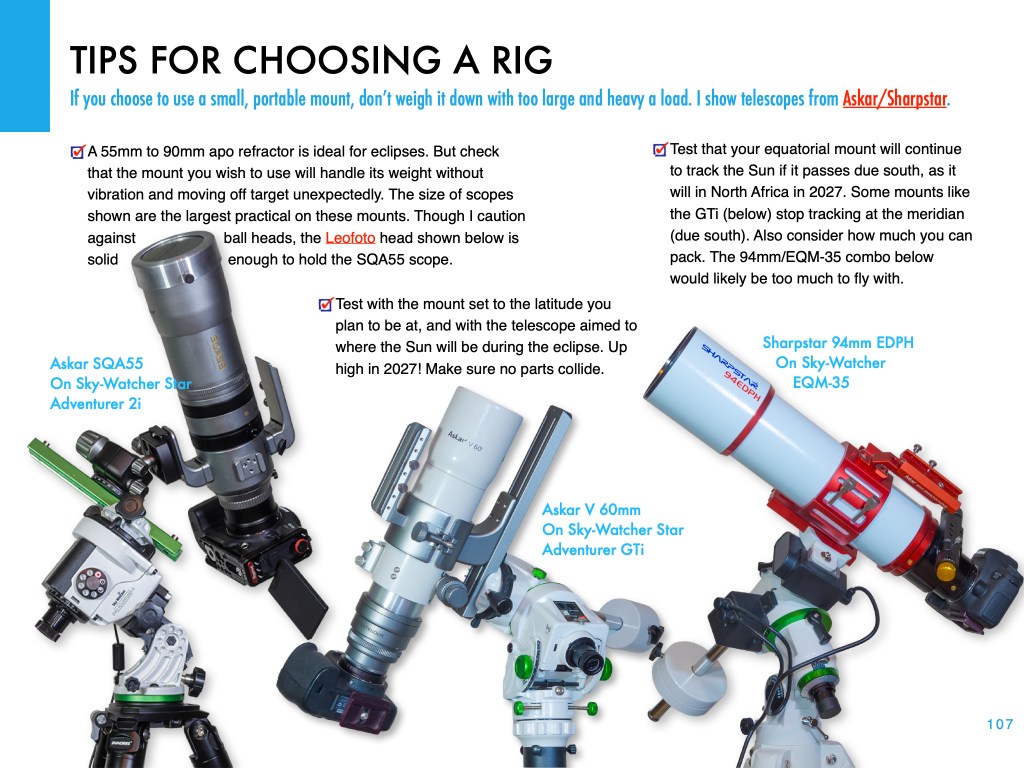
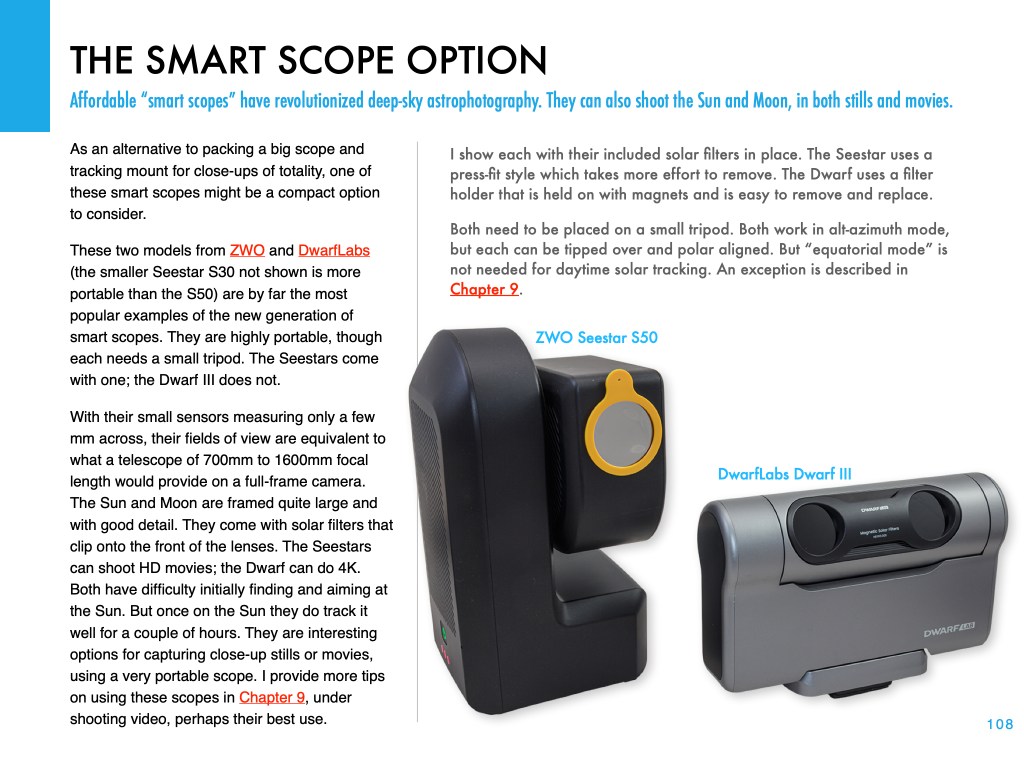
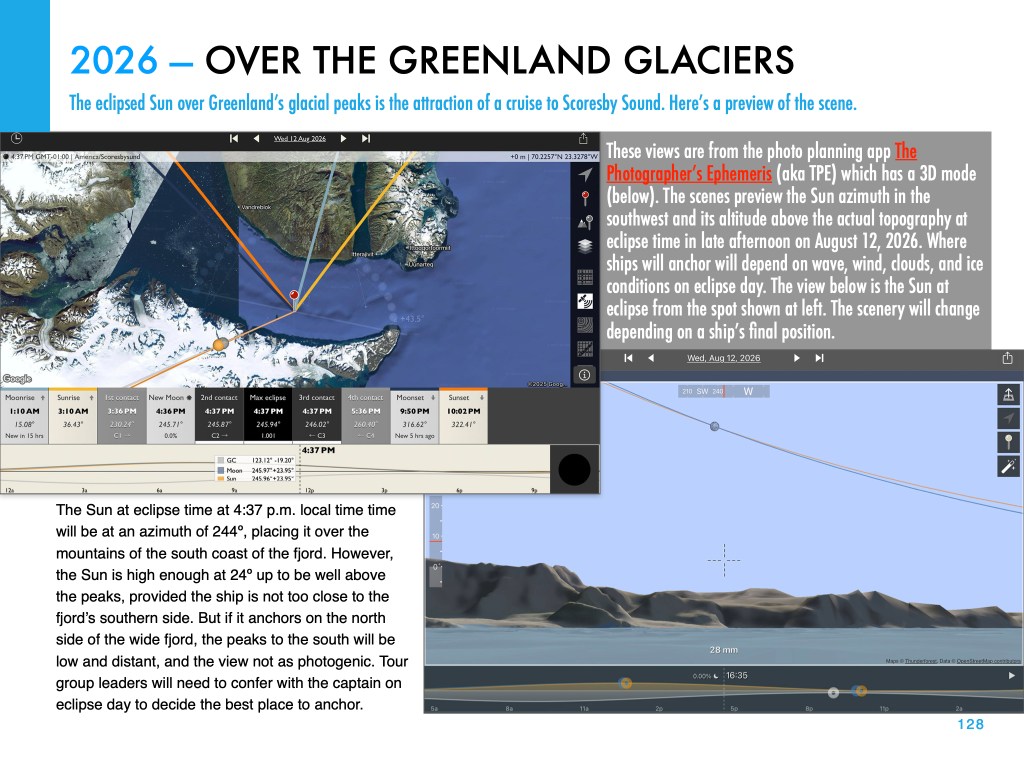
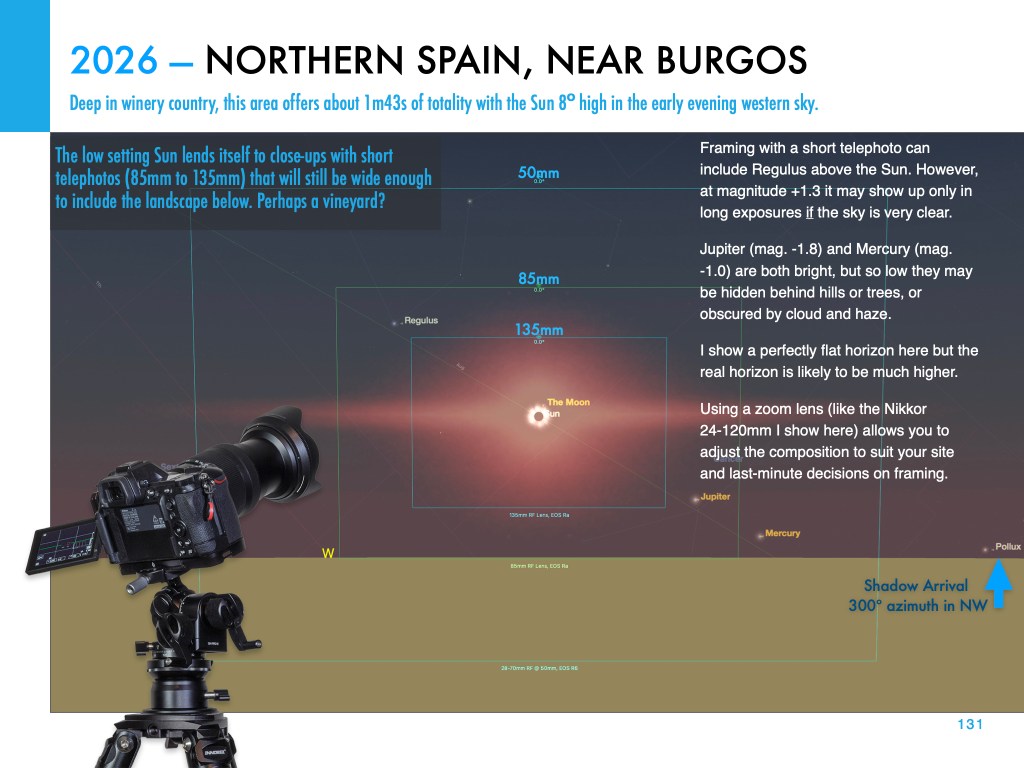
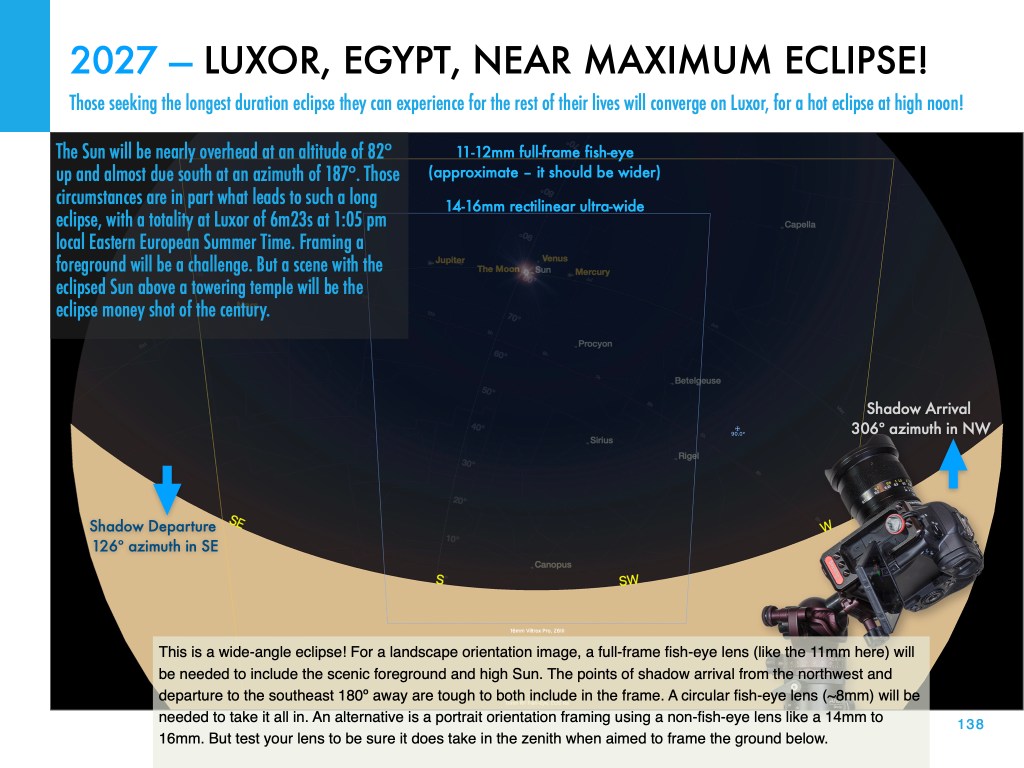
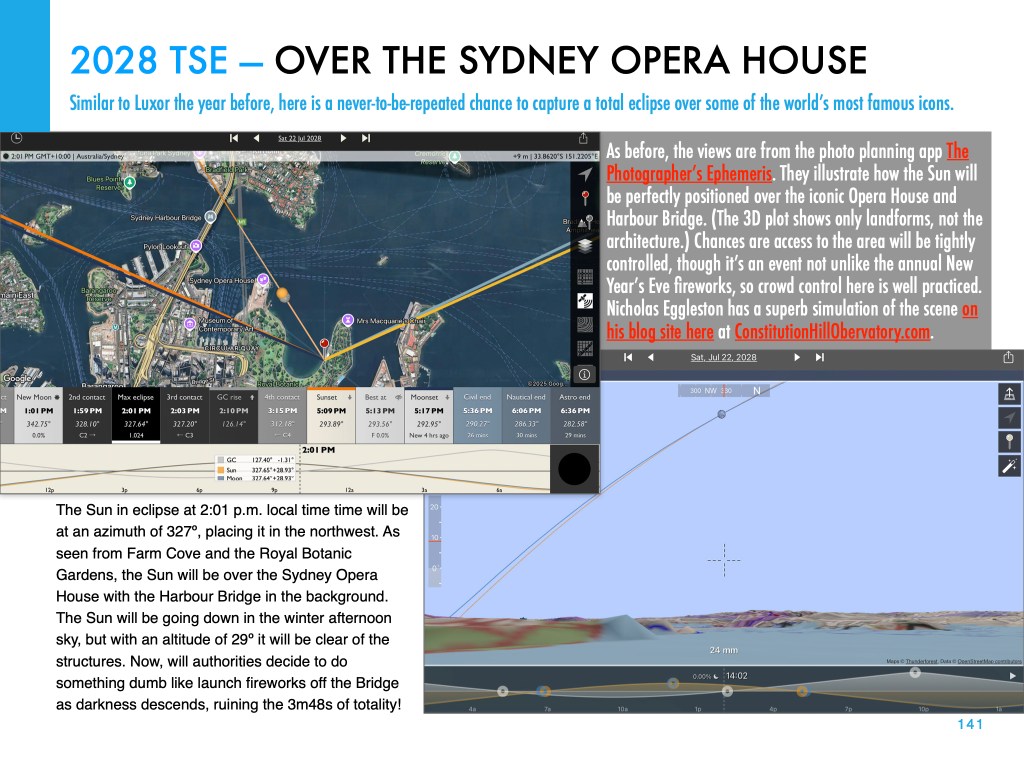
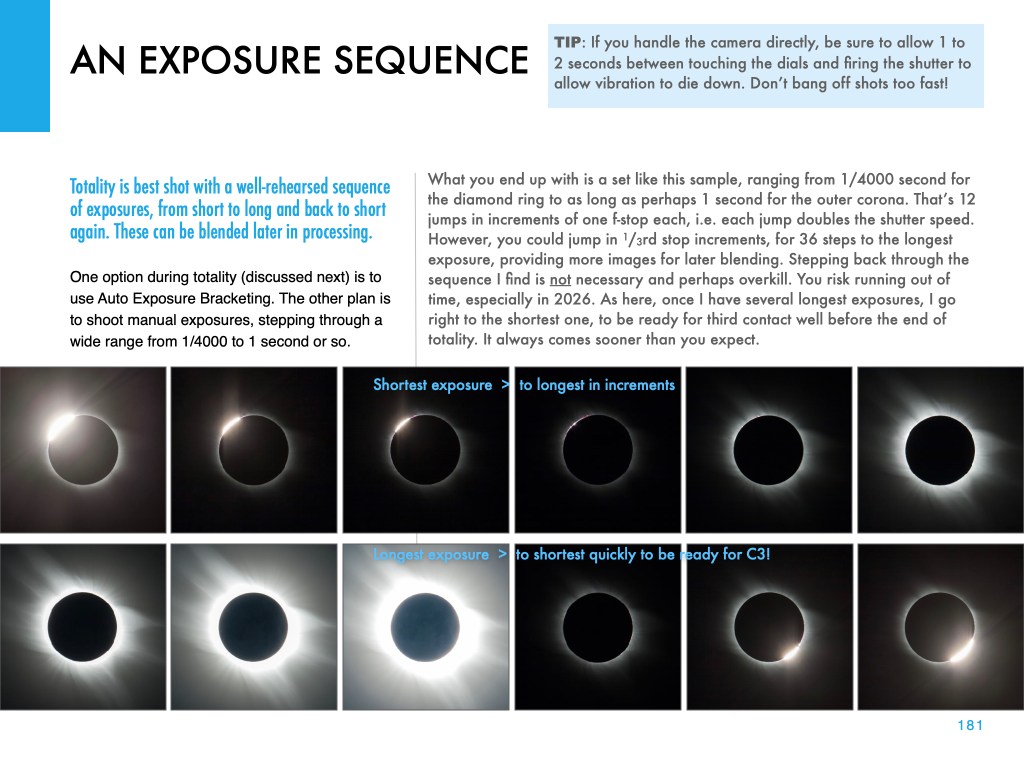
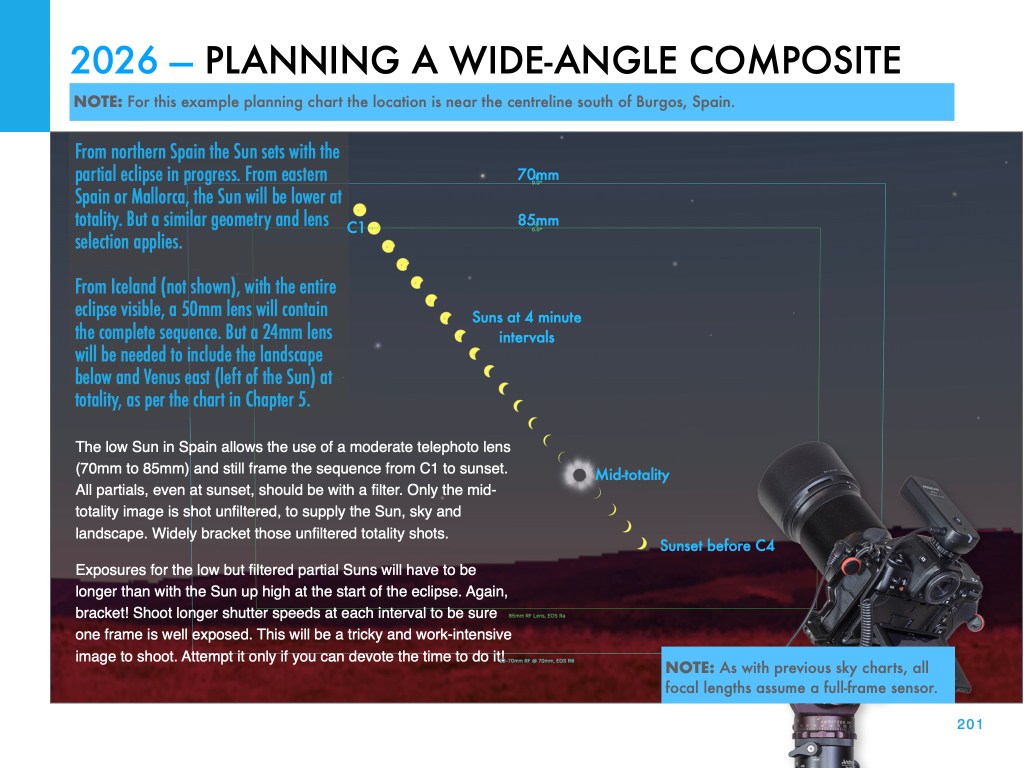
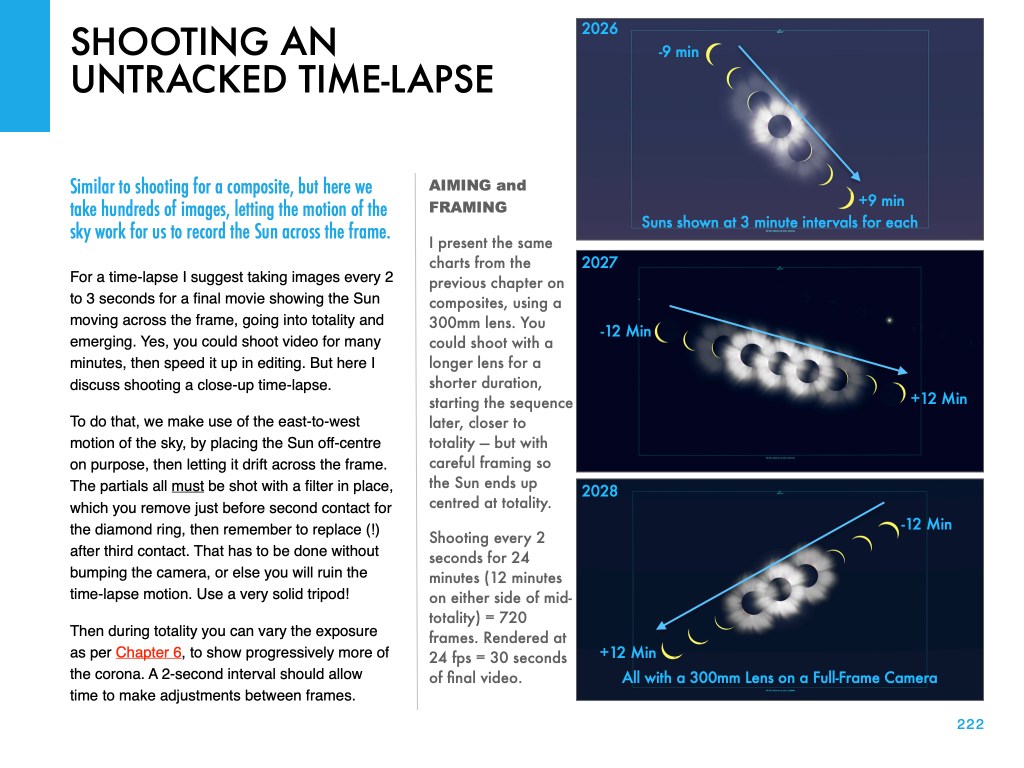
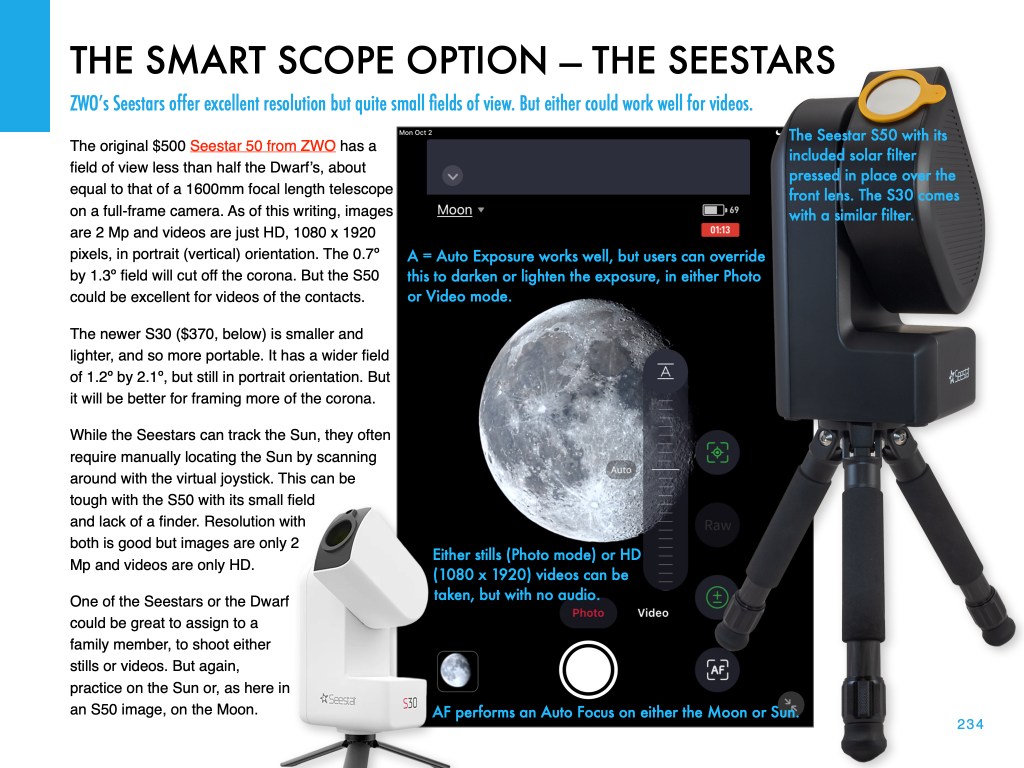
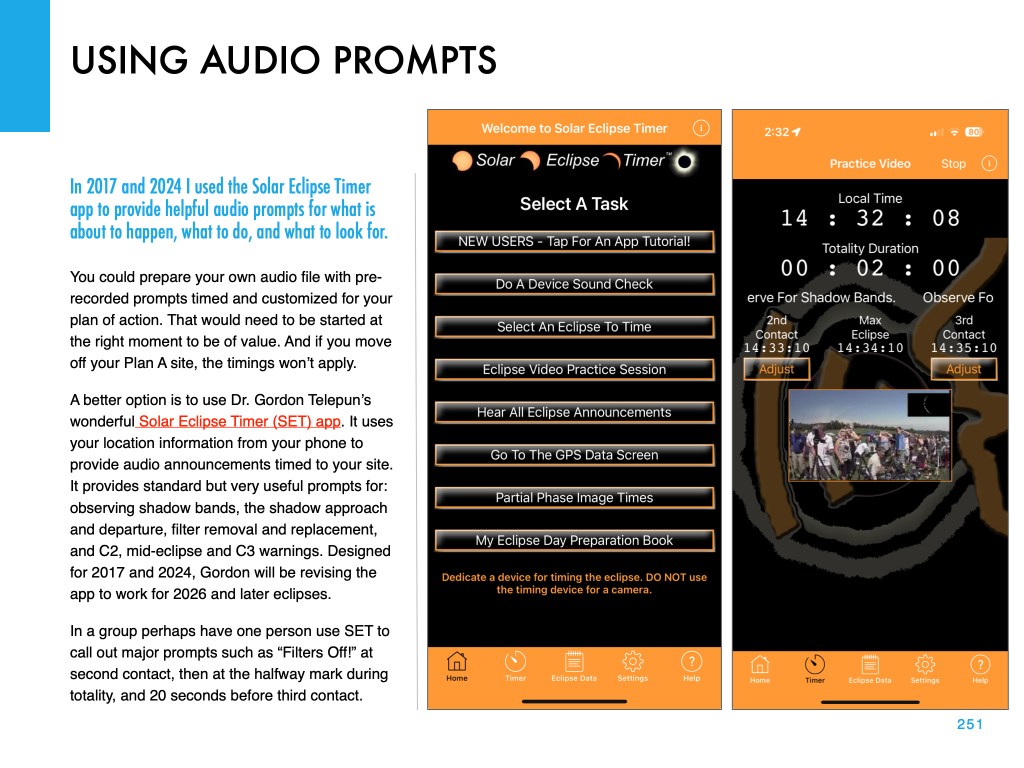
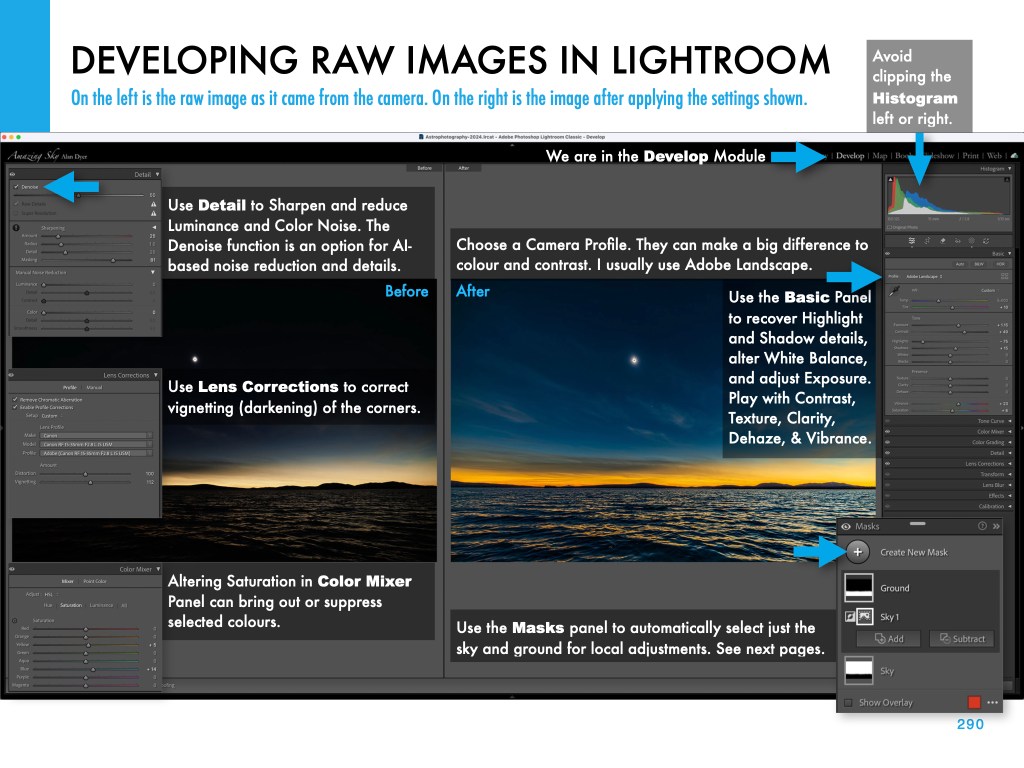
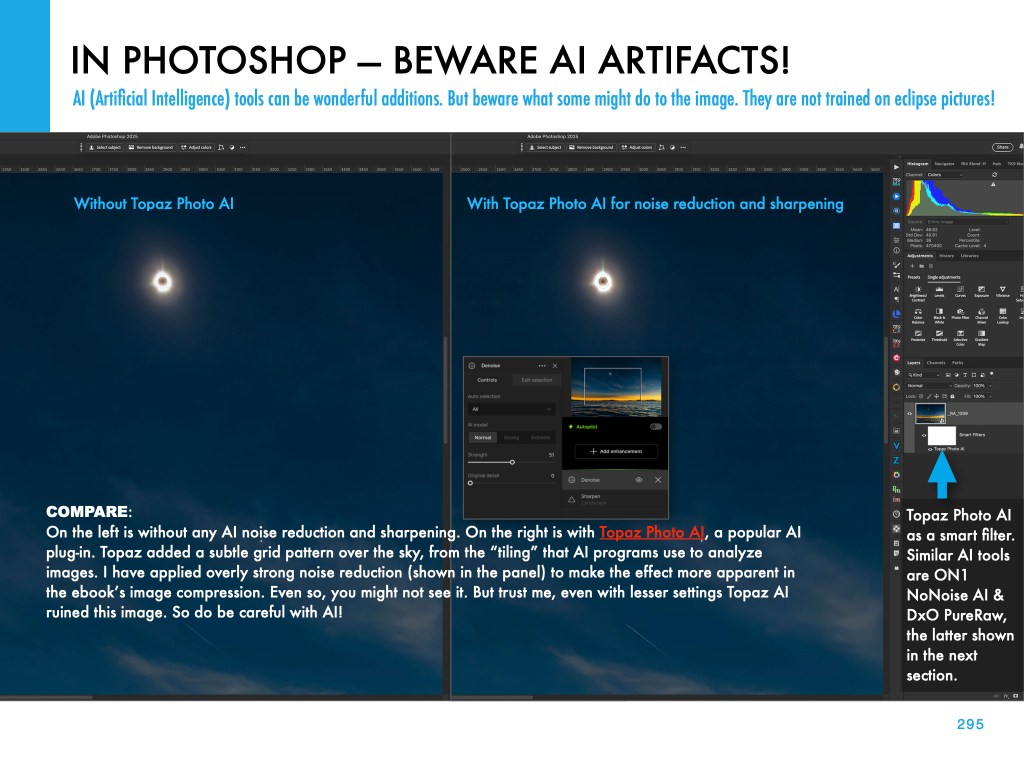
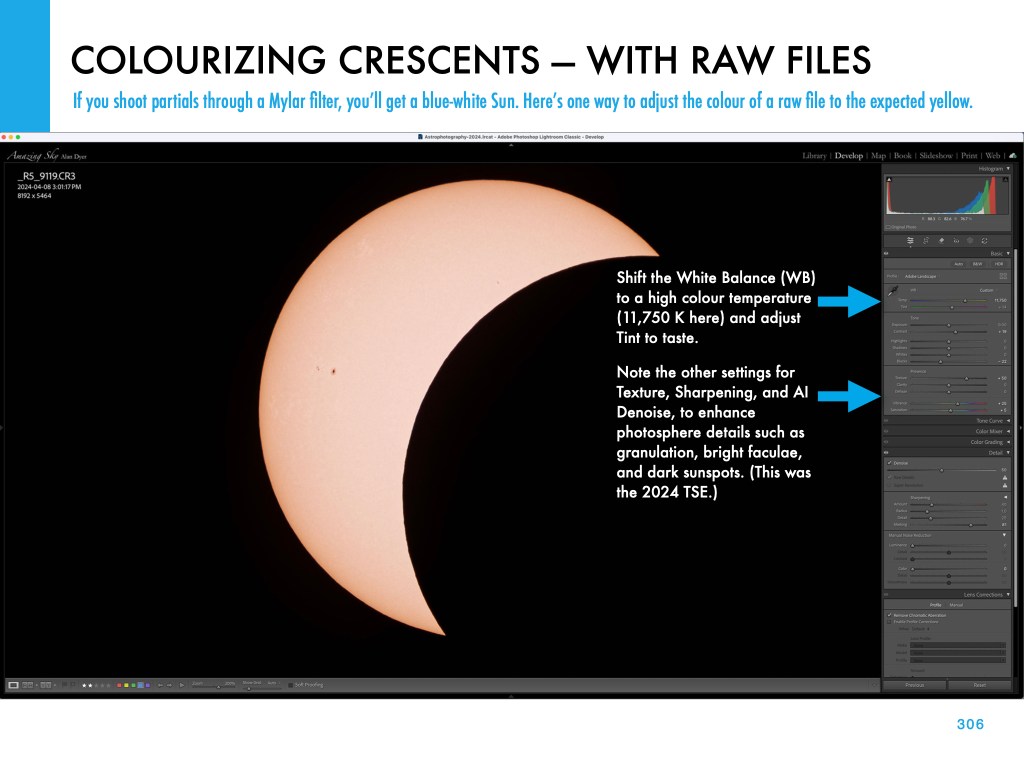
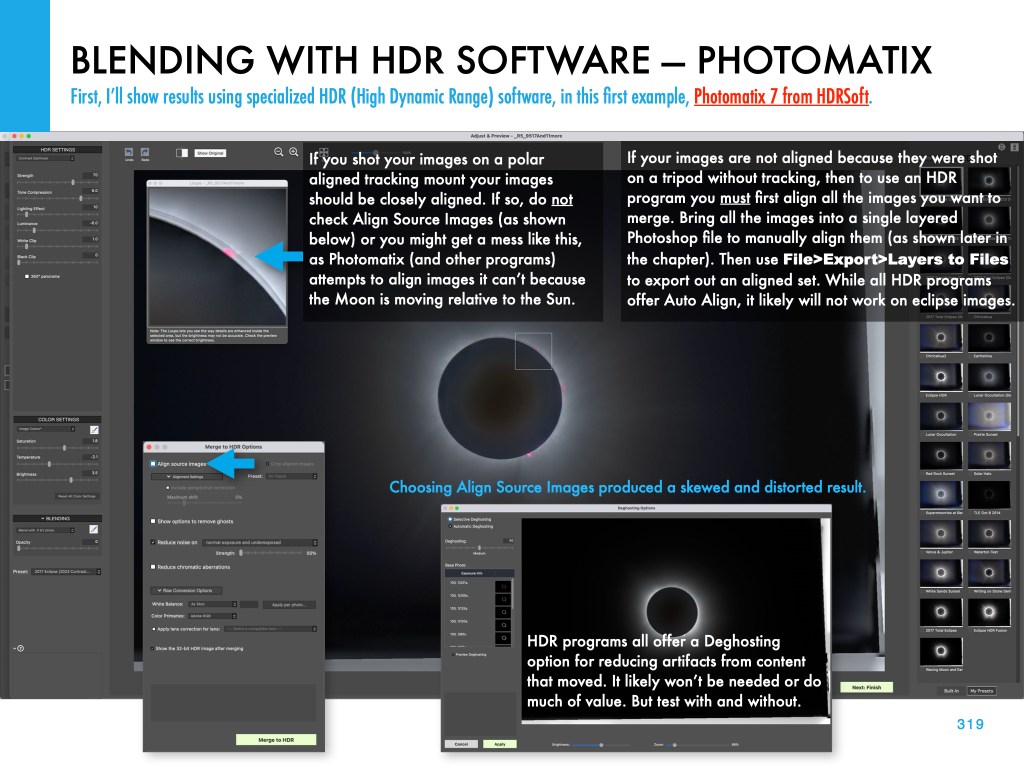
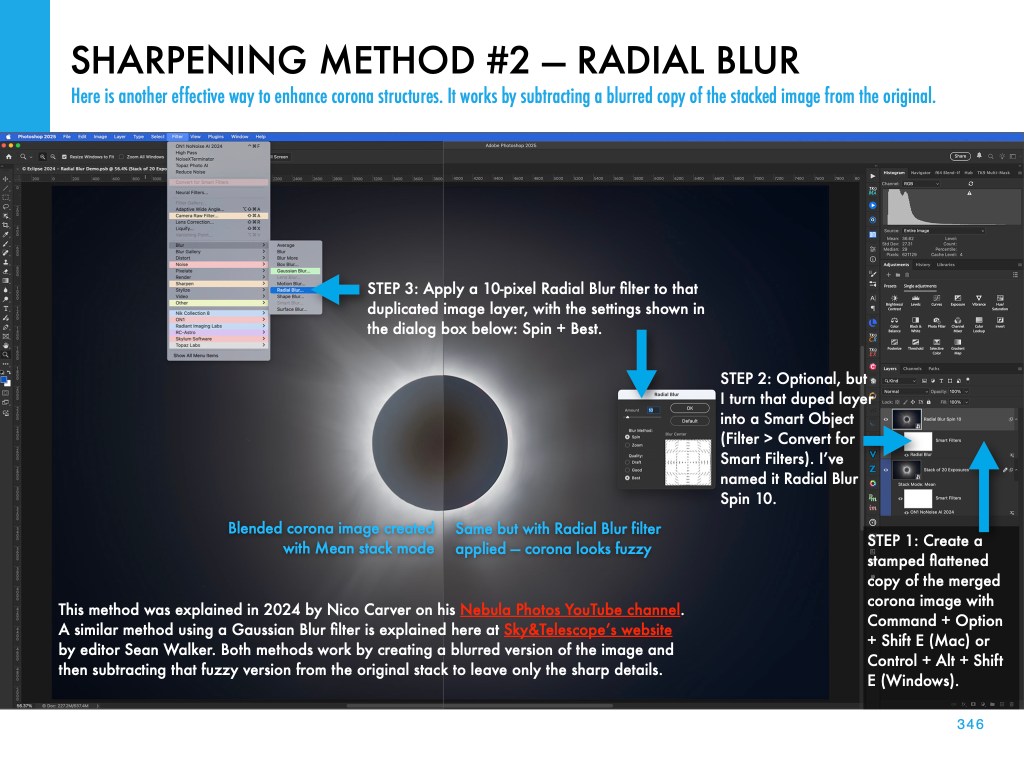
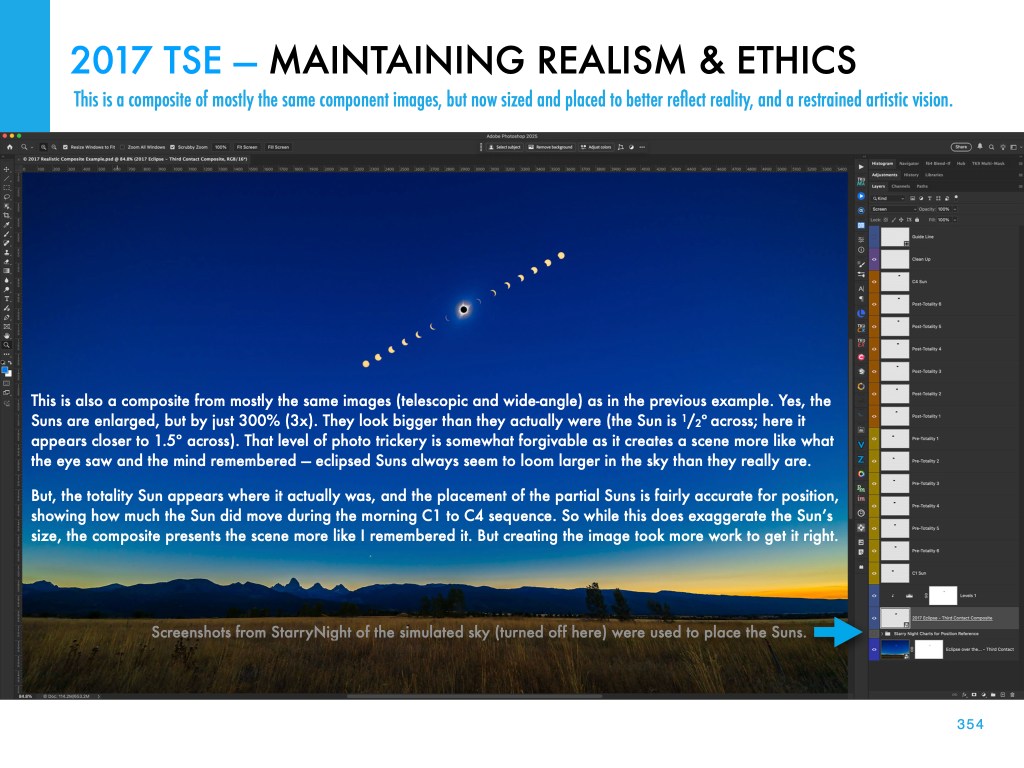
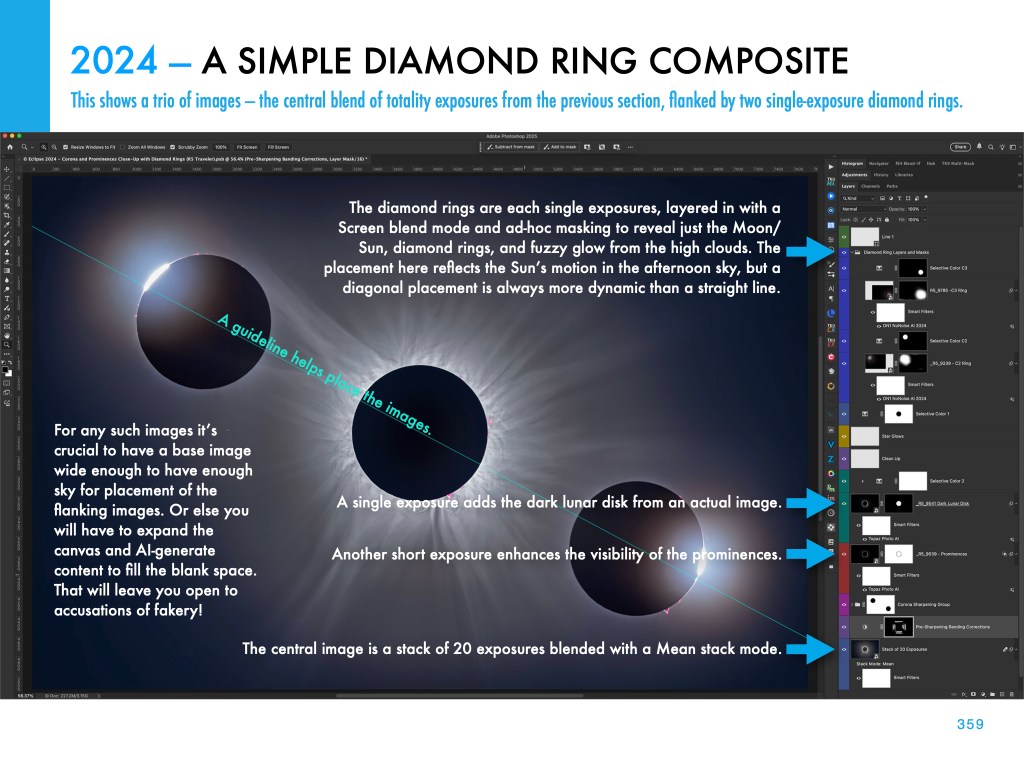
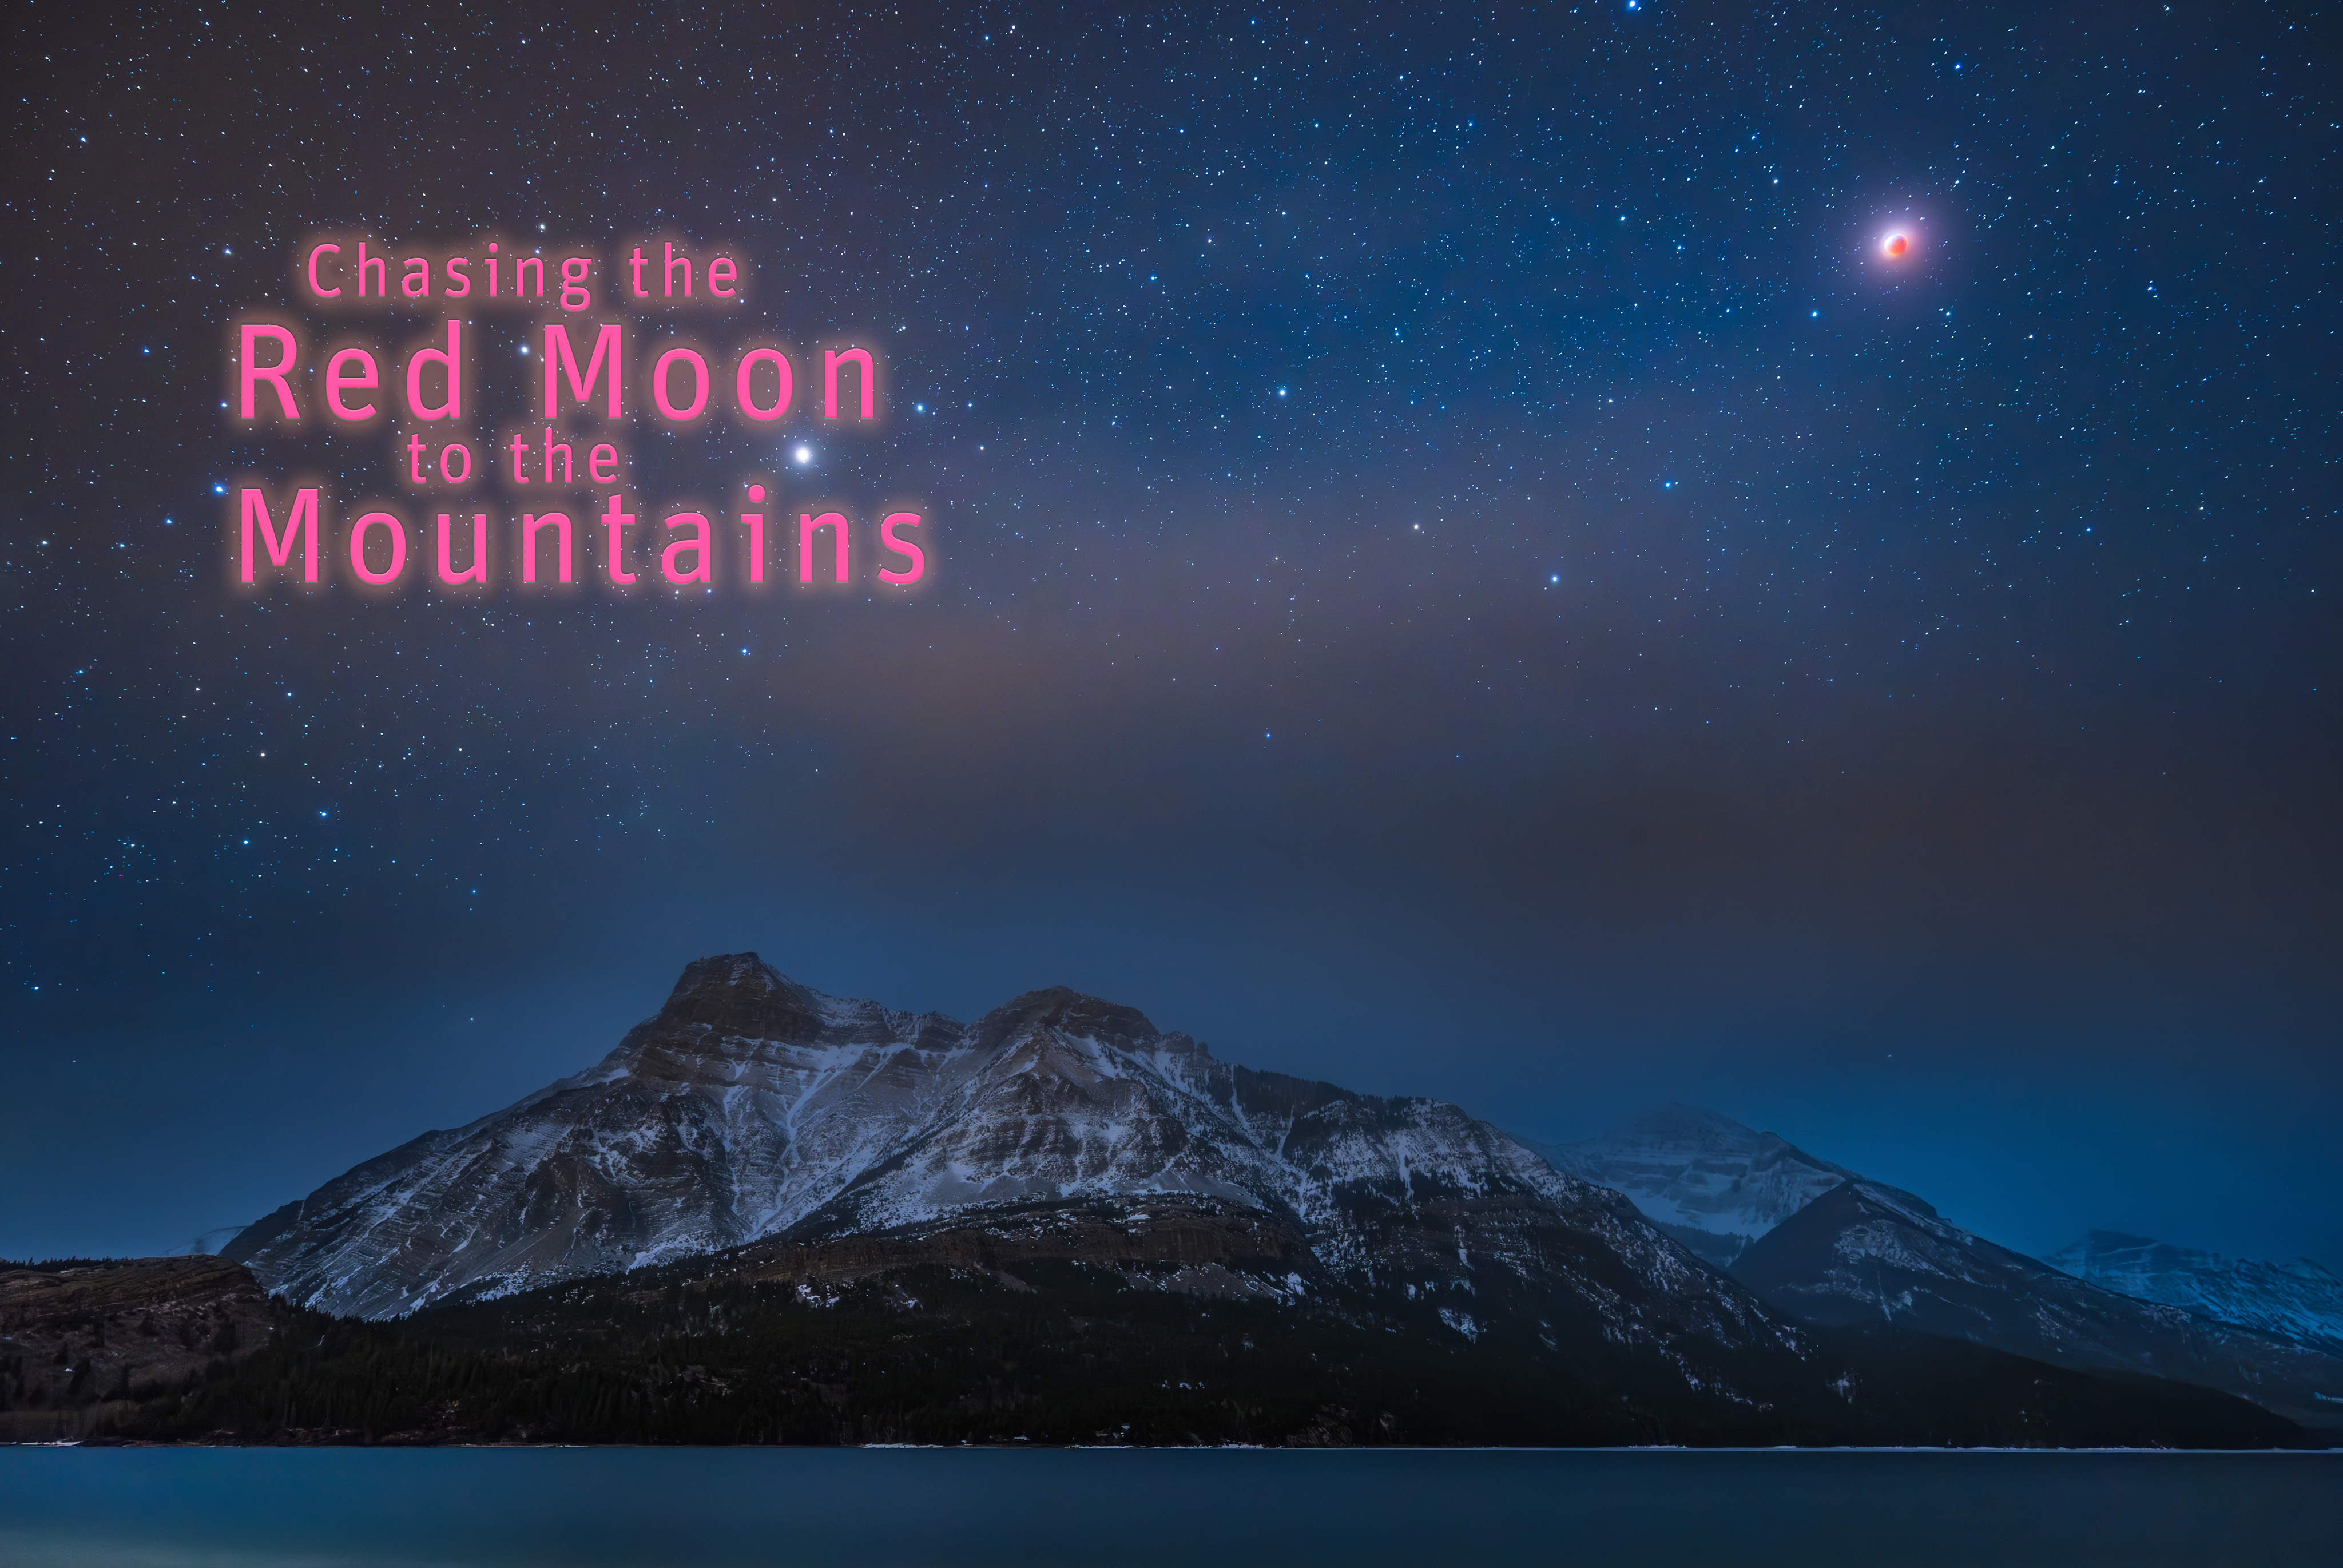
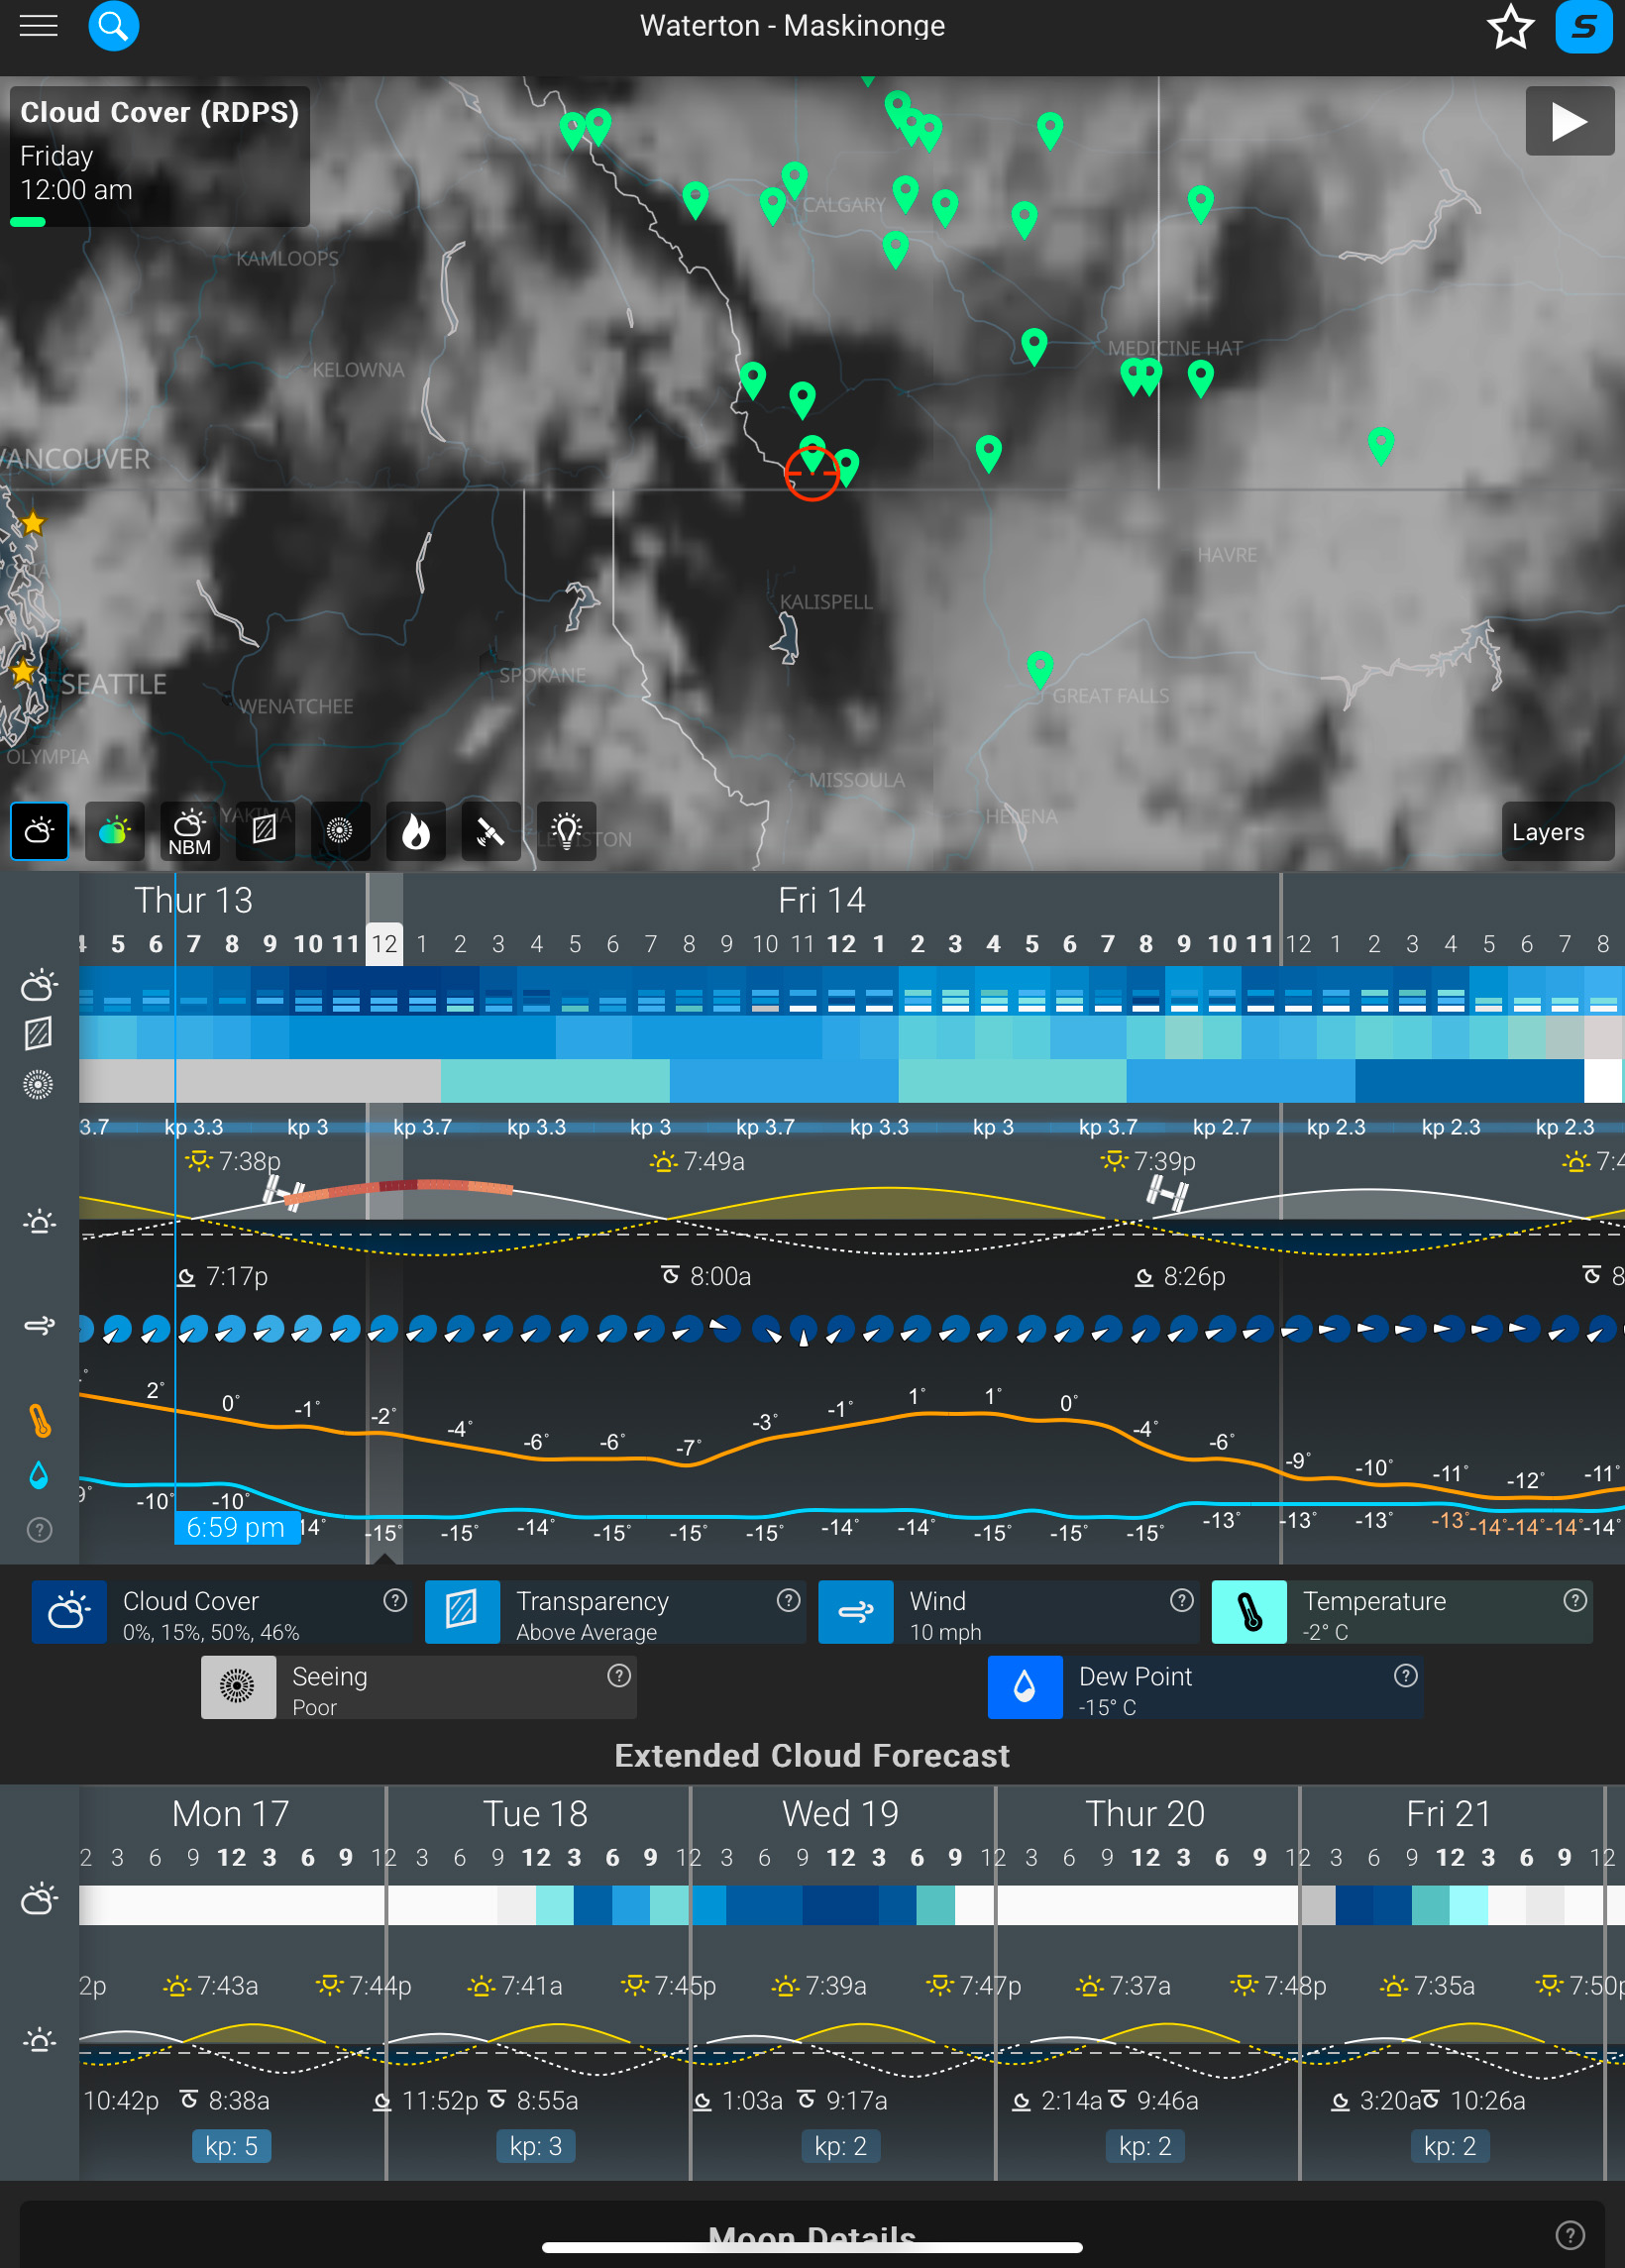
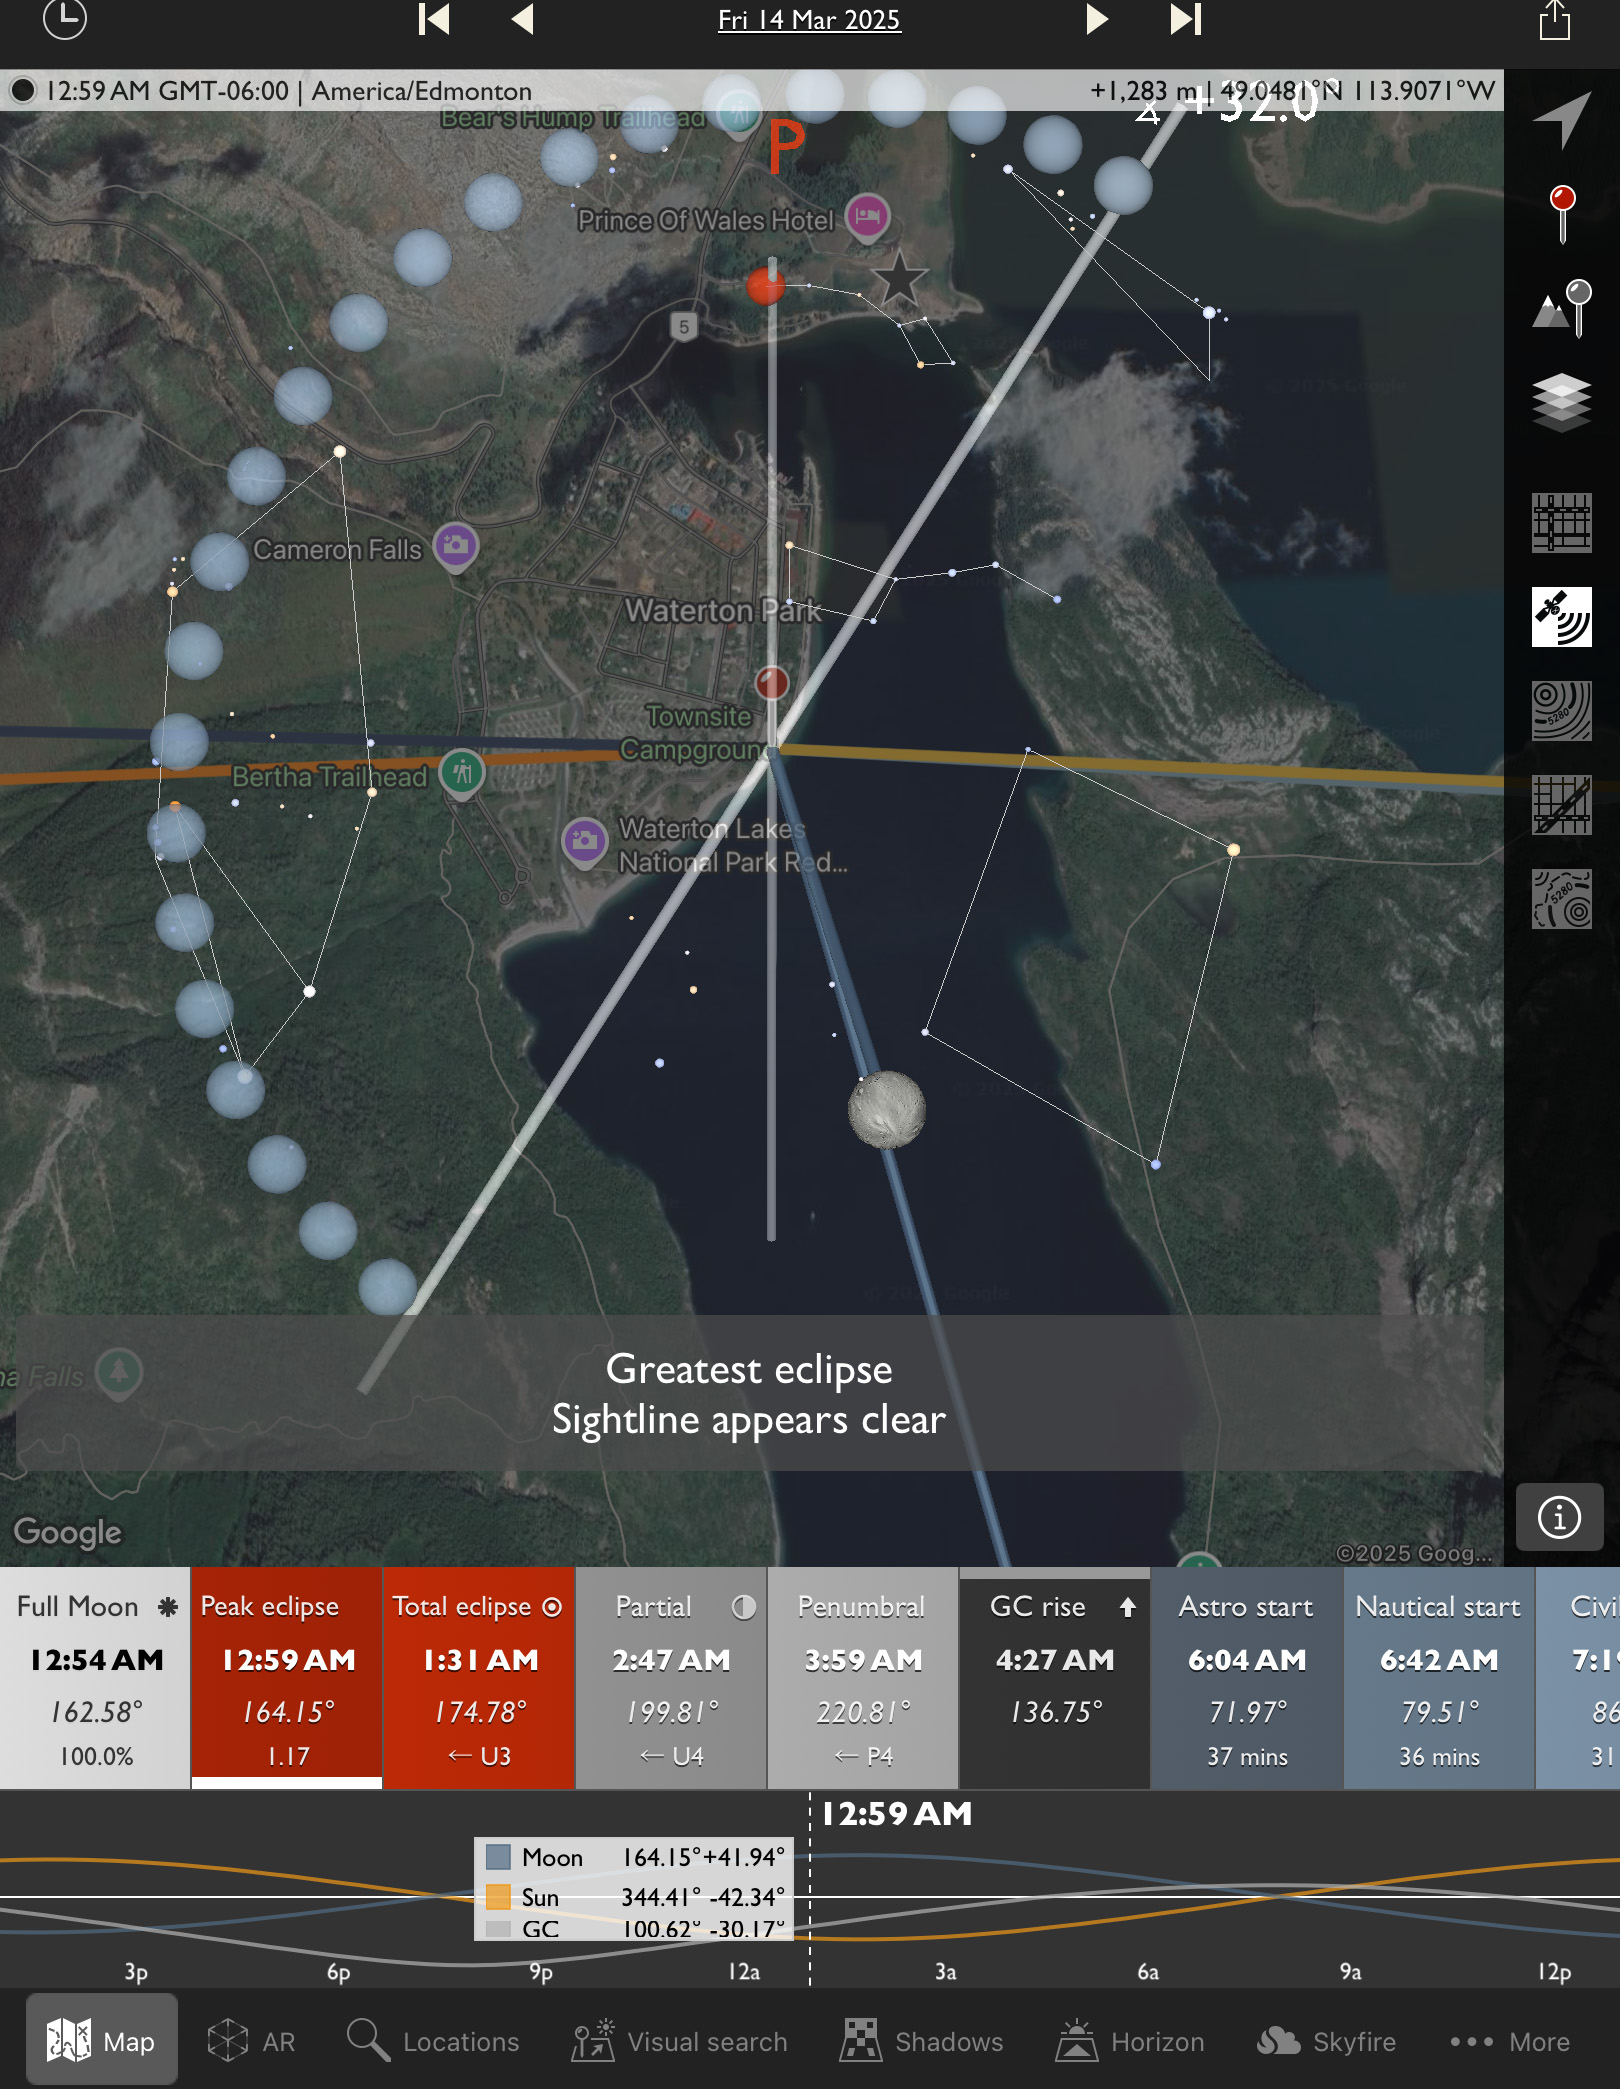
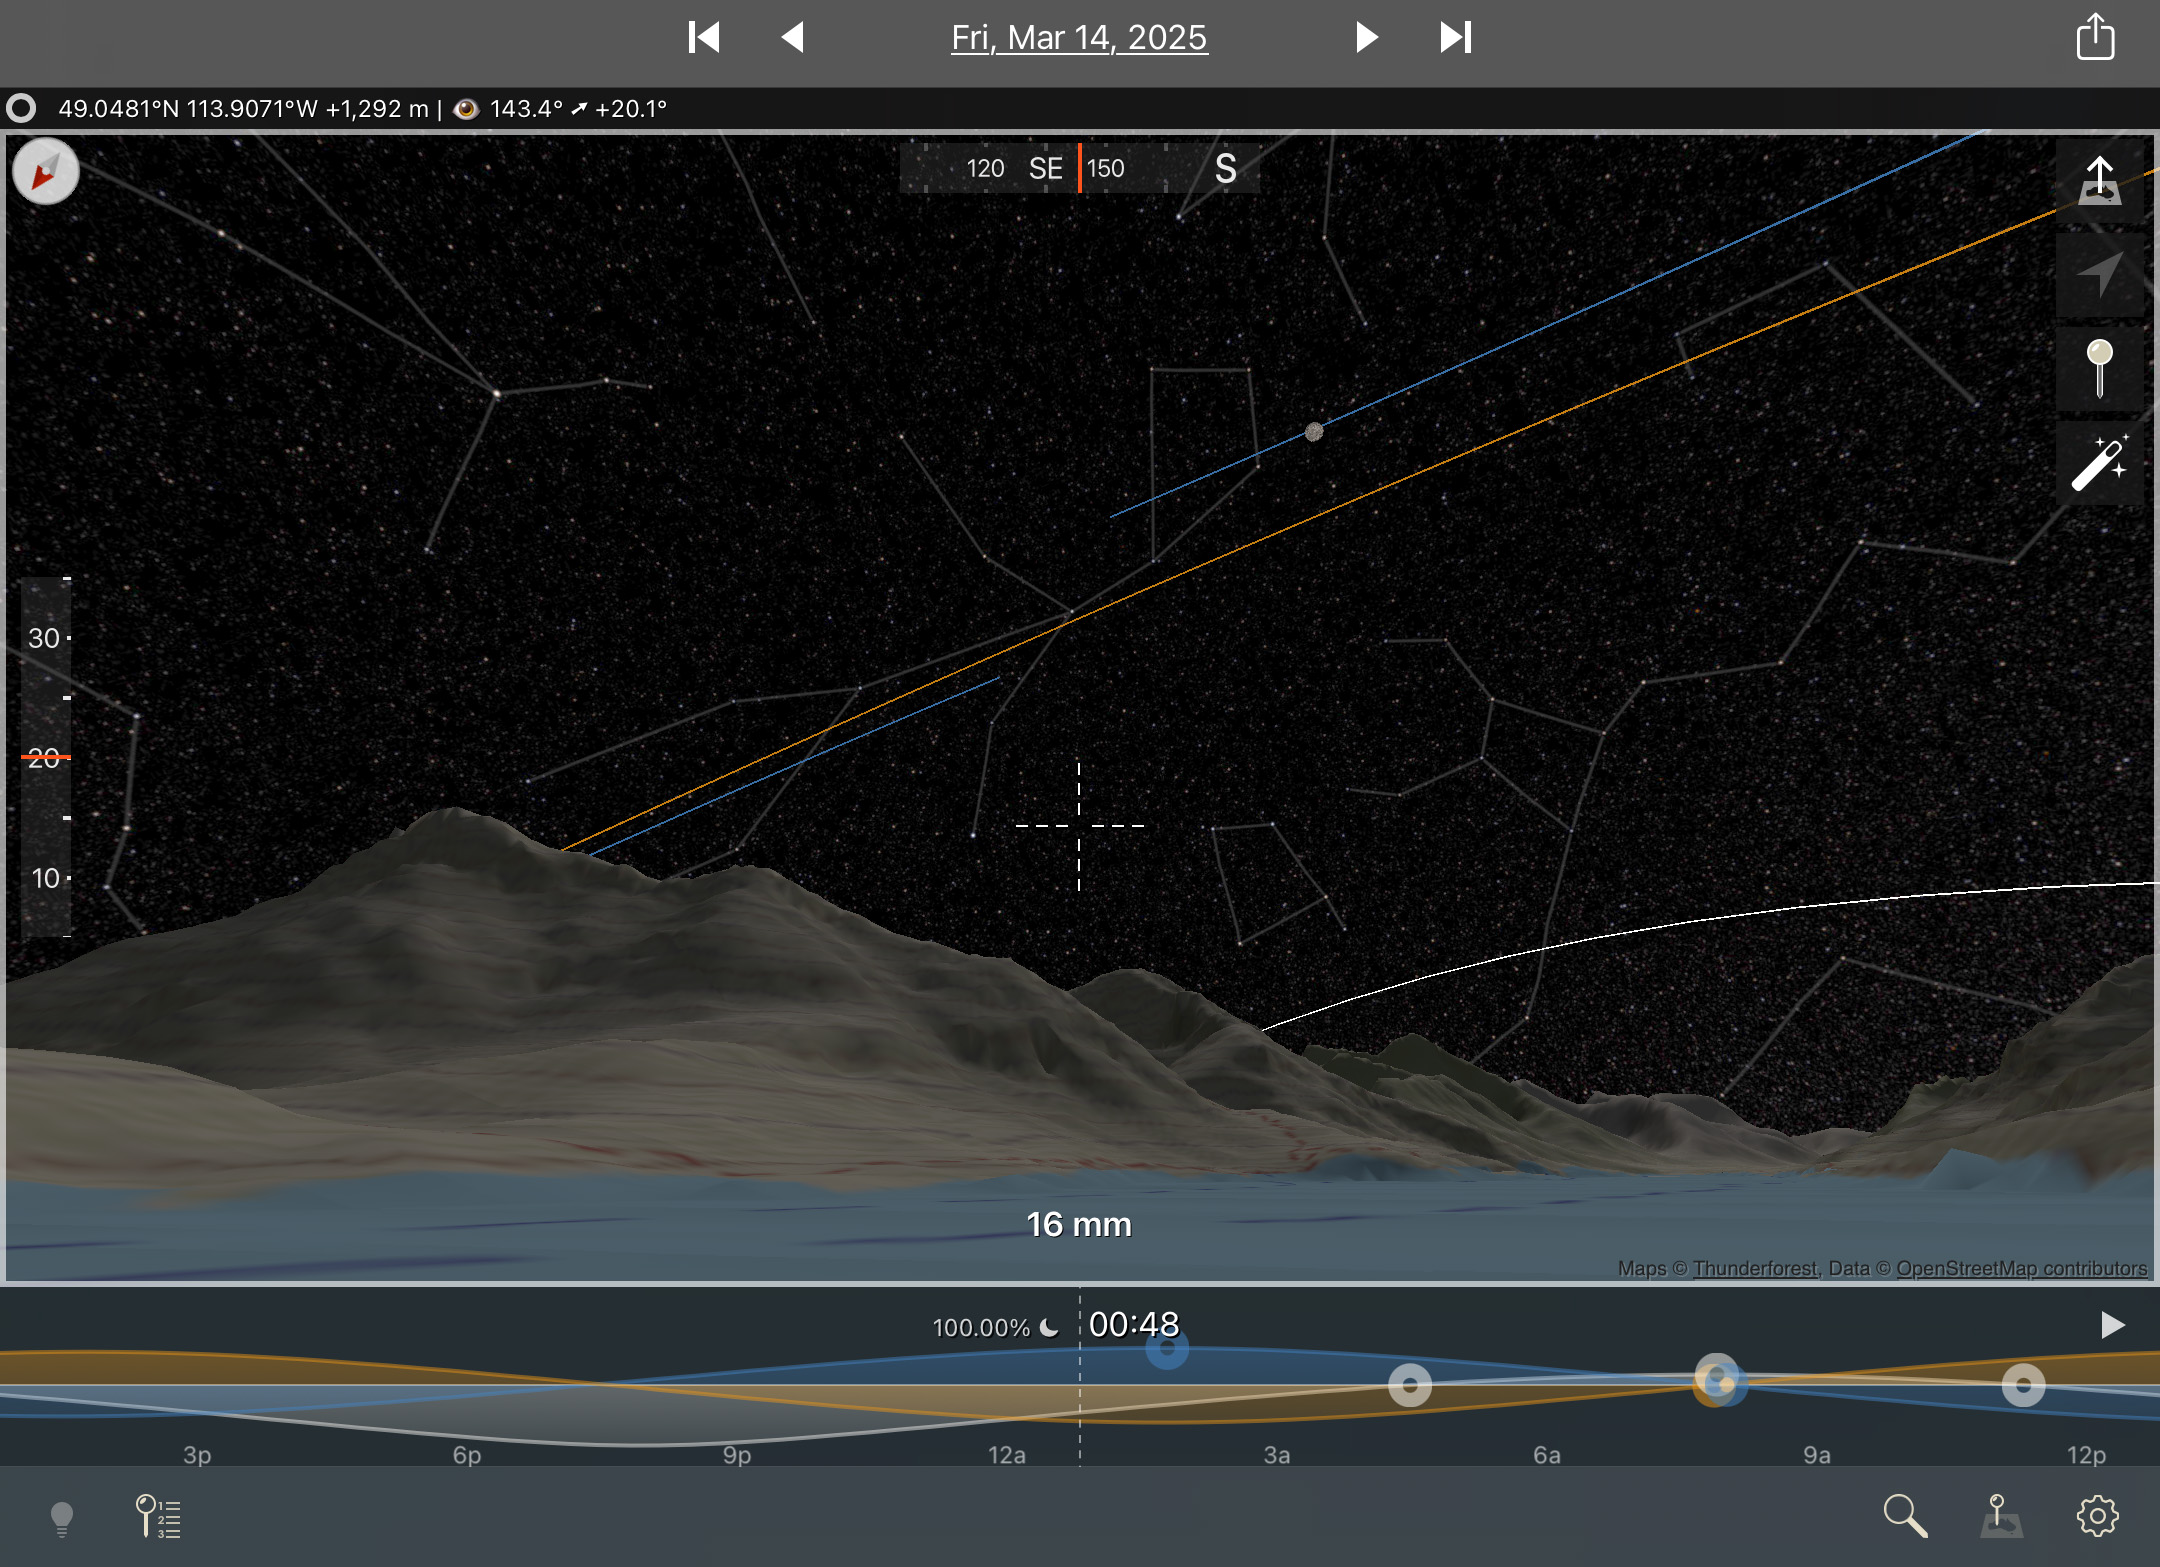
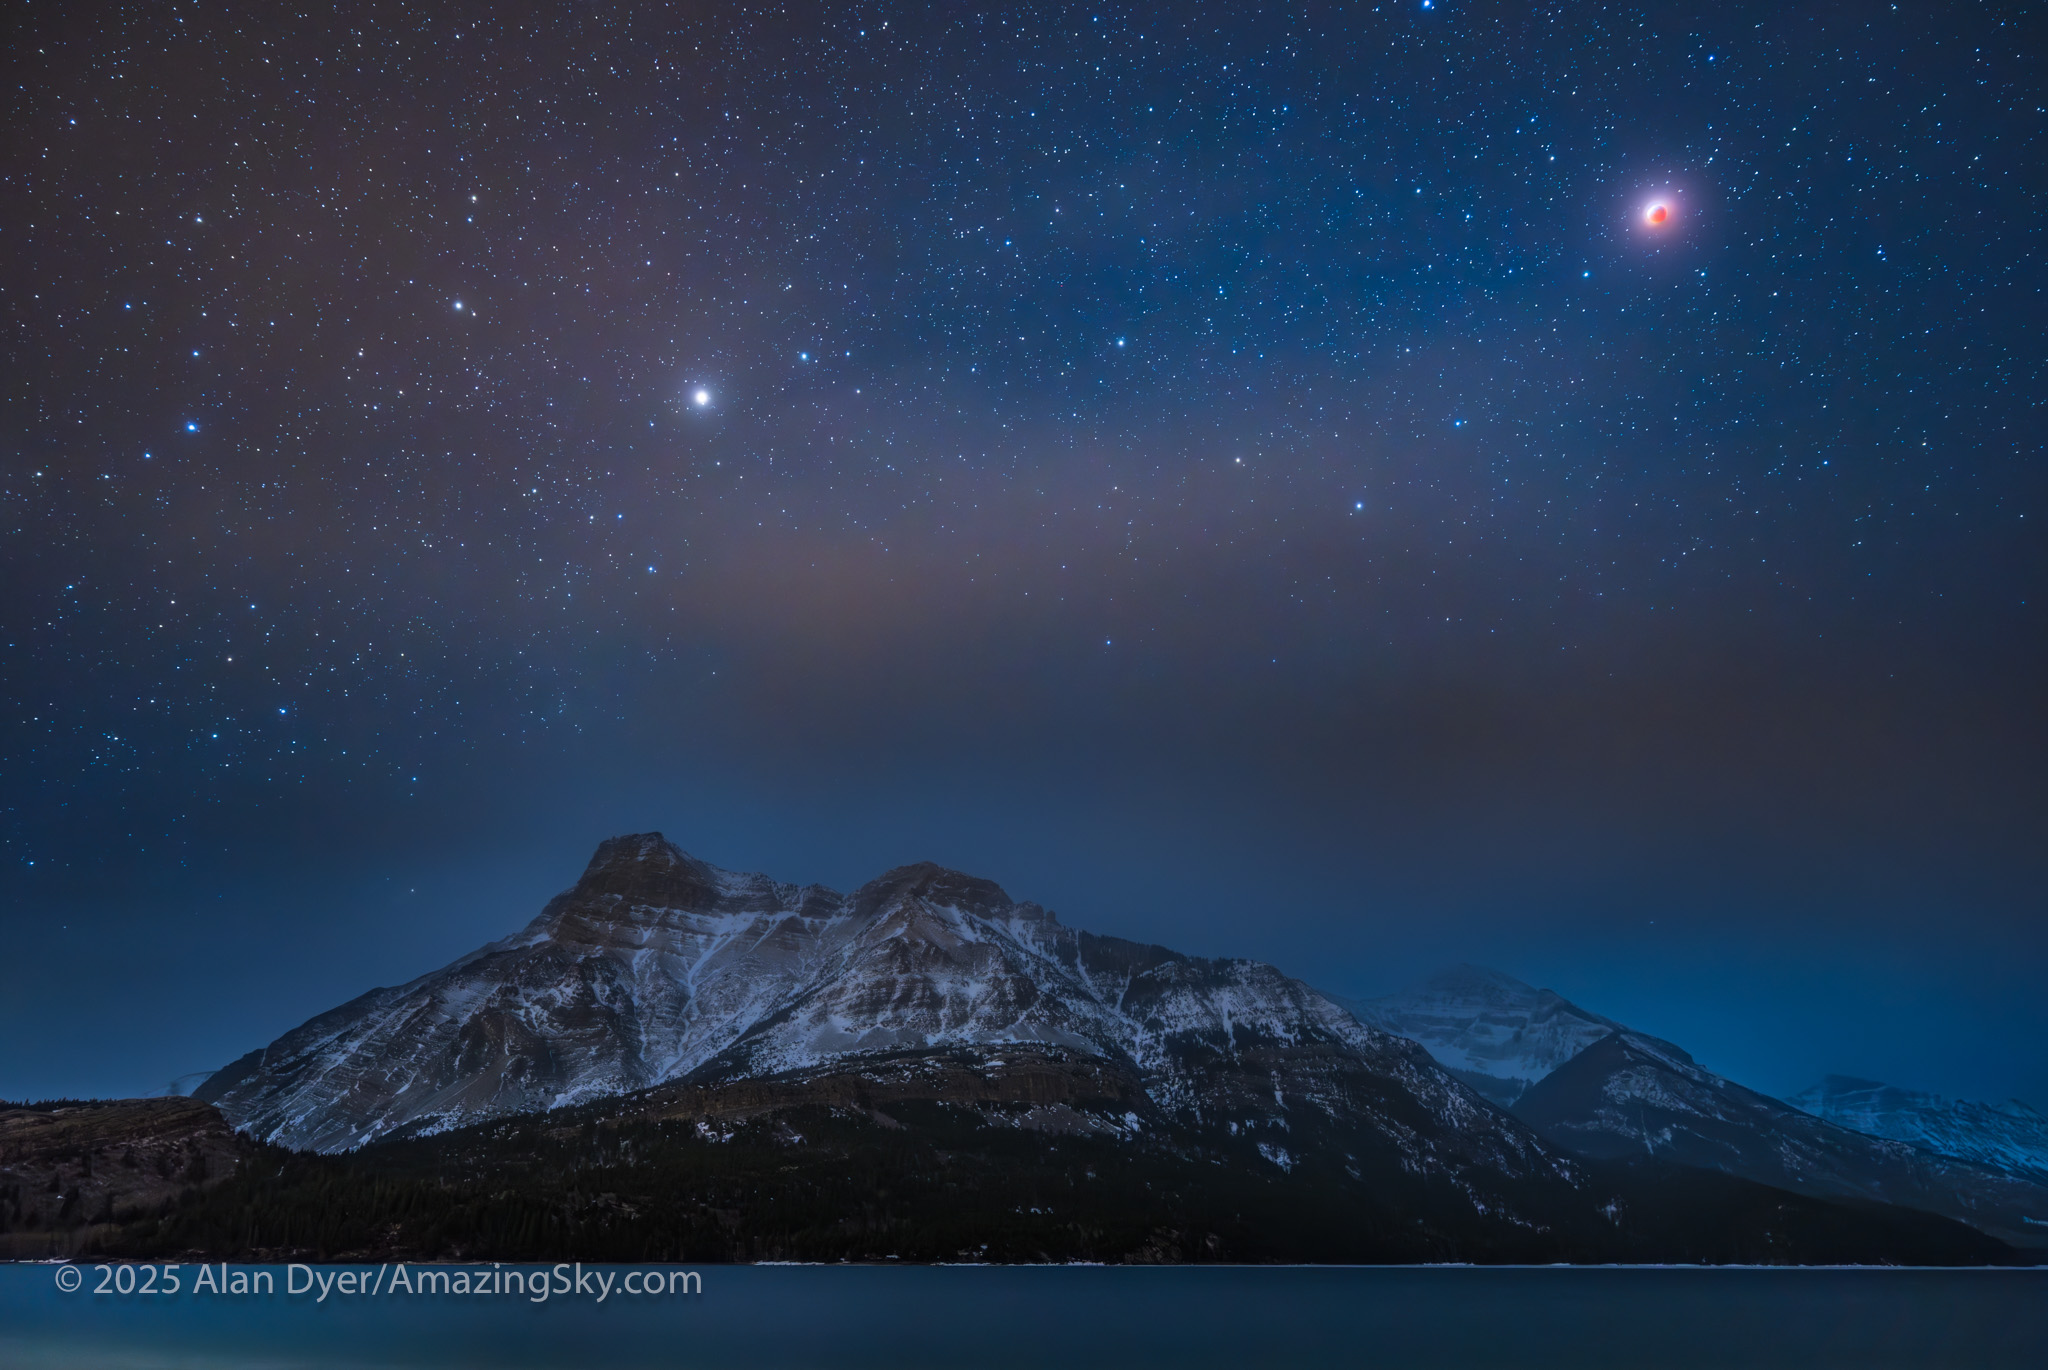
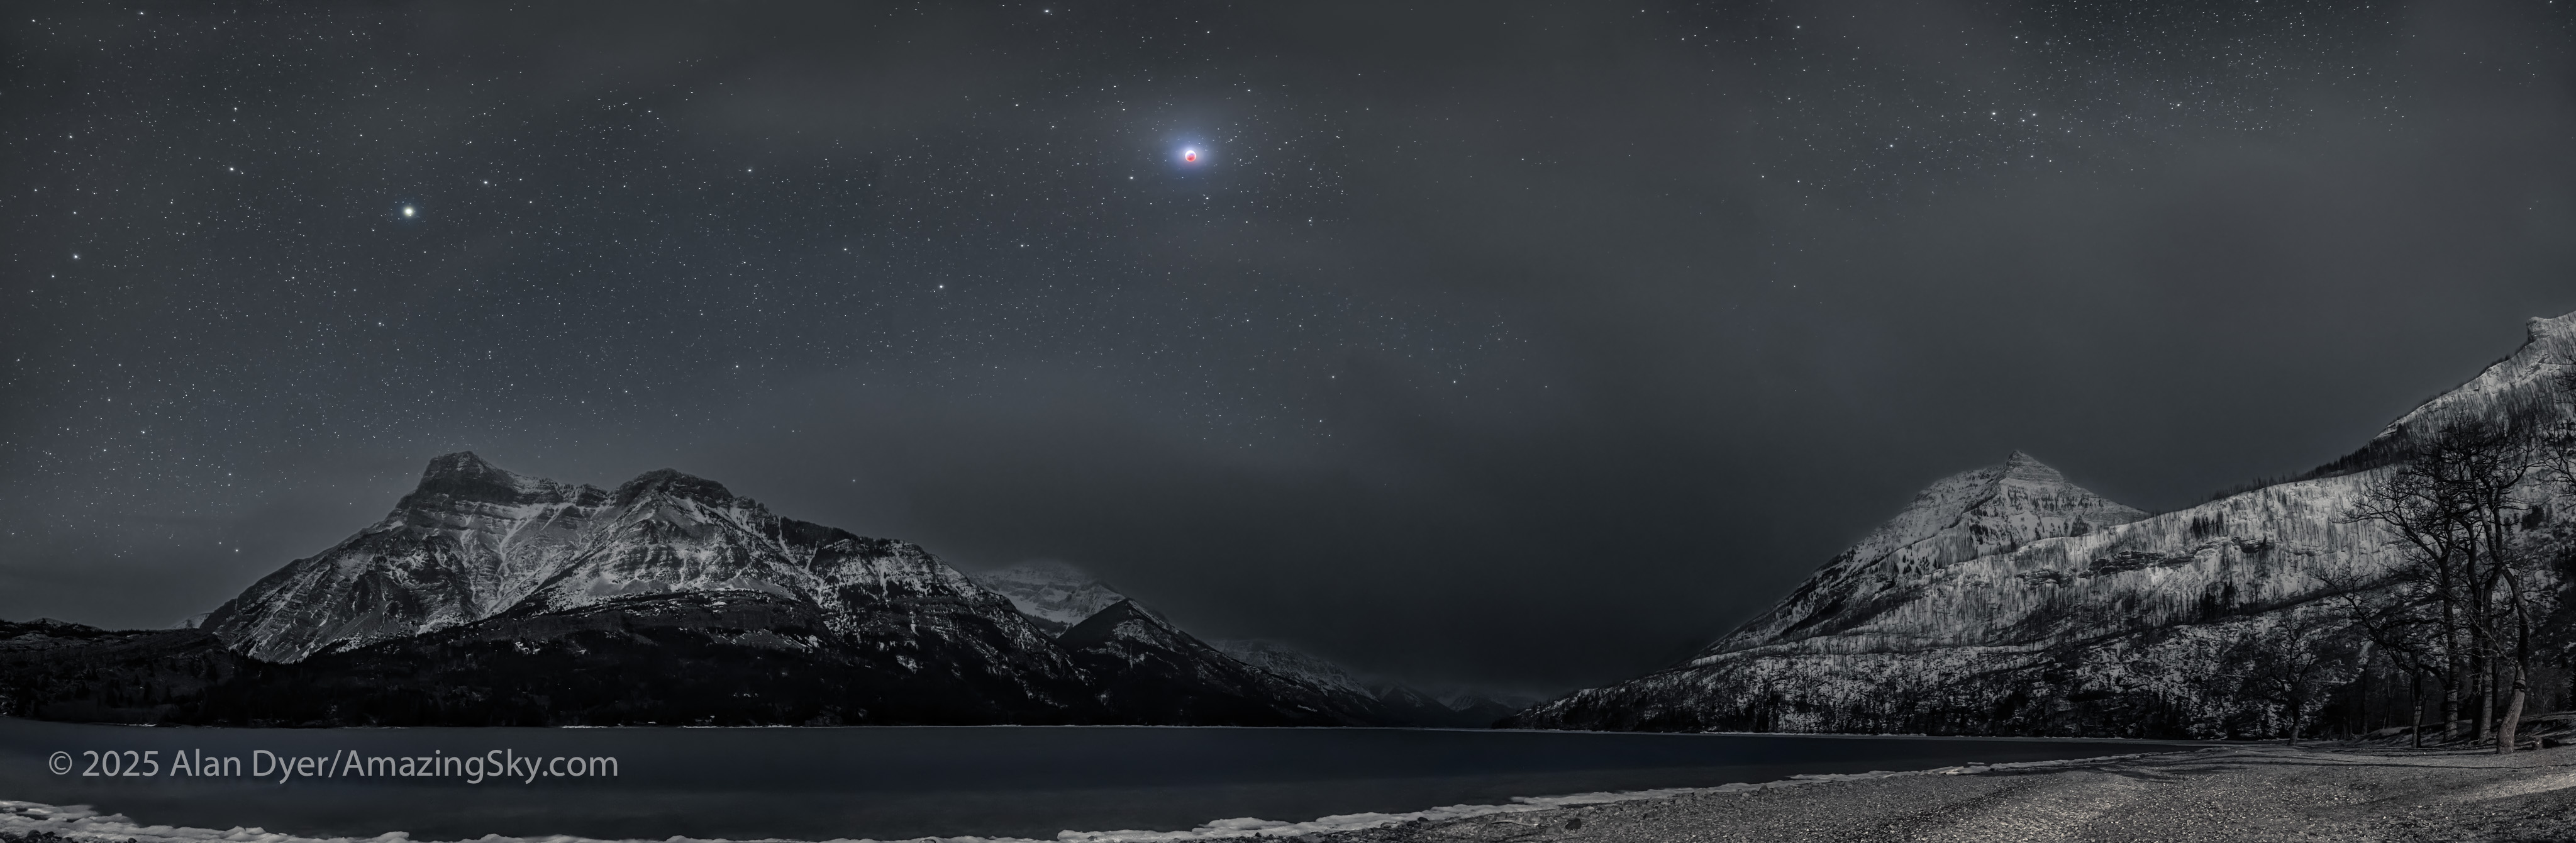
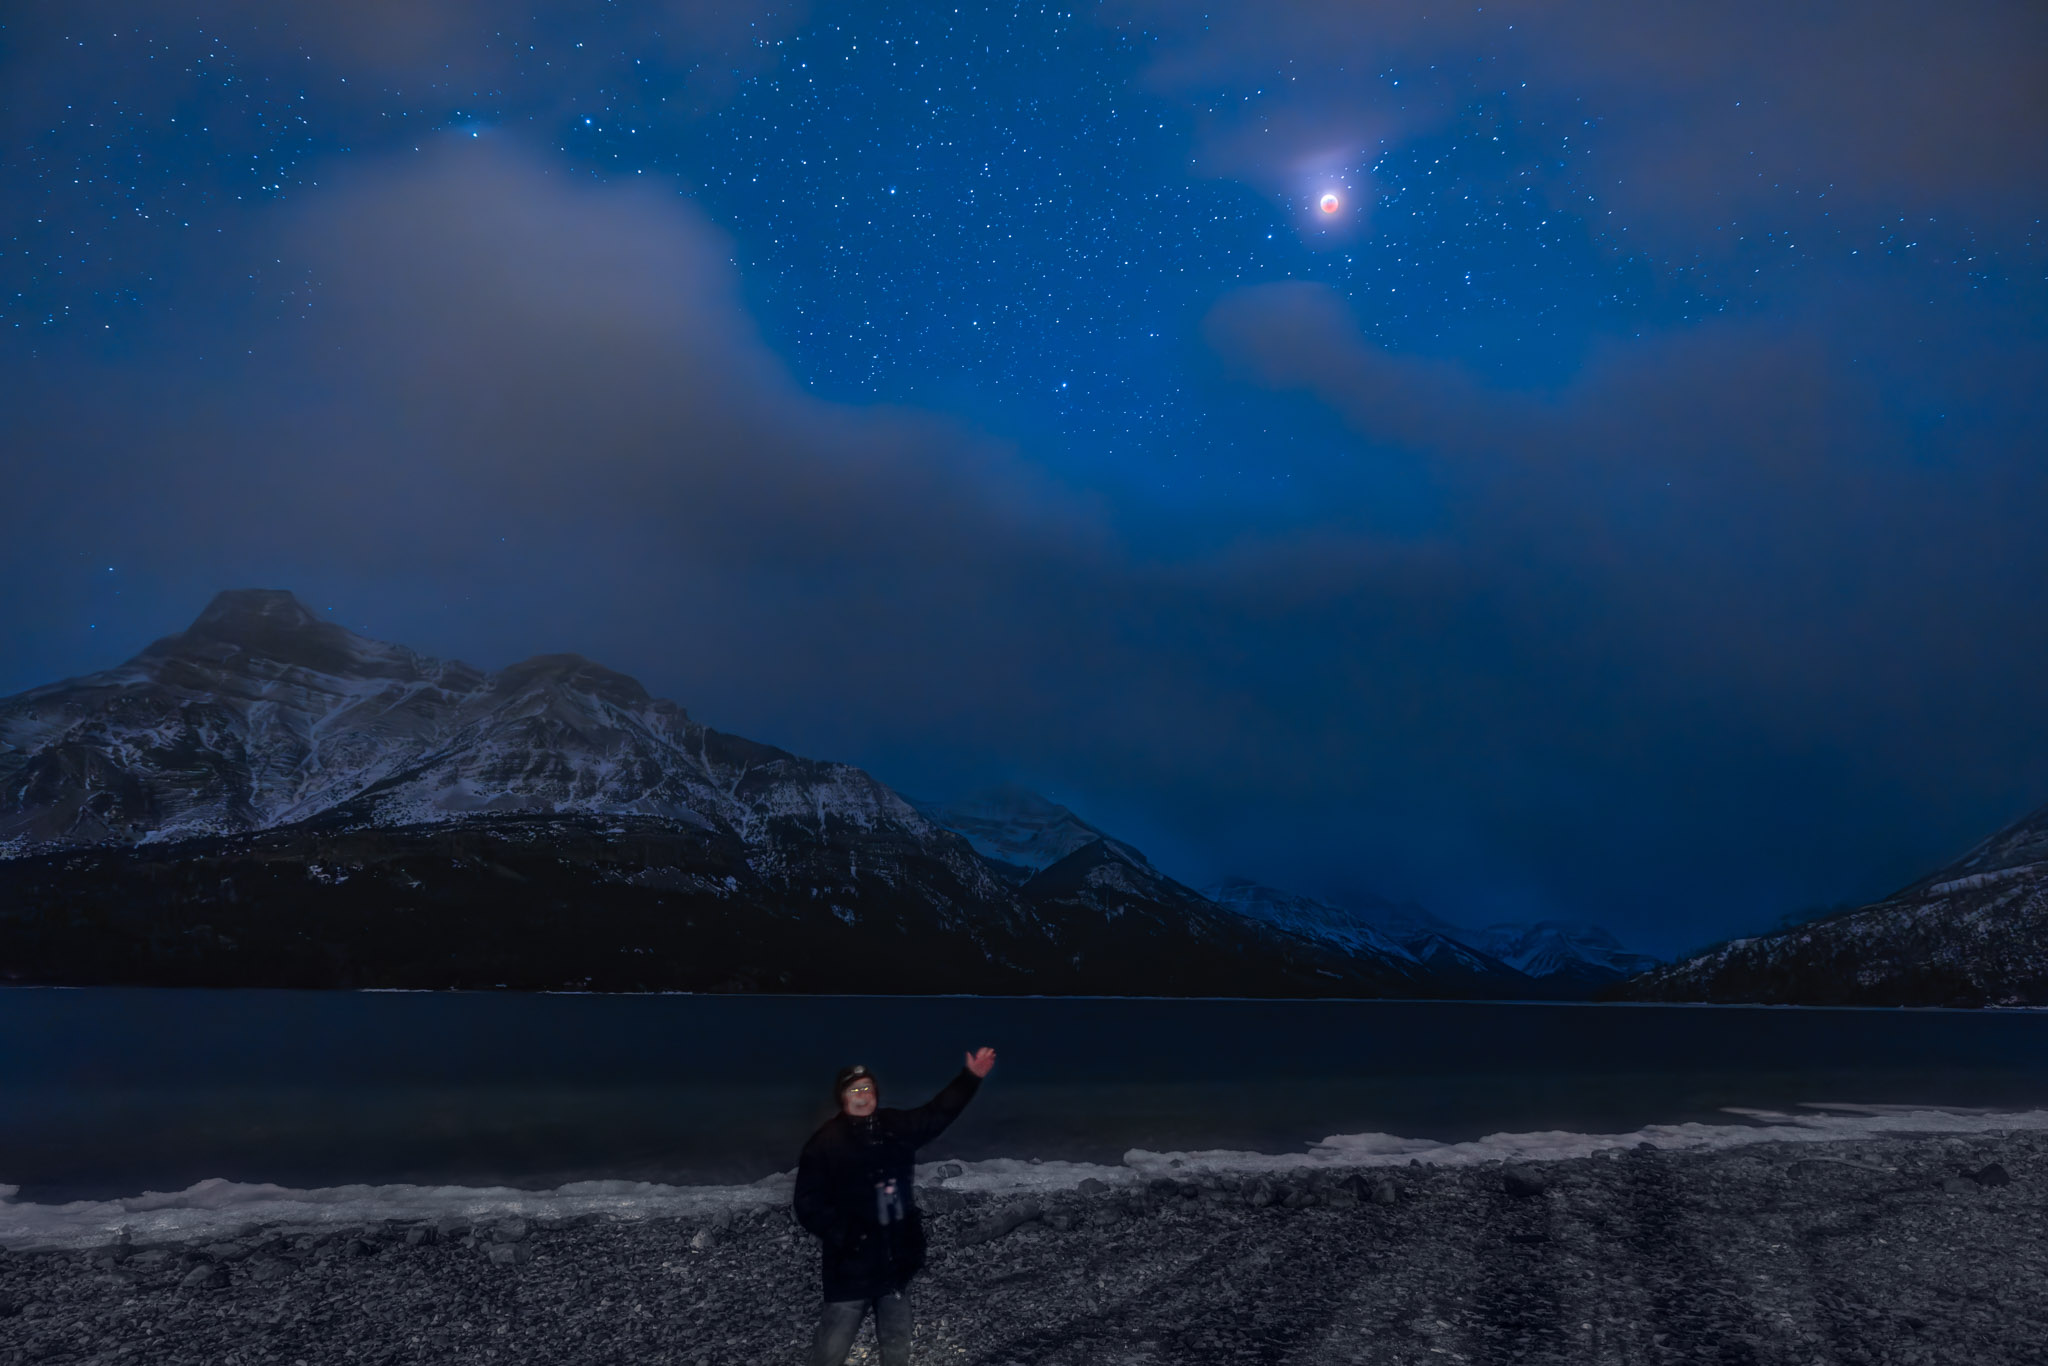
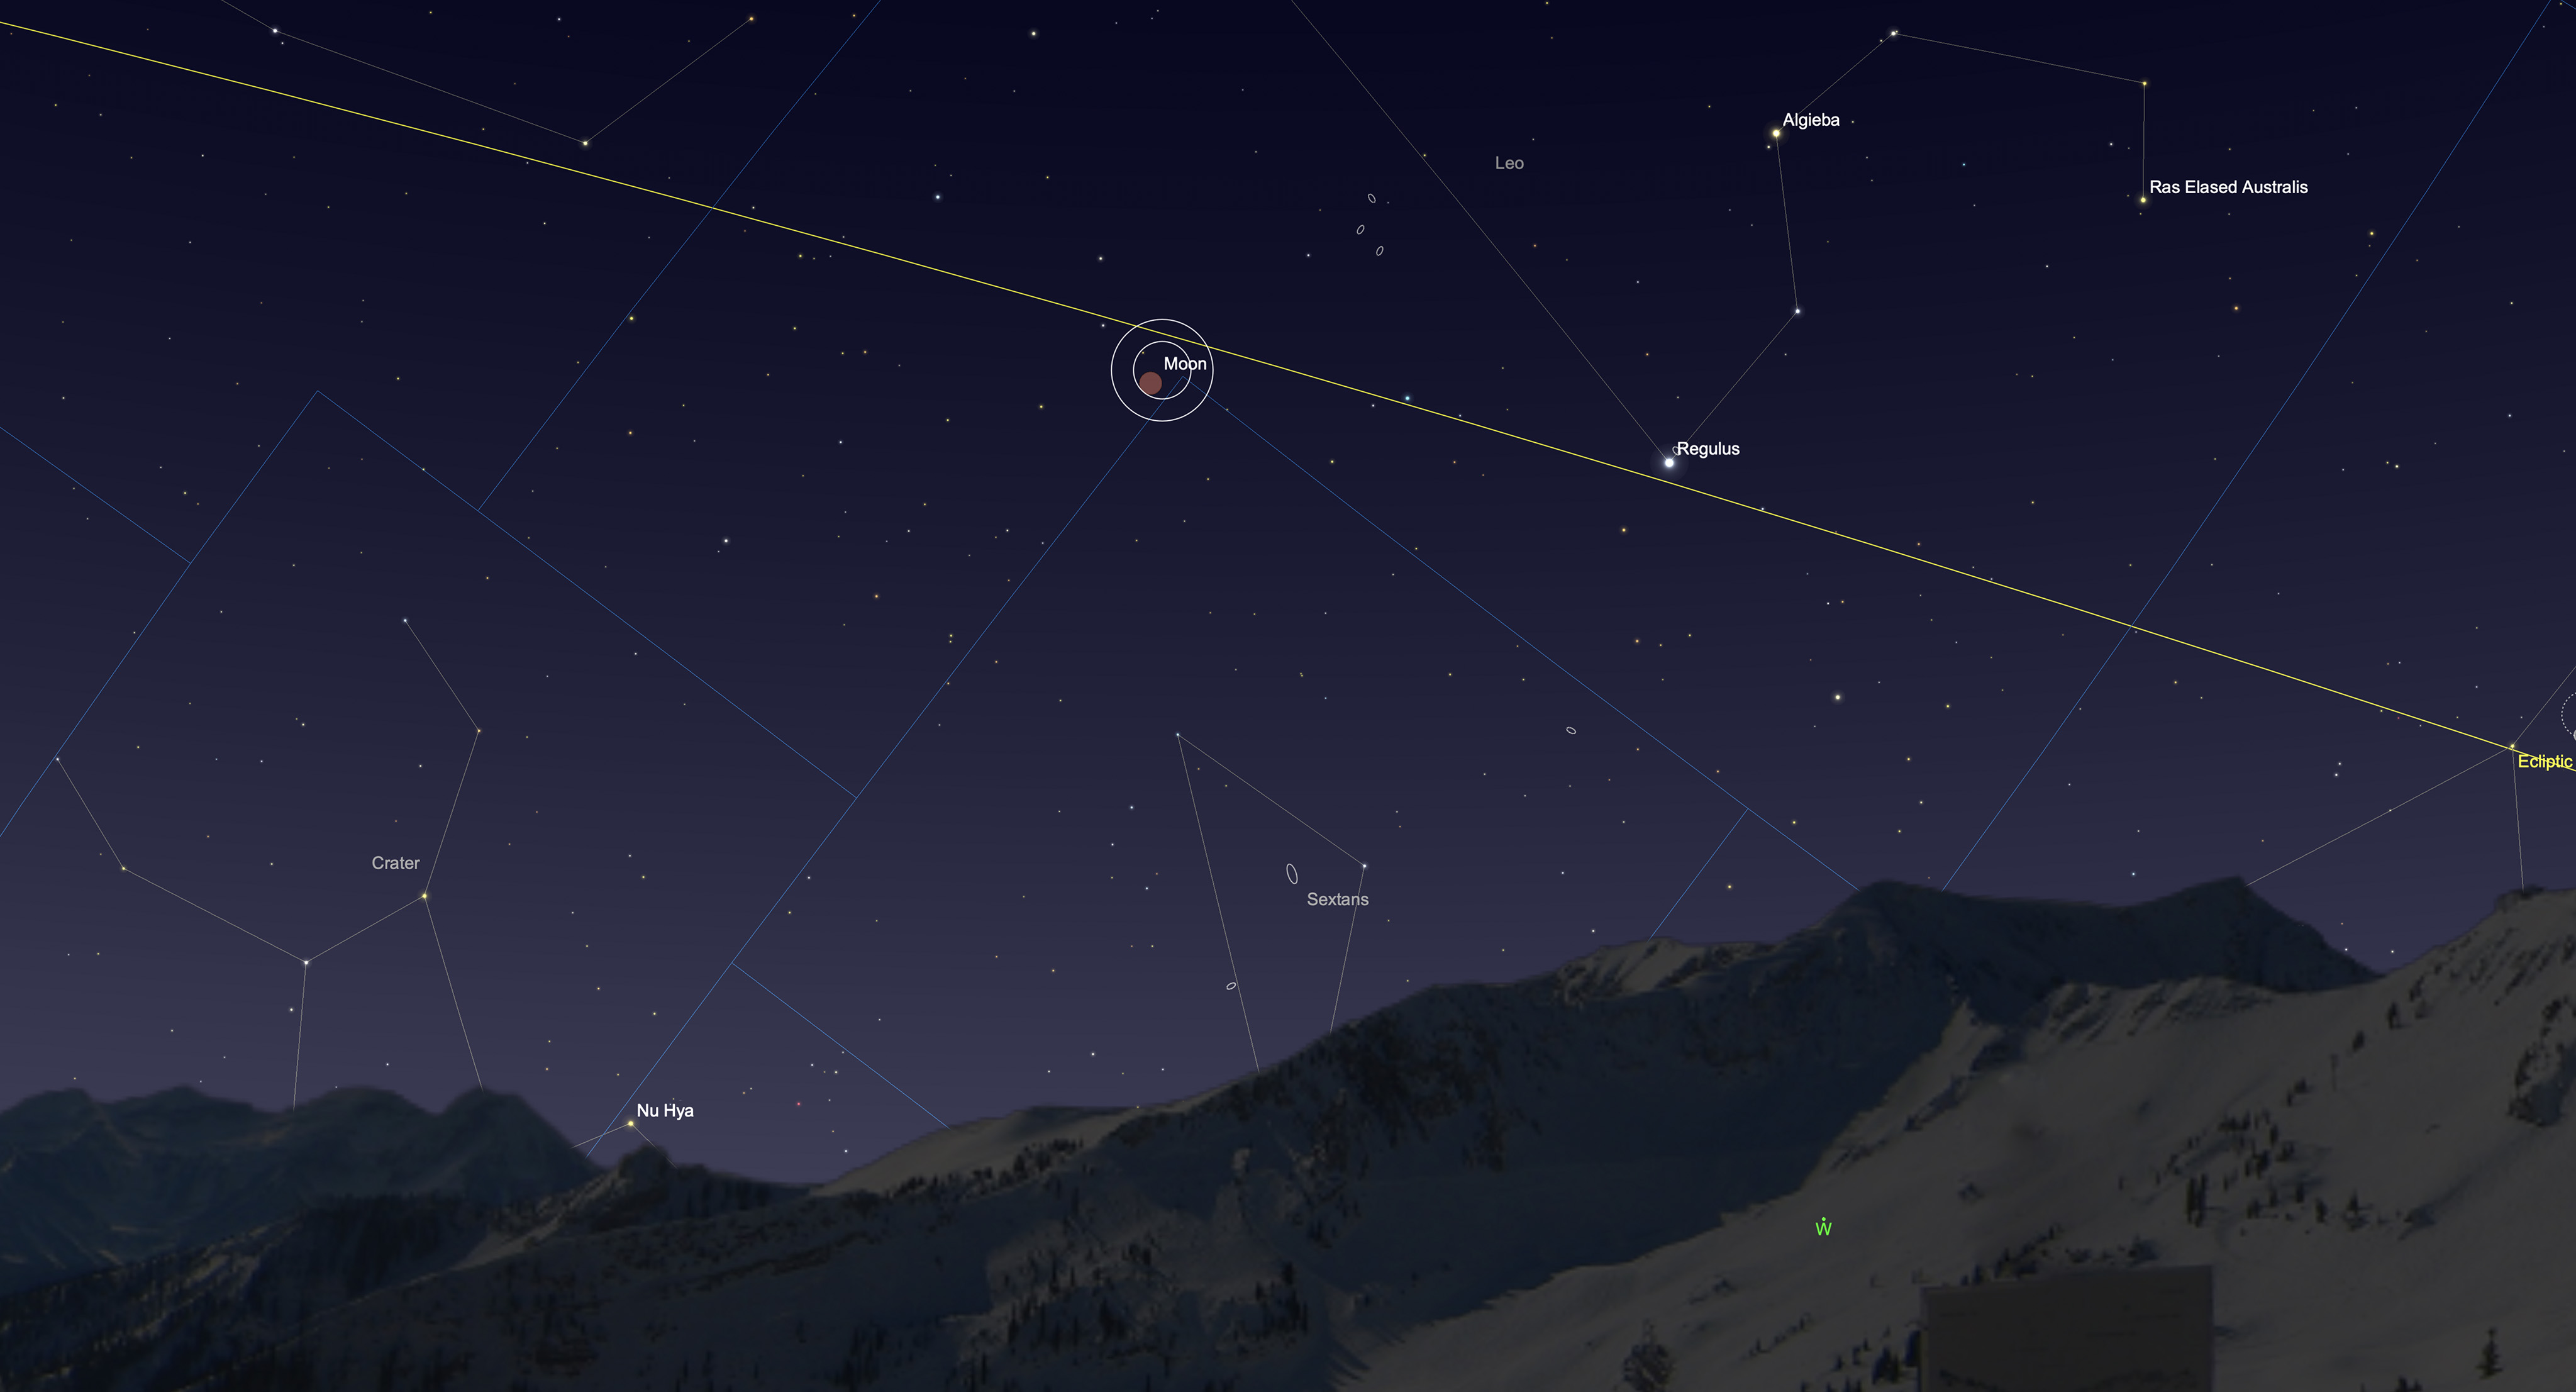

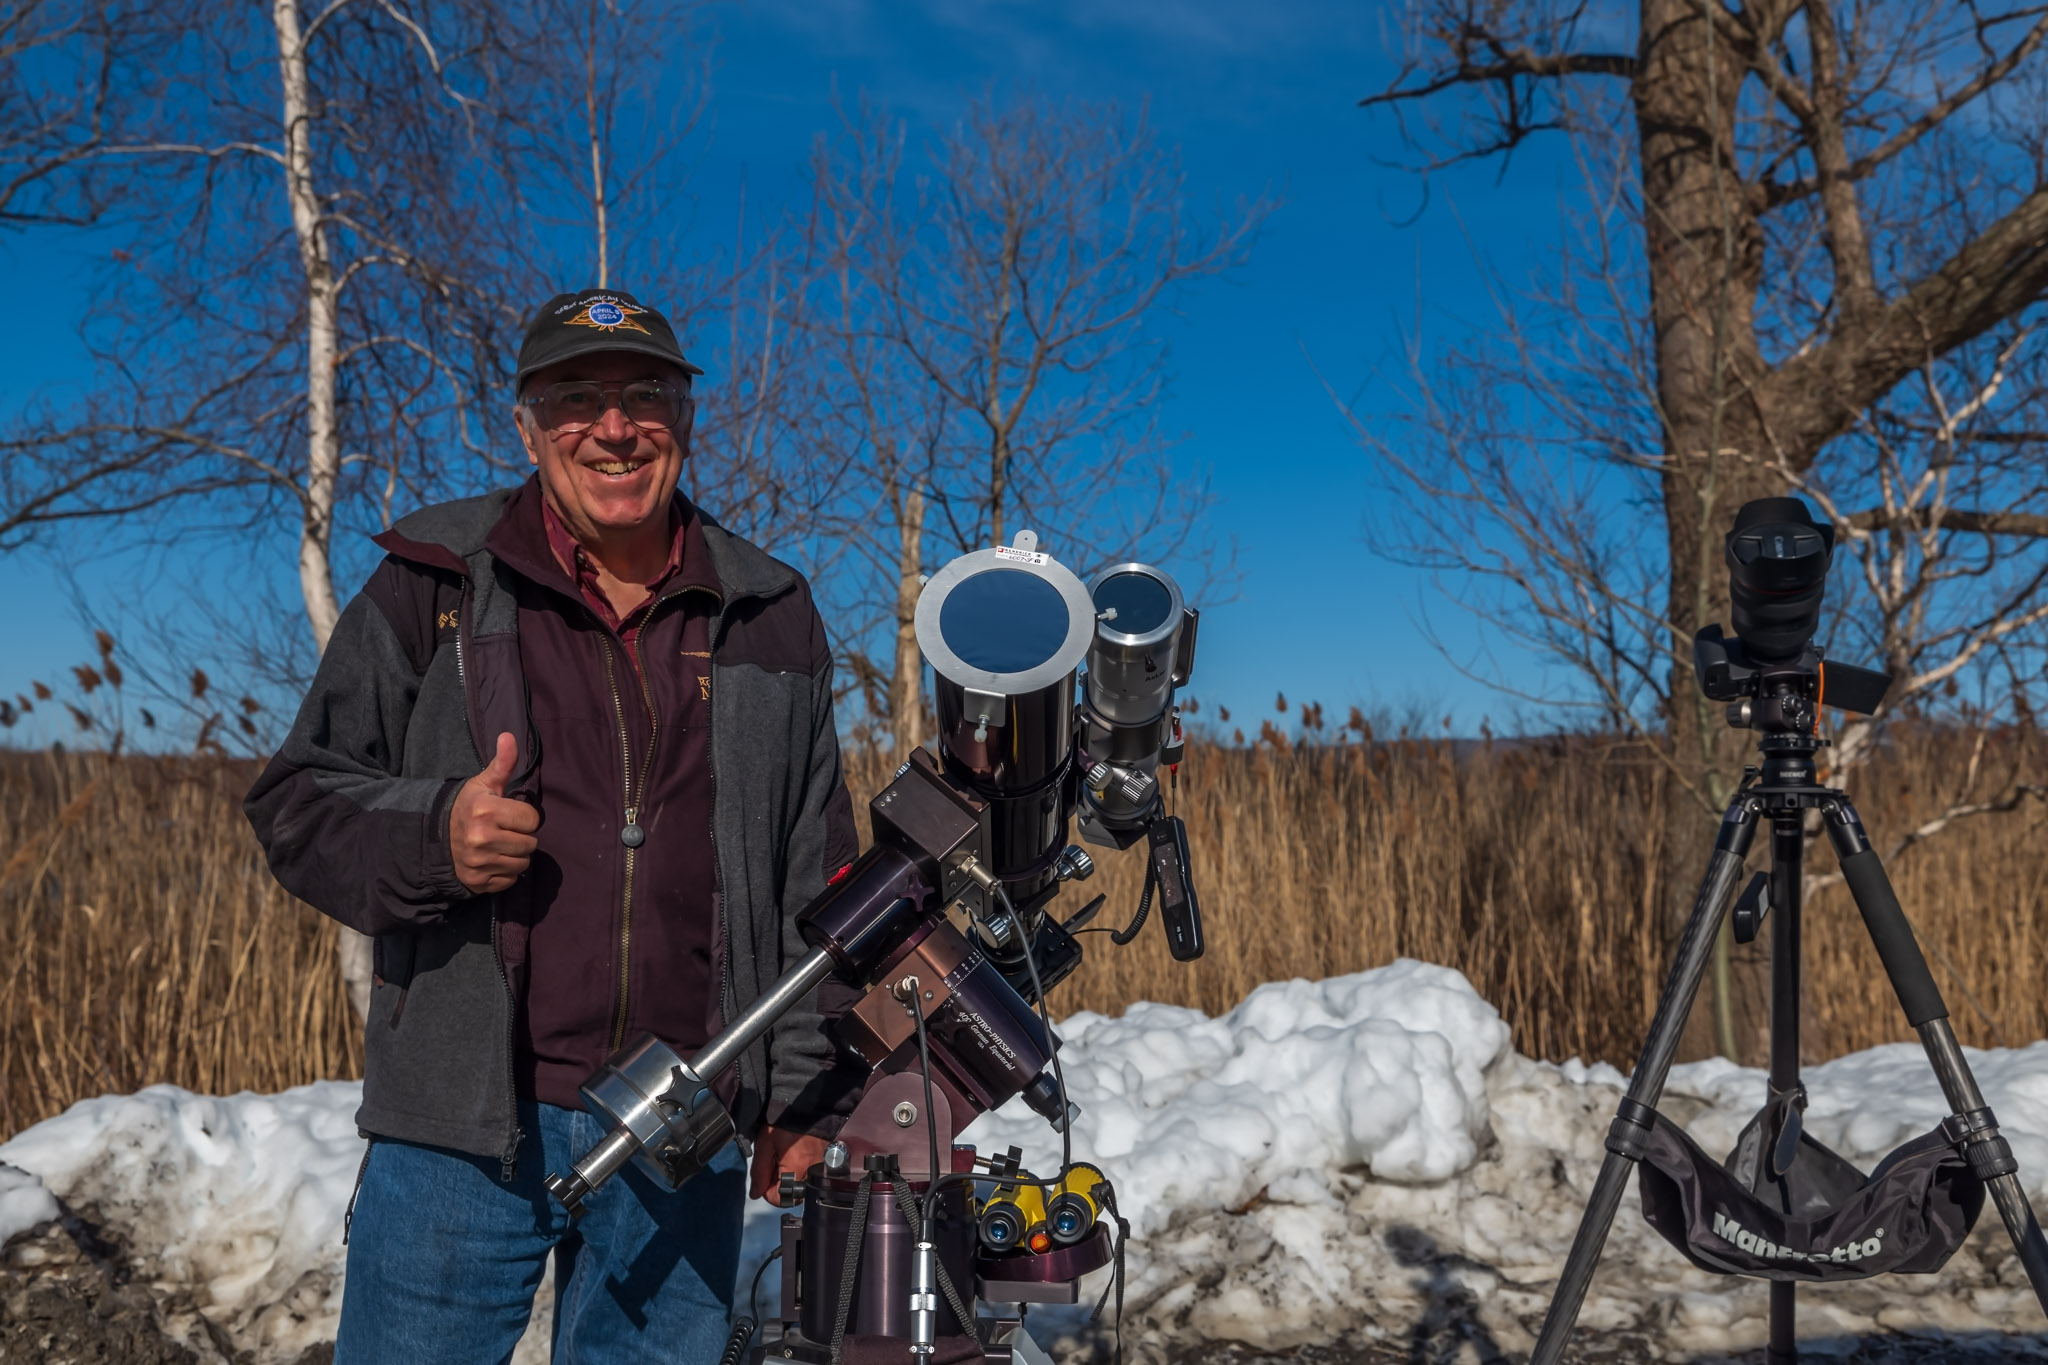


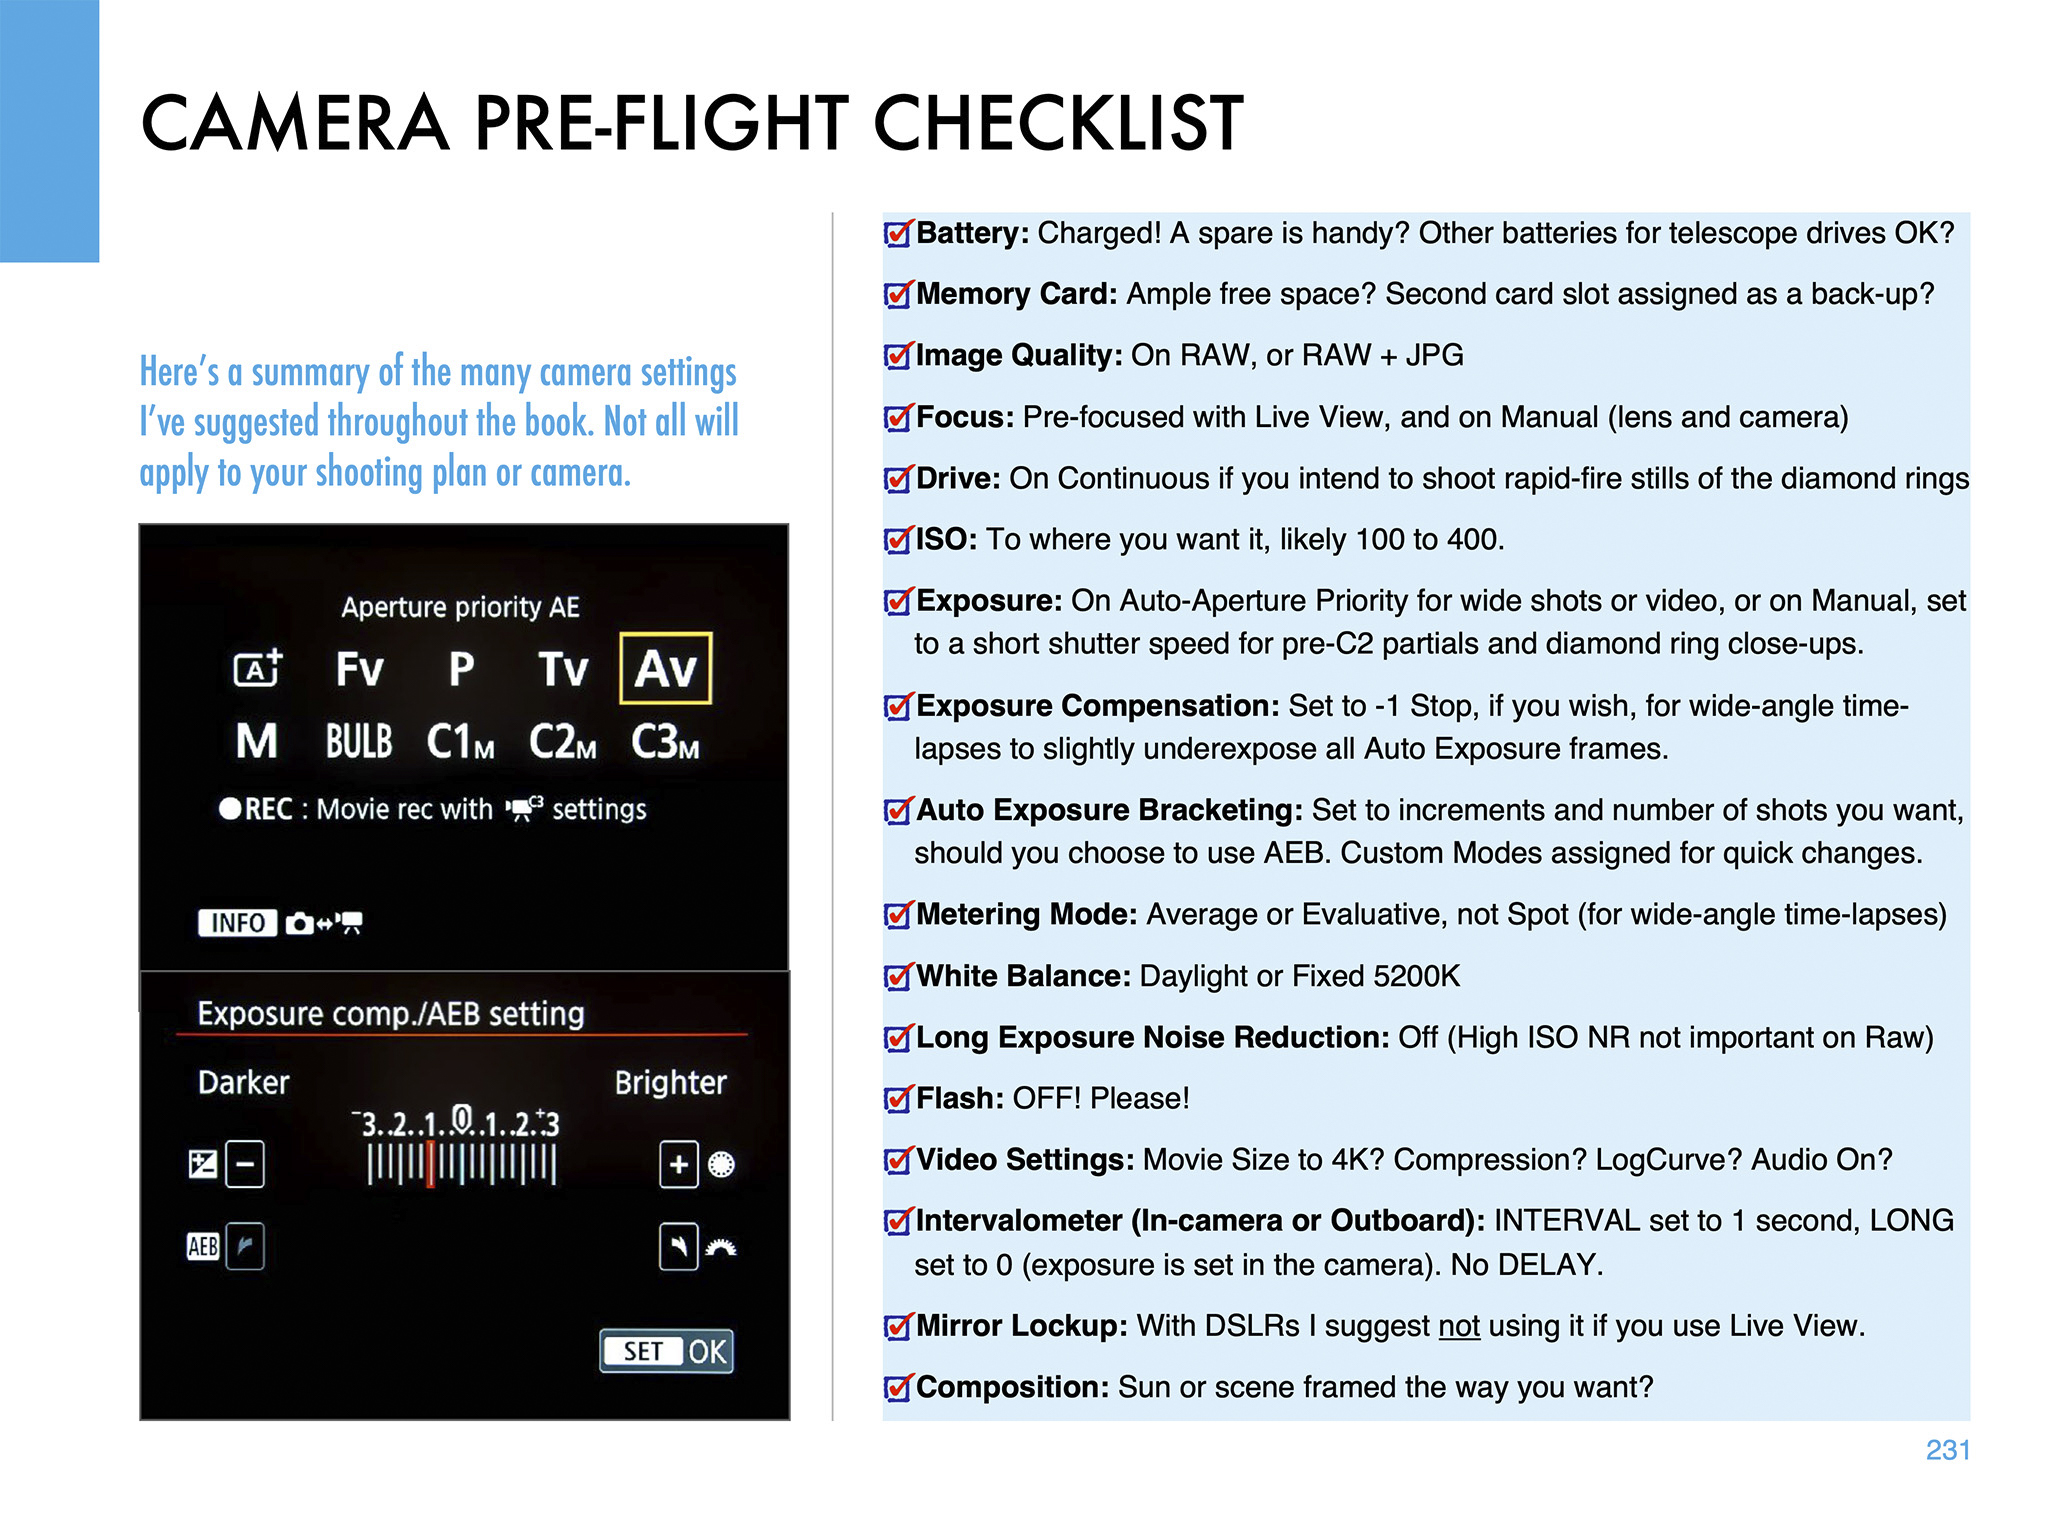


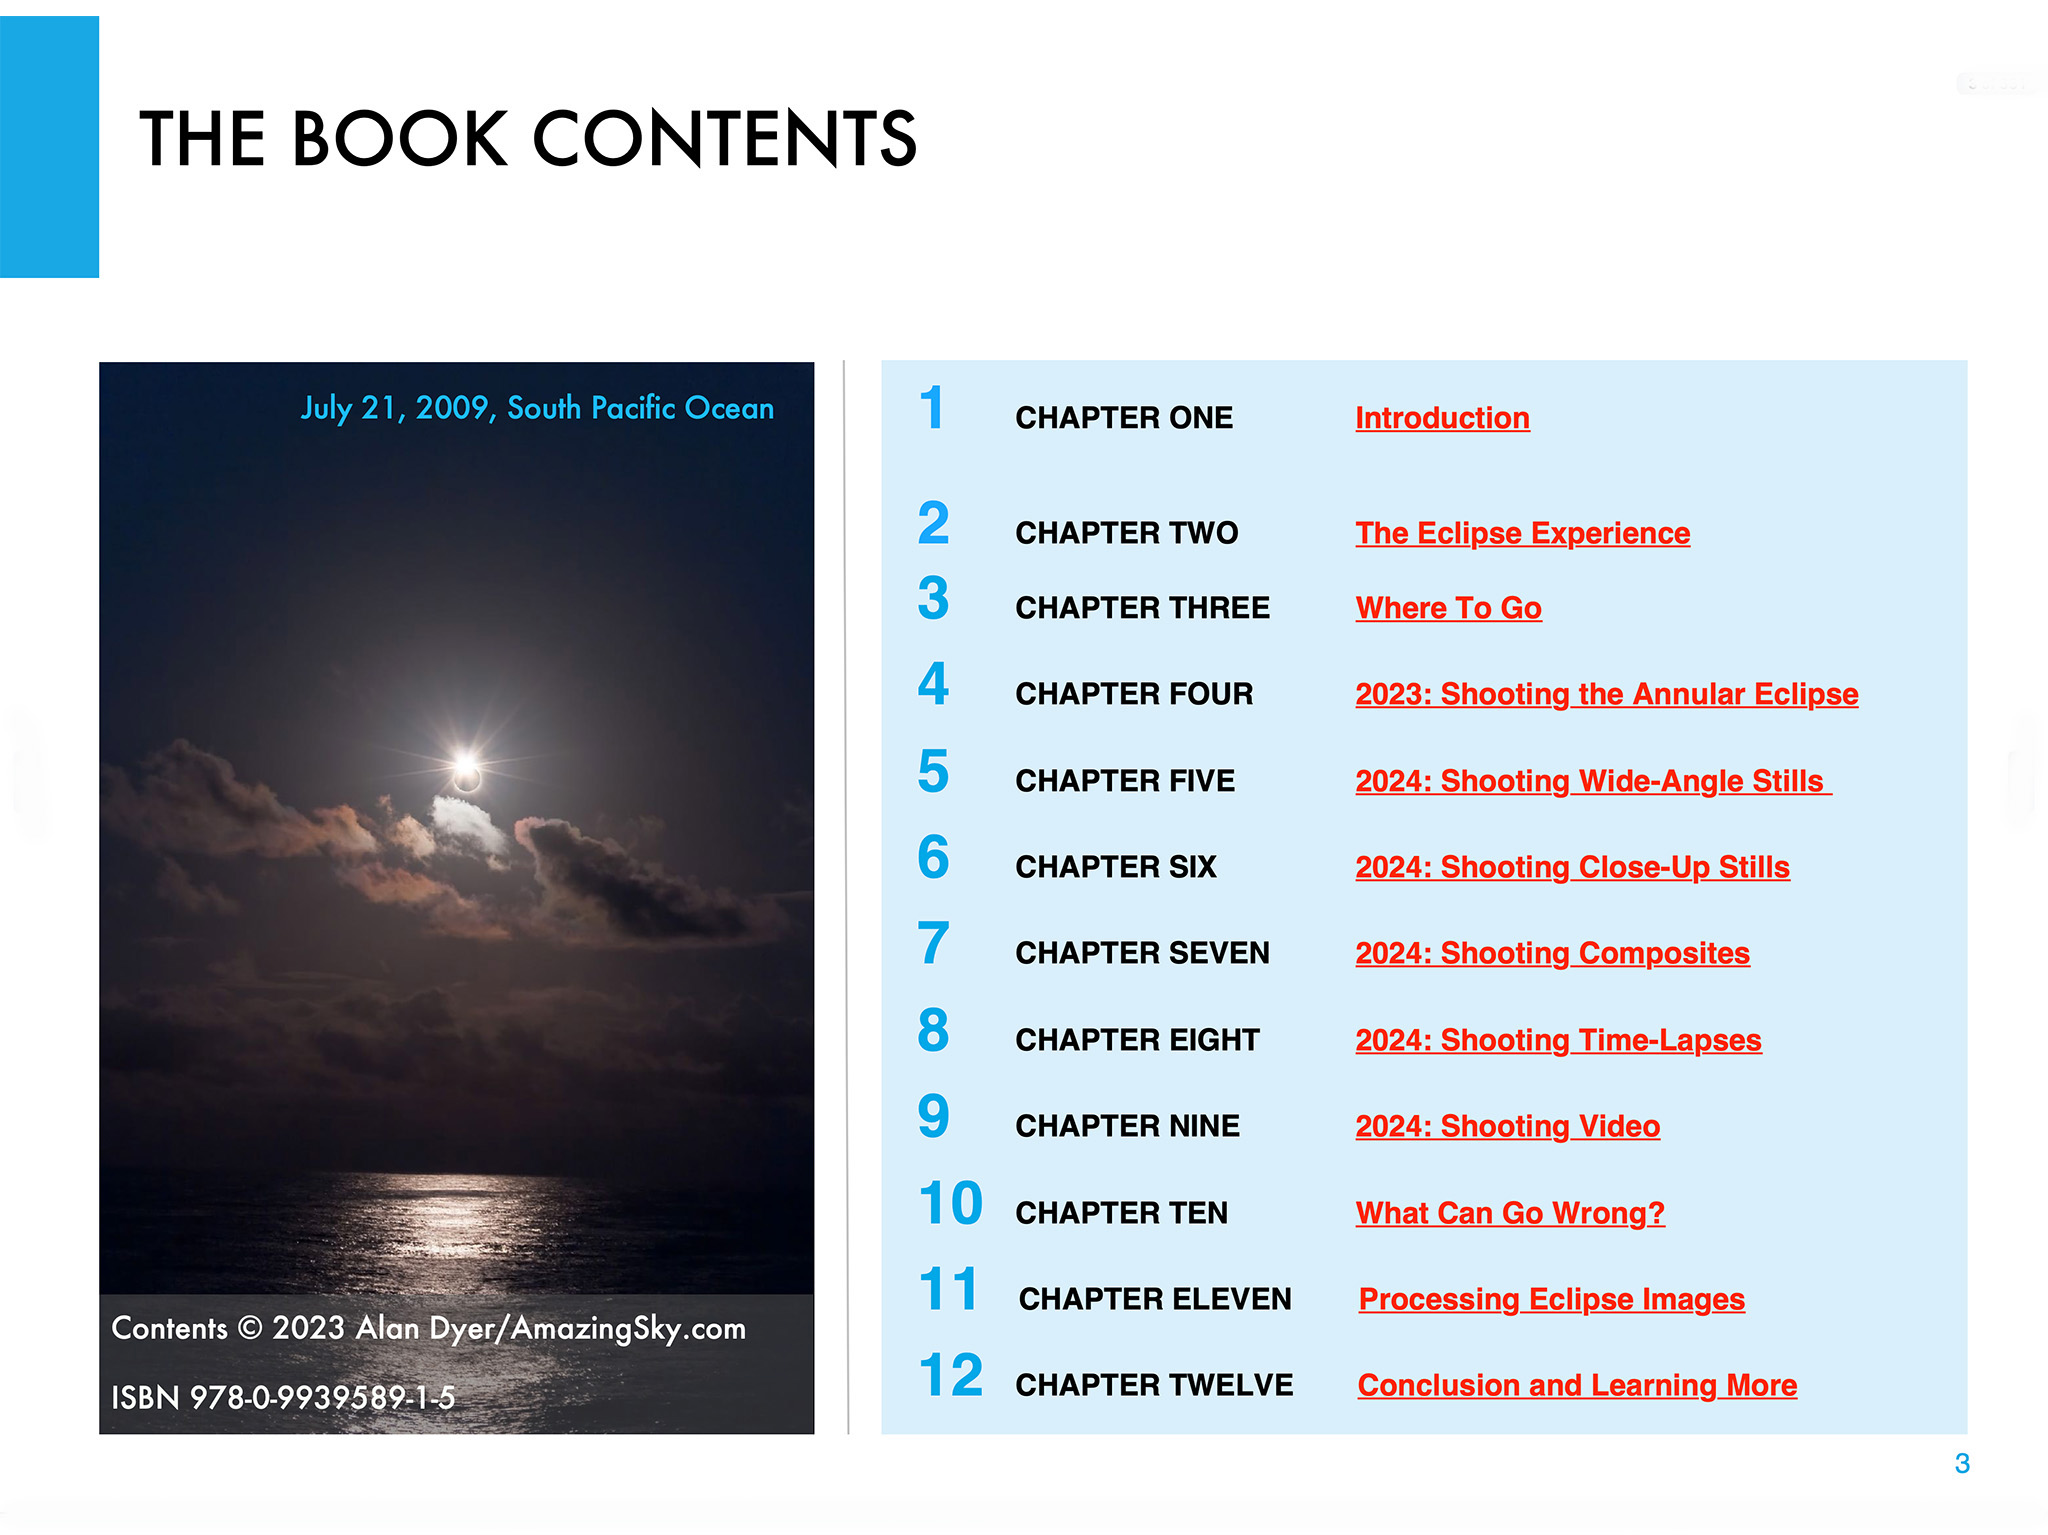


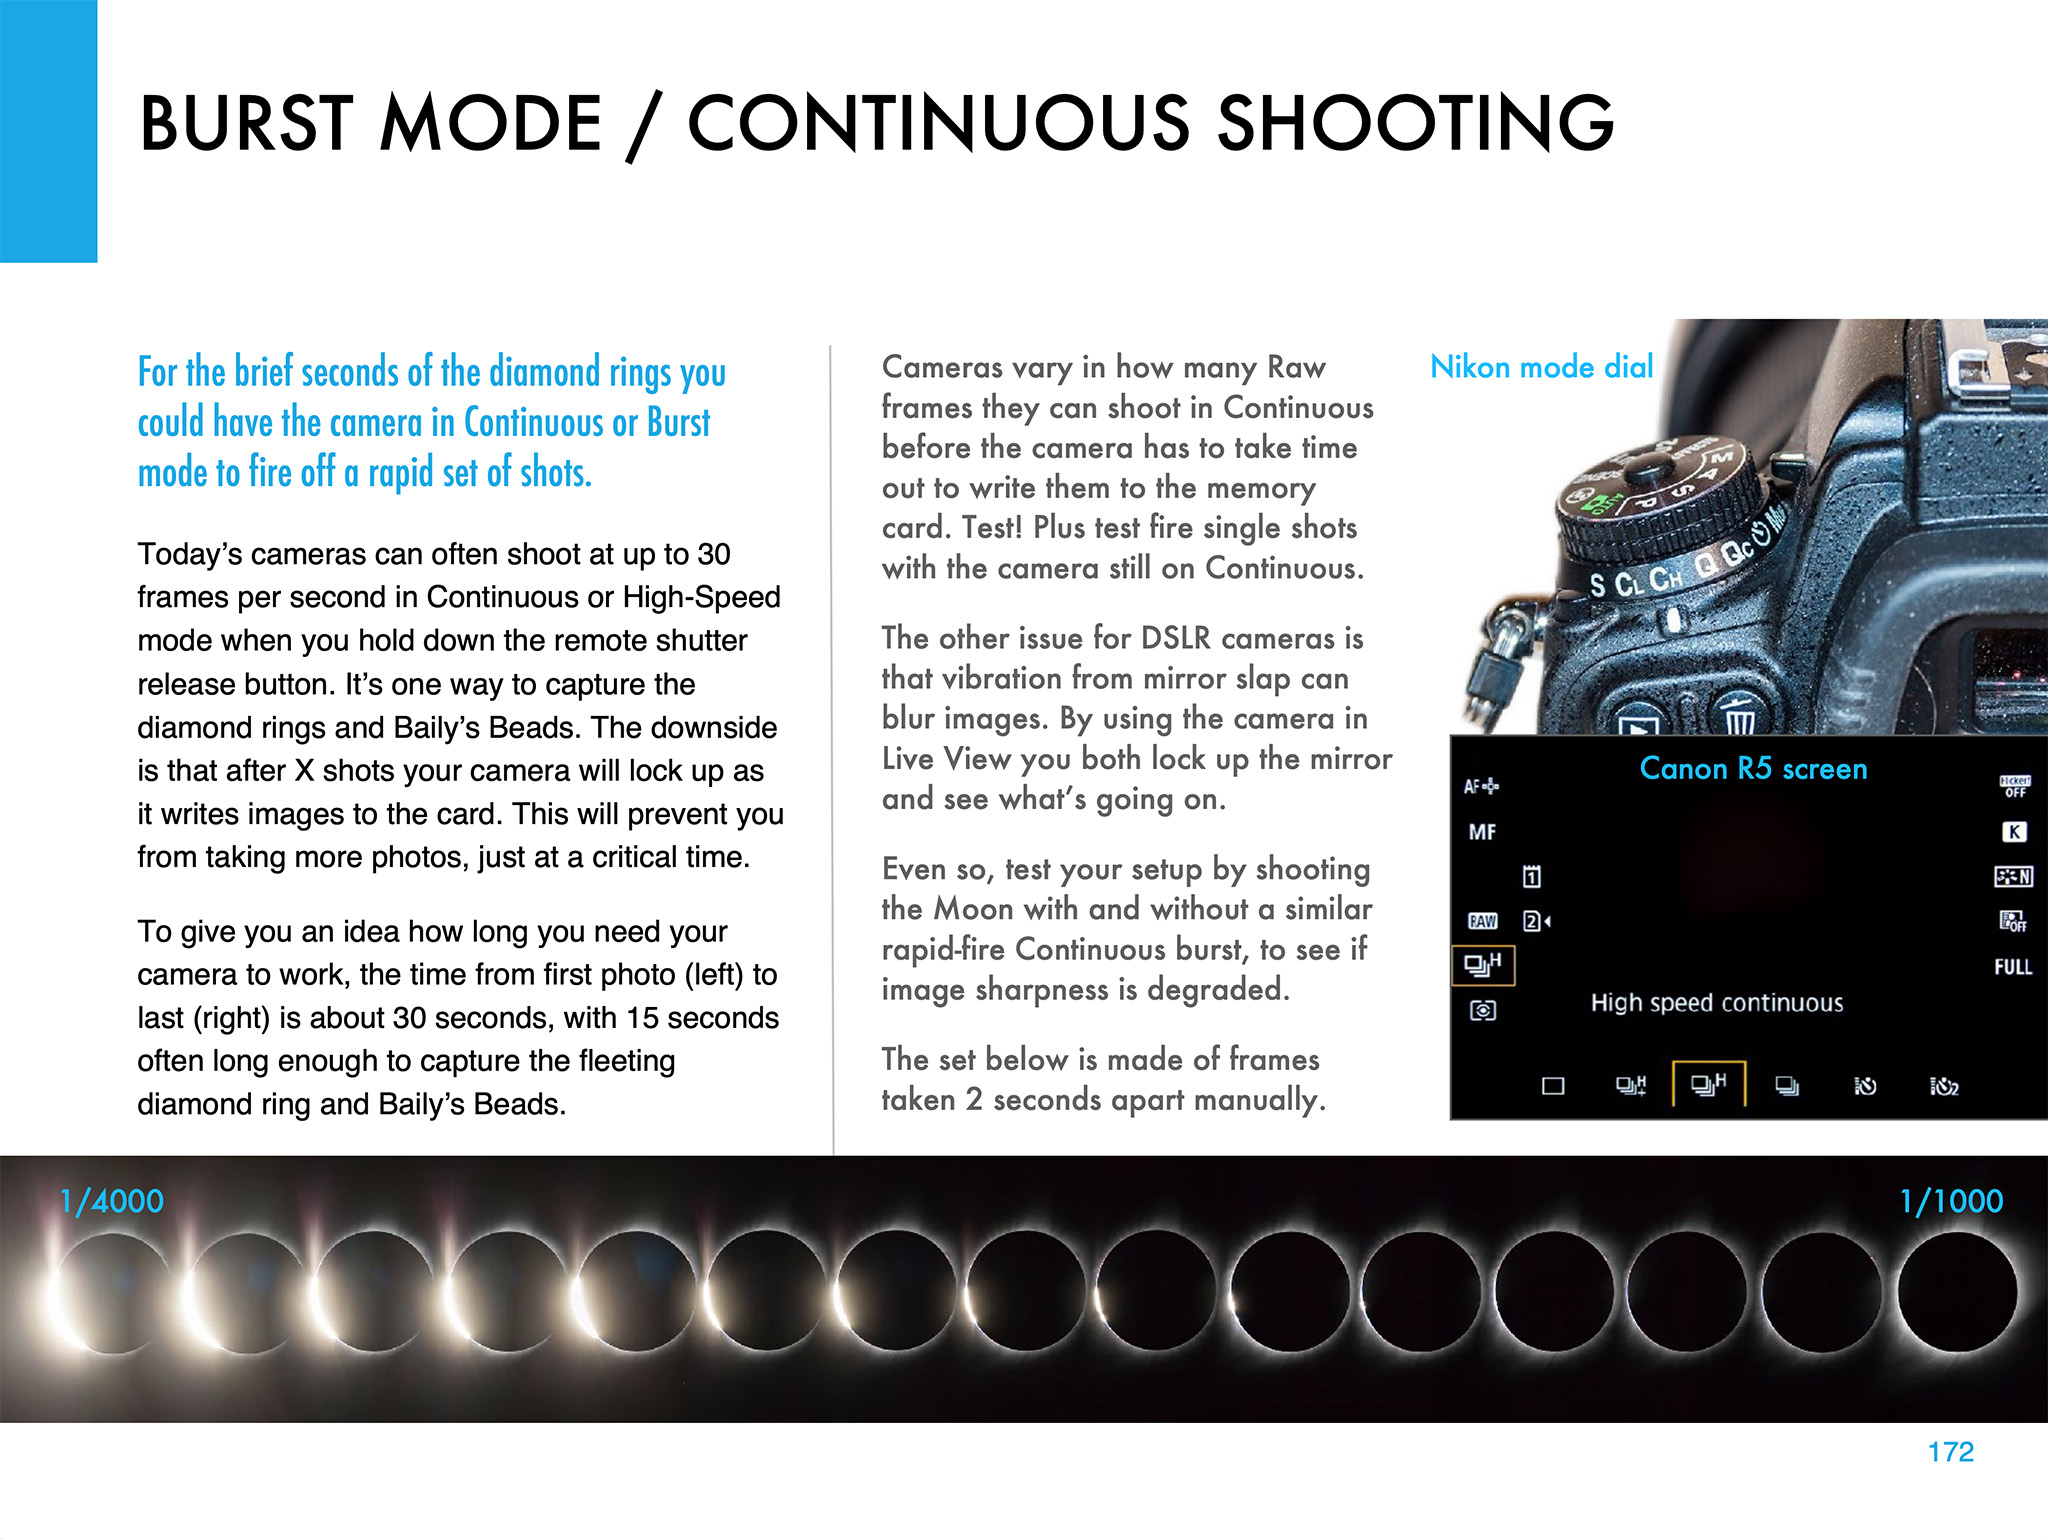

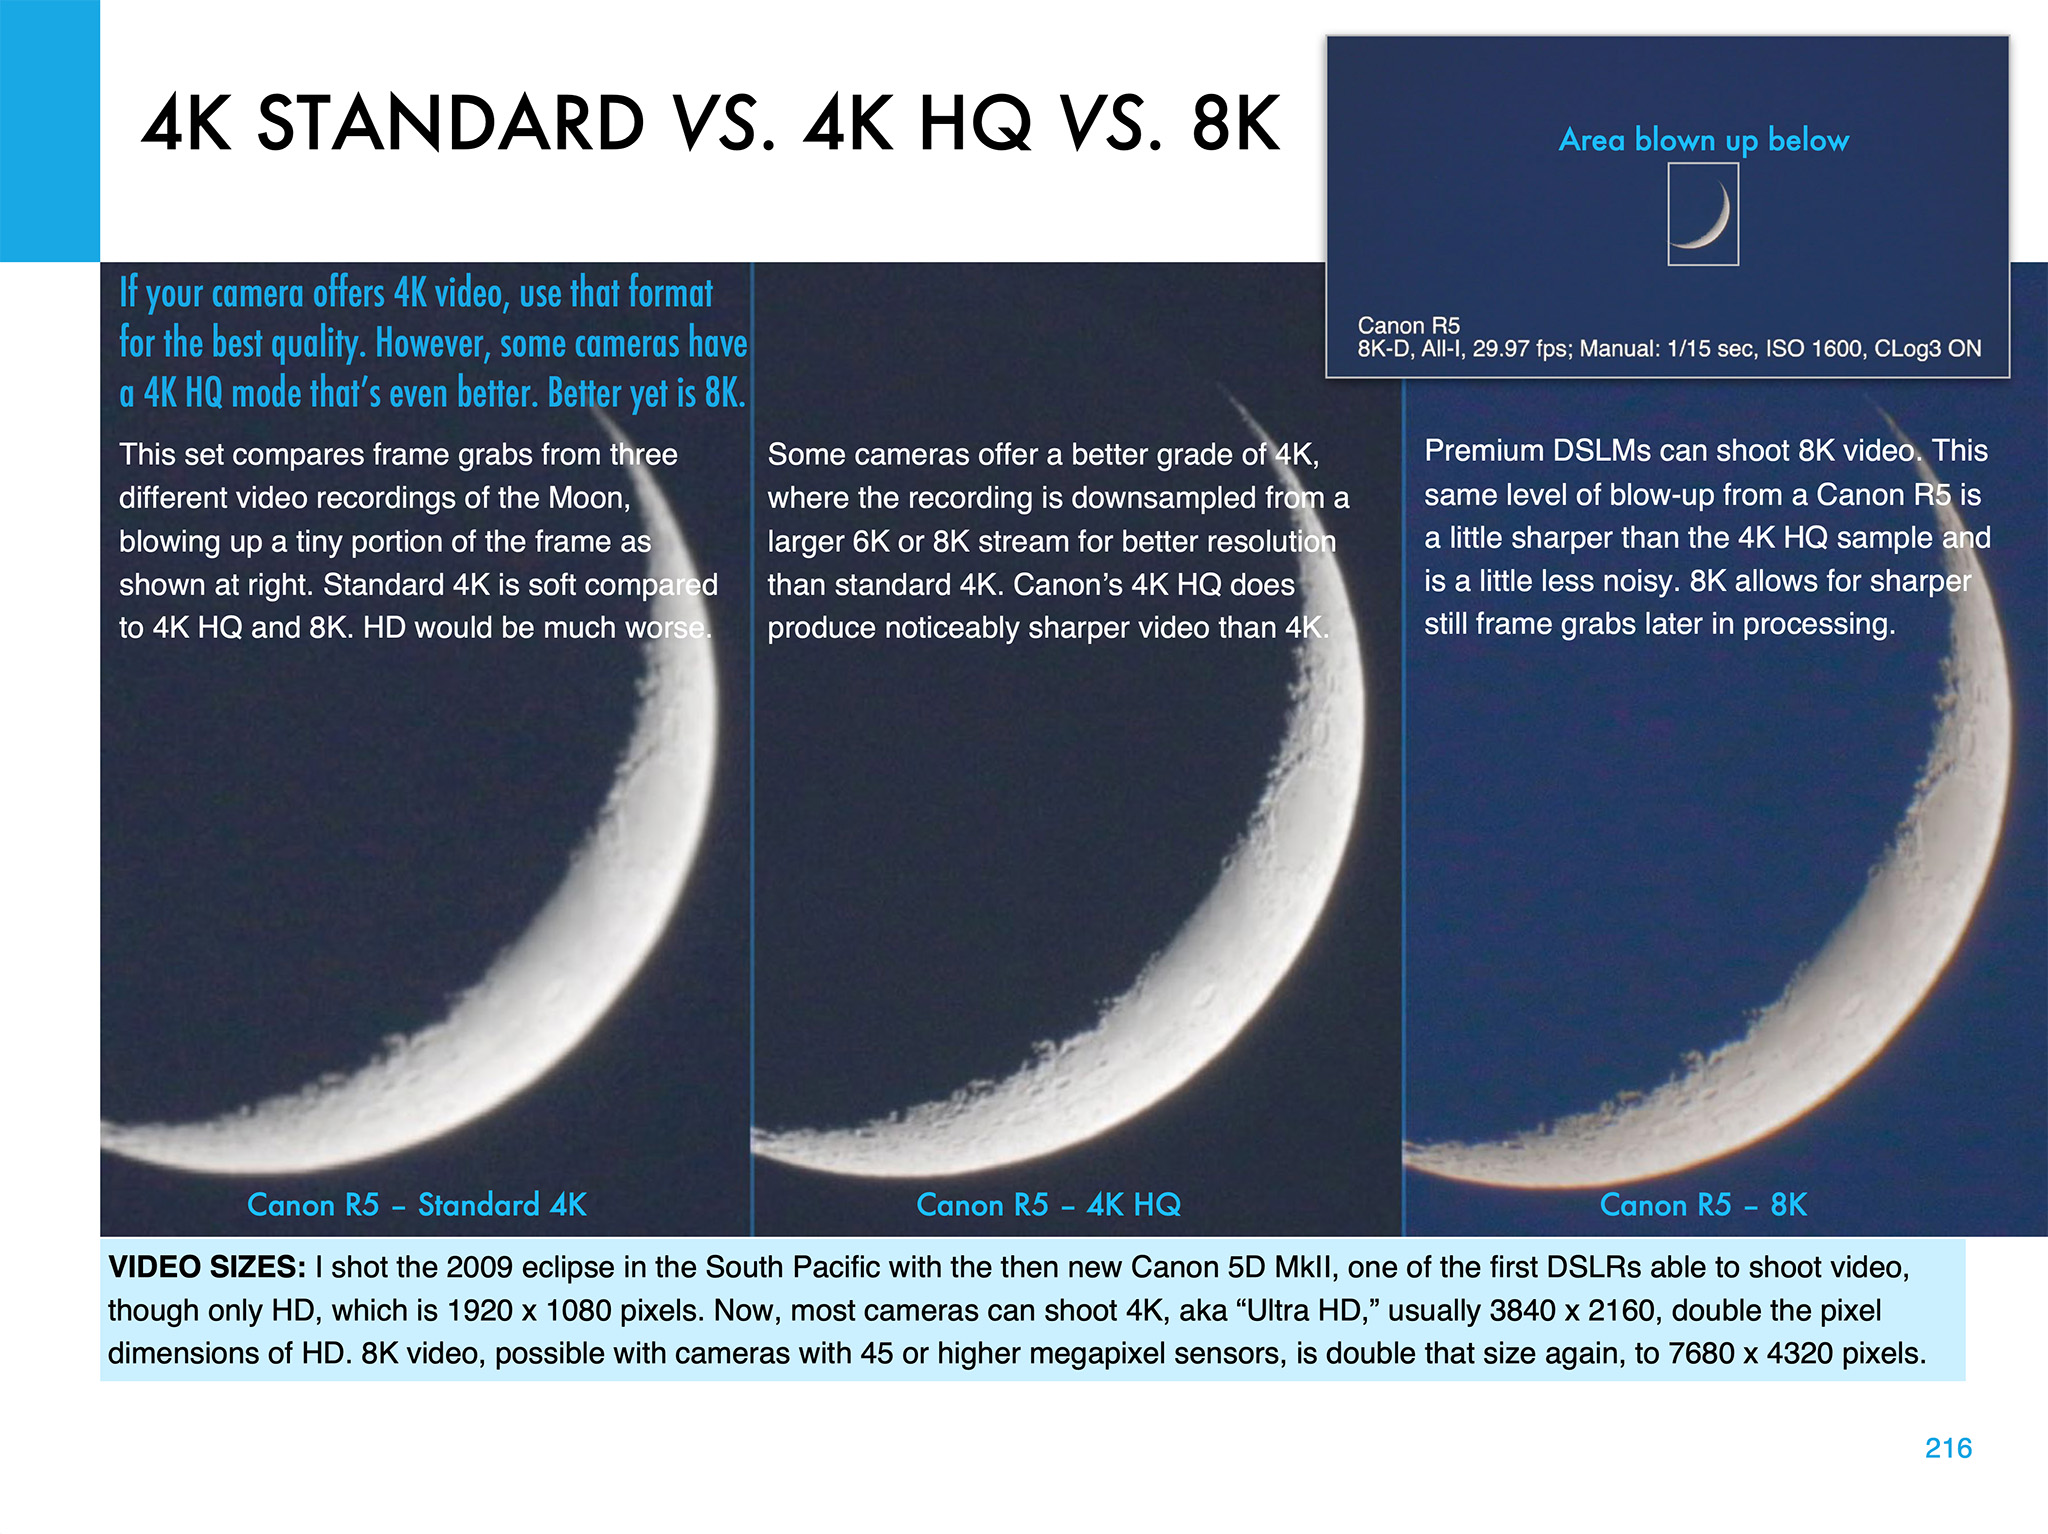
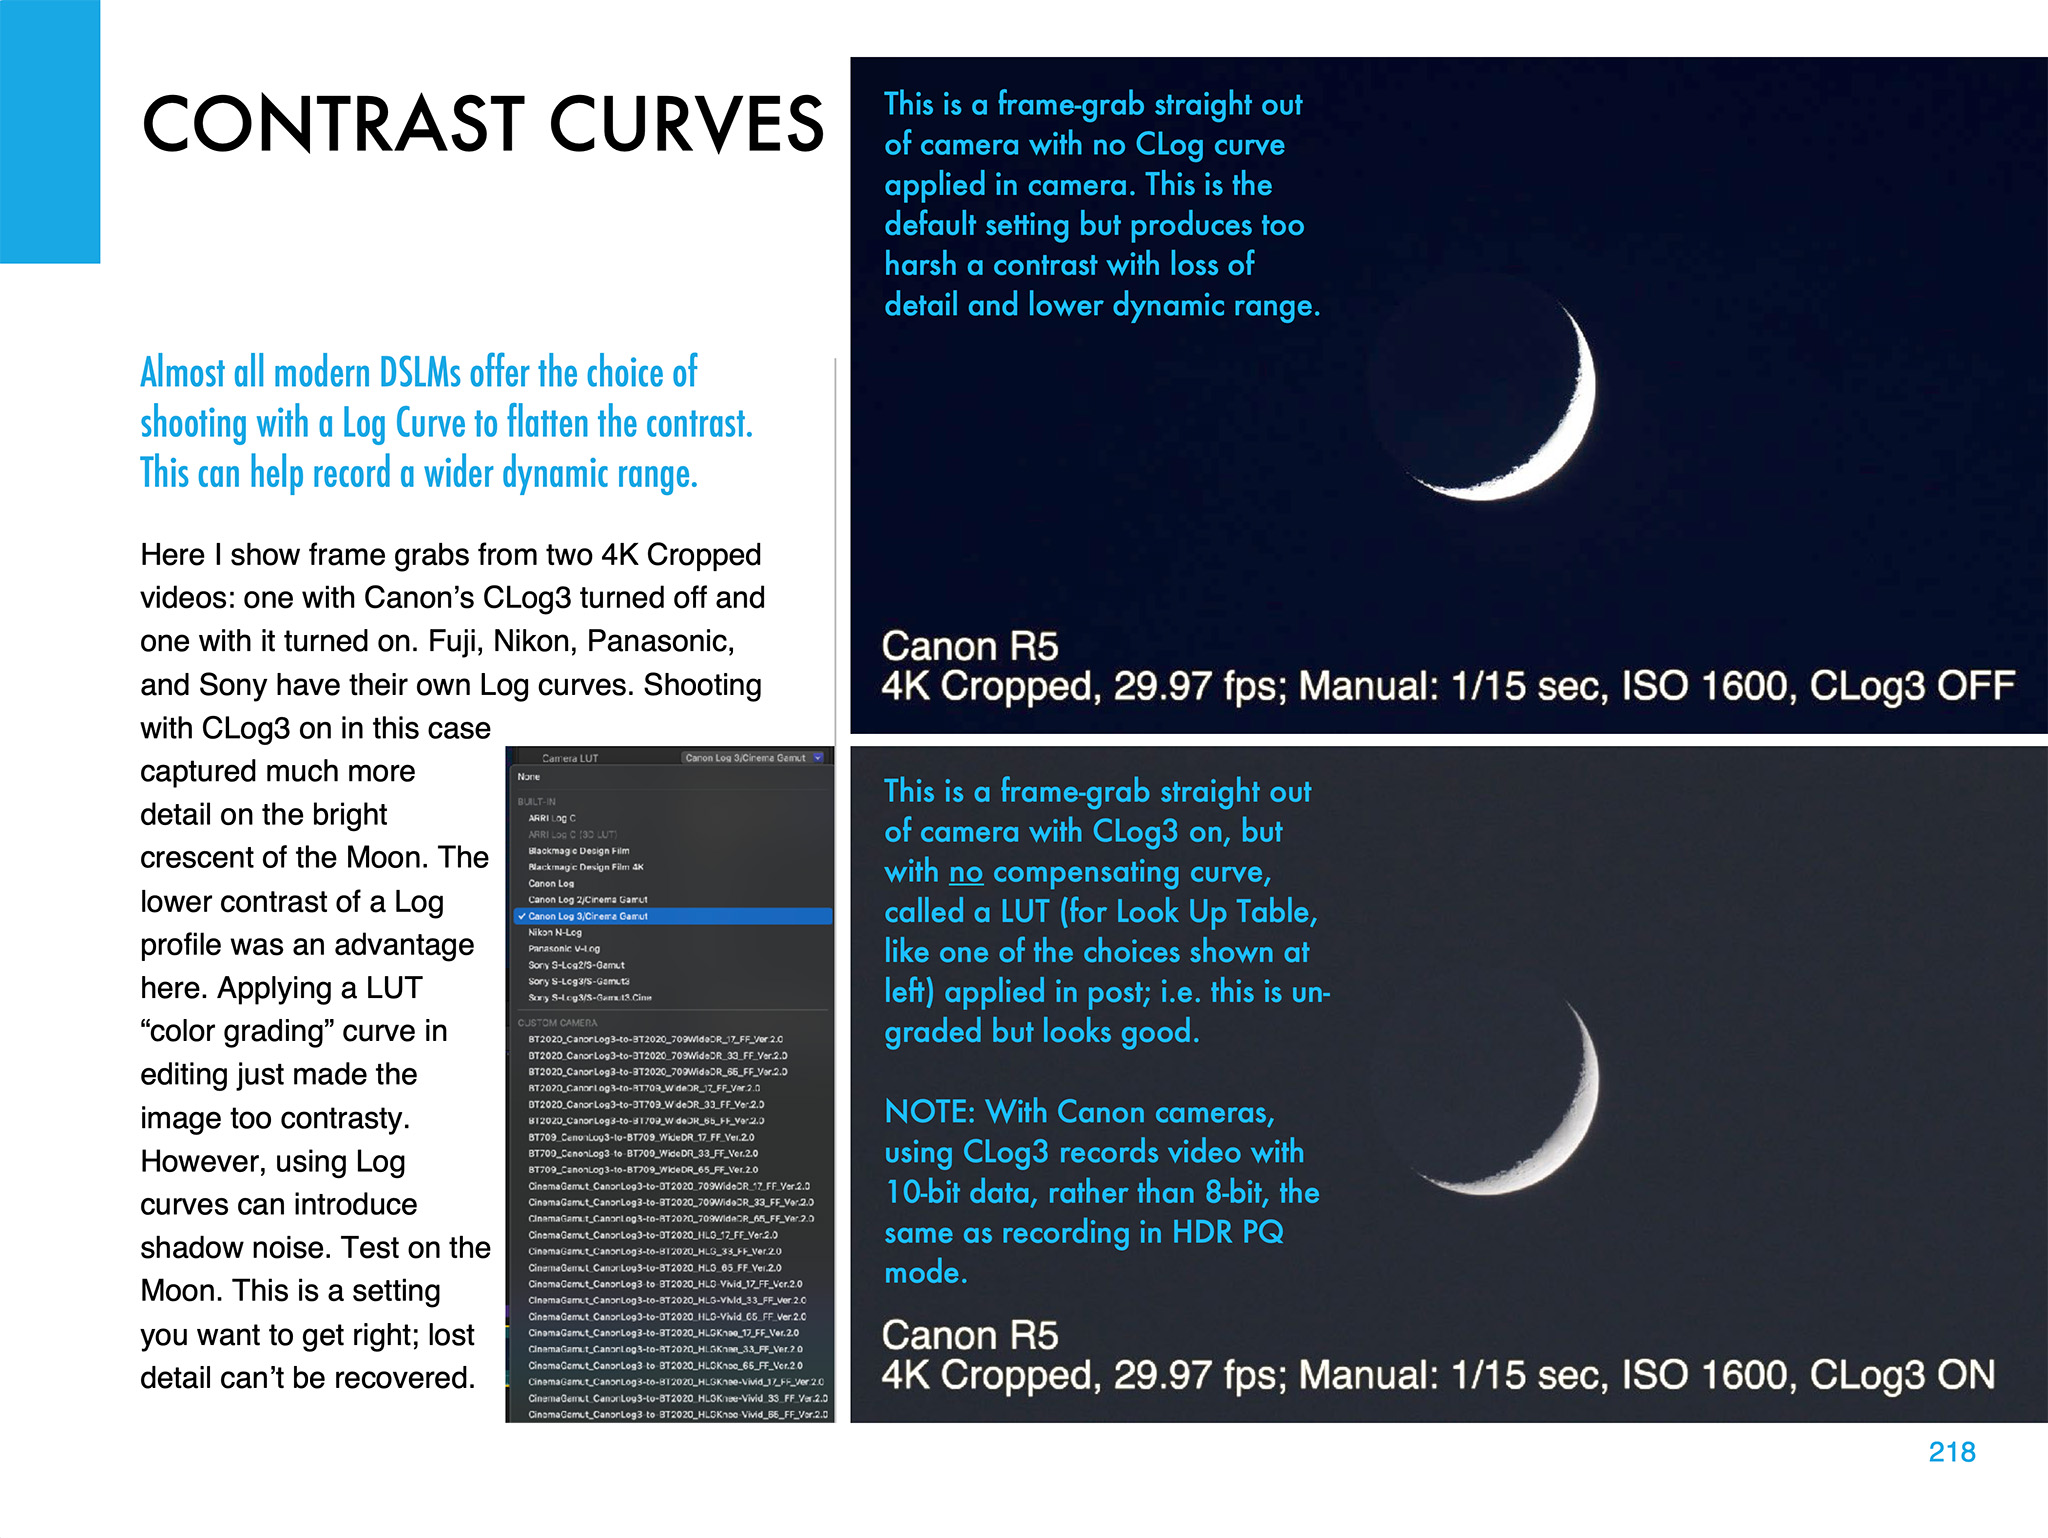
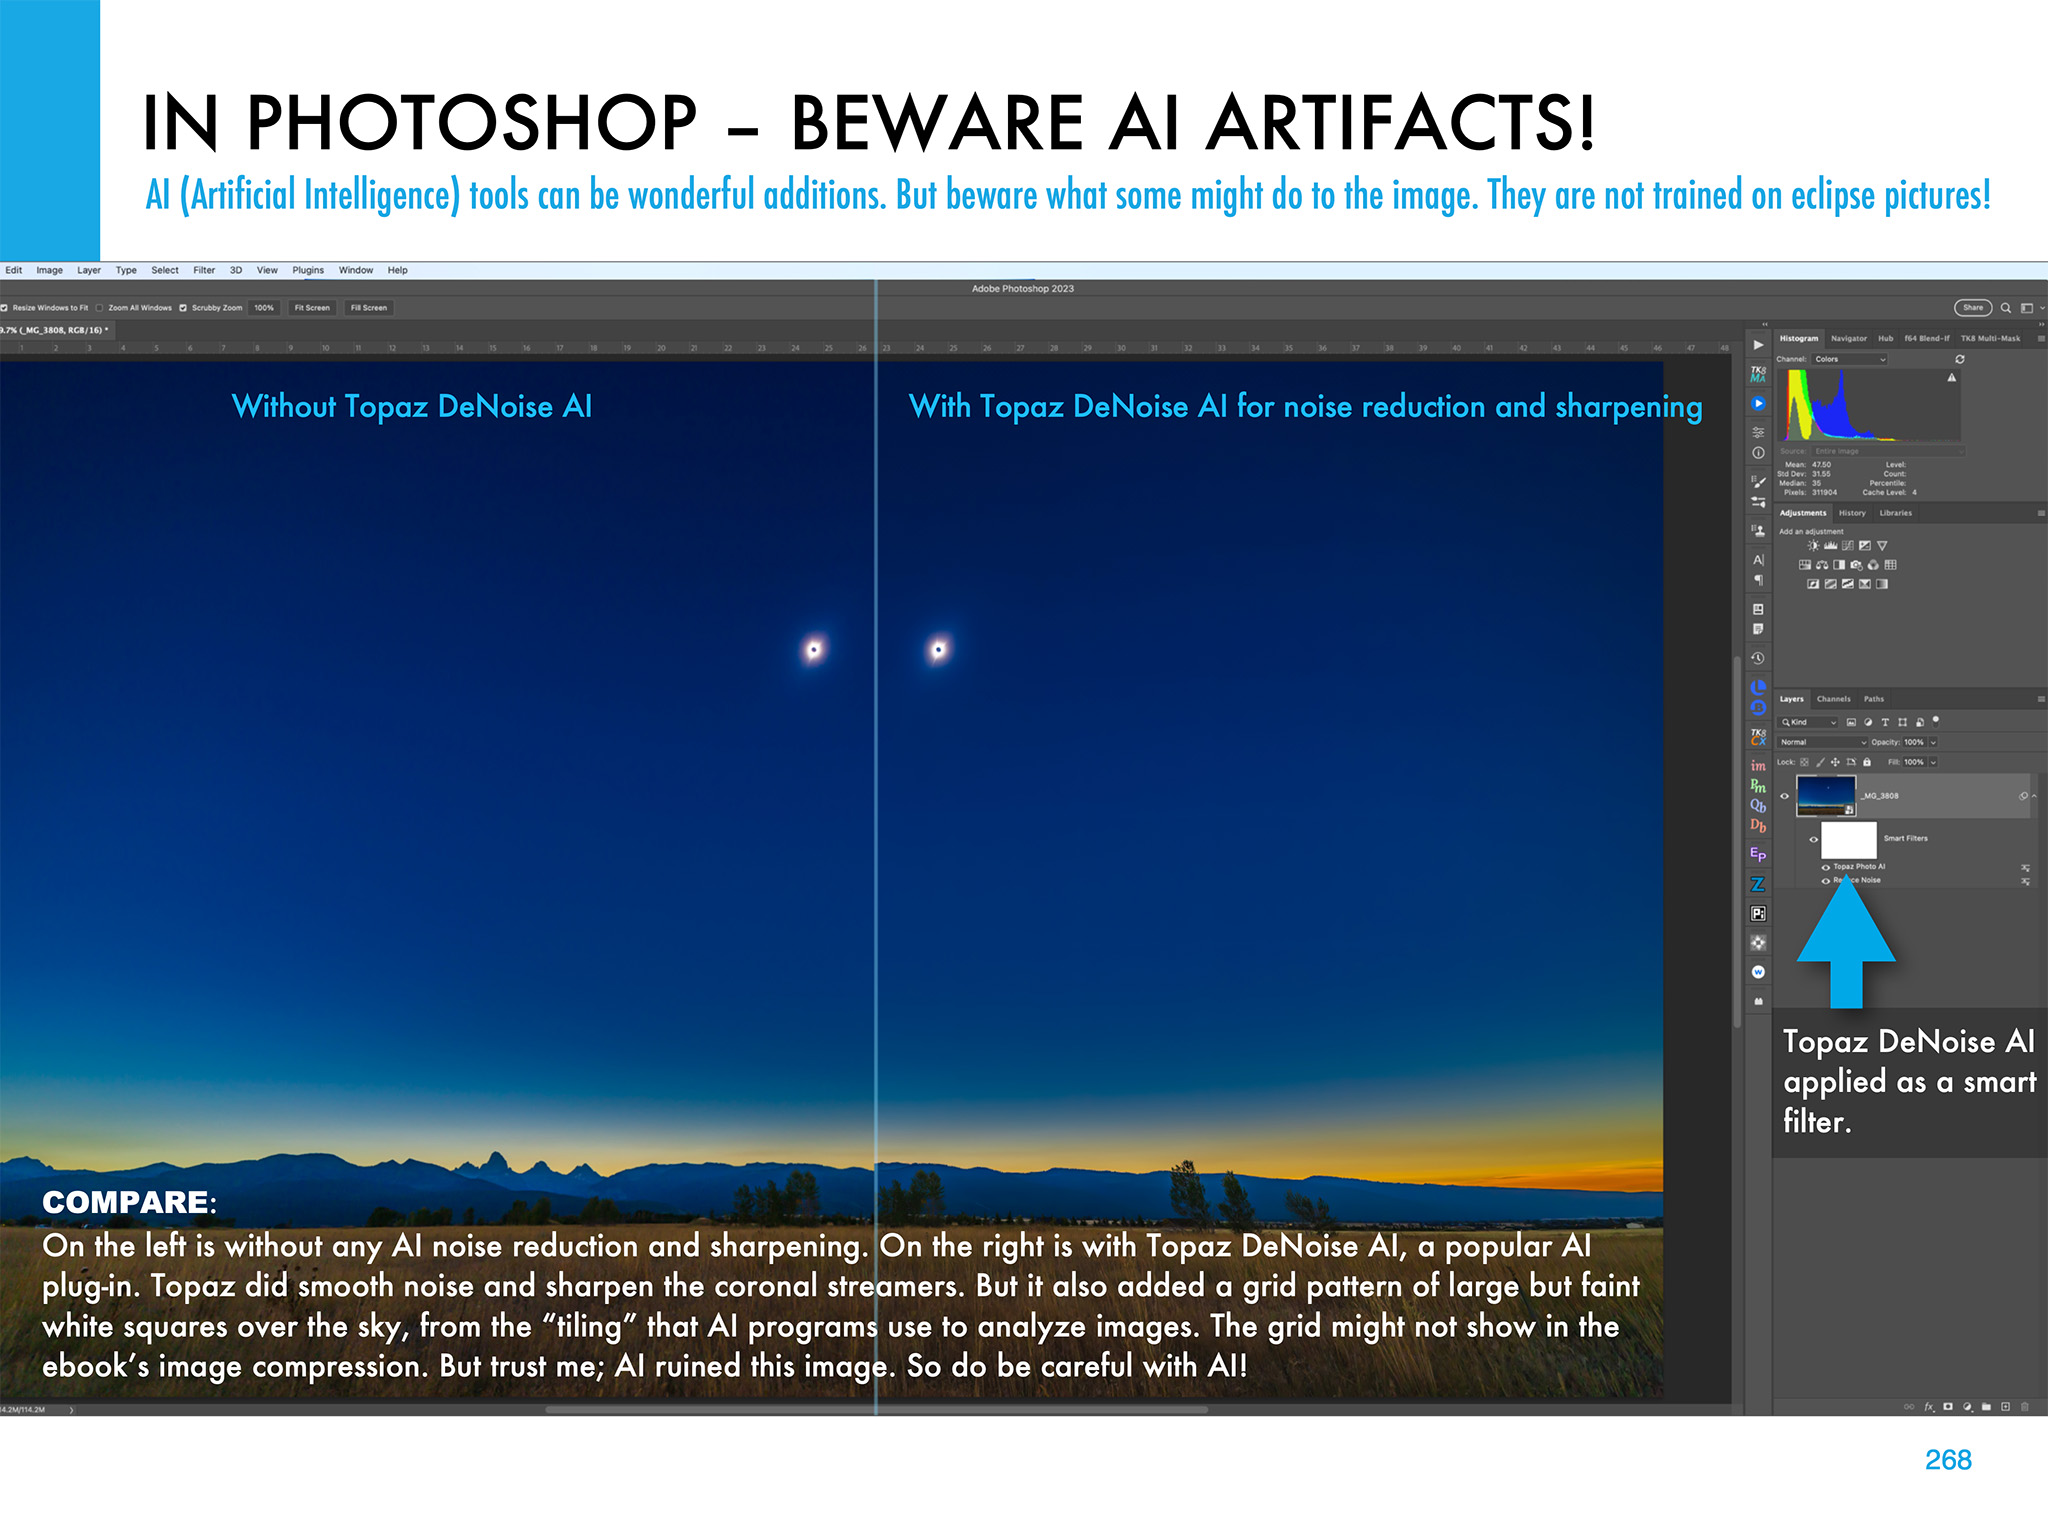

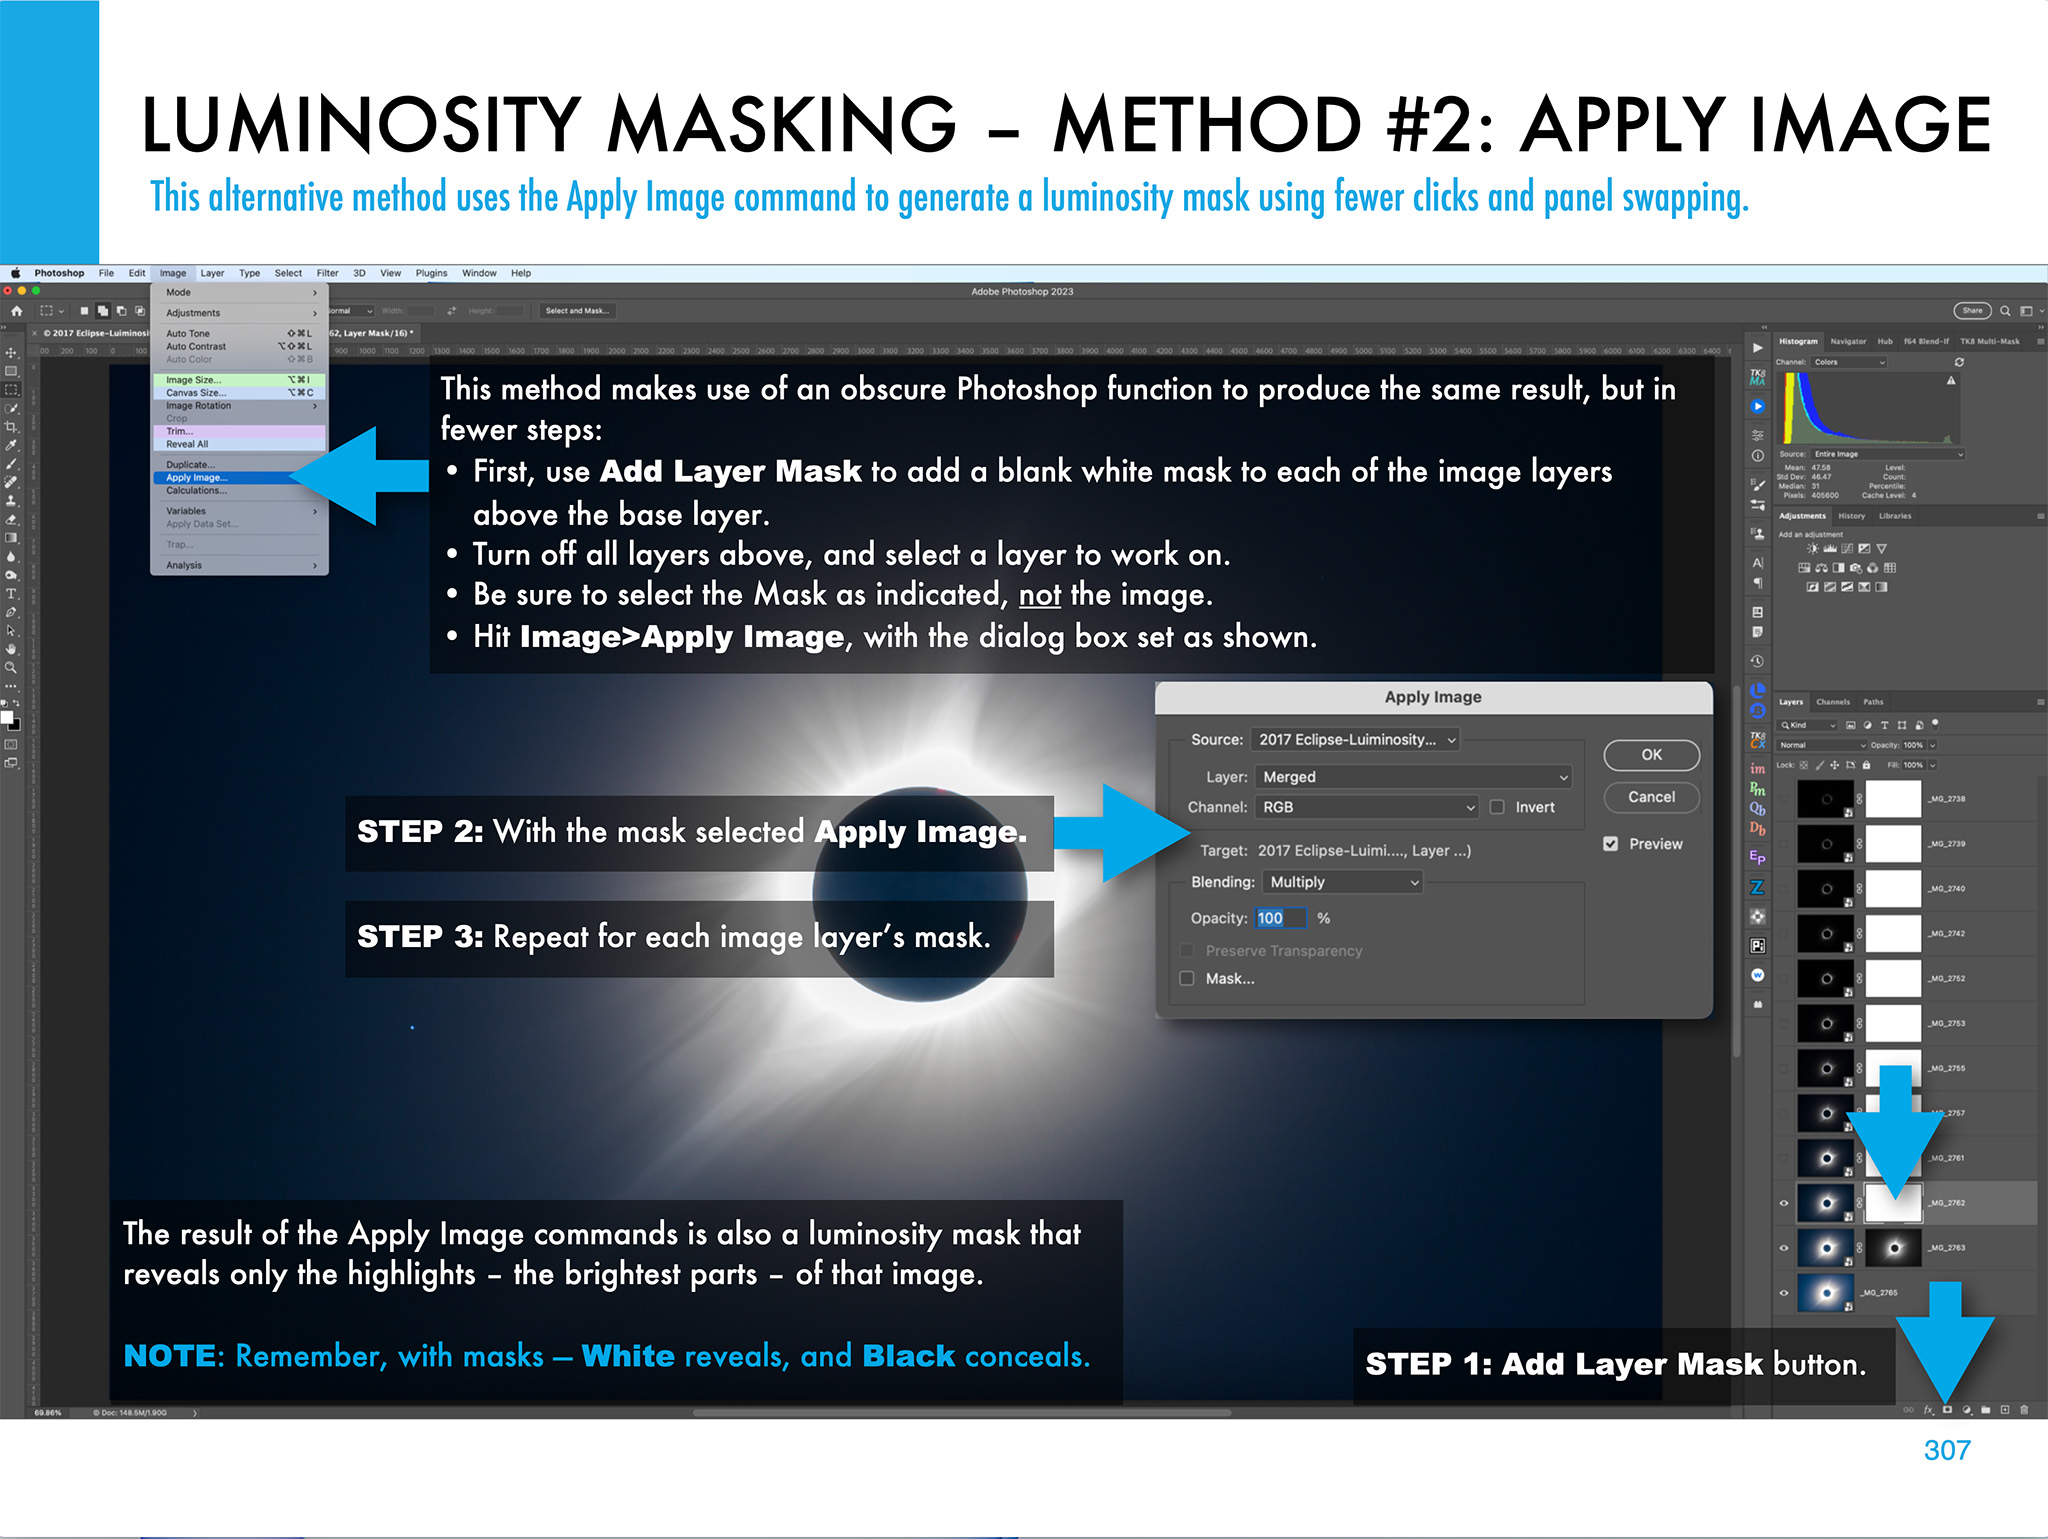
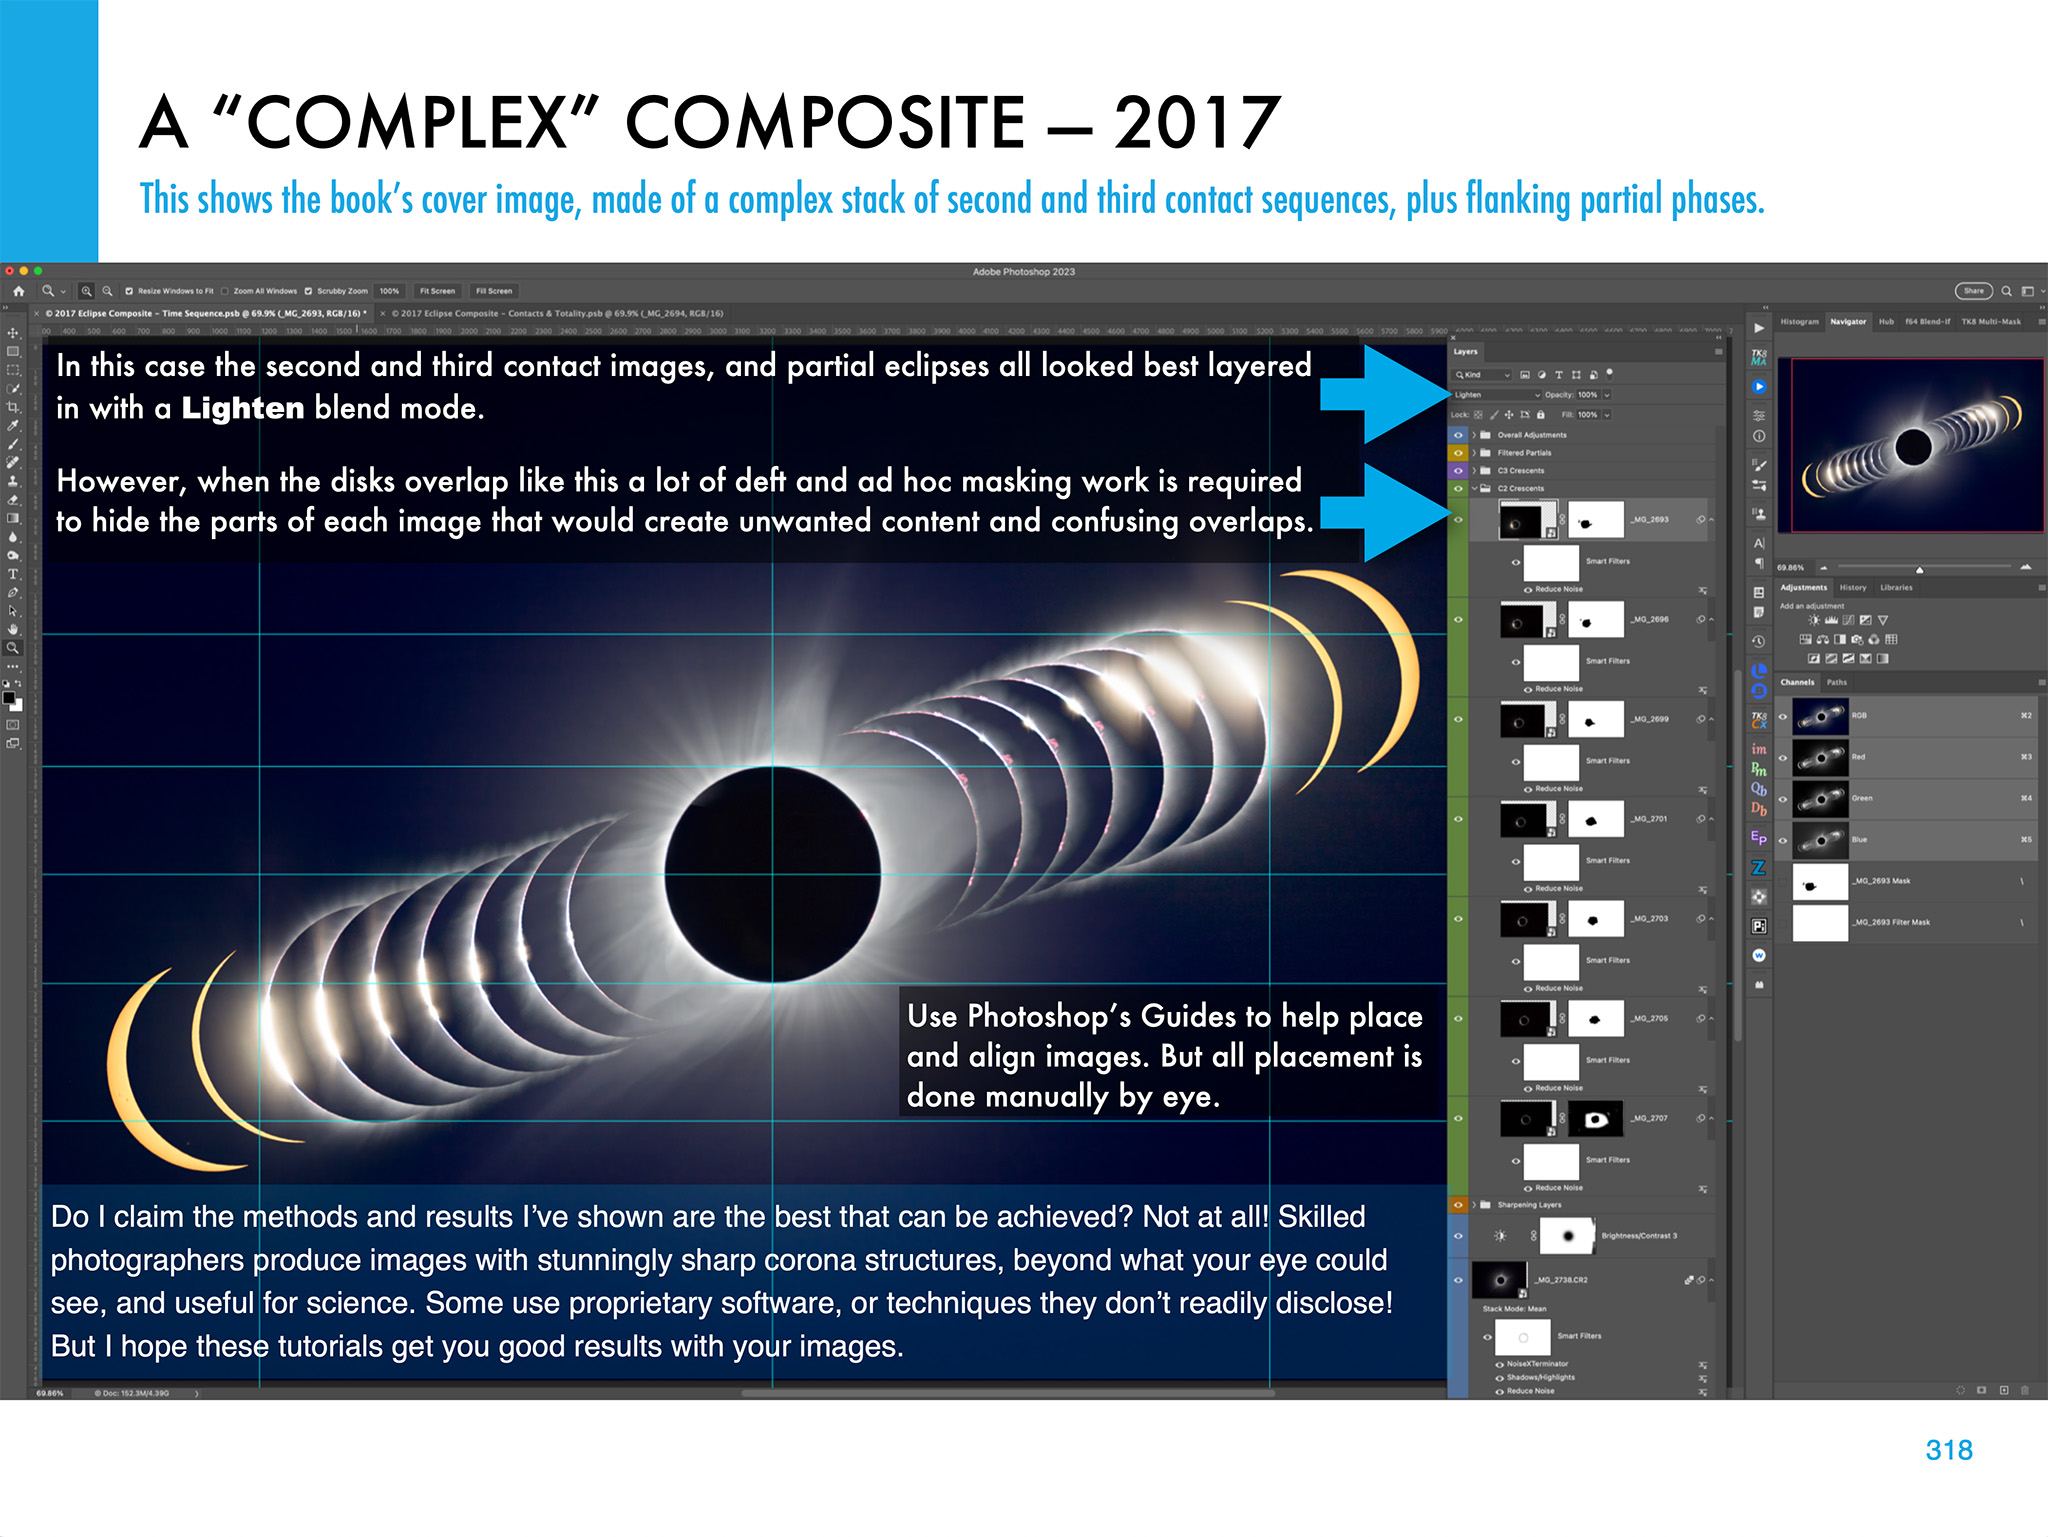
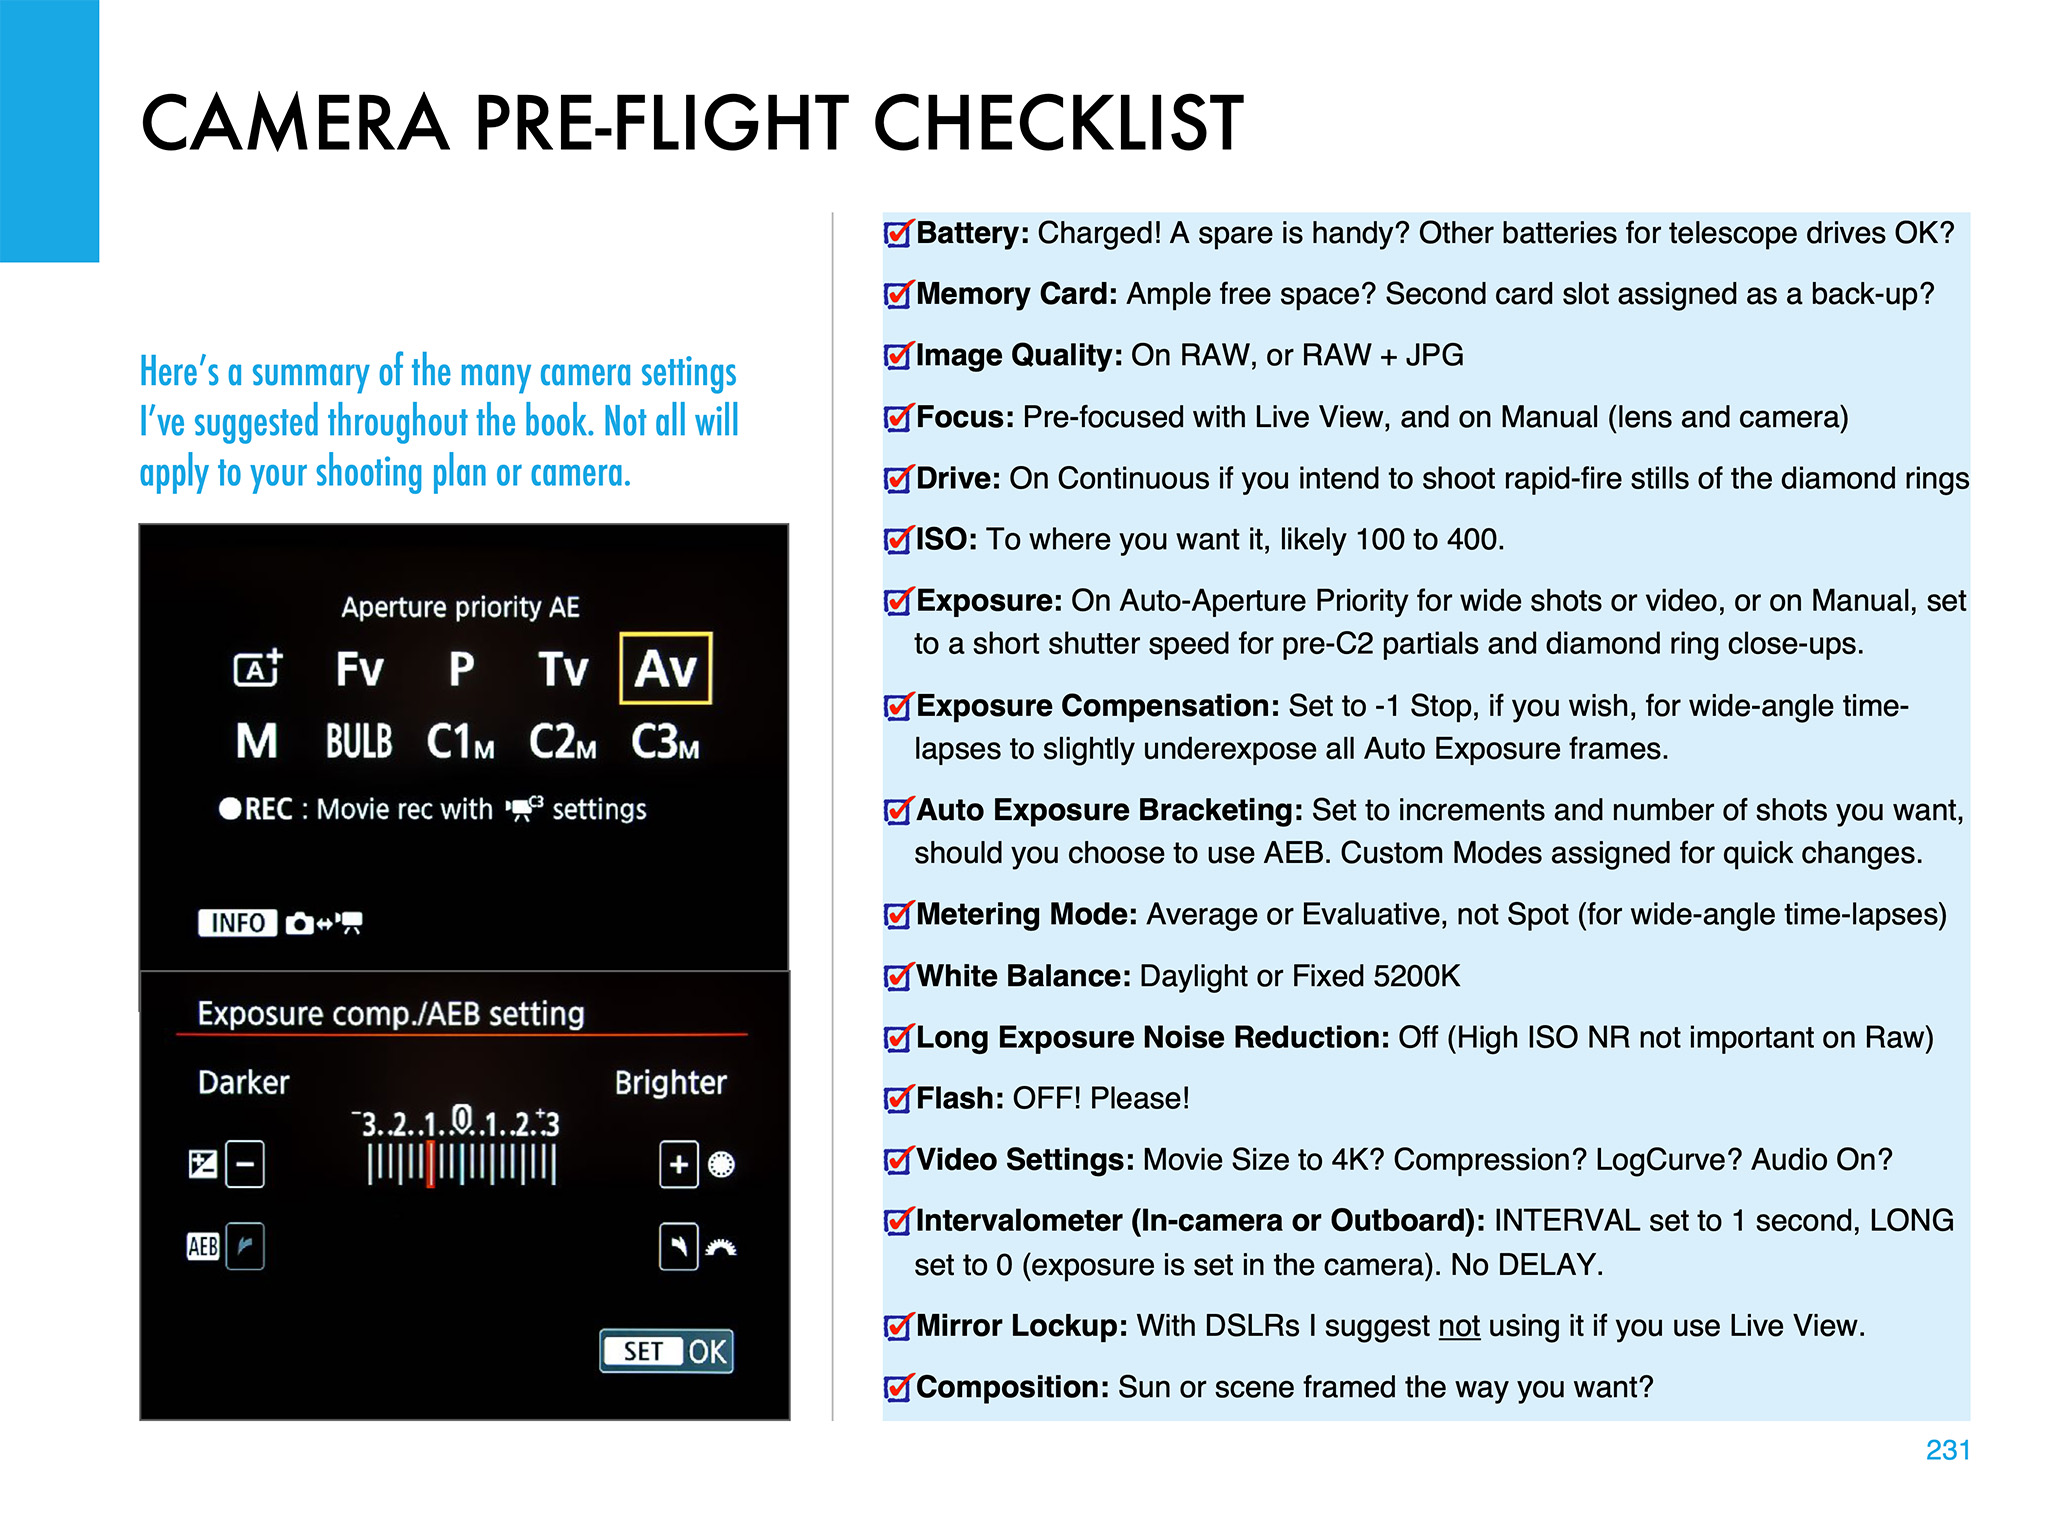


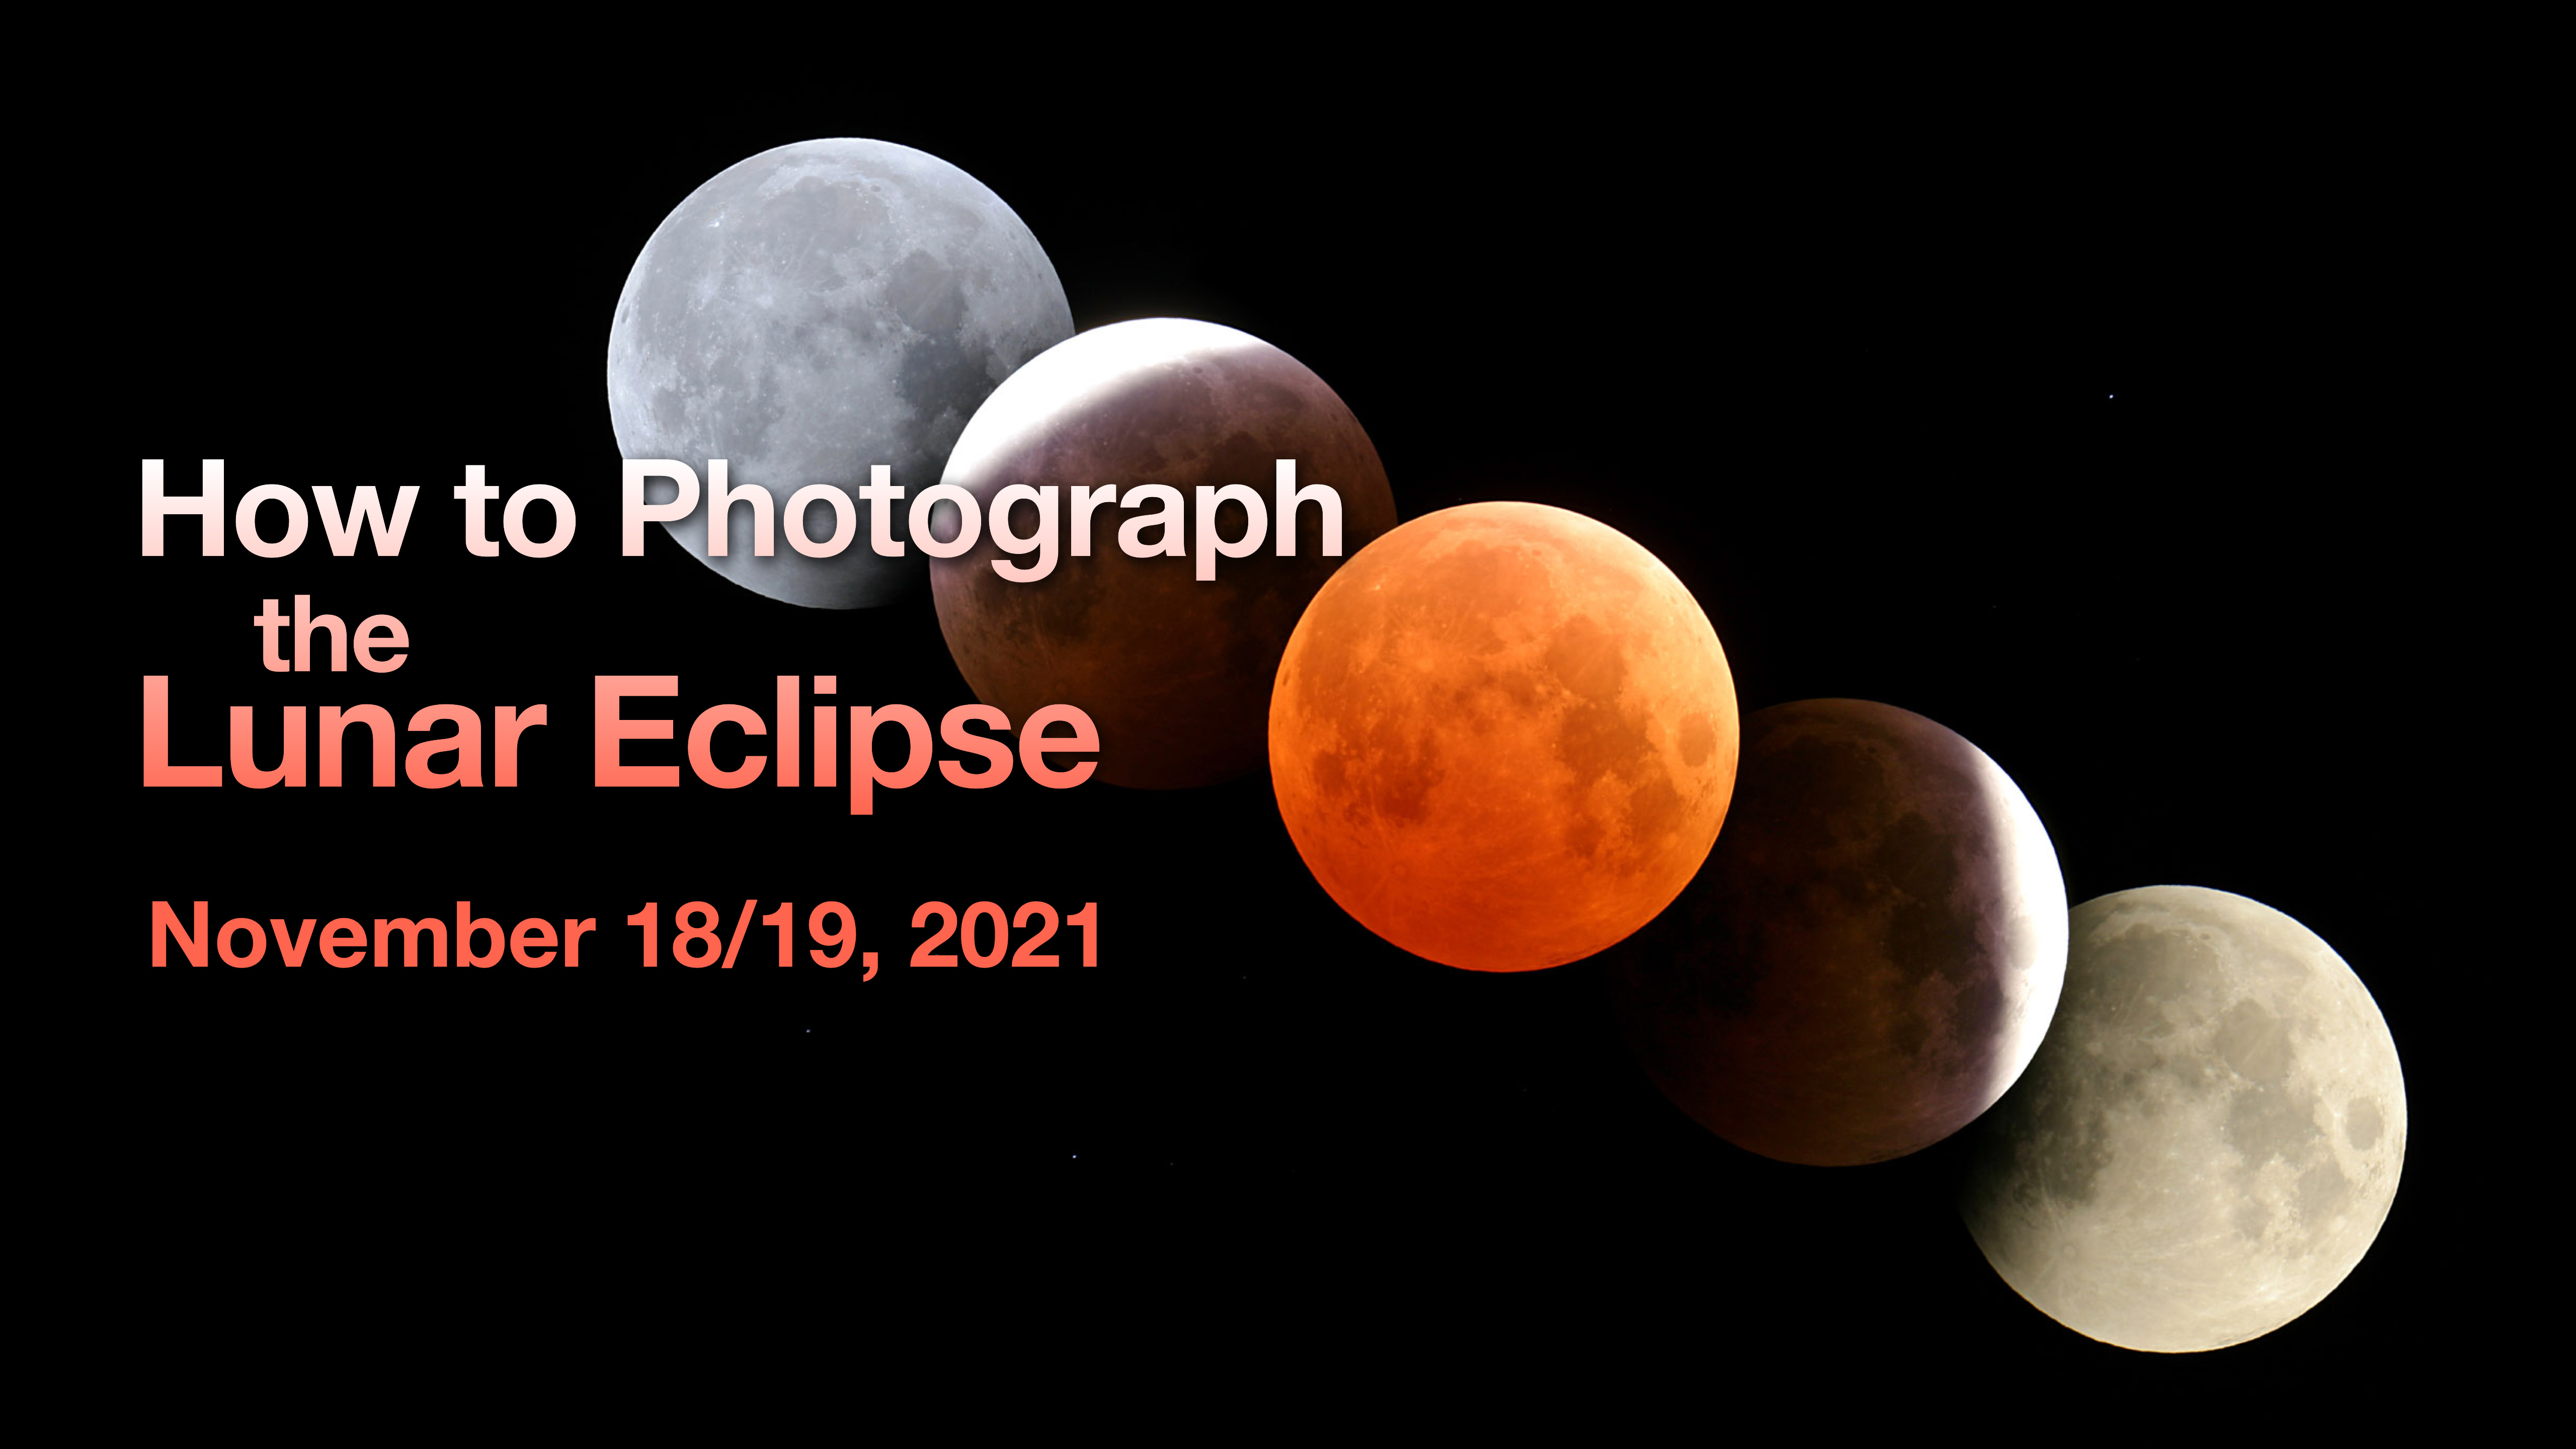

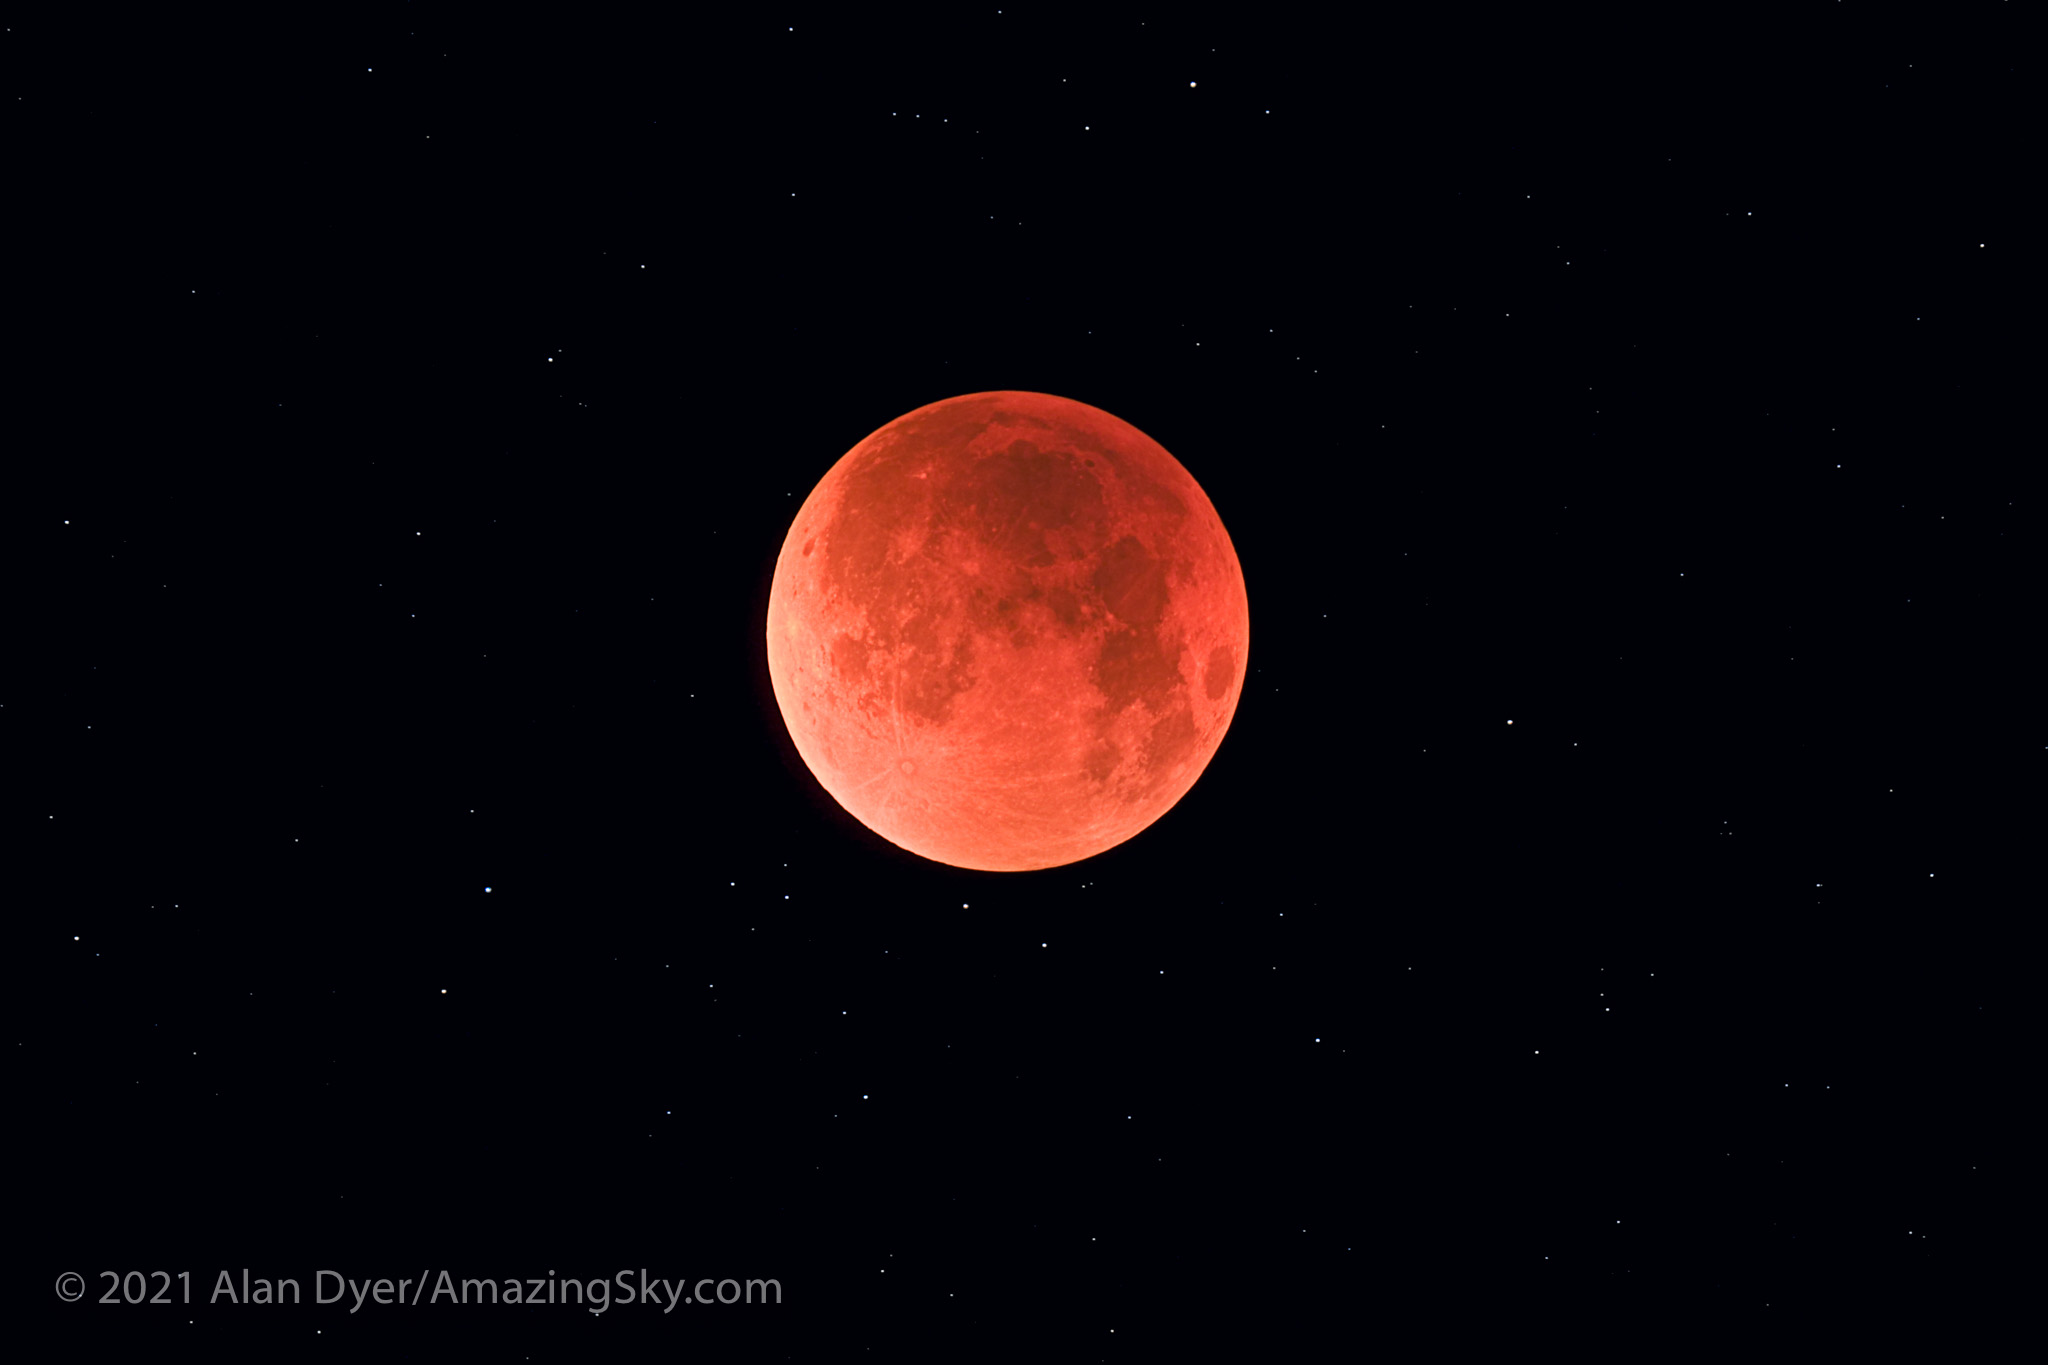
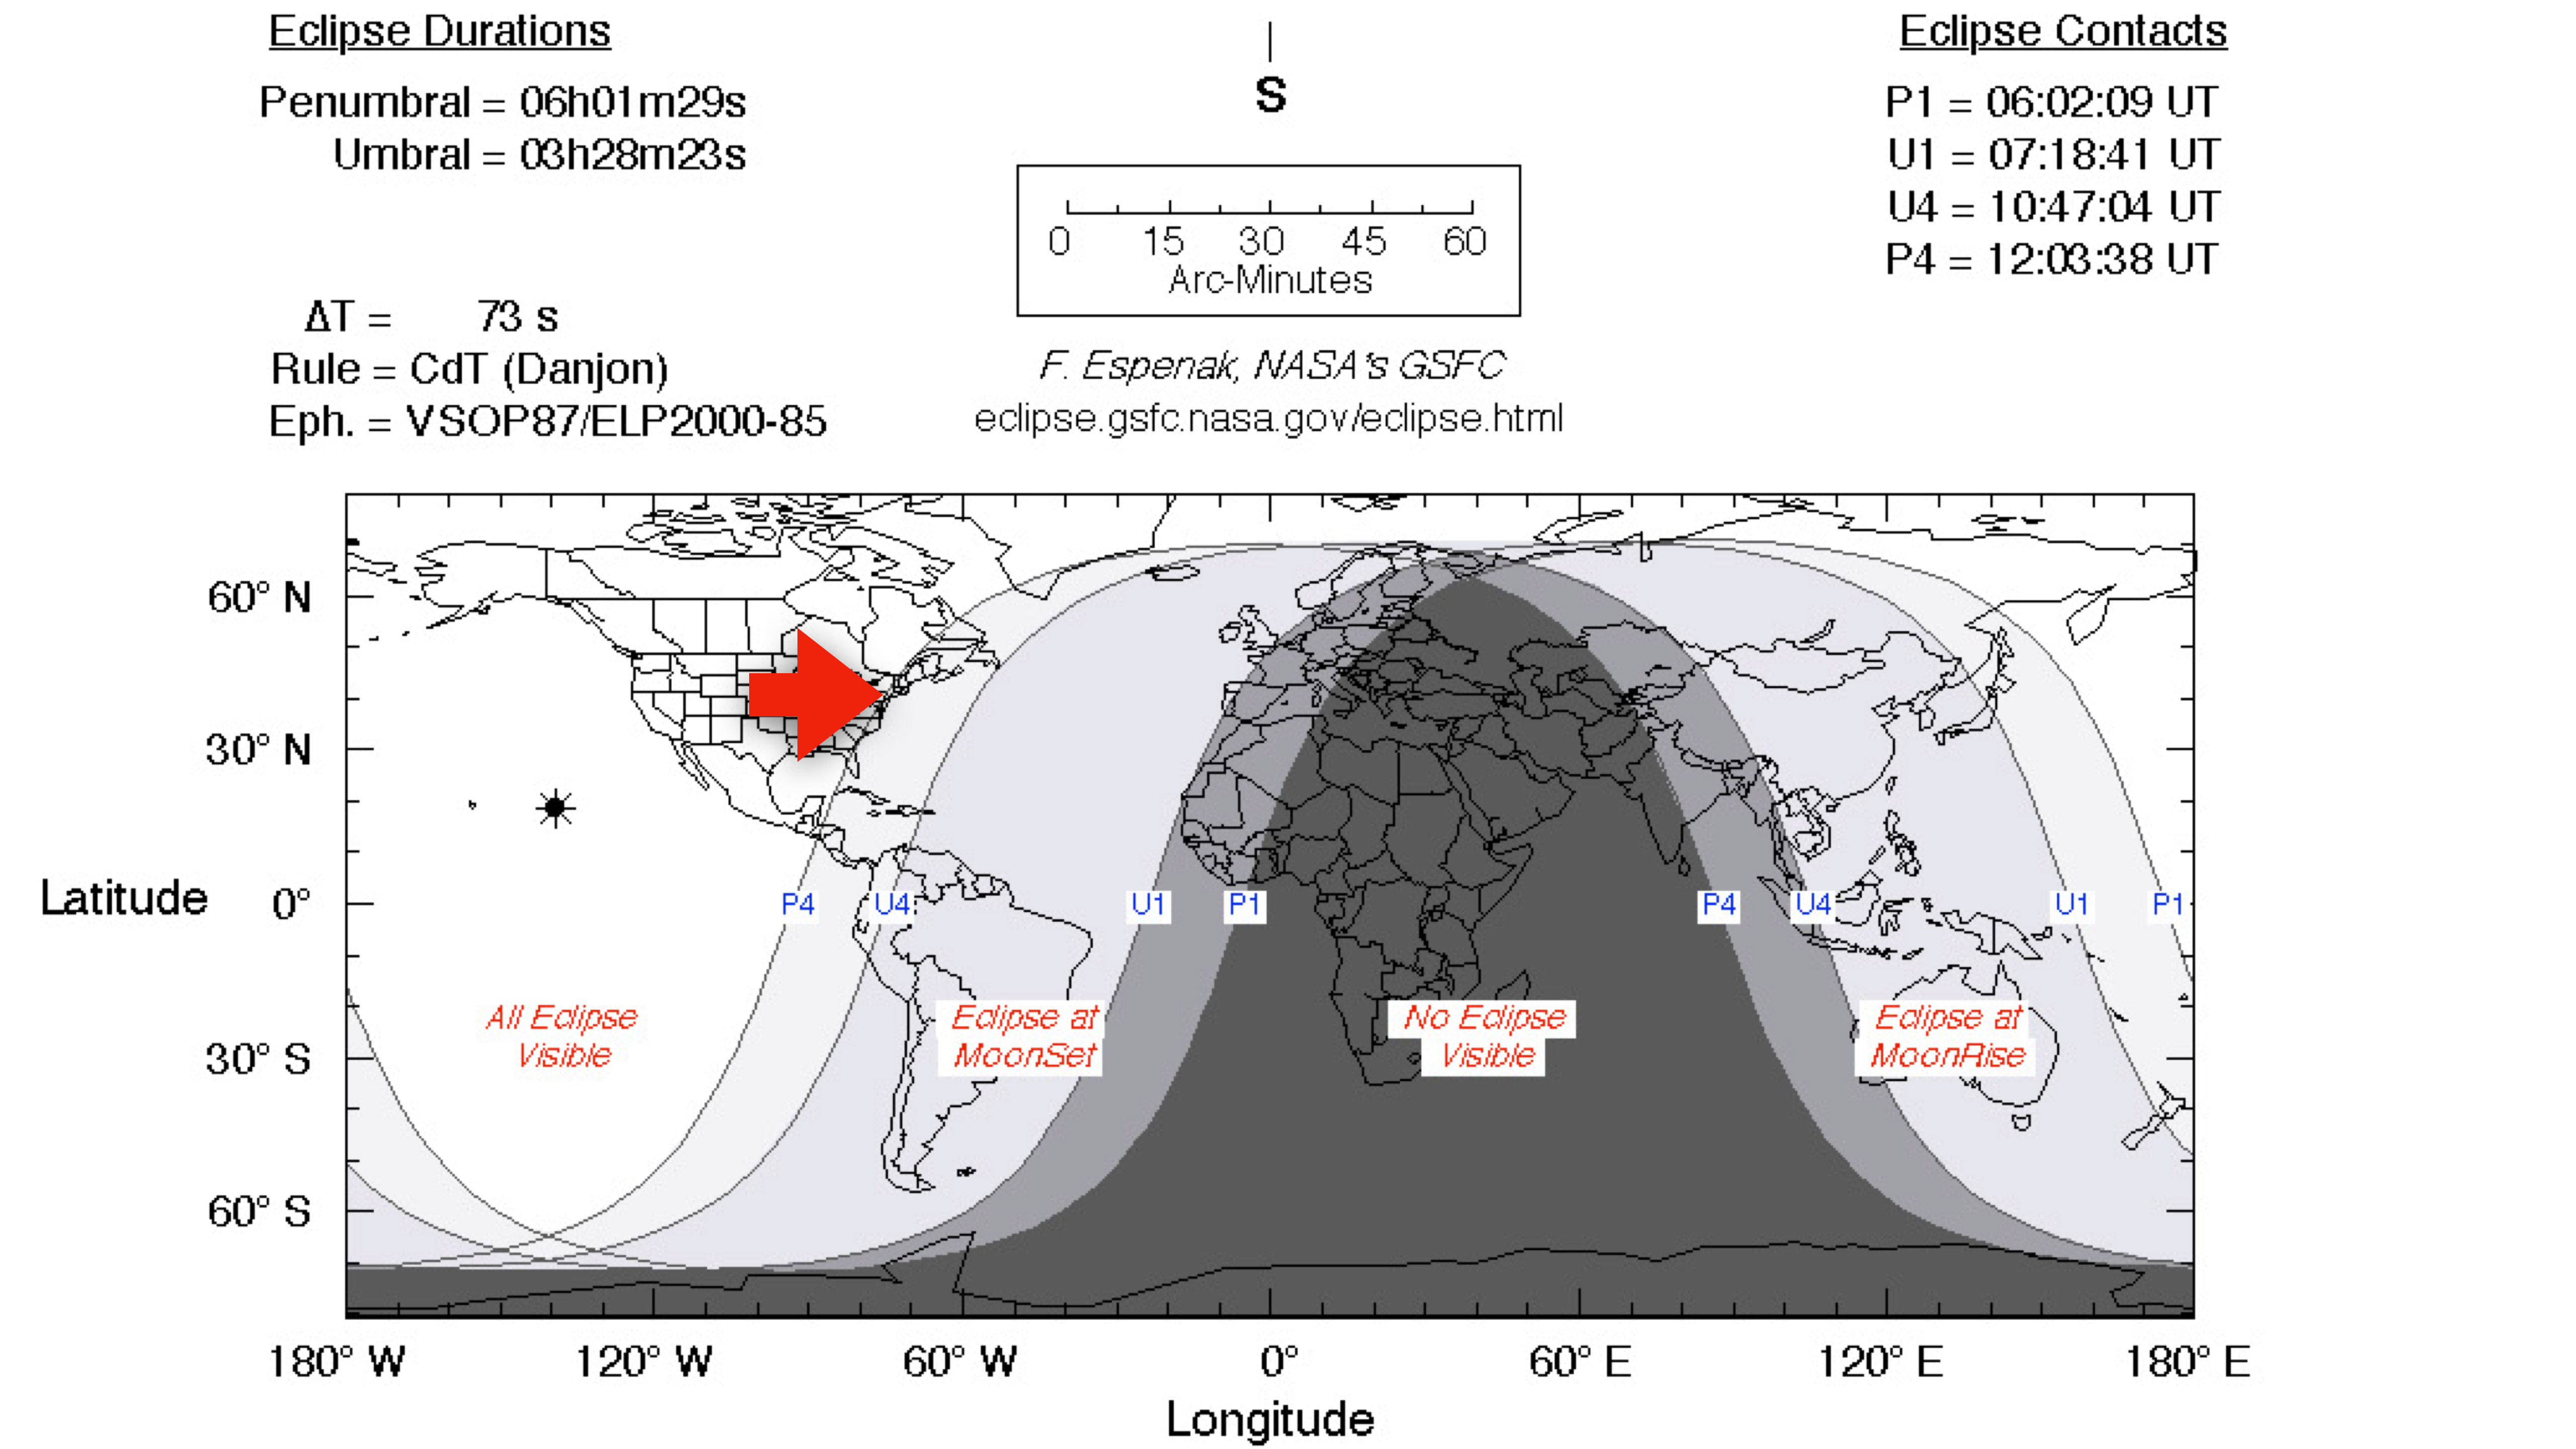
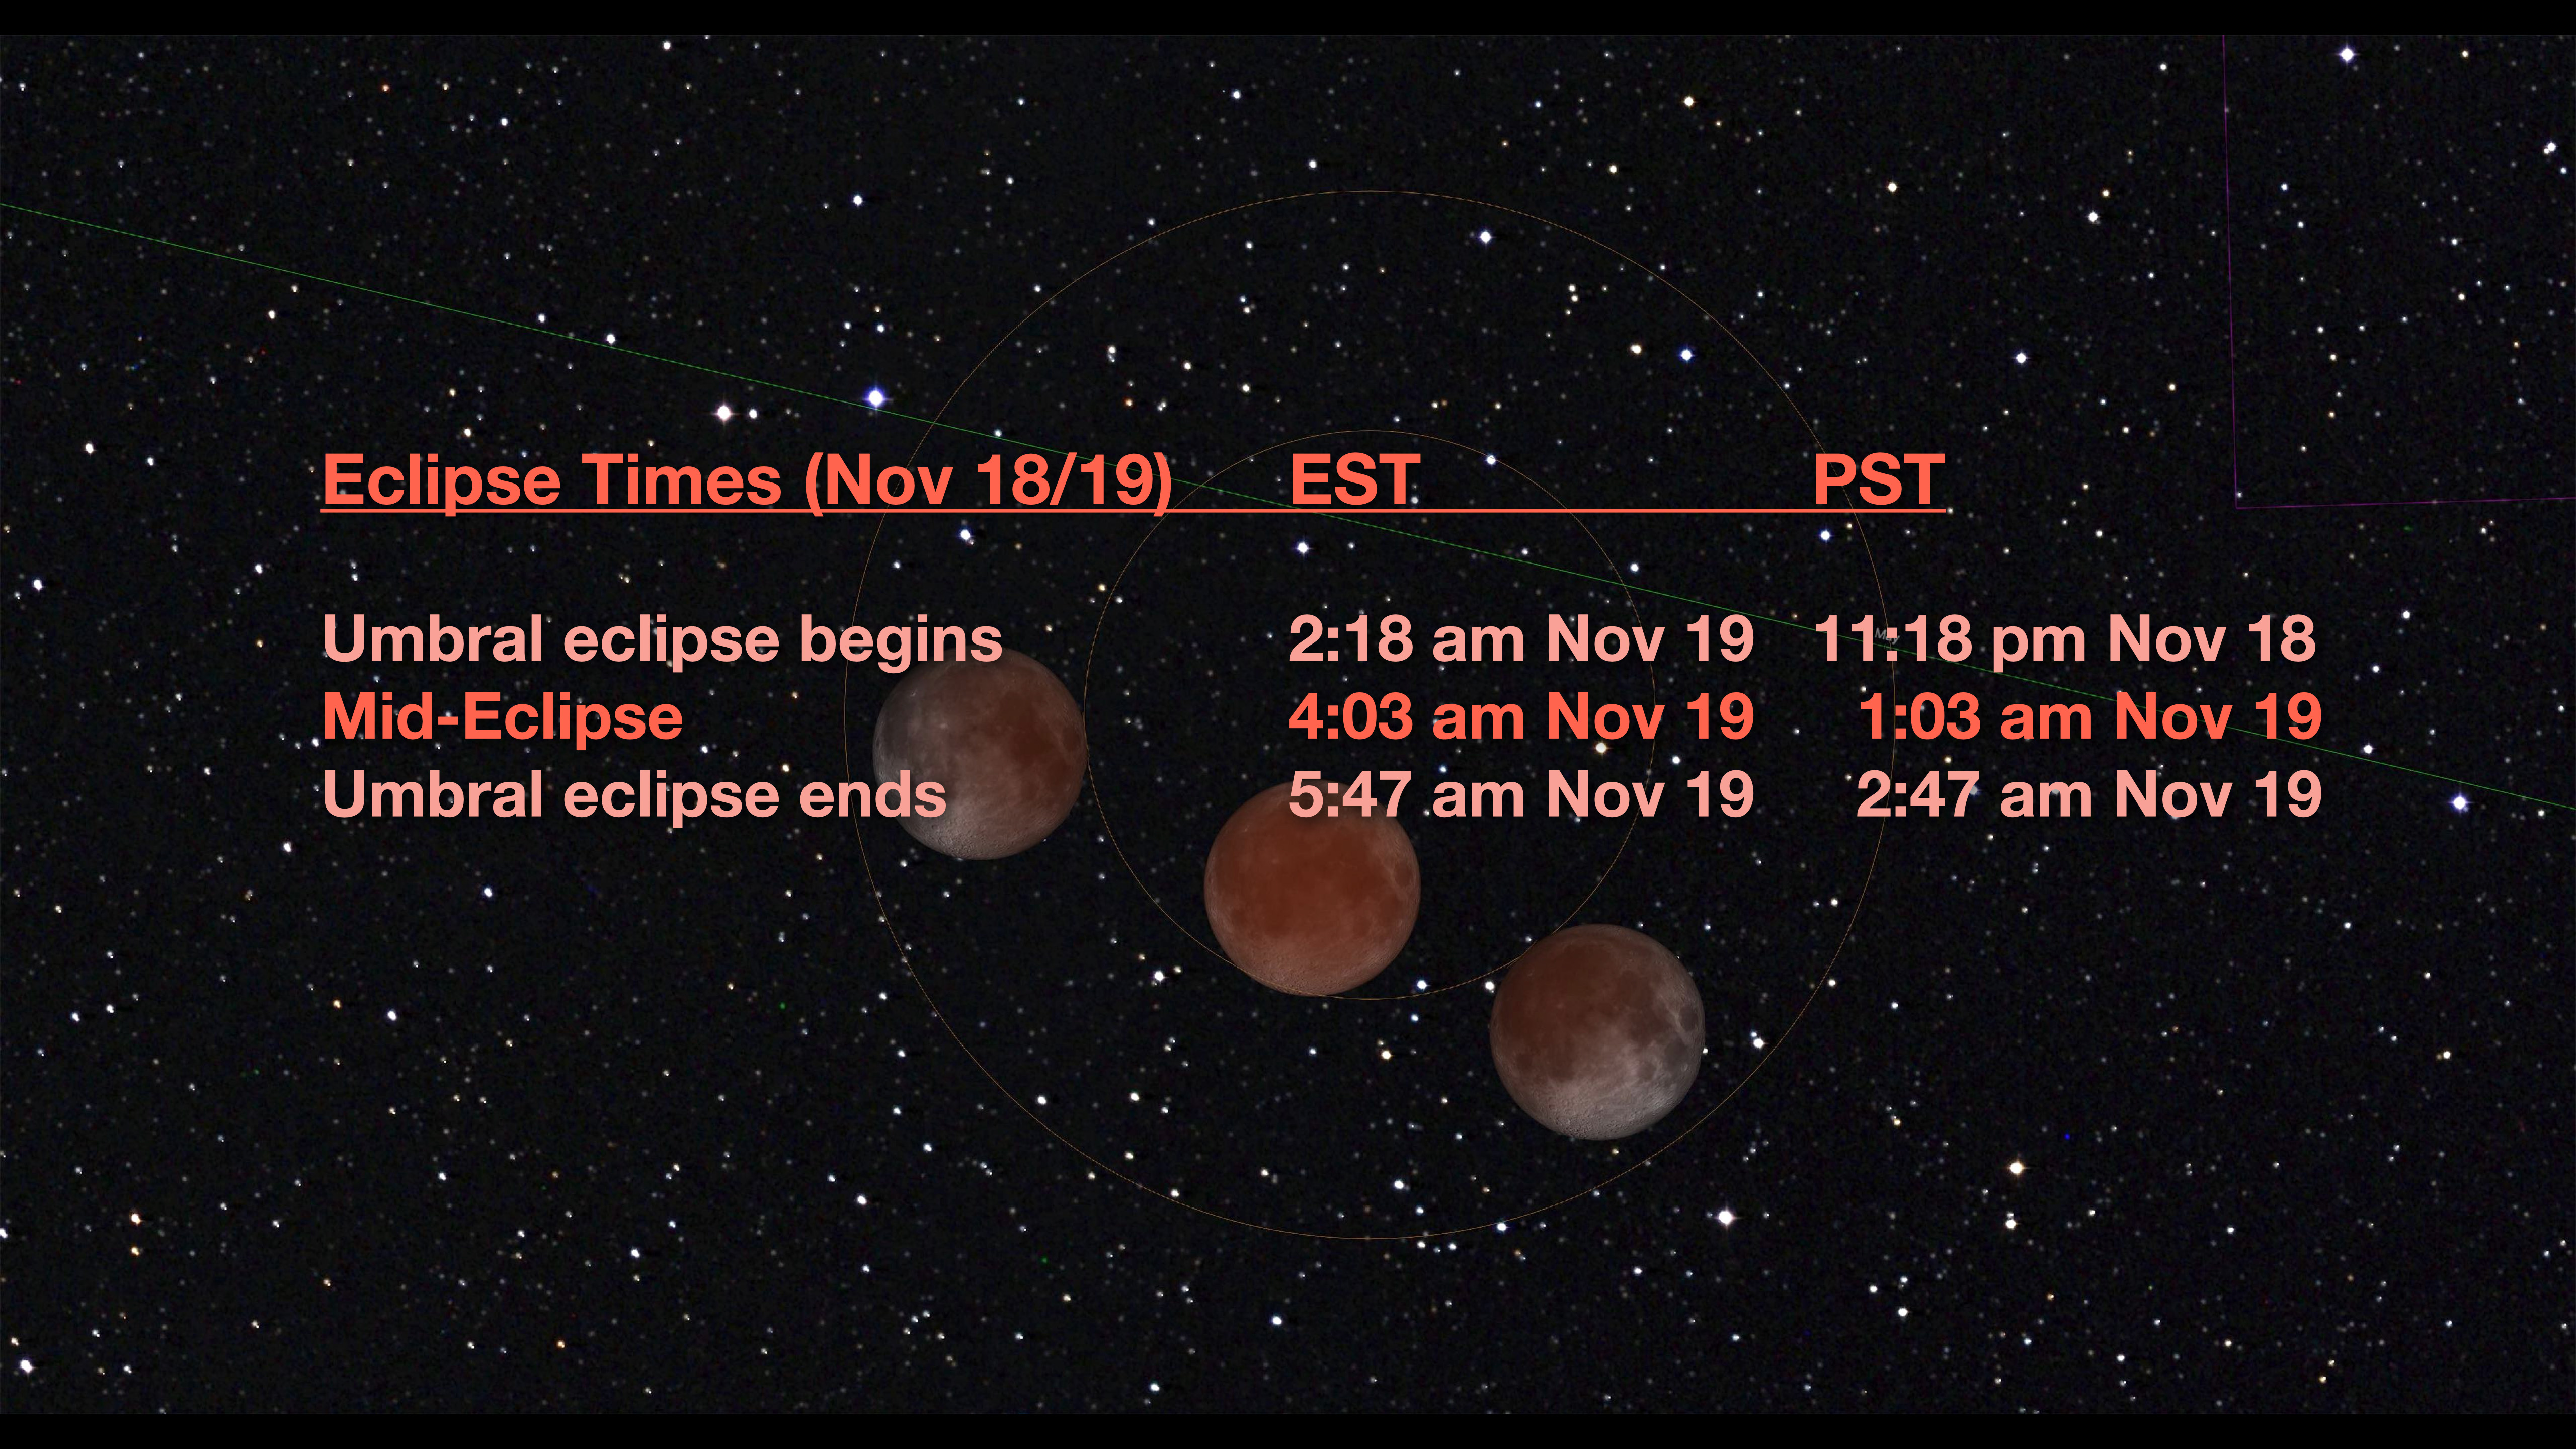

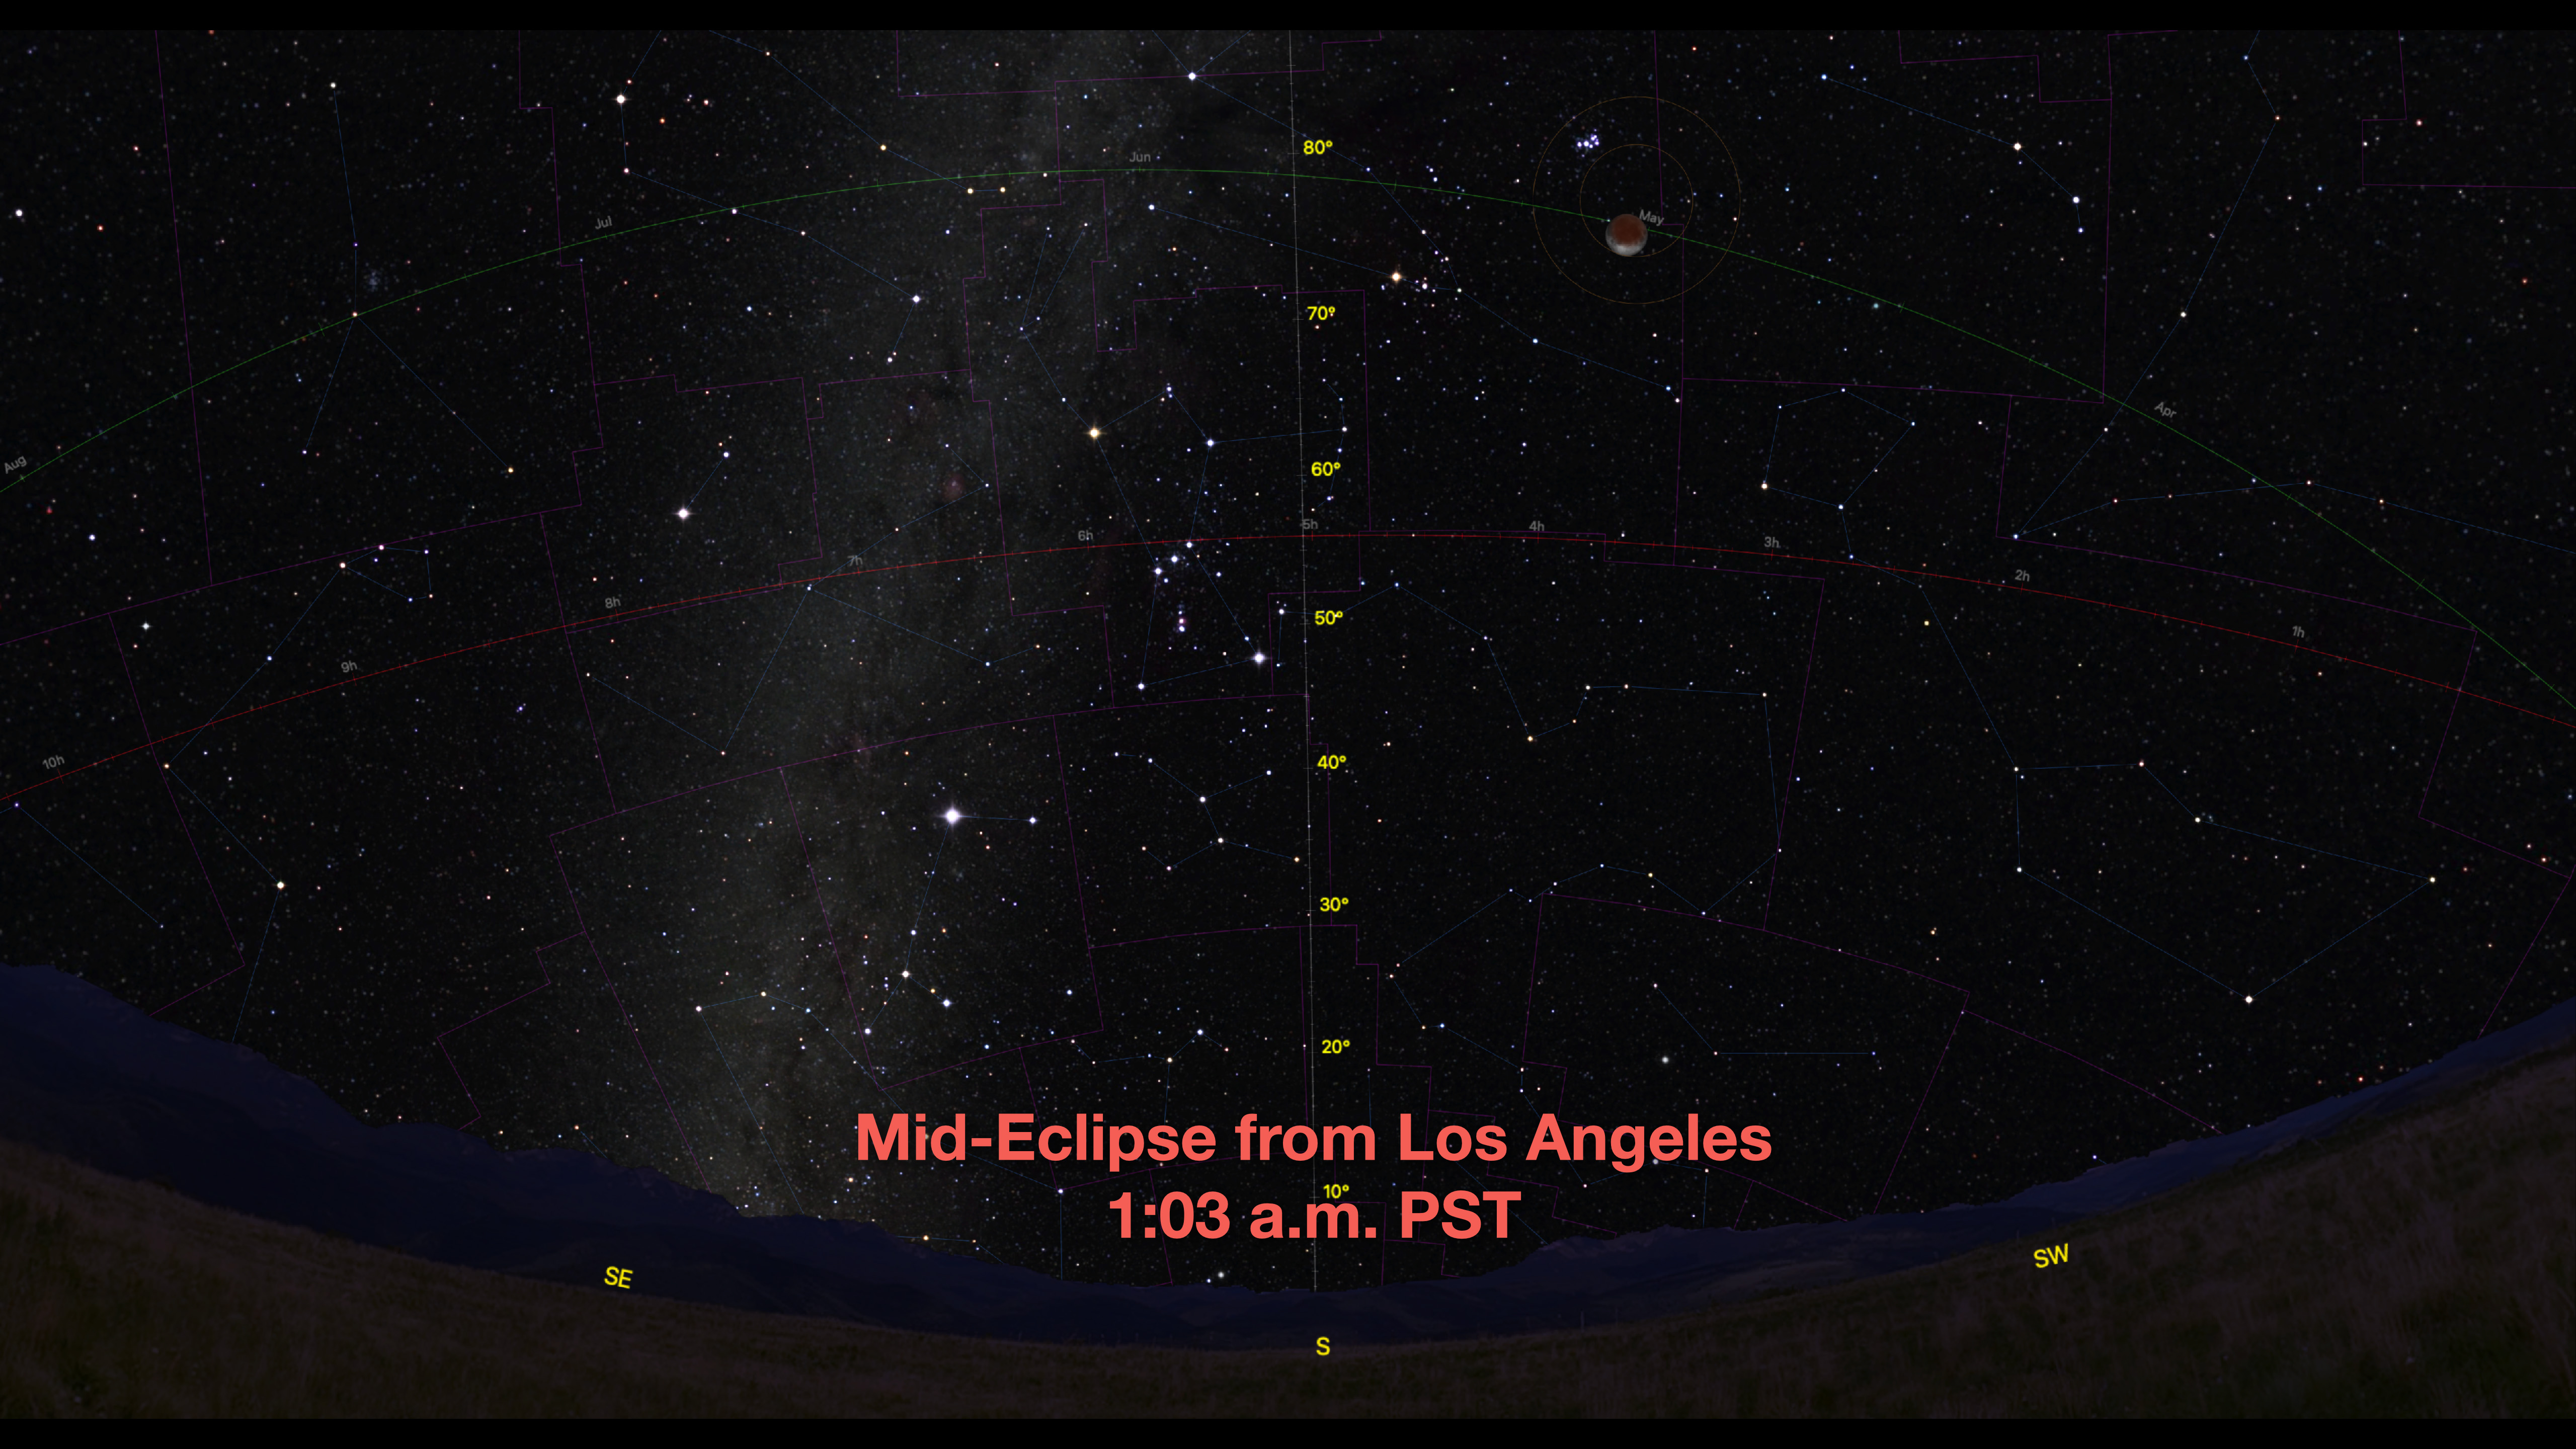
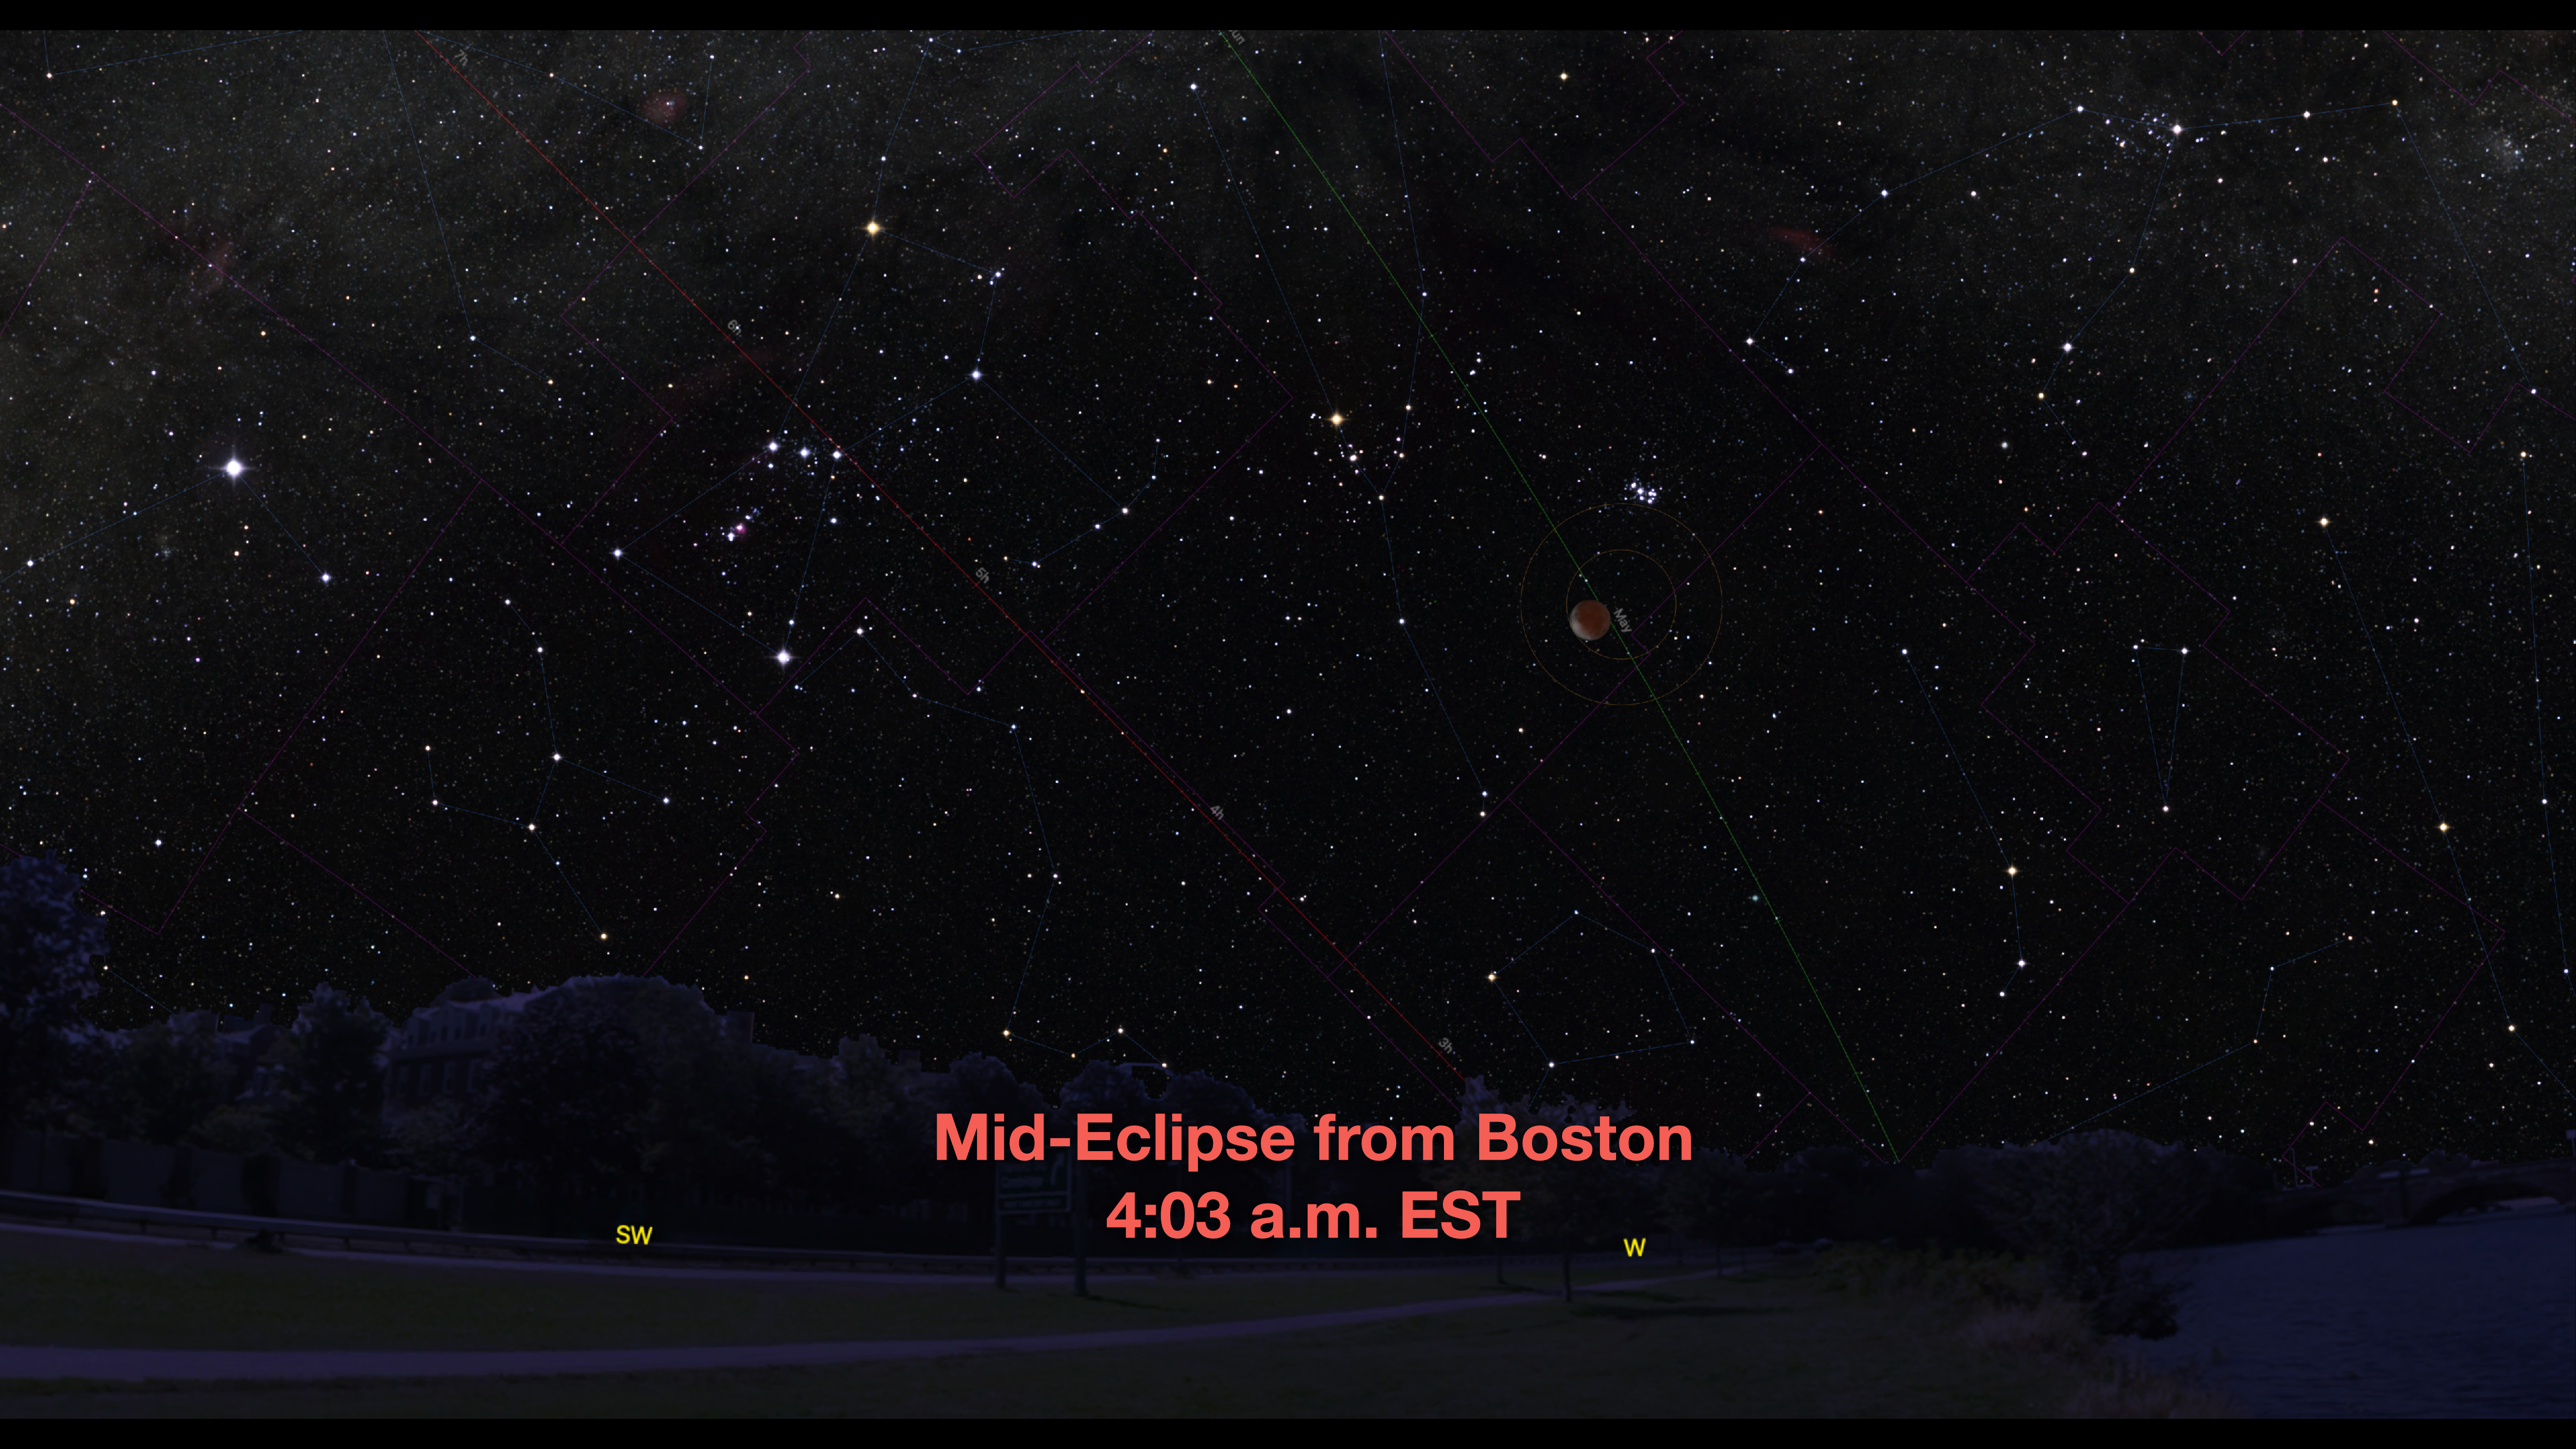
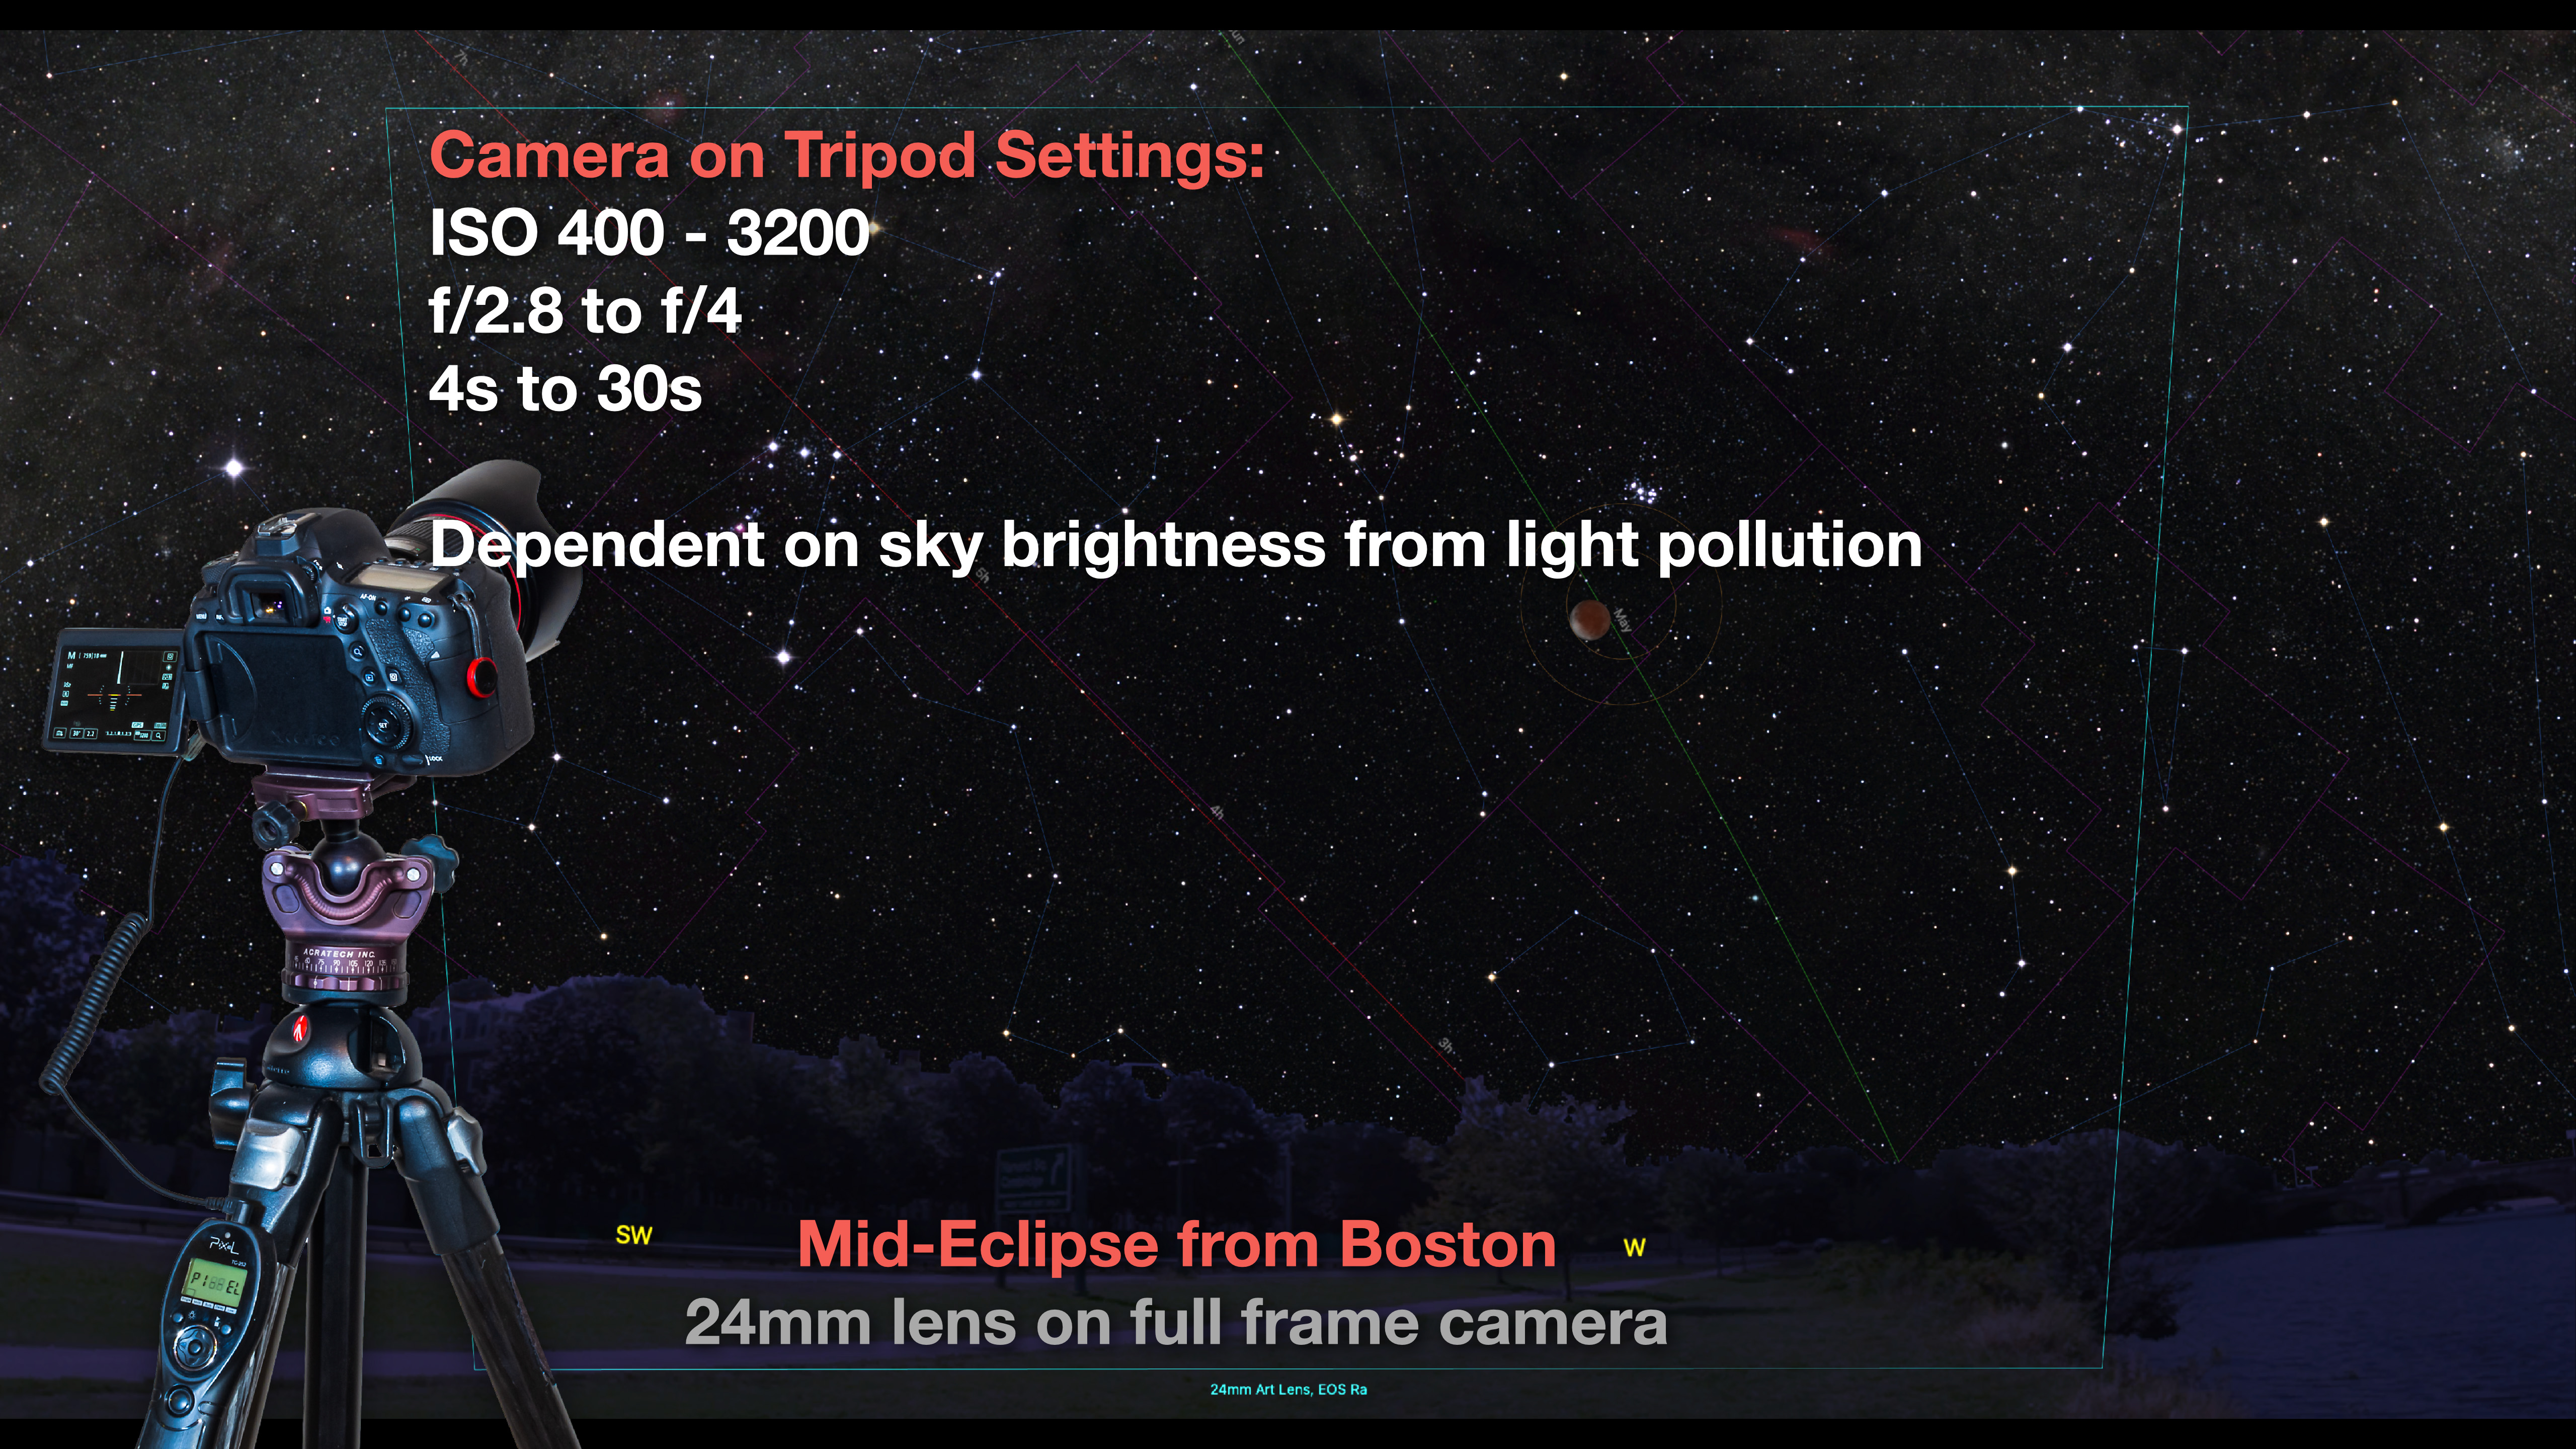
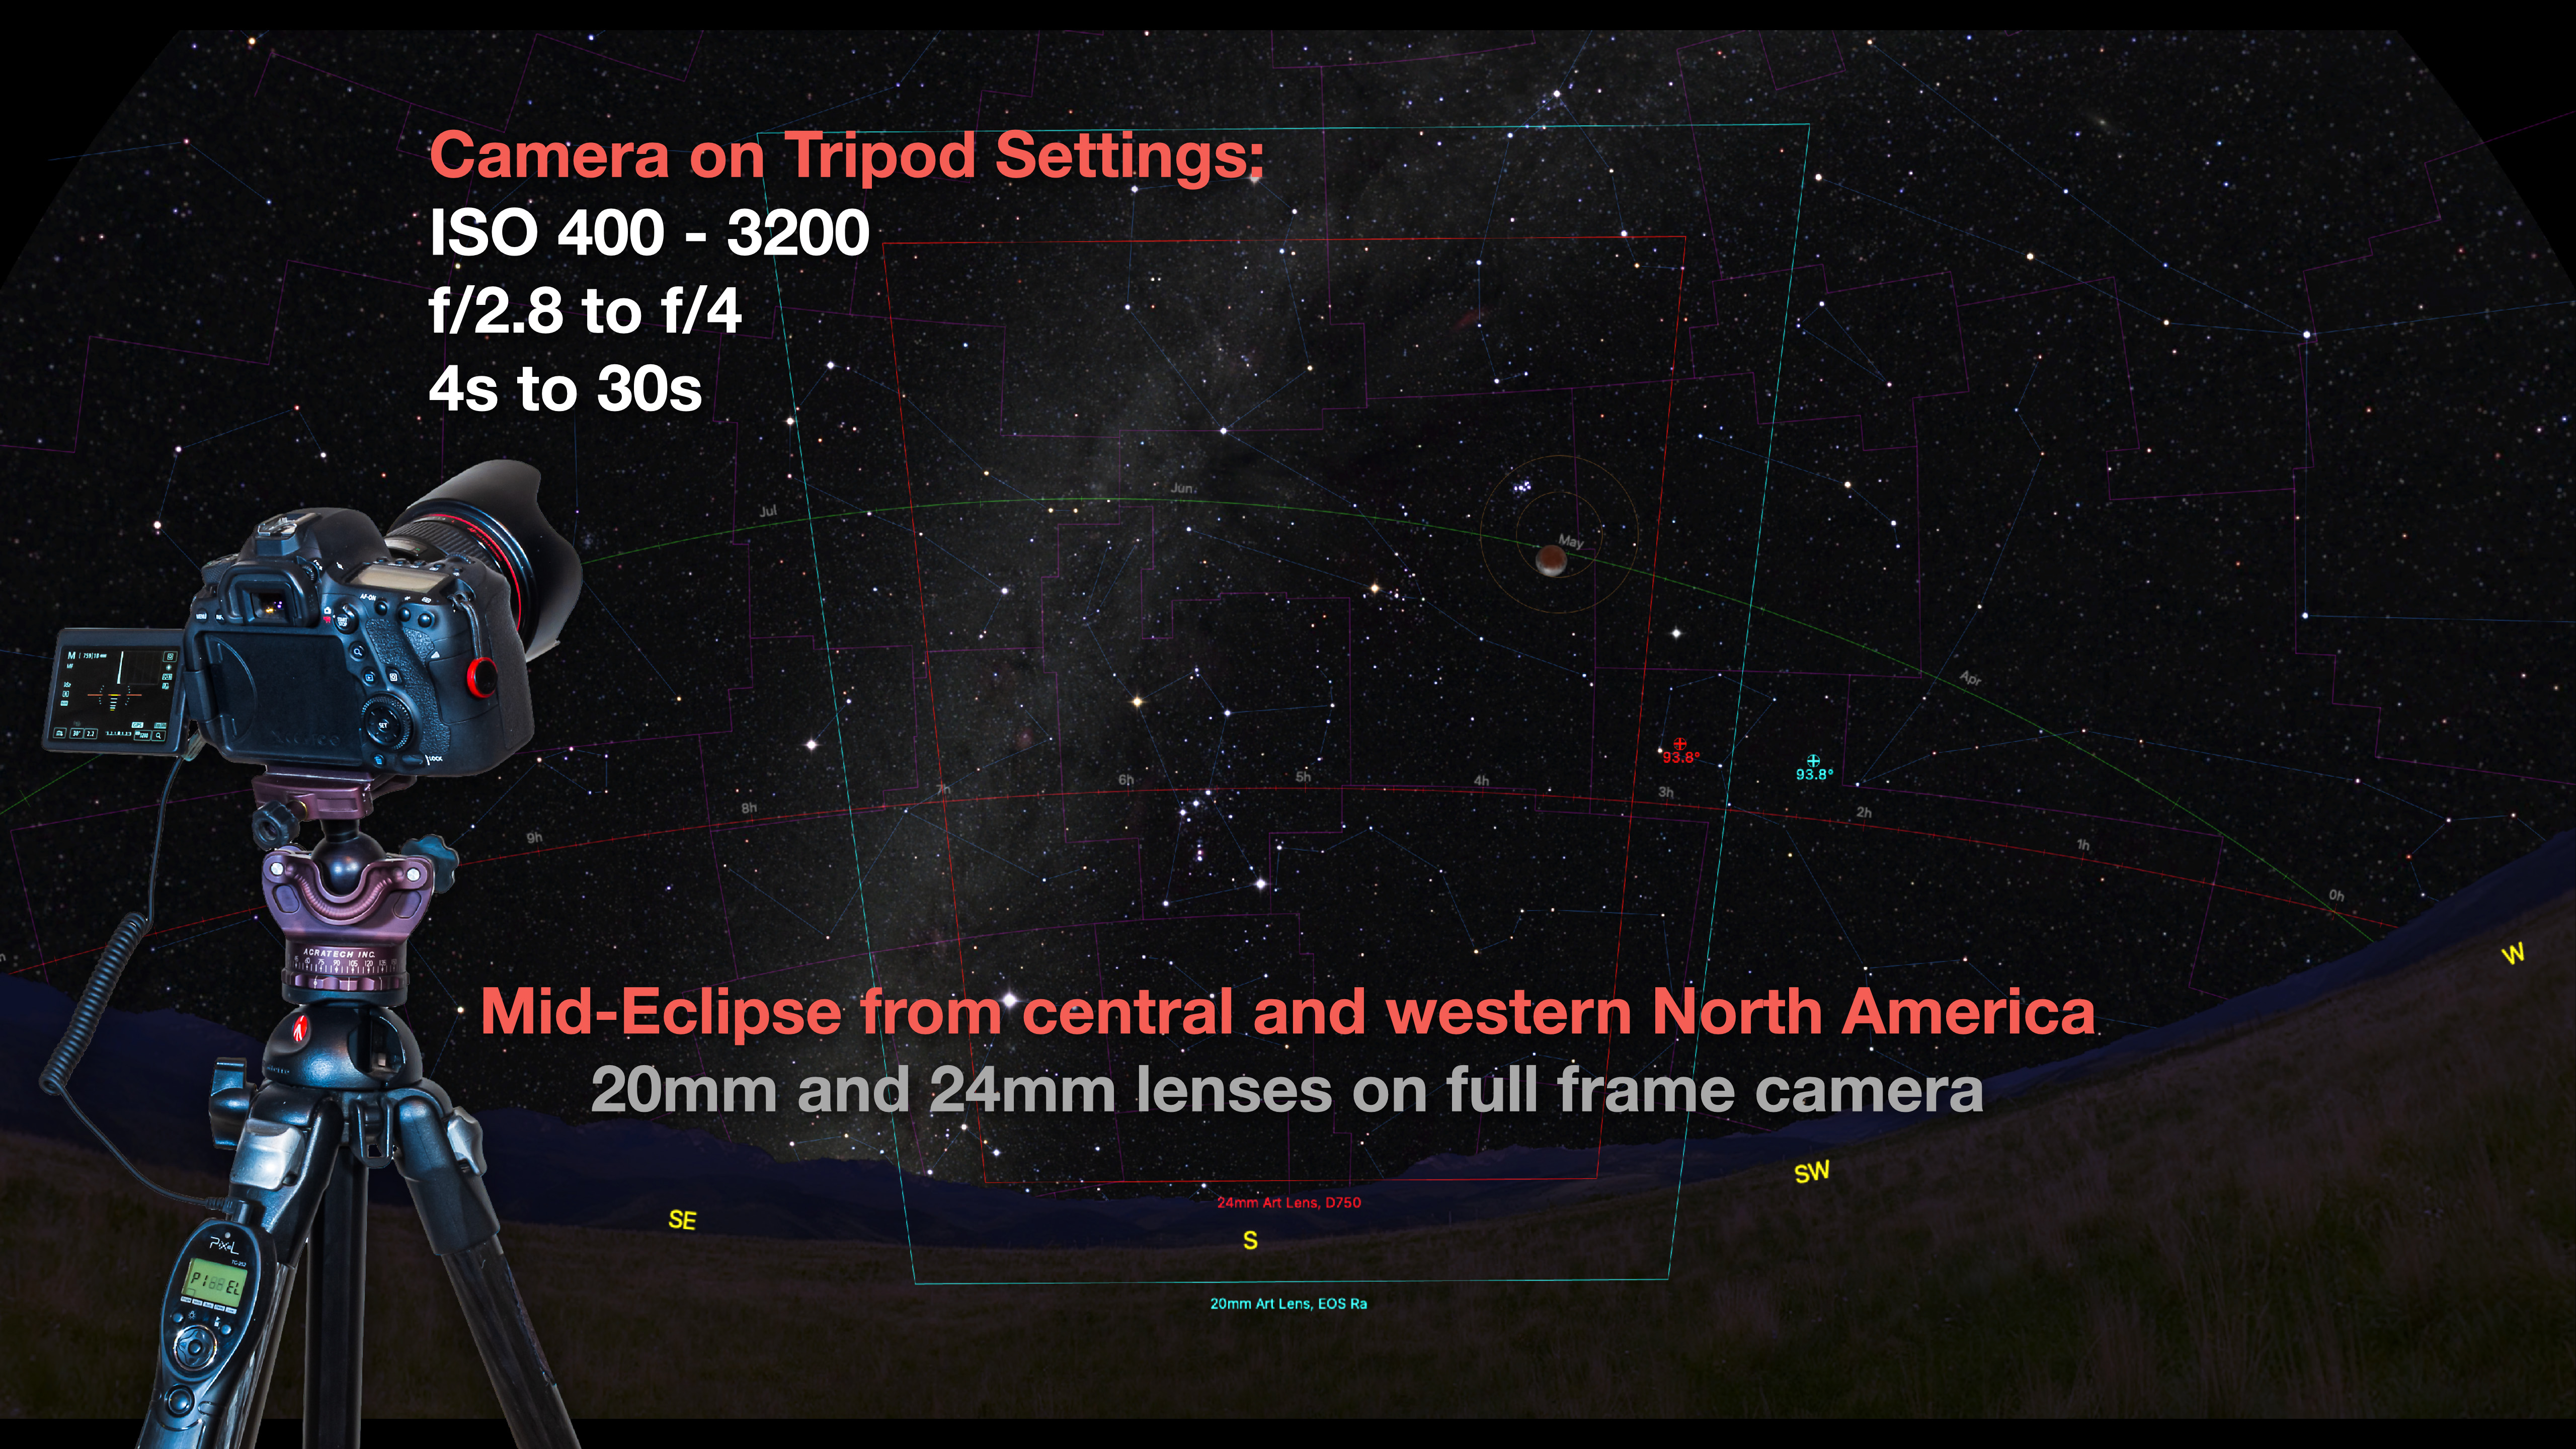

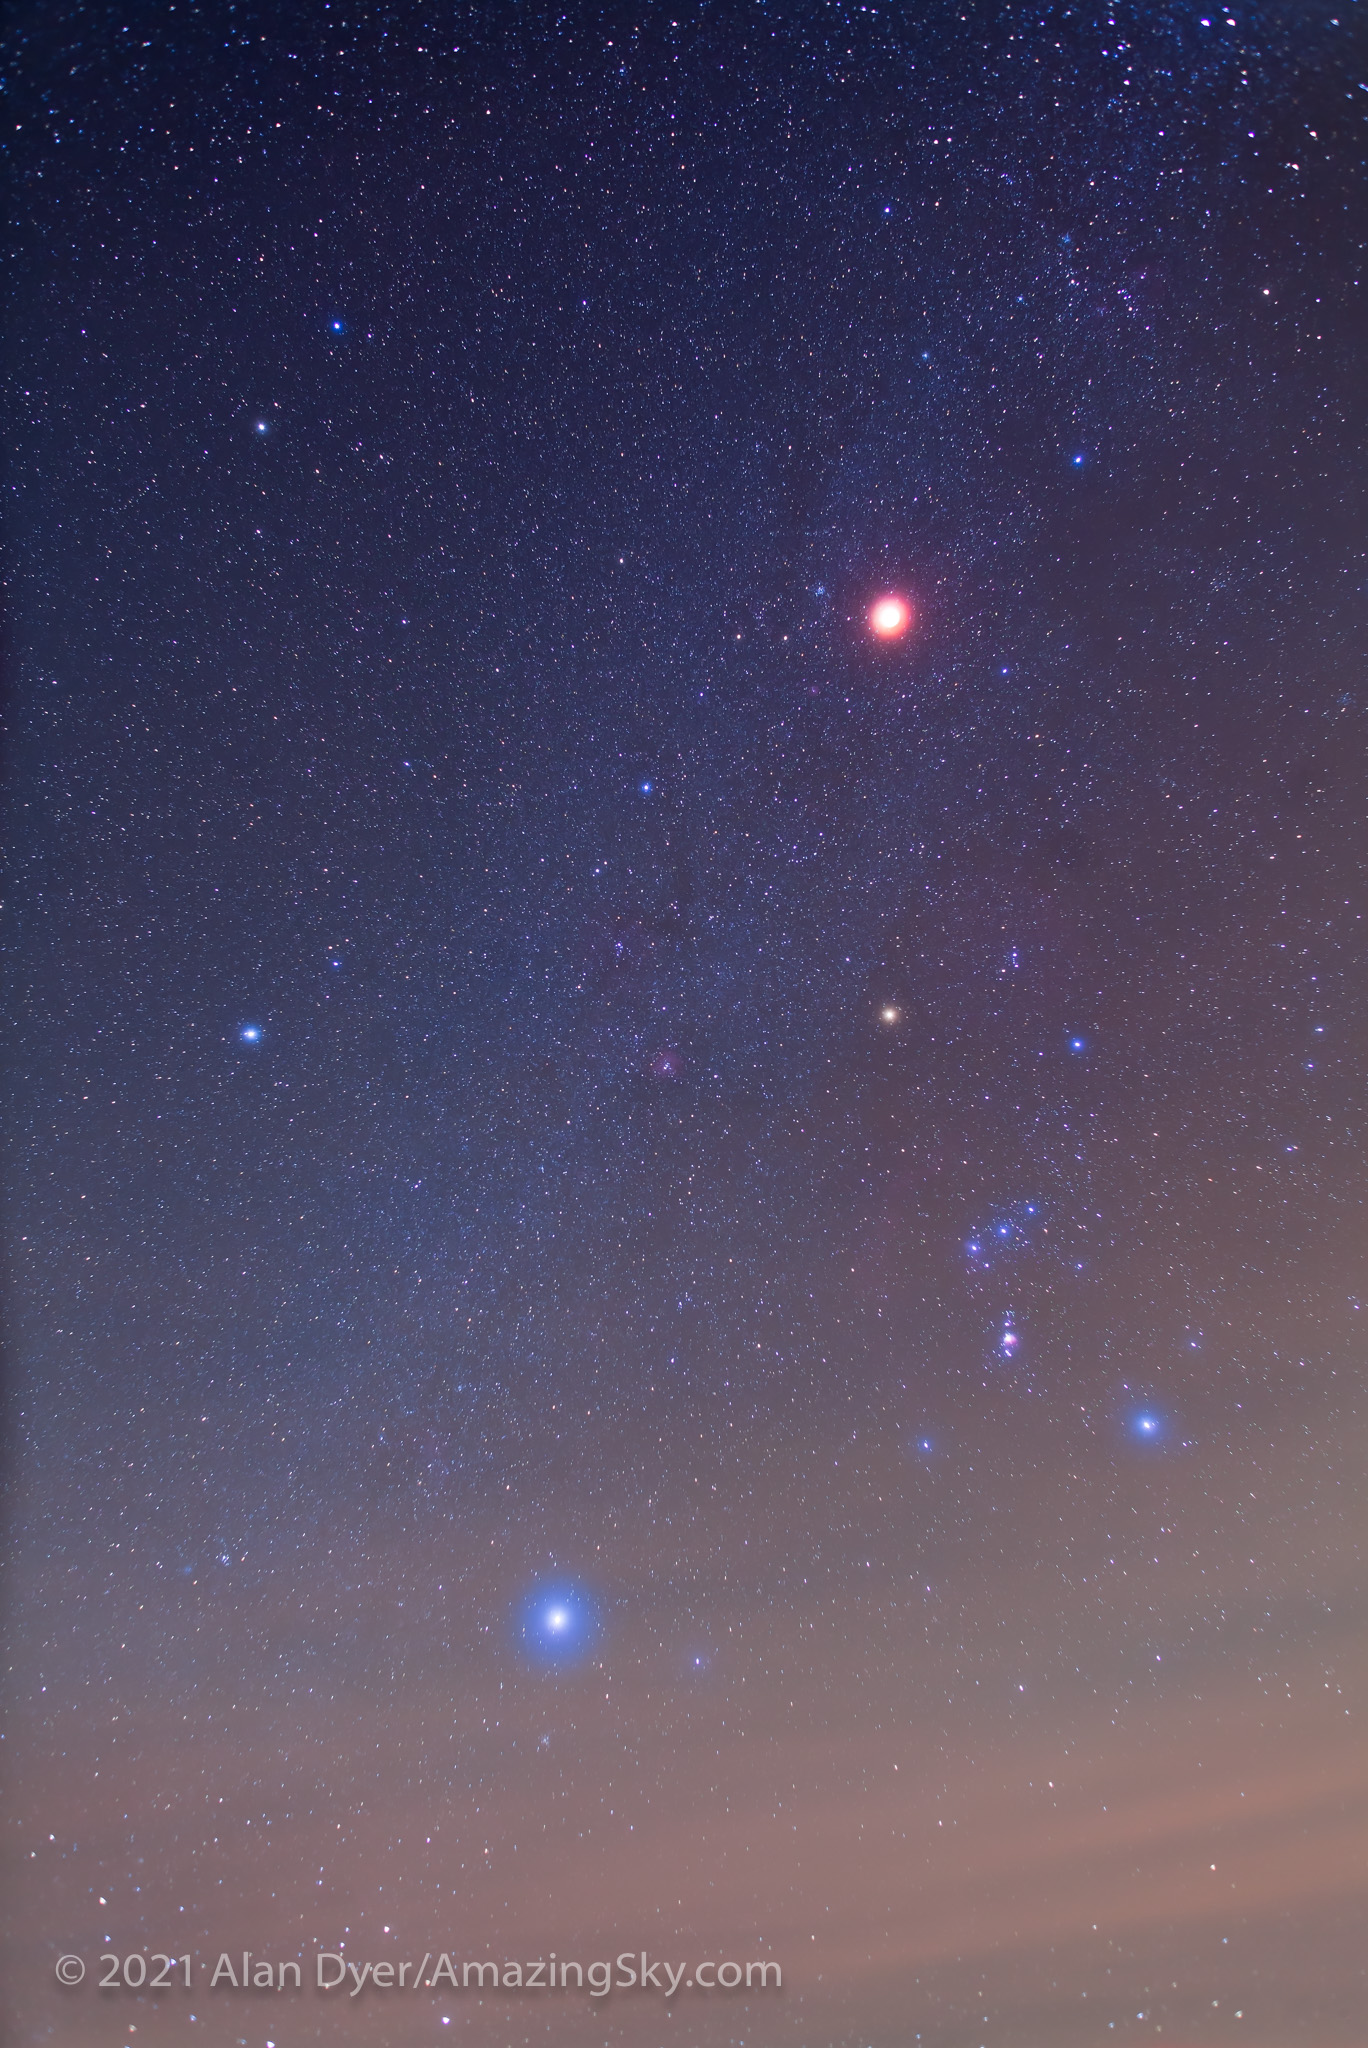
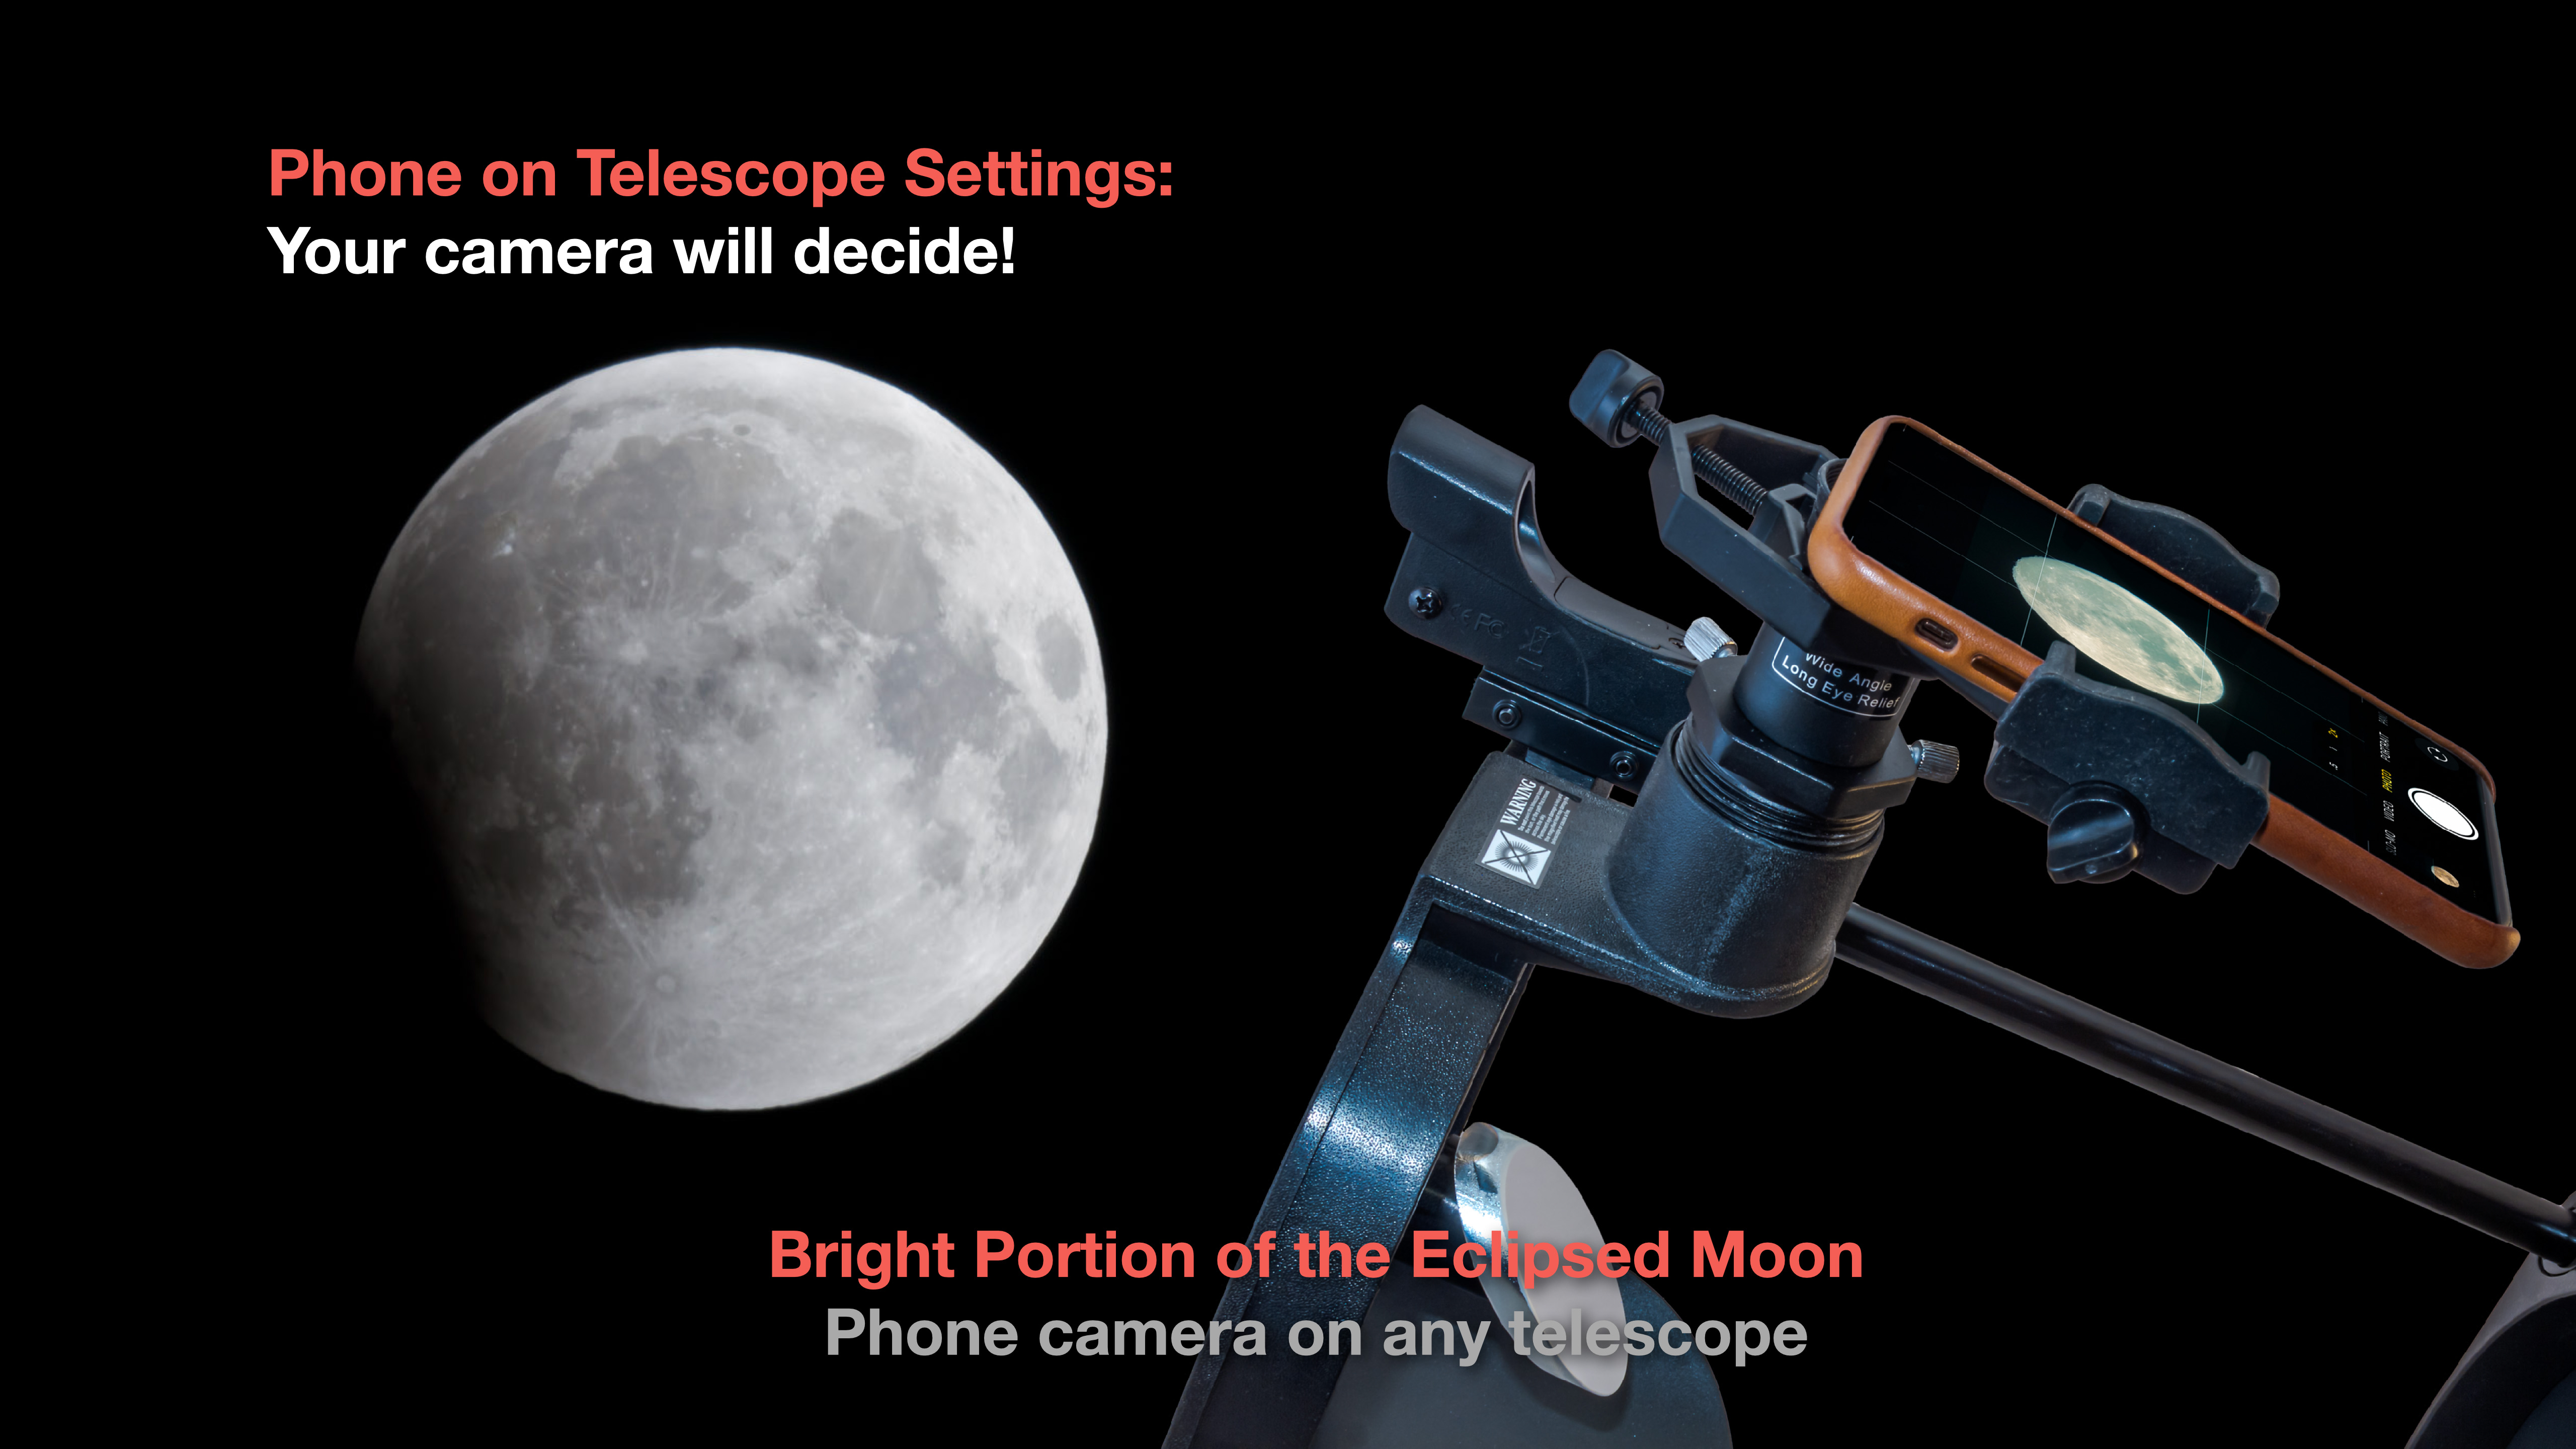

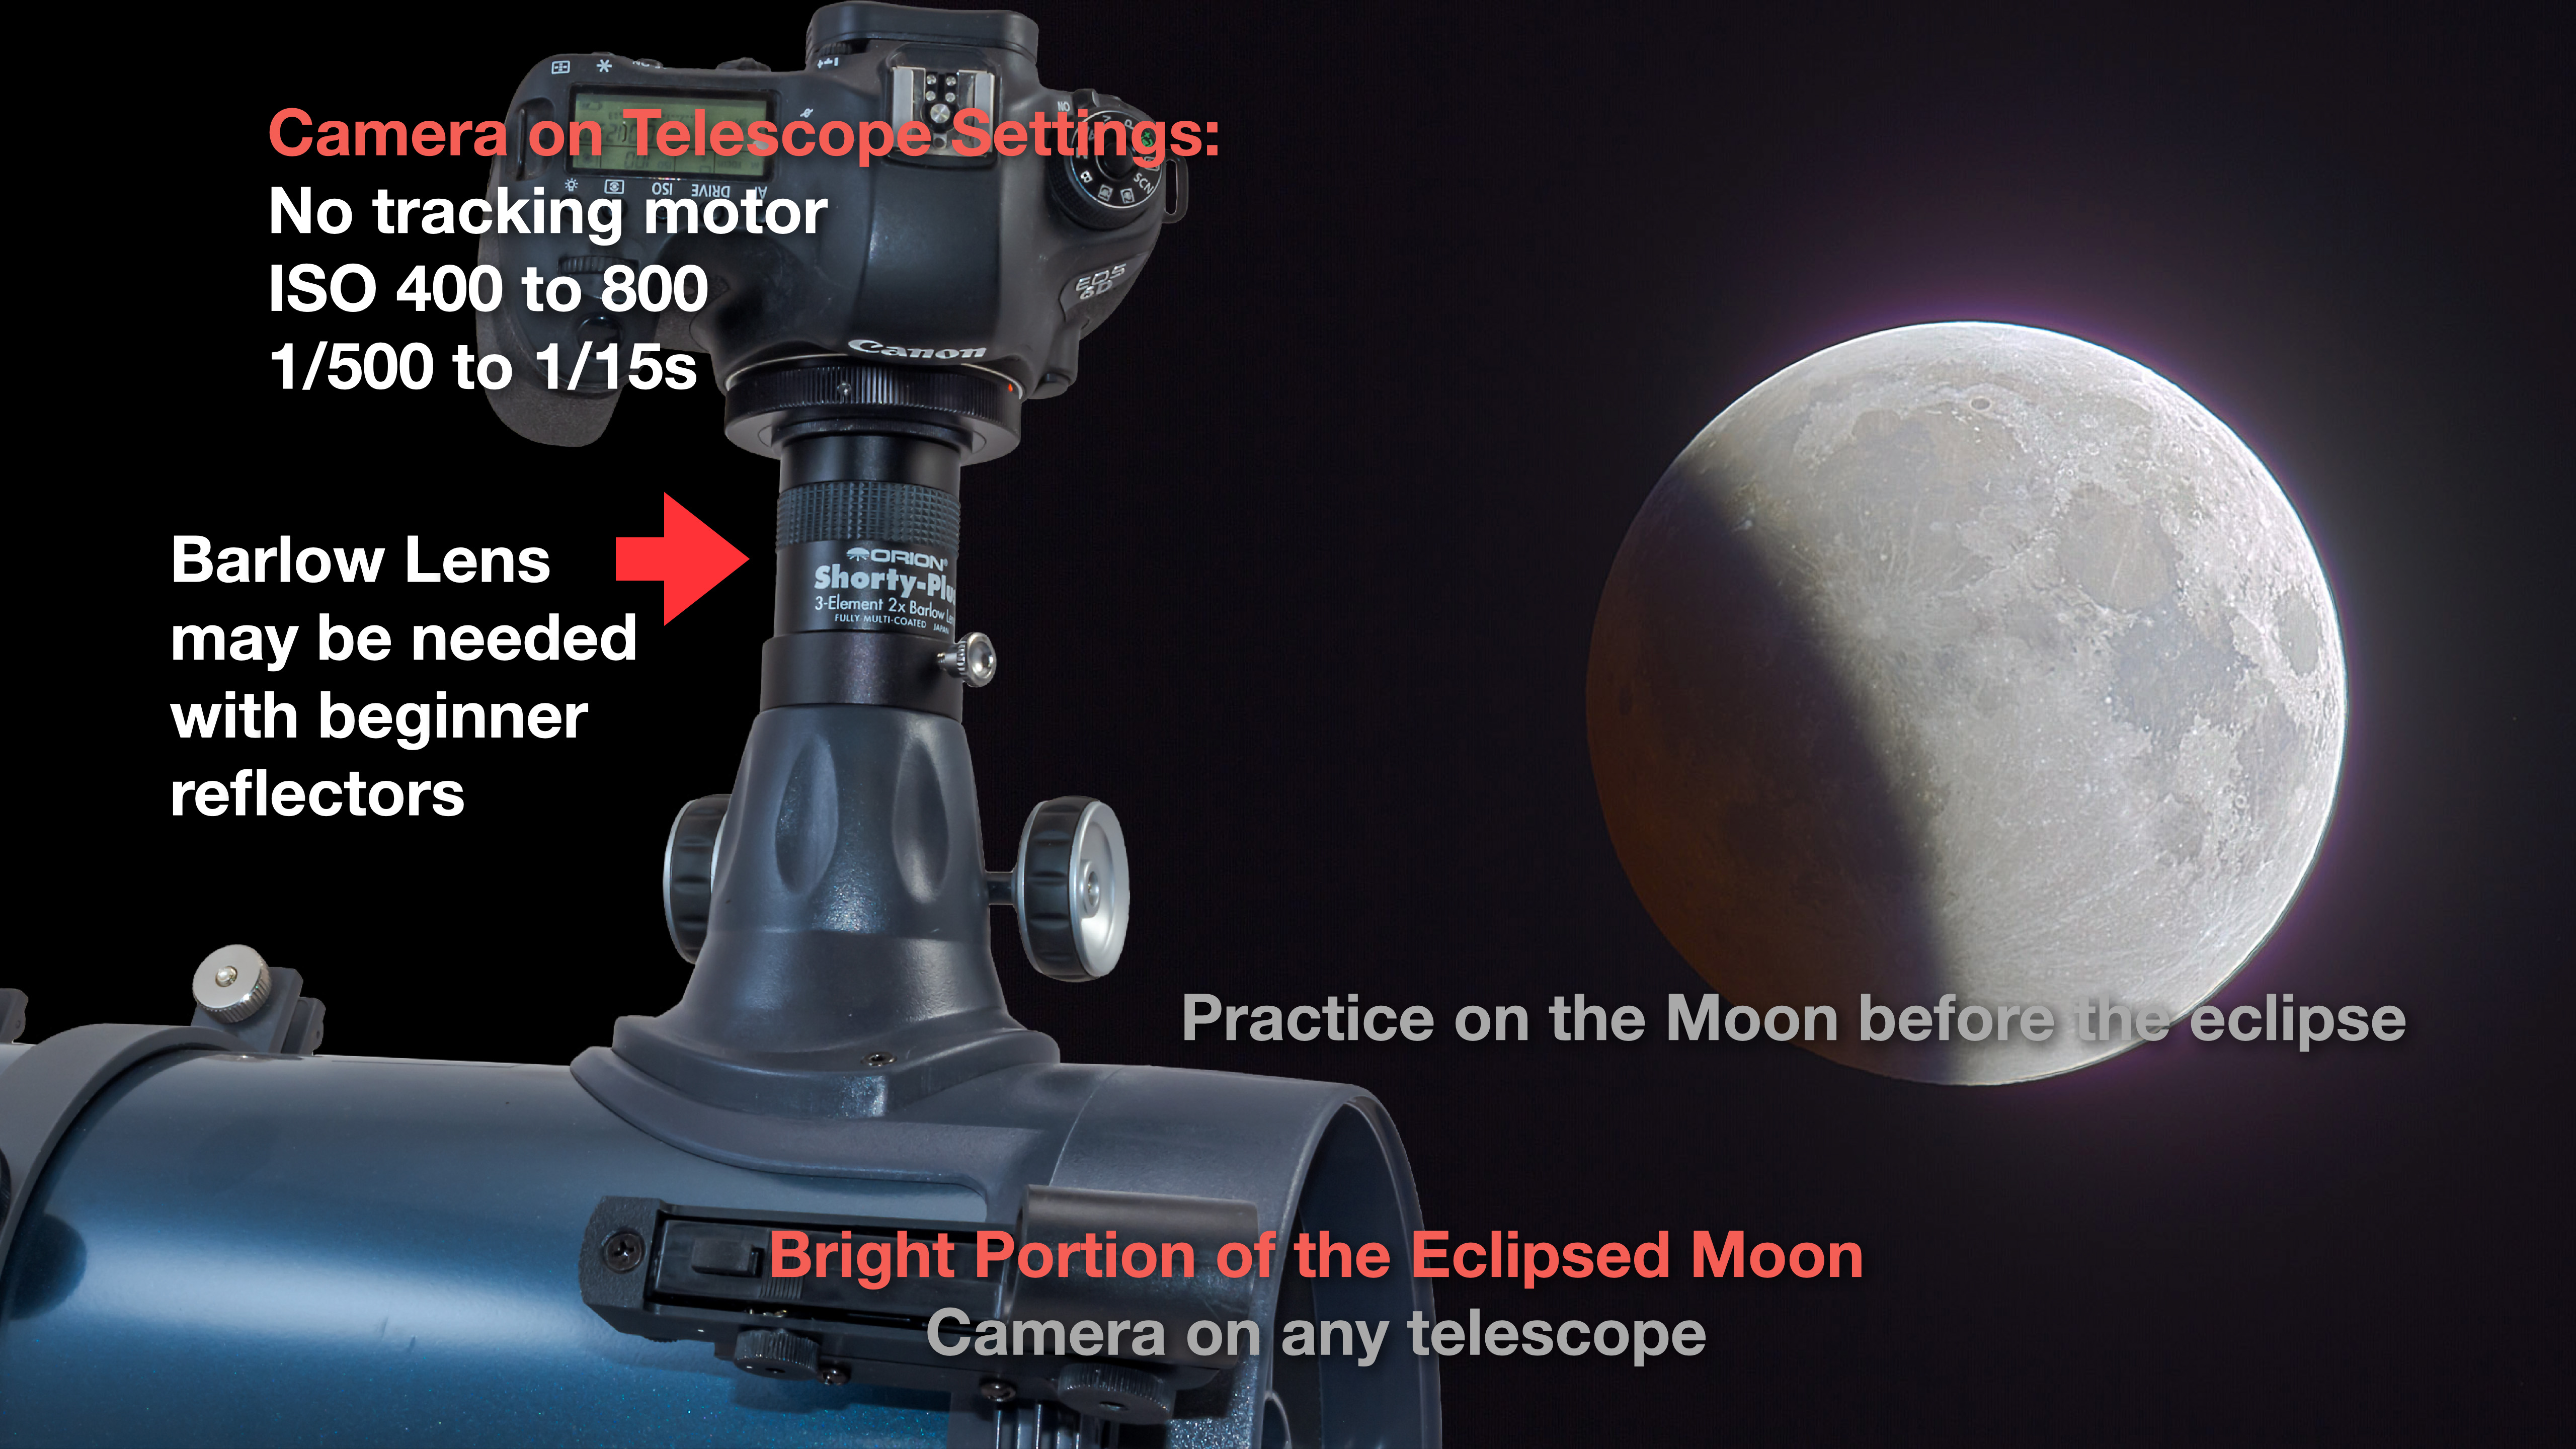
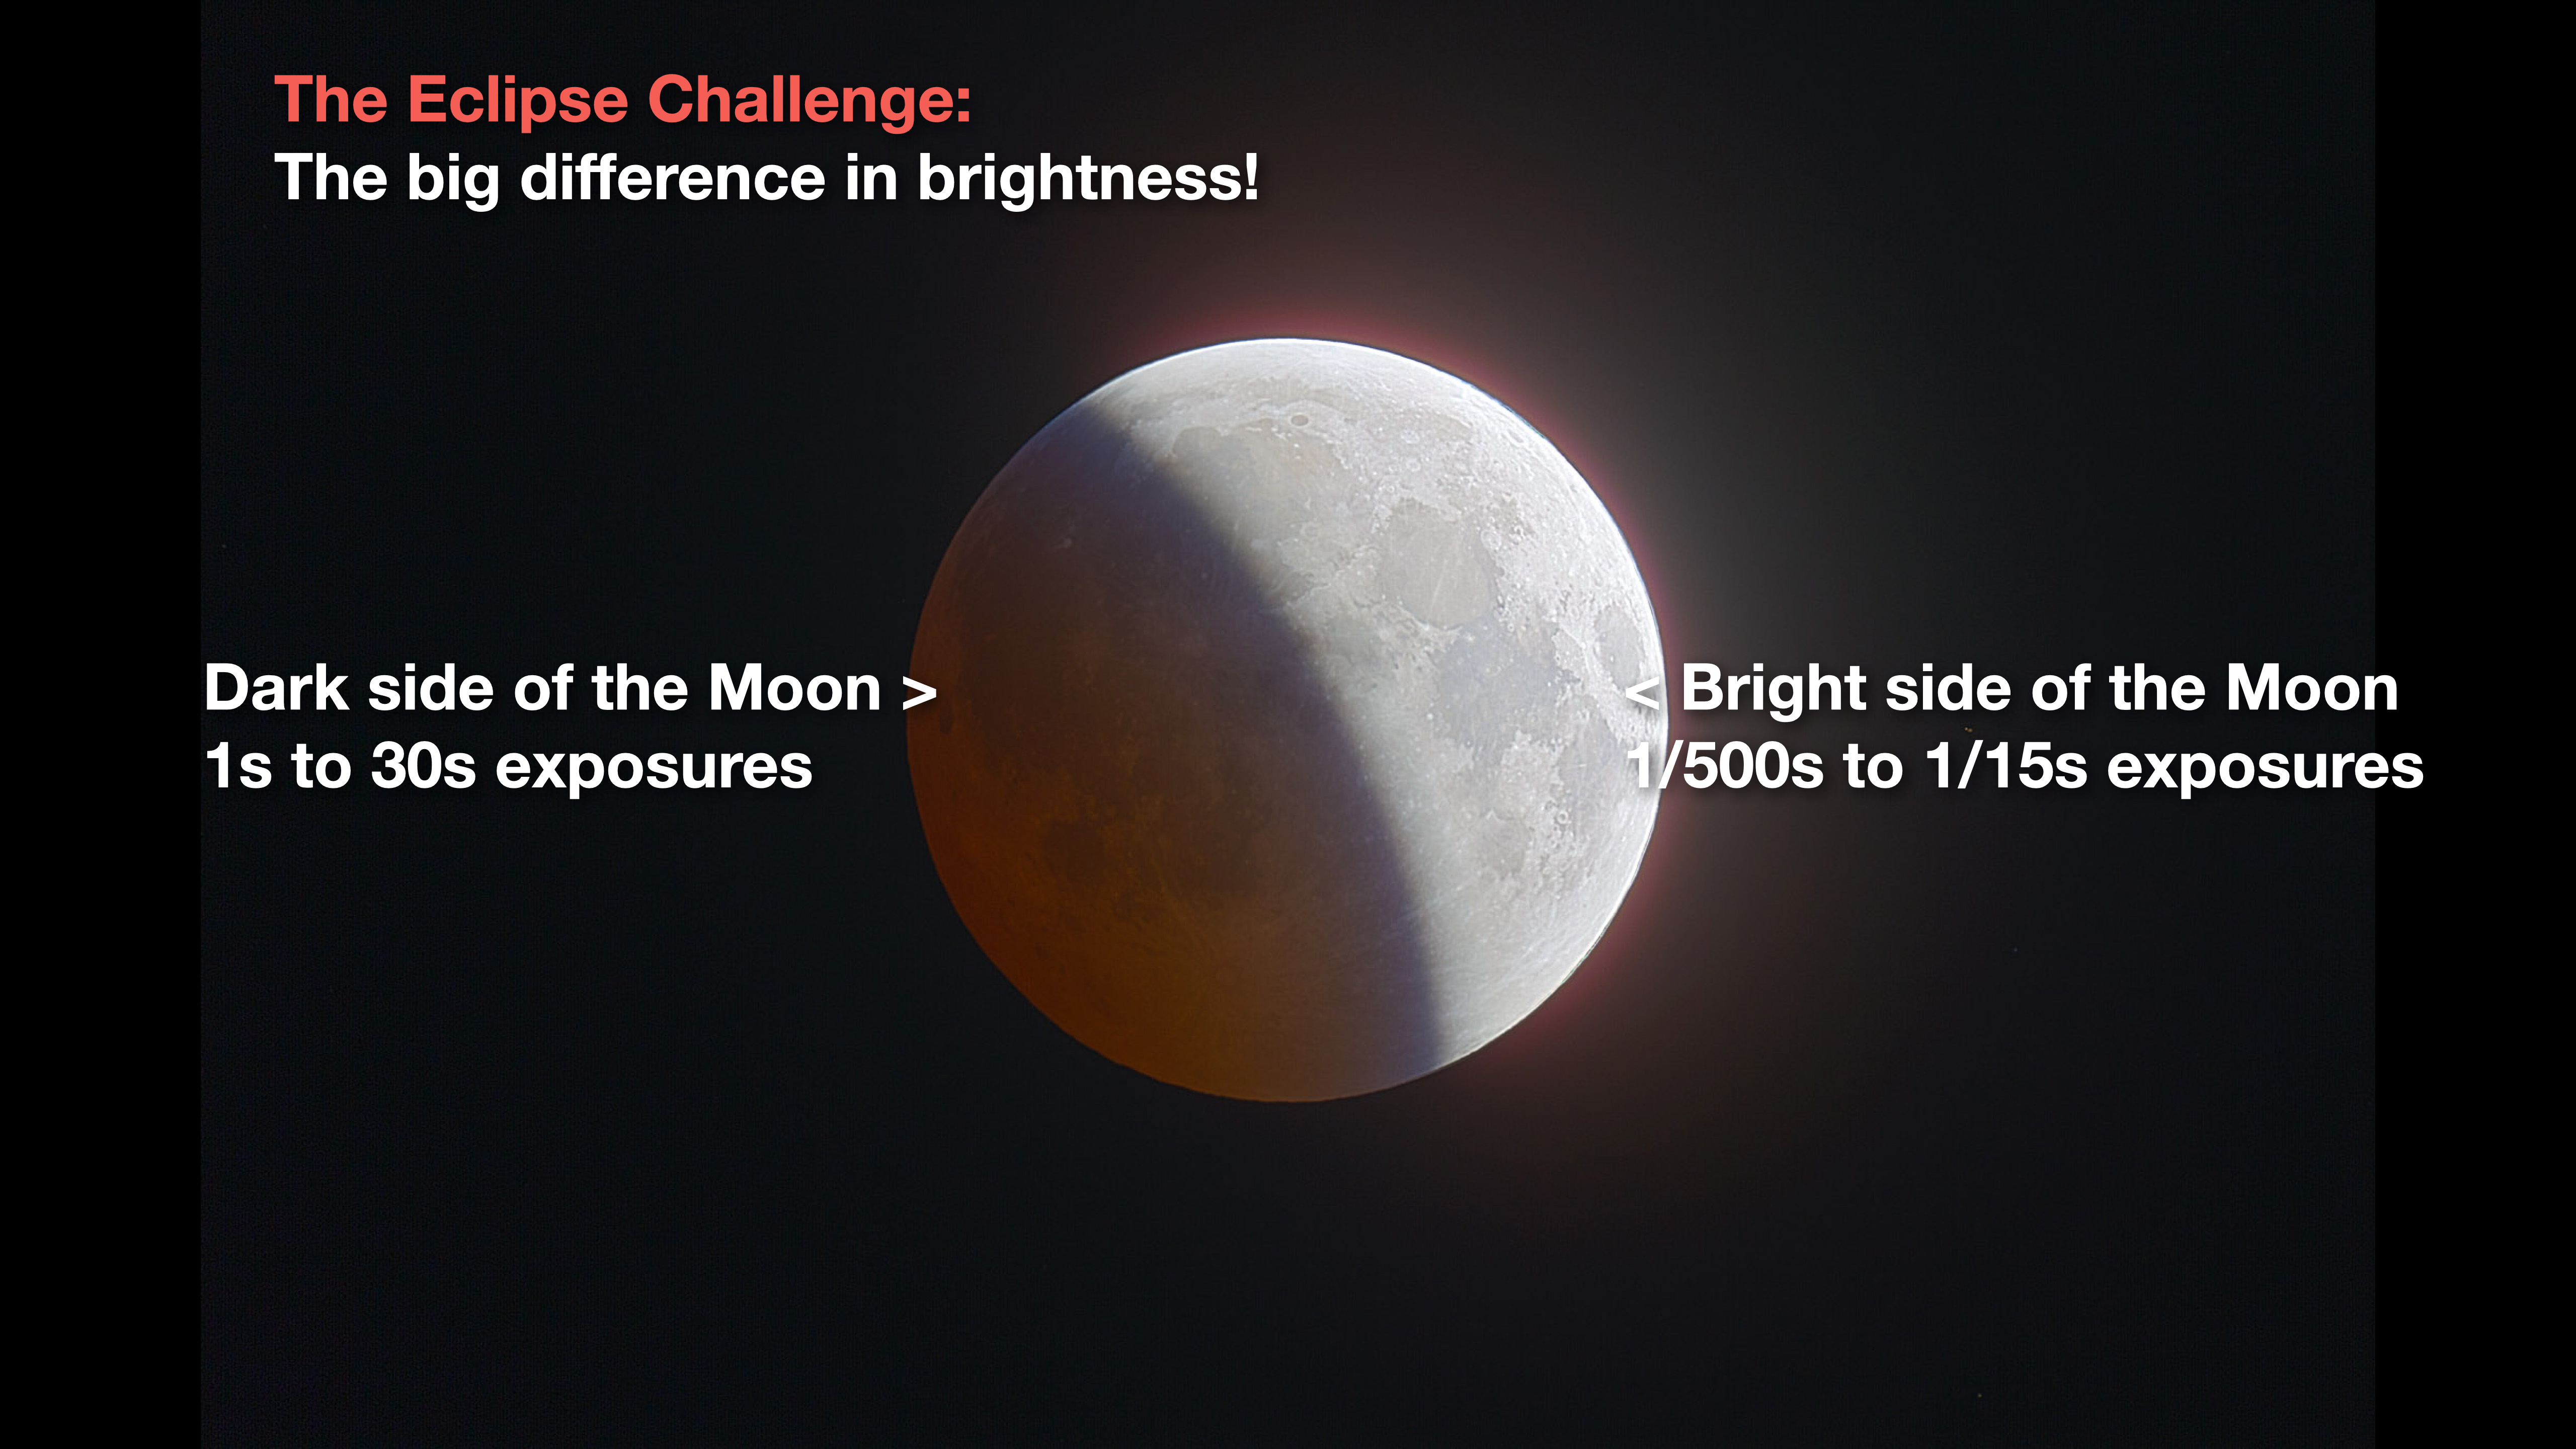
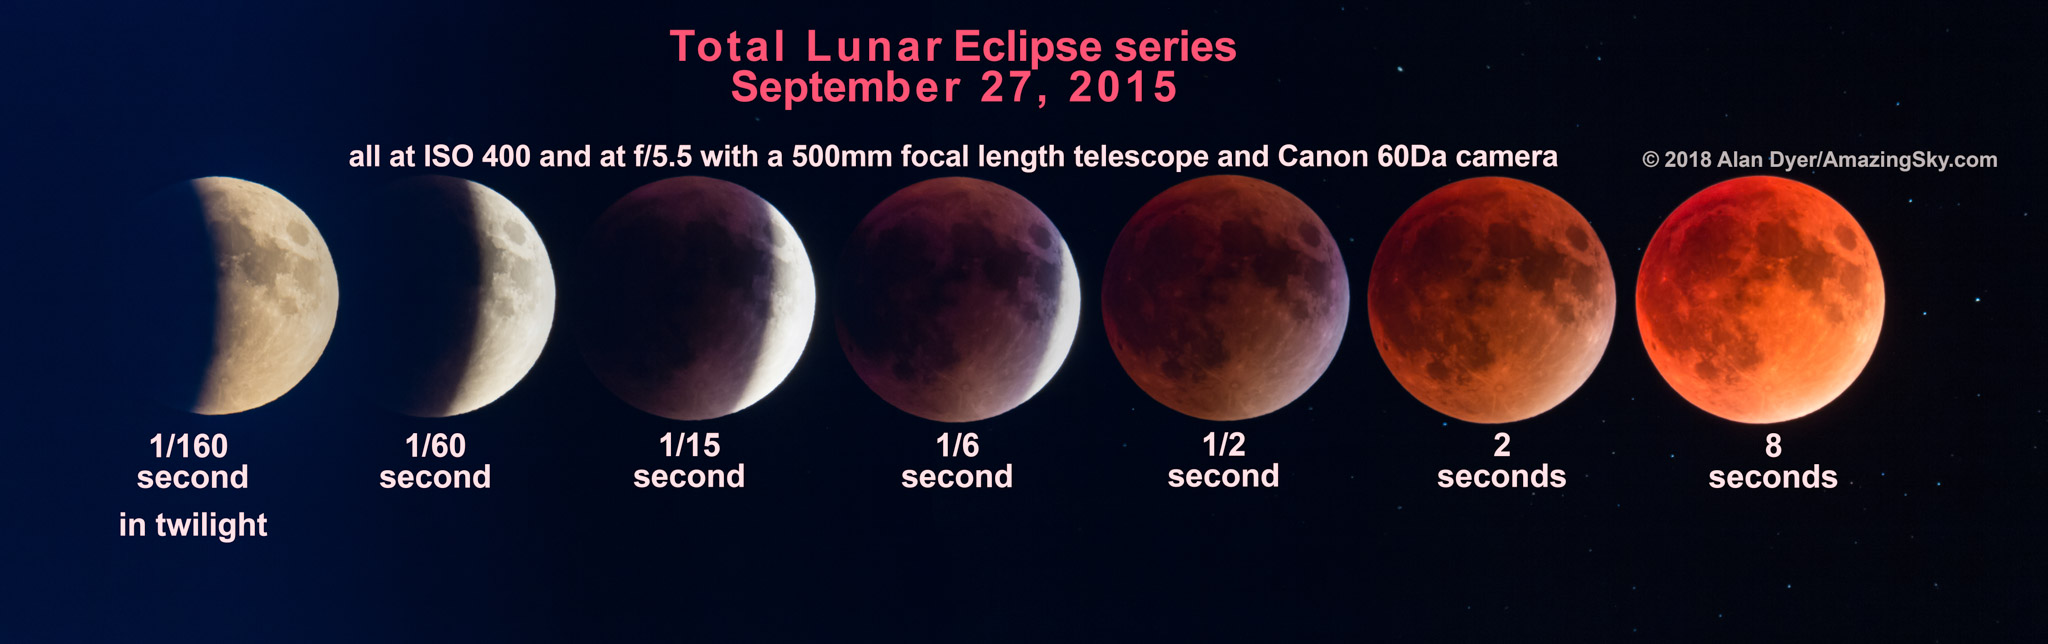
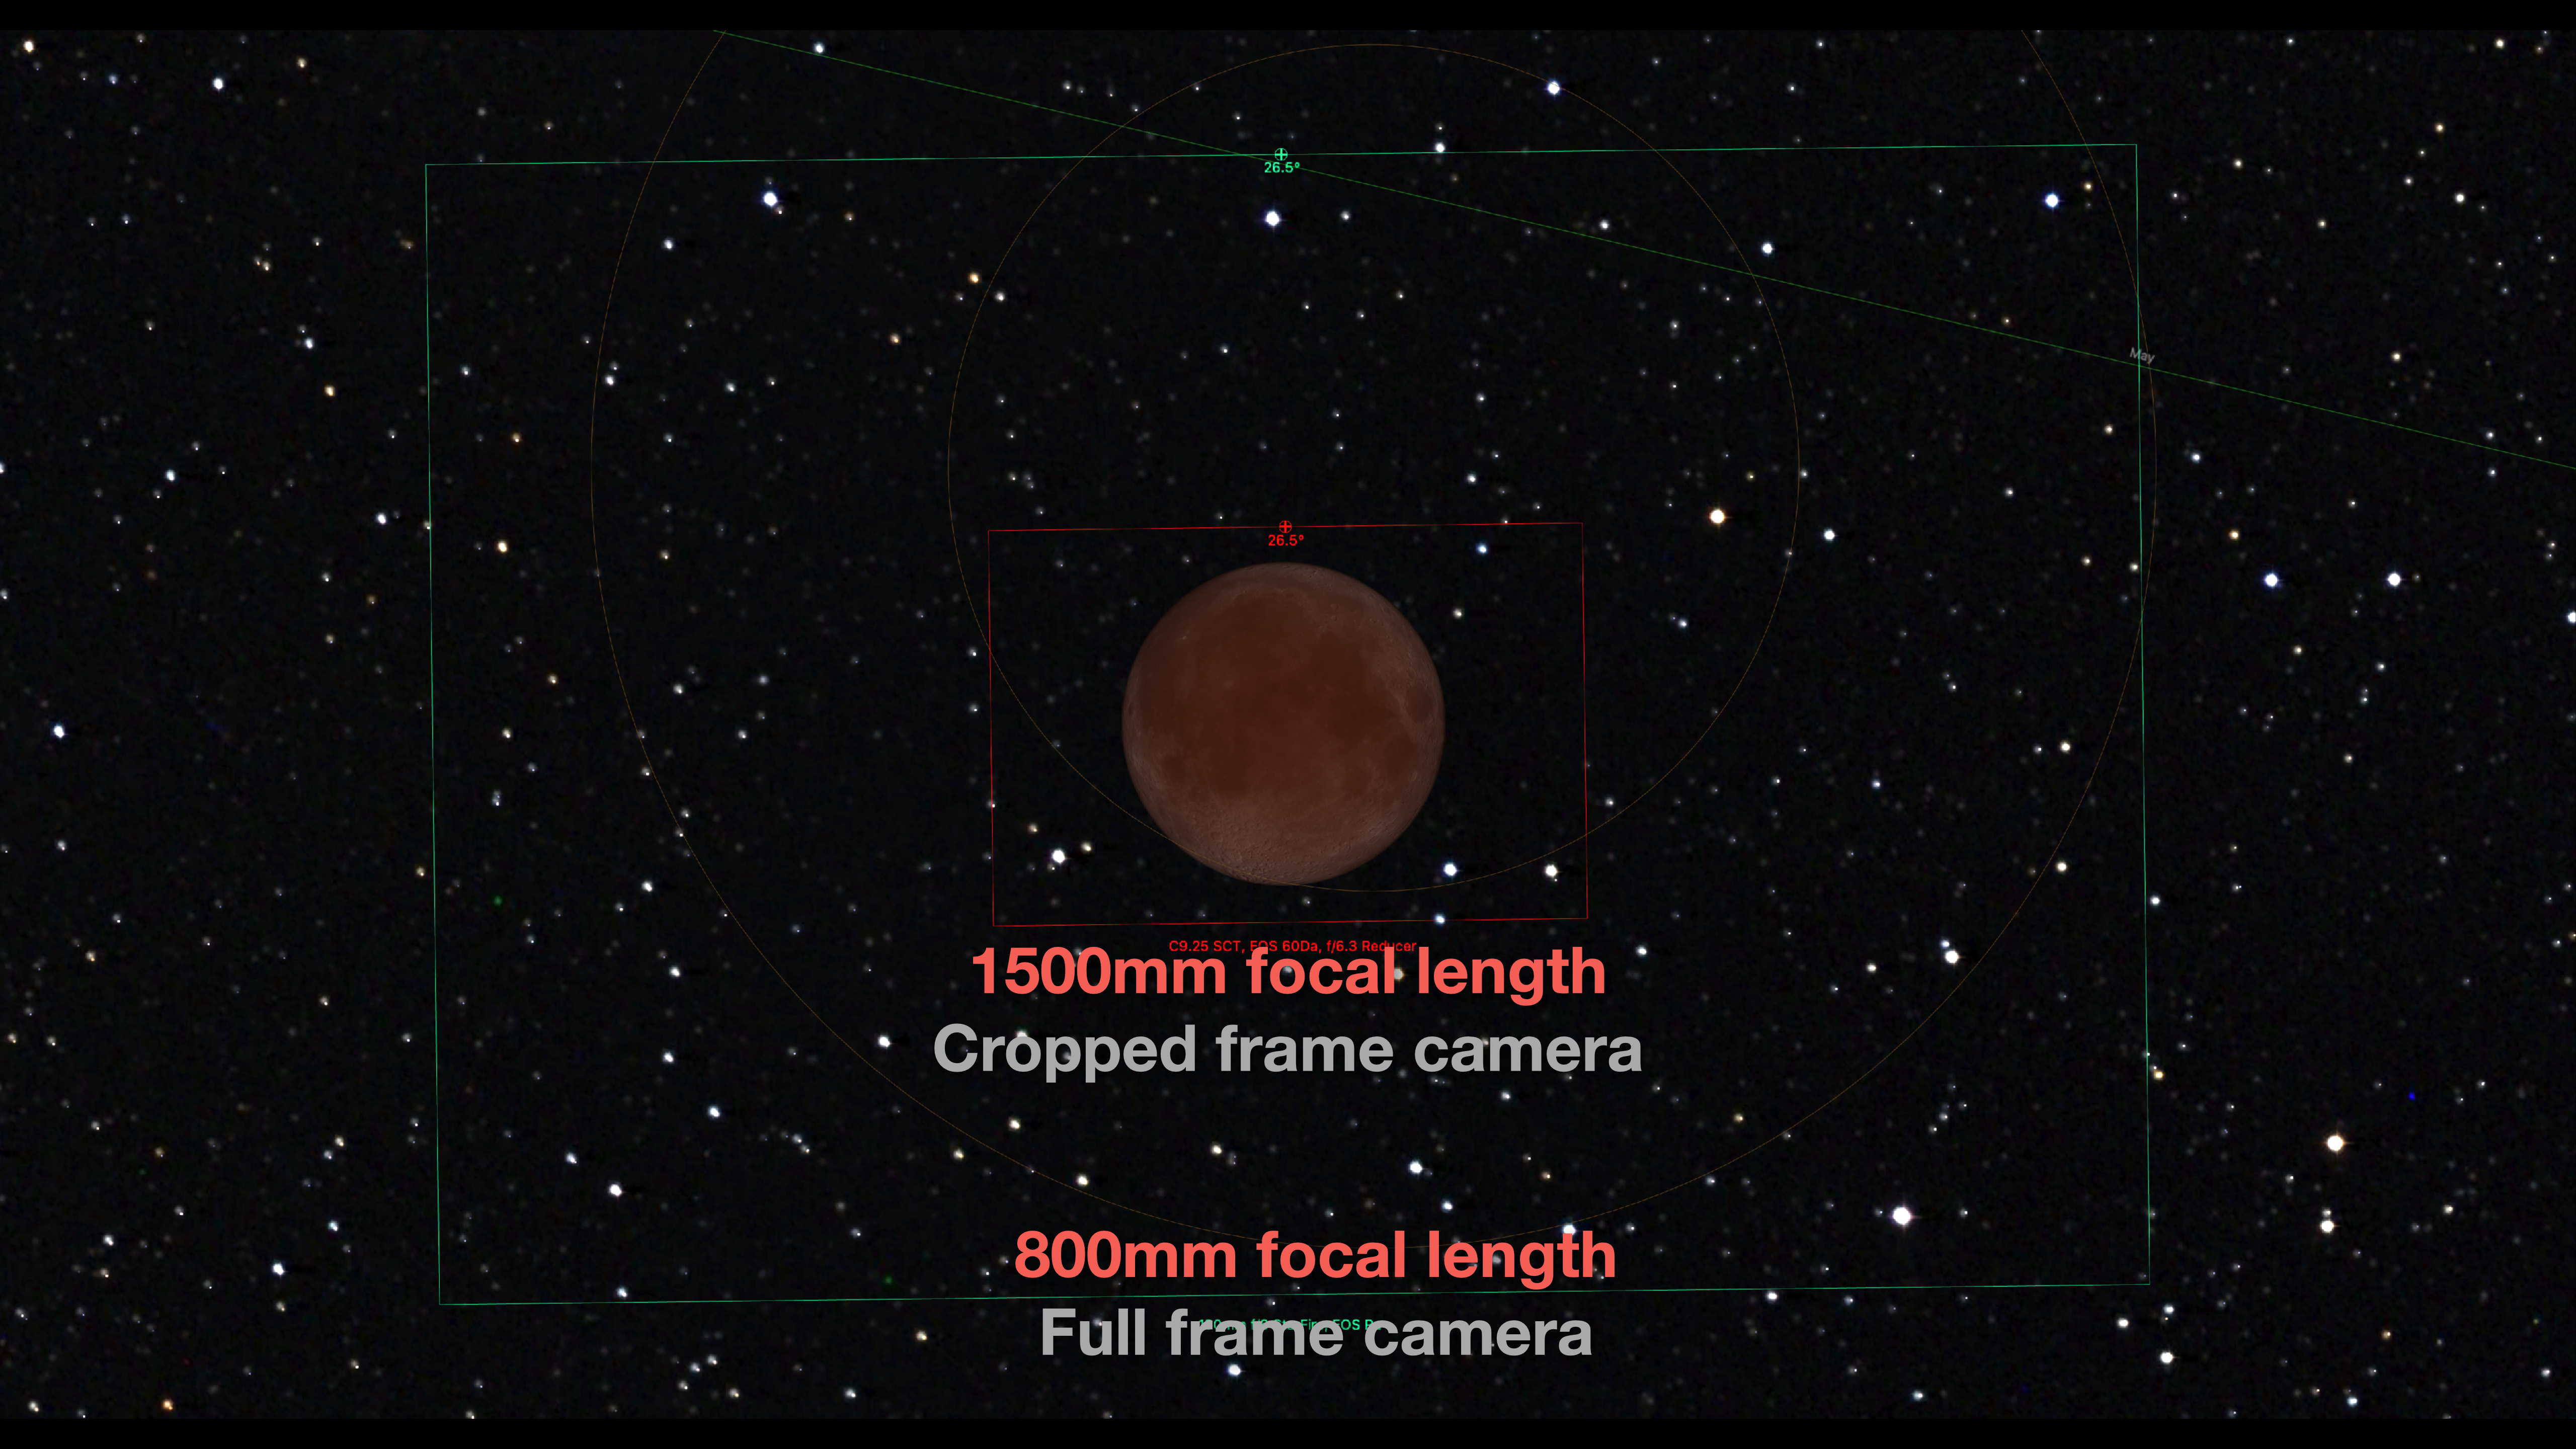
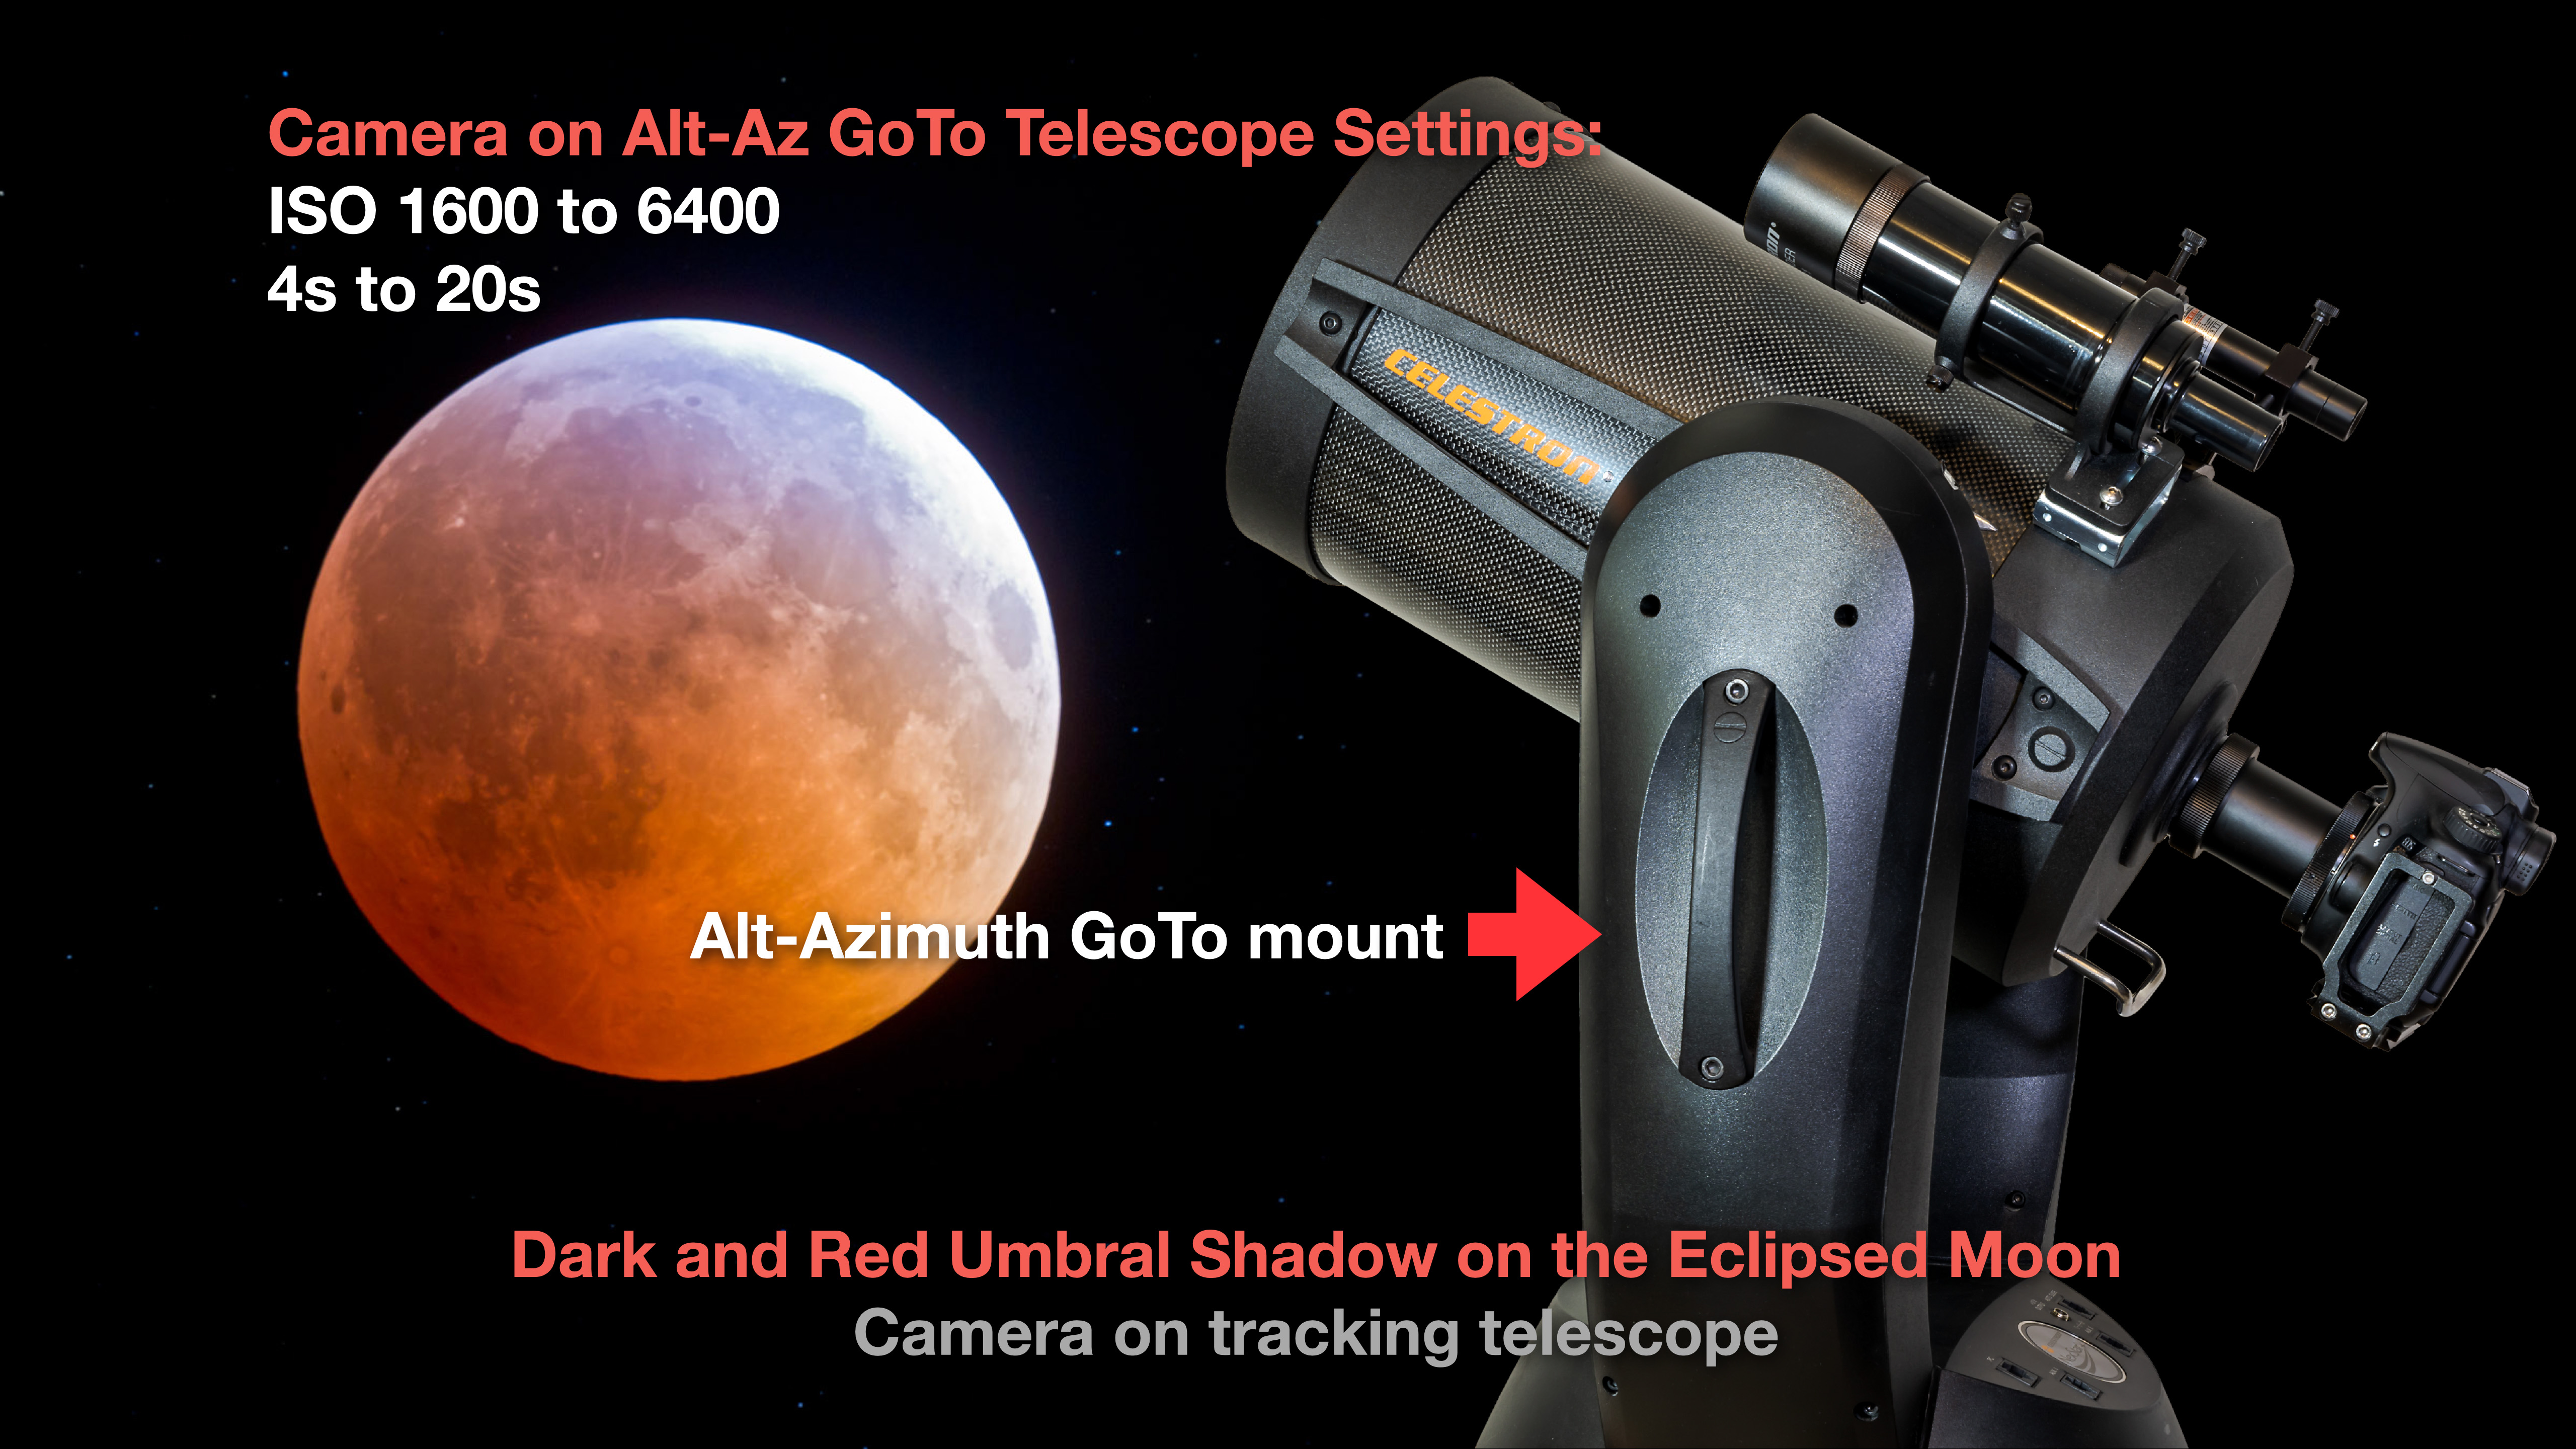
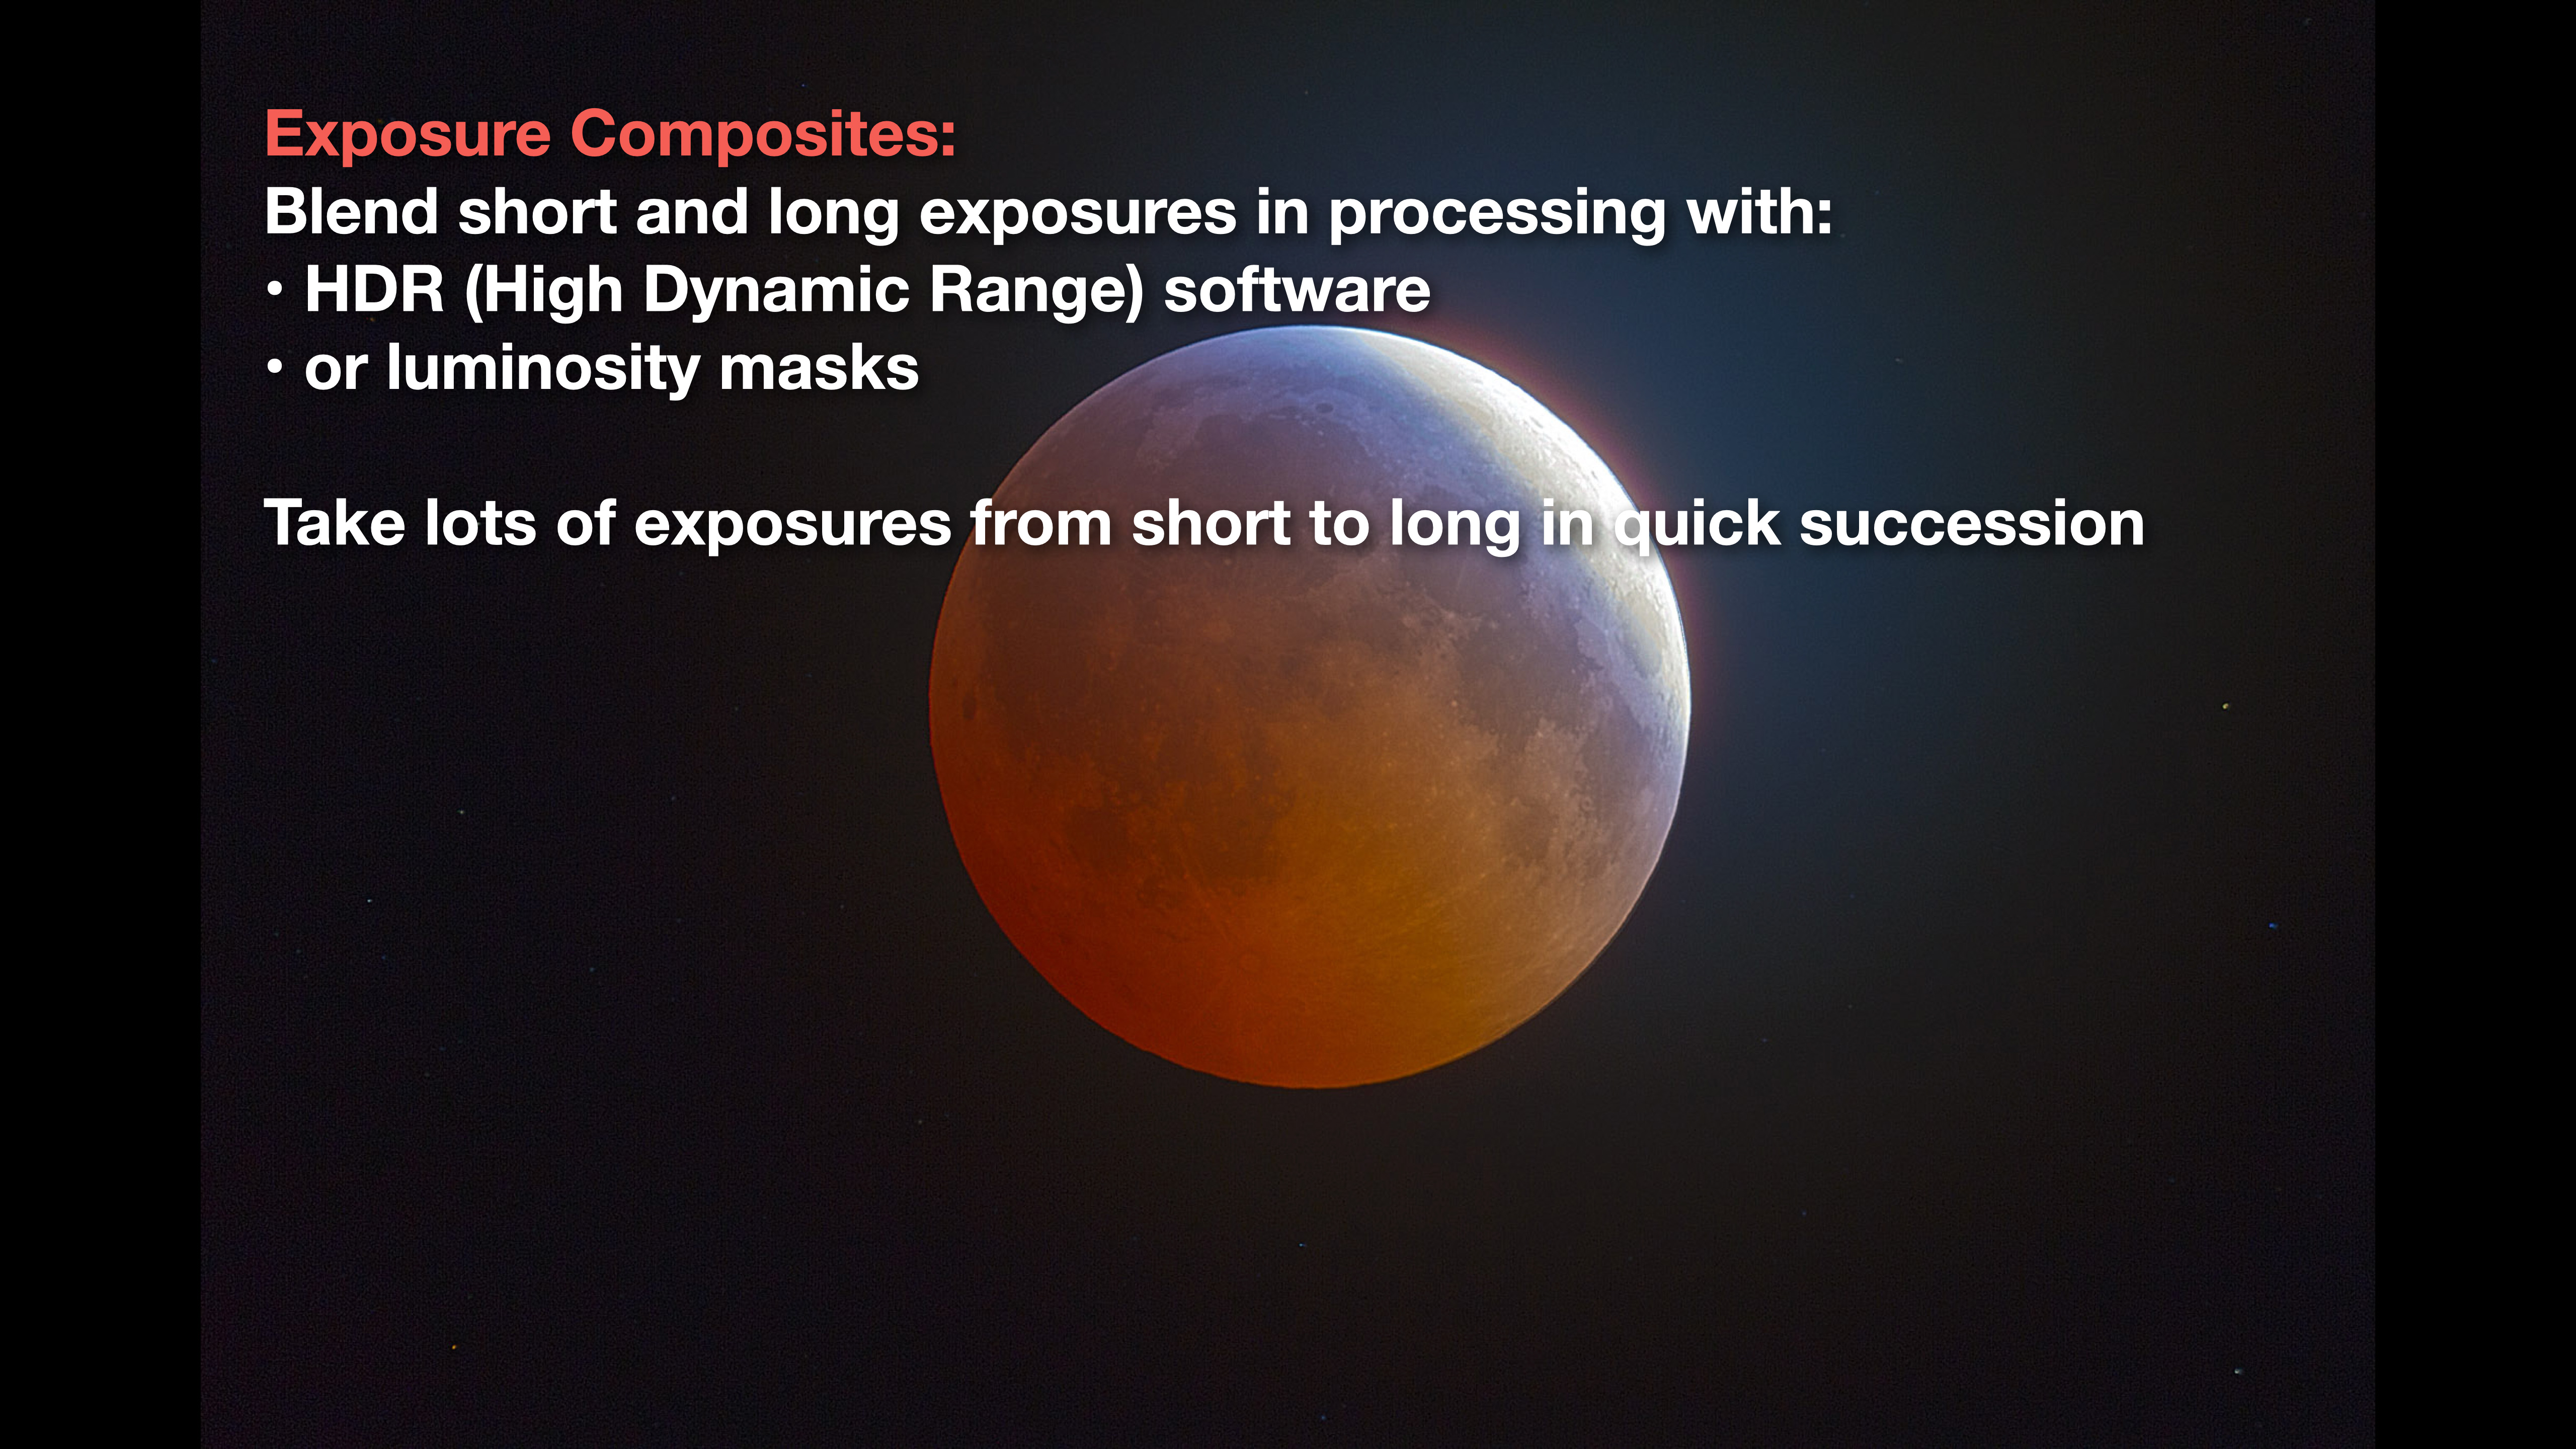
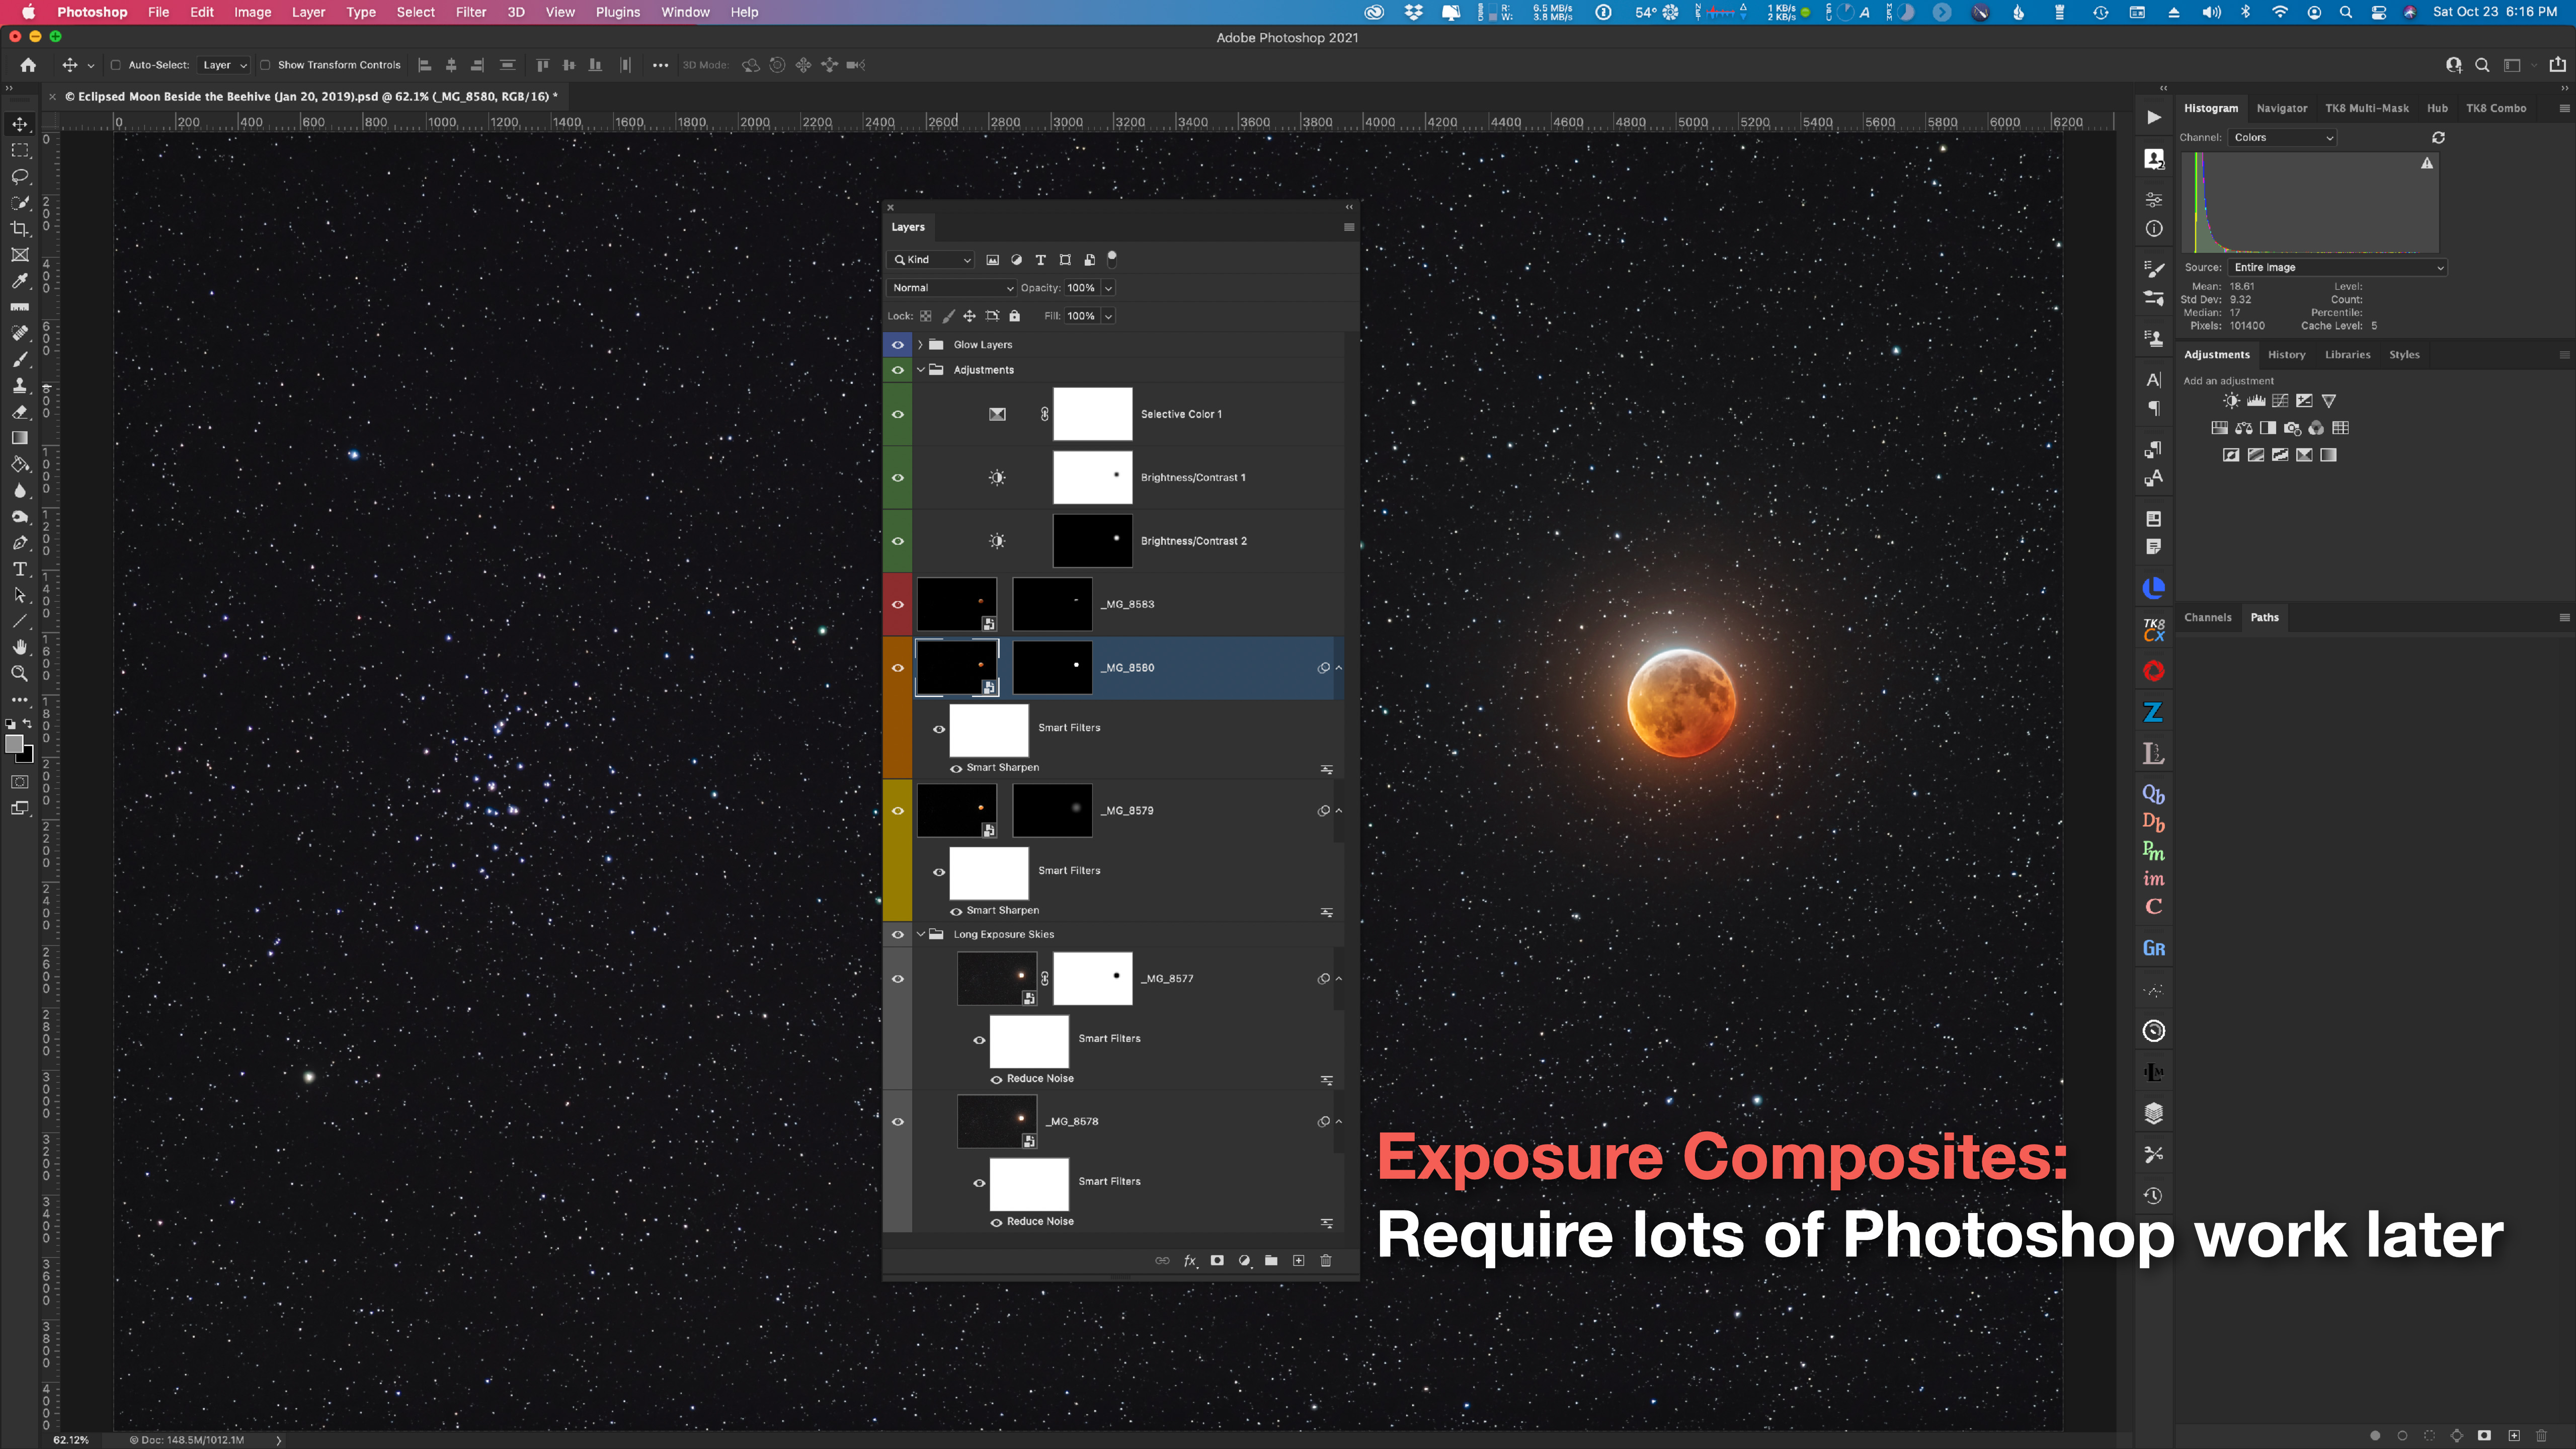
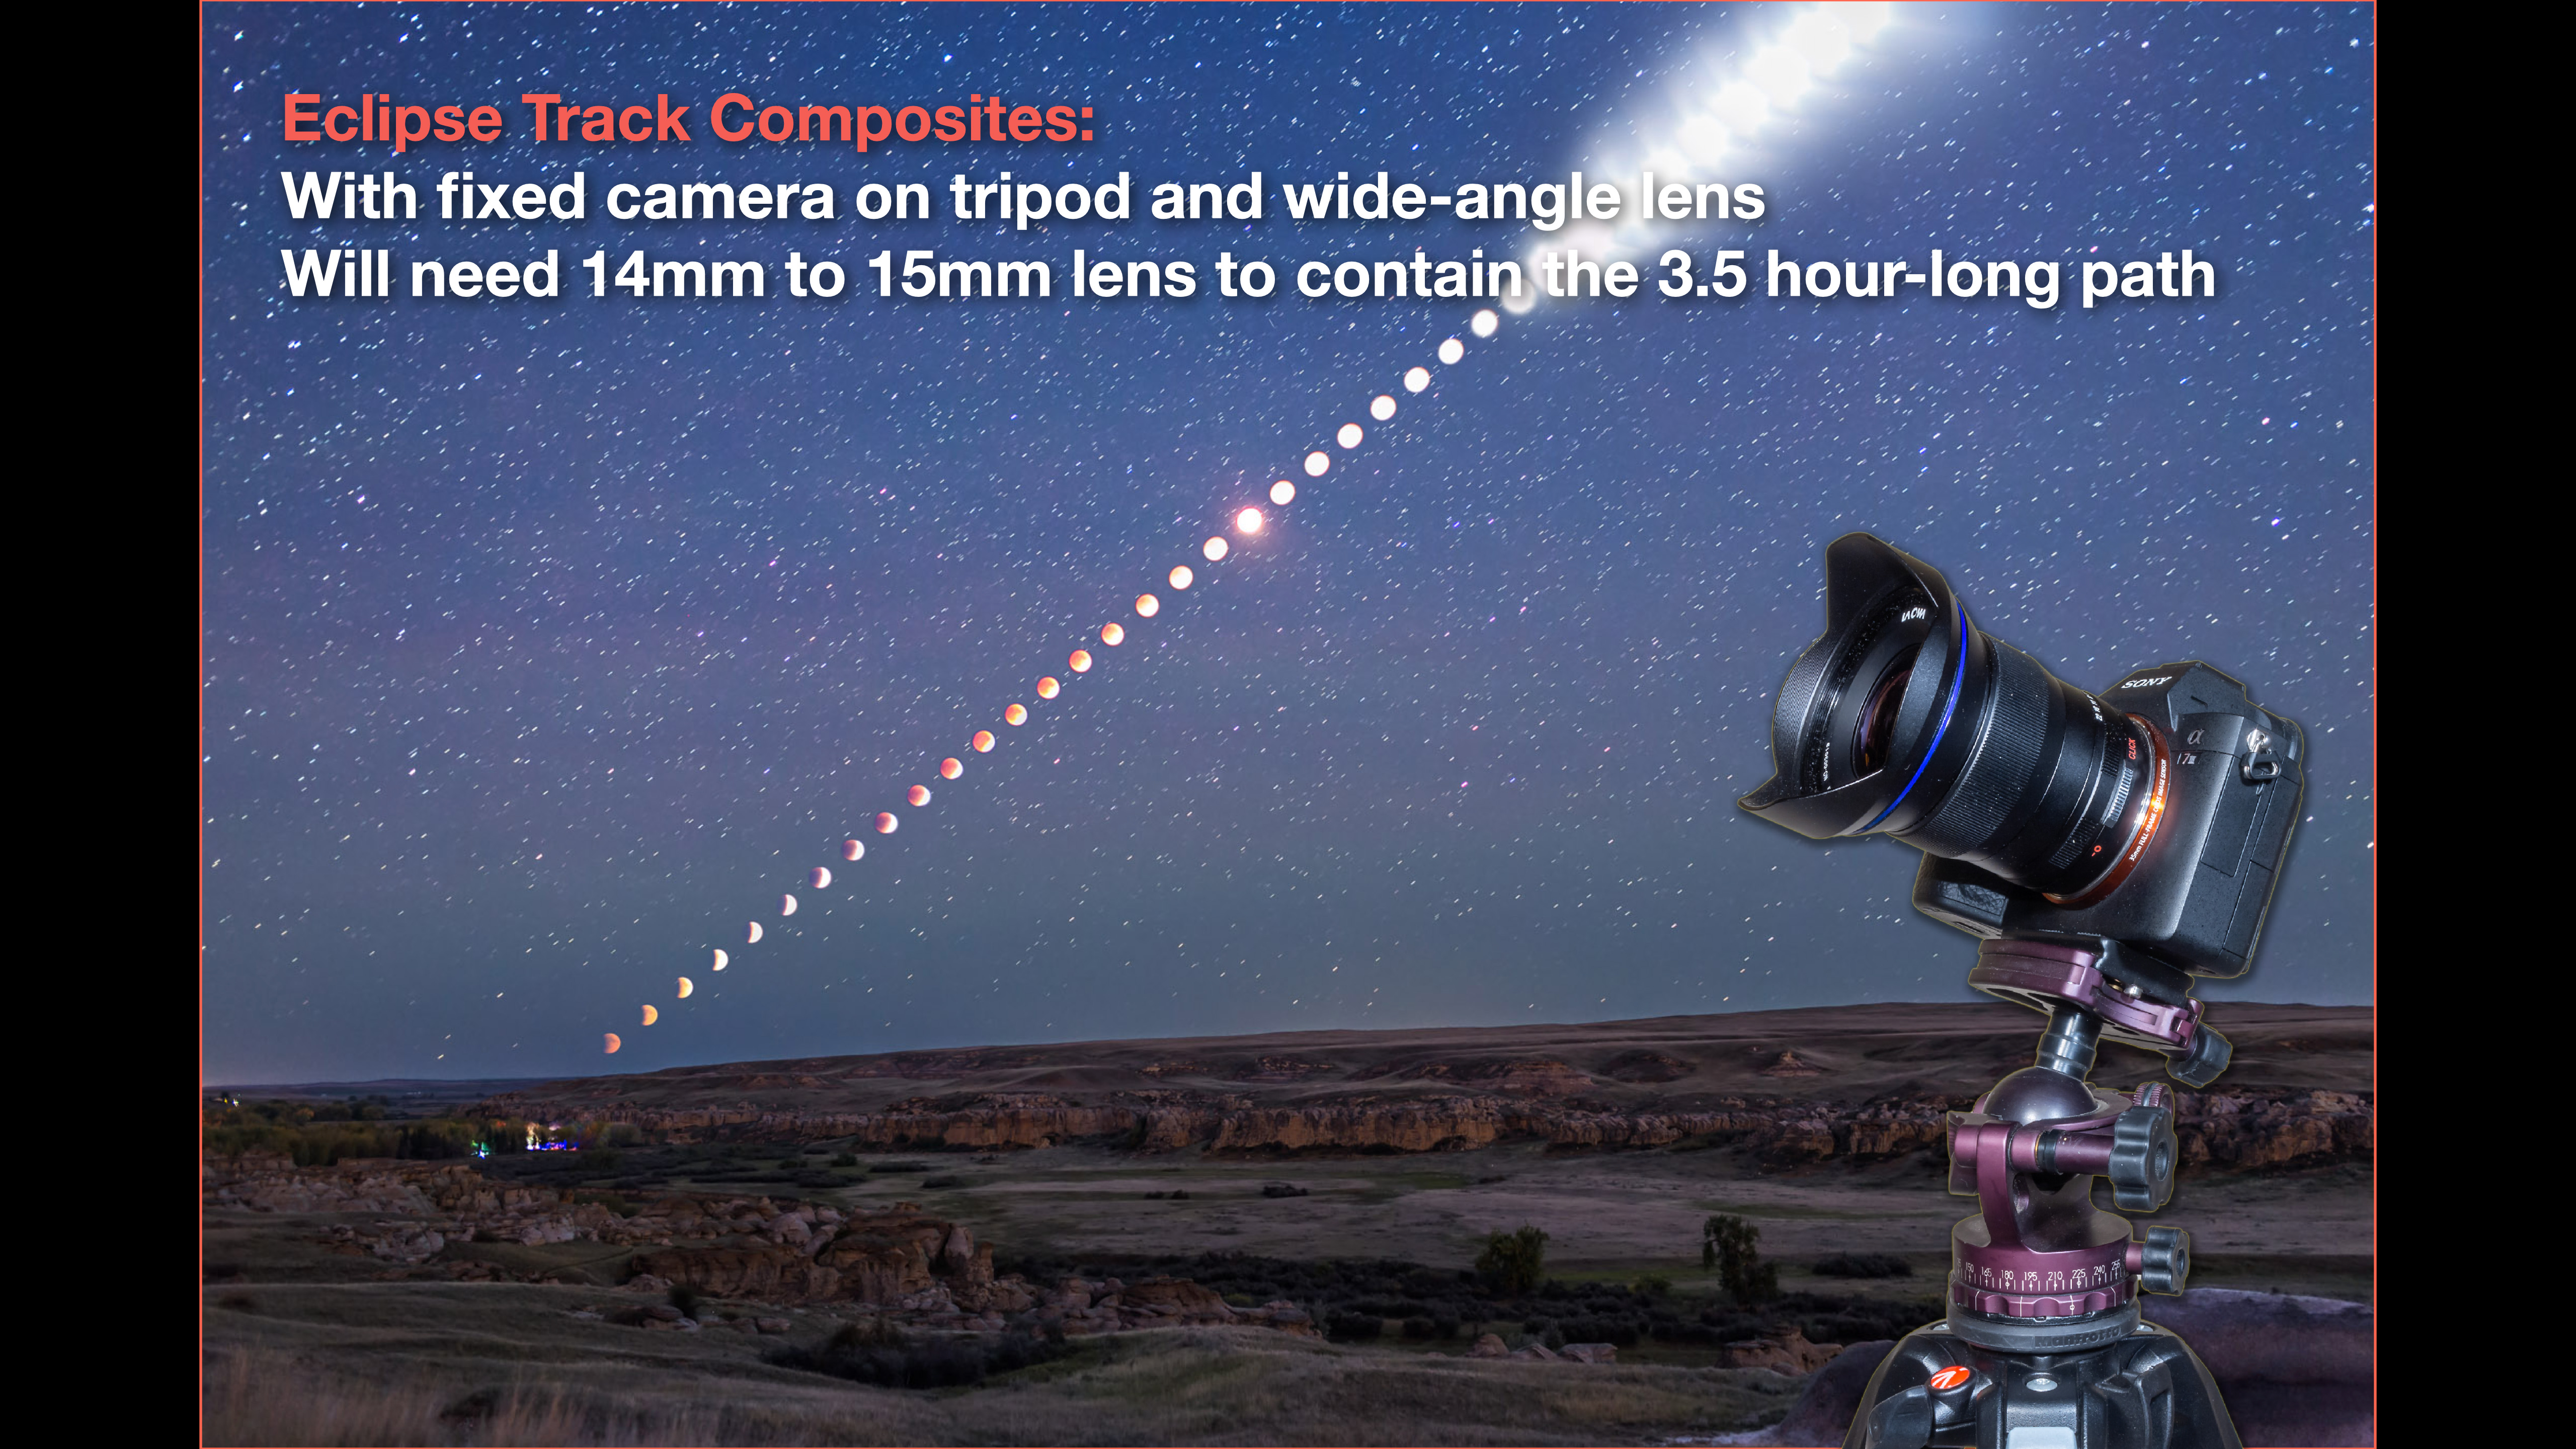
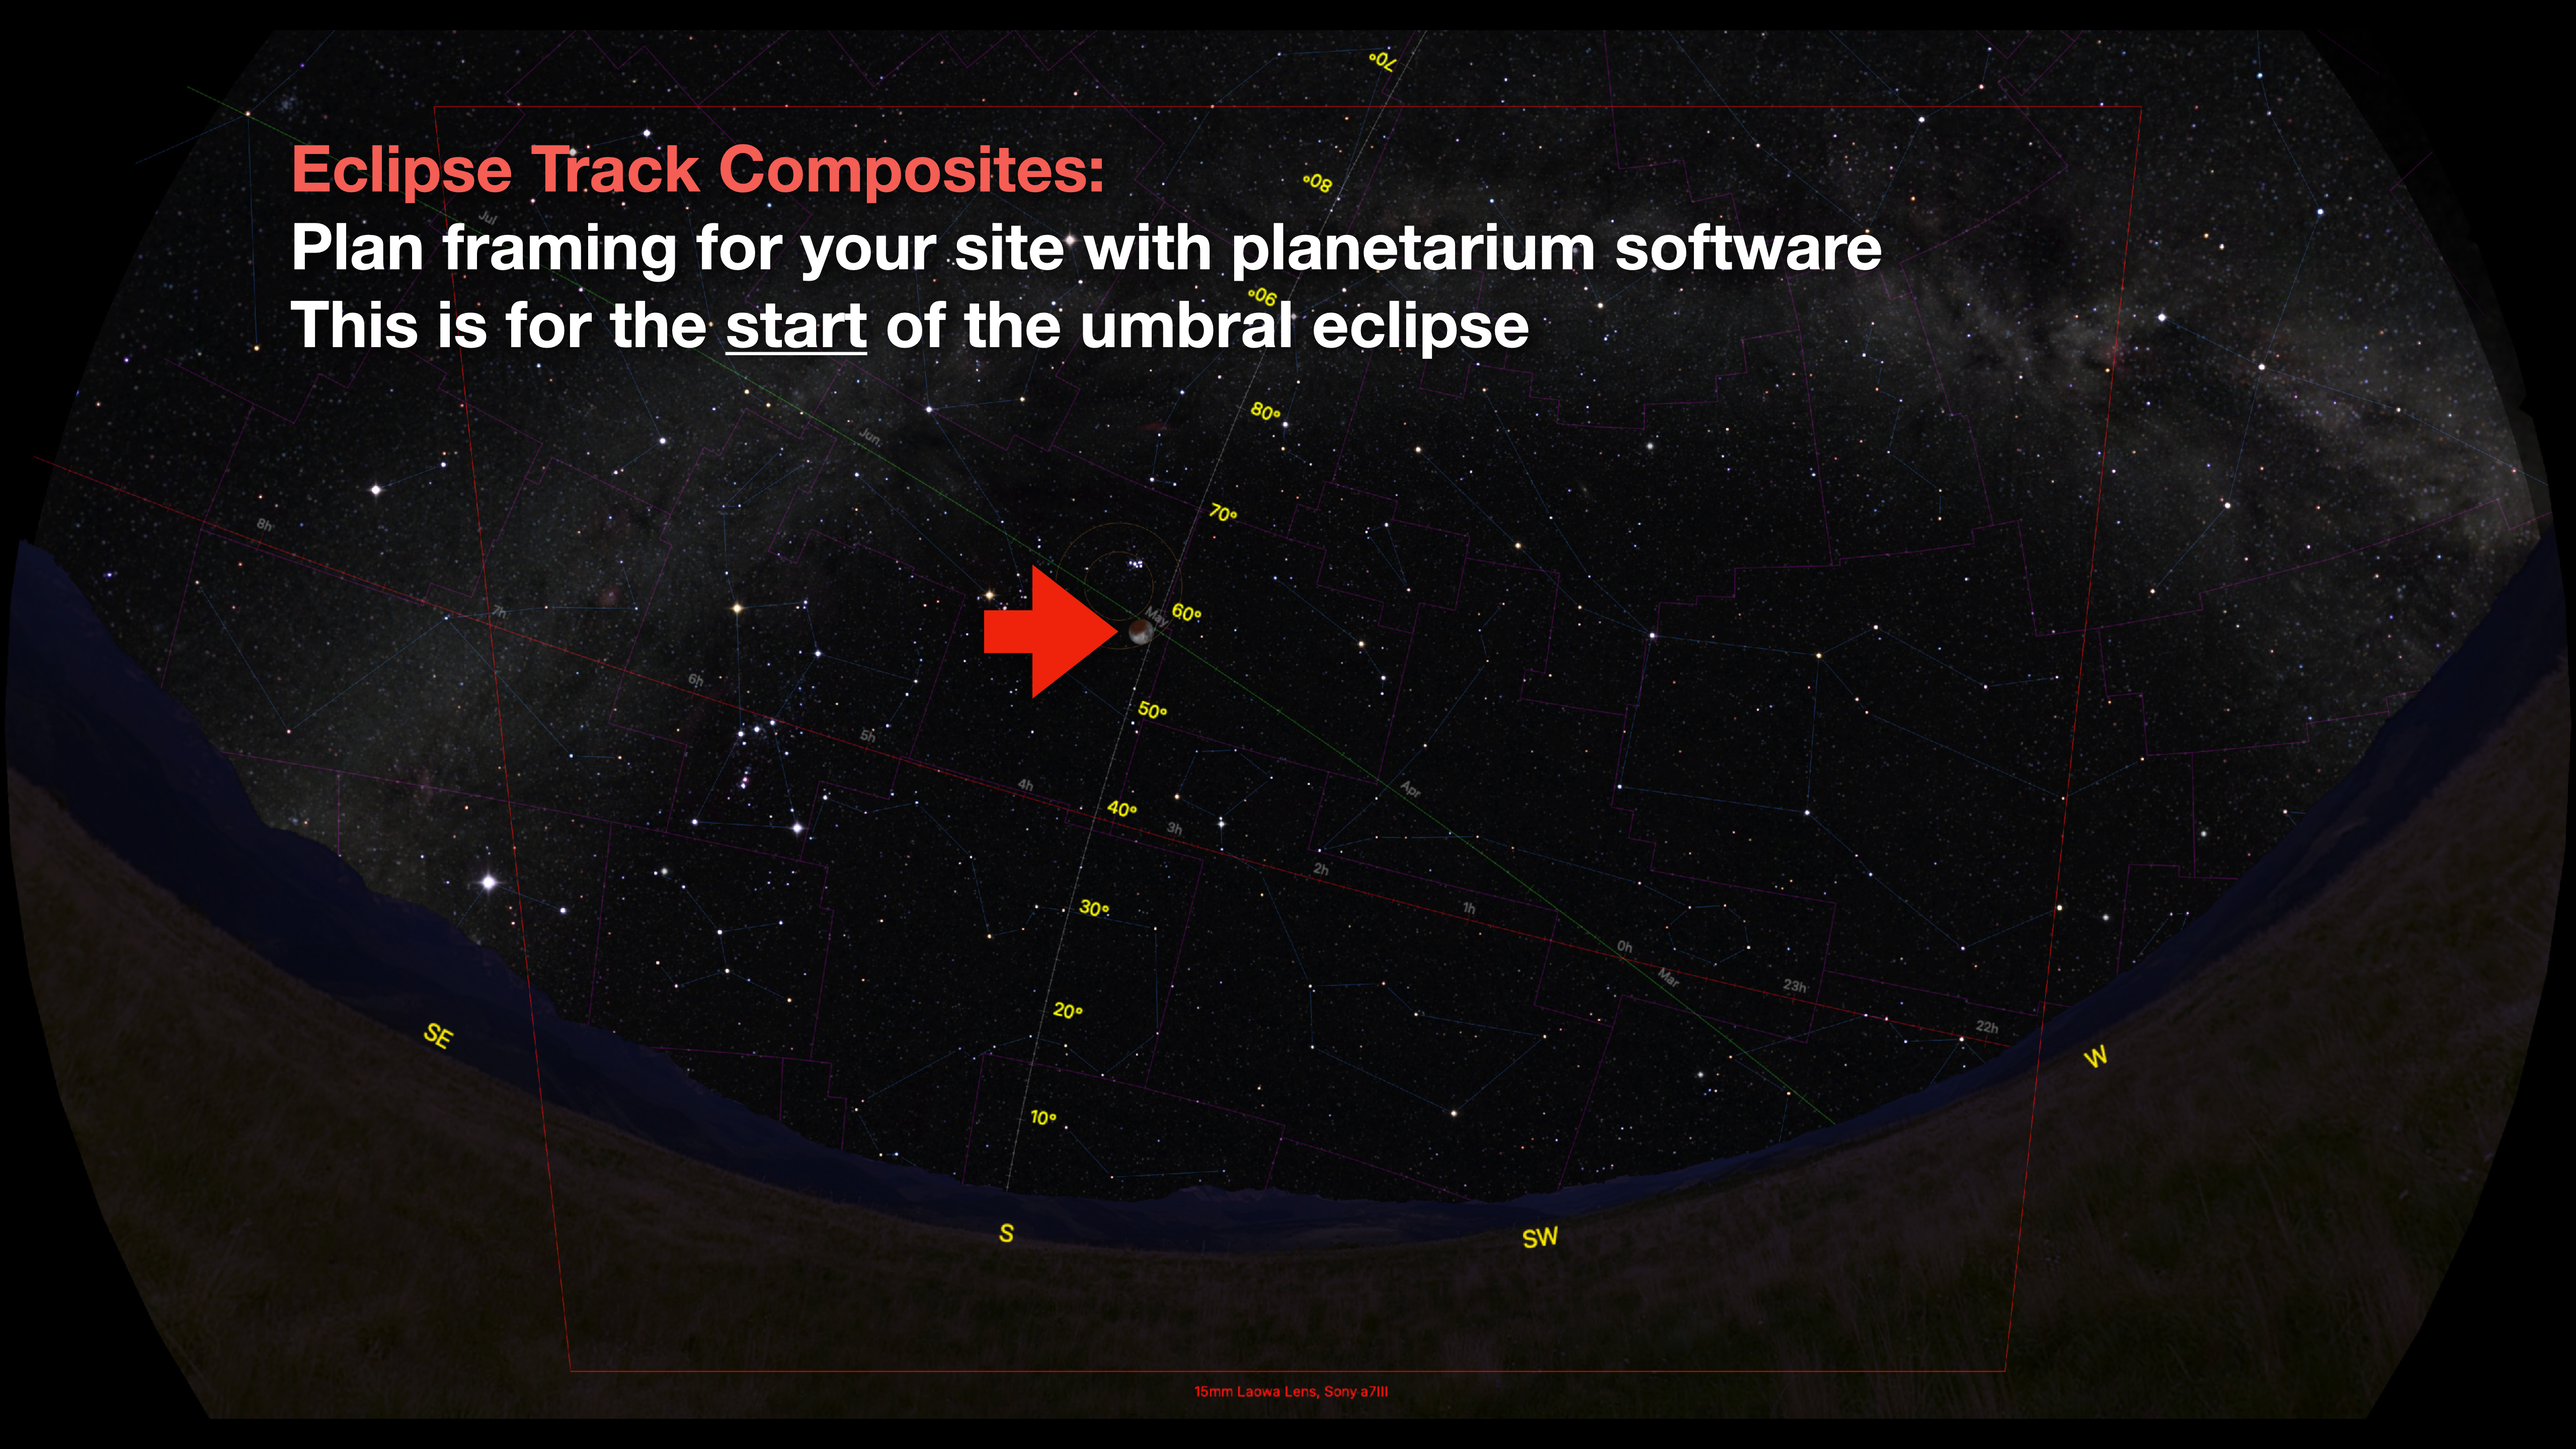

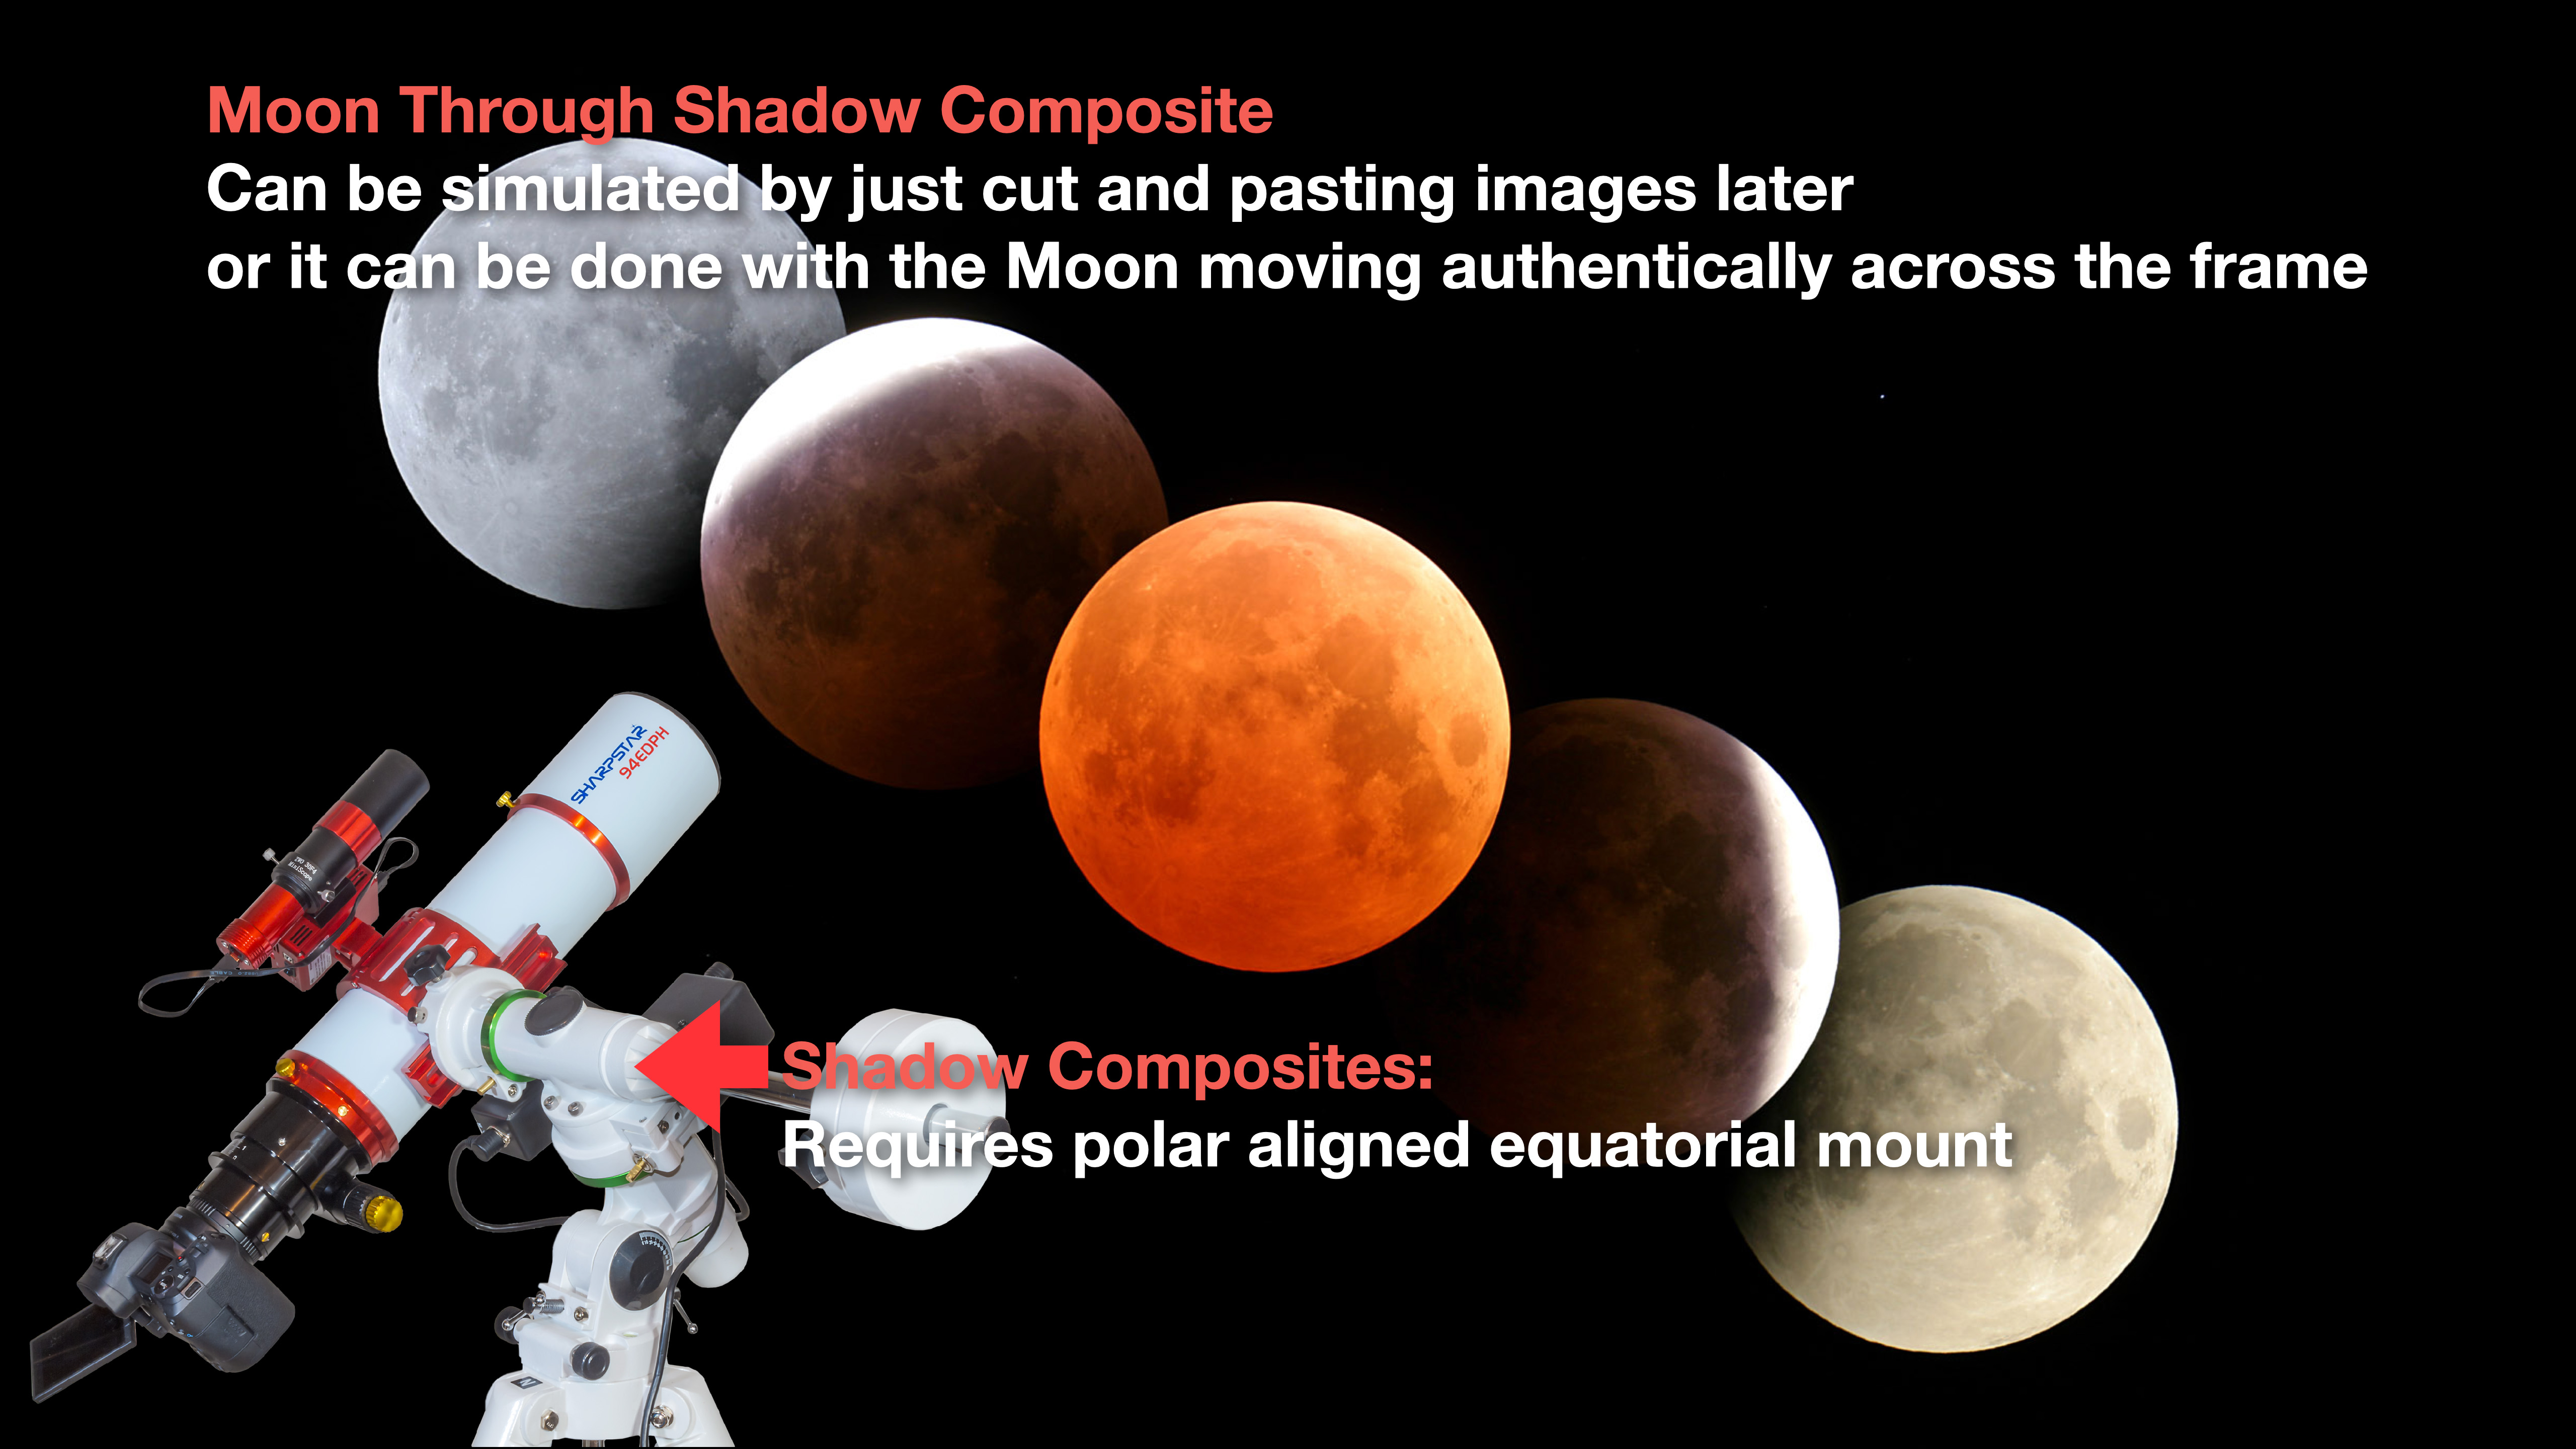
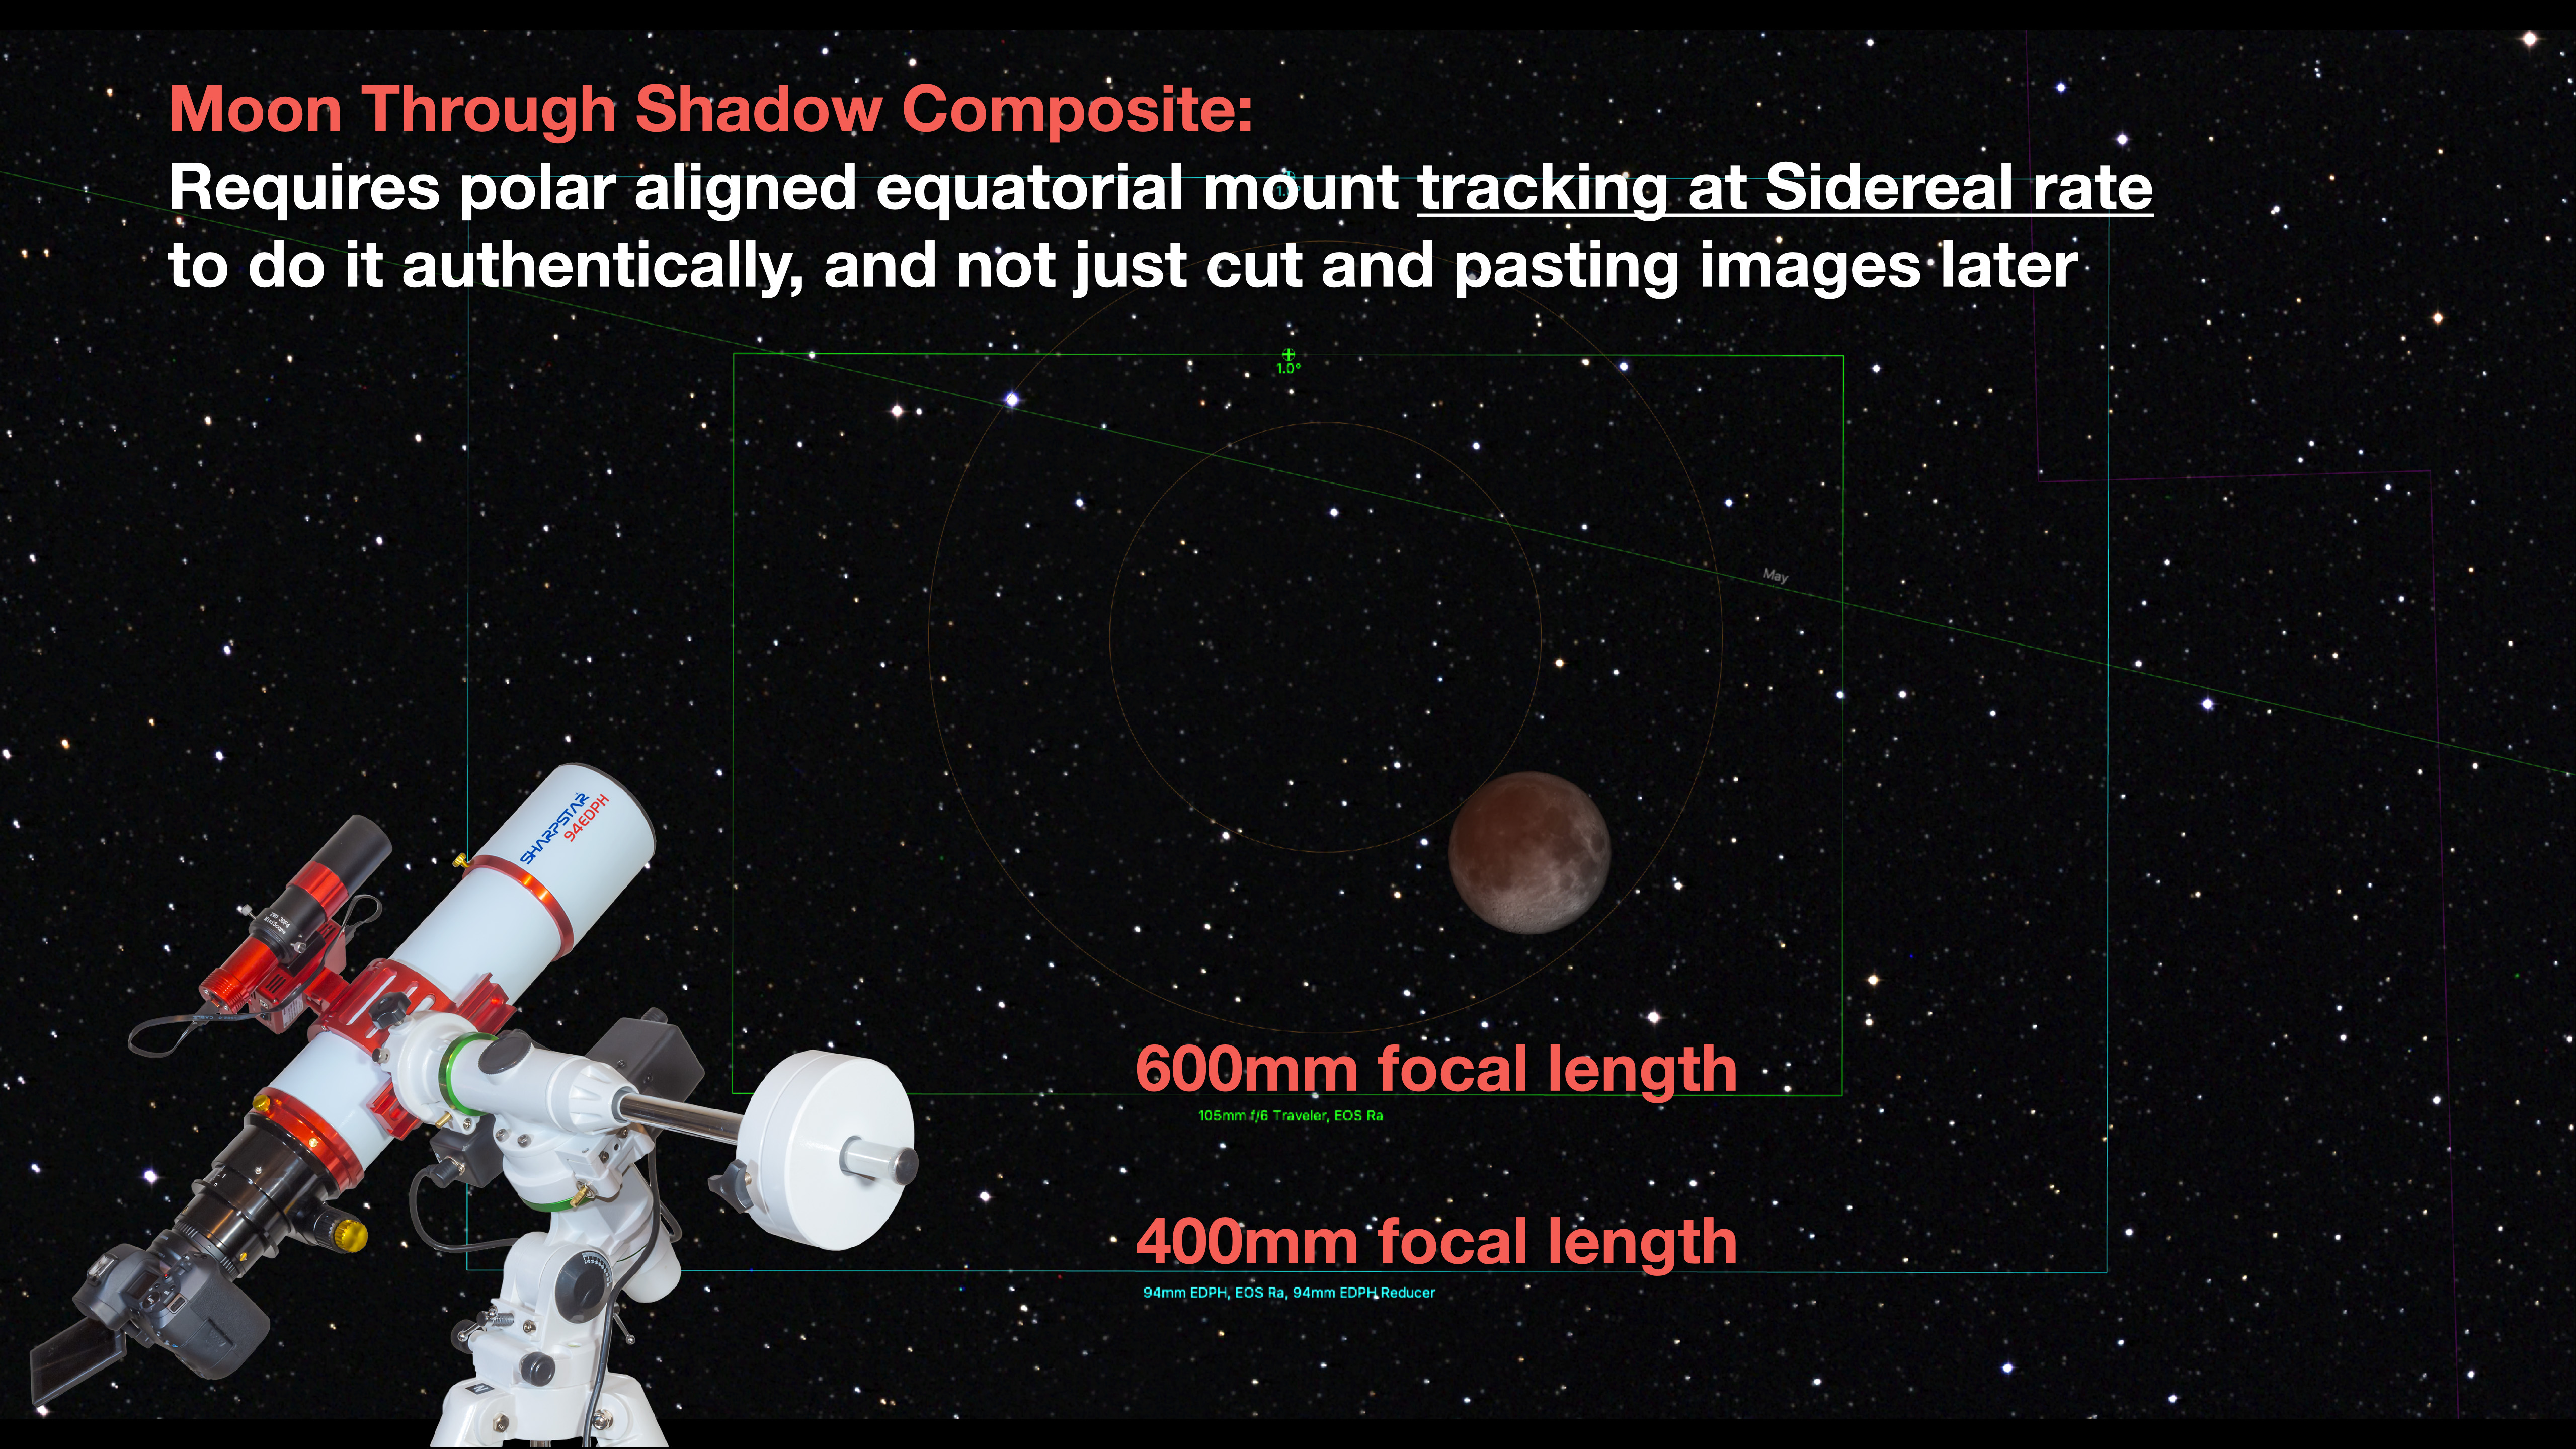
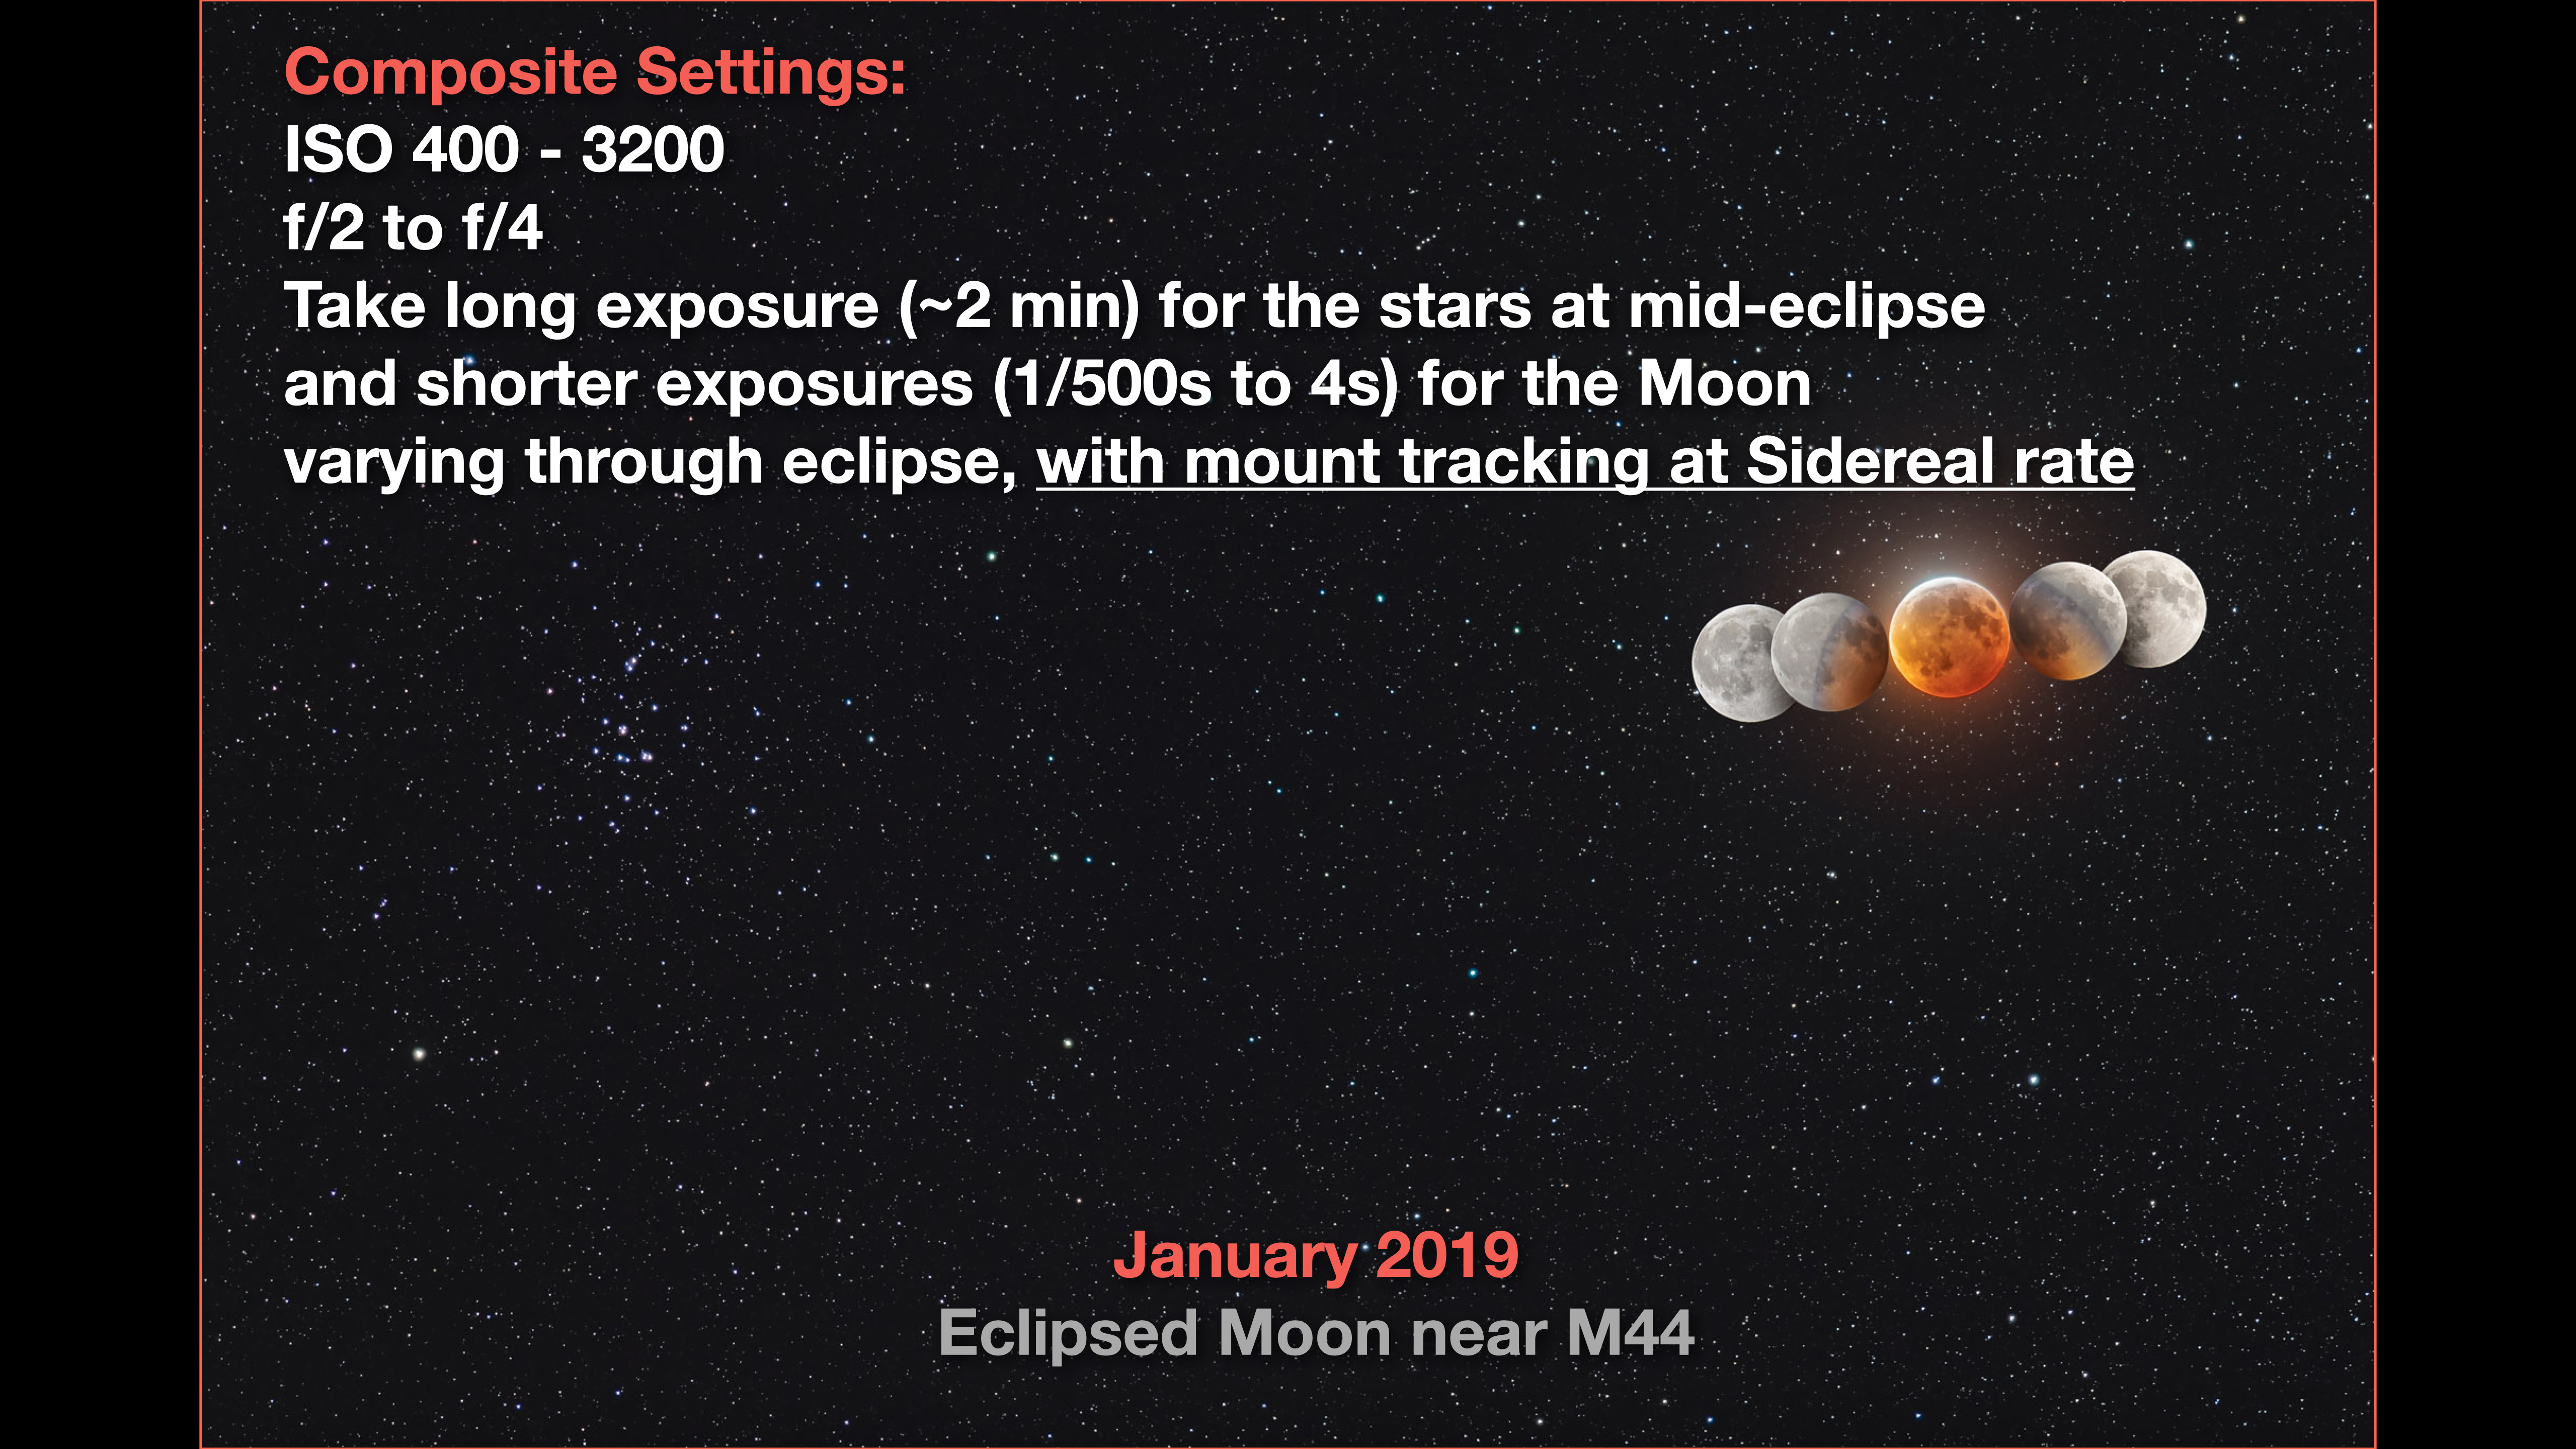
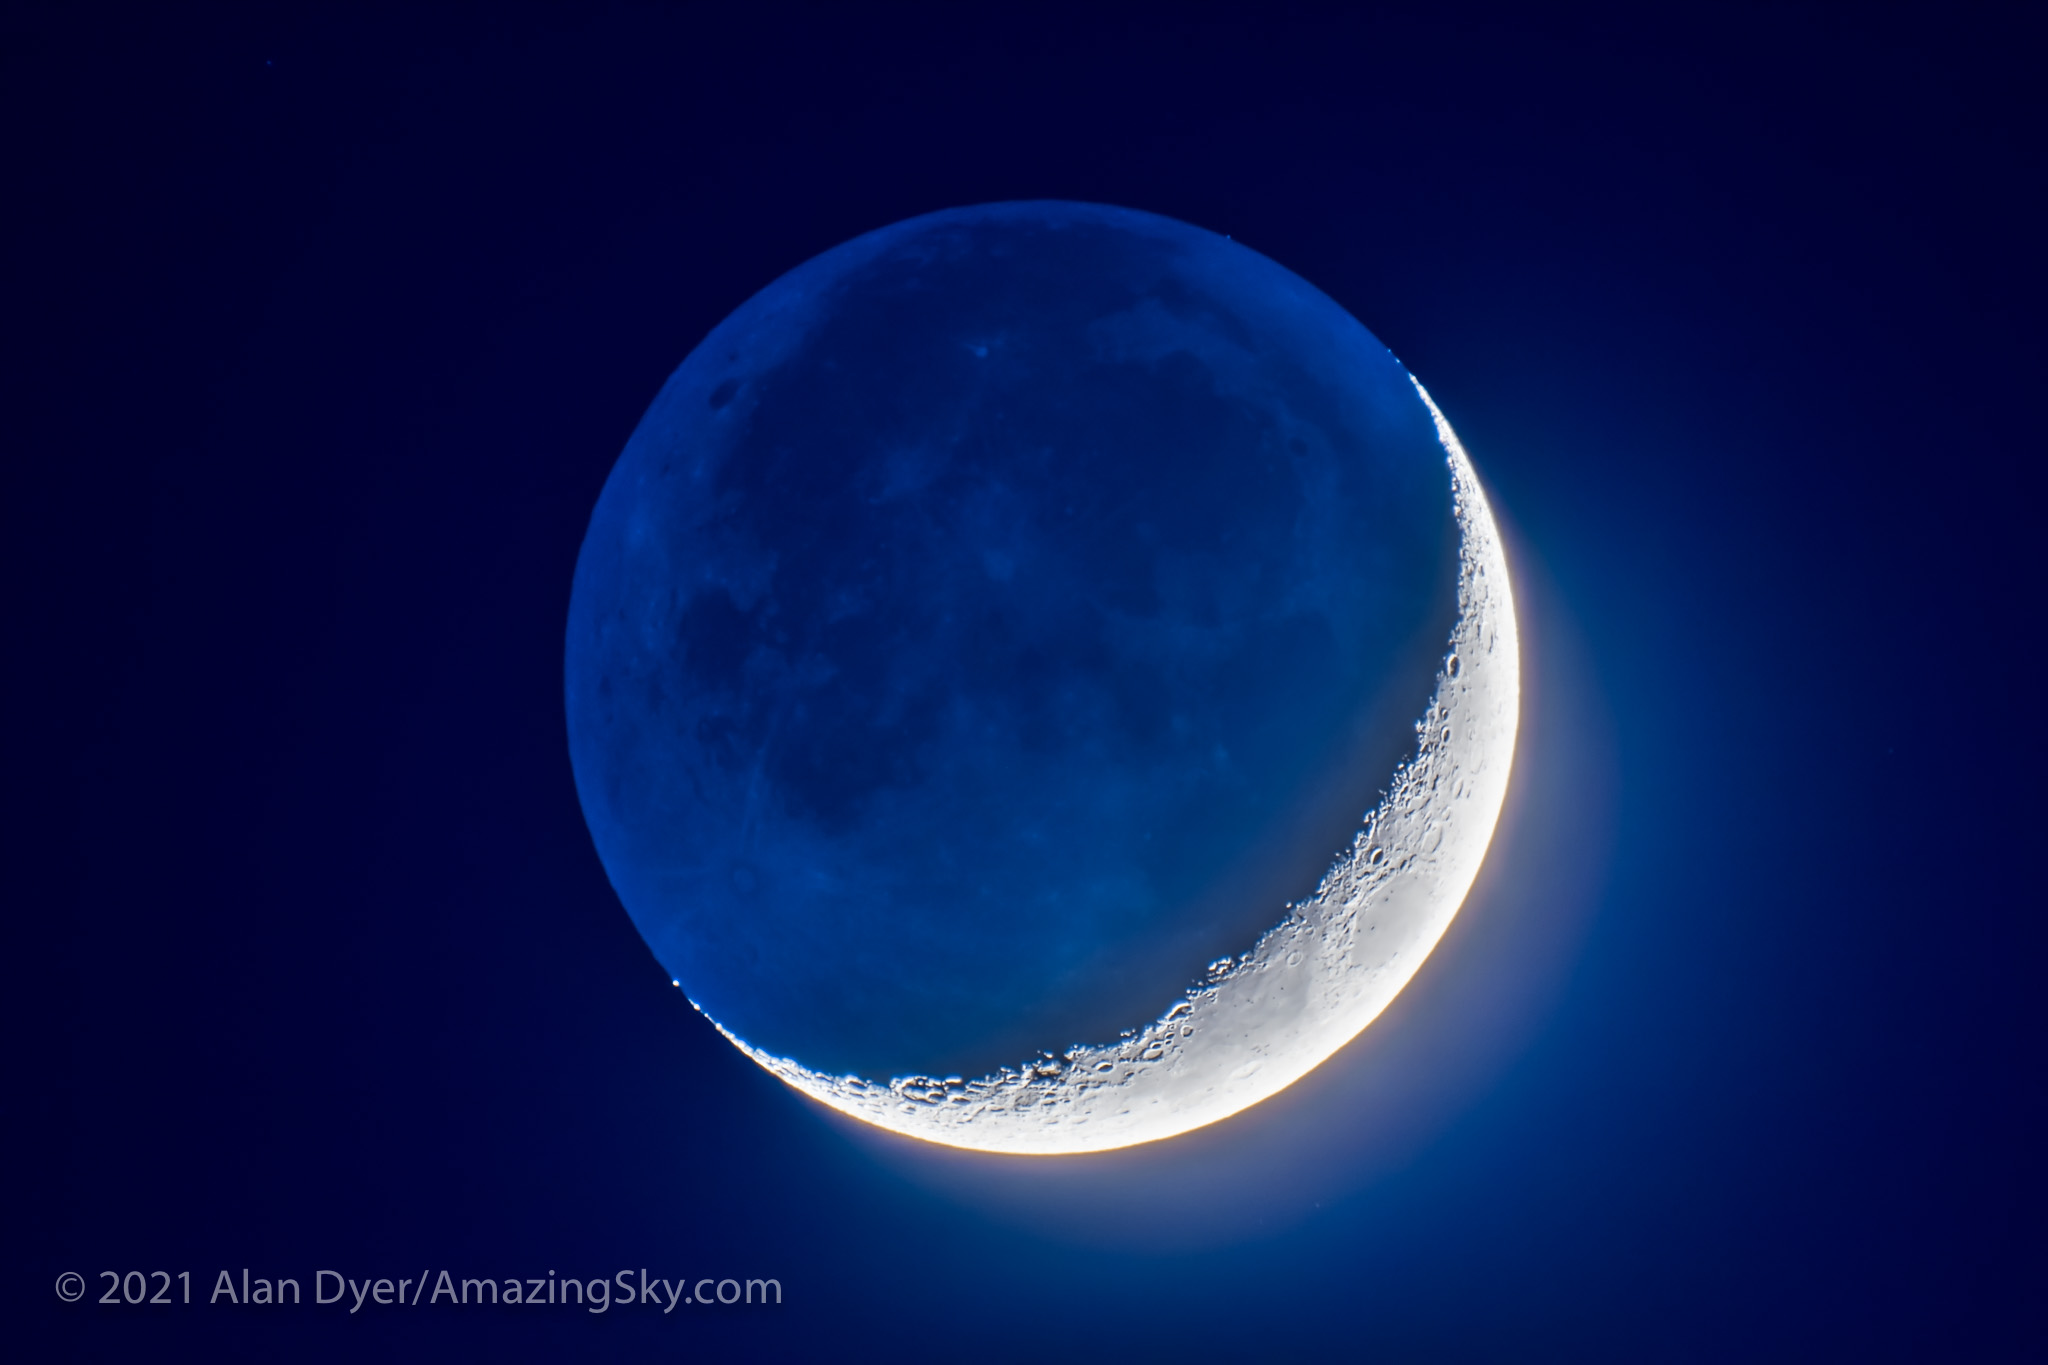
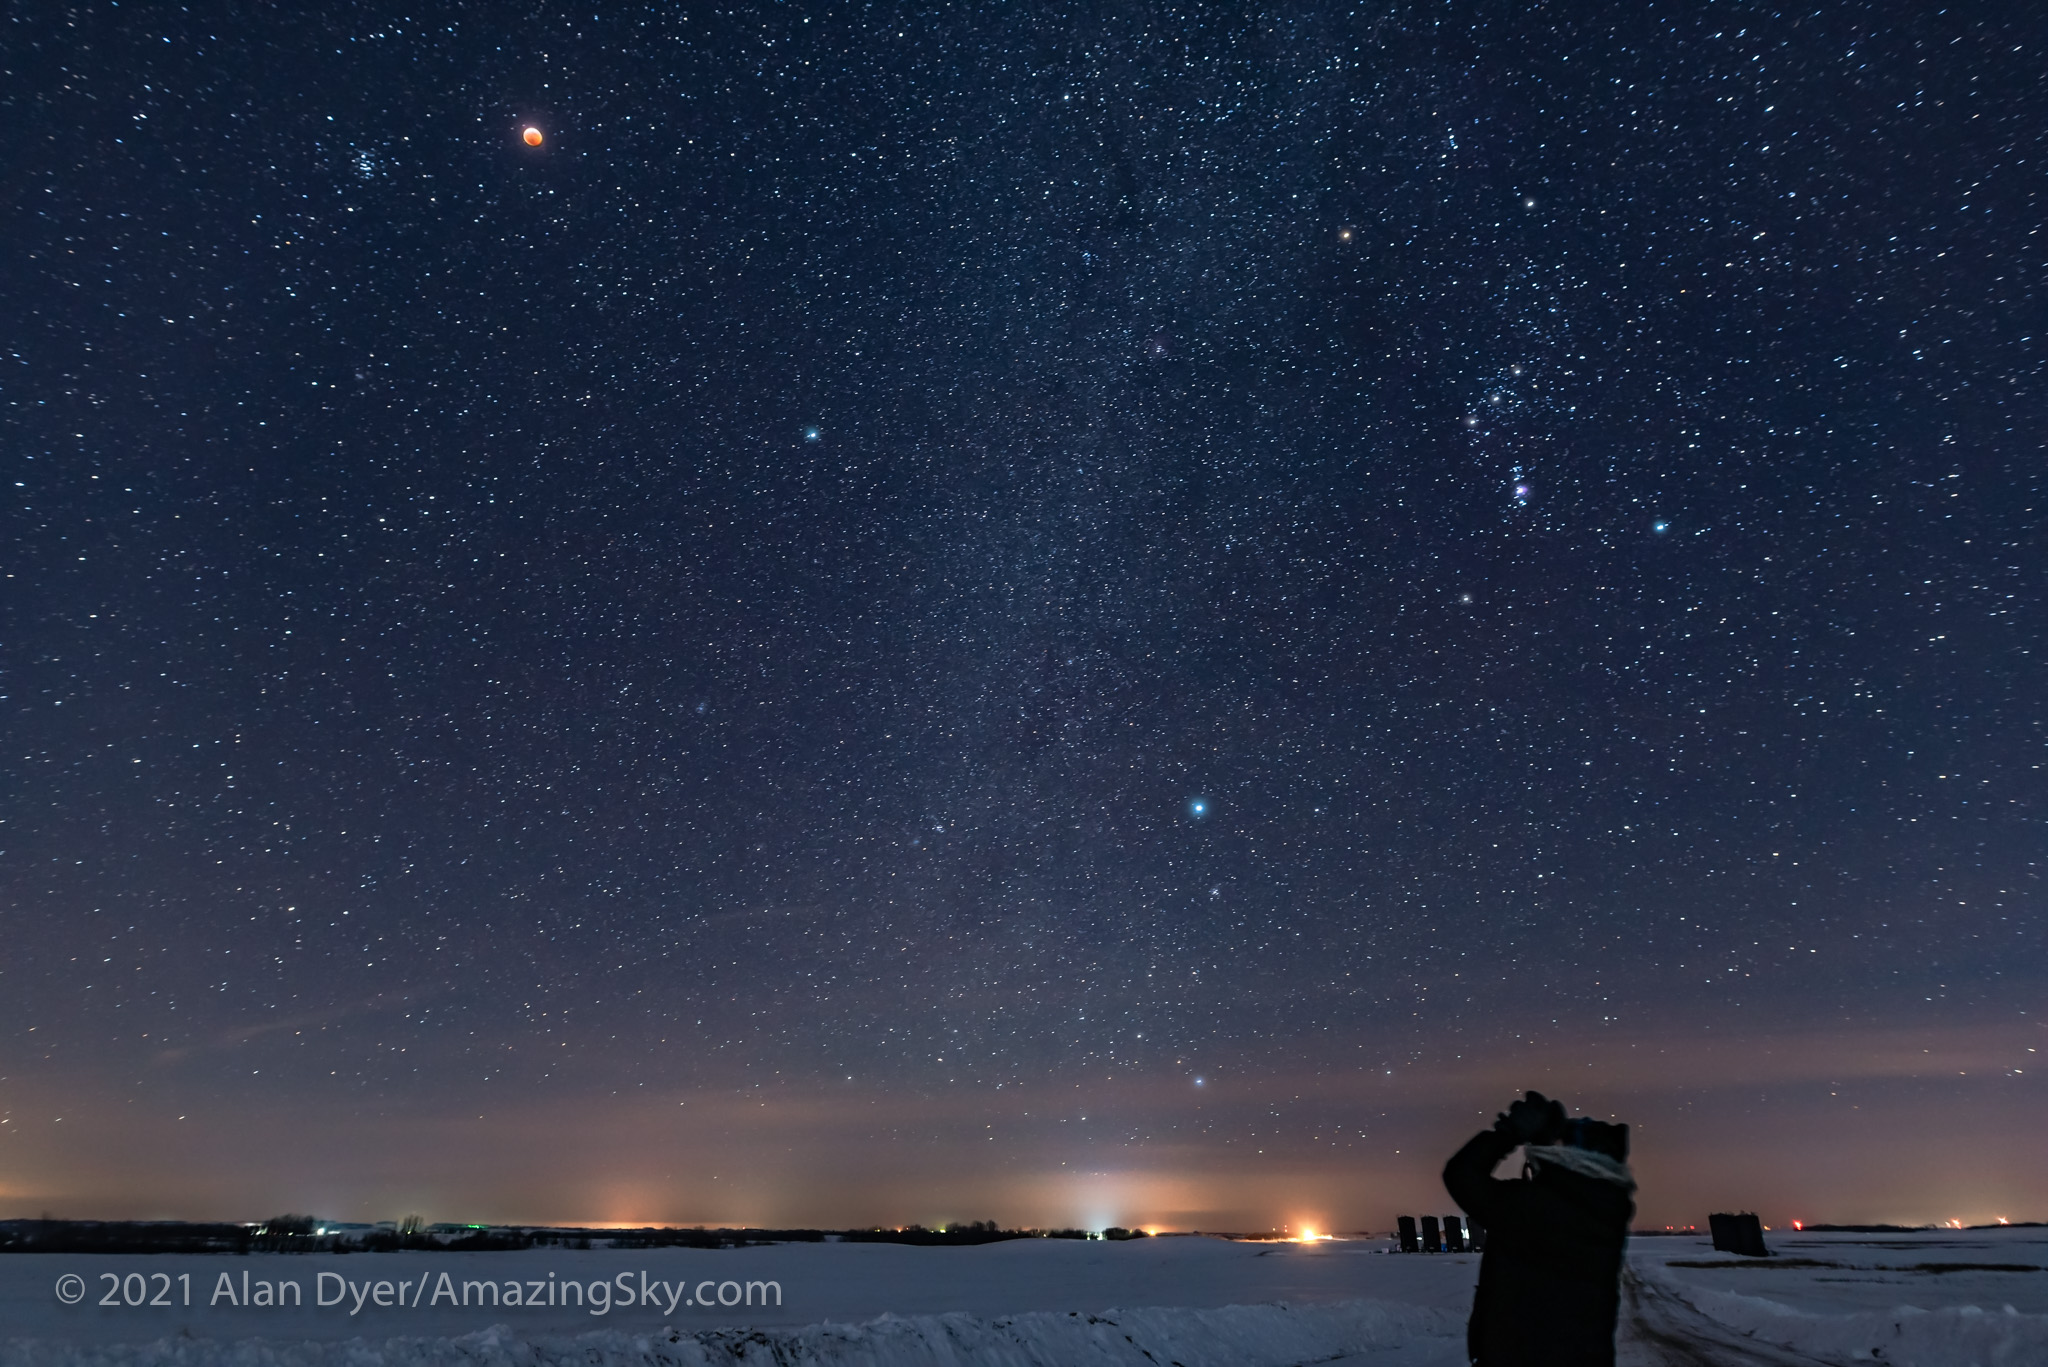
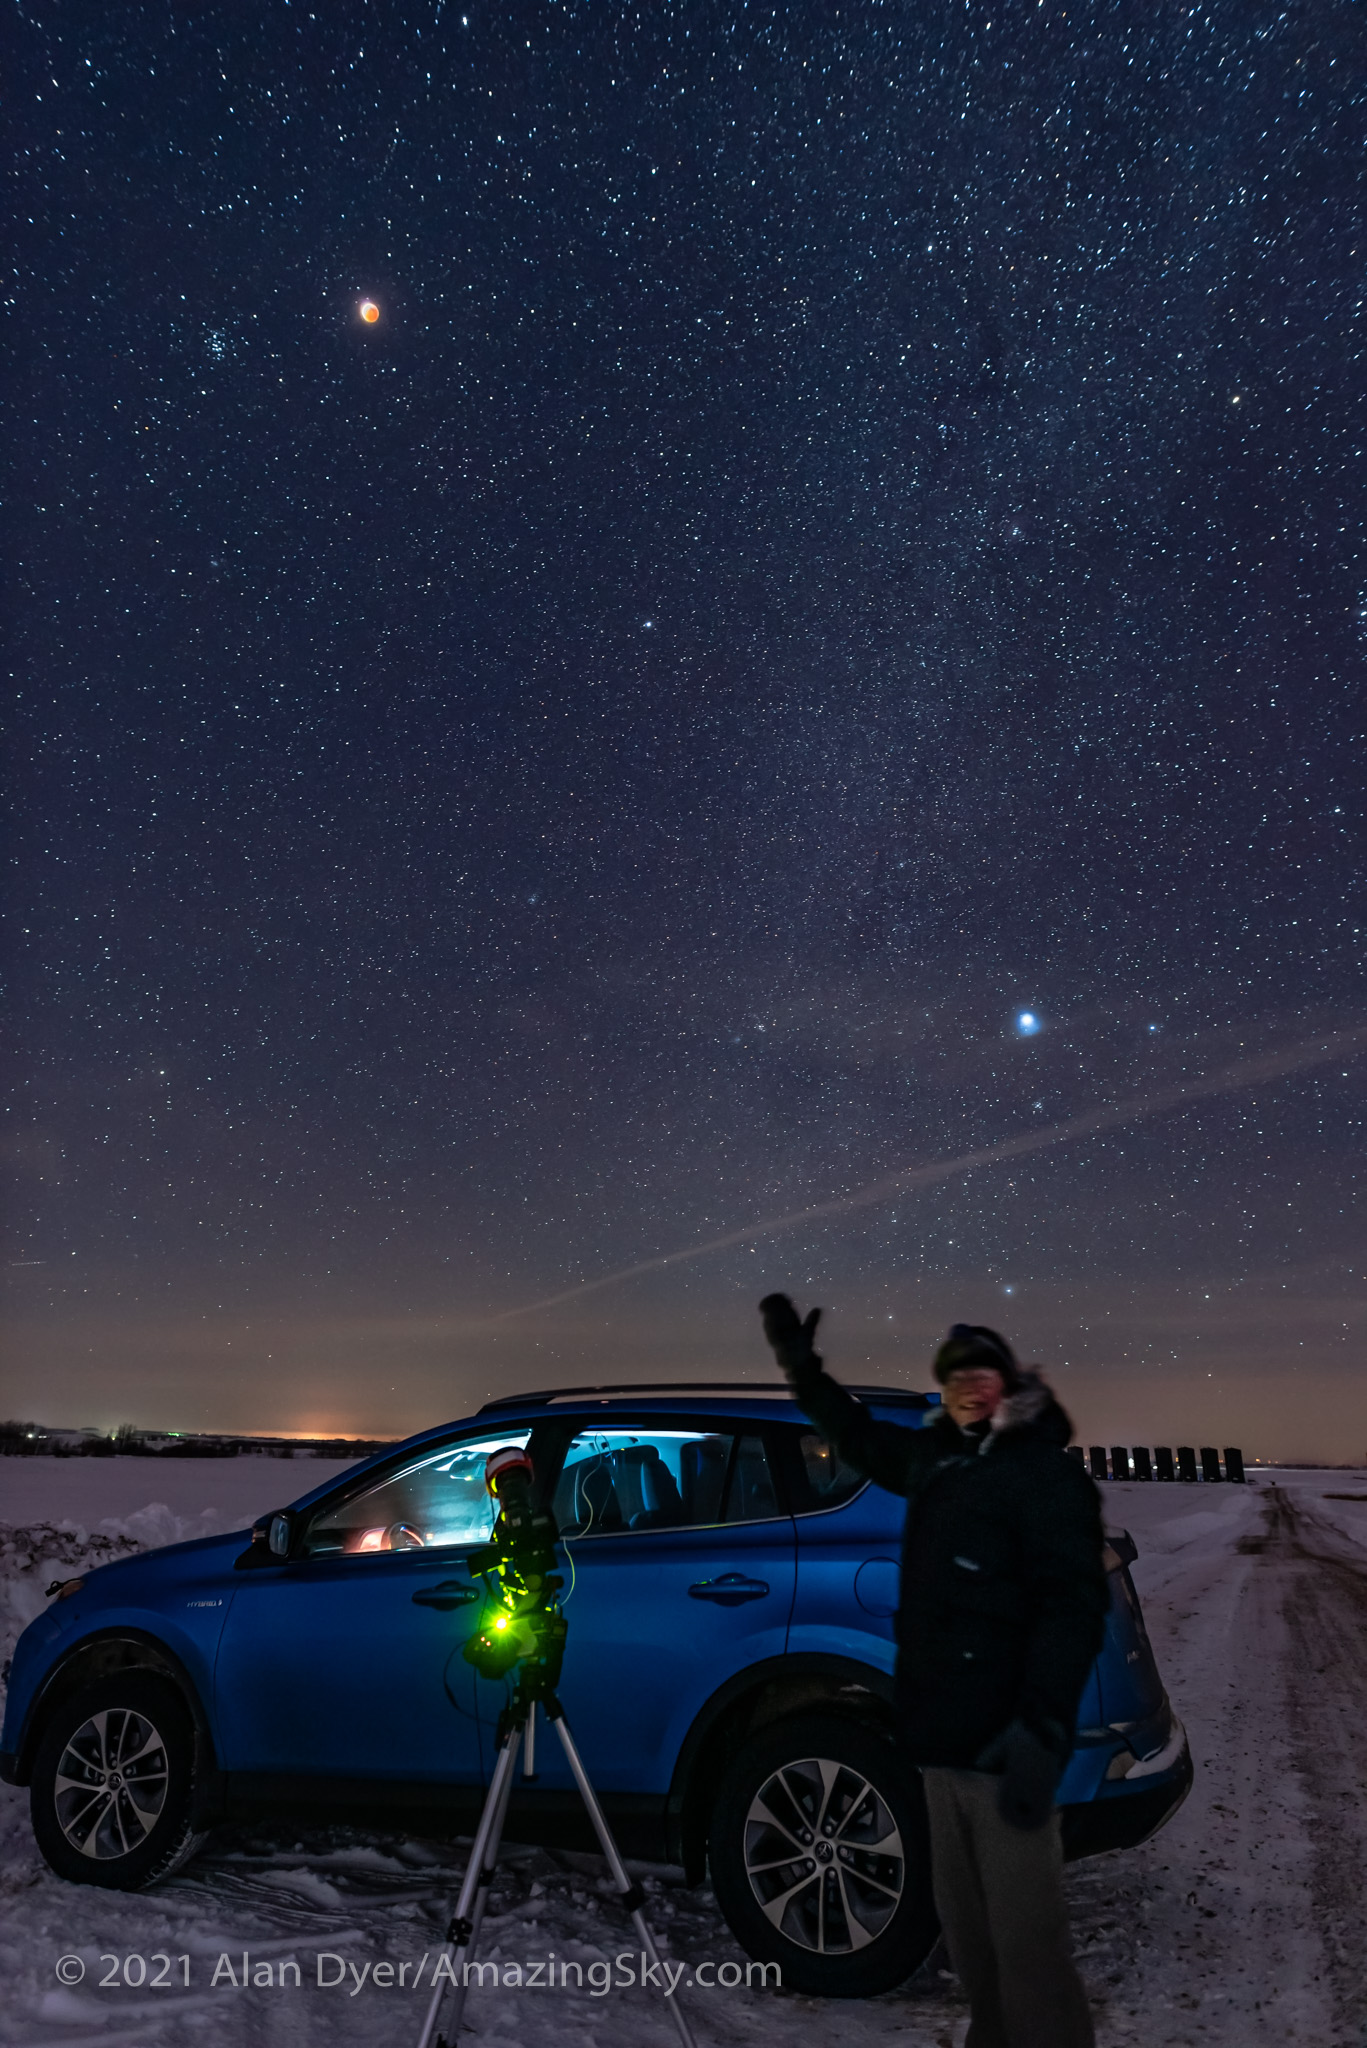
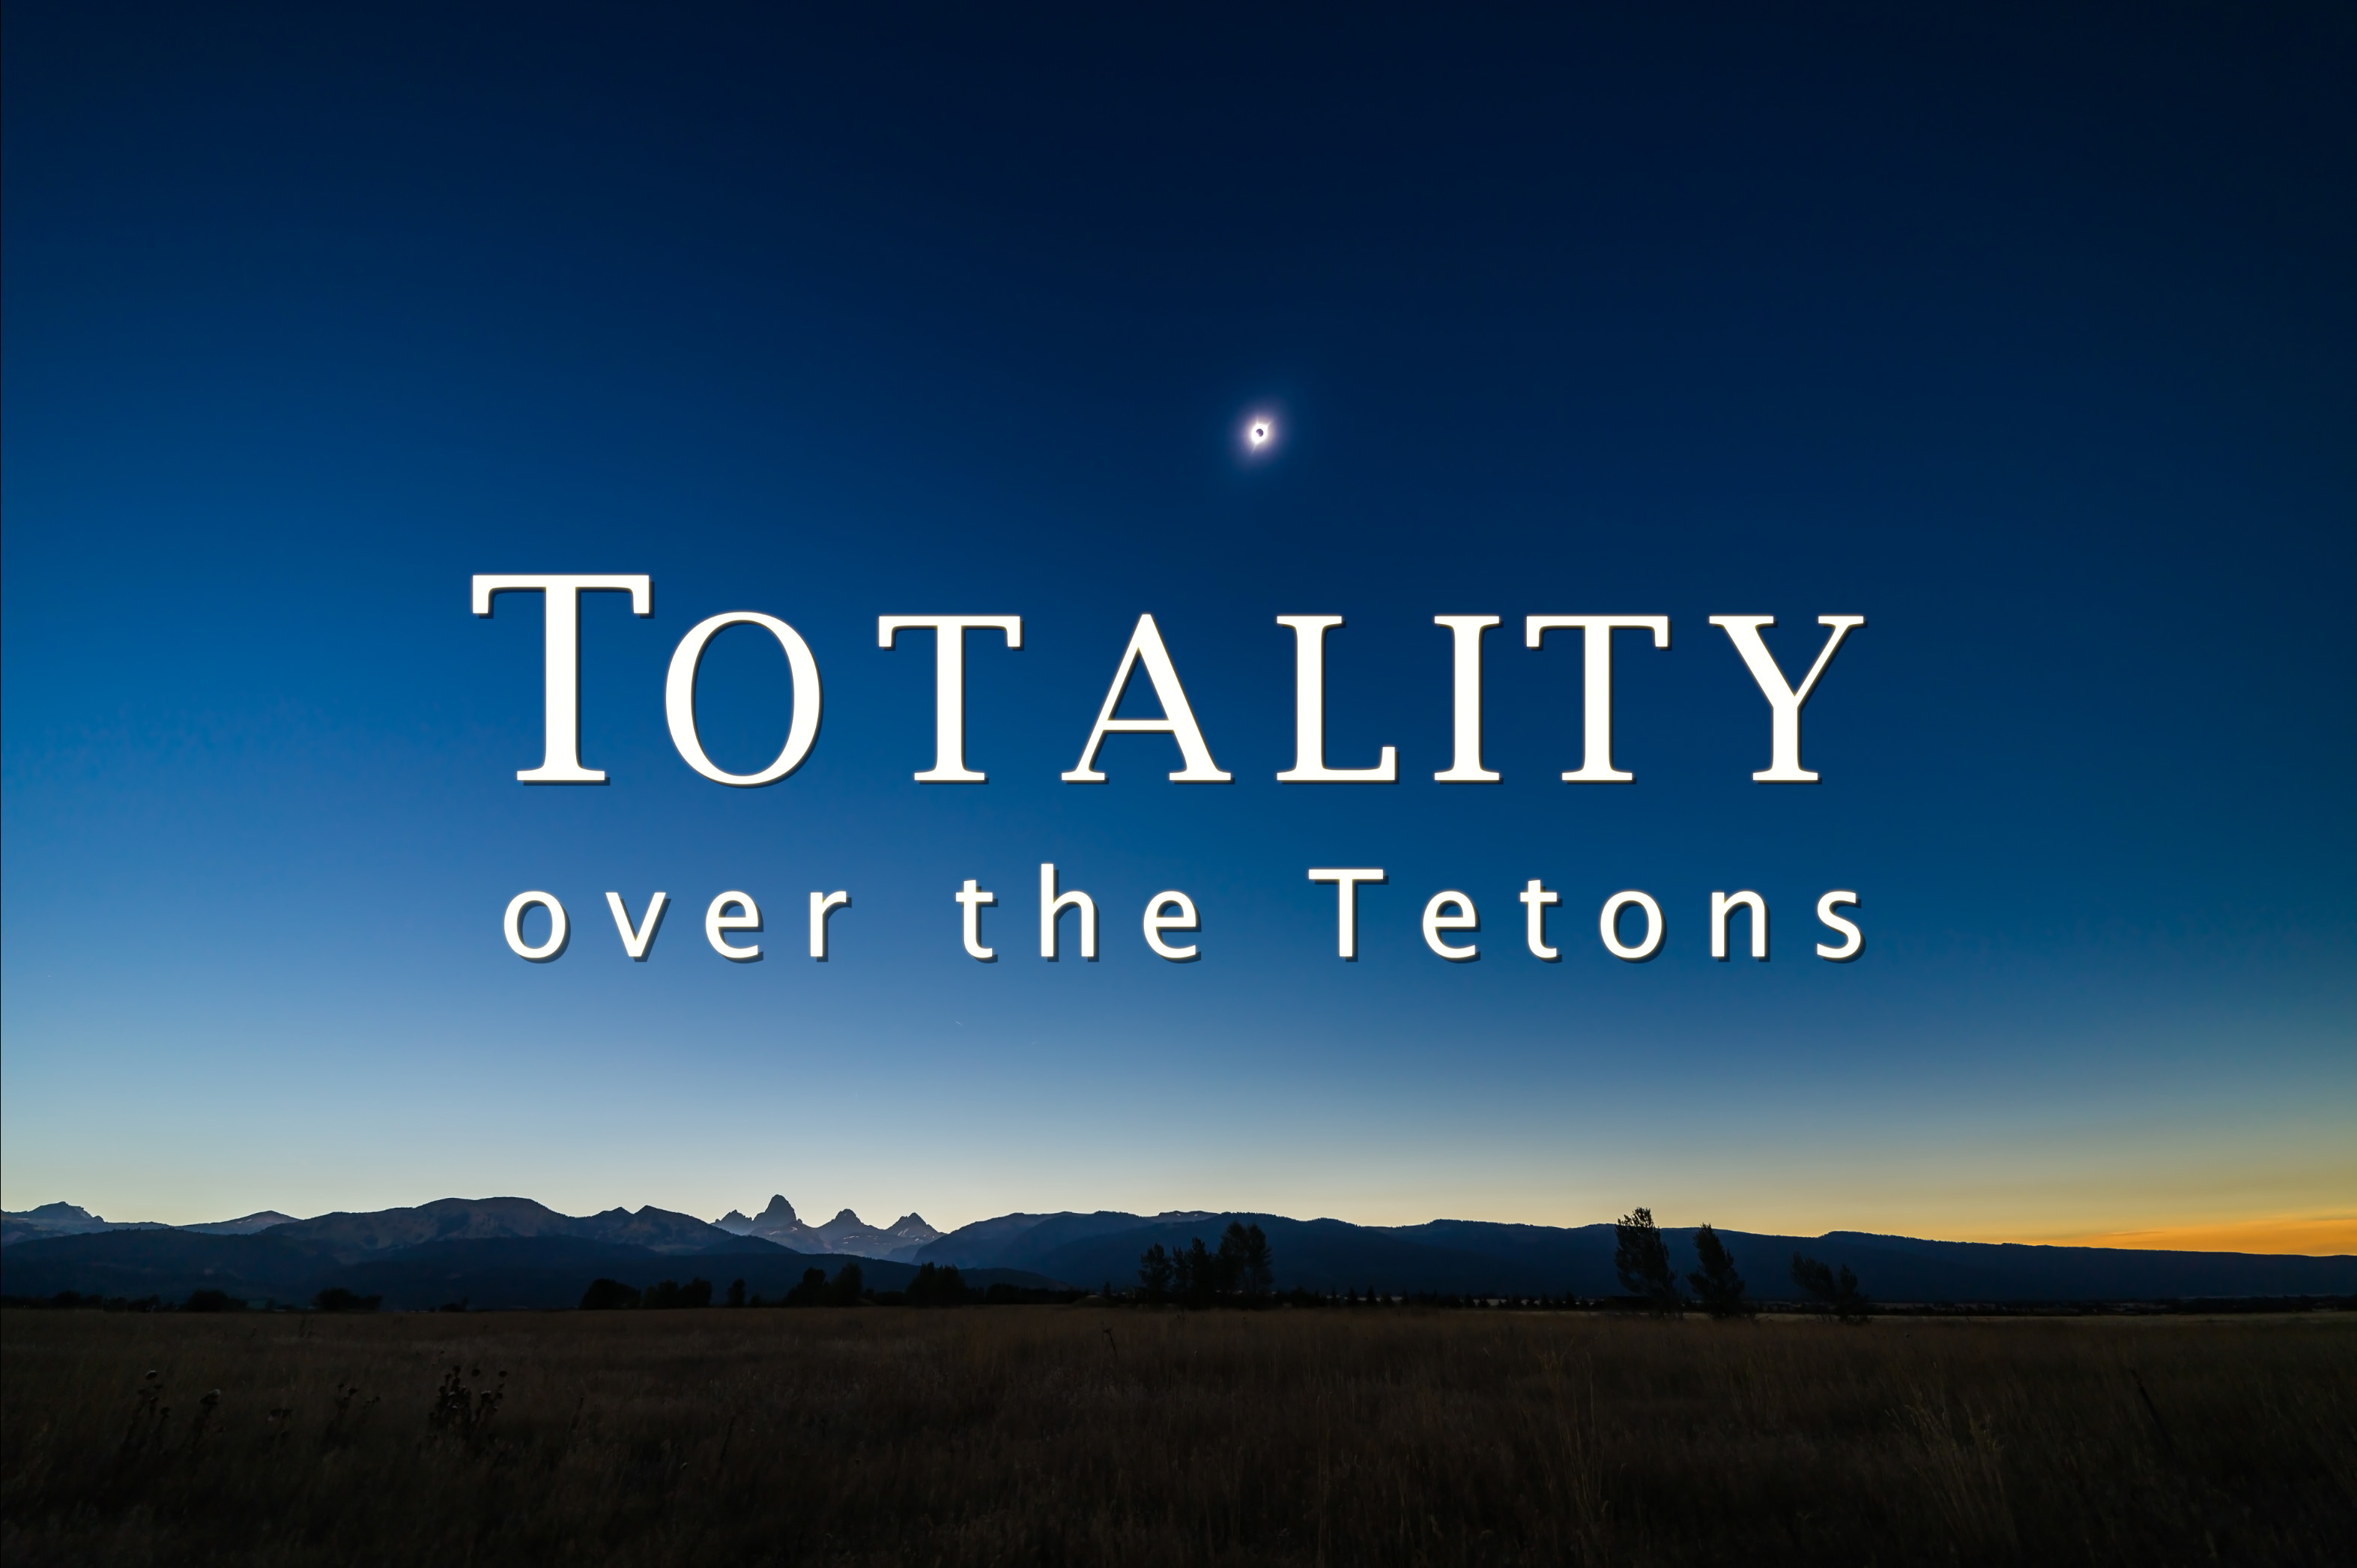
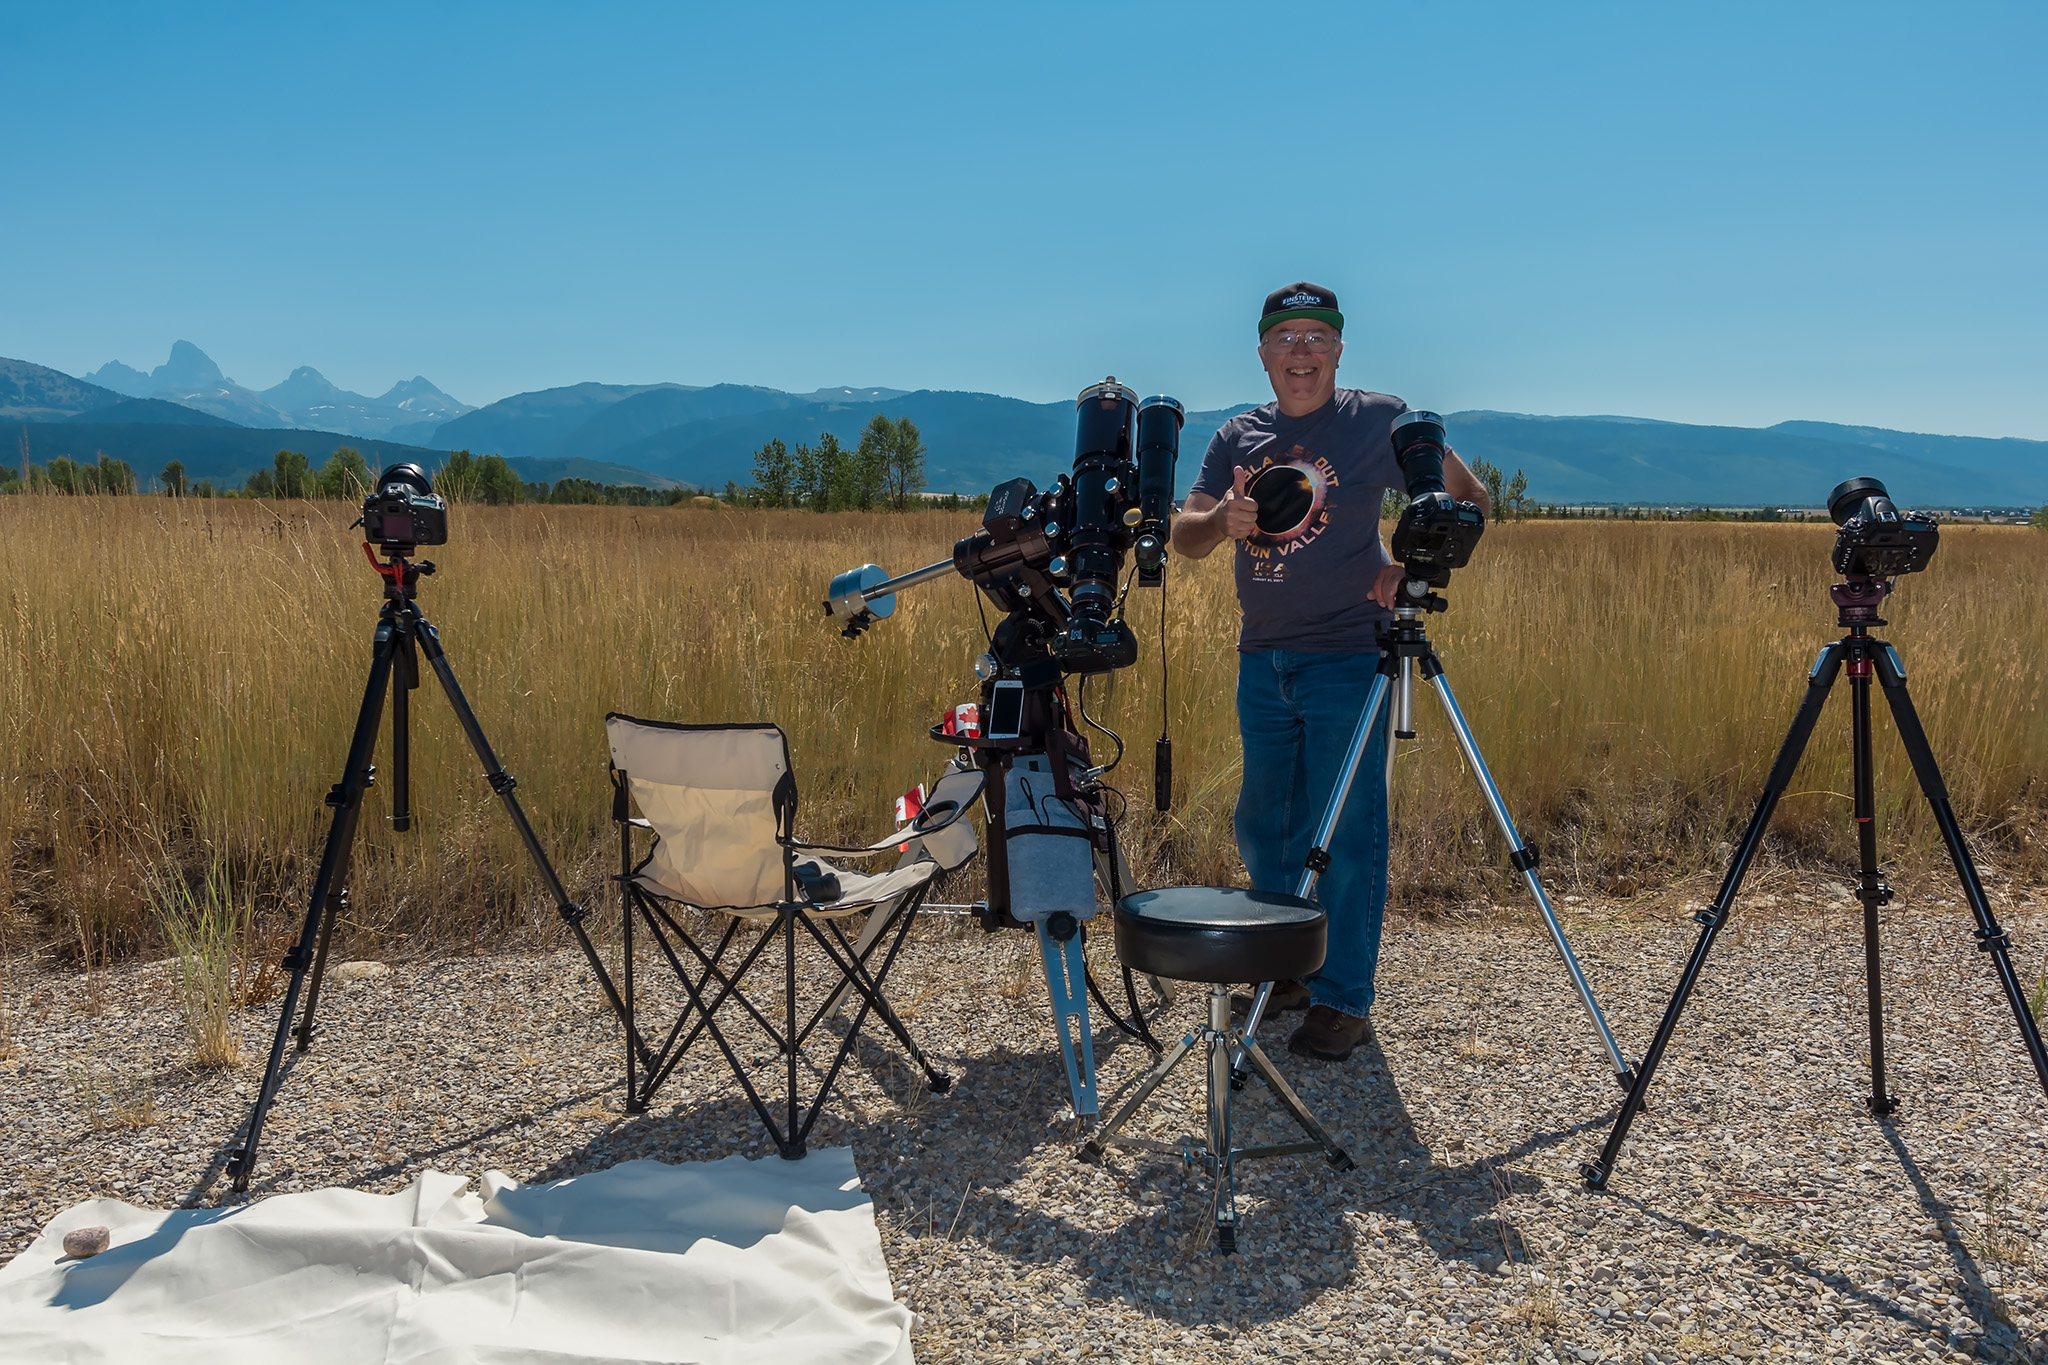
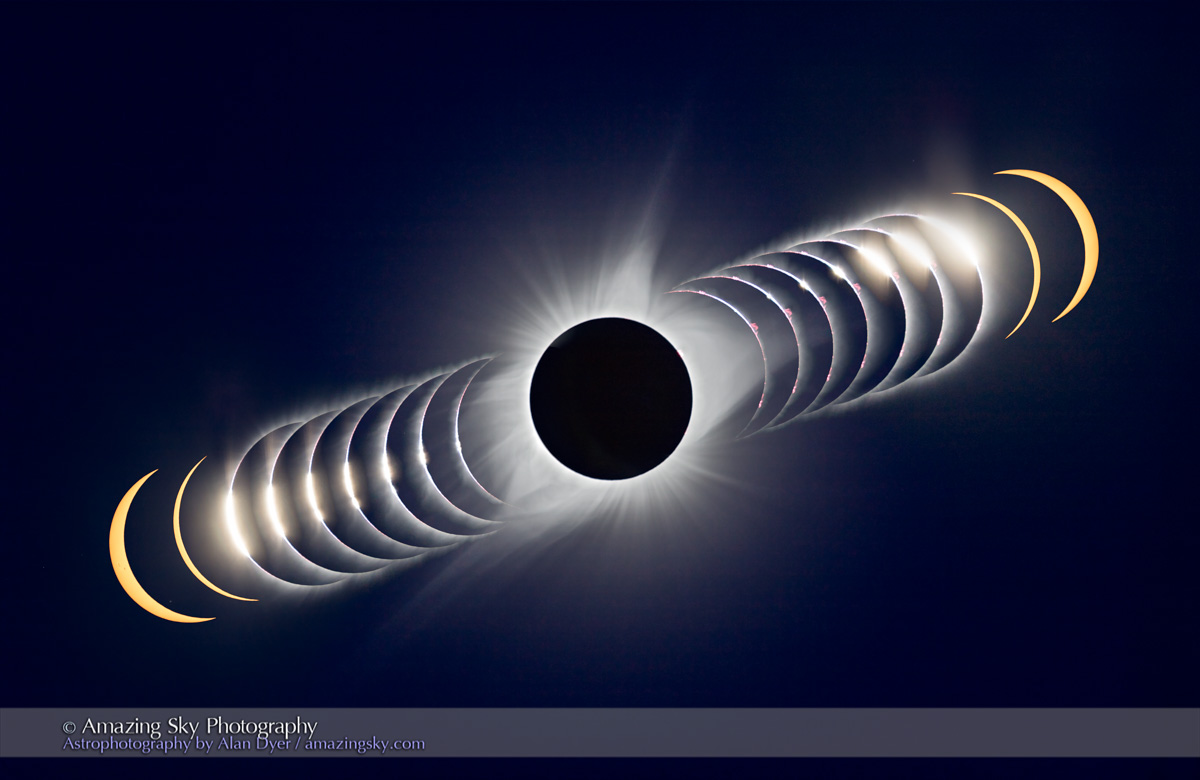
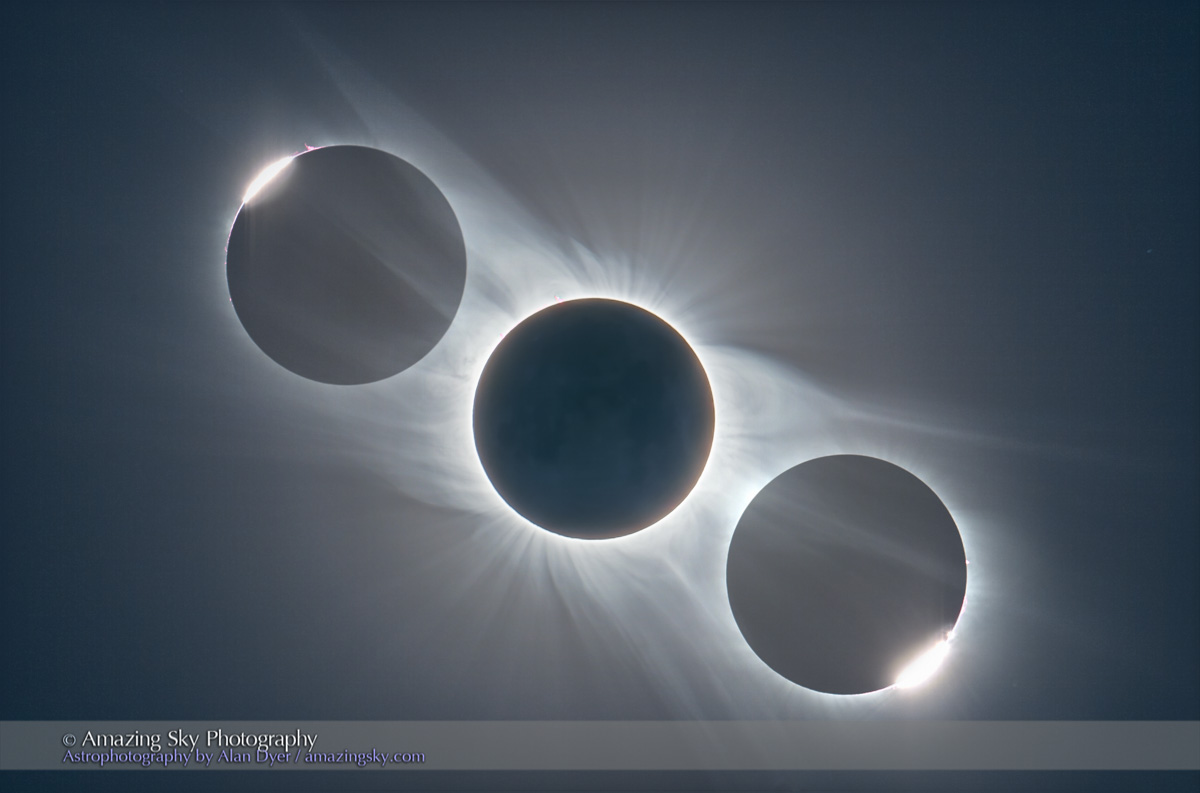

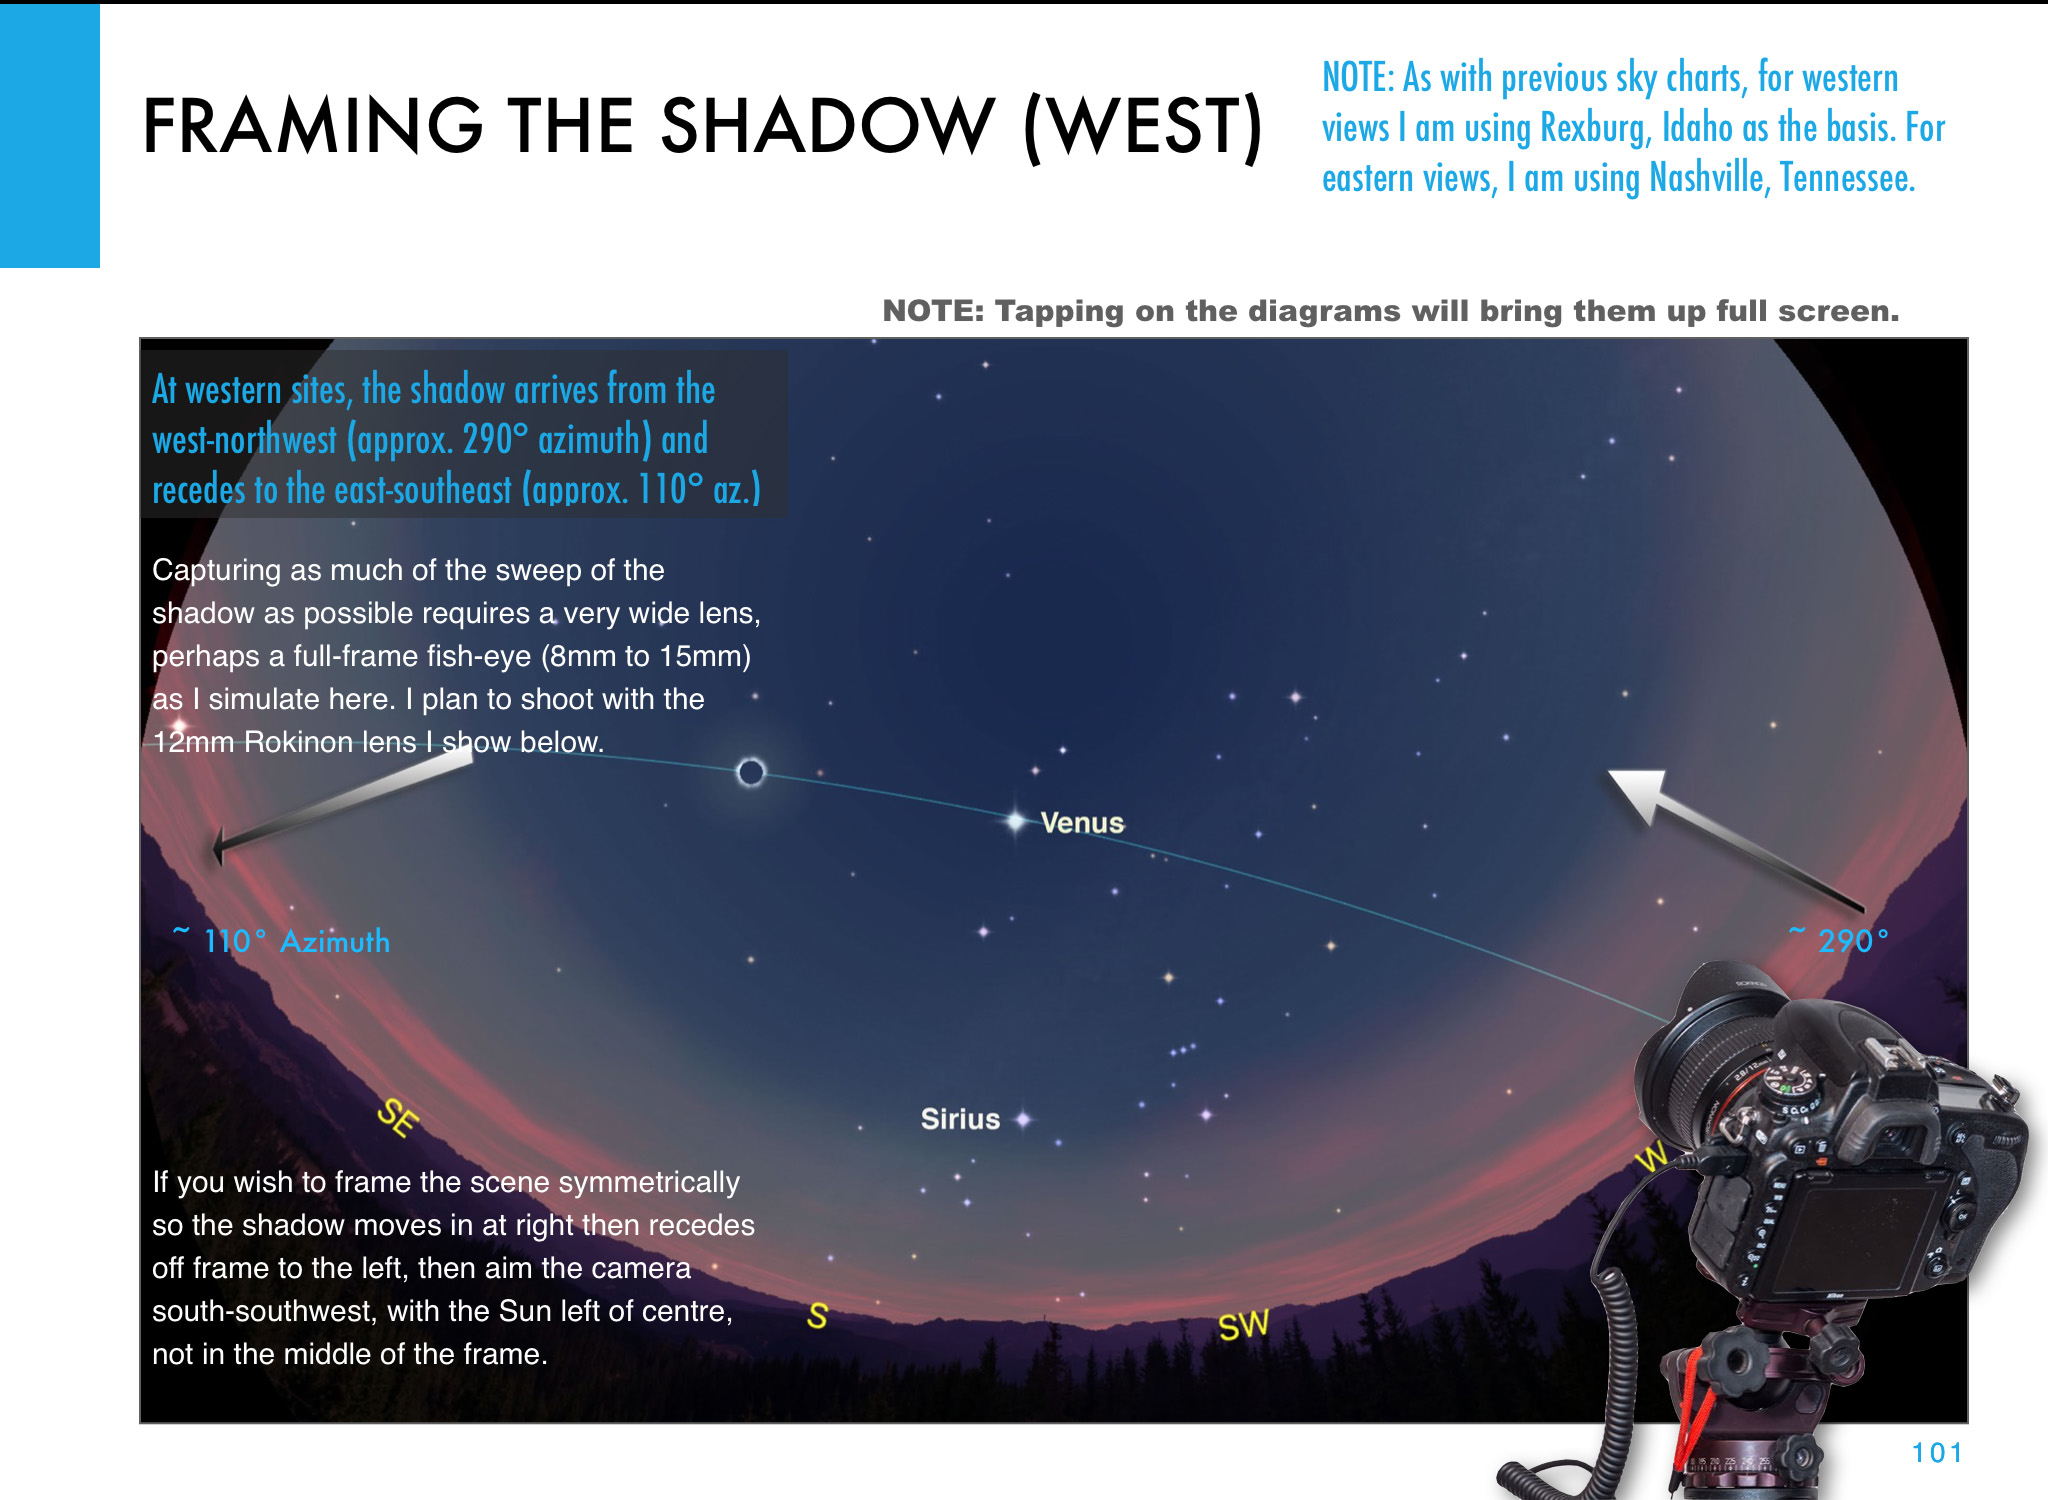
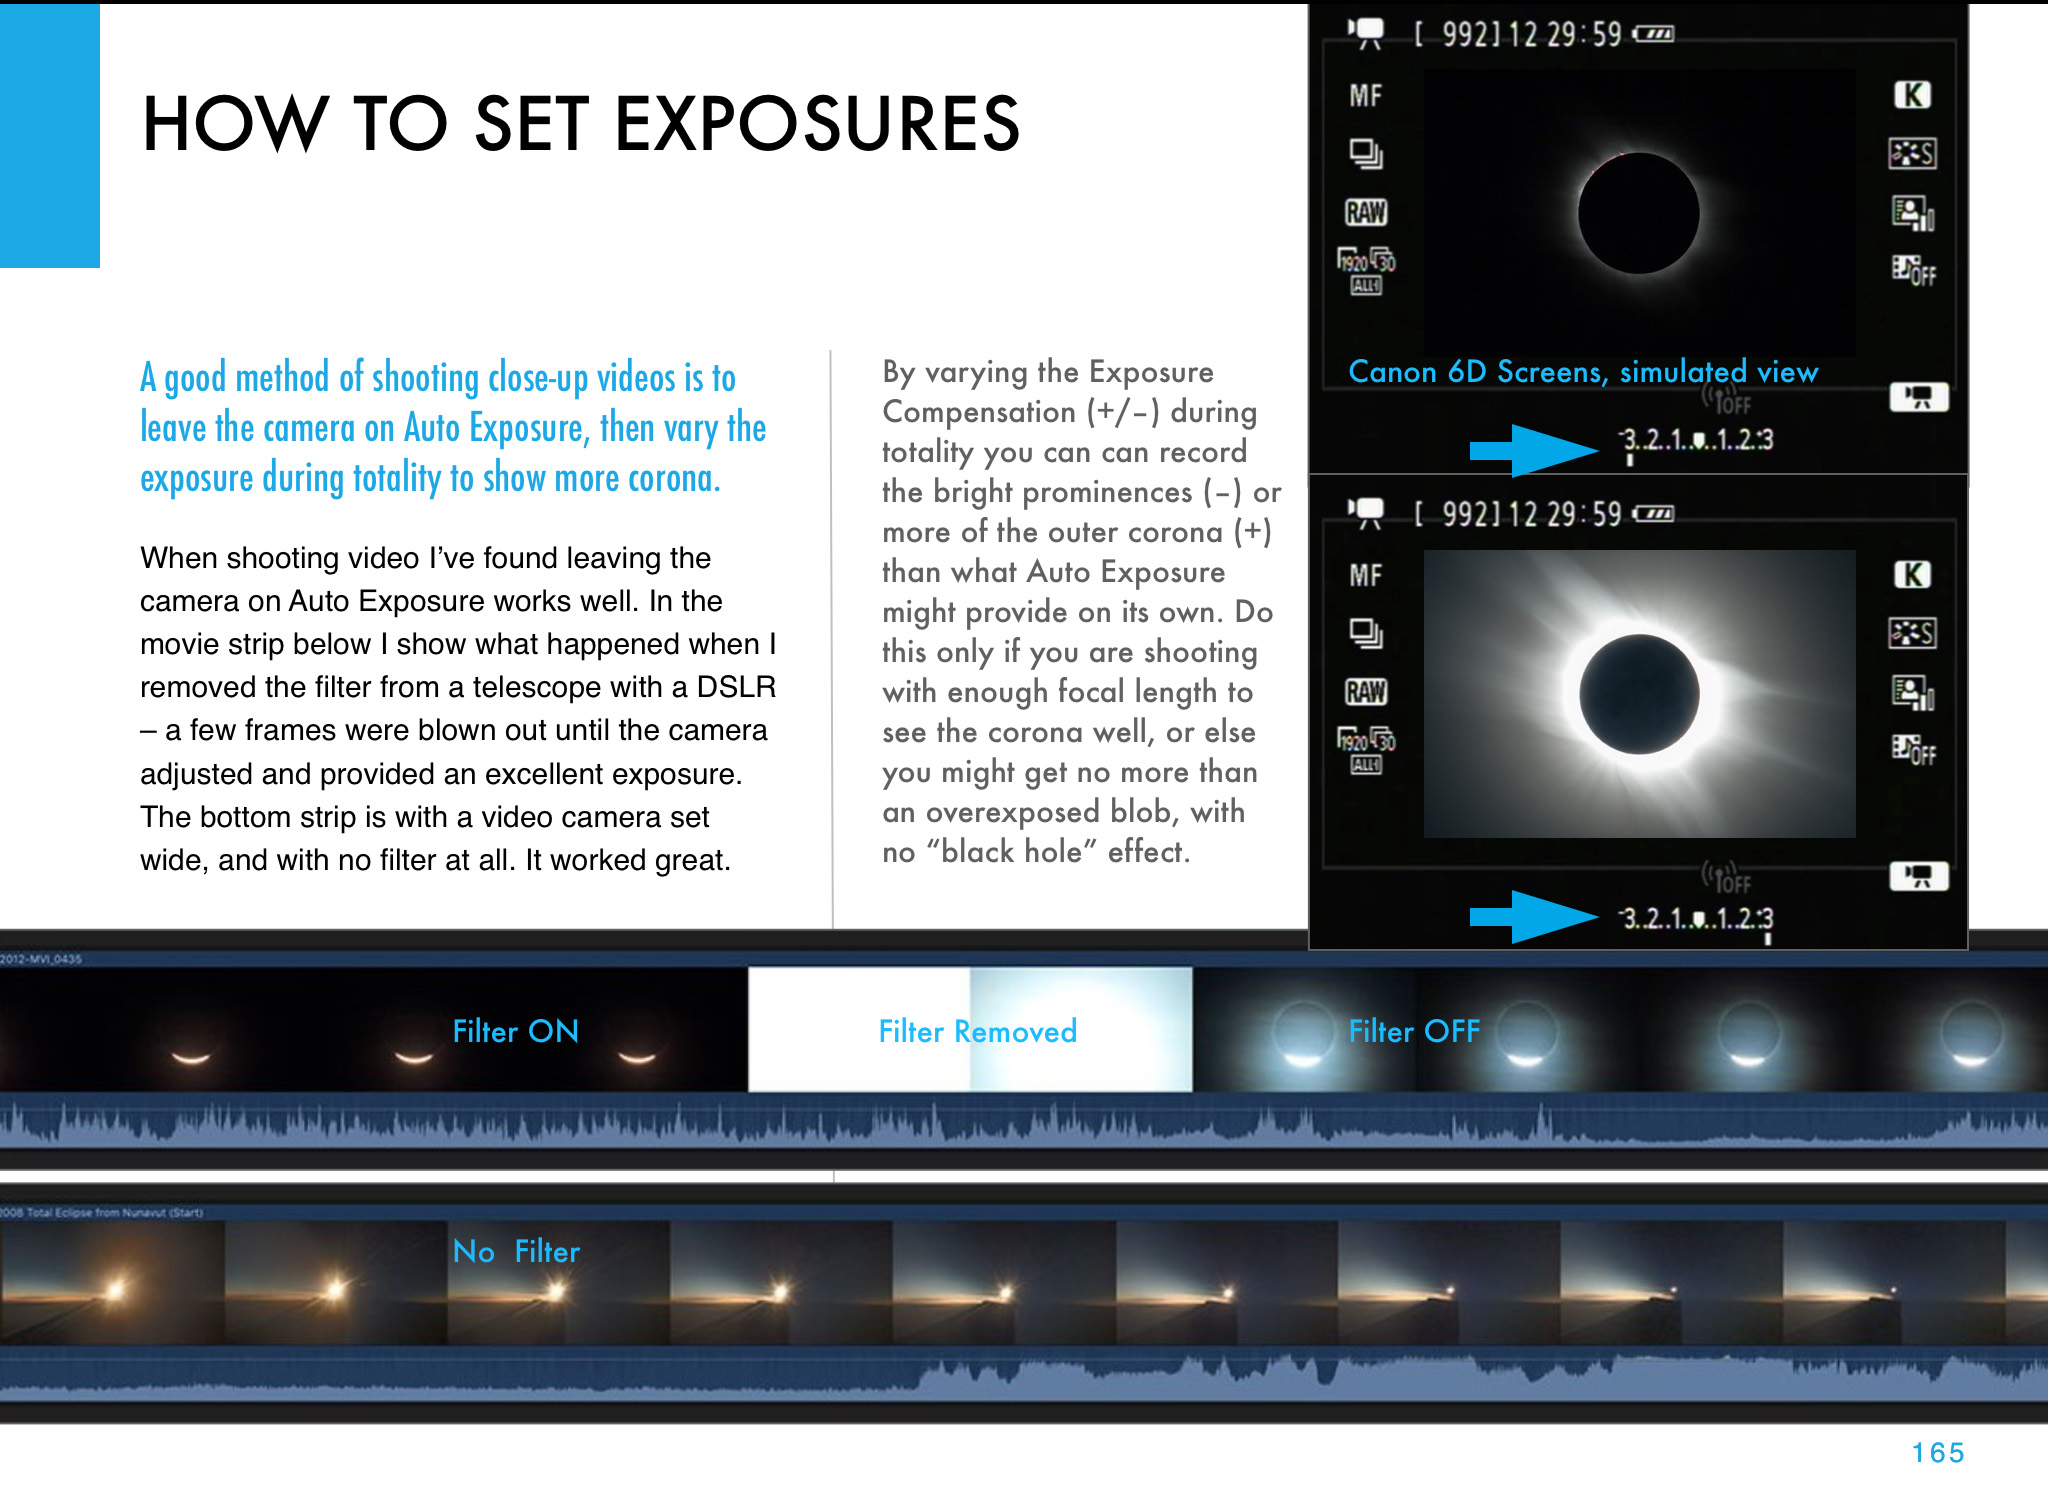

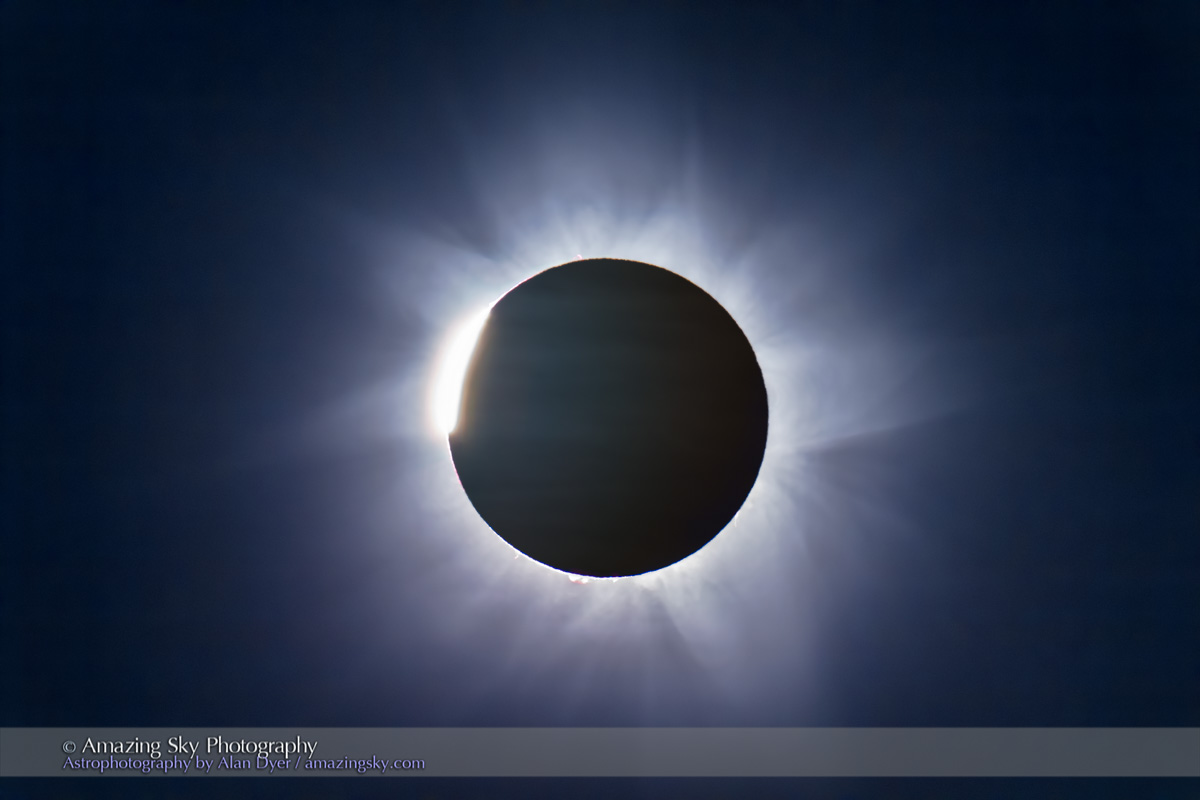
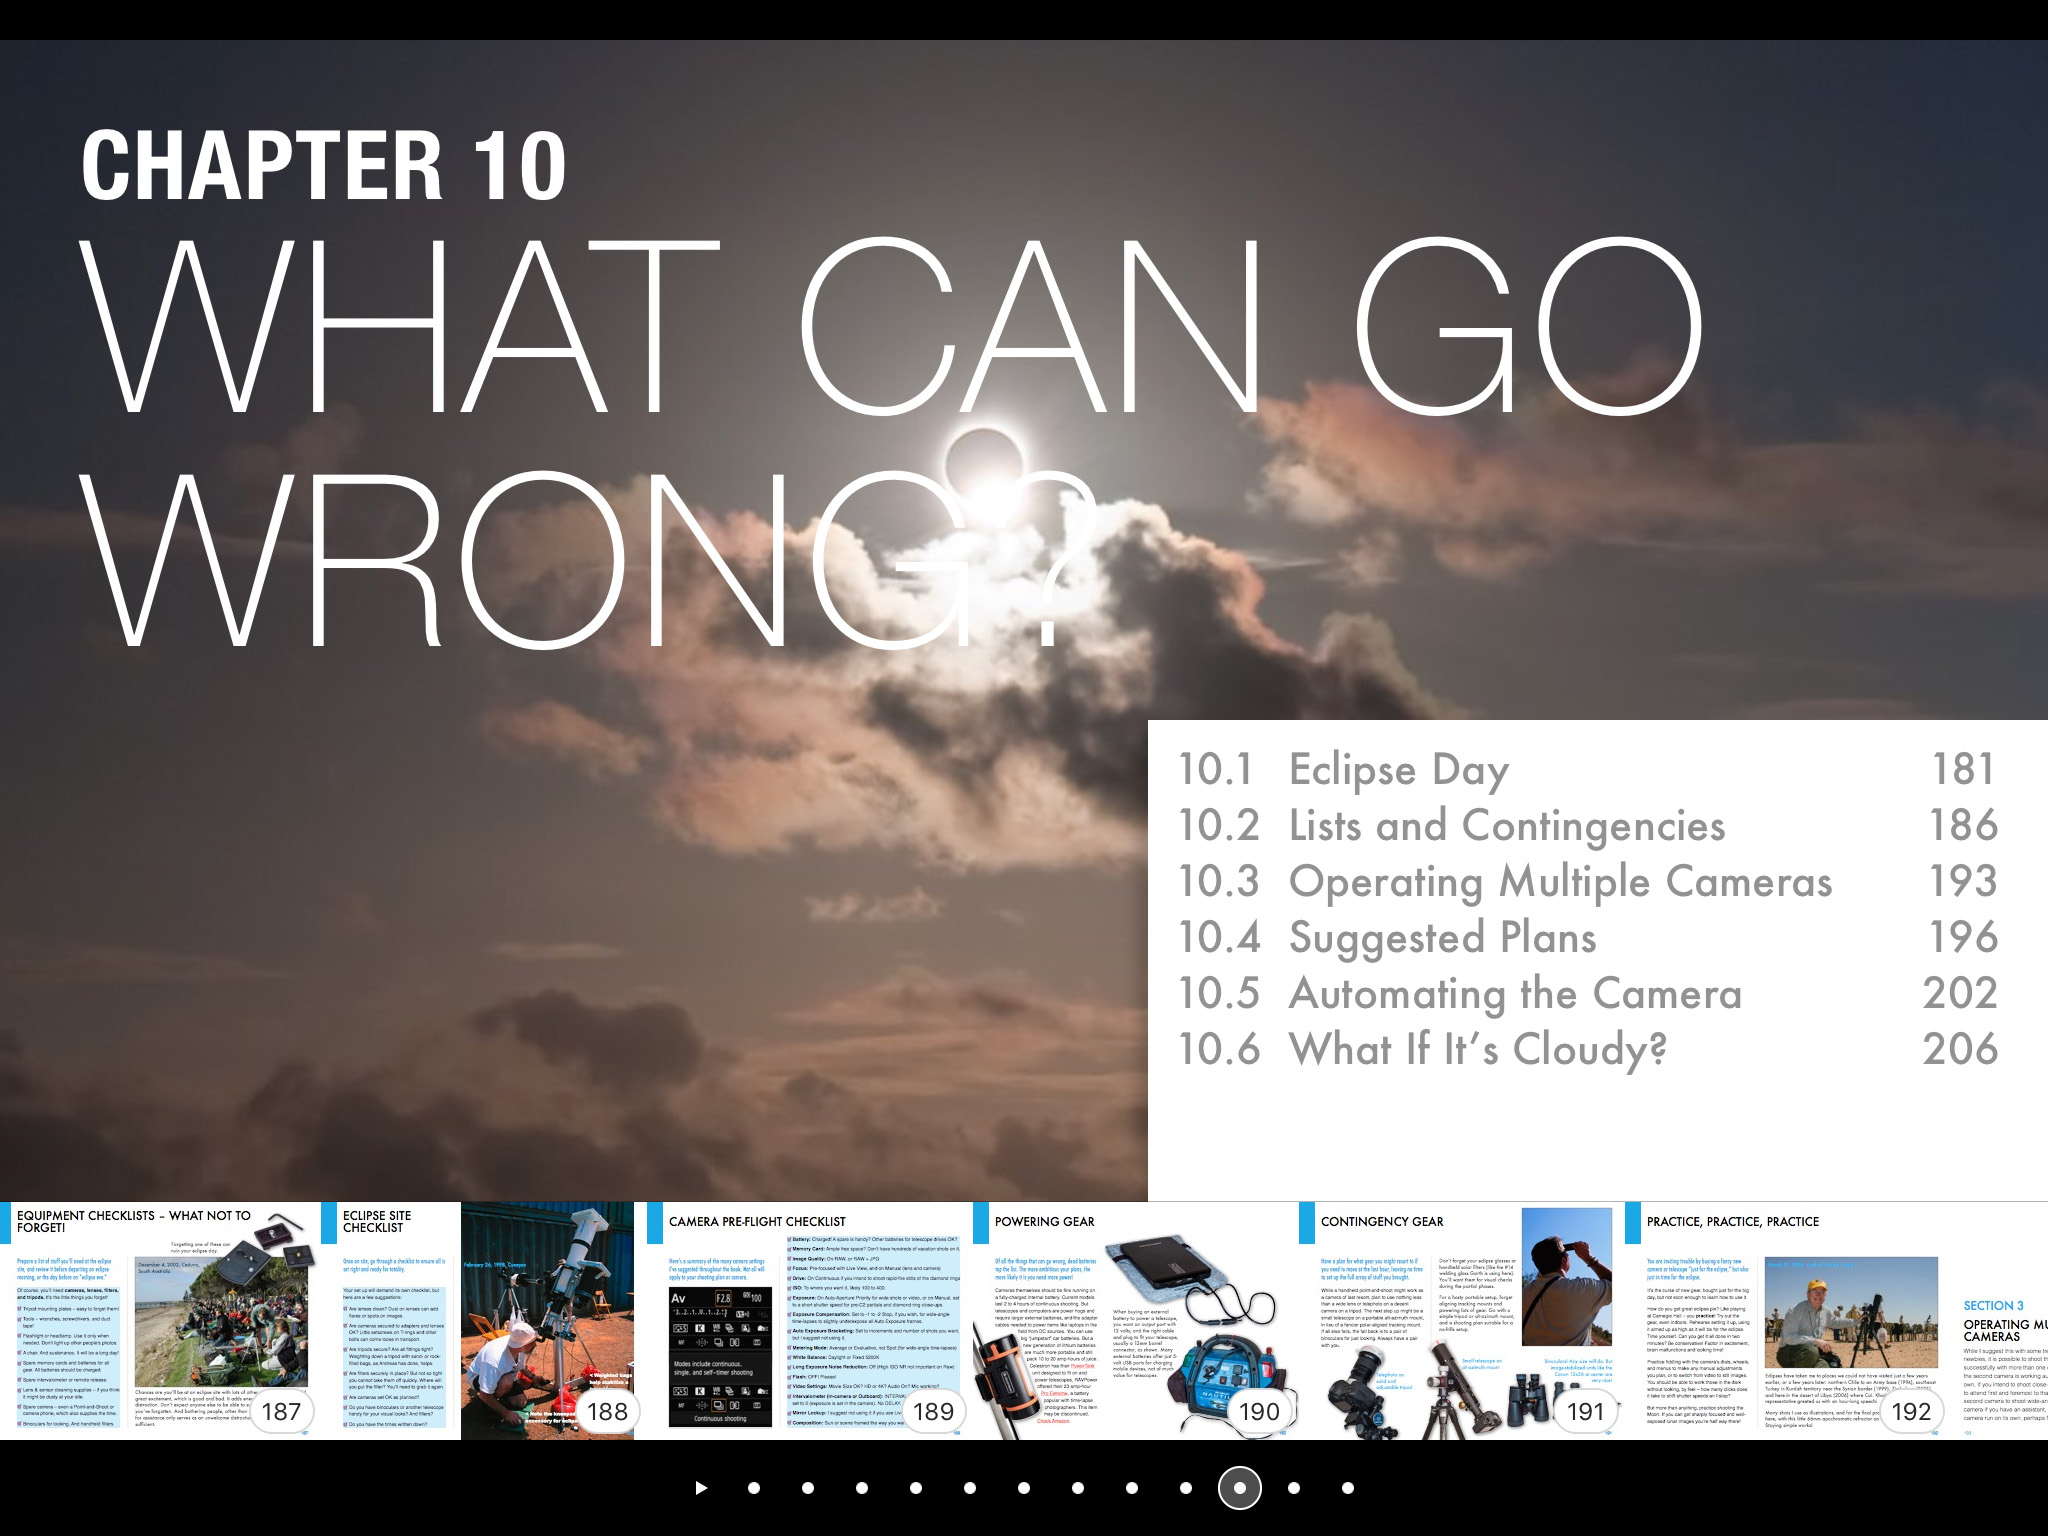


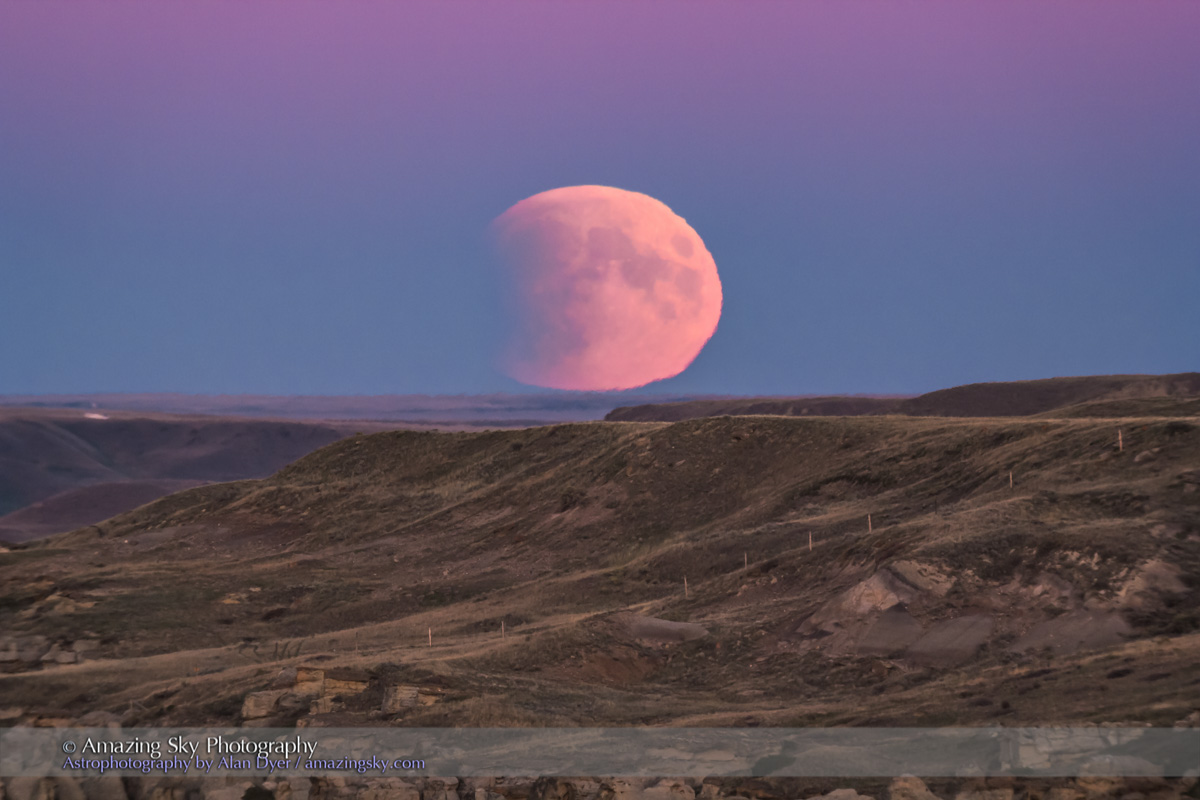

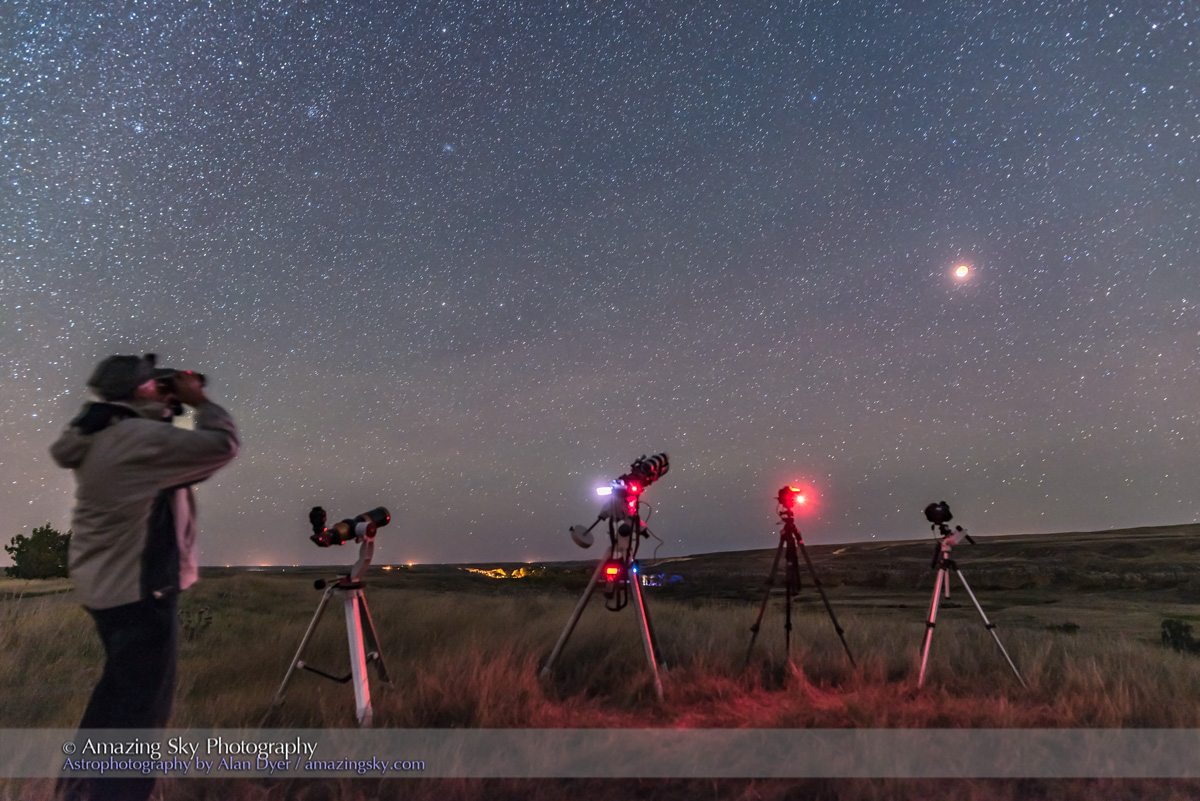
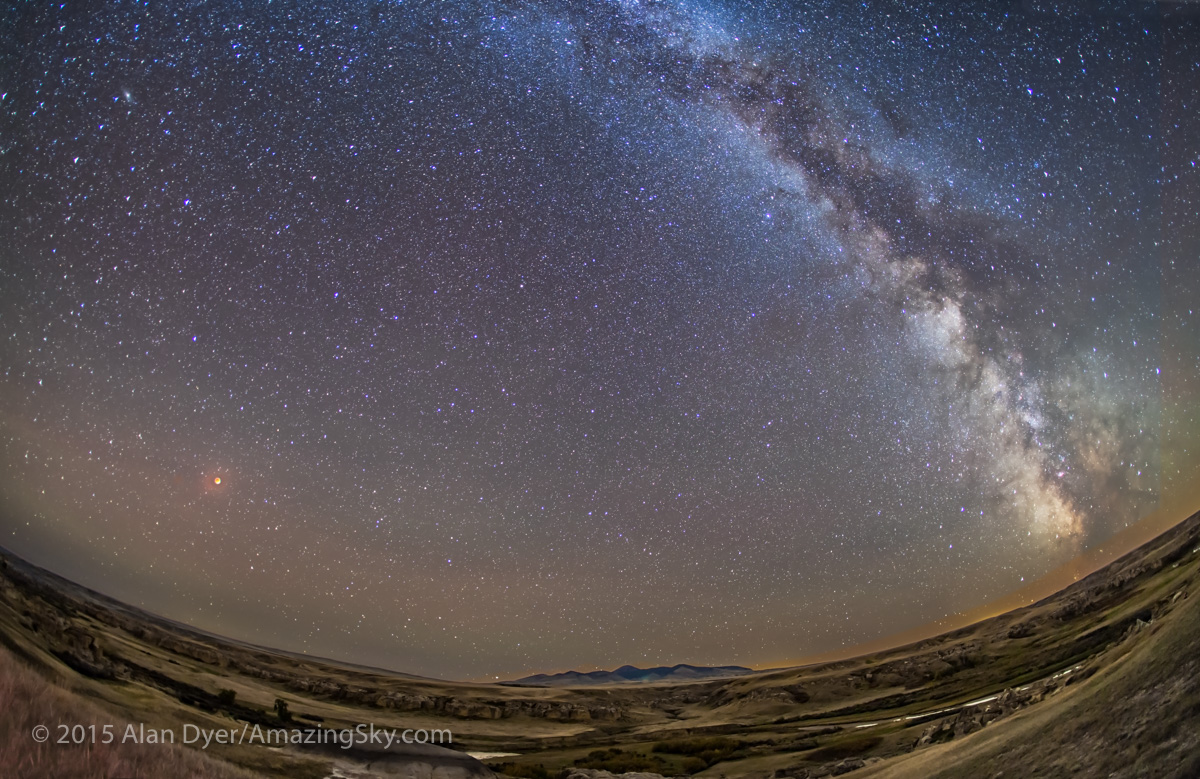
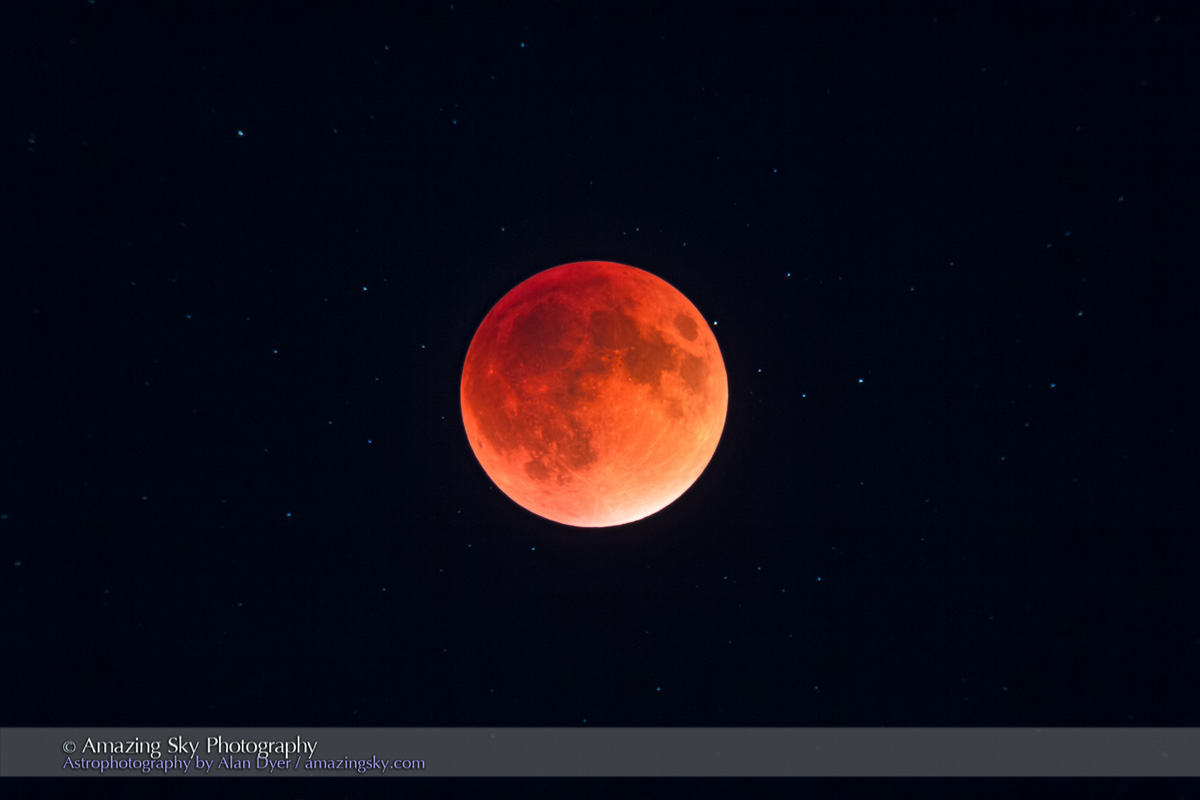


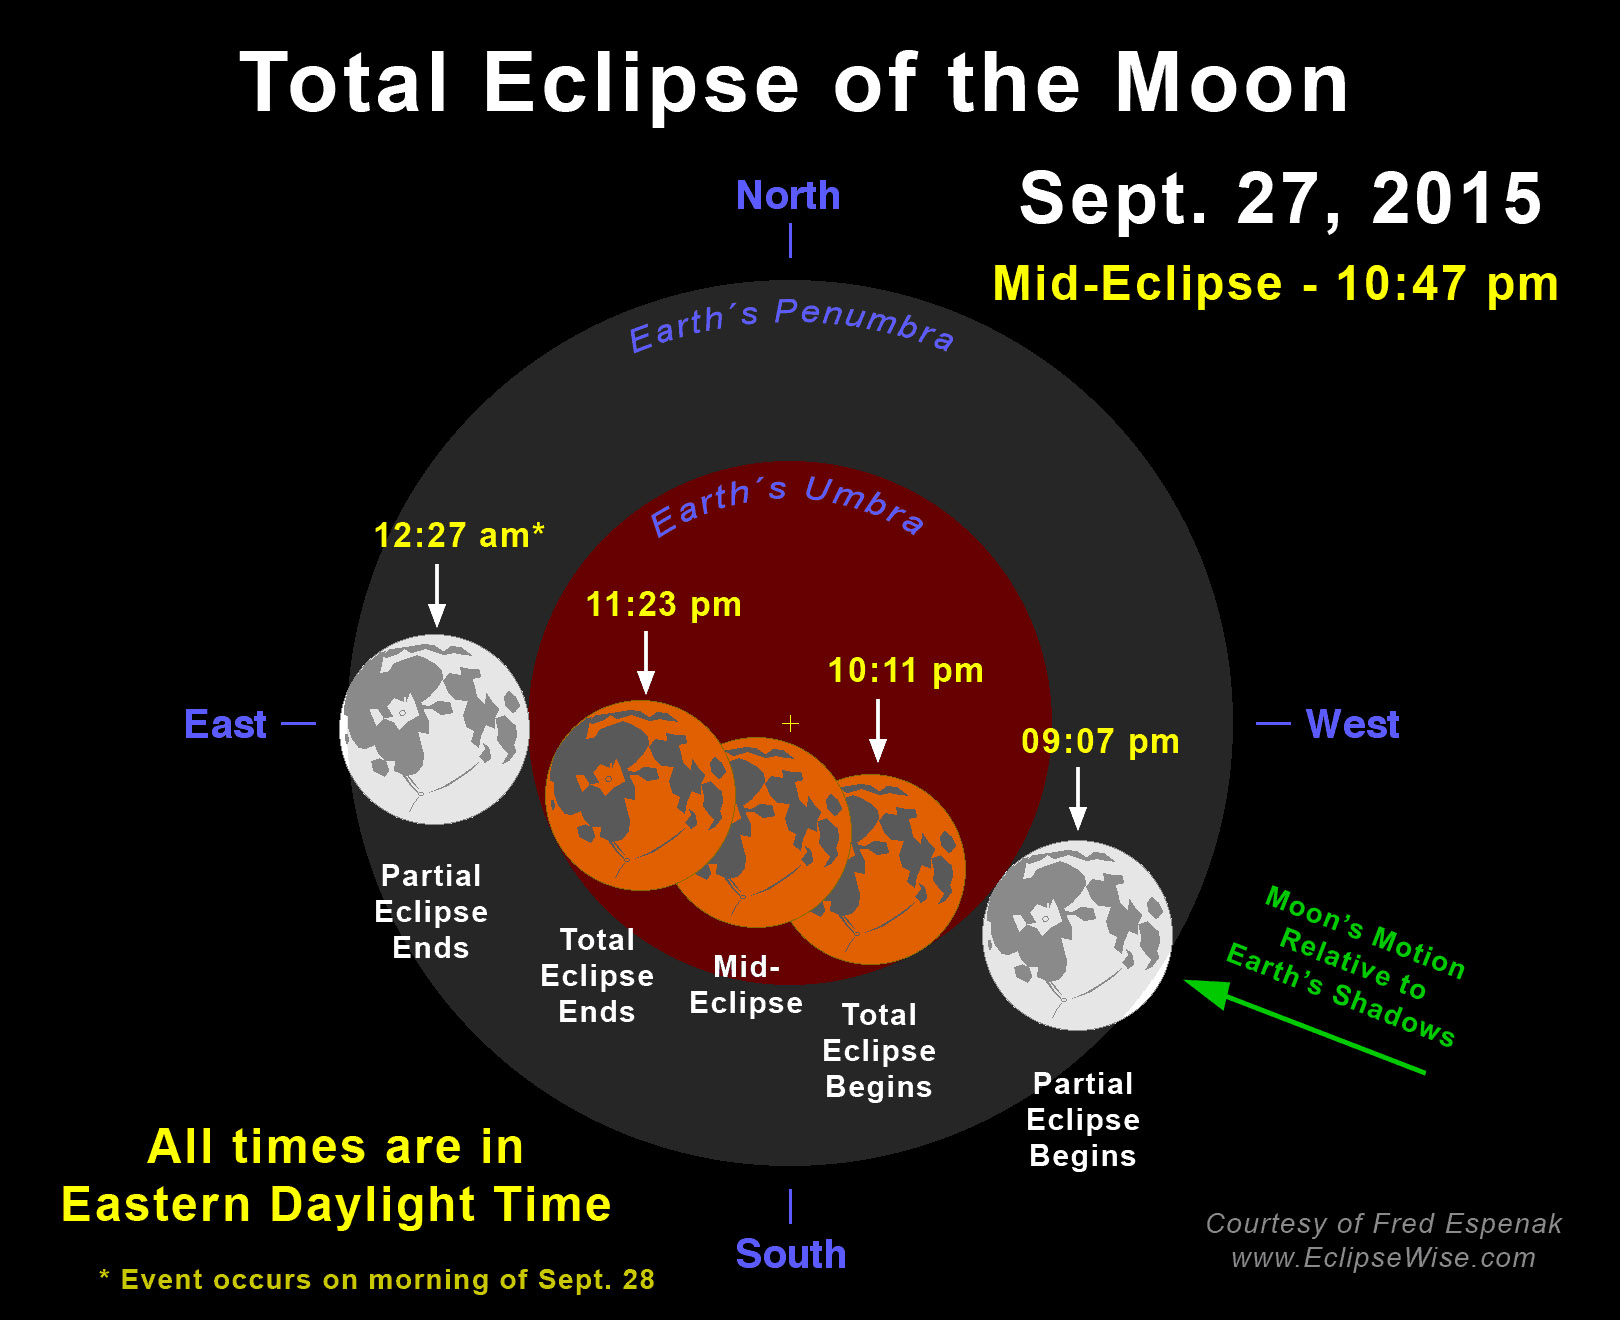
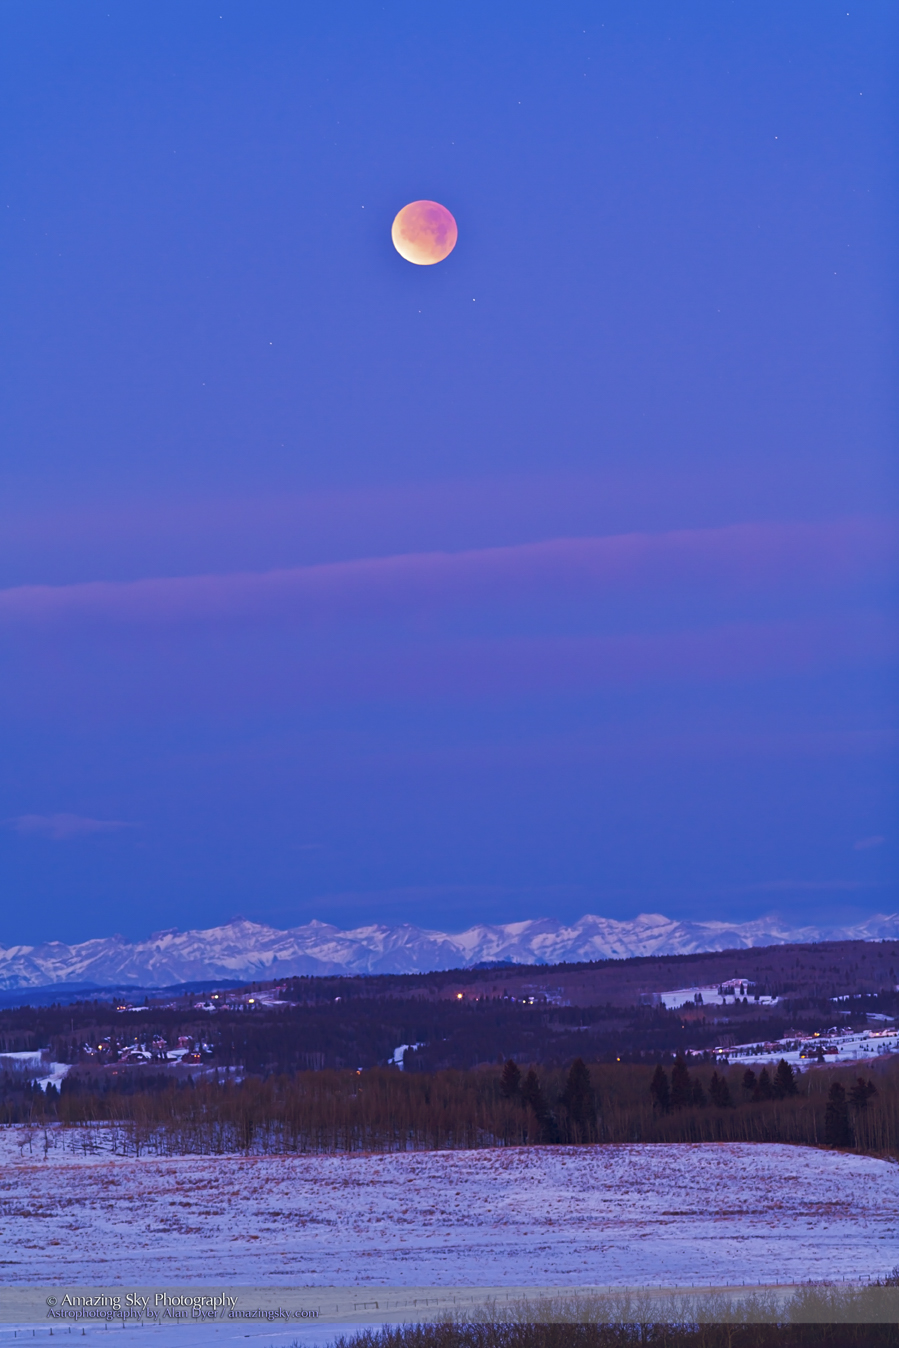


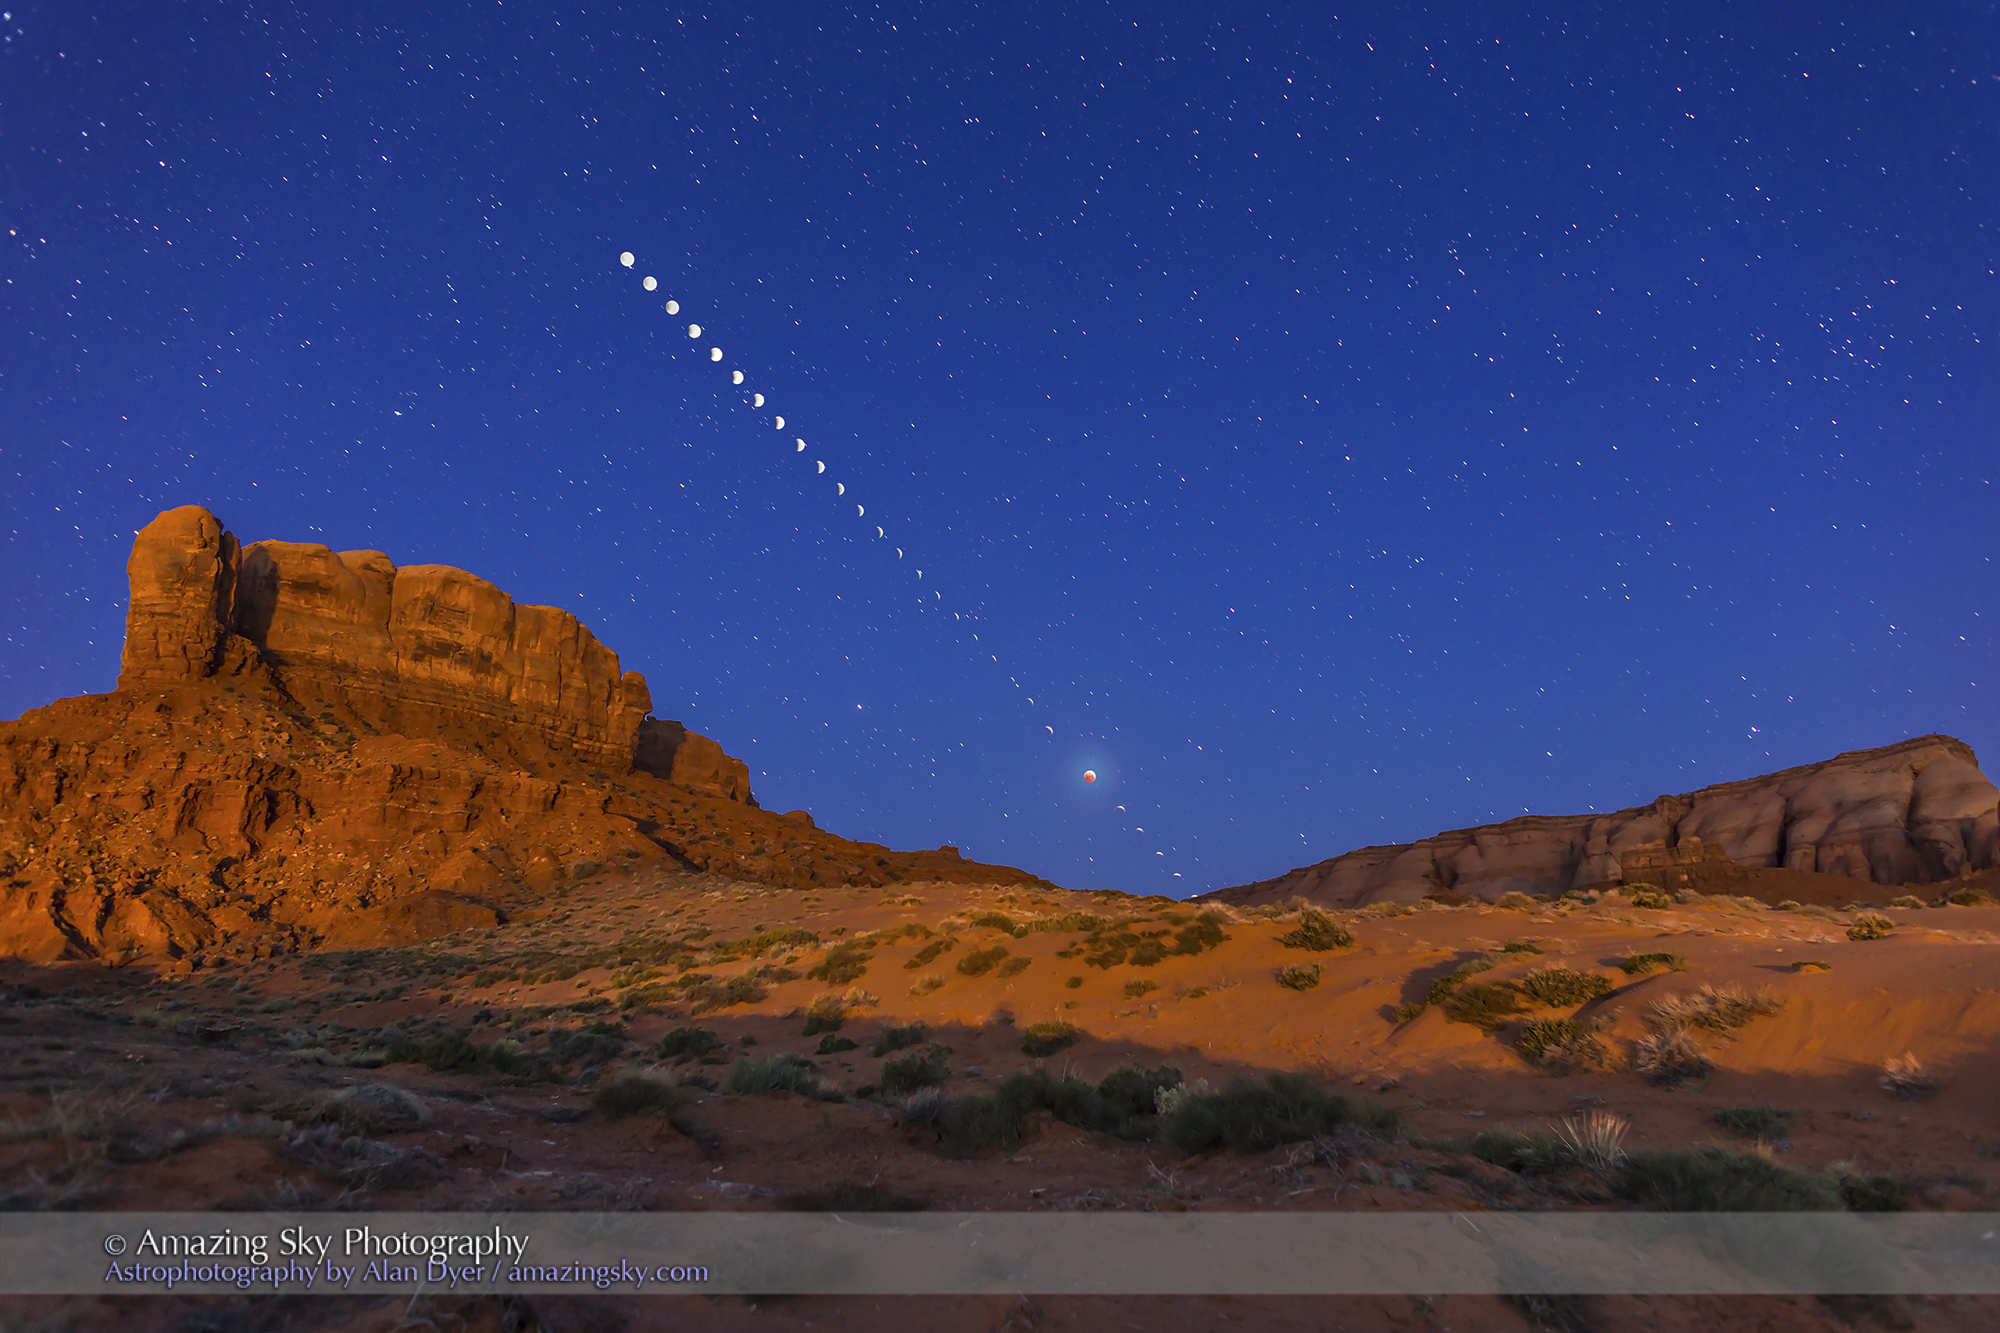


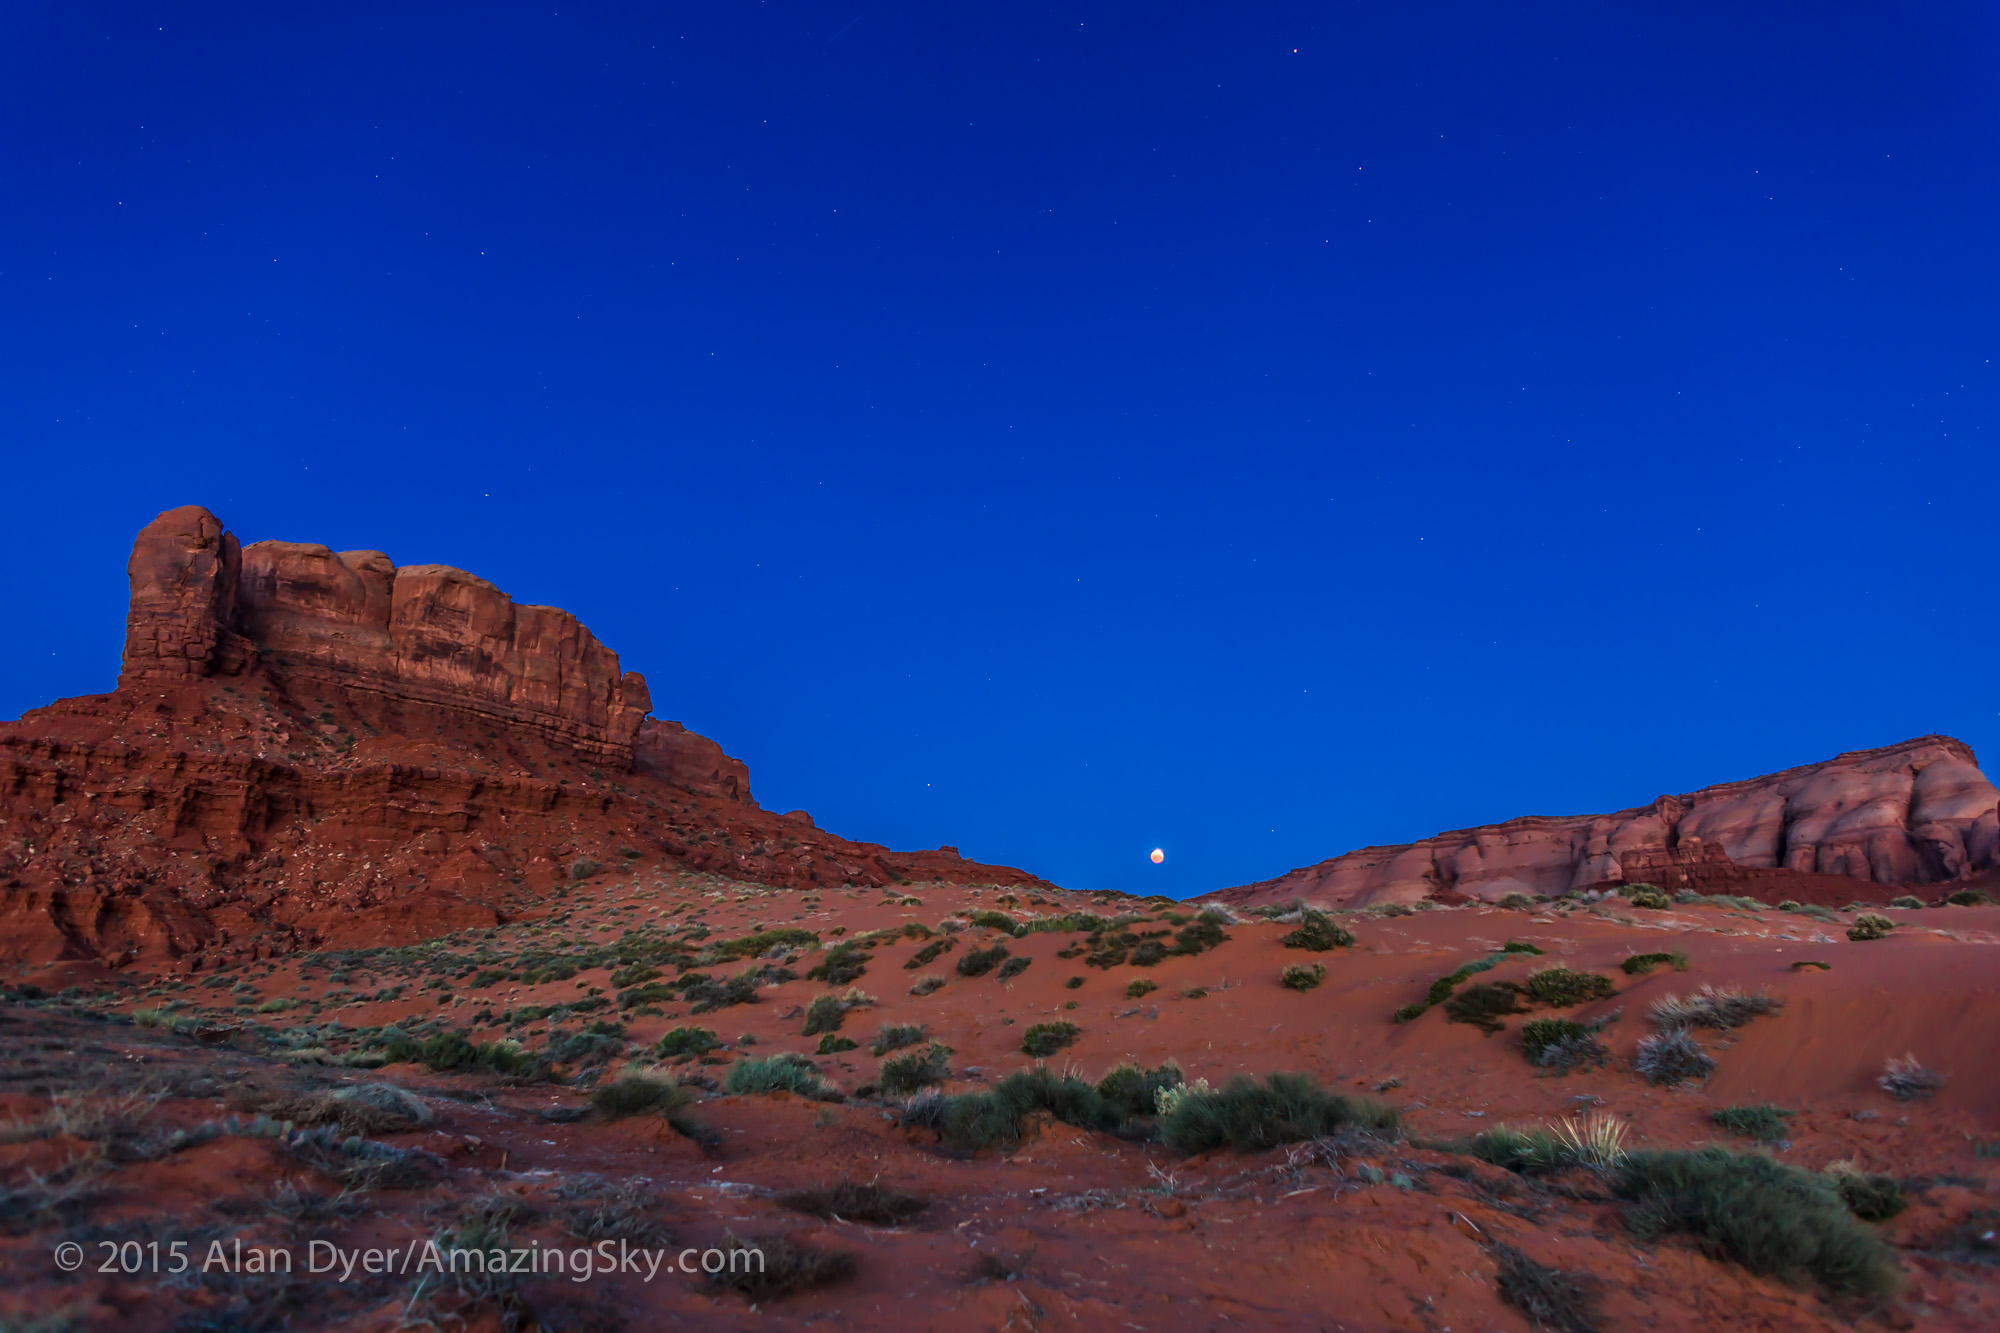
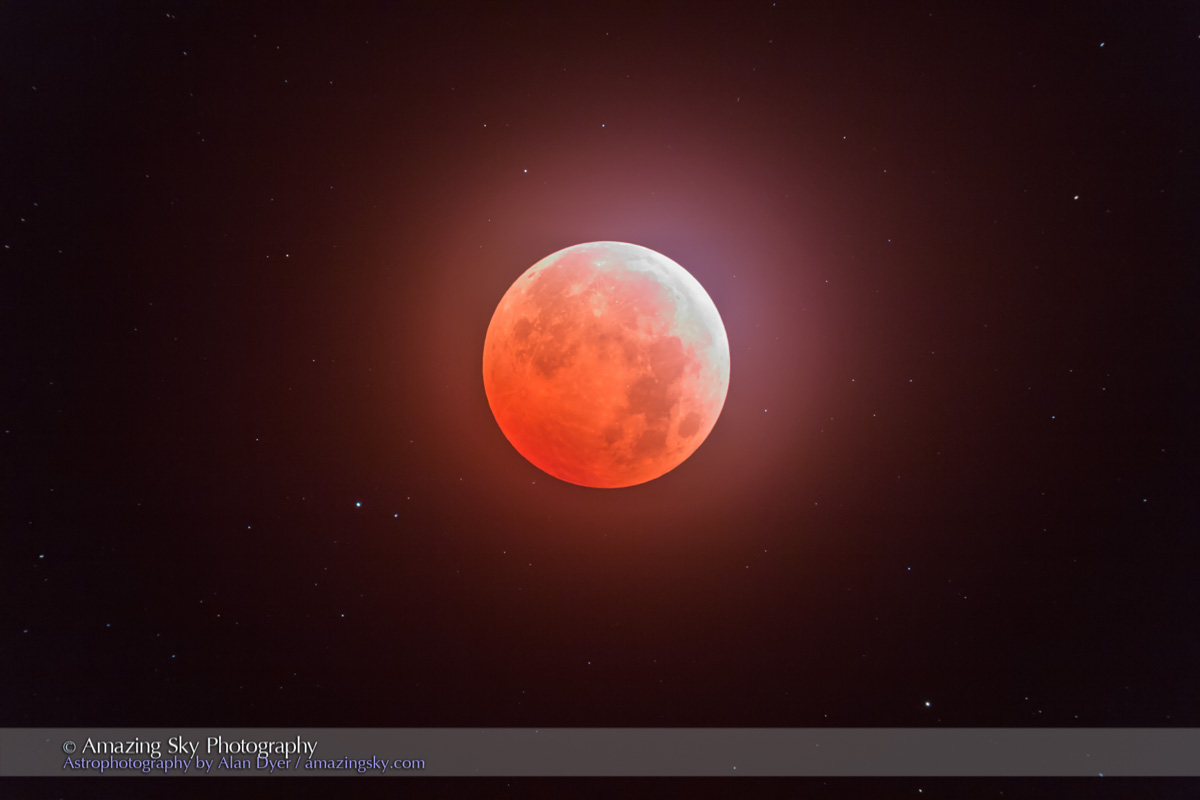
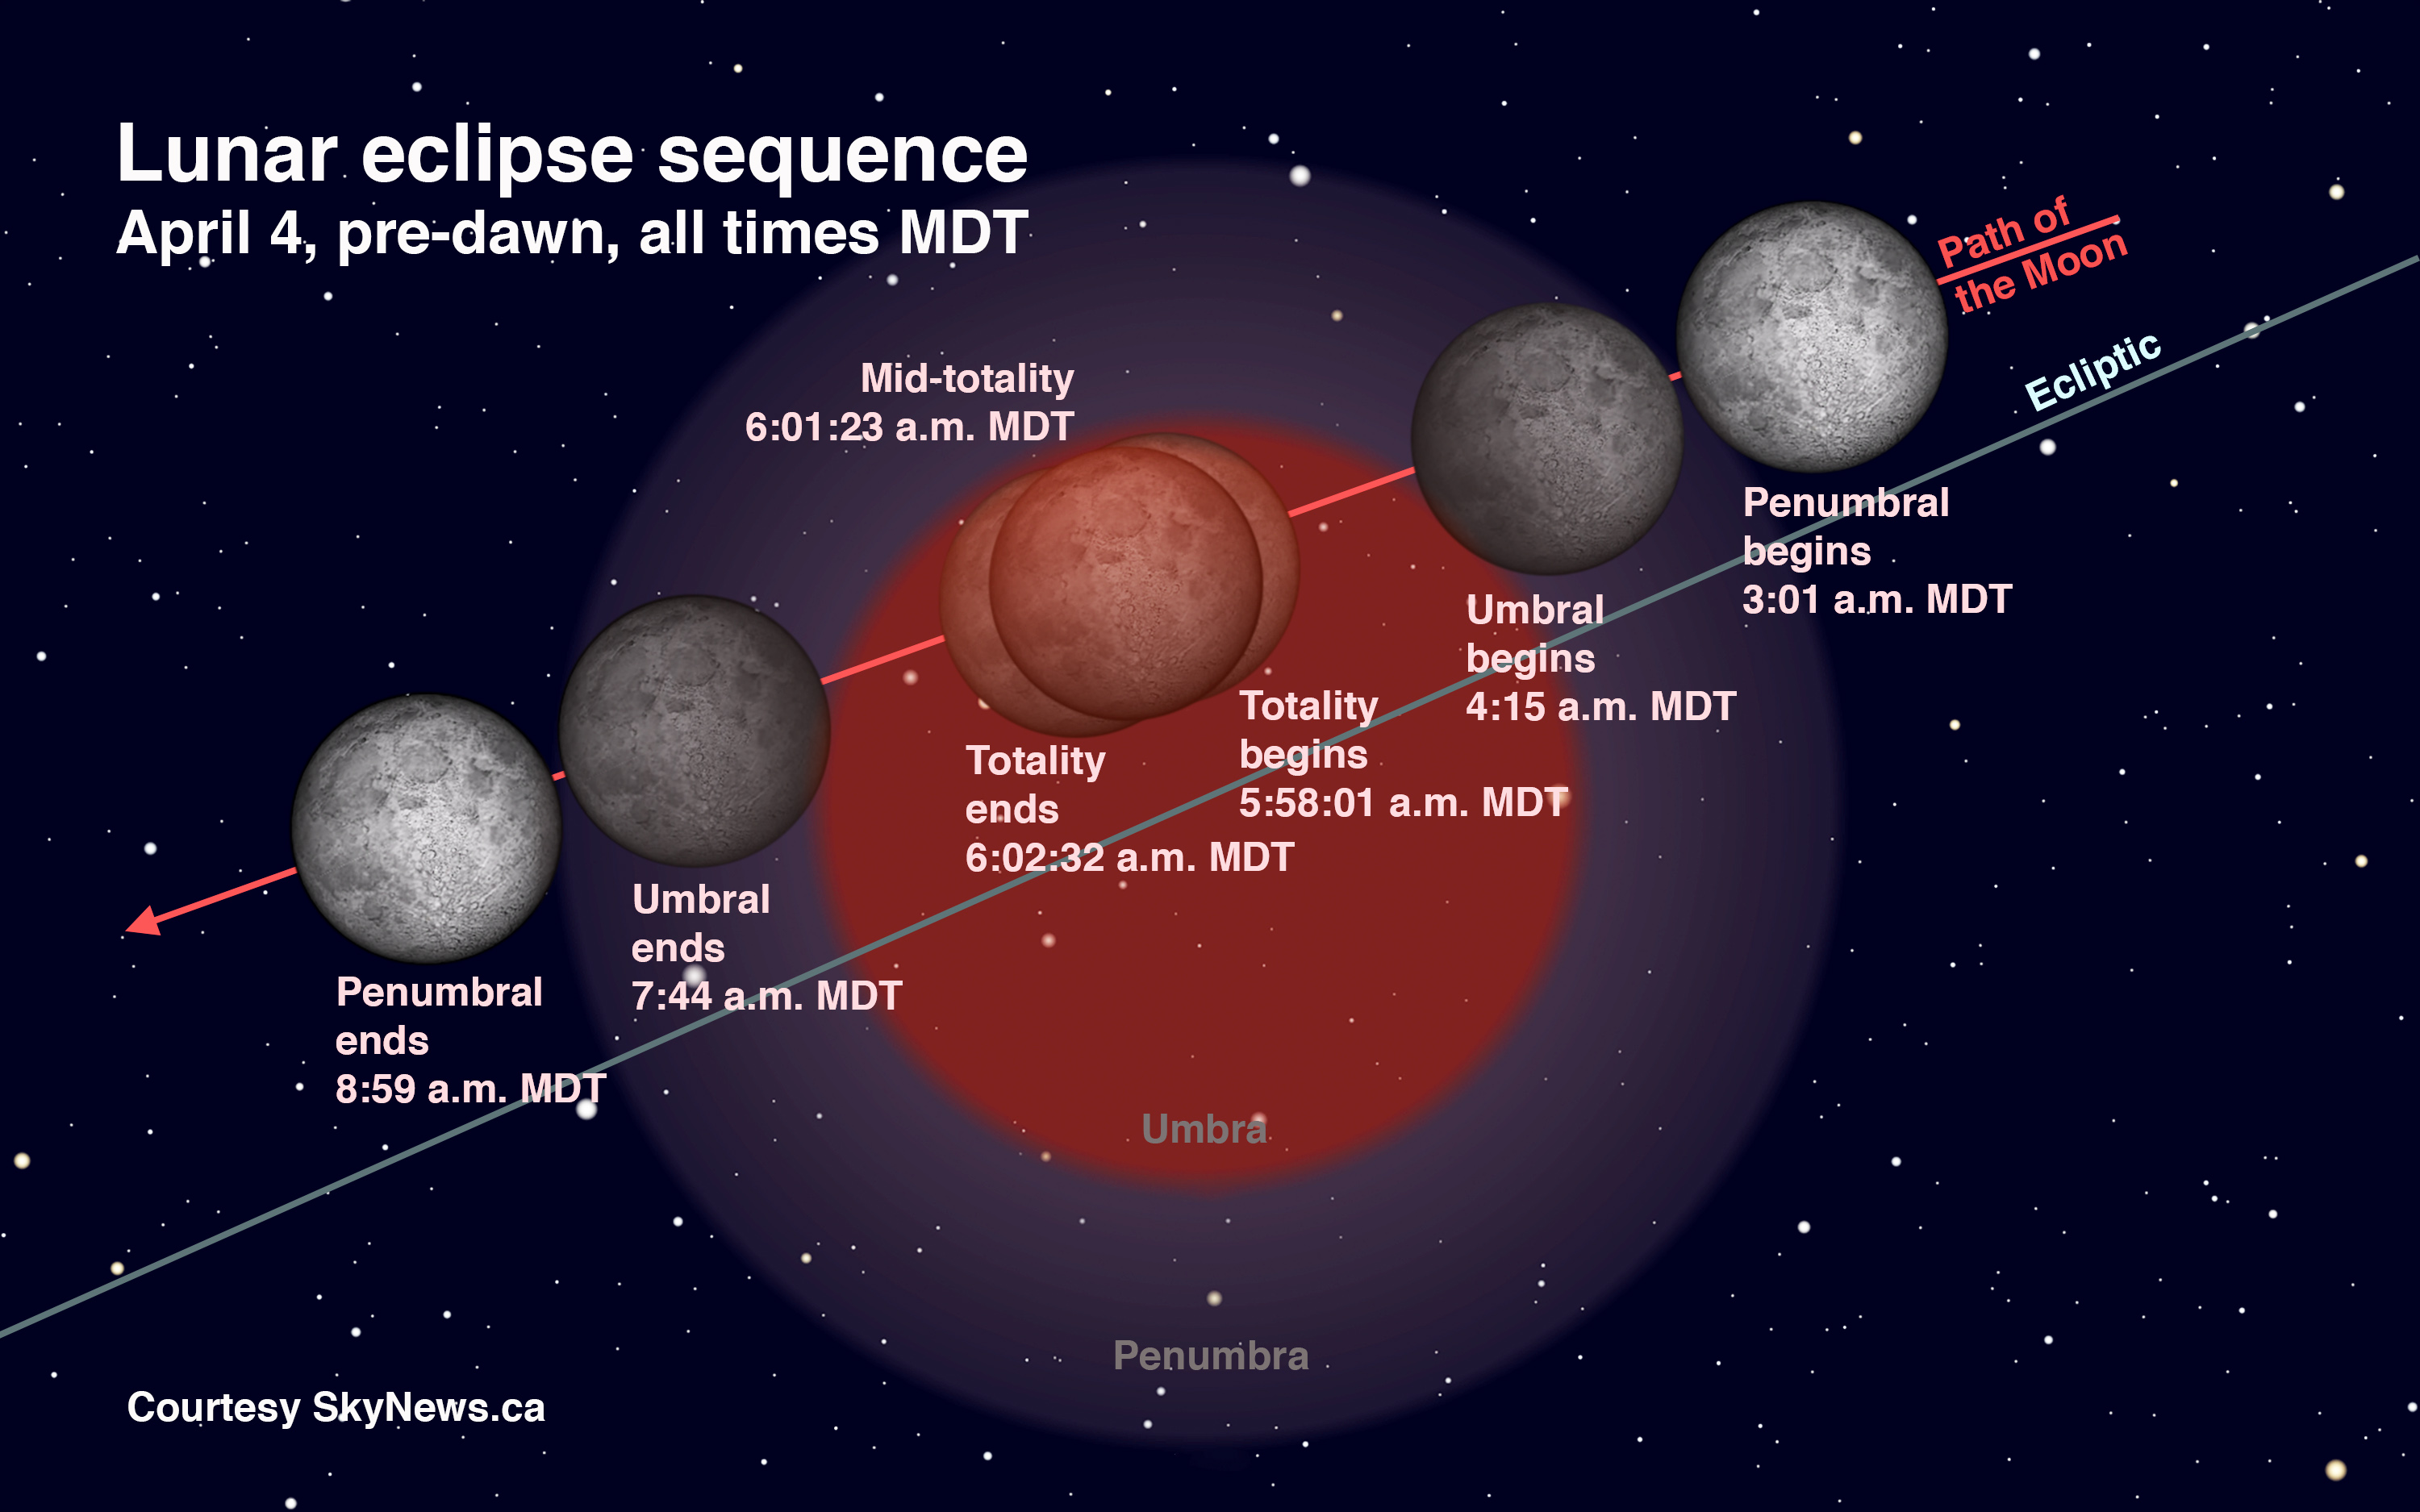
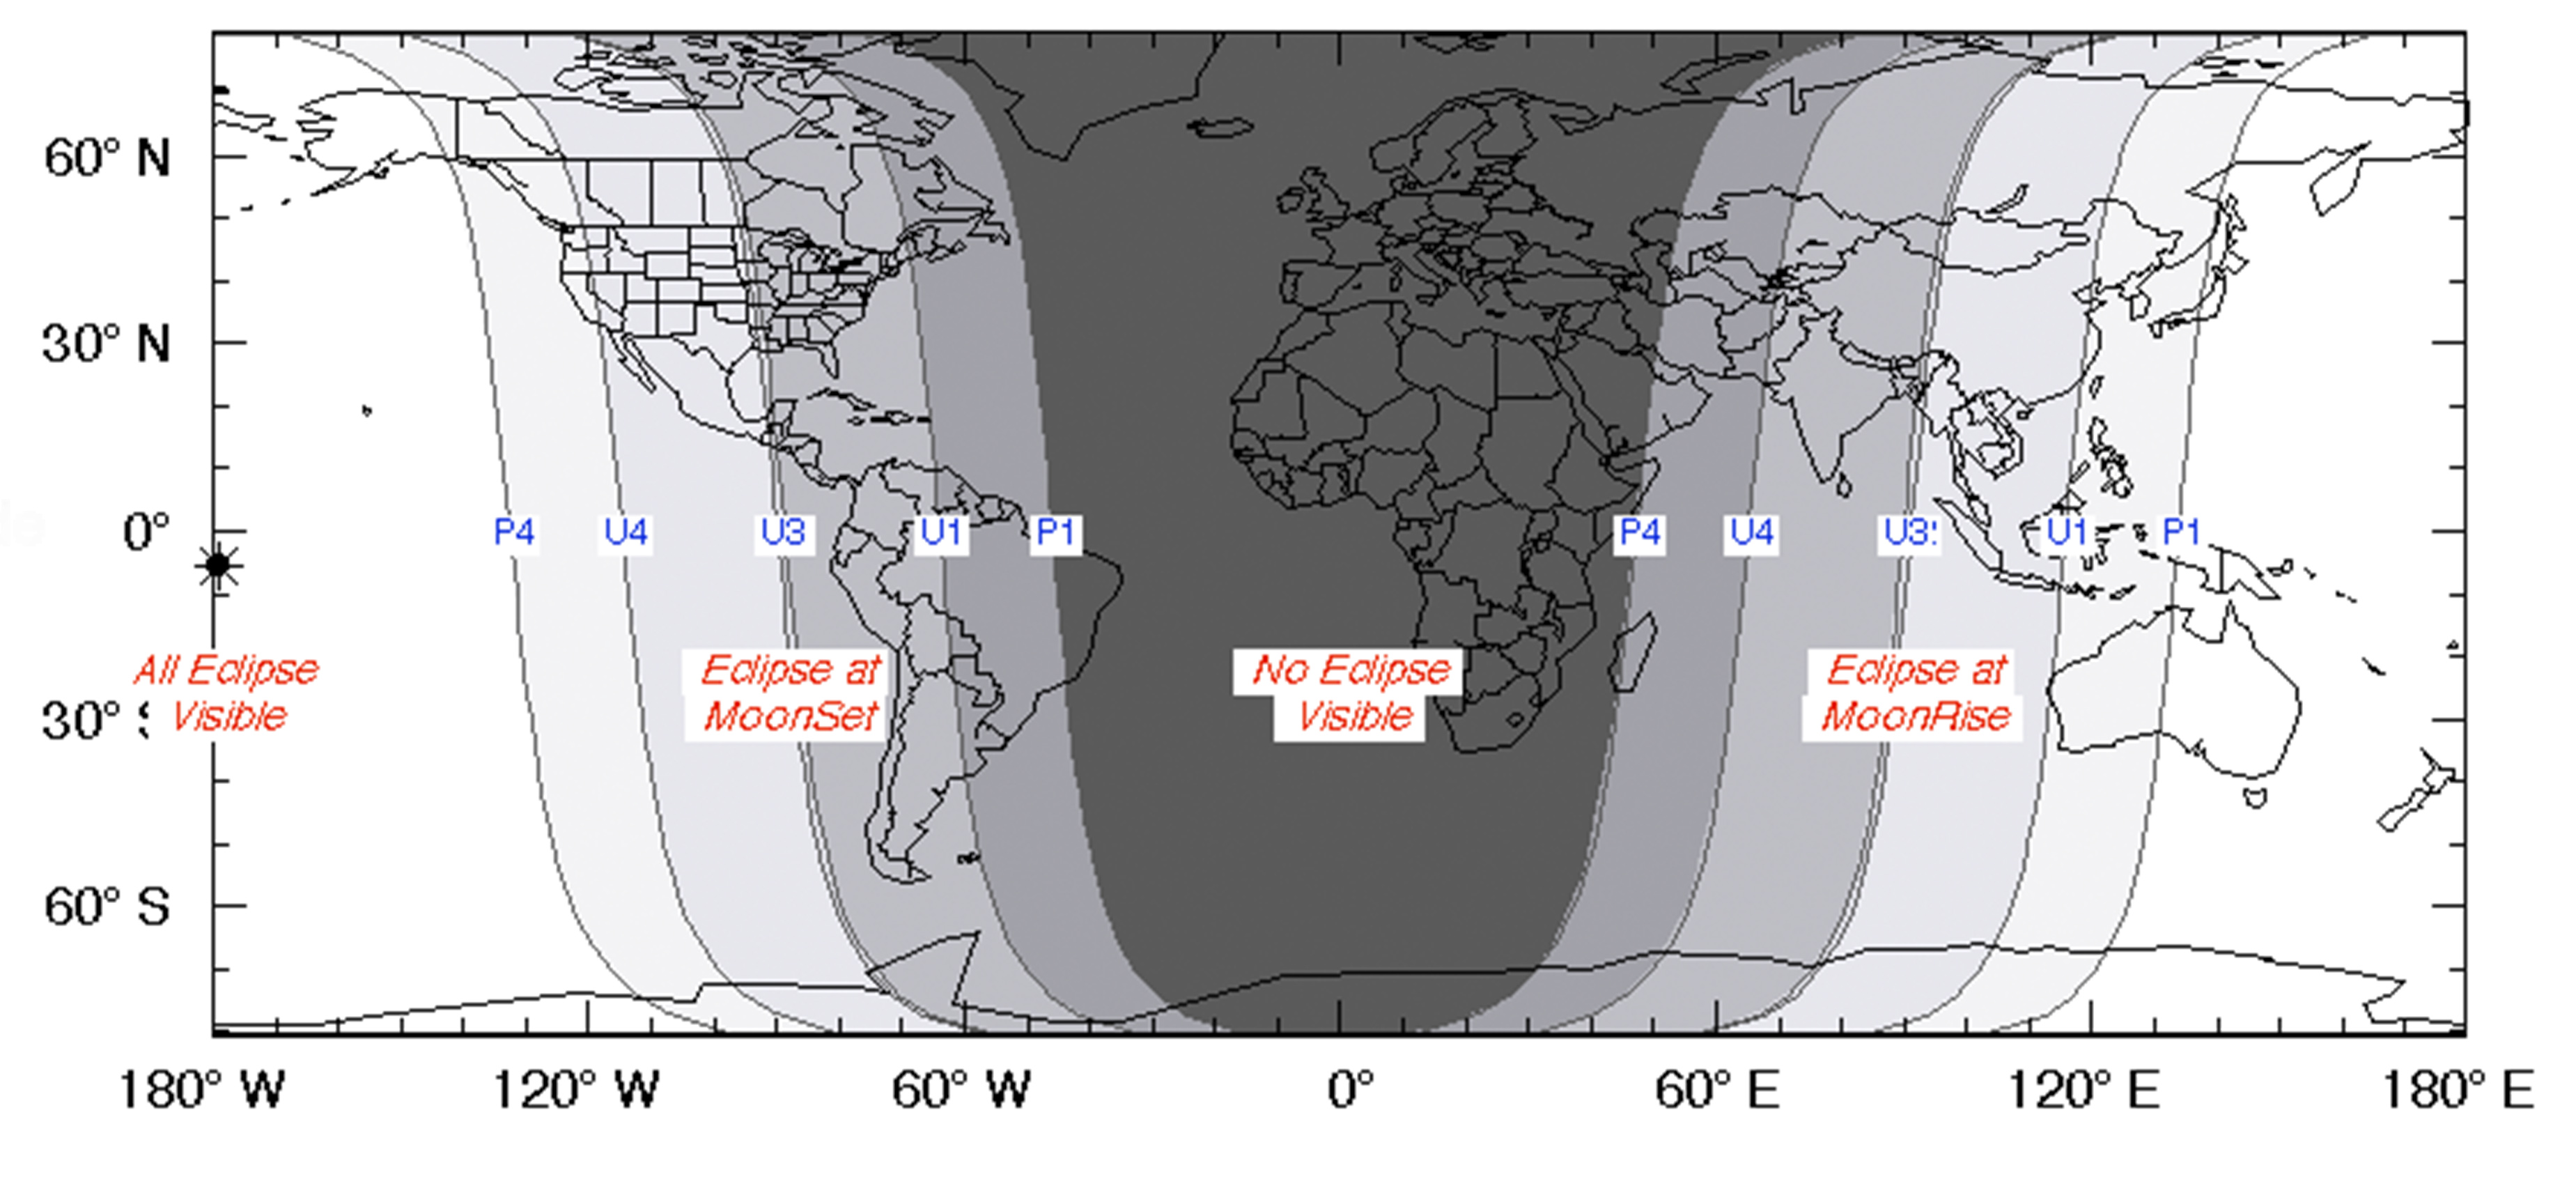
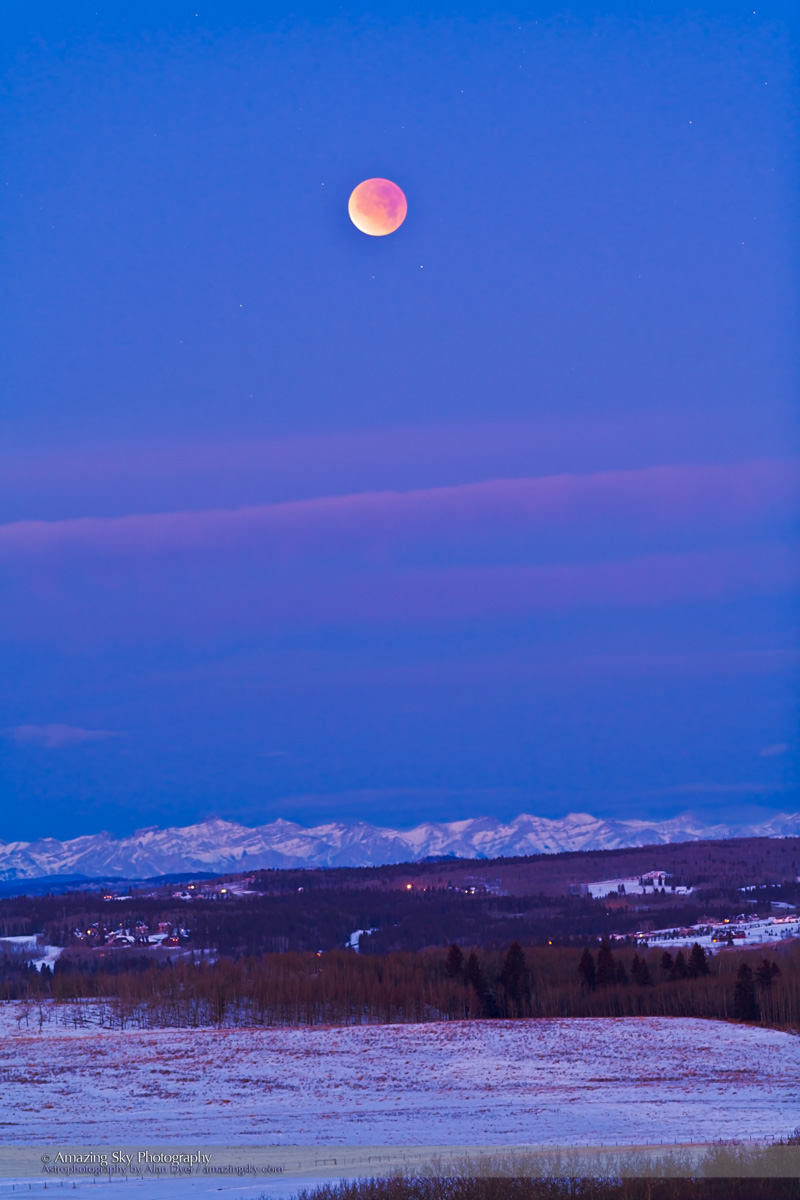

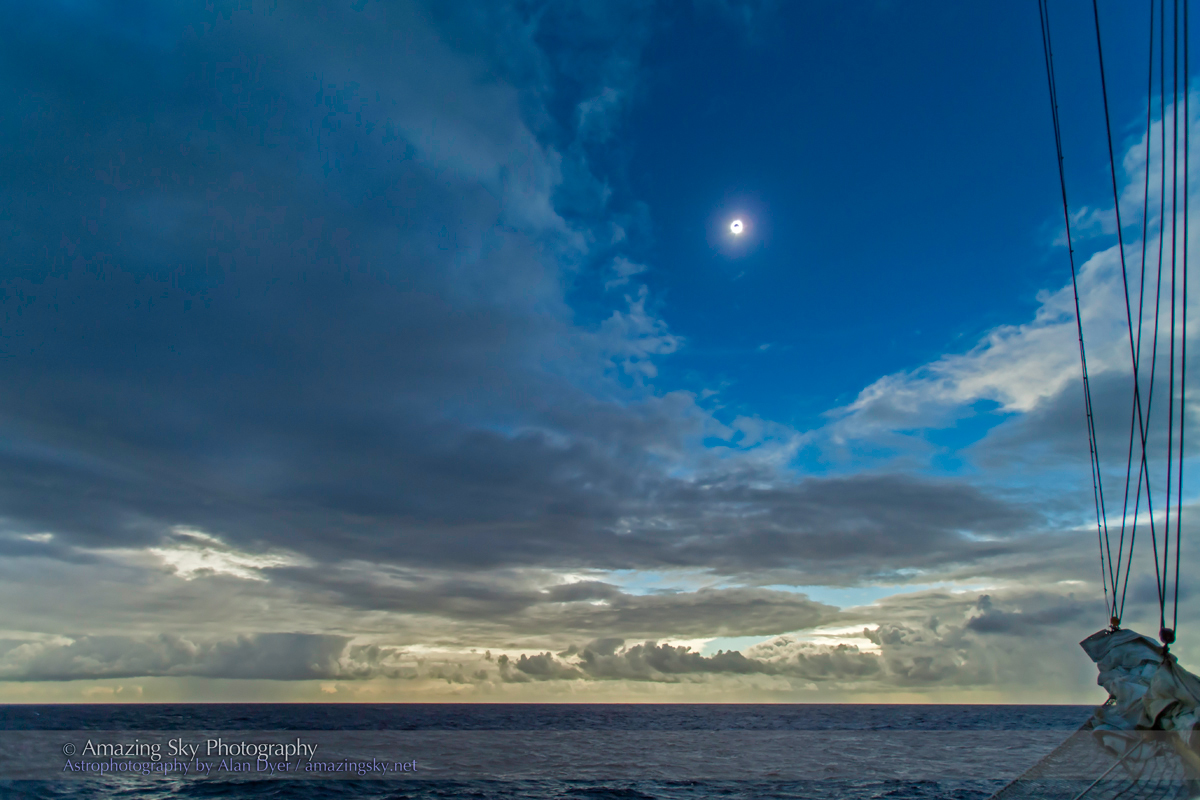

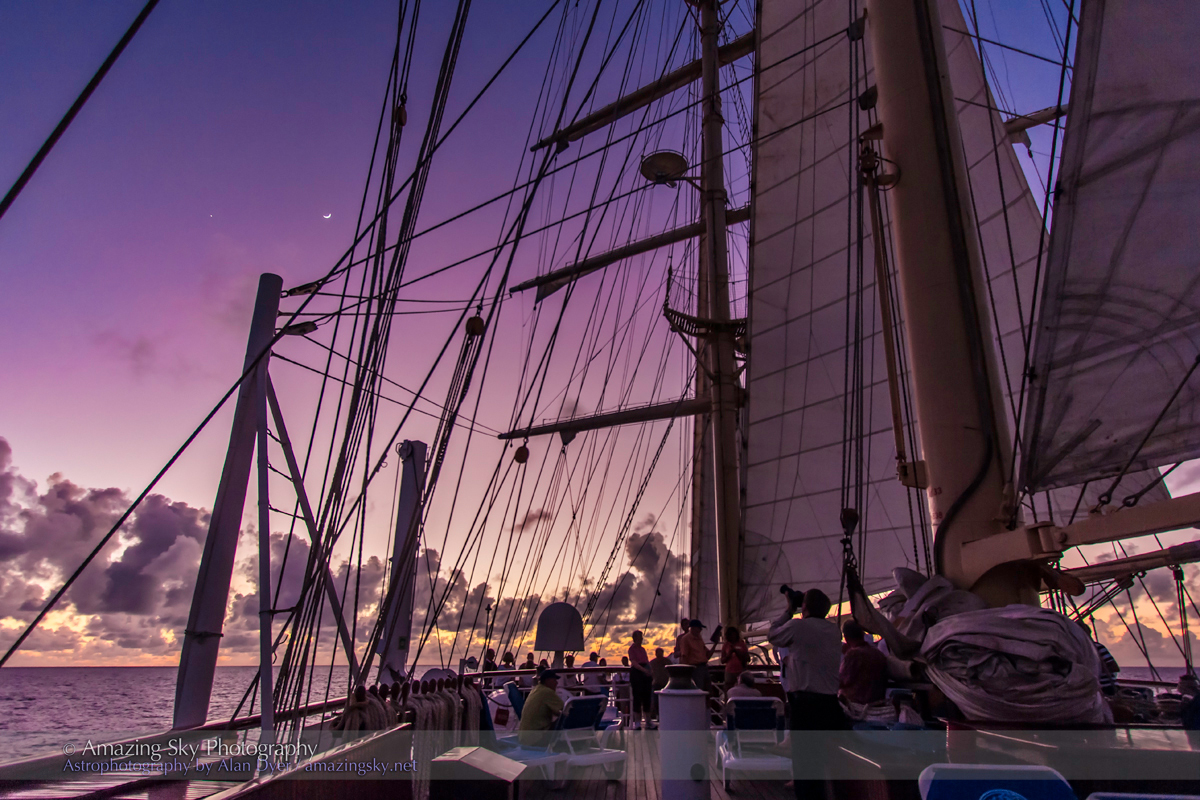
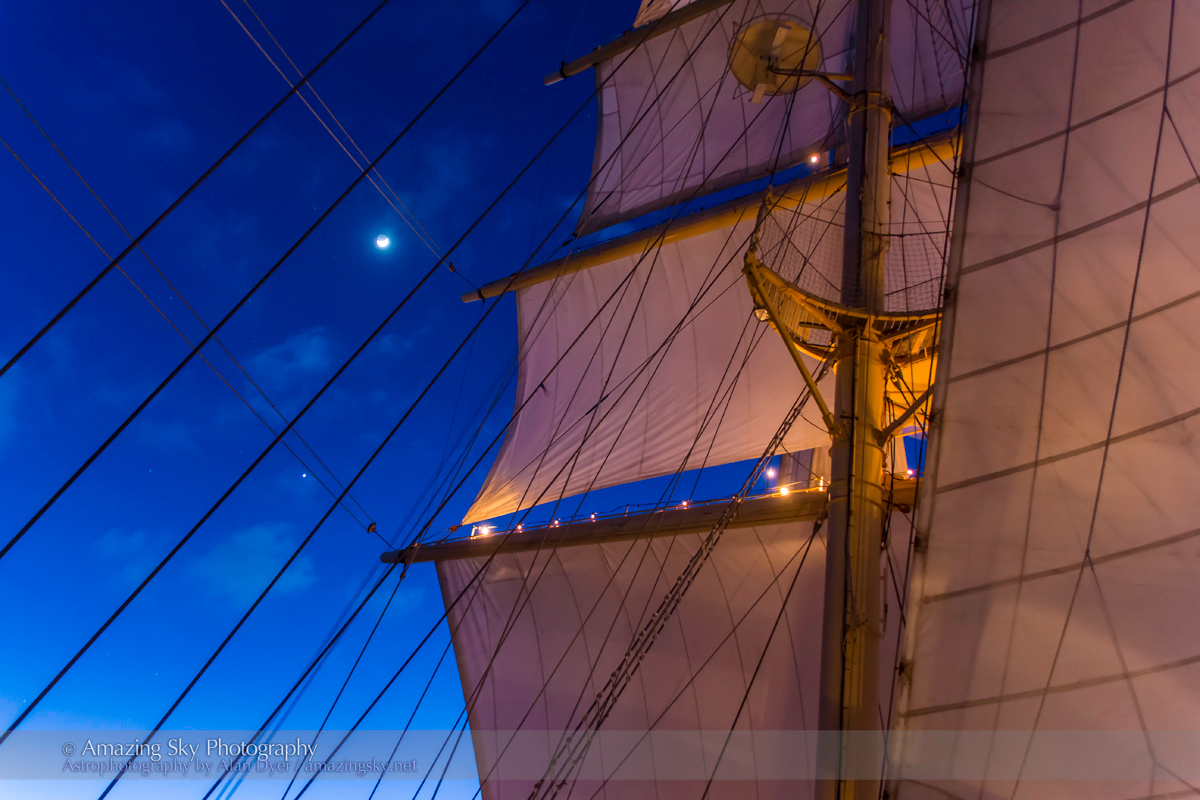
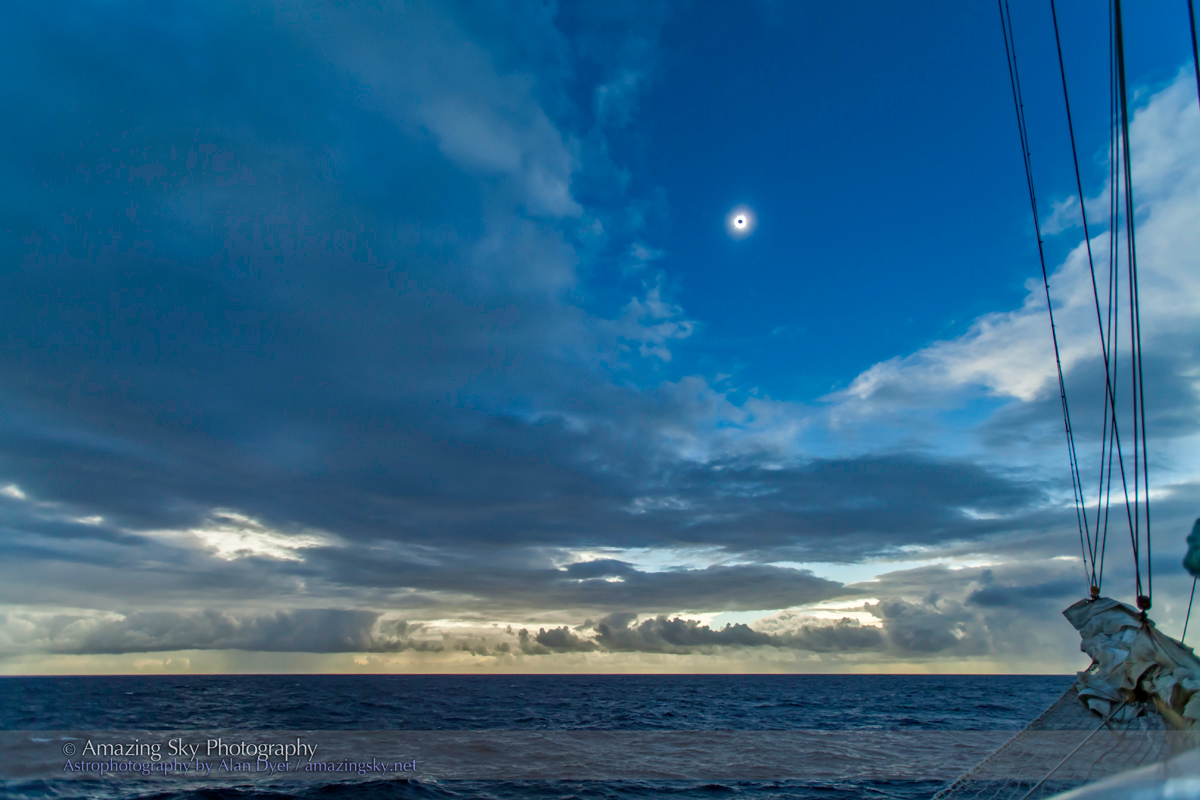

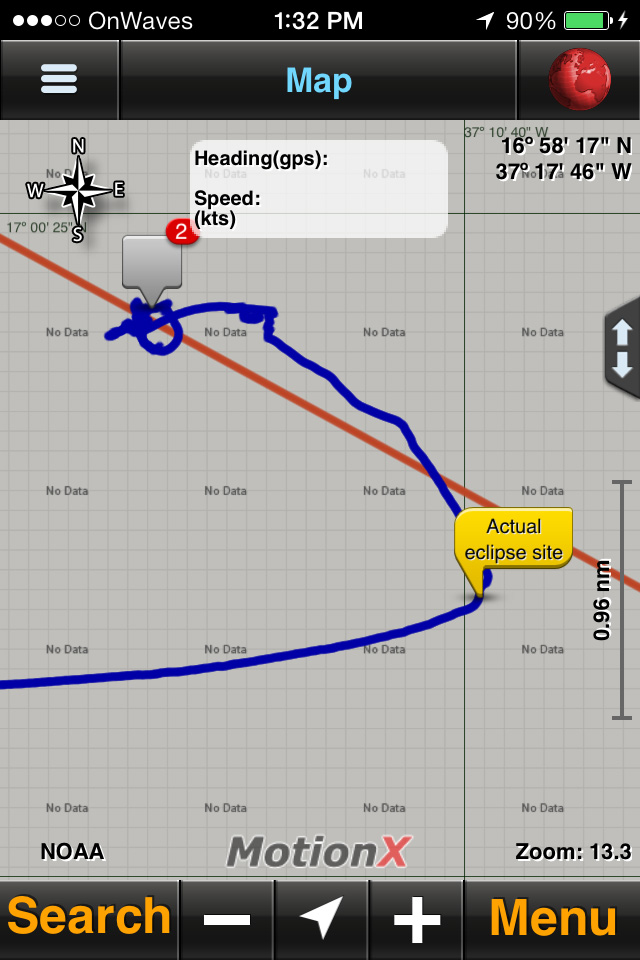

")


