We have a bevy of new and very affordable fish-eye lenses to choose from. They can work great for astrophotography. But which one is best?
Chinese lens makers are showering the market with affordable lenses, and for the most part they’re of quite good quality. Among them are fish-eyes, very special-purpose lenses. One of those purposes is astrophotography — shooting wide swaths of the night sky, if not the entire sky, in one frame. That’s ideal for capturing sky-filling auroras, or the sweep of the Milky Way.
Here I test five low-cost fish-eyes on the night sky:
The AstrHori 6mm at f/2.8 on the Canon R5..
The 7Artisans 10mm at f/2.8 on the Nikon Z8.
– Two circular format lenses that project a round image taking in a full 360° by 180º within the rectangular frame, plus …
– Three lenses that fill the rectangular frame corner to corner (i.e. they are “full-frame” or “diagonal” fish-eyes) with a field that is about 180º wide across the frame diagonal. They present curved horizons; they are not “zero-distortion” ultra-wide lenses.
All five lenses work well on full-frame (36mm x 24mm sensor) cameras. All have fast f/2.8 or f/2 optics, making them suitable for astrophotography. Slower f/4 and f/5.6 fish-eyes are not so well suited.
I tested them all under a dark starry sky, checking for horizon-to-horizon sharpness and edge artifacts, and on a moonlit night looking for lens flares.
NOTE: My blog features many high-resolution images that may take a while to load.
However, you can CLICK or TAP on a test image to bring it up full screen for closer inspection, and save it as a JPG download.
All five lenses work surprisingly well for such low-cost optics. And all are well made, with smooth, well-dampened manual focusing. None are “plastic-fantastic” junk.
For a full-frame fish-eye the 7Artisans 10mm stands out for astro use, for its optical quality and good features such as the glow-in-the-dark markings, and an excellent storage case. It will be the best lens here for Milky Way images where star sharpness counts most.
For a circular fish-eye, the 6mm AstrHori and the 7.5mm TTArtisan each have unique features: an amazing 220º field of view for the 6mm, and fast f/2 speed for the 7.5mm. Both would be superb for capturing all-sky aurora shows, perhaps for projection in digital planetarium domes.
The five fish-eyes, to compare their relative sizes
THE LENSES
Here are the five lenses under test, in order of increasing focal length, shown above from L to R to compare their sizes —
— 6mm f/2.8 AstrHori circular fish-eye – with an advertised 220º field of view
— 7.5mm f/2 TTArtisan circular fish-eye – 180º field of view (advertised)
— 10mm f/2.8 7Artisans full-frame fish-eye – 185º diagonal field of view (advertised)
— 11mm f/2.8 TTArtisan full-frame fish-eye – 180º diagonal field of view (advertised)
— 12mm f/2.8 AstrHori full-frame fish-eye – 185º diagonal field of view (advertised)
The 6mm, 11mm and 12mm lenses I tested on a 45 megapixel Canon R5.
The 7.5mm and 10mm lenses I tested on a 45 megapixel Nikon Z8.
However, all the lenses are available for a wide range of camera brands, as I list below. All are manual-focus only, with no electrical connections to the camera body. So there is no restriction from Canon in offering them in RF-mount versions. But when using them on any camera, no EXIF metadata is recorded for lens brand, focal length or aperture.
With the exception of the TTArtisan 11mm (which has versions for older Canon EF and Nikon F mounts), the lenses are for mirrorless cameras only — they will not fit on DSLR camera bodies. By virtue of their design, none of the lenses accept filters, either front- or rear-mounted. None feature a rear weather sealing gasket.
But the key factor is that none sell for more than $300; some cost less than $200. At that price, why not have one? Or two?
The 7Artisans 10mmThe AstrHori 6mm
WHY DIDN’T YOU TEST…?
First, I am not a test lab; I bought these lenses for personal use and out of curiosity. I selected low-cost lenses made for full-frame mirrorless cameras, what I shoot with. Indeed, the short flange distance of mirrorless cameras is what makes these lens designs possible.
I did not test fish-eyes made just for APS-C or Micro4/3rds cameras, for example from the Chinese brands Meike (their 3.5mm and 7.5mm) and Brightin Star (their 7.5mm).
However, despite it being made for full-frame cameras, I chose not to buy and include the new Brightin Star 11mm f/2.8 Mark II ($270), a decision based on expert lens reviewer Christopher Frost’s test here on his YouTube channel. The lens’s edge performance, important for astro work, was shown as poor, even when stopped down. I saved my money.
Nor did I test the new Laowa/Venus Optics 8-15mm f/2.8 zoom fish-eye, which offers a circular-format and full-frame fish-eye in one lens. It might perform well but is $700 US, so not a low-cost option – but you do get two lenses for the price of one. Ditto on the new Canon RF7-14mm f/2.8-f/3.5 L fish-eye – it has autofocus and is $1,900 US.
The AstrHori 6mm
TESTING NOTES:
— For my aberration tests I shot all the lenses on the same moonless night, with them aimed straight up to take in as much sky as possible to put stars across the frame. The cameras were on a star tracker (not shown) to eliminate star trails that can mask or mimic aberrations.
— In all cases where I show examples shot at different apertures, both images were shot for equal exposure value (by doubling the ISO for the smaller aperture shot), and then processed identically. So any brightness difference you see is from the lens performance, not my exposure or processing.
— I did not apply any lens corrections or brighten the edges to compensate for vignetting. However, none of the diagonal fish-eyes suffer from obvious corner vignetting, unlike rectilinear ultra-wides that can exhibit very dark corners from extreme light fall-off.
— For my lens flare tests I shot all the lenses on the same moonlit night with a waxing Moon in the southwest which I placed off-centre to prompt internal reflections. The cameras were also on a tracker.
— I bought most of these lenses directly from the manufacturers from their on-line stores in China. Delivery in all cases was quick by mail, fulfilled from a North American distribution point. While I had no issues, product quality for bargain lenses can vary, so consider buying from a source where you can easily return the lens for a replacement or a refund.
I will state at the outset that none of these lenses offer pinpoint stars to the edges of their image circles, certainly not at their maximum apertures. You can’t expect aberration-free performance at these prices.
If you wish optical perfection in a fish-eye lens then look at the Sigma 15mm f/1.4 DG DN, for $2,200 US. (See Nico Carver’s test of that lens here on his Nebula Photos YouTube channel.)
Here are the test details, with the five fish-eyes presented in order of increasing focal length.
The AstrHori 6mm f/2.8 Circular Fish-Eye
Available for Sony E, Panasonic L, Canon RF, Nikon Z Lens Mounts
The unique selling point of this lens is that it has an amazing 220º field of view across its image circle. It can actually see behind itself! To stay out of the frame, duck!
When aimed straight up it will include not only the entire sky down to the horizon, but also the ground well below the horizon, good for putting the sky in context to the landscape below. Doing so with any other lens requires shooting a multi-segment panorama. While panos have the benefit of higher resolution, the 6mm lens allows for all-sky time-lapses and movies.
Previously, to get such a field of view with such a speed (f/2.8) you had to pay more than $100,000 (!!!) for a rare sample of the massive 6mm f/2.8 Nikkor lens made in limited quantities in the early 1980s. By contrast, the 6mm from AstrHori (it is not AstroHori!) is downright tiny. And cheap!
The lens has a knurled manual focus ring that turns smoothly, and a ribbed aperture ring with firm clicks at each f-stop. Infinity focus, with the stars sharpest, proved to be slightly shy of the centre of the infinity mark, so the lens requires careful manual focusing. The lens can focus past infinity.
The press-on metal lens cap is boldly marked with the lens identity. Like all AstrHori lenses, the 6mm comes with a thick soft cloth pouch.
The short length of the lens makes it difficult to wrap an anti-dew heater coil around it, certainly not without risk of shifting the focus or aperture. That’s a consideration, as aimed straight up its lens is bound to attract dew or frost over long shoots.
IMAGE QUALITY
The 6mm AstrHori doesn’t quite fill the frame across the sensor’s short dimension (24mm). Instead, the lens’s image circle is about 21mm across. The edge of the image circle is soft but clean – it is not rimmed by odd colours or internal reflections.
6mm AstrHori at f/2.8 – In all test images the image on the right is a blow-up of the blue-framed area at left.
Stars in the centre are tack sharp at f/2.8, with some longitudinal chromatic aberration (LoCA) adding small blue halos. The LoCA is gone at f/4. Stars toward the edges show an increasing amount of elongation from astigmatism, and exhibit colour streaks from lateral chromatic aberration (LaCA). Both diminish at f/4 but are still present.
6mm AstrHori at f/4 – Note the brighter edge and ground compared to f/2.8
By comparison, Sigma’s old 8mm f/3.5 circular fish-eye, now long discontinued but that I used for many years on my Canon DSLRs, had smaller but still noticeable levels of astigmatism and lateral chromatic aberration at the edges, even when stopped down to f/4 or f/4.5. So the $300 AstrHori is not far below the classic but much more costly Sigma 8mm for edge sharpness.
The main benefit to stopping down the AstrHori 6mm is the reduced vignetting that brightens the field overall, but especially the horizon around the edges. So if the horizon content is important, stop the lens down. Otherwise, this lens works well at f/2.8.
LENS FLARES
A 30-second exposure at f/2.8 with the Moon in the frame (if it’s in the sky it’ll be in the frame with this lens!) showed only a small lens flare (arrowed) opposite the Moon. It tightened up at f/4 (not shown) but was still present. In all, this is a good performance.
Faint lens flare is arrowed.
But for all-sky time-lapses with the Moon up, expect to see a lens flare moving opposite the Moon. The same might be true of all-sky images of a total solar eclipse. The eclipse of August 2, 2027 with the Sun at the zenith from Egypt would be a great use-case for this lens!
The TTArtisan 7.5mm f/2 Circular Fish-Eye
Available for Sony E, Leica L, Canon RF, Fuji X, Nikon Z Lens Mounts
The unique selling point of this lens is its speed – f/2! All the others are f/2.8. However, technically this is a lens made for APS-C sensor cameras, where it would serve as a full-frame fish-eye. But it works as a near-circular-format fish-eye on full-frame cameras, though with the image truncated at the top and bottom, as I show. You don’t get a full circle. But you do get a much wider field than with the full-frame fish-eyes that follow.
The 7.5mm does not come with a case or pouch, unlike lenses from TTArtisan’s competitors. (The case I show above is one I bought extra for this lens.) The lens has a metal front cap with a thread-on central disk, as shown above. With the disk removed, the remaining ring acts as an iris that mechanically vignettes the image to a 24mm-wide circle, but with much less than 180° horizon-to-horizon coverage. I’ve never used this lens that way; I prefer to record as much of the image as the lens projects, then mask down the image later if needed.
I like this lens so much I bought it twice – for Canon RF and for Nikon Z. The Nikon copy I test here has better optics with less tilt (or “decentering”) in the lens elements. The Canon copy is notably soft on the left side. I asked TTArtisan about this, hoping to get a replacement for my Canon RF unit, but their rep said that’s within their acceptable level of performance. That’s the drawback of low-cost lenses like these; expect unit-to-unit variations.
The best focus, with the stars sharpest, proved to be well short of the infinity mark, requiring manual focusing. But I suspect that, too, will vary from unit to unit, likely true of most of these lenses.
With its f/2 speed, the 7.5mm is great for rapid-fire time-lapses of fast-moving auroras, or even real-time 4K or 8K aurora movies where fast lens speed is essential, to keep the ISO lower for less noise.
IMAGE QUALITY
The image circle is fairly cleanly defined, but does show two small dark shadows protruding into both the top and bottom of the frame from some mechanical vignetting. A dark blue glow also rims the periphery of the image circle. Keep in mind, on the APS-C cameras the lens is designed for you wouldn’t see the outer part of the image circle.
7.5mm TTArtisan at f/2
At f/2 stars are quite sharp at the centre, but begin to soften and elongate from what looks like coma as well as astigmatism in the outer third of the image circle.
7.5mm TTArtisan at f/2.8
Star sharpness improves at f/2.8, and more at f/4, by which point stars now look very sharp almost to the edge of the image circle.
7.5mm TTArtisan at f/4
As the examples show, the image also brightens and becomes more evenly illuminated as you stop down. In all, shooting at f/2.8 will work best for most astrophoto situations. Shoot at f/2 if you need the extra speed for rapid time-lapses or movies. Shoot at f/4 if star sharpness is paramount, such as for projection in a digital planetarium dome.
LENS FLARES
7.5mm TTArtisan at f/2
The TTArtisan 7.5mm proved surprisingly immune to lens flares. I didn’t see any in the sky itself. What you do get is a flare around the periphery from an internal reflection off bright lights, like the Moon here. This might need masking out in the final images.
The 7Artisans 10mm f/2.8 Mark II Full-Frame Fish-Eye
Available for Sony E, Leica L, Canon RF, Nikon Z Lens Mounts
This is the first, and so far only, lens I have used from the China-based company 7Artisans. I am impressed with it. The 10mm came with both a cloth lens pouch and a hard-sided zippered lens case, both shown above. Very nice! Nikon should take note and be so generous with their premium S-line lenses.
The lens is solid, with all-metal construction and a metal press-on lens cap. The rear cap is plastic, true of all the lenses. The focus movement is smooth with a good level of resistance or dampening. Infinity focus, with the stars sharpest, proved to be left of the infinity mark. The lens focuses past infinity, so careful manual focusing is needed. The aperture ring is click-less, preferred for video use, but a bit of a nuisance for photography.
The fluorescent lens markings
An added bonus, clearly showing this lens has been designed for night use in mind, is that the focus and depth of field markings are fluorescent. Hit the lens with white light and they will glow in the dark for a while, as above. Nice!
I tested the new Manual Focus Mark II model, advertised as having “enhanced performance” over the original lens – with two of the 11 lens elements being ED glass, versus the original model’s single ED element. I never used the original 10mm, so I can’t comment on how the Mark II version has improved. And don’t confuse this new MkII 10mm with another 10mm f/2.8 AF lens 7Artisans also sells. That 10mm has auto-focus but is only for APS-C cameras.
IMAGE QUALITY
I aimed all the full-frame fish-eyes straight up to the zenith, to put stars in all corners. However, I am zooming in on the edge of the long dimension in these samples. Click or tap on an image to download a high-resolution JPG for closer inspection of all parts of an image.
10mm 7Artisans at f/2.8
The 7Artisans 10mm proved very sharp at the centre and toward the edges of the frame, showing only a small level of astigmatism and lateral colour at the edges at f/2.8. Bright stars at the very corners did show “wings” from astigmatism.
10mm 7Artisans at f/4
Stars tightened up at f/4, but still had some astigmatism at the pixel-peeping level. The 10mm also had the widest field of view of the three full-frame fish-eyes, by a slight margin.
The image edges brightened with the lens at f/4, as expected from the reduced vignetting all wide-angle lenses show when stopped down. But unless you are very fussy about star shapes, the 7Artisans 10mm will work very well when shot wide-open at f/2.8.
LENS FLARES
10mm 7Artisans at f/2.8
I didn’t see any noticeable flares in my moonlight test shots, quite remarkable! What slight halo you can see around the Moon, here shot at f/2.8, is in the sky, from the thin clouds this night.
The TTArtisan 11mm f/2.8 Full-Frame Fish-Eye
Available for Sony E, Leica L, Panasonic/Olympus M43, Canon RF, Fuji X, Nikon Z Lens Mounts plus for Nikon F and Canon EF DSLR cameras in a different model.
I’ve owned this lens for several years during which time it has served me well for many aurora shows. As best I can tell the lens sold today is the same as the one I bought some 5 years ago. Like the 7.5mm, the 11mm does not come with a case or pouch, a shortcoming of TTArtisan lenses. The case I show above is an extra one I had on hand that works well for this lens.
Note, this is the one lens of the group that is available for DSLR cameras – for Canon EF and Nikon F – though in a different optical design than the lens I tested.
The lens is compact, solid and dense, with all-metal construction, including the front lens cap. The focus turns smoothly with just the right amount of dampening. Infinity focus, with the stars sharpest, proved to be actually at the infinity mark with the focus at the extreme end. The lens does not focus past infinity, making it the easiest lens of the group to focus in the field. The aperture ring is click-less, again not ideal for photography.
IMAGE QUALITY
The 11mm TTArtisan’s test images proved to be about 1/2-stop darker than images with the 10mm 7Artisans and 12mm AstrHori, when all were shot at the same camera settings.
The 11mm also had the narrowest field of the three diagonal fish-eyes, even compared to the 12mm AstrHori, though the difference was slight.
11mm TTArtisan at f/2.8
Stars were sharp in the centre of the frame with minimal LoCA. Astigmatism increasingly elongated the stars into streaks toward the edges of the frame at f/2.8, though with minimal lateral colour. Stars tightened up at f/4 but still showed more aberration than did the 10mm 7Artisans.
11mm TTArtisan at f/4
Stopping down brightened the frame edges. But overall, this lens can work well at f/2.8, which is how I’ve used it for most shooting, mostly of auroras. If Milky Way nightscapes are your priority, look at the 7Artisans 10mm.
LENS FLARES
11mm TTArtisan at f/2.8 – a small lens flare is arrowed.
The TTArtisan 11mm was fairly immune to lens flares, showing only a slight coloured flare (arrowed) opposite the Moon in my test images. So its coatings must be performing fairly well, despite the overall lower level of light transmission of this older lens.
The Astrhori 12mm f/2.8 Full-Frame Fish-Eye
Available for Sony E, Leica L, Canon RF, Nikon Z Lens Mounts
AstrHori offers a 12mm as their diagonal fish-eye for full-frame cameras. It is solidly made, but larger than the others with a bulbous front lens element. It is also the heaviest lens of the group, weighing 830 grams with lens caps, compared to 700 grams for the 7Artisans 10mm, and 550 grams for the much smaller TTArtisan 11mm.
While the 12mm came with AstrHori’s standard lens pouch it is far too small for this lens. What were they thinking? The lens has a smoothly-turning manual focus ring and, similar to the others, with a good level of dampening. Infinity focus with the stars sharpest was shy of the infinity mark, between 1 metre and infinity. The lens focused past infinity, so careful manual focusing is required, true of all the lenses except the TTArtisan 11mm.
The aperture ring has firm click stops at 1/2-stop intervals from f/2.8 to f/8, and one each for f/11 and f/16. This is the only lens of the group with a plastic front cap, but it is deep and presses on very securely. The aperture values have large white figures making them easy to read in the dark.
IMAGE QUALITY
Stars are sharp in the centre with only slight LoCA-induced blue halos at f/2.8 that disappear at f/4. Stars begin to soften and elongate from astigmatism at the outermost edges of the field at f/2.8.
12mm AstrHori at f/2.8
They tighten somewhat at f/4 but not by much compared to f/2.8. The entire field, not just the field edges, brightens at f/4 from the more uniform illumination.
12mm AstrHori at f/4 – Note the brighter field at f/4.
Of the three full-frame fish-eyes I’d rank the 12mm as #2 for across-the-field star sharpness, behind the 10mm 7Artisans but ahead of the 11mm TTArtisan.
LENS FLARES
I don’t need to add an arrow to point out the lens flares here! Wow! They are extreme.
12mm AstrHori lens flare at three f/ratios – Gone at f/4 – The white ring around the Moon is a natural ice halo.
Wide open at f/2.8 the lens shows rainbows of internal lens reflections, with an odd split appearance. Stopping down to the click stop halfway between f/2.8 and f/4 (about f/3.2) eliminates half the reflections. Stopping down to f/4 gets rid of all of them. Very odd.
Either the lenses are not properly edge blackened, or the lens hood is inducing reflections in the bulbous front element, or there is some shiny component inside adding the reflections.
12mm AstrHori at f/2.8 and at f/4, with Moon below centre.
The flares get larger as the light source (the Moon here) moves to the edge of the frame. With the Moon closer to the centre (as shown above), the coloured rings disappear but there are still radial streaks pointing away from the Moon. They disappear at f/4.
I never noticed these flares on dark sky shots of the stars and aurora. But this is not a lens you can shoot the sky with if the Moon or Sun are in it, at least not at f/2.8. If you shoot an eclipse sky time-lapse with this lens, you must stop it down.
This is a serious flaw AstrHori needs to fix in a Mark II version of this lens.
Recommendations
I think every astrophotographer should have a fish-eye lens in their kit, especially true of aurora chasers. The low cost of these new Chinese lenses makes it easy to add one, for the few special nights it’ll be used.
A blend of three exposures – two for the ground and me without the light on, and one for the sky with the headlamp on. Untracked, with the 7Artisans MkII 10mm lens wide-open at f/2.8 on the Nikon Z8 at ISO 3200 for 15 seconds each.
A full-frame fish-eye is the first choice I would recommend. But do note they produce a curved horizon, as above. If that’s not to your liking, buy an ultra-wide rectilinear lens. But none have as a wide a field as a fish-eye, and rectilinears will distort objects much more by stretching them at the corners.
Of the three full-frame fish-eyes I tested I liked the 10mm 7Artisans the best. It offered the best optical quality, nice fittings with its glow-in-the-dark markings, an excellent hard storage case, and it was compact.
The 12mm AstrHori was bright and relatively sharp, but much larger than the others so is not a lens you can tuck away in a bag in case you might need it. And its wild lens flares made it unsuitable for use wth the Sun or Moon in the frame, at least when shot wide open.
The 11mm TTArtisan was compact but darker than the others, showing its older coatings perhaps, and lower light transmission. Again, mine was an older unit.
A single 2.5-second exposure with the TTArtisan 7.5mm fish-eye lens at f/2 on the Nikon Z6III at ISO 1600. From the Churchill Northern Studies Centre, Manitoba.
The f/2 speed of the 7.5mm TTArtisan is great if you intend to take time-lapses or movies of the aurora. It would be good for sequences shot for tilt-dome planetariums.
Otherwise, the unique 220º 6mm AstrHori is perfect for capturing all the sky and ground below on one frame. It would be good for shooting stills or time-lapses of auroras or sky motion for planetarium projection, especially in non-tilt-dome (flat-floor) theatres.
I hope this test has helped you make a choice. We have some fine lenses to pick from now, and at appealing prices, compared to the DSLR days when there were few fish-eyes on offer, all costly.
On November 11, 2025 the sky erupted with a swath of red Northern Lights seen over much of North America.
It is rare when those living at southerly latitudes can see Northern Lights. Instead of having to travel north to Arctic sites, the aurora comes south to them. That’s what happened on November 11, 2025 when one of the largest solar storms in recent years brought the aurora down over much of the North America.
This was the latest in a set of wonderful aurora shows we’ve enjoyed in the last two years, as the Sun reached the peak of its 11-year cycle of activity.
As I show below, the apps and indicators were registering extreme conditions, with the “Kp Index” peaking at 8 out of a maximum of 9, and the auroral “Ovation” oval lighting up red, indicating a major geomagnetic storm was underway. In the lingo of the local Alberta Aurora Chasers Facebook group, it was most definitely a “pants on” night!
Kp 8! Red Alert!
The source of the storm was two major flares on the Sun in quick succession. In only a day the high-speed “coronal mass ejections” they had unleashed reached Earth and lit up the sky.
As a result the ring of aurora borealis which usually circles the Arctic moved down over southern Canada and the northern United States. I was under that ring of lights!
This is a blend of two exposures, for sky and ground, both 8 seconds at f/2.8 with the TTArtisan 11mm full-frame fish-eye lens on the Canon R5 at ISO 1600.
As it got dark this night, large swaths of red were easily visible to the eye, especially to the northwest as above, and below.
A single 5-second exposure at f/2.8 with the TTArtisan 11mm lens on the Canon R5 at ISO 1600.
Early on a large curtain of red extended across the sky, from northwest to southeast. It is rare to see bright reds with the eye, and unusual to see the reds so extensive and sky-spanning.
This 360º panorama is a stitch of 6 segments, 60º apart, each 5-second exposures at f/2.8 with the TTArtisan 11mm full-frame fish-eye lens on the Canon R5 at ISO 1600, and in landscape orientation.
The reds are mostly from oxygen atoms, but can also come from nitrogen molecules, which require the input of a lot of energy to get excited and glow! They certainly were this night.
The reds mixed with the more common green light from oxygen to produce shades of yellow and orange, and with blues from nitrogen to produce vivid pinks and magentas. While the eye could see some of these subtle colours, a camera (with its longer exposure and wider aperture lens compared to the human eye) was best for picking up the full range of what this show had on display.
This 360º panorama is a stitch of 10 segments, 36º apart, each 4-second exposure at f/2.8 with the Laowa 10mm rectilinear wide-angle lens on the Nikon Z8 at ISO 1600, and in portrait orientation.
The panorama above taken about 2 hours after the previous all-sky scene, shows a quieter aurora but still with curtains covering the sky and converging to the “magnetic zenith,” a little south of the point straight overhead.
Such an all-sky show of aurora is among the sky’s finest spectacles.
A real-time video with the Nikon Z6III at ISO 25600 and Viltrox 16mm lens at f/1/8.
In the video above taken early in the evening I pan around the horizon over the full 360º to take in the scene much as the eye did see it. Video uses shorter exposures more like the eye does. I narrate the video at the camera.
All single 4-second exposures at f/2.8 with the Laowa 10mm rectilinear wide-angle lens on the Nikon Z8 at ISO 1600.
When the aurora covers the sky it’s hard to take it all in and capture it on camera. The 10mm ultra-wide lens I used for the images above sweep up well past the zenith to show the converging curtains, forming shapes that kept changing by the minute.
In the video below I used the same lens with the camera turned to portrait orientation to create a “vertical video,” again narrated at the camera. It shows how the aurora was changing, but slowly this night. It did not have the rapid dynamics I’ve seen with other bright displays, despite the obvious high energies involved here to excite the reds.
Real-time video with the Laowa 10mm lens at f/2.8 and Nikon Z8 at ISO 25,600 & 1/4 second shutter.
Again, this real-time video captures the scene much as the unaided eye saw it. I’ve not processed either of these real-time videos, other than what the camera itself did.
This is a panorama of 12 segments, each 1 second at f/1.8 with the Viltrox 16mm lens on the Nikon Z6III at ISO 1600. Stitched in Adobe Camera Raw.This is a stitch of 6 segments, 60º apart, each 4-second exposure at f/2.8 with the TTArtisan 11mm full-frame fish-eye lens on the Canon R5 at ISO 1600, in landscape orientation. Stitched in PTGui.
On a night like this, I try to shoot not only single still images and videos, but also multi-image panoramas, such as the circular images earlier and these two rectangular “panos” above. Both cover a full 360º in width but don’t go up to the zenith.
Again, they record the range of colours that were on show on this Kp8 night, which were more visible and extensive than usual for an all-sky display.
I also shot two time-lapse sequences. These form the main visuals for this edited music video I produced around the time-lapses.
The link takes you to my Vimeo channel to watch the video. Do enlarge it to full screen!
A single 2.5-second exposure at f/1.8 with the Viltrox 16mm lens on the Nikon Z6III at ISO 1600.
I also always try to take some selfies at every great aurora show, with me often lit just by aurora light! They’re fun to use for talks and “bio pix.”
This is a single 4-second exposure at f/2.8 with the Laowa 10mm lens on the Nikon Z8 at ISO 1600.
As a final bonus this night, one of the fish-eye lens time-lapse frames happened to capture a bright meteor. You see it briefly in a flash in the music video above, but below is the single frame.
A single 4-second exposure at f/2 with the TTArtisan 7.5mm circular fish-eye lens on the Nikon Z8 at ISO 1600. Taken as part of a 780-frame time-lapse.
Because it is streaking away from the constellation of Taurus, this is likely a member of the annual Taurid meteor shower which was in its final nights of the long period it is active in late October and early November. In fact, there are two Taurid showers, Northern and Southern, active at once and coming from similar spots in Taurus. They are known to produce bright fireballs and this was certainly one!
While the Sun is now in the downward slope of its cycle, coming off “solar max” last year, we may still see more major storms and aurora shows like this. Historically, the biggest solar flares and aurora displays often occur in the 2 or 3 years after solar maximum.
So stay tuned! The sky may still light up red with Northern Lights!
I’ve been visiting Churchill, Manitoba during winter aurora season since 2014. But this was my last year for standing under its fabulous Northern Lights.
From February 21 to March 4, 2025 I was at the Churchill Northern Studies Centre for my annual visit serving as an instructor to visiting aurora tourists. I’d been doing the program for ten years, with a year off in 2021 when no one visited!
But I decided this was to be my last year, as it was time to “retire” and turn over the program to a new generation of instructors.
So here I present my last look at the Churchill auroras.
A 180º panorama across the north during an all-night display of Northern Lights, from the Churchill Northern Studies Centre, in Churchill, Manitoba, on February 22, 2025. A panorama of 7 segments, each 13-second exposures with the Viltrox 16mm lens at f/2 on the Nikon Z6III at ISO 1600.
Churchill, Manitoba is on the shore of Hudson Bay at a latitude of 58º North in the sub-Arctic.
It lies under the normal location of the “auroral oval,” the ring around the North Geomagnetic Pole where there is almost always some aurora happening, even on a quiet night. Churchill is as far south as the auroral oval appears in the world when the oval is in its normal state.
By visiting a site under the oval, aurora tourists are almost guaranteed a show, provided the sky is clear.
This is a 180º panorama of the Northern Lights across the northern, eastern and southern sky on February 27, 2025 during a Kp4-level display. This is a panorama of 3 segments, each 13-second exposures at f/2.8 with the Laowa 10mm lens on the Nikon Z6III at ISO 1600.
In winter in Churchill, the cold usually brings clear skies. In a decade of conducting programs I’ve only ever had one group clouded out for all five nights of the program. That’s a far better average than locations such as Iceland.
This is a 120º panorama of the Northern Lights across the northern sky on February 26, 2025 during a Kp3-level display. This shows some fine ray structure in the curtains. This is a panorama of 2 segments, each an 8-second exposure at f/2.8 with the Laowa 10mm lens on the Nikon Z6III at ISO 1600.
While several excellent travel companies and local businesses offer aurora tours to Churchill, signing up to one offered by the Northern Studies Centre offers some major advantages.
Notably, guests stay at the Centre, some 20 kilometres outside of Churchill on the site of the old Rocket Range. That makes the site dark and free of light pollution.
A panorama of the Northern Studies Centre. It has dorm rooms, a cafeteria, classrooms, lounges, a fitness room, library, and all the comforts needed for a great stay under the Lights.
And convenient. Guests sleep on site and need only dress up warm to quickly head outside when the “Lights are out!” call comes. Instructors wake up guests when the Lights don’t appear until late at night, as can often be the case. There’s no driving out to dark sites to wait for the Lights to appear.
A fish-eye 360° view of the fine display of Northern Lights on February 25, 2025, during a substorm outburst with bright curtains to the north. A single 2.5-second exposure with the TTArtisan 7.5mm fish-eye lens at f/2.
An option is also to head up to the CNSC’s rooftop aurora dome for viewing the Lights in warm shirt-sleeve comfort.
Aurora tourists enjoy the show at the Churchill Northern Studies Centre, February 26, 2025. This was the Learning Vacations tour group in late February 2025. This is a single 8-second exposure with the Laowa 10mm lens at f/2.8 and Nikon Z6III at ISO 1600.
But most guests opt to bundle up and brave the cold for the best experience and unobstructed views of the Lights filling the sky. A convenient option is the second floor observation deck, shown above, and in an image taken from the deck, below.
A photographer is capturing a bright display of Northern Lights at the Churchill Northern Studies Centre. This was the first night of a five-night session for aurora tourists from the Road Scholar education travel company. This is a single 4-second exposure with the Laowa 10mm lens at f/2.8 and Nikon Z6III at ISO 3200.
The program includes nightly science talks about the aurora and night sky. The daytime program includes dogsledding, snowshoeing, a tour of the old Rocket Range, and visits to sites in Churchill such as the murals and museums. It’s a very full five days of programming and learning.
A fish-eye 360° view of a dim and weak display of Northern Lights on February 24, 2025, showing a green diffuse band to the south and a dim red curtain overhead with rays to the east. This red aurora was just visible to the eye as a grey streak. A single long 30-second exposure with the TTArtisan 7.5mm fish-eye lens wide open at f/2 on the Nikon Z6III at ISO 1600.
The main attraction, the aurora, can vary from night to night. However, even when the aurora is weak, as it was this night, above, it can still put on a fine show for the camera, glowing in red colours that only long exposures reveal.
Aurora tourists from the Road Scholar travel company enjoy the show of Northern Lights at the Churchill Northern Studies centre in Churchill, Manitoba, March 1, 2025. This is a 6-second exposure at f/1.8 with the Viltrox 16mm lens on the Nikon Z6III at ISO 1600.
While I use high-end cameras and fast lenses, I’ve been impressed with how well today’s phone cameras can capture the Lights very simply and easily, as a guest is doing above, especially when the aurora is bright.
A band of bright green aurora appears here with some subtle red rays at right and magenta upper curtains at left, with the green glow lighting the snow green. A 10-second exposure with the Laowa 10mm lens at f/2.8 on the Nikon Z6III at ISO 1600.
When the aurora brightens, greens and sometimes pinks are visible to the eye, and not just to the camera. And the aurora exhibits rapid rippling and waving motions (check the video below).
A bright display of colourful curtains of Northern Lights at the Churchill Northern Studies Centre. This is looking northeast toward the direction of the midnight sector where the auroras usually brighten from. This is a single 8-second exposure with the Laowa 10mm lens at f/2.8 and Nikon Z6III at ISO 1600.
The finest sight is when the aurora curtains converge overhead at the zenith for a “coronal outburst.” The effect can be fleeting but the sight is unforgettable. It is one of the finest sights the sky can offer, ranking with a total eclipse of the Sun.
A fish-eye 360° view of the fine display of Northern Lights on February 25, 2025, with a complex of curtains passing overhead and across the sky from northeast (at lower left) to southwest (at upper right), with Venus setting at far right. Orion and Sirius are at bottom centre to the south. A single 10-second exposure with the TTArtisan 7.5mm fish-eye lens at f/2 on the Nikon Z6III at ISO 1600.
Indeed, on most nights the aurora, which might begin as a low arc across the north, moves south to fill the sky with swirling and curling curtains, as below.
This is a 180º panorama of the Northern Lights across the northern sky on February 27, 2025 during a Kp4-level display. The field extends from the horizon up to well past the zenith. This is a panorama of 6 segments, each an 8-second exposure at f/2.8 with the Laowa 10mm lens on the Nikon Z6III at ISO 1600.
A gallery of my images from Churchill from this year and from past years is on my main AmazingSky.com website here.
A musical collage of still images and real-time videos I shot this year is viewable here on YouTube.
Click through to YouTube for more information about the video.
It’s been a great ten years taking in the wonderful Northern Lights in Churchill. While this was my last year, I encourage you to visit to see the sights for yourself.
Everyone goes away with great memories, able to check the aurora off their bucket list of experiences.
The Sun peaked at “solar maximum” and gave us wonderful sky shows in 2024.
Officially, the Sun reached the peak of its roughly 11-year cycle of activity — “solar max” — in late 2024. That’s according to NASA and NOAA.
During 2024 several major solar storms erupted as a result of the Sun’s increased activity. They blew massive clouds of energetic particles — electrons and protons — away from the Sun. Some of those storm clouds swept past Earth, sparking bright auroras widely seen in both the Northern and Southern Hemispheres.
The rise and fall of solar activity. The peak at right is as of November 2024 in mid-Cycle 25. Courtesy SolarCycleScience.com.
I was fortunate enough, as many were, to witness several of 2024’s great auroras, from home in Alberta, and from as far south as Arizona.
Trips north to Churchill, Manitoba, and to northern Norway also presented some fine aurora nights. But that’s normal at any time in the solar cycle from those sub-Arctic and Arctic locations.
It’s when the aurora comes to you that you get a truly memorable show. And 2024 had its share of them.
NOTE: My blog has a lot of images and links to movies that may take a while to load. Images can be clicked on to bring them up full screen. The blog also contains many links to other sites to learn more!
Starting the Year — February in Churchill
This was the month I made my annual trek to Churchill, Manitoba, to instruct aurora tour groups at the Churchill Northern Studies Centre. Why not join us in 2025?
An aurora selfie at the Churchill Northern Studies Centre, on February 10, with a modest Kp4-level storm underway. This is 20-seconds with the TTArtisan 11mm fisheye lens at f/2.8 on the Canon R6 at ISO 1600.
Yes, the air is cold (usually about -25° C) but the skies are often clear and aurora filled, as Churchill sits under the normal location of the auroral oval, the main zone of auroras. In fact, it is as far south in the world as the auroral oval normally resides, at a latitude of only 58º North, well south of the Arctic. If it’s clear, there’s almost always some level of Northern Lights.
This year, 2024, was no exception. Even on nights with low readings on the usual auroral indicators we got sky-filling displays that are rare down south.
This is a southerly arc of green and red Northern Lights on February 9. This is a panorama of 5 segments, each 20 seconds with the Laowa 15mm lens at f/2 on the Canon R6 at ISO 1600.
What I find in Churchill is that even with numerically weak and visually dim shows, as above, the camera often sees very red and photogenic auroras. The eye sees the colours only when the aurora brightens, which it often does (as I record below), sparking rippling green curtains (from glowing oxygen) fringed with pink (from glowing nitrogen).
I didn’t shoot time-lapses or movies this year in Churchill. Instead, the example movie above, shot using just real-time (not time-lapse) videos, is from February 2019. It is from my AmazingSky YouTube channel.
The video presents the aurora much as the eye saw it, and as it appears when it dances.
This is a 360º panorama of the all-sky aurora of February 10, from the Churchill Northern Studies Centre. This is a panorama of 9 segments, each 15 seconds with the TTArtisan 11mm lens at f/2.8 on the Canon R6 at ISO 1600.
However, I tend now to shoot mostly panoramas, as above, from this year’s visit. They can take in the full show across the sky, in high-resolution images suitable for framing!
May 10 — The Great May Display
The aurora apps were beeping this day, warning a great display was in the offing. The composite satellite image below from NOAA shows the actual extent of the aurora around the Northern Hemisphere during the great display of May 10/11 .
Note how the auroral oval is indeed an oval and how the centre is not the geographic North Pole. It is the North Geomagnetic Pole, in the High Arctic of Canada. 🇨🇦 So the oval dips down farther south over North America than it does over Europe.
Image courtesy of the U.S. National Oceanic and Atmospheric Administration.
The May 10 solar storm rated a top “G5” on the G1 to G5 storm scale, while the “Kp”geomagnetic disturbance index reached Kp8 on the Kp0 (nothing) to Kp9 (OMG!) scale.
I gave a talk at a local community art gallery that evening, and alerted the audience to the likelihood of fine aurora later that night. Sure enough, I got home in time to see the sky already lighting up with aurora in the twilight and behind the clouds.
This was the multi-coloured curtain to the south during the great display of May 10. This is a 10-second exposure with the Laowa 15mm lens at f/2.8 on the Canon Ra at ISO 1600.
The clouds cleared off enough to reveal one of the most colourful shows I’d seen in many years. This time there was no question about seeing reds and vivid pinks with the unaided eye. This was the type of show everyone hopes for. But it takes a Kp6 show and higher to spark it.
This was the view as the aurora suddenly brightened and converged at the zenith for a superb corona effect. This lasted no more than a minute before it dimmed and subsided again. This is a 9-second exposure with the Laowa 7.5mm circular fisheye lens at f/2 on the Canon R5 at ISO 800.
And a music video of the May 10 display incorporating time-lapse and real-time video footage is on my YouTube channel, with the clickable link below. Do enlarge to full screen.
One of the most remarkable aspects of this show was the blue auroras later in the night (shown below), created by sunlight illuminating the upper curtains and reacting with atmospheric nitrogen. The usual auroral greens and reds are from oxygen. Pinks are also from nitrogen. Blues are less common, but were in abundance this night.
This is a 360° panorama of the May 10/11 aurora exhibiting vertical blue and magenta rays across the western (left), northern (bottom), and eastern (right) sky, and an odd bright patch to the south at top. This was toward the end of the main activity this night, at about 2:30 am. This is made of 20 segments, each 13-second exposures, with the Laowa 15mm lens at f/2 on the Canon Ra at ISO 800.
Auroras around summer solstice, June 21, can be more colourful and often blue, as the Sun lights the upper atmosphere all night. I saw blue auroras again later in the summer.
July — NLCs and Classic Auroral Arcs
June and July are normally when we in western Canada get good displays of another northern mid-latitude phenomenon, noctilucent clouds (NLCs).
This shows sunlit noctilucent clouds in the northwest in the summer twilight, and as the waxing crescent Moon sets at left. This was July 9 at 11:45 pm MDT, in a panorama of 5 segments, each a 30-second exposure with the Canon RF24-105mm lens at f/4 and 58mm on the Canon R5 at ISO 400.
These are ice clouds at 80 km altitude (almost in space) that are lit by sunlight all night long. I saw only a couple of displays of NLCs this year, and it wasn’t for lack of trying and clear nights, even amid forest fire smoke. The panorama above is from home on July 9, over a yellow canola field. NLC season always coincides with peak canola colour time!
Might NLCs be suppressed by high solar activity? There’s some data that suggests they are. However, we weren’t getting many auroras either in early summer.
A 180° panorama of the surprise aurora of July 25, as there was little indication in the days before that an aurora was possible this night. This is a panorama of 6 segments, with the Viltrox 16mm lens at f/2 on the Nikon Z6III at ISO 800, each 8-second exposures.
But at the end of July the Northern Lights returned for some classic shows of arcs across my northern sky, first on July 25 (above), with a prominent sunlit blue/purple ray at left by the Big Dipper. The Kp Index reached Kp5 this night, which is enough to produce a good display from my location in southern Alberta. The Moon is rising at right.
A 180° panorama of the Kp5-level aurora on July 29, with a green arc, and magenta and red rays. This is a panorama of 8 segments, each 30-second exposures with the Viltrox 16mm at f/2 on the Nikon Z6III at ISO 800.
Then again, four nights later on July 29, an auroral arc appeared across the north, this one with reds mixing with greens to create a yellow band in the east, as well as blue and magenta tops to the green arc that follows the curve of the auroral oval.
August 1 — STEVE Appears
While June and July were quiet months, August made up for them.
Of all the auroras this year, only this one, on August 1, produced a showing of STEVE, at least as best I saw in 2024. He can be elusive and easily missed!
This is a capture of a faint appearance of a STEVE-like arc during the Kp5 aurora of July31/Aug 1. This was at 12:10 a.m. MDT, so on Aug 1. The camera recorded the pinkish rays at right which are likely STEVE arcs below a more diffuse and fainter red band which may be a SAR, a Stable Auroral Red arc.
STEVE is the odd arc, often white or mauve, that appears southward of the main aurora (from here in the Northern Hemisphere), typically after a show has peaked, then subsided and retreated back north, as it did above.
STEVE stands for Strong Thermal Emission Velocity Enhancement, as it is caused by horizontally flowing hot gas, and so is not, by definition, a true aurora created by energetic particles raining vertically down magnetic field lines.
For a classic showing of STEVE see my video, above, from August 2022. High-resolution 4K video I shot this night formed the basis for a scientific research paper, as it revealed structures in STEVE no one had seen before.
This is a capture of a brief appearance of a STEVE arc in the west during the Kp5 aurora of July31/Aug 1. This was at 1:10 a.m. MDT, so on Aug 1. The mauve STEVE arc was visible for about 15 minutes before it gradually faded. The green picket fence fingers, which were visible to the eye but colourless, appeared only a minute or so before this image and were gone no more than 2 mnutes later.
STEVEs are often accompanied by green “picket fence fingers” hanging down from the mauve arc. These fingers are more akin to normal auroras, but are created by particles from the STEVE band raining down local magnetic field lines. They do not come from far out in space as they do in a normal aurora!
August 4 — A Coronal Outburst
On the night of August 3/4 I was able to join a photo tour run by local photographer Neil Zeller, to shoot Milky Way nightscapes. Escaping clouds, we ended up at a scenic spot south of Medicine Hat, Alberta, called Red Rock Coulee.
A 180° panorama of a Kp5-level aurora on a partly cloudy night, August 3/4. This was looking to the northeast at 3:00 am from a side road off the Trans-Canada Highway in southern Alberta just east of Brooks.
On the way home, the aurora began to let loose behind the clouds. We stopped once off the highway as the aurora brightened in an arc across the northeast, above.
A bright auroral curtain sweeps from the zenith down the western sky, as the sky brightens with the blue of a dawn twilight. This was the morning of August 4, with a Kp5 to 6 level aurora underway. The location was just off Highway 1 between Brooks and Bassano, Alberta. This is a single 13-second exposure with the Viltrox 16mm lens at f/2 on the Nikon Z6III at ISO 400.
We stopped again later, now at 4 am, and marvelled as the curtains converged at the zenith in the finest manifestation an aurora can produce, a swirling zenith “corona.”
A music video from August 4, using just a single real-time video, not a time-lapse, is above. It shows almost the full but brief appearance of the corona, just as the eye saw it looking straight up!
My plan was to shoot the annual Perseid meteor shower that was to peak on Sunday, August 11, from the same spot I shot it in 2016.
A 270° panorama of the aurora in the evening twilight on August 11, from the 70 Mile Butte trailhead in Grasslands National Park, West Block near Val Marie, Saskatchewan. This is a panorama of 11 segments, each 15 seconds with the Laowa 15mm lens at f/2.8 on the Canon R5 at ISO 800.
The aurora had other plans. Again, as it did on May 10, the sky was lighting up with colours as it darkened in the evening twilight, above.
This is a 360° all-sky panorama of the Kp6 to 7-level aurora on August 11, from Grasslands National Park. This is a panorama of 12 segments, each 4 seconds with the Laowa 15mm lens at f/2 on the Canon R5 at ISO 4000.
The aurora expanded to fill the sky, and with odd fragmented bits, shown above. My trio of cameras set up for the meteor shower got repurposed into taking aurora time-lapses, stills, and panoramas. And selfies! — the title slide for this blog was from this memorable night at Grasslands.
The aurora was bright enough during this substorm outburst at 12:15 am that the red and green colours could be seen with the eye, though they were subtle. This is a 2-second exposure with the Laowa 15mm lens at f/2 on the Canon R5 at ISO 3200.
A notable moment was at midnight when, even to the eye, the sky to the east suddenly turned red, and a wave of crimson aurora quickly swept in. The reds from oxygen mix with the more usual auroral greens, also from oxygen, to create areas of yellow in the sky.
This was also peak night for the 2024 Perseid meteor shower. One bright Perseid meteor shoots down the Milky Way in Cygnus at top, amid the converging rays of the aurora at the magnetic zenith. This is with the Laowa 10mm lens at f/2.8 on the Nikon Z6III at ISO 6400 for 2 seconds.
A few still frames in the time-lapses did manage to catch a Perseid meteor or two, as above, embedded in the vivid curtains of light. But the meteors were upstaged by the Northern Lights this night.
A music video of this show is above, also on my YouTube channel (it’s been a busy year!). Using only time-lapses, it captures the sudden arrival of the red sub-storm, sped up to be sure, but it seemed that quick!
August 30 — From Onset to Recovery
This night I was hoping to shoot deep-sky objects with telescopes I was testing at home. Again, the aurora had other ideas.
This view is looking north, but the fisheye lens is taking in much of the sky. The August 30 show was somewhat unexpected, though there were last-hour warnings a sky-covering display might be possible. This is a single 4-second exposure with the TTArtisan 7.5mm fisheye lens at f/2 on the Nikon Z6III at ISO 3200.
As the movie shows, a band of Lights across the north early in the evening promised to develop. So I set up a time-lapse camera and fisheye lens to capture, for once, a complete development of an aurora, from a diffuse band, to the onset of an active sub-storm outburst which occurred, as they often do, at midnight when we are looking down Earth’s magnetic tail at the source of the aurora particles.
As the video shows, the storm then subsides and the aurora changes character. During the post-sub-storm “recovery phase,” usually when we are under the dawn sector of the auroral oval, an aurora can switch to a pulsating effect with patches of aurora flashing off and on and flaming up to the zenith. This form of aurora is caused by electrons trapped in the Van Allen radiation belts that are bouncing back and forth from pole to pole.
The music video of this show, above, uses a mix of time-lapses and real-time videos shot with the 360º 7.5mm fisheye lens. It’s a great aurora lens for capturing it all!
September 16 — A Colourful All-Sky Show
Auroras are often most frequent, active, and bright around the spring and autumn equinoxes, when the magnetic field lines of Earth and interplanetary space better connect. It’s called the Russell-McPherron Effect.
This is a 360° panorama from left (southeast) to right (northeast) and extending from the horizon to the zenith, taking in the entire sky during an outburst of a particularly colourful aurora on September 16. This is a panorama of 12 segments, each 4 seconds with the Laowa 15mm lens at f/2 on the Canon R5 at ISO 400.
September 16 (6 days before the autumnal equinox) saw another all-sky show that, for us in western Canada, rivalled May 10. As with the spring show, this aurora was notable for its great range of colours, with nitrogen pinks and magentas mixed in with shades of oxygen yellow-greens and reds.
A darker blue-green band to the south (at left above) during the peak could be aurora from incoming protons exciting hydrogen, not from the usual electrons that excite all other auroras and light up oxygen and nitrogen atoms and molecules.
Yes, there are proton auroras. Another research paper using my images from an October 2021 aurora explored the relationship between proton auroras and SAR arcs (explained below).
This is an all-sky 360° panorama from the horizon at the edges, to the zenith at centre, taking in the entire sky during an outburst of a particularly colourful aurora on September 16. This is a panorama of 12 segments, each 4 seconds with the Laowa 15mm lens at f/2 on the Canon R5 at only ISO 400.
The September 16 show started with a diffuse band which quickly exploded as a sub-storm onslaught of energetic particles arrived to light up the aurora with greater brilliance, colours, and rapid motion. The onset of a substorm can happen in literally just a minute.
Even the nearly Full Moon failed to diminish this show, seen from home under perfect skies. Luckily, the smoky season had abated.
A music video of this night’s show is also above on YouTube. Do click through to watch this and the other videos in full screen mode.
October 10 — Red Aurora from Arizona
Six months to the day after the great May 10 show, the sky erupted again with auroras seen all over the world, even from more southerly latitudes that don’t normally see Northern Lights.
A rare red aurora seen from latitude +32º N from southeast Arizona during the major Kp8-level storm of October 10. This is looking north from the Quailway Cottage near Portal, Arizona and Rodeo, New Mexico. This is a single 15-second exposure with the Canon RF15-35mm lens at 15mm and f/2.8 on the Canon R5 at ISO 1600.
I know because I was at one of those latitudes, in southern Arizona at 32° N. The aurora created the kind of show seen from areas that don’t normally get auroras — a red sky on the horizon. It is these ominous red skies that provoked Medieval fears of divine wrath and myths of armies clashing in the distant North.
Red auroras can also occur in the Southern Hemisphere (as can every other form of aurora) when the aurora australis brightens and extends farther north than normal, lighting up the southern sky red at locations that rarely see the Southern Lights.
In both cases we are seeing just the red tops of distant curtains that mostly lie hidden over the horizon, the red coming from oxygen reactions that can happen only at the rarefied altitudes of 300 to 500 km. Oxygen greens come from 100 to 300 km up.
From Arizona, I saw what many in the U.S. saw this night — a prominent glow, obviously red even to the eye, across the northern horizon. I was missing a far better show at home!
This is a 360° panorama covering the entire sky and extending up to the zenith at centre, capturing a rare SAR (Stable Auroral Red) arc across the Arizona sky in the pre-dawn hours of October 11. This is a panorama of 12 segments, each 30 seconds at f/2.8 with the Canon RF15-35mm lens on the Canon R5 at ISO 3200.
But unique to my more southerly site was this phenomenon, also widely seen across the U.S. and southern Canada.
Accompanying the “normal” aurora to the north was a diffuse red (to the camera) arc across the sky that lasted most of the night. This was a Stable Auroral Red (SAR) arc, created by thermal energy flowing horizontally in the high atmosphere some 400 km up.
SARs have been seen evolving into STEVEs, as the mechanisms seem related. Indeed, one of my images from August 1, shown above, seems to show a SAR/STEVE hybrid.
I set up a wide-angle lens and time-lapse hoping to catch such an evolution first-hand, which would have been of great interest to researchers. Alas, the SAR did not cooperate, stubbornly remaining a SAR all night.
This was the pre-dawn scene from southeastern Arizona on the morning of October 11 that frames a suite of skyglows. This is a panorama of 3 segments, each a stack of 5 x 1-minute tracked exposures with the Canon RF15-35mm lens at 15mm and f/2.8 on the Canon R5 at ISO 1600.
By dawn, with blue sunlight at work, the SAR looked magenta in the twilight, accompanied by two other sky glows:
The pyramid-shaped Zodiacal Light created by sunlight reflecting off cometary and meteoric dust in the inner solar system,
And the winter Milky Way, created by the combined light of distant stars in our section of our Galaxy.
So in one image we have atmospheric, interplanetary, and interstellar sky glows! This was truly an amazing sky, the likes of which I might never see again.
Ending the Year — November in Norway
In early November I headed to Norway to instruct my first aurora group there since 2019. The location was on board a ship, the m/s Nordkapp, a ferry in the Hurtigruten fleet that does 12-day runs along the coast, from Bergen in the south, to Kirkenes in the far north, and back again.
Passengers on board the m/s Nordkapp are watching the Northern Light show on November 9, from the coast of Norway. This is 0.4 seconds at f/1.8 with the Nikkor 20mm lens on the Nikon Z6III at ISO 3200.
We got three nights in a row of active auroras on the northbound voyage. A Kp4 to 5 storm brought the Lights farther south and overhead for us early in the voyage, something we don’t normally see in Norway until we get underneath the auroral oval, which at that longitude in the world lies above the Arctic Circle, north of 66° latitude.
A colourful aurora appears in the darkening evening twilight sky at sea along the coast of Norway on November 9. This is a single 2-second exposure with the 20mm Nikkor lens at f/1.8 on the Nikon Z6III at ISO 1600.
But on November 9, with a storm underway, the show started early, rudely interrupting our group’s cocktail hour as we all rushed up on deck. As it can do, the aurora glowing in a twilight sky took on added tints.
This is a panorama of auroral arcs across the southern sky, with prominent red content contrasting with the oxygen yellow-green bands. Taken on November 10/11 (just after midnight). This is a panorama of 7 segments, each 1.3-second exposures with the Nikkor 20mm lens at f/1.8 on the Nikon Z6III at ISO 3200.
The next night, November 10, as we sailed through the mountainous Lofoten Islands, we were treated to an aurora with lots of red content, above. No two auroras are alike!
An arc of Northern Lights points the way into the narrow Trollfjord in the Lofoten Islands of Norway, as our ship, the m/s Nordkapp enters the fjord at night by searchlight. This is a 0.5-second exposure at f/1.8 with the Nikkor 20mm lens on the Nikon Z6III at ISO 1600.
A curtain of aurora also nicely pointed the way into the short but scenic Trollfjord, a fjord the ship captains like to navigate into for a memorable side trip as we slide through the narrow canyon with seemingly inches to spare.
A music video of real-time aurora sequences shot from on deck during my November 2024 Norway cruise is above on YouTube. Note the phones held high, the way most people now shoot the aurora, and usually with very good success!
What’s Coming for 2025?
We have more to look forward to in 2025.
First, it is likely that the Sun has not peaked, but may undergo a second peak of maximum activity in 2025 or 2026. A double peak is common at many solar maxes. Just look at the graph at the opening of the blog, and the previous peaks of Cycles 23 and 24.
Plus, the most energetic solar flares and storms often occur after the peak on the downward trend of activity. So we could well see more worldwide aurora displays like we had on May 10 and October 10 in the coming two to three years. The show is far from over!
Watch websites like SpaceWeather.com for aurora alerts and news of solar events coming our way.
A plan to shoot the promised bright comet of 2024 paid off, with fine views at dawn and at dusk of the best comet since 2020.
Comets are always a gamble. Any new comets discovered, the ones that usually become the brightest, have no track record of performance. Predictions of how bright a new comet might appear are based on what a typical comet should do. But comets can outperform expectations and dazzle us, or they can fizzle and fade away.
In late 2023 it was clear that a then newly-discovered comet, C/2023 A3, named Tsuchinshan-ATLAS after the observatories where it was co-discovered, had the potential to perform in late 2024.
The low angle and position of the comet from home in Canada in the late September dawn sky, simulated in StarryNight software.
Knowing where it would be in the sky (that trait of a comet can be predicted with accuracy!) I planned a field trip to the U.S. desert Southwest for late September and early October 2024. From farther south the comet would be higher than it would be from home (shown above), and over spectacular landscapes.
I had visions of another Comet NEOWISE from July 2020. As my blog from 2020 shows, we saw that photogenic comet well from our northern latitude in Canada, as it skimmed across the northern horizon. Tsuchinshan-ATLAS would require a chase south.
September 26 & 27 — at Bryce Canyon, Utah
In late September 2024 the comet would be inbound, approaching the Sun and in the morning sky. What better eastern scene than overlooking Bryce Canyon in Utah, where I had been a year before, for the October 14, 2023 annular eclipse of the Sun in the morning sky. (Click the link for my eclipse chase blog.)
I was fortunate to get two clear mornings, both from the Fairyland Canyon viewpoint, just a short walk from the parking lot to carry camera gear and tracking mounts.
Comet C/2023 A3, Tsuchinshan-ATLAS, at dawn over Bryce Canyon, on the morning of September 27, 2024.
My first look at the comet on September 27 was on the day the comet was at perihelion, closest to the Sun in its orbit, though not in the sky at our viewing angle from Earth.
The comet was just visible to the unaided eye, but was obvious on the camera view screen, even amid the bright twilight. I had to shoot fast as the window between “comet rise” and the sky brightening too much was only a few minutes long.
Comet C/2023 A3, Tsuchinshan-ATLAS, rising in the twilight over Bryce Canyon, on September 28, 2024.
Knowing better what to look for, I caught the comet a little sooner the next morning on September 28, and so the tail appeared longer and more impressive as it rose above the distant mountains. A group of other local photographers arrived just a few minutes too late both mornings, and so struggled to just sight the comet, let alone photograph it.
This vertical panorama takes in the nebula-rich northern winter Milky Way over the formations of Bryce Canyon National Park, from the Fairyland Canyon viewpoint.
But I had arrived extra early, to shoot a vertical panorama (above) of the winter Milky Way over the canyon formations below. This and the comet images were shot with the aid of a sky tracker to follow the stars, but with the tracker off for separate shots of the ground.
So I had bagged the comet at Bryce! On to the next stop.
September 28 & 29 — at Monument Valley, Utah
There’s no more iconic or famous landscape in the American West than the buttes of Monument Valley, on the Navaho Tribal Lands on the Arizona/Utah border.
This panorama from the Navaho Tribal Park at Monument Valley shows the evening twilight sky looking east opposite the sunset to the rising dark blue arc of Earth’s shadow cast on the atmosphere. The shadow is rimmed with a pink “Belt of Venus” tint from sunlight still hitting the upper atmosphere.
A clear first evening provided a fabulous view of the arc of Earth’s shadow across the eastern sky from the viewpoint near the aptly named The View Hotel.
This is a panorama of the sunrise scene at the Navaho Tribal Park, Monument Valley, Arizona, taken just after sunrise with the low Sun lighting the iconic buttes and mesas of the Valley. The West and East Mittens are at left; the Sun was behind Merrick Butte at centre, and lighting Mitchell Mesa at right.
A wonderful sunrise on my second morning there made for a spectacular panorama. But while clouds created fine sunrise lighting, they aren’t conducive to seeing comets!
Comet C/2023 A3, Tsuchinshan-ATLAS (at centre), is rising in the dawn twilight over Monument Valley, Arizona on the morning of September 30, 2024. The comet is rising just south (right) of Merrick Butte.
A band of clear sky near the horizon allowed me to catch the comet rising to the right of Merrick Butte, as seen from a spot south of The View from where I had calculated the comet would rise in the right position. From the usual Valley viewpoint farther north the comet would have been behind the butte.
While the planning worked, the result was not quite the spectacle I had envisioned. The comet was nice, but was starting to become lost in the bright sky as it descended toward the Sun.
There were only a couple of mornings left to catch the comet at dawn before it disappeared completely into the daytime sky close to the Sun.
October 1 to 11 — at Quailway Cottage, Arizona
The major block of time in my trip was booked for an astrophoto retreat at a cottage I’d rented twice before but not since late 2017. The Quailway Cottage, popular among birders, is also ideal for stargazing as it is in one of the darkest areas of the Southwest, north of Douglas, Arizona, and just across the Arizona/New Mexico border.
This captures both the glow of Zodiacal Light in the eastern dawn sky (the band of light extending up across the frame) and the dust tail of Comet Tsuchinshan-ATLAS rising from behind the Pelloncillo mountains, at dawn on October 2, 2024.
When I arrived the comet was putting in its last show in the dawn sky. In fact, on October 2 I managed to capture a dawn scene with the morning Zodiacal Light created by sunlight reflecting off cometary dust in the inner solar system, and just the tail of the comet rising before the bright comet head appeared.
Comet C/2023 A3, Tsuchinshan-ATLAS, is rising in the dawn twilight over the Pelloncillo Mountains in New Mexico, on October 2, 2024.
An image taken a little later showed the entire comet, now sporting a more impressive tail. It was blossoming into a fine comet indeed. But we were about to lose sight of it for more than a week.
Arizona Deep-Sky Imaging
While at Quailway I had clear skies every night. And so, as planned, I went to town shooting all kinds of “deep-sky” objects and fields with two astrophoto rigs I had brought with me: a longer-focal length 120mm refractor for small targets, and a short-focal length refractor for wide fields in the Milky Way. I had reviewed both new telescopes in recent months.
The Askar APO120 on a veteran Astro-Physics AP400 mount. The Founder Optics Draco 62 on the small Star Adventurer GTi mount.
I concentrated on shooting targets low in the south that are impossible to get from home in Canada, and that I’ve missed shooting, or have not shot well, during my visits to Australia. See my blog here about my latest trek Down Under.
The two brightest Fornax cluster members are the elliptical galaxy NGC 1399 at upper left, paired with smaller NGC 1404, and the galaxy NGC 1365 at lower right, considered one of the best barred spirals in the sky.
Here’s an example, above, with the larger Askar 120APO: a field of galaxies in the constellation of Fornax that rivals the better-known Markarian’s Chain of galaxies in Coma Berenices in the northern spring sky.
This frames the spectacular region of the Milky Way near the direction of the galactic centre in Sagittarius.
And here’s a field (above) with the small Founder Optics Draco 62mm scope, framing the rich Sagittarius Starcloud punctuated with the small dark Ink Spot Nebula, all below the bright Lagoon and Trifid Nebulas.
This panorama extends for about 240º along the northern half of the Milky Way, from Orion at left, to Sagittarius at right, and centered on the Galactic Equator.
In autumn the Milky Way is up all night. So I used a simple star tracker, the MSM Nomad reviewed here on my blog, and a 28-70mm lens at 35mm to shoot a panorama from dusk to dawn along the Milky Way — from the summer stars of Sagittarius and Cygnus (at right, above), through the autumn constellations overhead in Cassiopeia and Perseus (at centre), and down into the pre-dawn sky with the winter stars in and around Orion (at left).
A Bonus Aurora from Arizona
I was just north of the Mexican border, at a latitude 32° North, more than 20° farther south than at home in Alberta. But what should appear in my sky but … aurora!
A selfie of me observing the great red aurora of October 10, 2024, from southern Arizona.
On October 9, and then again more so on October 10, a great solar storm brought Northern Lights down to me. And indeed across all of Canada and the U.S. The result for me was a red glow to the north — the tops of distant auroral curtains I would have seen filling my sky at home.
A time-lapse of an Arizona aurora, using a 15mm wide-angle lens shooting nearly 400 forty-second exposures. View it in-line here. Enlarge to a full screen view. There is no sound.
Above is a time-lapse video of the aurora that night, from a camera aimed due north for four hours. The red curtains come and go through the night.
This is a 360° panorama covering the entire sky and extending up to the zenith at centre, capturing a rare SAR arc across the Arizona sky in the pre-dawn hours of October 11, 2024.
The remarkable feature that night, October 10/11, was not the aurora, but what is called a SAR (Stable Auroral Red) arc that persisted all night. It appeared as a diffuse red band across the sky, created by heat energy leaking into the upper atmosphere during the solar storm. SAR arcs can accompany an aurora but are not auroras themselves.
This panorama takes in a rare confluence of skyglows in a colourful dawn sky.
By dawn the next morning, now October 11, the tall Zodiacal Light was prominent alongside the magenta SAR arc to the north (left) and the winter Milky Way to the south (right). There’s even a short pillar of light that might be an aurora fragment, or the tail of the comet!
The Comet Returns
However, toward the end of my 11-night marathon of deep-sky imaging, the bright head of the comet was to be rising into the evening sky for Part 2 of its apparition. Below is a shot from the evening of October 11, my last at Quailway. Yes, there it was, just above the Chiricahua Mountains. But it was a blip, barely visible in binoculars and to the camera. I had hoped for more.
This is Comet Tsuchinshan-ATLAS (C/2023 A3) at far right, barely visible emerging into the evening sky and low in the twilight, on October 11, 2024. This view includes Venus at left. Venus was obvious; the comet was not!
With the Moon now waxing into the evening sky, my plan was to head back north, stopping at scenic spots on the trip home, to catch the comet over moonlit landscapes to the west in the dusk sky.
My first two nights, October 12 and 13, at the VLA Radio Observatory near Socorro, New Mexico, then farther north near Canyon de Chelly, Arizona, were both beset by clouds to the west. From images posted on-line, I knew the comet was improving. But it was eluding me.
October 14 & 15 — at Arches National Park, Utah
The next stop was Arches National Park in Utah, which I last visited in April 2015. The first night’s forecast for October 14 also looked to be cloudy. But October 15 was supposed to be clear. So I extended my stay by an extra night, thinking that might be my only chance.
As it turned out October 14 was fabulous (below). The comet was easily visible to the unaided eye as a classic comet in the west. I pointed it out to folks walking by at the Windows Arches area. And I could hear other people commenting on it. At last a comet! One that anyone could see — though it helped to be at a clear sky site like Arches.
Comet Tsuchinshan-ATLAS at its finest in the evening sky, two days after its closest approach to Earth, and with it sporting a 10º- to 15º-long dust tail, and a narrow anti-tail pointed toward the horizon.
By then the Moon was well advanced in age to a bright gibbous phase, so the sky was by no means dark. It was deep blue in photos.
Still the comet showed up brilliantly; it had blossomed a lot in a couple of nights. Above, I framed it beside moonlit Turret Arch.
Below is a scene from the next night, October 15, my “back-up” night. The comet was certainly performing well after all. Even in the moonlight. In binoculars the tail stretched for the same length as the camera recorded it, some 15°.
This is a telephoto close-up Comet Tsuchinshan-ATLAS over the red rocks of Arches National Park, Utah, on a superb moonlit night, October 15, 2024.
Indeed, that was my last view of the comet for a while, as clouds prevented any more shooting on the rest of my journey north through Idaho and Montana. I even hit a snowstorm in southern Montana.
Late October — Back at Home in Alberta
But the comet was not done yet! Through October, while it receded from us in distance, it climbed higher into our sky, placing it into a dark sky with the Moon now out of the way.
This is Comet Tsuchinshan-ATLAS in a wide-angle nightscape scene over the Badlands of Dinosaur Provincial Park, Alberta, on October 23, 2024.
On October 23, a short trip out to Dinosaur Provincial Park east of home allowed me to shoot the comet over the Alberta Badlands landscape, beside the setting summer Milky Way.
This is a telephoto lens framing of Comet Tsuchinshan-ATLAS in Ophiuchus on the night of October 30, 2024 near several large star clusters. The field of view is 15º by 10º so the tail extends for about 6º to 8º.
By a week later, on October 30, the comet had diminished in size and brightness, but still looked like a classic comet, here framed in a telephoto close-up as it passed near some bright star clusters. This was from my front yard. The chase was over.
Clouds and a trip to Norway starting November 4 prevented more opportunities to shoot the comet. (My travel schedule also kept me from writing this blog until now!)
It had been a good chase over a month, yielding images I was happy with. The photos from Utah and Arizona I could not have taken at home, even if the skies had been clear during the comet’s prime-time. (They weren’t!) And it was great to finally get back to my favourite haunts in southern Arizona and New Mexico after an absence of seven years.
In all, Comet Tsuchinshan-ATLAS provided a fine finale to what has been a superb year of stargazing events and celestial sights.
It has been many years since we were treated to an aurora as widely seen as the show on May 10, 2024. Here’s my tale of the great display.
As the sky darkened around the world on May 10/11, 2024, sky watchers in both the northern and southern hemispheres were amazed to see the sky lit by the deep reds, greens and pinks of a massive display of aurora. For me, this was my first Kp8 to 9 show (to use one measure of aurora intensity) in more than 20 years, back in the film era!
Throughout the day, aurora chasers’ phones (mine included) had been beeping with alerts of the arrival of a major solar storm, with the usual indicators of auroral activity pinned to the top of the scale.
A NOAA satellite’s eye view of the ring of aurora May 10/11, showing it south of me in Alberta, and across the northern U.S. People in the southern U.S. saw it to their north.
As I show below, the graphic of the intensity of the band of aurora, the auroral oval, was lit up red and wide. This was a night we didn’t have to chase north to see the Northern Lights or aurora borealis — they were coming south to meet us (as I show above).
The Kp Index was reading 9 on SpaceWeatherLiveThe auroral oval was lit up red in the Ovation mapThe 3-hour predictions called for red and magenta alerts!
Observers in the southern hemisphere had the normally elusive aurora australis move much farther north than usual, bringing the Southern Lights even to tropical latitudes in Australia, South America and Africa.
The cause was a massive sunspot group on the Sun which had let off several intense solar flares.
Sunspot group 3664 was so big it could be seen with the naked eye, using solar eclipse glasses. Photo courtesy NASA.
The flares had in turn blown off parts of the Sun’s atmosphere, the corona, that anyone who saw the total eclipse a month earlier had admired so much. But a month later, the corona was being blown our way, in a series of Coronal Mass Ejections (CMEs), to collide with Earth.
A movie of six CMEs blasting toward Earth, captured by the SOHO satellite. Courtesy NASA/ESA.
As it happened I was scheduled to give a community talk in the nearby town early in the evening of May 10, on the topic of The Amazing Sky! Watching the indicators, I could more or less promise the audience that we would indeed see an amazing sky later that evening as it got dark.
Post talk, I hurried home to get the cameras ready, choosing to forgo more hurried driving out to a scenic site in southern Alberta, for the convenience of shooting from my rural backyard. As the sky darkened, the clouds were lit purple, and curtains of aurora appeared in the clear patches.
Clouds and aurora in twilight with the 11mm TTArtisan full-frame fish-eye lens.A bright arc of aurora shining through the purple clouds, with the 7.5mm TTArtisan circular fish-eye lens.
Something big was going on! This was promising to be the best show of Northern Lights I had seen from home in a year. (Spring 2023 had three great shows at monthly intervals, followed by an aurora drought for many months. See The Great April Aurora.)
A selfie at the start of the great aurora show of May 10, 2024.
I shot with four cameras (a Canon EOS R, Ra, R5 and R6) — two for time-lapses, one for real-time movies, and one for still images. I used the latter to take many multi-image panoramas, as they are often the best way to capture the wide extent of an aurora across the sky.
The arc of aurora in purple and white across the northern sky from home in Alberta at the start of the great display (about 11:30 p.m. MDT).
Early in the evening the arc of aurora wasn’t the usual green from oxygen, but shades of purple, pink, and even white, likely from sunlit nitrogen. The panorama above is looking north toward a strangely coloured arc of nitrogen (?) aurora.
Then after midnight a more normal curtain appeared suddenly, but toward the south, brightening and rising to engulf much of the southern sky and the sky overhead.
Looking south with the 15mm wide-angle lens.
It is at local midnight to 1 a.m. when substorms usually hit, as we are then looking straight down Earth’s magnetic tail, toward the rain of incoming aurora particles bombarding the Earth. During a substorm, the rain turns into a deluge — the intensity of the incoming electrons increases, sparking a sudden brightening of the aurora, making it dance all the more rapidly.
This is a 300° panorama of my home sky now filled with colourful curtains.
As the aurora explodes in brightness it often swirls up to the zenith (or more correctly, the magnetic zenith) to form one of the sky’s greatest sights, a coronal outburst. Rays and beams converge overhead to form a tunnel effect. It is jaw-dropping.
I’ve seen this many times from northern sites such as Churchill and Yellowknife, where the aurora often dances straight up. And from my latitude of 51° N in western Canada, the aurora does often come down to us.
But this night, people at latitudes where, at best, the aurora might be seen just as a glow on the horizon, saw it dance overhead in a corona show to rival the solar eclipse, and that other corona we saw on April 8!
This is a panorama of a substorm outburst creating an overhead corona with rays converging to the magnetic zenith (south of the true zenith), and amid clouds. The rays show a rich mix of oxygen greens and reds, as well as nitrogen blues blending to create purples. Some greens and reds are mixing to make yellows.
Yes, the long exposures of aurora photos (even those taken with phone cameras) show the colours better than your eye can see them (insensitive as our eyes are to colour in dim light). But this night portions of the arcs and rays were bright enough that greens and pinks were easily visible to the naked eye.
This is a single 9-second exposure of the peak of a bright outburst at 1 a.m. MDT. It was with the Laowa 7.5mm circular fish-eye lens at f/2 on the Canon R5 at ISO 800. It is one frame from a time-lapse sequence. A brief outburst of a substorm created an overhead corona with bright rays converging to the magnetic zenith (south of the true zenith).The corona shows a mix of oxygen greens and reds, as well as nitrogen blues blending to create purples. Some greens and reds mix to make yellows.
At its peak the show was changing rapidly enough, I couldn’t get to all the cameras to aim and frame them, especially the movie camera. The brightest outburst at 1 a.m. lasted just a minute — the time-lapse cameras caught it. The sequence below shows the view in 9-second exposures taken consecutively just 1 second apart.
This series shows a brief outburst of bright aurora at the magnetic zenith overhead. The time between these 7 consecutive 9-second exposures is only 1 second, so this bright outburst did not last long (little more than a minute). With the TTArtisan 7.5mm f/2 fish-eye lens on the Canon R5. Click or tap to enlarge to full screen.
Here’s another sequence of frames taken as part of a time-lapse sequence with the 11mm lens. It shows the change in the aurora over the 80 minutes or so that it was most active for me at my site.
The time between these 12 images is usually 8 minutes, though to include some interesting activity at a bright outburst, the interval is 5 minutes for three of the images around 1 a.m. Each is a 7- or 9-second exposure taken as part of a time-lapse sequence using the 11mm TTArtisan lens at f/2.8 on the Canon R at ISO 800 or 1600.
Shooting time-lapses with fish-eye lenses captures the show with a minimum of attention needed (except to adjust ISO or exposure times when the aurora brightens!). I could use the still camera (with the Laowa 15mm f/2 lens) to take individual shots, such as more selfies and home shots.
This is a single 6-second exposure with the Laowa 15mm lens at f/2 and Canon Ra at ISO 2000.This is a single 4-second exposure with the Laowa 15mm lens at f/2 and Canon Ra at ISO 1600. This is a single 8-second exposure with the Laowa 15mm lens at f/2 on the Canon Ra at ISO 800. Another camera taking a time-lapse is in the scene. I had four going this night.
As colourful as the aurora was at its best between midnight and 1:30 a.m., I think the most unique shots came after the show had subsided to appear just as faint rays across the north again, much as it had begun. To the eye it didn’t look like much, but even on the camera’s live screen I could see unusual colours.
I took more panoramas, to capture one of the most unusual auroral arcs I’ve even seen — a blue and magenta aurora across the north, similar to how the night started.
This a stitch of 11 segments, each 13-second exposures, with the Laowa 15mm lens at f/2 on the Canon Ra camera at ISO 800, and turned to portrait orientation. Processed in Camera Raw and stitched with PTGui.
The colours may be from nitrogen glowing, which tends to light up in blues and purples, especially when illuminated by sunlight at high altitudes. At 2 to 2:30 a.m. the Sun might have been illuminating the aurora at a height of 150 to 400 km, and far to the north.
I’d seen blue-topped green auroras before (and there’s a green aurora off to the west at left here). But this was the first time I’d seen an all-blue aurora, no doubt a product of the intense energy flowing in the upper atmosphere this night. And the season and my latitude.
The panorama is a spherical projection spanning 360º, and reaching to the zenith 90° high at centre. This a stitch of 20 segments, each 13-second exposures, with the Laowa 15mm lens at f/2 on the Canon Ra camera at ISO 800, and turned to portrait orientation. Processed in Camera Raw and stitched with PTGui.
The weirdest aurora was at 2:30 a.m., when in addition to the blue rays of nitrogen, an odd white and magenta patch appeared briefly to the south. What was that??
The lesson here? During a bright show do not go back to sleep when things seem to be dying down. Interesting phenomena can appear in the post-storm time, as we’ve learned with STEVE and other odd red arcs and green proton blobs that we aurora photographers have helped document.
I end with a finale music video, mostly made of the time-lapses I shot this night.
Enjoy!
Bring on more aurora shows as the Sun peaks in activity, perhaps this year. But the best shows often occur in the 2 or 3 years after solar max. So we have several more years to look forward to seeing the Lights dance in our skies.
Watch in full screen and in 4K if you can. For all the tech details click through to YouTube and check the description below the video.
In an extensive technical blog, I put the Canon R6 mirrorless camera through its paces for the demands of astrophotography.
Every major camera manufacturer, with the lone exception of stalwart Pentax, has moved from producing digital lens reflex (DSLR) cameras, to digital single lens mirrorless (DSLM) cameras. The reflex mirror is gone, allowing for a more compact camera, better movie capabilities, and enhanced auto-focus functions, among other benefits.
But what about for astrophotography? I reviewed the Sony a7III and Nikon Z6 mirrorless cameras here on my blog and, except for a couple of points, found them excellent for the demands of most astrophotography.
For the last two years I’ve primarily used Canon’s astro-friendly and red-sensitive EOS Ra mirrorless, a model sadly discontinued in September 2021 after just two years on the market. I reviewed that camera in the April 2020 issue of Sky & Telescope magazine, with a quick first look here on my blog.
The superb performance of the Ra has prompted me to stay with the Canon mirrorless R system for future camera purchases. Here I test the mid-priced R6, introduced in August 2020.
NOTE: In early November 2022 Canon announced the EOS R6 MkII, which one assumes will eventually replace the original R6 once stock of that camera runs out. The MkII has a 24 Mp sensor for slightly better resolution, and offers longer battery life. But the main improvements over the R6 is to autofocus accuracy, a function of little use to astrophotographers. Only real-world testing will tell if the R6 MkII has better or worse noise levels than the R6, or has eliminated the R6’s amp glow, reported on below.
M31, the spiral galaxy in Andromeda, with the Canon R6 mirrorless camera. It is a stack of 8 x 8-minute exposures at ISO 800, blended with a stack of 8 x 2-minute exposures at ISO 400 for the core, to prevent it from overexposing too much, all with a SharpStar 76mm apo refractor at f/4.5 with its field flattener/reducer.
TL;DR SUMMARY
The Canon R6 has proven excellent for astrophotography, exhibiting better dynamic range and shadow recovery than most Canon DSLRs, due to the ISO invariant design of the R6 sensor. It is on par with the low-light performance of Nikon and Sony mirrorless cameras.
The preview image is sensitive enough to allow easy framing and focusing at night. The movie mode produces usable quality up to ISO 51,200, making 4K movies of auroras possible. Canon DSLRs cannot do this.
Marring the superb performance are annoying deficiencies in the design, and one flaw in the image quality – an amp glow – that particularly impacts deep-sky imaging.
R6 pros
The Canon R6 is superb for its:
Low noise, though not exceptionally so
ISO invariant sensor performance for good shadow recovery
Sensitive live view display with ultra-high ISO boost in Movie mode
Relatively low noise Movie mode with full frame 4K video
Low light auto focus and accurate manual focus assist
Good battery life
R6 cons
The Canon R6 is not so superb for its:
Design Deficiencies
Lack of a top LCD screen
Bright timer display in Bulb on the rear screen
No battery level indication when shooting
Low grade R3-style remote jack, same as on entry-level Canon DSLRs
Image Quality Flaw
Magenta edge “amp glow” in long exposures
The Canon Ra on the left with the 28-70mm f/2 RF lens and the Canon R6 on the right with the 70-200mm f/2/8 RF lens, two superb but costly zooms for the R system cameras.
CHOOSING THE R6
Canon’s first full-frame mirrorless camera, the 30-megapixel EOS R, was introduced in late 2018 to compete with Sony. As of late-2021 the main choices in a Canon DSLM for astrophotography are either the original R, the 20-megapixel R6, the 26-megapixel Rp, or the 45-megapixel R5.
The new 24-megapixel Canon R3, while it has impressive low-noise performance, is designed primarily for high-speed sports and news photography. It is difficult to justify its $6,000 cost for astro work.
I have not tested Canon’s entry-level, but full-frame Rp. While the Rp’s image quality is likely quite good, its small battery and short lifetime on a single charge will be limiting factors for astrophotography.
Nor have I tested the higher-end R5. Friends who use the R5 for nightscape work love it, but with smaller pixels the R5 will be noisier than the R6, which lab tests at sites such as DPReview.com seem to confirm.
Meanwhile, the original EOS R, while having excellent image quality and features, is surely destined for replacement in the near future – with a Canon EOS R Mark II? The R’s successor might be a great astrophoto camera, but with the Ra gone, I feel the R6 is currently the prime choice from Canon, especially for nightscapes.
I tested an R6 purchased in June 2021 and updated in August with firmware v1.4. I’ll go through its performance and functions with astrophotography in mind. I’ve ignored praised R6 features such as eye tracking autofocus, in-body image stabilization, and high speed burst rates. They are of limited or no value for astrophotography.
Along the way, I also offer a selection of user tips, some of which are applicable to other cameras.
LIVE VIEW FOCUSING AND FRAMING
“Back-of-the-camera” views of the R6 in its normal Live View mode (upper left) and its highly-sensitive Movie Mode (upper right), compared to views with four other cameras. Note the Milky Way visible with the R6 in its Movie mode, similar to the Sony in Bright Monitoring mode.
The first difference you will see when using any new mirrorless camera, compared to even a high-end DSLR, is how much brighter the “Live View” image is when shooting at night. DSLM cameras are always in Live View – even the eye-level viewfinder presents a digital image supplied by the sensor.
As such, whether on the rear screen on in the viewfinder, you see an image that closely matches the photo you are about to take, because it is the image you are about to take.
To a limit. DSLMs can do only so much to simulate what a long 30-second exposure will look like. But the R6, like many DSLMs, goes a long way in providing a preview image bright enough to frame a dark scene and focus on bright stars. Turn on Exposure Simulation to brighten the live image, and open the lens as wide as possible.
The Canon R6 in its Movie Mode at ISO 204,800 and with a lens wide open.
But the R6 has a trick up its sleeve for framing nightscapes. Switch the Mode dial to Movie, and set the ISO up to 204,800 (or at night just dial in Auto ISO), and with the lens wide open and shutter on 1/8 second (as above), the preview image will brighten enough to show the Milky Way and dark foreground, albeit in a noisy image. But it’s just for aiming and framing.
This is similar to the excellent, but well-hidden Bright Monitoring mode on Sony Alphas. This high-ISO Movie mode makes it a pleasure using the R6 for nightscapes. The EOS R and Ra do not have this ability. While their live view screens are good, they are not as sensitive as the R6’s, with the R and Ra’s Movie modes able to go up to only ISO 12,800. The R5 can go up to “only” ISO 51,200 in its Movie mode, good but not quite high enough for live framing on dark nights.
Comparing Manual vs. Auto Focus results with the R6.
The R6 will also autofocus down to a claimed EV -6.5, allowing it to focus in dim light for nightscapes, a feat impossible in most cameras. In practice with the Canon RF 15-35mm lens at f/2.8, I found the R6 can’t autofocus on the actual dark landscape, but it can autofocus on bright stars and planets (provided, of course, the camera is fitted with an autofocus lens).
Autofocusing on bright stars proved very accurate. By comparison, while the Ra can autofocus on distant bright lights, it fails on bright stars or planets.
Turning on Focus Peaking makes stars turn red, yellow or blue (your choice of colours) when they are in focus, as a reassuring confirmation.
The Focus Peaking and Focus Guide menu.The R6 live view display with Focus Guide arrows on and focused on a star, Antares.
In manual focus, an additional Focus Aid overlay provides arrows that close up and turn green when in focus on a bright star or planet. Or you can zoom in by 5x or 10x to focus by eye the old way by examining the star image. I wish the R6 had a 15x or 20x magnification; 5x and 10x have long been the Canon standards. Only the Ra offered 30x for ultra-precise focusing on stars.
In all, the ease of framing and focusing will be the major improvement you’ll enjoy by moving to any mirrorless, especially if your old camera is a cropped-frame Canon Rebel or T3i! But the R6 particularly excels at ease of focusing and framing.
NOISE PERFORMANCE
The key camera characteristic for astrophoto use is noise. I feel it is more important than resolution. There’s little point in having lots of fine detail if it is lost in a blizzard of high-ISO noise. And for astro work, we are almost always shooting at high ISOs.
Comparing the R6’s noise at increasingly higher ISO speeds on a starlit nightscape.
With just 20 megapixels, low by today’s standards, the R6 has individual pixels, or more correctly “photosites,” that are each 6.6 microns in size, the “pixel pitch.”
By comparison, the 30-megapixel R (and Ra) has a pixel pitch of 5.4 microns, the 45-megapixel R5’s pixel pitch is 4.4 microns, while the acclaimed low-light champion in the camera world, the 12-megapixel Sony a7sIII, has large 8.5-micron photosites.
The bigger the photosites (i.e. the larger the pixel pitch), the more photons each photosite can collect in a given amount of time – and the more photons they can collect, period, before they overfill and clip highlights. More photons equals more signal, and therefore a better signal-to-noise ratio, while the greater “full-well depth” yields higher dynamic range.
Each generation of camera also improves the signal-to-noise ratio by suppressing noise via its sensor design and improved signal processing hardware and firmware. The R6 uses Canon’s latest DIGIC X processor shared by the company’s other mirrorless cameras.
Comparing the R6noise with the 6D MkII and EOS Ra on a deep-sky subject, galaxies.
In noise tests comparing the R6 against the Ra and Canon 6D Mark II, all three cameras showed a similar level of noise at ISO settings from 400 up to 12,800. But the 6D Mark II performed well only when properly exposed. Both the R6 and Ra performed much better for shadow recovery in underexposed scenes.
Comparing the R6noise with with the 6D MkII and EOS Ra on a shadowed nightscape.Comparing the R6 noise with the EOS Ra on the Andromeda Galaxy at typical deep-sky ISO speeds.
In nightscapes and deep-sky images the R6 and Ra looked nearly identical at each of their ISO settings. This was surprising considering the Ra’s smaller photosites, which perhaps attests to the low noise of the astronomical “a” model.
Or it could be that the R6 isn’t as low noise as it should be for a 20 megapixel camera. But it is as good as it gets for Canon cameras, and that’s very good indeed.
I saw no “magic ISO” setting where the R6 performed better than at other settings. Noise increased in proportion to the ISO speed. It proved perfectly usable up to ISO 6400, with ISO 12,800 acceptable for stills when necessary.
ISO INVARIANCY
The flaw in many Canon DSLRs, one documented in my 2017 review of the 6D Mark II, was their poor dynamic range due to the lack of an ISO invariant sensor design.
The R6, as with Canon’s other R-series cameras, has largely addressed this weakness. The sensor in the R6 appears to be nicely ISO invariant and performs as well as the Sony and Nikon cameras I have used and tested, models praised for their ISO invariant behaviour.
Where this trait shows itself to advantage is on nightscapes where the starlit foreground is often dark and underexposed. Bringing out detail in the shadows in raw files requires a lot of Shadow Recovery or increasing the Exposure slider. Images from an ISO invariant sensor can withstand the brightening “in post” far better, with minimal noise increase or degradations such as a loss of contrast, added banding, or horrible discolourations.
Comparing the R6 for ISO Invariancy on a starlit nightscape.
To test the R6, I shot sets of images at the same shutter speed, one well-exposed at a high ISO, then several at successively lower ISOs to underexpose by 1 to 5 stops. I then brightened the underexposed images by increasing the Exposure in Camera Raw by the same 1 to 5 stops. In an ideal ISO invariant sensor, all the images should look the same.
The R6 did very well in images underexposed by up to 4 stops. Images underexposed by 5 stops started to fall apart, but I’ve seen that in Sony and Nikon images as well.
Comparing the R6 for ISO Invariancy on a moonlit nightscape.
This behaviour applies to images underexposed by using lower ISOs than what a “normal” exposure might require. Underexposing with lower ISOs can help maintain dynamic range and avoid highlight clipping. But with nightscapes, foregrounds can often be too dark even when shot at an ISO high enough to be suitable for the sky. Foregrounds are almost always underexposed, so good shadow recovery is essential for nightscapes, and especially time-lapses, when blending in separate longer exposures for the ground is not practical.
With its improved ISO invariant sensor, the R6 will be a fine camera for nightscape and time-lapse use, which was not true of the 6D Mark II.
Comparing R6 images underexposed in 1-stop increments by using shorter shutter speeds.Comparing R6 images underexposed in 1-stop increments by using smaller apertures.
However, to be clear, ISO invariant behaviour doesn’t help you as much if you underexpose by using too short a shutter speed or too small a lens aperture. I tested the R6 in series of images underexposed by keeping ISO the same but decreasing the shutter speed then the aperture in one-stop increments.
The underexposed images fell apart in quality much sooner, when underexposed more than 3 stops. Again, this is behaviour similar to what I’ve seen in Sonys and Nikons. For the best image quality I feel it is always a best practice to expose well at the camera. Don’t count on saving images in post.
An in-camera image fairly well exposed with an ETTR histogram.
TIP: Underexposing by using too short an exposure time is the major mistake astrophotographers make, who then wonder why their images are riddled with odd artifacts and patten noise. Always Expose to the Right (ETTR), even with ISO invariant cameras. The best way to avoid noise is to give your sensor more signal, by using longer exposures or wider apertures. Use settings that push the histogram to the right.
LONG EXPOSURE NOISE REDUCTION
All cameras will exhibit thermal noise in long exposures, especially on warm nights. This form of noise peppers the shadows with hot pixels, often brightly coloured.
This is not the same as the shot and read noise that adds graininess to high-ISO images and that noise reduction software can smooth out. This is a common misunderstanding, even among professional photographers who should know better!
Long Exposure Noise Reduction (LENR) eliminates this thermal noise by taking a “dark frame” and subtracting it in-camera to yield a raw file free of hot pixels.
And yes, LENR does apply to raw files, another fact even many professional photographers don’t realize. It is High ISO Noise Reduction that applies only to JPGs, along with Color Space and Picture Styles.
Comparing a dark nightscape without and with LENR on a warm night. Hot pixels are mostly gone at right.
The LENR option on the R6 did eliminate most hot pixels, though sometimes still left, or added, a few. LENR is needed more on warm nights, and with longer exposures at higher ISOs. So the extent of thermal noise in any camera can vary a lot from shoot to shoot.
When LENR is active, the R6’s rear screen lights up with “Busy,” which is annoyingly bright. To hide this display, the only option is to close the screen.
As with the EOS Ra, and all mirrorless cameras, the R6 has no “dark frame buffer” that allows several exposures to be taken in quick succession even with LENR on. Canon’s full-frame DSLRs have this little-known buffer that allows 3, 4, or 5 “light frames” to be taken in a row before the LENR dark frame kicks in a locks up the camera on Busy.
Comparing long exposure images with the lens cap on (dark frames), to show just thermal noise. The right edge of the frame is shown, blown up, to reveal the amp glow, which LENR removes.
With all Canon R cameras, and most other DSLRs, turning on LENR forces the camera to take a dark frame after every light frame, doubling the time it takes to finish every exposure. That’s a price many photographers aren’t willing to pay, but on warm nights it can be necessary, and a best practice, for the reward of cleaner images.
The standard Canon Sensor Cleaning menu.
TIP: If you find hot pixels are becoming more obvious over time, try this trick: turn on the Clean Manually routine for 30 seconds to a minute. In some cameras this can remap the hot pixels so the camera can better eliminate them.
STAR QUALITY
Using LENR with the R6 did not introduce any oddities such as oddly-coloured, green or wiped-out stars. Even without LENR I saw no evidence of green stars, a flaw that plagues some Sony cameras at all times, or Nikons when using LENR.
Comparing the R6 for noise and star colours at typical deep-sky ISOs and exposure times.
Canons have always been known for their good star colours, and the R6 is no exception. According to DPReview the R6 has a low-pass anti-alias filter in front of its sensor. Cameras which lack such a sensor filter do produce sharper images, but stars that occupy only one or two pixels might not de-Bayer properly into the correct colours. That’s not an issue with the R6.
I also saw no “star-eating,” a flaw Nikons and Sonys have been accused of over the years, due to aggressive in-camera noise reduction even on raw files. Canons have always escaped charges of star-eating.
VIGNETTING/SHADOWING
DSLRs are prone to vignetting along the top and bottom of the frame from shadowing by the upraised mirror and mirror box. Not having a mirror, and a sensor not deeply recessed in the body, largely eliminates this edge vignetting in mirrorless cameras.
This illustrates the lack of edge shadows but magenta edge glows in a single Raw file boosted for contrast.
That is certainly true of the R6. Images boosted a lot in contrast, as we do with deep-sky photos, show not the slightest trace of vignetting along the top or bottom edges There were no odd clips or metal bits intruding into the light path, unlike in the Sony a7III I tested in 2018.
The full frame of the R6 can be used without need for cropping or ad hoc edge brightening in post. Except …
EDGE ARTIFACTS/AMP GLOWS
The R6 did exhibit one serious and annoying flaw in long-exposure high-ISO images – a magenta glow along the edges, especially the right edge and lower right corner.
Comparing a close-up of a nightscape, without and with LENR, to show the edge glow gone with LENR on.
Whether this is the true cause or not, it looks like “amplifier glow,” an effect caused by heat from circuitry illuminating the sensor with infra-red light. It shows itself when images are boosted in contrast and brightness in processing. It’s the sort of flaw revealed only when testing for the demands of astrophotography. It was present in images I took through a telescope, so it is not IR leakage from an auto-focus lens.
I saw this type of amp glow with the Sony a7III, a flaw eventually eliminated in a firmware update that, I presume, turned off unneeded electronics in long exposures.
Amp glow is something I have not seen in Canon cameras for many years. In a premium camera like the R6 it should not be there. Period. Canon needs to fix this with a firmware update.
UPDATE AUGUST 1, 2022: As of v1.6 of the R6 firmware, released in July 2022, the amp glow issue remains and has not been fixed. It may never be at this point.
It is the R6’s only serious image flaw, but it’s surprising to see it at all. Turning on LENR eliminates the amp glow, as it should, but using LENR is not always practical, such as in time-lapses and star trails.
For deep-sky photography high-ISO images are pushed to extremes of contrast, revealing any non-uniform illumination or colour. The usual practice of taking and applying calibration dark frames should also eliminate the amp glow. But I’d rather it not be there in the first place!
RED SENSITIVITY
The R6 I bought was a stock “off-the-shelf” model. It is Canon’s now-discontinued EOS Ra model that is (or was) “filter-modified” to record a greater level of the deep red wavelength from red nebulas in the Milky Way. Compared to the Ra, the R6 did well, but could not record the depth of nebulosity the Ra can, to be expected for a stock camera.
Comparing the stock R6 with the filter-modified Ra on Cygnus nebulosity.
In wide-field images of the Milky Way, the R6 picked up a respectable level of red nebulosity, especially when shooting through a broadband light pollution reduction filter, and with careful processing.
Comparing the stock R6 with the filter-modified Ra on the Swan Nebula with a telescope with minimal processing to the Raw images.Comparing the stock R6 with the filter-modified Ra on the Swan Nebula with a telescope with a dual narrowband filter and with colour correction applied to the single Raw images.
However, when going after faint nebulas through a telescope, even the use of a narrowband filter did not help bring out the target. Indeed, attempting to correct the extreme colour shift introduced by such a filter resulted in a muddy mess and accentuated edge glows with the R6, but worked well with the Ra.
While the R6 could be modified by a third party, the edge amp glow might spoil images, as a filter modification can make a sensor even more sensitive to IR light, potentially flooding the image with unwanted glows.
TIP: Buying a used Canon Ra (if you can find one) might be one choice for a filter-modified mirrorless camera, one much cheaper than a full frame cooled CMOS camera such as a ZWO ASI2400MC. Or Spencer’s Camera sells modified versions of all the R series cameras with a choice of sensor filters. But I have not used any of their modded cameras.
RESOLUTION
A concern of prospective buyers is whether the R6’s relatively low 20-megapixel sensor will be sharp enough for their purposes. R6 images are 5472 by 3648 pixels, much less than the 8000+ pixel-wide images from high-resolution cameras like the Canon R5, Nikon Z7II or Sony a1.
Unless you sell your astrophotos as very large prints, I’d say don’t worry. In comparisons with the 30-megapixel Ra I found it difficult to see a difference in resolution between the two cameras. Stars were nearly as well resolved in the R6, and only under the highest pixel-peeping magnification did stars look a bit more pixelated in the R6 than in the Ra. Faint stars were equally well recorded.
Comparing resolution of the R6 vs. Ra with a blow-up of wide-field 85mm imagesComparing resolution of the R6 vs. Ra on blow-ups of the Andromeda Galaxy with a 76mm apo refractor. The R6 is more pixellated but it takes pixel peeping to see it!
The difference between 20 and 30 megapixels is not as great as you might think for arc-second-per-pixel plate scale. I think it would take going to the R5 with its 45 megapixel sensor to provide enough of a difference in resolution over the R6 to be obvious in nightscape scenes, or when shooting small, detailed deep-sky subjects such as globular clusters.
If landscape or wildlife photography by day is your passion, with astrophotography a secondary purpose, then the more costly but highly regarded R5 might be the better choice.
Super Resolution menu in Adobe Lightroom.
TIP: Adobe now offers (in Lightroom and in Camera Raw) a Super Resolution option, that users might think (judging by the rave reviews on-line) would be the answer to adding resolution to astro images from “low-res” cameras like the R6.
Comparing a normal R6 image with the same image upscaled with Super Resolution.
Sorry! In my tests on astrophotos I’ve found Super Resolution results unsatisfactory. Yes, stars were less pixelated, but they became oddly coloured in the AI-driven up-scaling. Green stars appeared! The sky background also became mottled and uneven.
I would not count on such “smart upscaling” options to add more pixels to astro-images from the R6. Then again, I don’t think there’s a need to.
RAW vs. cRAW
Canon now offers the option of shooting either RAW or cRAW files, the latter being the same megapixel count but compressed in file size by almost a factor of two. This allows shooting twice as many images before card space runs out, perhaps useful for shooting lots of time-lapses on extended trips away from a computer.
The R6 Image Quality menu with the cRAW Option.Comparing an R6 cRAW with a RAW image.
However, the compression is not lossless. In high-ISO test images purposely underexposed, then brightened in post, I could see a slight degradation in cRAW images – the noise background looked less uniform and exhibited a blocky look, like JPG artifacts.
The R6’s dual SD card slots.
TIP: With two SD card slots in the R6 (the second card can be set to record either a backup of images on card one, or serve as an overflow card) and the economy of large SD cards, there’s not the need to conserve card space as there once was. I would suggest always shooting in the full RAW format. Why accept any compression and loss of image quality?
BATTERY LIFE
The R6 uses a new version of Canon’s standard LP-E6 battery, the LP-E6NH, that supports charging through the USB-C port and has a higher 2130mAh capacity than the 1800mAh LP-E6 batteries. However, the R6 is compatible with older batteries.
On warm nights, I found the R6 ran fine on one battery for the 3 to 4 hours needed to shoot a time-lapse sequence, with power to spare. However, as noted below, the lack of a top LCD screen means there’s no ongoing display of battery level, a deficiency for time-lapse and deep-sky work.
For demanding applications, especially in winter, the R6 can be powered by an outboard USB power bank that has “Power Delivery” capability. That’s a handy feature. There’s no need to install a dummy battery leading out to a specialized power source.
The R6’s Connection menu with Airplane mode to turn off battery-eating WiFi and Bluetooth.
TIP: Putting the camera into Airplane mode (to turn off WiFi and Bluetooth), turning off the viewfinder, and either switching off or closing the rear screen all helps conserve power. The R6 does not have GPS built in. Tagging images with location data requires connecting to your phone.
VIDEO USE
A major selling point for me was the R6’s low-light video capability. It replaces my Sony A7III, which had been my “go to” camera for real-time 4K movies of auroras.
As best I can tell (from the dimmer auroras I’ve shot to date), the R6 performs equally as well as the Sony. It is able to record good quality (i.e. acceptably noise-free) 4K movies at ISO 25,600 to ISO 51,200. While it can shoot at up to ISO 204,800, the excessive noise makes the top ISO an emergency-use only setting.
The R6’s Movie size and quality options, with 4K and Full HD formats and frame rates.
Comparing the R6 on a dim aurora at various high ISO speeds. Narrated at the camera — excuse the wind noise! Switch to HD mode for the best video playback quality. This was shot in 4K but WordPress plays back only in HD.
The R6 can shoot at a dragged shutter speed as slow as 1/8-second – good, though not as slow as the Sony’s 1/4-second slowest shutter speed in movie mode. That 1/8-second shutter speed and a fast f/1.4 to f/2 lens are the keys to shooting movies of the night sky. Only when auroras get shadow-casting bright can we shoot at the normal 1/30-second shutter speed and at lower ISOs.
As with Nikons (but not Sonys), the Canon R6 saves its movie settings separately from its still settings. When switching to Movie mode you don’t have to re-adjust the ISO, for example, to set it higher than it might have been for stills, very handy for taking both stills and movies of an active aurora, where quick switching is often required.
Unlike the R and Rp, the R6 captures 4K movies from the full width of the sensor, preserving the field of view of wide-angle lenses. This is excellent for aurora shooting.
The R6’s Movie Cropping menu option
A 4K movie of the Moon in full-frame and copped-frame modes, narrated at the camera. Again, this was shot in 4K but WordPress plays back only in HD.Comparing blow-ups of frame-grabbed stills from a full-frame 4K vs. Cropped frame 4K. The latter is less pixellated.
However, the R6 offers the option of a “Movie Crop” mode. Rather than taking the 4K movie downsampled from the entire sensor, this crop mode records from a central 1:1 sampled area of the sensor. That mode can be useful for high-magnification lunar and planetary imaging, for ensuring no loss of resolution. It worked well, producing videos with less pixelated fine details in test movies of the Moon.
Though of course I have yet to test it on one, the R6 should be excellent for movies of total solar eclipses. It can shoot 4K up to 60 frames per second in both full frame and cropped frame. It cannot shoot 6K (buy the R3!) or 8K (buy the R5!).
The R6’s Canon Log settings menu for video files.
Shooting in the R6’s Canon cLog3 profile records internally in 10-bit, preserving more dynamic range in movies, up to 12 stops. During eclipses, that will be a benefit for recording totality, with the vast range of brightness in the Sun’s corona. It should also aid in shooting auroras which can vary over a huge range in brightness.
Grading a cLog format movie in Final Cut under Camera LUT.
TIP: Processing cLog movies, which look flat out of camera, requires applying a cLog3 Look Up Table, or LUT, to the movie clips in editing, a step called “colour grading.” This is available from Canon, from third-party vendors or, as it was with my copy of Final Cut Pro, might be already installed in your video editing software. When shooting, turn on View Assist so the preview looks close to what the final graded movie will look like.
EXPOSURE TRACKING IN TIME-LAPSES
In one test, I shot a time-lapse from twilight to darkness with the R6 in Aperture Priority auto-exposure mode, of a fading display of noctilucent clouds. I just let the camera lengthen the shutter speed on its own. It tracked the darkening sky very well, right down to the camera’s maximum exposure time of 30 seconds, using a fish-eye lens at f/2.8. This demonstrated that the light meter in the R6 was sensitive enough to work well in dim light.
Other cameras I have used cannot do this. The meter fails at some point and the exposure stalls at 5 or 6 seconds long, resulting in most frames after that being underexposed. By contrast, the R6 showed excellent performance, negating the need for special bulb ramping intervalometers for some “holy grail” scenes. Here’s the resulting movie.
A time-lapse of 450 frames from 0.4 seconds to 30 seconds, with the R6 in Av mode. Set to 1080P for the best view! A screenshot from LRTimelapse showing the smoothness of the exposure tracking (the blue line) through the sequence,
In addition, the R6’s exposure meter tracked the darkening sky superbly, with nary a flicker or variation. Again, few cameras can do this. Nikons have an Exposure Smoothing option in their Interval Timers which works well.
The R6 has no such option but doesn’t seem to need it. The exposure did fail at the very end, when the shutter reached its maximum of 30 seconds. If I had the camera on Auto ISO, it might have started to ramp up the ISO to compensate, a test I have yet to try. Even so, this is impressive time-lapse performance in auto-exposure.
MISSING FEATURES
The R6, like the low-end Rp, lacks a top LCD screen for display of camera settings and battery level. In its place we get a traditional Mode dial, which some daytime photographers will prefer. But for astrophotography, a backlit top LCD screen provides useful information during long exposures.
The R6 top and back of camera view.
Without it, the R6 provides no indication of battery level while a shoot is in progress, for example, during a time-lapse. A top screen is also useful for checking ISO and other settings by looking down at the camera, as is usually the case when it’s on a tripod or telescope.
The lack of a top screen is an inconvenience for astrophotography. We are forced to rely on looking at the brighter rear screen for all information. It is a flip-out screen, so can be angled up for convenient viewing on a telescope.
The R6’s flip screen, similar to most other new Canon cameras.
The R6 has a remote shutter port for an external intervalometer, or control via a time-lapse motion controller. That’s good!
However, the port is Canon’s low-grade 2.5mm jack. It works, and is a standard connector, but is not as sturdy as the three-pronged N3-style jack used on Canon’s 5D and 6D DSLRs, and on the R3 and R5. Considering the cost of the R6, I would have expected a better, more durable port. The On/Off switch also seems a bit flimsy and easily breakable under hard use.
The R6’s side ports, including the remote shutter/intervalometer port.
These deficiencies provide the impression of Canon unnecessarily “cheaping out” on the R6. You can forgive them with the Rp, but not with a semi-professional camera like the R6.
INTERVAL TIMER
Unlike the Canon R and Ra (which still mysteriously lack a built-in interval timer, despite firmware updates), the R6 has one in its firmware. Hurray! This can be used to set up a time-lapse sequence, but on exposures only up to the maximum of 30 seconds allowed by the camera’s shutter speed settings, true of most in-camera intervalometers.
The Interval Timer menu page.
For 30-second exposures taken in succession as quickly as possible the interval on the R6 has to be set to 34 seconds. The reason is that the 30-second exposure is actually 32 seconds, true of all cameras. With the R6, having a minimum gap in time between shots requires an Interval not of 33 seconds as with some cameras, but 34 seconds. Until you realize this, setting the intervalometer correctly can be confusing.
Like all Canon cameras, the R6 can be set to take only up to 99 frames, not 999. That seems a dumb deficiency. Almost all time-lapse sequences require at least 200 to 300 frames. What could it possibly take in the firmware to add an extra digit to the menu box? It’s there at in the Time-lapse Movie function that assembles a movie in camera, but not here where the camera shoots and saves individual frames. It’s another example where you just can’t fathom Canon’s software decisions.
Setting the Interval Timer for rapid sequence shots with a 30-second exposure.
TIP: If you want to shoot 100 or more frames, set the Number of Frames to 00, so it will shoot until you tell the camera to stop. But awkwardly, Canon says the way to stop an interval shoot is to turn off the camera! That’s crude, as doing so can force you to refocus if you are using a Canon RF lens. Switching the Mode dial to Bulb will stop an interval shoot, an undocumented feature.
BULB TIMER
As with most recent Canon DSLRs and DSLMs, the menu also includes a Bulb Timer. This allows setting an exposure of any length (many minutes or hours) when the camera is in Bulb mode. This is handy for single long shots at night.
The Bulb Timer menu page. Bulb Timer only becomes an active choice when the camera is on Bulb.
However, it cannot be used in conjunction with the Interval Timer to program a series of multi-minute exposures, a pity. Instead, a separate outboard intervalometer has to be used for taking an automatic set of any exposures longer than 30 seconds, true of all Canons.
In Bulb and Bulb Timer mode, the R6’s rear screen lights up with a bright Timer readout. While the information is useful, the display is too bright at night and cannot be dimmed, nor turned red for night use, exactly when you are likely to use Bulb. The power-saving Eco mode has no effect on this display, precisely when you would want it to dim or turn off displays to prolong battery life, another odd deficiency in Canon’s firmware.
The Bulb Timer screen active during a Bulb exposure. At night it is bright!
The Timer display can only be turned off by closing the flip-out screen, but now the viewfinder activates with the same display. Either way, a display is on draining power during long exposures. And the Timer readout lacks any indication of battery level, a vital piece of information during long shoots. The Canon R, R3 and R5, with their top LCD screens, do not have this annoying “feature.”
TIP: End a Bulb Timer shoot prematurely by hitting the Shutter button. That feature is documented.
IN-CAMERA IMAGE STACKING
The R6 offers a menu option present on many recent Canon cameras: Multiple Exposure. The camera can take and internally stack up to 9 images, stacking them by using either Average (best for reducing noise) or Bright mode (best for star trails). An Additive mode also works for star trails, but stacking 9 images requires reducing the exposure of each image by 3 stops, say from ISO 1600 to ISO 200, as I did in the example below.
The Multiple Exposure menu page.
The result of the internal stacking is a raw file, with the option of also saving the component raws. While the options work very well, in all the cameras I’ve owned that offer such functions, I’ve never used them. I prefer to do any stacking needed later at the computer.
Comparing a single image with a stack of 9 exposures with 3 in-camera stacking methods.
TIP: The in-camera image stacking options are good for beginners wanting to get advanced stacking results with a minimum of processing fuss later. Use Average to stack ground images for smoother noise. Use Bright for stacking sky images for star trails. Activate one of those modes, then control the camera with a separate intervalometer to automatically shoot and internally stack several multi-minute exposures.
SHUTTER OPERATION
Being a mirrorless camera, there is no reflex mirror to introduce vibration, and so no need for a mirror lockup function. The shutter can operate purely mechanically, with physical metal curtains opening and closing to start and end the exposure.
However, the default “out of the box” setting is Electronic First Curtain, where the actual exposure, even when on Bulb, is initiated electronically, but ended by the mechanical shutter. That’s good for reducing vibration, perhaps when shooting the Moon or planets through a telescope at high magnification.
R6 Shutter Mode options.
In Mechanical, the physical curtains both start and end the exposure. It’s the mode I usually prefer, as I like to hear the reassuring click of the shutter opening. I’ve never found shutter vibration a problem when shooting deep sky images on a telescope mount of any quality.
In Mechanical mode the shutter can fire at up to 12 frames a second, or up to 20 frames a second in Electronic mode where both the start and end of the exposure happen without the mechanical shutter. That makes for very quiet operation, good for weddings and golf tournaments!
Electronic Shutter Mode is for fastest burst rates but has limitations.
Being vibration free, Electronic shutter might be great during total solar eclipses for rapid-fire bursts at second and third contacts when shooting through telescopes. Maximum exposure time is 1/2 second in this mode, more than long enough for capturing fleeting diamond rings.
Longer exposures needed for the corona will require Mechanical or Electronic First Curtain shutter. Combinations of shutter modes, drive rates (single or continuous), and exposure bracketing can all be programmed into the three Custom Function settings (C1, C2 and C3) on the Mode dial, for quick switching at an eclipse. It might not be until April 8, 2024 until I have a chance to test these features. And by then the R6 Mark II will be out!
TIP: While the R6’s manual doesn’t state it, some reviews mention (including at DPReview) that when the shutter is in fully Electronic mode the R6’s image quality drops from 14-bit to 12-bit, true of most other mirrorless cameras. This reduces dynamic range. I would suggest not using Electronic shutter for most astrophotography, even for exposures under 1/2 second. For longer exposures, it’s a moot point as it cannot be used.
The menu option that fouls up all astrophotographers using an R-series camera.
TIP: The R6 has the same odd menu item that befuddles many a new R-series owner, found on Camera Settings: Page 4. “Release Shutter w/o Lens” defaults to OFF, which means the camera will not work if it is attached to a manual lens or telescope it cannot connect to electronically. Turn it ON and all will be solved. This is a troublesome menu option that Canon should eliminate or default to ON.
OTHER MENU FEATURES
The rear screen is fully touch sensitive, allowing all settings to be changed on-screen if desired, as well as by scrolling with the joystick and scroll wheels. I find going back to an older camera without a touchscreen annoying – I keep tapping the screen expecting it to do something!
The Multi-Function Button brings up an array of 5 settings to adjust. This is ISO.
The little Multi-Function (M-Fn) button is a worth getting used to, as it allows quick access to a choice of five important functions such as ISO, drive mode and exposure compensation. However, the ISO, aperture and shutter speed are all changeable by the three scroll wheels.
The Q button brings up the Quick Menu for displaying and adjusting key functions.
There’s also the Quick menu activated by the Q button. While the content of the Quick menu screen can’t be edited, it does contain a good array of useful functions, adjustable with a few taps.
Under Custom settings, the Dials and Buttons can be re-assigned to other functions.
Unlike Sonys, the R6 has no dedicated Custom buttons per se. However, it does offer a good degree of customization of its buttons, by allowing users to re-assign them to other functions they might find more useful than the defaults. For example ….
This shows the AF Point button being re-assigned to the Maximize Screen Brightness (Temporary) command.
I’ve taken the AF Point button and assigned it to the Maximize Screen Brightness function, to temporarily boost the rear screen to full brightness for ease of framing.
The AE Lock button I assigned to switch the Focus Peaking indicators on and off, to aid manual focusing when needed.
The Depth of Field Preview button I assigned to switching between the rear screen and viewfinder, through that switch does happen automatically as you put your eye to the viewfinder.
The Set button I assigned to turning off the Rear Display, though that doesn’t have any effect when the Bulb Timer readout is running, a nuisance.
While the physical buttons are not illuminated, having a touch screen makes it less necessary to access buttons in the dark. It’s a pity the conveniently positioned but mostly unused Rate button can’t be re-programmed to more useful functions. It’s a waste of a button.
Set up the Screen Info as you like it by turning on and off screen pages and deciding what each should show.
TIP: The shooting screens, accessed by the Info button (one you do need to find in the dark!), can be customized to show a little, a lot, or no information, as you prefer. Take the time to set them up to show just the information you need over a minimum of screen pages.
LENS AND FILTER COMPATIBILITY
The new wider RF mount accepts only Canon and third-party RF lenses. However, all Canon and third-party EF mount lenses (those made for DSLRs) will fit on RF-mount bodies with the aid of the $100 Canon EF-to-RF lens adapter.
The Canon ER-to-RF lens adapter will be needed to attach R cameras to most telescope camera adapters and Canon T-rings made for older DSLR cameras.
This adapter will be necessary to attach any Canon R camera to a telescope equipped with a standard Canon T-ring. That’s especially true for telescopes with field flatterers where maintaining the standard 55mm distance between the flattener and sensor is critical for optimum optical performance.
The shallower “flange distance” between lens and sensor in all mirrorless cameras means an additional adapter is needed not just for the mechanical connection to the new style of lens mount, but also for the correct scope-to-sensor spacing.
The extra spacing provided by a mirrorless camera has the benefit of allowing a filter drawer to be inserted into the light path. Canon offers a $300 lens adapter with slide-in filters, though the choice of filters useful for astronomy that fit Canon’s adapter is limited. AstroHutech offers a few IDAS nebula filters.
Clip-in filters made for the EOS R, such as those offered by Astronomik, will also fit the R6. Though, again, most narrowband filters will not work well with an unmodified camera.
The AstroHutech adapter allows inserting filters into the light path on telescopes.
TIP: Alternatively, AstroHutech also offers its own lens adapter/filter drawer that goes from a Canon EF mount to the RF mount, and accepts standard 52mm or 48mm filters. It is a great way to add interchangeable filters to any telescope when using an R-series camera, while maintaining the correct back-focus spacing. I use an AstroHutech drawer with my Ra, where the modified camera works very well with narrowband filters. Using such filters with a stock R6 won’t be as worthwhile, as I showed above.
A trio of Canon RF zooms — all superb but quite costly.
As of this writing, the selection of third-party lenses for the Canon RF mount is limited, as neither Canon or Nikon have “opened up” their system to other lens makers, unlike Sony with their E-mount system. For example, we have yet to see much-anticipated RF-mount lenses from Sigma, Tamron and Tokina.
A trio of third party RF lenses — L to R: the TTArtisan 7.5mm f/2 and 11mm f/2.8 fish-eyes and the Samyang/Rokinon AF 85mm f/1.4.
The few third-party lenses that are available, from TTArtisan, Venus Optics and other boutique Chinese lens companies, are usually manual focus lenses with reverse-engineered RF mounts offering no electrical contact with the camera. Some of these wide-angle lenses are quite good and affordable. (I tested the TTArtisan 11mm fish-eye here.)
Until other lens makers are “allowed in,” if you want lenses with auto-focus and camera metadata connections, you almost have to buy Canon. Their RF lenses are superb, surpassing the quality of their older EF-mount equivalents. But they are costly. I sold off a lot of my older lenses and cameras to help pay for the new Canon glass!
Astrophotographers often like to operate their cameras at the telescope using computers running specialized control software. I tested the R6 with two popular Windows programs for controlling DSLR and now mirrorless cameras, BackyardEOS (v3.2.2) and AstroPhotographyTool (v3.88). Both recognized and connected to the R6 via its USB port.
Both programs recognized the Canon R6.
Another popular option is the ASIair WiFi controller from ZWO. It controls cameras via one of the ASIair’s USB ports, and not (confusingly) through the Air’s remote shutter jack marked DSLR. Under version 1.7 of its mobile app, the ASIair now controls Canon R cameras and connected to the R6 just fine, allowing images to be saved both to the camera and to the Air’s own MicroSD card.
With an update in 2021, the ZWOASIair now operates Canon R-series cameras.
The ASIair is an excellent solution for both camera control and autoguiding, with operation via a mobile device that is easier to use and power in the field than a laptop. I’ve not tried other hardware and software controllers with the R6.
TIP: While the R6, like many Canon cameras, can be controlled remotely with a smartphone via the CanonConnect mobile app, the connection process is complex and the connection can be unreliable. The Canon app offers no redeeming features for astrophotography, and maintaining the connection via WiFi or Bluetooth consumes battery power.
A dim red and green aurora from Dinosaur Provincial Park, Alberta, on August 29/30, 2021. This is a stack of 4 exposures for the ground to smooth noise and one exposure for the sky, all 30 seconds at f/2.8 with the Canon 15-35mm RF lens at 25mm and the Canon R6 at ISO 4000.
SUGGESTIONS TO CANON
To summarize, in firmware updates, Canon should:
Fix the low-level amp glow. No camera should have amp glow.
Allow either dimming the Timer readout, turning it red, or just turning it off!
Add a battery display to the Timer readout.
Expand the Interval Timer to allow up to 999 frames, as in the Time-Lapse Movie.
Allow the Rate button to be re-assigned to more functions.
Default the Release Shutter w/o Lens function to ON.
Revise the manual to correctly describe how to stop an Interval Timer shoot.
Allow programming multiple long exposures by combining Interval and Bulb Timer, or by expanding the shutter speed range to longer than 30 seconds, as some Nikons can do.
The Zodiacal Light in the dawn sky, September 14, 2021, from home in Alberta, with the winter sky rising. This is a stack of 4 x 30-second exposures for the ground to smooth noise, and a single 30-second exposure for the sky, all with the TTArtisan 7.5mm fish-eye lens at f/2 and on the Canon R6 at ISO 1600.
CONCLUSION
The extended red sensitivity of the Canon EOS Ra makes it better suited for deep-sky imaging. But with it now out of production (Canon traditionally never kept its astronomical “a” cameras in production for more than two years), I think the R6 is now Canon’s best camera (mirrorless or DSLR) for all types of astrophotography, both stills and movies.
However, I cannot say how well it will work when filter-modified by a third-party. But such a modification is necessary only for recording red nebulas in the Milky Way. It is not needed for other celestial targets and forms of astrophotography.
A composite showing about three dozen Perseid meteors accumulated over 3 hours of time, compressed into one image showing the radiant point of the meteor shower in Perseus. All frames were with the Canon R6 at ISO 6400 and with the TTArtisan 11mm fish-eye lens at f/2.8.
The low noise and ISO invariant sensor of the R6 makes it superb for nightscapes, apart from the nagging amp glow. That glow will also add an annoying edge gradient to deep-sky images, best dealt with when shooting by the use of LENR or dark frames.
As the image of the Andromeda Galaxy, M31, at the top of the blog attests, with careful processing it is certainly possible to get fine deep-sky images with the R6.
For low-light movies the R6 is Canon’s answer to the Sony alphas. No other Canon camera can do night sky movies as well as the R6. For me, it was the prime feature that made the R6 the camera of choice to complement the Ra.
I test out a fast and very wide lens designed specifically for Sony mirrorless cameras.
In a previous test I presented results on how well the Sony a7III mirrorless camera performs for nightscape and deep-sky photography. It works very well indeed.
But what about lenses for the Sony? Here’s one ideal for astrophotography.
TL;DR Conclusions
Made for Sony e-mount cameras, the Venus Optics 15mm f/2 Laowa provides excellent on- and off-axis performance in a fast and compact lens ideal for nightscape, time-lapse, and wide-field tracked astrophotography with Sony mirrorless cameras. (UPDATE: Venus Optics has announced versions of this lens for Canon R and Nikon Z mount mirrorless cameras.)
I use it a lot and highly recommend it.
Size and Weight
While I often use the a7III with my Canon lenses by way of a Metabones adapter, the Sony really comes into its own when matched to a “native” lens made for the Sony e-mount. The selection of fast, wide lenses from Sony itself is limited, with the new Sony 24mm G-Master a popular favourite (I have yet to try it).
However, for much of my nightscape shooting, and certainly for auroras, I prefer lenses even wider than 24mm, and the faster the better.
Aurora over Båtsfjord, Norway. This is a single 0.8-second exposure at f/2 with the 15mm Venus Optics lens and Sony a7III at ISO 1600.
The Laowa 15mm f/2 from Venus Optics fills the bill very nicely, providing excellent speed in a compact lens. While wide, the Laowa is a rectilinear lens providing straight horizons even when aimed up, as shown above. This is not a fish-eye lens.
The Venus Optics 15mm realizes the potential of mirrorless cameras and their short flange distance that allows the design of fast, wide lenses without massive bulk.
While compact, at 600 grams the Laowa 15mm is quite hefty for its size due to its solid metal construction. Nevertheless, it is half the weight of the massive 1250-gram Sigma 14mm f/1.8 Art. The Laowa is not a plastic entry-level lens, nor is it cheap, at $850 from U.S. sources.
For me, the Sony-Laowa combination is my first choice for a lightweight travel camera for overseas aurora trips
However, this is a no-frills manual focus lens. Nor does it even transfer aperture data to the camera, which is a pity. There are no electrical connections between the lens and camera.
However, for nightscape work where all settings are adjusted manually, the Venus Optics 15mm works just fine. The key factor is how good are the optics. I’m happy to report that they are very good indeed.
Testing Under the Stars
To test the Venus Optics lens I shot “same night” images, all tracked, with the Sigma 14mm f/1.8 Art lens, at left, and the Rokinon 14mm SP (labeled as being f/2.4, at right). Both are much larger lenses, made for DSLRs, with bulbous front elements not able to accept filters. But they are both superb lenses. See my test report on these lenses published in 2018.
The next images show blow-ups of the same scene (the nightscape shown in full below, taken at Dinosaur Provincial Park, Alberta), and all taken on a tracker.
I used the Rokinon on the Sony a7III using the Metabones adapter which, unlike some brands of lens adapters, does not compromise the optical quality of the lens by shifting its focal position. But lacking a lens adapter for Nikon-to-Sony at the time of testing, I used the Nikon-mount Sigma lens on a Nikon D750, a DSLR camera with nearly identical sensor specs to the Sony.
Vignetting
A tracked image with the Venus Optics Laowa 15mm at f/2. Click or tap on an image to download a full-resolution JPG for closer inspection.
Above is a tracked image (so the stars are not trailed, which would make it hard to tell aberrations from trails), taken wide open at f/2. No lens correction has been applied so the vignetting (the darkening of the frame corners) is as the lens provides.
As shown above, when used wide open at f/2 vignetting is significant, but not much more so than with competitive lenses with much larger lenses, as I compare below.
And the vignetting is correctable in processing. Adobe Camera Raw and Lightroom have this lens in their lens profile database. That’s not the case with current versions (as of April 2019) of other raw developers such as DxO PhotoLab, ON1 Photo RAW, and Raw Therapee where vignetting corrections have to be dialled in manually by eye.
A tracked image with the Venus Optics Laowa 15mm stopped down 1 stop to f/2.8.
When stopped down to f/2.8 the Laowa “flattens” out a lot for vignetting and uniformity of frame illumination. Corner aberrations also improve but are still present. I show those in close-up detail below.
Above, I compare the vignetting of the three lenses, both wide open and when stopped down. Wide open, all the lenses, even the Sigma and Rokinon despite their large front elements, show quite a bit of drop off in illumination at the corners.
The Rokinon SP actually seems to be the worst of the trio, showing some residual vignetting even at f/2.8, while it is reduced significantly in the Laowa and Sigma lenses. Oddly, the Rokinon SP, even though it is labeled as f/2.4, seemed to open to f/2.2, at least as indicated by the aperture metadata.
Above I show lens sharpness on-axis, both wide open and stopped down, to check for spherical and chromatic aberrations with the bright blue star Vega centered. The red box in the Navigator window at top right indicates what portion of the frame I am showing, at 200% magnification in Photoshop.
On-axis, the Venus Optics 15mm shows stars just as sharply as the premium Sigma and Rokinon lenses, with no sign of blurring spherical aberration nor coloured haloes from chromatic aberration.
Focusing is precise and easy to achieve with the Sony on Live View. My unit reaches sharpest focus on stars with the lens set just shy of the middle of the infinity symbol. This is consistent and allows me to preset focus just by dialing the focus ring, handy for shooting auroras at -35° C, when I prefer to minimize fussing with camera settings, thank you very much!
The Laowa and Sigma lenses show similar levels of off-axis coma and astigmatism, with the Laowa exhibiting slightly more lateral chromatic aberration than the Sigma. Both improve a lot when stopped down one stop, but aberrations are still present though to a lesser degree.
However, I find that the Laowa 15mm performs as well as the Sigma 14mm Art for star quality on- and off-axis. And that’s a high standard to match.
The Rokinon SP is the worst of the trio, showing significant elongation of off-axis star images (they look like lines aimed at the frame centre), likely due to astigmatism. With the 14mm SP, this aberration was still present at f/2.8, and was worse at the upper right corner than at the upper left corner, an indication to me that even the premium Rokinon SP lens exhibits slight lens de-centering, an issue users have often found with other Rokinon lenses.
Real-World Examples – The Milky Way
This is a stack of 8 x 2-minute exposures with the Venus Optics Laowa 15mm lens at f/2 and Sony a7III at ISO 800, on the Sky-Watcher Star Adventurer tracker. A single exposure taken through the Kenko Softon A filter layered in with Lighten mode adds the star glows, though exaggerates the lens distortion on the bright stars.This is a stack of 12 exposures for the ground, mean combined to smooth noise, and one exposure for the sky, all 30 seconds at f/2 with the Laowa 15mm lens on the Sony a7III camera at ISO 6400. These were the last frames in a 340-frame time-lapse sequence.
The fast speed of the Laowa 15mm is ideal for shooting tracked wide-field images of the Milky Way, and untracked camera-on-tripod nightscapes and time-lapses of the Milky Way.
Image aberrations are very acceptable at f/2, a speed that allows shutter speed and ISO to be kept lower for minimal star trailing and noise while ensuring a well-exposed frame.
Real World Examples – Auroras
Aurora over the Churchill Northern Studies Centre, Churchill, Manitoba. This is 6 seconds at f/2 with the 15mm Venus Optic lens and Sony a7III at ISO 3200.Aurora from near Yellowknife, NWT, September 8, 2018. This is 2.5-seconds at f/2 with the Venus Optics 15mm lens and Sony a7IIII at ISO 3200.The Northern Lights from at sea when leaving the Lofoten Islands, Norway heading toward the mainlaind, from Stamsund to Bodo, March 3, 2019. This was from the Hurtigruten ship the ms Trollfjord. This is a single 1-second exposure for at f/2 with the 15mm Venus Optics lens and Sony a7III at ISO 6400.
Where the Laowa 15mm really shines is for auroras. On my trips to chase the Northern Lights I often take nothing but the Sony-Laowa pair, to keep weight and size down.
Above is an example, taken from a moving ship off the coast of Norway. The fast f/2 speed (I wish it were even faster!) makes it possible to capture the Lights in only 1- or 2-second exposures, albeit at ISO 6400. But the fast shutter speed is needed for minimizing ship movement.
Video Links
The Sony also excels at real-time 4K video, able to shoot at ISO 12,800 to 51,200 without excessive noise.
Aurora Reflections from Alan Dyer on Vimeo.
The Sky is Dancing from Alan Dyer on Vimeo.
The Northern Lights At Sea from Alan Dyer on Vimeo.
Click through to see the posts and the videos shot with the Venus Optics 15mm.
As an aid to video use, the aperture ring of the Venus Optics 15mm can be “de-clicked” at the flick of a switch, allowing users to smoothly adjust the iris during shooting, avoiding audible clicks and jumps in brightness. That’s a very nice feature indeed.
In all, I can recommend the Venus Optics Laowa 15mm lens as a great match to Sony mirrorless cameras, for nightscape still and video shooting. UPDATE: Versions for Canon R and Nikon Z mount mirrorless cameras will now be available.
October has brought clear skies and some fine celestial sights. Here’s a potpourri of what was up from home.
We’ve enjoyed some lovely early autumn weather here in southern Alberta, providing great opportunities to see and shoot a series of astronomical events.
Conjunctions
Venus and Mars in close conjunction in the dawn sky on October 5, 2017. Venus is the brightest object; Mars is below it; while the star above Venus is 4th magnitude Sigma Leonis. The foreground is illuminated by light from the setting Full Moon in the west. This is a single 1-second exposure with the 135mm lens at f/2 and Canon 60Da at ISO 800.
On October 5, Venus and Mars appeared a fraction of a degree apart in the dawn twilight. Venus is the brightest object, just above dimmer but red Mars. This was one of the closest planet conjunctions of 2017. Mars will appear much brighter in July and August 2018 when it makes its closest approach to Earth since 2003.
Satellites: The Space Station
An overhead pass of the ISS on October 5, 2017, with the Full Moon rising in the east at left. The ISS is moving from west (at right) to east (at left), passing nearly overhead at the zenith at centre. North is at the top, south at bottom in this fish-eye lens image with an 8mm Sigma fish-eye lens on the Canon 6D MkII camera. This is a stack of 56 exposures, each 4 seconds long at an interval of 1 second.
The Space Station made a series of ideal evening passes in early October, flying right overhead from my site at latitude 51° N. I captured it in a series of stacked still images, so it appears as a dashed line across the sky. In reality it looks like a very bright star, outshining any other natural star. Here, it appears to fly toward the rising Moon.
Satellites: Iridiums
A pair of nearly simultaneous and parallel Iridium satellite flares, on October 9, 2017, as they descended into the north. The left or westerly flare was much brighter and with a sharp rise and fall in brightness. While it was predicted to be mag. -4.4 I think it got much brighter, perhaps mag -7, but very briefly. These are Iridium 90 (left) and Iridium 50 (right). This is a stack of 40+ exposures each, 2 seconds at 1-second intervals, with the Sigma 24mm lens at f/1.4 and Nikon D750 at ISO 6400.
Often appearing brighter than even the ISS, Iridium satellite flares can blaze brighter than even Venus at its best. One did so here, above, in another time-lapse of a pair of Iridium satellites that traveled in parallel and flared at almost the same time. But the orientation of the reflective antennas that create these flares must have been better on the left Iridium as it really shot up in brilliance for a few seconds.
Auroras
A circumpolar star trail composite with Northern Lights, on October 13, 2017, shot from home in southern Alberta. The Big Dipper is at bottom centre; Polaris is at top centre at the axis of the rotation. The bottom edge of the curtains are rimmed with a pink fringe from nitrogen. This is a stack of 200 frames taken mostly when the aurora was a quiescent arc across the north before the substorm hit. An additional single exposure is layered in taken about 1 minute after the main star trail set to add the final end point stars after a gap in the trails. Stacking was with the Advanced Stacker Plus actions using the Ultrastreaks mode to add the direction of motion from the tapering trails. Each frame is 3 seconds at f/2 and ISO 6400 wth the Sigma 14mm lens and Nikon D750.
Little in the sky beats a fine aurora display and we’ve had several of late, despite the Sun being spotless and nearing a low ebb in its activity. The above shot is a composite stack of 200 images, showing the stars circling the celestial pole above the main auroral arc, and taken on Friday the 13th.
A decent aurora across the north from home in southern Alberta, on Friday the 13th, October, 2017, though these frames were taken after midnight MDT. 3 seconds at f/2 and ISO 6400 wth the Sigma 14mm lens and Nikon D750.
This frame, from some 1300 I shot this night, October 13, captures the main auroral arc and a diffuse patch of green above that pulsed on and off.
You can see the time-lapse here in my short music video on Vimeo.
Friday the 13th Aurora from Alan Dyer on Vimeo.
It’s in 4K if your monitor and computer are capable. It nicely shows the development of the aurora this night, from a quiescent arc, through a brief sub-storm outburst, then into pulsing and flickering patches. Enjoy!
What all these scenes have in common is that they were all shot from home, in my backyard. It is wonderful to live in a rural area and to be able to step outside and see these sites easily by just looking up!
The Northern Lights dance in the solstice sky over a prairie lake.
This was a surprise display. Forecasts called for a chance of Lights on Saturday, June 24, but I wasn’t expecting much.
Nevertheless, I headed to a nearby lake (Crawling Lake) to shoot north over the water, not of the Lights, but of noctilucent clouds, a phenomenon unique to the summer solstice sky and our latitudes here on the Canadian prairies.
But as the night darkened (quite late at solstice time) the aurora began to appear in the deepening twilight.
I started shooting and kept shooting over the next four hours. I took a break from the time-lapses to shoot some panoramas, such as the headline image at top, capturing the sweep of the auroral oval over the lake waters.
Just on the horizon you can see some noctilucent clouds (NLCs) as well – clouds so high they are lit by the Sun all night long. NLCs sit at the same height as the bottom of the auroral curtains. But they appear here lower and much farther away, which they likely were, sitting farther north than the auroral band.
A 360° panorama of the aurora and Milky Way in the twilight sky of a summer solstice evening.
I also shot this 360° panorama (above) capturing the arc of the aurora and of the Milky Way. This is a stitch of 8 segments with a 14mm lens mounted in portrait mode.
I’ve assembled the several time-lapse sequences I shot into a short music video. Check it out on Vimeo here. Click through to the Vimeo page for more technical information on the video sequences.
As always click HD, and relax and enjoy the dancing lights over the calm waters of a prairie lake on a summer evening.
The solar winds blew some fine auroras our way this past week.
Oh, that I had been in the North last week, where the sky erupted with jaw-dropping displays. I could only watch those vicariously via webcams, such as the Explore.org Northern Lights Cam at the Churchill Northern Studies Centre.
But here in southern Alberta we were still treated to some fine displays across our northern sky. The image below is from March 1, from my rural backyard.
A full-frame fish-eye lens image of the aurora on March 1 with curtains reaching up into the Big Dipper.
The Sun wasn’t particularly active and there were no coronal mass ejections per se. But a hole in the corona let a wind of solar particles through to buffet our magnetosphere, stirring up geomagnetic storms of Level 4 to 5 scale. That’s good enough to light our skies in western Canada.
A 160° panorama of the main auroral oval to the north on March 2 about 11:40 pm MST.
Above is the display from March 2, taken over a frozen pond near home. I like how the Lights reflect in the ice.
This night, for about 30 minutes, an odd auroral form appeared that we see from time to time at our latitudes. A wider panorama shows this isolated arc well south of the main auroral oval and forming a thin arc stretching across the sky from west to east.
A 220° panorama of the isolated arc to the west (left) and east (right) and the main auroral oval to the north.
The panorama above shows just the western and eastern portion of the arc. Overhead (image below) it looked like this briefly.
The overhead portion of the isolated arc at its peak.
Visually, it appeared colourless. But the camera picks up this isolated arc’s usual pink color, with a fringe of white and sometimes (here very briefly) a “picket-fence” effect of green rays.
The western portion of the isolated auroral arc at its peak.
This is the view of the isolated arc to the west. Erroneously called “proton arcs,” these are not caused by incoming protons. Those produce a very diffuse, usually sub-visual glow. But the exact nature of these isolated arcs remains a mystery.
As we head into solar minimum in the nest few years, displays of Northern Lights at lower latitudes will become less frequent. But even without major solar activity, last week’s displays demonstrated we can still get good shows.
The Northern Lights once again performed beautifully from Churchill, Manitoba, making the sky dance with colours.
As I do each winter, I spent time in Churchill, Manitoba at the wonderful Churchill Northern Studies Centre, attending to groups of “aurora tourists” there to check an item off their bucket list – seeing the Northern Lights.
In the 30 years the courses have been presented only one group has ever come away not seeing the Lights. Well, make that two now. A bout of unseasonably warm weather in my first week brought clouds every night. Mild temperatures to be sure. But we want it to be -25° C! That’s when it is clear.
Our first clear night was very clear, affording us a wonderful view of the winter Milky Way before the Lights came out. Such a view is unusual from the North, as the Lights usually wash out the sky, which they did later this night. Even here, you can see some wisps of green aurora.
Normal temperatures didn’t return until week 2 of my stay. The second group fared much better, getting good displays on 4 of their 5 nights there, more typical of Churchill.
A few determined die-hards from Group 1 (here shooting the Lights) stayed on a couple of more nights, and were rewarded with the views they had come for. They were happy!
In the images here, at no time did the auroral activity exceed a level of Kp 3 (on a scale of 0 to 9) and was often just Kp 1 or 2. Farther south no one would see anything. But at latitude 58° N Churchill lies under the auroral oval where even on quiet nights the aurora is active and often spectacular.
In speaking to a Dene elder who presents a cultural talk to each of the CNSC groups, Caroline said that to the Dene of northern Canada their word for the Lights translates to “the sky is dancing.” Wonderful! It did for us.
The Auroras of Churchill from Alan Dyer on Vimeo.
This music video presents a montage of time-lapse movies I shot over four nights, from January 25 to 29, 2017. They provide an idea of what we saw under the dancing sky.
As usual, choose HD and enlarge to full screen to view the movie. Or go to Vimeo with the V button.
With the harvest in full swing, the aurora and Moon lit the fields on a clear September evening.
This night, September 19, showed prospects for a good display of Northern Lights, and sure enough as it got dark a bright, well-defined arc of Lights danced to the north.
I headed off to some photogenic spots near home, on the prairies of southern Alberta. By the time I got in place, the aurora had already faded.
However, the arc still photographed well and provided a great backdrop to these rural scenes. The rising Moon, then 3 days past full, lit the foreground. In the lead image, lights from combines and trucks working the field behind the bins are at left.
A diffuse arc of aurora and the rising waning gibbous Moon light the sky over the old barn near home at harvest time, September 19, 2016. The glows from Strathmore and Calgary light the clouds to the west at far left. The Big Dipper shines over the barn, with Capella and the stars of Perseus at right. The Pleiades are rising to the left of the Moon. This is a panorama of 5 segments, with the 20mm lens and Nikon D750. Stitched with ACR.
The image above was from later in the night, just down the road at a favourite and photogenic grand old barn.
The Big Dipper and a diffuse aurora over the old barn near home, in southern Alberta, on September 16, 2016. The waning gibbous Moon off camera at right provides the illumination. This is a stack of 4 exposures, averaged, for the ground to smooth noise and one exposure for the sky to keep the stars untrailed. All 13 seconds at f/2.8 with the Sigma 20mm lens, and ISO 1600 with the Nikon D750. Diffraction spikes on stars added with Noel Carboni’s Astronomy Tools actions.
Note the Big Dipper above the barn. A waning and rising Moon like this is great for providing warm illumination.
The time around equinox is usually good for auroras, as the interplanetary and terrestrial magnetic fields line up better to let in the electrons from the Sun. So perhaps we’ll see more Lights, with the Moon now gradually departing the evening sky.
The aurora has been lighting up our skies a lot in recent nights, in a great sweeping arc across the northern sky.
It’s been a good week or so for Northern Lights, with several nights in a row of fine displays. These images are from one night, taken near home in southern Alberta, on September 2.
The lead image at top shows the display at its best, with the arc of curtains reflected in a nearby pond. The green curtains fade to shades of magenta as they tower into the high atmosphere, as one process of glowing oxygen giving off green light transitions to another emitting red light.
A 180° panorama of the Northern Lights exhibiting classic concentric ars across the north, with an isolated arc to the east at far right. This is a stitch of 10 segments, each 2-second exposures with the 20mm Sigma Art lens at f/1.6 and Nikon D750 at ISO 3200. Stitched with PTGui.A little later the curtains had changed form, into a more homogenous arc above a set of sharper curtains below that are farthest north. People in northern Alberta or the Northwest Territories would have been seeing these curtains dancing above them.
What we are seeing is the classic curving arc of the auroral oval, the ring of light created by electrons raining down into our atmosphere in roughly an oval sweeping across the continent and centred on the magnetic pole in the Canadian Arctic.
However, at right, you can see a odd detached bit of more southerly aurora, with a dominant red colour.
An isolated auroral arc to the east on September 2, 2016, shot from near home during a fine display with active curtains to the north at left. A single 8-second exposure with the 20mm lens at f/1.4 and Nikon D750 at ISO 3200.This is a closeup, showing the characteristic form of these odd “isolated arcs” — usually featureless, often thin, without much motion, and often red.
An isolated auroral arc to the west on September 2, 2016, shot from home during a fine display with active curtains to the north. A single 13-second exposure with the 20mm lens at f/1.4 and Nikon D750 at ISO 3200.Later, the arc had brightened and expanded to cross the sky. The above view is looking west from home, with the arc now displaying a mix of pink, white and green.
An isolated overhead auroral arc on September 2, 2016, shot from home during a fine display with active curtains to the north. The Summer Triangle stars stand out here due to high cloud fuzzing their images. A single 13-second exposure with the 20mm lens at f/1.4 and Nikon D750 at ISO 3200.Here, we are looking up the isolated arc, with the impression of it being a thin sheet seen at an angle, with the bottom green component being closest and the red top being highest and farthest away.
An isolated auroral arc to the southeast on September 2, 2016, shot from home during a fine display with active curtains to the north. This one displays the classic picket fence apperarance, with fingers of green aurora that moved along the band during a time-lapse of the scene. A single 13-second exposure with the 20mm lens at f/1.4 and Nikon D750 at ISO 3200.This is the view looking southeast to the strange aurora. For a time it broke up and displayed a “picket fence” formation. And it moved!
Just what these isolated arcs are is a mystery. They have been called “proton arcs,” under the assumption they are caused by incoming protons, not electrons. But while there are such things as proton arcs and auroras, they are diffuse and invisible to the eye and camera in normal visible light. So these features are not proton arcs.
Nevertheless, these odd arcs are not like the usual auroral curtains, and likely have a different origin. But just what is still the object of research. Images by amateur astronomers such as these can help in the study.
What a night this was – perfect skies over an iconic location in the Rockies. And an aurora to top it off!
On August 31 I took advantage of a rare clear night in the forecast and headed to Banff and Moraine Lake for a night of shooting. The goal was to shoot a time-lapse and stills of the Milky Way over the lake.
The handy planning app, The Photographer’s Ephemeris, showed me (as below) that the Milky Way and galactic centre (the large circles) would be ideally placed over the end of the lake as astronomical twilight ended at 10:30 p.m. I began the shoot at 10 p.m. as the sky still had some twilight blue in it.
I planned to shoot 600 frames for a time-lapse. From those I would extract select frames to create a still image. The result is below.
This is looking southwest with the images taken about 11:15 pm on August 31, 2016.The ground is illuminated by a mix of starlight, lights from the Moraine Lake Lodge, and from a display of aurora brightening behind the camera to the north. The starclouds of Scutum and Sagittarius are just above the peaks of the Valley of Ten Peaks. This is a stack of 16 images for the ground, mean combined to smooth noise, and one exposure for the sky, untracked, all 15 seconds at f/2 with the Sigma 20mm Art lens and Nikon D750 at ISO 6400. The frames are part of a 450-frame time-lapse.
As the caption explains, the still is a composite of one exposure for the sky and 16 in succession for the ground, averaged together in a technique to smooth noise. The camera wasn’t tracking the sky, so stacking sky images isn’t feasible, as much as I might like to have the lower noise there, too. (There are programs that attempt to align and stack the moving sky but I’ve never found they work well.)
About midnight, the Valley of Ten Peaks around the lake began to light up. An aurora was getting active in the opposite direction, to the north. With 450 frames shot, I stopped the Milky Way time-lapse and turned the camera the other way. (I was lazy and hadn’t hefted a second camera and tripod up the steep hill to the viewpoint.)
The lead-image panorama is the first result, showing the sweeping arc of Northern Lights over Desolation Valley.
The Northern Lights in a fine Level 4 to 5 display over Desolation Valley at Moraine Lake, Banff National Park, on the night of August 31/Sept 1. This is one frame from a 450-frame time-lapse with the aurora at its best. This is a 2-second exposure at f/2 with the Sigma 20mm Art lens and Nikon D750 at ISO 5000.
Still images shot, I began a time-lapse of the Lights, grabbing another 450 frames, this time using just 2-second exposures at f/1.6 for a rapid cadence time-lapse to help freeze the motion of the curtains.
The final movies and stills are in a music video here:
I ended the night with a parting shot of the Pleiades and the winter stars rising behind the Tower of Babel formation. I last photographed that scene with those same stars in the 1980s using 6×7 film.
The early winter stars rising behind the Tower of Babel formation at Moraine Lake, Banff National Park, with a bright aurora to the north at left. Visible are the Pleiades at centre, and Capella and the stars of Auriga at left. Just above the mountain are the Hyades and Taurus rising. At top are the stars of Perseus. Aries is just above the peak of Babel. The aurora in part lights the landscape green. This is a stack of 16 images for the ground, mean combined to smooth noise, and 1 image for the sky, untracked, all for 15 seconds at f/2.2 with the Sigma 20mm Art lens, and Nikon D750 at ISO 3200. All with LENR turned on.
In a summer of clouds and storms, this was a night to make up for it.
It was a great night for shooting meteors as the annual Perseids put on a show.
For the Perseid meteor shower I went to one of the darkest sites in Canada, Grasslands National Park in southern Saskatchewan, a dark sky preserve and home to several rare species requiring dark nights to flourish – similar to astronomers!
This year a boost in activity was predicted and the predictions seemed to hold true. The lead image records 33 meteors in a series of stacked 30-second exposures taken over an hour.
It shows only one area of sky, looking east toward the radiant point in the constellation Perseus – thus the name of the shower.
Extrapolating the count to the whole sky, I think it’s safe to say there would have been 100 or more meteors an hour zipping about, not bad for my latitude of 49° North.
A lone Perseid meteor streaking down below the radiant point in Perseus, with the sky and landscape lit by the waxing gibbous Moon, August 11, 2016. Perseus is rising in the northeast, Andromeda is at right, with the Andromeda Galaxy right of centre. Cassiopeia is at top. Taken from the 70 Mile Butte trailhead in Grasslands National Park, Saskatchewan.
The early part of the evening was lit by moonlight, which lent itself to some nice nightscapes scenes but fewer meteors.
The 2016 Perseid meteor shower, in a view looking north to the Big Dipper and with the radiant point in Perseus at upper right, the point where the meteors appear to be streaking from. This is a stack of 10 frames, shot over one hour from 1:38 a.m. to 2:37 a.m. CST. The camera was on the Star Adventurer tracker so all the sky frames aligned. The ground is from a stack of four frames, mean combined to smooth noise, and taken with the tracker motor off to minimize ground blurring, and taken at the start of the sequence. All exposures 40 seconds at f/3.2 with the 16-35mm lens and Canon 6D at ISO 6400.
But once the Moon set and the sky darkened the show really began. Competing with the meteors was some dim aurora, but also the brightest display of airglow I have even seen.
It was bright enough to be visible to the eye as grey bands, unusual. Airglow is normally sub-visual.
But the camera revealed the airglow bands as green, red, and yellow, from fluorescing oxygen and sodium atoms. The bands slowly rippled across the sky from south to north.
Airglow is something you can see only from dark sites. It is one of the wonders of the night sky, that can make a dark sky not dark!
TECHNICAL:
The lead image is stack of 31 frames containing meteors (two frames had 2 meteors), shot from 1:13 am to 2:08 a.m. CST, so over 55 minutes. The camera was not tracking the sky but was on a fixed tripod. I choose one frame with the best visibility of the airglow as the base layer. For every other meteor layer, I used Free Transform to rotate each frame around a point far off frame at upper left, close to where the celestial pole would be and then nudged each frame to bring the stars into close alignment with the base layer, especially near the meteor being layered in.
This placed each meteor in its correct position in the sky in relation to the stars, essential for showing the effect of the radiant point accurately.
Each layer above the base sky layer is masked to show just the meteor and is blended with Lighten mode. If I had not manually aligned the sky for each frame, the meteors would have ended up positioned where they appeared in relation to the ground but the radiant point would have been smeared — the meteors would have been in the wrong place.
Unfortunately, it’s what I see in a lot of composited meteor shower shots.
It would have been much easier if I had had this camera on a tracker so all frames would have been aligned coming out of the camera. But the other camera was on the tracker! It took the other composite image, the one looking north.
The ground is a mean combined stack of 4 frames to smooth noise in the ground. Each frame is 30 seconds at f/2 with the wonderful Sigma 20mm Art lens and Nikon D750 at ISO 5000. The waxing Moon had set by the time this sequence started, leaving the sky dark and the airglow much more visible.
My latest music video includes images, time-lapses and real-time videos of the Northern Lights shot in February and March 2016 in Churchill.
While I’ve posted my recent images of the aurora here and at many social media sites, all the videos I shoot take more work before they are ready to unveil to the public. Videos work best when set to music.
In this case, I’m very pleased to have received permission from EverSound Music to incorporate the music of one of my favourite artists, John Adorney, in my latest music video montage. The selection is If a Rose Could Speak, from his 2013 album The Wonder Well. It features vocals by Daya.
The video incorporates still images, as well as time-lapse sequences, and real-time videos of the Northern Lights.
The all-sky time-lapses are intended to be projected in digital planetarium theatres, recreating the scene on their 360° domes.
Please click on the V for Vimeo button to really see the video well. And select 1080p HD for the best image quality. And do share!
ABOUT THE VIDEO
I shot all scenes at the Churchill Northern Studies Centre, near Churchill, Manitoba, on the shore of Hudson Bay at a latitude of 58° North. Churchill’s location places it under the usual location of the auroral oval, providing spectacular displays of Northern Lights even on nights when locations to the south are seeing nothing.
I was at the CNSC to present sets of 5-night aurora viewing programs to guests from across North America. Click the link above for more details on their programs. The 2016 aurora season is over, but we’ll have more aurora programs in January and February of next year.
TECHNICAL
I shot all images with Canon 6D and Nikon D750 DSLR cameras, usually at ISO 3200. The fish-eye all-sky sequences were with a Sigma 8mm lens on the Canon, while most of the still images and other full-frame time-lapses were with the Sigma 20mm Art lens on the Nikon. For the “rapid-cadence” time-lapses I used 1- to 2-second exposures at an interval of one second.
The real-time video clips were with the Nikon – set to ISO 25600 – and the Sigma wide open at f/1.4. While these clips are prone to digital noise, they do record the fast movement and subtle colour of the aurora much as the eye saw it. See my earlier music video with real-time clips shot February 12 for more examples of these.
The all-sky sequences were processed through LRTimelapse v4 software, to handle the huge range in brightness of the Lights. Real-time video clips were processed in Photoshop with the Camera Raw filter.
Temperatures ranged from a bitter -35° C to just (!) -15° C on most nights.
I kept the long-duration, all-sky, time-lapse camera going by placing it in a Camera Parka (www.atfrostedlens.com) and inserting disposable hand warmer packs inside the insulated parka. It worked very well, making it possible to shoot for up to 3 hours. Without it, the battery died after an hour.
It was a night to remember, when the sky exploded with a jaw-dropping display of Northern Lights.
Warnings went out around the world and the aurora meters were hitting high numbers. By sunset we were charged up with high expectations of seeing the aurora in high gear dancing in the twilight. We were not disappointed.
From our location at the Churchill Northern Studies Centre near Churchill, Manitoba (latitude 58° North), we see aurora almost every clear night, even when indicators are low.
But this night, the Index was reading 7 on the scale of 0 to 9. I was afraid, after all the effort to come north to see the Lights, the Lights would abandon us and head south. Not so!
The night did start with the Lights in the south, as shown in the panorama image at top. It takes in a full 360°, with the aurora arcing from east to west across the southern sky in Orion. The north over the Centre is clear.
But the curtains soon moved back north and engulfed most of our sky for most of the rest of the night.
Participants in our aurora tour group took their aurora “selfies,” and just looked up in awe at one of nature’s great sky shows. When the last of the group turned in at 2:30 a.m. the Lights were still going.
What follows is a selection — just a few! — of the still shots I took. I also shot time-lapse sequences and real-time videos. All those will take more editing to turn them into a music video, still to come.
Enjoy!
A lone observer gazes skyward at the start of a wonderful aurora display on March 6, 2016, as the curtains begin to appear and dance in the deep blue twilight. This was at the Churchill Northern Studies Centre, Churchill, Manitoba.
A lone observer gazes at an array of colourful curtains of aurora during an active display, March 6, 2016, with curtains in the evening twilight adding blue tints to the sky and tops of the curtains, as well as the greens and reds from oxygen. Curtains toward the horizon are more yellow due to atmospheric extinction. Jupiter is rising at left, then near opposition.
Auroral curtains converge at the zenith in the evening twilight during a Kp Index 7 night of aurora in Churchill, Manitoba. Blue twilight adds the blue tints to the sky and curtains.
Our group of Learning Vacations tourists enjoy the start of a fine display of Northern Lights at the Churchill Northern Studies Centre, March 6, 2016. As curtains appear to the east, another array of curtains shines to the west behind them with a strong purple tint lighting the sky and ground. The Andromeda Galaxy sits amid the curtains.
Aurora watchers looking south to a bright curtain of Northern Lights while other curtains rippled behind them to the north. This was a fabulous all-sky display, March 6, 2016. The temperature was about -25° C.
The green aurora lights the ground and snow green in a spectacular display March 6, 2016. This is looking northeast from the Churchill Northern Studies Centre, Churchill, Manitoba.
A series of curtains of aurora, in a layered series across the sky, from the March 6, 2016 display in Churchill, Manitoba,
The aurora over the Churchill Northern Studies Centre building, home to Arctic research and to many programs for tourists about northern ecology and science. The March Learning Vacations aurora tour group experienced a fabulous display this night, March 6, 2016.
Some of our group of Learning Vacations aurora tourists outside the Churchill Northern Studies Centre enjoying the sky show on March 6, 2016 on a night with a Level 5 to 7 aurora.
What do you see in the swirling patterns of aurora curtains at the zenith? They rapidly take many forms as they move about. This was the wonderful display of March 6, 2016.
My 10-minute video captures the Northern Lights in real-time video – no time-lapses here!
I hadn’t tried this before but the display of February 12, 2016 from Churchill, Manitoba was so active it was worth trying to shoot it with actual video, not time-lapse still frames.
I used very high ISO speeds resulting in very noisy frames. But I think the motion and colours of the curtains as they ripple and swirl more than overpower the technical limitations. And there’s live commentary!
Select HD and Enter Full Screen for the best quality.
Scenes have been edited for length, and I did not use all the scenes I shot in the final edit. So the scenes you see in the 10-minute video actually took place over about 20 minutes. But each scene is real-time. They show the incredibly rapid motion and fine structure in the auroral curtains, detail blurred in long multi-second exposures.
I used a Nikon D750 camera at ISO speeds from 12,800 to 51,200. While it is certainly very capable of shooting low-light video, the D750 is not optimized for it. A Sony a7s, with its larger pixels and lower noise, would have been a better camera. Next time!
The lens, however, was key. I used the new Sigma 20mm Art lens which, at f/1.4, is the fastest lens in its focal length class. And optical quality, even wide open, is superb.
The temperature was about -30 degrees C, with a windchill factor of about -45 C. It was cold! But no one in the aurora tour group of 22 people I was instructing was complaining. Everyone was outside, bundled up, and enjoying the show.
It was what they had traveled north to see, to fulfill a life-long desire to stand under the Northern Lights. Everyone could well and truly check seeing the aurora off their personal bucket lists this night.
For more information about aurora and other northern eco-tourism tours offered by the Churchill Northern Studies Centre, see churchillscience.ca
From Churchill, Manitoba the Northern Lights dance almost every night over the boreal forest.
This year, as in the last two years, I have traveled to the shores of a frozen Hudson Bay and to the town of Churchill, Manitoba to view and photograph the aurora borealis.
I’m instructing two tour groups at the Churchill Northern Studies Centre, one this week and one last week, in the science and sagas of the aurora and on how to shoot the Lights. The participants in the groups are fabulous, keenly interested and unfazed by the cold and wind.
From Churchill’s latitude of 58° N, we are under the main auroral oval almost every night. Even on nights with low official activity levels, as they were on all the nights I shot these images, we still get sky-filling displays.
Here’s a selection of still images from the last week of shooting, with clear skies on all but a couple of nights. There’s still room in our March sessions!
Circumpolar star trails and aurora over the boreal forest at the Churchill Northern Studies Centre, Churchill, Manitoba, on Feb 9, 2016. This is a stack of 250 frames shot over one hour (until the battery died) for a time-lapse but here stacked for a single image star trail using the Advanced Stacker Plus actions and Long Streaks effect. Each exposure was 15 seconds at f/2.8 with the 15mm lens and Canon 6D at ISO 6400.
An all-sky aurora display of multiple curtains of aurora borealis over the boreal forest at the Churchill Northern Studies Centre, in Churchill, Manitoba, taken on Feb 5, 2016. The view is looking almost due north. Jupiter is at right. The Big Dipper is at centre frame. This is one frame from a 380-frame time-lapse sequence shot for digital dome projection in planetariums. This is a 20-second exposure at f/5 (stopped down by accident — should have been f/3.5) with the 8mm Sigma fish-eye lens and Canon 6D at ISO 3200. Temperature was -35° C. But no wind!
Participants in the Arctic Skies tour and course observe and photograph the Northern Lights from the upper level observing deck at the Churchill Northern Studies Centre, Churchill, Manitoba on Feb 10, 2016, the first night of their tour. A Level 1 to 2 display provided a good first night show though with bitterly cold temperatures and wind chills of near -50° C. This is a single exposure of 8 seconds at f/1.4 with the 20mm Sigma Art lens and Nikon D750 at ISO 3200.
The Northern Lights over the Churchill Northern Studies Centre on Feb 8/9, 2016 during a weak all-sky display. The arcs lay primarily in the south when the display was at its best this night. Orion and the Pleiades are just setting in the west over the town of Churchill. This is a 20 second exposure at f/2.8 with the 15mm full-frame fish-eye lens and Canon 6D at ISO 3200.
A panorama across the northern horizon of the sweeping curtains of the aurora, taken from the observation deck of the Churchill Northern Studies Centre, Manitoba. I shot this on Feb 10, 2016 on the first night of the Arctic Skies tour group week. Vega is low in the north at left of centre, Arcturus is the bright star at right of centre. This is a 4-segment panorama, stitched with Adobe Camera Raw, with each segment 5 seconds at f/1.4 with the 20mm Sigma lens and Nikon D750 at ISO 3200.
Curtains of the aurora looking northeast and east toward Leo rising (at upper right) and Jupiter (at right), over the boreal forest of the Hudson Bay Lowlands near Churchill, Manitoba, on Feb 5, 2016. This is a single frame from a 680-frame time-lapse. This is a 4-second exposure at f/1.4 with the Sigma 20mm Art lens and Nikon D750 at ISO 3200.
Vertical curtains of aurora converging to the zenith overhead over the snowy boreal forest at the Churchill Northern Studies Centre, Churchill, Manitoba. I shot this Feb 4, 2016 on a night with temperatures of -35° C with a slight wind. The Big Dpper is at right. Exposure was 10 seconds at f/2.8 with the 15mm lens anf Canon 6D at ISO 3200.
A lone figure gazes skyward at the aurora over the Churchill Northern Studies Centre, Churchill, Manitoba. I shot this Feb 4, 2016 on a night with temperatures of -35° C with a slight wind. Exposure was 13 seconds at f/2.8 with the 15mm lens anf Canon 6D at ISO 3200.
A wide vertical portrait of the Northern Lights in the northern sky, with the stars of the Big Dipper and Polaris above centre. Shot from the upper deck of the Churchill Northern Studies Centre on a very windy night with wind chills of -50°, so standing in the wind to take this image was bitter! You grab a few images and retreat! This is a single 15-second exposure at f/2.8 with the 15mm lens and Canon 6D at ISO 3200.
The February Arctic Skies tour group watching and photographing the aurora from the second floor deck of the Churchill Northern Studies Centre, where it is out of the wind, which this night was producing -50° C wind chills. This is a single 6-second exposure at f/2.8 with the 15mm lens and Canon 6D at ISO 6400.
A self-portrait of me watching the Northern Lights from the upper deck of the Churchill Northern Studies Centre, looking south to the winter stars of Orion, Gemini and Auriga. This was Feb 11, 2016, a very windy, almost blizzard night with blowing snow and reduced visibility. However the aurora did appear through the haze and clouds. In the distance are the buildings of the old Churchill Rocket Range. This is a single 15-second exposure at f/2.8 with the 15mm lens and Canon 6D at ISO 3200.
The New Year’s sky was filled with Northern Lights, a panorama of stars, and a comet at dawn.
It was a busy night for stargazing as 2015 turned to 2016. A fine display of Northern Lights kicked off the celebrations, as curtains danced in the east as Orion rose (below).
Toward midnight the Lights kicked up again, now with Jupiter (on the horizon) and Leo rising in the east (below).
I shot hundreds of frames for time-lapse sequences, and assembled them into a short music video. Click on the buttons to enlarge it to HD.
Just before midnight, while the second time-lapse was going and the aurora was still active, but before the Last Quarter Moon rose to light the sky, I shot a set of tracked images taking in the entire winter sky from horizon to well past the zenith.
That image is at top. It takes in the winter sky and northern winter Milky Way, from Canis Major just above the horizon, up past Orion, then on up to Perseus and Cassiopeia at top right.
It shows how Orion and Sirius, the night sky’s brightest star, stand nearly due south at midnight on New Year’s Eve.
Comet Catalina (C/2013 US10) near Arcturus in the constellation of Bootes, at pre-dawn on the morning of January 1, 2016, with the Last Quarter Moon nearby illluminating the sky. A long, faint ion tail is visible extending 2 to 3 degrees to the right while a brighter but stubby dust tail extends down to the south. Shot from home using the 200mm Canon telephoto and 1.4x extender at f/4.5 for a stack of 8 x 2-minute exposures at ISO 800 with the Canon 6D. Median combined stacked to eliminate satellite trails. The comet is slightly blurred due to its own motion in that time.The final show of the night, now before dawn on New Year’s Day 2016, was Comet Catalina sitting right next to the bright spring star Arcturus. The comet was visible in the moonlight as a fuzzy object next to brilliant Arcturus, but the photo begins to show its faint tails, just standing out in the moonlit sky.
The comet will become more visible later this month once the waning Moon exits the dawn sky, as Catalina is expected to remain a nice binocular comet for most of the month as it heads high into northern sky.
Learn the basics of shooting nightscape and time-lapse images with my three new video tutorials.
In these comprehensive and free tutorials I take you from “field to final,” to illustrate tips and techniques for shooting the sky at night.
At sites in southern Alberta I first explain how to shoot the images. Then back at the computer I step you through how to process non-destructively, using images I shot that night in the field.
Tutorial #1 – The Northern Lights
This 24-minute tutorial takes you from a shoot at a lakeside site in southern Alberta on a night with a fine aurora display, through to the steps to processing a still image and assembling a time-lapse movie.
Tutorial #2 – Moonlit Nightscapes
This 28-minute tutorial takes you from a shoot at Waterton Lakes National Park on a bright moonlit night, to the steps for processing nightscapes using Camera Raw and Photoshop, with smart filters, adjustment layers and masks.
Tutorial #3 – Star Trails
This 35-minute tutorial takes you from a shoot at summer solstice at Dinosaur Provincial Park, then through the steps for stacking star trail stills and assembling star trail time-lapse movies, using specialized programs such as StarStaX and the Advanced Stacker Plus actions for Photoshop.
As always, enlarge to full screen for the HD versions. These are also viewable at my Vimeo channel.
The Moon, planets and Northern lights provided a wonderful show in the dawn sky.
What a superb scene this was. On October 8 the waning crescent Moon shone near Venus (brightest) and Regulus, with red Mars and bright Jupiter paired below.
If that wasn’t enough, as the wide-angle panorama below shows, the Northern Lights were also ending a night of performance, with an arc along the horizon and pulsing waves rising up the sky to the northeast near the planet grouping.
The panorama also sweeps right, to the south, to take in the winter Milky Way and constellations of Orion and Canis Major. Click on the image to bring it up full screen.
The Moon will appear near Mars and Jupiter on the morning of October 9, and then the three planets will begin to converge for a tight gathering for a few mornings around October 25.
Be sure to wake early for the dawn sky show that continues all this month!
The Northern Lights dance over the badlands of Dinosaur Provincial Park, a World Heritage Site.
Aurora alerts called for a fine display on Friday, September 11. Forewarned, I headed to one of my favourite shooting spots at Dinosaur Provincial Park, and aimed three cameras at the sky. It didn’t take long before the lights appeared, right on cue.
The display started out with lots of promise, but did fade after 12:30 a.m., just when it was supposed to be peaking in intensity. I let the cameras run for a while but eventually stopped the shutters and packed it in…
…But not before I captured this odd bit of aurora in the east, shown below, that appeared as an isolated and stationary band pulsing up and down in brightness, but with little movement.
I’ve seen these before and have never heard a good explanation of what process creates such an effect, with a patch of sky appearing to “turn on” and off.
You can see the effect at the end of the time-lapse compilation, linked below from Vimeo.
As usual, please enlarge to full-screen and watch in HD for the best quality.
Unfortunately, a patrolling park official checking on things, spoiled some frames with her truck’s headlights. It’s one of the hazards of time-lapse imaging.
As a final image, here are all the fish-eye lens frames stacked into one image, to create a single star trail showing the sky rotating about the celestial pole.
Each exposure was 20 seconds at f/3.5 with the Sigma 8mm lens and at ISO 6400 with the Canon 6D. The ground comes from a stack of 16 images taken early in the sequence turned into a smart object and mean combined with Mean stack mode, to average out and smooth noise. The sky comes from 198 exposures, Lighten stacked using the Advanced Stacker Actions from StarCircleAcademy.com.
It’s been a good week for auroras, with a promise of more to come perhaps, as we approach equinox, traditionally a good time for magnetic field lines to align, funnelling solar storm particles into our magnetosphere.
The lights came out and danced in my sky in the early morning hours.
The early warning signs weren’t calling for anything too impressive for a display last night, September 8/9, but the sky surprised us with a fantastic display of Northern lights.
I shot with one camera – it was very late, or very early! – but shot enough frames to create this short 1.5-minute music video.
I photographed the sequence with a single fixed-camera aimed east toward a bright auroral curtain, showing fast pulsing forms common to the later stages of a substorm. But then a new bright curtain sweeps in from the north and the display brightens even more in a new substorm. The display then fades.
The exposures were taken over an hour from 1:30 a.m. to 2:30 a.m. MDT. Each was a 2-second exposure with an interval of 2 seconds, shot with the Nikon D750 at ISO 3200 and Sigma 24mm lens at f/2, for a total of just over 850 frames.
The summer Milky Way shines over the Milk River and the sandstone formations of Writing-on-Stone Provincial Park.
Earlier this week I spent two nights shooting at a favourite site in southern Alberta, near the U.S. border. Here, the Milk River winds through a small canyon and coulees lined with eroded sandstone formations called hoodoos. Carved on those hoodoos are ancient graffiti – petroglyphs dating back hundreds of years recording life on the plains. Thus the name: Writing-on-Stone.
It’s a beautiful place, especially so at night. I was there to shoot video scenes for an upcoming “How to Photograph the Milky Way” tutorial. And to collect images for the tutorial.
Above is a shot that is one frame from a time-lapse sequence, one that captures a meteor and the Milky Way over the Milk River, with the Sweetgrass Hills of Montana in the distance.
This image is from a set of exposures I took with the camera and ultra-wide 15mm lens tracking the turning sky, to prevent the stars from trailing in long exposures. A set of images with the tracker motor turned off supplied the sharp ground.
It shows the sweep of the summer Milky Way, with some clouds and forest fire smoke intruding to the south.
In both images the ground is green because, in part, it is being lit by an aurora display going on behind the camera to the north.
Here’s the view looking east, with a green aurora fringed with red lighting the northern sky.
The display on the night of July 22/23 formed a classic arc across the north. This was my panoramic view of the vast auroral oval that was wrapping around the planet at far northern latitudes. Here, I was at 49° north, almost on the Canada-U.S. border, and well south of the main oval.
In all, it was a magical two nights at a scenic and sacred site.
On June 22 I shot the great all-sky aurora with three cameras all shooting time-lapse frames. Here’s the result!
The rapidly moving and astonishing patterns of the aurora are ideal for time-lapse photography. Except for a total eclipse of the Sun, nothing else in the sky changes with such dramatic and jaw-dropping intensity.
For the June 22 outbreak of Northern Lights across the sky, I shot some 2,200 frames, and assembled them into the time-lapse compilation here.
One sequence records the entire sky and the complete development of the display, from when it first appeared in twilight about 11:15 p.m., to when it faded into a diffuse glow across the sky by 1:15 a.m. I shot that sequence with an 8mm fish-eye lens, to capture a scene suitable for projection in a digital planetarium theatre.
I shot the other sequences with 15mm and 24mm lenses. All total, the 3-minute movie comes from about 50 gigabytes of images.
Still images from this night, and from the time-lapse sequences, are in my previous blog post.
I hope you enjoy the video. Do enlarge it to full screen 1080p HD.
Aurora watchers were on alert! Look up after sunset on June 22 and the sky should be alive with dancing lights.
And the predictions were right.
I headed out to a nearby lake in preparation for seeing and shooting the show. And as soon as the sky got dark enough the Lights were there, despite the bright solstice twilight.
The display reached up to the zenith, as seen in my fish-eye images, like the one below. I shot with three cameras, all shooting time-lapses, with the fish-eye camera recording the scene suitable for projection in a digital planetarium.
However, it was apparent we here in western Canada were seeing the end of the display that had been going on for hours during an intense geomagnetic storm. The aurora was most intense early in the evening, with a minor outburst about 11:30 to 11:45 pm MDT.
The aurora then subsided in structure and turned into a more chaotic pulsating display, typical of the end of a sub-storm.
However, an attraction of this display was its juxtaposition over another storm, an earthly one, flashing lightning to the northwest of me.
By 1 a.m. MDT the display, while still widespread over a large area of the northern sky, had turned into a diffuse glow.
But 60 gigabytes of images later, I headed home. The time-lapse compilation will come later!
The summer solstice sky was filled with twilight glows, planets, and dancing Northern Lights.
What a magical night this was. The evening started with the beautiful sight of the waxing crescent Moon lined up to the left of the star Regulus, and the planets Jupiter and Venus (the brightest of the trio), all set in the late evening twilight.
They are all reflected in the calm waters of a prairie lake.
I shot the above photo about 11 p.m., as late a twilight as we’ll get. From here on, after solstice, the Sun sets sooner and the sky darkens earlier.
Later, about 12:30 a.m., as predicted by aurora apps and alert services, a display of Northern Lights appeared on cue to the north. It was never very bright to the eye, but the camera nicely picks up the wonderful colours of a solstice aurora.
At this time of year the tall curtains reaching up into space catch the sunlight, with blue tints adding to the usual reds fringing the curtain tops, creating subtle shades of magenta and purple.
The display made for a photogenic subject reflected in the lake waters.
The northern lights returned to our prairie sky in a colourful display near solstice.
Last night, Sunday, June 7, I headed out to a nearby abandoned farmyard to shoot the planets setting into the western twilight. But as the sky darkened the faint arc of an aurora appeared to the northeast, promising a fine show after midnight.
Sure enough, as the sky got dark, which doesn’t happen until very late now at 50° north in mid-June, the aurora began to dance.
The top image is a frame from the display at its best. It is one of 400 frames I shot for a time-lapse sequence.
This image is from the start of the sequence, just as the aurora was beginning to get good, with curtains of green laced with tints of magenta and purple. At this time of year the tops of the curtains often look blue, as they scatter direct sunlight streaming over the pole.
However, the colours were not visible to the unaided eye — only the camera brought out the colours, as this display never got intensely bright to the eye.
Toward the end of the sequence the display began to spread out, becoming patchy and less colourful, a typical behaviour after a substorm outburst.
More activity may be in store this week. So keep looking up! And check Spaceweather.com for alerts.
The skies were spectacular at a pioneer homestead on the Saskatchewan prairie.
Canada’a province of Saskatchewan bills itself as the “Land of Living Skies,” and that was certainly true last week when I spent three perfect nights under some of the darkest skies in the country.
The location was the Old Man on His Back Prairie & Heritage Conservation Area, deep in dry southwest Saskatchewan, between Grasslands National Park and Cypress Hills Interprovincial Park, two favourite places of mine for nightscape photography and astronomy.
The Conservation Area reclaims and preserves original short grass prairie habitat. It is named for the formation to the west that is said to resemble the profile of Napi, the creator being of Siksika legends, who after creating the world, lay back here to rest.
The land was once a working ranch first settled by the Butala family. The white pioneer house in my photos dates from that time. It was built in Montana and moved here in the 1920s.
In the mid-1990s Peter and Sharon Butala transferred their land to the Nature Conservancy of Canada, to create an island of original prairie amid the heavily grazed land around it.
For astronomers, the Area serves also as an island of darkness amid intruding light pollution. The region is very dark, with few lights and manmade sky-glows on the horizon.
My 360° panorama above shows that the greatest glows come from the arc of the aurora to the north and the arch of the Milky Way stretching across the sky. This is a stargazer’s paradise.
My 2-minute compilation of time-lapse videos and still images taken over three crystal clear nights attempts to capture the wonder of the night sky from such a dark site. Be sure to enlarge the video to full screen to view it.
It was in the little white house that Sharon Butala wrote some of her best-selling books retelling stories of her life on the prairie, notably The Perfection of the Morning, and Wild Stone Heart.
In the latter book, Sharon writes:
“At night the Milky Way glittered and gleamed above us, fathomlessly deep and numberless, the constellations wheeled slowly across the sky with the seasons, and the moon came and went, sometimes white as a maiden’s face, sometimes a looming orange sphere … under such an endless, open sky.”
– Sharon Butala, Wild Stone Heart (Harper Collins, 2000)
A strange red arc of aurora moved slowly across the sky on May 10.
All indicators looked favourable early in the evening on May 10 for a good auroral display later that night, and sure enough we got one. But it was an unusual display.
From my site in southern Alberta, the northern sky did have a diffuse glow of “normal” green aurora that never did take much form or structure.
But overhead the aurora took the form of an arc across the sky, starting as an isolated ray in the southeast initially, then reaching up to arch across the sky with what looked to the eye like a colourless band.
But the camera showed it as a red arc, with just a fringe of green curtains appearing for a few minutes.
Be sure to click HD and enlarge the video to fill your screen.
The time-lapse movie shows the sequence, over about 90 minutes, with 170 frames playing back at 12 frames per second. You can see the red arc develop, then become more narrow, then exhibit a few green curtains. Then it fades away.
Large-scale pulses also brighten the whole sky momentarily.
The other images are individual frames taken during the evening, showing snapshots of the red arc development, as it became more narrow in structure and gained green curtain-like fringes.
Presumably the red structure was very high in the atmosphere while the green curtains attached to it that did appear hung down from the high-altitude red arc.
I shot all images with an 8mm fish-eye lens to capture most of the sky. The camera is looking north toward Polaris, with the Big Dipper almost directly overhead near the centre of the frames.
The main image at top is a star-trail stack of 80 frames showing the sky’s circumpolar motion around Polaris and the aurora blurred and blended over 45 minutes of motion. I stacked the frames with the Advanced Stacker Actions from StarCircleAcademy.com
The aurora dances behind a pioneer homestead on the Alberta prairies.
After a stay of five months in New Mexico I arrived back in Alberta earlier this week, and was greeted tonight, April 15, with a display of Northern Lights. They’ve been very active in the last month, but I’ve seen nothing of them from where I was in New Mexico.
But here in southern Alberta, I just walk out onto my back deck and there they are! An email alert prompted me to have a look, after predictions earlier in the day called for little activity tonight. But indicators picked up nicely late in the evening.
I headed to an abandoned pioneer homestead near my acreage. A photogenic foreground always adds to the scene.
A little further down the road is a prairie pond, ruffled a little by wind tonight, blurring the reflection I was hoping to capture.
It’s nice to be back under the Northern Lights. Bring them on!
My new 3-minute music video compiles still and time-lapse imagery of the aurora I shot in February 2015 from Churchill, Manitoba.
Churchill’s location at 58° North on the shore of Hudson Bay puts it directly under the main auroral oval, the zone of greatest auroral activity. Over the 9 nights, 2 were cloudy, with a roaring blizzard.
But on the 8 clear nights we saw aurora every night. I shot time-lapses on 6 of those nights, shooting about 3,500 frames, most of which appear in the final cut of this movie.
Despite the amazing displays we saw, on no night was the auroral activity index (on a scale of 0 to 9) higher than 2 or 3. These were all “normal” quiet nights for auroras in Churchill. Anyone farther south would have seen little in their sky on most of these nights.
I shot many of the time-lapses with an 8mm spherical fish-eye lens, to create sequences suitable for projection in digital planetarium domes. One other time-lapse sequence (the last in this movie) I shot with a 15mm full-frame fish-eye. Even it is not wide enough to take in the entire display when the Lights fill the sky.
Exposures were typically 10 to 15 seconds at f/3.5 and ISO 1600 to 4000, all with the Canon 6D. I powered it from its lone internal battery. Amazingly, despite temperatures that were considered extreme even for Churchill (often -32° C at night) the batteries lasted 90 to 150 minutes allowing me to take lots of frames with no battery change or perhaps just one battery change. Churchill is very dry and only on one night did I have an issue with the lens frosting up.
Music is by Dan Phillipson, his composition “Into the Unknown,” purchased for royalty-free use through Triple Scoop Music. I edited the movie in Apple Aperture, with a title sequence created in Photoshop. Processing of the original images was with Adobe Camera Raw, Photoshop, and LRTimelapse, with assembly of movie frames done with Sequence for MacOS.
I hope you enjoy it! Do click on the Enlarge button to watch it full screen. It may take a while to start playing.
Last night the sky exploded with waves of green and pink as the Northern Lights danced in the bitter cold.
With blizzard conditions forecast for the next two days, last night might have been our last for viewing the aurora from Churchill. But if so, we ended on a high note.
The aurora appeared on schedule again at about 9 to 9:30 p.m., following my evening lecture, as it has done every clear night for the last couple of weeks. It began as a sweeping arc to the north, as above, then moved south to encompass the entire sky.
About 11 p.m. the sky burst open with waves of green arcs, but with generous tints of red and magenta that the camera picks up easily. To the eye, the reds are barely visible unless the aurora gets very bright.
Despite the bitterly cold temperatures of -34° C with a -50° wind chill, everyone in the tour group braved the night to take in the sight. And many managed to work their cameras and tripods, no small feat under such conditions, to get great shots.
The groups this week and last saw aurora every clear night, with clear nights on at least 3 out of the 5 nights of each course. Not a bad take, fulfilling everyone’s “bucket list” dream of standing under the aurora borealis.
It was a bitterly cold night for watching the dancing Northern Lights.
When Environment Canada issues Extreme Cold warnings for Churchill, you know its cold! With temperatures at -32° C and with high winds last night, the wind chill equivalent was -50° C.
But that didn’t stop us from watching the Lights!
I nicely finished my evening lecture at 9 pm when the Lights appeared on cue. They were faint at first, but then brightened nicely by 10 pm. The show was over by midnight, a well-timed and convenient display.
The 22 participants in this week’s course all bundled up and headed out, onto the second floor viewing deck and out onto the ground for views and photos of the aurora.
This was not a brilliant display – the official activity level was still reading only 1 or 2 on scale of 0 to 9. But it provided us with some beautiful curtains and lovely colours. The hazy appearance is from high clouds and local blowing snow.
The views from the Deck overlooking the boreal forest make for some nice photo opportunities, from a spot largely out of the constant westerly winds.
We have three more nights here, though snow is forecast for the last two. Tonight may be our last night to enjoy the Northern Lights. But all are happy with what they have seen and shot so far.
The Northern Lights have performed beautifully the last few nights, presenting curtains of light dancing across the sky.
Two nights ago in Churchill, Manitoba we were treated to a “storm level” show of aurora, with the Lights all across the sky in green curtains waving and curling before our eyes.
The curtains tower several hundred kilometres up into the atmosphere, from the lower edge at about 80 km up (still high above the stratosphere) to the curtain tops at about 400 km altitude at the edge of space.
The camera picks up the colours far better than the eye can, recording not only the predominant green hues but also shades of pink, magenta and red.
The magentas and reds come from the sections of the curtains at the highest altitudes, from the top of the auroral curtains. Here, where the atmosphere is a near vacuum, sparse oxygen atoms can glow with a red emission line.
However, there must be a blue component as well, leading to the magenta or pink tones, as in my photos here. Nitrogen can glow in blues and purples and might be contributing to the colours.
The top two photos are from Tuesday night, Feb 17, when storm levels of 5 were in effect worldwide.
Lower down, at about 100 km altitude, the air is denser and oxygen glows with a brighter green hue, which the eye can detect more easily.
The photo above from last night, with an activity level of just 2, also shows most of the sky covered with a faint emission, with a patchy appearance, with dark “holes” also moving and flowing in the time-lapse movies I shot.
Closer to the horizon, and far to the north, the aurora brightens into the more characteristic green snaking curtains.
This image from three nights ago shows an usually coloured aurora at the start of the night, glowing mostly a deeper red and orange.
The green was still off in the distance far to the east. It arrived a few minutes later as green curtains swept in over us.
But the initial red was from low-energy electrons lighting up just high-altitude oxygen. Only when the higher energy particles arrived did the sky light up green.
I shot all these images with an 8mm fish-eye lens as frames in time-lapse sequences intended for use projected in digital planetarium domes, where the 360° “all-sky” scene would be recreated on the dome as it was in real life.
If you are with a planetarium, contact me if you’d like to get aurora clips.
Our second group of aurora tourists has arrived today at the Churchill Northern Studies Centre, and the weather is warming to a high of -20° C. Balmy!
We’re hoping for more fine displays, though the space weather forecast calls for a quiet magnetic field in the next few days.
Beautiful curtains of light draped across the sky despite the blizzard blowing below.
Last night, February 16, was the last night for aurora viewing for the first aurora tour group hosted by the Churchill Northern Studies Centre.
Despite predictions calling for an active display, we had given up hope of seeing anything, as a blizzard had been raging all day and into the evening. But about 10 pm I knocked on doors down the hall — get up! The Lights are out!
Against all odds, skies cleared enough to reveal a wonderful all-sky display of Northern Lights, with multiple curtains of light snaking over the sky.
The view above overlooks the now derelict launch buildings of the abandoned Churchill Rocket Range, in use from the late 1950s until the 1980s. Some 3500 rockets were fired from here in its heyday, shot into the active auroras that occur here almost nightly under the auroral oval.
This view overlooks the boreal forest on the frozen shore of Hudson Bay, and shows the multiple curtains that twisted and turned across the sky.
Tonight’s display was marked by fringes of magenta, rather than the deeper reds we observed 2 nights ago.
Winds were howling and snow was blowing, but from the shelter of the Centre’s second floor observing deck we could view the display in windless comfort, despite the -30° C temperatures.
The group was delighted at having this bonus viewing night. Now the concern is whether the blizzard will abate enough to allow flights in and out of Churchill Airport. The group might get another night under the Lights!
The Northern Lights dance overhead each night from Churchill, Manitoba.
If you really want to see the Northern Lights, don’t wait for them to come to you. Instead, you go to them.
For the second year in a row I’ve been able to participate as an instructor during week-long aurora courses and tours at the Churchill Northern Studies Centre on the shore of Hudson Bay. The site is at 58° latitude, far enough north to place us directly under the main auroral oval, the prime location for viewing the Northern Lights.
If it’s clear, a view of dancing arcs and curtains of aurora is almost guaranteed. Two nights ago we had a marvellous display, despite official indicators of aurora strength and geomagnetic activity all reading low or even zero.
Still, the Lights came out and danced across the sky.
The top photo is selfie of me standing the display in a 360° all-sky image shot for use in a planetarium. The research centre building is at left. The view is generally looking north.
This view is from the second floor deck of the centre, usually a bit more sheltered from the wind. It allows a good view to the north and east, where displays typically start, as they did this night. Feb. 13.
As the display developed the curtain rose up into the sky to arc from east to west across heavens.
This image, also a 360° fish-eye image taken with an 8mm lens, shows the display at its best, with rippling curtains hanging overhead. It’s part of a time-lapse sequence.
The next night, February 14, was marked by fainter but an unusually red aurora, appropriate for Valentine’s Day perhaps. Or the 50th anniversary of our red and white Canadian flag.
The sky was a little hazier, but the aurora shone through, initially only with a red and orange tint, colours we could just see with the unaided eye – the long exposures of the camera really bring out the colours the eye can only just perceive when the aurora is dim.
The green curtains, seen here in the distance, did arrive a few minutes later, lighting up the curtains in the more usual green colour, with just upper fringes of red.
It seems the red is from low-energy electrons exciting oxygen only in the upper atmosphere. Only later did the more energetic electrons arrive to excite the green oxygen transition that occurs at lower altitudes.
With luck, I’ll have more nights to stand under the auroral oval and look up in wonder at the Northern Lights.
The sky lights up in greens and reds from aurora and airglow.
This has been a good week for aurora watching. Friday night the Northern Lights danced again, this time in a sky already filled with a more subtle phenomenon, airglow.
Airglow adds its own bands of reds and greens across the sky, seen here as arcs from left (west) to centre (north) and into the east. Airglow is light from fluorescing air molecules releasing energy absorbed from the Sun by day.
The aurora adds the brighter green curtains across the north with vertical beams of yellow and red shooting up.
A weird structure which I assume is from the aurora is the sharp-edged yellow band at left in the west. It lasted no more than 2 or 3 minutes, enough to record in three frames of this 7-segment 180° panorama taken near home at an array of grain bins, now filled from the harvest.
To the west and east urban light pollution adds glows of yellow to the horizon.
The autumn constellations rise into a colourful sky at Dinosaur Provincial Park, Alberta.
Last night the sky started out beautifully clear but as it got darker it was apparent even to the eye that the sky wasn’t really dark, despite the lack of any Moon.
The camera captured the culprit – extensive green airglow, to the east at right. A faint aurora also kicked up to the north, at left, adding a red glow. Light pollution from gas plants nearby and from Brooks 50 km away added yellow to the sky scattered off haze and incoming cloud.
The sky colours added to the scene of the autumn constellations of Cassiopeia, Andromeda, Perseus and Pegasus rising in the east. The Andromeda Galaxy is at centre. The Pleiades is (are?) just rising over the hill.
This is a composite of five stacked and tracked exposures for the sky (with the camera on the Star Adventurer tracking mount) and four stacked but untracked exposures I took at the end of the sequence for the sharp ground (I just turned the tracker motor off for these).
The sky presents a panoramic show from Pyramid Island in Jasper National Park.
What a wonderful place to watch the stars. Last night I walked out to Pyramid Island in Jasper, via the historic boardwalk built in the 1930s. The site provides a panorama view around the lake and sky.
To the left is the “mainland.” Just left of centre the waxing gibbous Moon is setting over Pyramid Lake.
To the right of centre, the boardwalk leads out the small island, with Pyramid Mountain behind it.
To the right of the frame, a faint aurora glows to the northeast over the still waters of the lake.
This is a 360° panorama shot with the 15mm full-frame fish-eye lens in portrait orientation, with the segments stitched with PTGui software.
After shooting some panoramas I walked to the end of the island and shot this view looking north and northwest to Pyramid Mountain. The Big Dipper is to the right of the peak, and the aurora lights up the northern horizon at right.
As I shot these images, the night was absolutely quiet. Until the wolves began to howl at the north end of the lake, in mournful howls that echoed across the waters.
It was one of the most spine-chilling moments I’ve experienced in many years of shooting landscapes at night.
The northern lights dance, and light the pioneer homes at the old Larson Ranch in Grasslands National Park.
What a night this was! I arrived at the Larson Ranch site in the Frenchman River valley to shoot some Milky Way panoramas, when, right on cue, the aurora broke loose.
Some aurora had been there since nightfall as a diffuse arc, but about 11 p.m. local time (Central Standard Time in Saskatchewan) the curtains began to dance and pulse with activity as a sub-storm hit, raining solar particles onto our atmosphere from down the magnetic tail of the Earth.
The aurora glow lit the old pioneer buildings of the Larson Ranch, one of the stops on the scenic backroad drive through the Park.
The Larsons ran their ranch by the Frenchman, or Whitemud River, from the 1920s until 1985 when they sold their ranch to the National Park system, forming the first land for the new Grasslands National Park.
The house at left is the original home of cowboy author Will James, who lived here for a time working on ranches in the valley before moving to the United States. He was from Quebec, where he was Ernest Dufault.
I shot this 360° panorama using a 15mm lens, shooting 8 segments at 45° spacings, each a 1-minute exposure at ISO 2500 and f/3.2 with the Canon 6D. I used PTGui software to stitch the segments into a equi-rectangular projection pan.
The Milky Way and the Northern Lights arch across the sky in the Frenchman River valley of Grasslands National Park.
This 360° panorama takes in two arches of light:
• The Milky Way rising out of the northeast at left and stretching across the sky overhead at top and down into the southwest at right of centre.
• And the Northern Lights, as an arc of green and red across the northern horizon. They got brighter and higher later this night, August 26/27, as my previous post shows.
Bands of green airglow also stretch across the sky from east to west.
I shot this last night from the Frenchman River coulee, a wide valley cut at the end of the Ice Age by glacial run off, and occupied today by the meandering Frenchman River. It winds through the heart of Grasslands National Park and makes its way to the Missouri River to drain into the Gulf of Mexico, one of only a handful of rivers in Canada to do so.
The river and wide pasture land made this a choice place for a ranch. For decades this was home to the 76 Ranch, one of the largest in Canada. At right is its old wood corral, in front of the Milky Way and its “Dark Horse” structure in the dark lanes of the Milky Way. Appropriate I thought.
The only lights visible are from spotlights from researches conducting studies of the nocturnal black-footed ferret. Otherwise, the site was as dark as you’ll find it in southern Canada.
I assembled this panorama using PTGui software, from 8 segments shot with a 14mm lens in portrait orientation, all untracked 80-second exposures at ISO 4000 and f/2.8.
The Northern Lights dance over the prairie landscape of Grasslands National Park.
The aurora warnings were out for last night but I hadn’t expected to see much. But about 10:30 pm a faint arc appeared to the northeast. The display brightened about local midnight (Central Standard Time here in Saskatchewan) and became fairly active for a time.
The main arc increased in intensity and moved with fine structure and detail. The eye could see some faint, colourless curtains extending upward but the camera picks them up as red, typical of auroral curtains reaching into the top of the atmosphere.
I shot these from the Frenchman River valley, a wide coulee formed by glacial rivers and now the heart of the West Block of Grasslands National Park.
It was a beautifully dark site except for flashes of spotlights now and then (not seen in the photos here) from naturalists doing census studies of the nocturnal and endangered black-footed ferret recently re-introduced to the Park. Ironically, their lights spoiled the otherwise pristine and pitch-black night in this dark sky preserve.
What a fabulous night this was! Forewarned about an impending solar storm I headed to the site of a rustic barn near home to shoot the Northern Lights.
The night started with cloud but upon looking out after midnight (it pays never to go to bed too early!) the skies were clear. Checking Spaceweather.com showed an active auroral oval lit up red and Storm in Progress warnings!
That was all the cue I needed to pack up the gear and head over to the old barn site where I have been shooting time-lapses all this week.
The aurora remained quiet and diffuse for the first hour and a half, but then about 2 a.m., the substorm hit. Within seconds the curtains began to light up with well-defined rays and beams shooting to the zenith. And they danced.
The notable feature of this display, as with one in May 2013, was the blue and purple colour of the tops of the curtains. I think this is partly due to sunlight illuminating the tops of the curtains, possible at this time of year when the upper atmosphere is perpetually lit by the midnight Sun.
From the start I shot with two cameras taking time-lapses (the main still image at top is a frame from one of the movies). Then toward the end of the night I switched to just shooting still images framed to suit the curtains towering up to the zenith.
As above, I also shot a “selfie” of me shooting the vertical image in the middle of the set.
But below is the result of a night of shooting time-lapse movies and stills, in a montage set to music. The link takes you to my Vimeo site. Do turn on HD mode.
Here’s a time-lapse of the strange glow of light that moved across the northern sky on the night of the Camelopardalid meteor shower.
What I thought was an odd curtain of slow-moving, colourless aurora — and I’ve seen those before — has many people who also saw it suspecting it was a glow from a fuel dump from an orbiting satellite. Perhaps.
This short time-lapse of 22 frames covers about 22 minutes starting at 11:59 pm MDT on May 23 (as logged by the camera’s GPS). Each frame is a 60-second exposure taken at 2 second intervals. I’m playing them back at one frame per second.
The camera was on a tracking platform to follow the stars — thus the ground slowly rotates. This was one of the cameras I had operating the night of May 23-24 to capture meteors from the Camelopardalid meteor shower. The shower was a dud, but …
The most interesting thing my cameras did catch was this odd glow which started large and diffuse and then became more defined as it got smaller and moved off (or so it appears) to the north, then fades away. My photos (and I have it on frames from another camera), and photos taken by other observers across North America, show a faint satellite moving along south to north parallel to the cloud’s long axis. Is this the culprit that caused the cloud? If so, it would have to be very high to be seen from a wide range of longitudes – astronomers in Manitoba and Minnesota also saw and shot it.
But any fuel dumps I’ve seen always have clouds that start small and concentrated then become large and diffuse. This did the opposite.
The Milky Way, an odd aurora, and the glow of urban light pollution lit the sky. But alas, no meteors!
On Friday afternoon, May 23 I headed 3 hours east of home toward the clearest skies in the province. The quest was for sightings of the Camelopardalid meteors, the new and much publicized meteor shower from Comet LINEAR, 209/P that had been predicted for tonight.
I had very good skies for the first couple of hours of darkness, from a viewpoint looking north over the prairies on the high rim of the Cypress Hills, Alberta. Clouds did move in about 12:30 a.m., about the time the shower was to be peaking. But up to that point I had sighted just a handful of meteors and many were likely random ones, as they didn’t seem to be streaking out of the radiant point. A few other people who had converged at the site saw other meteors to the south that might have been shower members.
Perhaps the peak came later under cover of clouds. But up to 12:30 a.m. I saw little sign of an active shower. Still, it was worth taking the chance to chase into clear skies in hopes of bagging a herd of Camelopardalids.
I shot hundreds of frames with two cameras and none picked up a Cam meteor – lots of satellites, like the streak at lower centre. And for a few minutes this strange white auroral curtain appeared, slowly drifting from east to west across the northern sky, like a searchlight, above the magenta horizon glow of low-level aurora. To the northwest glowed the lights of Medicine Hat, illuminating the clouds toxic yellow in a classic demonstration of light pollution.
The northern lights – the aurora borealis – shine above the trees of the northern forest – the boreal forest.
This was the scene on Sunday night, February 9, 2014, as the aurora intensified for a few minutes making for a photogenic backdrop to the snow-covered pine trees of the boreal forest.
The landscape looks like daylight but is actually being lit by the light of the bright waxing Moon in the south. These scenes are looking north.
I shot these images as part of my stay at the Churchill Northern Studies Centrewhere I have been presenting enrichment lectures to two groups of tourists here to see the northern lights during week-long stays. Both groups have been successful in seeing the lights on at least one to two nights of their stay, with the displays usually appearing as sky-spanning arcs overhead.
Here I took the time to take a “selfie” under the northern lights, as the curtains began to wave early in the evening.
In all, it has been a fantastic experience, to witness the lights from a site right under the active auroral oval at 58° north.
Watch waves of aurora wash over the sky rising out of the west to swirl overhead.
This was the spectacle we saw Friday night at the Churchill Northern Studies Centre, as the northern lights filled our sky. I set up my camera on the east side of the main building, out of the bitterly cold west wind. The fish-eye lens is aimed west but its view takes in most of the sky.
The bright object at lower left is the Moon.
The still image above is a frame from the 349-frame time-lapse movie below.
Each frame is a 7-second exposure at f/3.5 and ISO 1250. The interval is 1 second.
The movie covers about 45 minutes of time, compressed into 30 seconds. It shows the aurora peaking in intensity, then fading out behind the ever-present thin cloud drifting through all night.
What amazes me are the waves and loops of auroral curtains that come at us from the west (bottom behind the building) then swirl around the zenith overhead. They move off to the east and north at the top of the frame.
Even watching this in real-time the scene was astonishing. The curtains rippled so quickly, forming and reforming over the sky, you didn’t know where to look. As the image above shows, people just stood amazed.
Last night, February 7, the Northern Lights danced for us again, starting with a curtain of green and pink in the south.
Our second tour group at the Churchill Northern Studies Centre has been here a couple of days, all under what looked like hopeless cloud. But last night the clouds cleared unexpectedly to reveal a moonlit winter sky.
I completed my evening talk all about the Sun and aurora, during which we were monitoring the auroral activity indicators on SpaceWeather.com. Sure enough, about 9:30 pm, right on cue and perfectly timed for convenience, a curtain of light began to dance across the southern sky, appearing in Orion. The gibbous Moon is just off frame to the right. We began the viewing from the Centre’s second floor viewing deck which looks east and southeast.
This view shows the auroral curtain over the derelict launch towers of the Churchill Rocket Range. Built in 1957 for the International Geophysical Year, the Rocket Range was in use until the mid-1980s as Canada’s only launch facility. Hundreds of sounding rockets, many of them Canadian-built Black Brants, were launched from here, shooting up into the ionosphere on nights just like this to study the aurora.
Orion is at right. While we saw this curtain in our southern sky, others farther south in Canada were seeing it in their northern sky. The greens were easy to see with the eye but the magentas were visible only by the camera and I have punched up their intensity here.
This night, as the aurora display developed it moved north to the zenith, shown here, with the sky also lit by moonlight and with some high haze. But the combination makes for a wonderful abstract swirl of light and colour.
Orion and Sirius shine over the abandoned launch towers of the Churchill Rocket Range.
This was the view Monday night, during a lull in the aurora display when I took a few moments to shoot the stars. You can see Orion at centre, with his trio of Belt stars pointing left and down to Sirius, the Dog Star in Canis Major, and the brightest star in the night sky. The Belt stars point up and right to Aldebaran, the brightest star in Taurus the bull.
They look closer to the horizon than you might be used to as this is from 58° north latitude.
These winter stars shine above some of the launch structures of the old Churchill Rocket Range. Built in 1957 for the International Geophysical Year, the Rocket Range served for many years as Canada’s only launch facility. No satellites were launched here. Instead the towers were used to launch sub-orbital sounding rockets into the ionosphere to explore the aurora.
Some of the rockets were repurposed military missiles, like Nikes and Aerobees. But many were Black Brants, civilian research rockets still being built in Winnipeg by Bristol Aerospace.
But no Black Brants take off from here now. The Rocket Range was shut down in the mid-1980s as Canada’s space program focused on satellites, the Space Shuttle, and sending astronauts into space. Attempts by private companies to revive the site have all failed and the structures are now becoming derelict, being too costly to remove.
The sky simply does not get any more amazing than this, as the Northern Lights dance across the heavens.
On the last night for our first aurora tour group of the season, the sky performed perfectly. Clouds cleared to reveal a star-filled winter sky, and after the evening talks and farewell drinks, the aurora began to appear. First it was a bright arc across the north, prompting me to try some self-portraits, as below.
But at about 2 a.m. a diffuse arc across the zenith exploded into activity, with rapidly waving and weaving curtains.
Everyone was awestruck. Some cheered and hollered. Others just watched in stunned silence. Some were busy with cameras. Others just enjoyed the view of a lifetime.
It was a cold night, but the aurora kept performing in waves, dimming for a time – allowing us to retreat to the warm cafeteria for hot chocolate. Then the display would brighten again to the west and a new wave of intensity would sweep across the sky to the east.
You didn’t know quite where to look to take it all in. The sight was overwhelming. Here the curtains ripple through Orion, Taurus and Auriga, all setting into the west.
The Churchill Northern Studies Centre has a new building opened in 2011 that is ideally set up for aurora watching. The building can go dark, and is located far enough from Churchill that local light pollution is not an issue. On the roof is a plexiglas dome where several people can view the Northern Lights and the entire sky in shirtsleeve comfort. The image is good enough for wide-angle photography. Sheer luxury!
But there’s nothing like being outside on a cold Arctic night, looking up and seeing this sight – thin curtains of light twisting and turning more quickly than you can take in and comprehend. It is one of nature’s greatest shows. And what a fantastic place to see it.
Tonight the aurora shone so brightly for a time it was visible through the cloud.
Here at the Churchill Northern Studies Centre we’ve been battling clouds all week. But on several nights the clouds have cleared for 30 minutes or more, enough to give us glimpses of the aurora and stars. Tonight, February 2/3, the clouds never did clear away enough for a great view. This was as good as it got, with the Northern Lights shining through haze and cloud but nevertheless filling the sky.
Remarkably, this was on a night when the usual indicators of auroral activity were registering all quiet. This shows the benefit of traveling north to stand right under the auroral oval, the zone of maximum activity. In this case I’m at 58° North, in Churchill, Manitoba. Even on a quiet night the Churchill sky can be filled with curtains of dancing colours.
Our tour group to see the Northern Lights finally saw what they traveled north to experience – the aurora borealis dancing across the sky.
This week and next I’m helping to lead some tour groups who have come to Churchill, Manitoba to see the aurora. We’ve been here 3 nights so far but last night was the first with clearing skies and when the Northern Lights appeared above us.
Our home base is the beautiful Churchill Northern Studies Centre, far enough from the main townsite to give us dark skies. Being able to sleep, eat and take in lectures (or for me, give lectures) right where we can see the aurora is a tremendous luxury and convenience. The Centre is perfectly set up for aurora viewing, with a rooftop dome, and the ability to “go dark” with all lights off.
Here in Churchill, on the shores of Hudson Bay, we are at a latitude of 58° north. But critically, we are right under the usual position of the auroral oval, the main band of Northern Lights that circles the world at high latitudes.
As such, even though last night the various aurora and magnetic field indicators were registering a quiet display with little disturbance in the field, we still saw a beautiful display. It wasn’t very active but did display curtains and rays shooting up to the zenith.
As seen here, for much of the time the main band of aurora was actually in the south. That’s Jupiter glowing through the aurora and thin clouds at upper right.
We’ve been fighting clouds all week but last night skies cleared for long enough and it seemed at just the right time to coincide with the brightest outburst of this display. After I took these images, the aurora died down to a more diffuse glow then the clouds thickened in again. By then it was 3 am and we all retired to our rooms.
My 2-minute music video looks back at some of the celestial highlights of 2013, in images and videos I captured.
Some of the events and scenes I show were accessible to everyone who looked up. But some required a special effort to see.
• In 2013 we had a couple of nice comets though not the spectacle hoped for from Comet ISON.
• Chris Hadfield became a media star beaming videos and tweets from the Space Station. We on Earth could look up and see his home sailing through the stars.
• The sky hosted a few nice conjunctions of planets, notably Mars, Venus and Jupiter in late May.
• The Sun reached its peak in solar activity (we think!) unleashing solar storms and some wonderful displays of northern lights.
• Locally, record rain storms in Alberta unleashed floods of devastating consequences in June, with a much publicized super moon in the sky.
• For me, the summer proved a productive one for shooting the “star” of the summer sky, the Milky Way.
• But the year-end finale was most certainly the total eclipse of the Sun on November 3. Few people saw it. I did, from a ship in the Atlantic Ocean. The video ends with that sight and experience, the finest the sky has to offer.
I hope you enjoy this music video mix of time-lapse, real-time video and still images, shot from Alberta, New Mexico and from the Atlantic.
You can watch a better quality version of this video at my Vimeo channel.
A mix of sky glows fills the pre-dawn sky in New Mexico.
To the eye the sky looked dark, marred only by some high haze drifting through. But the camera reveals a sky filled with an amazing wealth of colourful glows.
I took this 360° panorama in the pre-dawn hours (4:45 a.m.) this morning (December 8) from the Painted Pony Resortin southwest New Mexico. It reveals a swath of green airglow to the north, the zodiacal light, and the Milky Way. At northern latitudes there was bright aurora visible last night. We might have seen some sign of it here in New Mexico in the form of increased airglow activity.
The panorama takes in, from left to right:
• Arcturus, shining like an ornament on the treetop
• the zodiacal light rising up from the east
• red Mars embedded in the zodiacal light below Leo
• the Milky Way from Puppis and Canis Major at left arching up and across the sky down into Perseus at right
• Sirius the brightest star
• Orion setting over the main house
• Jupiter, the bright object at top centre in Gemini
• Aldebaran and the Pleiades setting right of the main house in Taurus
• Polaris over the smaller house at right
• the Big Dipper at upper right pointing down to Polaris
• a green glow along the northern horizon above the smaller house that is likely intense airglow.
• green and red bands throughout the sky are airglow, caused by atmospheric molecules flourescing at night
• bands of high cloud also permeate the sky adding natural glows around the stars.
I stitched this panorama using PTGui software, from 6 segments, all tracked, taken with the 14mm Rokinon lens at f/2.8 for 2.5 minutes each and with the Canon 5D MkII at ISO 1600.
A red and green aurora lights the night on the Canadian prairie.
This was certainly a surprise aurora, with conditions officially registering as “quiet” early in the evening. However, checking Spaceweather.com showed the interplanetary magnetic field was tipped far south, a good sign.
So I made a point of checking after dark and sure enough, a fairly bright aurora was present all across the northern horizon. Conditions now registered “storm!”
The main image above is looking east, back over Saskatchewan. What was remarkable was the intense red curtains above the main green arc. These were invisible to the naked eye but the camera sure picked them up.
There was also an odd green band in the southern sky, above. Again, the green band was obvious to the naked eye, but the camera picked up an isolated red arc as well.
This is proving to be a quiet solar maximum, but the best displays often come on the downside of the cycle. So with luck we’ll be in for some good sky shows in the next couple of years.
The silvery Milky Way and green bands of airglow stretch across the high plains and big sky of the Cypress Hills.
The Moon had long set and the night looked as dark as it could be. No lights interrupted the flat clear horizon. These are the high plains of the Cypress Hills, the highest place in Canada between Labrador and the Rockies.
And yet, in the panoramic photos I took last night the sky revealed its true colours.
In the 360° panorama above, the Milky Way arches overhead from northeast to southwest. It was obvious to the naked eye. But stretching across the sky from east to west are also bands of green and red airglow that were completely invisible to the eye, except perhaps for making the sky look more grey than it might have otherwise.
These aren’t aurora but are emissions of light caused by oxygen atoms fluorescing as they give off some of the energy they absorbed by day. Time-lapse sequences show these bands moving slowly across the sky.
I drove up the Graburn Road last night, to the plateau of Cypress Hills, to shoot a time-lapse of the Milky Way moving above this lone tree on the plains. It’s called the Survivor Tree, subject to drought, blizzards fire, cattle, and even being cut down at one time. But still it survives. With a cold wind blowing last night I had a taste of what this tough Lodgepole Pine has had to endure.
This is one frame from the final movie clip, with the tree and sky still lit by the light of the setting waxing Moon. An enduring tree beneath the timeless stars.
Early in the evening the northern sky was also marked by another sky phenomenon, noctilucent clouds – very high altitude clouds still lit by sunlight long after the Sun has set locally. These clouds made for a nice photo for a few minutes but soon faded from view as the Sun set even as seen from where these clouds live at the edge of space.
The night was left dark, with no aurora tonight – just the Milky Way and the faint wisps of airglow over the high plains of southern Alberta.
A country road winds off into the dancing Northern Lights.
The sky put on another fine show last night, the fourth in a row with some level of aurora activity. This was the scene Sunday night as a display blossomed for a while, dancing at the end of the back road through the Cypress Hills on the Alberta-Saskatchewan border.
I had one camera shooting north and devoted to the Northern Lights, while, as you can see below, I had two other cameras on rigs to shoot time-lapse movies looking south.
This was the scene at the overlook to the Battle Creek valley, with the Moon setting and me getting the time-lapse gear going, to shoot the Milky Way moving over the hills. One camera was on a mount to pan across the landscape following the stars. The other camera was on a motion control dolly to travel down a track over the 3 hours of the shoot. I spent a lot of time in the car listening to BBC Desert Island Discs and The Life Scientific podcasts last night — the thrill of time-lapse shooting!
This is one frame from one of the movies. Streaks of green and red airglow tint the sky around the Milky Way. Amazingly, the scene is lit only by starlight and by the aurora. You could never have done this with film. It’s the sensitivity of digital cameras that makes such scenes possible, though it takes some clever processing (such as Shadow Detail recovery in Raw, Shadows and Highlights, & masked Adjustment Layers) to balance Earth and sky in the final image.
The Northern Lights sweep across the northern horizon in a classic arc of green and magenta curtains.
The aurora on the night of July 13/14 never got very bright but the sweep of the auroral oval still made for an interesting panoramic image.
I shot this at about 2 a.m. local time, from the high plains of southwest Saskatchewan, right on the Alberta-Saskatchewan border, on the rolling hills of the historic Reesor Ranch. The only man-made light visible is a glow on the horizon just left of the auroral arc, from the city of Medicine Hat, Alberta.
The panorama takes in about 180° of sky, framing the sweep of the auroral oval across the northern horizon from northeast to northwest. In fact, you can see the gravel road I was on at far left and far right. The main band of green from glowing oxygen is topped by curtains of magenta, from oxygen and nitrogen atoms.
If you could see this display from space you would see it as an oval of light across the top half of North America. From my perspective on Earth, I could see just a portion of the complete oval, as an arc across the northern sky.
To create this image I shot 6 segments at 30° spacings, each a 30-second exposure with a 24mm lens at f/2.8 on a Canon 5D MkII at ISO 1600. I used Photoshop to stitch the segments. It blended them seamlessly.
A long exposure captures streaks from the turning stars and passing satellites.
This was a busy sky. The feature photo stacks a dozen images taken over 6 minutes.
During that time the northern stars around the Big Dipper turned about the celestial pole just off frame at upper right.
Meanwhile, two satellites passed through the field, both flaring in brightness briefly, tracing tapered streaks from left to right above the treetops. These may have been Iridium satellites, infamous for producing sunglint flares as they momentarily reflect the Sun from their mirror-like antenna panels.
A magenta aurora tints the northern sky as well.
This image is from the same sequence of 300 or so I took last night for a time-lapse movie, but this is a single 30-second exposure so the stars look more natural and pinpoint. Now you can make out the familiar pattern of the Big Dipper.
I shot several sequences last night, until the clouds rolled in and curtailed photography. However, skies are clearing again and the forecast is for several clear nights to come over the Cypress Hills. I’ve got a few locations picked out for time-lapse shooting if the skies cooperate.
Curtains of purple and pink top the usual green bands of aurora.
The last couple of nights have been very clear and filled with aurora. Two nights ago, July 9, the sky really let loose for a good display showing a great range of colours. Only the green was readily visible to the naked eye, but the cameras picked up the fainter bands of purple and magenta.
Most of the colours here come from oxygen atoms glowing. But high up, in the near vacuum of space, oxygen can glow red. The curtains can also be lit by sunlight coming over the pole, lending a blue tint to the aurora. The two colours blend to give purple.
Lower down in the atmosphere, green lines from oxygen predominate. When an aurora is very energetic, the incoming electrons can trigger nitrogen lower in the atmosphere to glow red and pink, giving the curtains a red fringe on the lower edge. That didn’t happen this night.
This fish-eye shot of the entire sky shows the high purple curtains arching up the sky. Over several minutes they separated and ascended away from the main green band, shooting up the sky. It seemed as if they were their own curtains and not just a different coloration fringing the main display.
The Northern Lights have been active lately so keep an eye on Spaceweather.com and AuroraWatch for alerts and warnings.
The Northern Lights danced all night, as Earth was buffeted by winds from the Sun.
As soon as I saw the warning notices at Spaceweather.com I was hoping we would be in for a wonderful night of aurora watching. I wasn’t disappointed.
Forewarned, I headed out to the Wintering Hills Wind Farm near my home in southern Alberta. I thought it would be neat to get shots of the effects of the solar wind from beneath and beside the wind turbines of the farm. The shot above is from a time-lapse movie taken with a fish-eye lens that will look great when projected in a full-dome digital planetarium.
I shot with three cameras, with two aimed east to where the brightest part of the auroral arc usually sits. It was also exactly where the Moon would rise after midnight. This shot, above, captures the scene right at moonrise, which was also right when the aurora kicked into high gear as a sub-storm of solar particles rained down on our upper atmosphere. The ground lit up green with the glow of oxygen in the mesosphere, some 100 kilometres up.
This shot, taken moments later with a longer focal length lens, grabs the waning Moon shining behind the distant wind machines, and beneath the arc of auroral curtains.
In all, I shot 50 gigabytes of raw images, both still images and frames for time-lapse movies. I’ve assembled most of them into a musical collage that honours the night. In the final sequence of the movie, it almost looks like the wind machine is facing into the brunt of the solar wind, as pulses of aurora surge from out of the east toward the turbine towering overhead.
The music is by a new favourite artist of mine, the Italian composer Ludovico Einaudi. His latest album of alt-classical/new age music is called “In a Time Lapse.” How could you not like that?! Buy it on iTunes. It’s stunning.
I hope you got to see the Night of the Northern Lights in person. If not, I trust these images and movies give you a sense of the wonder of what the solar wind can do.
This is the prairie night sky taken at the moment of summer solstice.
I shot this 360° panorama in the field near my house just before midnight on June 20, 2013, right about the official time of summer solstice. This is the longest night of the year and the brightest. The presence of the gibbous Moon contributes most of the night light, but there to the north at left you can see the glow of twilight and an aurora. At right, the waxing Moon shines in clouds, surrounded by a faint halo from ice crystals in the clouds.
Nights around solstice are always bright and filled with wonderful colours and atmospheric phenomena.
The tranquility of the solstice scene is in contrast with the horrific weather disaster taking place west of me near the mountains, as record floods from torrential rains wash away roads, railway lines, and houses. Roads are closed in and out of the mountains and entire neighbourhoods of Calgary near rivers are being evacuated.
Everyone knows somebody who is affected. For many this is indeed a very long and stressful night. I hope everyone keeps safe.
What strange clouds these are, moving where there shouldn’t be winds, and forming where there’s barely any air.
These are noctilucent clouds, sometimes called polar mesospheric clouds. Their icy strands form around particles at the top of the atmosphere some 80 km up. There’s almost no air up there so just how these clouds form has always been a mystery. They may be condensing around meteoric dust particles. They may also be more common now than in past decades and centuries, as the upper atmosphere cools due to an odd quirk of global warming that sees the lower troposphere warm while the upper mesosphere cools.
This was the first display of NLCs I’ve seen so far this season. They can only be seen, and indeed they only form, in summer. Sunlight streams over the pole and lights these clouds all night long. They are literally “night-shining” clouds. Only from a latitude range of 45° to 60° north and around summer solstice is the geometry right to see the clouds, usually as electric blue cirrus strands moving slowly along the northern horizon.
The time-lapse movies capture their motion over 30 to 90 minutes of shooting.
The 40-second movie contains three clips:
• The first, a wide-angle view of the amazing aurora that danced in fast accompaniment to the slow noctilucent clouds.
• The second clip, very short, zooms in a little more to the northern horizon. However, I cut that sequence short so I could switch lenses and take the next clip.
• The third scene is with a telephoto lens, framing the east-to-west slow motion of the clouds. I took 4-second exposures at 1-second intervals so it shows some pretty fine motion.
This was certainly one of the best NLC displays I’d seen and my best shot at capturing them.
What was especially rare was seeing them accompanied by auroral curtains actually moving among the clouds (or so it appeared). Both are up high in the near vacuum of near space, but they may have been miles apart in latitude.
Colourful sky phenomena combine to provide a remarkable sky show.
What a night this was! On Sunday, June 9 the aurora kicked off with a burst in the bright twilight but really got going as the sky got dark, shooting beams of magenta and blue up from the main green arc.
Then on cue, streamers of noctilucent clouds appeared low in the north, shining with their characteristic electric blue. These are odd clouds at the edge of space lit by sunlight streaming over the Pole.
Both these apparitions of the upper atmosphere glowed above a horizon rimmed with the orange of perpetual twilight set in a deep blue background sky.
Yes, the camera has brought out the colours more intensely than the eye saw, but nevertheless it was a remarkable evening close to solstice. This is a magical time of year when all kinds of sky glows light the night.
This night the European Einstein ATV cargo craft also flew over, twice, each time about 10 minutes ahead of the even brighter Space Station that it is chasing for a docking later this week.
More images to come from this night, including time-lapses of the Lights and Clouds.
A low aurora appears in the city skyglow and bright moonlight at the local observatory.
After several days of rain, skies cleared beautifully for a Saturday night star party for the public at the local university observatory, the Rothney Astrophysical Observatory, southwest of Calgary.
The evening was capped off by the appearance, as expected, of an auroral arc to the north. Despite the light from the nearly Full Moon and urban sky glow to the north, the aurora managed to compete and put on a show for a few minutes before fading.
About 100 people attended the evening, and were treated to views of Saturn, shining in the south near Spica. Unfortunately, clouds to the west over the mountains never cleared away enough to allow us views, and me photos, of the triple-planet conjunction of Mercury, Venus and Jupiter. Still, a good time was had by all.
The Northern Lights dance through the night, ending with a finale burst of blue.
Here’s the time-lapse movie, below, that I shot Friday, May 17, beginning at 11:30 pm and ending 4 hours later at 3:30 am. The sky was bright with moonlight when I started the sequence, with the aurora especially active over half the sky. The display settled down to form a slowly pulsing green band behind the old barn, which went into silhouette after the Moon set.
Then, just as the sky was brightening with the first glow of dawn, the aurora kicked up its heels again and danced across the north, shooting beams of blue across the sky.
I ended the sequence as dawn was fading in … and I was fading out! Still, it was a wonderful night to be out under the stars.
The movie compresses 4 hours of aurora shooting into 40 seconds of aurora playback!
I assembled the time-lapse movie from 1200 frames, each 11-second exposures at 1 second intervals, with the Canon 60Da at ISO 1600 and 10-22mm lens at f/4.
As the Northern Lights dance they light up an old barn on a moonlit night.
The still frame above is from the movie down below, a 3-hour-long time-lapse taken on May 17, the night of the big aurora display. I shot this with a camera riding along on a motorized dolly track, to provide the panning motion to the scene.
You can see the rig in this image just below, which I took with another camera framing the entire scene.
Using the second camera, I was intending to take shots showing a motion-control time-lapse sequence being taken, for illustration in talks and publications.
The aurora quickly forced me to change plans with camera #2. But I let the main motion-control camera continue down its track for the rest of the night, resulting in the movie below. At one point in the movie I briefly appear at right, as I moved the second camera to the south side of the barn to look north to the main area of the display.
In the movie, the stars of Virgo and the planet Saturn rise into a sky lit blue by moonlight early in the evening. As the Moon sets, the shadows rise and engulf the barn.
While catching stars rising behind the rustic old building was the original intention of the shot, the Northern Lights added a bonus. Not only do they dance in the sky behind the barn, but the north face of the old grey barn, in shadow from the moonlight, lights up green from the glow of aurora shining in the north.
Very nice. It certainly made for a colourful scene under the skies of southern Alberta.
The memorable night of Northern Lights ended with a final outburst sending blue curtains into the dawn twilight.
This is a frame from May 17-18, taken near the end of my time-lapse sequence, when the aurora kicked up again in intensity and shot towering blue curtains into the northern sky. The pink glow of dawn tinges the northeastern sky, bookending the sequence of 1200 frames and 27 gigabytes of images. Good thing I had a large capacity memory card!
Each shot was 11 seconds at ISO 1600 to try to freeze the moving curtains while still maintaining a good level of exposure.
Here, lights from a passing car at 3 a.m. illuminated the old barn.
As a postscript, I also note that this was my 300th blog post since beginning The Amazing Sky in February 2011. I hope you’ve enjoyed the views of the sky I’ve been able to publish over the last two years.
You know you are in for a good night when the aurora appears even before the sky gets dark.
I shot this in the evening twilight, as the curtains of Northern Lights began their dance in the dusk. Light from the quarter Moon also illuminates the scene. It was a mad rush to get the camera set and aimed to begin shooting. I was also looking after another camera that was shooting a dolly-shot time-lapse of the barn.
For this image I used the Canon 60Da and Canon 10-22mm lens at the widest setting. Even that was not enough to take in the whole of the display that was covering the sky.
What a night this was, with a display of Northern Lights dancing across the sky as soon as it got dark. They danced all night.
I set up May 17 at my neighbourhood rustic farmstead for a night of time-lapse shooting of the old barn in the moonlight, but knowing an aurora was likely. My iPad app beeped and alerted me to that possibility only an hour or so before sunset, letting me know a storm was underway. And sure enough, as soon as it got dark, there were the curtains of green dancing all over the blue twilight sky. This frame is from 1200 I shot in a dusk to dawn time-lapse movie. It is from early in evening, with a pink glow of twilight still fringing the northwest horizon.
What marked this display was the blue and purple curtains, with those colours only really apparent in the camera images. I think those tints come from sunlight hitting the auroral curtains high in the atmosphere where the Sun is still shining. At this time of year the high atmosphere never gets dark and is always lit by sunlight streaming over the pole.
The Milky Way appears from behind the colourful curtains of the Northern Lights.
This was the scene last Saturday night, into the pre-dawn hours of Sunday morning, May 5, as the summer Milky Way rose in the east while a display of aurora played across the northern sky. The Northern Lights weren’t particularly bright this night, but the long 2-minute exposure I used to bring out the Milly Way recorded the aurora with colours and an intensity only the camera could see this night.
The green is from oxygen glowing in the lower part of the atmosphere, though still some 80 km up, where only rockets and high-altitude balloons can fly. The tops of the auroral curtains are tinged with the pinks from another type of oxygen emission possible only at the very top of our atmosphere, where molecules are few and far between and what’s left of the air that surrounds us meets the vacuum of space some 150 km up.
From Earth it’s hard to visualize just what we are seeing when we look at display like this. But check out some of the Aurora videos at NASA’s Gateway to Astronaut Photography of Earth. You’ll see time-lapse videos taken from the Space Station as it flies by and through the same types of aurorae with green lower bands and pink upper fringes, beautifully captured floating high above the Earth in vertical curtains reaching up into the blackness of space.
Here’s a celestial gift for the Easter season – a display of northern lights on Good Friday.
It wasn’t a particularly clear night but in this case the clouds added to the photos. In one direction I was shooting the Northern Lights to the northeast, while to the west at the other end of the yard I was shooting the winter sky setting, plus having a quick look at Comet PANSTARRS. It was certainly a sky filled with attractions.
Happy Easter to all and I hope spring is finally arriving where you live – assuming you are a northerner!
Look east now late at night and you’ll see Jupiter rising amid the stars of Taurus.
I took this shot a week ago from my rural backyard on the last clear night I’ve had. Remarkably, I had bought a new camera – a Canon 60Da – earlier that day and was actually able to try it out. This is the first real shot I took with it. It shows Jupiter amid the horns of Taurus the bull, and below the Pleiades. A faint aurora lights up the northern sky at left.
There have been some superb aurora displays in the last week but clouds just got in the way.
This is my 200th blog post since I began AmazingSky.net in early 2011. I hope you have enjoyed the images and will continue to do so. Thanks for looking!
The Big Dipper swings low over the Badlands of Dinosaur Provincial Park, with an aurora added for good measure.
This another shot from my very productive night last Sunday out at Dinosaur Park, 100 km east of me. Here the curtains of aurora that made the news that evening shimmer below the iconic seven stars of the Big Dipper, now low in the northern sky on autumn evenings.
Light from the Full Moon provides the illumination. People wonder how we astrophotographers can take pictures of the stars in the daytime. We don’t. We take them at night, letting the Moon light the scene. Its light is just reflected sunlight, so a long enough exposure (and in this case it was only 8 seconds) records the landscape looking as if it were daytime, complete with blue sky, but with stars – and this night an aurora – in the sky.
It was a marvellous night – a triple act: with a fabulous sunset, a beautiful moonrise, then as the sky got dark the aurora came out and danced.
Sunday night I headed out to Dinosaur Provincial Park near Brooks, Alberta, site of the world’s best late-Cretaceous fossil finds, and a striking landscape of eroded badlands. I was just finishing taking frames for a sunset-to-twilight time-lapse movie when the aurora kicked up in activity, quite bright at first, despite the light from the nearly Full Moon, which is illuminating the landscape. I swung the camera around, loaded in a new memory card and begun shooting another time-lapse sequence of the dancing northern lights in the moonlight.
While the display faded to the eye over the next hour, the camera still nicely picked up the subtle colours, like the magenta hues. I shot 330 frames, each 8 seconds long at ISO 800 and f/2.8 with a 16-35mm lens and Canon 5D MkII camera.They’ll make a great movie sequence.
It was a 40-gigabyte night, as the second camera was shooting the moonrise over the badlands. But then I pressed it into service as well shooting the aurora. It was a great night to be at a location as wonderful as Dinosaur Park.
At last … a good display of northern lights towering up the sky.
The evening of Tuesday, September 4 provided the best aurora display I’ve seen in recent years. It was fairly bright and reached up to the zenith and beyond into the south. Colours were green, with just a hint of high-altitude red visible to the naked eye. The camera picks up the colours of an aurora better than the eye can see.
I shot this aurora from my rural backyard. The display came up quite quickly over 10 to 15 minutes starting about 11 p.m., and, as usual, started as an arc across the northeast then rose higher to cover all the northern sky up to the zenith, as shown in this horizon-to-zenith image. The light from the waning gibbous Moon just off camera to the right illuminated the foreground. The show was short-lived. By 12:30 a.m. the auroral curtains had faded into obscurity.
This image depicts a 360° panorama of the field and sky at the Saskatchewan Summer Star Party.
This was my first time shooting a nighttime panorama but it was easy. Just 12 exposures taken at 30° intervals panning around on a levelled tripod, in classic planetarium panorama style. Each exposure was 30 seconds at f/2 and ISO 3200 with the Canon 5D MkII and 24mm lens. It helps to have a high-quality fast lens.
North is at centre, south on either end.
The sky contains some interesting and subtle features that show up well in a wide-angle panorama like this:
– The bright summer Milky Way is setting at left in the southwest while the fainter winter half of the Milky Way is rising opposite, at right in the northeast.
– Jupiter and the Pleiades rise at right just off the Milky Way
– A meteor streaks over the trees at centre
– At centre, to the north, glows a faint yellow and magenta aurora
– The larger green glow left of centre is, I suspect, airglow rather than aurora. It has a striated structure, particularly at right of centre above the trees where it appears as subtle green and red bands arching across the northeast.
The sky this night was dark but did have a brighter than usual background, likely due to the presence of this faint airglow that the camera picks up better than the eye.
Even so, I can see another faint glow:
– A whitish band coming up from the northeast passing through Jupiter and below the Pleaides. That’s the Zodiacal Band, an extension of the brighter Zodiacal Light and caused by sunlight reflecting off cometary dust in the ecliptic plane.
The location of the panorama and star party was the Cypress Hills Interprovincial Park in southwest Saskatchewan, one of the darkest places in southern Canada.
Here is nearly two hours of auroral dancing compressed into 25 seconds.
This was the “all-sky” aurora of August 5/6, 2011, widely seen over North America but perhaps (from early reports) best from the western half, especially Canada, favoured for Northern Lights due to our latitude.
I shot this with the 8mm fish-eye lens and the Canon 5D MkII. The movie consists of 255 frames, each 24 to 30 seconds in exposure duration, taken one second apart. ISO speed was 1600 and aperture f/3.5. The playback frame rate is 10 fps.
This display was quite chaotic, without the graceful rippling curtains present in many displays, but rather huge patches of sky turning off and on. This is typical of an aurora in the declining part of the storm — it had already been raging for several hours by the time it got dark here in Alberta.
Nor was the display very bright, so the longer exposures needed to record it well further blur any fine motion. Nevertheless, you get a good idea of the intense activity this aurora displayed. The magnetosphere was jumping last night!
It’s been quite a while since I’ve seen a display of Northern Lights as good as this one. But with the Sun picking up in activity from a record lull in the last few years, great all-sky displays like this might become more frequent.
The last time I saw aurora cover most of the sky like it did last night (August 5) was back in the days of shooting film. So this was the first chance I had to shoot an all-sky aurora with digital cameras. This is with the Canon 7D and the ultra-wide 10-22mm zoom. I also shot with the fish-eye 8mm, and an “all-sky” movie of those frames will be in the next posting.
This display was widely seen and predicted, as solar monitoring satellites had observed major flares on the Sun earlier in the week and tracked the resulting “coronal mass ejections” across the solar system. We knew they were aimed at Earth and would hit August 5. In this case, the resulting geomagnetic storm raged for long enough that people across a wide swath of longitudes from Europe to North America were able to see the display during their local night, August 5/6. Even people in the northern U.S. had a good look.
While the display was certainly active and extensive it never did get really bright. So this one still falls short of the “10 out 10” scale for spectacle. Nevertheless, as digital cameras can do so well, the images picked up the greens from glowing oxygen with remarkable intensity. More interesting are the purples, seen toward the beginning of the night but then they faded away. The purple tints come from the tops of the towering curtains of aurora which often glow red from nitrogen molecules at very high altitudes being charged up and excited. But the tops of the curtains can also be lit by sunlight. The blue from the sunlight and the red from the aurora itself mix to produce a purple tint. Only the camera picked this up.

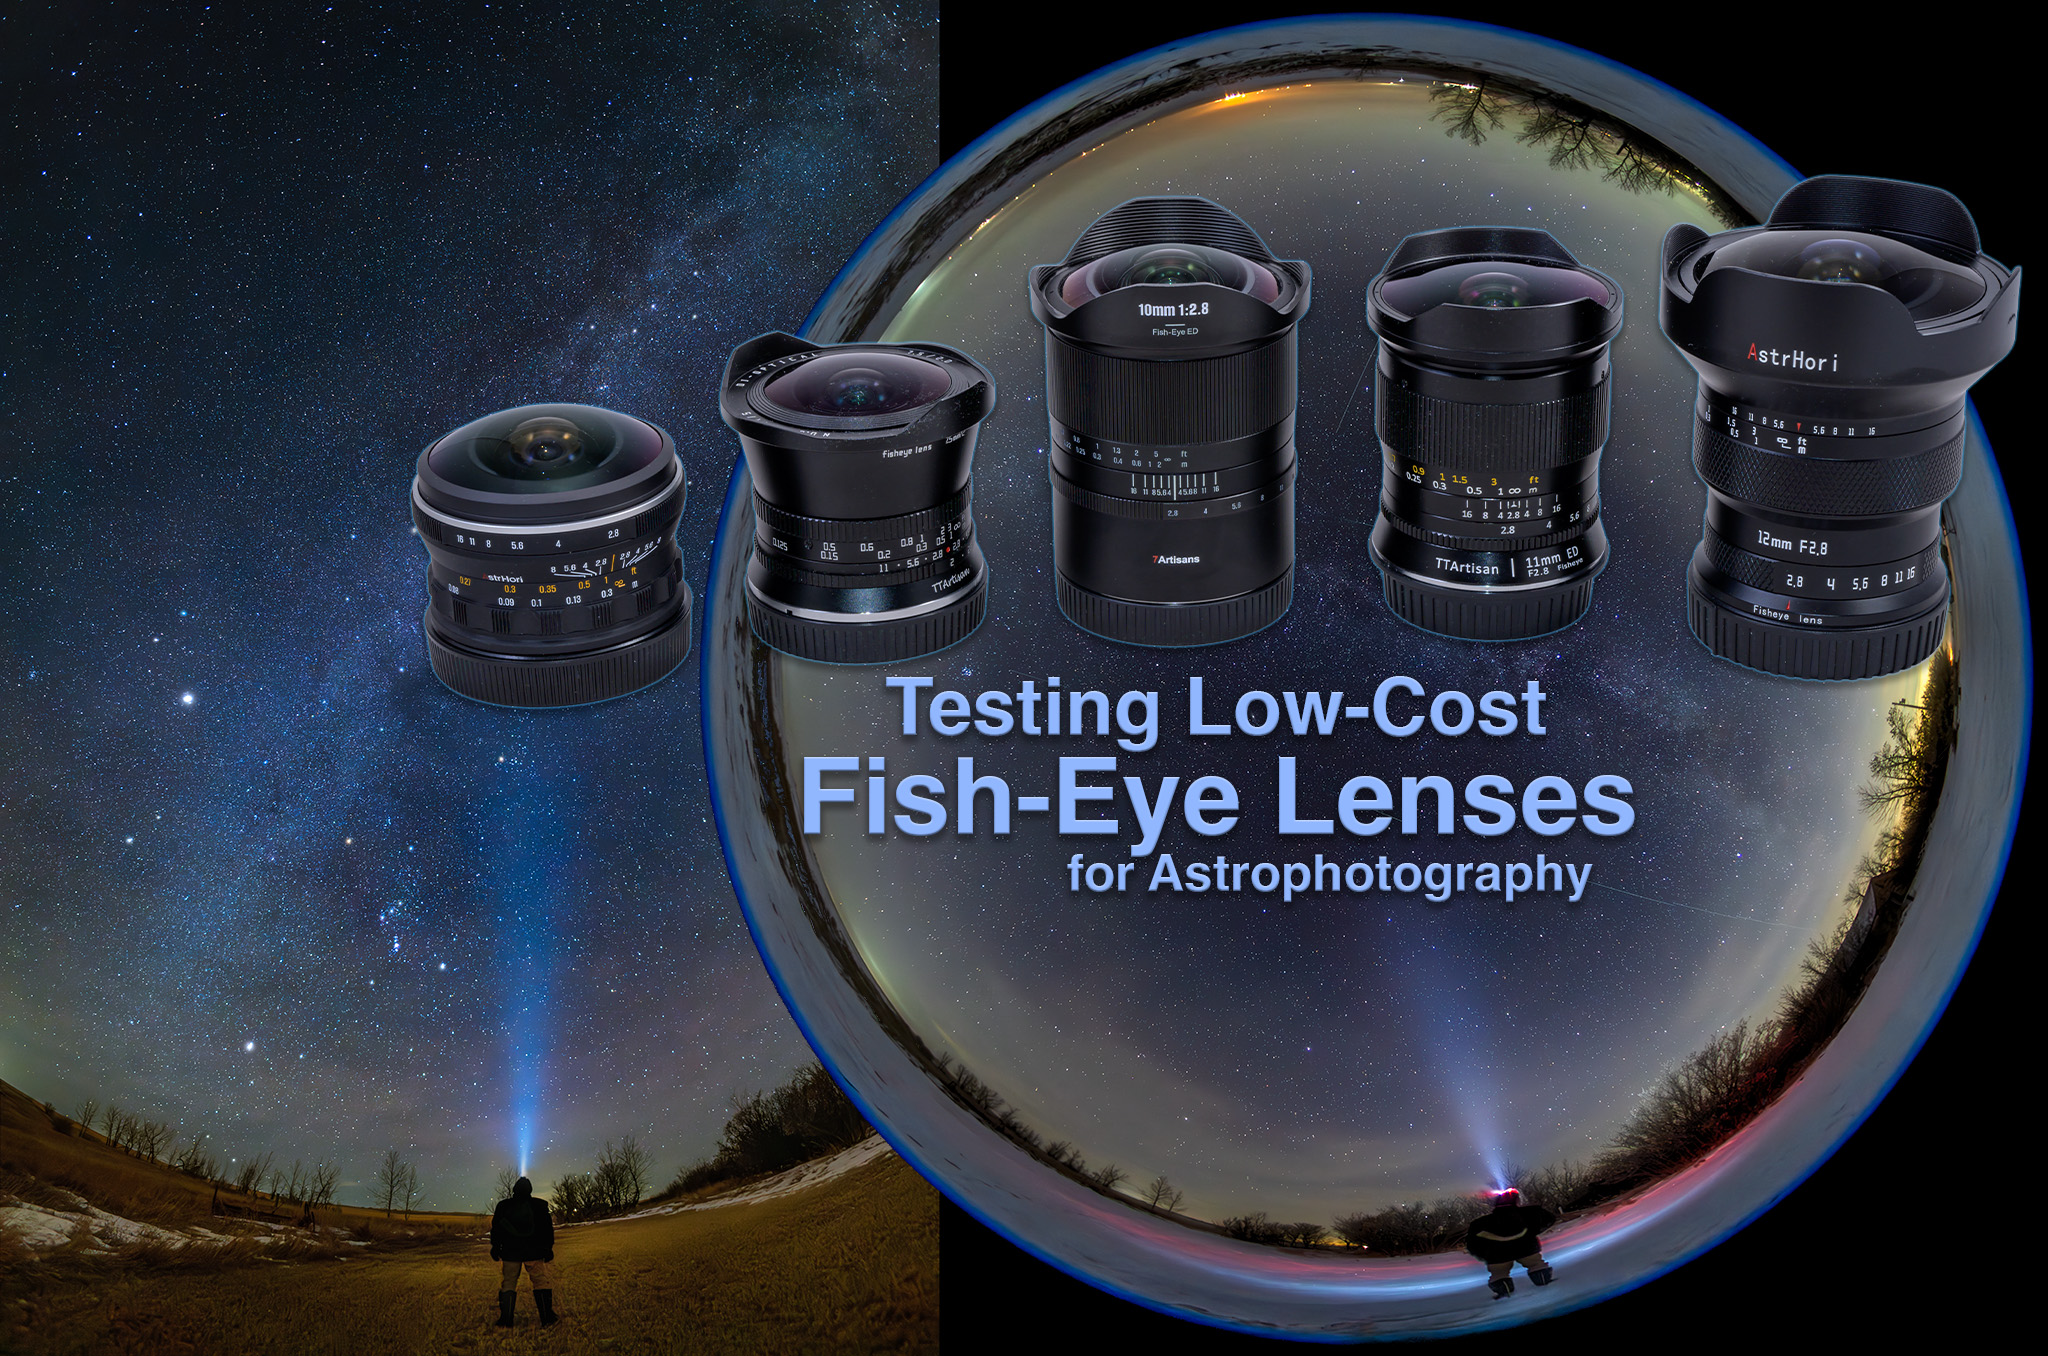
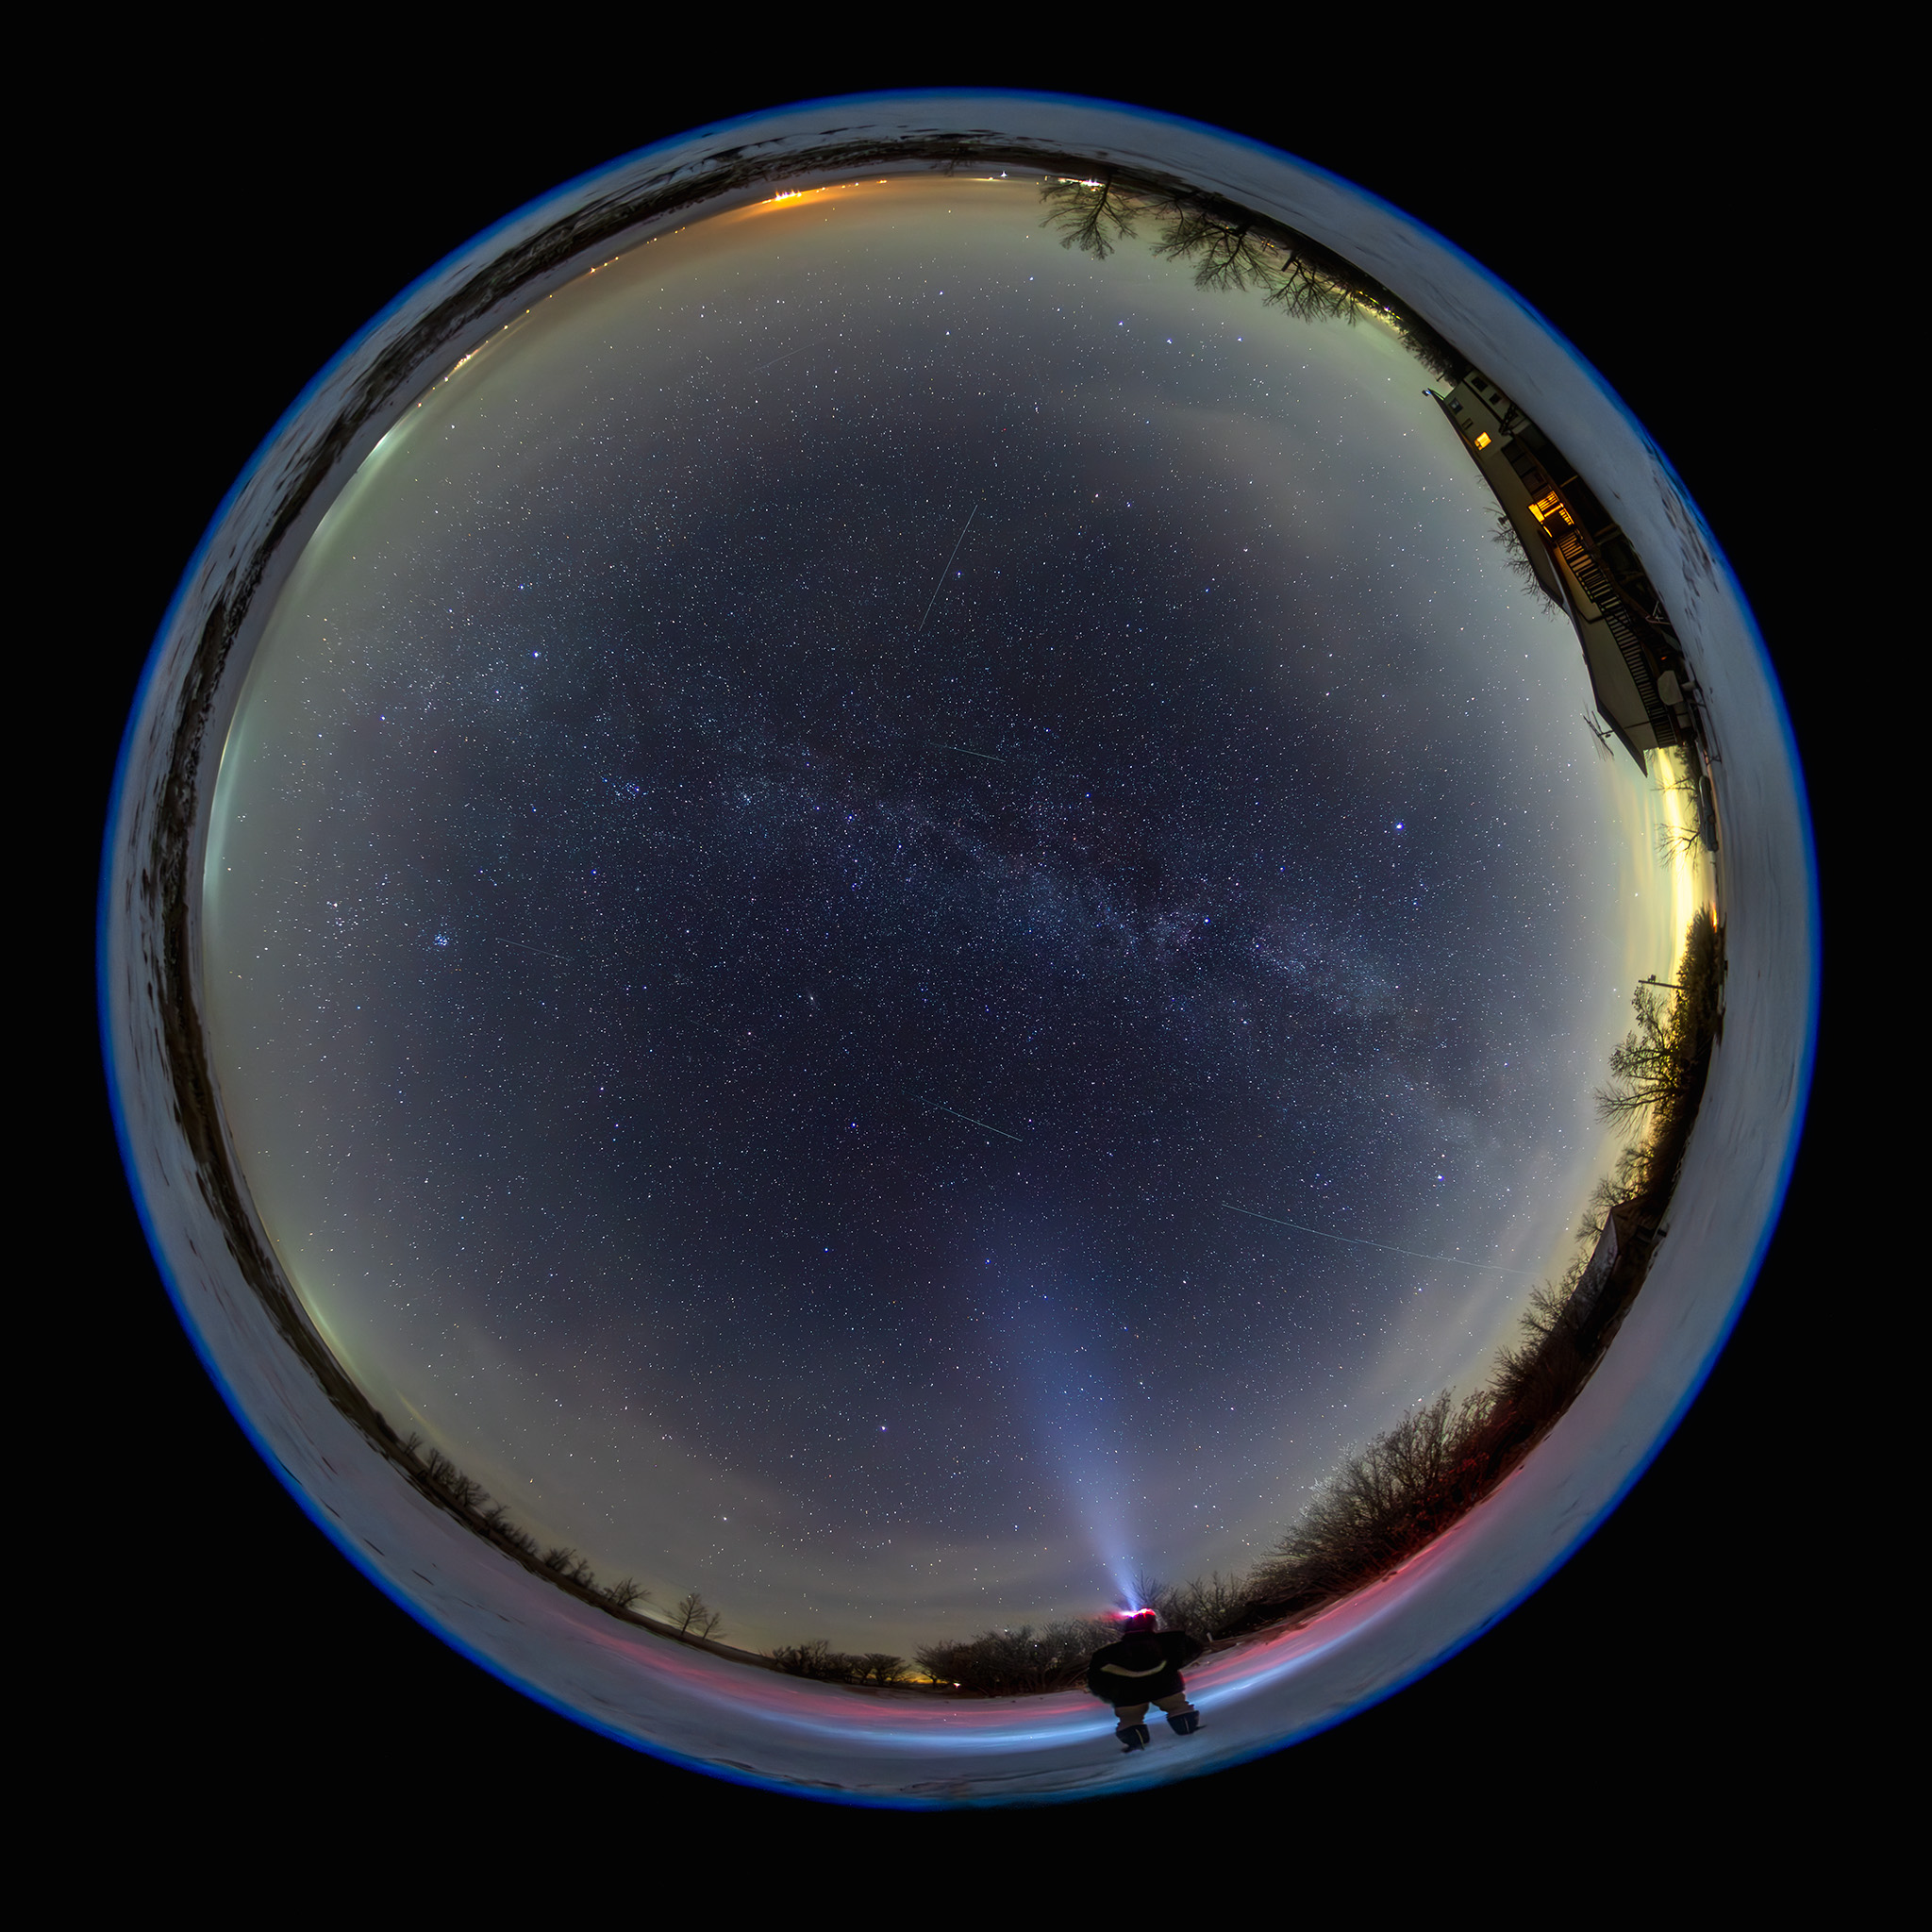
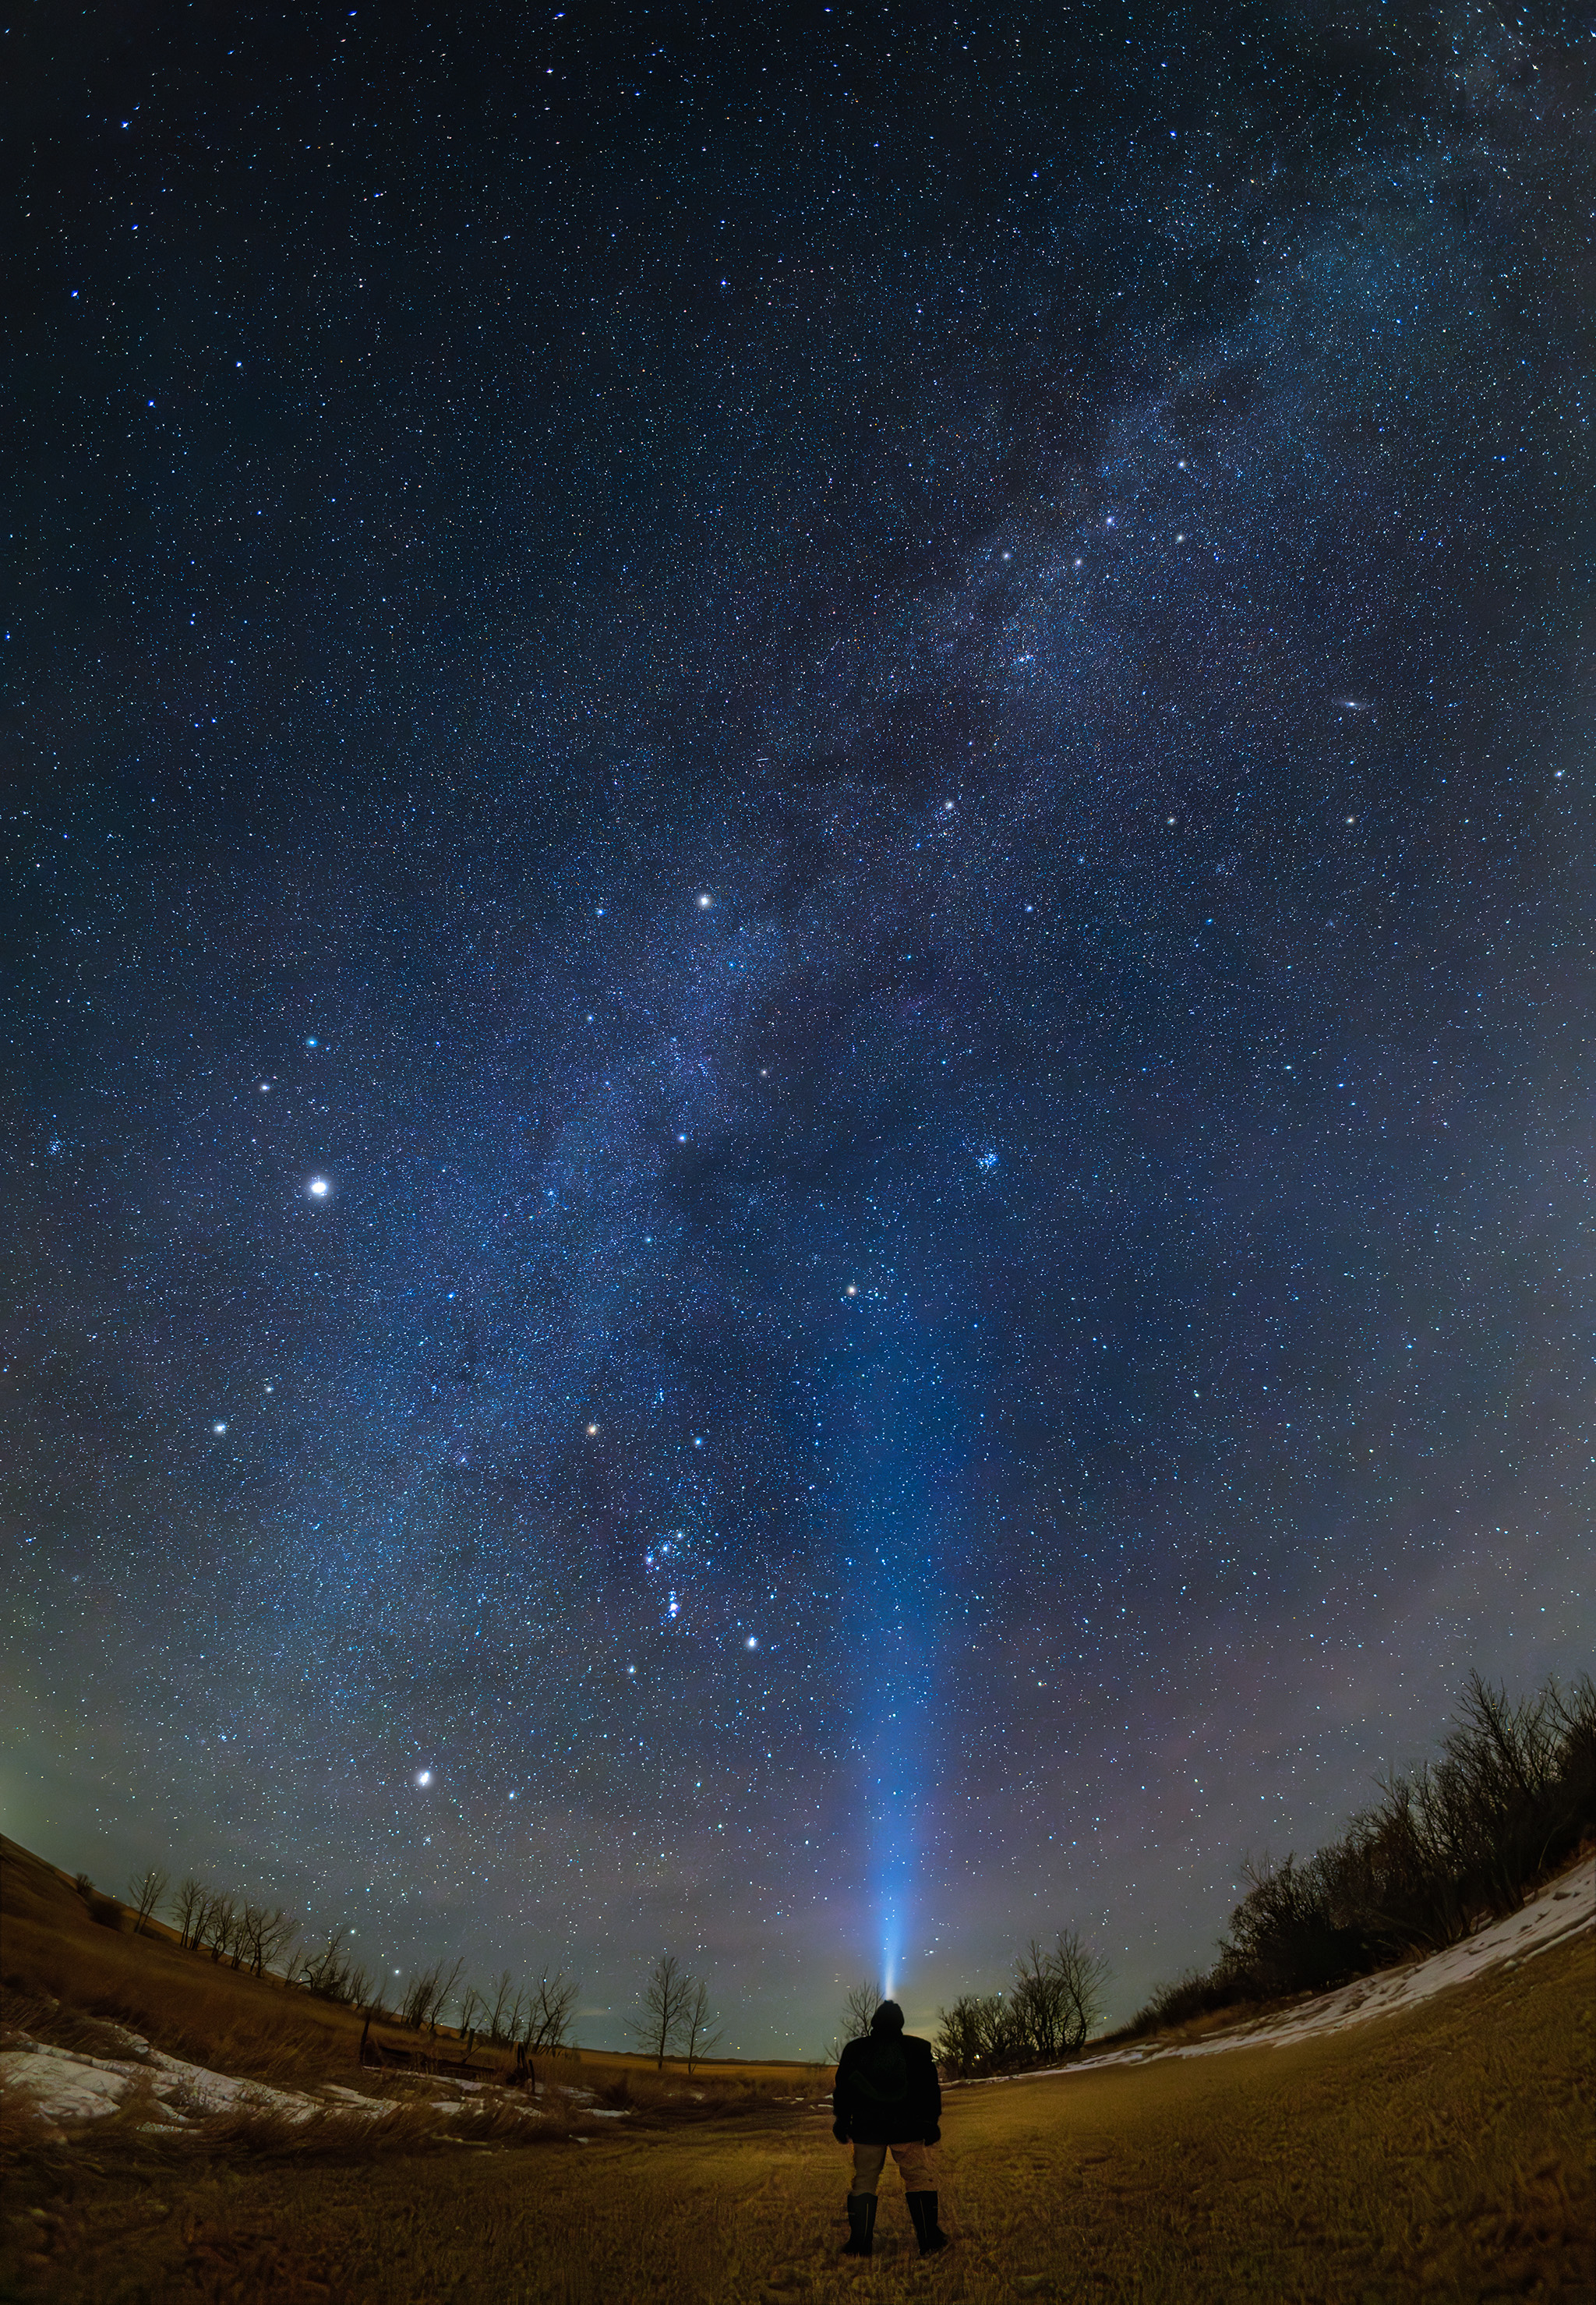
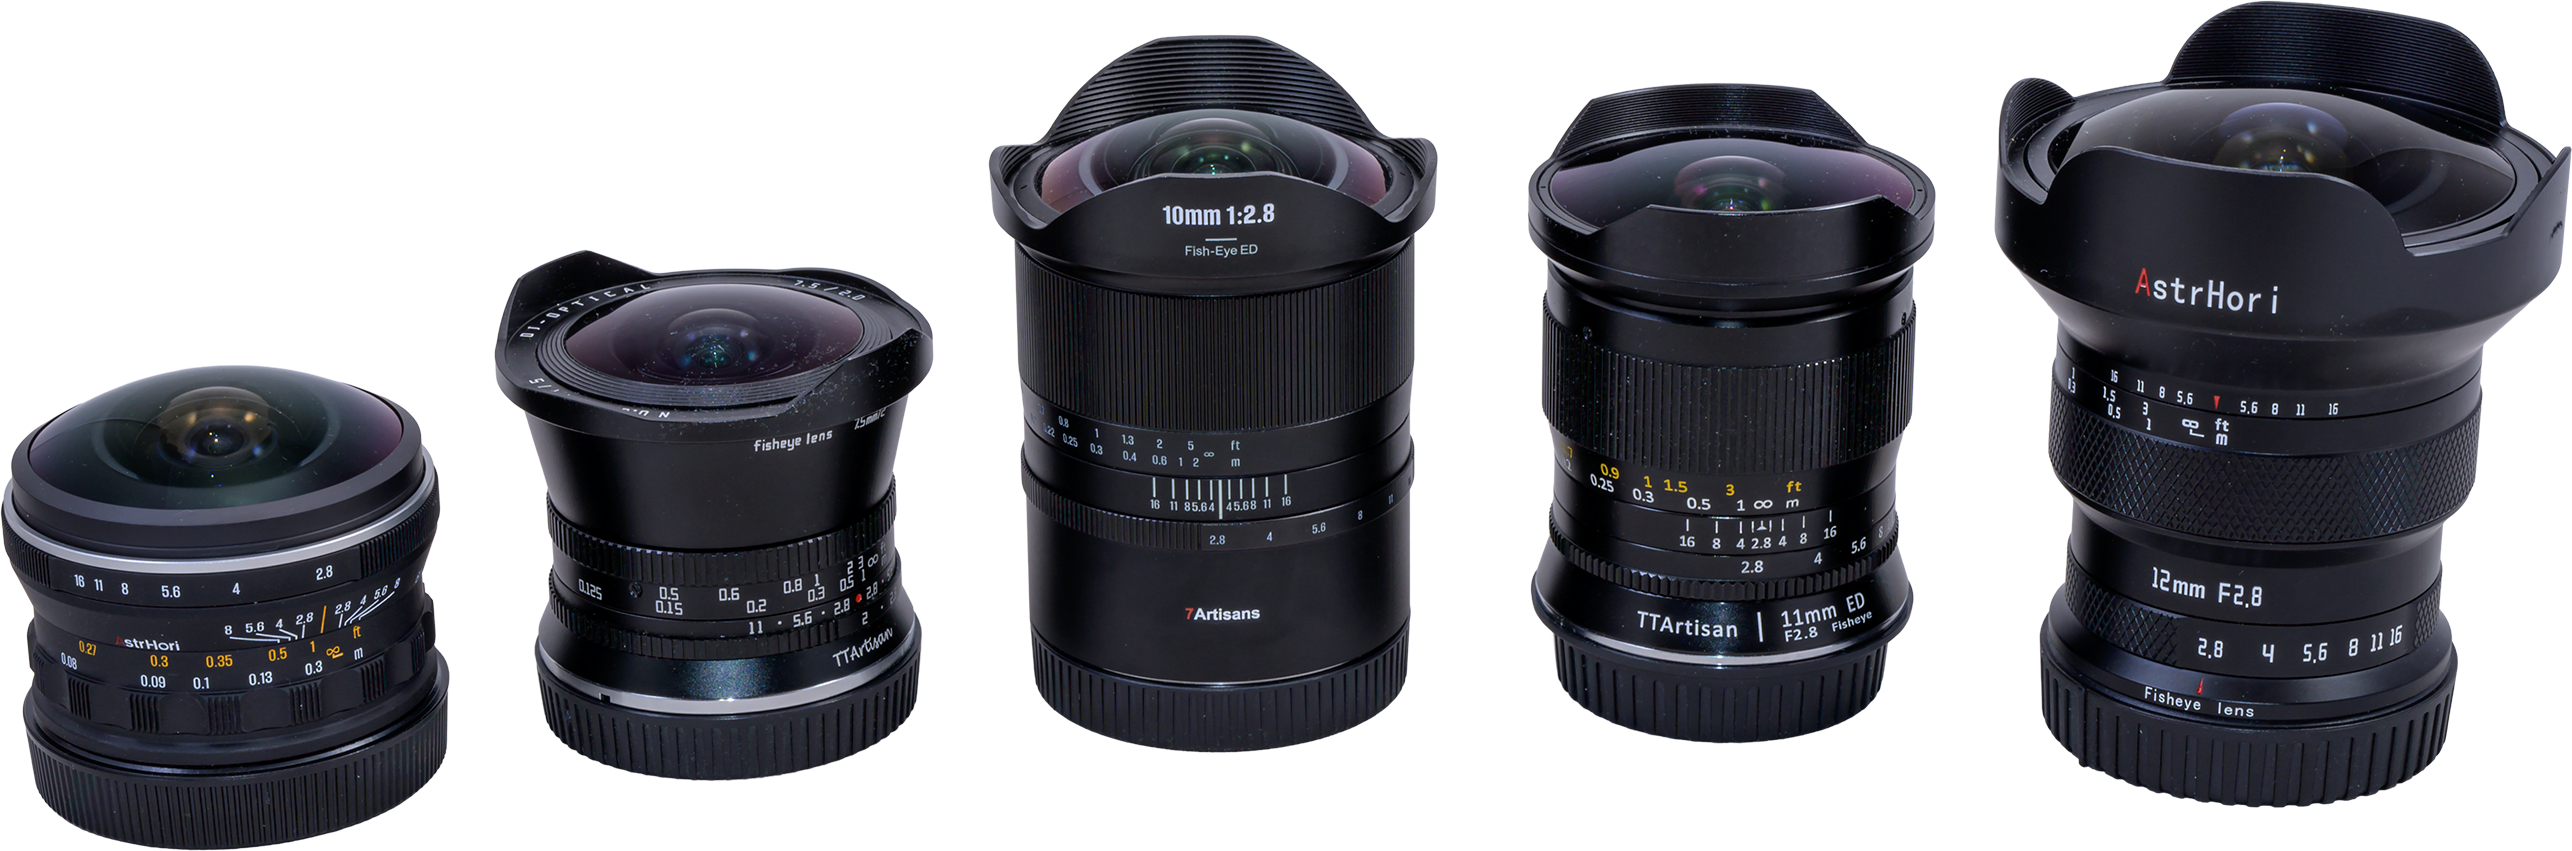
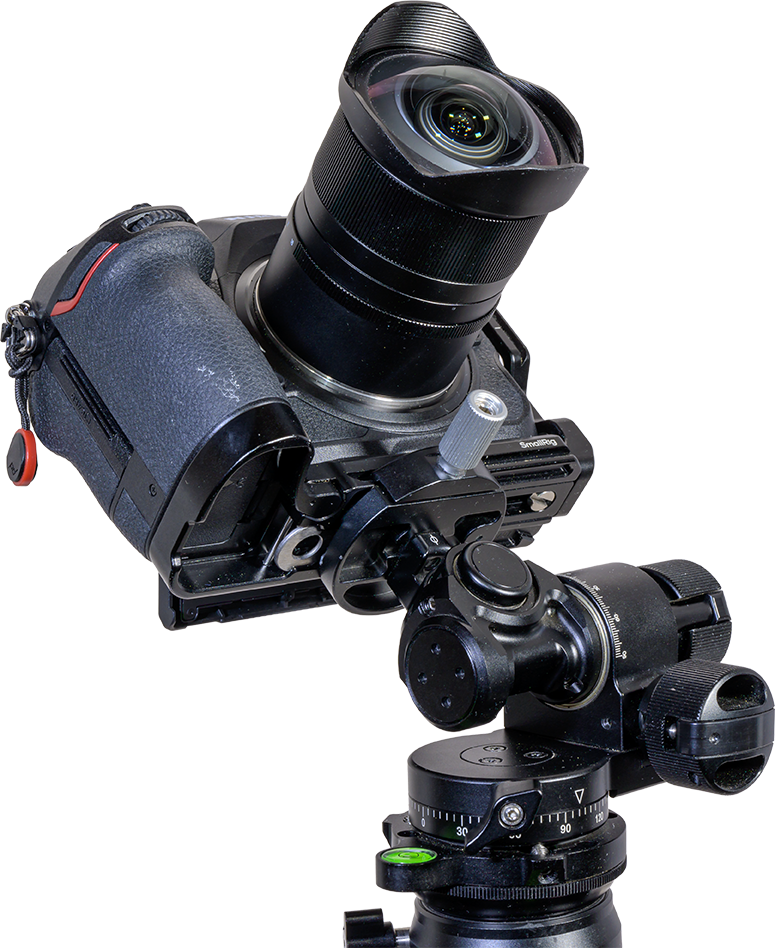

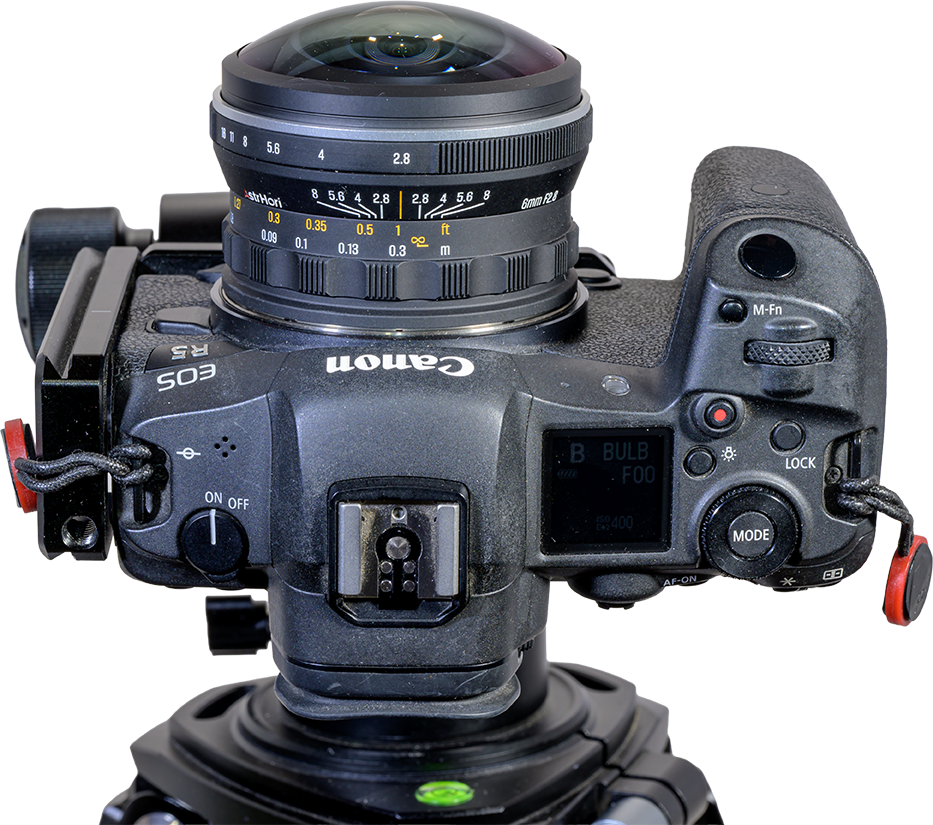
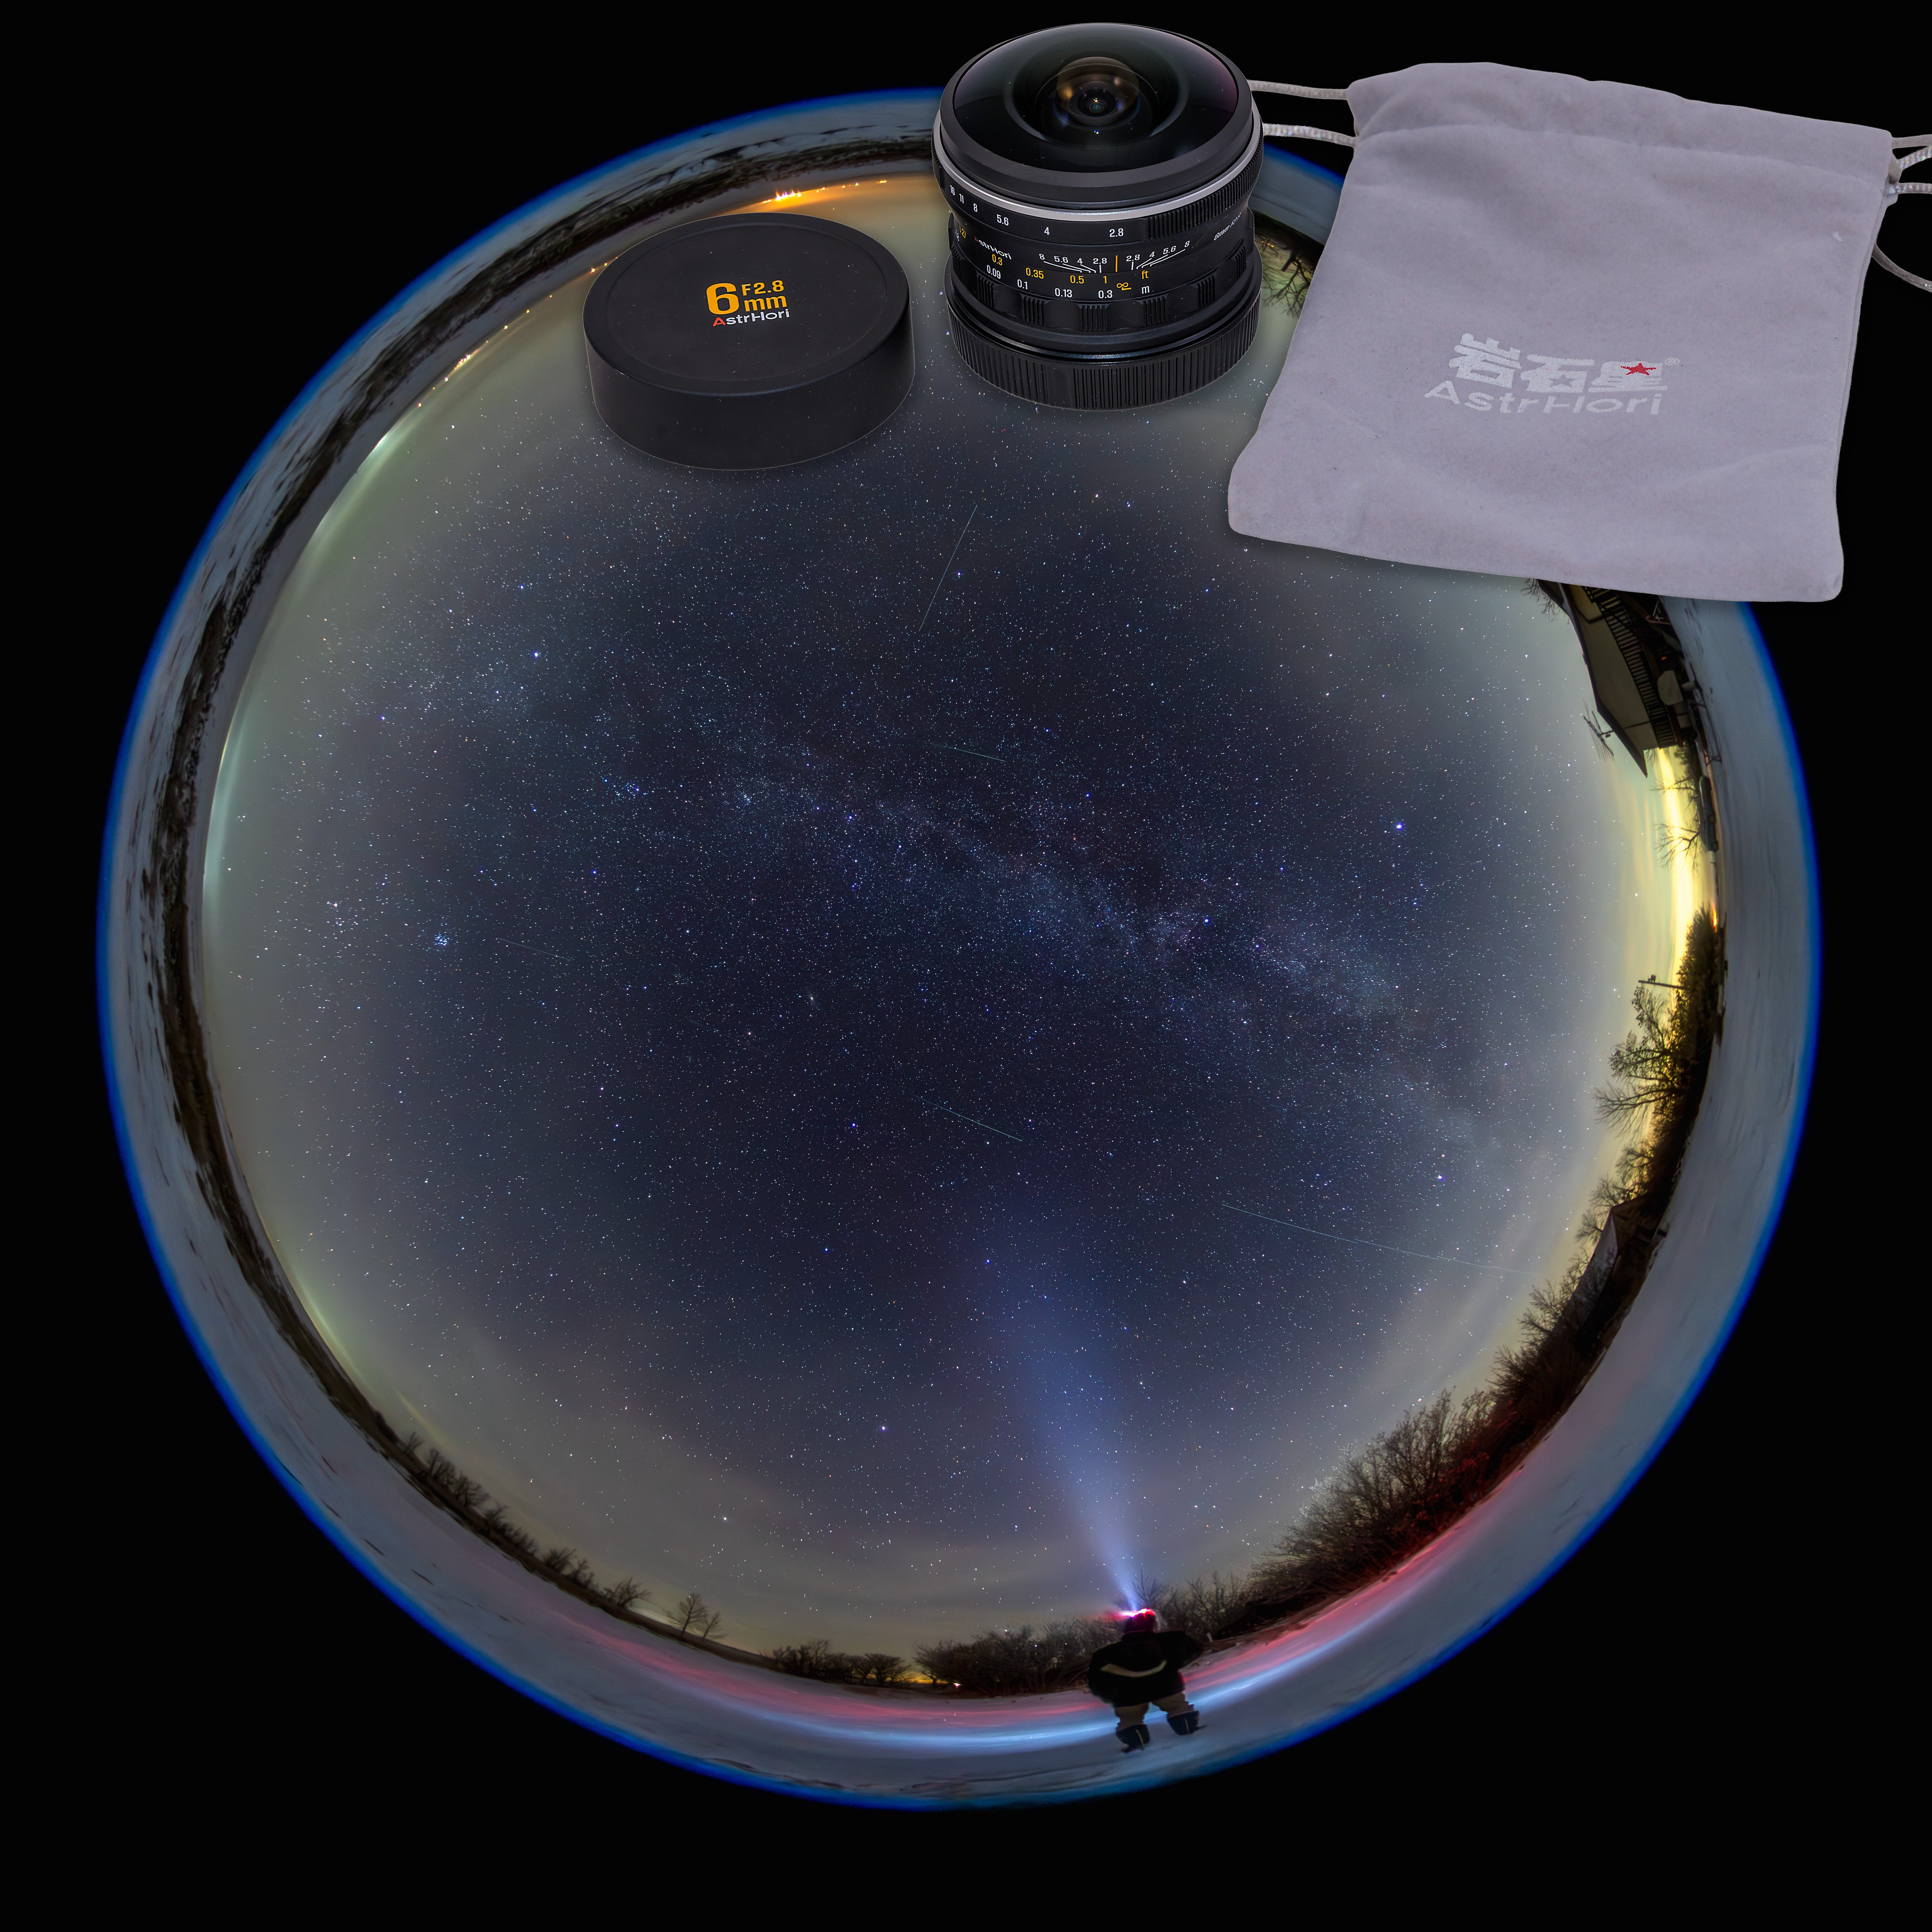
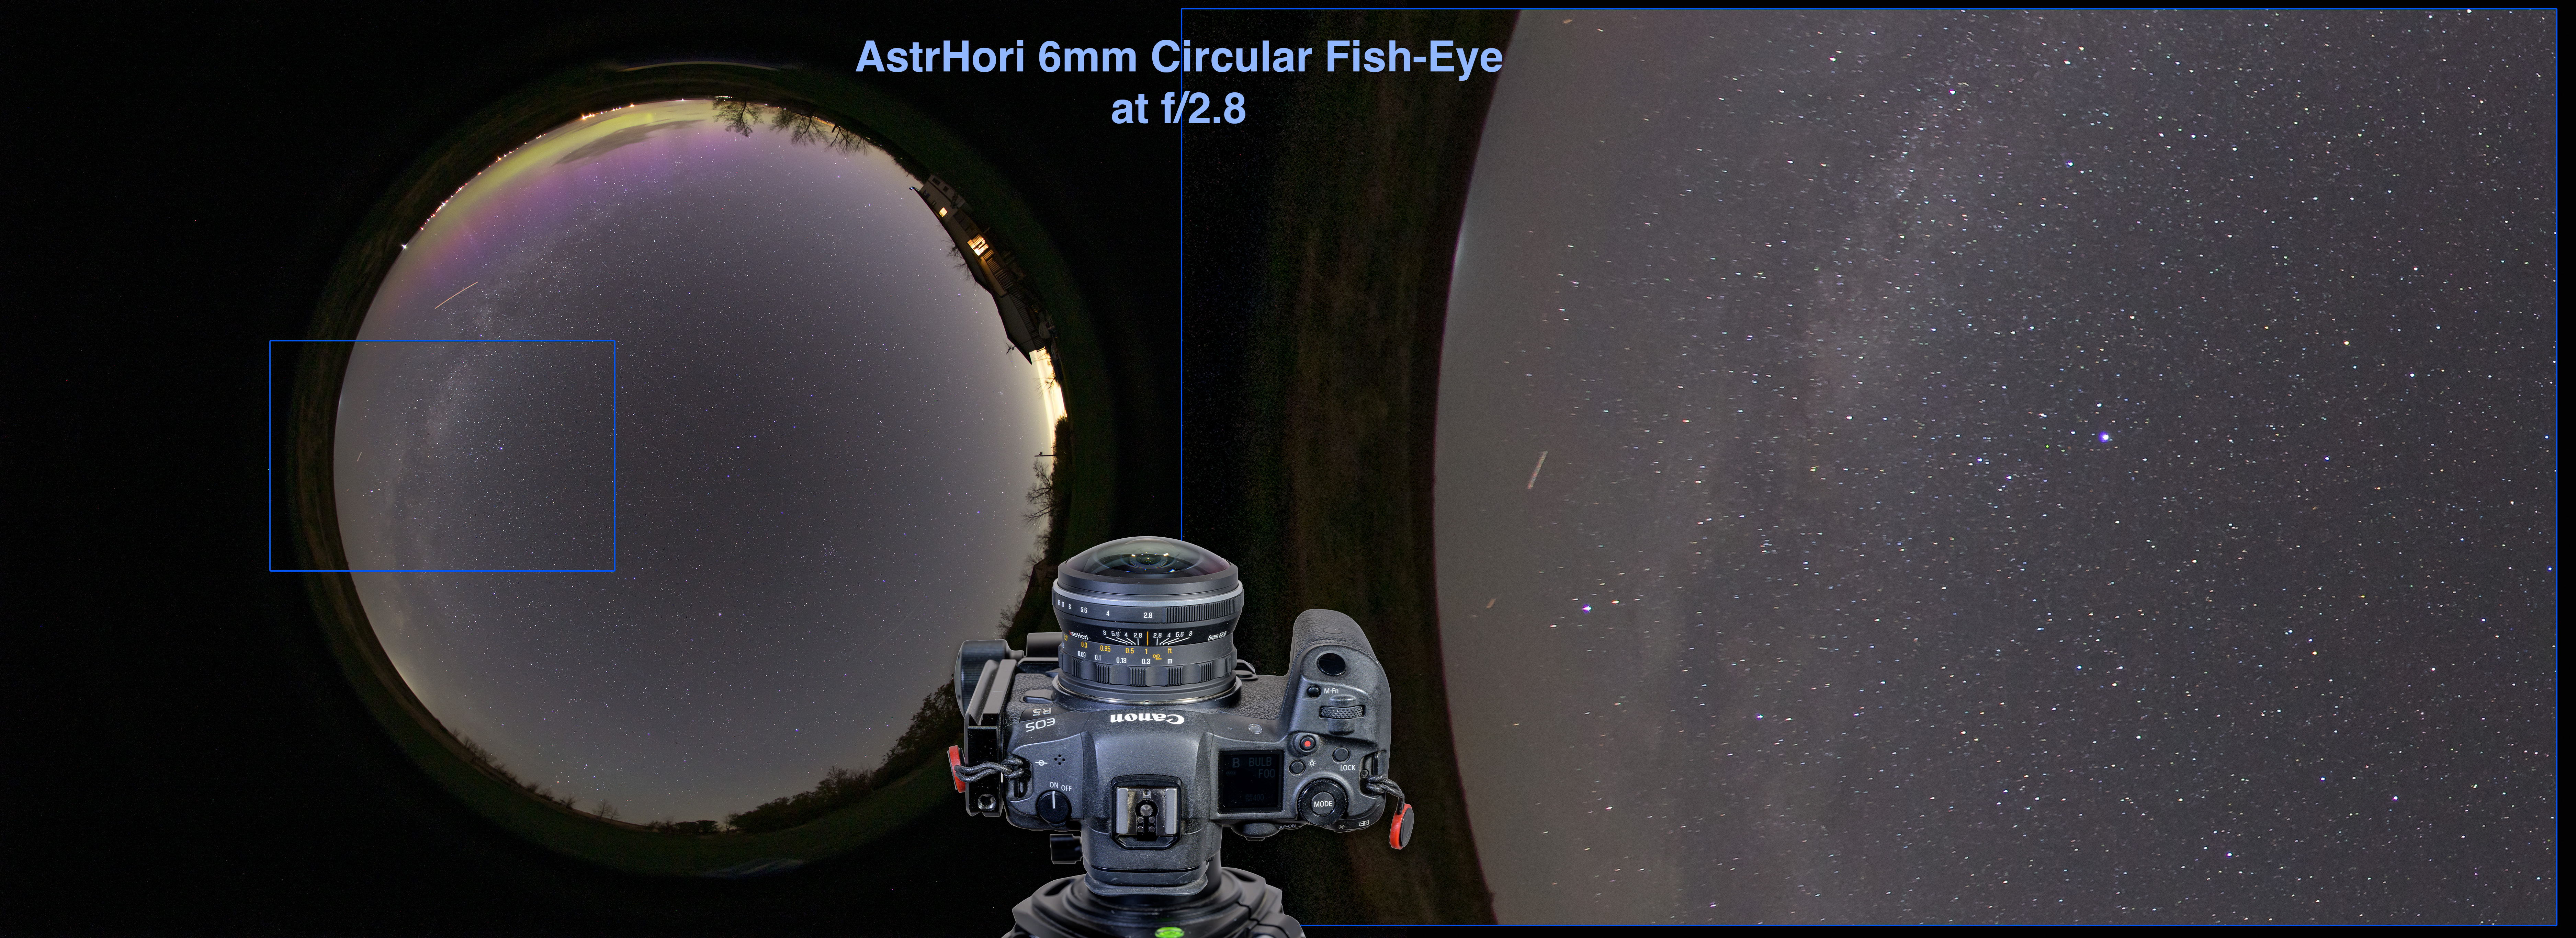
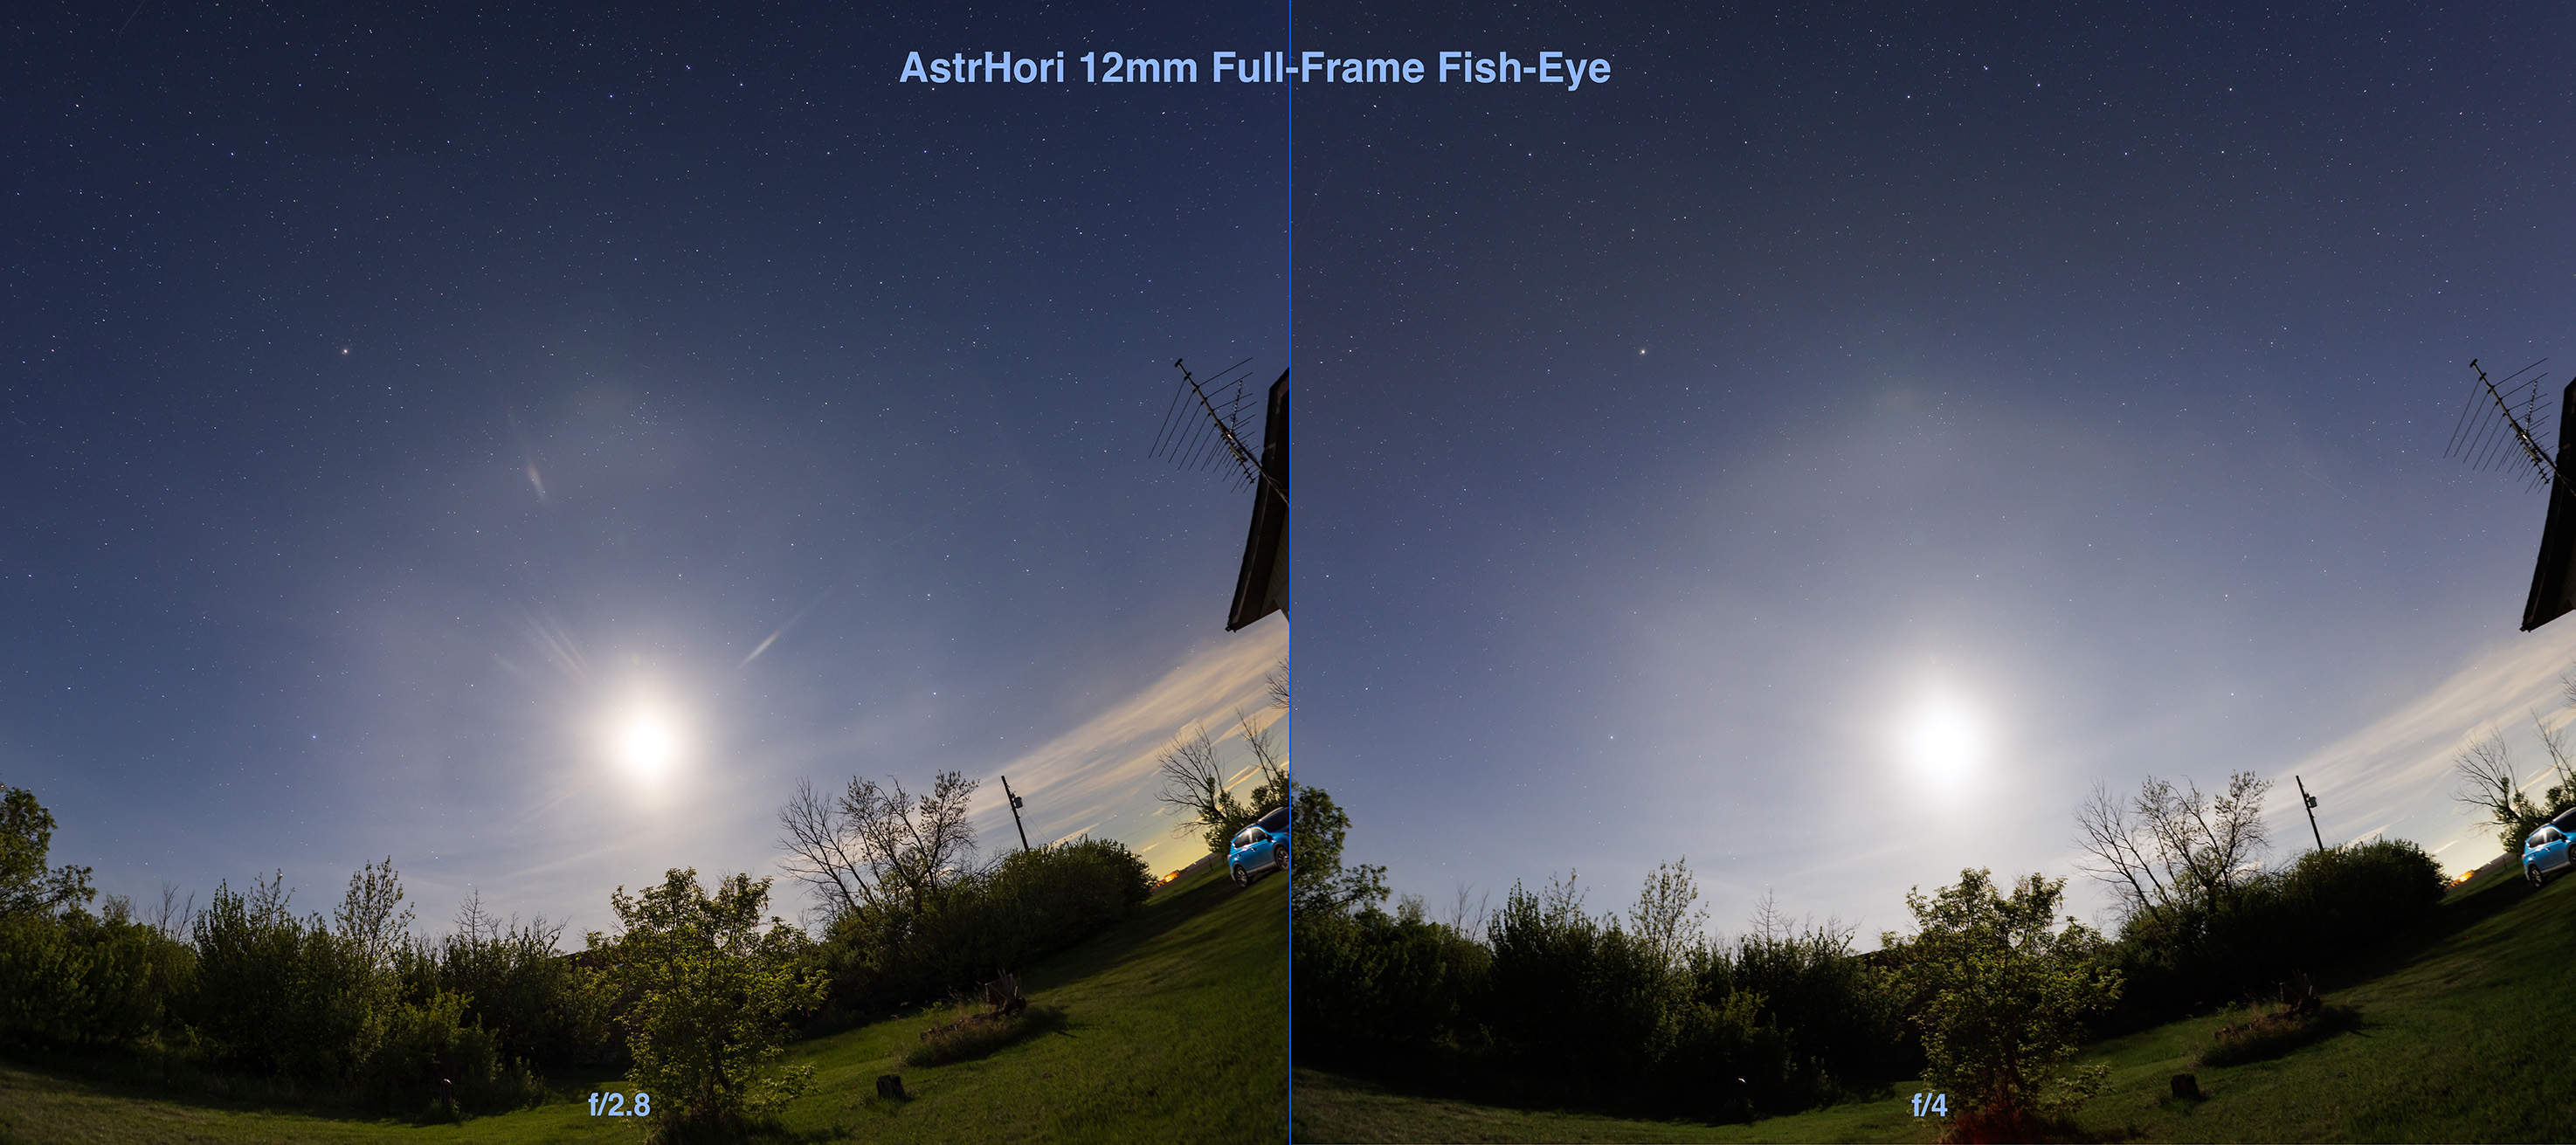
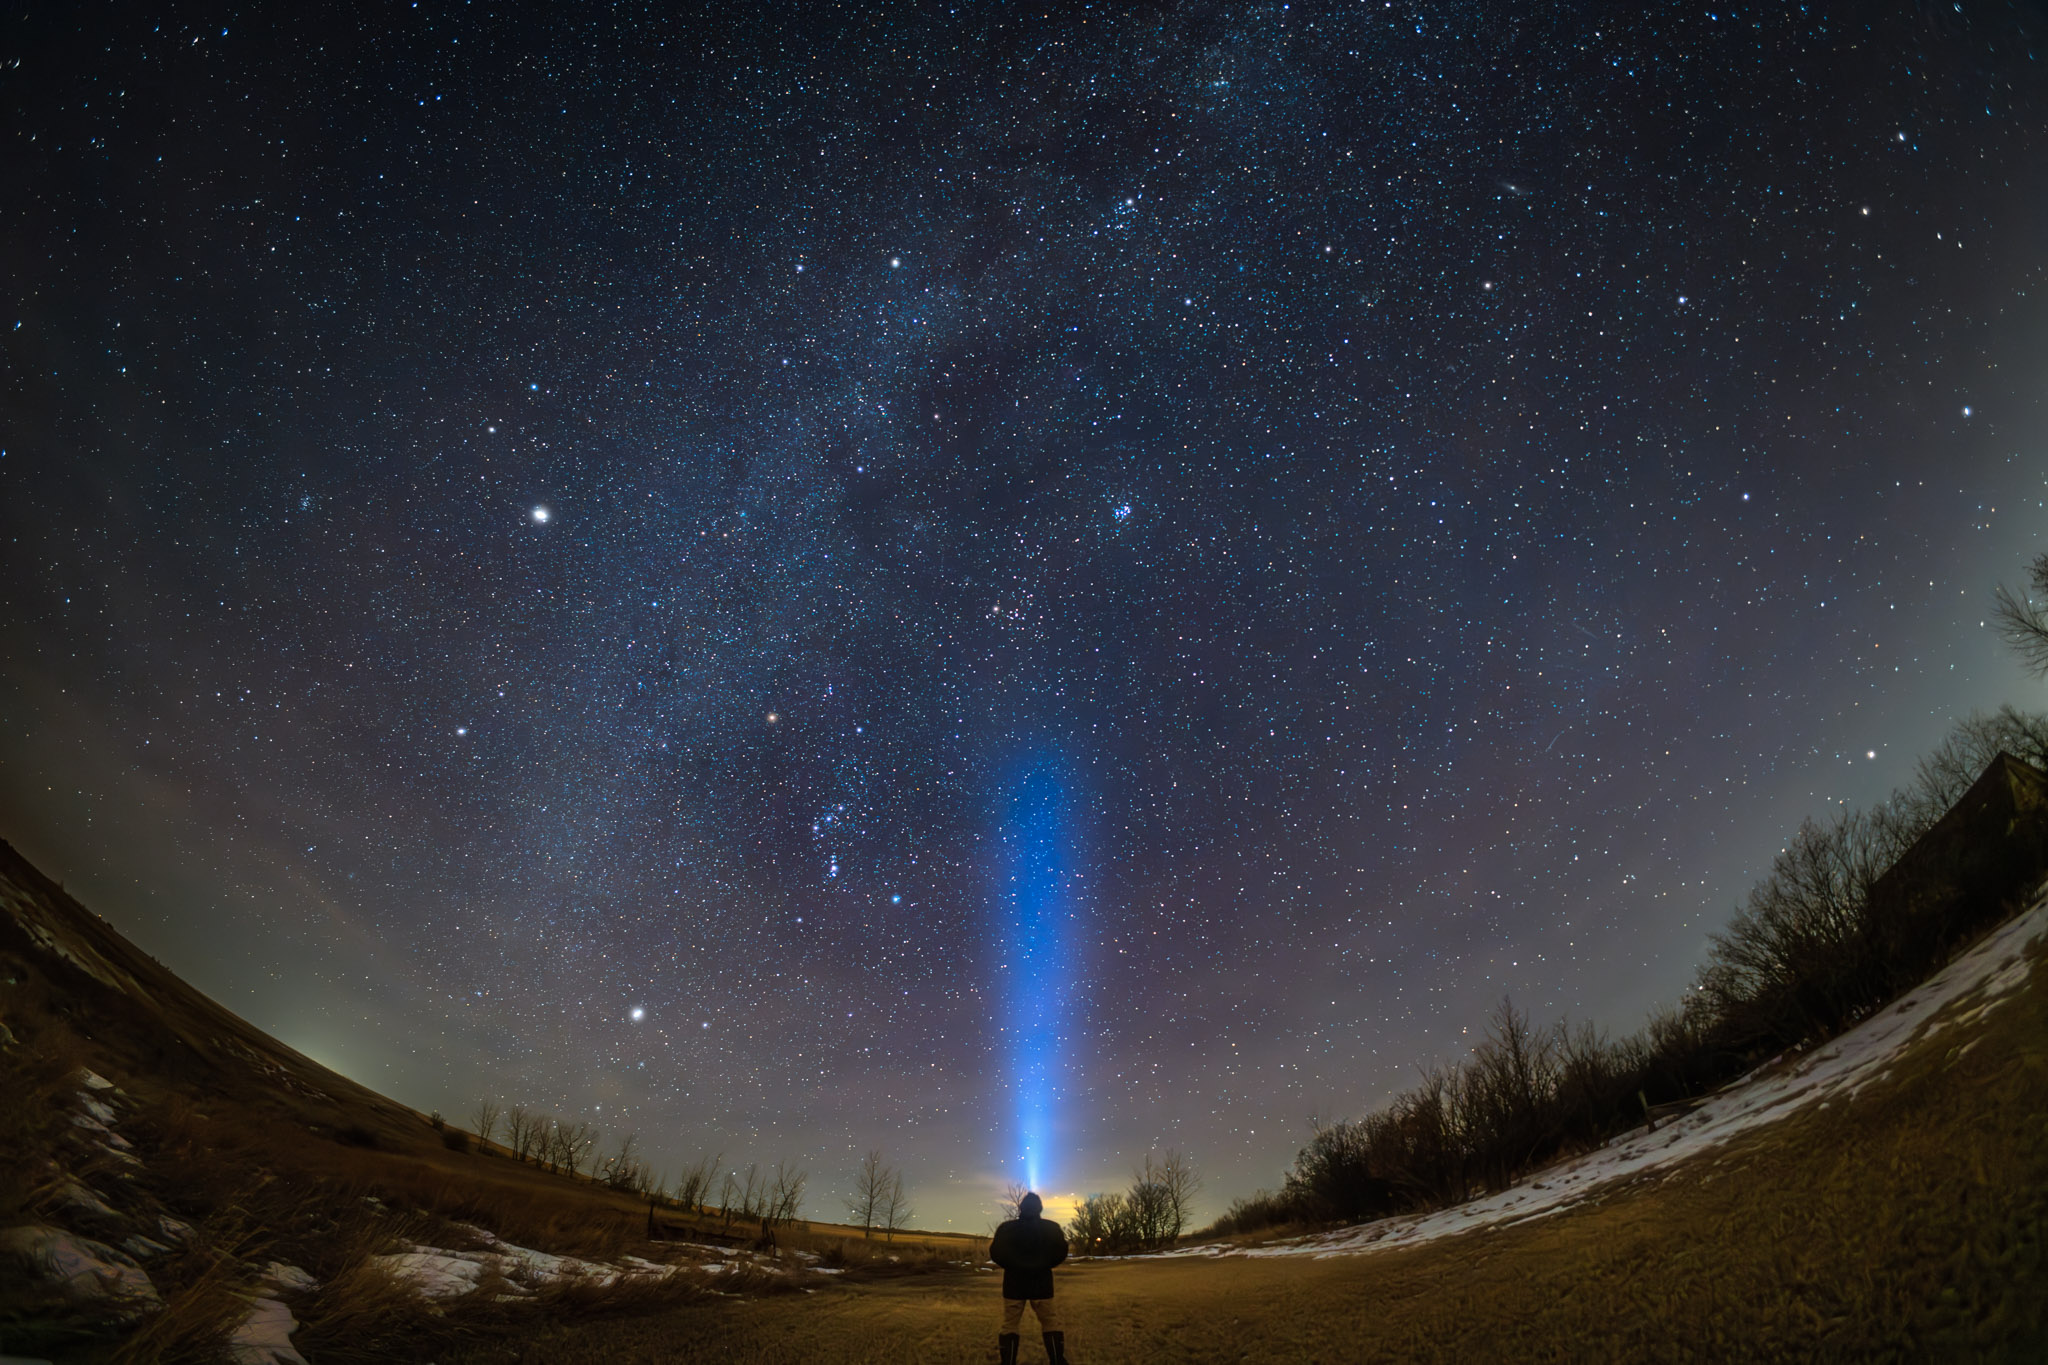
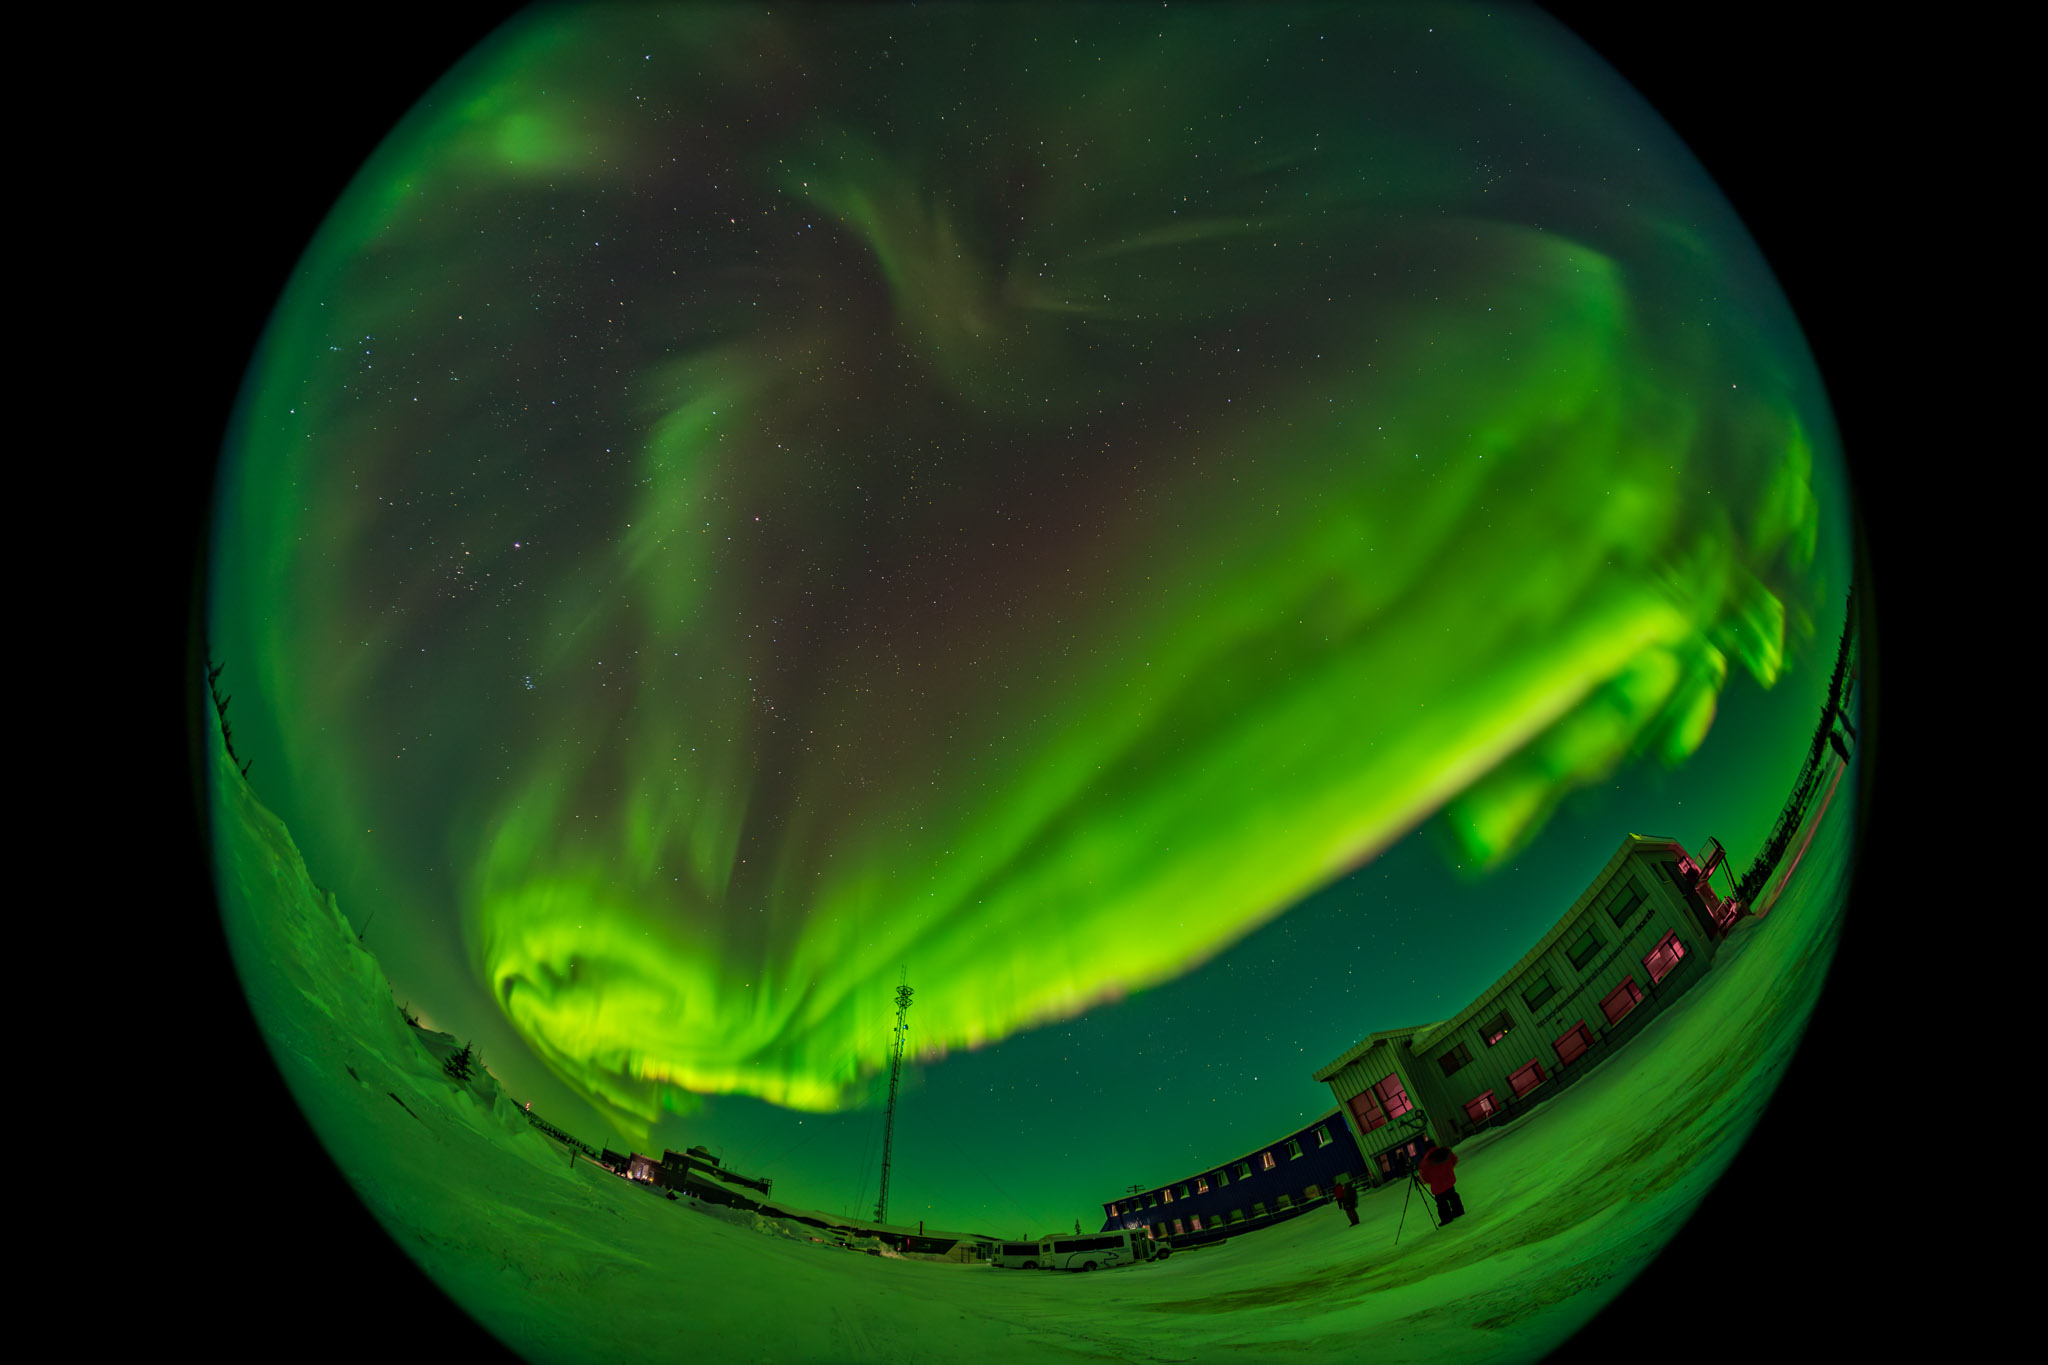
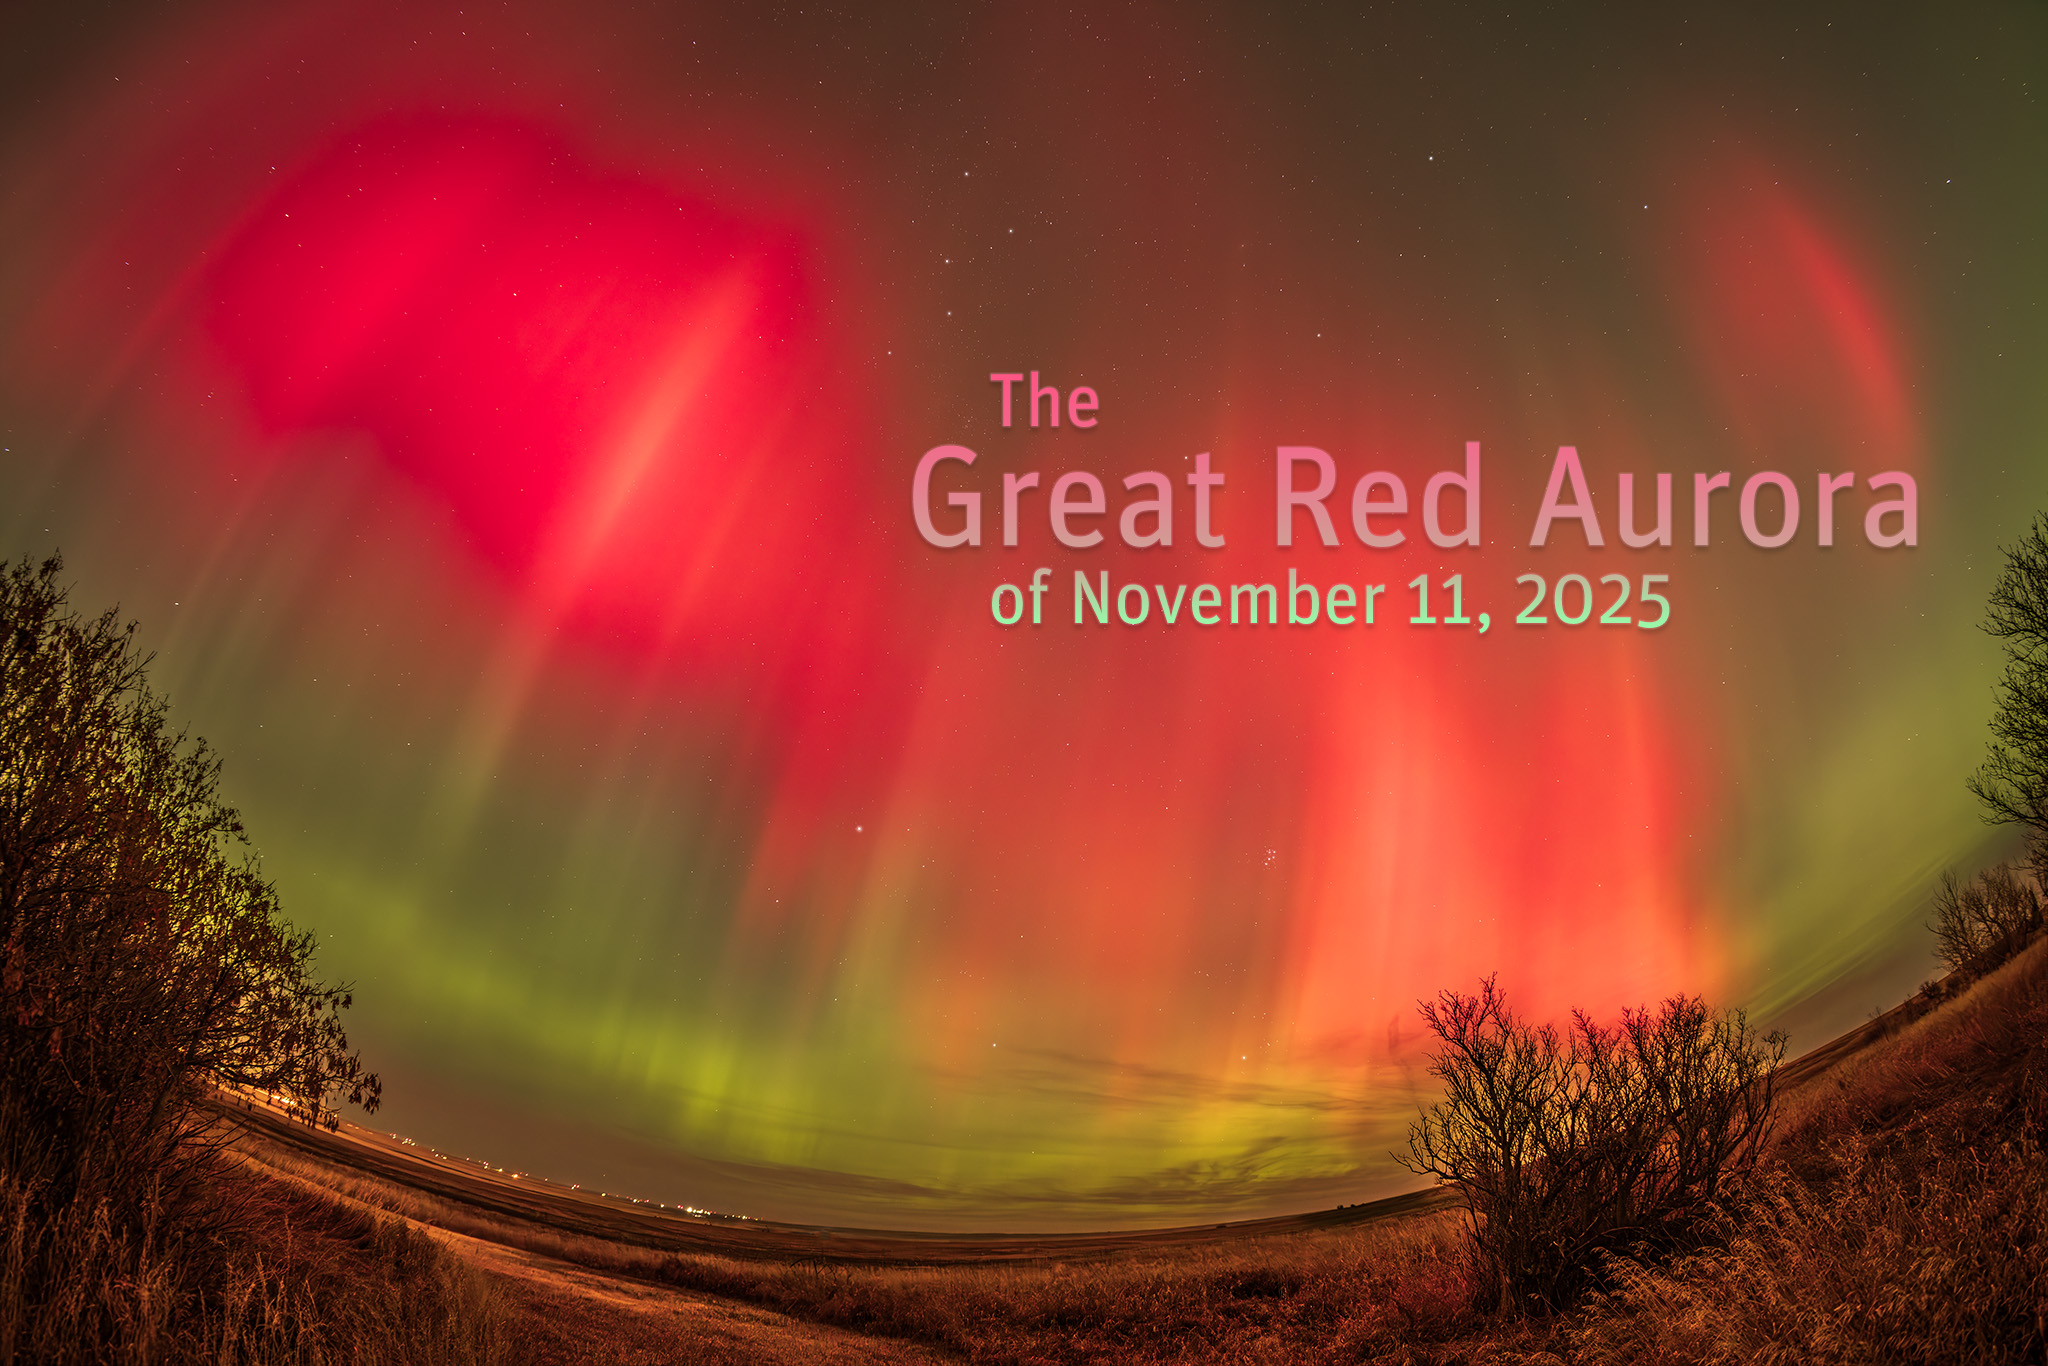
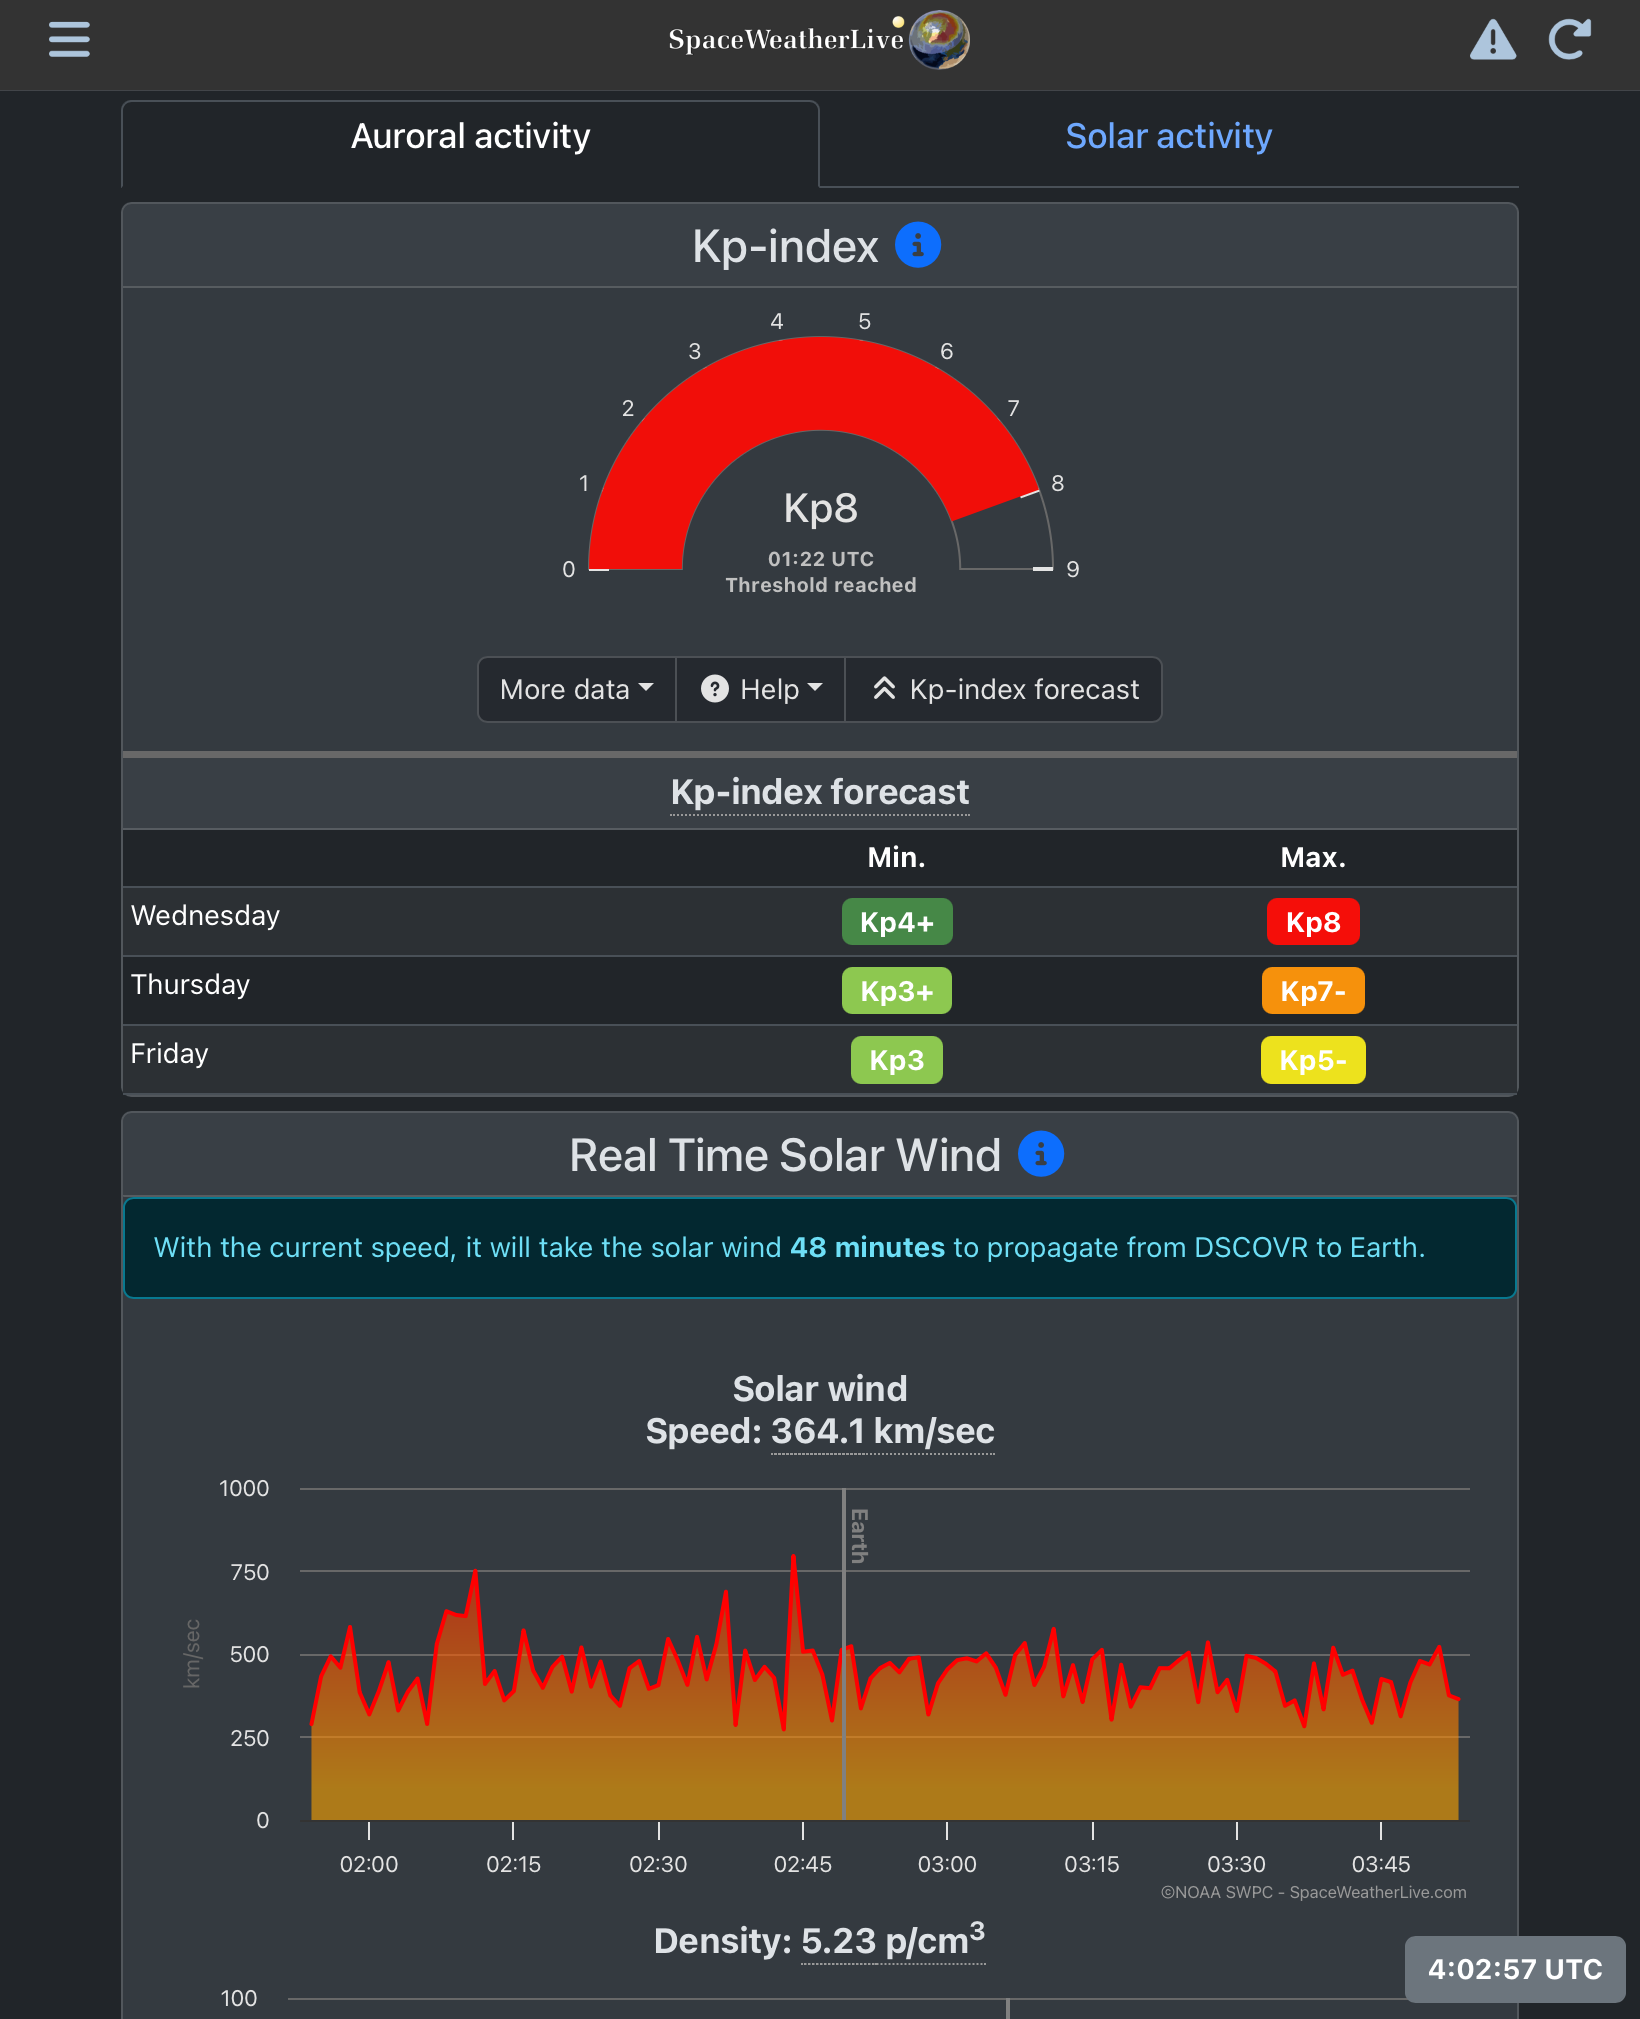
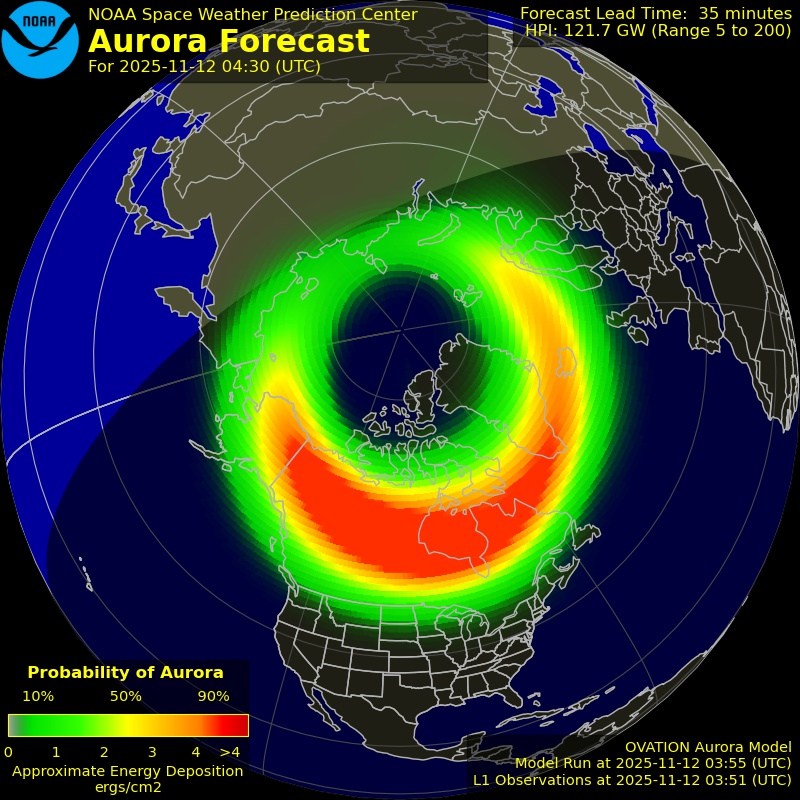
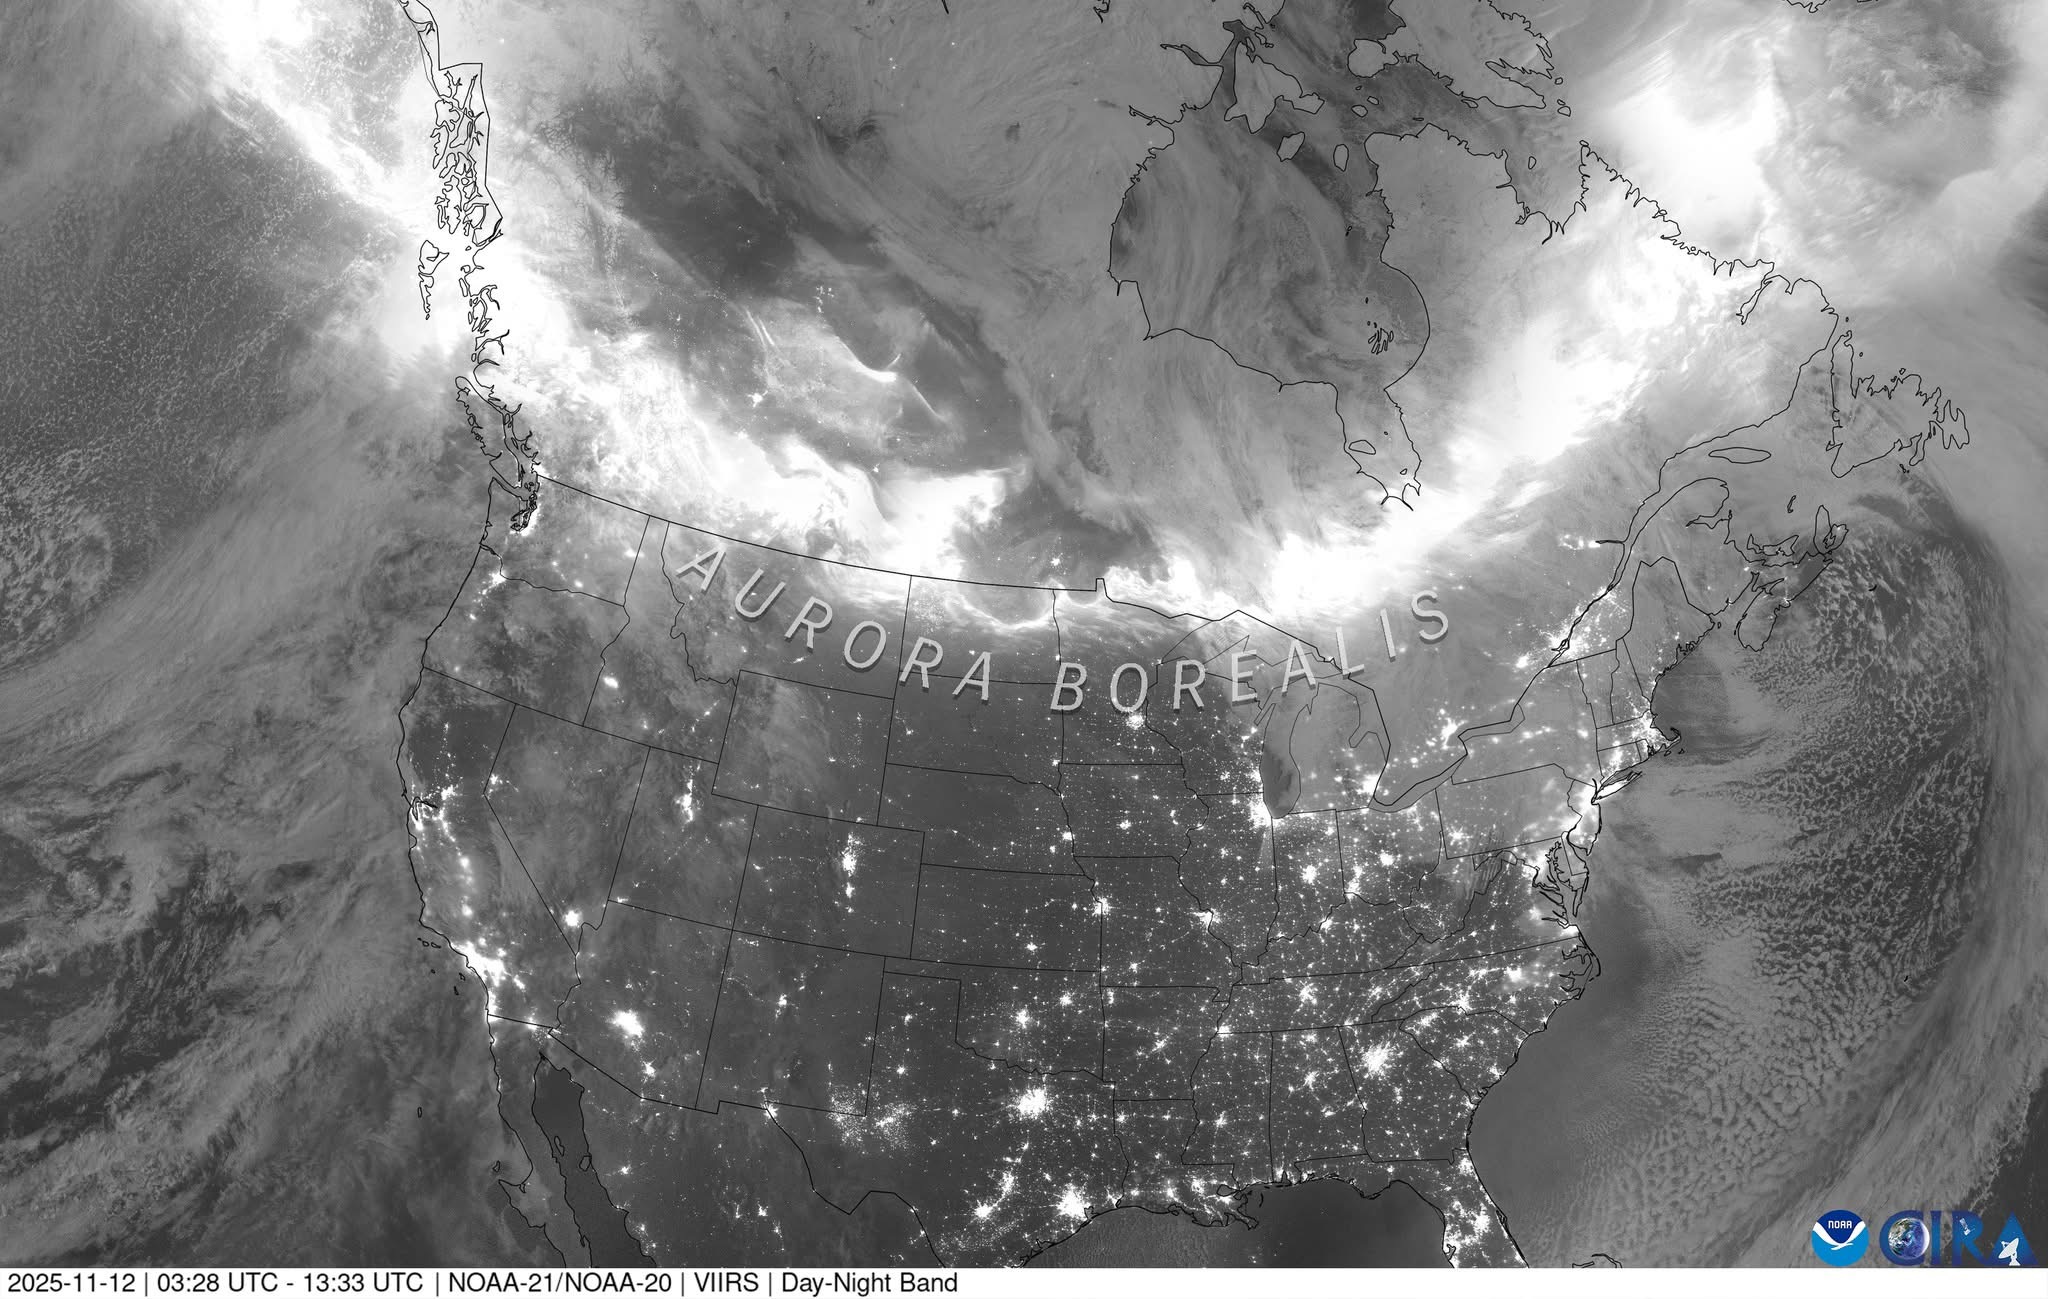

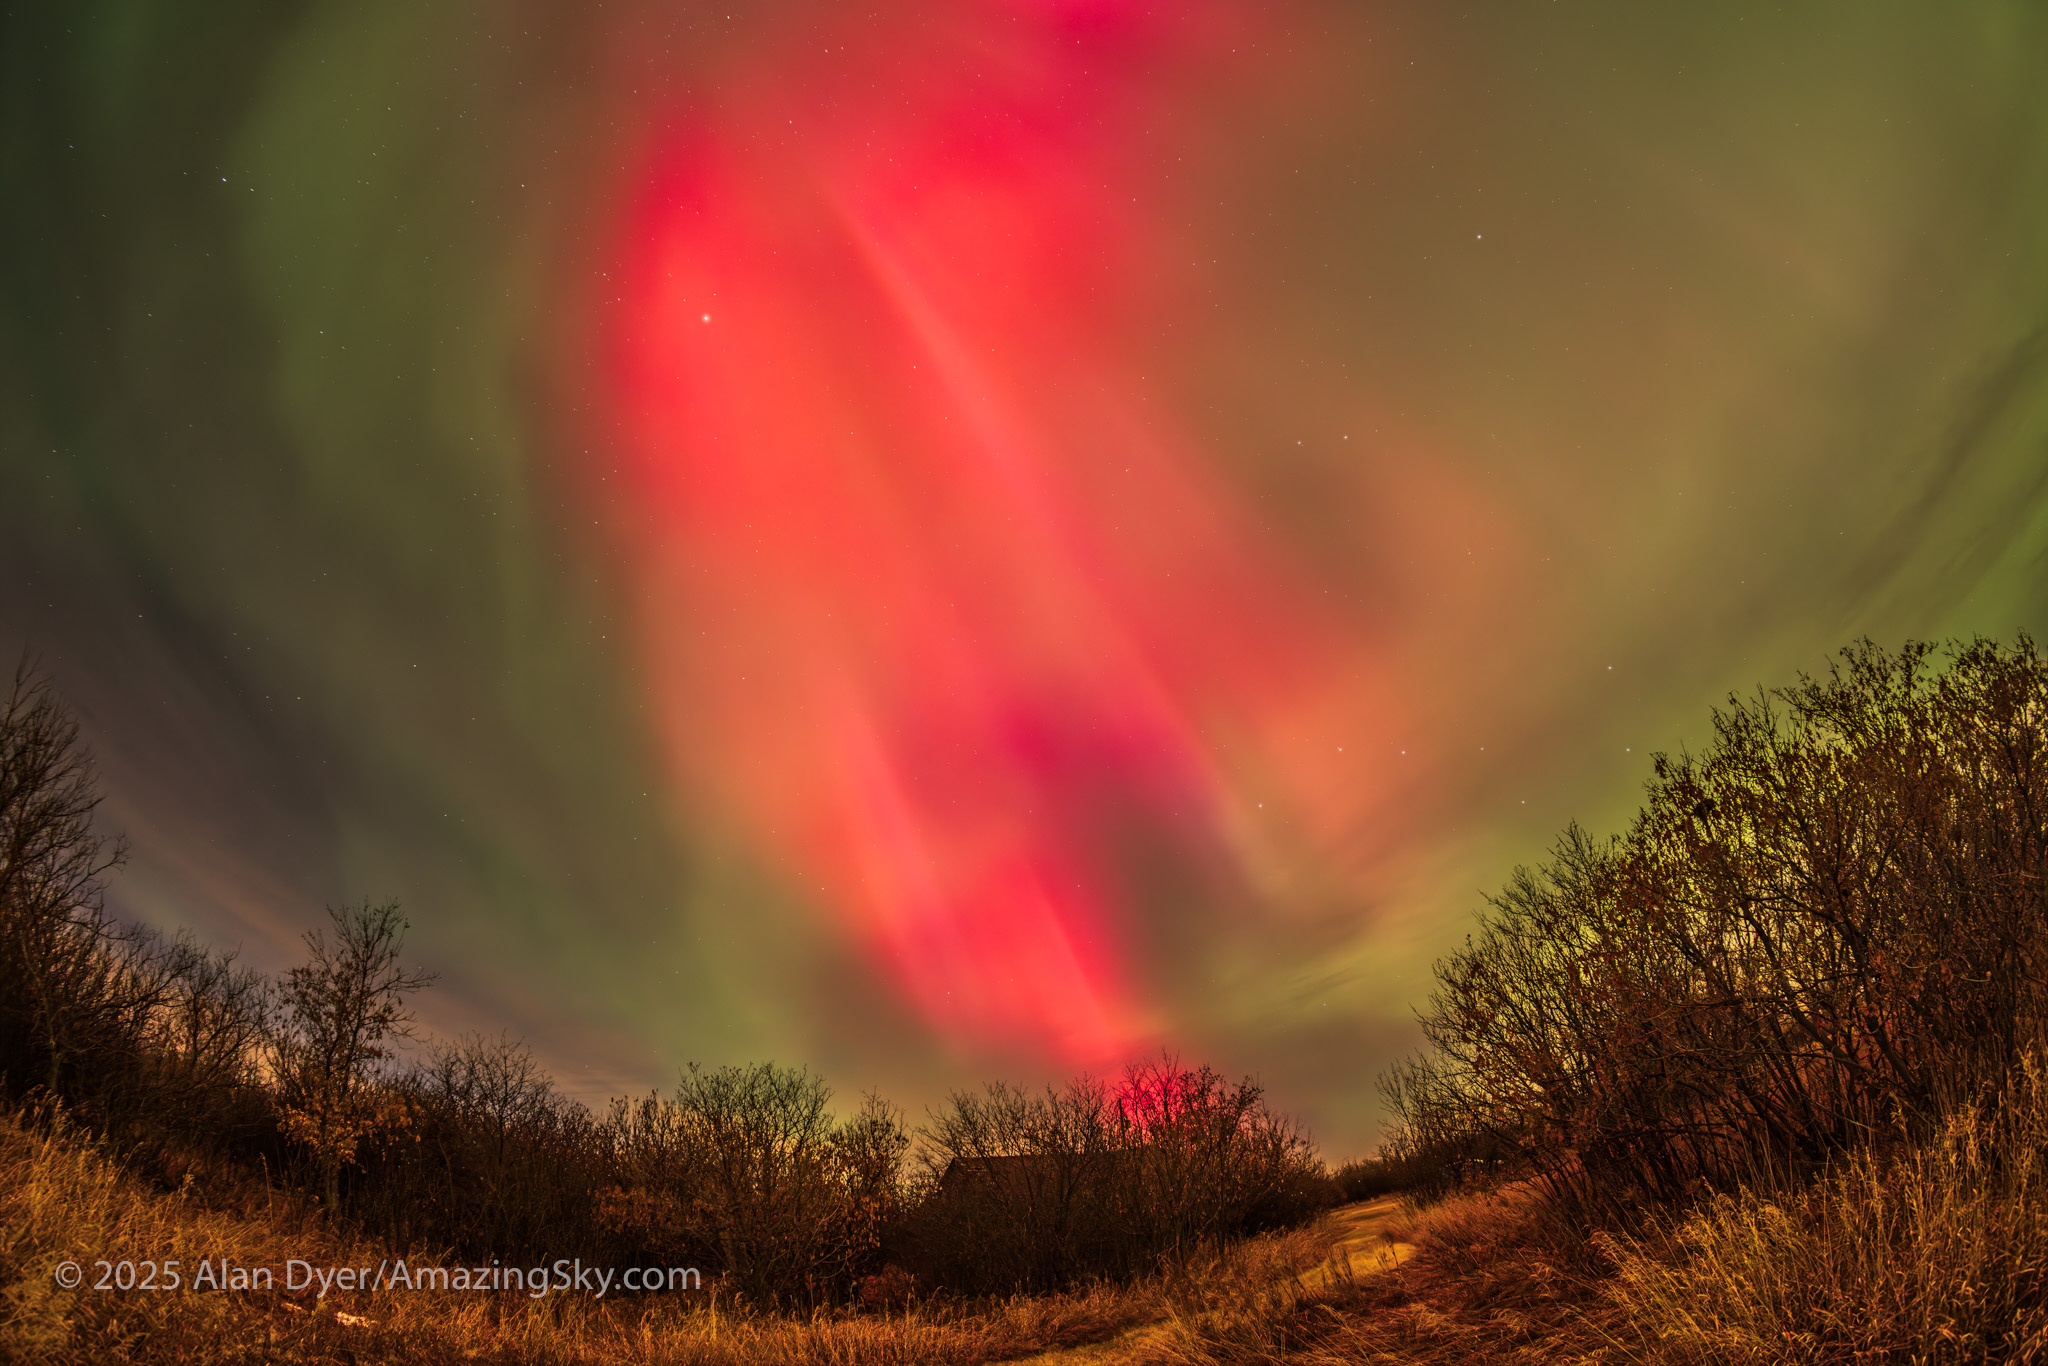
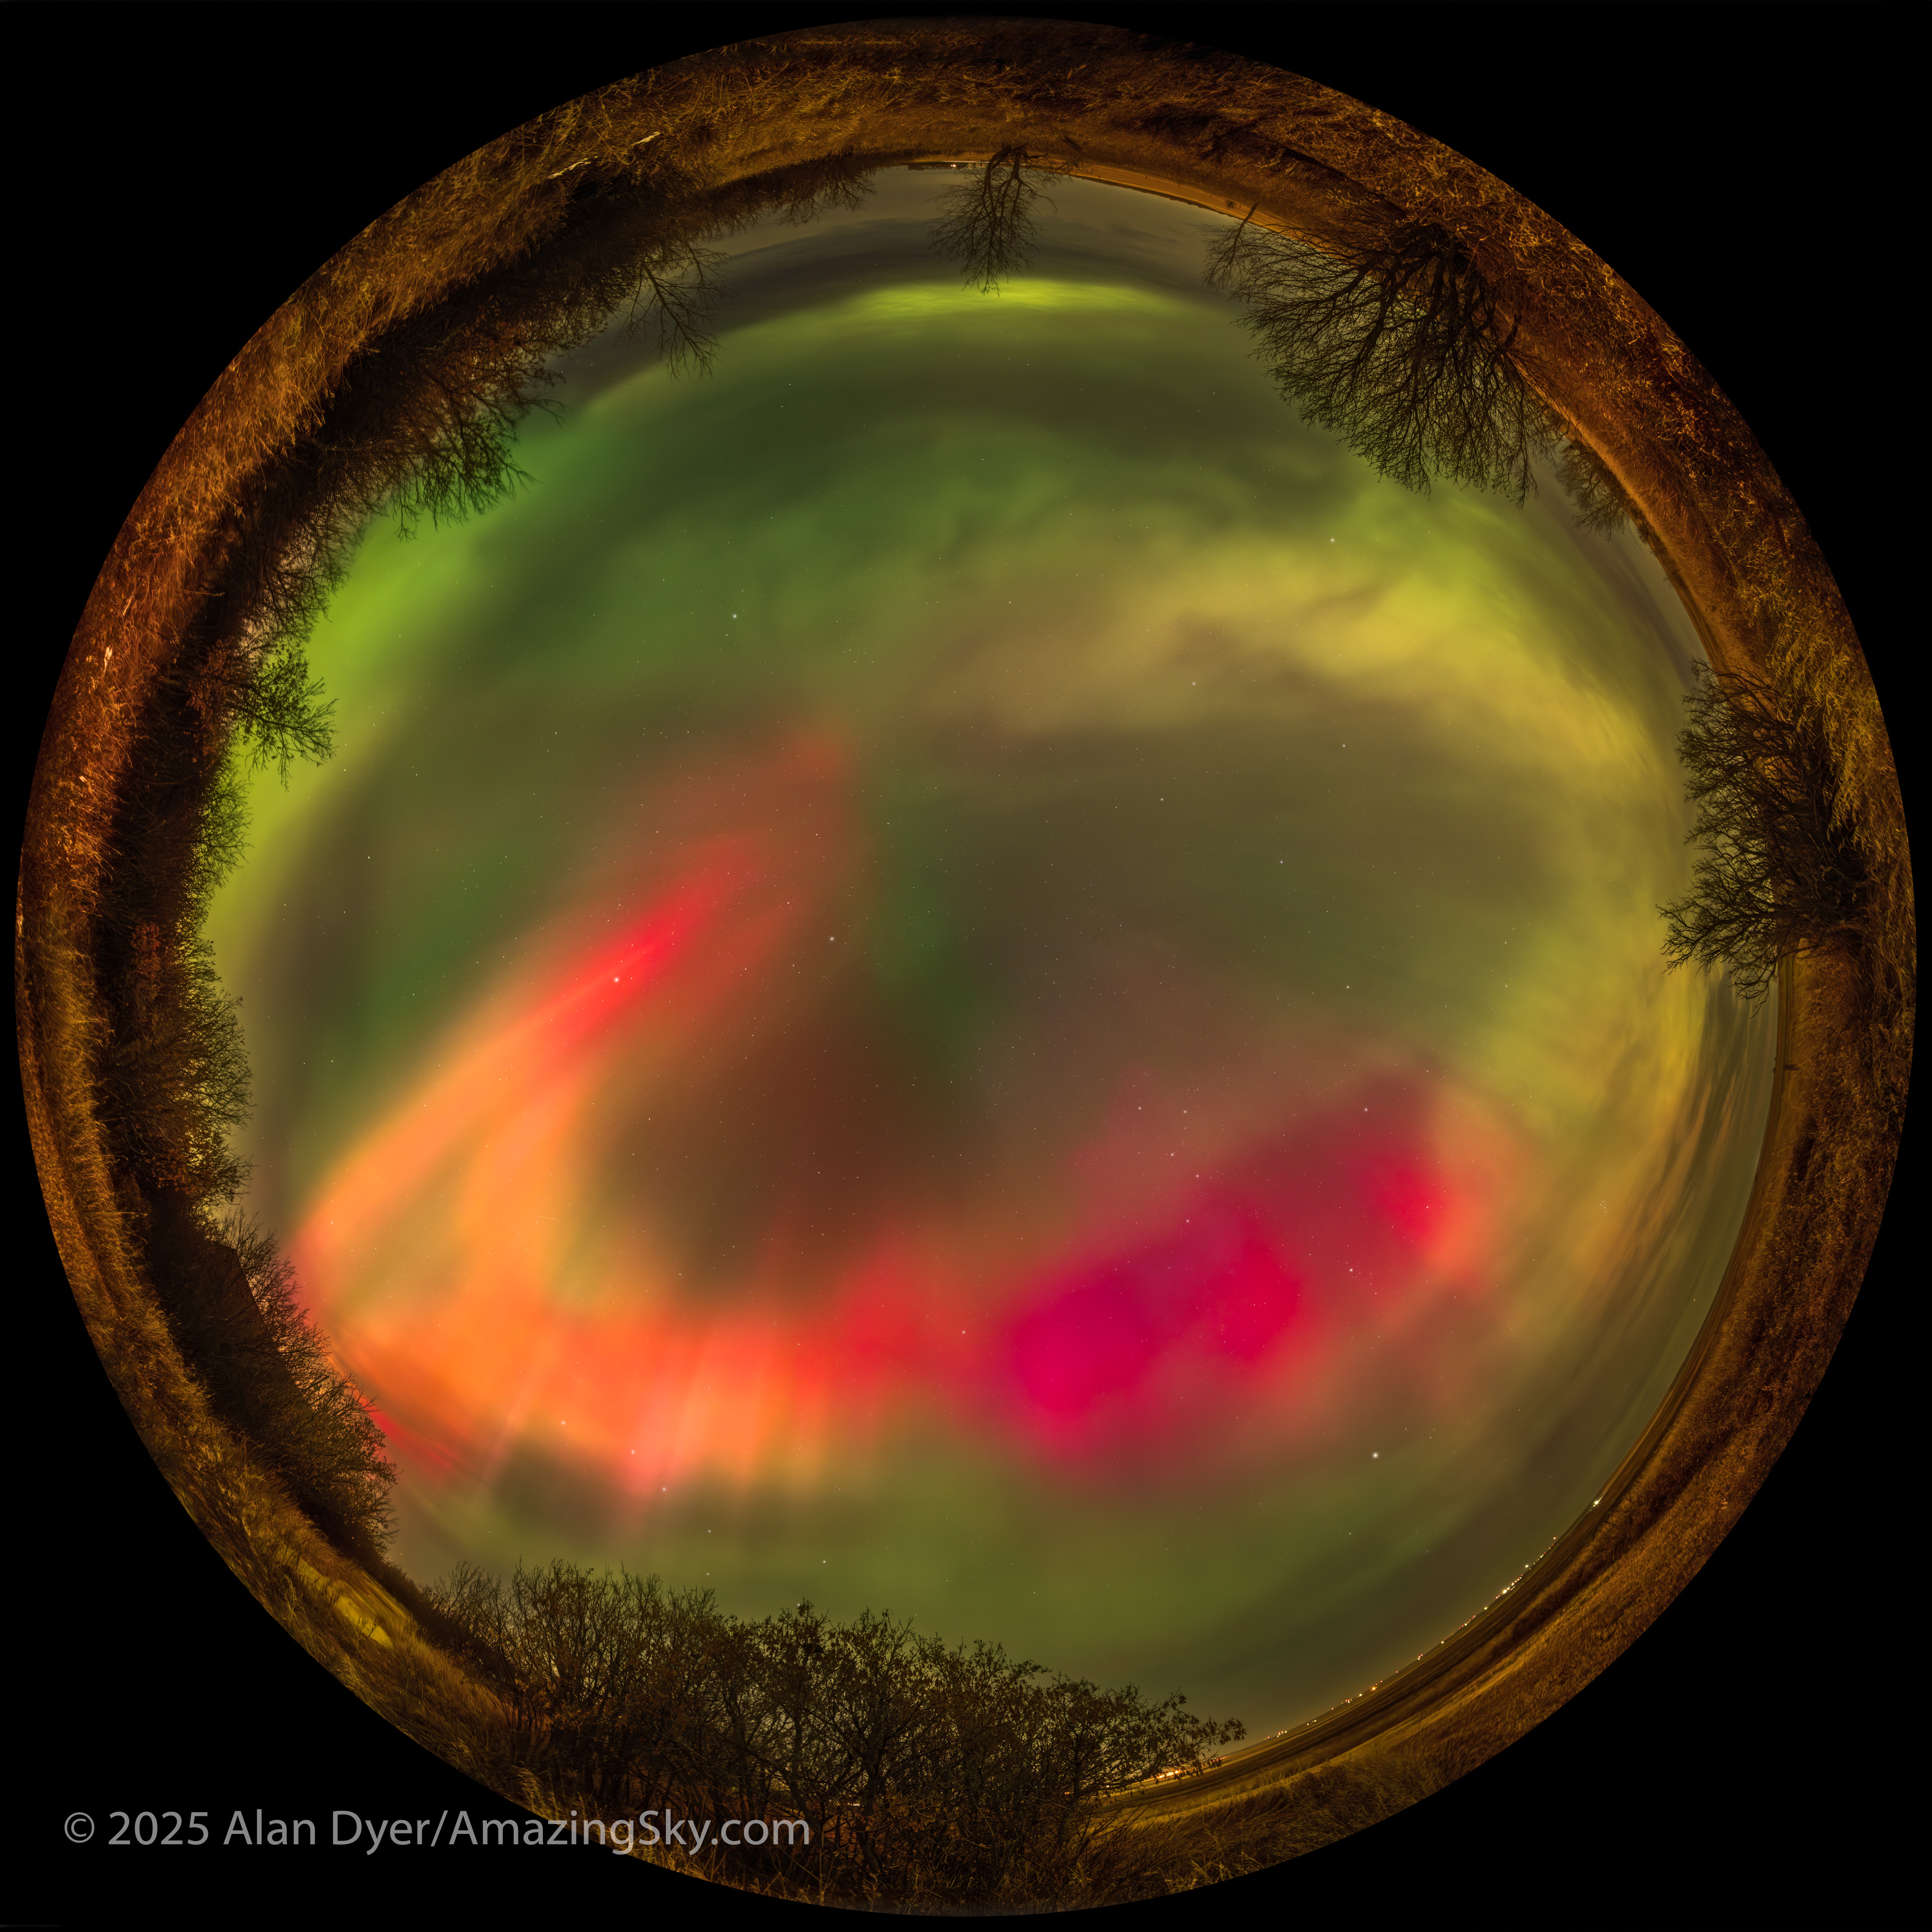
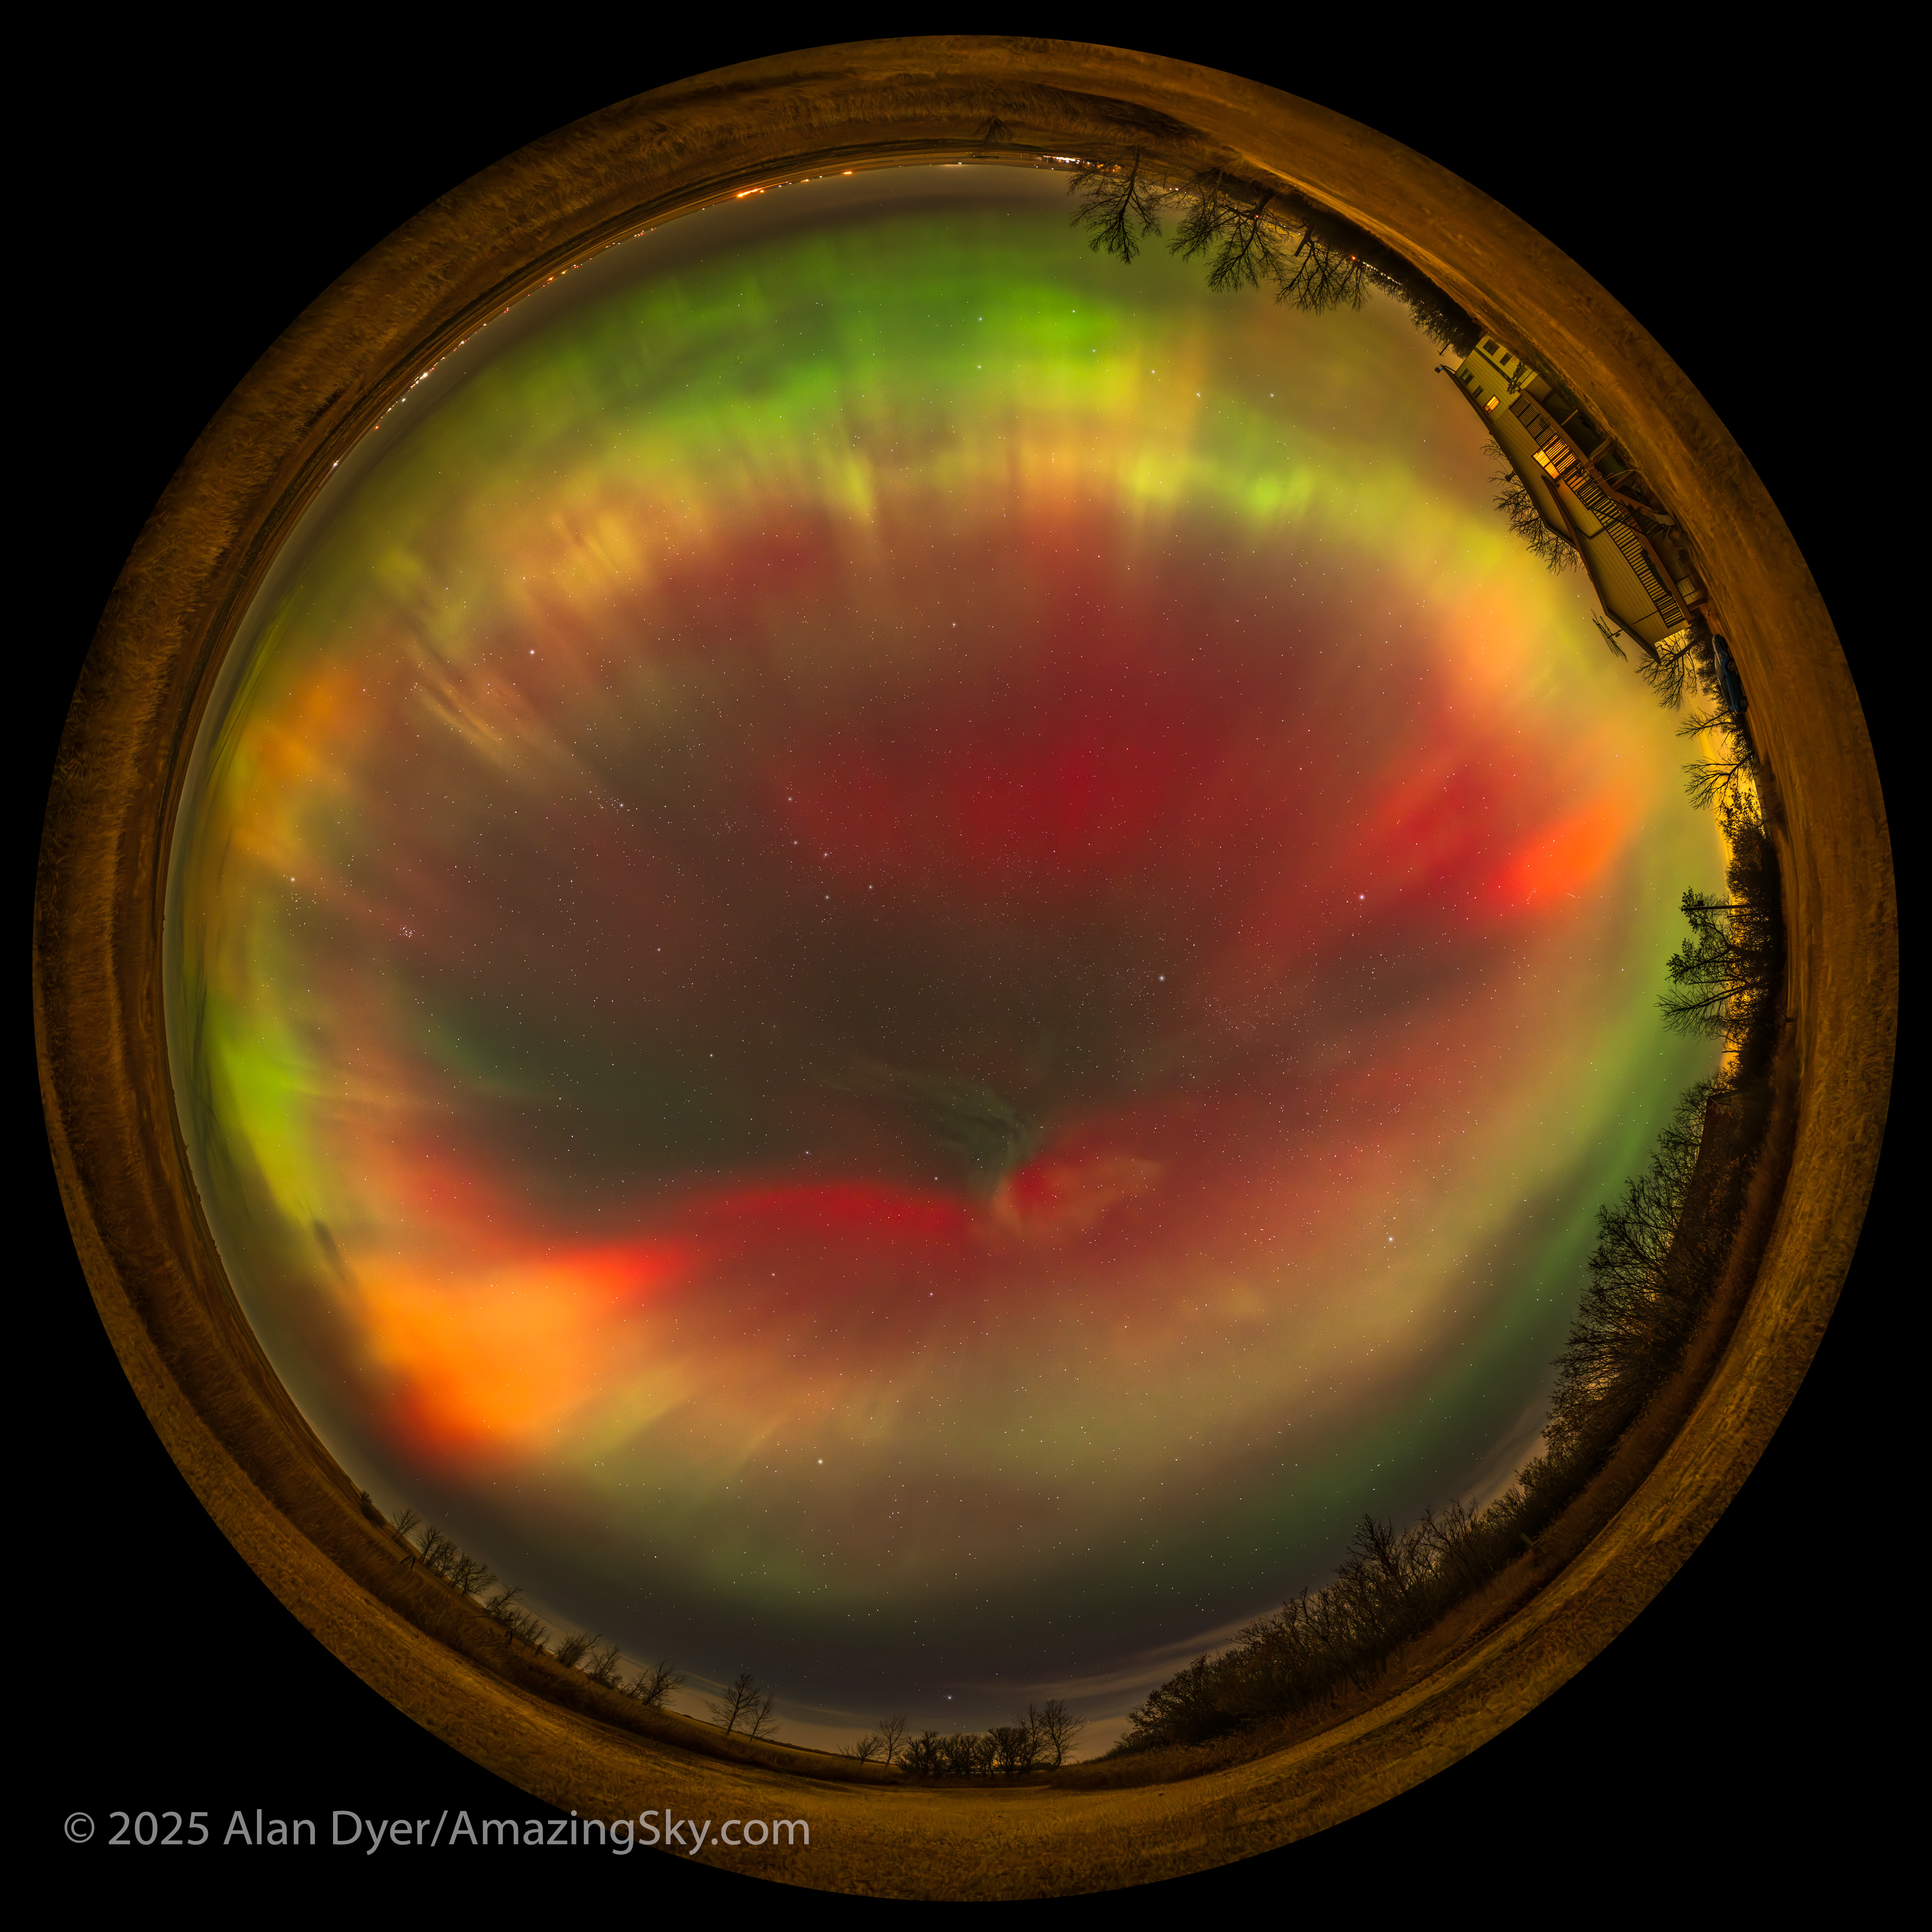
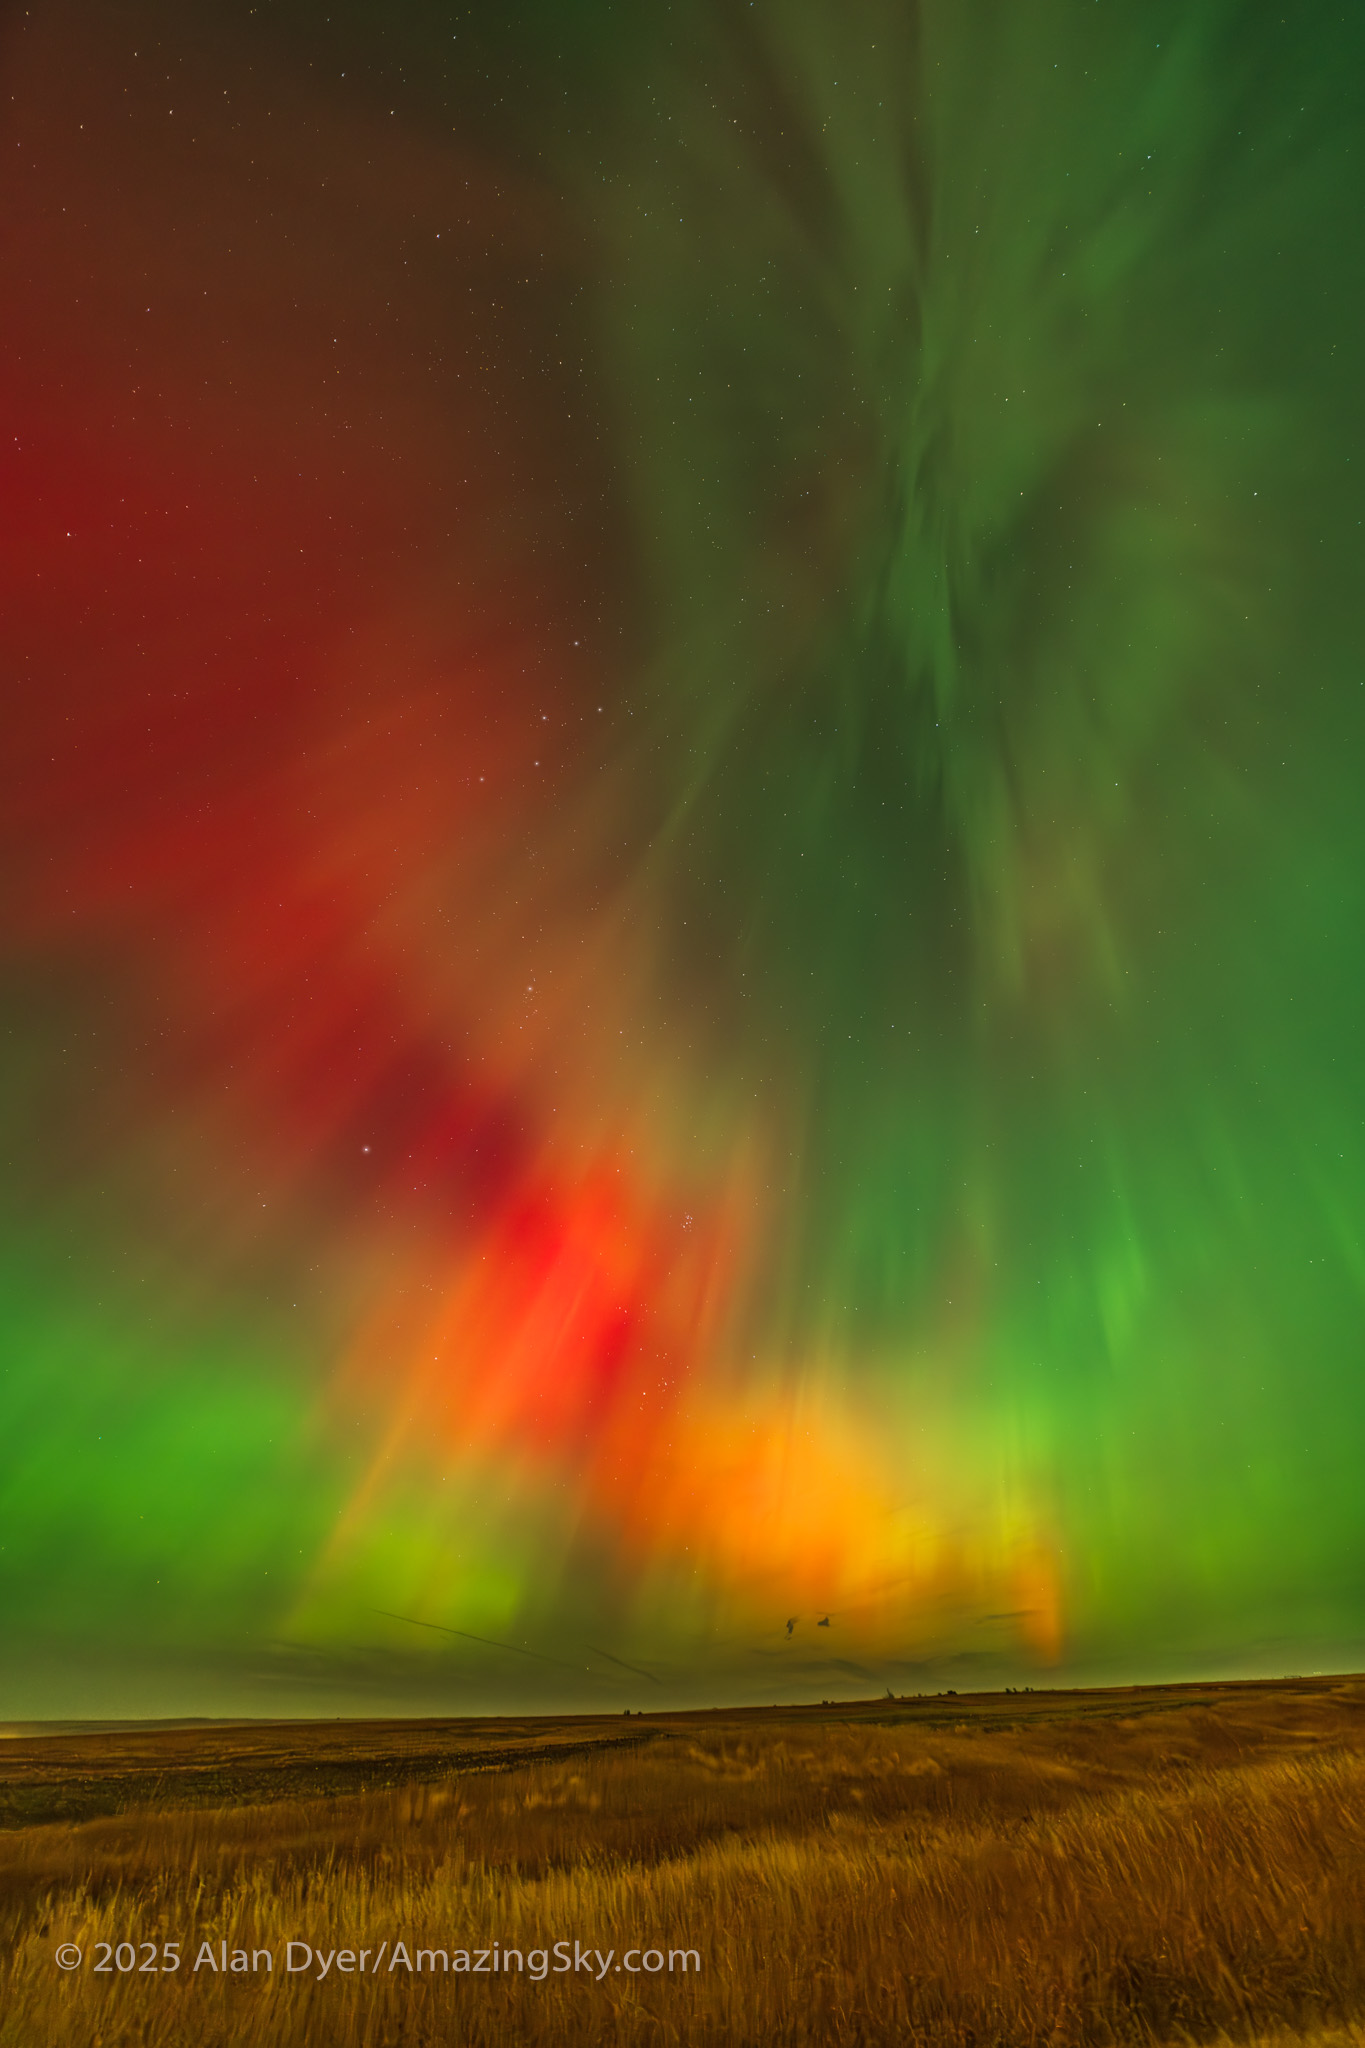
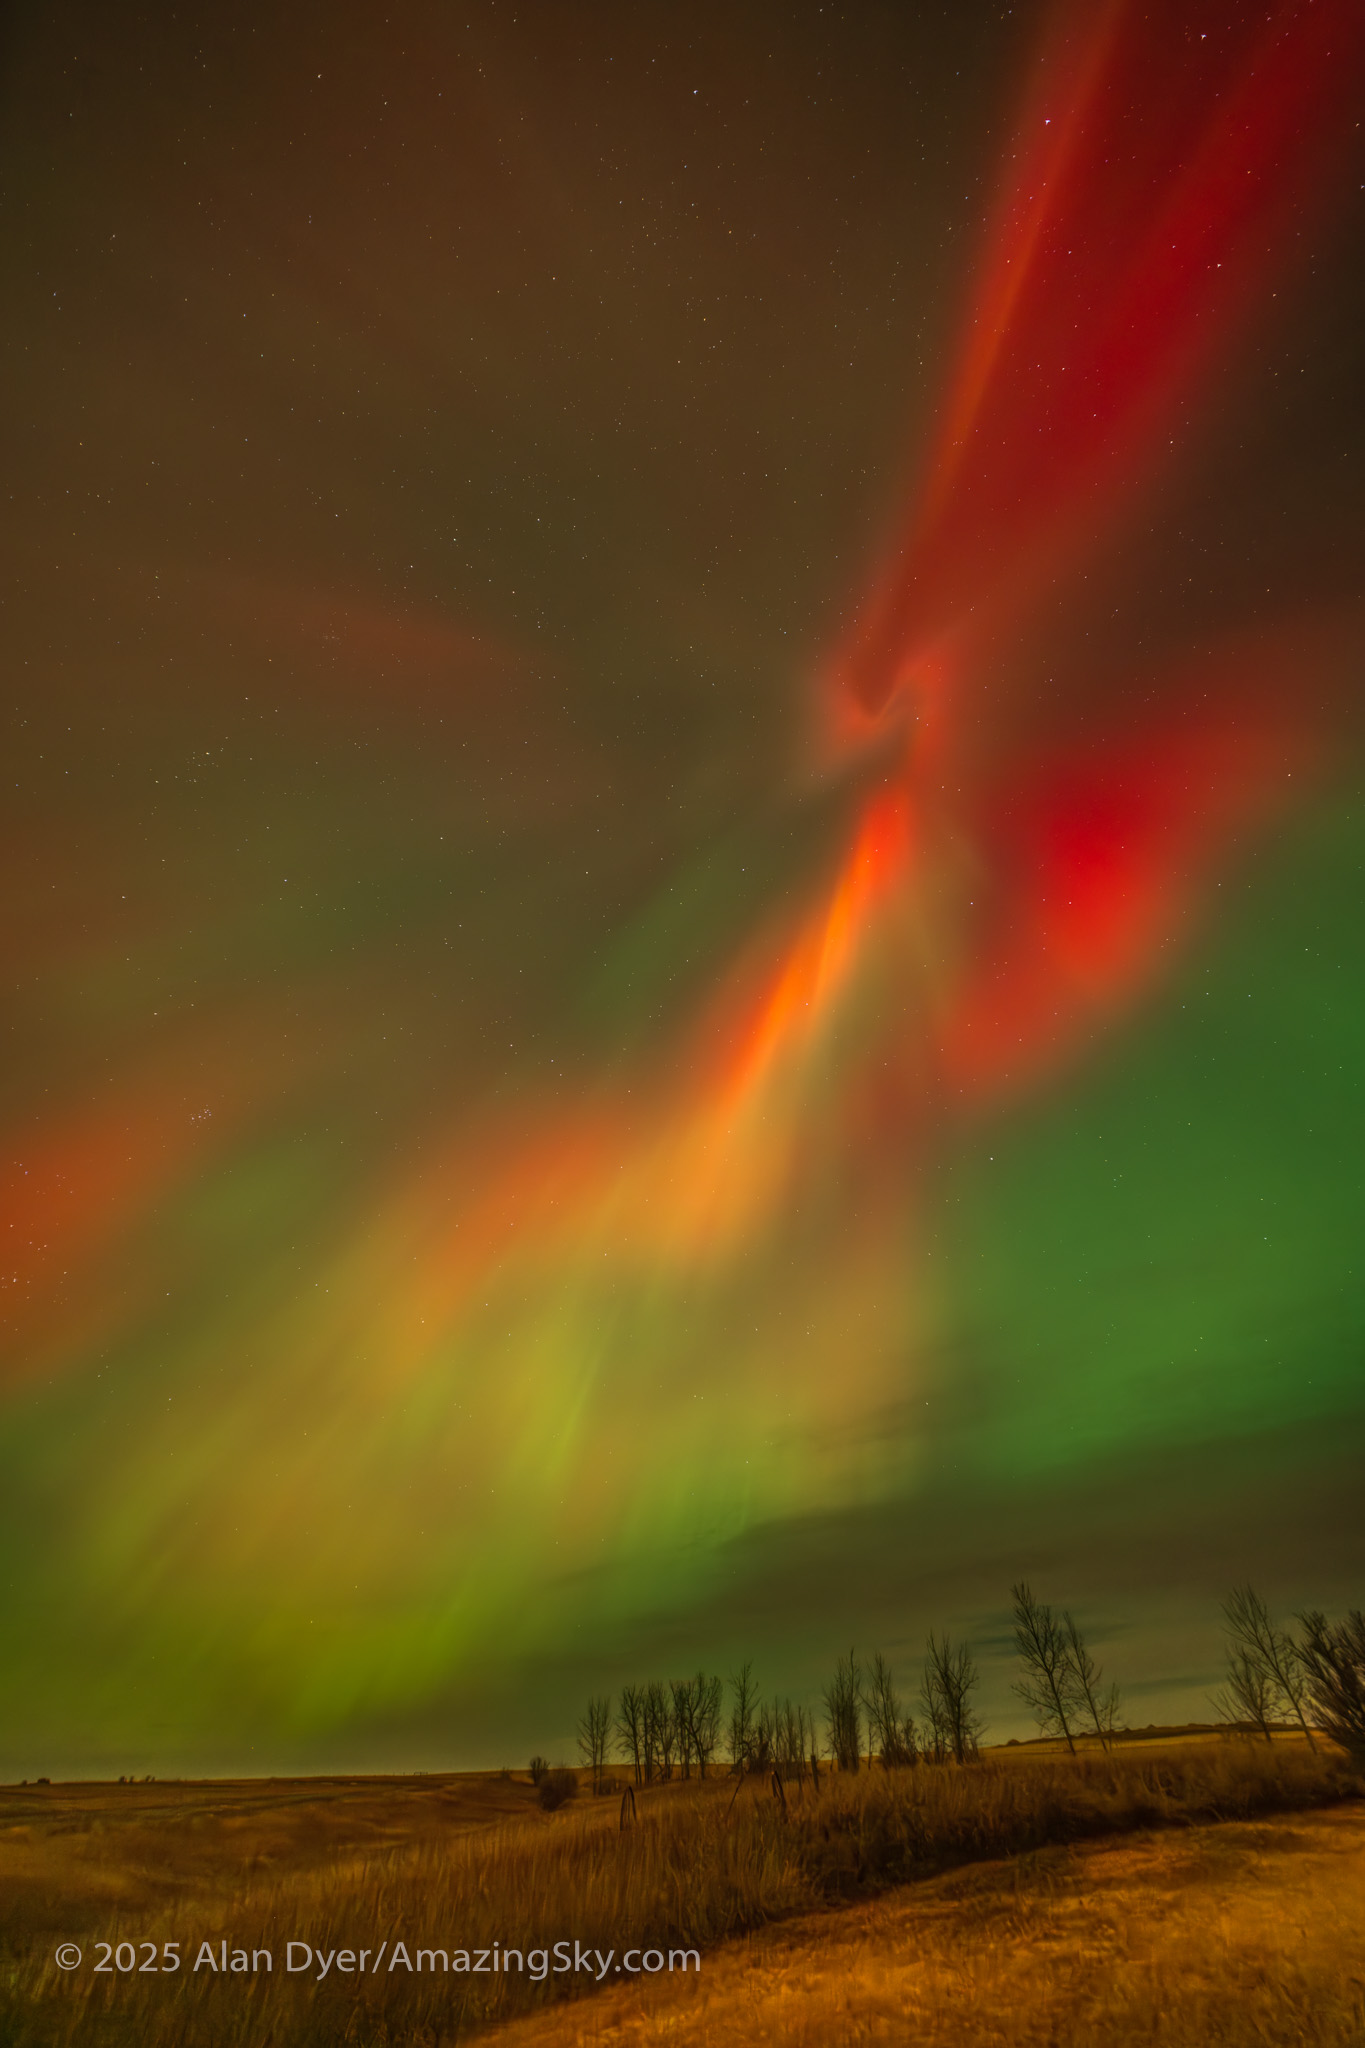
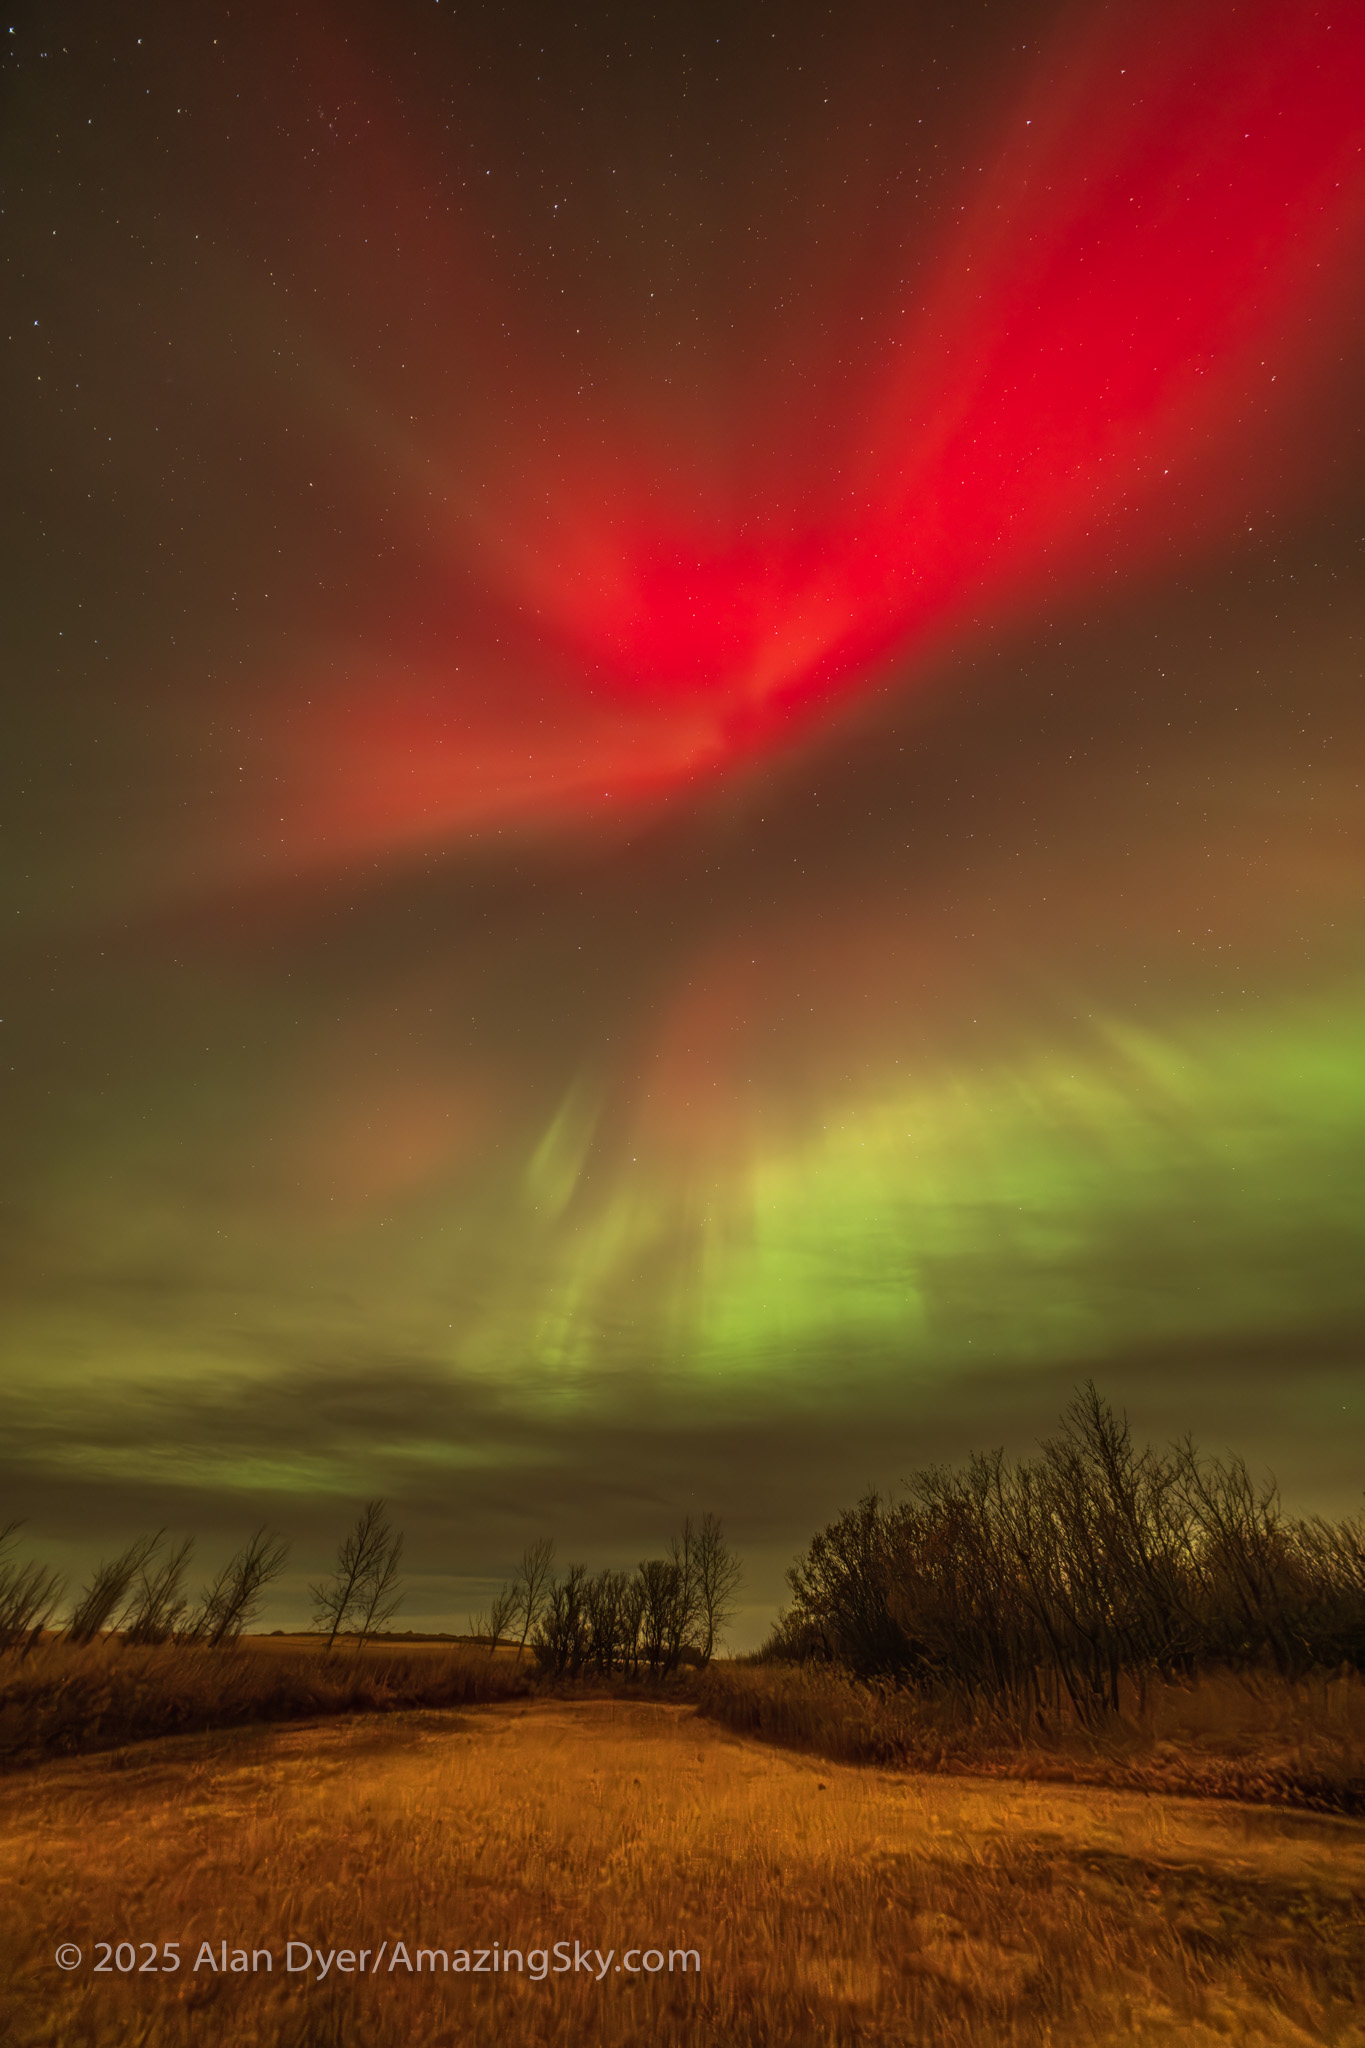
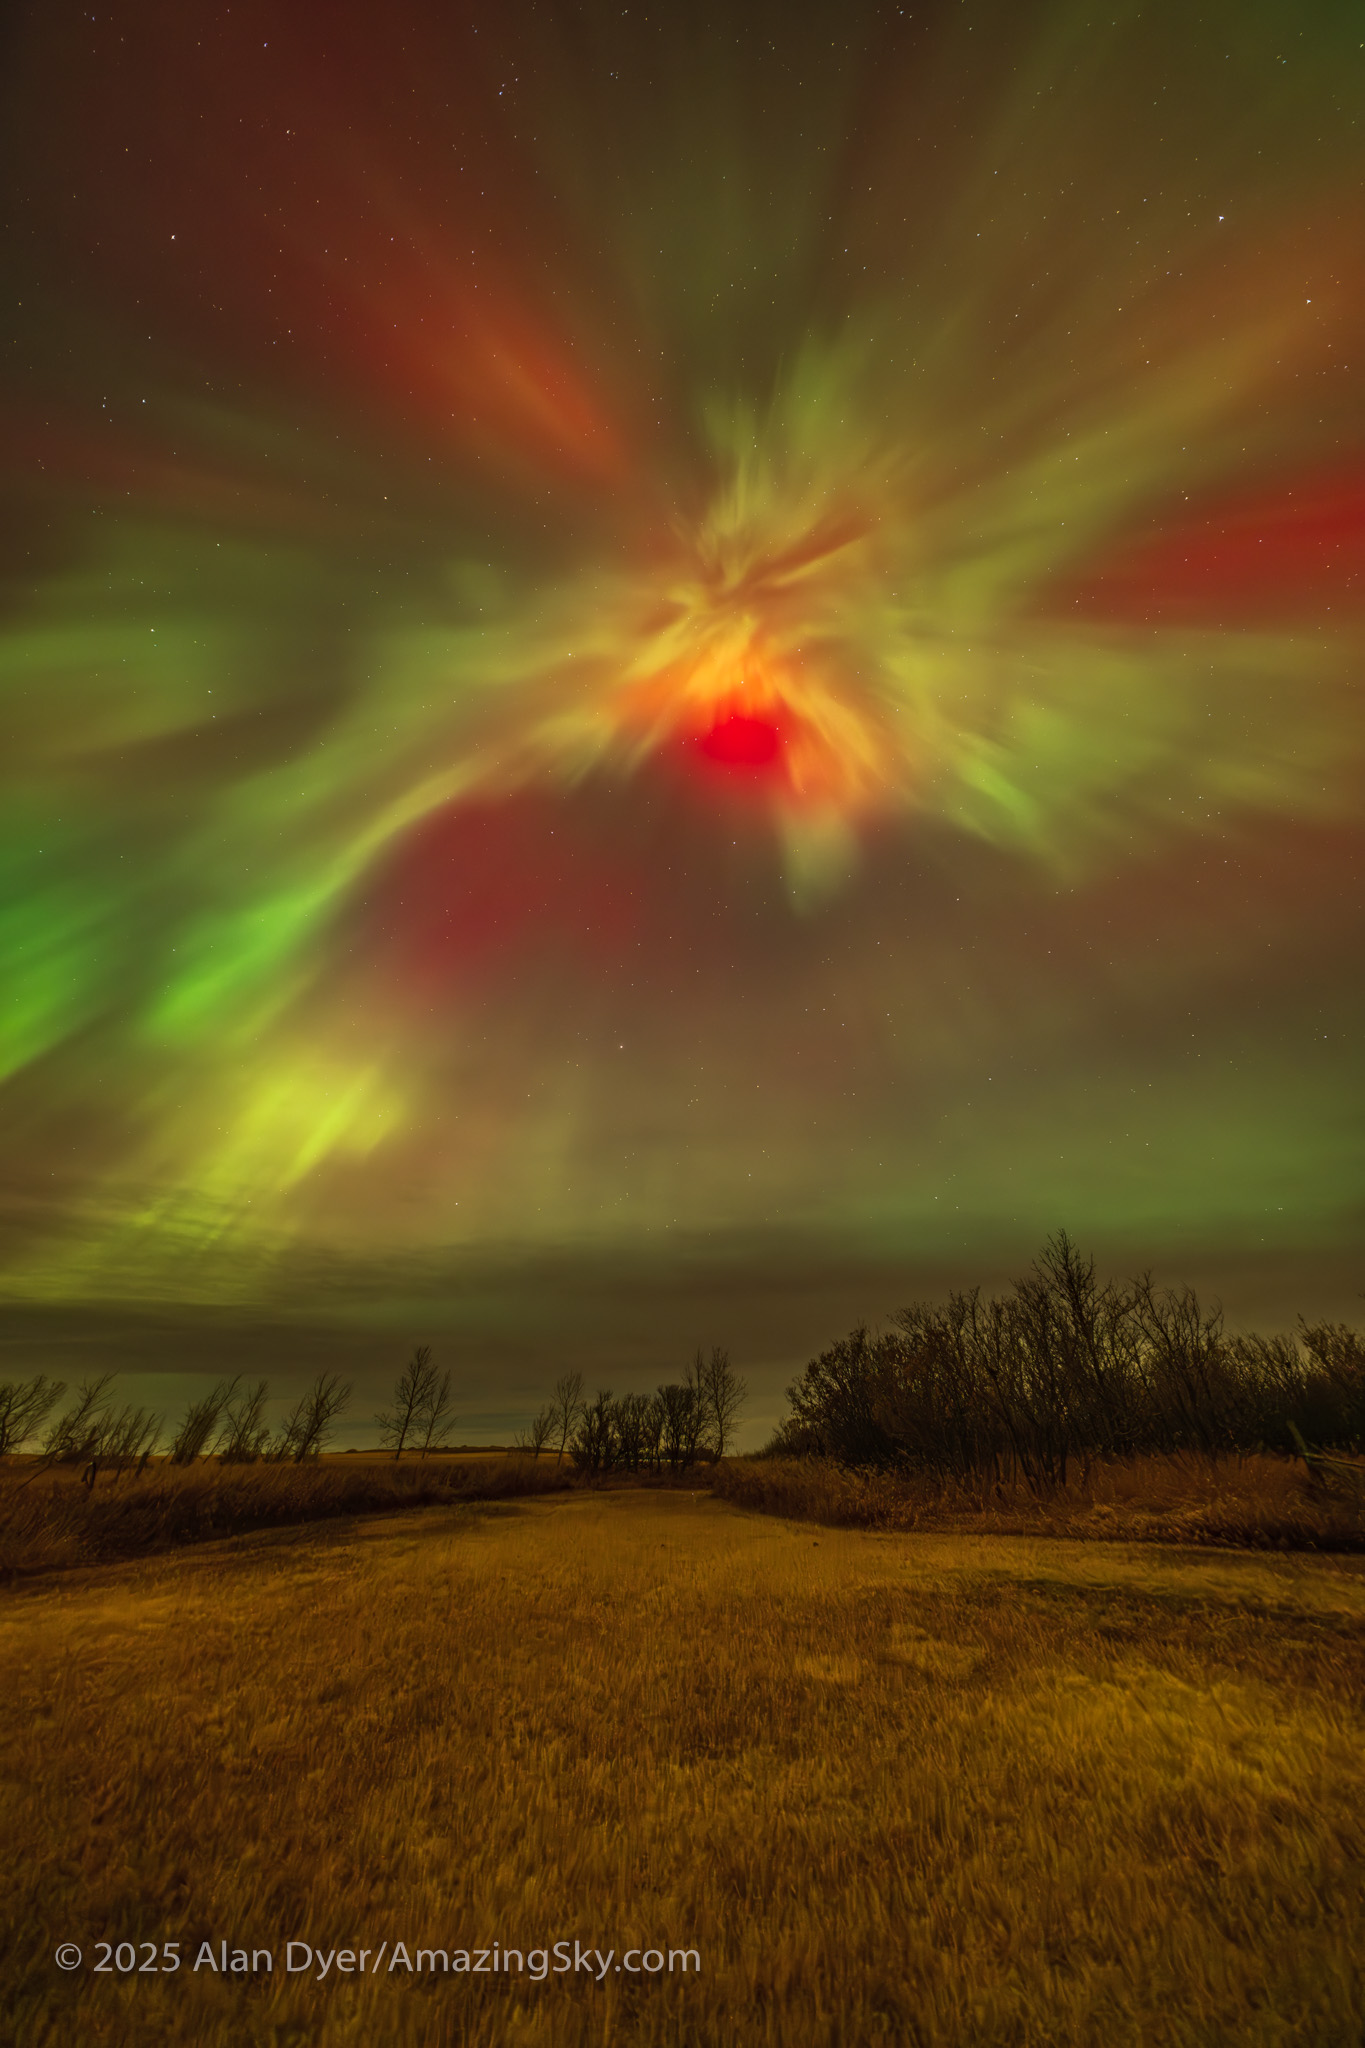
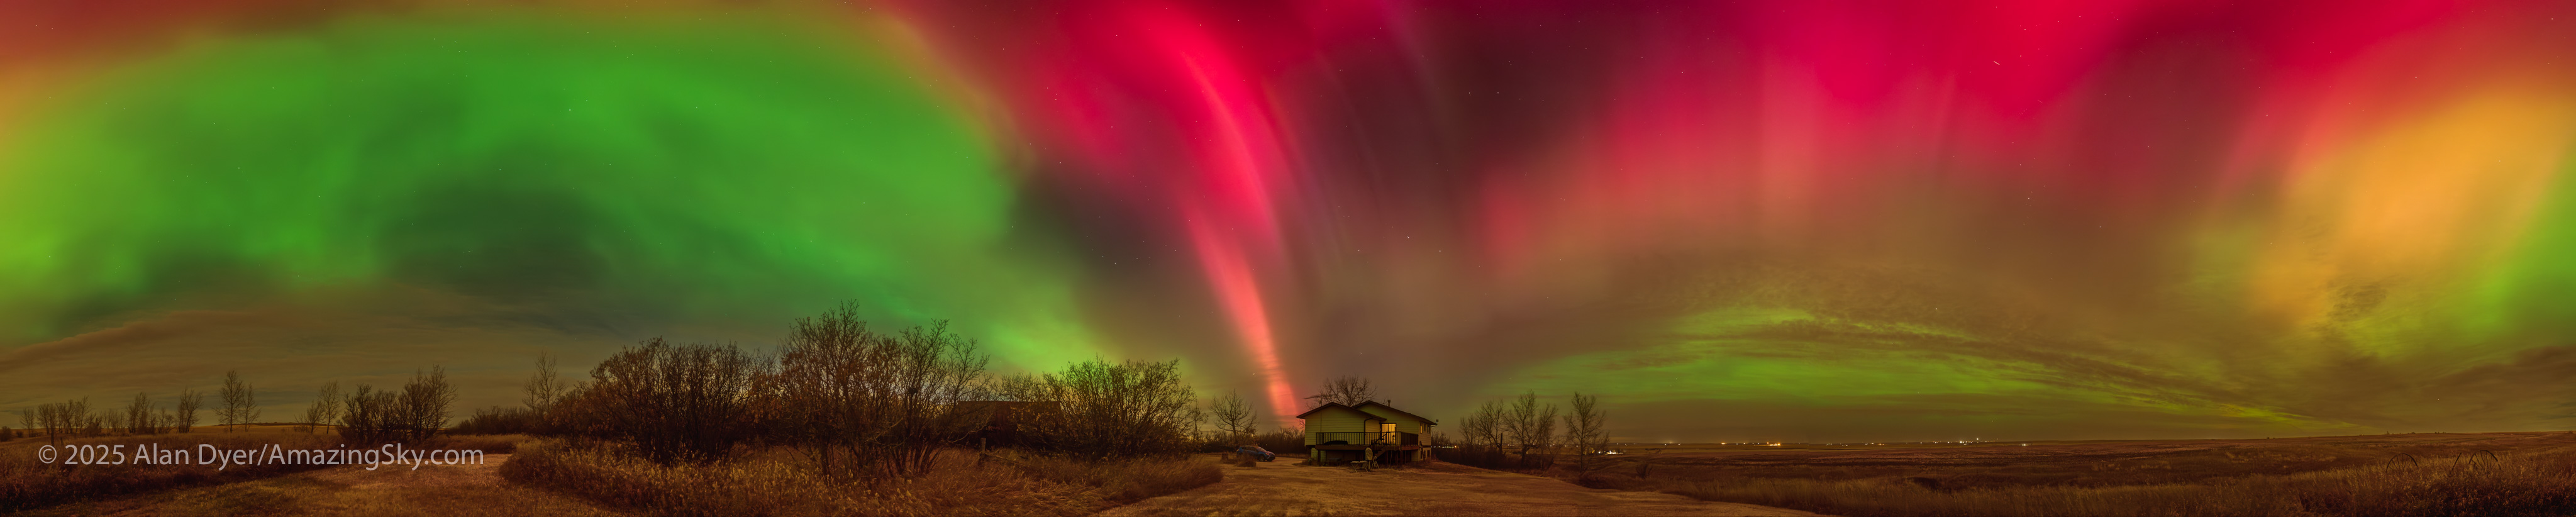
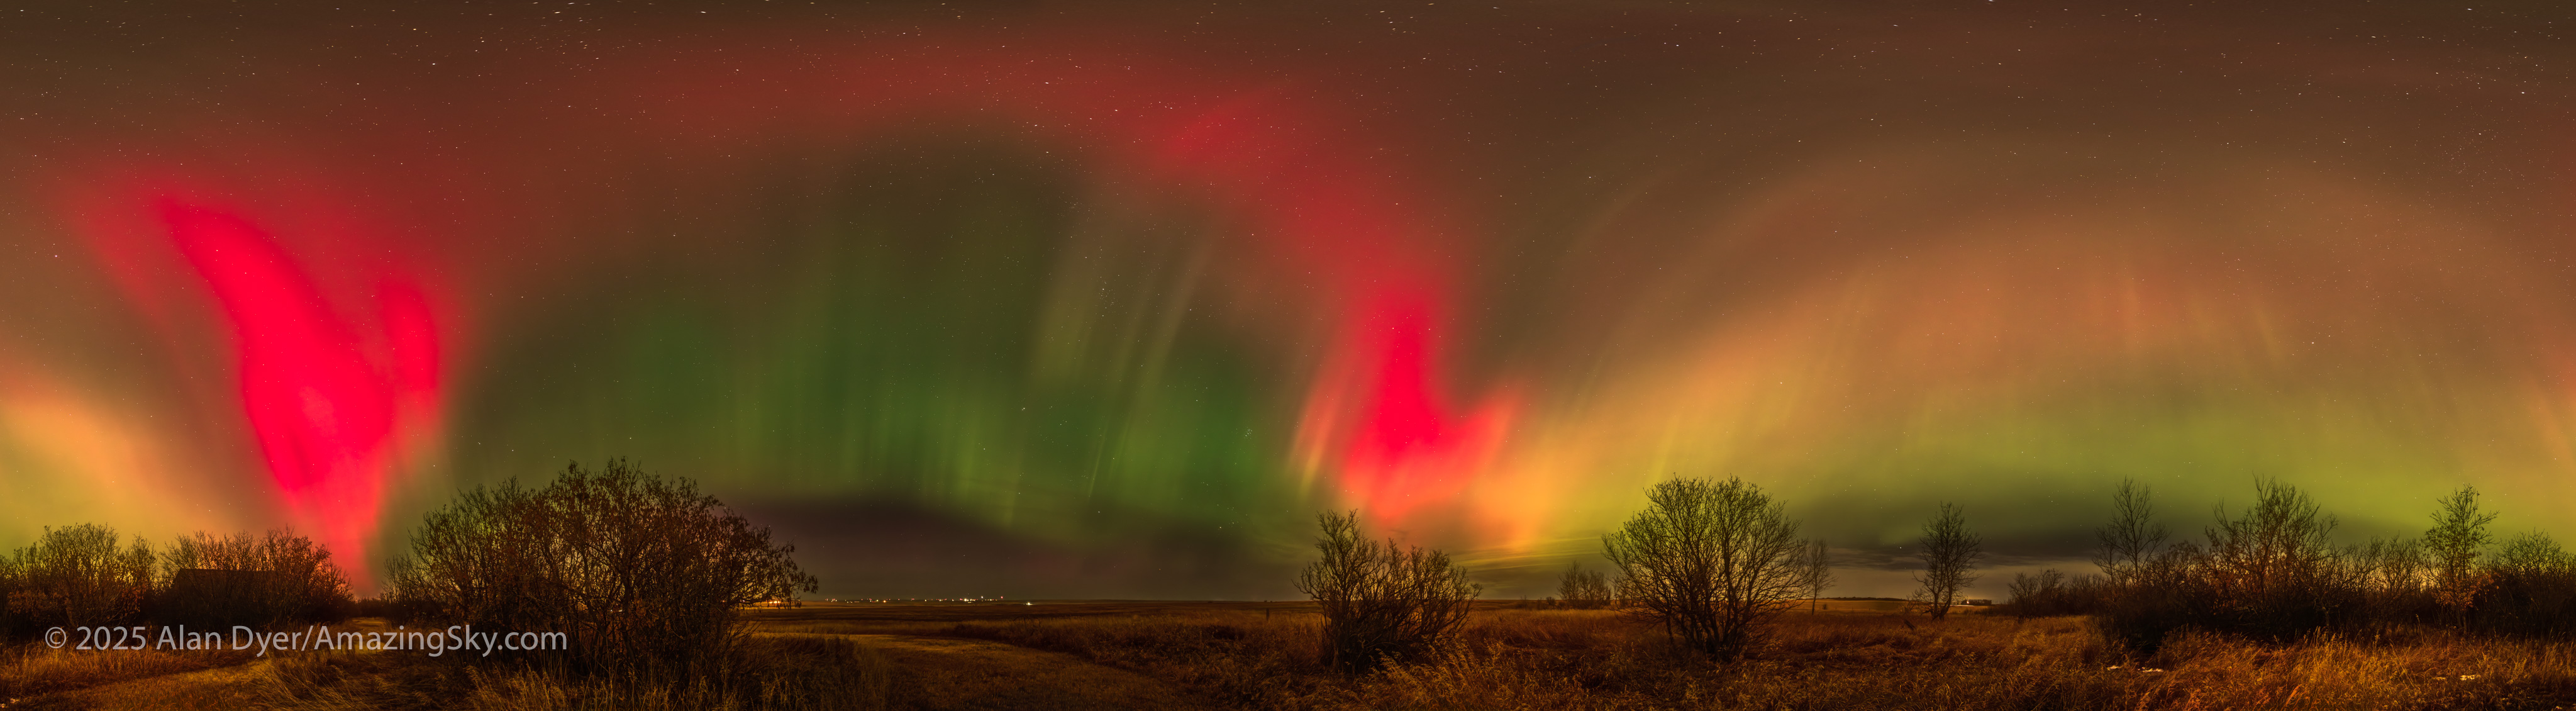
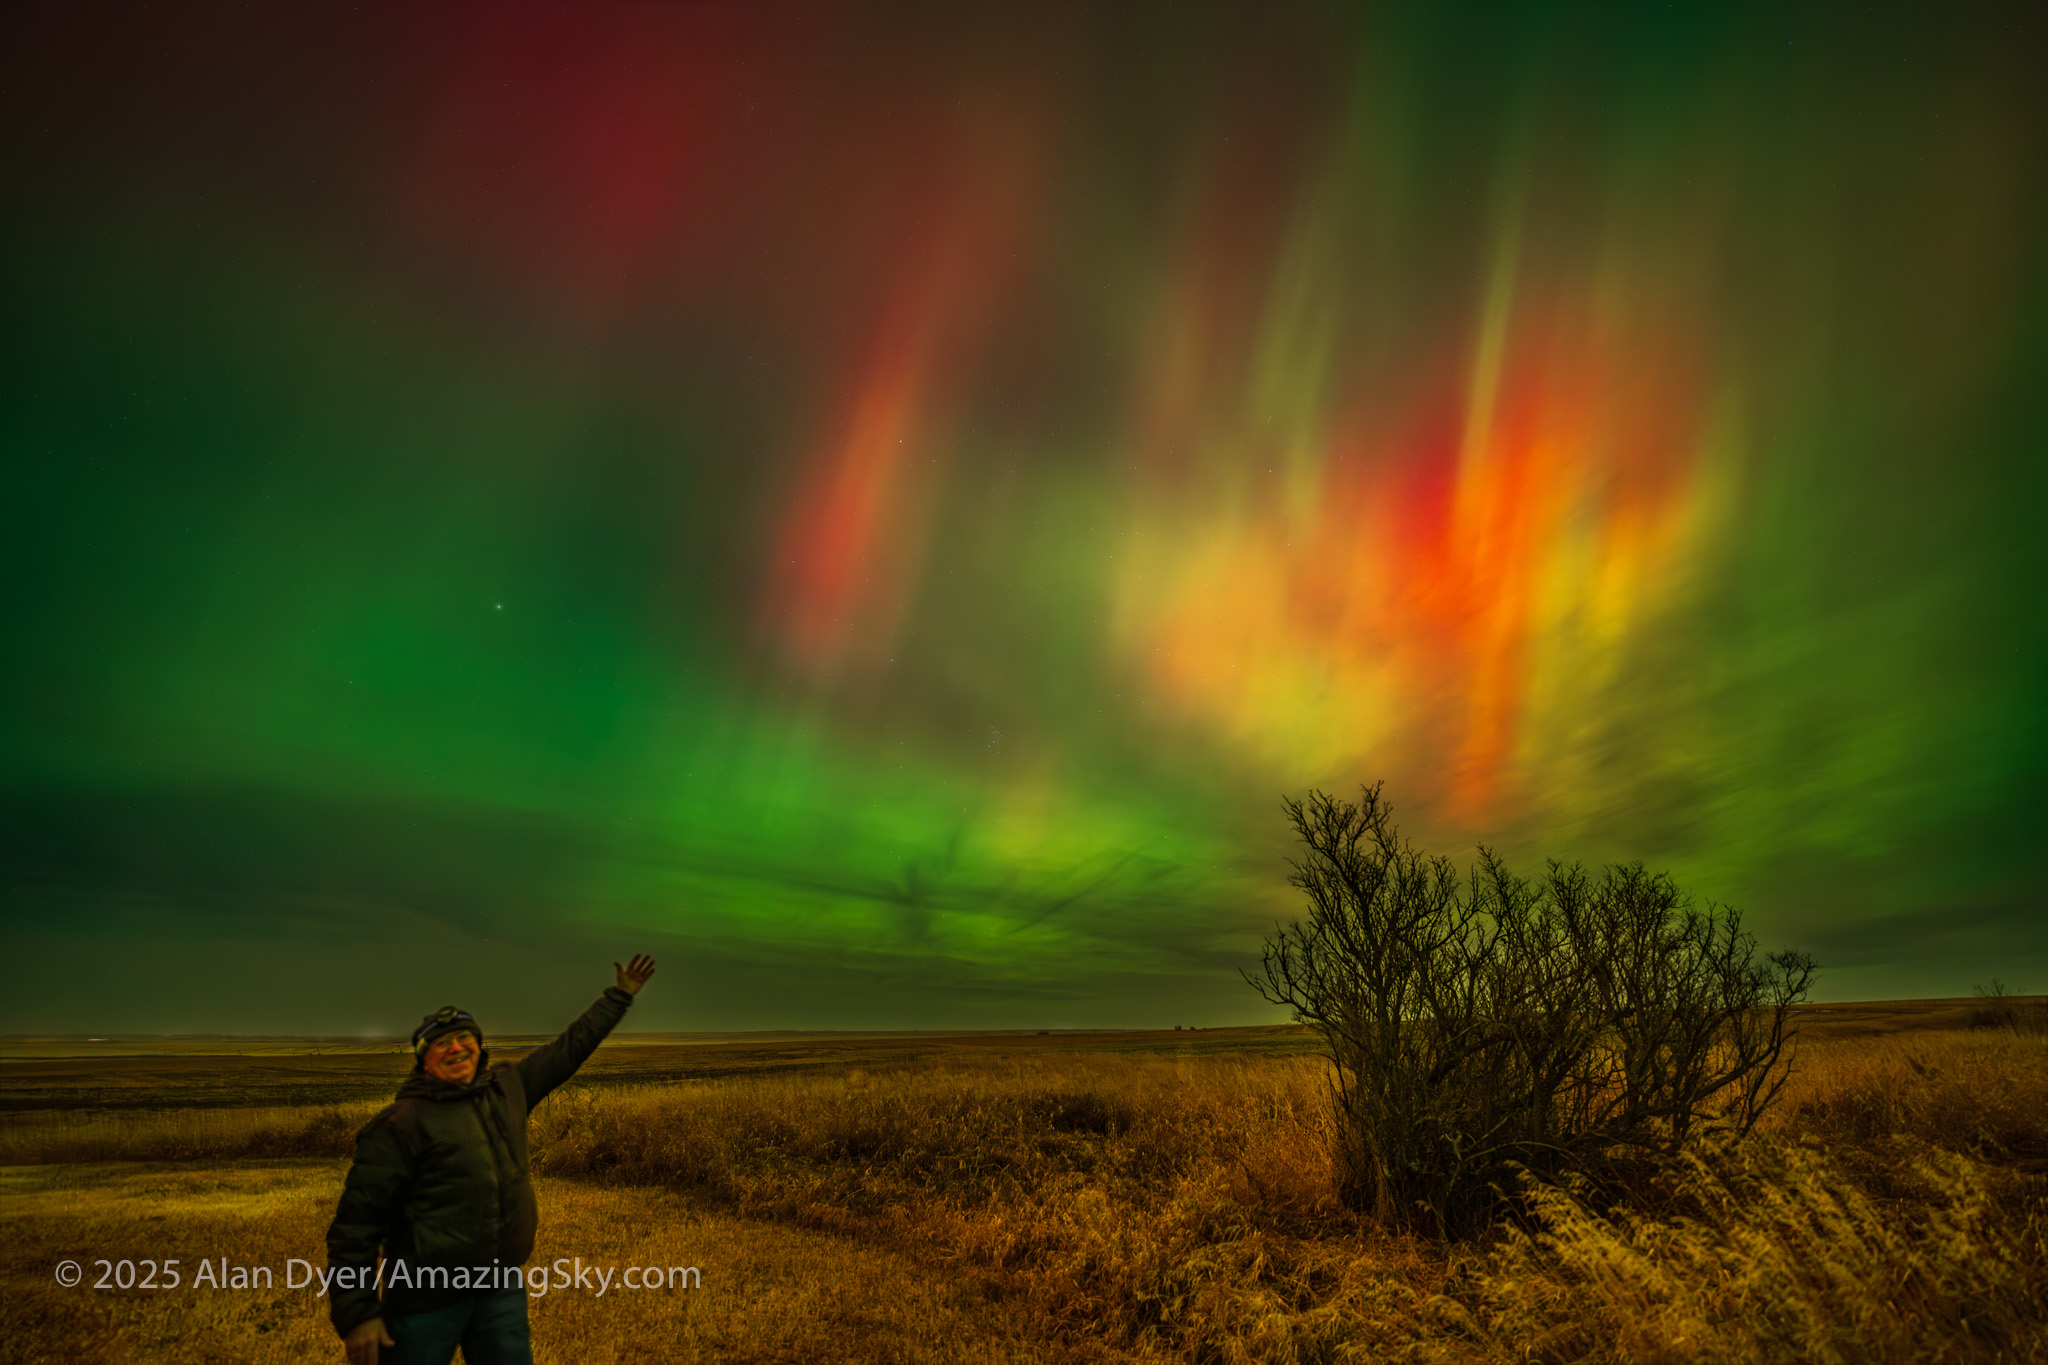
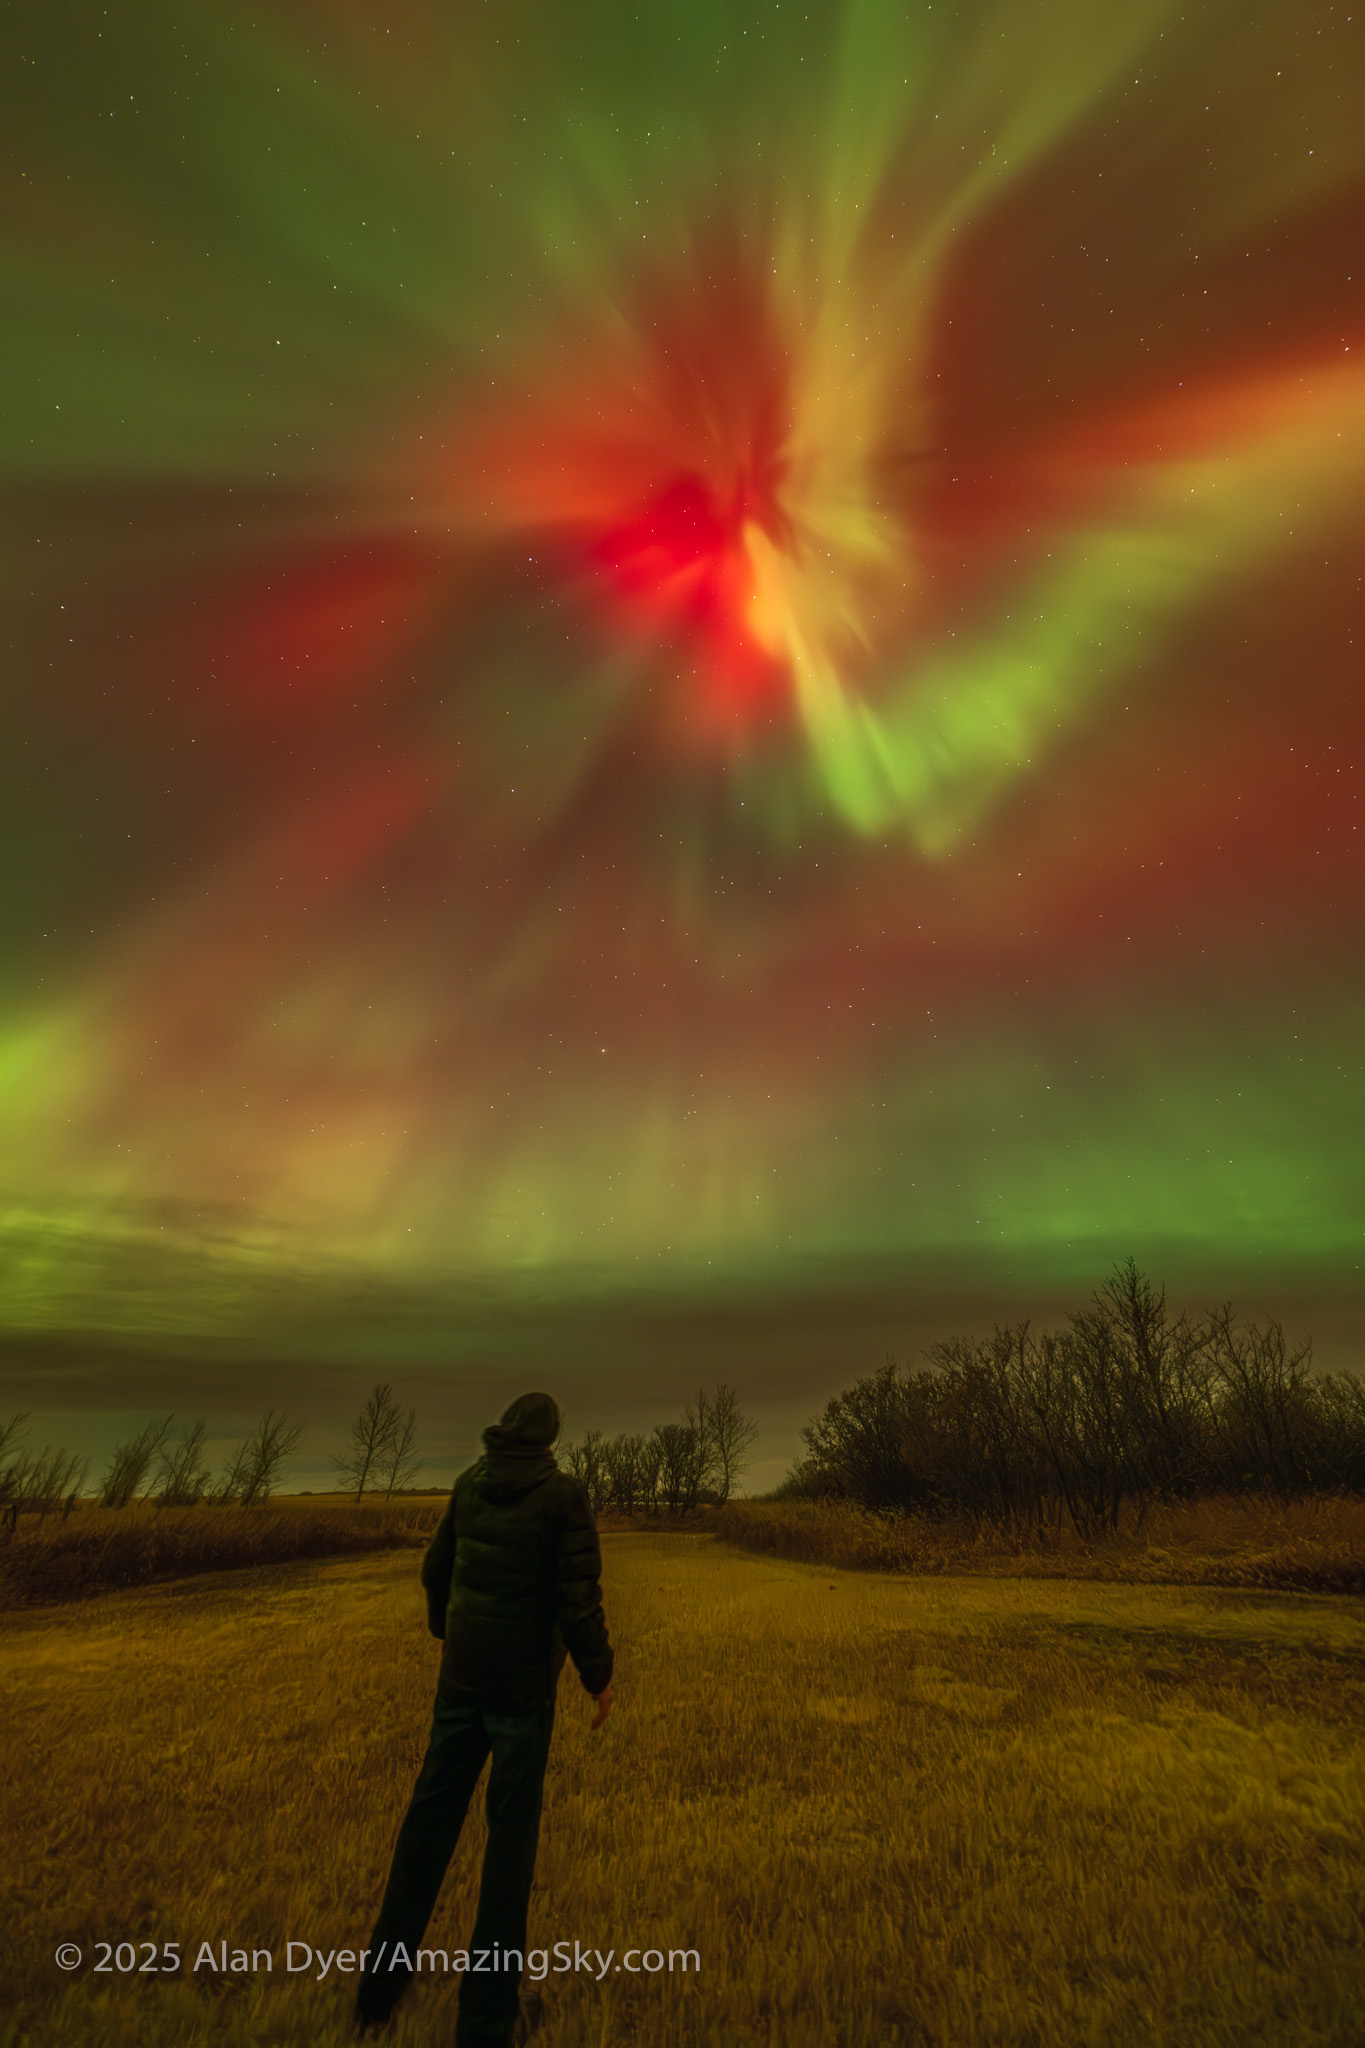
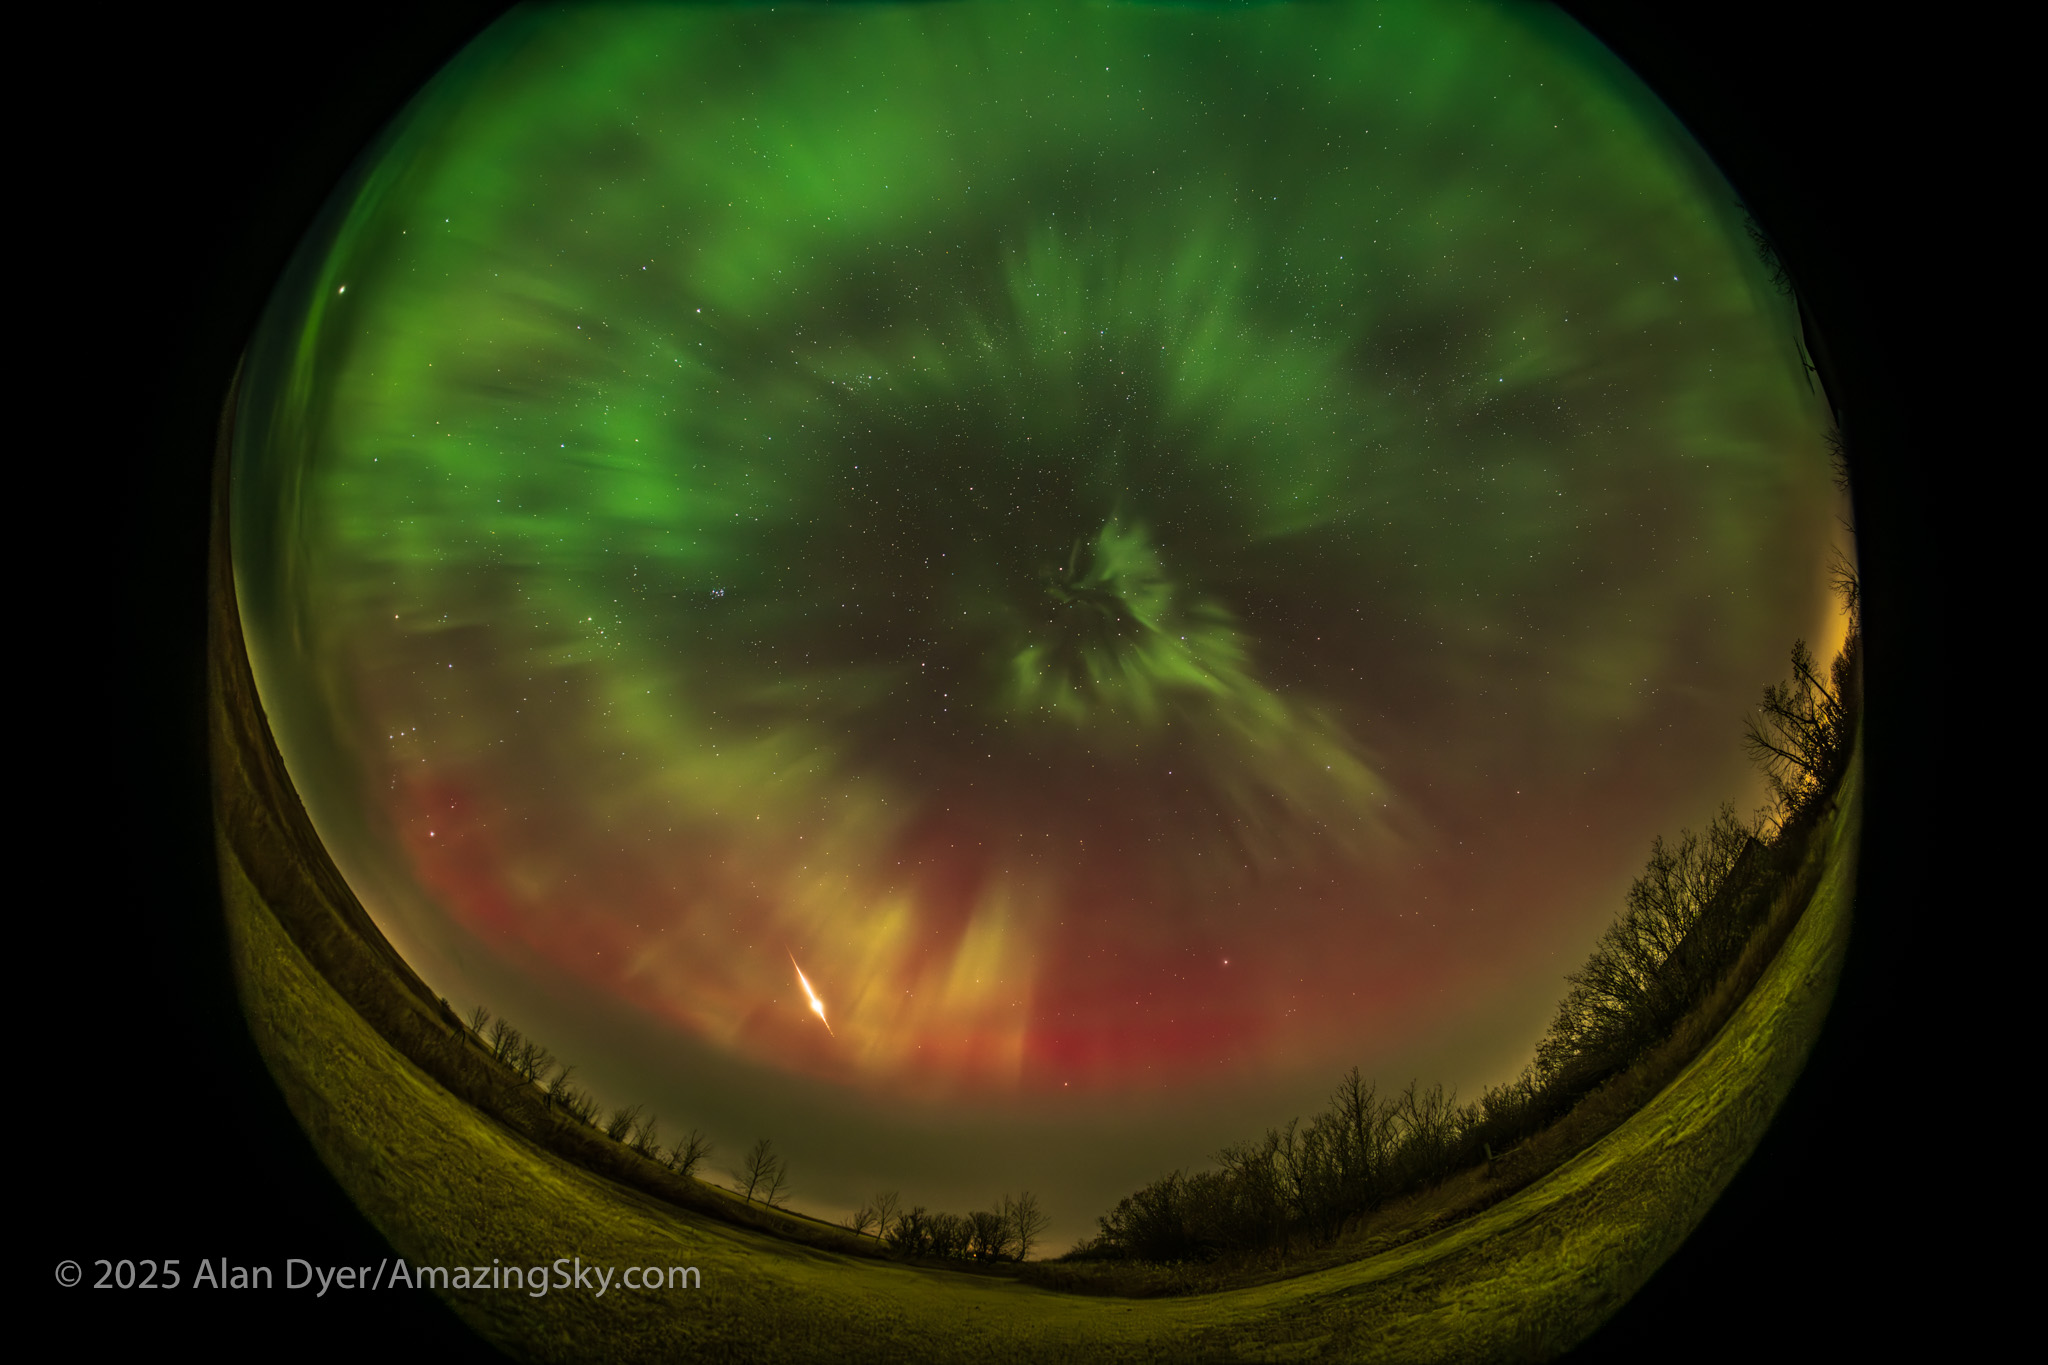
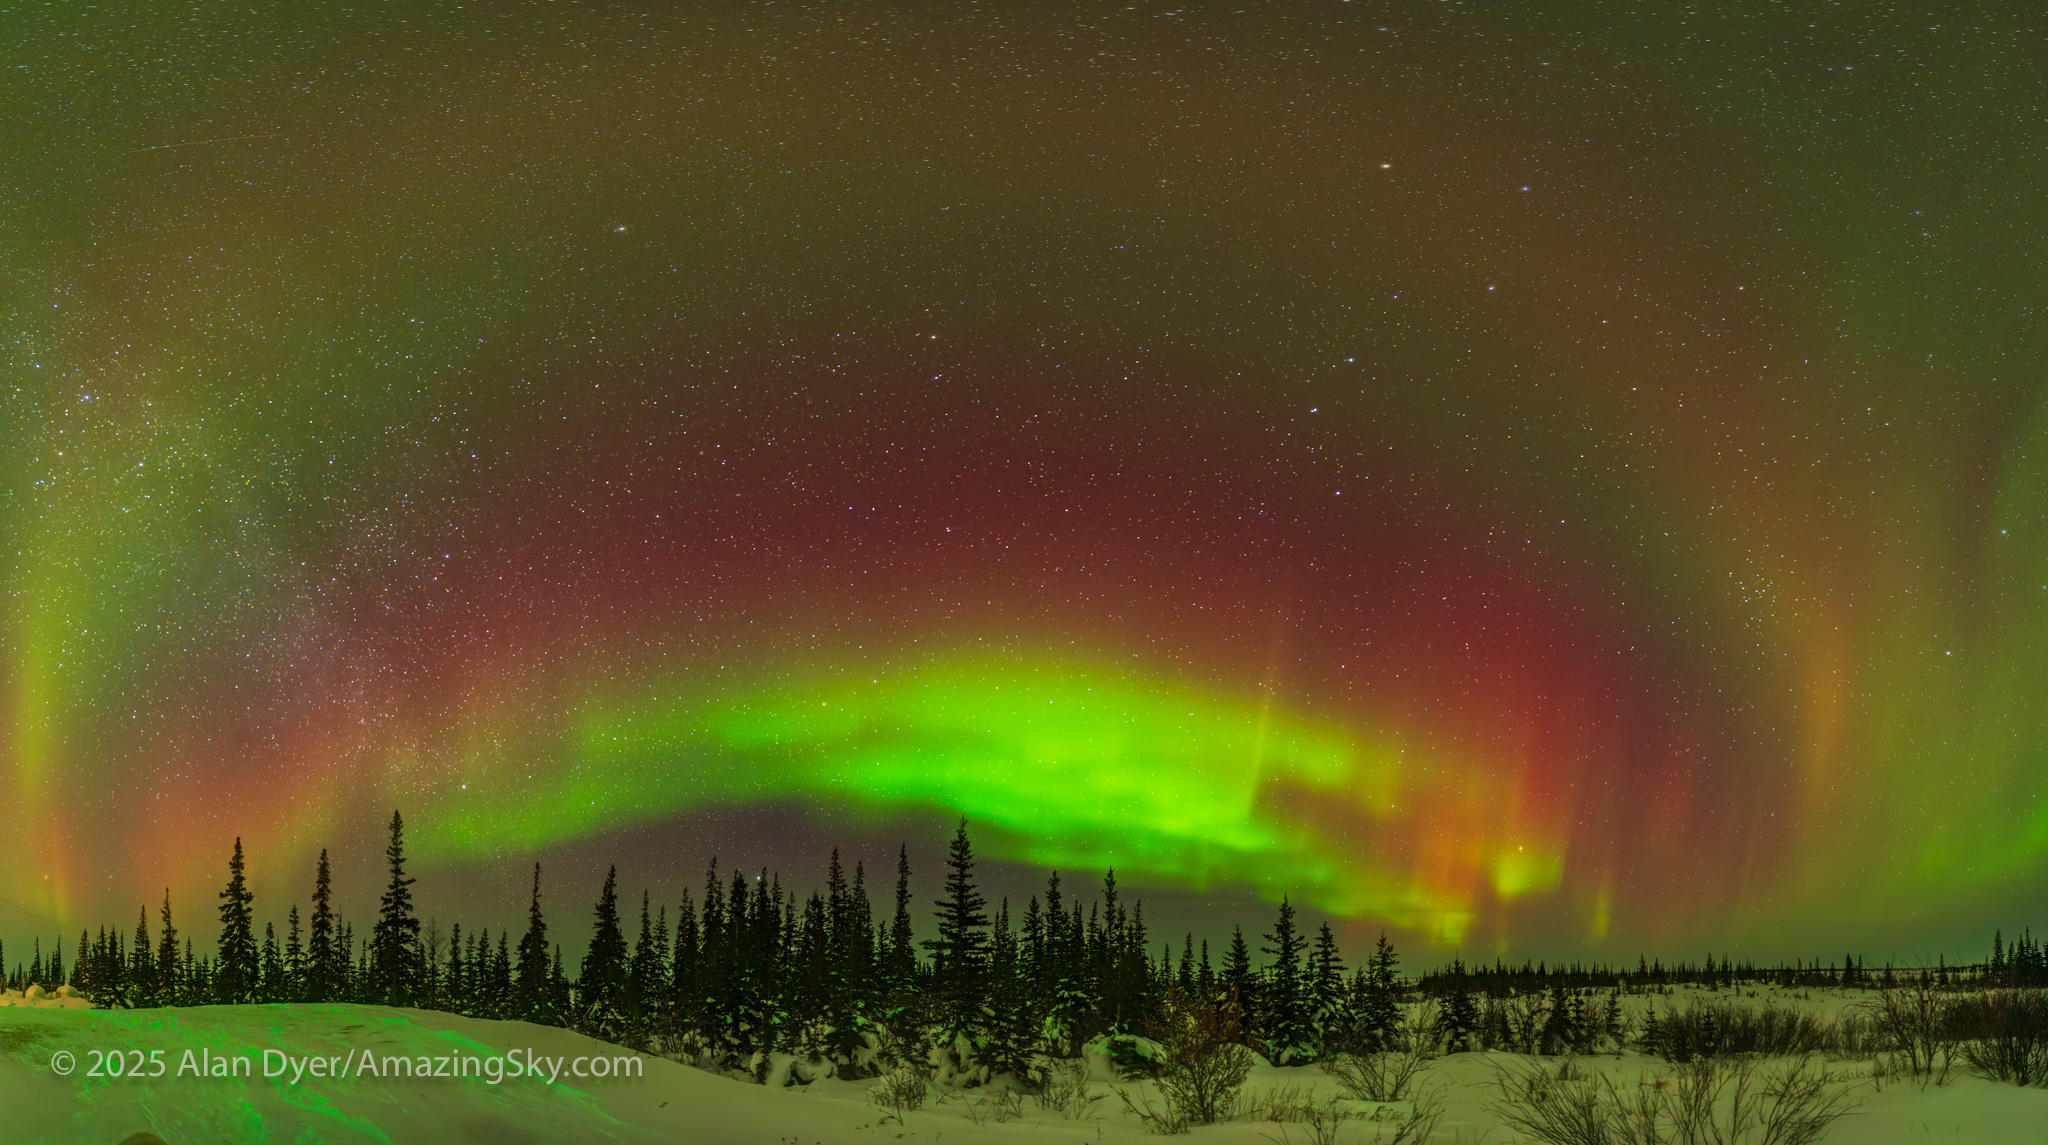
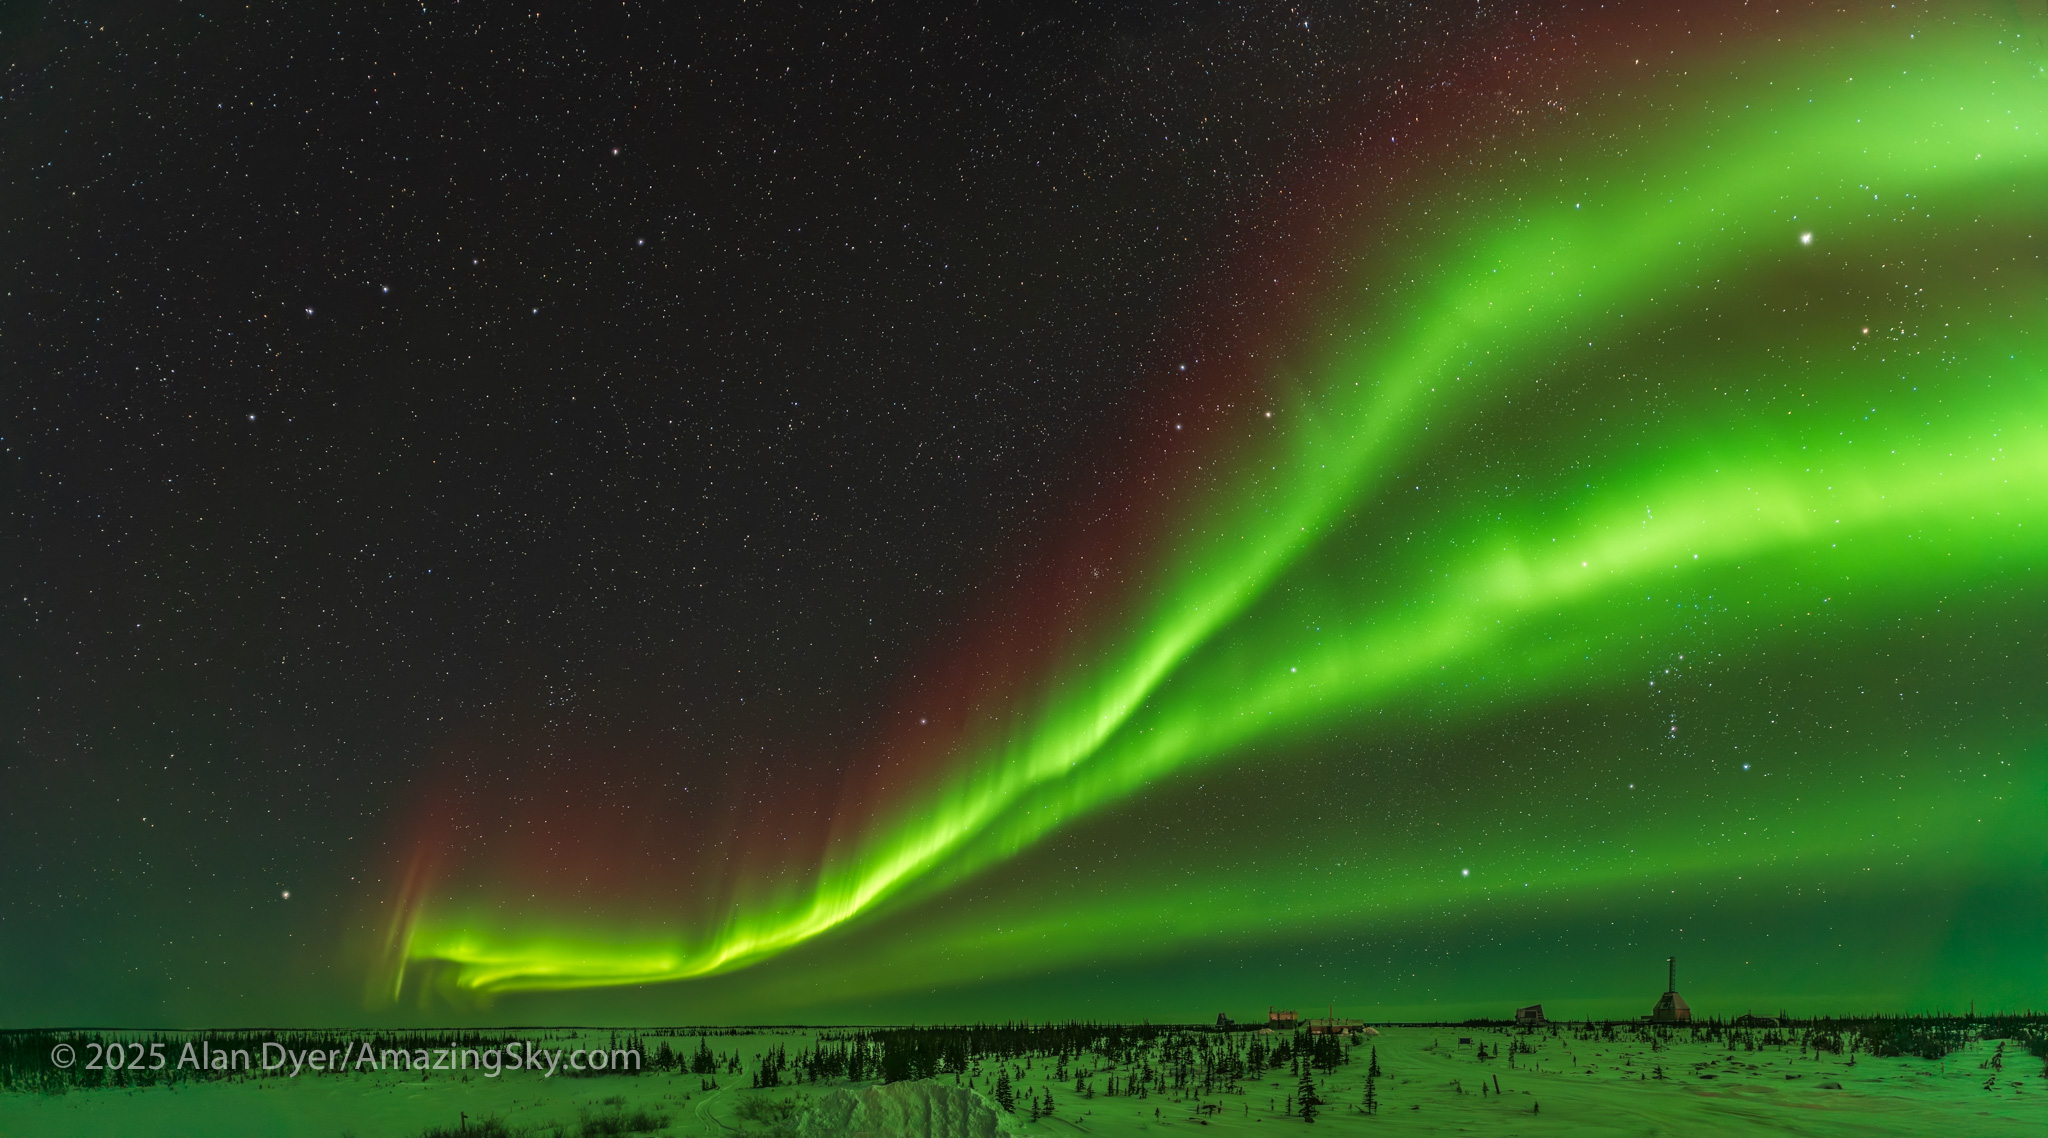
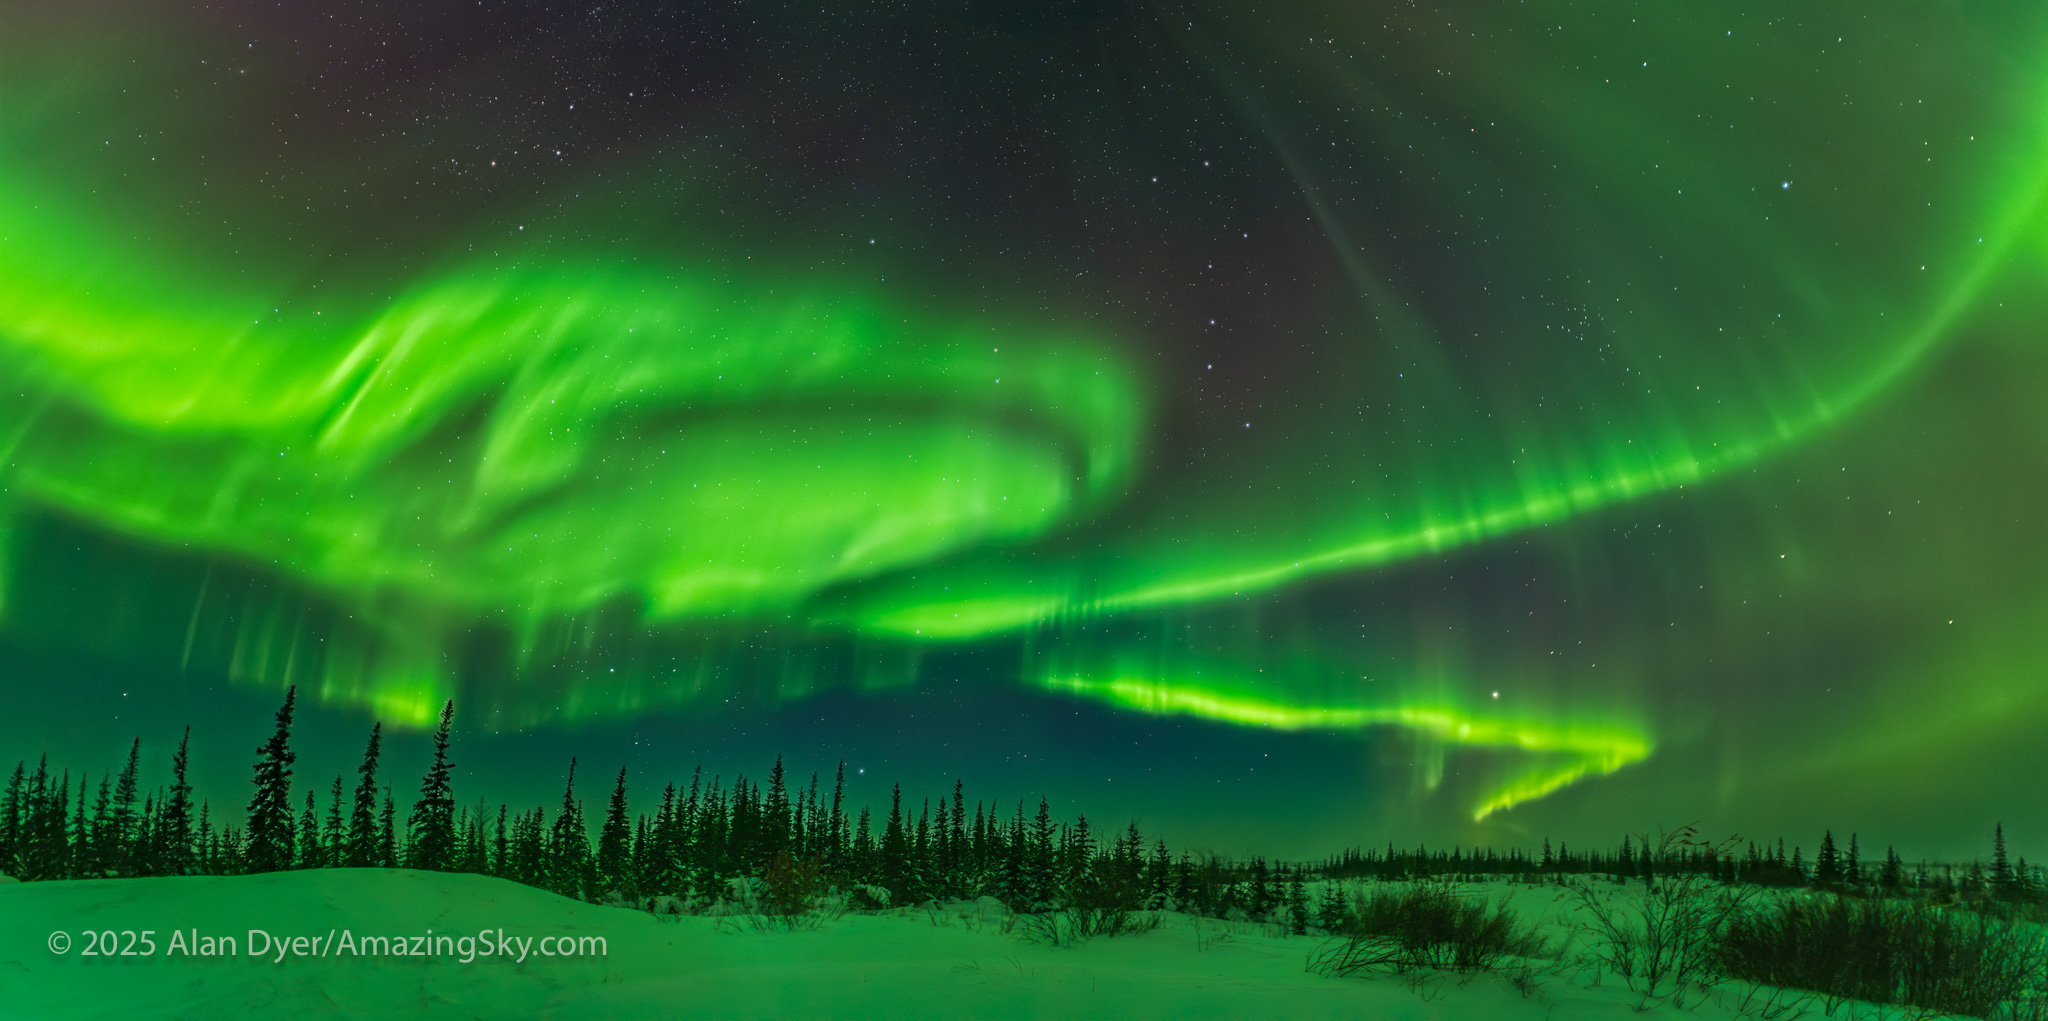

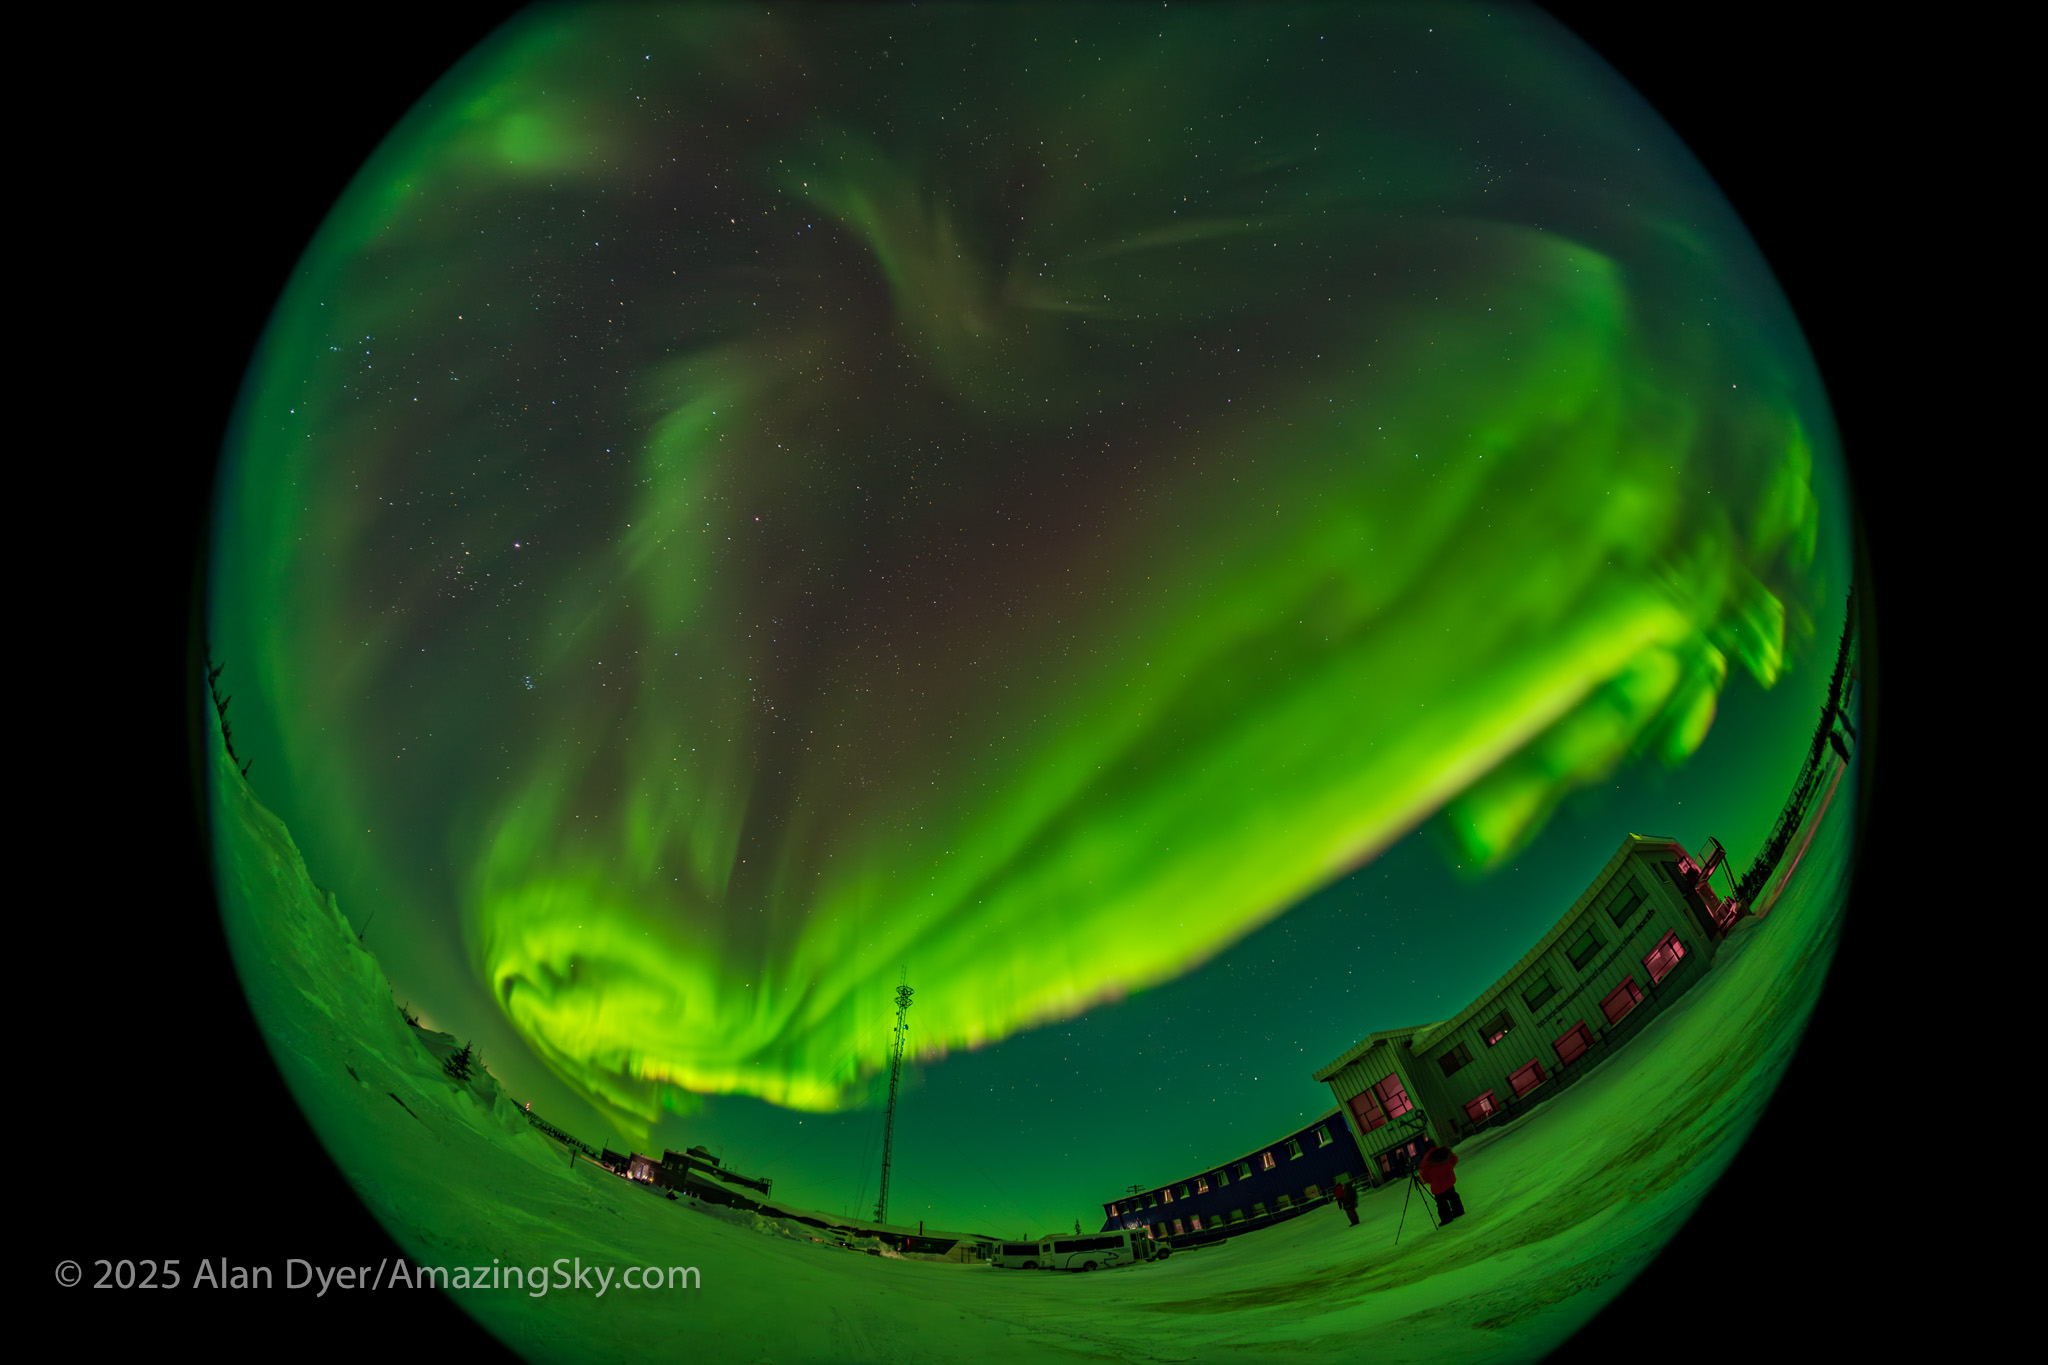
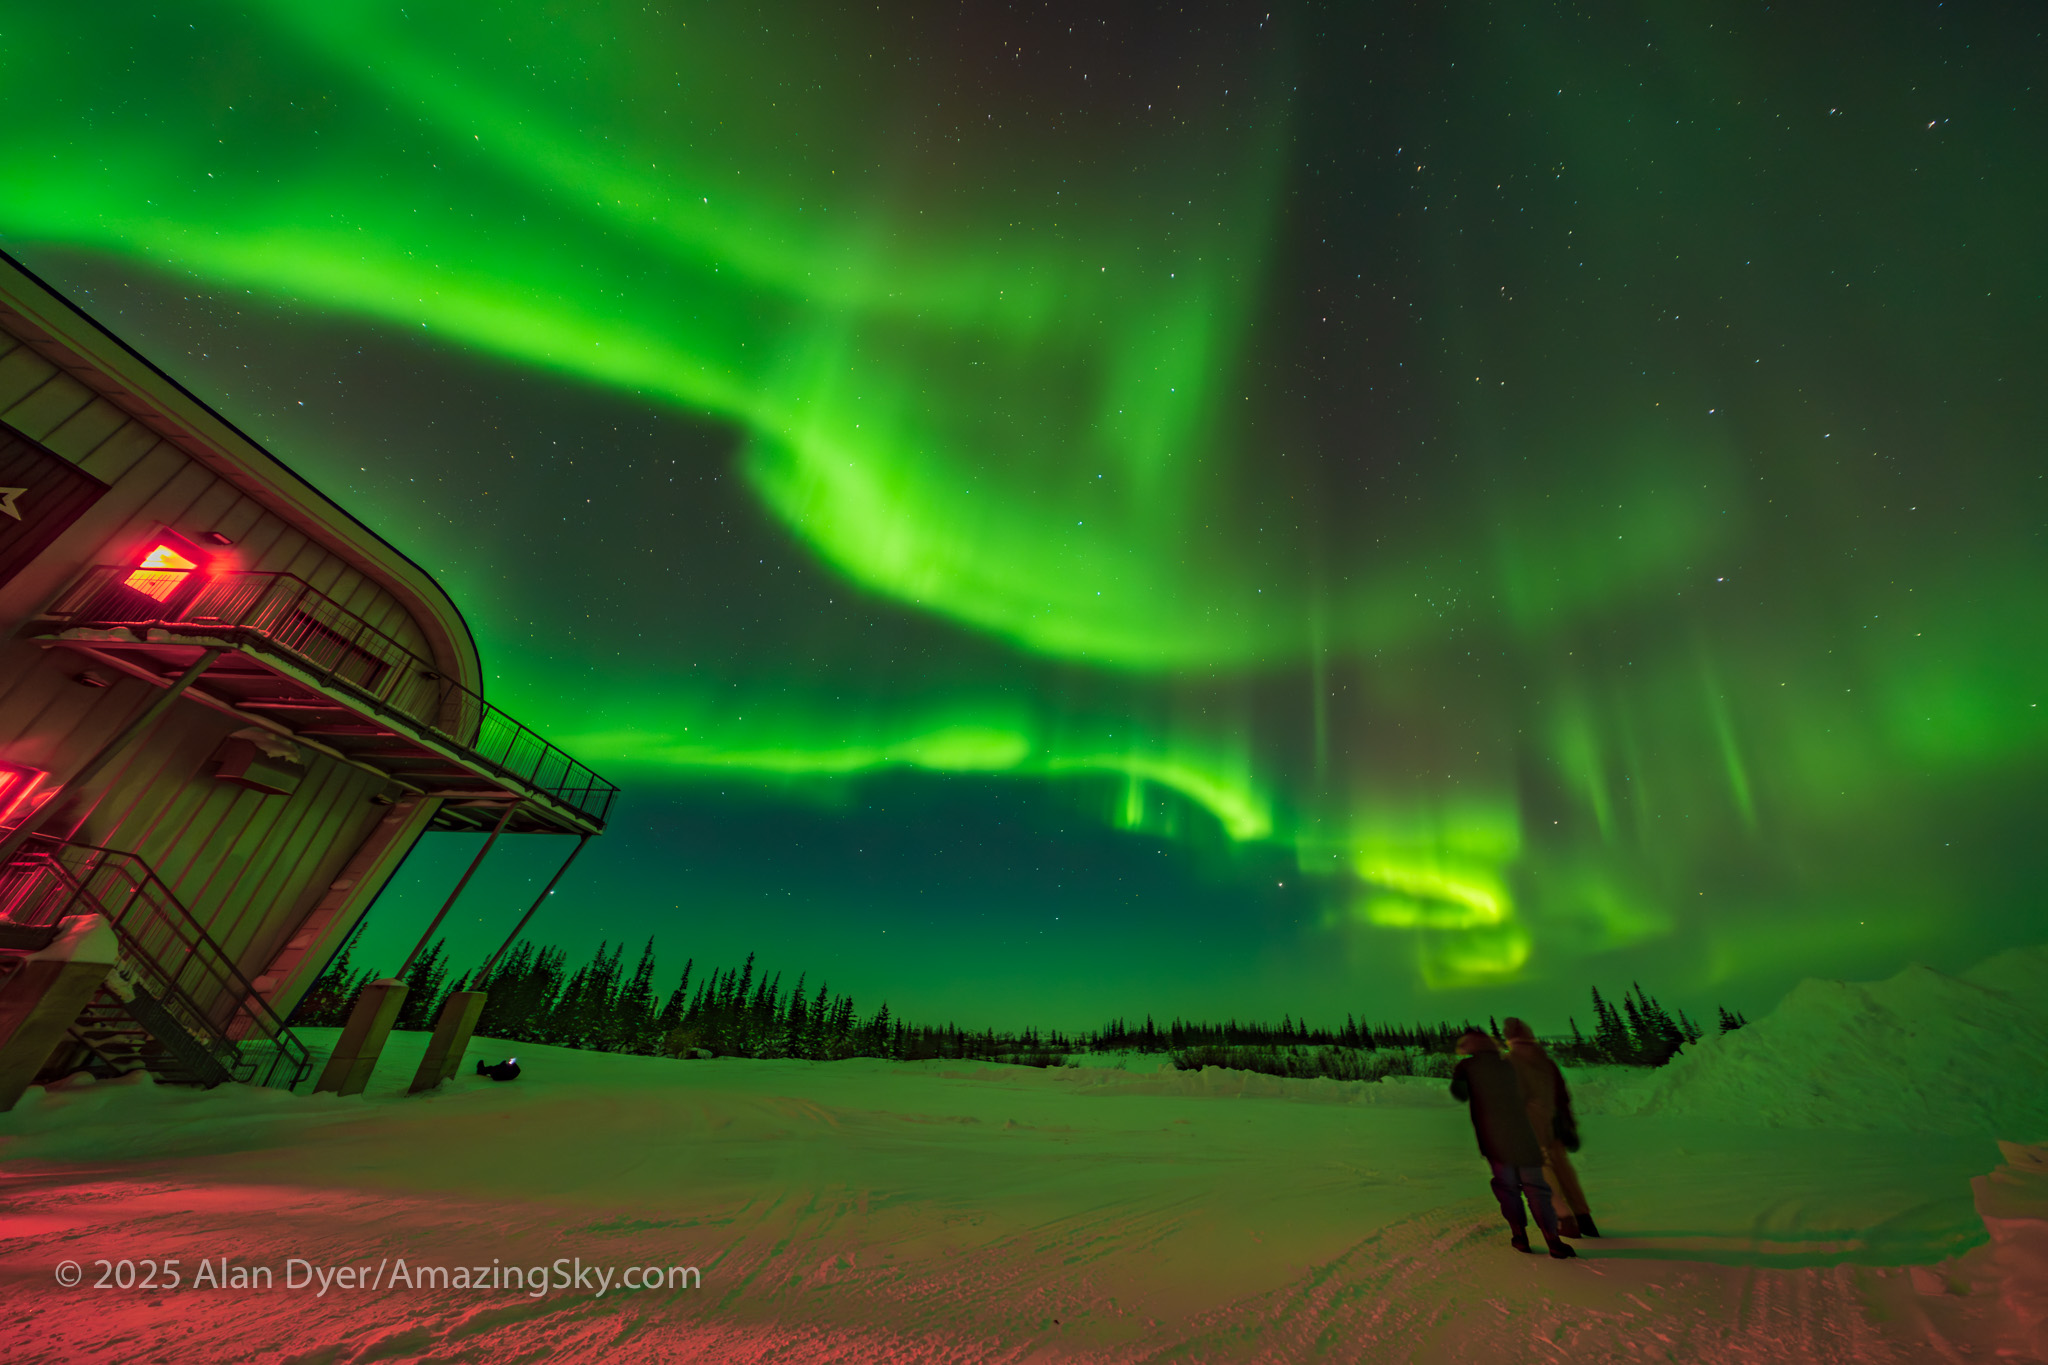
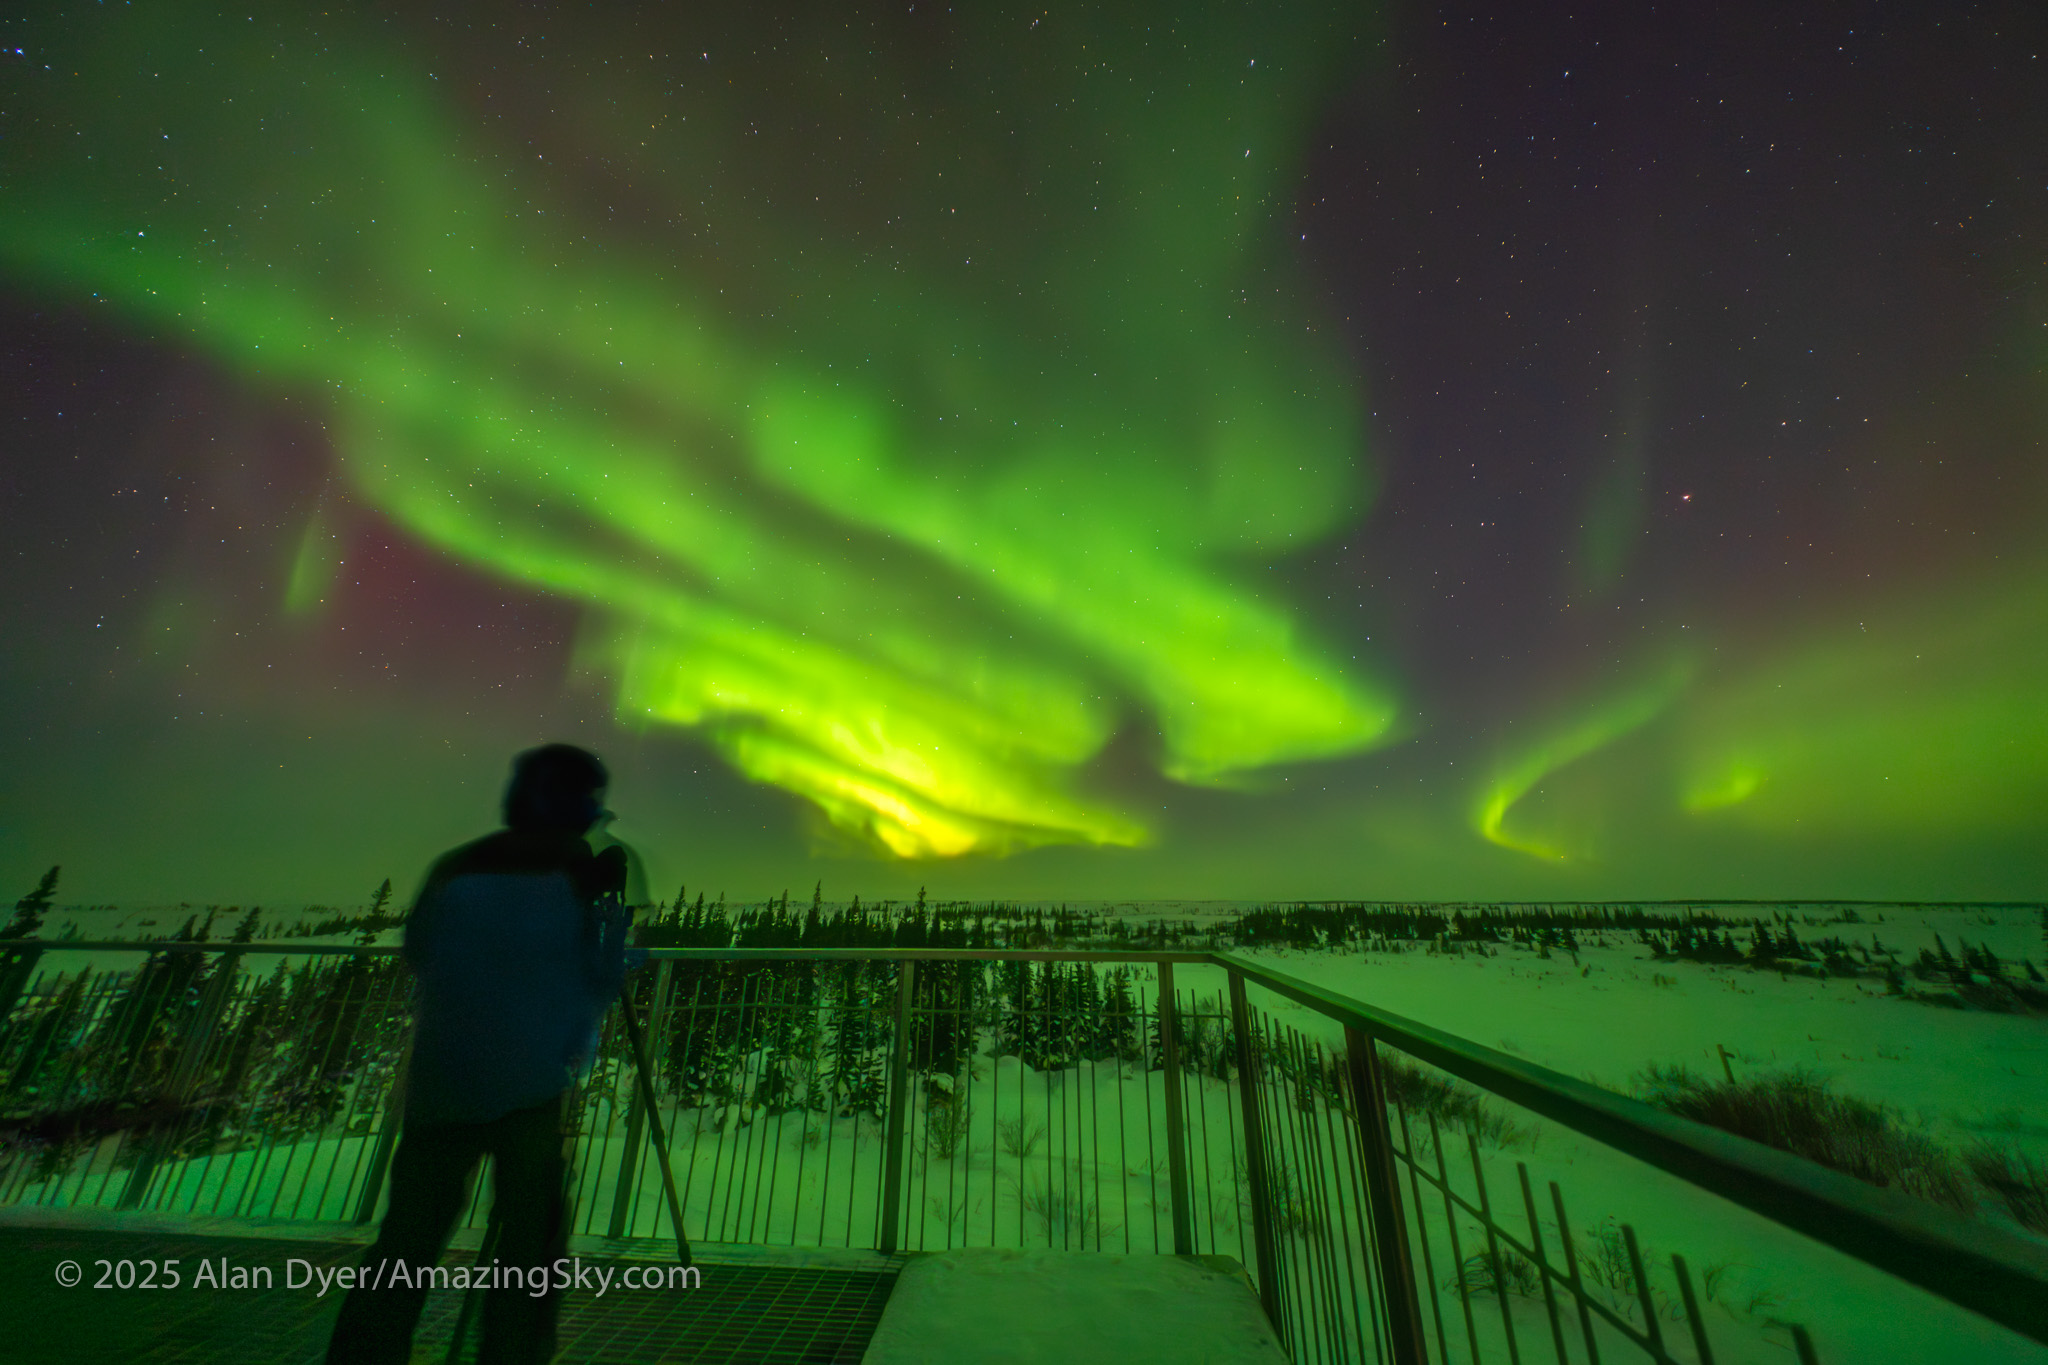
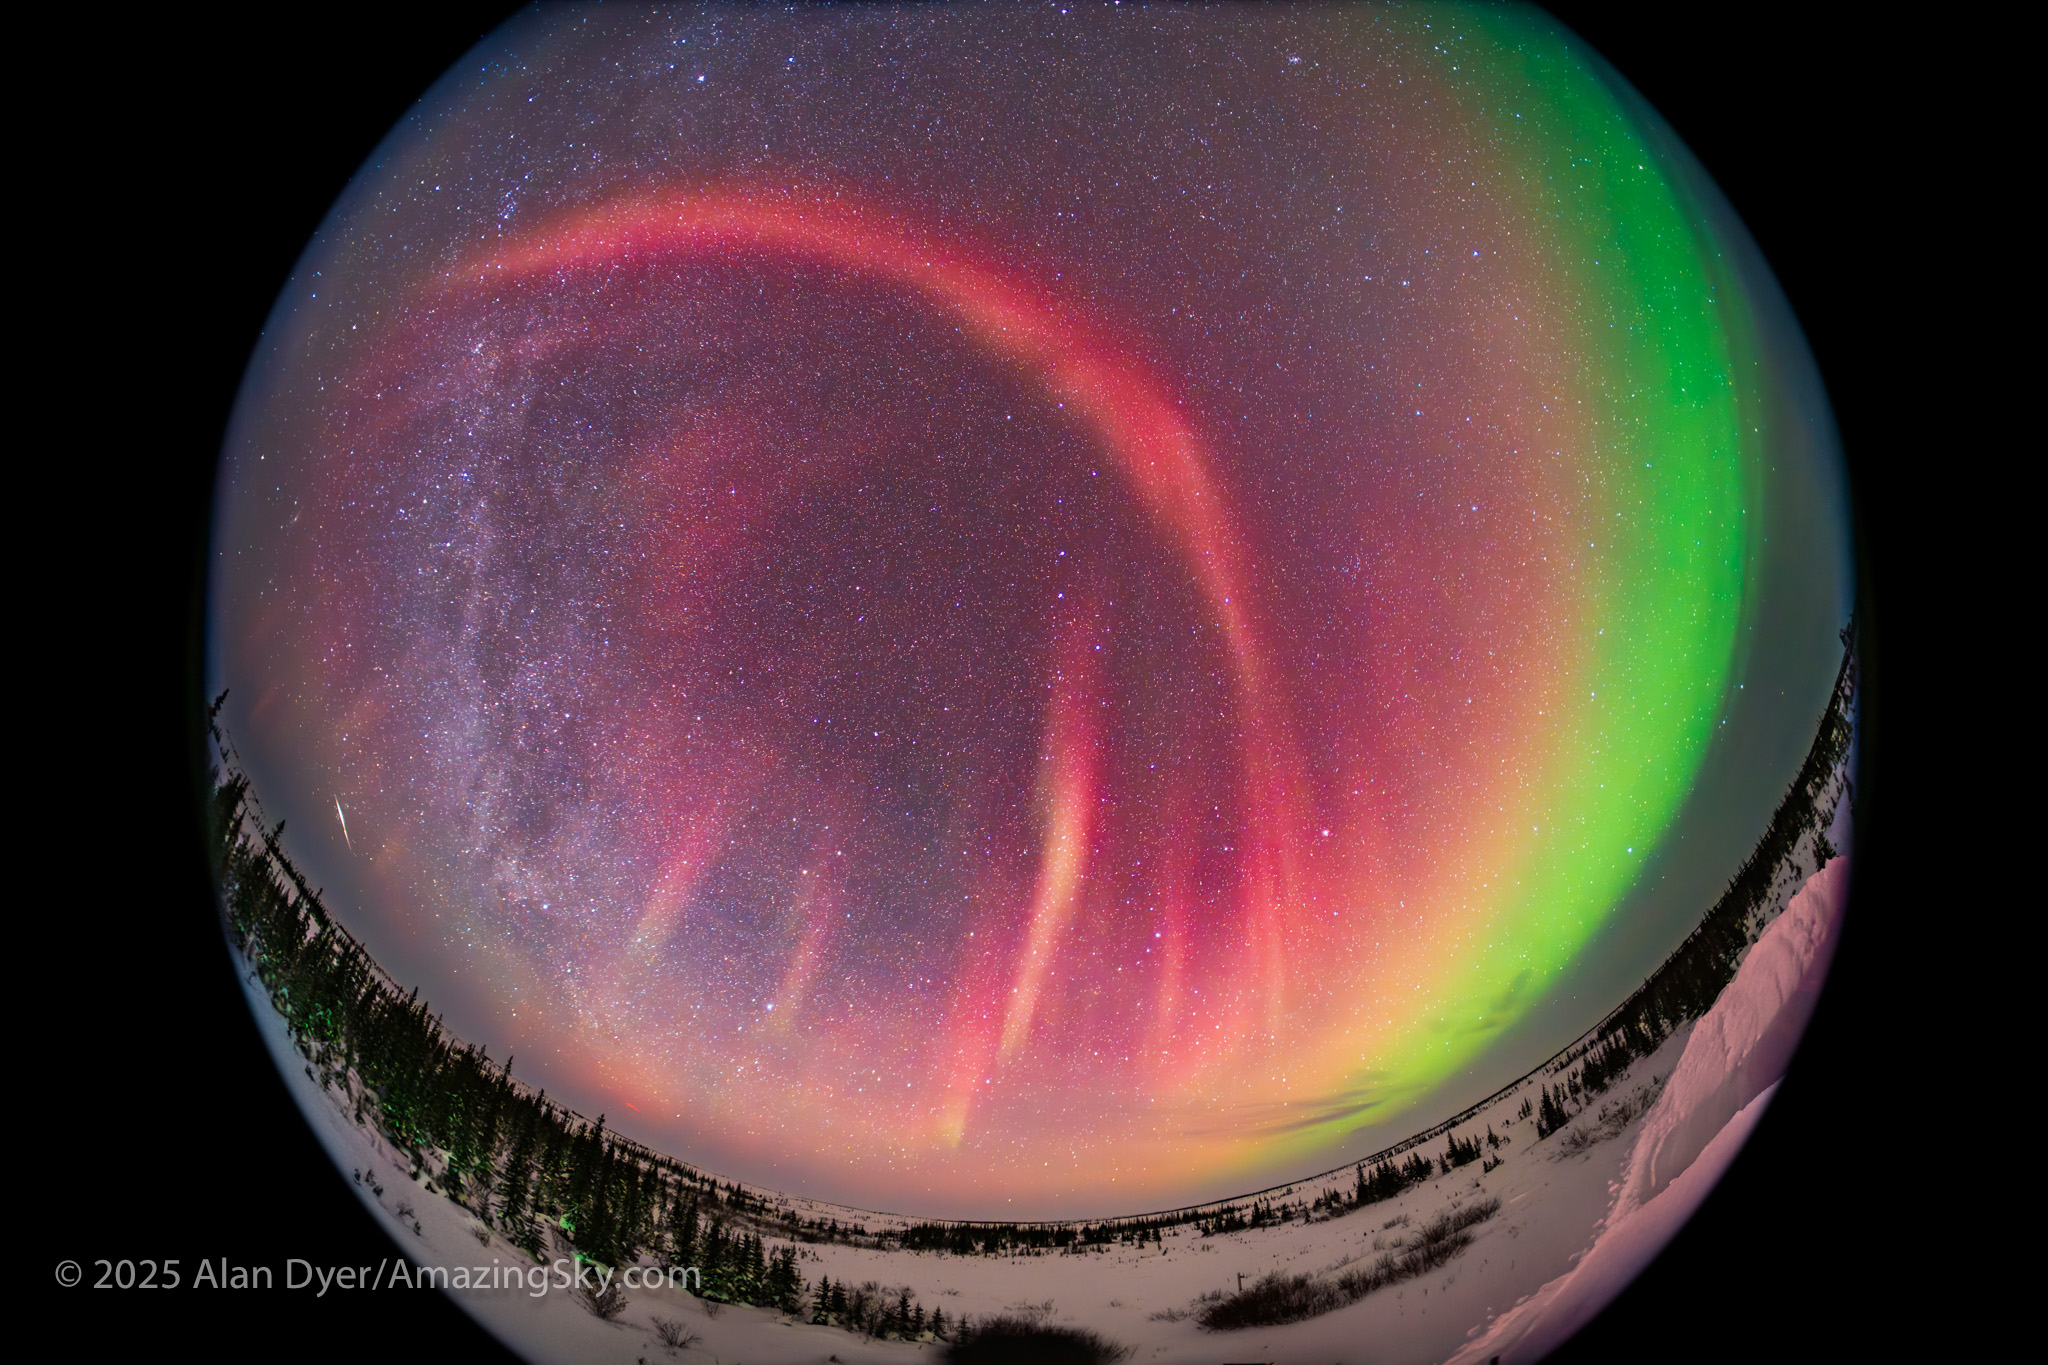
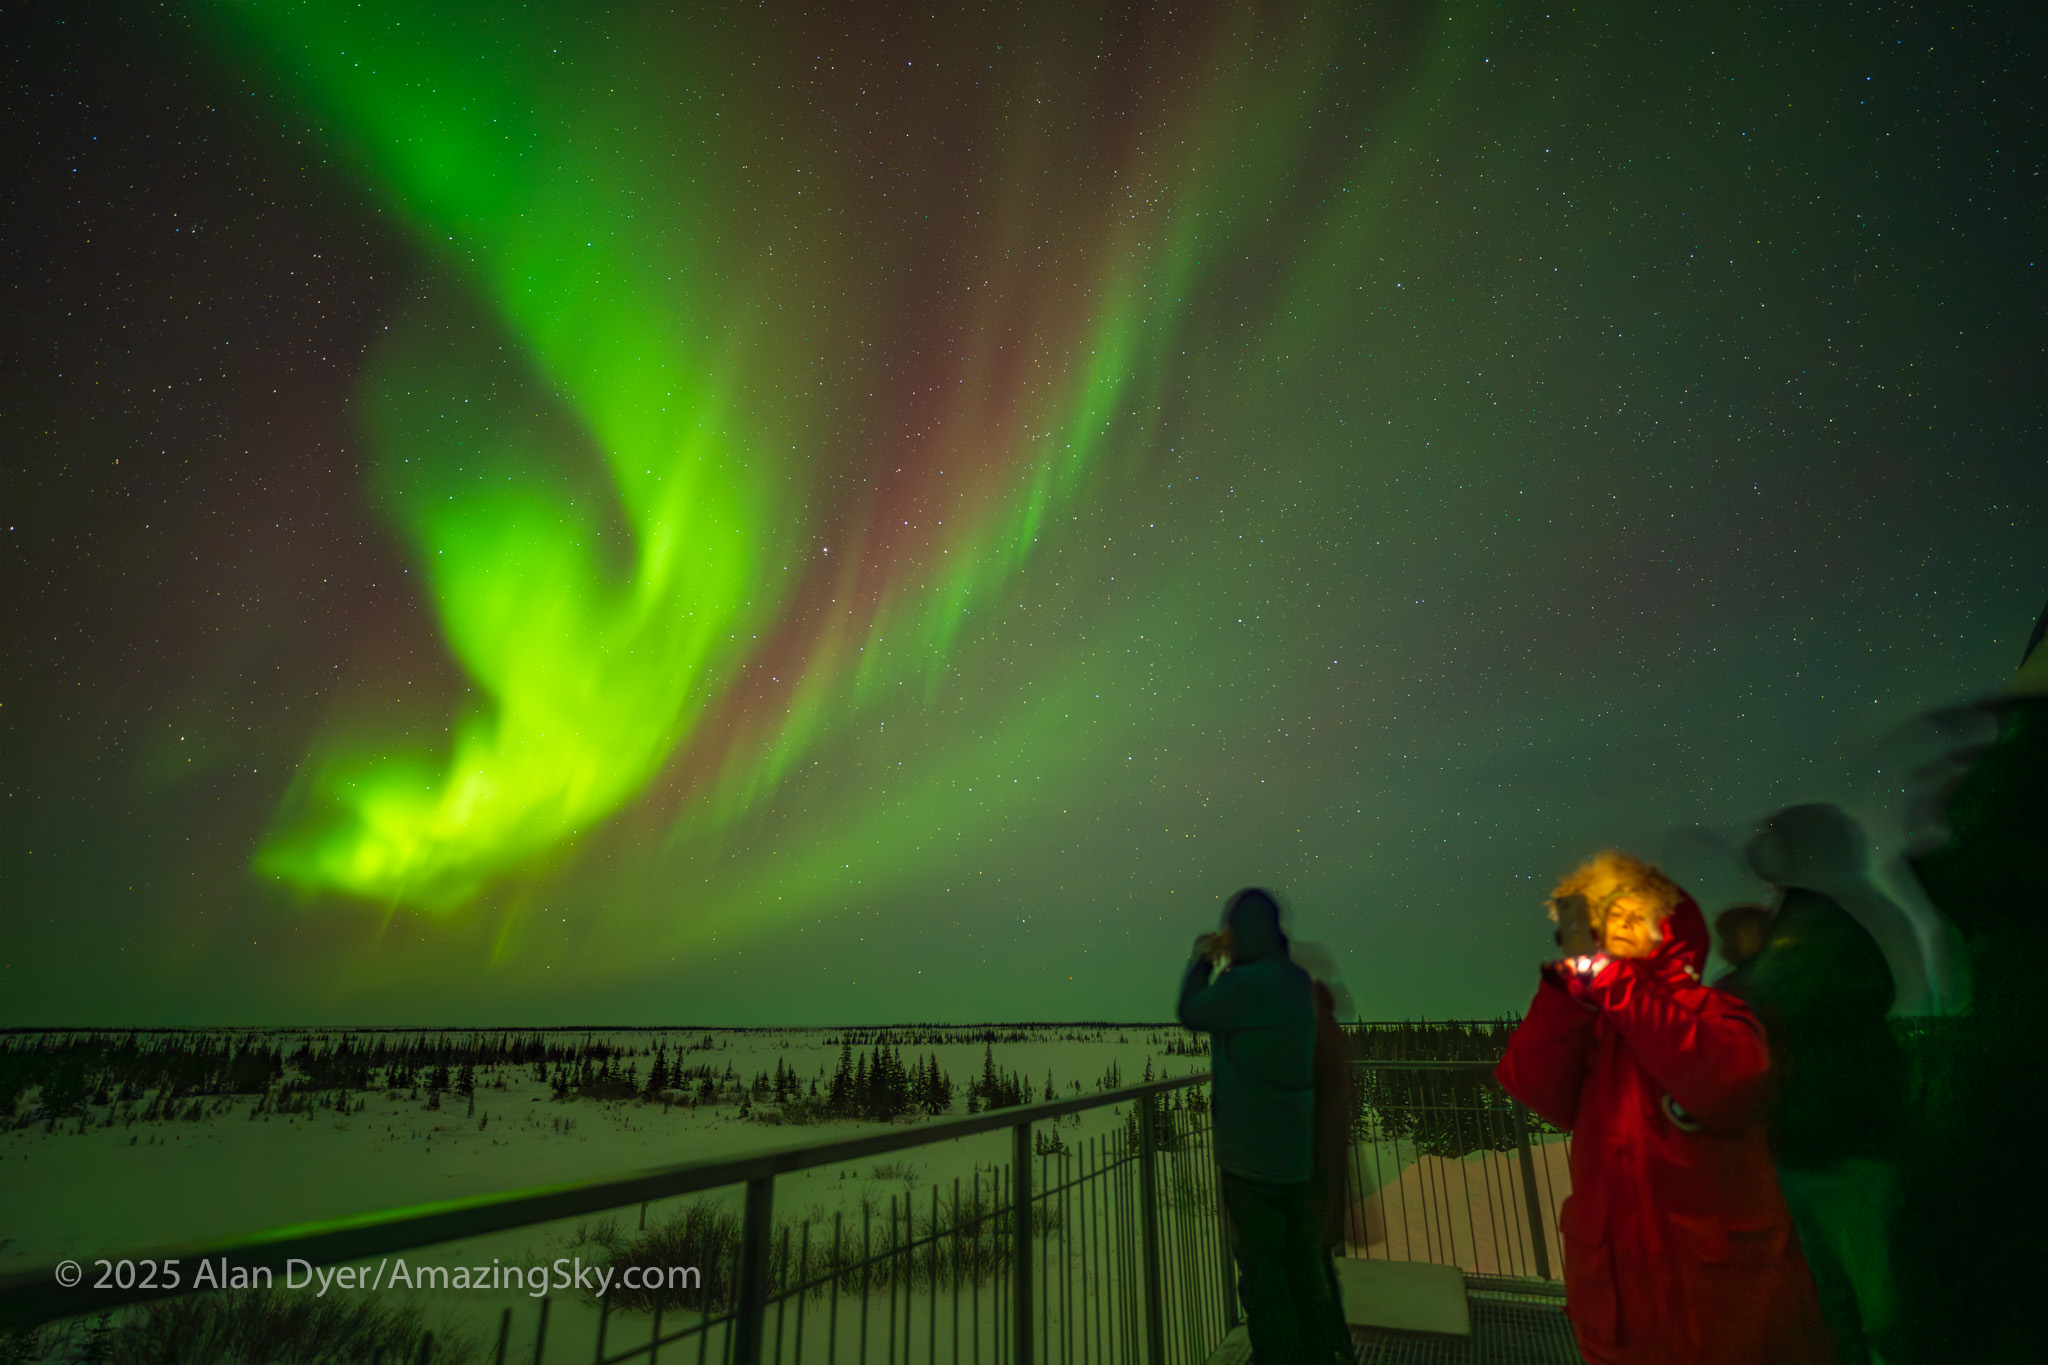
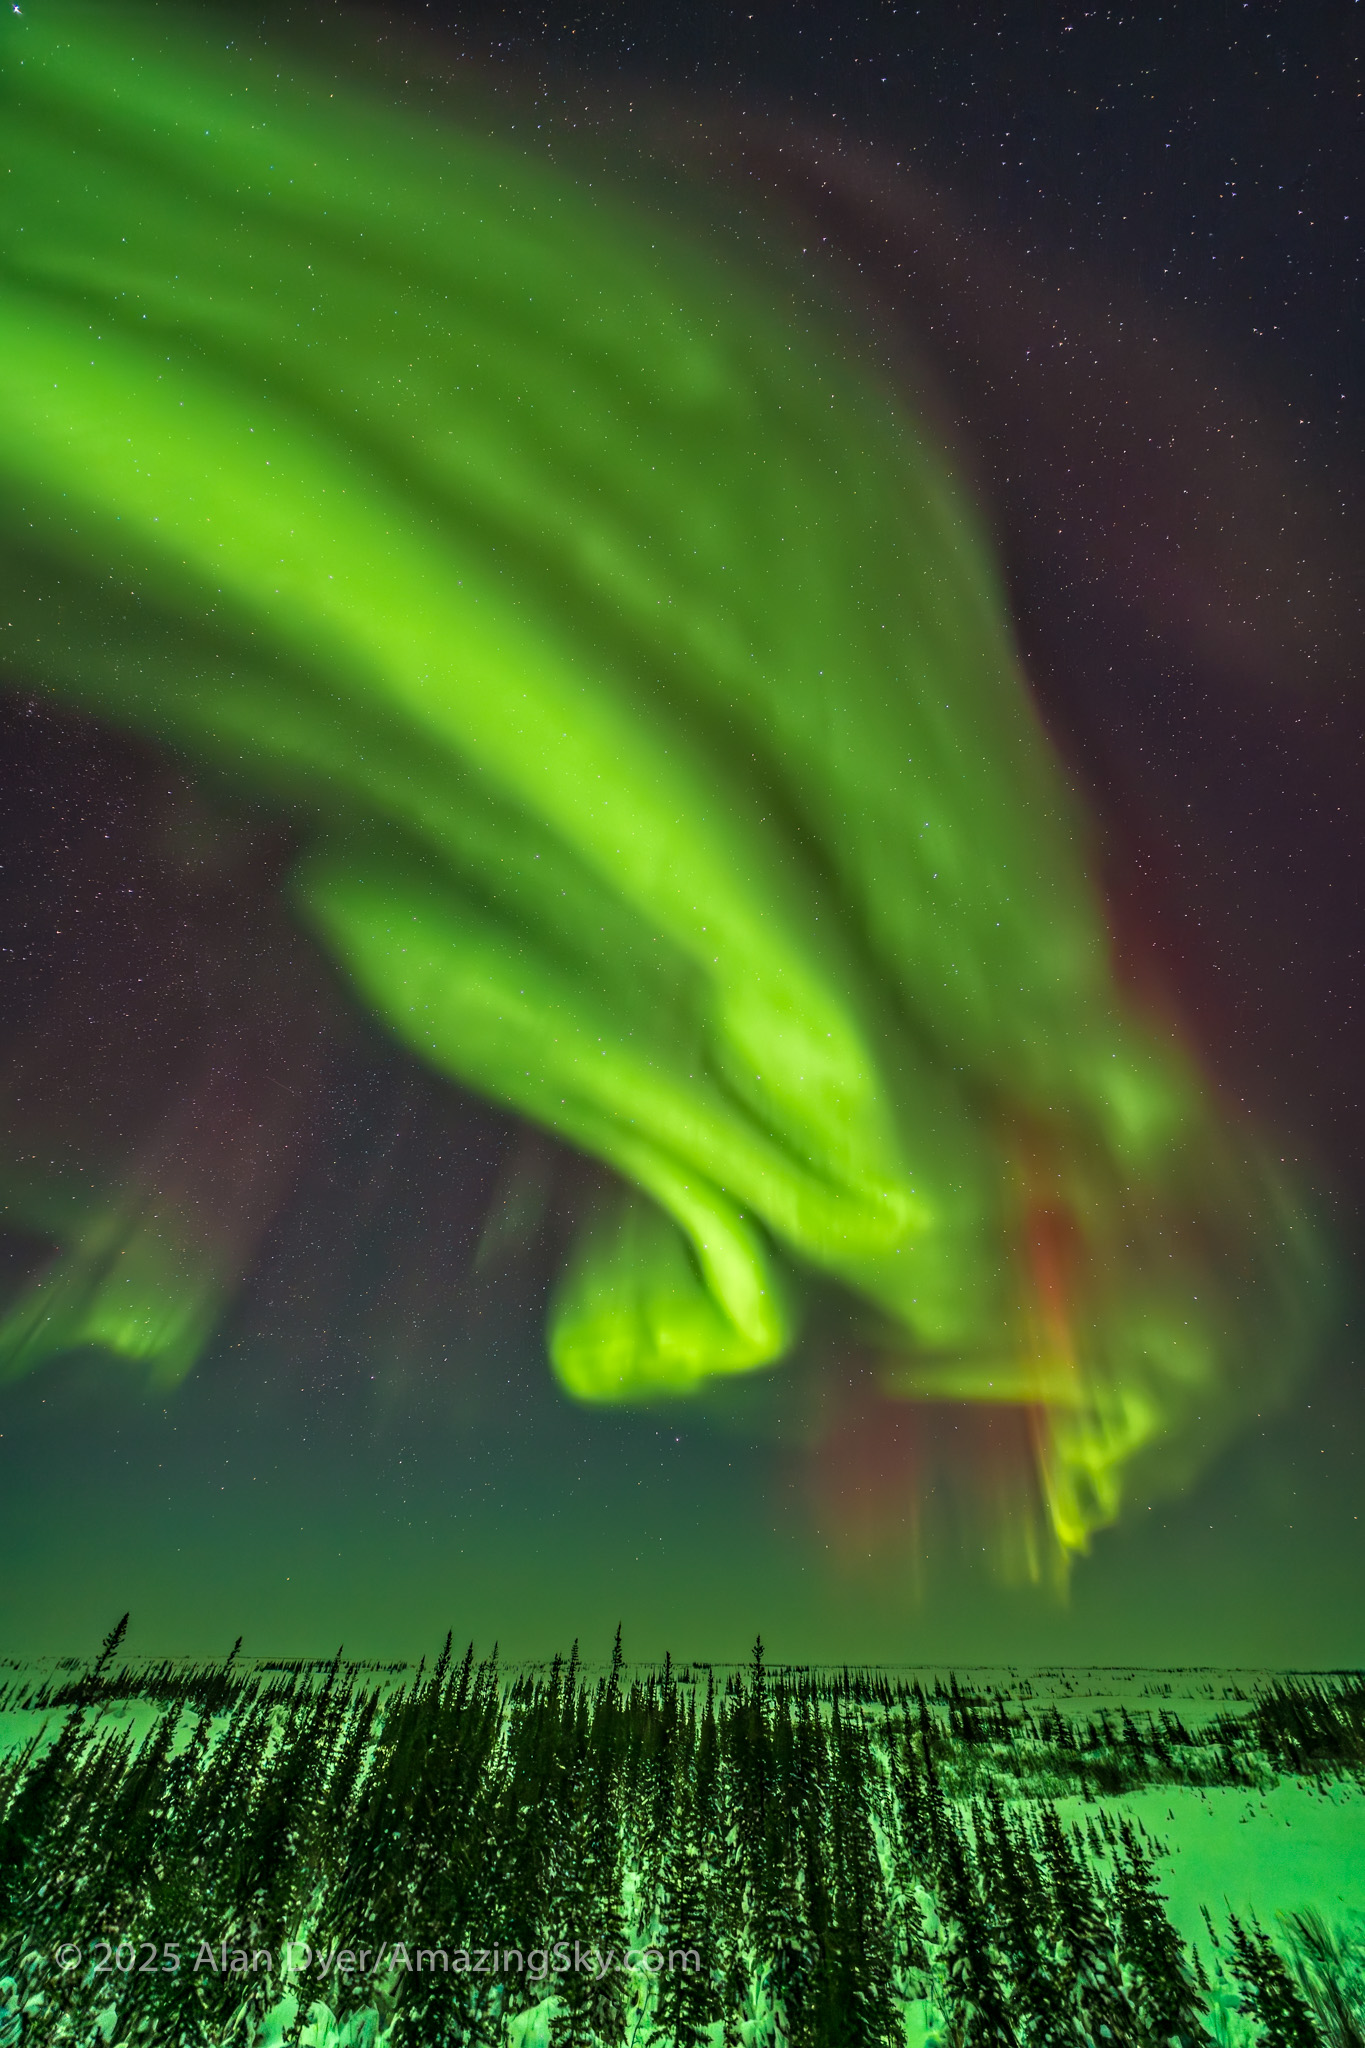
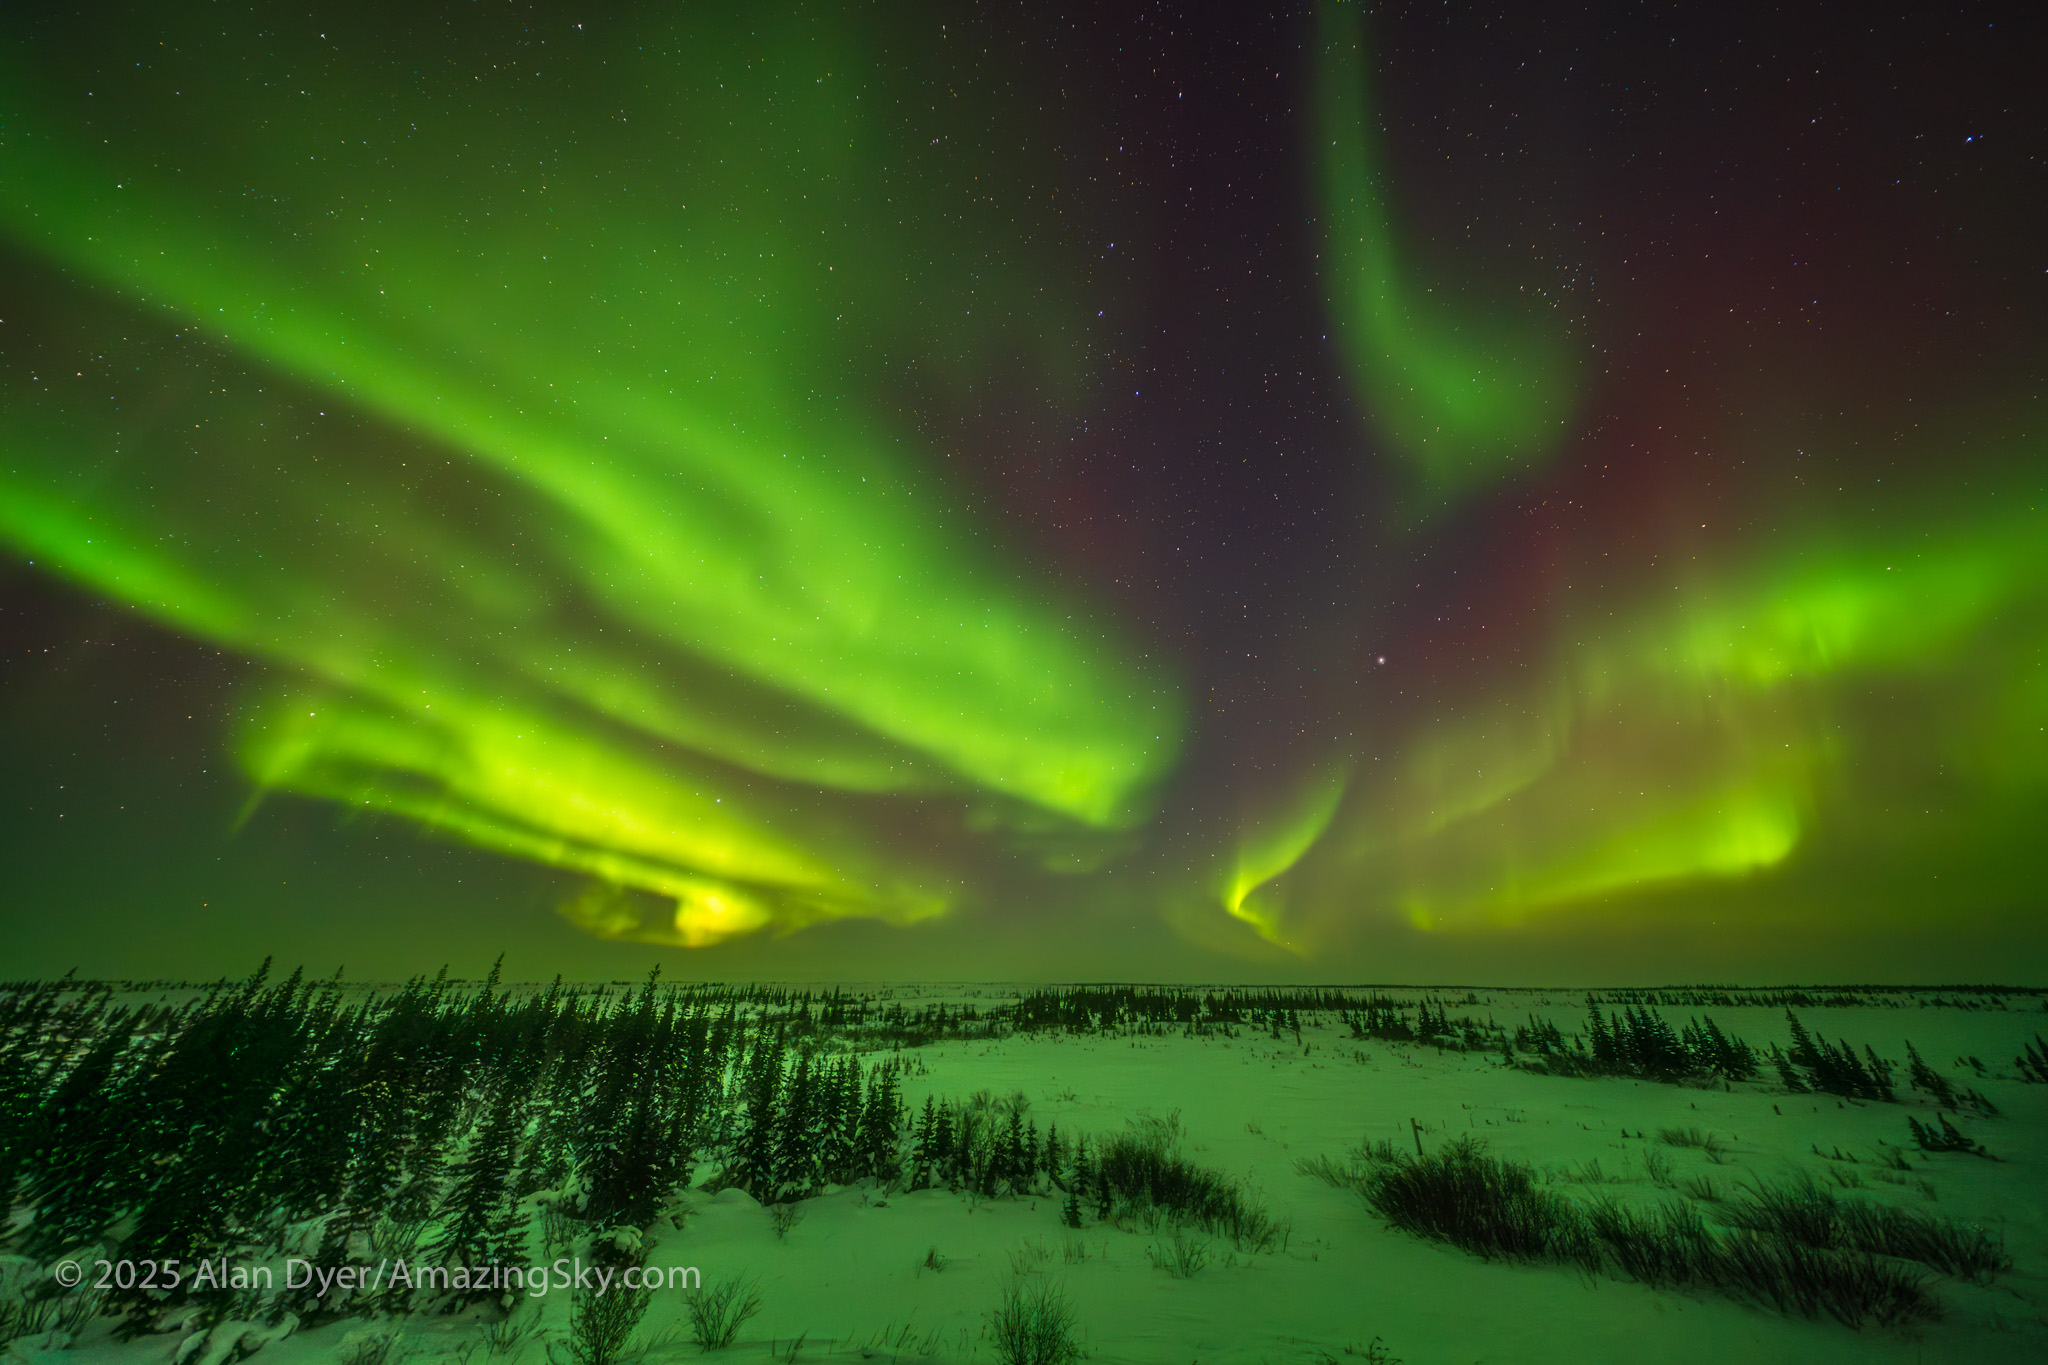
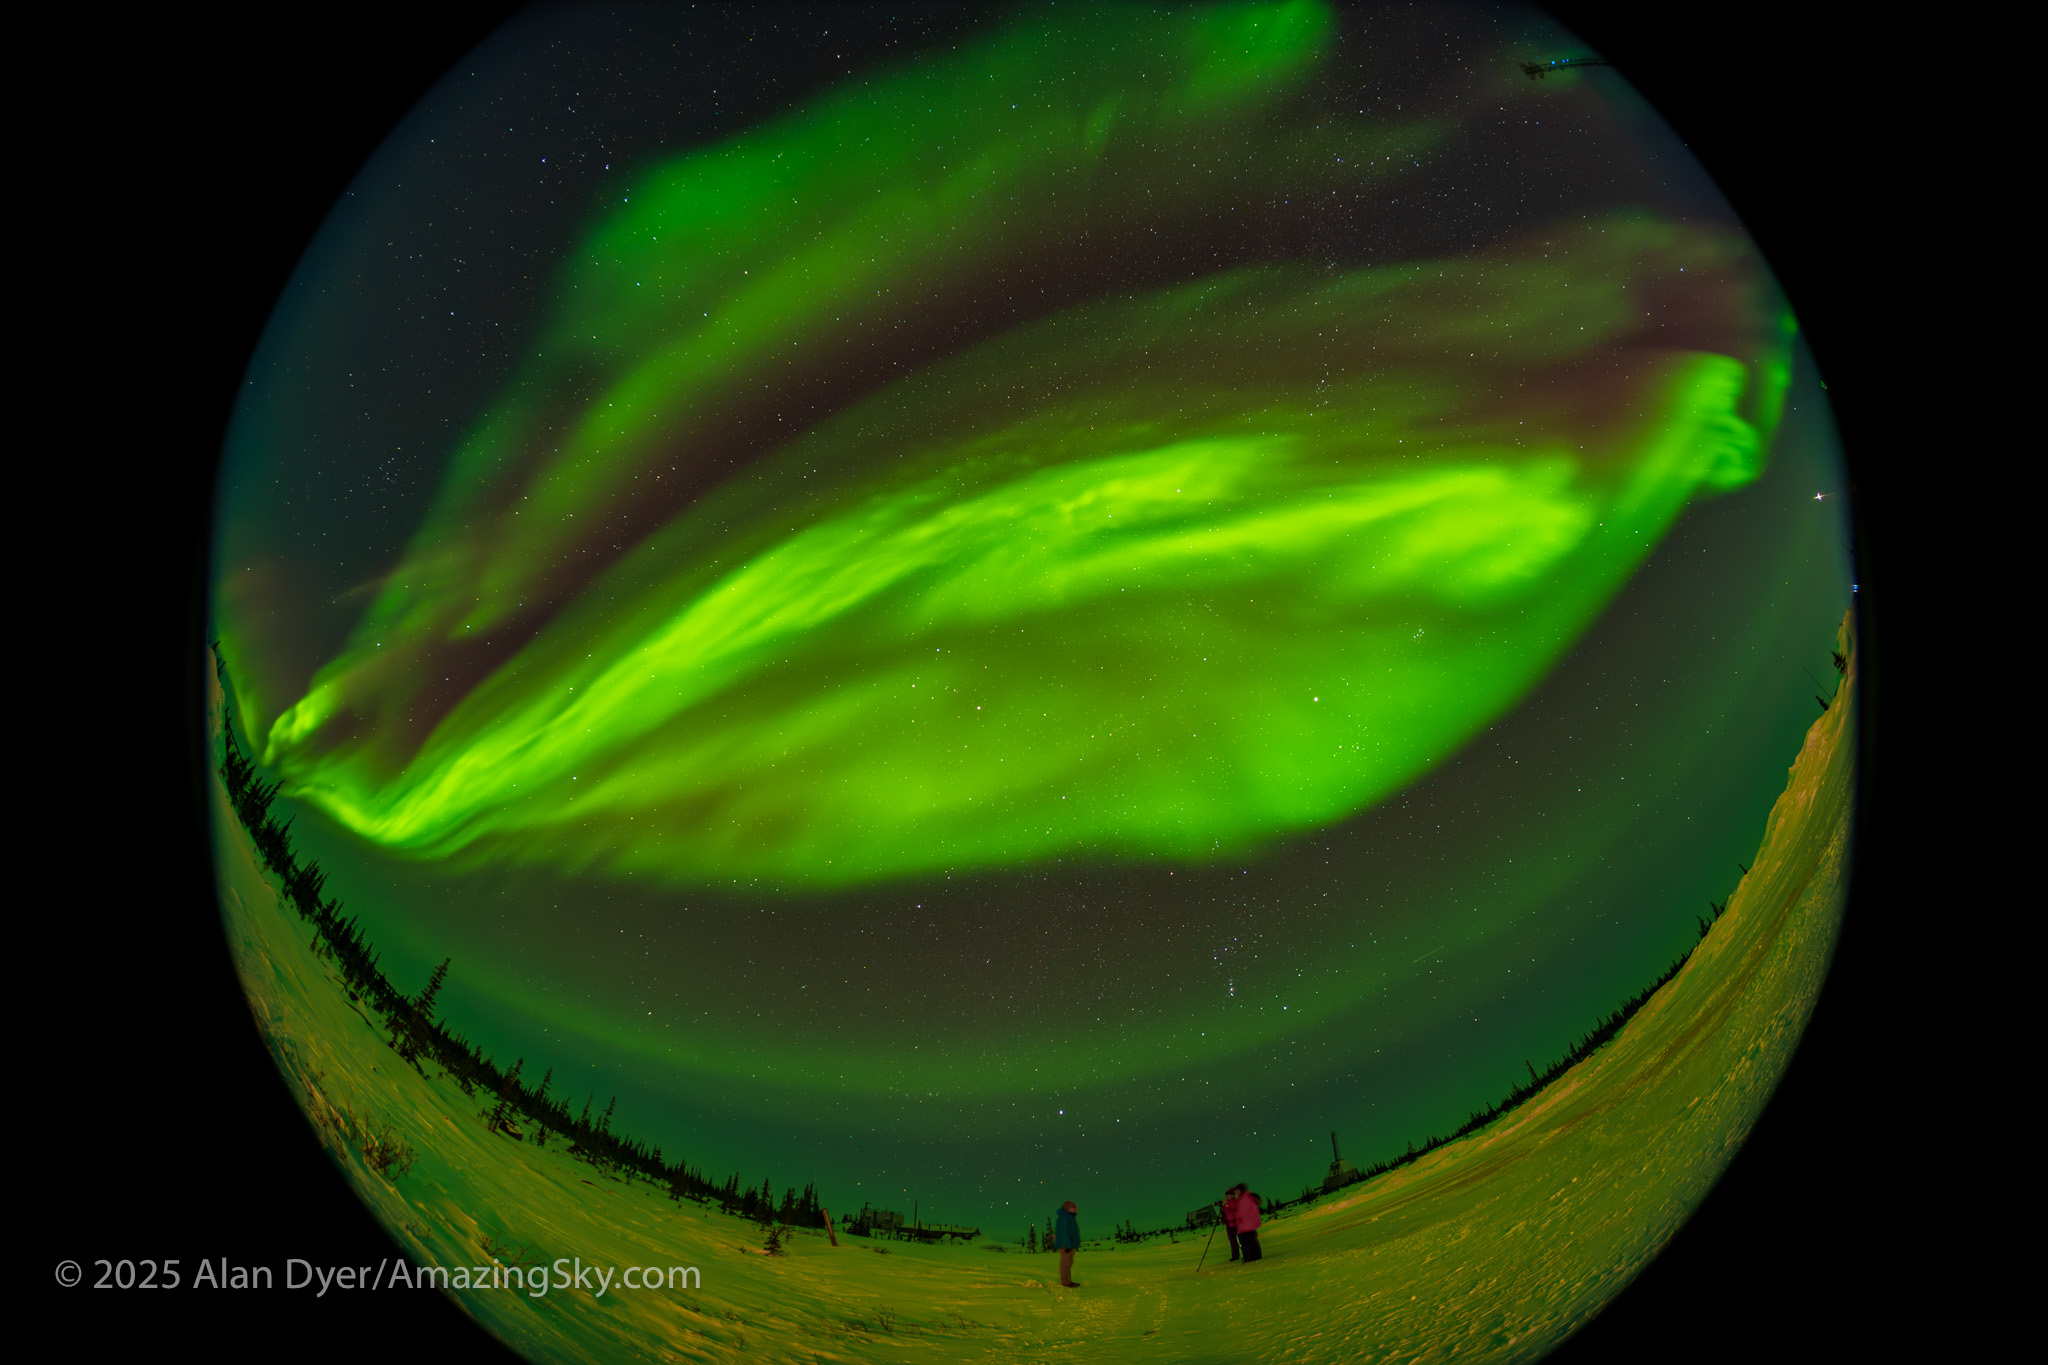
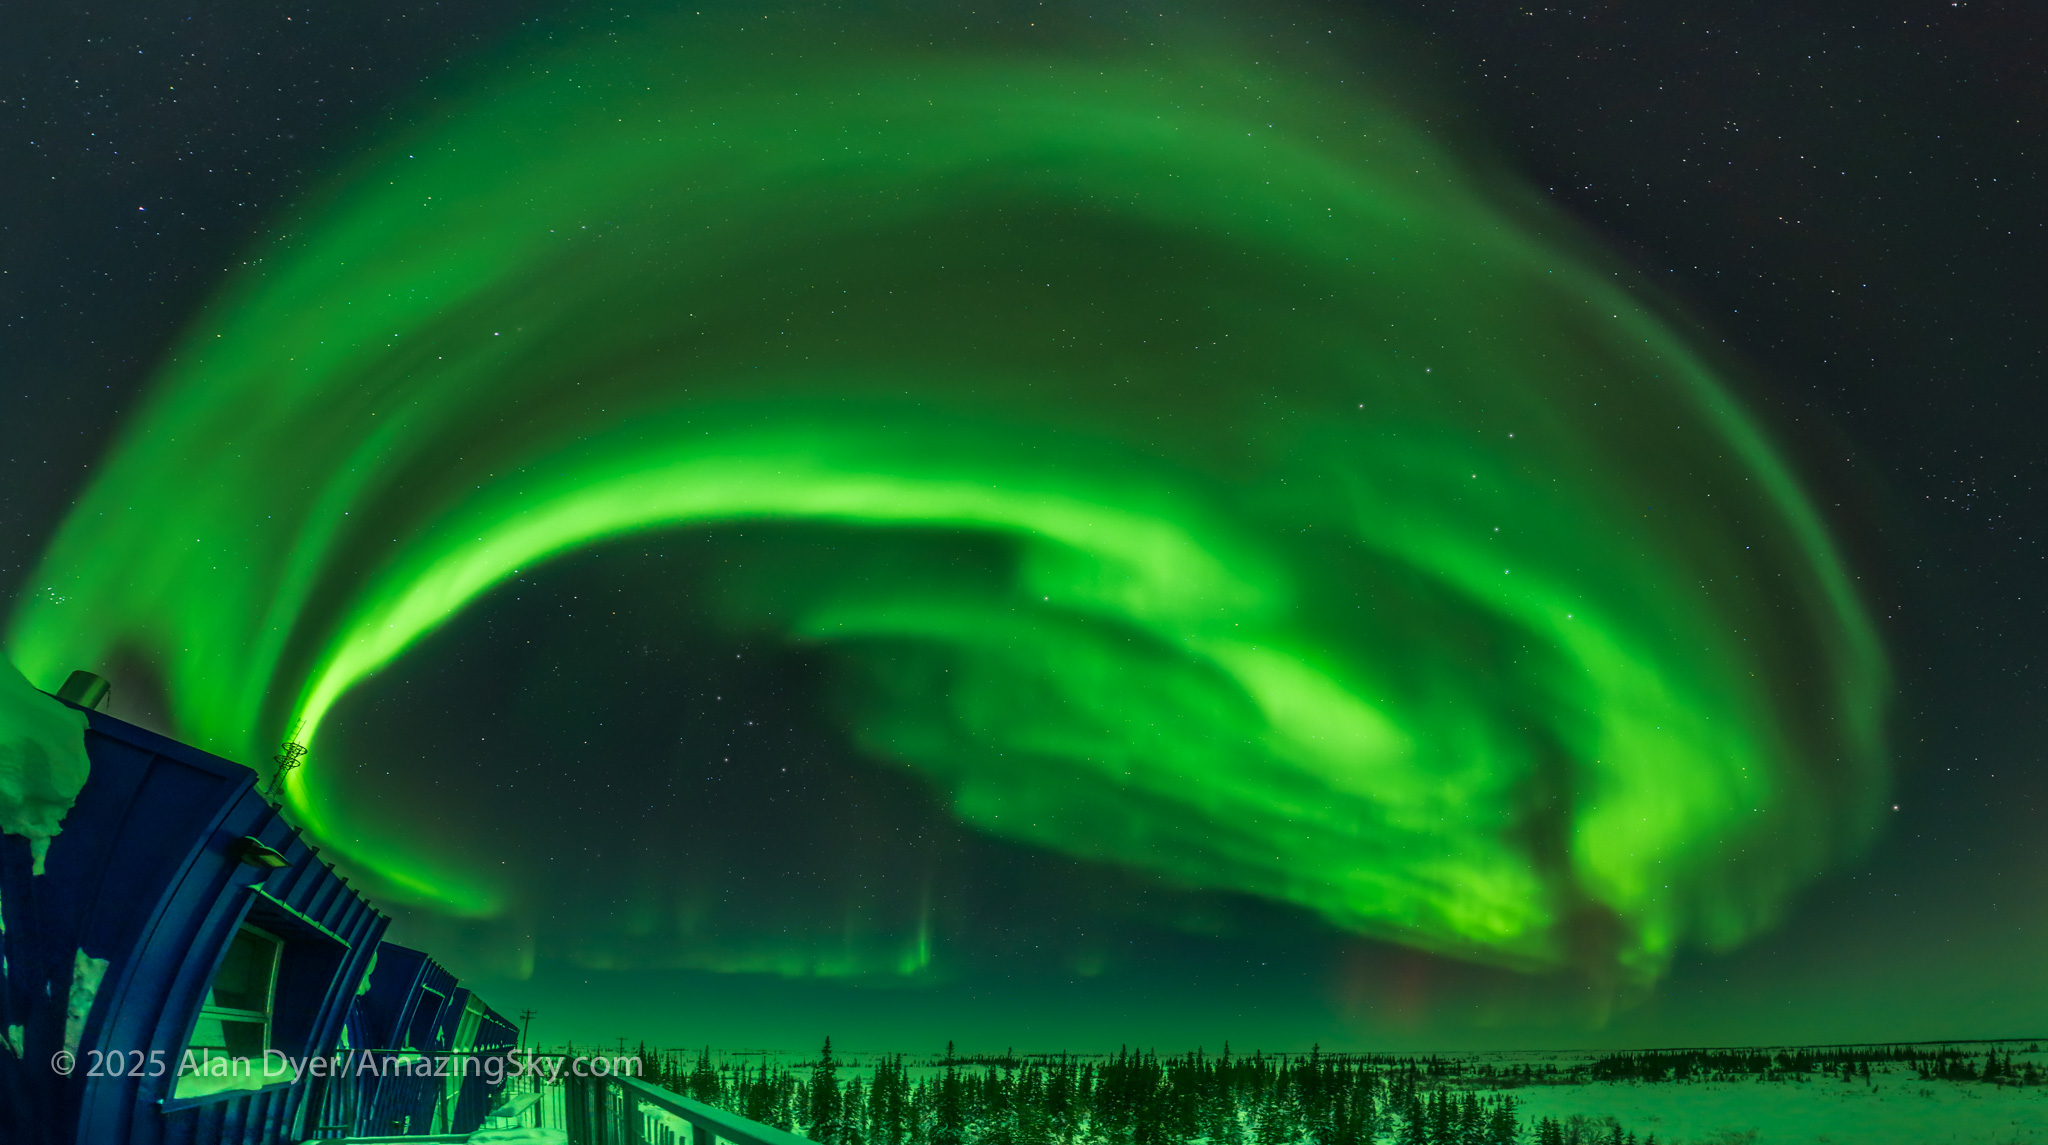

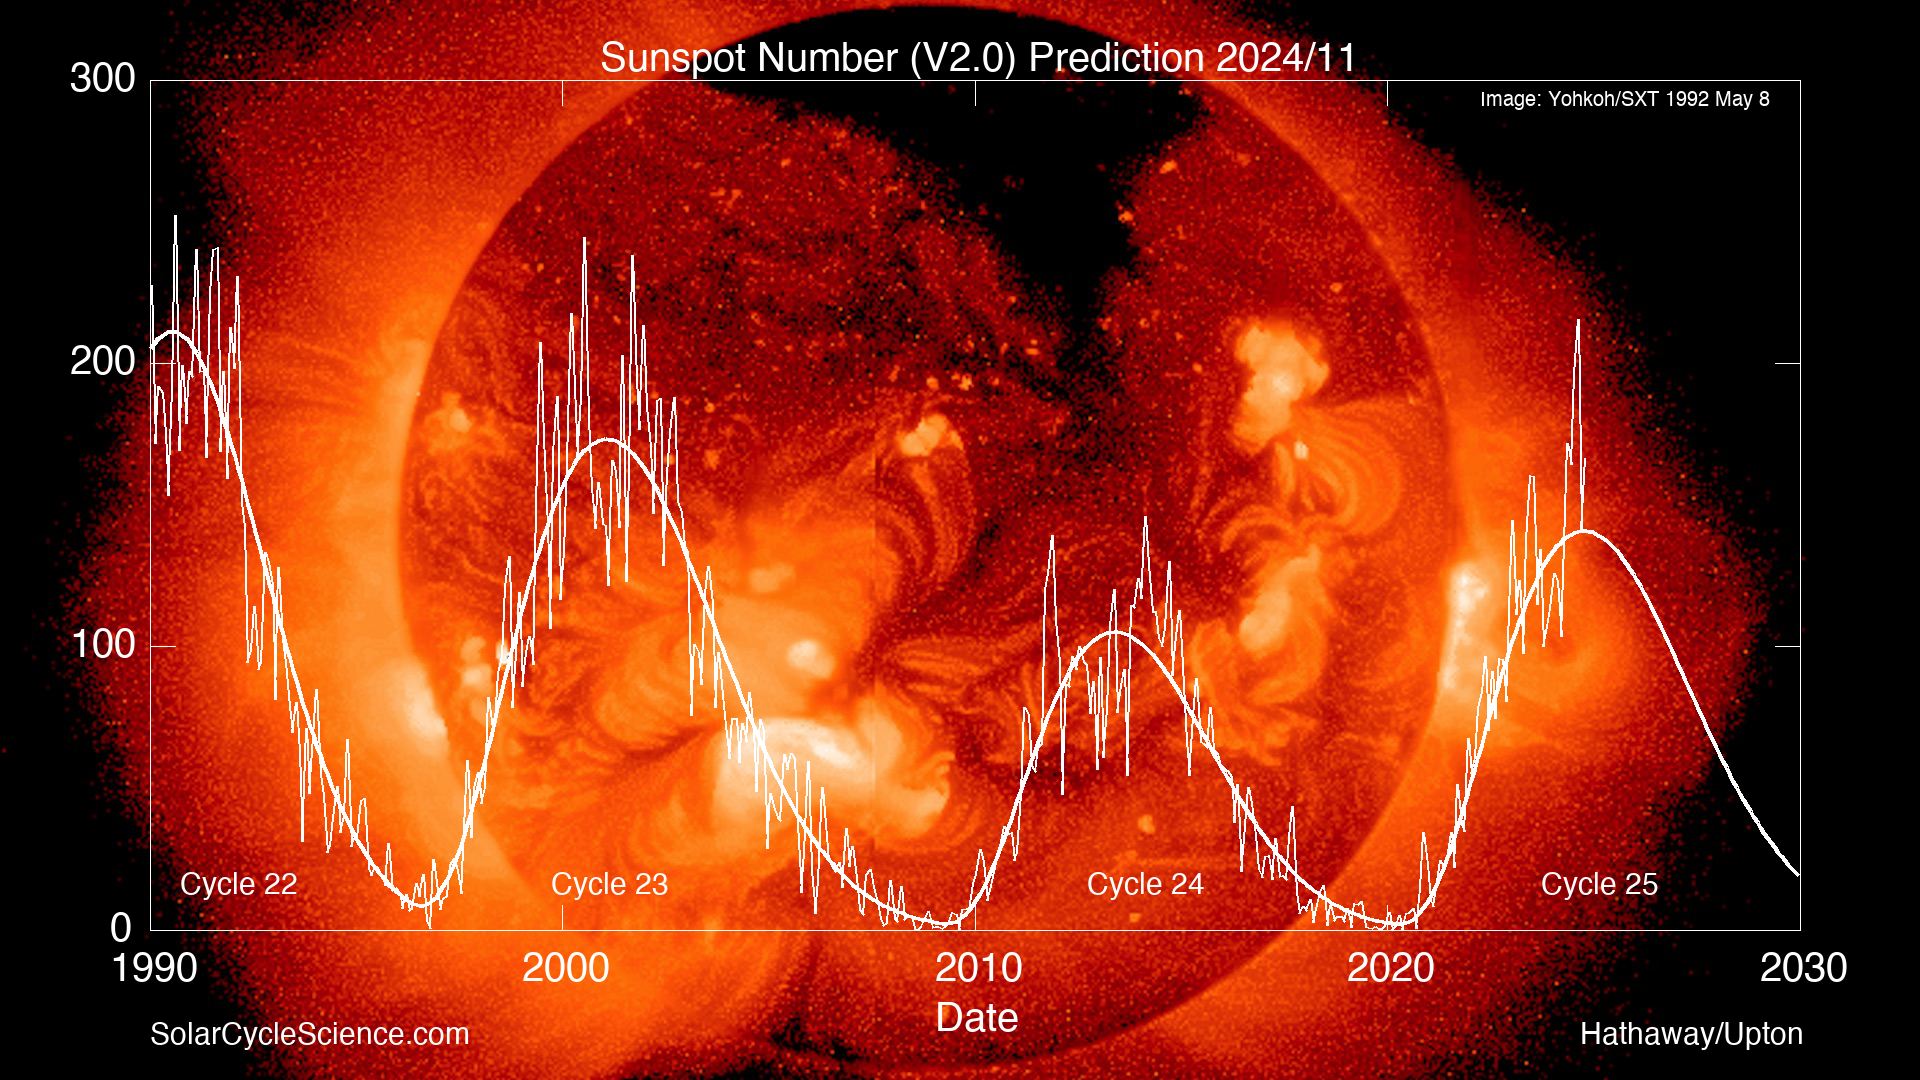
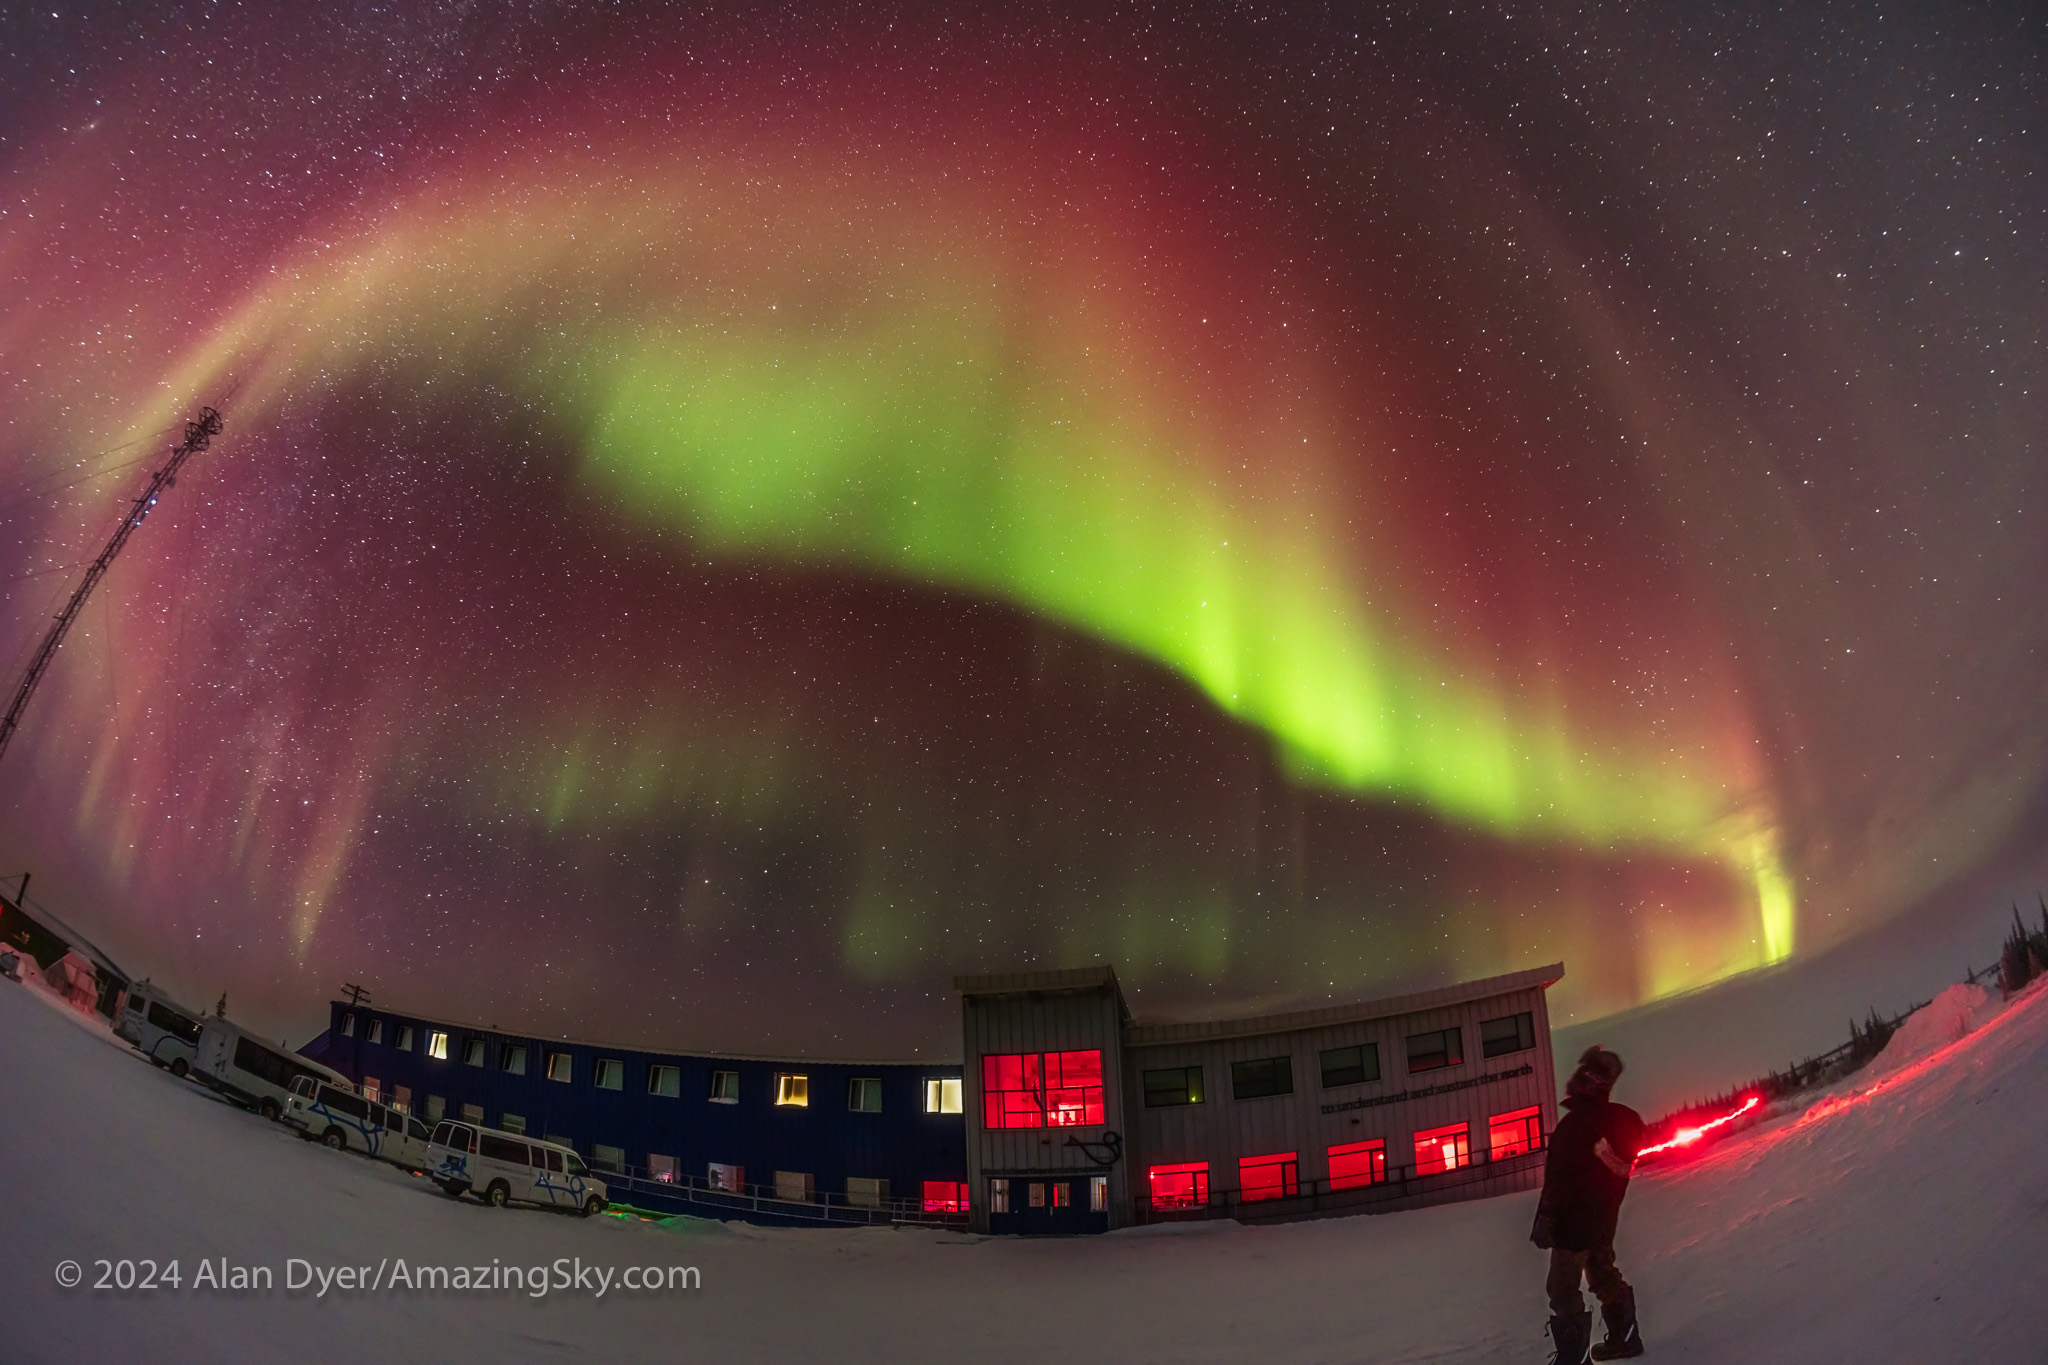
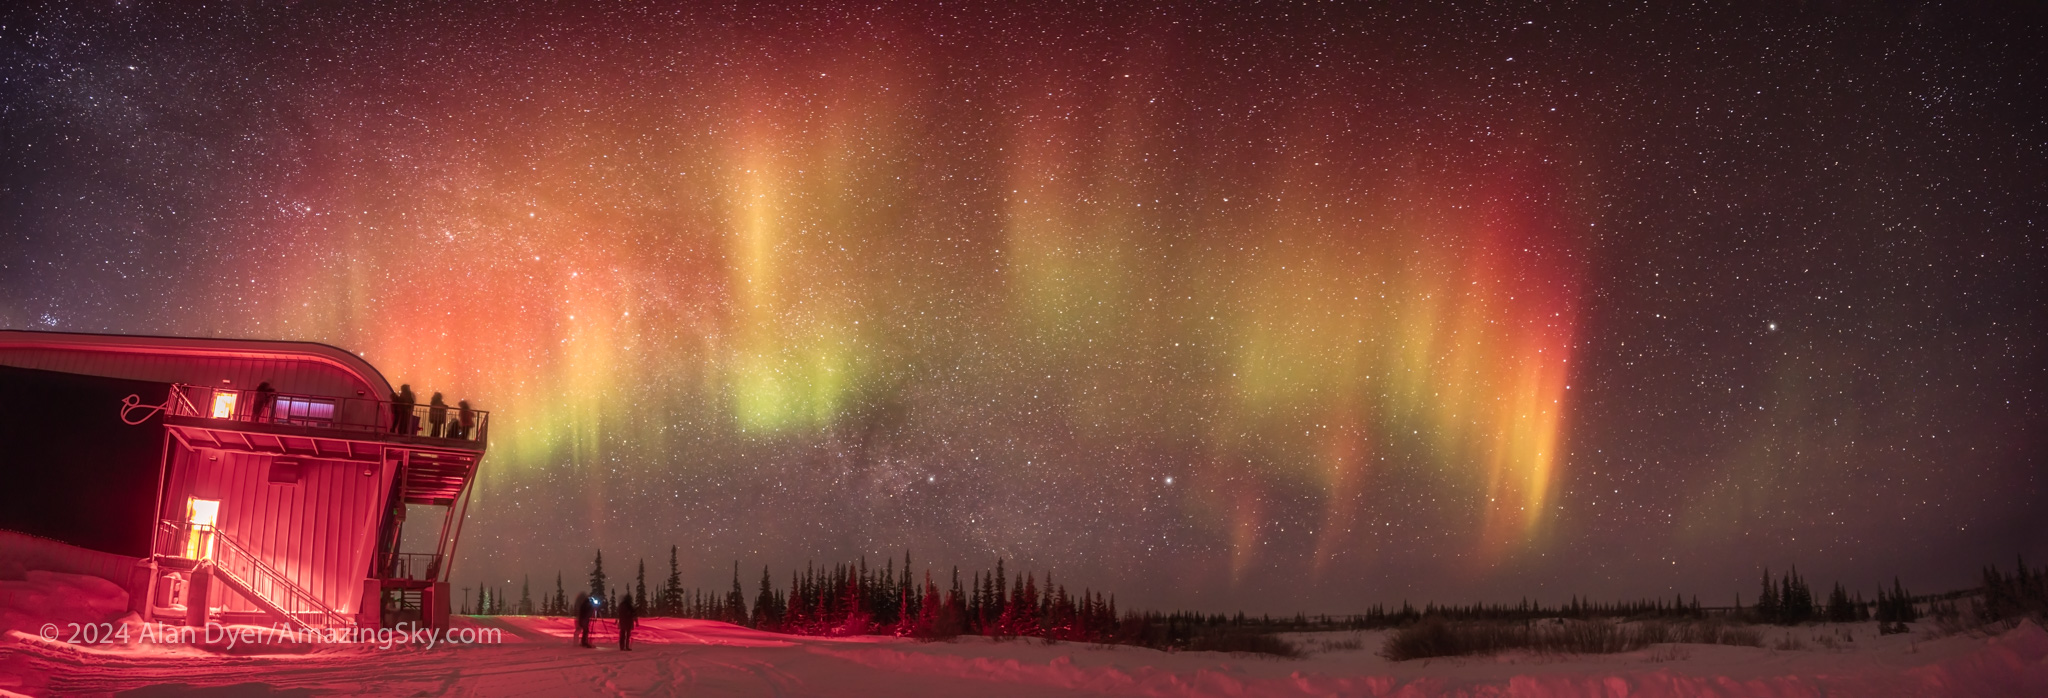

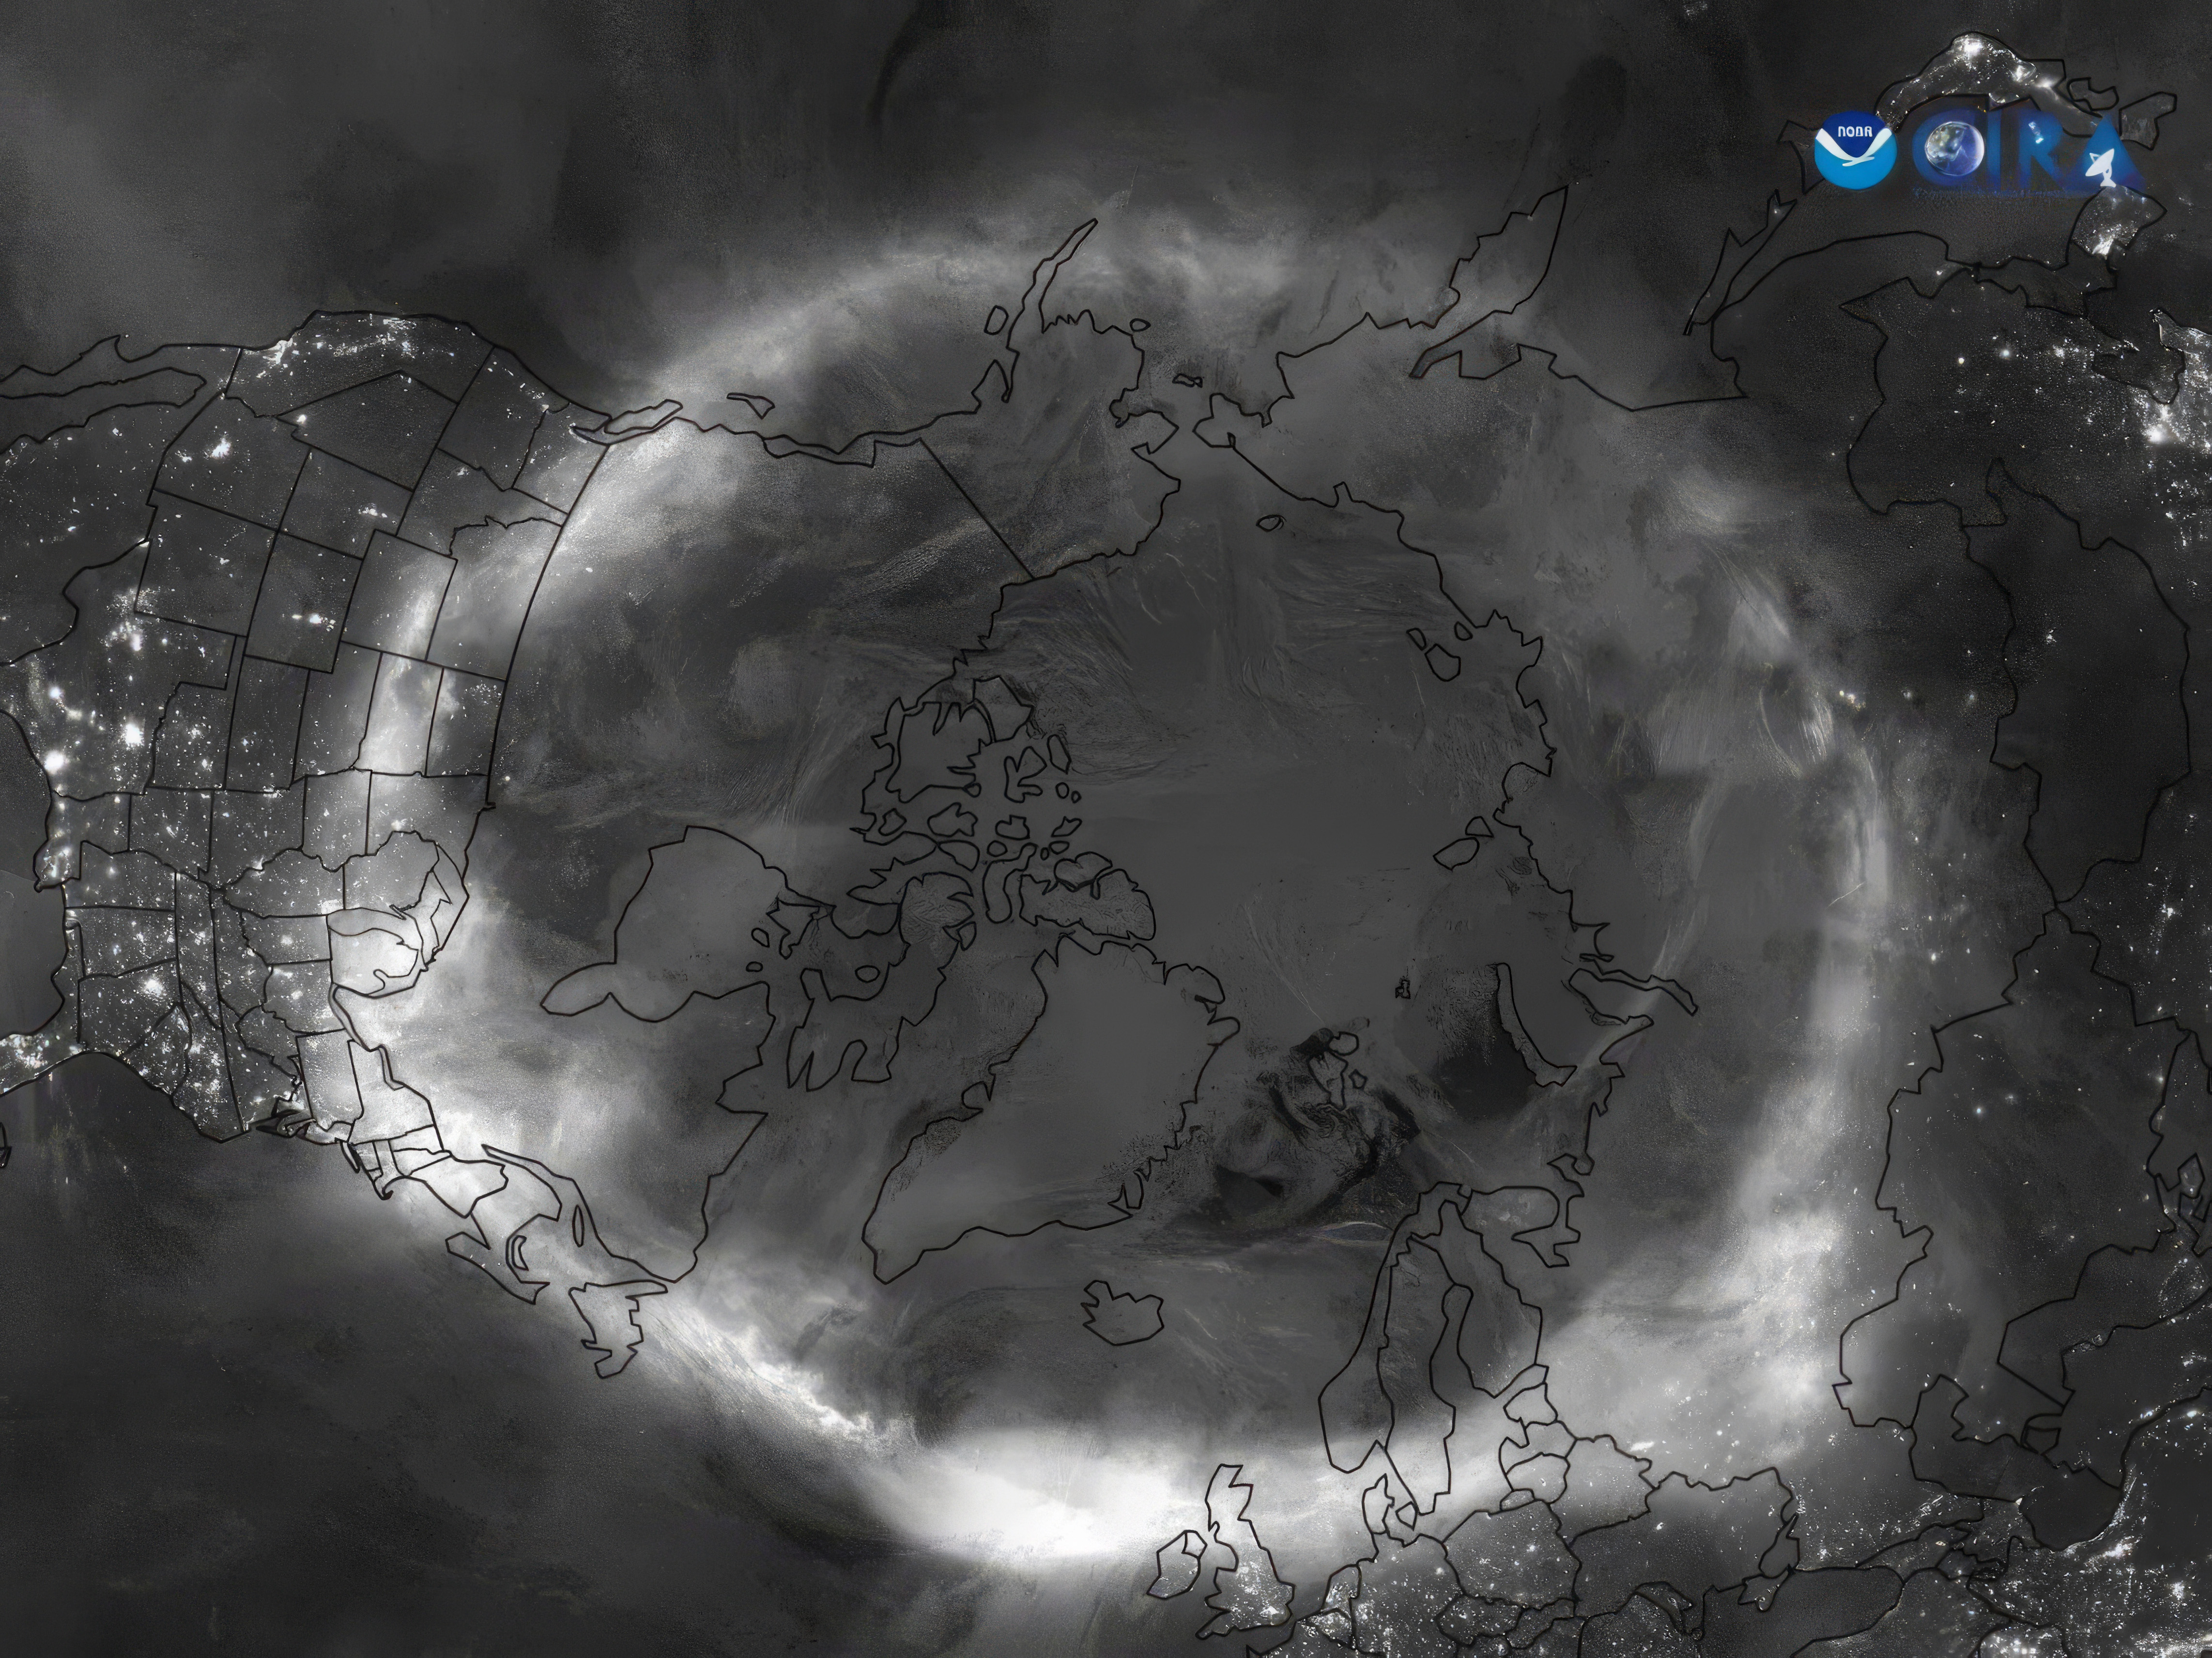
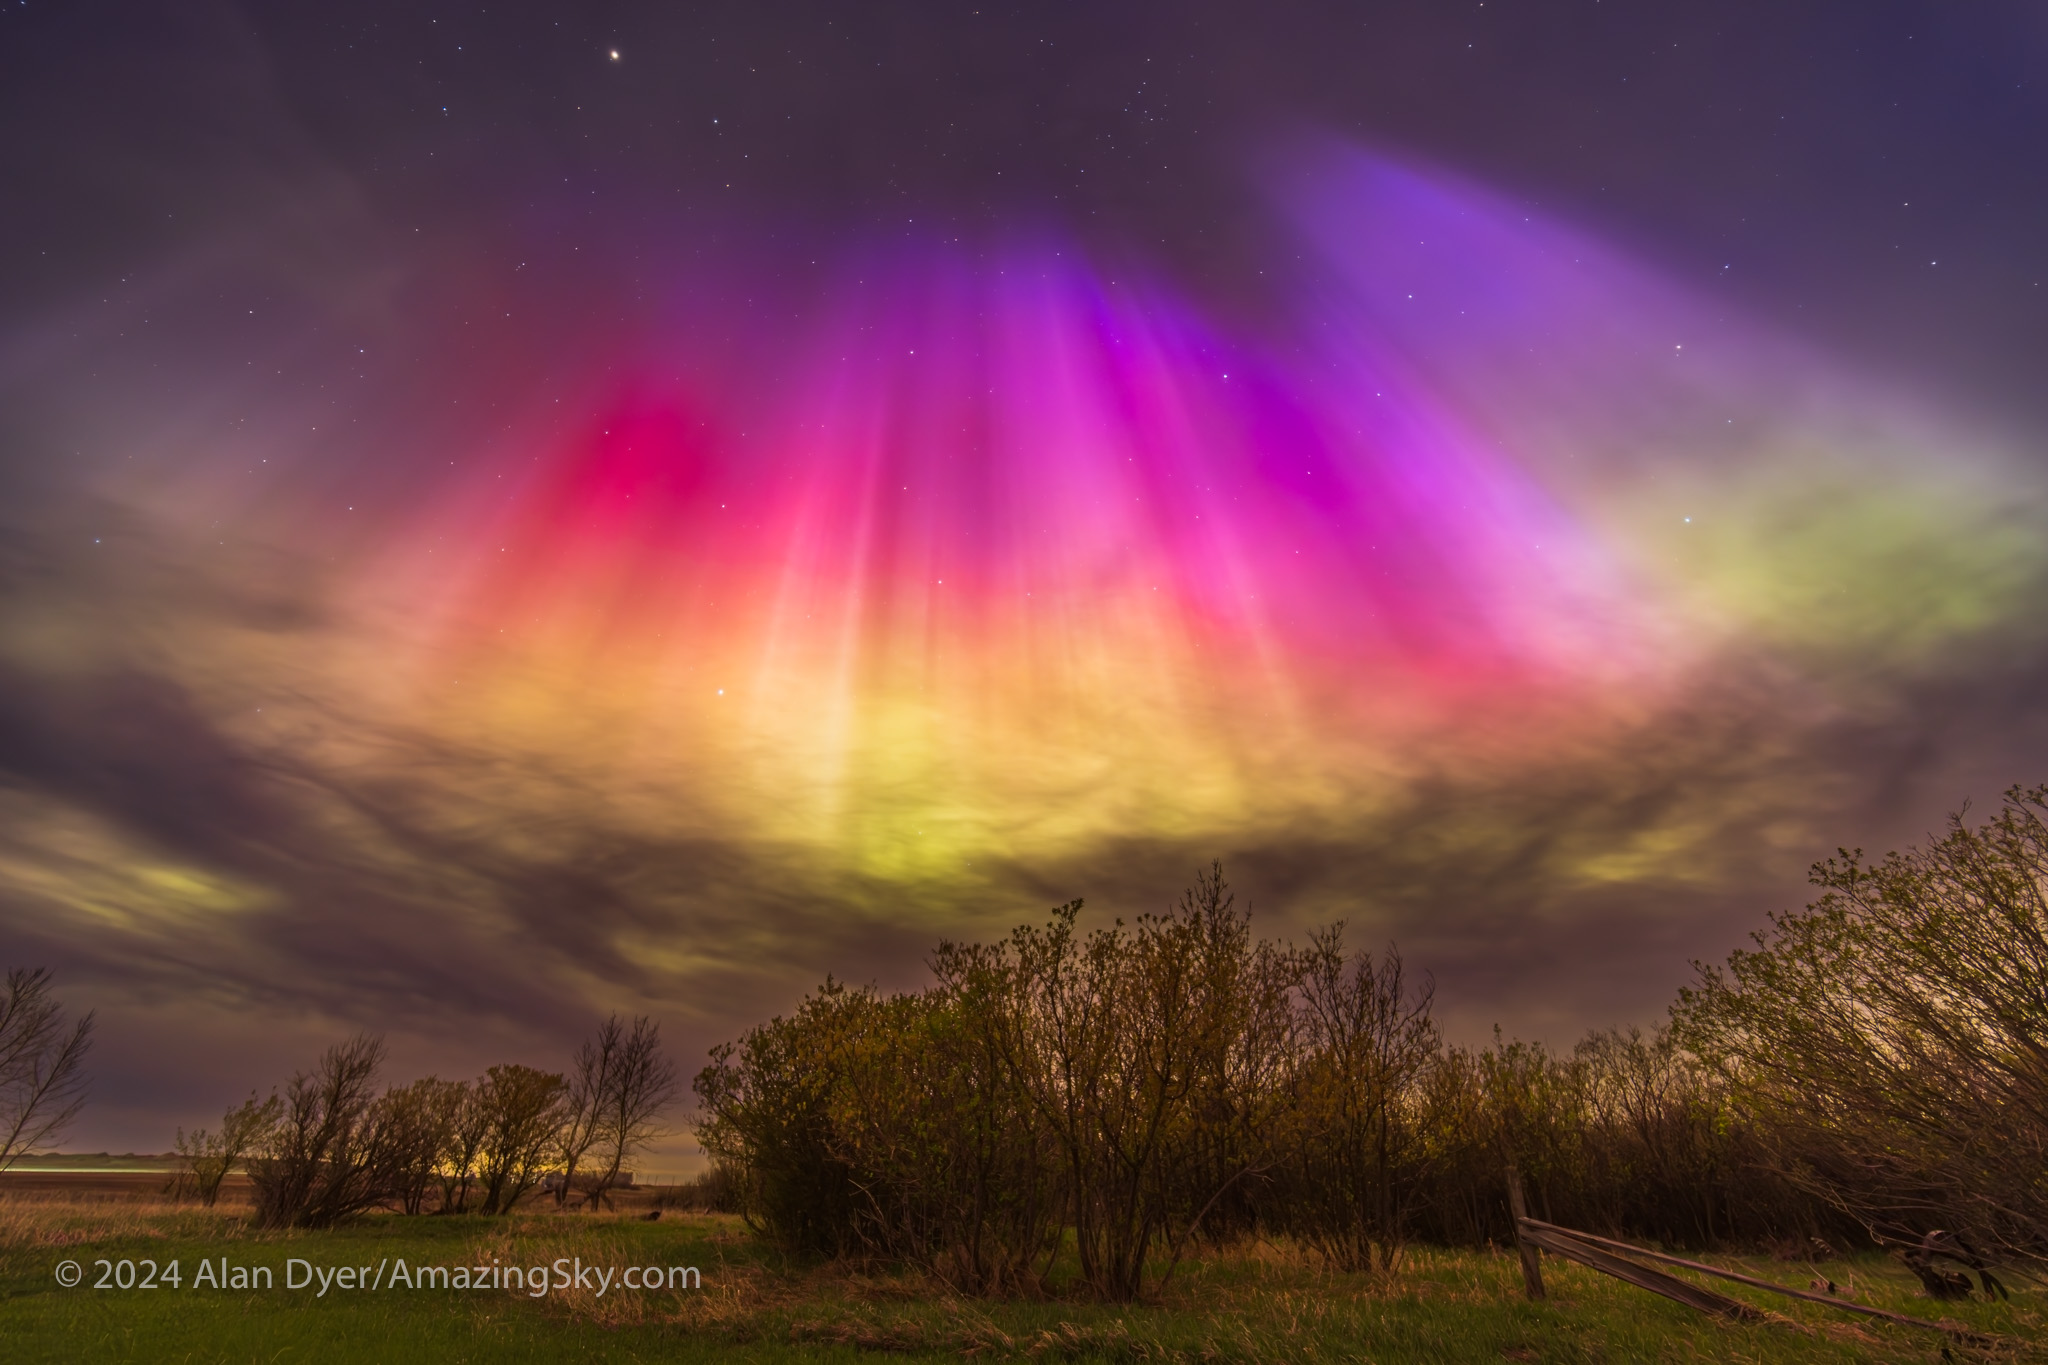
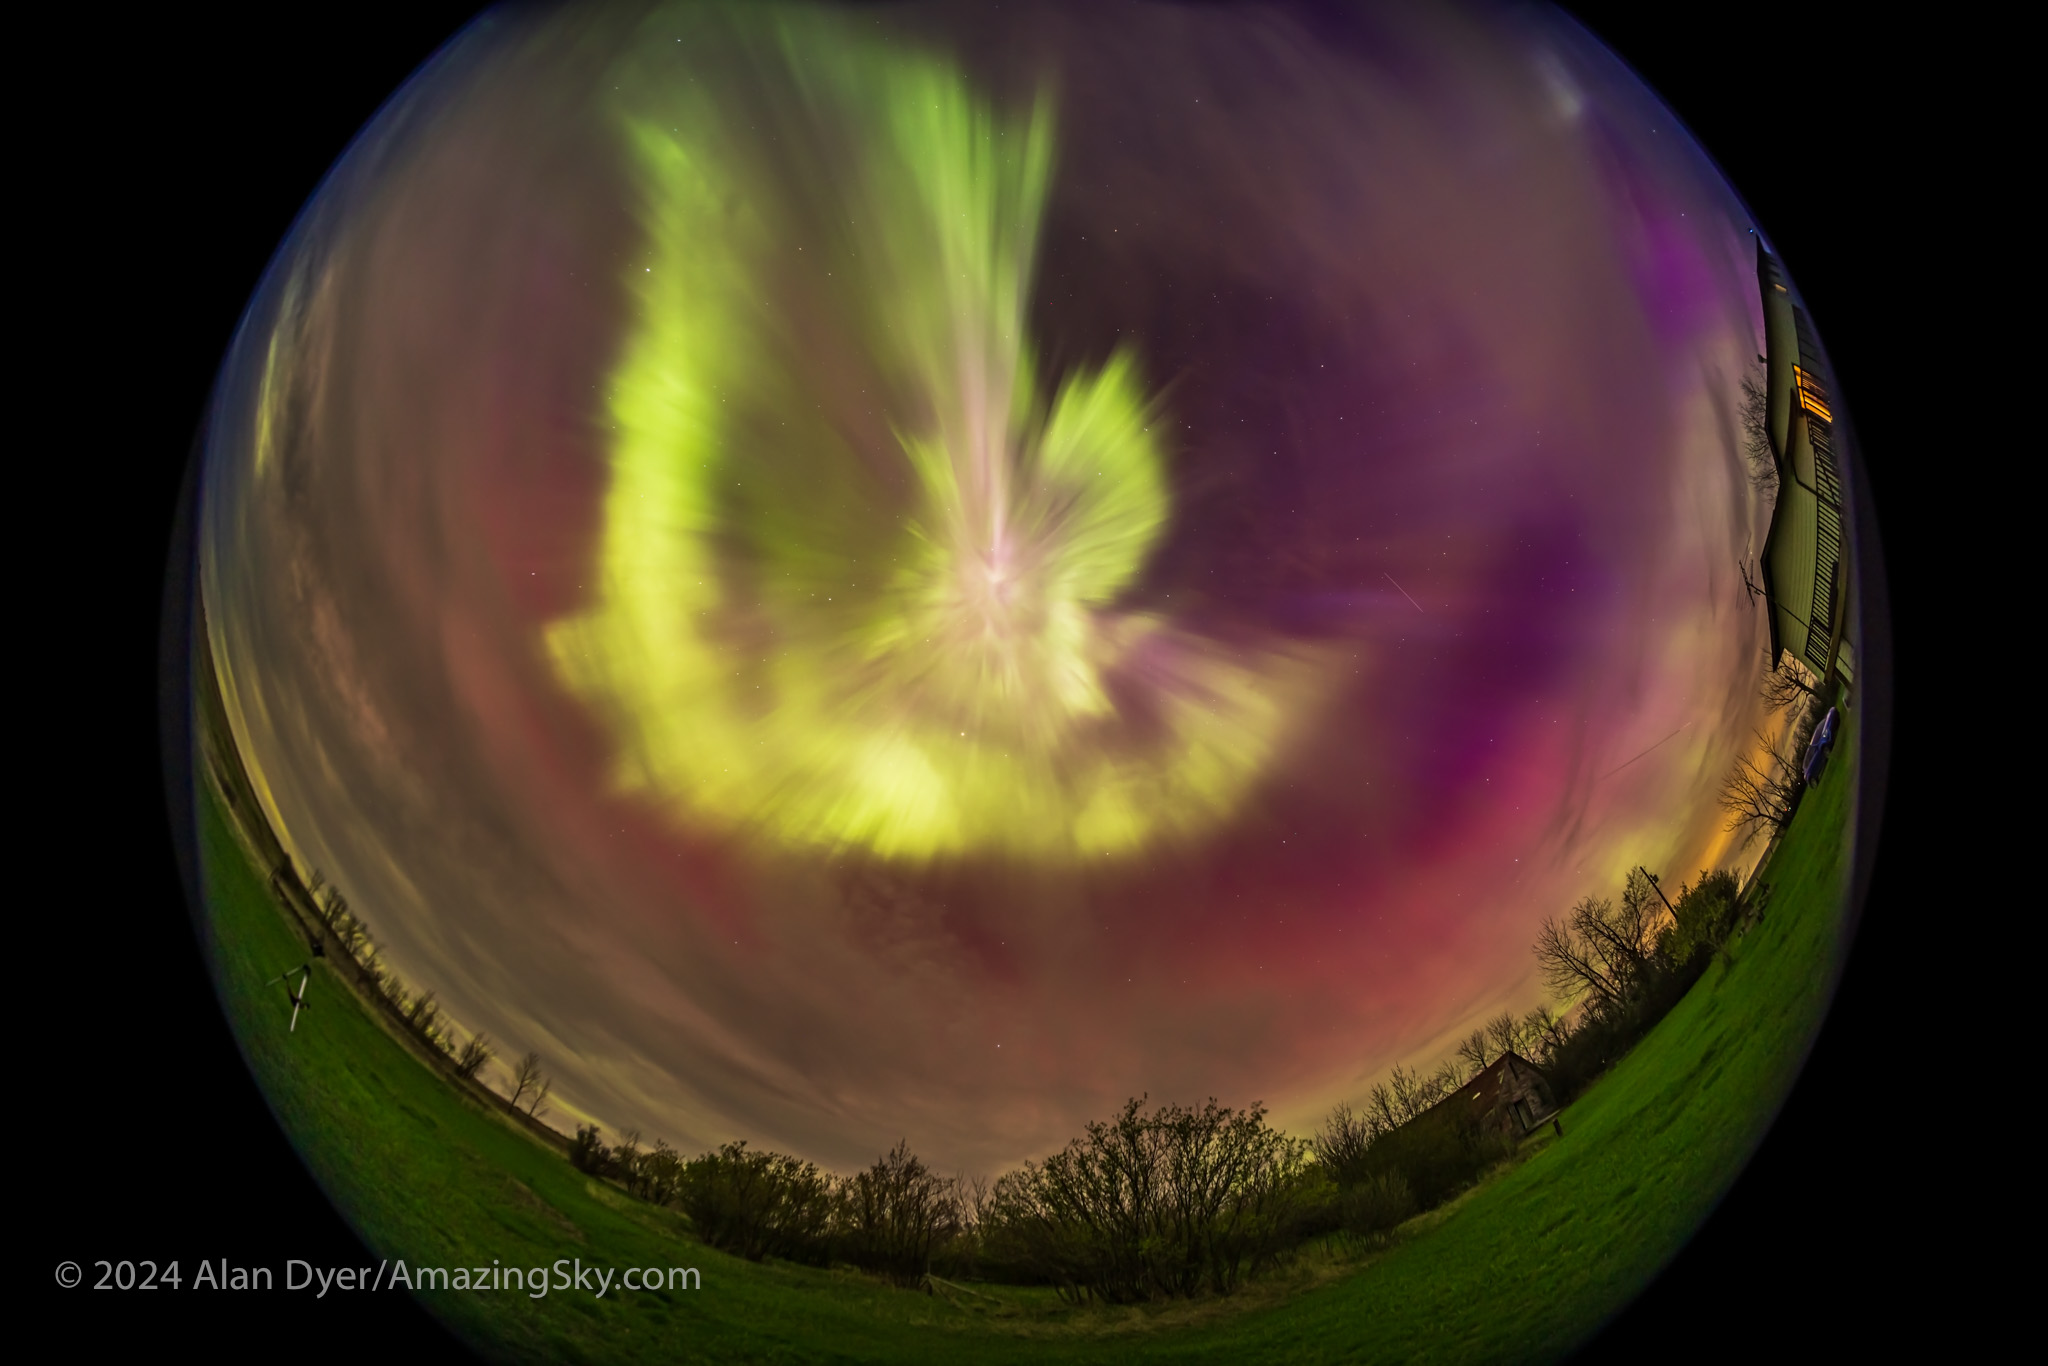

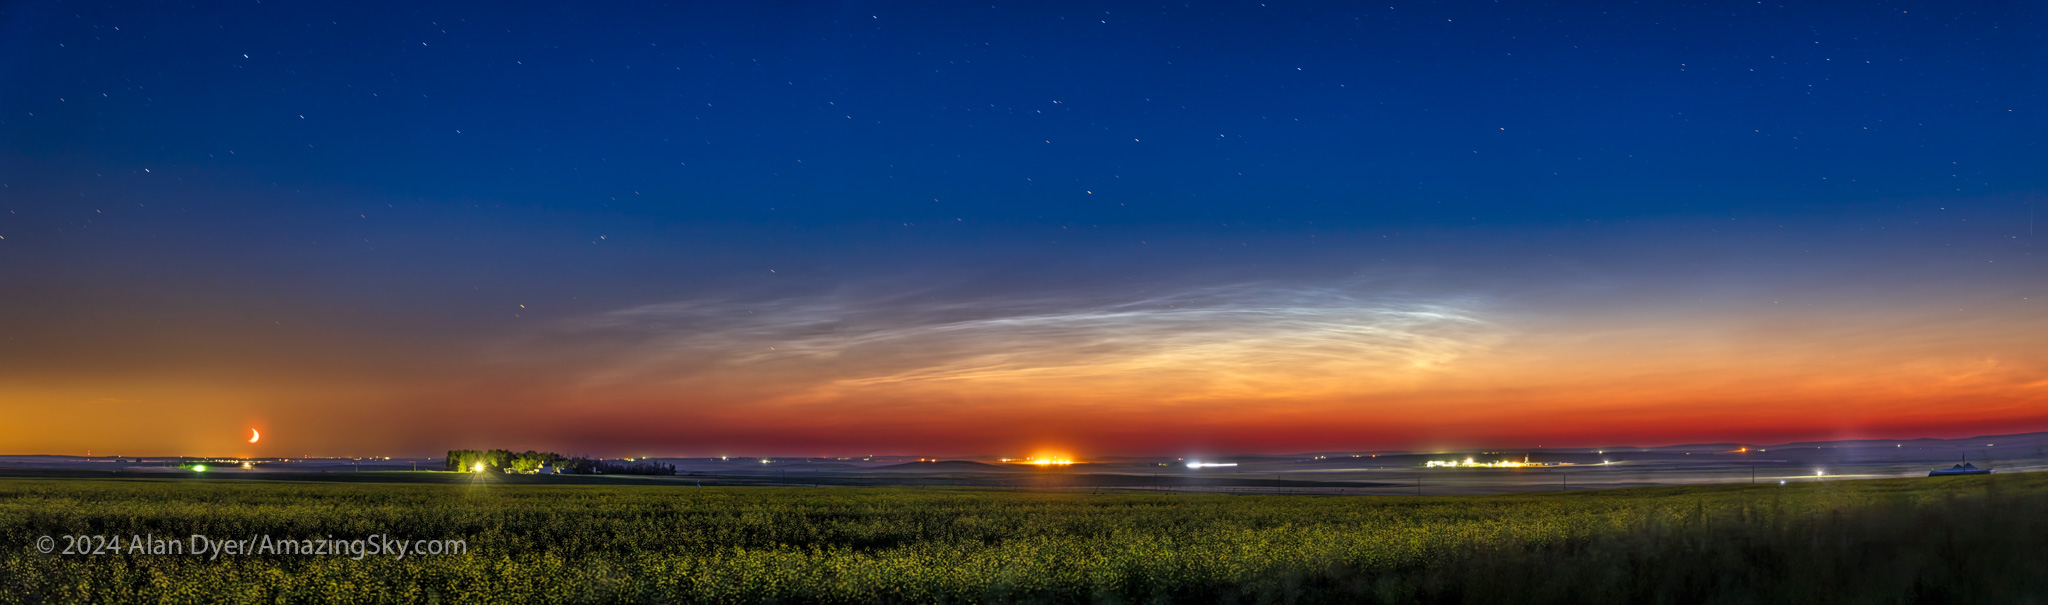
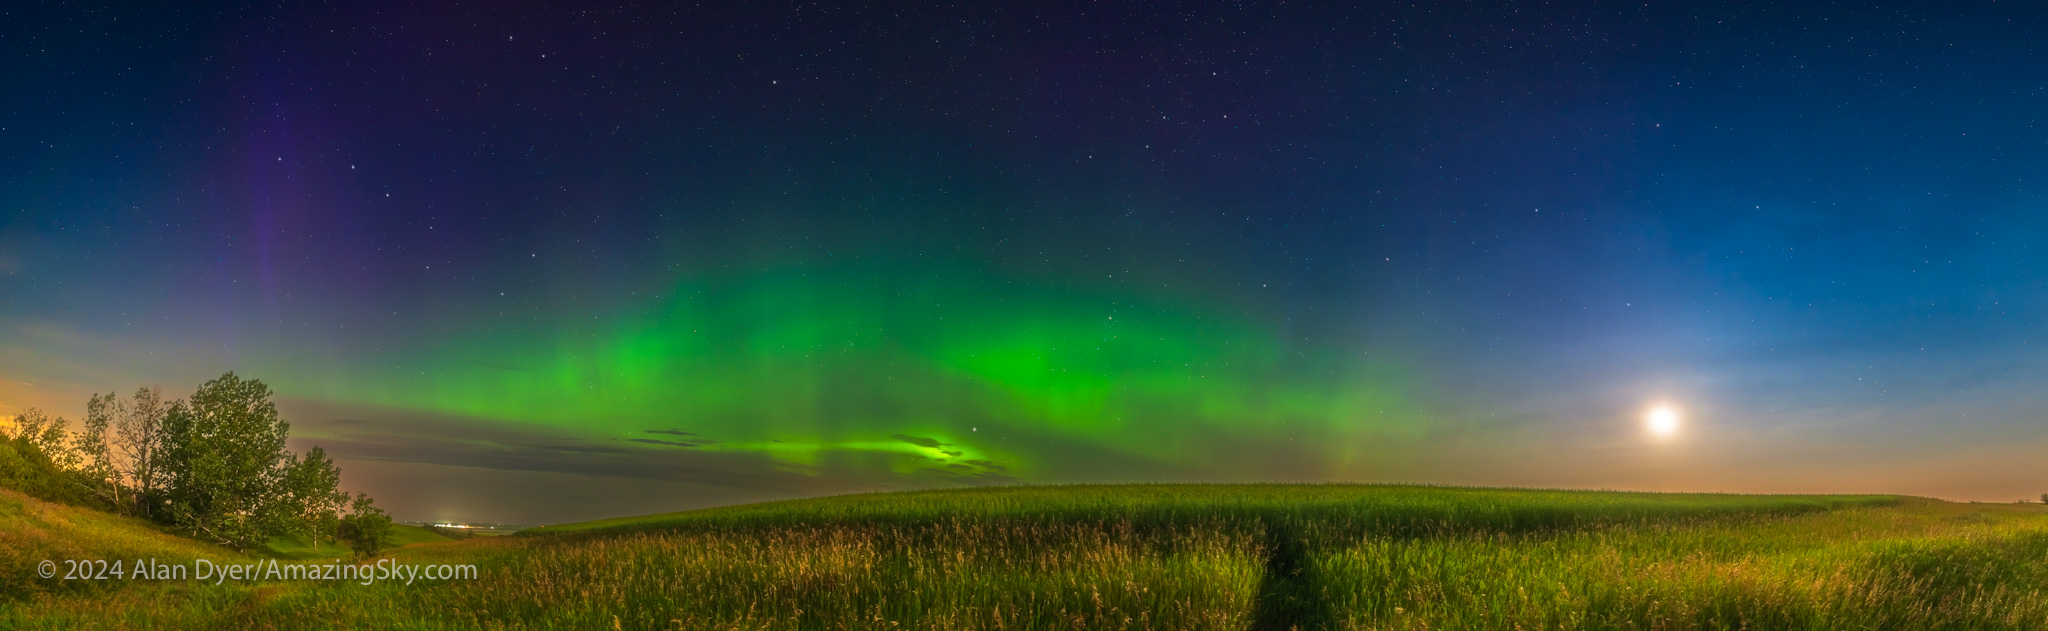
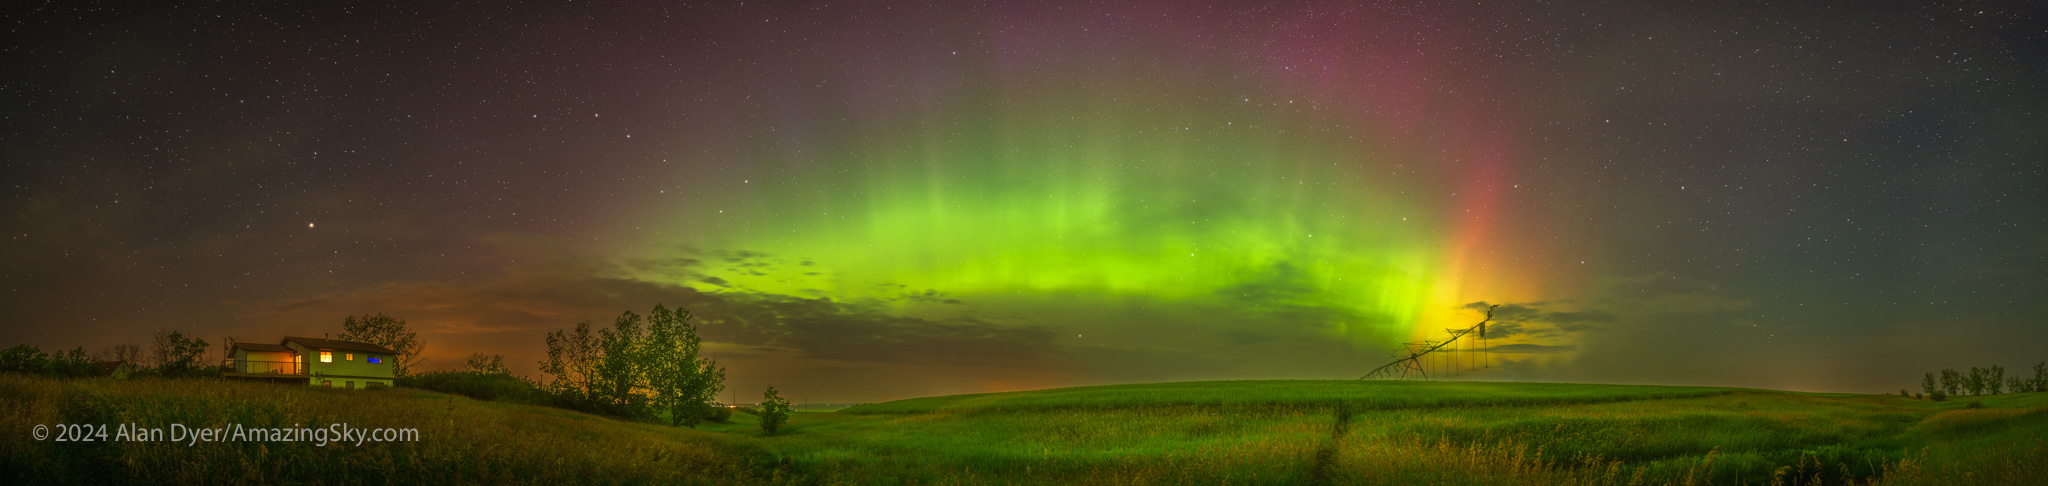
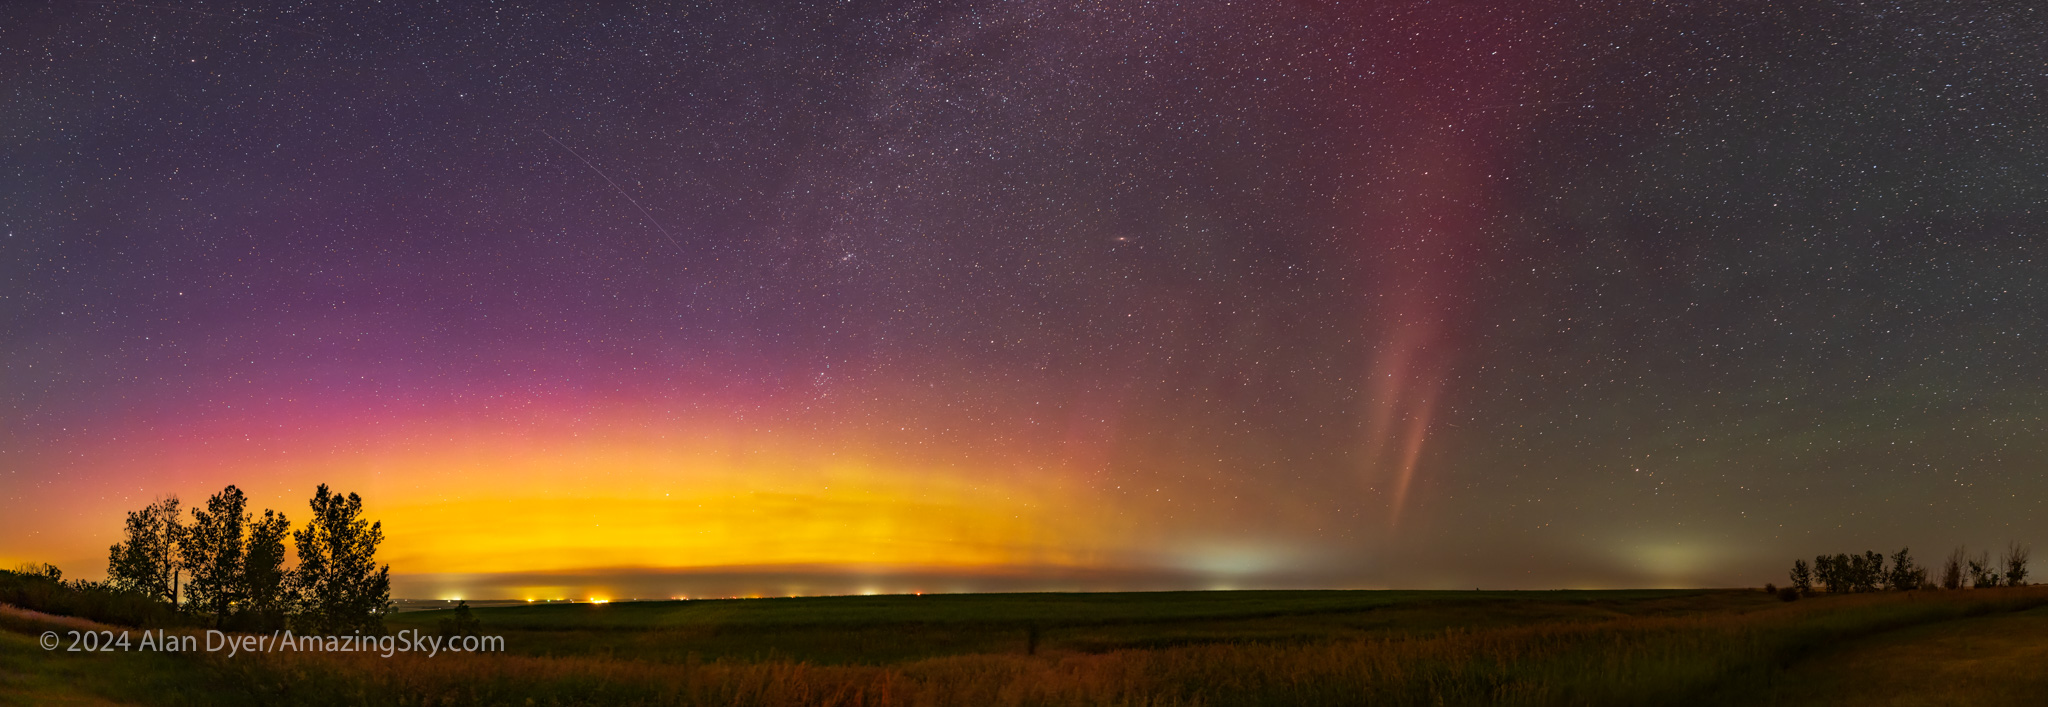
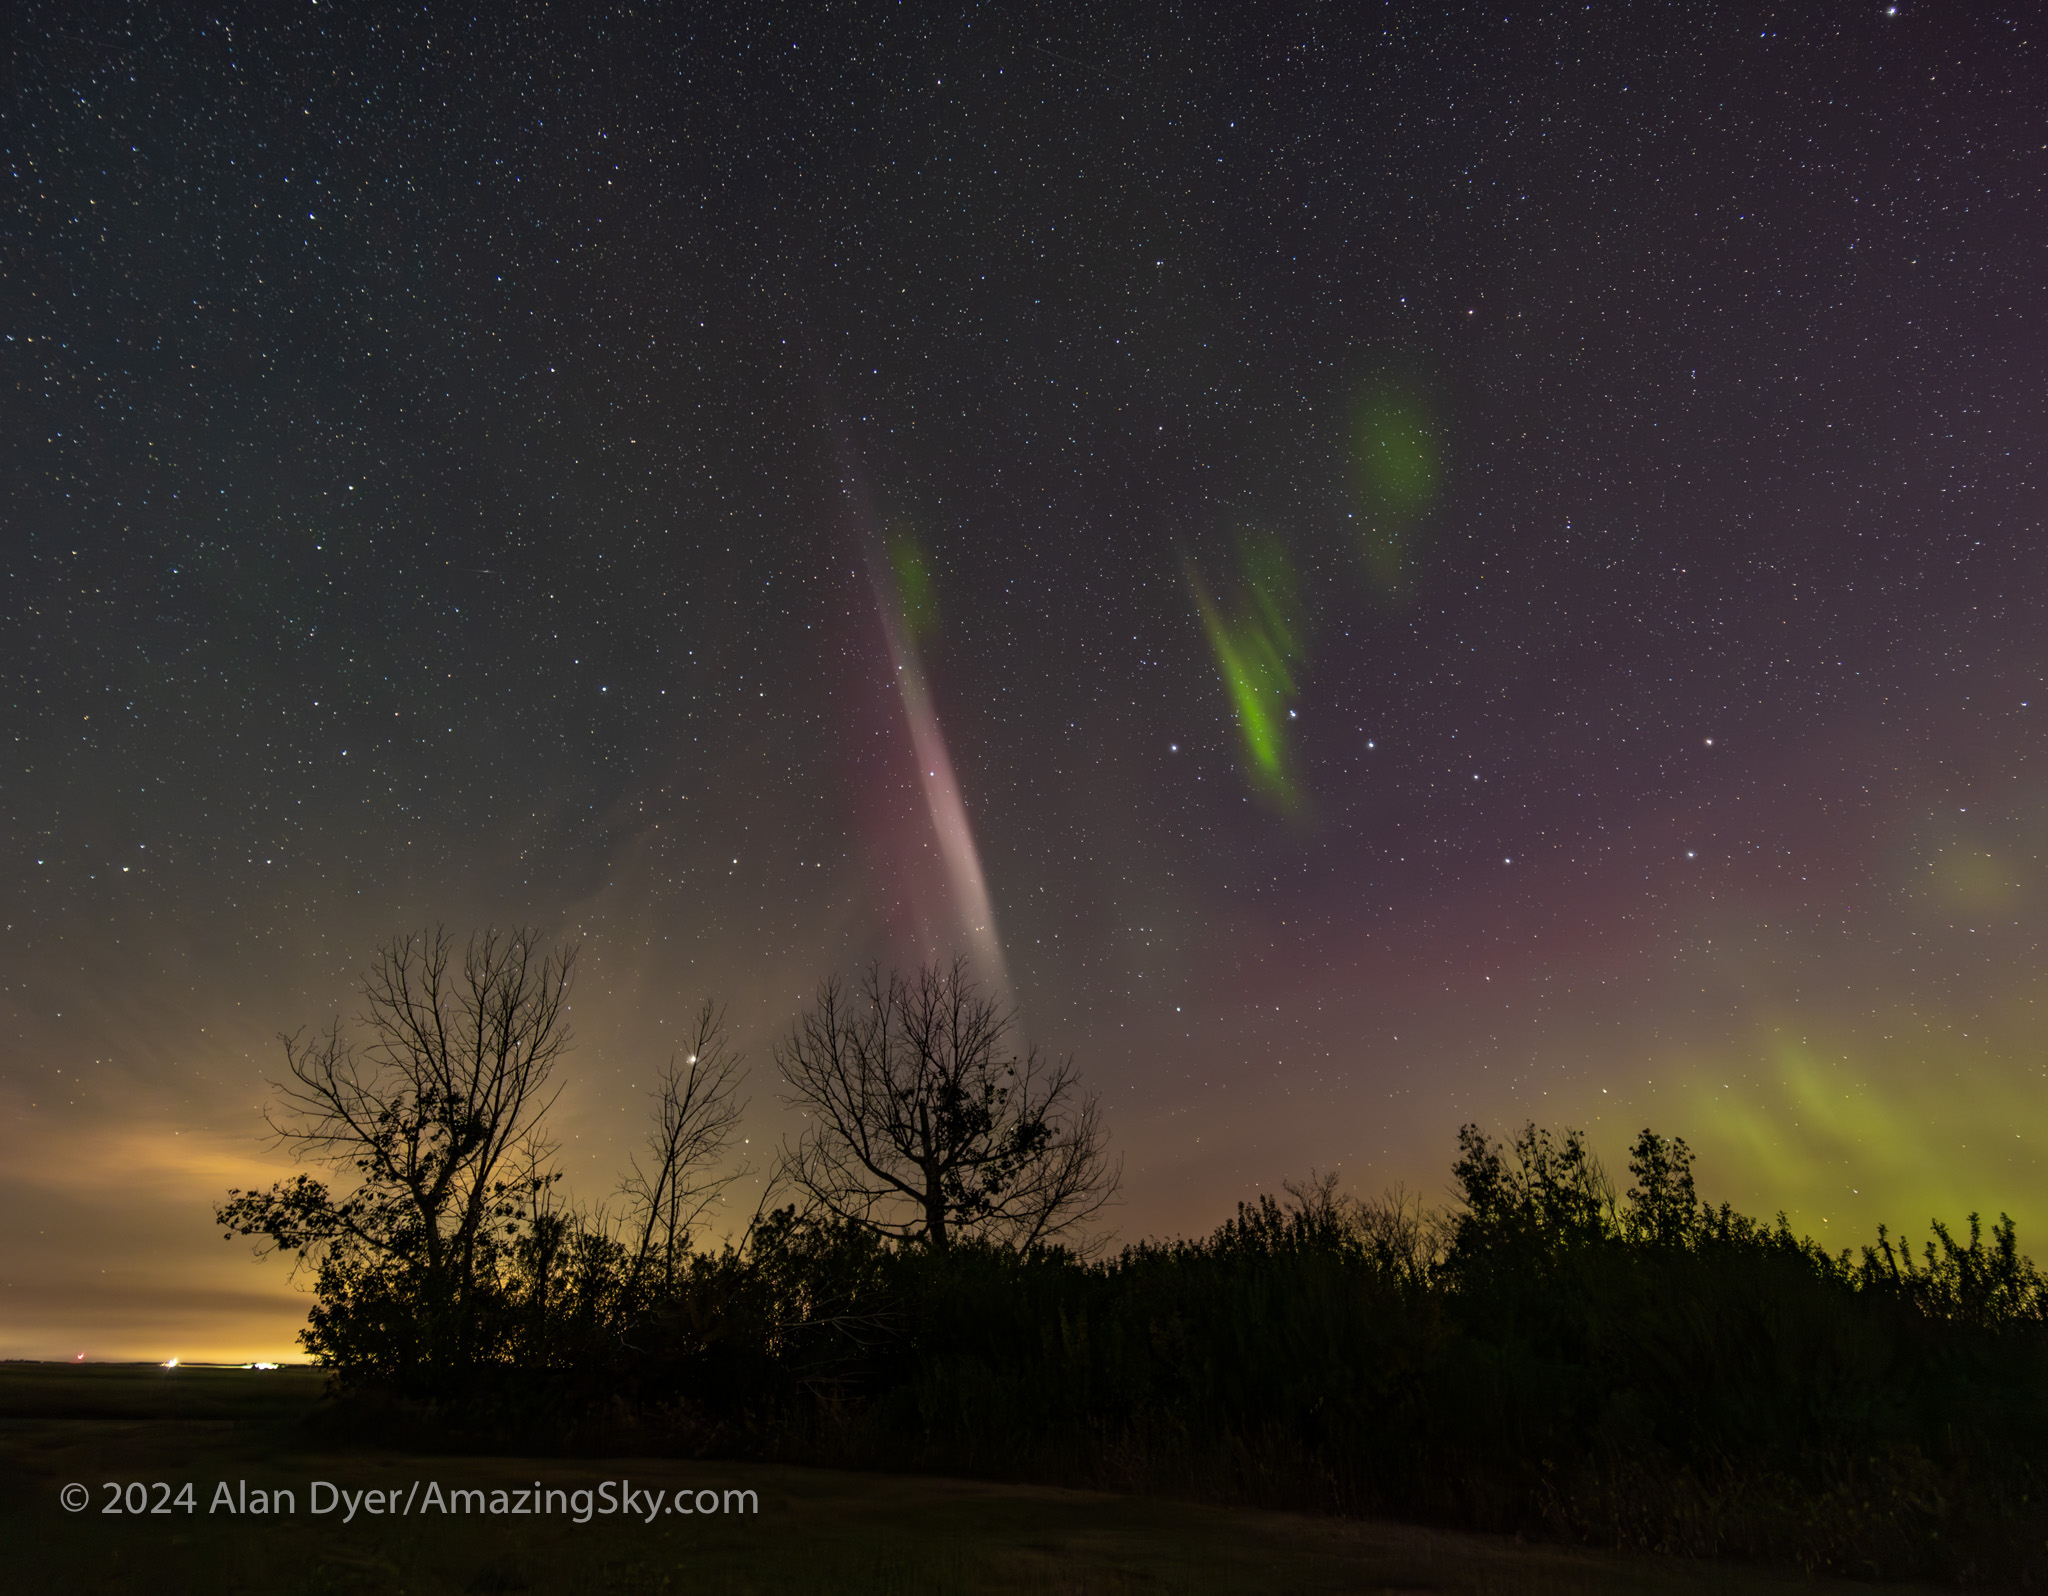
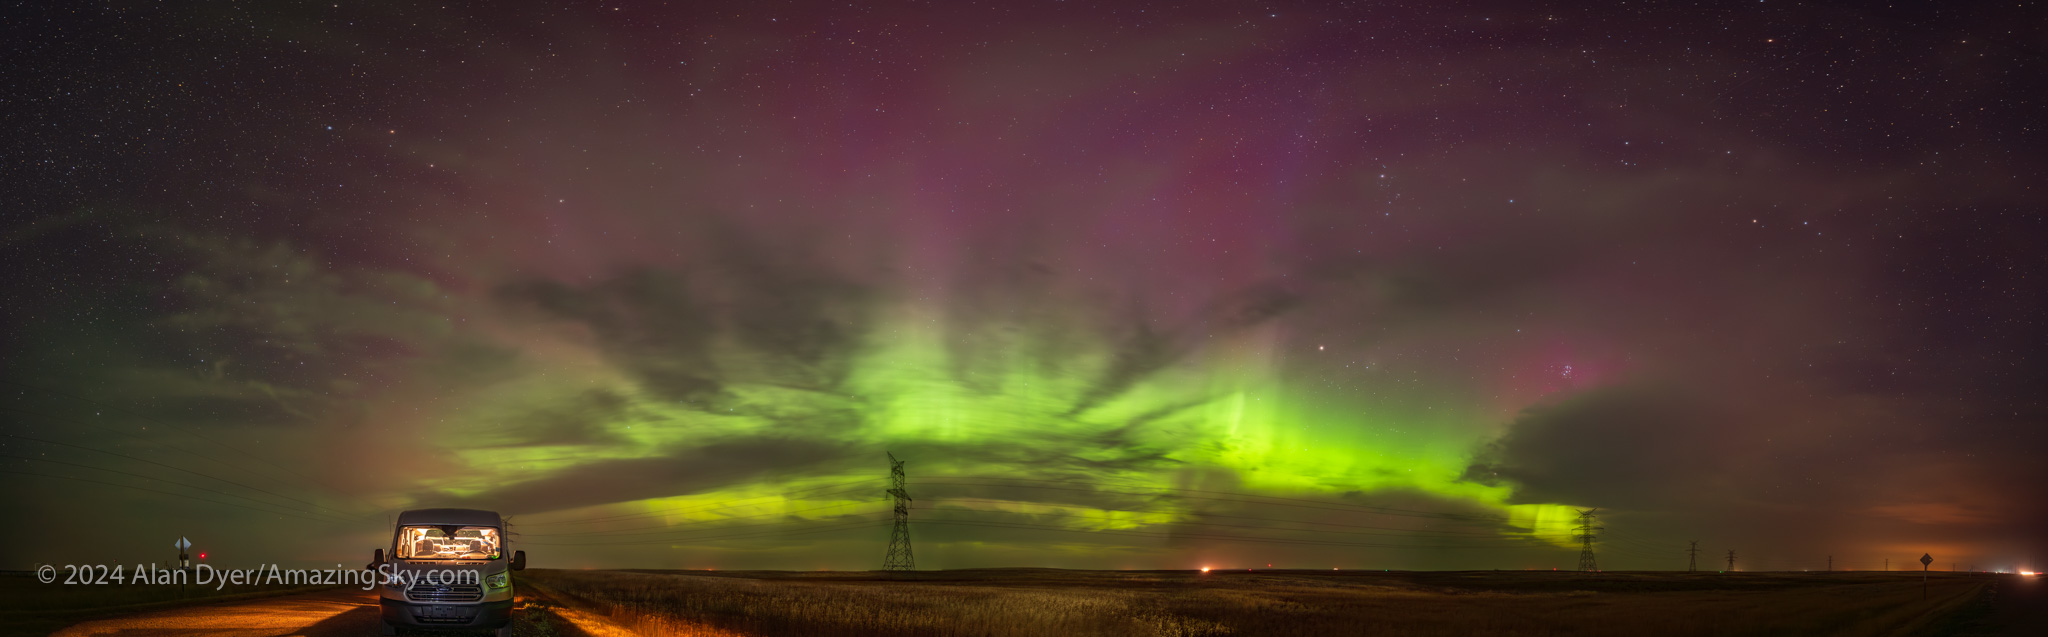
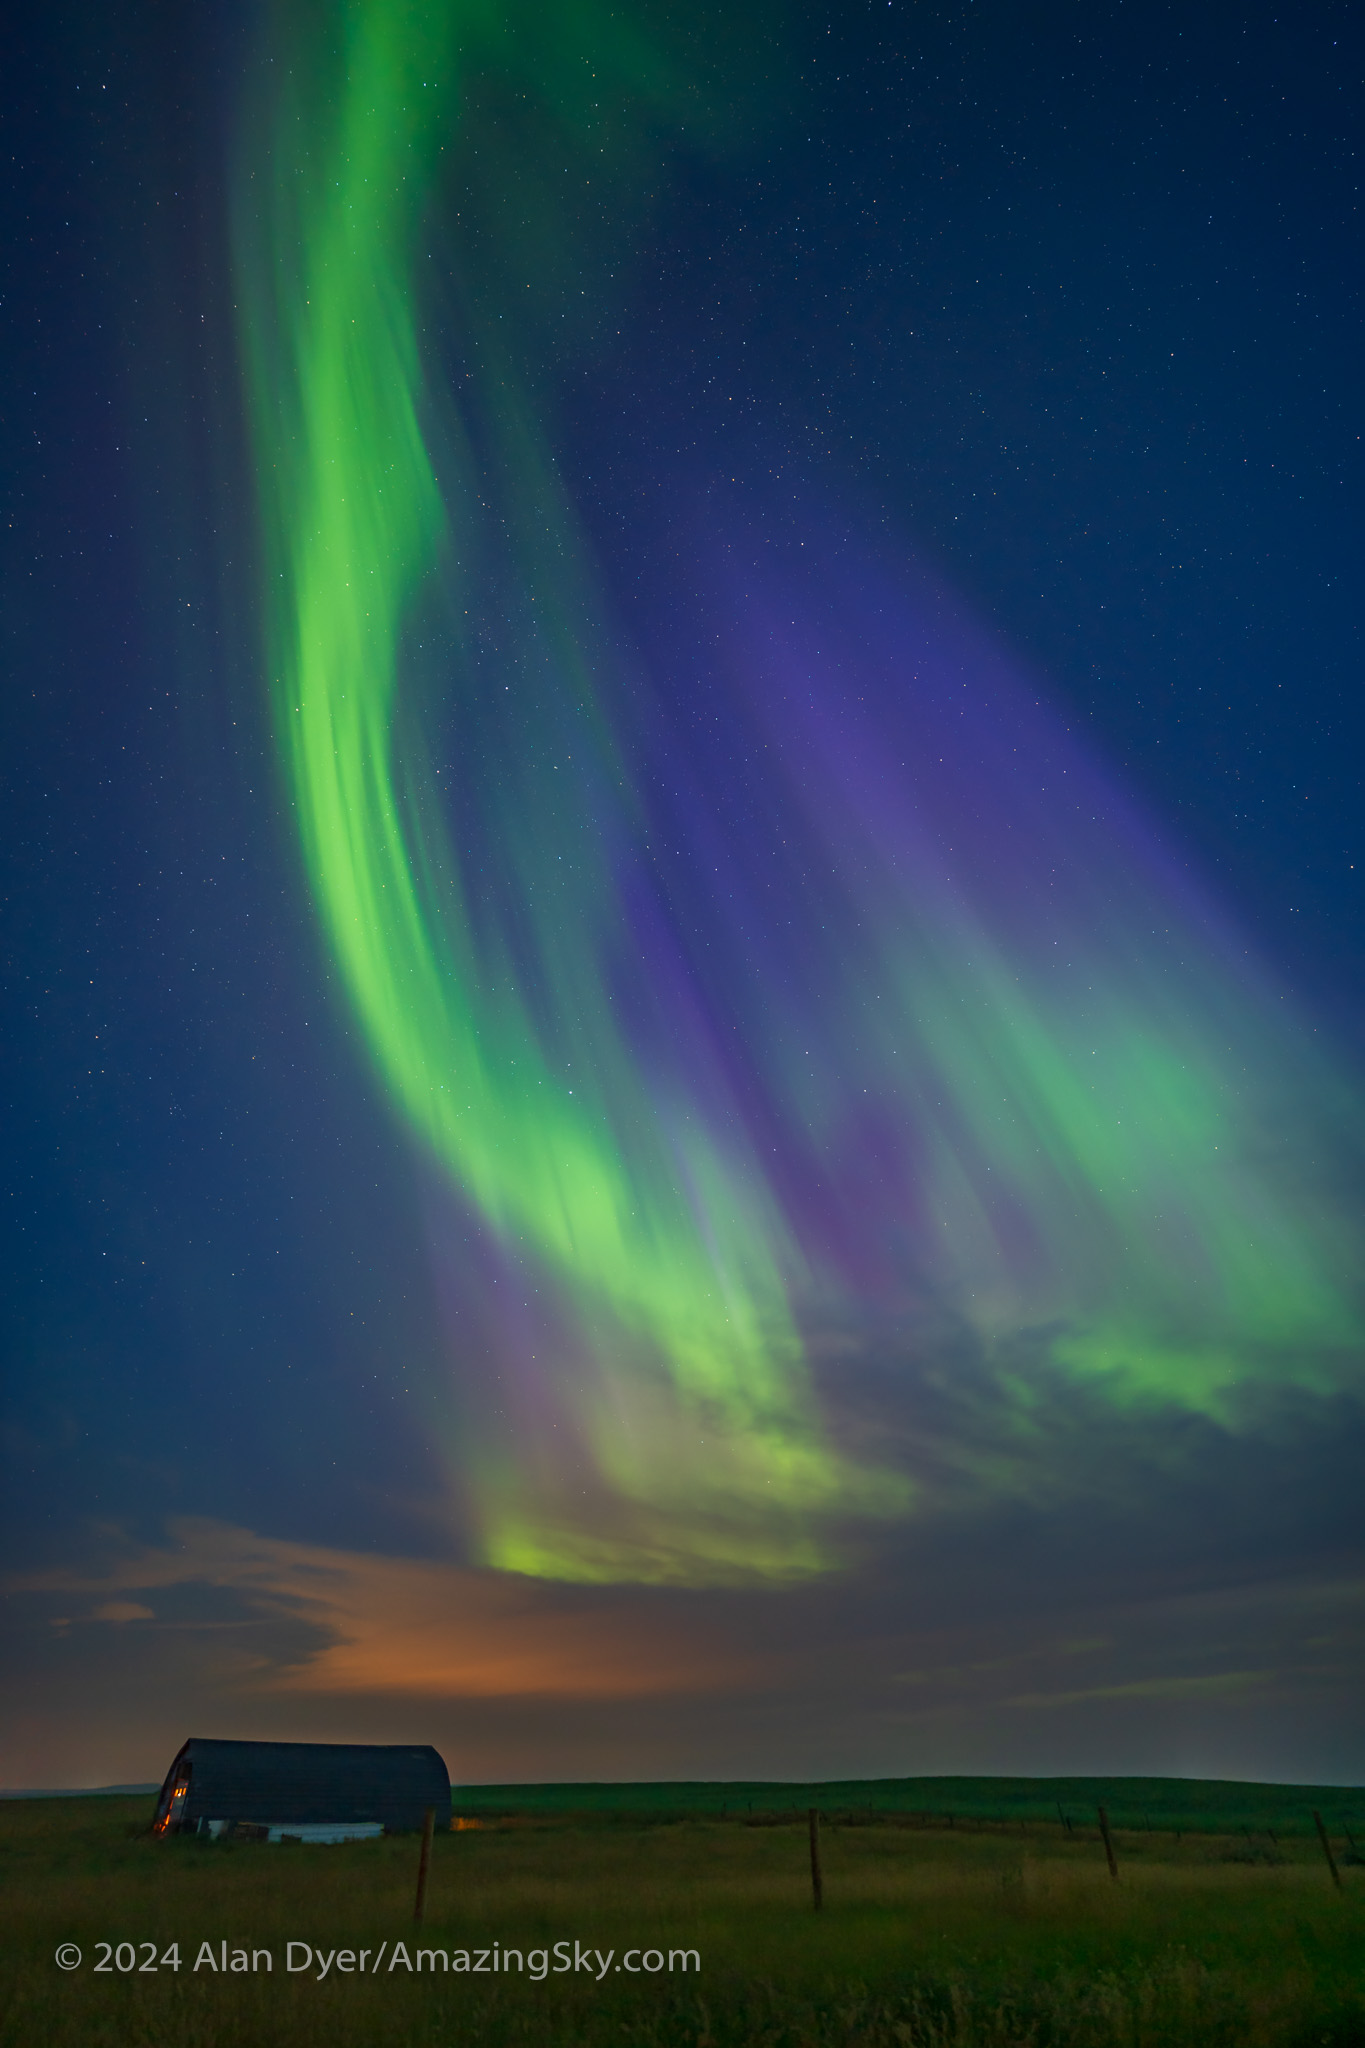
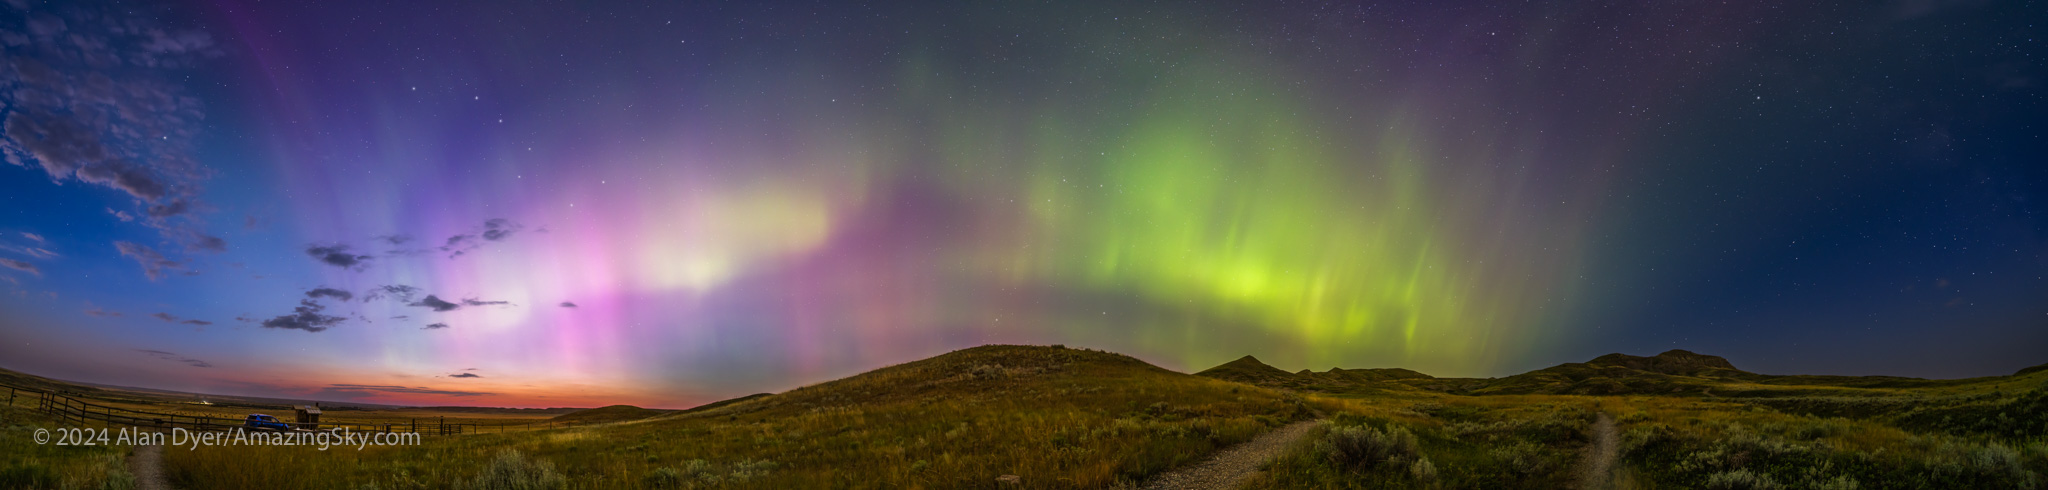
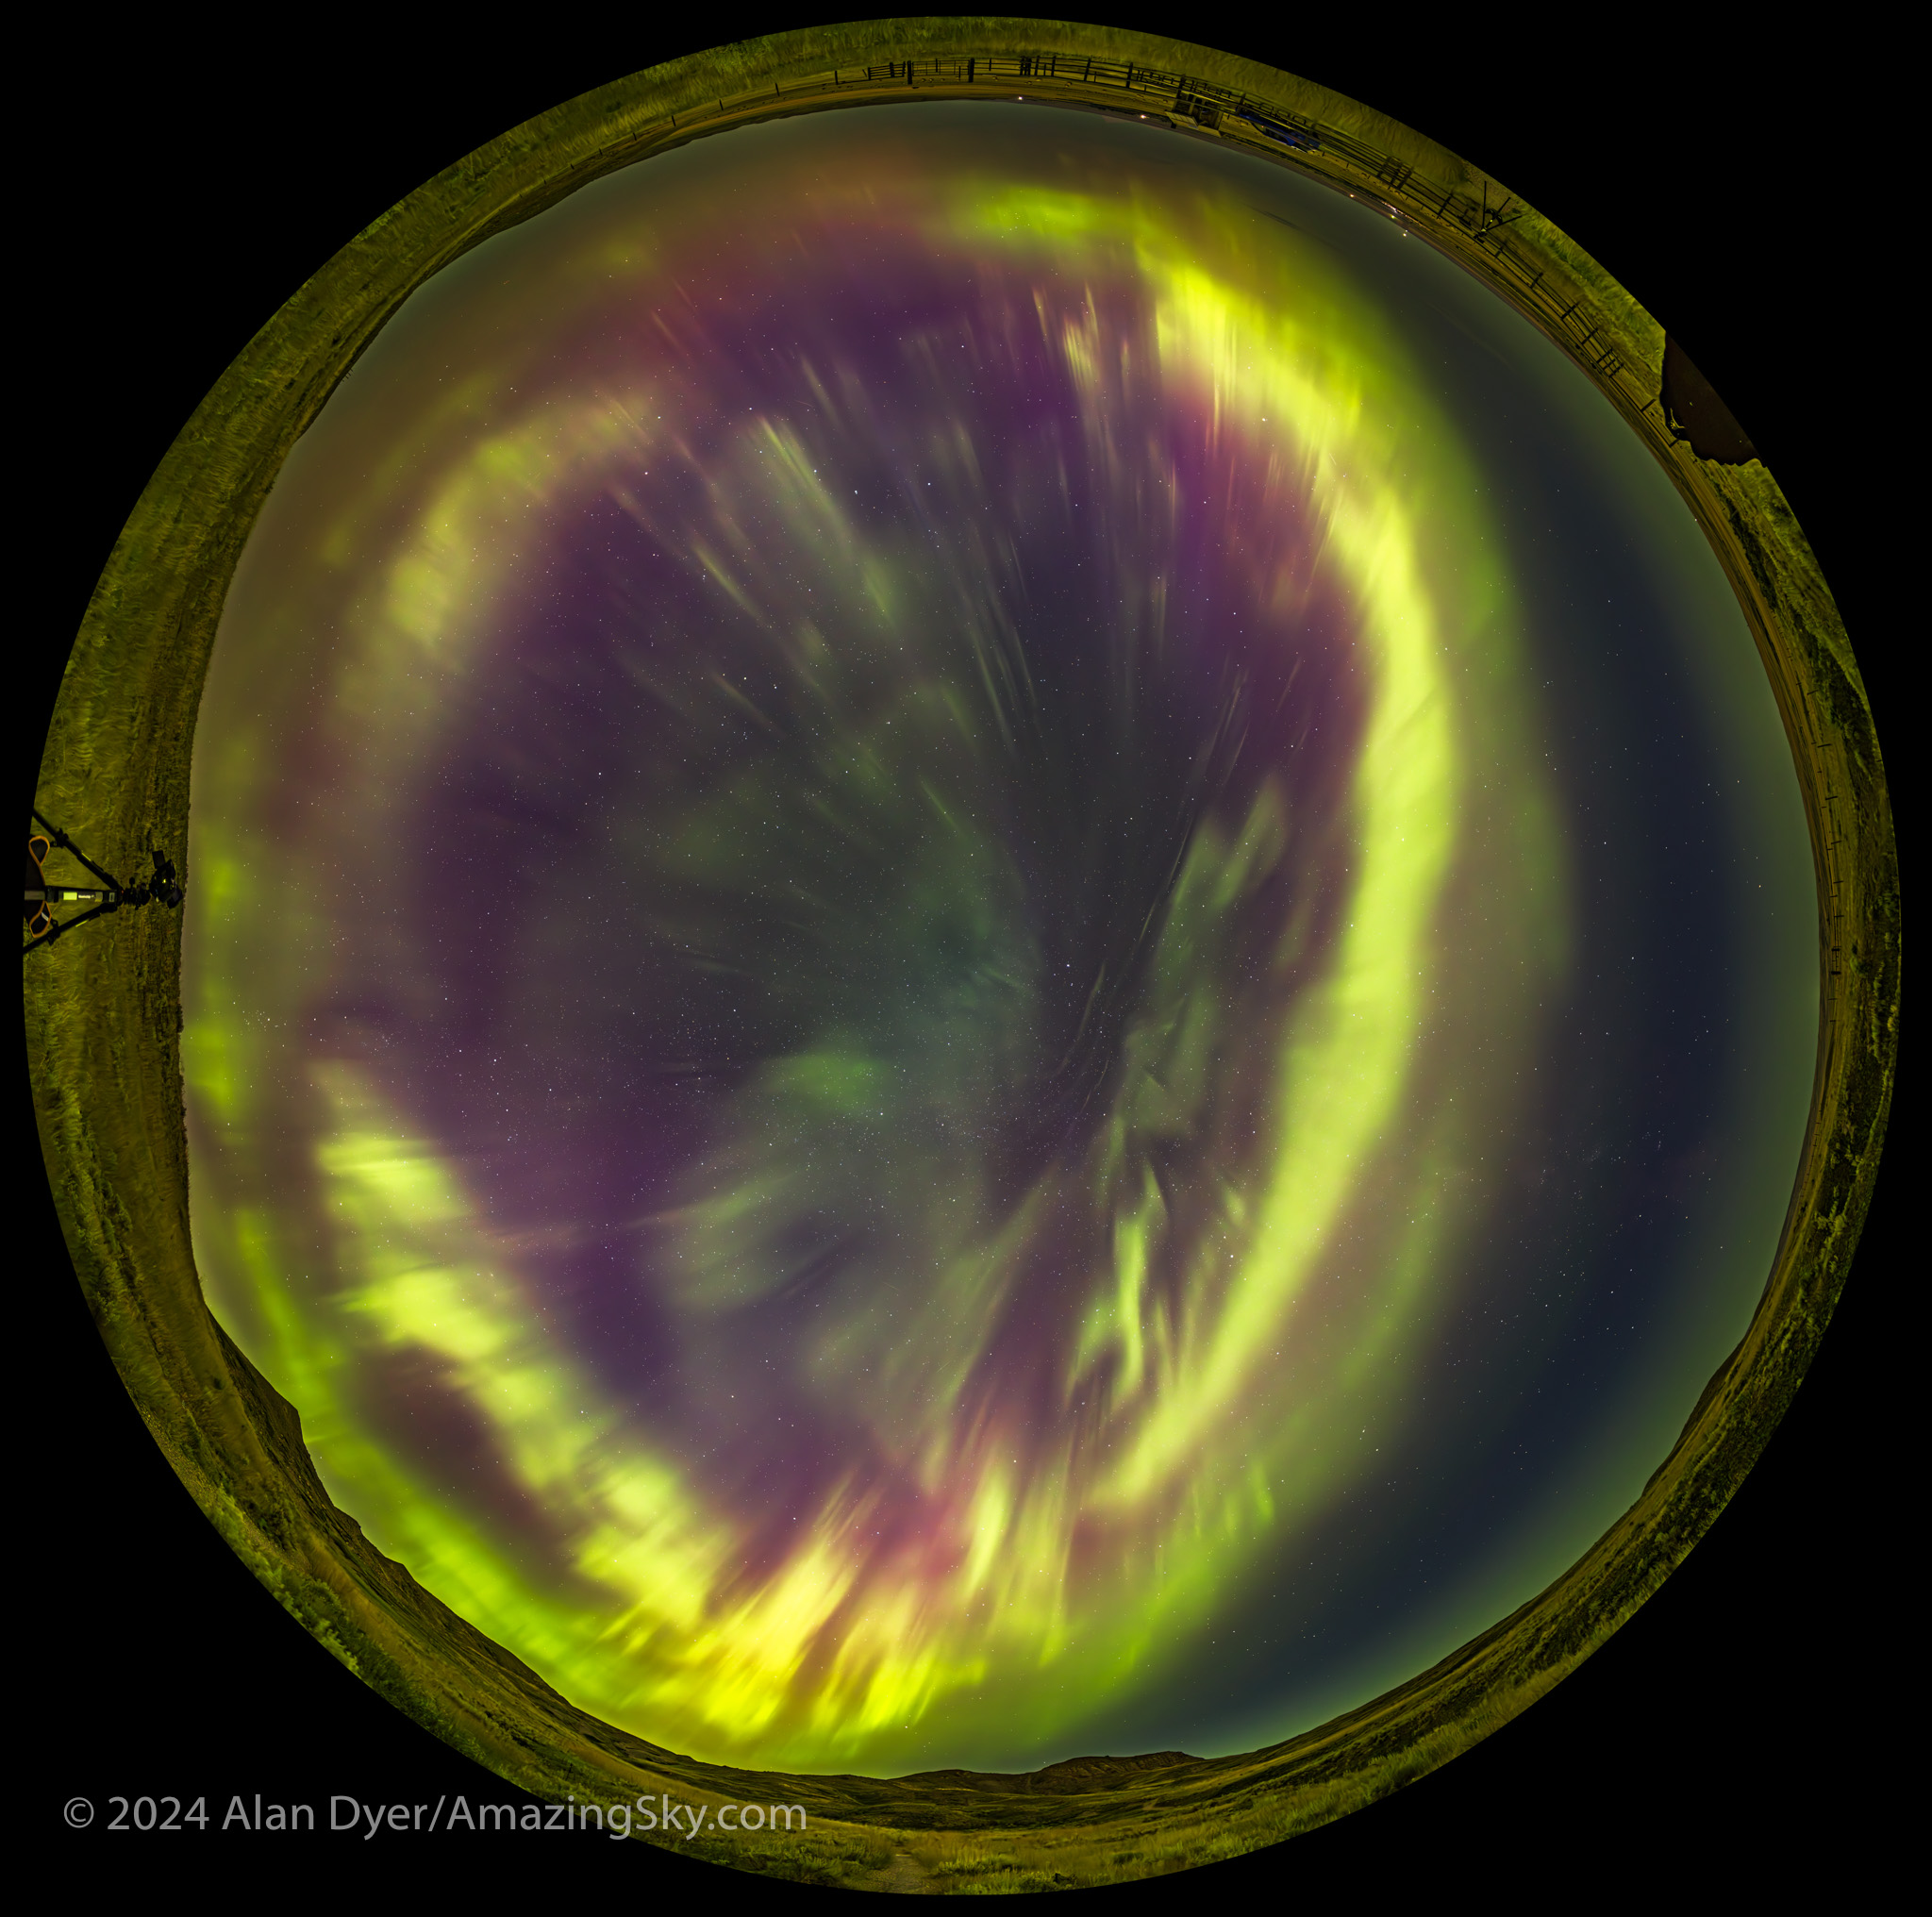
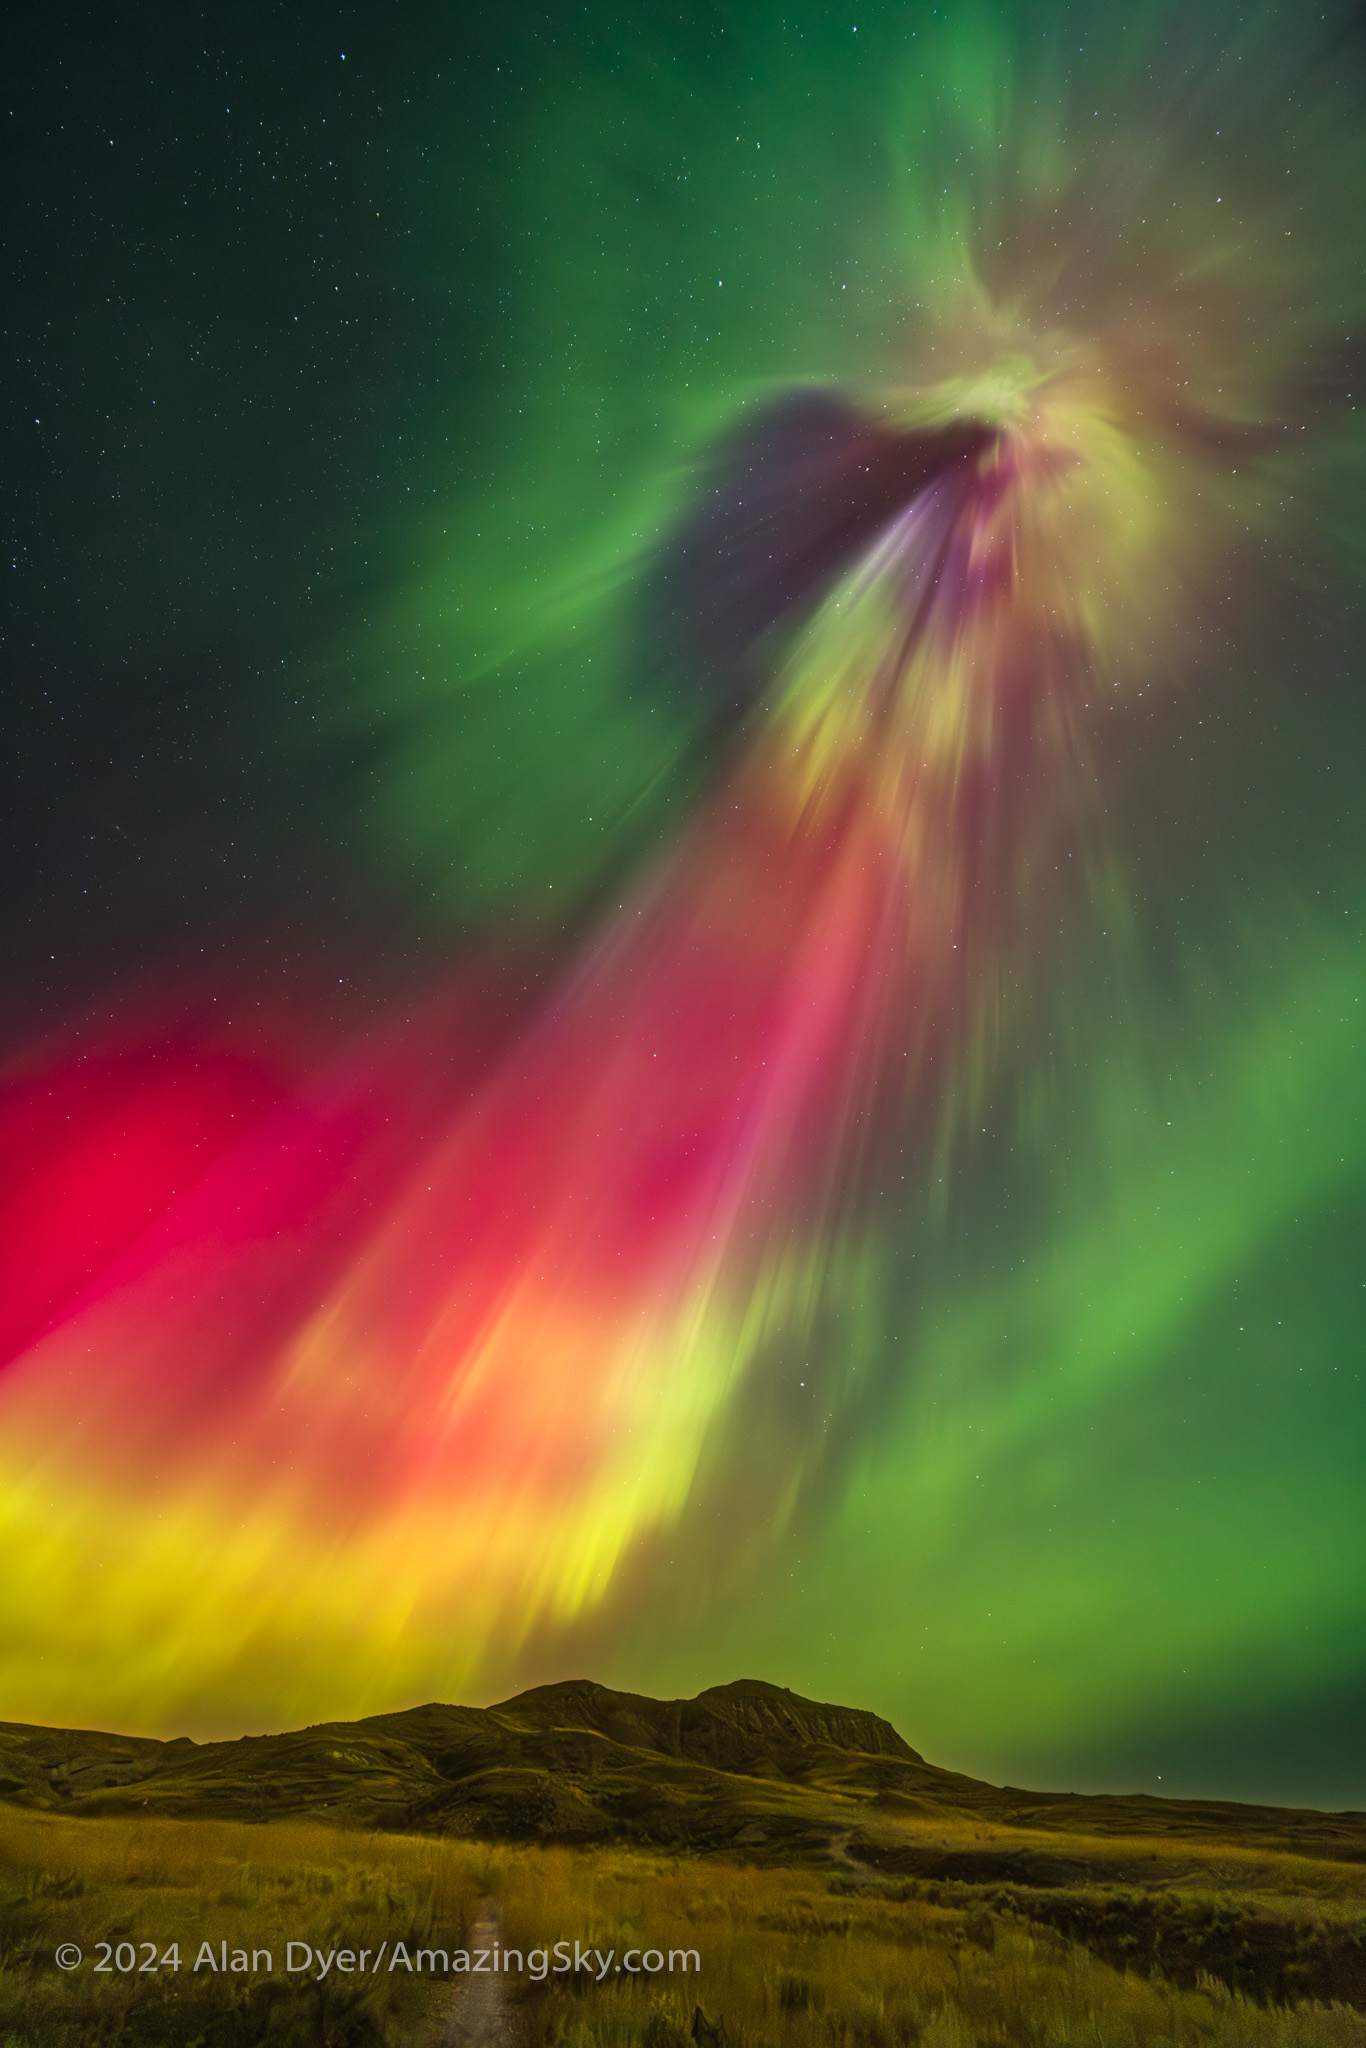
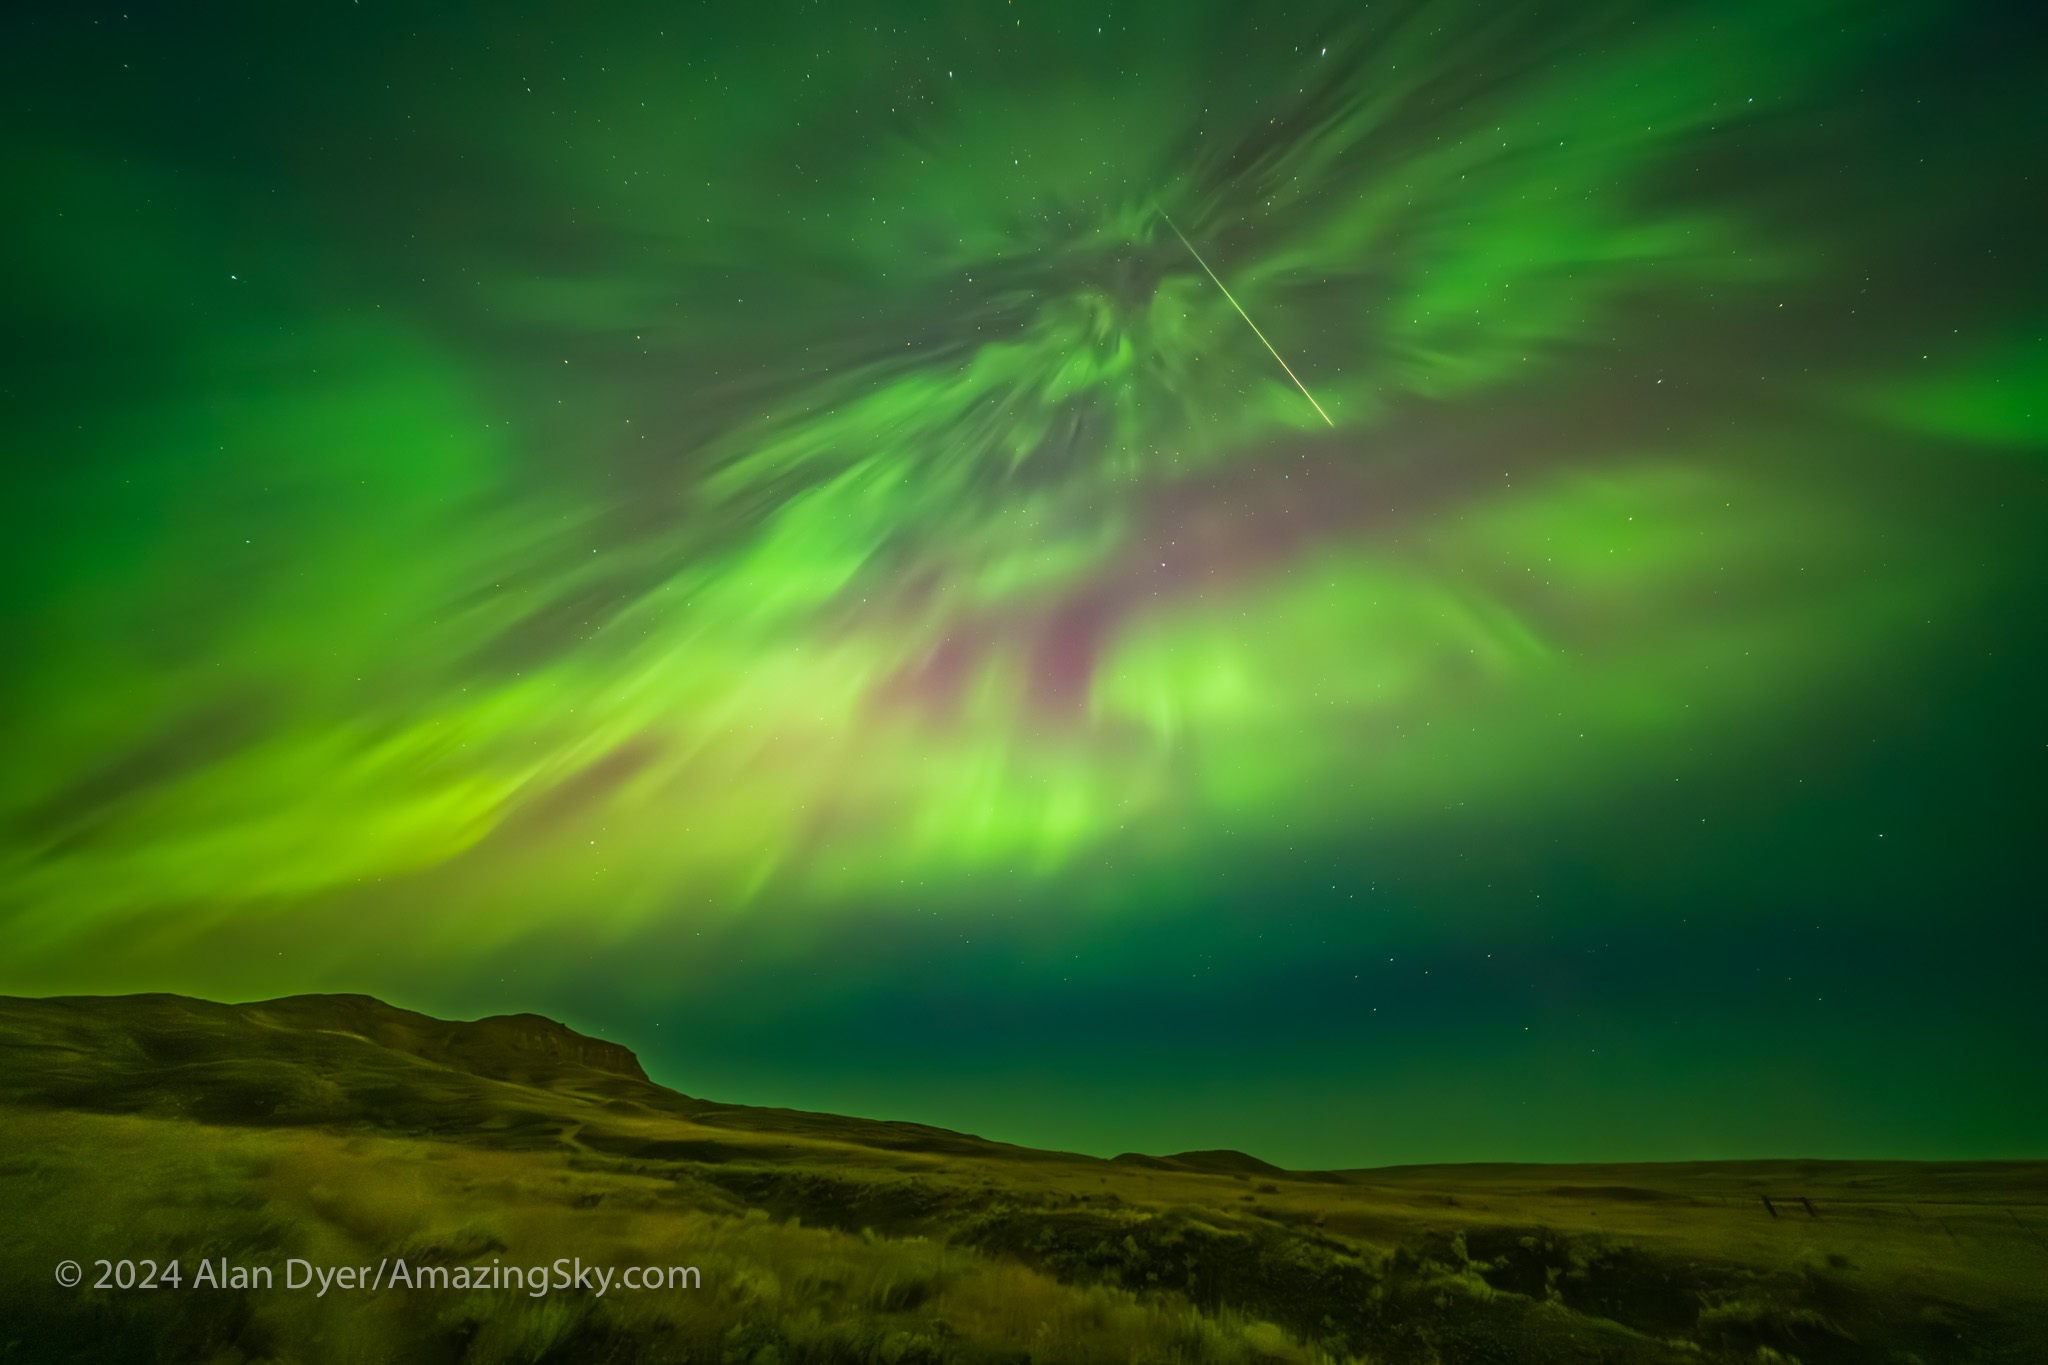
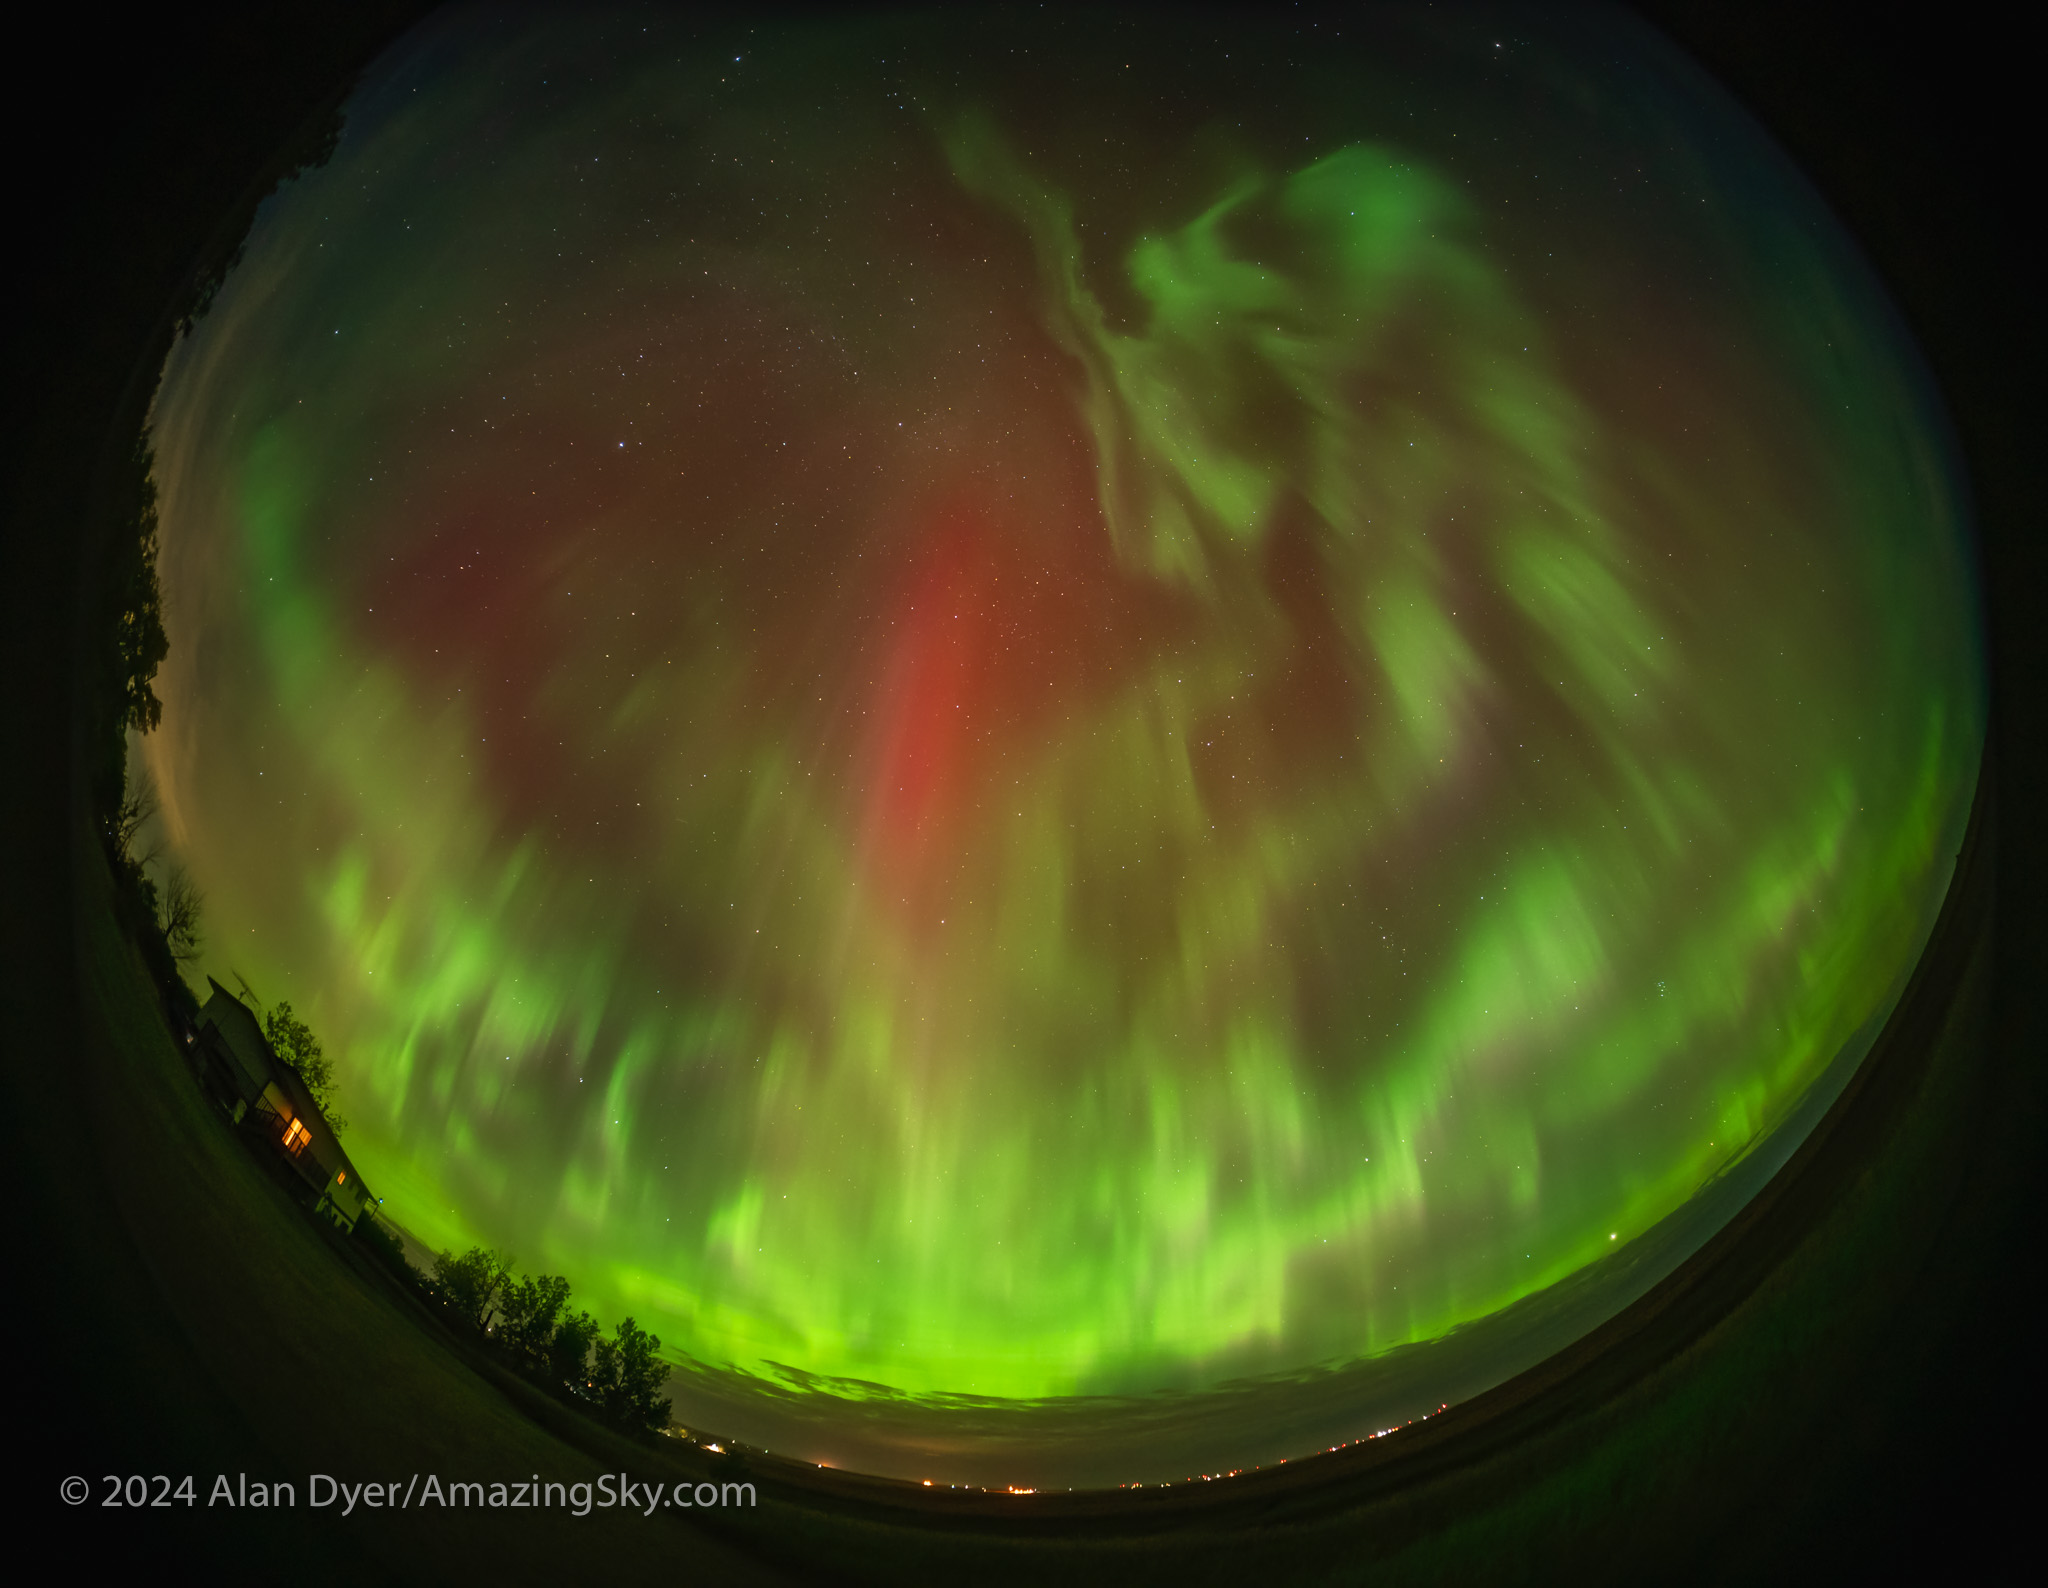
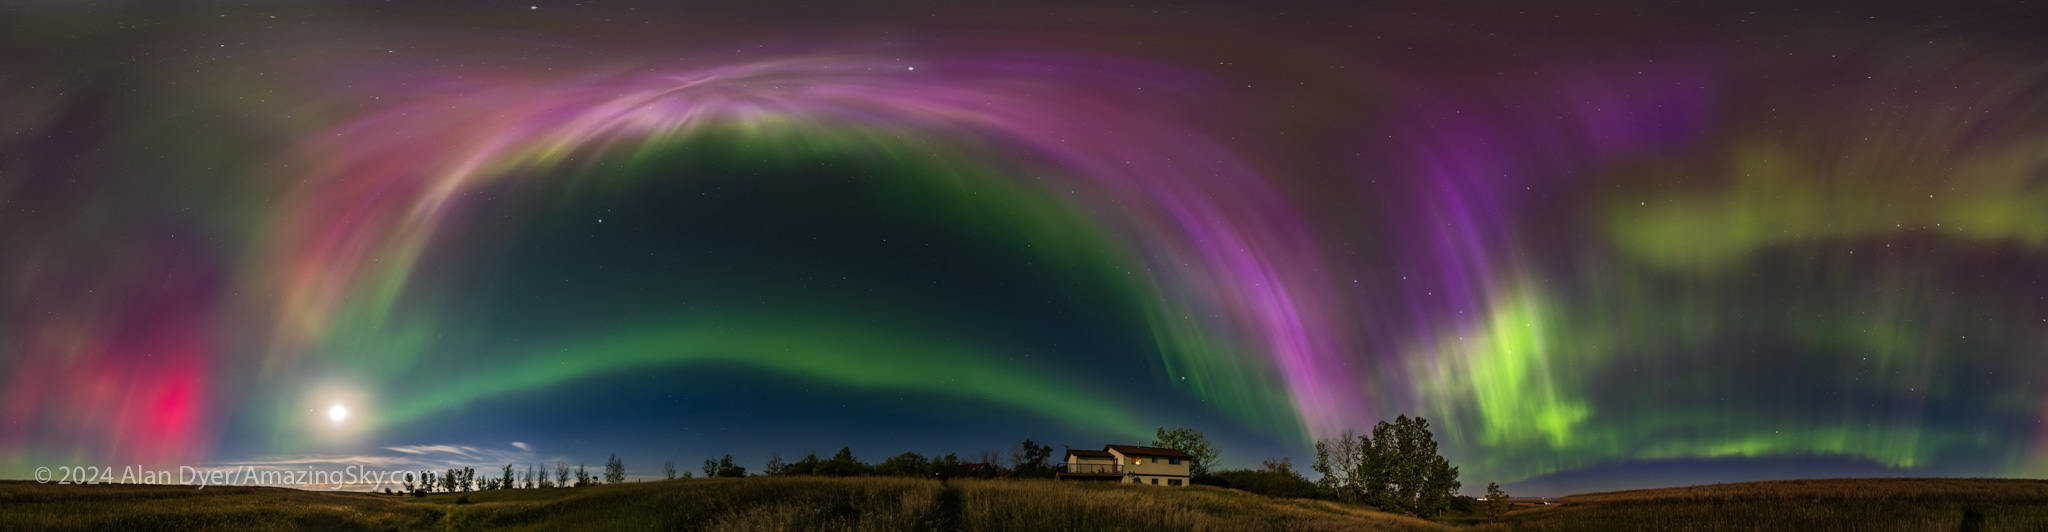
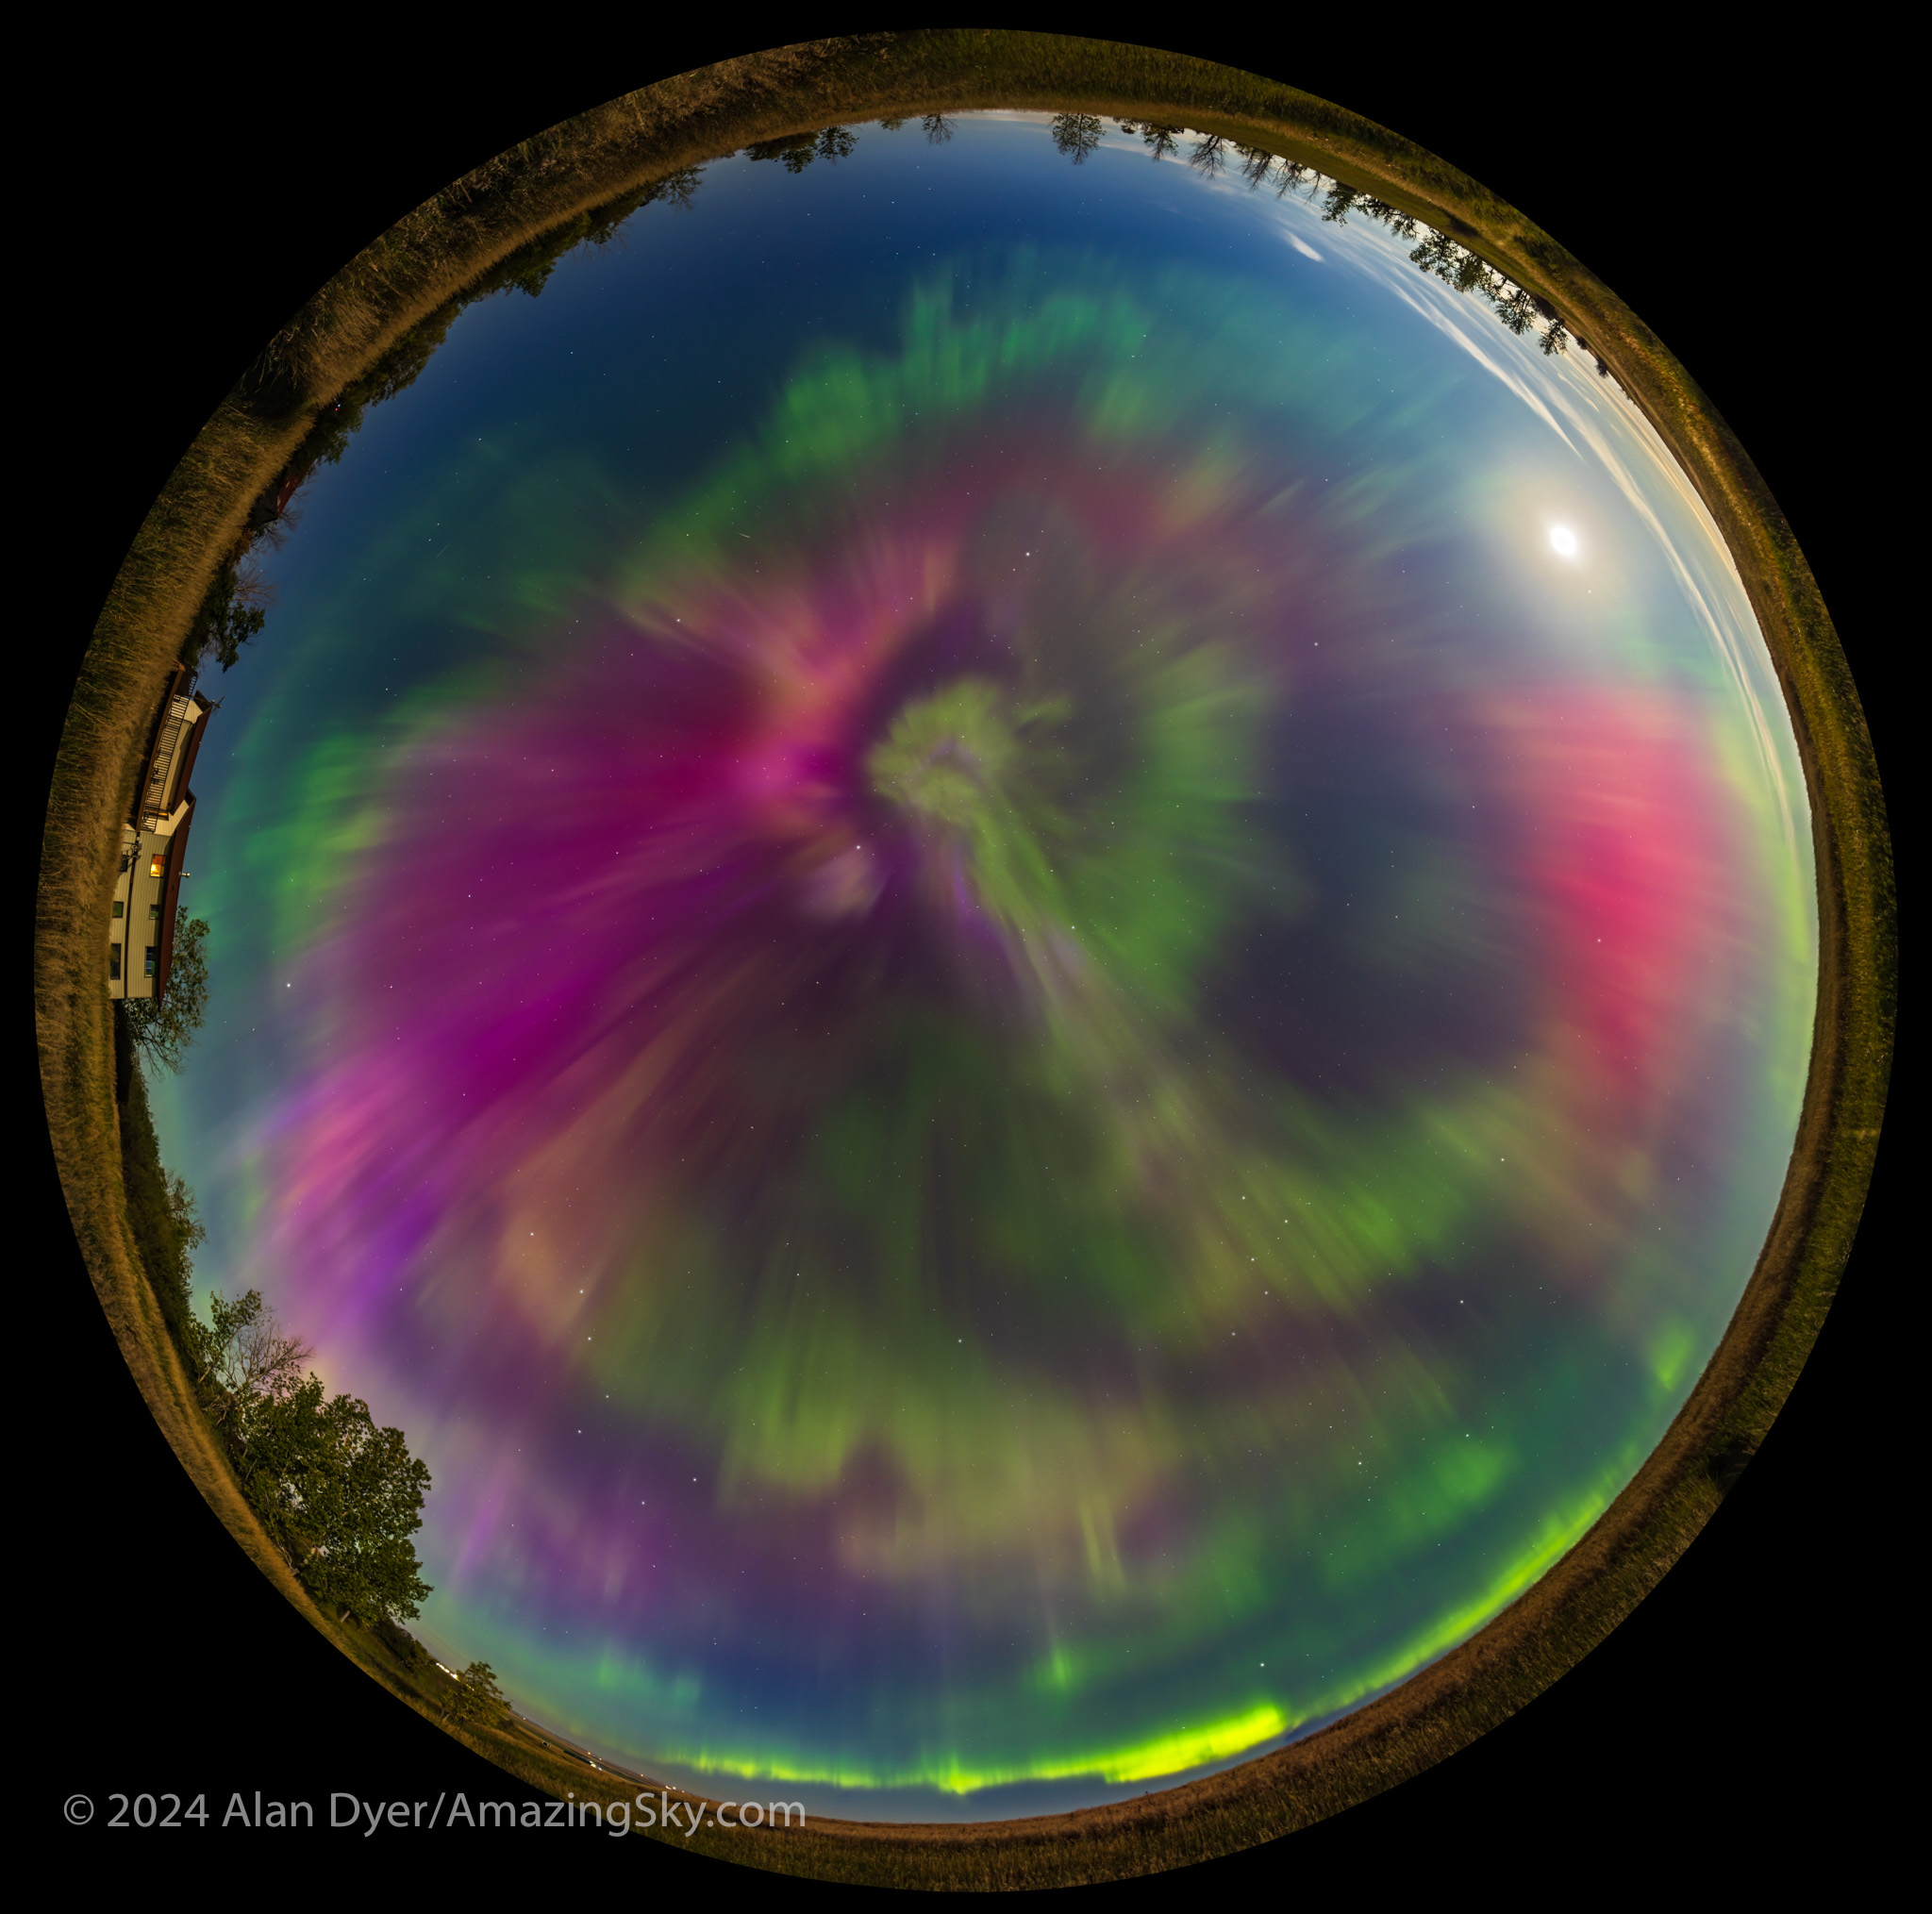
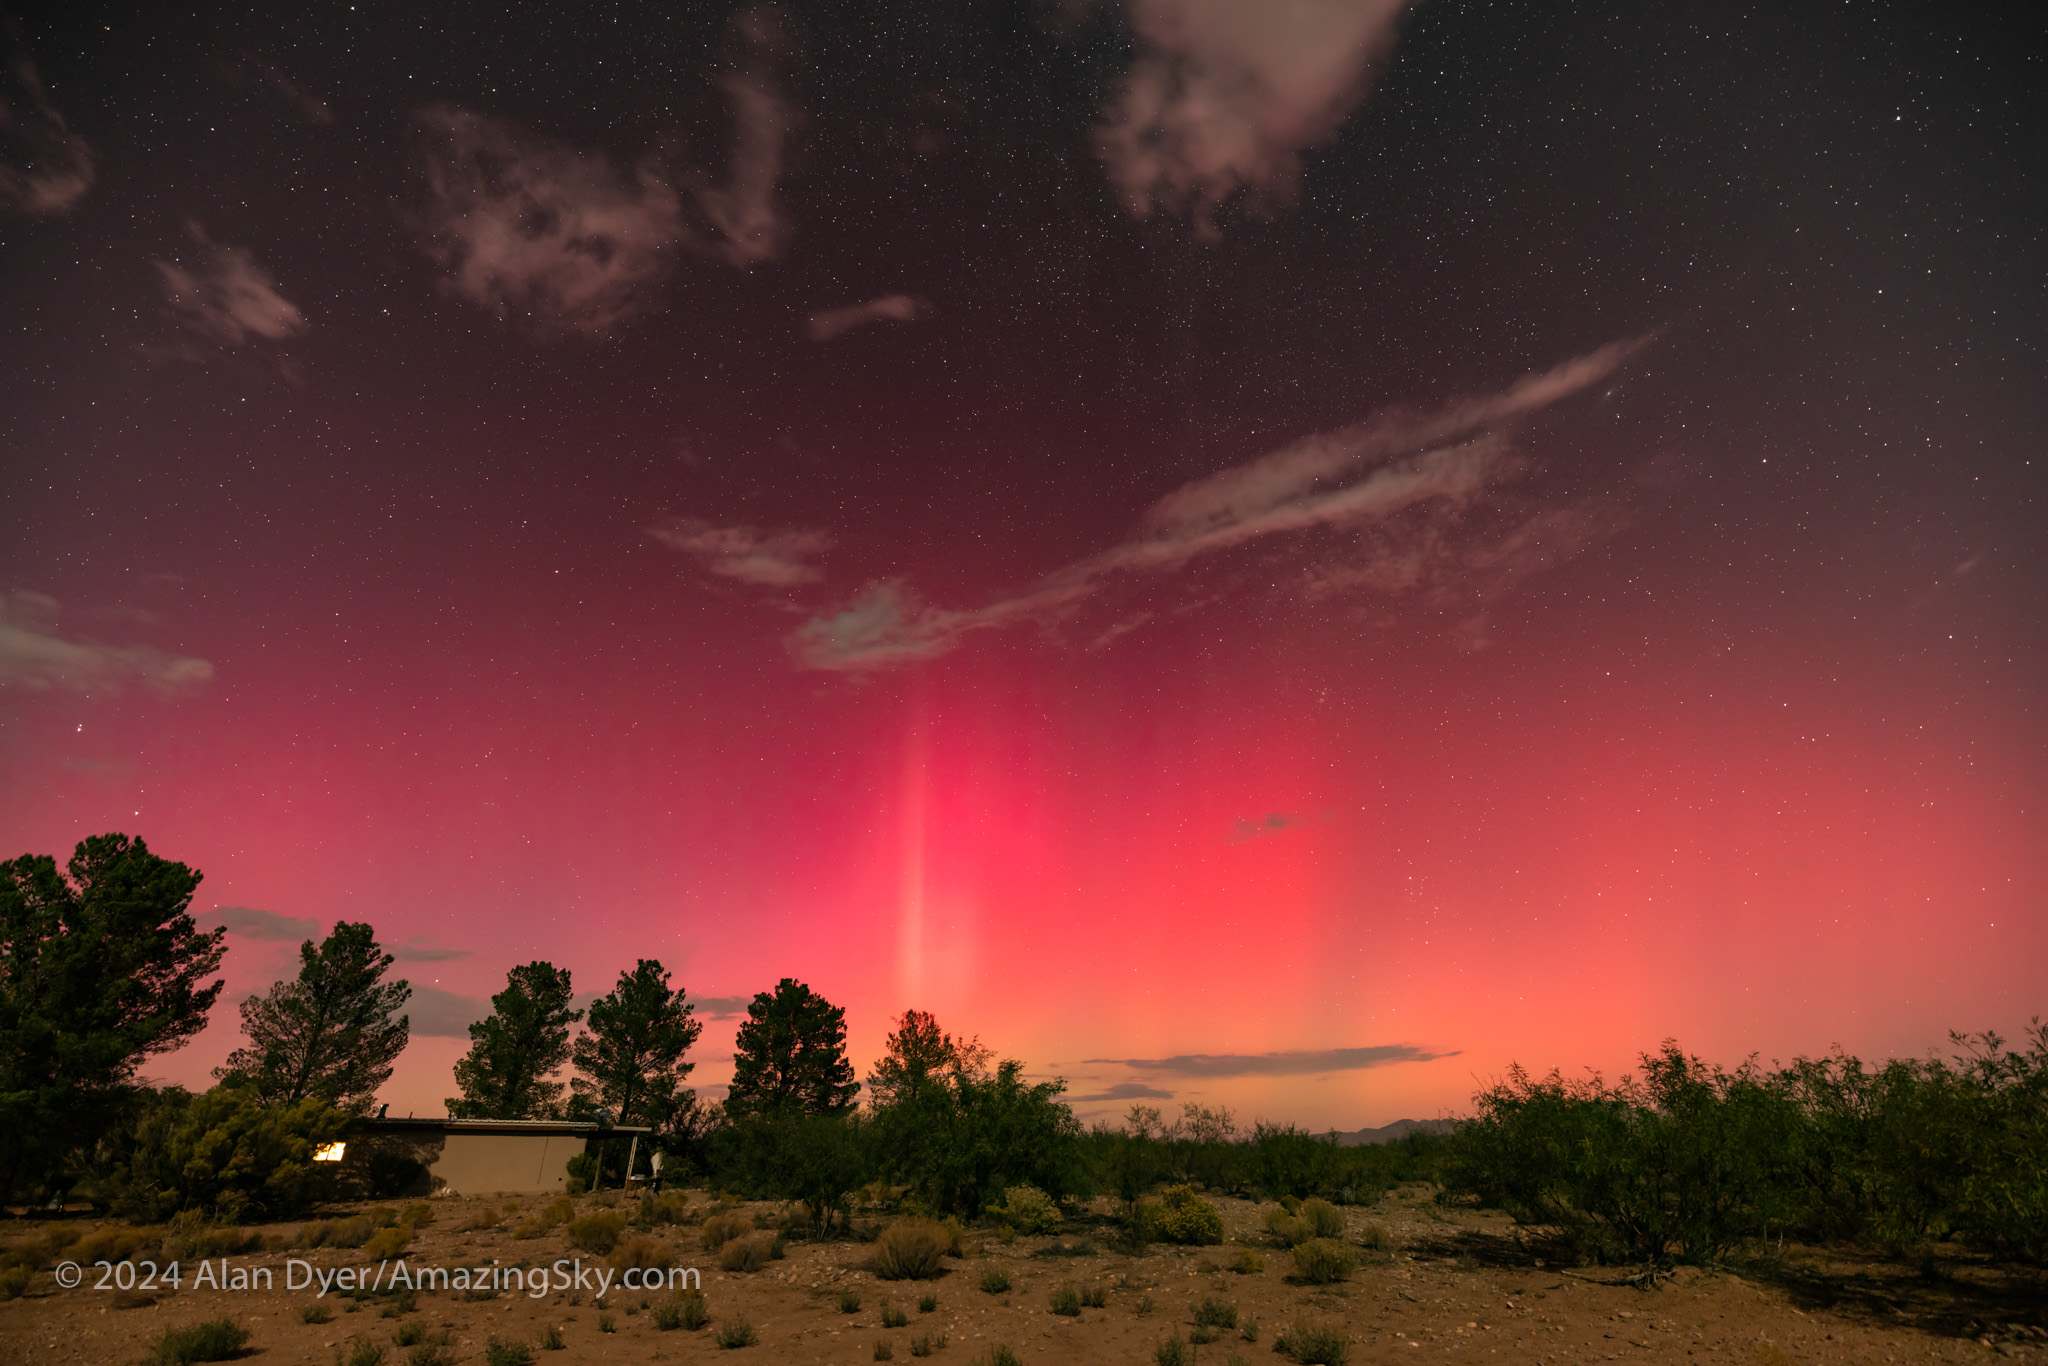
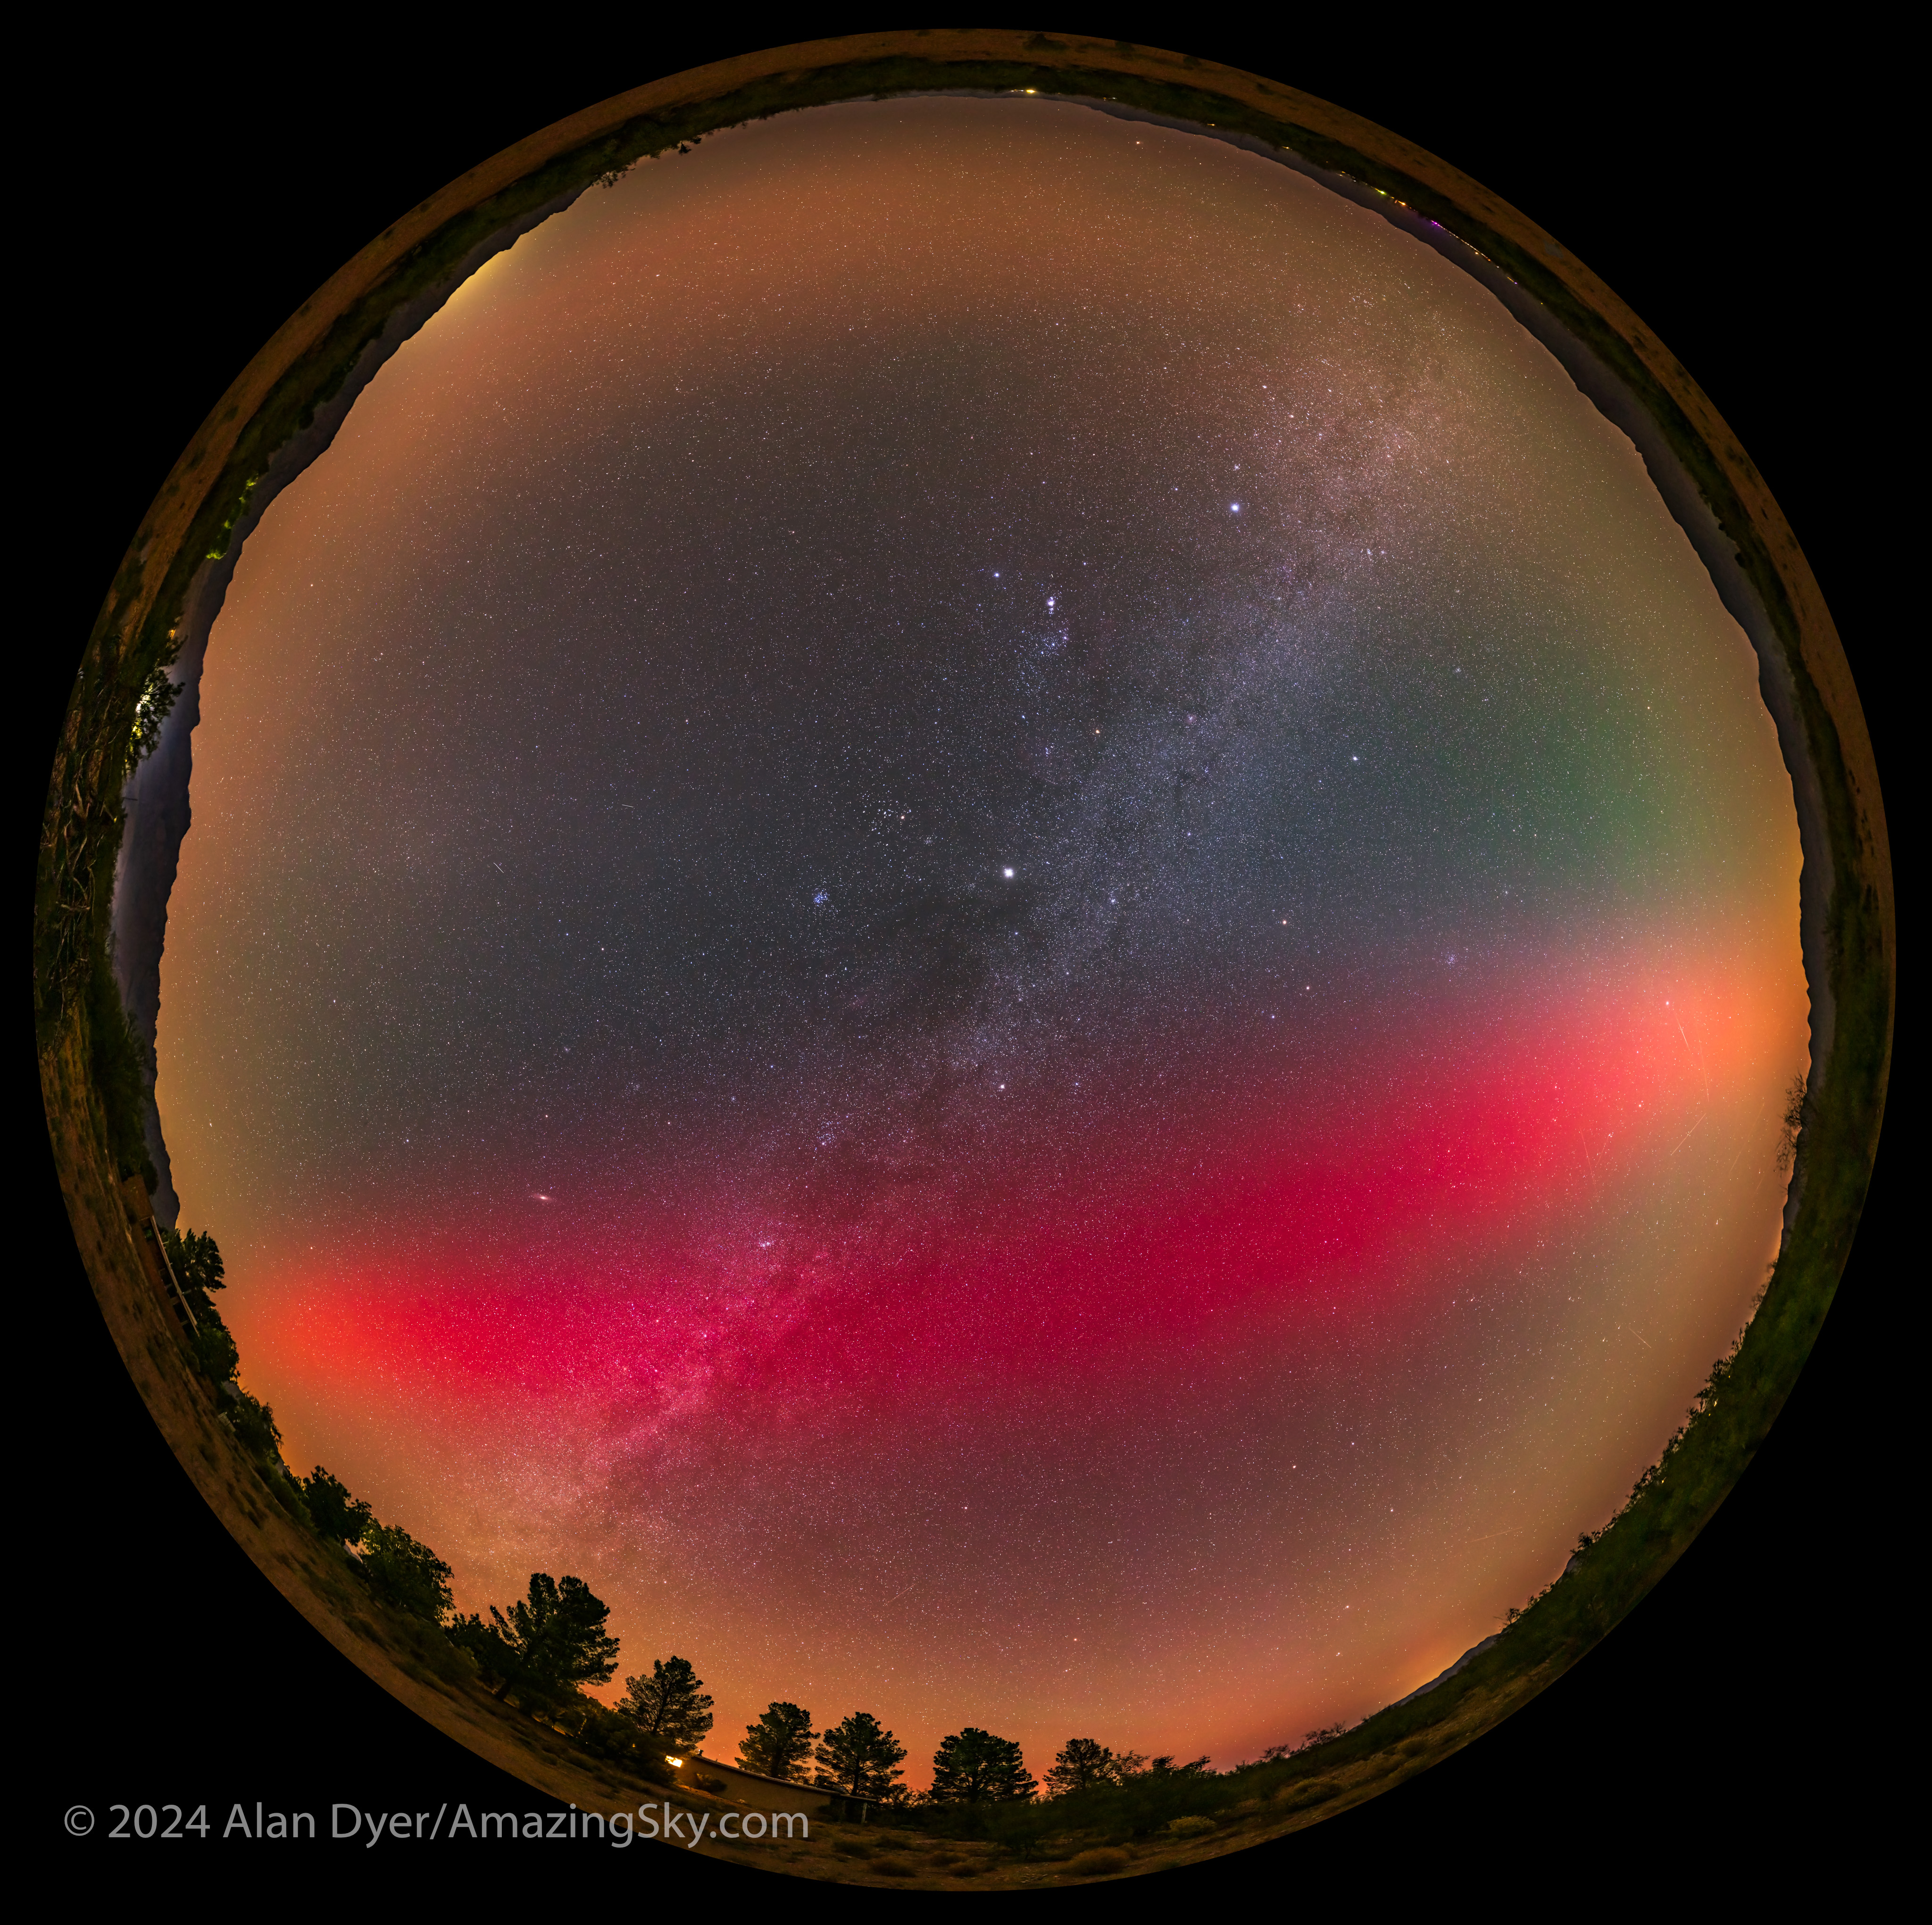
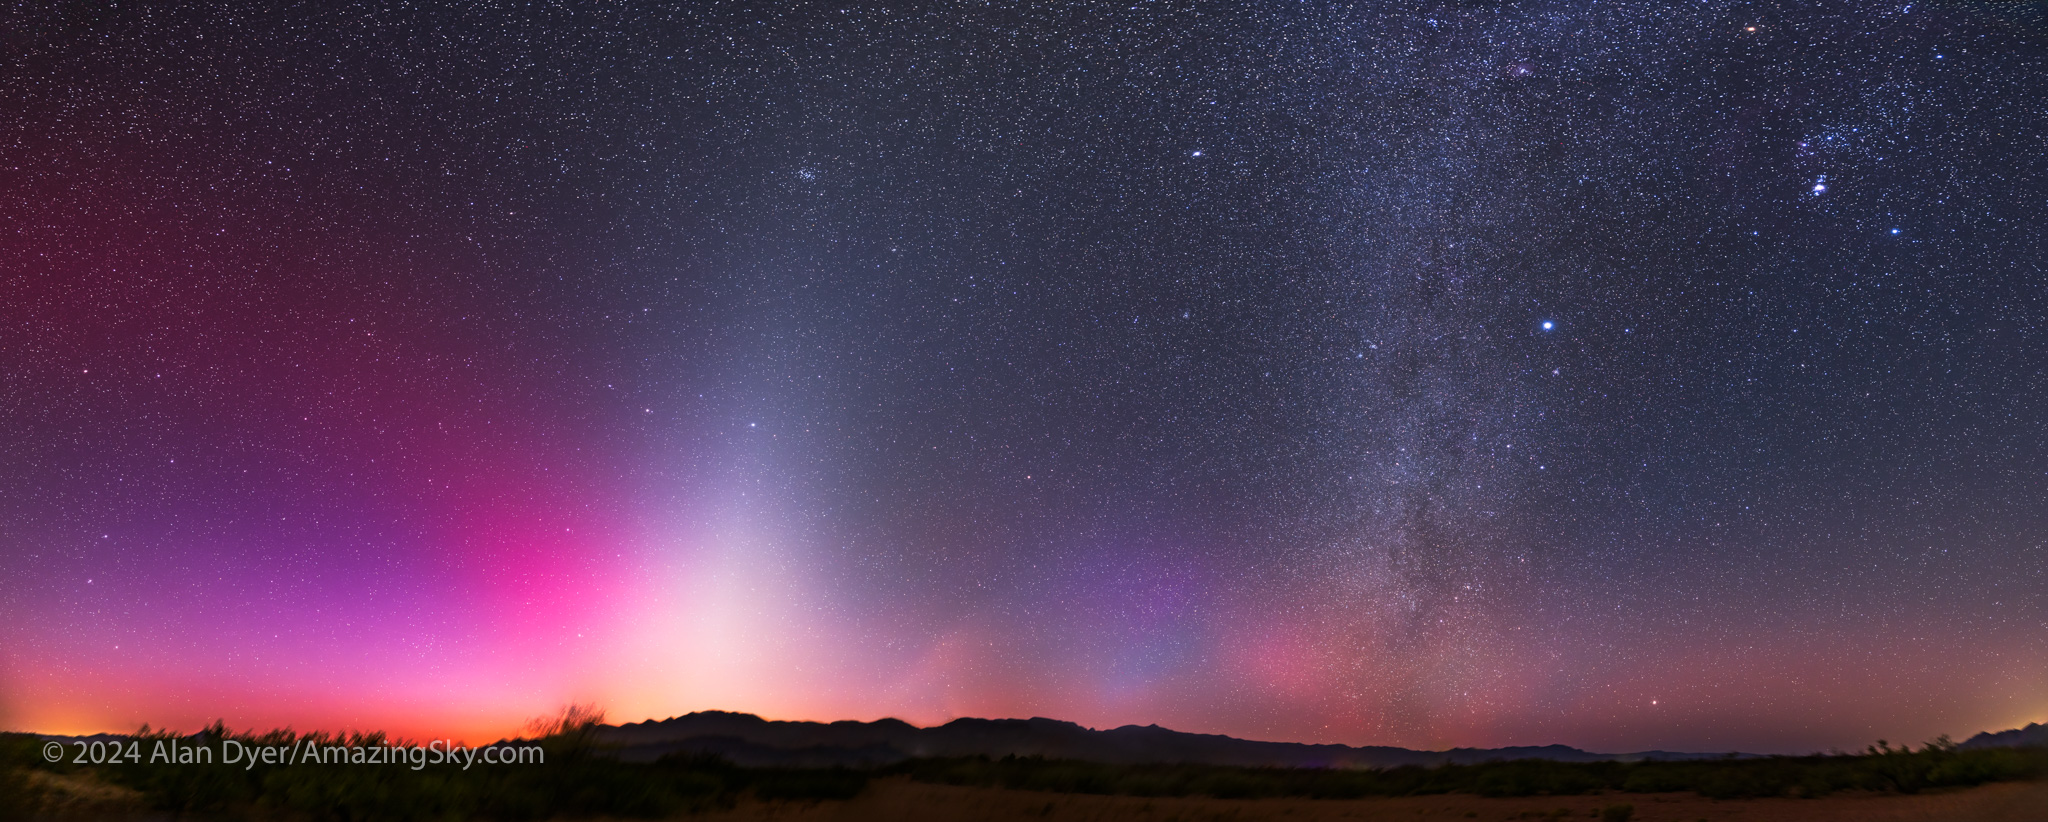
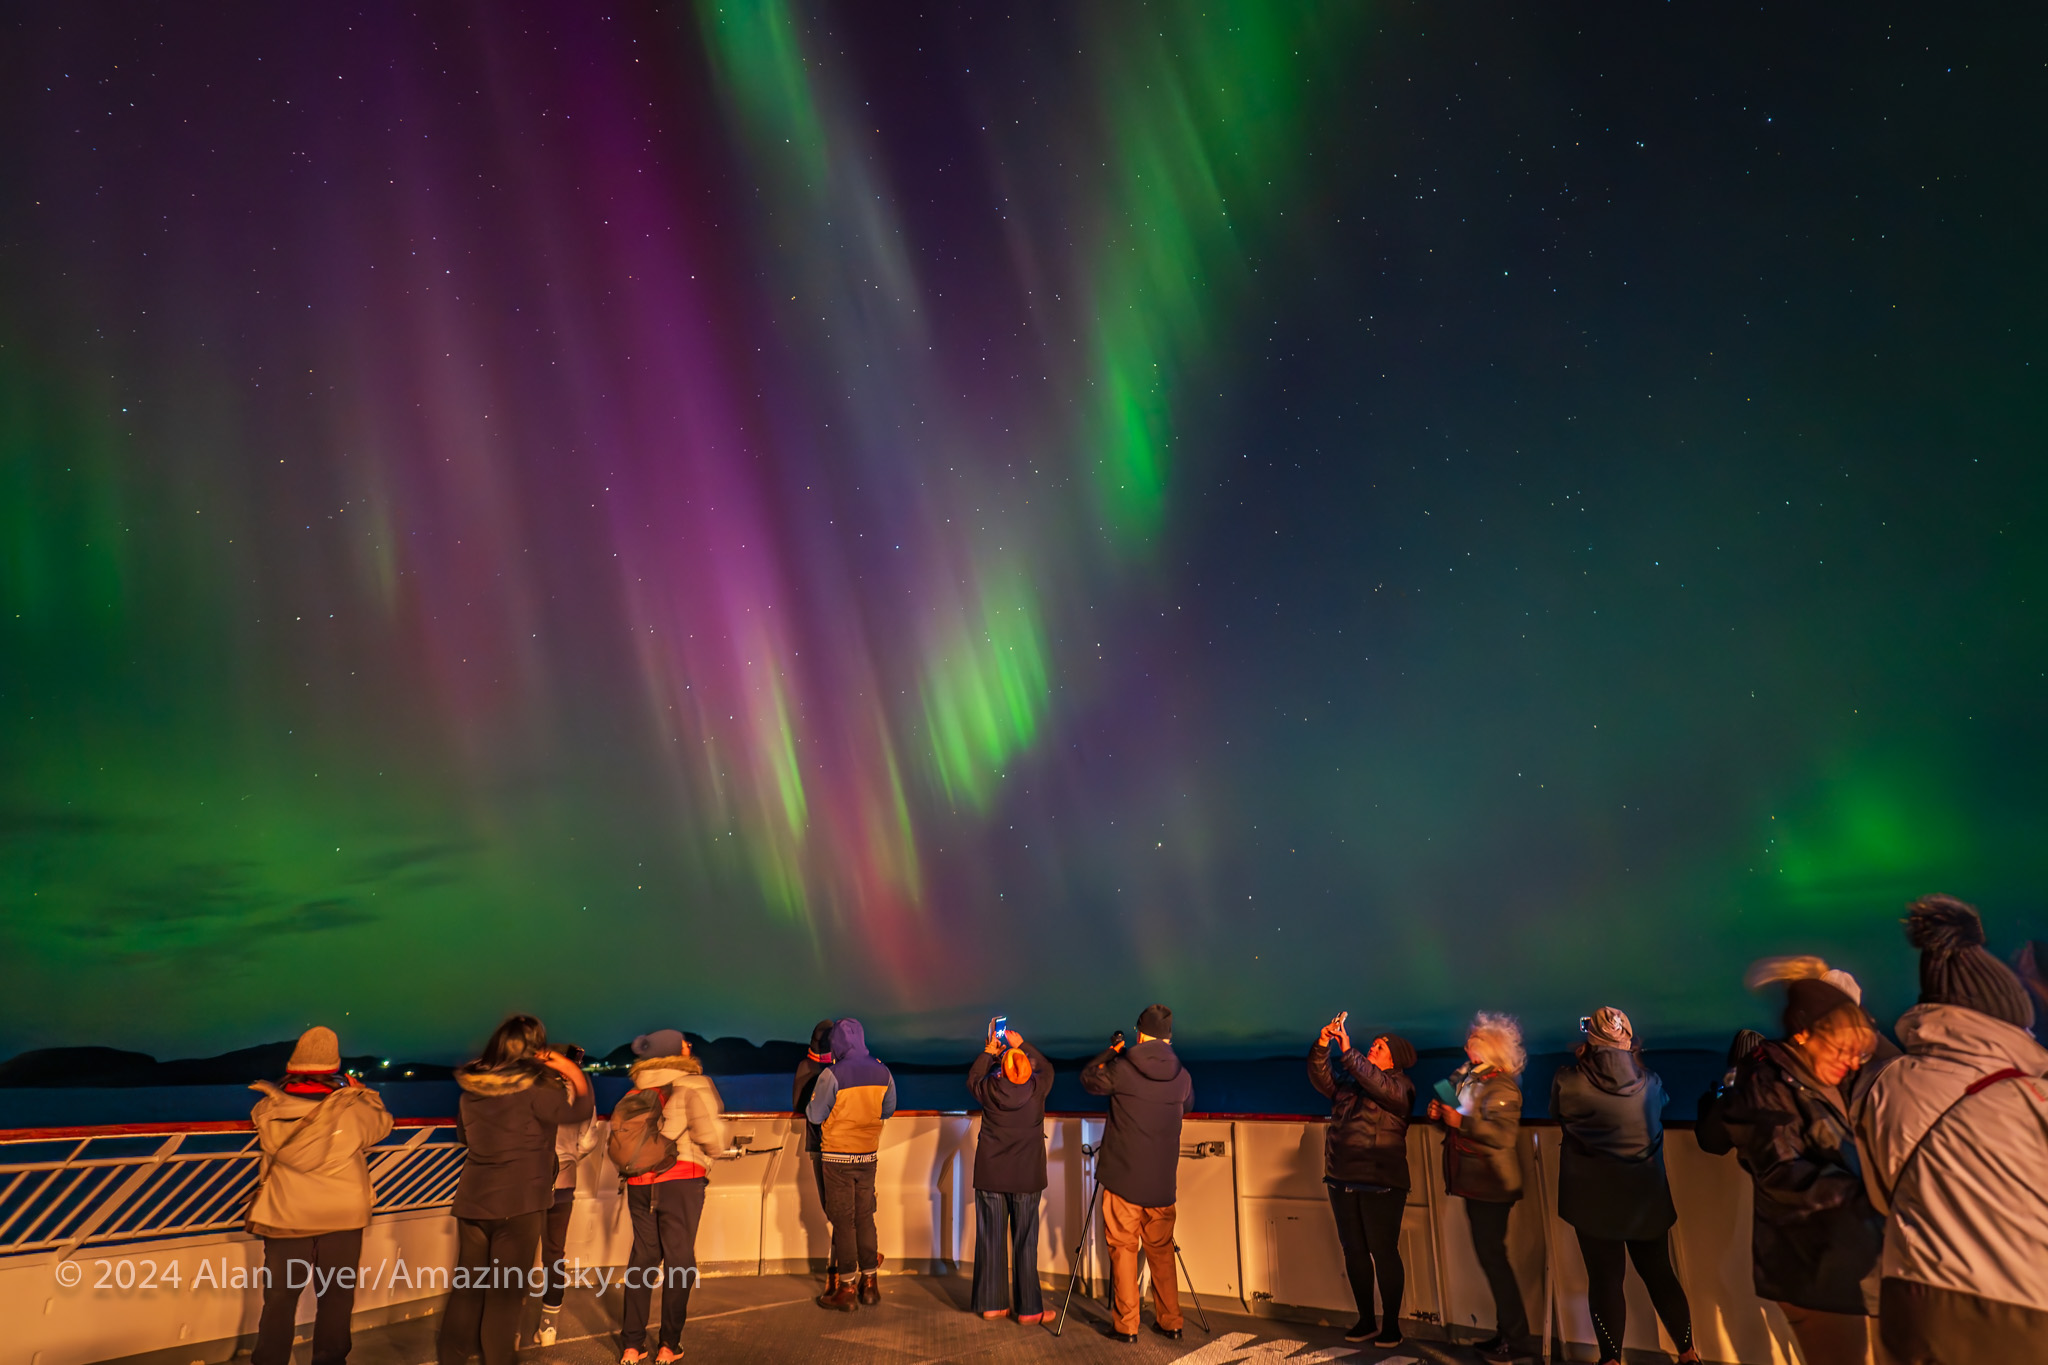

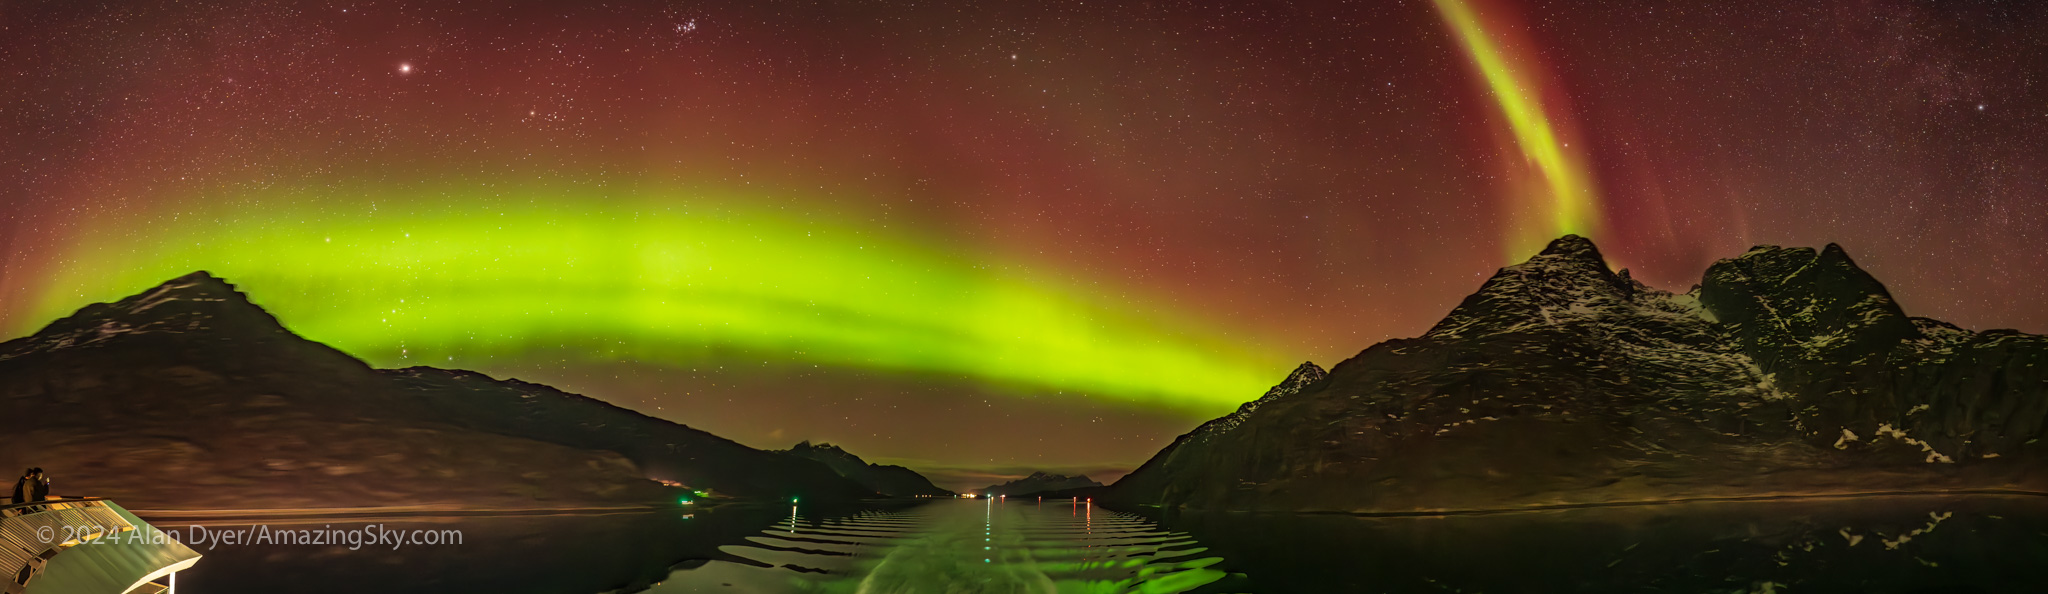
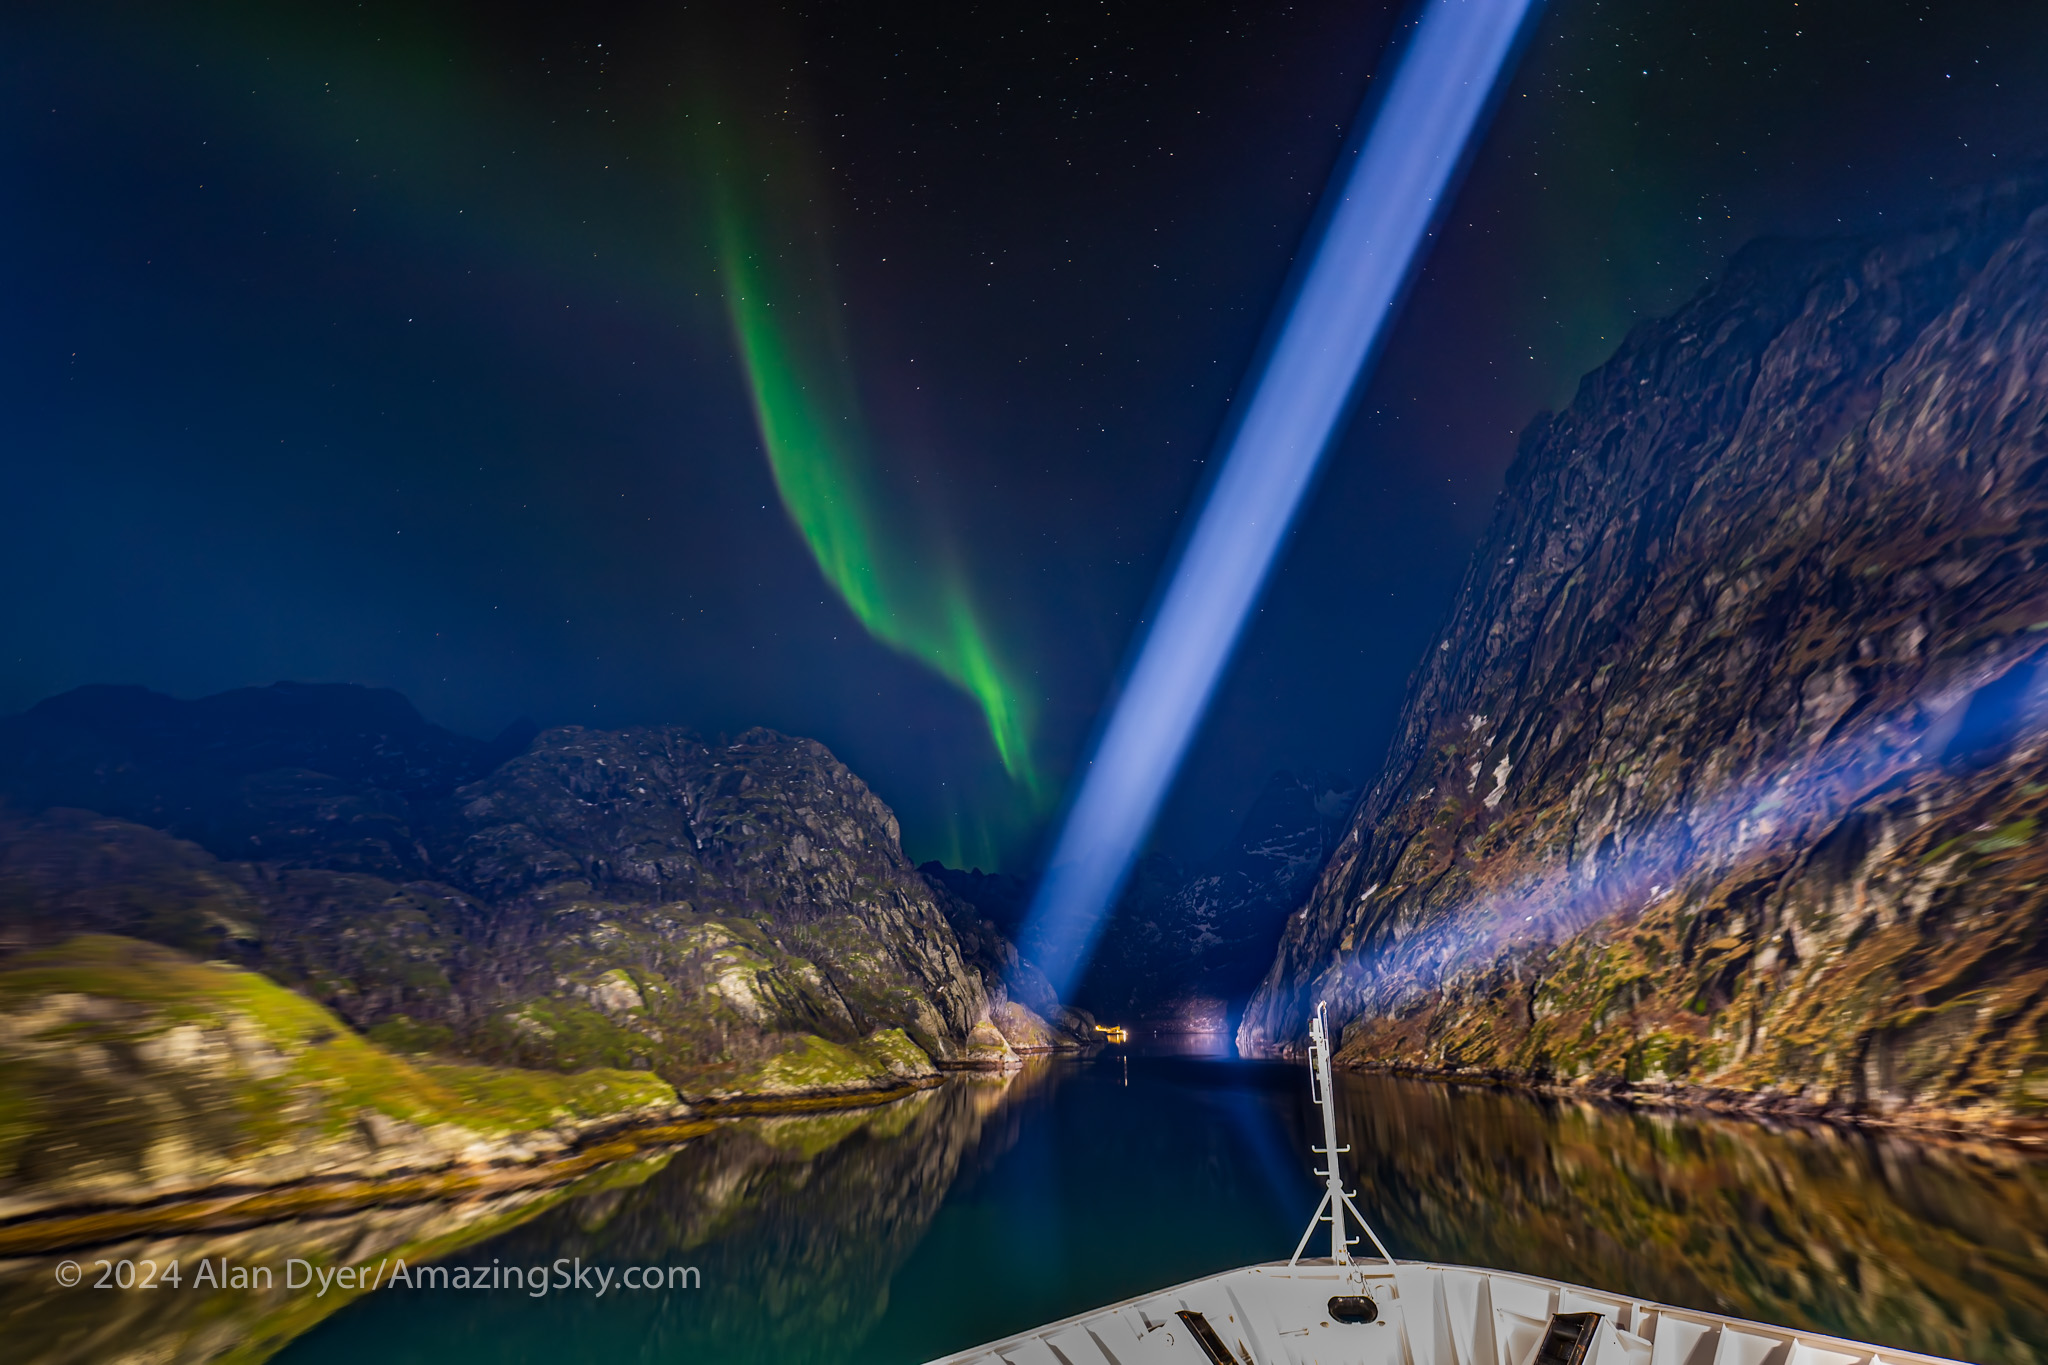
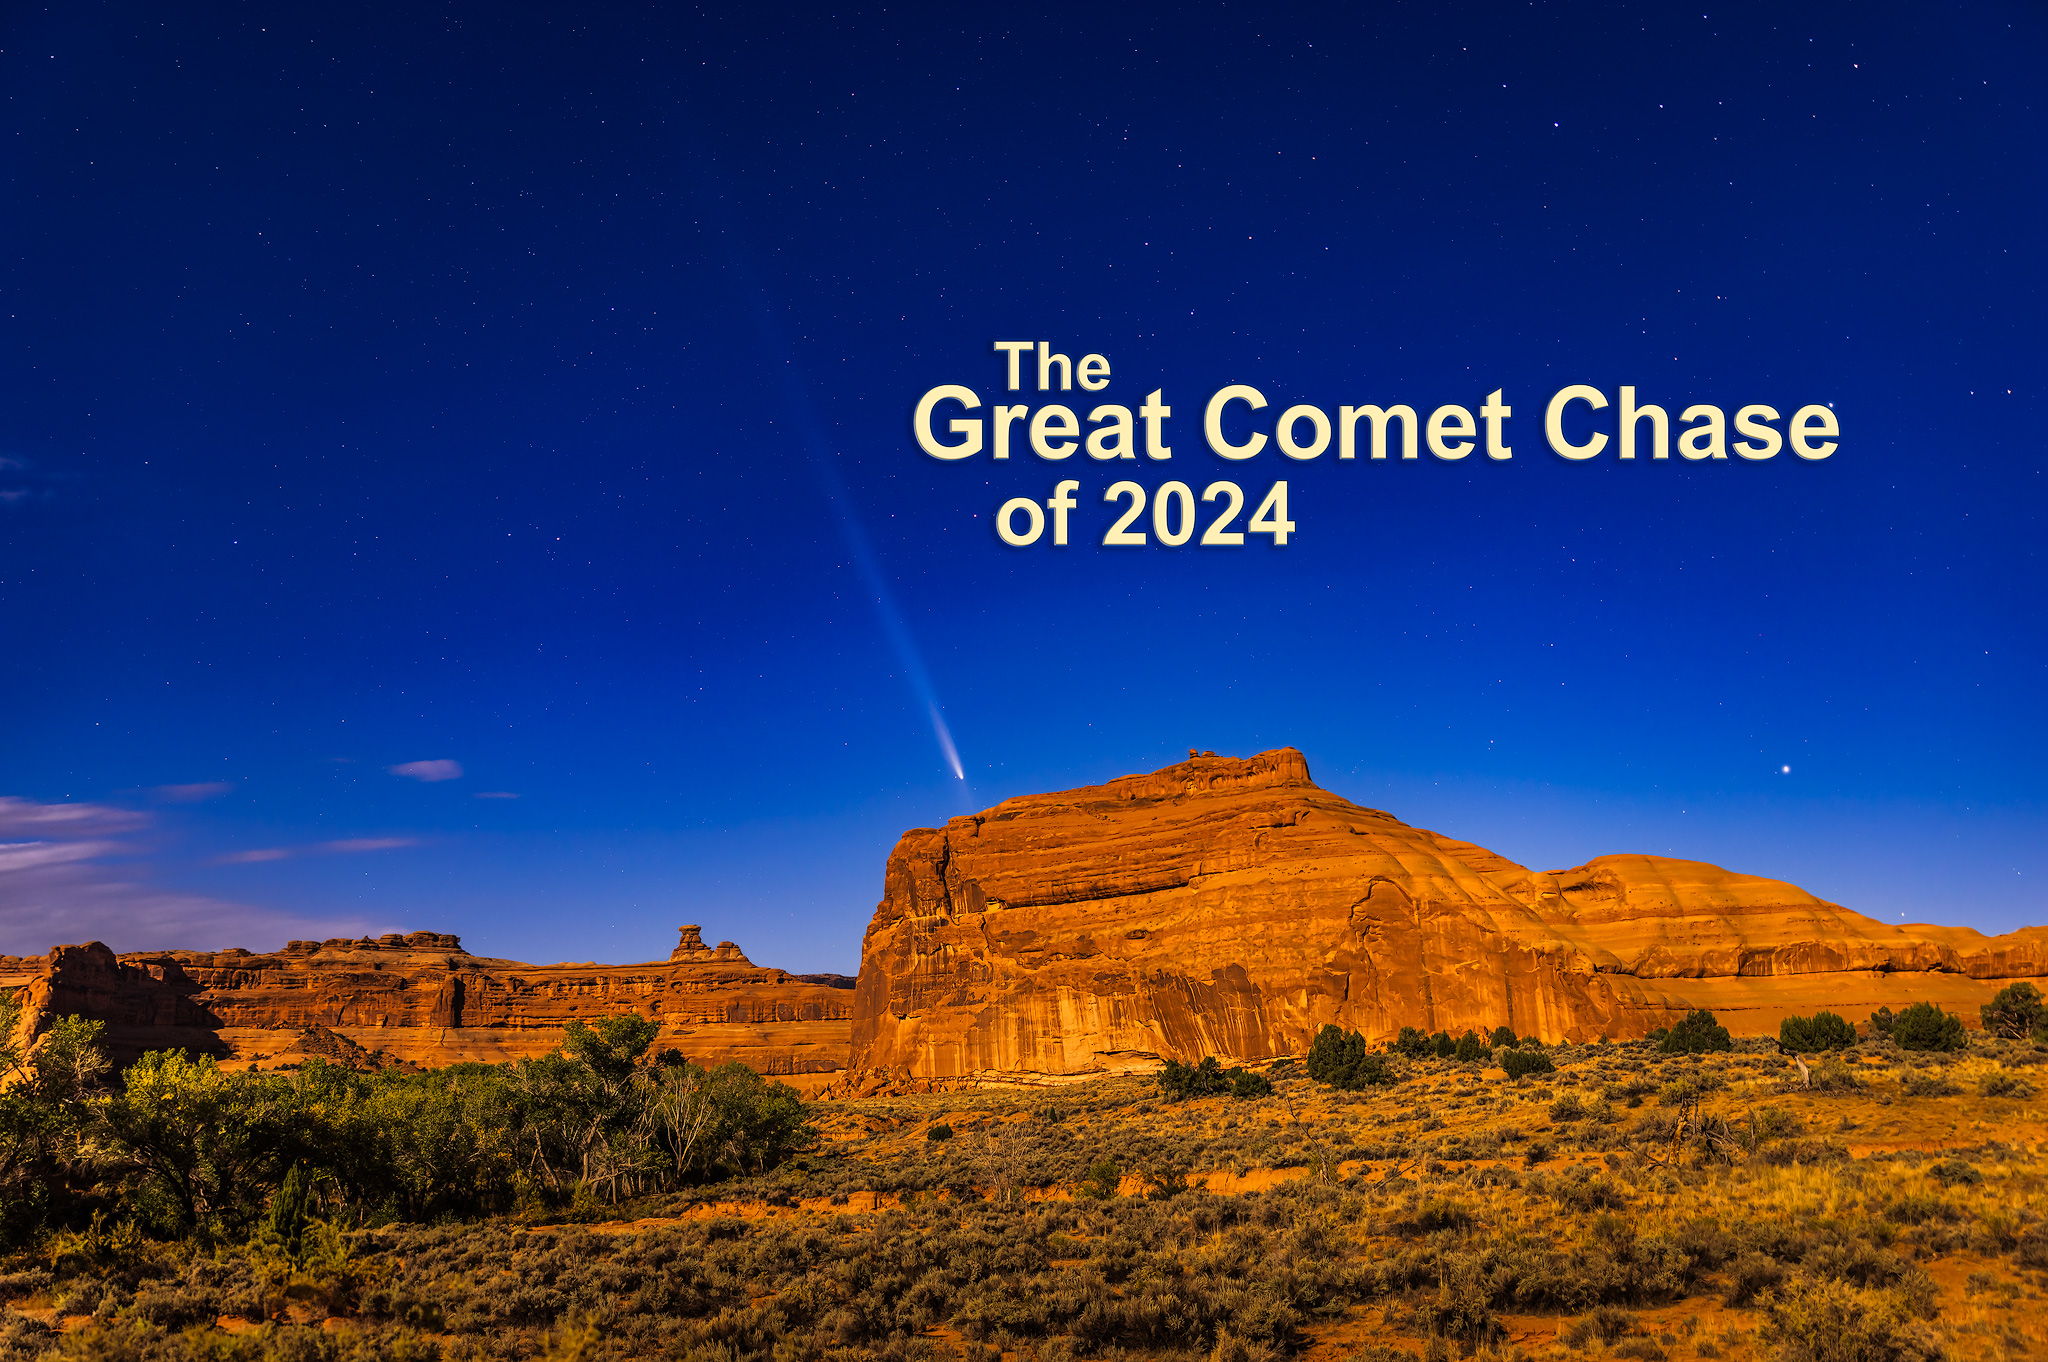

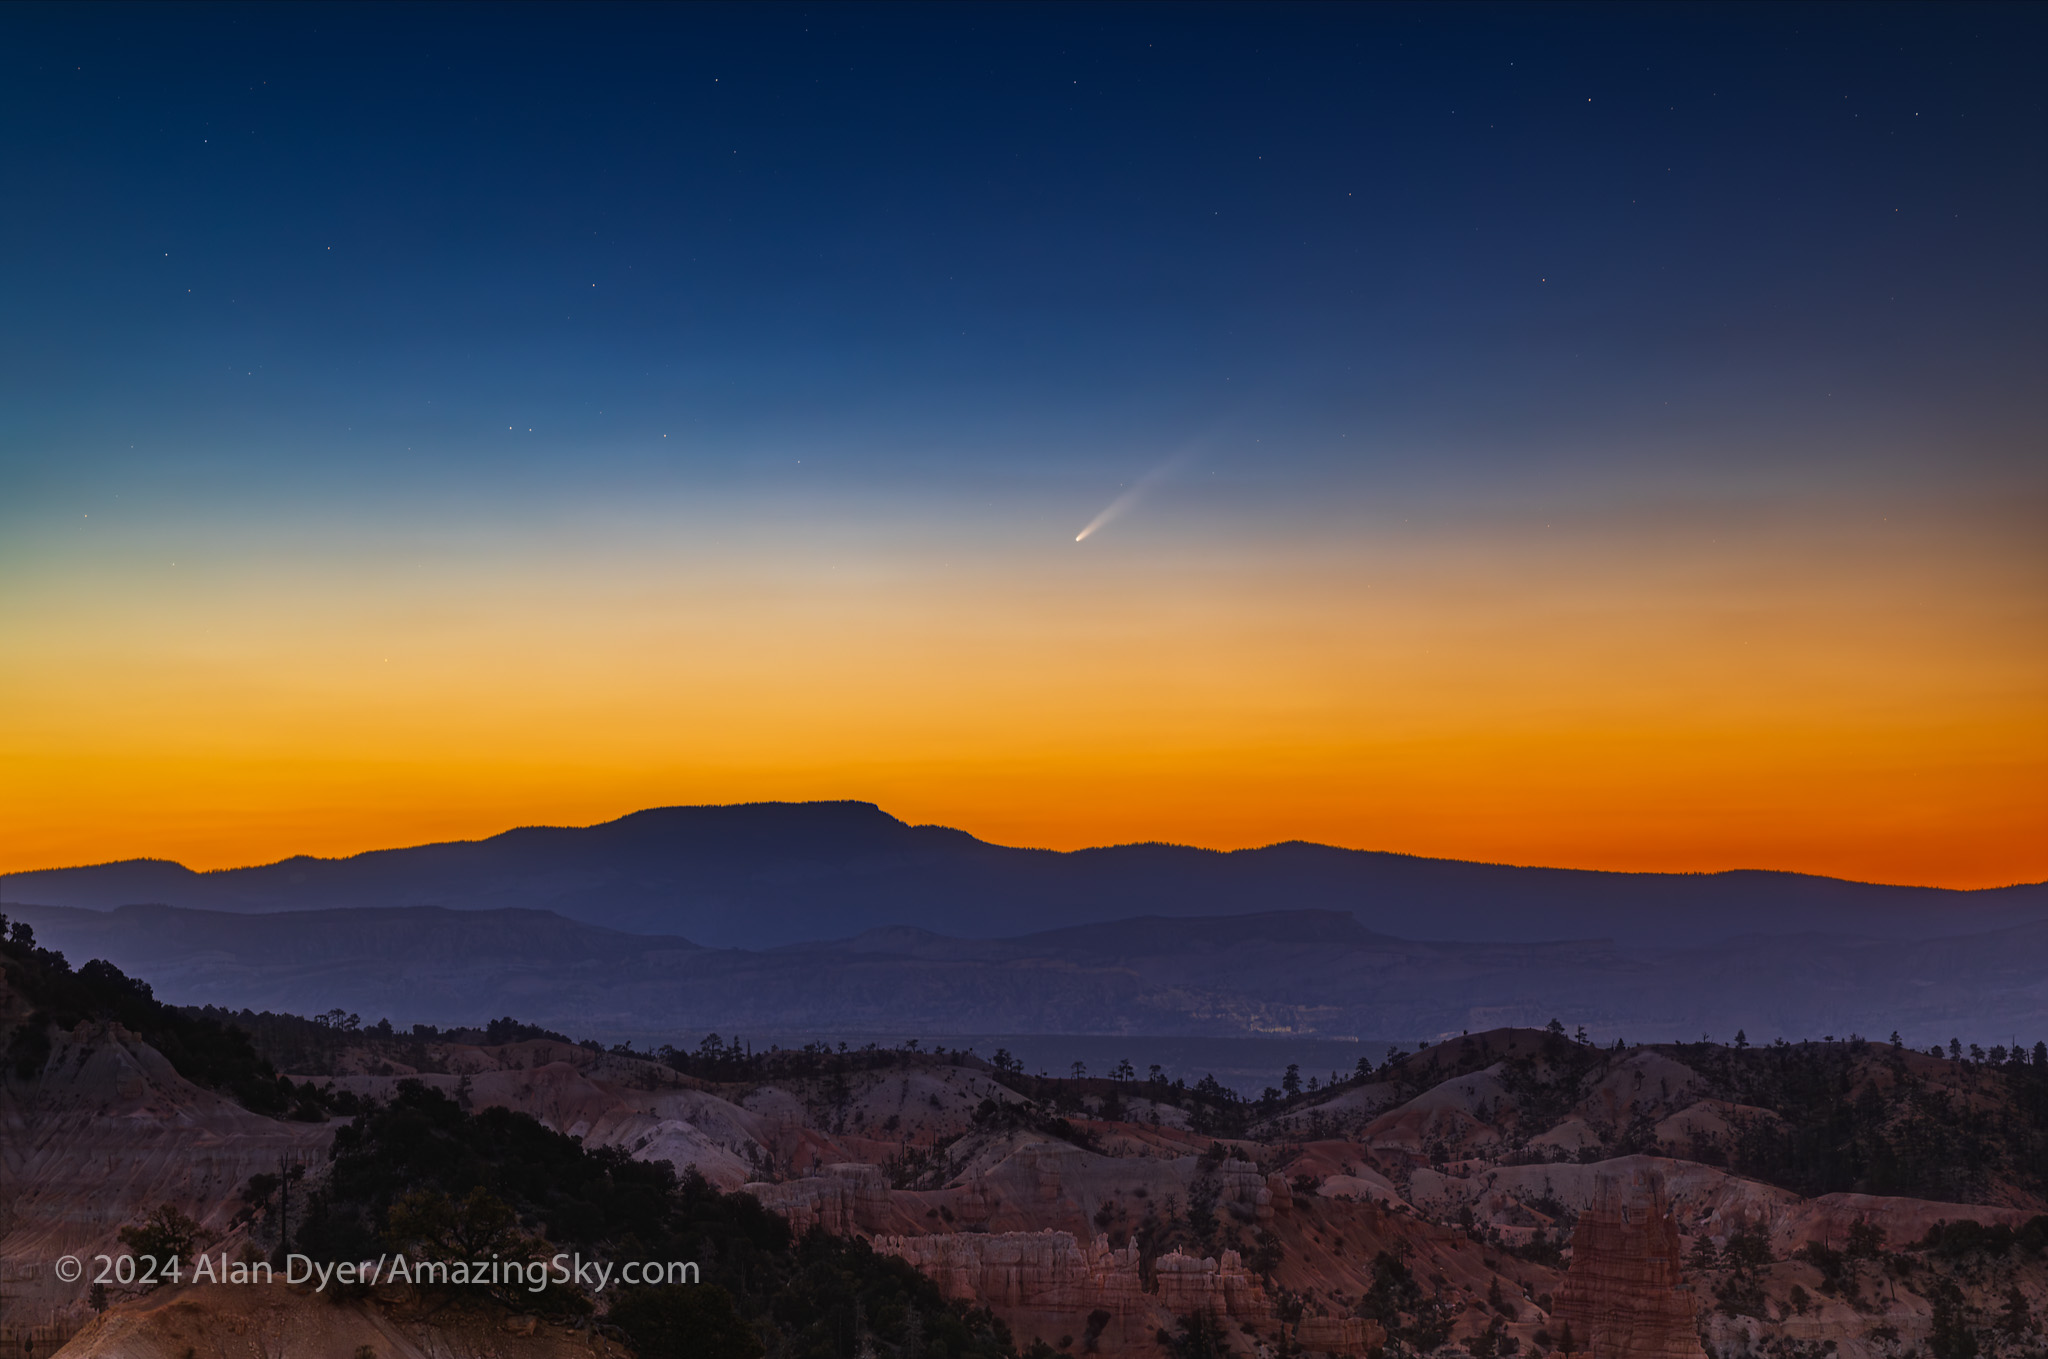
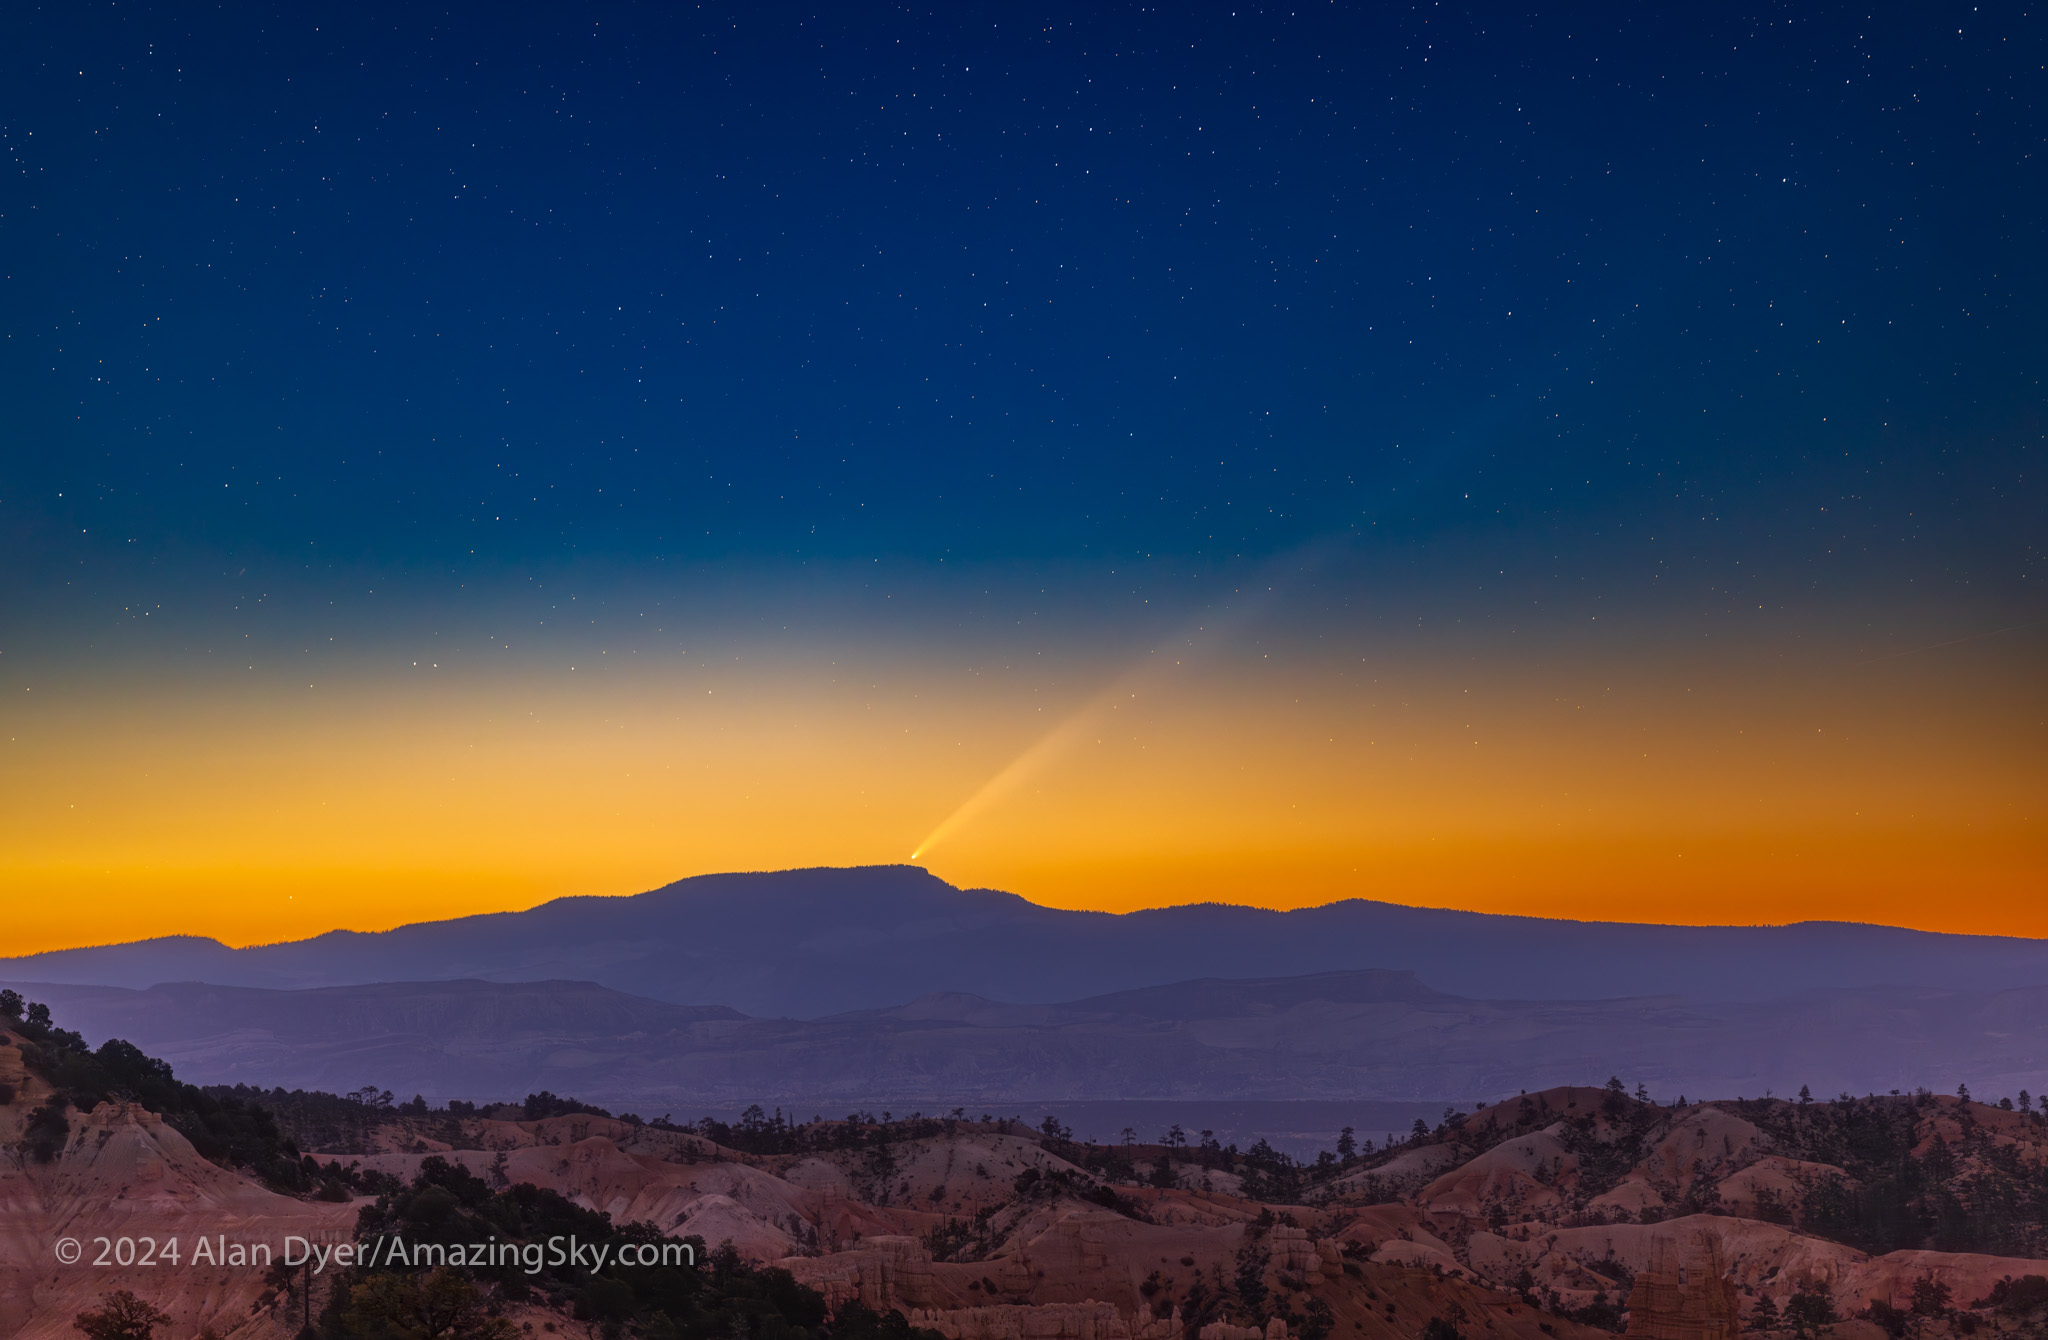
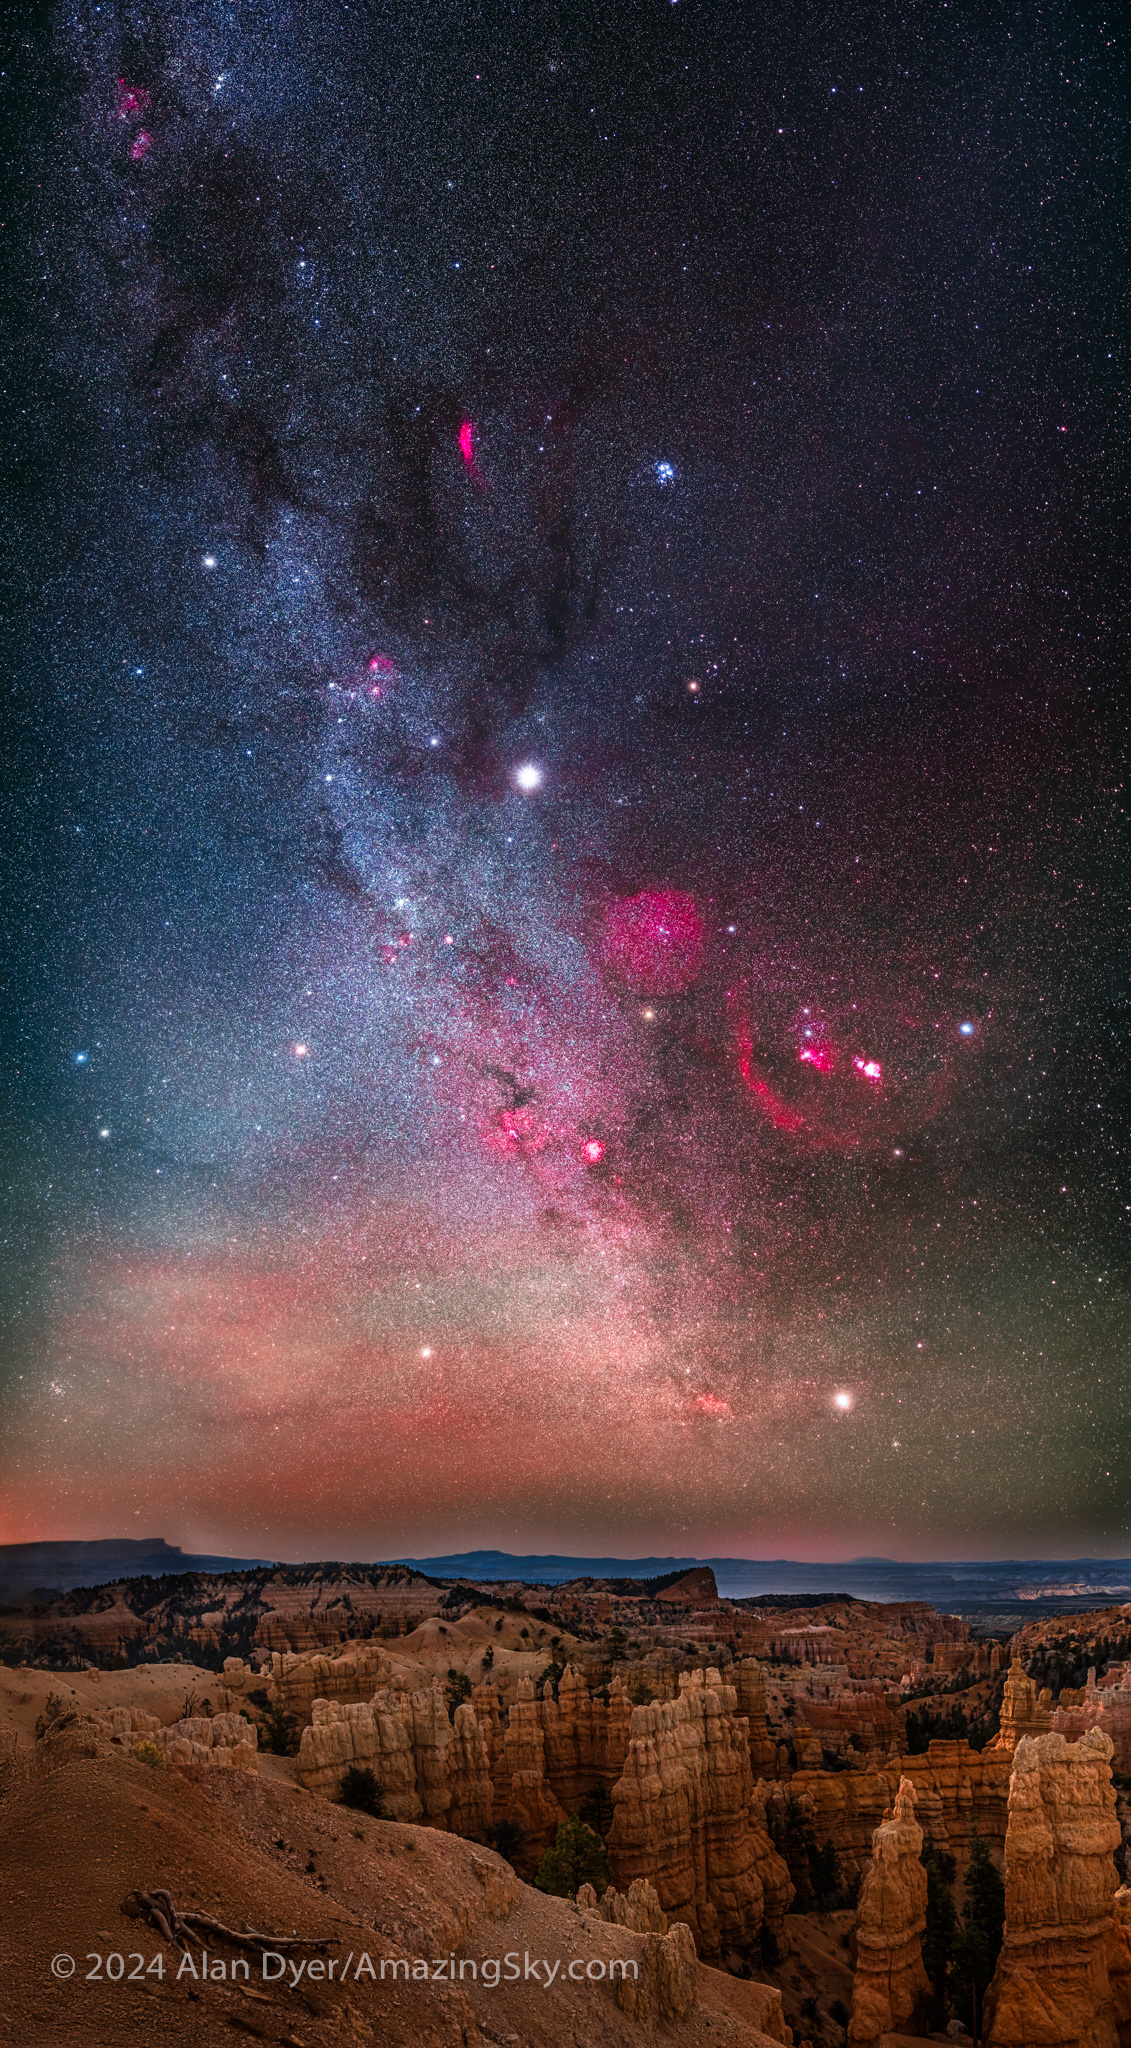

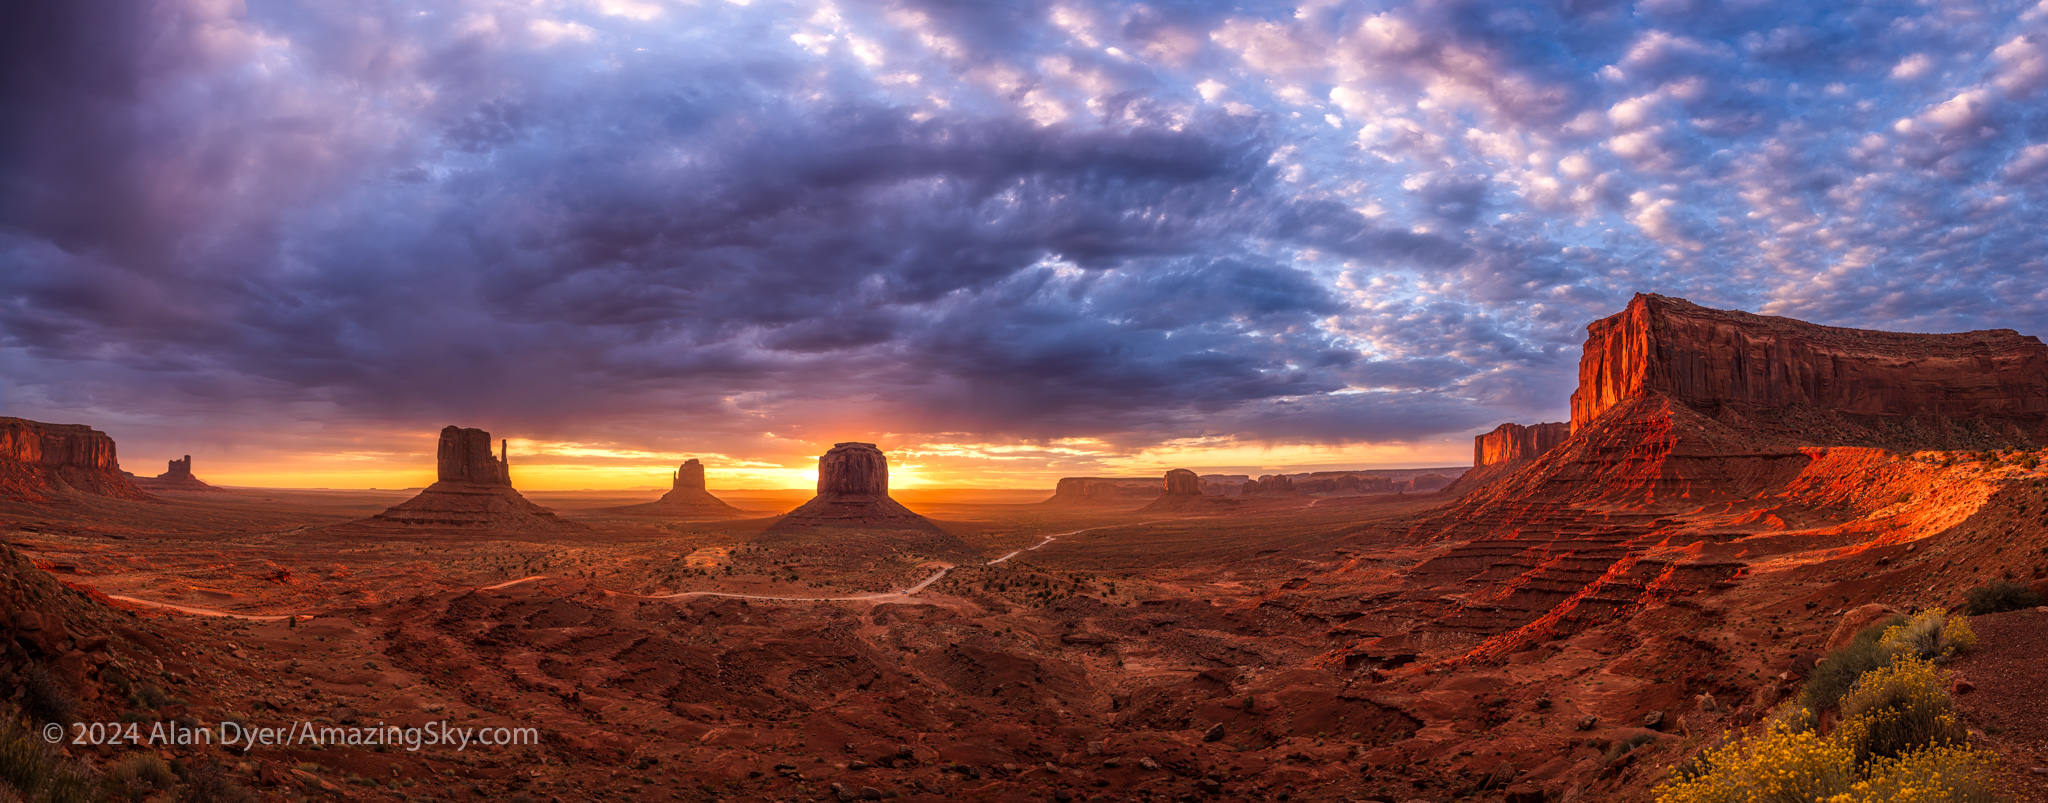
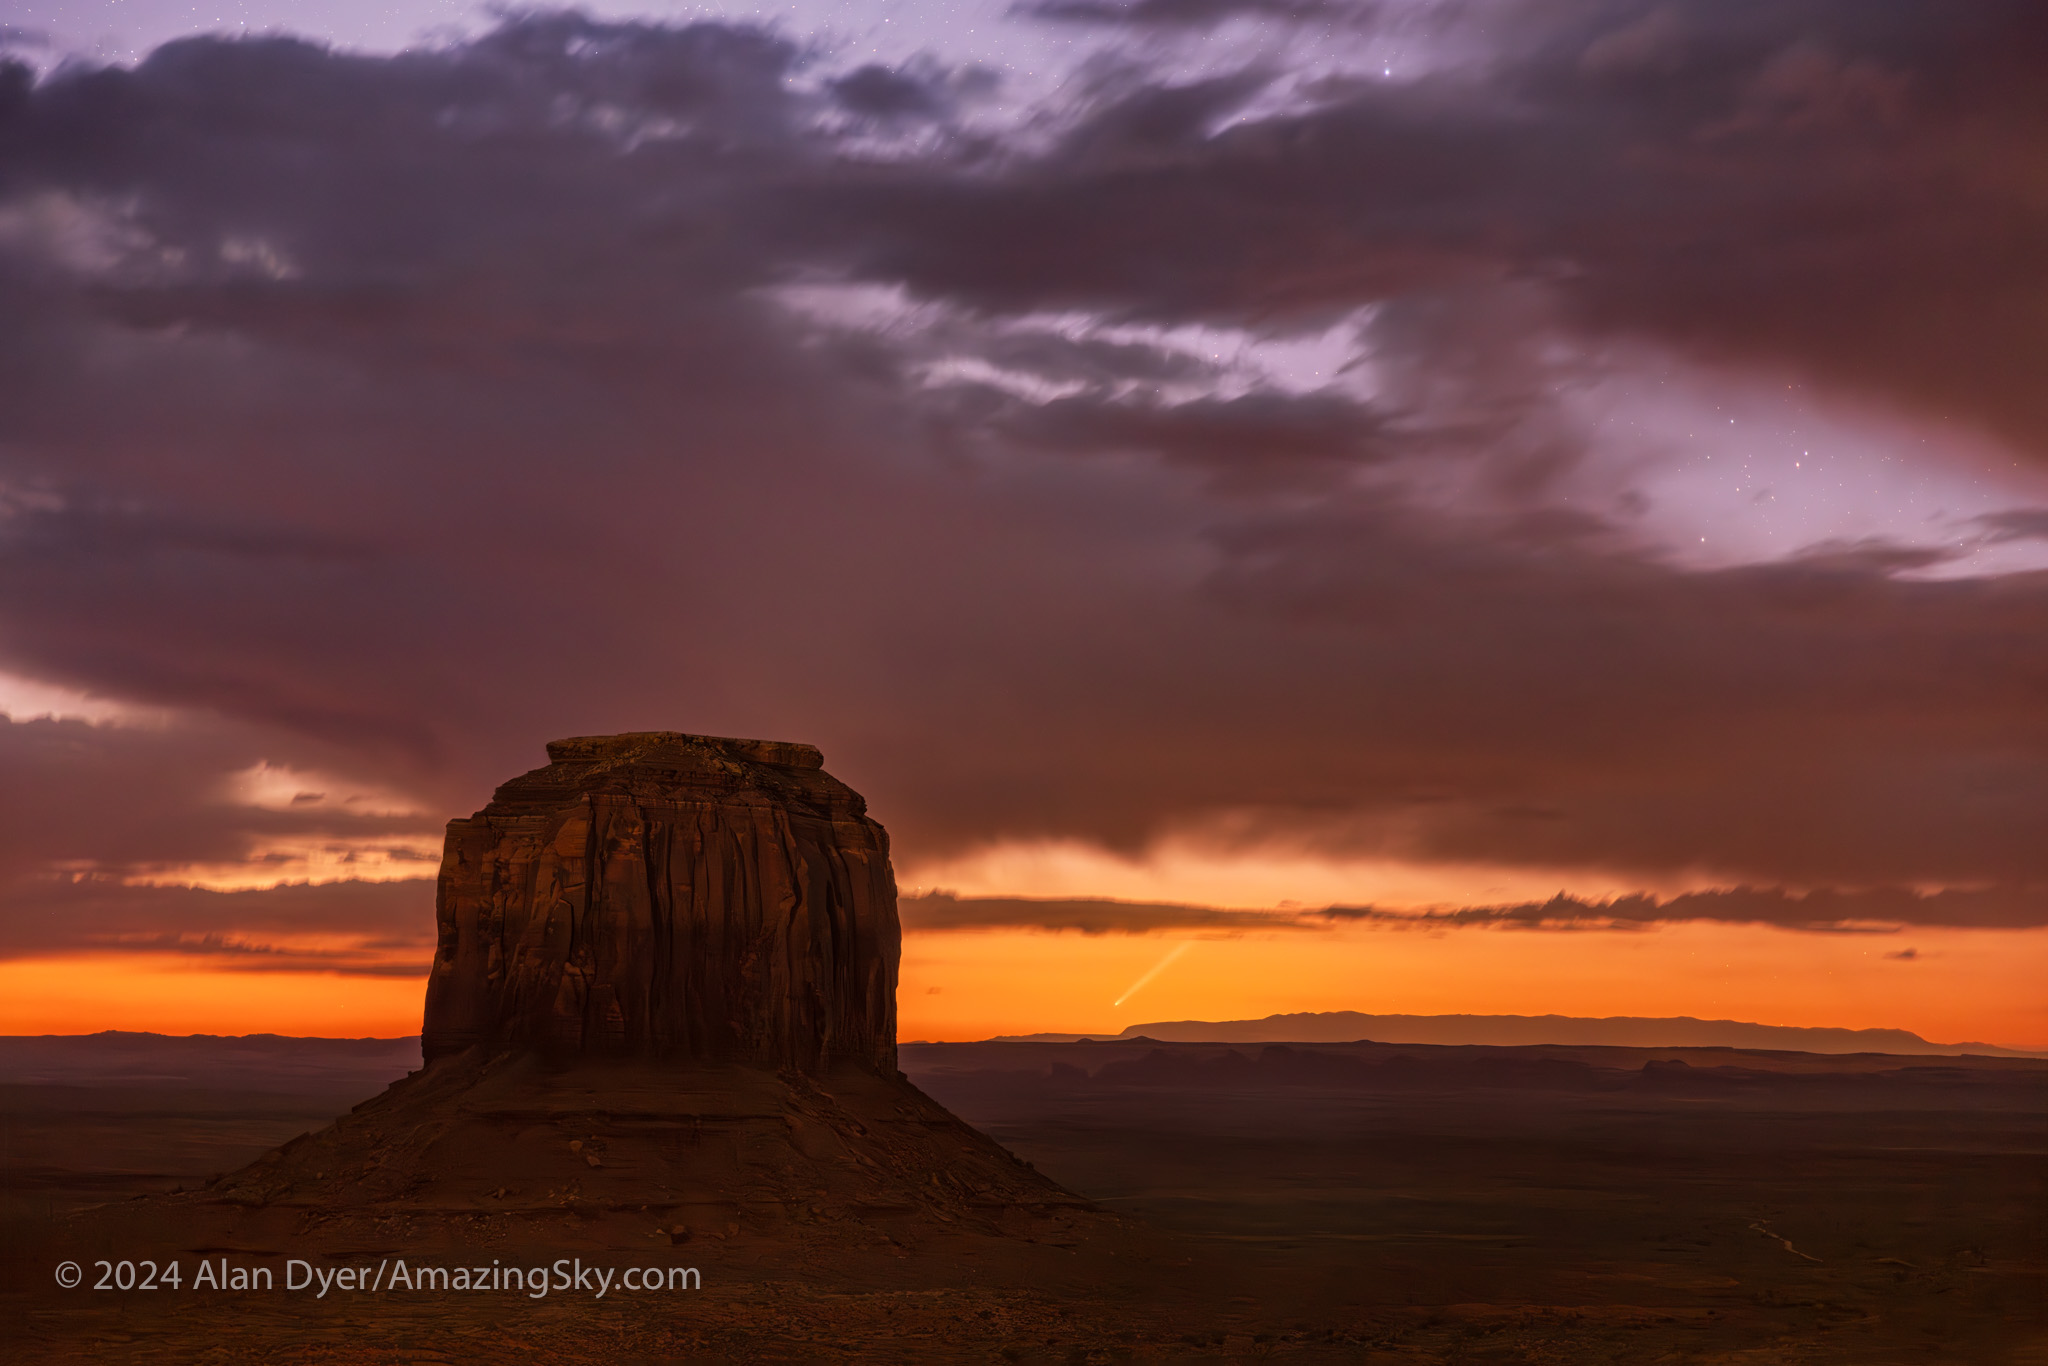

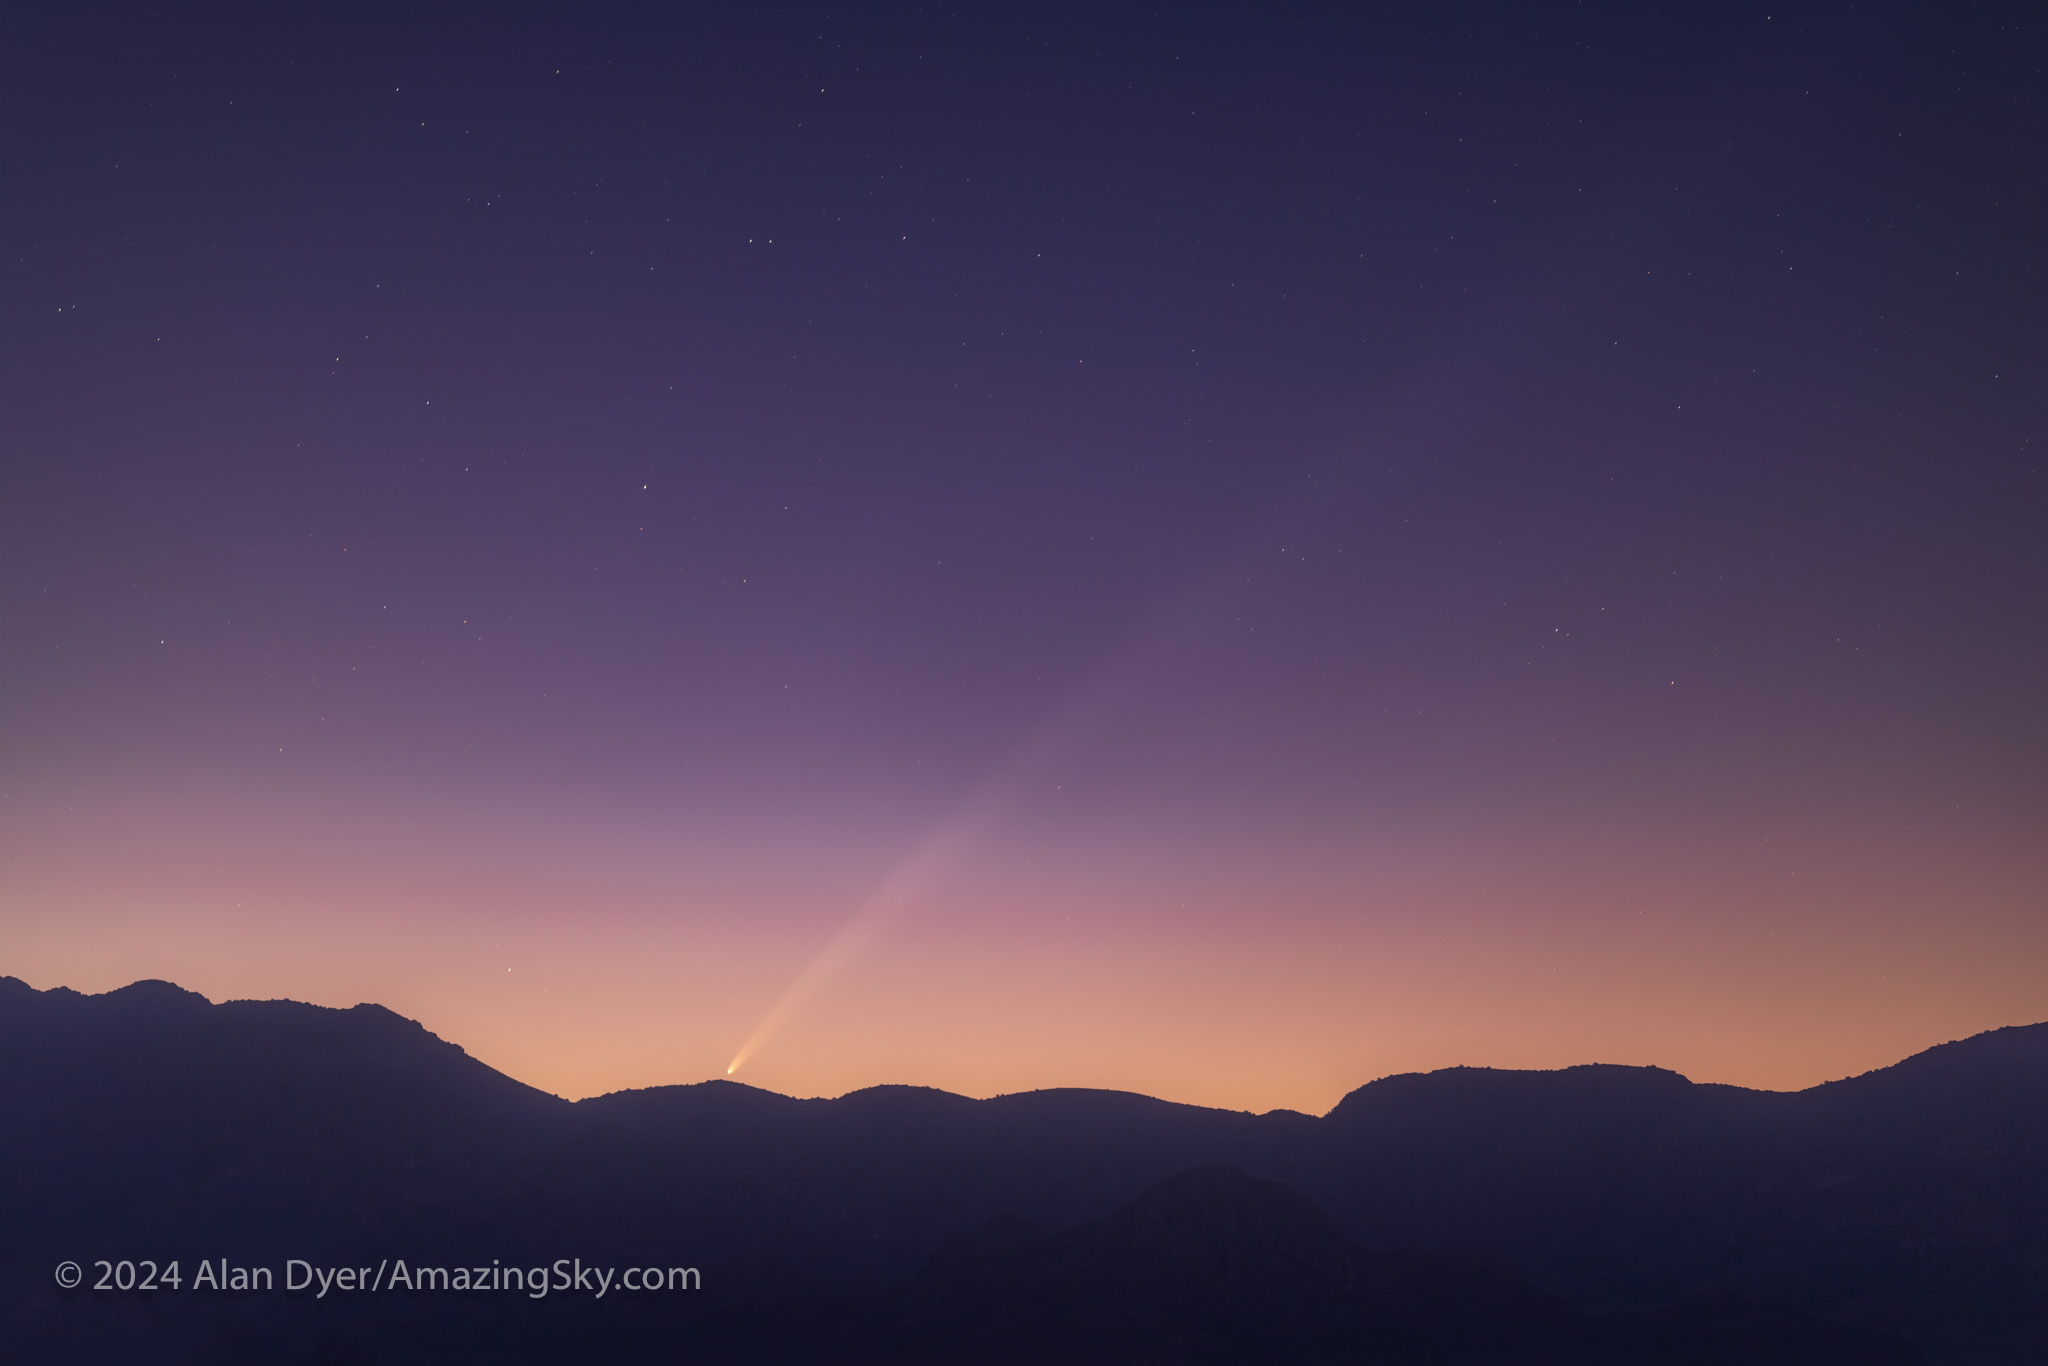
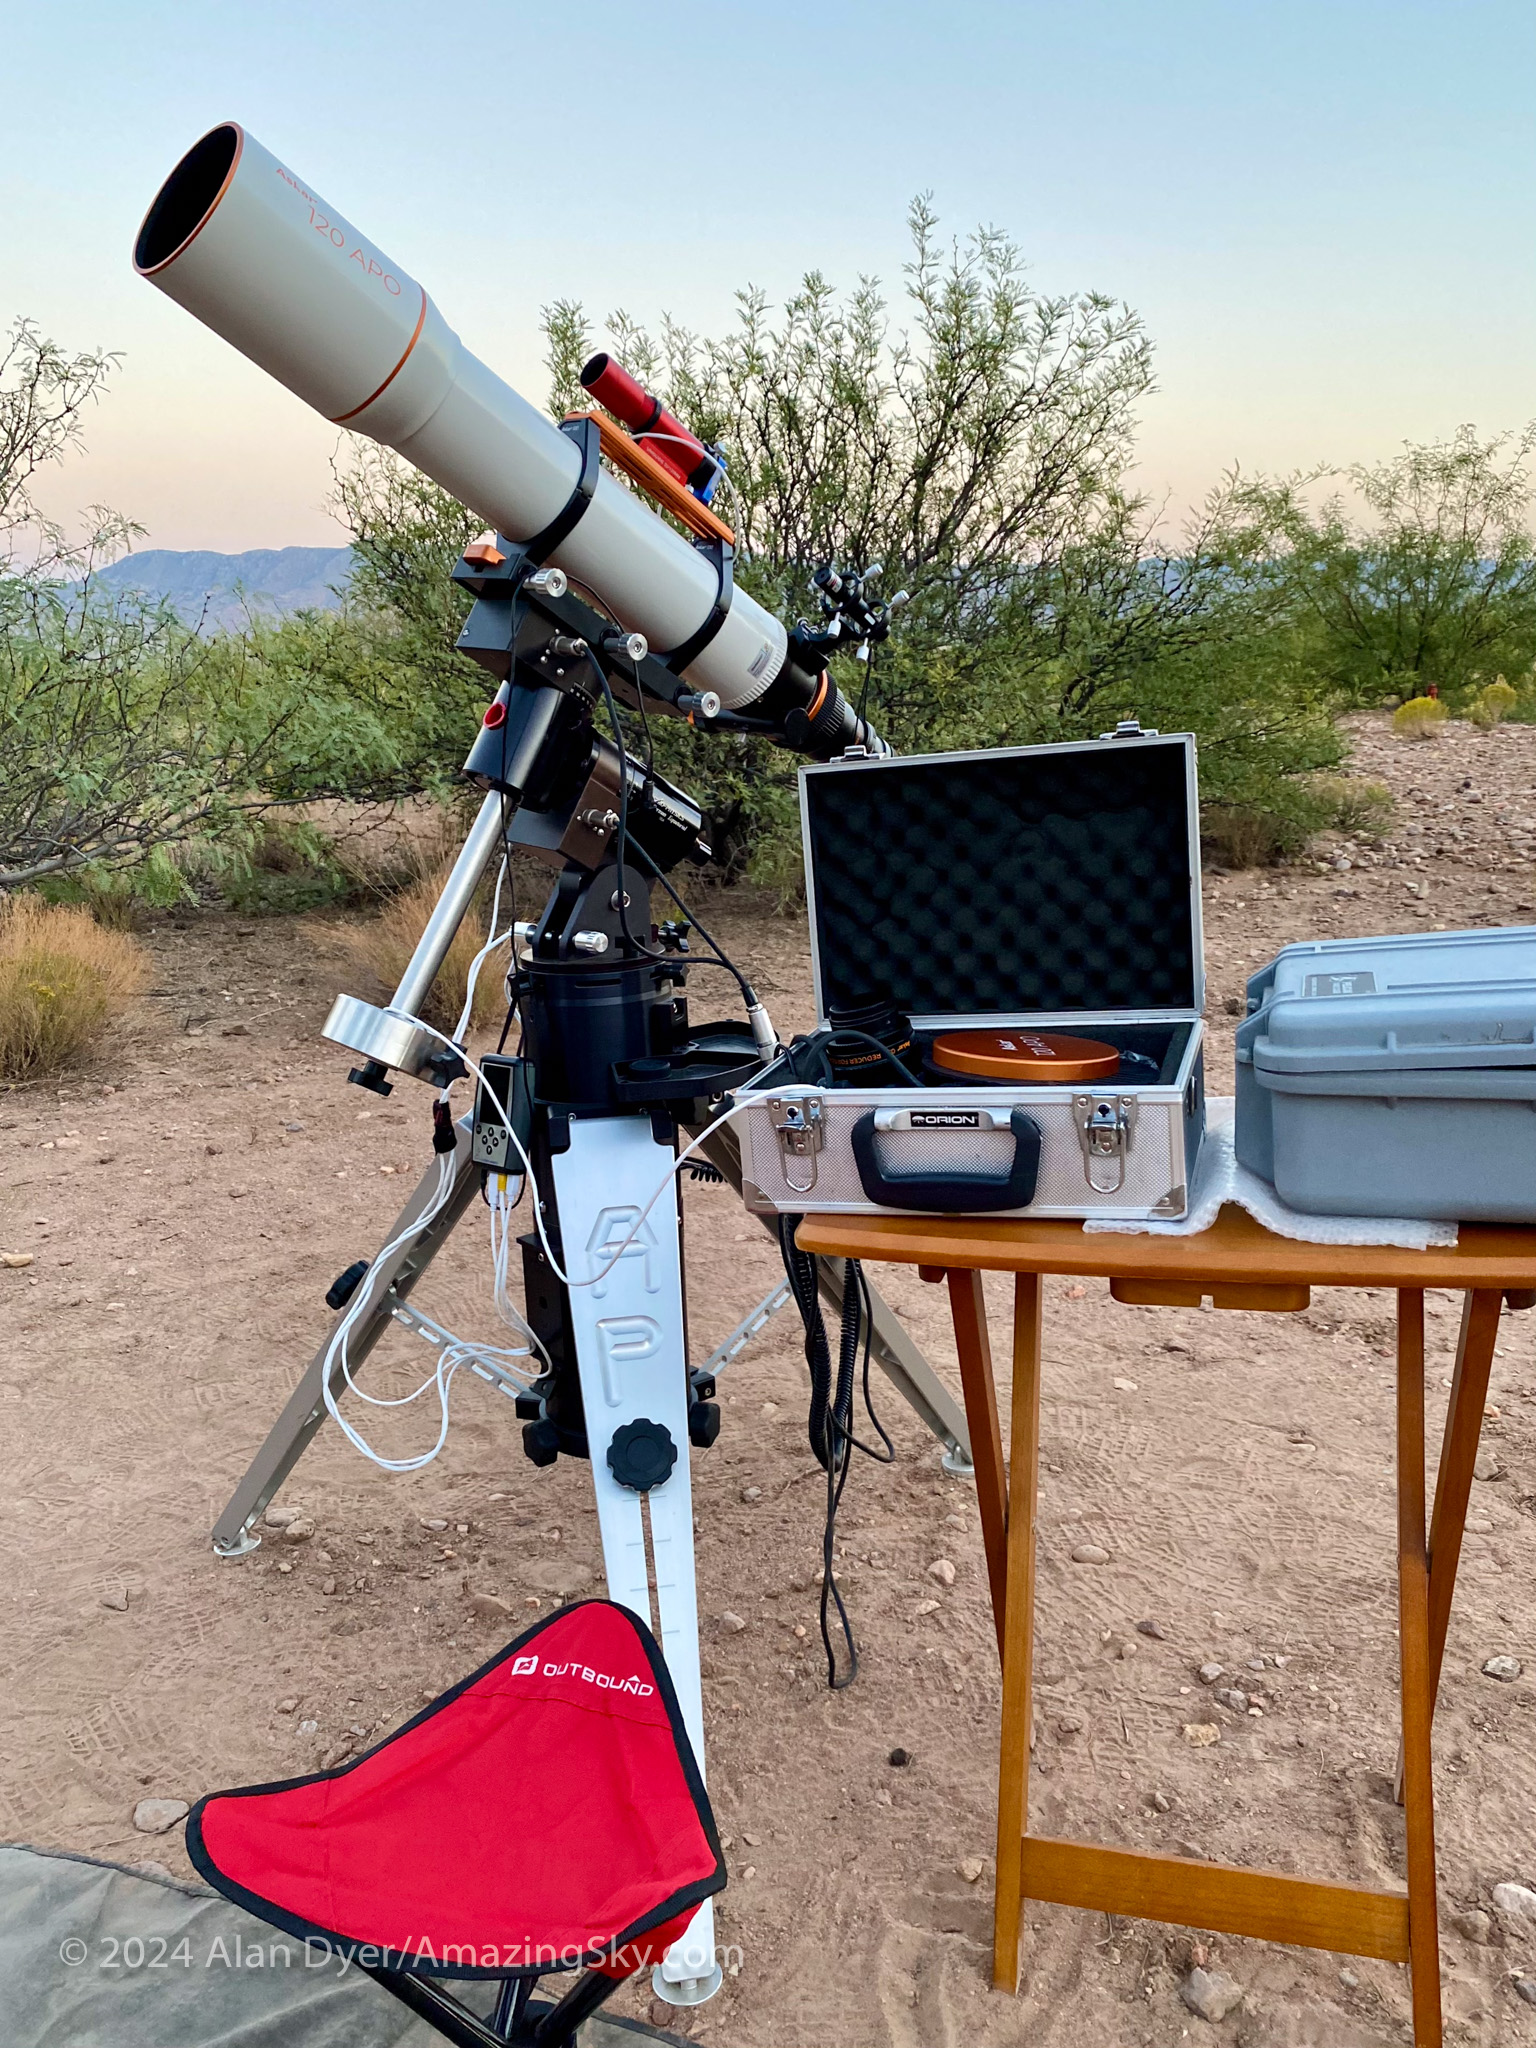
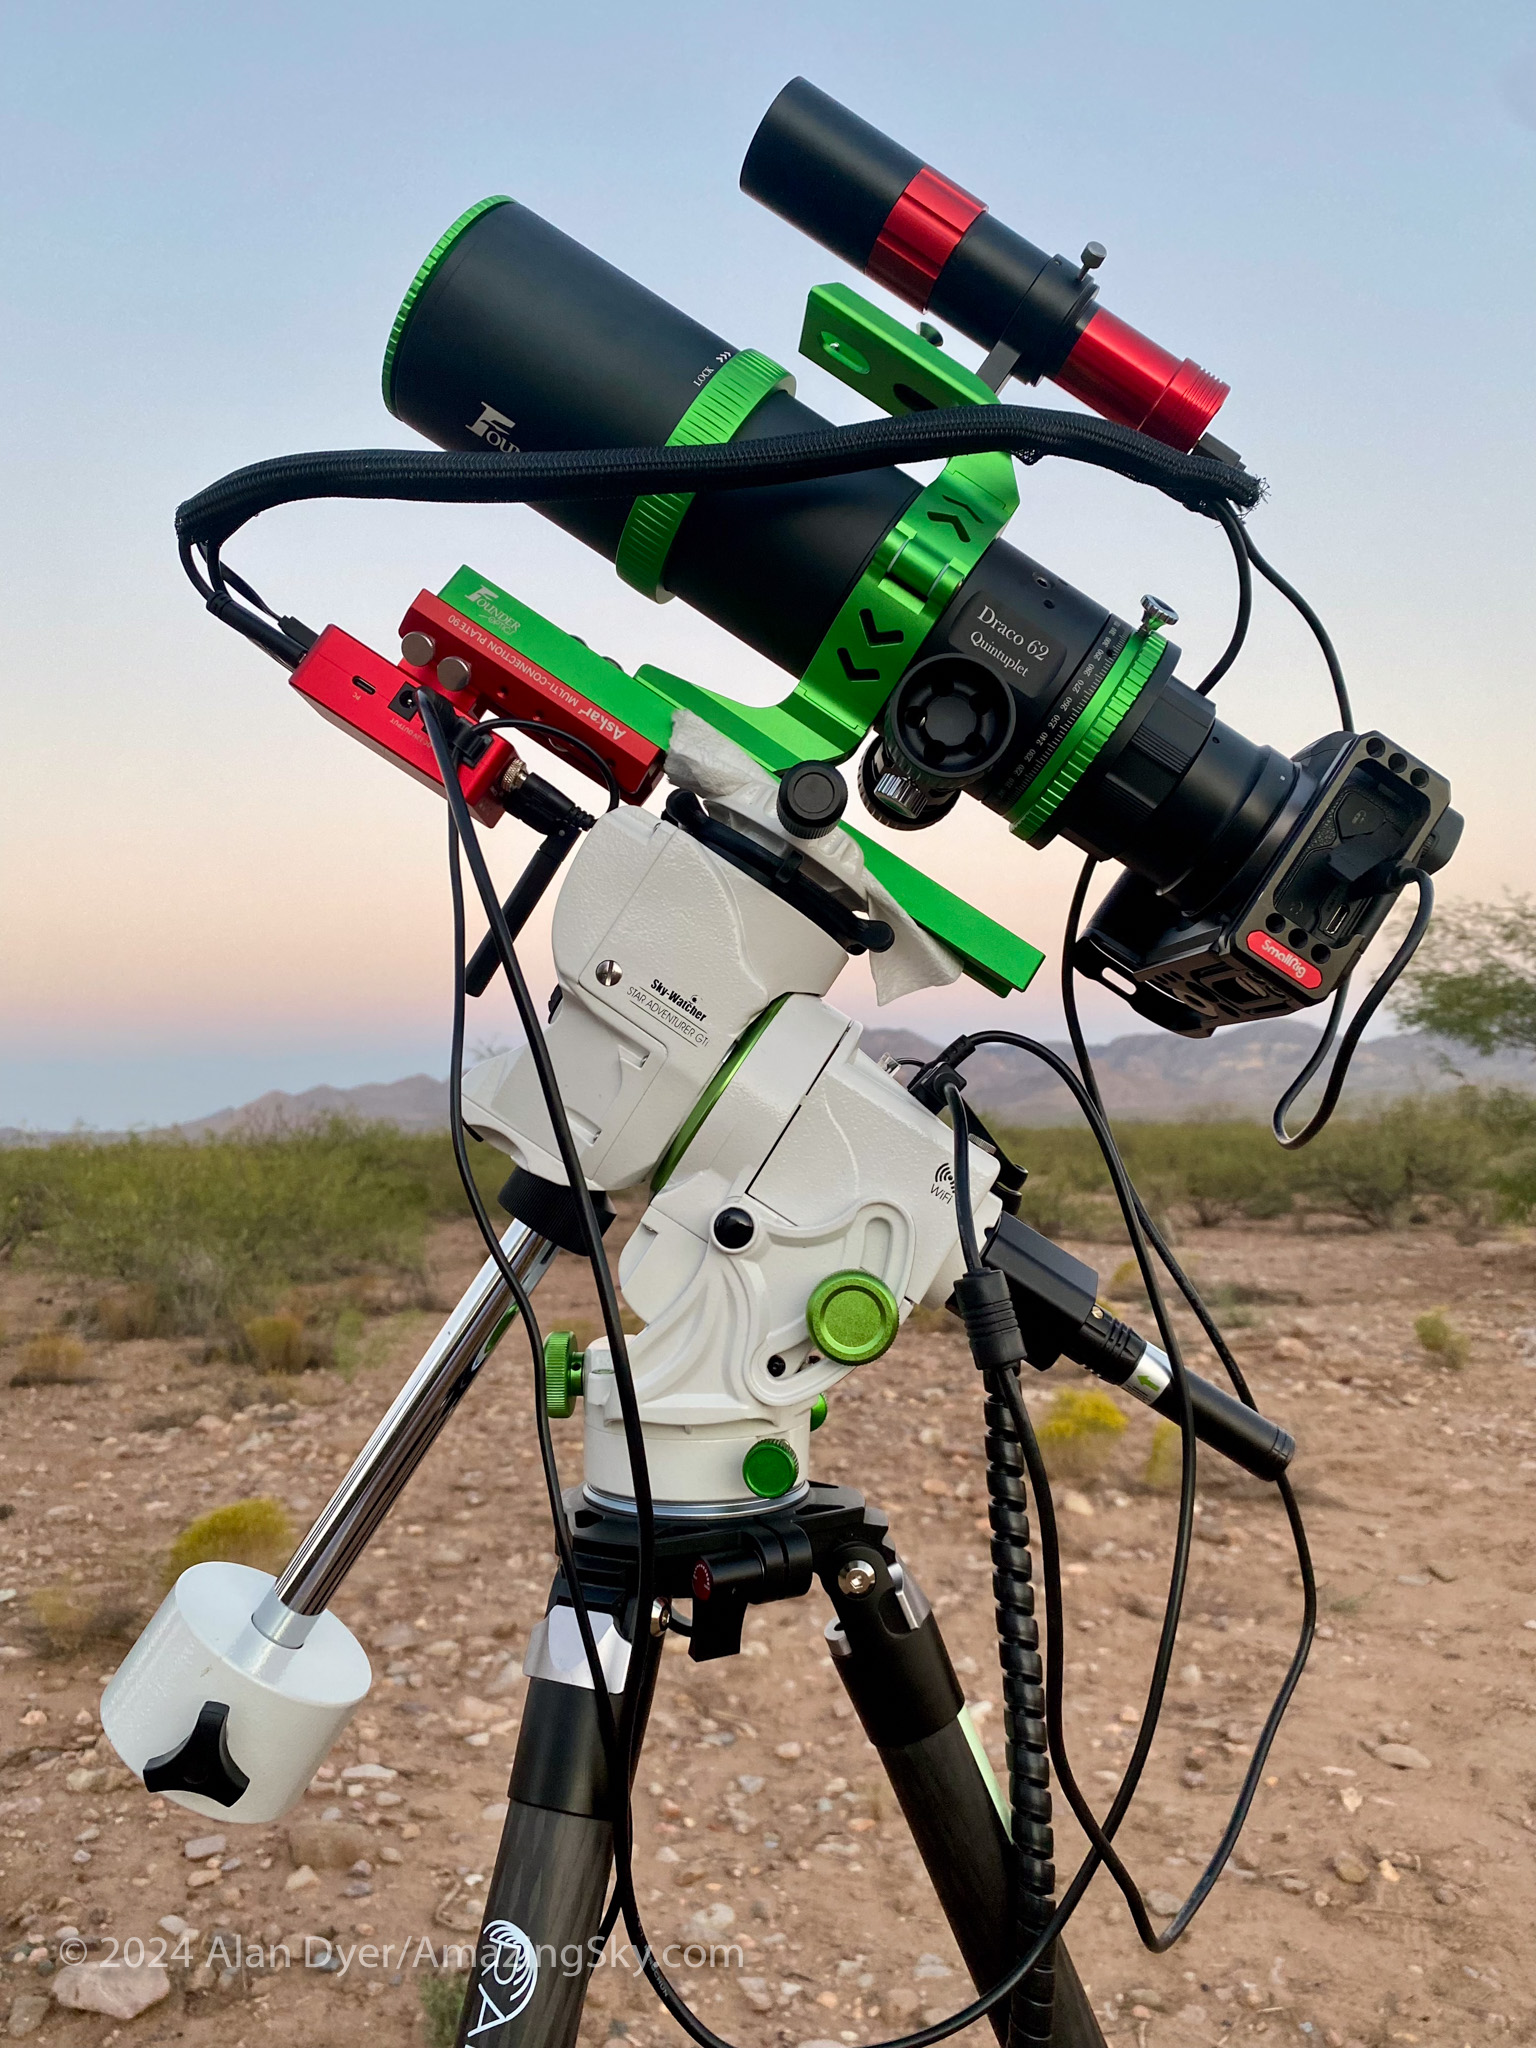
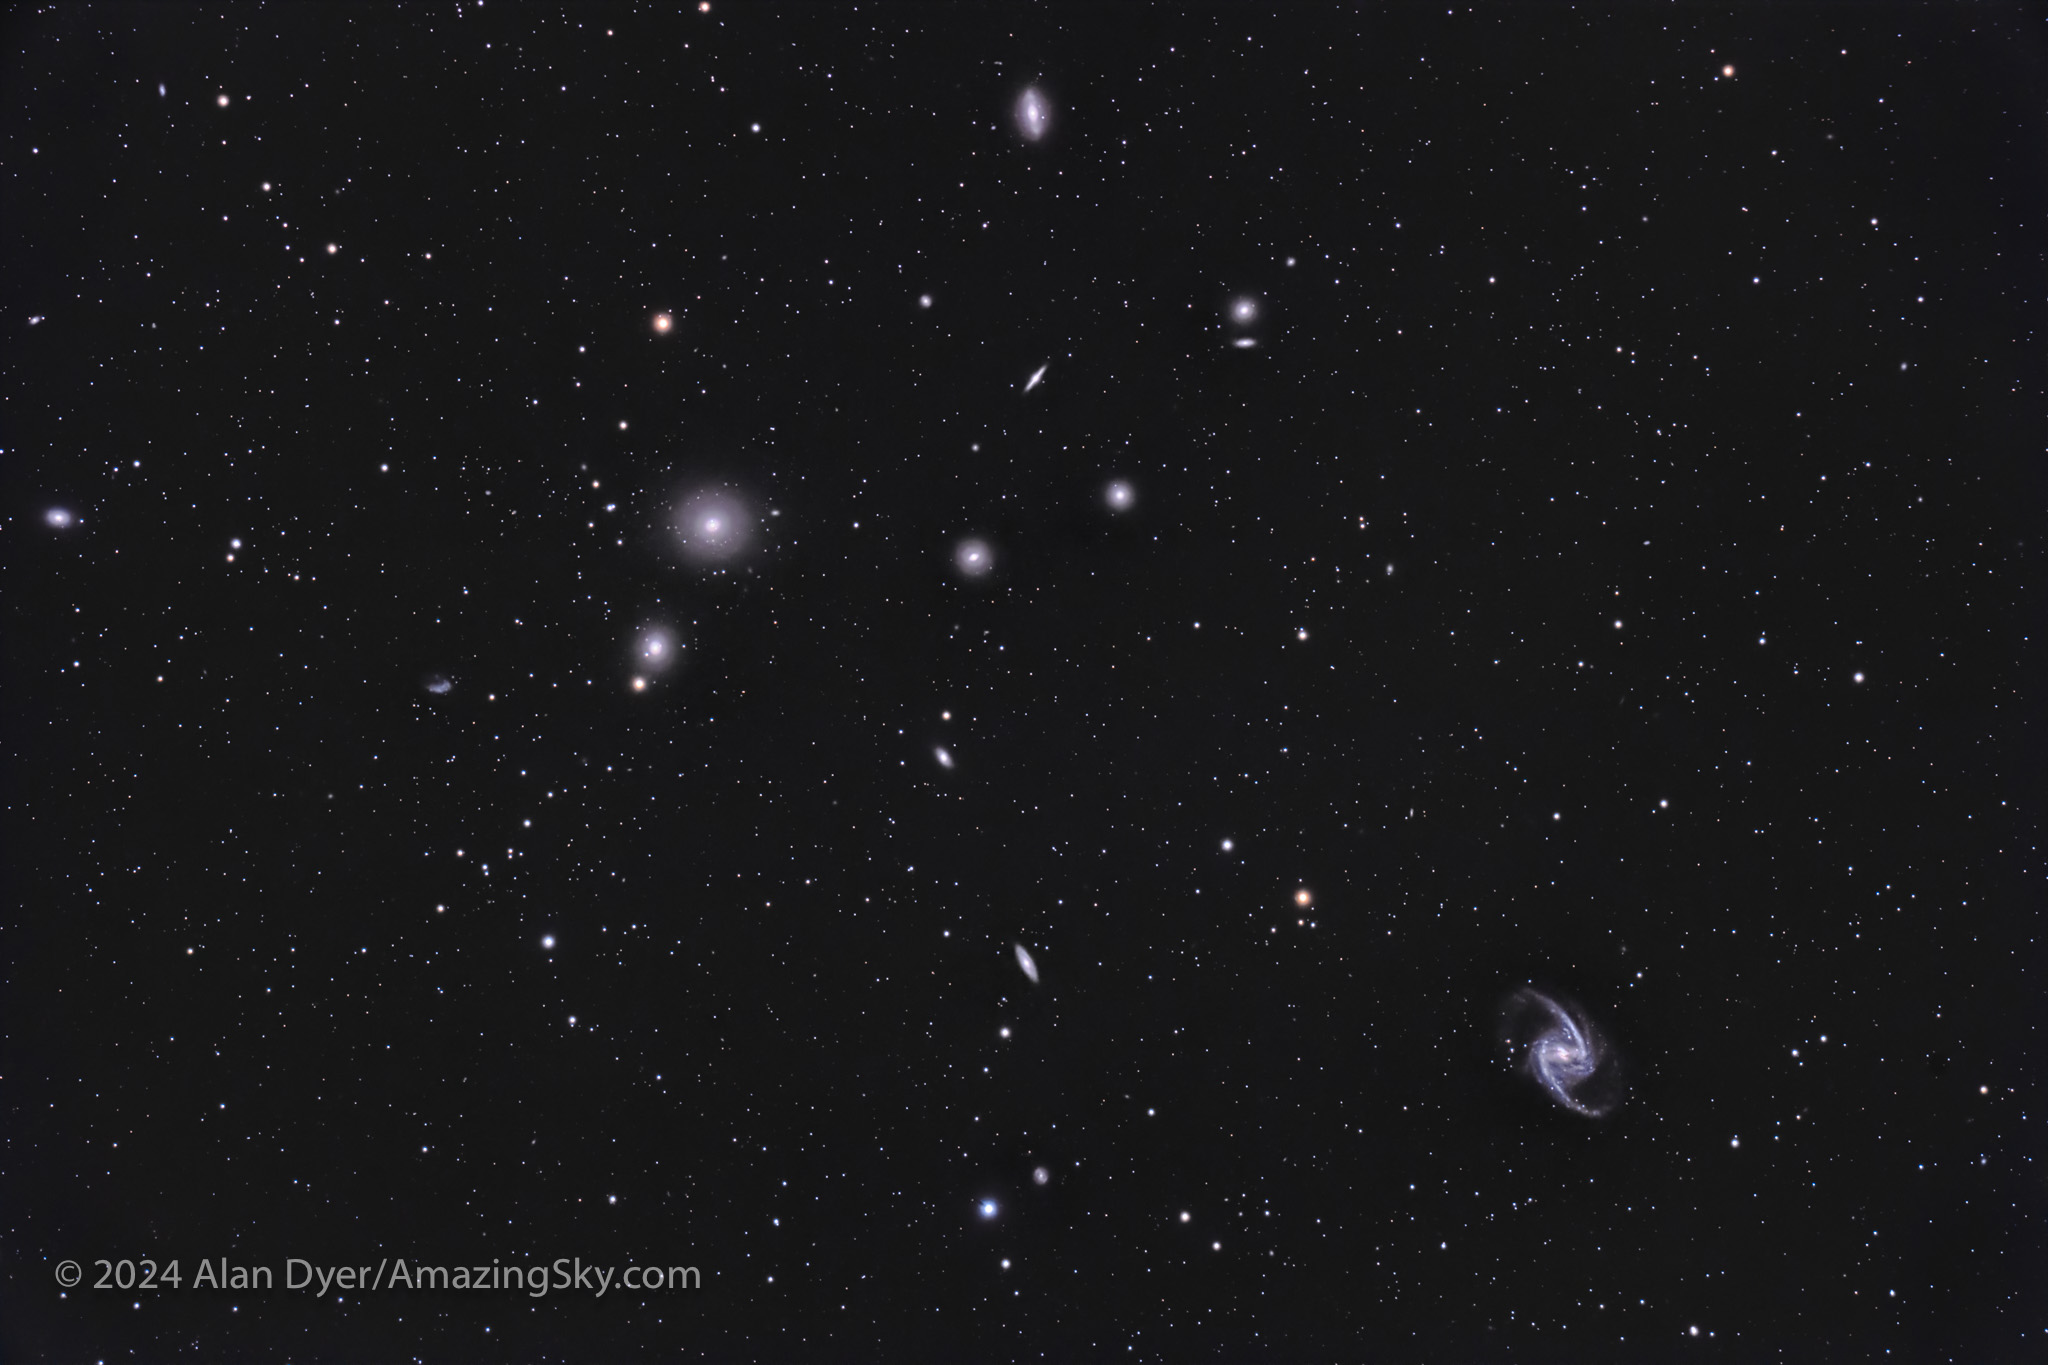
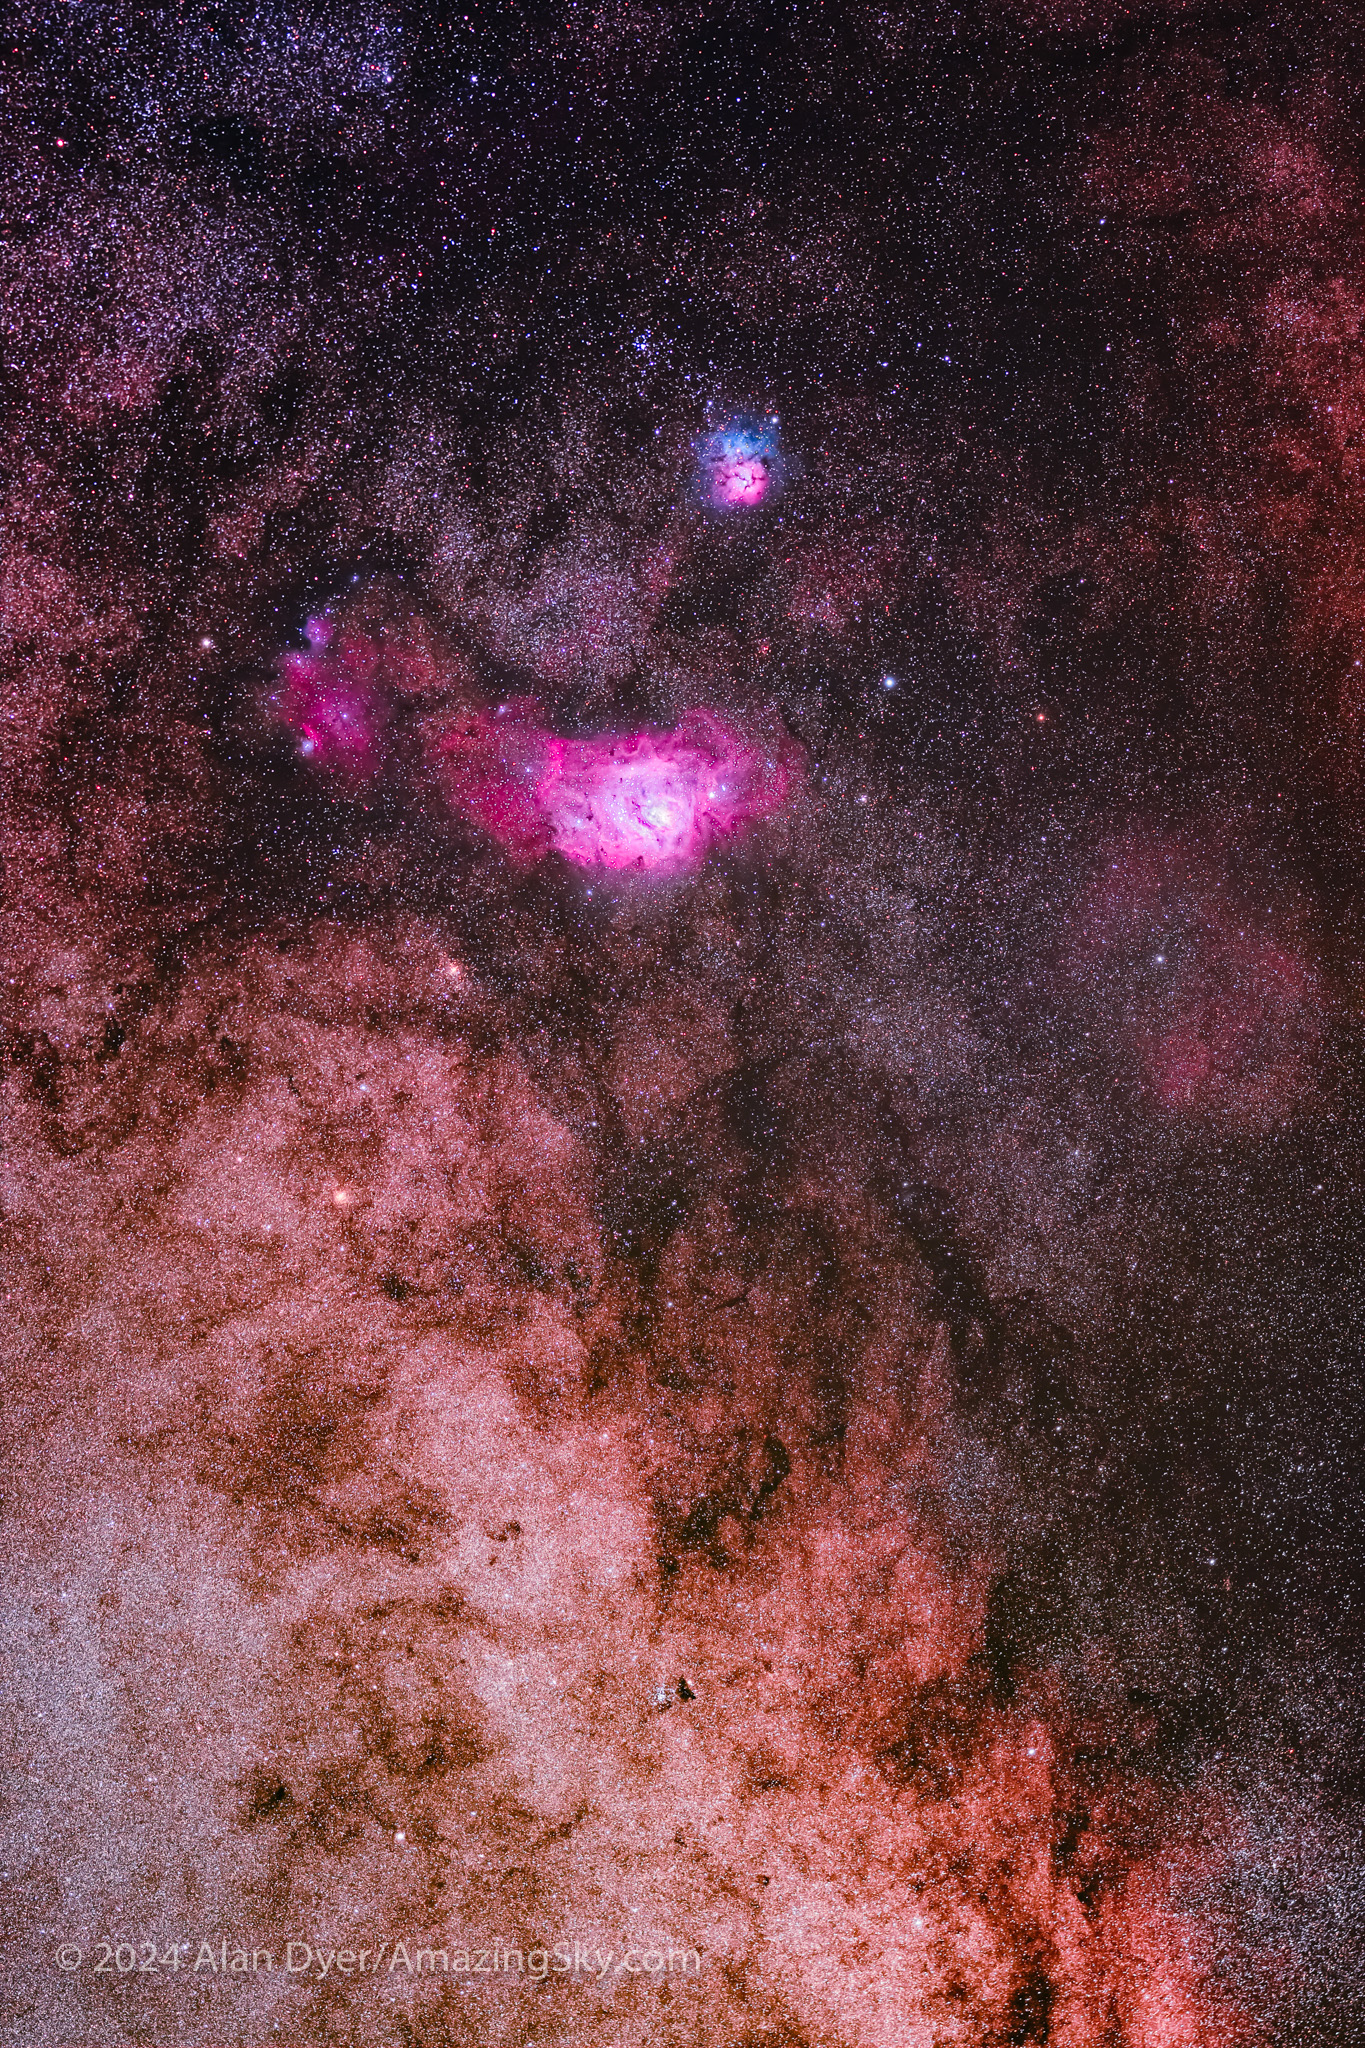
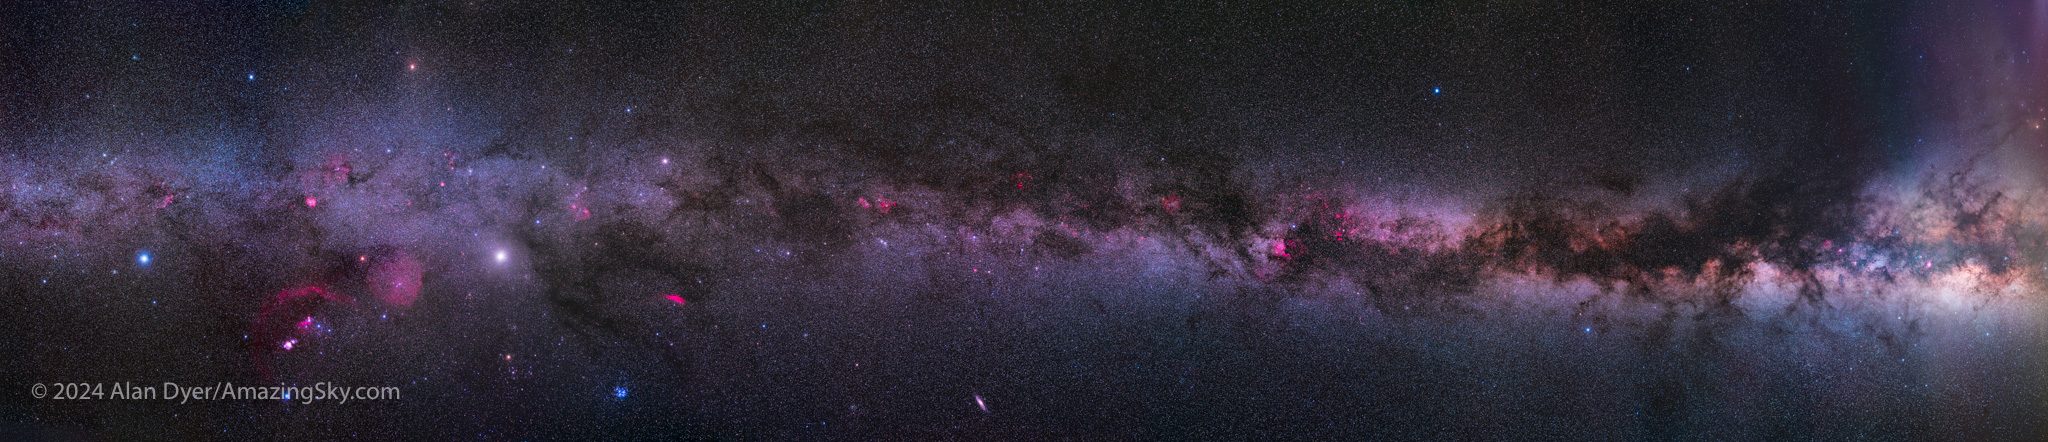
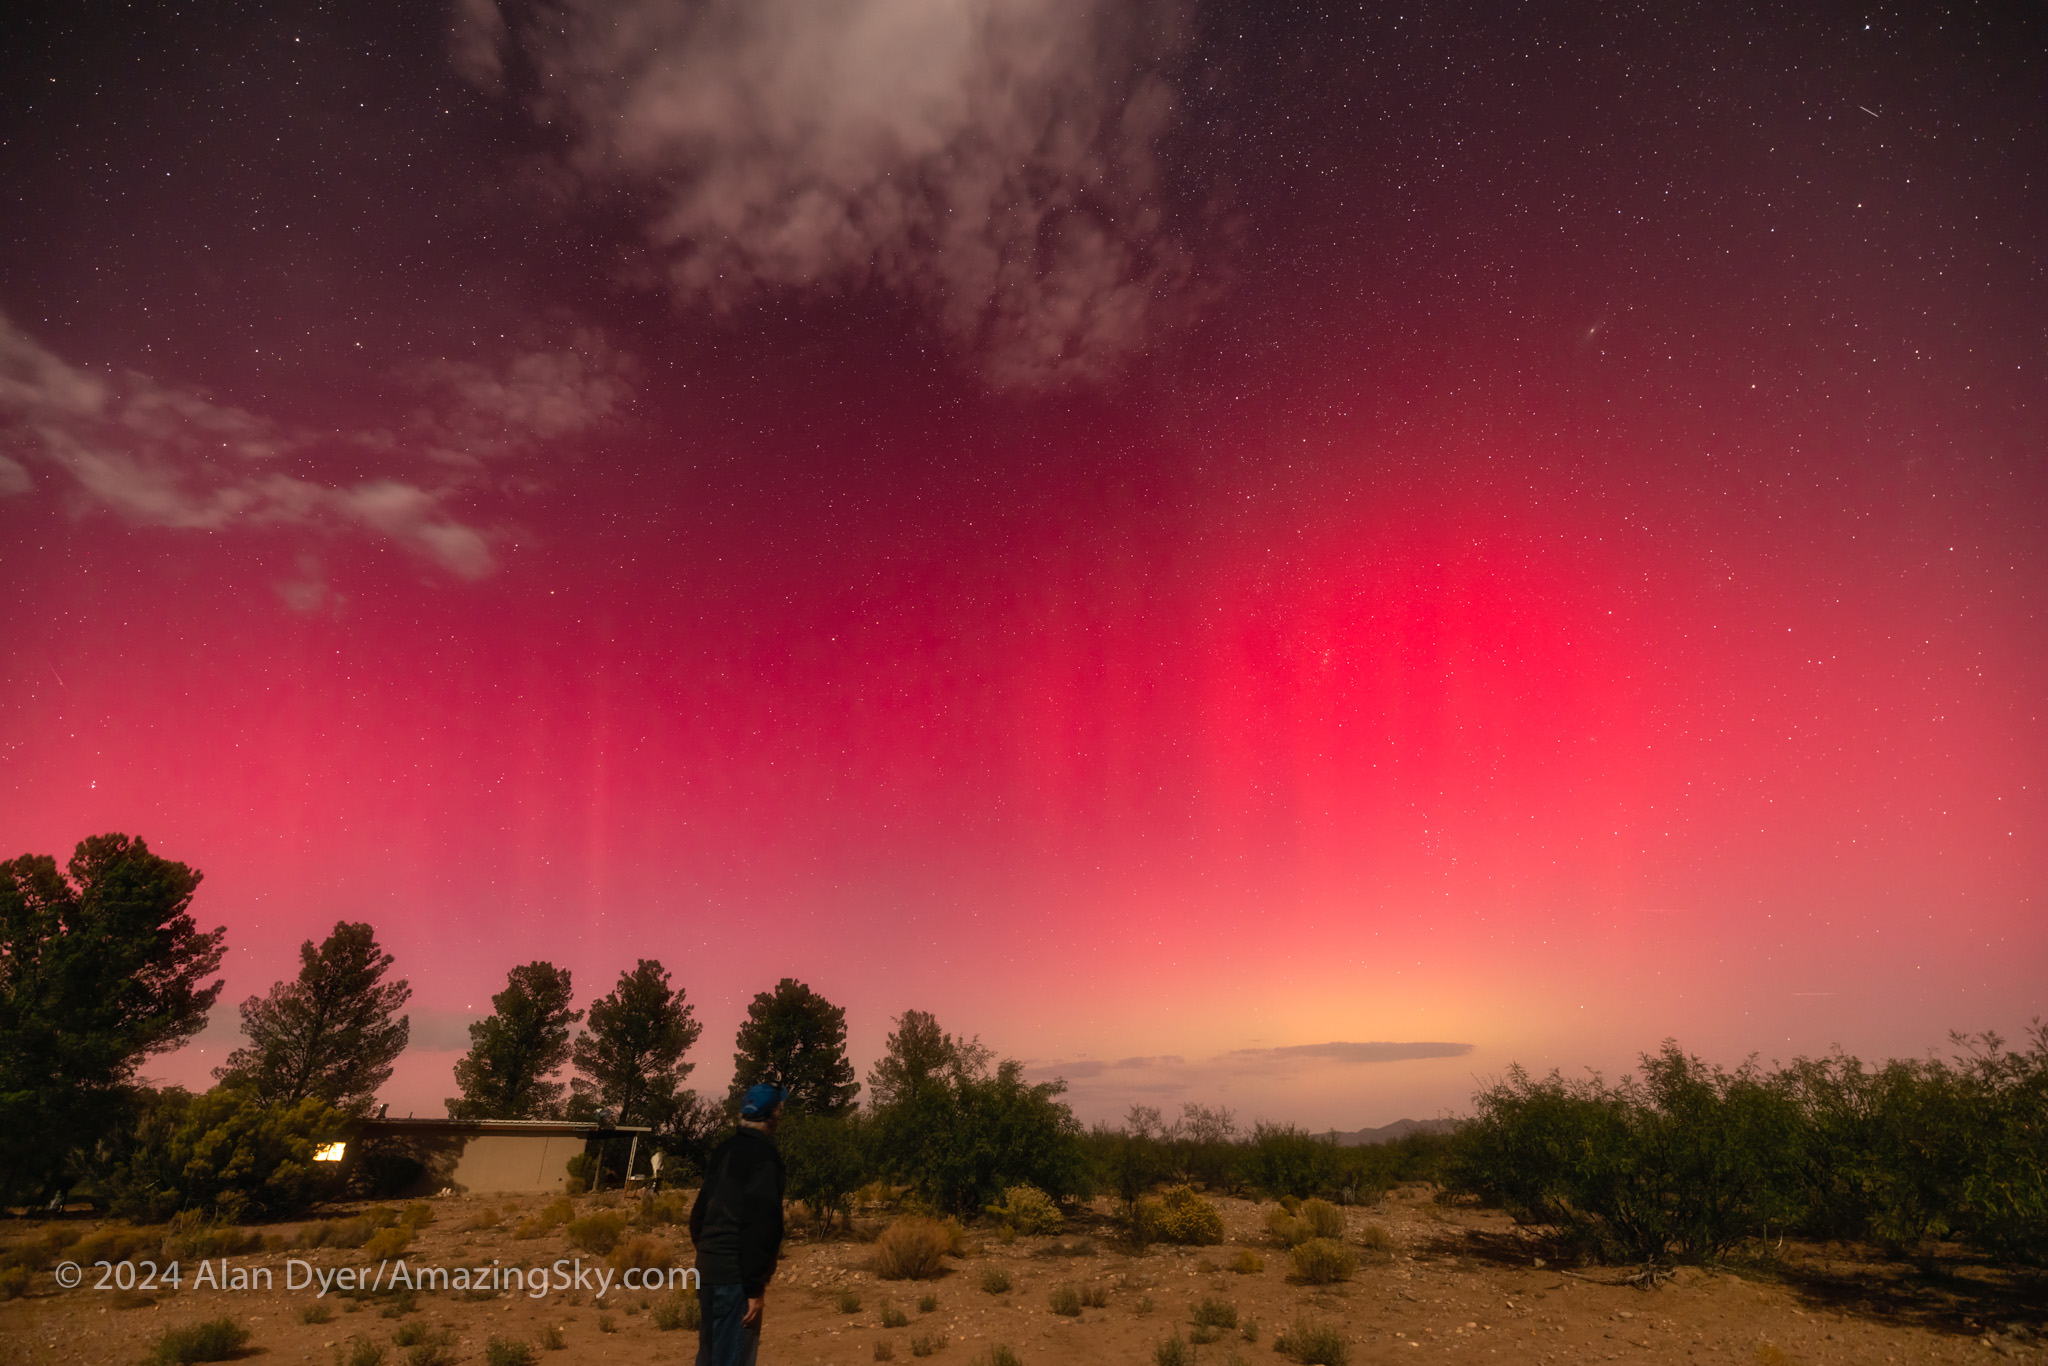
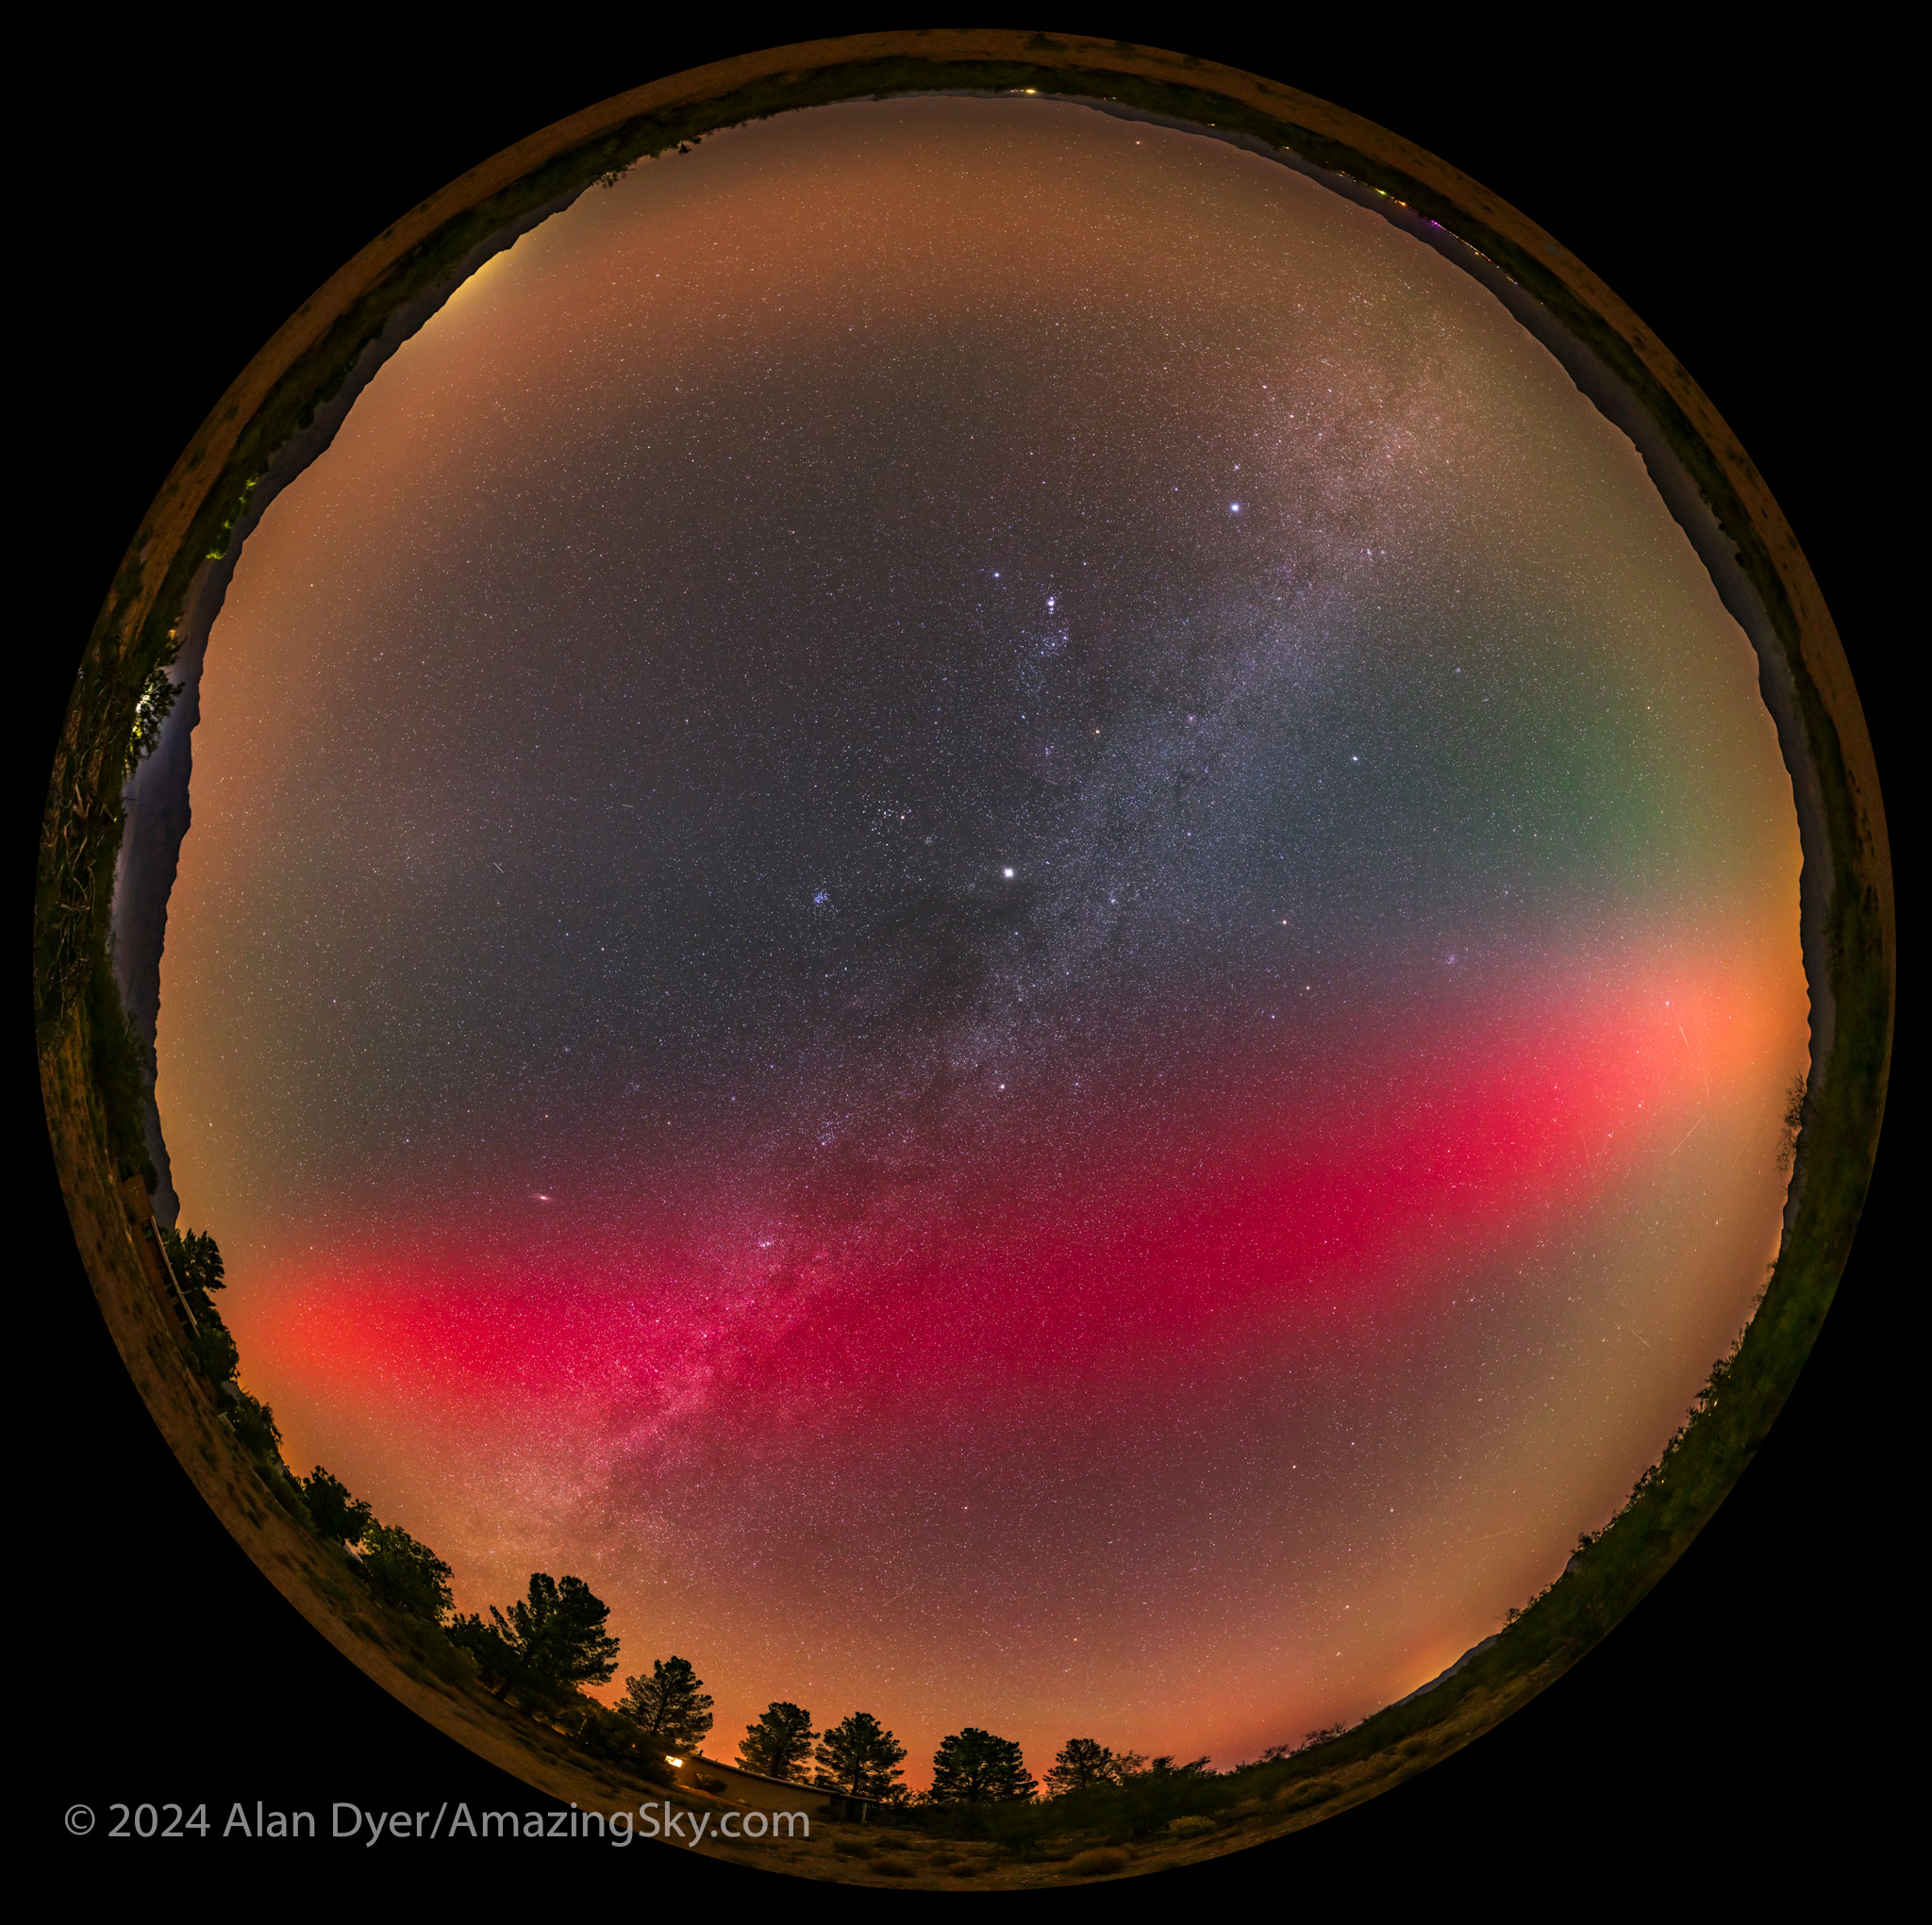


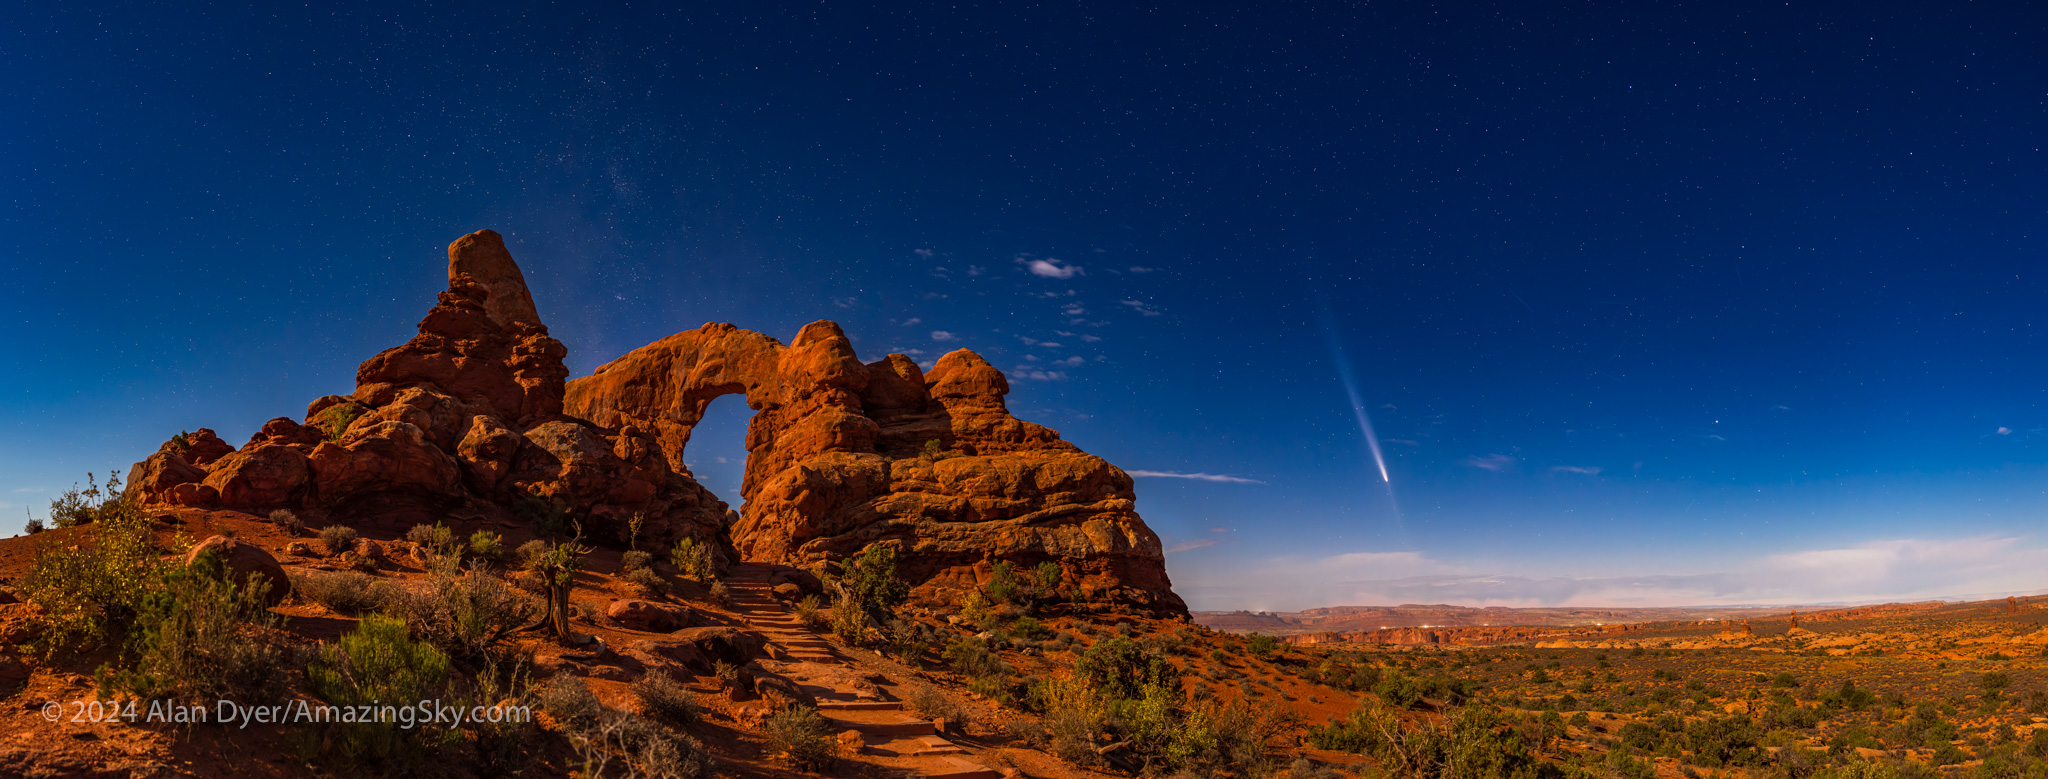
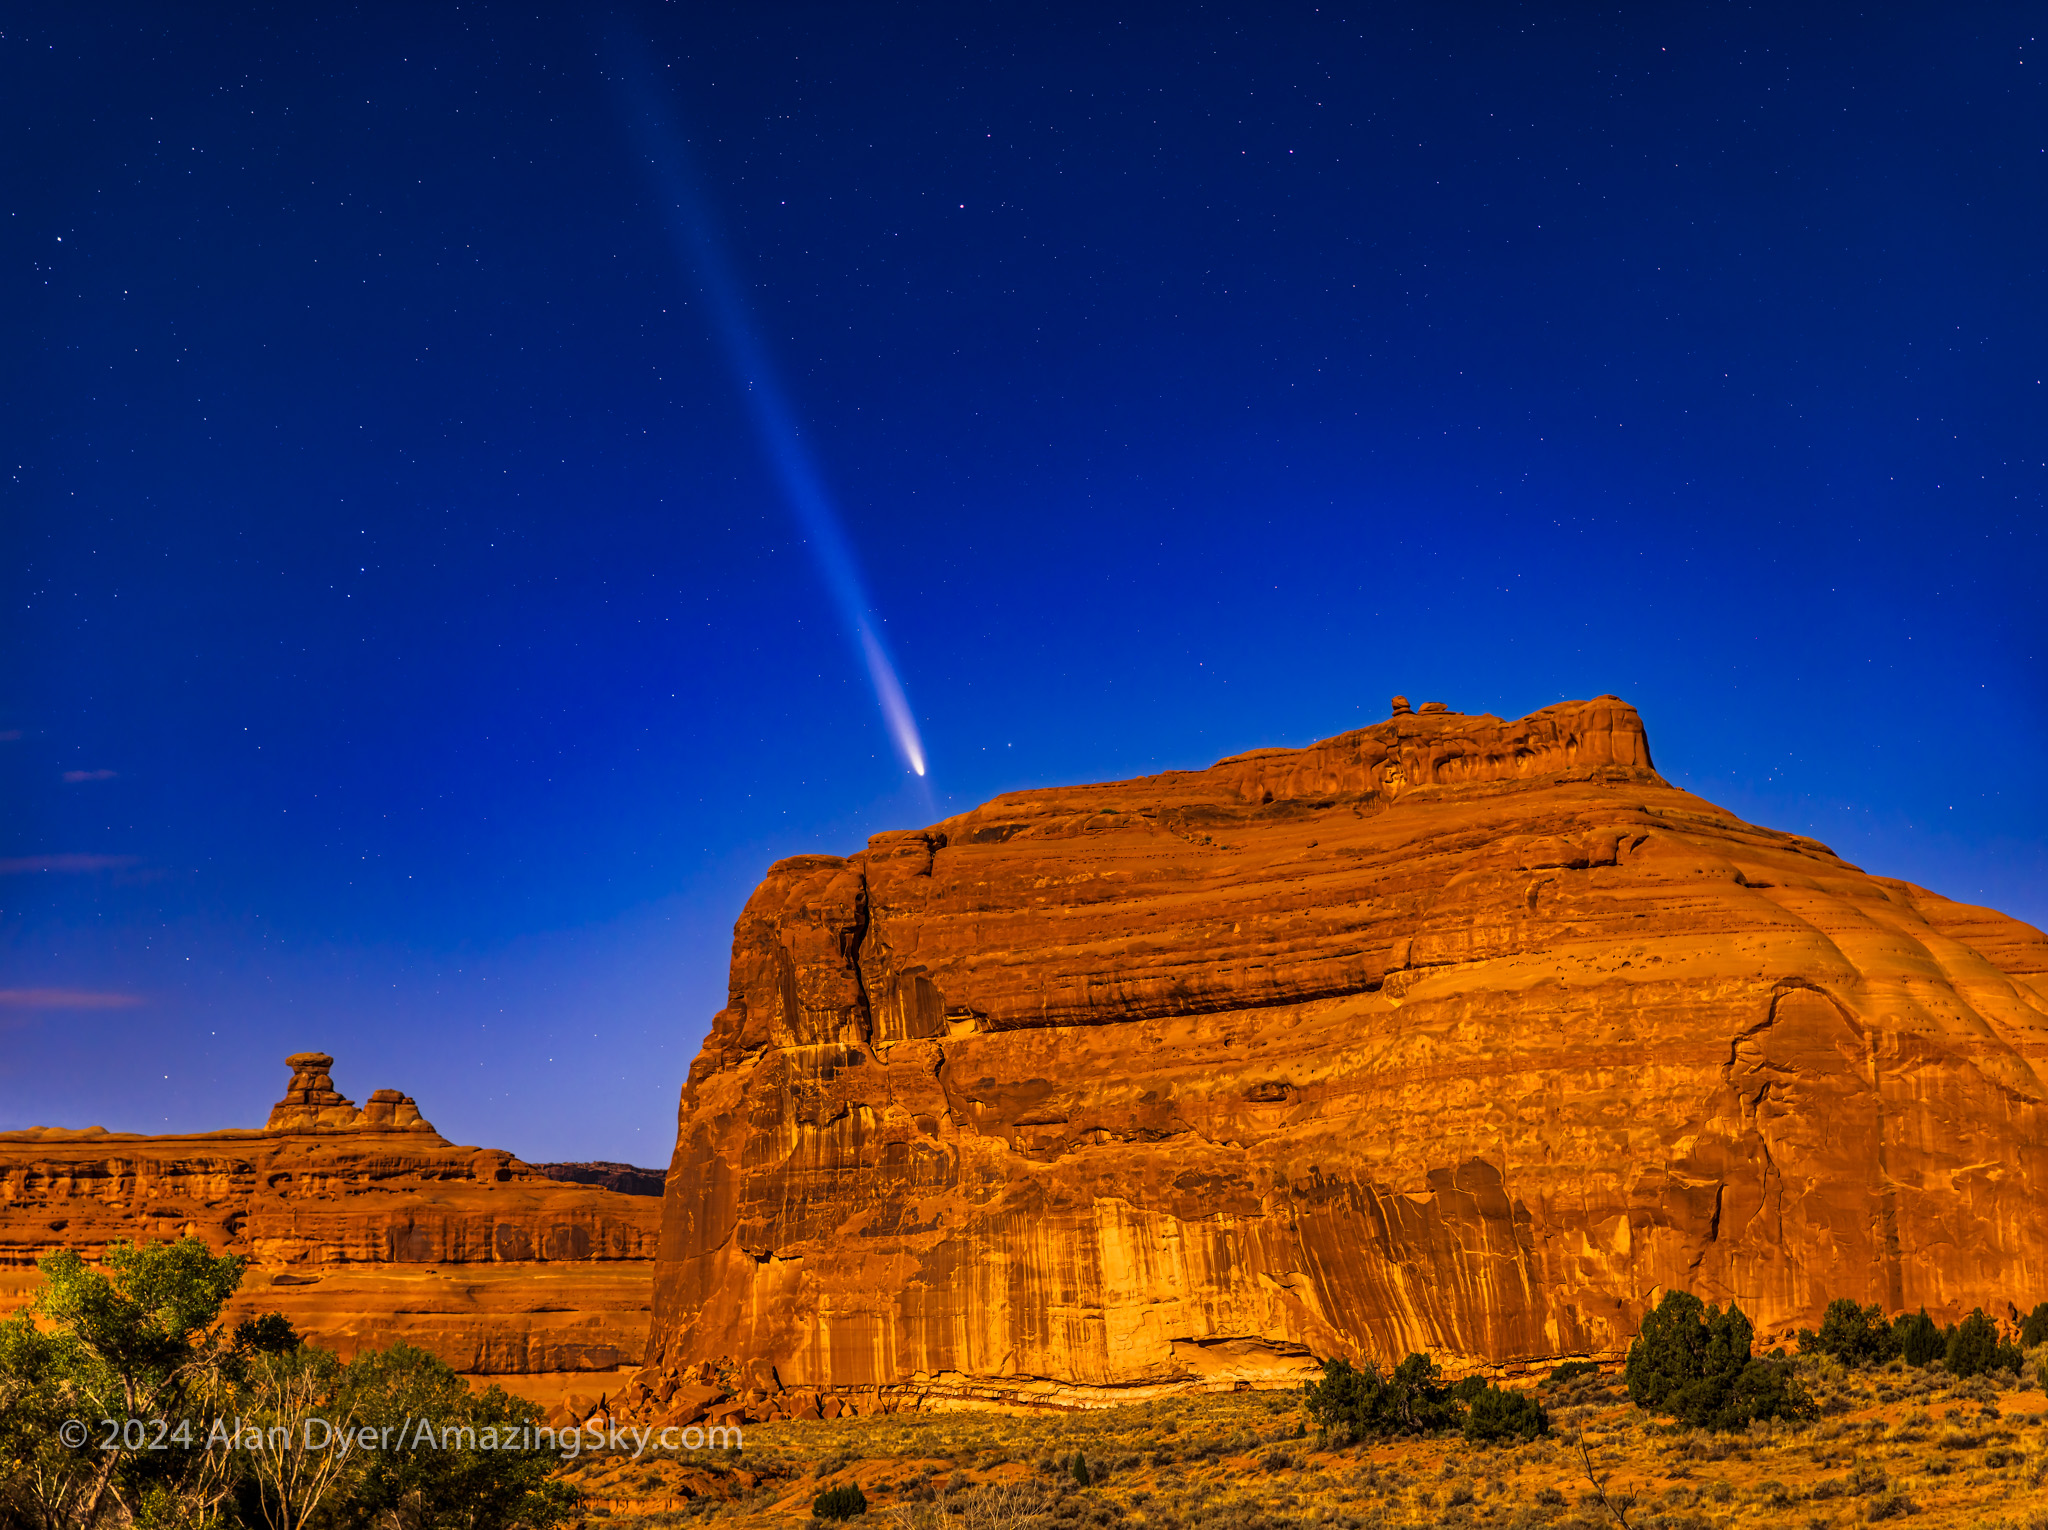
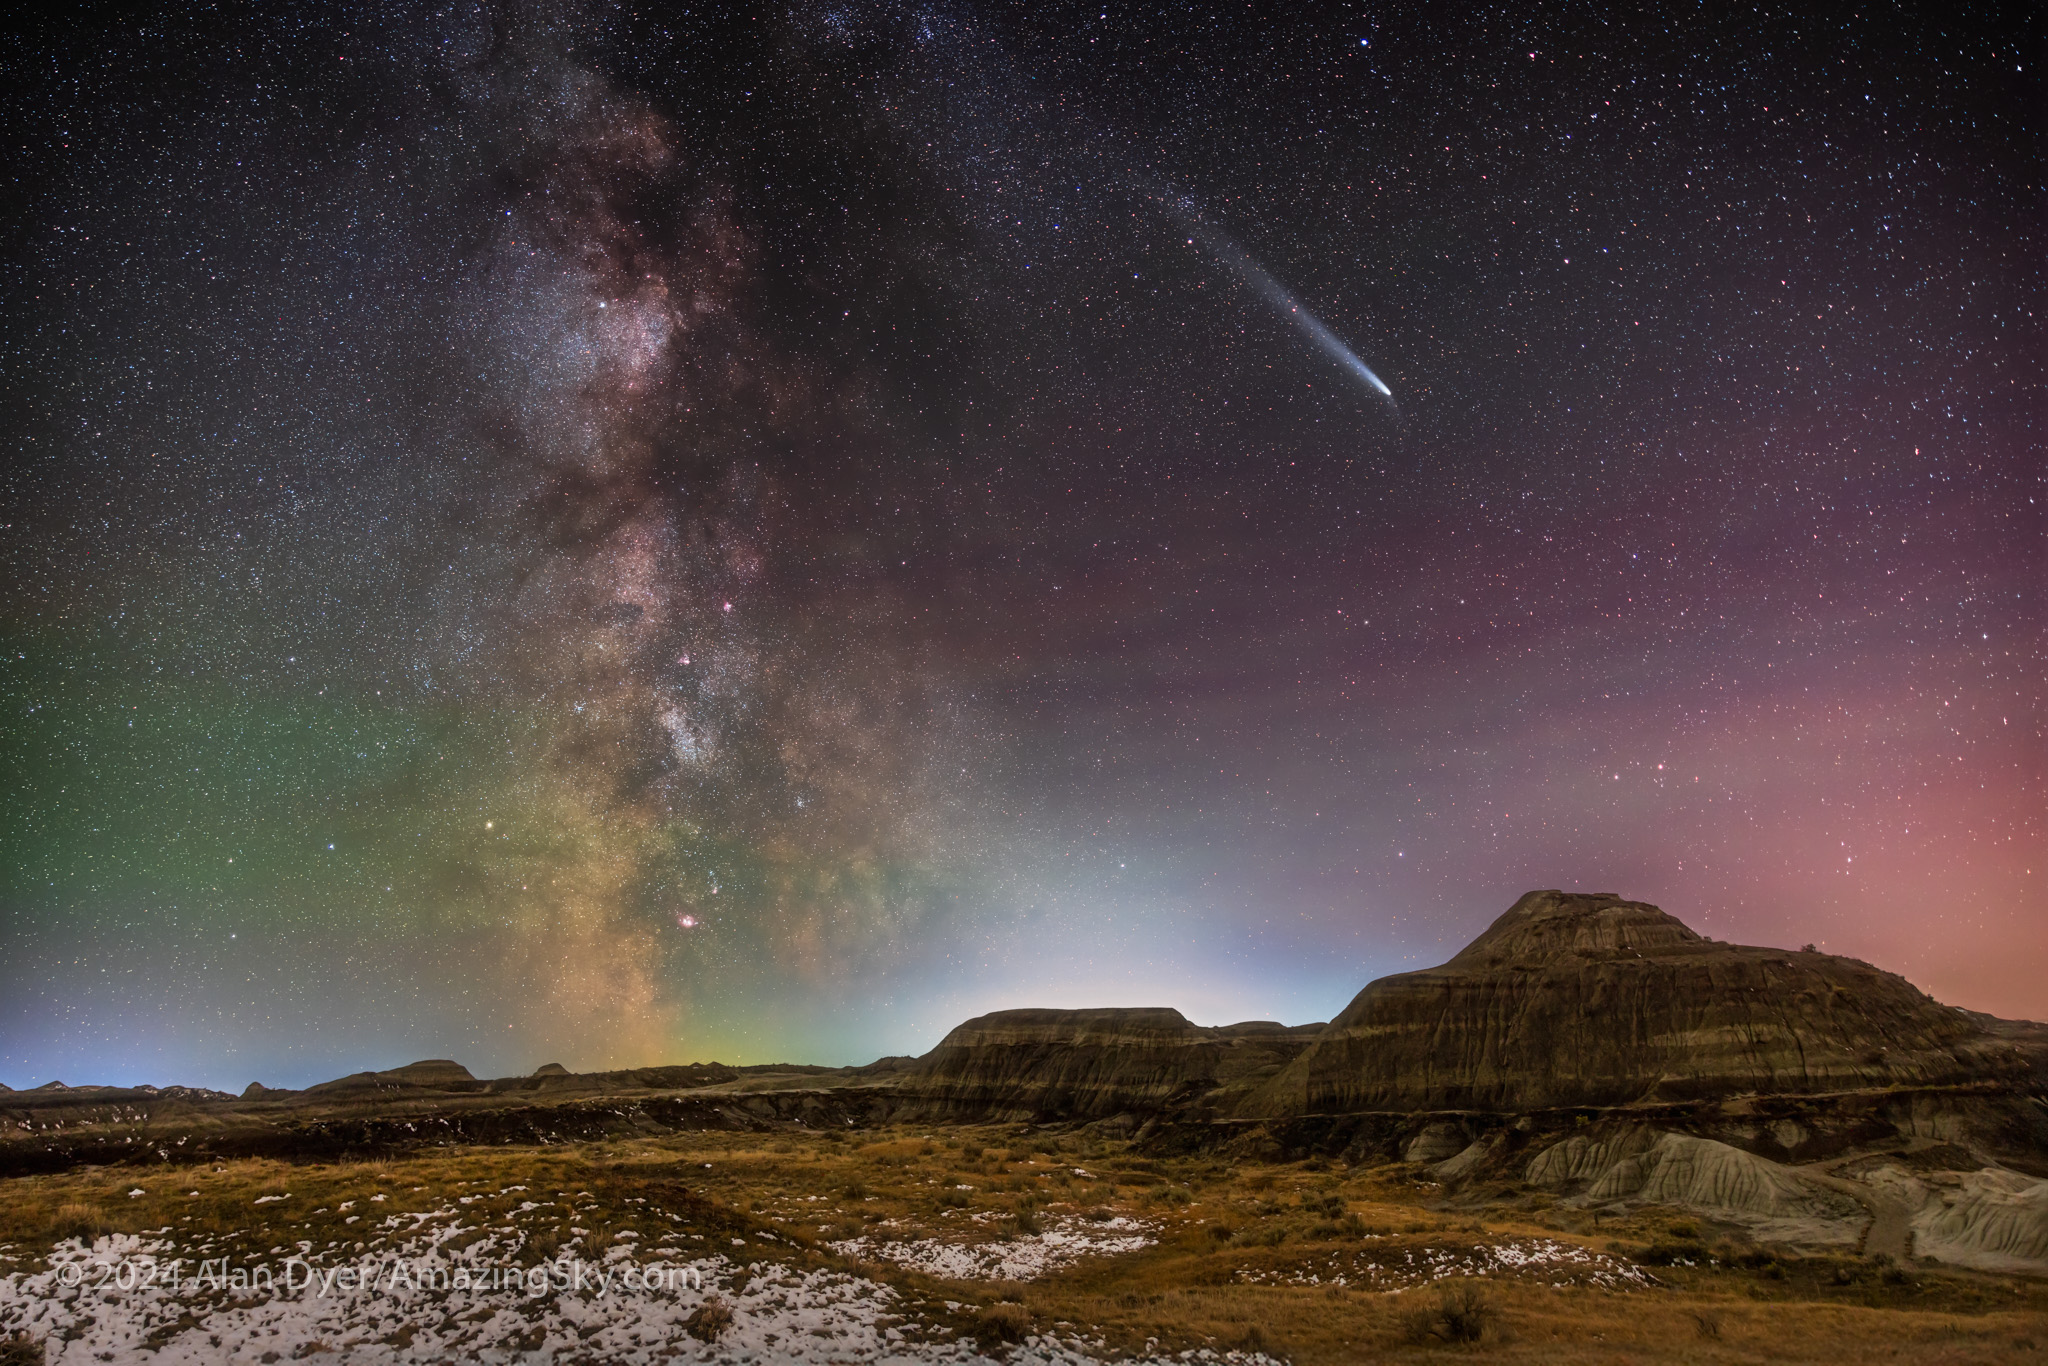
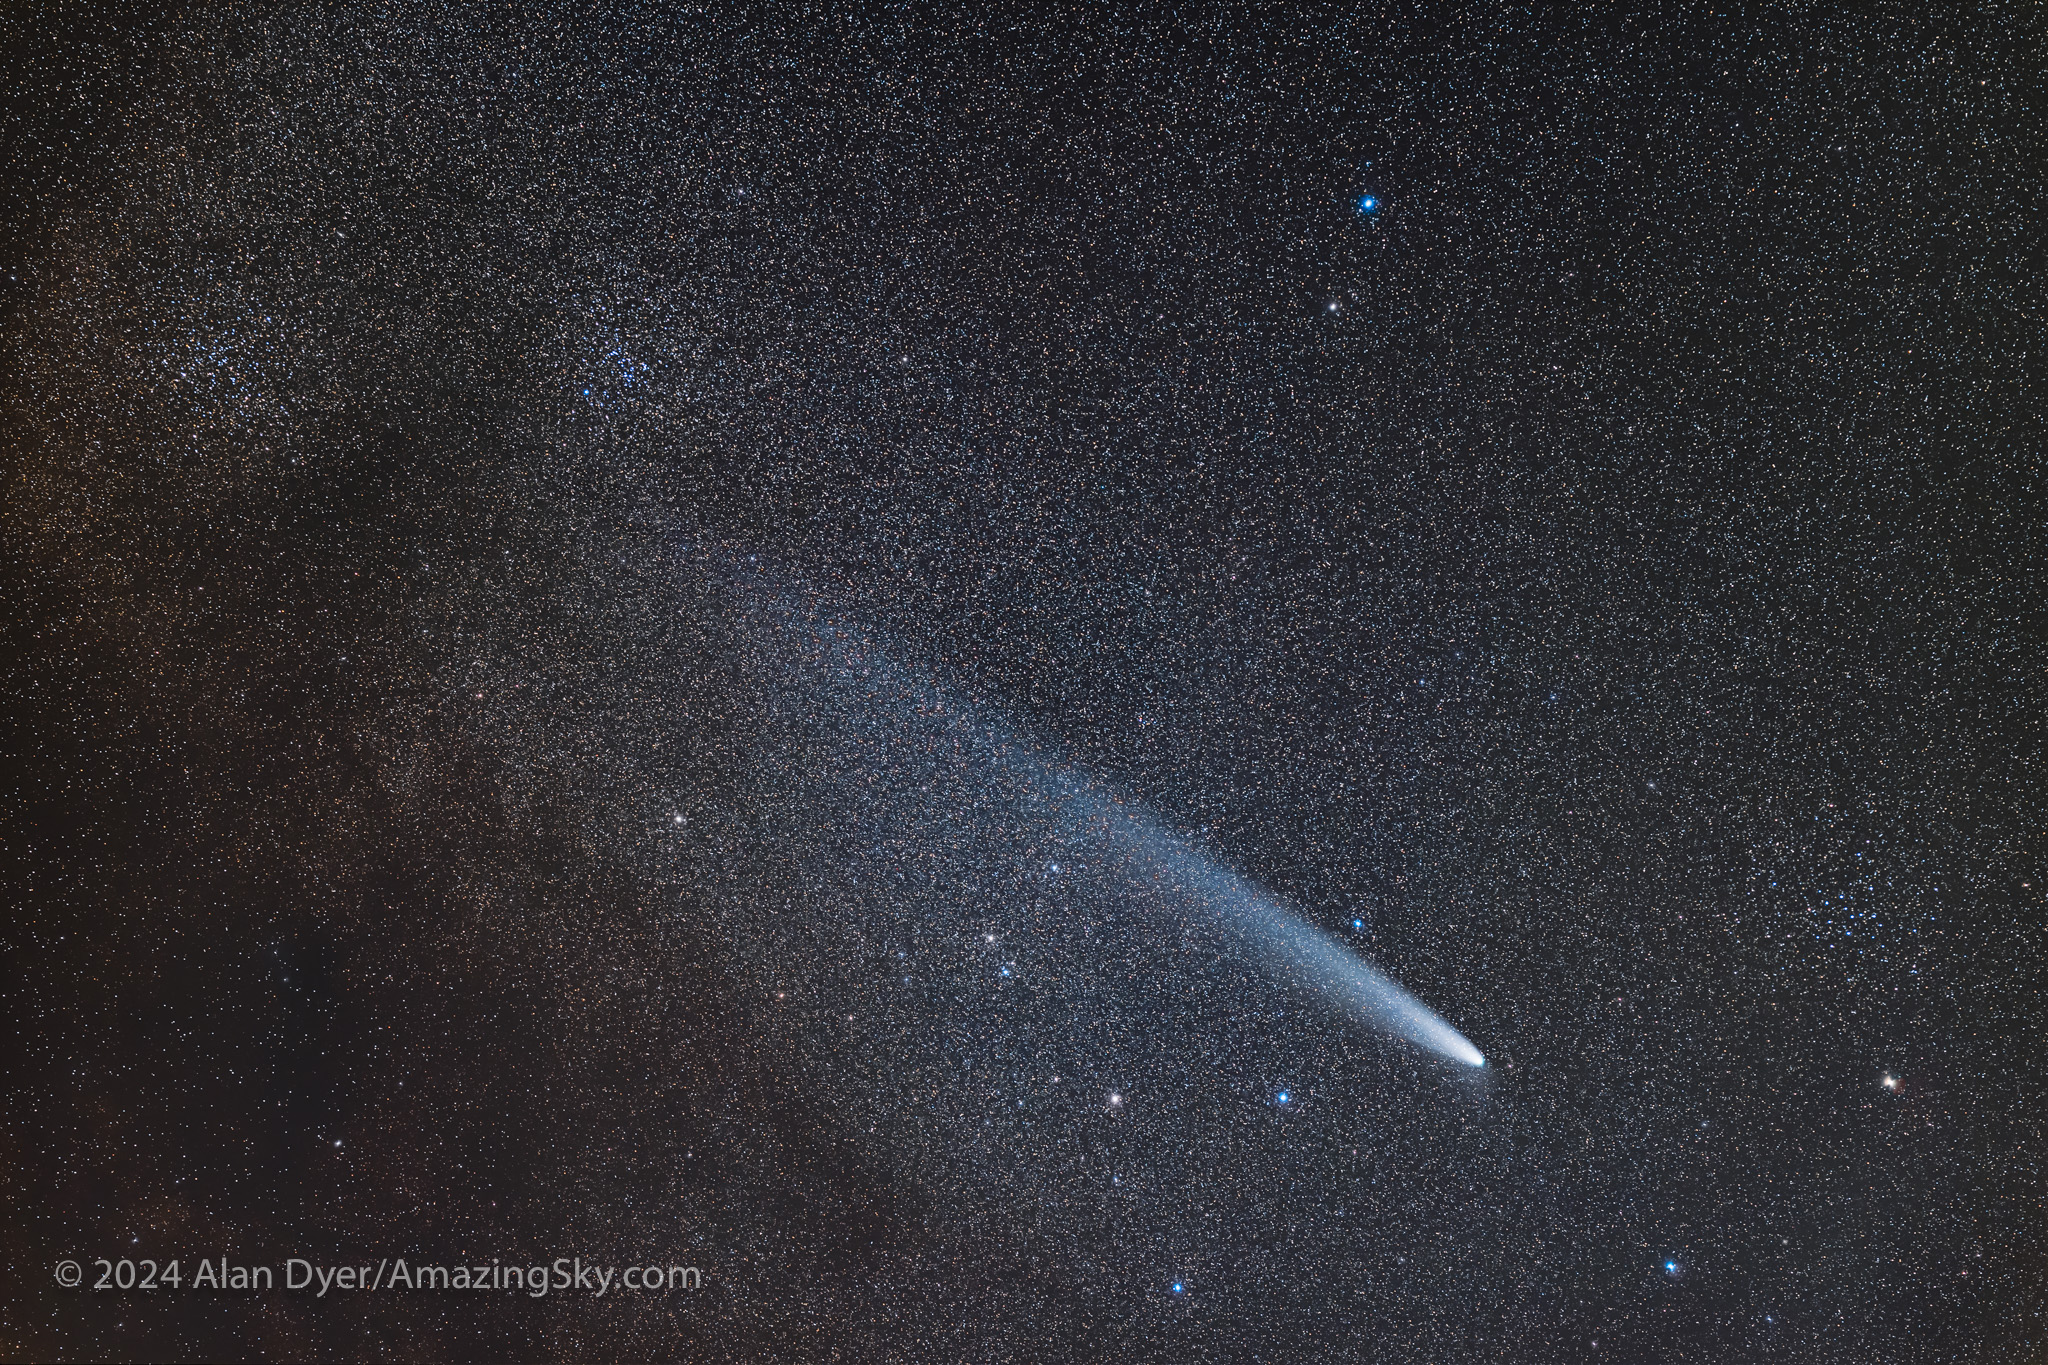
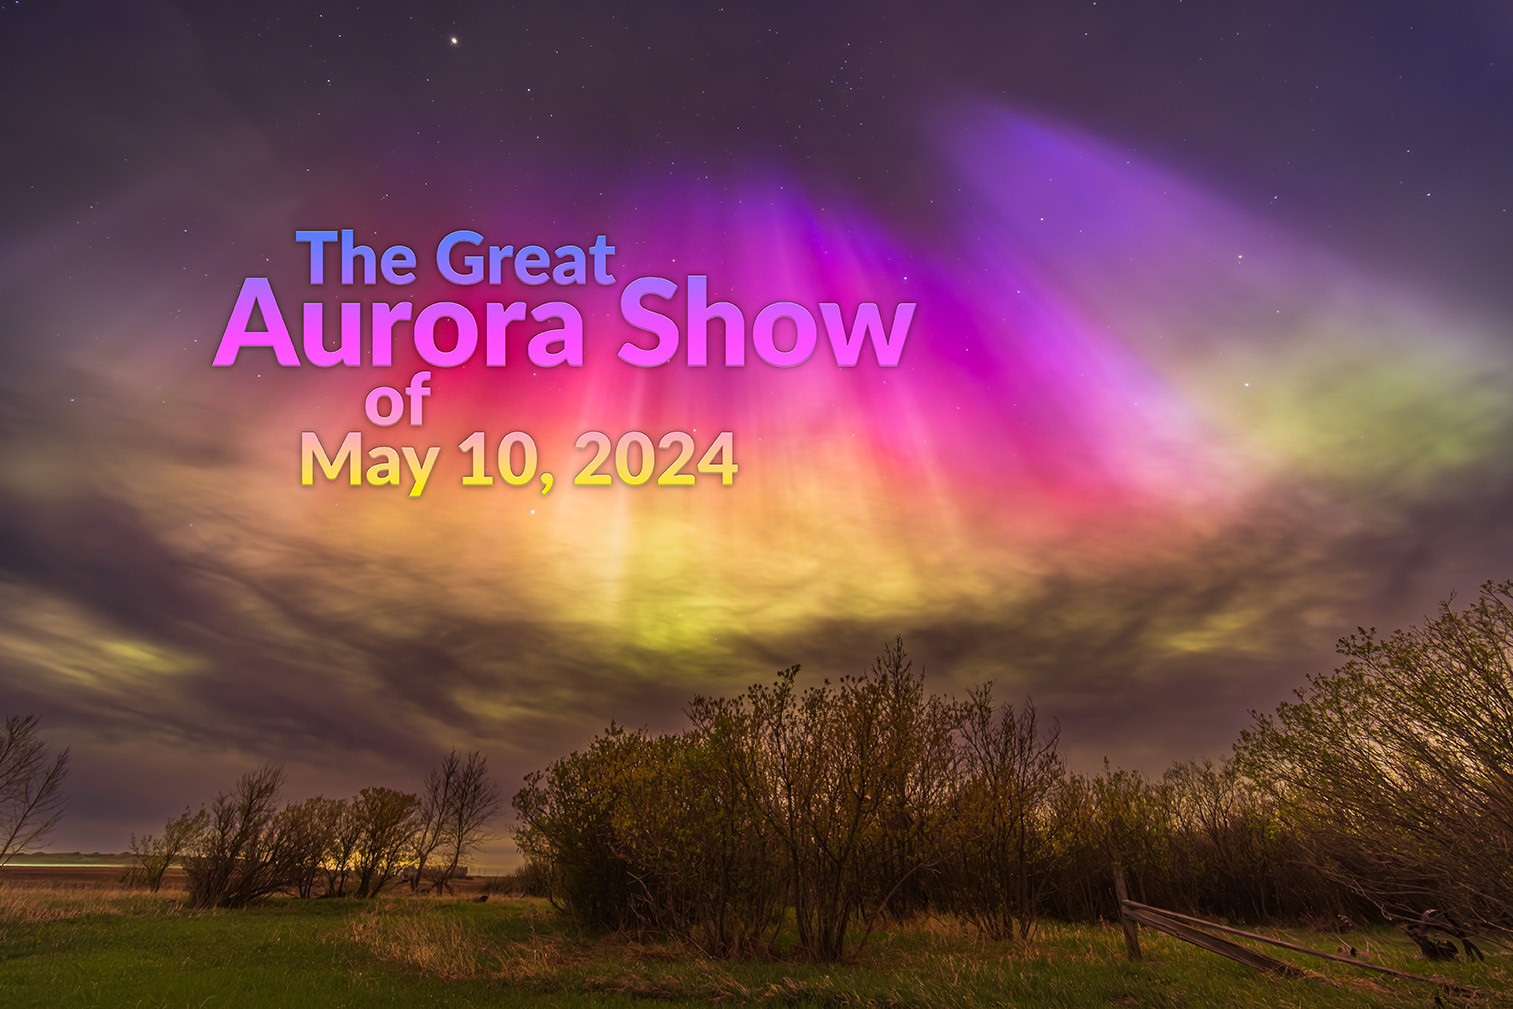
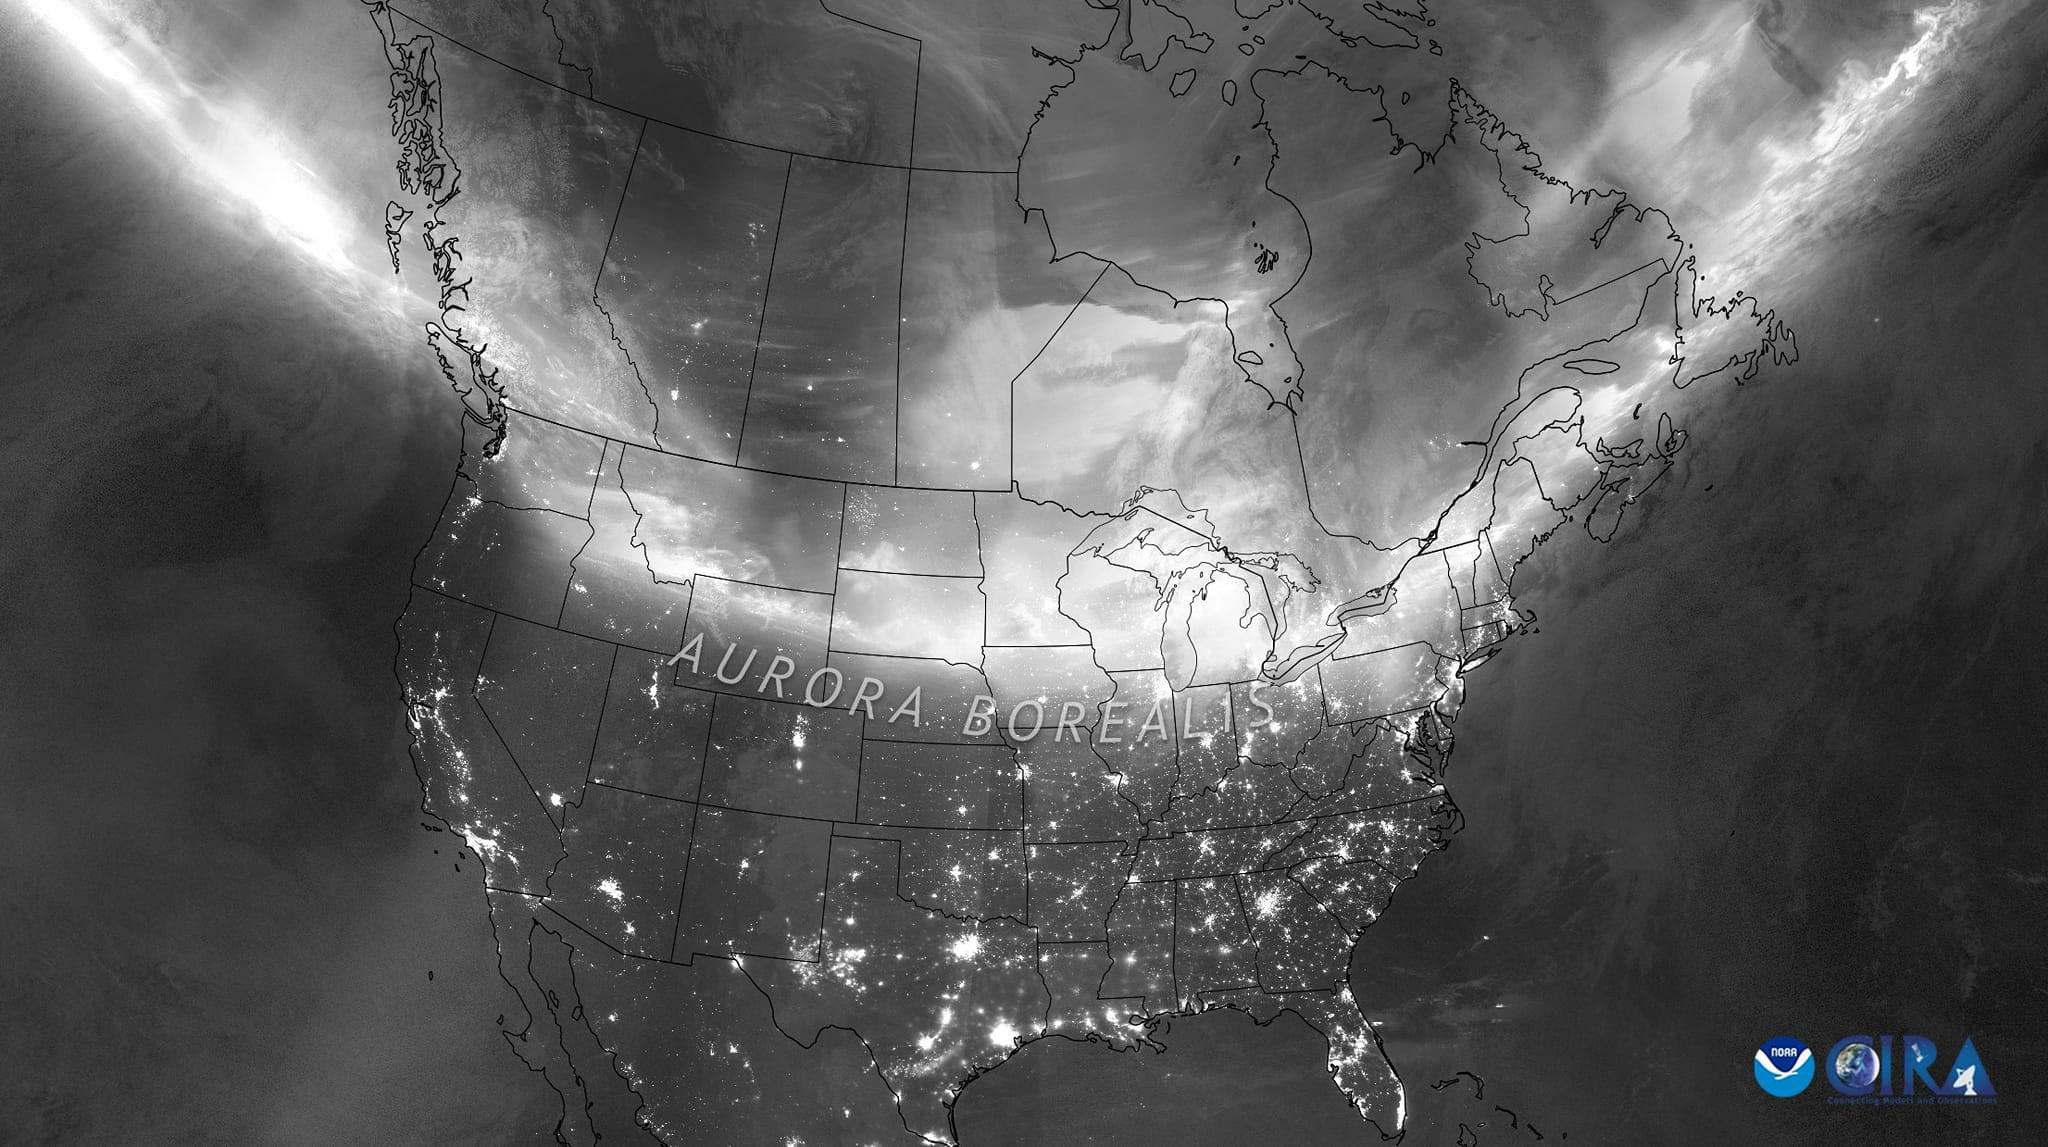
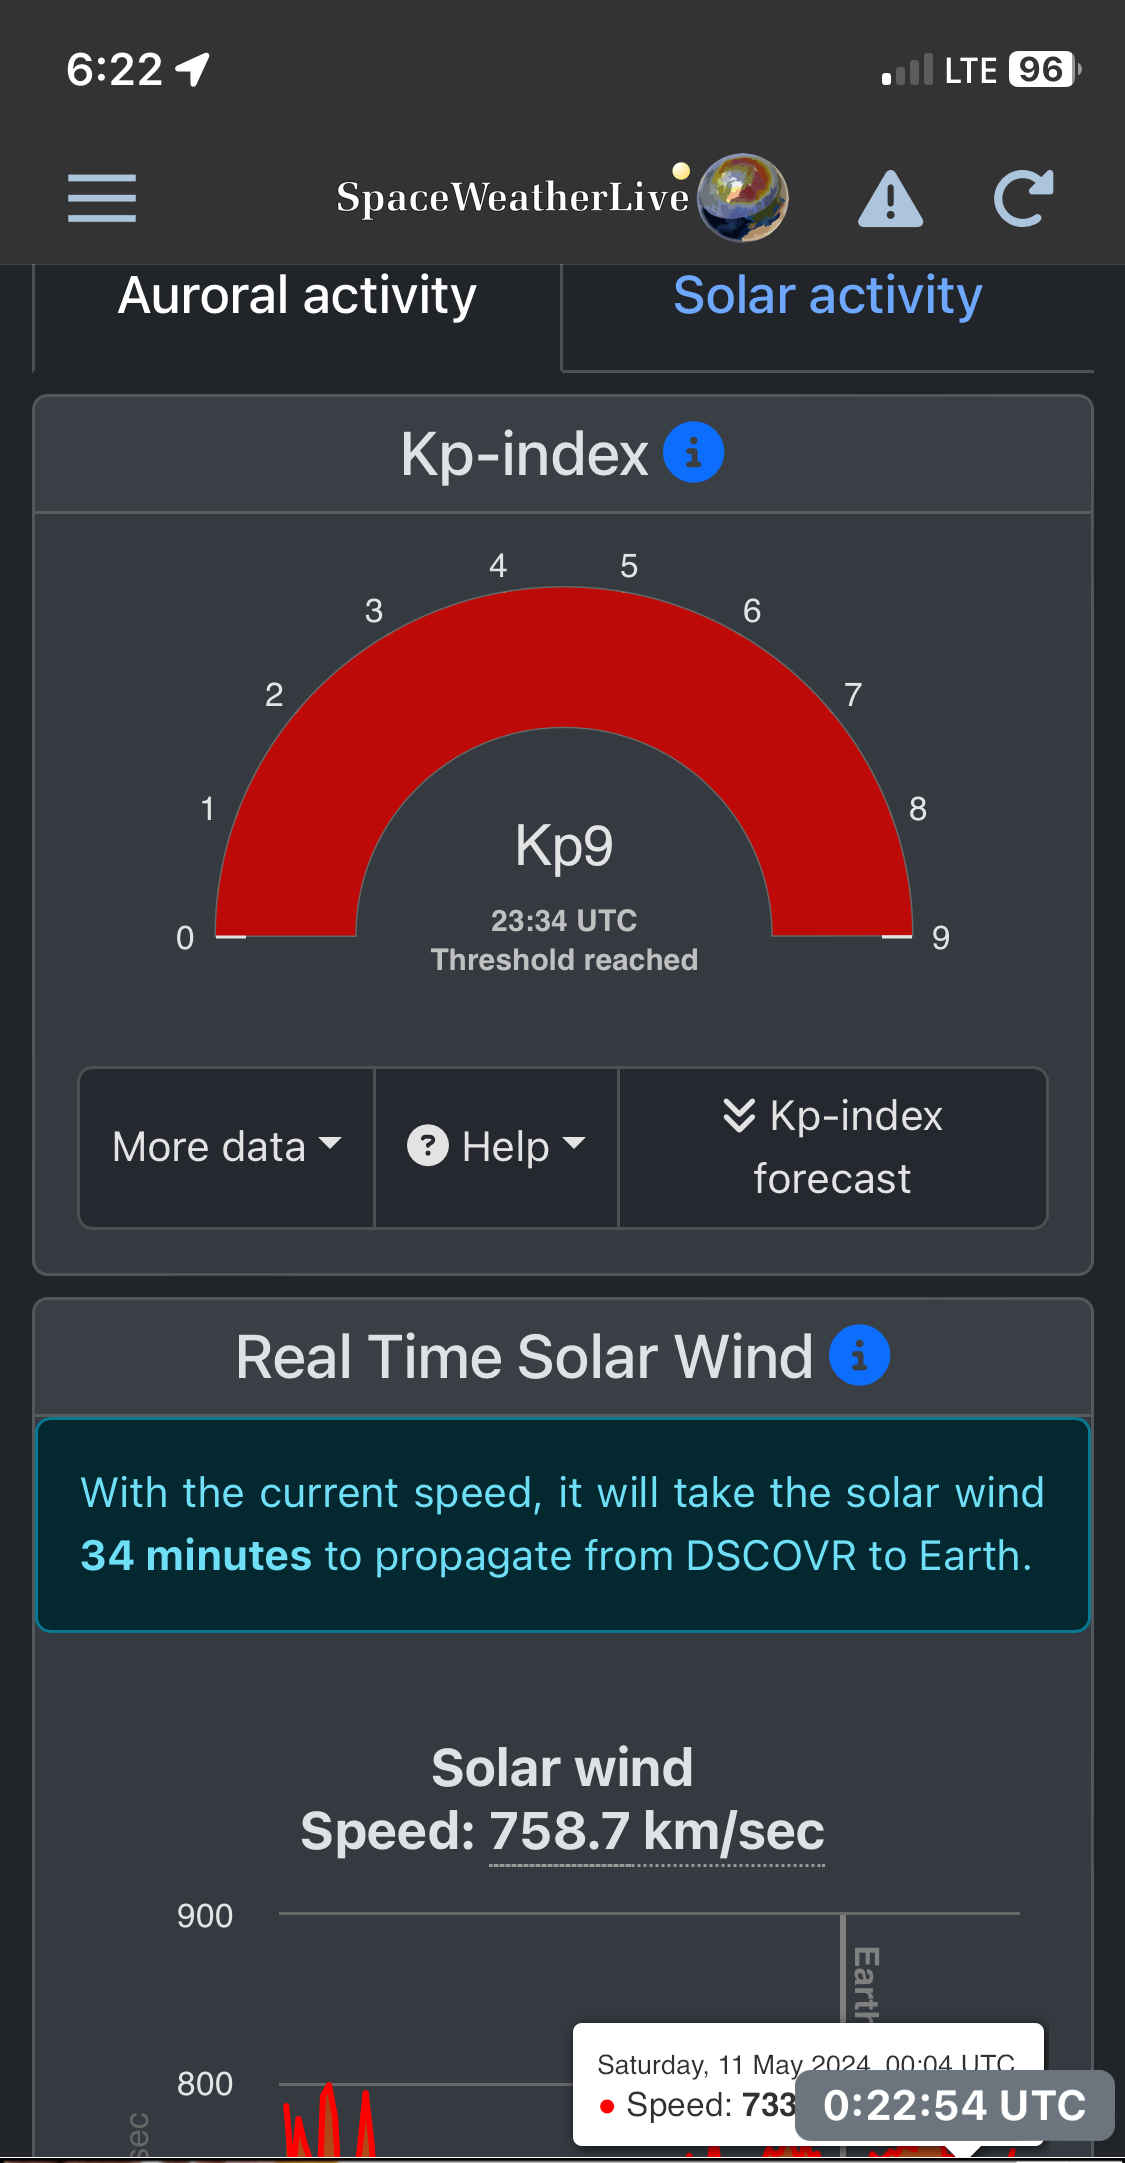

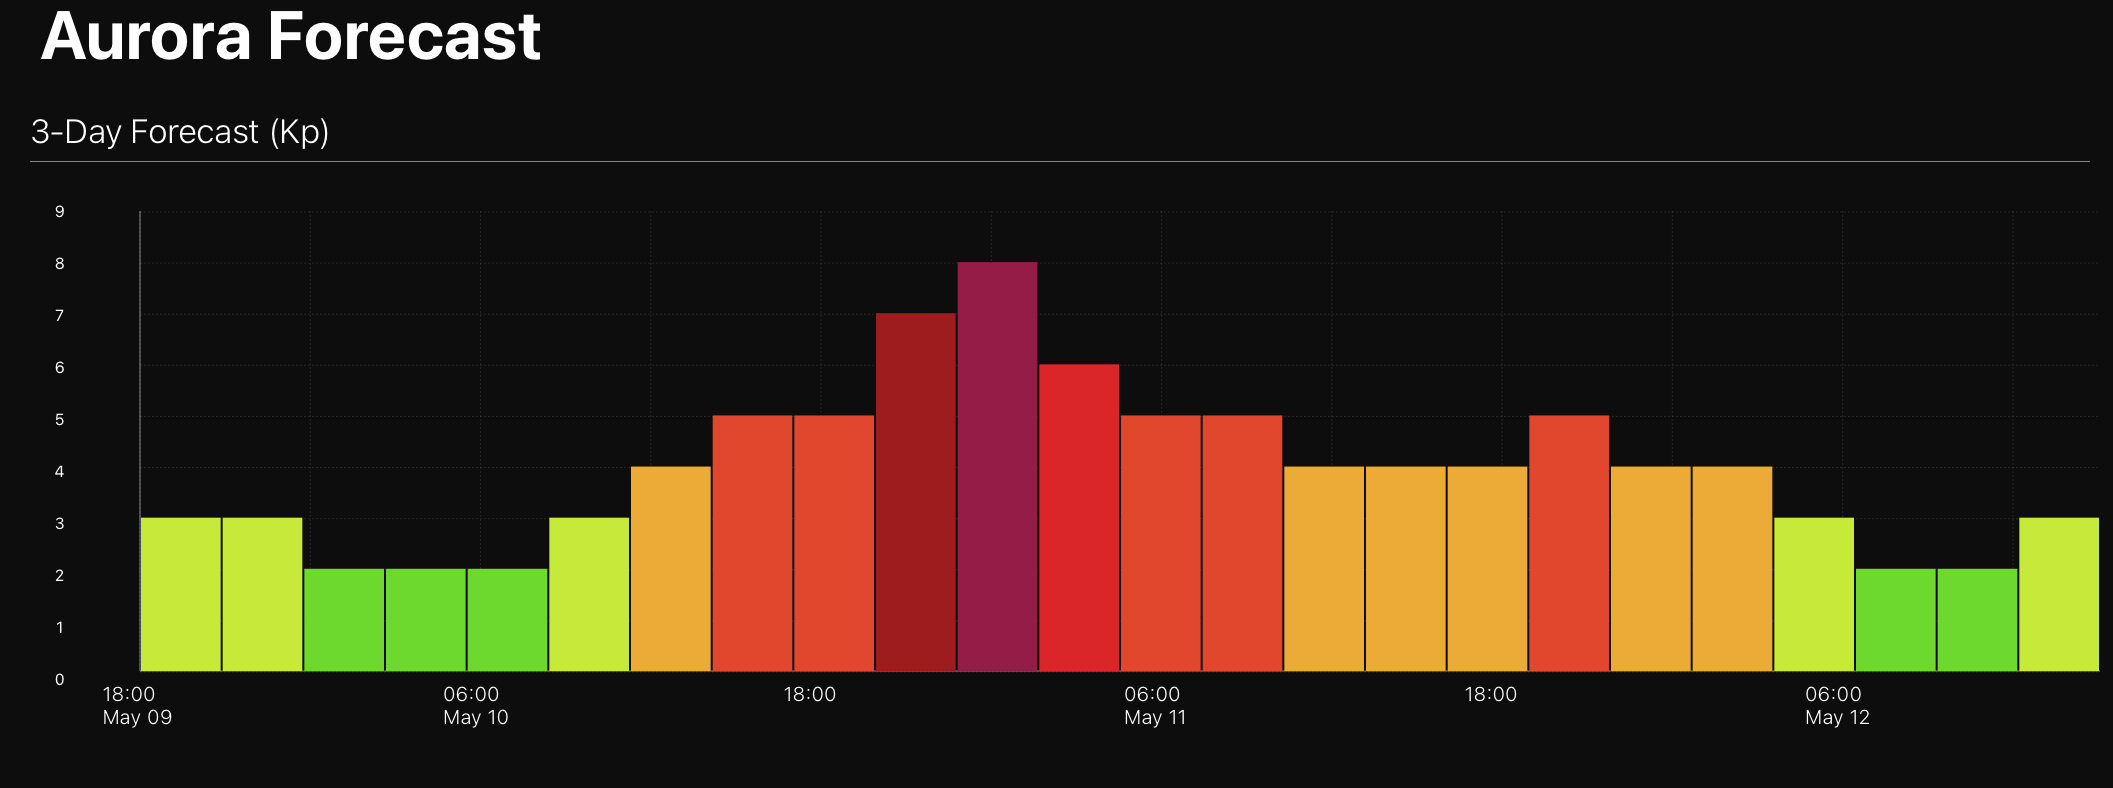
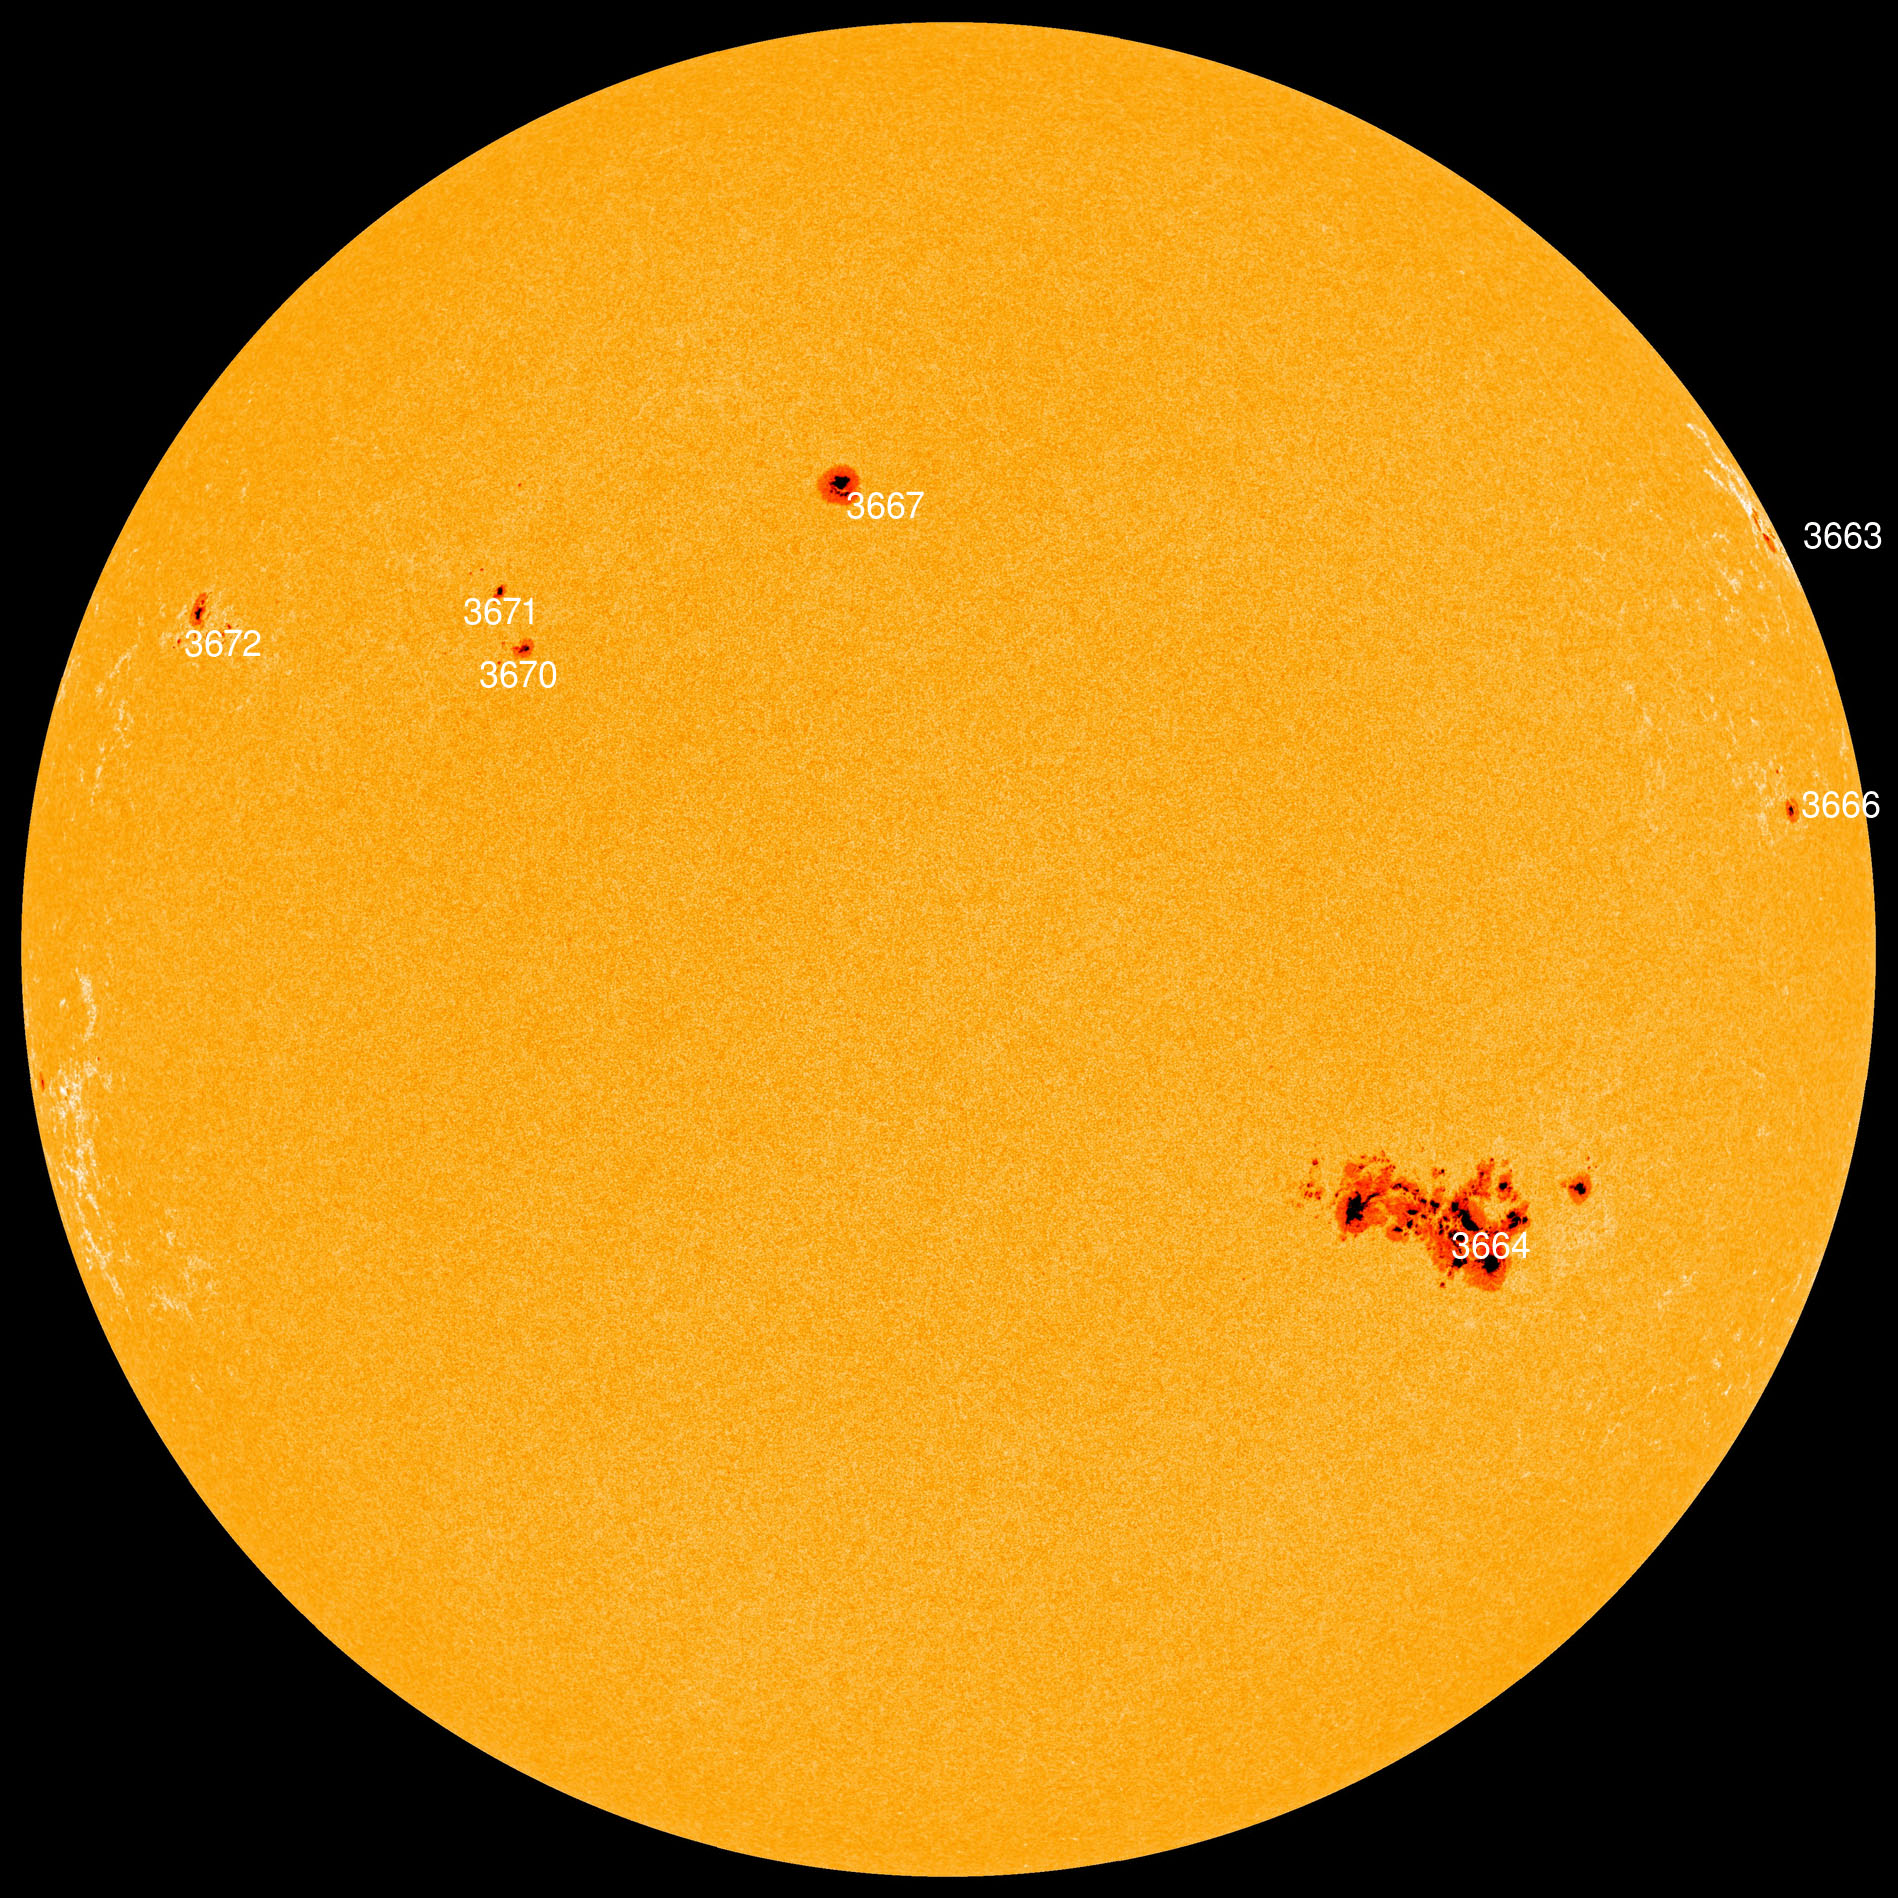


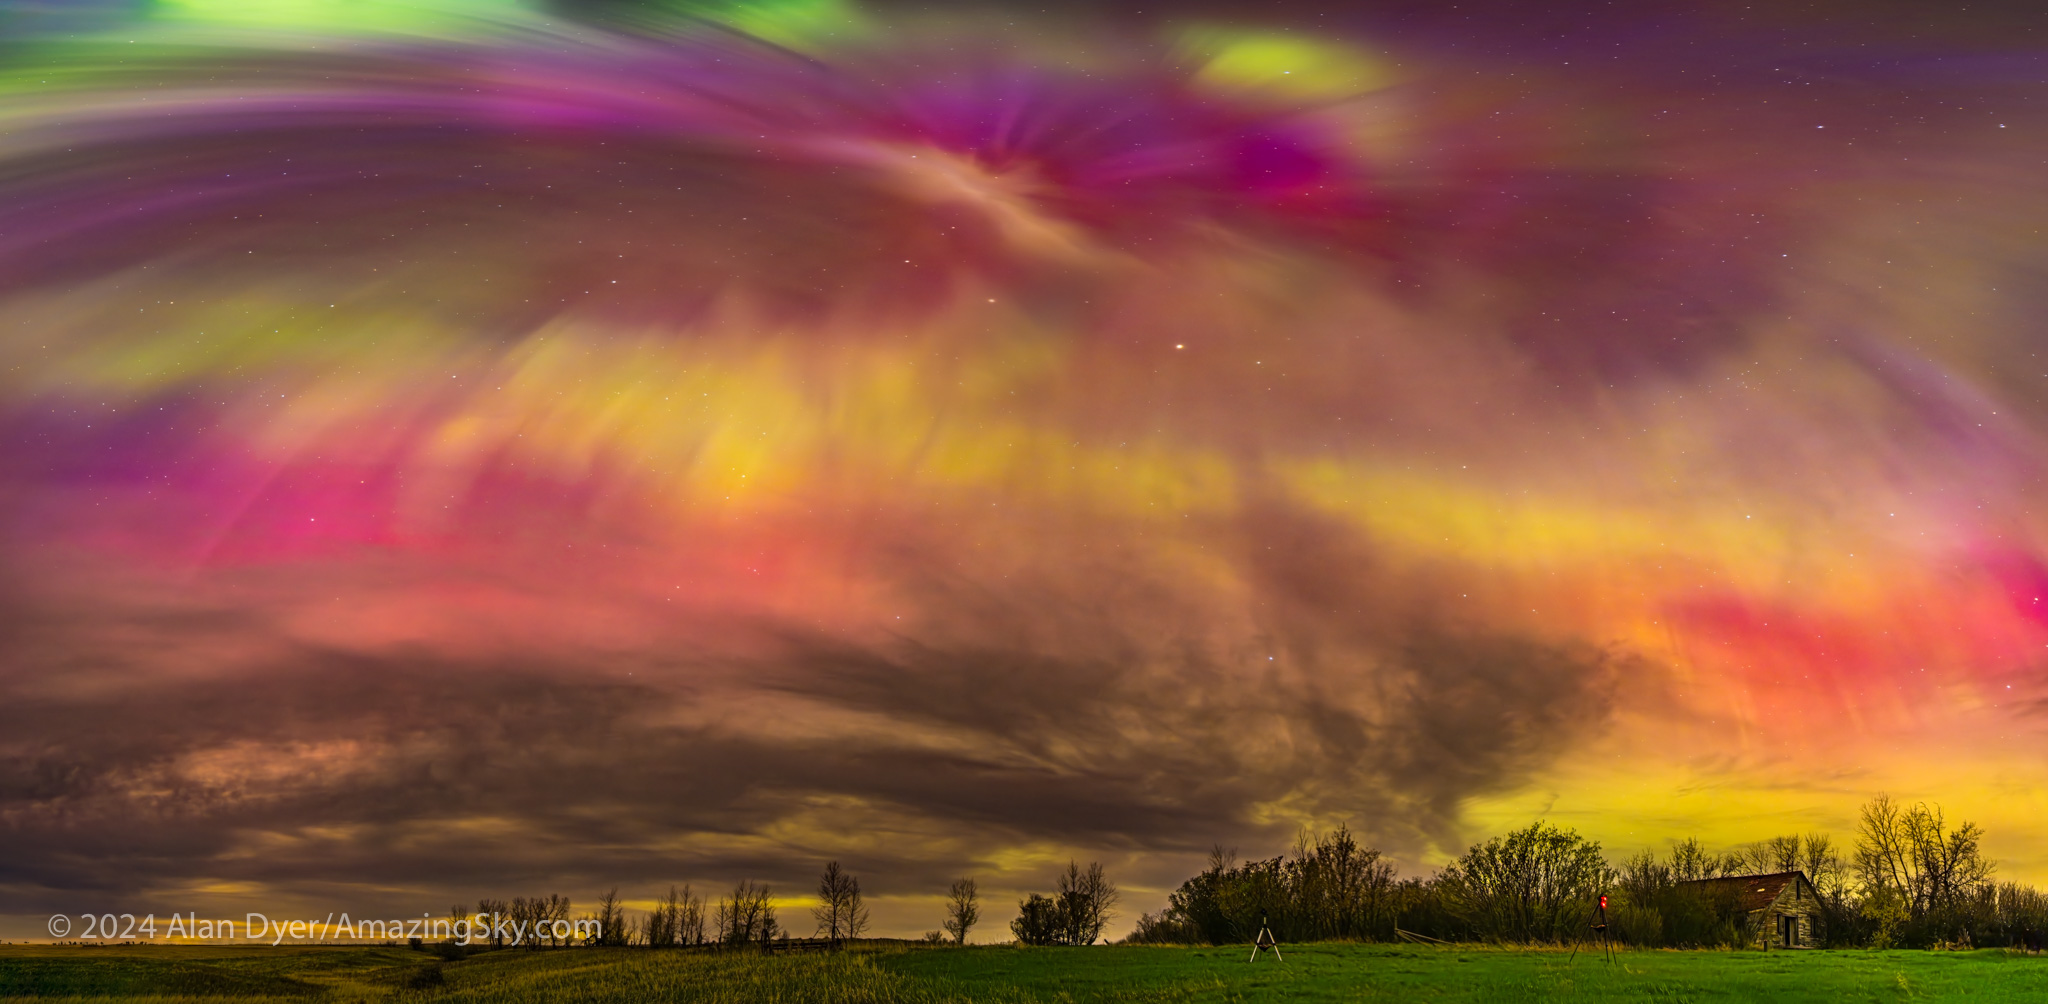


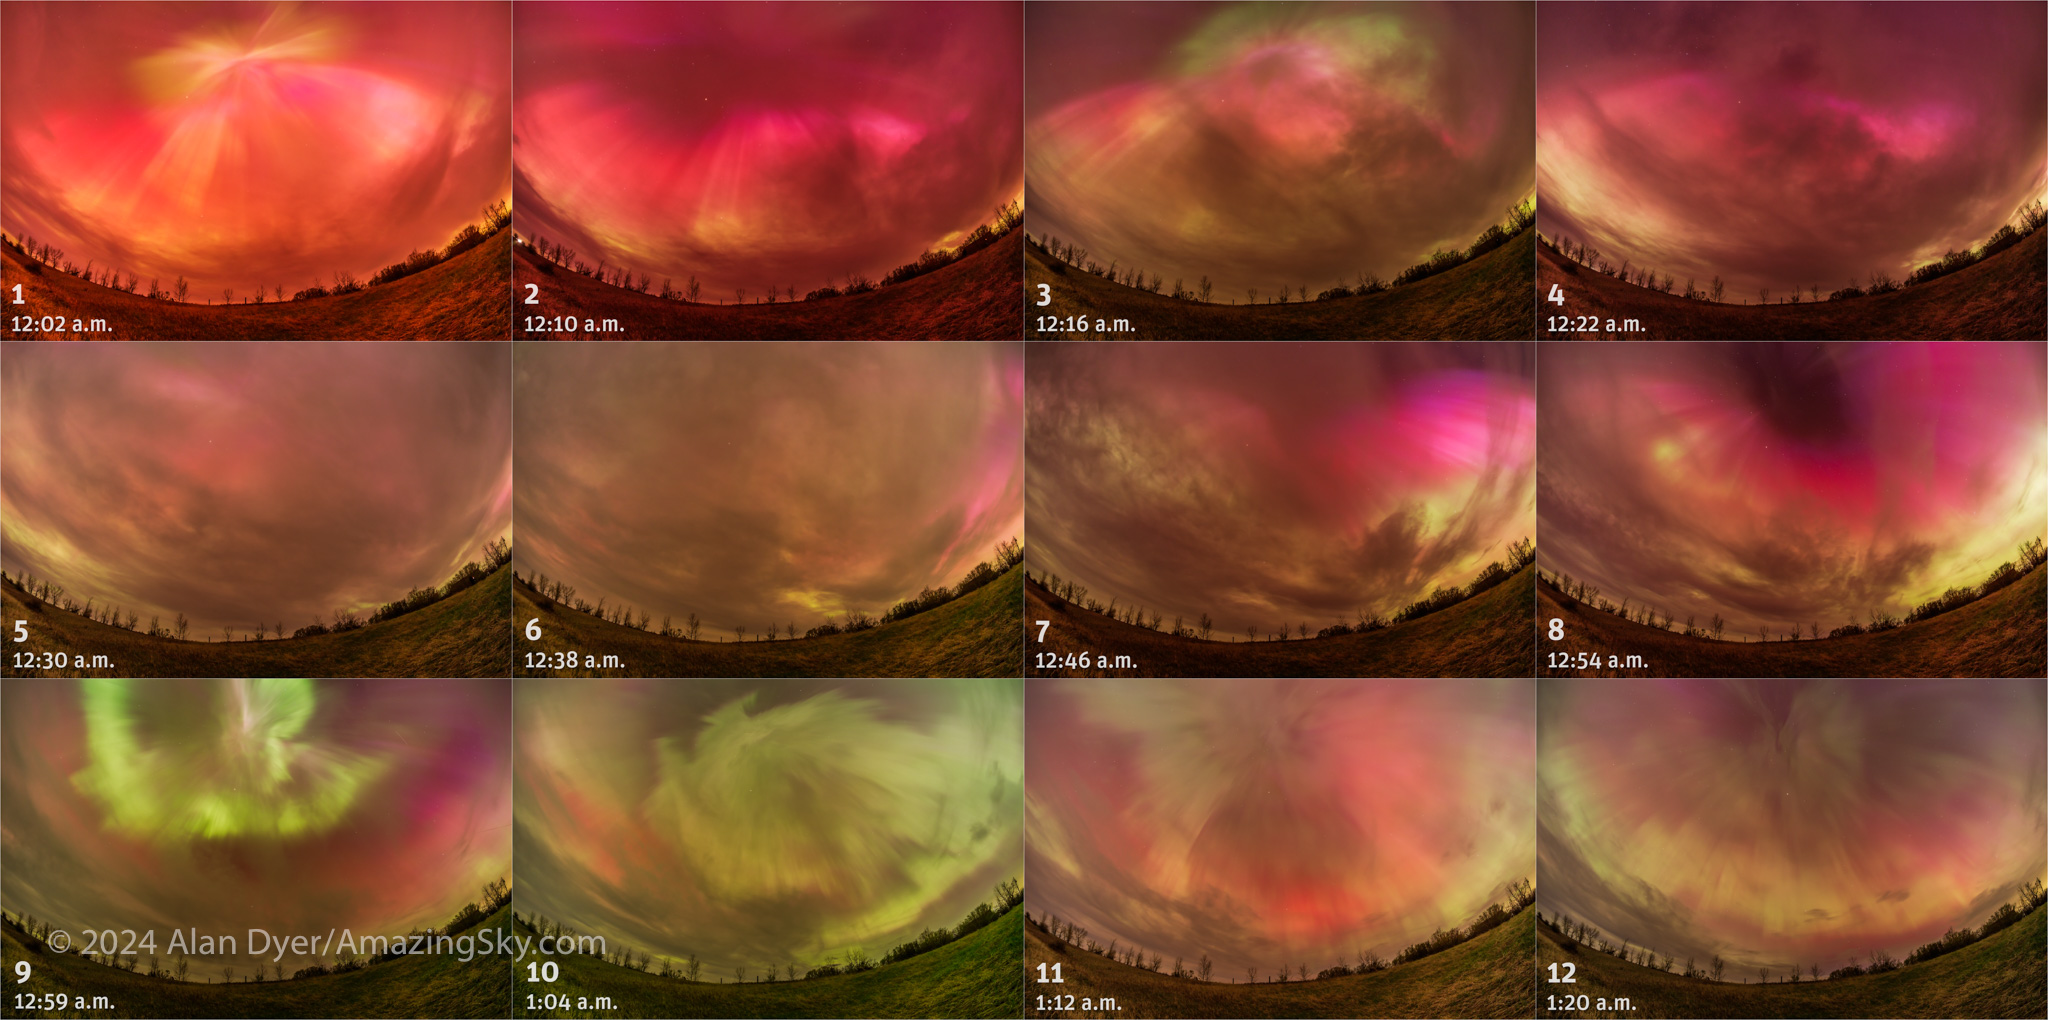
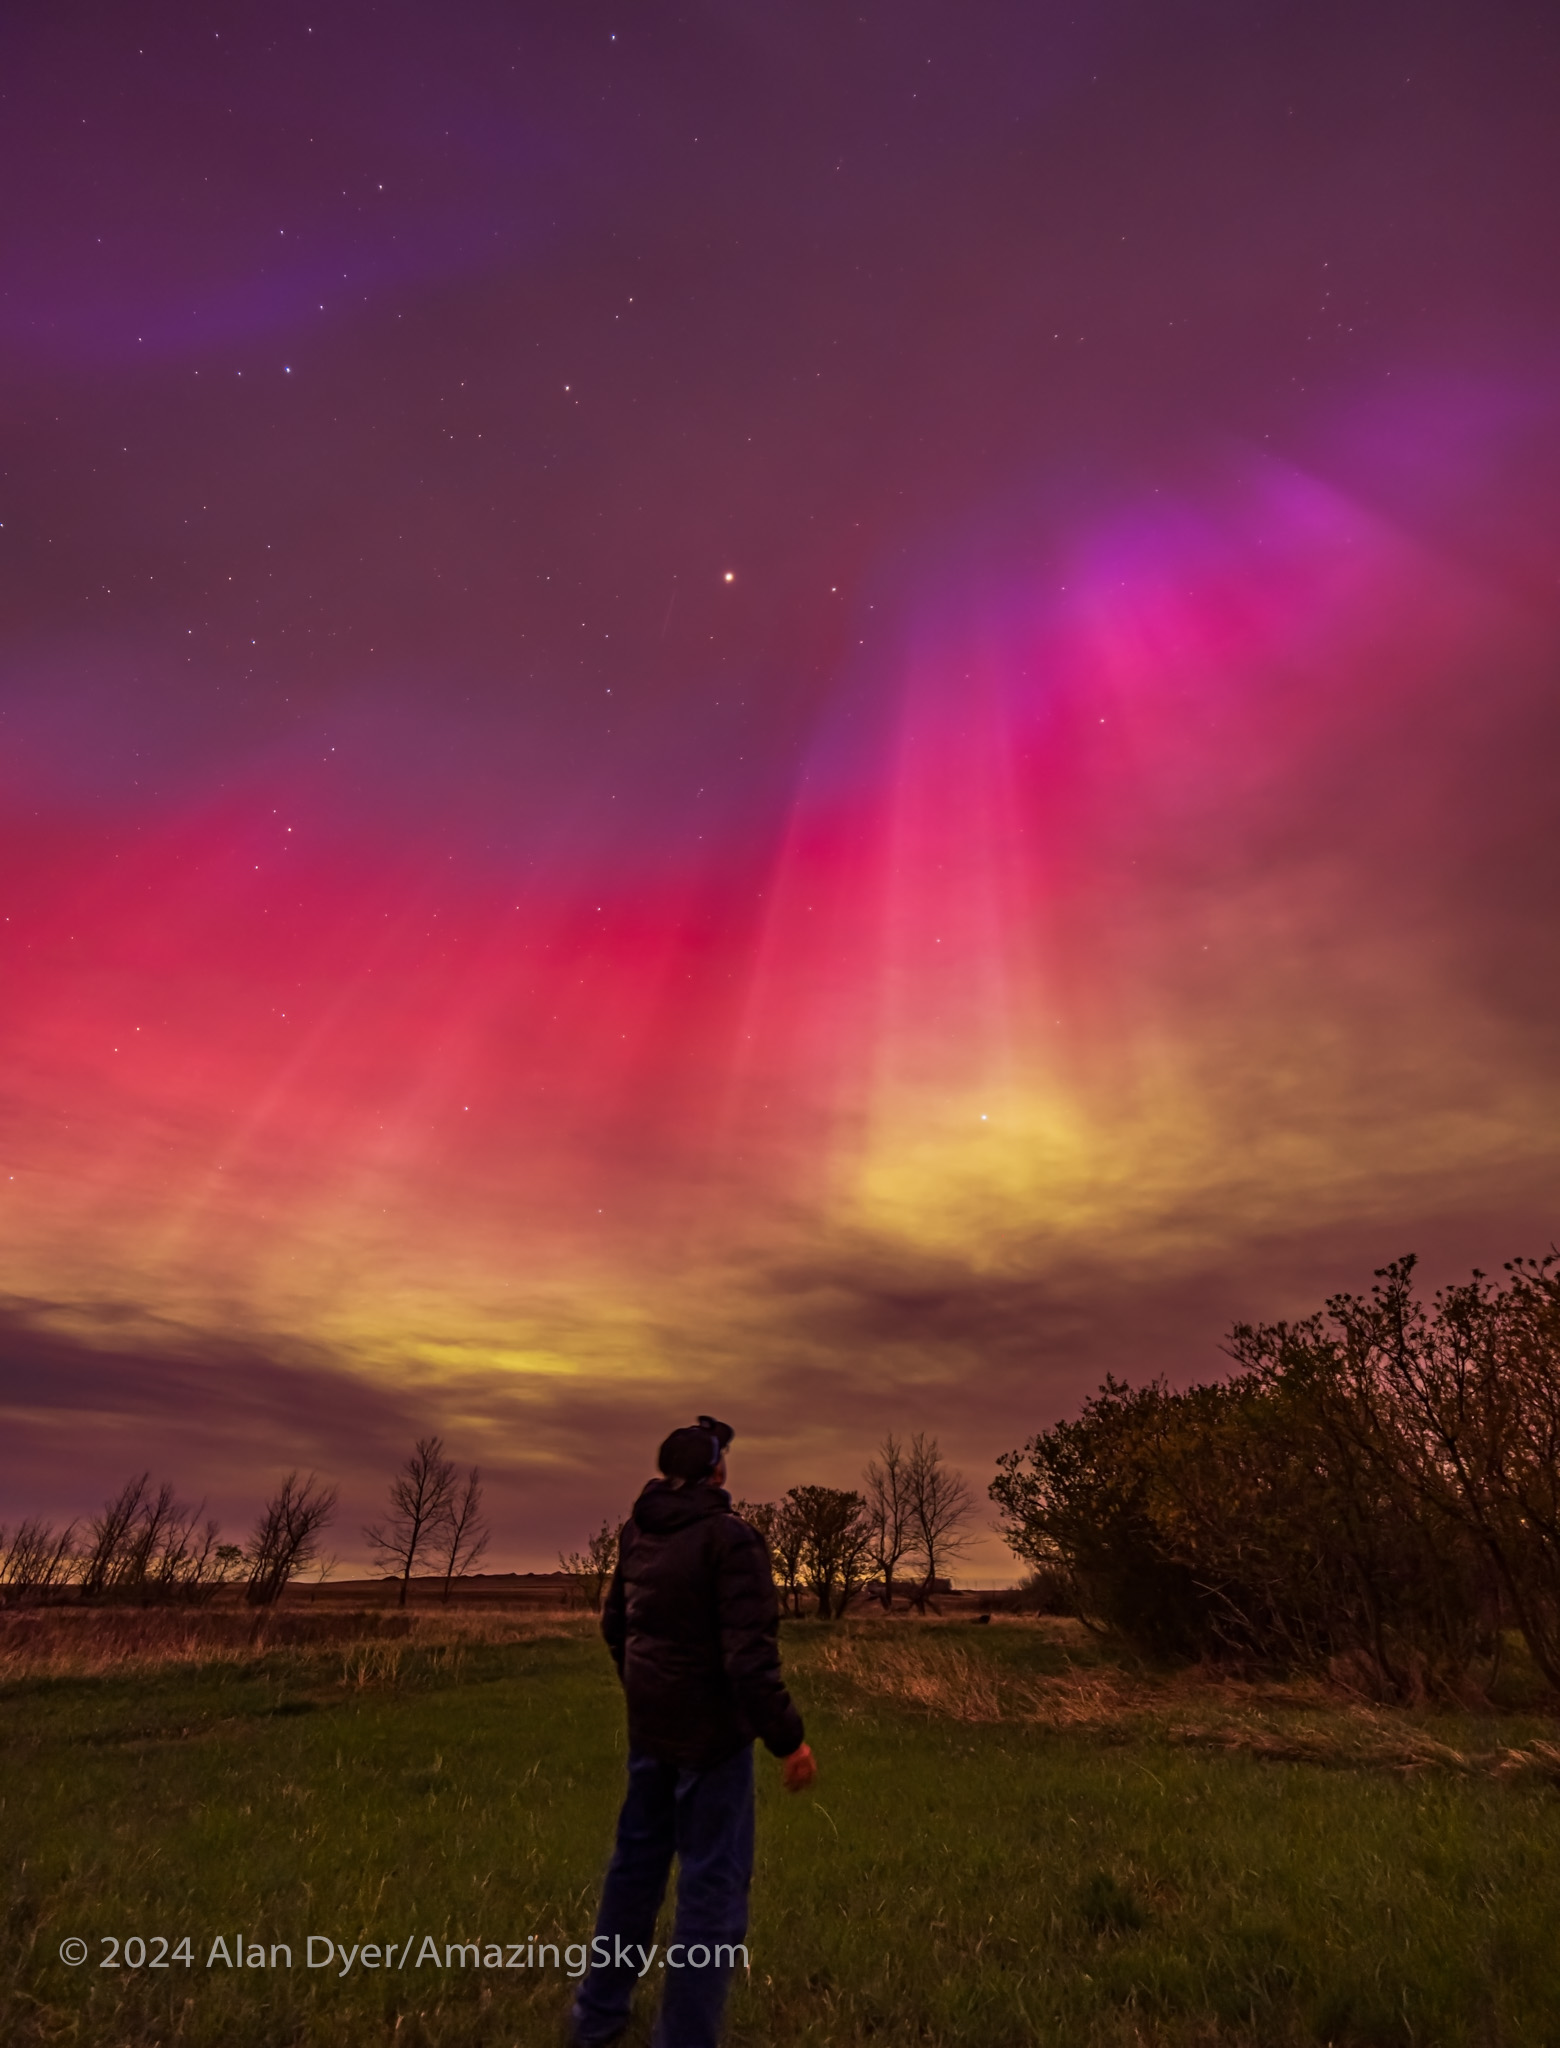
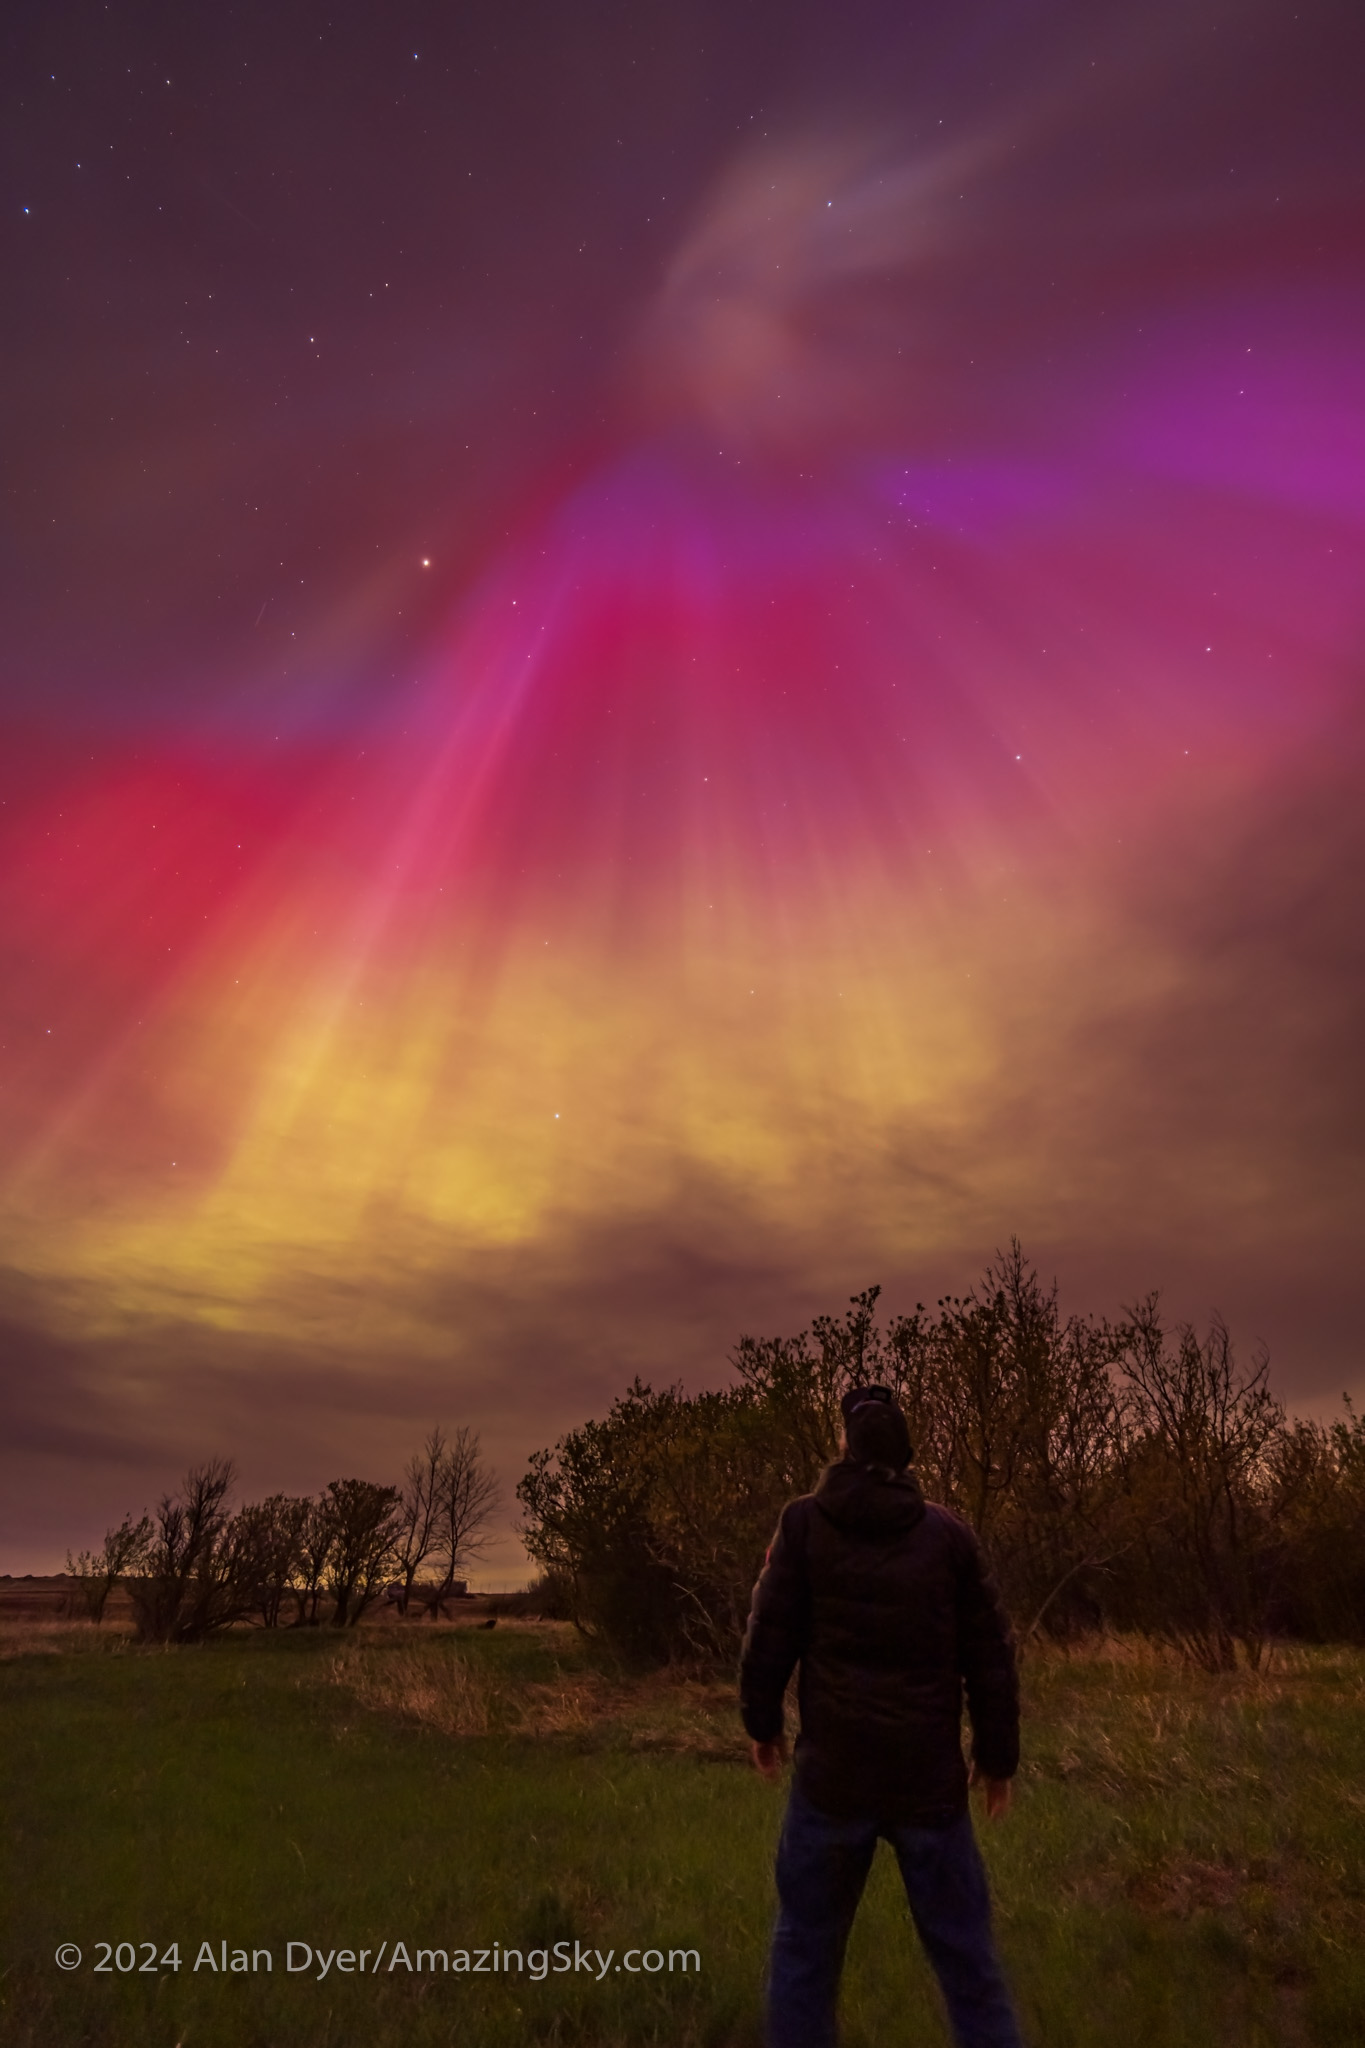


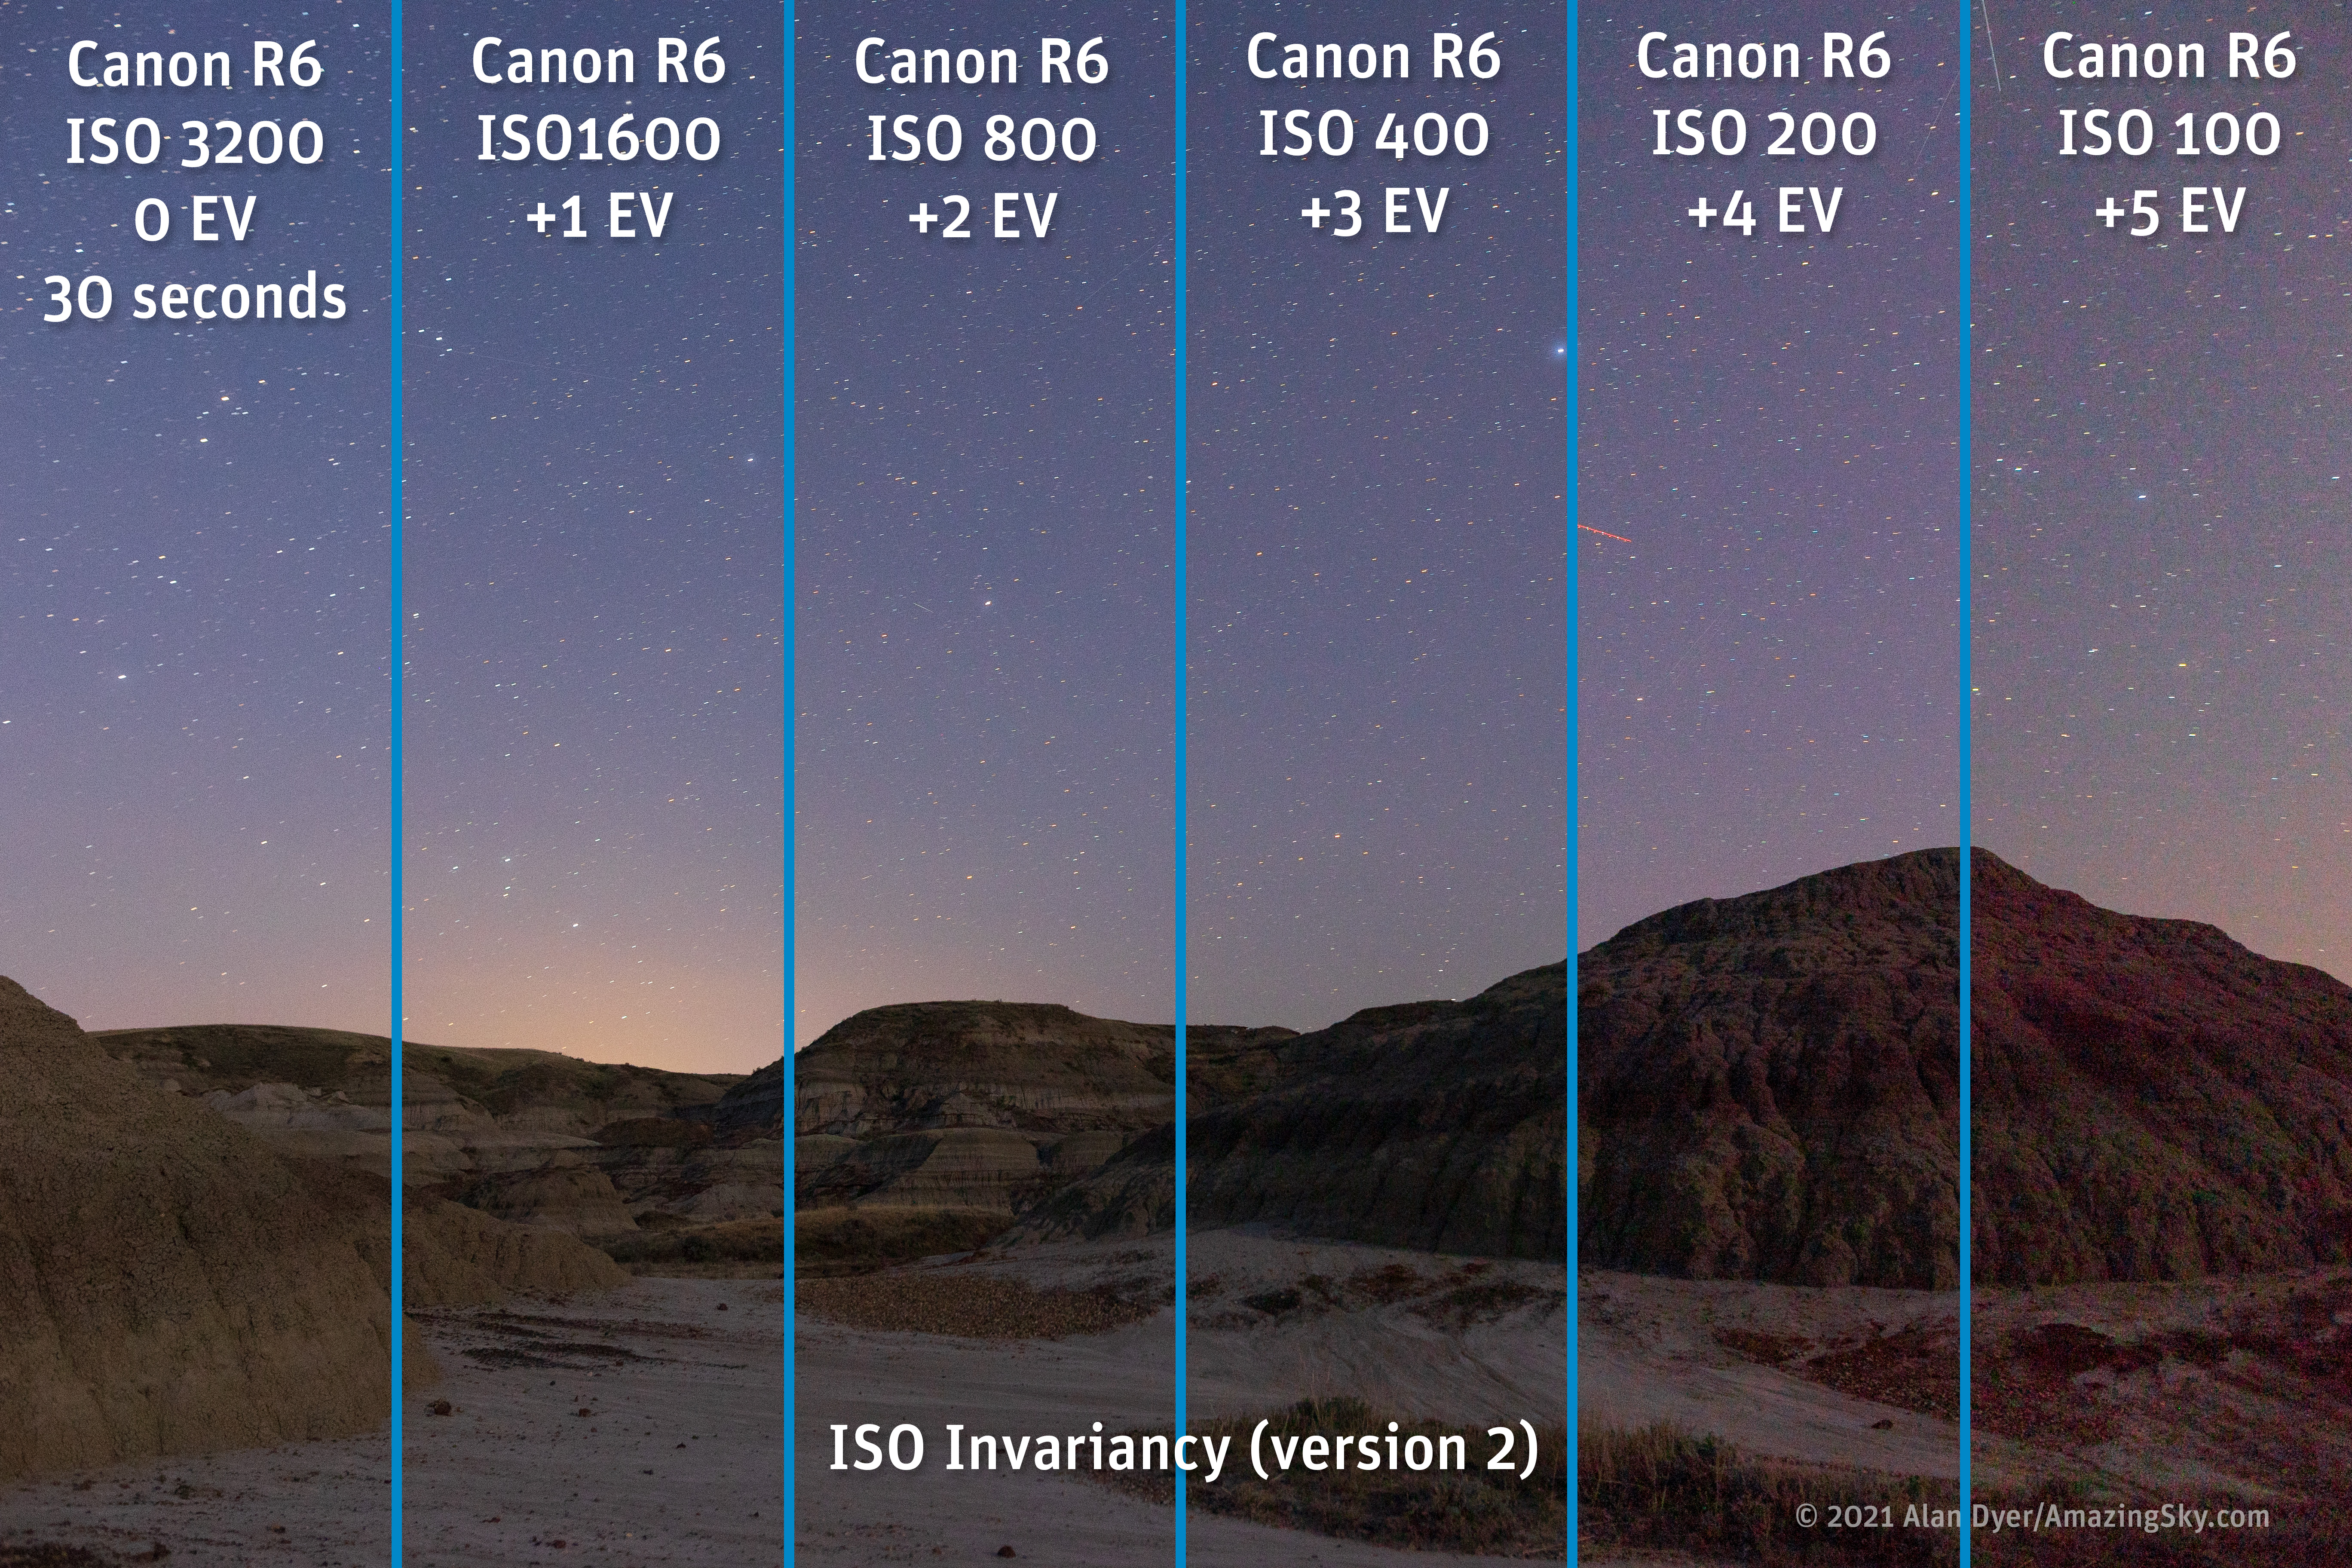
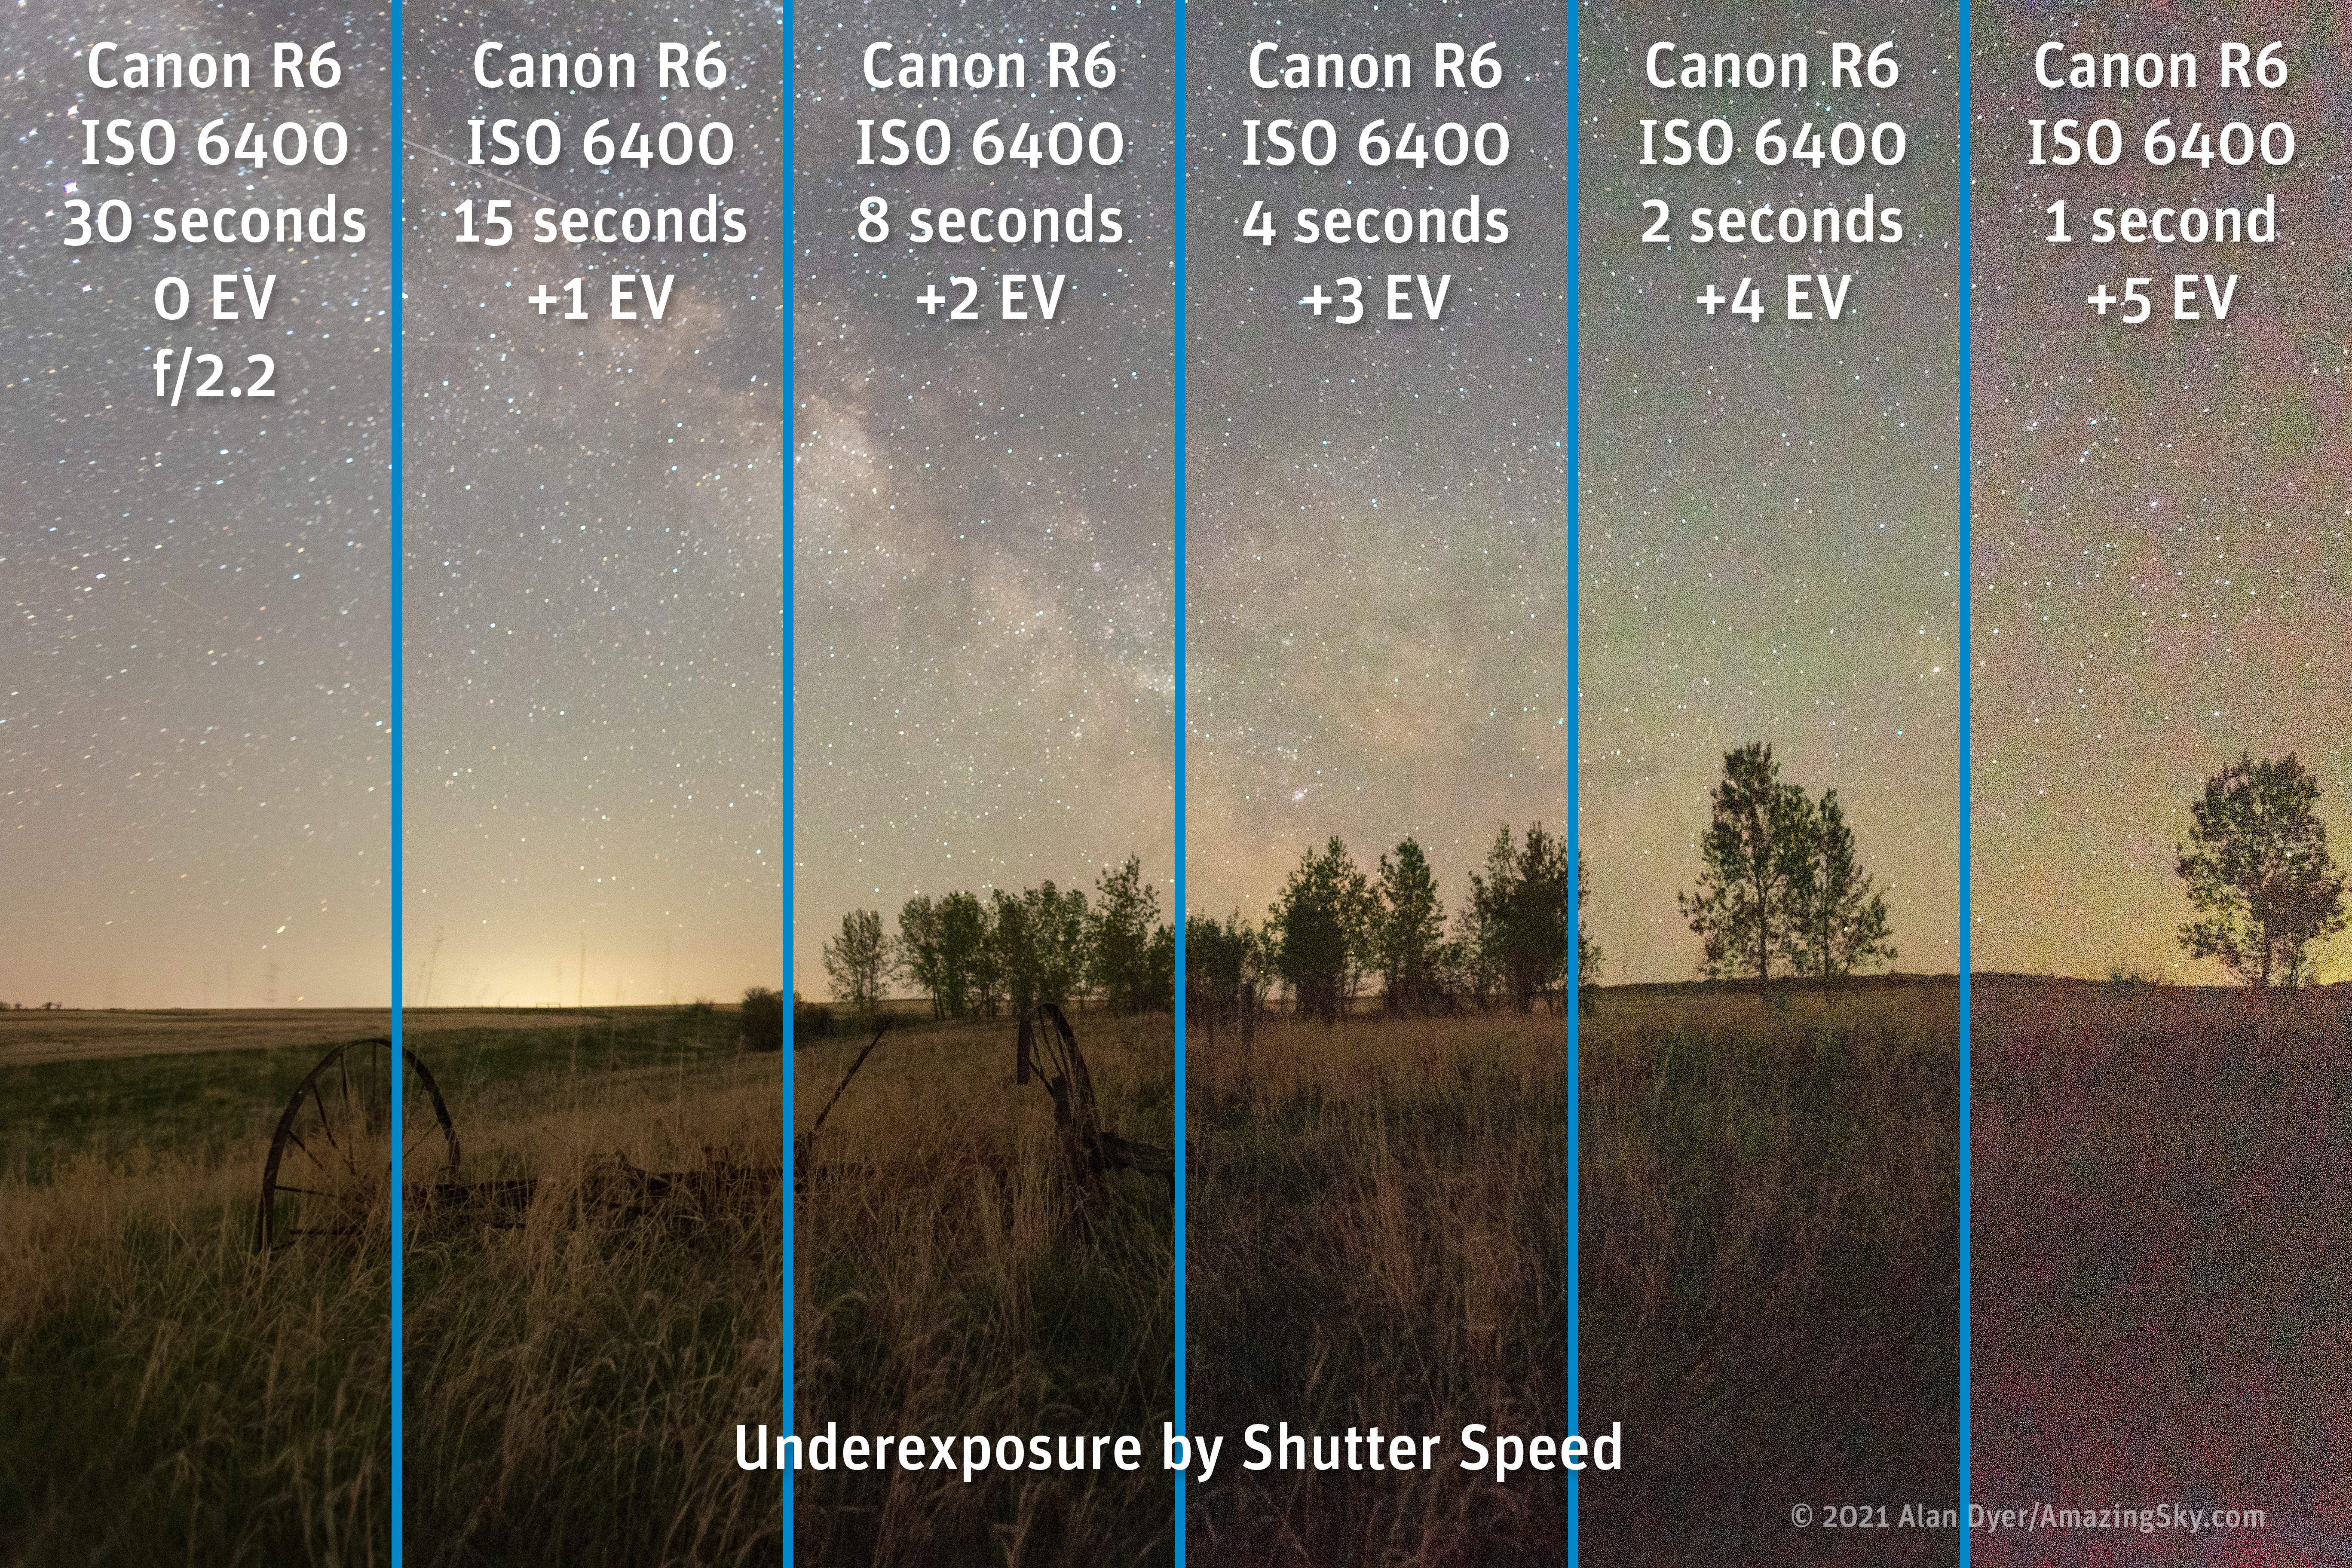


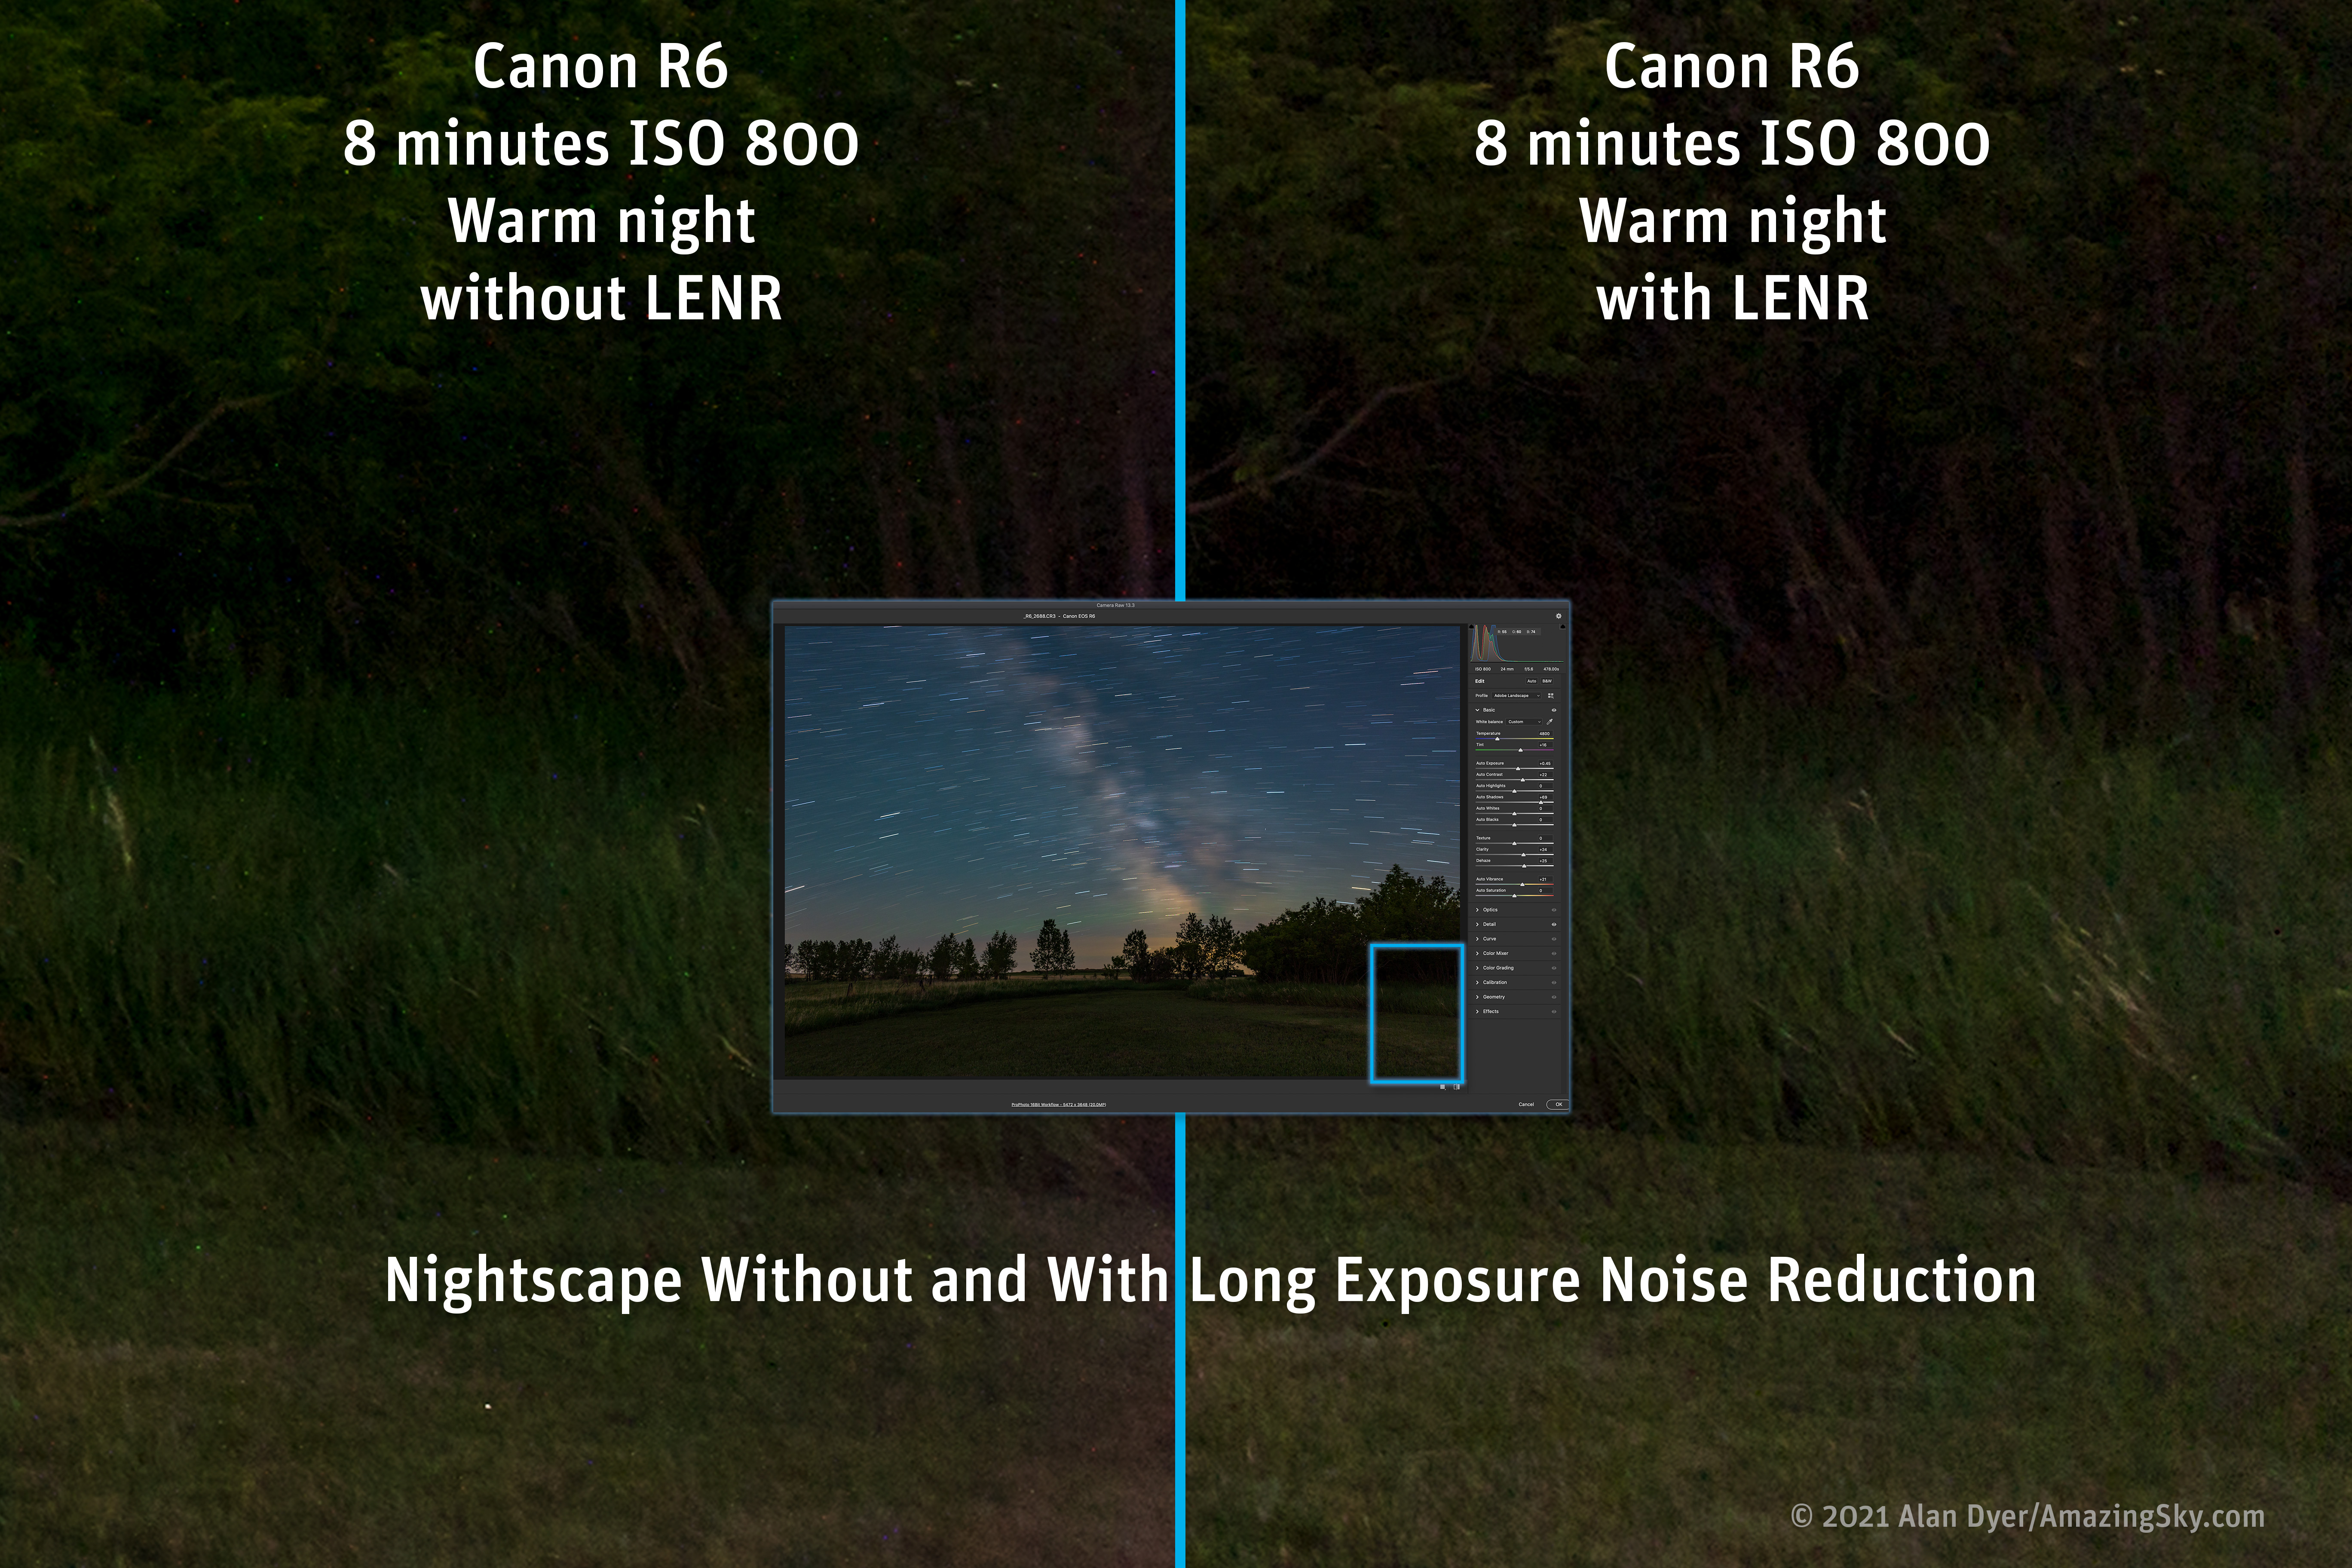

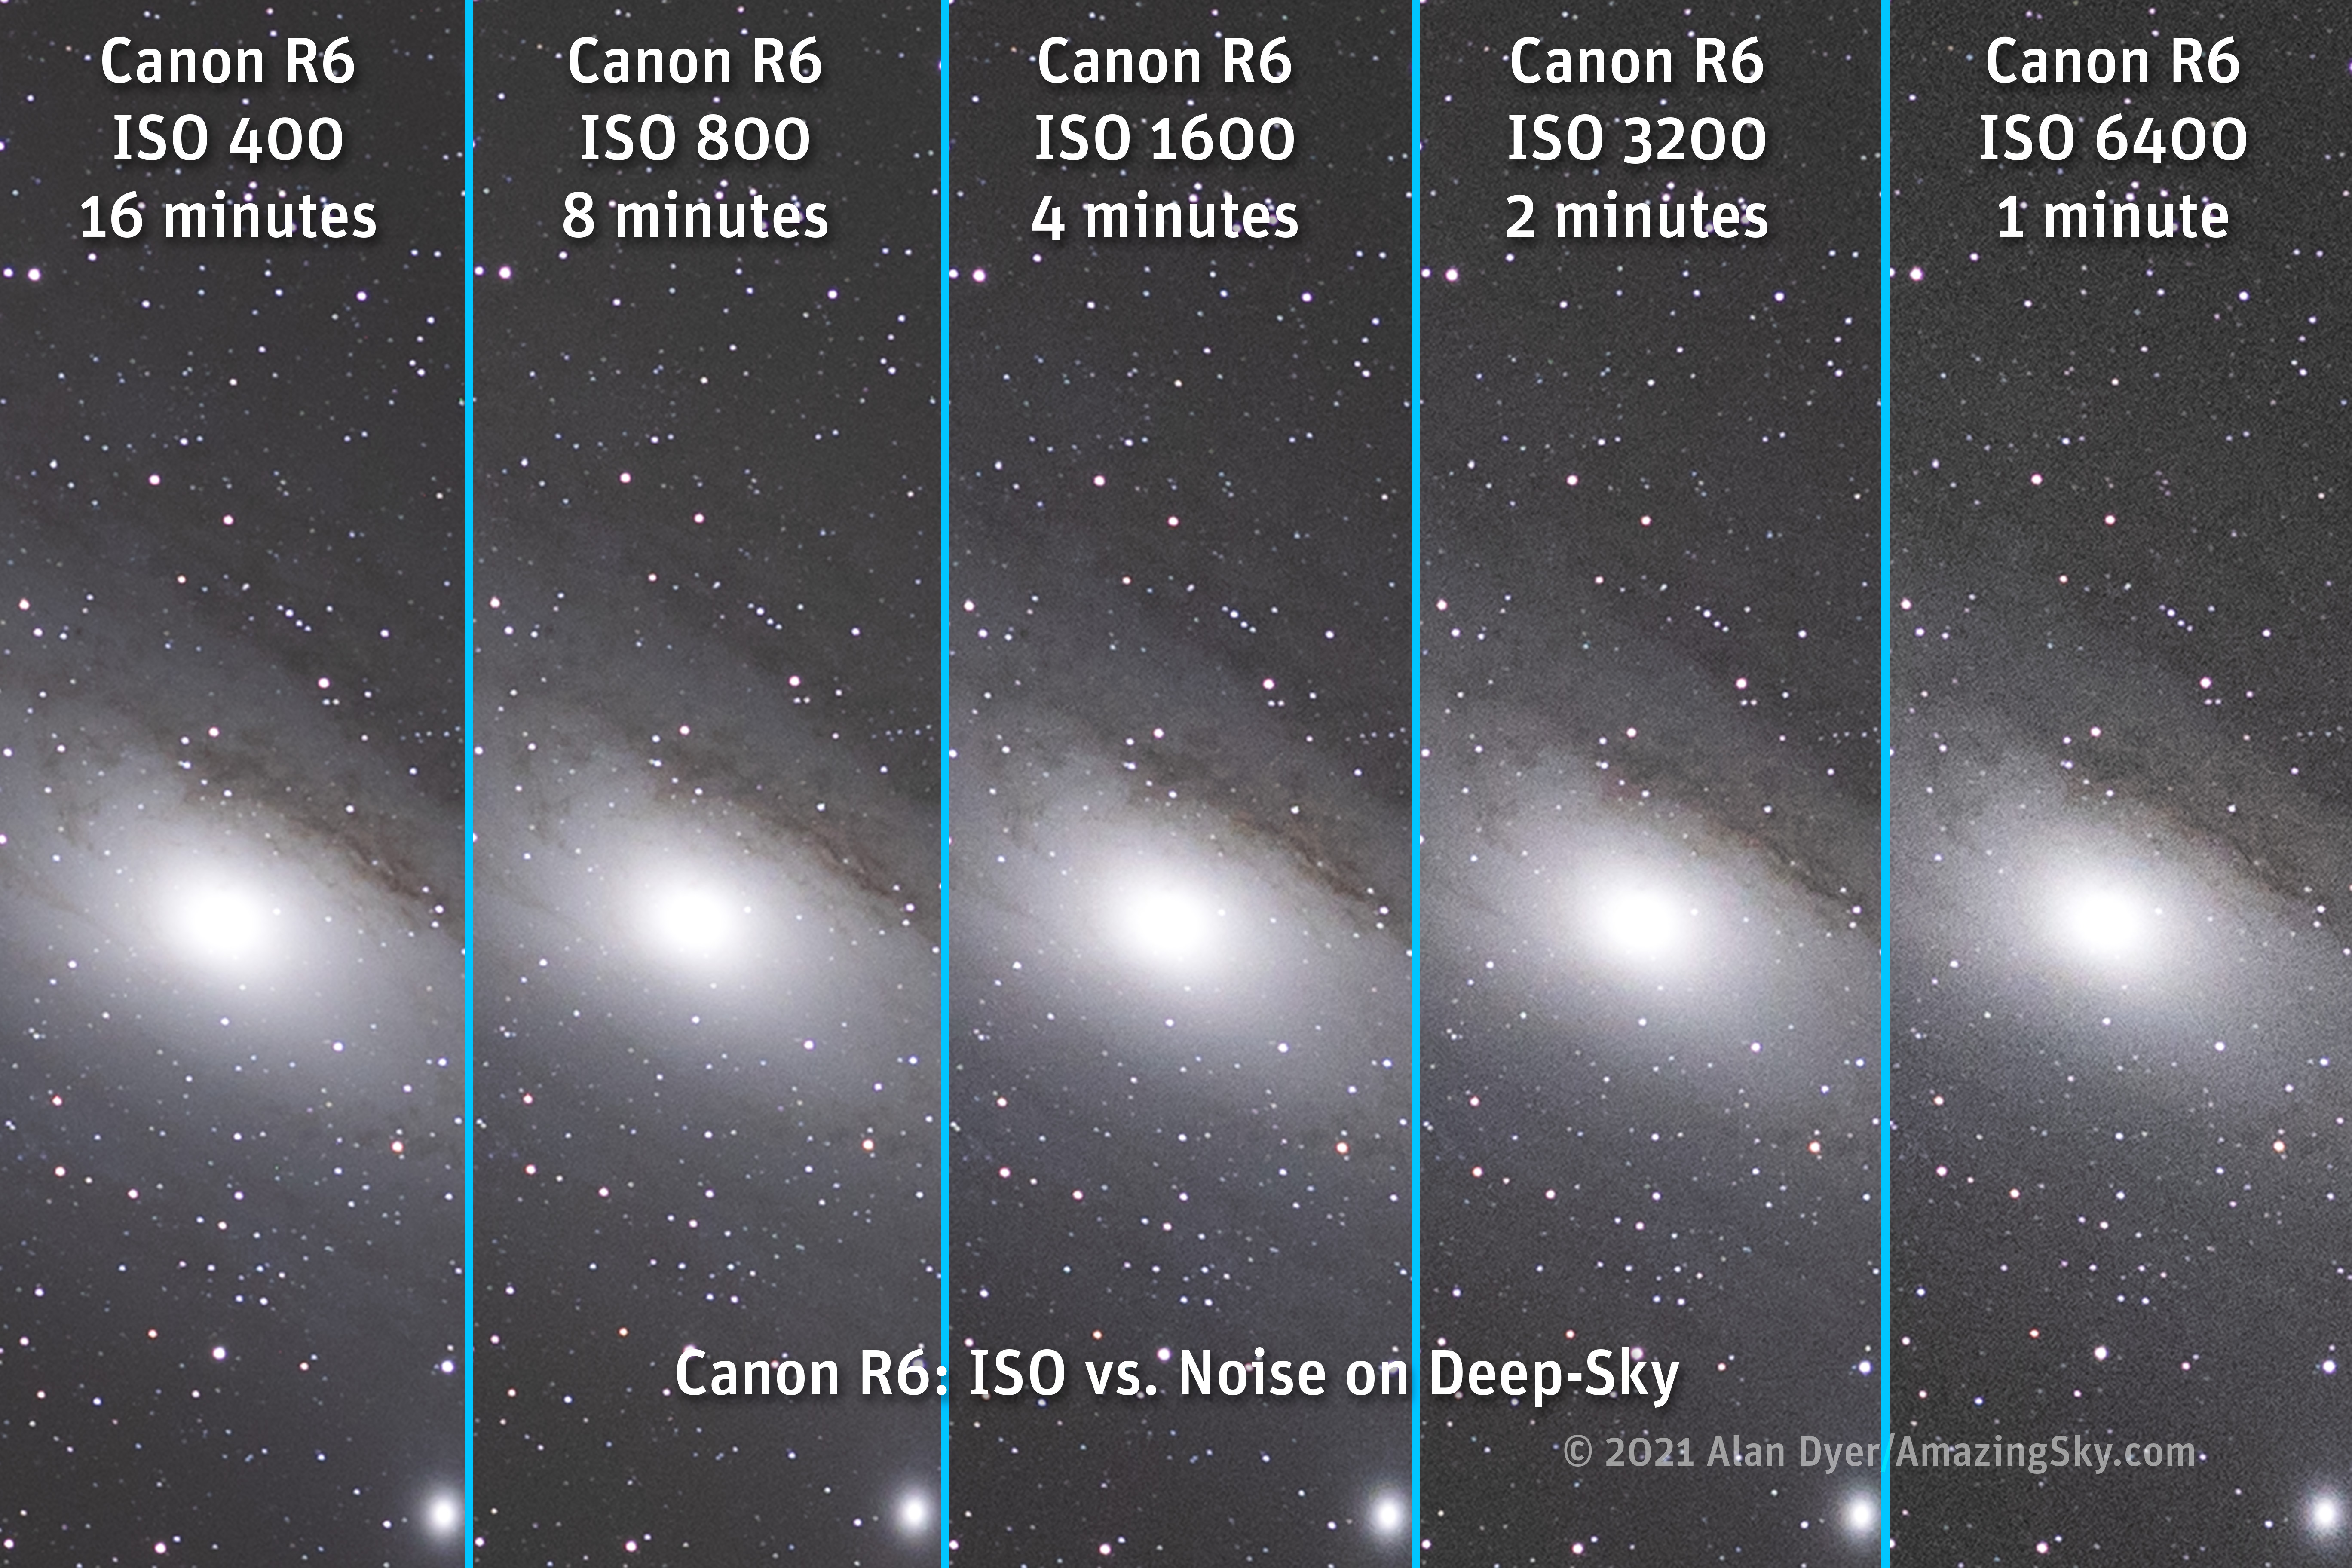
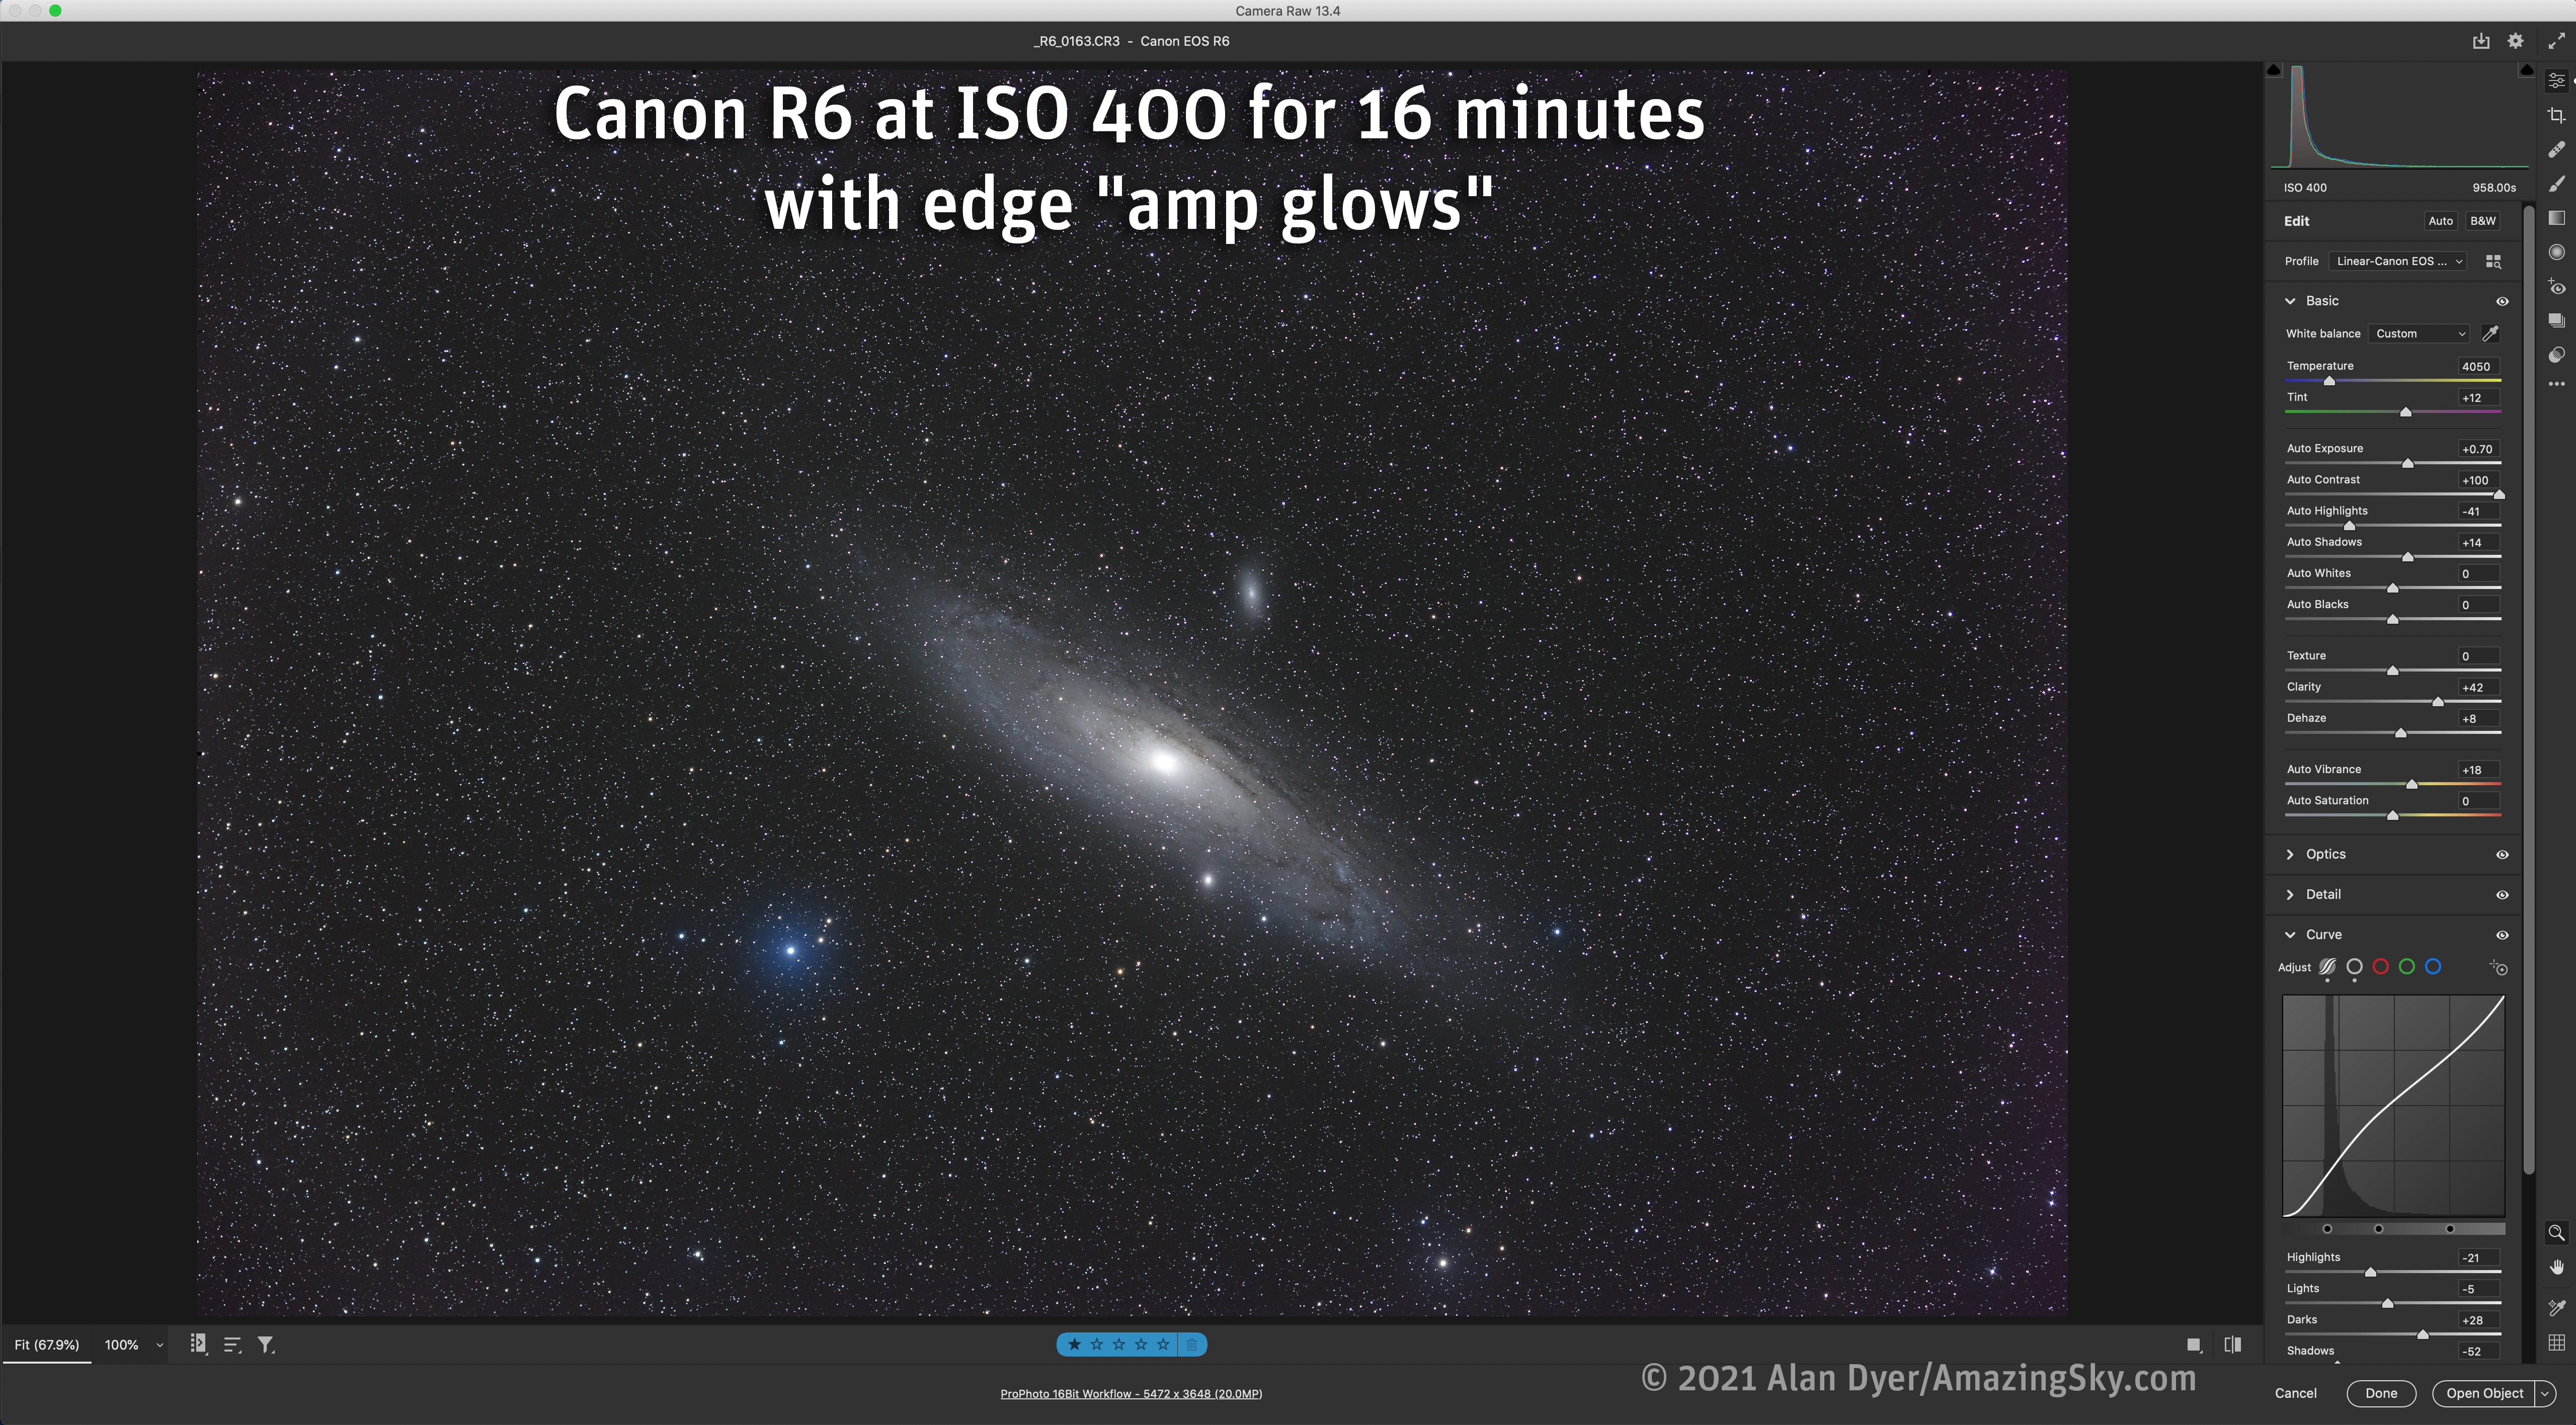
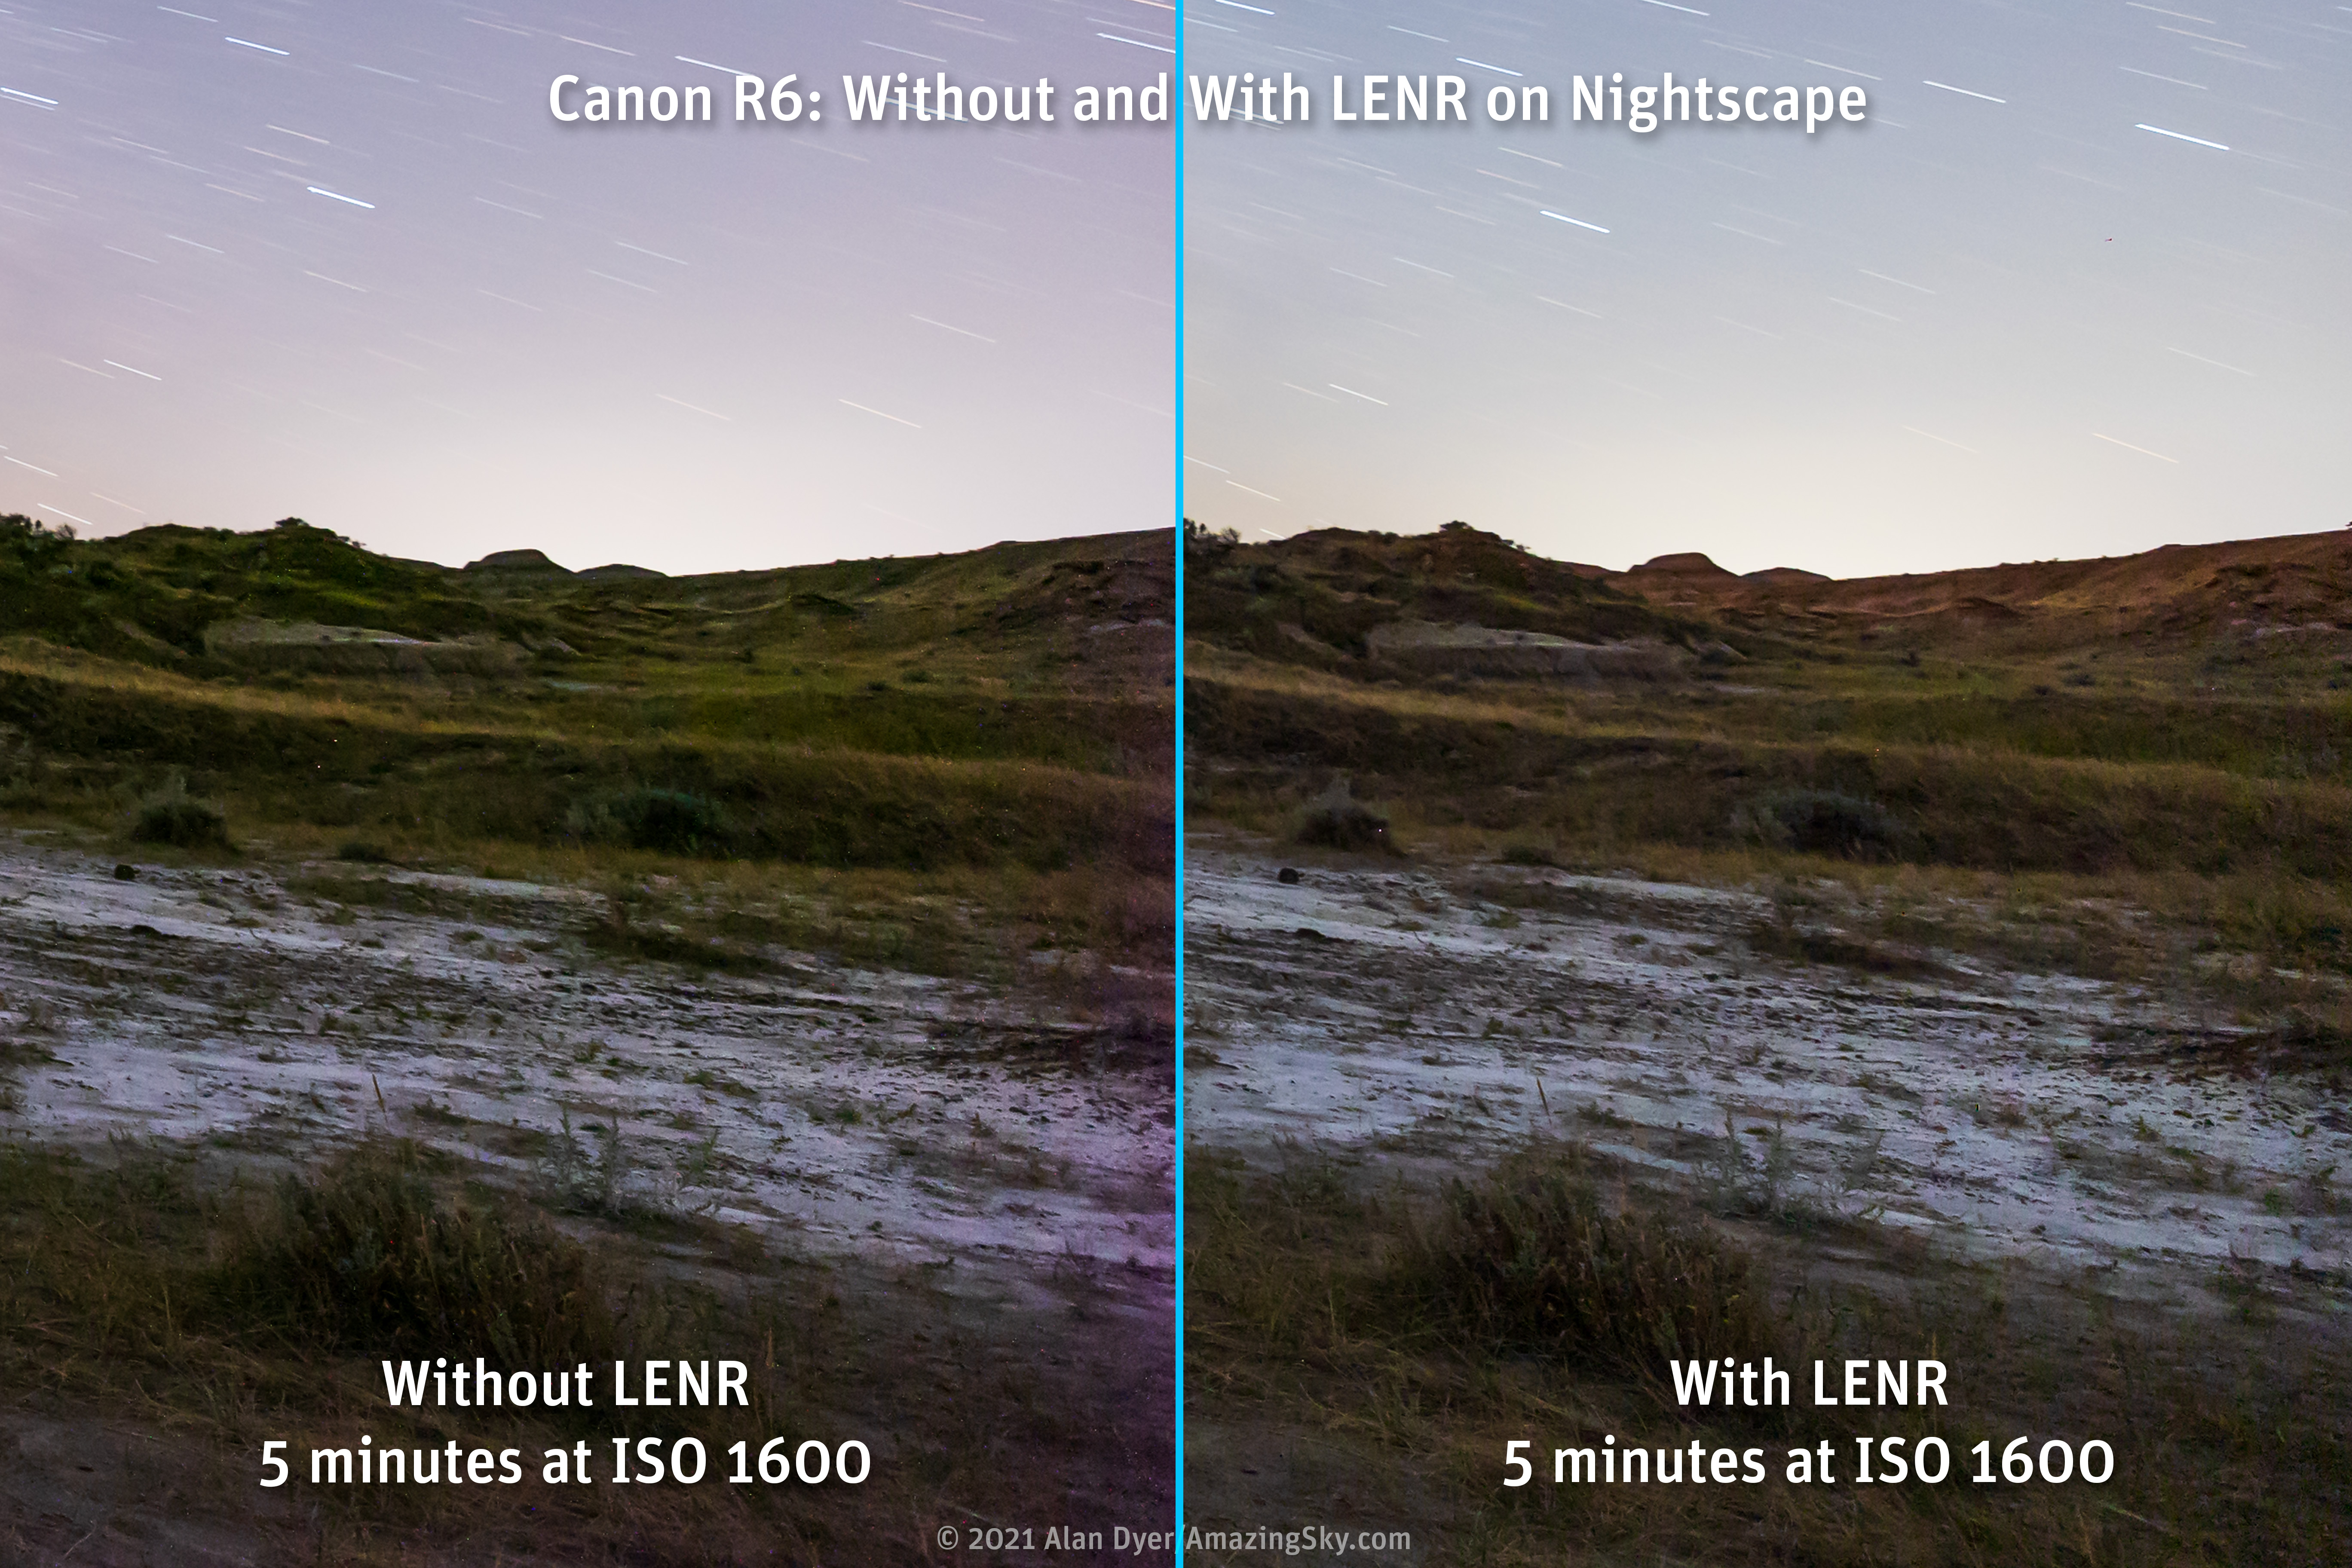
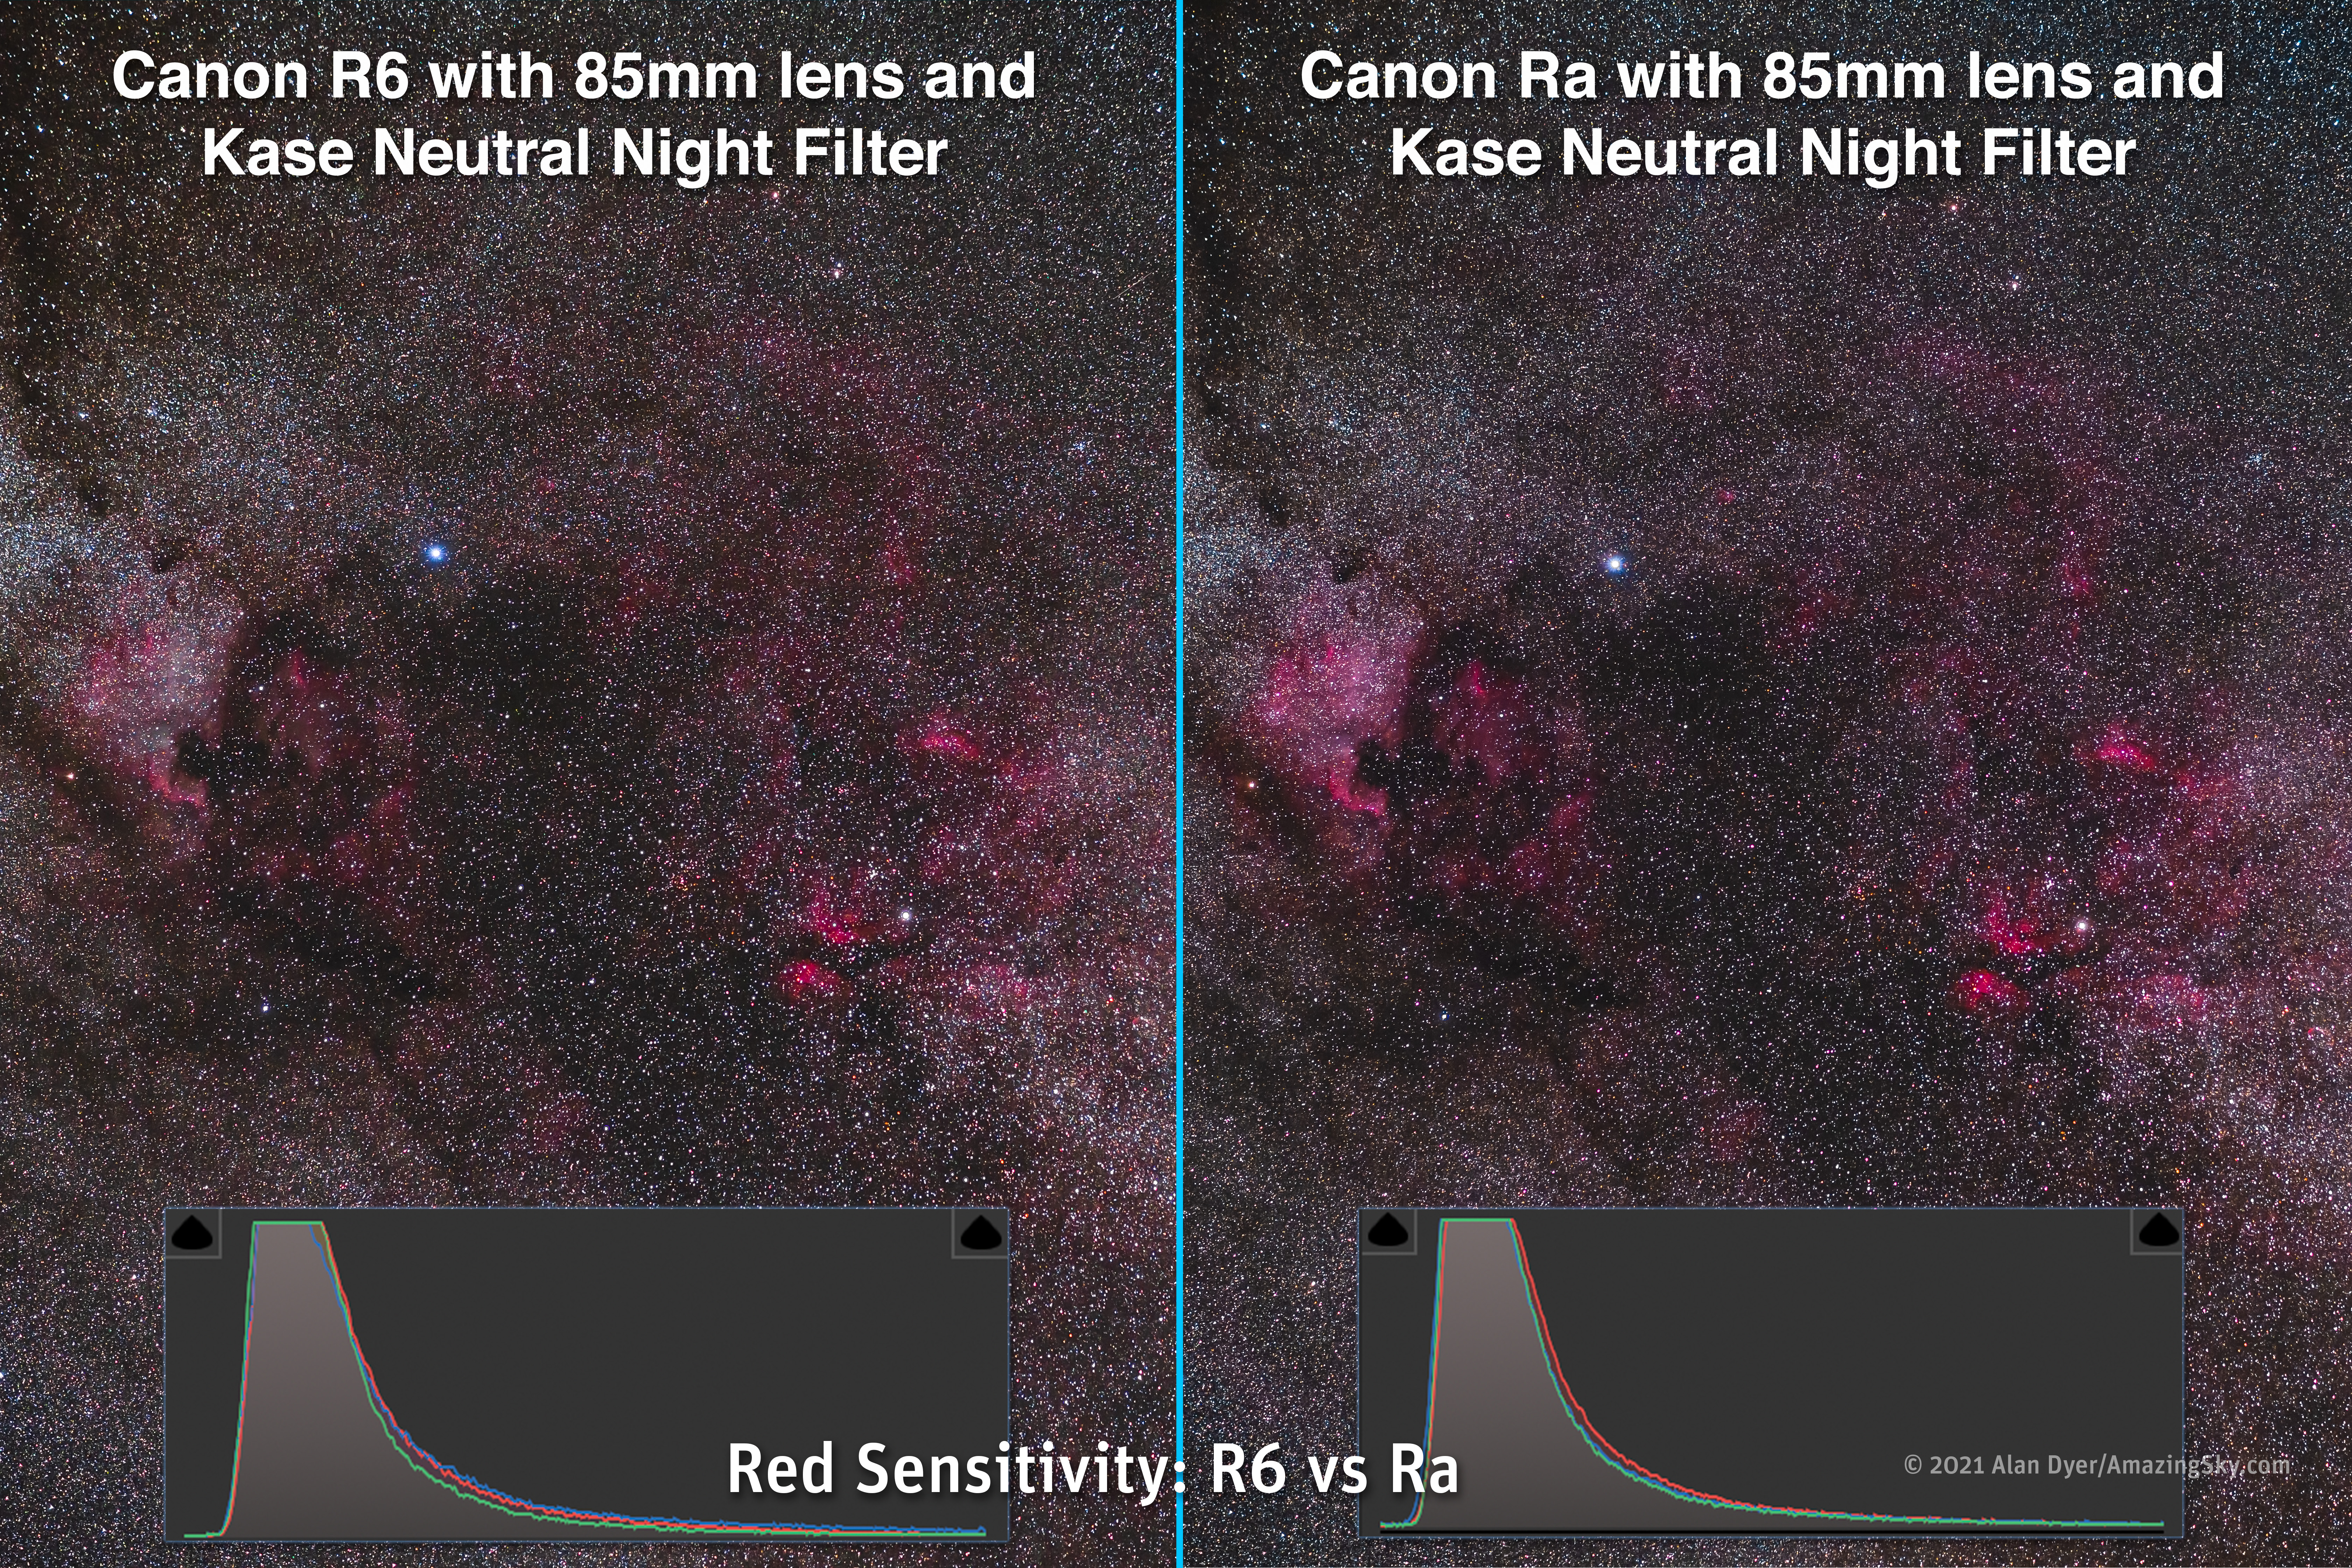

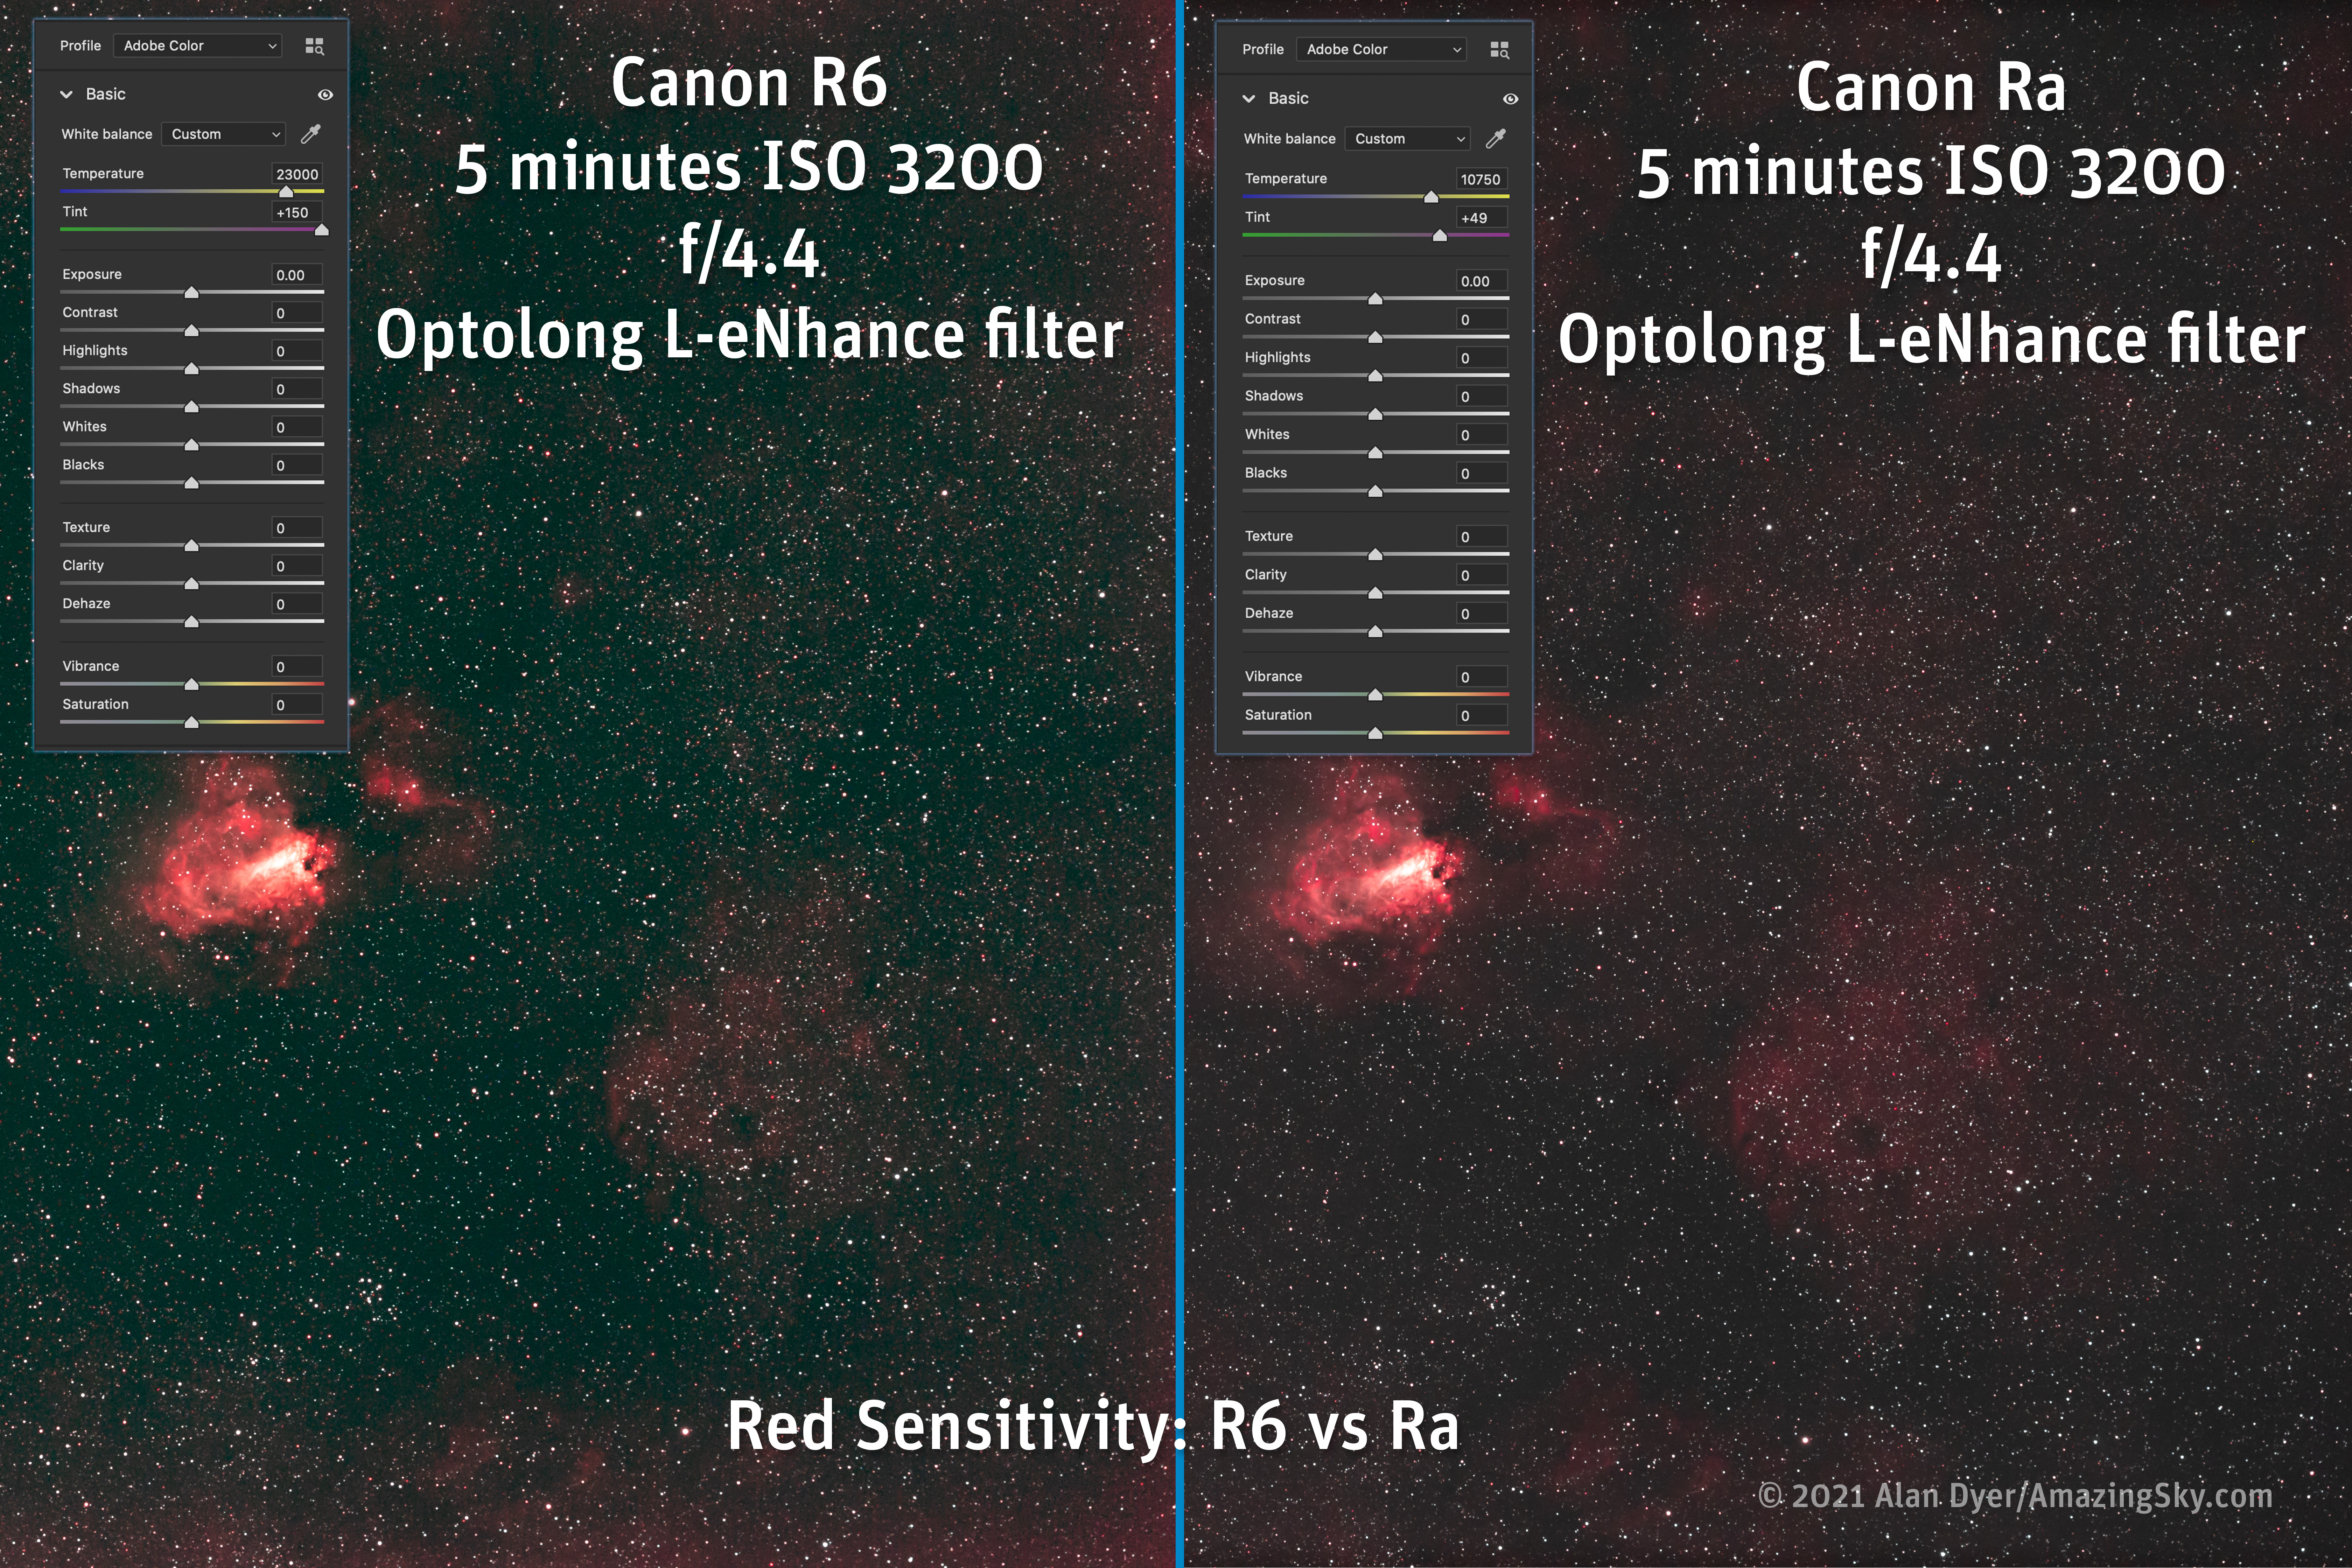


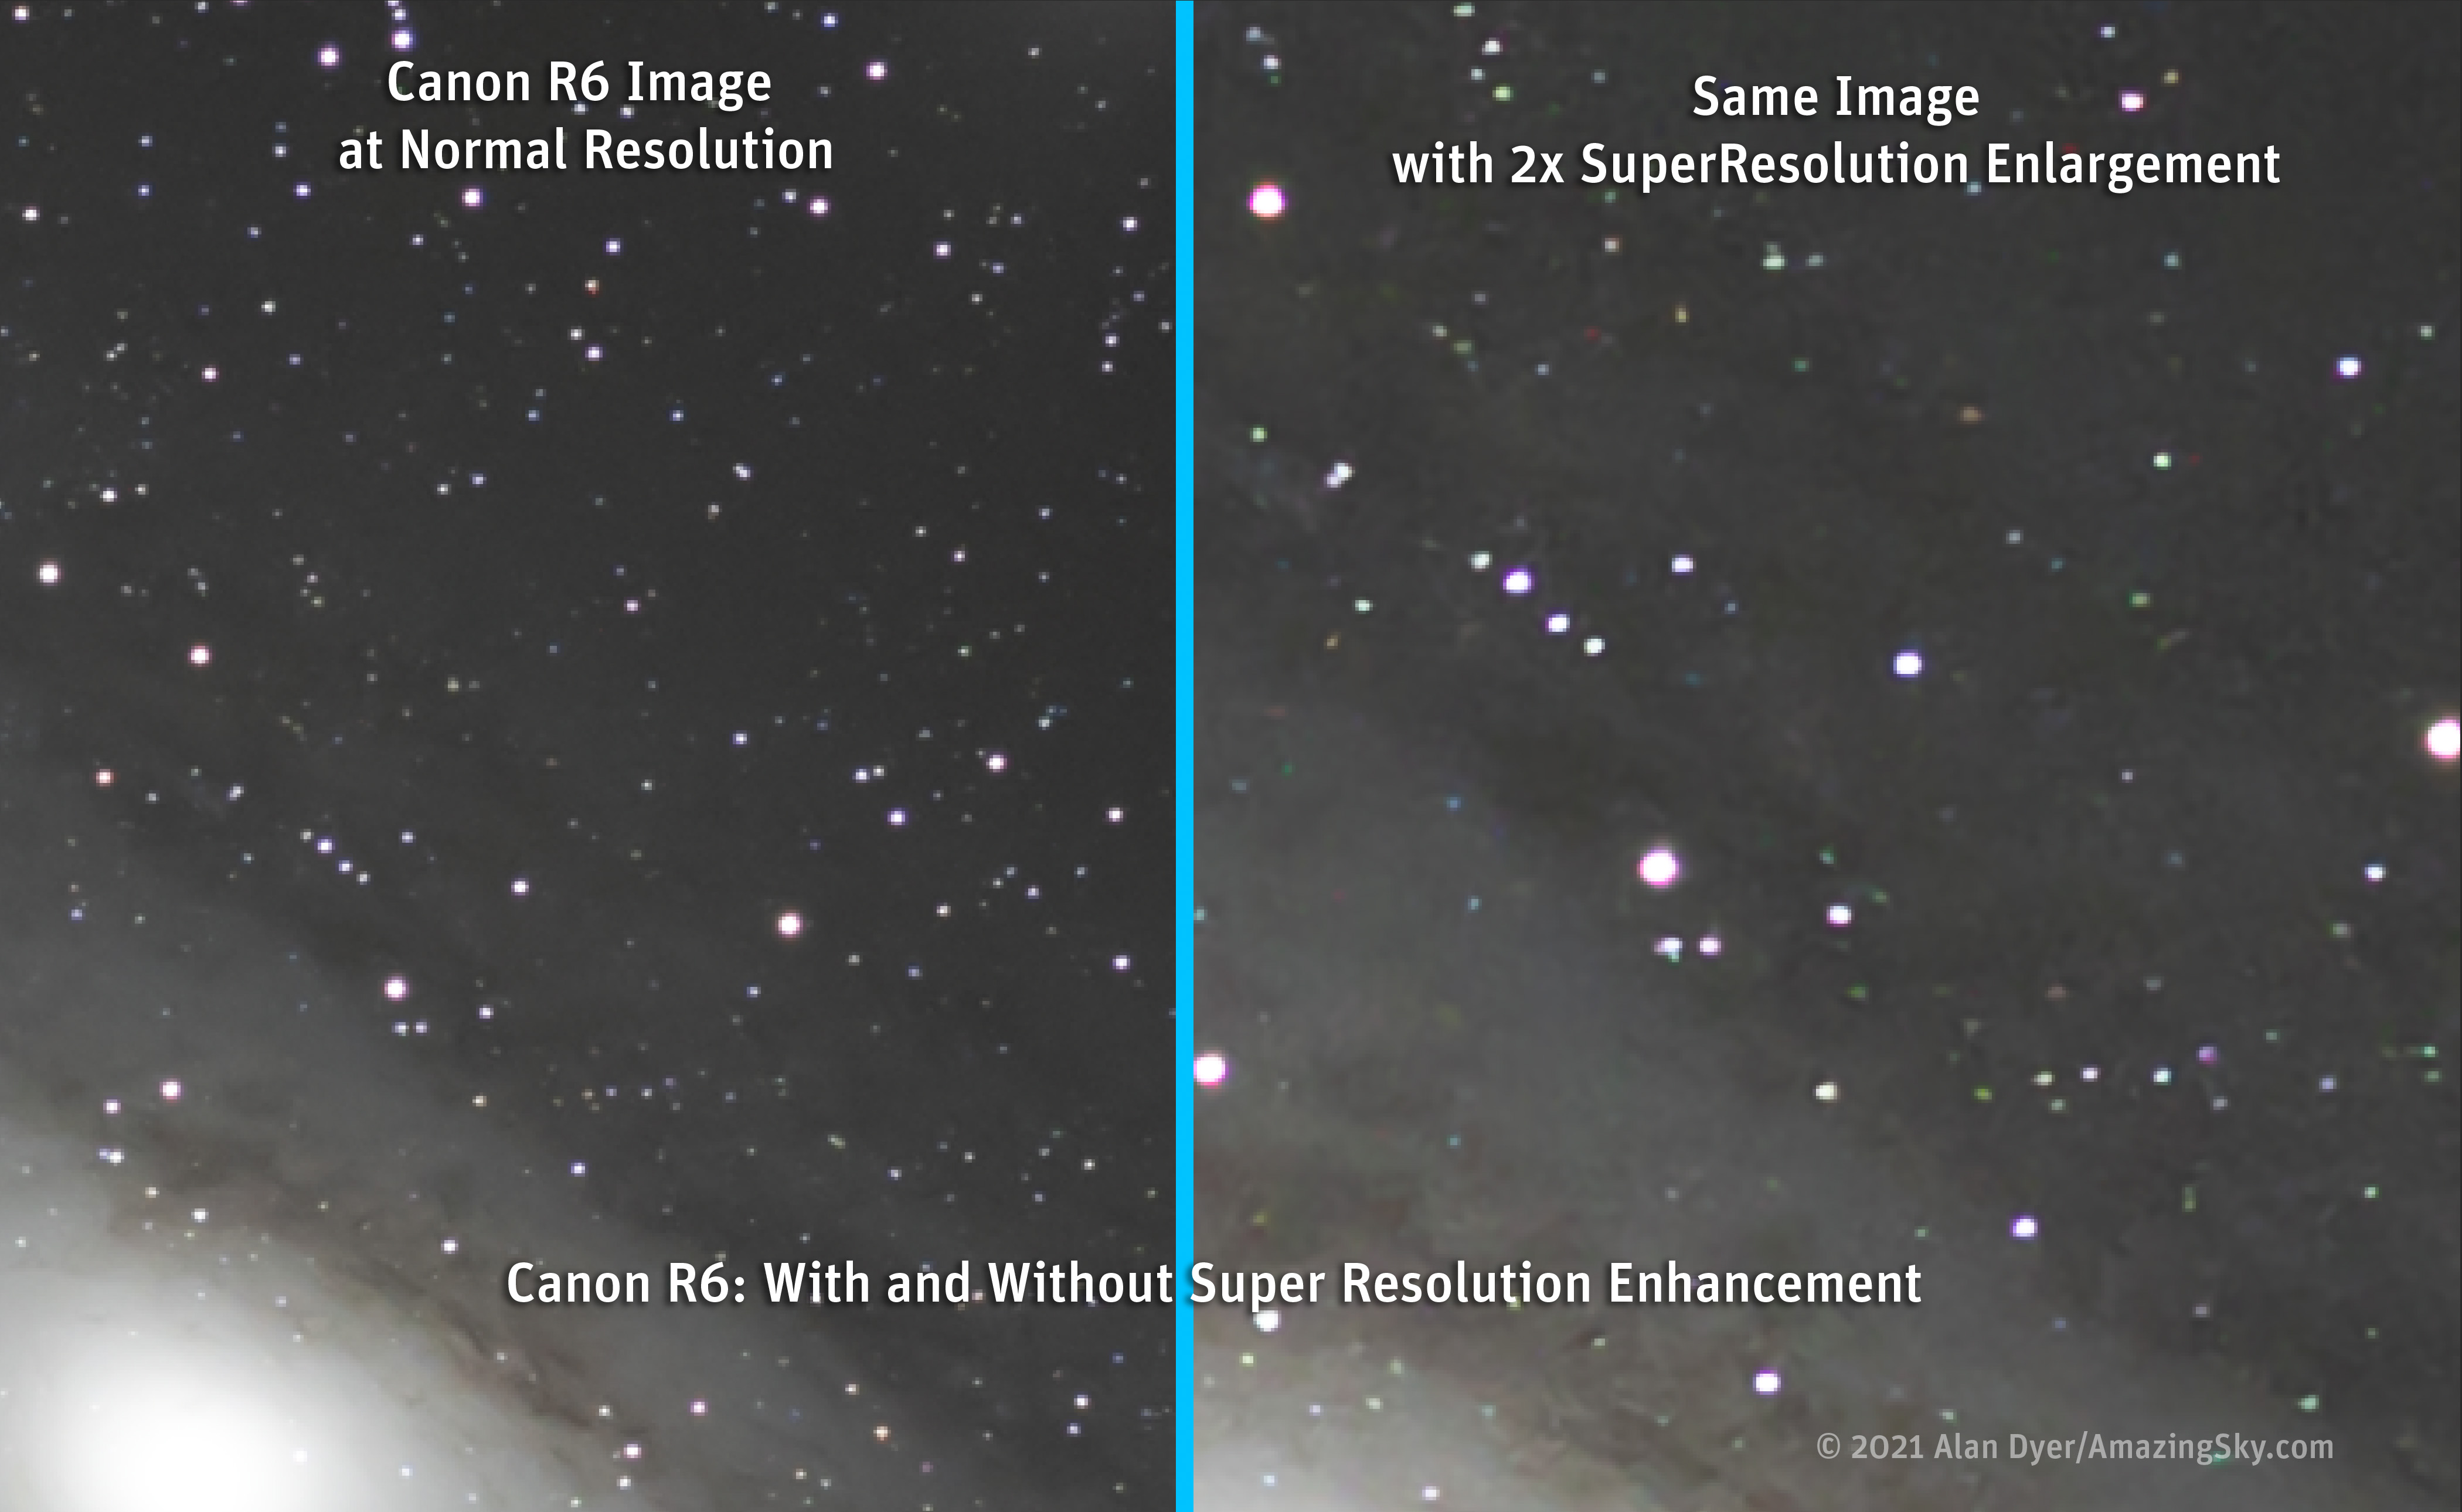


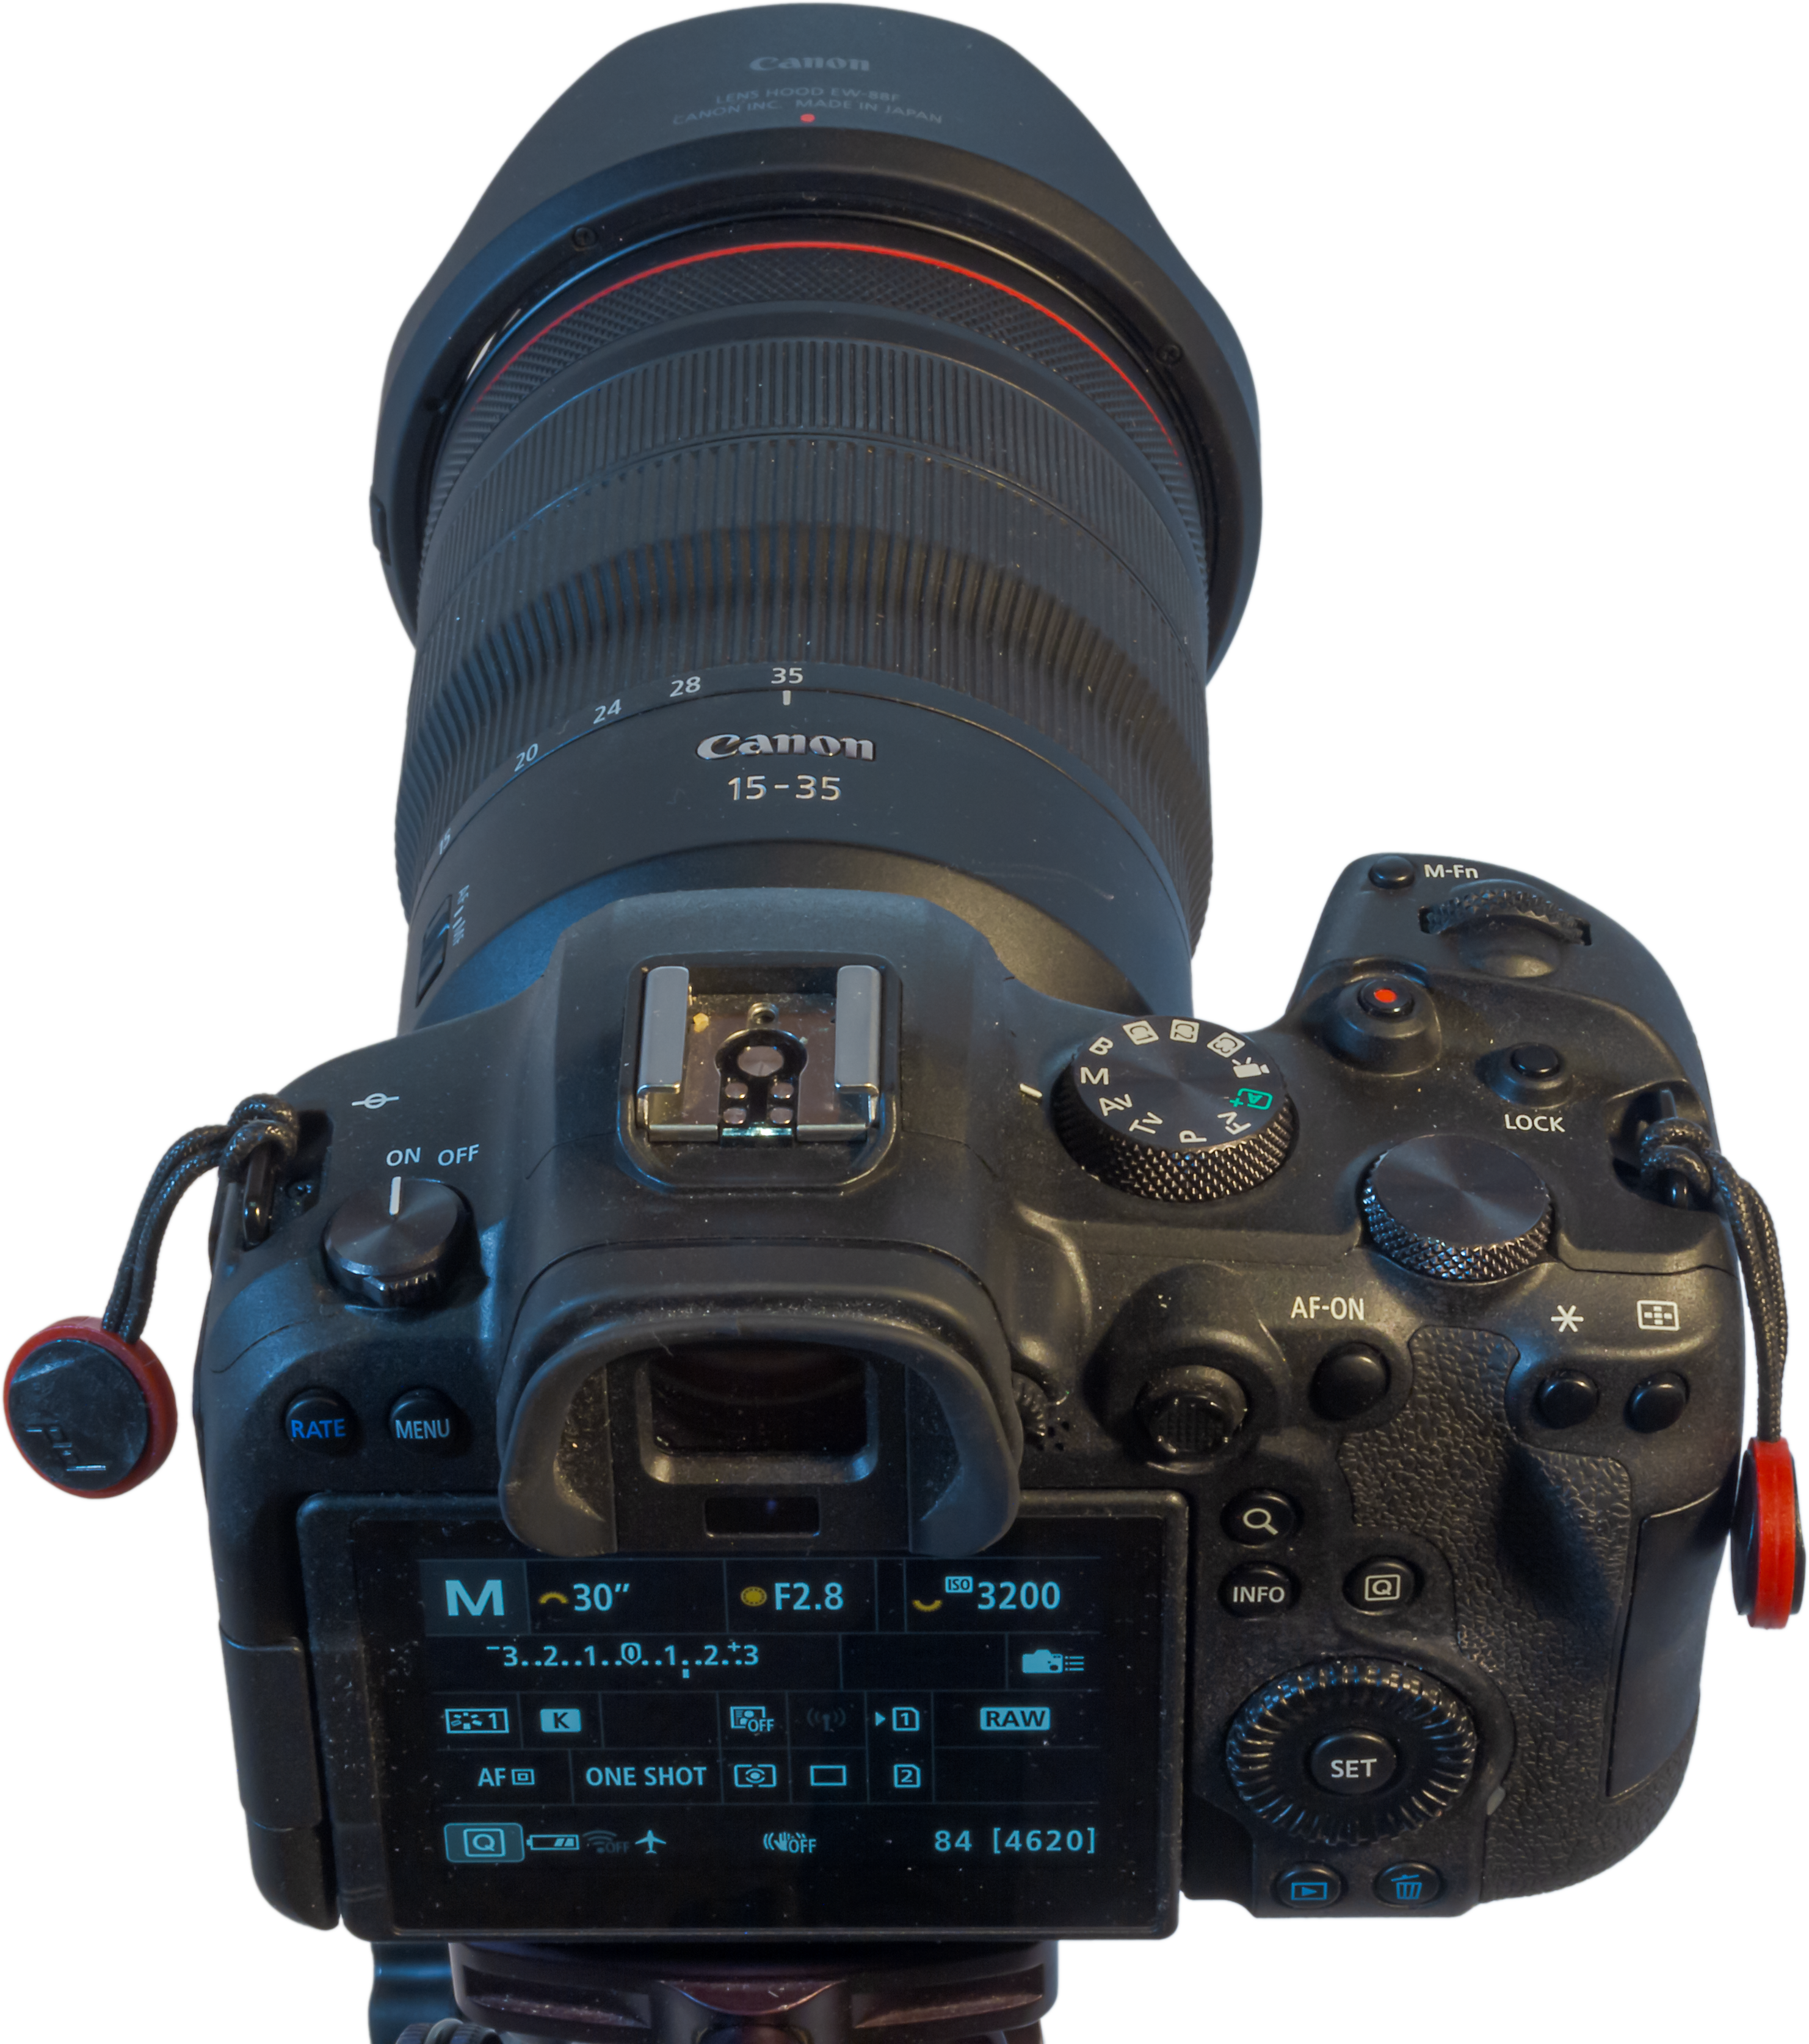


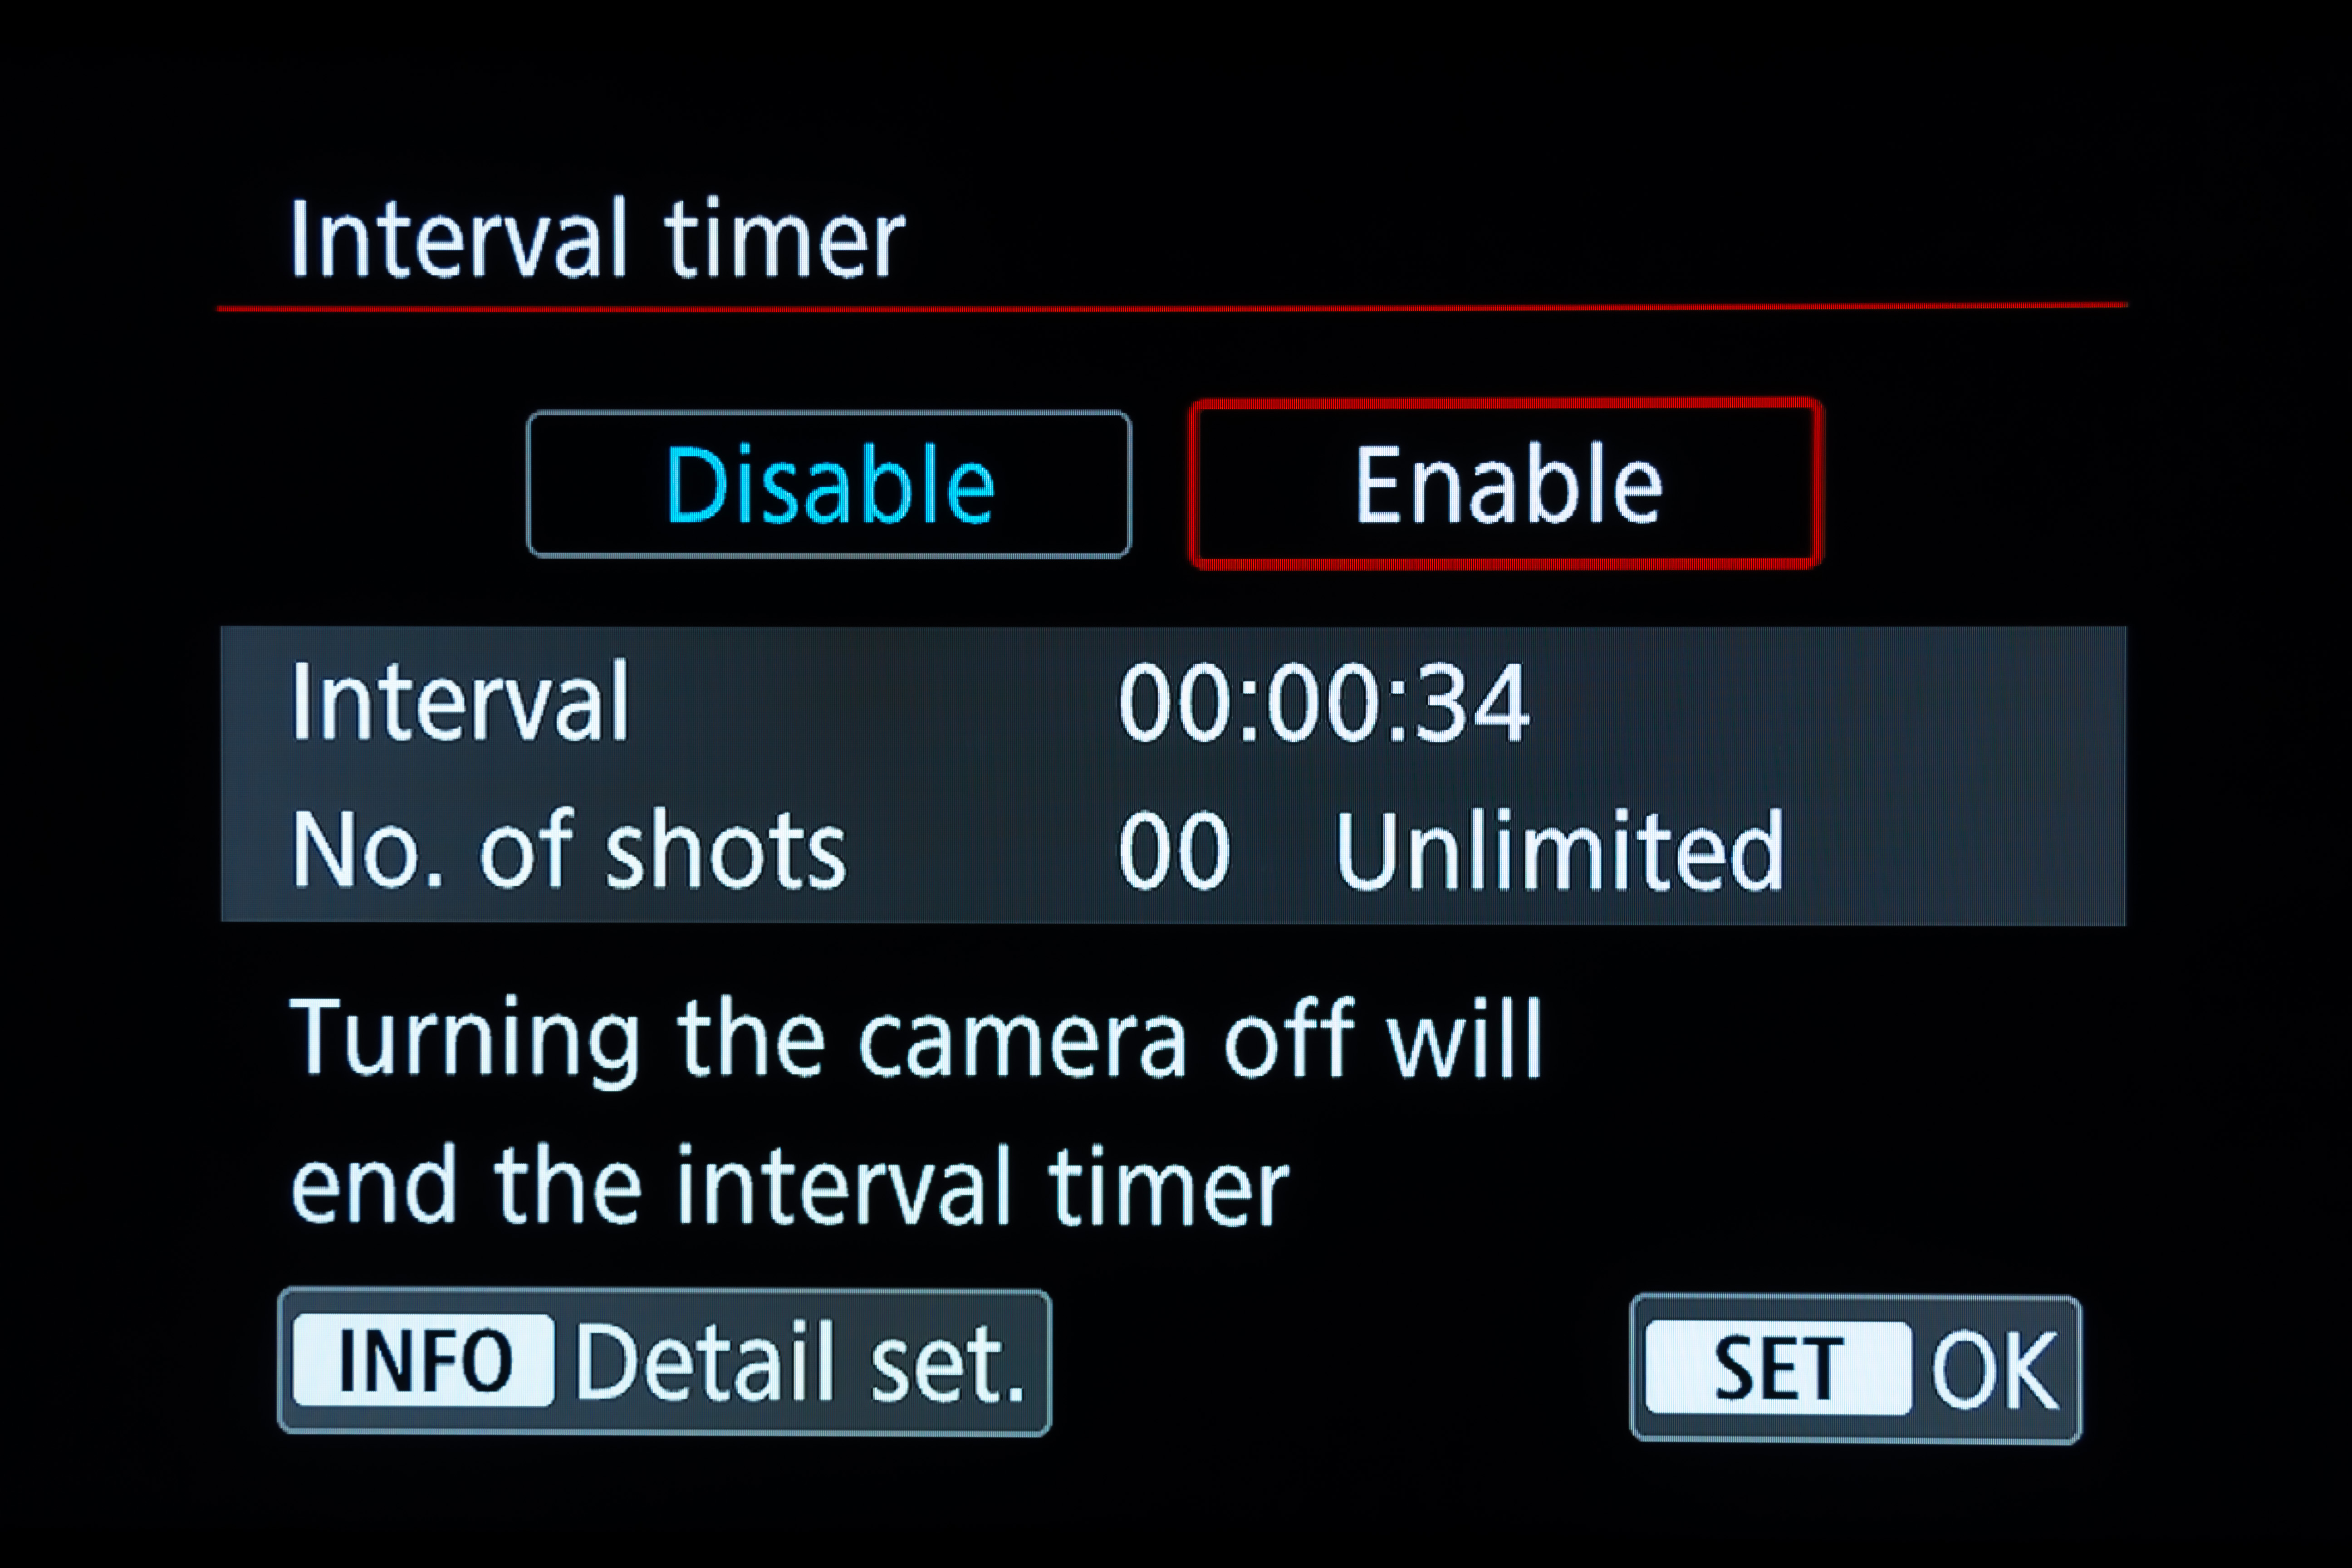
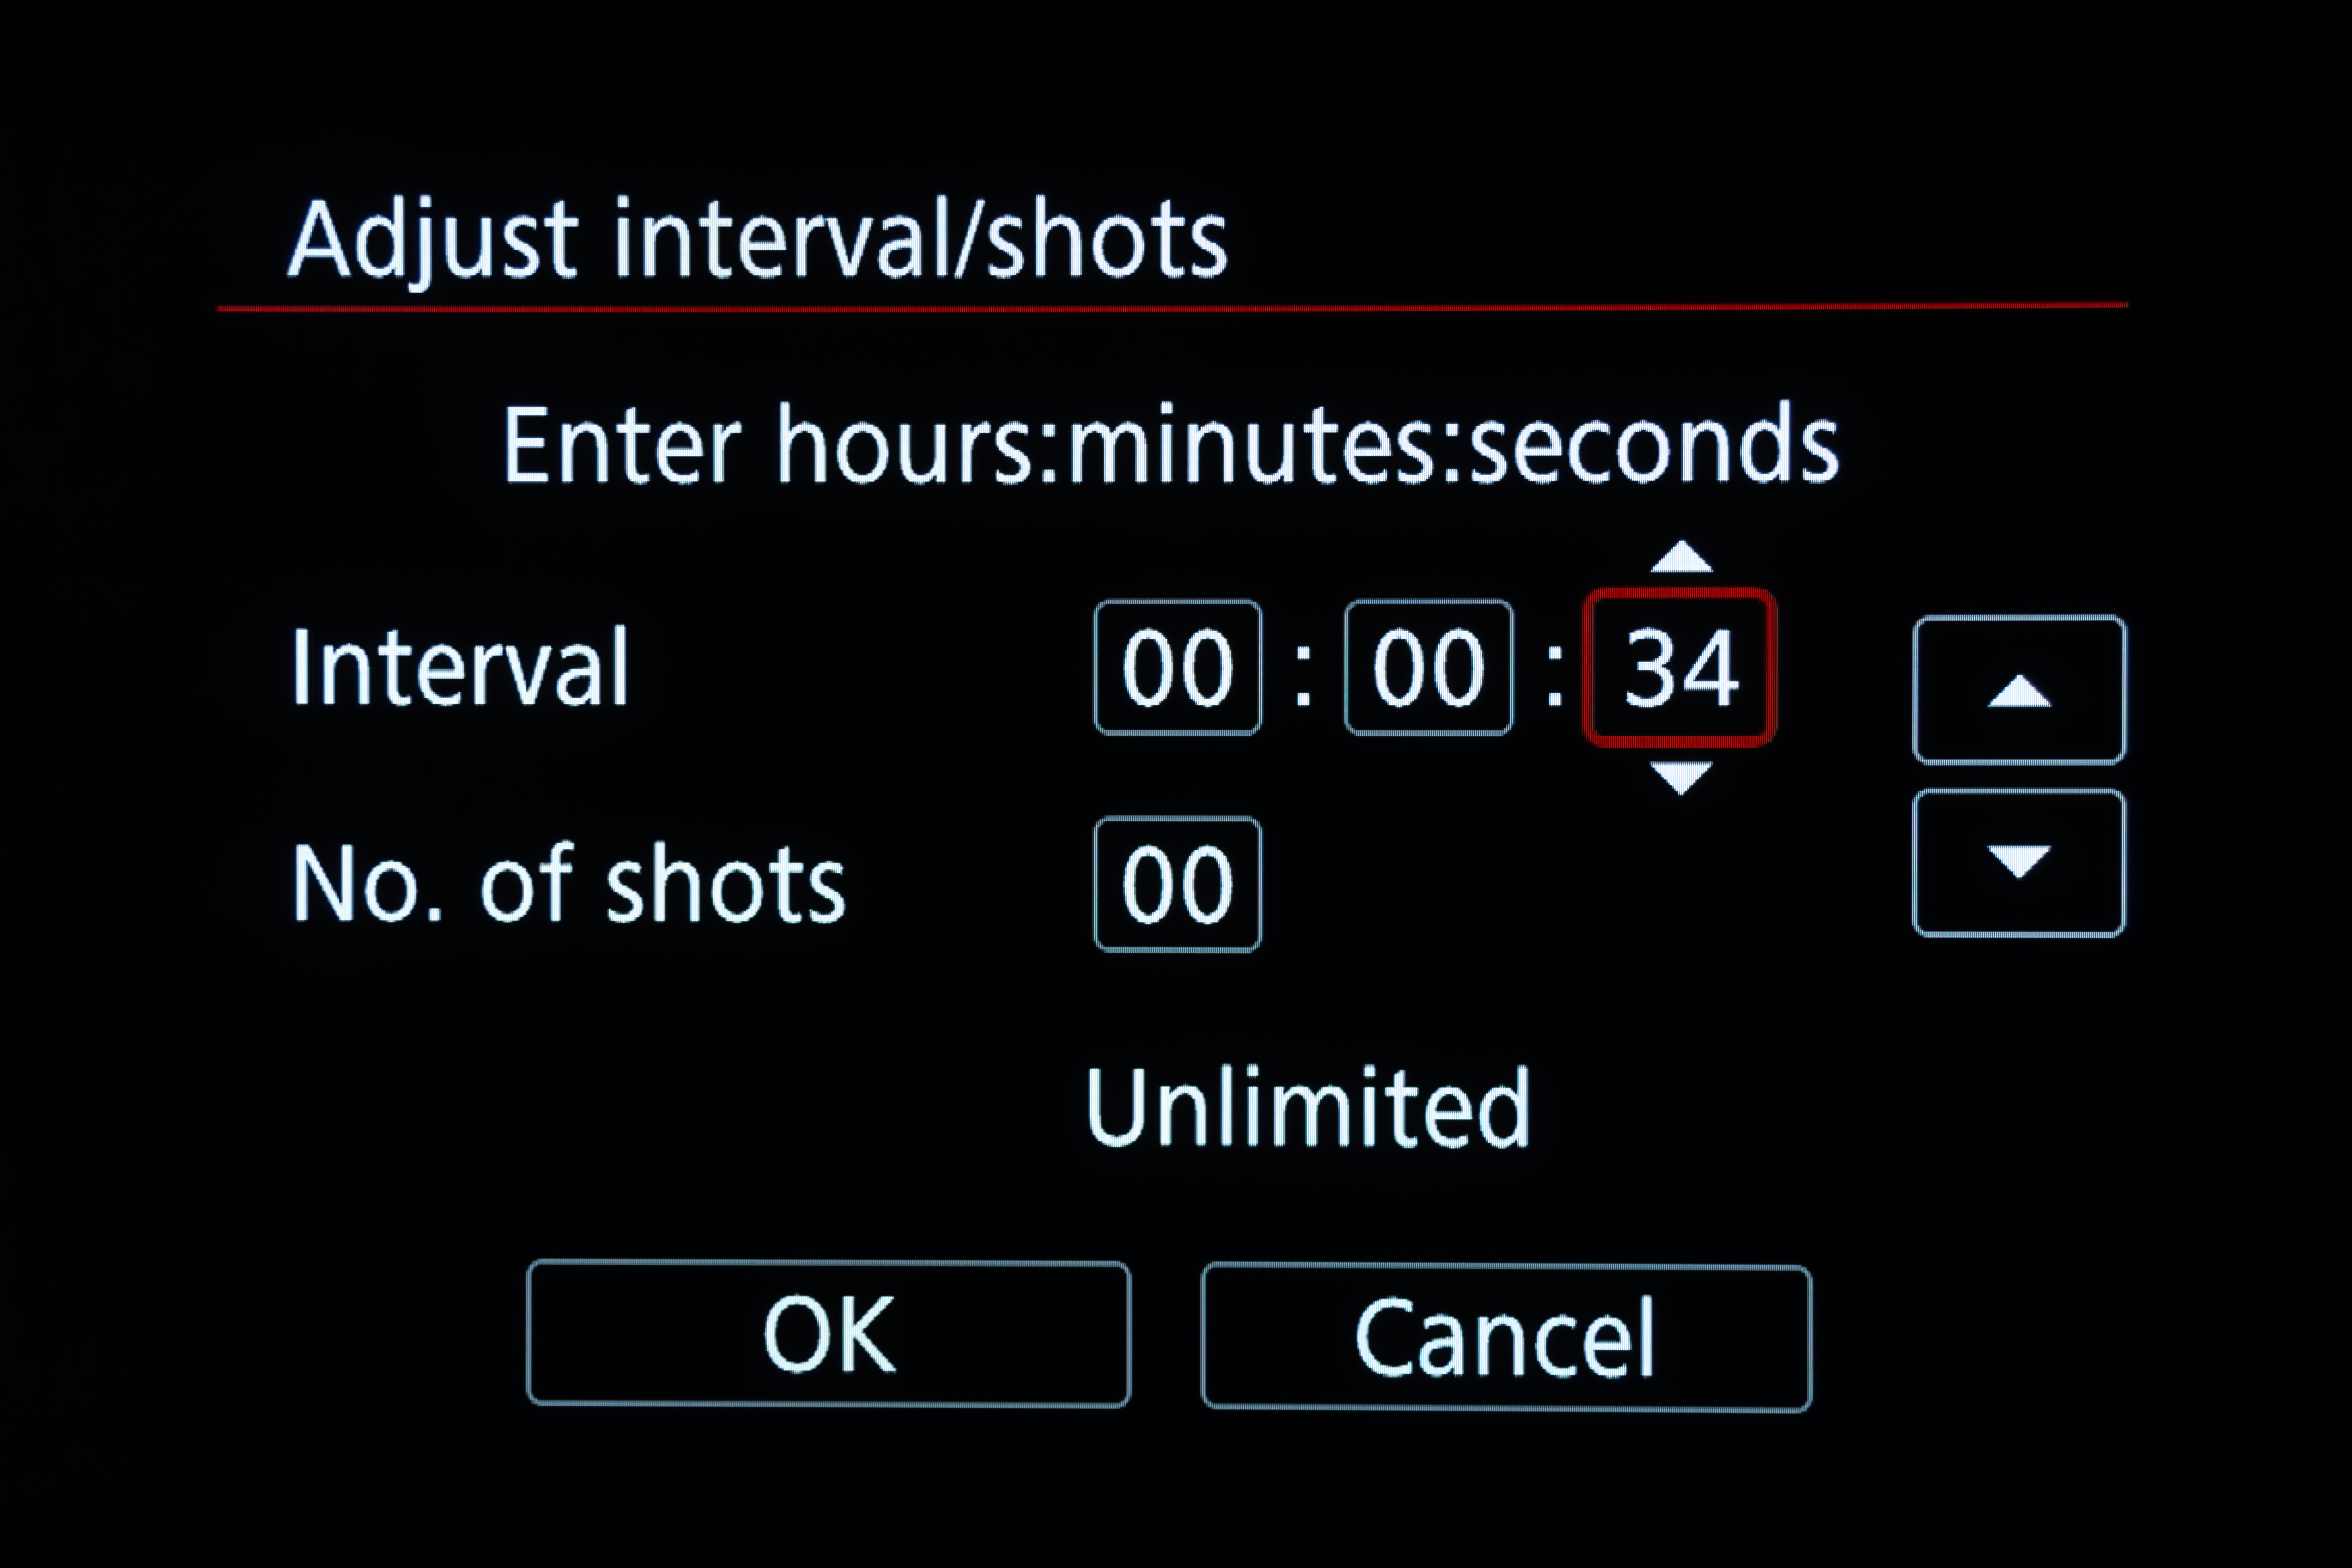

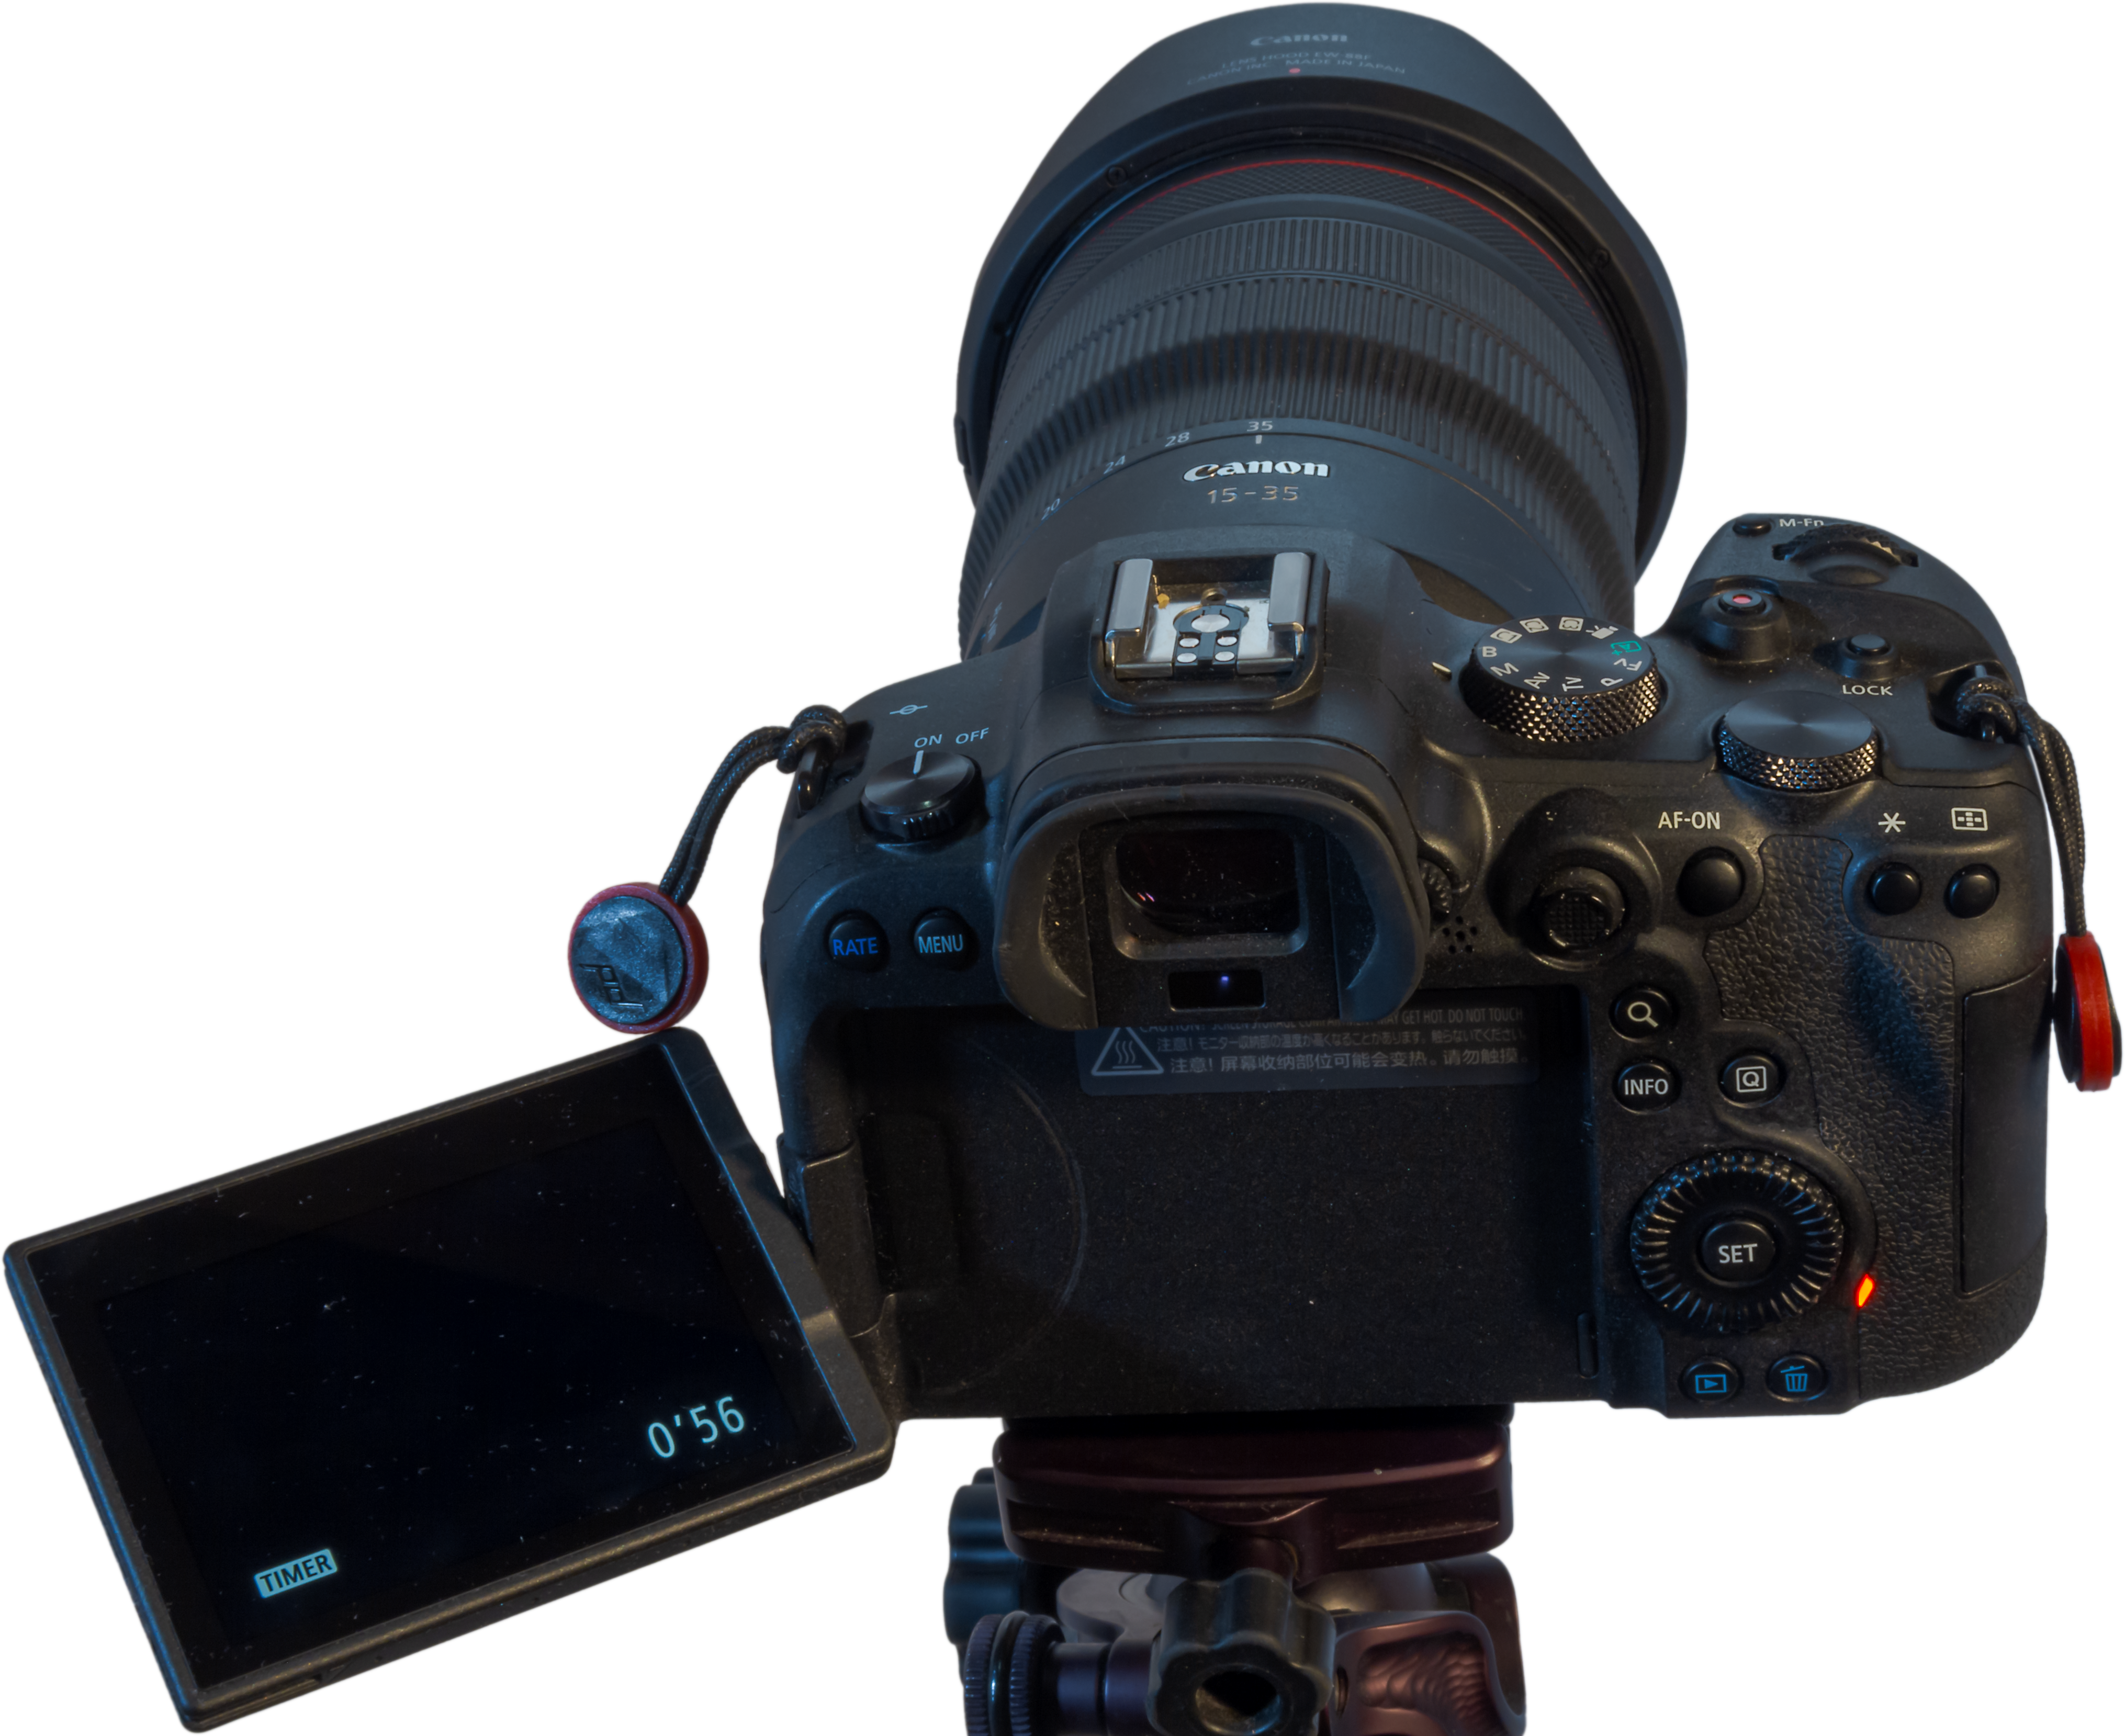
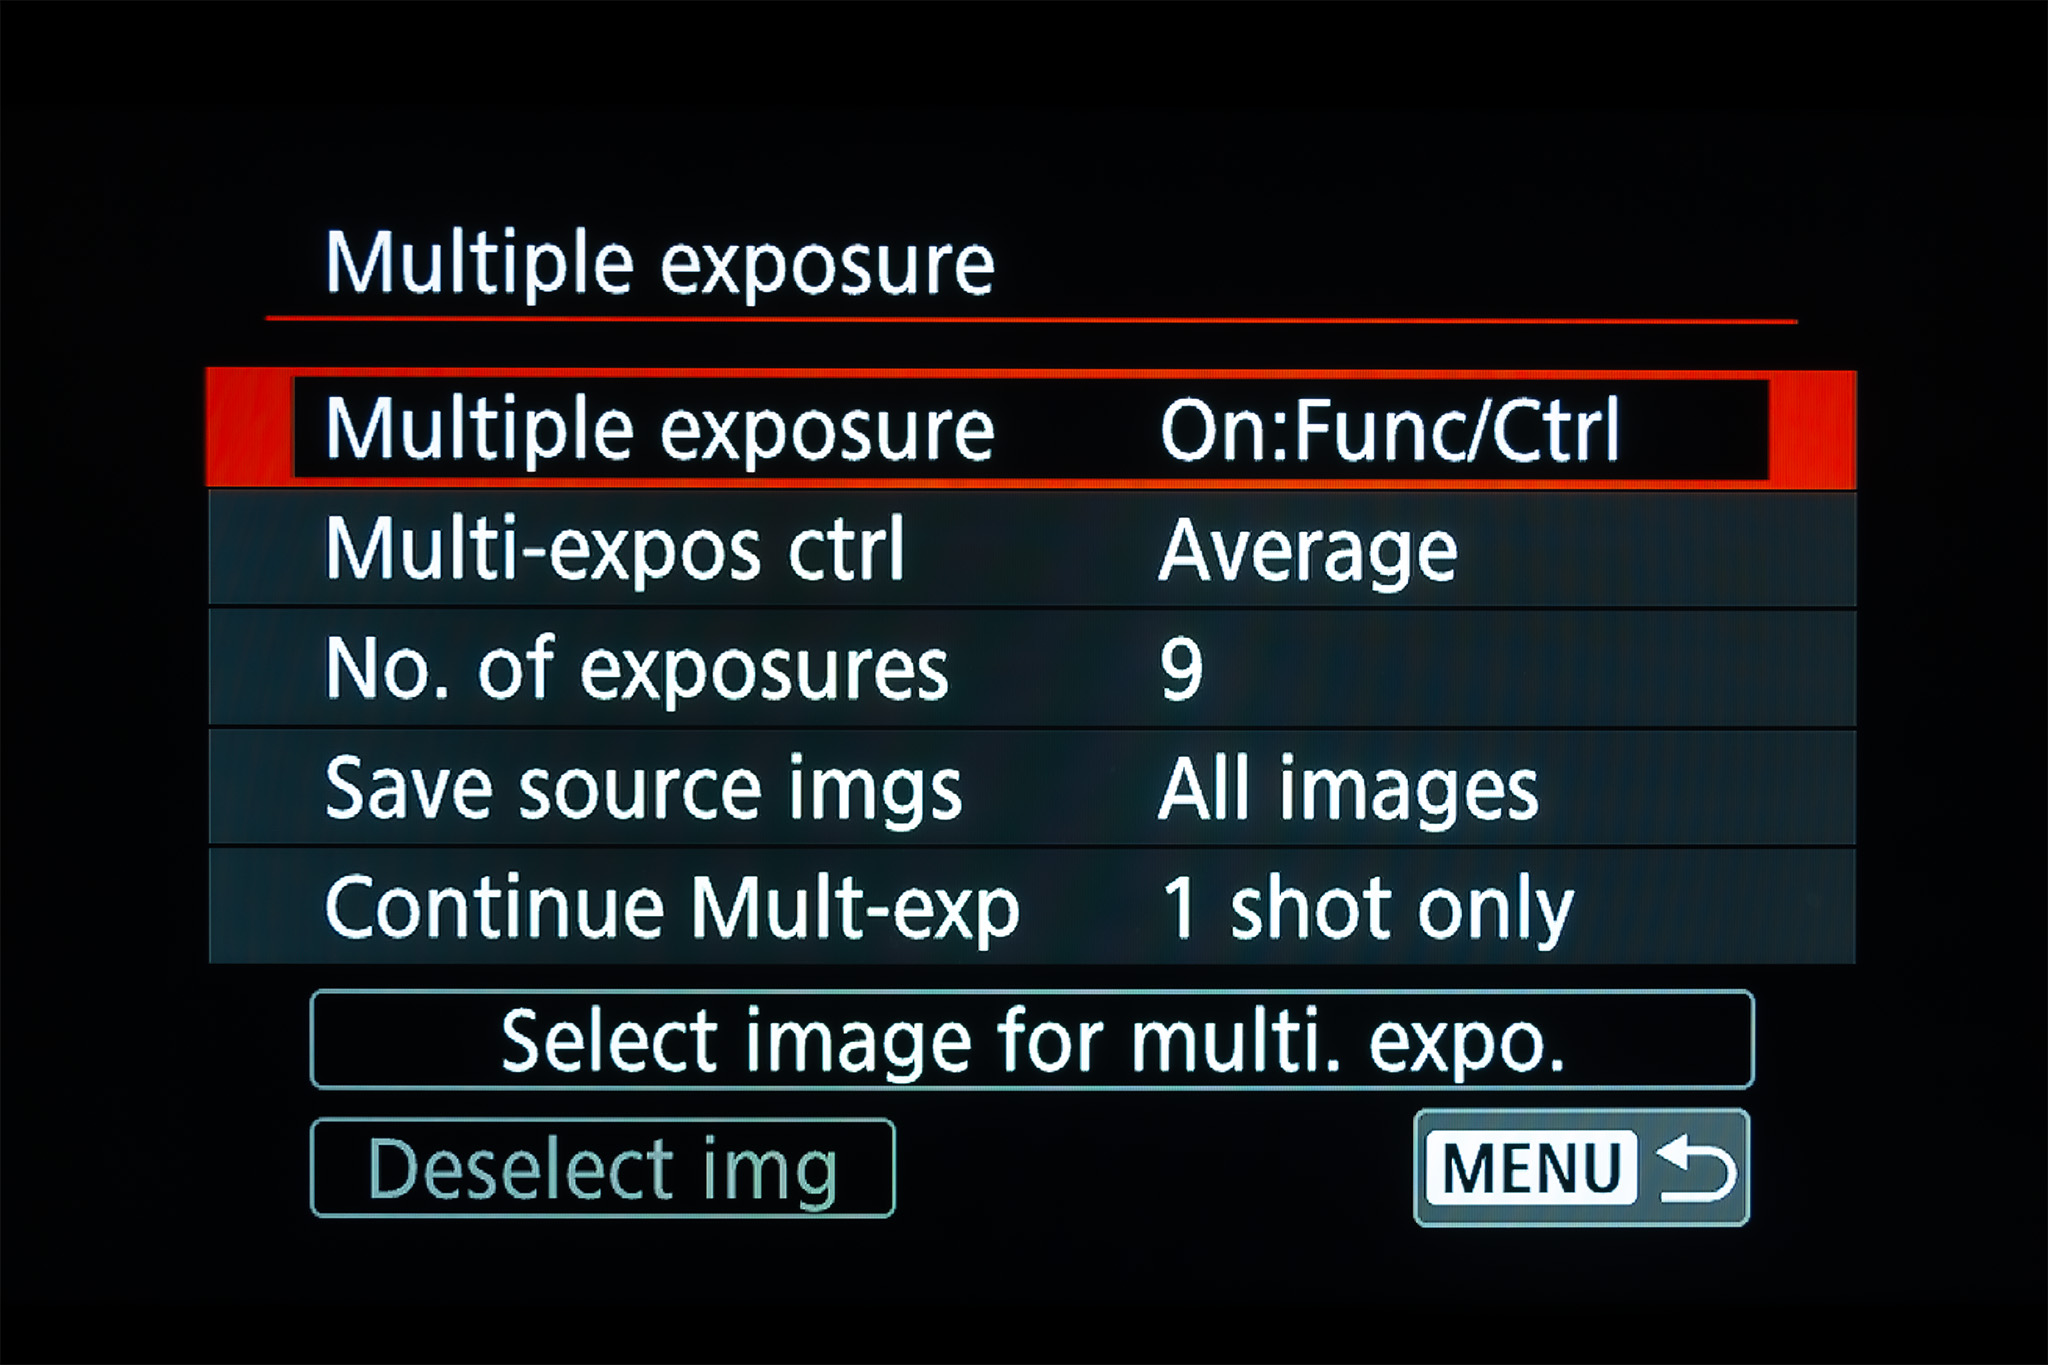
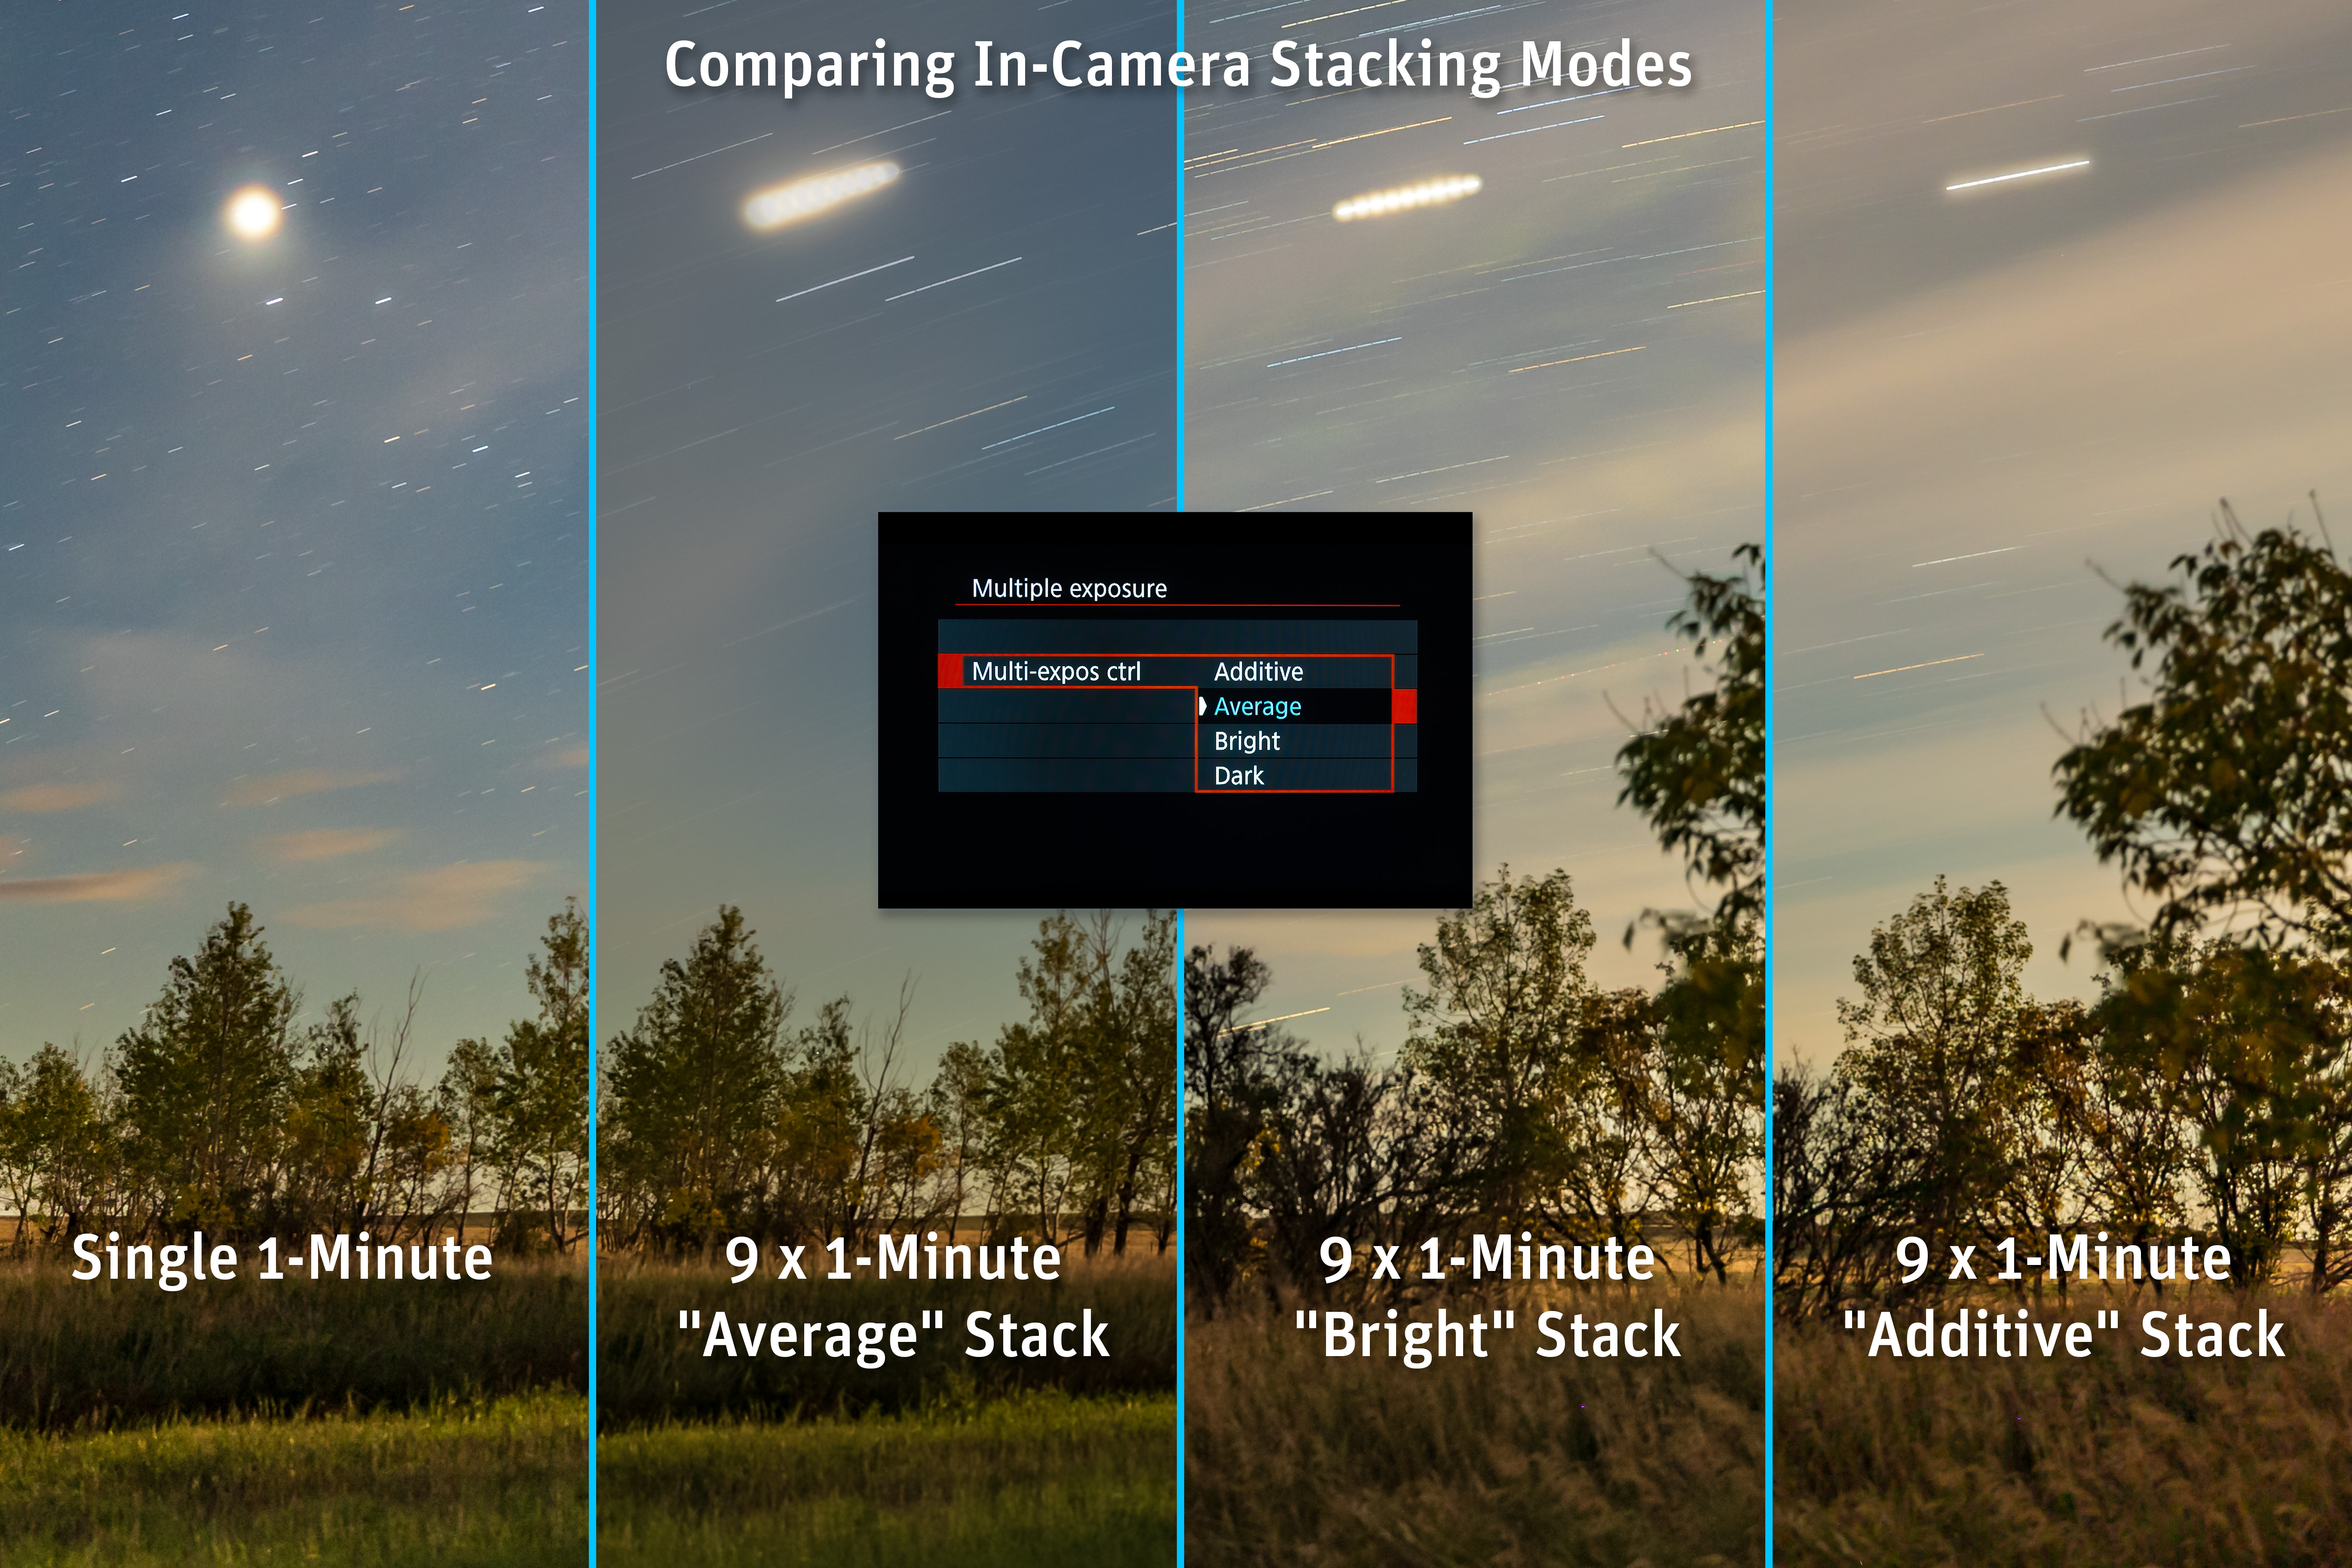


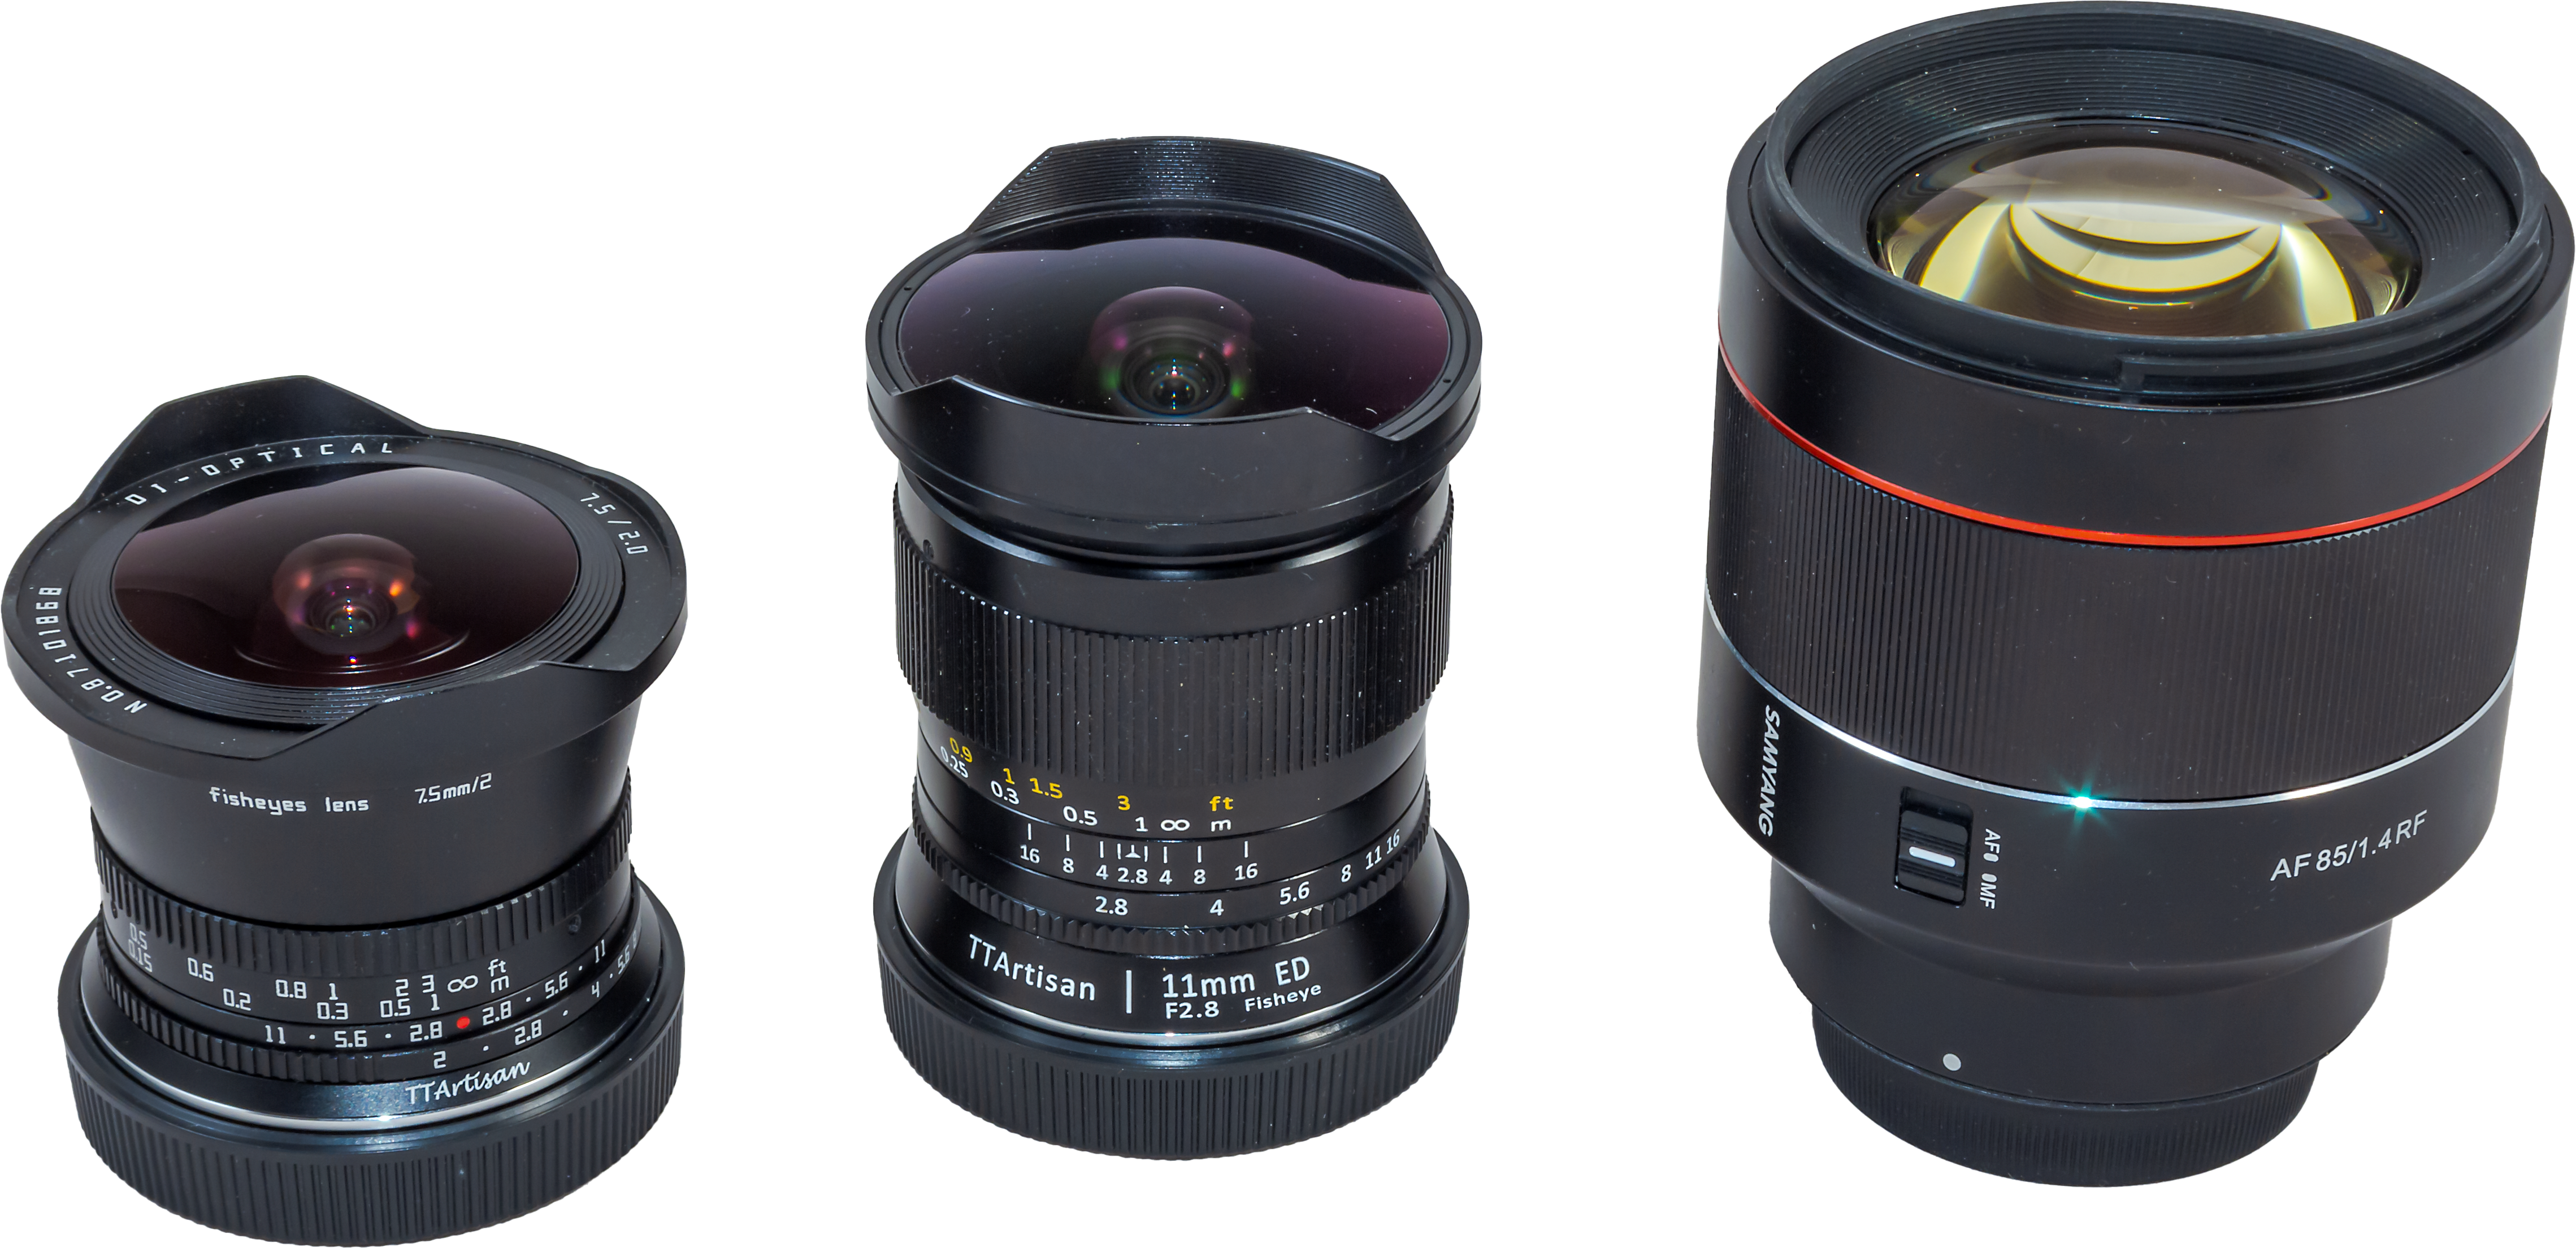
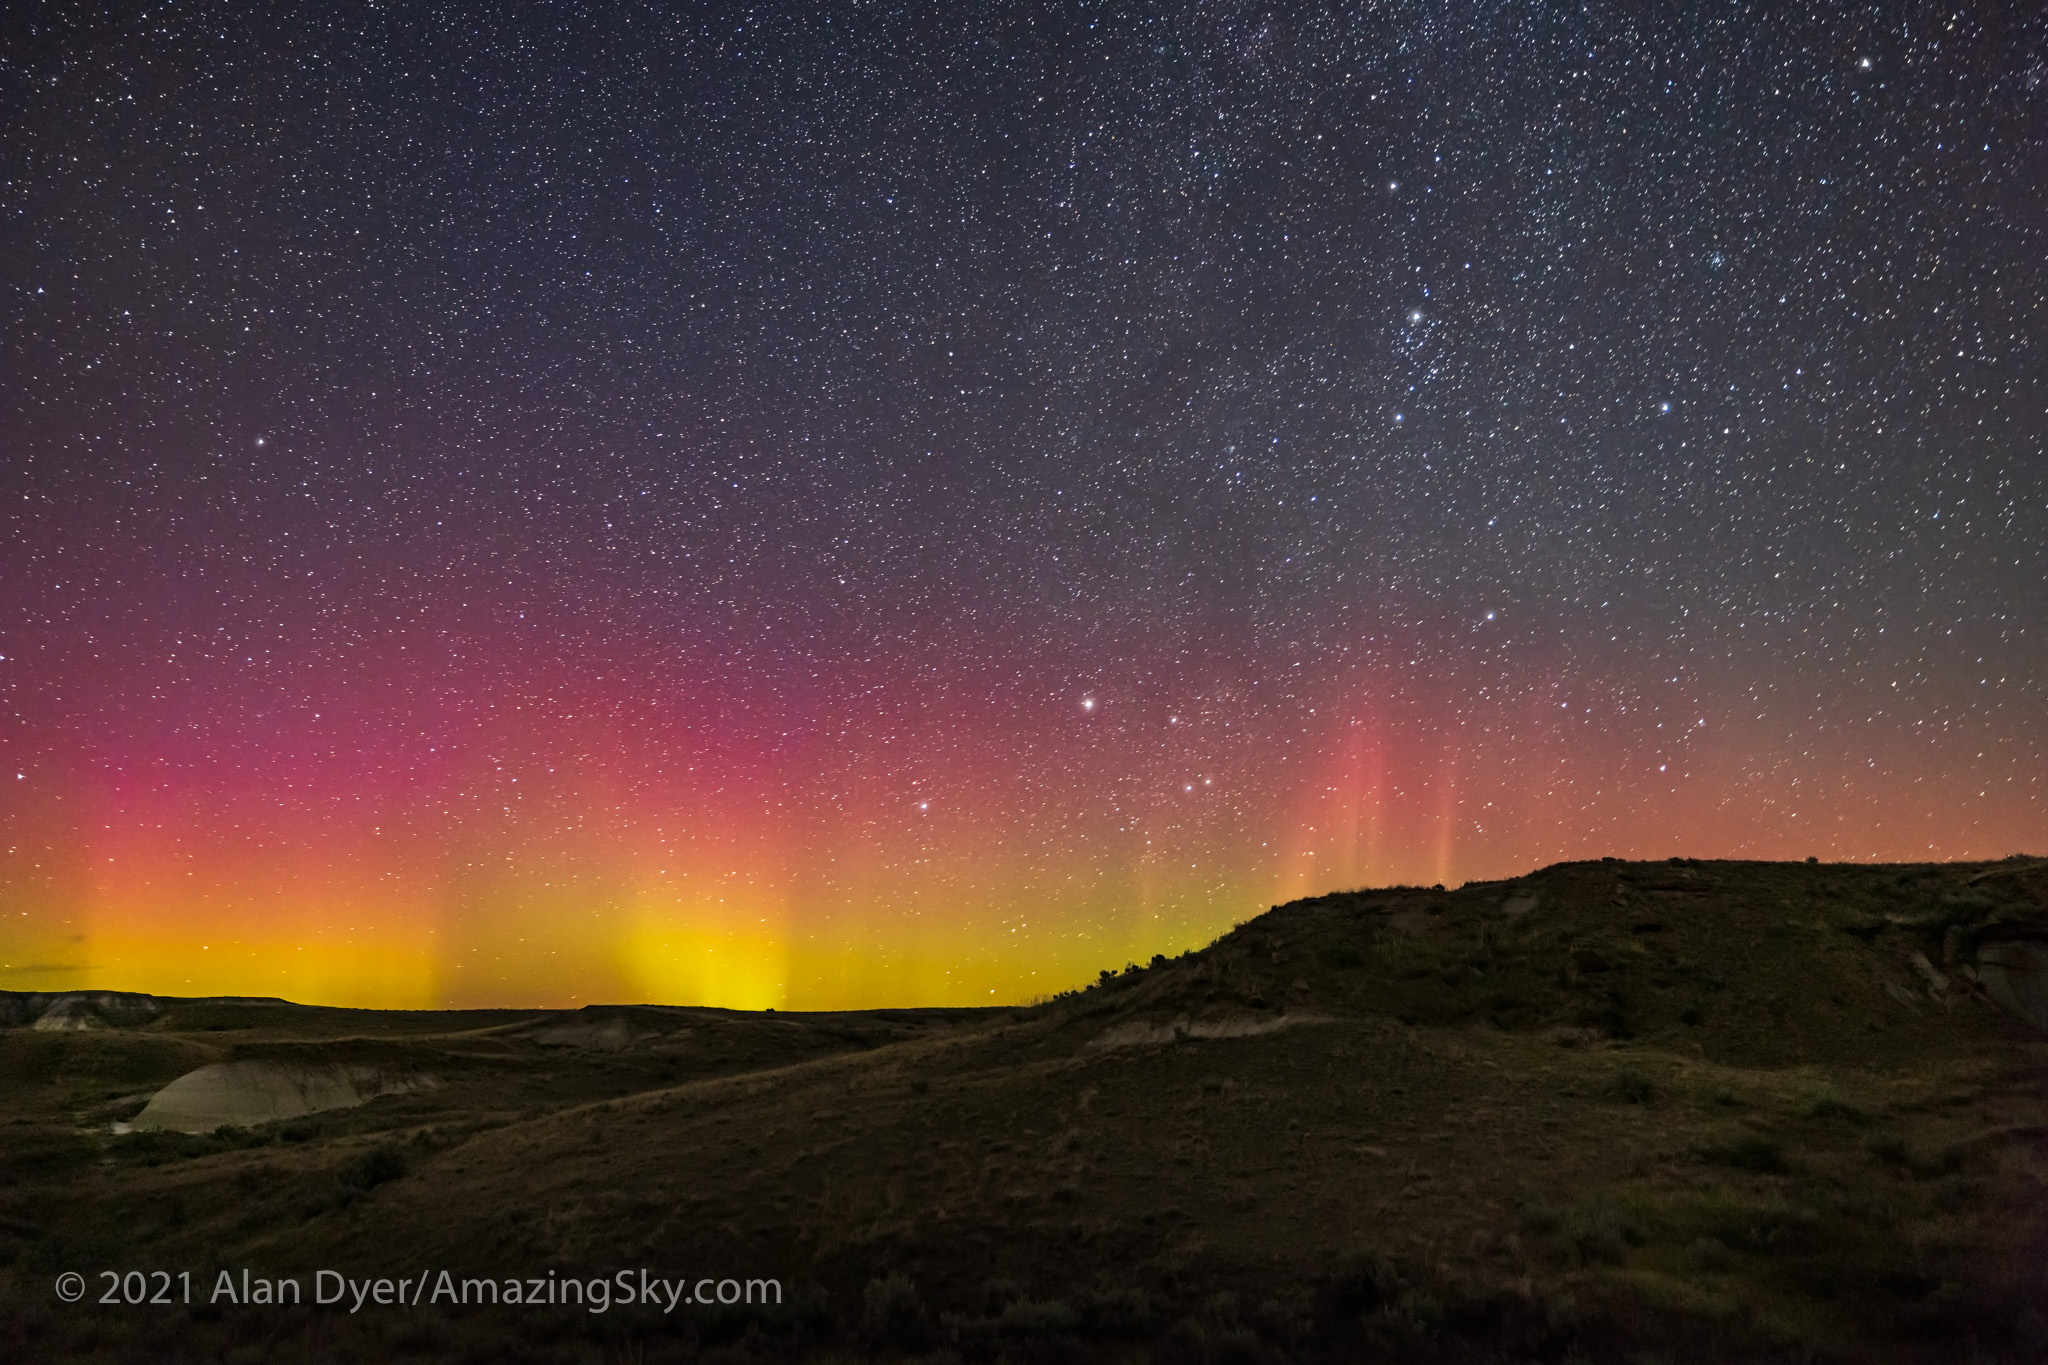
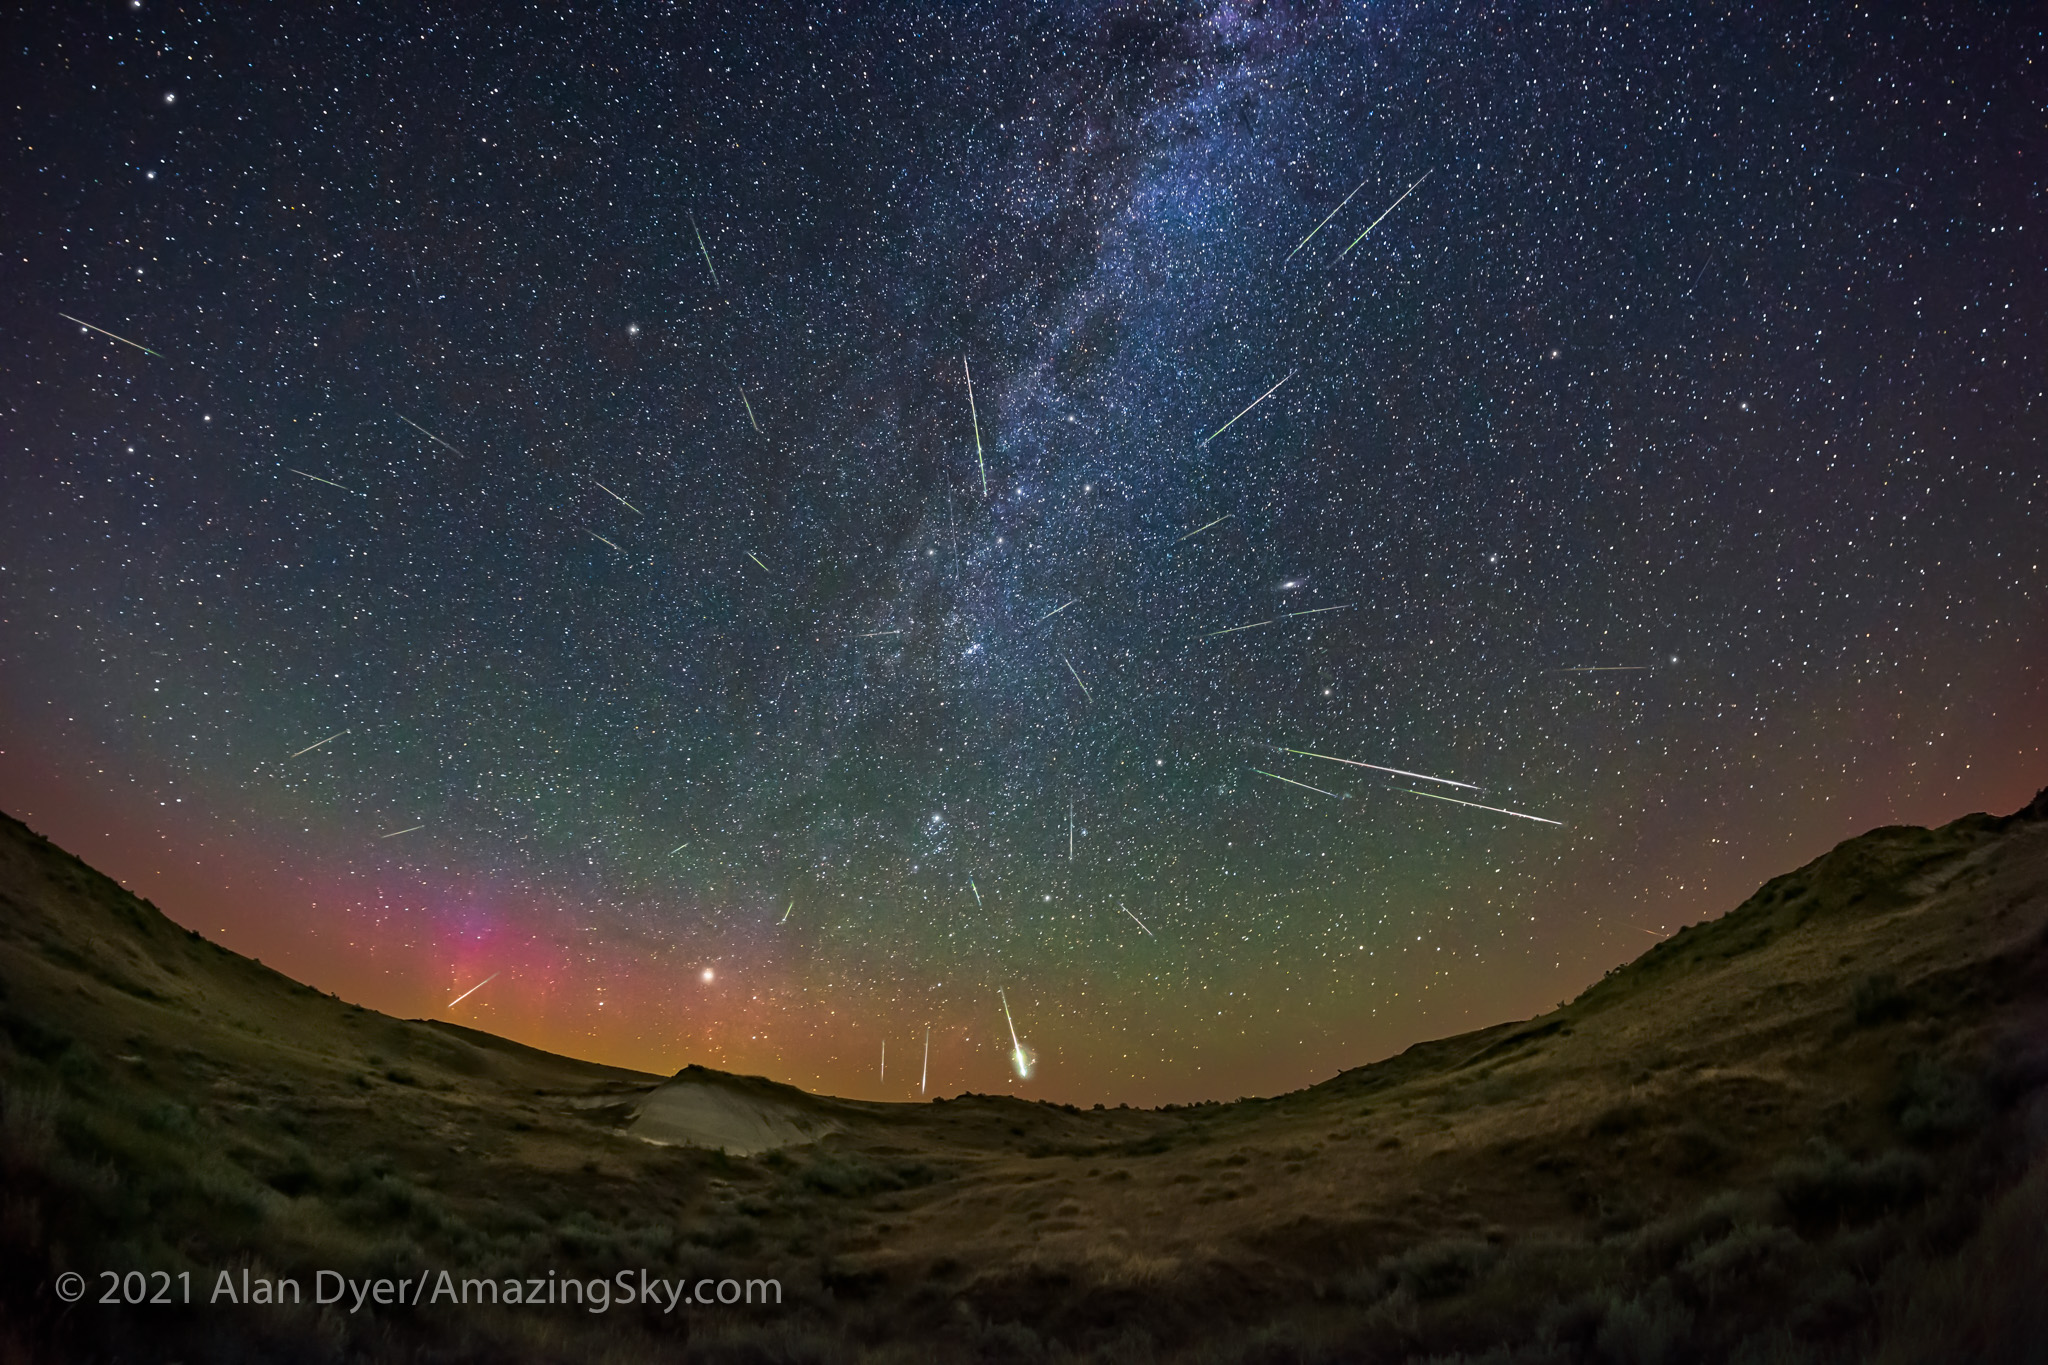


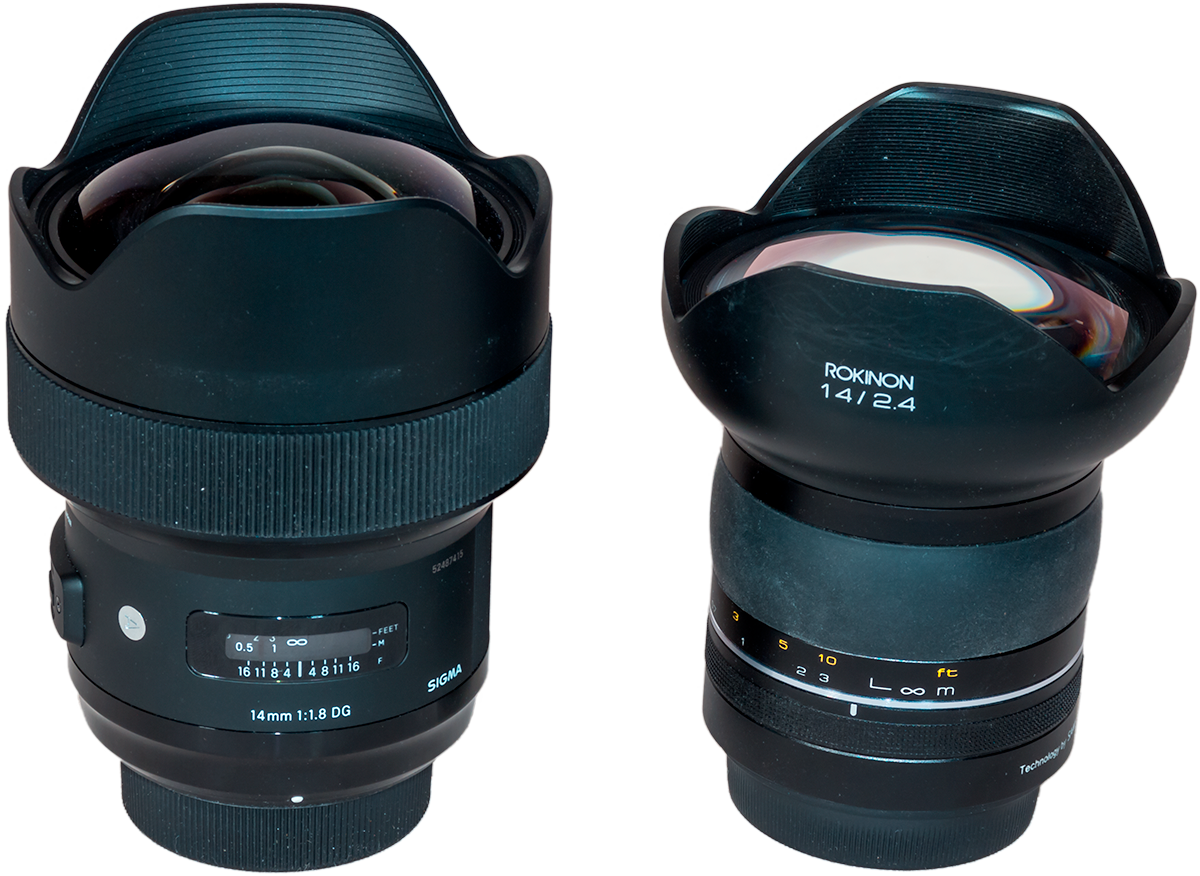

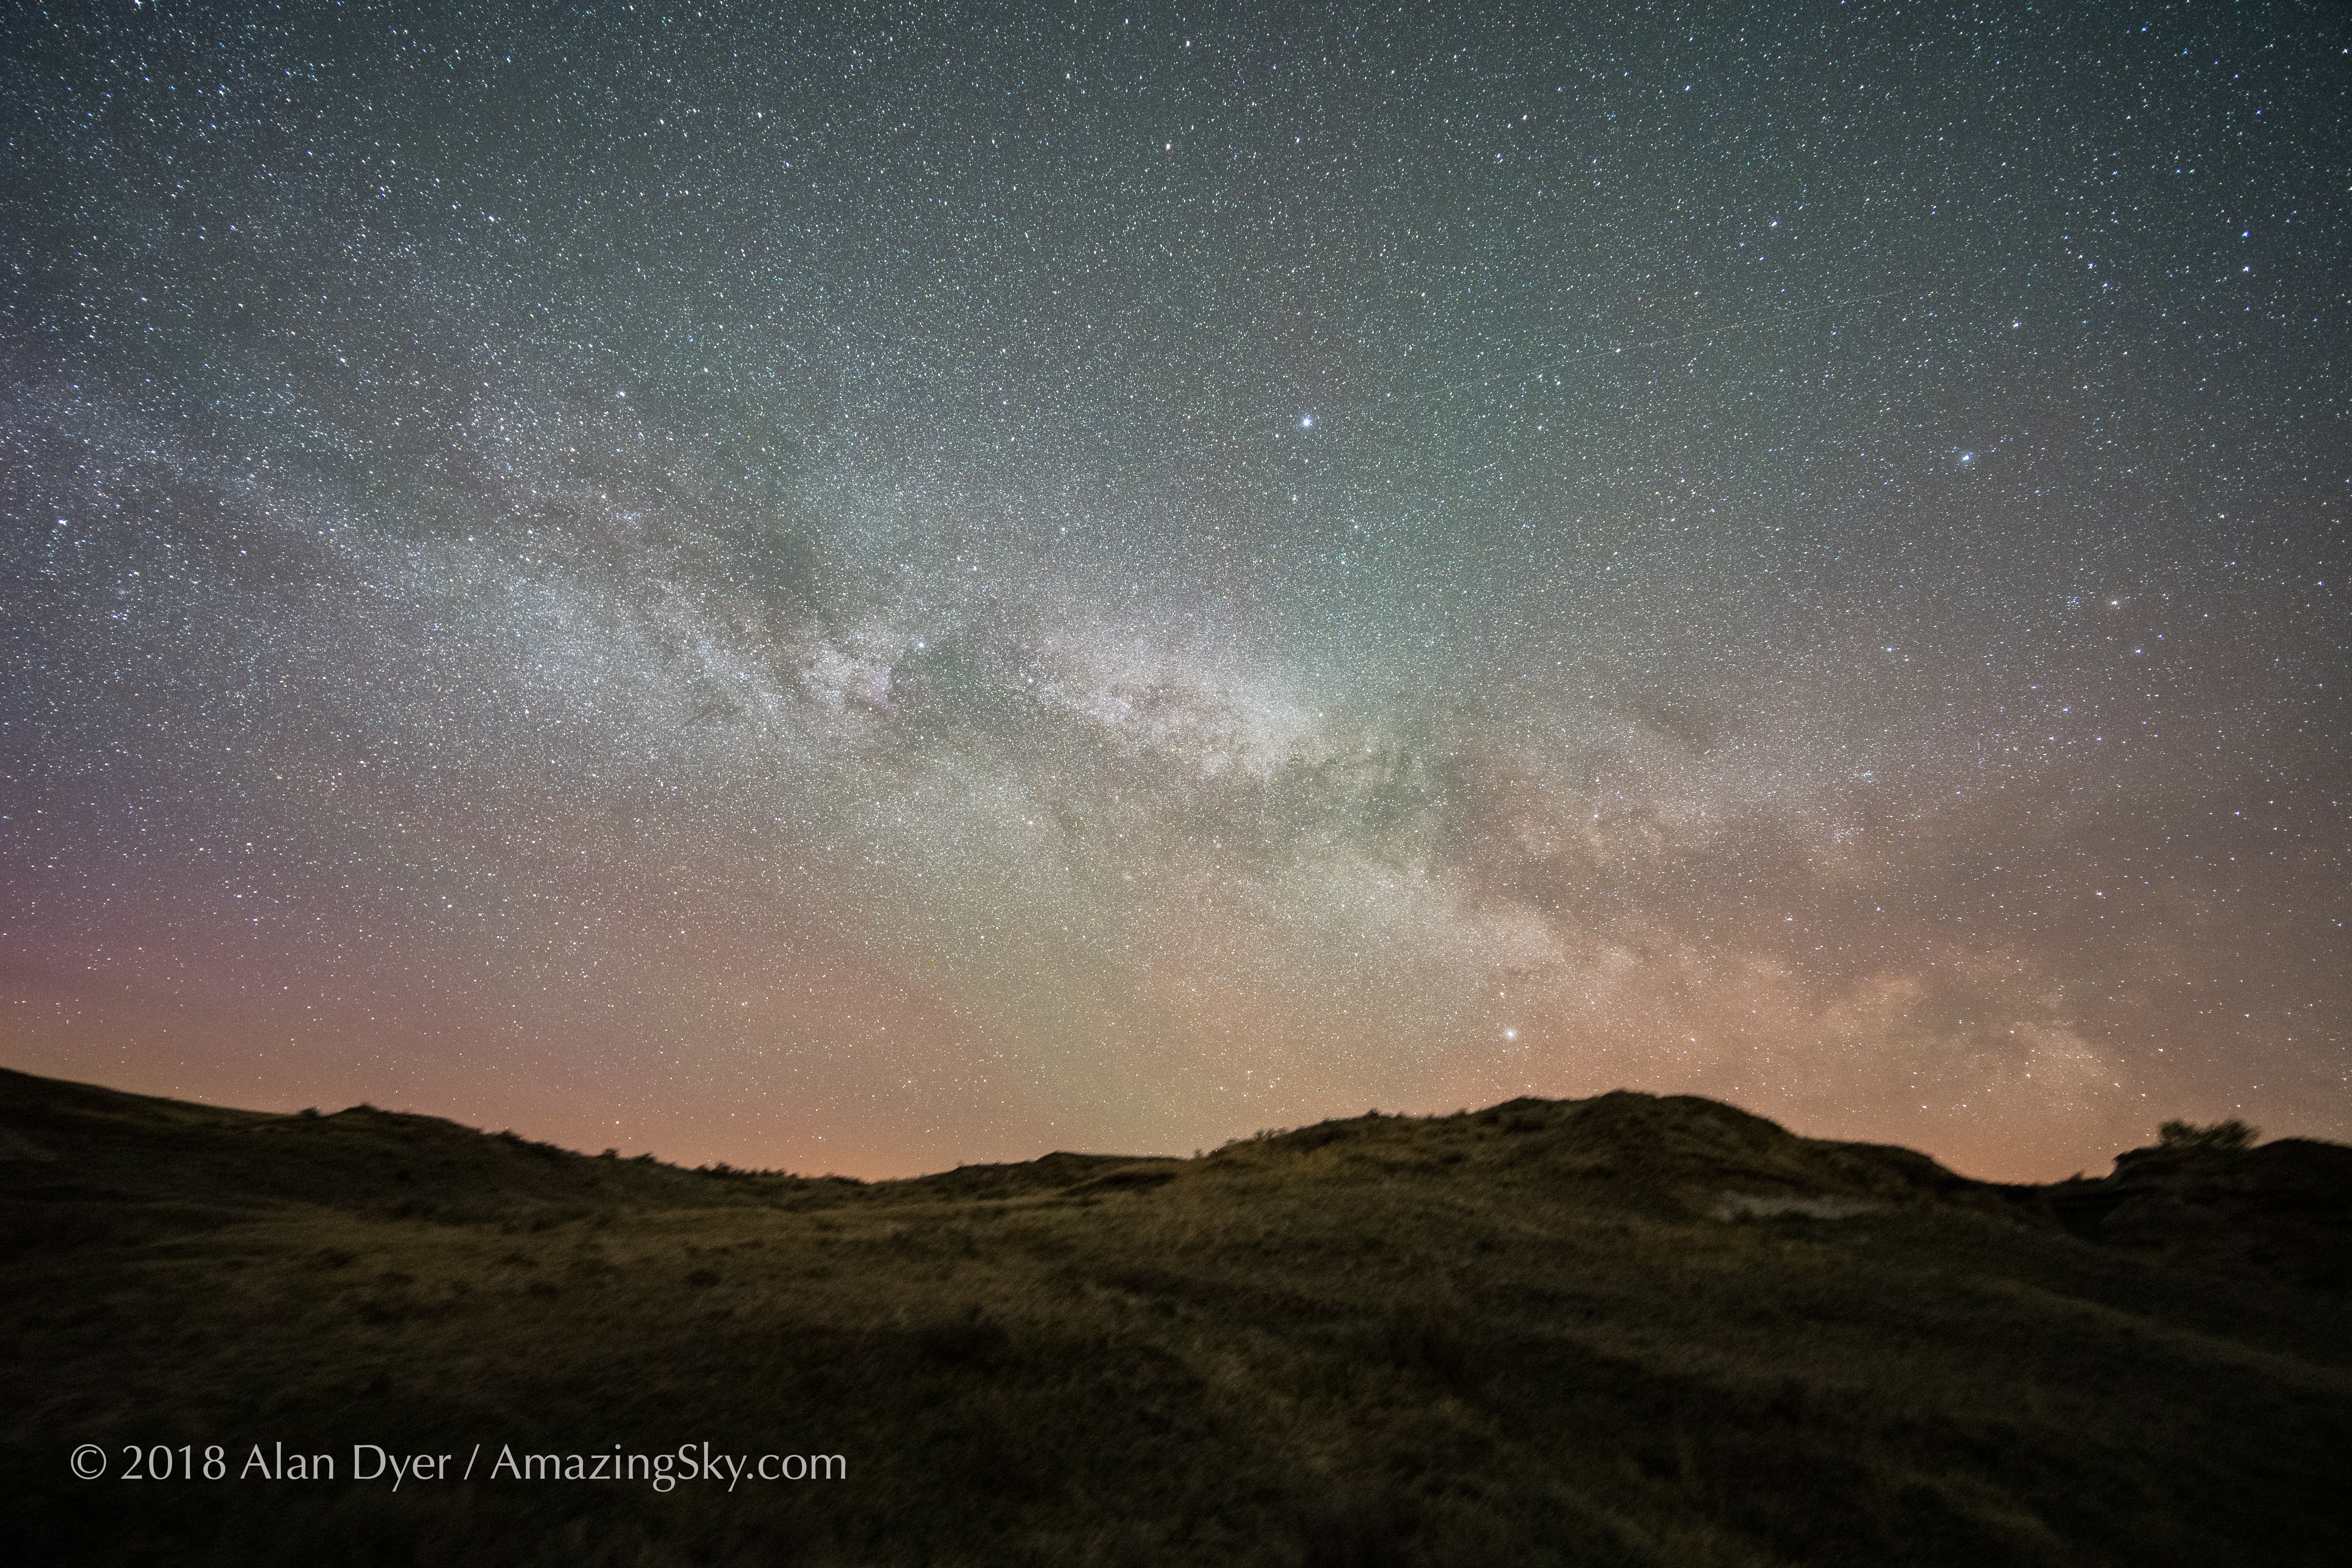


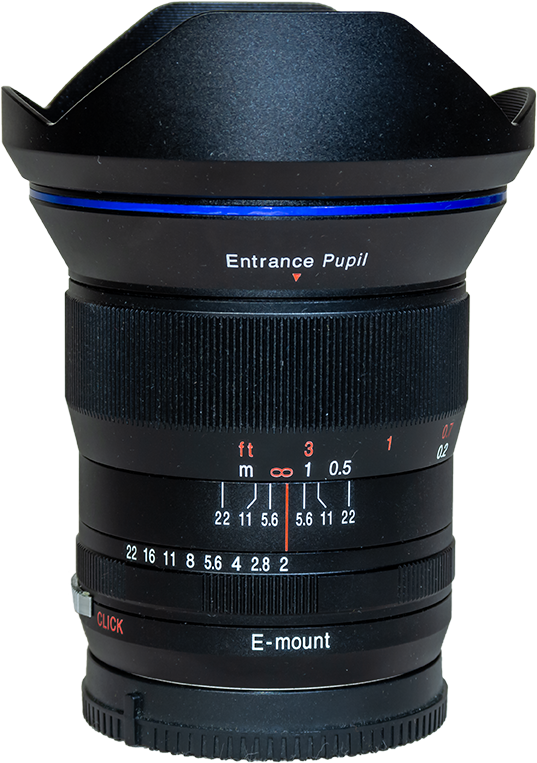
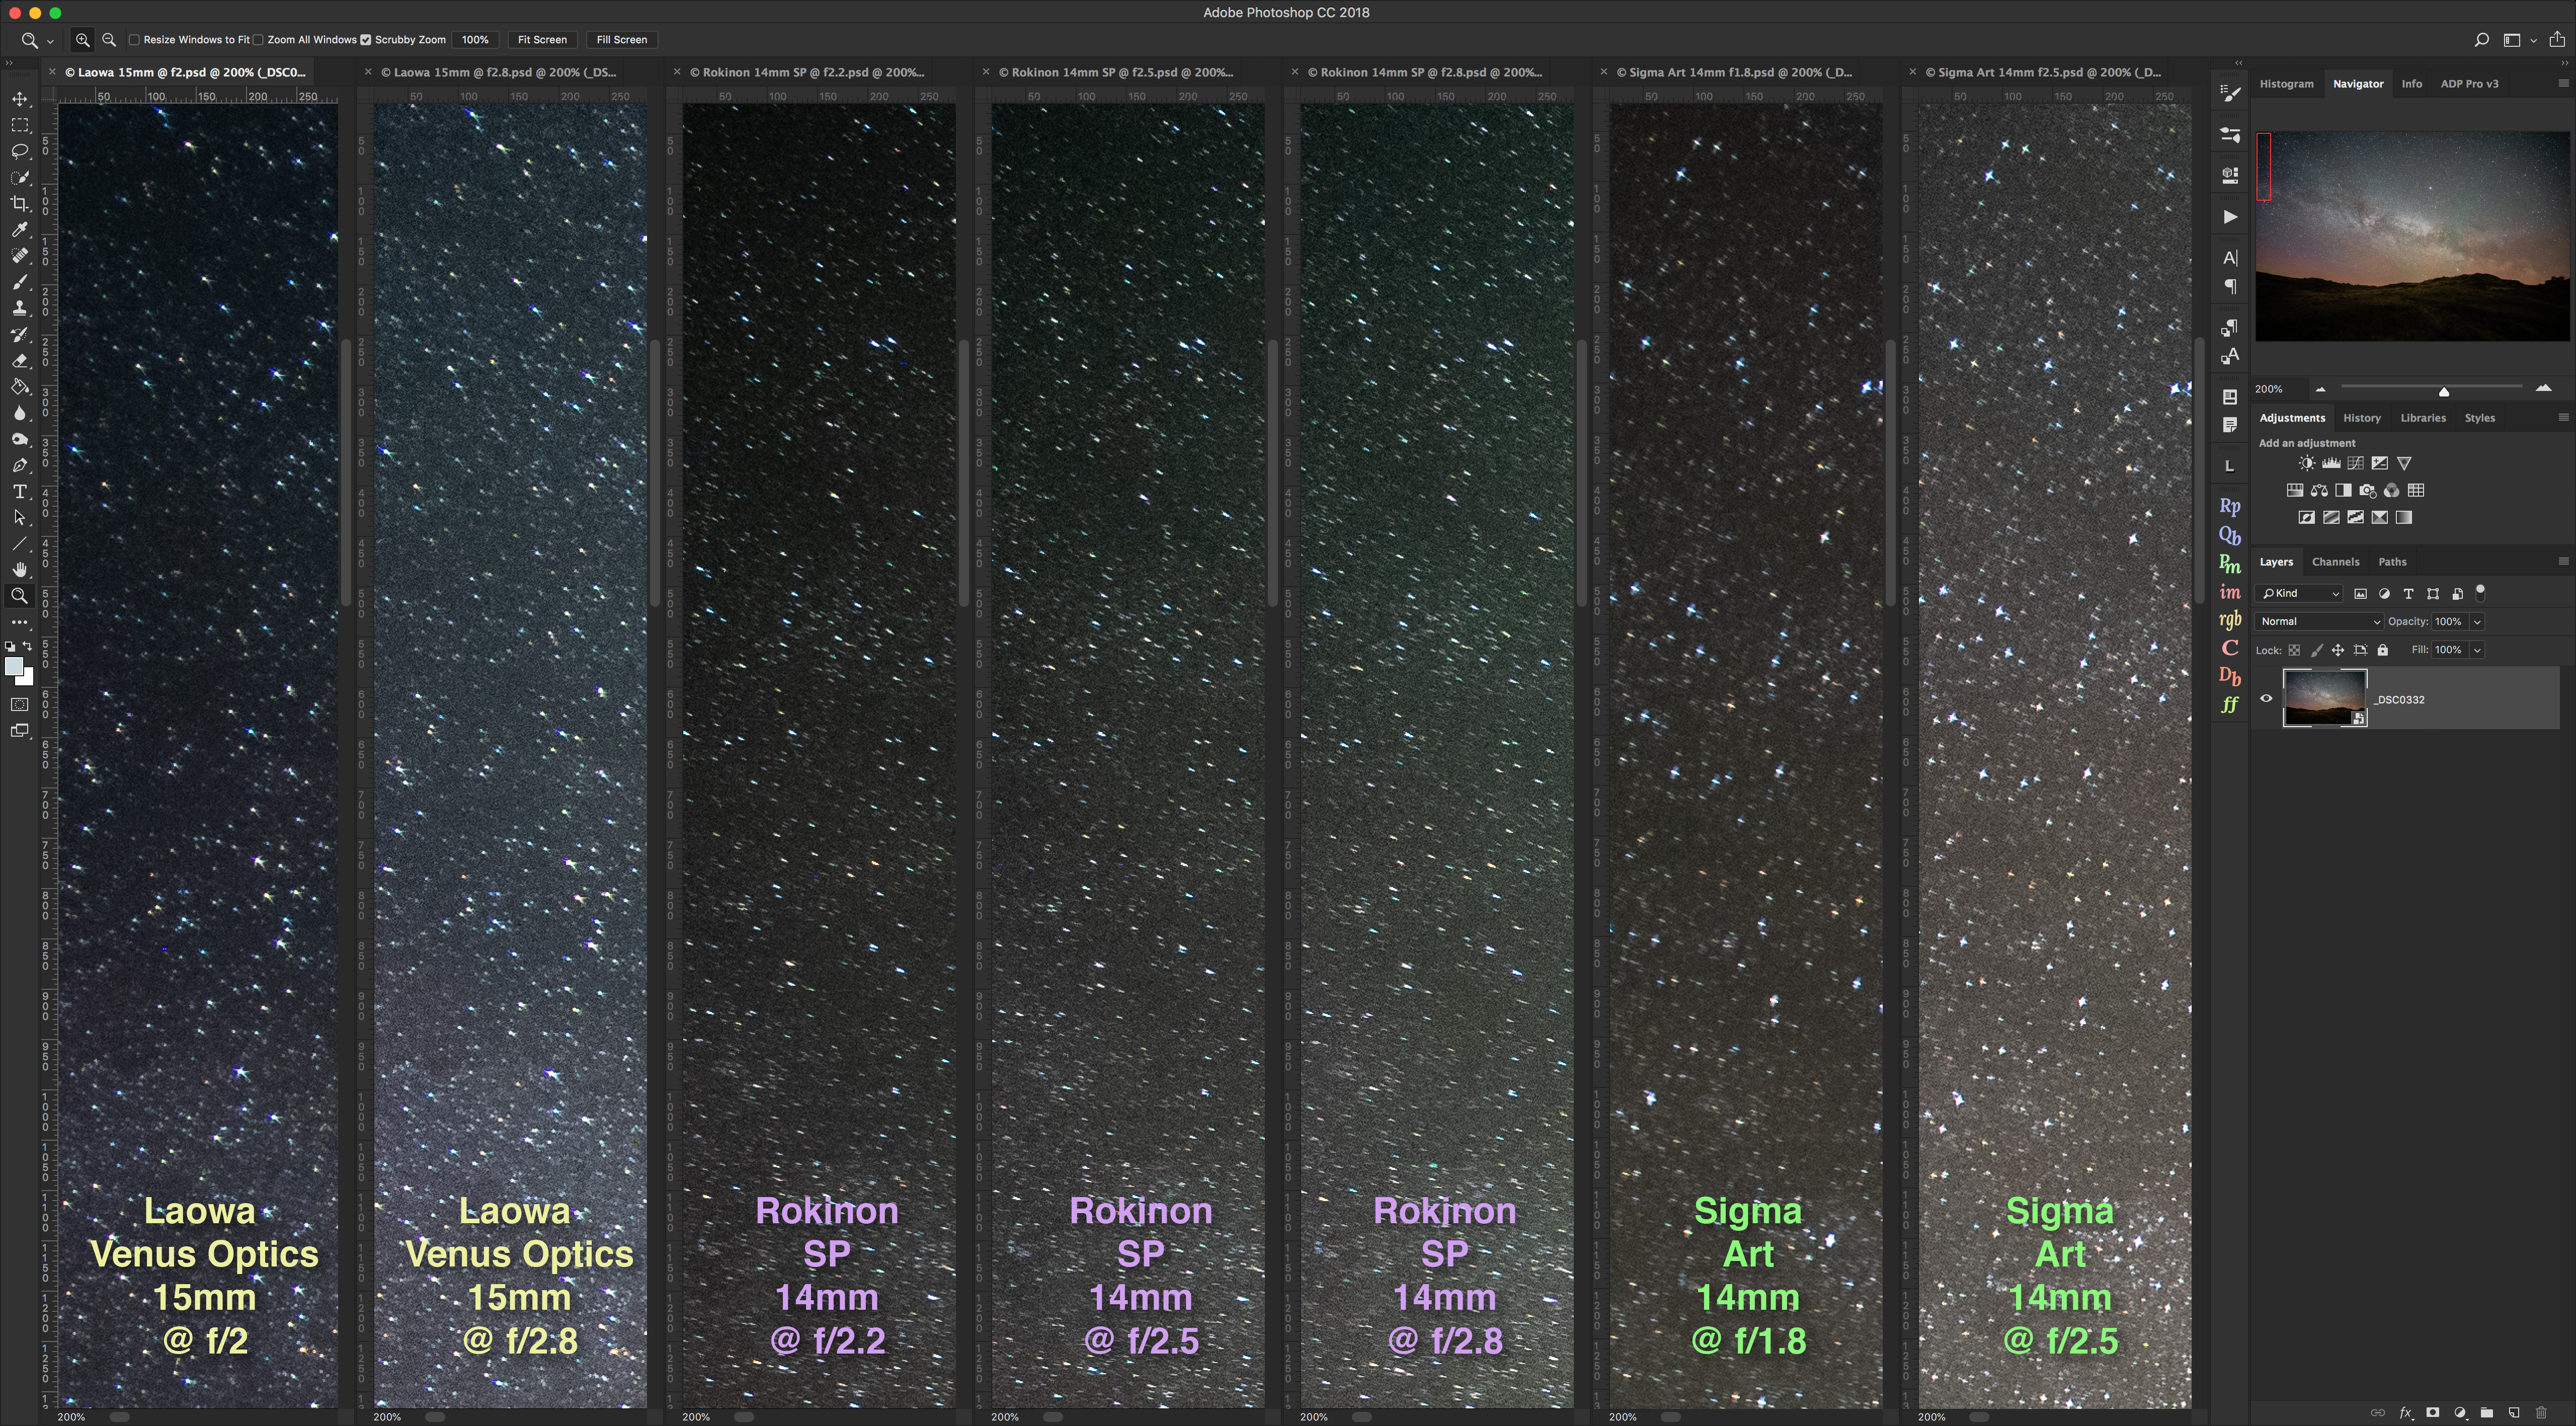

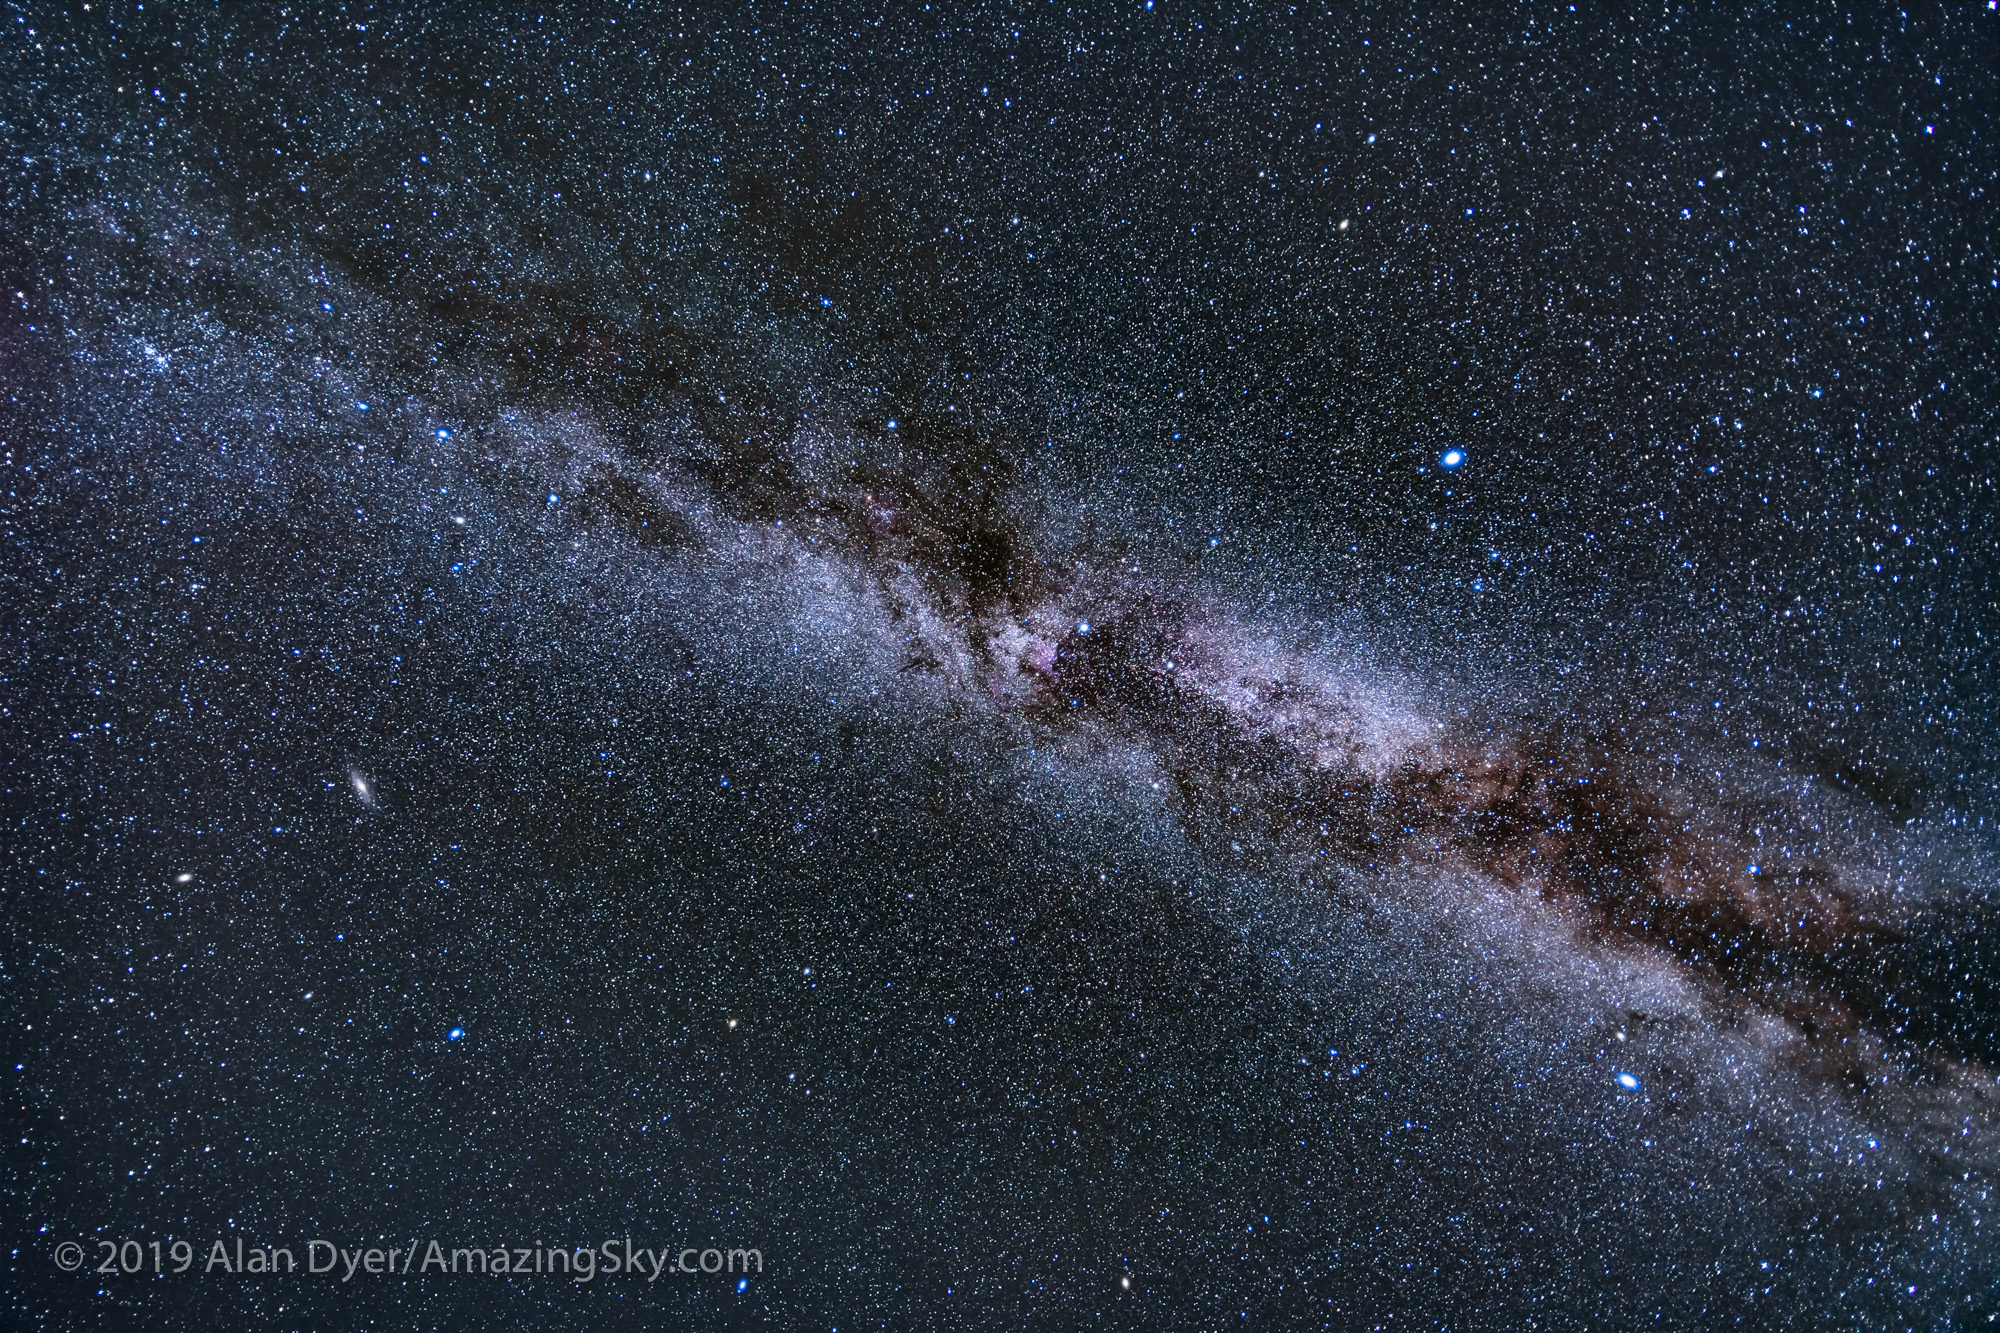


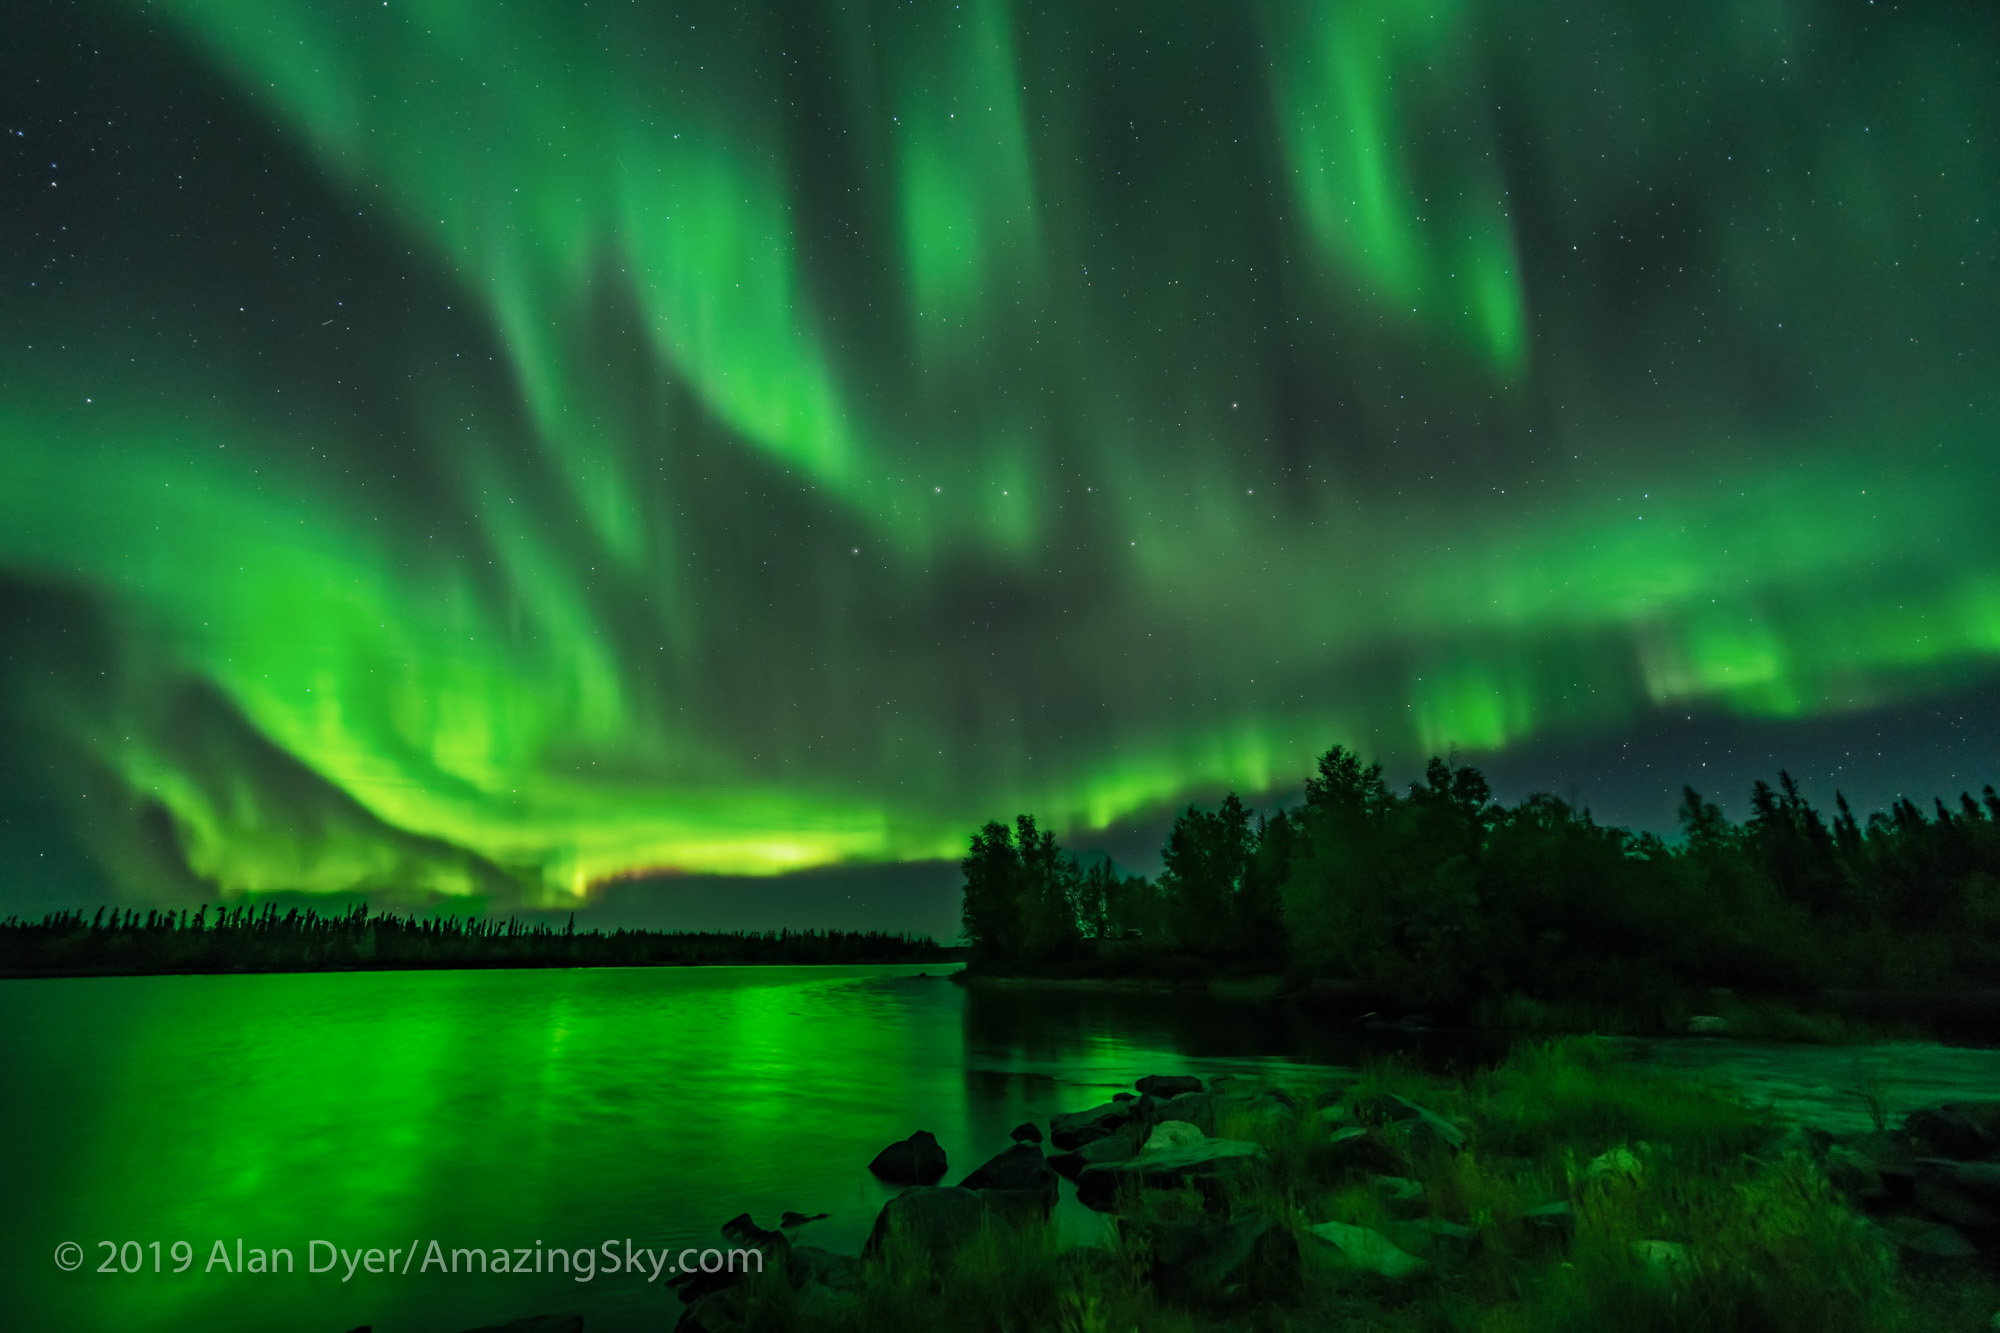

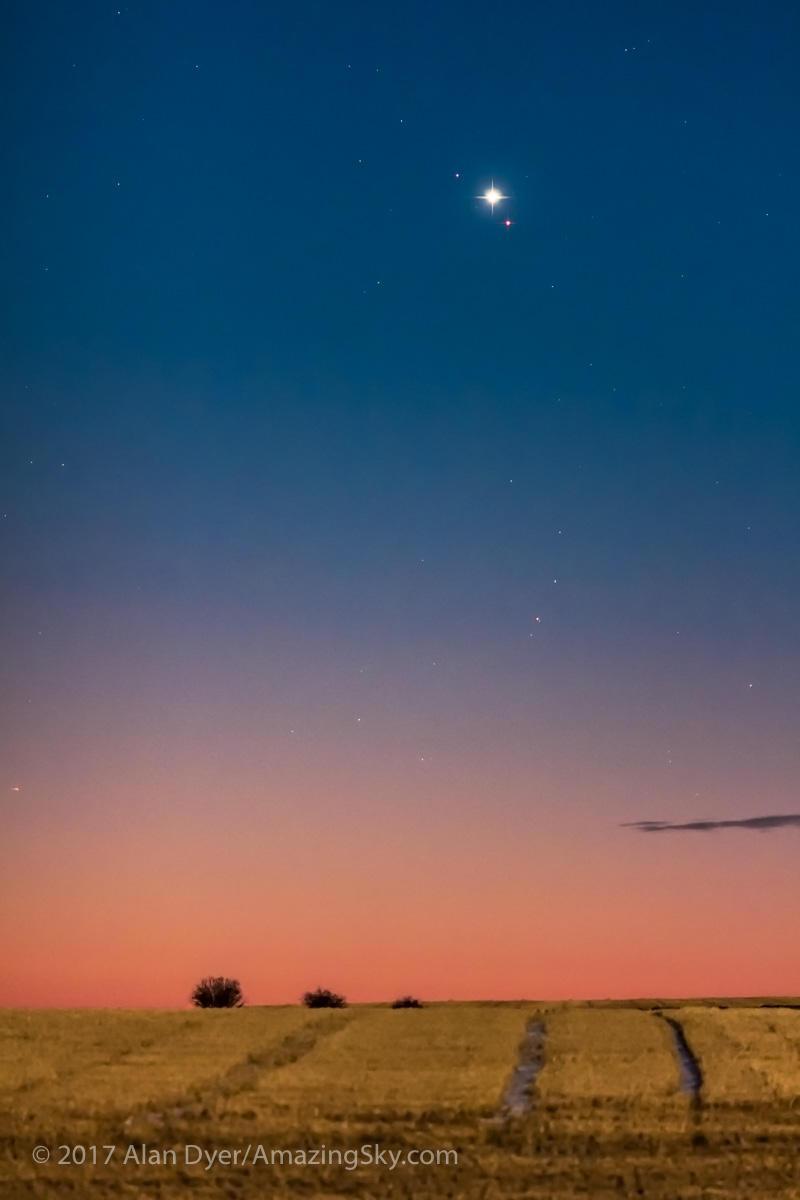


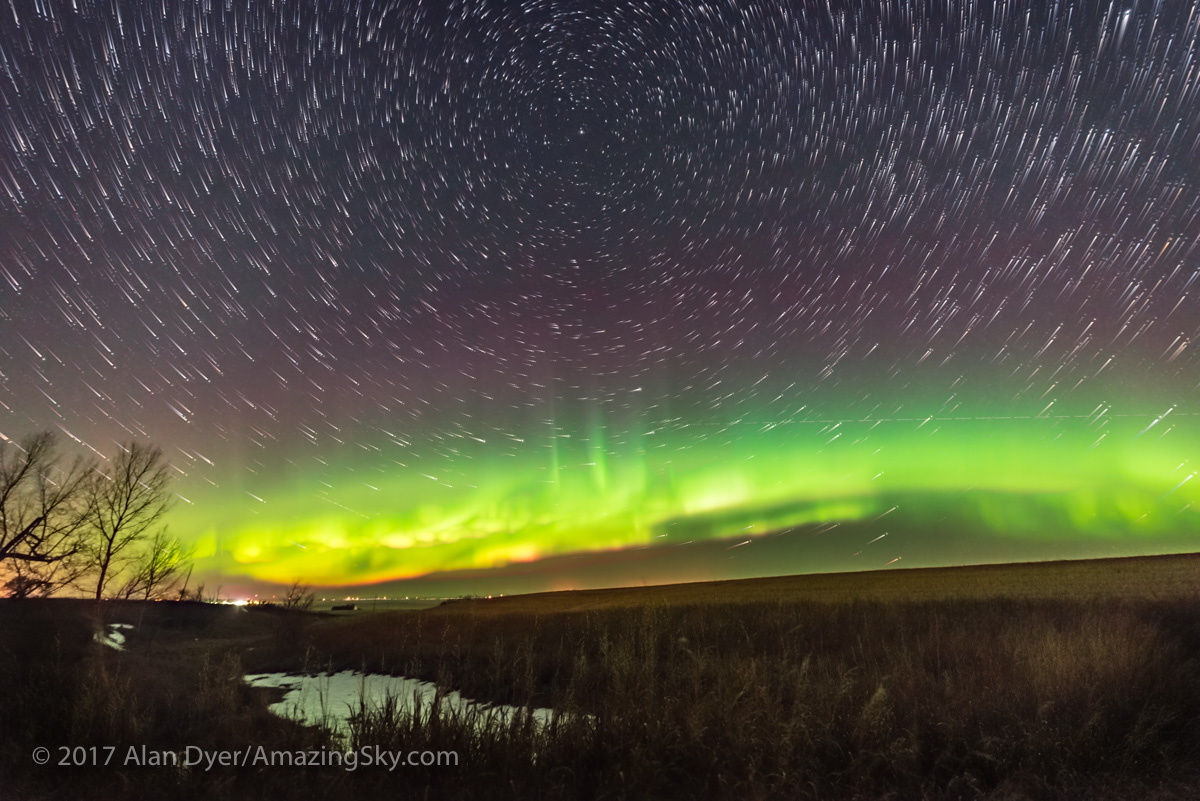

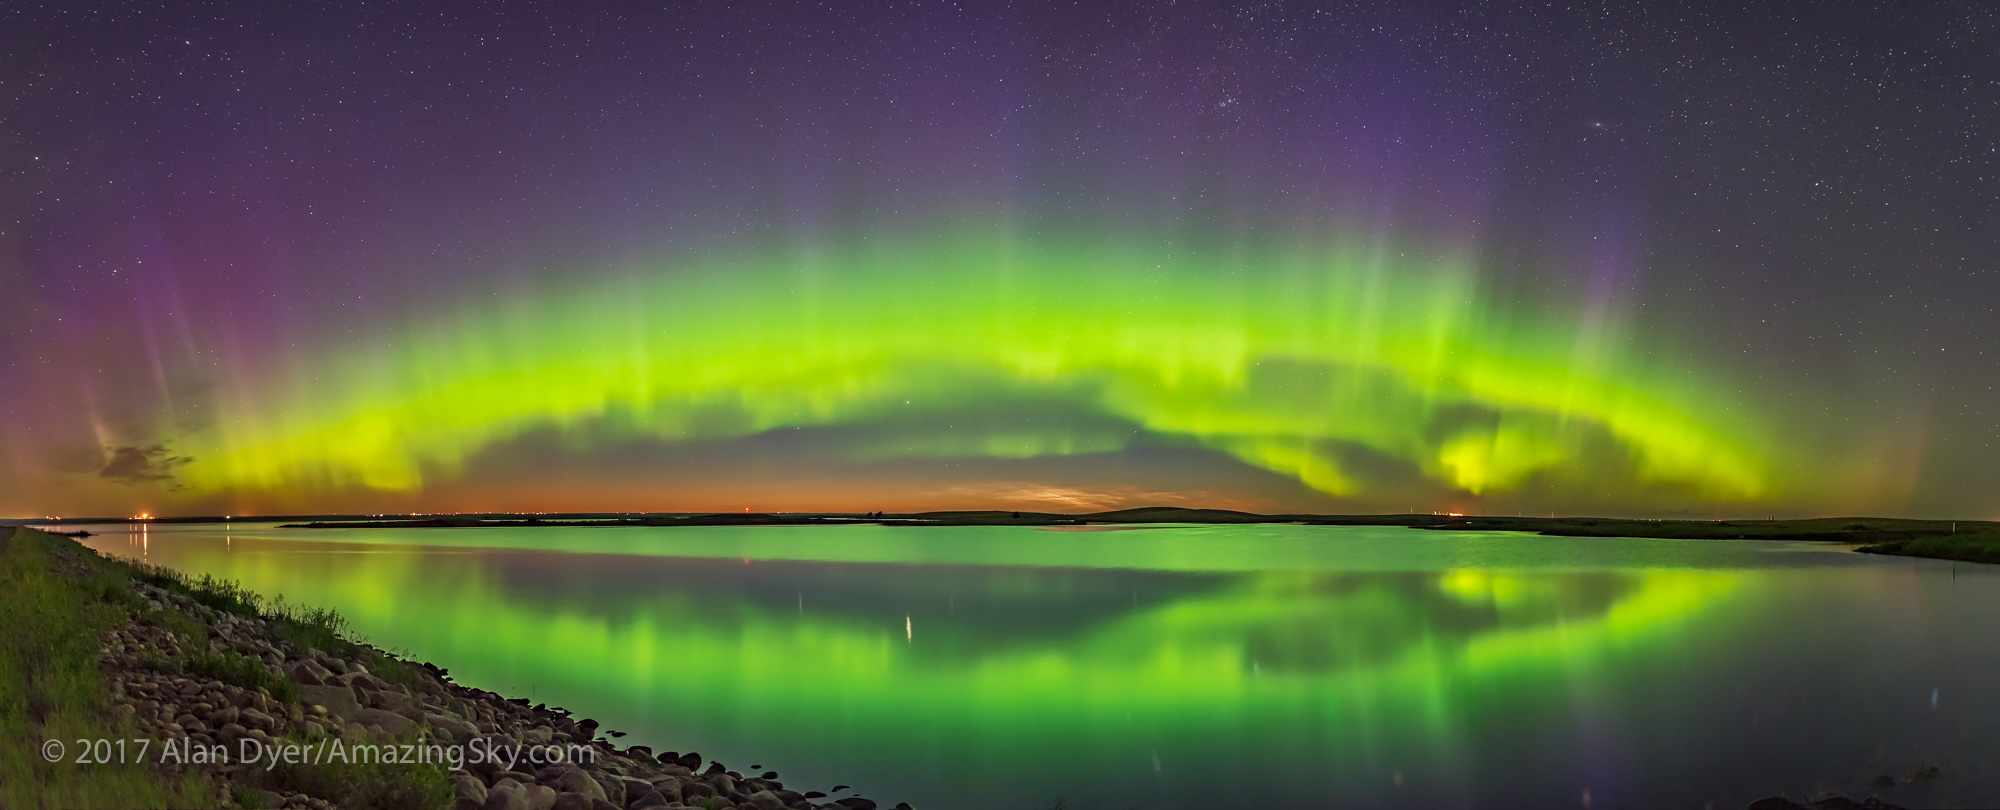
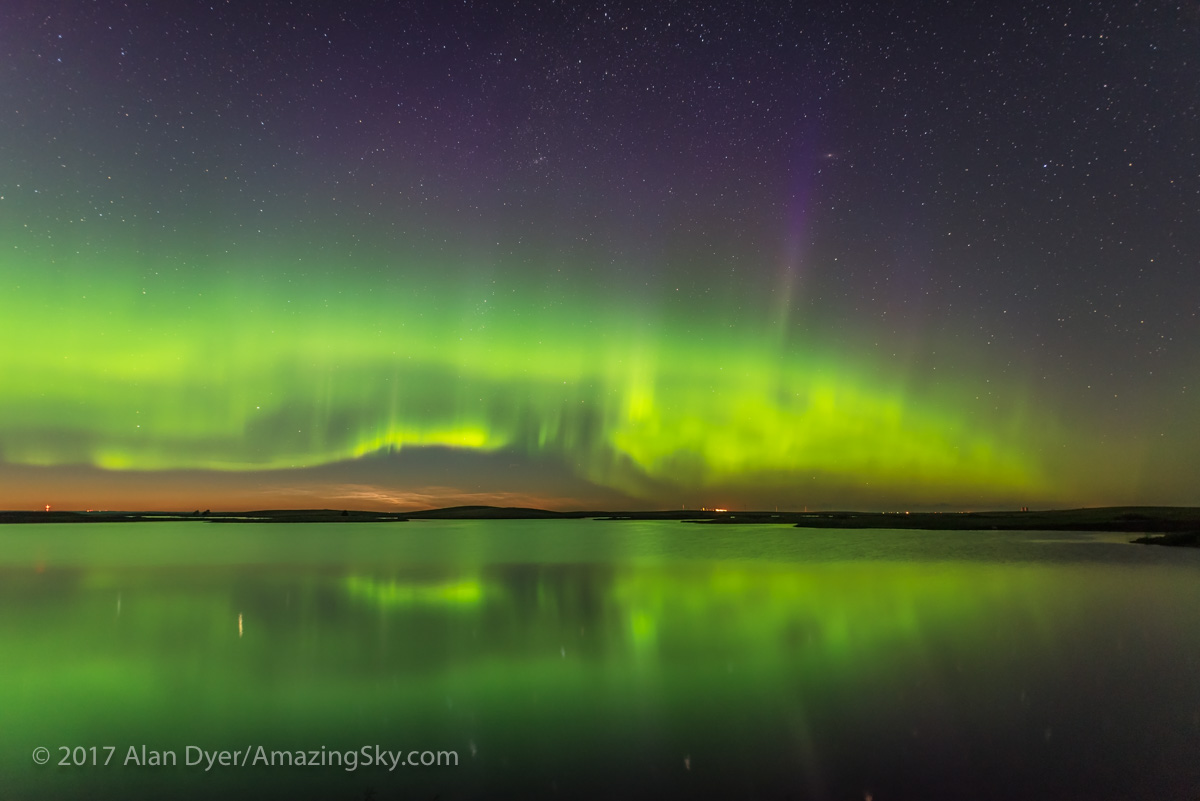
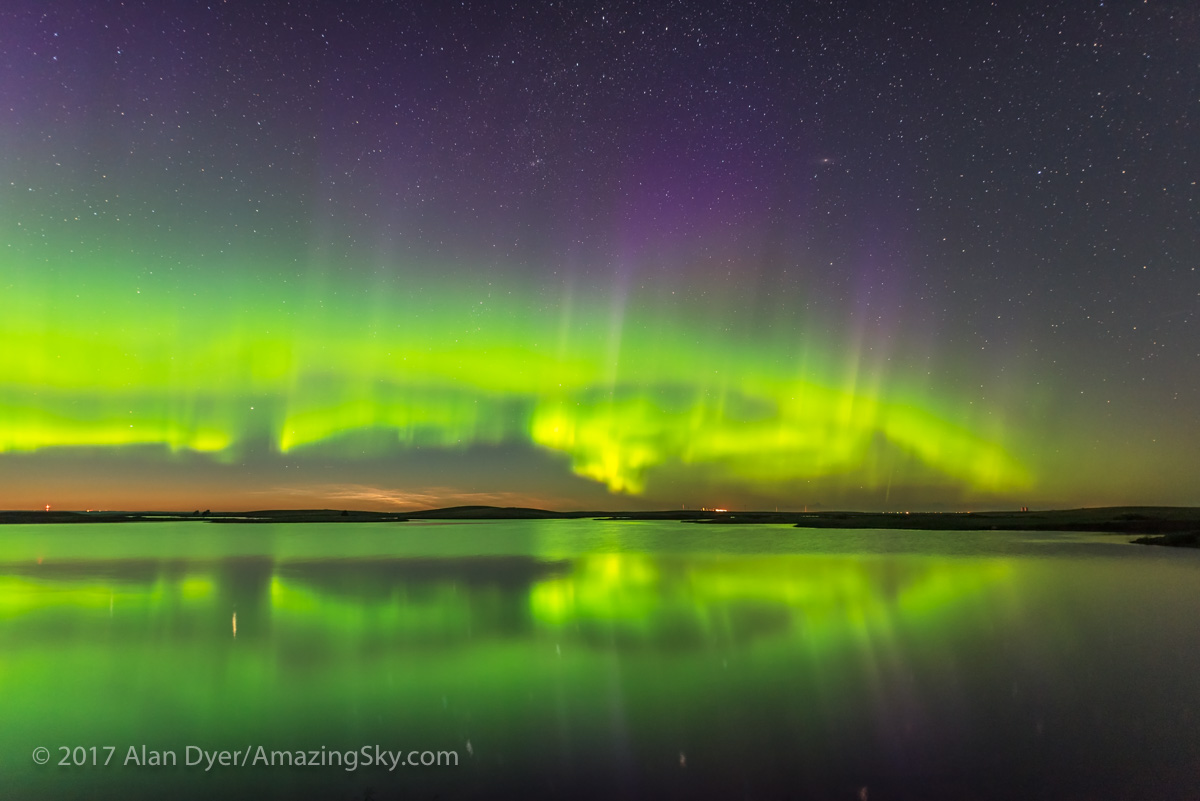

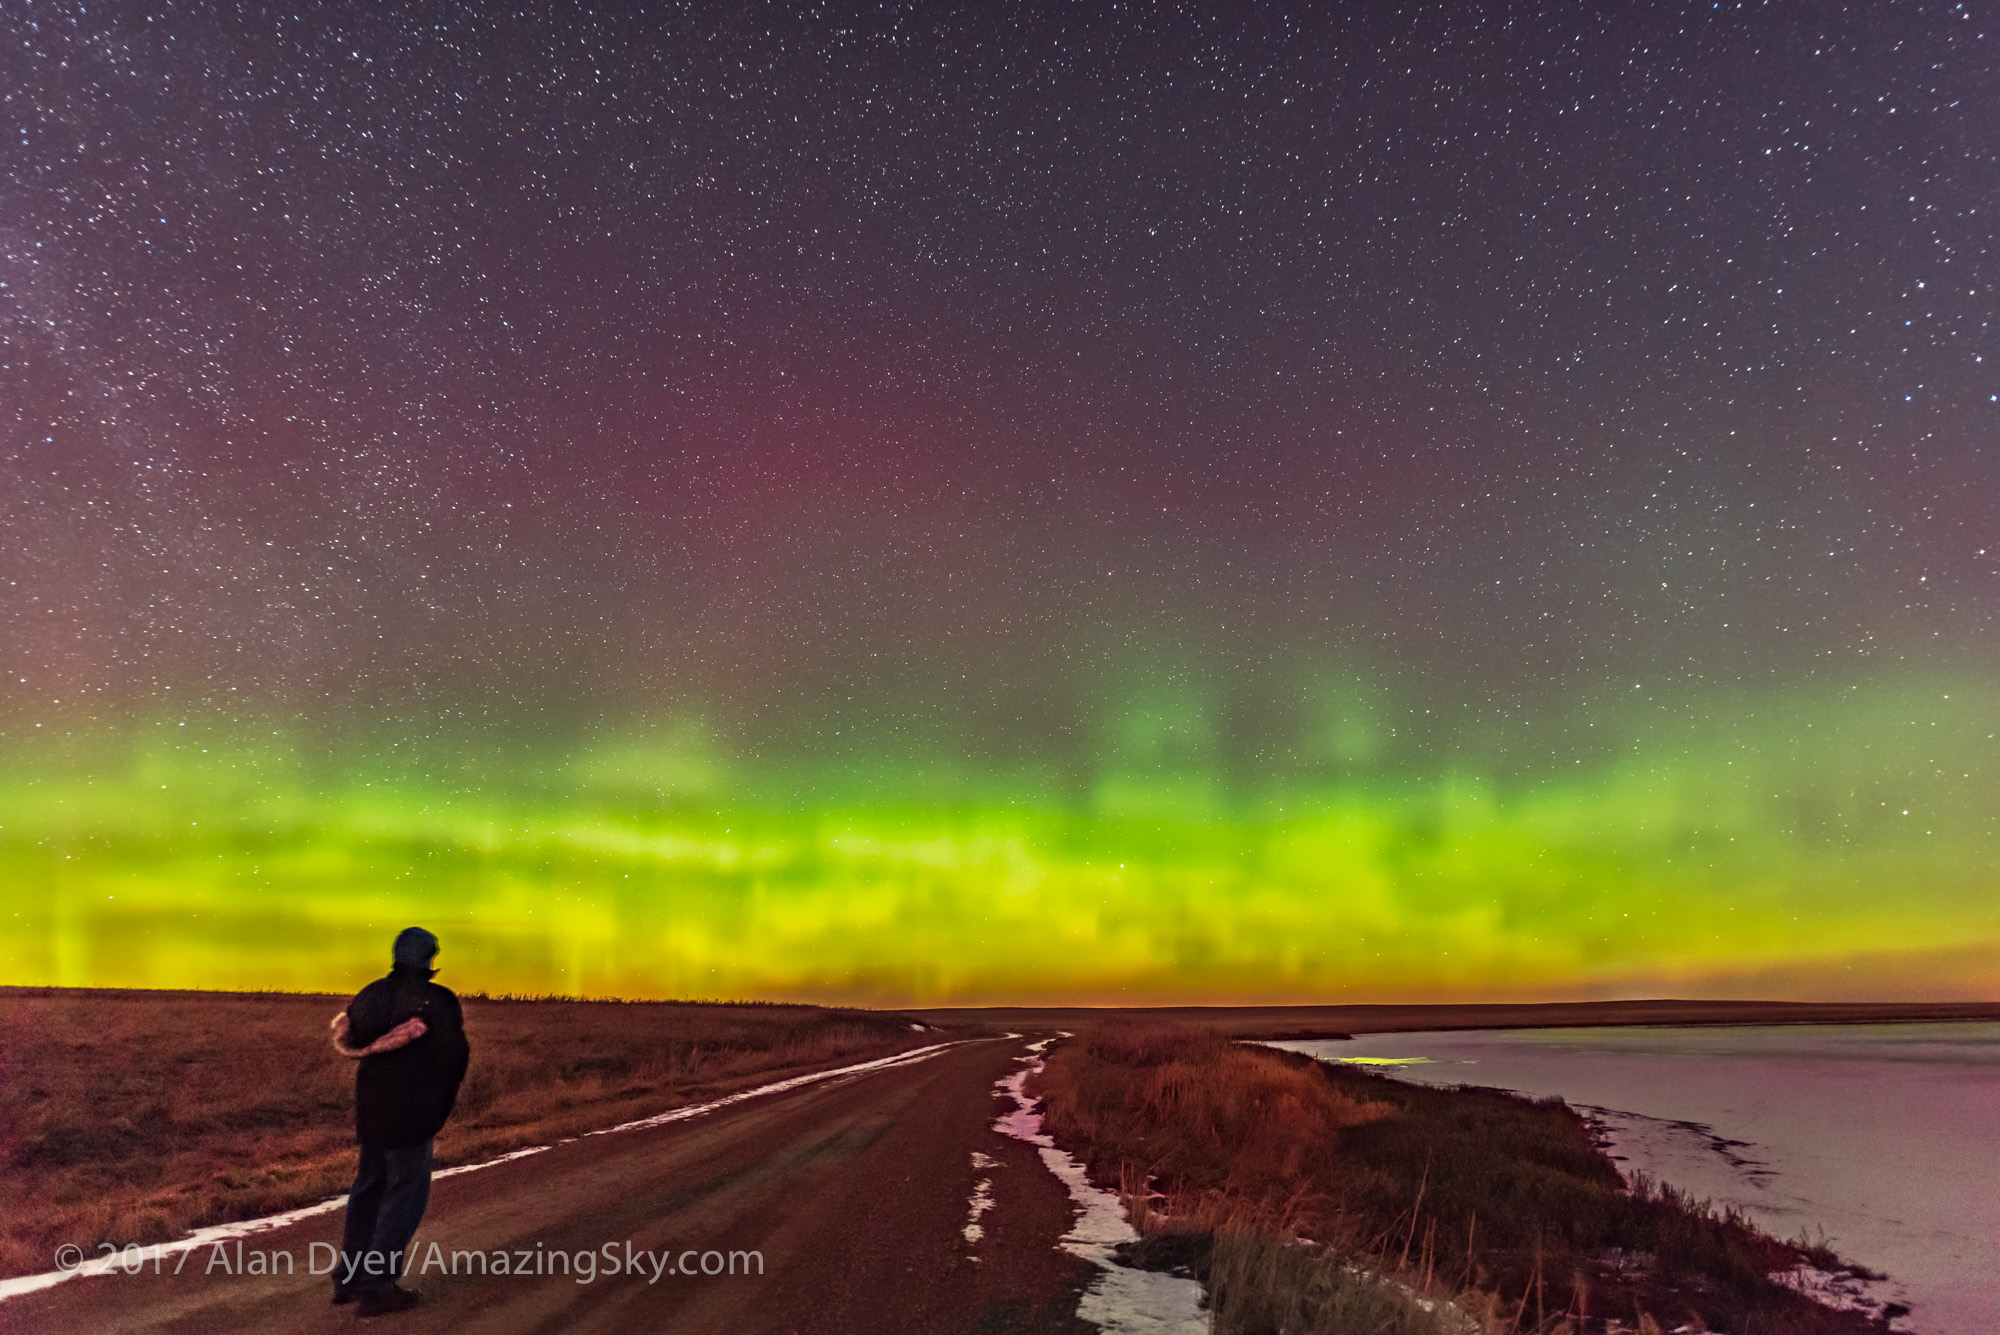
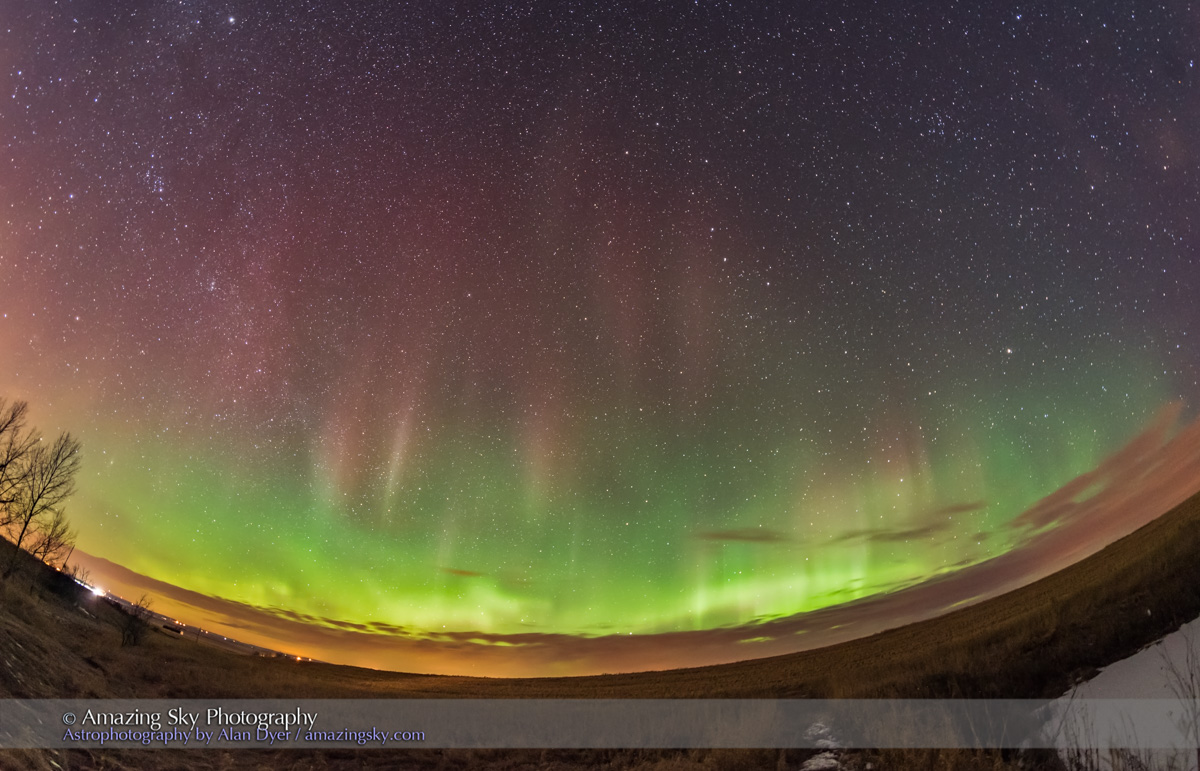
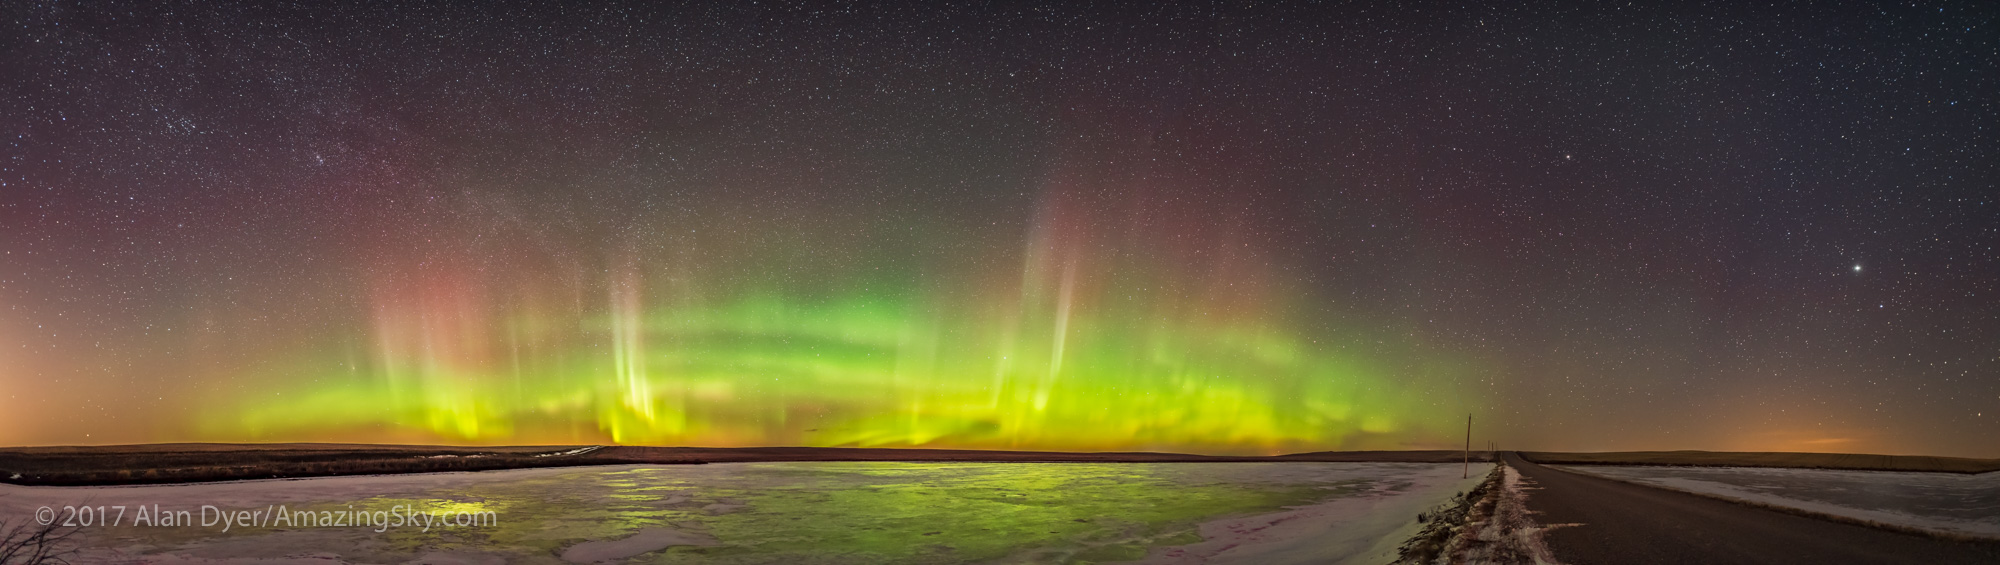

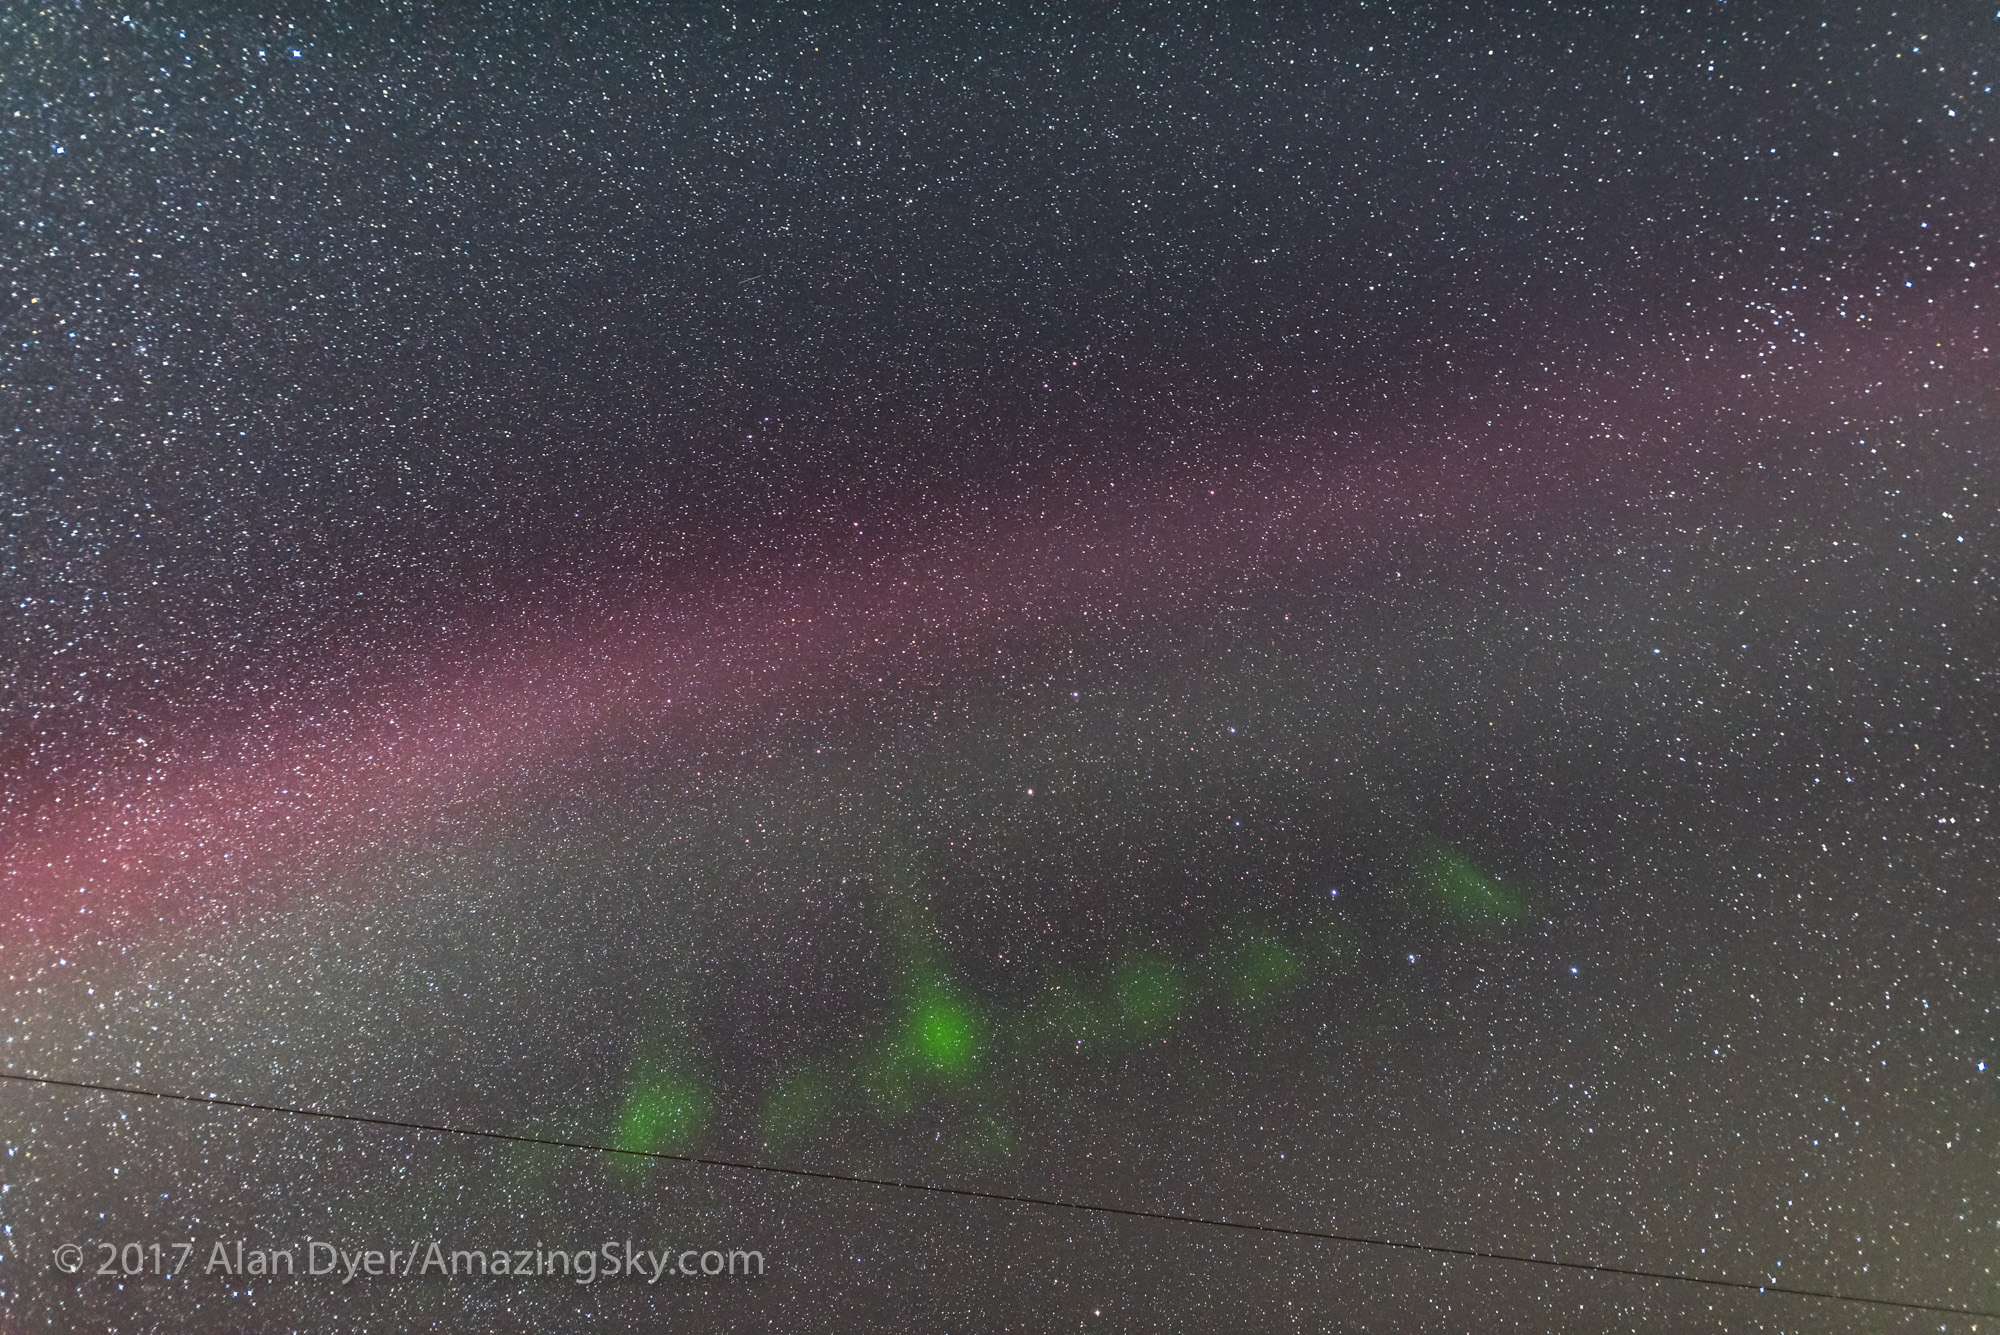
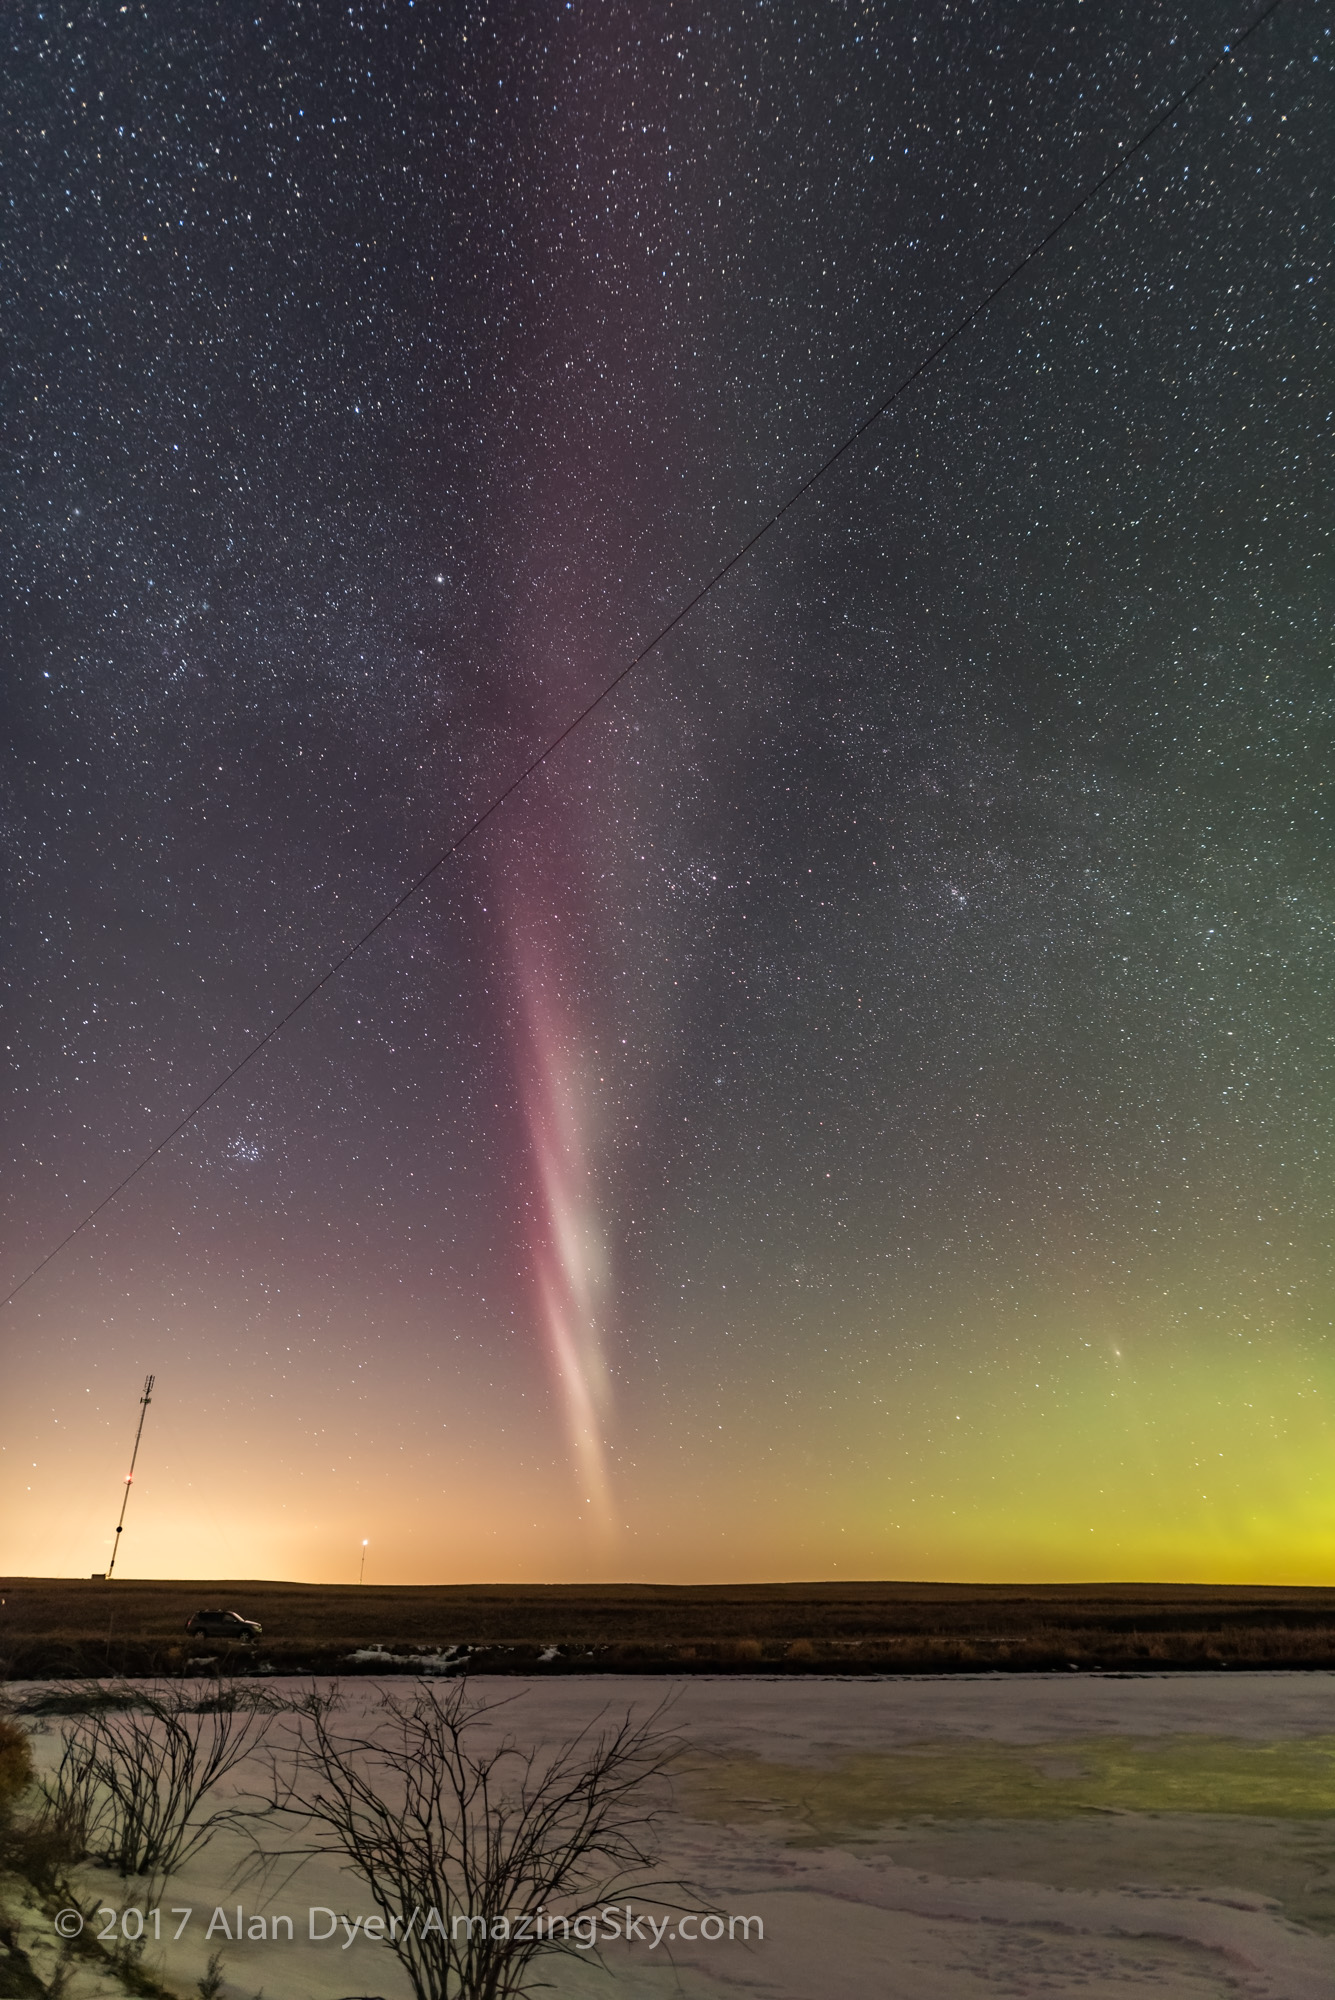
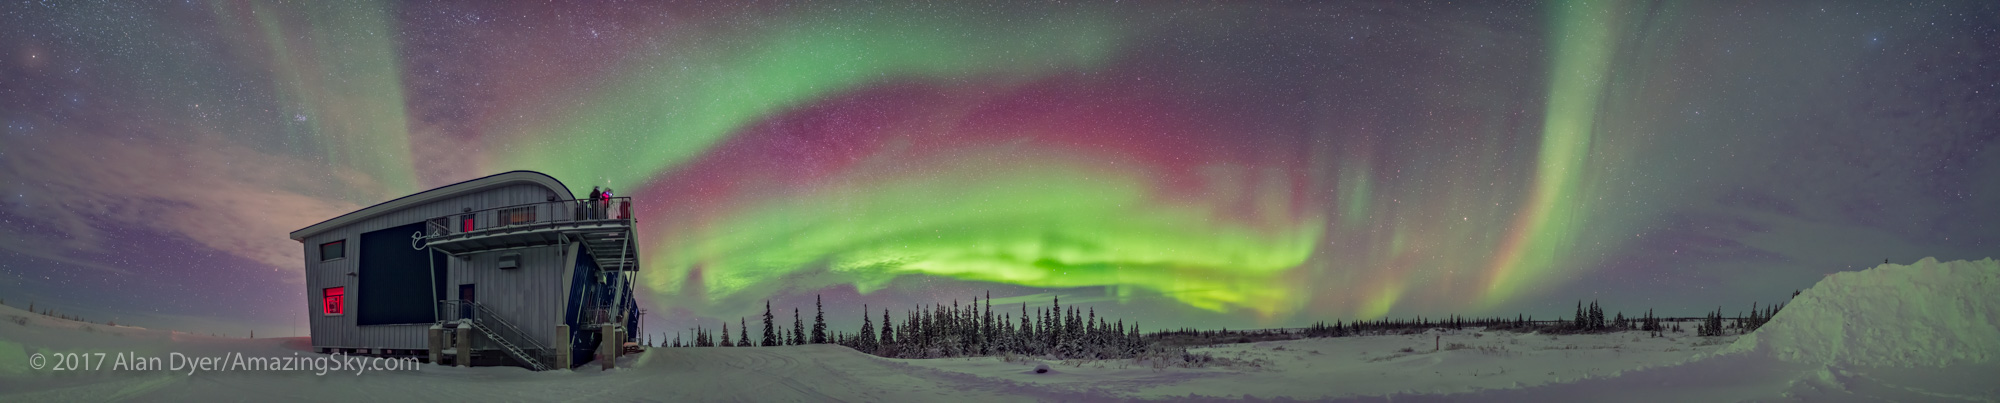
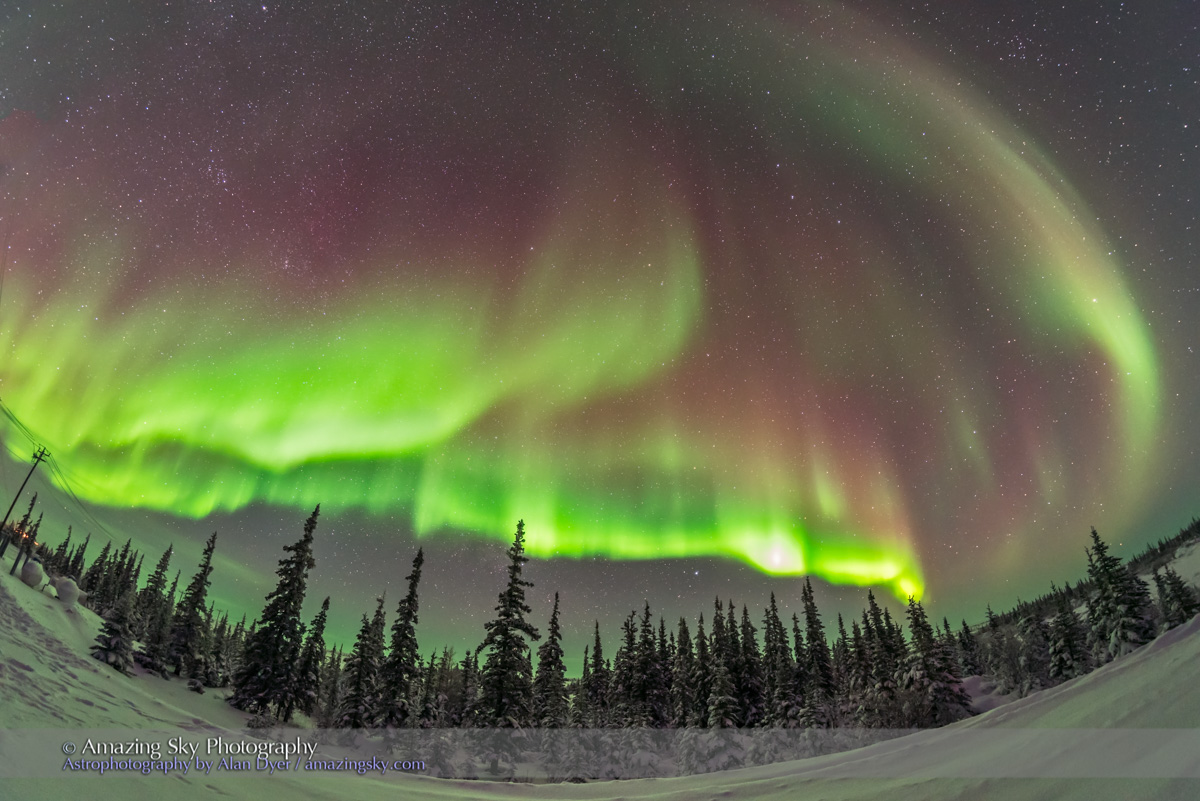

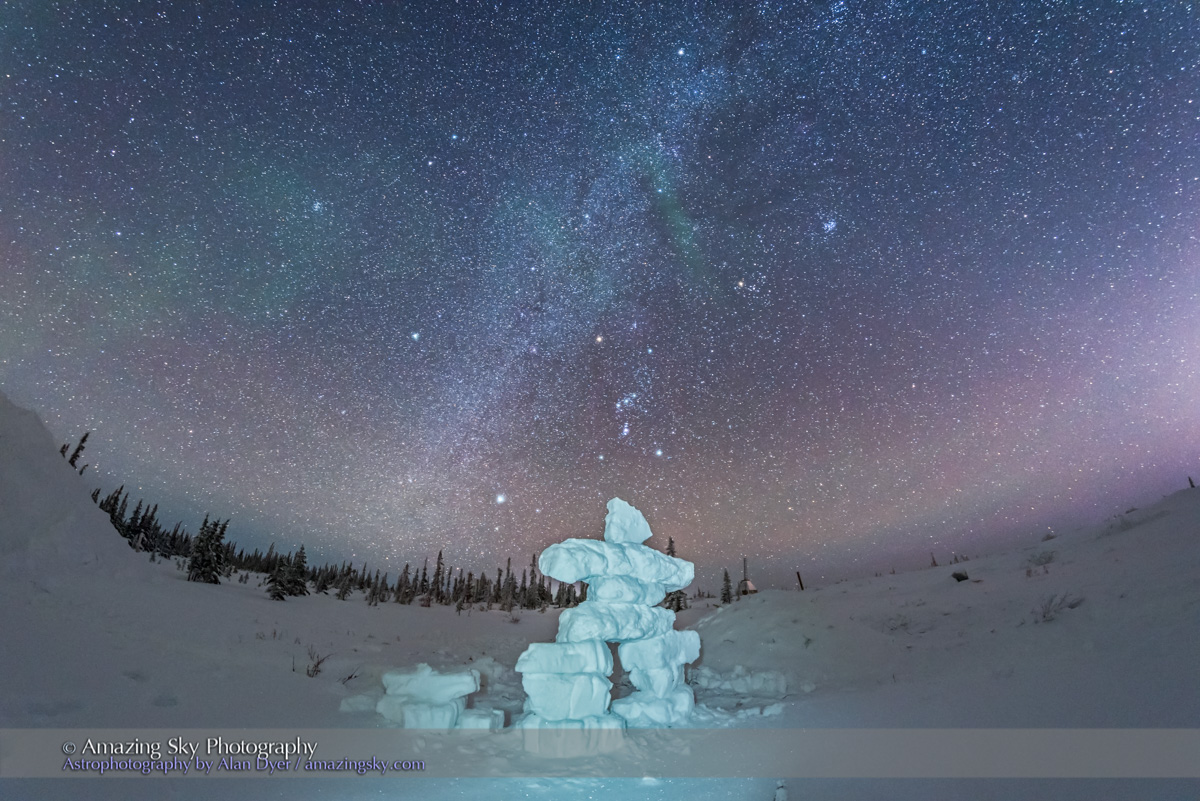

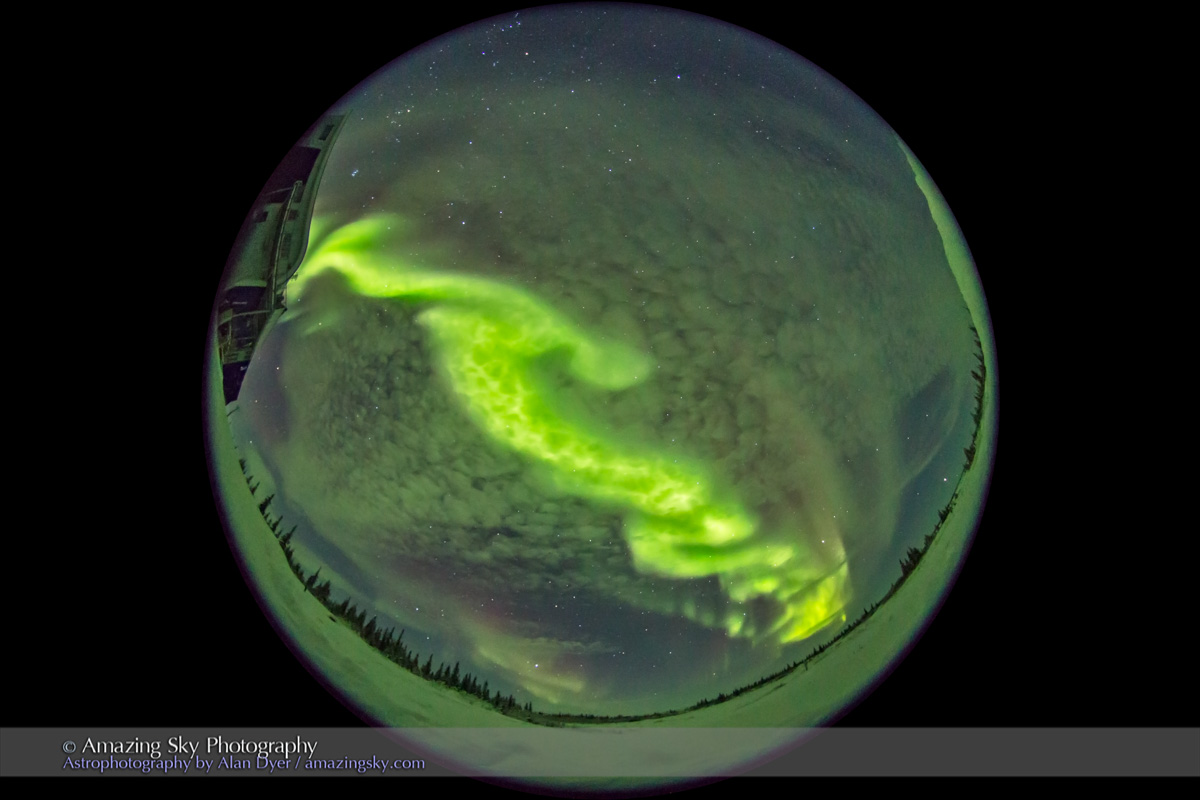

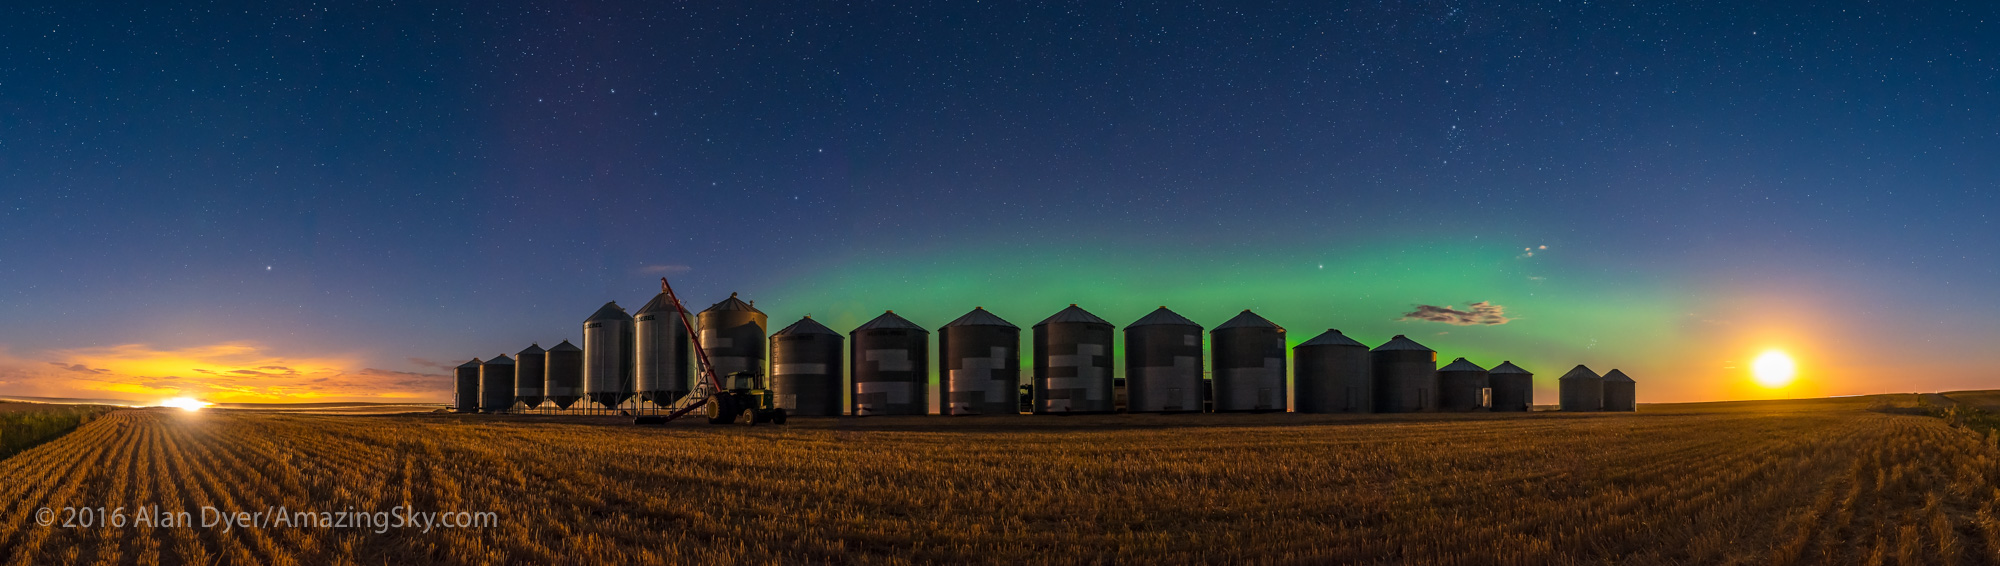
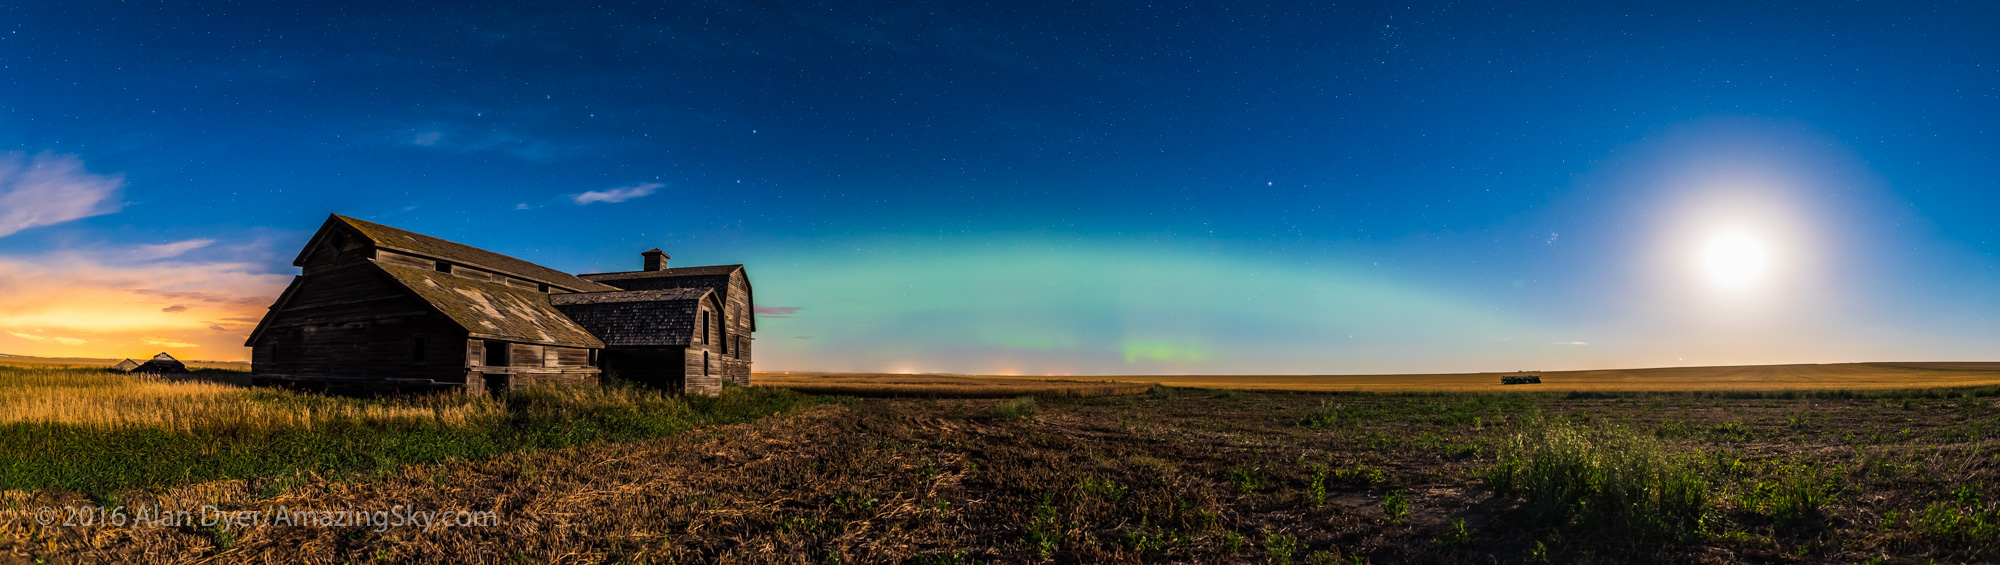
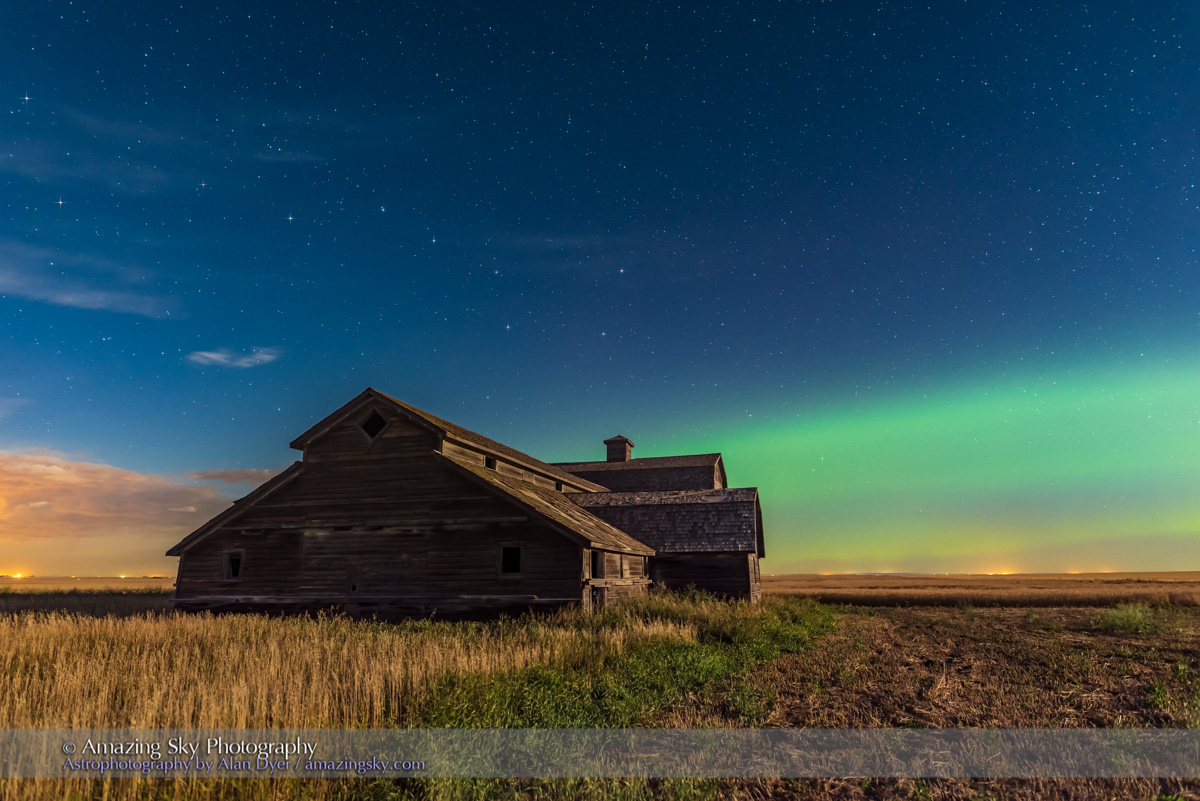


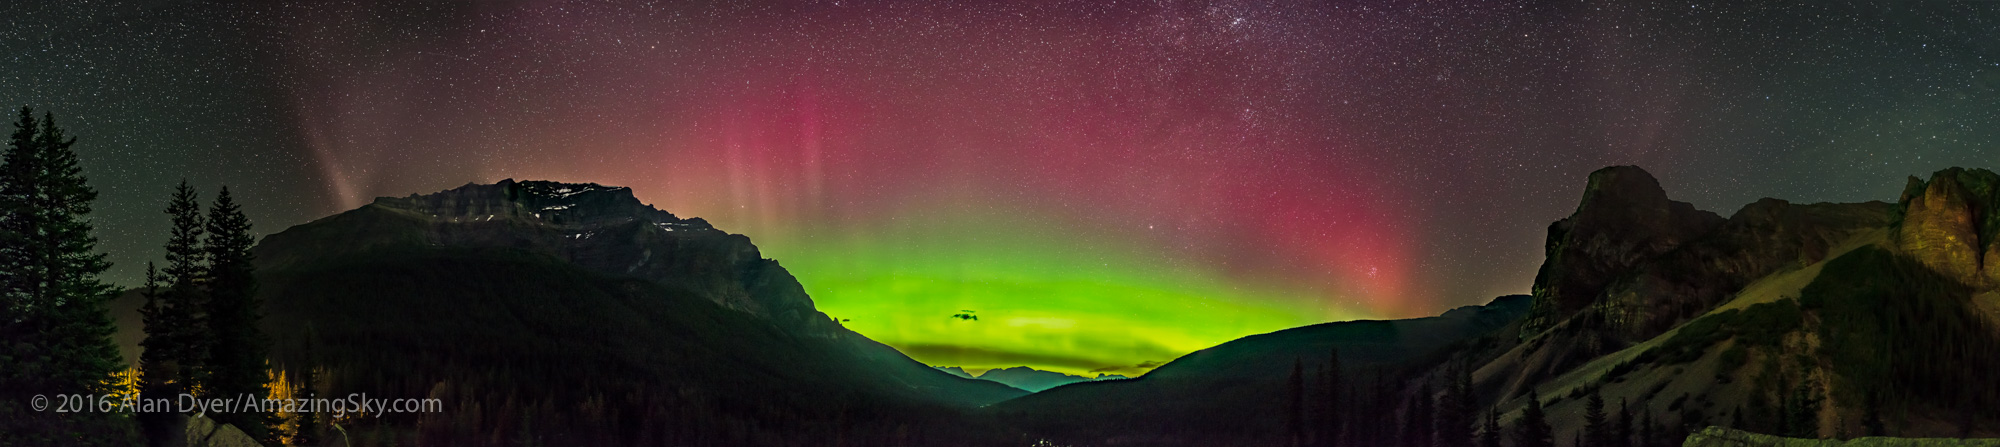


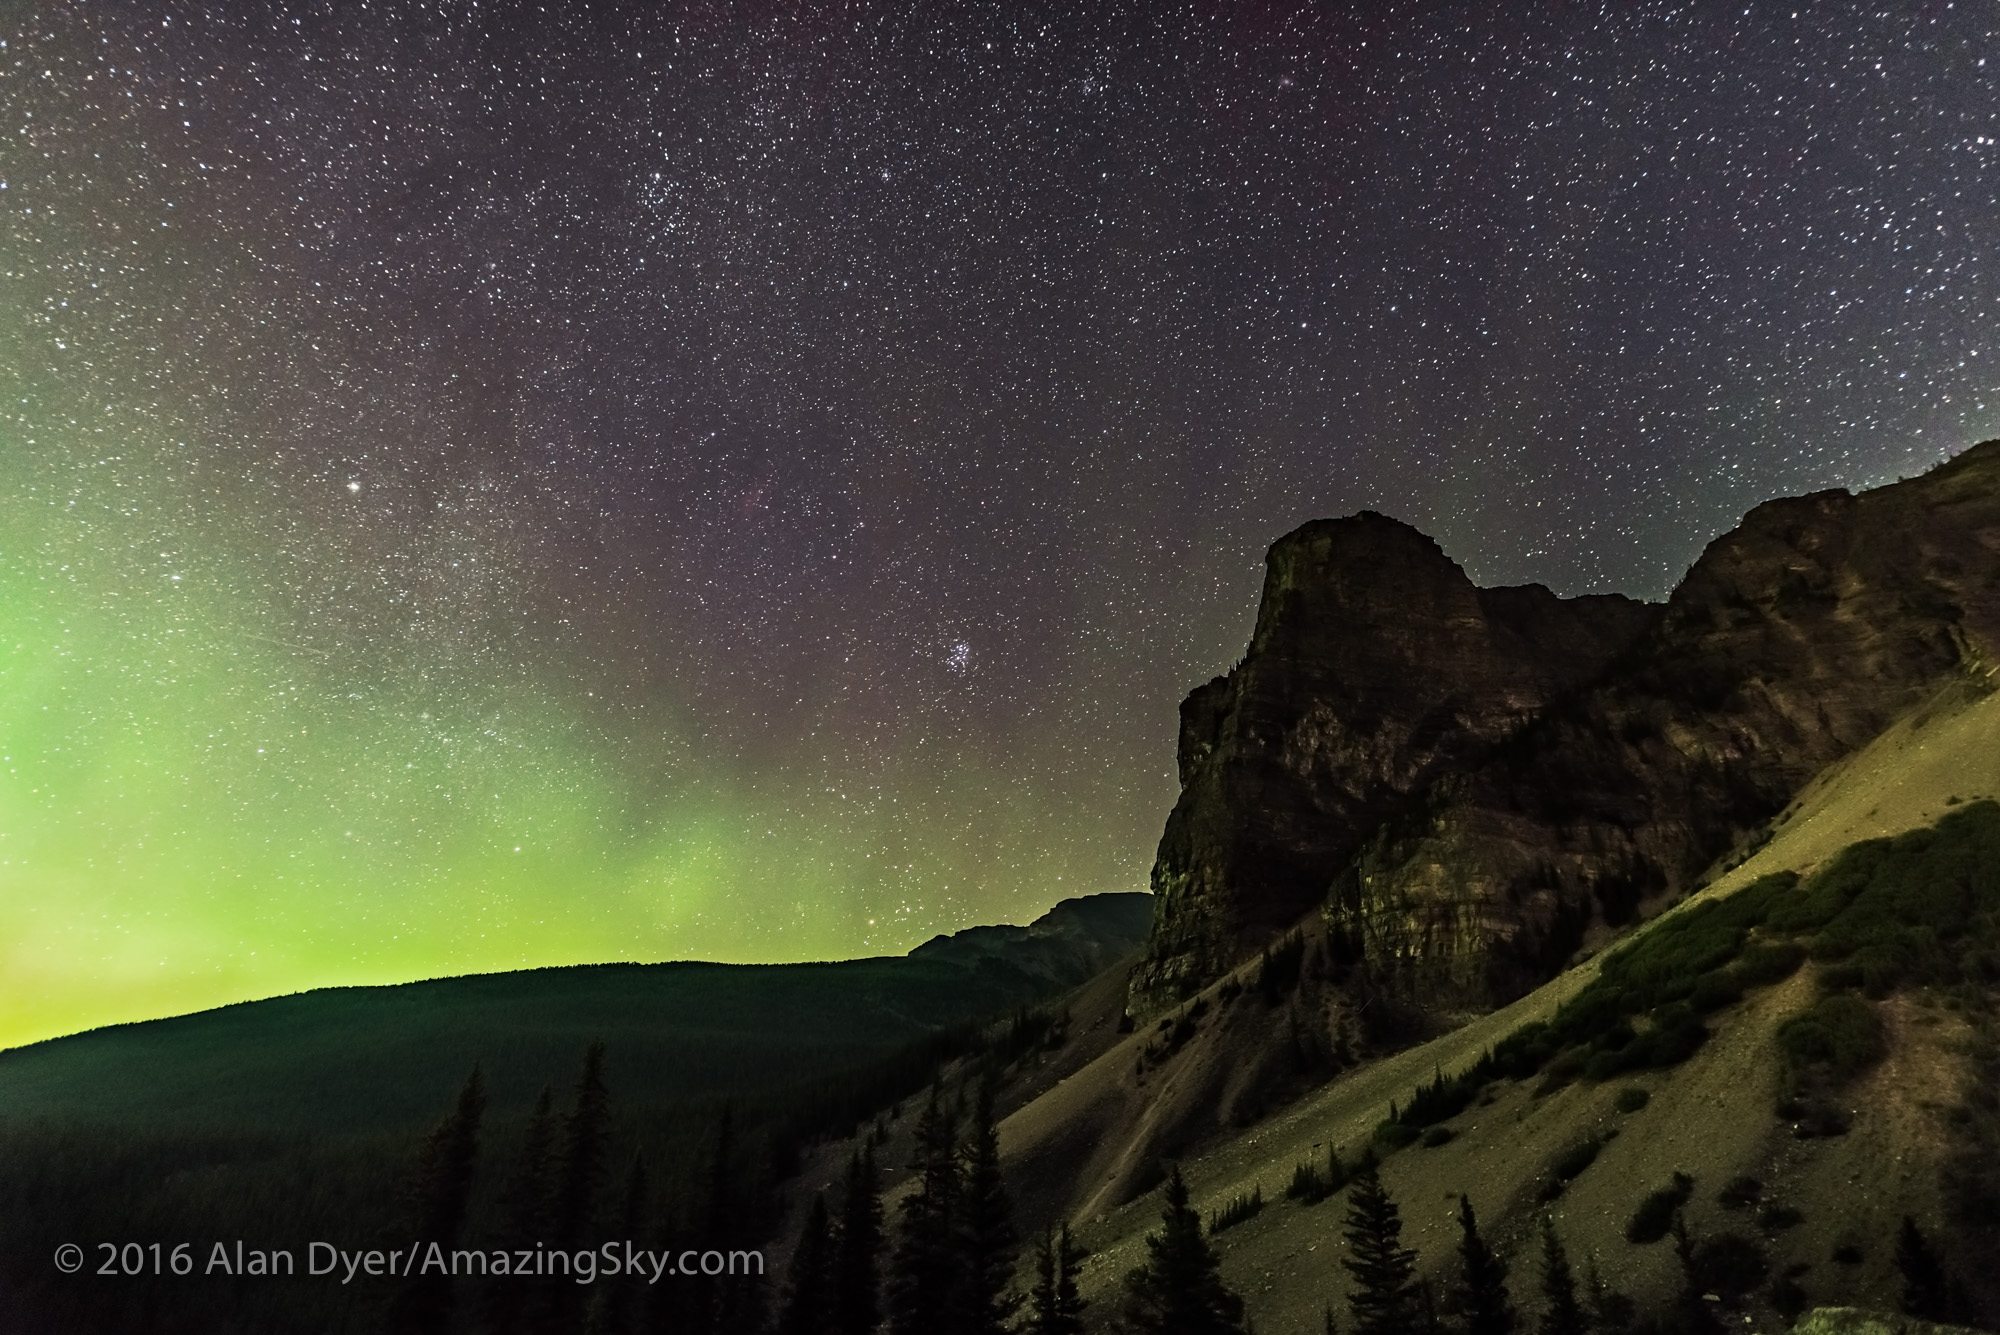
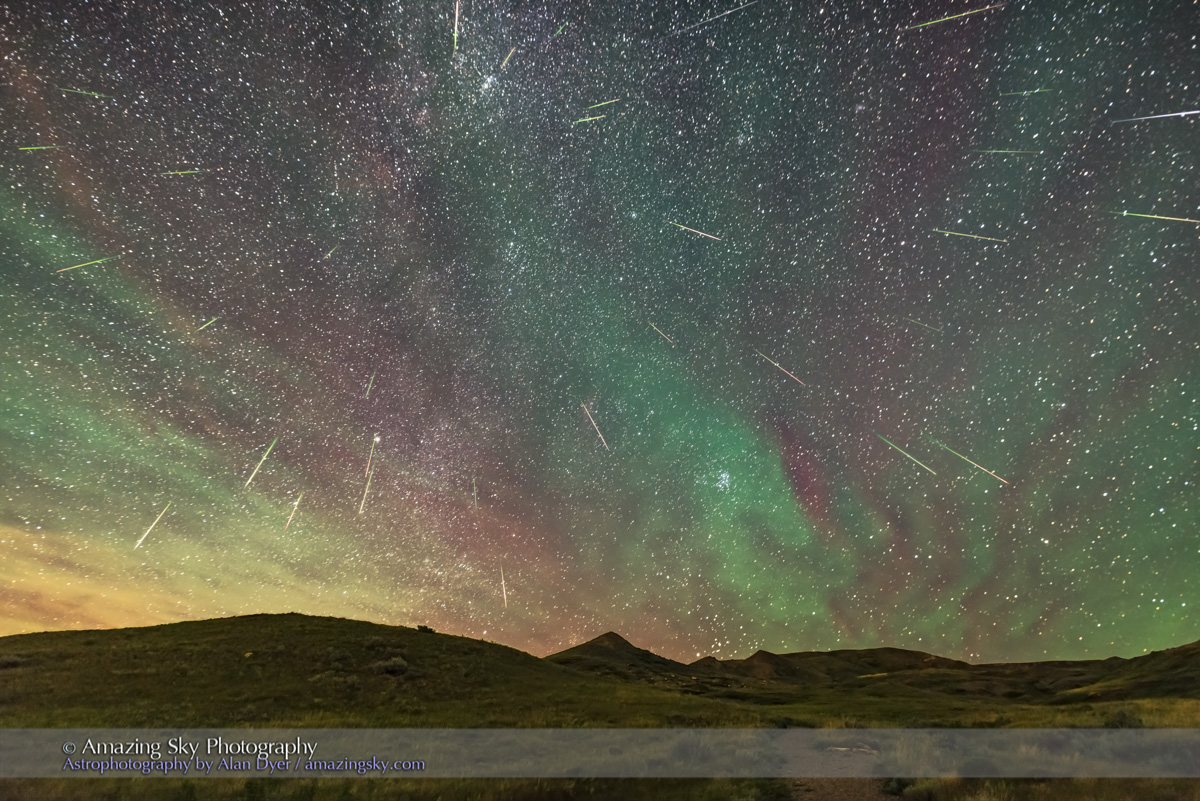

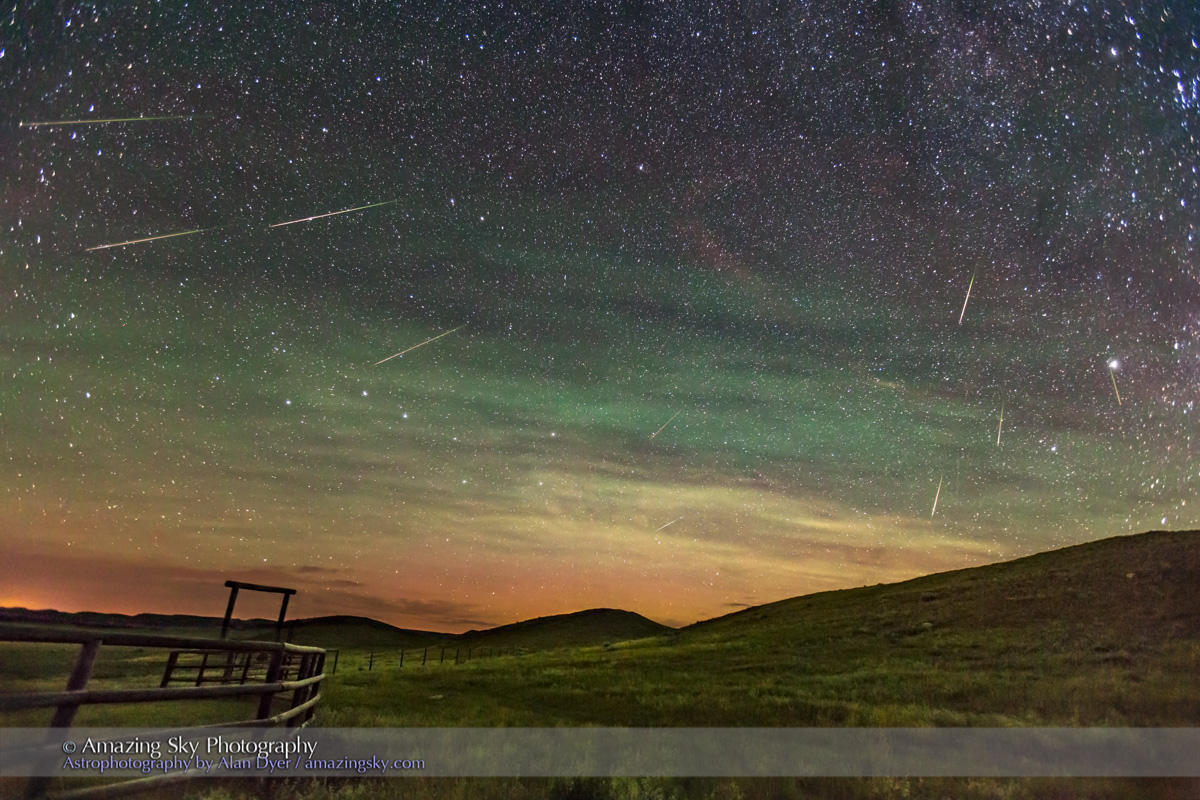

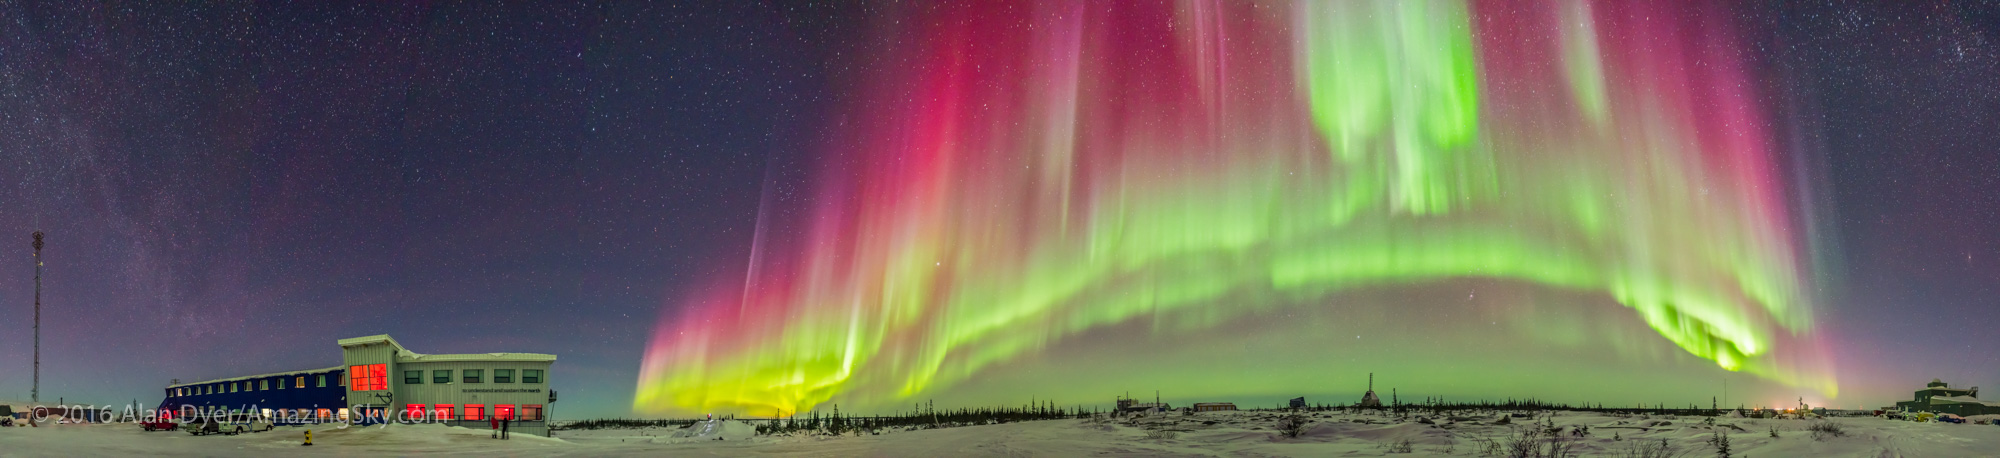

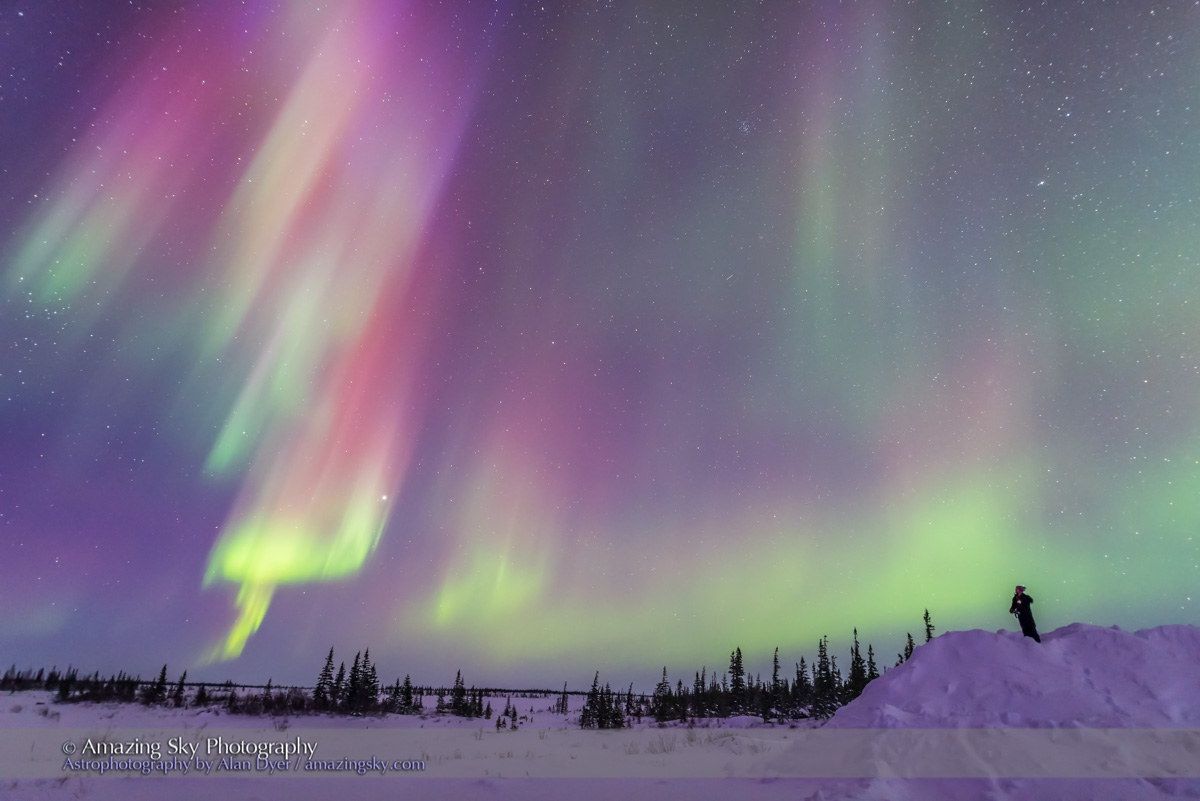
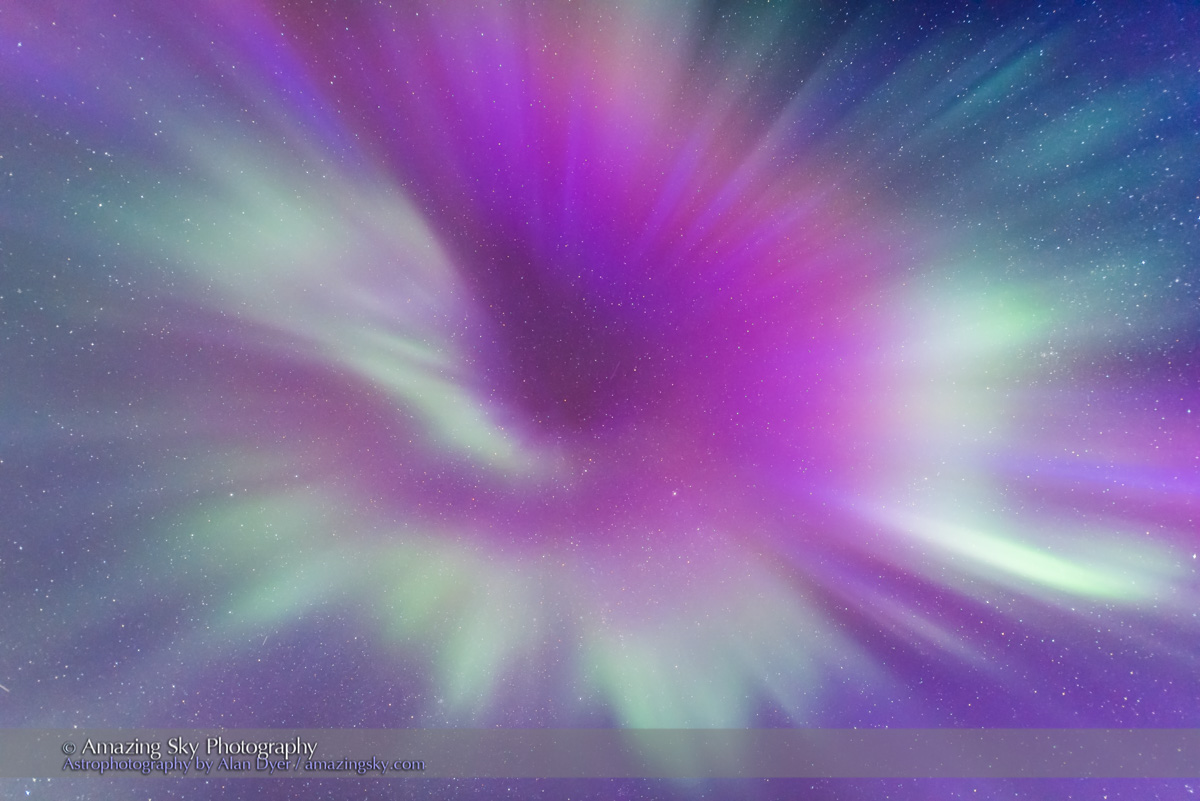
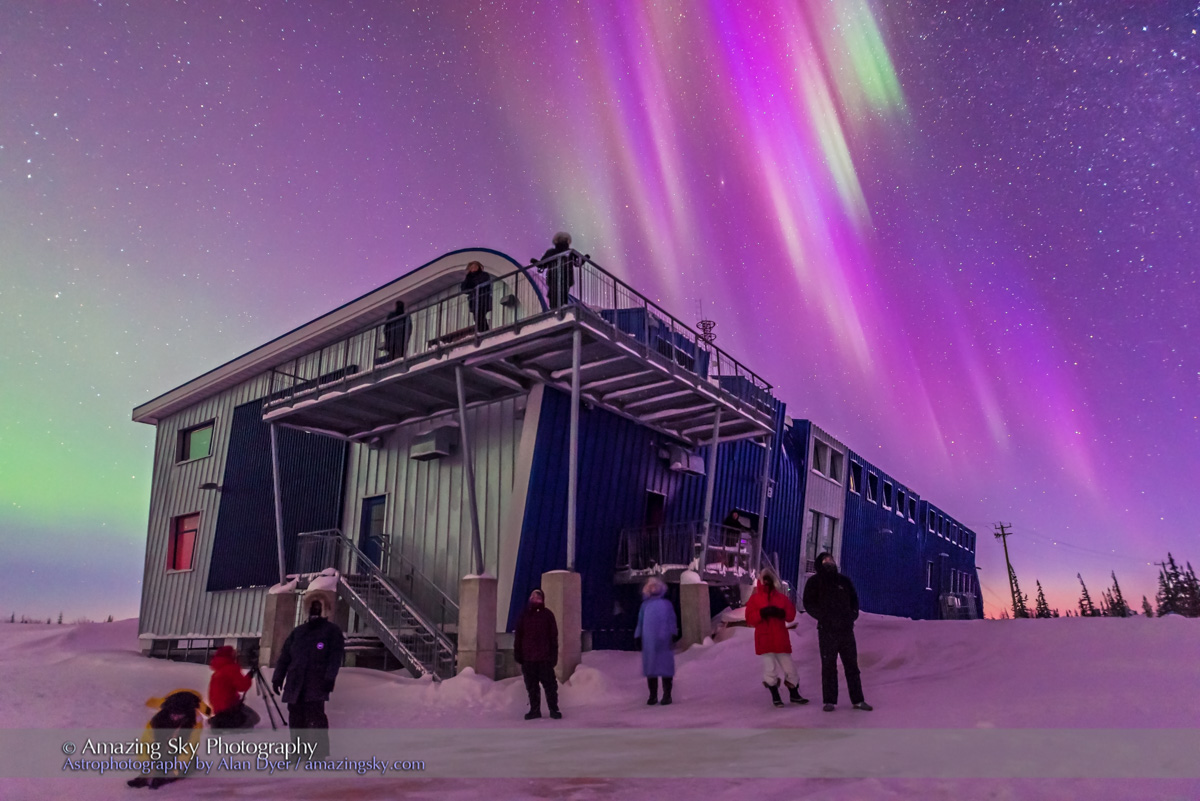

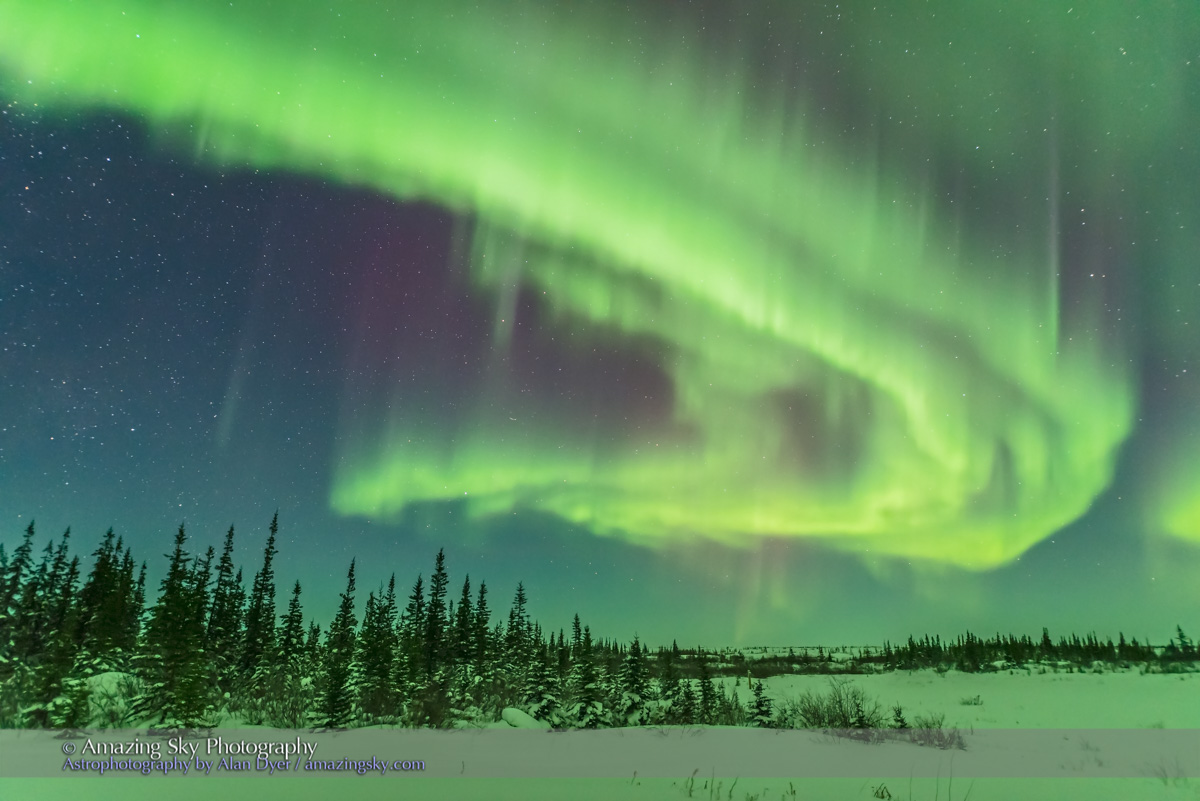
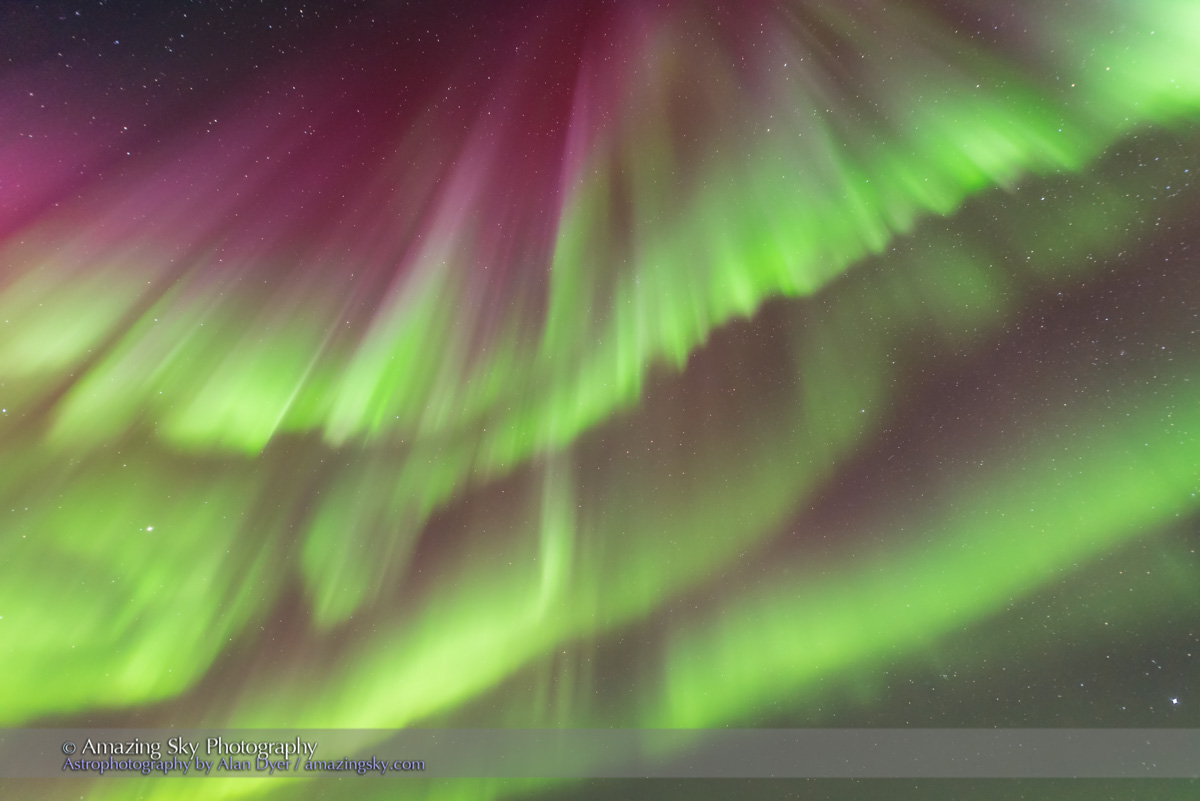

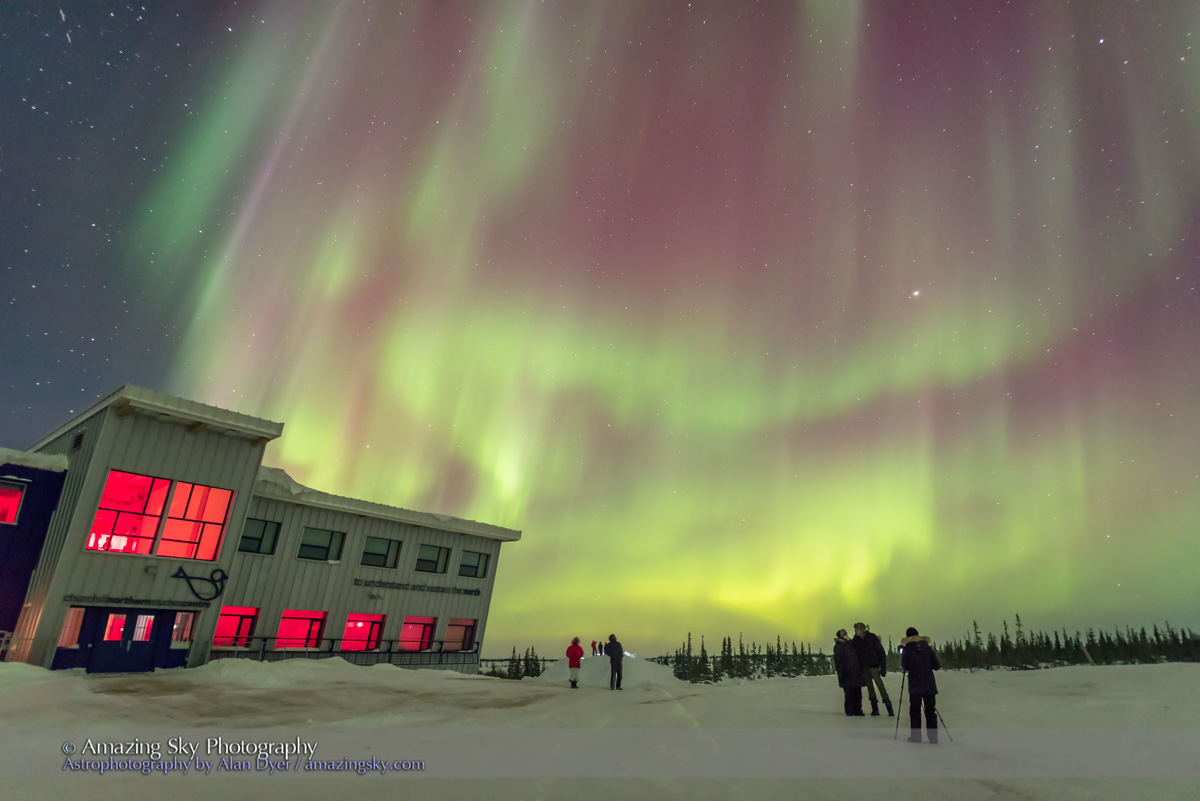


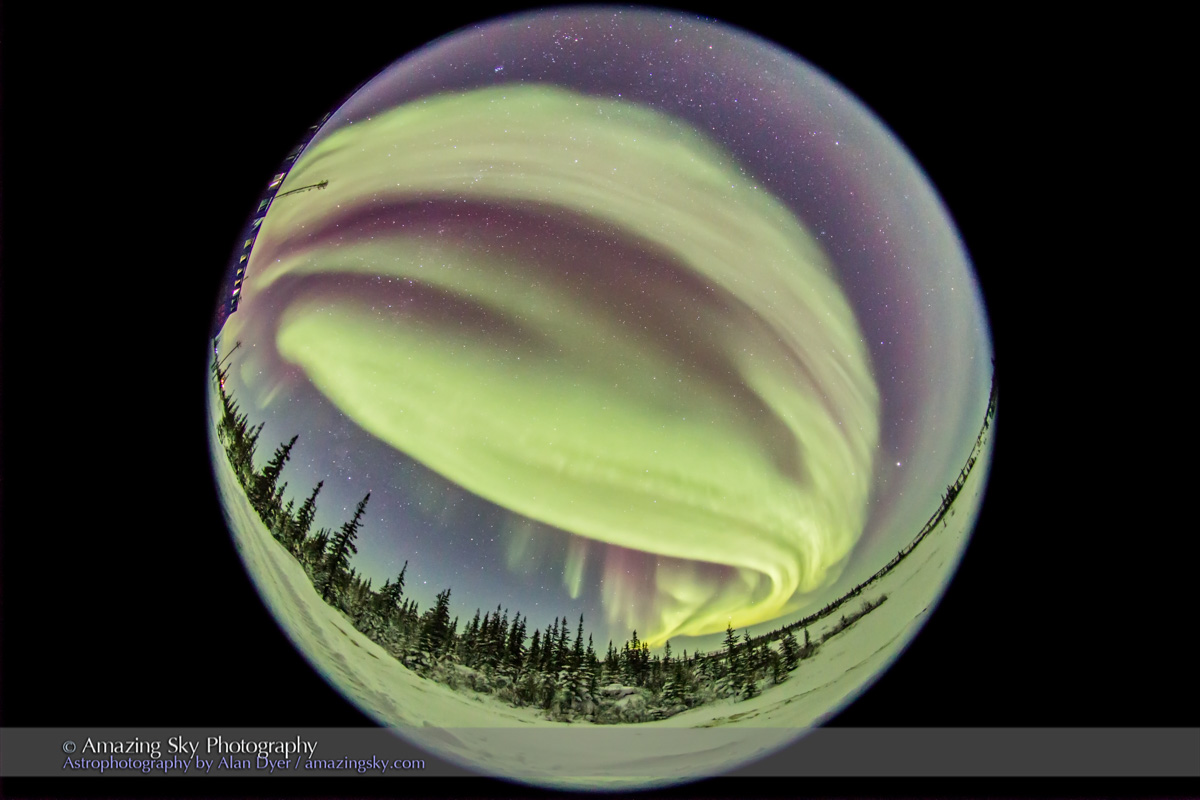
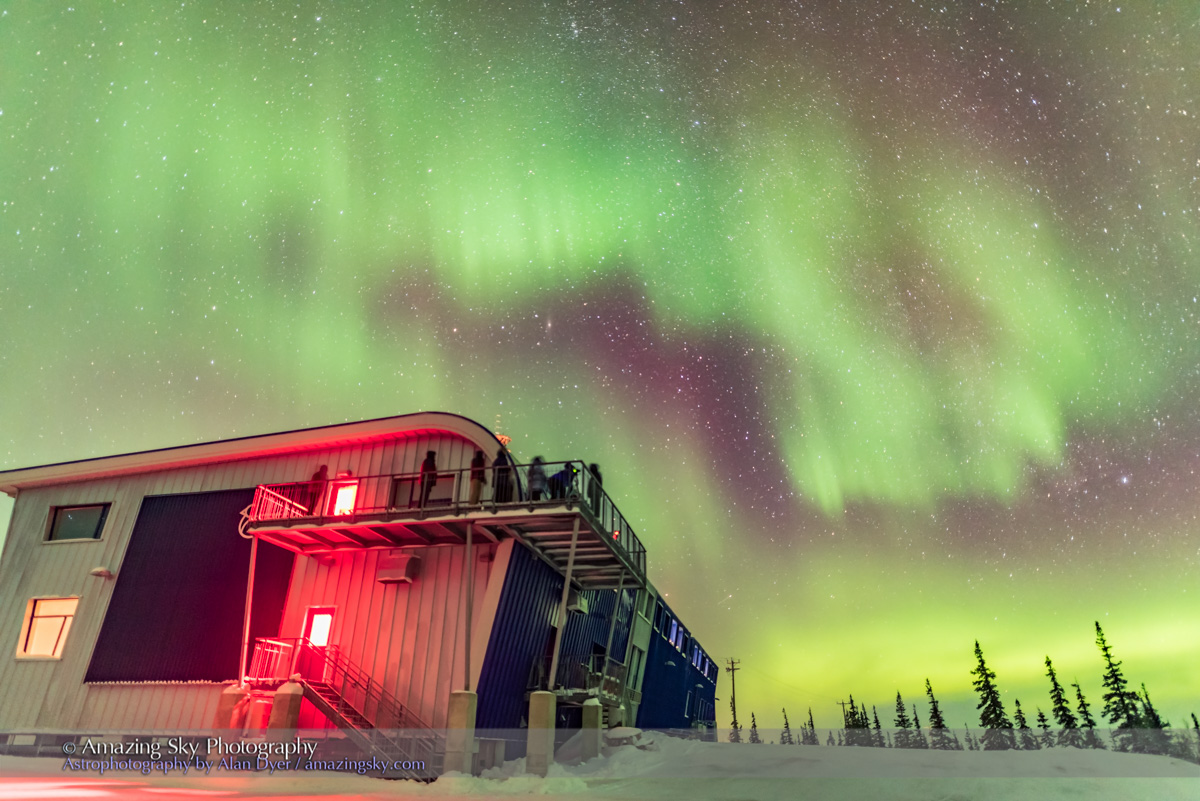

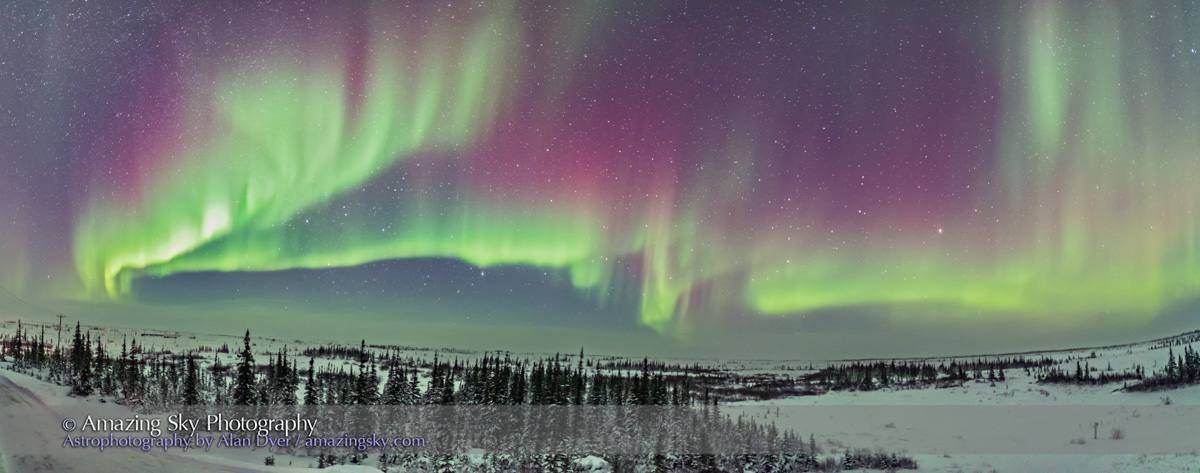
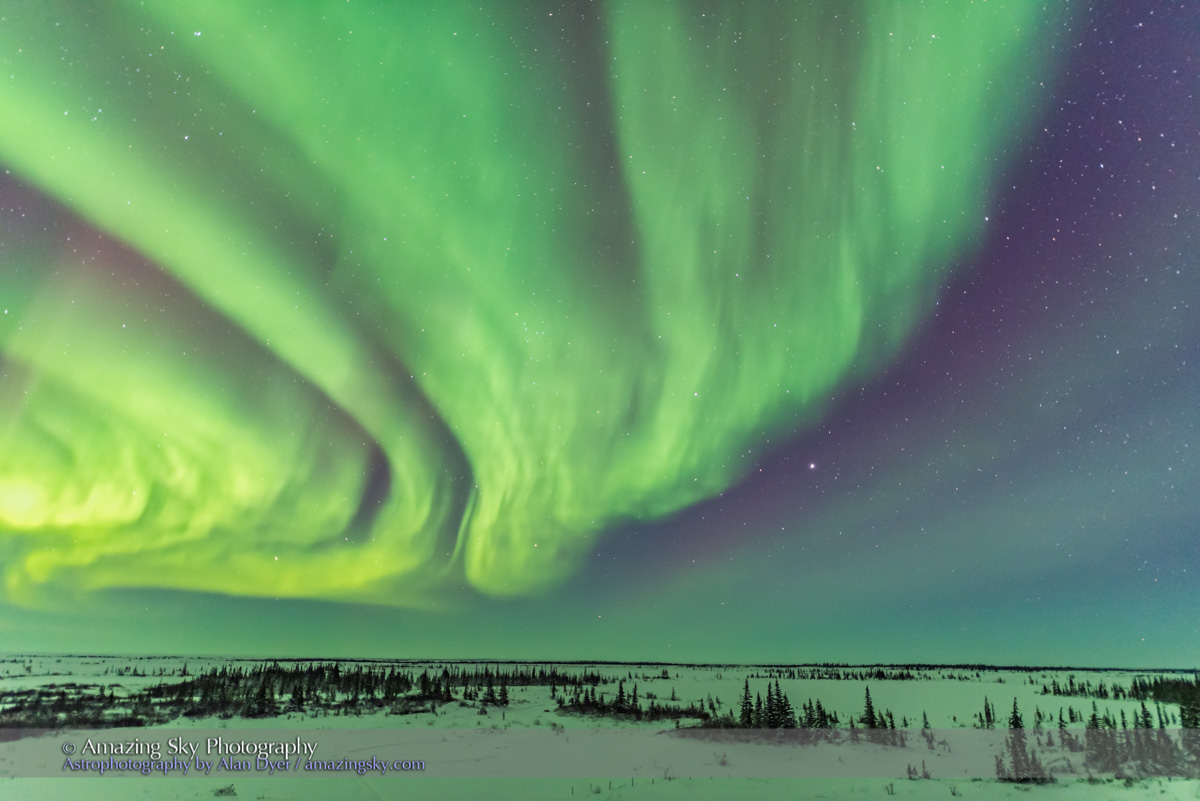
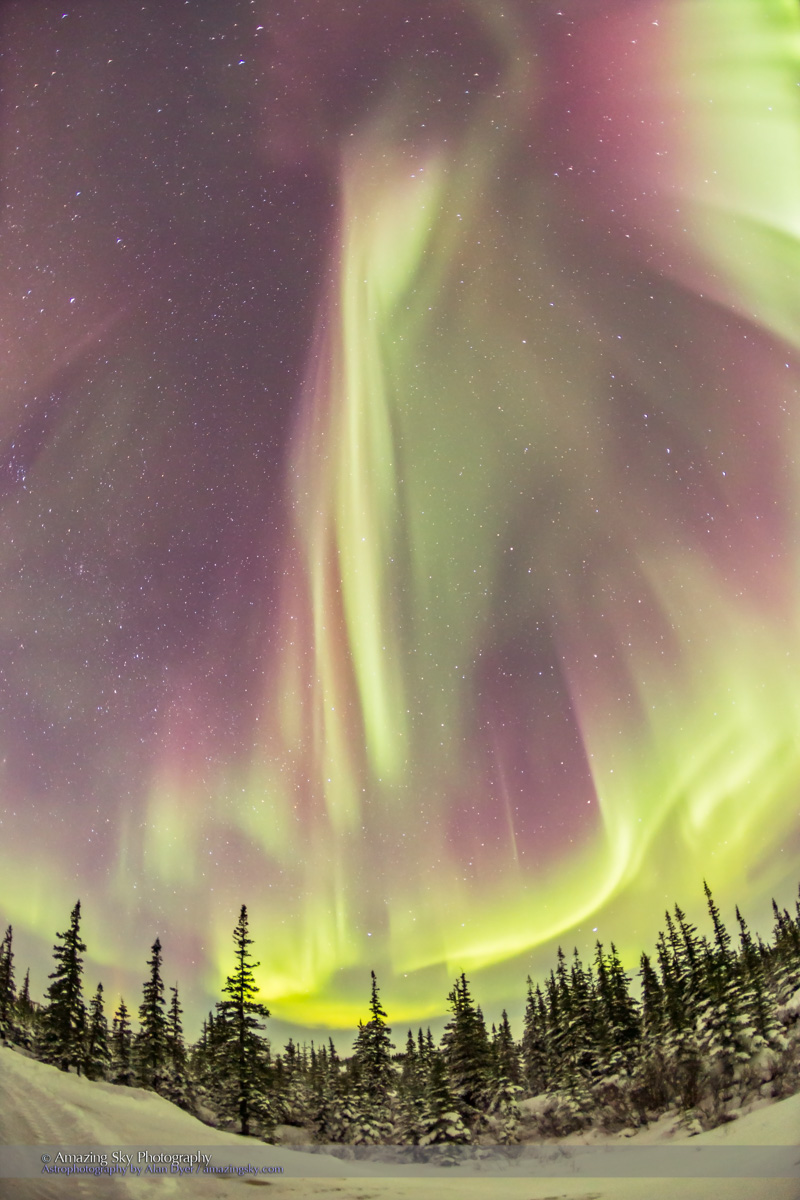

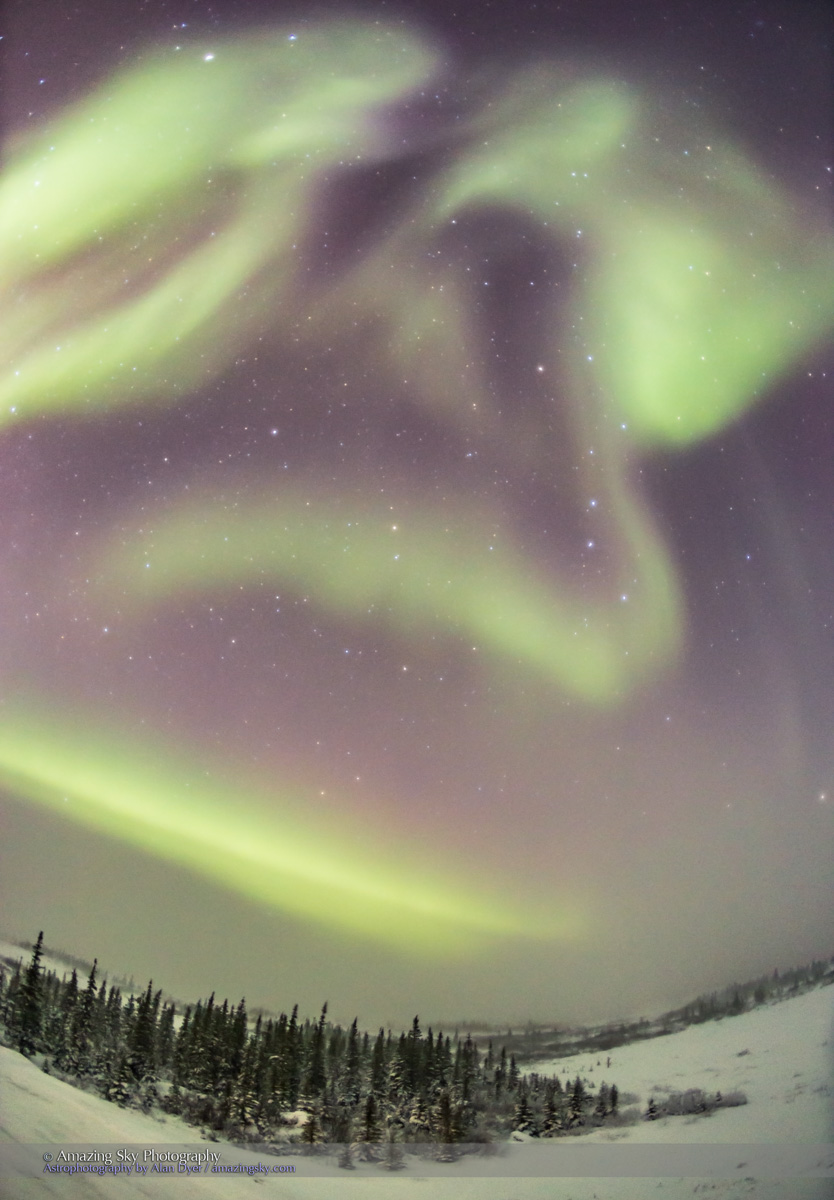


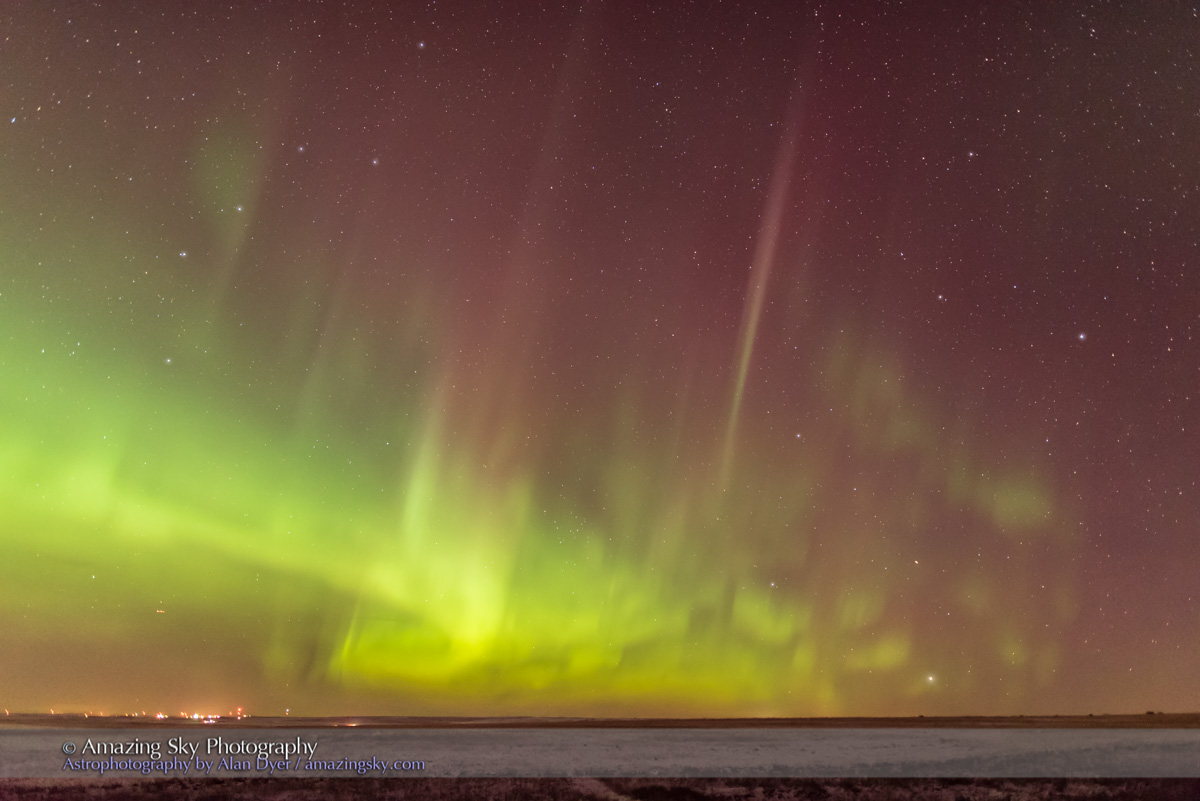
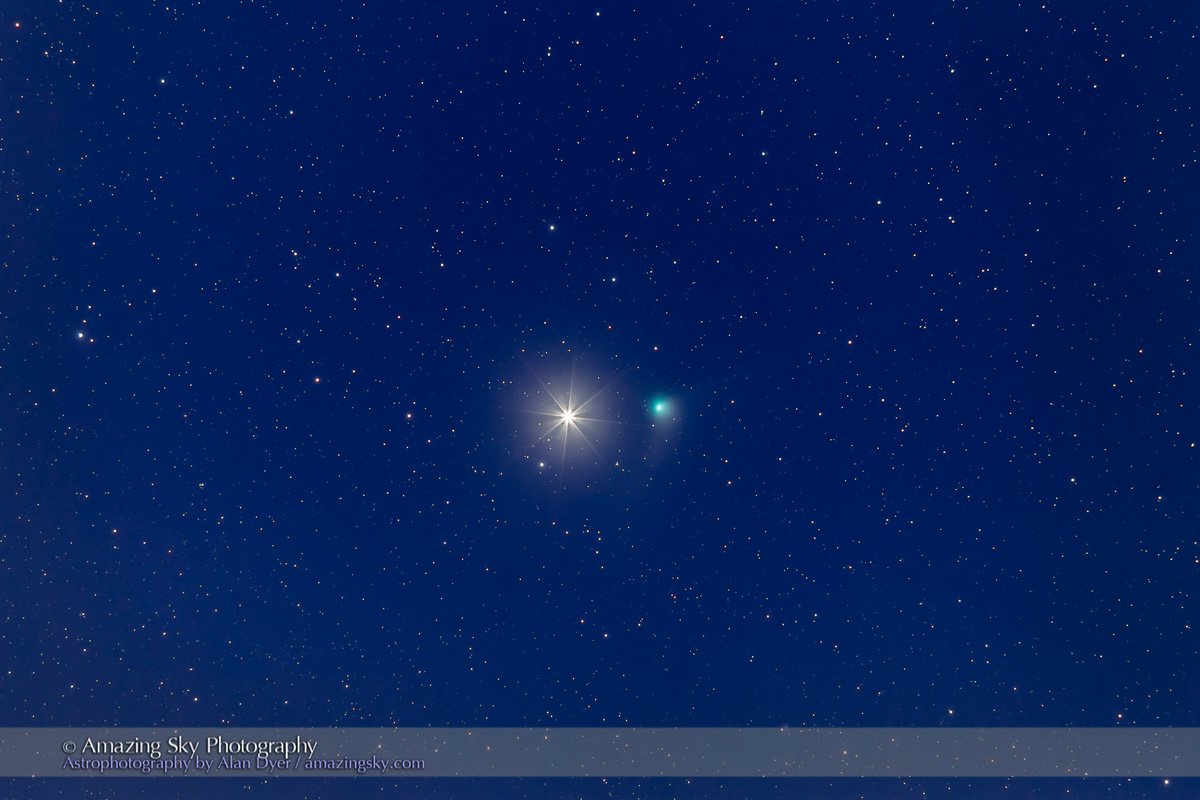


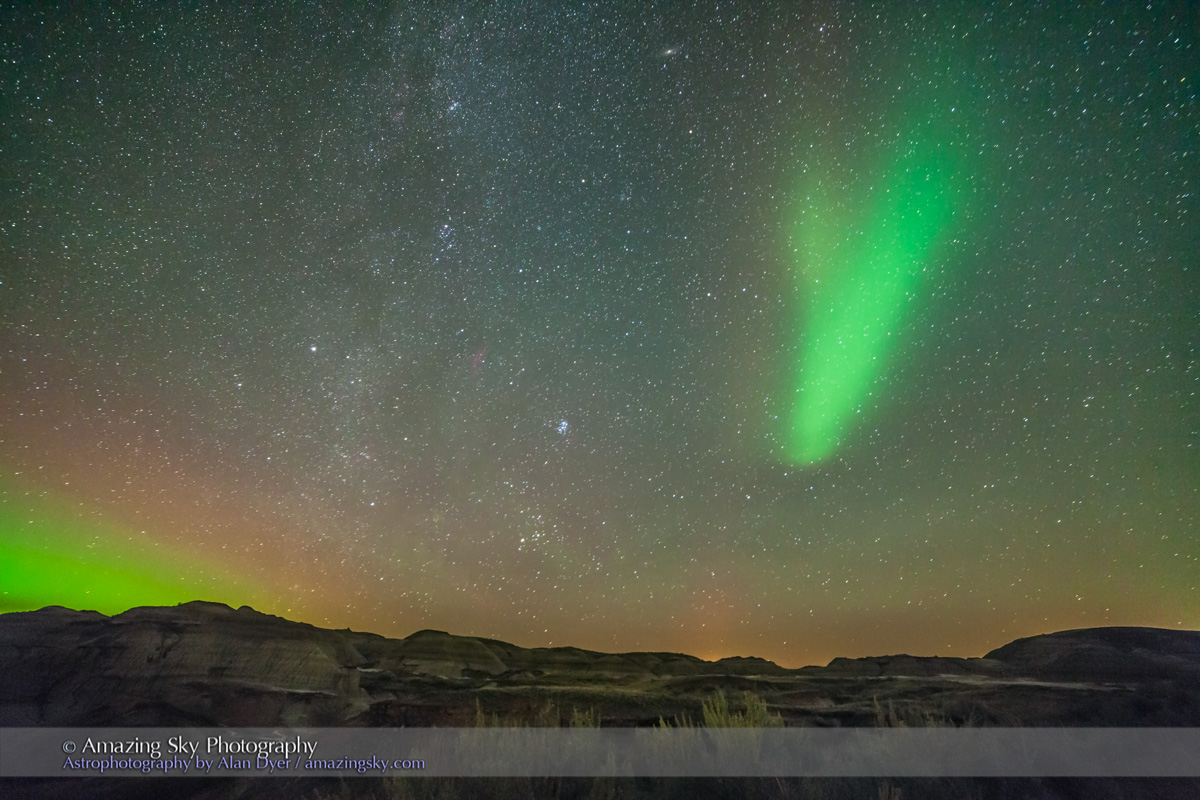

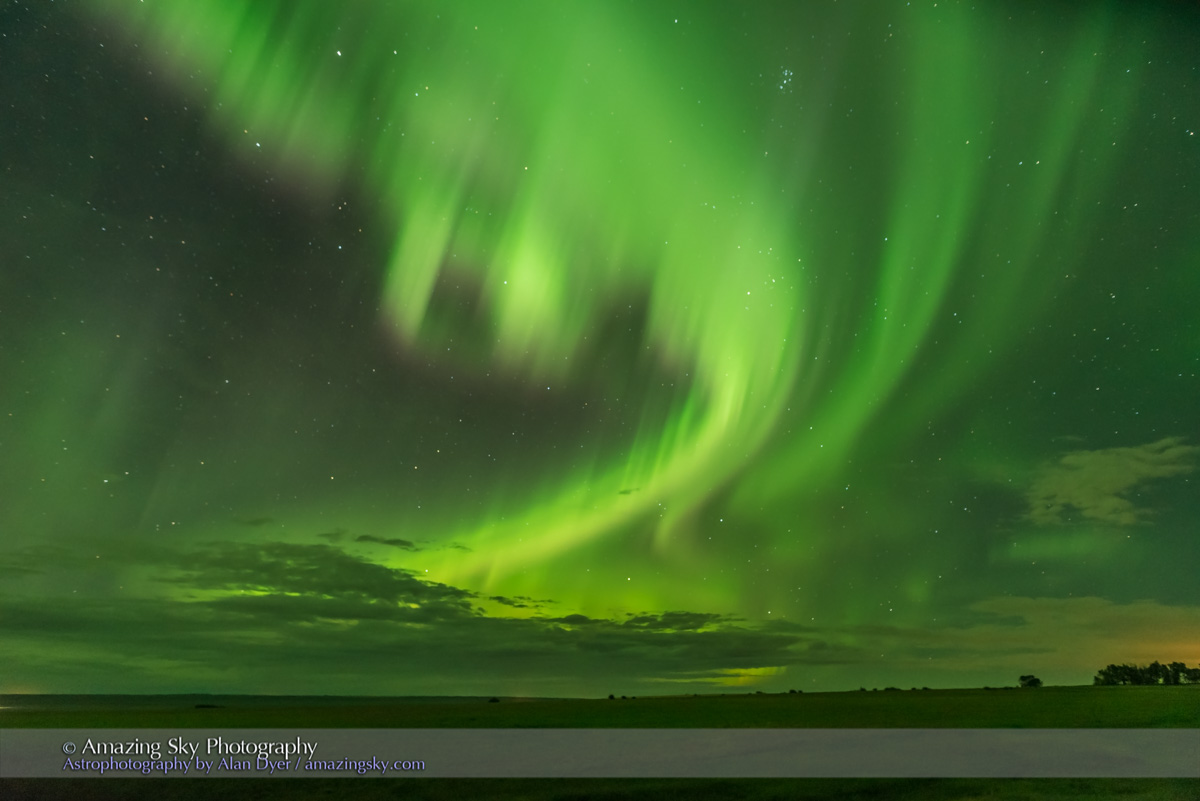


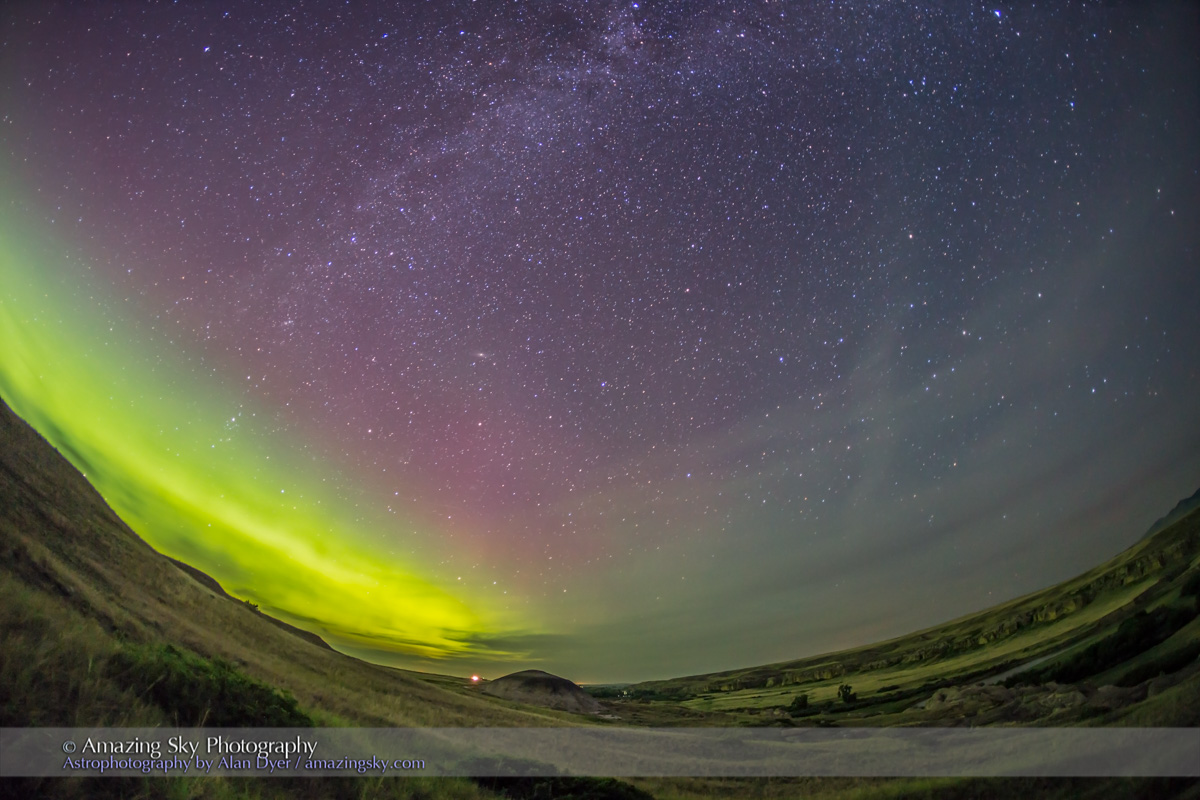


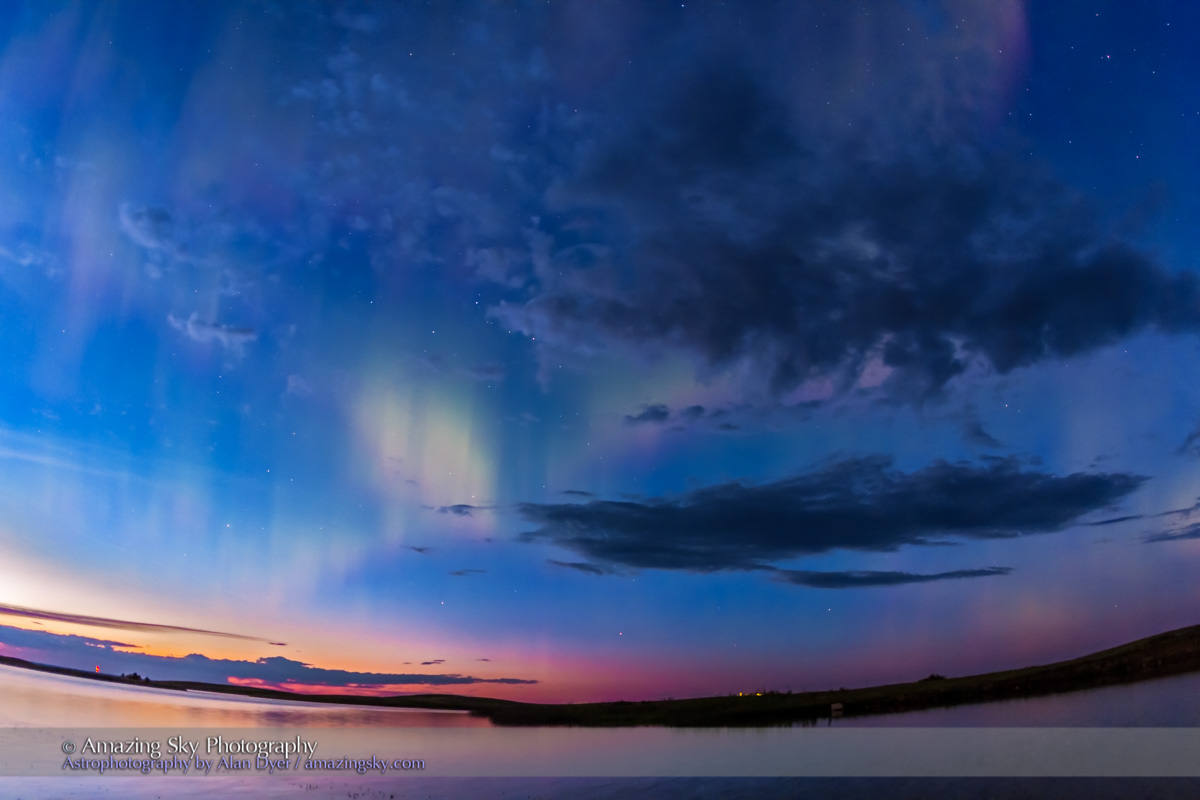
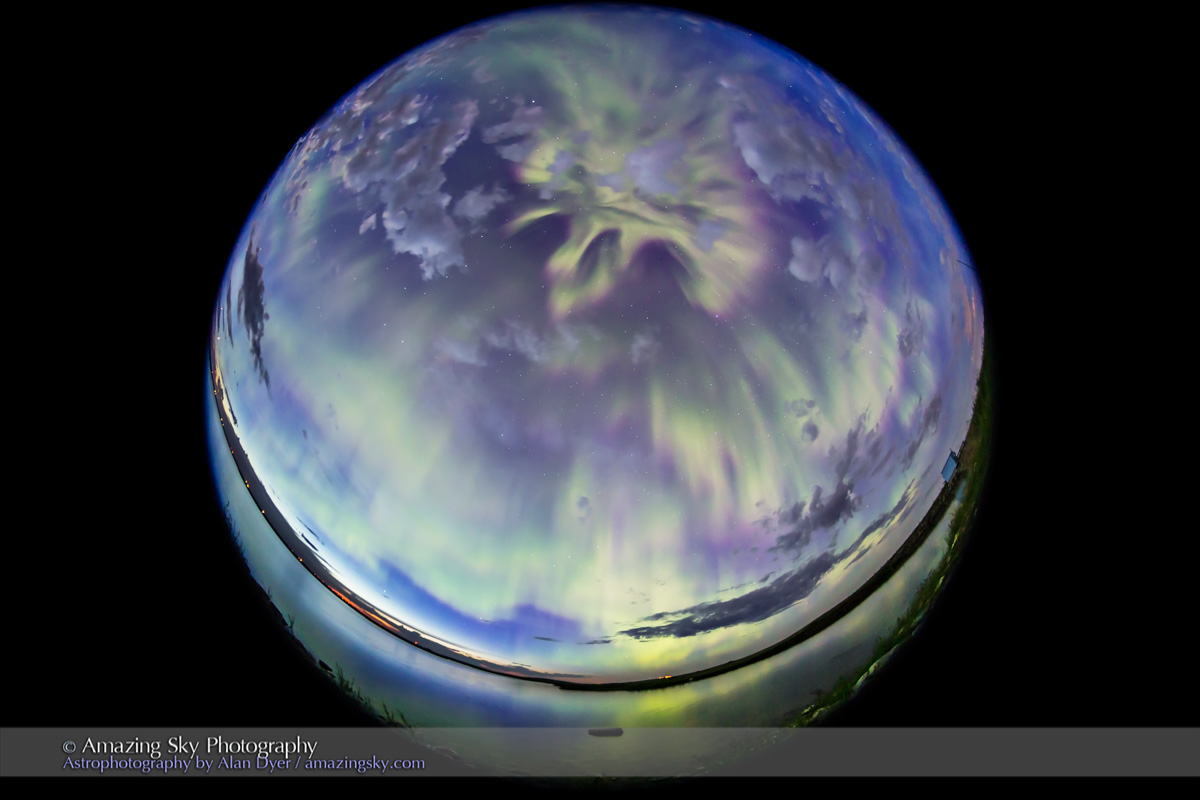


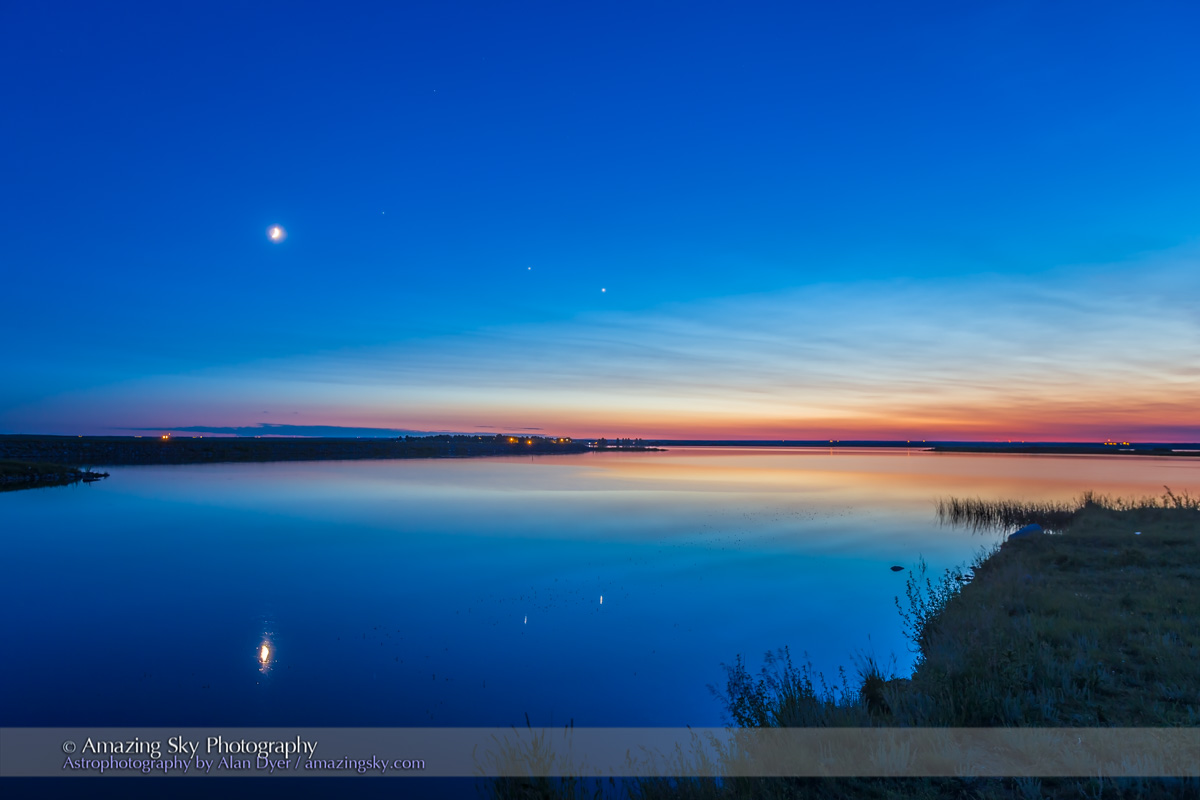
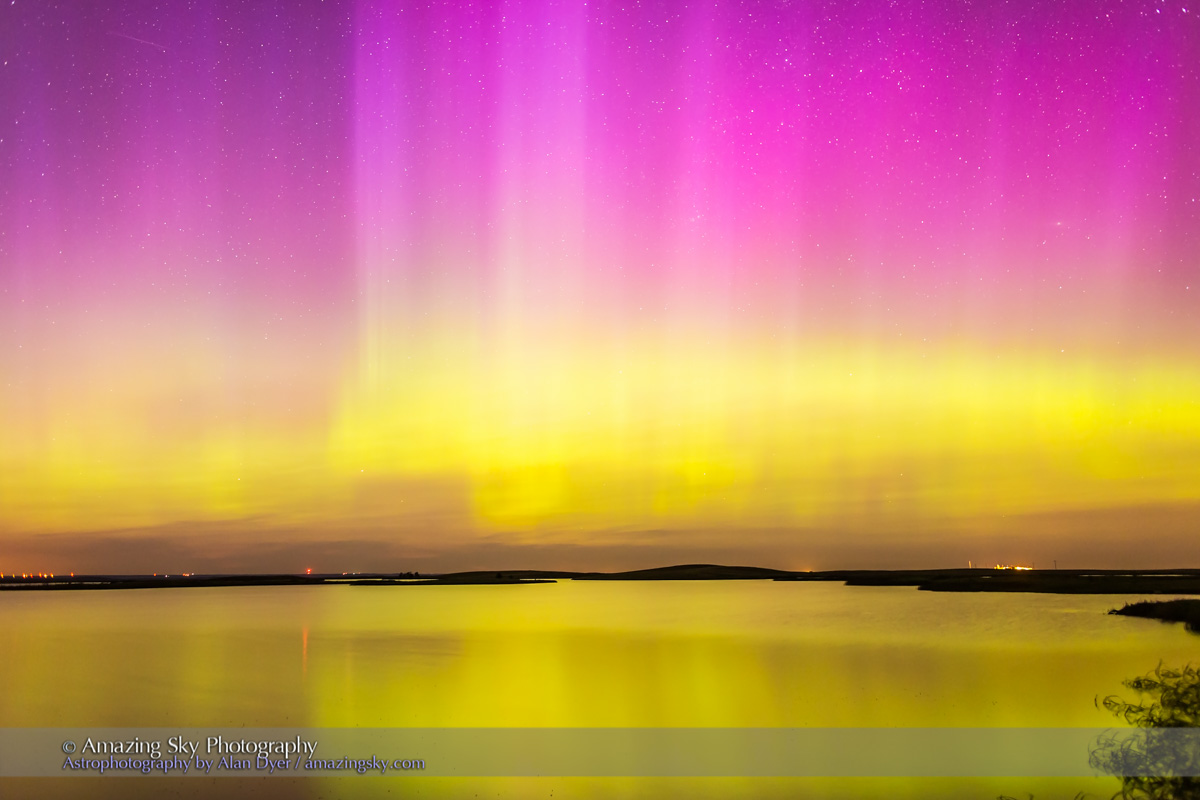
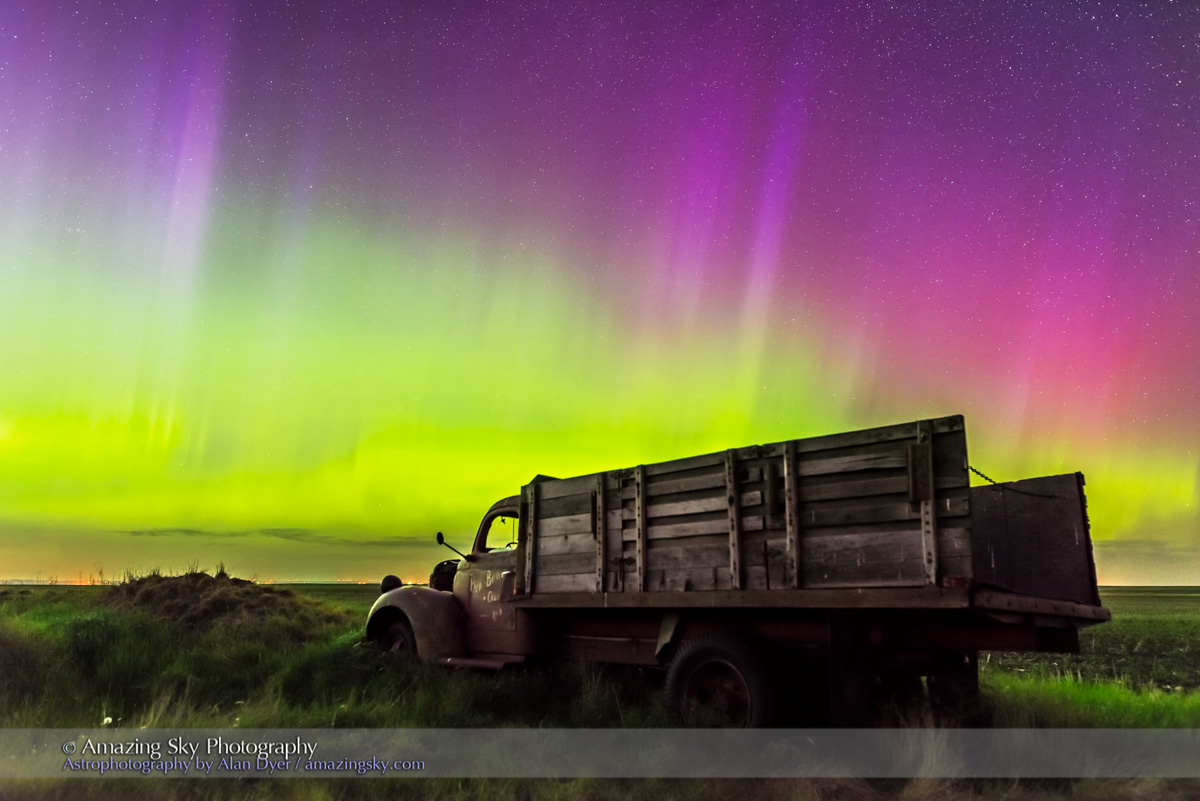
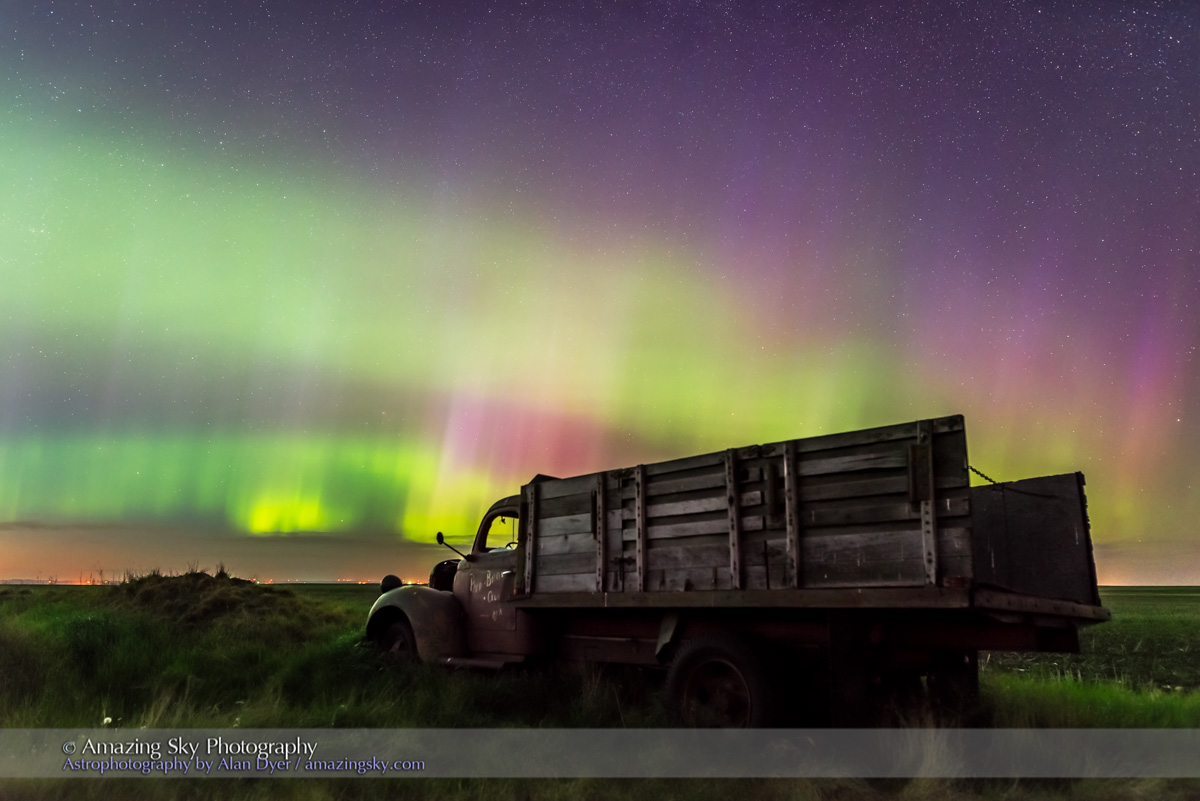
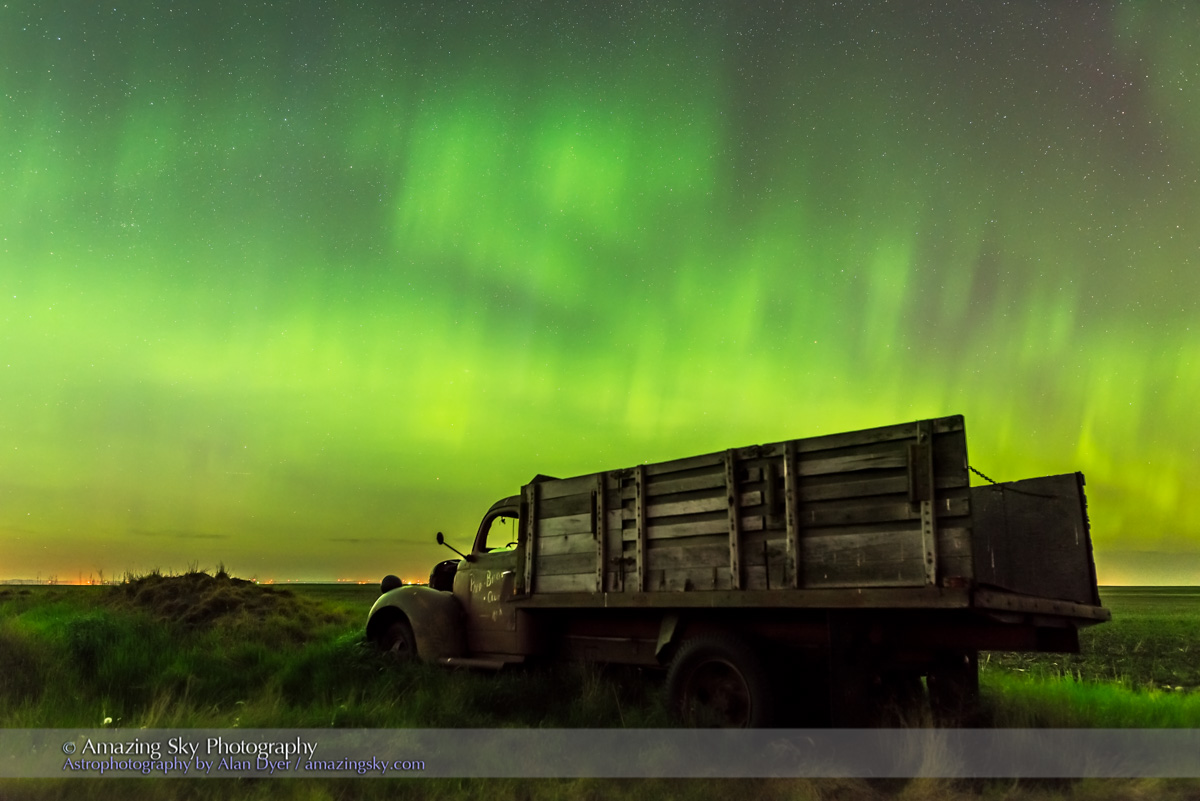

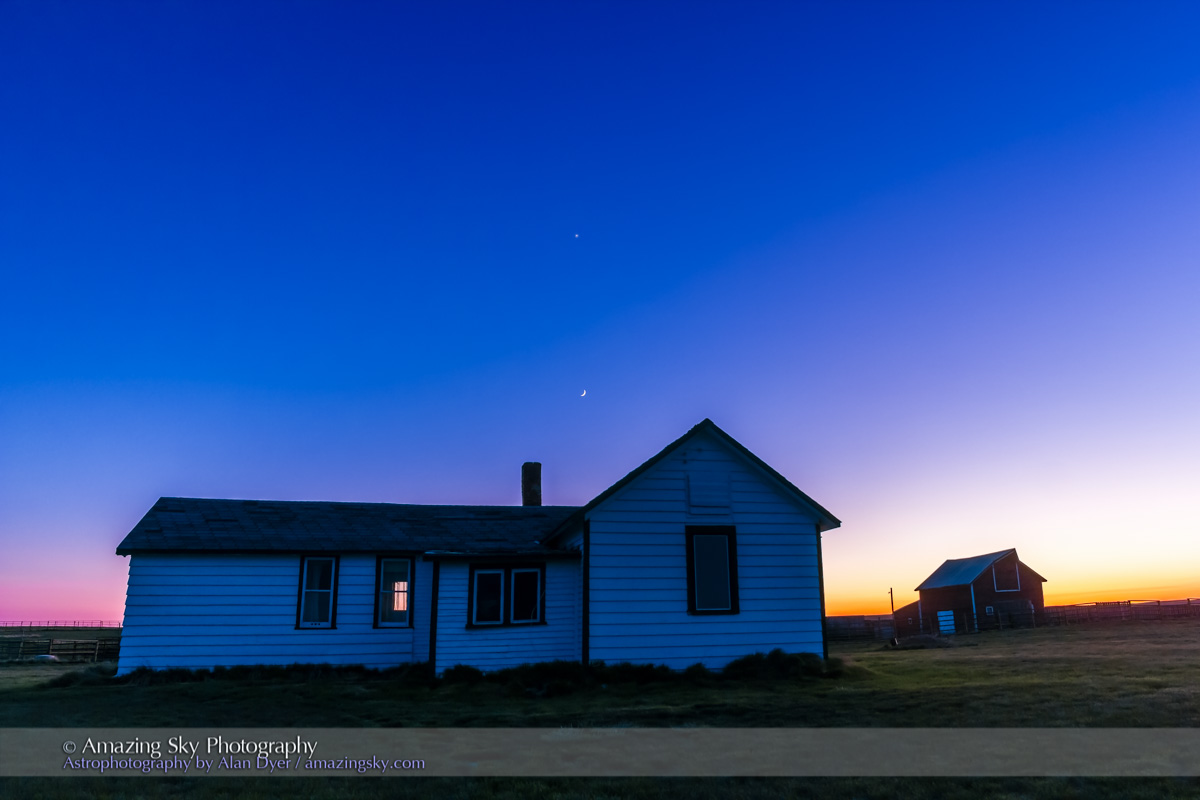
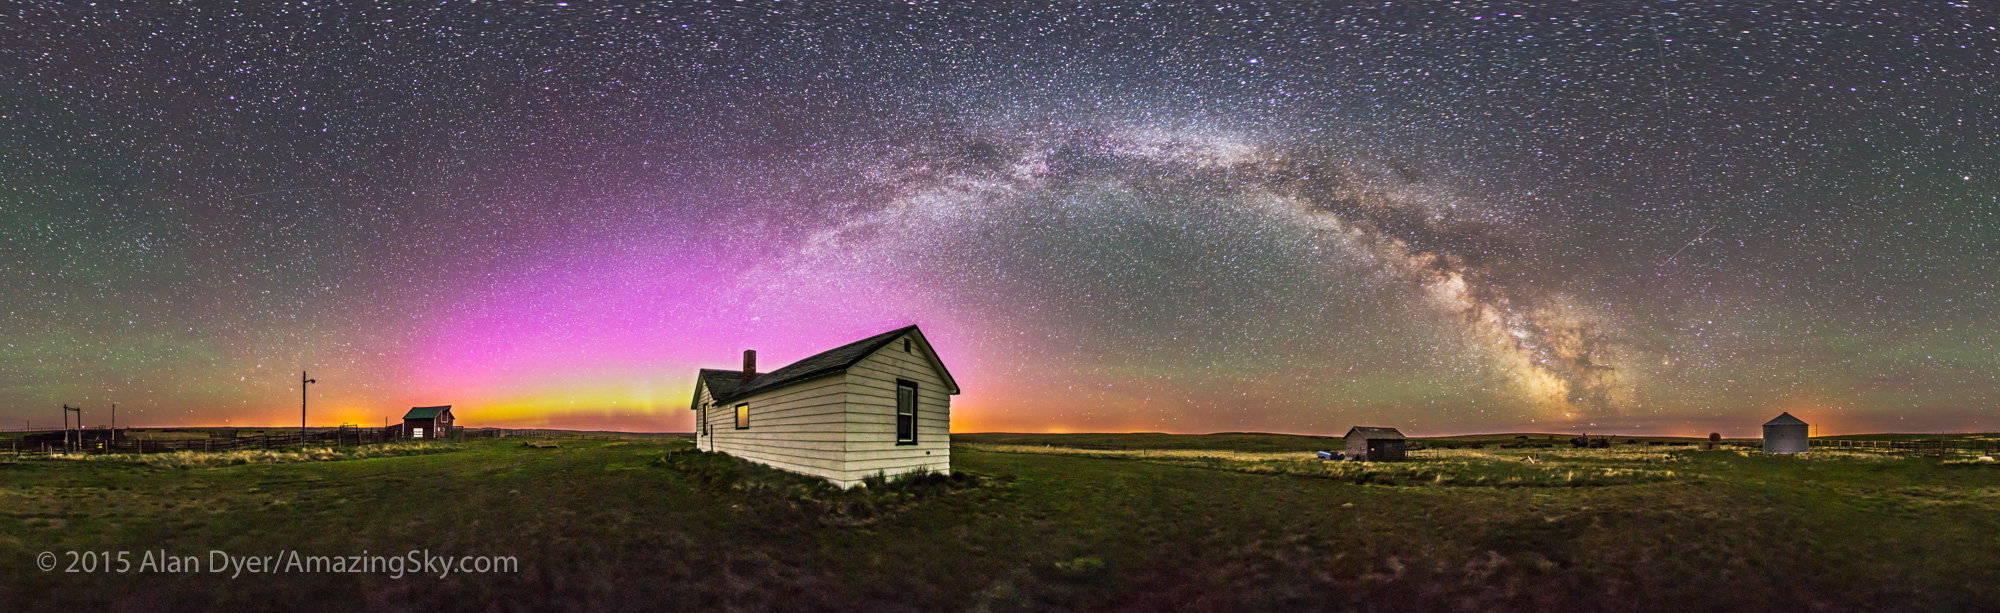
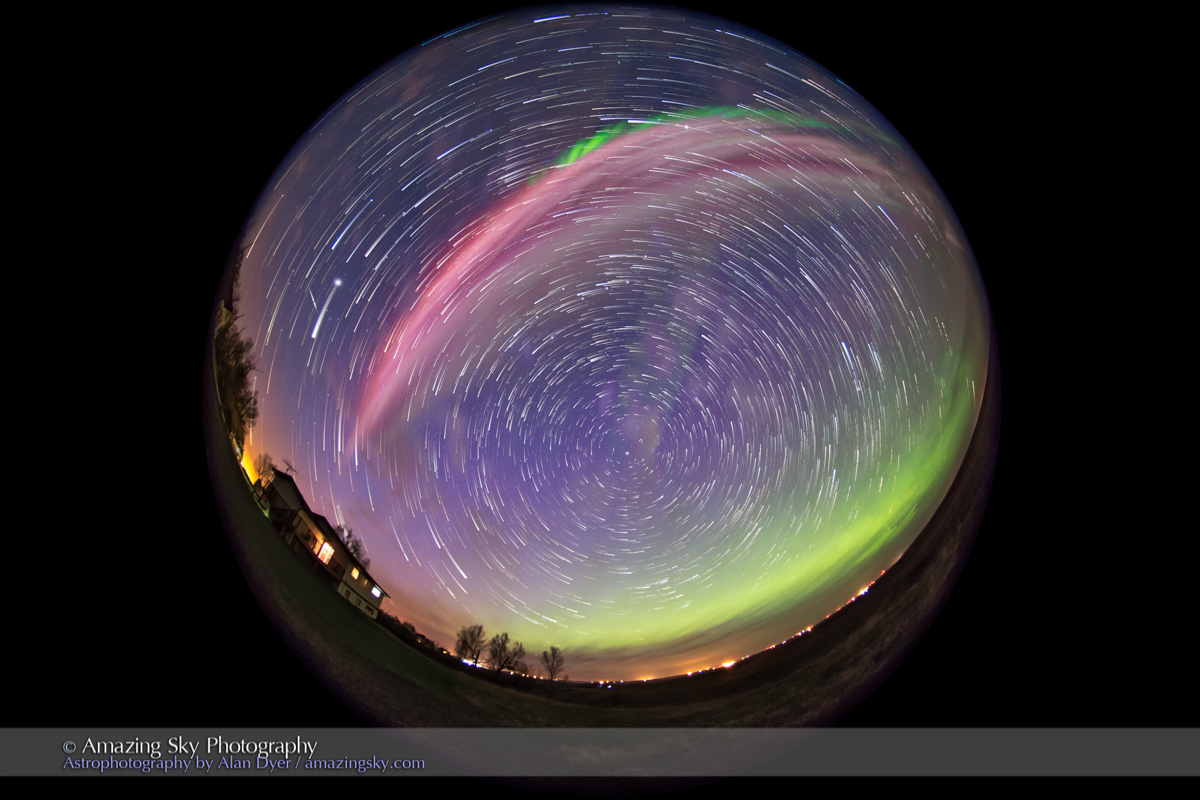


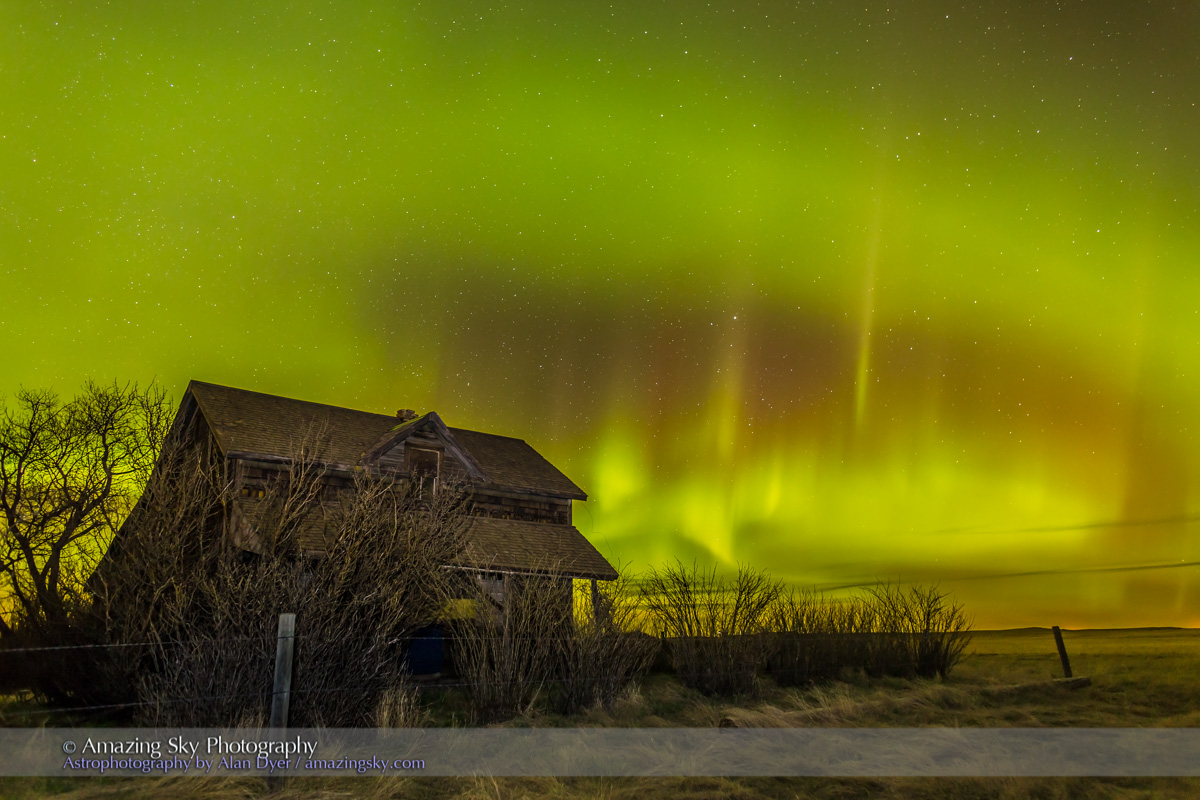


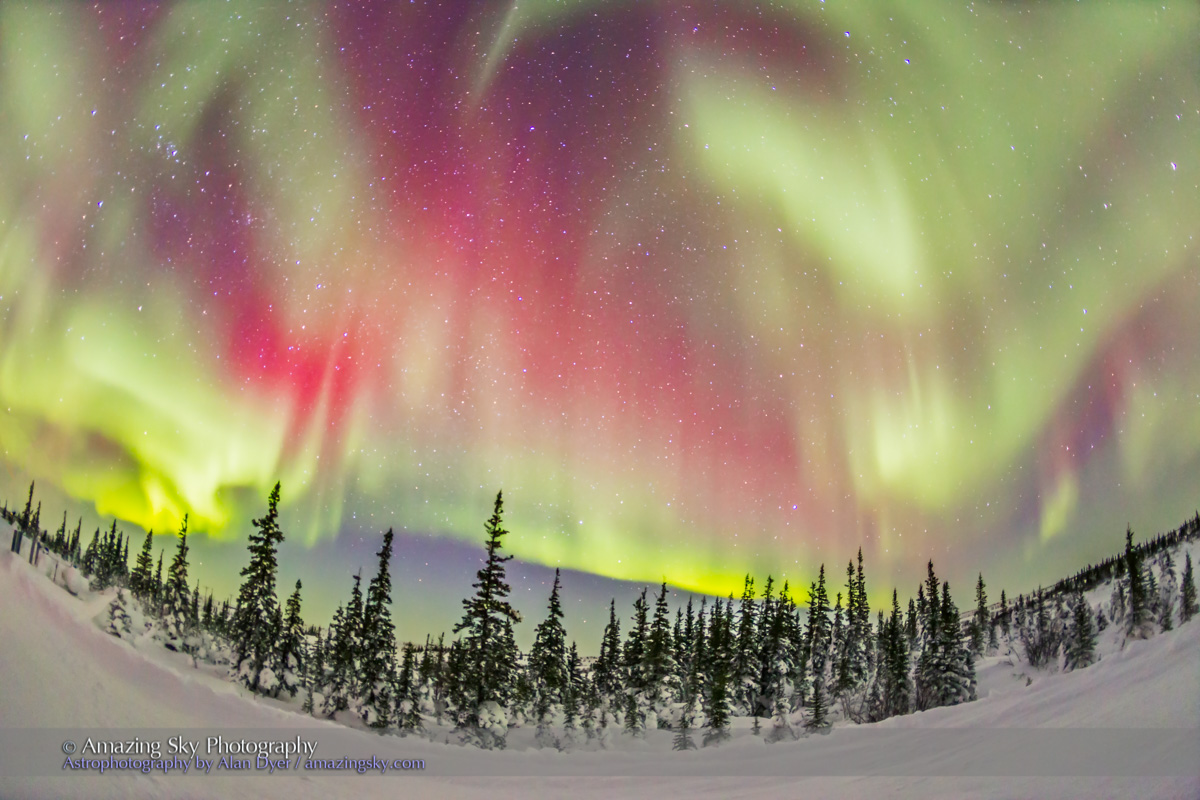
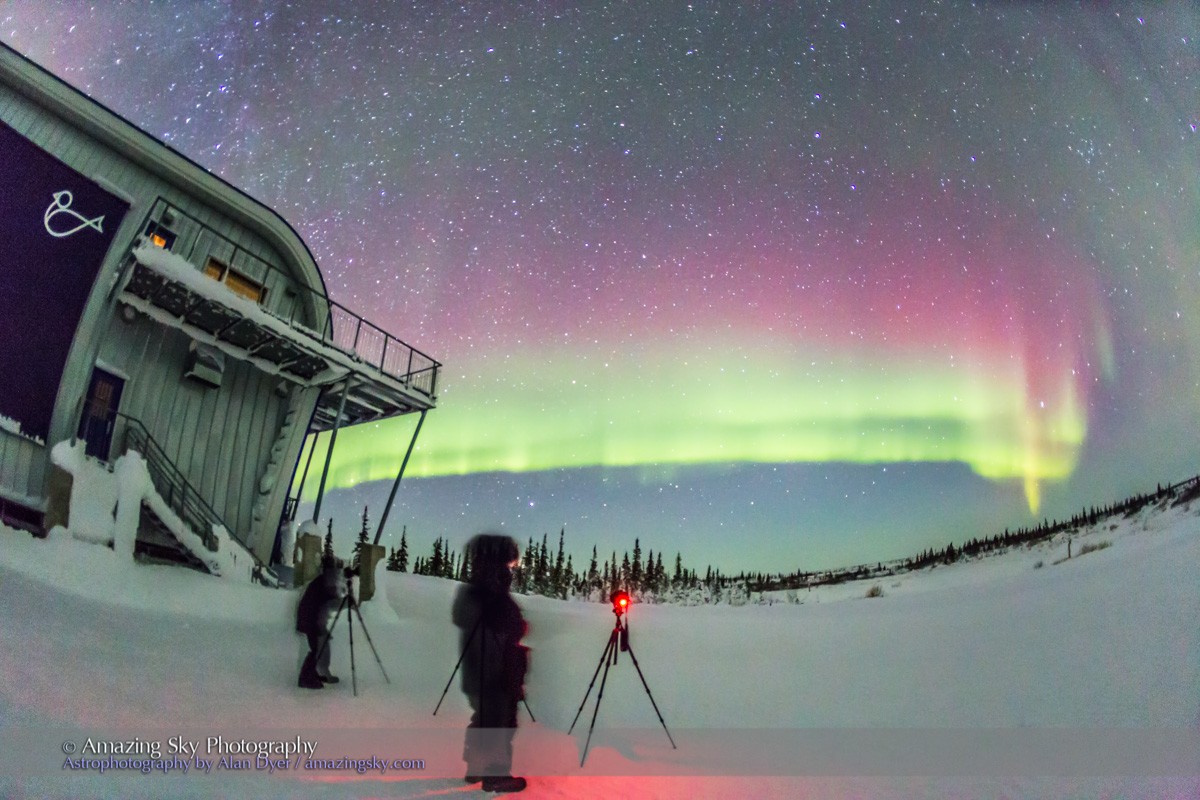

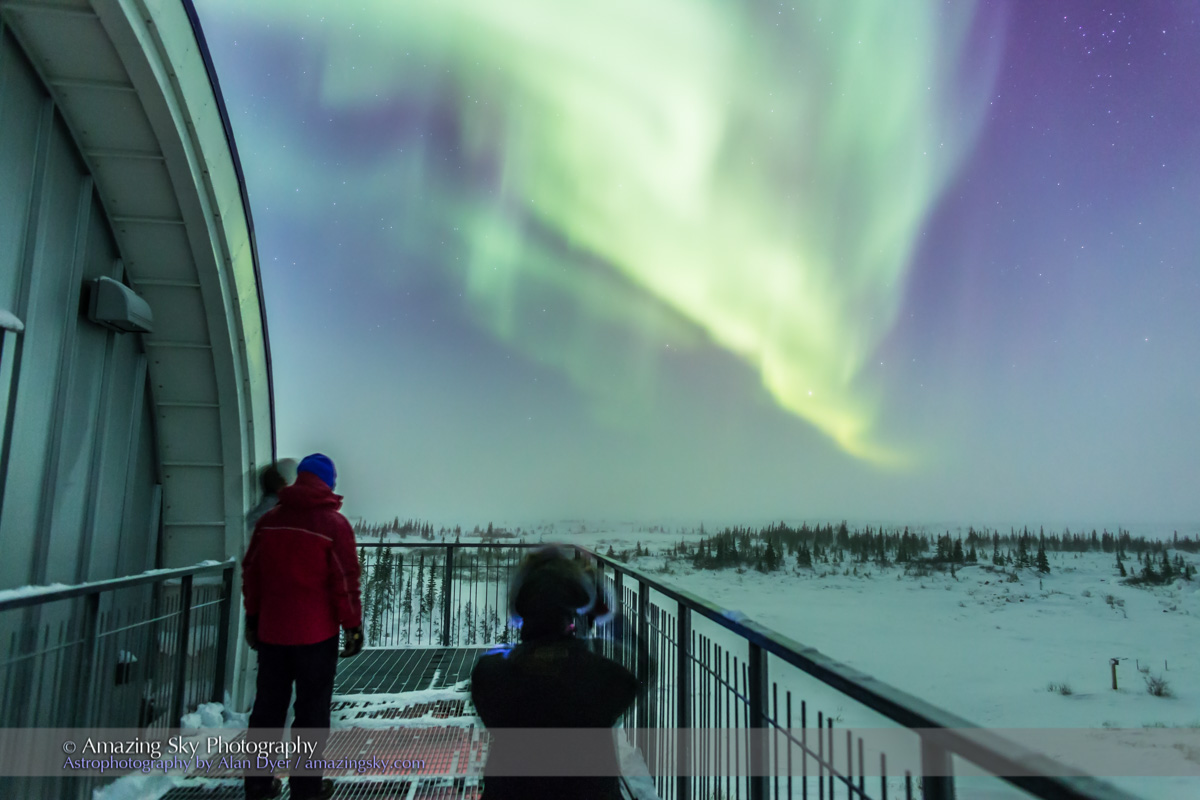
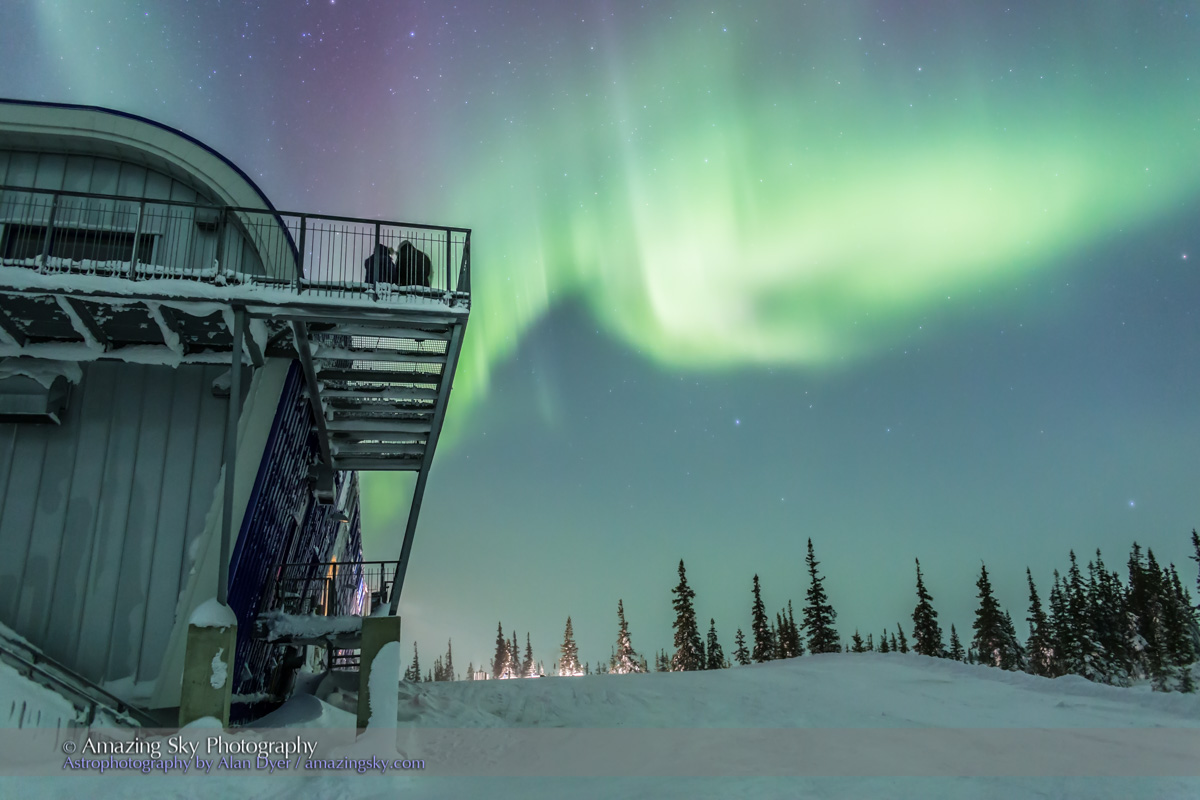
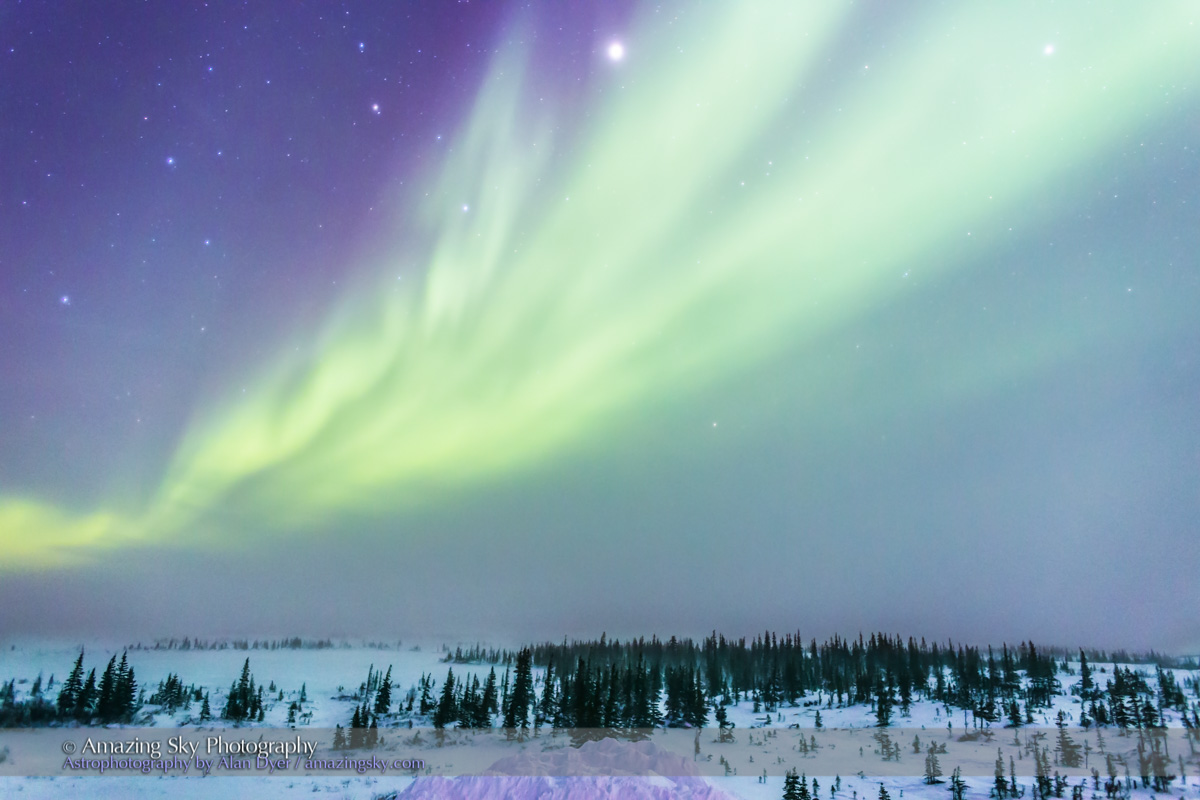
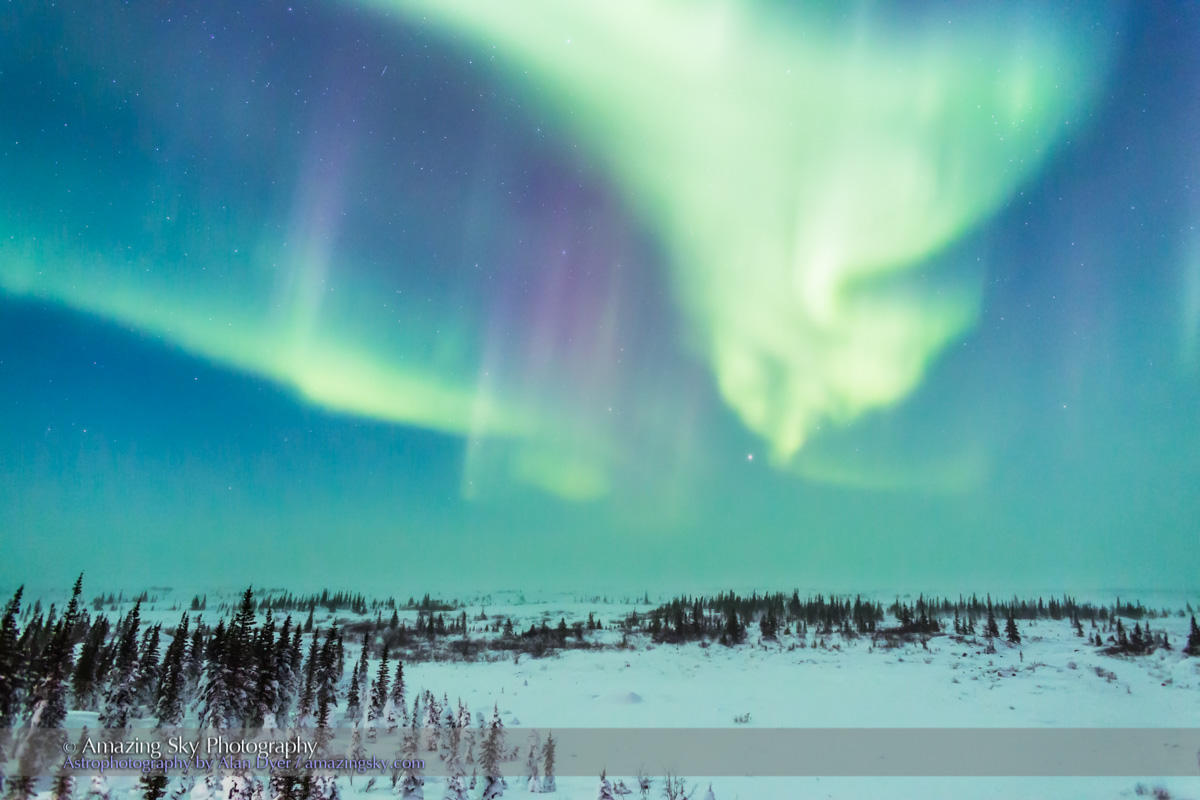
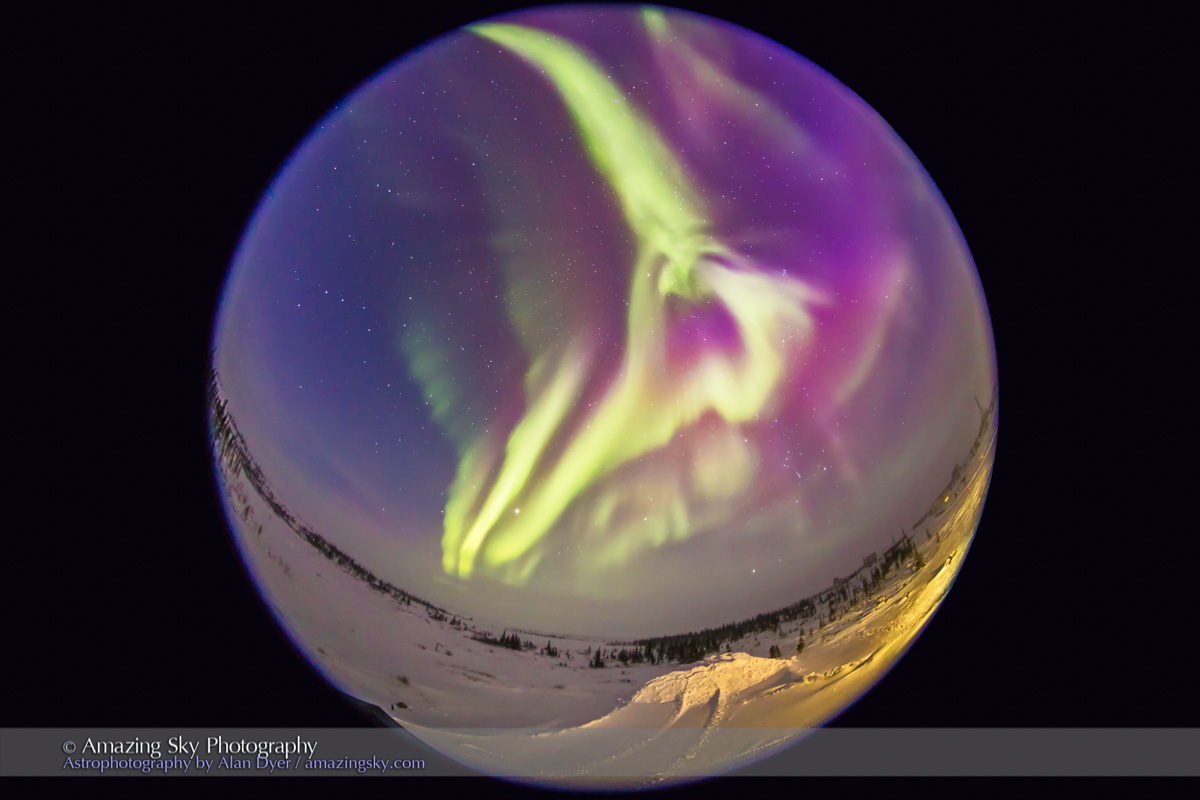
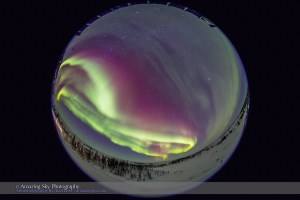

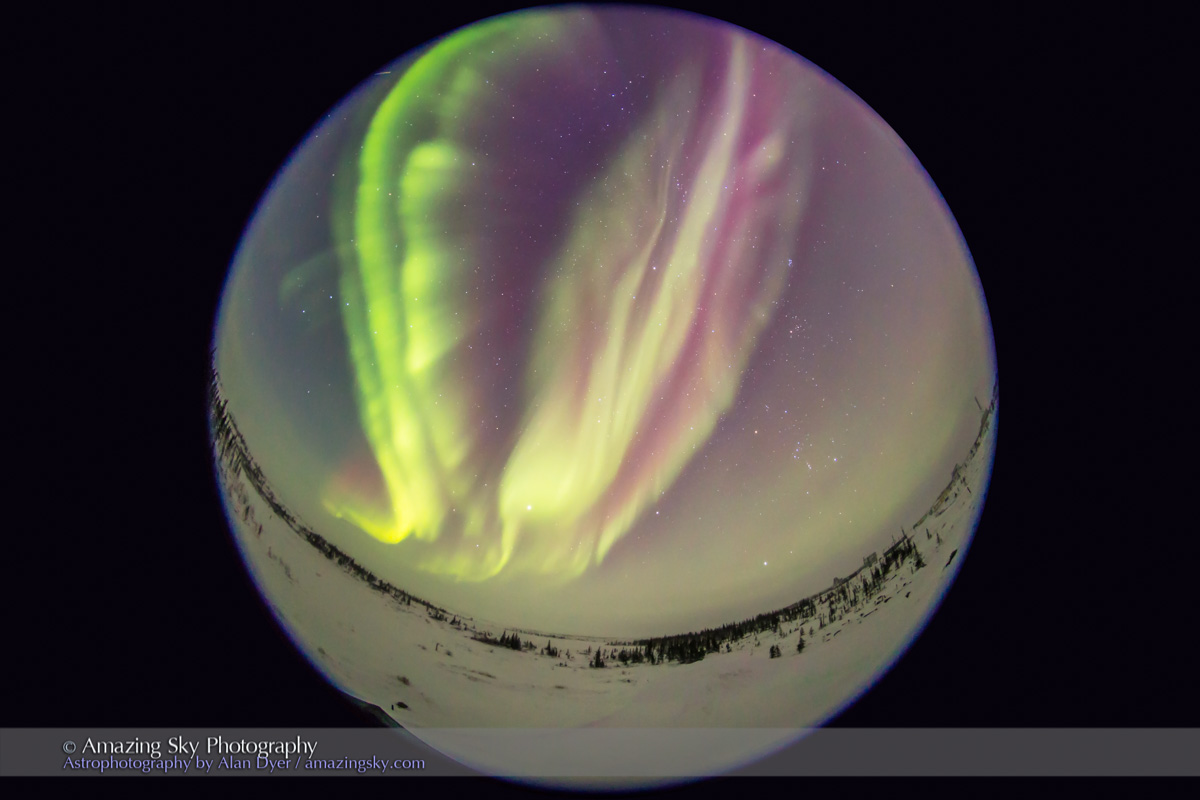

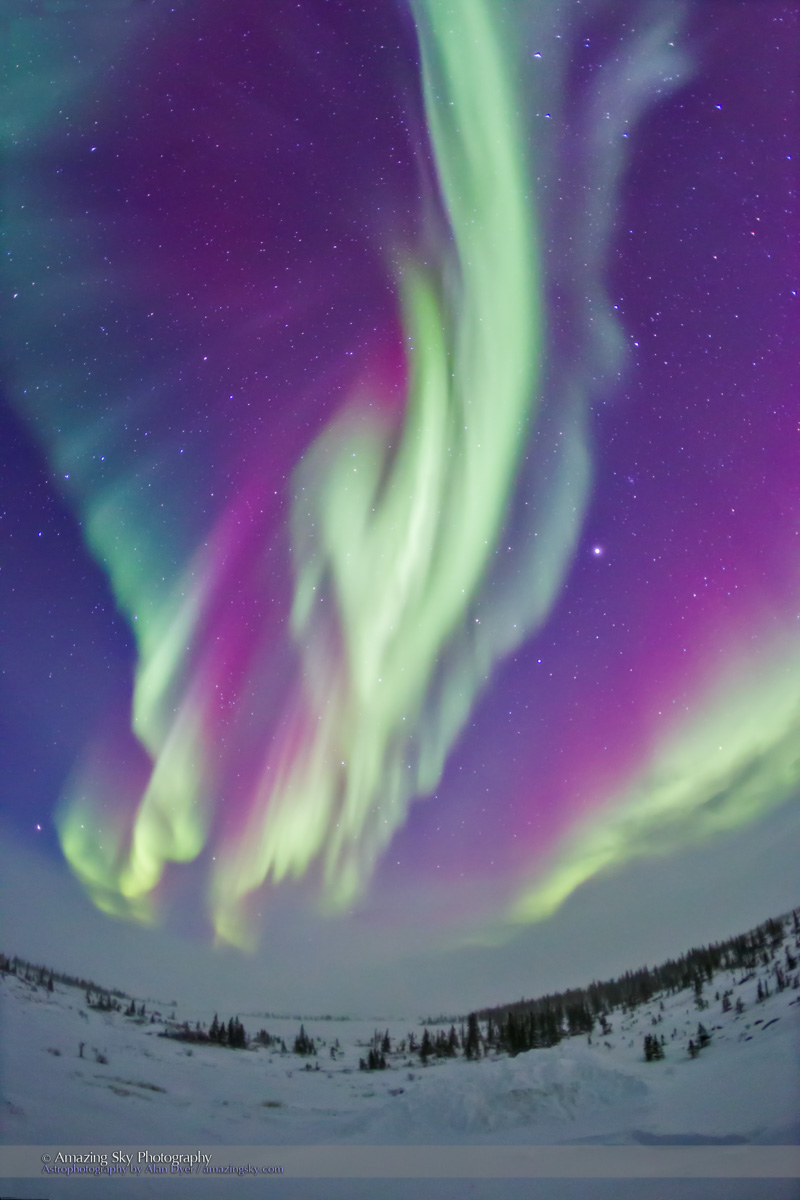
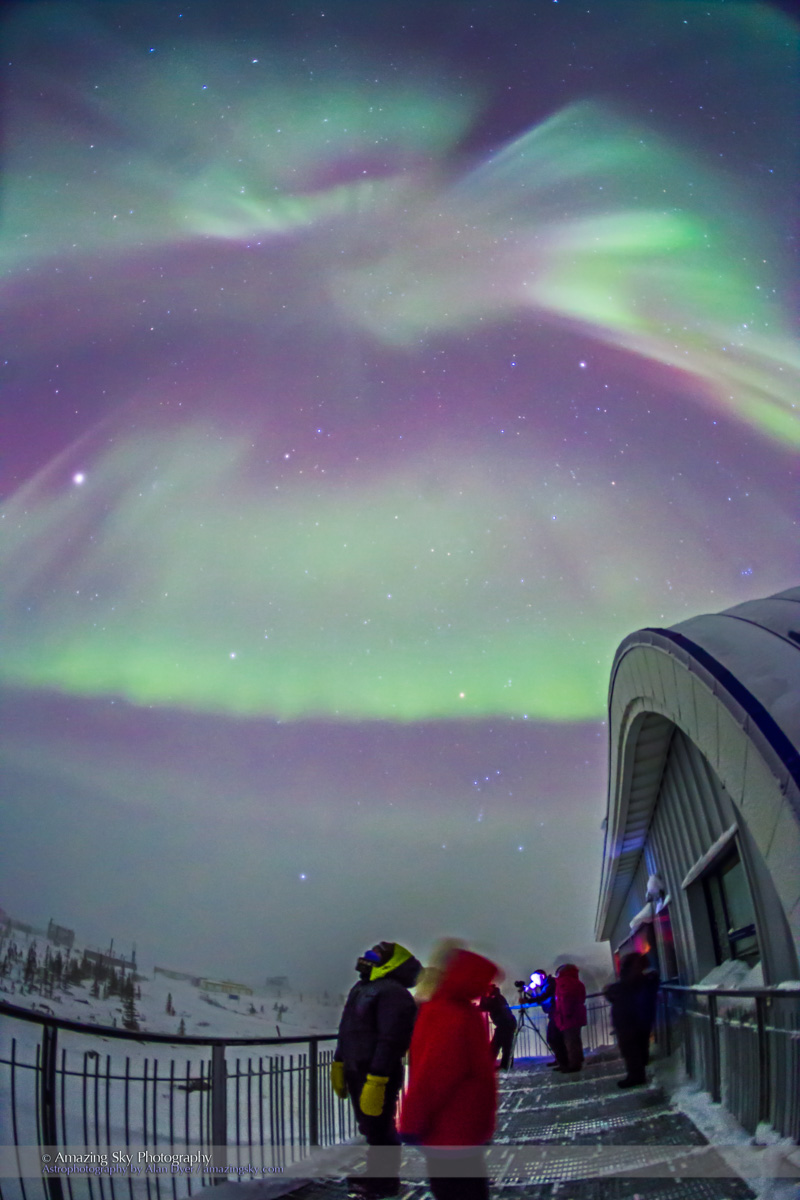
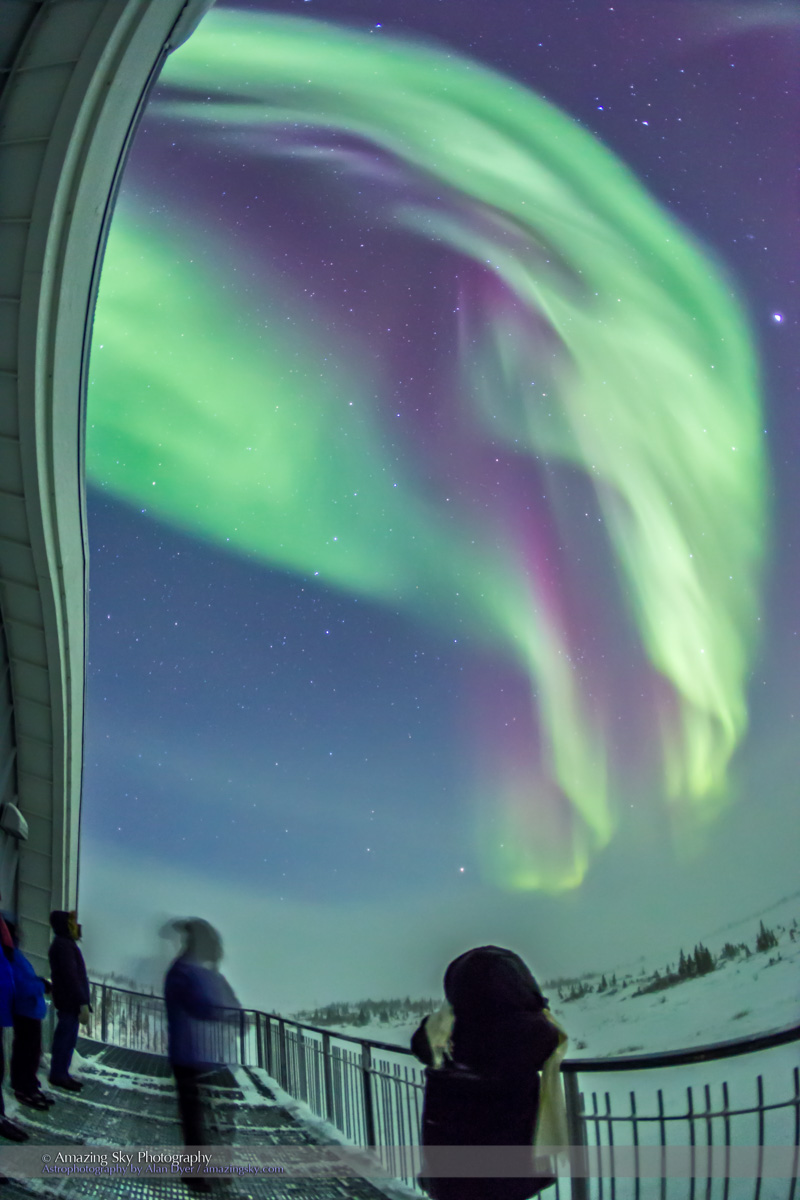


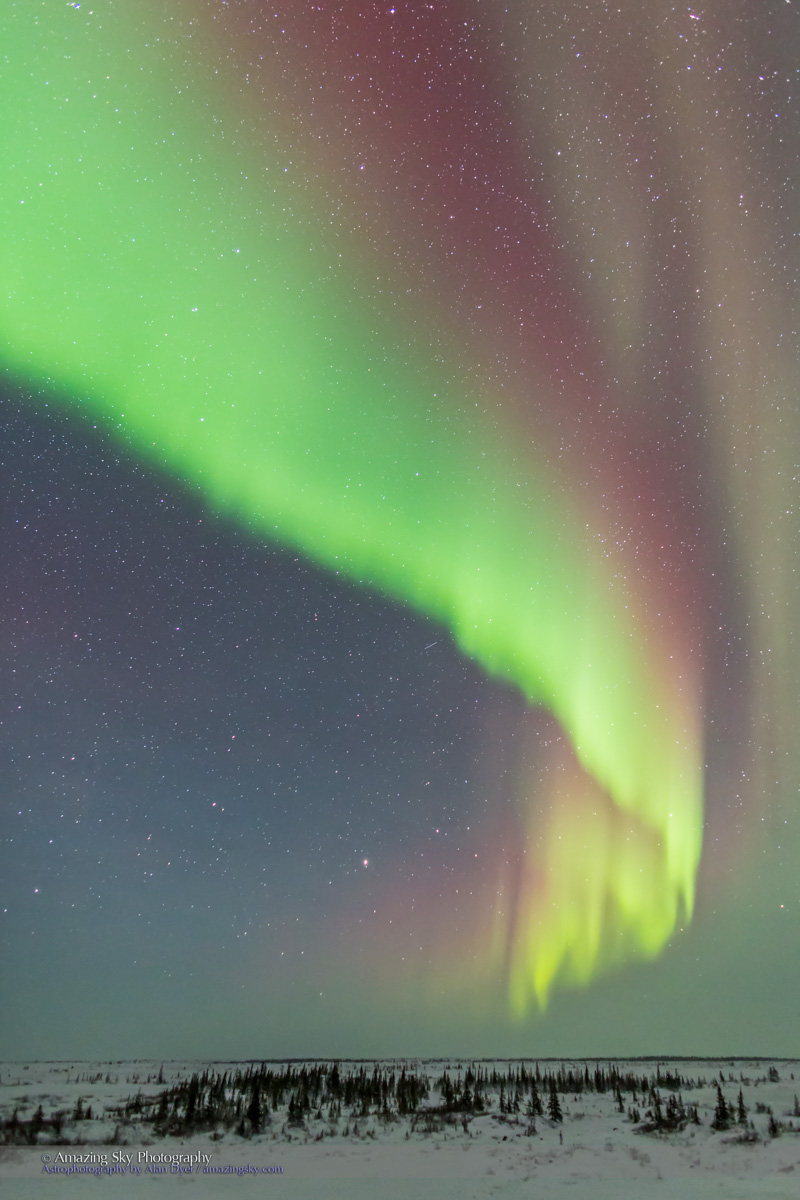
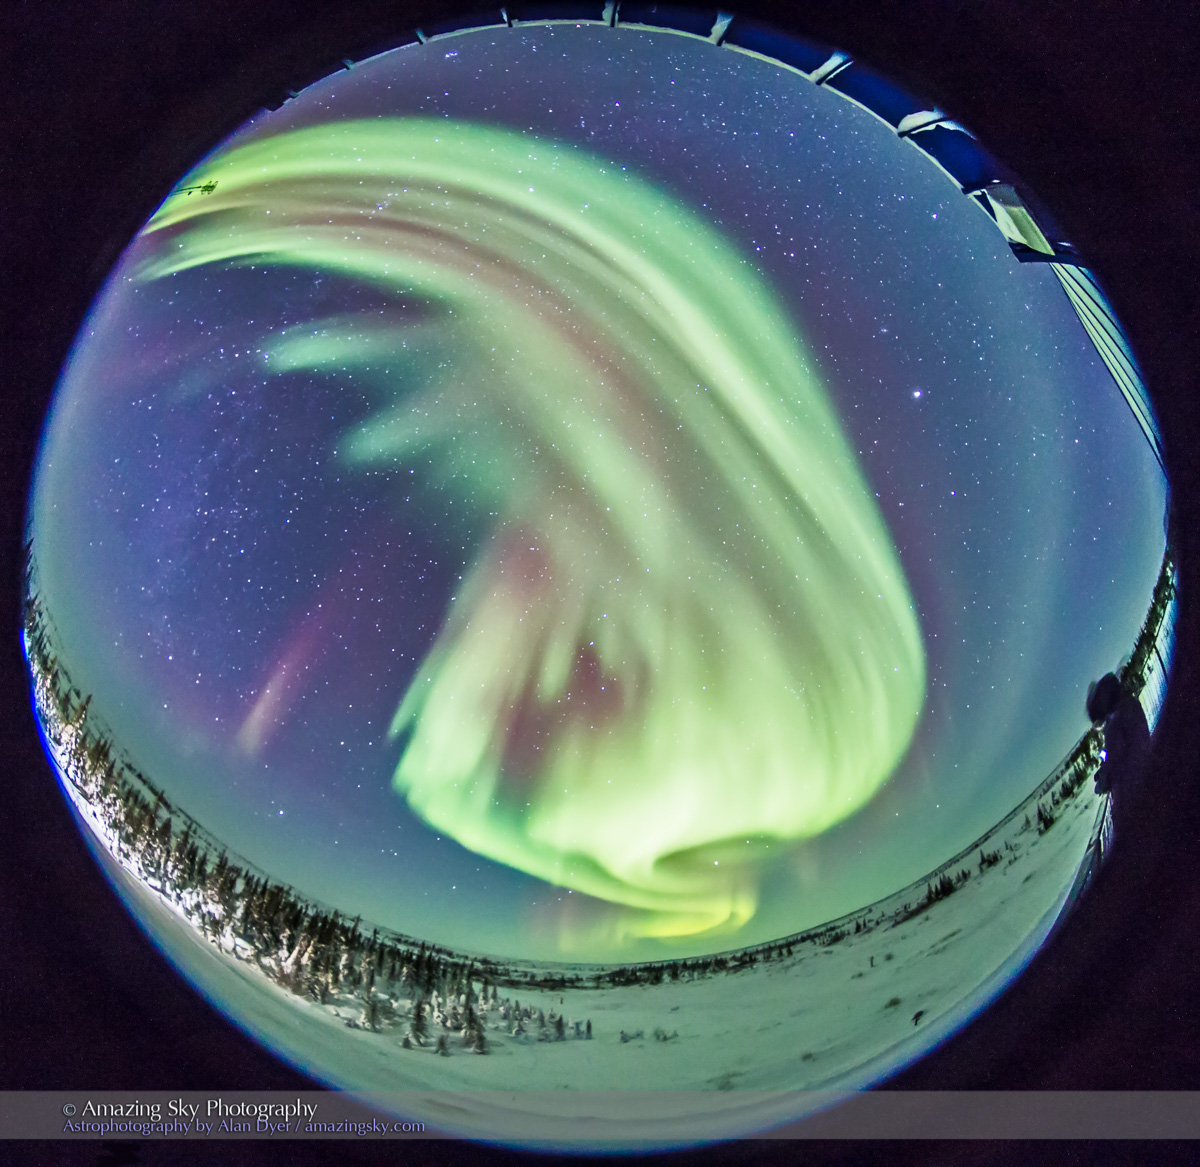

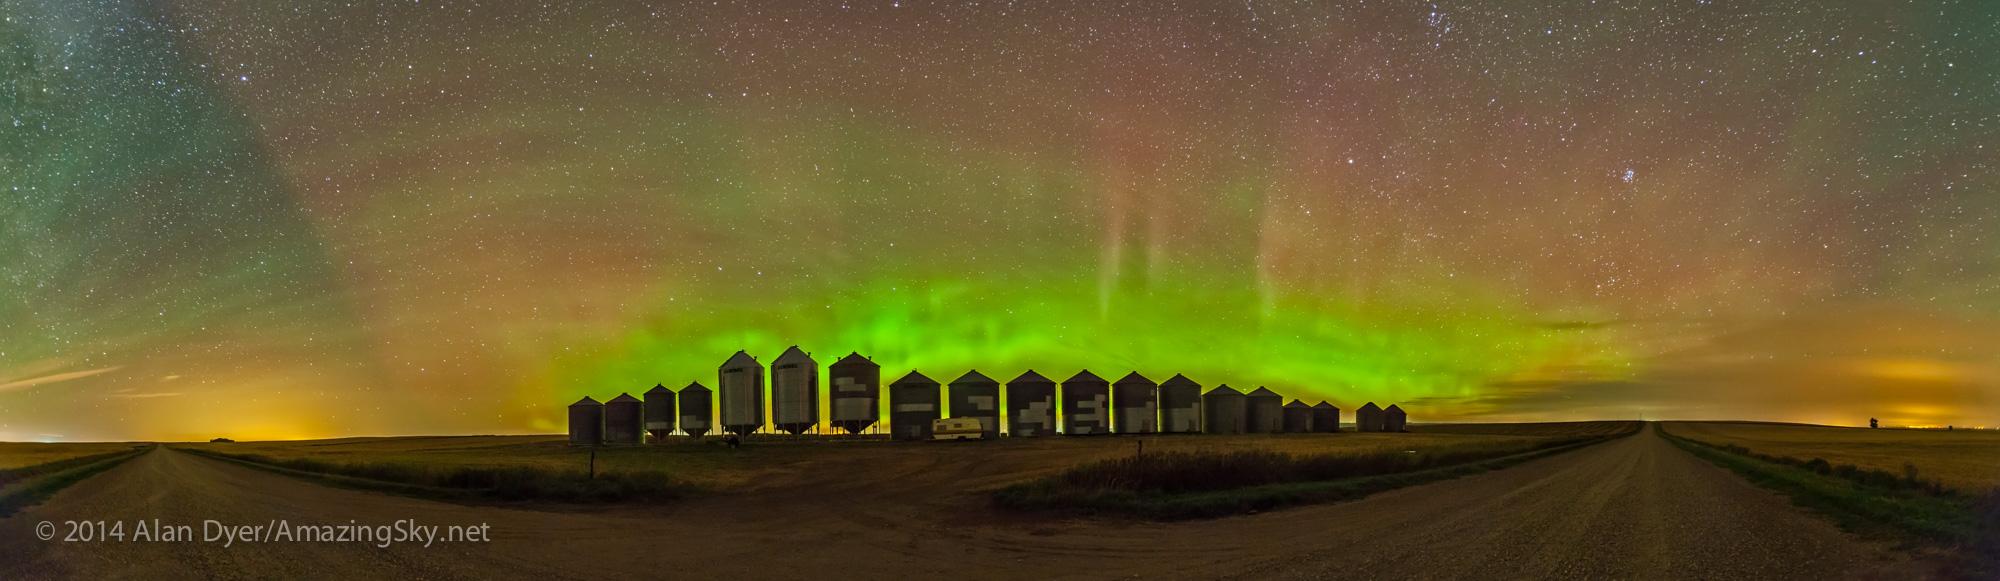
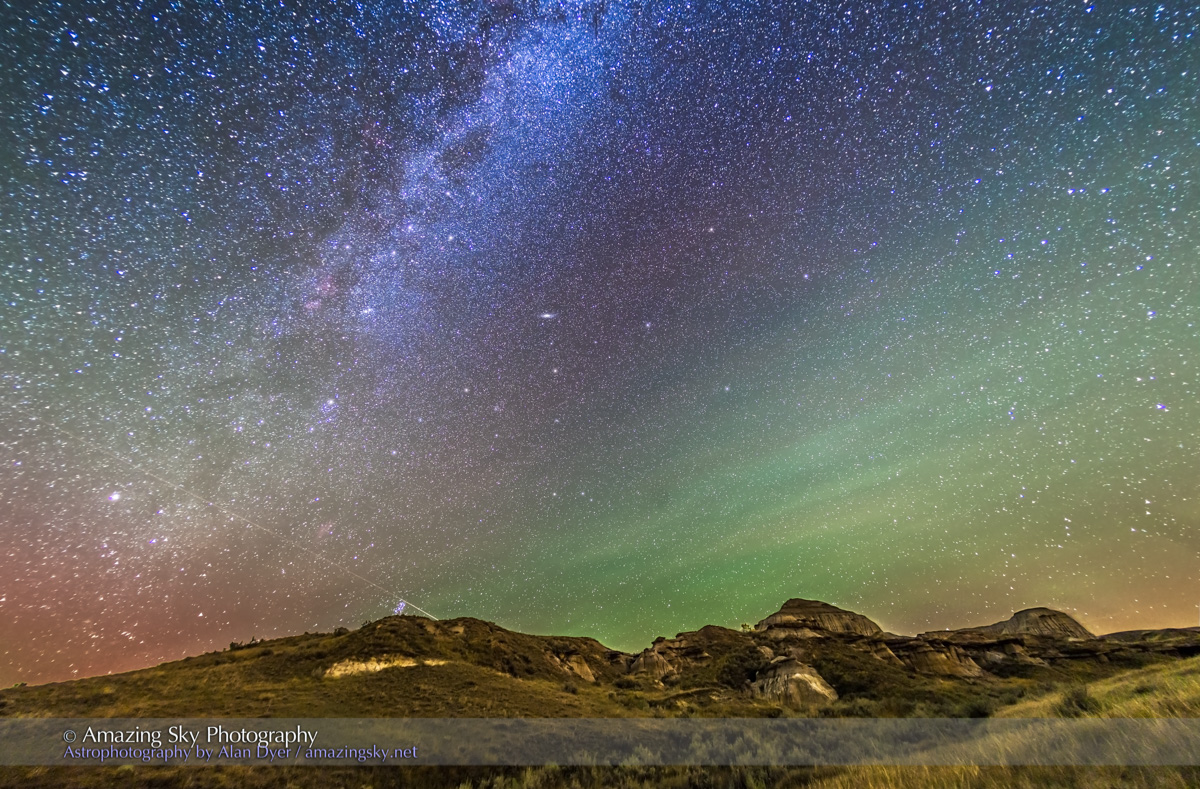


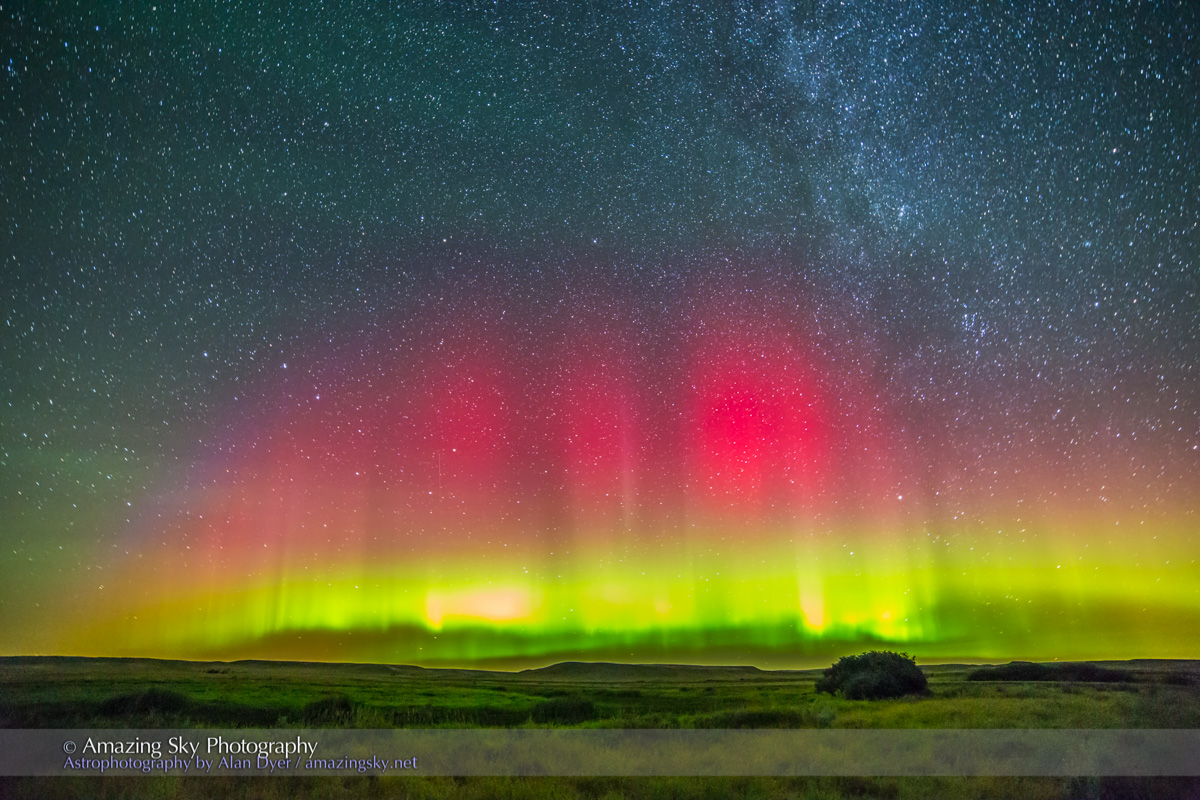
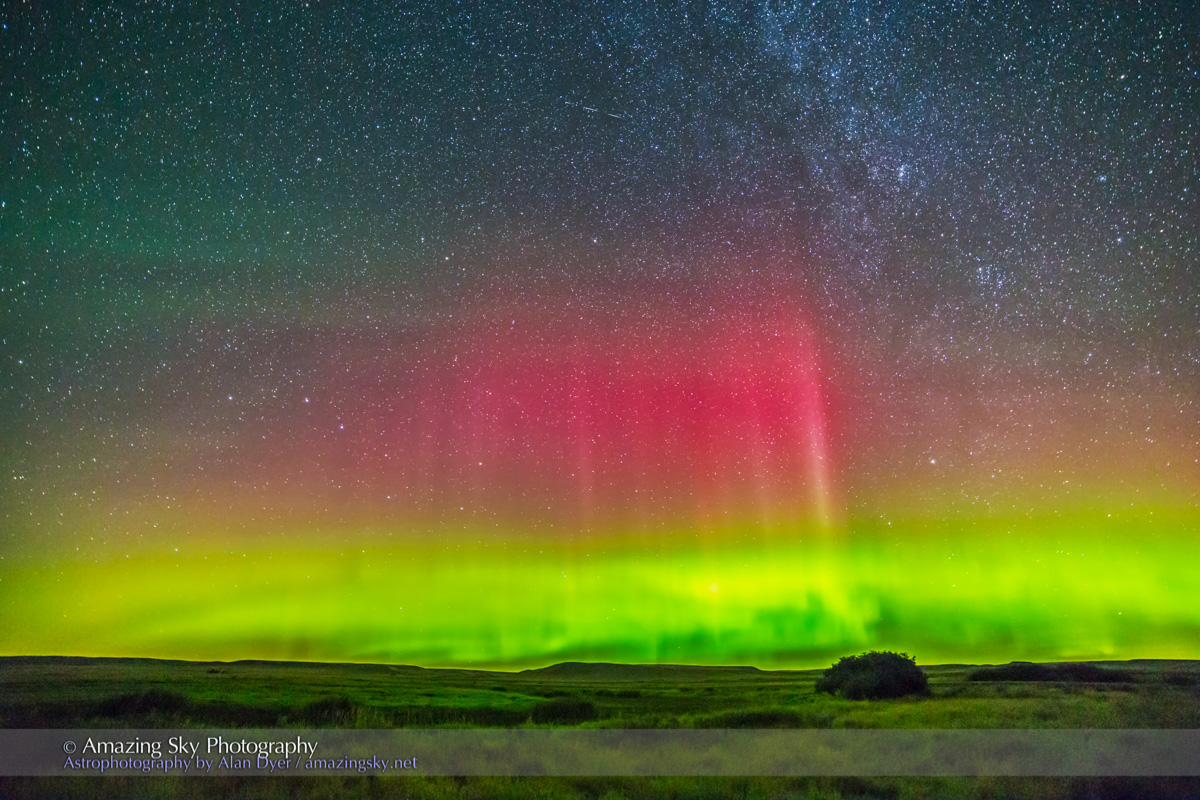
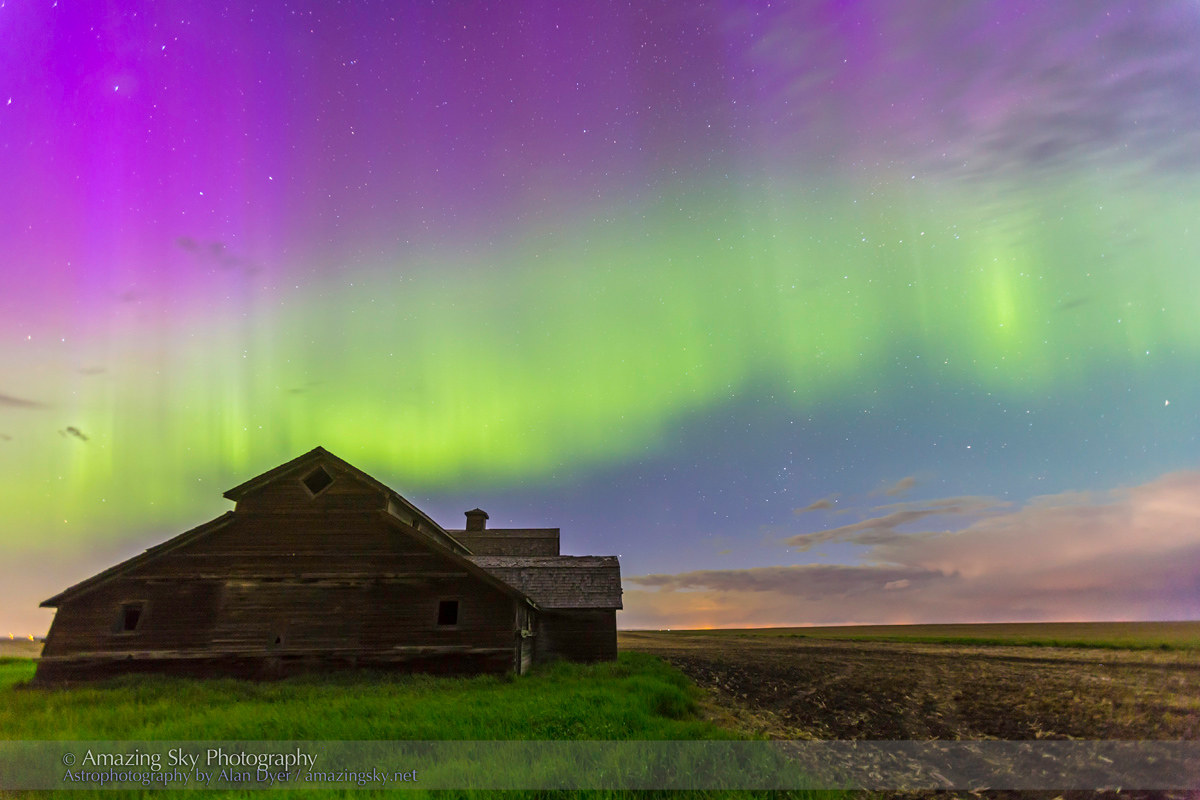


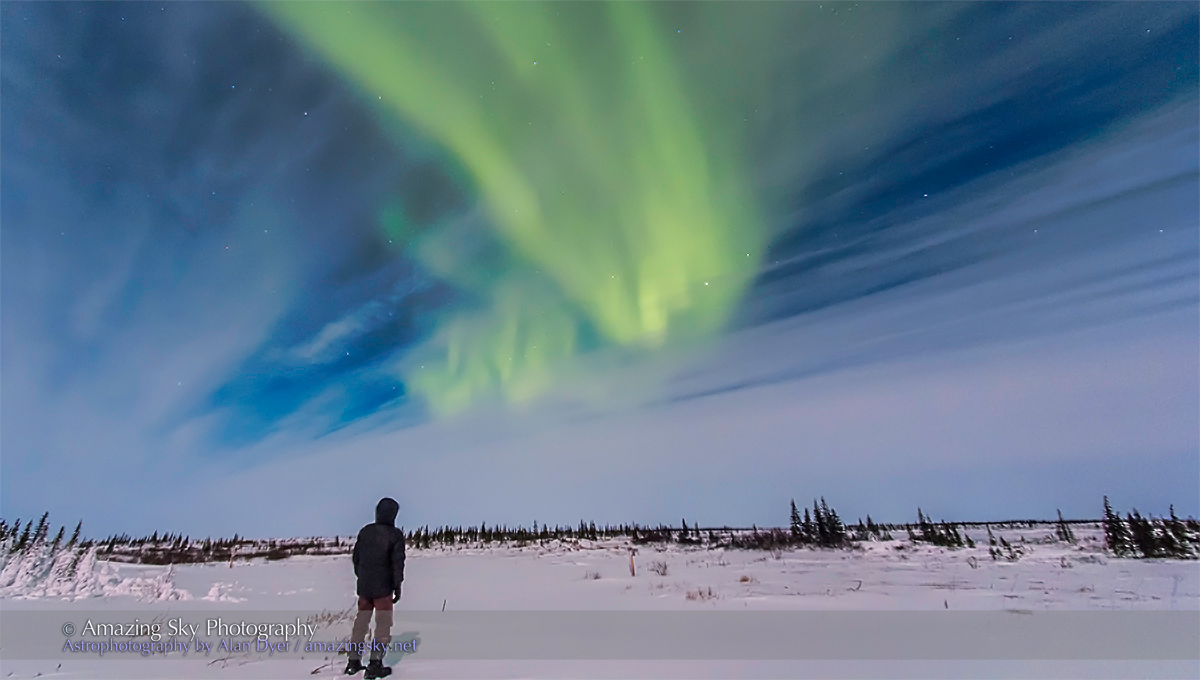

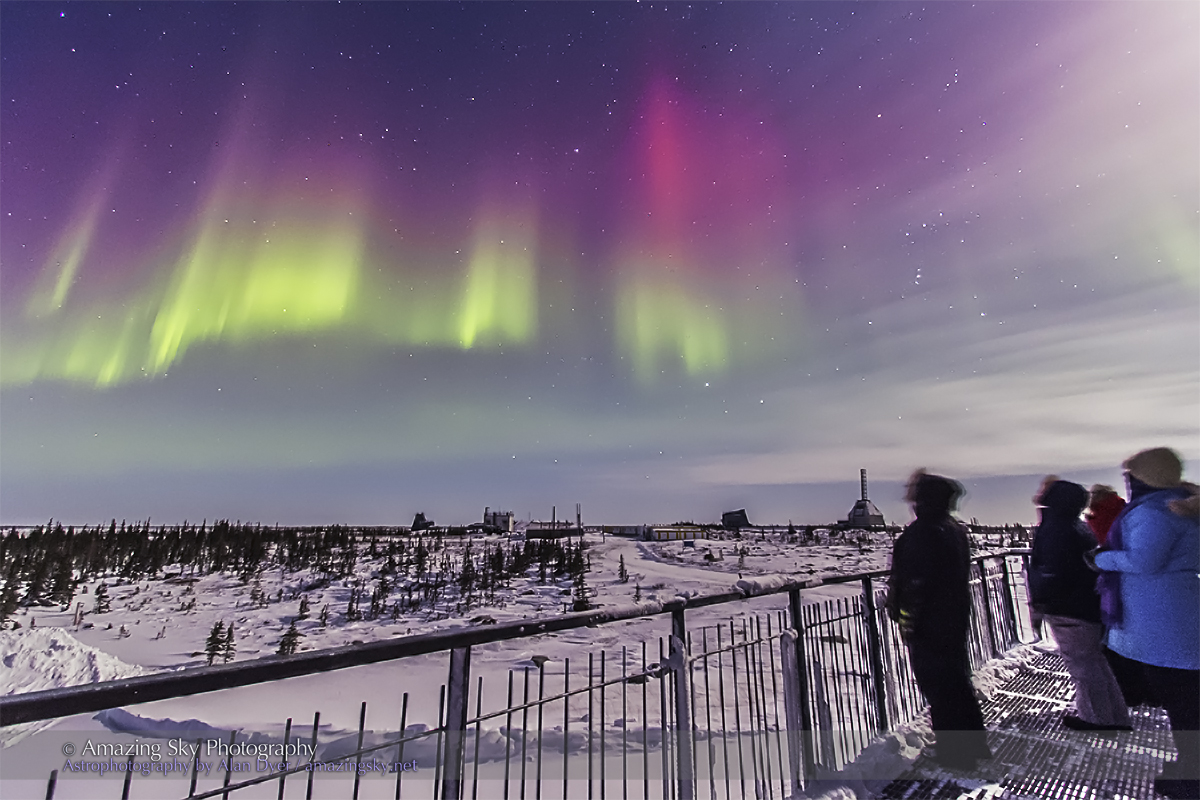
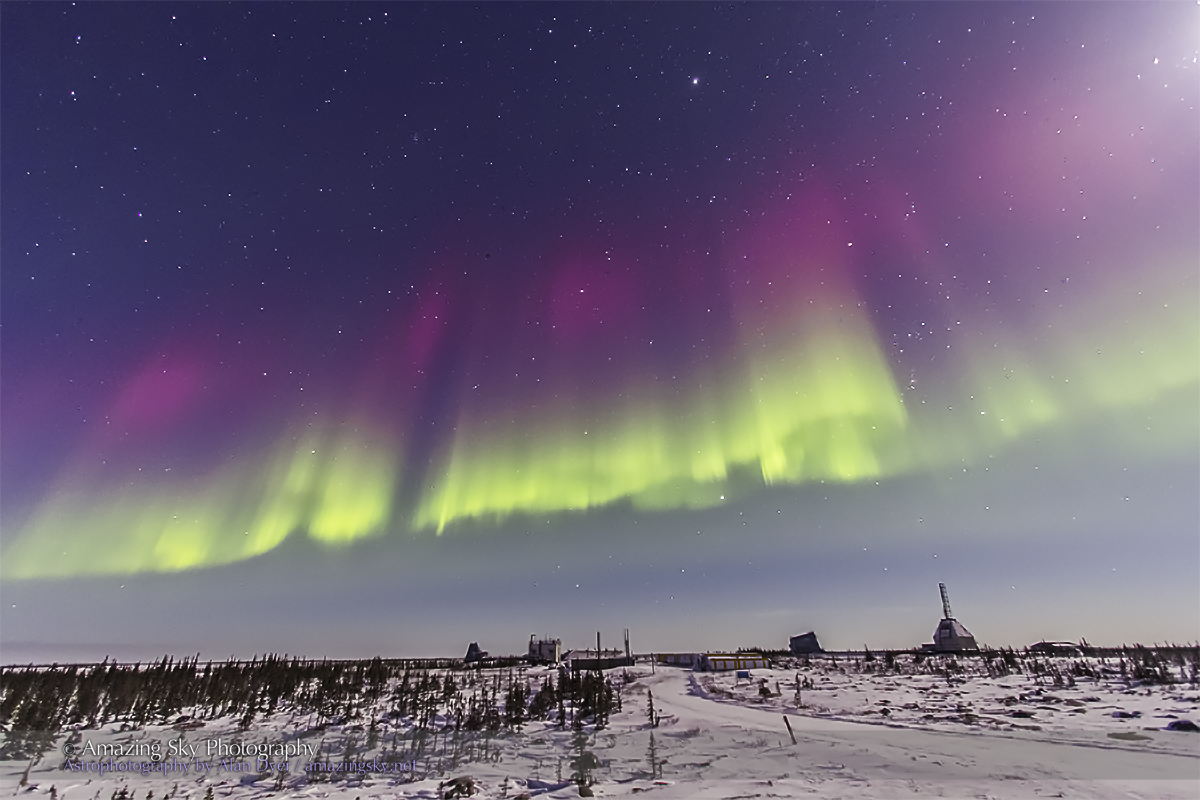
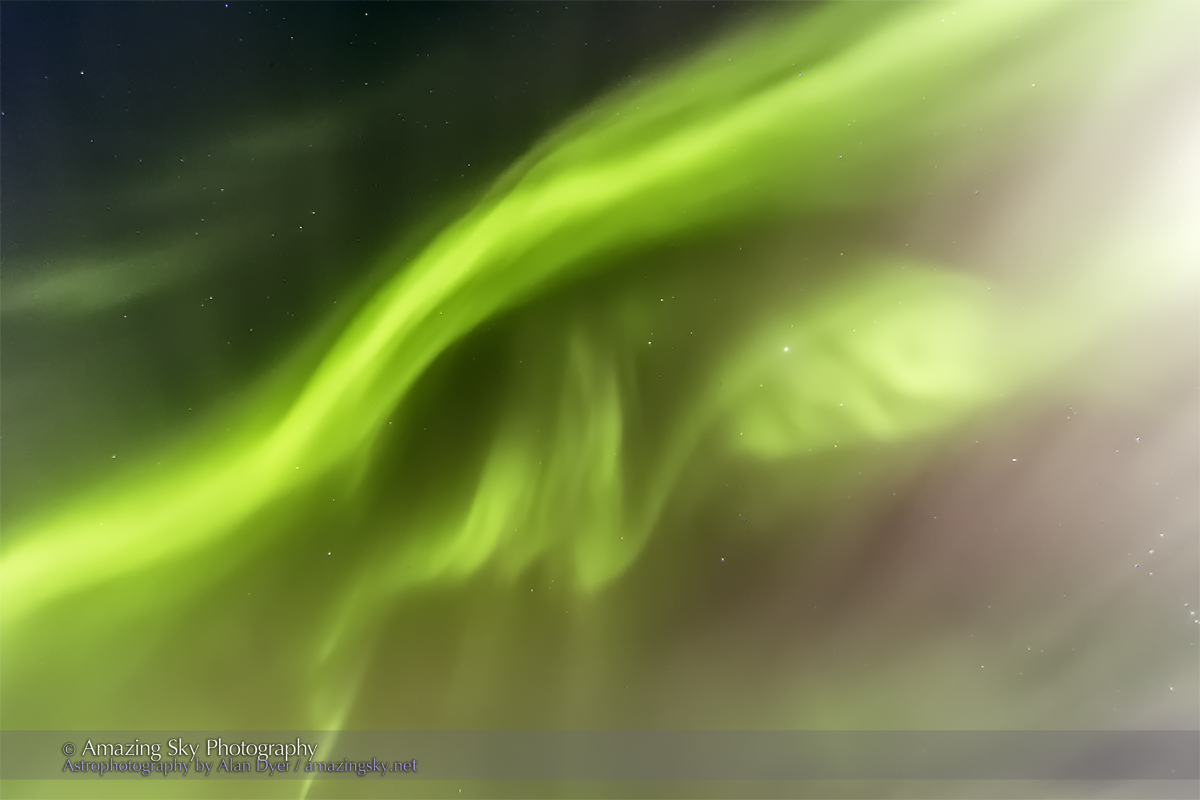

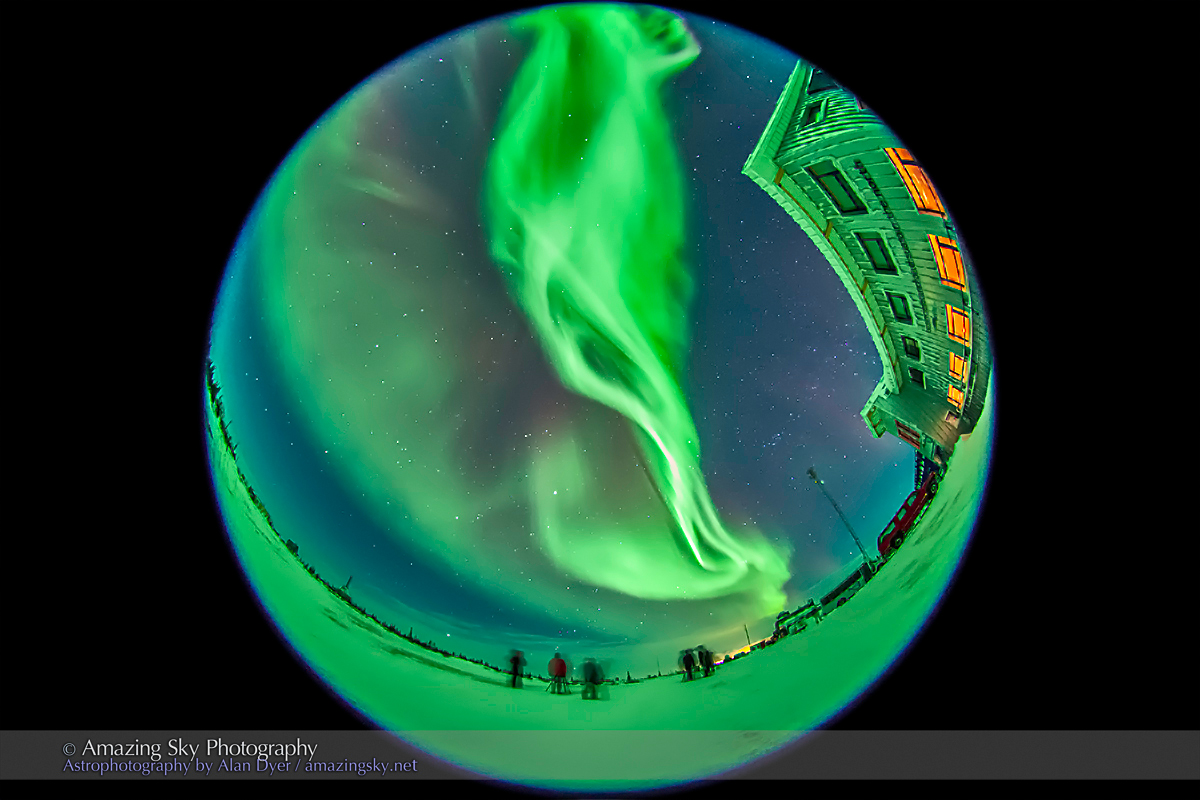
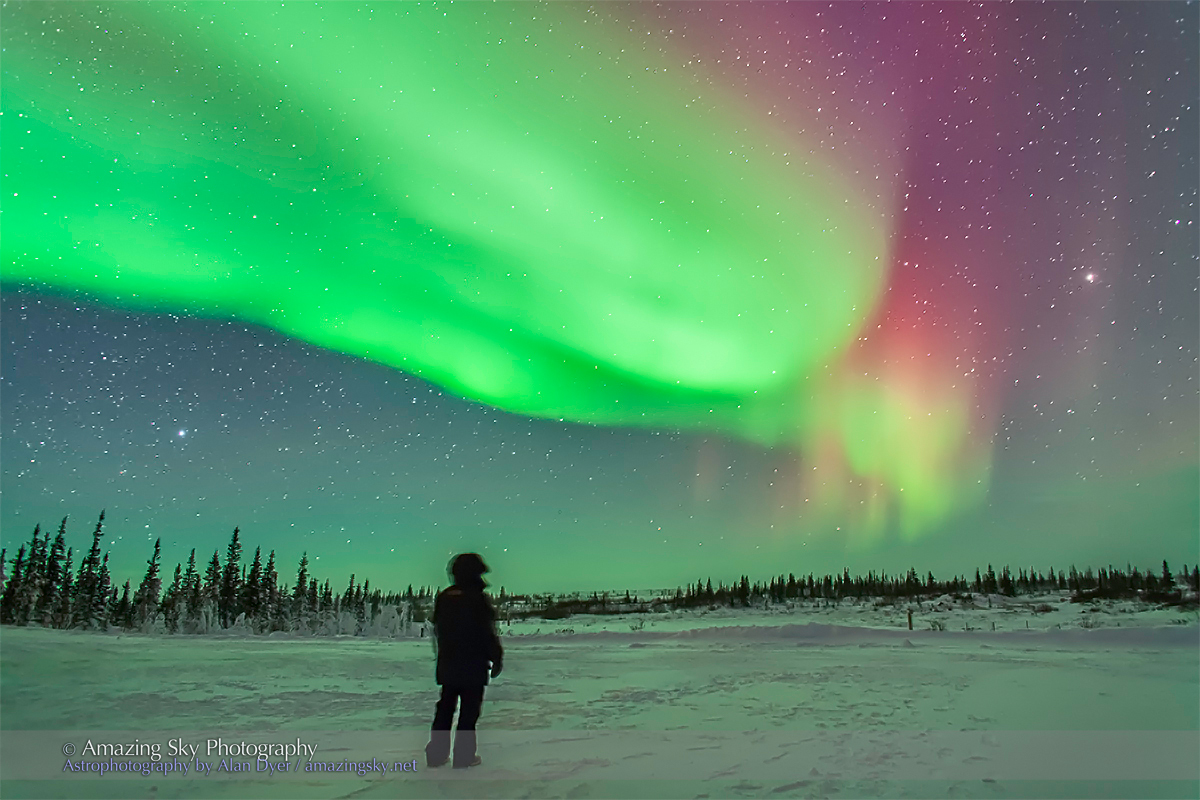


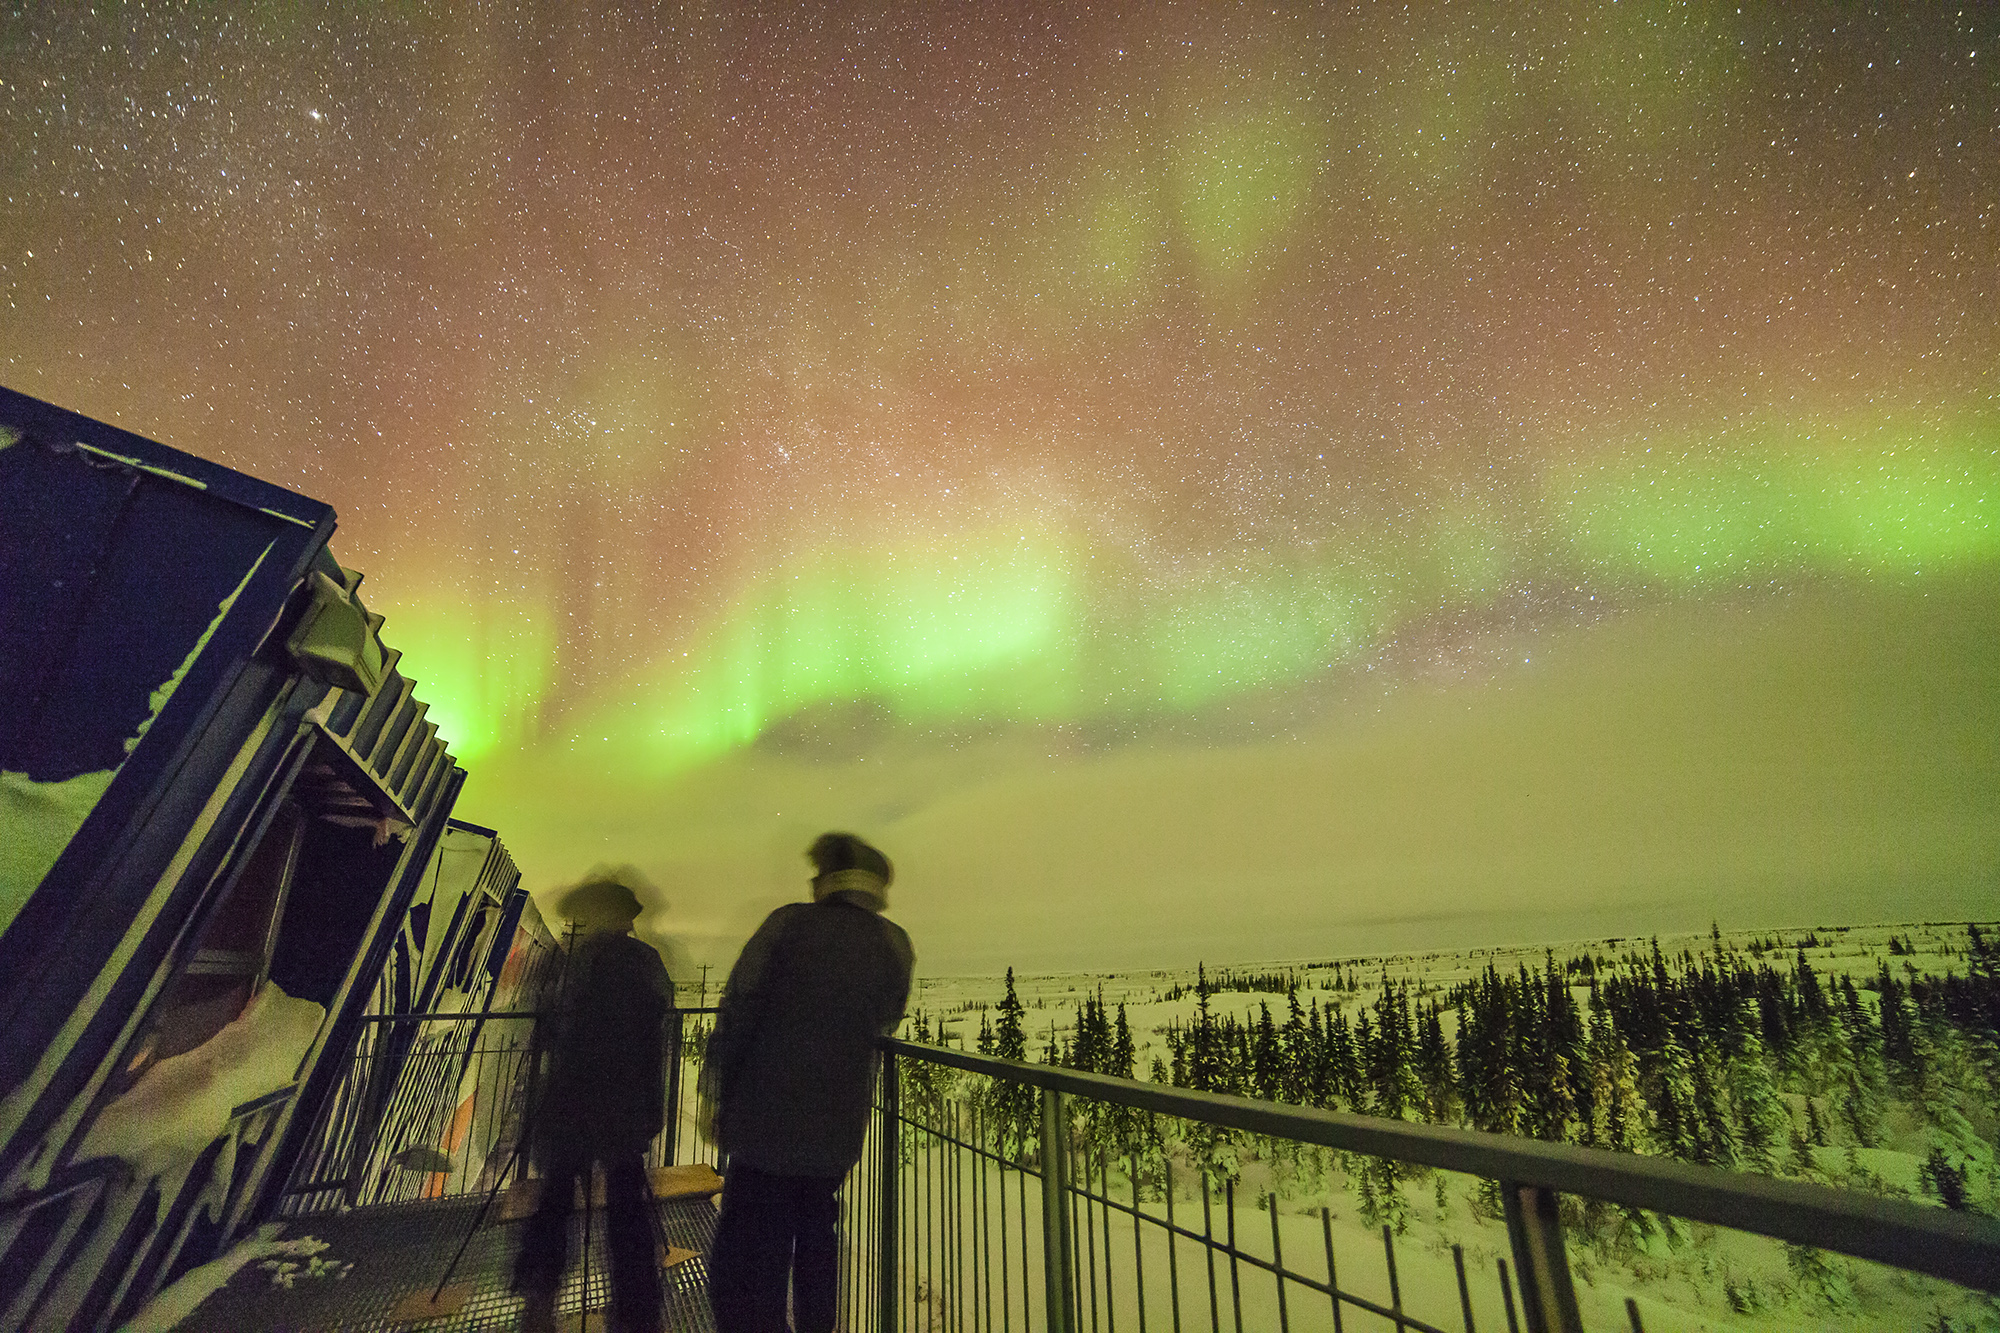
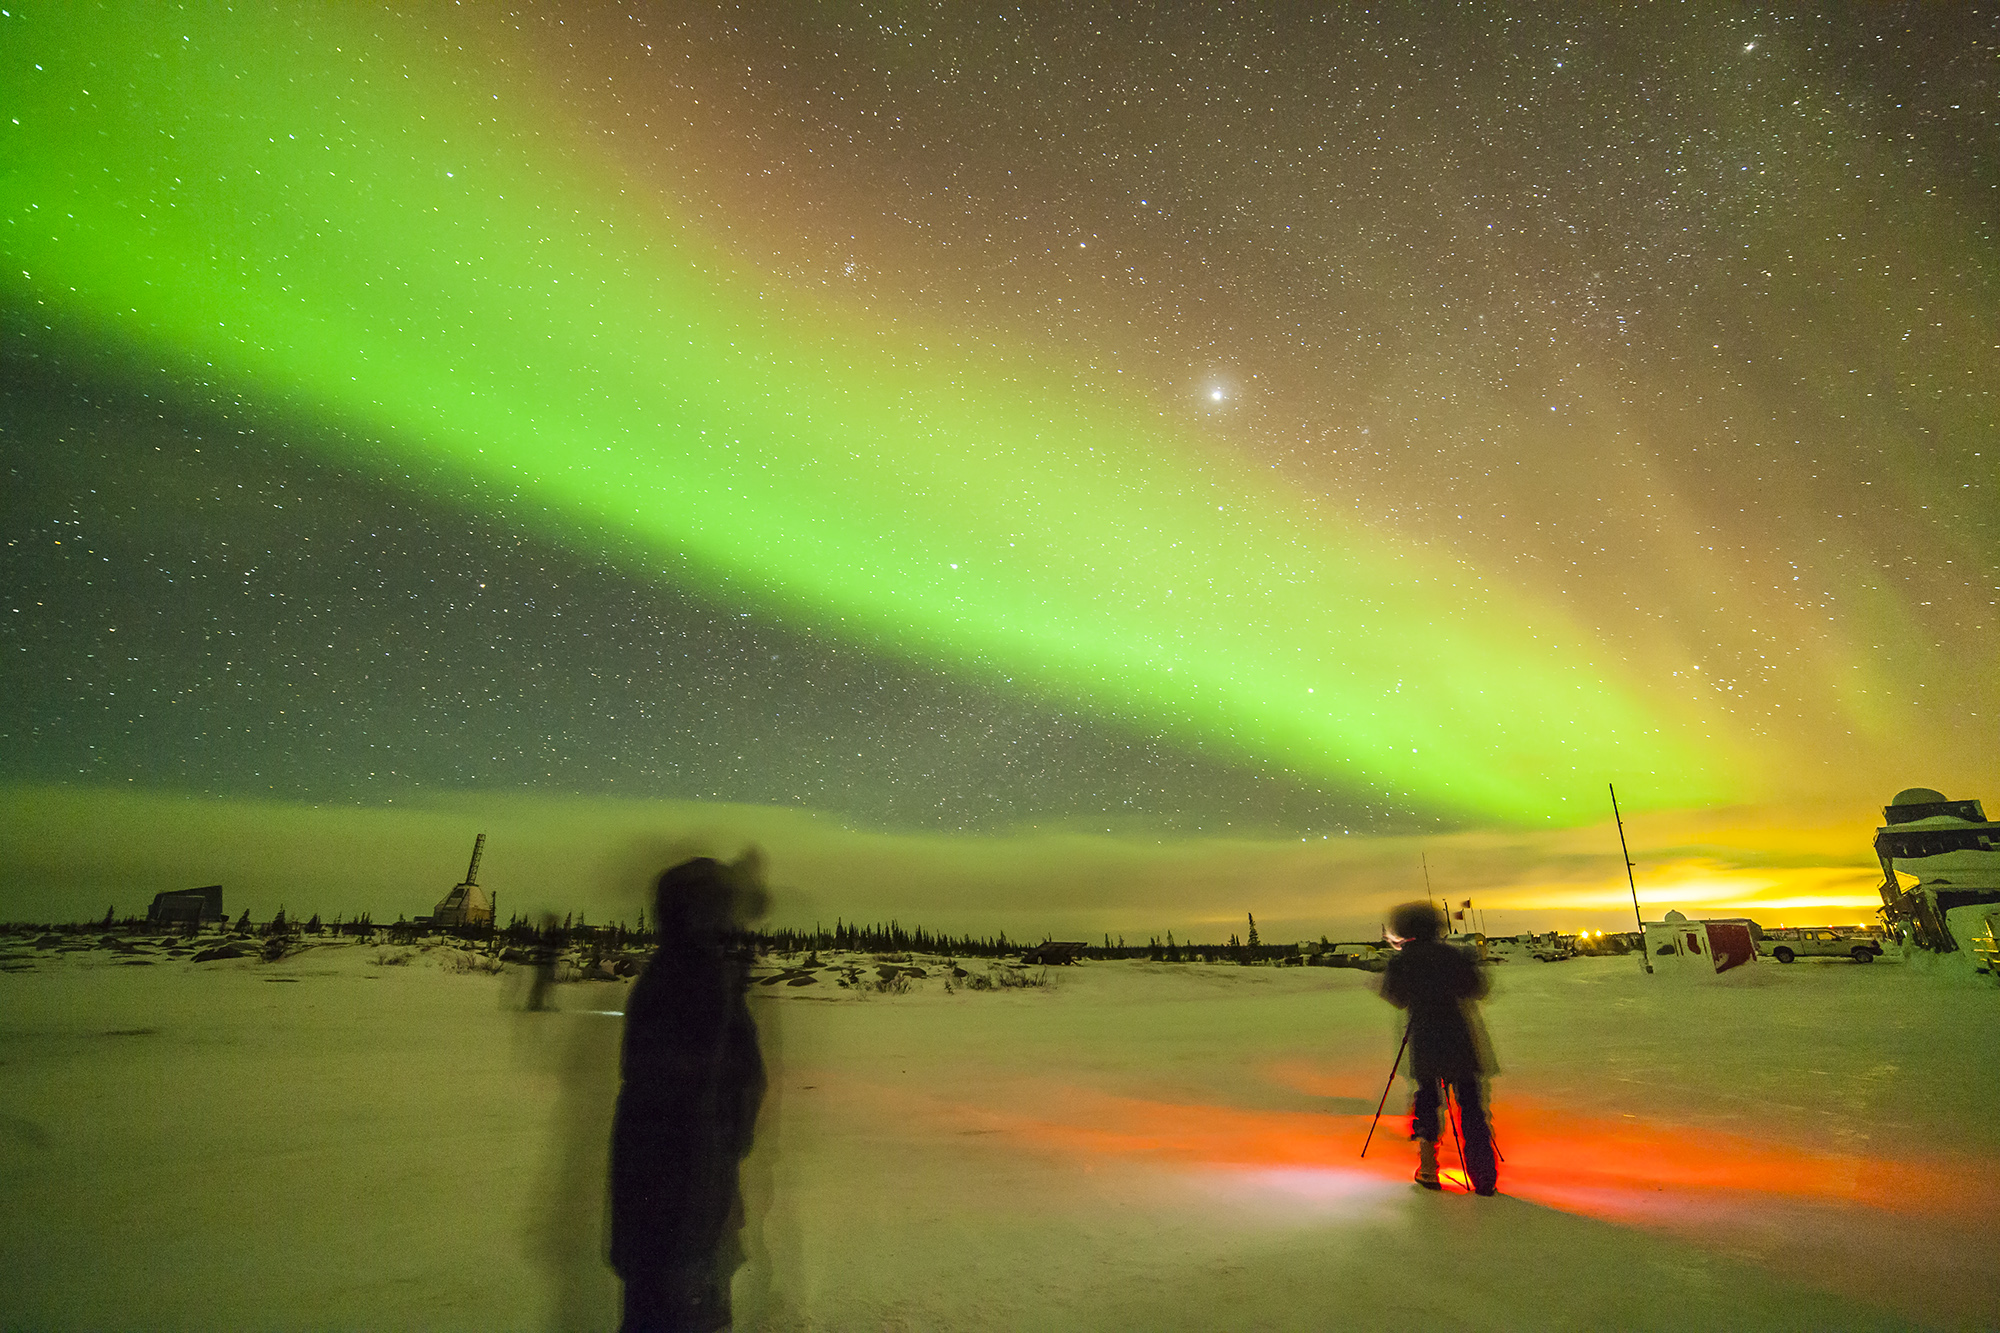
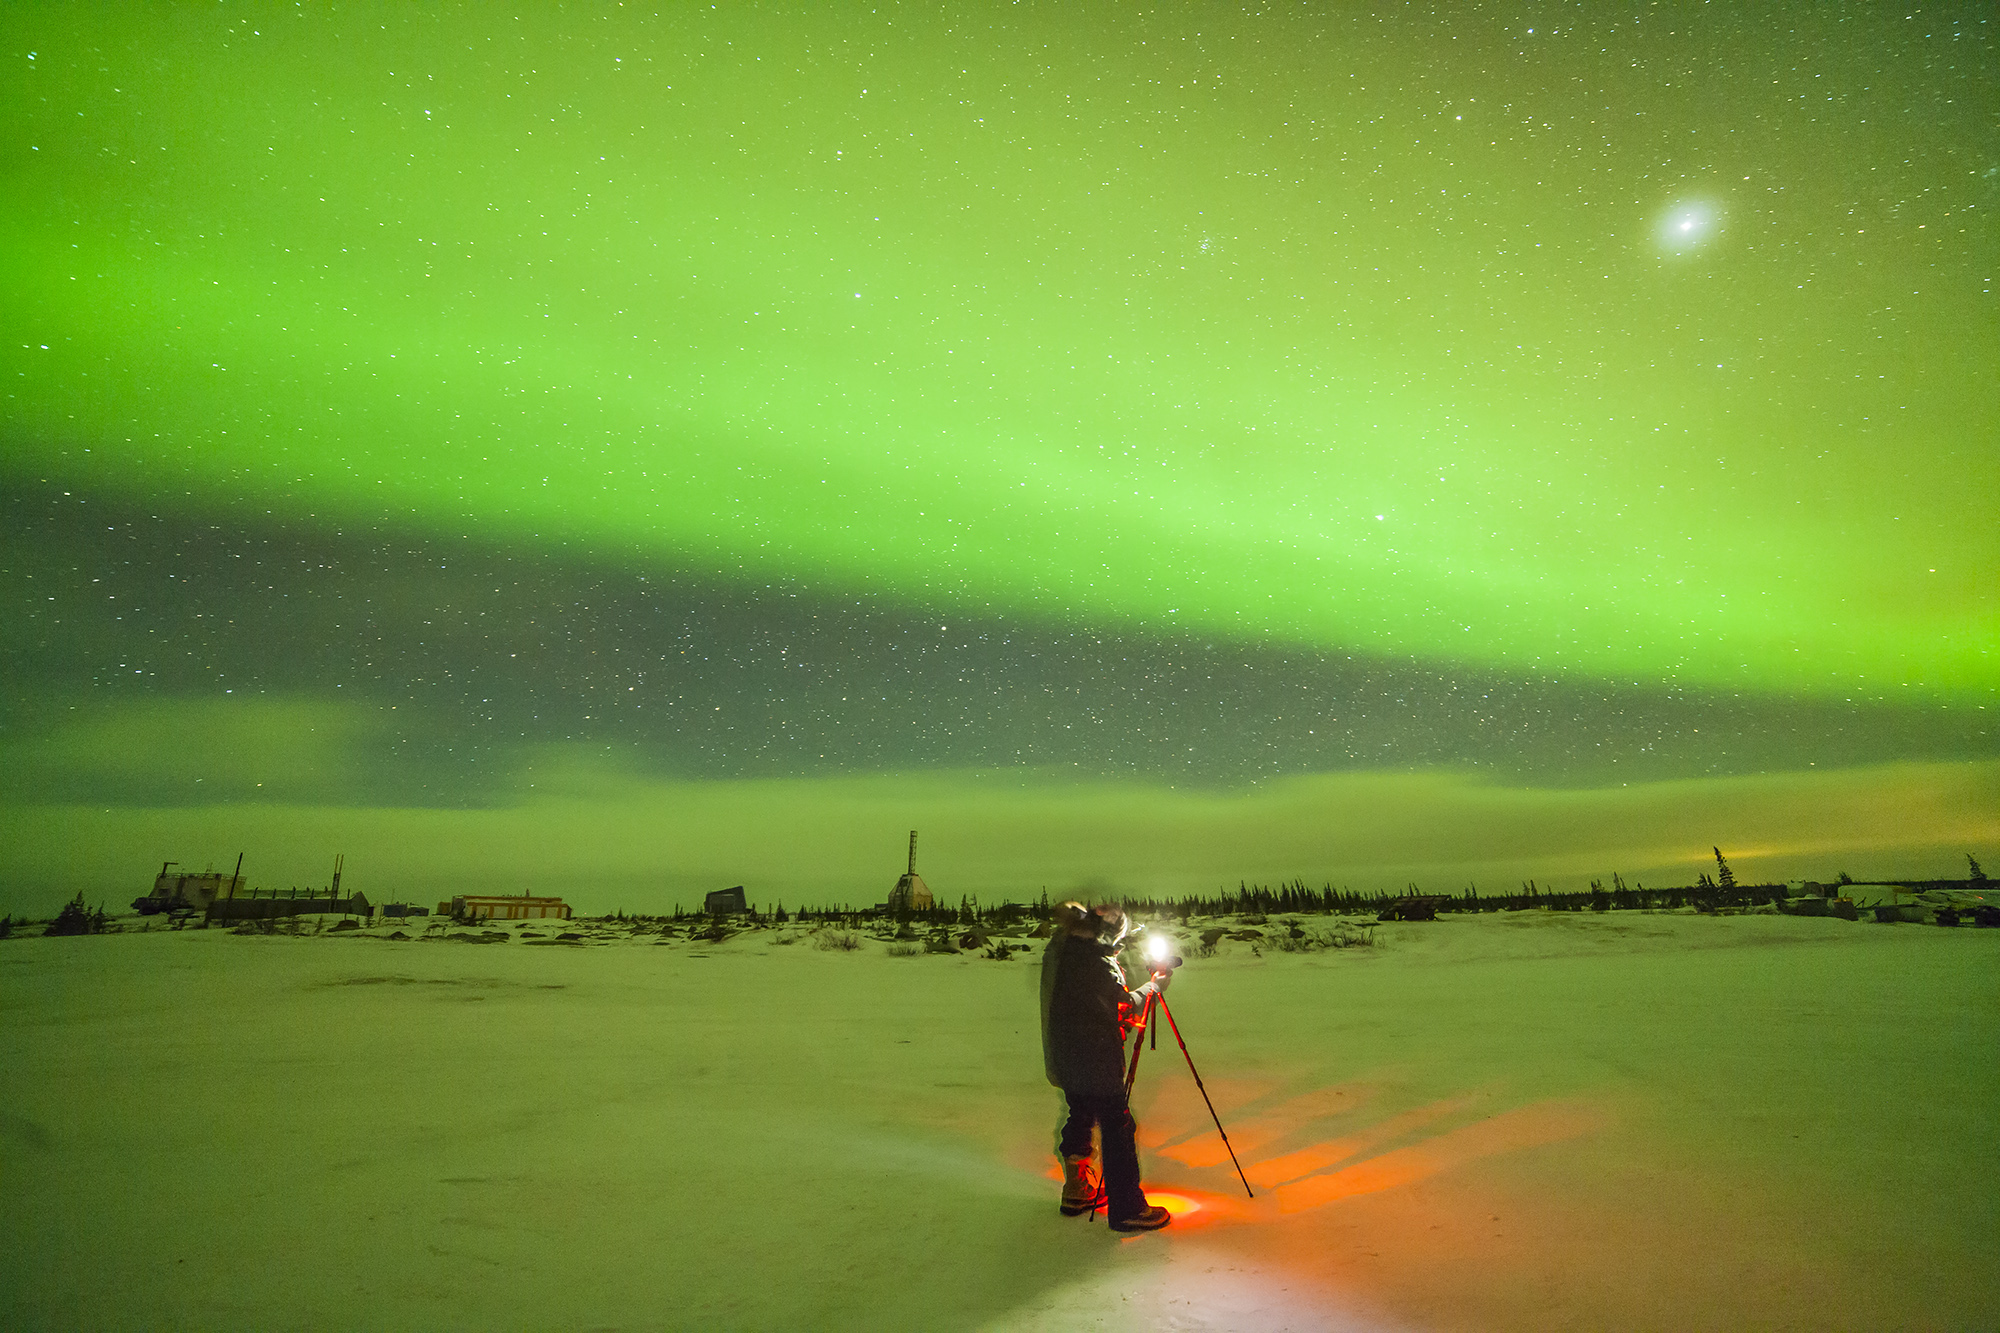

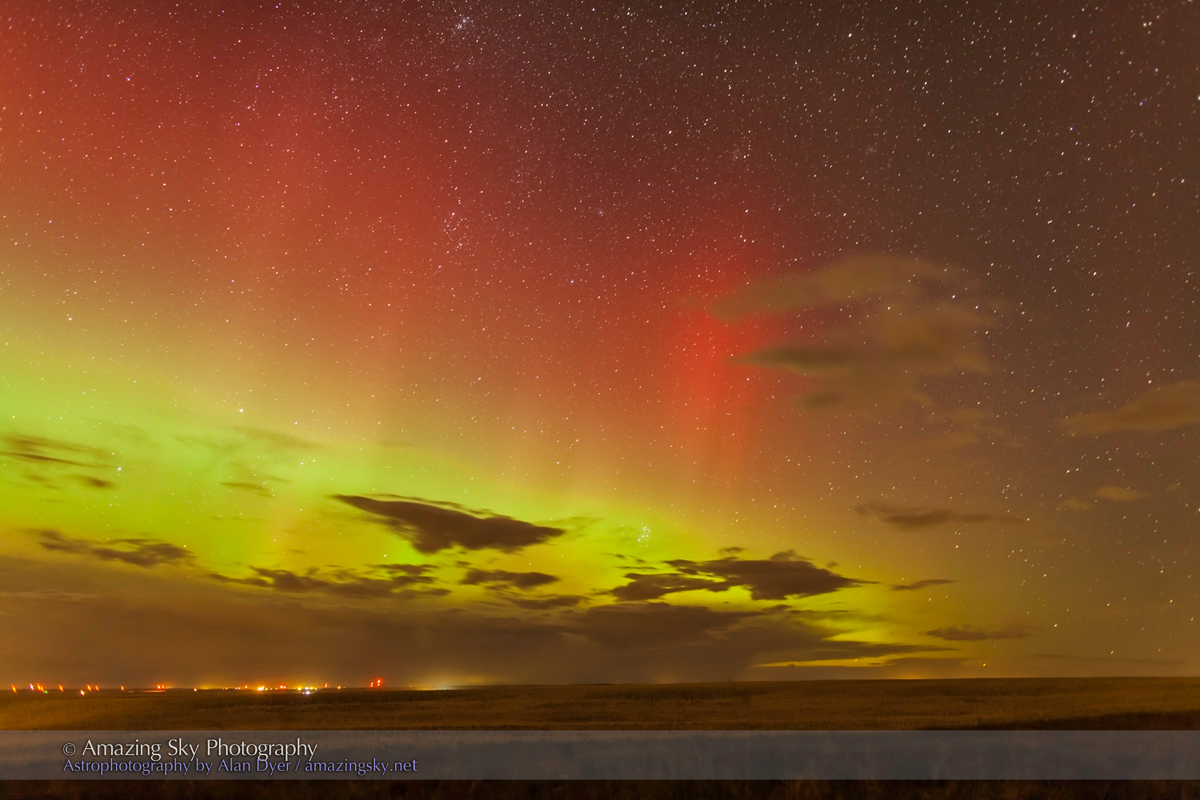
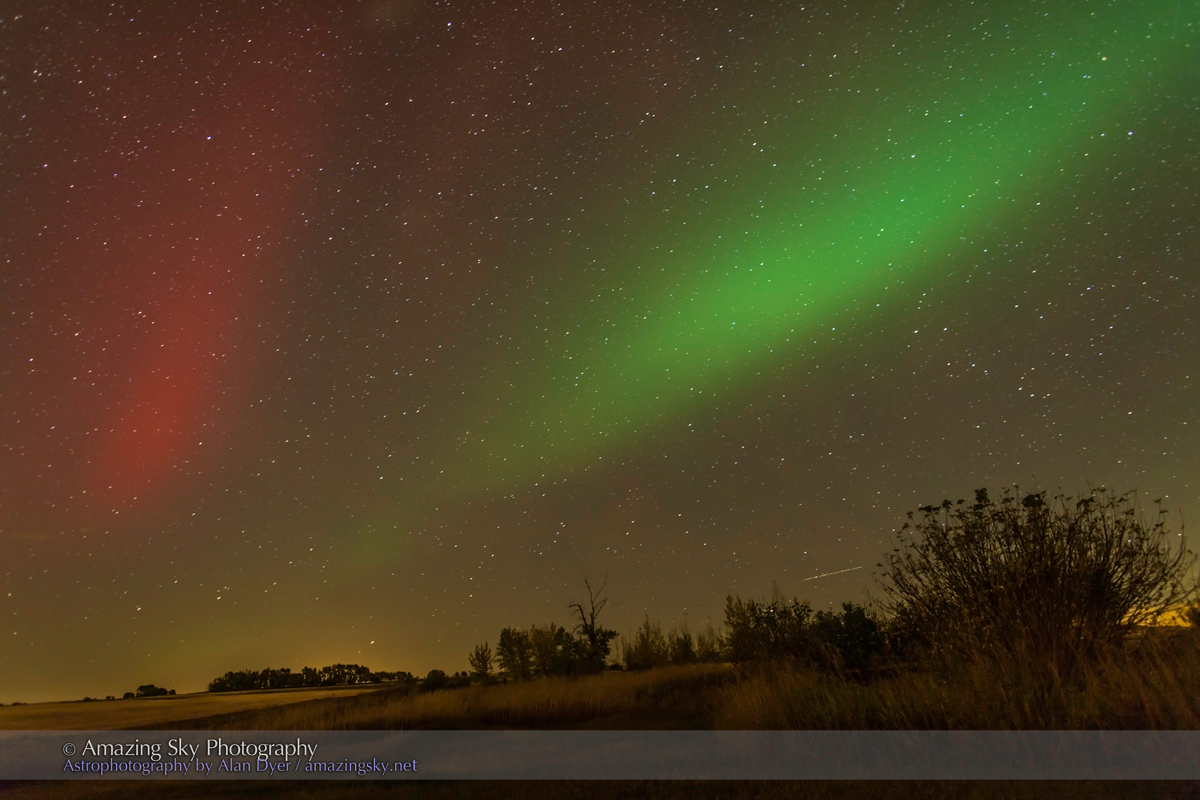
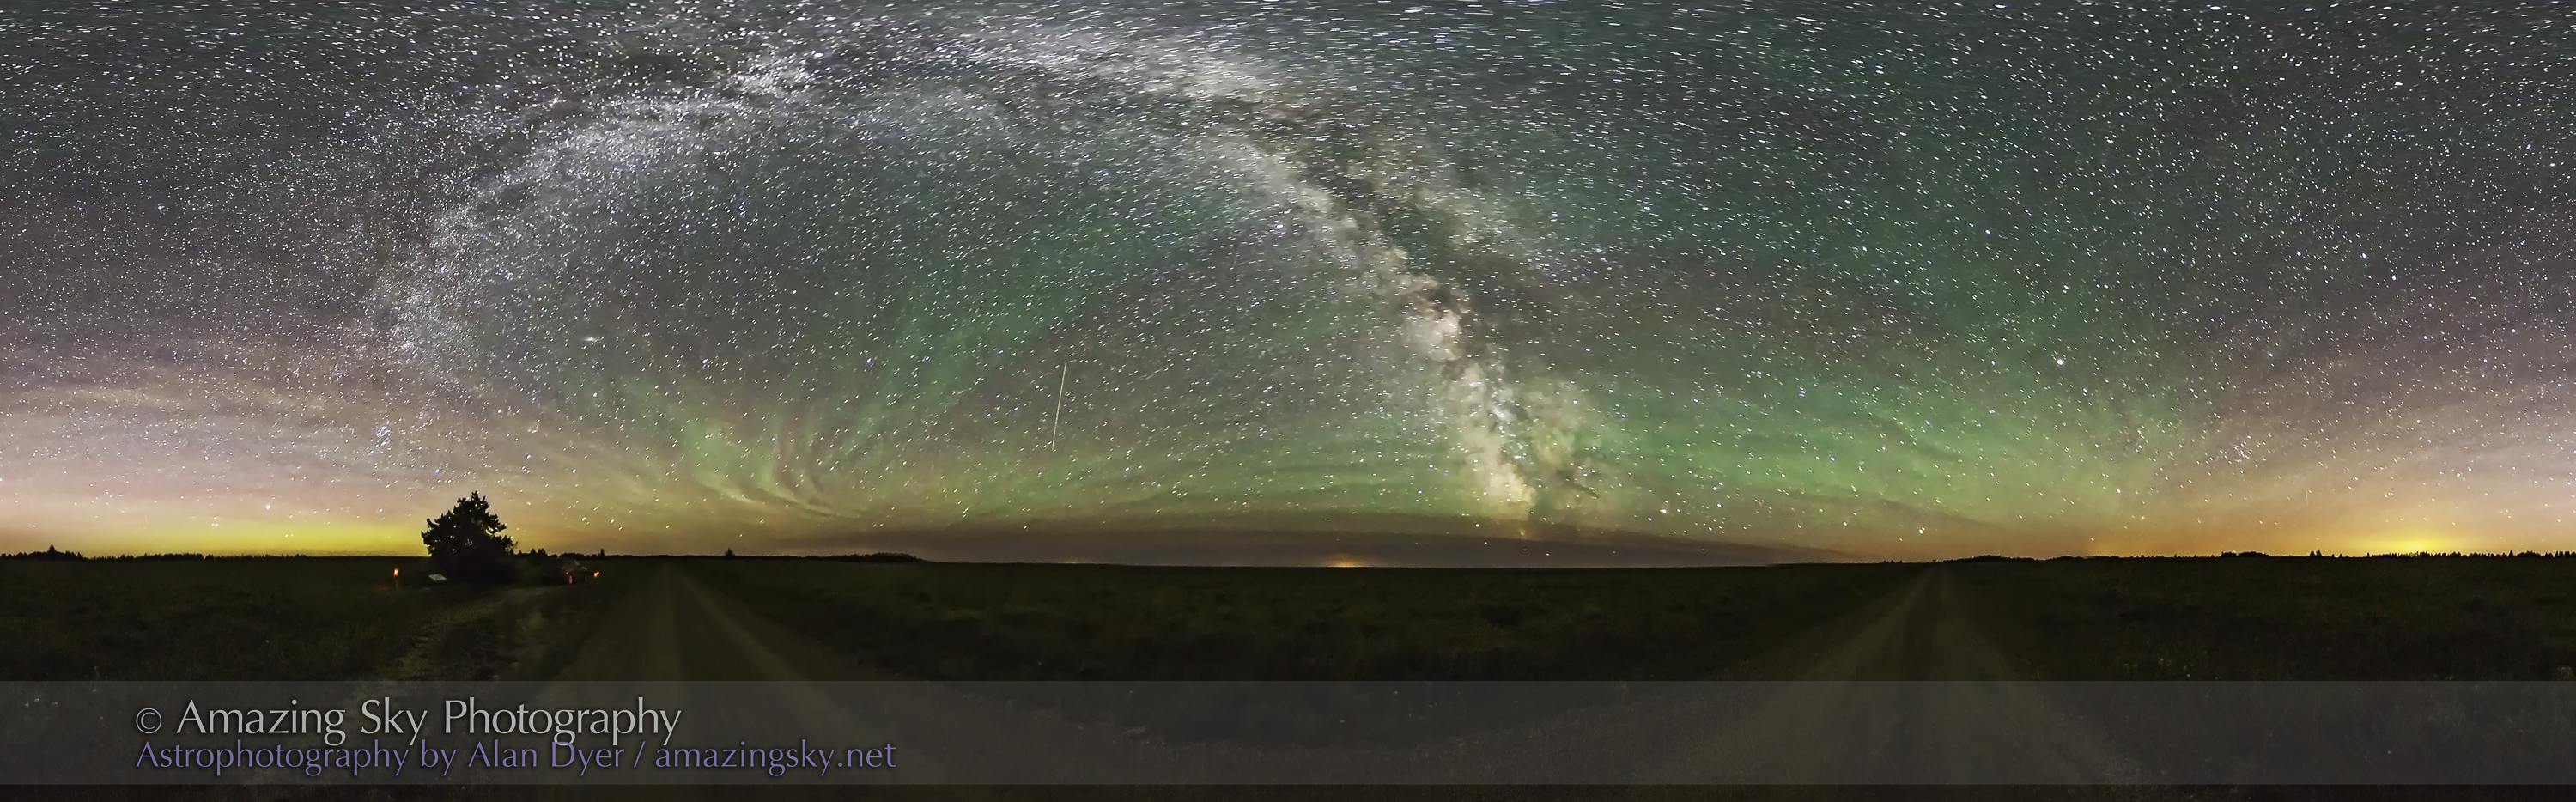
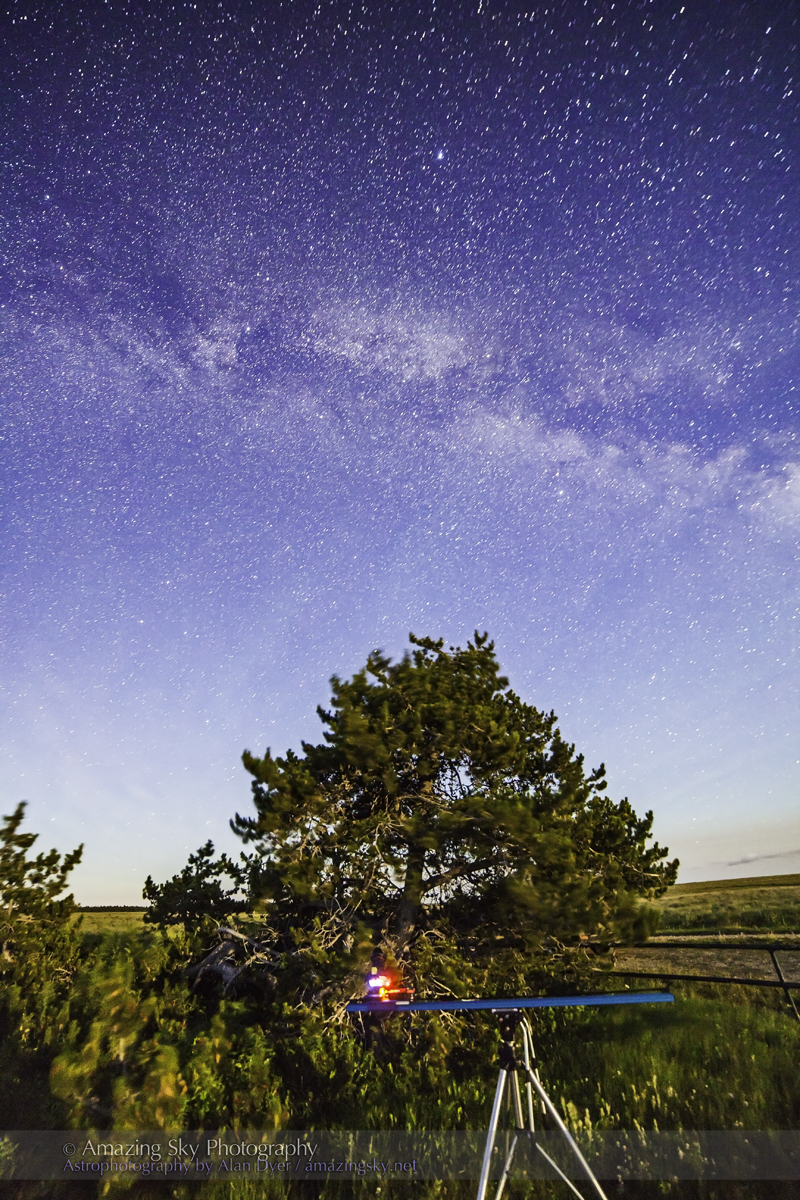
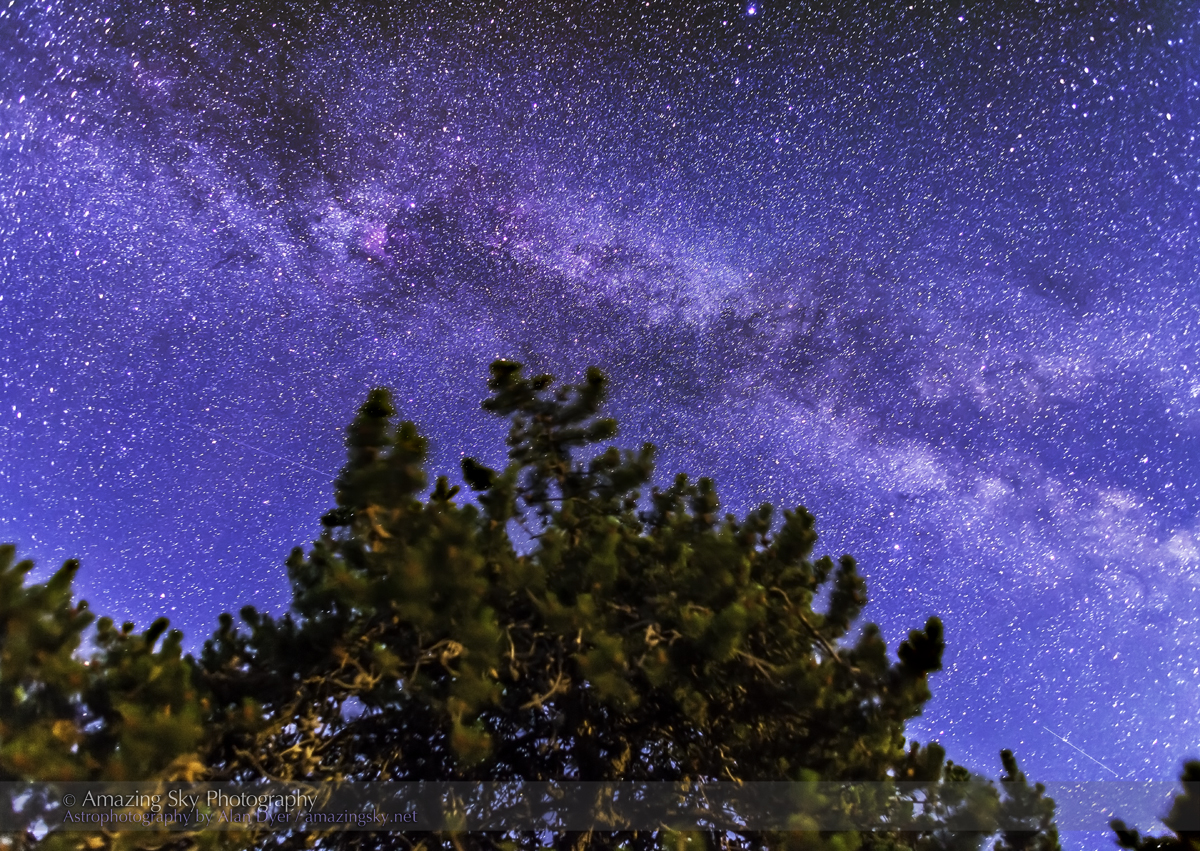


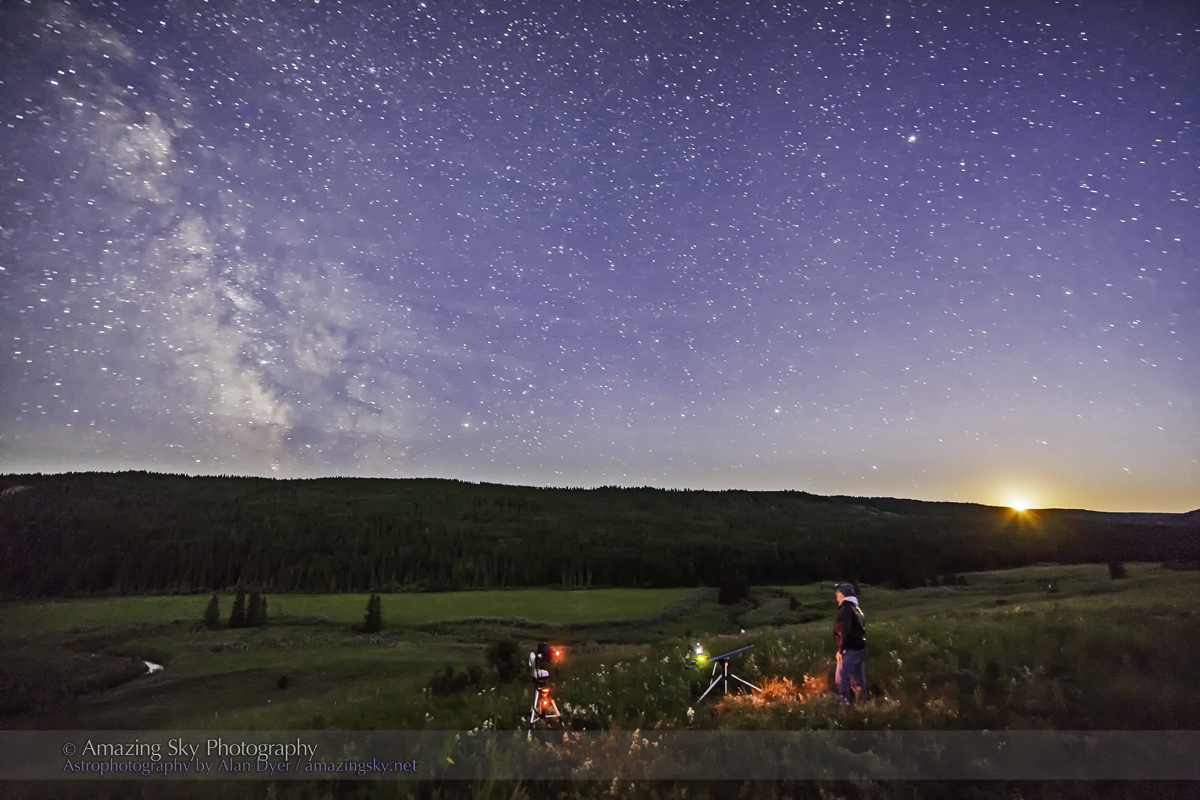


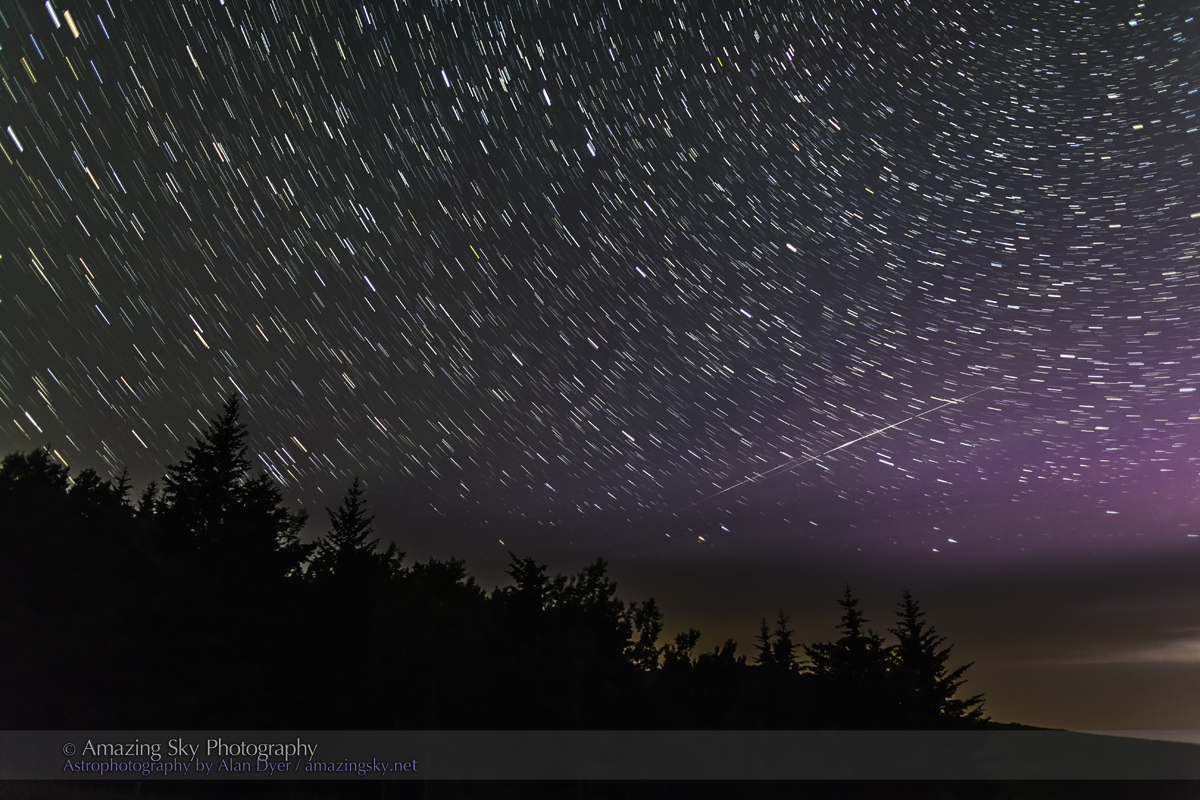
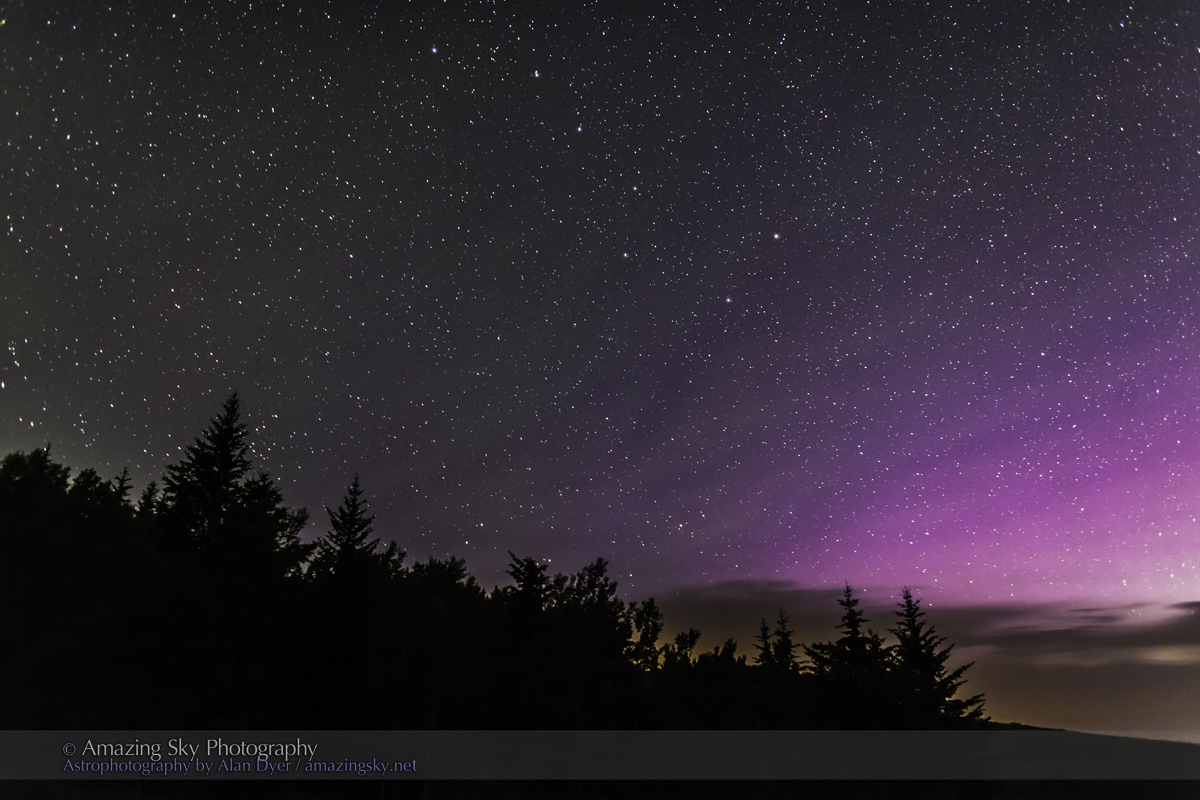


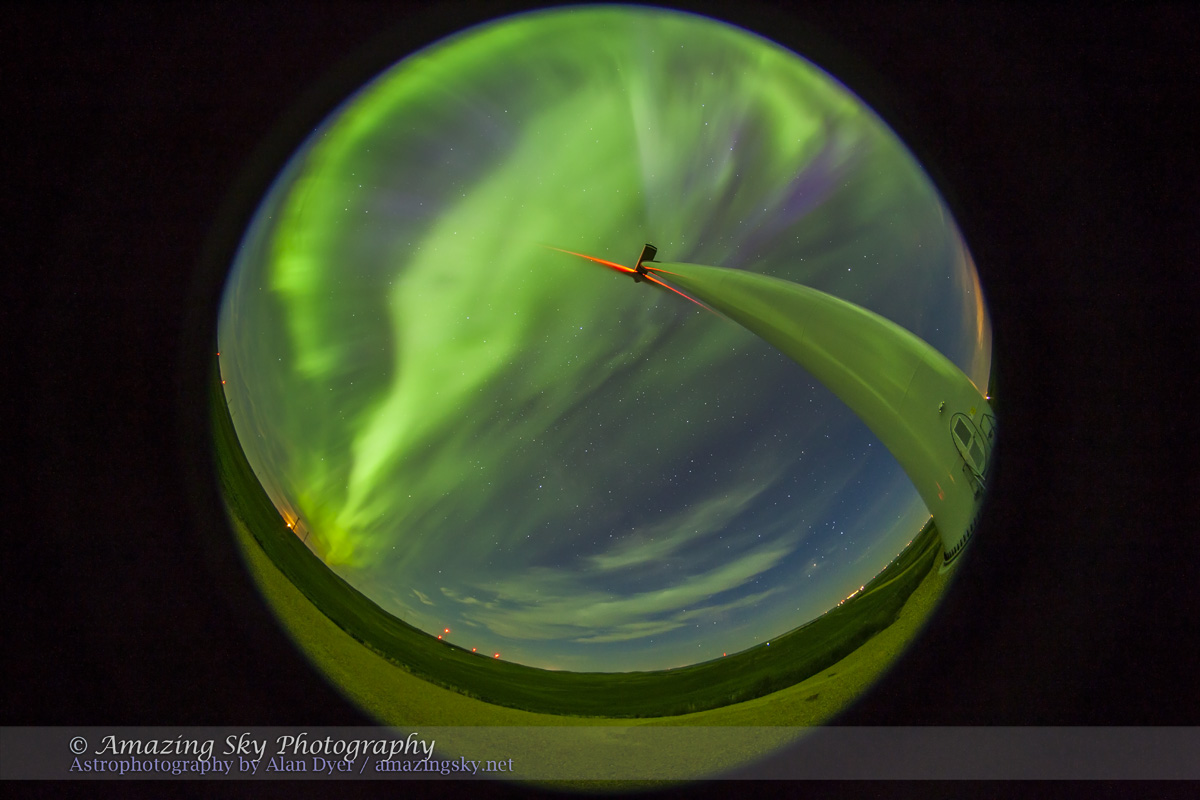

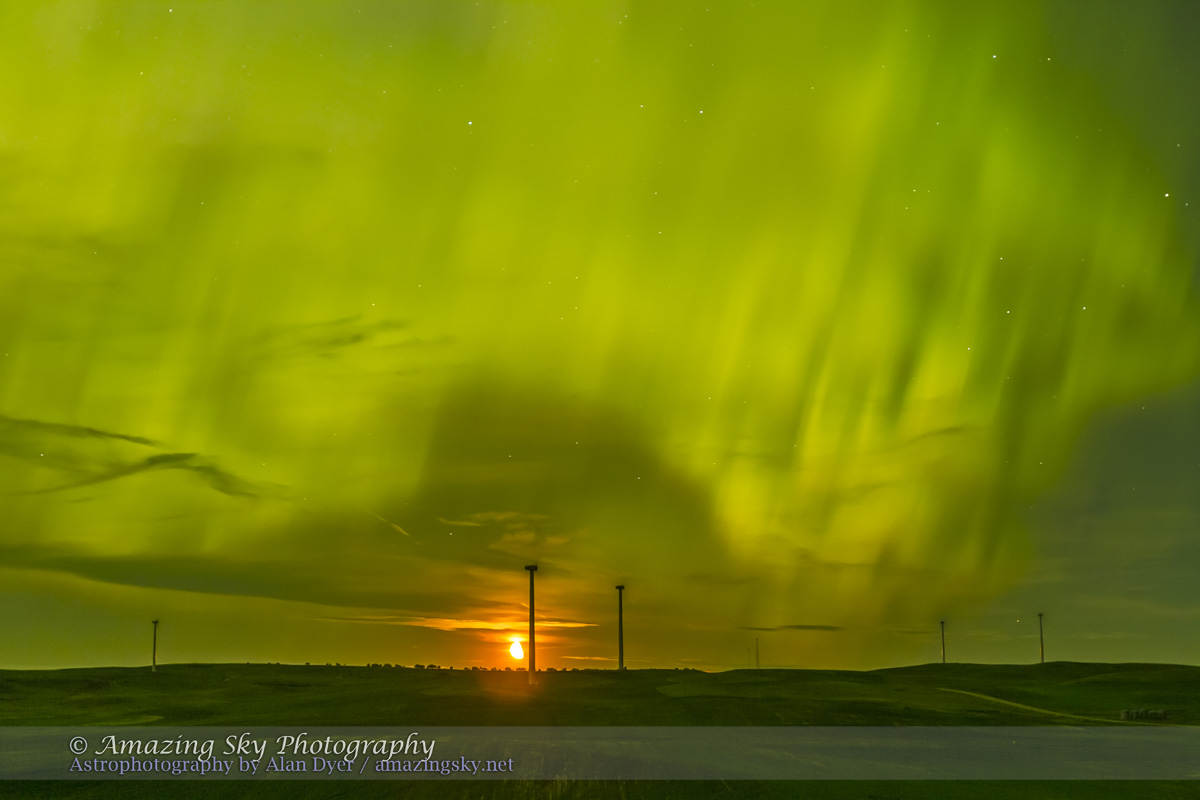
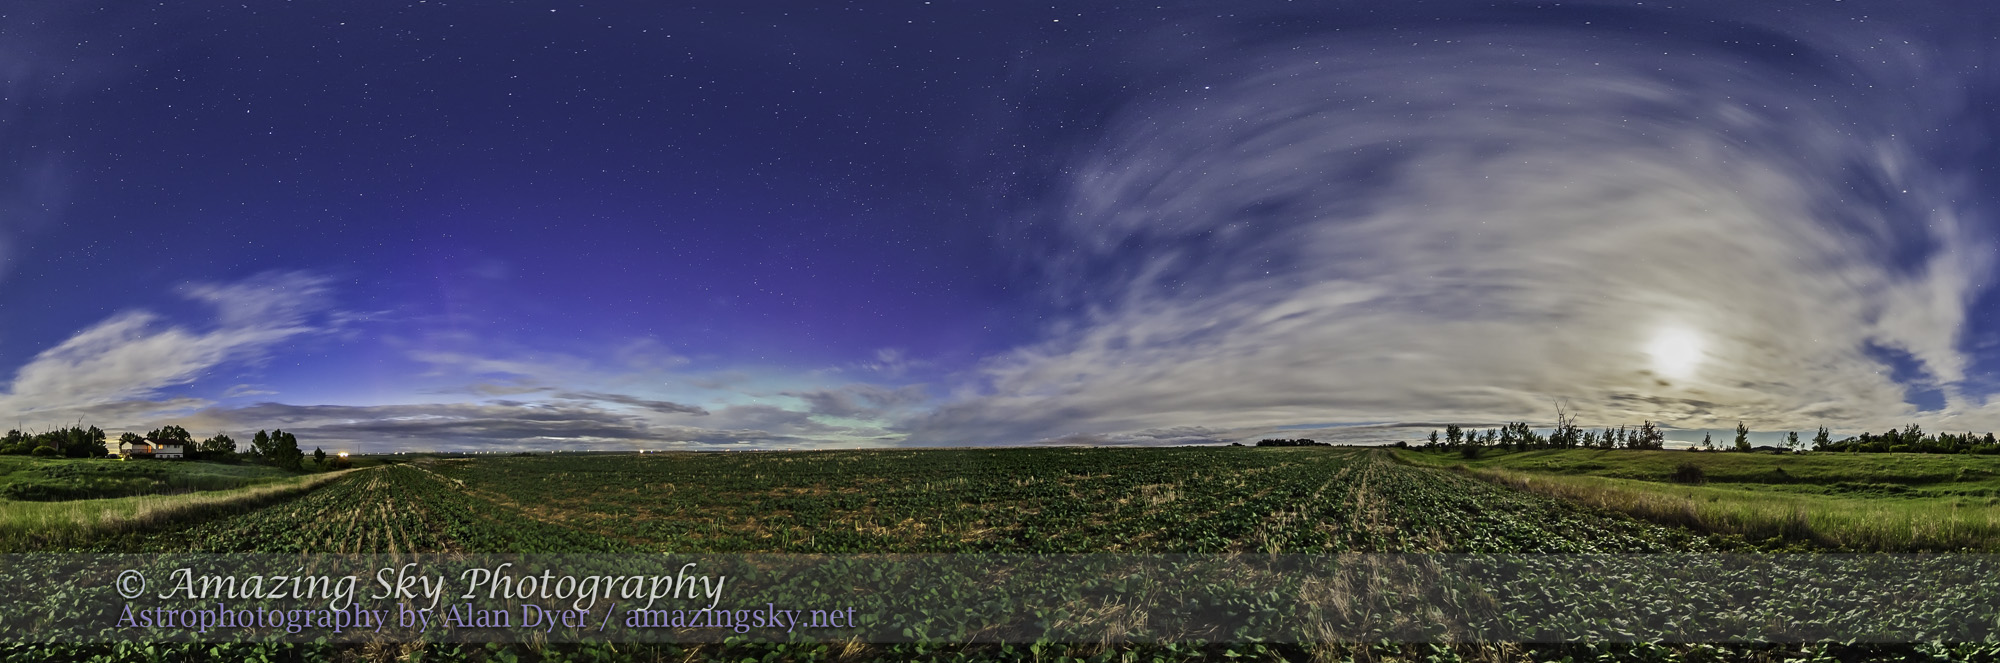


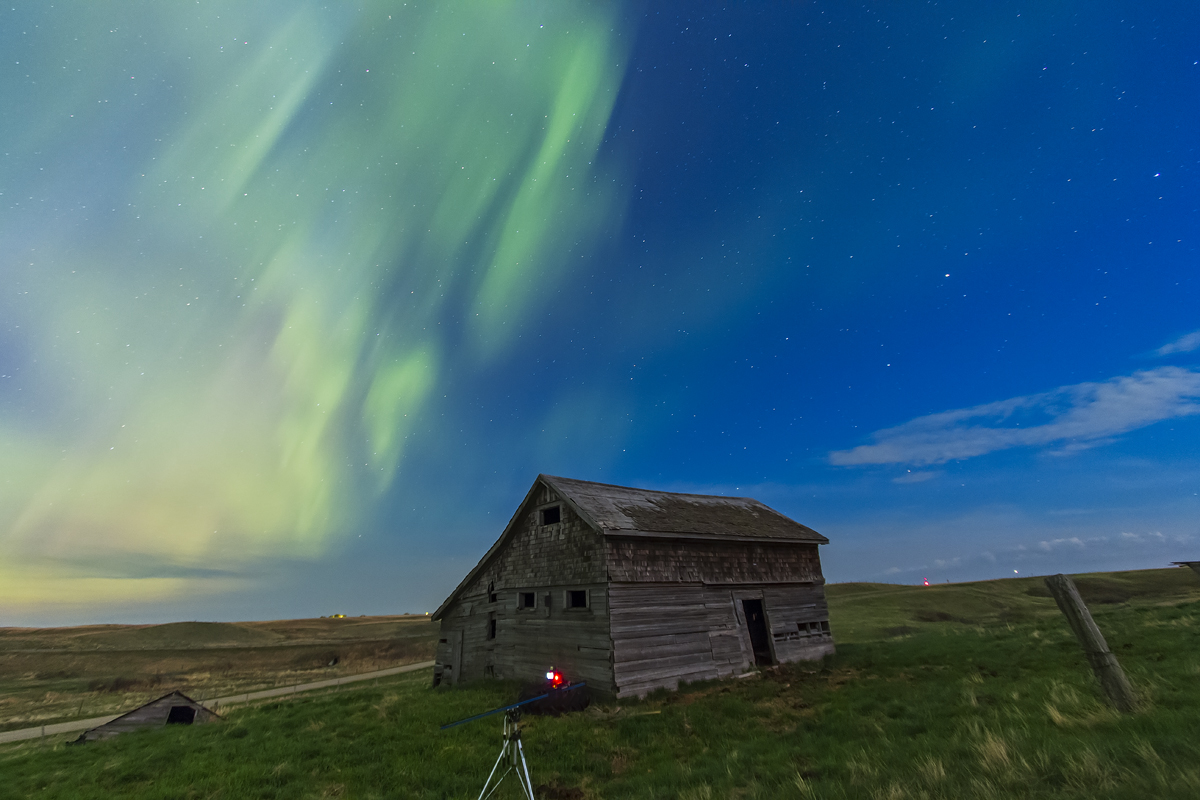
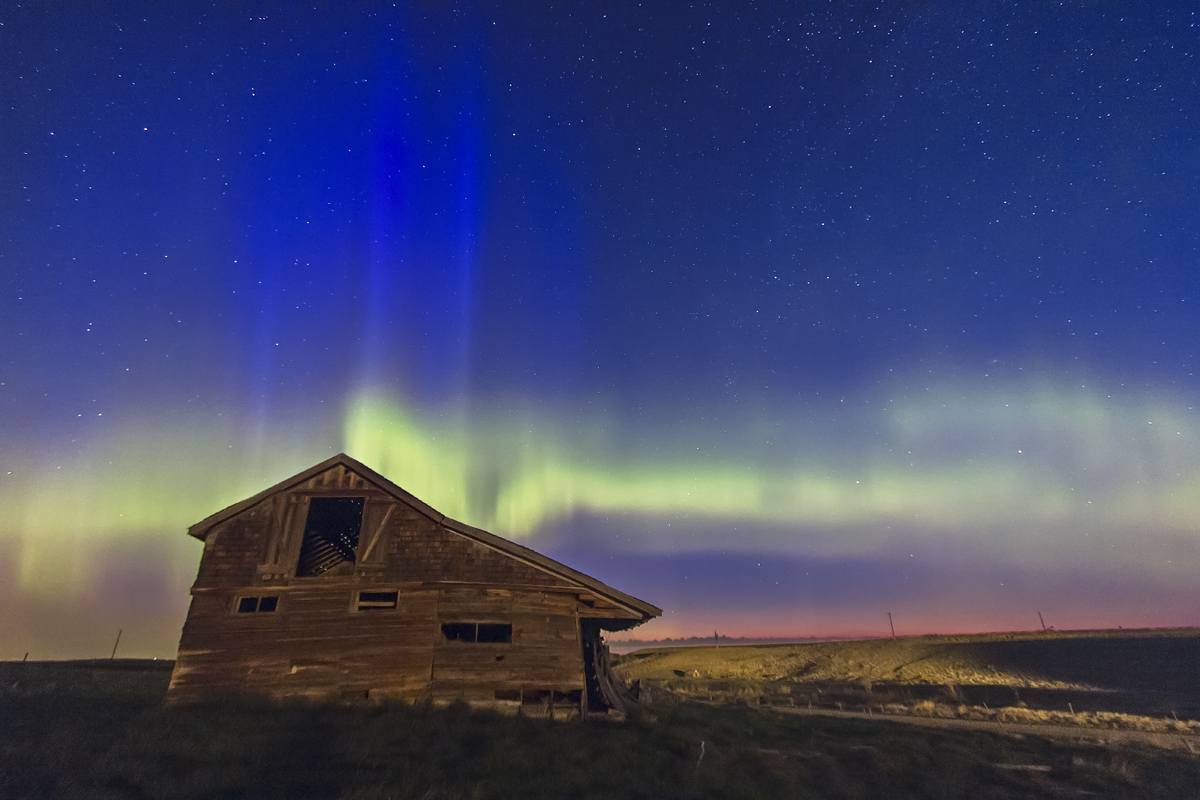


")


