On November 11, 2025 the sky erupted with a swath of red Northern Lights seen over much of North America.
It is rare when those living at southerly latitudes can see Northern Lights. Instead of having to travel north to Arctic sites, the aurora comes south to them. That’s what happened on November 11, 2025 when one of the largest solar storms in recent years brought the aurora down over much of the North America.
This was the latest in a set of wonderful aurora shows we’ve enjoyed in the last two years, as the Sun reached the peak of its 11-year cycle of activity.
As I show below, the apps and indicators were registering extreme conditions, with the “Kp Index” peaking at 8 out of a maximum of 9, and the auroral “Ovation” oval lighting up red, indicating a major geomagnetic storm was underway. In the lingo of the local Alberta Aurora Chasers Facebook group, it was most definitely a “pants on” night!
Kp 8! Red Alert!
The source of the storm was two major flares on the Sun in quick succession. In only a day the high-speed “coronal mass ejections” they had unleashed reached Earth and lit up the sky.
As a result the ring of aurora borealis which usually circles the Arctic moved down over southern Canada and the northern United States. I was under that ring of lights!
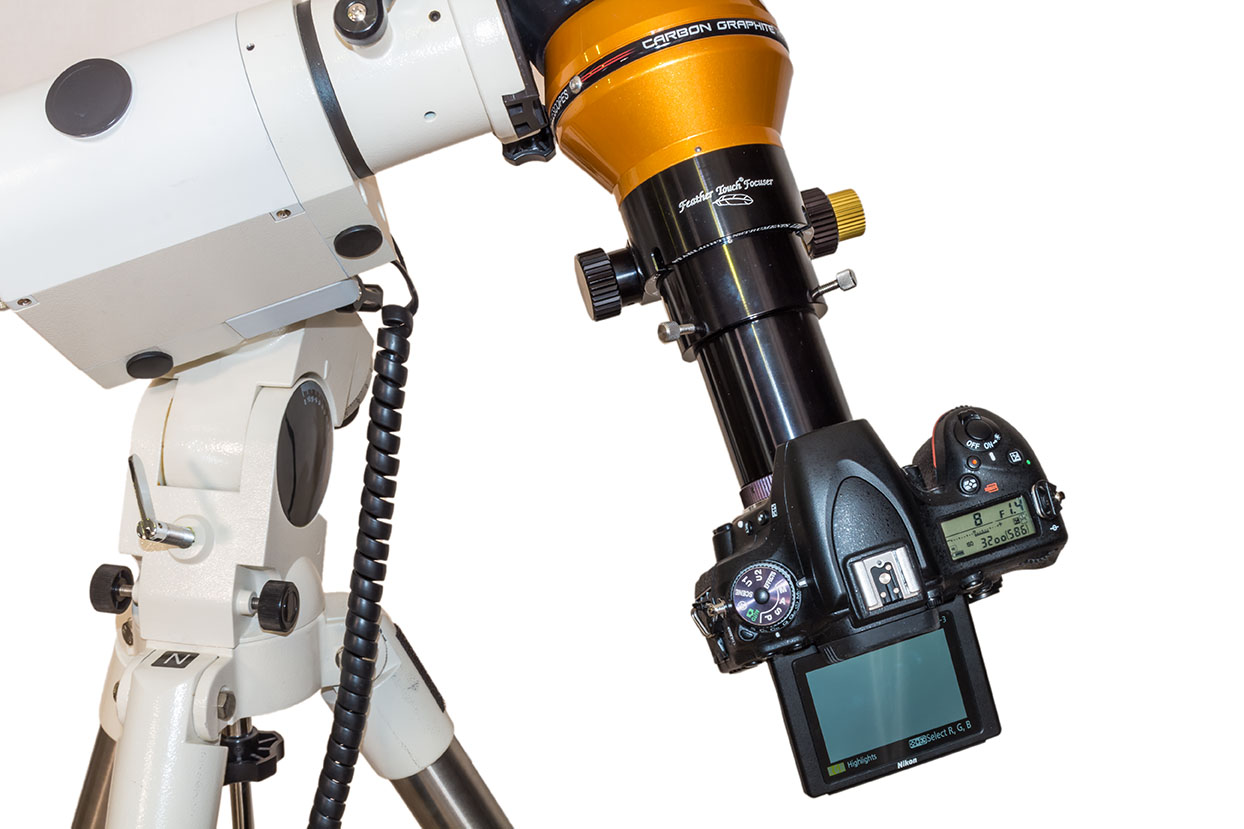
This is a blend of two exposures, for sky and ground, both 8 seconds at f/2.8 with the TTArtisan 11mm full-frame fish-eye lens on the Canon R5 at ISO 1600.
As it got dark this night, large swaths of red were easily visible to the eye, especially to the northwest as above, and below.
A single 5-second exposure at f/2.8 with the TTArtisan 11mm lens on the Canon R5 at ISO 1600.
Early on a large curtain of red extended across the sky, from northwest to southeast. It is rare to see bright reds with the eye, and unusual to see the reds so extensive and sky-spanning.
This 360º panorama is a stitch of 6 segments, 60º apart, each 5-second exposures at f/2.8 with the TTArtisan 11mm full-frame fish-eye lens on the Canon R5 at ISO 1600, and in landscape orientation.
The reds are mostly from oxygen atoms, but can also come from nitrogen molecules, which require the input of a lot of energy to get excited and glow! They certainly were this night.
The reds mixed with the more common green light from oxygen to produce shades of yellow and orange, and with blues from nitrogen to produce vivid pinks and magentas. While the eye could see some of these subtle colours, a camera (with its longer exposure and wider aperture lens compared to the human eye) was best for picking up the full range of what this show had on display.
This 360º panorama is a stitch of 10 segments, 36º apart, each 4-second exposure at f/2.8 with the Laowa 10mm rectilinear wide-angle lens on the Nikon Z8 at ISO 1600, and in portrait orientation.
The panorama above taken about 2 hours after the previous all-sky scene, shows a quieter aurora but still with curtains covering the sky and converging to the “magnetic zenith,” a little south of the point straight overhead.
Such an all-sky show of aurora is among the sky’s finest spectacles.
A real-time video with the Nikon Z6III at ISO 25600 and Viltrox 16mm lens at f/1/8.
In the video above taken early in the evening I pan around the horizon over the full 360º to take in the scene much as the eye did see it. Video uses shorter exposures more like the eye does. I narrate the video at the camera.
All single 4-second exposures at f/2.8 with the Laowa 10mm rectilinear wide-angle lens on the Nikon Z8 at ISO 1600.
When the aurora covers the sky it’s hard to take it all in and capture it on camera. The 10mm ultra-wide lens I used for the images above sweep up well past the zenith to show the converging curtains, forming shapes that kept changing by the minute.
In the video below I used the same lens with the camera turned to portrait orientation to create a “vertical video,” again narrated at the camera. It shows how the aurora was changing, but slowly this night. It did not have the rapid dynamics I’ve seen with other bright displays, despite the obvious high energies involved here to excite the reds.
Real-time video with the Laowa 10mm lens at f/2.8 and Nikon Z8 at ISO 25,600 & 1/4 second shutter.
Again, this real-time video captures the scene much as the unaided eye saw it. I’ve not processed either of these real-time videos, other than what the camera itself did.
This is a panorama of 12 segments, each 1 second at f/1.8 with the Viltrox 16mm lens on the Nikon Z6III at ISO 1600. Stitched in Adobe Camera Raw.This is a stitch of 6 segments, 60º apart, each 4-second exposure at f/2.8 with the TTArtisan 11mm full-frame fish-eye lens on the Canon R5 at ISO 1600, in landscape orientation. Stitched in PTGui.
On a night like this, I try to shoot not only single still images and videos, but also multi-image panoramas, such as the circular images earlier and these two rectangular “panos” above. Both cover a full 360º in width but don’t go up to the zenith.
Again, they record the range of colours that were on show on this Kp8 night, which were more visible and extensive than usual for an all-sky display.
I also shot two time-lapse sequences. These form the main visuals for this edited music video I produced around the time-lapses.
The link takes you to my Vimeo channel to watch the video. Do enlarge it to full screen!
A single 2.5-second exposure at f/1.8 with the Viltrox 16mm lens on the Nikon Z6III at ISO 1600.
I also always try to take some selfies at every great aurora show, with me often lit just by aurora light! They’re fun to use for talks and “bio pix.”
This is a single 4-second exposure at f/2.8 with the Laowa 10mm lens on the Nikon Z8 at ISO 1600.
As a final bonus this night, one of the fish-eye lens time-lapse frames happened to capture a bright meteor. You see it briefly in a flash in the music video above, but below is the single frame.
A single 4-second exposure at f/2 with the TTArtisan 7.5mm circular fish-eye lens on the Nikon Z8 at ISO 1600. Taken as part of a 780-frame time-lapse.
Because it is streaking away from the constellation of Taurus, this is likely a member of the annual Taurid meteor shower which was in its final nights of the long period it is active in late October and early November. In fact, there are two Taurid showers, Northern and Southern, active at once and coming from similar spots in Taurus. They are known to produce bright fireballs and this was certainly one!
While the Sun is now in the downward slope of its cycle, coming off “solar max” last year, we may still see more major storms and aurora shows like this. Historically, the biggest solar flares and aurora displays often occur in the 2 or 3 years after solar maximum.
So stay tuned! The sky may still light up red with Northern Lights!
Amateur astronomers like nothing more than spending time under a dark night sky with a field of friends.
Star parties are a popular part of the hobby of amateur astronomy. They’re chances for stargazers to get under dark skies and meet up with others who love the night sky.
Each year I attend the biggest such event in my area in western Canada, the Saskatchewan Summer Star Party. It usually attracts about 320 sky lovers to the very dark skies of southwest Saskatchewan.
A light pollution map where grey = good!
The label marks the spot for the Party, in the Cypress Hills, and in the Cypress Hills Interprovincial Park, that straddles the border of Saskatchewan and Alberta. As per its name, the SSSP is held on the Saskatchewan side of the Park, in the Centre Block south of Maple Creek. (A complementary Southern Alberta Star Party is held on the Alberta side of the Cypress Hills, in September. I’ll be there!)
As the map shows, the Cypress Hills are far from any light pollution and offer “Bortle 2-class” skies — 1 being the darkest, and 9 being downtown Las Vegas!
In fact, the Park is a Dark Sky Preserve, a designation awarded in 2004. Parks are increasingly aware of their role in not only conserving flora, fauna, and historical sites, but also the increasingly threatened night sky. As the saying goes, “Half the Park is after dark!”
The DSP Declaration
The Dark Sky Preserve designation, and efforts to refit what lighting is in the Park to “dark-sky friendly” fixtures, came about as a direct result of the Park, and Star Party, being the site of a comet discovery three years earlier.
It was at the Star Party in August 2001 that Regina amateur astronomer Vance Petriew discovered a comet, an observing feat that merits a comet being named for the discoverer.
This year, a new sign and plaque were unveiled commemorating the discovery, replacing a cairn that had fallen into disrepair over 20 years. Here is the unveiling —
Park officials, fellow astronomers and Vance unveil the sign.
This was a fine event with all the star party folks in attendance, many of whom were there in 2001! — including the now adult daughters of the Petriew family.
Click on the images below to bring the photos up full screen.
The Petriew FamilyThe comet scope in 2025.Comet Petriew plaque
While that was a highlight of the week, the real show was the sky above. The Milky Way was on display in a sky clearer and darker than we had seen it for many years. No clouds, no smoke, and little dew and bugs! The Cypress Hills are a mecca for stargazing!
The road into the Meadows Campground, home to the Saskatchewan Summer Star Party. The SSSP is organized by the Royal Astronomical Society of Canada centres in Regina and Saskatoon. Telescopes and tents under the Milky Wa.yA sky tour in the early evening with blue twilight.The Big and Little Dippers in the Cypress Hills
A popular part of this star party, as it is at many such events, is a laser-guided tour of naked-eye sights, where a guide points out the constellation patterns, and highlights objects that need nothing more than binoculars to see well.
In a slide show below, astronomer Ron Waldron from Saskatoon conducts the 2025 Friday night “star walk.” It’s BYOB — Bring Your Own Binoculars!
Laser touring the sky
Yes, there was an aurora
Look up! Look way up!
Peering into the Galactic Core
While participants stay up until the wee hours to enjoy all that the sky has to offer, every star party offers a range of daytime activities (but not happening too early!). Star parties are great places to see fields of telescopes of every description. This year the program included a formal “show-and-shine” tour of some notable gear for all to admire. And there’s the ever-popular swap meet with bargains on offer.
The Swap Meet
Kevin’s astrophoto rig
Wade’s classic refractor
Ed’s super astrophoto scope
Nick’s astrophoto array
Dan’s super solar scope
We enjoyed several talks on a range of astronomy topics, not just stargazing, but also the latest in science research. We heard about a satellite being built in Saskatchewan by U of S and U of R students, and about how the Mars Perseverance rover collects samples, in a talk from one of the researchers involved with the NASA mission.
Kimberly Sibbald delivered the opening keynote on her amazing astrophotos.
Dr. Chris Herd from the U of A explained Mars sample collection.
And I gave a short talk about eclipses coming up.
A 3D model of the Sask Sat
And of course there were awards and door prizes to be won! Always to a capacity crowd at the Cypress Resort conference room.
The door prizes being handed out. You must be in the room to win!
It was a superb 4 days of astronomy and stargazing. If you are in the area, I highly recommend attending. Next year’s SSSP will be August 12 to 15 inclusive — it’s always at New Moon. The website is here but won’t be updated for the 2026 event details until next year.
I won’t be there in 2026, as August 12 is the date of the next total eclipse of the Sun, which I discuss in my previous blog. I plan to be in Spain!
This is the new sign and plaque commemorating the discovery in 2001 of a comet here in the Cypress Hills Interprovincial Park by Vance Petriew.
But I highly recommend attending in 2026. As most people do, you may find yourself enjoying the weekend so much you make it an annual event in your calendar. I shall miss my annual August ritual of the SSSP in 2026 and in 2027 — there’s an eclipse that August, too!
But 2025 was certainly a fine year to enjoy all that the Cypress Hills have to offer under the stars.
If you saw the total eclipse in 2024 (or you missed it!) you have three chances in the next three years to see another. But you will have to travel.
Typically, total eclipses of the Sun occur about 18 to 24 months apart. Unusually, in the next three years, we have a trio of total eclipses each only a year apart. Or to be precise, a lunar year — 12 lunar phase cycles — apart.
The map above (courtesy EclipseAtlas.com) plots the paths of all central solar eclipses (annulars, totals and hybrids) from 2021 to 2030. Included are the paths of the 2023 annular and 2024 total in North America you might have seen.
But the next total eclipse in populated North America is not until August 2044, then again in August 2045. To see a total eclipse in the next few years, those of us in the Americas will have to travel.
However, those in Europe can drive to the next eclipse, to their first total eclipse at home since August 1999.
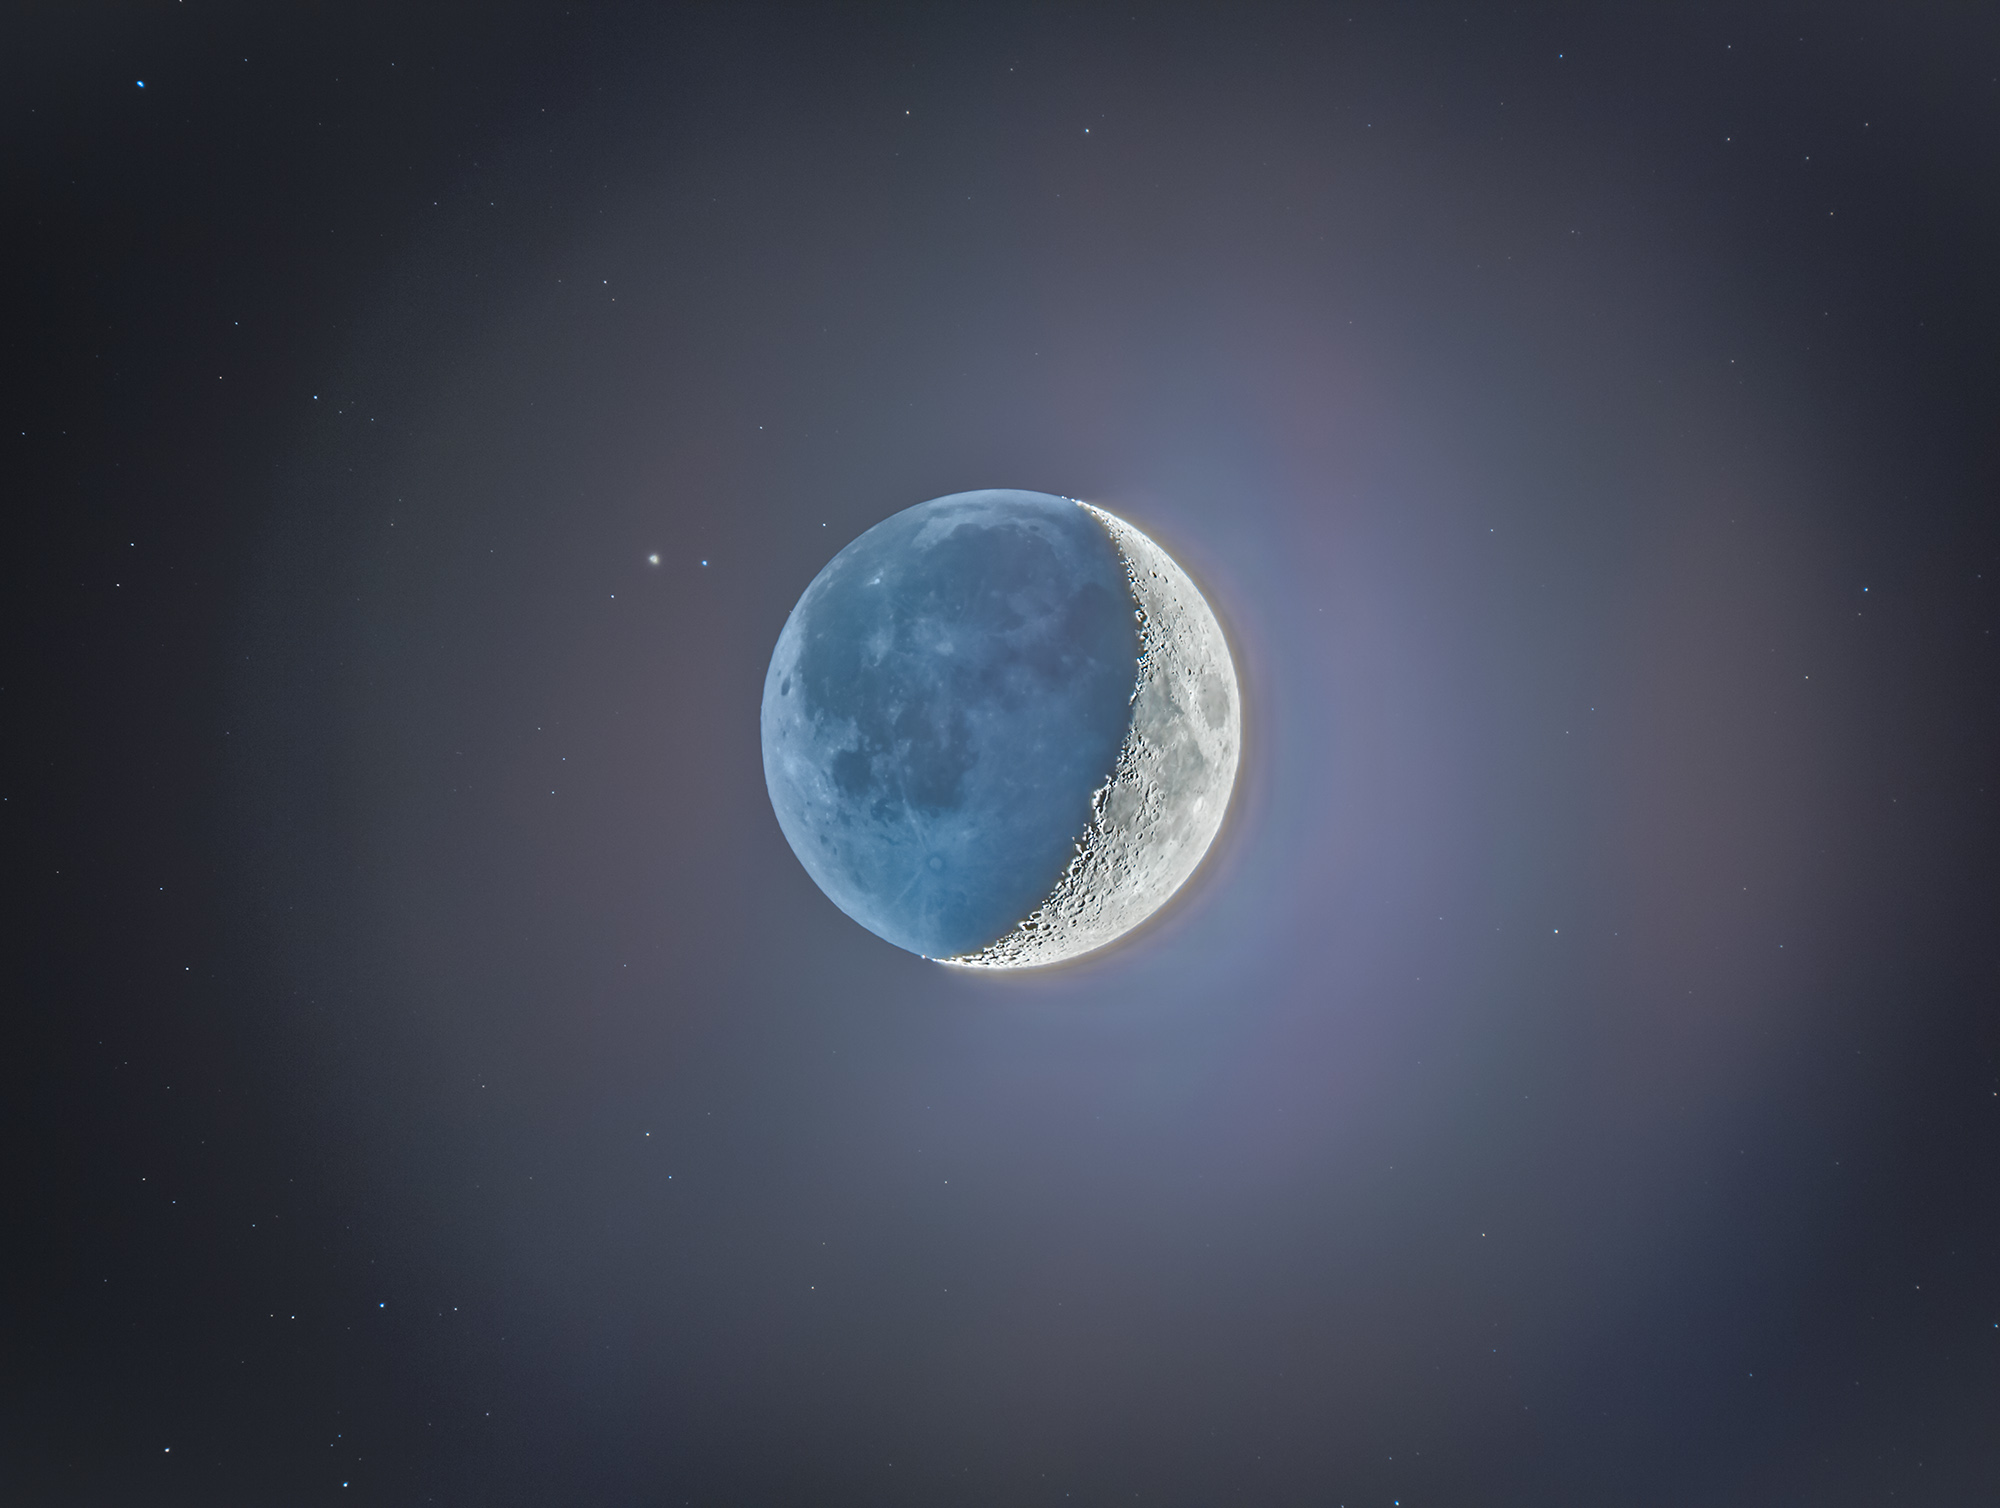
A year from now as I write this, the Moon’s umbral shadow will intercept the Earth for the first time since April 8, 2024. The path of this next total eclipse is unusual in that it starts in northern Russia, travels north over the North Pole, then sweeps down from the north to cross eastern Greenland, nipping the west coast of Iceland, then crossing Spain, to end at sunset over the Balearic Islands of Spain.
Weather prospects are surprisingly good for the several cruise ships planning to be in a Greenland fjord. Iceland is iffy, but had the eclipse been this year (on August 12, 2025) many people would have seen it. Spain was the opposite — statistically it has the best weather prospects along the 2026 path, but on August 12, 2025 most of the country was beset by storms.
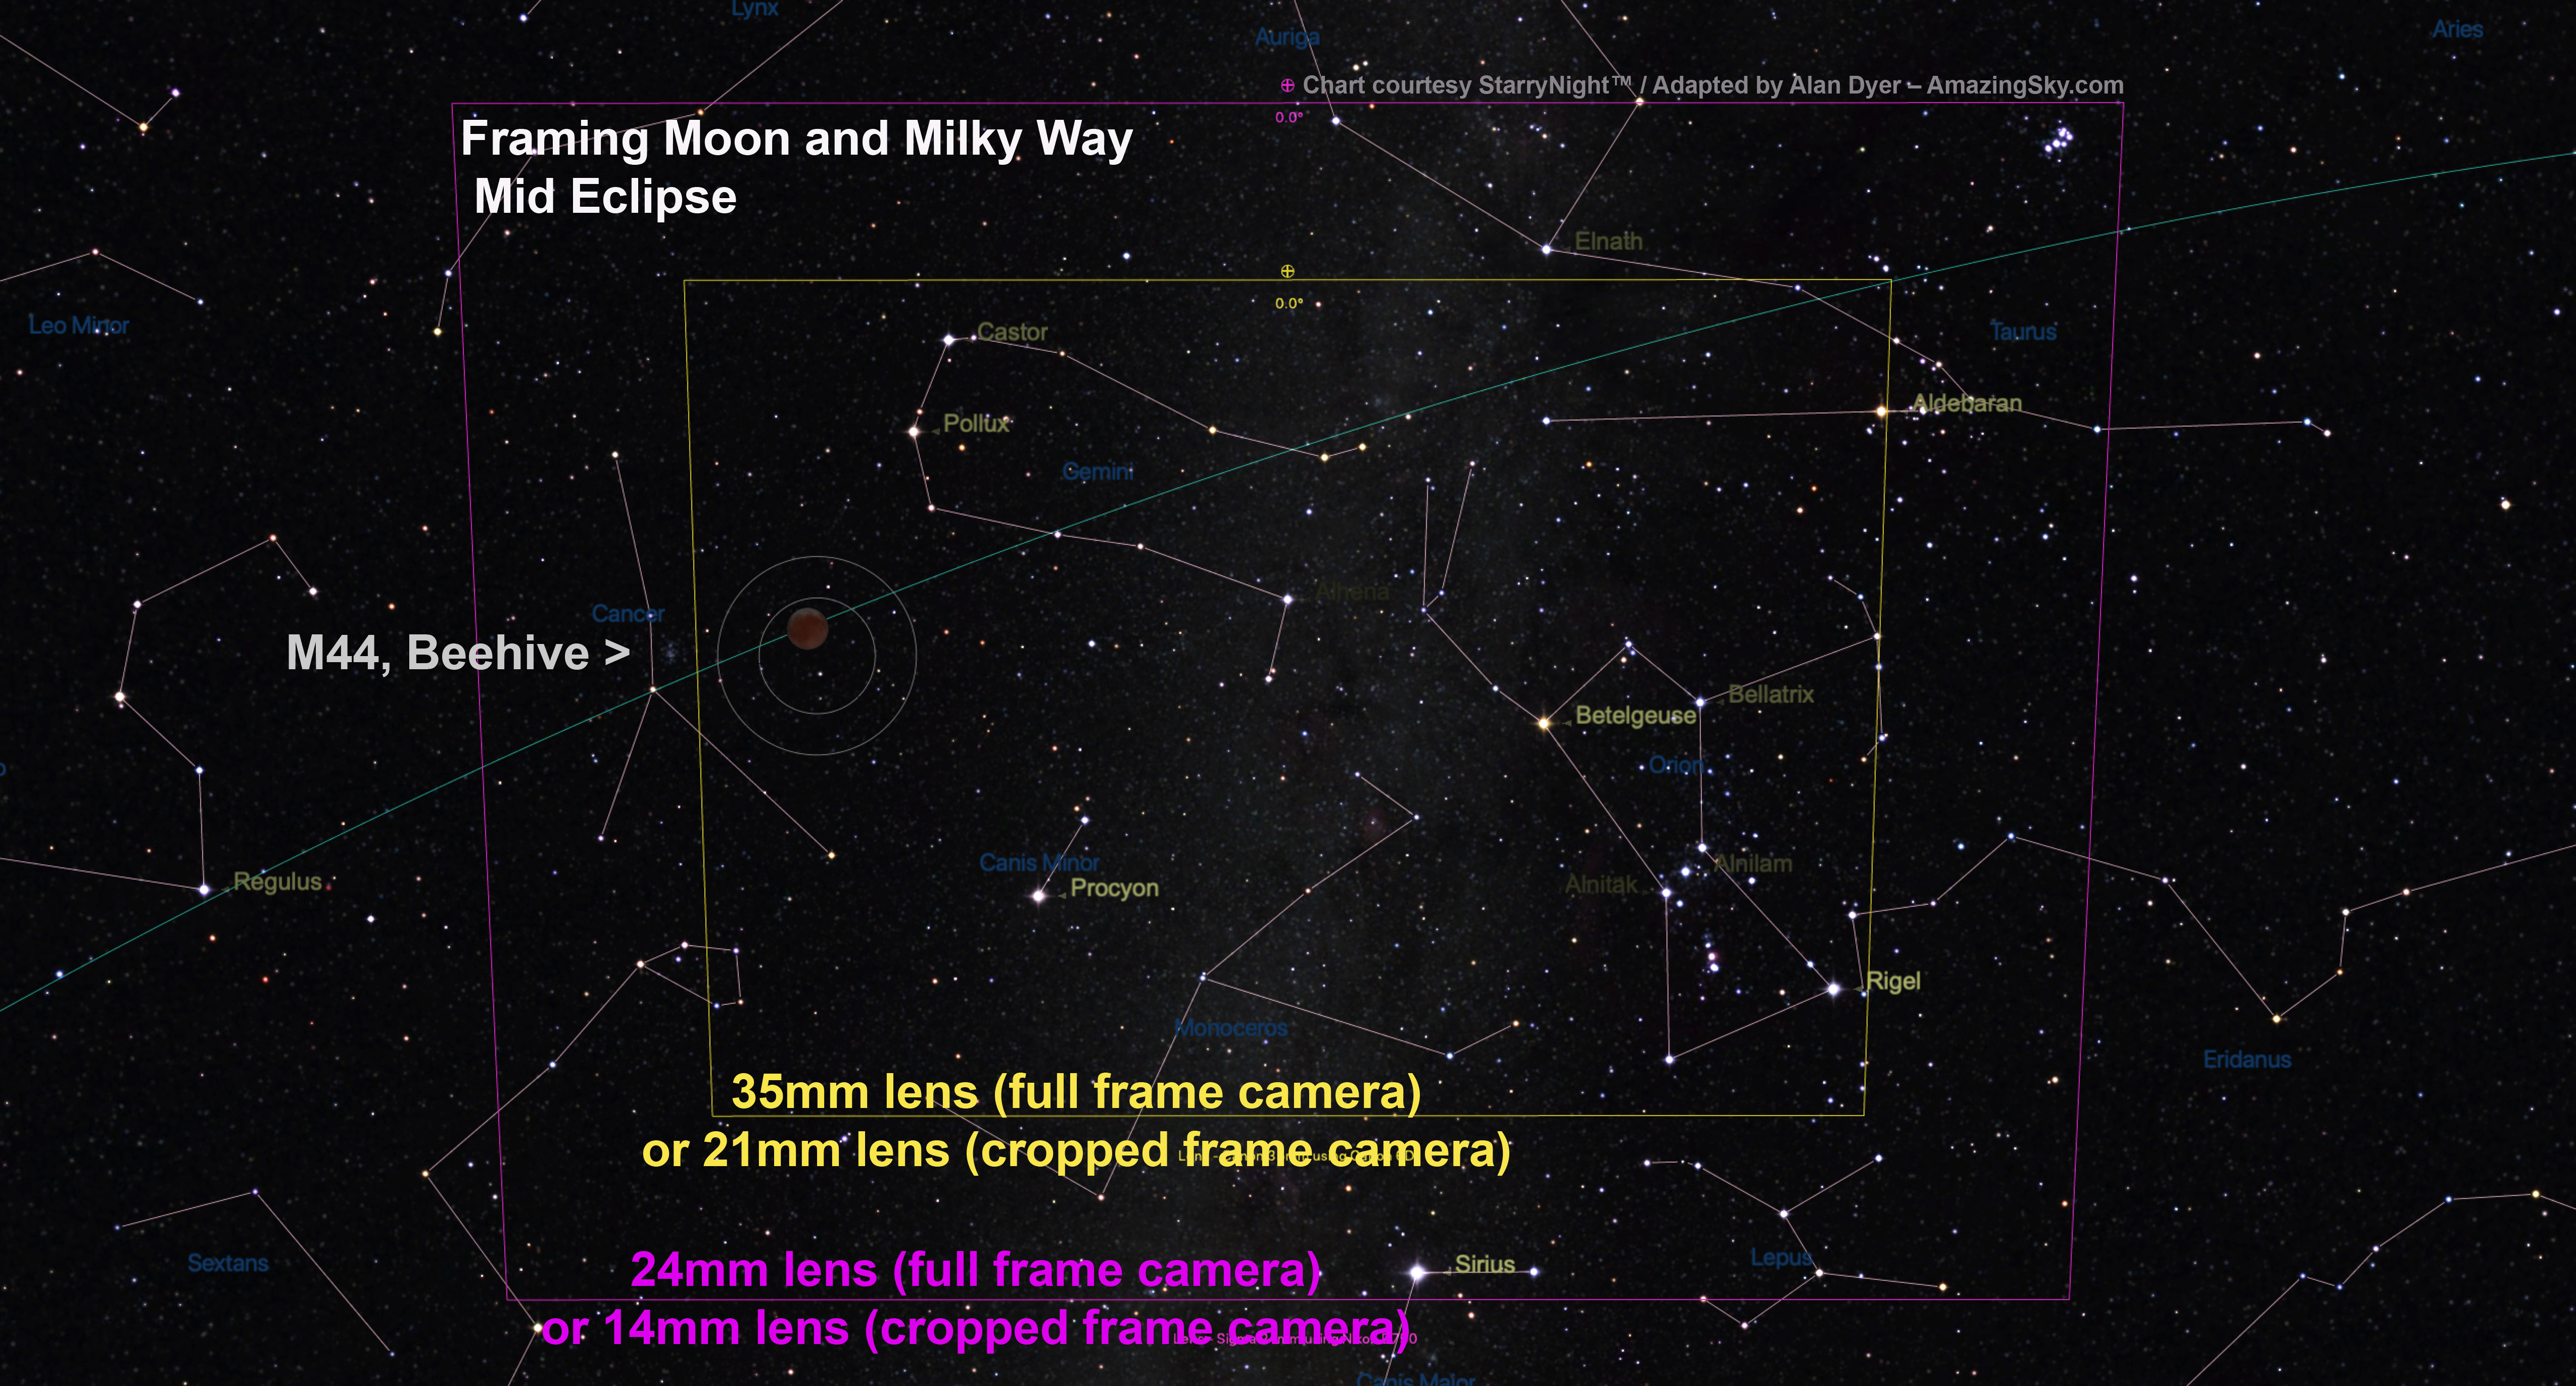
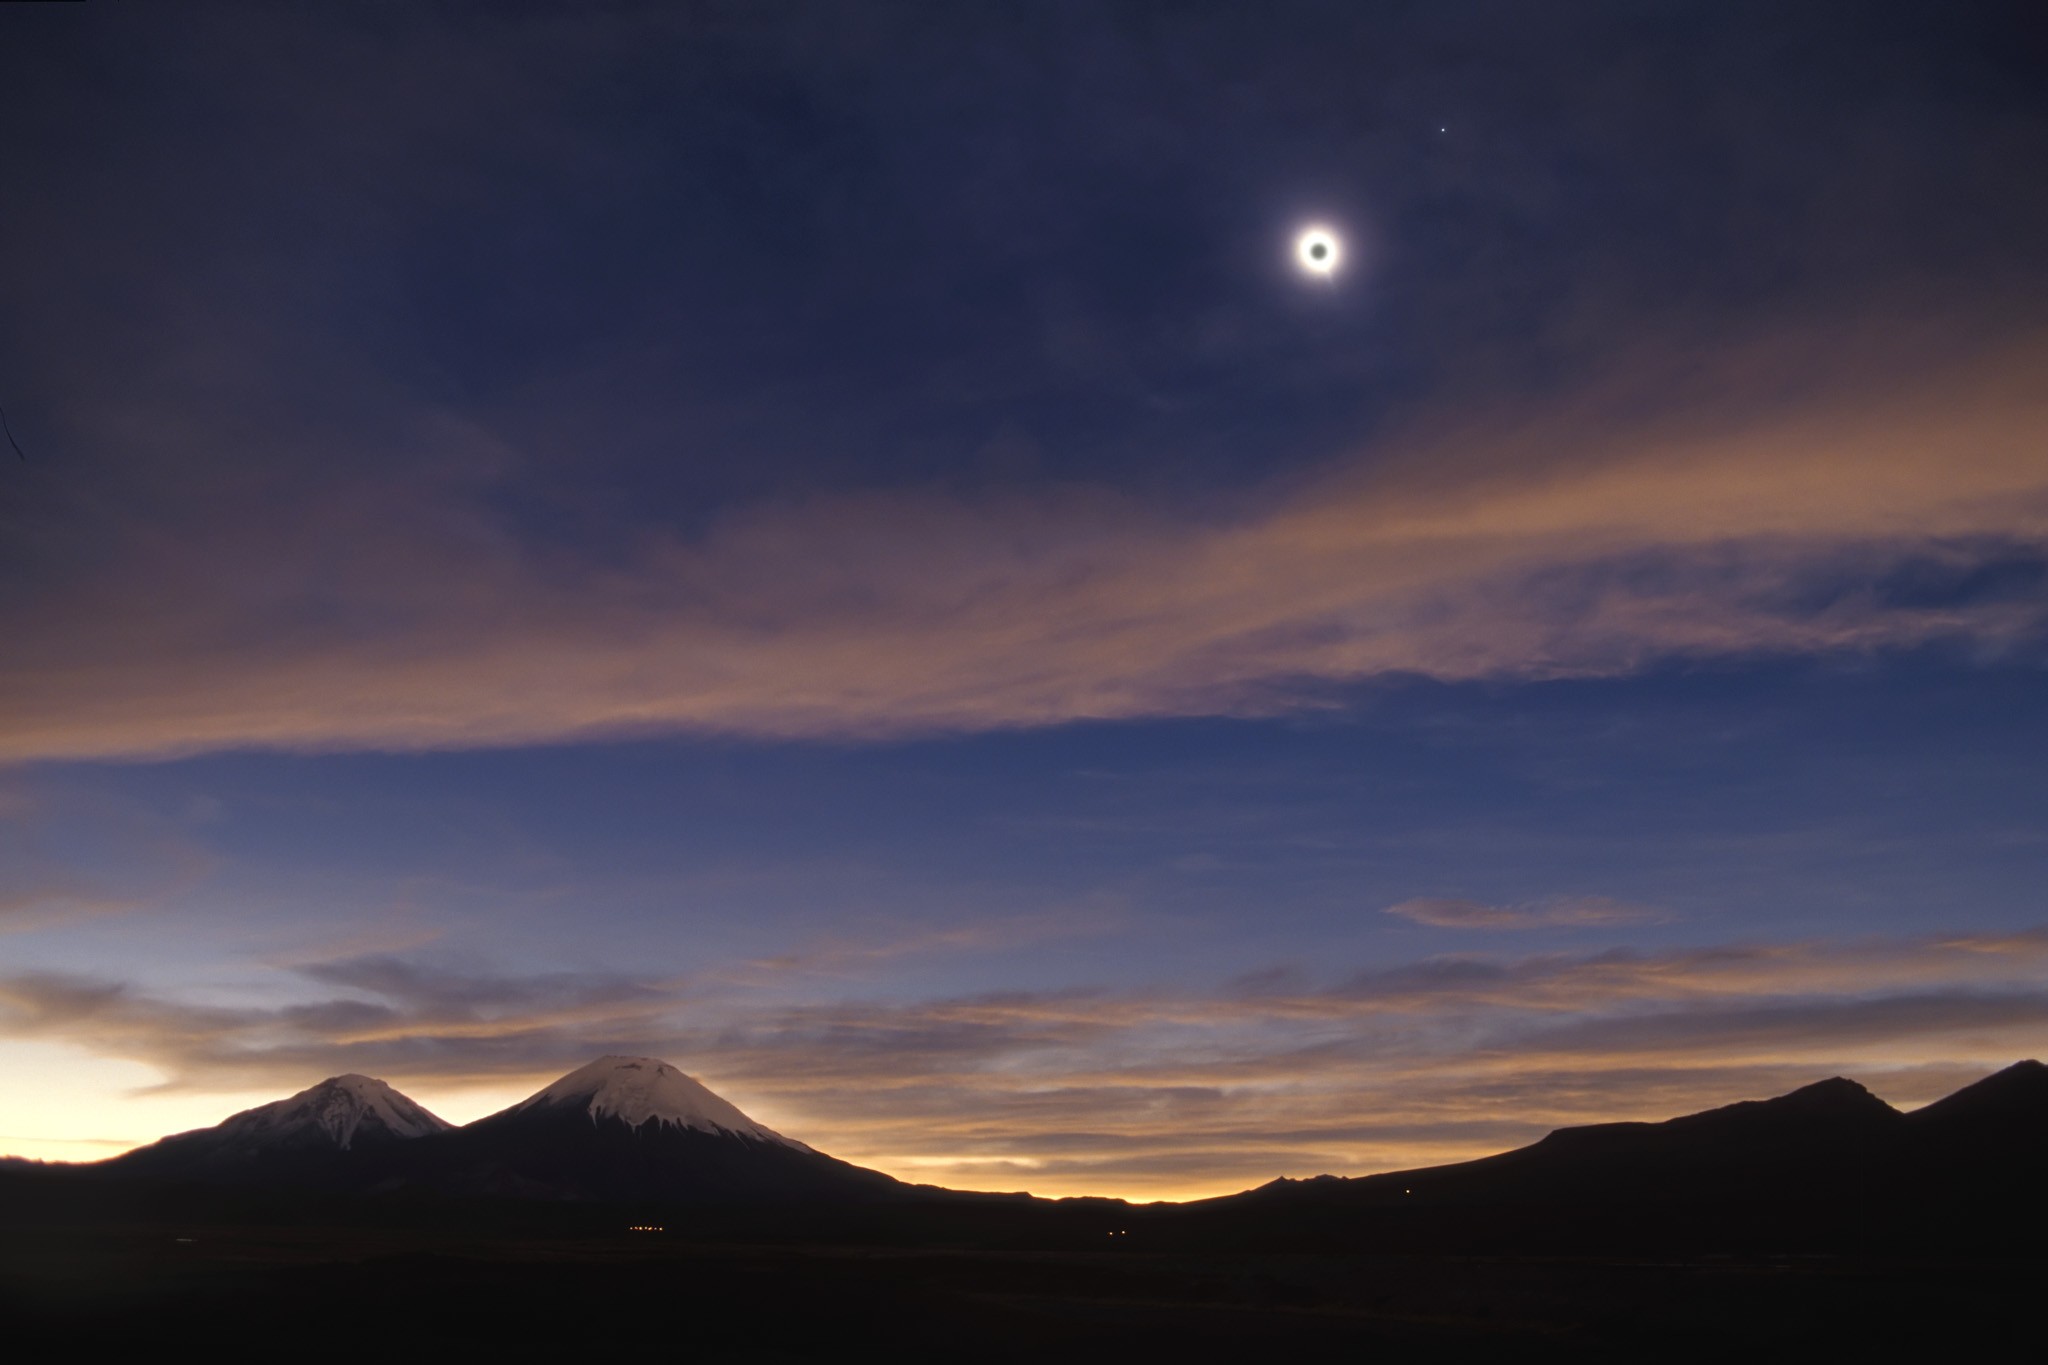
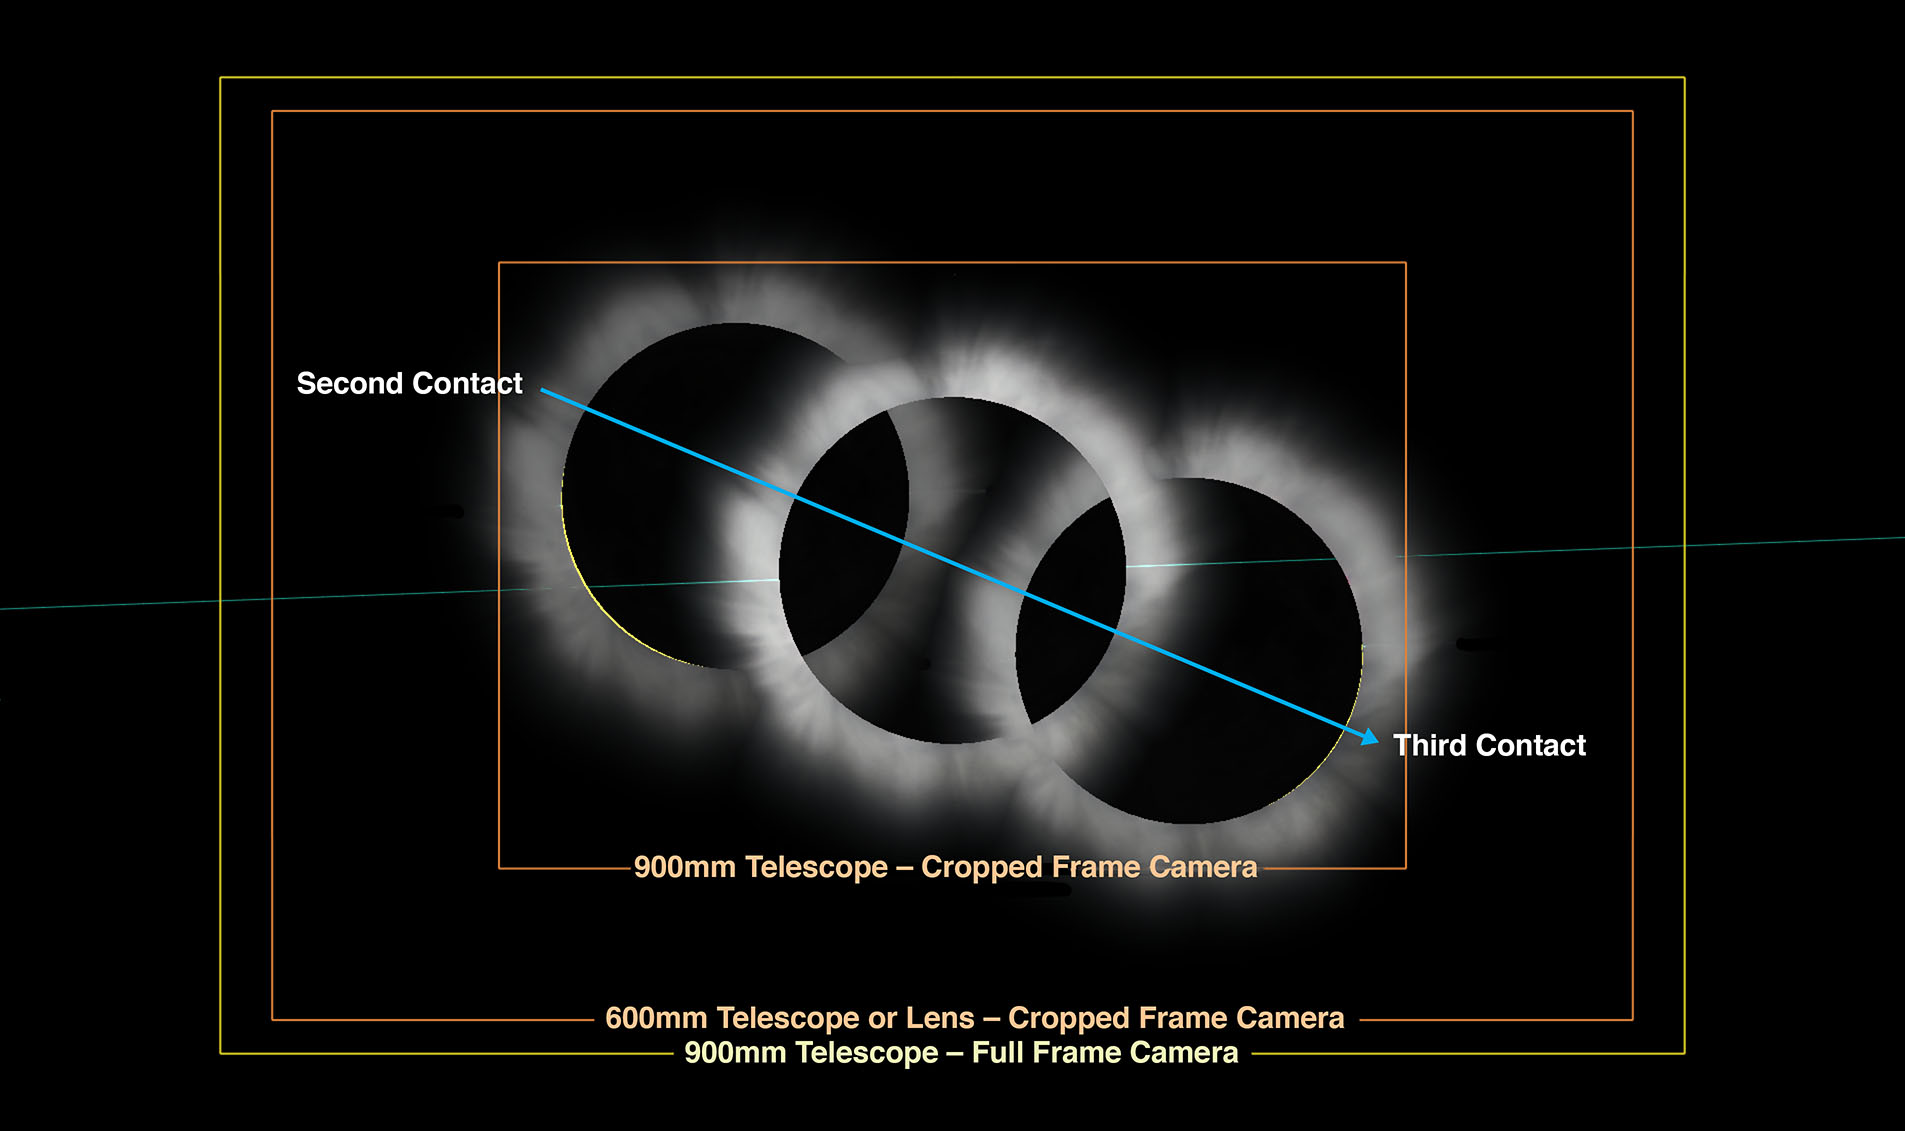
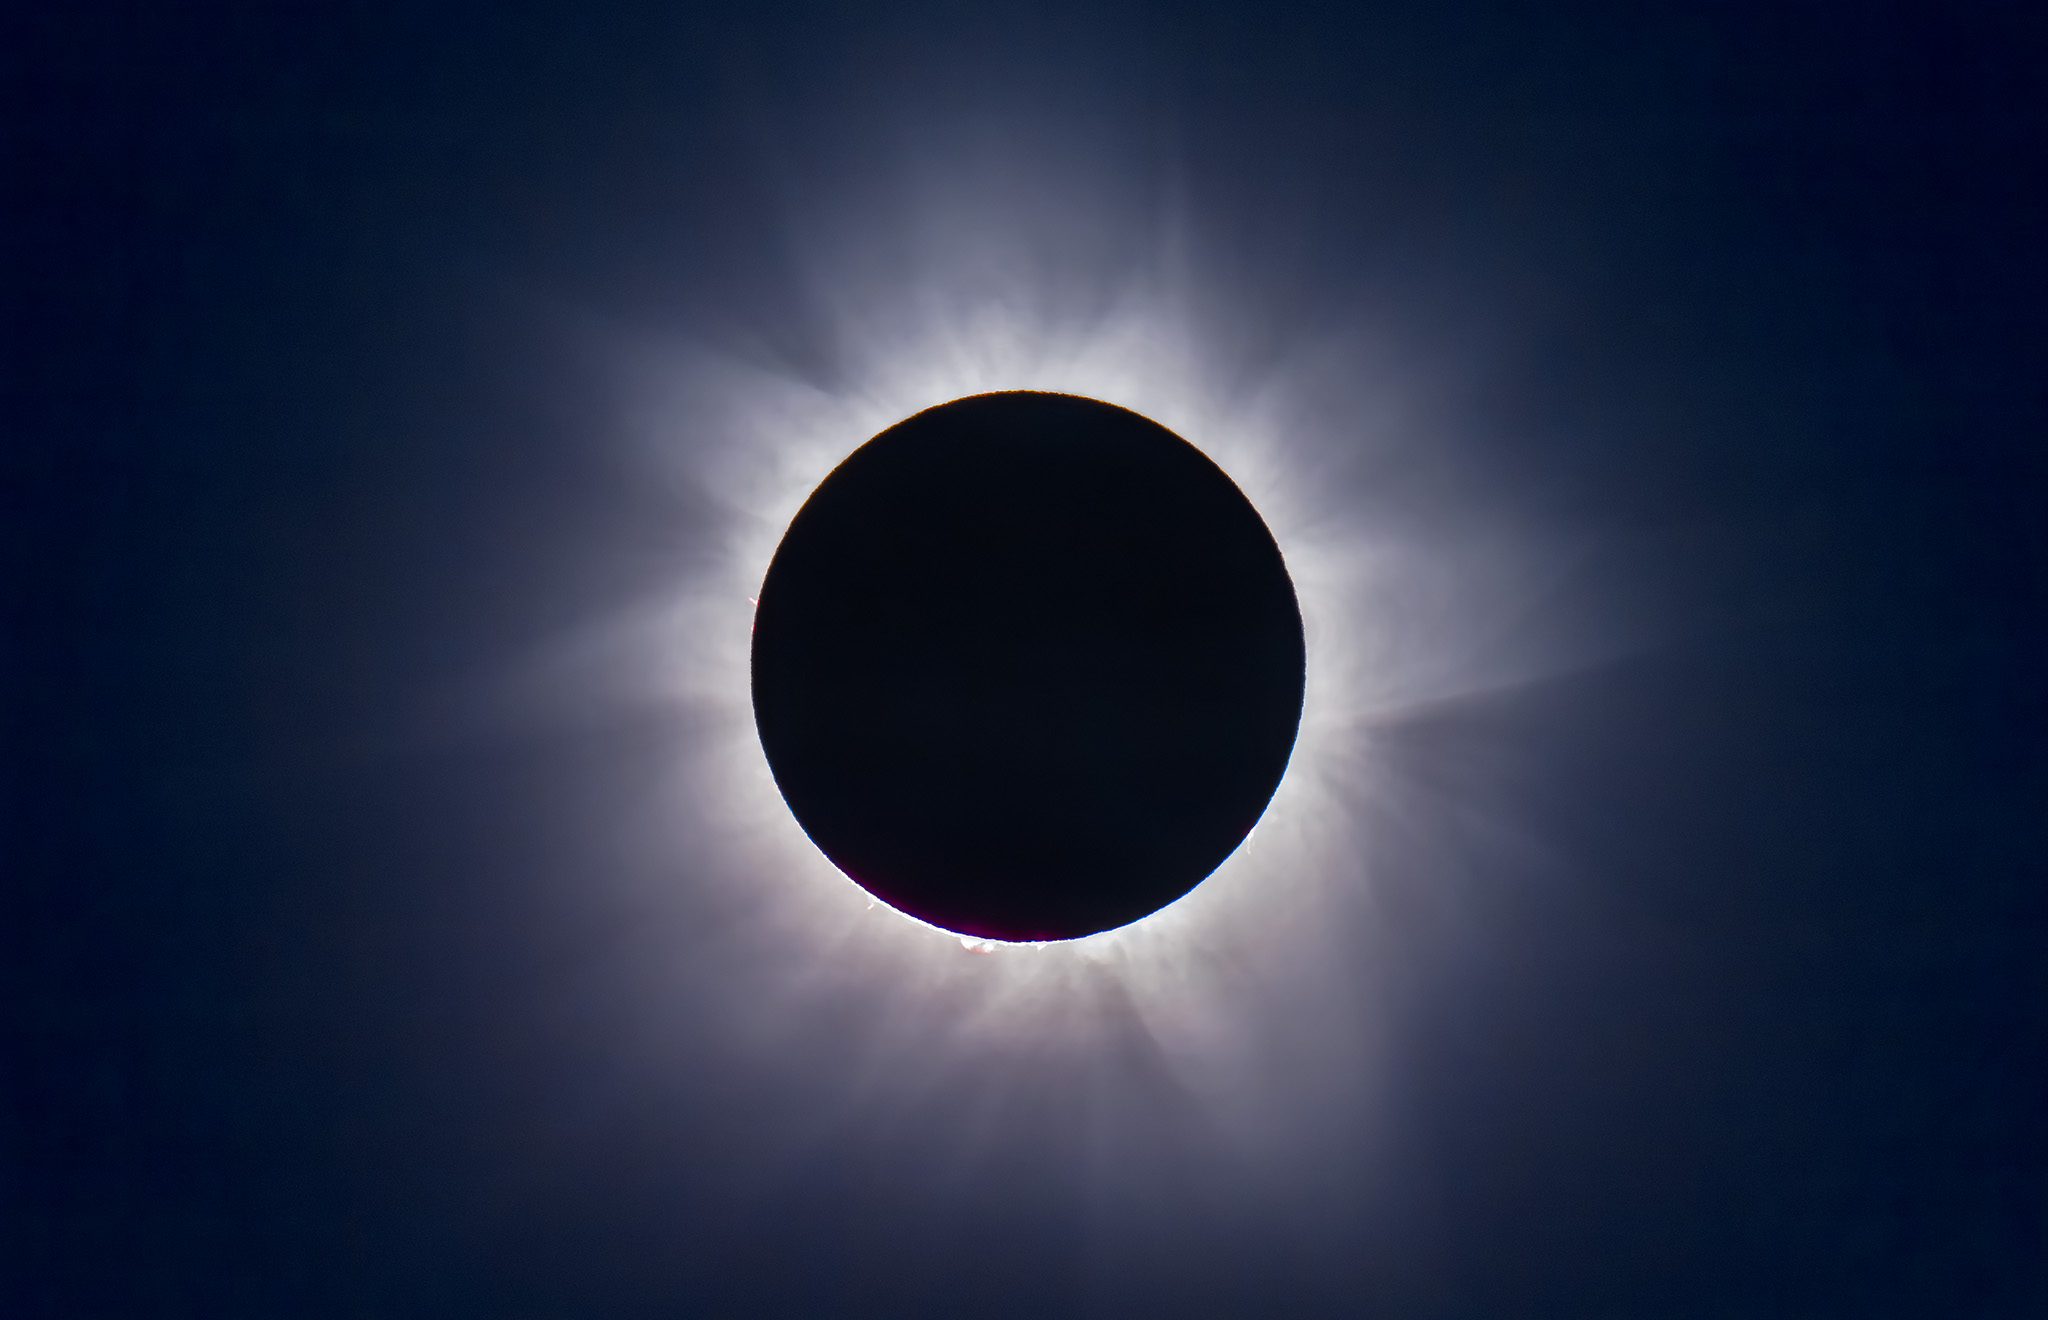
From northern Spain, where I intend to be and as I show above, the Sun will be low in the west in the early evening sky, for a relatively short 1m40s of totality. A low eclipse can be spectacular, but riskier as there’s a greater chance of clouds hiding a low Sun.
This and the other images of the Sun’s position at each eclipse are pages from my eclipse ebook, described below.
Twelve new Moons later, the lunar shadow again crosses the Earth, this time passing over North Africa where skies are almost always clear in summer. But the days are hot! The shadow crosses the Strait of Gibraltar and passes over Morocco, Algeria, Tunisia, Libya, Egypt, and Saudi Arabia. In addition to the good weather, the attraction is that this is the longest total eclipse for the rest of the 21st century.
The spectacular temples of Luxor, Egypt are at the point of maximum eclipse, with an unusual 6m23s of totality with the Sun high overhead. Even at Gibraltar, totality is 4m35s, seven seconds longer than the maximum in Mexico in 2024.
From Tunisia, as I show above, the Sun is 55º high over the Mediterranean, and totality is a generous 5m44s.
Another 12 lunar months later, the Moon shadow sweeps across the southern hemisphere, for another generously long eclipse. Remote Western Australia enjoys 5m10s of totality on a winter’s day.
But millions lie in the path in New South Wales, where Sydneysiders can watch a total eclipse over Sydney Harbour lasting 3m48s. The sky scene is below, with a late afternoon winter Sun heading down in the west. From Farm Cove, the eclipsed Sun will be over the Opera House and Harbour Bridge, for a never-to-be-repeated photo op.
The South Island of New Zealand sees a sunset eclipse (the shadow passes over Milford Sound) that lasts 2m55s, longer than the 2017 eclipse in the United States.
Coincidentally, Australia also hosts the next total eclipse to follow, after a gap of 28 months, on November 25, 2030. And the lunar shadow crosses Australia on July 13, 2037 and December 26, 2038 — a Boxing Day eclipse down under. So Australia is the place to be for the next decade or so.
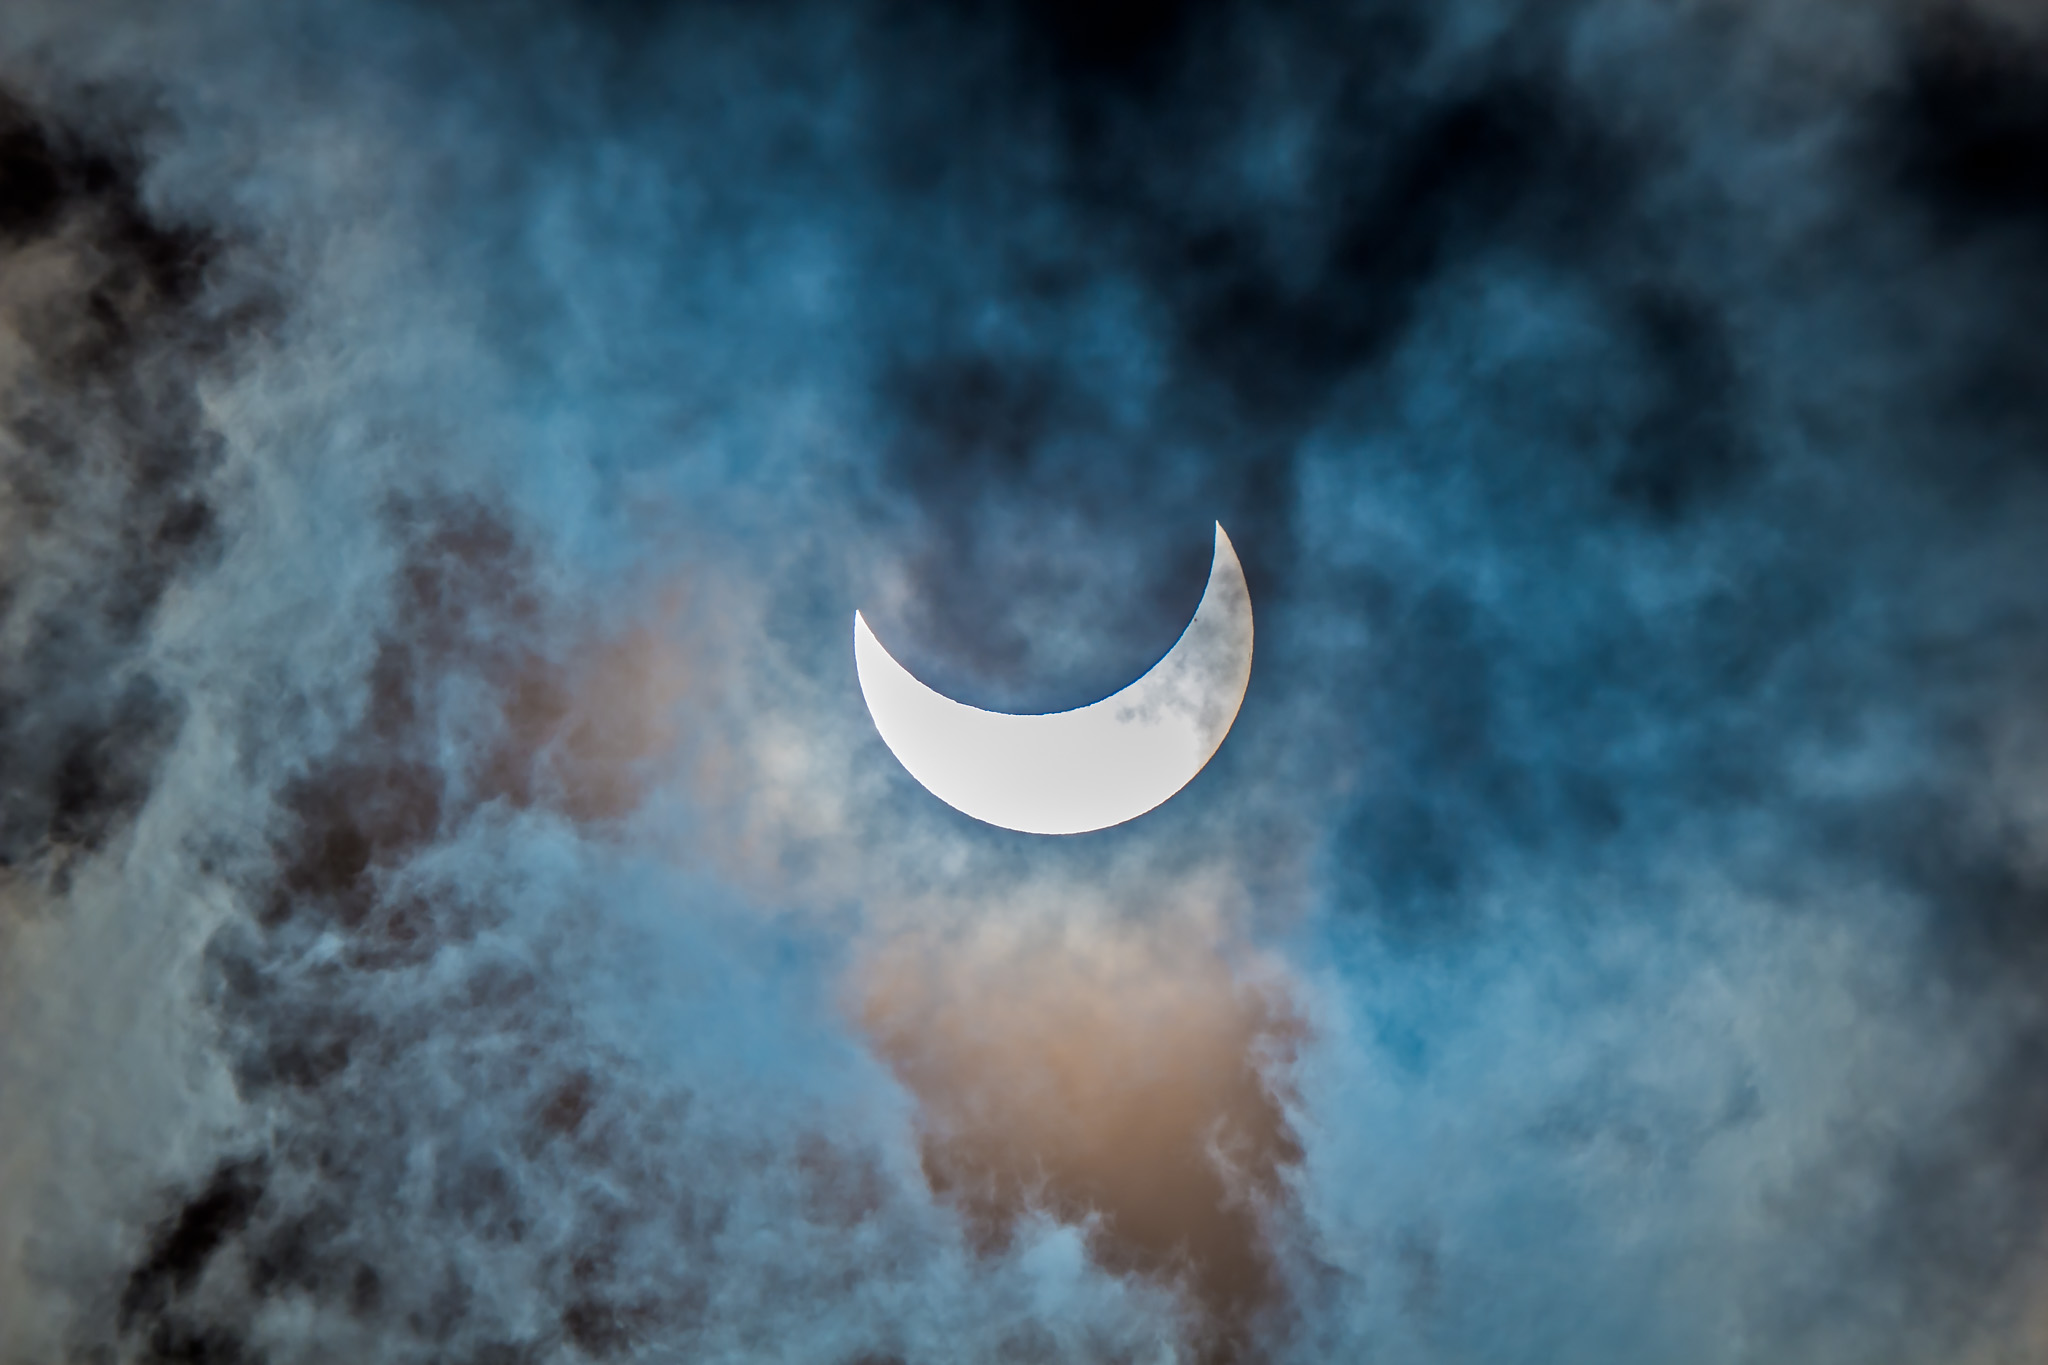
But between 2026 and 2028, Spain is host to three eclipses, as the 2027 total crosses Spanish territory, and the January 26, 2028 annular eclipse ends at sunset in western Spain. At this eclipse the Moon is not large enough to completely hide the Sun, so at mid-eclipse we see a bright ring of light, similar to the annular eclipse here in North America on October 14, 2023.
My Plans
Where will I be? For 2026 I have signed onto a trip to Spain with the well-travelled photo tour company CaptureTheAtlas.com.
They are planning a very photo-centric tour to Spain for viewing the eclipse from a winery near Burgos. I’ll be one of the instructors, among a stellar line-up of eclipse veterans and astrophoto experts. I invite you to check out the details of the tour here at its webpage. We’d love to have you join us!
For 2027 I am planning to be in Tunisia, on the Mediterranean coast, with a tour group from Astro-Trails.com.
The path of totality passes just a few kilometres from Coonabarabran, the “Astronomy Capital of Australia,” as the Siding Spring Observatory is just down the Timor Road in the path. In July the Milky Way is at its best, with the centre of the Galaxy high overhead at nightfall. That’s a sight equal to an eclipse for bucket-list spectacle.
My EBook
The cover of my new 400-page ebook
For 2017’s eclipse I prepared an ebook on how to photograph it. It proved popular, and so for the 2023 and 2024 eclipses I revised it to cover both the annular and total eclipses.
Its popularity prompted me to revise it again, this time to cover the coming trio of eclipses, plus I included pages on the January 2028 annular, as many who visit Spain for the totals may plan to return for the sunset annular (low annulars are also the most spectacular!).
My new ebook is 40 pages larger than the previous edition, with most of the added content in the 100-page chapter on processing eclipse images, from wide-angles, to time-lapses, and to blended exposures of totality close-ups. I include lots of information on choosing the right gear — filters, camera, lenses, telescopes, and tracking mounts.
The slide show above presents images of sample pages. Do page through the gallery for a look at the content.
But for all the details and links to buy the book (from Apple Books or as a PDF for all platforms) see its webpage at my website.
It will be a busy three years for eclipse chasers, as rarely do we get three-in-a-row like this. The diversity of locations and eclipse circumstances make this an exciting trio to chase. But you can just go back to Spain to see most of them!
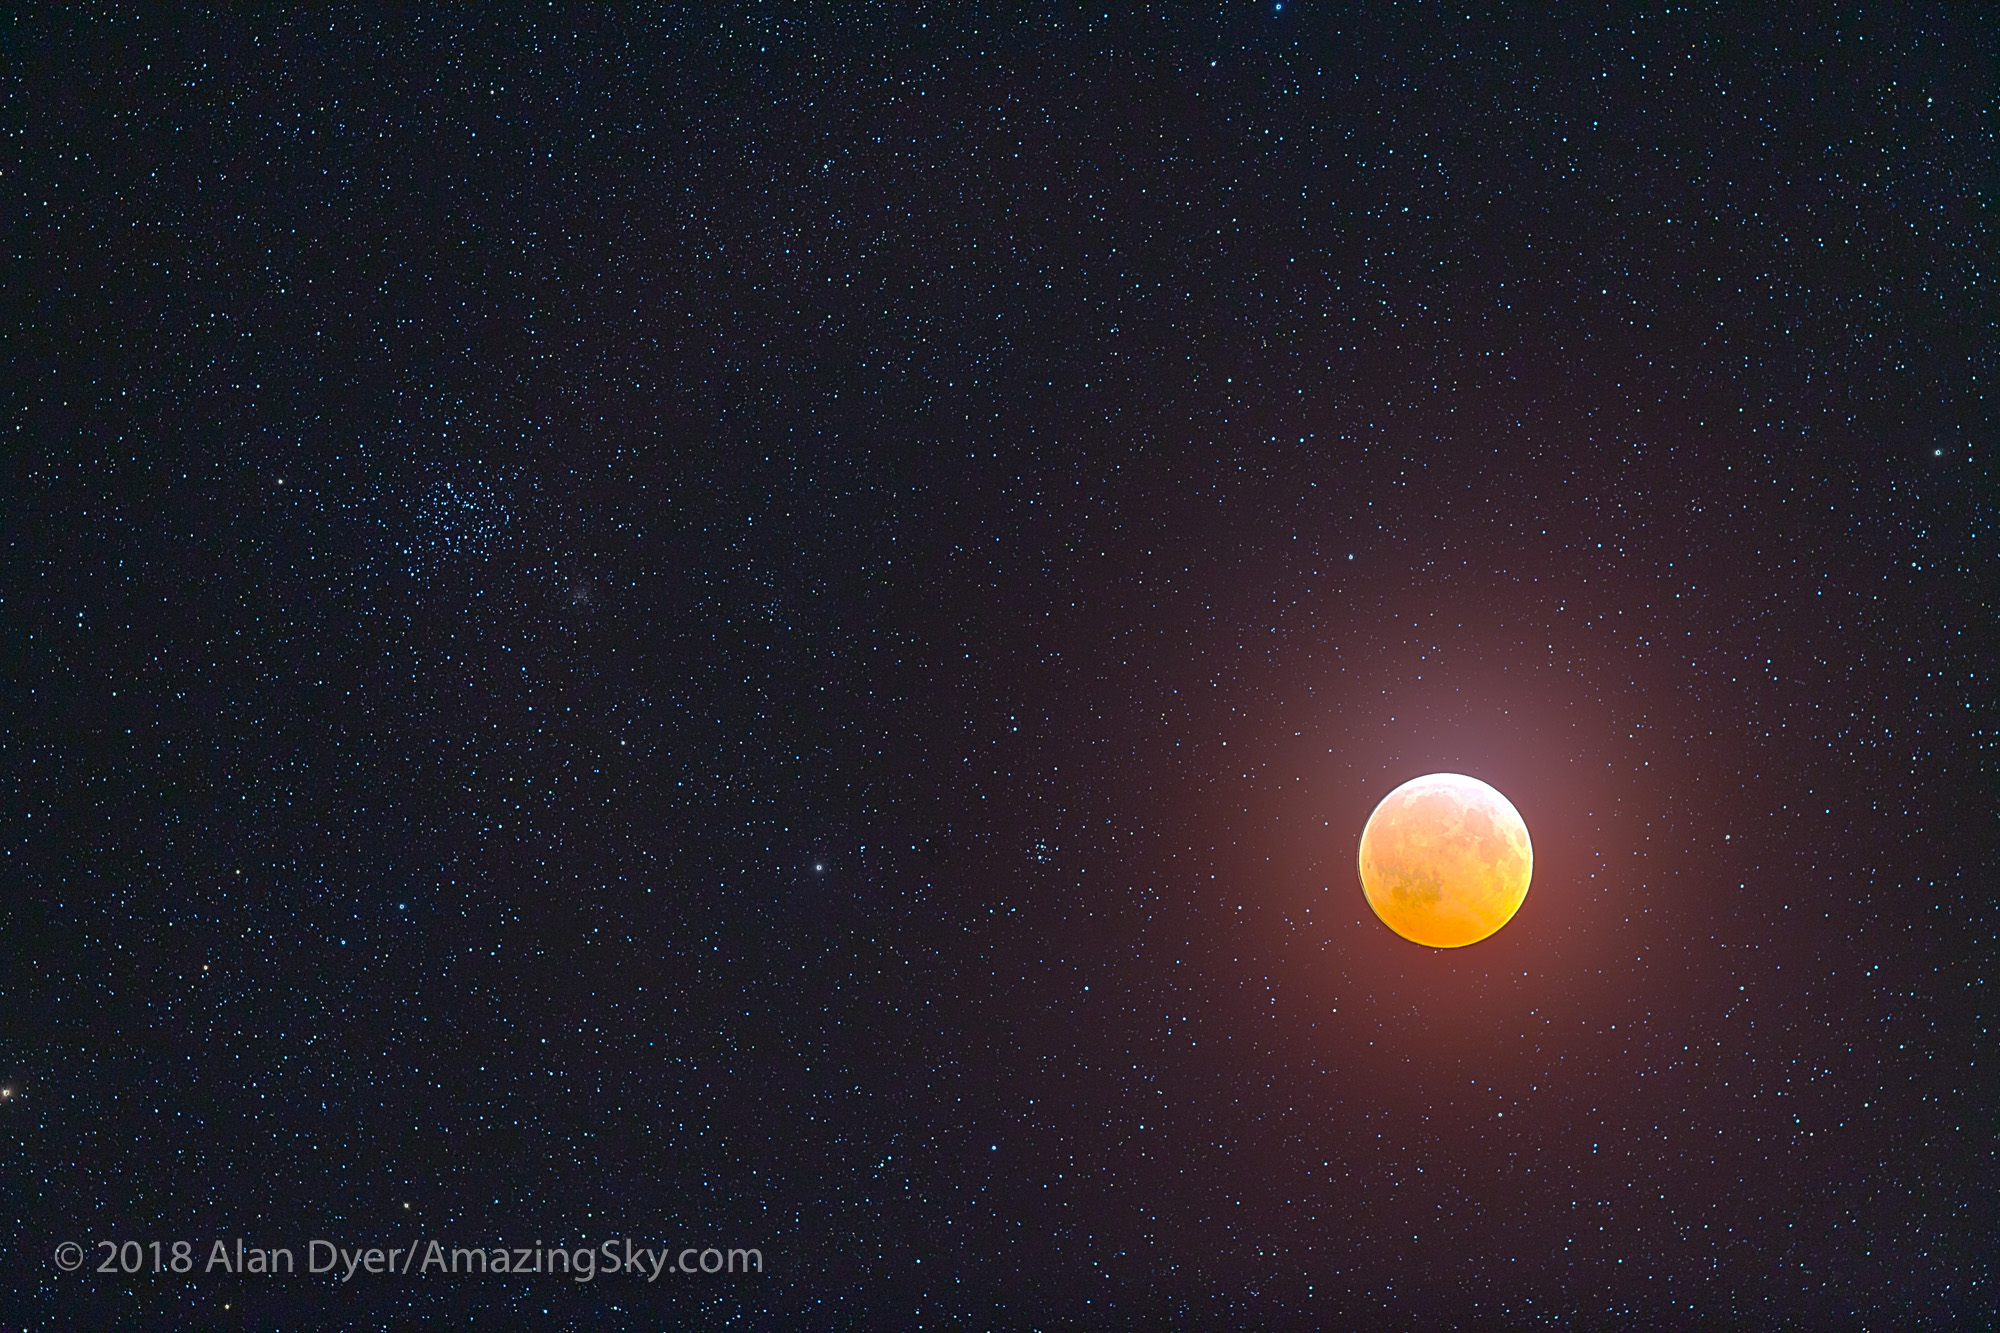
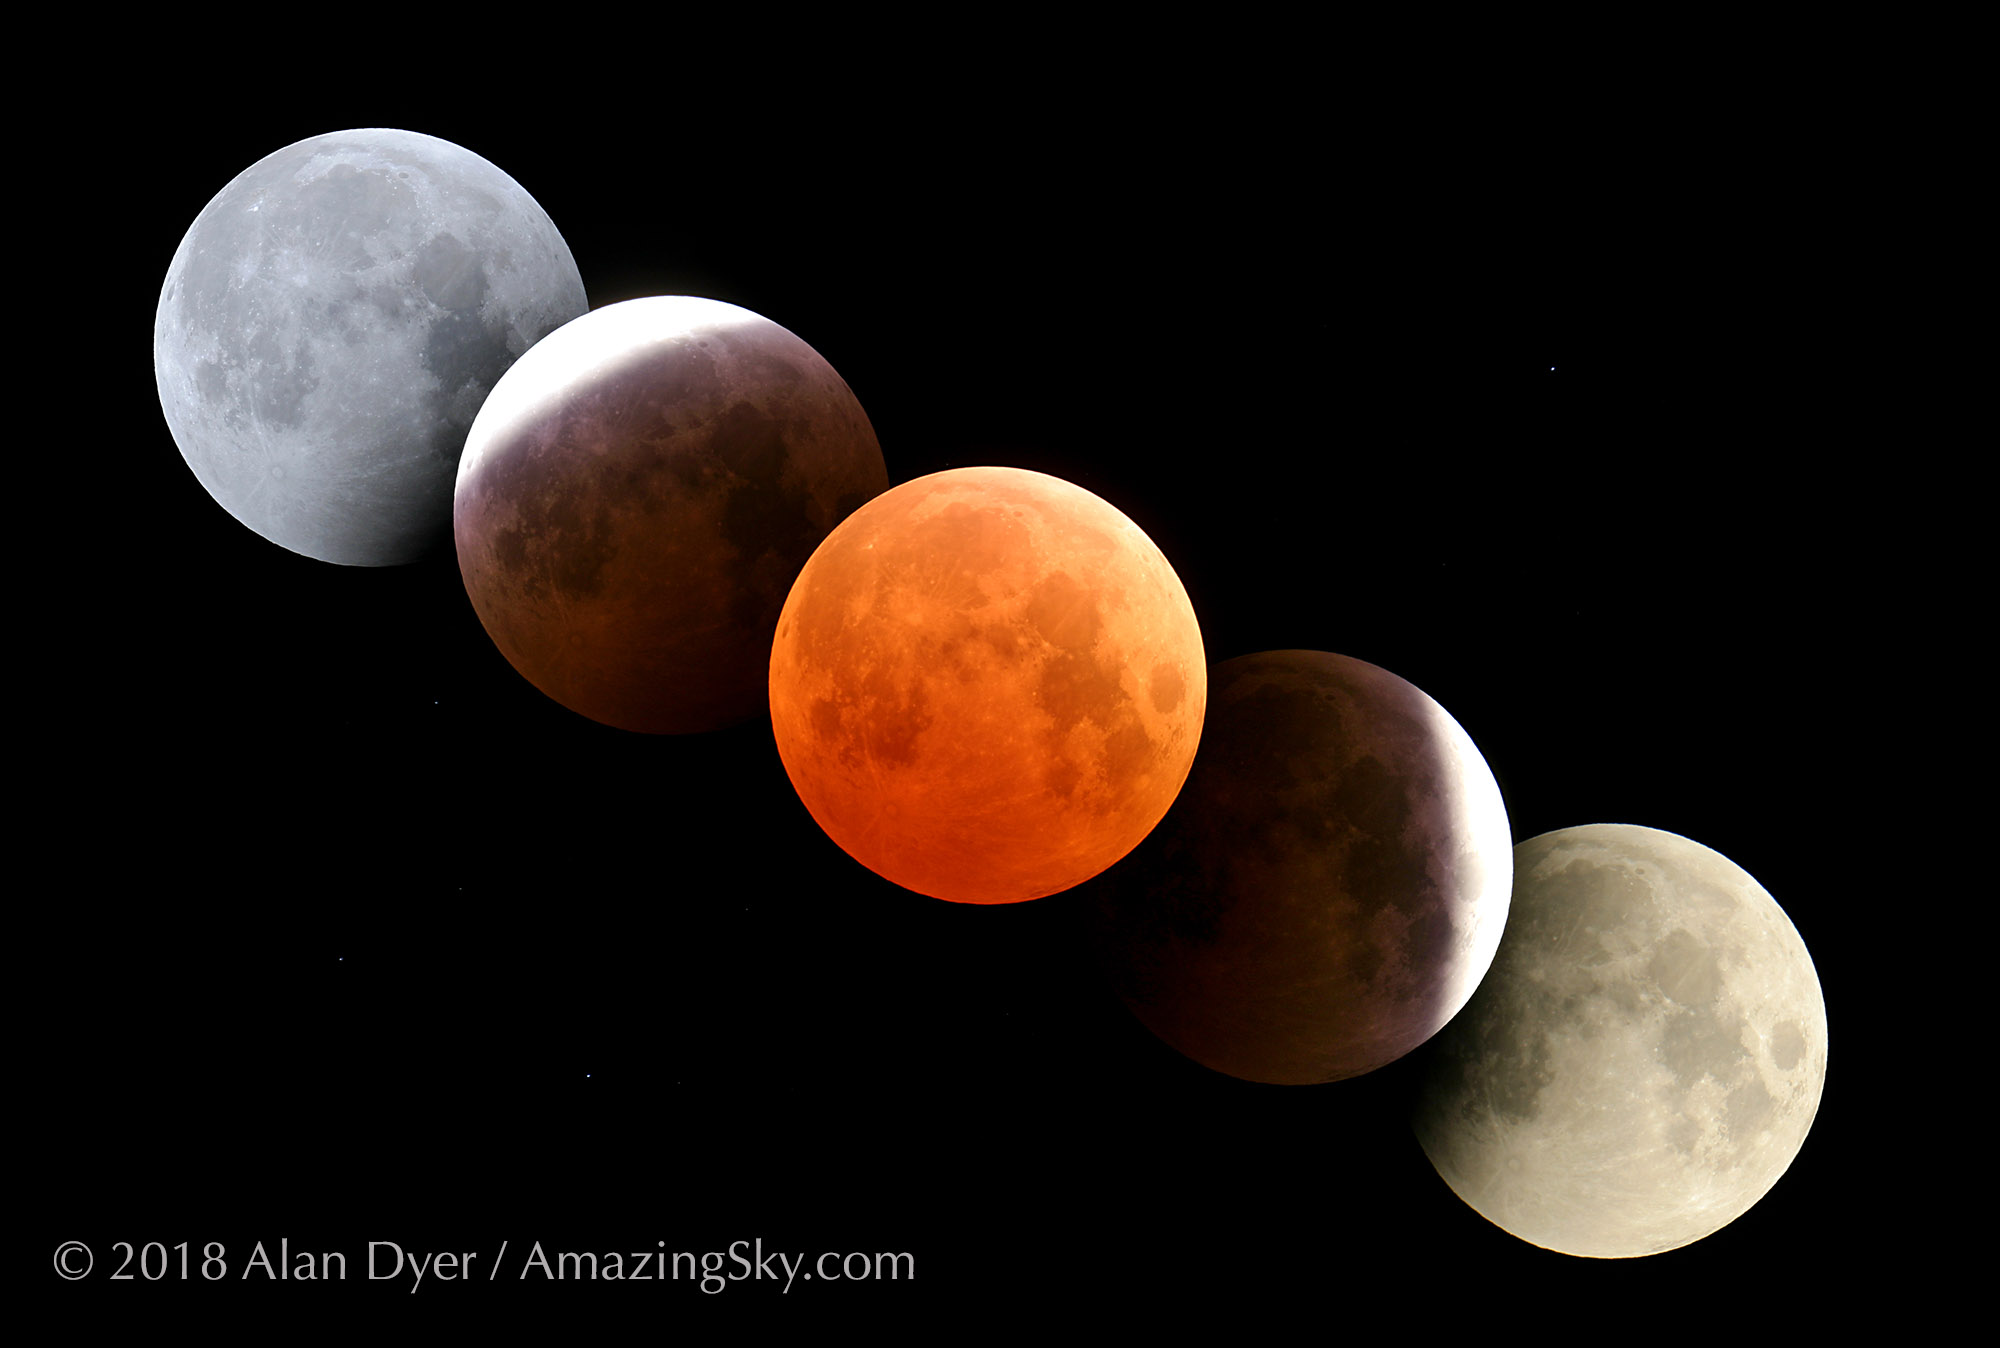
It took a last-minute chase, but I managed to capture the total eclipse of the Moon on March 14, 2025.
It would not be an eclipse without a chase. Solar eclipses of the total kind almost always involve travel, often to exotic locales around the world. But total lunar eclipses come to you, as they can be seen from an entire hemisphere of the planet.
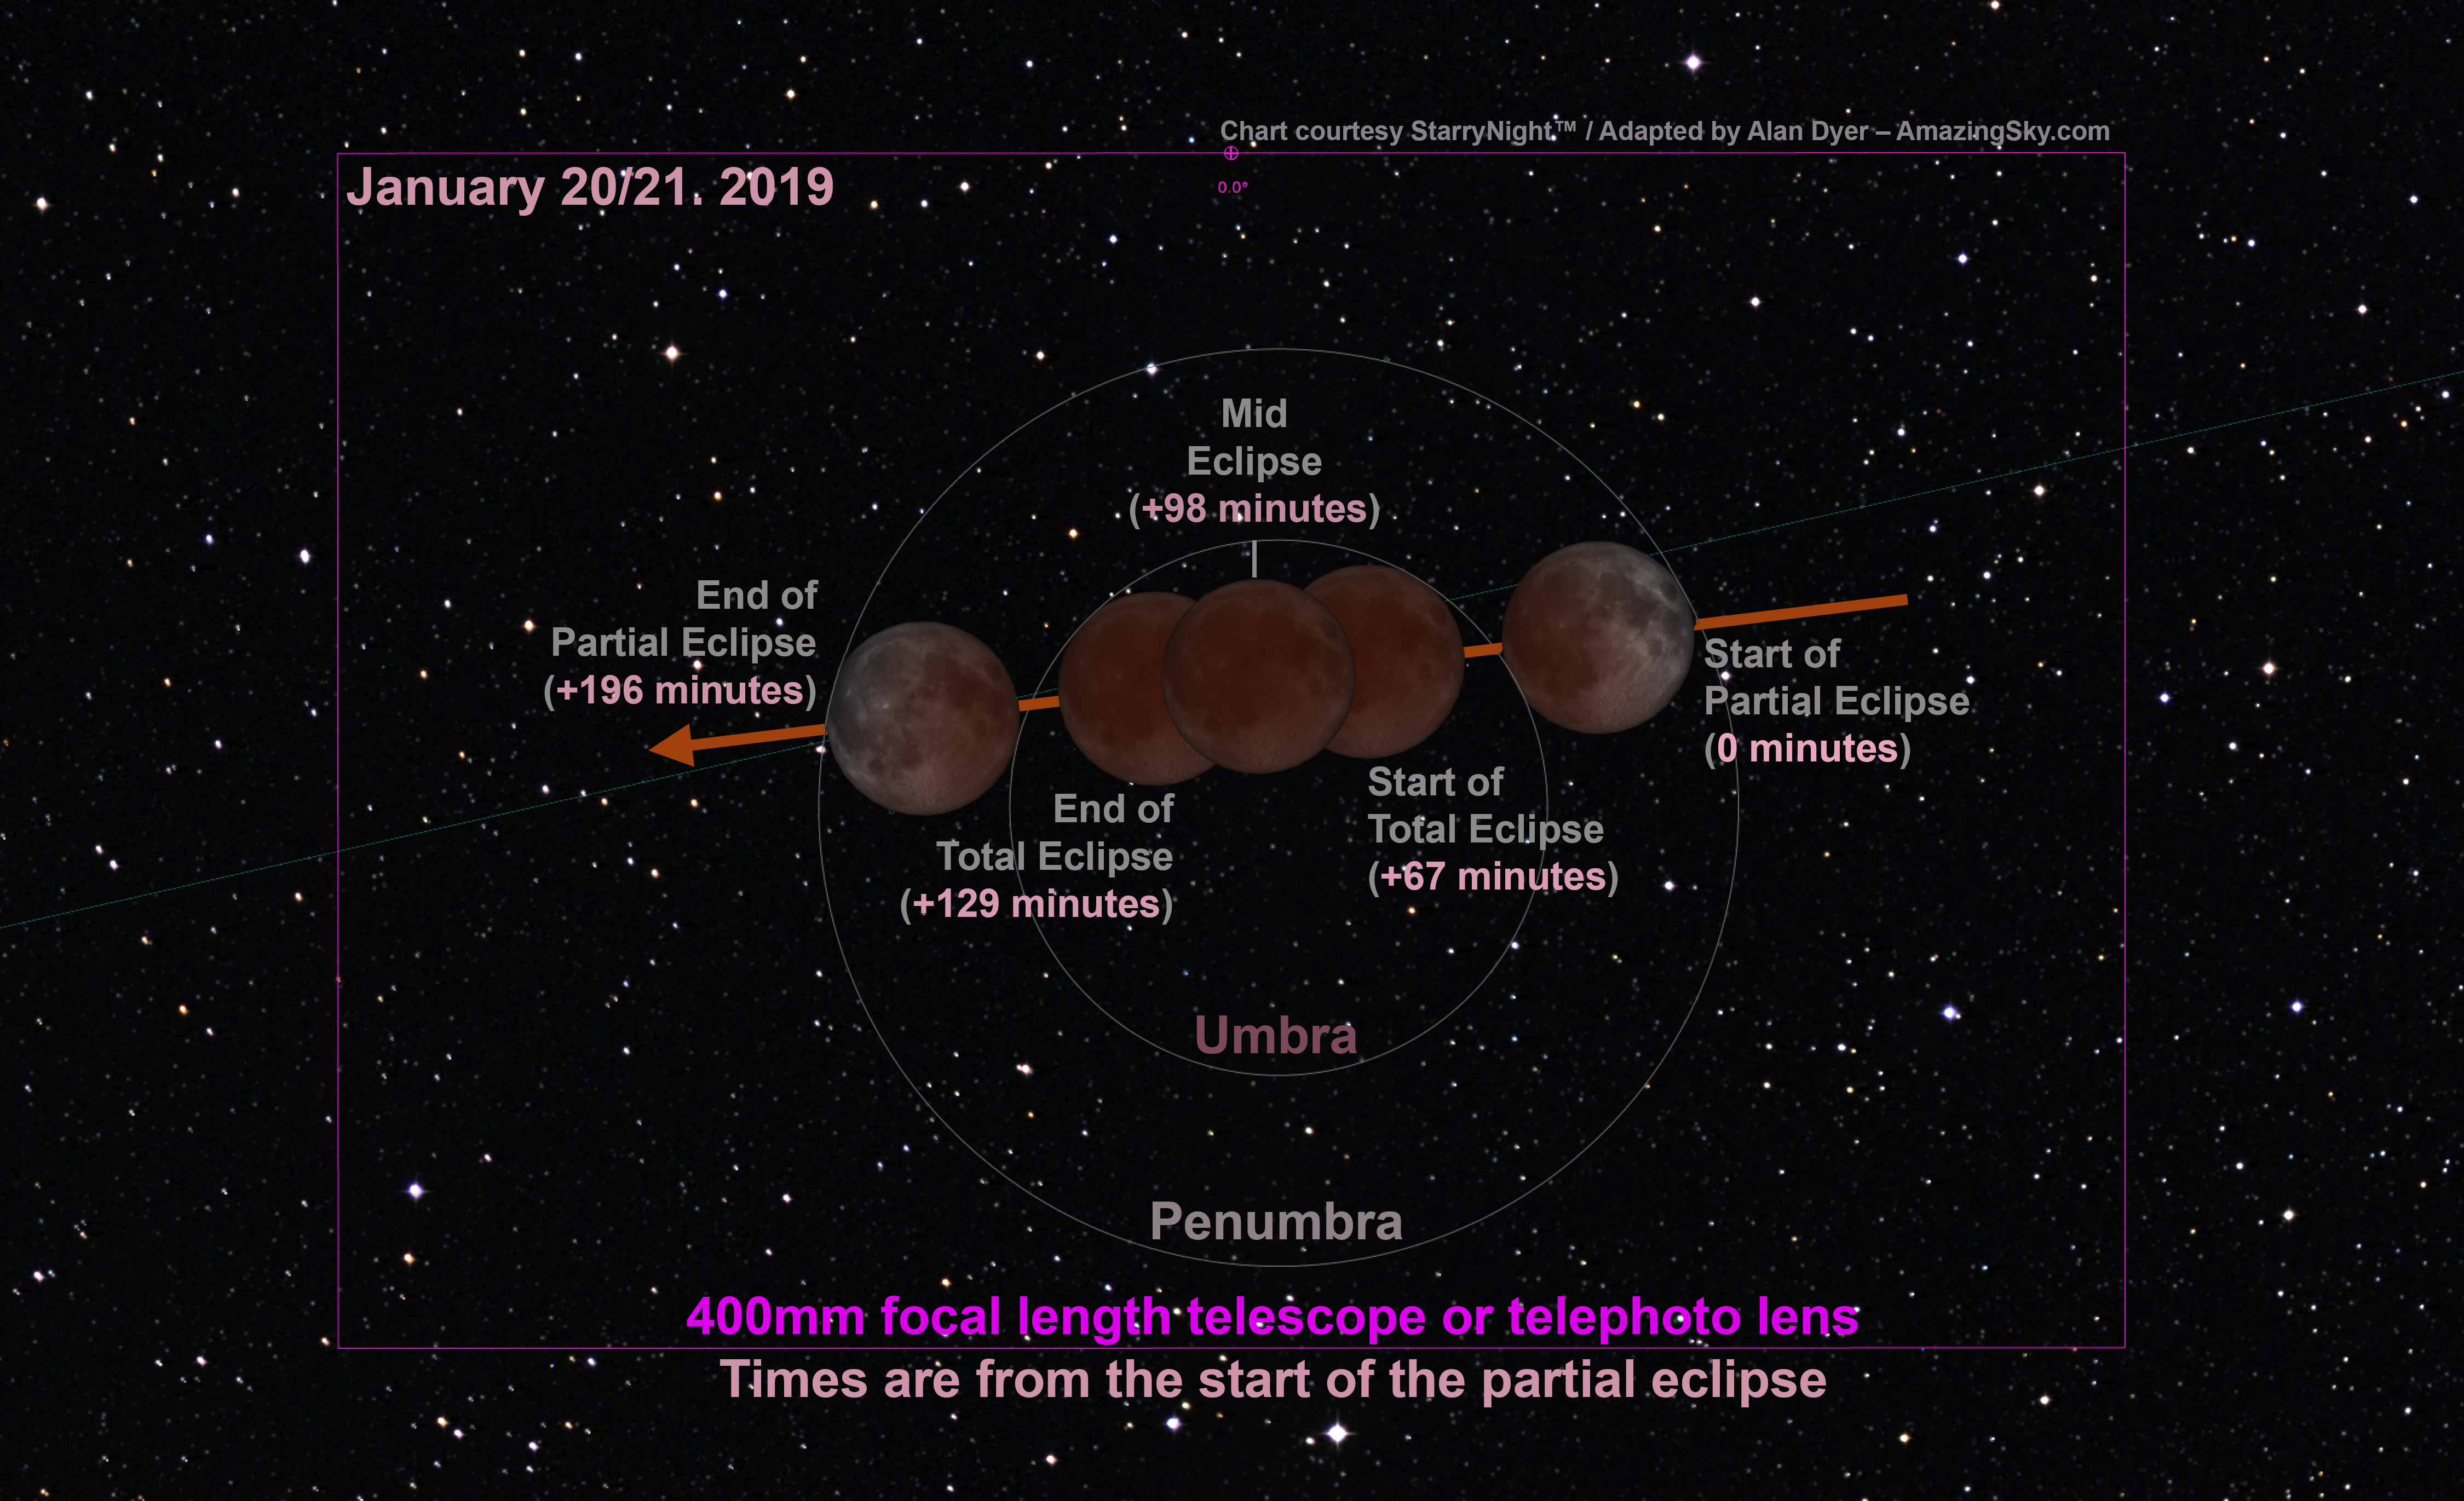
Except there’s one problem — clouds! Over the last decade since 2014, of the eight total lunar eclipses (TLEs) I was home in Alberta for, I had to chase into clear skies for all but one. A recounting of one such chase from January 2019 is here.
Only for the TLE before this most recent (on November 8, 2022) was I able to stay home to watch it. Though in that case a snowstorm the day before made the roads and travel poor, so I had to stay home. I recounted that eclipse story here. You’ll find links to my other lunar eclipse stories below.
Once again, for the March 13/14, 2025 TLE, weather prospects looked poor. Not just in my area but in many regions of the continent. But there was hope!
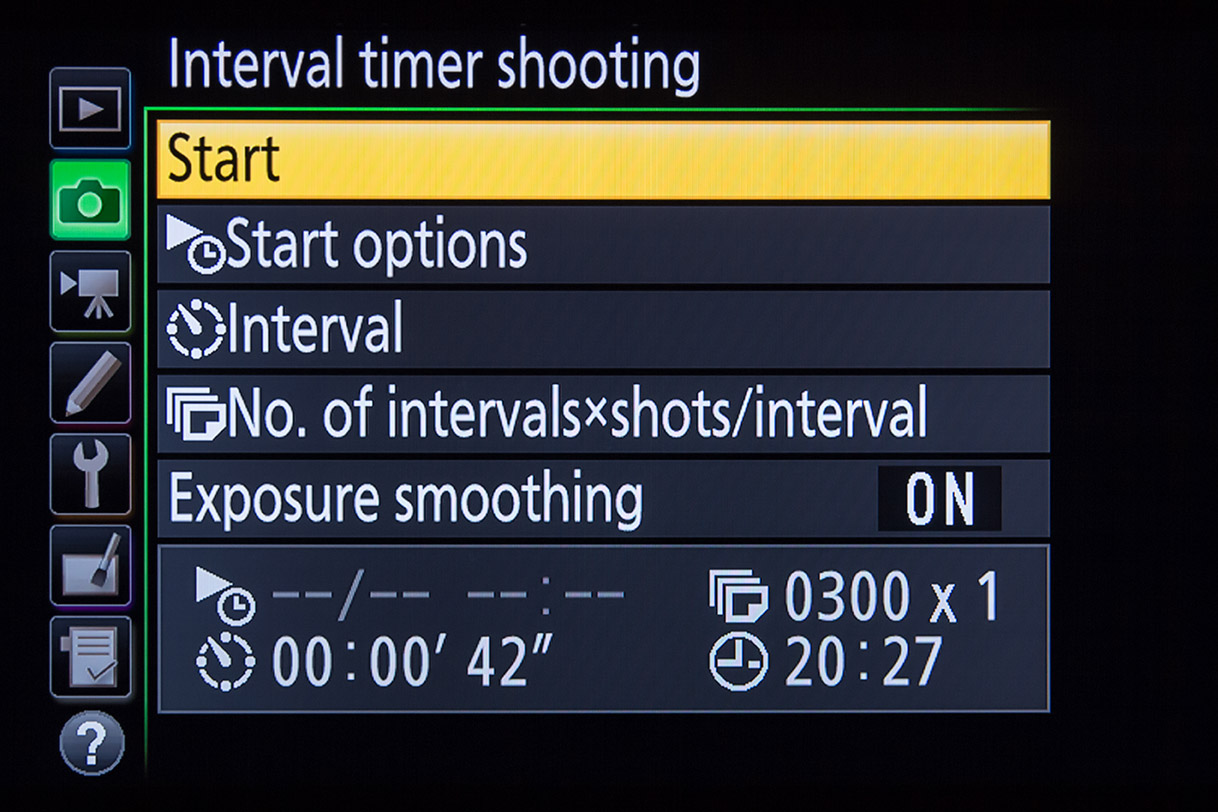
Astrospheric and Environment Canada cloud forecast + Moon information
The forecast cloud cover showed home to be hopeless. But a clear area was supposed to be open in southwestern Alberta, marked by the red circle above. That’s Waterton Lakes National Park, just on the US border. It’s a favourite place of mine for nightscape photography anyway (see my blog from this past summer here).
The chart above from the app Astrospheric shows the clear hole, and the dark blue on the time-line indicates the period with no clouds. Note how it coincides with the wavy line below which shows Moon altitude, with the orange and red regions indicating when the eclipse would take place. Looks good! So I made my plan to chase.
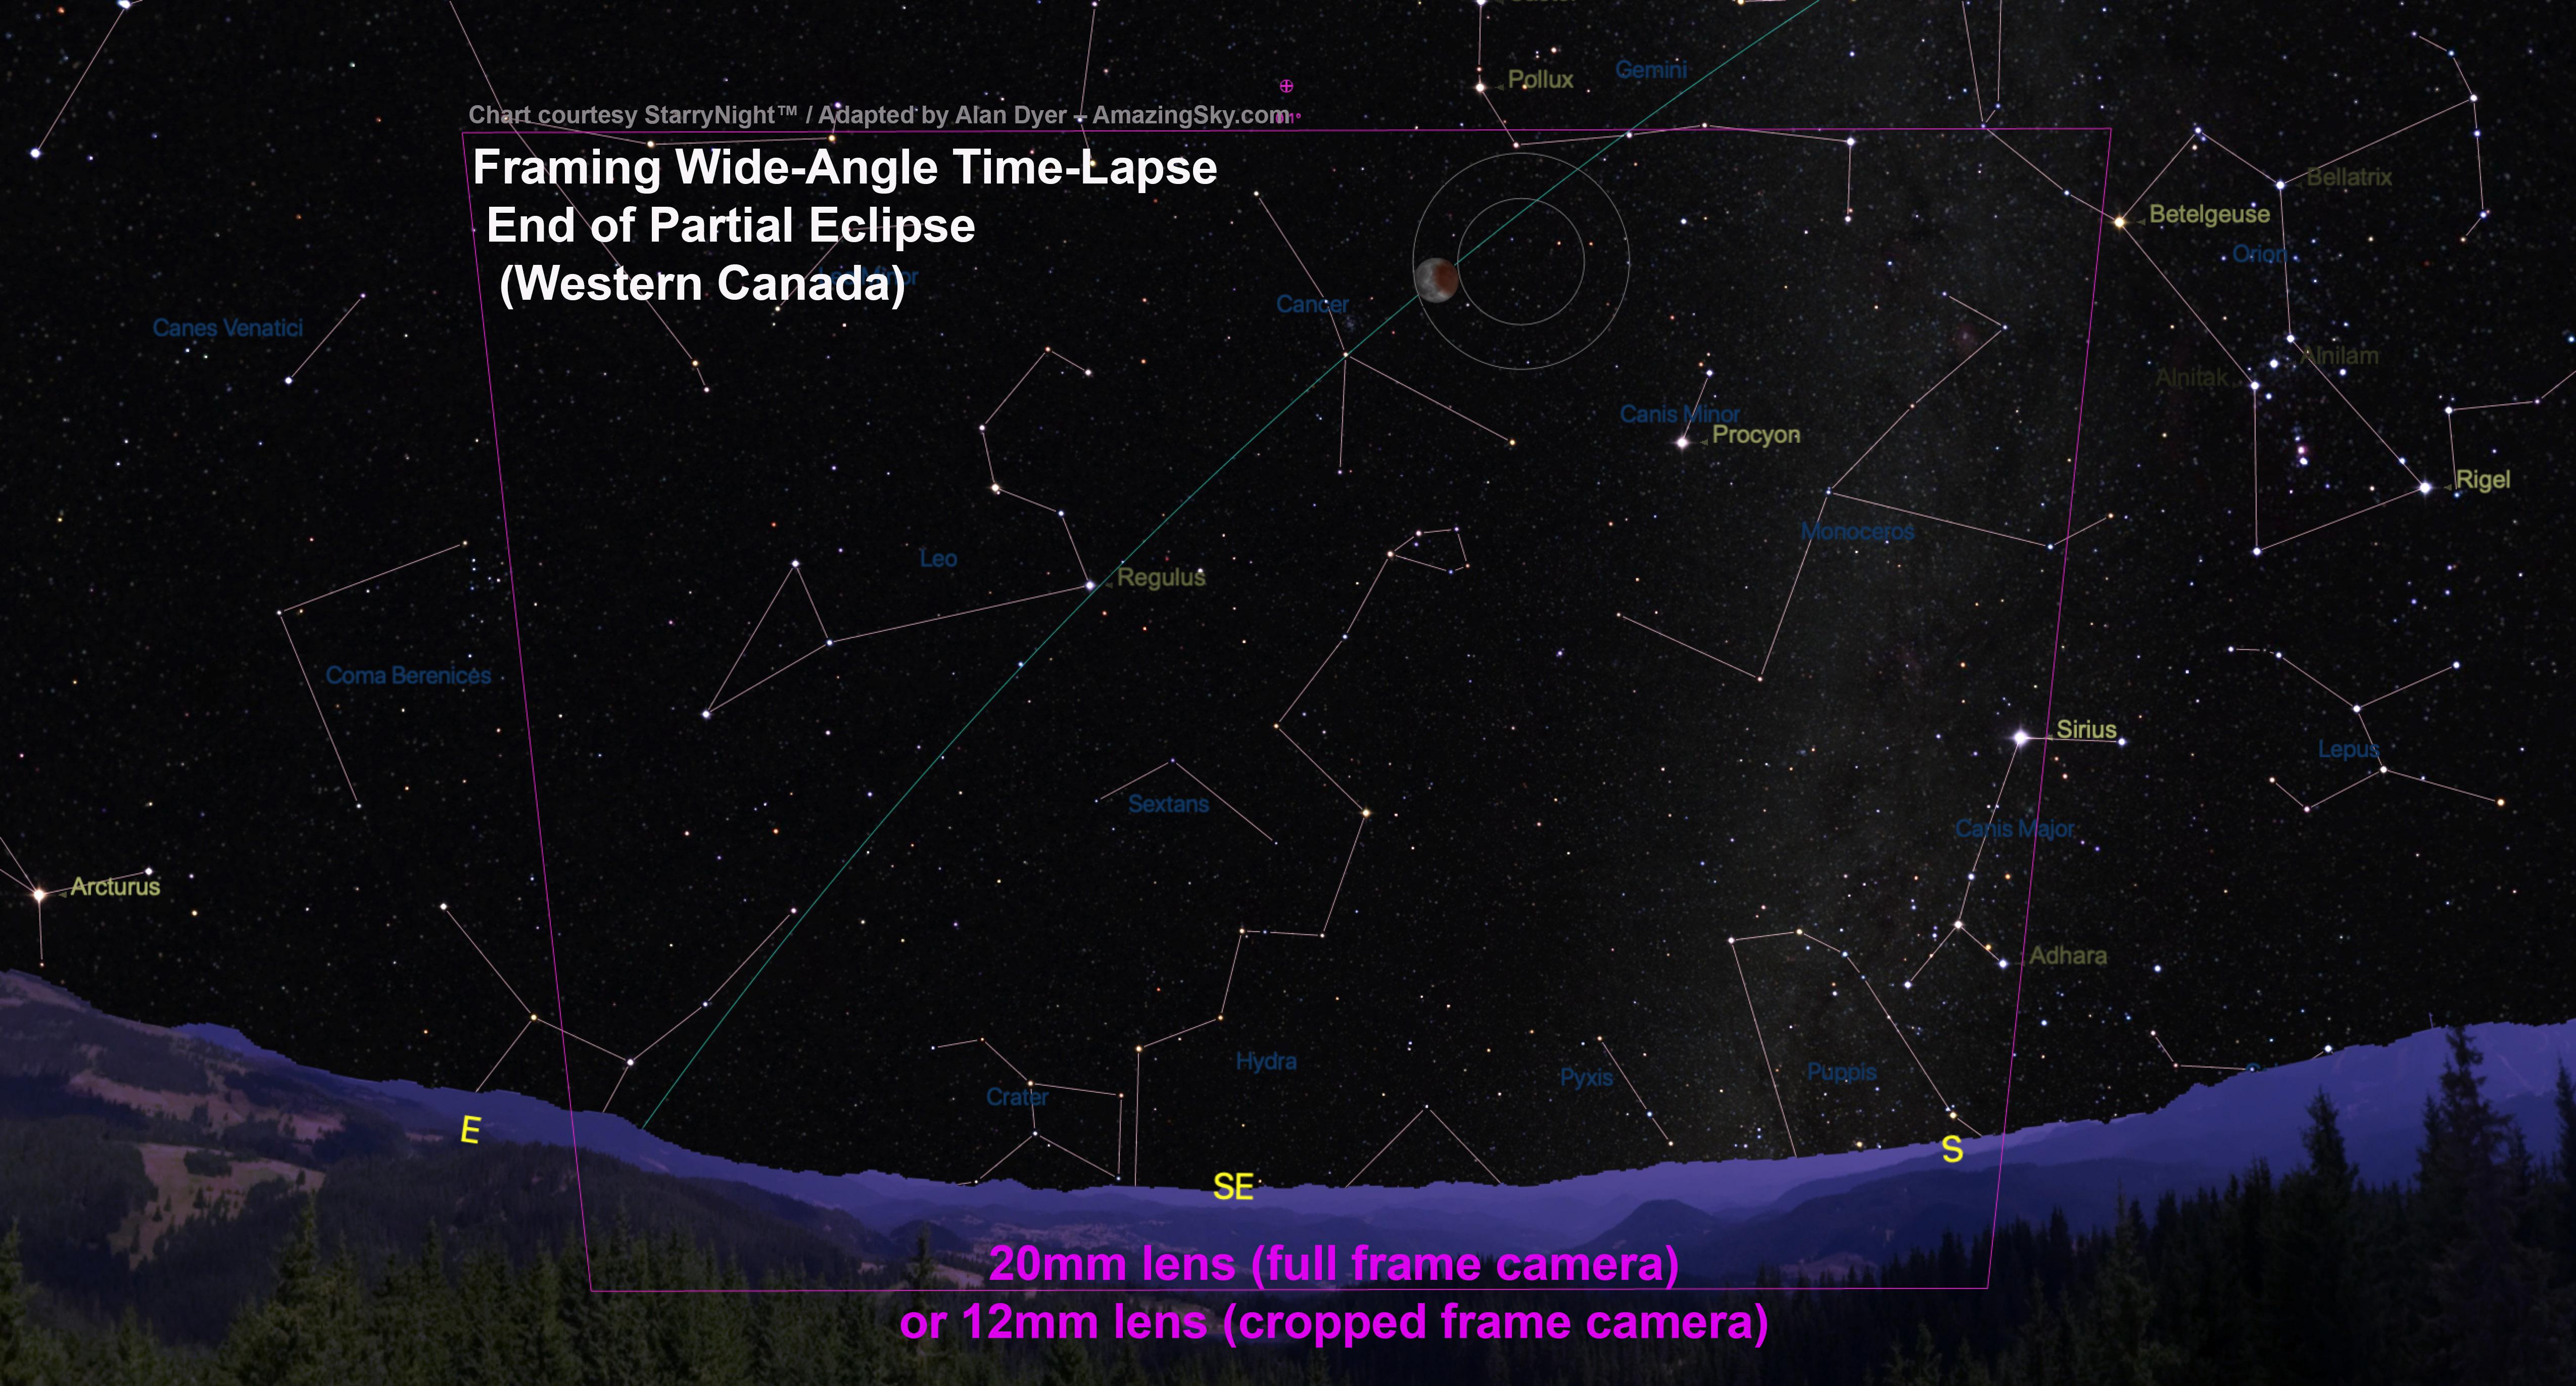
I knew the area well enough to know the site would be a good one for the eclipse, and the Moon’s location to the south. But it pays to check. I use The Photographer’s Ephemeris as my main photo planning app.
TPE Plot of Sightlines
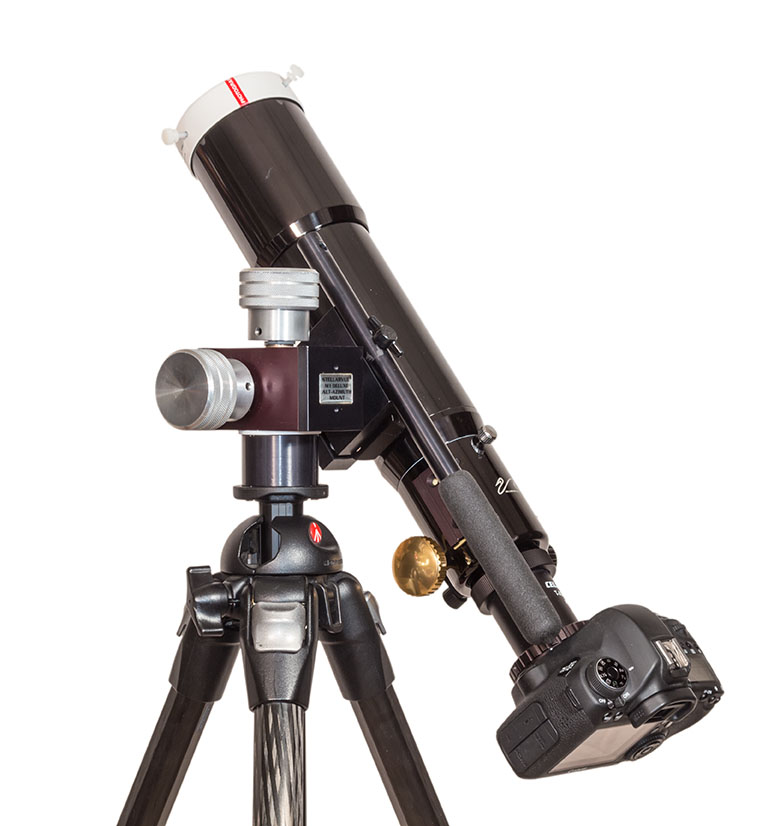
It showed the sightline toward the Moon during the eclipse as straight down Upper Waterton Lake. My chosen spot was on the lakeside Waterton Avenue, where I could set up both the wide-angle camera and a telescope without having to heft gear any distance. Winter road closures also limited my site choices. Indeed, in winter the Park is quiet, with only a few hotels and restaurants open, and many businesses boarded up.
TPE 3D Simulation
Switching to the companion app TPE 3D (above) showed a preview of the landscape and the Moon’s position in the sky relative to the scene below.
Compare the simulation to the real thing below! Pretty accurate, except for the scattered clouds that drifted through.
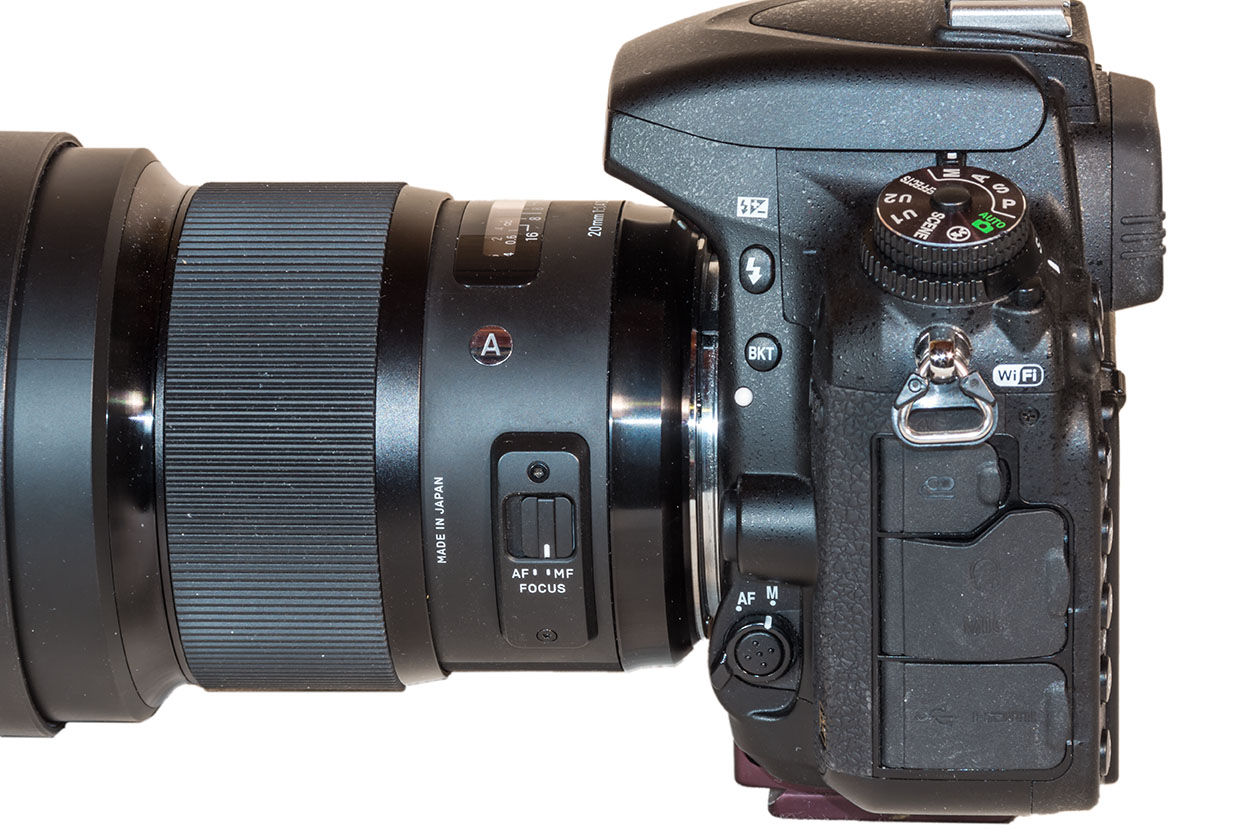
This is a blend of separate images for the sky and ground: a stack of two untracked images for 60 seconds each for the ground, then a third exposure for the sky and untrailed stars, taken immediately afterwards with the tracker motor on, for 30 seconds, all with the Canon RF15-35mm lens wide-open at f/2.8 and at 20mm, on the Canon R5 at ISO 1600. Separate shorter tracked exposures of 15, 8 and 4 seconds blended in kept the lunar disk from overexposing, showing it more as the eye saw it.
The above image is a blend of tracked exposures for the Moon and sky, with untracked exposures for the ground. I shot them just before mid-totality at 1 am MDT. That image was second in priority. First, was a panorama. That result is below.
This is a panorama of four segments at 30º spacing, taken in two passes: first untracked for 30 seconds each, then a second pass immediately afterwards with the tracker motor on, also for 30 seconds each, all with the Canon RF15-35mm lens wide-open at f/2.8 and at 20mm, on the Canon R5 at ISO 1600, with the camera in landscape orientation. Separate shorter exposures of 15s, 10s, 5s and 2.5s at ISO 400 were blended in to preserve the lunar disk more as the eye saw it.
I shot this scene just as totality began, to ensure I got it. While the Moon was in clear sky before totality during the partial phase, sure enough as the Moon became fully eclipsed, the clouds wafting over the mountains threatened to move in and obscure the view.
Luckily, while they did hide the Moon now and then, they opened up enough for good views and images for a few minutes at a time throughout the eclipse.
For the panorama I processed the image for a more monochromatic look, to resemble the naked-eye view, but with the Moon appearing as a red globe in the sky, the only colour in the scene. (I shot the tracked shots with the MSM Nomad tracker I reviewed here.)
The site proved excellent, but it was a cold night! While the temperature was only just below freezing, the brisk Waterton wind off the lake made it a chilly experience watching the eclipse for two hours. I was actually being hit by ice pellets blowing off the lake.
I decided not to set up the telescope for close-ups; the wide-angle images were the priority anyway from such a scenic spot.
A single untracked 15-second exposure with the RF15-35mm lens at f/2.8 and 17mm on the Canon R5 at ISO 3200.
But I am not complaining. I got the eclipse, once again by chasing to where the weather predictions said it would be clear. The above is my requisite trophy shot.
Had I stayed home I would have been clouded out. Had predictions called for clear skies at home, I would not have made the trip to Waterton to enjoy the eclipse over its wonderful scenery.
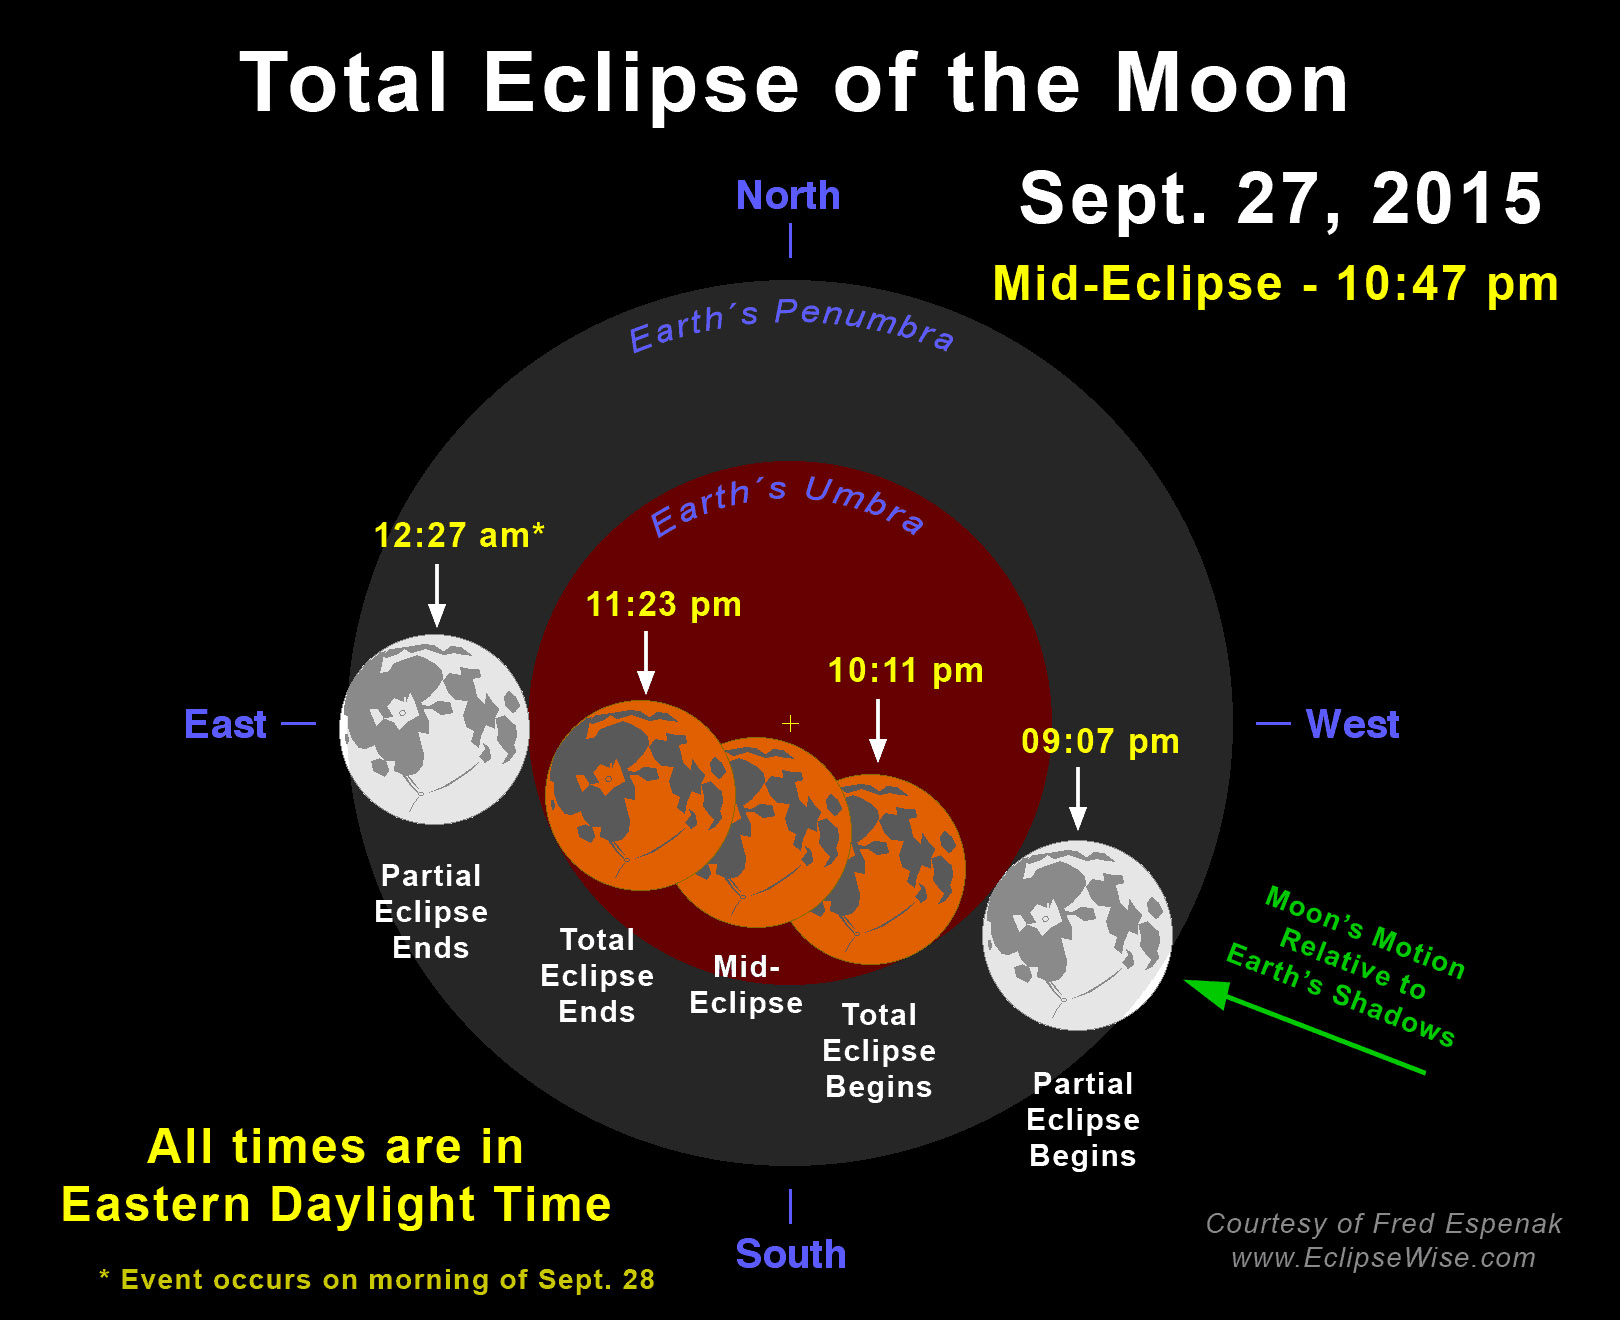
The next total lunar eclipse is September 7, 2025, six months after this eclipse. But it is visible from the opposite hemisphere to this one, with no part of that eclipse visible from North America. I will not chase that far for a TLE!
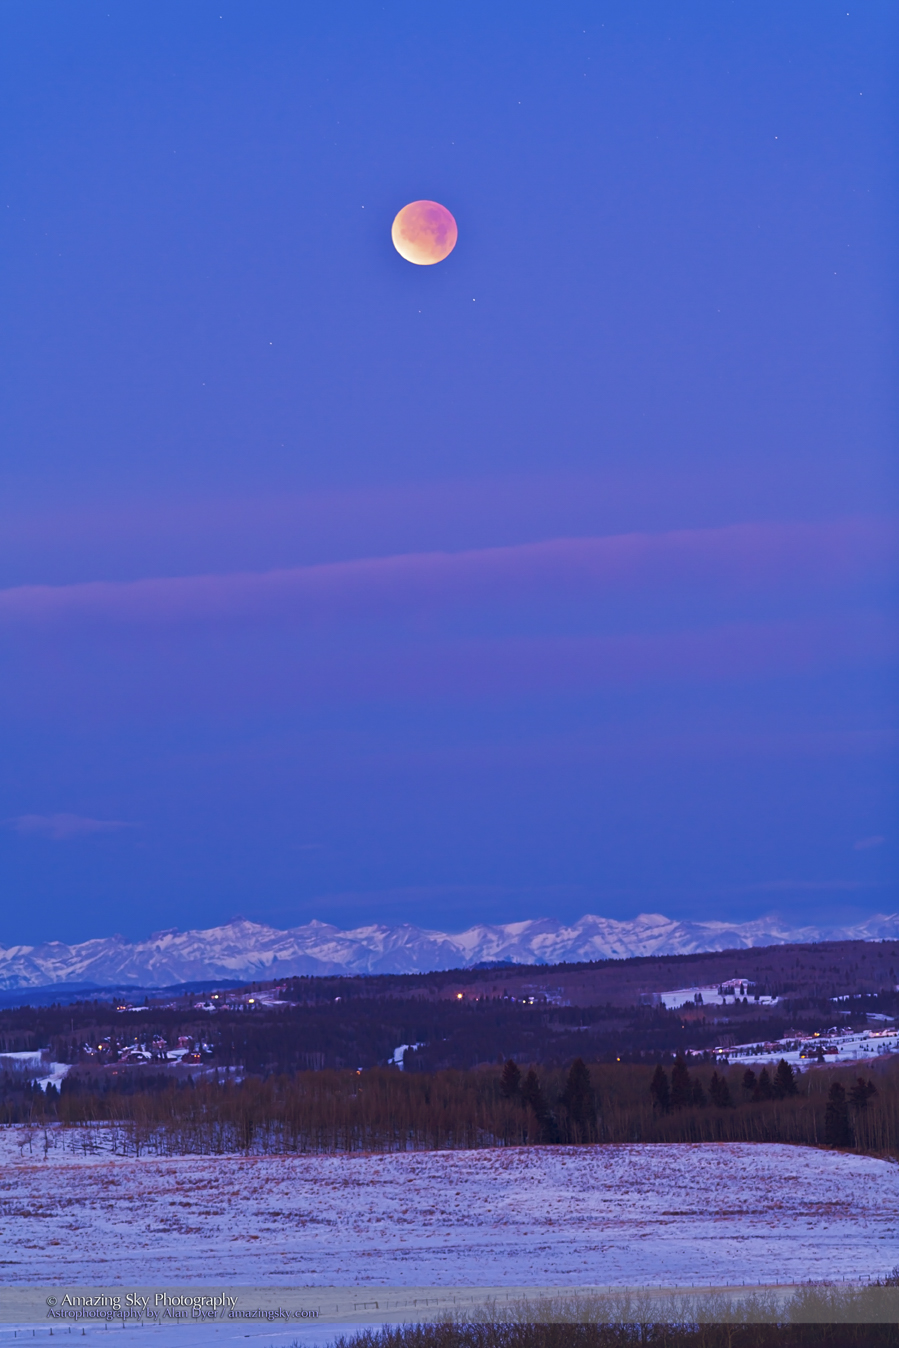
The March 3, 2026 TLE from Alberta
After that, and after a passage of one lunar year (355 days or 12 lunar cycles) since the March 14, 2025 TLE, I have a chance for another total lunar eclipse from home, with western North America favoured. As I preview above, it’ll be an early morning event on March 3, 2026, with the eclipsed Moon setting in the west in the pre-dawn hours.
Sounds like another chase to a mountain site with the red Moon over the Rockies. That’ll be the plan!
I’ve been visiting Churchill, Manitoba during winter aurora season since 2014. But this was my last year for standing under its fabulous Northern Lights.
From February 21 to March 4, 2025 I was at the Churchill Northern Studies Centre for my annual visit serving as an instructor to visiting aurora tourists. I’d been doing the program for ten years, with a year off in 2021 when no one visited!
But I decided this was to be my last year, as it was time to “retire” and turn over the program to a new generation of instructors.
So here I present my last look at the Churchill auroras.
A 180º panorama across the north during an all-night display of Northern Lights, from the Churchill Northern Studies Centre, in Churchill, Manitoba, on February 22, 2025. A panorama of 7 segments, each 13-second exposures with the Viltrox 16mm lens at f/2 on the Nikon Z6III at ISO 1600.
Churchill, Manitoba is on the shore of Hudson Bay at a latitude of 58º North in the sub-Arctic.
It lies under the normal location of the “auroral oval,” the ring around the North Geomagnetic Pole where there is almost always some aurora happening, even on a quiet night. Churchill is as far south as the auroral oval appears in the world when the oval is in its normal state.
By visiting a site under the oval, aurora tourists are almost guaranteed a show, provided the sky is clear.
This is a 180º panorama of the Northern Lights across the northern, eastern and southern sky on February 27, 2025 during a Kp4-level display. This is a panorama of 3 segments, each 13-second exposures at f/2.8 with the Laowa 10mm lens on the Nikon Z6III at ISO 1600.
In winter in Churchill, the cold usually brings clear skies. In a decade of conducting programs I’ve only ever had one group clouded out for all five nights of the program. That’s a far better average than locations such as Iceland.
This is a 120º panorama of the Northern Lights across the northern sky on February 26, 2025 during a Kp3-level display. This shows some fine ray structure in the curtains. This is a panorama of 2 segments, each an 8-second exposure at f/2.8 with the Laowa 10mm lens on the Nikon Z6III at ISO 1600.
While several excellent travel companies and local businesses offer aurora tours to Churchill, signing up to one offered by the Northern Studies Centre offers some major advantages.
Notably, guests stay at the Centre, some 20 kilometres outside of Churchill on the site of the old Rocket Range. That makes the site dark and free of light pollution.
A panorama of the Northern Studies Centre. It has dorm rooms, a cafeteria, classrooms, lounges, a fitness room, library, and all the comforts needed for a great stay under the Lights.
And convenient. Guests sleep on site and need only dress up warm to quickly head outside when the “Lights are out!” call comes. Instructors wake up guests when the Lights don’t appear until late at night, as can often be the case. There’s no driving out to dark sites to wait for the Lights to appear.
A fish-eye 360° view of the fine display of Northern Lights on February 25, 2025, during a substorm outburst with bright curtains to the north. A single 2.5-second exposure with the TTArtisan 7.5mm fish-eye lens at f/2.
An option is also to head up to the CNSC’s rooftop aurora dome for viewing the Lights in warm shirt-sleeve comfort.
Aurora tourists enjoy the show at the Churchill Northern Studies Centre, February 26, 2025. This was the Learning Vacations tour group in late February 2025. This is a single 8-second exposure with the Laowa 10mm lens at f/2.8 and Nikon Z6III at ISO 1600.
But most guests opt to bundle up and brave the cold for the best experience and unobstructed views of the Lights filling the sky. A convenient option is the second floor observation deck, shown above, and in an image taken from the deck, below.
A photographer is capturing a bright display of Northern Lights at the Churchill Northern Studies Centre. This was the first night of a five-night session for aurora tourists from the Road Scholar education travel company. This is a single 4-second exposure with the Laowa 10mm lens at f/2.8 and Nikon Z6III at ISO 3200.
The program includes nightly science talks about the aurora and night sky. The daytime program includes dogsledding, snowshoeing, a tour of the old Rocket Range, and visits to sites in Churchill such as the murals and museums. It’s a very full five days of programming and learning.
A fish-eye 360° view of a dim and weak display of Northern Lights on February 24, 2025, showing a green diffuse band to the south and a dim red curtain overhead with rays to the east. This red aurora was just visible to the eye as a grey streak. A single long 30-second exposure with the TTArtisan 7.5mm fish-eye lens wide open at f/2 on the Nikon Z6III at ISO 1600.
The main attraction, the aurora, can vary from night to night. However, even when the aurora is weak, as it was this night, above, it can still put on a fine show for the camera, glowing in red colours that only long exposures reveal.
Aurora tourists from the Road Scholar travel company enjoy the show of Northern Lights at the Churchill Northern Studies centre in Churchill, Manitoba, March 1, 2025. This is a 6-second exposure at f/1.8 with the Viltrox 16mm lens on the Nikon Z6III at ISO 1600.
While I use high-end cameras and fast lenses, I’ve been impressed with how well today’s phone cameras can capture the Lights very simply and easily, as a guest is doing above, especially when the aurora is bright.
A band of bright green aurora appears here with some subtle red rays at right and magenta upper curtains at left, with the green glow lighting the snow green. A 10-second exposure with the Laowa 10mm lens at f/2.8 on the Nikon Z6III at ISO 1600.
When the aurora brightens, greens and sometimes pinks are visible to the eye, and not just to the camera. And the aurora exhibits rapid rippling and waving motions (check the video below).
A bright display of colourful curtains of Northern Lights at the Churchill Northern Studies Centre. This is looking northeast toward the direction of the midnight sector where the auroras usually brighten from. This is a single 8-second exposure with the Laowa 10mm lens at f/2.8 and Nikon Z6III at ISO 1600.
The finest sight is when the aurora curtains converge overhead at the zenith for a “coronal outburst.” The effect can be fleeting but the sight is unforgettable. It is one of the finest sights the sky can offer, ranking with a total eclipse of the Sun.
A fish-eye 360° view of the fine display of Northern Lights on February 25, 2025, with a complex of curtains passing overhead and across the sky from northeast (at lower left) to southwest (at upper right), with Venus setting at far right. Orion and Sirius are at bottom centre to the south. A single 10-second exposure with the TTArtisan 7.5mm fish-eye lens at f/2 on the Nikon Z6III at ISO 1600.
Indeed, on most nights the aurora, which might begin as a low arc across the north, moves south to fill the sky with swirling and curling curtains, as below.
This is a 180º panorama of the Northern Lights across the northern sky on February 27, 2025 during a Kp4-level display. The field extends from the horizon up to well past the zenith. This is a panorama of 6 segments, each an 8-second exposure at f/2.8 with the Laowa 10mm lens on the Nikon Z6III at ISO 1600.
A gallery of my images from Churchill from this year and from past years is on my main AmazingSky.com website here.
A musical collage of still images and real-time videos I shot this year is viewable here on YouTube.
Click through to YouTube for more information about the video.
It’s been a great ten years taking in the wonderful Northern Lights in Churchill. While this was my last year, I encourage you to visit to see the sights for yourself.
Everyone goes away with great memories, able to check the aurora off their bucket list of experiences.
I test a trio of wide-angle, auto-focus lenses for astrophotography, all for Nikon Z mount: the Nikkor 20mm f/1.8 S, the Viltrox 16mm f/1.8, and the Laowa 10mm f/2.8 Zero D.
As a bonus, I also test a fourth lens: the TTArtisan manual-focus 7.5mm f/2 fish-eye.
NOTE: Images are large and may take a while to load.
While the selection of lenses for Nikon Z mirrorless cameras is not as diverse as it is for Sony E-mount, Nikon shooters have more brands of lenses to pick from than do users of Canon R mirrorless cameras. For nightscapes and Milky Way photography we want fast, wide-angle lenses, usually in the 14mm to 24mm range.
Canon, Nikon, and Sony all have excellent zoom lenses that cover the range. I use Canon’s RF 15-35mm L lens a lot, and reviewed it here on my blog from 2022.
But all these wide-angle zooms are f/2.8. While that’s a good speed for most astro work, having an even faster lens can be valuable. An aperture of f/2 or faster allows for:
— Shorter exposures for untrailed stars when shooting just on a tripod with no tracker.
— Capturing fainter and more numerous meteors during a shower.
— Rapid-cadence time-lapses of auroras, freezing the motions of curtains.
— Real-time movies of auroras and satellite passages at lower, less noisy ISO settings.
The Nikkor 20mm at f/1.8 allowed a short 1.3-second exposure for capturing the aurora from a ship off the coast of Norway, to minimize ship motion trailing the stars.
Also, stopping those faster lenses down to f/2.8 can sometimes yield better image quality than shooting with a native f/2.8 lens wide open.
Canon and Sony each have fast f/2 zooms that cover the range from 28mm to 70mm. While those focal lengths can be useful, both lenses are expensive and heavy. And they are still not wide enough for many astro subjects. For fast lenses with even shorter focal lengths we need to turn to “prime” lenses, ones with fixed focal lengths.
As of this writing Canon has few fast, wide primes for their RF lens mount (their new 24mm f/1.4 VCM is a costly choice designed primarily for video use). A few third-party lens makers offer fast (f/2 or faster) primes for Canon full-frame cameras, always as manual focus lenses. For example, Laowa has a 15mm f/2, and TTArtisan has a 21mm f/1.5.
Yes, Sigma now offers auto-focus 16mm and 23mm f/1.4 primes, and Samyang has a new 12mm f/2, but they are only for Canon RF-S cropped-frame cameras. Canon has yet to allow other companies to produce auto-focus lenses for their full-frame cameras.
Nikon has been restrictive as well. Sigma’s much-lauded Art series that includes the 14mm rectilinear (i.e. the horizon remains straight) and 15mm fish-eye (with a curved horizon), both f/1.4 and aimed at astrophotographers, are not offered for Nikon or Canon, only for Sony E-mount and Panasonic/Leica L-mount cameras.
However, while Sigma lenses are missing, there is a wider choice of third-party lenses for Nikon Z-mount compared to Canon RF, plus Nikon itself makes a very fine 20mm prime in their premium S-series.
That’s what I test here — three wide-angle rectilinear primes for Nikon Z: A 20mm Nikkor, and two third-party primes: one from Viltrox, their 16mm; and one from Laowa, their new 10mm.
As a bonus, I add in a test of a fast fish-eye lens, from TTArtisan, their 7.5mm f/2.
NOTE: All test images can be downloaded as full-resolution JPGs for closer inspection. Click or tap on the images.
Prices are from B&H Photo, but will vary with sales and special promotions.
The Nikkor 20mm S-Line Lens ($1,050)
The Nikkor 20mm accepts 77mm filters.The rear mount has weather sealing.
I shot the northern summer Milky Way (below) with the three rectilinear wide-angle lenses (meaning these are not fish-eyes) with the camera on a star tracker, to prevent star trailing. The tracker was the Move-Shoot-Move Nomad, reviewed here on my blog.
The Nikon Z6III and 20mm Nikkor on the MSM Nomad tracker.
I shot with Nikon’s new Z6III, a 24-megapixel full-frame camera I reviewed in the December 2024 issue of Sky & Telescope magazine. It offers a number of excellent features for nightscape photography. Most notably, auto-focus lenses zip to the infinity focus point automatically when the camera is turned on, something I wish Canon cameras would do.
The Nikkor 20mm has a field of view along the long dimension of 84°.
The Nikkor 20mm is the widest prime lens in Nikon’s premium S-Line series. It offers what I consider to be an ideal focal length for most nightscape and wide-field Milky Way images.
While a 14mm lens is often thought of as the default nightscape lens, a 20mm presents less distortion (objects leaning in or stretched out at the corners) and a more natural perspective. Plus the lens can be made faster (in this case f/1.8), smaller, and not cost as much as an ultra-fast 14mm like the Sigma f/1.4 Art lens.
Nikkor 20mm Corner Aberrations
The four panels show the upper left corner, in the area outlined in the inset that shows the full frame.
Sharp stars right to the corners is the ideal for all forms of astro images. We don’t want stars to turn into winged seagulls or coloured streaks. They should remain as pinpoint as possible.
The Nikkor 20mm shows very little aberrations across the frame. Stars are elongated by tangential astigmatism and discoloured by lateral chromatic aberration only slightly and only at the extreme corners.
Stopping down the lens decreased the aberrations, but some residual astigmatism remained, even at f/4. However, the corner aberrations are low enough, and so restricted to the very corners, that this is a lens you can certainly use wide open at f/1.8, or perhaps at f/2, without any penalty of image sharpness.
Nikkor 20mm Vignetting
The four panels show the left side, as outlined in the inset. The inset is the f/1.8 sample.
Ideally, we also want images to be as fully-illuminated across the frame as possible. Light fall-off, or vignetting, creates dark corners with less signal reaching the sensor. Less signal gives rise to more noise, noticeable when brightening the corners in processing. That can reveal unsightly noise, banding, and discolouration in nightscapes, especially in the ground, often the darkest part of a scene, not the starry sky.
The 20mm shows a fair degree of edge and corner darkening when wide open at f/1.8. Stopping the lens down to f/2 improves the field illumination notably. And by f/2.8 the field is fairly uniformly lit. There is little need to go as slow as f/4.
In all, the Nikkor 20mm S is a superb lens ideal for nightscapes and Milky Way images.
The Viltrox AF 16mm STM ASPH ED IF ($580)
The Viltrox also accepts 77mm filters. The Viltrox has weather sealing and a USB port, obscured here, for powering the lens when not on a camera.
The new company Viltrox has been making a name for themselves recently with the introduction of a number of top-quality pro-grade lenses to compete with the best from any brand, and at much more affordable prices.
The horizontal field of view of the Viltrox 16mm is 100°.
Their 16mm is an auto-focus lens that, on the Nikon, can actually auto-focus on stars, as can the Nikkor 20mm. However, it, too, will zip to infinity focus when powered up. Plus two function buttons can be programmed to rack between two preset focus distances, one of which can be infinity.
The buttons at left are for preset distances.The display shows depth of field as well as focus distance and aperture.
A manual aperture ring (above left) has 1/3rd-stop detents, or it can be set to A for controlling the aperture in the camera.
A colour OLED display (above right) shows the focus distance and aperture, a nice way to confirm your settings at night. The display is too bright on the darkest nights; I cover it with red gel.
An option to turn it red using the Viltrox app would be welcome. Or to turn it off! ….
NOTE ADDED FEB 24, 2025 — I tested all lenses on a stock camera. But when used on an astro-modified camera with greater red and infra-red sensitivity, the Viltrox 16mm can add a noticeable red glow or flare to images, as a colleague has found and reported to me. I did confirm this with very long exposures and high ISOs with my stock Z6III. It barely shows up in dark frames boosted a lot for brightness (see below – it’s the faint magenta band across the centre of the frame).
But in modded cameras it is much more obvious. This comes from the lens’s top OLED display. The trick is to slightly dismount the lens, which turns the display off, but still maintains data contact to the camera. Viltrox is aware of the issue and has said they will fix it in a firmware update.
With Viltrox lens fully engaged and display ONUpdate at your risk!Connect if you can!Set if you can!
Uniquely, this and other Viltrox lenses have Bluetooth built in, for direct connection to a mobile device for firmware updates and lens settings, shown above. However, I found the app buggy; it would connect to the lens, but then refuse to allow settings to be changed, claiming the lens was not connected. Or the app would freeze, disconcerting during a firmware update. Luckily, that did not brick the lens.
Viltrox 16mm Corner Aberrations
The four panels show the small corner area outlined in the centre inset that shows the entire image.
At the extreme corners, the Viltrox shows some softness (perhaps from field curvature), but only minimal astigmatism and lateral chromatic aberration when wide open at f/1.8, and slightly sharper corners at f/2. At f/2.8 corner performance is nearly perfect, and certainly is at f/4.
This is a level of aberration correction even the most premium of lenses have a hard time matching.
Viltrox 16mm Vignetting
The panels show the left side outlined in the centre inset, which shows the f/1.8 image.
As is often the case with wider lenses, the Viltrox does show a great deal of vignetting at f/1.8, more so than the Nikkor 20mm. While this can be corrected in processing it will raise noise levels.
Stopping down to just f/2 helps, but the field becomes more uniform only at f/2.8, the sweet spot for this lens for the best all-round performance. But it offers the speed of f/1.8 when needed, such as for auroras.
If you prefer a wider field than a 20mm provides, the Viltrox 16mm (also available for Sony) is a great choice that won’t break the bank. Until Canon changes their third-party lens policy, Canon owners are out of luck getting this excellent lens.
The Venus Optics/Laowa 10mm Zero-D FF ($800)
The Laowa also accepts 77mm filters, unusual for such a wide lens..The Laowa also has a weather-sealing gasket. The lens has a unique blue-grey finish.
The lens maker Venus Optics (aka Laowa) is known for its innovative and often unusual lens designs.
Introduced in 2024, their new 10mm offers the widest field available in a rectilinear (not fish-eye) lens for full-frame cameras. The “Zero-D” label is for the lens’s lack of pincushion or barrel distortion. Horizons remain straight no matter where they fall on the frame. However, objects at the corners become elongated a lot.
The Northern Lights in a superb display on August 11-12, 2024, at Grasslands National Park, Saskatchewan. This is with the Laowa 10mm wide open at f/2.8 on the Nikon Z6III at ISO 6400.
Even so, there’s a lot to be said for having a field that extends for 130° across the long dimension of a full-frame sensor. That’s more than enough to go from well below the horizon to past the zenith when the camera is in portrait orientation. Even in landscape orientation (as above) the lens covers nearly a 90° field across the short dimension, enough to go almost from horizon to zenith.
The f/2.8 speed is slower than the other lenses on test here, but is still faster than most ultra-wide lenses. Remarkably, it accepts common 77mm filters, the same as the Nikkor 20mm and Viltrox 16mm.
The 10mm is available as an auto-focus lens for Sony E and Nikon Z, and in manual focus versions for Canon RF and Panasonic L, oddly all at the same price.
Laowa 10mm Corner Aberrations
The four panels show the corner area outlined in the inset, at four apertures between f/2.8 and f/4.
Corner aberrations are much worse than in the 20mm and 16mm lenses, showing a fair degree of tangential and sagittal astigmatism, elongating stars radially and adding wings to them, respectively. The aberrations are larger and reach deeper into the frame than in the Nikkor and Viltrox lenses.
There’s also some lateral chromatic aberration adding blue and purple fringes to the stars at the corners. Stopping down to f/4 improves, but doesn’t eliminate, the aberrations.
Laowa 10mm Vignetting
The four panels show the left side, as outlined in the inset, which shows the f/2.8 image.
Edge and corner darkening were also worse than in the other lenses and required about a +50 setting to correct in Adobe Camera Raw, far less than the maximum of +100. So it’s still quite acceptable and correctable.
However, while stopping the lens down to f/4 improves vignetting, it does not eliminate it, still requiring a +40 correction. Vignetting will be a factor to deal with in all astrophotos with this ultra-wide lens.
Laowa 10mm Lens Flares
Three panels showing the Moon framed in the left corner (L), centred (C), and in the right corner (R).
With such a wide lens, the Moon or other bright light sources are bound to be within the frame. The Laowa exhibits a prominent internal lens flare when bright objects are in the corners, but just in the corners. Objects near the edge but centered are fine.
Showing the effect of decreasing aperture on the lens flare and bright light source.
Stopping down the lens adds diffraction spikes (or “sunstars”) to bright lights, but doesn’t eliminate the circular internal reflection. None of this is a serious issue for most images, but it is something to be mindful of when framing nightscapes.
With the Laowa 10mm lens at f/2.8 on the Nikon Z6III at ISO 3200. Note the Big Dipper at left and Orion at right.
In Milky Way and starfield images, constellations in the corners can distort into unnatural shapes that look odd, as I show above. While the lens can take in a great swath of sky, its distortion and corner aberrations make it less than desirable for tracked Milky shots.
An aurora in the dawn twilight on September 17, 2024. A 4-second exposure with the Laowa 10mm at f/2.8.
Where the Laowa 10mm really proves its worth is for auroras, as above, which can require as wide a field as you can muster. Note the flat horizon.
For ultra-wide nightscapes in a single image (not a panorama) with a natural looking (not curved) horizon, and for meteor showers, the Laowa is just the ticket.
BONUS TEST: The TTArtisan 7.5mm f/2 Fish-Eye ($140)
The TTArtisan has a fixed lens hood. Front filters are not possible without vignetting. There’s no weather sealing or electrical connections at this price.
Technically, this lens is designed to be used on cropped-frame (or APS-sensor) cameras where it fills the frame with a curving horizon. But it works on a full-frame camera where it projects a circular image slightly larger in diameter than the short dimension of the frame, so not a complete circle as with a true circular fish-eye like the old Sigma 8mm f/3.5.
An aurora in the dawn twilight on September 17, 2024 in a 2-second exposure with the TTArtisan 7.5mm fish-eye lens at f/2 on the Nikon Z6III at ISO 800.
For all-sky auroras, this is ideal, where the TTArtisan’s fast f/2 speed is unprecedented in a fish-eye lens. That makes rapid-cadence time-lapses possible, as well as real-time movies. An example is here on my YouTube channel.
A stack of 4 x 4-minute exposures with the TTArtisan 7.5mm f/2 fish-eye lens stopped down to f/2.8 on the Nikon Z6III at ISO 1600, on the MSM Nomad tracker.
Or you can just capture the Milky Way from horizon to horizon, as above. For the latter, having stars sharp across the circular field is still desirable.
I have this lens for Canon RF as well, but that unit shows a noticeable softening of the left edge with defocused stars, likely from lens de-centering. I was told by TTArtisan that was a normal unit-to-unit variation and not a defect warranting replacement. Annoying!
I hesitated to buy one for my Nikon. But this is such a unique lens, and so affordable, I took the chance. The Nikon Z-mount version proved much better.
TTArtisan 7.5mm Edge Performance
There is no corner performance or vignetting to test here.
TTArtisan 7.5mm lens at f/2, showing the left side area shown in the blowups below.
Instead, I’m inspecting the same side on the Nikon Z version that caused a problem on my Canon version.
Comparing f/2 and f/2.8 edge aberrations.
The Nikon version looks fine, with stars sharp along the edge even at f/2, showing just a low level of astigmatism, to be expected in such a fast, wide lens. Stars tighten up a bit more at f/2.8. Most critically, the field was flat and in focus across the frame. There was no evidence of lens de-centering or optical defects.
The edges do show some discolouration and a soft edge to the image area. I also see two odd dark protrusions at the top of the frame. Looking through the lens, there’s nothing obvious intruding into the light path.
Keep in mind when used on a full-frame camera you’re seeing more of the projected image than was intended in the design.
The 7.5mm lens comes with a metal lens cap with a threaded centre disk. Remove it to create an aperture that vignettes the image to a smaller but complete circle.
The TTArtisan 7.5mm is a specialty lens to be sure. But at its low price it isn’t a big outlay to include in your lens arsenal, for unique all-sky images, of auroras, satellite passages, sky colours, and the Milky Way. And it is terrific for time-lapses and movies of the whole sky. It is a no-frills manual lens available for most camera mounts.
Recommendations
The Viltrox 16mm, Laowa 10mm and TTArtisan 7.5mm are all available for Sony E-mount. The Laowa and TTArtisan are available for Canon RF, but the Viltrox 16mm is not, as it is an auto-focus, full-frame lens, the class of lenses Canon has yet to allow on their RF mounts, much to the disdain of all concerned but Canon management it seems.
Viltrox 16mm — For nightscape use, the Viltrox 16mm might be the single best choice, as being the most versatile and affordable of the trio of wide-angle lenses. Its focal length is a good balance between the usual 14mm and what I think is a more useful 20mm.
Nikkor 20mm — I like the Nikkor 20mm for its lower level of vignetting, slightly tighter framing, and very sharp stars. I think a 20mm is an ideal focal length for many nightscapes and Milky Way scenes. But it is the most expensive lens tested here.
Laowa 10mm — While nearly as costly as the Nikkor 20mm, the Laowa 10mm is much more specialized and, I think, not as useful as the others for general nightscape and Milky Way shooting. But it is superb for auroras, if you are in a place where they are common, as they are here in Alberta. Otherwise, I think you’d find the 10mm a costly lens that might not see a lot of use for astrophotography. Its real forté is architecture and real-estate interiors.
TTArtisan 7.5mm — Ditto on its limited use. But it is so affordable it’s easy to justify even if it doesn’t get a lot of use. The astro images, time-lapses, and movies it can produce are unique and impossible to create any other way. Be sure to buy it from a source where you can return it easily if you find your sample defective.
Reason To Go Mirrorless
The quality of these and other premium lenses from Nikon, and also from Canon, Sony and third-party makers like Sigma and Viltrox, is one of the major benefits of migrating to mirrorless cameras. DSLRs, and the lenses made for them, are now effectively dead as new gear choices.
Yes, mirrorless cameras can be better in many aspects of their operation than DSLRs. But it is the lenses made for mirrorless that show the greatest improvement over their DSLR equivalents, many of which date back to the forgiving film days.
I present a selection of new images taken at local World Heritage Sites, along with some advanced nightscape shooting tips.
I’m fortunate in living near scenic landscapes here in southern Alberta. Many are part of UNESCO World Heritage Sites that preserve regions of unique scenic and cultural significance. In early June I visited several to shoot nightscapes of starry skies over the scenic landscapes.
I also took the opportunity to experiment with some new shooting techniques. So I’ve included some tips and techniques, most of the advanced variety.
First up was Dinosaur Provincial Park.
The Milky Way and its core region in Sagittarius and Scorpius is here low over the Badlands landscape of Dinosaur Provincial Park, Alberta.
After nearly a month of rain and clouds, the night of May 31/June 1 proved wonderfully clear at last. I headed to a favourite location in the Red Deer River valley, amid the eroded badlands formations of Dinosaur Provincial Park, site of late-Cretaceous fossil finds.
The bright core of the Milky Way in Sagittarius would be in the south. With the night only three weeks before summer solstice, from the Park’s latitude of 50.5° N the sky would not get astronomically dark. But it would be dark enough to show the Milky Way well, as above in this framing looking south on the Trail of the Fossil Hunters.
However, May and June are “Milky Way Arch” months, at least for the northern hemisphere. The full sweep of the northern Milky Way, from Perseus in the northeast to Sagittarius in the southeast, then stretches across the sky — high enough to be impressive, but low enough (unlike later in summer) to be framable in a horizontal panorama.
This is a 200° panorama of the arch of the northern Milky Way rising over the Badlands landscape of Dinosaur Provincial Park, Alberta.
To capture the arc of the Milky Way I shot a panorama — in fact three:
one exposed for the ground
one exposed for the sky, but with the camera now tracking the sky to keep stars pinpoint
and a final sky panorama but with a specialized filter installed in front of the camera sensor to let through only the deep red light emitted by nebulas along the Milky Way
Rig for tracked panoramas with the MSM Nomad tracker
The image above shows my rig for taking tracked panoramas. The rectangular box is the little Nomad sky tracker from Move-Shoot-Move (MSM), here equipped with its accessory laser pointer to aid the “polar alignment” that is needed for this or any tracker to follow the turning sky properly.
A review of the MSM Nomad will be forthcoming (subscribe to my blog!). However, I’ve found it works very well, much better than MSM’s original Rotator tracker, which was entirely unreliable!
On top of the little Nomad is an Acratech pano head, so I can turn the camera by a specific angle between each pano frame, both horizontally from segment to segment, and vertically if needed when raising the camera from the ground pano to the sky pano.
The pano head is on a “V-Plate” sold by MSM and designed by the late, great nightscape photographer (and engineer by trade), Alyn Wallace. The V-Plate allows the camera to turn parallel to the horizon when on a tipped-over tracker. The entire rig is on a Benro 3-Axis tripod head (also sold by MSM, but widely available) that makes it easy to precisely aim the tracker for polar alignment and then hold it rock steady.
The H-Alpha Panorama rendered in monochrome
I’d taken many panos before using sets of untracked ground and tracked sky panoramas. New this night was the use a “narrowband” Hydrogen-Alpha filter to take a final pano that brings out the red nebulas. I used a filter from Astronomik that clips into the camera in front of the sensor. Such a filter has to be used on a camera that has been modified to be more sensitive to deep red light, as the Canon Ra shown below is (or was, as Canon no longer makes it).
While a modded camera brings out the nebulas, using an H-Alpha filter as well really shows them off. But using one is not easy!
Astronomik clip-in filters, the 12nm H-a on the right
The clip-in placement (unlike a filter in front of a lens) requires that the lens be refocused — infinity focus now falls at the 3 to 6 metre point (the focus shift varies with the lens and focal length — the wider the lens the greater the shift). With the image so dark and deep red, seeing even a bright star to manually focus on is a challenge.
Shifting the lens focus also changes the overall image size (called “focus breathing”) and often introduces more off-axis lens aberrations, again depending on the lens.
So, blending the H-Alpha pano (which I rendered out in monochrome, above) into the final stack is tough, requiring lots of manual alignment, image warping, BlendIf adjustments, and masking. This is where I added in the red colouration to taste. Careful here, as the “Saturation Police” patrolling social media will issue tickets if they judge you have exceeded their “speed limit.”
The complete panorama with Photoshop layers and adjustments
The final pano required a complex blend of image and adjustment layers, all applied non-destructively, so the many elements of the scene can be individually tweaked at any time.
The work was worth it, as the final pano records the deep red nebulas contrasting with the deep blue of a sky still lit partly by twilight, a magenta aurora to the north, and bands of green and yellow airglow, all above the earth tones of the Badlands. It is one of my favourite nightscape panoramas.
As a further note on software: For stitching panos I try to use Adobe Camera Raw first. It can work very well. But complex panos, especially taken with very wide lenses, often require the specialized program PTGui, which offers more choice of pano projection methods, cleaner stitching, and control of panorama framing and levelling.
Next up was Writing-on-Stone Provincial Park.
A week later, with the waxing Moon beginning to appear in the western sky and the promise of clear nights, I headed south to the 49th parallel borderlands of the Milk River and Writing-on-Stone Provincial Park, known as Áísínai’pi to the Blackfoot First Nation who revere the site as sacred.
My plan was a framing of the galactic centre over the Milk River valley and distant Sweetgrass Hills in Montana, perhaps using the H-Alpha filter again. But clouds got in the way!
A 13-segment panorama of the landscape and sky just as the Sun sets over Writing-on-Stone Provincial Park (Áísínai’pi) in Alberta.
When you are faced with a cloudy sky, you make use of it for a colourful sunset. I like shooting panoramas at such sites as they capture the grand sweep of the “big sky” and prairie landscape. Above is the scene at sunset.
A 14-segment panorama of the landscape and sky at sunset at Writing-on-Stone Provincial Park.
Above is the same scene a few minutes later as the Sun, though now set, still lights the high clouds with its red light, mixing with the blue sky to make purples. On the hill at right, a couple admires the sunset, adding a human scale to the vast skyscape.
This pano was with the Canon RF15-35mm lens at 15mm and the camera in portrait orientation to capture as much of the sky and ground as possible in a single-row pano.
A 13-segment panorama of the sandstone landscape in blue-hour twilight at Writing-on-Stone Provincial Park.
I finished the evening with another panorama, but using a Canon RF70-200mm telephoto lens at 70mm to zoom in on the Sweetgrass Hills in the deepening twilight.
Rig for untracked panoramasPanorama head close-up
For these panoramas, exposures were short, so I didn’t need to track the sky. I used another combination of gear shown above. An Acratech ball head sits atop another style of panorama head that has adjustable click stops to make it easy to move the camera from segment to segment at set angles. When the lighting is changing by the second, it helps to be quick about shooting all the pano segments. Such pano heads are readily available on Amazon.
That pano head sits atop an Acratech levelling head (there are many similar units for sale), an essential addition that makes it easy to level the pano head so the camera turns parallel to the horizon. Any tilt will result in a panorama that waves up and down, likely requiring fussy warping or cropping to correct. Avoid that; get it right in-camera!
A single-image portrait of a sunset sky with the waxing two-day-old crescent Moon amid colourful clouds over the prairie.
As the sky lit up, I also shot the crescent Moon above the sunset clouds and prairie scene. While the clouds made for a fine sunset, they did not clear off, thwarting my Milky Way plans this night. I headed back to Milk River, to travel farther west the next day.
From Writing-on-Stone I drove along scenic Highways 501 and 5 to Waterton Lakes National Park.
A nightscape scene under a twilight “blue-hour” sky, on the Red Rock Canyon Parkway in Waterton Lakes National Park, Alberta, looking west toward the sunset with the four-day-old crescent Moon.
After an initial cloudy night, I made use of the (mostly) clear night on June 10 to shoot twilight scenes with the now four-day-old crescent Moon in the evening sky. Here I wanted to play with another technique I had not used much before: focus stacking.
To keep exposures short (here to minimize the blurring effects of the constant wind at Waterton) you have to shoot at wide apertures (f/2 in this case). But that produces a very shallow depth of field, where only a small area of the image is in focus.
So I shot a series of six images, shifting the focus from near (for the foreground flowers) to far (for the mountains and sky). Photoshop has an Auto Blend function that will merge the images into one with everything in focus. I also shot separate images exposed for the bright sky, shooting a vertical panorama — dubbed a “vertorama” — moving the camera up from frame to frame.
I shot an additional short exposure just for the Moon, to prevent its disk from overexposing too much, as it did in the twilight sky images.
Twilight sky assembly and layers in Photoshop
So what looks like a simple snapshot of a twilight scene is actually a complex blend of focus-stacked ground images, panoramic sky images, and a single short image of the Moon replacing its otherwise overly bright disk. But the result better resembles what the eye saw, as single exposures often cannot record the range of brightness the eye can take in.
A nightscape scene under a moonlit sky, on the Red Rock Canyon Parkway in Waterton Lakes National Park, Alberta, looking back along Pass Creek to the south, with the Milky Way rising at left.
About an hour later, from the same location, I shot the other way, toward the Milky Way rising over Vimy Peak, but the sky still lit blue by moonlight. This, too, is a blend of focus-stacked ground and panorama sky images. But the camera was on a fixed tripod for exposures no longer than 15 seconds. So I didn’t use the tracker.
And here the longer exposures do pick up more (colours, fainter stars, and brighter ground detail) than was visible to the eye. Revealing more than the eye can see is the essence and attraction of astrophotography.
A vertical panorama of the moonlit spring sky with the Big Dipper and Arcturus over the jagged outline of Anderson Peak at the Red Rock Canyon area of Waterton Lakes National Park, Alberta.
Heading down the Red Rock Canyon Parkway, I set up the tracker rig for the darker sky, now that the Moon was nearly setting. I shot a vertical panorama, with two untracked ground segments and four tracked sky segments, to capture Arcturus and the Big Dipper over the iconic Anderson Peak.
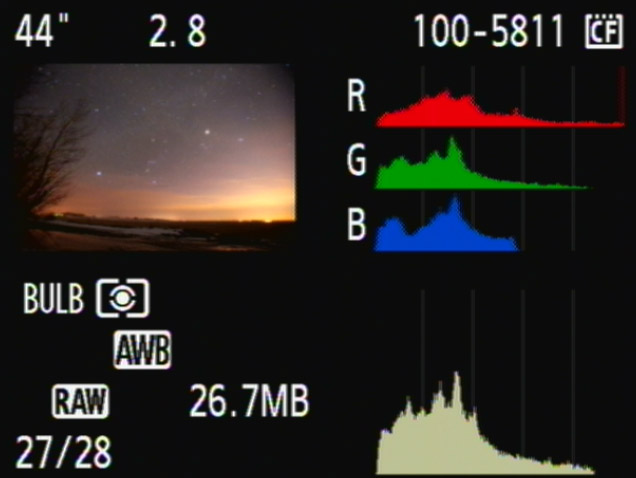
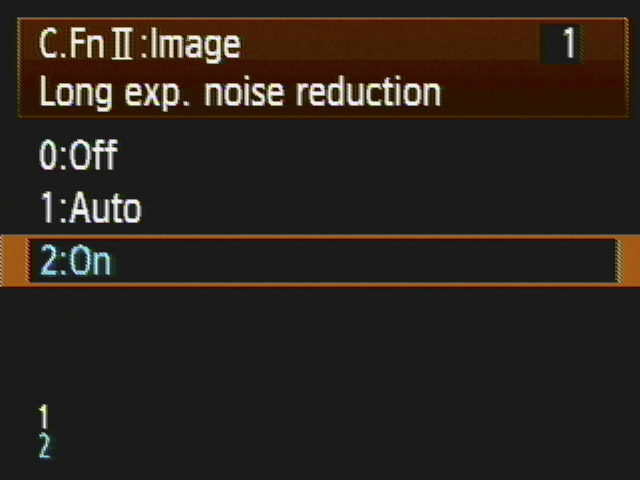
Comparing without and with LENR – Lots of coloured specks without LENR! Tap to zoom up.
For all the images at Waterton and Writing-on-Stone I used the 45-megapixel Canon R5 camera, great for high resolution, but prone to noise, especially colourful thermal hot pixels. (See my review here.)
For all the long exposures I turned on Long Exposure Noise Reduction, a feature most cameras have. LENR forces the camera to take a “dark frame,” a second exposure of equal length, but with the shutter closed. The camera subtracts the dark frame (which records only the hot pixels) from the previous light frame. The final image takes twice as long to appear, but is much cleaner, as I show above. So a two-minute exposure requires four minutes to complete.
While there are clever ways to eliminate hot pixels later in processing (using Photoshop’s Dust and Scratches filter), doing so can blur details. I’ve long found that doing it “in-camera” always produces better results.
The Milky Way rising over the peak of Mt. Blakiston, in Waterton Lakes National Park, Alberta, Canada.
With the Moon now down, I turned the camera the other direction toward Mt. Blakiston, to capture the star clouds of the summer Milky Way rising behind the mountain, in an example of a “deepscape,” a nightscape with a telephoto lens. This is another technique I’ve not used very often, as the opportunities require good location planning and timing, transparent skies, and a tracker. Apps like ThePhotographersEphemeris coupled with TPE3D, and PlanItPro can help.
Deepscapes frame landscape fragments below some notable deep-sky objects and starfields, in this case a region with several “Messier objects” — nebulas and star clusters well-known to amateur astronomers.
This was a blend of one untracked and one tracked exposure, again on the Nomad. Taking more frames for stacking and noise reduction, while a common practice, was not practical here — at this focal length of 70mm the sky was moving enough that the mismatch between sky and ground would make blending tough to do.
And the reality is that today’s AI-trained noise reduction software (see my test report here) is so good, image stacking is not as essential as it once was.
For many of the Waterton images I used the Canon RF28-70mm lens, usually wide open at f/2. For the image below I used the RF15-35mm lens at its maximum aperture of f/2.8. (See my test report on these lenses here.)
The stars and clouds trail across the sky over Cameron Lake in Waterton Lakes National Park, Alberta, and Mt. Custer across the border in Glacier National Park in Montana.
On my final night in Waterton I drove the Akamina Parkway to Cameron Lake, located in extreme southwest Alberta on the borders with British Columbia and Montana. The glaciated peak to the south is Mt. Custer in Glacier National Park, Montana.
Again, I had hoped to get a deepscape of the photogenic starfields in Scorpius above Mt. Custer. But as is often the case at this site, clouds wafting over the Continental Divide defeated those plans. So Plan B was a set of long exposures of the clouds and stars trailing with the last light of the low Moon lighting parts of the scene. Chunks of ice still drift in the lake.
This is a blend of separate multi-minute exposures for the ground and sky, all at the slow ISO of just 100, and all untracked to purposely create the star trails, not avoid them.
So over a total of four nights at these wonderful World Heritage Sites, I was able to try out some new shooting techniques:
H-Alpha blending
Focus stacking
Deepscapes
As well as panoramas, both horizontal and vertical
Every nightscape outing is a learning process. And you have to be prepared to change plans as the clouds dictate. I didn’t get all the shots I had hoped to, but I still came away with images I was very pleased with.
AI-based noise reduction programs continue to improve, to provide remarkable results on many images. But … how well do they work on star-filled astrophotos?
As we know, software evolves rapidly. So here’s my latest look at versions of those programs current of as May 2024, plus new entries into the category, all with a focus on how well they perform on a variety of astrophotos. Only two programs tested here, NoiseXTerminator and GraXpert, are specifically designed to be used on astrophotos, primarily telescopic images of deep-sky objects.
The other programs on test are general purpose, for use on noisy images such as wildlife photos shot at high ISOs to freeze motion, or any photos shot under low light. But the latter includes nightscapes.
I tested programs in three categories, defined primarily by how they are used in a processing workflow:
Adobe DeNoise AI in Camera RawDxO PureRAW 4 stand-alone app
General programs usable only on Raw files at the start of a workflow:
Adobe DeNoise AI from within Adobe Camera Raw (v16.3) or Lightroom (v13.3)
DxO PureRAW 4 (v4.1), a stand-alone app only
Luminar Neo Noiseless AION1 NoNoise AI 2024Topaz Photo AI
General programs usable as stand-alone apps on Raw files, but also as plug-ins for Photoshop for use later in a workflow (I tested both workflows):
Luminar Neo (v1.19.1) and its Noiseless AI filter
ON1 NoNoise AI 2024 (v18.3)
Topaz Photo AI (v3.02)
GraXpert stand-alone app
Programs specialized for astro work:
RC-Astro NoiseXTerminator (v1.1.3), usable only as a Photoshop plug-in
GraXpert (v3.0.2), usable only as a stand-alone application
(The latter two can also be installed as “processes” accessed from within the specialized astrophoto program PixInsight; I did not test that workflow.)
Comparing ACR’s standard noise reduction to 5 AI-based noise reduction programs
MY METHODS (“BUT WHAT ABOUT …?”)
I tested the five general-purpose programs on four types of astrophotos:
Nightscapes
Aurora images
Total solar eclipse images
Deep-sky images, both wide-field and telescopic
I tested the two specialized programs only on sample deep-sky photos, the types of images they are designed and trained for.
In all cases, the test images are single frames. I did not stack any images for these examples, as I wanted to show what the programs could do with noisy originals.
I tested only on Raw files from mirrorless cameras. I did not test on FITS files from specialized cooled astronomy cameras, as those require a quite different workflow and software.
Anticipating the “What about …?” question — no, I did not test Topaz DeNoise AI. While popular among astrophotographers, both it and its companion program, Sharpen AI, were discontinued in 2023, in favor of Topaz concentrating on their single program, Photo AI, that can de-noise, sharpen, and upscale.
I made an exception for Luminar Neo. While it includes general processing functions, it is used more often (certainly by me!) just as a plug-in for its AI-driven effects and filters, noise reduction being one.
PLEASENOTE:
All the test images are full-resolution JPGs (6,000 to 8,000 pixels wide) that you can download (by right-clicking) for detailed inspection. You will often need to do so, to see the pixel-level differences I refer to.
But the sizes of the images make the blog page slow to load initially. Patience, please!
DxO PureRAW can be called up from within Adobe Bridge by going to File>Open With … and choosing DxO PureRAW.
In Lightroom, the route to send images to PureRAW is File>Plug-In Extras>Process and Preview with DxO PureRaw 4. You cannot choose Photo>Edit In … as you might do to send images to other programs.
TL;DR SUMMARY (with links to the software websites)
Of the two Raw-only programs, Adobe’s DeNoise AI and DxO’s PureRAW 4, both worked well, with v4 of PureRAW much improved over its earlier artifact-prone v2 I tested and dismissed in 2022. Similarly, unlike its early version, Adobe DeNoise AI did not invent structures, such as auroral arcs.
Adobe’s DeNoise AI brought out details in the shadows much better than DxO’s PureRAW 4, which blocked up shadows. But PureRAW produced sharper details in illuminated landscapes, yielding less of the plastic appearance that Adobe DeNoise is still prone to. However, both programs turned star trails into wiggly worms.
Each of the three other general-purpose programs failed as stand-alone apps when importing Raw files, then exporting them as either Raw DNG (Digital Negative) files (ON1 NoNoise AI and Topaz Photo AI), or as TIFF files (Luminar Neo). Their exported images were either dark, vignetted, or hugely shifted in color or tonal balance. Results with that Raw-to-DNG/TIFF workflow were often unusable.
However, the same three programs (Luminar Neo, ON1 NoNoise AI and Topaz Photo AI) worked well as plug-ins from within Adobe Photoshop. Images now looked fine, with ON1 NoNoise producing what I thought was the best overall noise reduction with the fewest artifacts and “patchiness” in most examples. Luminar Neo’s Noiseless AI was consistently the poorest performer in all cases. It’s the program I can rule out of the running for noise reduction.
The two specialized astro programs, NoiseXTerminator and GraXpert, did a fine job on deep-sky images, reducing fine-grained noise without eliminating stars, just what they are “trained” to do. However, I felt NoiseXTerminator did the better job, with the new (as of May 2024) GraXpert 3.0 softening stars or leaving residual mottled artifacts. Neither worked well on nightscapes — while they didn’t harm detail too much, other programs performed better on what are often detailed but dark and noisy foregrounds.
My main takeaway — No one piece of AI software works best on all astrophotos. A program that provides great results on one image or class of image might perform poorly on another image. That’s the nature of AI-driven processing.
So … my overall conclusion and personal workflow picks? —
Adobe DeNoise AI would be my first choice for noisy nightscape images, where it has to be applied early in the workflow. It will be worth trying on deep-sky images.
DxO PureRAW might work better on some nightscapes with lots of ground textures.
ON1 NoNoise AI works well on many images when applied as a plug-in later in the workflow, but its sliders often need adjusting from the defaults.
NoiseXTerminator remains my preferred plug-in for deep-sky images.
PLEASENOTE:
I have not provided prices and explained buying options, as frankly some can be complex!
For those details, go to the software’s website by clicking on the links in the names above. With the exception of Luminar Neo, all are available as free trial copies.
All programs are available for Windows and MacOS. I tested the latter versions, on an M1 Max MacBook Pro.
A typical test image, showing the small section that the comparison examples zoom in on. This is the first image shown below in detail.
RAW-ONLY PROGRAMS — NIGHTSCAPES
To provide evidence for my conclusions, I focus first on the two Raw-only programs, Adobe DeNoise AI and DxO PureRAW 4, as they produced by far the best results of all the programs on demanding nightscapes, often remarkably so. They not only reduce noise, they also recover fine details with AI sharpening you cannot turn off. How well that works is what I demonstrate below.
In each of the following examples, I show the two programs compared to an image processed in Adobe Camera Raw (ACR) using the Detail panel’s old non-AI adjustments for sharpening and noise reduction.
I developed all the images in ACR, then sent them through Adobe’s DeNoise AI option or into DxO PureRAW. Both options produce new raw DNG files, with all the develop settings intact and accurate, with some exceptions with PureRAW as shown below.
Peyto Lake Nightscape
Peyto Lake corner closeup — with Canon R5 at ISO 3200
In most cases I show only a section of images blown up by 250% to 500%. Here, in the first example of a nightscape shot I zoom in on a corner, as illustrated above, where noise often lurks due to lens vignetting. (I shot this and many of the nightscape examples with the 45-megapixel Canon R5. See my test of it for astrophotography here.)
The standard ACR noise reduction leaves a blizzard of fine noise and large color blotches. The Adobe DeNoise AI version (with it at 60%, the setting I used for all the DeNoise images) shows much less noise and somewhat reduced color blotches. The PureRAW version shows even better noise reduction, but the trees turn very dark with no detail.
But compare the mountainside. Adobe turns the rock layers into artificial-looking ropey bands; PureRAW’s detail recovery looks much more natural for texture.
Lake Edith Nightscape
Lake Edith corner closeup — with Canon R5 at ISO 5000
In this example, I again zoom in on a badly underexposed corner. The standard ACR version looks awful, riddled with color splotches and banding. The Adobe DeNoise version has cleaned up most of the mess. But the PureRAW version is better, eliminating even more noise and artifacts.
So is PureRAW better? Not so fast!
Storm Mountain Nightscape
Storm Mountain corner closeup — with Canon R5 at ISO 100
In this close-up of the Storm Mountain twilight image (that I show in full farther down the page), the normal image shot at ISO 100 isn’t marred too much by noise. But it does exhibit the magenta discoloration often seen in underexposed frame corners when the shadows are “lifted” brighter, as I show in the inset of the Basics panel.
The Adobe DeNoise version automatically corrected the color back to normal (I made no manual adjustments) and brought out the fine details. By comparison, PureRAW turned the trees completely dark, a lazy way to reduce noise! I tried further lifting the shadows with some reverse vignetting (as shown), but the result was a muddy mess. PureRAW crushed the shadows to the point no detail was recoverable.
So is Adobe better? Not necessarily ….
Lake Louise Nightscape
Lake Louise close-up — with Canon R5 at ISO 1600
Here I zoom in on famous Mount Victoria at the end of Lake Louise in Banff, in a one-minute exposure taken for the ground. As before, I think PureRAW has done a better job at recovering details in the mountain, though maybe to the point of over-sharpening? Adobe DeNoise perhaps looks more natural here.
But look at the star trails, which we sometimes want in our nightscapes, or have whether we want them or not! Yes, the sky in the AI-processed images looks less noisy, but the star trails now look like wiggly irregular streaks. PureRAW is a little worse, but both programs suffer from the same AI misinterpretation of the content. Both ruined the sky.
Will this always be the case?
Sierra Cabins Nightcape
Sierra Cabins close-up — with Fuji GFX100S at ISO 3200
All the other image examples are from Canon mirrorless cameras: the EOS R, Ra or R5. But this is a blow-up of a 100-megapixel photo from a medium-format Fuji GFX100S. The rustic cabin and the sky is less noisy in the AI images, with PureRAW the better performer here by a small margin. Stars look fine, and the AI sharpening of both programs has brought out the faint stars without any artifacts, a welcome improvement I think.
RAW-ONLY PROGRAMS — AURORA
I include this as a separate example, as an aurora photo provides a sky with a different type of content. In the past I’ve seen Adobe AI invent aurora rays.
Aurora Curtain
Aurora close-up — with Canon Ra at ISO 1600
This is an image from the Great Aurora show of May 10, 2024. There’s less noise in the AI versions of this example, and both programs also eliminated the errant hot red pixel at lower right in the ACR image. I’ve found these two AI programs can correctly identify and eliminate some hot pixels, though hot pixel removal can be hit or miss.
In all, I found the AI routines of Adobe and DxO did a fine job on auroras, reducing noise without introducing artifacts such as banding or posterized color gradations. Neither overly sharpened foreground details, nor added structures into the aurora or clouds that shouldn’t be there or that look unrealistic.
RAW-ONLY PROGRAMS — SOLAR ECLIPSE
Many of us have close-ups of the April 8, 2024 total eclipse of the Sun. Even though you might have shot them at a low ISO (even when eclipsed, the Sun is bright), you might have been surprised to see how much fine noise remains in the corona and sky.
Solar Eclipse Corona Close-Up
Corona close-up — with Canon R5 at ISO 100
This is a close-up of a frame taken through a 105mm f/6 refractor at a focal length of 630mm. Even at ISO 100, there’s a pixel-level granulation visible, but in this case I don’t think either Adobe DeNoise or PureRAW provided much of an improvement, likely because this is a low-ISO original.
In fact, I think Adobe DeNoise AI made noise worse, as its inherent sharpening added some dark flecks throughout the corona. But neither program introduced any banding, unlike Topaz was guilty of below.
RAW-ONLY PROGRAMS — DEEP-SKY
Here I compare the two Raw-only programs on several examples of deep-sky images — photos of the Milky Way and nebulas taken with tracking mounts so the stars remain pinpoints, ideally! These examples are tough tests, as the AI models have likely received little training on what these are supposed to look like! And faint stars can look like noise.
Orion Portrait
Orion close-up — with Canon Ra at ISO 800
First is a wide-angle portrait of Orion, blowing up the center of a tracked exposure with a 28-70mm zoom lens set to 46mm. (See my test of Canon RF zoom lenses here.) Shot at ISO 800, low for deep-sky images, this single frame is fairly clean to begin with. The AI programs do smooth the noise, without wiping out stars. Nice!
But they do accentuate the residual chromatic aberration (the blue haloes) on stars. PureRAW looks a little worse as it seems to have shifted the color to more magenta. All three Raw files have identical settings and profiles applied, yet PureRAW looks slightly different.
Cygnus H-alpha Monochrome
Cygnus close-up — with Canon Ra at ISO 3200 with Astronomik 12nm H-a clip-in filter
This is a more demanding example, shot with the same lens but at 70mm, and with the red-sensitive Canon Ra. It is rendered in monochrome as it was shot through a deep-red hydrogen-alpha filter to isolate the red light from the nebulas, here in Cygnus.
This is a single frame (you would normally stack lots of these!), very noisy due not only to the high ISO used, but also because only the red pixels (one quarter of the total on the sensor) recorded any signal.
Both Adobe DeNoise AI and DxO PureRaw have cleaned up the noise well. PureRAW has added more sharpening, tightening the stars and enhancing fine structure. Whether this is good or not depends on your goals and tolerance for AI-induced changes. In this case, I don’t think it has invented details.
But then there’s this example ….
Vela Supernova Remnant
Vela SNR close-up — with modified Canon R at ISO 3200
This, too, is a filtered single frame, taken through a 61mm-aperture telescope equipped with a “dual narrowband” filter which isolates the red H-alpha wavelength, but also the cyan Oxygen emission lines prominent in supernova remnants like this one in Vela. The deep filter requires shooting at a high ISO. So there’s lots of noise.
In this trio, I also applied NoiseXTerminator to the left image, an AI-based noise reduction program designed for just such images. I show more examples with “NoiseX” at the end.
I don’t think Adobe DeNoise or PureRAW have done any better job than NoiseX at reducing noise. If anything, each might have added some additional texturing that looks artificial, and accentuated chromatic aberration haloes on the stars. NoiseX wins here, right?
Well … look at the fine structures of the wisps of nebulas in all three panes. In the two panels at center and right, you can see more structure in the nebulosity, such as the protruding red fingers at top, that are not there in the NoiseX version at left. Is this real? Might other sharpening routines later in the workflow have brought it out anyway? Or are these details the products of AI imagination!?
Before purists dismiss the Adobe and DxO AI programs for fabricating details, here’s another example.
Crab Nebula
Crab Nebula close-up — with modified Canon R at ISO 800
This is another supernova remnant, the famous Crab Nebula in Taurus. It is a 500% blow-up of the center of a single exposure with a modified Canon R on a 120mm f/7 refractor.
In this case, the “normal” image on the left has had just ACR’s old-style noise reduction applied, nothing else. In the middle and on the right, the Adobe and DxO AI versions are noticeably less noisy.
But … the small red tendrils are also more obvious with AI enhancement — and they are real (as comparisons to other more detailed astrophotos showed me). So here the AI has helped bring out subtle details while smoothing noise. I think PureRAW has sharpened stars a little too much, and shifted the colors, again to magenta.
Summary Points:
Both Adobe DeNoise AI and DxO PureRAW 4 can work wonders on nightscapes…
… Except on star trails! Both programs ruin star trails.
Their improvements to low ISO images is not so great, if minimal.
In its conversion of Raw to DNG, PureRAW sometimes introduced minor and unwelcome changes to images’ brightness and color. Adobe DeNoise did not.
But PureRAW recovered details in textured landscapes much better than DeNoise, which can suffer from plastic looking artifacts.
Both programs are worth trying on deep-sky images, if your workflow allows working with Raw files.
But you have to look carefully at the details – pixel peep! – as you might see oddities introduced by either program that you feel are unacceptable. Or you might see welcome sharpening, saving you more work later in processing.
Recommendations:
Adobe DeNoise AI has the advantage that if you are an Adobe Cloud subscriber you already have it. It is included with Lightroom and Camera Raw. So try DeNoise AI; you might like the results. Or not! But as with DxO PureRAW, it can be applied only to Raw files and only at the start of a workflow.
Download the trial copy of DxO PureRAW and test it on your own images. You might prefer it in your workflow.
OTHER PROGRAMS — WORKING STAND-ALONE ON RAW FILES
Now I test Luminar Neo Noiseless AI, ON1 NoNoise AI, and Topaz Photo AI — three AI noise reduction programs that can work not only on Raw files but on other file formats, allowing them to be applied at various points in a workflow.
All three programs can read Raw files from a wide range of cameras. Like PureRAW, ON1 and Topaz can also export DNG files, Adobe’s universal version of a Raw file. The best format Luminar can export to is a 16-bit TIFF.
I sent all the raw images I’ve shown above, plus a dozen more I’m not showing, through all three programs working as stand-alone apps, similar to how PureRAW operates. I usually applied their default or auto settings for noise reduction, and also for sharpening, as both Adobe and DxO also sharpen — you can’t have them not sharpen. I wanted to compare like to like.
Aurora Curtain
Aurora Curtain with three programs as stand-alone apps
The exported files from all three programs showed noticeable differences in brightness and color on this aurora example from the May 10, 2024 display. Again, all have had the same develop settings applied to them as were applied to the original file in Camera Raw. Topaz shows over-sharpening, but that can be turned down from the usually excessive level chosen by its “Auto Pilot” routine.
Aurora over House
Aurora over House with three programs as stand-alone apps
Another aurora example also shows significant differences in brightness, color and contrast. Auroras are particularly sensitive to shifts in white balance and to the camera profile chosen. In this case the profile was Camera Neutral. Only Luminar honored that profile; ON1 and Topaz offered only a generic Color profile in their DNGs. Luminar did not apply the lens correction for the Venus Optics 15mm lens used here, as it was not in its database. So its image looks dark and vignetted, requiring manual adjustments.
Peyto Lake Nightscape
Peyto Lake nightscape with three programs as stand-alone apps
The differences became even more marked on some of my test nightscapes. In this ISO 3200 Canon R5 image from Peyto Lake in Banff only Topaz’s exported DNG succeeds in resembling the original developed Raw file from ACR. Luminar’s TIFF is far too dark and ON1’s DNG is way too bright and contrasty. What happened there?
Storm Mountain Nightscape
Storm Mountain twilight scene with three programs as stand-alone apps
Another example, shot at ISO 100 with the Canon R5, also shows major disparities between the original Raw files and the exported images, with Luminar’s now looking the closest, ON1 still too bright and contrasty, and Topaz’s way too dark. There is no predicting what you’ll get.
I think the differences might be due to how each program interprets the camera profile used, but the reason is a mystery.
Summary Points:
Unlike DxO PureRAW 4, none of these three programs can be used in practice as stand-alone noise reduction apps, at least not with reliable results.
Recommendations:
Use Luminar Neo, ON1 NoNoise AI and Topaz Photo AI only as plug-ins, at least for noise reduction. That’s what I test next.
THE SAME TRIO — AS PLUG-INS WITHIN PHOTOSHOP
Thankfully, when I used the same three programs called up from within Photoshop as filter plug-ins, all worked well, though with varying levels of noise reduction quality.
All three can also be called up from within Adobe Lightroom.
Sending images to Plug-Ins with Lightroom, using Edit in ….
However, for the latter, do not use the route I advised at the beginning for DxO PureRAW. Do not send images to them via File>Plug-In Extras …. While that will work, you’ll get the same bad results I show in the previous section when using the programs as stand-alone apps.
Instead, as I show immediately above, from Lightroom, use Photo>Edit In… and choose your plug-in. That will produce the same good results I show below.
An even better method is to choose Photo>Edit In>Open as Smart Object in Photoshop. You can then apply these or any plug-in as a non-destructive “smart filter,” with settings you can re-adjust at any time, rather than being “baked into” the resulting TIFF file. That’s what I did for the tests below.
I can hear the anti-Adobe faction clamouring! For those who do not use Photoshop, all three programs will also install as plug-ins into Affinity Photo 2, a very Photoshop-like layer-based editor available under a perpetual license at low cost. However, I did not test that workflow variation.
Peyto Lake Nightscape
Peyto Lake close-up — with Canon R5 at ISO 3200
Here, on blow-ups of a noisy frame corner, I show the settings I used. Most are default, except for ON1 where I backed off its Tack Sharp Deblur from the 100 it had picked. While ON1 NoNoise ostensibly has an Auto function for detecting and applying an amount of noise reduction and sharpening suitable for each photo, it often picks 100%.
However, ON1 NoNoise AI did the best job. Topaz Photo AI still left noise in the foreground. Luminar Noiseless AI wasn’t bad, but left a noisier sky with some patchy artifacts.
Aurora Curtain
Aurora Curtain — with Canon Ra at ISO 1600
On the aurora example, I also applied Photoshop’s old Reduce Noise filter to the image brought in from Camera Raw. It can do a good job smoothing fine-scale noise.
With that conventional filter applied I found there wasn’t a big difference among the four versions. The three AI programs did a good job, with ON1 and Topaz better than Luminar, which still left some noise. Topaz over-sharpened the stars and trees, leaving colorful ringing artifacts on the latter. And that was with its Sharpen filter backed off to 30 from the 50 the Auto Pilot routine suggested using.
Vela Supernova Remnant Deep-Sky
Vela SNR close-up — with modified Canon R at ISO 3200
Luminar Noiseless AI improved this noisy frame by only a small degree. ON1 and Topaz were much better, providing good noise reduction without adding significant artifacts or odd “invented” structures. As usual, Topaz sharpened stars by default, and perhaps a little too much.
Cygnus Starfield Deep-Sky
Cygnus close-up — with Canon Ra at ISO 1600
This star-rich field taken with a 70mm lens tests how well the programs can retain tiny stars while smoothing noise. Luminar left stars intact but didn’t provide much better noise reduction over what Camera Raw’s old manual noise sliders produced.
ON1 did provide a smoother background sky. But retaining faint stars required backing off Luminance noise reduction and increasing Enhance Detail to bring back the faint stars it wiped out with its default settings. Boosting Deblur and Micro Contrast can add ugly haloes on stars. So, with a deft touch to the sliders the results with ON1 can be very good, with the added benefit that it appears to reduce residual chromatic aberration around stars without affecting star colors.
With Topaz, sliding up Original Detail helped bring back stars lost to noise smoothing. However, there was an odd general reduction in contrast over the image.
Solar Eclipse Corona Close-Up
Corona close-up — with Canon R5 at ISO 100
Each program handled this low-ISO file a little differently. Luminar seemed to actually increase noise, adding coarser structures and some banding. ON1 was the smoothest, with noticeably less noise than the original Camera Raw image. Topaz left (or added?) some fine scale color noise. It sharpened the lunar limb very well, though with a slight dark halo.
But the real revelation was when I zoomed out to look at the darker sky beyond the brightest parts of the corona.
Solar Corona Banding Artifacts
Corona sky close-up — with Canon R5 at ISO 100, showing Topaz banding artifacts
Topaz Photo AI introduced very noticeable banding in the form of square blocks, an artifact of how AI programs analyze images in “tiles.” I did see this in other photos processed with Photo AI, in areas that should look smooth. The culprit is the noise reduction; turn it off and the banding goes away, but now you have noise!
In this case, Topaz’s noise reduction ruined the image, though its sharpening was useful. Overall, I think ON1 NoNoise AI 2024 was the winning plug-in for noise reduction. But I’ve used Photo AI to sharpen solar prominences.
Summary Points:
All three programs worked well as plug-ins, with none of the extreme shifts in color or tone shown in the previous section in the stand-alone app exports.
However, even as a plug-in I felt Luminar Neo’s Noiseless AI filter consistently produced the worst results, or often little benefit at all.
Topaz Photo AI can produce good results, but watch for banding artifacts and over-sharpening. I also found that Topaz was prone to crashes and lock-ups, requiring force-quitting.
ON1 NoNoise AI 2024 provided the best overall noise reduction among these three plug-ins. The 2024 version is much improved over the 2023 version which had a High Detail mode that was awful! Even so, watch for loss of stars, or sharpening haloes. Play with the sliders.
Recommendations:
While Topaz Photo AI is popular among nature photographers, I would suggest ON1’s NoNoise AI 2024 is the better choice for astrophotographers looking for a noise reduction plug-in.
I can’t dismiss Luminar Neo. I like it for some of its other special effect filters, such as Orton glows, Magic Light, Sky Enhancer AI, and Accent AI. I find it a useful plug-in for effects and finishing touches. However, I would not recommend Luminar for noise reduction.
SPECIALIZED PROGRAMS — NOISE XTERMINATOR and GRAXPERT
No review of AI programs for astrophotography can leave out RC-Astro’s XTerminator plug-ins. Here I show Russell Croman’s NoiseXTerminator which uses AI trained on star-filled astrophotos. I tested it as a filter plug-in for Photoshop.
Also becoming popular in the last year is the free stand-alone application GraXpert. Developed first to eliminate nasty gradients of tone and color across deep-sky images due to light pollution, GraXpert now also includes AI-based noise reduction. I tested it as a stand-alone application; it does not install as a plug-in, though like NoiseXTerminator, it can install as a process accessible from within the popular astrophoto program PixInsight.
As a stand-alone app, GraXpert can only import and work on TIFFs, JPGs, or FITS files, the latter format produced by dedicated astro cameras.
I show only deep-sky image examples, as that’s the domain of these two programs.
Crab Nebula with NoiseXTerminator vs. ON1 and Topaz
Crab Nebula close-up — with modified Canon R at ISO 800
First I show a comparison of the Crab Nebula test image with ACR’s standard non-AI noise reduction applied plus Photoshop’s old Reduce Noise filter. I compare this to the same image but with NoiseXTerminator also applied at 60% strength. Now compare this to versions with ON1 NoNoise and Topaz Photo AI.
NoiseXTerminator produced the smoothest result with no detrimental affect on the stars or nebulosity. ON1 is a good second place for noise reduction, with slightly sharper stars, which may or may not be desirable. Topaz produced subtle patchy artifacts and added tiny structures that may or may not be real.
NGC 1763 with NoiseXTerminator vs. ON1 and Topaz
NGC 1763 in LMC — with modified Canon R at ISO 3200
This is a single-frame close-up of the second best nebula in the Large Magellanic Cloud (after the Tarantula), taken at ISO 3200 through a dual-narrowband filter. So it is noisy.
The left panel is again with ACR and Photoshop’s Reduce Noise. But applying NoiseXTerminator cleaned the image up a lot. ON1 looks almost as good. Topaz sharpened detail to the point of revealing pinprick faint stars that are just blurs in the other images. These may indeed be real!
Vela Supernova Remnant with Noise XTerminator and GraXpert
Vela SNR close-up — with modified Canon R at ISO 3200
The same Vela SNR image I used earlier shows excellent noise reduction from NoiseXTerminator, with star colors and nebula structures left alone. GraXpert at 50% strength (the developers have suggested backing off the settings) did not produce as smooth a sky. Applying GraXpert at 100% strength did yield noise reduction on par with NoiseX, but produced a slightly softer overall image.
Crab Nebula with Noise XTerminator and GraXpert
Crab Nebula close-up — with modified Canon R at ISO 800
Processing the Crab Nebula image shows much the same results. Though I think here even at 100% GraXpert isn’t producing as good a level of noise reduction as NoiseX, leaving some patchiness amid the nebula, and a mottled texturing to the background sky.
Summary Points:
For the best noise reduction on deep-sky images, especially telescopic close-ups, the dedicated programs NoiseXTerminator and GraXpert trained on such images can do a better job than general-purpose AI programs.
I find NoiseXTerminator the better of the two, but GraXpert is new and evolving.
Recommendations:
GraXpert has the great benefit of being free! But on Macs it runs very slowly, something the developers admit and seem resigned to, as their market is Windows users. My test images each took 2 to 2.5 minutes to process, some 5 to 10 times slower than any of the other programs. And it runs only as a stand-alone app, yet it cannot read Raw files from DSLRs or mirrorless cameras, unlike PureRAW. But if you are a deep-sky imager, try it, as its main purpose – gradient removal – might prove indispensable.
As I prefer to accomplish as much of my editing as possible within one program, I prefer NoiseXTerminator as it can be applied from within Photoshop, and as an editable smart filter. I use it on most of my deep-sky images. I highly recommend it and RC-Astro’s other plug-ins.
YOUR MILEAGE MAY VARY!
The nature of AI means that results with any program can vary from image to image. That’s why no one, me included, can claim that one program is “the best!” Best for what? And with what workflow?
As some programs, such as Topaz Photo AI, offer multiple AI models and settings for strength and sharpening, results on the same image can be quite different. In most of my testing I used either the program’s auto defaults or backed off from those defaults where I thought the effect was too strong and detrimental to the image.
This is all by way of saying, your mileage may vary! In fact, it certainly will.
So don’t take my word for it. Most programs (Luminar Neo is an exception) are available as free trial copies to test out on your astro-images and in your preferred workflow. Test for yourself.
But do pixel peep. That’s where you’ll see the flaws. And the benefits. We are fortunate to have such a great arsenal of tools at our disposal. They will only get better as the AI models improve.
I hope my review – as lengthy as it is! – has helped you make an informed decision on what to buy.
It has been many years since we were treated to an aurora as widely seen as the show on May 10, 2024. Here’s my tale of the great display.
As the sky darkened around the world on May 10/11, 2024, sky watchers in both the northern and southern hemispheres were amazed to see the sky lit by the deep reds, greens and pinks of a massive display of aurora. For me, this was my first Kp8 to 9 show (to use one measure of aurora intensity) in more than 20 years, back in the film era!
Throughout the day, aurora chasers’ phones (mine included) had been beeping with alerts of the arrival of a major solar storm, with the usual indicators of auroral activity pinned to the top of the scale.
A NOAA satellite’s eye view of the ring of aurora May 10/11, showing it south of me in Alberta, and across the northern U.S. People in the southern U.S. saw it to their north.
As I show below, the graphic of the intensity of the band of aurora, the auroral oval, was lit up red and wide. This was a night we didn’t have to chase north to see the Northern Lights or aurora borealis — they were coming south to meet us (as I show above).
The Kp Index was reading 9 on SpaceWeatherLiveThe auroral oval was lit up red in the Ovation mapThe 3-hour predictions called for red and magenta alerts!
Observers in the southern hemisphere had the normally elusive aurora australis move much farther north than usual, bringing the Southern Lights even to tropical latitudes in Australia, South America and Africa.
The cause was a massive sunspot group on the Sun which had let off several intense solar flares.
Sunspot group 3664 was so big it could be seen with the naked eye, using solar eclipse glasses. Photo courtesy NASA.
The flares had in turn blown off parts of the Sun’s atmosphere, the corona, that anyone who saw the total eclipse a month earlier had admired so much. But a month later, the corona was being blown our way, in a series of Coronal Mass Ejections (CMEs), to collide with Earth.
A movie of six CMEs blasting toward Earth, captured by the SOHO satellite. Courtesy NASA/ESA.
As it happened I was scheduled to give a community talk in the nearby town early in the evening of May 10, on the topic of The Amazing Sky! Watching the indicators, I could more or less promise the audience that we would indeed see an amazing sky later that evening as it got dark.
Post talk, I hurried home to get the cameras ready, choosing to forgo more hurried driving out to a scenic site in southern Alberta, for the convenience of shooting from my rural backyard. As the sky darkened, the clouds were lit purple, and curtains of aurora appeared in the clear patches.
Clouds and aurora in twilight with the 11mm TTArtisan full-frame fish-eye lens.A bright arc of aurora shining through the purple clouds, with the 7.5mm TTArtisan circular fish-eye lens.
Something big was going on! This was promising to be the best show of Northern Lights I had seen from home in a year. (Spring 2023 had three great shows at monthly intervals, followed by an aurora drought for many months. See The Great April Aurora.)
A selfie at the start of the great aurora show of May 10, 2024.
I shot with four cameras (a Canon EOS R, Ra, R5 and R6) — two for time-lapses, one for real-time movies, and one for still images. I used the latter to take many multi-image panoramas, as they are often the best way to capture the wide extent of an aurora across the sky.
The arc of aurora in purple and white across the northern sky from home in Alberta at the start of the great display (about 11:30 p.m. MDT).
Early in the evening the arc of aurora wasn’t the usual green from oxygen, but shades of purple, pink, and even white, likely from sunlit nitrogen. The panorama above is looking north toward a strangely coloured arc of nitrogen (?) aurora.
Then after midnight a more normal curtain appeared suddenly, but toward the south, brightening and rising to engulf much of the southern sky and the sky overhead.
Looking south with the 15mm wide-angle lens.
It is at local midnight to 1 a.m. when substorms usually hit, as we are then looking straight down Earth’s magnetic tail, toward the rain of incoming aurora particles bombarding the Earth. During a substorm, the rain turns into a deluge — the intensity of the incoming electrons increases, sparking a sudden brightening of the aurora, making it dance all the more rapidly.
This is a 300° panorama of my home sky now filled with colourful curtains.
As the aurora explodes in brightness it often swirls up to the zenith (or more correctly, the magnetic zenith) to form one of the sky’s greatest sights, a coronal outburst. Rays and beams converge overhead to form a tunnel effect. It is jaw-dropping.
I’ve seen this many times from northern sites such as Churchill and Yellowknife, where the aurora often dances straight up. And from my latitude of 51° N in western Canada, the aurora does often come down to us.
But this night, people at latitudes where, at best, the aurora might be seen just as a glow on the horizon, saw it dance overhead in a corona show to rival the solar eclipse, and that other corona we saw on April 8!
This is a panorama of a substorm outburst creating an overhead corona with rays converging to the magnetic zenith (south of the true zenith), and amid clouds. The rays show a rich mix of oxygen greens and reds, as well as nitrogen blues blending to create purples. Some greens and reds are mixing to make yellows.
Yes, the long exposures of aurora photos (even those taken with phone cameras) show the colours better than your eye can see them (insensitive as our eyes are to colour in dim light). But this night portions of the arcs and rays were bright enough that greens and pinks were easily visible to the naked eye.
This is a single 9-second exposure of the peak of a bright outburst at 1 a.m. MDT. It was with the Laowa 7.5mm circular fish-eye lens at f/2 on the Canon R5 at ISO 800. It is one frame from a time-lapse sequence. A brief outburst of a substorm created an overhead corona with bright rays converging to the magnetic zenith (south of the true zenith).The corona shows a mix of oxygen greens and reds, as well as nitrogen blues blending to create purples. Some greens and reds mix to make yellows.
At its peak the show was changing rapidly enough, I couldn’t get to all the cameras to aim and frame them, especially the movie camera. The brightest outburst at 1 a.m. lasted just a minute — the time-lapse cameras caught it. The sequence below shows the view in 9-second exposures taken consecutively just 1 second apart.
This series shows a brief outburst of bright aurora at the magnetic zenith overhead. The time between these 7 consecutive 9-second exposures is only 1 second, so this bright outburst did not last long (little more than a minute). With the TTArtisan 7.5mm f/2 fish-eye lens on the Canon R5. Click or tap to enlarge to full screen.
Here’s another sequence of frames taken as part of a time-lapse sequence with the 11mm lens. It shows the change in the aurora over the 80 minutes or so that it was most active for me at my site.
The time between these 12 images is usually 8 minutes, though to include some interesting activity at a bright outburst, the interval is 5 minutes for three of the images around 1 a.m. Each is a 7- or 9-second exposure taken as part of a time-lapse sequence using the 11mm TTArtisan lens at f/2.8 on the Canon R at ISO 800 or 1600.
Shooting time-lapses with fish-eye lenses captures the show with a minimum of attention needed (except to adjust ISO or exposure times when the aurora brightens!). I could use the still camera (with the Laowa 15mm f/2 lens) to take individual shots, such as more selfies and home shots.
This is a single 6-second exposure with the Laowa 15mm lens at f/2 and Canon Ra at ISO 2000.This is a single 4-second exposure with the Laowa 15mm lens at f/2 and Canon Ra at ISO 1600. This is a single 8-second exposure with the Laowa 15mm lens at f/2 on the Canon Ra at ISO 800. Another camera taking a time-lapse is in the scene. I had four going this night.
As colourful as the aurora was at its best between midnight and 1:30 a.m., I think the most unique shots came after the show had subsided to appear just as faint rays across the north again, much as it had begun. To the eye it didn’t look like much, but even on the camera’s live screen I could see unusual colours.
I took more panoramas, to capture one of the most unusual auroral arcs I’ve even seen — a blue and magenta aurora across the north, similar to how the night started.
This a stitch of 11 segments, each 13-second exposures, with the Laowa 15mm lens at f/2 on the Canon Ra camera at ISO 800, and turned to portrait orientation. Processed in Camera Raw and stitched with PTGui.
The colours may be from nitrogen glowing, which tends to light up in blues and purples, especially when illuminated by sunlight at high altitudes. At 2 to 2:30 a.m. the Sun might have been illuminating the aurora at a height of 150 to 400 km, and far to the north.
I’d seen blue-topped green auroras before (and there’s a green aurora off to the west at left here). But this was the first time I’d seen an all-blue aurora, no doubt a product of the intense energy flowing in the upper atmosphere this night. And the season and my latitude.
The panorama is a spherical projection spanning 360º, and reaching to the zenith 90° high at centre. This a stitch of 20 segments, each 13-second exposures, with the Laowa 15mm lens at f/2 on the Canon Ra camera at ISO 800, and turned to portrait orientation. Processed in Camera Raw and stitched with PTGui.
The weirdest aurora was at 2:30 a.m., when in addition to the blue rays of nitrogen, an odd white and magenta patch appeared briefly to the south. What was that??
The lesson here? During a bright show do not go back to sleep when things seem to be dying down. Interesting phenomena can appear in the post-storm time, as we’ve learned with STEVE and other odd red arcs and green proton blobs that we aurora photographers have helped document.
I end with a finale music video, mostly made of the time-lapses I shot this night.
Enjoy!
Bring on more aurora shows as the Sun peaks in activity, perhaps this year. But the best shows often occur in the 2 or 3 years after solar max. So we have several more years to look forward to seeing the Lights dance in our skies.
Watch in full screen and in 4K if you can. For all the tech details click through to YouTube and check the description below the video.
As eclipse day approaches here are some tips and video tutorials from me about how best to capture the total eclipse of April 8, 2024.
There are many ways to capture great images and movies of a total eclipse of the Sun. I outline them all in great detail in my 380-page ebook How to Capture the Solar Eclipses, linked to at right.
Originally published in June 2023, I revised the ebook following the October 14, 2023 annular eclipse of the Sun to include “lessons learned at the eclipse,” and some processing tutorials on assembling annular eclipse composites. I’ve also added new content on using software to control cameras and updated information about solar filters.
Brief Tips and Techniques
The August 21, 2017 total solar eclipse over the Grand Tetons as seen from the Teton Valley in Idaho, near Driggs. With the Canon 6D and 14mm SP Rokinon lens at f/2.5 for 1/10 second at ISO 100.
My breakdown of recommend methods, in order from simplest to most complex, and with increasing demands on your time, is generally this:
Use a Phone Camera for a Movie. While they can be used for a quick handheld grab shot during totality, a better method is to place a phone on a tripod using a clamp of some kind. Then a few minutes before totality aim and frame the scene, with no filter over the camera lens. Start it in movie mode to record video of the eclipse and sky changes, and the excited sounds of your group! Just remember to stop the video shortly after the end of totality and aim the phone away from the Sun. Never leave any unfiltered camera aimed at the Sun for a long time.
Shoot a Wide-Angle Time-Lapse. Using a DSLR or mirrorless camera and a wide-angle lens (it might need to be as wide as a 14mm at sites in Mexico and the southern U.S.) aim and frame the camera to include the Sun and landscape below. Focus the lens! And leave it on manual focus. But put the camera into Auto-Exposure Aperture Priority (Av) with wide-area metering and with it set to underexpose by -1 EV Exposure Compensation. With the camera at ISO 100 or 200, use either its internal intervalometer (if it has one) or an external intervalometer to take frames once per second. Start the sequence with no filter on the lens a few minutes before totality. Let it run on its own until a few minutes after totality. The result is hundreds of frames you can turn into a time-lapse movie of the lunar shadow approaching and receding, and of the changes in sky colours. Or you can extract single frames at key points to process individually, as I did for the image above from August 2017. The advantage, as with the phone camera movie method, is that the camera, once going, requires no further attention. You can enjoy the eclipse!
Shoot a Telephoto Video. Use a 300mm to 500mm lens on a DSLR or mirrorless camera to shoot a real-time close-up video of the eclipse. Start the video a minute or two before totality with the Sun positioned to the left of frame centre and with a solar filter over the lens. Use a slow ISO, the lens wide open (typically f/4 to f/5.6) and the camera on Auto-Exposure Aperture Priority (Av). Just be careful to focus precisely on the filtered Sun before starting the video. Poor focus is what spoils most eclipse images, not poor exposure. Just before totality (about 30 seconds prior to Second Contact) remove the filter. The auto-exposure will compensate and provide a proper exposure for the rest of totality. Just let the camera run and the Sun drift across the frame from left to right. Just remember to replace the filter, or cap the lens, and stop the video shortly (~30 seconds) after totality and Third Contact. The video will capture the diamond rings and a well-exposed corona. Vary the exposure compensation during totality if you wish, but that involves more work at the camera. Otherwise, you can just let the camera run. But, as I illustrate in my ebook, it’s important to plan and place the Sun correctly to begin with (using a planetarium app to plan the sequence), so it does not drift off the frame or close to the edge.
Shoot Telephoto Close-Up Stills. Use the same type of gear to shoot still images. While you could shoot stills on Auto-Exposure, it’s better to shoot still images over a range of exposures, from very short (~1/1000 second) for the diamond rings and prominences, to long (~1 second) for the outer corona. No one exposure can capture all that the eye can see during totality. This takes more work at the camera, and with the camera on a static tripod you might have to re-centre the Sun during totality, another thing to fuss with and where things can go wrong. Using the camera’s Auto-Bracketing mode can help automate the shooting, allowing the camera to automatically shoot a set of 7 to 9 exposures at say, one-stop increments in quick succession with just one press of the shutter button (by using the self-timer set to 2 seconds).
Shoot with a Telescope on a Tracking Mount. Telescopes (I like 60mm- to 100mm-aperture apochromatic refractors) allow longer focal lengths, though I would advise against shooting with any optics longer than 600mm to 800mm, so the image frames the corona well. Use similar settings as above, but with the telescope (or a telephoto lens) on a tracking mount to turn from east to west at the same rate as the sky moves. That will ensure the Sun stays centred on its own, provided you have at least roughly polar aligned the mount. (Set it to your site’s latitude and aim the polar axis as due north as you can determine from compass apps.)
Those are brief summaries of the methods I recommend, as they are ones I’ve used with success in the past and plan to use on April 8. My ebook contains much more information, and answers to most of the “But what about using ….?” questions. And I provide lots of information on what can go wrong! Some learned the hard way over 16 previous total solar eclipses.
Video Tutorials
For a video tutorial, check out the webinar I conducted as part of the Kalamazoo Astronomical Society’s excellent Eclipse Series here on YouTube. It is about a 1-hour presentation, plus with lots of Q&A at the end.
KAS Eclipse Series — Part 1: Shooting
Of course, once you have all your images, you need to process them. My ebook’s biggest chapter (at 80 pages) is the one on processing still images and time-lapses.
So, a month after I presented the above webinar on Shooting, I was back on-line again for a follow-up webinar on Processing. You can view that KAS Eclipse Series tutorial here on YouTube.
KAS Eclipse Series — Part 2: Processing
I cover processing single wide-angle images, a wide-angle time-lapse series, single-image close-ups, and blending multiple exposure composites.
A month later, I presented a further webinar to the Astronomical League as part of their AL Live series, again on shooting the eclipse, but now with an emphasis on techniques amateur astronomers and astrophotographers with typical telescope gear might use.
You can view the AL Live webinar here. My presentation begins at the 44-minute mark.
AL Live Webinar — Scrub ahead to 44 minutes
I emphasized that the kinds of gear astrophotographers use these days with great success on deep-sky objects might not work well for the eclipse. The specialized cameras, and software used to control them, are just not designed for the demands of a total eclipse, where exposures have to range over a wide array of settings and change very quickly. Images have to be taken and recorded in rapid succession.
I suspect a lot of ambitious and overly-confident astrophotographers will come away from the 2024 eclipse disappointed — and what’s worse, without having seen the eclipse because they were too wrapped up looking at laptop screens trying to get their high-tech gear working.
The Checklist page from my eBook
Practice, Practice, Practice
In these webinars and in my ebook, my common theme is the importance of practicing.
Don’t assume something will work. Practice with the gear you intend to use, on the Sun now (with proper filters) and on the Moon. The crescent Moon, with dim Earthshine lighting the lunar night side, is a great practice target because of its wide range of brightness. And it moves like the Sun will, to check maximum exposure times vs. image blurring from motion.
Practice with your tripod or mount aimed to the altitude and location in the sky where the Sun will be from the site you have chosen. Set a tracking mount to the latitude you will be at to be sure it will aim at and track the Sun without issues. Some telescope mounts stop tracking when they reach due south, exactly where the Sun will be at totality from southern sites. That’s a nasty surprise you do not want to encounter on eclipse day.
All this and much more is covered in my ebook, available for Apple Books and as a PDF for all platforms here from my website at https://www.amazingsky.com/EclipseBook
My latest ebook describes in detail the many techniques we can use to capture great still images and movies of the 2023 and 2024 eclipses of the Sun.
In the next few months we have two major eclipses of the Sun visible from North America.
On October 14, 2023 the Moon will cross the disk of the Sun creating a partial eclipse. But from along a narrow path in the western U.S. the Moon’s disk will be centered on the Sun’s disk but not be large enough to completely cover it. For a few minutes, viewers will see an “annular” eclipse, as above, as what remains of the Sun forms a brilliant ring of light around the dark disk of the Moon.
Six lunar months later, the Moon again crosses the Sun but is now large enough to completely cover the Sun’s bright disk. The result is the most spectacular celestial sight, a total eclipse of the Sun, on April 8, 2024. The last such total solar eclipse (TSE) in North America was on August 21, 2017, shown above. After 2024, the next TSE in southern North America will not be until August 23, 2044. (There’s a TSE in northern Alaska on March 30, 2033.)
In 2017 I prepared an ebook about how to shoot that year’s total eclipse. This year I revised and expanded the book extensively to cover both the 2023 annular and 2024 total eclipses. The new 350-page ebook explains how to frame the eclipses depending on where you are along the paths. New information covers the advances in camera gear, with more details added on shooting video. Revised tutorials cover new software and processing techniques.
Above is the ebook’s Contents page, so you can see what topics it covers, over an extensive 350 pages. I provide not only advice on lots of techniques and gear, but also suggestions for what not to do, and what can go wrong!
The Fundamentals
I discuss the filters needed, comparing the various types available, and when to use them, and when to remove them. (A filter is always needed for the annular eclipse, but failing to remove the filter is a common failing at a total eclipse!)
For the 2023 annular eclipse I explain how to shoot close-ups, but also another type of image, the multiple exposure composite. Framing, timing and exposing correctly are crucial.
I do the same for the 2024 total eclipse, as a wide-angle shot of the eclipsed Sun over a landscape is one of the easiest ways to capture the event. It’s possible to set up a camera to take the images automatically, leaving you free to enjoy the view of the event without fussing with gear. I explain how best to do that.
For both eclipses, many people will want to shoot close-ups with telephoto lenses or telescopes. It takes more work and more can go wrong, but I show what’s required for equipment and exposures, and explain how to avoid the common flaws of fuzzy focus and trailed images.
But good exposure is also essential. However, for a total eclipse close-up, no one exposure is best. It takes a range of exposures to record the wide dynamic range of phenomena during totality. That demands work at the camera.
Setting Cameras
I show how we can use a camera’s auto-bracketing function to help automate the process of taking a set of exposures, from short exposures for the prominences, to long for the faint outer corona.
Another option is using a continuous burst mode to capture the fleeting moments of the diamond rings at the start and end of totality in 2024. But this can also be useful for capturing the “reverse Baily’s beads” that appear briefly as the Moon reaches the inner contact points at the start and end of the annular phase of the 2023 eclipse.
Using a tracking mount can help with shooting a set of images during totality. I describe the options for choosing the right mount and telescope, and how to set it up for accurate tracking. I discuss the advantages — and pitfalls — of using a tracking mount.
Shooting Video
Video is now an important feature of many cameras. But the choices of formats and settings can be daunting! 4K, 8K, 4K HQ — what to use? I illustrate the differences, using the best practice target, the crescent Moon.
Choosing the right contrast curve for your video — such as CLog3 here — can also make a big difference to the final video quality. It’s important to get that right. You have only one chance!
I also devote a chapter to shooting time-lapses, with wide-angle lenses and telescopes.
Image Processing
Chapter 11 is the biggest, with 68 pages of tutorials on how to process eclipse images, using the latest software. I show the benefit new AI tools can provide, but also the oddities they can impart to eclipse images.
I illustrate how to use HDR software (comparing sample results from several popular programs) to blend multiple exposures for greater dynamic range.
I illustrate other methods of stacking and blending exposure sets, such as luminosity masks and stack modes. Examples are all with Adobe products, but the methods are applicable to other layer-based programs such as Affinity Photo.
The processing chapter ends with illustrations on how to create layered composites from images taken at multiple stages of an eclipse.
What Can Go Wrong?
The ebook ends with advice for the ambitious (!) on how best to use several cameras to capture different aspects of the eclipse. And I includes lots of tips and checklists to ensure all goes well on eclipse day — or what to do for Plan B if all does not go well!
The ebook is available for Apple Books (for Macs and iPads) and as a PDF for all devices. Links to buy and more details on ebook content are at my website at www.amazingsky.com/EclipseBook.
I’ll be posting more eclipse “tips and techniques” blogs in the coming months, so be sure to subscribe.
On December 21 we have a chance to see and shoot a celestial event that no one has seen since the year 1226.
As Jupiter and Saturn each orbit the Sun, Jupiter catches up to slower moving Saturn and passes it every 20 years. For a few days the two giant planets appear close together in our sky. The last time this happened was in 2000, but with the planets too close to the Sun to see.
Back on February 18, 1961 the two planets appeared within 14 arc minutes or 0.23° (degrees) of each other low in the dawn sky.
But on December 21 they will pass each other only 6 arc minutes apart. To find a conjunction that close and visible in a darkened sky you have to go all the way back to March 5, 1226 when Jupiter passed only 3 arc minutes above Saturn at dawn. Thus the media headlines of a “Christmas Star” no one has seen for 800 years!
Photographing the conjunction will be a challenge precisely because the planets will be so close to each other. Here are several methods I can suggest, in order of increasing complexity and demands for specialized gear.
Easy — Shooting Nightscapes with Wide Lenses
This shows the field of view of various lenses on full-frame cameras (red outlines) and a 200mm lens with 1.4x tele-extender on a cropped frame camera (blue outline). The date is December 17 when the waxing crescent Moon also appears near the planet pair for a bonus element in a nightscape image.
Conjunctions of planets in the dusk or dawn twilight are usually easy to capture. Use a wide-angle (24mm) to short telephoto (85mm) lens to frame the scene and exposures of no more than a few seconds at ISO 200 to 400 with the lens at f/2.8 to f/4.
The sky and horizon might be bright enough to allow a camera’s autoexposure and autofocus systems to work.
Indeed, in the evenings leading up to and following the closest approach date of December 21 that’s a good method to use. Capture the planet pair over a scenic landscape or urban skyline to place them in context.
For most locations the planets will appear no higher than about 15° to 20° above the southwestern horizon as it gets dark enough to see and shoot them, at about 5 p.m. local time. A 50mm lens on a full-frame camera (or a 35mm lens on a cropped frame camera) will frame the scene well.
This was Jupiter and Saturn on December 3, 2020 from the Elbow Falls area on the Elbow River in the Kananaskis Country southwest of Calgary. This is a blend of 4 untracked images for the dark ground, stacked to smooth noise, for 30 seconds each, and one untracked image for the bright sky for 15 seconds to preserve colours and highlights, all with the 24mm Sigma lens and Canon EOS Ra at ISO 200.
NIGHTSCAPE TIP — Use planetarium software such as Stellarium (free), SkySafari, or StarryNight (what I used here) to simulate the framing with your lens and camera. Use that software to determine where the planets will be in azimuth, then use a photo planning app such as PhotoPills or The Photographer’s Ephemeris to plan where to be to place the planets over the scene you want at that azimuth (they’ll be at about 220° to 230° — in the southwest — for northern latitude sites).
This was Jupiter and Saturn on December 10, 2020 from Red Deer River valley, north of Drumheller, Alberta. This is a blend of 4 images for the dark ground, stacked to smooth noise, for 20 seconds each at f/5.6, and a single image for the sky for 5 seconds at f/2.8, all with the 35mm Canon lens and Canon EOS Ra at ISO 400. All untracked.
Harder — Shooting With Longer Lenses
The planet pair will sink lower and closer to the horizon, to set about 7:00 to 7:30 p.m. local time each night.
As the sky darkens and the planet altitude decreases you can switch to ever-longer lenses to zoom in on the scene and still frame the planets above a carefully-chosen horizon, assuming you have very clear skies free of haze and cloud.
For example, by 6 p.m. they will be low enough to allow a 135mm telephoto to frame the planets and still have the horizon in the frame. Using a longer lens has the benefit or resolving the two planets better, showing them as two distinct objects, which will become more of a challenge the closer you are to December 21.
On December 21 wide-angle and even short telephoto lenses will likely show the two planets as an unresolved point of light, no brighter than Jupiter on its own.
On closest approach day the planets will be so close that using a wide-angle or even a normal lens might only show them as an unresolved blob of light. You’ll need more focal length to split the planets well into two objects.
However, using longer focal lengths introduces a challenge — the motion of the sky will cause the planets to trail during long exposures, turning them from points into streaks. That trailing will get more noticeable more quickly the longer the lens you use.
A rule-of-thumb says the longest exposure you can employ before trailing becomes apparent is 500 / the focal length of the lens. So for a 200mm lens, maximum exposure is 500 / 200 = 2.5 seconds.
To be conservative, a “300 Rule” might be better, restricting exposures with a 200mm telephoto to 300 / 200 = 1.5 seconds. Now, 1.5 seconds might be long enough for the scene, especially if you use a fast lens wide open at f/2.8 or f/2 and a faster ISO such as 400 or 800.
This shows the motion of Jupiter relative to Saturn from December 17 to 25, with the outer frame representing the field of view of a 200mm lens and 1.4x tele-extender on a cropped frame camera. The smaller frame shows the field of a telescope with an effective focal length of 1,200mm.
TELEPHOTO TIP — Be sure to focus carefully using Live View to manually focus on a magnified image of the planets. And refocus through an evening of shooting. While people fuss about getting the one “correct” exposure, it is poor focus that ruins more astrophotos.
Even More Demanding — Tracking Longer Lenses
This one popular sky tracker, the iOptron SkyGuider Pro, here with a telephoto lens. It and other trackers such as the Sky-Watcher Star Adventurer seen in the opening image, can be used with lenses and telescopes up to about 300mm focal length, if they are balanced well. Even longer lenses might work for the short exposures needed for the planets, but vibration and wind can blur images.
However, longer exposures might be needed later in the evening when the sky is darker, to set the planets into a starry background. After December 17 we will have a waxing Moon in the evening sky to light the sky and foreground, so the sky will not be dark, even from a rural site.
Even so, to ensure untrailed images with long telephotos — and certainly with telescopes — you will need to employ a sky tracker, a device to automatically turn the camera to follow the sky. If you don’t have one, it’s probably too late to get one and learn how to use it! But if you have one, here’s a great opportunity to put it to use.
Polar align it (you’ll have to wait for it to get dark enough to see the North Star) and then use it to take telephoto close-up images of the planets with exposure times that can now be as long as you like, though they likely won’t need to be more than 10 to 20 seconds.
You can now also use a slower ISO speed for less noise.
TRACKER TIP — Use a telephoto to frame just the planets, or include some foreground content such as a hilltop, if it can be made to fit in the frame. Keep in mind that the foreground will now blur from the tracking, which might not be an issue. If it is, take exposures of the foreground with the tracker motor off, to blend in later in processing.
The Most Difficult Method — Using a Telescope
An alt-azimuth mounted GoTo scope like this Celestron SE6 can work for short exposures of the planets, provided it is aligned and is tracking properly. Good focus will be critical.
Capturing the rare sight of the planets as two distinct disks (not just dots of light) accompanied by their moons, all together in the same frame, is possible anytime between now and the end of the year.
But … resolving the disks of the planets takes focal length — a lot of focal length! And that means using a telescope on a mount that can track the stars.
While a sky tracker might work, they are not designed to handle long and heavy lenses and telescopes. You’d need a telescope on a solid mount, though it could be a “GoTo” telescope on an alt-azimuth mount. Such a mount, while normally not suited for long-exposure deep-sky imaging, will be fine for the short exposures needed for the planets.
You will need to attach your camera to the telescope using a camera adapter, so the scope becomes the lens. If you have never done this, to shoot closeups of the Moon for example, and don’t have the right adapters and T-rings, then this isn’t the time to learn how to do it.
A simulation of the view with a 1,200mm focal length telescope on December 21. Even with such a focal length the planet disks still appear small.
TELESCOPE TIP — As an alternative, it might be possible to shoot the planets using a phone camera clamped to the low-power eyepiece of a telescope, but focusing and setting the exposure can be tough. It might not be worth the fuss in the brief time you have in twilight, perhaps on the one clear night you get! Just use your telescope to look and enjoy the view!
But if you have experience shooting the Moon through your telescope with your DSLR or mirrorless camera, then you should be all set, as the gear and techniques to shoot the planets are the same.
This is the setup I might use for a portable rig best for a last-minute chase to clear skies. It’s a Sky-Watcher EQM-35 mount with a 105mm apo refractor (the long-discontinued Astro-Physics Traveler), and here with a 2x Barlow to double the effective focal length to 1,200mm.
However, once again the challenge is just how close the planets are going to get to each other. Even a telescope with a focal length of 1200mm (typical for a small scope) still gives a field of view 1° wide using a cropped frame camera. That’s 60 arc minutes, ten times the 6 arc minute separation of Jupiter and Saturn on December 21!
TELESCOPE TIP — Use a 2x or 3x Barlow lens if needed to increase the effective focal length of the scope. Beware that introducing a Barlow into the light path usually requires racking the focus out and/or adding extension tubes to reach focus. Test your configuration as soon as possible to make sure you can focus it.
TELESCOPE TIP — With such long focal lengths shoot lots of exposures. Some will be sharper than others.
TELESCOPE TIP — But be sure to focus precisely, and refocus over the hour or so you might be shooting, as changing temperatures will shift the focus. You can’t fix bad focus!
Jupiter and Saturn in the same telescope field on December 5, 2020. Some of the moons are visible in this exposure taken in twilight before the planets got too low in the southwest. This is a single exposure with a 130mm Astro-Physics apo refractor at f/6 (so 780mm focal length) for 4 seconds at ISO 200 with the Canon 6D MkII. The disks of the planets are overexposed to bring out the moons.
Short exposures under one second might be needed to keep the planet disks from overexposing. Capturing the moons of Jupiter (it has four bright moons) and Saturn (it has two, Titan and Rhea, that are bright) will require exposures of several seconds. Going even longer will pick up background stars.
Or … with DSLRs and mirrorless cameras, try shooting HD or 4K movies. They will likely demand a high and noisy ISO, but might capture the view more like you saw and remember it.
FINAL TIP — Whatever combination of gear you decide to use, test it! Don’t wait until December 21 to see if it works, nor ask me if I think such-and-such a mount, telescope or technique will work. Test for yourself to find out.
Jupiter and Saturn taken in the deep twilight on December 3, 2020 from the Allen Bill flats area on the Elbow River in the Kananaskis Country southwest of Calgary, Alberta. This is a blend of 4 untracked images for the dark ground, stacked to smooth noise, for 2 minutes each at ISO 400, and two tracked images for the sky (and untrailed stars) for 30 seconds each at ISO 400, all with the 35mm Canon lens at f/2.8 and Canon EOS Ra. The tracker was the Sky-Watcher Star Adventurer 2i.
Don’t Fret or Compete. Enjoy!
The finest images will come from experienced planetary imagers using high-frame-rate video cameras to shoot movies, from which software extracts and stacks the sharpest frames. Again, if you have no experience with doing that (I don’t!), this is not the time to learn!
And even the pros will have a tough time getting sharp images due to the planets’ low altitude, even from the southern hemisphere, where some pro imagers have big telescopes at their disposal, to get images no one else in the world can compete with!
In short, use the gear you have and techniques you know to capture this unique event as best you can. And if stuff fails, just enjoy the view!
Jupiter and Saturn taken December 3, 2020 from the Allen Bill flats area on the Elbow River in the Kananaskis Country southwest of Calgary, Alberta. This is a blend of 4 untracked images for the dark ground, stacked to smooth noise, for 2 minutes each at ISO 400, and two tracked images for the sky for 30 seconds at ISO 1600, all with the 35mm Canon lens at f/2.8 and Canon EOS Ra. The tracker was the Sky-Watcher Star Adventurer 2i.
If you miss closest approach day due to cloud, don’t worry.
Even when shooting with telephoto lenses the photo ops will be better in the week leading up to and following December 21, when the greater separation of the planets will make it easier to capture a dramatic image of the strikingly close pairing of planets over an Earthly scene.
The annual Geminid meteor shower peaks under ideal conditions this year, providing a great photo opportunity.
The Geminids is the best meteor shower of the year, under ideal conditions capable of producing rates of 80 to 120 meteors an hour, higher than the more widely observed Perseids in August. And this year conditions are ideal!
The Perseids get better PR because they occur in summer. For most northern observers the Geminids demand greater dedication and warm clothing to withstand the cool, if not bitterly cold night.
A Good Year for Geminids
While the Geminids occur every year, many years are beset by a bright Moon or poor timing. This year conditions couldn’t be better:
• The shower peaks on the night of December 13-14 right at New Moon, so there’s no interference from moonlight at any time on peak night.
• The shower peaks in the early evening of December 13 for North America, about 8 p.m. EST (5 p.m. PST). This produces a richer shower than if it peaked in the daytime hours, as it can in some years.
The two factors make this the best year for the Geminids since 2017 when I shot all the images here.
A composite of the 2017 Geminid meteor shower looking east to the radiant point. This is a stack of 40 images, each a 30-second exposure at f/2.5 with the Rokinon 14mm SP lens and Canon 6D MkII at ISO 6400. The images are the 40 frames with meteors out of 357 taken over 3.25 hours. The ground is a stack of 8 images, mean combined to smooth noise. The background base-image sky is from one exposure. The camera was on a fixed tripod, not tracking the sky. I rotated and moved each image in relation to the base image and around Polaris at upper left, in order to place each meteor at approximately the correct position in relation to the background stars, to preserve the effect of the meteors streaking from the radiant near Castor at centre.
What Settings to Use?
To capture the Geminids, as is true of any meteor shower, you need:
A good DSLR or mirrorless camera set to ISO 1600 to 6400.
A fast, wide-angle lens (14mm to 24mm) set to f/2.8 or wider, perhaps f/2. Slow f/4 to f/.6 kit zooms are not very suitable.
Exposures of 30 to 60 seconds each.
An intervalometer to fire the shutter automatically with no more than 1 second between exposures. As soon as one exposure ends and the shutter closes, the next exposure begins.
Take hundreds of images over as long a time period as you can on peak night.
Use an intervalometer to control the shutter speed, with the camera on Bulb. Set the interval to one second to minimize the time the shutter is closed.
Out of hundreds of images, a dozen or more should contain a meteor! You increase your chances by using:
A high ISO, so the meteor records in the brief second or two it appears.
A wide aperture, to again increase the light-gathering ability of the lens for those fainter meteors.
A wide-angle lens so you capture as much area of sky as possible.
Running two or more cameras aimed at different spots, perhaps to the east and south to maximize sky coverage.
A minimum interval between exposures. Increase the interval to more than a second and you know it’s during that “dark time” when the shutter is closed that the brightest meteor of the night will occur. Keep the shutter open as much as possible.
This sky chart looking east for December 13, 2020 shows the position of the radiant and the constellation of Gemini at about 7 p.m. local time. Orion is just rising in the east.
When to Shoot?
The radiant point of the shower meteors in Gemini rises in the early evening, so you might see some long, slow Earth-grazing meteors early in the night, streaking out of the east.
For Europe the peak of the shower occurs in the middle of the night of December 13/14.
For North America, despite the peak occurring in the early evening hours, meteors will be visible all night and will likely be best after your local midnight.
So wherever you are, start shooting as the night begins and keep shooting for as long as you and your camera can withstand the cold!
A single bright meteor from the Geminid meteor shower of December 2017, dropping toward the horizon in Ursa Major. Gemini itself and the radiant of the shower is at top centre. It is one frame from a 700-frame sequence for stacking and time-lapses. The ground is a mean stack of 8 frames to smooth noise. Exposures were 30 seconds at ISO 6400 with the Rokinon 14mm lens at f/2.5 and Canon 6D MkII.
Where to Go?
To take advantage of the moonless night, get away from urban light pollution to as dark a sky as you can. Preferably, put the major urban skyglow to the west or north.
While from brightly lit locations the very brightest meteors will show up, they are the rarest, so you’d be fortunate to capture one in a night of shooting from a city or town.
From a dark site, you can use longer exposures, wider apertures and higher ISOs to boost your chances of capturing more and fainter meteors. Plus the Milky Way will show up.
The Geminid meteor shower of December 13, 2017 in a view framing the winter Milky Way from Auriga (at top) to Puppis (at bottom) with Gemini itself, the radiant of the shower at left, and Orion at right. The view is looking southeast. This is a composite stack of one base image with the brightest meteor, then 20 other images layered in each with a meteor. The camera was not tracking the sky, so I rotated and moved each of the layered-in frames so that their stars mroe or less aligned with the base layer. The images for this composite were taken over 107 minutes, with 22 images containing meteors picked from 196 images in total over that time. Each exposure was 30 seconds with the Rokinon 14mm SP lens at f/2.5 and Canon 6D MkII at ISO 6400.
Where to Aim?
You can aim a camera any direction, even to the west.
But aiming east to frame the constellation of Gemini (marked by the twin stars Castor and Pollux) will include the radiant point, perhaps capturing the effect of meteors streaking away from that point, especially if you stack multiple images into one composite, as most of my images here are.
The Star Adventurer star tracker, on its optional equatorial wedge to aid precise polar alignment of its motorized rotation axis.
Using a Tracker
Using a star tracker such as the Sky-Watcher Star Adventurer shown here, makes it possible to obtain images with stars that remain untrailed even in 1- or 2-minute exposures. The sky remains framed the same through hours of shooting, making it much easier to align and stack the images for a multi-meteor composite.
A tracked composite showing the 2017 Geminid meteors streaking from the radiant point in Gemini at upper left. This is a stack of 43 exposures, each 1-minute with the 24mm Canon lens at f/2.5 and filter-modified Canon 5D MkII camera at ISO 6400, set fast to pick up the fainter meteors. These were 43 exposures with meteors (some with 2 or 3 per frame) out of 455 taken over 5 hours. The background sky comes from just one of the exposures. All the other frames are masked to show just the meteor.
However, a tracker requires accurate polar alignment of its rotation axis (check its instruction manual to learn how to do this) or else the images will gradually shift out of alignment through a long shoot. Using Photoshop’s Auto-Align feature or specialized stacking programs can bring frames back into registration. But good polar alignment is still necessary.
If you aim east you can frame a tracked set so the first images include the ground. The camera frame will move away from the ground as it tracks the rising sky.
A composite of the 2017 Geminid meteor shower, from the peak night of December 13, with the radiant in Gemini, at top, high overhead. So meteors appear to be raining down to the horizon. This was certainly the visual impression. This is a stack of 24 images, some with 2 or 3 meteors per frame, each a 30-second exposure at f/2.5 with the Rokinon 14mm SP lens and Canon 6D MkII at ISO 6400. The images are the 24 frames with meteors out of 171 taken over 94 minutes. The ground is a stack of 8 images, mean combined to smooth noise. The background base-image sky is from one exposure. The camera was on a fixed tripod, not tracking the sky.
Using a Tripod and Untracked Camera
The simpler method for shooting is to just use a camera (or two!) on a fixed tripod, and keep exposures under about 30 seconds to minimize star trailing. That might mean using a higher ISO than with tracked images, especially with slower lenses.
The work comes in post-processing, as stacking untracked images will produce a result with meteors streaking in many different orientation and locations, ruining the effect of meteors bursting from a single radiant.
To make it easier to stack untracked images, try to include Polaris in the field of the wide-angle lens, perhaps in the upper left corner. The sky rotates around Polaris, so it will form the easy-to-identify point around which you can manually rotate images in editing to bring them back into at least rough alignment.
Covering the steps to composite tracked and untracked meteor shower images is beyond the purview of this blog.
The images shown here were layered, masked and blended with those steps and are used as examples in the book’s tutorials.
A trio of Geminid meteors over the Chiricahua Mountains in southeast Arizona, with Orion and the winter stars setting. I shot this at the end of the night of December 13/14, 2017 with the rising waxing crescent Moon providing some ground illumination. This is a stack of one image for the ground and two fainter meteors, and another image with the bright meteor. The camera was on a Star Adventurer Mini tracker so the stars are not trailed, though the ground will be slightly blurred. All were 30-second exposures at f/2.8 with the 24mm Canon lens and filter-modified Canon 5D MkII at ISO 5000.
Keeping Warm
Keeping yourself warm is important. But your camera is going to get cold. It should work fine but its battery will die sooner than it would on a warm night. Check it every hour, and have spare, warm batteries ready to swap in when needed.
Lenses can frost up. The only way to prevent this is with low-voltage heater coils, such as the DewDestroyer from David Lane. It works very well. Other types are available on Amazon.
It took a chase but it was worth it to catch the January 20, 2019 total eclipse of the Moon in the winter sky.
While the internet and popular press fawned over the bogus moniker of “Super Blood Wolf” Moon, to me this was the “Cold Moon” eclipse. And I suspect that was true for many other observers and eclipse chasers last Sunday.
Total solar eclipses almost always involve a chase, usually to far flung places around the world to stand in the narrow shadow path. But total lunar eclipses (TLEs) come to you, with more than half the planet able to view the Moon pass through the Earth’s shadow and turn red for several minutes to over an hour.
The glitch is clouds. For several of the last TLEs I have had to chase, to find clear skies in my local area, creating pre-eclipse stress … and post-eclipse relief!
A screen shot from Astrospheric
That was the case for the January 20, 2019 total lunar, as the weather predictions above, based on Environment Canada data, were showing east-central Alberta along the Saskatchewan border as the only clear hole within range and accessible.
The above is a screen shot from the wonderful app Astrospheric, a recommended and great aid to astronomers. In 2014, 2015, and 2018 the Environment Canada predictions led me to clear skies, allowing me to see an eclipse that others in my area missed.
So trusting the predictions, the day before the eclipse I drove the 5 hours and 500 km north and east to Lloydminster, a town where the provincial border runs right down the main street, Highway 17.
A screen shot from Theodolite
The morning of the evening eclipse, I drove up and down that highway looking for a suitable site to setup. Scenery was not in abundance! It’s farm land and oil wells. I settled for a site shown above, an access road to a set of wells and tanks where I would likely not be disturbed, that had no lights, and had a clear view of the sky.
The image above is from the iOS app Theodolite, another fine app for planning and scouting sites, as it overlays where the camera was looking.
Scenery was not a priority as I was mostly after a telephoto view of the eclipsed Moon near the Beehive star cluster. Wide views would be a bonus if I could get them, for use in further ebook projects, as is the plan for the image below.
This is a single untracked exposure of 25 seconds at f/2.8 and ISO 1600 with the Nikon D750 and Sigma 20mm Art lens, but with a shorter exposure of 1 second blended in for the Moon itself so it retains its color and appearance to the naked eye. Your eye can see the eclipsed Moon and Milky Way well but the camera cannot in a single exposure. The scene, taken just after the start of totality, just fit into the field of the 20mm lens. A little later in the night it did not.
The site, which was east of the border in Saskatchewan, served me well, and the skies behaved just as I had hoped, with not a cloud nor haze to interfere with the view. It was a long and cold 5-hour night on the Prairies, with the temperature around -15° C.
It could have been worse, with -25° not uncommon at this time of year. And fortunately, the wind was negligible, with none of the problems with frost that can happen on still nights.
Nevertheless, I kept my photo ambitions in check, as in the cold much can go wrong and running two cameras was enough!
The Moon in mid-total eclipse, on January 20, 2019, with it shining beside the Beehive star cluster, Messier 44, in Cancer. This view tries to emulate the visual scene through binoculars, though the camera picks up more stars and makes the Moon more vivid than it appears to the eye. However, creating a view that looks even close to what the eye can see in this case takes a blend of exposures: a 1-minute exposure at ISO 800 and f/2.8 for the stars, which inevitably overexposes the Moon. So I’ve blended in three shorter exposures for the Moon, taken immediately after the long “star” exposure. These were 8, 4 and 2 seconds at ISO 400 and f/4, and all with the Canon 200mm telephoto on a Fornax Lightrack II tracking mount to follow the stars.
Above was the main image I was after, capturing the red Moon shining next to the Beehive star cluster, a sight we will not see again for another 18-year-long eclipse “saros,” in January 2037.
But I shot images every 10 minutes, to capture the progression of the Moon through the shadow of the Earth, for assembly into a composite. I’d pick the suitable images later and stack them to produce a view of the Moon and umbral shadow outline set amid the stars.
The Moon in total eclipse, on January 20, 2019, in a multiple exposure composite showing the Moon moving from right to left (west to east) through the Earth’s umbral shadow. The middle image is from just after mid-totality at about 10:21 pm MST, while the partial eclipse shadow ingress image set is from 9:15 pm and the partial eclipse shadow egress image set is from 11:15 pm. I added in two images at either end taken at the very start and end of the umbral eclipse to add a more complete sequence of the lunar motion. The central image of totality includes a 1-minute exposure at ISO 800 and f/2.8 for the stars, which inevitably overexposes the Moon. So I’ve blended in three shorter exposures for the Moon, taken immediately after the long “star” exposure. These were 8, 4 and 2 seconds at ISO 400 and f/4, and all with the Canon 200mm telephoto. The two partial eclipse phases are stacks of 7 exposures each, from very short for the bright portion of the lunar disk, to long for the shadowed portion. They are blended with luminosity masks created with ADP Pro v3 panel for Photoshop, but modified with feathering to blend the images smoothly.
Above is the final result, showing the outline of the circular umbral shadow of the Earth defined by the shadow edge on the partially eclipsed Moons. The umbra is about three times the size of the Moon. And at this eclipse the Moon moved across the northern half of the shadow.
So mission accomplished!
This is an untracked single exposure of 15 seconds at ISO 3200 and f/2.8 with the Sigma 20mm Art lens and Nikon D750. However, I blended in a shorter 1-second exposure for the red eclipsed Moon itself to prevent its disk from overexposing as it would in any exposure long enough to record the Milky Way.
I usually try to take a “trophy” shot of the successful eclipse chaser having bagged his game. This is it, from mid-eclipse during totality, with the red Moon shining in the winter sky beside the Beehive.
With this eclipse I can now say I have seen every total lunar eclipse visible from my area of the world since May 2003. I’m not counting those TLEs that were visible from only the eastern hemisphere — I’m not so avid as to chase those. And there were a couple of TLEs in that time that were visible from North America, but not from Alberta. So I’m not counting those.
And a couple of TLEs that were visible from here I did not see from here in Alberta — I saw April 15, 2014 from Australia and April 4, 2015 from Utah.
With that tally I’ve seen all the locally visible TLEs over a full saros cycle, 18 years. The last local TLE I missed was January 20, 2000, exactly 19 years — a Metonic cycle — ago. It must have been cloudy!
The next total eclipse of the Moon is May 26, 2021, visible from Alberta as the Moon sets at dawn. I’d like to be in Australia for that one (depicted above in a screen shot from StarryNight™), to see the eclipsed Moon beside the galactic centre as both rise in the east, a sight to remember. Being late austral autumn, that will be a “cool Moon.”
On the evening of January 20 for North America, the Full Moon passes through the umbral shadow of the Earth, creating a total eclipse of the Moon.
No, this isn’t a “blood,” “super,” nor “wolf” Moon. All those terms are internet fabrications designed to bait clicks.
It is a totallunareclipse — an event that doesn’t need sensational adjectives to hype, because they are always wonderful sights! And yes, the Full Moon does turn red.
As such, on January 20 the evening and midnight event provides many opportunities for great photos of a reddened Moon in the winter sky.
Here’s my survey of tips and techniques for capturing the eclipsed Moon.
First … What is a Lunar Eclipse?
As the animation below shows (courtesy NASA/Goddard Space Flight Center), an eclipse of the Moon occurs when the Full Moon (and they can happen only when the Moon is exactly full) travels through the shadow of the Earth.
The Moon does so at least two times each year, though often not as a total eclipse, one where the entire disk of the Moon enters the central umbral shadow. Many lunar eclipses are of the imperceptible penumbral variety, or are only partial eclipses.
Total eclipses of the Moon can often be years apart. The last two were just last year, on January 31 and July 27, 2018. However, the next is not until May 26, 2021.
At any lunar eclipse we see an obvious darkening of the lunar disk only when the Moon begins to enter the umbra. That’s when the partial eclipse begins, and we see a dark bite appear on the left edge of the Moon.
While it looks as if Earth’s shadow sweeps across the Moon, it is really the Moon moving into, then out of, our planet’s umbra that causes the eclipse. We are seeing the Moon’s revolution in its orbit around Earth.
At this eclipse the partial phases last 67 minutes before and after totality.
This shows the length of the eclipse phases relative to the start of the partial eclipse as the Moon begins to enter the umbra at right. The Moon’s orbital motion takes it through the umbra from right to left (west to east) relative to the background stars. The visible eclipse ends 196 minutes (3 hours and 16 minutes) after it began. Click or tap on the charts to download a high-res version.
Once the Moon is completely immersed in the umbra, totality begins and lasts 62 minutes at this eclipse, a generous length.
The Moon will appear darkest and reddest at mid-eclipse. During totality the lunar disk is illuminated only by red sunlight filtering through Earth’s atmosphere. It is the light of all the sunsets and sunrises going on around our planet.
And yes, it is perfectly safe to look at the eclipsed Moon with whatever optics you wish. Binoculars often provide the best view. Do have a pair handy!
Total eclipse of the Moon, December 20/21, 2010, taken from home with 130mm AP apo refractor at f/6 and Canon 7D at ISO 400 for 4 seconds, single exposure, shortly after totality began.
At this eclipse because the Moon passes across the north half of the umbra, the top edge of the Moon will always remain bright, as it did above in 2010, looking like a polar cap on the reddened Moon.
Near the bright edge of the umbra look for subtle green and blue tints the eye can see and that the camera can capture.
Where is the Eclipse?
As the chart below shows, all of the Americas can see the entire eclipse, with the Moon high in the evening or late-night sky. For the record, the Moon will be overhead at mid-eclipse at local midnight from Cuba!
All of the Americas can see this eclipse. The eclipse gets underway as the Moon sets at dawn over Europe. Diagram courtesy EclipseWise.com
I live in Alberta, Canada, at a latitude of 50 degrees North. And so, the sky charts I provide here are for my area, where the Moon enters the umbral shadow at 8:35 p.m. MST with the Moon high in the east. By the end of totality at 10:44 p.m. MST the Moon shines high in the southeast. This sample chart is for mid-eclipse at my site.
The sky at mid-eclipse from my Alberta site. Created with the planetarium software Starry Night, from Simulation Curriculum.
I offer them as examples of the kinds of planning you can do to ensure great photos. I can’t provide charts good for all the continent because exactly where the Moon will be during totality, and the path it will take across your sky will vary with your location.
In general, the farther east and south you live in North America the higher the Moon will appear. But from all sites in North America the Moon will always appear high and generally to the south.
To plan your local shoot, I suggest using planetarium software such as the free Stellarium or Starry Night (the software I used to prepare the sky charts in this post), and photo planning apps such as The Photographer’s Ephemeris or PhotoPills.
The latter two apps present the sightlines toward the Moon overlaid on a map of your location, to help you plan where to be to shoot the eclipsed Moon above a suitable foreground, if that’s your photographic goal.
When is the Eclipse?
While where the Moon is in your sky depends on your site, the various eclipse events happen at the same time for everyone, with differences in hour due only to the time zone you are in.
While all of North America can see the entirety of the partial and total phases of this eclipse (lasting 3 hours and 16 minutes from start to finish), the farther east you live the later the eclipse occurs, making for a long, late night for viewers on the east coast.
Those in western North America can enjoy all of totality and be in bed at or before midnight.
Here are the times for the start and end of the partial and total phases. Because the penumbral phases produce an almost imperceptible darkening, I don’t list the times below for the start and end of the penumbral eclipse.
PM times are on the evening of January 20.
AM times are after midnight on January 21.
Note that while some sources list this eclipse as occurring on January 21, that is true for Universal Time (Greenwich Time) and for sites in Europe where the eclipse occurs at dawn near moonset.
For North America, if you go out on the evening of January 21 expecting to see the eclipse you’ll be a day late and disappointed!
Picking a Photo Technique
Lunar eclipses lend themselves to a wide range of techniques, from a simple camera on a tripod, to a telescope on a tracking mount following the sky.
If this is your first lunar eclipse I suggest keeping it simple! Select just one technique, to focus your attention on only one camera on a cold and late winter night.
The total eclipse of the Moon of September 27, 2015, through a telescope, at mid-totality with the Moon at its darkest and deepest into the umbral shadow, in a long exposure to bring out the stars surrounding the dark red moon. This is a single exposure taken through a 92mm refractor at f/5.5 for 500mm focal length using the Canon 60Da at ISO 400 for 8 seconds. The telescope was on a SkyWatcher HEQ5 equatorial mount tracking at the lunar rate.
Then during the hour of totality take the time to enjoy the view through binoculars and with the unaided eye. No photo quite captures the glowing quality of an eclipsed Moon. But here’s how to try it.
Option 1: Simple — Camera-on-Tripod
The easiest method is to take single shots using a very wide-angle lens (assuming you also want to include the landscape below) with the camera on a fixed tripod. No fancy sky trackers are needed here.
During totality, with the Moon now dimmed and in a dark sky, use a good DSLR or mirrorless camera in Manual (M) mode (not an automatic exposure mode) for settings of 2 to 20 seconds at f/2.8 to f/4 at ISO 400 to 1600.
That’s a wide range, to be sure, but it will vary a lot depending on how bright the sky is at your site. Shoot at lots of different settings, as blending multiple exposures later in processing is often the best way to reproduce the scene as your eyes saw it.
Shoot at a high ISO if you must to prevent blurring from sky motion. However, lower ISOs, if you can use them by choosing a slower shutter speed or wider lens aperture, will yield less digital noise.
Focus carefully on a bright star, as per the advice below for telephoto lenses. Don’t just set the lens focus to infinity, as that might not produce the sharpest stars.
Total eclipse of the Moon, December 20/21, 2010, with 15mm lens at f/3.2 and Canon 5D MkII at ISO 1600 for a 1-minute tracked exposure. Without a tracker, use shorter exposures (less than 20 seconds) and higher ISOs or wider apertures to avoid trailing,
One scene to go for at this eclipse is similar to the above photo, with the reddened Moon above a winter landscape and shining east of Orion and the winter Milky Way. But that will require shooting from a dark site away from urban lights. But when the Moon is totally eclipsed, the sky will be dark enough for the Milky Way to appear.
Click or tap on any of the charts to download a high-resolution copy.
The high altitude of the Moon at mid-eclipse from North America (with it 40 to 70 degrees above the horizon) will also demand a lens as wide as 10mm to 24mm, depending whether you use portrait or landscape orientation, and if your camera uses a cropped frame or full frame sensor. The latter have the advantage in this category of wide-angle nightscape.
Alternatively, using a longer 14mm to 35mm lens allows you to frame the Moon beside Orion and the winter Milky Way, as above, but without the landscape. Again, this will require a dark rural site.
If you take this type of image with a camera on a fixed tripod, use high ISOs to keep exposures below 10 to 20 seconds to avoid star trailing. You have an hour of totality to shoot lots of exposures to make sure some will work best.
Total eclipse of the Moon, December 20/21, 2010, with Canon 5D MKII and 24mm lens at f2.8 for stack of four 2-minute exposures at ISO 800. Taken during totality using a motorized sky tracker. The eclipsed Moon is the red object above Orion, and the stars appear bloated due to high haze and fog rolling in.
If you have a sky tracker to follow the stars, as I did above, exposures can be much longer — perhaps a minute to pick up the Milky Way really well — and ISOs can be lower to avoid noise.
Option 1 Variation — Urban Eclipses
Unfortunately, point-and-shoot cameras and so-called “bridge” cameras, ones with non-interchangeable lenses, likely won’t have lenses wide enough to capture the whole scene, landscape and all. Plus their sensors will be noisy when used at high ISOs. Those cameras might be best used to capture moderate telephoto closeups at bright urban sites.
With any camera, at urban sites look for scenic opportunities to capture the eclipsed Moon above a skyline or behind a notable landmark. By looking up from below you might be able to frame the Moon beside a church spire, iconic building, or a famous statue using a normal or short telephoto lens, making this a good project for those without ultra-wide lenses.
Lunar eclipse, Feb 20, 2008 with a 135mm telephoto and Canon 20Da camera showing the Moon’s size with such a lens and cropped-frame camera. This is a blend of 8-second and 3-second exposures to bring out stars and retain the Moon. Both at ISO200 and f/2.8. Saturn is at lower left and Regulus at upper right.
Whatever your lens or subject, at urban sites expose as best you can for the foreground, trying to avoid any bright and bare lights in the frame that will flood the image with lens flares in long exposures.
Capturing such a scene during the deep partial phases might produce a brighter Moon that stands out better in an urban sky than will a photo taken at mid-totality when the Moon is darkest.
TIP: Practice, Practice, Practice!
With any camera, especially beginner point-and-shoots, ensure success on eclipse night by practicing shooting the Moon before the eclipse, during the two weeks of the waxing Moon leading up to Full Moon night and the eclipse.
The crescent Moon with Earthshine on the dark side of the Moon is a good stand-in for the eclipsed Moon. Set aside the nights of January 8 to 11 to shoot the crescent Moon. Check for exposure and focus. Can you record the faint Earthshine? It’s similar in brightness to the shadowed side of the eclipsed Full Moon.
The next week, on the nights of January 18 and 19, the waxing gibbous Moon will be closer to its position for eclipse night and almost as bright as the uneclipsed Full Moon, allowing some rehearsals for shooting it near a landmark.
Option 2: Advanced — Multiple Exposures
An advanced method is to compose the scene so the lens frames the entire path of the Moon for the 3 hours and 16 minutes from the start to the end of the partial eclipse.
This set of 3 charts shows the position of the Moon at the start, middle, and end of the eclipse, for planning lens choice and framing of the complete eclipse path. The location is Alberta, Canada.
As shown above, including the landscape will require at least a 20mm lens on a full frame camera, or 12mm lens on a cropped frame camera. However, these charts are for my site in western Canada. From sites to the east and south where the Moon is higher an even wider lens might be needed, making this a tough sequence to take.
With wide lenses, the Moon will appear quite small. The high altitude of the Moon and midnight timing won’t lend itself to this type of multiple image composite as well as it does for eclipses that happen near moonrise or moonset, as per the example below.
This is a multiple-exposure composite of the total lunar eclipse of Sunday, September 27, 2015, as shot from Writing-on-Stone Provincial Park, Alberta, Canada. For this still image composite of the eclipse from beginning to end, I selected just 40 frames taken at 5-minute intervals, out of 530 I shot in total, taken at 15- to 30-second intervals for the full time-lapse sequence included below.
A still-image composite with the lunar disks well separated will need shots only every 5 minutes, as I did above for the September 27, 2015 eclipse.
Exposures for any lunar eclipse are tricky, whether you are shooting close-ups or wide-angles, because the Moon and sky change so much in brightness.
As I did for the image below, for a still-image composite, you can expose just for the bright lunar disk and let the sky go dark.
Exposures for just the Moon will range from very short (about 1/500th second at f/8 and ISO 100) for the partials, to 1/2 to 2 seconds at f/2.8 to f/4 and ISO 400 for the totals, then shorter again (back to 1/500 at ISO 100) for the end shots when the Full Moon has returned to its normal brilliance.
That’ll take constant monitoring and adjusting throughout the shoot, stepping the shutter speed gradually longer thorough the initial partial phase, then shorter again during the post-totality partial phase.
You’d then composite and layer (using a Lighten blend mode) the well-exposed disks (surrounded by mostly black sky) into another background image exposed longer for 10 to 30 seconds at ISO 800 to 1600 for the sky and stars, shot at mid-totality.
To maintain the correct relative locations of the lunar disks and foreground, the camera cannot move.
The total lunar eclipse of April 4, 2015 taken from near Tear Drop Arch, in western Monument Valley, Utah. I shot the totality images during the short 4 minutes of totality. The mid-totality image is a composite of 2 exposures: 30 seconds at f/2.8 and ISO 1600 for the sky and landscape, with the sky brightening blue from dawn twilight, and 1.5 seconds at f/5.6 and ISO 400 for the disk of the Moon itself. Also, layered in are 26 short exposures for the partial phases, most being 1/125th sec at f/8 and ISO 400, with ones closer to totality being longer, of varying durations.
That technique works best if it’s just a still image you are after, such as above. This image is such a composite, of the April 4, 2015 total lunar eclipse from Monument Valley, Utah.
This type of composite takes good planning and proper exposures to pull off, but will be true to the scene, with the lunar disk and its motion shown to the correct scale and position as it was in the sky. It might be a composite, but it will be accurate.
My Rant!
That’s in stark contrast to the flurry of ugly “faked” composites that will appear on the web by the end of the day on January 21, ones with huge telephoto Moons pasted willy-nilly onto a wide-angle sky.
Rather than look artistic, most such attempts look comically cut-and-pasted. They are amateurish. Don’t do it!
Option 3: Advanced — Wide-Angle Time-Lapses
If it’s a time-lapse movie you want (see the video below), take exposures every 10 to 30 seconds, to ensure a final movie with smooth motion.
Unlike shooting for a still-image composite, for a time lapse each frame will have to be exposed well enough to show the Moon, sky, and landscape.
That will require exposures long enough to show the sky and foreground during the partial phases — likely about 1 to 4 seconds at f/2.8 and ISO 400. In this case, the disk of the partially-eclipsed Moon will greatly overexpose, as it does toward the end of the above time-lapse from September 27, 2015..
But the Moon will darken and become better exposed during the late stages of the partial eclipse and during totality when a long exposure — perhaps now 10 to 20 seconds at f/2.8 and ISO 800 to 1600 — will record the bright red Moon amid the stars and winter Milky Way.
Maintaining a steady cadence during the entire sequence requires using an interval long enough throughout to accommodate the expected length of the longest exposure at mid-totality, with similar camera settings to what you’ve used for other Milky Way nightscapes. If you’ve never taken those before, then don’t attempt this complex sequence.
After totality, as the Moon and sky re-brighten, exposures will have to shorten again, andsymmetrically in reverse fashion for the final partial phases.
Such a time-lapse requires consistently and incrementally adjusting the camera over the three or more hours of the eclipse on a cold winter night. The high altitude of the Moon and its small size on the required wide angle lenses will make any final time lapse less impressive than at eclipses that occur when the Moon is rising or setting.
But … the darkening of the sky and “turning on” of the Milky Way during totality will make for an interesting time-lapse effect. The sky and scene will be going from a bright fully moonlit night to effectively a dark moonless night, then back to moonlit. It’s a form of “holy grail” time lapse, requiring advanced processing with LRTimelapse software.
Again, do not move the camera. Choose your lens and frame your camera to include the entire path of the Moon for as long as you plan to shoot.
Even if the final movie looks flawed, individual frames should still produce good still images, or a composite built from a subset of the frames.
Option 4: Simple — Telephoto Close-Ups
The first thought of many photographers is to shoot the eclipse with as long a telephoto lens as possible. That can work, but …
The harsh reality is that the Moon is surprisingly small (only 1/2-degree across) and needs a lot of focal length to do it justice, if you want a lunar close-up.
You’ll need a 300mm to 800mm lens. Unfortunately, the Moon and sky are moving and any exposures over 1/4 to 2 seconds (required during totality) will blur the Moon badly if its disk is large on the frame and all you are using is a fixed tripod.
If you don’t have a tracking mount, one solution is to keep the Moon’s disk small (using no more than a fast f/2 or f/2.8 135mm to 200mm lens) and exposures short by using a high ISO speed of 1600 to 3200. Frame the Moon beside the Beehive star cluster as I show below.
Take a range of exposures. But … be sure to focus!
TIP: Focus! And Focus Again!
Take care to focus precisely on a bright star using Live View. That’s true of any lens but especially telephotos and telescopes.
Focus not just at the start of the night, but also more than once again later at night. Falling temperatures on a winter night will cause long lenses and telescopes to shift focus. What was sharp at the start of the eclipse won’t be by mid totality.
The catch is that if you are shooting for a time-lapse or composite you likely won’t be able to re-point the optics to re-focus on a star in mid-eclipse. In that case, be sure to set up the gear well before you want to start shooing to let it cool to ambient air temperature. Now focus on a star, then frame the scene. Then hope the lens doesn’t shift off focus. You might be able to focus on the bright limb of the Moon but it’s risky.
Fuzzy images, not bad exposures, are the ruin of most attempts to capture a lunar eclipse, especially with a telephoto lens. And the Moon itself, especially during totality, is not a good target to focus on. Use a bright star. The winter sky has lots!
Option 5: Advanced — Tracked Telescopic Close-Ups
If you have a mount that can be polar aligned to track the sky, then many more options are open to you.
You can use a telescope mount or one of the compact and portable trackers, such as the Sky-Watcher Star Adventurer (I show the Mini model above) or iOptron Sky Tracker units. While these latter units work great, you are best to keep the payload weight down and your lens size well under 300mm.
That’s just fine for this eclipse, as you really don’t need a frame-filling Moon. The reason is that the Moon will appear about 6 degrees west of the bright star cluster called the Beehive, or Messier 44, in Cancer.
As shown above, a 135mm to 200mm lens will frame this unique pairing well. For me, that will be the signature photo of this eclipse. The pairing can happen only at lunar eclipses that occur in late January, and there won’t be any more of those until 2037!
That’s the characteristic that makes this eclipse rare and unique, not that it’s a “super-duper, bloody, wolf Moon!” But it doesn’t make for a catchy headline.
A High Dynamic Range composite of 7 exposures of the Dec 20/21, 2010 total lunar eclipse, from 1/2 second to 30 seconds, to show the more normally exposed eclipsed Moon with the star cluster M35, at left, in Gemini, to show the scene as it appeared in binoculars. Each tracked photo taken with a 77mm Borg apo refractor at f/4.2 (300mm focal length) and Canon 5D MkII at ISO 1600.
Exposures to show the star cluster properly might have to be long enough (30 to 120 seconds) that the Moon overexposes, even at mid-totality. If so, take different exposures for the Moon and stars, then composite them later, as I did above for the December 20, 2010 eclipse near the Messier 35 star cluster in Gemini.
If really you want to shoot with even more focal length for framing just the Moon, a monster telephoto lens will work, but a small telescope such as an 80mm aperture f/6 to f/7 refractor will provide enough focal length and image size at much lower cost and lighter weight, and be easier to attach to a telescope mount.
But even with a 500mm to 800mm focal length telescope the Moon fills only a small portion of the frame, though cropped frame cameras have the advantage here. Use one if it’s a big Moon you’re after!
No matter the camera, the lens or telescope should be mounted on a solid equatorial telescope mount that you must polar align earlier in the night to track the sky.
Alternatively, a motorized Go To telescope on an alt-azimuth mount will work, but only for single shots. The rotation of the field with alt-az mounts will make a mess of any attempts to shoot multiple-exposure composites or time-lapses, described below.
Whatever the mount, for the sharpest lunar disks during totality, use the Lunar tracking rate for the motor.
This series shows the need to constantly shift exposure by lengthening the shutter speed as the eclipse progresses. Do the same to shorten the exposure after totality. The exposures shown here are typical.
Assuming an f-ratio of f/6 to f/8, exposures will vary from as short as 1/250th second at ISO 100 to 200 for the barely eclipsed Moon, to 4 to 20 seconds at ISO 400 to 1600 for the Moon at mid-totality.
It’s difficult to provide a precise exposure recommendation for totality because the brightness of the Moon within the umbra can vary by several stops from eclipse to eclipse, depending on how much red sunlight manages to make it through Earth’s atmospheric filter to light the Moon.
TIP: Shoot for HDR
Total eclipse of the Moon, December 20/21, 2010, with 5-inch refractor at f/6 (780mm focal length) and Canon 7D (cropped frame camera) at ISO 400. This is an HDR blend of 9 images from 1/125 second to 2 seconds, composited in Photoshop. Note the blue tint along the shadow edge.
As I did above, during the deep partial phases an option is to shoot both long, multi-second exposures for the red umbra and short, split-second exposures for the bright part of the Moon not yet in the umbra.
Take 5 to 7 shots in rapid succession, covering the range needed, perhaps at 1-stop increments. Merge those later with High Dynamic Range (HDR) techniques and software, or with luminosity masks.
Even if you’re not sure how to do HDR processing now, shoot all the required exposures anyway so you’ll have them when your processing skills improve.
Option 6: Advanced — Close-Up Composites and Time-Lapses
With a tracking telescope on an equatorial mount you could fire shots every 10 to 30 seconds, and then assemble them into a time-lapse movie, as below.
But as with wide-angle time-lapses, that will demand constant attention to gradually and smoothly shift exposures, ideally by 1/3rd-stop increments every few shots during the partial and total phases. Make lots of small adjustments, rather than fewer large ones.
If you track at the lunar rate, as I did above, the Moon should stay more or less centred while it drifts though the stars, assuming your mount is accurately polar aligned, an absolutely essential prerequisite here.
Composite image digitally created in Photoshop of images taken during October 27, 2004 total lunar eclipse, from Alberta Canada. Images taken through 5-inch apo refractor at f/6 with Canon Digital Rebel 300D camera at ISO 200.
Conversely, track at the sidereal rate and the stars will stay more or less fixed while the Moon drifts through the frame from right to left (west to east) as I show above in a composite of the October 27, 2004 eclipse.
But such a sequence takes even more careful planning to position the Moon correctly at the start of the sequence so it remains “in frame” for the duration of the eclipse, and ends up where you want at the end.
In the chart below, north toward Polaris is at the top of the frame. Position the Moon at the start of the eclipse so it ends up just above the centre of the frame at mid-eclipse. Tricky!
Repeated from earlier, this chart shows the path of the Moon through the north half of the umbra, a path that will be the same for any site, as will be the timing. North is up here.
As I show above, for this type of “Moon-thru-shadow” sequence a focal length of about 400mm is ideal on a full frame camera, or 300mm on a cropped frame camera.
From such a time-lapse set you could also use several frames selected from key stages of the eclipse, as I did in 2004, to make up a multiple-image composite showing the Moon moving through the Earth’s shadow.
Again, planetarium software such as Starry Night I used above, which can be set to display the field of view of the camera and lens of your choice, is essential to plan the shoot. Don’t attempt it without the right software to plan the framing.
I would consider the telescopic time-lapse method the most challenging of techniques. Considering the hour of the night and the likely cold temperatures, your best plan might be to keep it simple.
It’s what I plan to do.
I’ll be happy to get a tracked telephoto close-up of the Moon and Beehive cluster as my prime goal, with a wide-angle scene of the eclipsed Moon beside Orion and the Milky Way as a bonus. A few telescope close-ups will be even more of a bonus.
The Astrospheric website, with astronomy-oriented weather predictions. It’s also available as a great mobile app.
However, just finding clear skies might be the biggest challenge!
Try the Astrospheric app for astronomy-oriented weather predictions. The Environment Canada data it uses has led me to clear skies for several recent eclipses that other observers in my area missed.
It’ll be worth the effort to chase!
The next total eclipse of the Moon anywhere on Earth doesn’t occur until May 26, 2021 in an event visible at dawn from Western North America. The next total lunar eclipse visible from all of North America comes a lunar year later, on May 15, 2022.
Total Lunar Eclipse from Alan Dyer on Vimeo.
I leave you with a music video of the lunar eclipse of September 27, 2015 that incorporates still and time-lapse sequences shot using all of the above methods.
The first total lunar eclipse in 2.5 years provides lots of opportunities for some great photos.
On the morning of January 31, before sunrise for North America, the Full Moon passes through the umbral shadow of the Earth, creating the first total eclipse of the Moon since September 27, 2015.
The pre-dawn event provides many photo opportunities. Here’s my summary of tips and techniques for capturing the eclipsed Moon.
But First … What is a Lunar Eclipse?
As the animation (courtesy NASA/Goddard Space Flight Center) shows, an eclipse of the Moon occurs when the Full Moon (and they can happen only when the Moon is exactly full) travels through the shadow of the Earth.
The Moon does so at least two times a year, though often not as a total eclipse, one where the entire disk of the Moon is engulfed by the umbra.
When the Moon is within only the outer penumbral shadow we see very little effect, with a barely perceptible darkening of the Moon, if that. I don’t even list the times below for the start and end of the penumbral phases.
An HDR stack of images to encompass the range of brightness from the bright portion of the lunar disk (at right here) still just in the penumbral shadow, to the dark portion of the disk at left deep in the umbral shadow. I shot this at the October 8, 2014 total lunar eclipse, from Writing-on-Stone Park in southern Alberta. Taken 7 to 5 minutes before totality began.
It’s only when the Moon begins to enter the central umbral shadow that we see an obvious effect. That’s when the partial eclipse begins, and we see a dark bite appear on the left edge of the Moon. The shadow appears to creep across the Moon to darken more of its disk. While it looks like the shadow is moving across the Moon, it is really the Moon moving into, then out of, the umbral shadow that causes the eclipse.
At this eclipse the partial phases last about an hour before and after totality.
Once the Moon is completely immersed in the umbra, totality begins, and lasts 77 minutes at this eclipse, a generous length. However, in North America, only sites in the western half of the continent get to see all or most of totality.
Where is the Eclipse?
Courtesy Fred Espenak and Royal Astronomical Society of Canada (Observer’s Handbook)
As the chart above shows, the Pacific area including Hawaii, Australia, and eastern Asia can see the entire eclipse with the Moon high in the evening or midnight sky.
Most of North America (my tips are aimed at North American photographers) can see at least some part of this eclipse.
From the eastern half of the continent the Moon sets at sunrise during either totality (from the central areas of North America), or during the first partial phases (from eastern North America). Those in the east can take advantage of interesting photo opportunities by capturing the partially eclipsed Moon setting in the west in the dawn twilight.
The total eclipse of the Moon on December 10, 2011, taken from the the Rothney Astrophysical Observatory, near Priddis, Alberta, and looking west to the Rockies. This is a 2 second exposure at ISO 800 with the Canon 5DMkII and Canon 200mm lens at f/4. This was taken toward the end of totality at 7:48 a.m. local time.
However, the most dramatic images of a deep red Moon in the western sky, such as above, will be possible only from the west. And even then, the further north and west you live, the better your view.
Even from the southwestern United States the Moon sets just after the end of totality, requiring a site with a low and clear horizon to the west in order to see the whole event.
I live in Alberta, Canada, and the diagrams I provide here are for my area, where the Moon sets during the final partial phase. I offer them as examples of the kinds of planning you can do to ensure great photos. But exactly where the Moon will be during totality, and where and when it will set on your horizon, will depend on your location.
The latter two apps present the sightlines toward the Moon overlaid on a map of your location, to help you plan where to be to shoot the eclipsed Moon setting behind a suitable foreground.
When is the Eclipse?
While where the Moon is in your sky depends on your site, the various eclipse events happen at the same time for everyone, with differences in hour due only to the time zone you are in.
Here are the times for the start and end of the partial and total phases.
Note that all times are A.M., in the early morning, before sunrise, on January 31. Go out at 6 P.M. on the evening of January 31 and you’ll be 12 hours too late. You missed it!
All times are A.M. on January 31. “—“ means the event is not visible; the Moon has set.
The time of moonset at your site will vary with your location. Use planning apps to calculate your local moonset time.
Picking a Site
No matter where you are in North America you want a site with a good view to the west and northwest, preferably with a clear view of a relatively unobstructed but photogenic horizon.
While having an eclipse occur at dawn (or at dusk) does limit the amount of eclipse we can see, it has the benefit of providing many more photo opportunities of the eclipsed Moon above a scenic landscape or foreground element.
The Full Moon rises in partial eclipse over the sandstone formations of Writing-on-Stone Provincial Park in southern Alberta, on the evening of September 27, 2015. Shot with the 200mm lens and 1.4x extender, on the Canon 5DMkII.
From eastern North America you will have to be content with images of the partially eclipsed Moon setting, similar to the image above of a rising partially-eclipsed Moon.
From the centre of the continent, where the Moon sets during totality, the dim, reddened Moon is likely to disappear into the brightening sky. Remember, when the Moon is full it sets just as the Sun rises. So shots of a red Moon right on the horizon aren’t likely to be possible. The Moon will be too dim and the sky too bright.
From sites in the west, the Moon will set either just at the end of totality or shortly afterwards, making the Moon brighter and more obvious in the sunrise sky, as the foreground in the west lights up with red light from the Sun rising in the east.
It is that same red sunlight filtered by our atmosphere that continues on into our planet’s shadow and lights the Moon red during totality.
Picking a Technique
Lunar eclipses lend themselves to a wide range of techniques, from a simple camera on a tripod, to a telescope on a tracking mount following the sky.
What you use depends not only on the gear you have on hand, but also on your site. It might not be practical to set up loads of gear at a scenic site you have to trek into — especially when you have to set up in the wee hours of a cold winter morning.
You could set up earlier that night on January 30, but only if your site is safe enough to leave the gear unattended while you sleep.
Keep it simple!
Option 1: Simple Camera-on-Tripod
The Moon in totality in the deep twilight on September 27, 2015, with a 35mm lens on a full-frame camera. This is one frame from a time-lapse sequence. A 5-second exposure at f/2.8 and at ISO 800.
The easiest method is to take single shots with a moderate wide-angle or normal lens with the camera on a fixed tripod. No fancy trackers are needed here.
If the sky is bright with twilight, you might be able to meter the scene and use Auto exposure.
Composing a single shot during mid-totality from southern Alberta, framed to include Castor and Pollux in Gemini.
But earlier in the night, with the Moon in a darker sky, as I show above, use Manual exposure and try settings of 1 to 10 seconds at f/2.8 to f/4 at ISO 400 to 1600. That’s a wide range, to be sure, but it will vary a lot depending on when you shoot and where you are, factors that will affect how bright the sky is at your site. Just shoot, check, and adjust.
Option 2: Advanced Camera-on-Tripod
A more advanced method is to compose the scene so the lens frames the entire path of the Moon from the start of the partial eclipse until moonset.
Framing a time-lapse sequence for southern Alberta. (Courtesy Starry Night™/Simulation Curriculum)
As shown above, that will take at least a 35mm lens on a full frame camera, or 20mm lens on a cropped frame camera.
Take exposures every 15 to 30 seconds if you want to turn the set into a time-lapse movie. But a still-image composite with the lunar disks well separated will need shots only every 5 to 10 minutes.
Such a composite takes good planning and proper exposures to pull off, but will be true to the scene, with the lunar disk and its motion shown to the correct scale as it was in the sky. That’s in stark contrast to the flurry of ugly “faked” composites that will appear on the web by the end of February 1, ones with huge telephoto Moons pasted willy-nilly onto a wide-angle sky. Don’t do it!
Exposures for any lunar eclipse are tricky, whether you are shooting closeups or wide-angles, because the Moon and sky change so much in brightness.
For wide-angle composites, you can expose just for the bright lunar disk and let the sky go dark. Exposures for just the Moon will range from very short (about 1/500th second at ISO 100) for the partials, to 1 to 2 seconds at ISO 400 for the totals, then shorter again (1/15 to 1/2 second at ISO 400) for the end shots in twilight when the Moon and sky may be similar in brightness. That’ll take constant monitoring and adjusting throughout the shoot.
As I did below, you’d then composite and layer the well-exposed disks into another background image exposed longer for the sky, likely shot in twilight. To maintain the correct relative locations of the lunar disks and foreground, the camera cannot move.
That technique works best if it’s just a still image you are after, such as below.
The total lunar eclipse of April 4, 2015 taken from near Tear Drop Arch, in Monument Valley, Utah. I shot the totality images at 6:01 a.m. MDT, during mid-totality during the very short 4 minutes of totality. The mid-totality image is a composite of 2 exposures: 30 seconds at f/2.8 and ISO 1600 for the sky and landscape, with the sky brightening blue from dawn twilight, and 1.5 seconds at f/5.6 and ISO 400 for the disk of the Moon itself. Also, layered in are 26 short exposures for the partial phases, most being 1/125th sec at f/8 and ISO 400, with ones closer to totality being longer, of varying durations. All are with a 24mm lens and Canon 6D on a static tripod, with the camera not moved through the entire sequence. The short duration of totality at this eclipse lent itself to a sequence with one total phase image flanked by partial phases.
The above image is a composite of the April 4, 2015 total lunar eclipse from Monument Valley, Utah. That eclipse occurred under similar circumstances as this month’s eclipse, with the eclipse underway as the Moon set in the west at sunrise.
A multiple-exposure composite of the total lunar eclipse of Sunday, September 27, 2015, as shot from Writing-on-Stone Provincial Park, Alberta, Canada. NOTE: The size of the Moon and its path across the sky are accurate here, because all the images for this composite were taken with the same lens using a camera that did not move during the shoot.
By comparison, the composite here is made of a few selected frames out of hundreds I took at 15-second intervals, and with each frame exposed for the sky, for use in a time-lapse movie. In this case, the Moon became overexposed at the end as it emerged from the umbra.
Indeed, if it’s a time-lapse movie you want (see the video linked to below), then each frame will have to be exposed well enough to show the sky and landscape.
While this method will overexpose the partially-eclipsed Moon, the Moon will darken and become better exposed throughout totality when the same long exposure for the reddened Moon might also work for the sky, to pick up stars. Exposures will have to shorten again as the sky brightens with twilight.
Again, constant baby-sitting and adjusting the camera will be needed. So if it’s cold where you are prepare for a frigid multi-hour shoot. I doubt you’ll be able to leave the camera on Auto exposure to run on its own, not until at least bright twilight begins.
Option 3: Telephoto Close-Ups
Size of the Moon with a 600mm telephoto on a full-frame and cropped-frame camera. (Courtesy Starry Night™/Simulation Curriculum)
The Moon is surprisingly small (only 1/2-degree across) and needs a lot of focal length to do it justice.
For an “in-your-face” close-up of the eclipse you’ll need a 300mm to 800mm (!) lens. Unfortunately, the Moon and sky are moving and any exposures over 1 to 2 seconds (required during totality) will blur the Moon badly if its disk is large on the frame.
If you don’t have a tracking mount, one solution is to keep the Moon’s disk small (using no more than a fast f/2.8 200mm lens) and exposures short by using a high ISO speed.
The eclipse of December 10, 2011, with the Moon setting in deep partial eclipse at sunrise.
Or plan to shoot with a telephoto only when the Moon is low in the sky, as I did above, when you can include the horizon which you would want to be sharp anyway. Framing the Moon and horizon won’t need a super telephoto.
The sky will then also be brighter and require short exposures that don’t need to be tracked. However, how bright and obvious the Moon will be will again depend on your location. This may or may not be a practical option, certainly not if the Moon is setting during mid-totality where you are.
Option 4: Tracked Telescopic Close-Ups
Framing the eclipsed Moon and the Beehive star cluster (Messier 44). (Courtesy Starry Night™/Simulation Curriculum)
If you have a mount that can be polar aligned to track the sky, then more options are open to you.
You can use a telescope mount or one of the compact and portable trackers, such as the Sky-Watcher Star Adventurer or iOptron Sky Tracker units. While these latter units work great, you are best to keep the payload weight down and your lens size under 300mm.
That’s just fine for this eclipse, as you really don’t need a frame-filling Moon. The reason is that the Moon will appear about 4 degrees away from the bright star cluster called the Beehive, or Messier 44, in Cancer. As shown above, a 200mm to 300mm lens will frame this unique pairing well.
Even so, exposures to show the cluster properly might have to be long enough that the Moon overexposes, even at mid-totality. If so, take different exposures for the Moon and stars and composite them later, as I did below.
A High Dynamic Range composite of 7 exposures of the Dec 20/21, 2010 total lunar eclipse, from 1/2 second to 30 seconds, to show the more normally exposed eclipsed Moon with the star cluster M35 at left in Gemini, to show the scene more like it appeared in binoculars. Each photo taken with a 77mm aperture Borg apo refractor at f/4.2 (300mm focal length) and Canon 5D MkII camera at ISO 1600.
If you do want to shoot with more focal length, a monster telephoto lens will work, but a small telescope such as an 80mm aperture f/6 to f/7 refractor will provide enough focal length and image size at much lower cost. But either way, the lens or telescope should be mounted on a solid equatorial telescope mount, and polar aligned to track the sky.
For the sharpest lunar disks, use the Lunar tracking rate.
Exposures will vary from as short as 1/500th second at ISO 100 to 200 for the barely eclipsed Moon, to 4 to 16 seconds at f/6 to f/8 and at ISO 400 to 1600 for the Moon at mid-totality.
Total eclipse of the Moon, December 20/21, 2010, taken with a 130mm AP apo refractor at f/6 and Canon 7D at ISO 400. An HDR composite of 9 images from 1/125 second to 2 seconds, composited in Photoshop.Taken at about 12:21 a.m. MST on Dec 21, about 20 minutes before totality began, during the partial phase.
As I did above, during the deep partial phases shoot both long exposures for the red umbra and short exposures for the bright part of the Moon not yet in the umbra. Merge those later with High Dynamic Range (HDR) techniques and software, or with luminosity masks.
Even if you’re not sure how to do this now, shoot all the required exposures anyway so you’ll have them when your processing skills improve.
Option 5: Time-Lapse Close-Ups
Total eclipse of the Moon, December 20/21, 2010, taken from home with 130mm AP apo refractor at f/6 and Canon 7D at ISO 400 for 4 seconds, single exposure, shortly after totality began.
With a tracking telescope you could fire shots every 30 seconds or so, and then assemble them into a time-lapse movie.
But as with wide-angle time-lapses, that will take constant attention to gradually and smoothly shift exposures, ideally by 1/3rd-stop increments every few shots during the partial and total phases.
If you track at the lunar rate, as I did in the still image below and in the music video linked to at bottom, the Moon will stay centred while it drifts though the stars.
Taken with 90mm Stowaway AP Refractor, with Borg .85x compressor/flattener for f/5.6. With Canon 20Da camera at ISO 400 for a 13 second exposure, on a Skywatcher HEQ5 mount tracking at Lunar rate. Exposure was long to bring out star background.
Track at the sidereal rate and the stars will stay more or less fixed while the Moon drifts through the frame from right to left (west to east). But that takes even more careful planning to position the Moon correctly at the start of the sequence so it remains “in frame” for the duration of the eclipse and ends up where you want at the end, which will occur with the Moon low in a bright sky.
Again, planetarium software such as Starry Night, which can be set to display a camera frame, is essential to plan the shoot.
Either way, do take care to accurately polar align your mount, or you’ll be confronted with the monumental task of having to manually align hundreds of images later. Trust me, I know!
Me enjoying the September 27, 2015 total lunar eclipse while various cameras snapped away, but still requiring constant attention and adjustments.
I would consider the telescopic time-lapse method the most challenging of techniques.
Considering the hour of the night and the likely cold temperatures, your best plan might be to keep it simple. It’s what I plan to do. I’ll be happy to get a few good wide-angle still images, and perhaps a tracked telephoto close-up of the Moon and Beehive as a bonus.
While there is another total lunar eclipse (TLE) in six months on July 27/28, it is not visible at all from North America.
Our next TLE occurs 12 Full Moons, or one lunar year from now, on the night of January 20/21, 2019, when all of North America gets to watch totality at a more reasonable hour, though perhaps not at a more reasonable temperature.
I leave you with a music video of the last TLE, on September 27, 2015 that incorporates still and time-lapse sequences shot using all of the above methods.
I present suggestions for how to ensure everything under your control will go well on eclipse day. The secret is: Practice, Practice, Practice!
The techniques I suggest practicing are outlined in my previous blog, Ten Tips for the Solar Eclipse. It’s prerequisite reading.
However, while you can read all about how to shoot the eclipse, nothing beats actually shooting to ensure success. But how do you do that, when there’s only one eclipse?
Here are my “Top 10” suggestions:
Total eclipse of the Sun, November 3, 2013 as seen from the middle of the Atlantic Ocean, from the Star Flyer sailing ship. I took this with a Canon 5D MkII and 16-35mm lens at 19mm for 1/40s at f/2.8 and ISO 800 on a heavily rolling ship.
Wide-Angle Shots – Shoot a Twilight Scene
The simplest way to shoot the eclipse is to employ a camera with a wide lens running on auto exposure to capture the changing sky colors and scene brightness.
Auto Exposure Check in Twilight
If you intend to shoot wide-angle shots of the eclipse sky and scene below, with anything from a mobile phone to a DSLR, practice shooting a time-lapse sequence or a movie under twilight lighting. Does your camera expose properly when set to Auto Exposure? If you are using a phone camera, does it have any issues focusing on the sky? How big a file does a movie create?
With Telephotos and Telescopes – Shoot the Filtered Sun
The toughest techniques involve using long lenses and telescopes to frame the eclipsed Sun up close. They need lots of practice.
Framing and Focusing
You’ll need to have your safe and approved solar filter purchased (don’t wait!) that you intend to use over your lens or telescope. With the filter in place, simply practice aiming your lens or telescope at the Sun at midday. It’s not as easy as you think! Then practice using Live View to manually focus on the edge of the Sun or on a sunspot. Can you get consistently sharp images?
The partial eclipse of the Sun, October 23, 2014, shot through thin cloud, but that makes for a more interesting photo than one in a clear sky. Despite the cloud, this was still shot through a Mylar filter, on the front of telescope with 450mm focal length, using the Canon 60Da for 1/25 sec exposure at ISO 100.
Exposure Times
Exposures of the filtered Sun will be the same as during the partial phases, barring cloud or haze, as above, that can lengthen exposure times. Otherwise, only during the thin crescent phases will shutter speeds need to be 2 to 3 stops (or EV steps) longer than for a normal Sun.
Solar filters that clamp around the front of lenses are easier to remove than ones that screw onto lenses. They will bind and get stuck!
Filter Removal
With the camera aimed away from the Sun (very important!), perhaps at a distant landscape feature, practice removing the filter quickly. Can you do it without jarring the camera and bumping it off target? Perhaps try this on the Moon at night as well, as it’s important to also test this with the camera and tripod aimed up high.
Articulated LCD screens are a great aid for framing and viewing the eclipse in Live View when the camera is aimed up high, as it will be!
Ease of Use
With the Sun up high at midday (as it will be during the eclipse from most sites), check that you can still look through, focus, and operate the camera easily. Can you read screens in the bright daylight? What about once it gets darker, as in twilight, which is how dark it will get during totality.
The east-to-west motion of the sky will carry the Sun its own diameter across the frame during totality, making consistent framing an issue with very long lenses and telescopes.
Sun Motion
If you are using an untracked tripod, check how much the Sun moves across your camera frame during several minutes. For videos you might make use of that motion. For still shots, you’ll want to ensure the Sun doesn’t move too far off center.
An equatorial mount like this is great but needs to be at least roughly polar aligned to be useful.
Aligning Tracking Mounts
If you plan to use a motorized equatorial mount capable of tracking the sky, “Plan A” might be to set it up the night before so it can be precisely polar aligned. But the reality is that you might need to move on eclipse morning. To prepare for that prospect, practice roughly polar aligning your mount during the day to see how accurate its tracking is over several minutes. Do that by leveling the mount, setting it to your site’s latitude, and aiming the polar axis as close as you can to due and true north. You don’t need precise polar alignment to gain the benefits of a tracking mount – it keeps the Sun centered – for the few minutes of totality.
The Full Moon is the same brightness as the Sun’s inner corona.
Telephotos and Telescopes – Shoot Full Moon Closeups
Exposure Check
Shoot the Full Moon around July 8 or August 7. If you intend to use Auto Exposure during totality, check how well it works on the Full Moon. It’s the same brightness as the inner corona of the Sun, though the Moon occupies a larger portion of the frame and covers more metering sensor points. This is another chance to check your focusing skill.
The crescent Moon has a huge range in brightness and serves as a good test object. Remember, the Moon is the same size as the Sun. That’s why we get eclipses!
Telescopes and Telescopes – Shoot Crescent Moon Closeups
Exposure Check
Shoot the waxing crescent moon in the evening sky during the last week of June and again in the last week of July. Again, test Auto Exposure with your camera in still or movie mode (if you intend to shoot video) to see how well the camera behaves on a subject with a large range in brightness. Or step through a range of exposures manually, from short for the bright sunlit crescent, to long for the dark portion of the Moon lit by Earthshine. It’s important to run through your range of settings quickly, just as you would during the two minutes of totality. But not too quickly, as you might introduce vibration. So …
Good focus matters for recording the fine prominences and sharp edge of the Moon.
Sharpness Check
In the resulting images, check for blurring from vibration (from you handling the camera), from wind, and from the sky’s east-to-west motion moving the Moon across the frame, during typical exposures of 1 second or less.
By practicing, you’ll be much better prepared for the surprises that eclipse day inevitably bring. Always have a less ambitious “Plan B” for shooting the eclipse simply and quickly should a last-minute move be needed.
However, may I recommend …
My 295-page ebook on photographing the August 21 total eclipse of the Sun is now available. See http://www.amazingsky.com/eclipsebook.html It covers all techniques, for both stills, time-lapses, and video, from basic to advanced, plus a chapter on image processing. And a chapter on What Can Go Wrong?! The web page has all the details on content, and links to order the book from Apple iBooks Store (for the best image quality and navigation) or as a PDF for all other devices and platforms.
For much more detailed advice on shooting options and techniques, and for step-by-step tutorials on processing eclipse images, see my 295-page eBook on the subject, available as an iBook for Apple devices and as a PDF for all computers and tablets.
I present my Top 10 Tips for photographing the August 21 total eclipse of the Sun.
If the August total eclipse will be your first, then you could heed the advice of many and simply follow “Tip #0:” Just don’t photograph it! Look up and around to take in the spectacle. Even then, you will not see it all.
However, you might see less if you are operating a camera.
But I know you want pictures! To help you be successful, here are my tips for taking great photos without sacrificing seeing the eclipse.
An iPhone in a tripod bracket and on a small tabletop tripod.
TIP #1: Keep It Simple
During the brief minutes of totality, the easiest way to record the scene is to simply hold your phone camera up to the sky and shoot. Zoom in if you wish, but a wide shot may capture more of the twilight effects and sky colors, which are as much a part of the experience as seeing the Sun’s gossamer corona around the dark disk of the Moon.
Better yet, use an adapter to clamp your phone to a tripod. Frame the scene as best you can (you might not be able to include both the ground and Sun) and shoot a time-lapse, or better yet, a video.
Start it 2 or 3 minutes before totality (if you can remember in the excitement!) and let the camera’s auto exposure take care of the rest. It’ll work fine.
That way you’ll also record the audio of your excited voices. The audio may serve as a better souvenir than the photos. Lots of people will have photos, but nobody else will record your reactions!
Just make sure your phone has enough free storage space to save several minutes of HD video or, if your camera has that feature, 4K video.
A wide shot of the 2006 eclipse in Libya with a high altitude Sun. 10mm lens on a cropped-frame Canon 20Da camera.
TIP #2: Shoot Wide With a DSLR
For better image quality, step up to this hands-off technique.
Use a tripod-mounted camera that accepts interchangeable lenses (a digital single lens reflex or a mirrorless camera) and use a lens wide enough to take in the ground below and Sun above.
Depending on where you are and the sensor size in your camera, that’ll likely mean a 10mm to 24mm lens.
By going wide you won’t record details in the corona of the Sun or its fiery red prominences. But you can record the changing sky colors and perhaps the dark shadow of the Moon sweeping from right to left (west to east) across the sky. You can also include you and your eclipse group silhouetted in the foreground. Remember, no one else will record you at the eclipse.
A sequence of shots of the 2012 eclipse from Australia, with a wide 15mm lens and camera on Auto Exposure showing the change of sky color.
The total eclipse of the Sun, November 14, 2012, from a site near Lakeland Downs, Queensland, Australia. Shot with the Canon 5D Mark II and 15mm lens for a wide-angle view showing the Moon’s conical shadow darkening the sky and the twilight glow on the horizon. Taken near mid-eclipse.
TIP #3: Shoot on Auto Exposure
For wide shots, there’s no need to attend to the camera during the eclipse. Set the camera on Auto Exposure – Aperture Priority (Av), the camera ISO between 100 to 400, and your lens aperture to f/2.8 (fast) to f/5.6 (slow).
Use a higher ISO if you are using a slower lens such as a kit zoom. But shoot at ISO 100 and at f/2.8 if you have a wide lens that fast.
In Av mode the camera will decide what shutter speed to use as the lighting changes. I’ve used this technique at many eclipses and it works great.
An accessory intervalometer set for an interval of 1 second.
TIP #4: Let the Camera Do the Shooting
To make this wide-angle technique truly hands-off use an intervalometer (either built into your camera or a separate hardware unit) to fire the shutter automatically.
Once again, start the sequence going 3 to 5 minutes before totality, with the intervalometer set to fire the shutter once every second. Don’t shoot at longer intervals, or you’ll miss too much. Shutter speeds won’t likely exceed one second.
Again, be sure your camera’s memory card has enough free space for several hundred images. And don’t worry about a solar filter on your lens. It’ll be fine for the several minutes you’ll have it aimed up.
Out of the many images you’ll get, pick the best ones, or turn the entire set into a time-lapse movie.
A Nikon DSLR and lens set to Manual Focus.
TIP #5: Shoot on Manual Focus
Use Auto Exposure and an intervalometer. But … don’t use Auto Focus.
Switch your lens to Manual Focus (MF) and focus on a distant scene element using Live View.
Or use Auto Focus to first focus on something in the distance, then switch to Manual and don’t touch focus after that. If you leave your lens on Auto Focus the shutter might not fire if the camera decides it can’t focus on the blank sky.
A comparison of a Raw image as it came from the camera (left) and after developing in Lightroom (right).
TIP #6: Shoot Raw
For demanding subjects like a solar eclipse always shoot your images in the Raw file format. Look in your camera’s menus under Image Quality.
Shoot JPGs, too, if you like, but only Raw files record the widest range of colors and brightness levels the camera sensor is capable of detecting.
Later in processing you can extract amazing details from Raw files, both in the dark shadows of the foreground, and in the bright highlights of the distant twilight glows and corona around the Sun. Software to do so came with your camera. Put it to use.
A 200mm telephoto and 1.4x Extender, with the camera on a sturdy and finely adjustable tripod head.
TIP #7: OK, Use a Telephoto Lens! But …
If you really want to shoot close-ups, great! But don’t go crazy with focal length. Yes, using a mere 135mm or 200mm lens will yield a rather small image of the eclipsed Sun. But you don’t need a monster 600mm lens or a telescope, which typically have focal lengths starting at 600mm. With long focal lengths come headaches like:
•Keeping the Sun centered. The Earth is turning! During the eclipse that motion will carry the Sun (and Moon) its own diameter across your frame from east to west during the roughly two minutes of totality. While a motorized tracking mount can compensate for this motion, they take more work to set up properly, and must be powered. And, if you are flying to the eclipse, they will be much more challenging to pack. I’m trying to keep things simple!
•Blurring from vibration. This can be an issue with any lens, but the longer your lens, the more your chances of getting fuzzy images because of camera shake, especially if you are touching the camera to alter settings.
An ideal focal length is 300mm to 500mm. But …
When using any telephoto lens, always use a sturdy tripod with a head that is easy to adjust for precise aiming, and that can aim up high without any mechanical issues. The Sun will be halfway, or more, up the sky, not a position some tripod heads can reach.
A re-processed version of a still frame of the total solar eclipse of November 14, 2012 taken from our site at Lakeland Downs, Queensland, Australia. This is a still frame shot during the shooting of an HD video of the eclipse, using the cropped-frame Canon 60Da and Astro-Physics Traveler 4-inch apo refractor telescope at f/5.8 (580mm focal length). The image is 1/60th second at ISO 100. This is a full-sized still not a frame grab taken from the movie.
A sequence from a movie showing the camera adjusting the exposure automatically when going from a filtered view (left) to an unfiltered view of the diamond ring (right).
TIP #8: Use Auto Exposure, or … Shoot a Movie
During totality with your telephoto, you could manually step through a rehearsed set of exposures, from very short shutter speeds (as short as 1/4000 second) for the diamond rings at either end of totality, to as long as one or two seconds at mid-totality for the greatest extent of the corona’s outermost streamers.
But that takes a lot of time and attention away from looking. Yes, there are software programs for automating a camera, or techniques for auto bracketing. But if this is your first eclipse an easier option is to simply use Auto Exposure/Aperture Priority and let the camera set the shutter speed. Again, you could use an intervalometer to fire the shutter so you can just watch.
Don’t use high ISO speeds. A low ISO of 100 to 400 is all you need and will produce less noise. The eclipsed Sun is still bright. You don’t need ISO 800 to 3200.
Even on Auto Exposure, you’ll get good shots, just not of the whole range of phenomena an eclipsed Sun displays.
Or, once again and better yet – put your camera into video mode and shoot an HD or 4K movie. Auto Exposure will work just fine, allowing you to start the camera then forget it.
Place the Sun a solar diameter or two to the left of the frame and let the sky’s motion drift it across the frame for added effect. Start the sequence running a minute or two before totality with your solar filter on. Then just let the camera run … except …
A small refractor telescope with a solar filter over the front aperture. That filter has to be removed for totality.
TIP #9: Remember to Remove the Filter!
You will need a safe solar filter over your lens or telescope to shoot the partial phases of the eclipse, and to frame and focus the Sun. This cannot be a photo neutral density or polarizing filter. It must be a filter designed for observing and shooting the Sun, made of metal-coated glass or Mylar plastic. Anything else is not safe and likely far too bright.
But you do NOT need the filter for totality.
Remove it … when?
The answer: a minute or so before totality if you want to capture the first diamond ring just before totality officially starts. Set a timer to remind you, as visually it is very difficult to judge the right moment with your unaided eye. The eclipse will start sooner than you expect.
If you have your camera on Auto Exposure, it will compensate just fine for the change in brightness, from the filtered to the unfiltered view.
But don’t leave your unfiltered camera aimed at the Sun. Replace the filter no more than a minute or so after totality and the second diamond ring ends.
The partial eclipse of the Sun, October 23, 2014, shot through a mylar filter, on the front of the 66mm f/7 apo refractor shown above (450mm focal length), using a cropped-frame Canon 60Da camera for 1/8000 second exposure at ISO 100. Focus on the sharp tips of the crescent Sun or a sunspot if one is present.
TIP #10: Focus!
Everyone worries about getting the “best exposure.” Don’t! You’ll get great looking telephoto eclipse close-ups with any of a wide range of exposures.
What ruins most eclipse shots, other than filter forgetfulness, is fuzzy images, from either shaky tripods or poor focus.
Focus manually using Live View on the filtered partially eclipsed Sun. Zoom up on the edge of the Sun or sharp tip of the crescent. Re-focus a few minutes before totality, as the changing temperature can shift the focus of long lenses and telescopes.
But you needn’t worry about re-focusing after you remove the filter. The focus will not change with the filter off.
Me in Libya in 2006 with my eclipse setup: a small telescope on an alt-azimuth mount.
TIP #1 AGAIN: Keep It Simple!
I’ll remind you to keep things simple for a reason other than giving you time to enjoy the view, and that’s mobility.
You might have to move at the last minute to escape clouds. Complex photo gear can be just too much to take down and set up, often with minutes to spare, as many an eclipse chaser can attest is often necessary. Keep your gear light, easy to use, and mobile. Committing to an overly ambitious and inflexible photo plan and rig could be your undoing.
By following both my “Ten Tips” advice blogs you should be able to get great eclipse images to wow your friends and fans, all without missing the experience of actually seeing … and feeling … the eclipse.
However … may I recommend …
My 295-page ebook on photographing the August 21 total eclipse of the Sun is now available. See http://www.amazingsky.com/eclipsebook.html It covers all techniques, for both stills, time-lapses, and video, from basic to advanced, plus a chapter on image processing. And a chapter on What Can Go Wrong?! The web page has all the details on content, and links to order the book from Apple iBooks Store (for the best image quality and navigation) or as a PDF for all other devices and platforms. Thanks! Clear skies on eclipse day, August 21, 2017.
For much more detailed advice on shooting options and techniques, and for step-by-step tutorials on processing eclipse images, see my 295-page eBook on the subject, available as an iBook for Apple devices and as a PDF for all computers and tablets.
The most spectacular sight the universe has to offer is coming to a sky near you this summer.
On August 21 the Moon will eclipse the Sun, totally!, along a path that crosses the continental USA from coast to coast. All the details of where to go are at the excellent website GreatAmericanEclipse.com.
If this will be your first total solar eclipse, you might want to just watch it. But many will want to photograph or video it. It can be easy to do, or it can be very complex, for those who are after ambitious composites and time-lapses.
To tell you how to shoot the eclipse, with all types of cameras, from cell phones to DSLRs, with all types of techniques, from simple to advanced, I’ve prepared a comprehensive ebook, How to Photograph the Solar Eclipse.
It is 295 pages of sage advice, gathered over 38 years of shooting 15 total solar eclipses around the world.
The book is filled with illustrations designed specifically for the 2017 eclipse – where the Sun will be, how to frame the scene, what will be in the sky, how the shadow will move, where the diamond rings will be, what lenses to use, etc.
Here are a few sample pages:
I cover shooting with everything from wide-angle cameras for the entire scene, to close-ups with long telephotos and telescopes, both on tripods and on tracking mounts.
I cover all the details on exposures and camera settings, and on focusing and ensuring the sharpest images. Most bad eclipse pix are ruined not by poor exposure but poor focus and blurry images – the Sun is moving!
A big chapter covers processing of eclipse images, again, from simple images to complex stacks and composites.
For example, I show how to produce a shot like this, from 2012, combining a short diamond ring image with a long-exposure image of the corona.
A final chapter covers “what can go wrong!” and how to avoid the common mistakes.
The ebook is available on the Apple iBooks Store for Mac and iOS devices. This version has the best interactivity (zoomable images), higher quality images (less compression), and easiest content navigation.
However, for non-Apple people and devices, the ebook can also be purchased directly from my website as a downloadable PDF, which has embedded hyperlinks to external sites.
I think you’ll find the ebook to be the most comprehensive guide to shooting solar eclipses you’ll find. It is up to date (as of last week!) and covers all the techniques for the digital age.
Many thanks, and clear skies on August 21, wherever you may be in the shadow of the Moon!
I’m pleased to announce that after a year in production, our video tutorial series, Nightscapes and Time-Lapses: From Field to Photoshop, is now available.
It’s been quite a project! Over the last few years I’ve presented annual astrophoto workshops in conjunction with our local telescope dealer All-Star Telescope to great success.
However, we always had requests for the workshops on video. Attempts to video the actual workshops never produced satisfactory results. So we spent a year shooting in the field and in the studio to produce a “purpose-built” series of programs.
They are available now as a set of three programs, totalling 4 hours of instruction, for purchase and download at Vimeo at
For those wanting “hard copies” we will also be selling the programs on mailed USB sticks. See All-Star Telescope for info and prices. The downloaded version can also be ordered from there.
This series deals with the basics of capturing, then processing nightscape still images and time-lapse movies of the night sky and landscapes lit by moonlight and starlight.
Here’s the content outline:
Program 1 – Choosing Equipment (1 Hour)
• Tips for Getting Started • Essential Gear • Choosing A Camera • Photo 101 – Exposure Triangle • Setting Exposure • Expose to the Right • Setting a Camera – File Types • Photo 101 – Noise Sources • Setting a Camera – Noise Reduction • Setting a Camera – Focusing • Setting a Camera – Other Menus • Choosing Lenses • Choosing an IntervalometerSummary and Tips
Program 2 – Shooting in the Field (1 hour)
• Climbing the Learning Curve • Twilights • Astronomy 101 – Conjunctions • Shooting Conjunctions • Moonrises • Shooting Auroras • Astronomy 101 – Auroras • Photo 101 – Composing • Moonlit Nightscapes • Astronomy 101 – Where is the Moon? • Choosing a Location • Shooting the Milky Way • Astronomy 101 – Where is the Milky Way? • Astronomy 101 – Daily Sky Motion • Tracking the Sky • Shooting Star Trails • Shooting Time-Lapses • Calculating Time-Lapses • A Pre-Flight Checklist • Summary and Tips
Program 3 – Processing Nightscapes and Time-Lapses (2 hours)
• Workflows • Using Adobe Bridge – Importing and Selecting • Photo 101 – File Formats • Using Adobe Lightroom – Importing and Selecting • Adobe Camera Raw – Essential Settings • Adobe Camera Raw – Developing Raw Images • Adobe Lightroom – Develop Module • Adobe Photoshop – Introduction • Photoshop – Setup • Photoshop – Smart Filters • Photoshop – Adjustment Layers • Photoshop – Masking • Photoshop – Processing Star Trails & Time-Lapses • Stacking Star Trails • Assembling Time-Lapse Movies • Archiving • Summary & Finale
If this first introductory series is successful we may produce follow-up programs on more advanced techniques.
On Sunday, September 27 the Moon undergoes a total eclipse, the last we’ll see until January 2018.
This is a sky event you don’t want to miss. Whether you photograph it or just enjoy the view, it will be a night to remember, as the Full Moon turns deep red during a total eclipse.
Note — For this article I’m giving times and sky directions for North America. For Europe the eclipse occurs early in the morning of September 28, as the Moon sets into the west. But for here in North America the timing could not be better. Totality occurs in the evening of Sunday, September 27 as the Moon rises into the east.
Courtesy Wikimedia Commons
ECLIPSE BASICS
A total lunar eclipse occurs when the Moon — and it can only be Full — passes through the shadow cast into space by Earth. The Sun, Earth and Moon are in near-perfect alignment.
All total eclipses of the Moon consist of 3 main parts:
• The initial partial eclipse occurs as the Moon slowly enters the dark central portion of our planet’s shadow, the umbra. This lasts about an hour.
• Totality begins as the entire disk of the Moon is within the umbra. For this eclipse, totality lasts a generous 72 minutes.
• Totality ends as the Moon emerges from the umbra to begin the final partial eclipse lasting another hour.
Courtesy Fred Espenak/EclipseWise.com – All times are Eastern Daylight. Subtract 1 hour for Central Daylight, 2 hours for Mountain Daylight, 3 hours for Pacific Daylight Time. Times apply for anywhere in that time zone.
WHERE TO SEE IT
All of North America, indeed most of the western hemisphere, can see this eclipse. In North America, the farther east you live on the continent the later in your evening the eclipse occurs and the higher the Moon appears in the southeast.
For example, in the Eastern time zone, totality begins at 10:11 p.m. EDT and ends at 11:23 p.m. EDT, with mid-totality is at 10:47 p.m. EDT with the Moon about 35 degrees up, placing it high in the southeast sky for southern Ontario, for example.
For me in the Mountain time zone, the total eclipse begins at 8:11 p.m. MDT and ends at 9:23 p.m. MDT, with mid-totality is at 8:47 p.m. MDT, with the Moon just 13 degrees up in the east from here in southern Alberta. From my time zone, and from most location in the Rocky Mountain regions, the Moon rises with the initial partial phases in progress.
This is the total eclipse of the Moon, December 10, 2011, taken from the grounds of the Rothney Astrophysical Observatory, near Priddis Alberta, and looking west to the Rockies. This is a 2 second exposure at ISO 800 with the Canon 5DMkII and Canon 200mm lens at f/4.
For locations on the west coast viewers miss most of the partial eclipse phase before totality. Instead, the Moon rises as totality begins, making for a more challenging observation. Viewers on the coast will need clear skies and a low horizon to the east, but the reward could be a beautiful sight and images of a red Moon rising.
Total eclipse of the Moon, December 20/21, 2010, taken from home with 130mm AP apo refractor at f/6 and Canon 7D at ISO 400. An HDR composite of 9 images from 1/125 second to 2 seconds, composited in Photoshop CS5. Taken at about 12:21 am MST on Dec 21, about 20 minutes before totality began, during the partial phase.
“SUPERMOON” ECLIPSE
This eclipse of the Moon is the last in a series of four total lunar eclipses that occurred at six-month intervals over the last two years. We won’t enjoy another such “tetrad” of total lunar eclipses until 2032-33.
But this eclipse is unique in that it also coincides with the annual Harvest Moon, the Full Moon closest to the autumnal equinox. Harvest Moons are known for their orange tint as they rise into what is sometimes a dusty autumn evening.
But what is making internet headlines is that this Full Moon is also the year’s “supermoon,” the Full Moon of 2015 that comes closest to Earth. In recent years these “perigee” Full Moons have been dubbed “supermoons.”
Call it what you will, it does make this Full Moon a little larger than usual, though the difference is virtually impossible to detect by eye. And it makes little difference to the circumstances or appearance of the eclipse itself.
Partial eclipse of the Moon at moonset, morning of June 26, 2010, at about 5:00 am. Shot with 200mm telephoto and 1.4x teleconvertor, for 1/15th sec at f/5 and ISO 100, using Canon 7D. From western North America the Moon will rise in partial eclipse like this on September 27.
HOW TO SEE IT
Just look up! You can enjoy the eclipse with the unaided eye, and even from within city limits.
Unlike eclipses of the Sun, the eclipsed Moon is perfectly safe to look at with whatever you wish to use to enhance the view. The best views are with binoculars or a telescope at low power.
Look for subtle variations in the red colouring across the disk of the Moon, and even tints of green or blue along the dark edge of the Earth’s advancing or retreating shadow during the partial phases.
If you can, travel to a dark site to enjoy the view of the stars and Milky Way brightening into view as the Full Moon reddens and the night turns dark.
HOW TO SHOOT IT
The total eclipse of the Moon, April 15, 2014 local time just after sunset from Australia. This is an 8-second exposure at f/2.8 with the 50mm lens on the Canon 60Da at ISO 800.
1. On A Tripod
The easiest method is to use a camera on a tripod, with a remote release to fire the shutter and prevent vibration from blurring the image. What lens you use will depend on how you wish to frame the scene and how high the Moon is in your sky.
Lens Choice
From eastern North America you’ll need a wide-angle lens (14mm to 24mm) to frame the eclipsed Moon and the ground below. The Moon will appear as a small red dot.
While you can shoot the Moon with longer focal lengths it takes quite a long lens (>300mm) to really make it worthwhile shooting just the Moon itself isolated in empty sky. Better to include a landscape to put the Moon in context, even if the Moon is small.
From western North America the lower altitude of the Moon allows it to be framed above a scenic landscape with a longer 35mm to 50mm lens, yielding a larger lunar disk.
From the west coast you could use a telephoto lens (135mm to 200mm) to frame the horizon and the eclipsed Moon as it rises for a dramatic photo.
Focusing
Use Live View (and zoom in at 10x magnification) to manually focus on the horizon, distant lights, or bright stars. The Moon itself my be tough to focus on.
Exposure Times
Exposures will depend on how bright your sky is. Use ISO 400 to 800 and try metering the scene as a starting point if your sky is still lit by twilight. Use wide lens apertures (f/4 to f/2) if you can, to keep exposures times as a short as possible.
The apparent motion of the Moon as the sky turns from east to west will blur the image of the Moon in exposures lasting more than a few seconds, especially ones taken with telephoto lenses.
The maximum exposure you can use before trailing sets in is roughly 500 / lens focal length.
Total eclipse of the Moon, December 20/21, 2010, taken with Canon 5D MKII and 24mm lens at f2.8 for stack of 4 x 2 minutes at ISO 800. Taken during totality using a camera tracker.
2. On a Tracker or Equatorial Mount
If you can track the sky using a motorized tracker or telescope mount, you can take exposures up to a minute or more, to record the red Moon amid a starry sky.
For this type of shot, you’ll need to be at a dark site away from urban light pollution. But during totality the sky will be dark enough that the Milky Way will appear overhead. Use a wide-angle lens to capture the red Moon to the east of the summer Milky Way.
The total eclipse of the Moon, October 8, 2014, the Hunter’s Moon, as seen and shot from Writing-on-Stone Provincial Park, Alberta. I shot this just after mid-totality in a single 15-second exposure at ISO 400 with the Canon 60Da, and with the 80mm apo refractor at f/6. It was mounted on the Sky-Watcher HEQ5 mount tracking at the lunar rate.
3. Through a Telescope
The most dramatic closeups of the eclipsed red Moon require attaching your camera body (with its lens removed) to a telescope. The telescope becomes the lens, providing a focal length of 600mm or more, far longer than any telephoto lens most of us own.
You’ll need the appropriate “prime focus” camera adapter and, to be blunt, if you don’t have one now, and have never shot the Moon though your telescope then plan on shooting with another method.
But even if you have experience shooting the Moon through your telescope, capturing sharp images of the dim red Moon demand special attention.
The telescope must be on a motorized mount tracking the sky, preferably at the “lunar,” not sidereal, drive rate. Focus on the Moon during the partial phases when it is easier to focus on the bright edge of the Moon.
Exposures during totality typically need to be 5 to 30 seconds at ISO 800 to 3200, depending on the focal ratio of your telescope. Take lots of exposures at various shutter speeds. You have over an hour to get it right!
The total lunar eclipse of April 4, 2015 taken from near Tear Drop Arch, in western Monument Valley, Utah. The mid-totality image is a composite of 2 exposures: 30 seconds at f/2.8 and ISO 1600 for the sky and landscape, with the sky brightening blue from dawn twilight, and 1.5 seconds at f/5.6 and ISO 400 for the disk of the Moon itself. Also, layered in are 26 short exposures for the partial phases, most being 1/125th sec at f/8 and ISO 400, with ones closer to totality being longer, of varying durations. All are with the 24mm lens and Canon 6D on a static tripod.
4. Time-Lapses
I’d suggest attempting time-lapses only if you have lots of experience with lunar eclipses.
Exposures can vary tremendously over the partial phases and then into totality. Any time-lapse taken through a telescope, or even with a wide-angle lens, will require a lot of manual attention to ensure each frame is well-exposed as the sky and Moon darken.
However, even if you do not get a complete set of frames suitable for a smooth, continuous time-lapse, selected frames taken every 5 to 10 minutes may work well in creating a multiple-exposure composite (as above), by layering exposures later in Photoshop.
Whatever method – or methods — you use, don’t get so wrapped up in fussing with cameras you forget to simply enjoy the eclipse for the beautiful sight it is.
This is the last total eclipse of the Moon anyone on Earth will see until January 31, 2018. So enjoy the view of the deep red Moon in the autumn sky.
Here are my top tips for shooting terrific still-image nightscapes … and time-lapse movies of the night sky.
1. Go for pixel size, not pixel count
When choosing a camera for night sky scenes, the most important characteristic is not number of megapixels. Just the opposite.
The best cameras are usually models with more modest megapixel counts. Each of their individual pixels is larger and so collects more photons in a given exposure time, yielding higher a signal-to-noise ratio – or lower noise, critical for night shooting.
Cameras with pixels (the “pixel pitch”) 6 to 8 microns across are best. Many high-megapixel cameras have tiny 4-micron pixels.
Large-pixel cameras are often the full-frame models, such as the Canon 5D MkIII and 6D, the Nikon D610, D750, and Df, and the Sony a7s and a7S II.
Many “cropped-frame” cameras are now 18- to 24-megapixel models with smaller, noise-prone pixels. They can certainly be used, but will require more care in exposing well at lower ISOs, and in processing to smooth out noise without blurring detail.
2. Learn to fly on manual
While DSLRs and Compact System Cameras have amazing automatic functions we use none of them at night.
Instead, we use the camera on Manual or Bulb, dialling in shutter speed, aperture and ISO speed manually. We also have to focus manually, using Live View mode to focus on a bright star or distant light.
Learn the tradeoffs involved: Increasing ISO sensitivity of the sensor keeps exposure times down but increases noise. Opening up the lens aperture to f/2 or f/1.4 also keeps exposures short but introduces image-blurring aberrations, especially at the frame corners.
To prevent stars from trailing due to the sky’s motion adhere to the “500 Rule:” the maximum exposure time is roughly 500 divided by the focal length of your lens.
3. Expose to the right
At night, always give the sensor plenty of signal.
Use whatever combination of shutter speed, aperture and ISO will provide a well-exposed image. The image “histogram,” the graph of number of pixels at each brightness level shown above, should never be slammed to the left.
It should be a well-distributed “mountain range” of pixels, extending well to the right. If the 500 Rule restricts your shutter speed, and your desire for sharp images across the frame demands you shoot at f/2.8 or even slower, then don’t be afraid to bump up the ISO speed to whatever it takes to produce a good histogram and a well-exposed image.
Noise will look far worse if you underexpose, then try to boost the image brightness later in processing. Expose to the right!
4. Shoot Raw!
Shoot Raw. Period.
When comparing Raw and compressed JPG versions of the same image, you can be fooled into thinking the JPGs look better (i.e. smoother) because of the noise reduction the camera has applied to the JPG that is beyond your control. However, that smoothing has also wiped out fine detail, like stars.
By shooting Raw you get to control whatever level of noise reduction and sharpening the image needs later in processing.
JPGs are also 8-bit images with a limited tonal range – or palette – in which to record the subtle gradations of brightness and colour present in our images.
Imported Raw files are 16-bit, with a much wider tonal scale and colour palette. That’s critical for all astrophotos when, even with a well-exposed image, many tonal values are down in the dark end of the range. Processing Raw images makes it possible to extract detail in the shadows and highlights.
Even when shooting a time-lapse sequence, shoot Raw.
5. Take dark frames (sometimes!)
LENR reduces noise.
It’s a topic of some debate, but in my experience it is always better to turn on the camera’s Long Exposure Noise Reduction (LENR) function when shooting individual nightscape images. Doing so forces the camera to take a “dark frame,” an exposure of equal length but with the shutter closed.
It records just the noise, which the camera then subtracts from the image. Yes, it takes twice as long to acquire an image, but the image is cleaner, with fewer noisy pixels.
This is especially true when shooting on hot summer nights (the warmer the sensor the higher the noise). That said, you cannot use LENR when shooting frames for star trail composites or time-lapse movies.
For those, the interval between images should be no more than 1 to 5 seconds. Using LENR would introduce unsightly gaps in the trails or jumps in the star motion in time-lapses.
As an alternative, it is possible to take separate dark frames at the end of the night by simply covering the lens and taking exposures of the same duration and at the same ISO as your “light frames.”
Some stacking software, such as StarStax and the Advanced Stacker Actions have places to put these dark frames, to subtract them from the stack later in processing.
6. Use fast lenses
A fast lens is your best accessory.
While the “kit zoom” lenses that come with many DSLRs are great for shooting bright twilight or Full Moon scenes, they will prove too slow for dark starlit scenes with the Milky Way.
In addition to exposing to the right and shooting Raw, the secret to great nightscapes is to shoot with fast lenses, usually “prime” lenses with fixed focal lengths. They are usually faster and have better image quality than zooms.
Your most-used lens for nightscape and time-lapse shooting is likely to be a 14mm to 24mm f/2 to f/2.8 lens.
Fortunately, because we don’t need (and indeed can’t use) autofocus we can live happily with low-cost manual lenses, such as the models made in Korea and sold under brands such as Rokinon, Samyang and Bower. They work very well.
7. Get to know the Moon & Milky Way
For many nightscape and time-lapse shoots, the Moon is your light source for illuminating the landscape.
When the Moon is absent, the Milky Way is often your main sky subject.
Knowing where the Moon will be in the sky at its various phases, and when it will rise (in its waning phases after Full Moon) or set (in its waxing phases before Full) helps you a plan a shoot, so you’ll know whether a landscape will be well lit.
Astronomy apps for desktop computers and mobile devices are essential planning aids. A good one specifically for photographers is The Photographer’s Ephemeris.
Knowing in what season and time of night the Milky Way will be visible is essential if you want to capture it. Don’t try for Milky Way shots in spring – it isn’t up!
8. Keep it simple to start
Don’t be seduced by the fancy gear.
Time-lapse imaging has blossomed into a field replete with incredible gear for moving a camera incrementally during a shoot, and for automating a shoot as day turns to night.
I explain how to use all the fancy gear in my ebook, linked to below, however … Great time-lapses, and certainly still-frame nightscapes, can be taken with no more than a DSLR camera with a good fast lens and mounted on a sturdy tripod. Invest in the lens and don’t scrimp on the tripod.
Another essential for shooting multi-frame star trails and time-lapses is a hardware intervalometer ($50 to $150).
9. Learn the intricacies of intervals
For time-lapses, an intervalometer is essential.
Mastering exposure and focus in still images is essential for great time-lapse movies because they are simply made of hundreds of well-exposed still frames.
But move to time-lapses and you have additional factors to consider: how many frames to shoot and how often to shoot them. A good rule of thumb is to shoot 200 to 300 frames per sequence, shot with an interval of no more than 1 to 5 seconds between exposures, at least for starry night sequences.
However, most intervalometers (the Canon TC-80N3 is an exception) define their “Interval” setting to mean the time from when the shutter opens to when it opens again. In that case, you set the Interval to be a value 1 to 5 seconds longer than the exposure time you are using. That’s also true of the intervalometer function Nikon builds into their internal camera firmware.
Test first!
10. Go to beautiful places
While the gear can be simple, great shots demand an investment in time.
By all means practice at home and at nearby sites that are quick to get to. Try out gear and techniques at Full Moon when exposures are short (the Full Moon is bright!) and you can see what you are doing.
But beautiful images of landscapes lit by moonlight or starlight require you to travel to beautiful locations.
When you are on site, take the time to frame the scene well, just as you would during the day. Darkness is no excuse for poor composition!
While shooting nightscapes and time-lapses can be done with a minimal investment in hardware and software, it does require an investment in time – time to travel and spend nights shooting at wonderful places under the stars.
Enjoy the night!
I cover all these topics, and much more, in detail in my ebook How to Photograph & Process Nightscapes and Time-Lapses. Click the link below to learn more.
I’ve been an avowed Canon DSLR user for a decade. I may be ready to switch!
[NOTE:This review dates from 2015. Tests done today with current models would certainly differ. Canon’s EOS R mirrorless series, for example, offer much better ISO Invariancy performance but lack the “dark frame buffer” advantage of Canon DSLRs. And indeed, I have used the Nikon D750 a lot since 2015. But I did not give up my Canons!]
Here, in a technical blog, I present my tests of two leading contenders for the best DSLR camera for nightscape and astronomical photography: the Canon 6D vs. the Nikon D750. Which is better?
To answer, I subjected both to side-by-side outdoor tests, using exposures you’ll actually use in the field for typical nightscapes and for deep-sky images.
Both cameras are stock, off-the-shelf models. They have not had their filters modified for astronomy use. Both are 20- to 24-megapixel, full-frame cameras, roughly competitive in price ($1,900 to $2,300).
For images shot through lenses, I used the Canon L-Series 24mm on the Canon 6D, and the Sigma 24mm Art lens on the Nikon D750.
The bottom line:Both are great cameras, with the Nikon D750 having the edge for nightscape work, and the Canon 6D the edge for deep-sky exposures.
The 24.3-megapixel Nikon D750 has 5.9-micron pixels, while the 20.2-megapixel Canon 6D has slightly larger 6.5-micron pixels which, in theory, should lead to lower noise for the Canon. How do they compare in practice?
The scene used to test for noise (here with the Nikon images) showing the development settings applied to both the Nikon and Canon sets. NO noise reduction (colour or lunminance) was applied to any of the images, but Exposure, Shadows, Contrast and Clarity were boosted, and Highlights reduced.
I shot a moonlit nightscape scene (above) at five ISO settings, from 800 to 12800, at increasingly shorter exposures to yield identically exposed frames. I processed each frame as shown above, with boosts to shadows, clarity, and contrast typical for nightscapes. However, I applied no noise reduction (either luminance or color) in processing. Nor did I take and apply dark frames.
The blowups of a small section of the frame (outlined in the box in the upper right of the Photoshop screen) show very similar levels of luminance noise. The Canon shows slightly more color noise, in particular more magenta pixels in the shadows at high ISOs. Its larger pixels didn’t provide the expected noise benefit.
TEST #2 — Resolution
Much has been written about the merits of Canon vs. Nikon re: the most rigorous of tests, resolving stars down at the pixel level.
I shot the images below of the Andromeda Galaxy the same night through a 92mm aperture apo refractor. They have had minimal but equal levels of processing applied. At this level of inspection the cameras look identical.
But what if we zoom in?
For many years Nikon DSLRs had a reputation for not being a suitable for stellar photography because of a built-in noise smoothing that affected even Raw files, eliminating tiny stars along with noise. Raw files weren’t raw. Owners worked around this by turning on Long Exposure Noise Reduction, then when LENR kicked in after an exposure, they would manually turn off the camera power.
This so-called “Mode 3” operation yielded a raw frame without the noise smoothing applied. Clearly, this clumsy workaround made it impossible to automate the acquisition of raw image sequences with Nikons.
Are Nikons still handicapped? In examining deep-sky images at the pixel-peeping level (below), I saw absolutely no difference in resolution or the ability to record tiny and faint stars. With its 4-megapixel advantage the Nikon should resolve finer details and smaller stars, but in practice I saw little difference.
Closeup of telescope view of Andromeda Galaxy with Canon 6D 4 minute exposure at ISO 800 No noise reduction applied in processing
Closeup of telescope view of Andromeda Galaxy with Nikon D750 4 minute exposure at ISO 800 No noise reduction applied in processing
On the other hand I saw no evidence for Nikon’s “star eater” reputation. I think it is time to lay this bugbear of Nikons to rest. The Nikon D750 proved to be just as sharp as the Canon 6D.
Note that in the closeups above, the red area marks a highlight (the galaxy core) that is overexposed and clipped. Nikon DSLRs also have a reputation for having sensors with a larger dynamic range than Canon, allowing better recording of highlights before clipping sets in.
However, in practice I saw very little difference in dynamic range between the two cameras. Both clipped at the same points and to the same degree.
TEST #3 — Mirror Box Shadowing
An issue little known outside of astrophotography is that a DSLR’s deeply-inset sensor can be shadowed by the upraised mirror and sides of the mirror box. Less light falls on the edges of the sensor.
The vignetting effect is noticeable only when we boost the contrast to the high degree demanded by deep-sky images, and when shooting through fast telescope systems.
Here I show the vignetting of the Canon and Nikon when shooting through my 92mm refractor at f/4.5.
The circular corner vignetting visible in the images below is from the field flattener/reducer I employed on the telescope. It can be compensated for by using Lens Correction in Adobe Camera Raw, or eliminated by taking flat fields.
Demonstrating the level of vignetting and mirror-box shadowing with the Canon 6D on a TMB 92mm apo refractor with a 0.85x field flattener/reducer lens
Demonstrating the level of vignetting and mirror-box shadowing with the Nikon D750 on a TMB 92mm apo refractor with a 0.85x field flattener/reducer lens
The dark edge at the bottom of the frame is from shadowing by the upraised mirror. It can be eliminated only by taking flat fields, or reduced by using masked brightness adjustments in processing.
Both cameras showed similar levels of vignetting, with the Canon perhaps having the slight edge.
TEST #4 — ISO Invariancy
So far the Nikon D750 and Canon 6D are coming up fairly equal in performance. But not here. This is where the Nikon outperforms the Canon by quite a wide margin.
Sony sensors (used in Sony cameras and also used by Nikon) have a reputation for being “ISO Invariant.”
What does that mean?
A typical Milky Way nightscape with the Nikon D750 and Sigma 24mm Art lens. With no Moon, shot at very high ISO of 6400 and wide aperture of f/1.4 to show image quality under these demanding shooting circumstances. Lens correction and basic development setttings applied.
A typical Milky Way nightscape with the Canon 6D and Canon 24mm L lens (original model). With no Moon, shot at very high ISO of 6400 and wide aperture of f/1.4 to show image quality under these demanding shooting circumstances. Lens correction and basic development setttings applied.
In the examples above, the correct exposure for the starlit scene was 15 seconds at f/1.4 at ISO 6400. See how the two cameras rendered the scene? Very similar, albeit with the Canon showing more noise and discoloration in the dark frame corners.
What if we shoot at the same 15 seconds at f/1.4 … but at ISO 3200, 1600, 800, and 400? These are now 1-, 2-, 3-, and 4-stops underexposed, respectively.
Then we boost the Exposure setting of the underexposed Raw files later in processing, by 1, 2, 3 or 4 f-stops. What do we see?
Nikon D750 – Comparing ISO Invariancy from ISO 6400 to 400 (Nightscape)
With the Nikon (above) we see images that look nearly identical for noise to what we got with the properly exposed ISO 6400 original. It really didn’t matter what ISO speed the image was shot at – we can turn it into any ISO we want later with little penalty.
Canon 6D – Comparing ISO Invariancy from ISO 6400 to 400 (Nightscape)
With the Canon (above) we get images with grossly worse noise in the shadows and with ugly magenta discoloration. Canons cannot be underexposed. You must use as high an ISO as needed for the correct exposure.
This “ISO Invariant” advantage of Nikon over Canon is especially noticeable in nightscapes scenes lit only by starlight, as above. The Canon turns ugly purple at -3EV underexposure, and loses all detail and contrast at -4EV underexposure.
For nightscape imaging this is an important consideration. We are limited in exposure time and aperture, and so are often working at the ragged edge of exposure. Dark areas of a scene are often underexposed and prone to noise. With the Nikon D750 these areas may still look noisy, but not much more so than they would be at that ISO speed.
With the Canon 6D, underexpose the shadows and you pay the price of increased noise and discoloration when you try to recover details in the shadows.
Apparently, the difference comes from where the manufacturer places the analog-to-digital circuitry: on the sensor (ISO invariant) or outboard on a separate circuit (ISO variant), and thus where in the signal path the amplification occurs when we boost ISO speed.
TEST #6 — Features
One could go on endlessly about features, but here I compare the two cameras on just a few key operating features very important to astrophotographers.
Intervalometer:
The Canon 6D has none, though newer Canons do. The Nikon D750, as do many Nikons, has a built-in intervalometer (shown above), even with a deflickering “Exposure Smoothing” option. However, exposure time is limited to the camera’s maximum of 30 seconds. Any longer requires an outboard intervalometer, as with the Canon.
If you use your camera with any motion control time-lapse unit, then it becomes the intervalometer, negating any capability built into the camera. But it’s nice to have.
Small Advantage: Nikon
Interval Length:
REVISED JUNE 2020:
When taking time-lapse or star trail images with the Canon I can set an interval as short as 1 second between frames, for a minimum of gaps or jumps in the stars. With the Nikon, controlled internally by its built-in intervalometer, a 1-second interval is possible but only if you set the interval to 33 seconds for a 30-second shutter speed.
That’s true of Canon and Sony built-in intervalometers as well, because on all cameras setting the exposure to 30 seconds really gives you a 32-second exposure. A little known fact! So the interval between shutter firings has to be set to 33 seconds. It’s tricky.
Advantage: None to either
Tiltable LCD Screen:
The Canon 6D has none. The Nikon D750 has a very useful tilt-out screen as shown above. This is hugely convenient for all forms of astrophotography. Only cropped-frame Canons have tilt-out screens. This feature might add weight, but it’s worth it!
Big Advantage: Nikon
Dark Frame Buffer:
The Nikon has none. With Long Exposure Noise Reduction ON, the Canon 6D allows up to four exposures to be shot in quick succession before the dark frame kicks in and locks up the camera. (Put the camera into Raw+JPG.)
[JUNE 2020: With the Canon 6D MkII the buffer allows three frames to be taken in quick succession.]
This is very useful for deep-sky imaging, for acquiring a set of images for stacking that have each had a dark frame subtracted in-camera, with a minimum of “down-time” at the camera.
Big Advantage: Canon
Live View Screen Brightness:
As pointed out to me by colleague Christoph Malin, with the Nikon you cannot dim the screen when in Live View mode and with Exposure Simulation ON. So it can be too bright at night. With the Canon you can dim the Live View screen — the LCD Brightness control affects the screen both during Live View as well as during playback of images.
Small Advantage: Canon
Software Compatibility:
Canon EOS cameras are well supported by advanced software, such as GBTimelapse (above) that controls only Canons, not Nikons, in complex time-lapse sequences, and Nebulosity, popular among deep-sky imagers for DSLR control.
Small Advantage: Canon
My take-away conclusions:
• Nikon DSLRs now are just as good for astrophotography as Canons, though that wasn’t always the case – early models did suffer from more noise and image artifacts than their Canon counterparts.
• Canon DSLRs, due to their sensor design, are more prone to exhibiting noise and image artifacts when images are greatly underexposed then boosted later in processing. Just don’t underexpose them – good advice for any camera.
It’s Perseid meteor shower time. Here are tips for seeing and shooting the meteors.
What are the Perseids?
They are an annual meteor shower, perhaps the most widely observed of the year, that peak every year about August 12. They are caused by Earth passing through a dust stream left by Comet Swift-Tuttle, last seen near Earth in 1992.
Each “shooting star” is really a bit of comet dust burning up in our atmosphere as it ploughs into us at 200,000 kilometres an hour. They don’t stand a chance of surviving – and none do.
All Perseid particles burn up. None reach Earth.
Perseid meteor caught night of August 12-13 2009 from Cypress Hills Prov Park in Saskatchewan at the annual Saskatchewan Summer Star Party. One frame of 250 shot as part of a time-lapse movie. Taken with Canon 5D MkII and 24mm lens at f/2.5 for 30s at ISO1600.
When are the Perseids?
The peak night of the Perseids this year is the night of Wednesday, August 12 into the early morning hours of August 13, with the peak hour occurring about midnight Mountain Daylight Time or 2 a.m. on the 13th for Eastern Daylight Time.
For North America, this is ideal timing for a good show this year. However, a good number of meteors will be visible the night before and night after peak night.
Even better, the Moon is near New and so won’t interfere with the viewing by lighting up the sky.
In all, except for the mid-week timing, conditions this year in 2015 couldn’t be better!
Perseid meteor caught night of August 12-13 2009 from Cypress Hills Prov Park in Saskatchewan at the annual Saskatchewan Summer Star Party. One frame of 260 shot as part of a time-lapse movie. Taken with Canon 20Da and 15mm lens at f/2.8 for 45s at ISO1600.
What do they look like?
Any meteor looks like a brief streak of light shooting across the sky. The brightest will outshine the brightest stars and are sure to evoke a “wow!” reaction.
However, the spectacular Perseids are the least frequent. From a dark site, expect to see about 40 to 80 meteors in an hour of patient and observant watching, but of those, only a handful – perhaps only 1 or 2 – will be “wow!” meteors.
A pair of Perseid meteors shoot at left in the late night sky at the Upper Bankhead parking lot in Banff National Park. The waning crescent Moon is just rising above the trees. Taken the night of Saturday, August 11 into the wee hours of Sunday, August 12, 2012 with the Canon 7D and 10-22mm Canon lens. This is a stack of two exposures, one for each meteor, each for 60 seconds at ISO 1250 and f/4.
Where do I look?
All the meteors will appear to radiate from a point in the constellation of Perseus in the northeastern sky in the early hours of the night, climbing to high overhead by dawn.
So you can face that direction if you wish, but Perseids can appear anywhere in the sky, with the longest meteor trails often opposite the radiant point, over in the southwest.
Shows unusual Perseid meteor varying in brightness? Or is this a satellite that mimics Perseid for position (it comes right out of the radiant point). Taken at Saskatchewan Star Party, August 14, 2010, using Canon 5D MkII and 15mm lens.
How do I look?
Simple – just lie back on a comfy lawn chair or patch of grass and look up!
But … you need to be at a dark location away from city lights to see the most meteors. You’ll see very little in a city or light-polluted suburbs.
Head to a site as far from city lights as you can, to wherever you’ll be safe and comfortable.
How do I take pictures?
To stand any chance of capturing these brief meteors you’ll need a good low-noise camera (a DSLR or Compact System Camera) with a fast (f/2.8 or faster) wide-angle lens (10mm to 24mm).
Sorry, keep your point-and-shoot camera and phone camera tucked away in your pocket – they won’t work.
Set up you camera on a tripod, open the lens to f/2.8 (wide open perhaps) and the ISO to 800 to 3200) and take a test exposure of 20 to 40 seconds. You want a well-exposed image but not over-exposed so the sky is washed out.
Set your exposure time accordingly – most cameras allow a maximum exposure of 30 seconds. Exposures longer than 30 seconds require a separate intervalometer to set the exposure, with the camera set on Bulb (B).
Take lots of pictures!
To up your chances of catching a meteor, you need to set the camera to shoot lots of frames in rapid succession.
Use an intervalometer to take shots one after the other with as little time between as possible – because that’s when a meteor will appear!
Barring an intervalometer, if you have standard switch remote control, set the camera on High Speed Continuous, and the shutter speed to 30 seconds, then lock the remote’s switch to ON to keep the camera firing. As soon as one exposure ends it’ll fire another.
Twin Perseids in this photo? Or are these satellites? Taken at SSSP, August 14, 2010, using Canon 5D MkII and 15mm lens.
What else do I need to know?
• Focus the lens carefully so the stars are sharp – the Live Focus mode helps for this. Focus on a bright star or distant light.
• Aim the camera to take in a wide swath of the sky but include a well-composed foreground for the most attractive shot.
• Aim northeast to capture meteors streaking away from the radiant. But you can aim the camera to any direction that lends itself to a good composition and still capture a meteor.
• To increase your chances, shoot with two or more cameras aimed to different areas of the sky. Meteors always appear where your camera isn’t aimed!
• Be patient! Despite shooting hundreds of frames only a handful will record a meteor, as only the brightest will show up.
Can I track the sky?
If you have a motorized equatorial mount or a dedicated sky tracking device (the iOptron Sky Tracker and Sky-Watcher Star Adventurer, each about $400, are popular), you can follow the stars while taking lots of shots. This avoids the stars trailing and allows you to use longer exposures.
The video above shows a Star Adventurer tracking the sky as it turns about its polar axis which is aimed up to a point near Polaris. Click the Enlarge and HD buttons to view the video properly.
Polar align the tracker, but then perhaps aim the camera to frame the summer Milky Way overhead. Take lots of 1- to 3-minute exposures, again at f/2.8 and ISO 800 to 1600. Some exposures will pick up meteors – with luck!
Tracking then stacking
Later, in processing, because the sky has remained fixed on the frame, it’s then possible to stack the images (using a “Lighten” blend mode on each image layer) so that the final composite frame contains more meteors, for an image with lots of meteors captured over an hour or more of shooting.
While it is possible to stack shots taken on a static tripod to produce such a meteor composite, doing so requires a lot of manual cutting, pasting and aligning of meteor images by hand. The result is a bit of a fake, though I’ve done it myself – the image at top is an example, though with only a trio of meteors.
50 embedded HD videos (no internet connection required) demonstrating time-lapse techniques.
60 multi-page tutorials with step-by-step instructions of how to use software: Adobe Bridge, Adobe Camera Raw, Photoshop, Lightroom, LRTimelapse, Advanced Stacker Actions, StarStaX, Panolapse, Sequence, GBTimelapse, and more.
Numerous Photo 101 sections explaining the basic concepts of photography and video production (f-stops, ISOs, file types, aspect ratios, frame rates, compression, etc.).
Numerous Astronomy 101 sections explaining the basics of how the sky works (how the sky moves, where the Moon can be found, when the Milky Way can be seen, when and where to see auroras).
Reviews of gear – I don’t just mention that specialized gear exists, I illustrate in detail how to use popular units such as the Time-Lapse+, Michron, and TriggerTrap intervalometers, and the All-View mount, Radian, Mindarin Astro, eMotimo, and Dynamic Perception motion-control units, with comments on what’s good – and not so good – to use.
You’ll learn —
• What are the best cameras and lenses to buy (cropped vs. full-frame, Canon vs. Nikon, manual vs. automatic lenses, zooms vs. primes).
• How to set your cameras and lenses for maximum detail and minimum noise (following the mantra of “exposing to the right” and using dark frames).
• How to shoot auroras, conjunctions, satellites, comets, and meteor showers.
• How to shoot nightscapes lit only by moonlit, and how to determine where the Moon will be to plan a shoot.
• How to shoot & stitch panoramas of the night sky and Milky Way, using Photoshop and PTGui software.
• How to shoot tracked long exposures of the Milky Way using camera trackers such as the iOptron Star Tracker and Sky-Watcher Star Adventurer.
• How to develop Raw files, the essential first step to great images and movies.
• How to process nightscape stills using techniques such as compositing multiple exposures, masking ground and sky, and using non-destructive adjustment layers and smart filters.
• How to shoot and stack star trail images made of hundreds of frames.
• How to assemble time-lapse movies from those same hundreds of frames.
• How to plan a time-lapse shoot and calculate the best balance of exposure time vs. frame count vs. length of shoot, and recommended apps to use.
• How to process hundreds of frames using Adobe Camera Raw, Bridge, Photoshop, and Lightroom.
• How to shoot and process advanced “Holy Grail” time-lapse transitions from day to night.
• How to shoot motion-control sequences using specialized dolly and pan/tilt devices.
• How to use time-lapse processing tools such as LRTimelapse, Panolapse, Sequence, and Advanced Stacker Actions.
• What can go wrong and how best to avoid problems in the field.
It’s a large, multi-media book available only for MacOS and iPads through the Apple iBookstore.
For technical and economic reasons, the book’s size and media content prevent it from being offered via other platforms such as Kindles and Android devices. It is not available as a static PDF or traditional print book. It’s subject makes use of an ebook’s ability to contain interactive and video content.
See http://tiny.cc/urdoqx for more about the book at iTunes. Available worldwide. It’s $24.95 in the U.S.

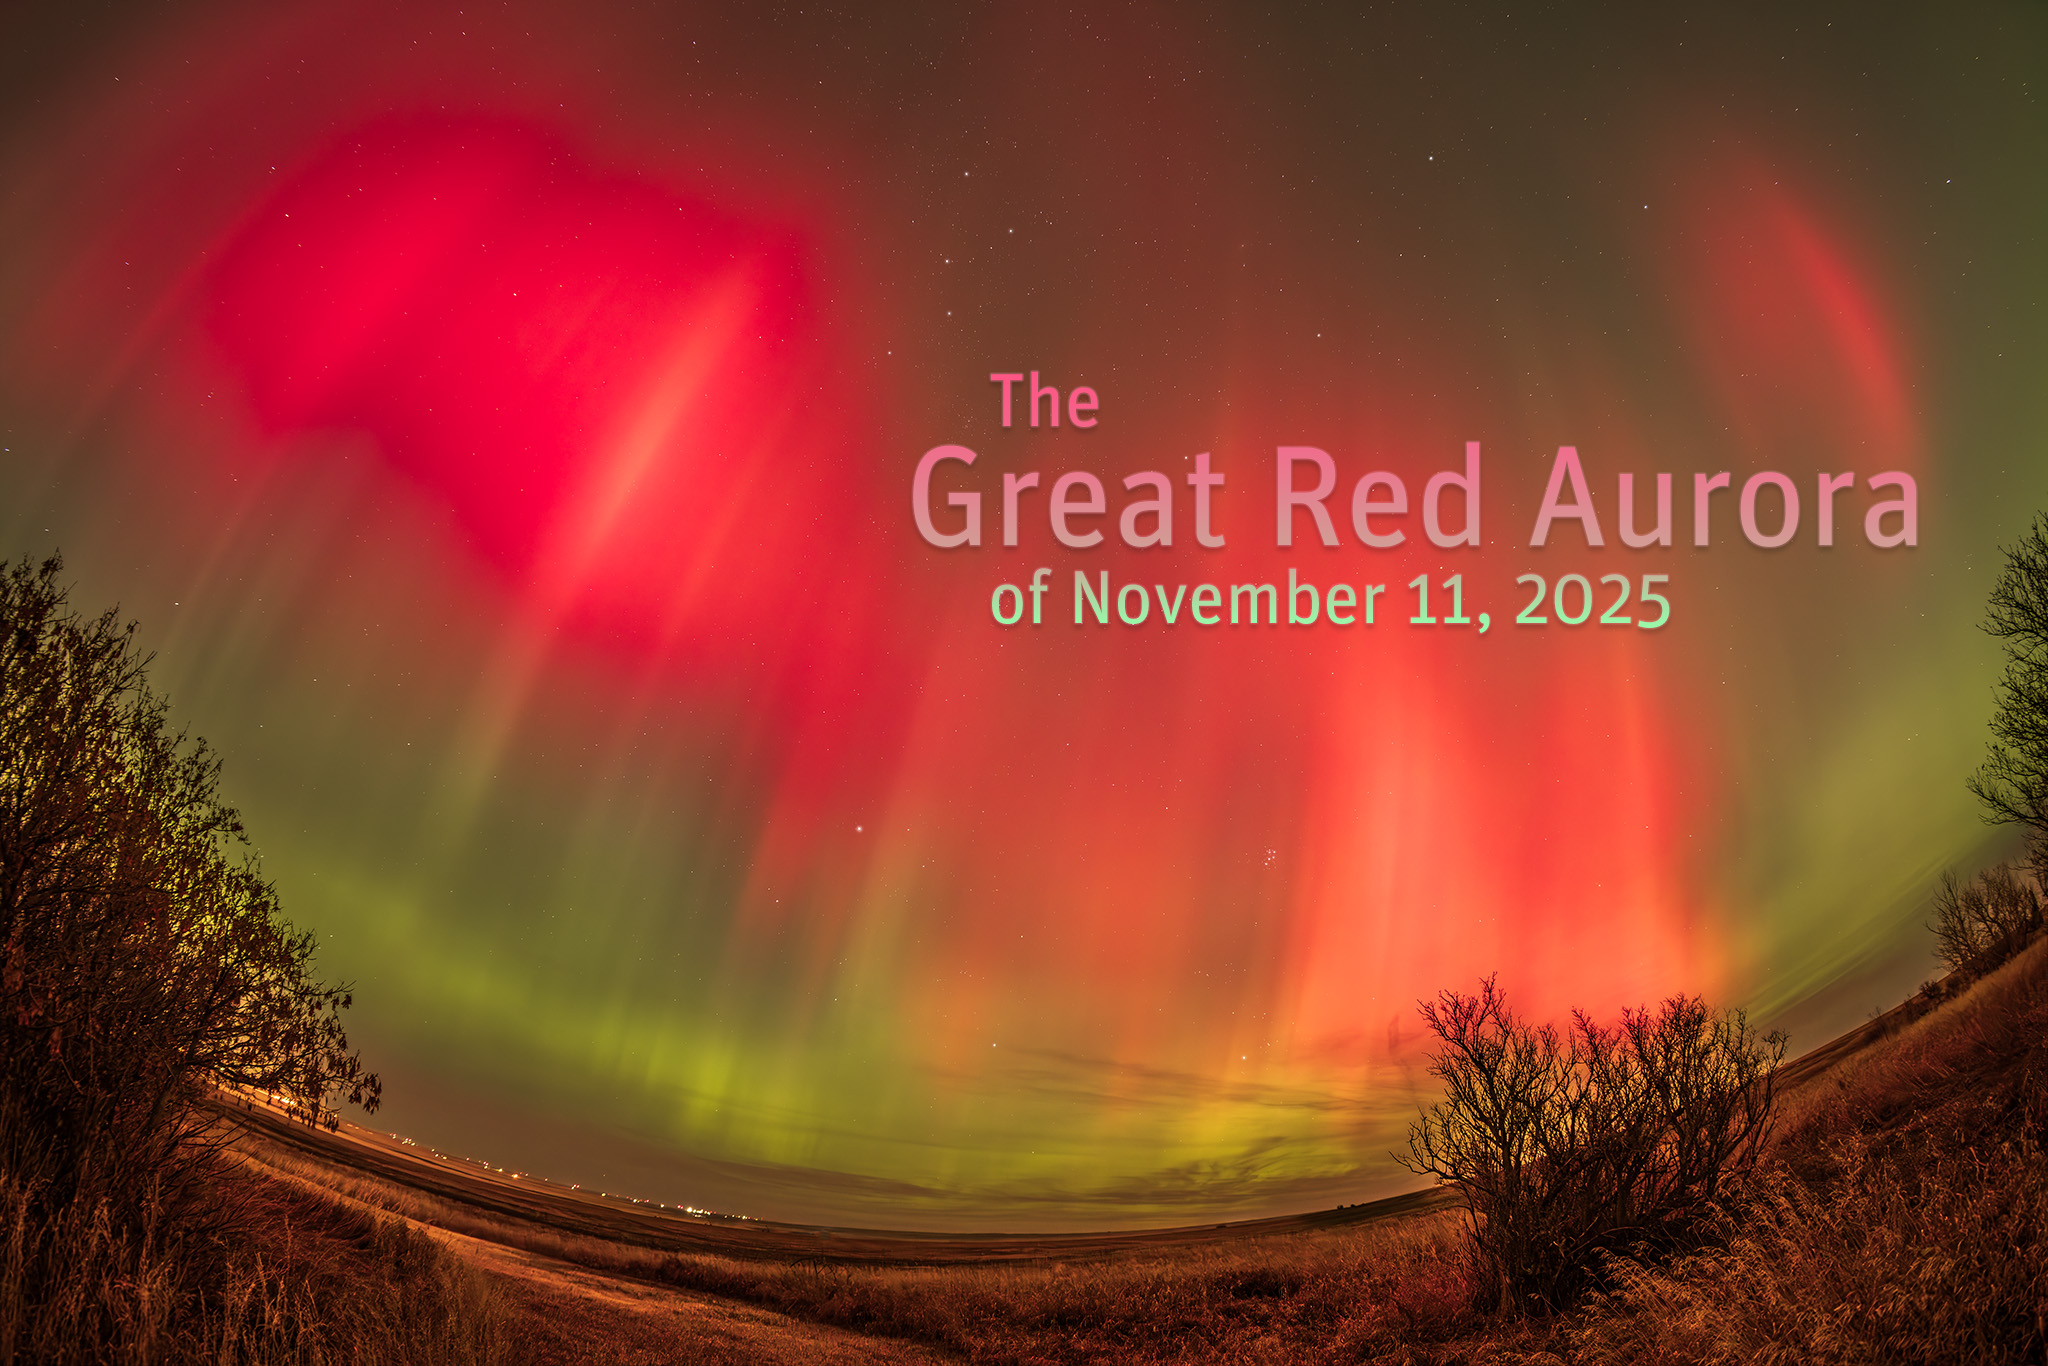
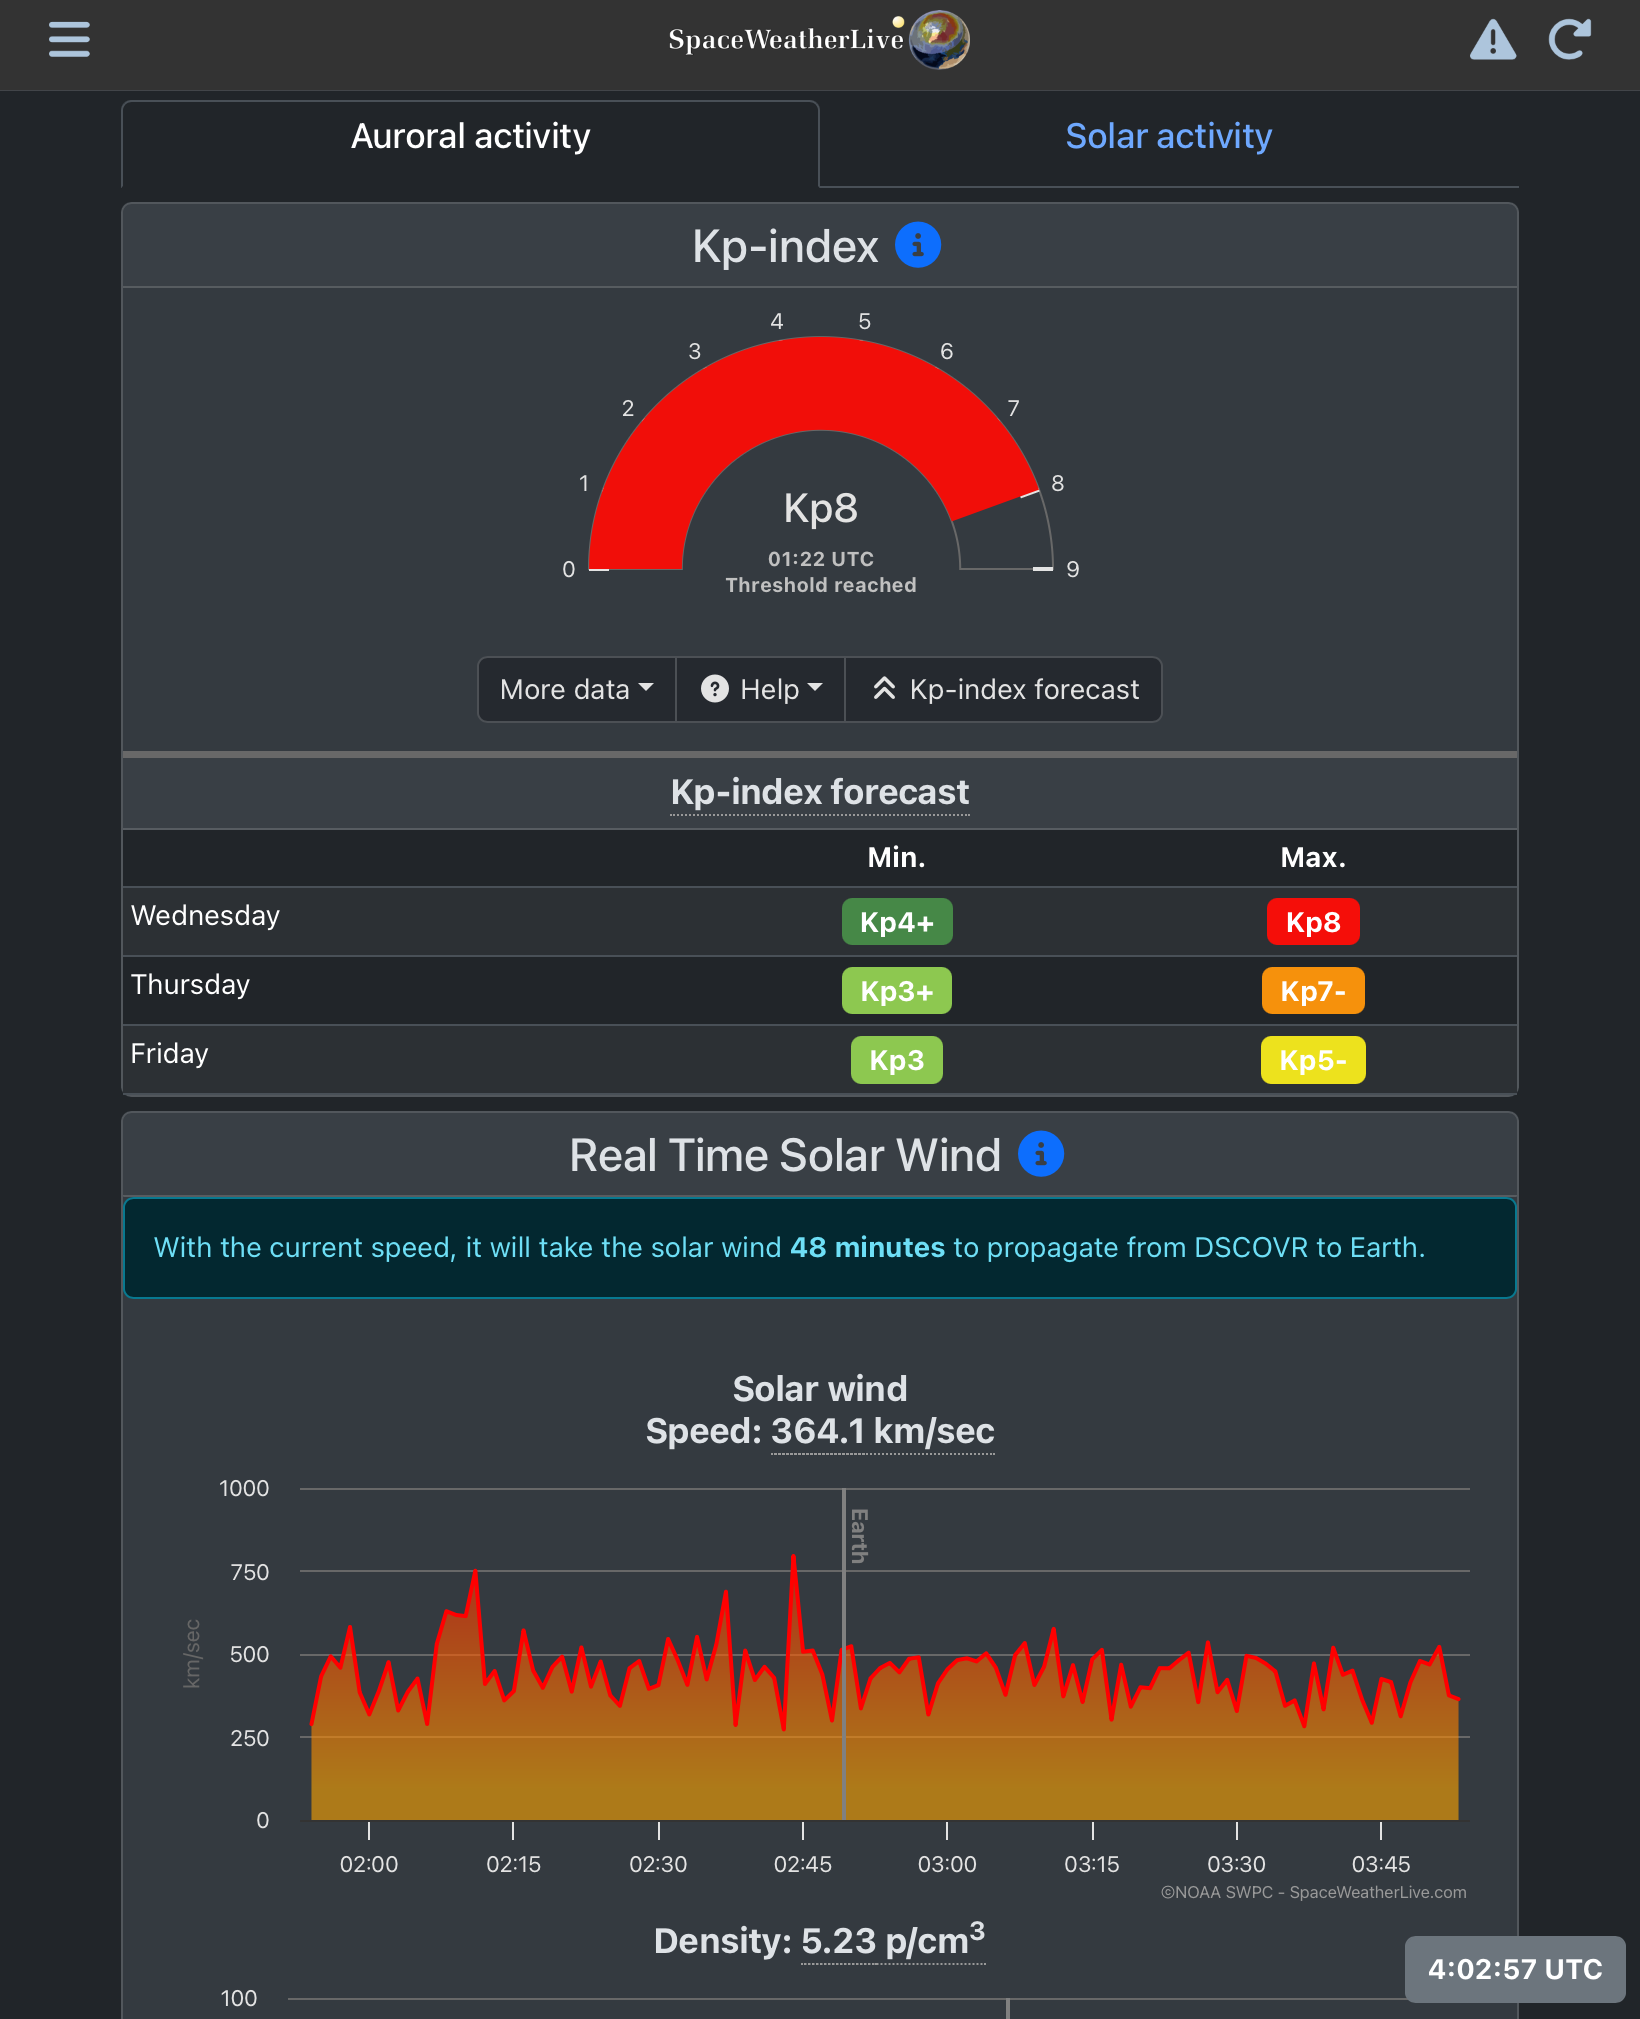
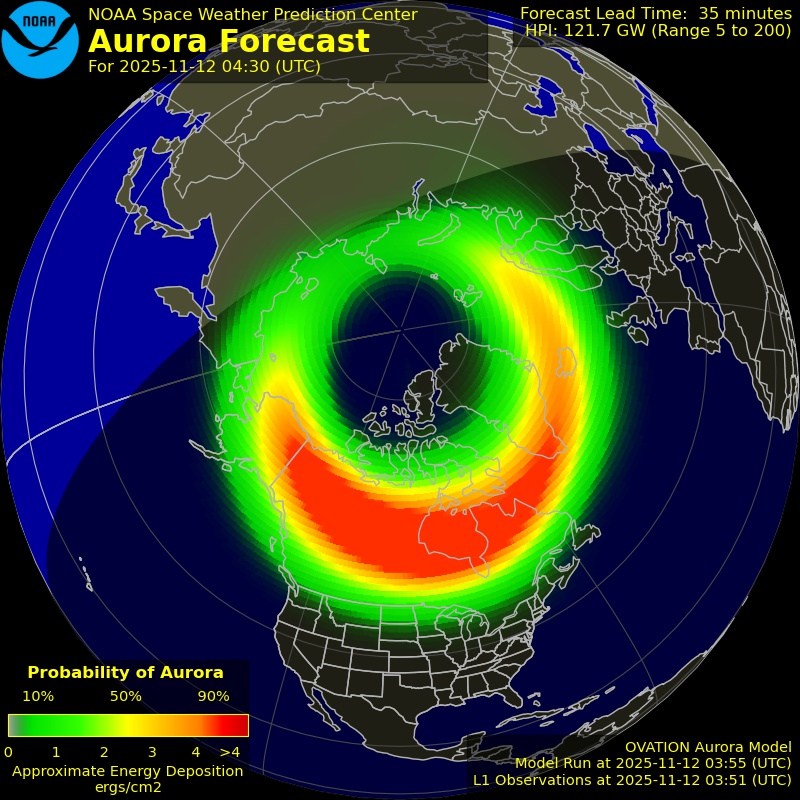
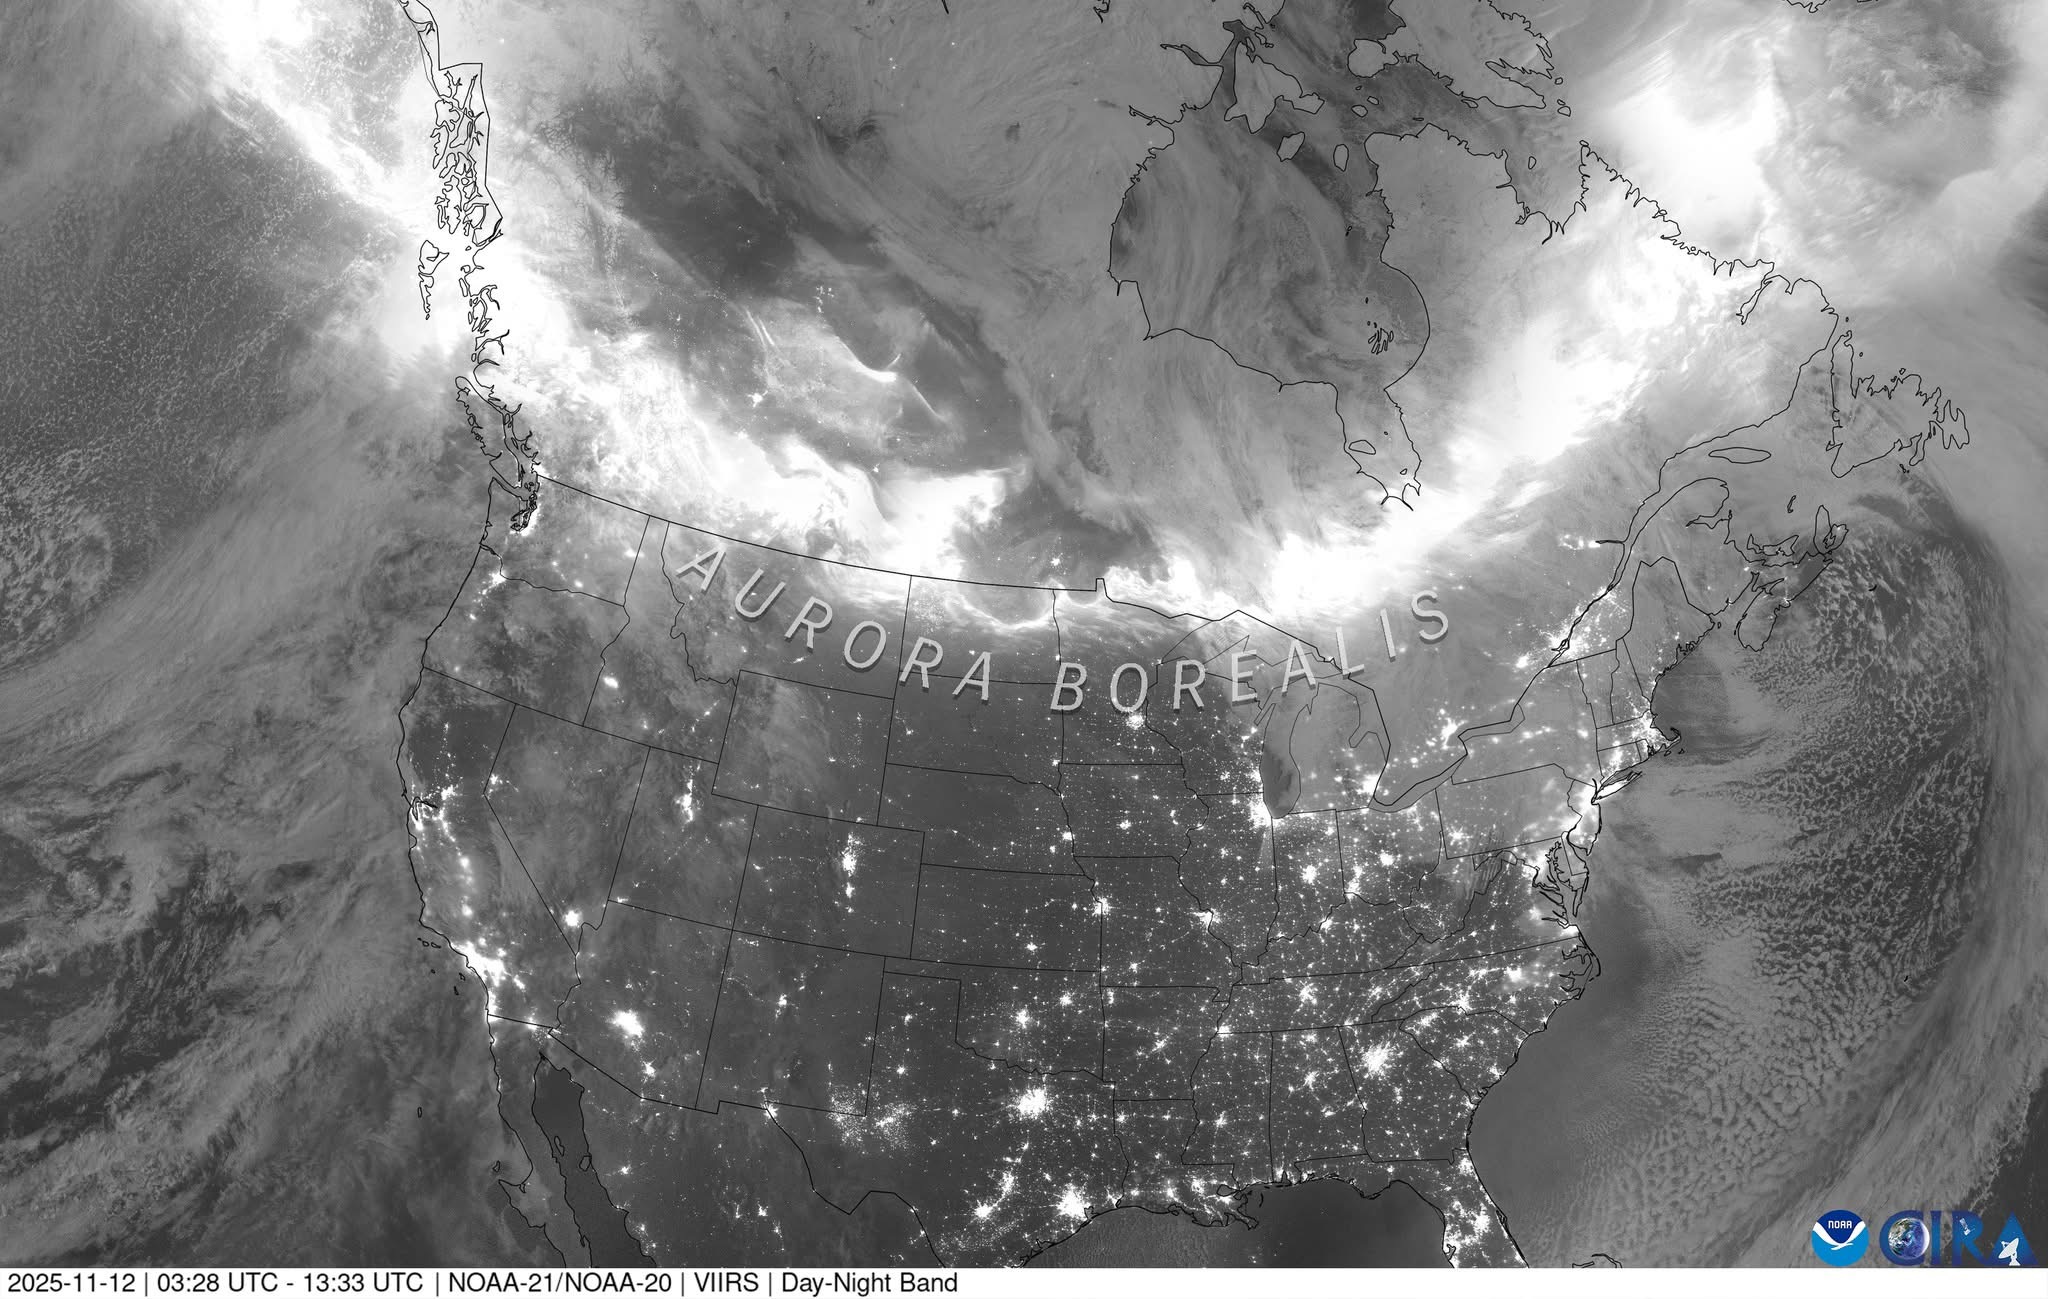

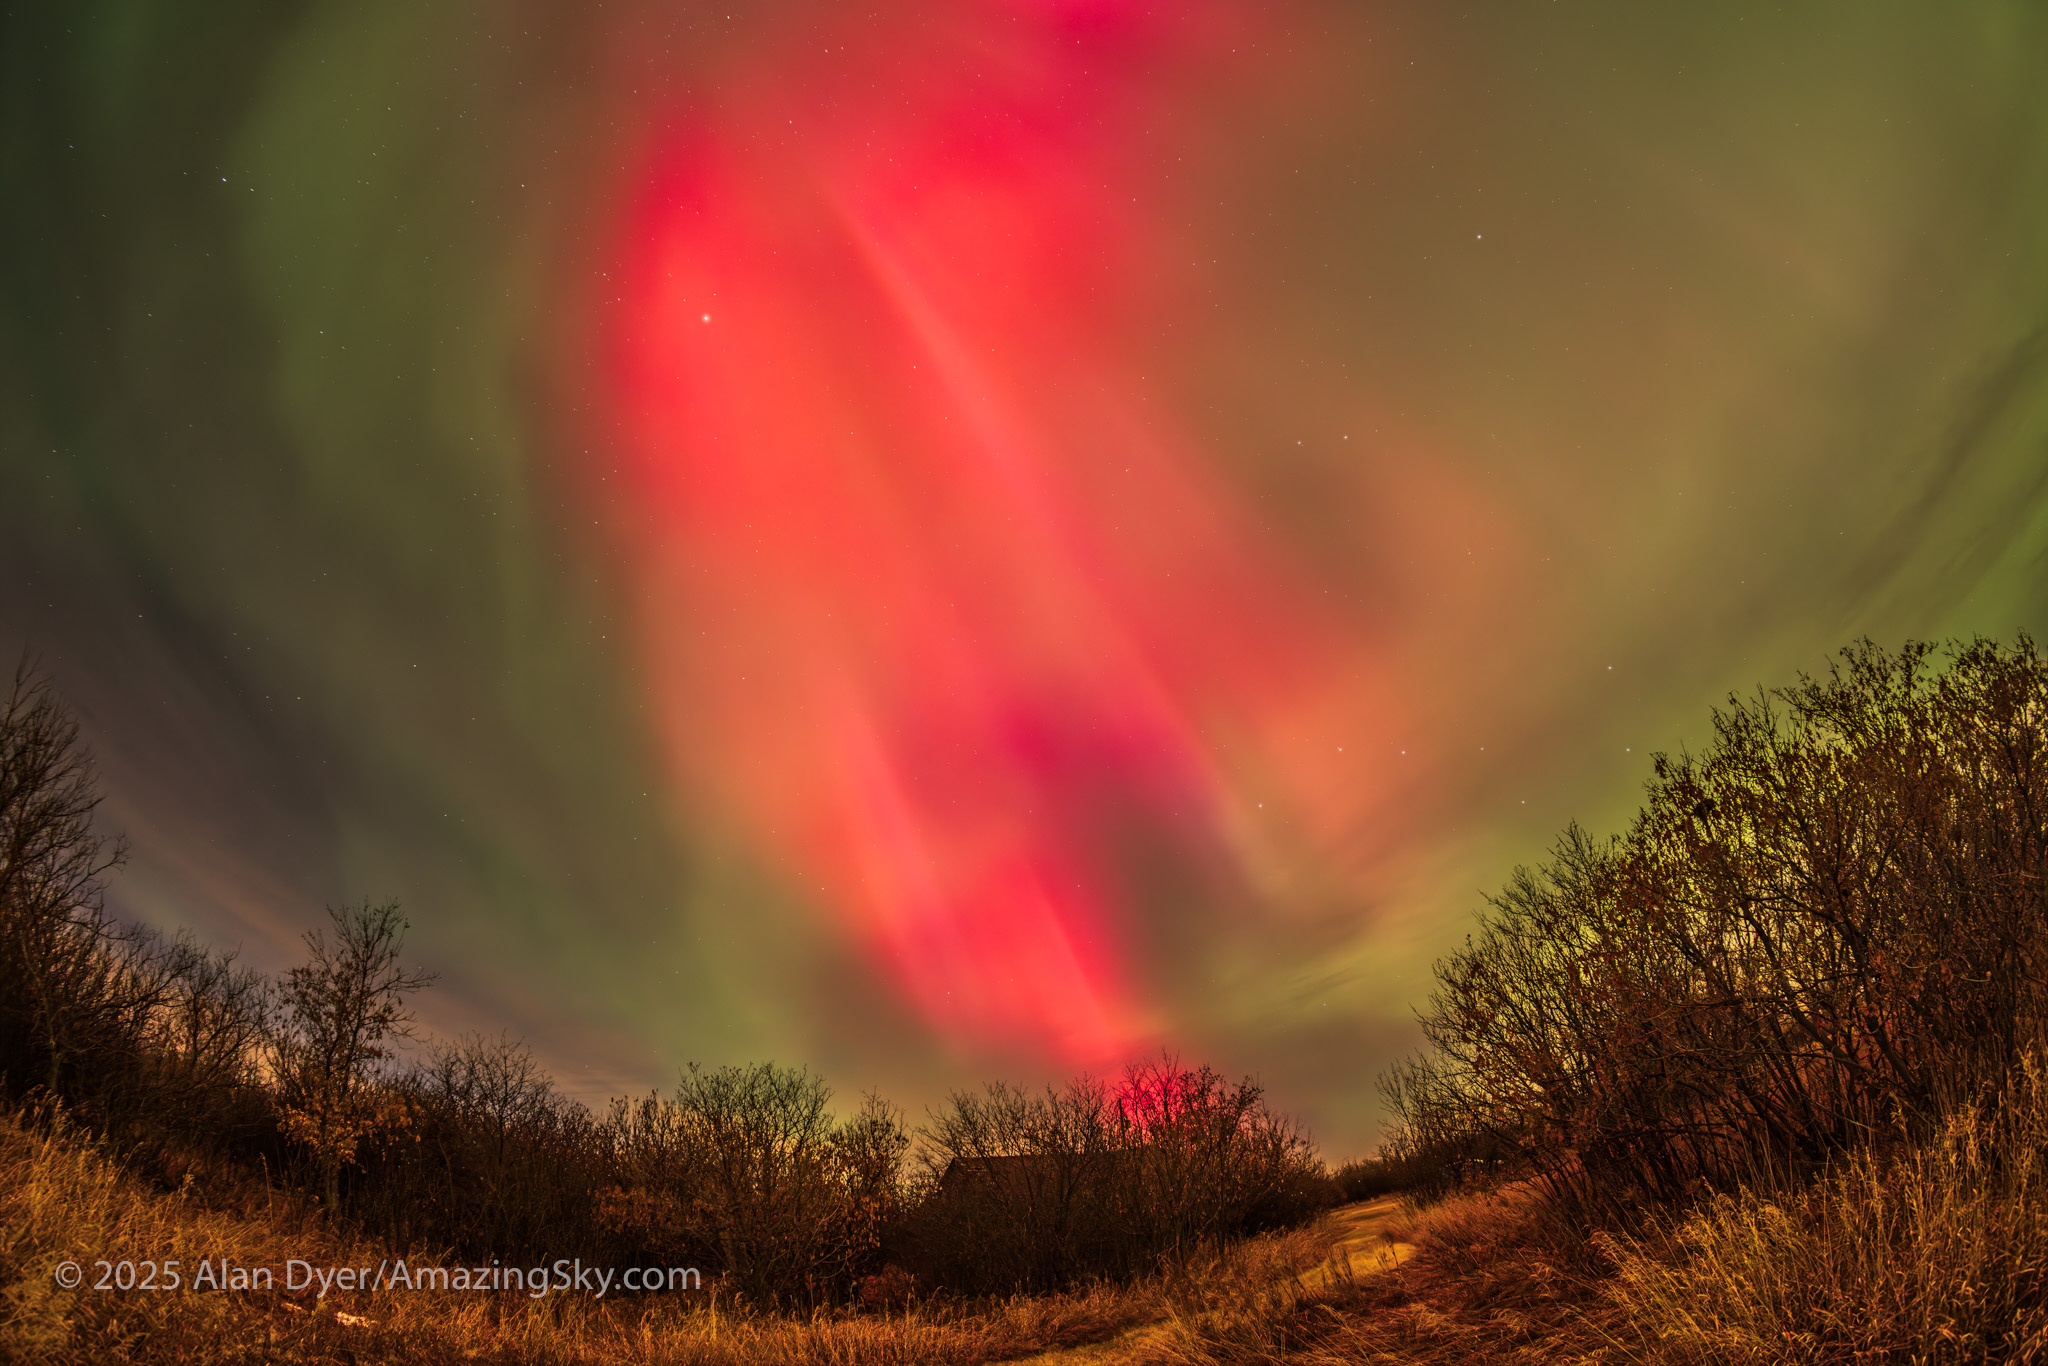
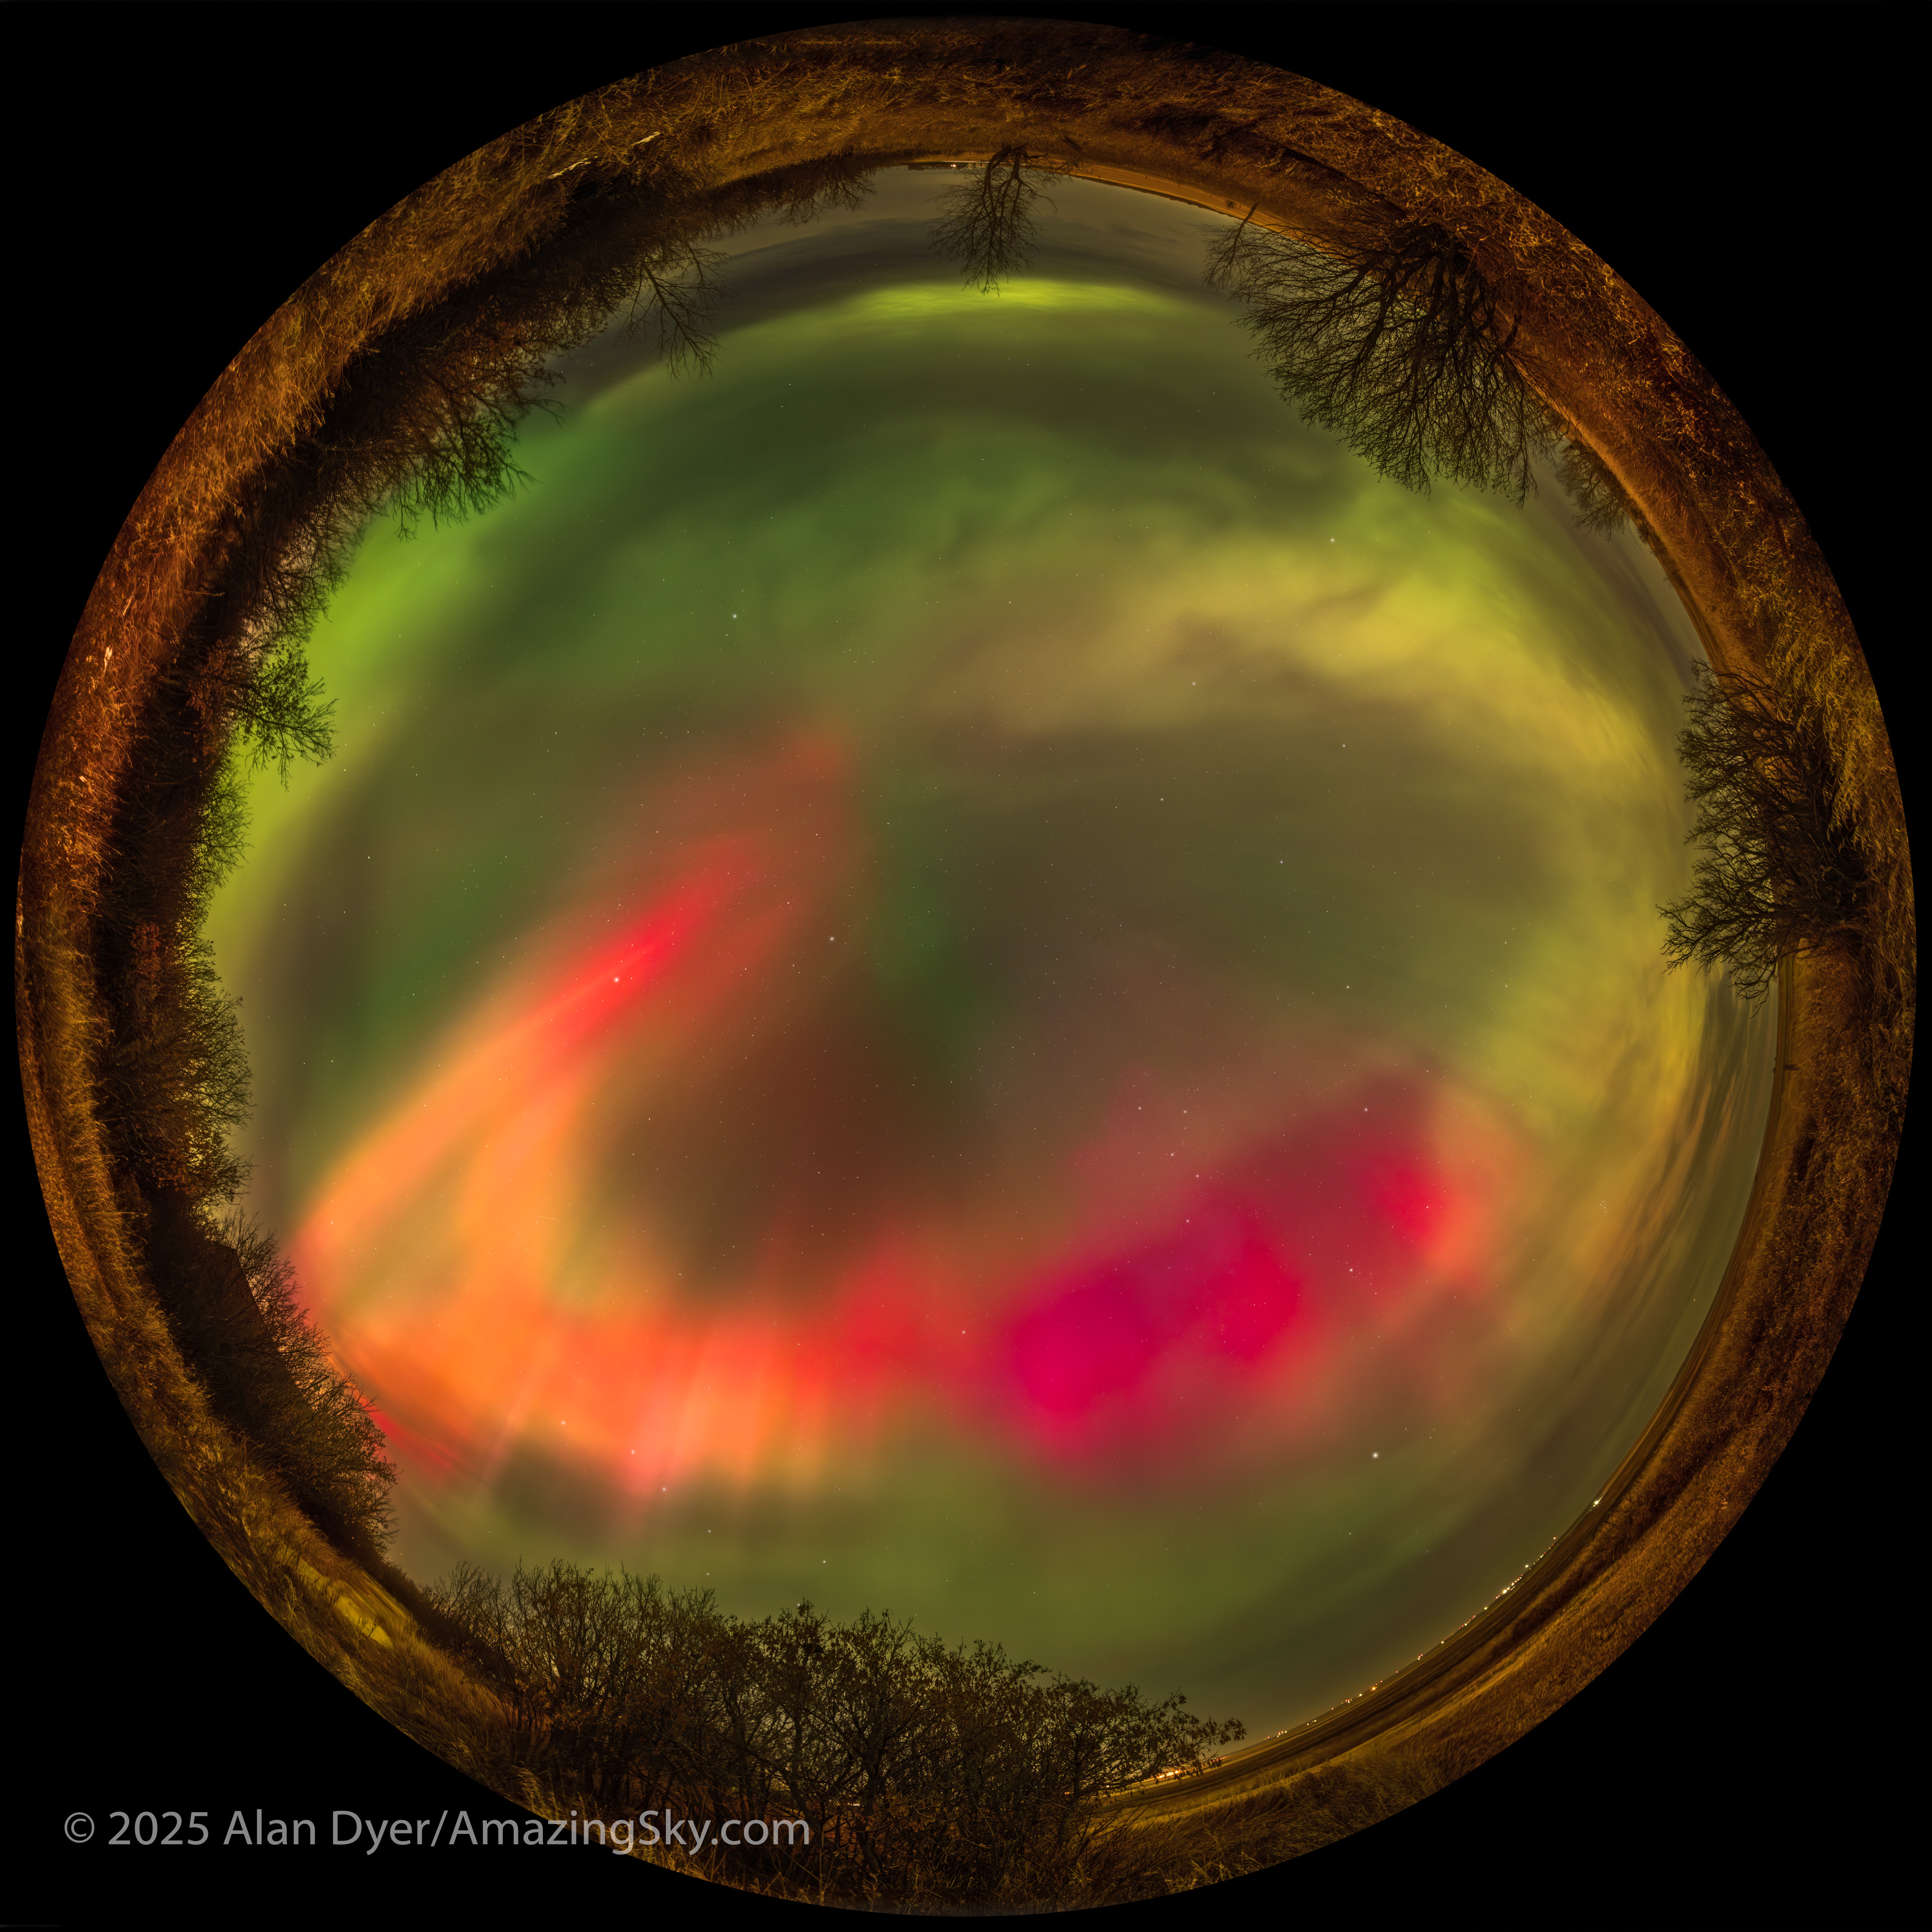
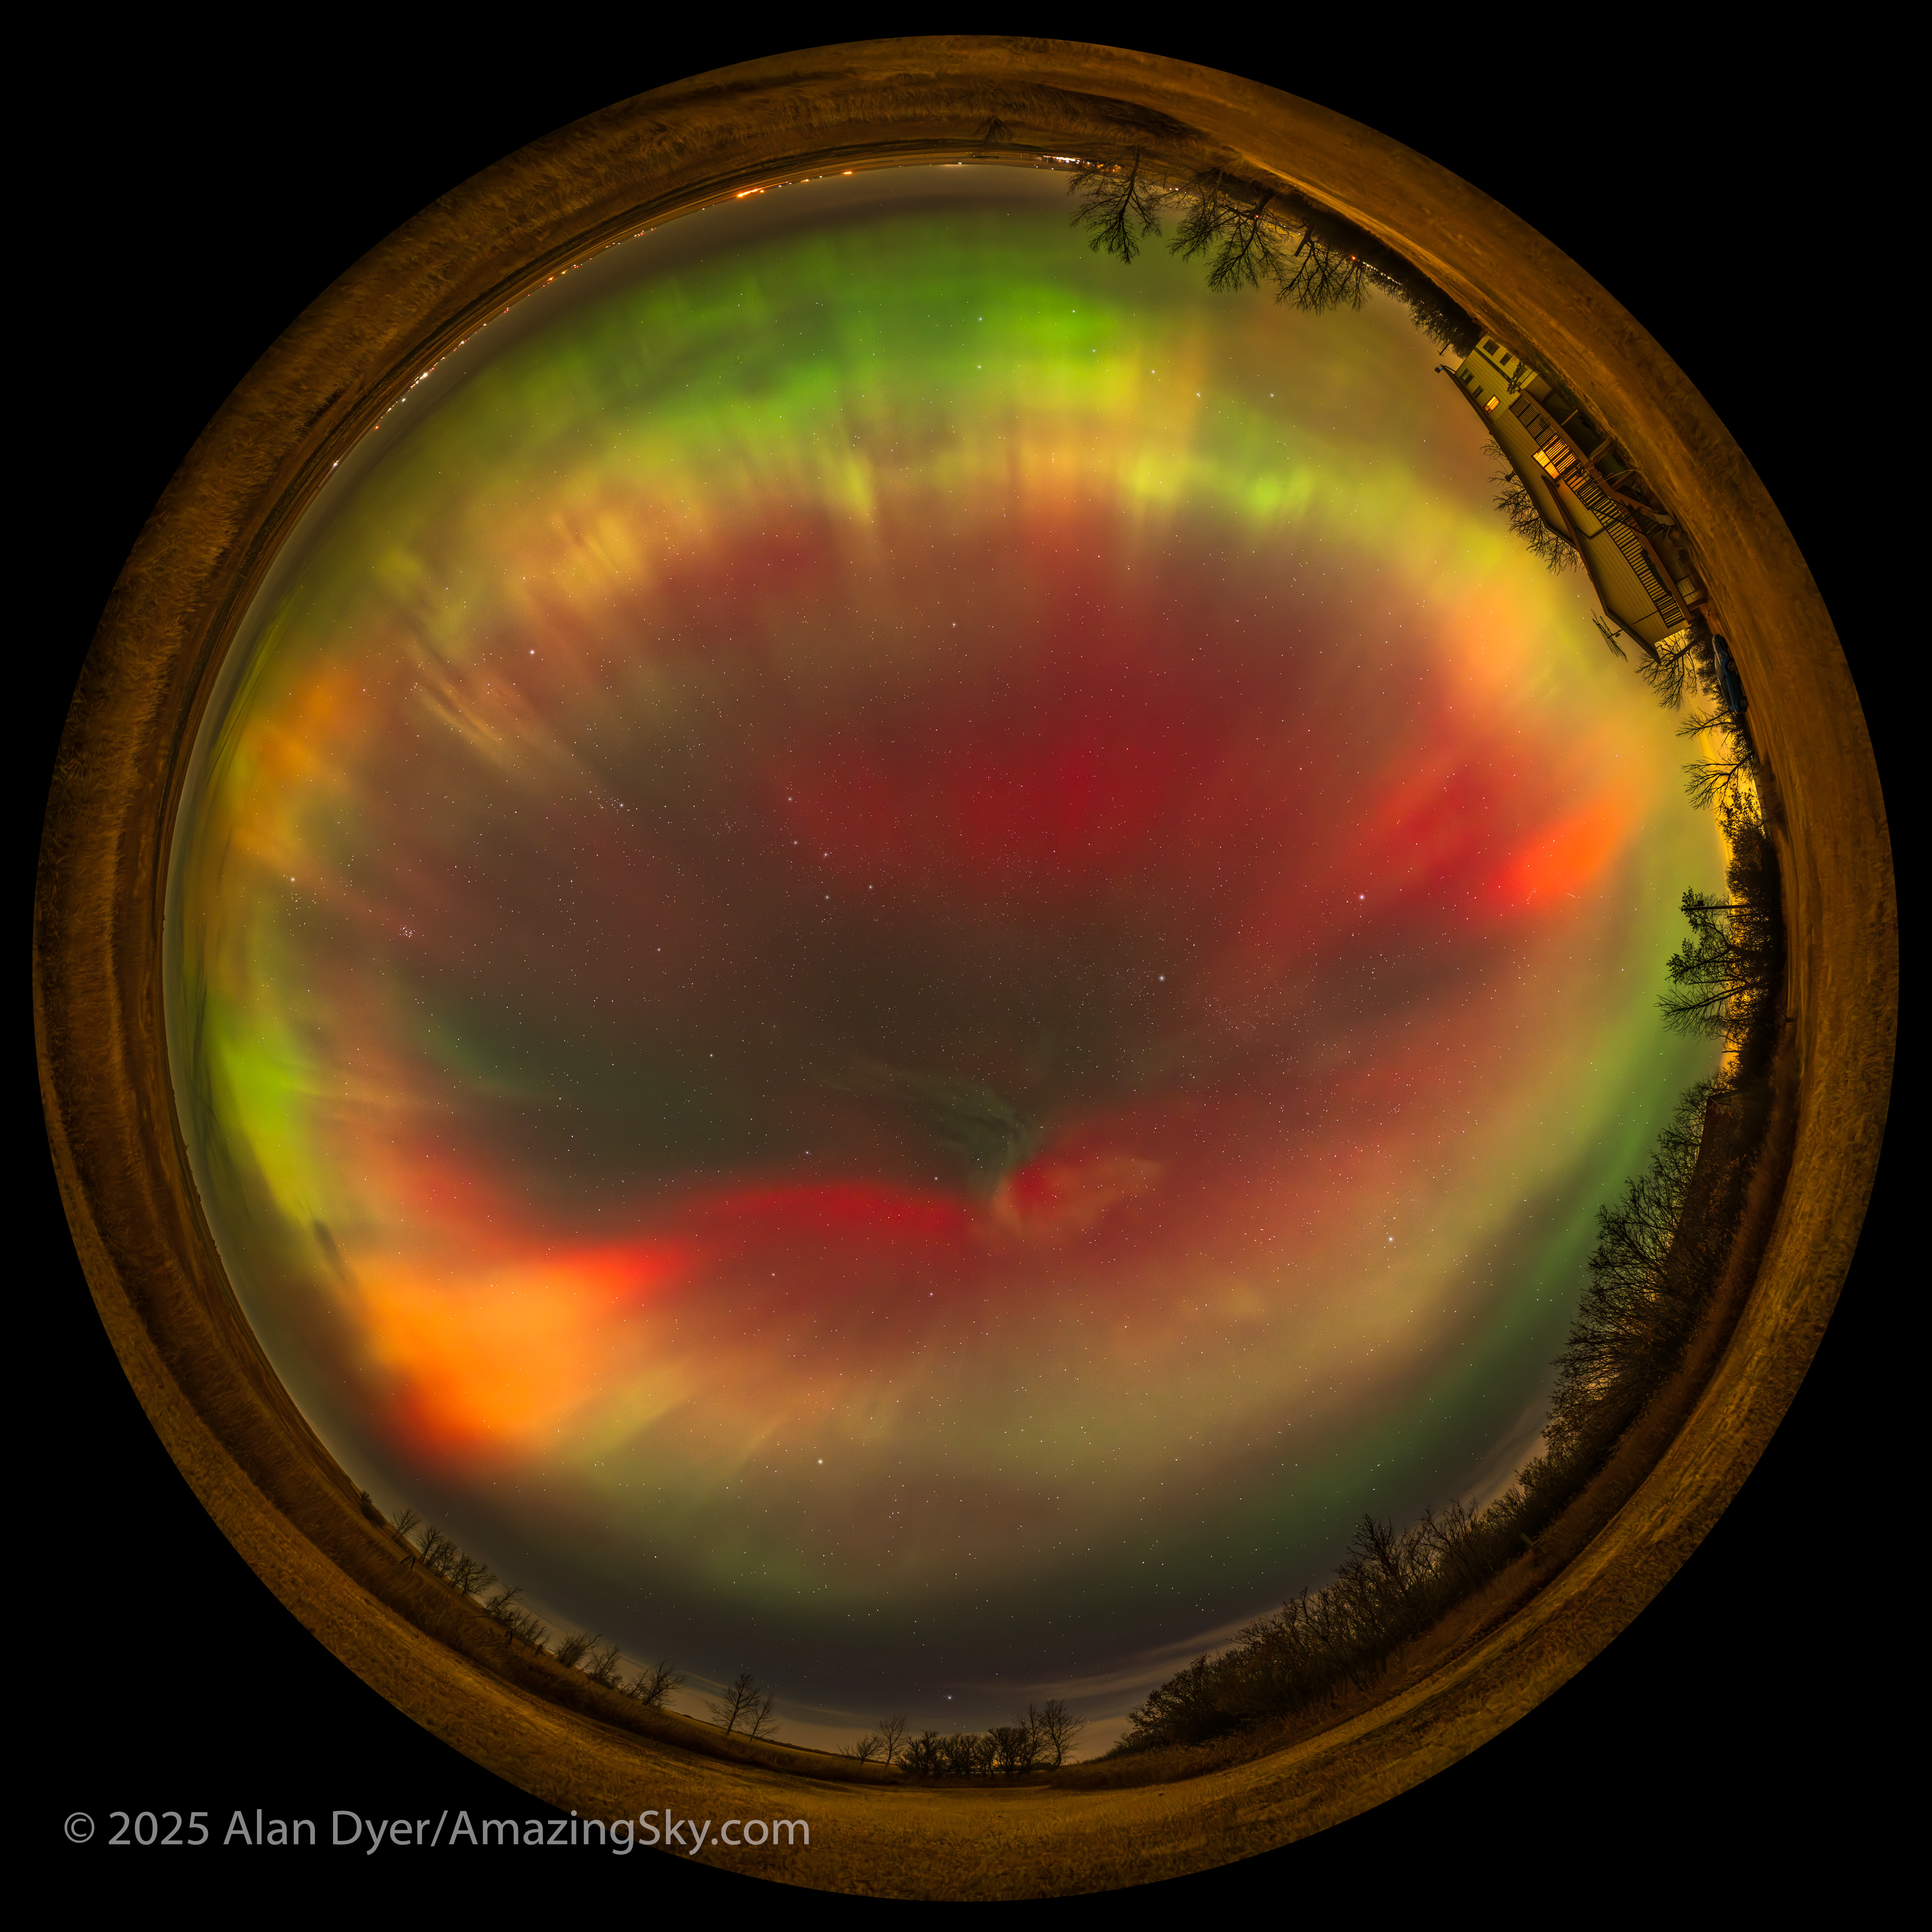
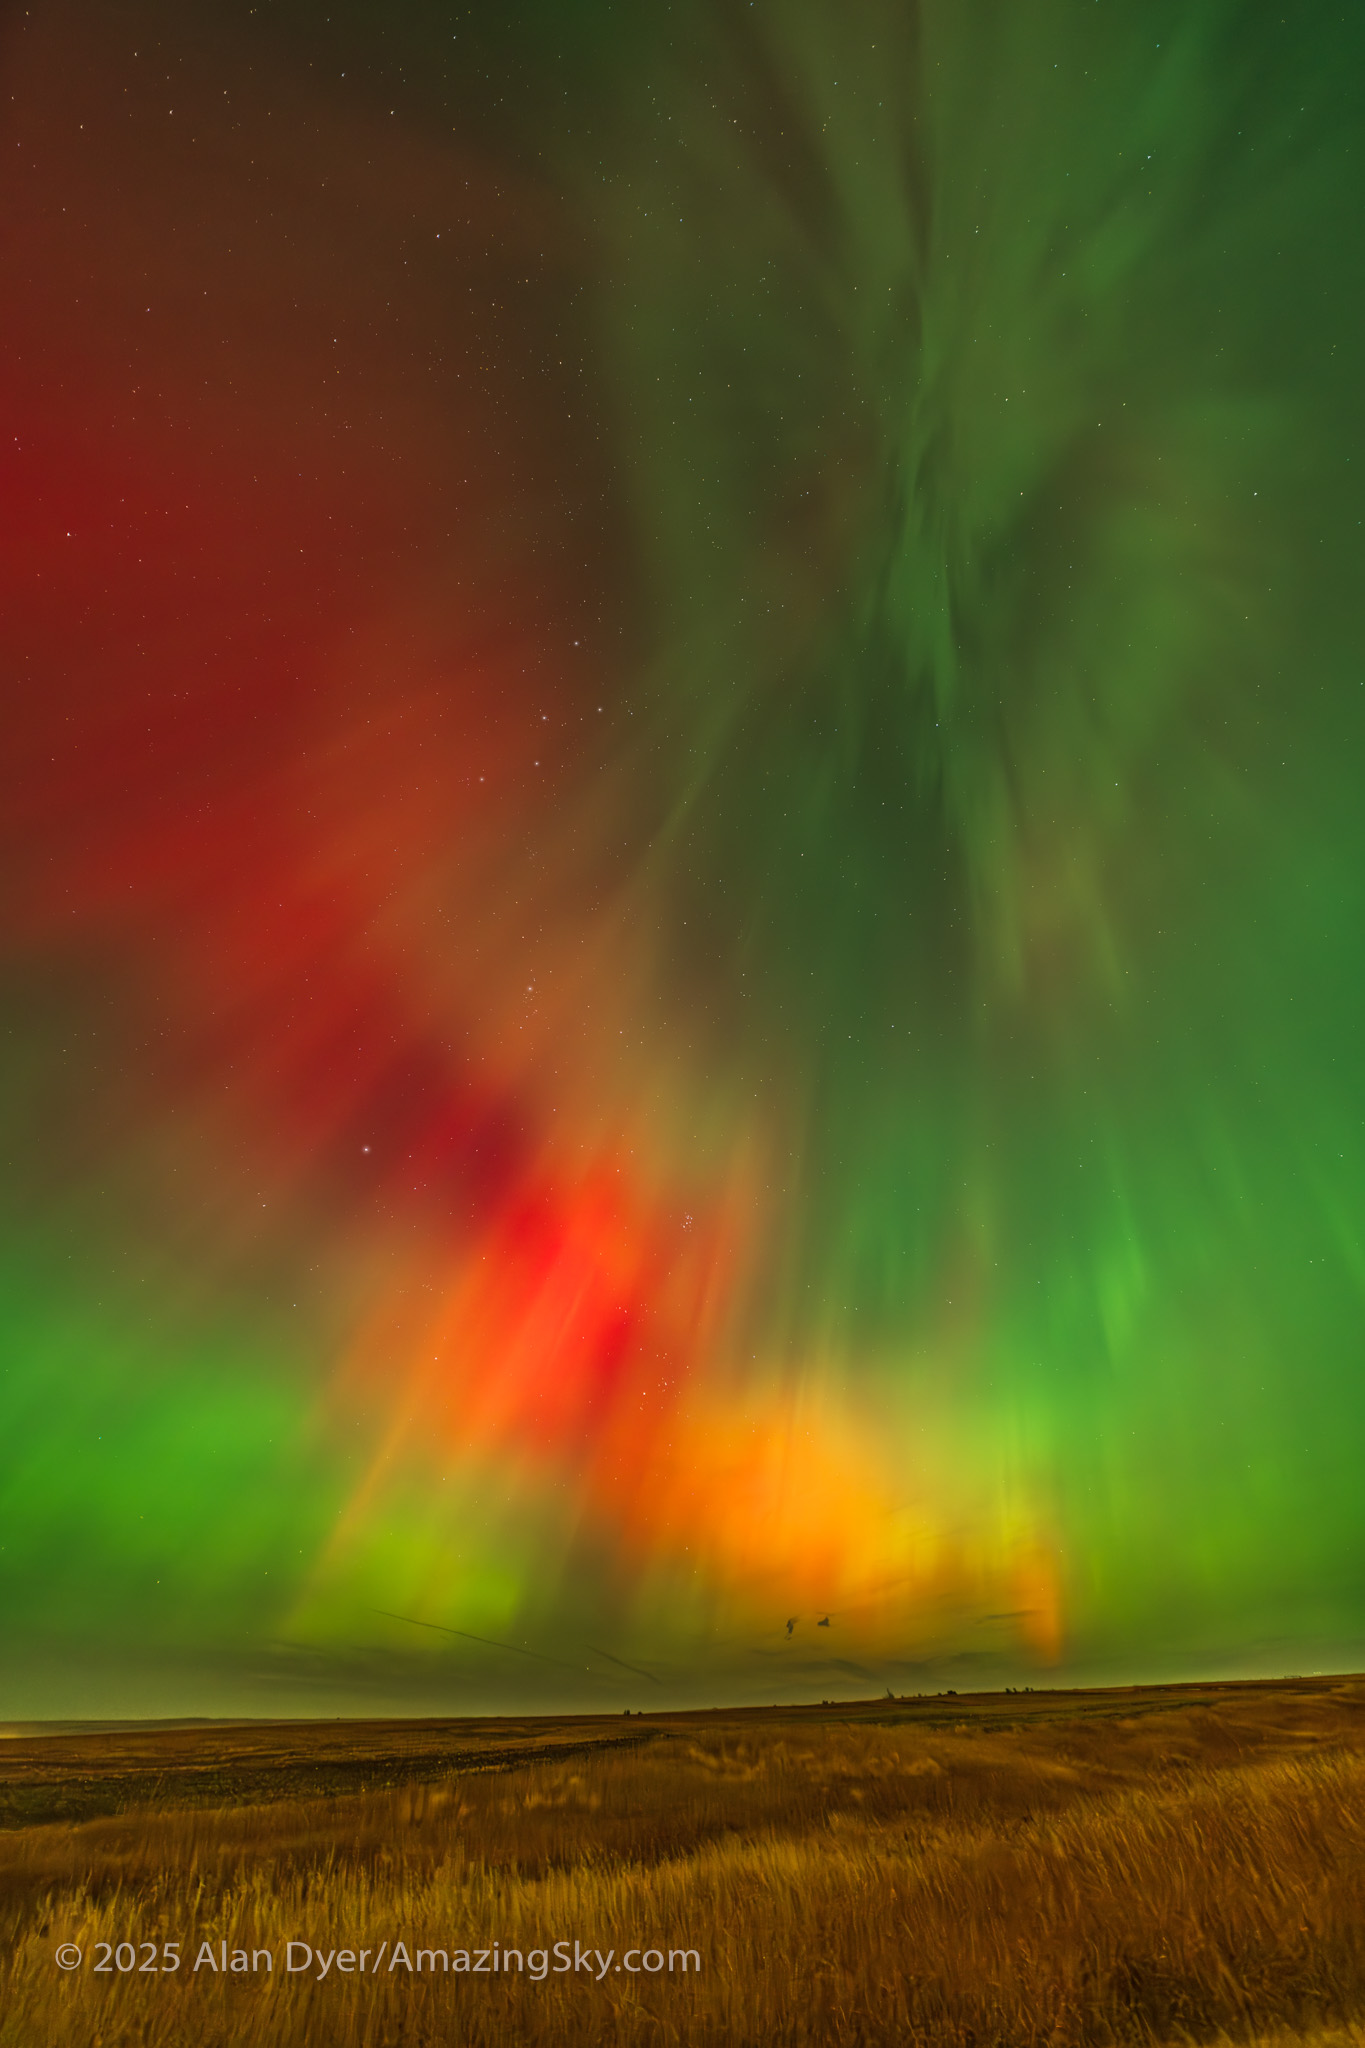
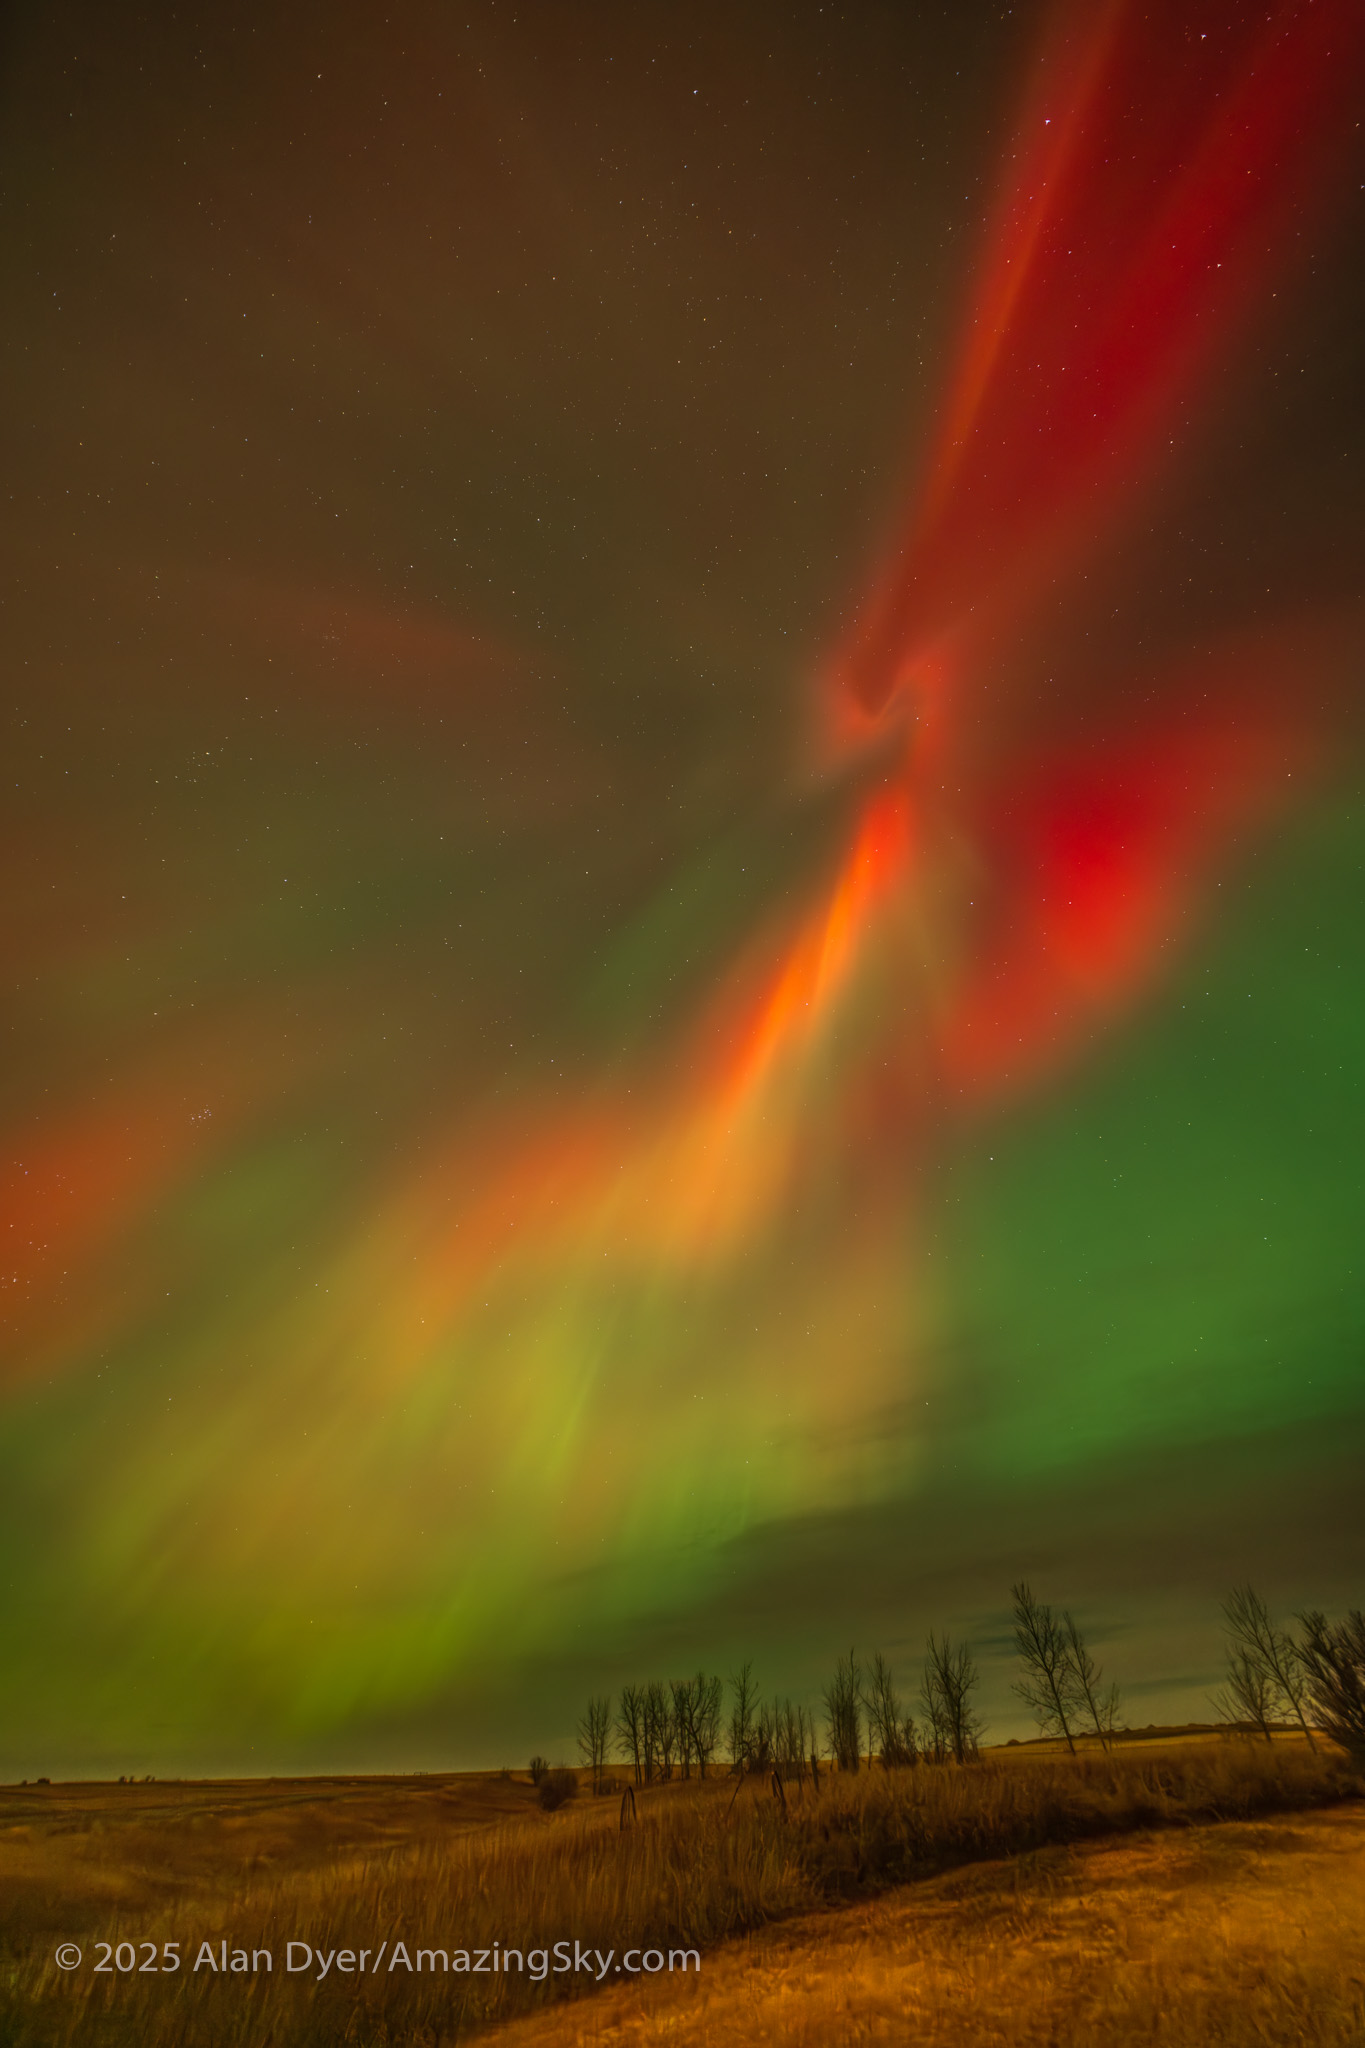
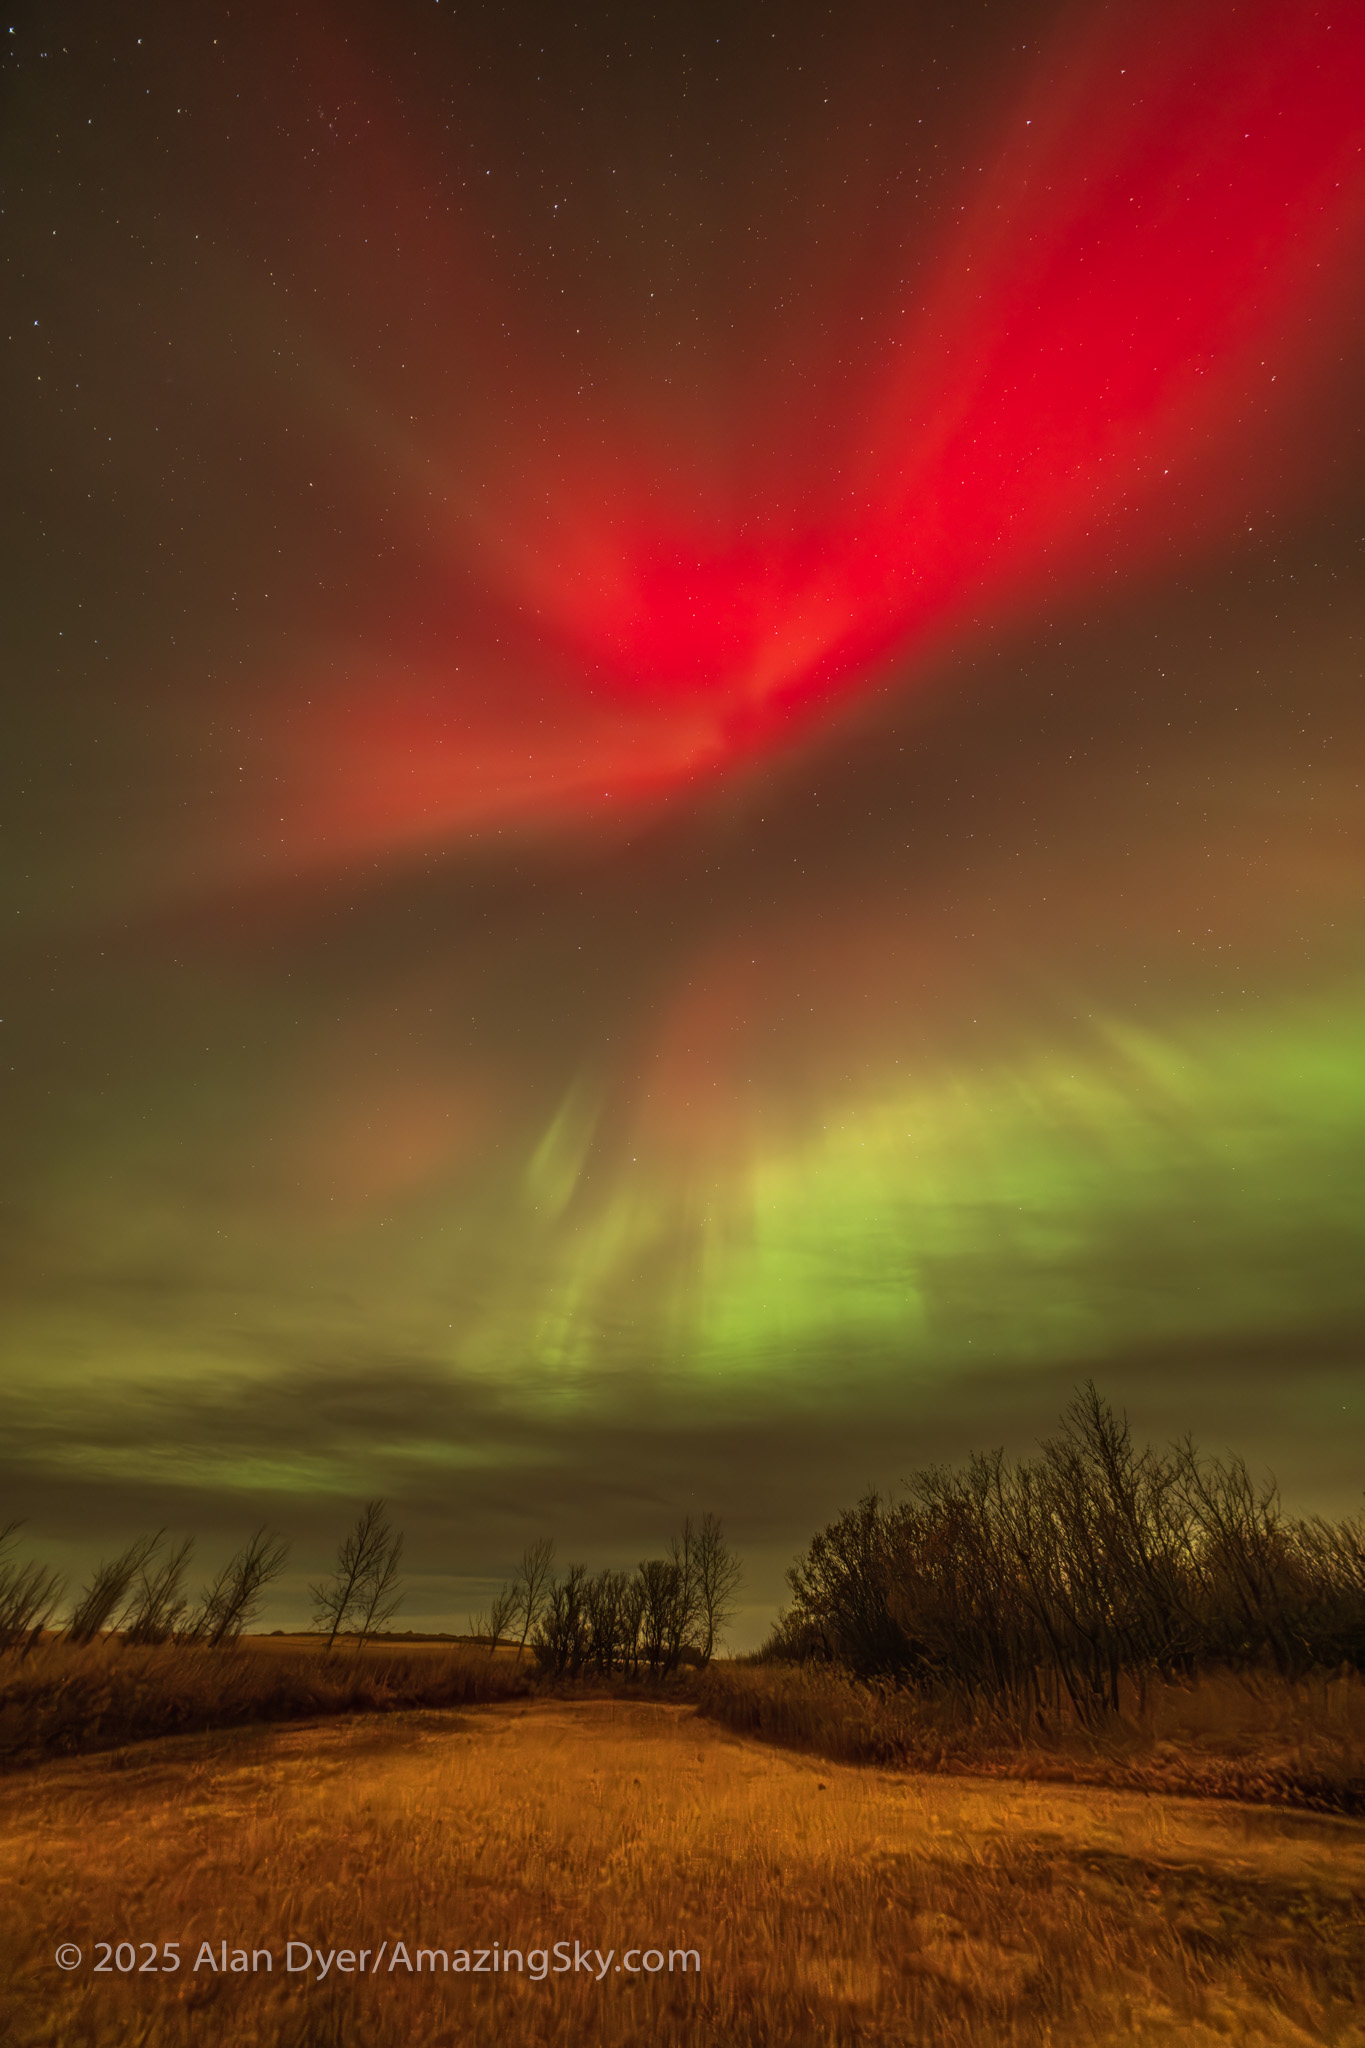
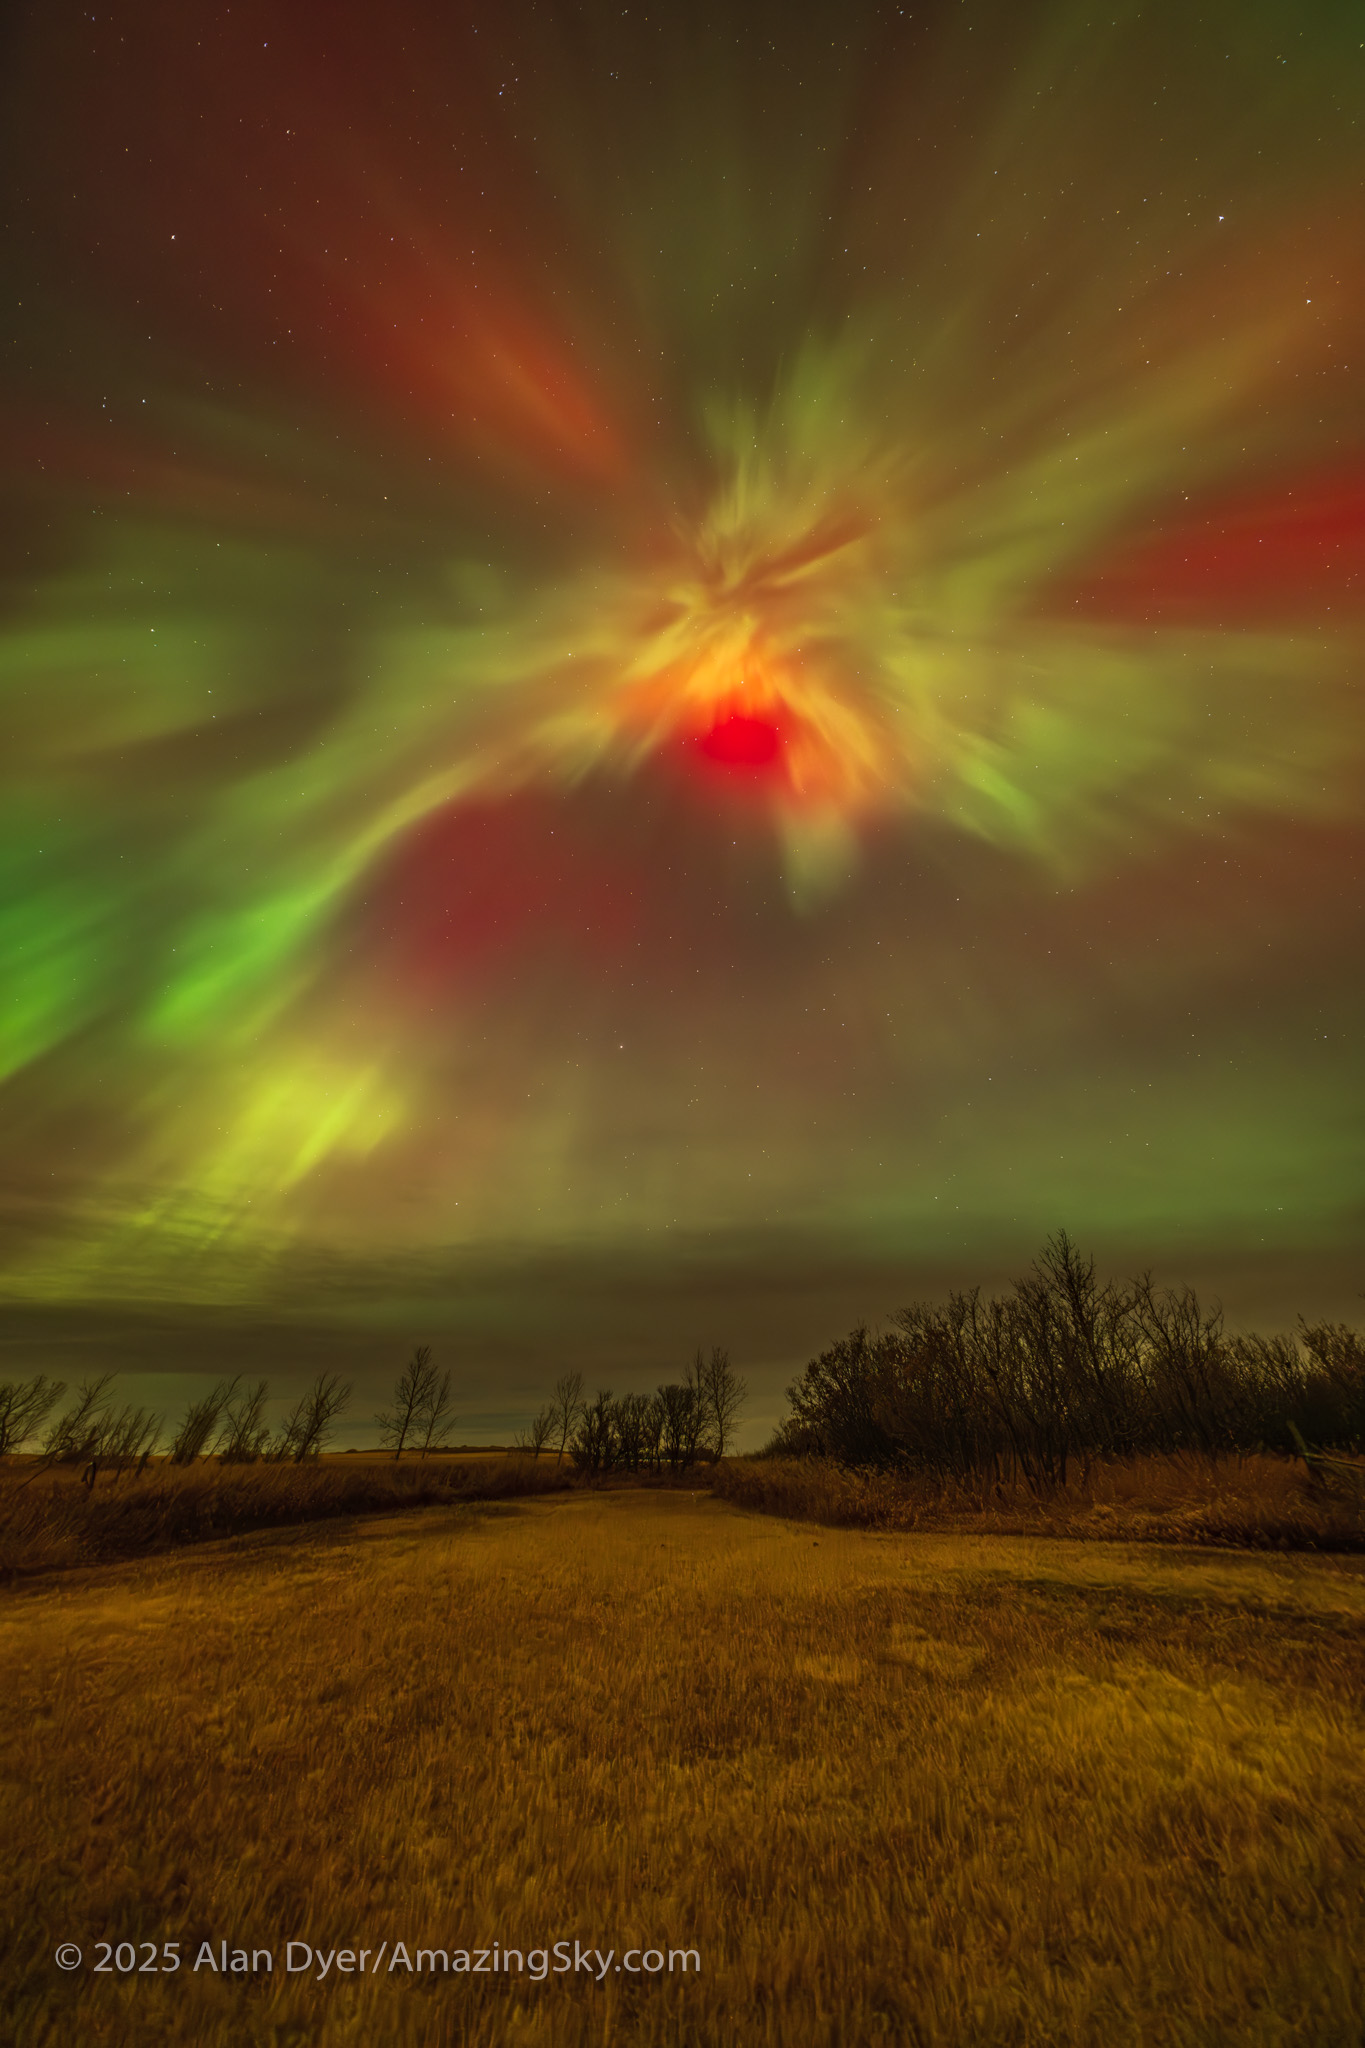
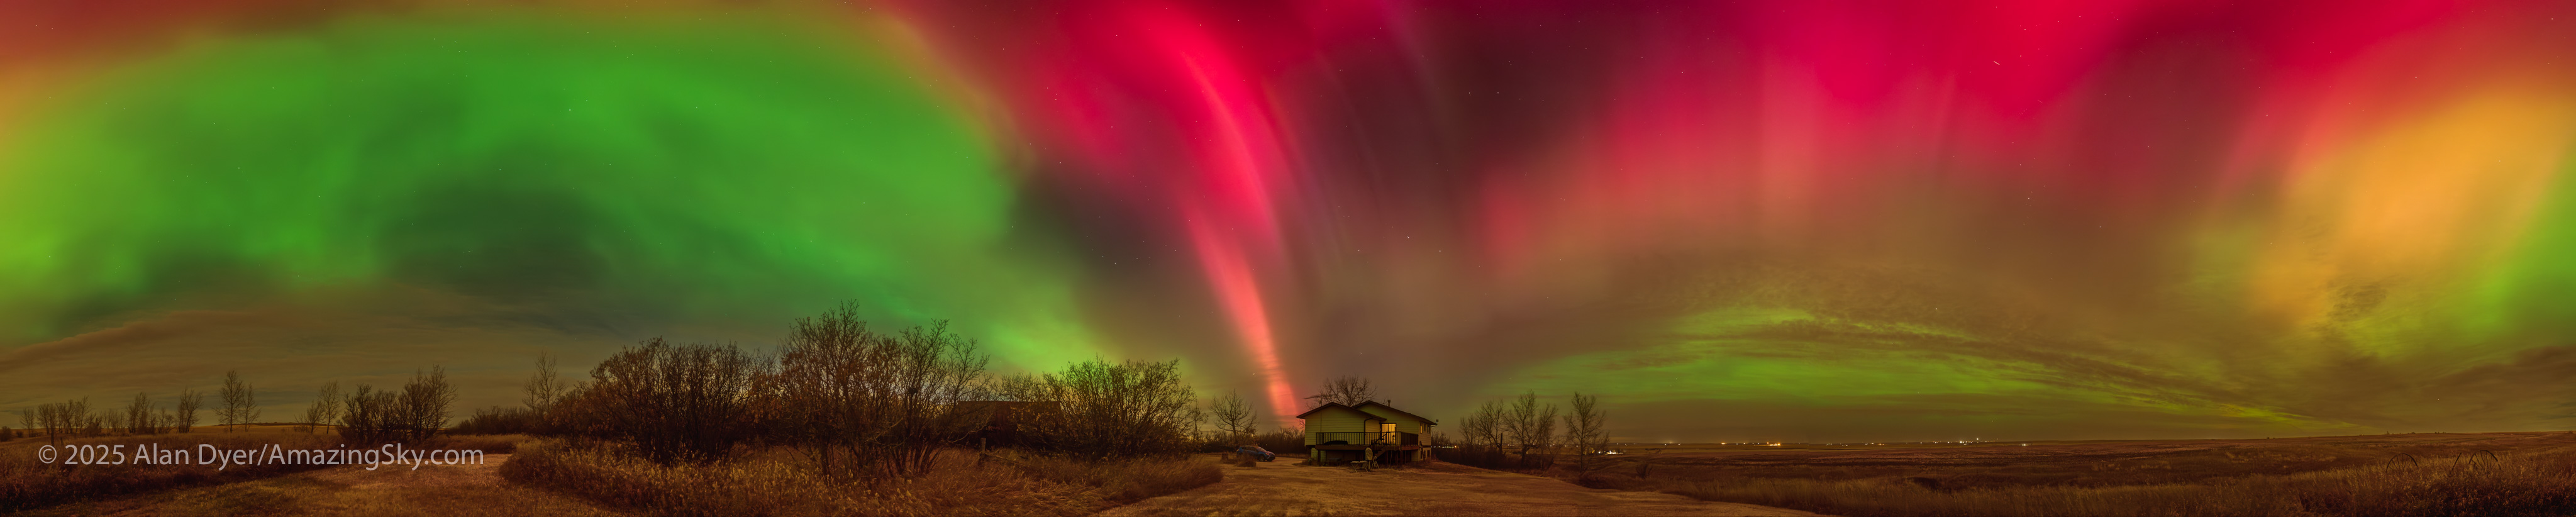
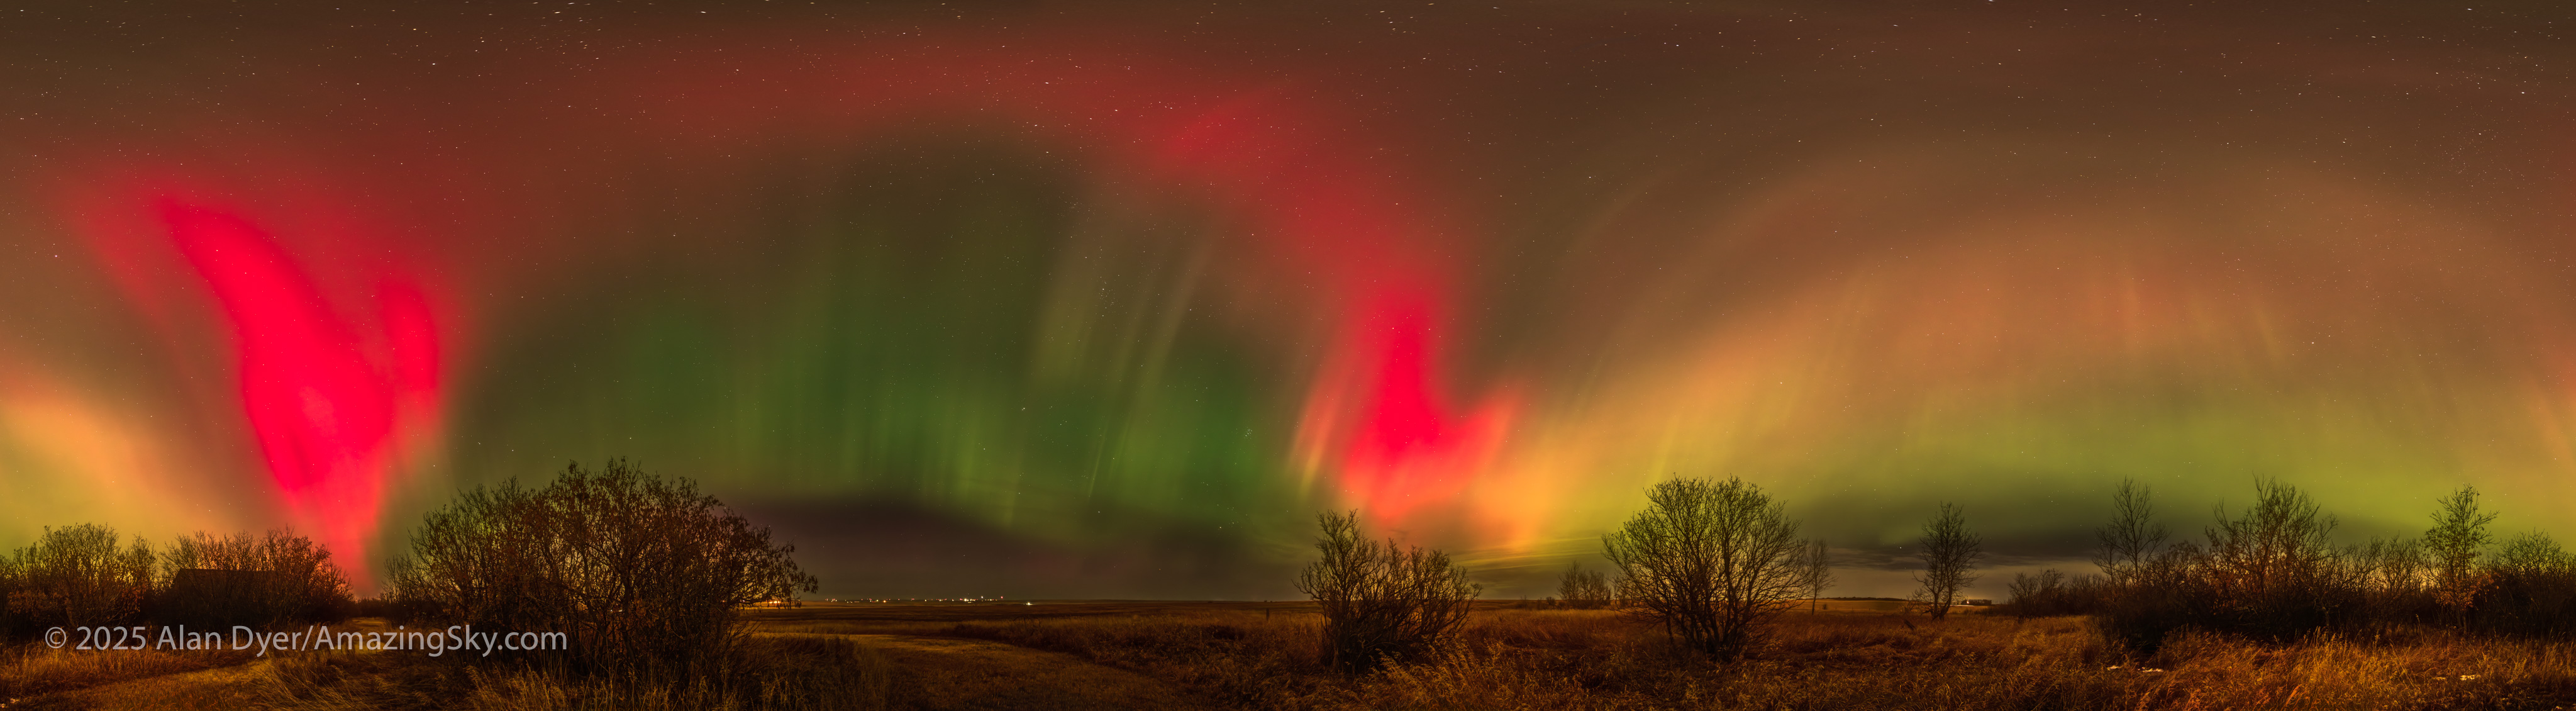

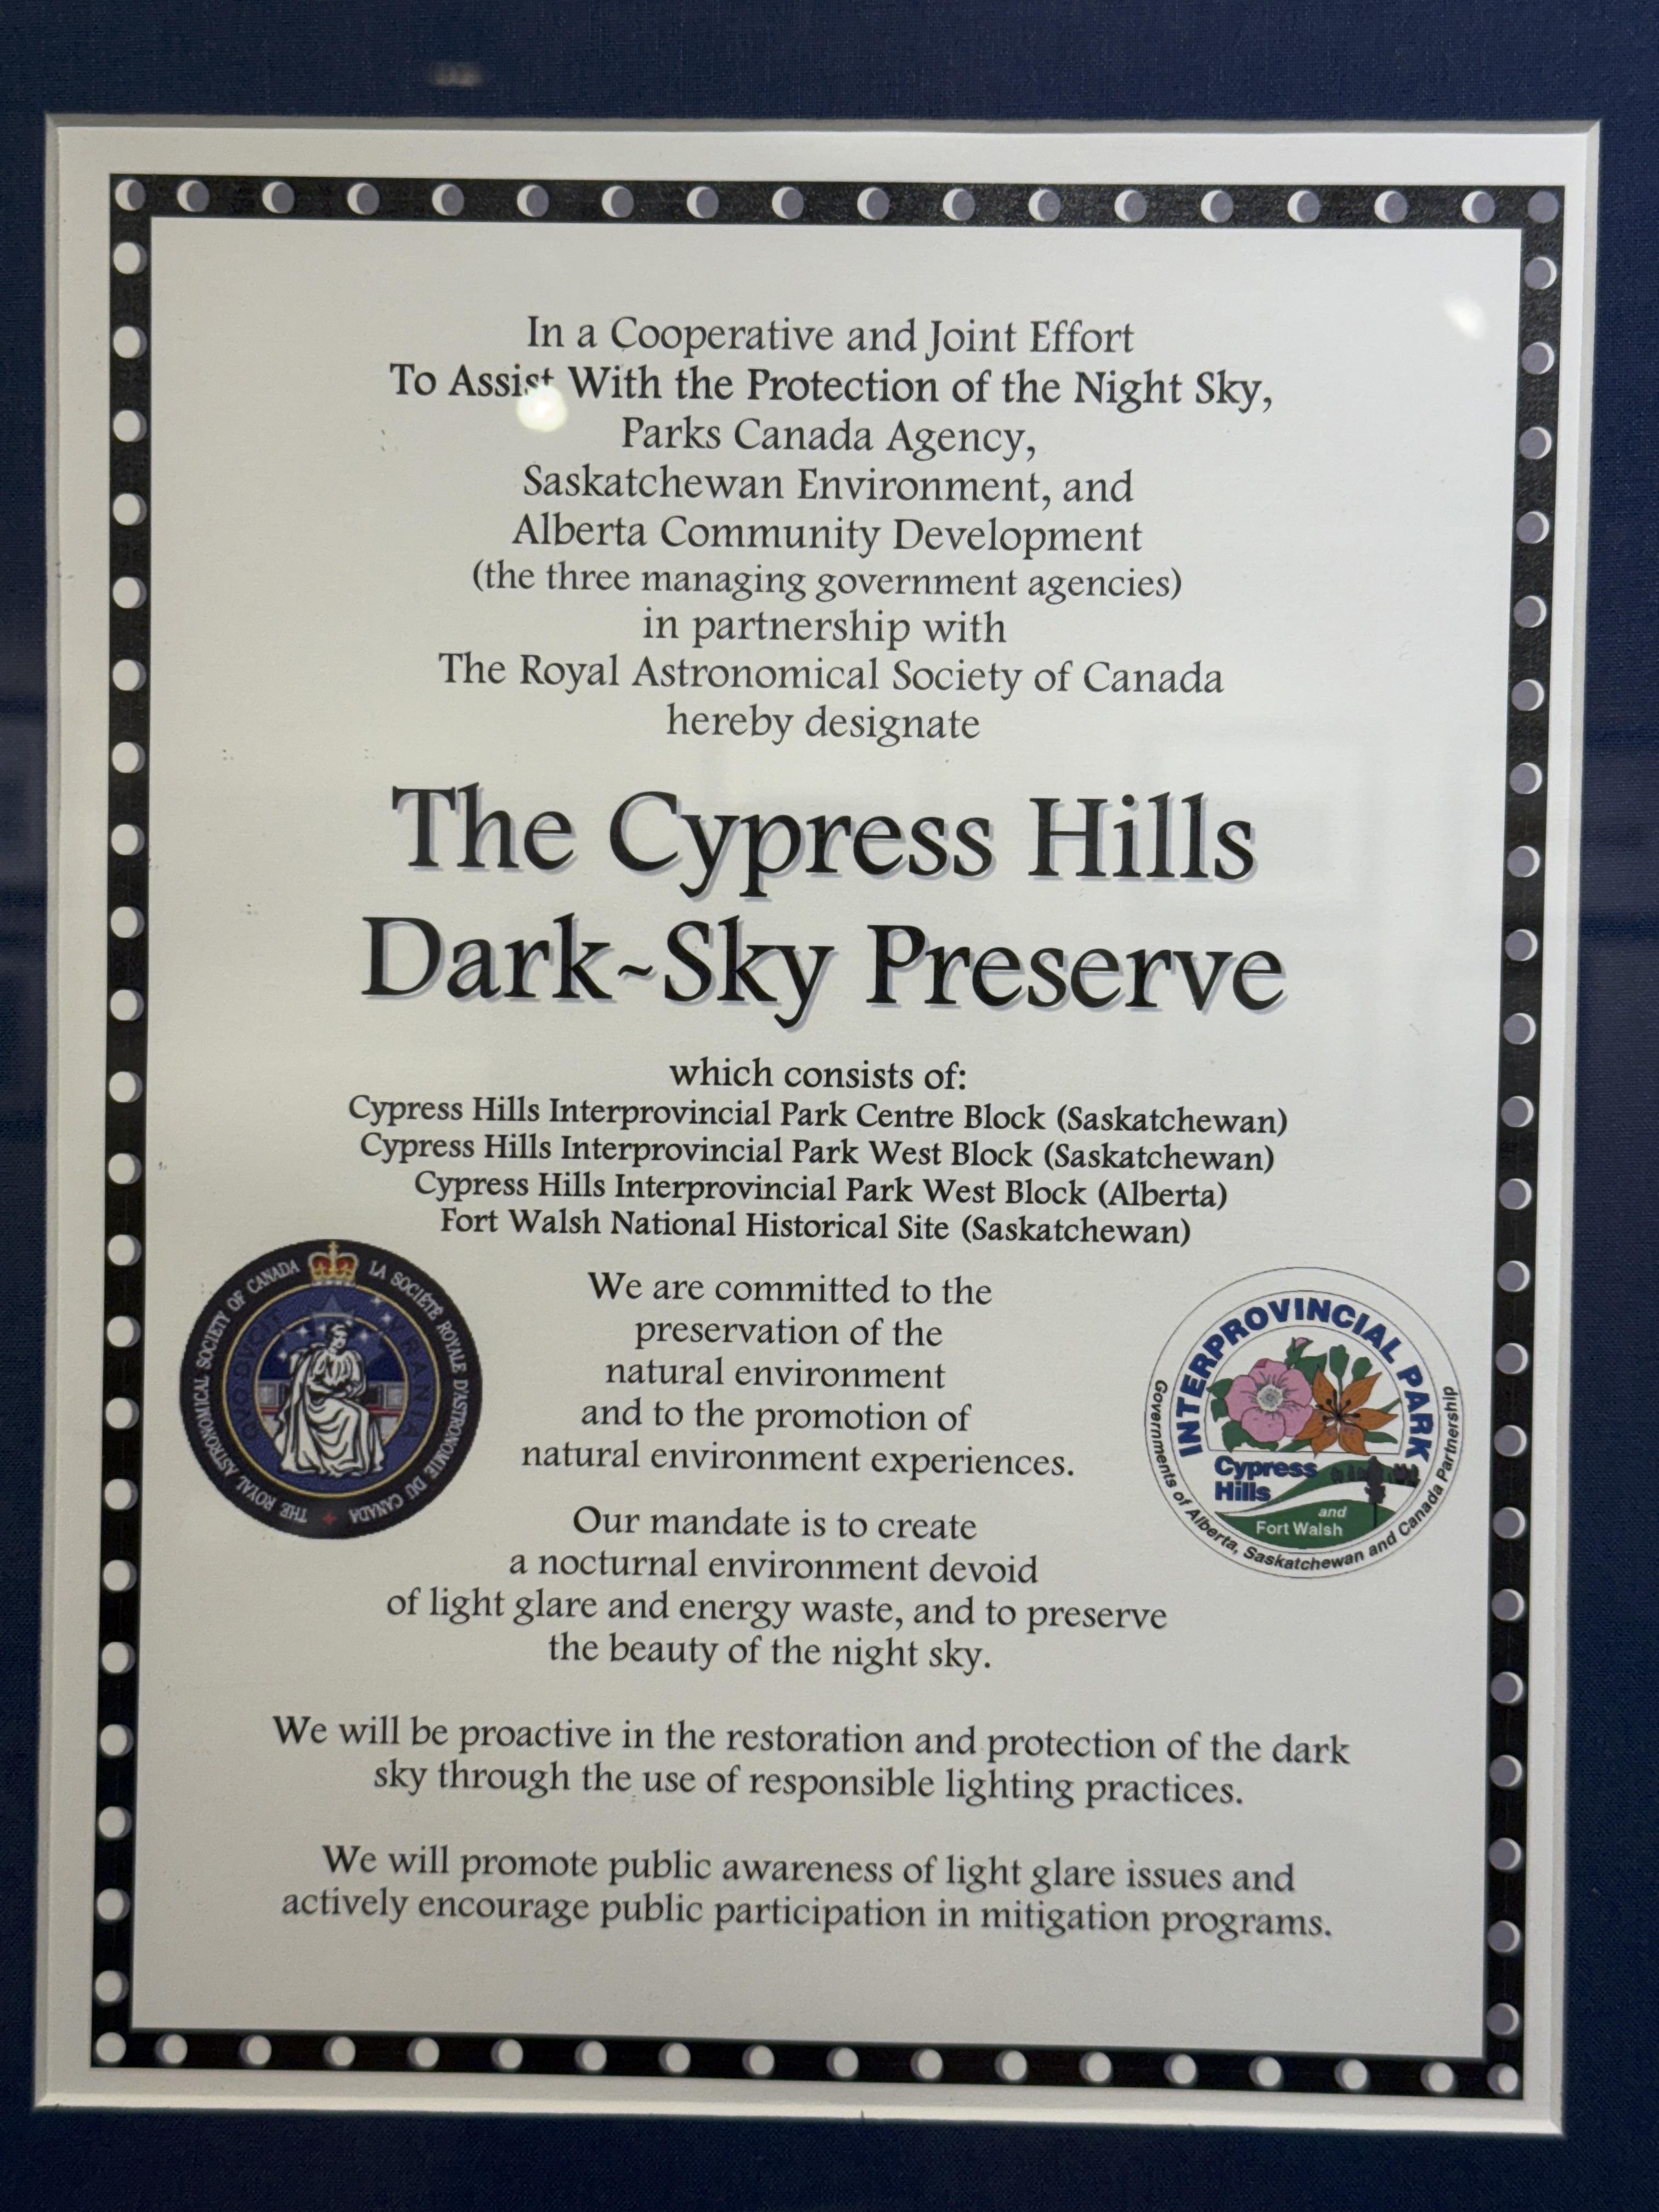
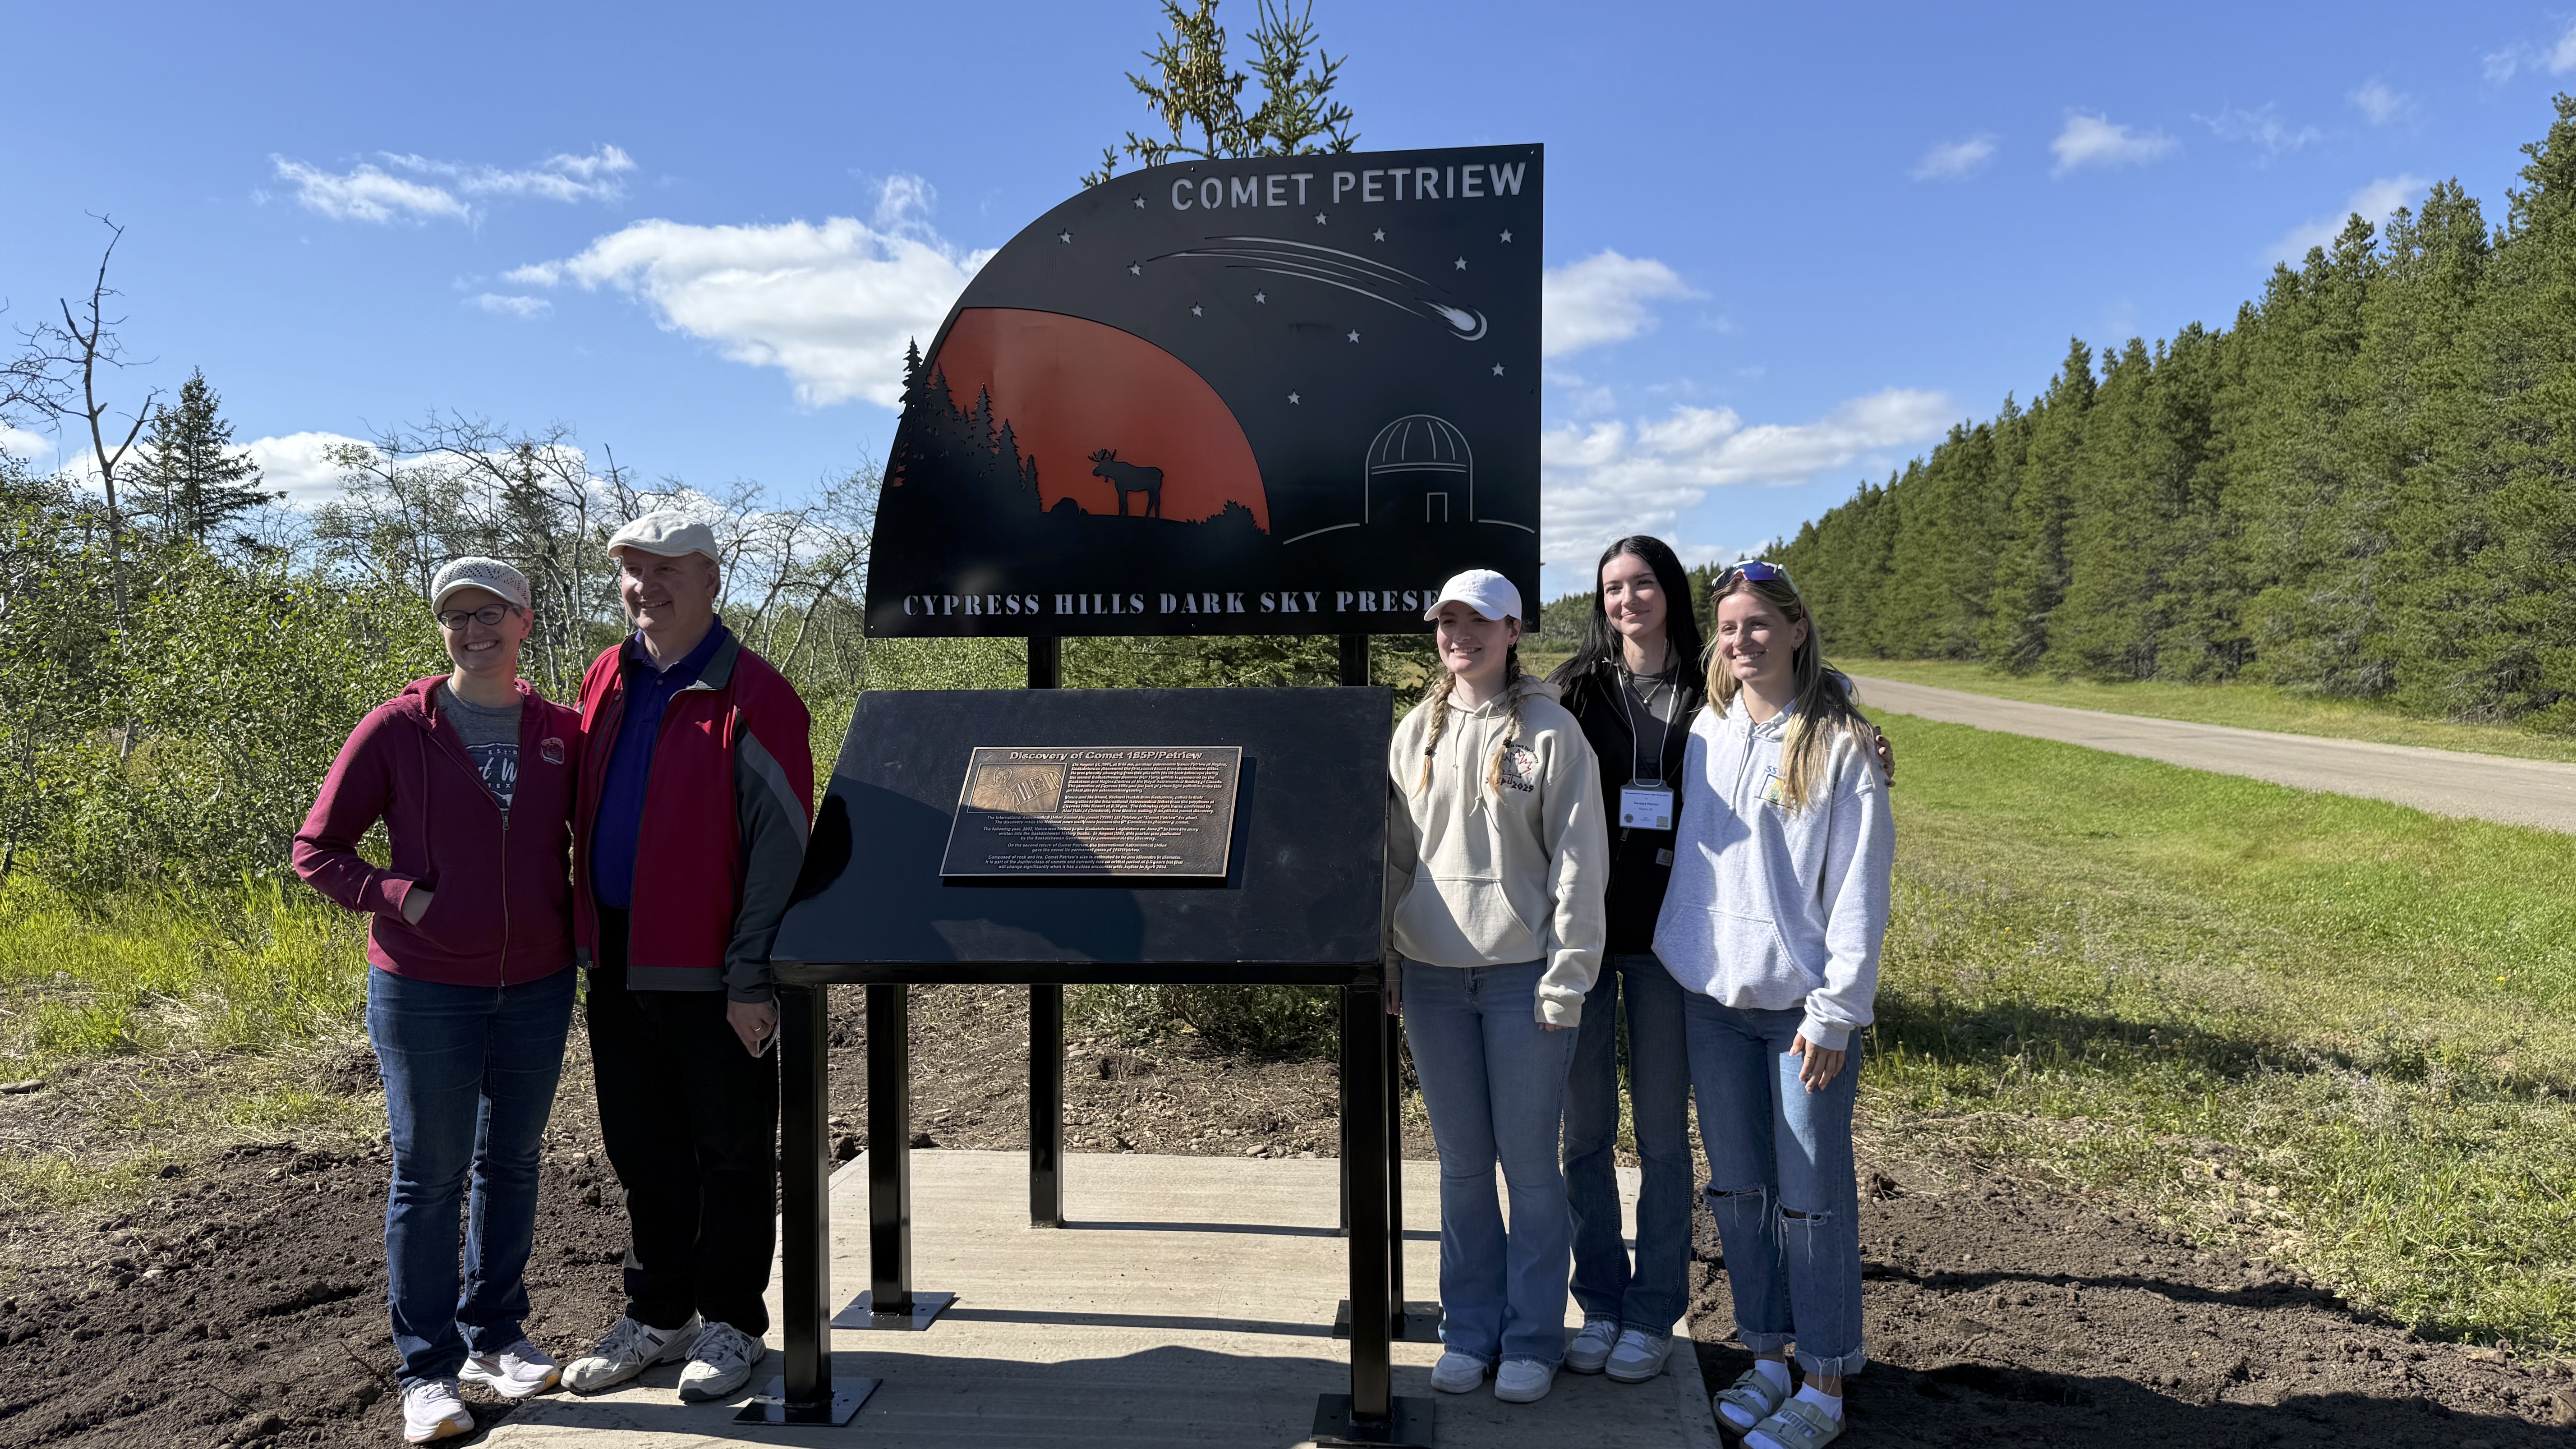
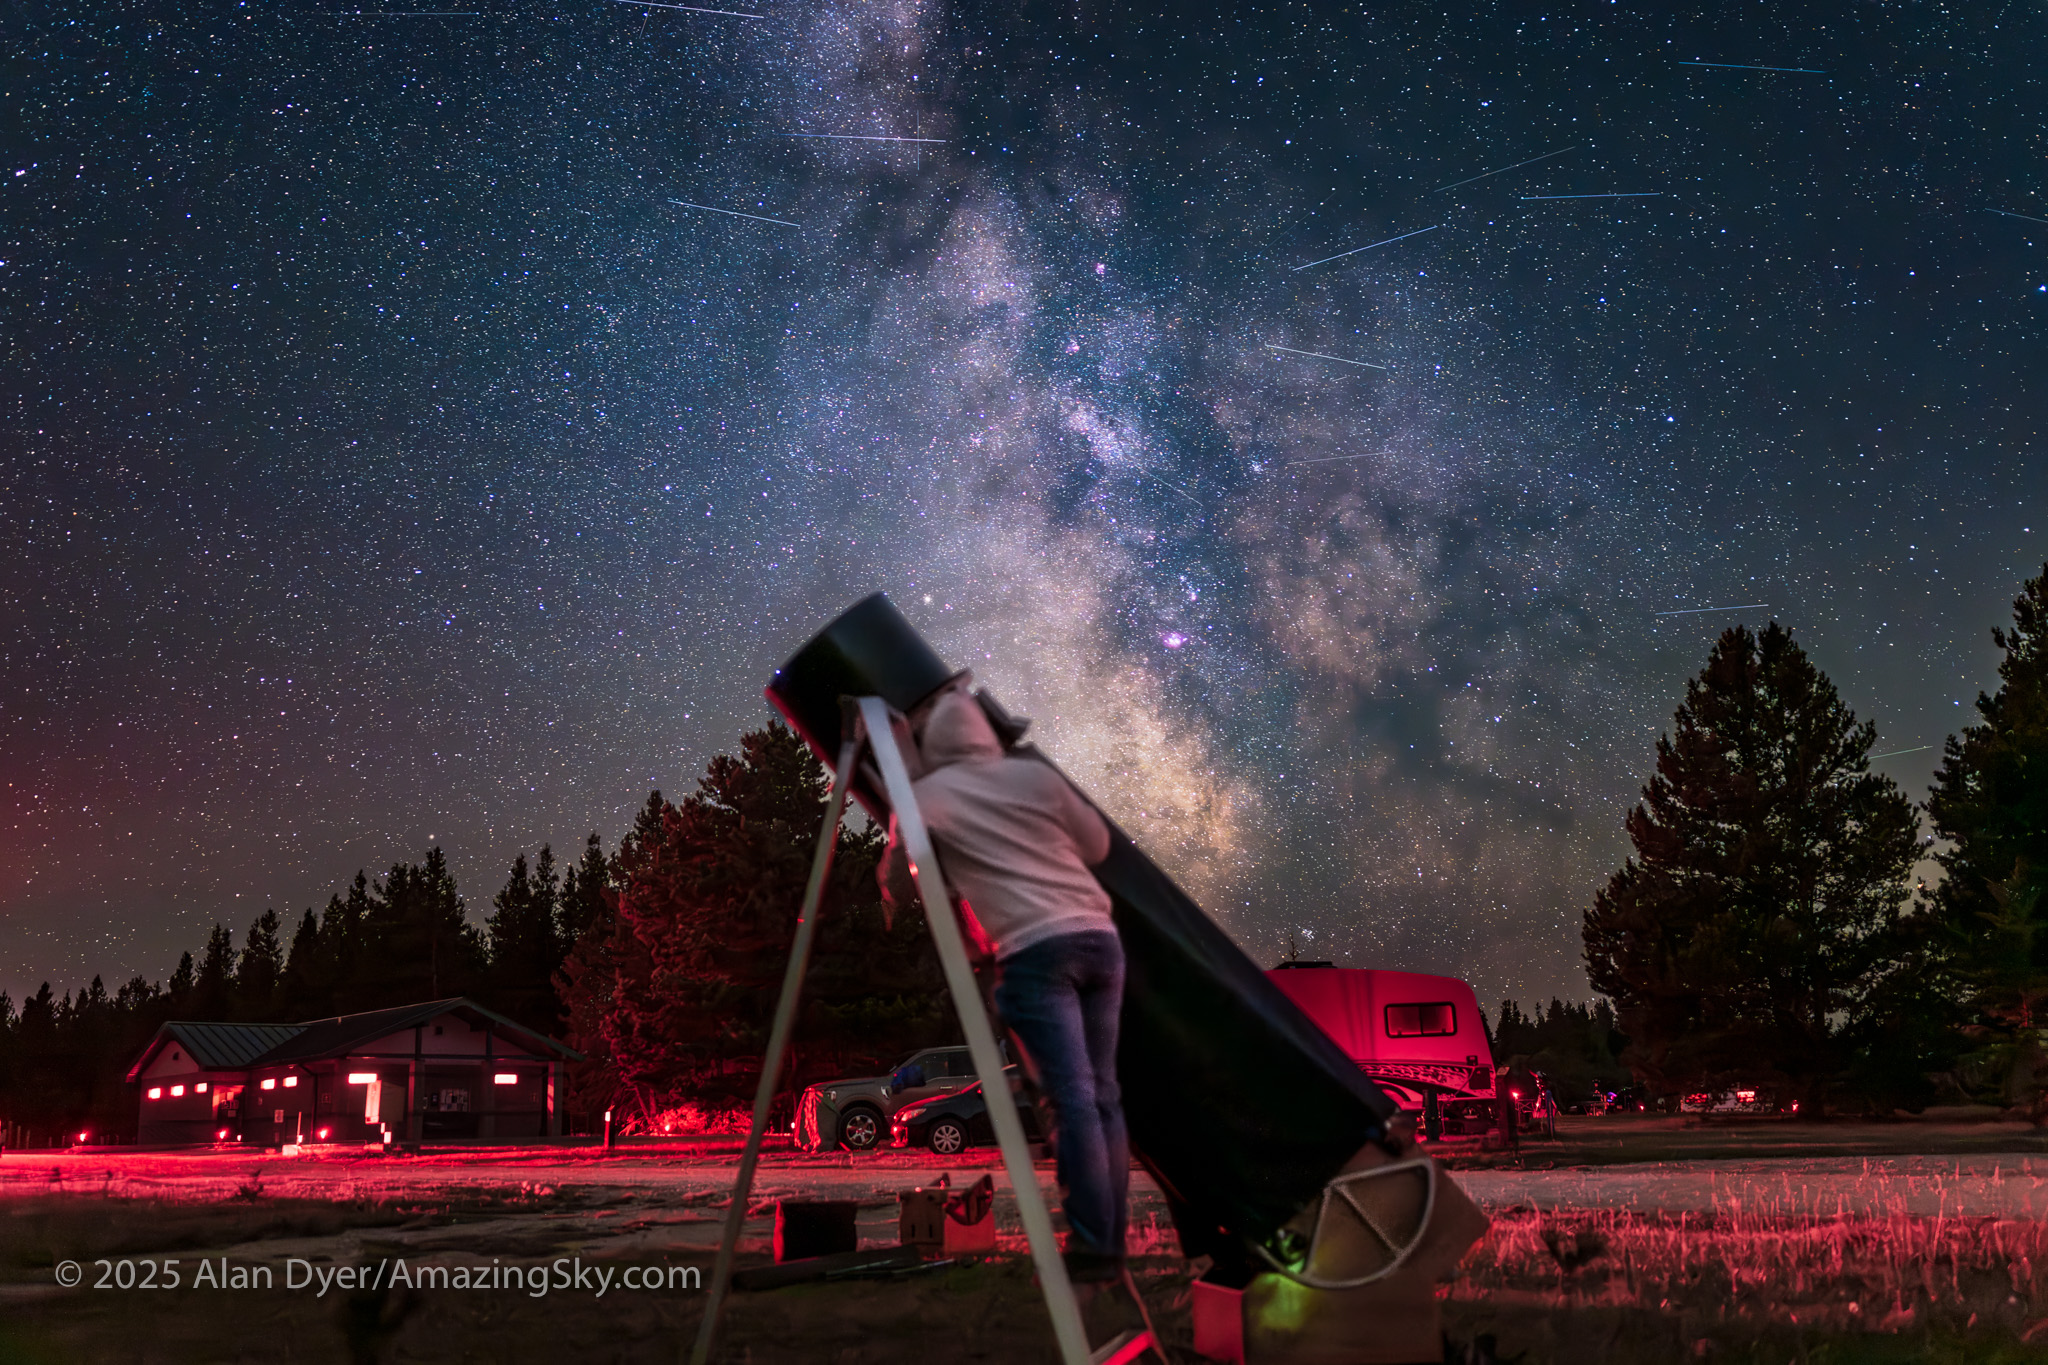
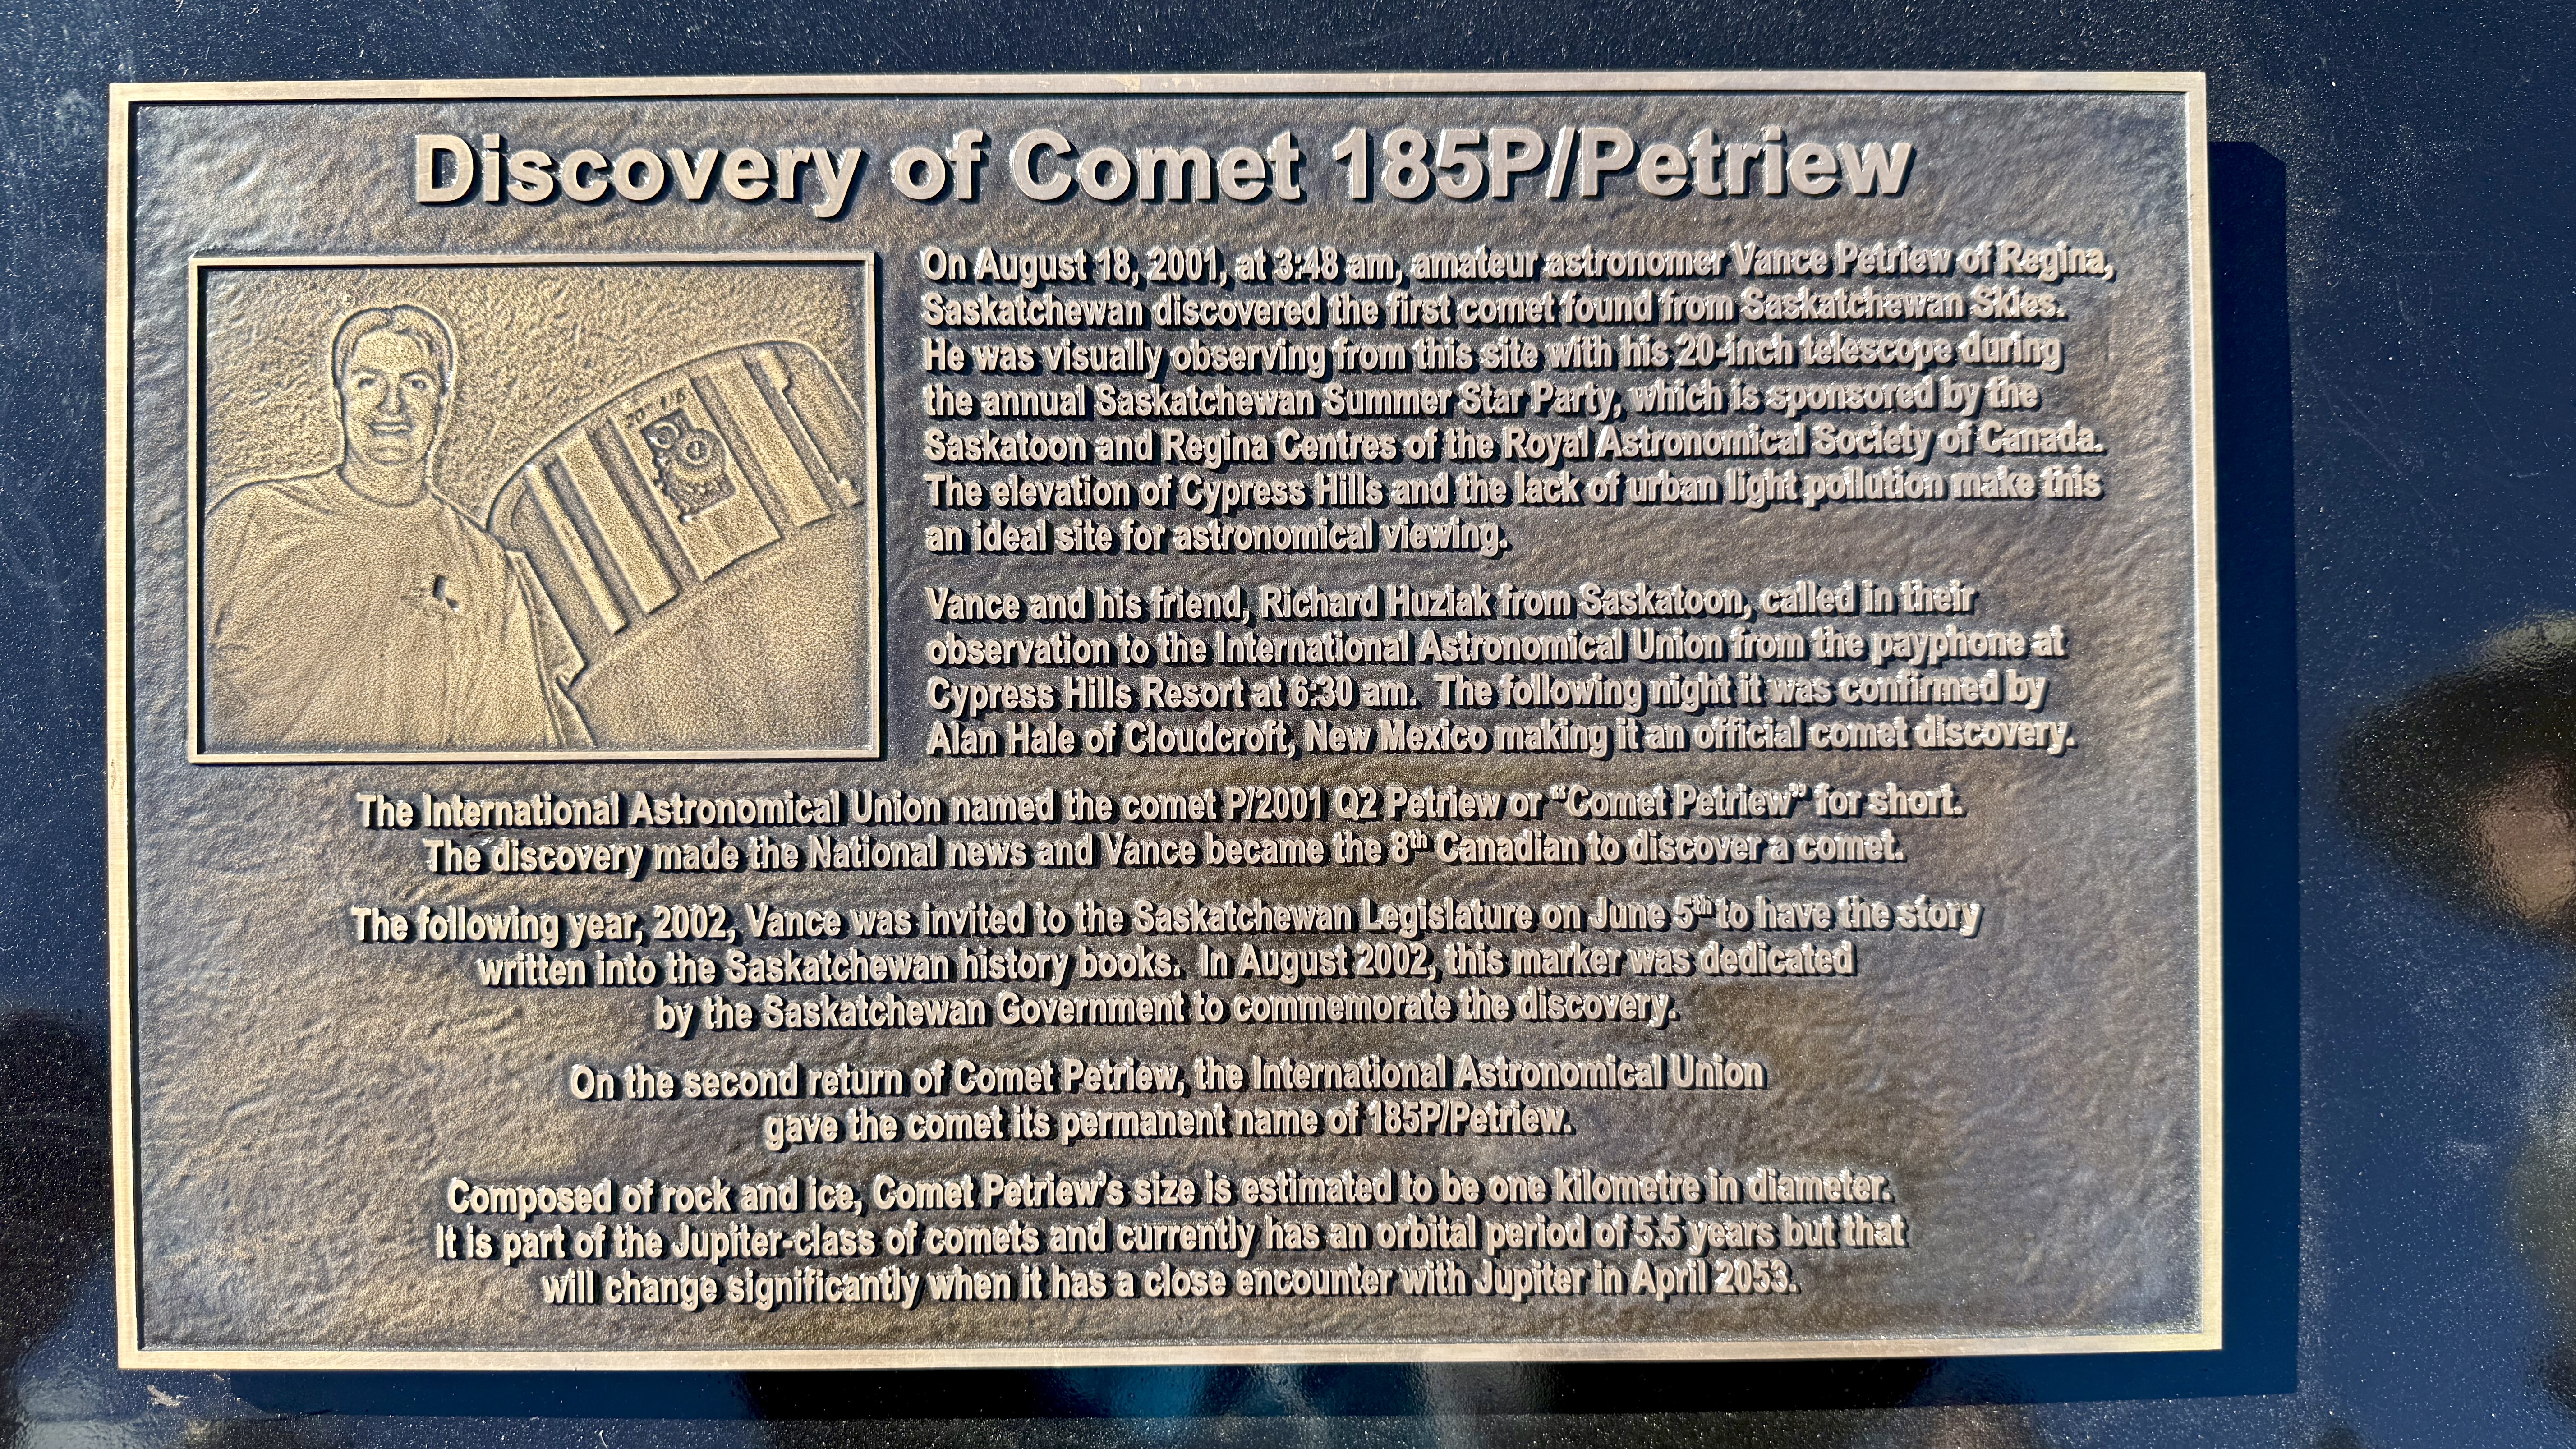
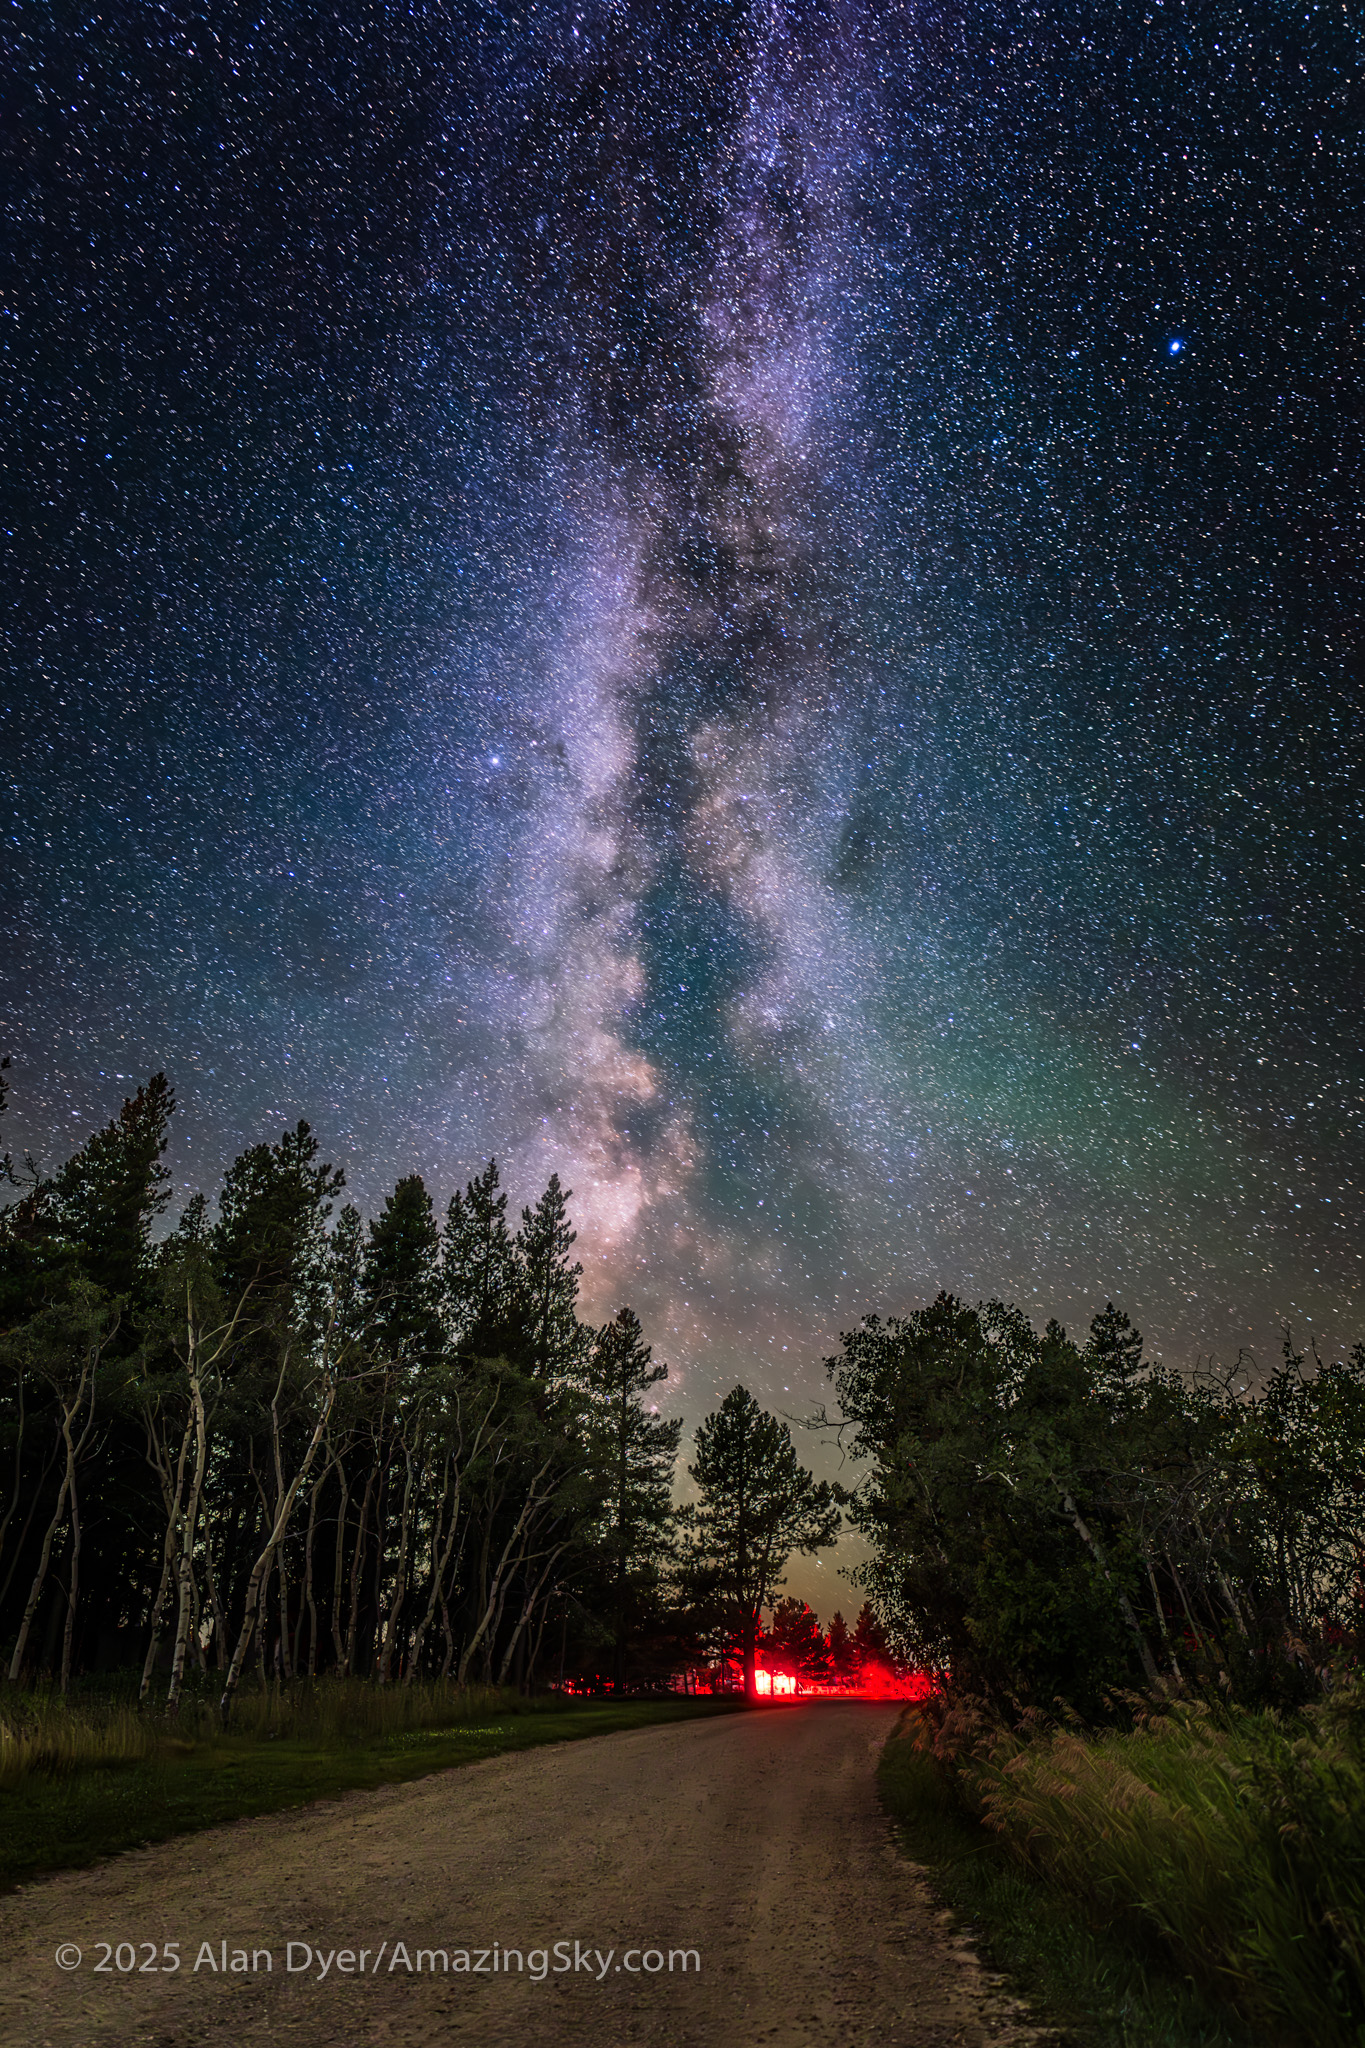
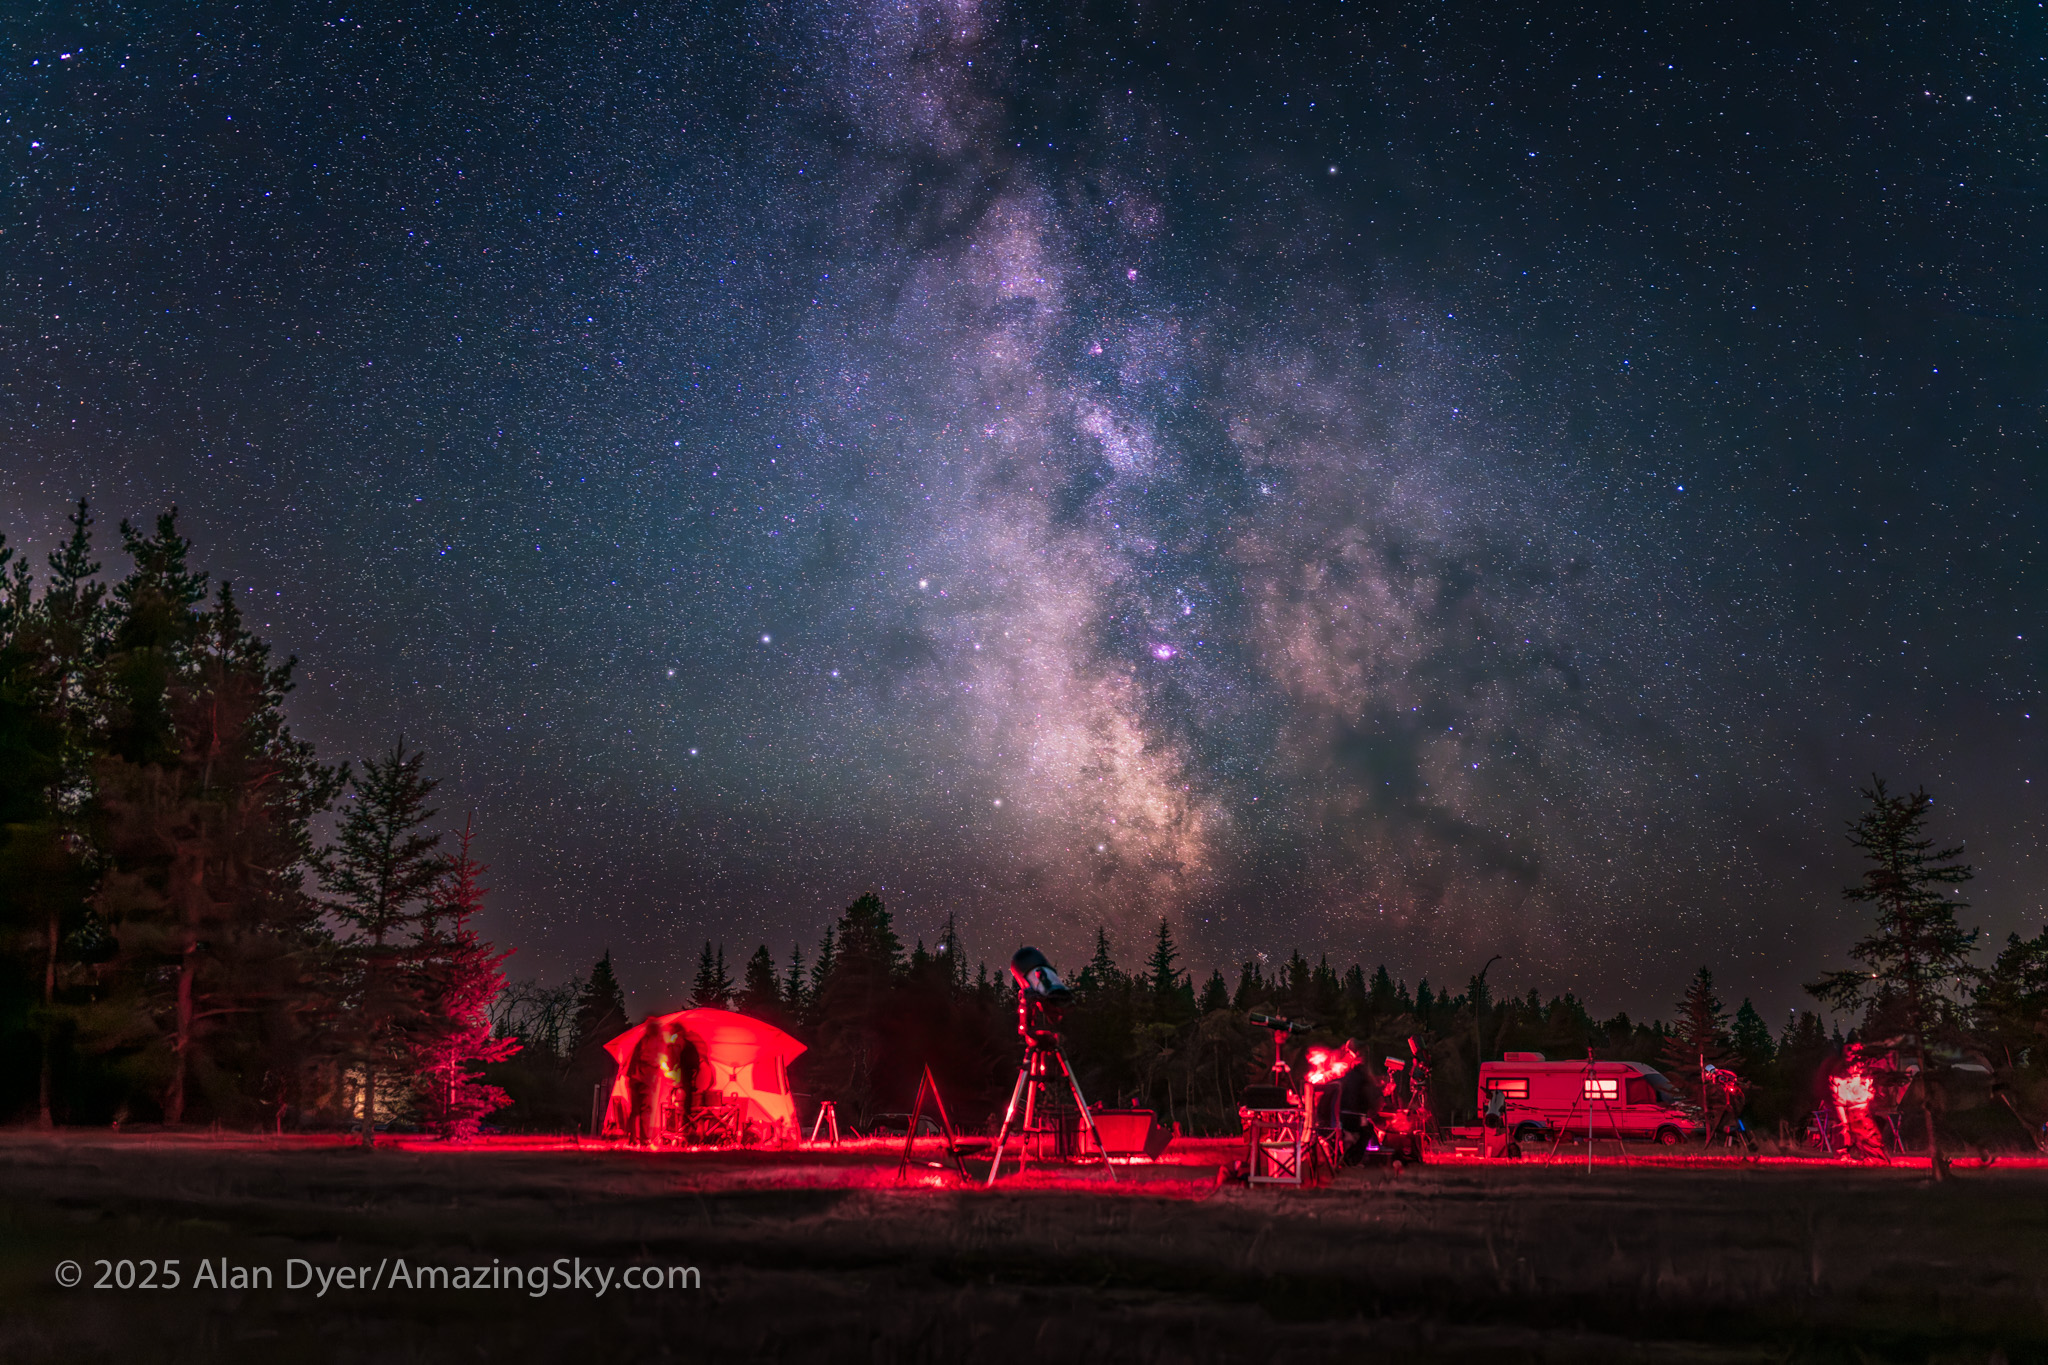
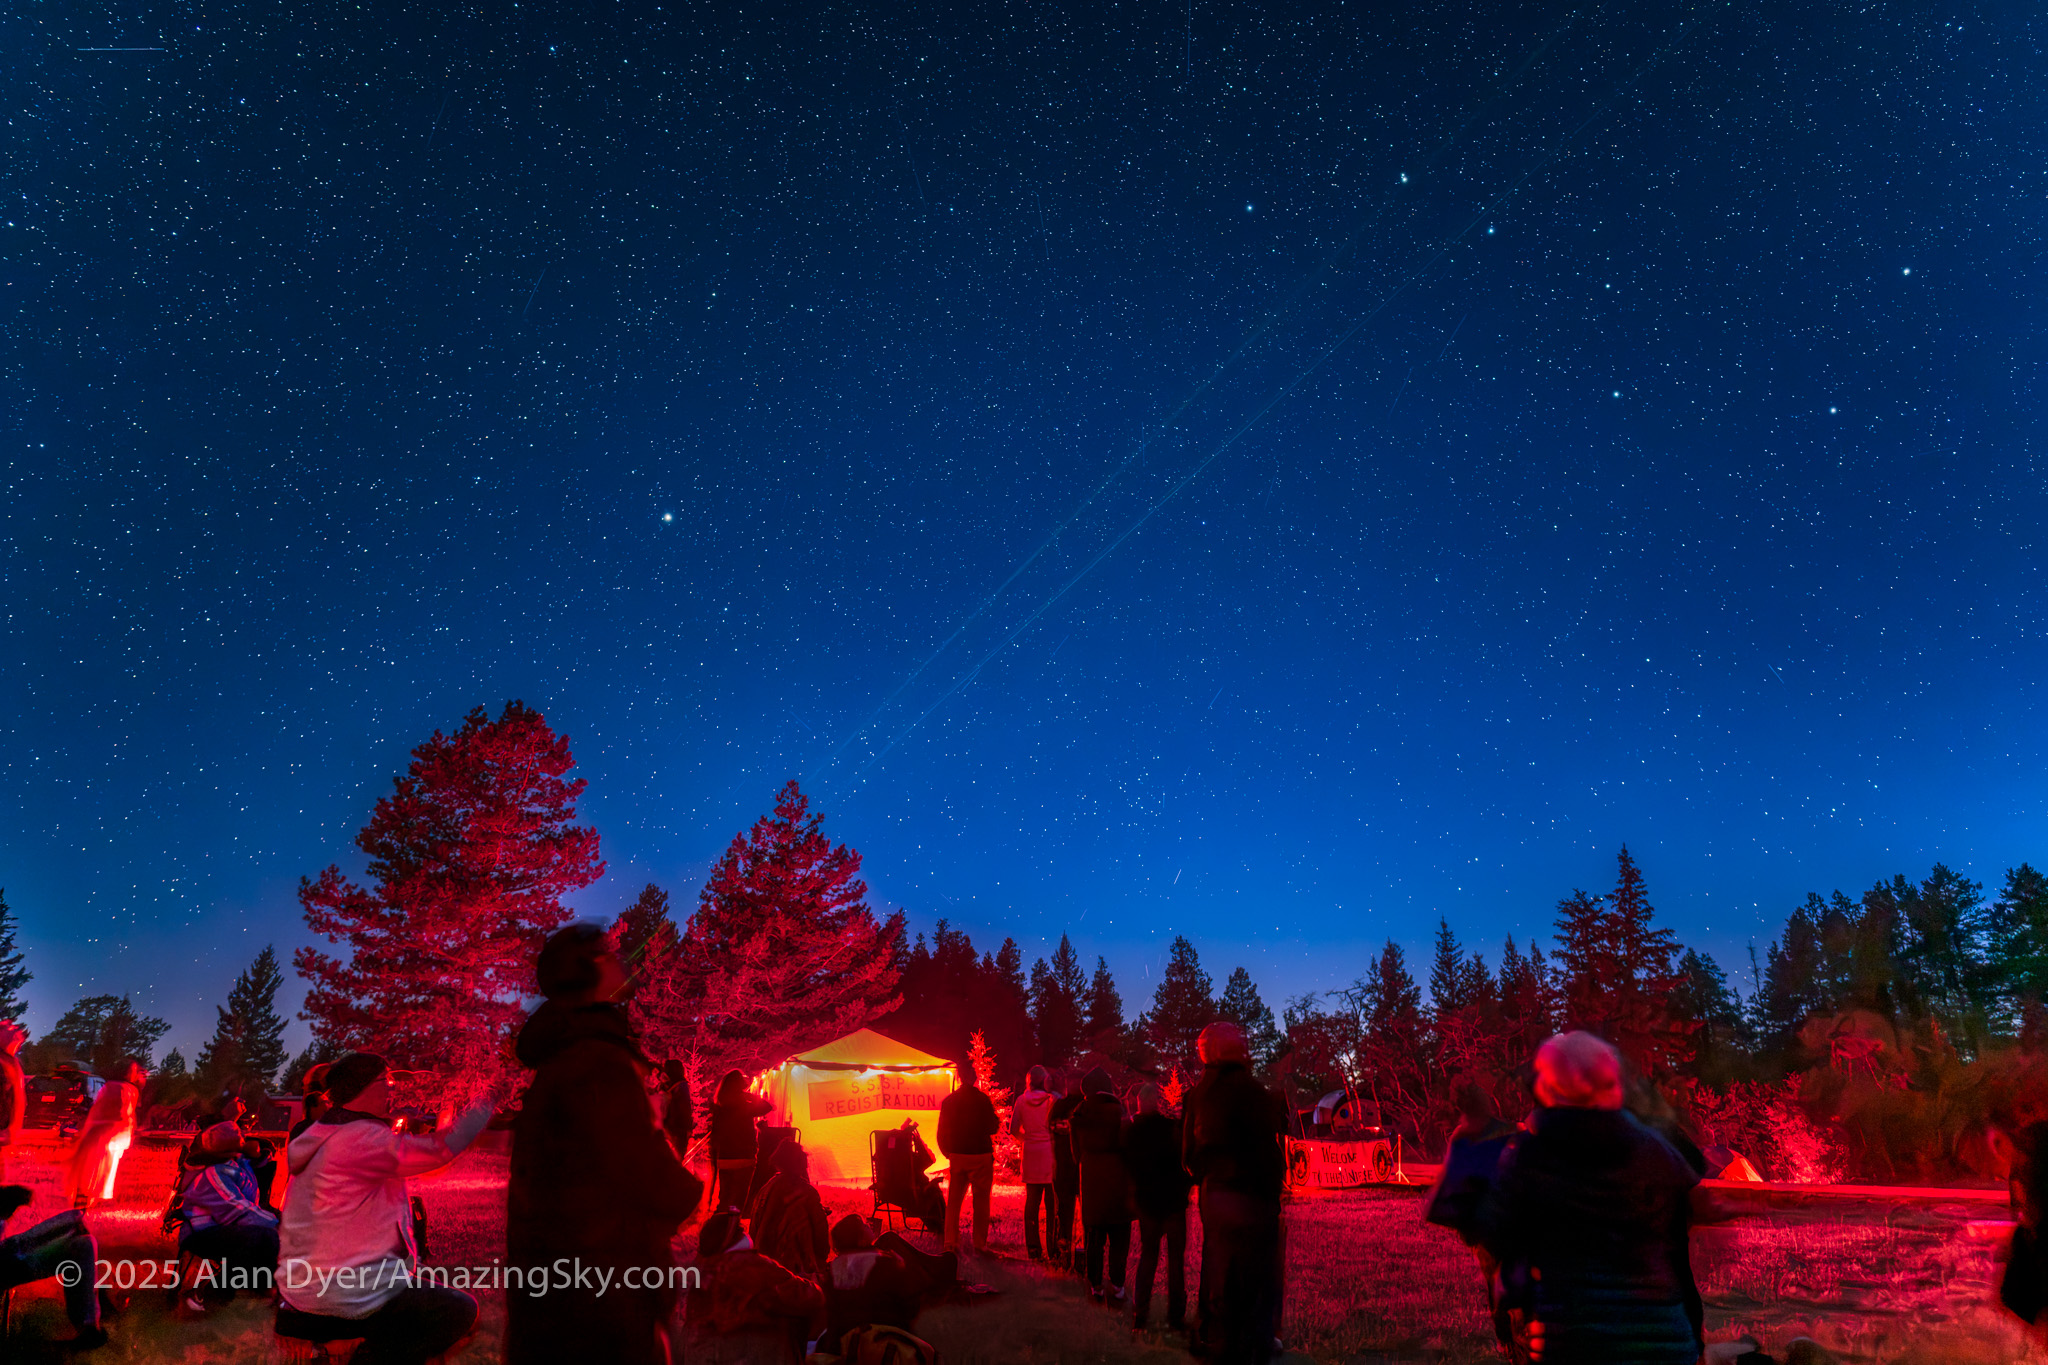
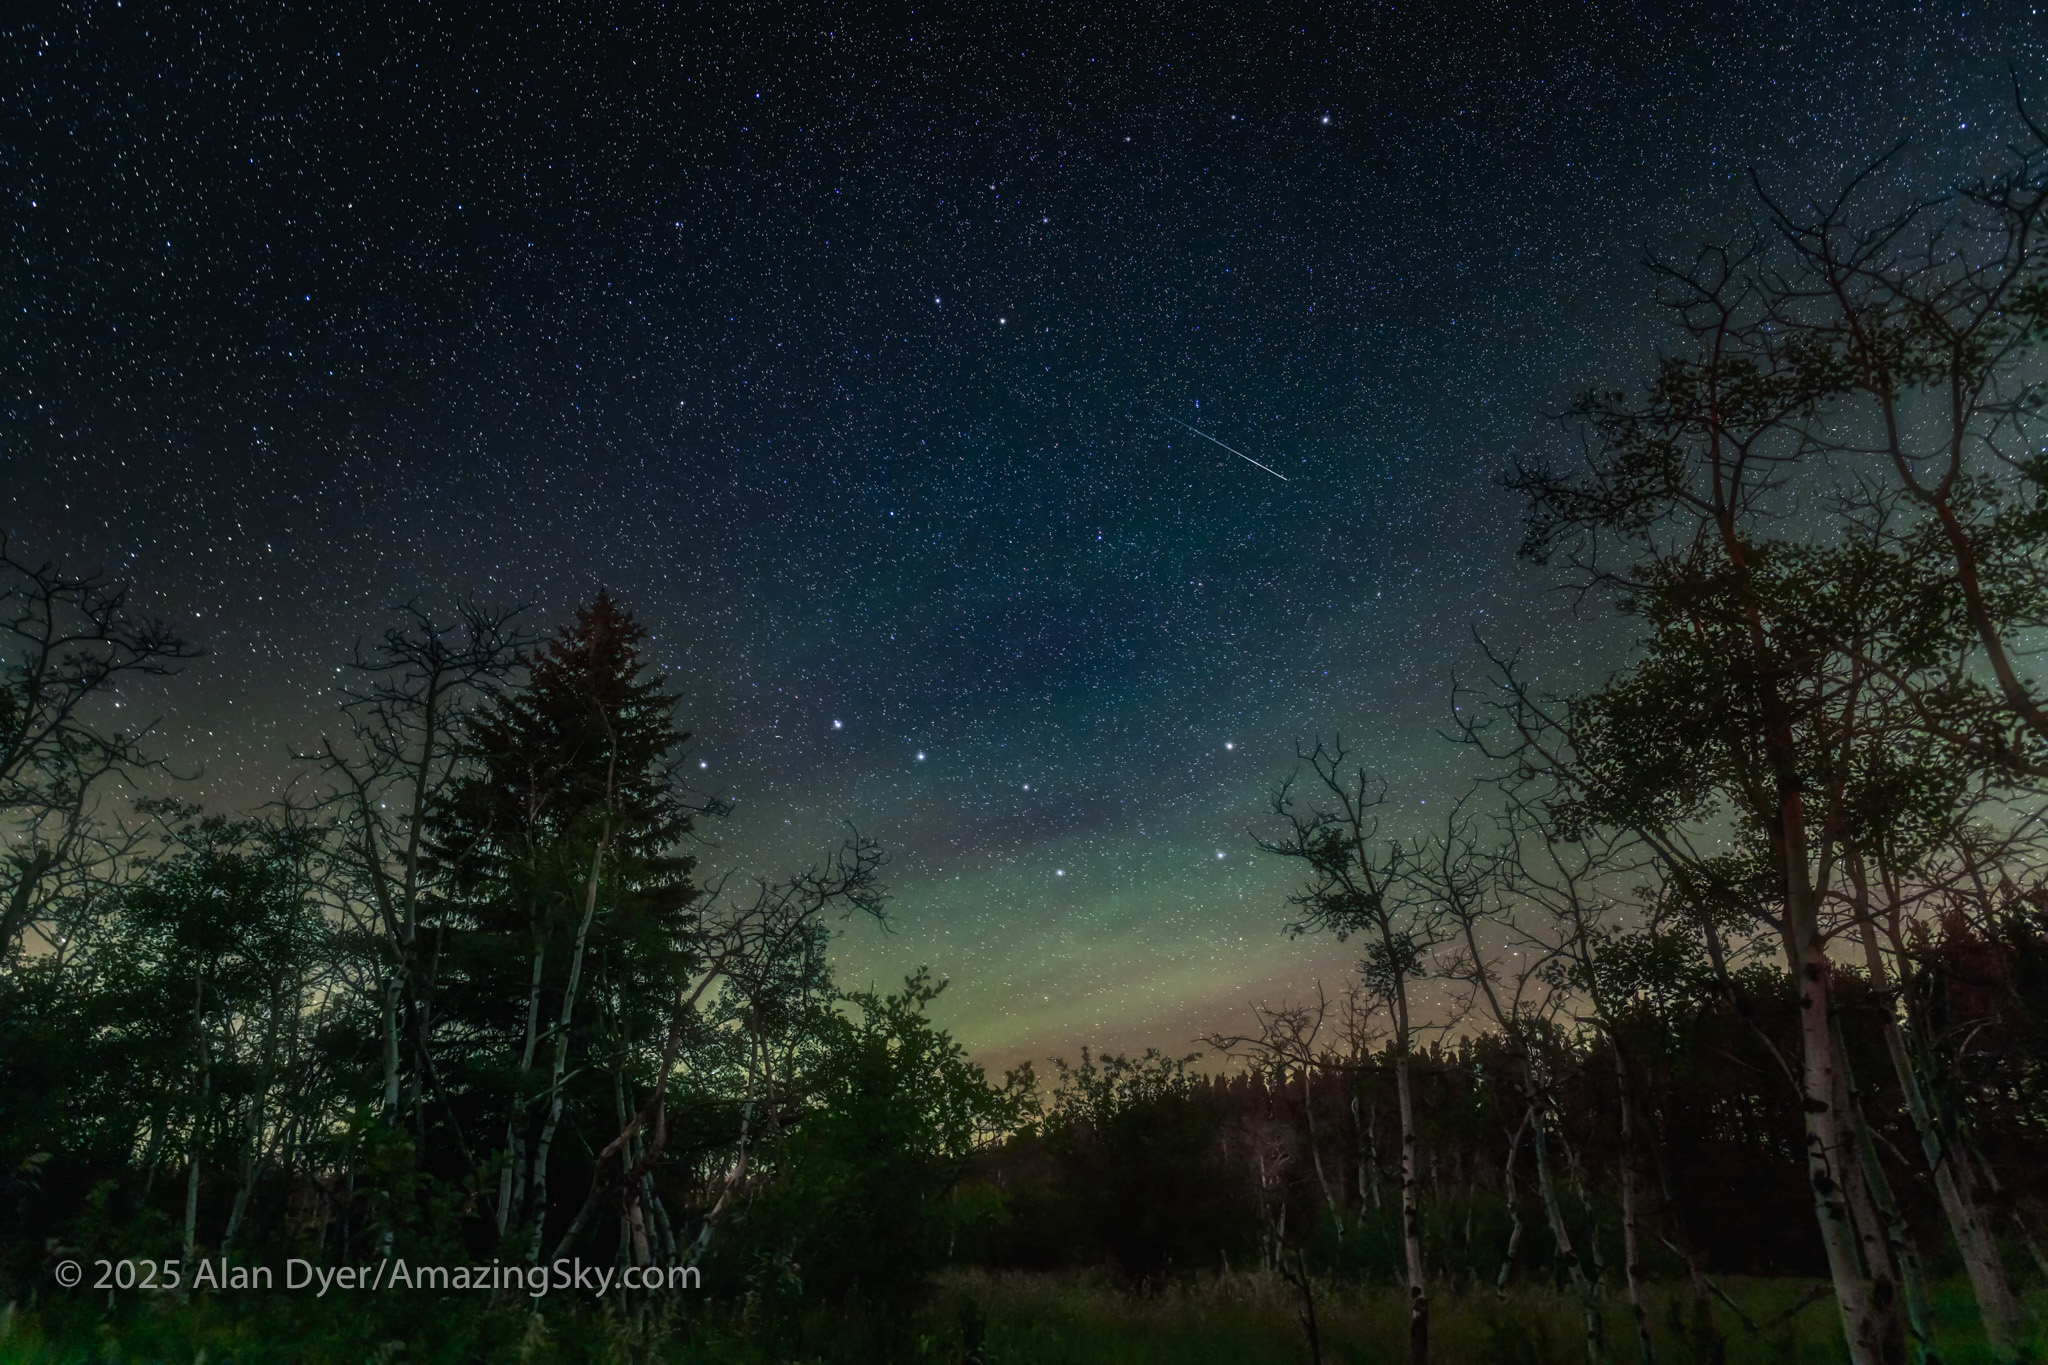
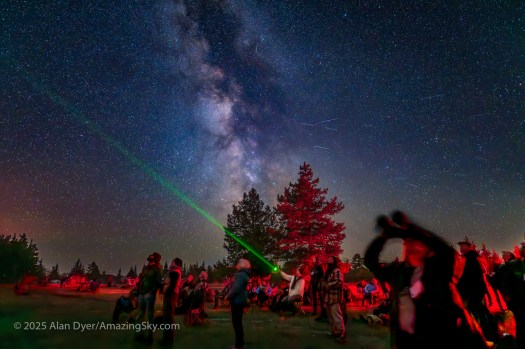


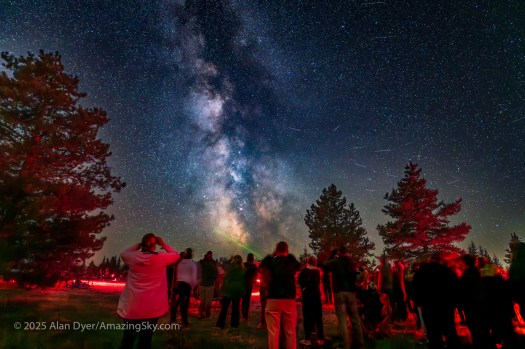
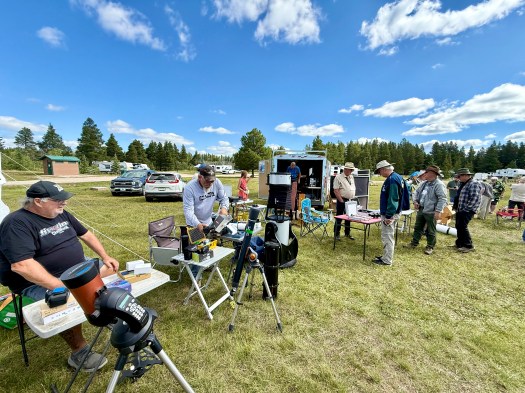
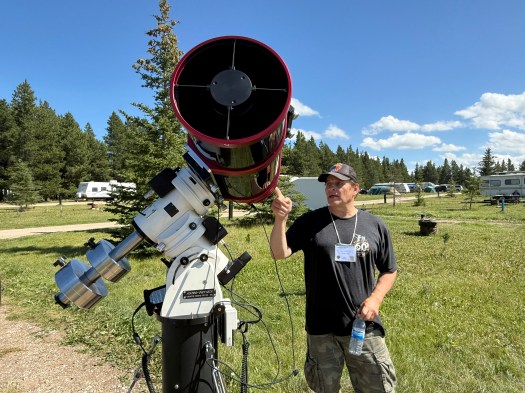
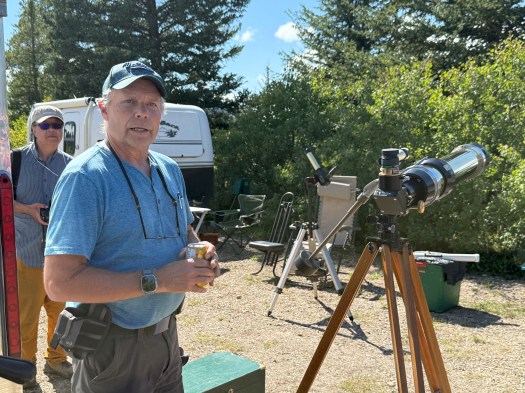
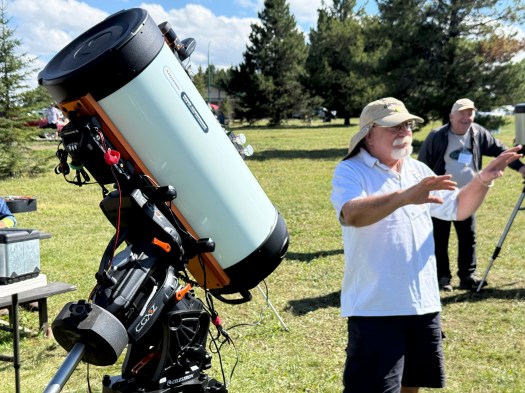
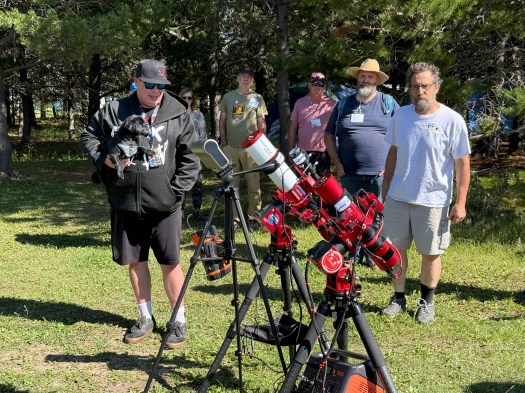
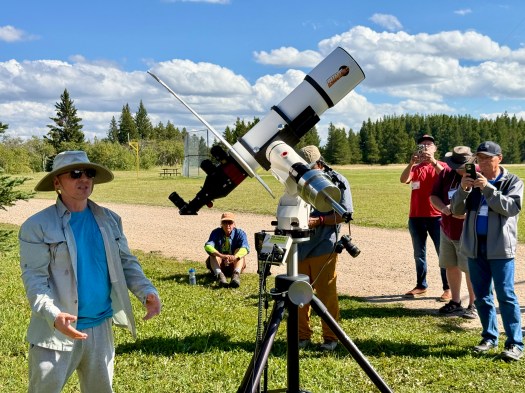

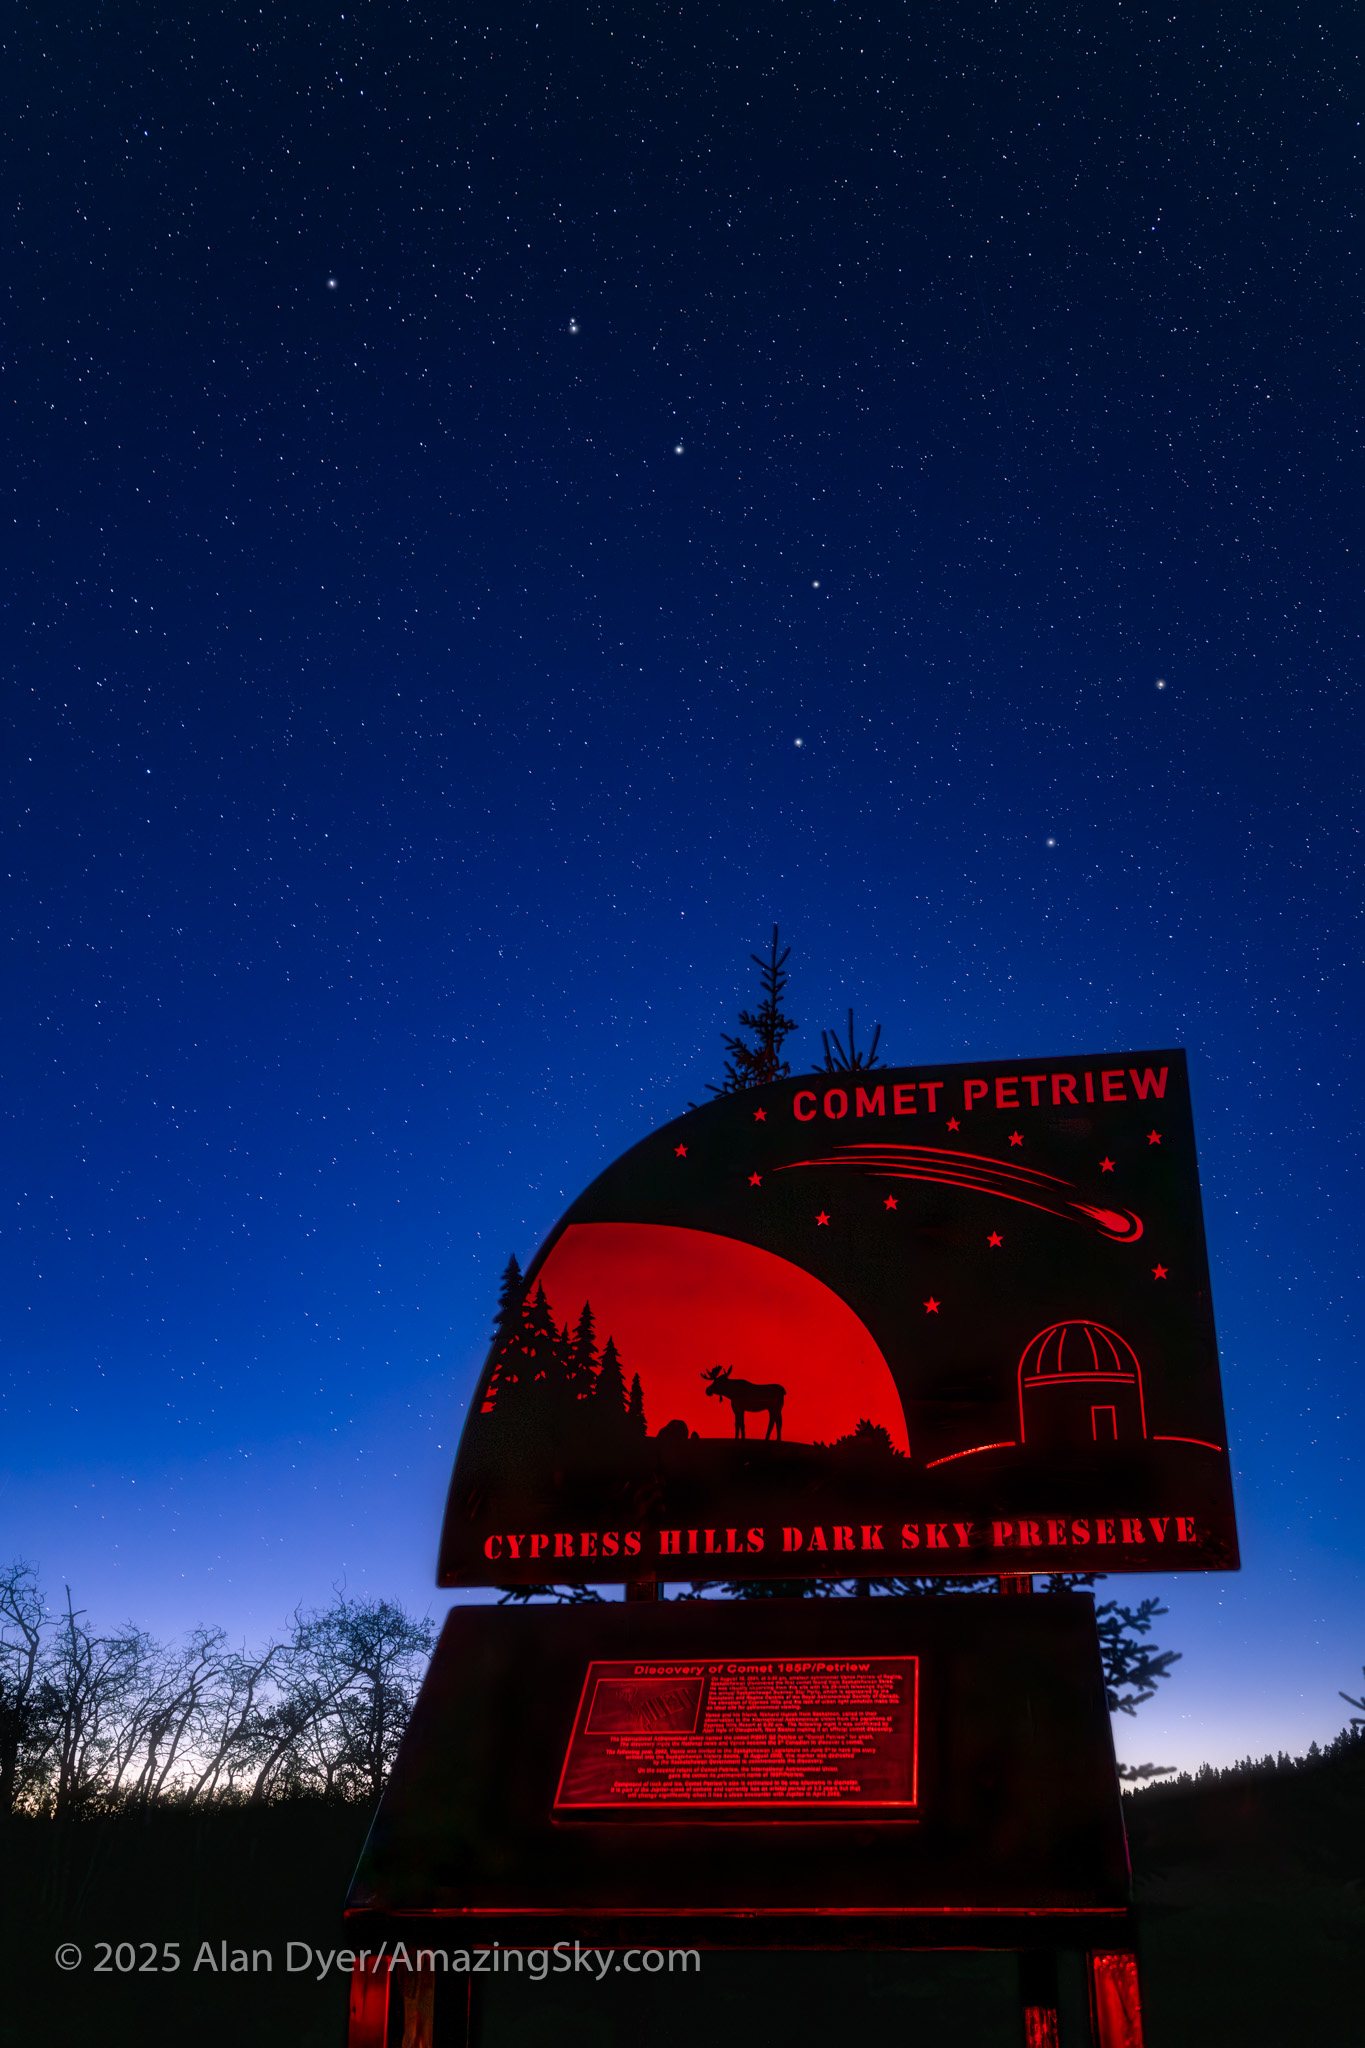
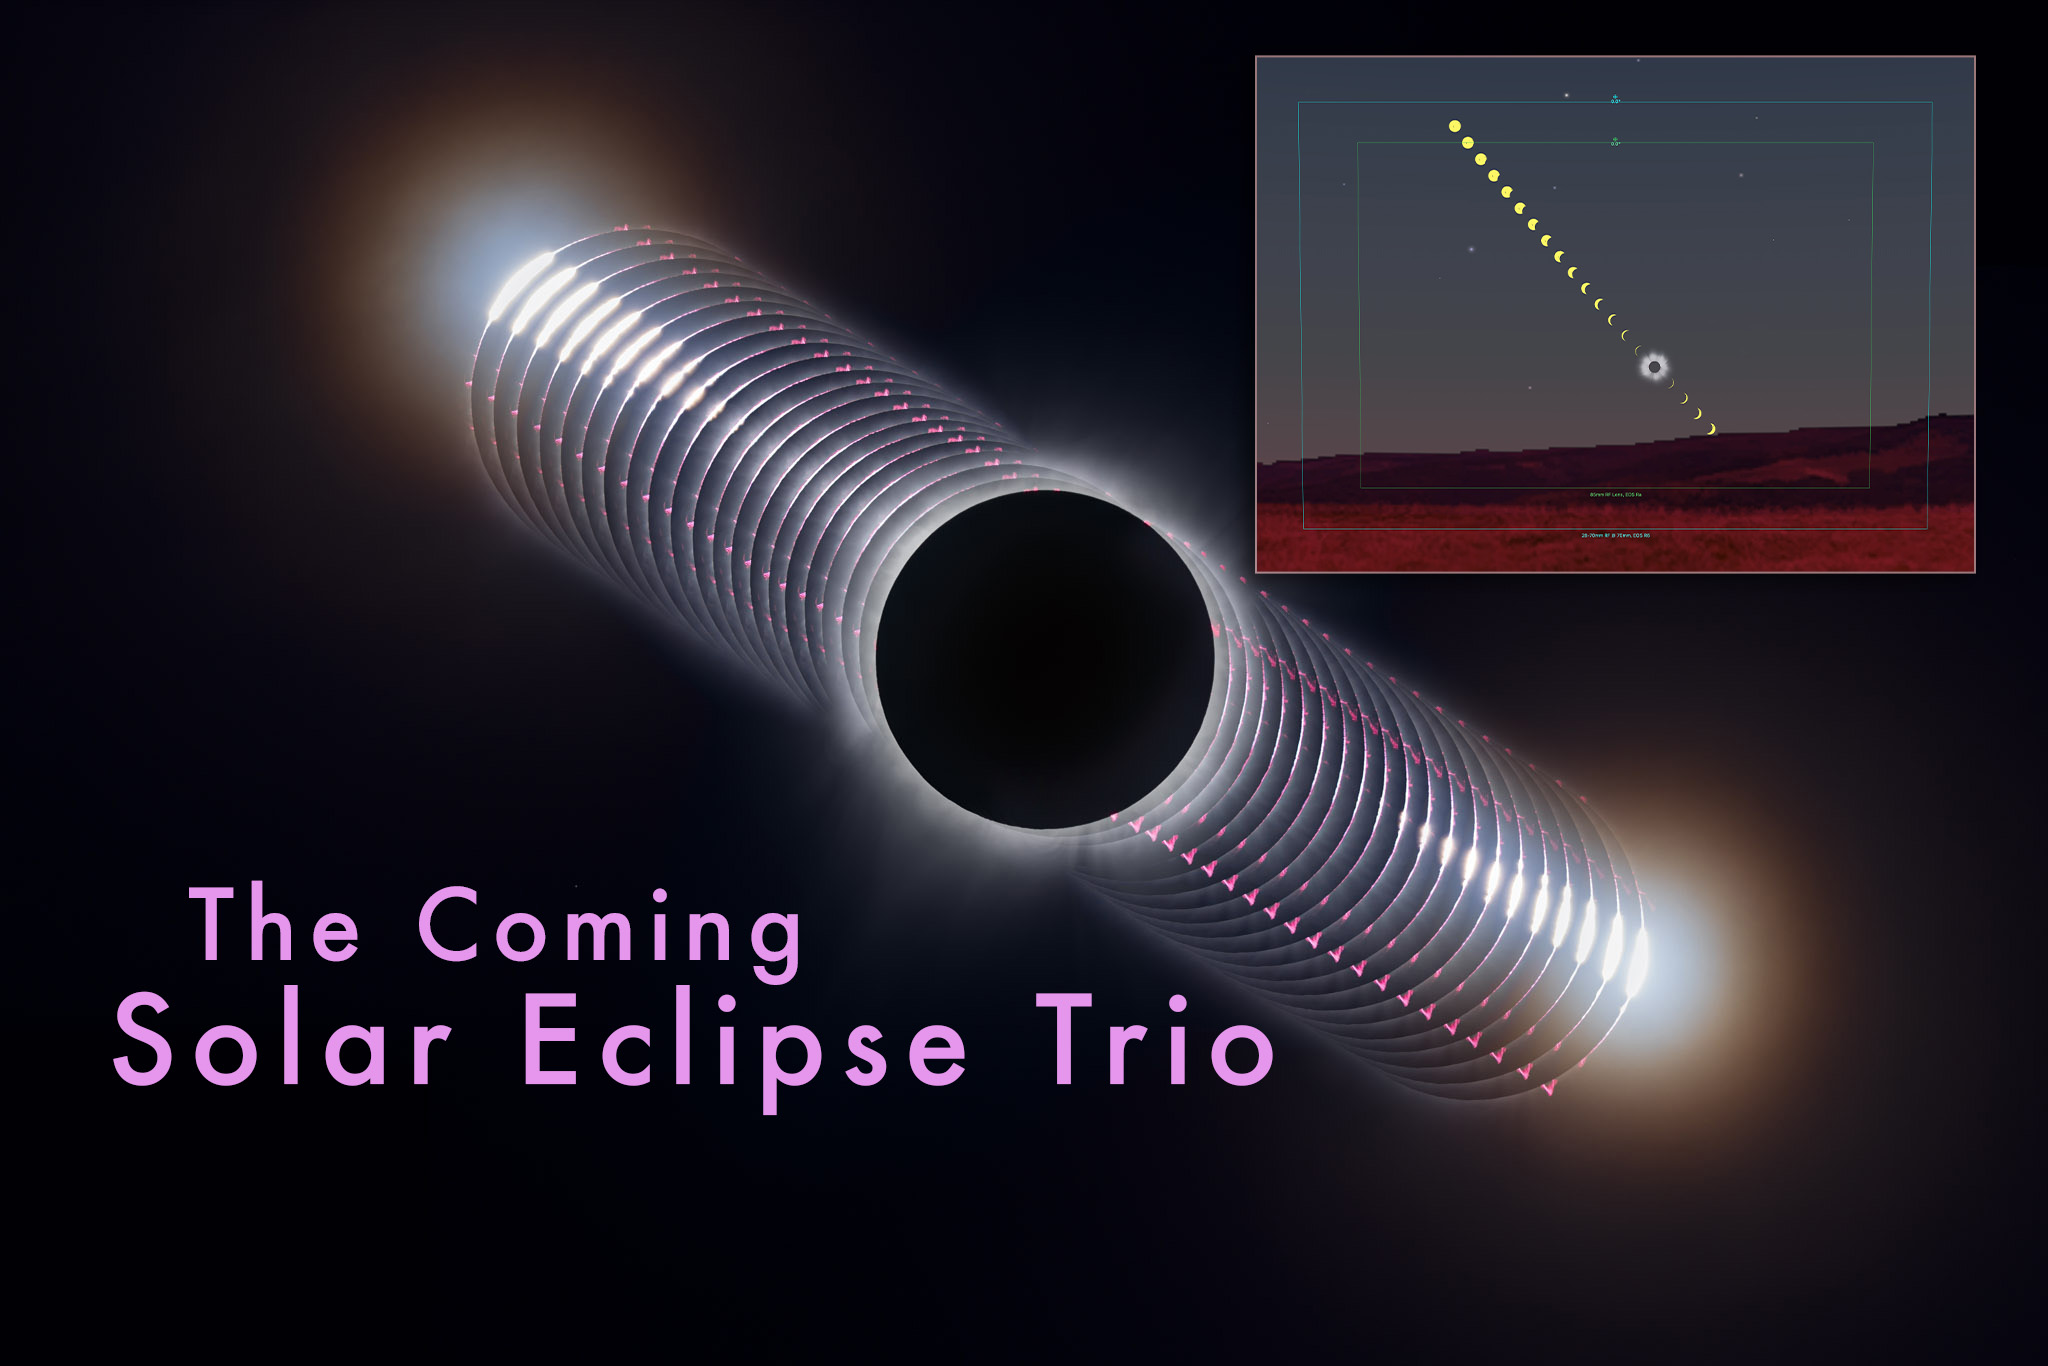
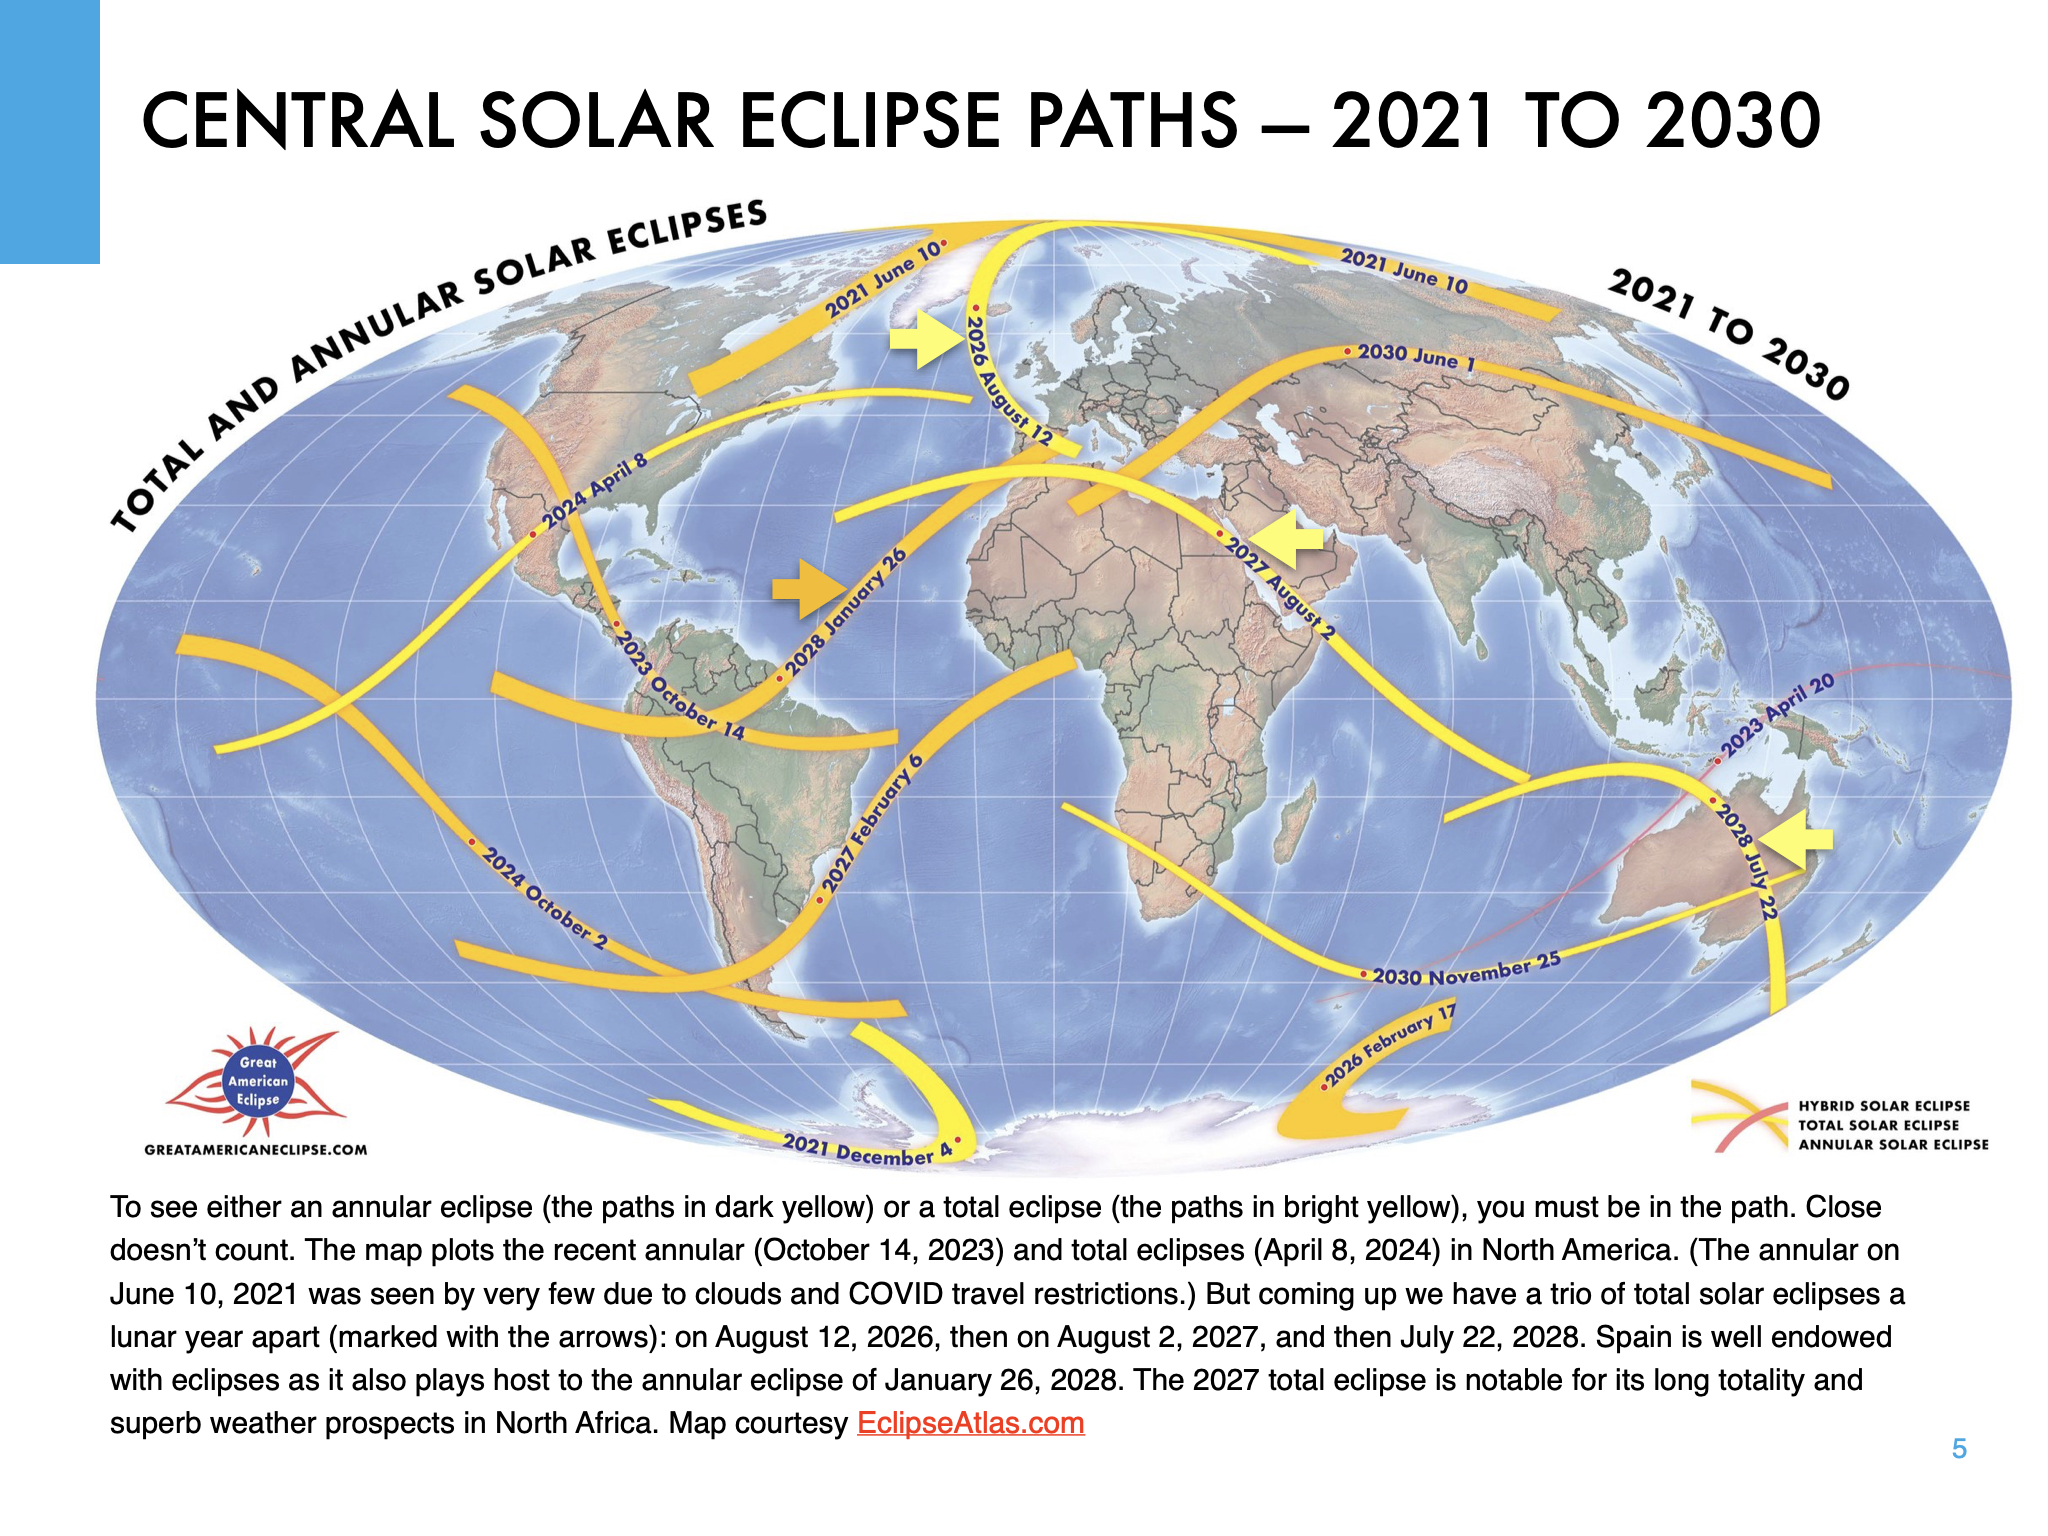
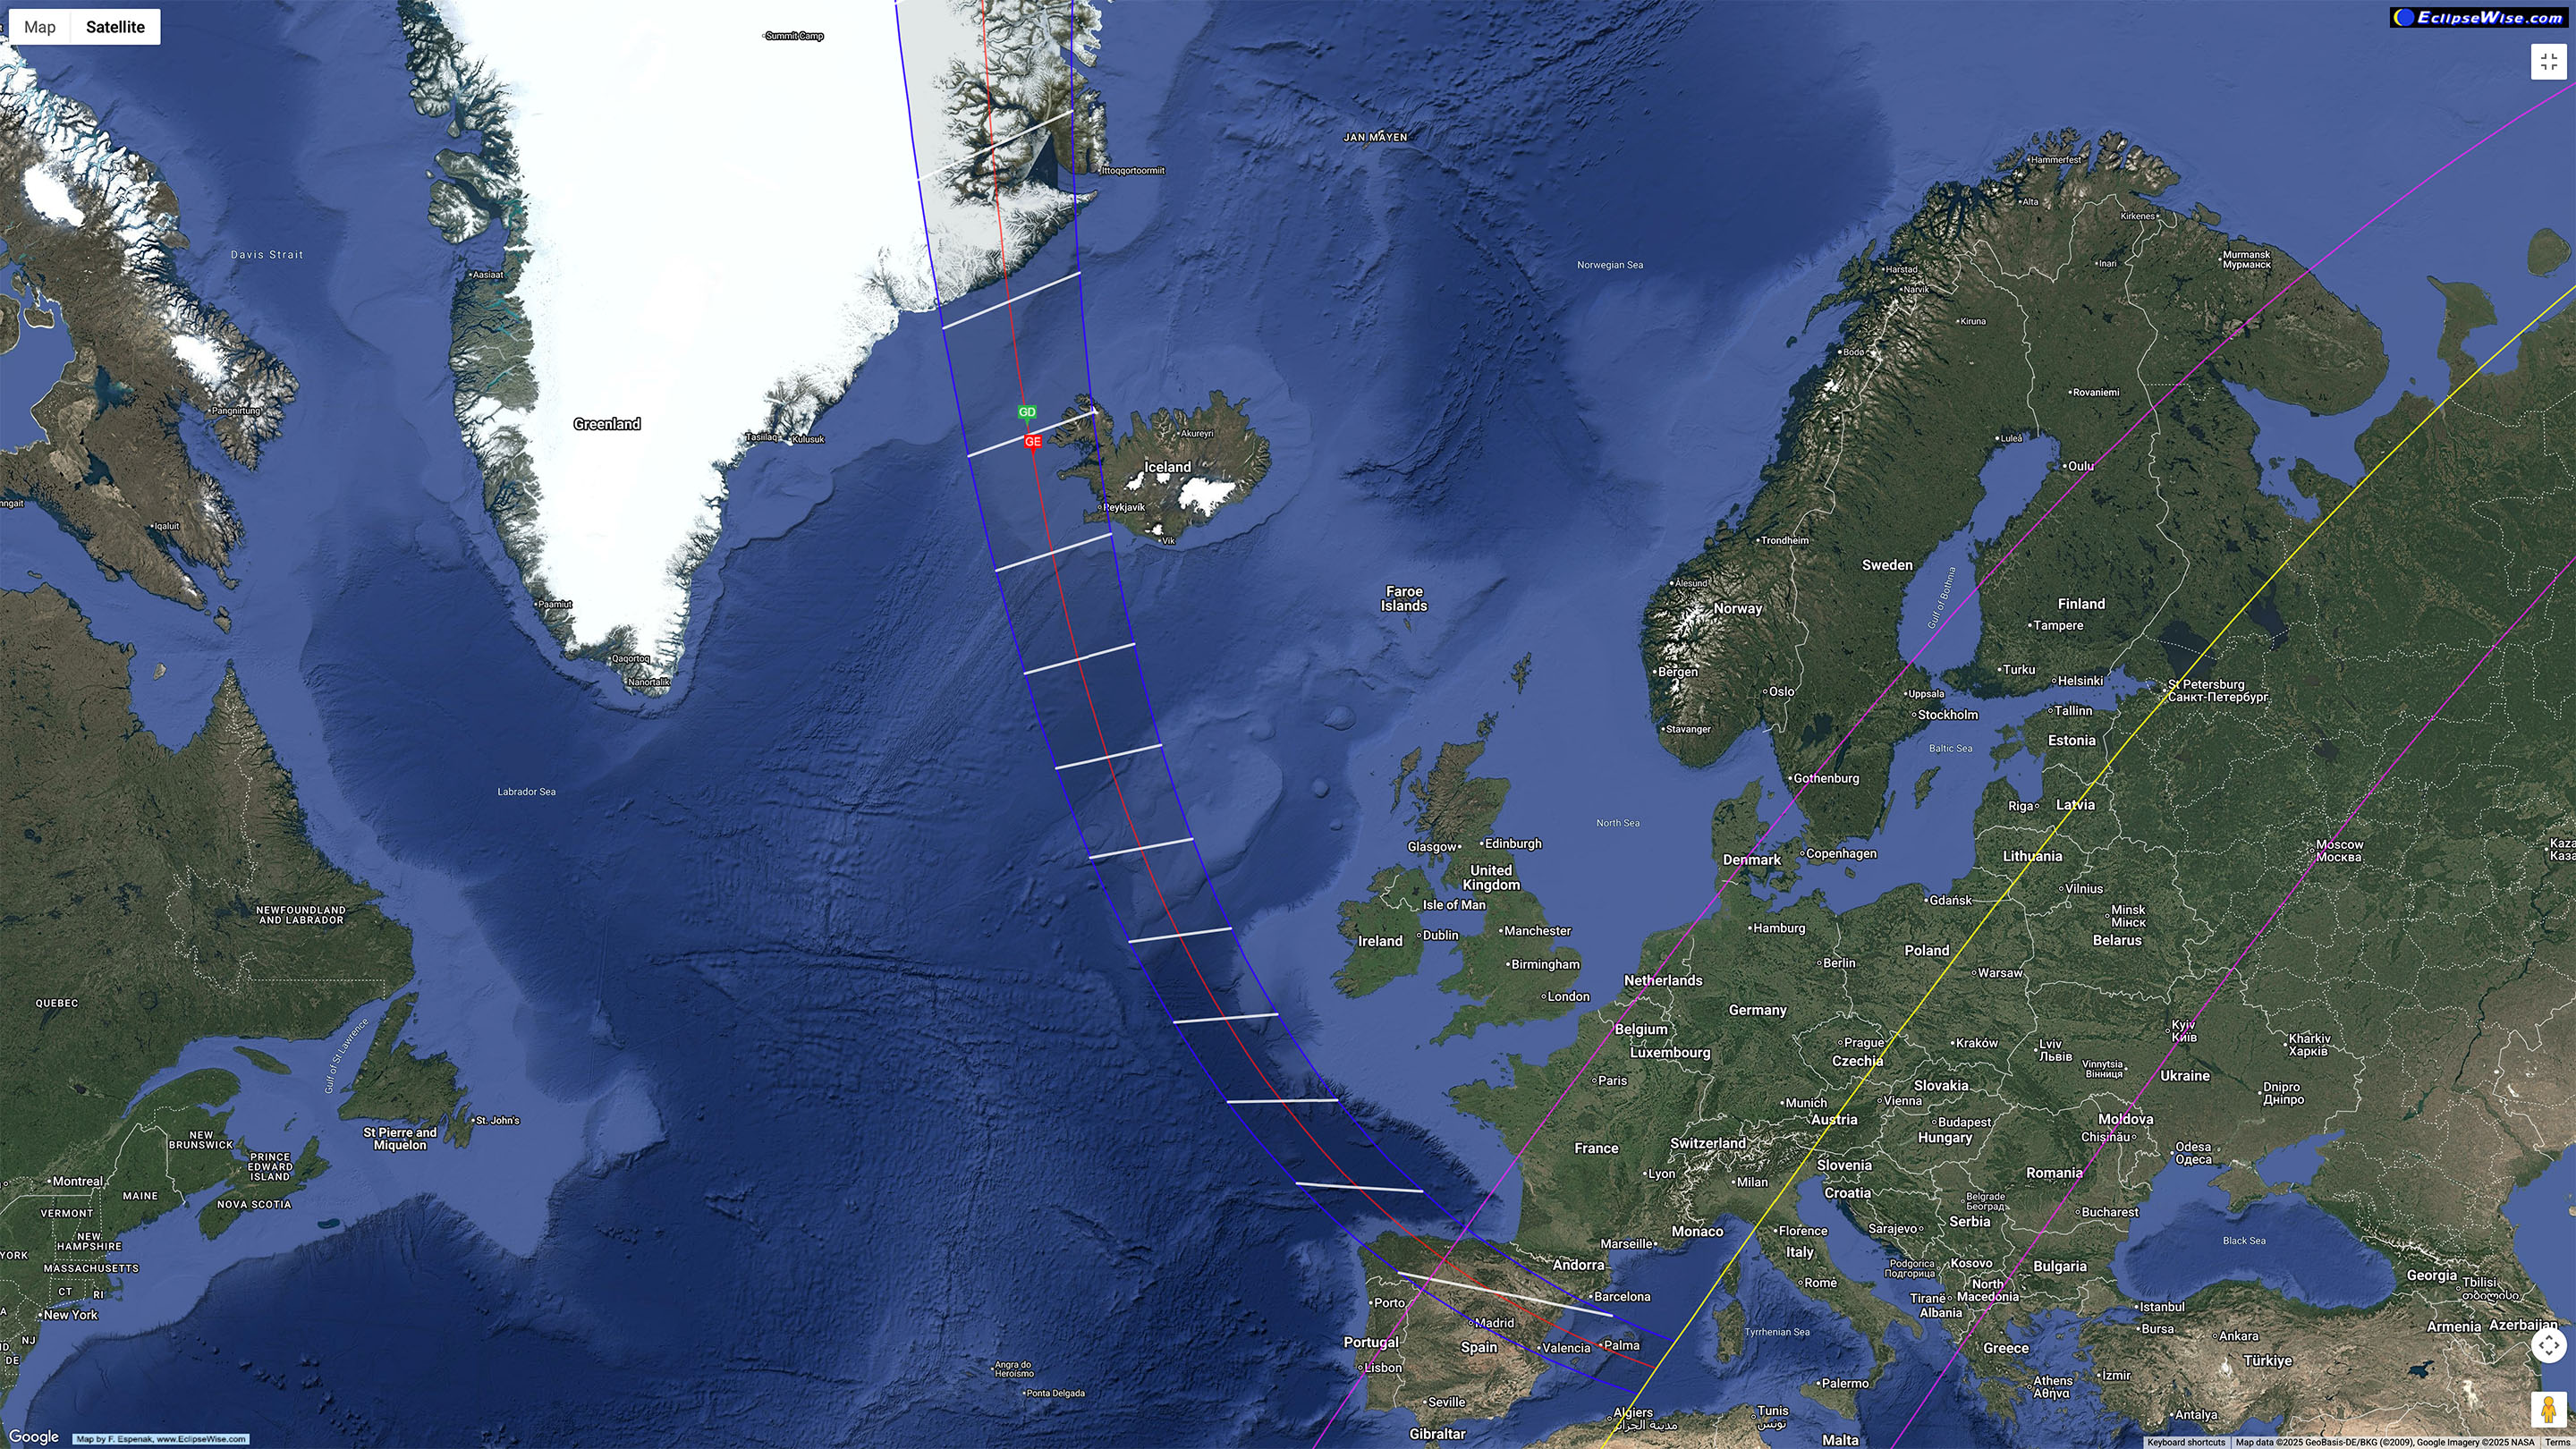
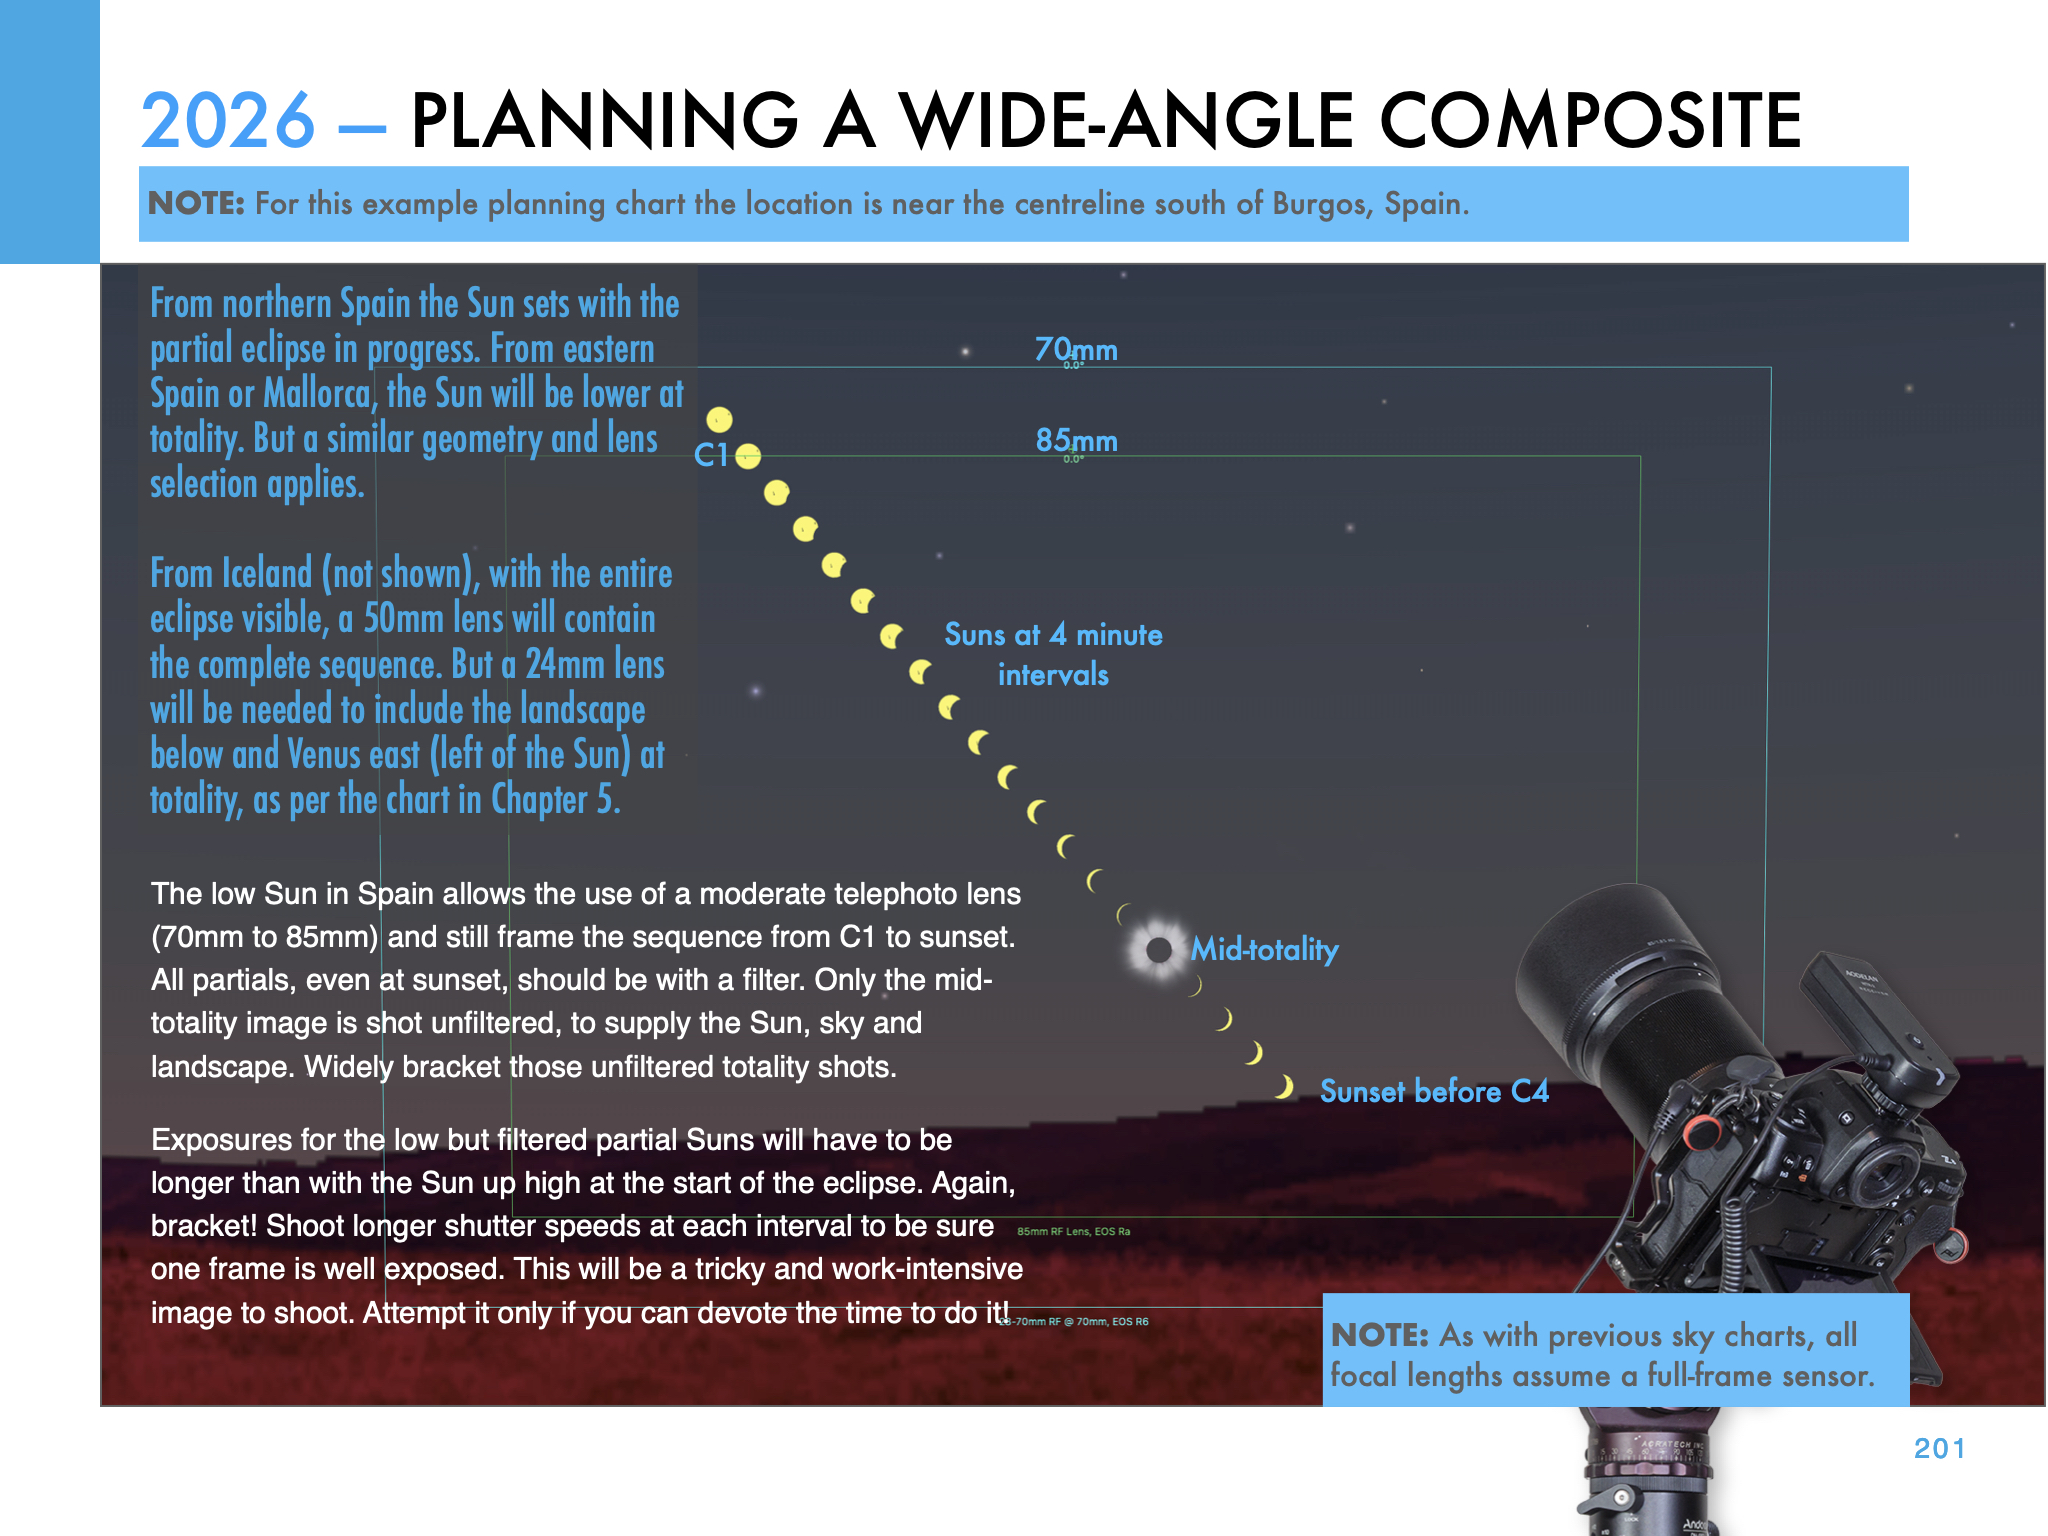
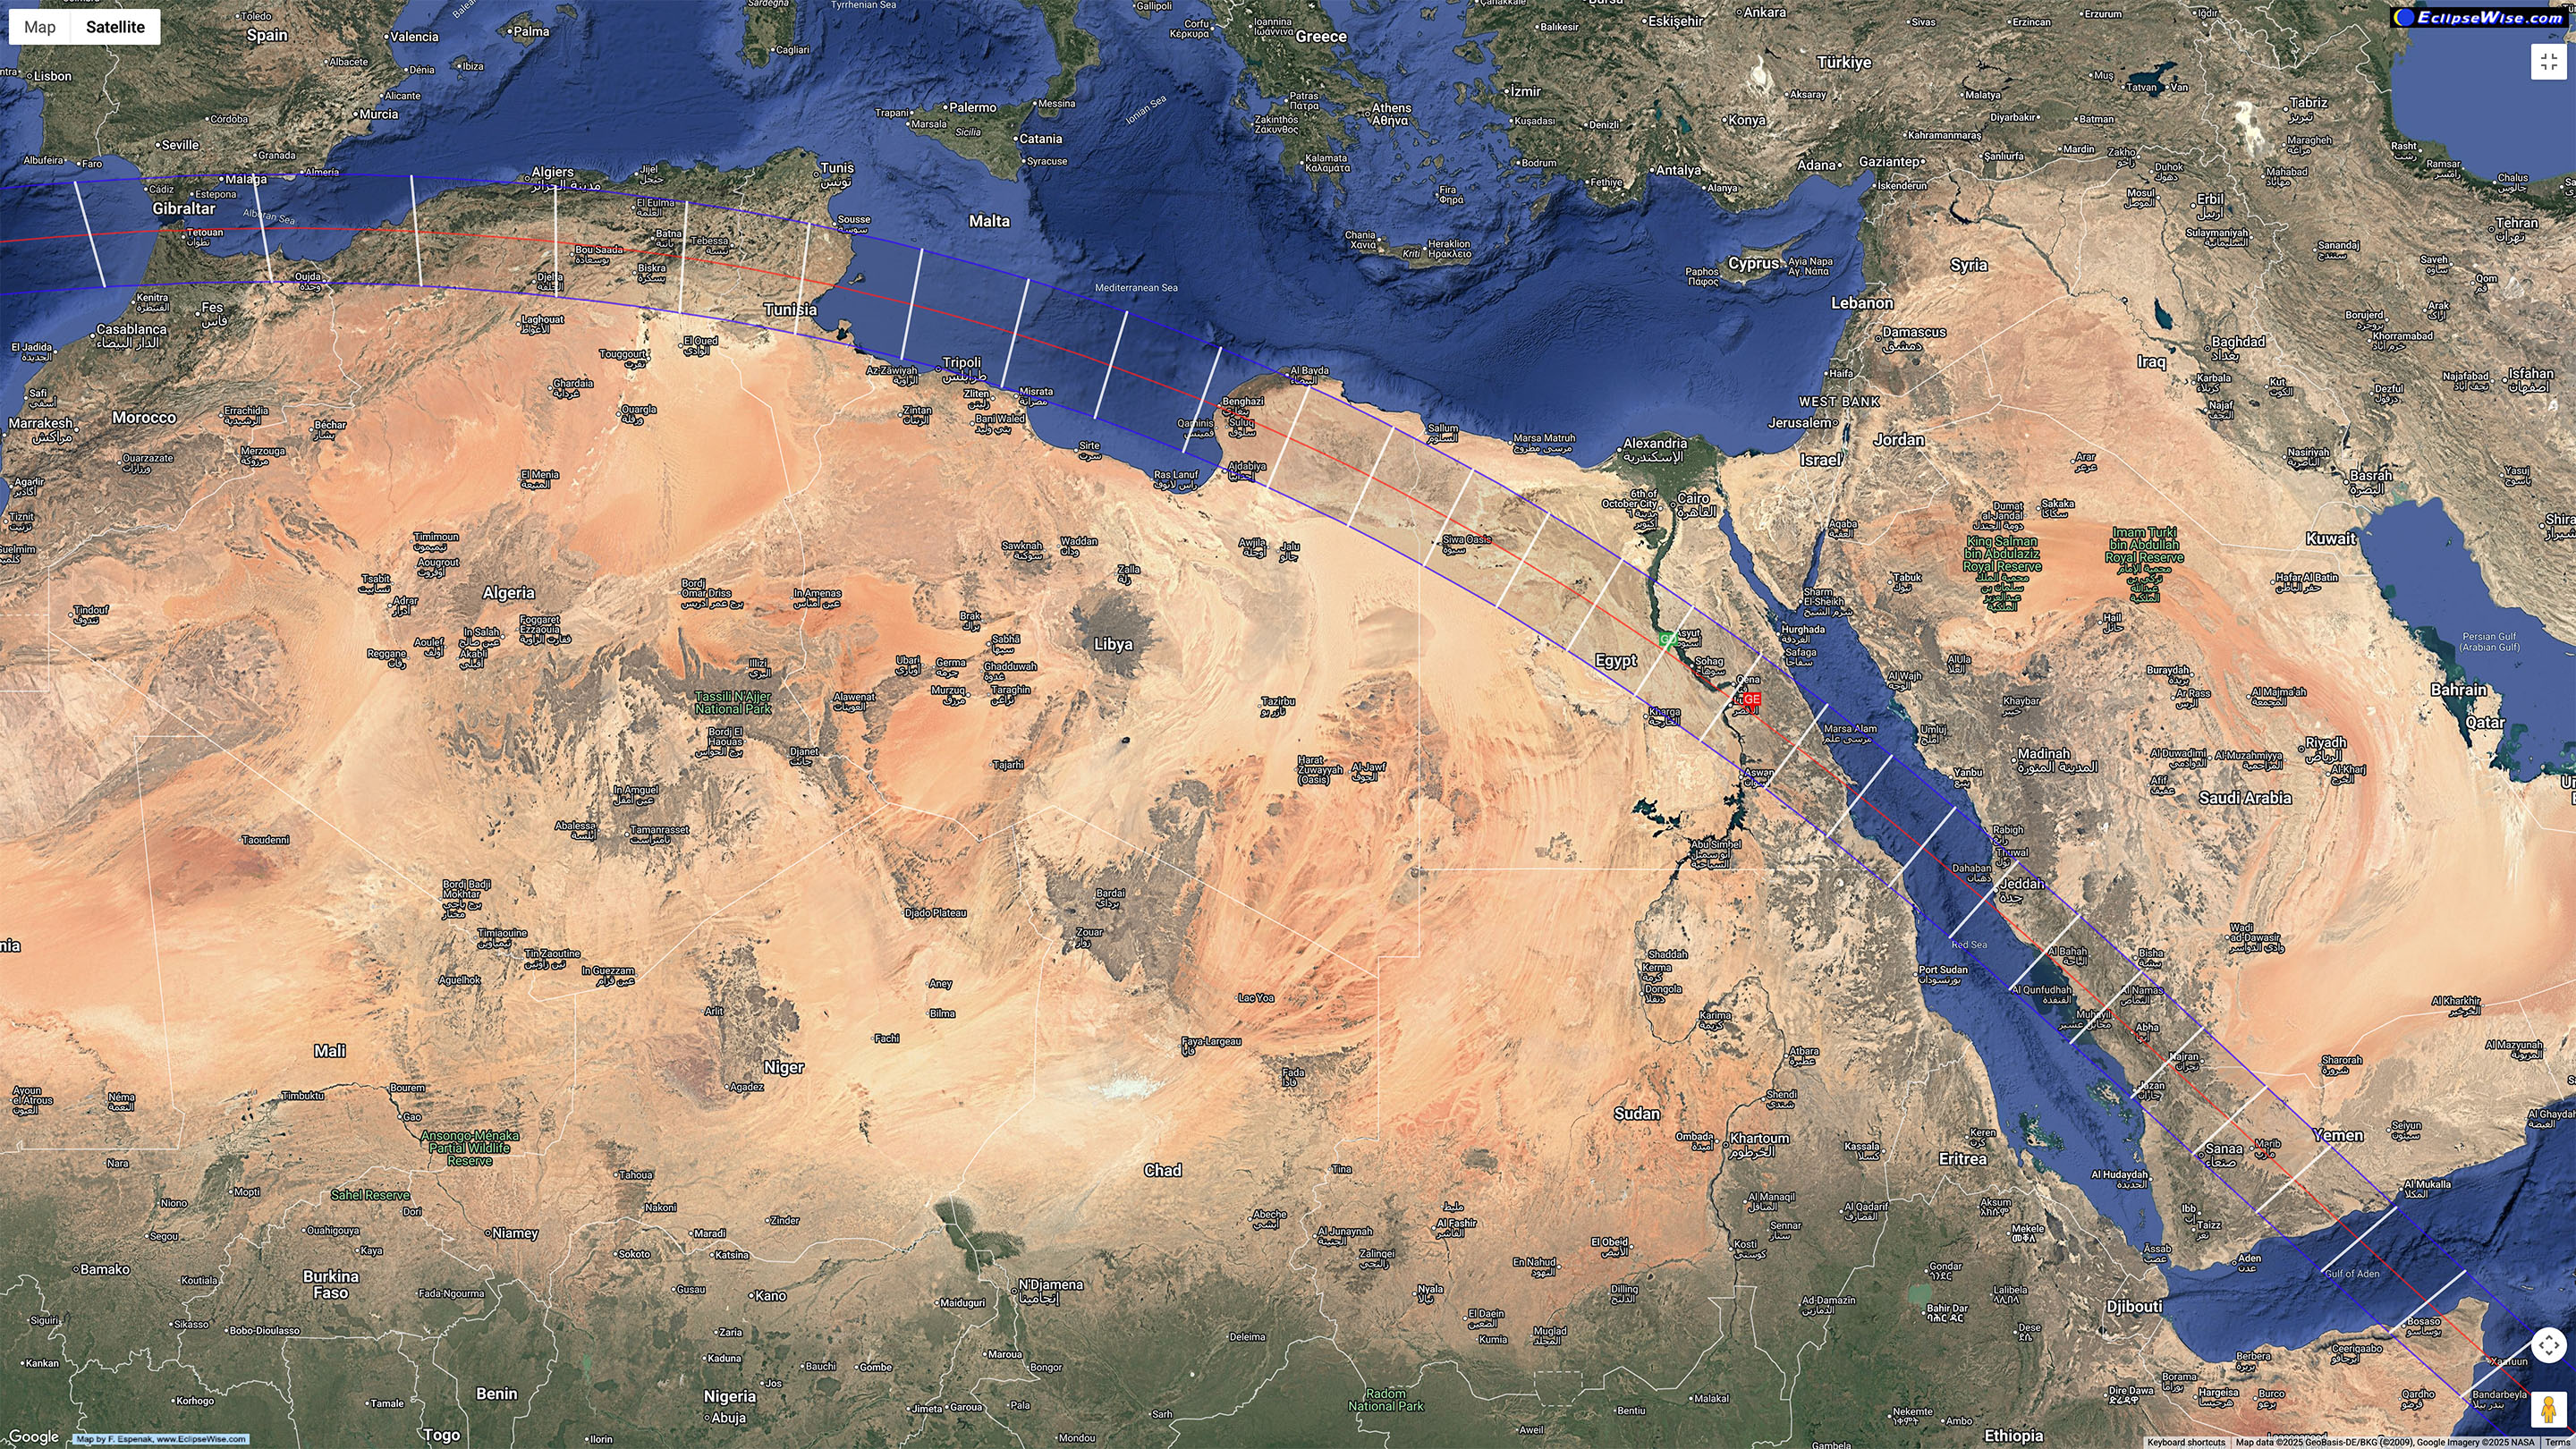
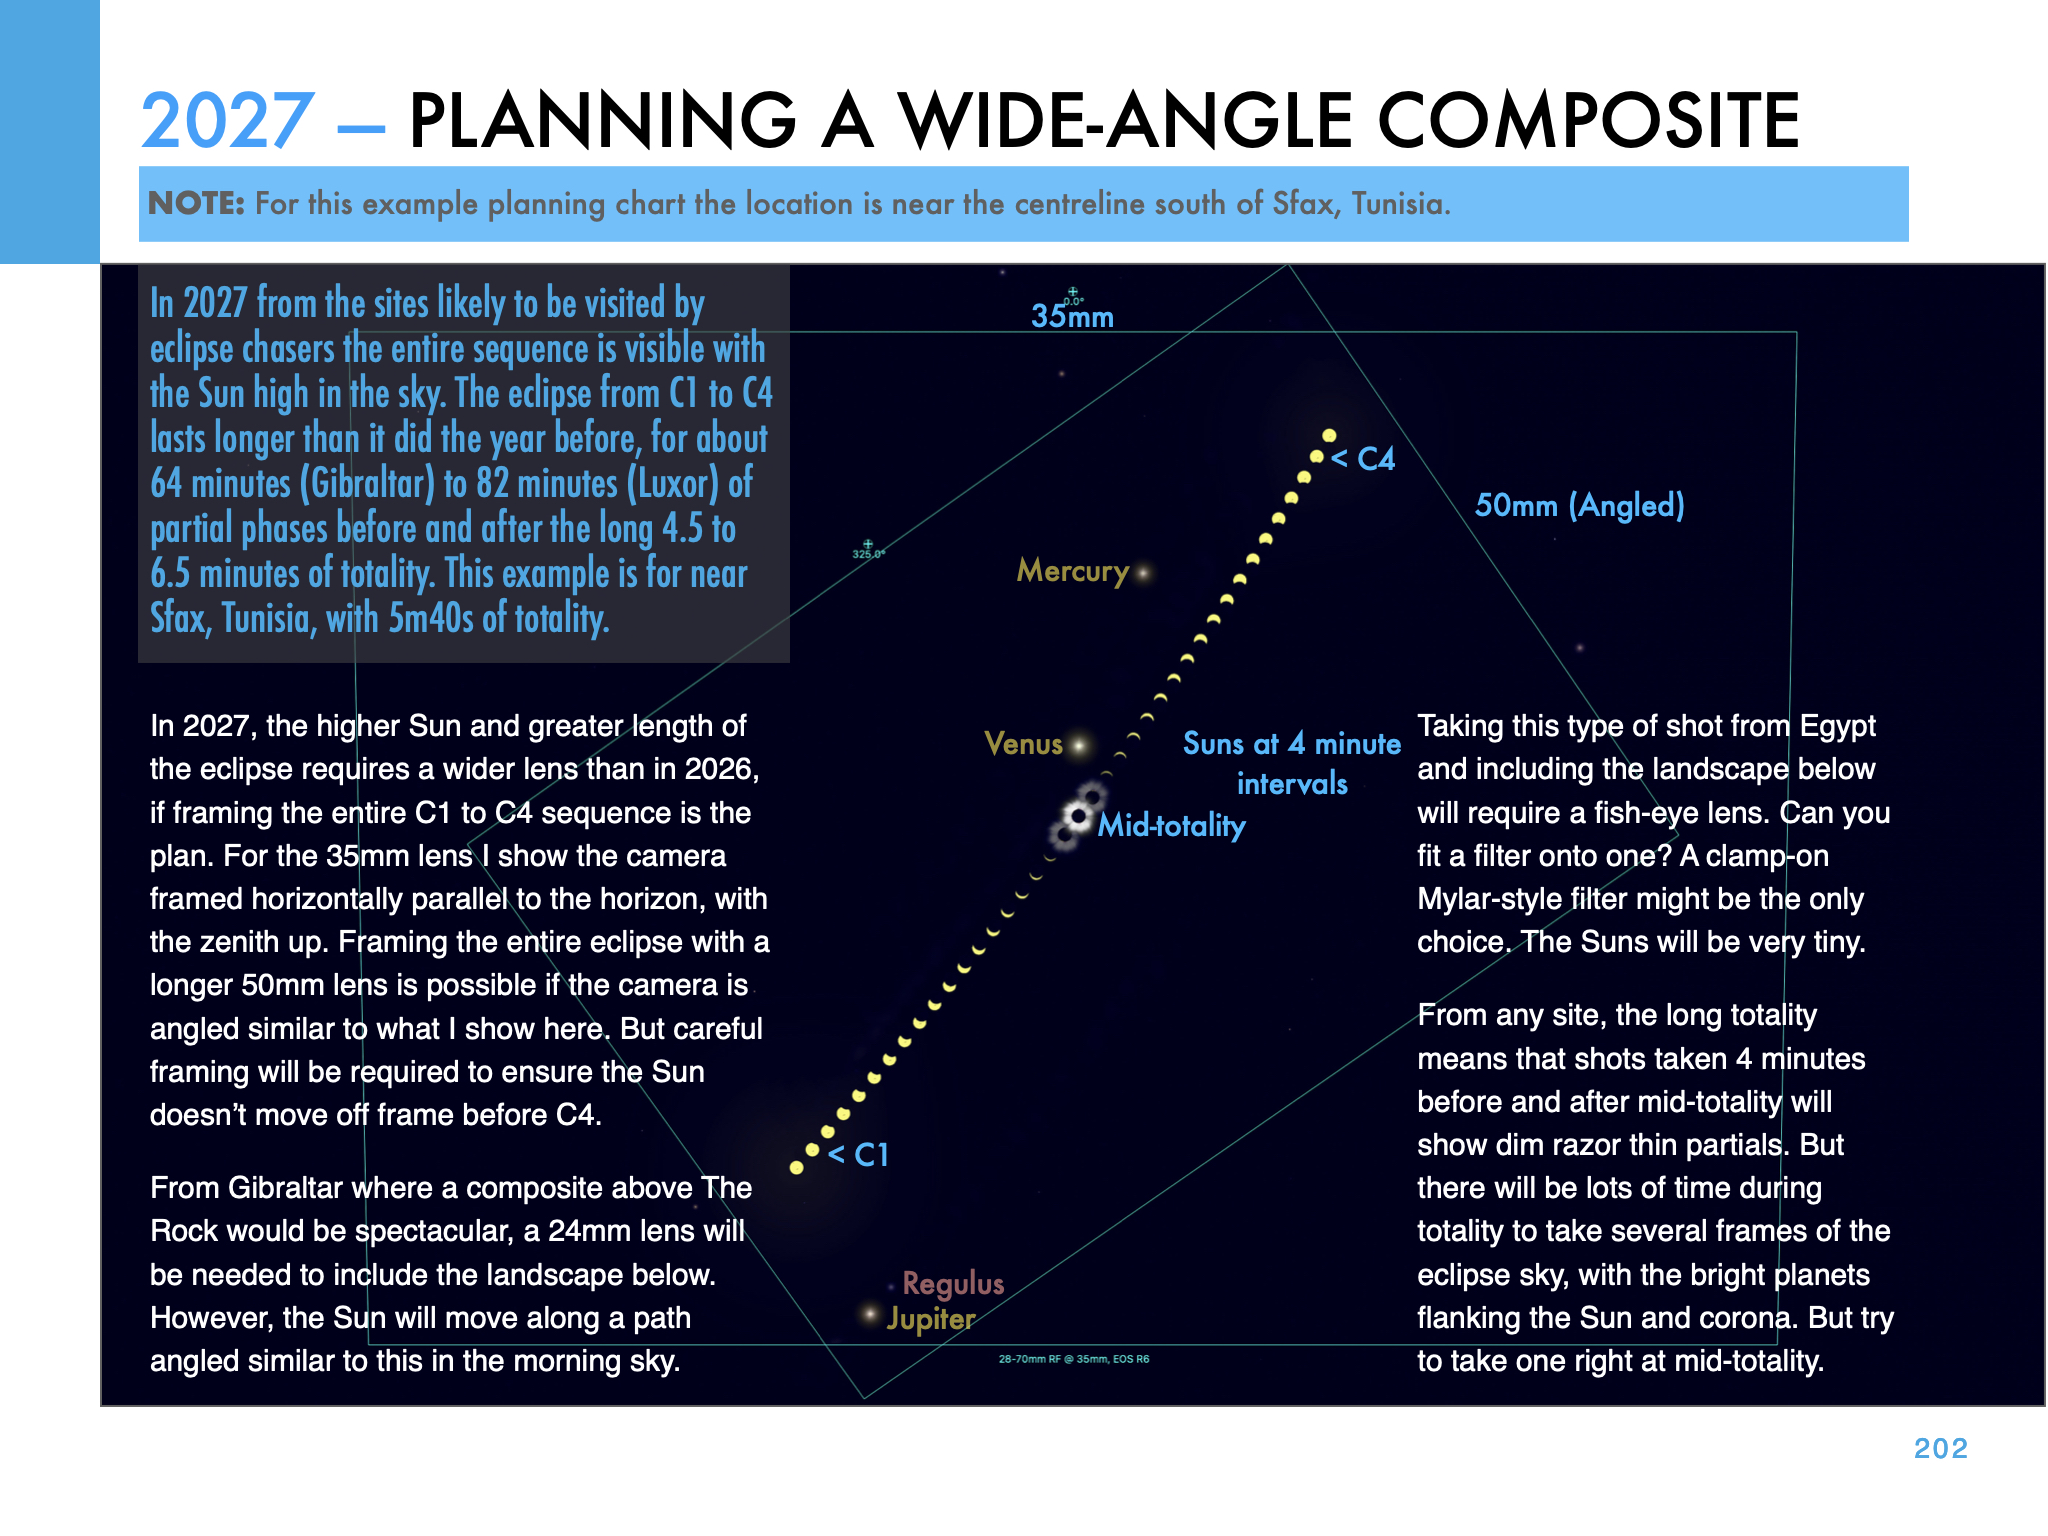
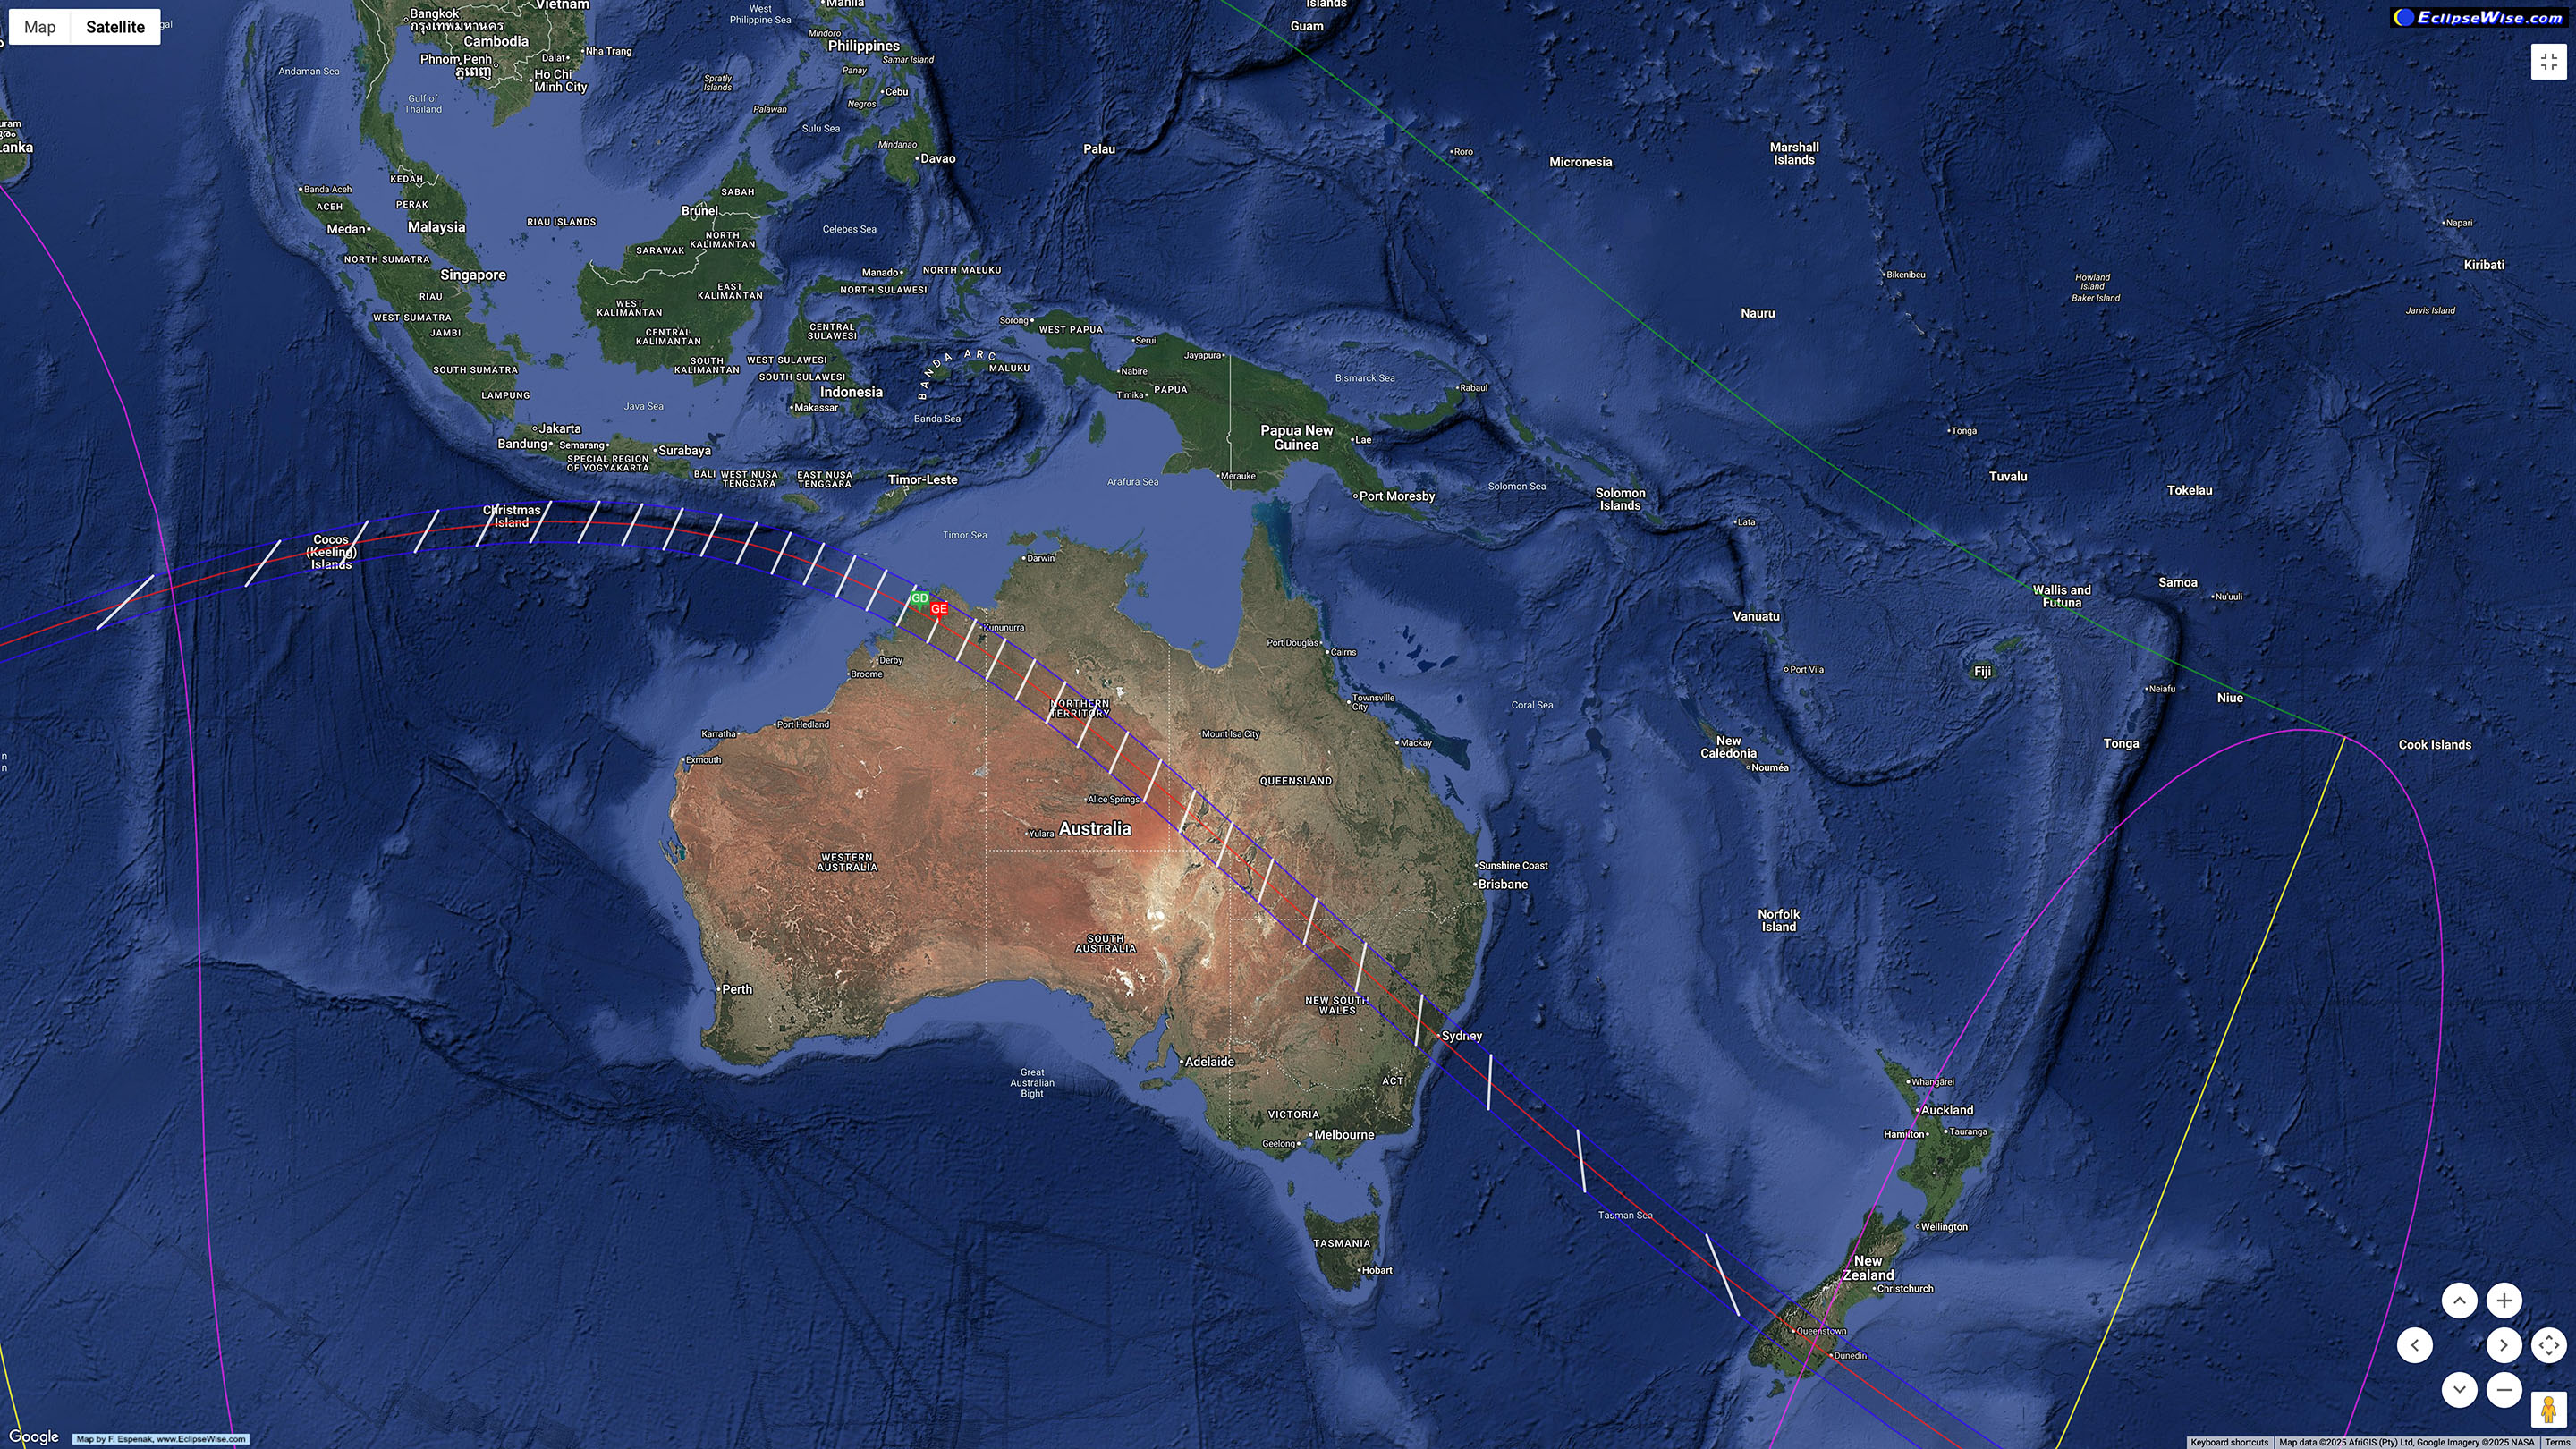
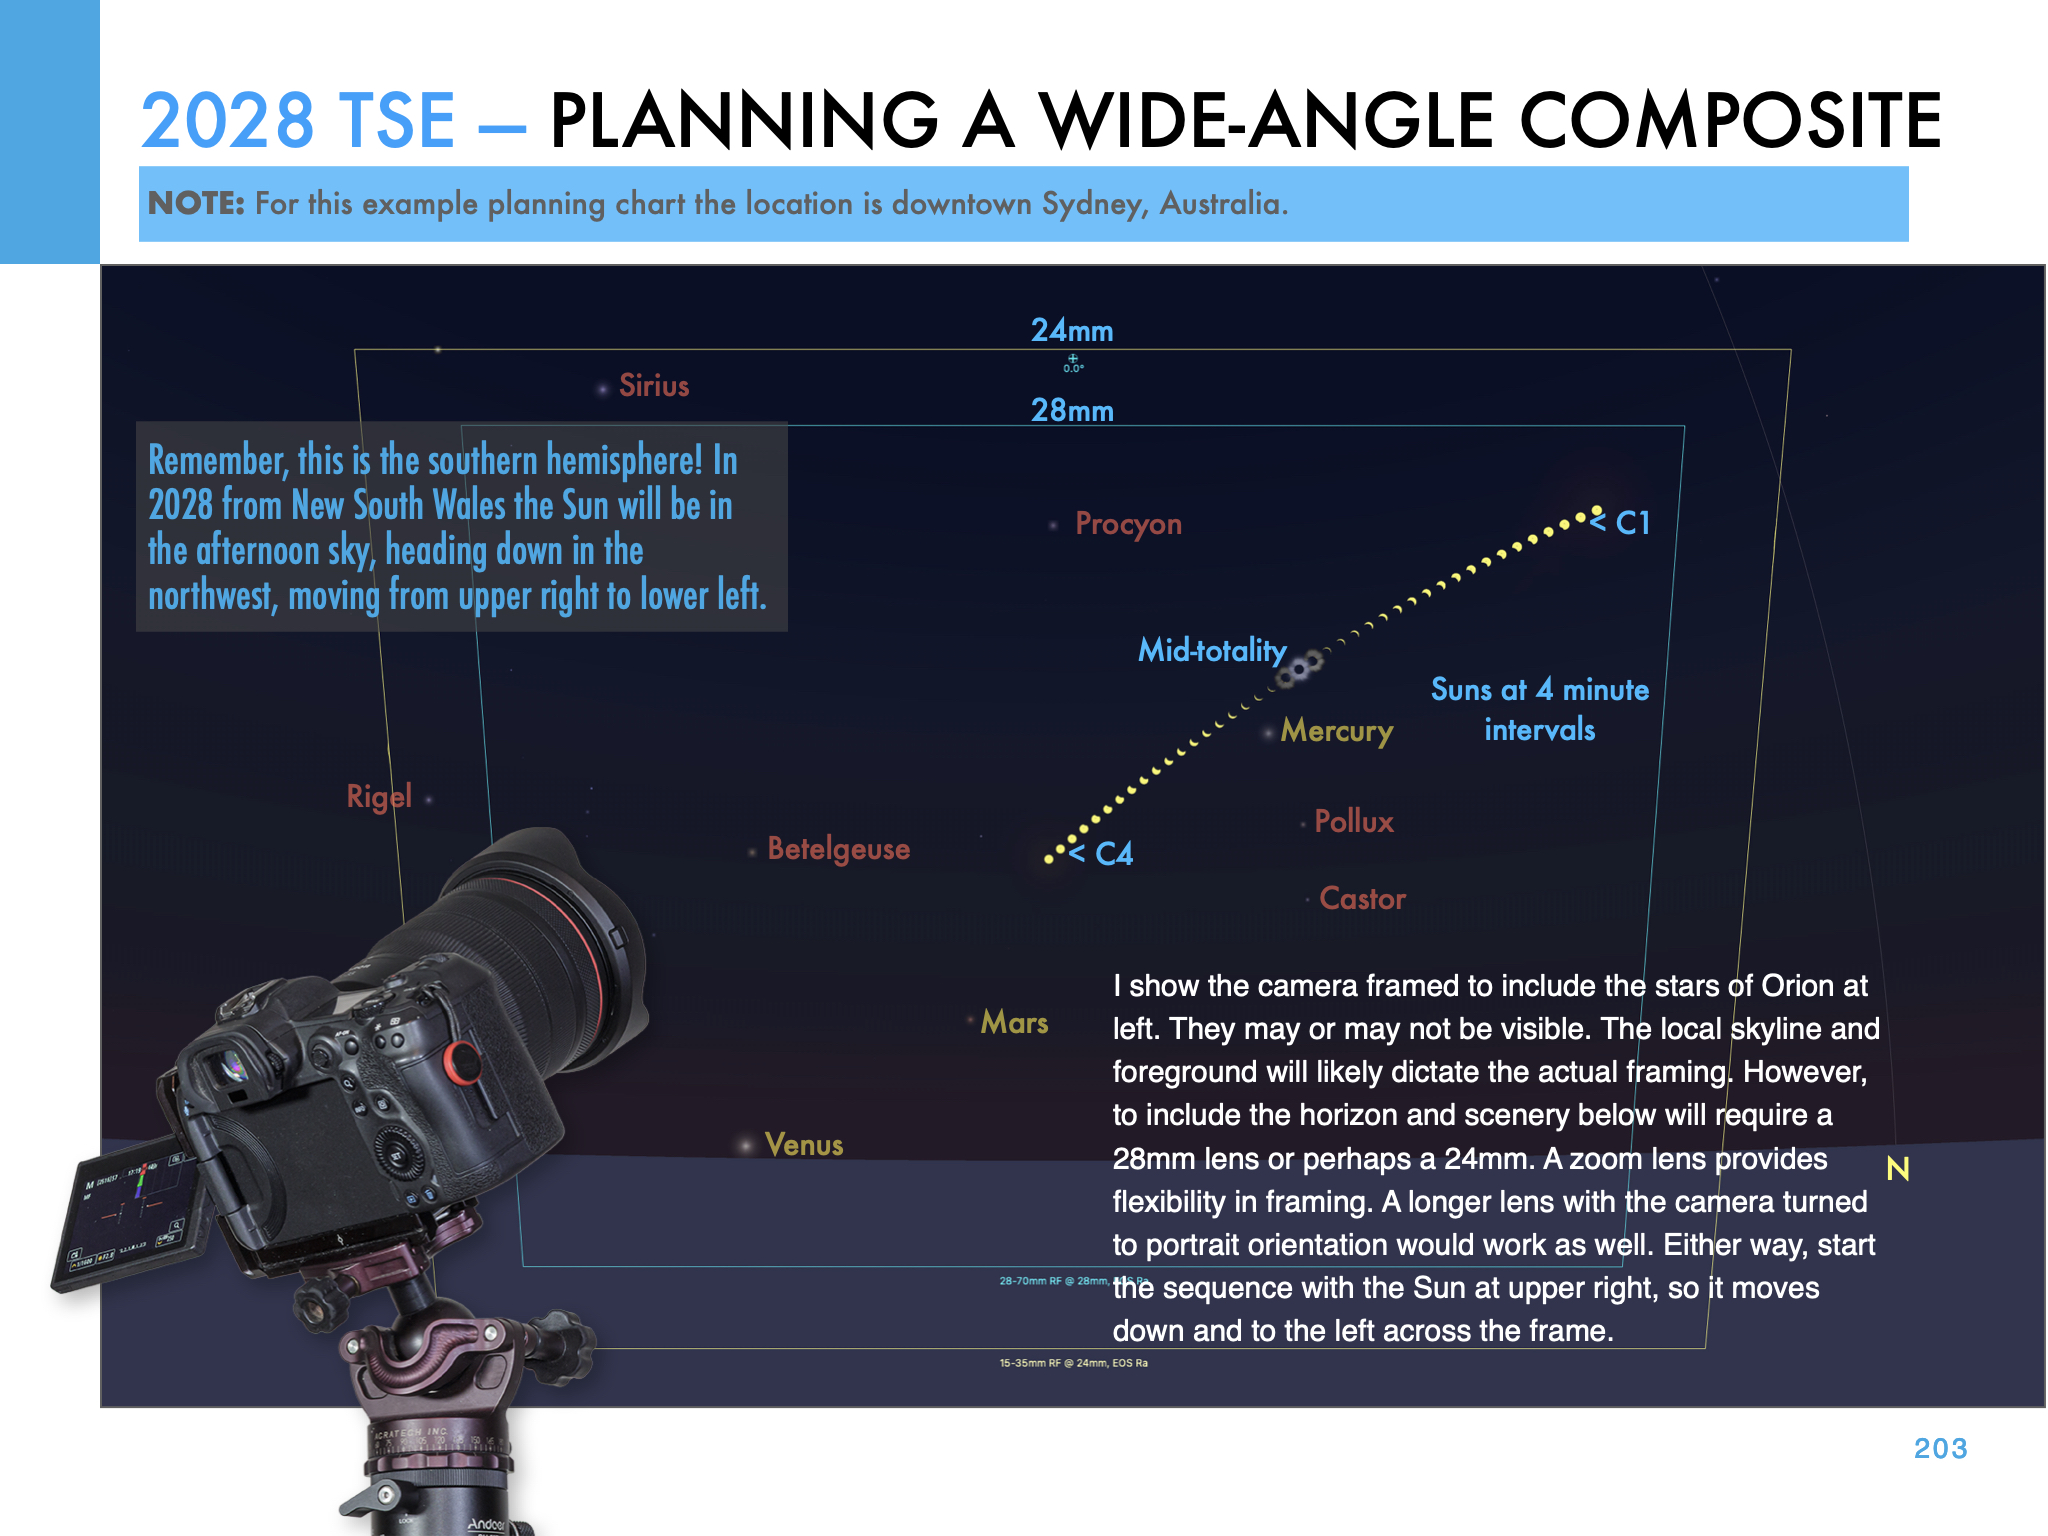
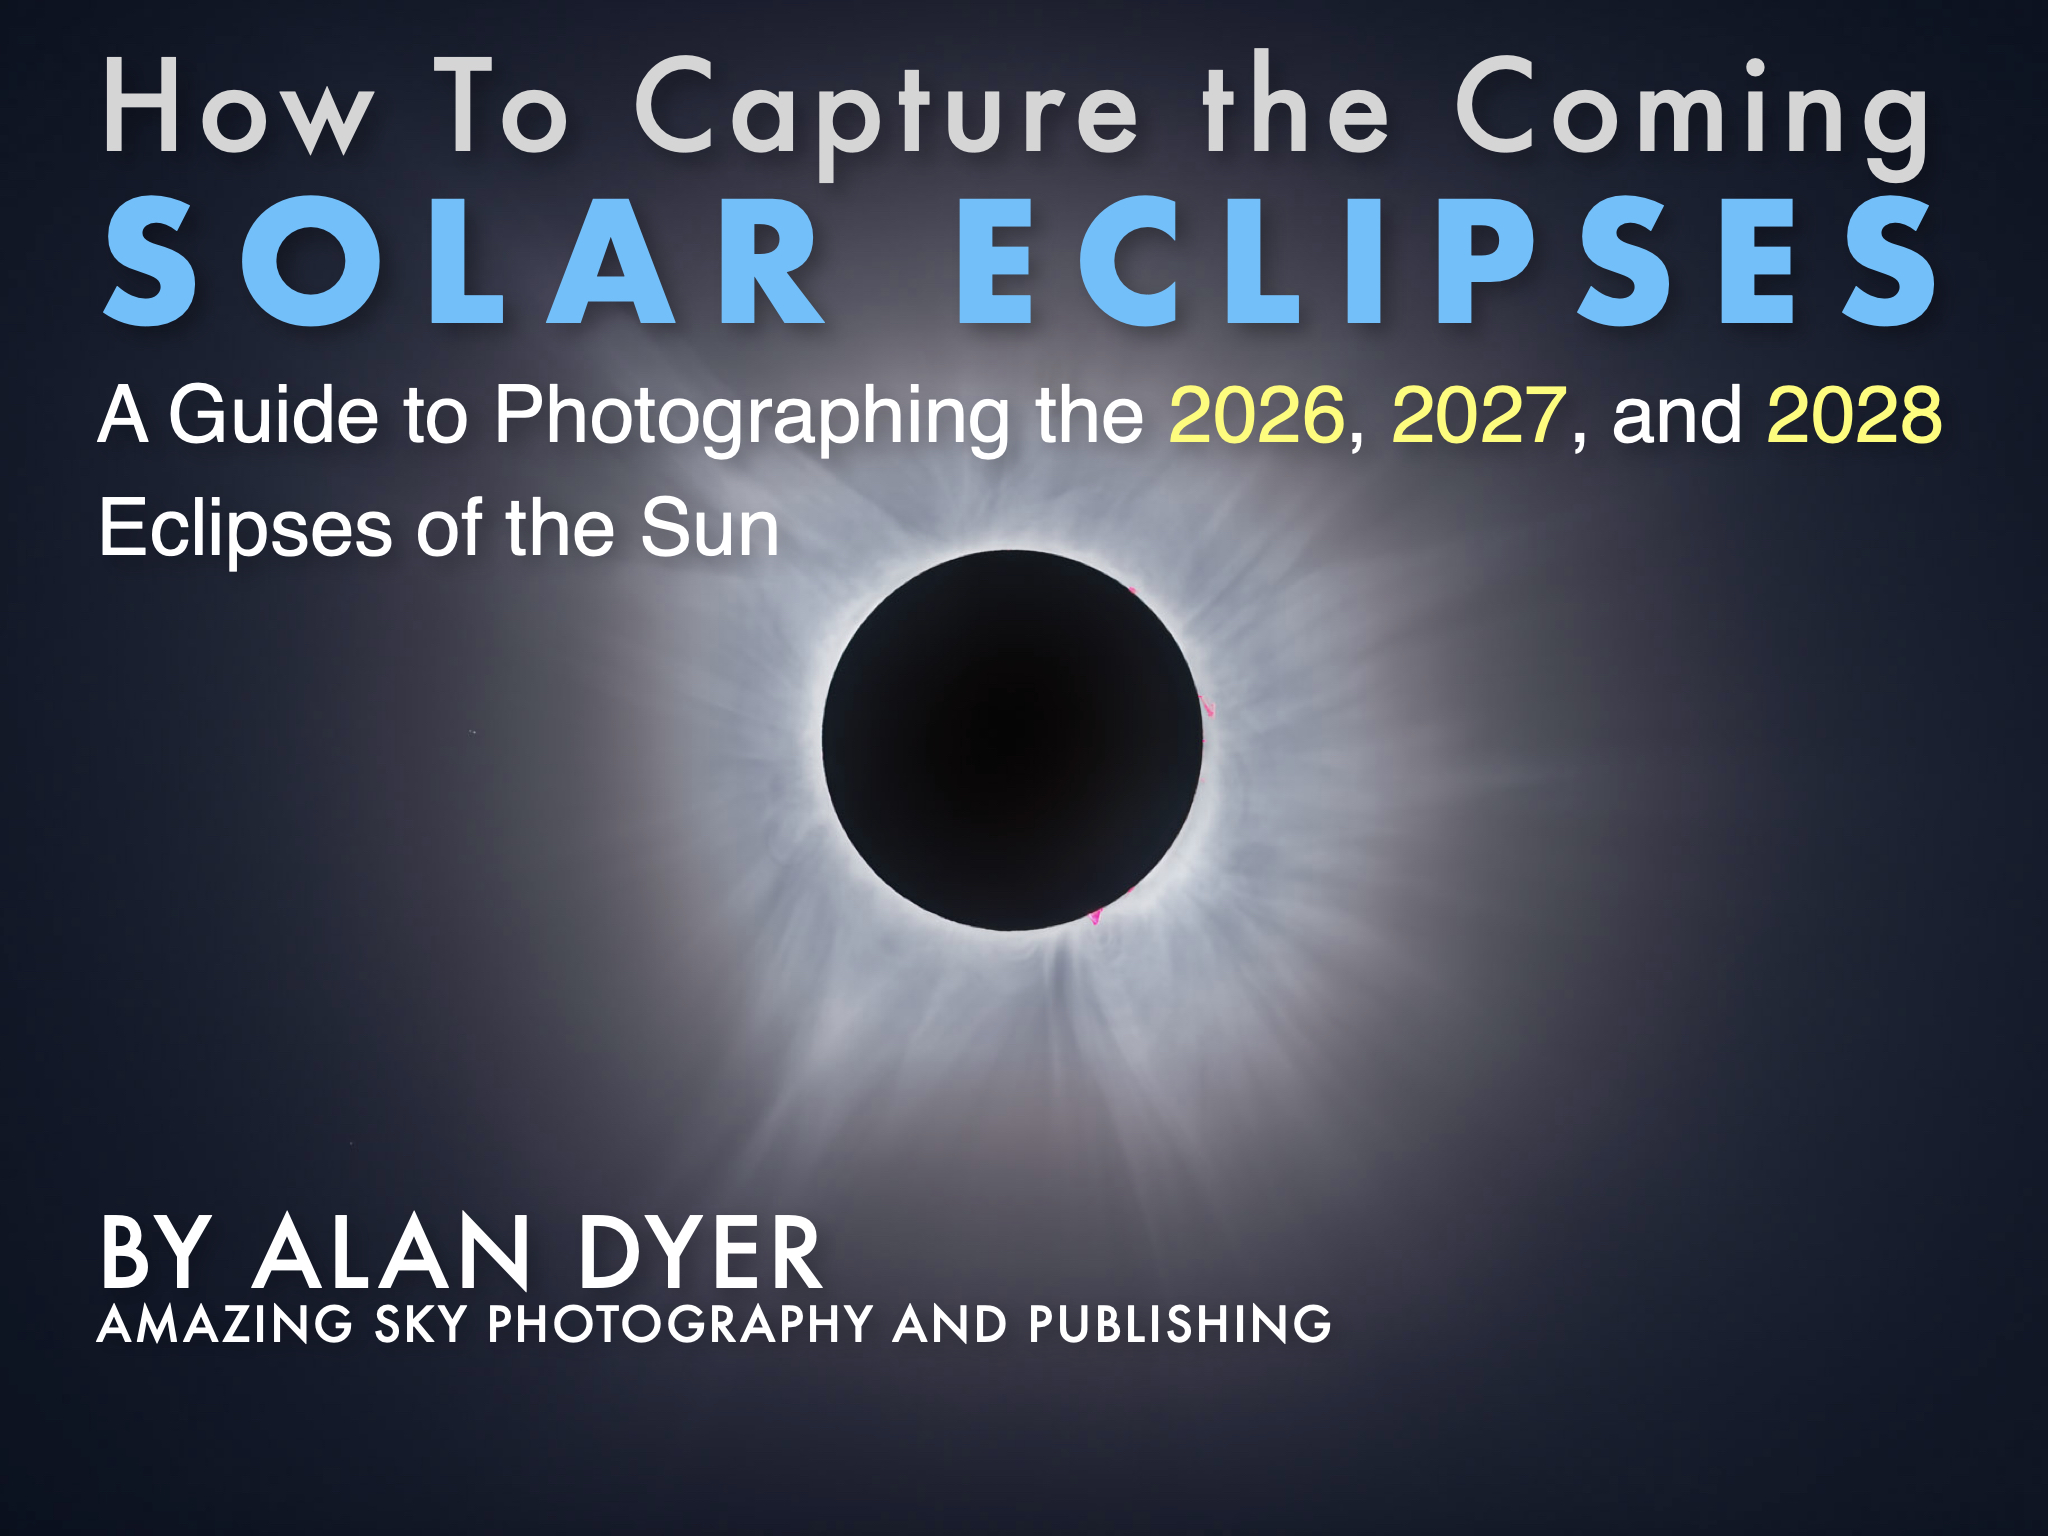
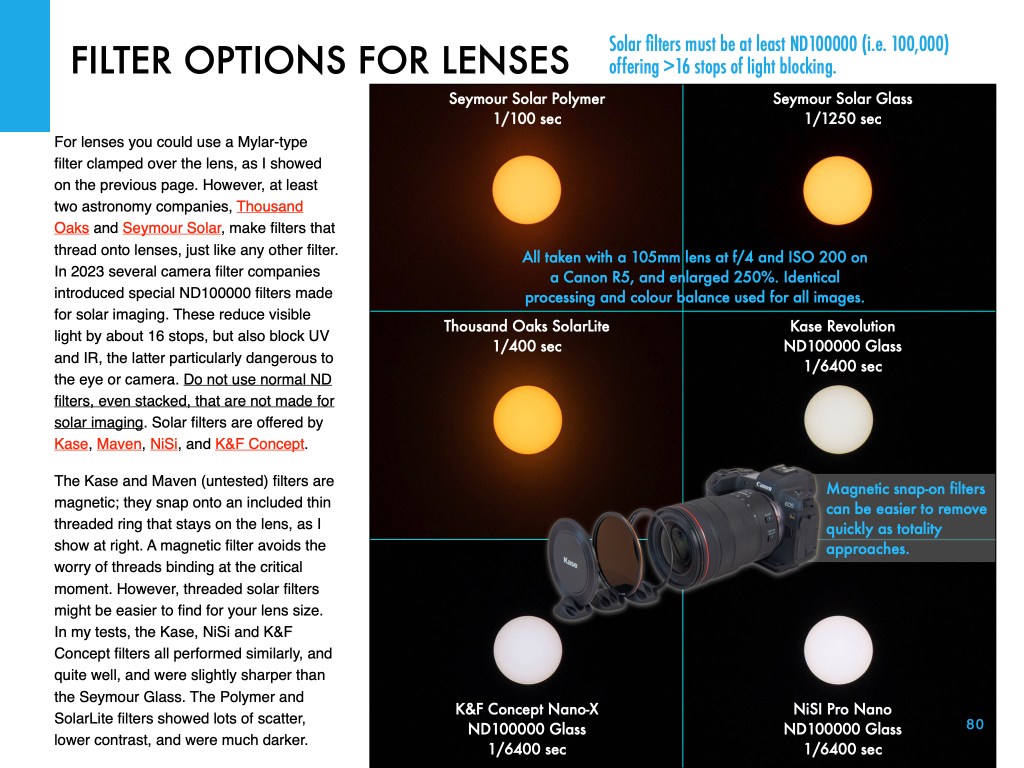
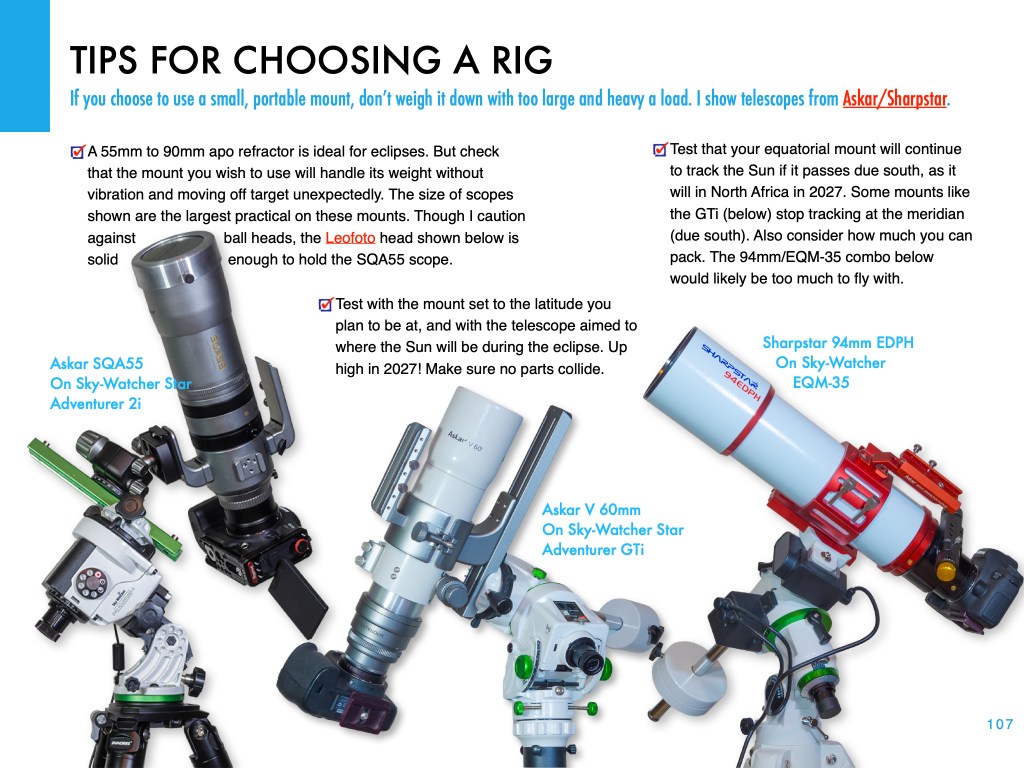
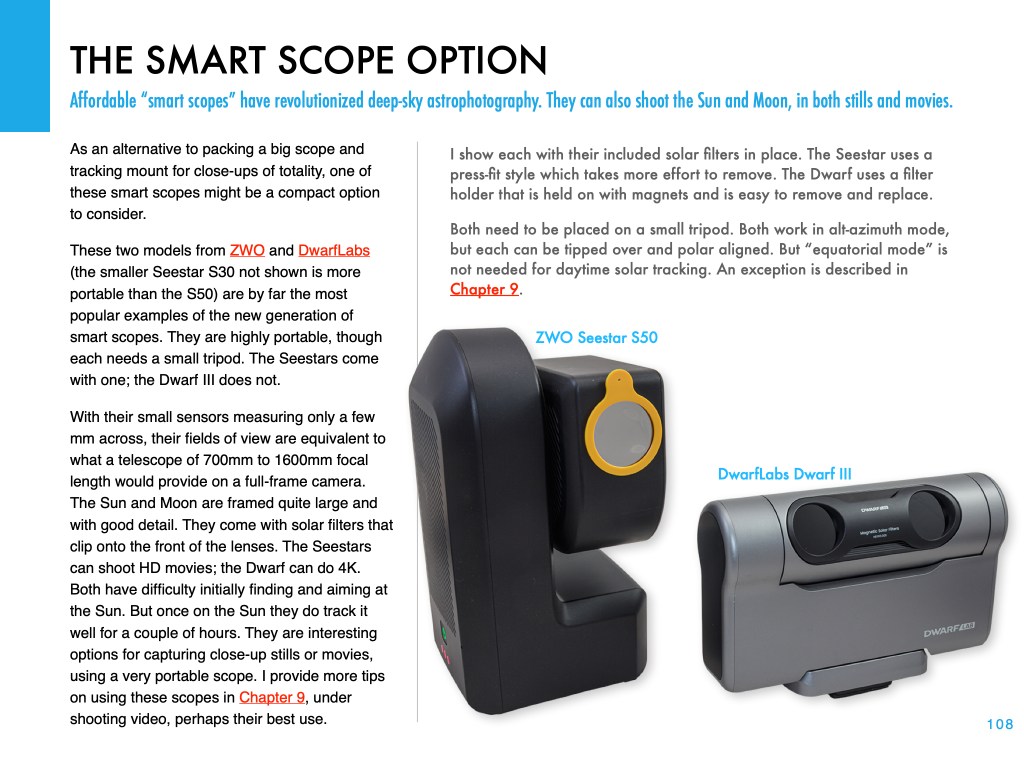
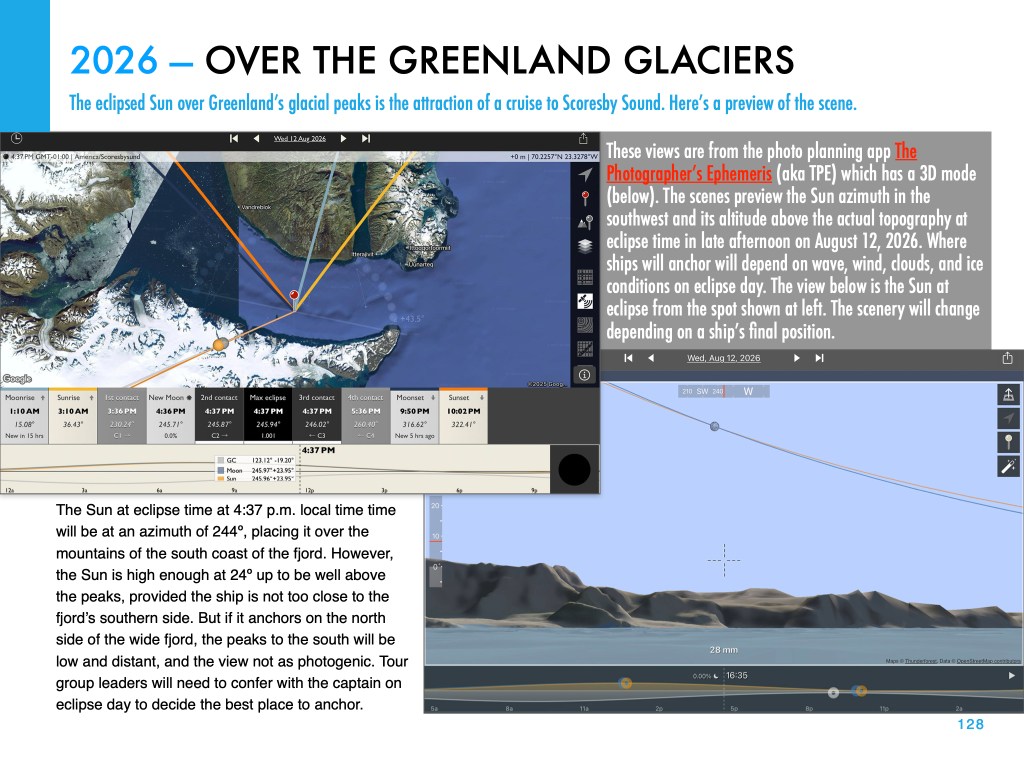
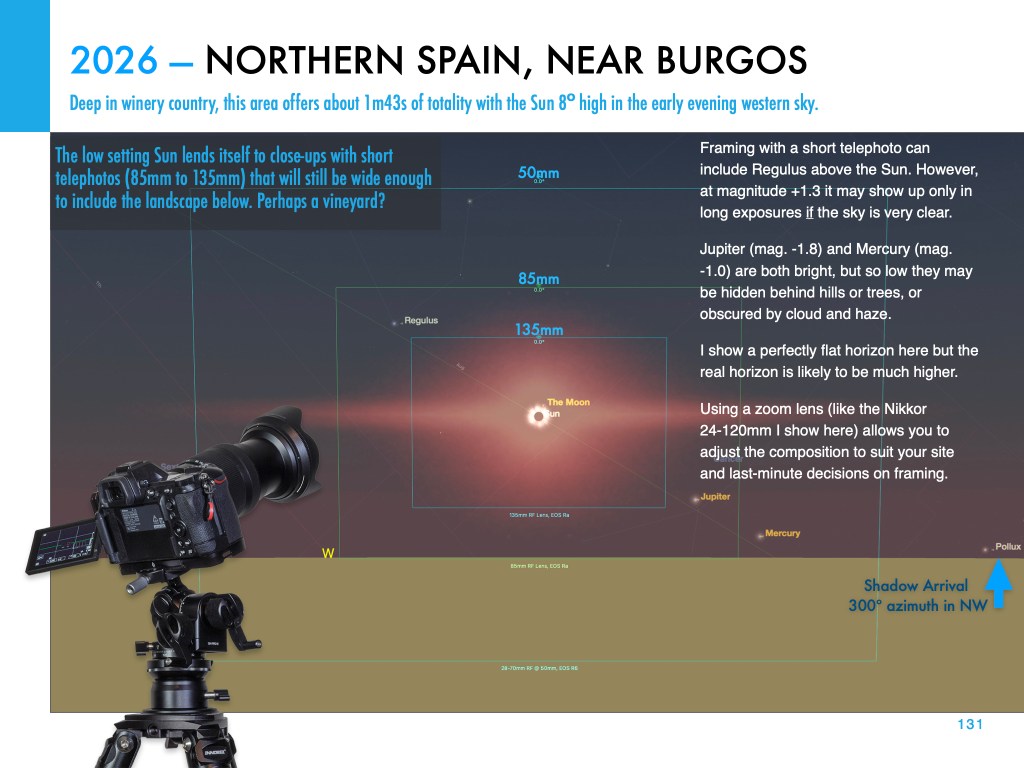
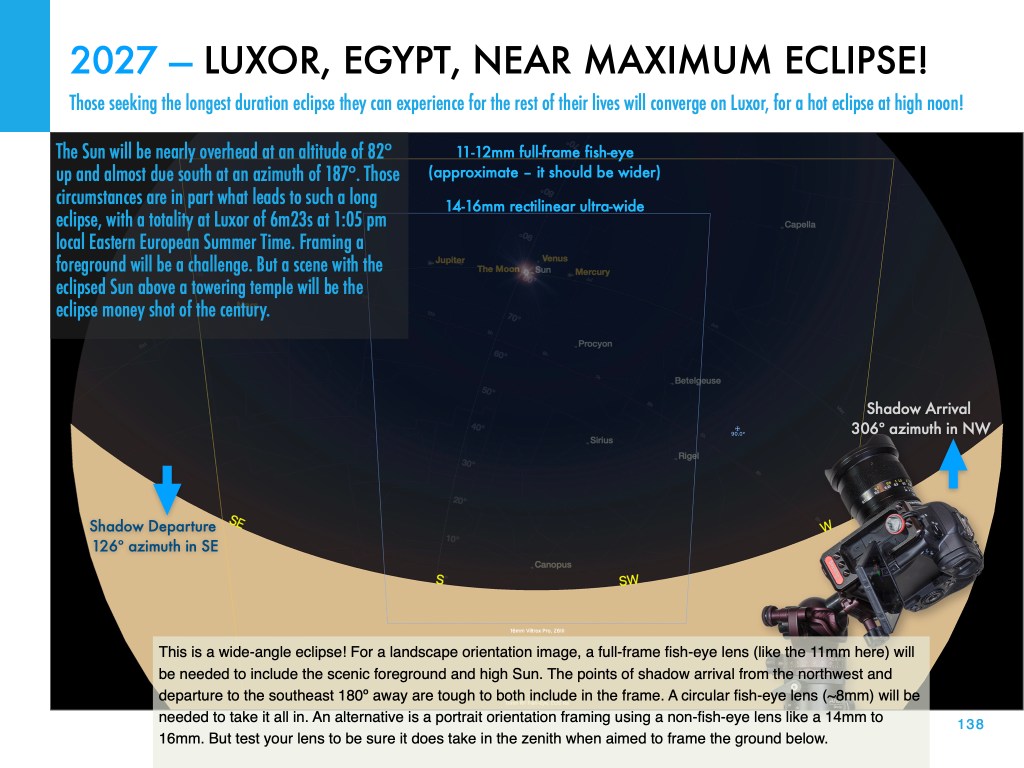
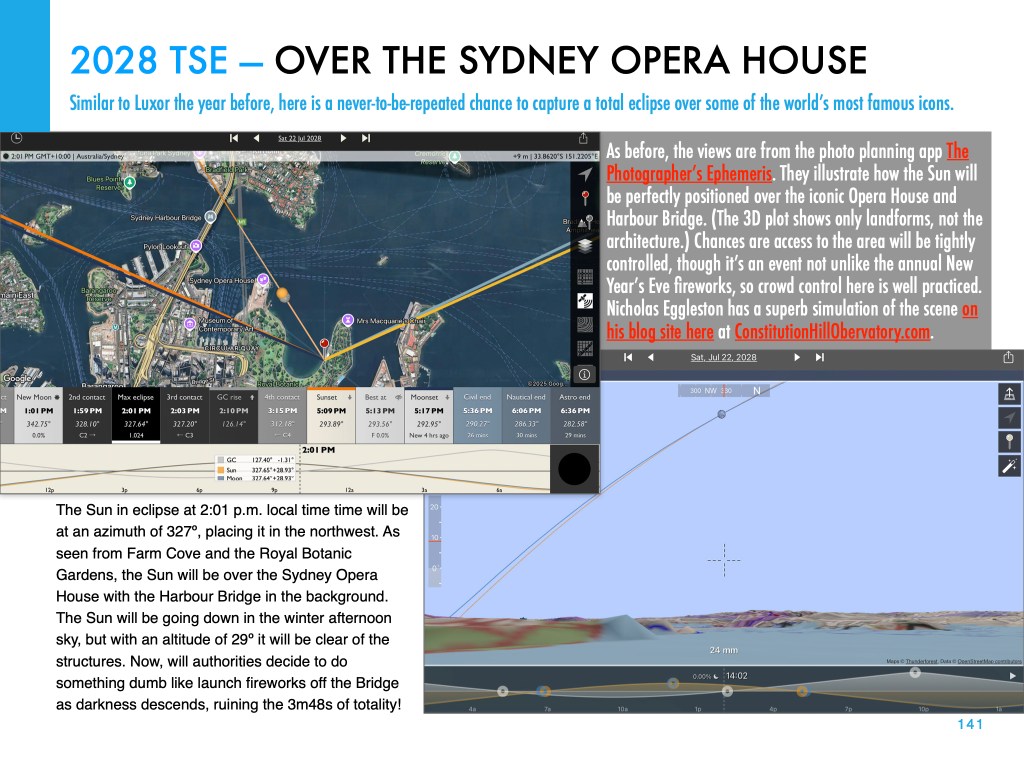
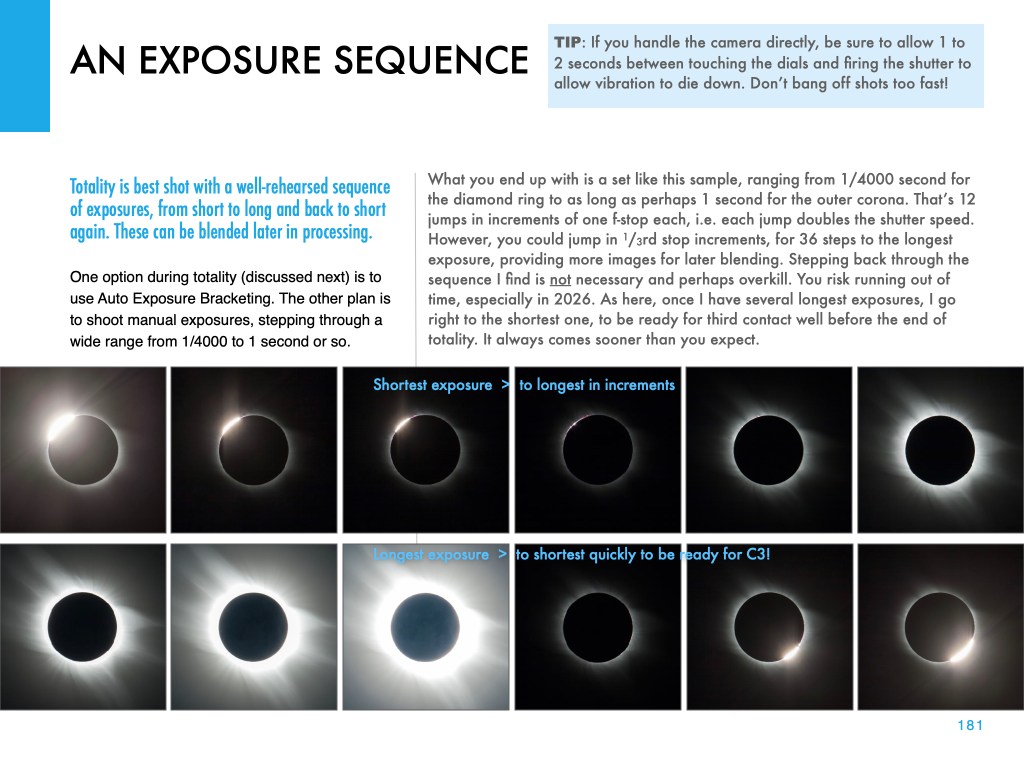
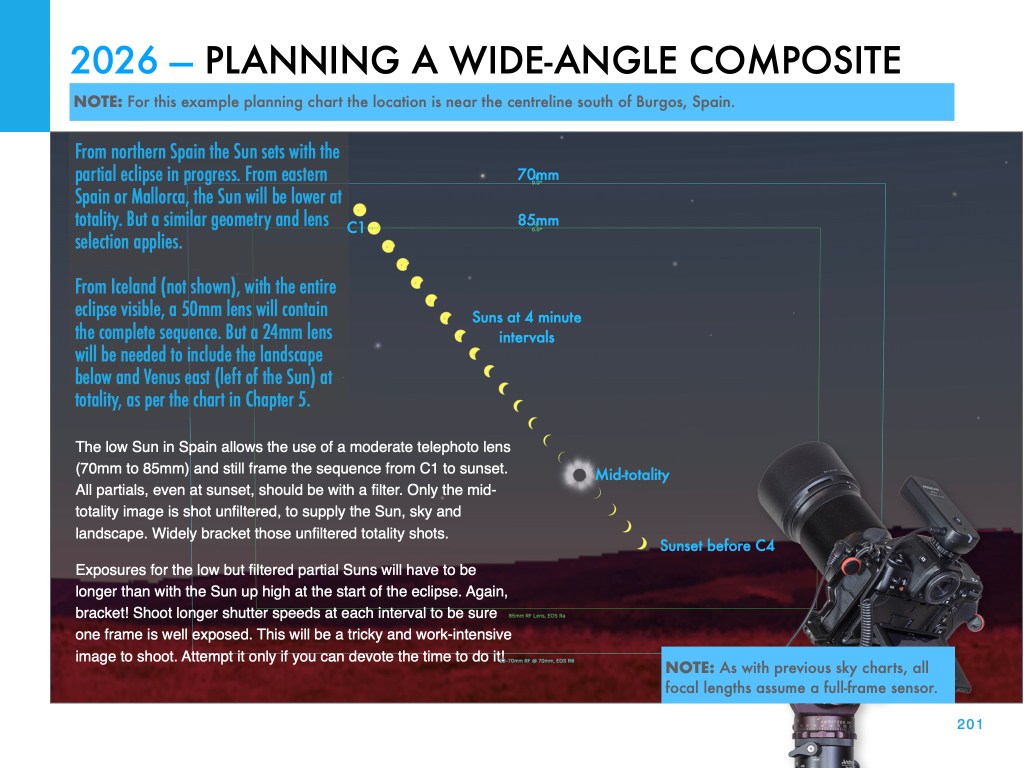
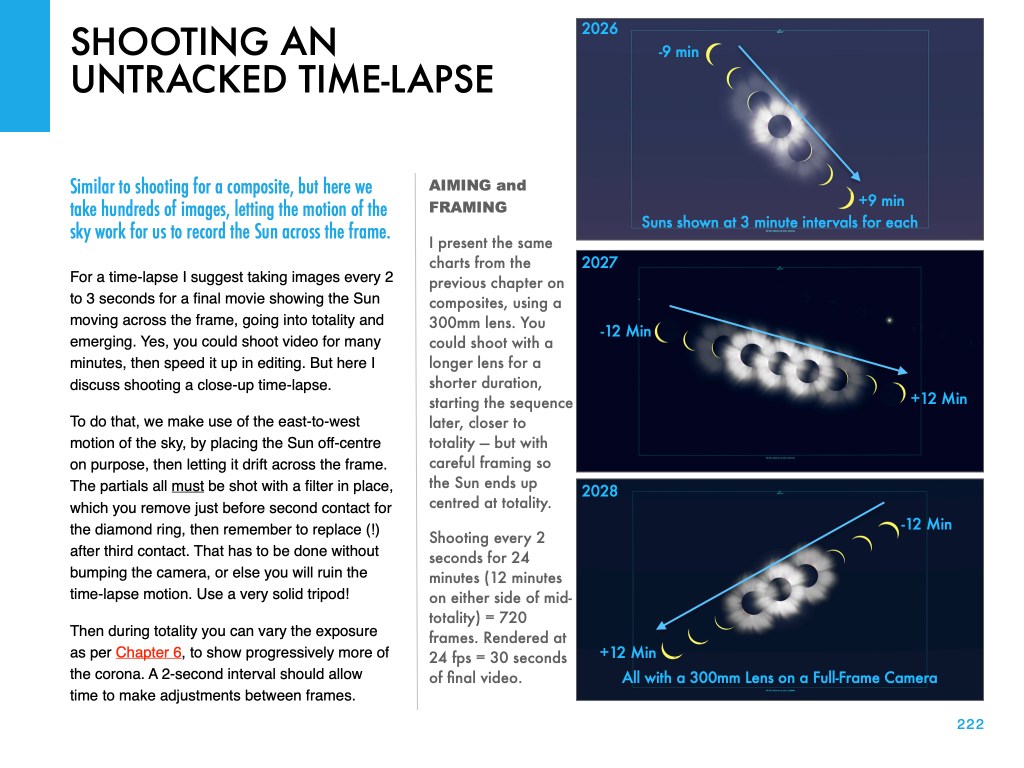
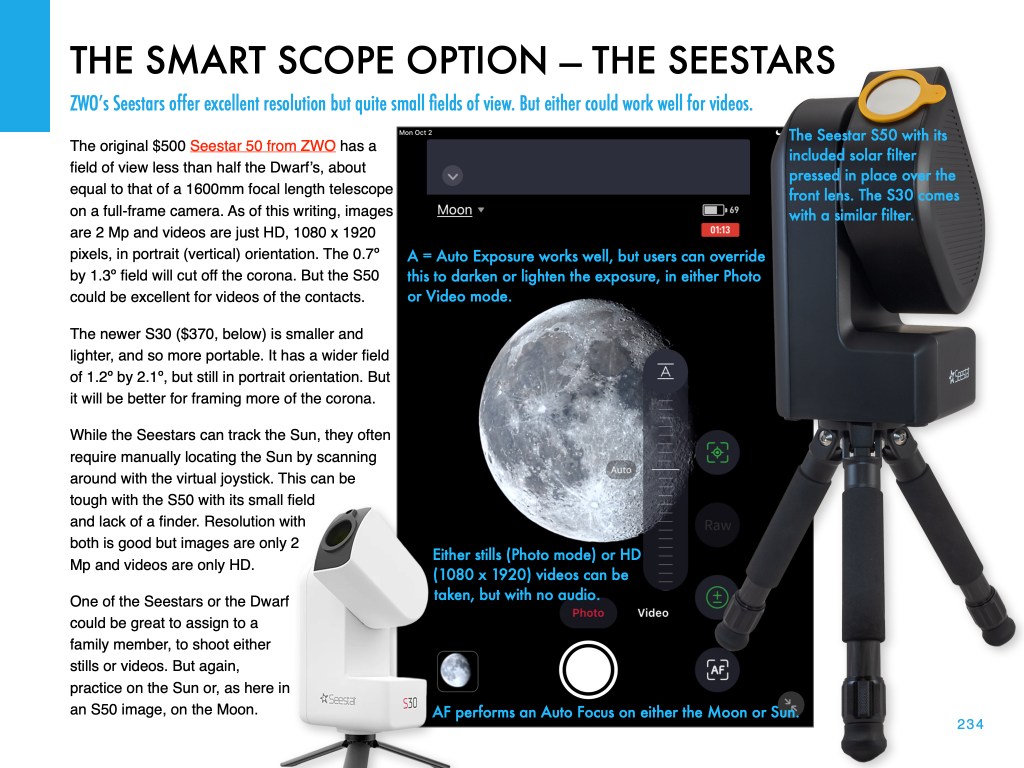
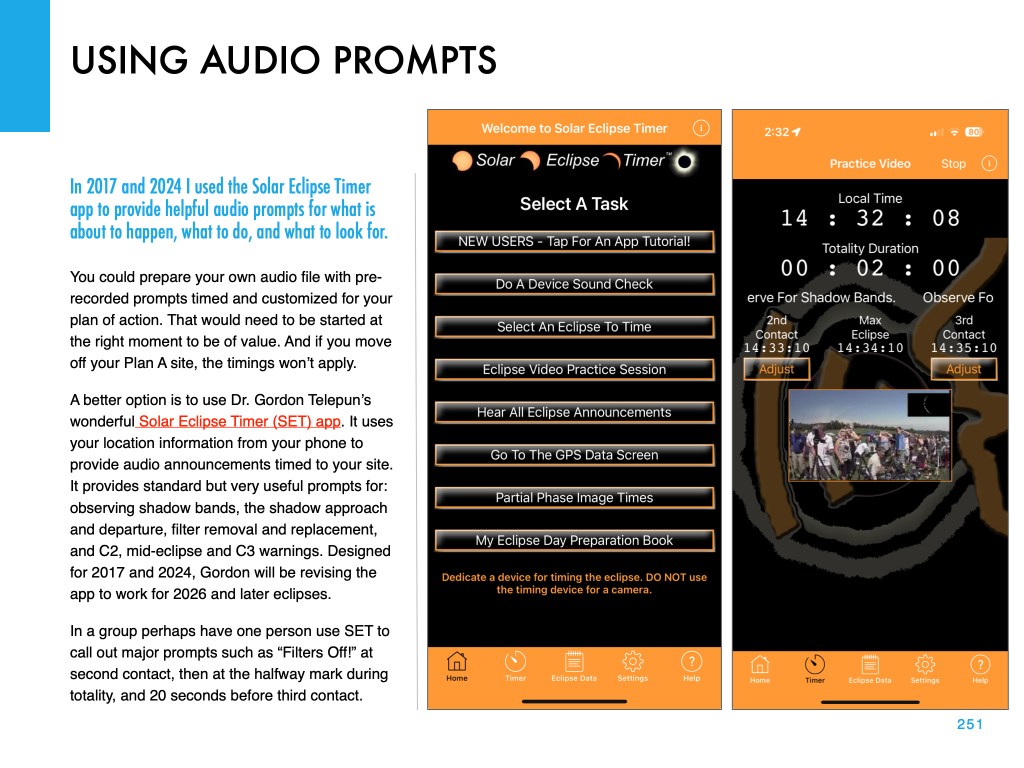
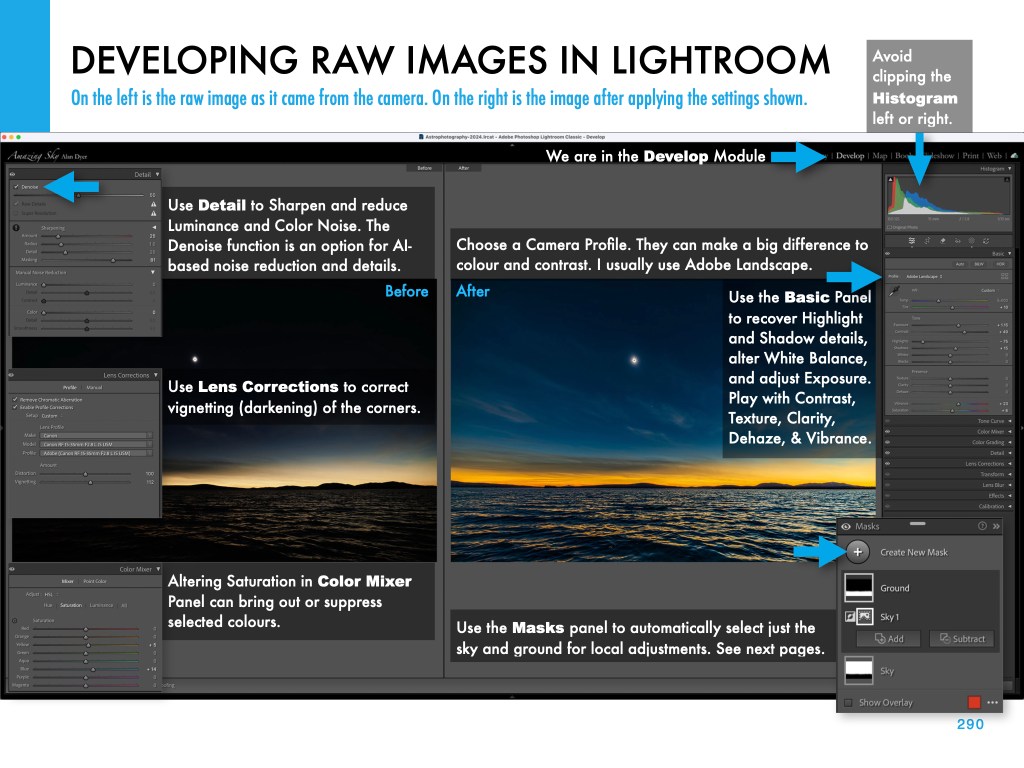
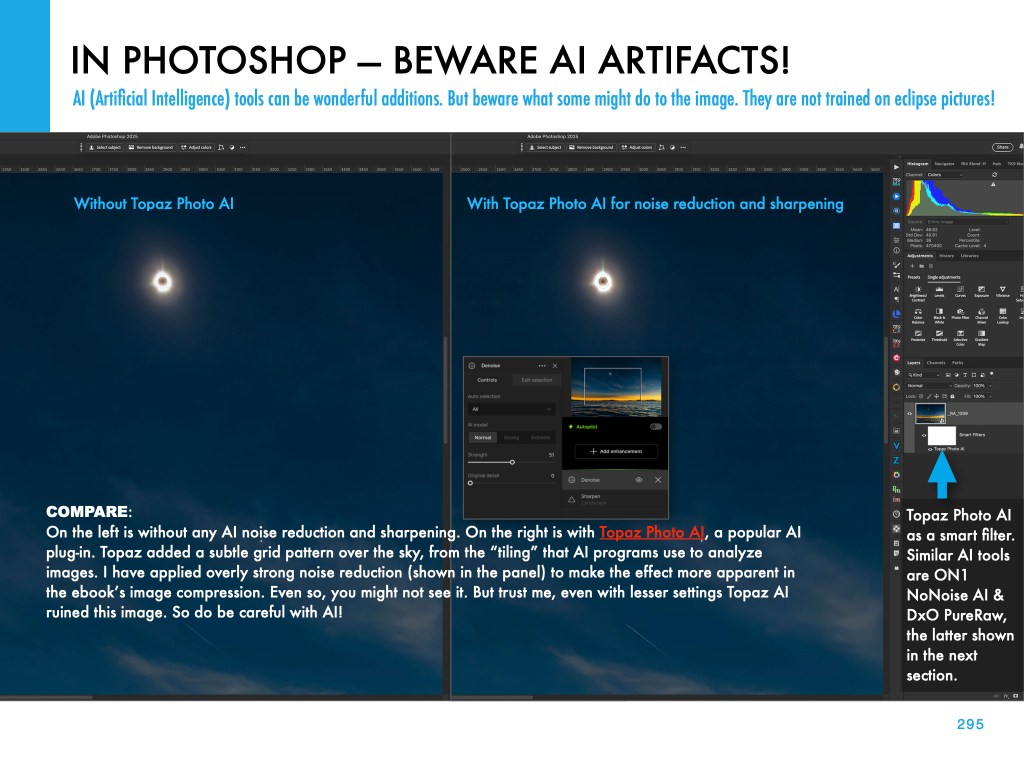
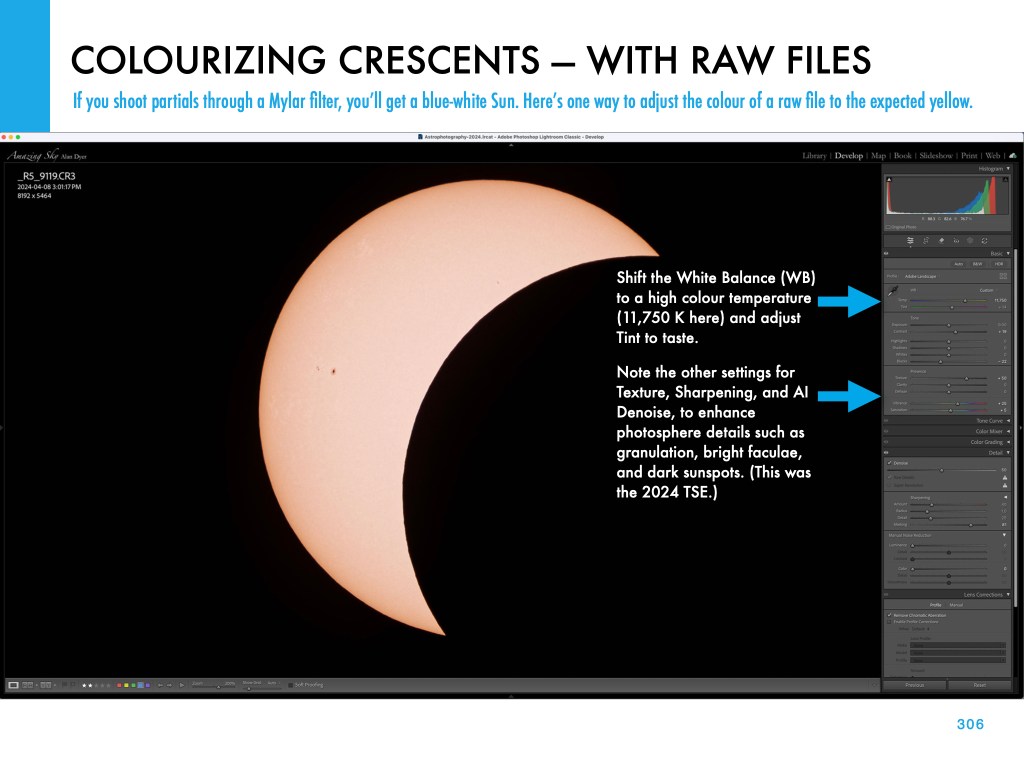
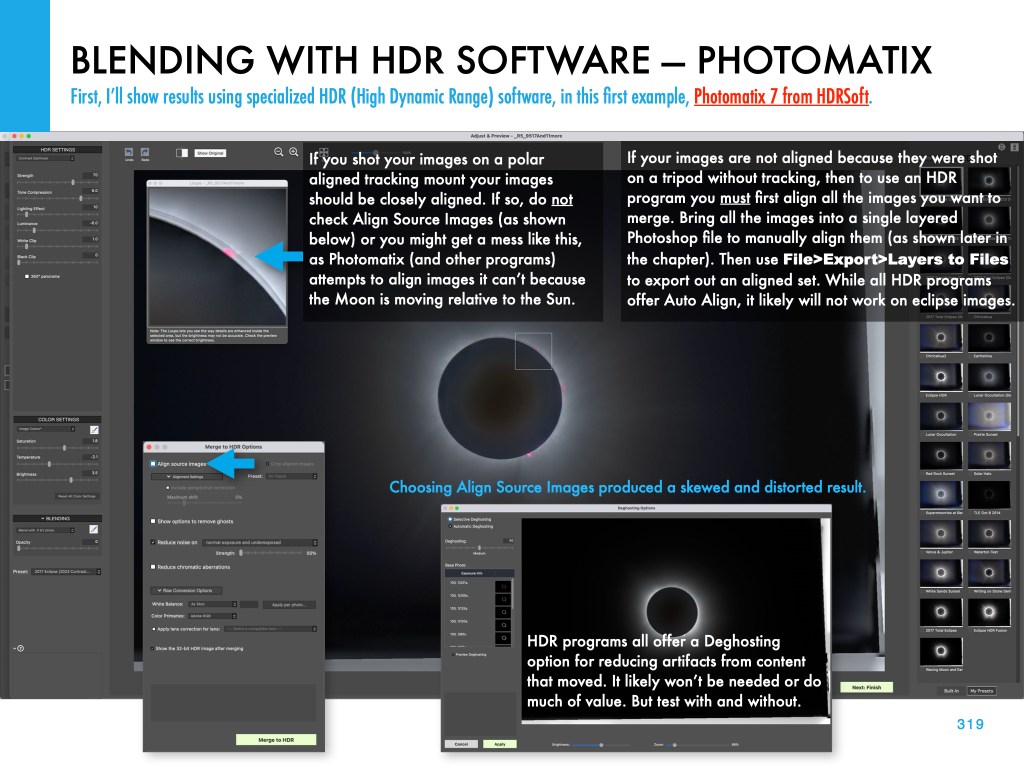
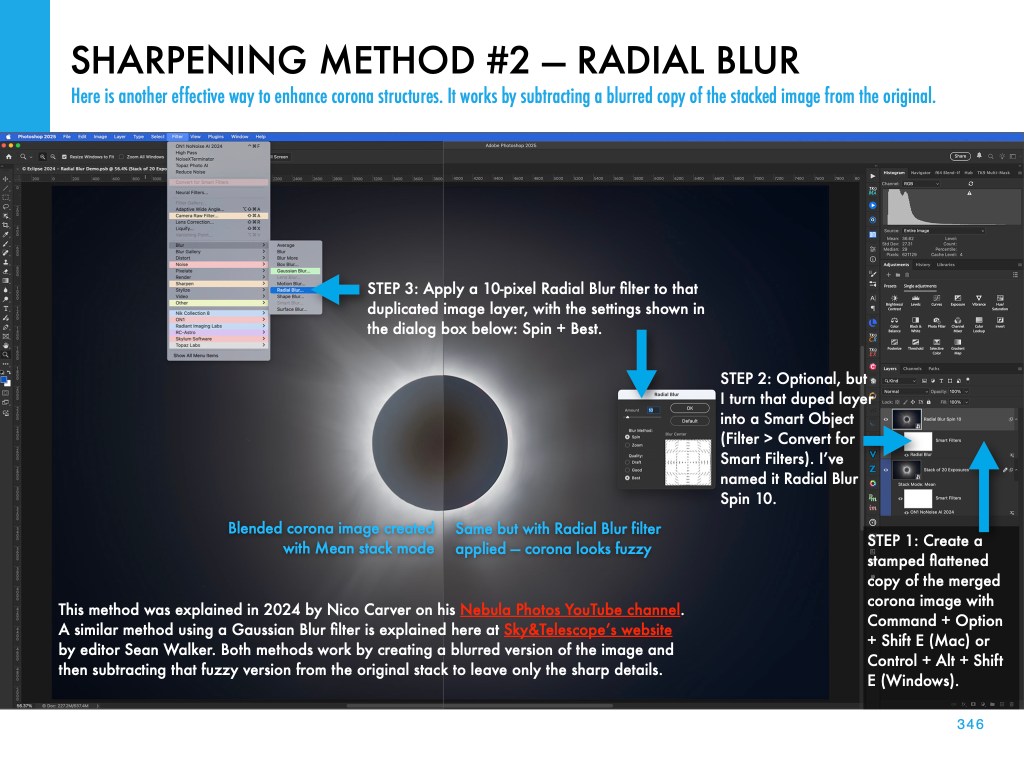
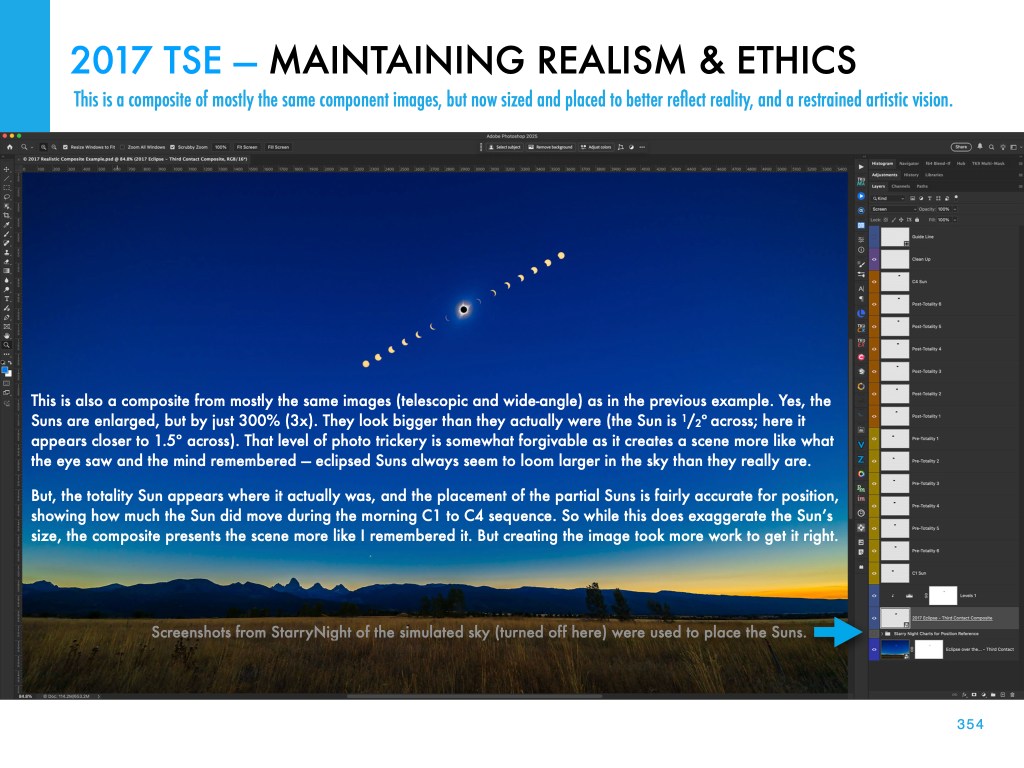
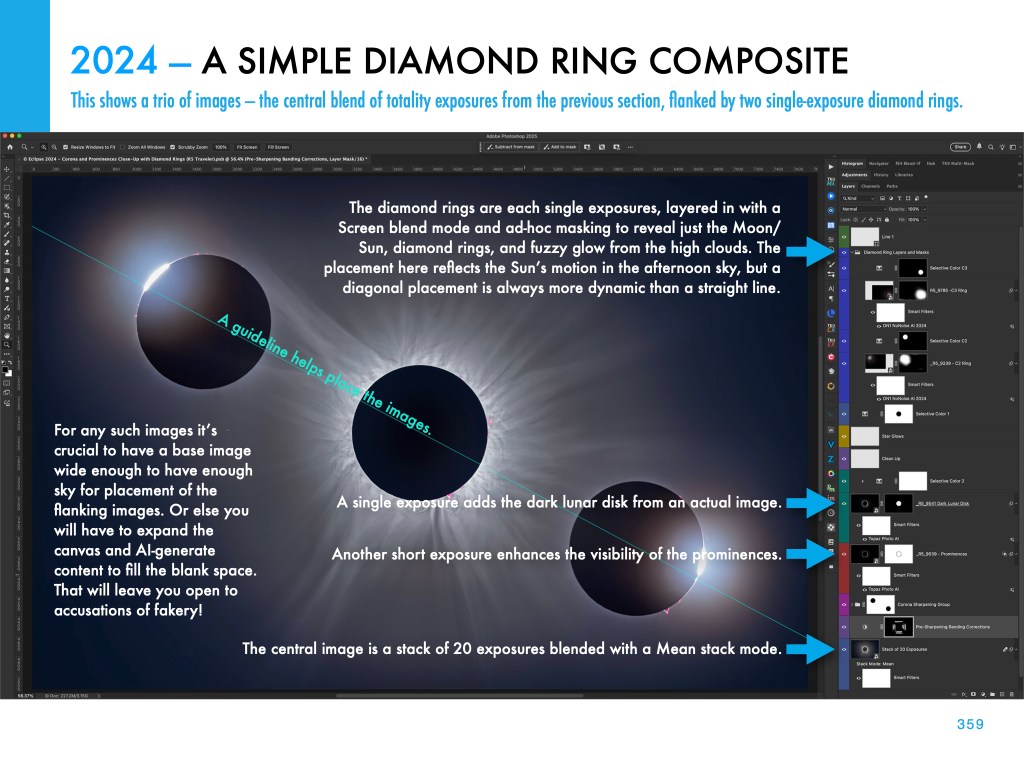
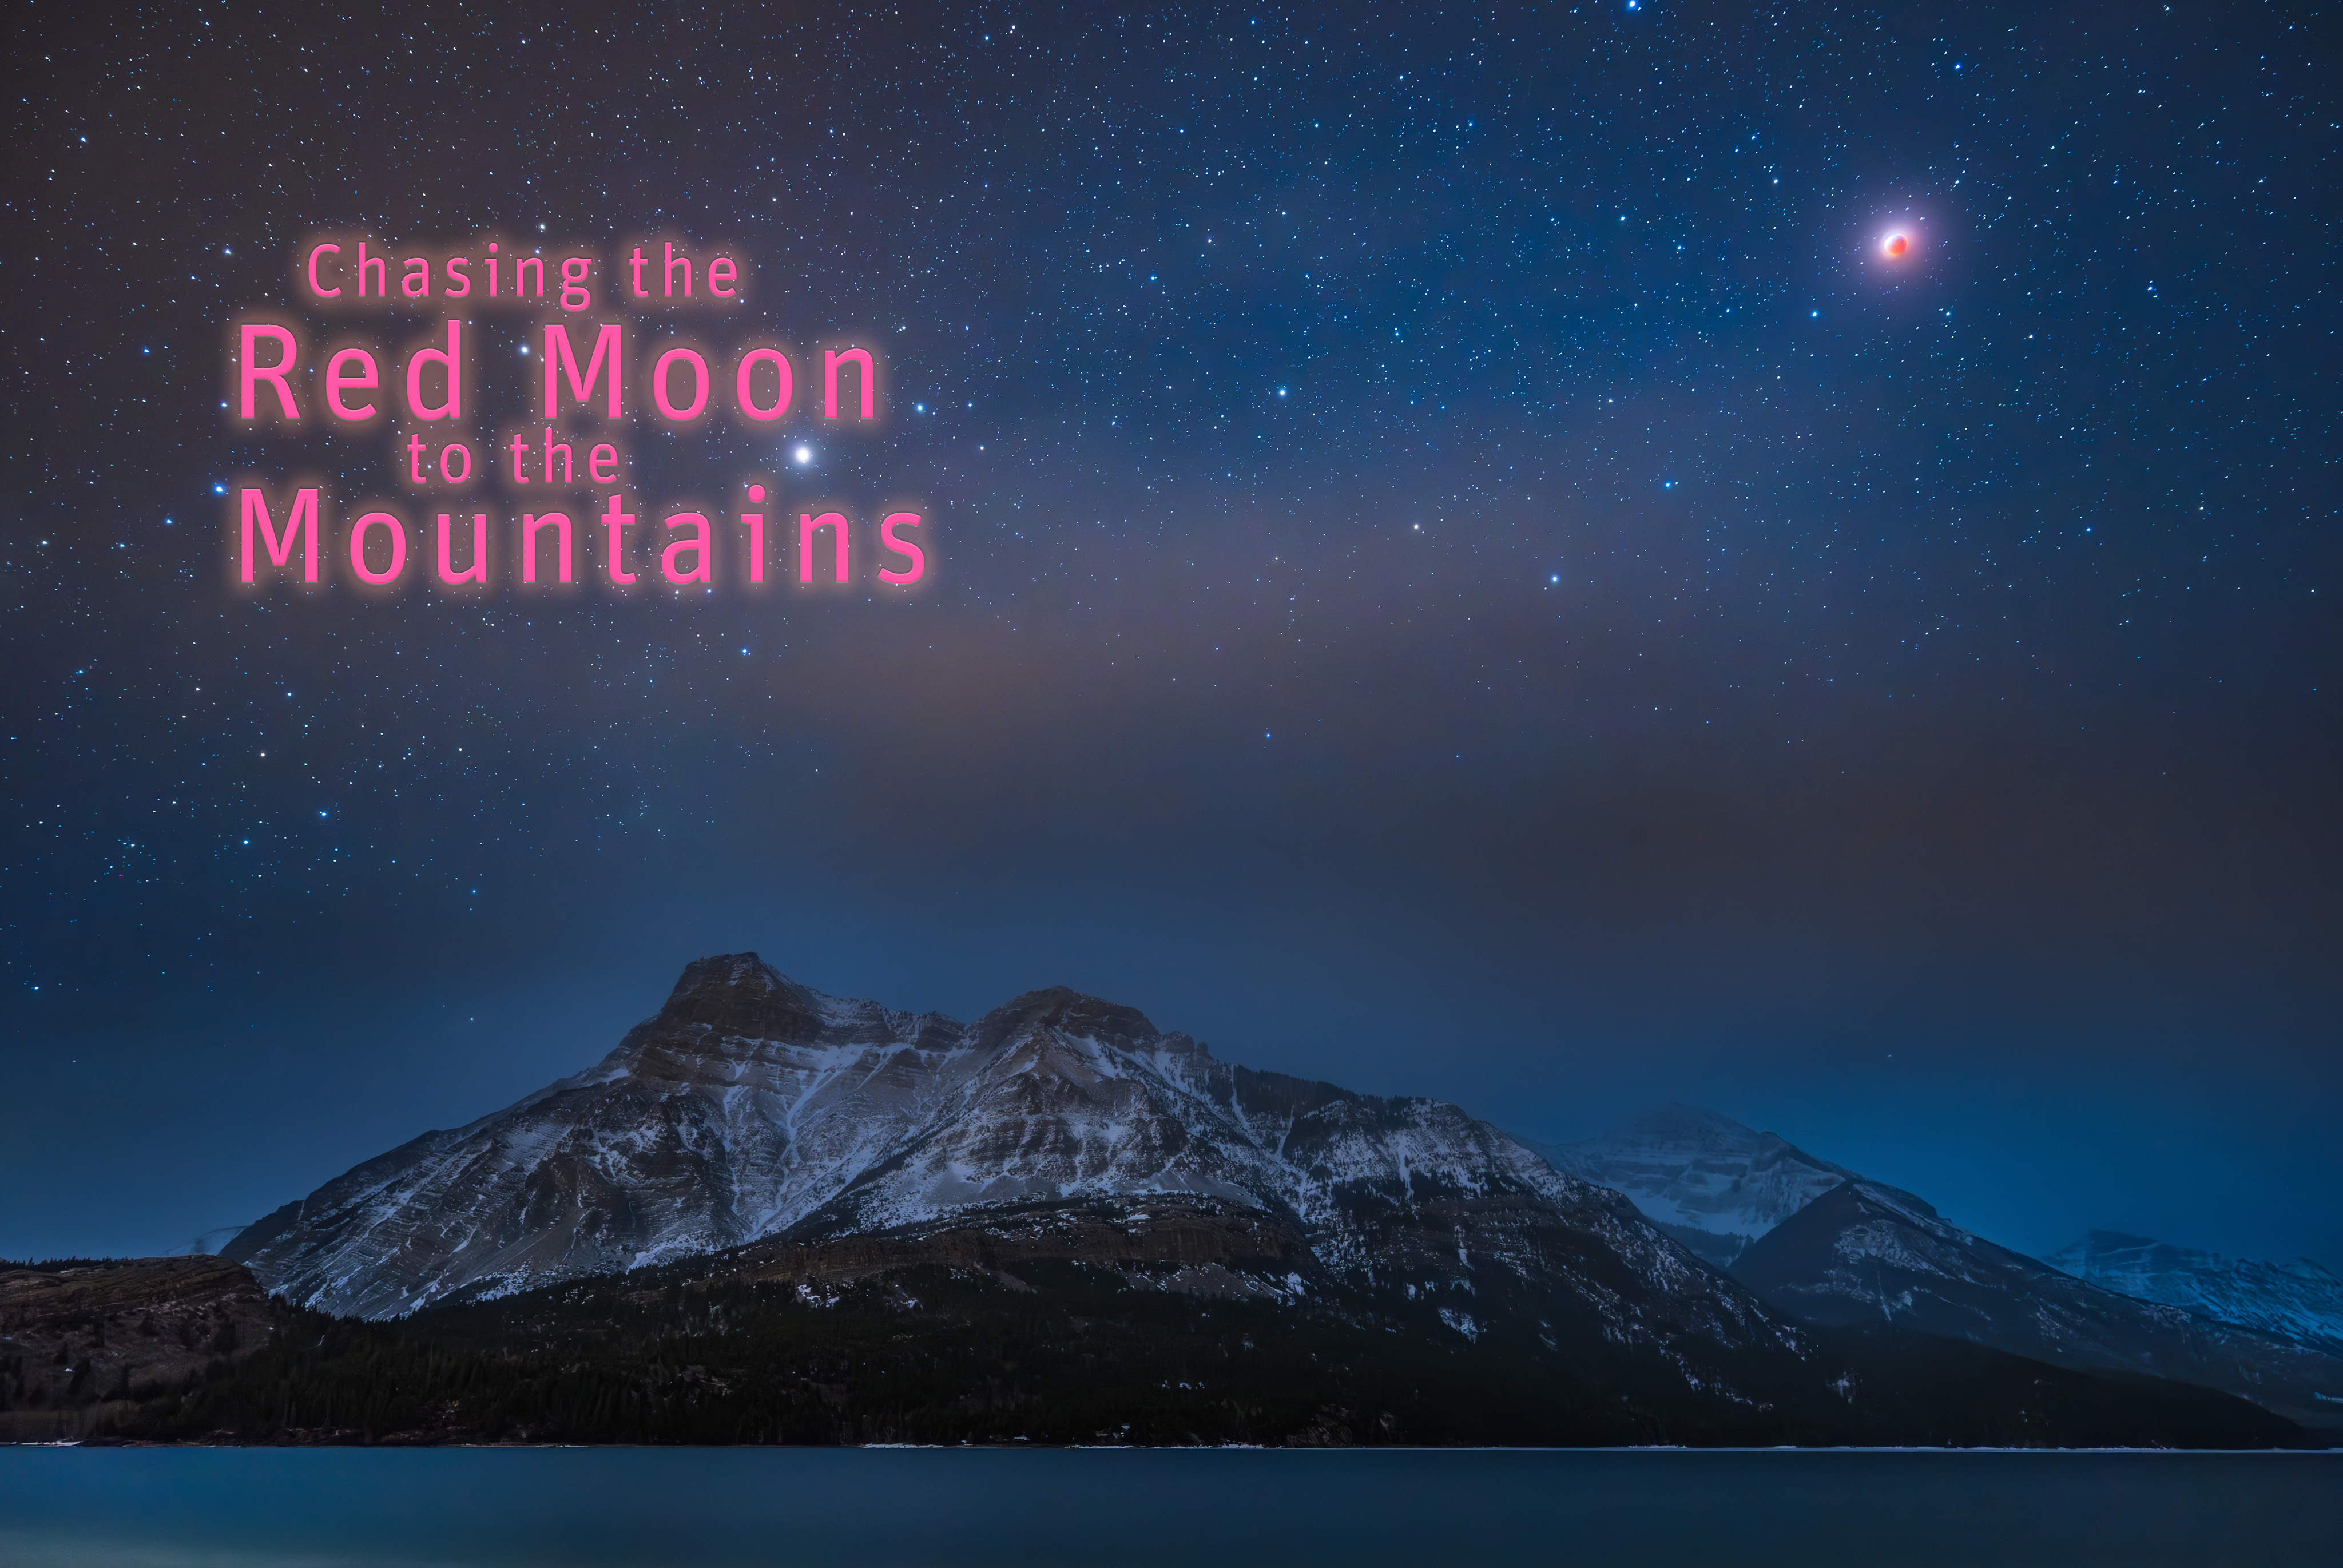
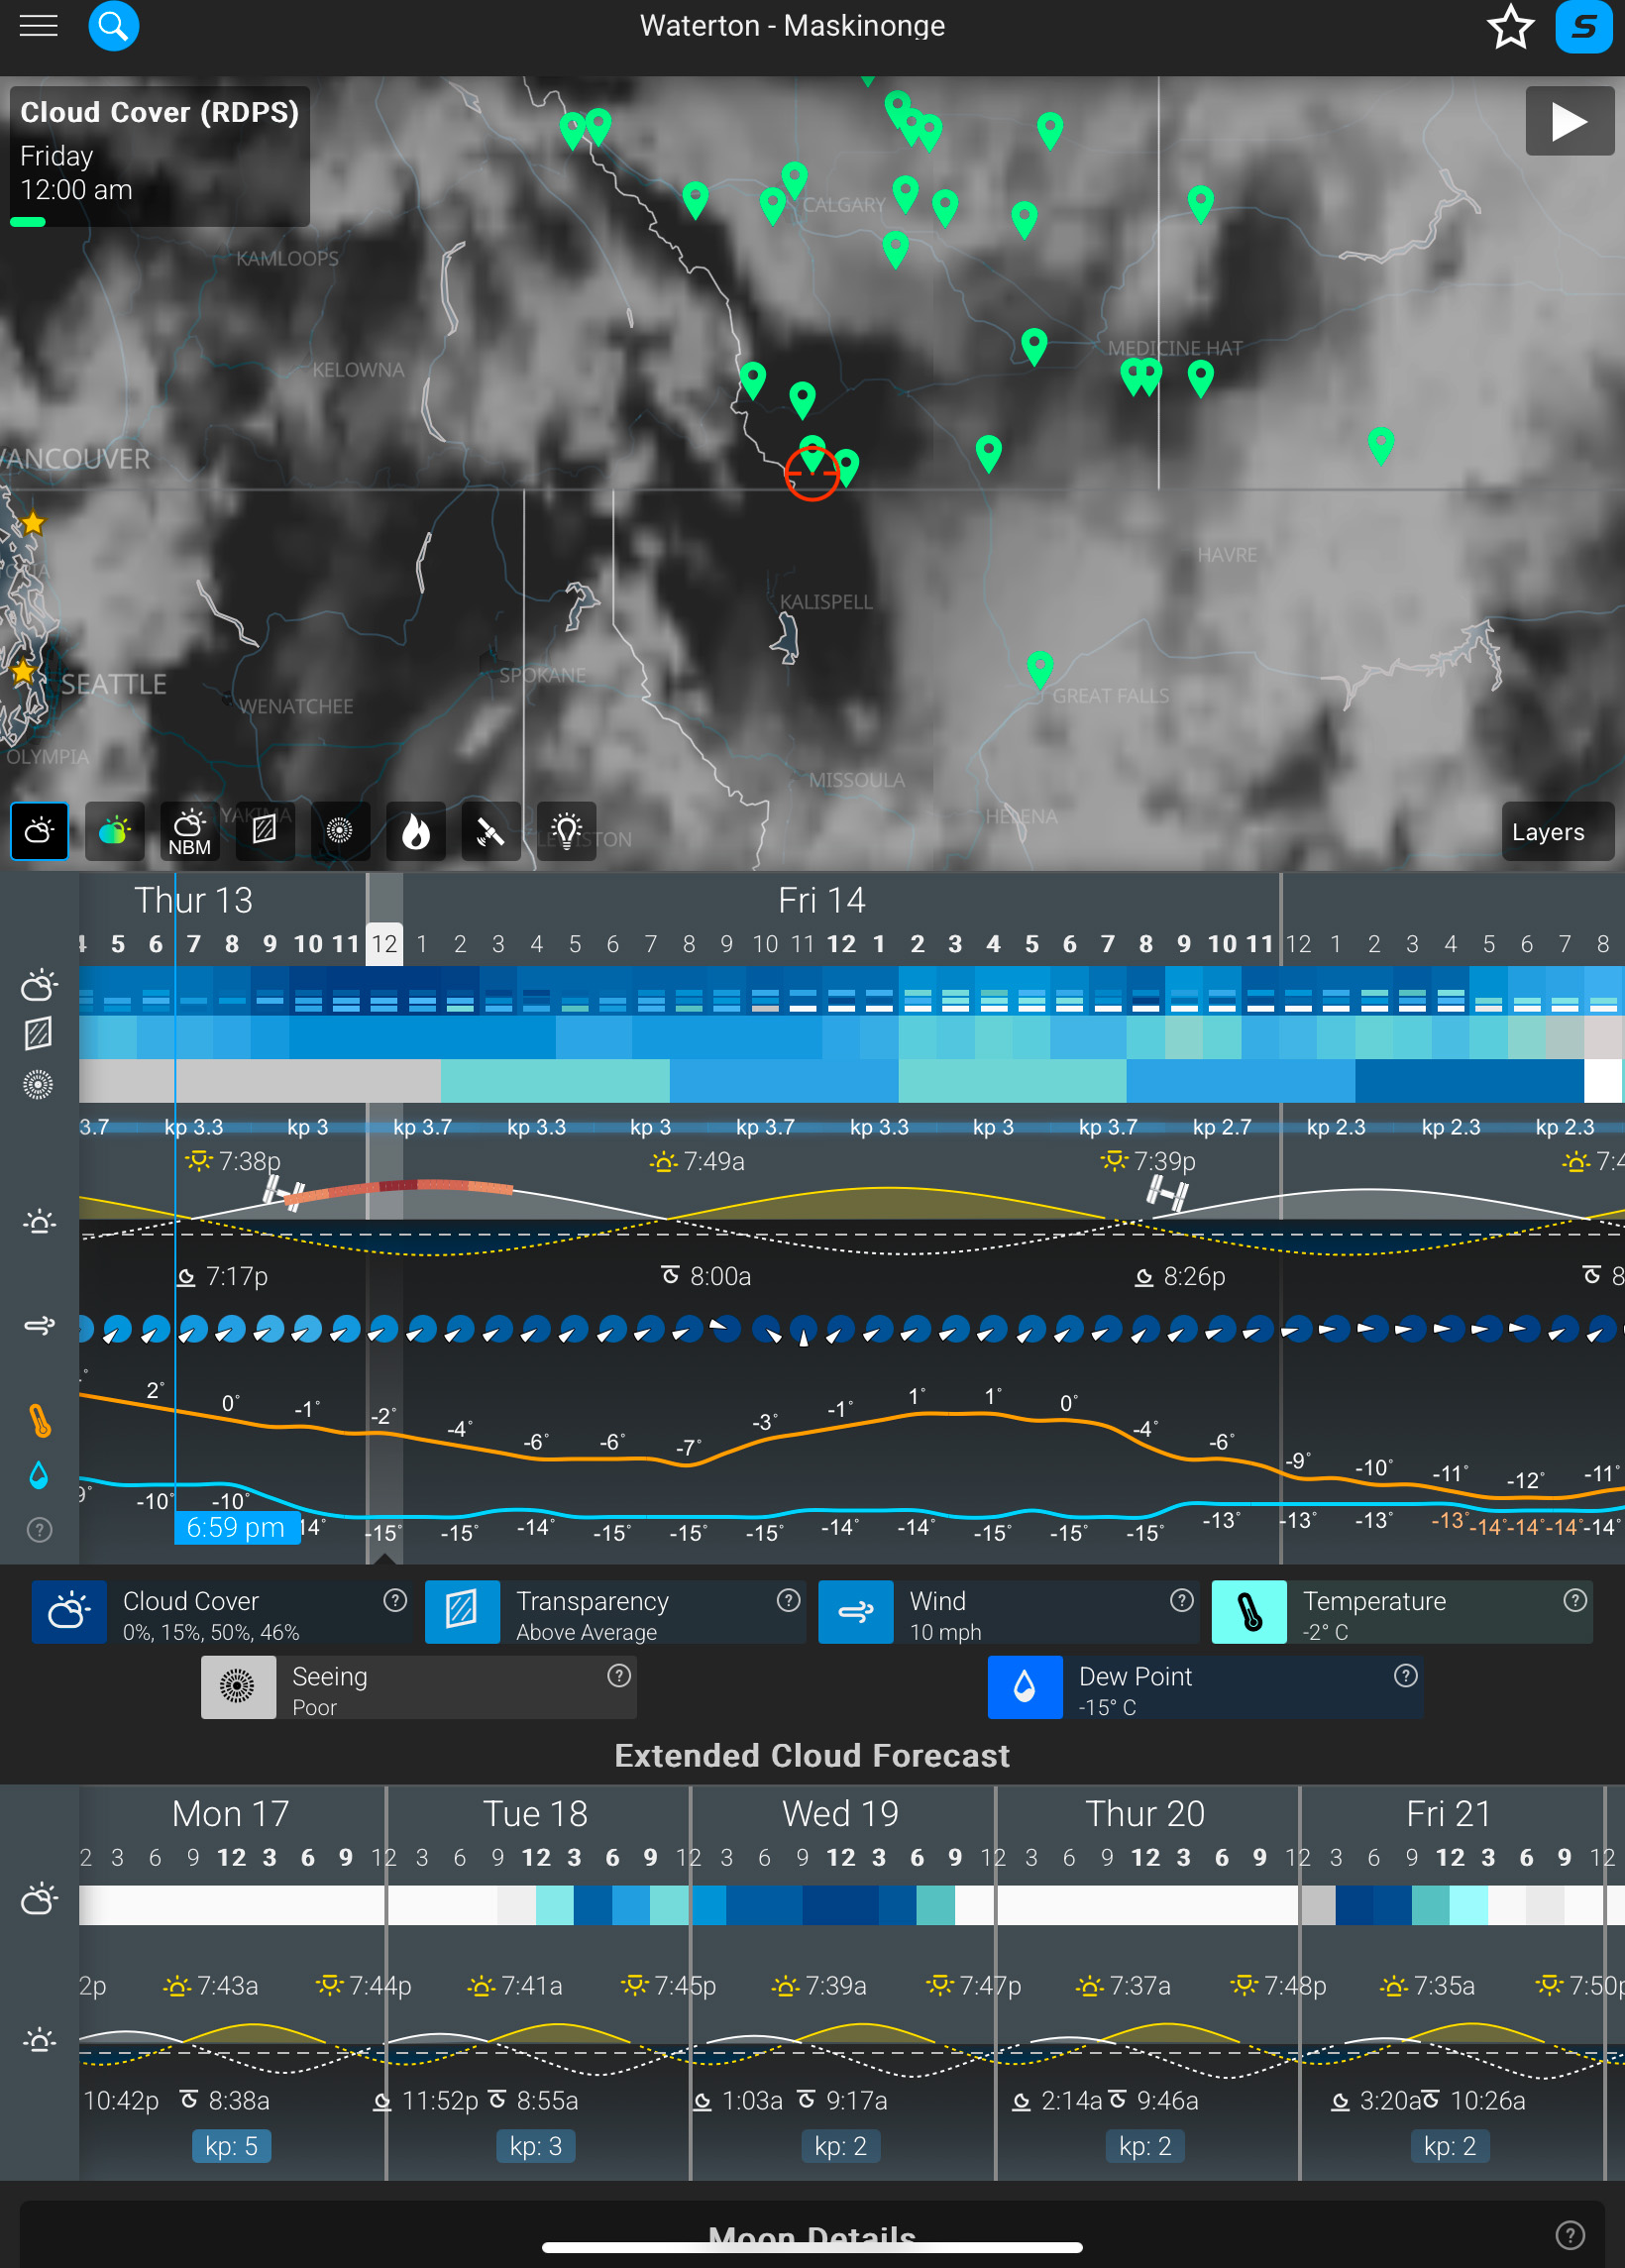
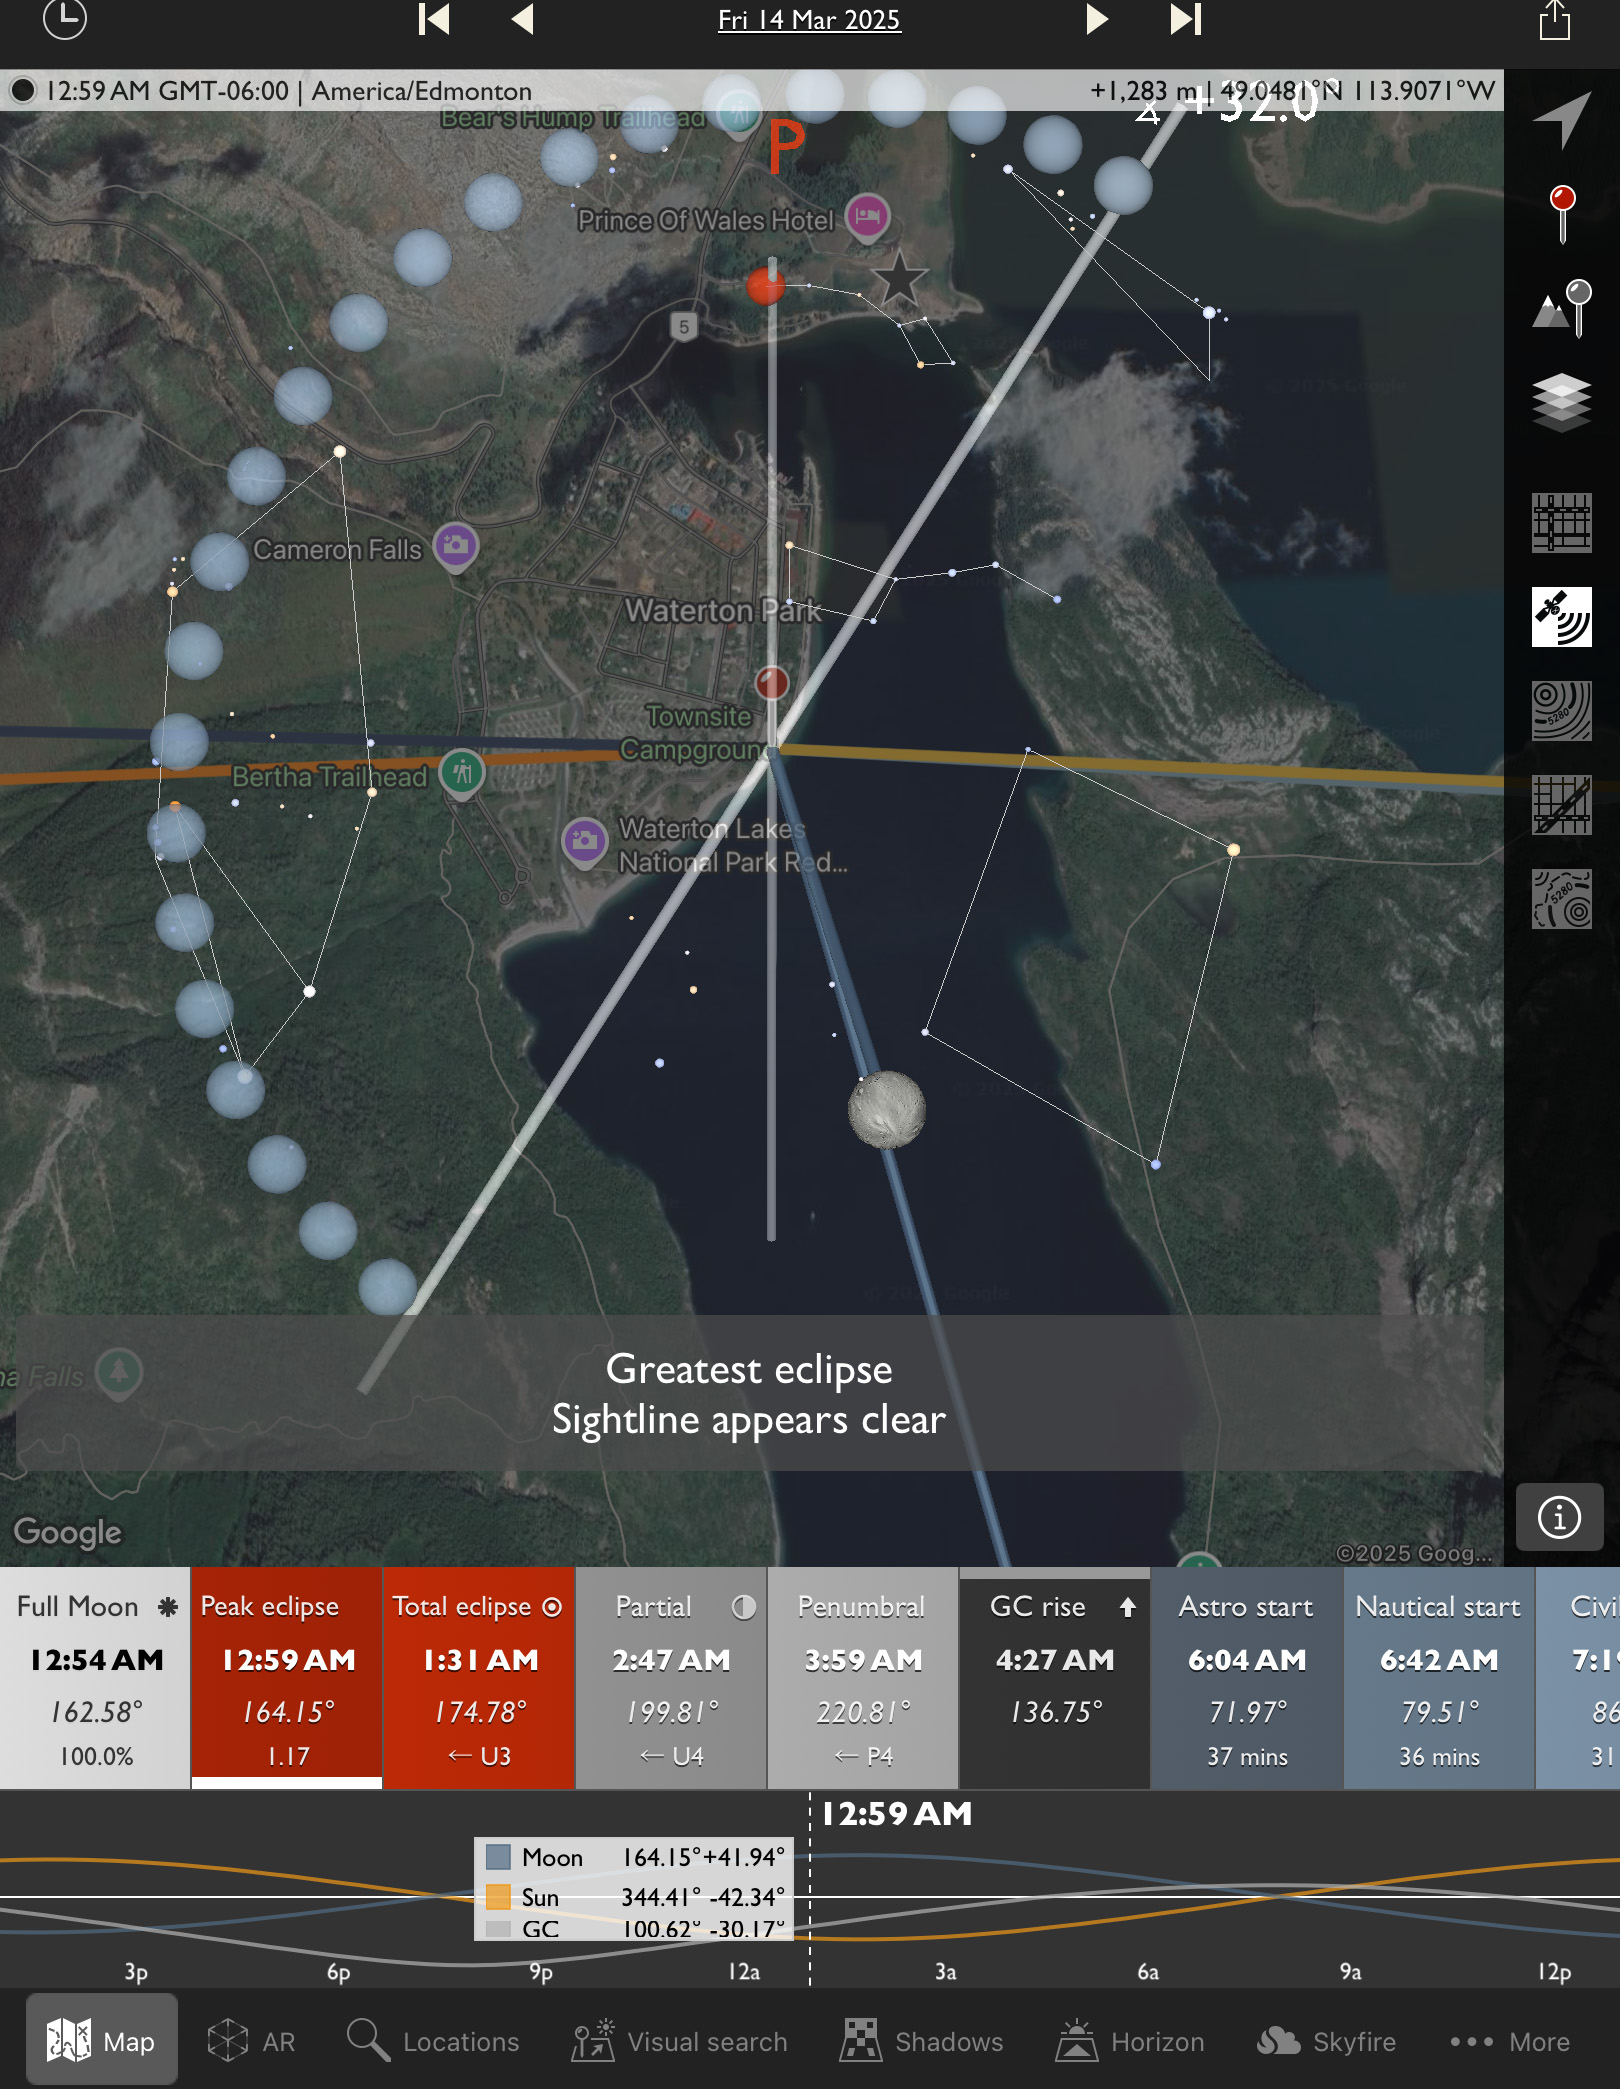
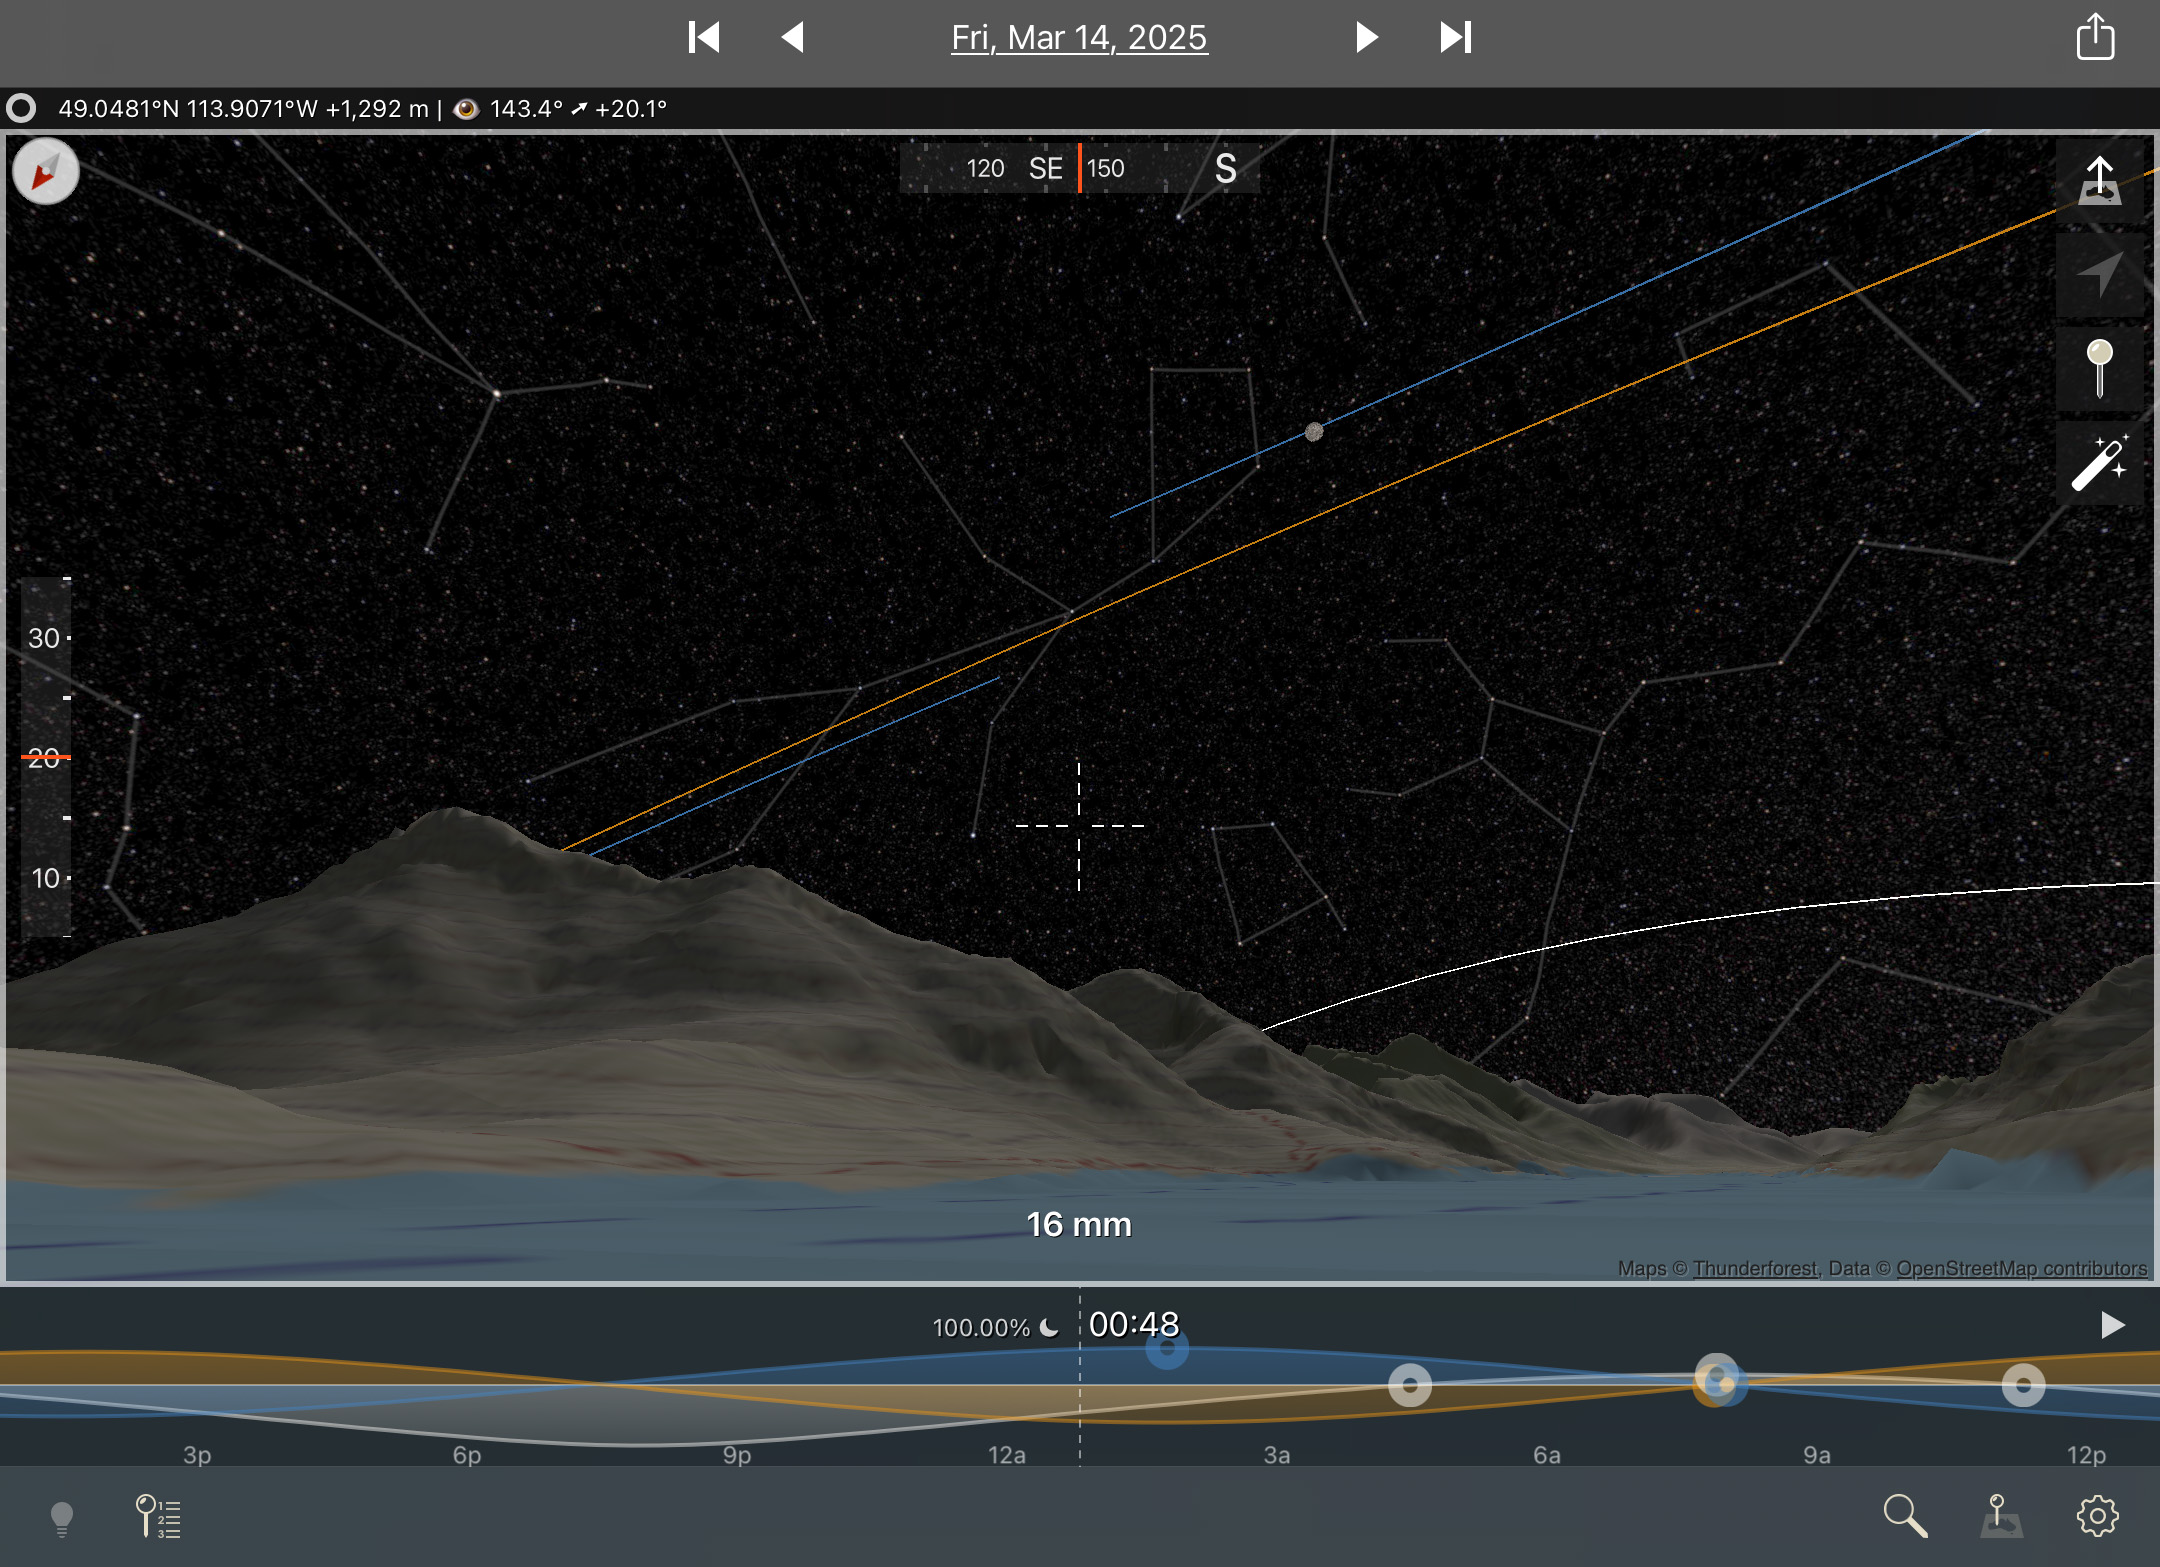
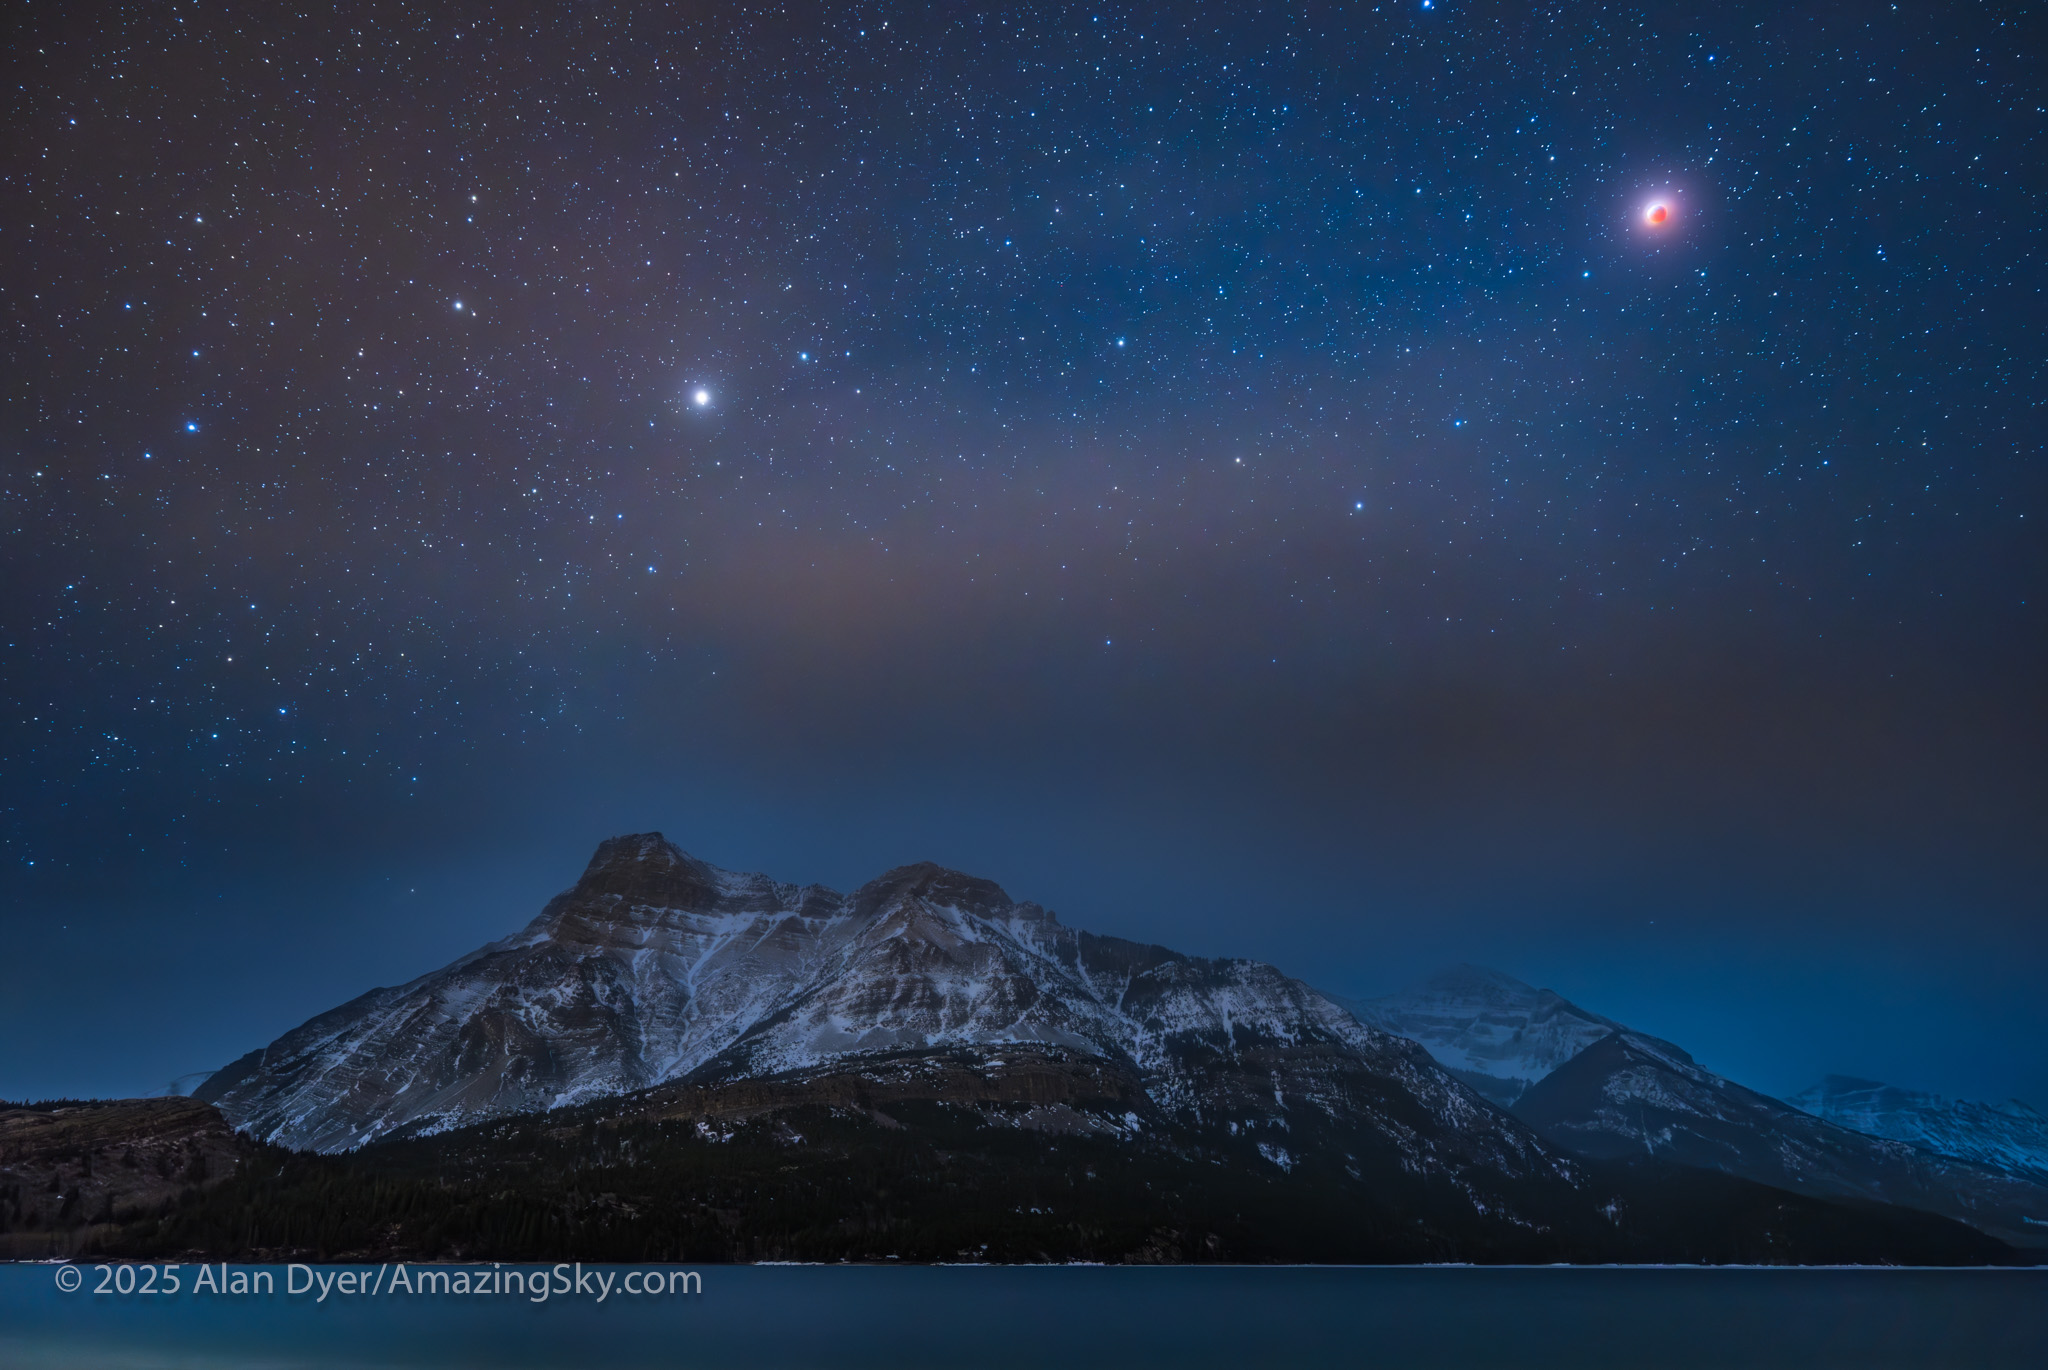
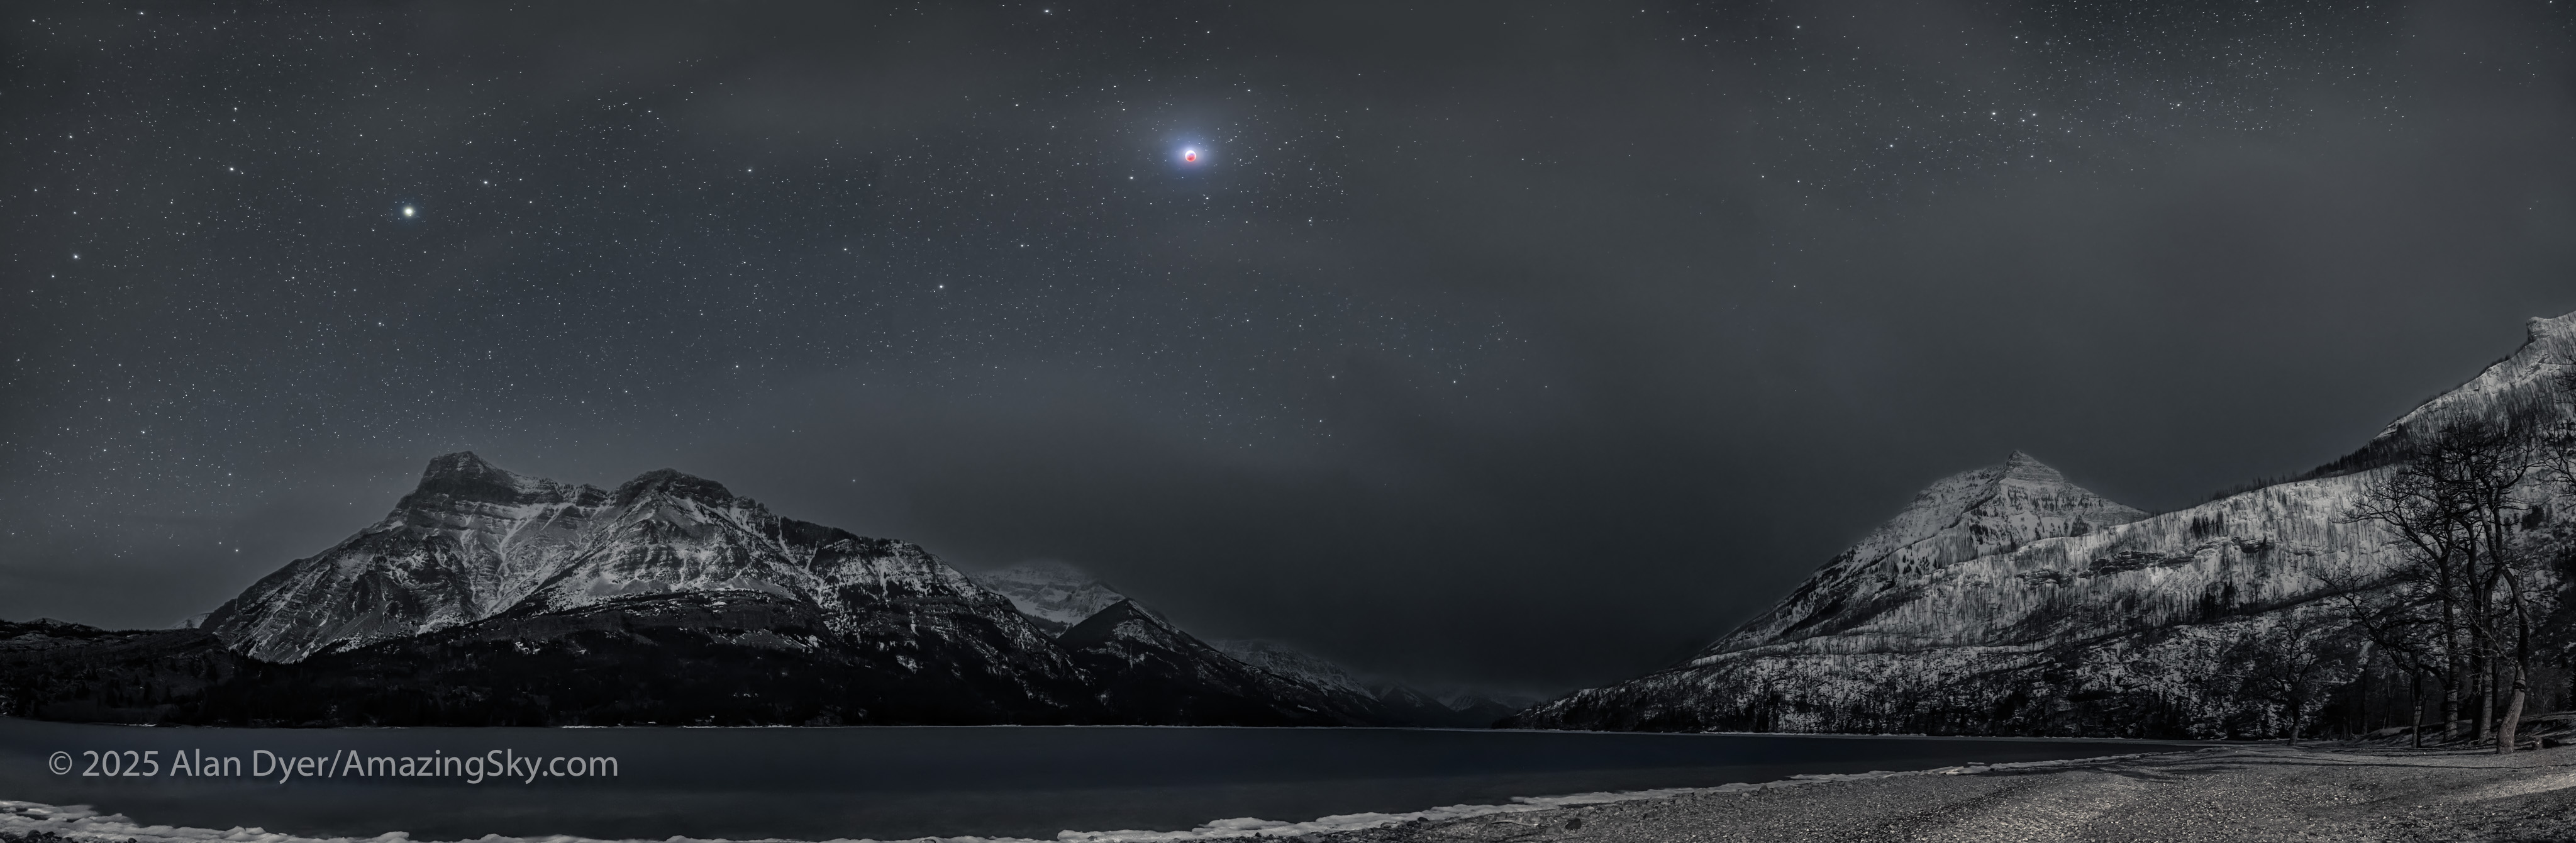
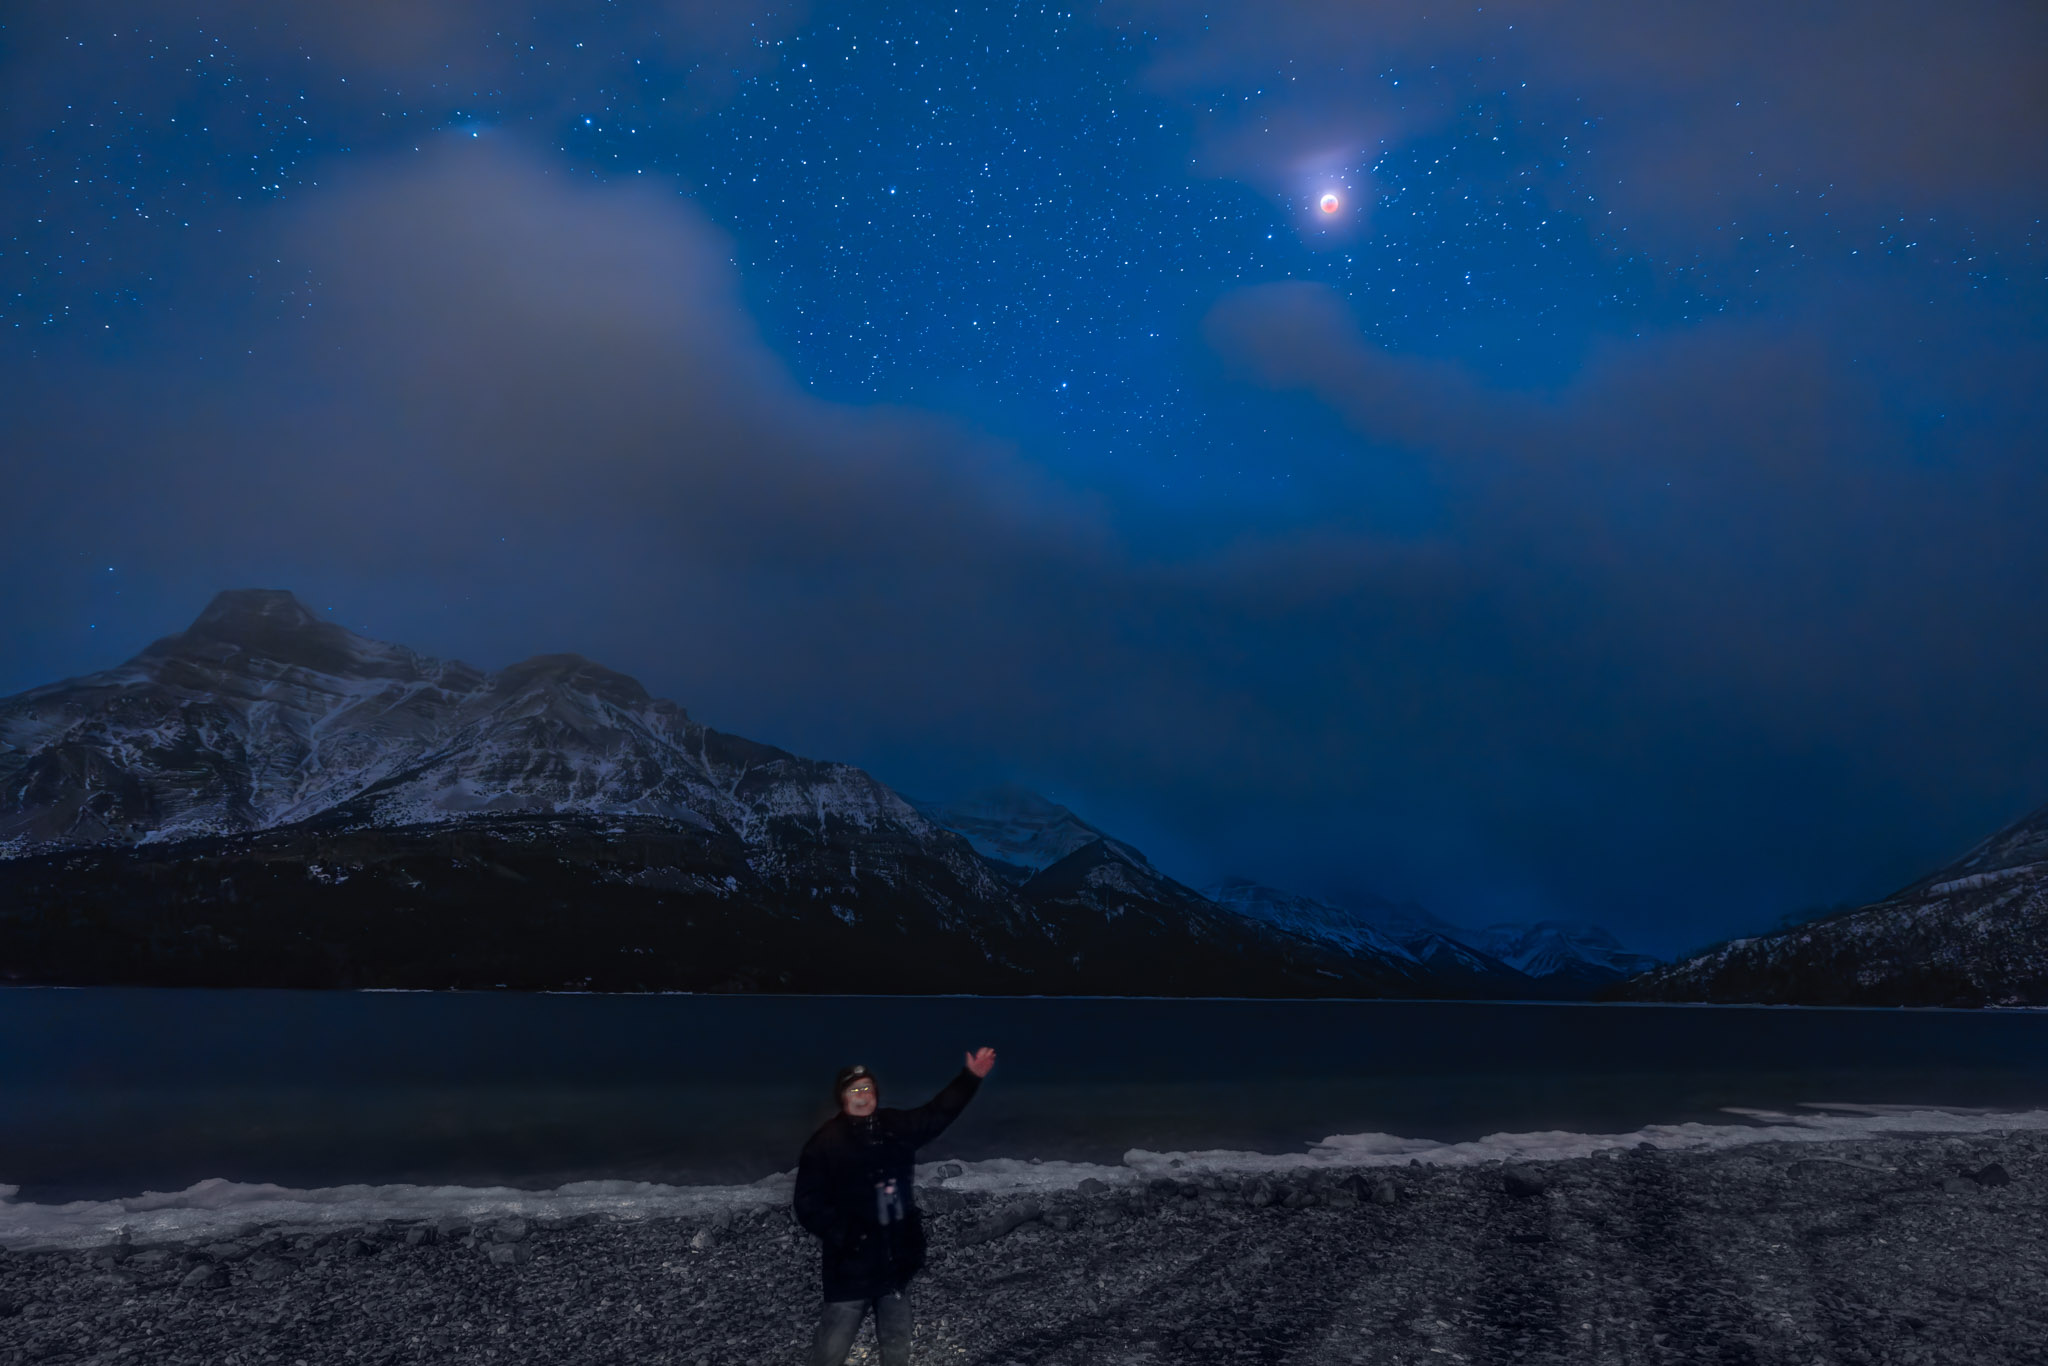
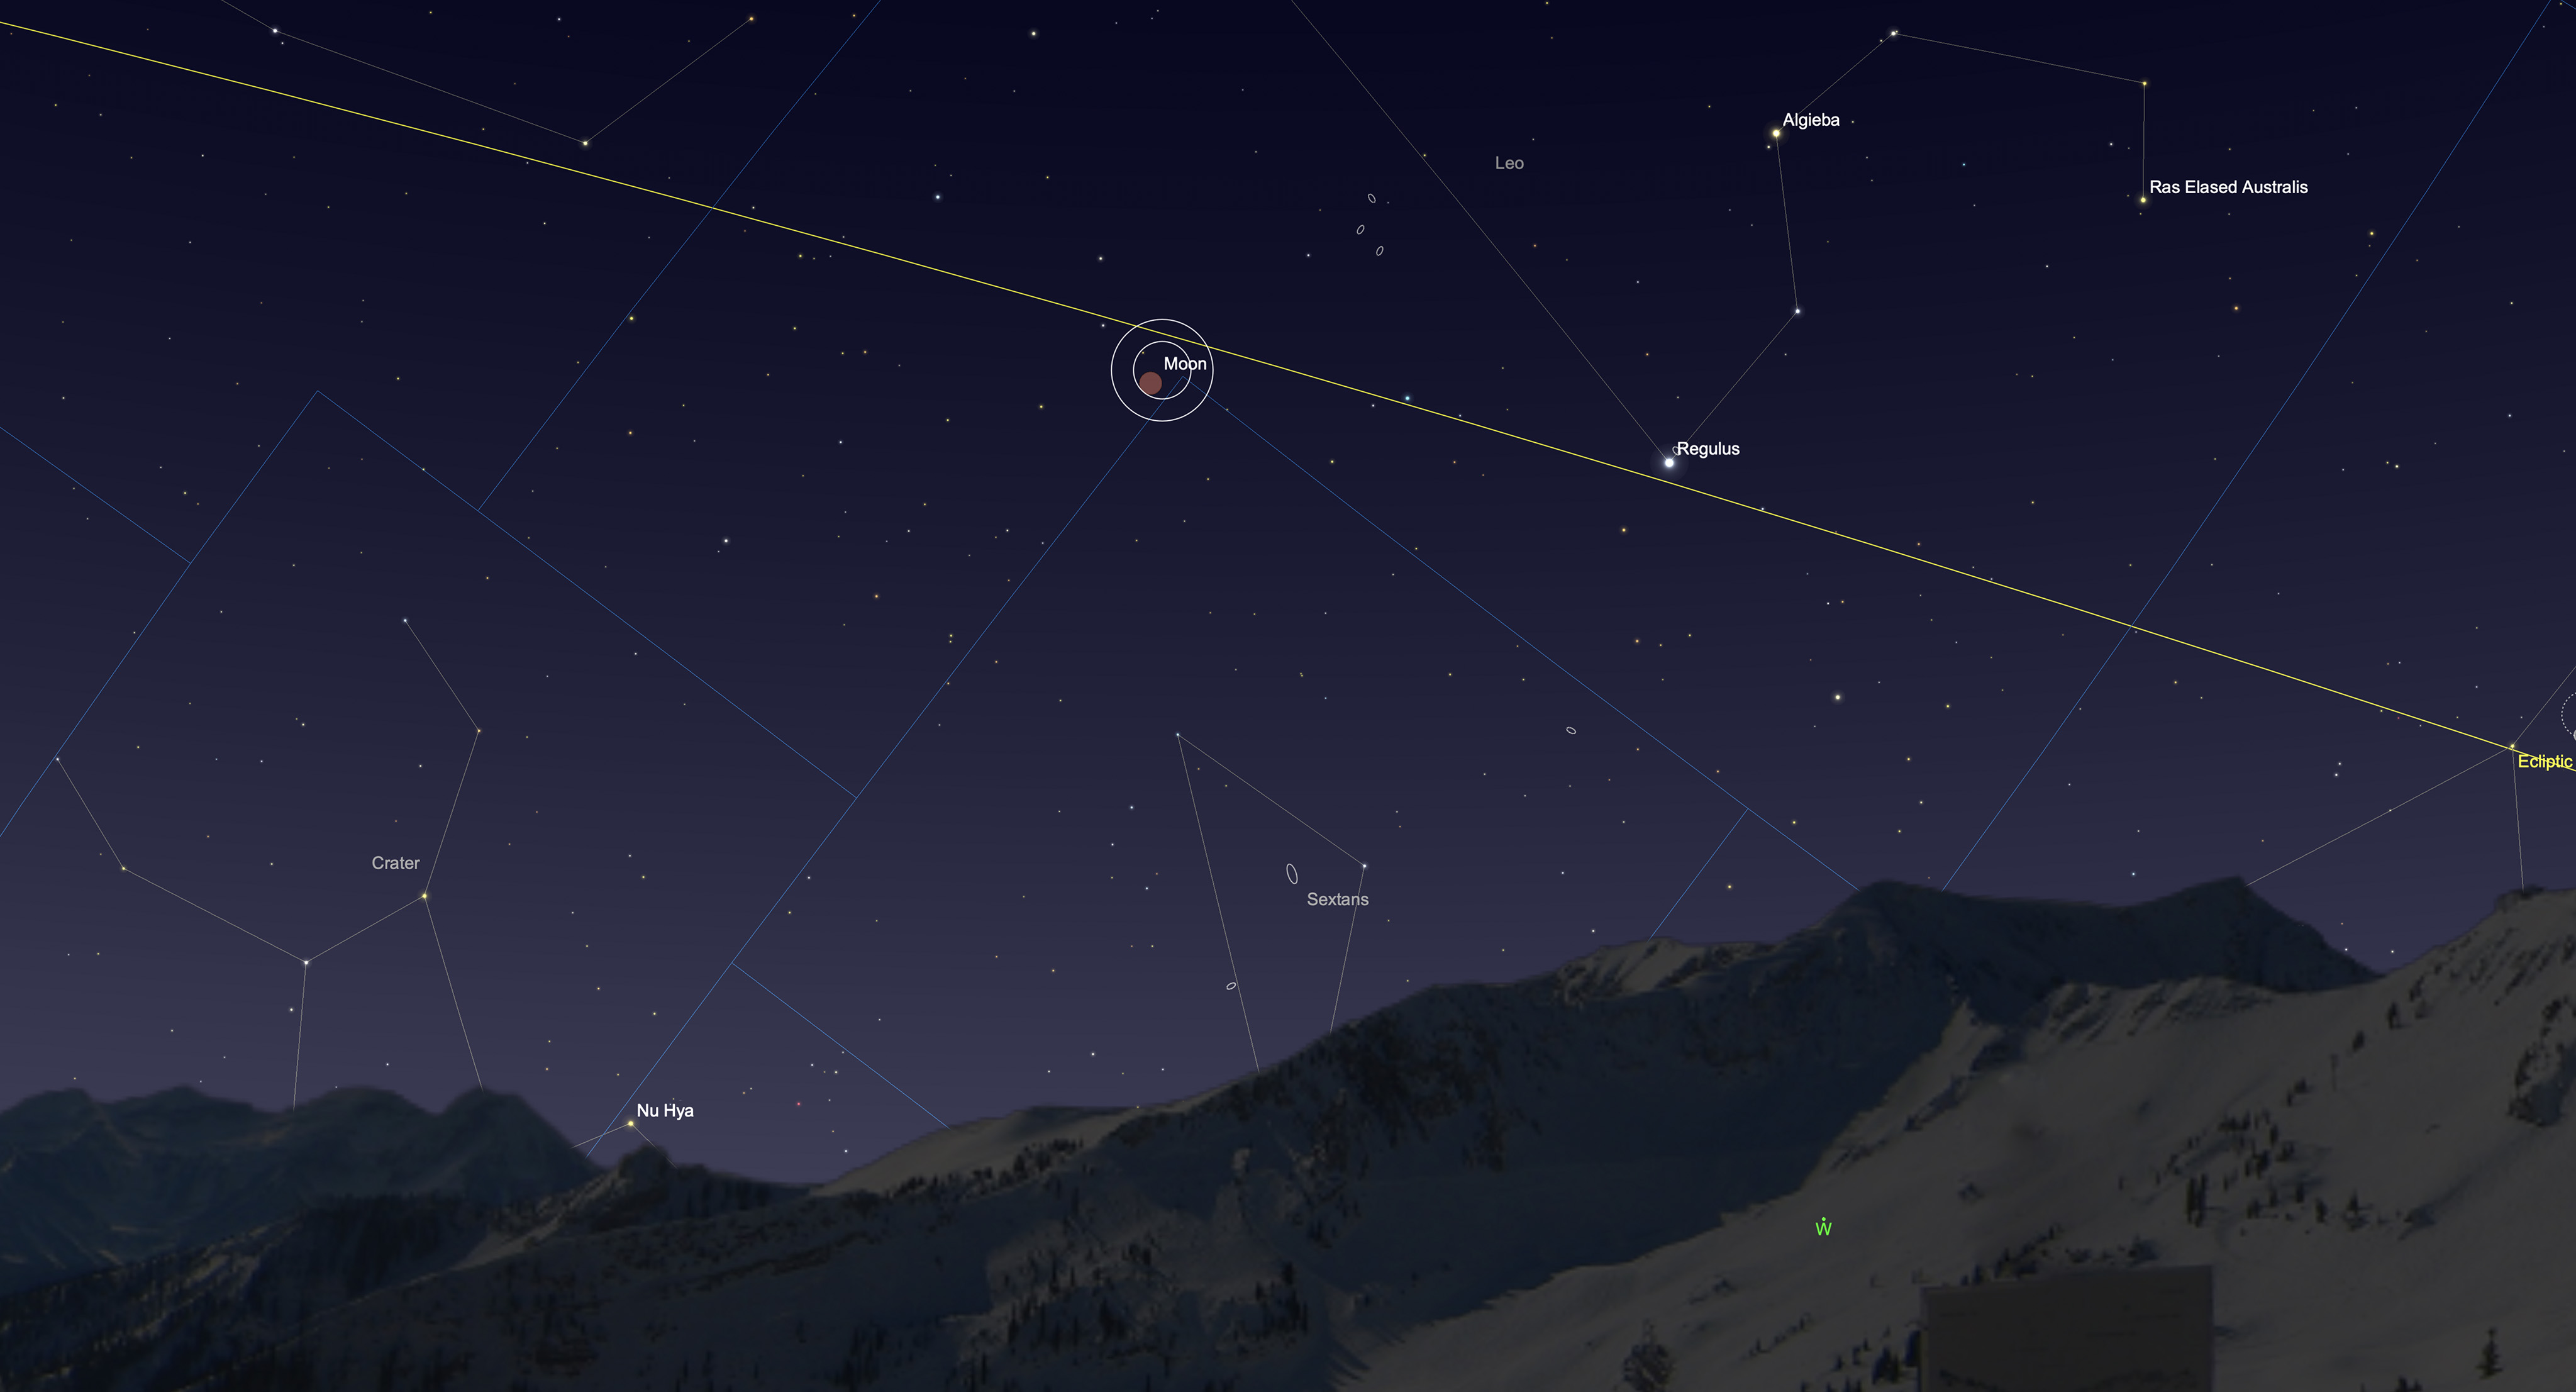
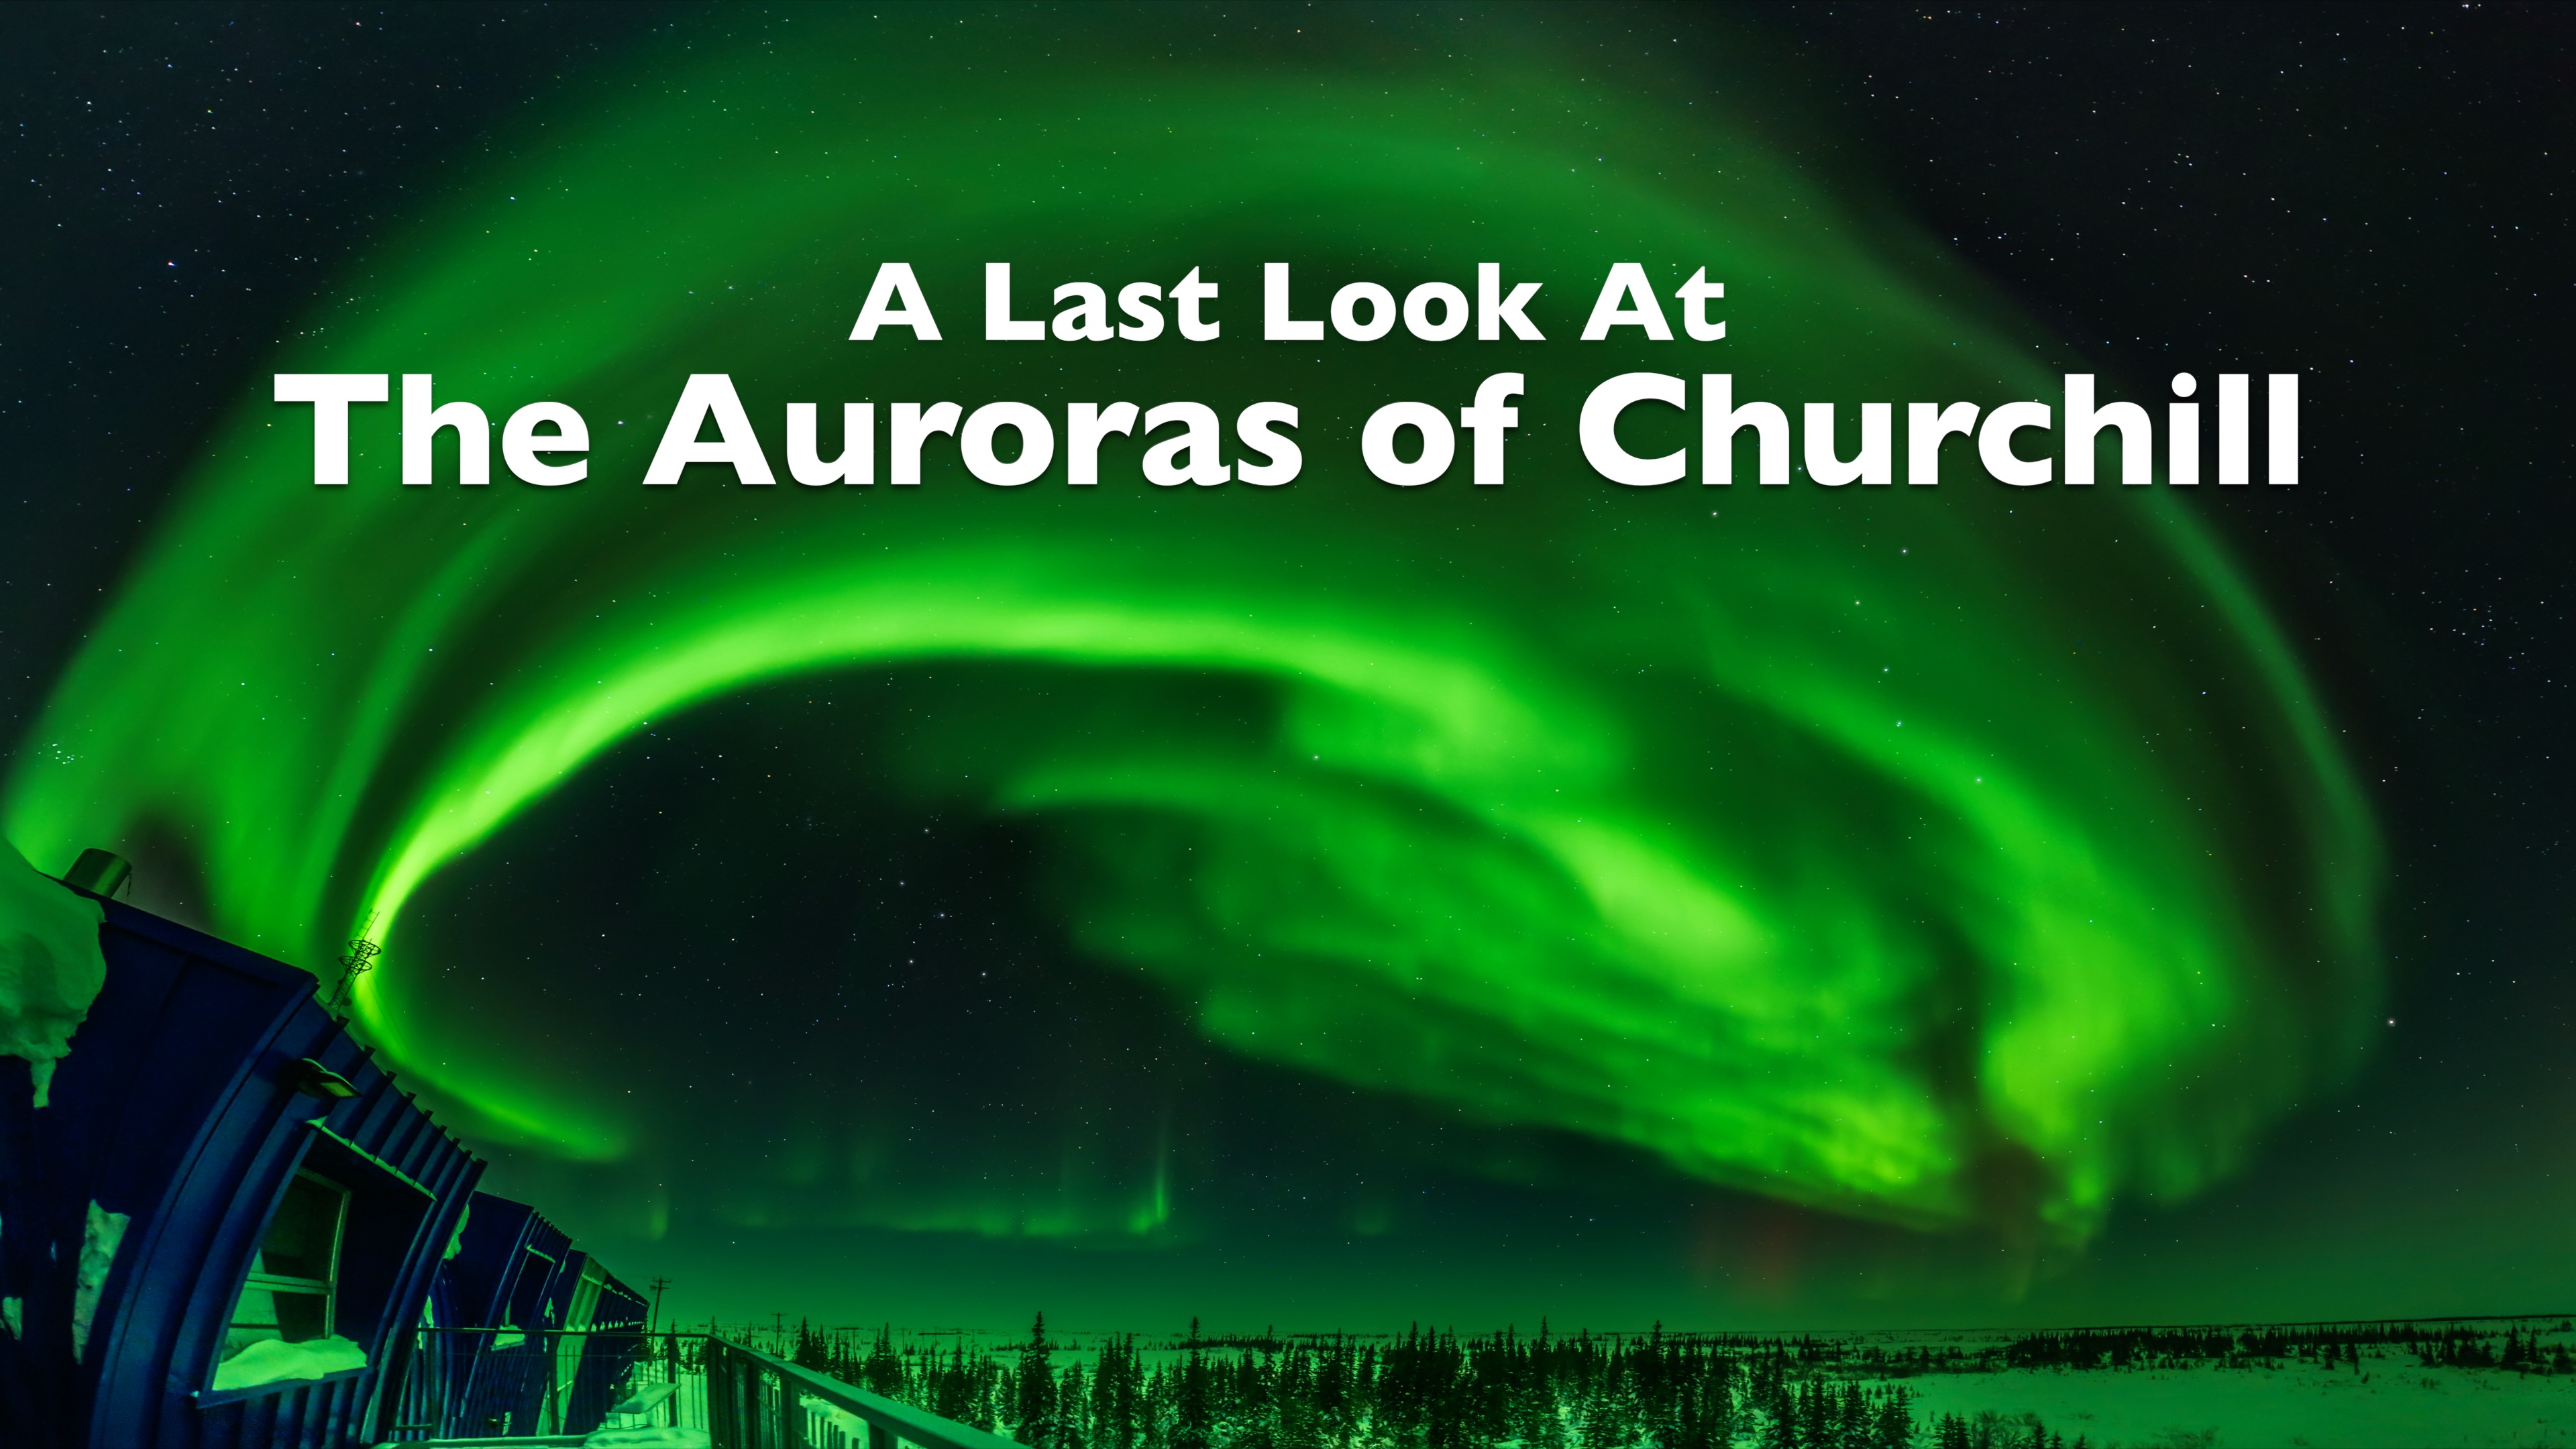
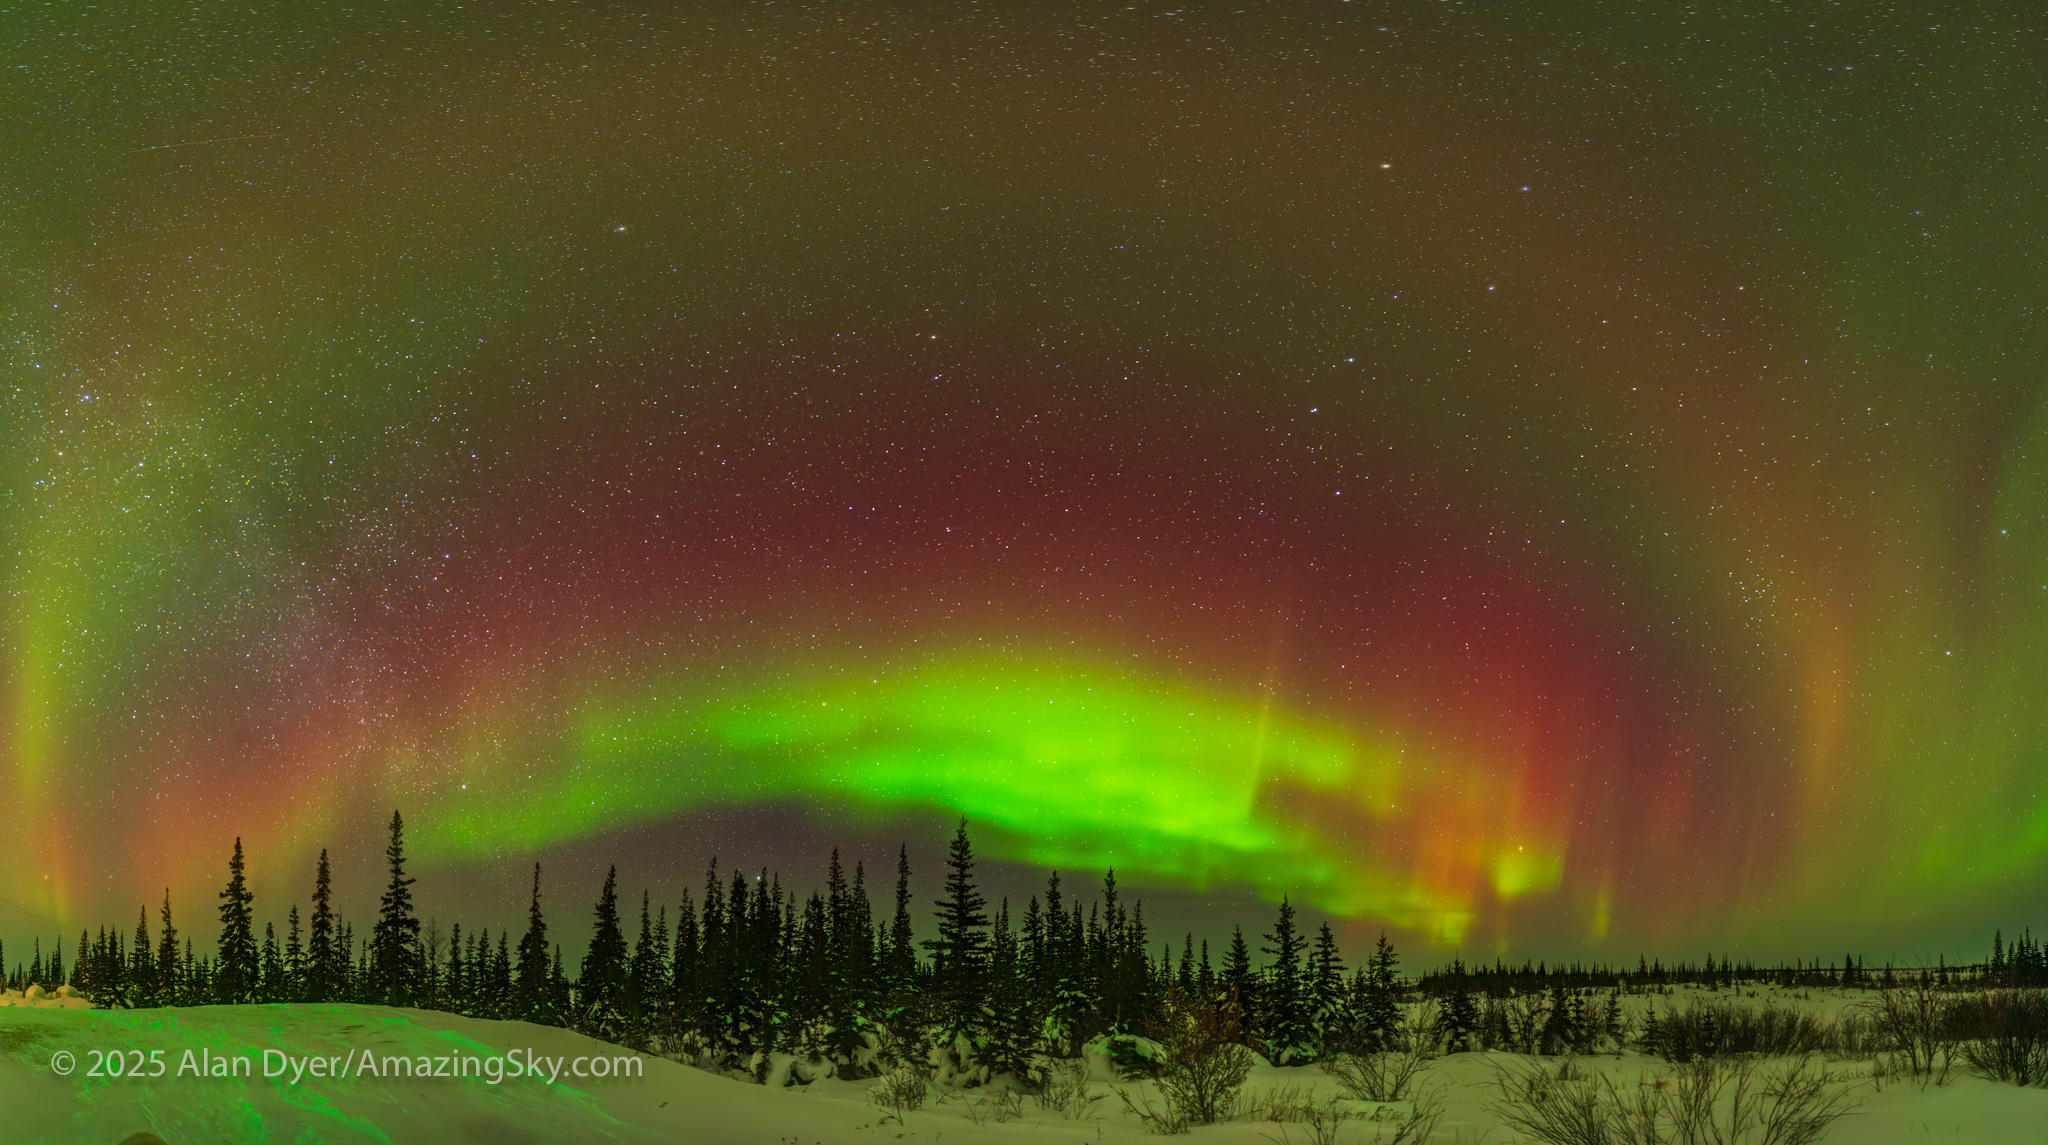
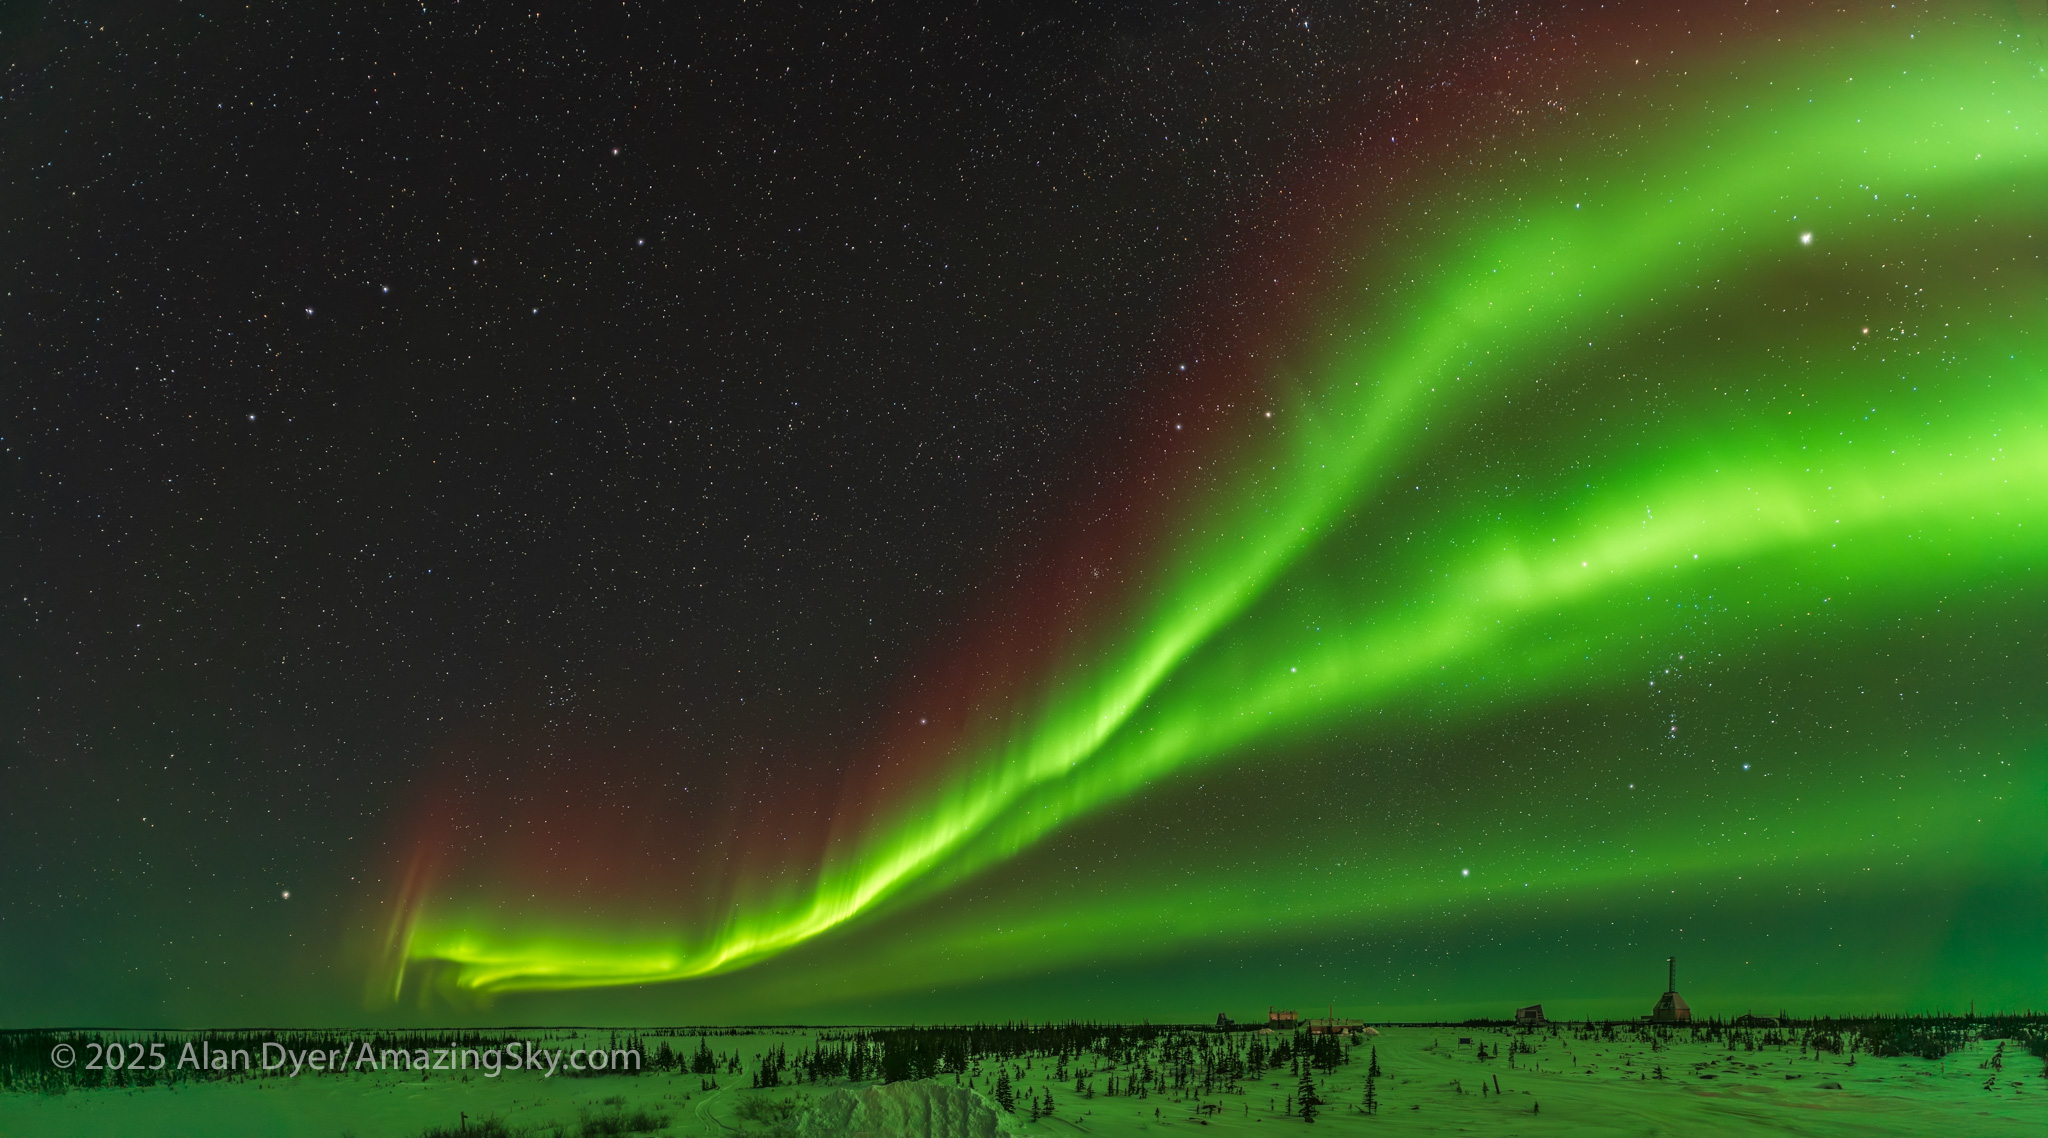
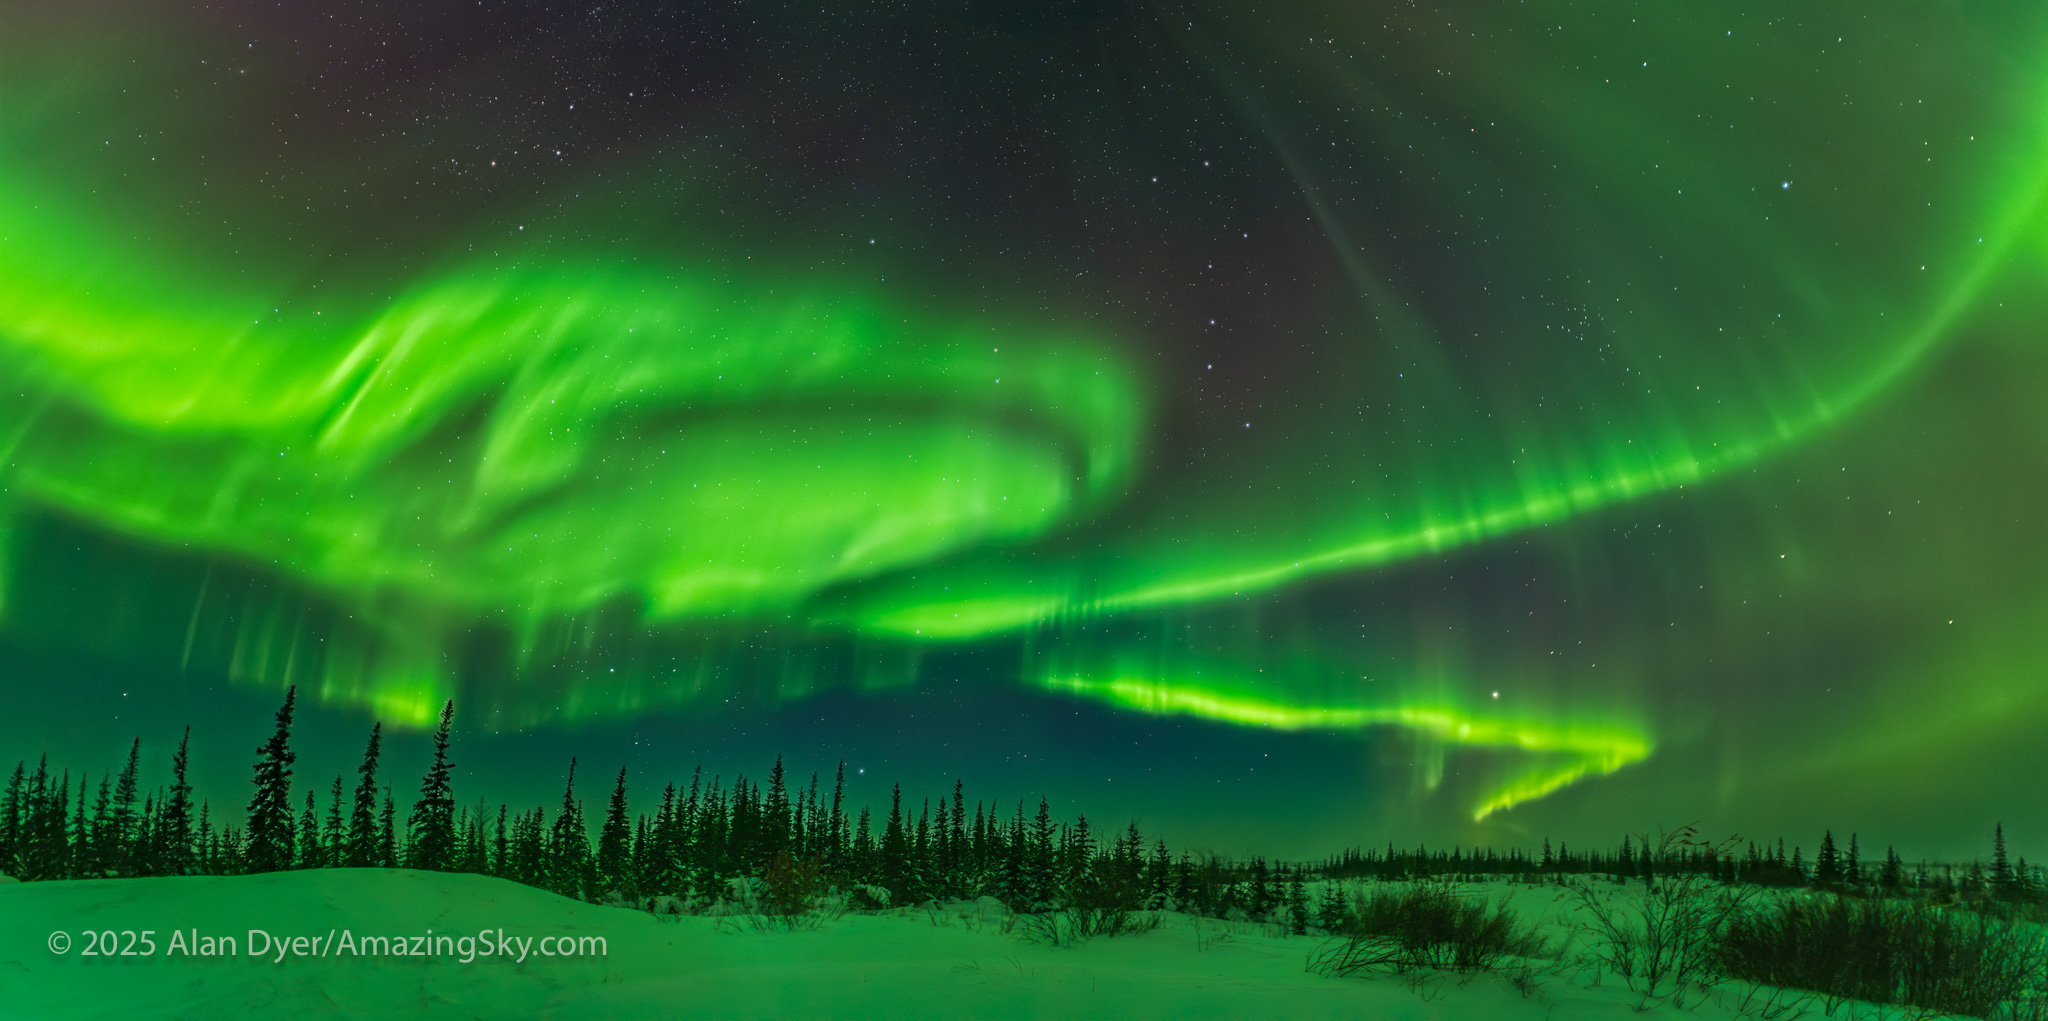

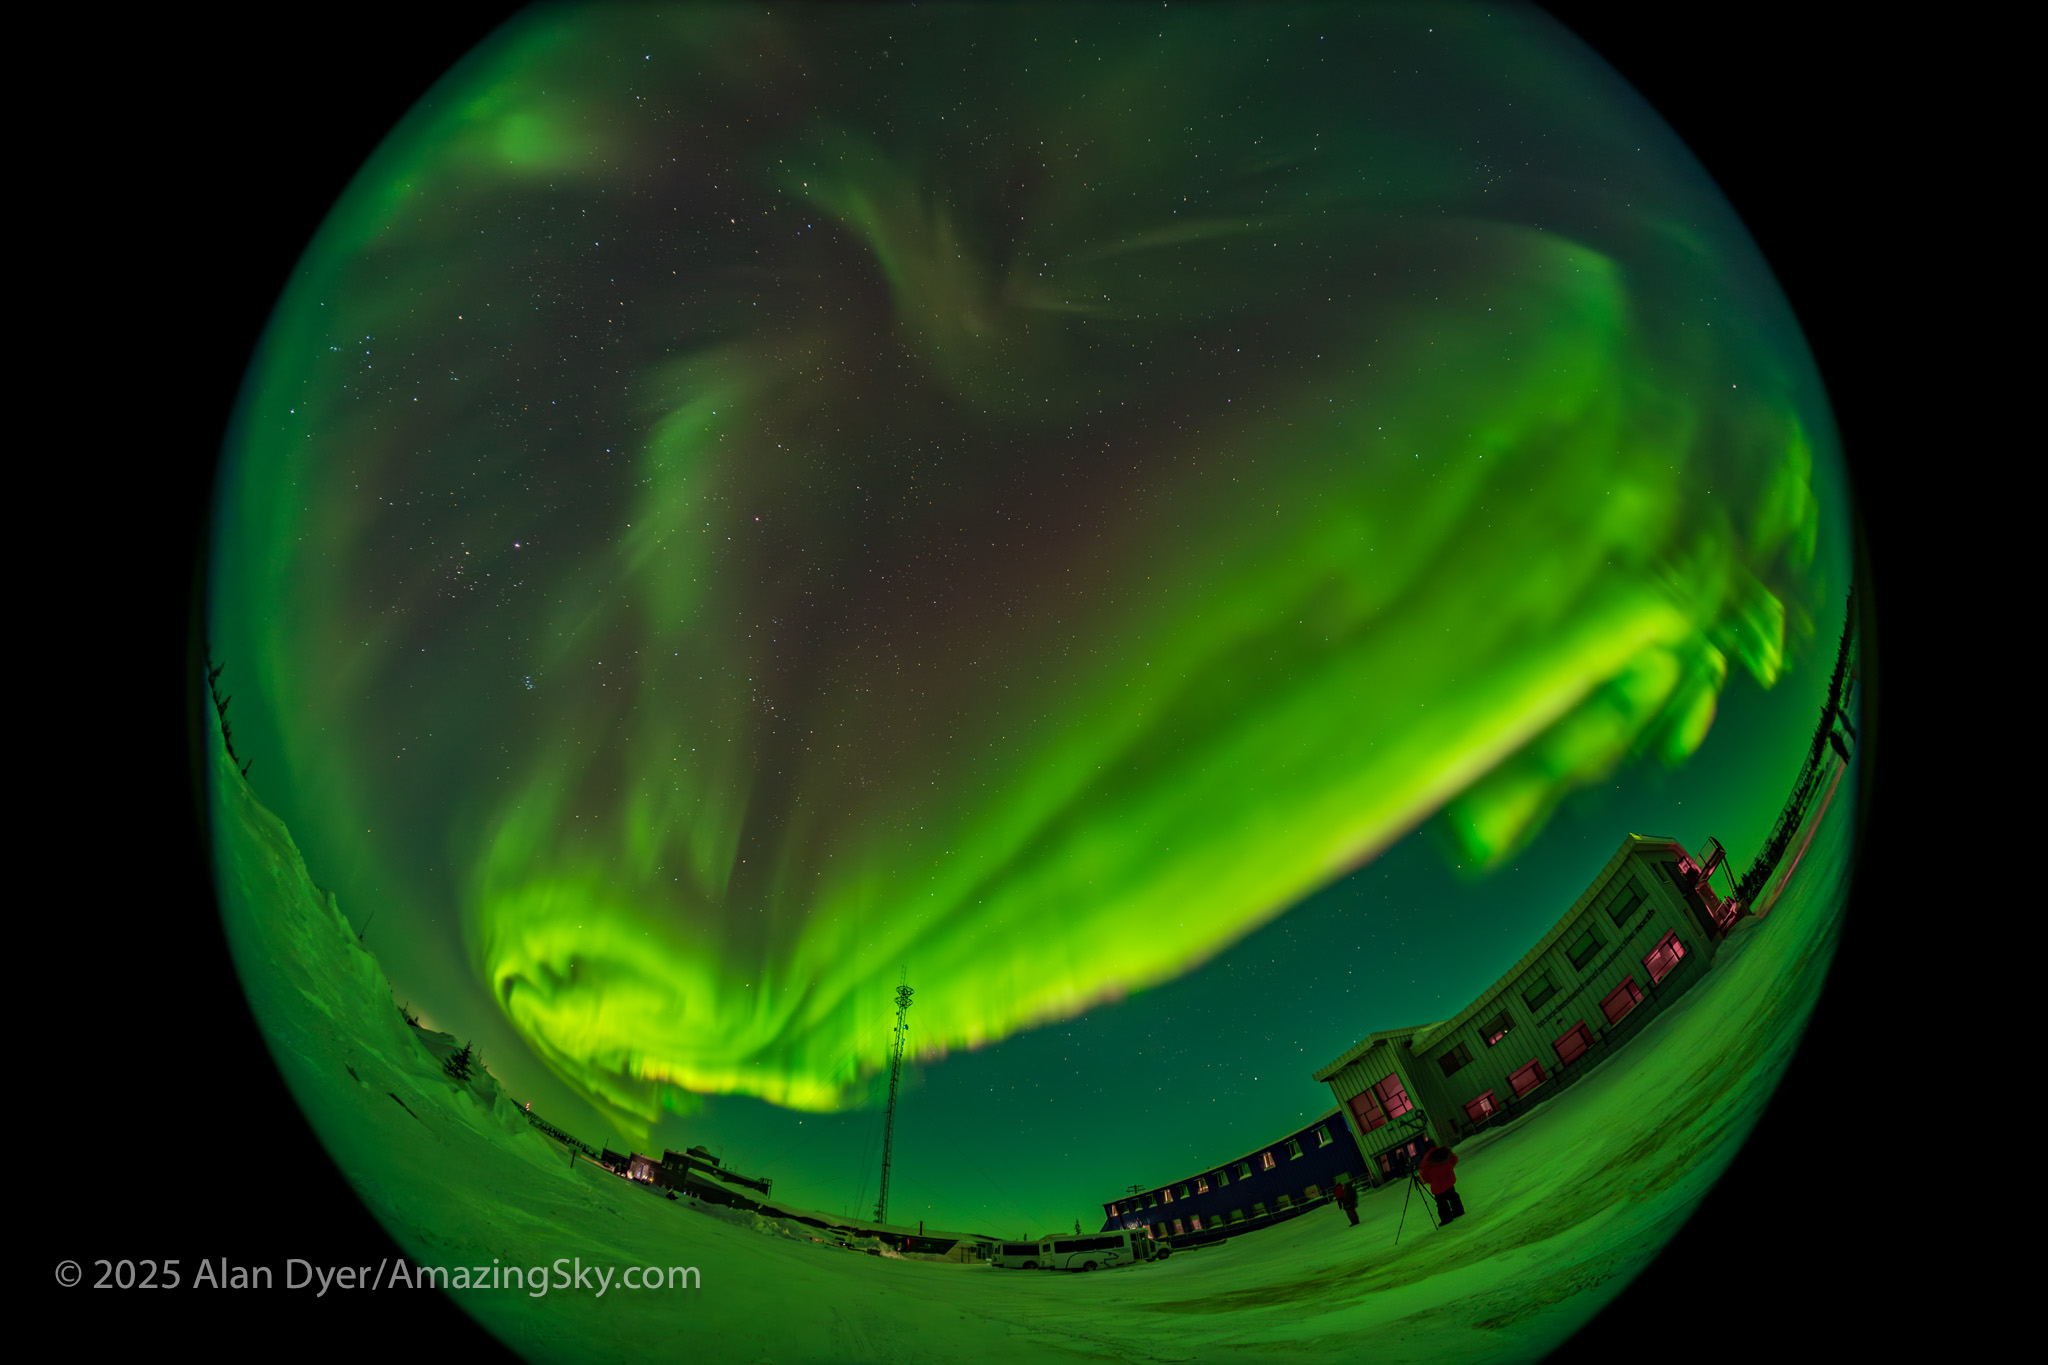
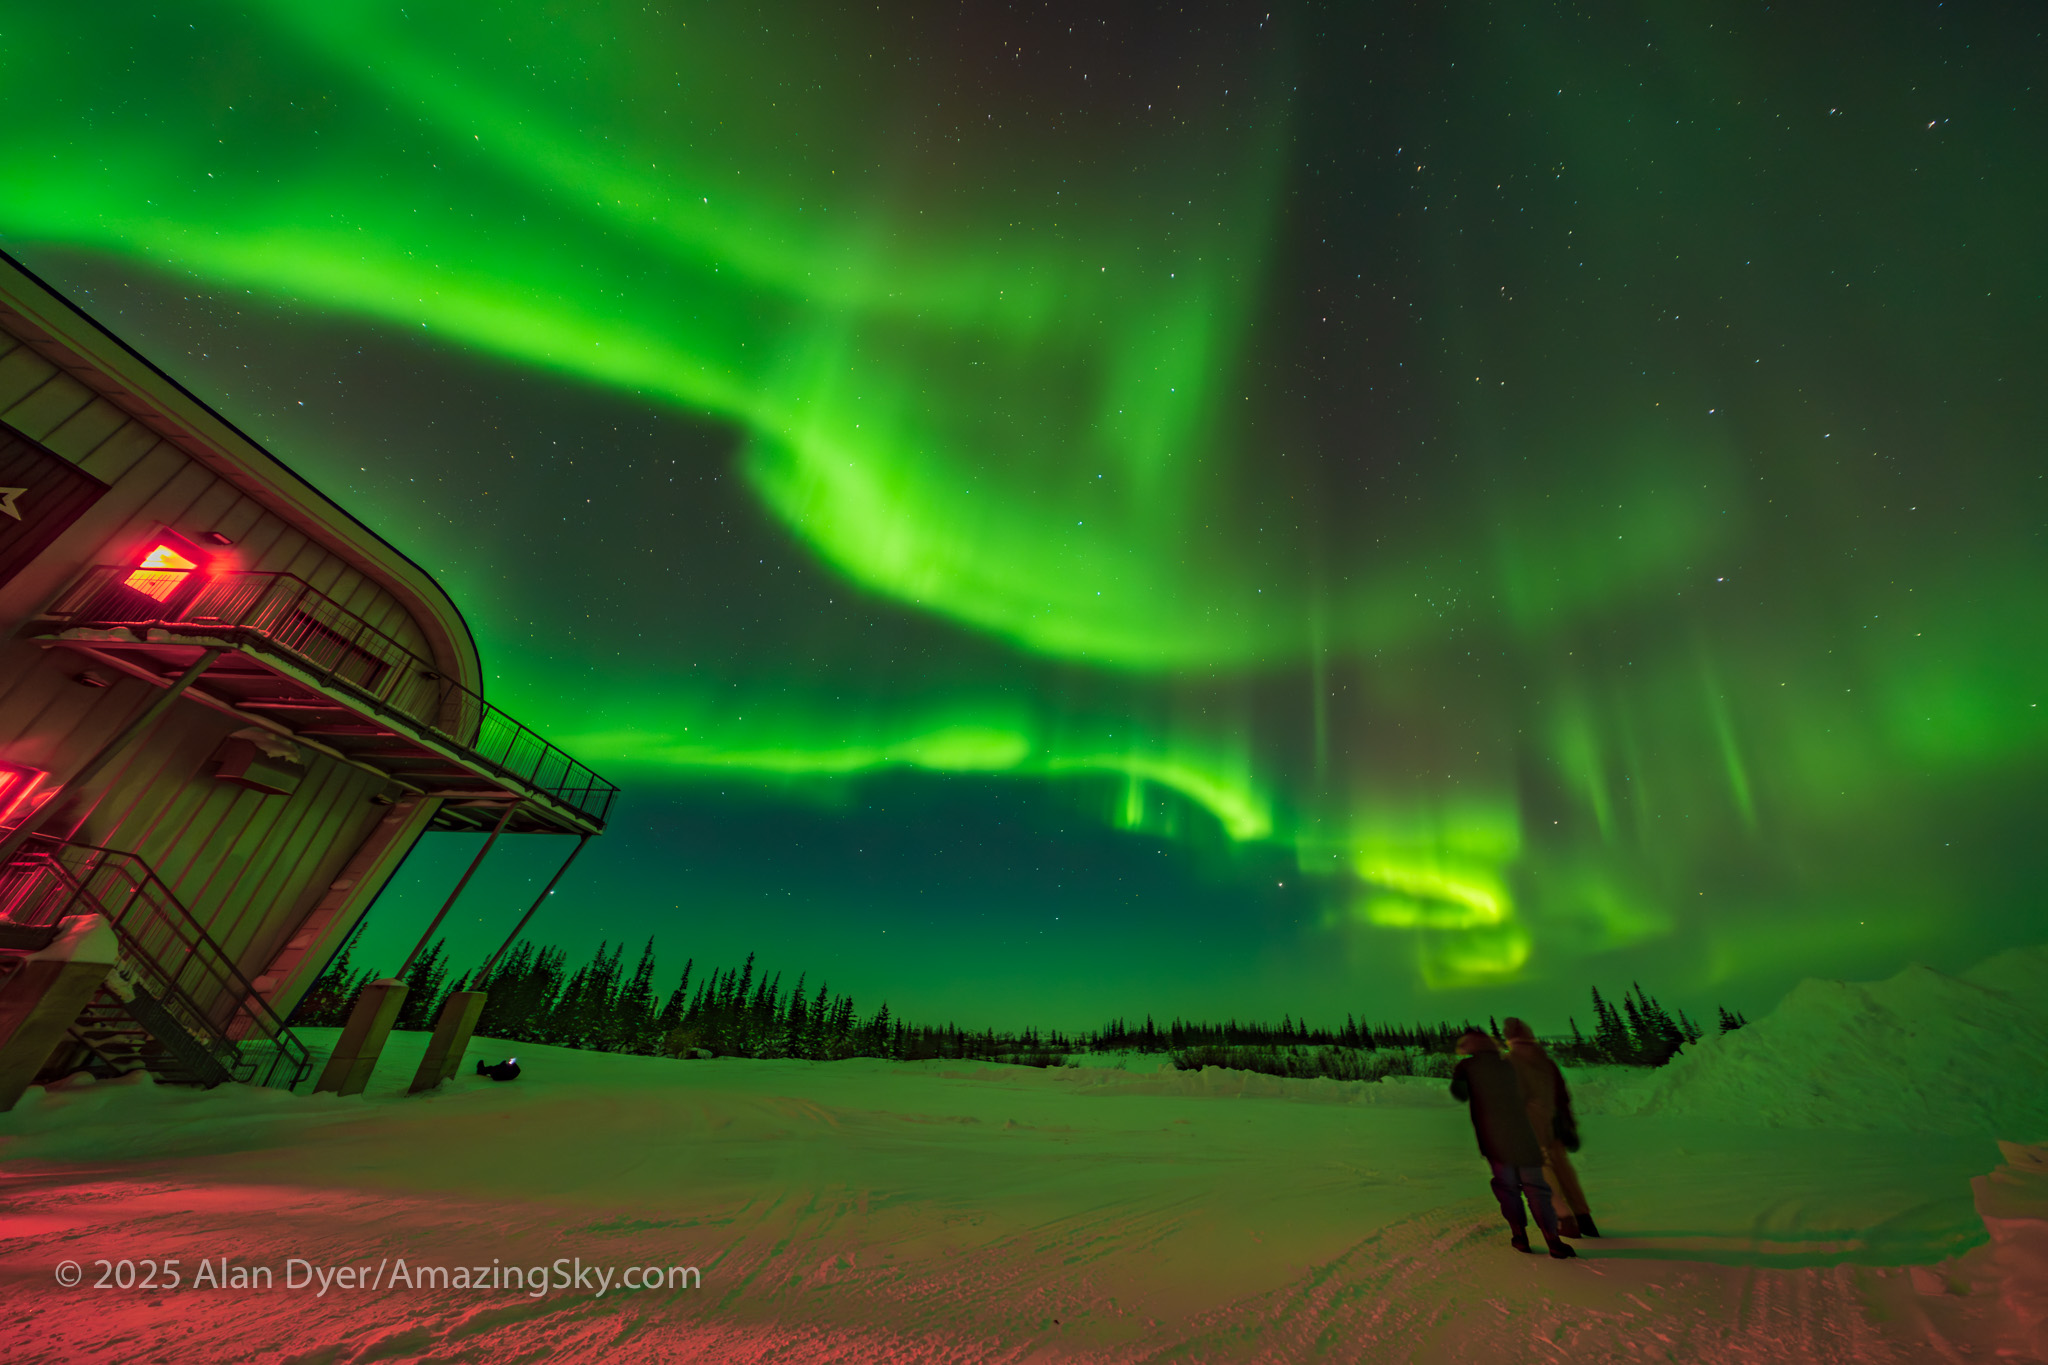
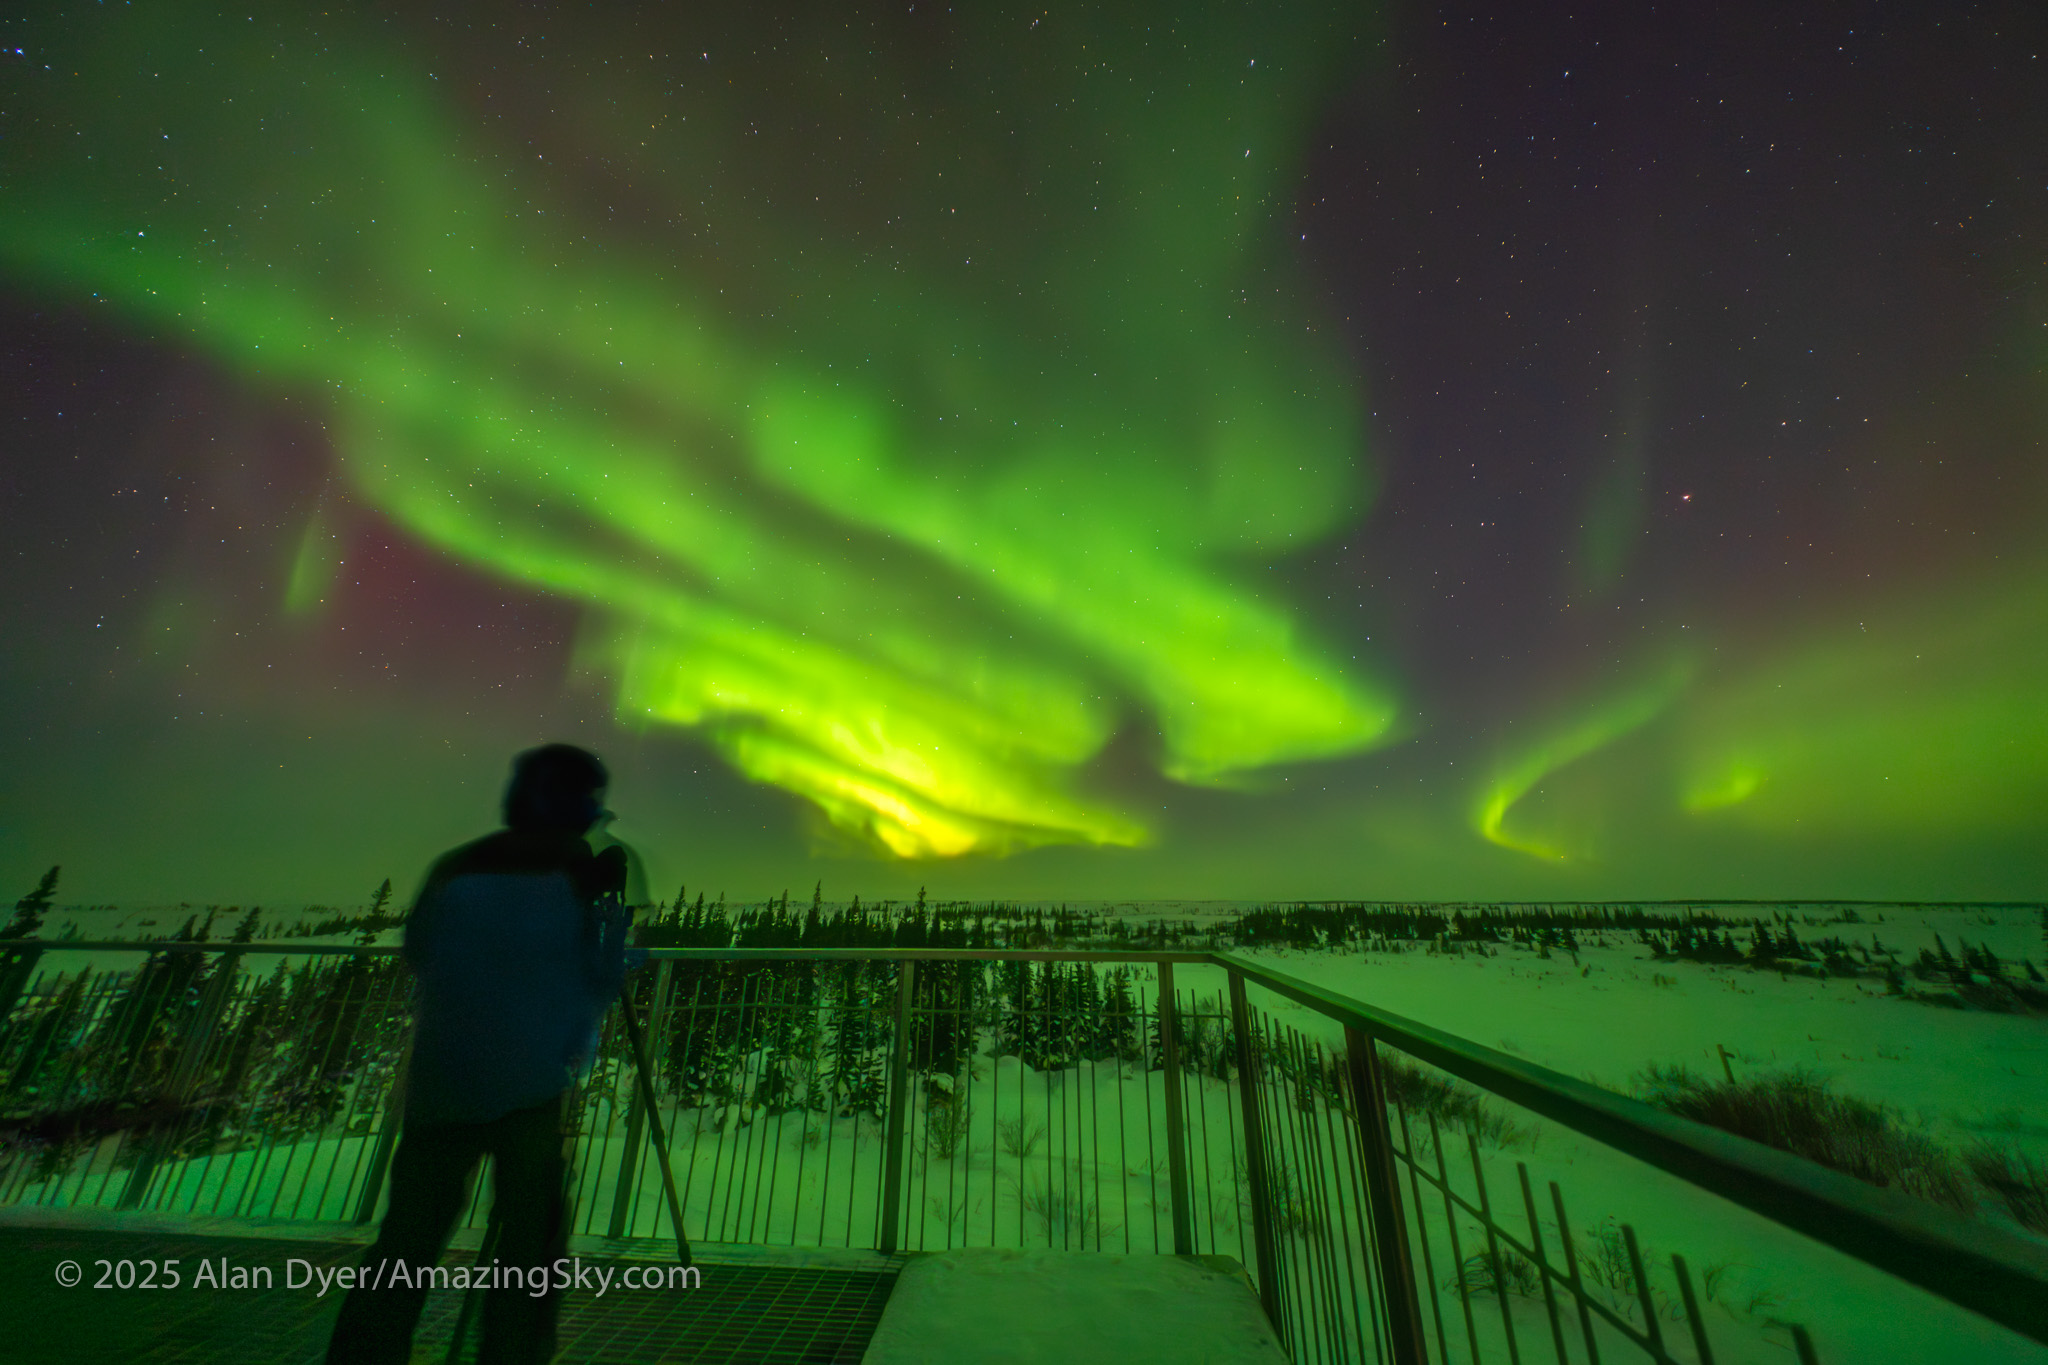
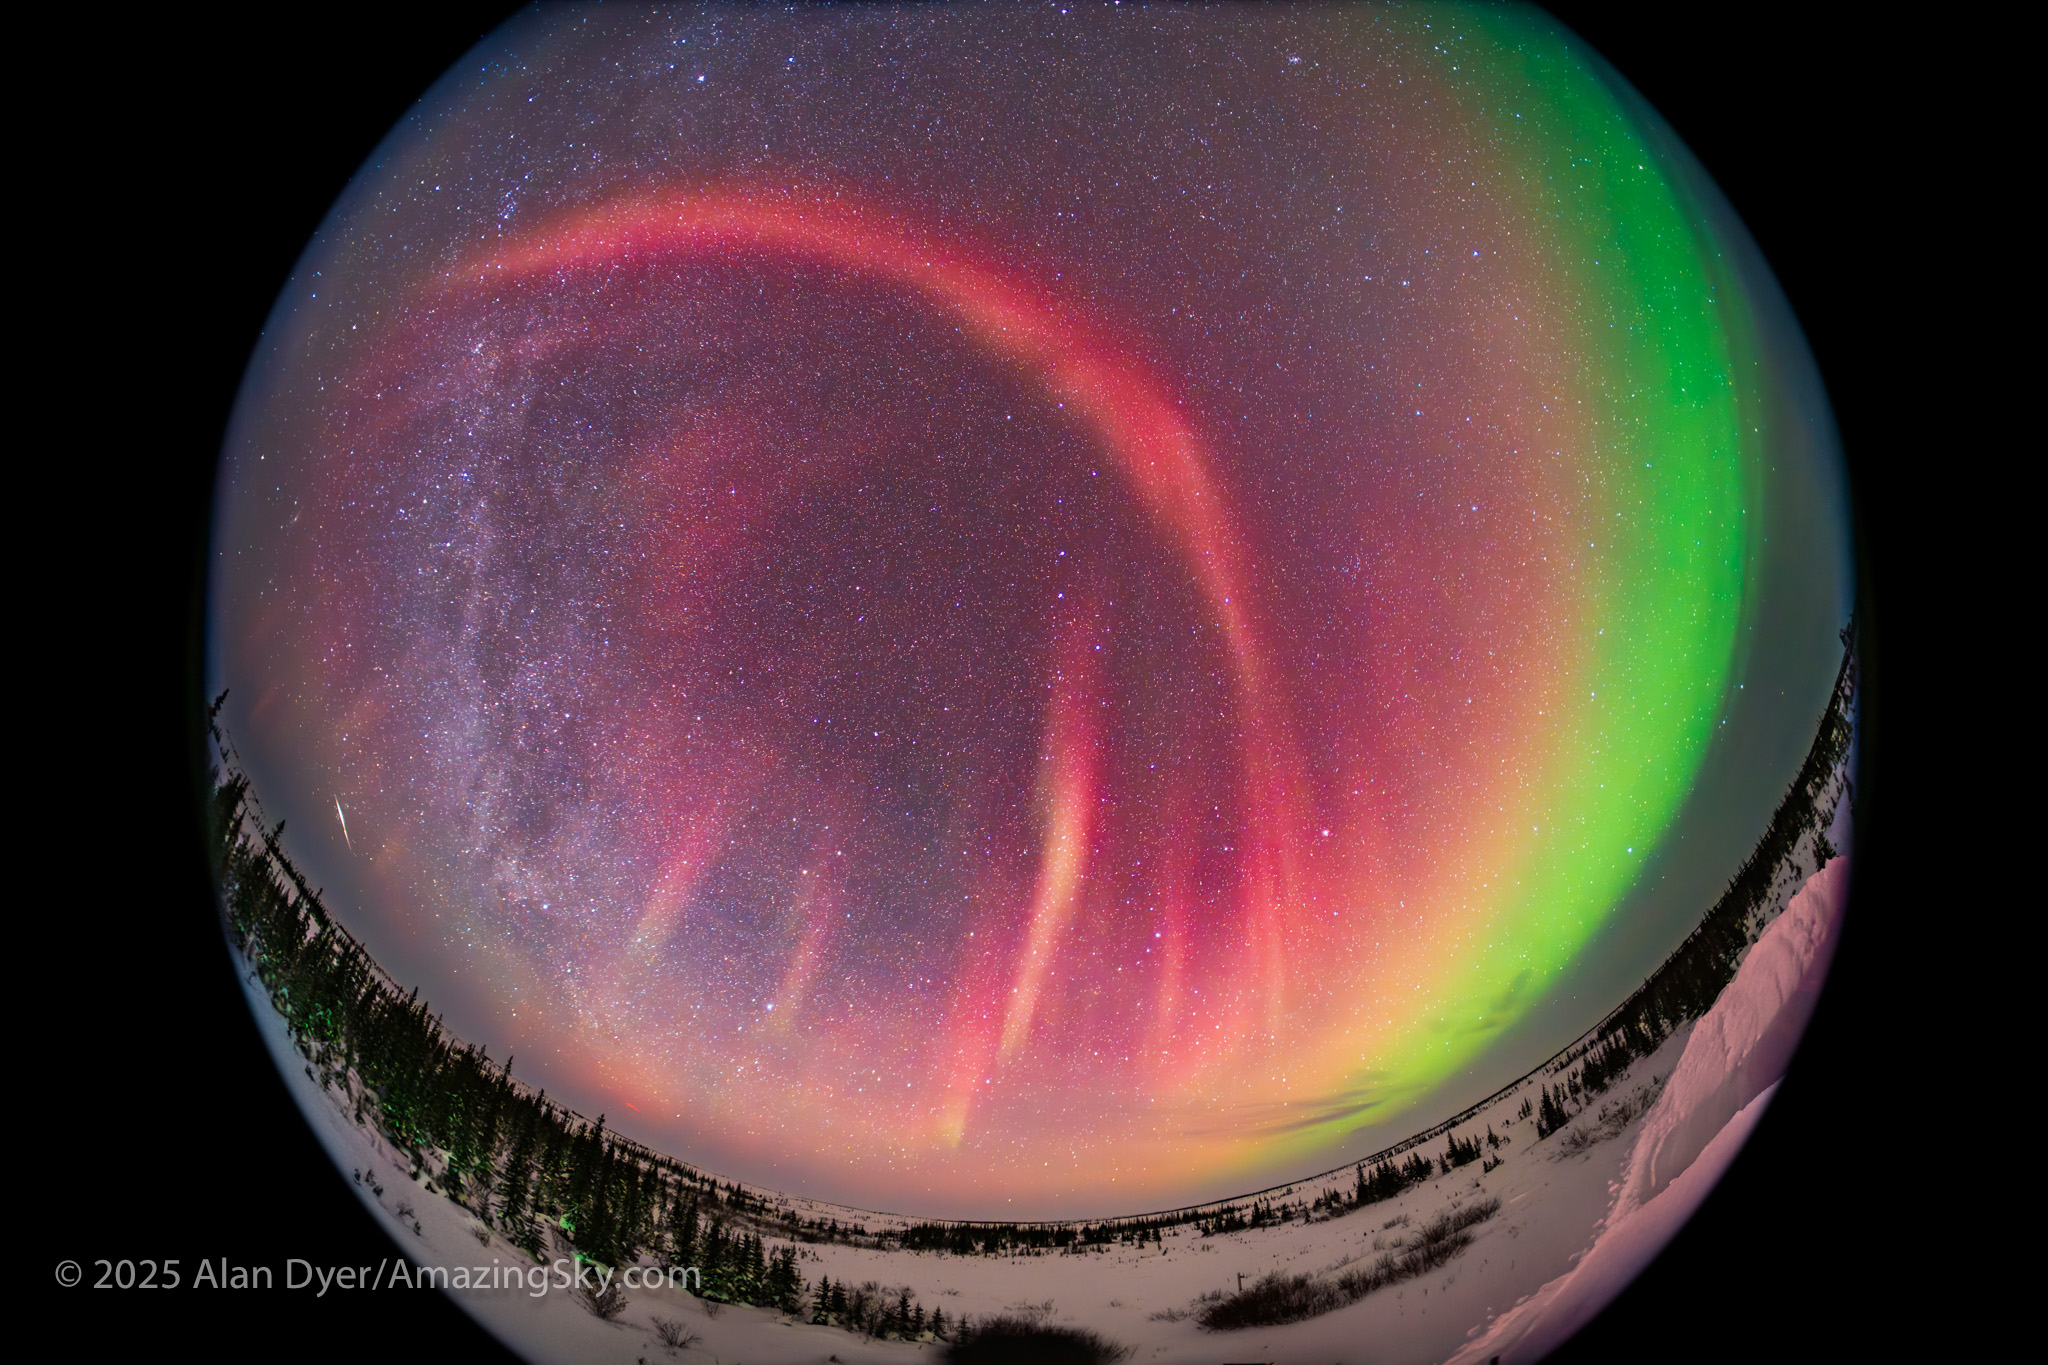
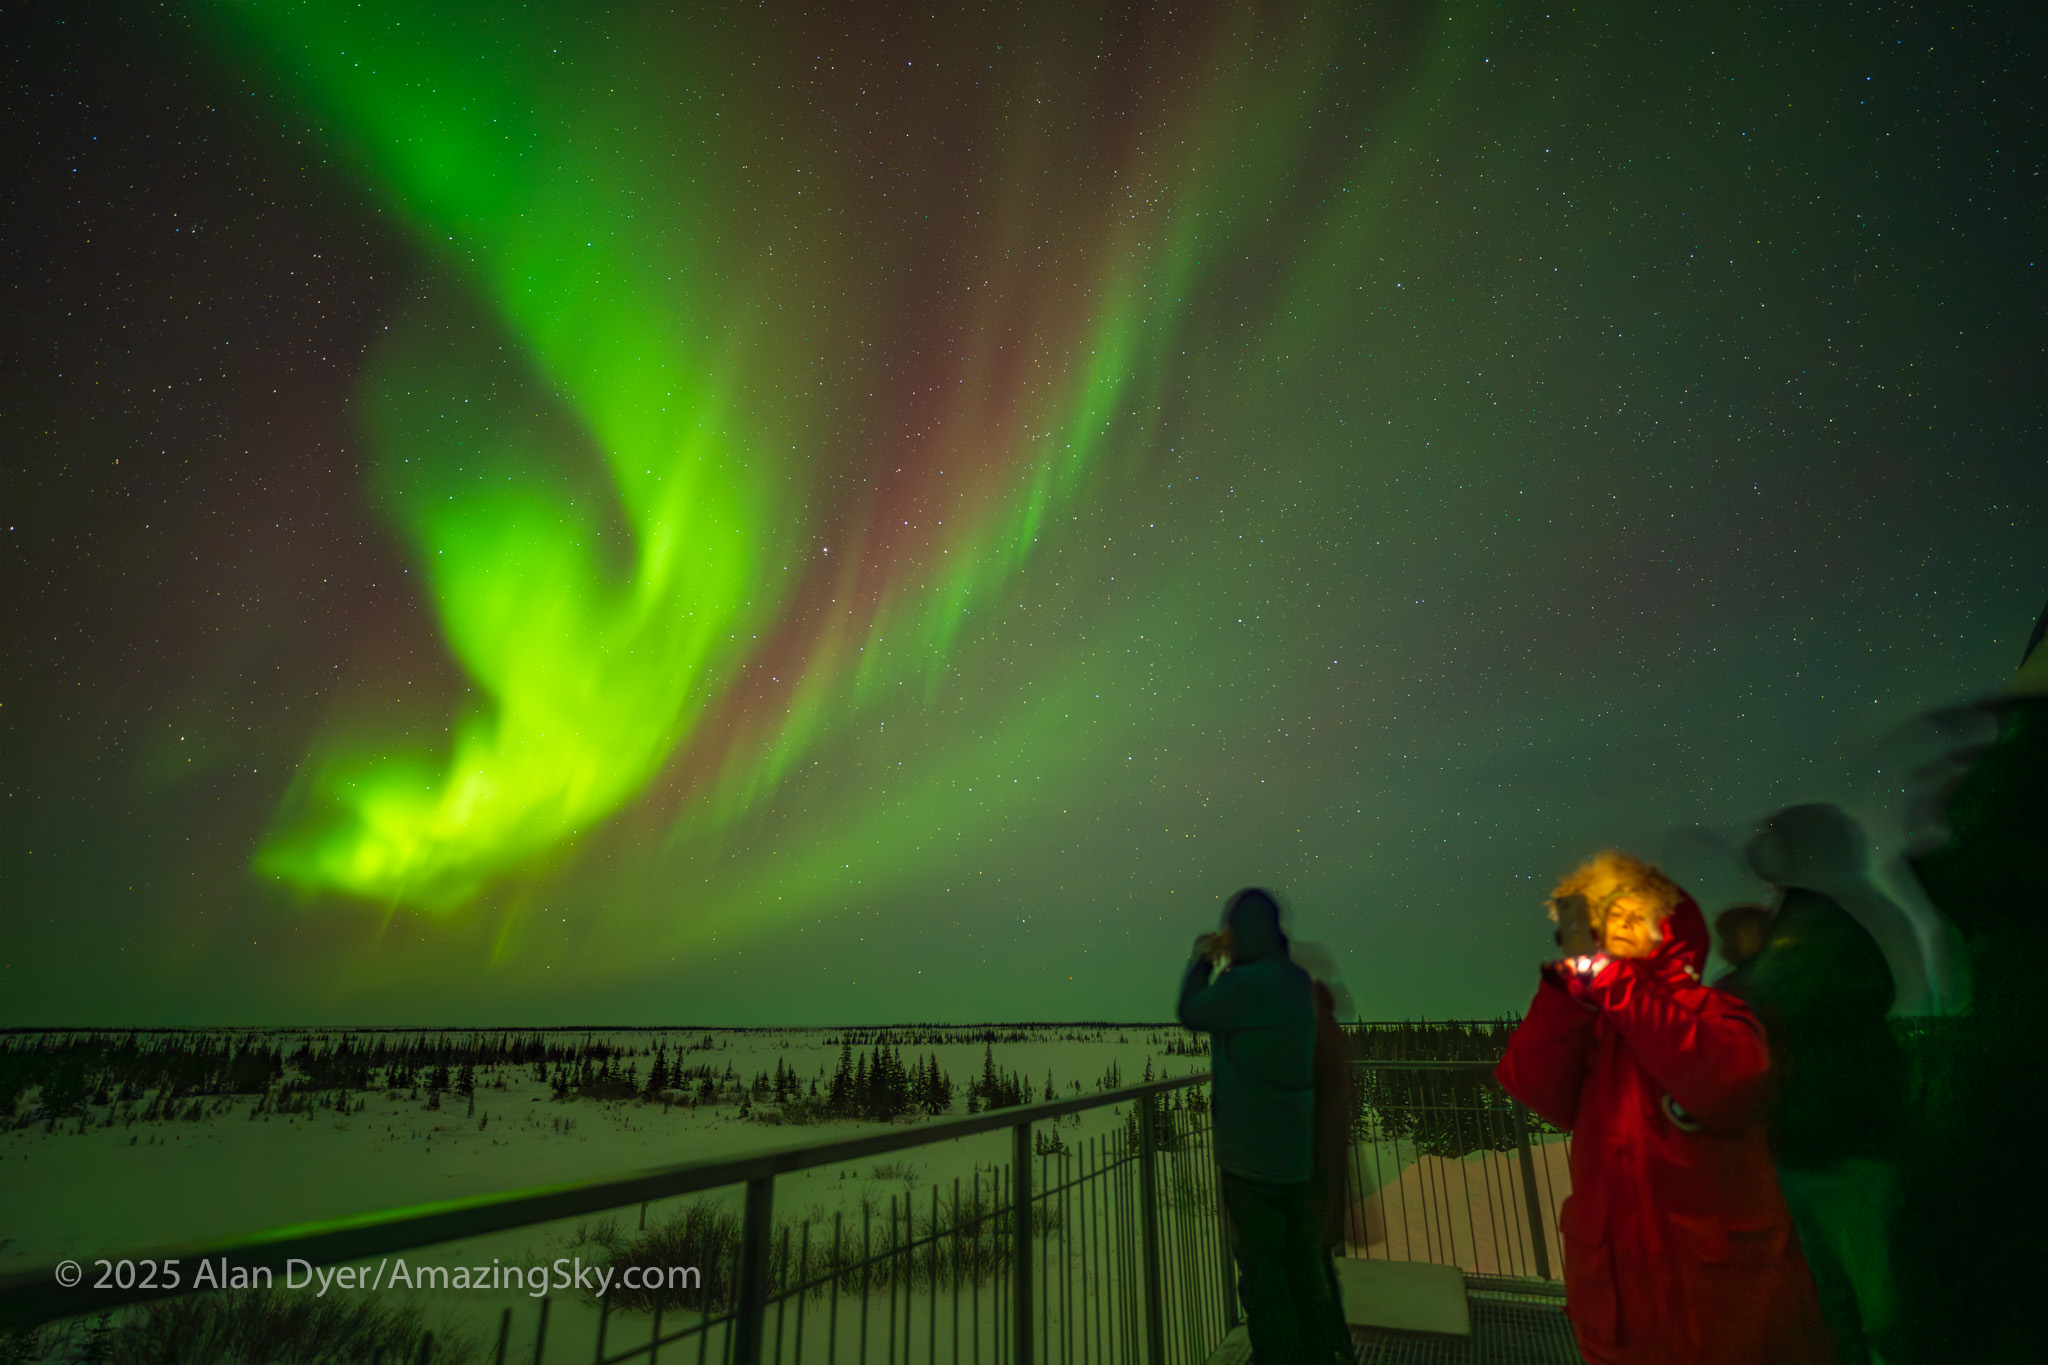
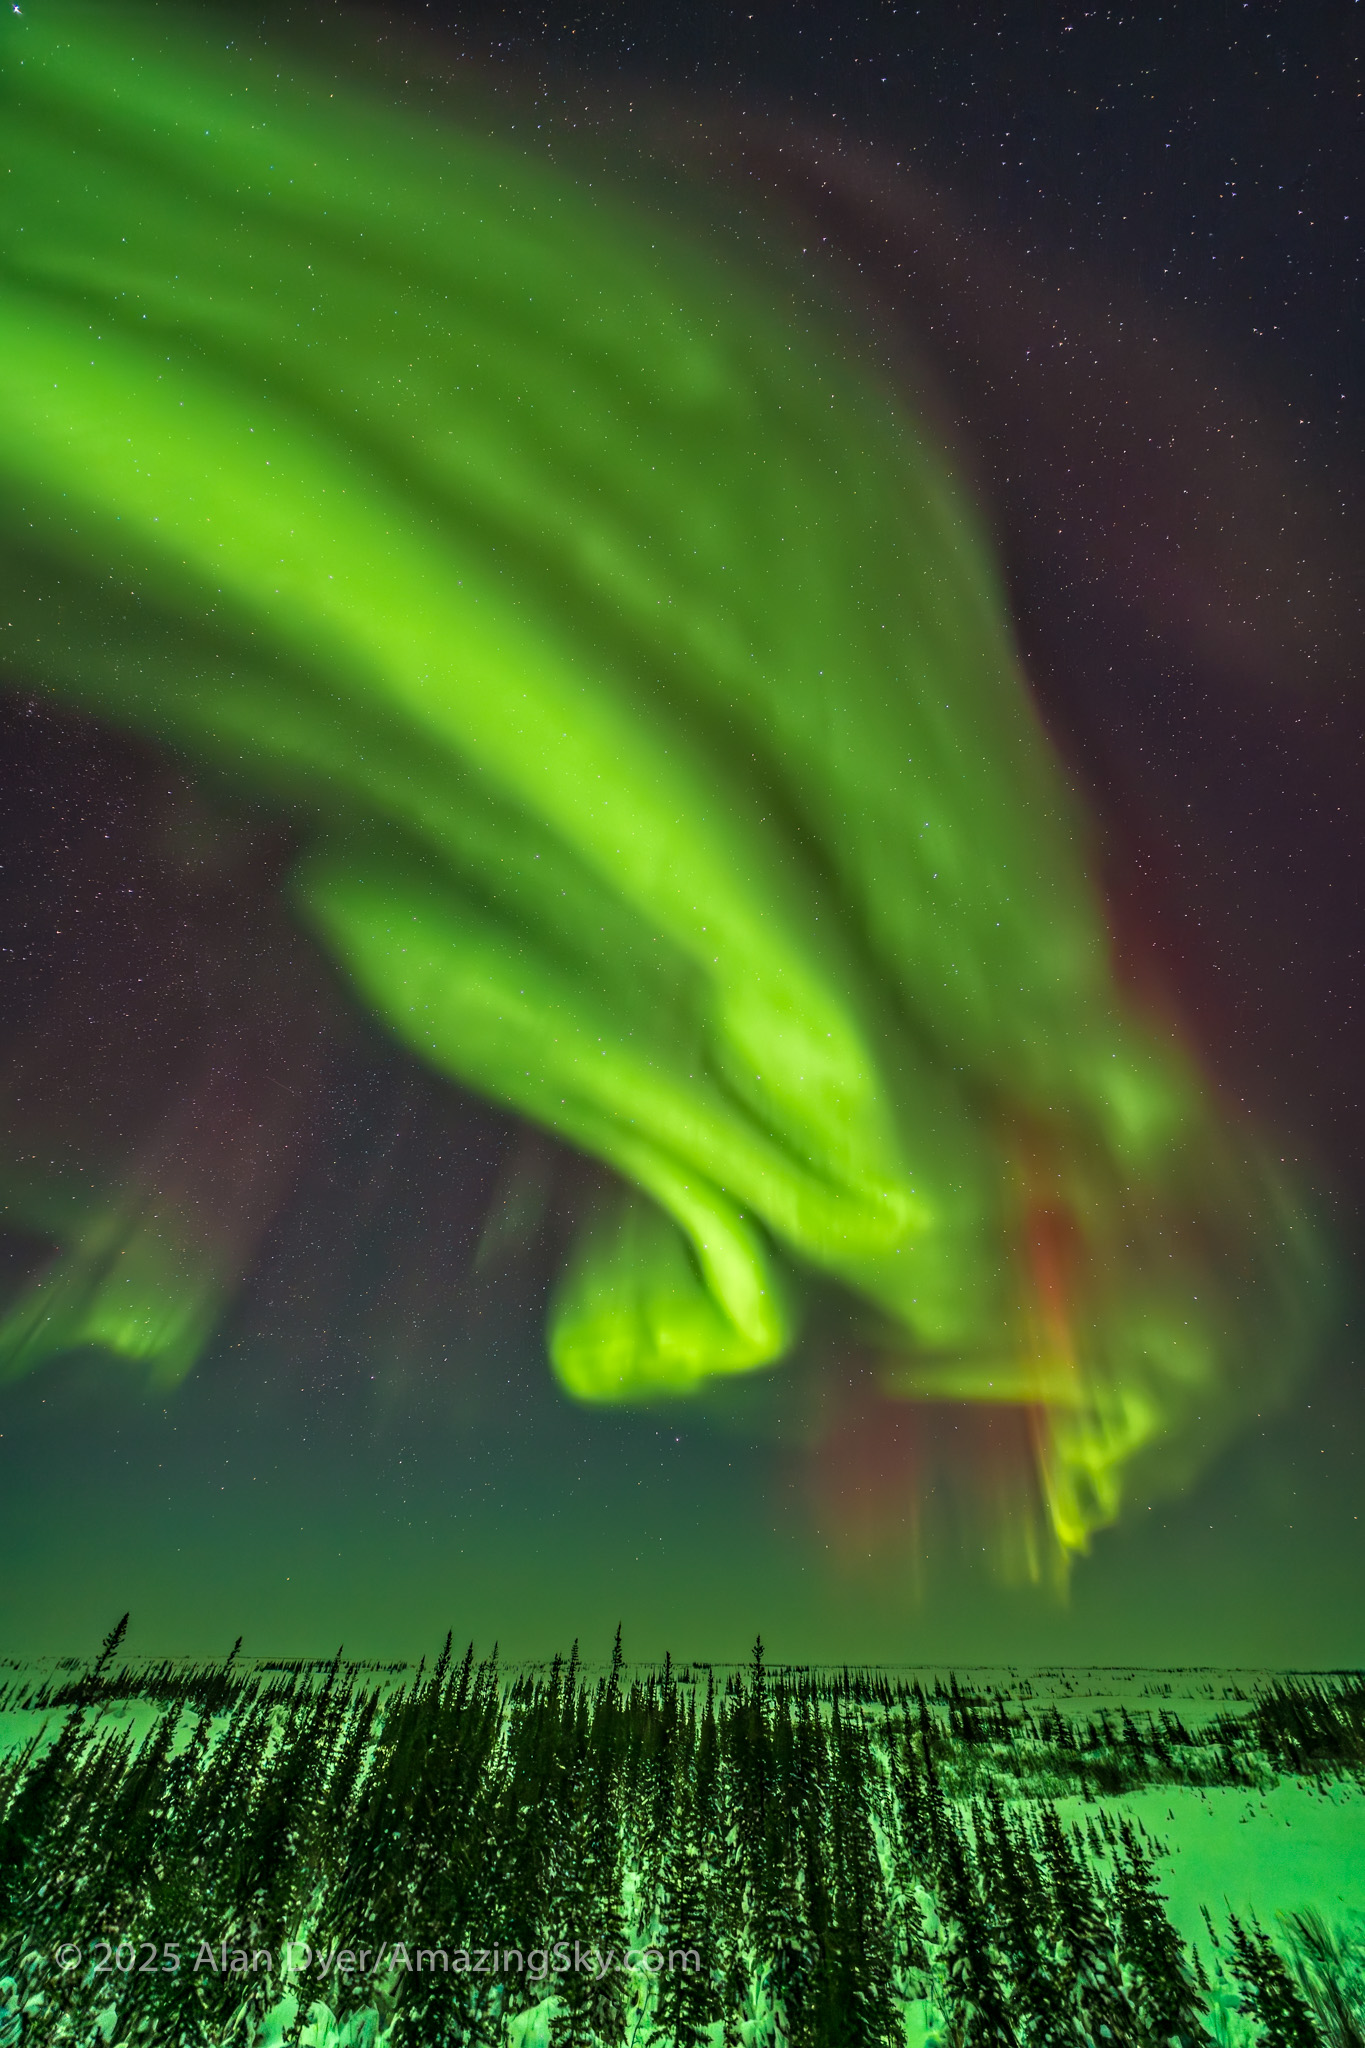
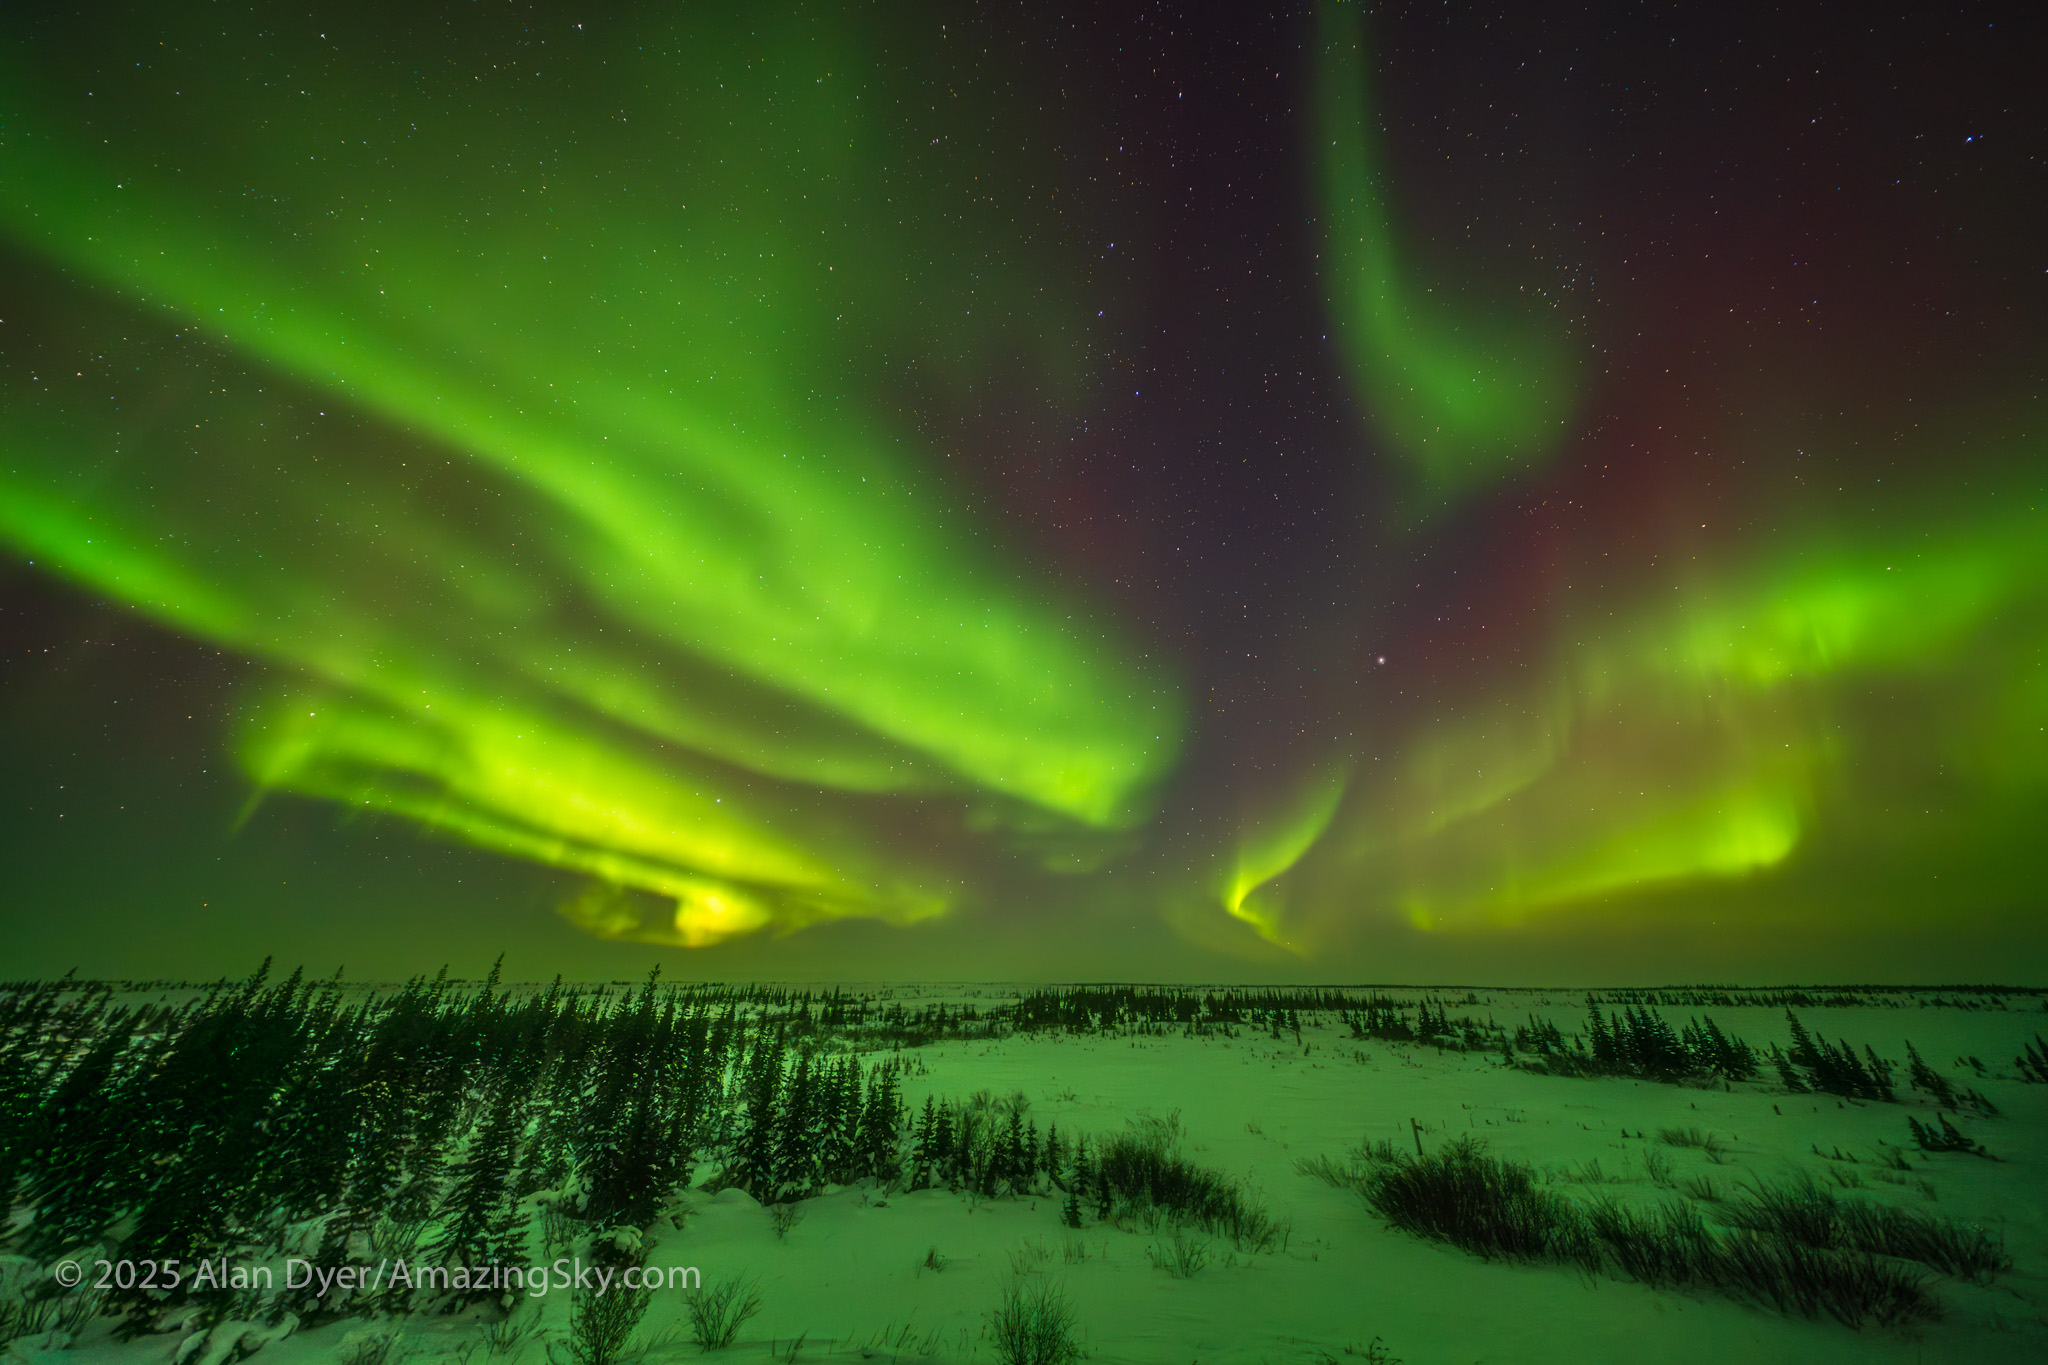
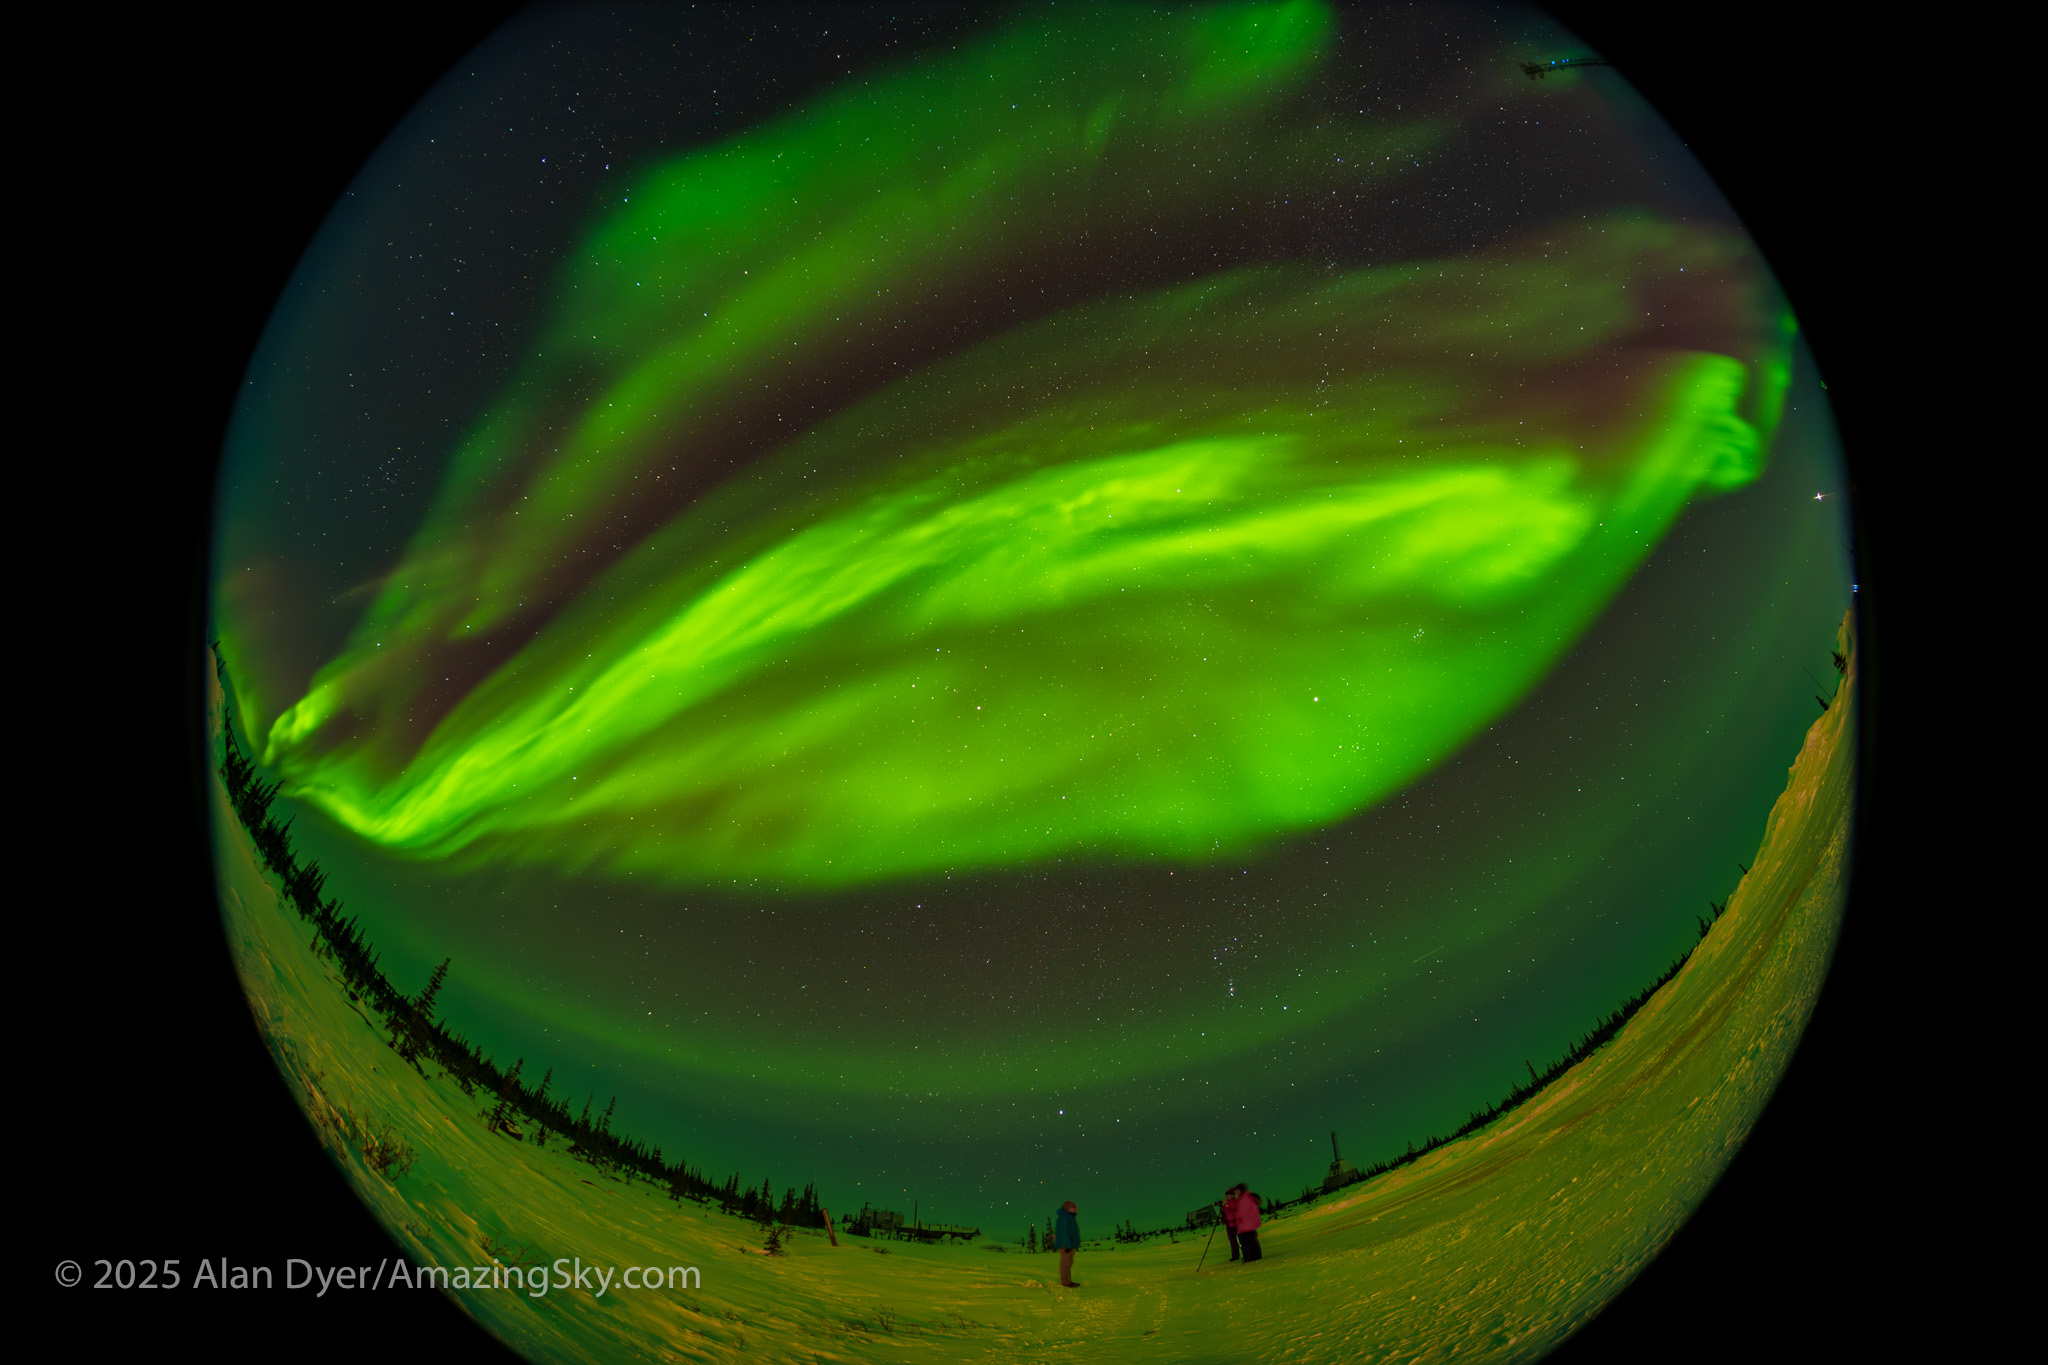
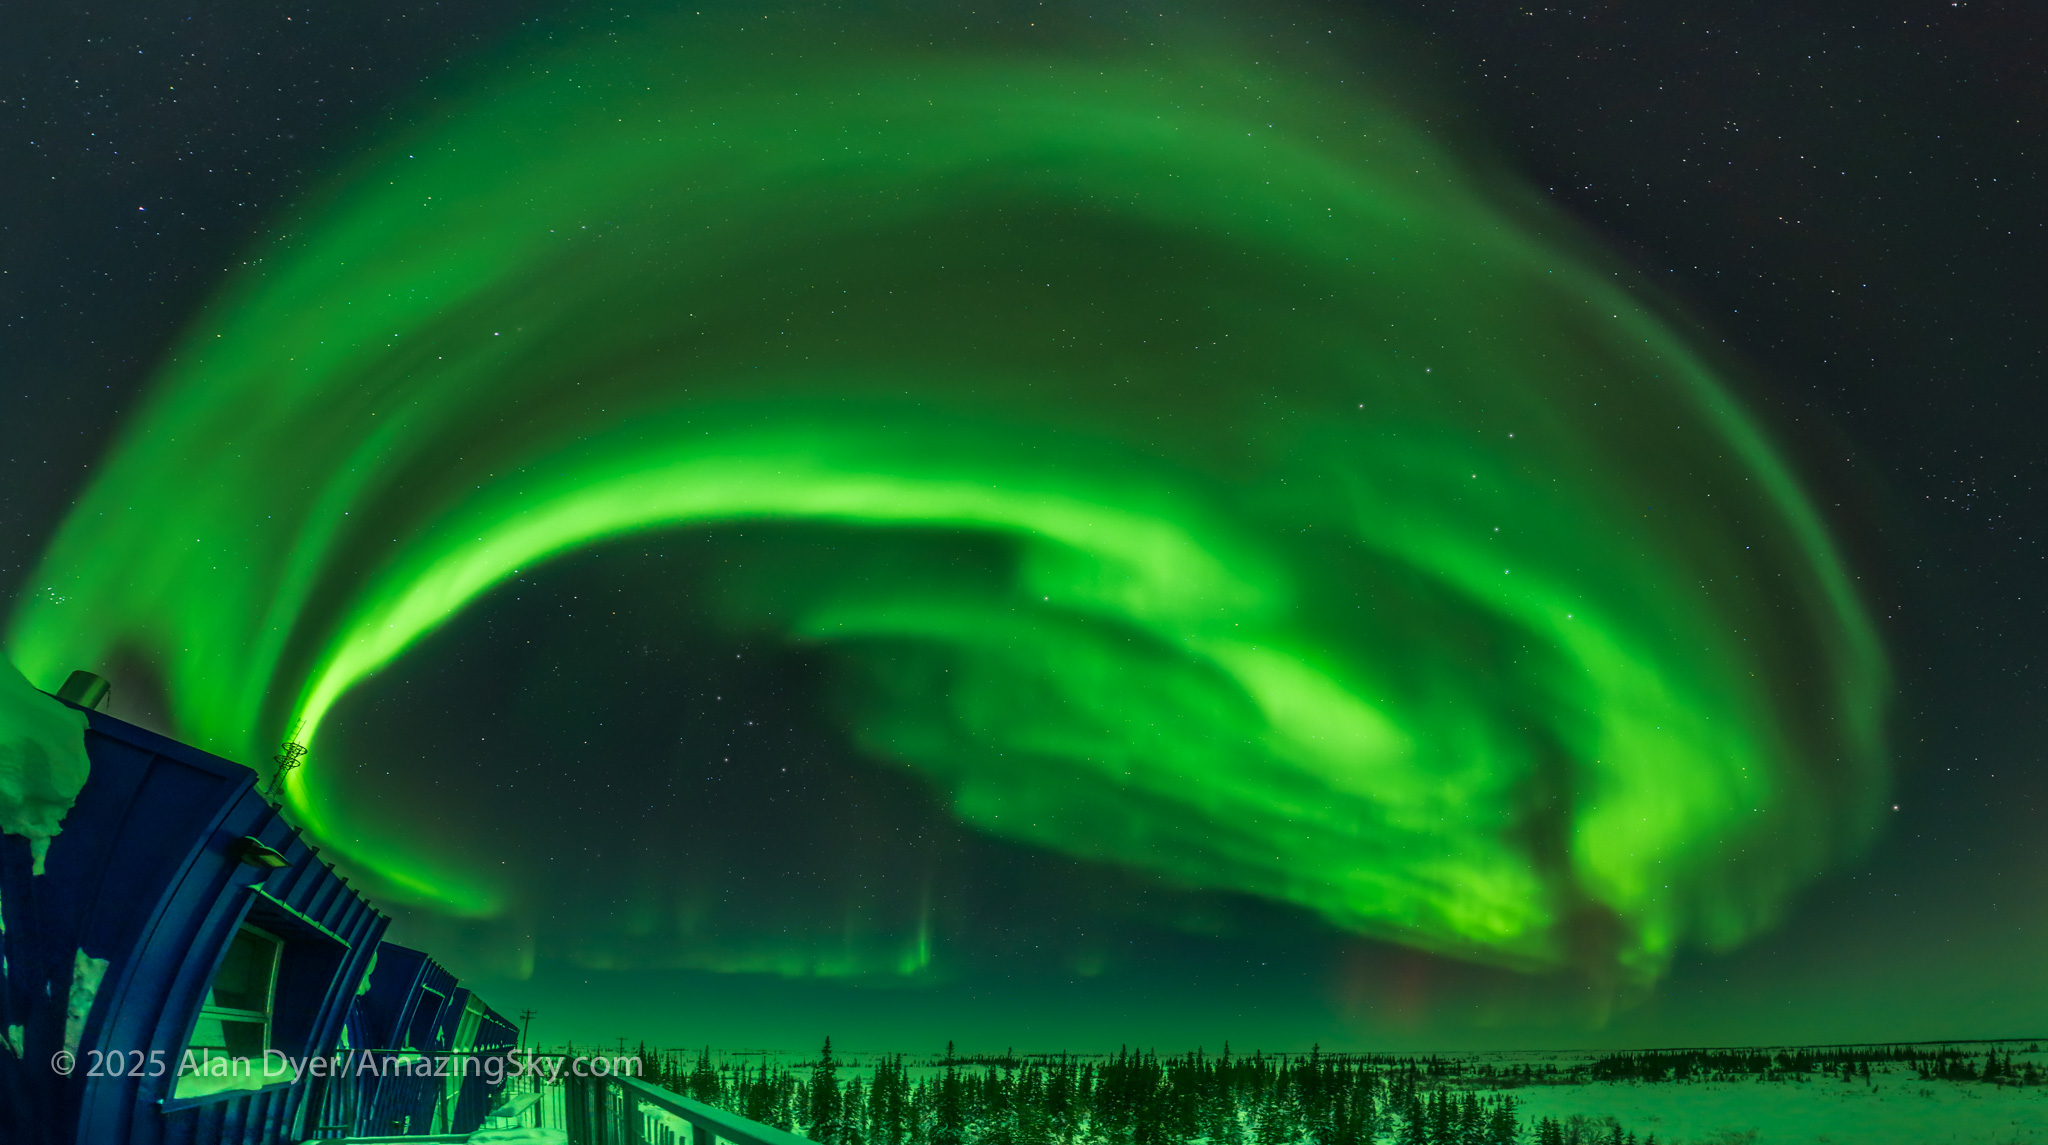

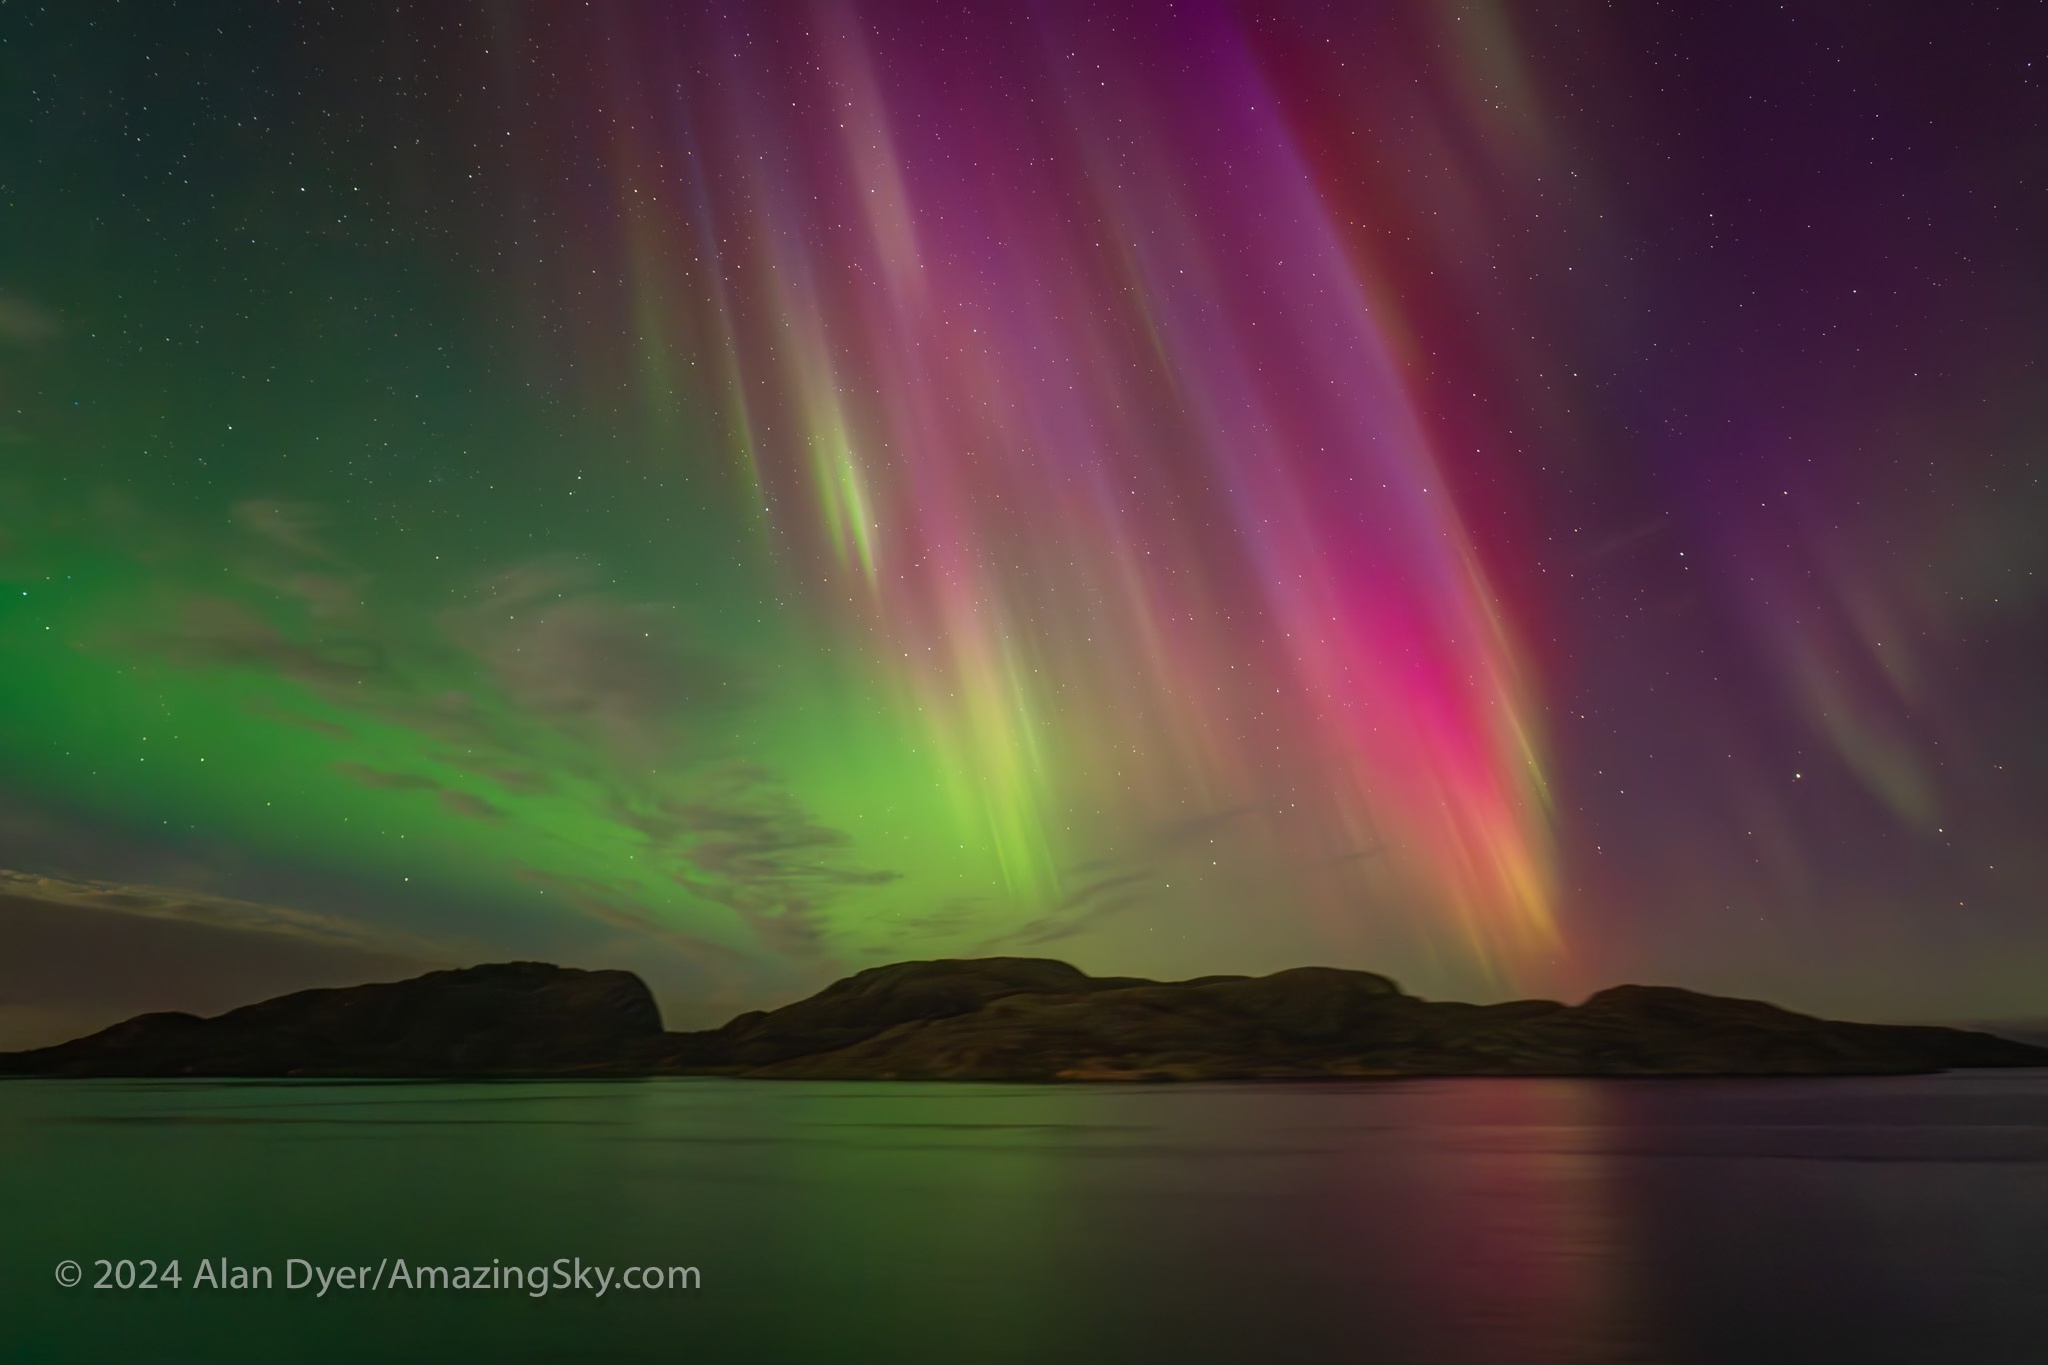

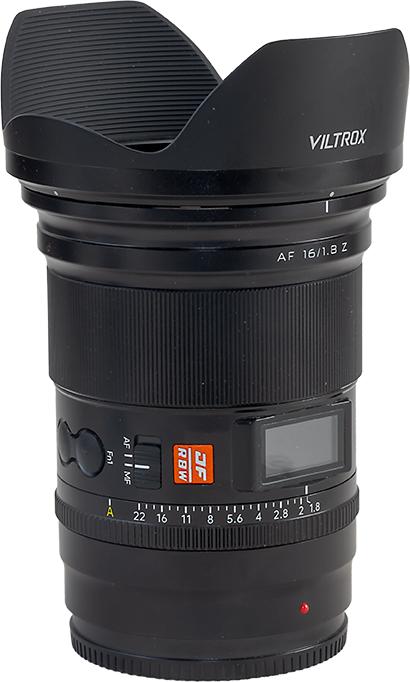


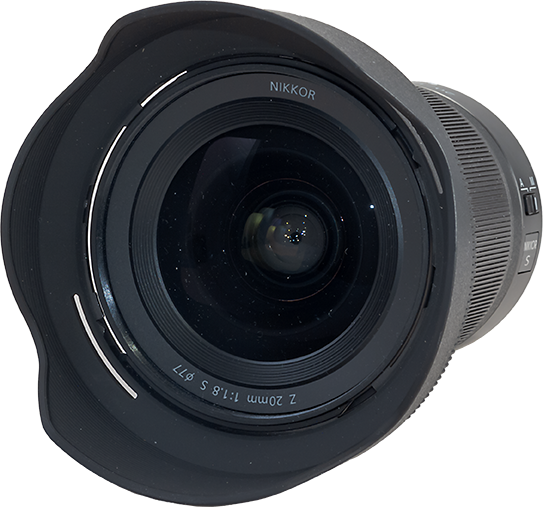
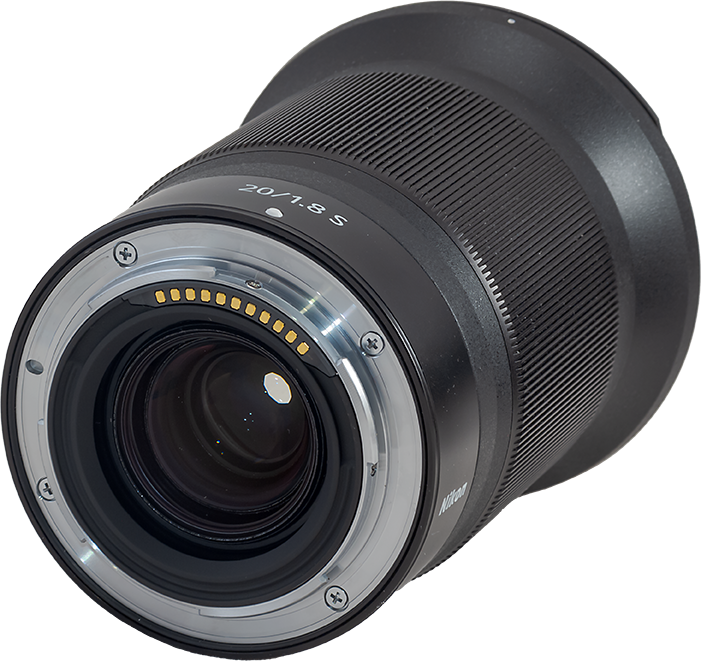


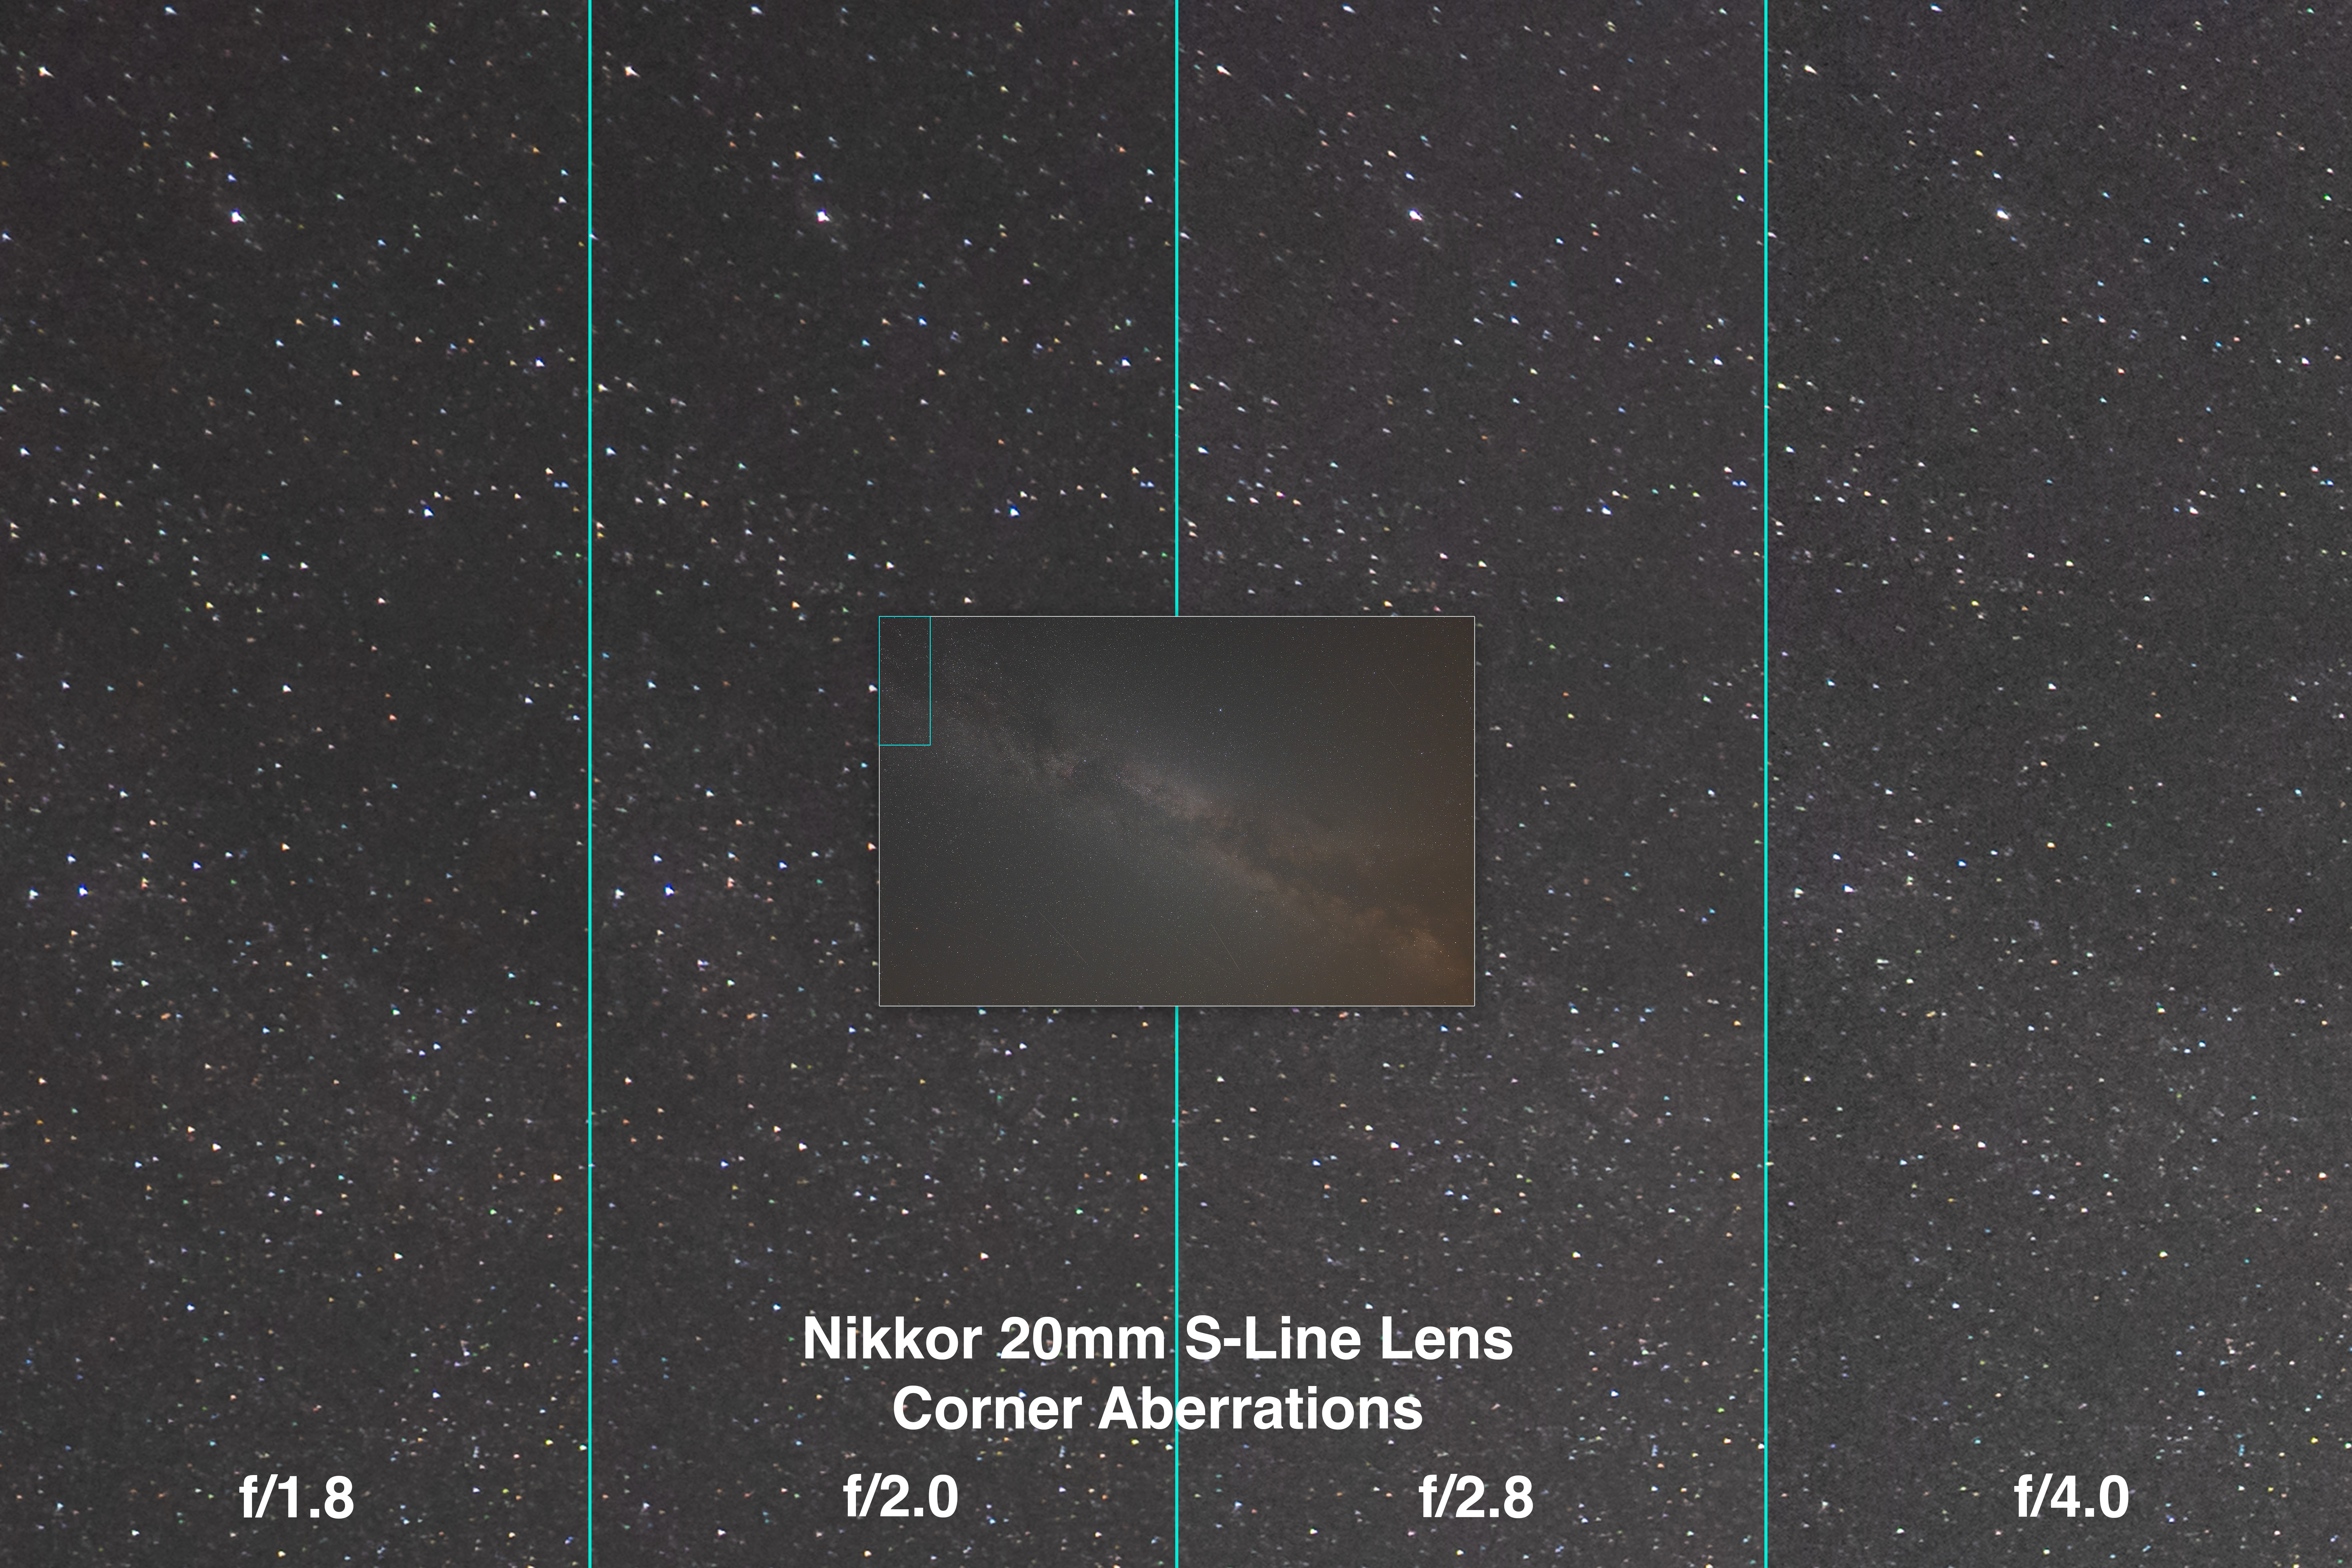
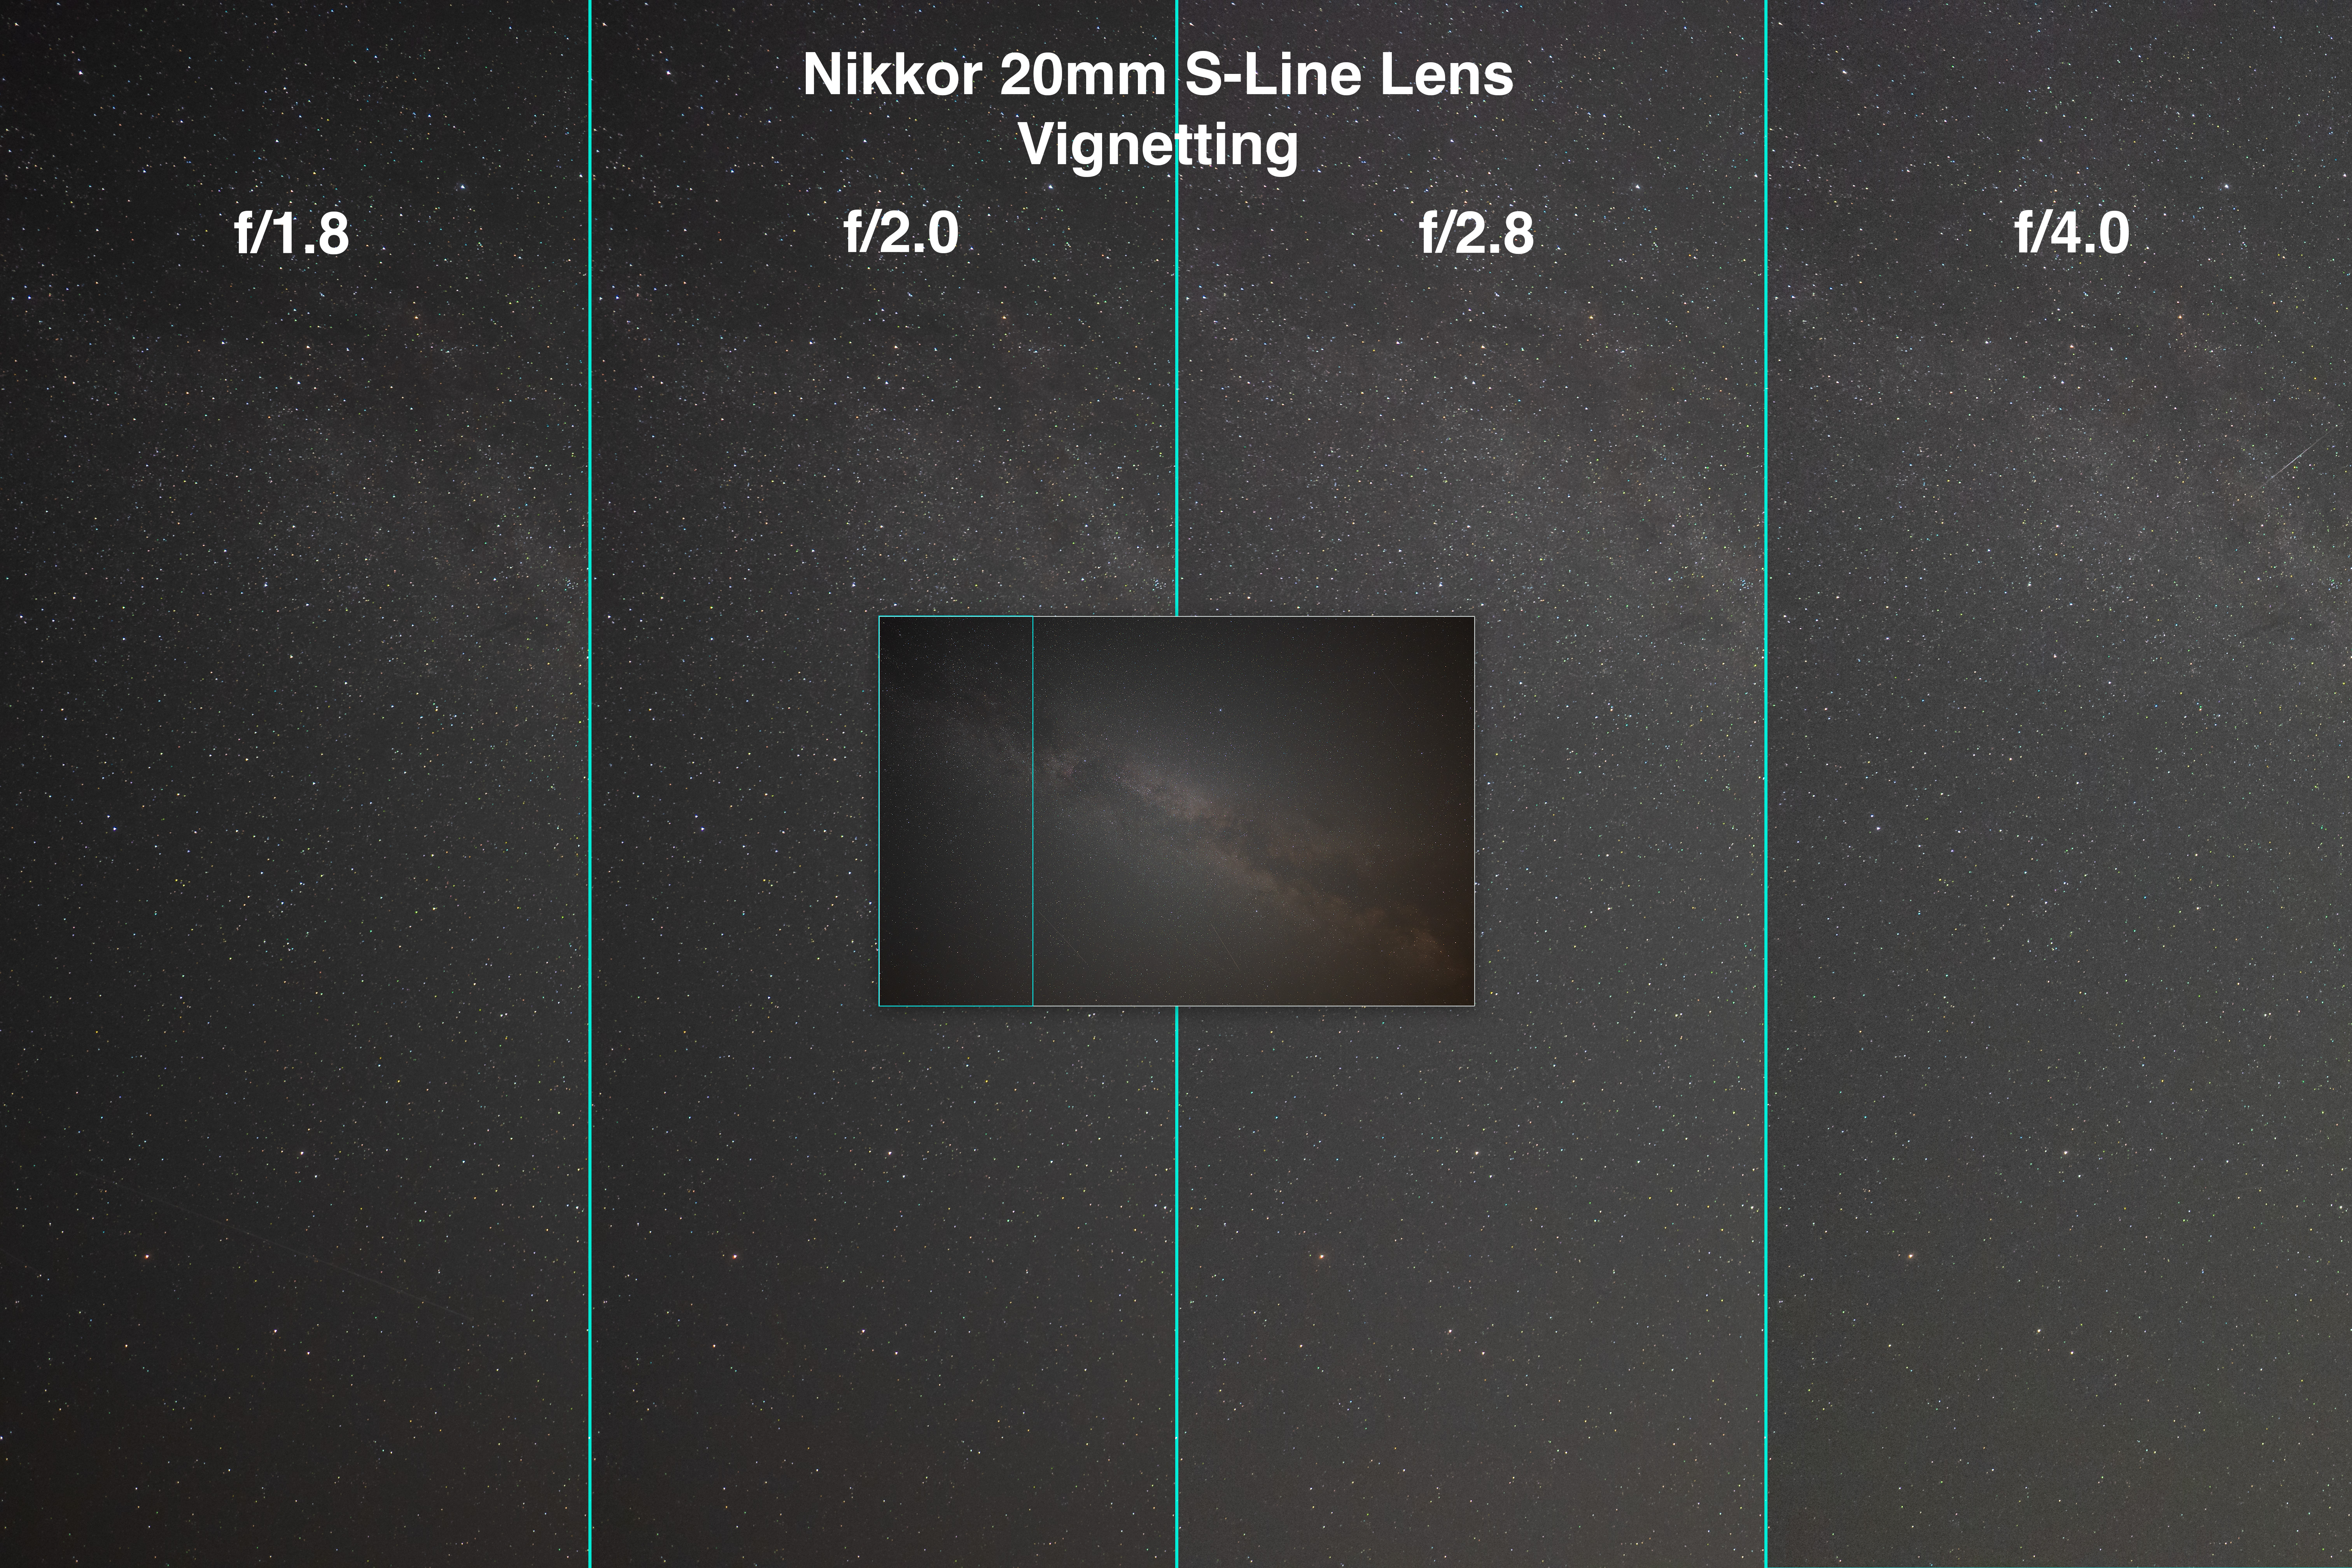
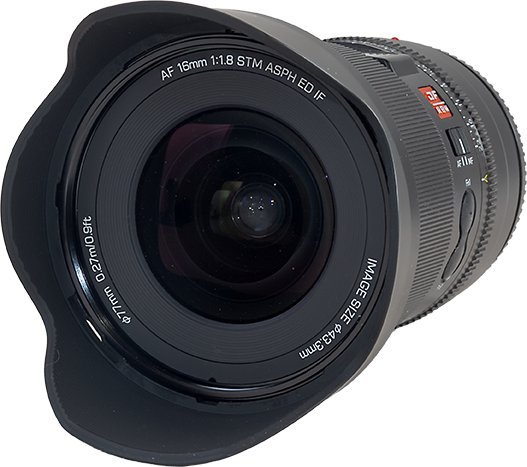
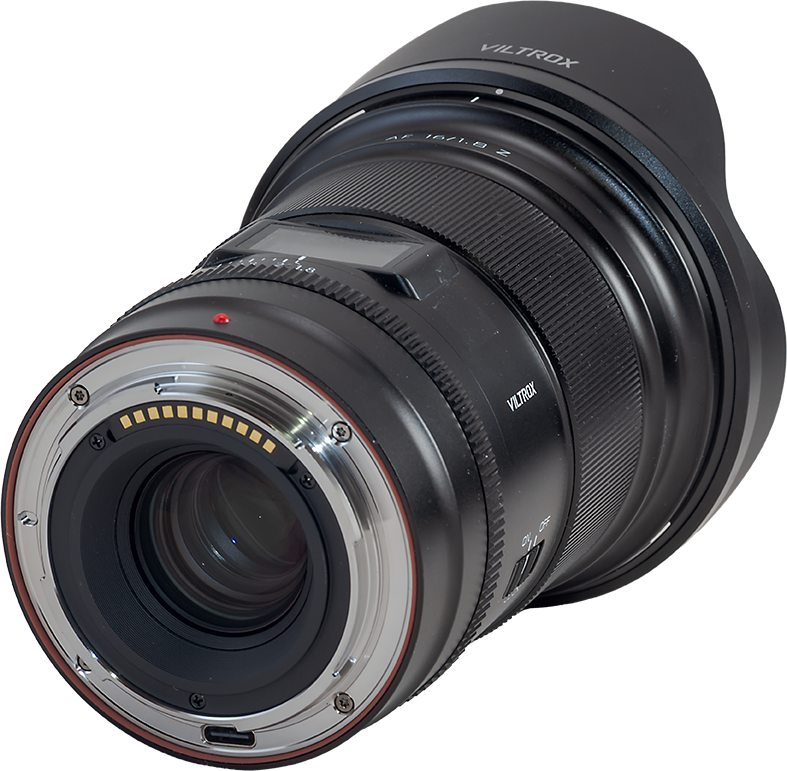

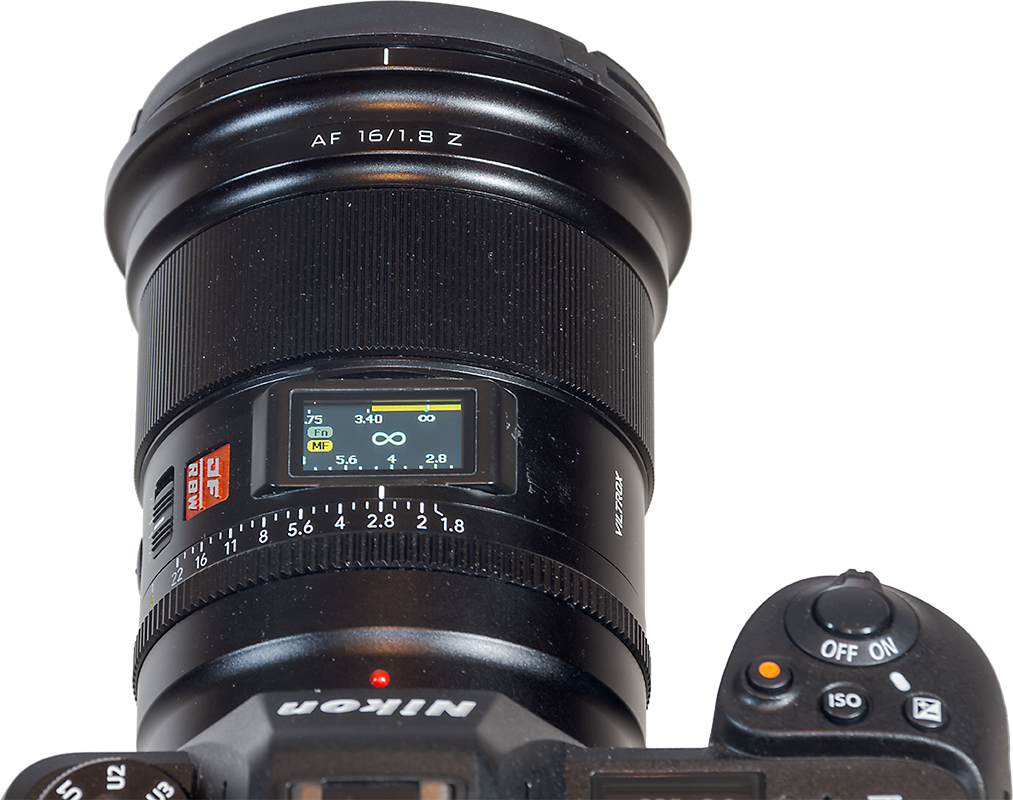
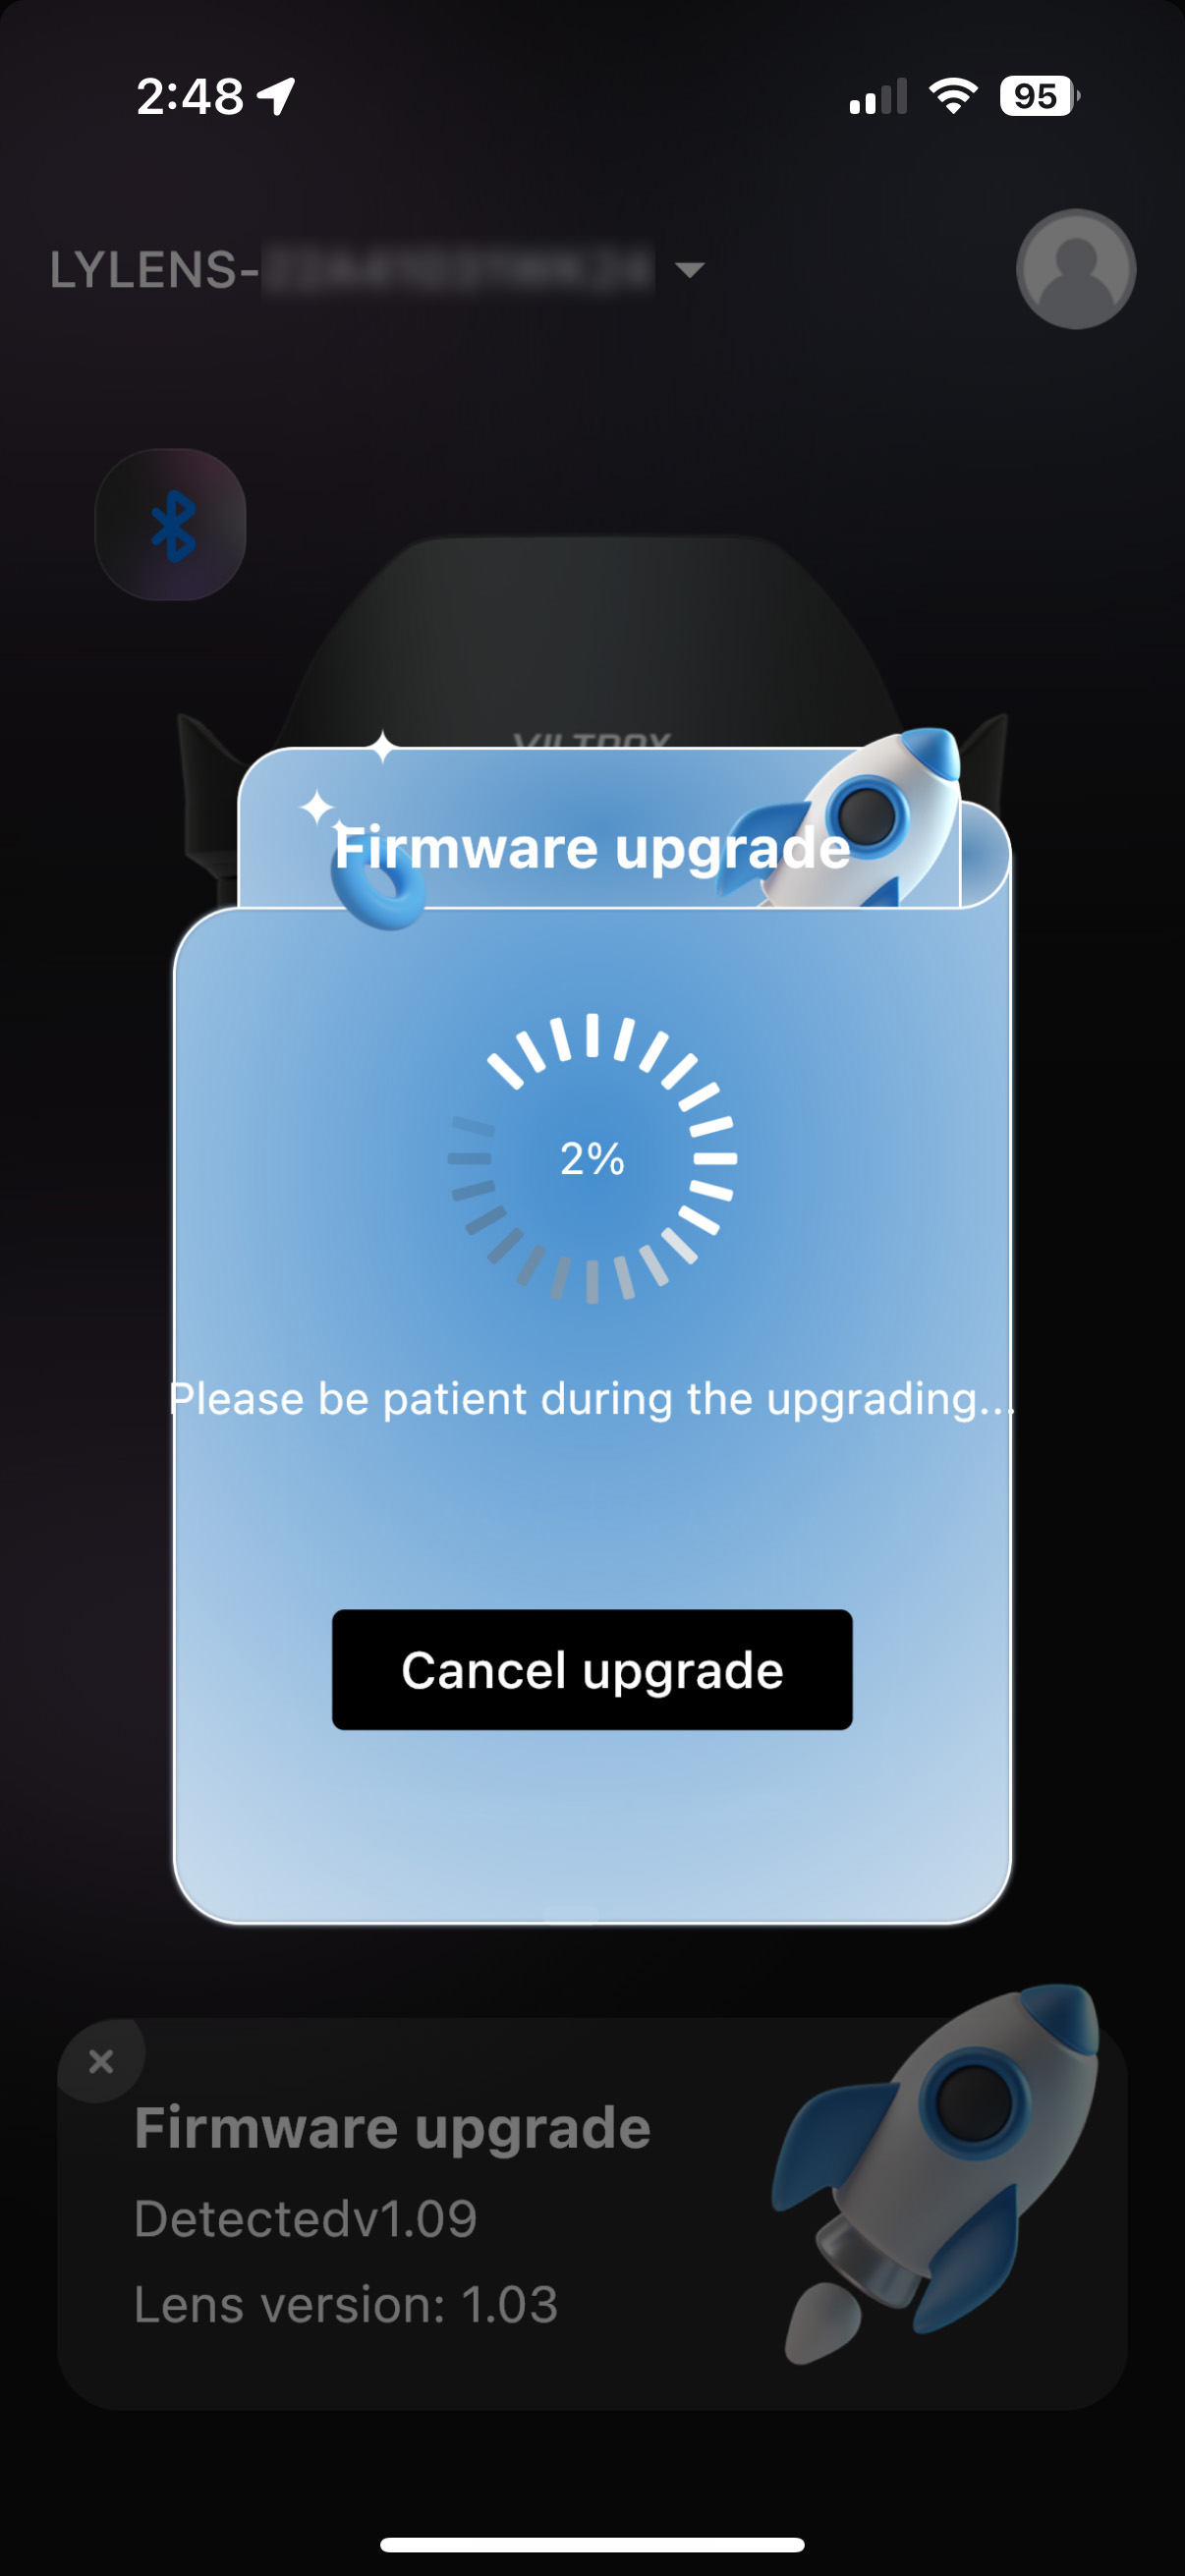
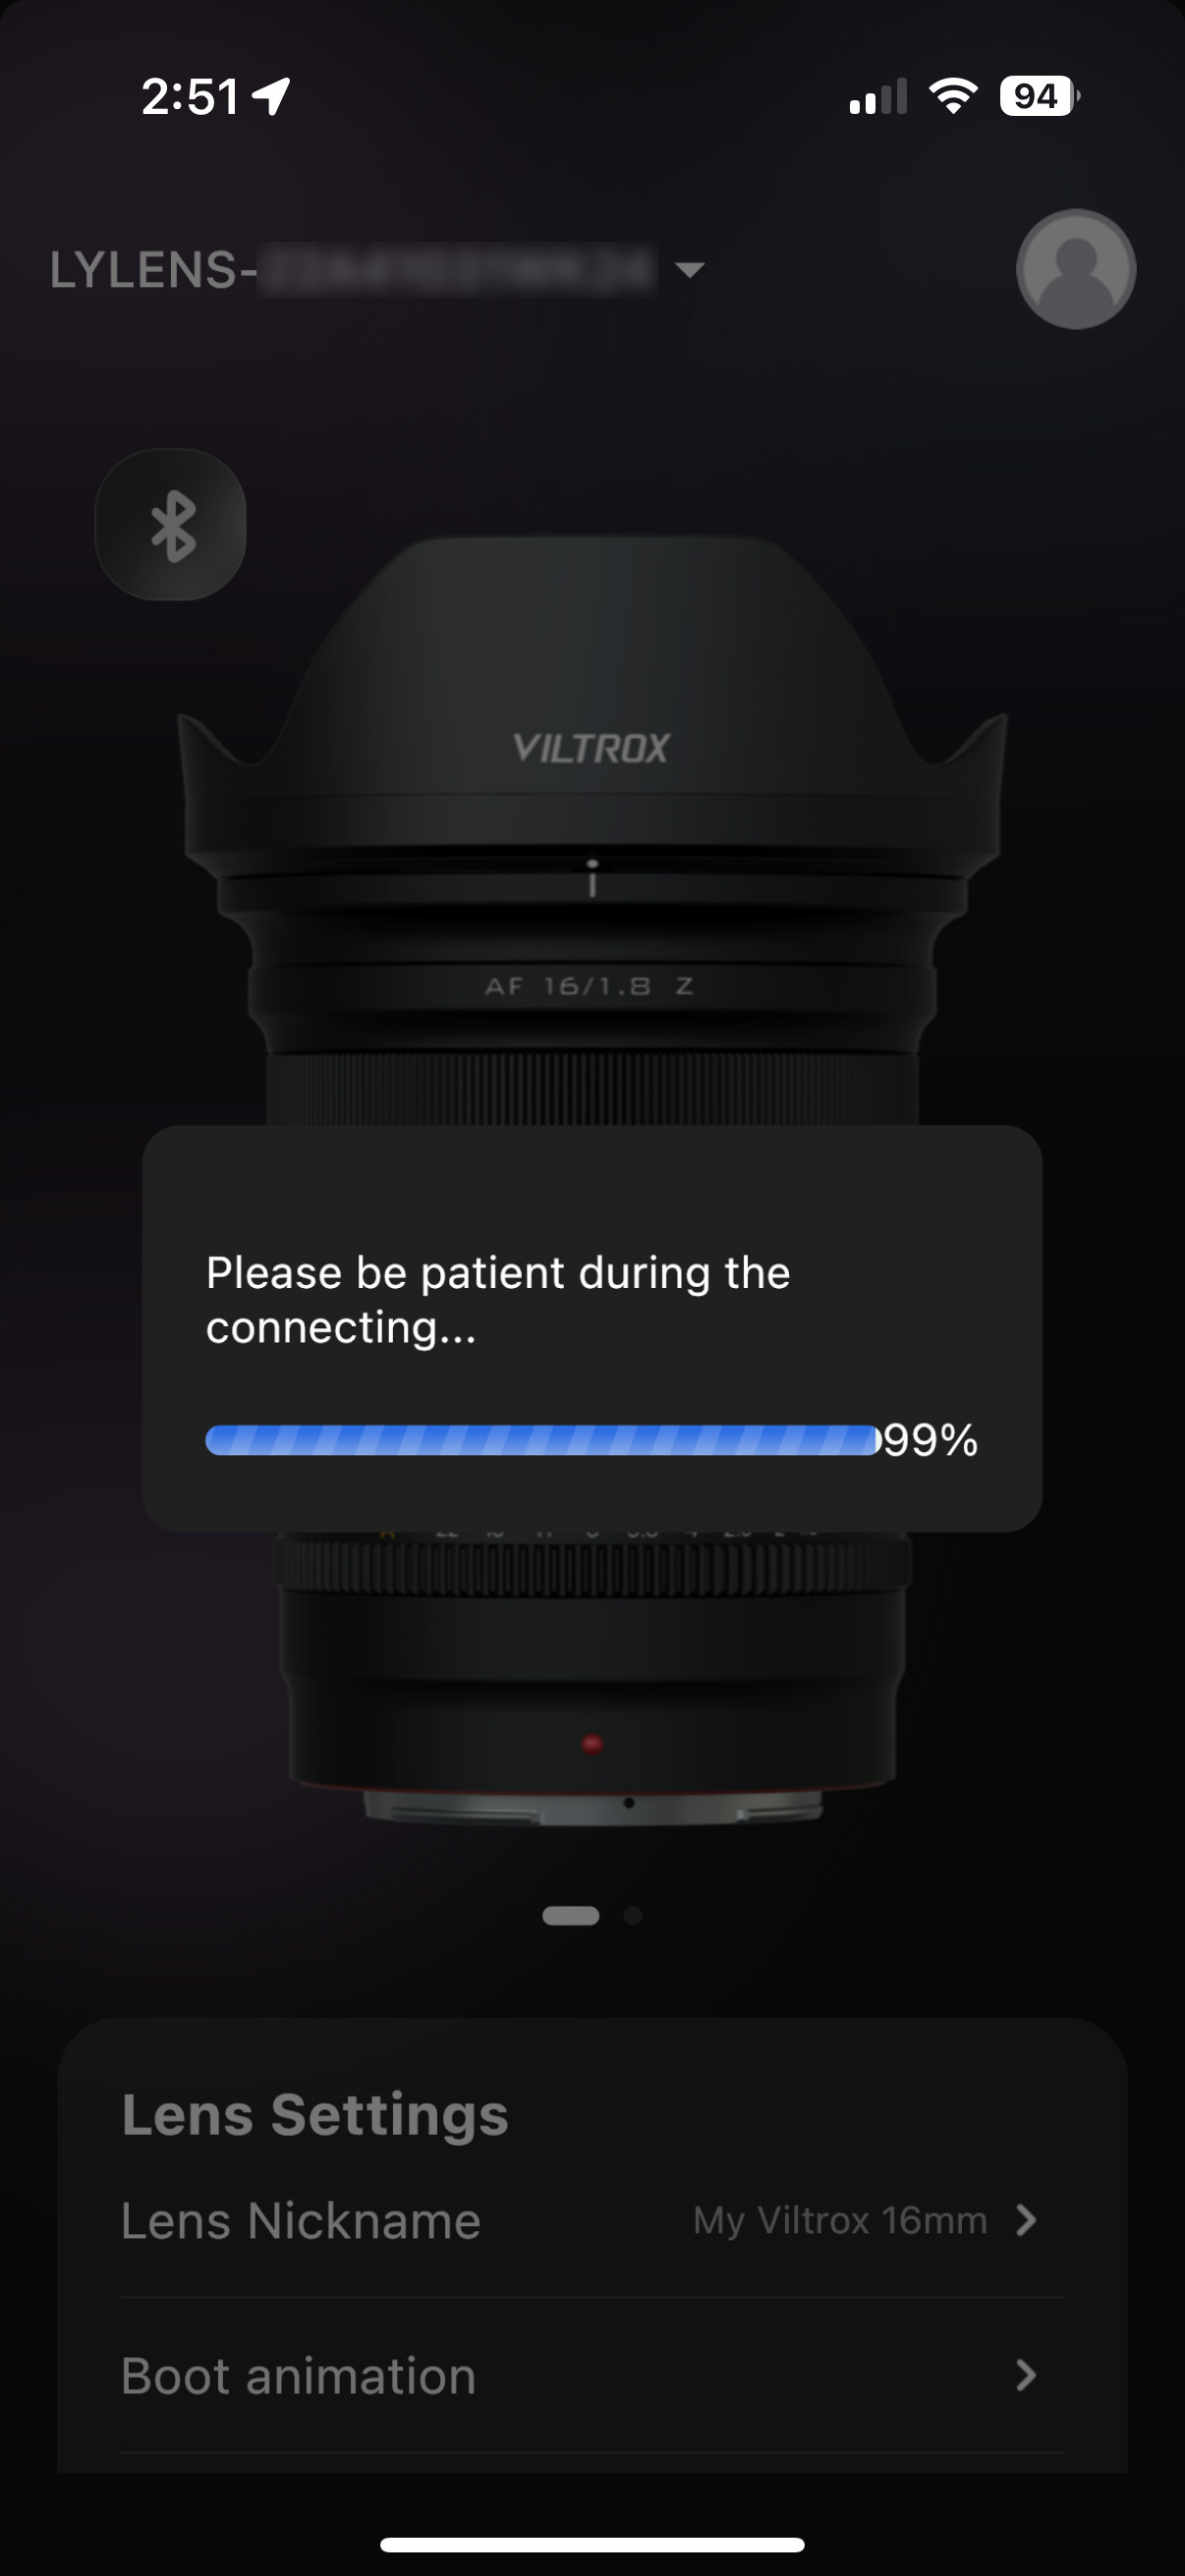
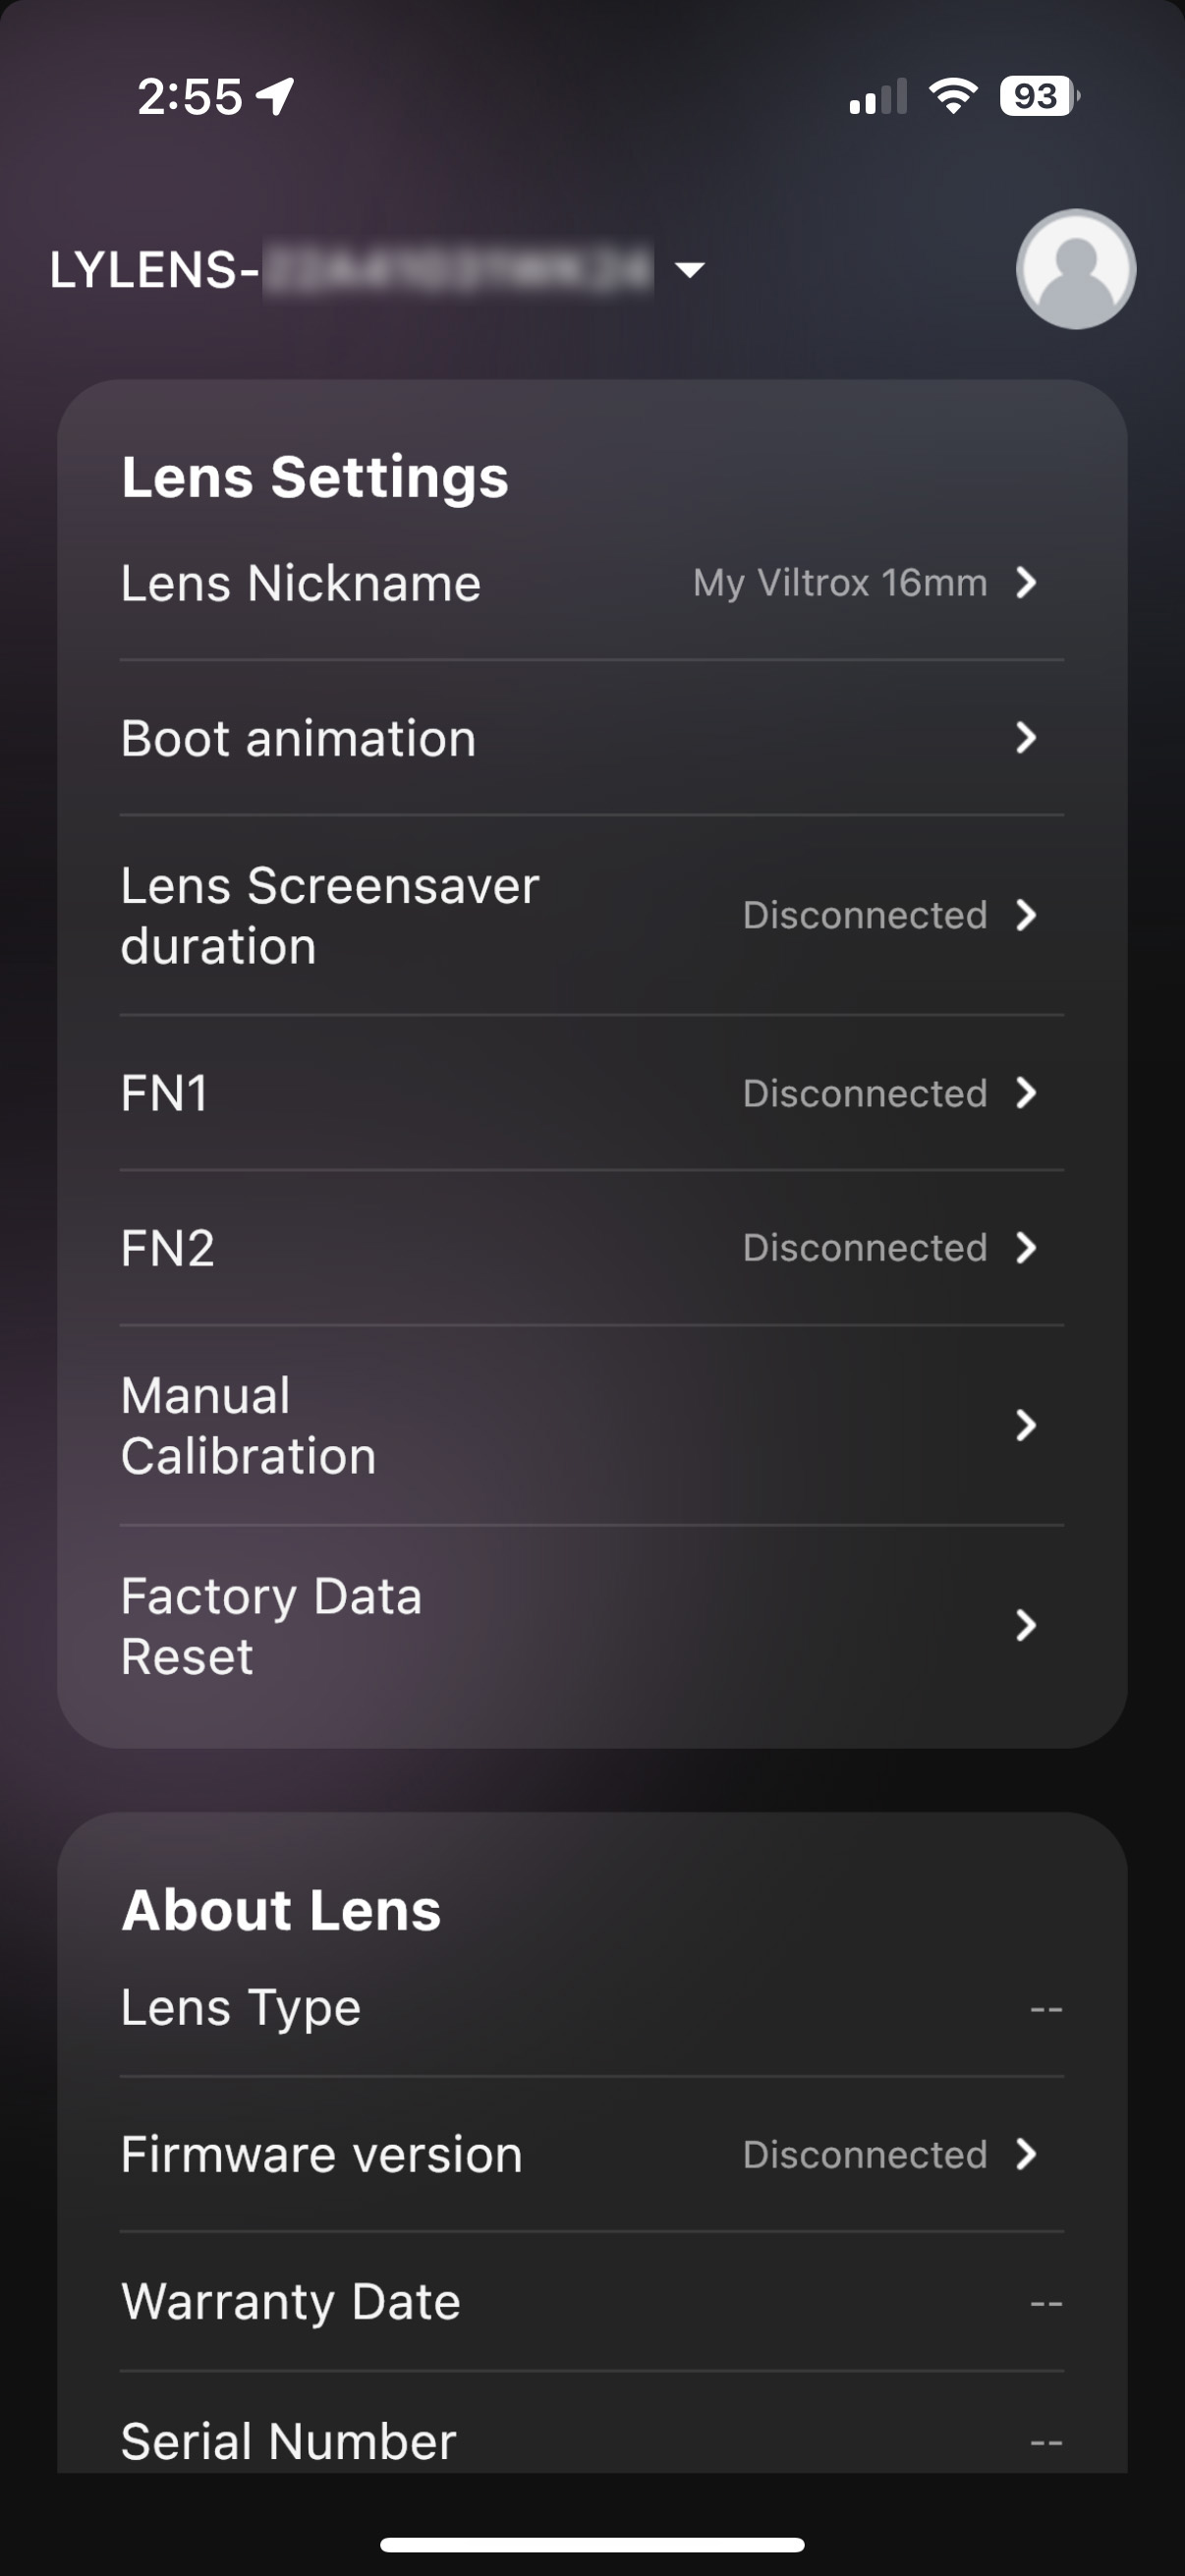


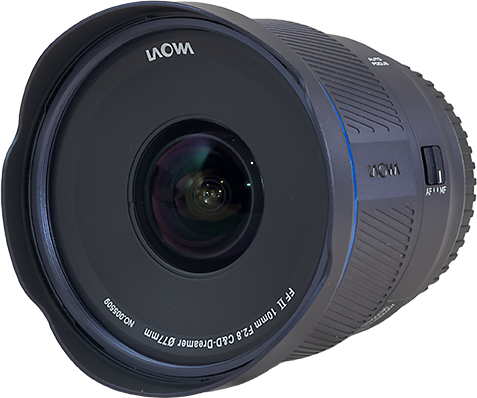
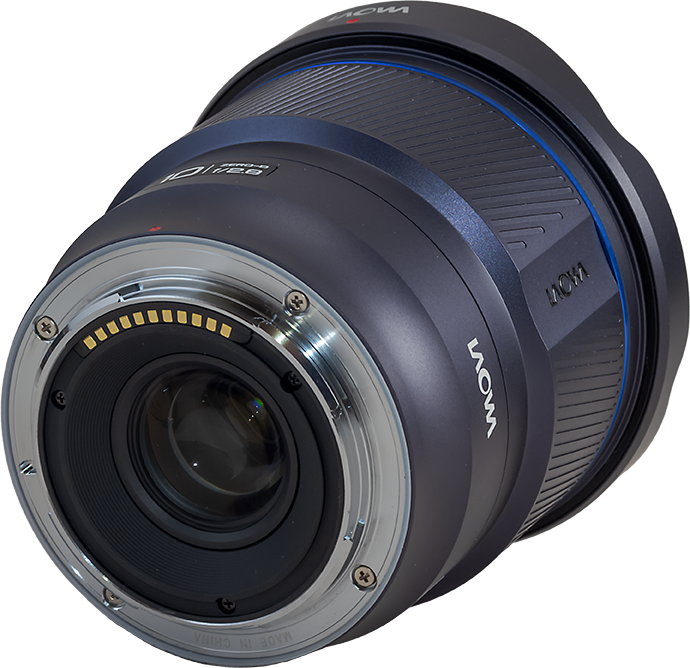
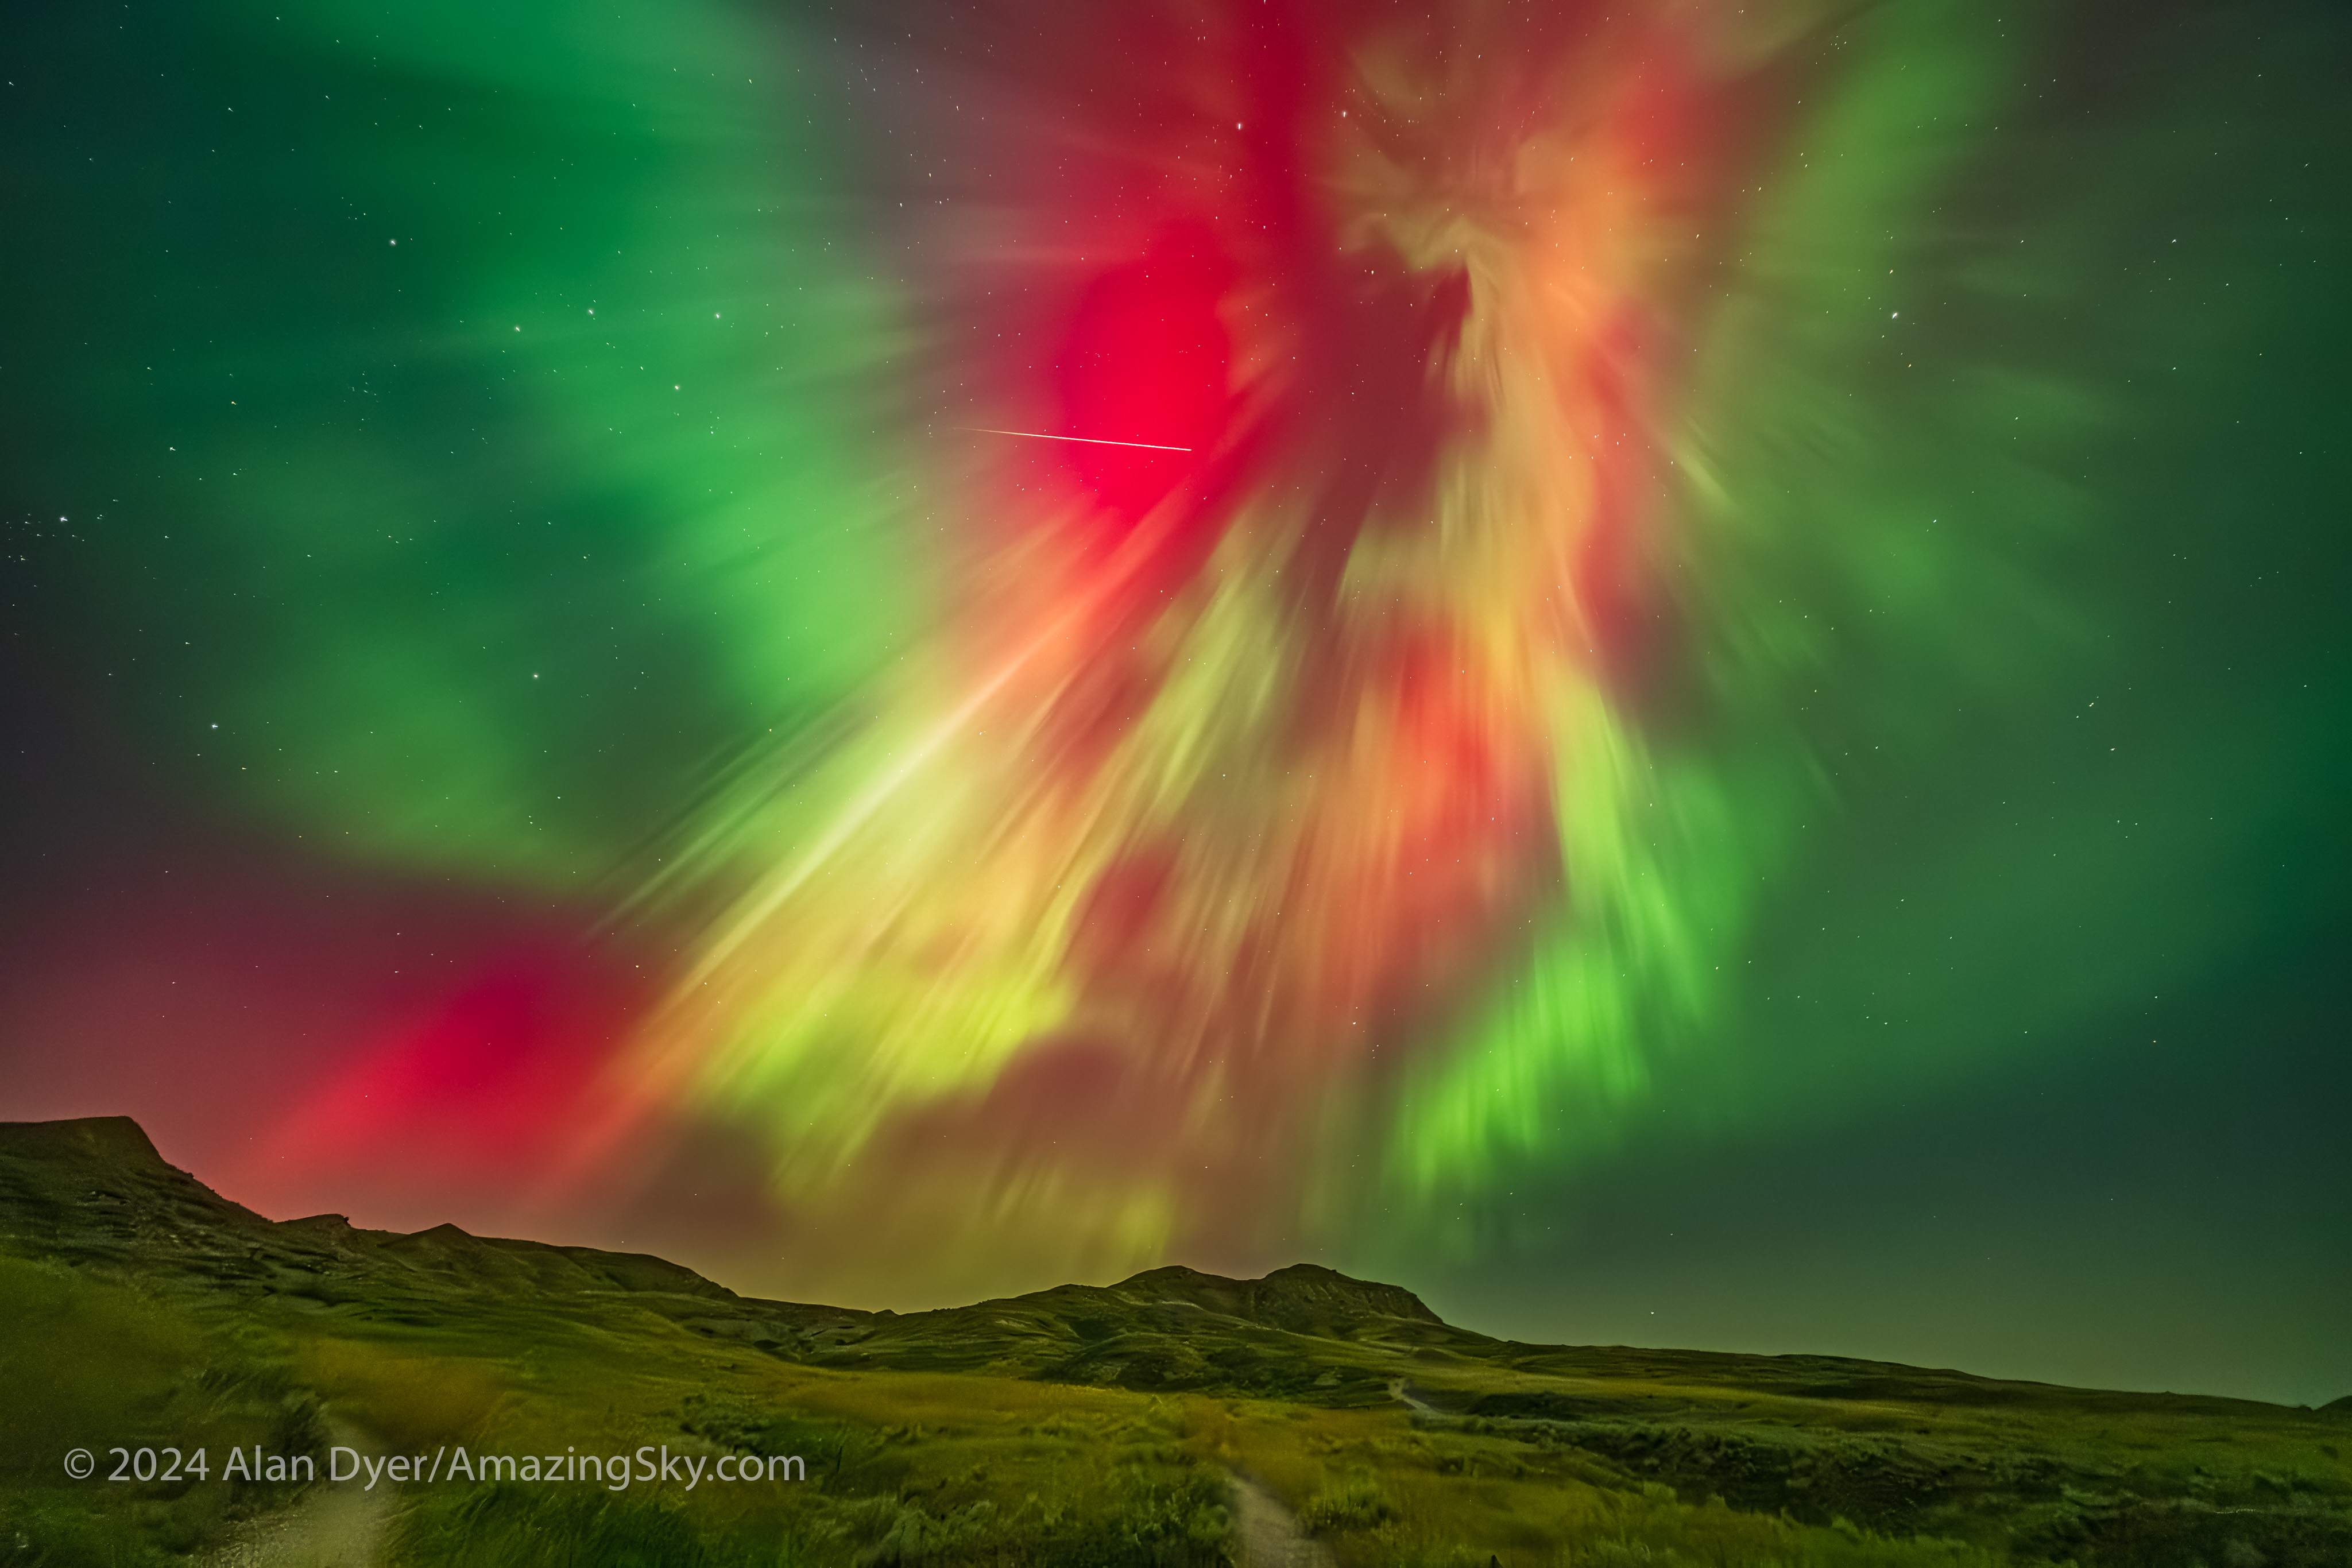
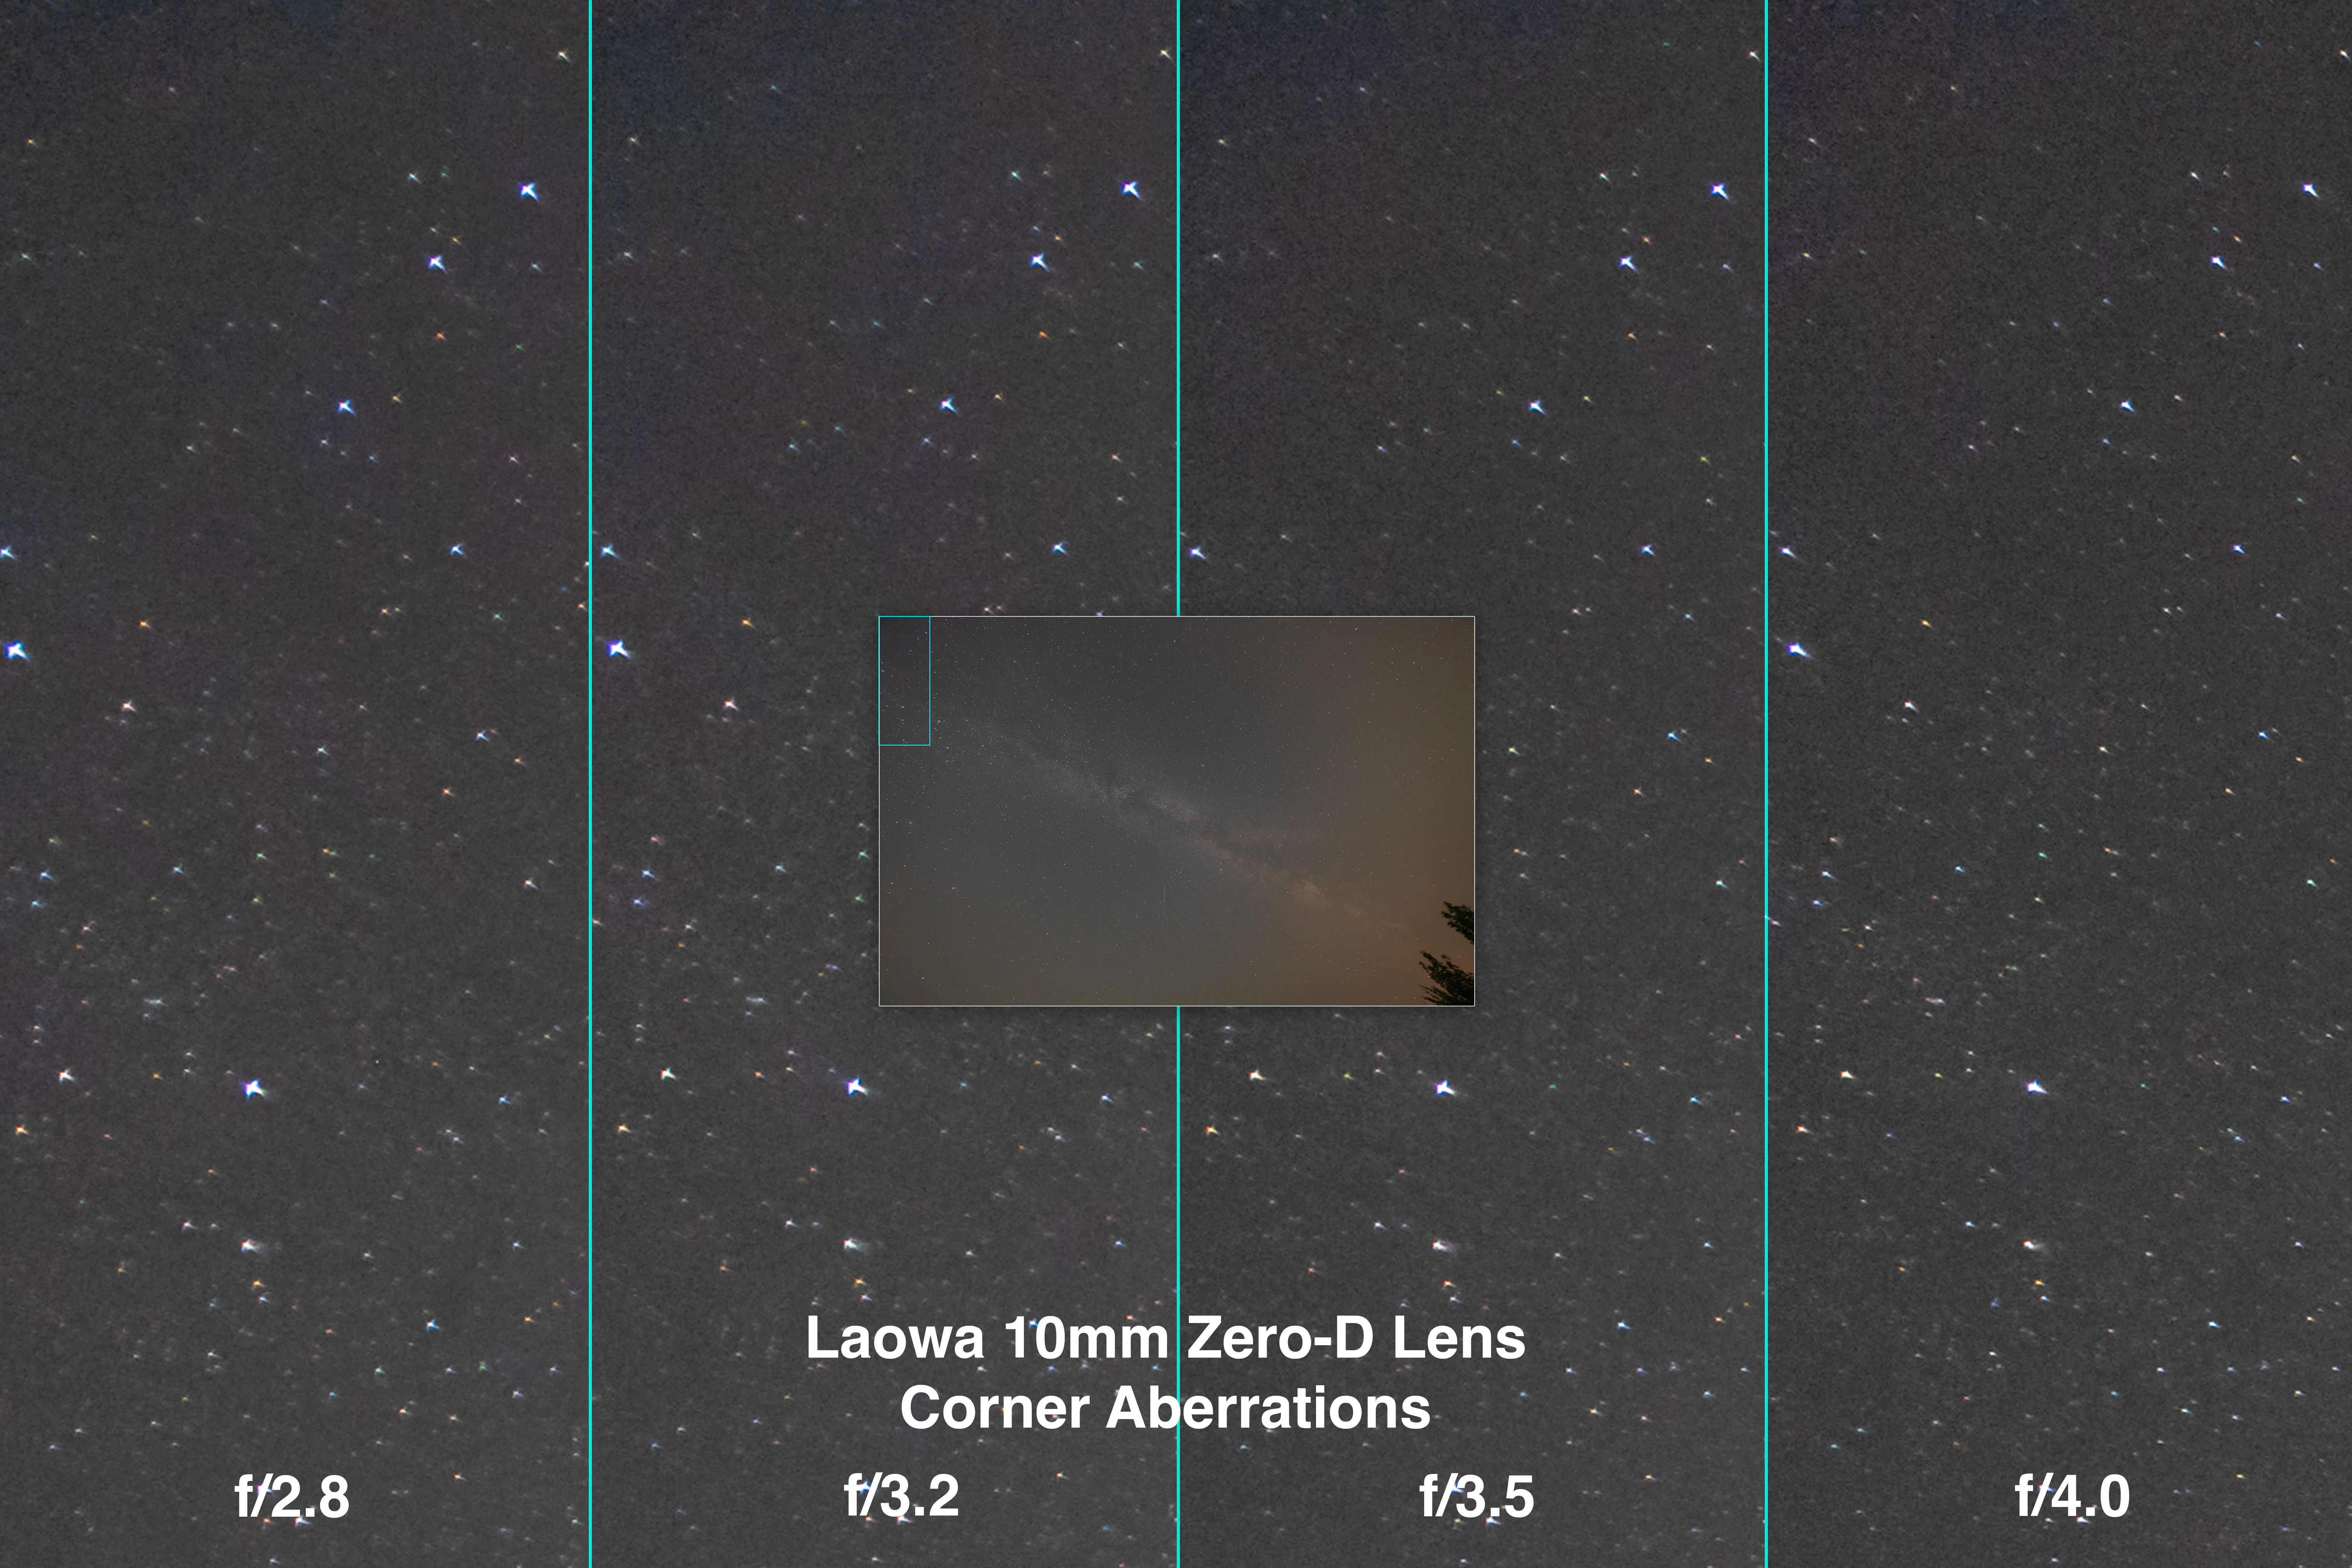


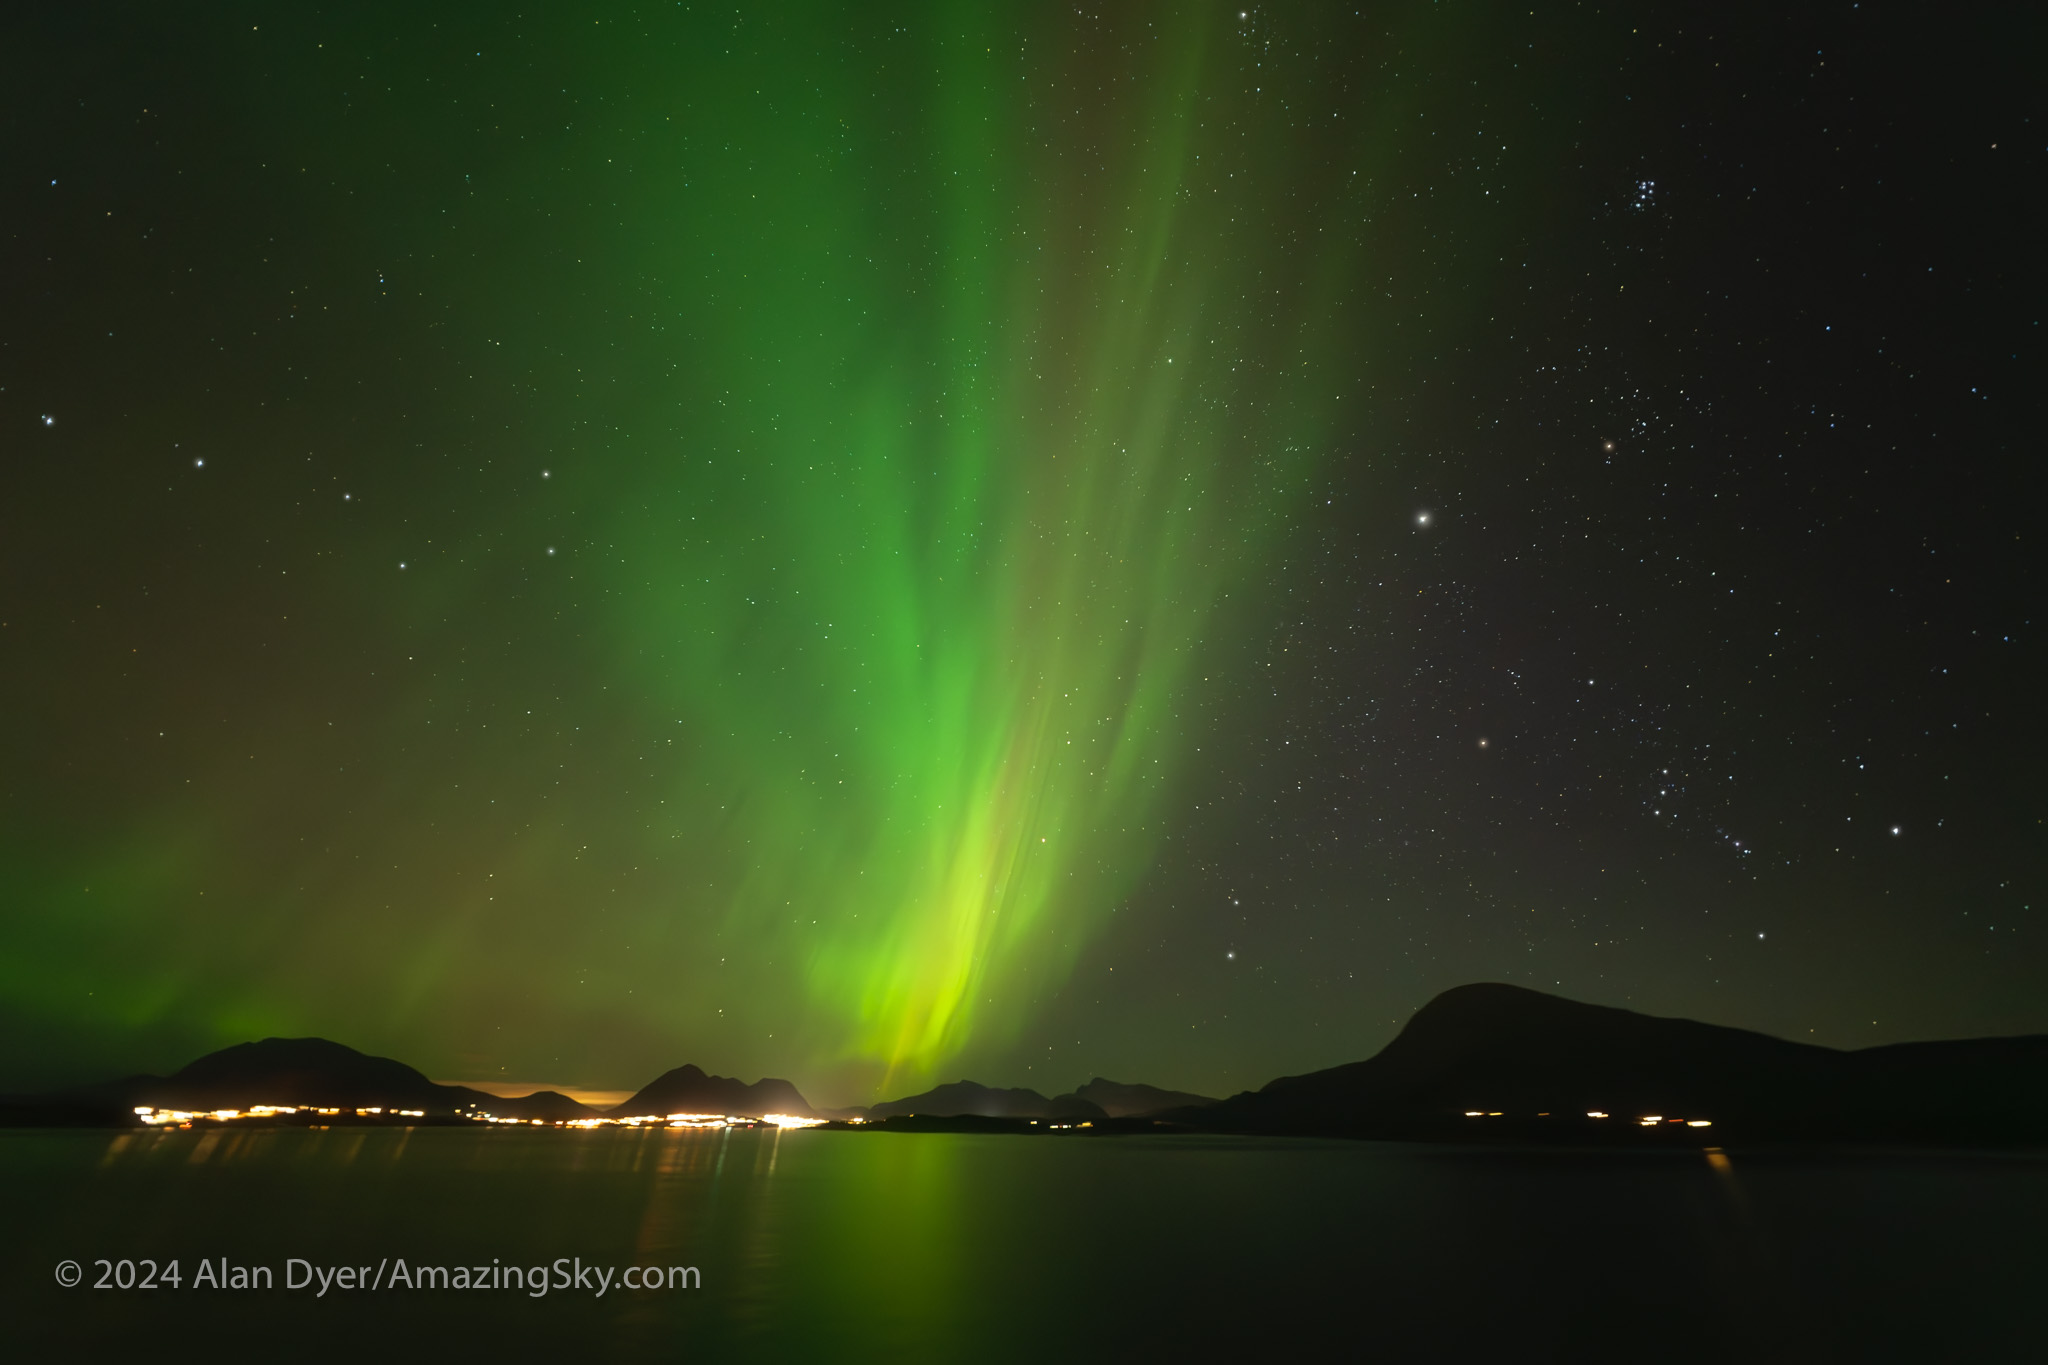
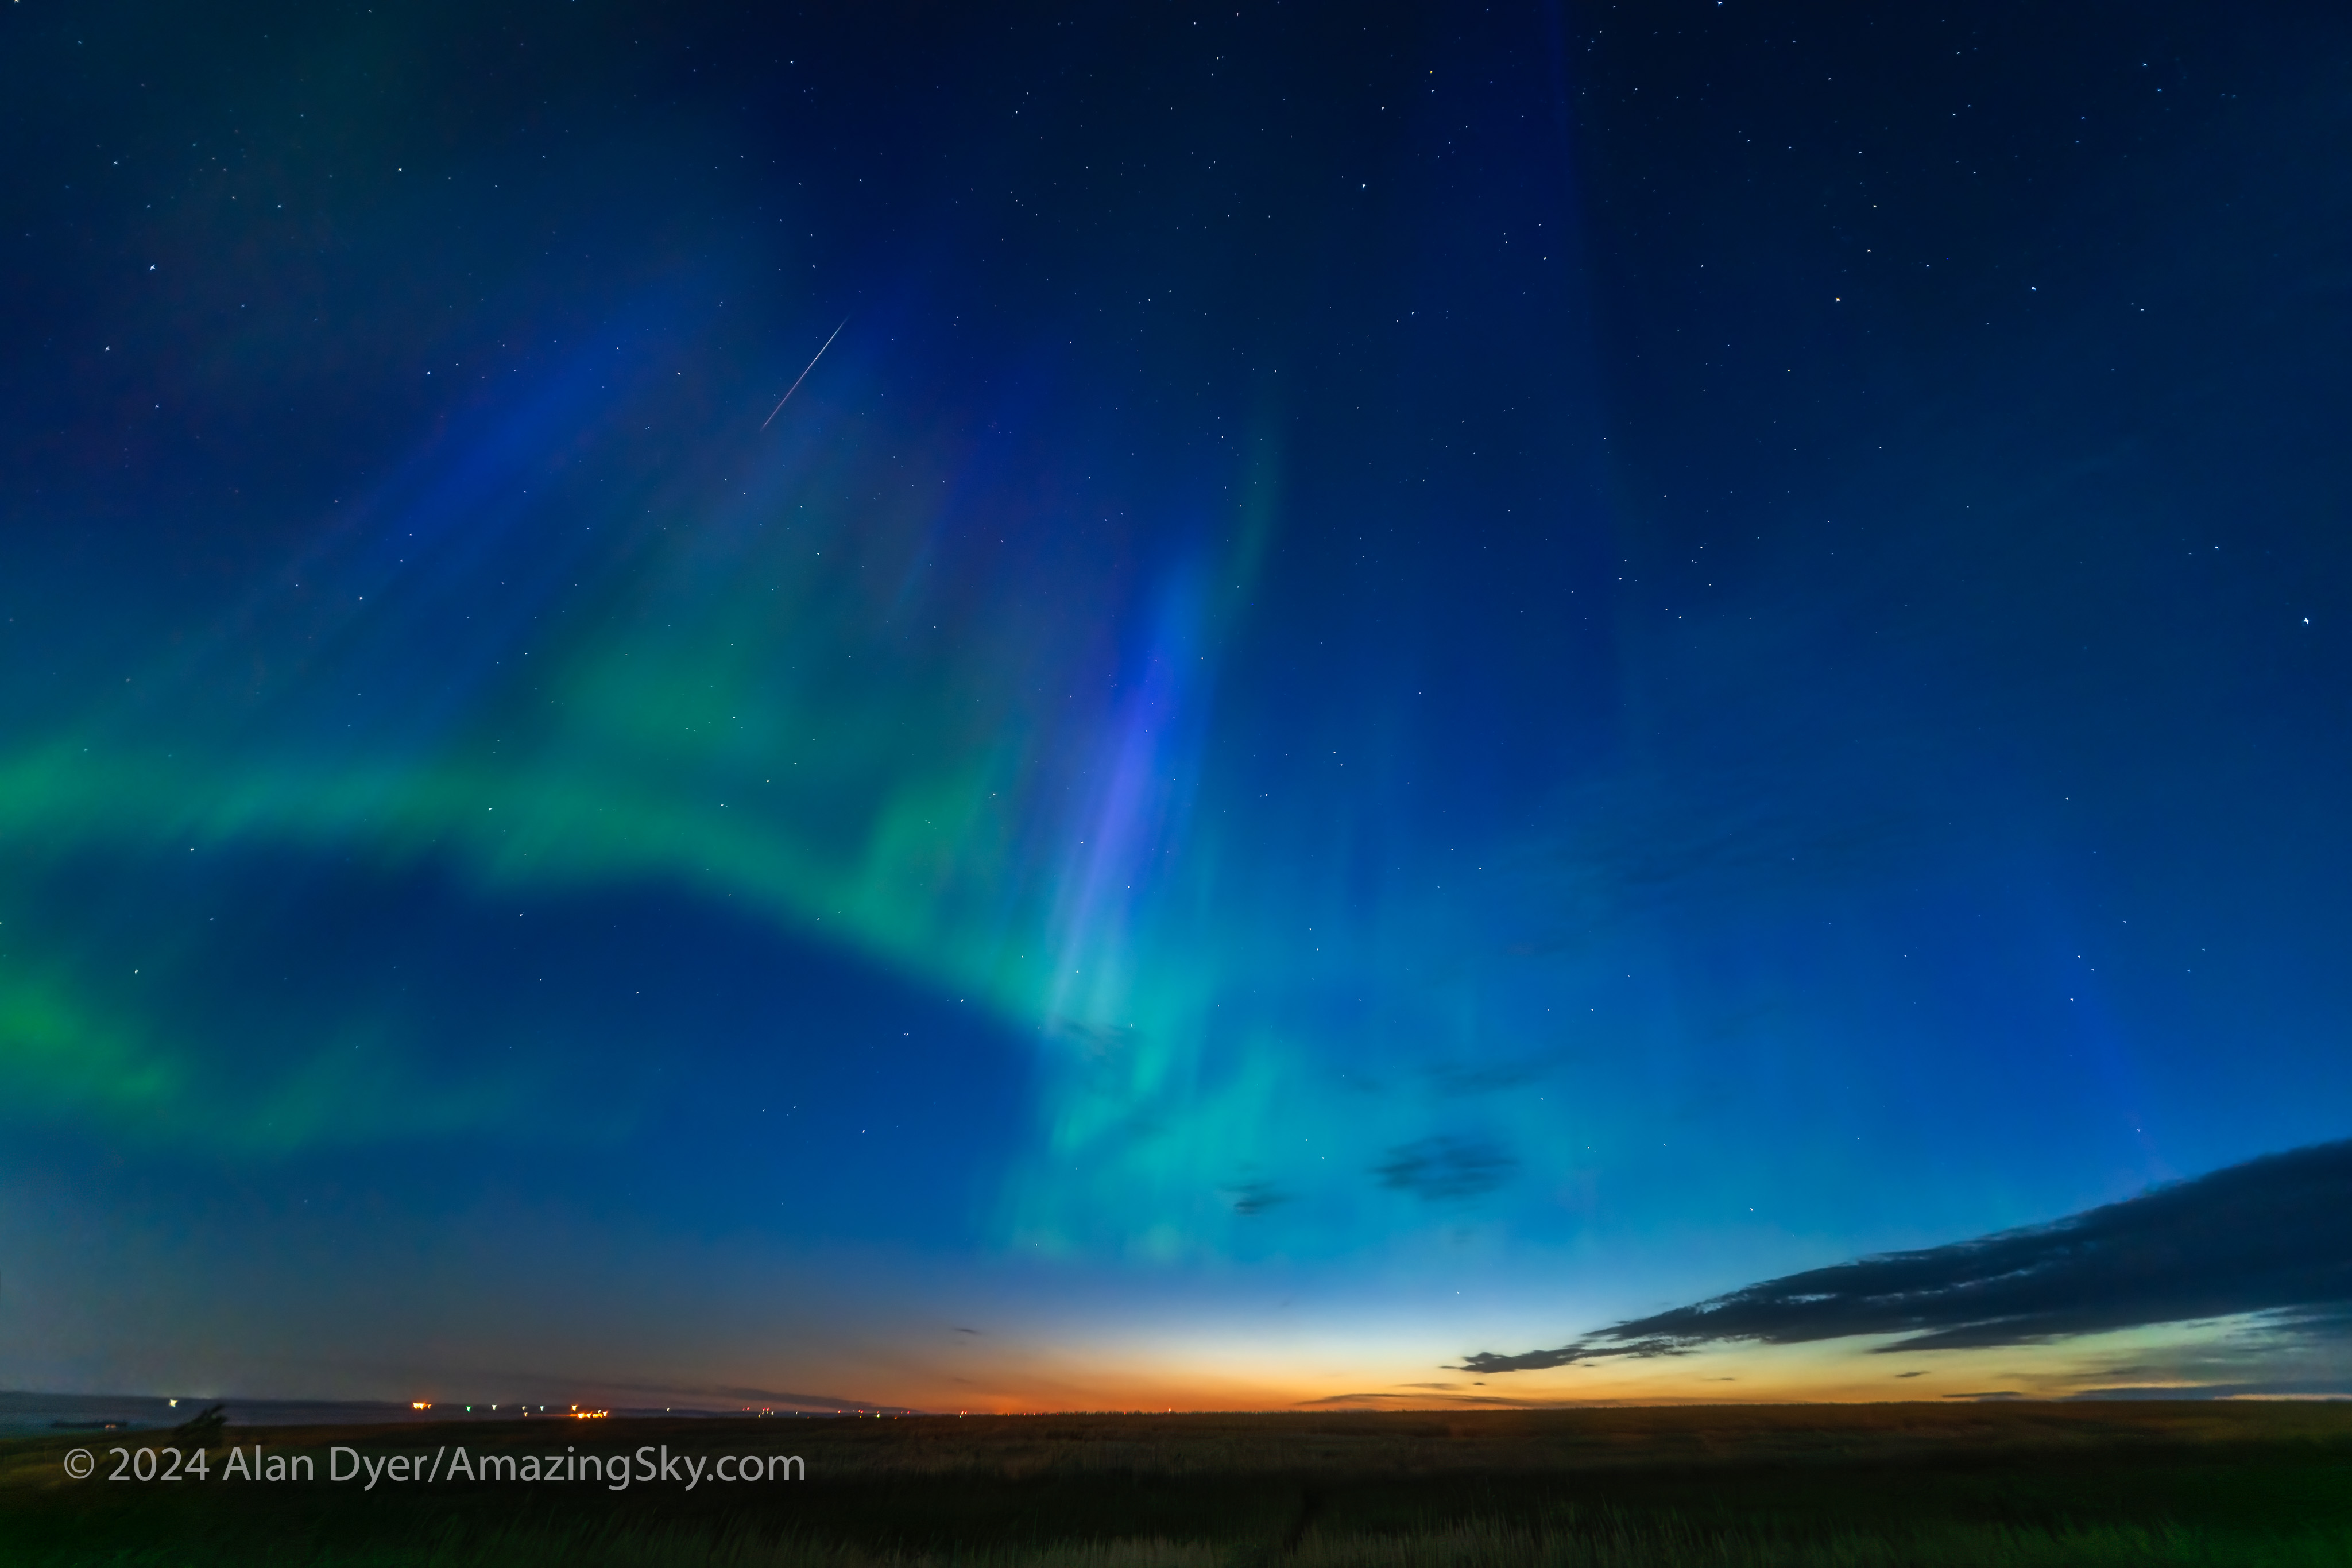
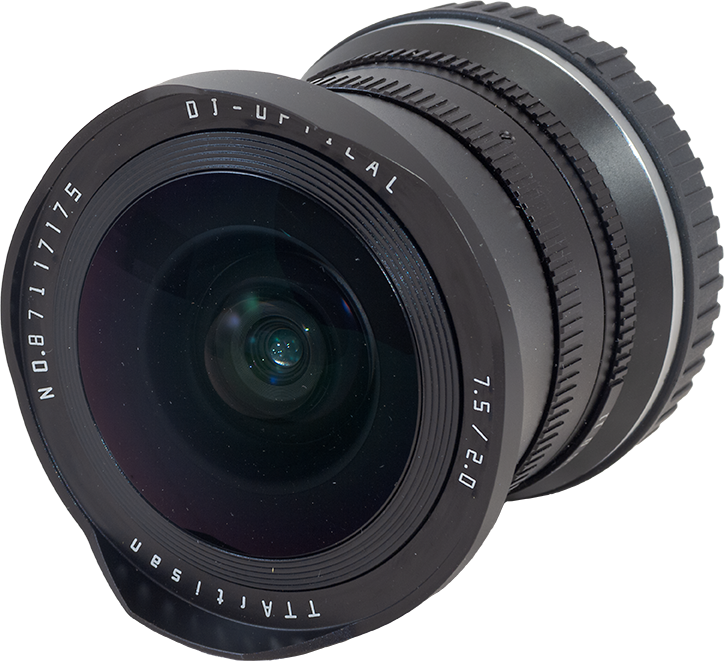
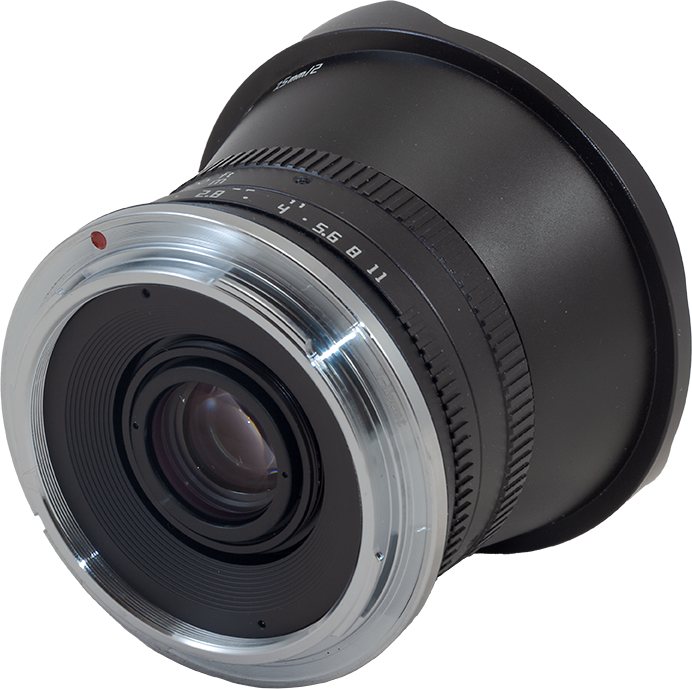
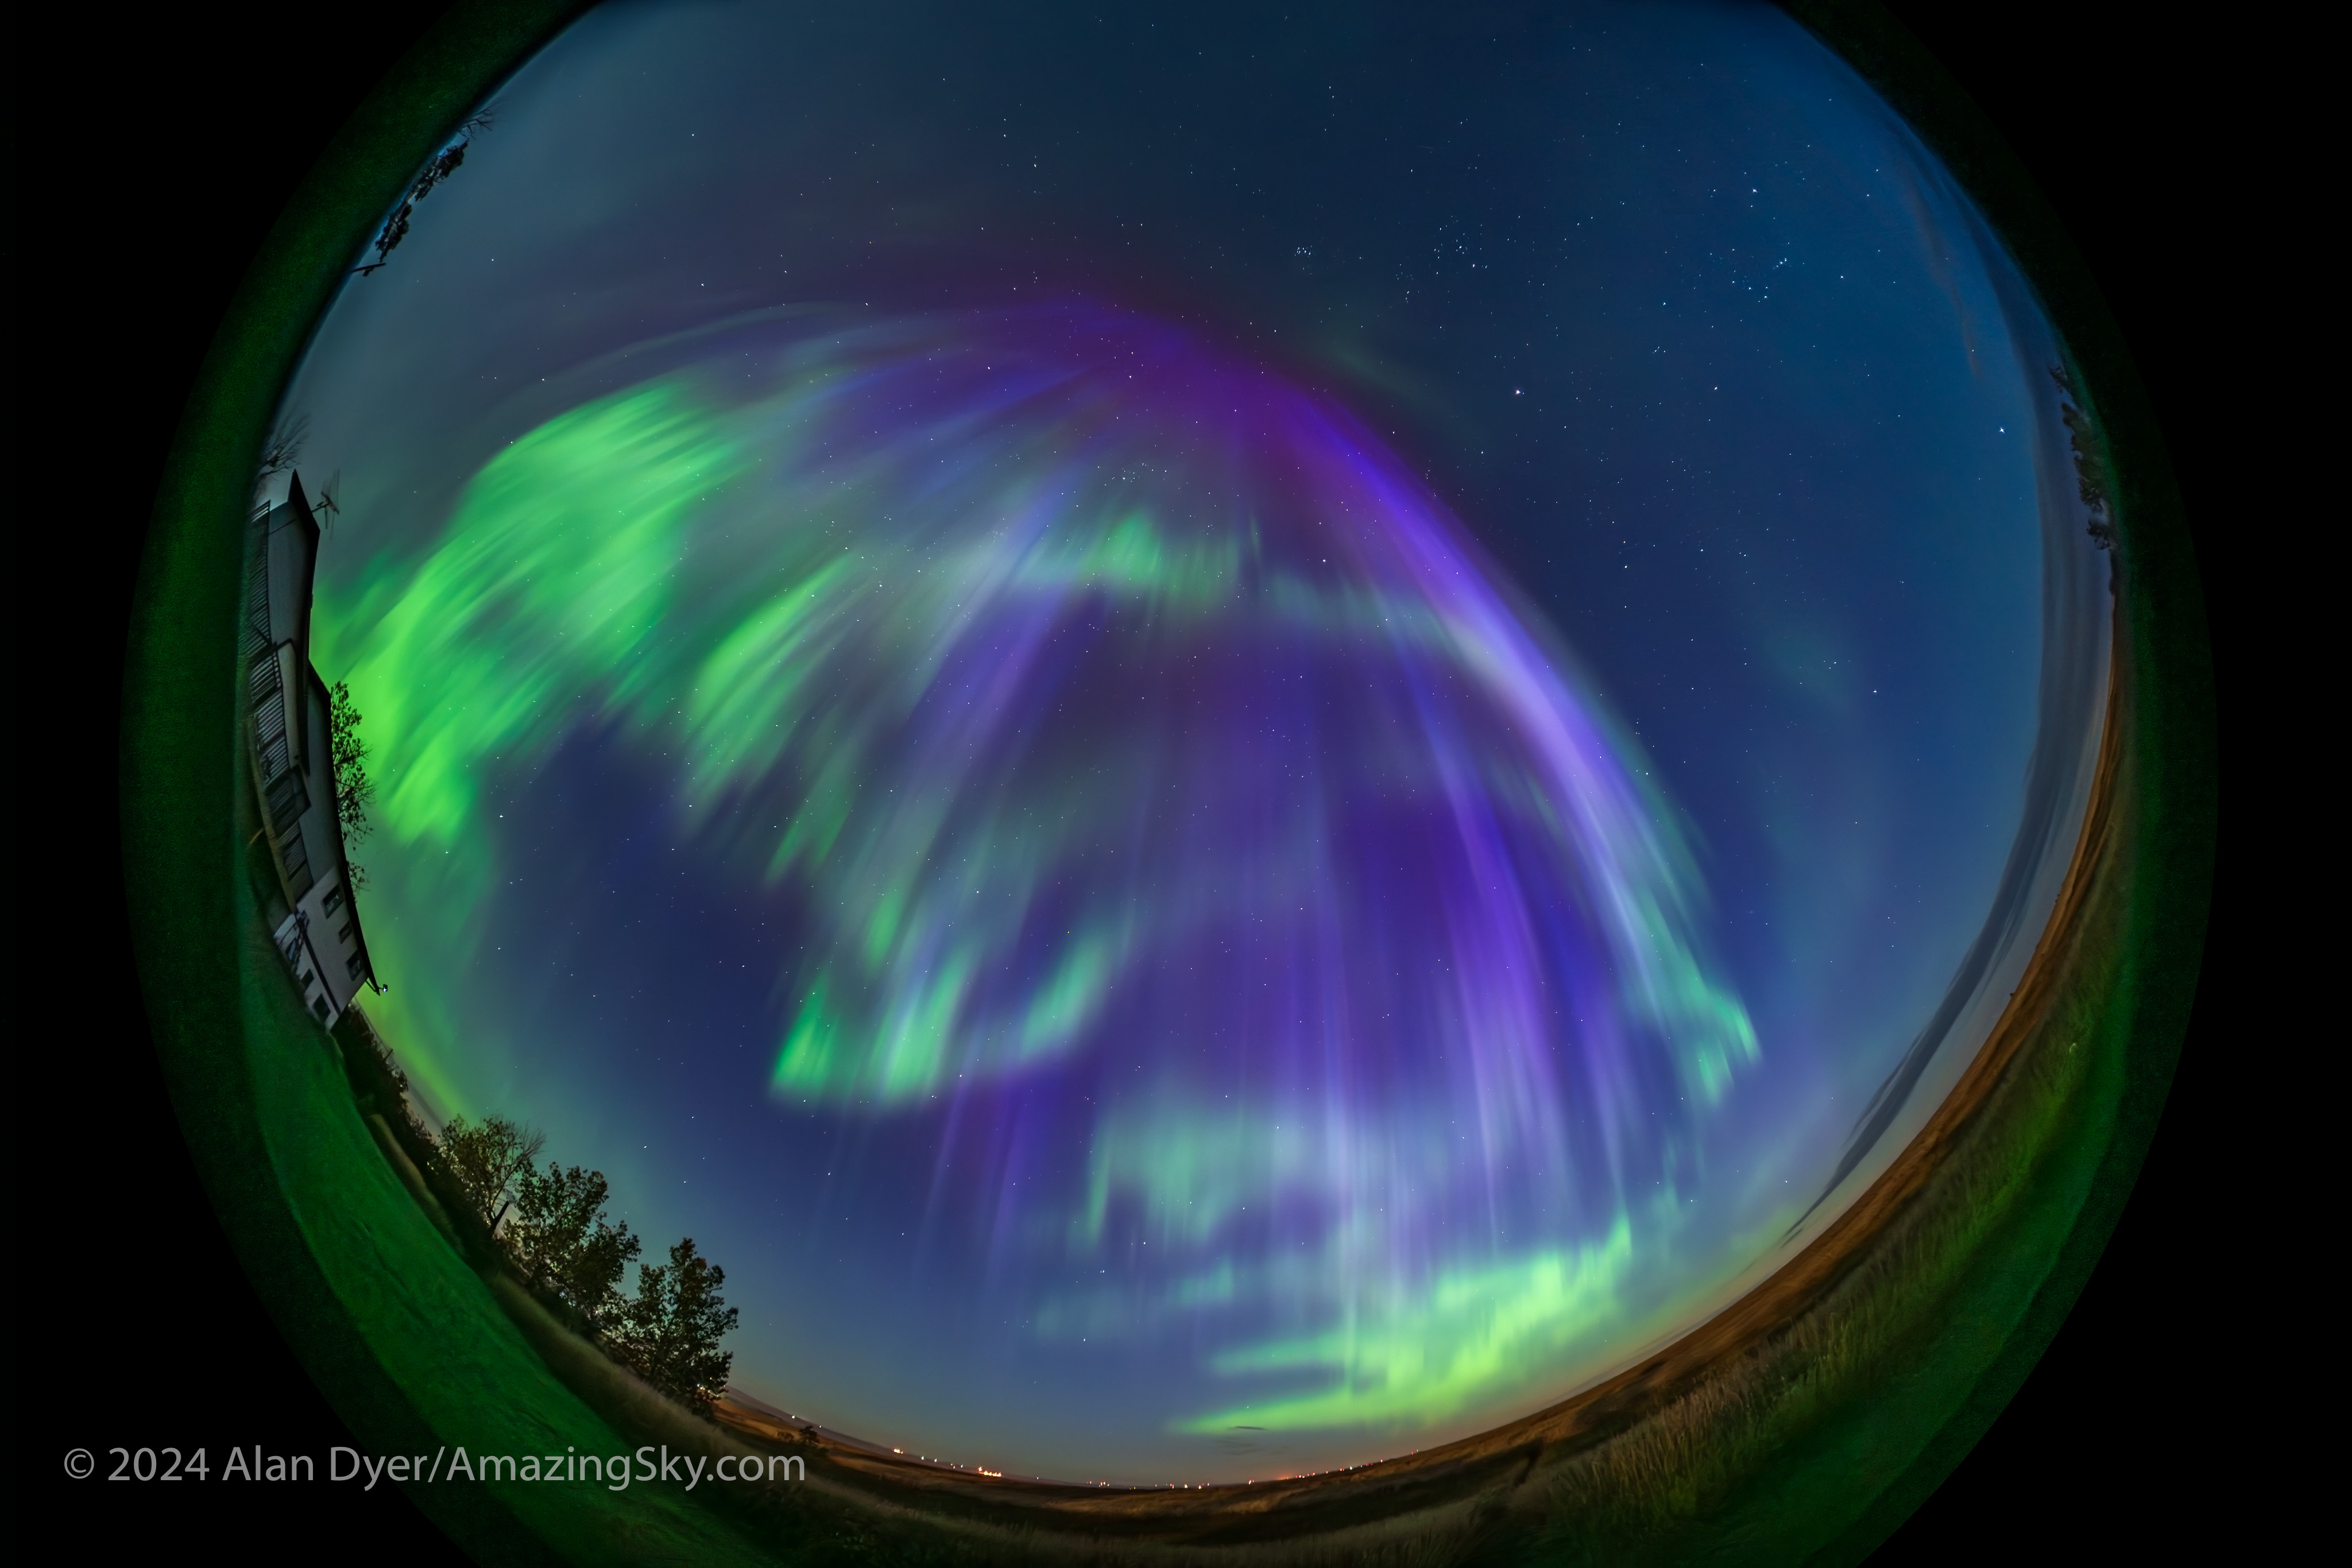
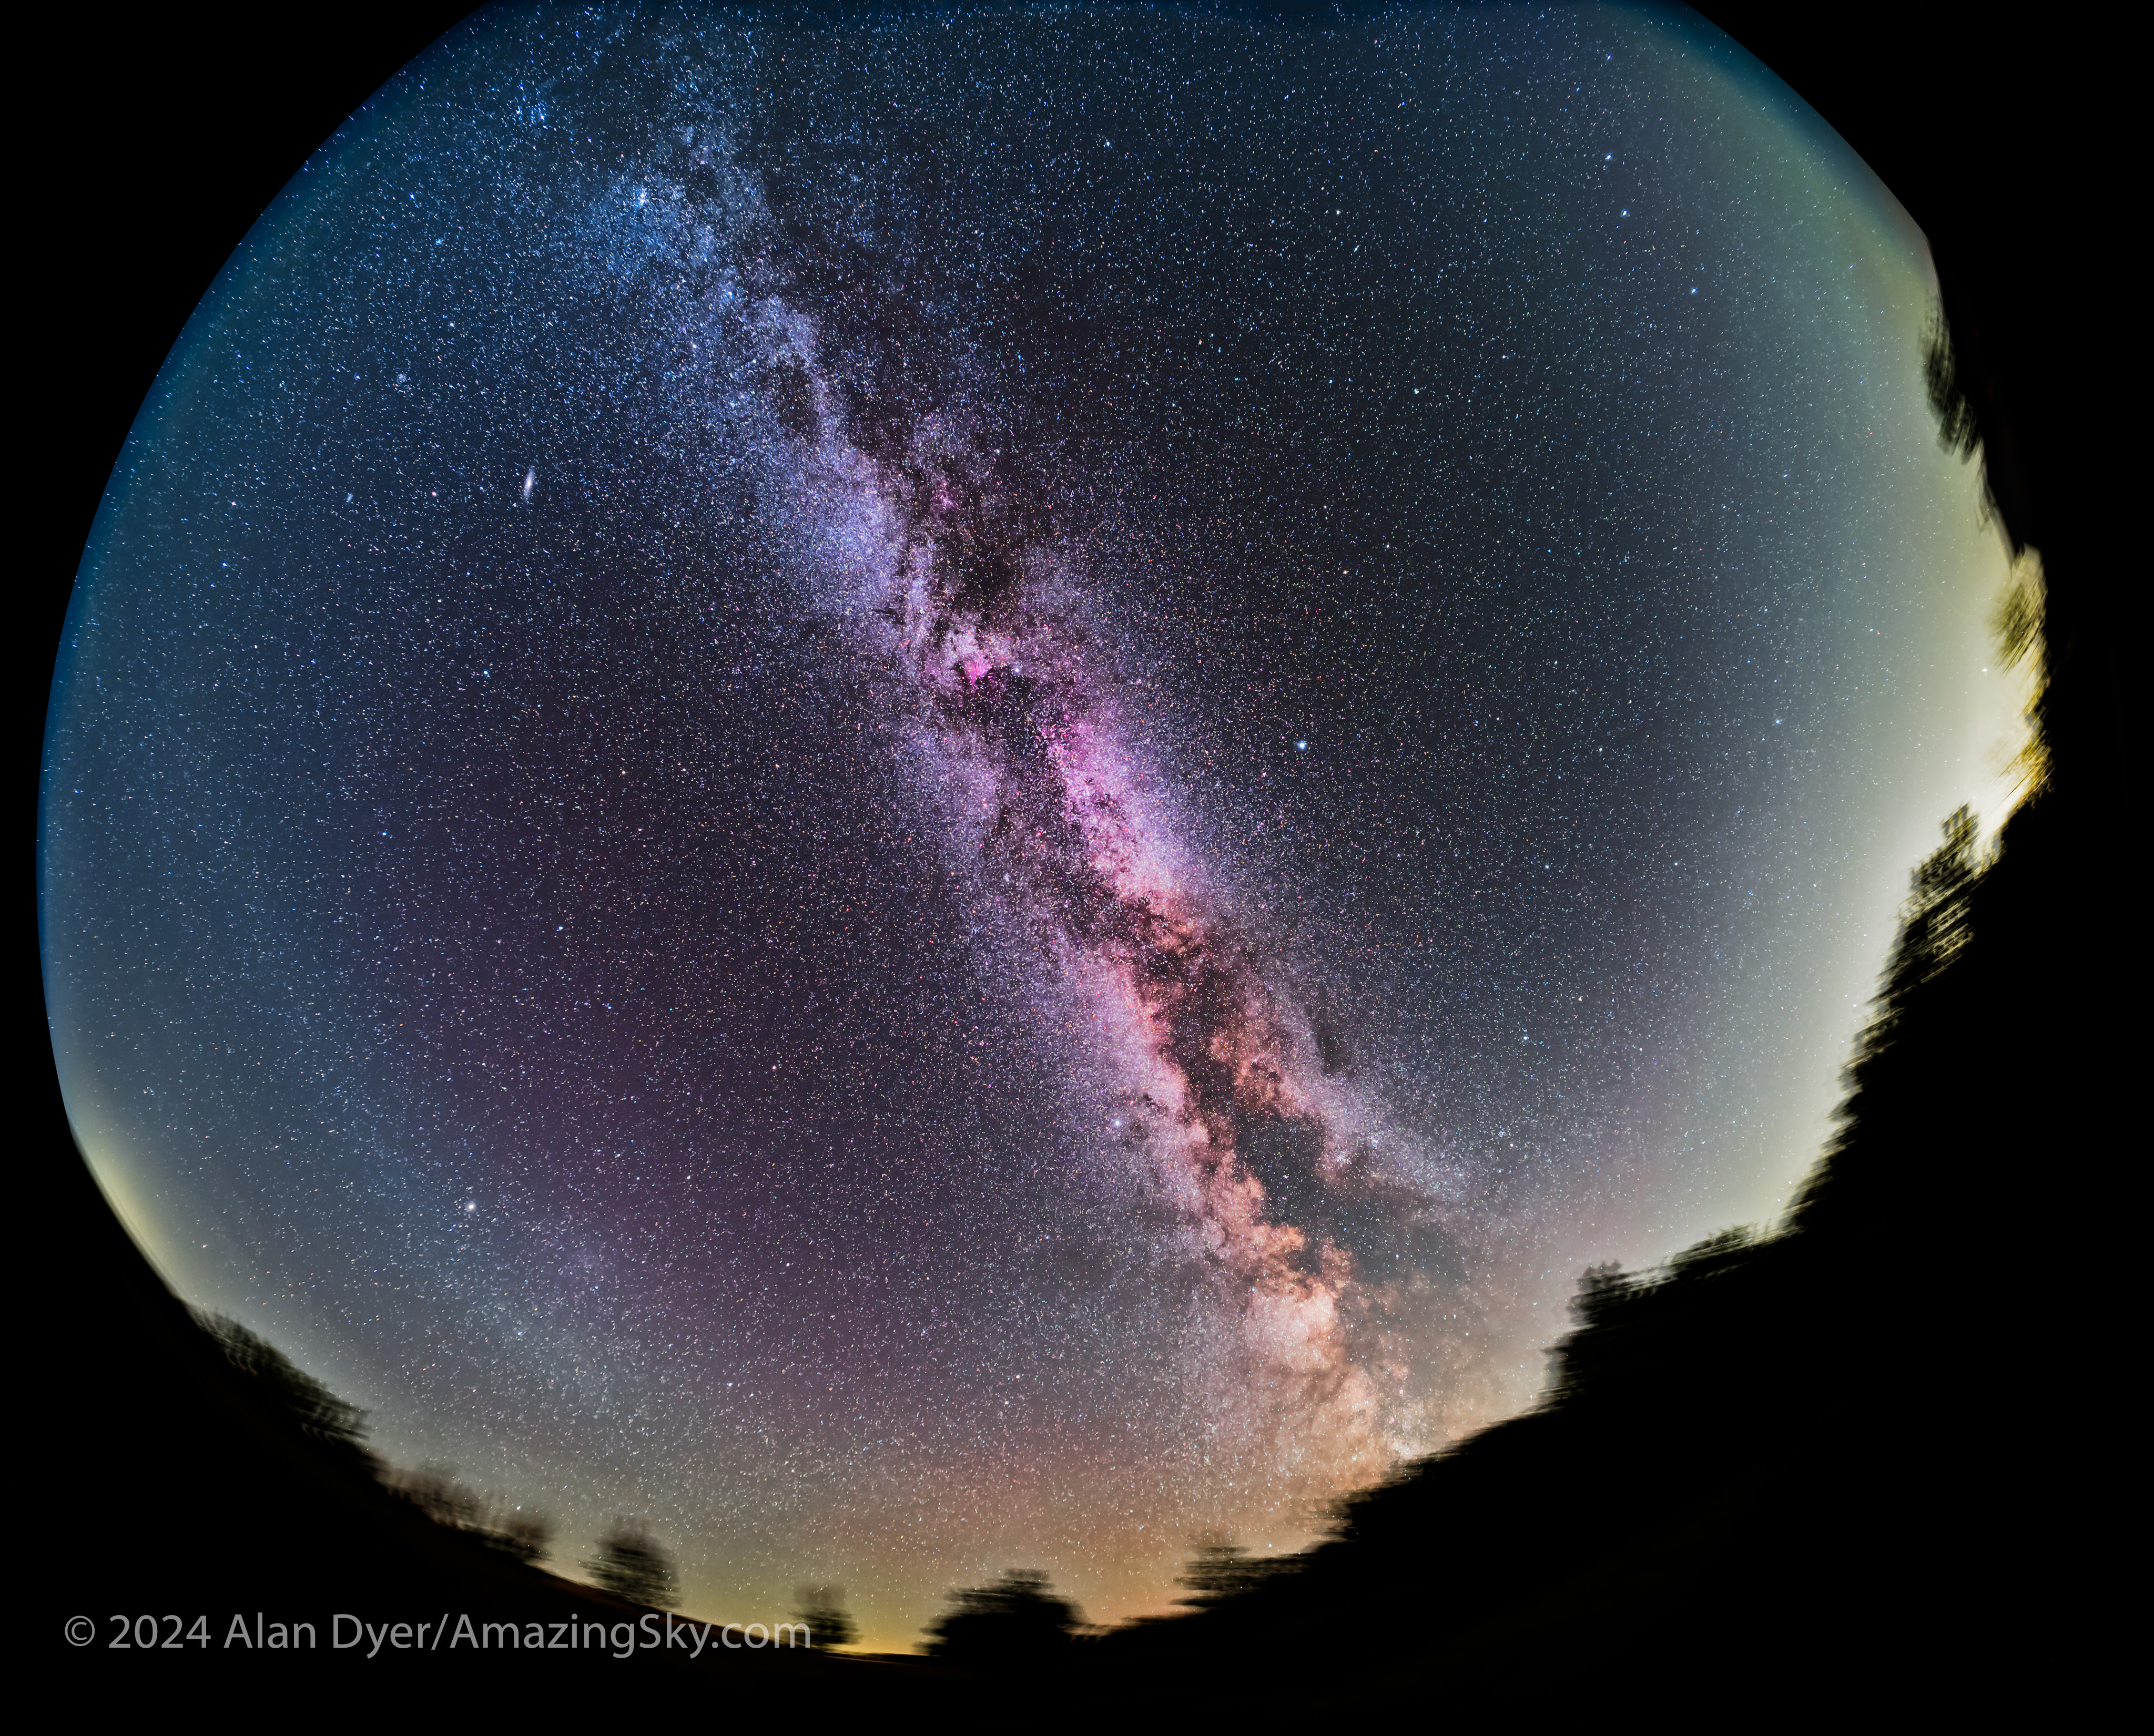


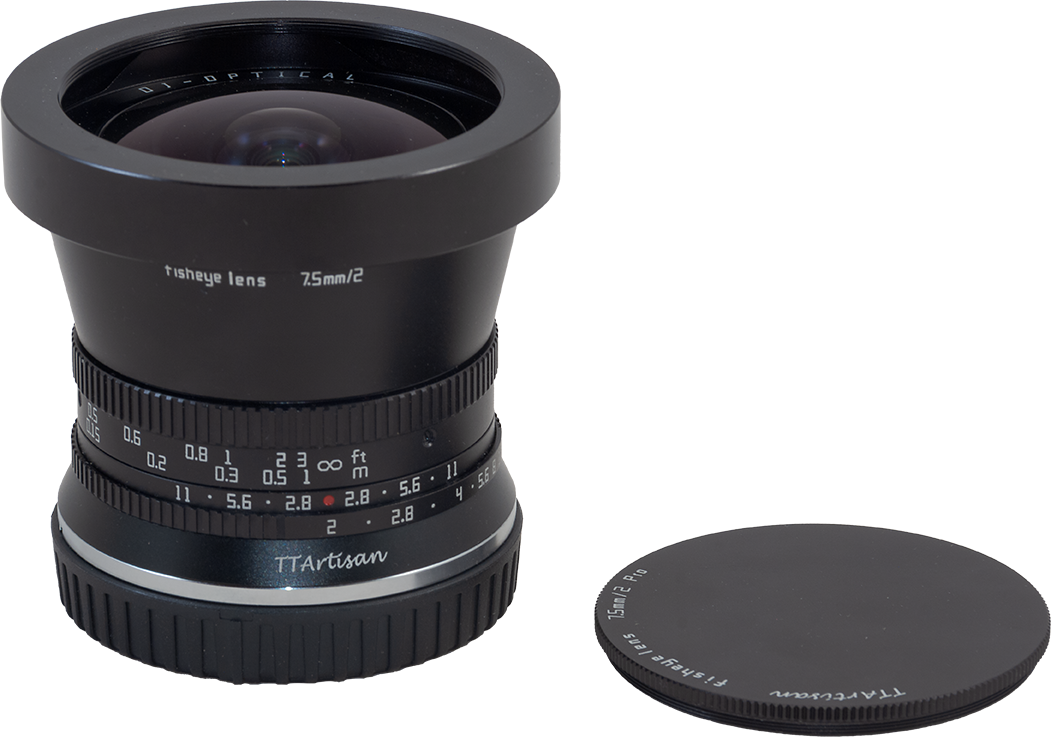

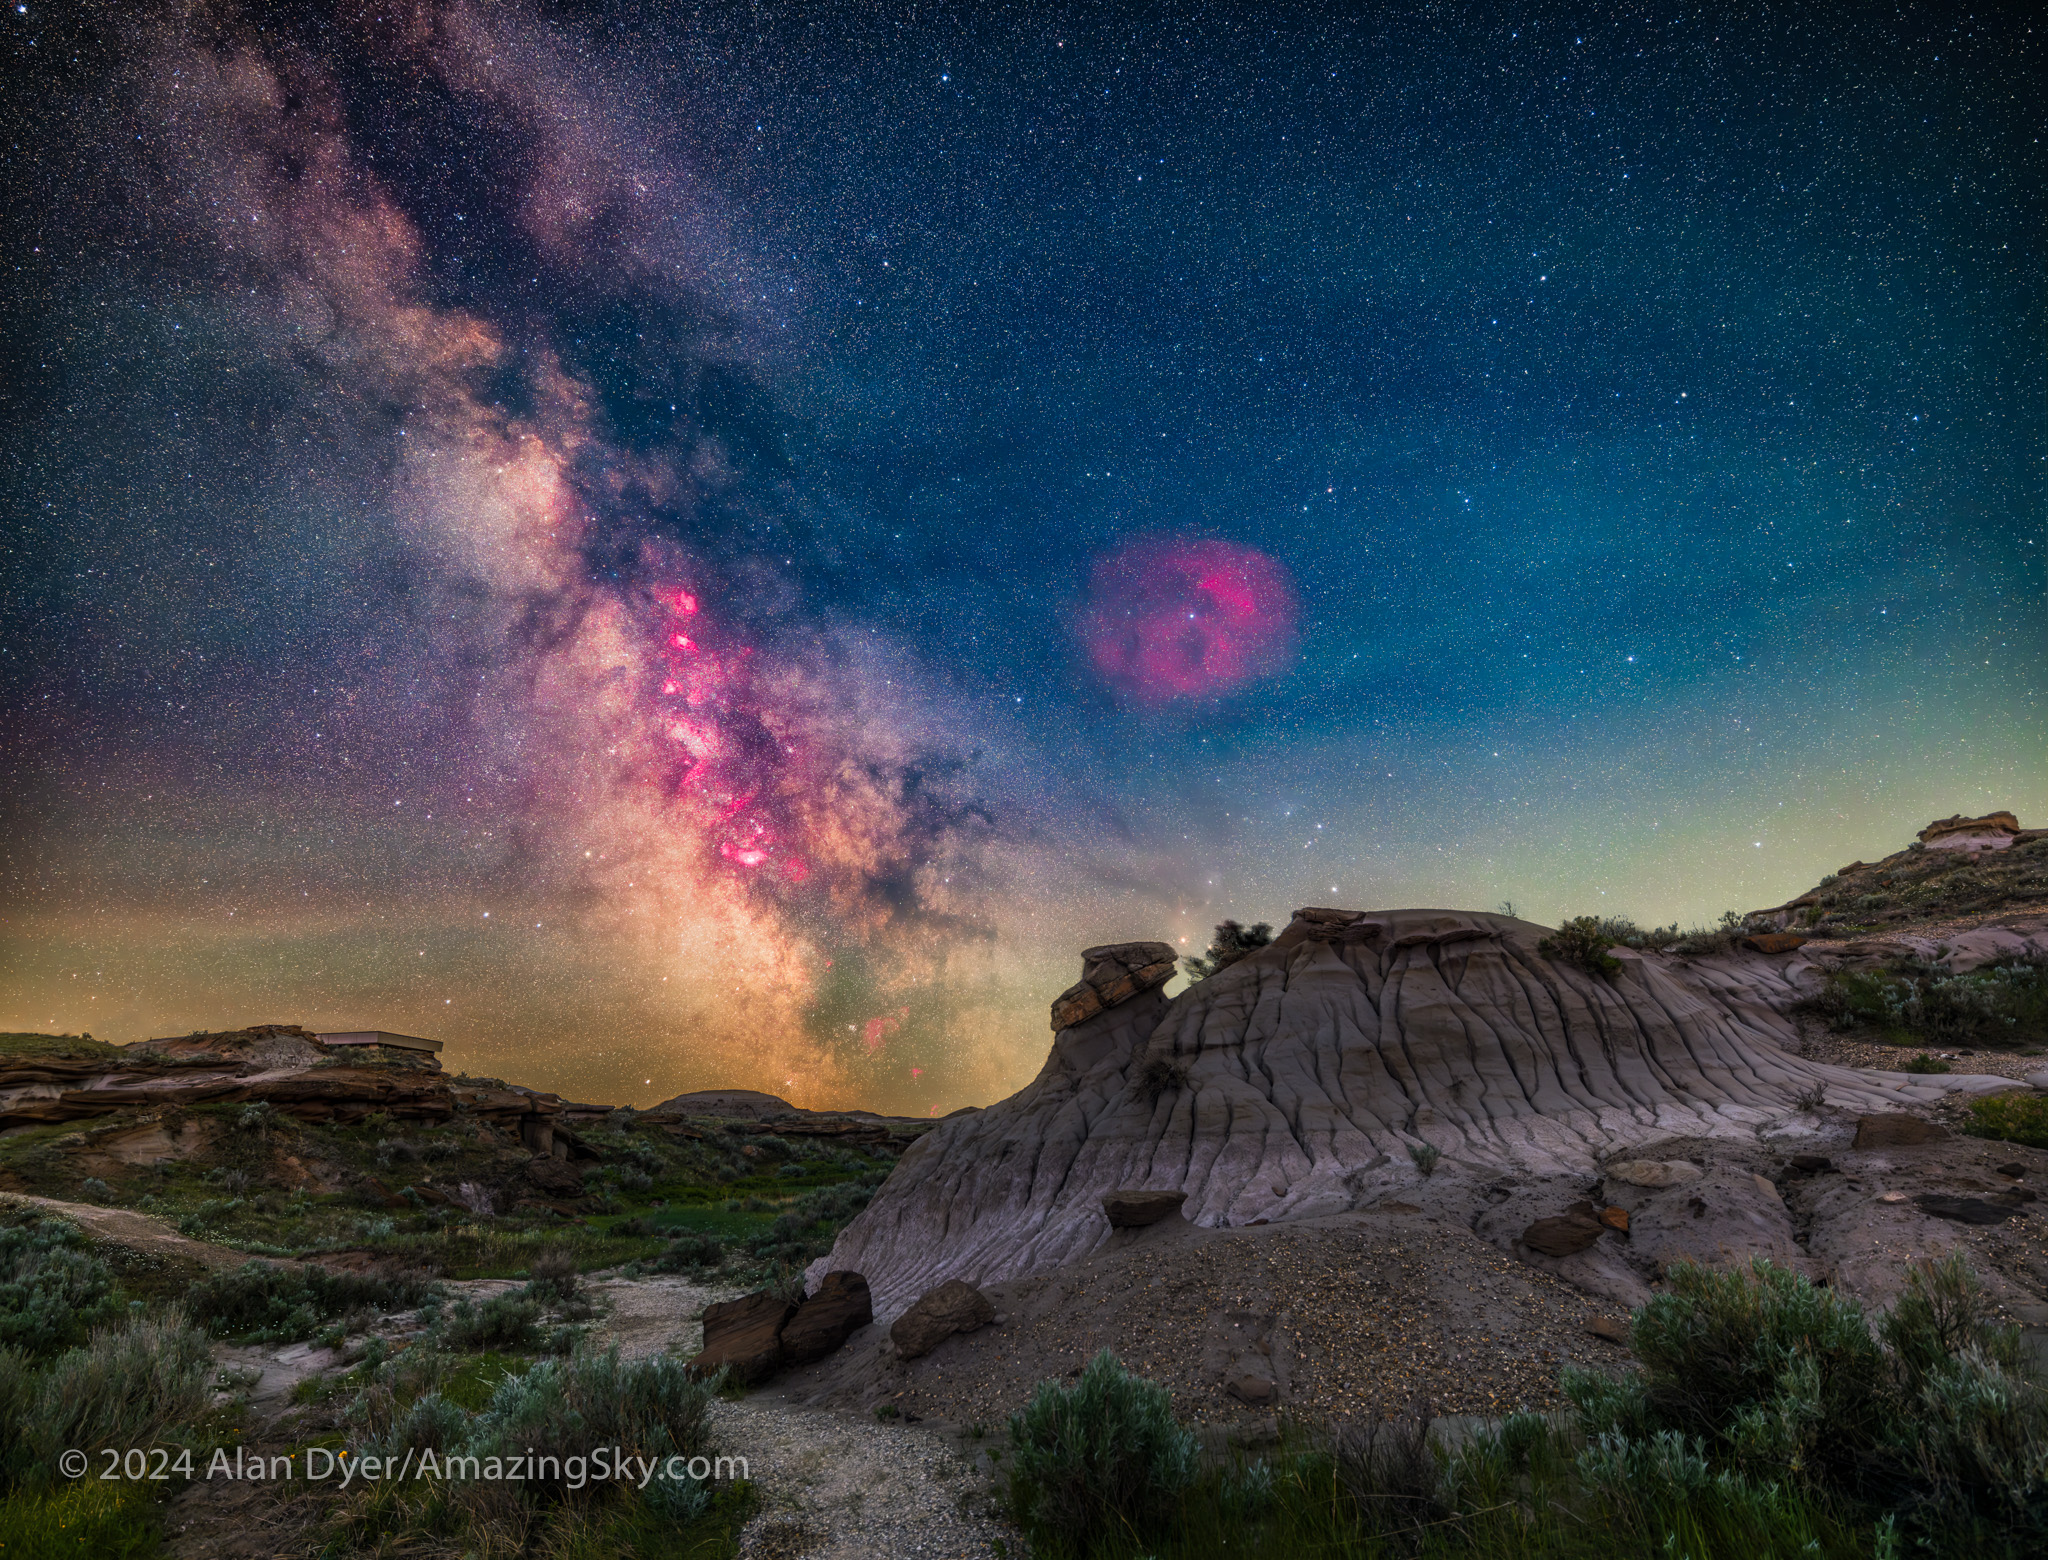
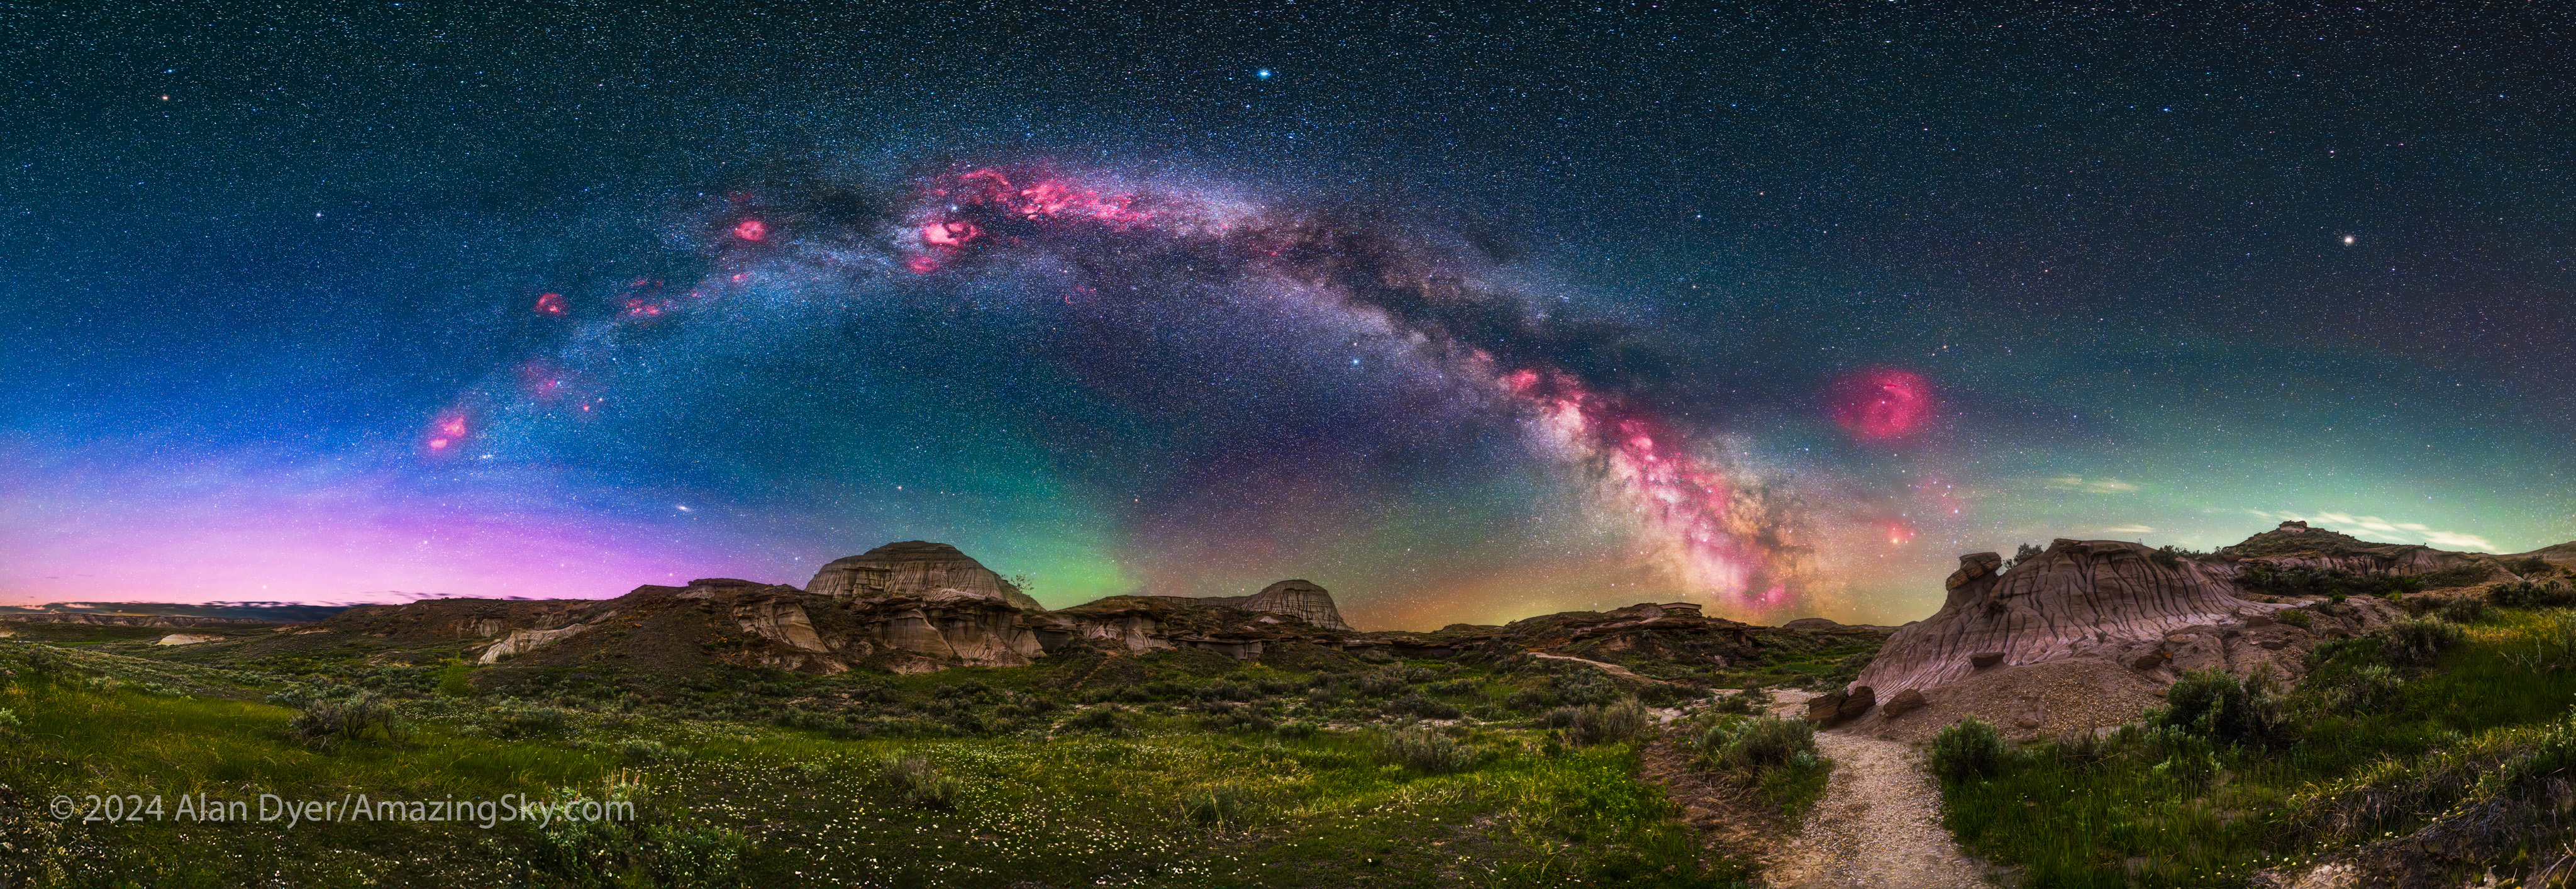

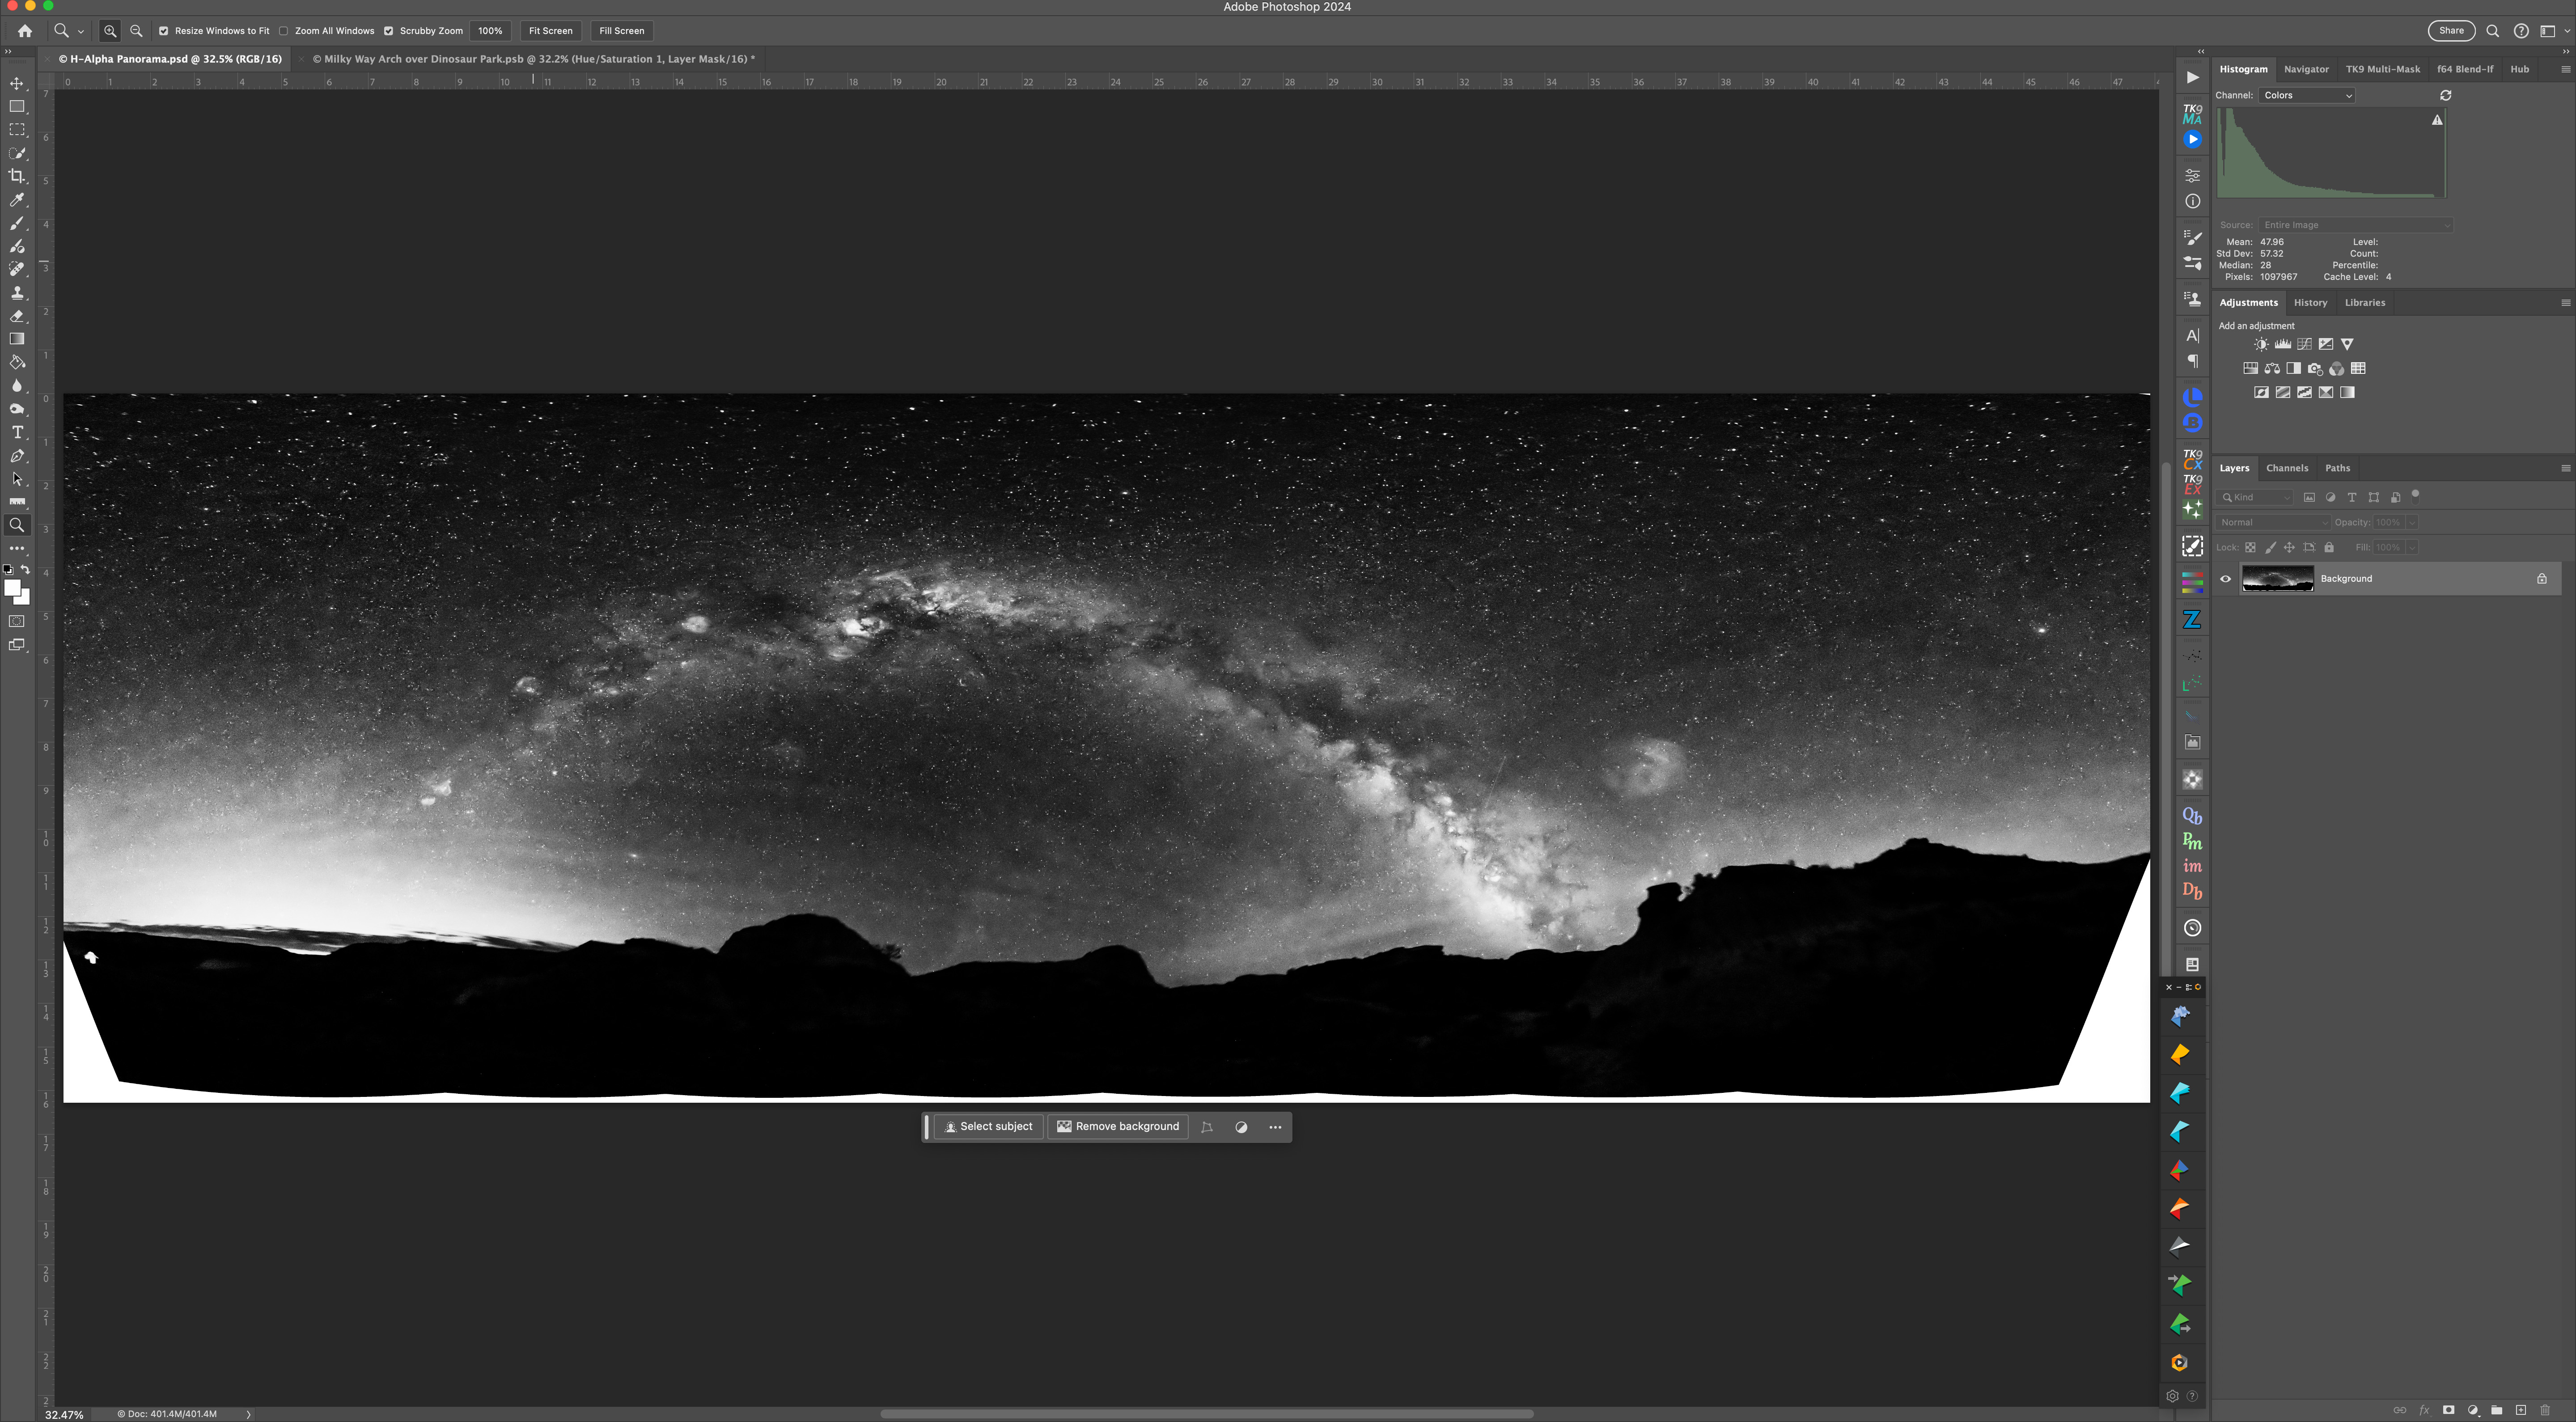
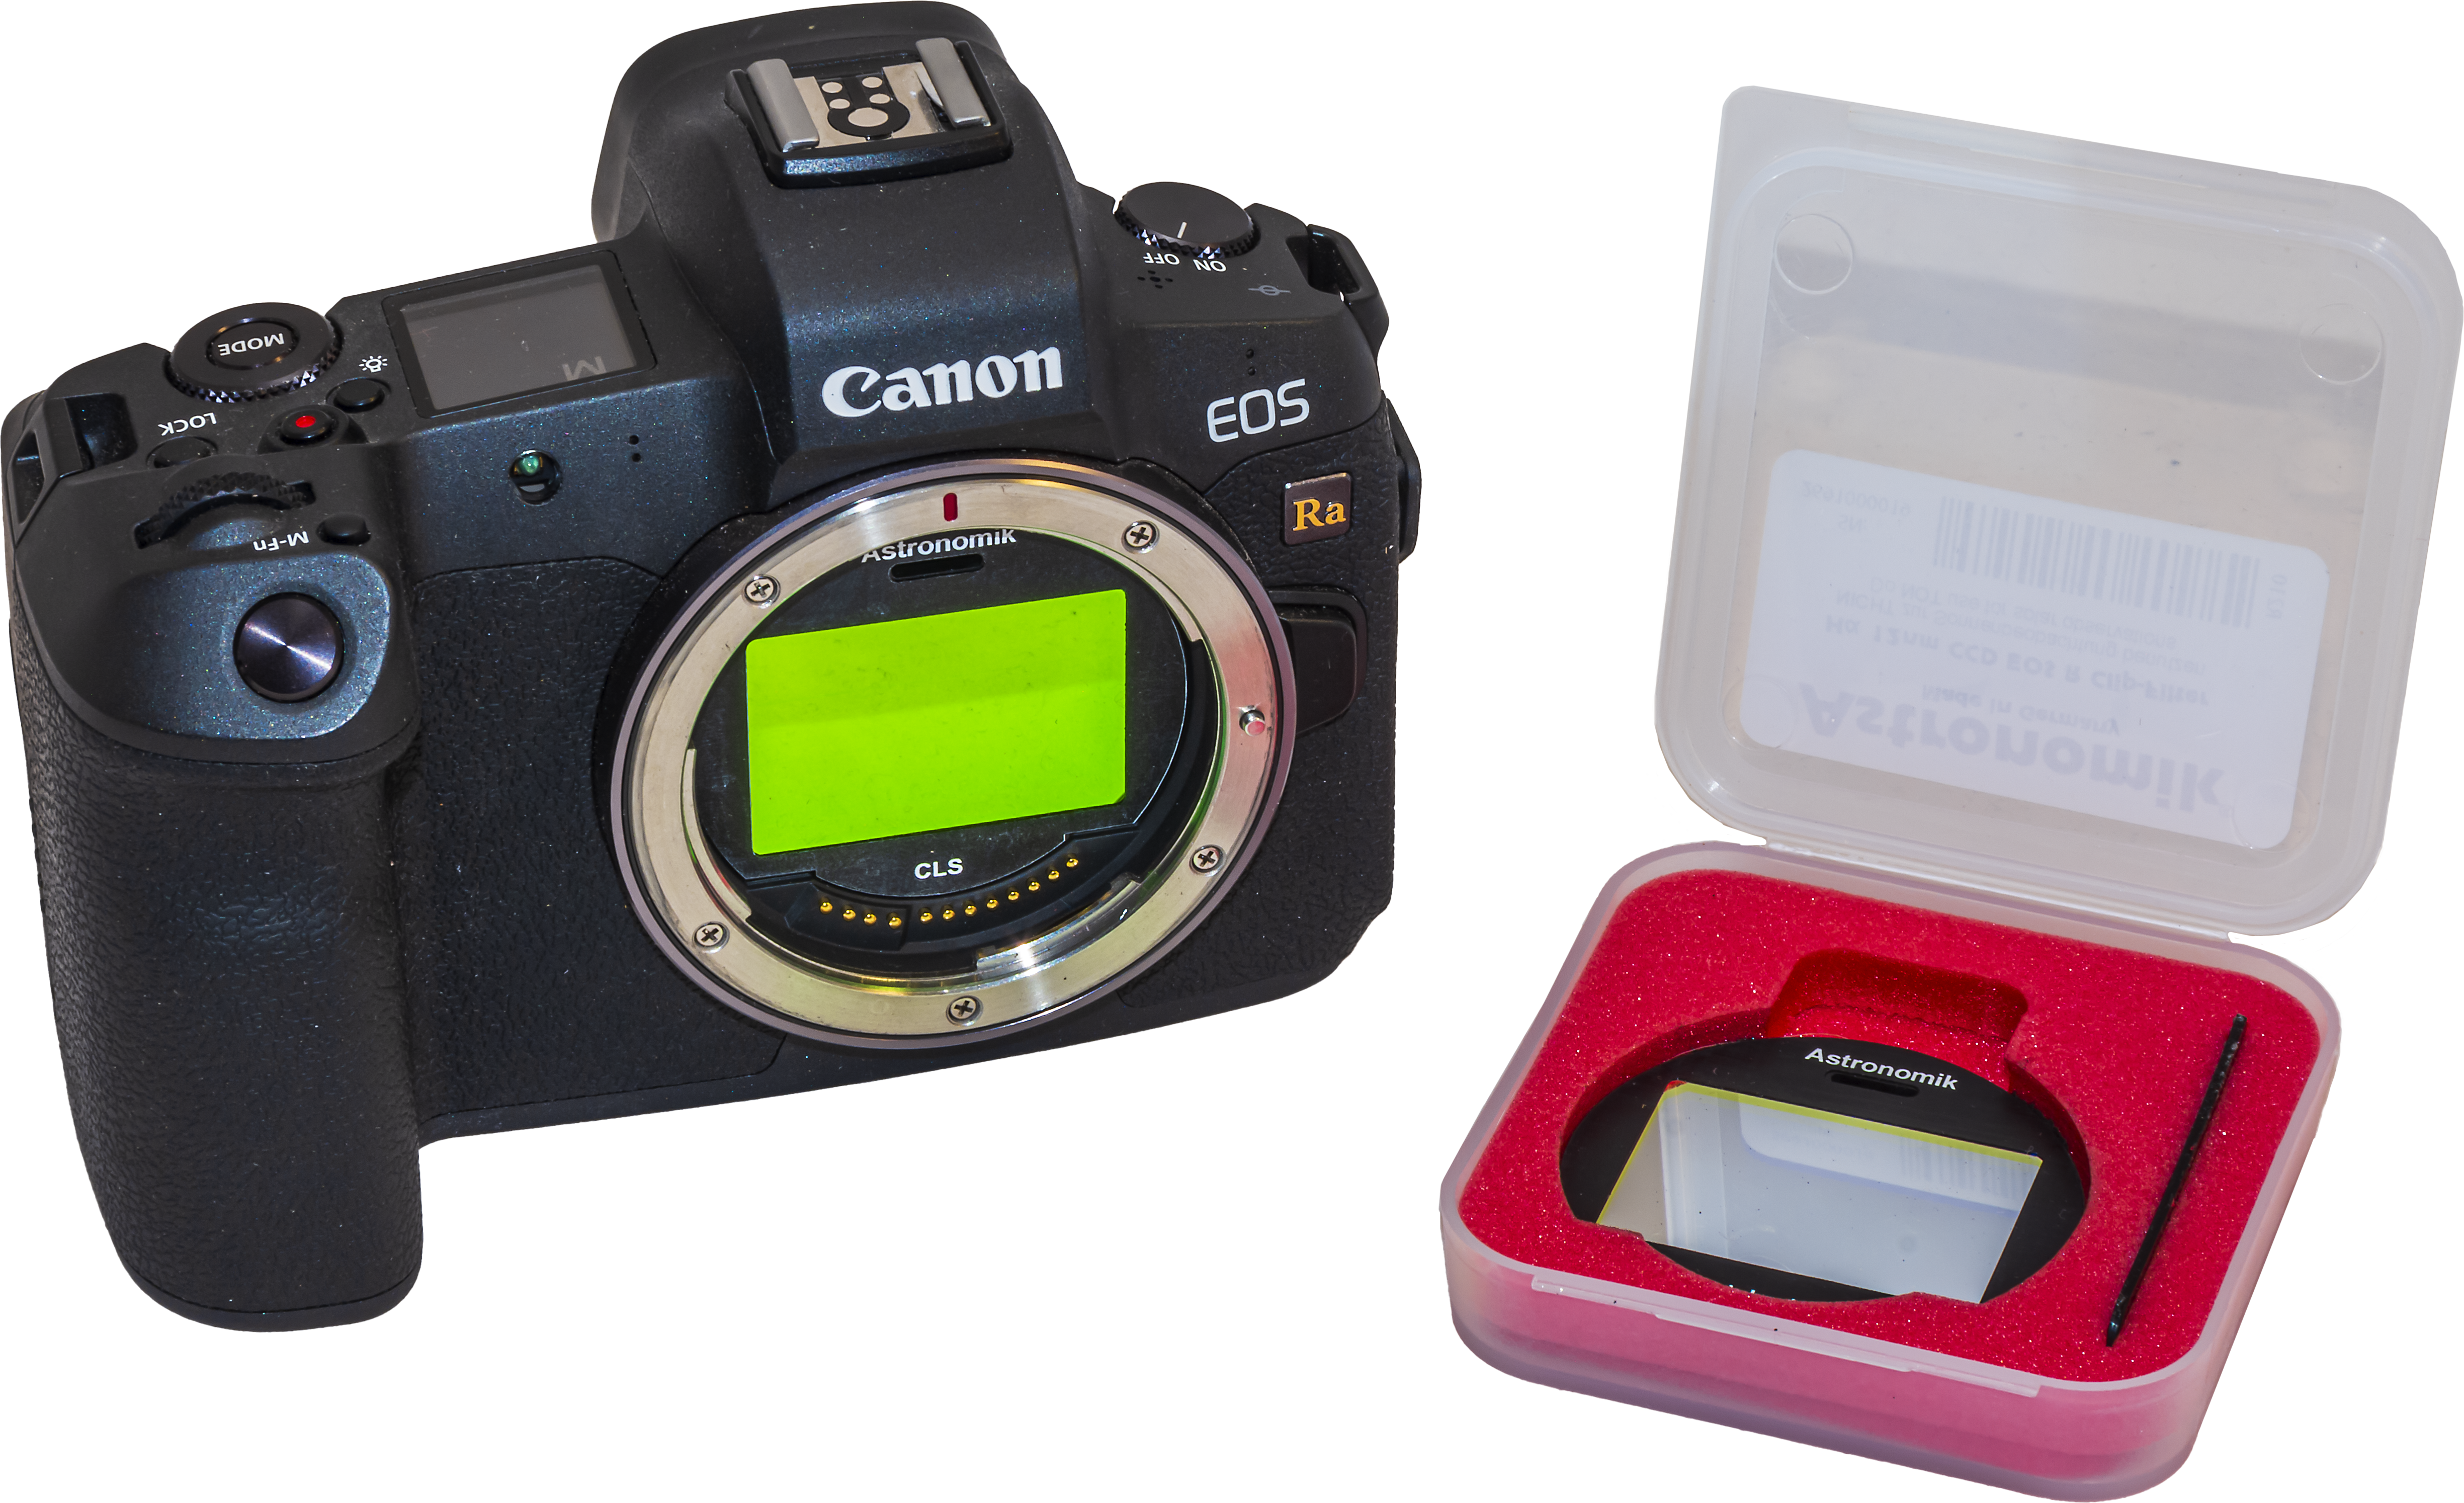
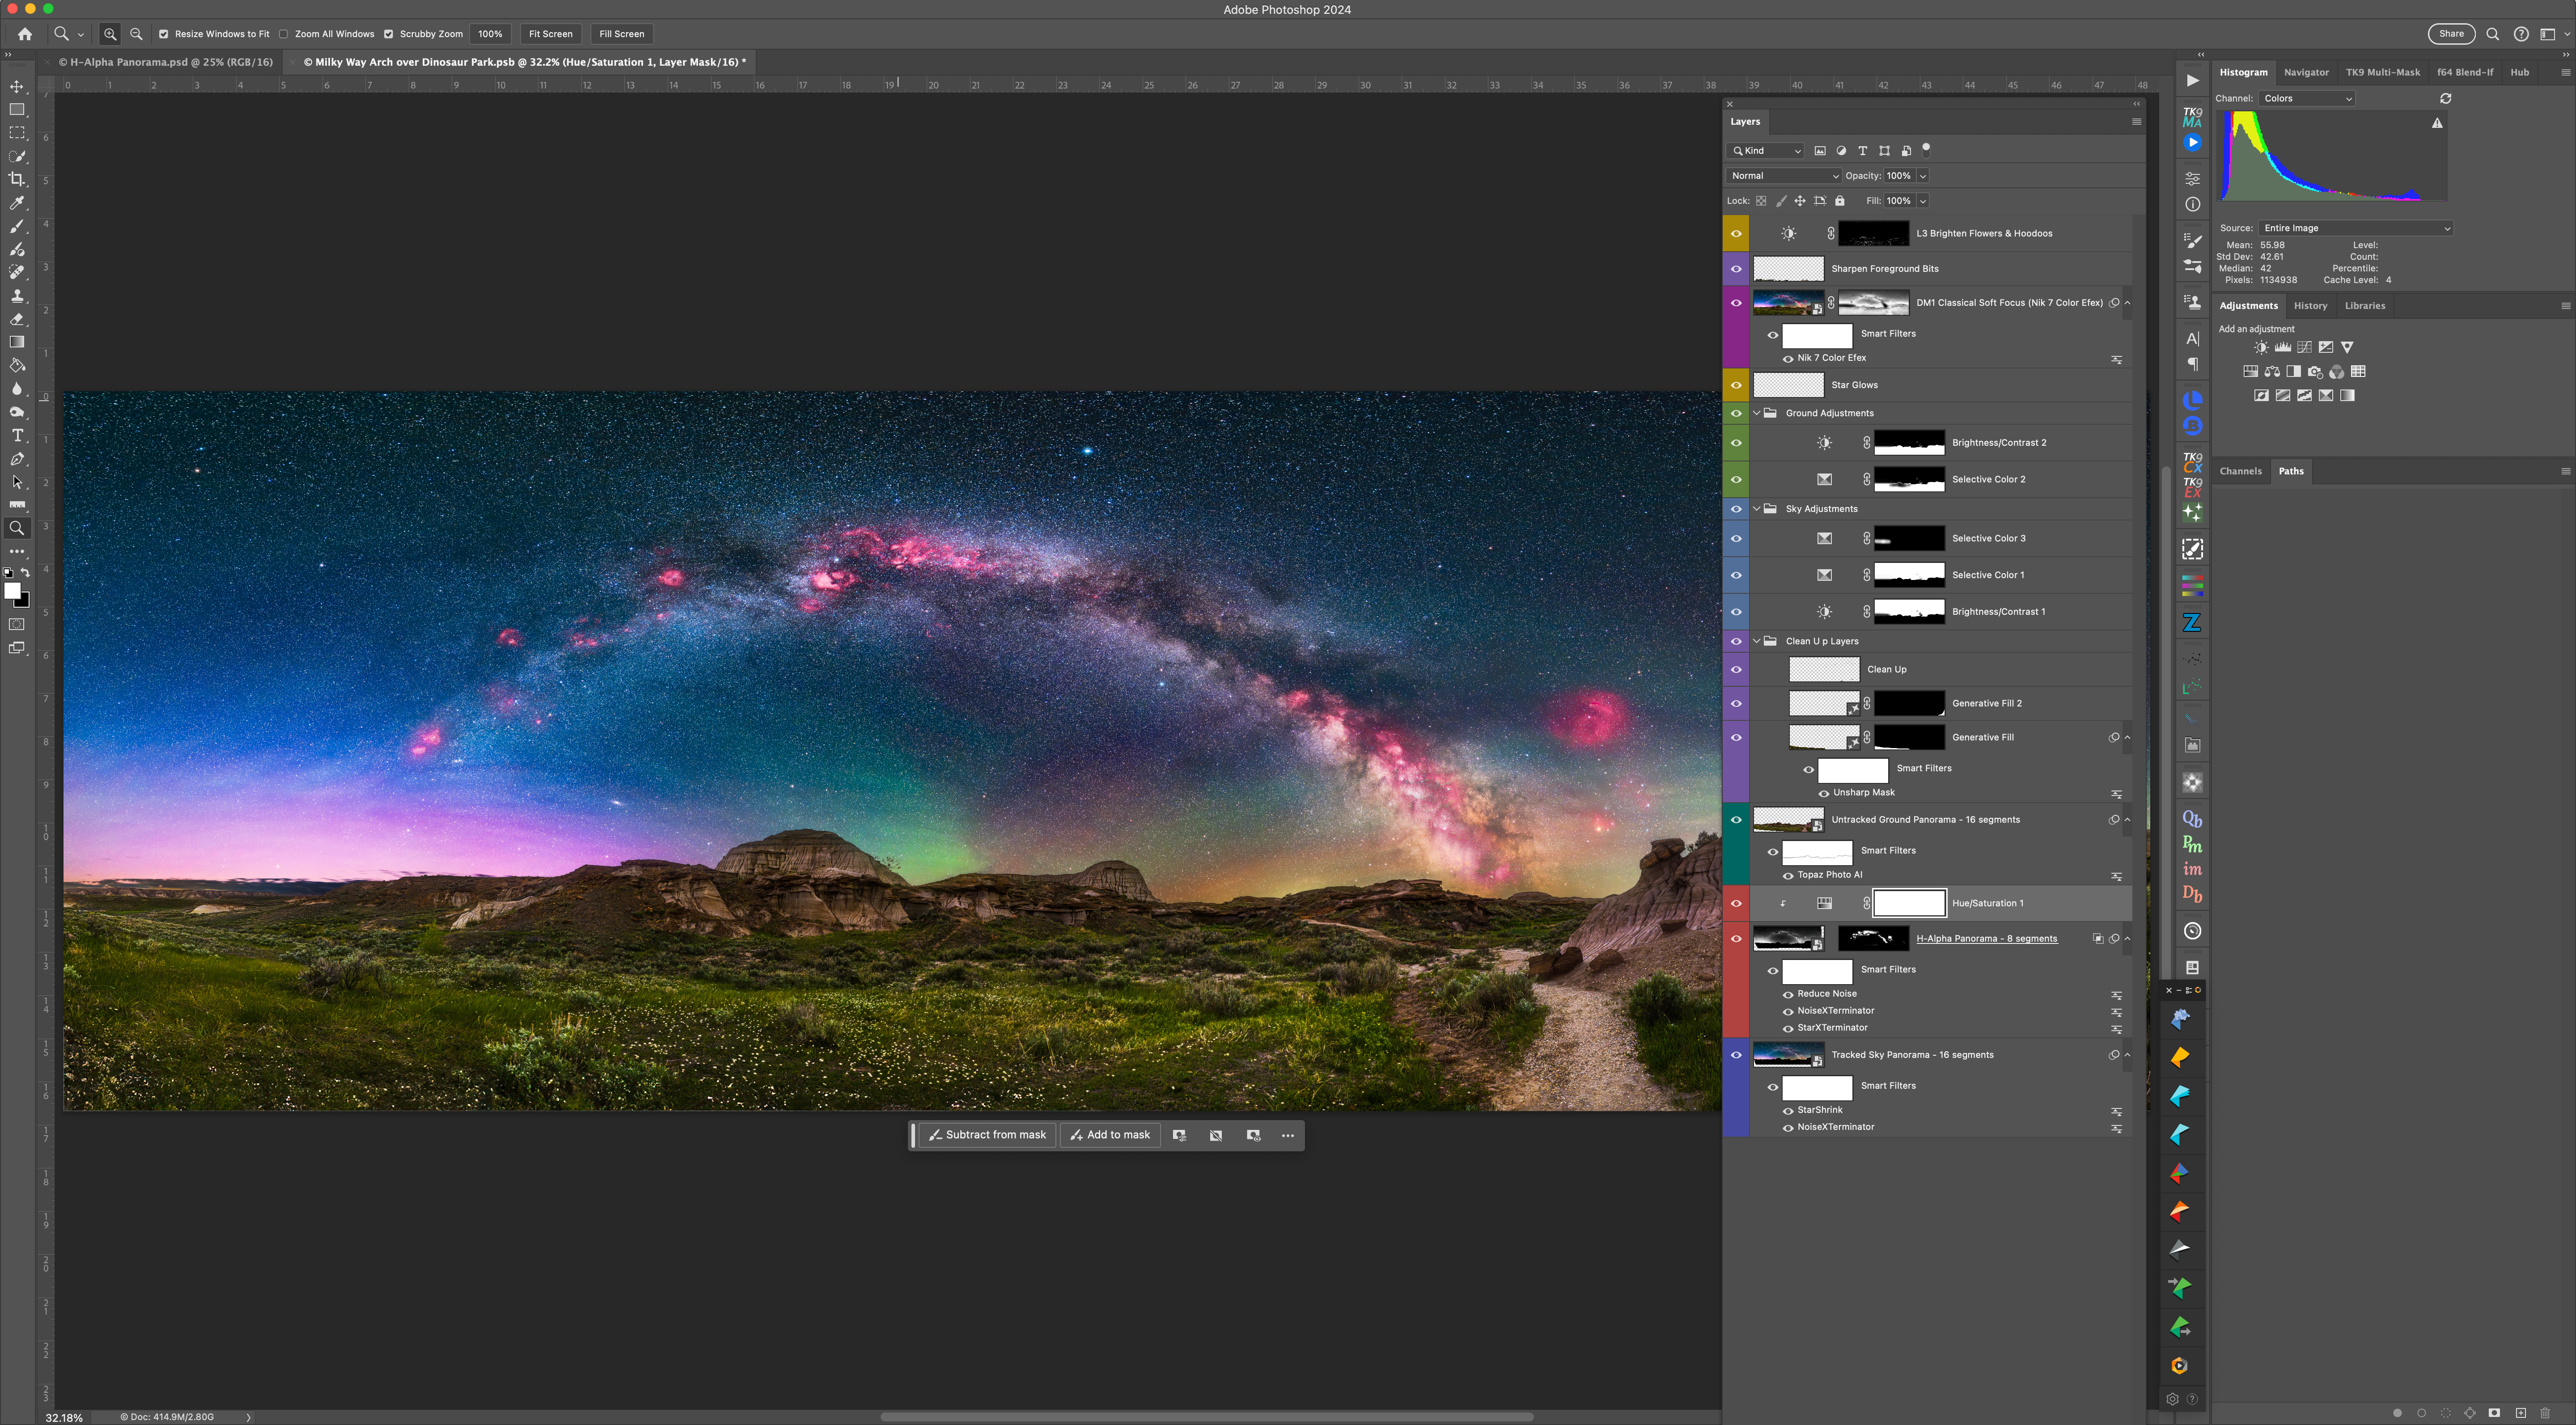

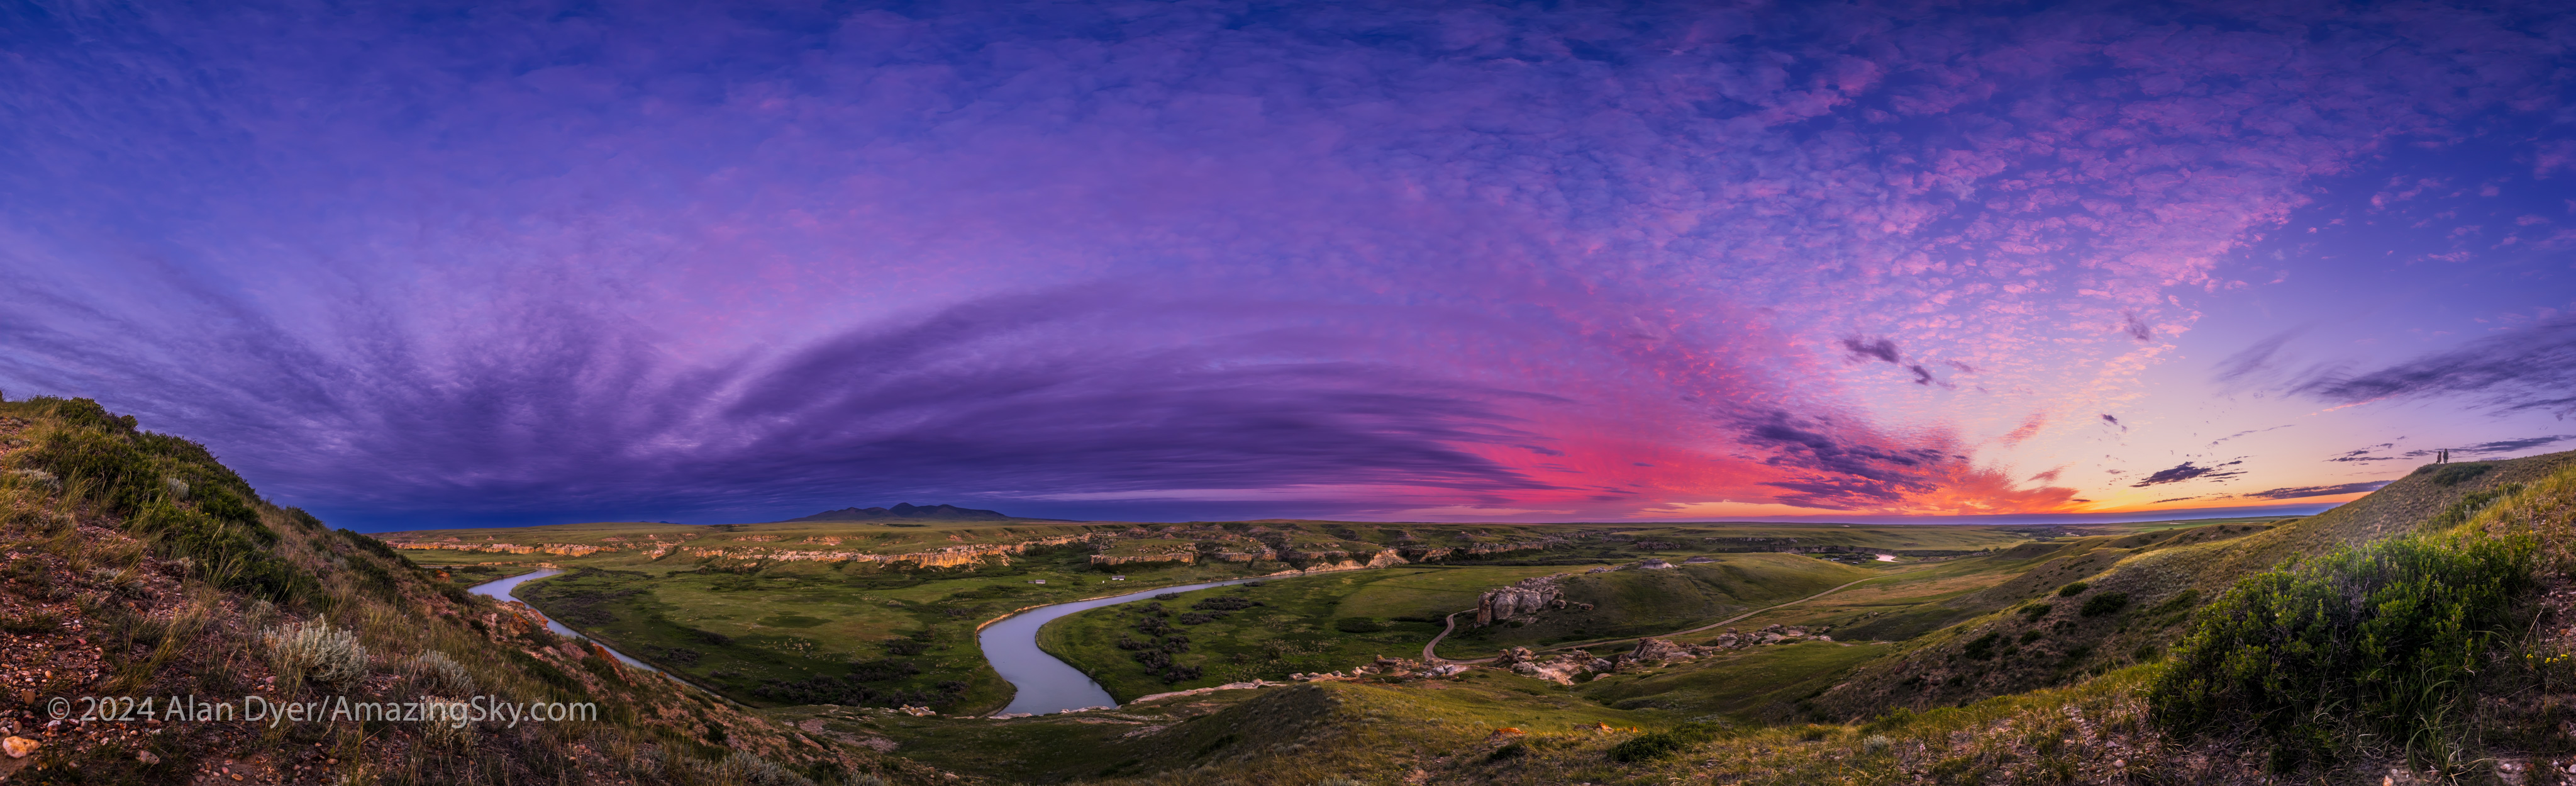

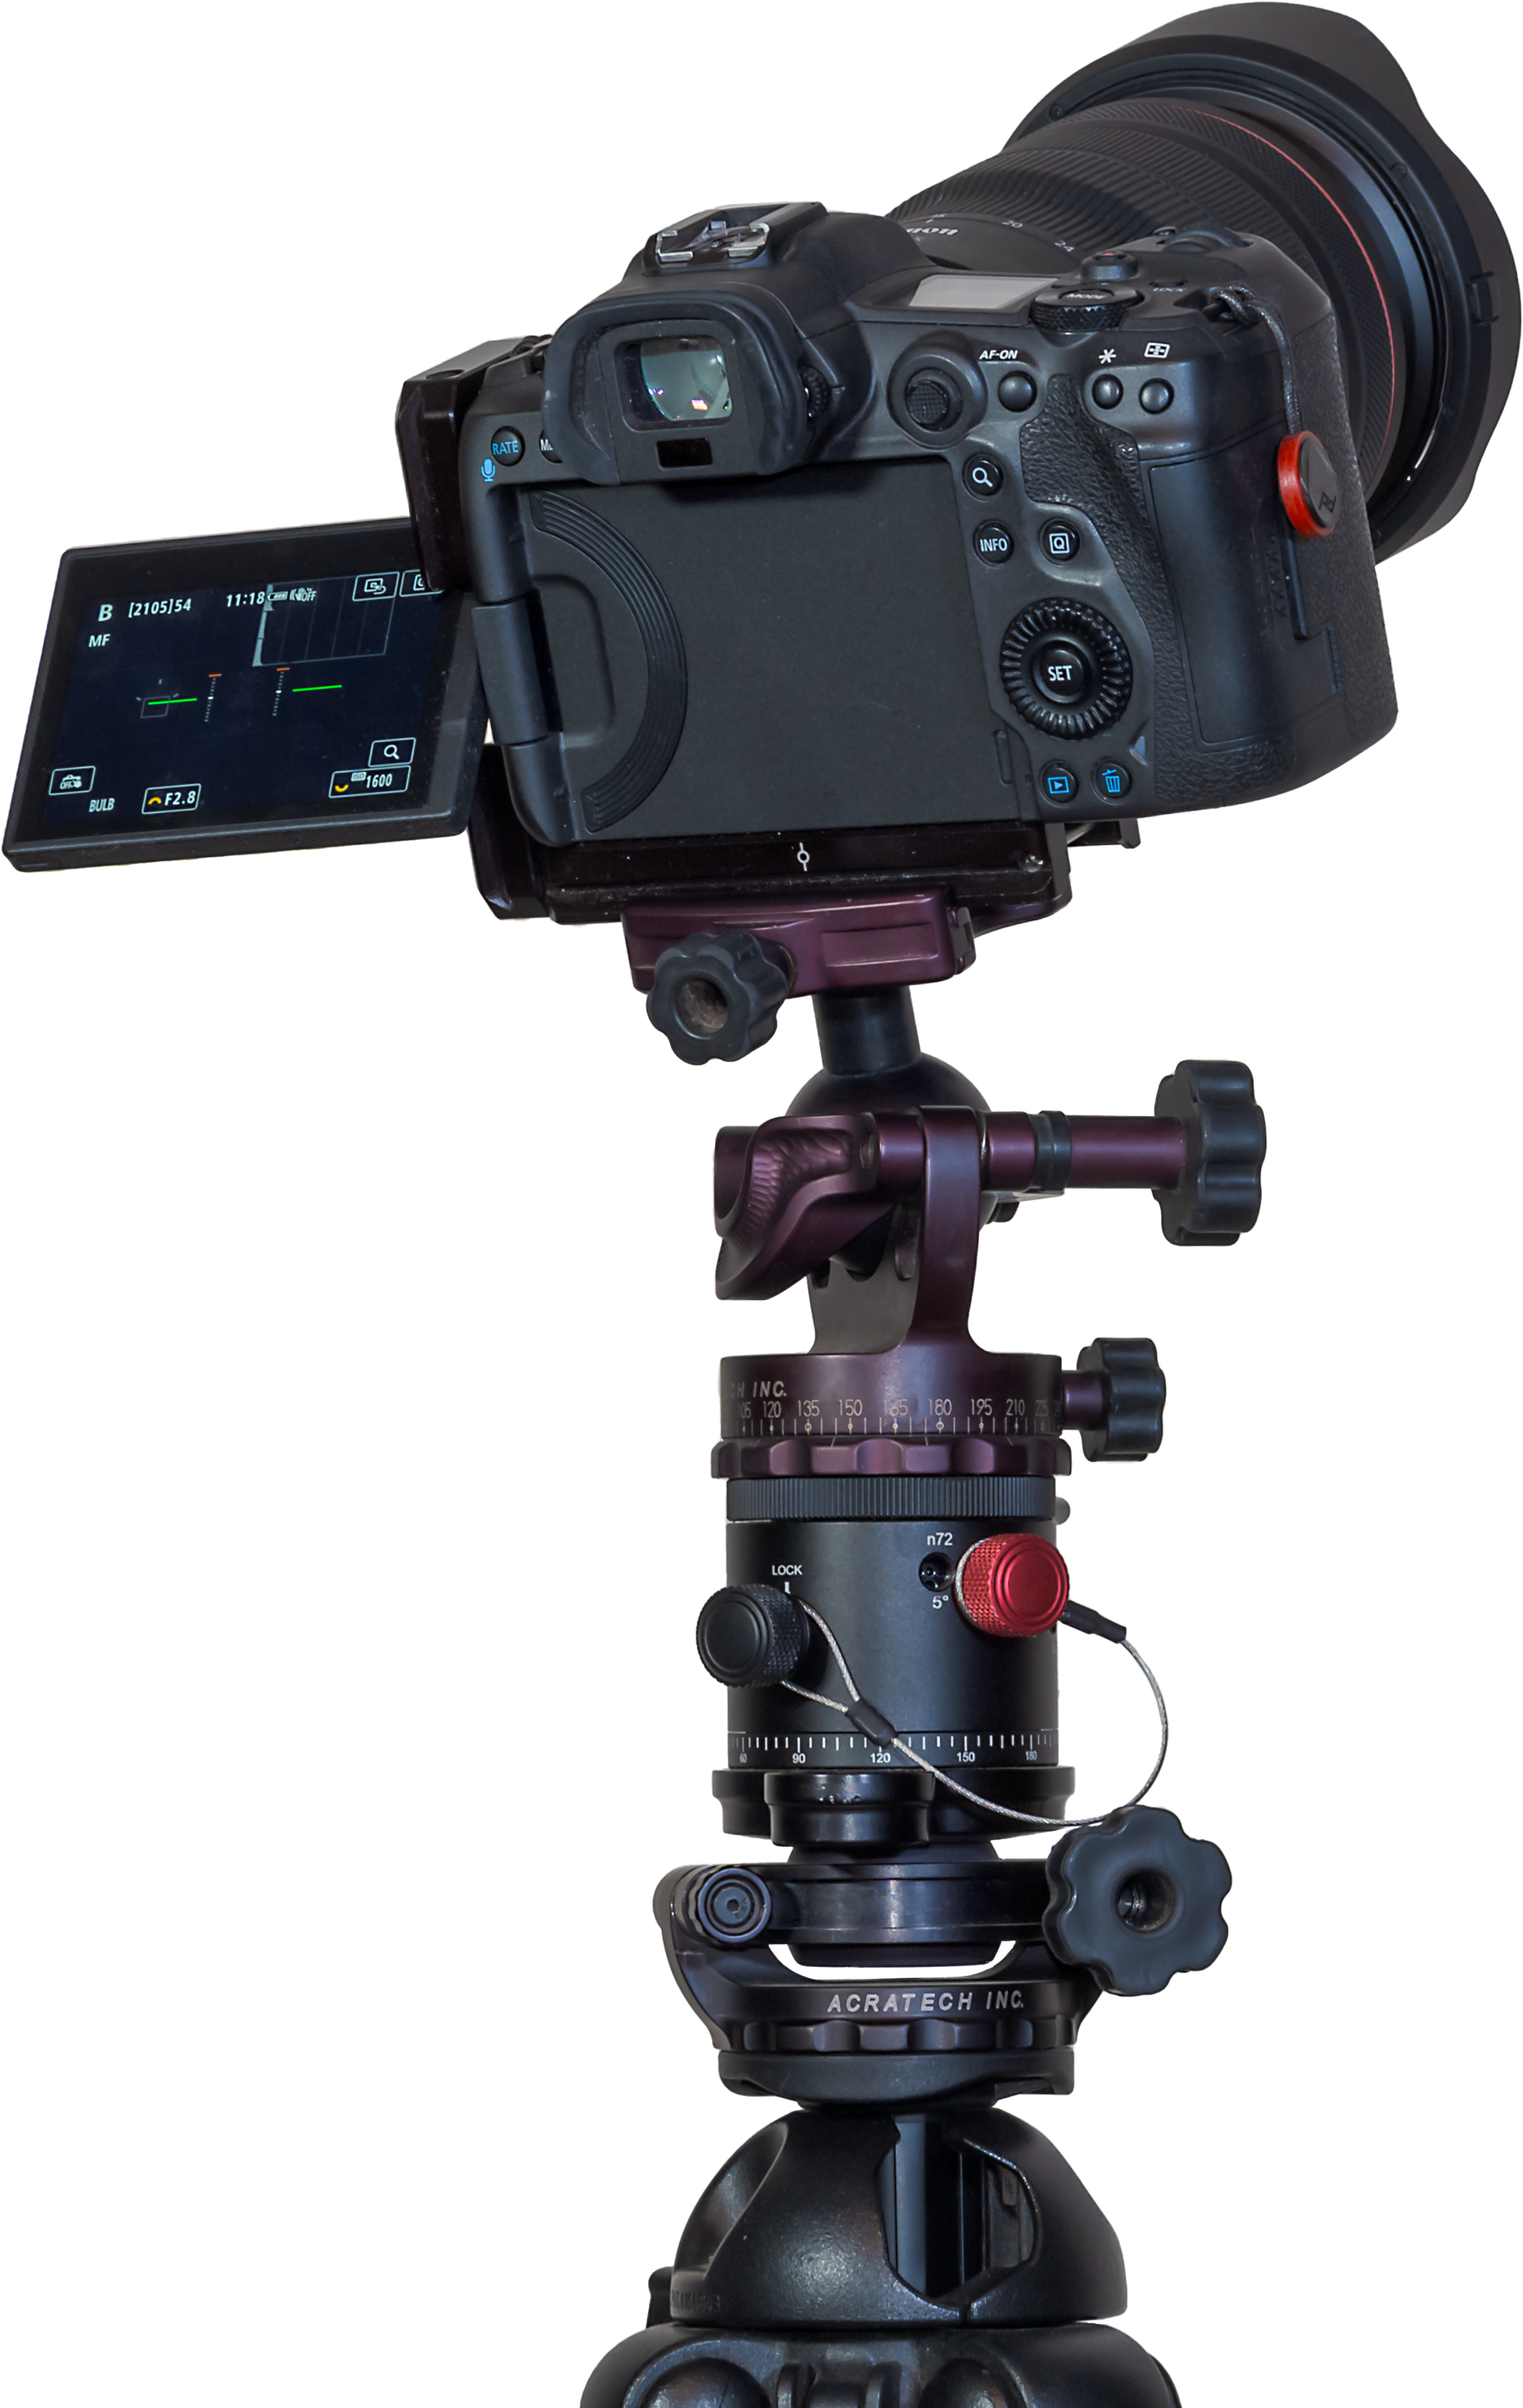
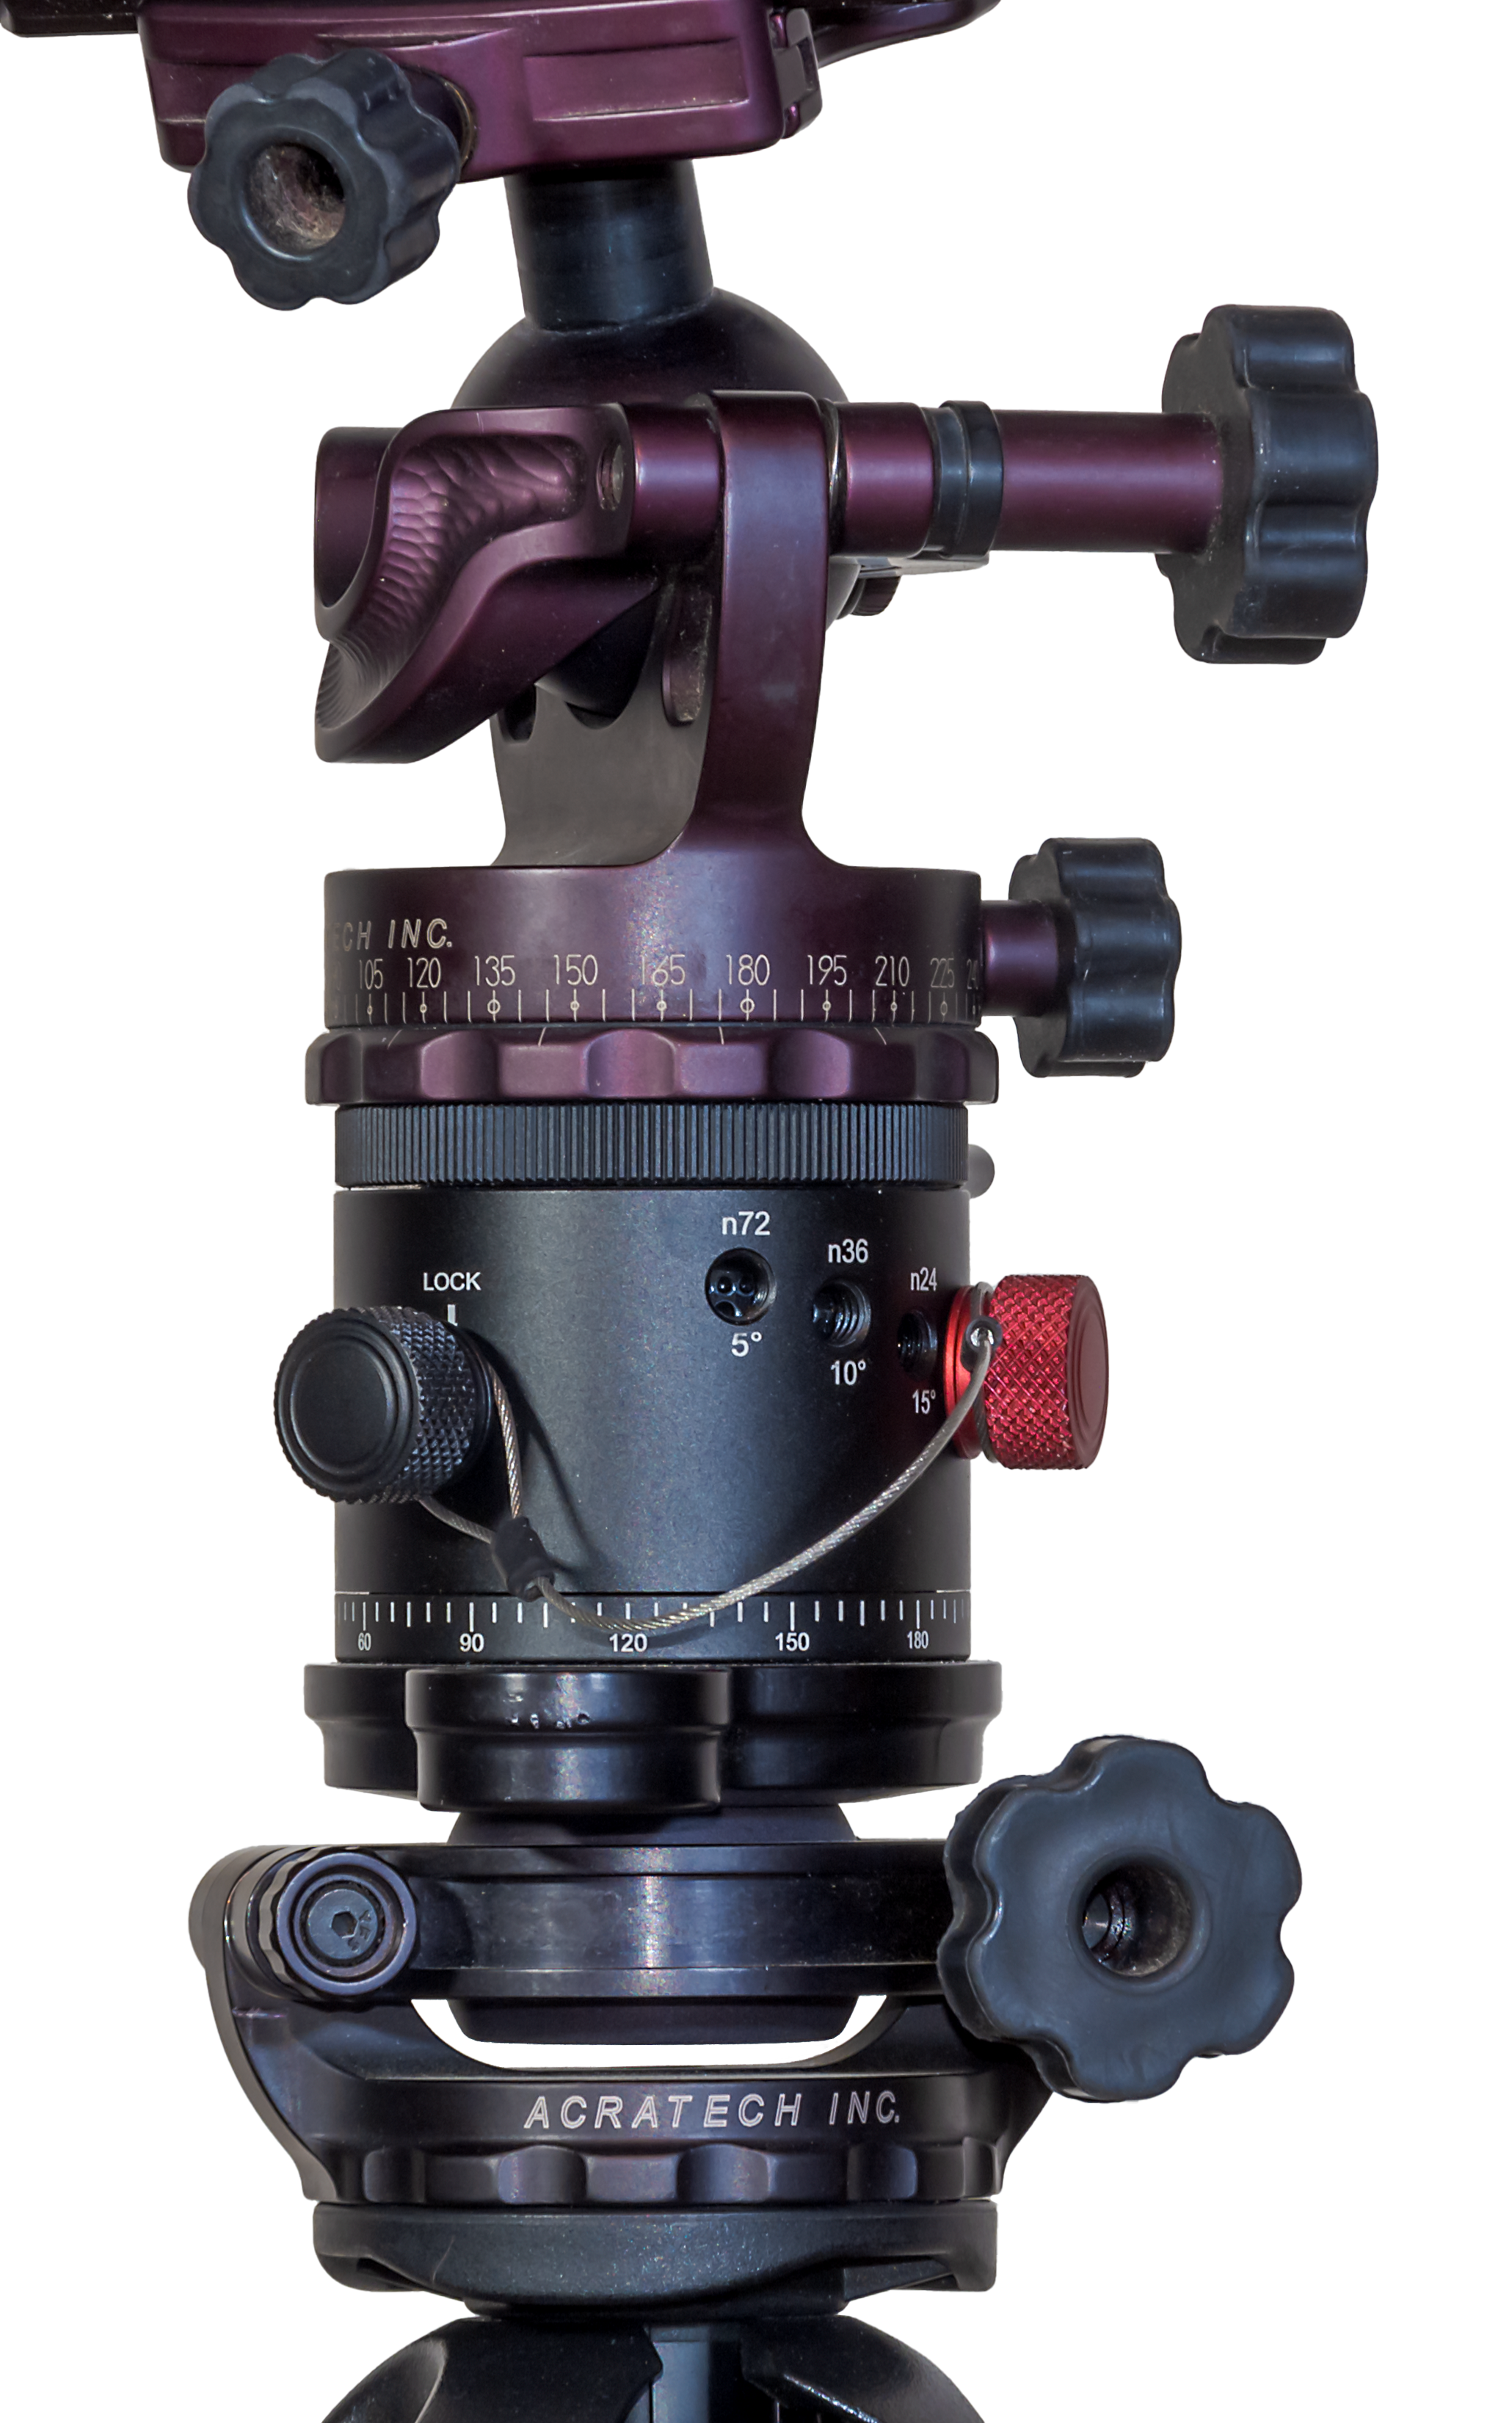
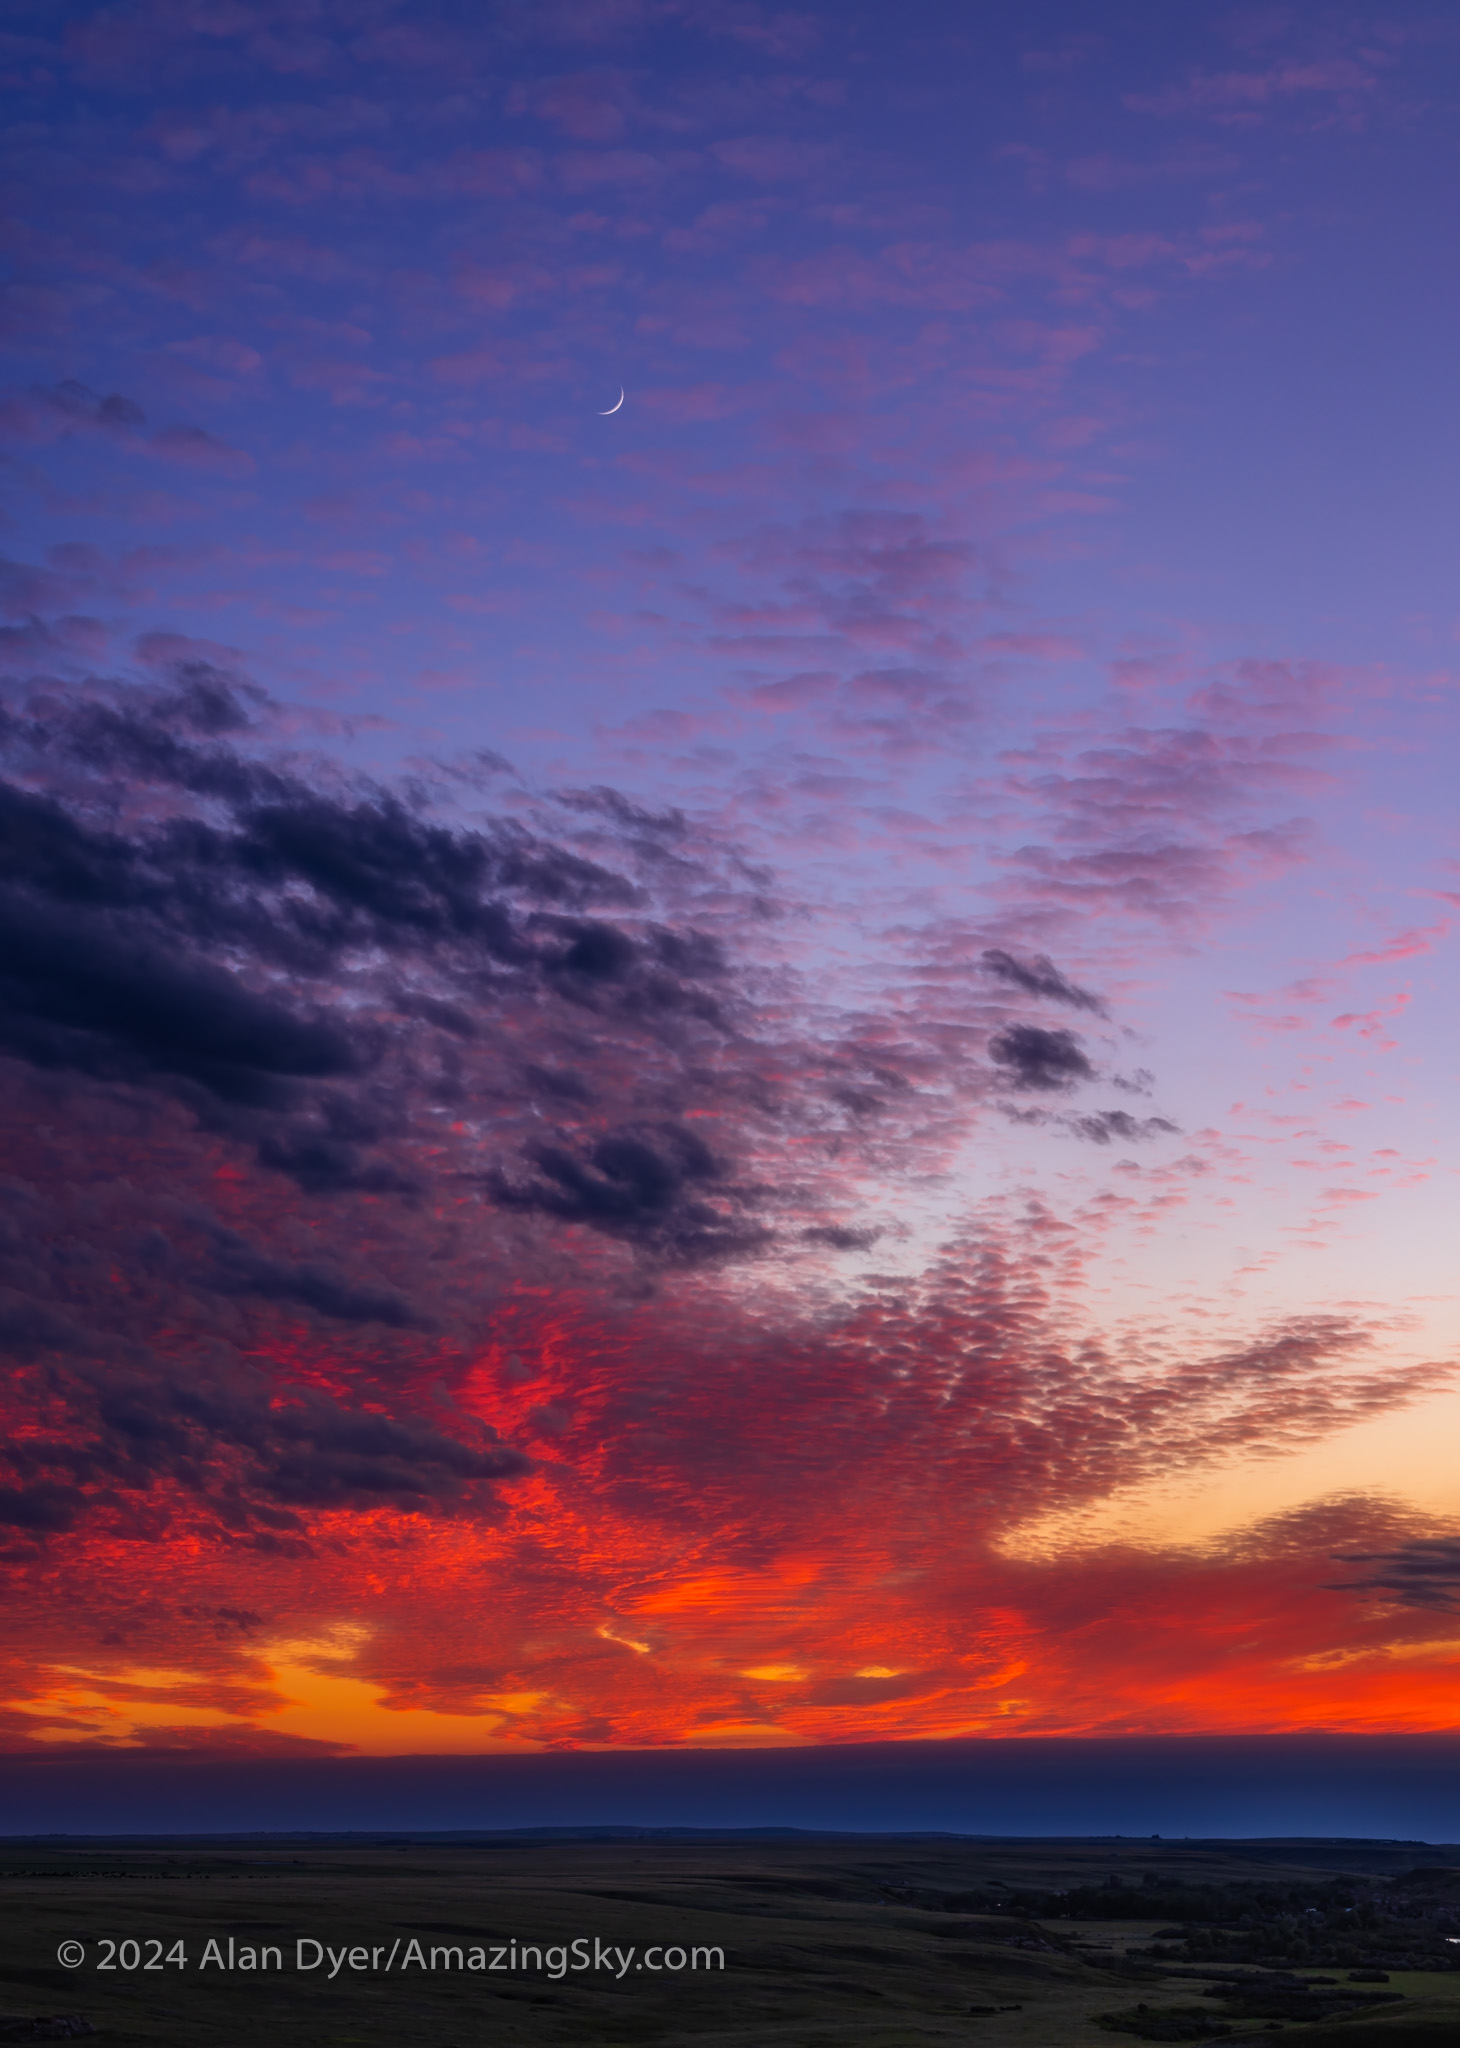
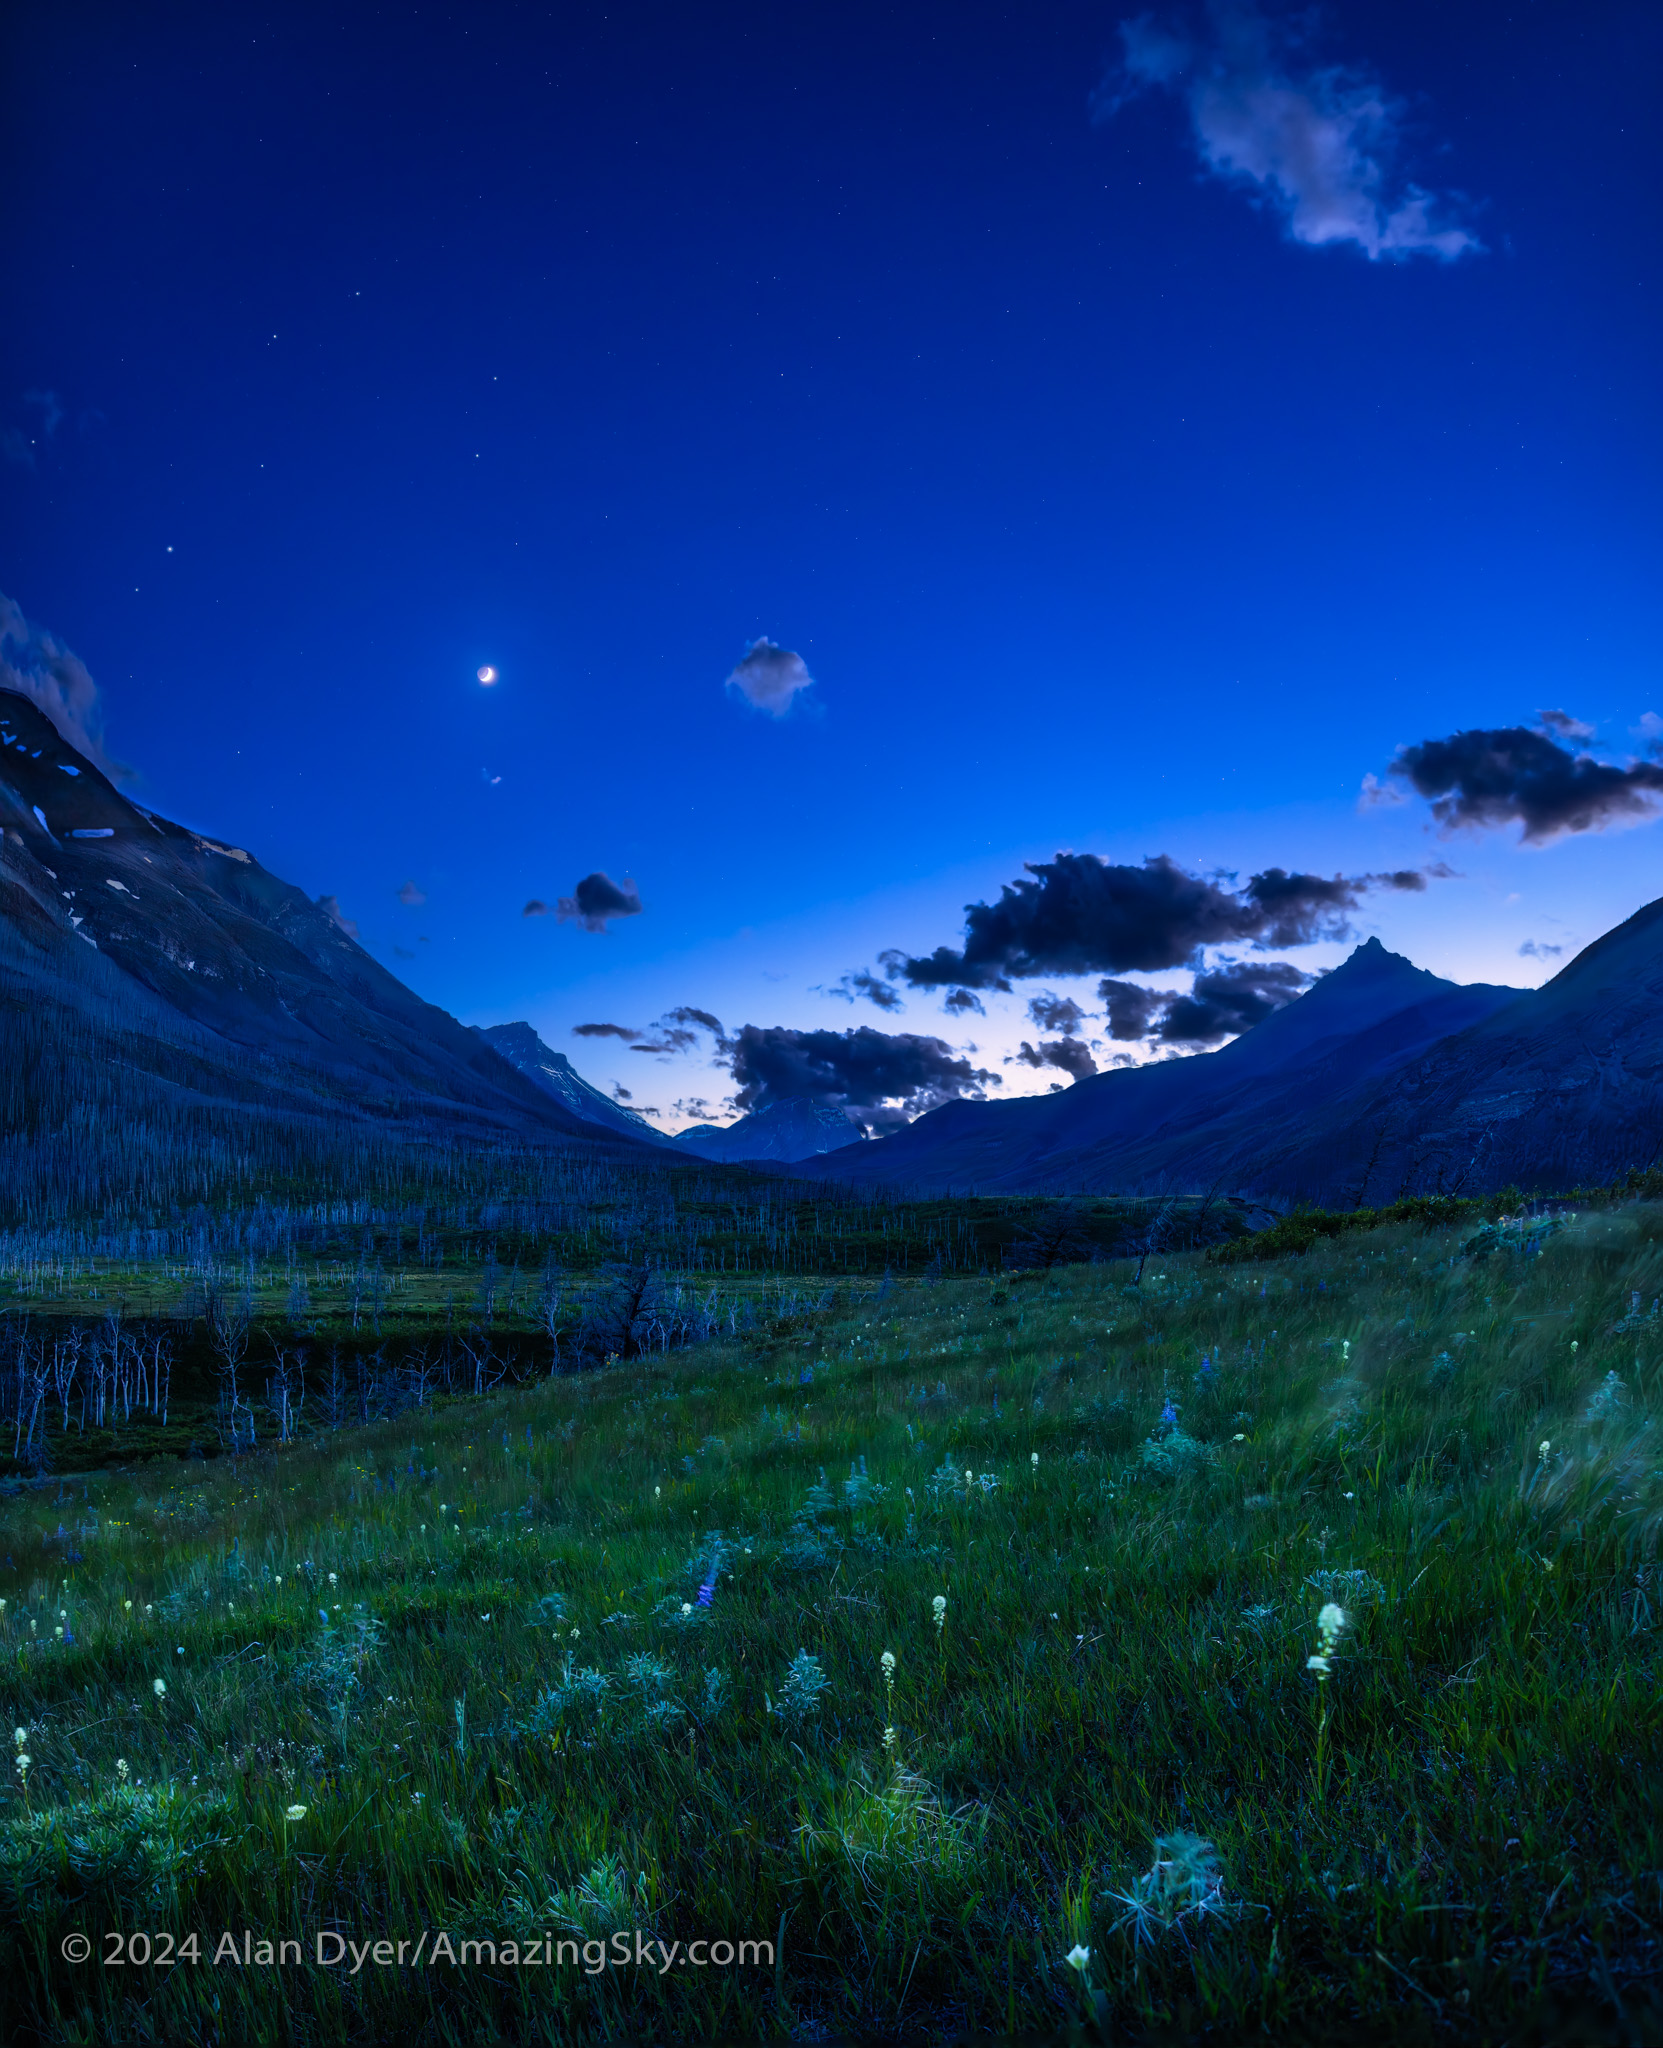
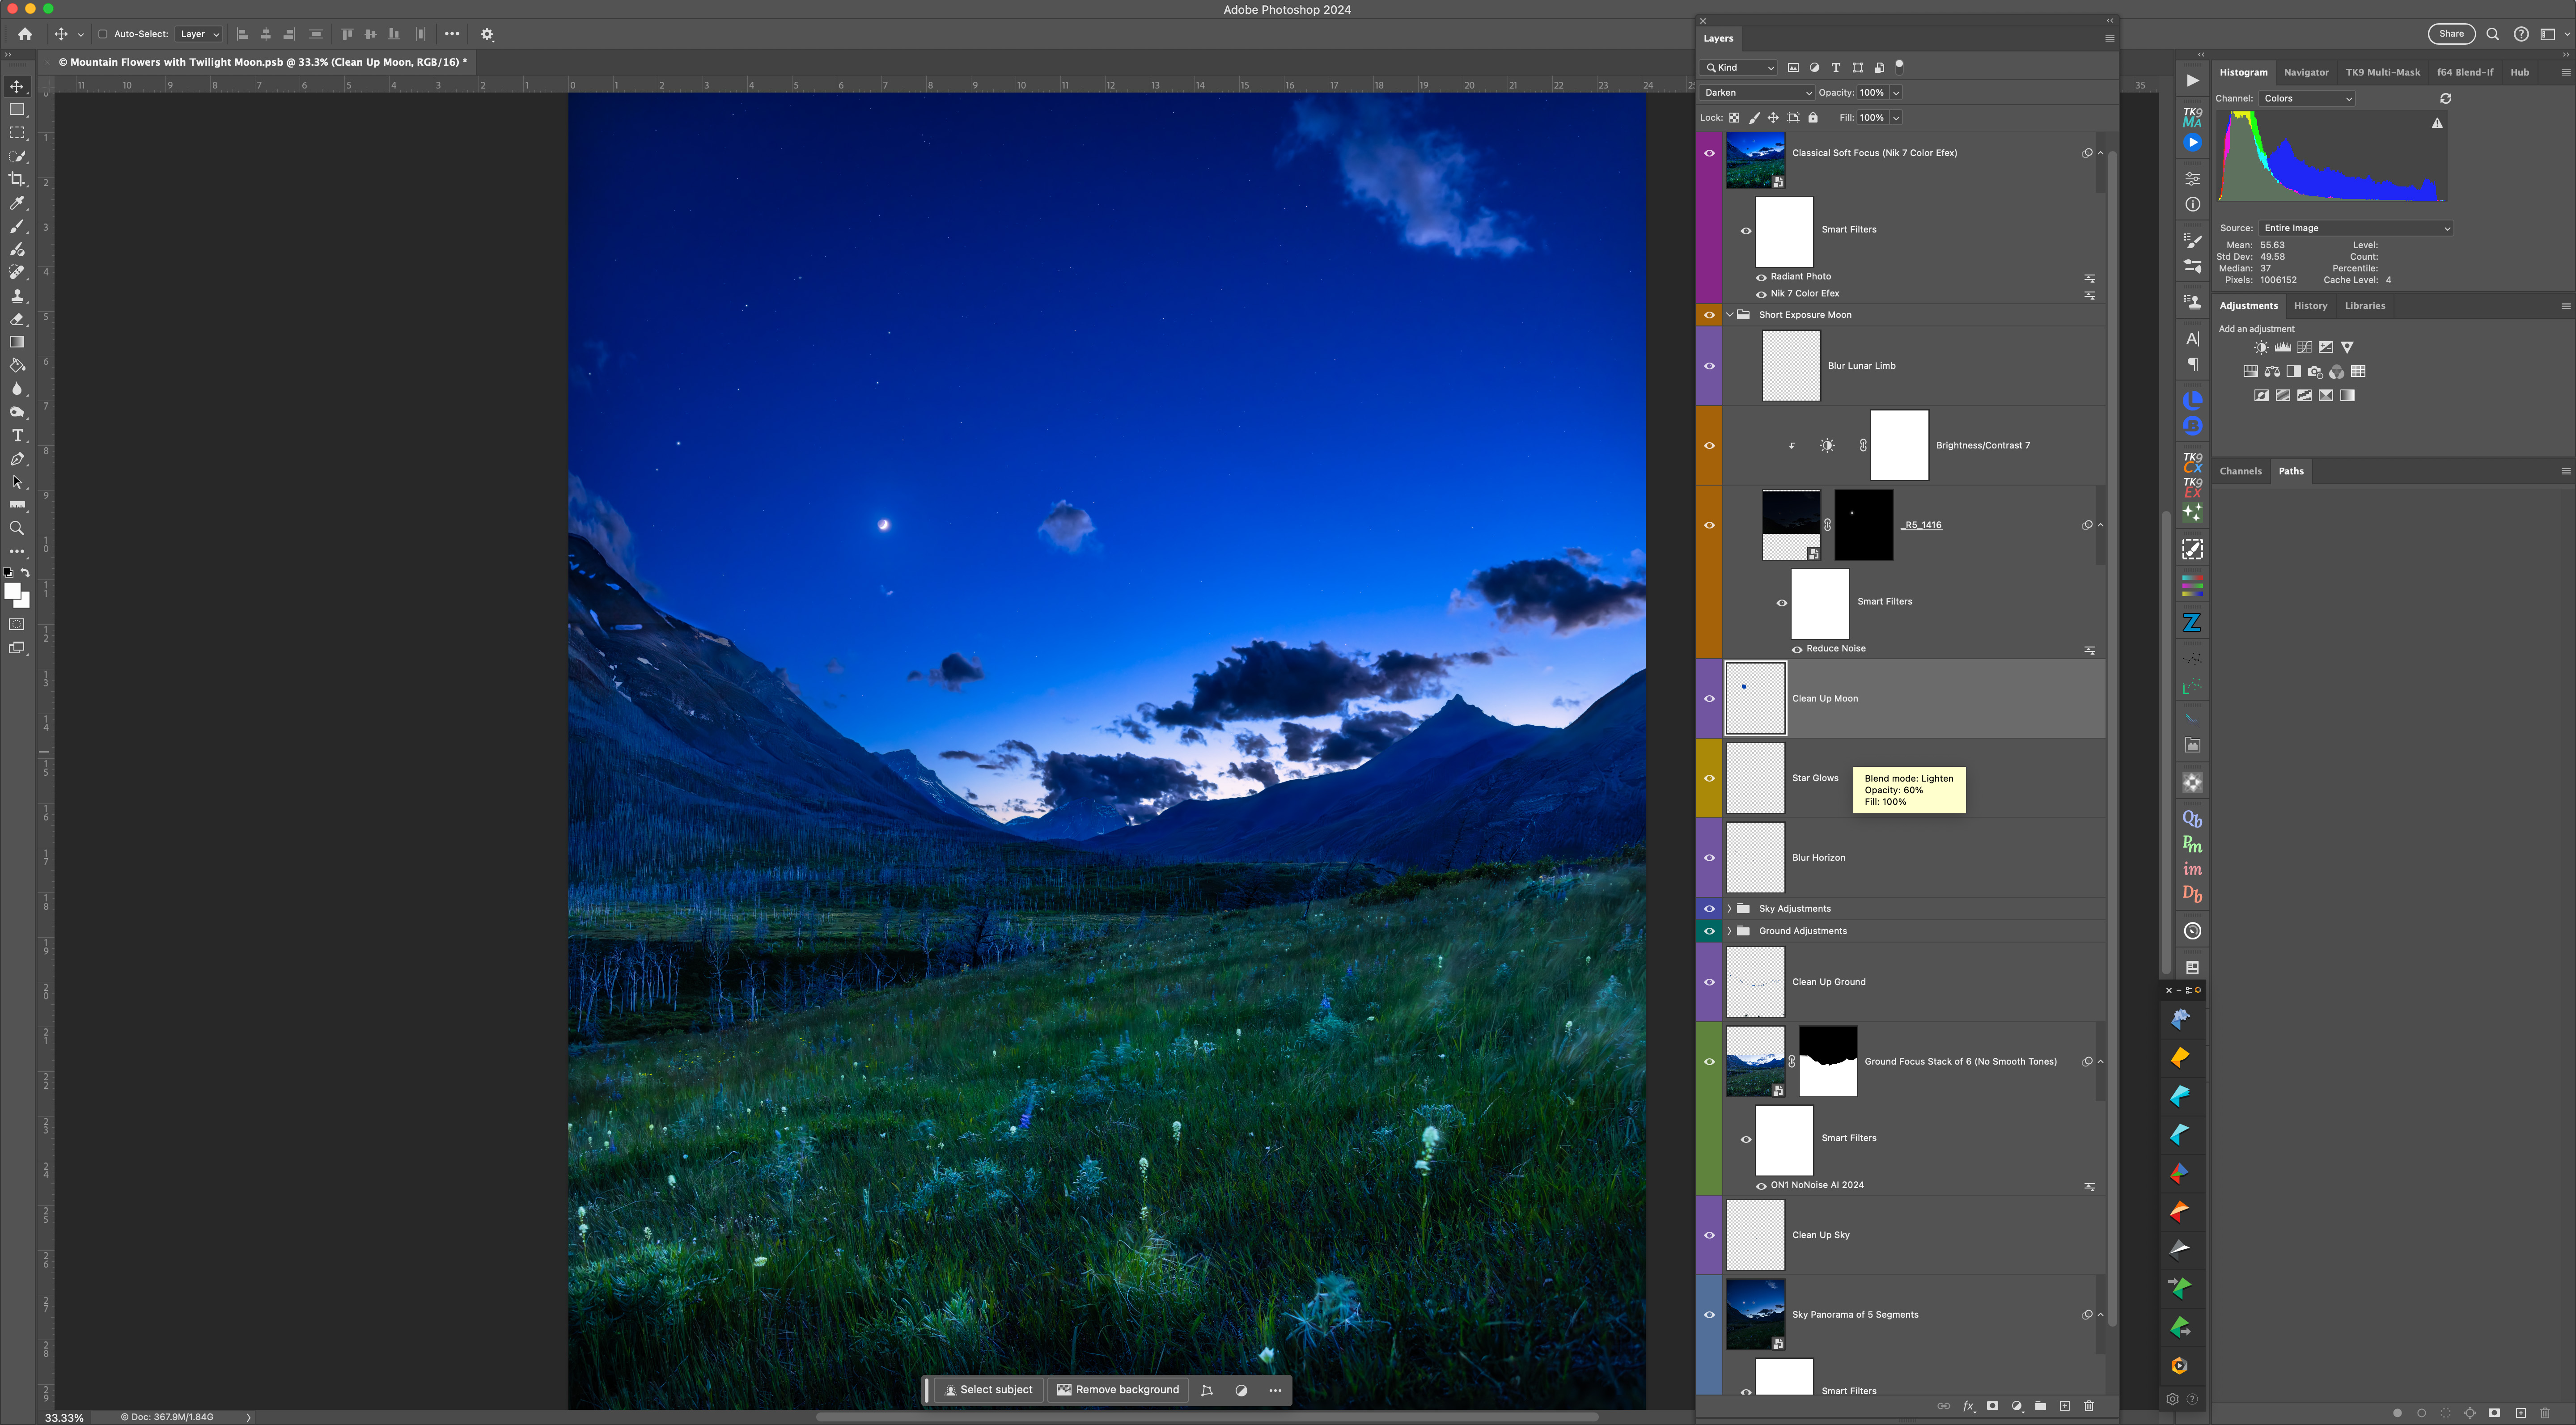
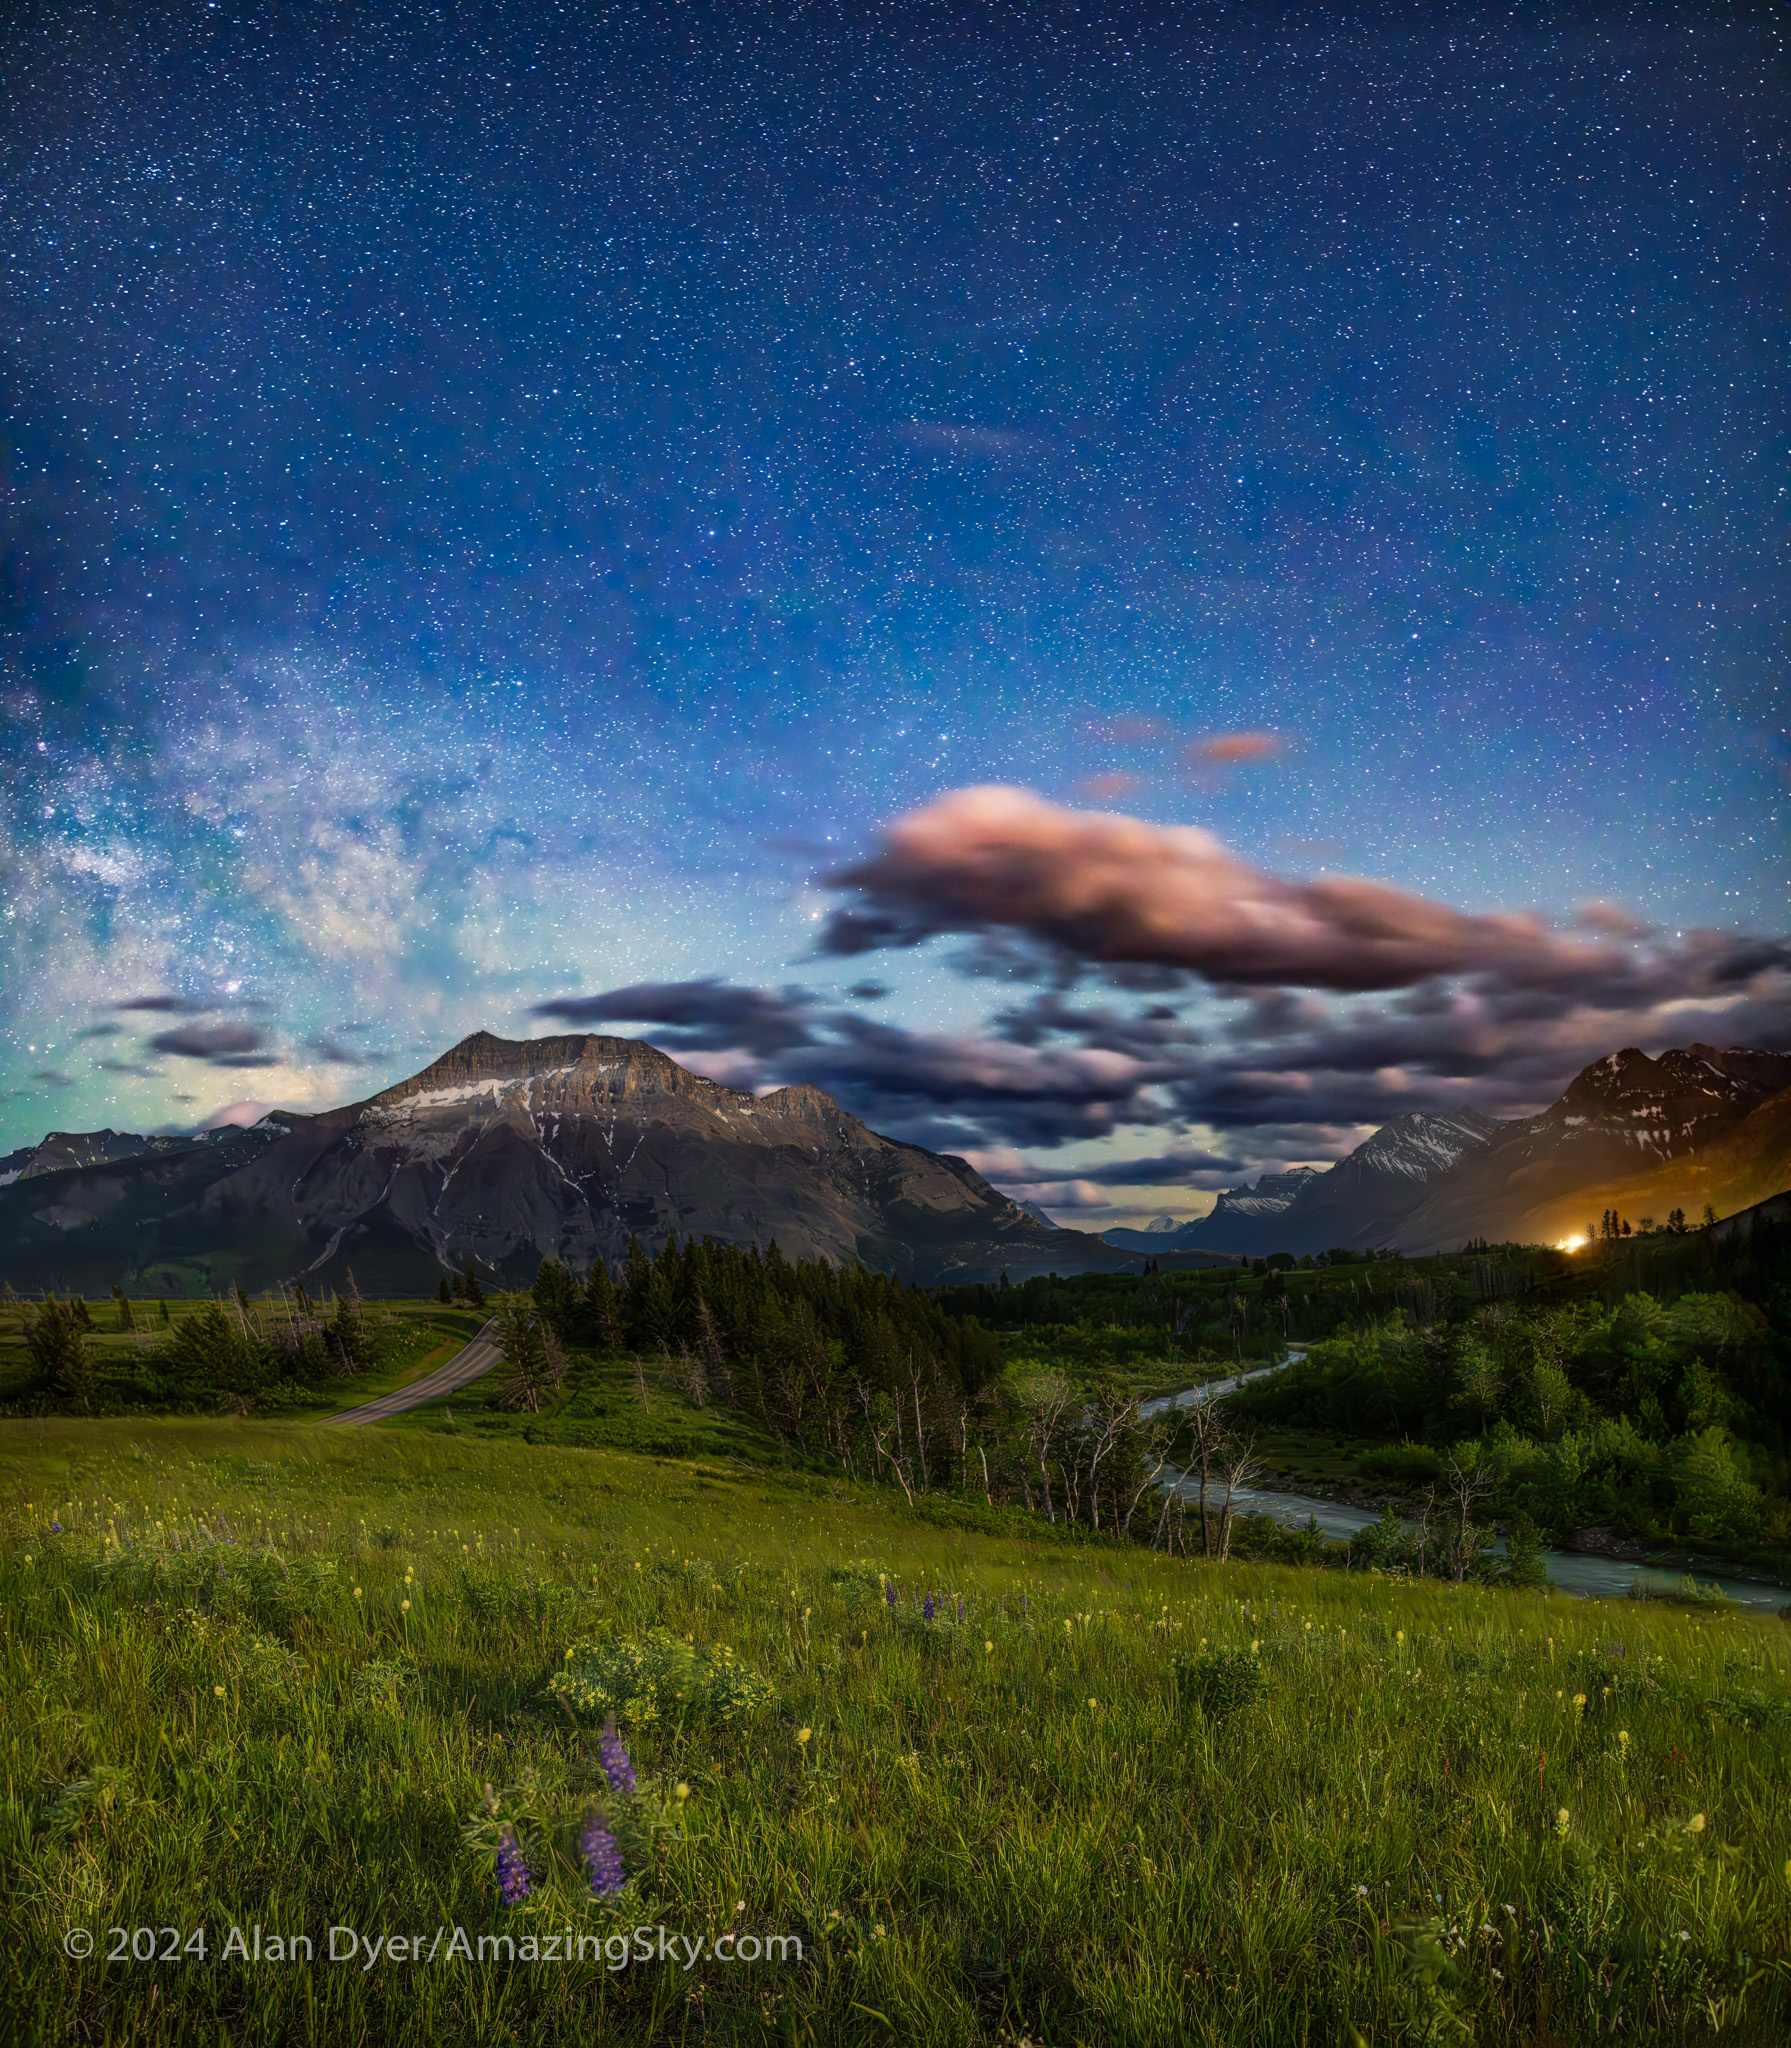
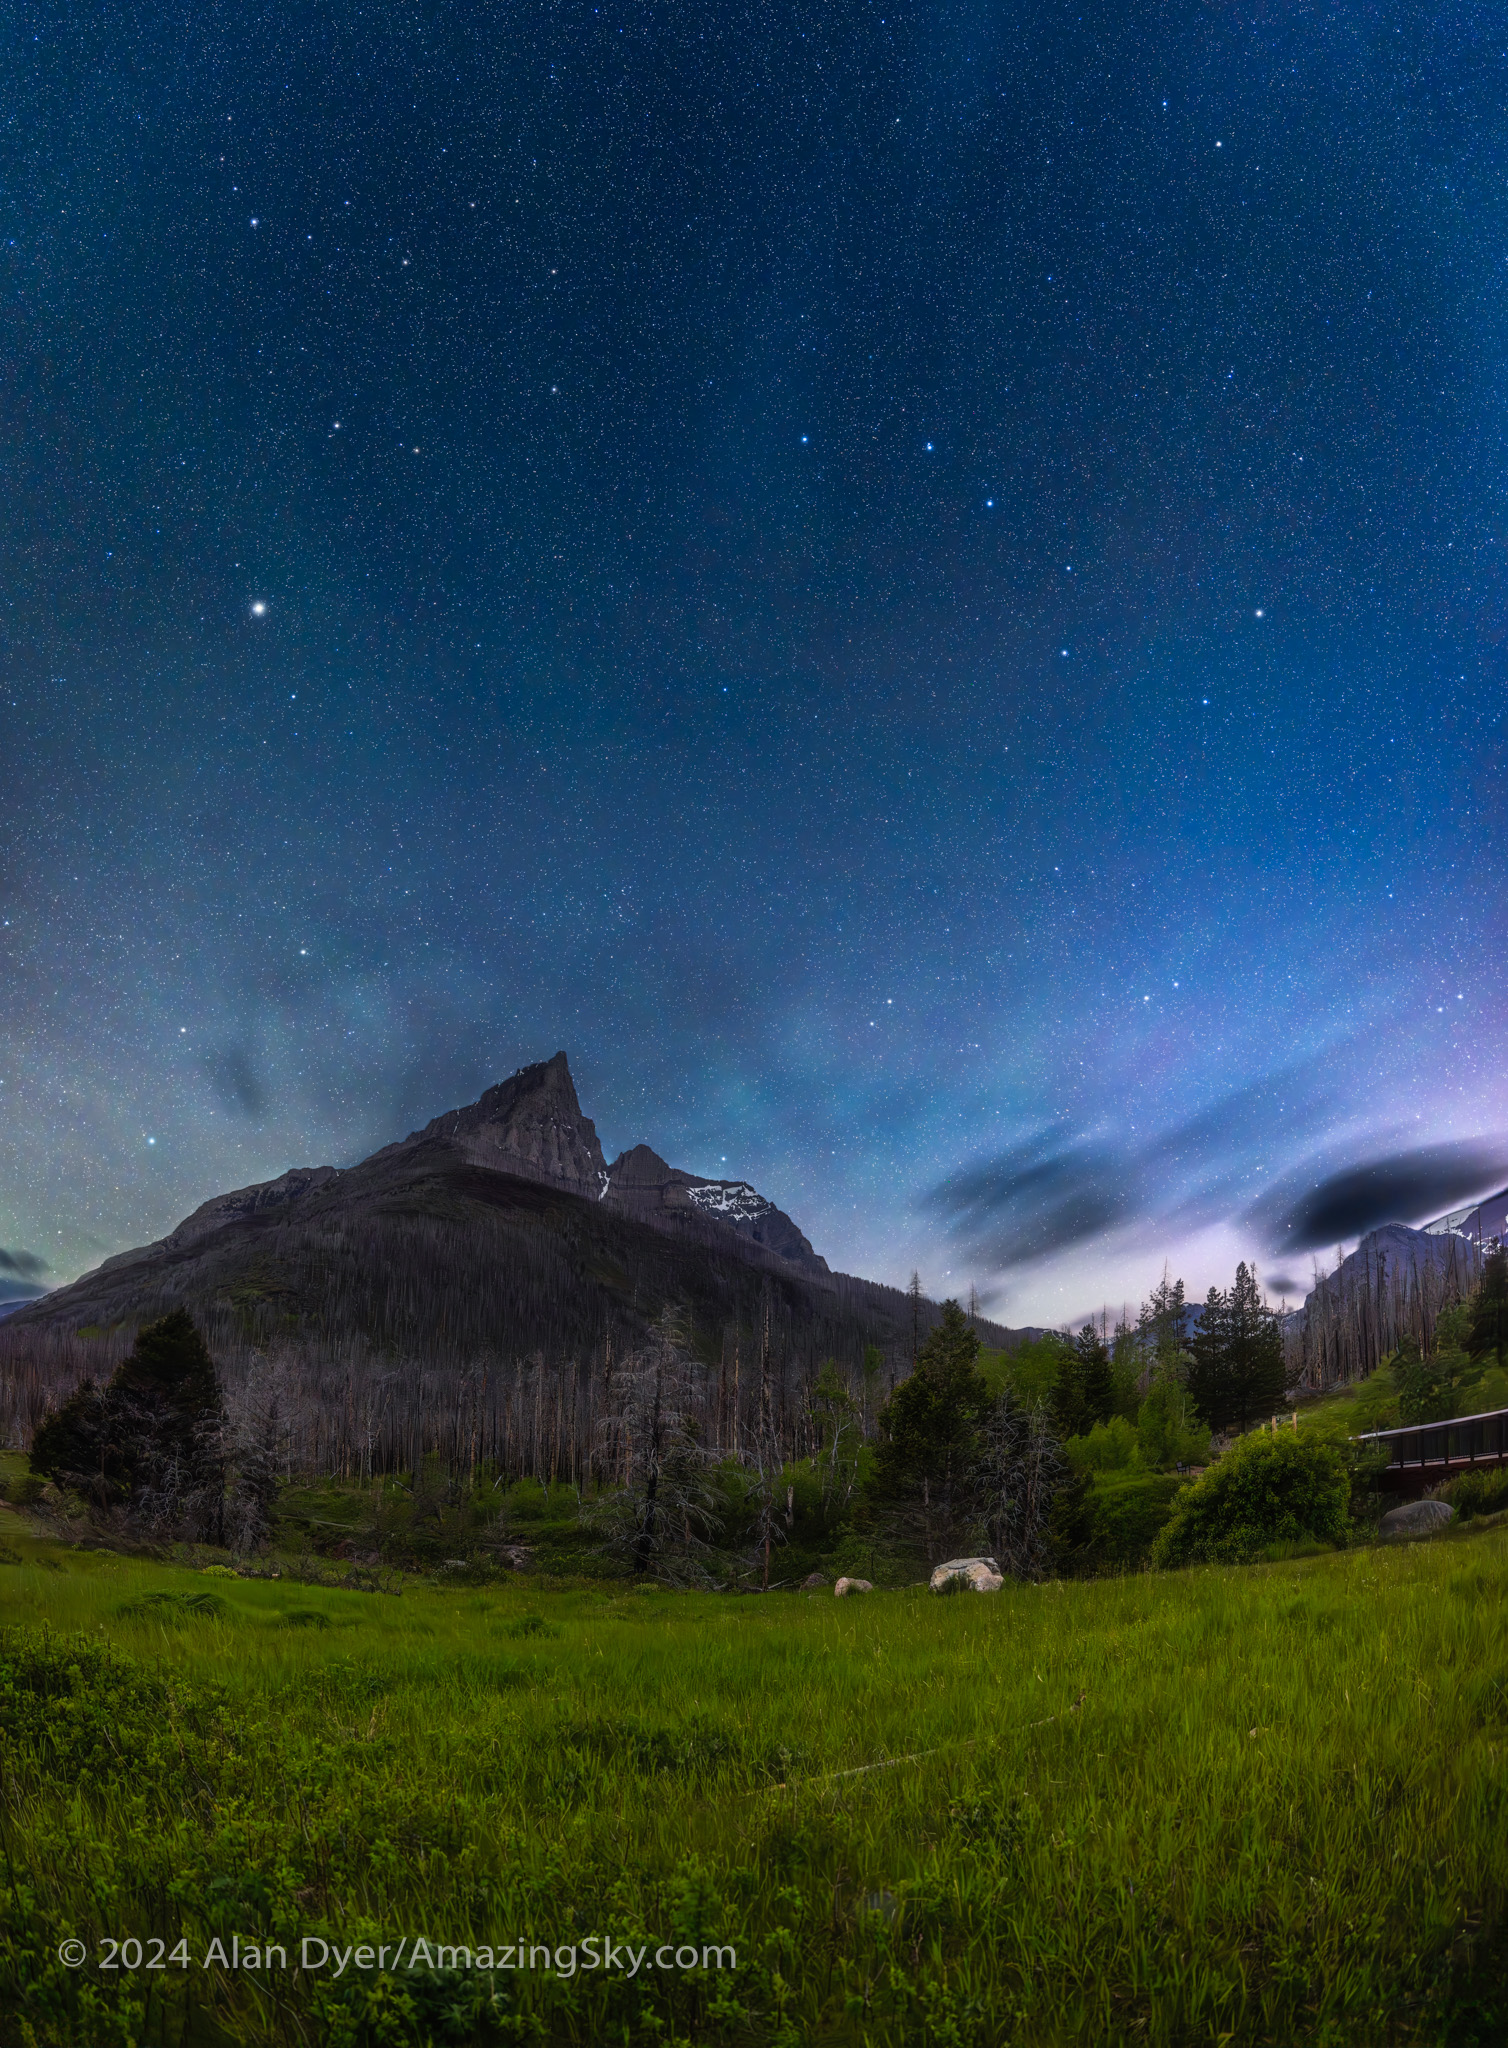


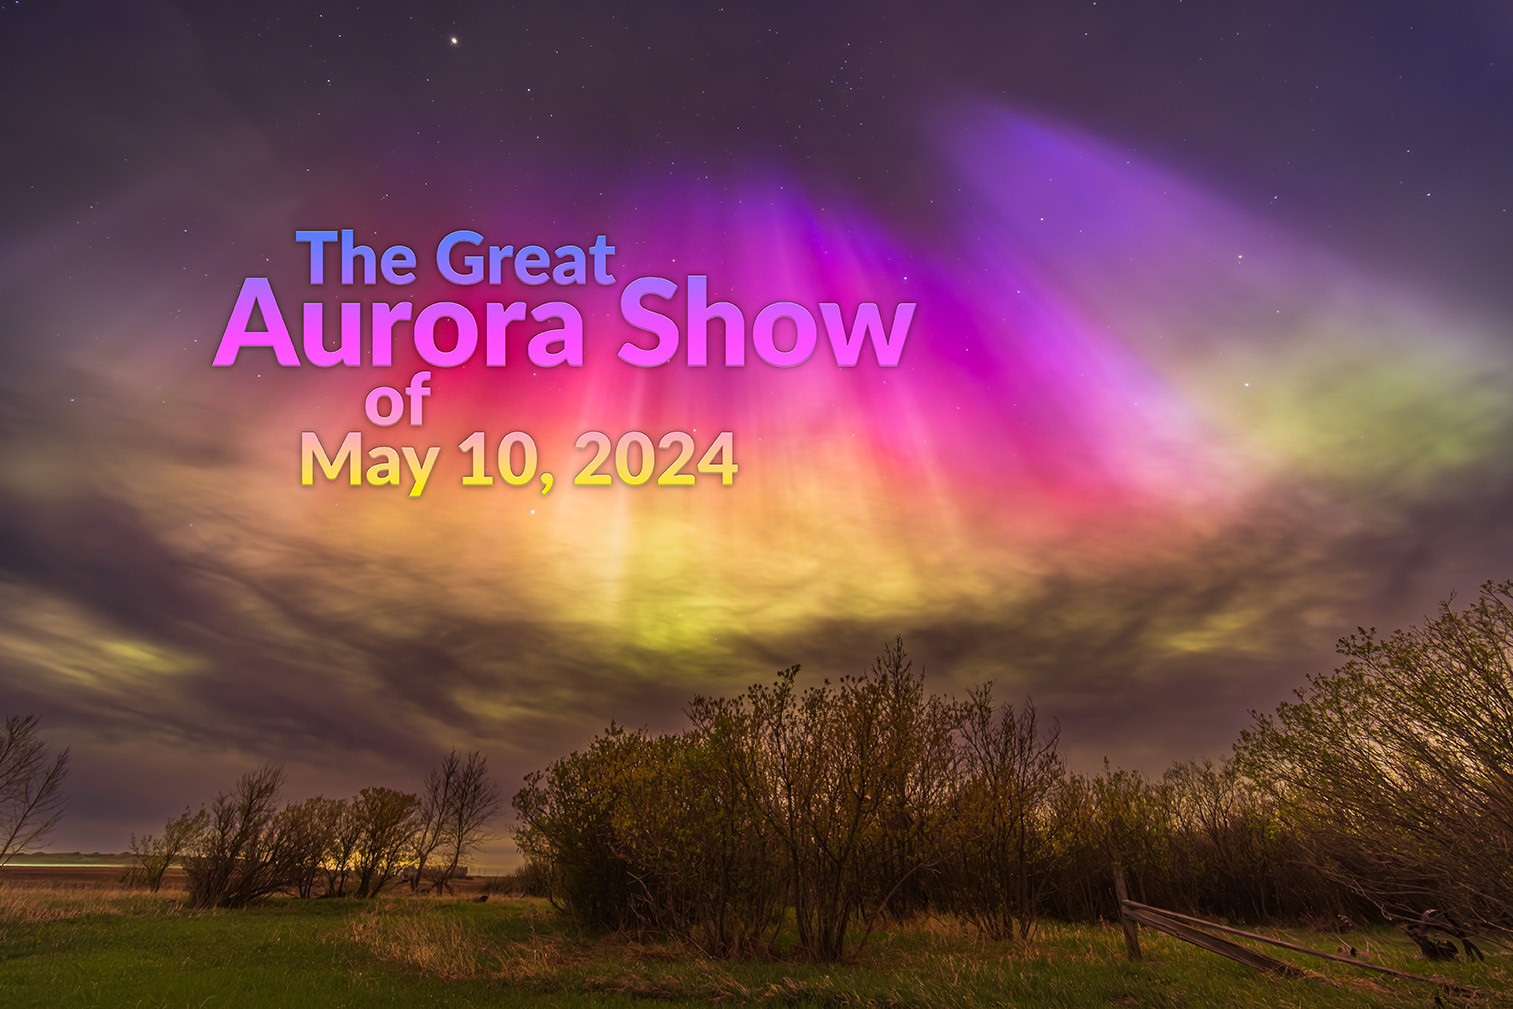
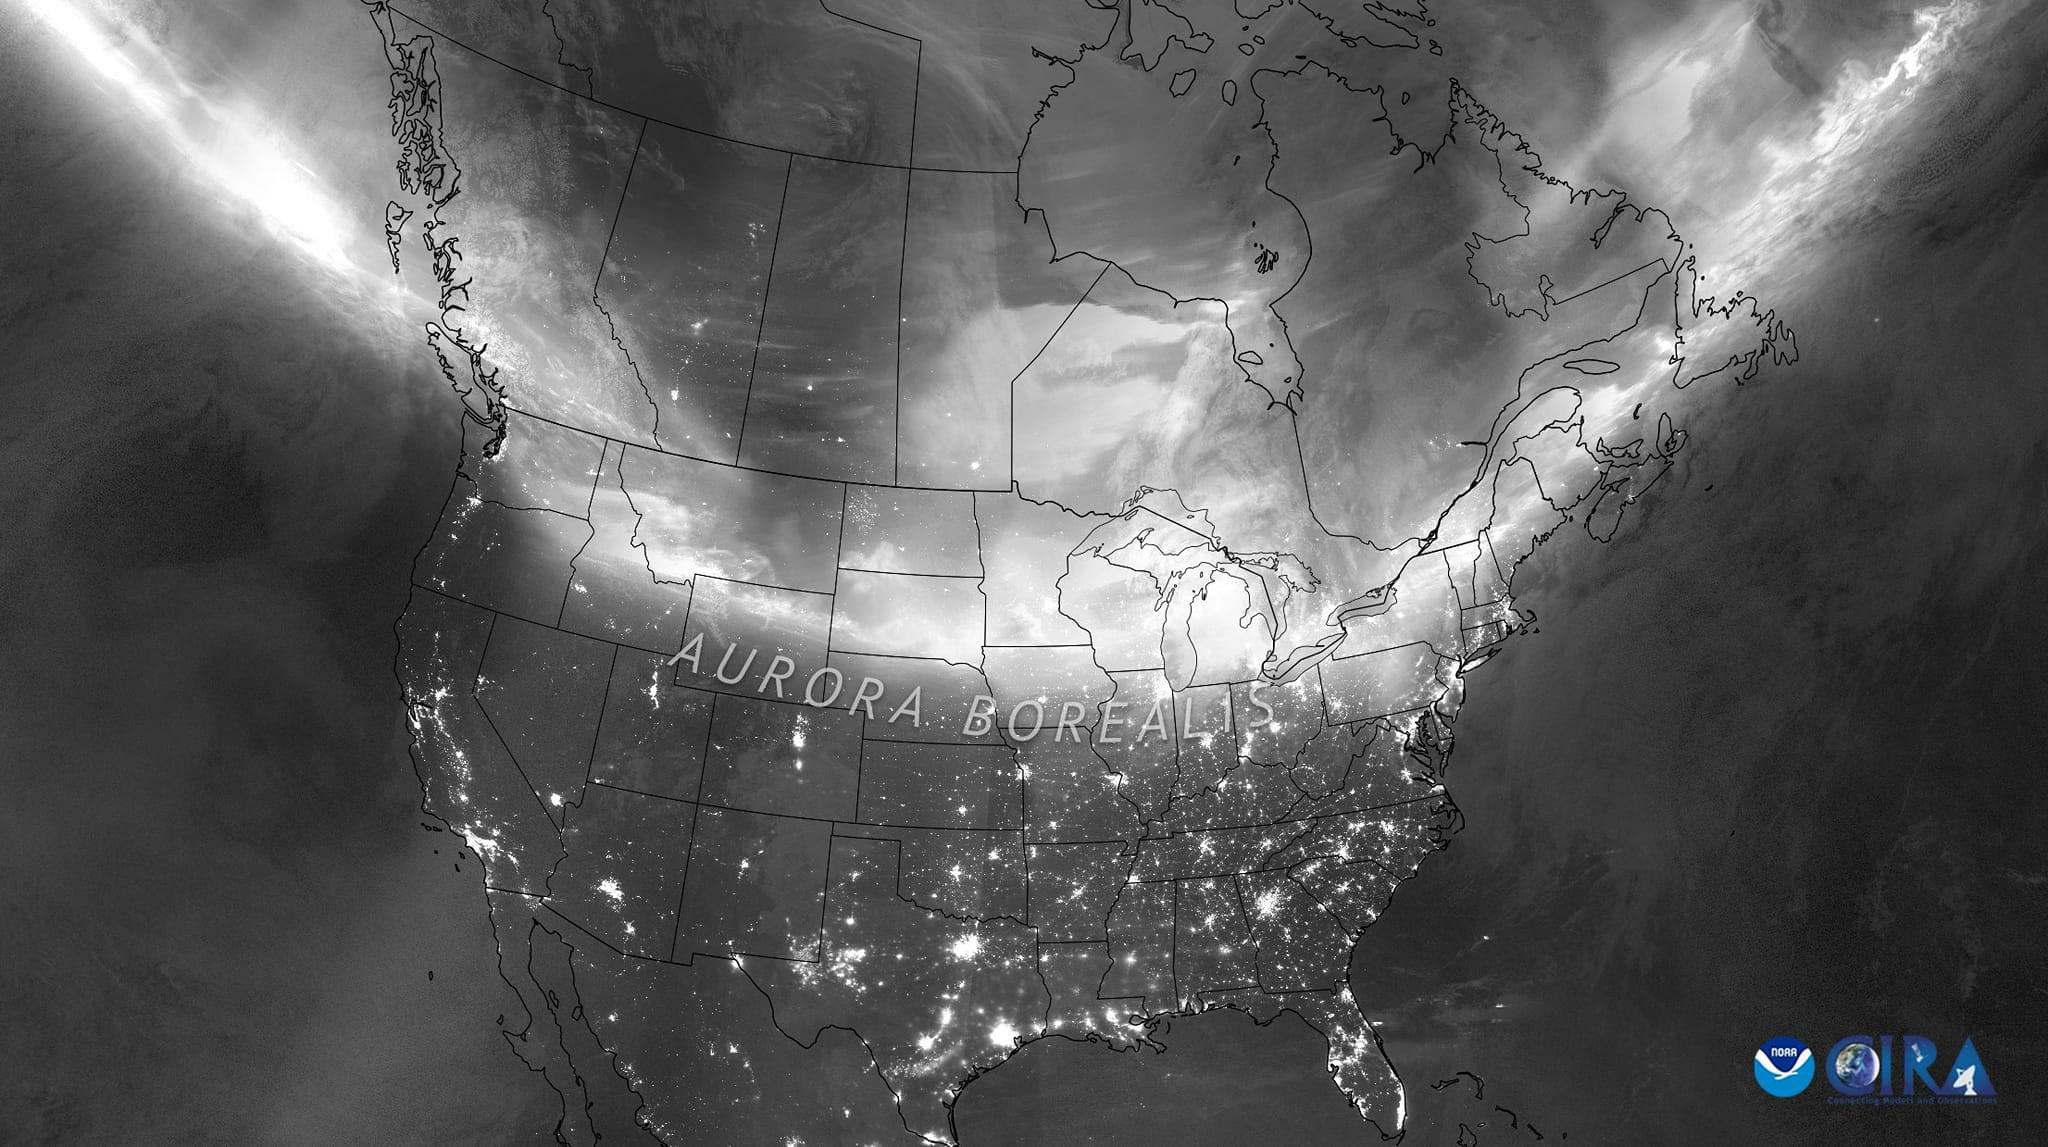
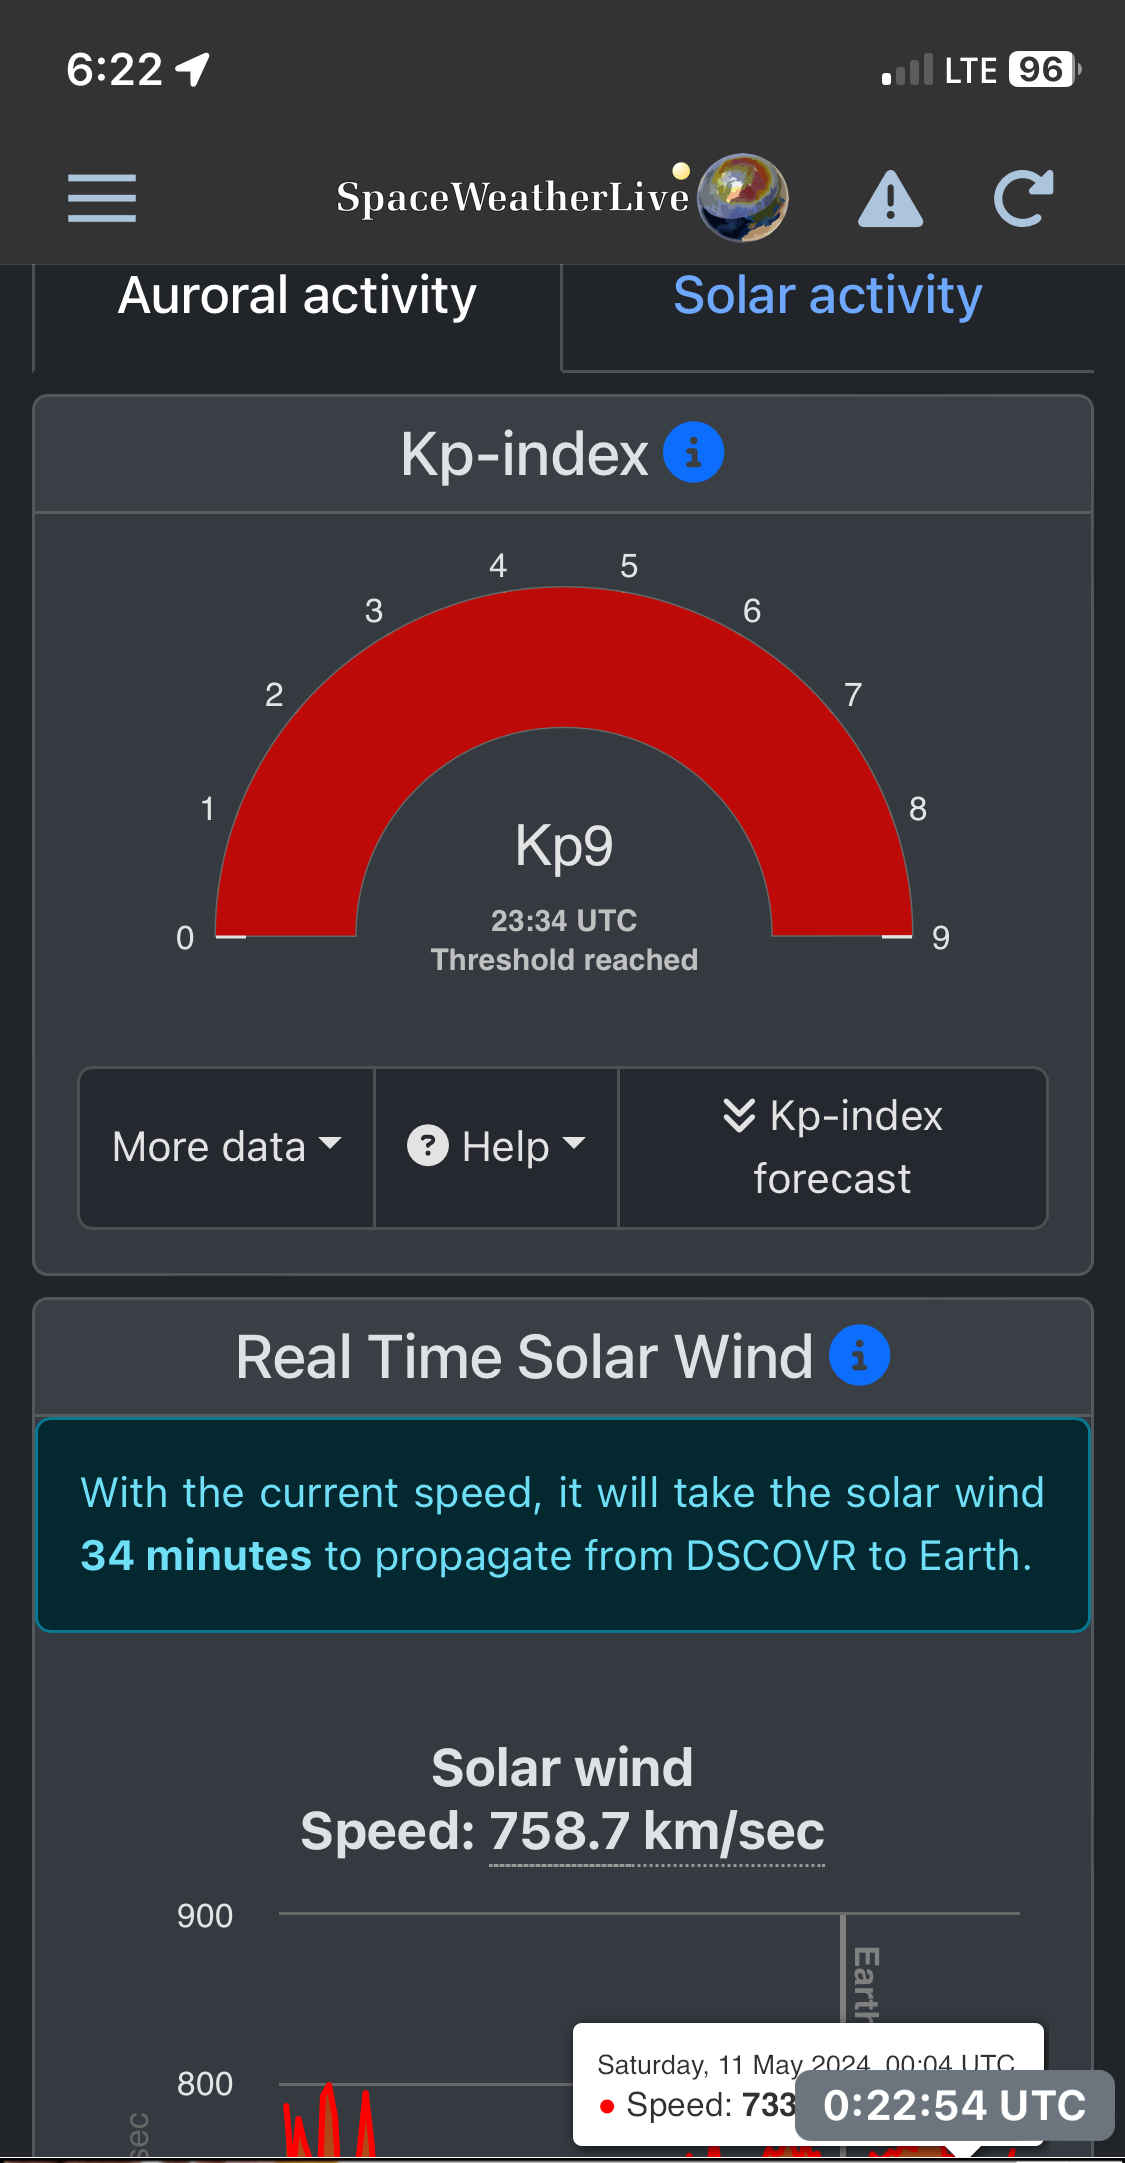

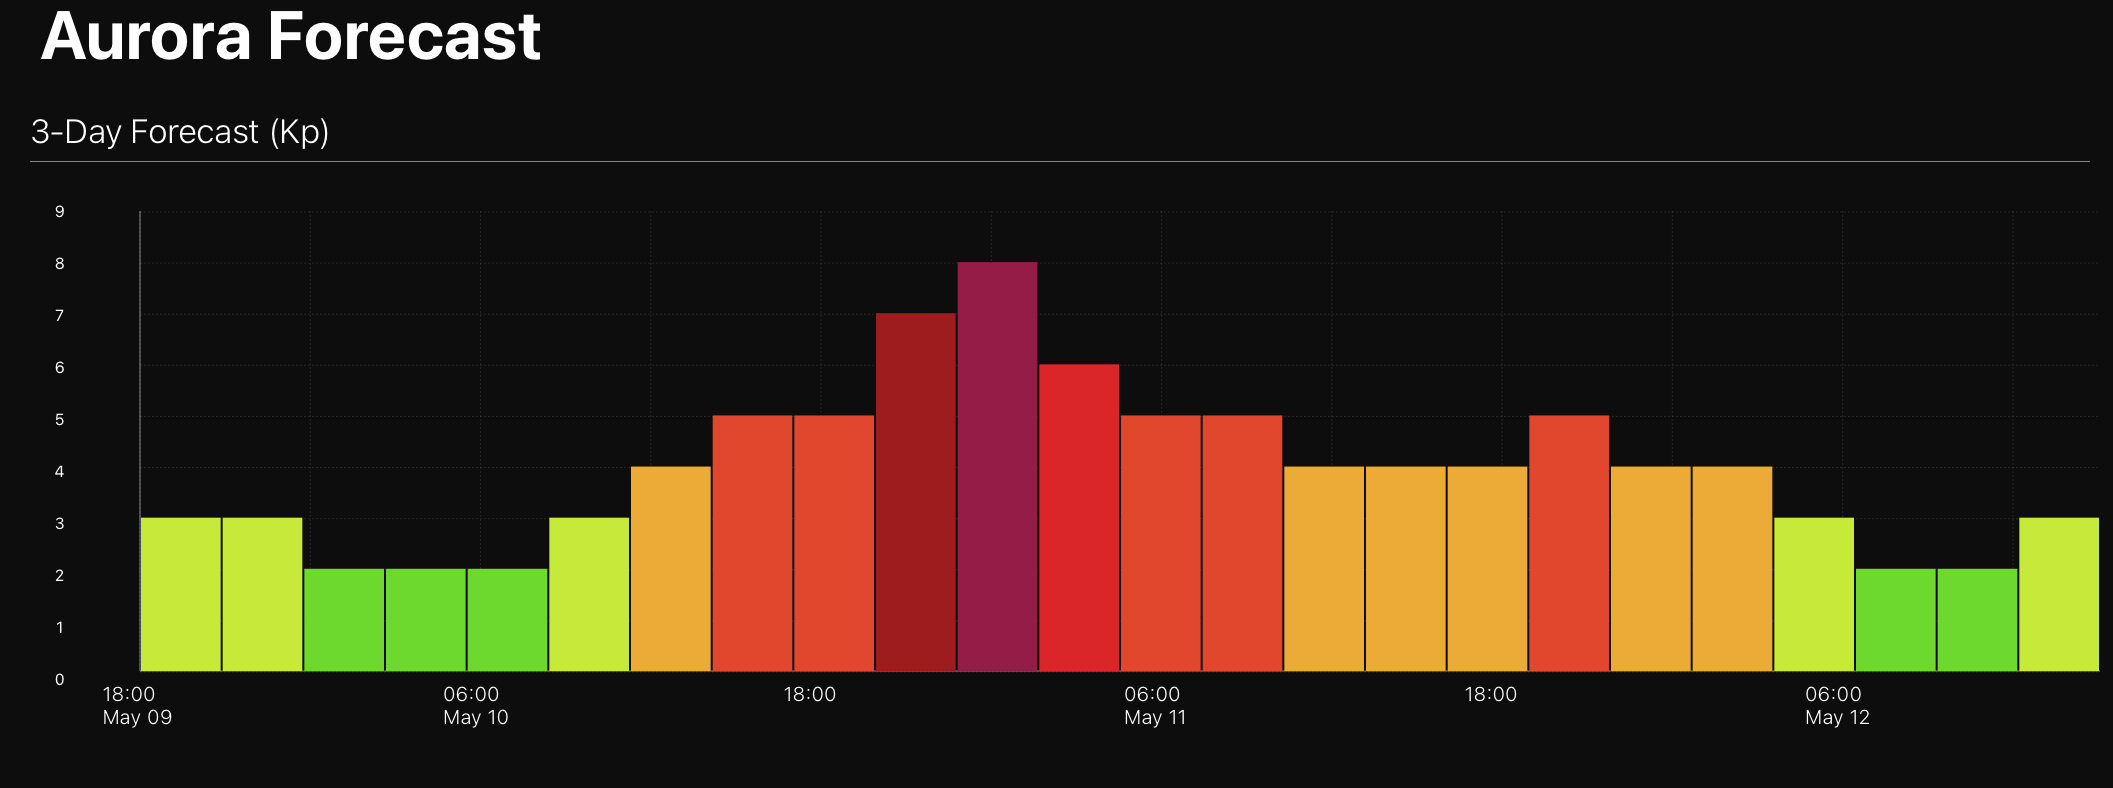
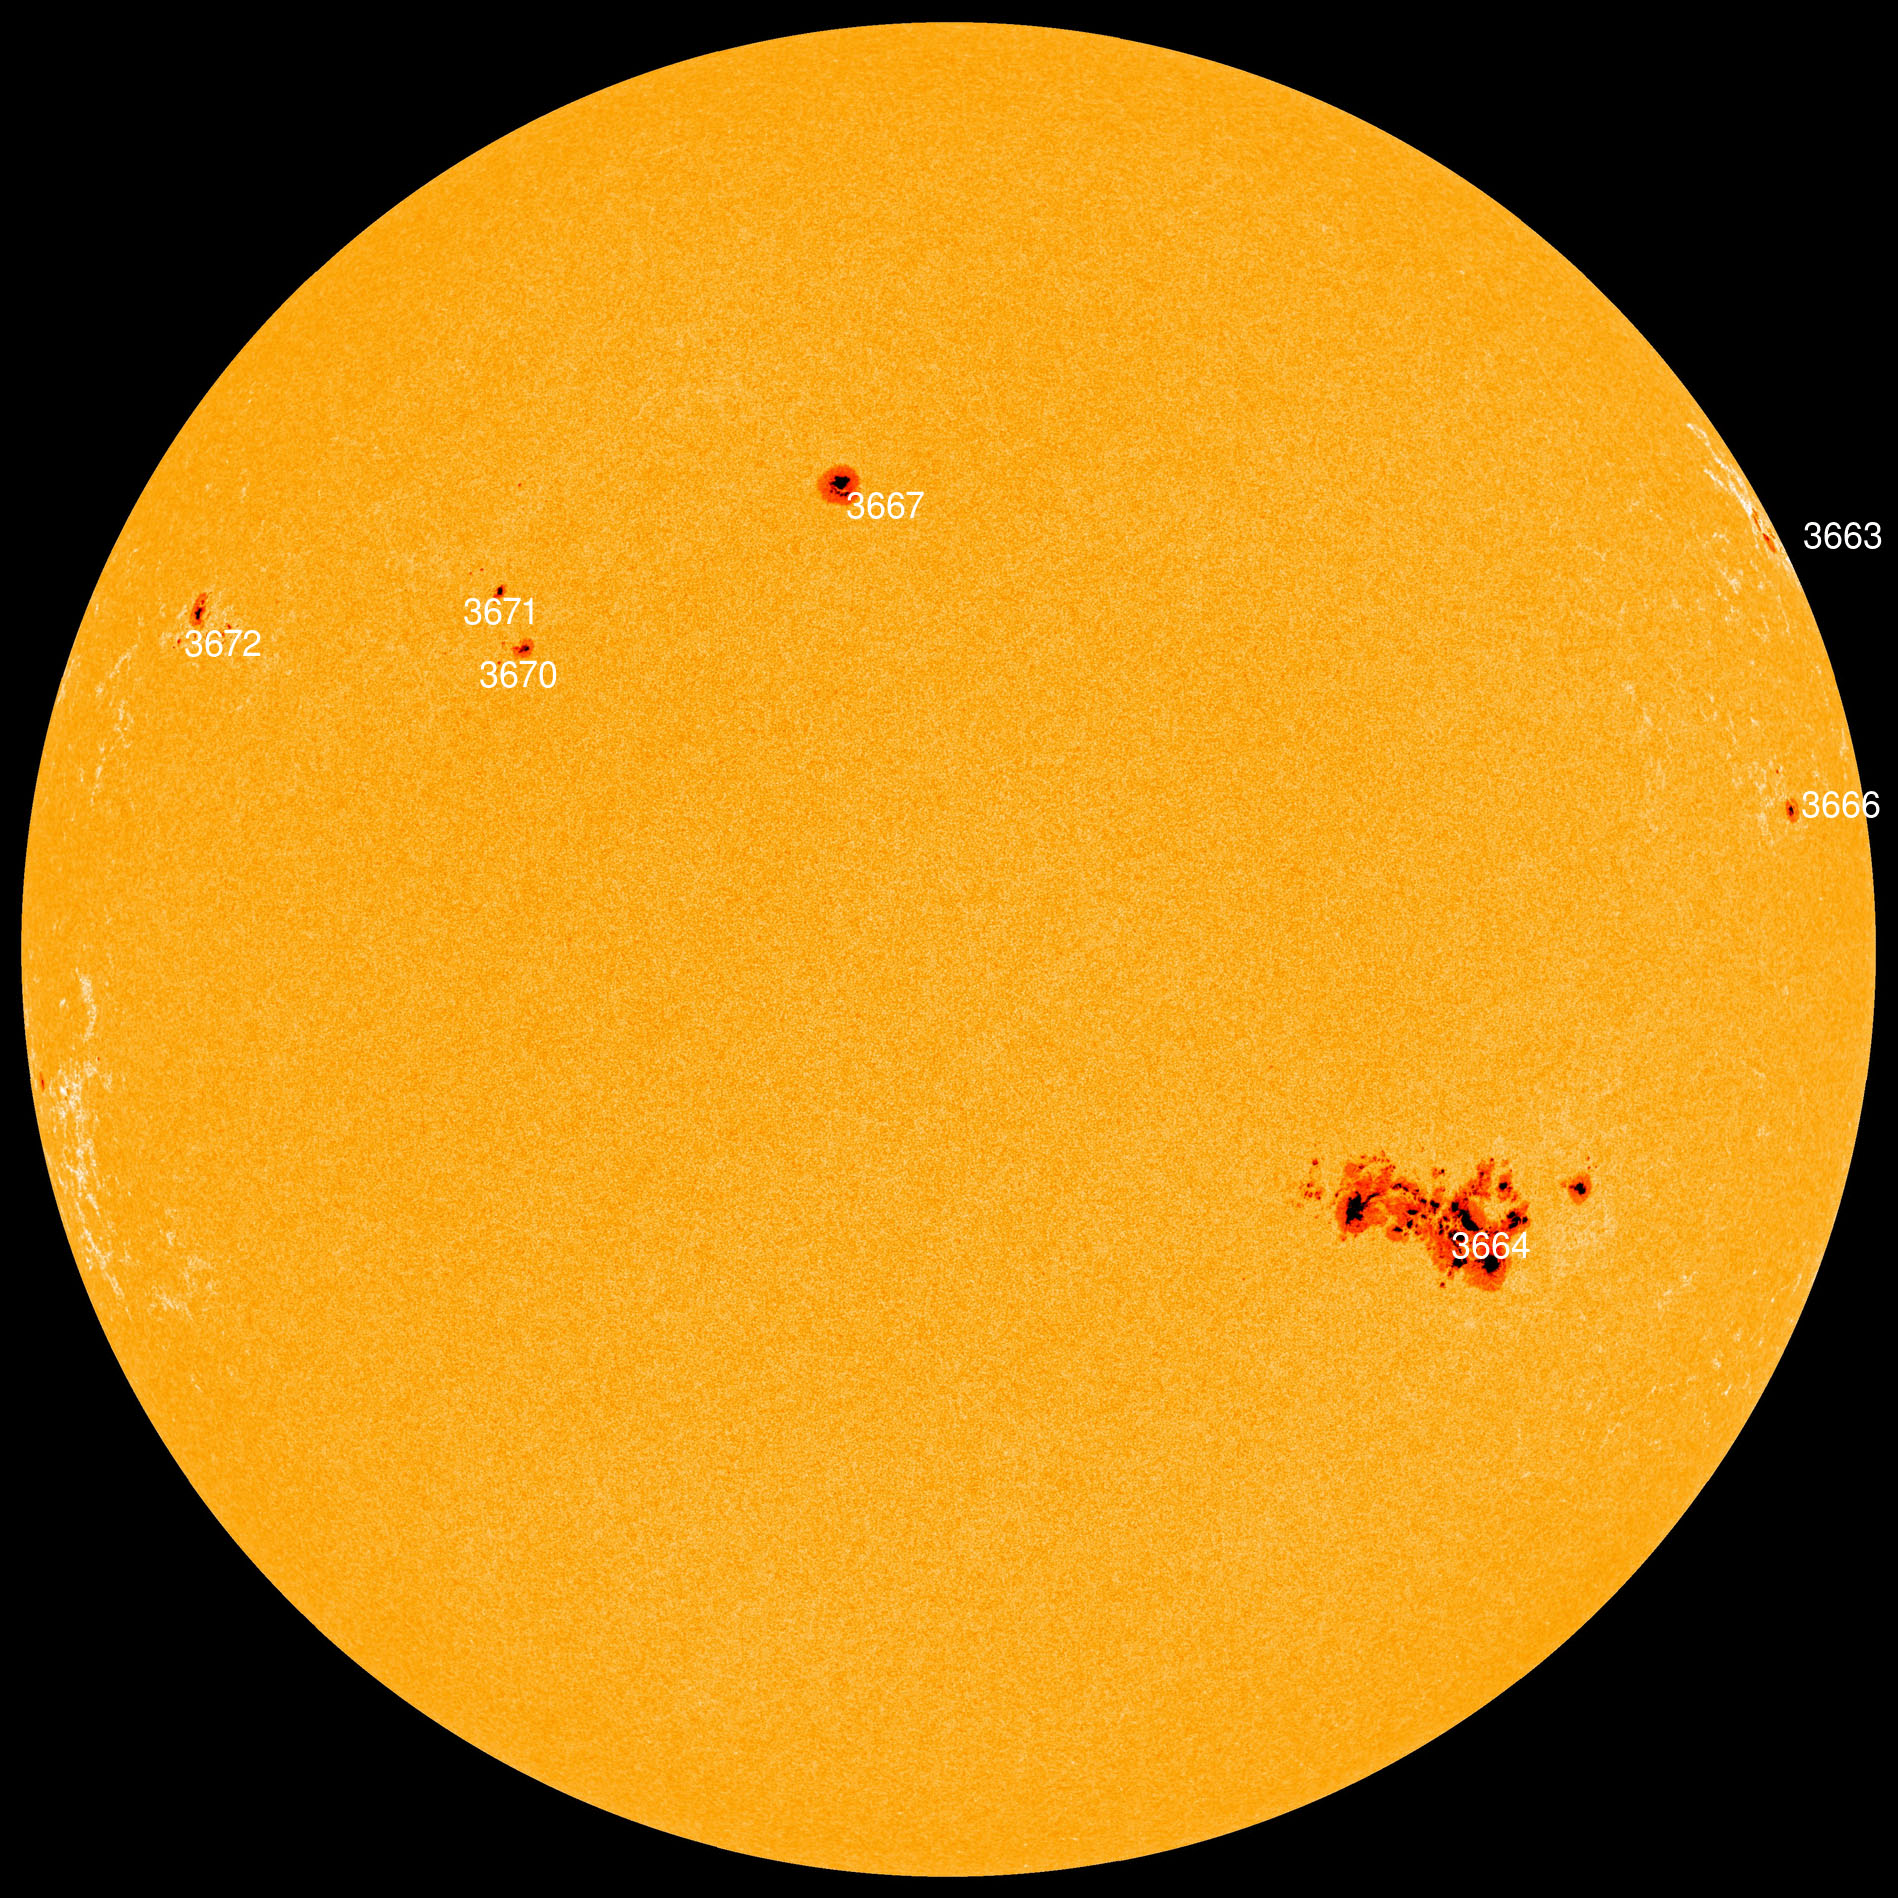
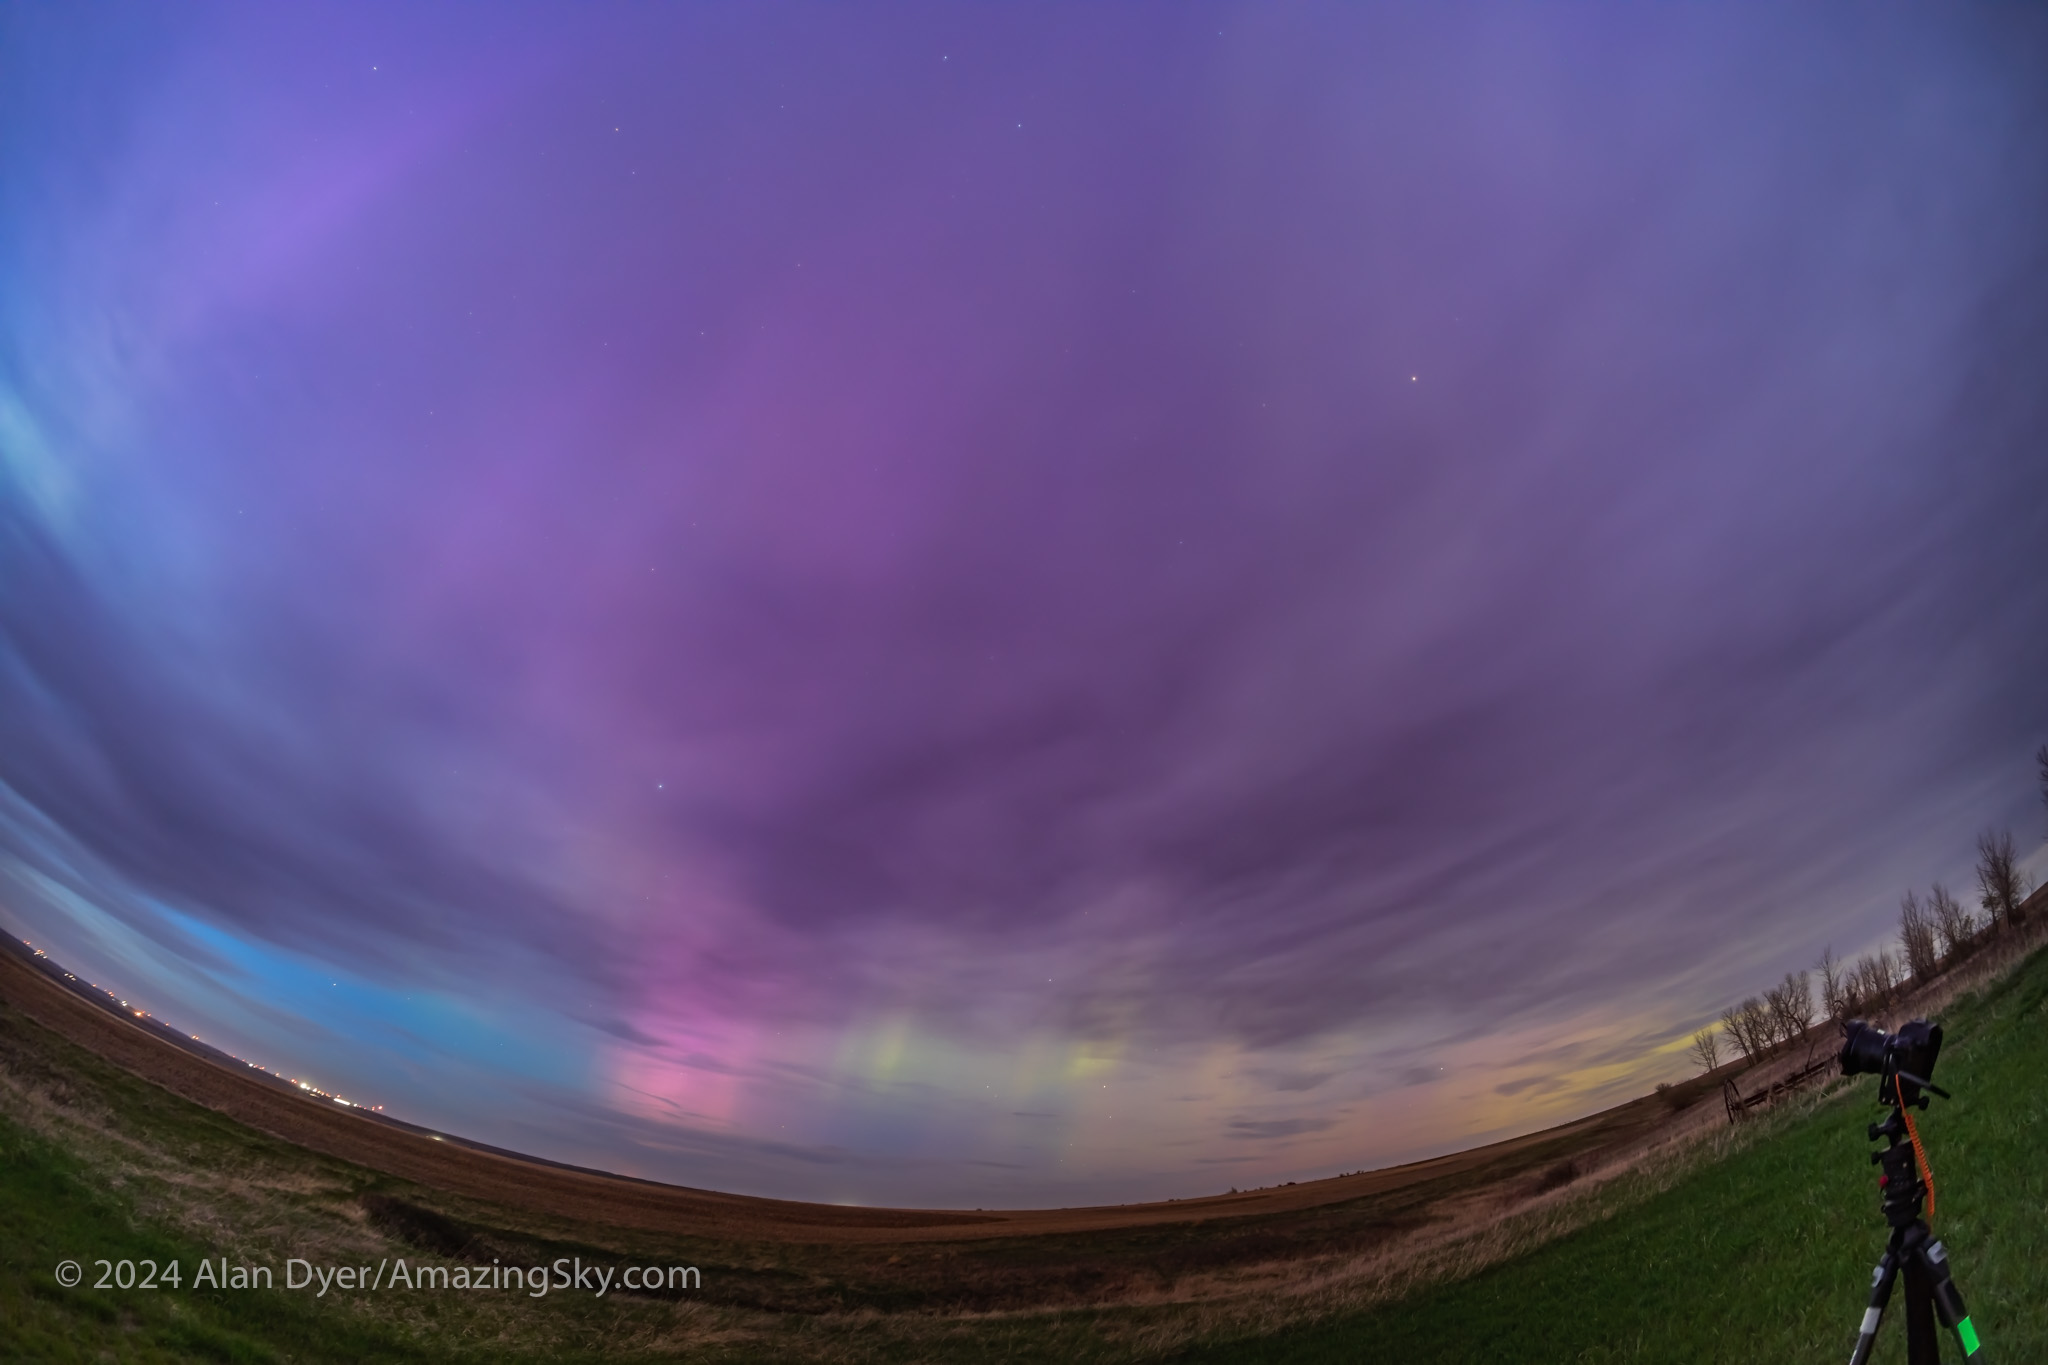


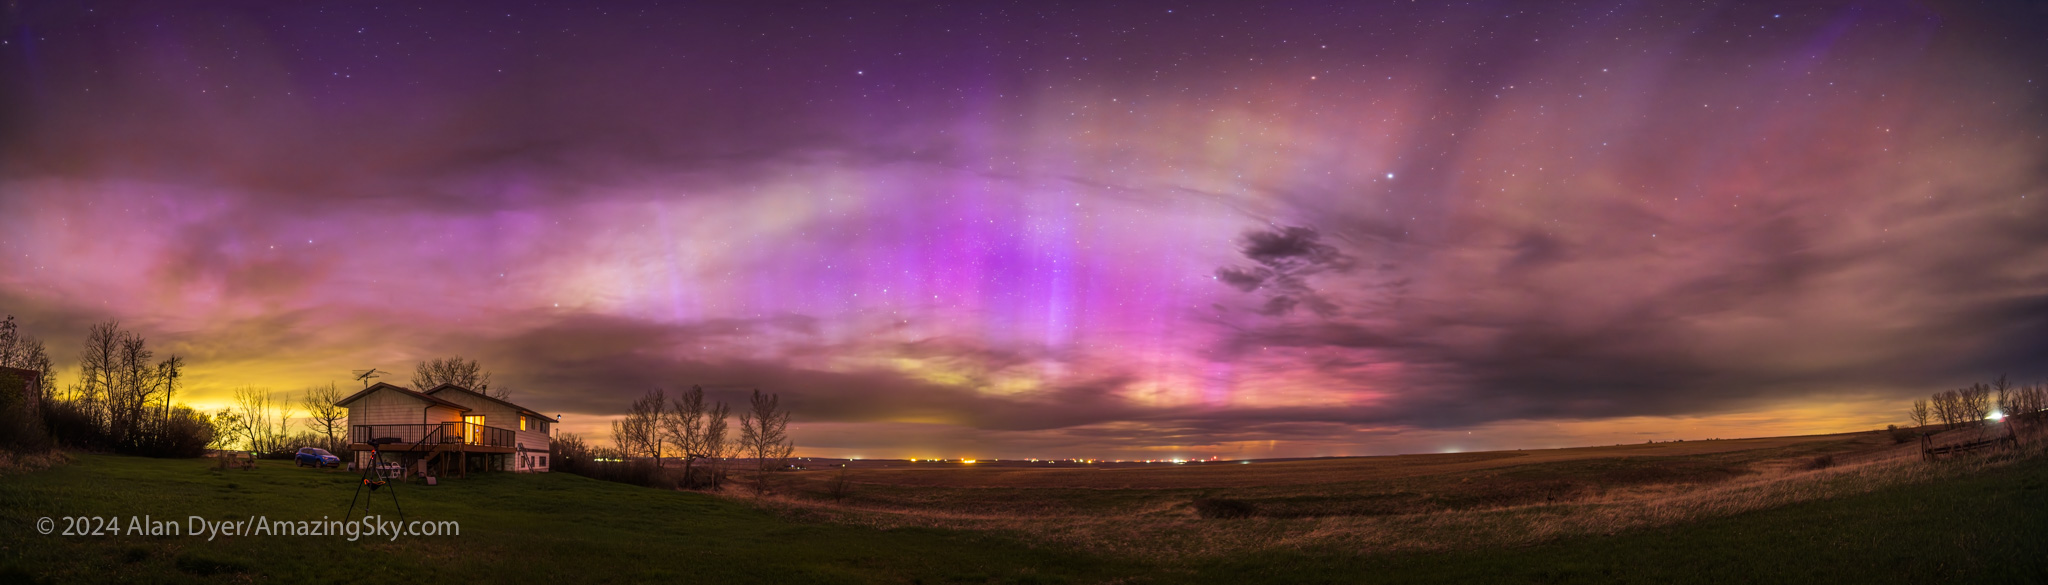

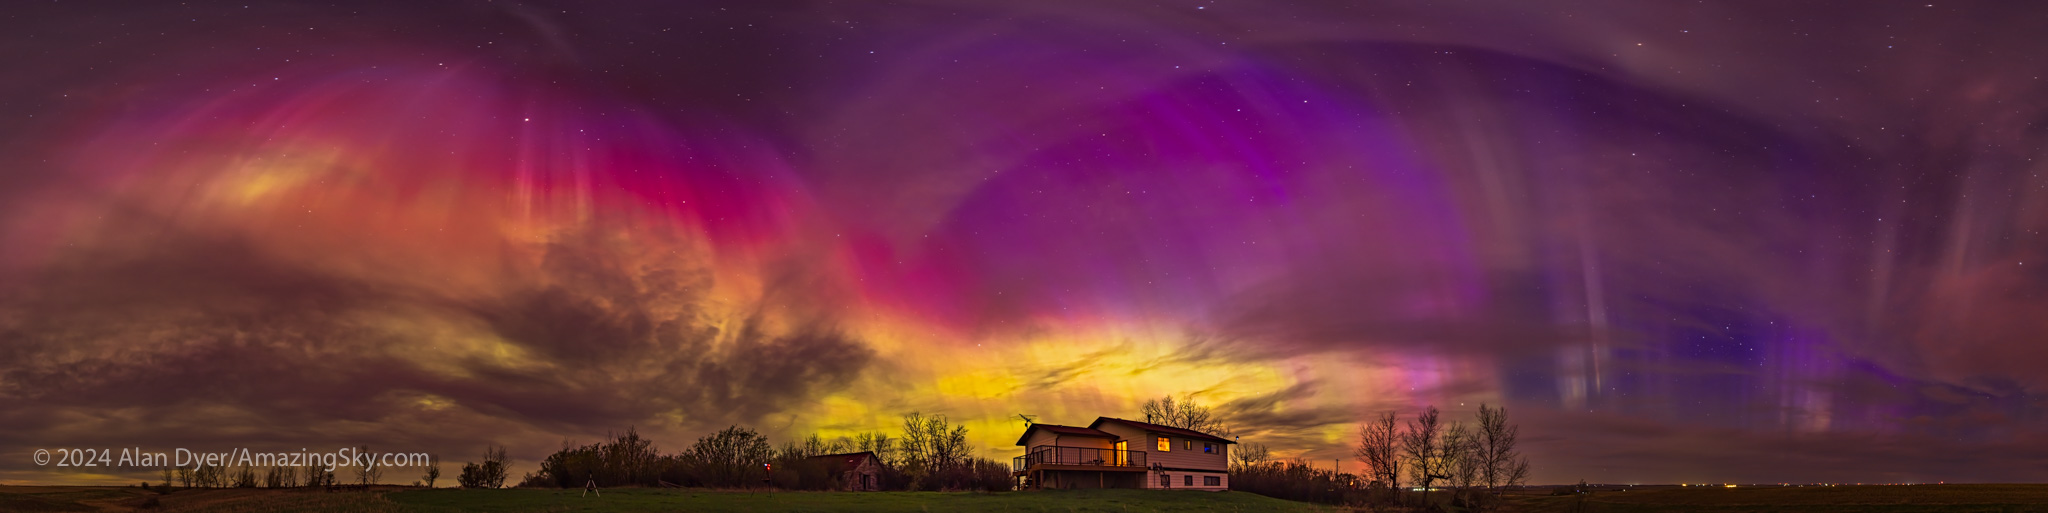
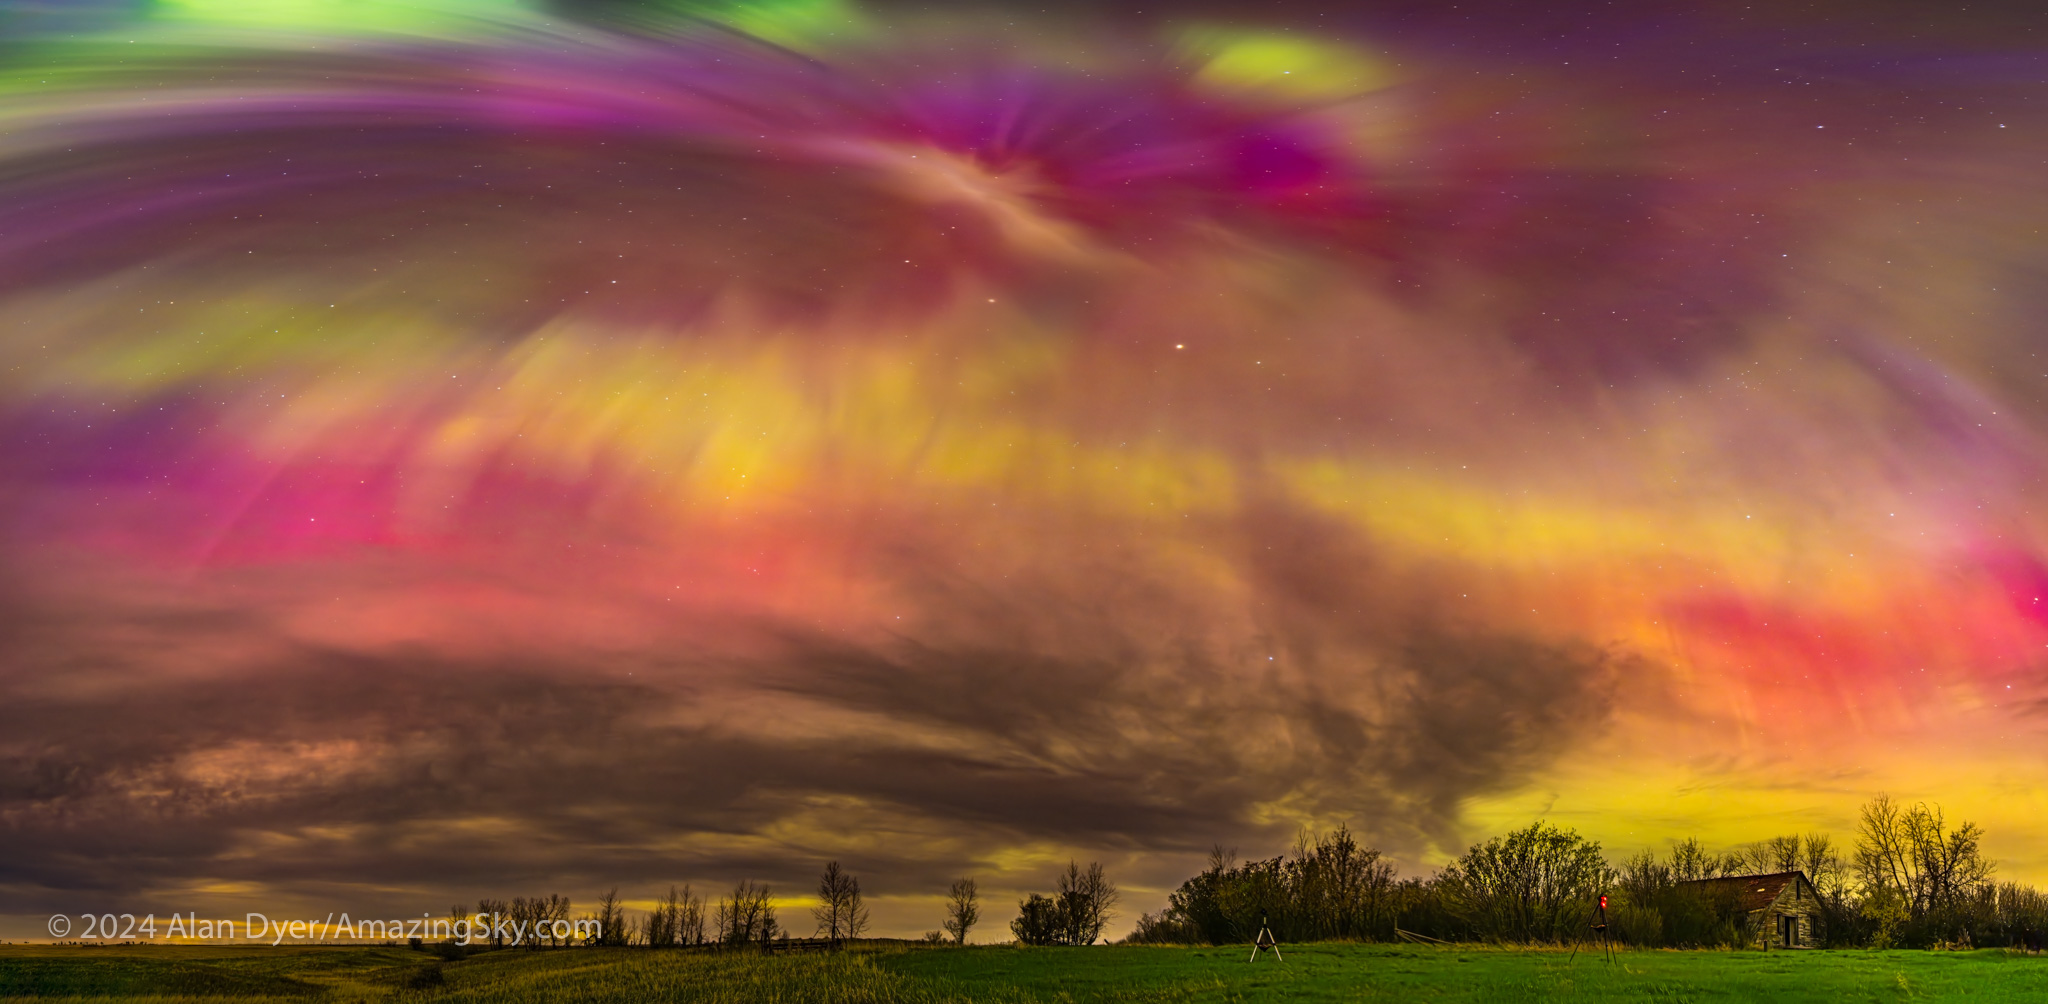
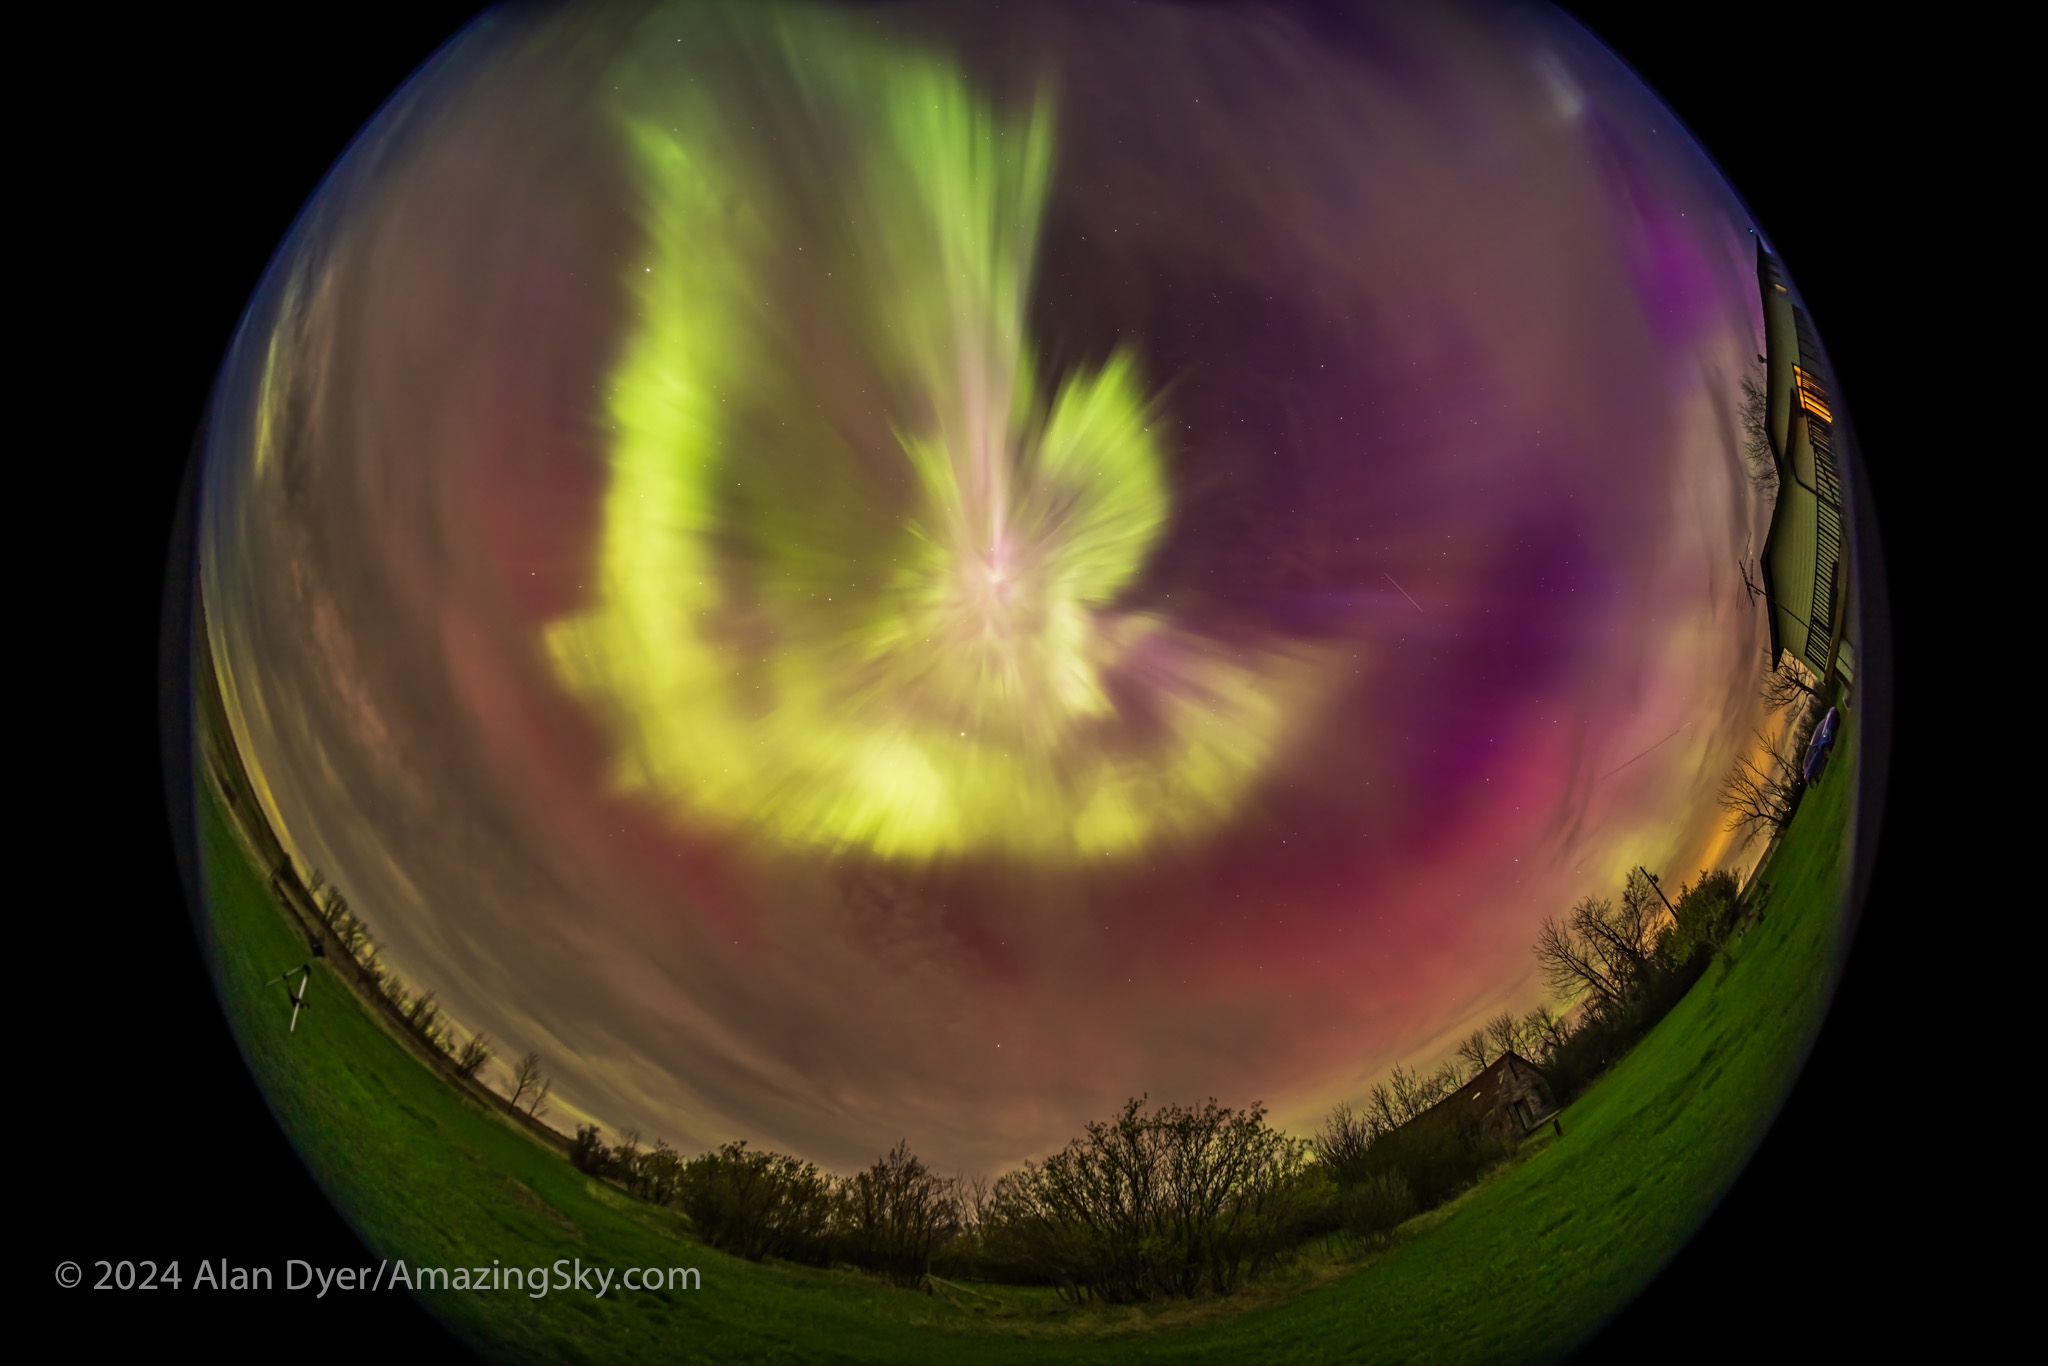


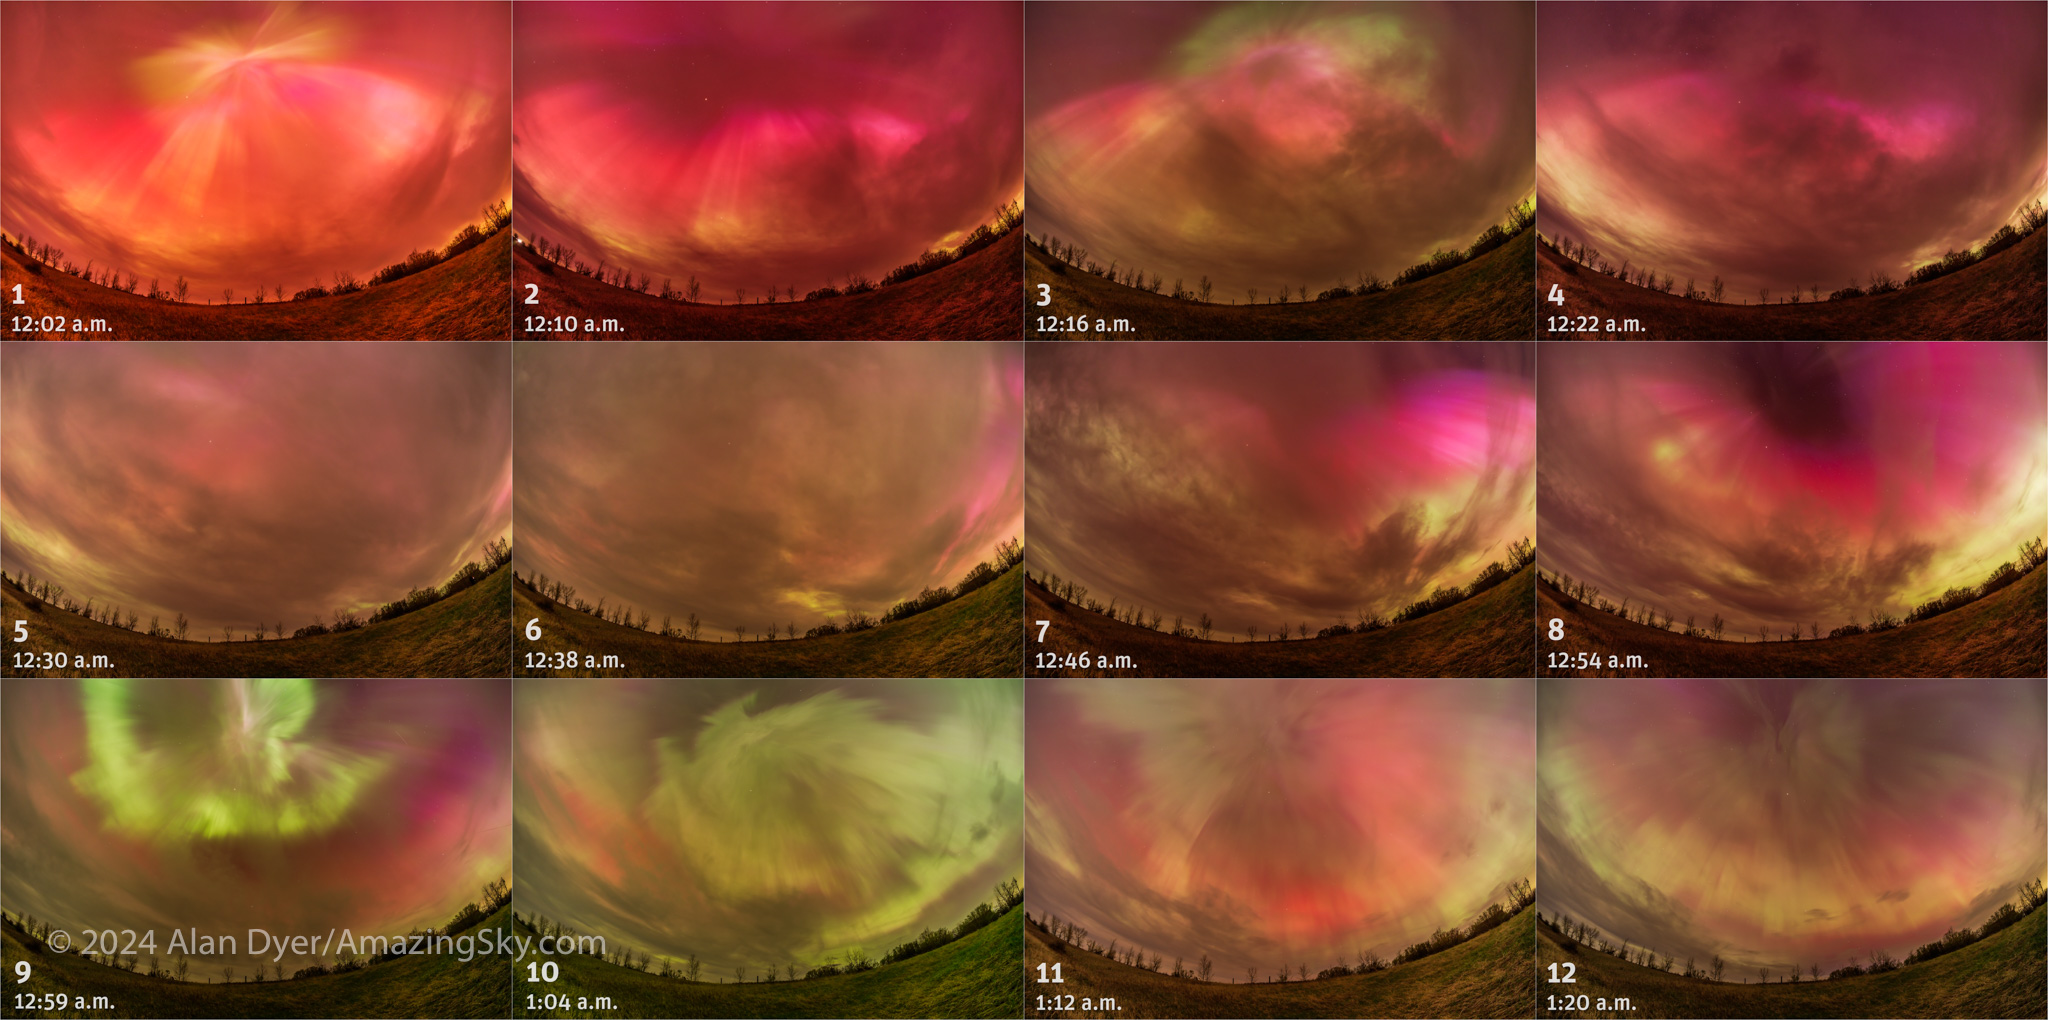
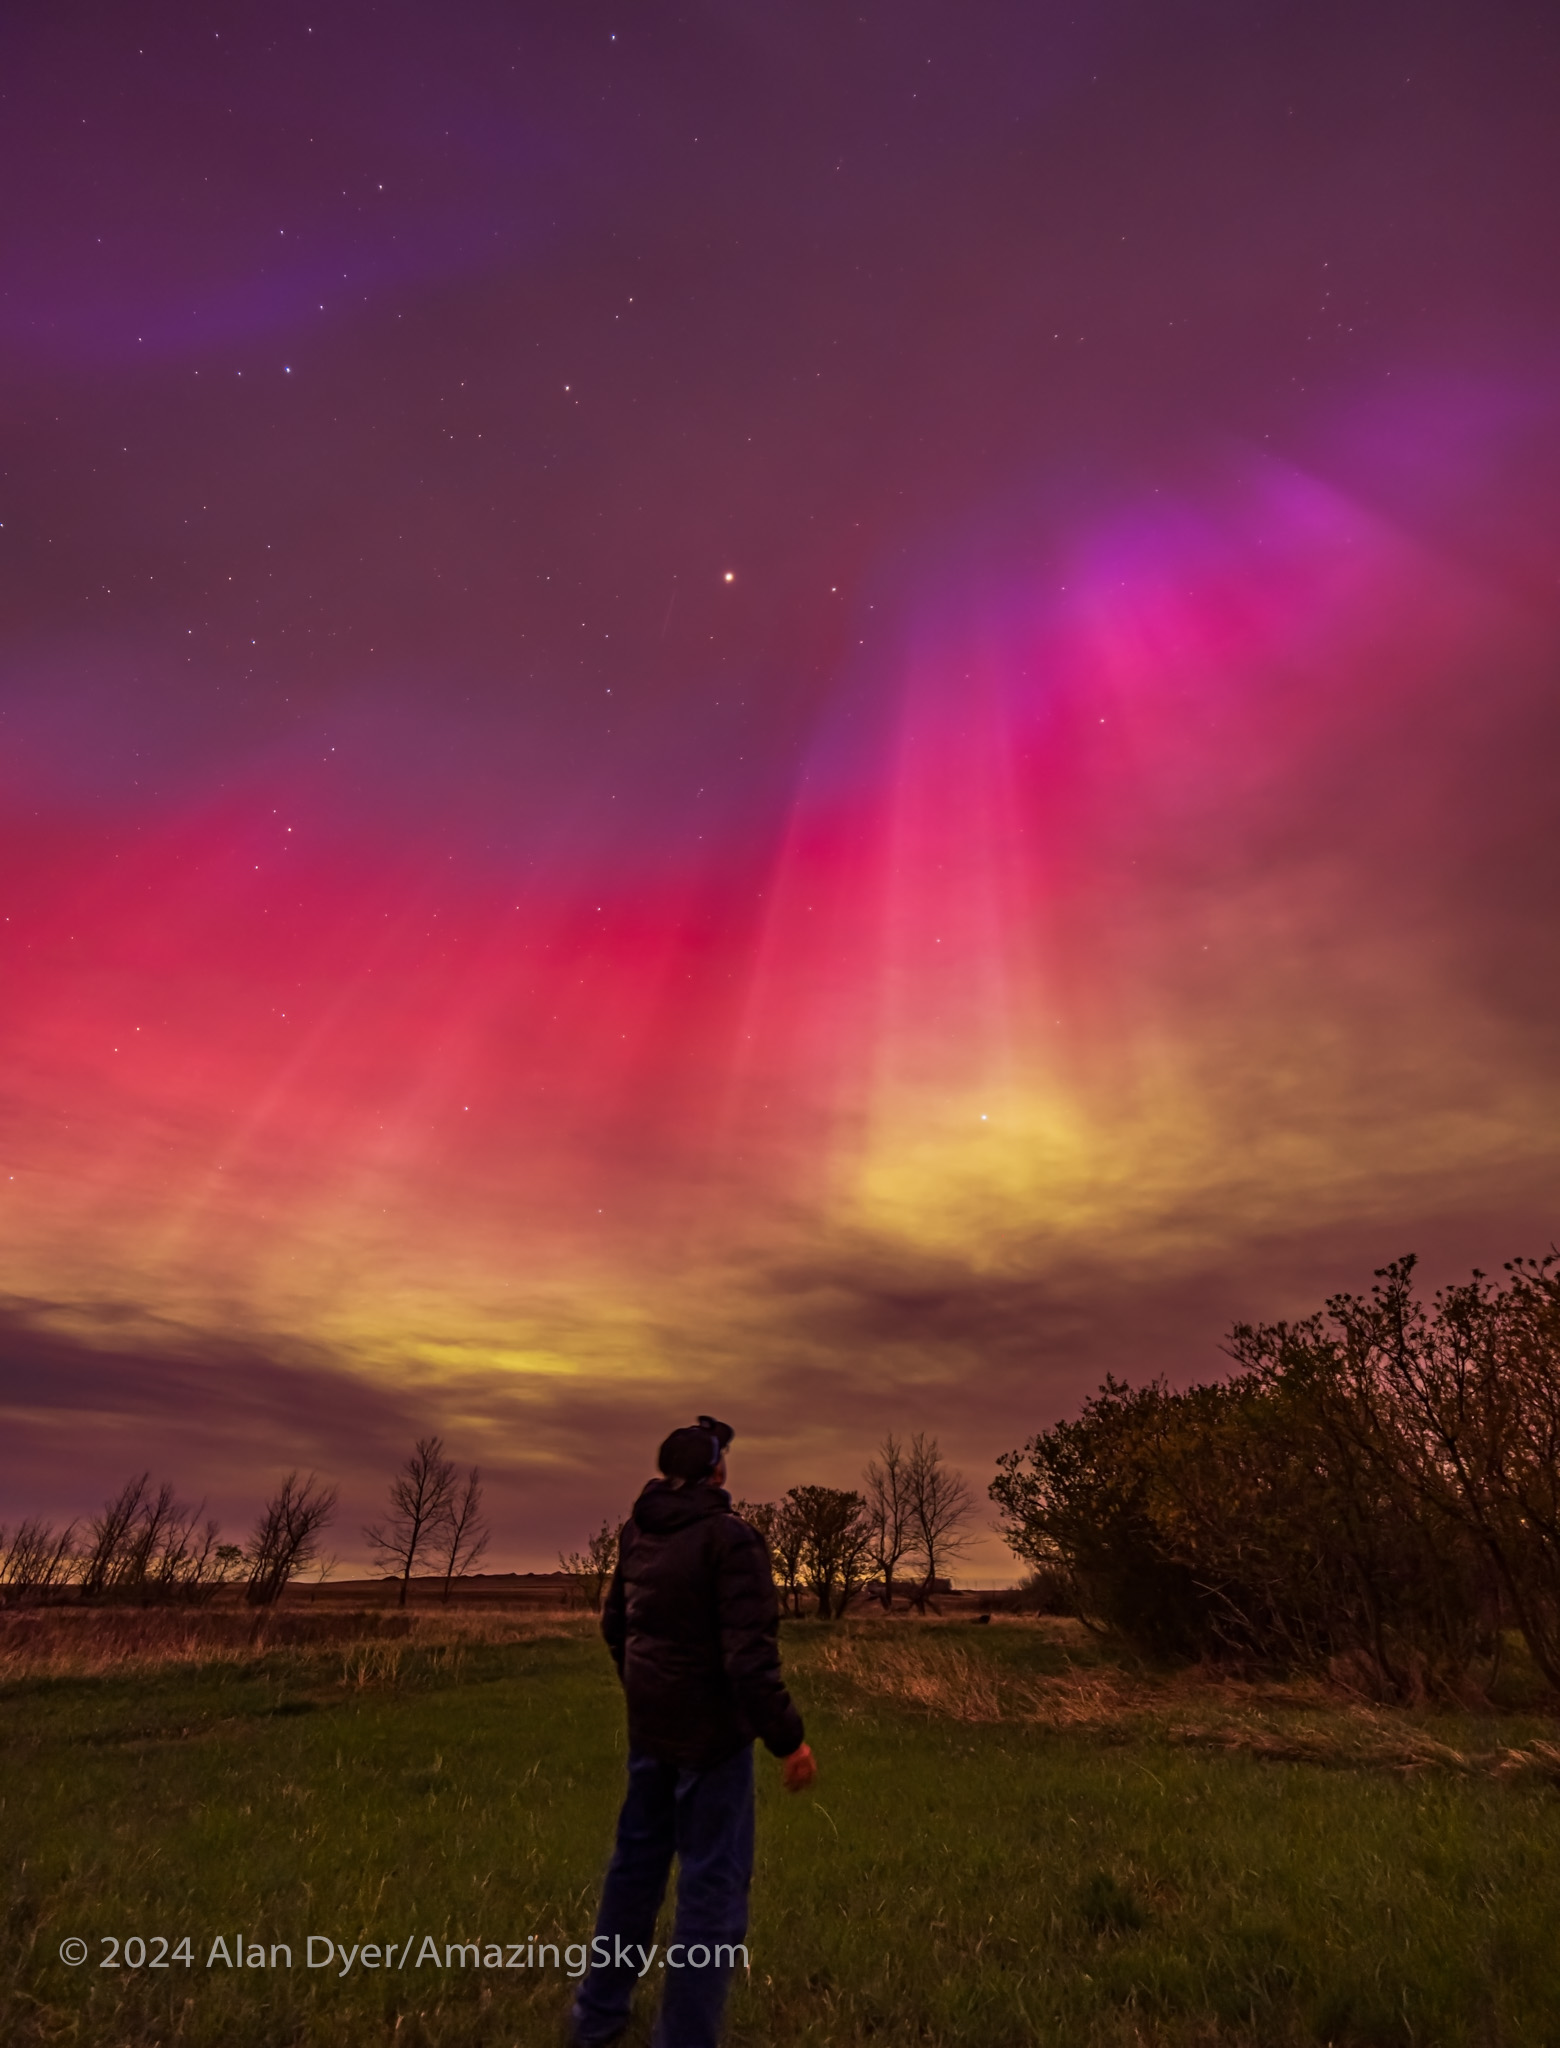
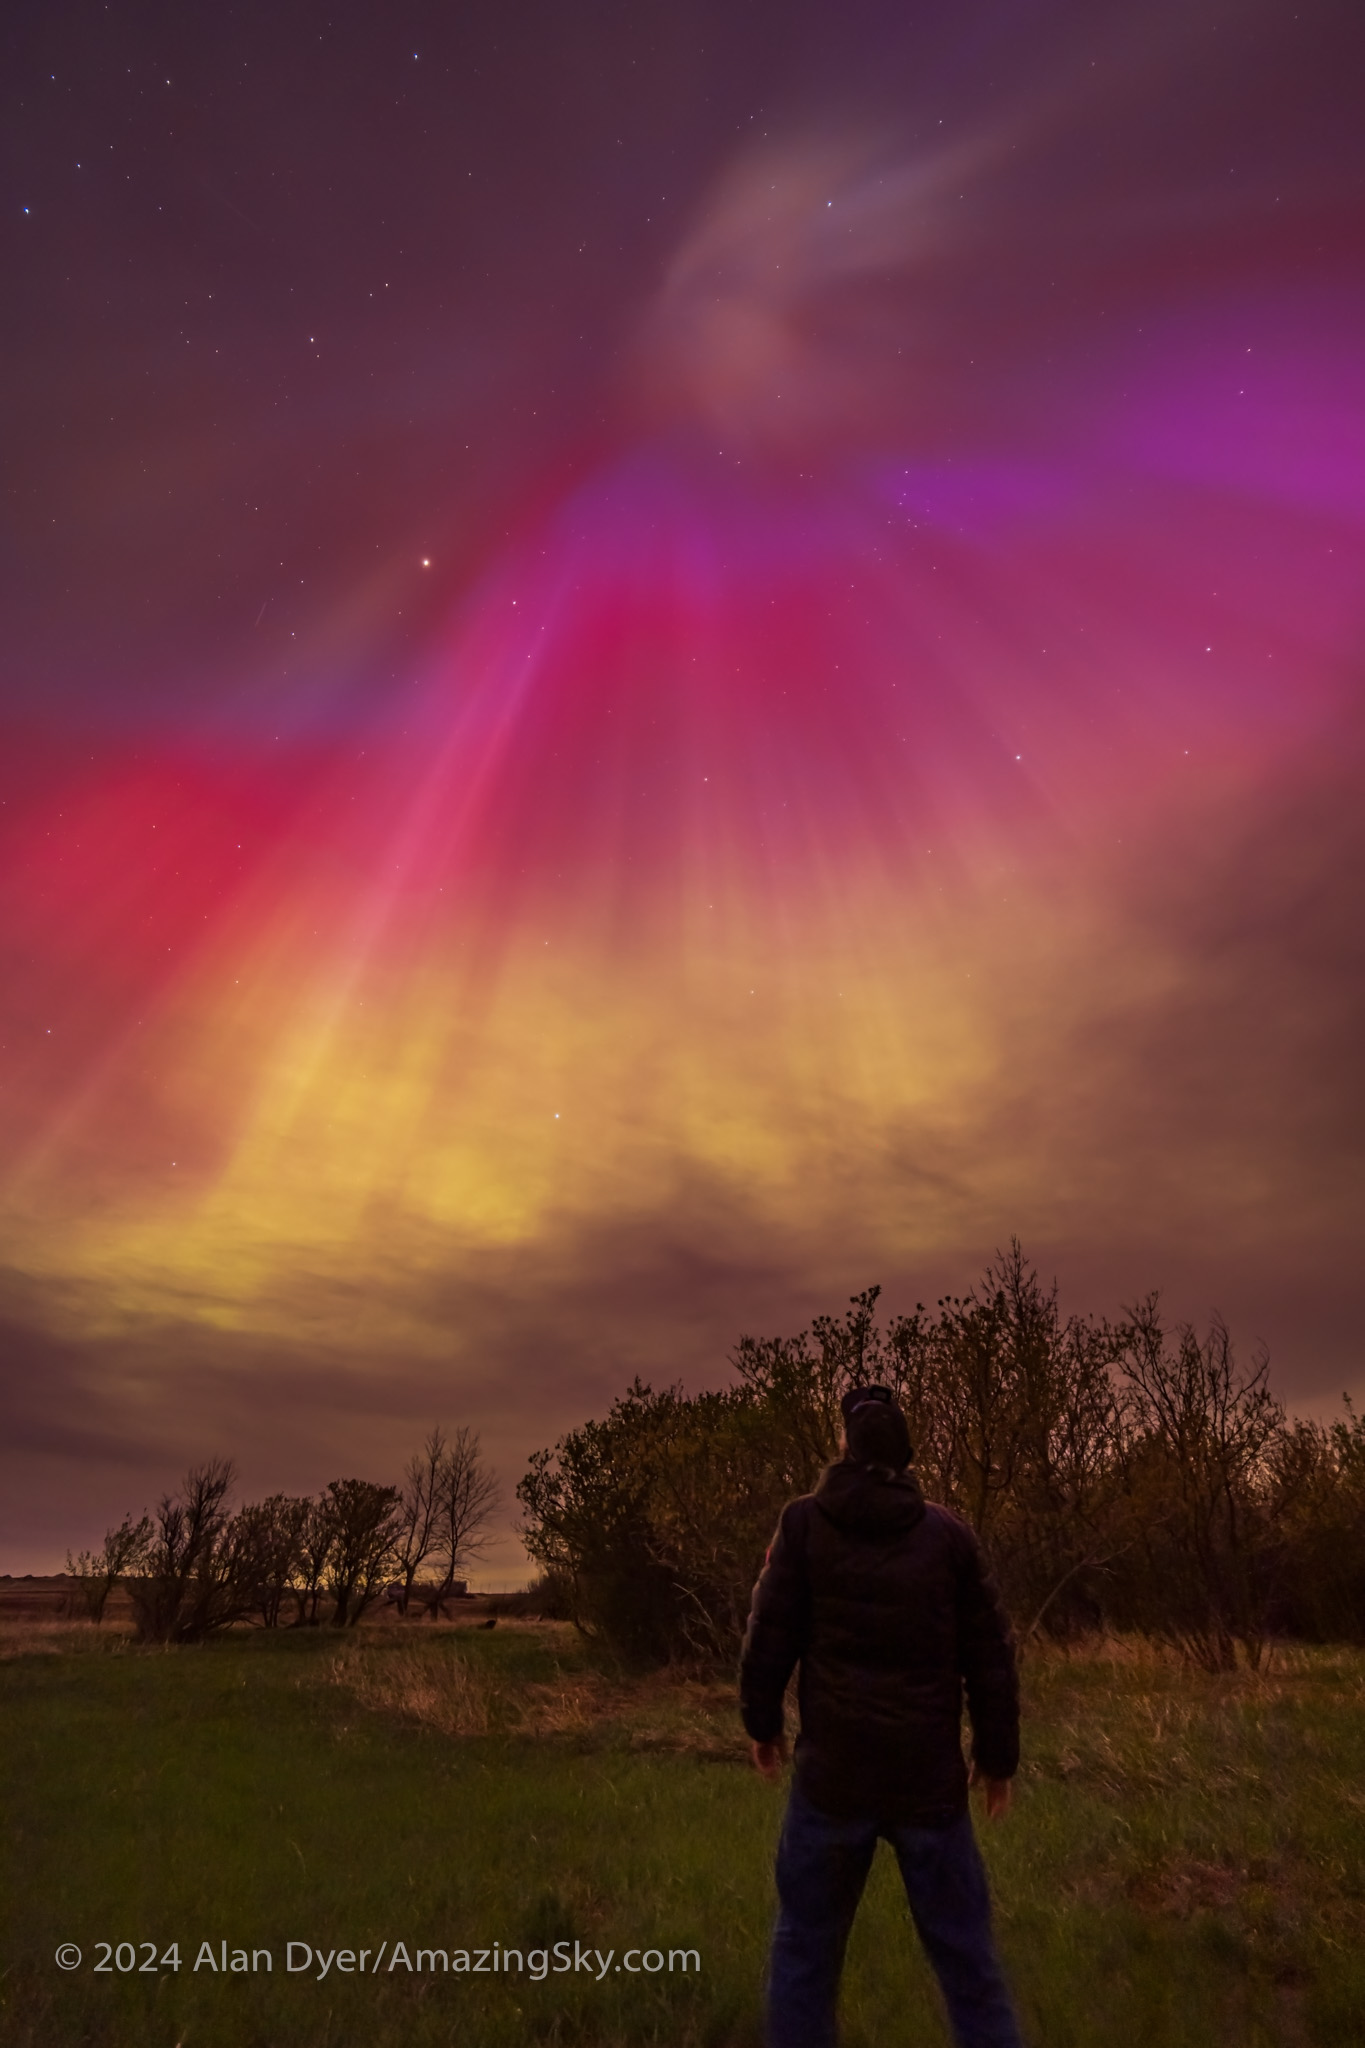

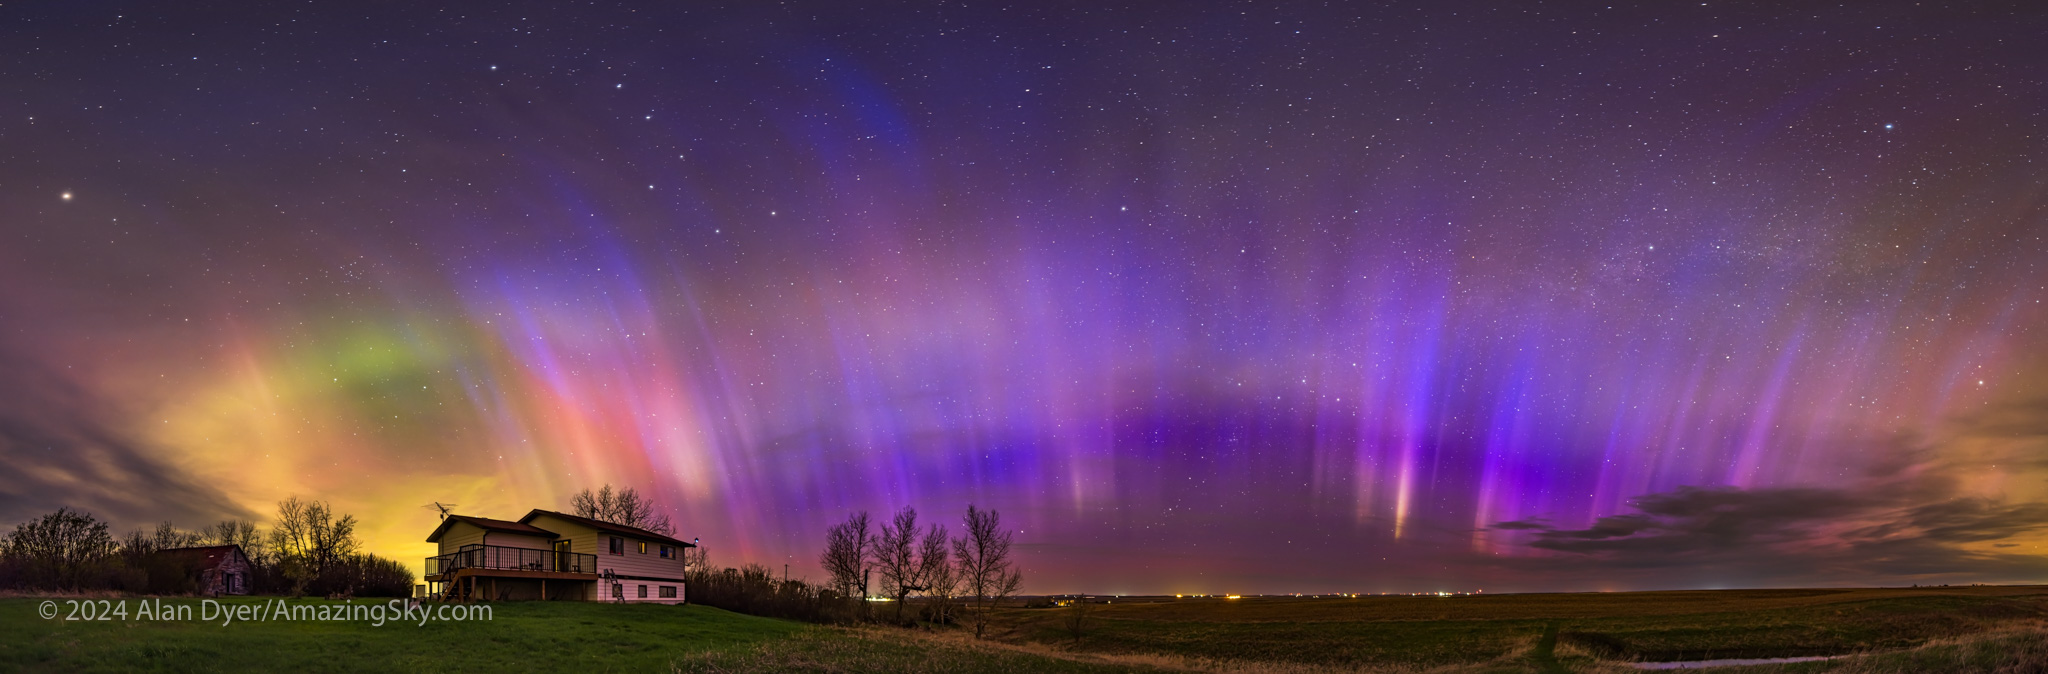
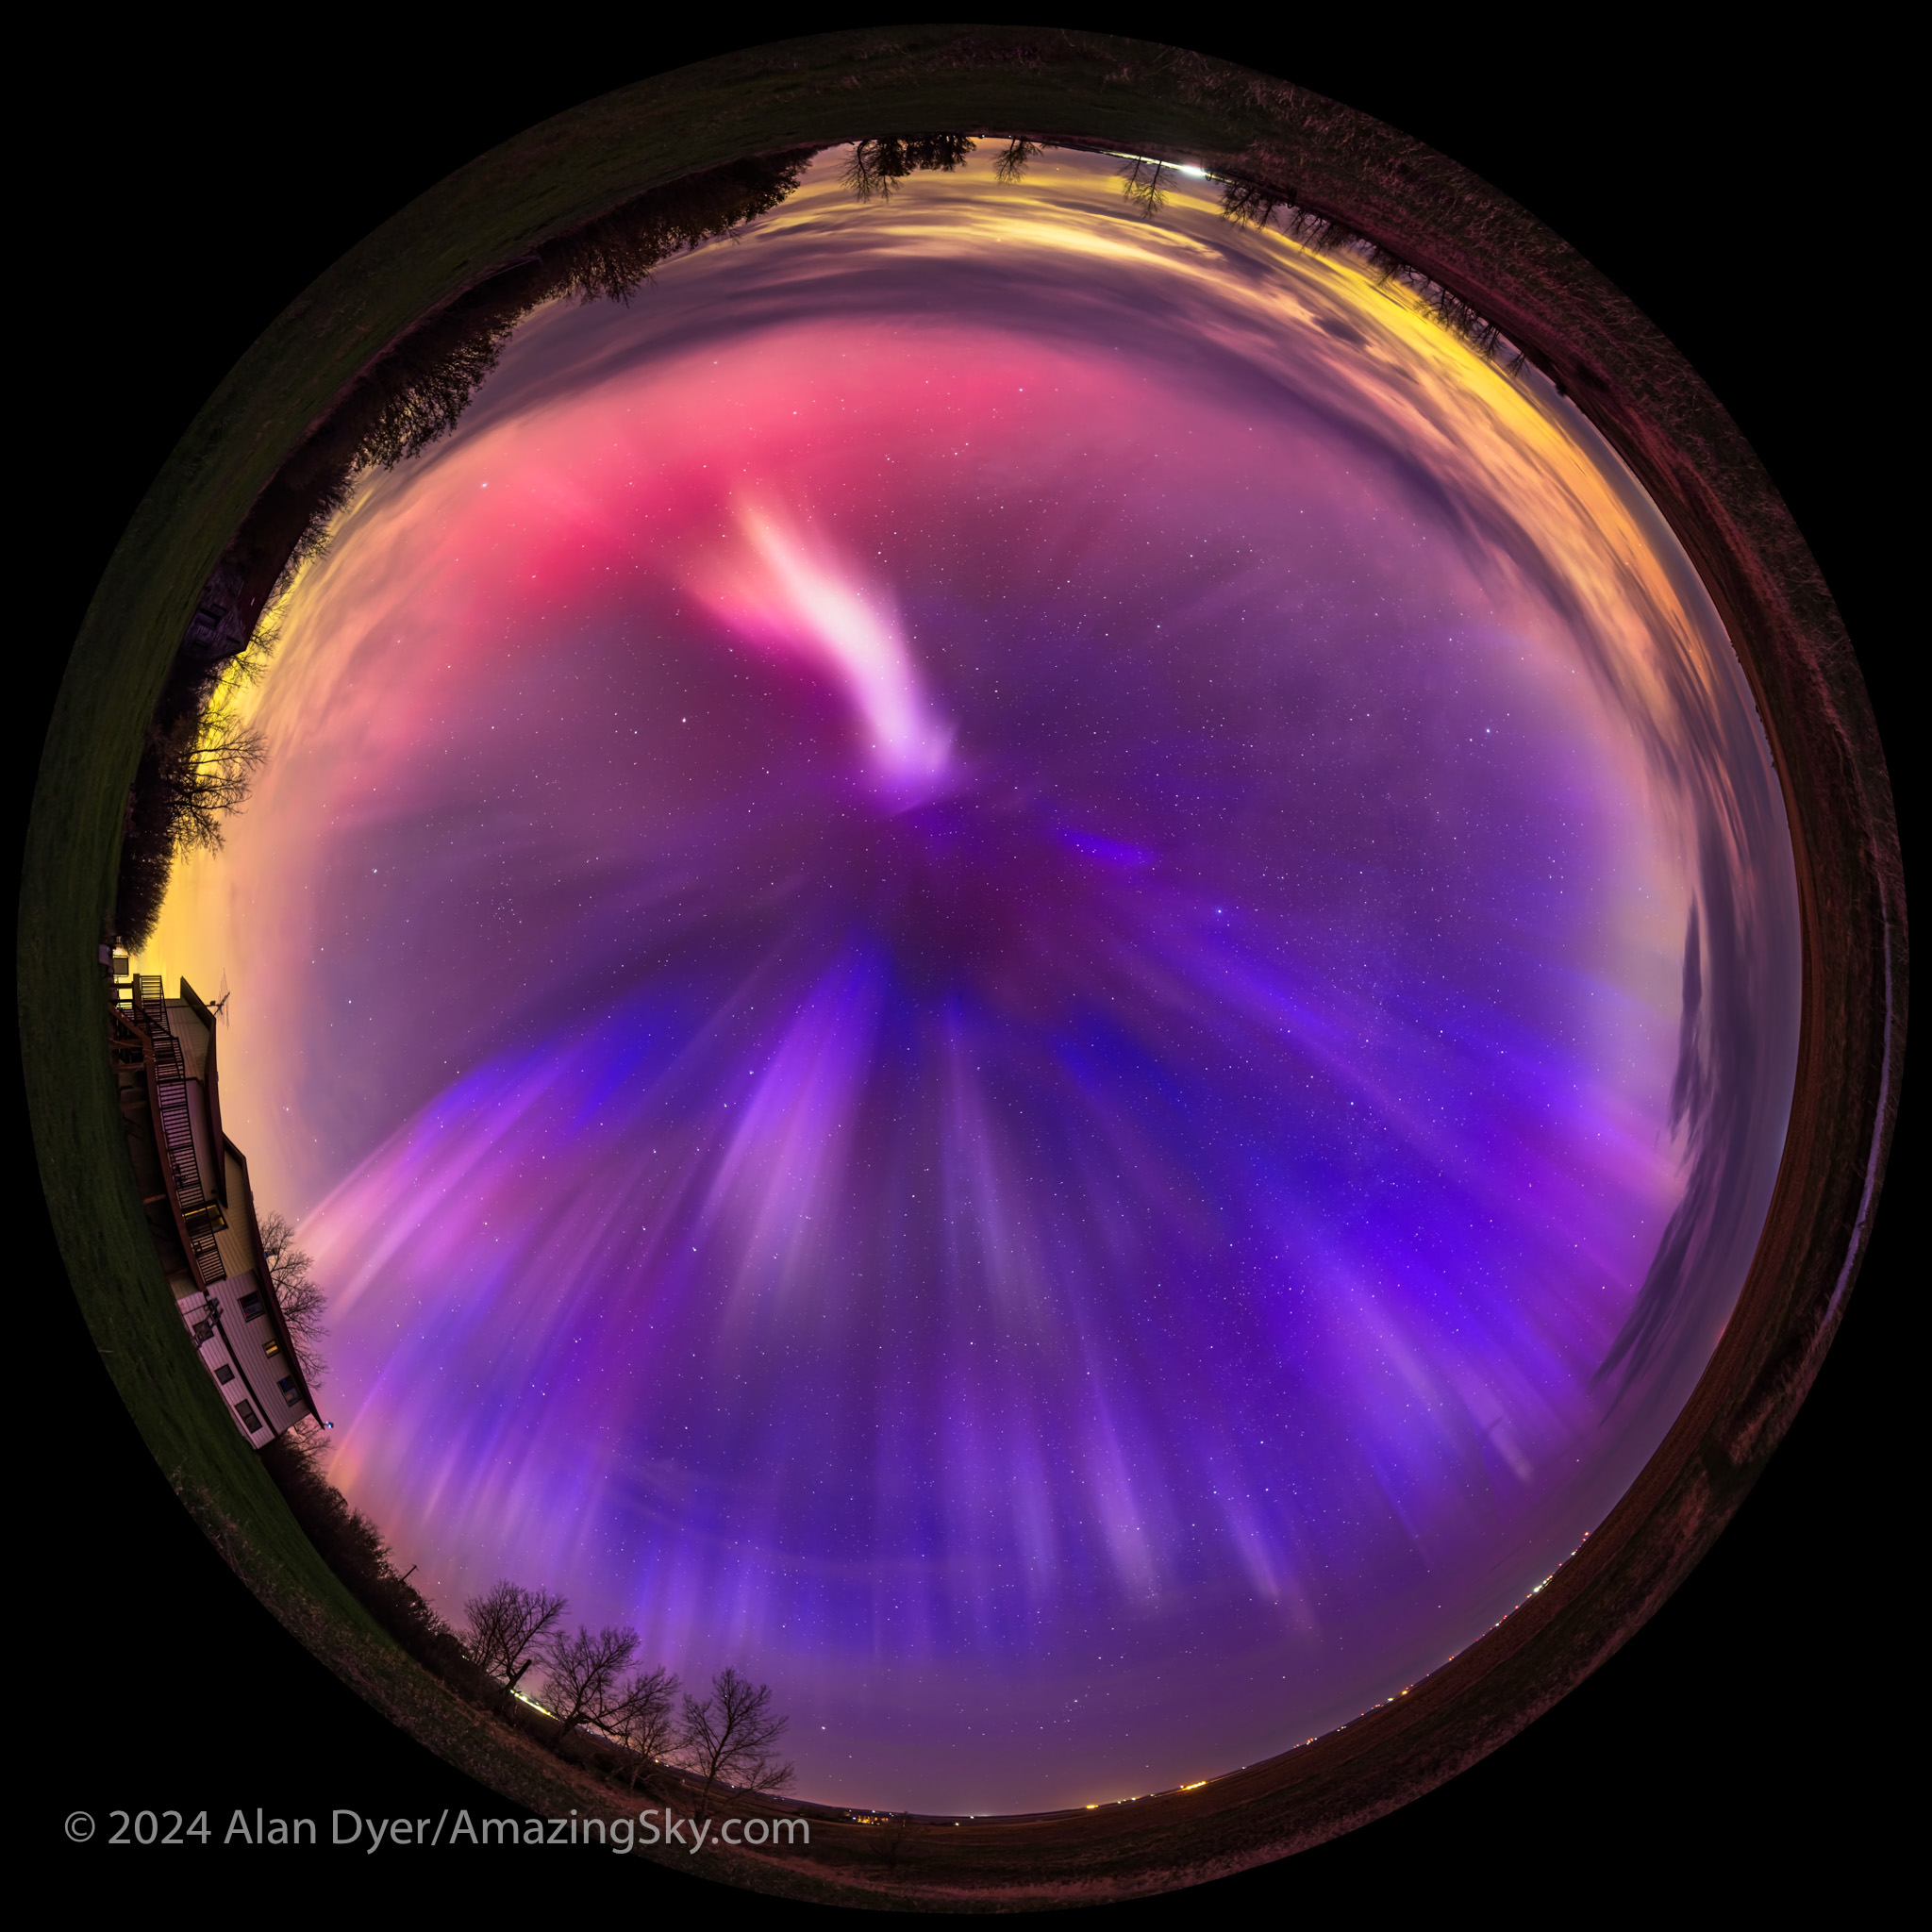


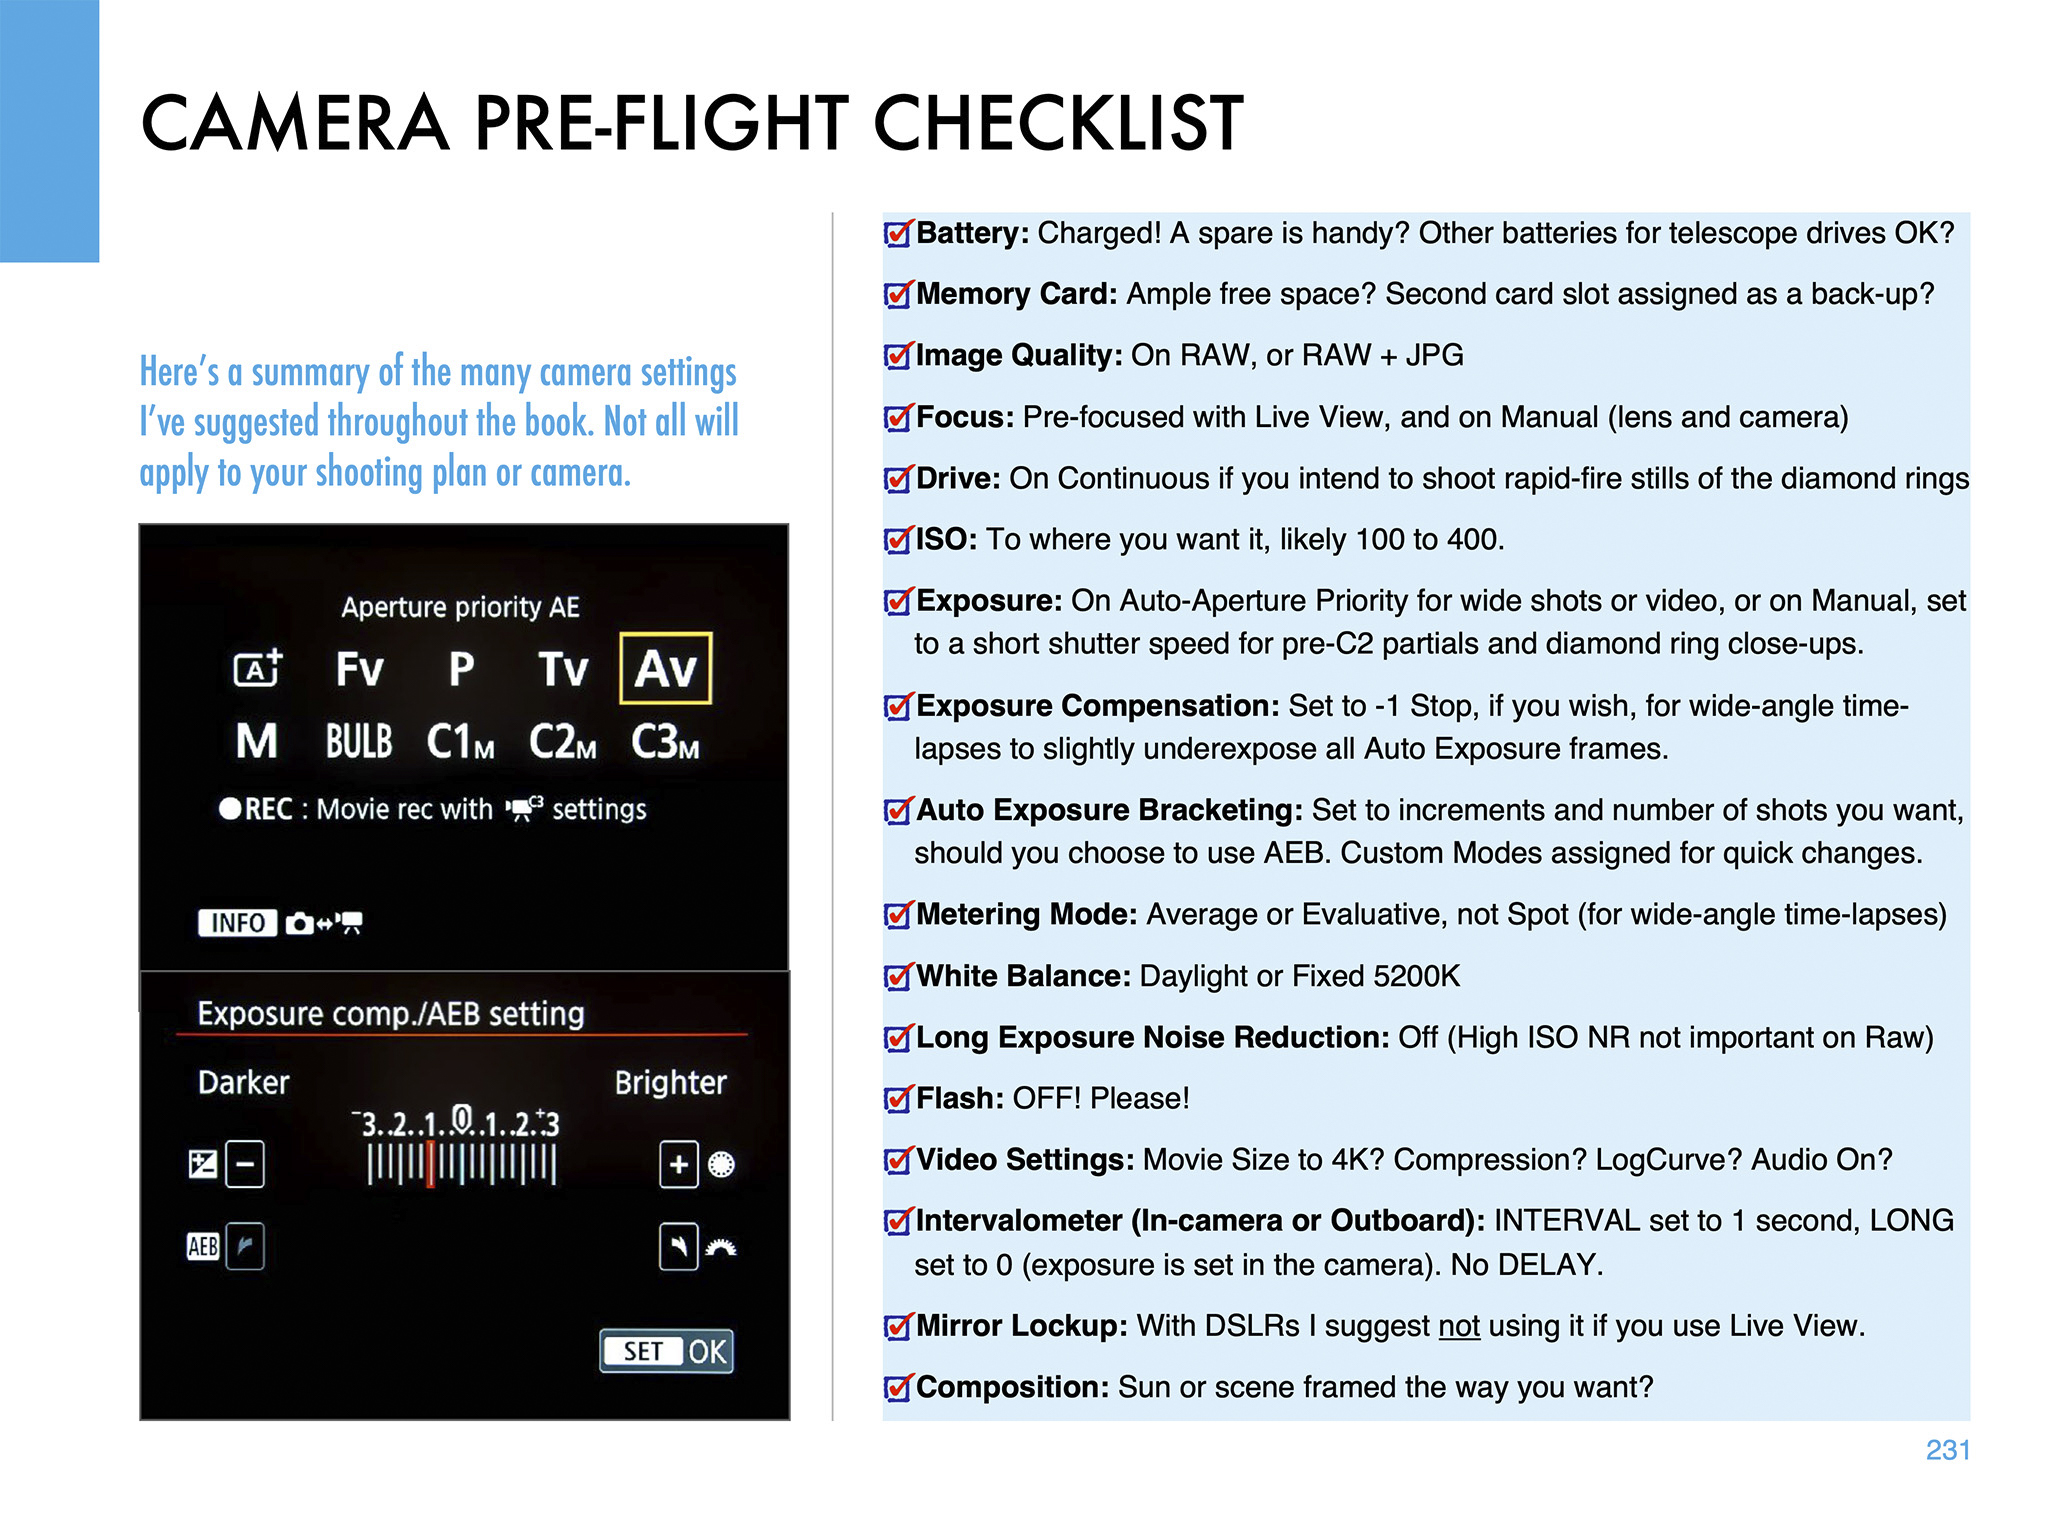


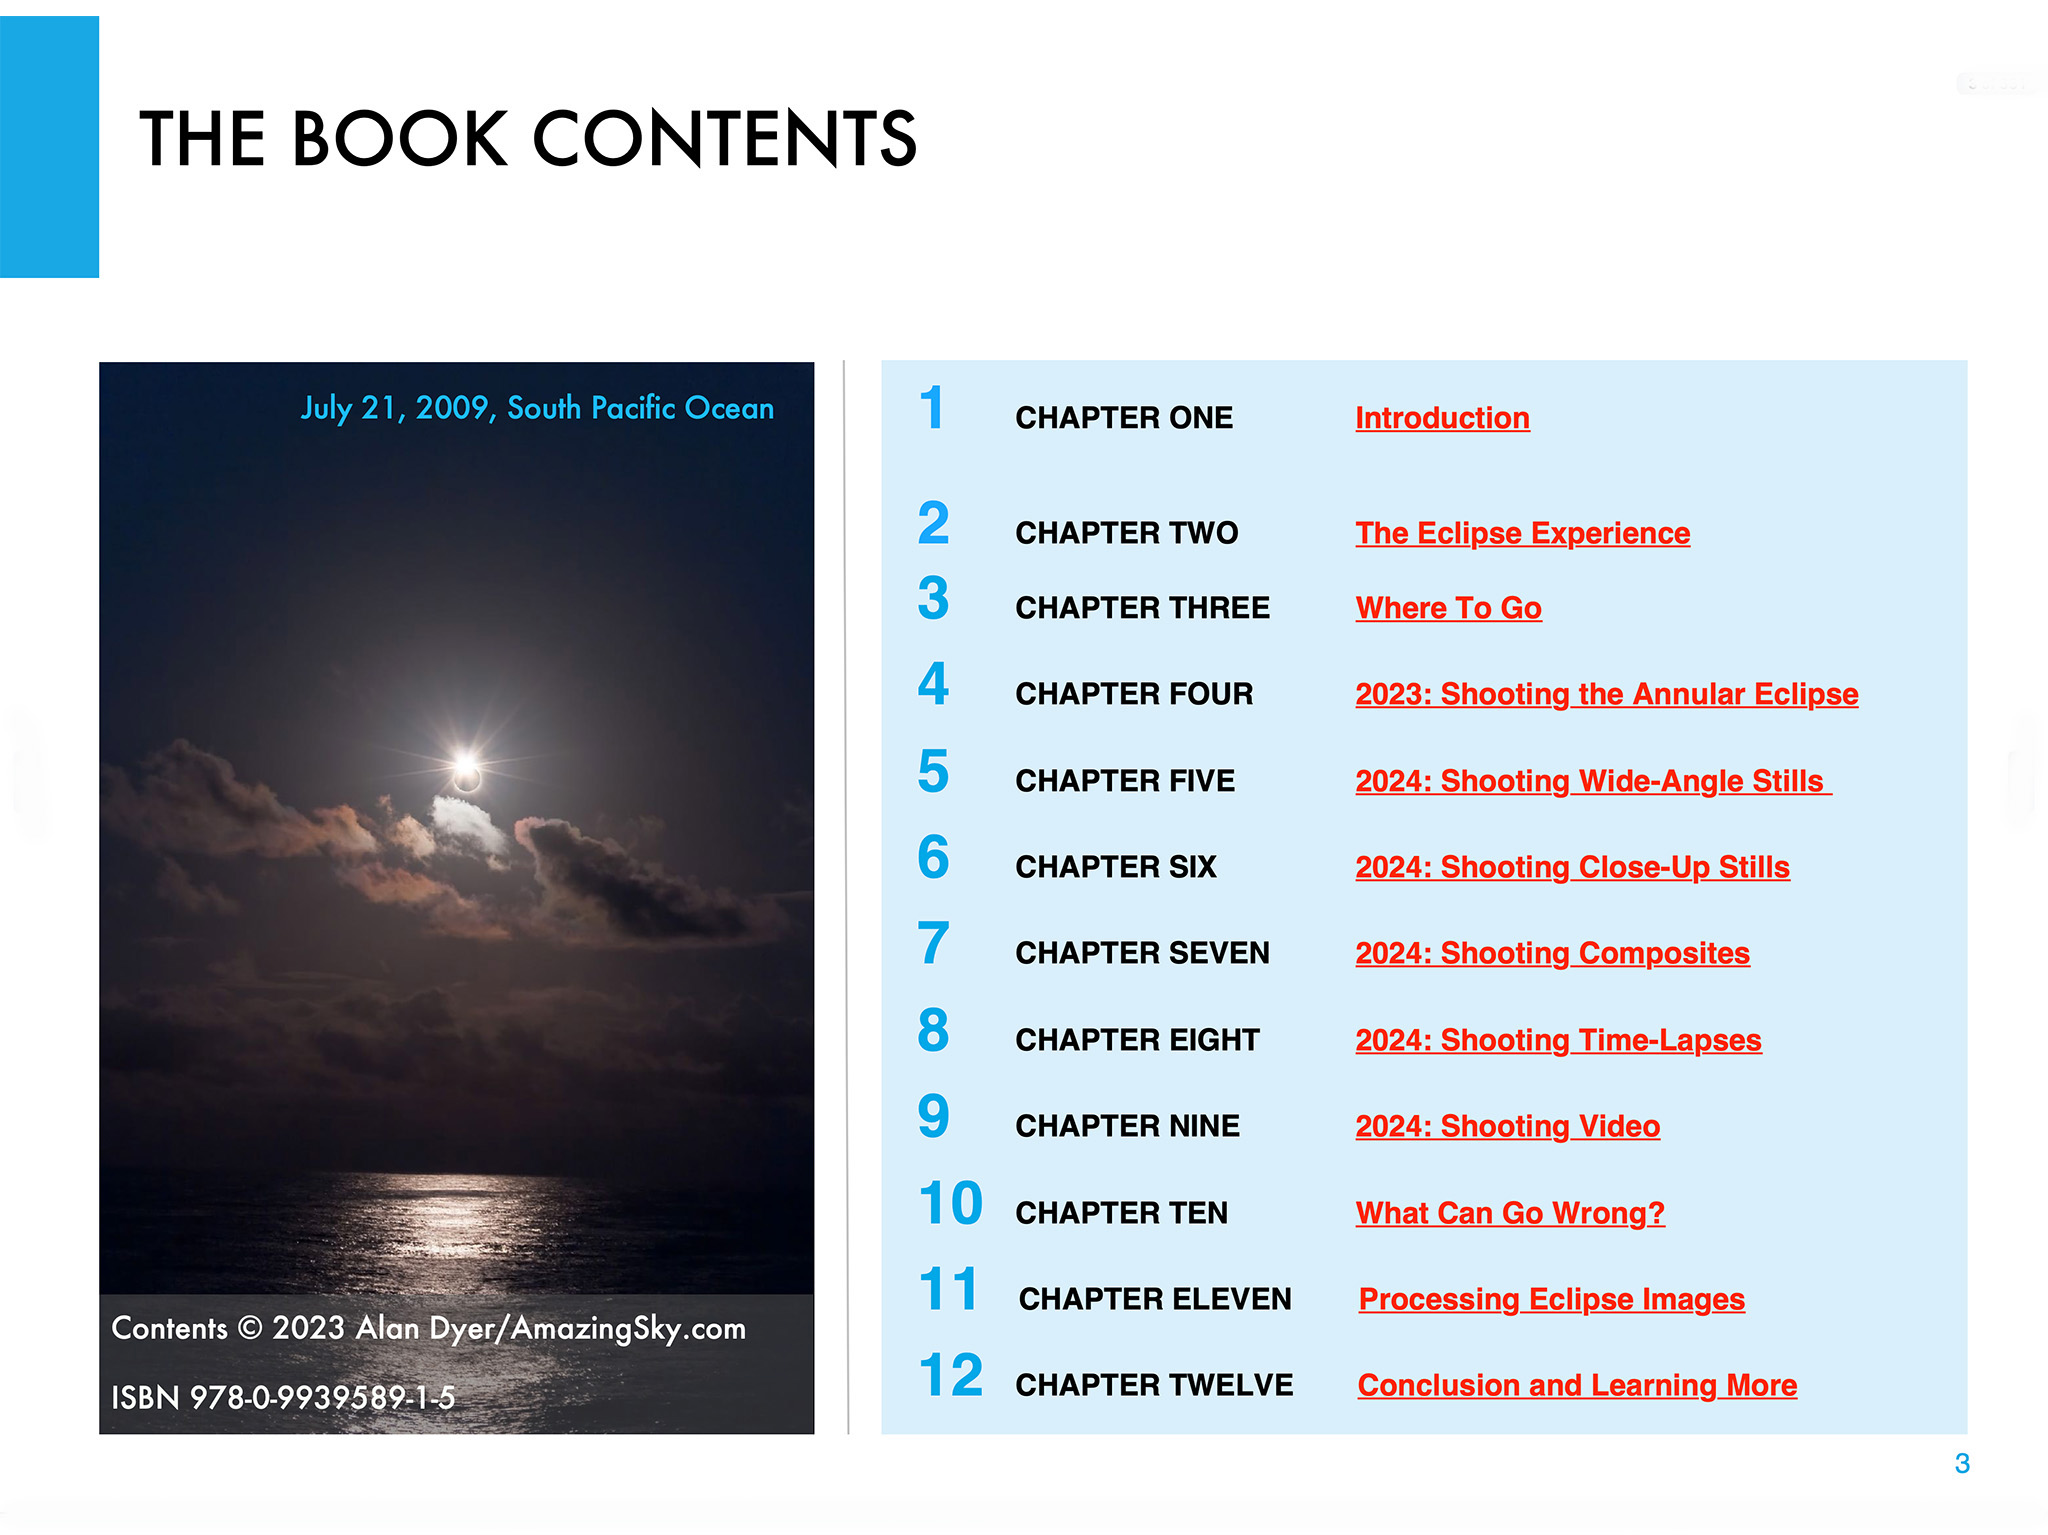


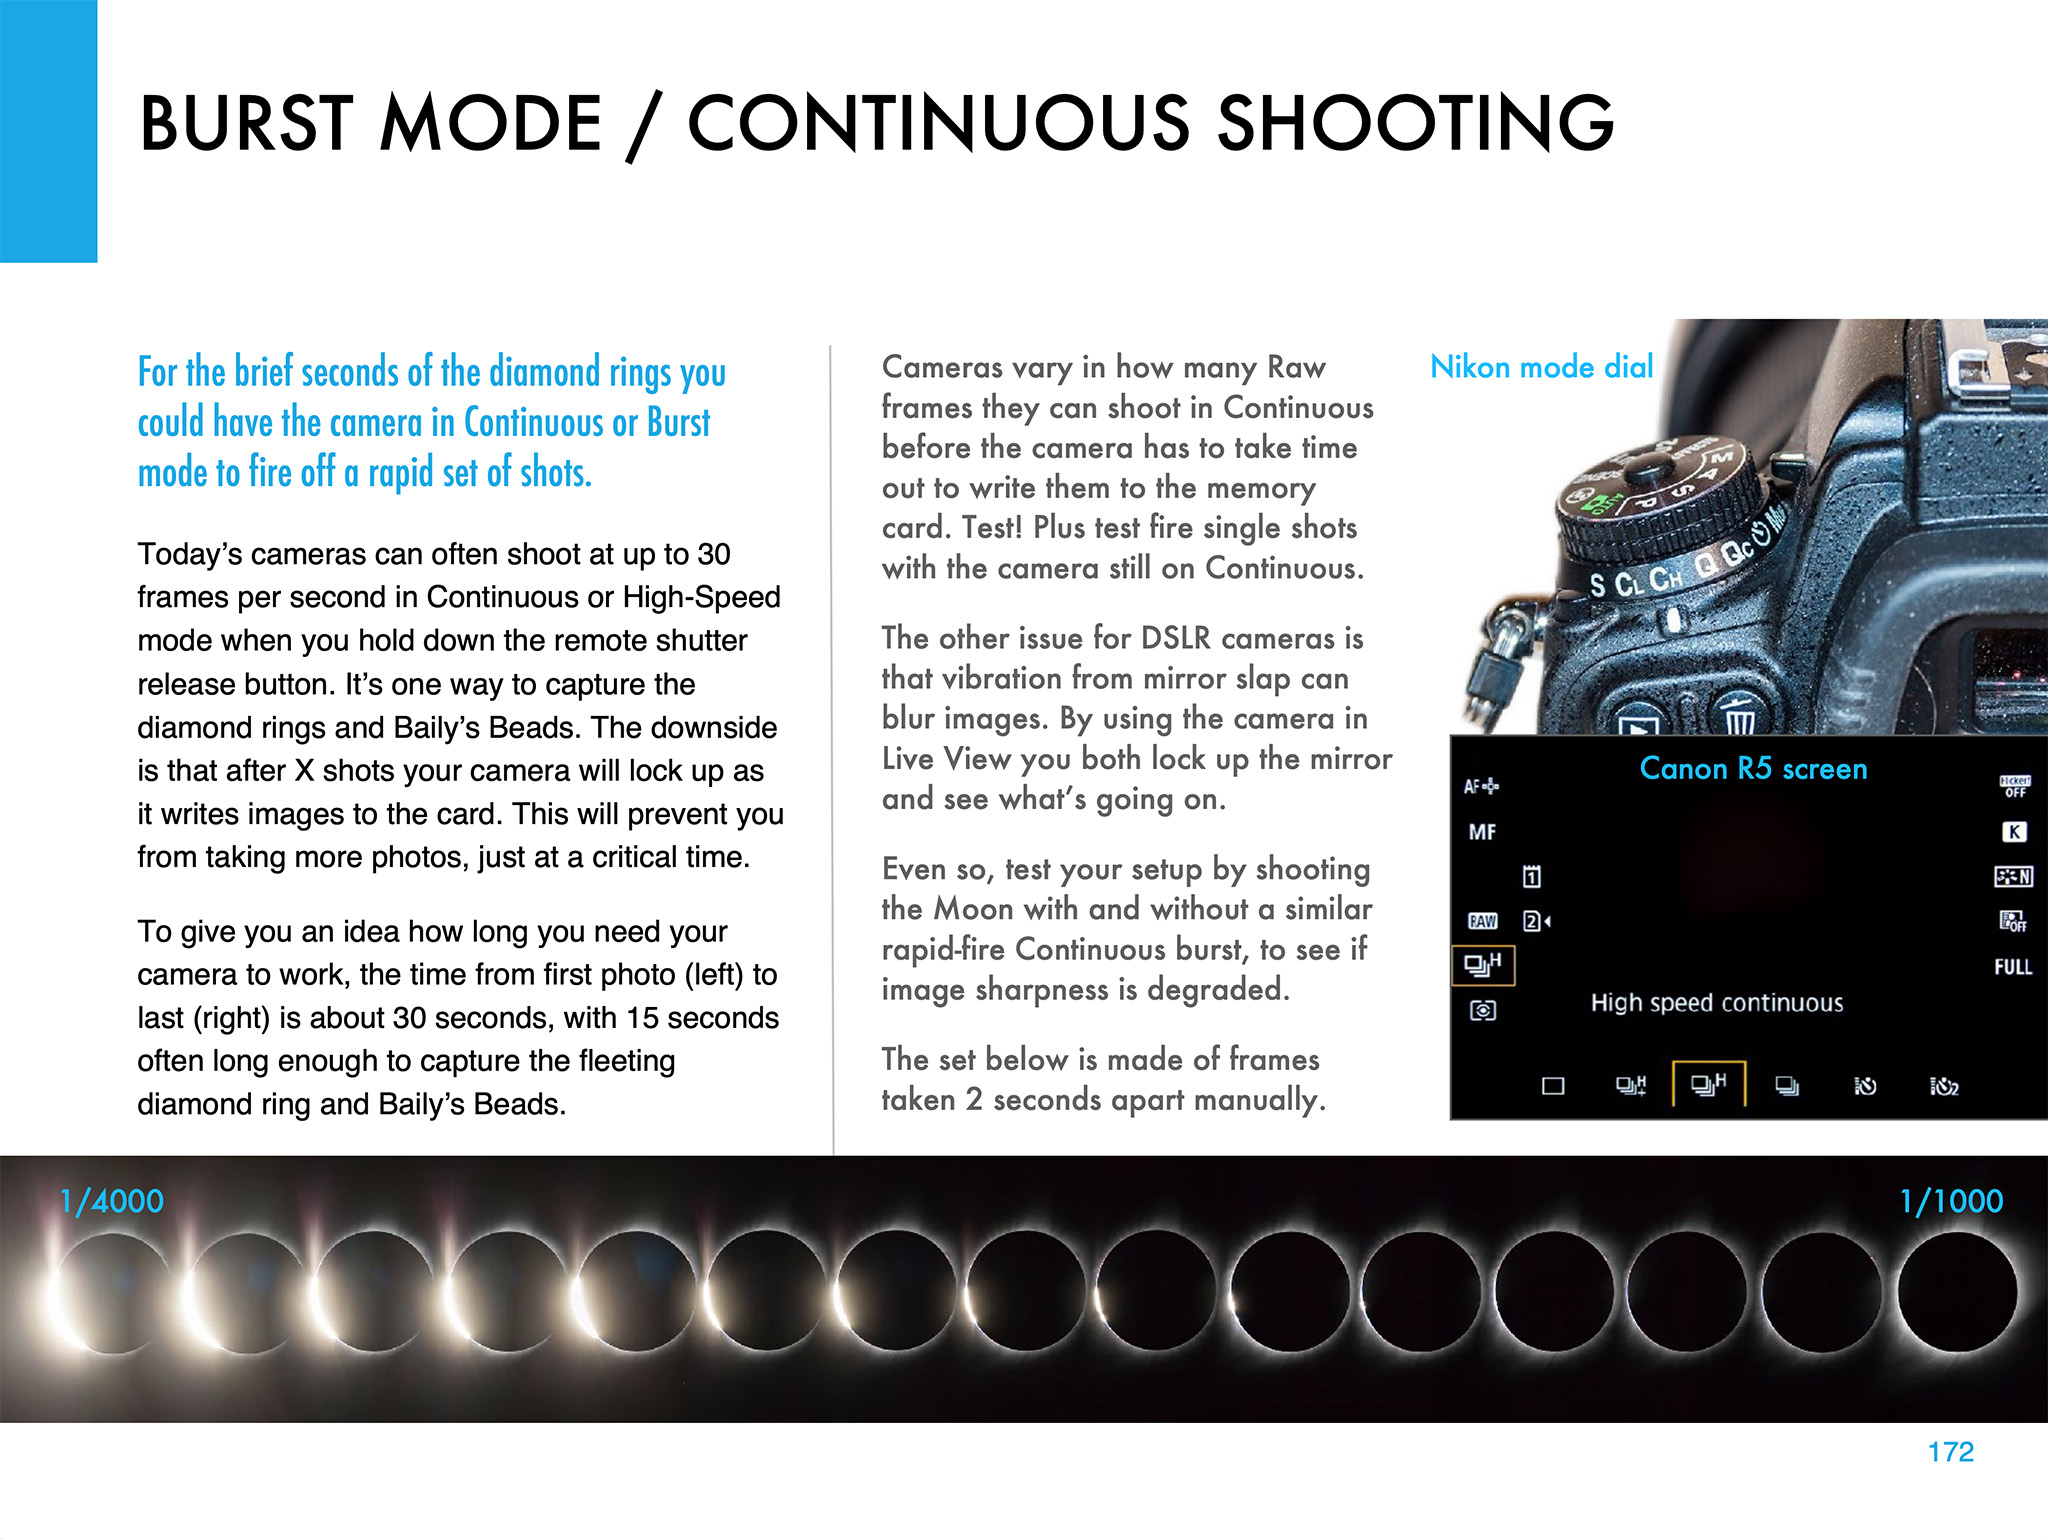

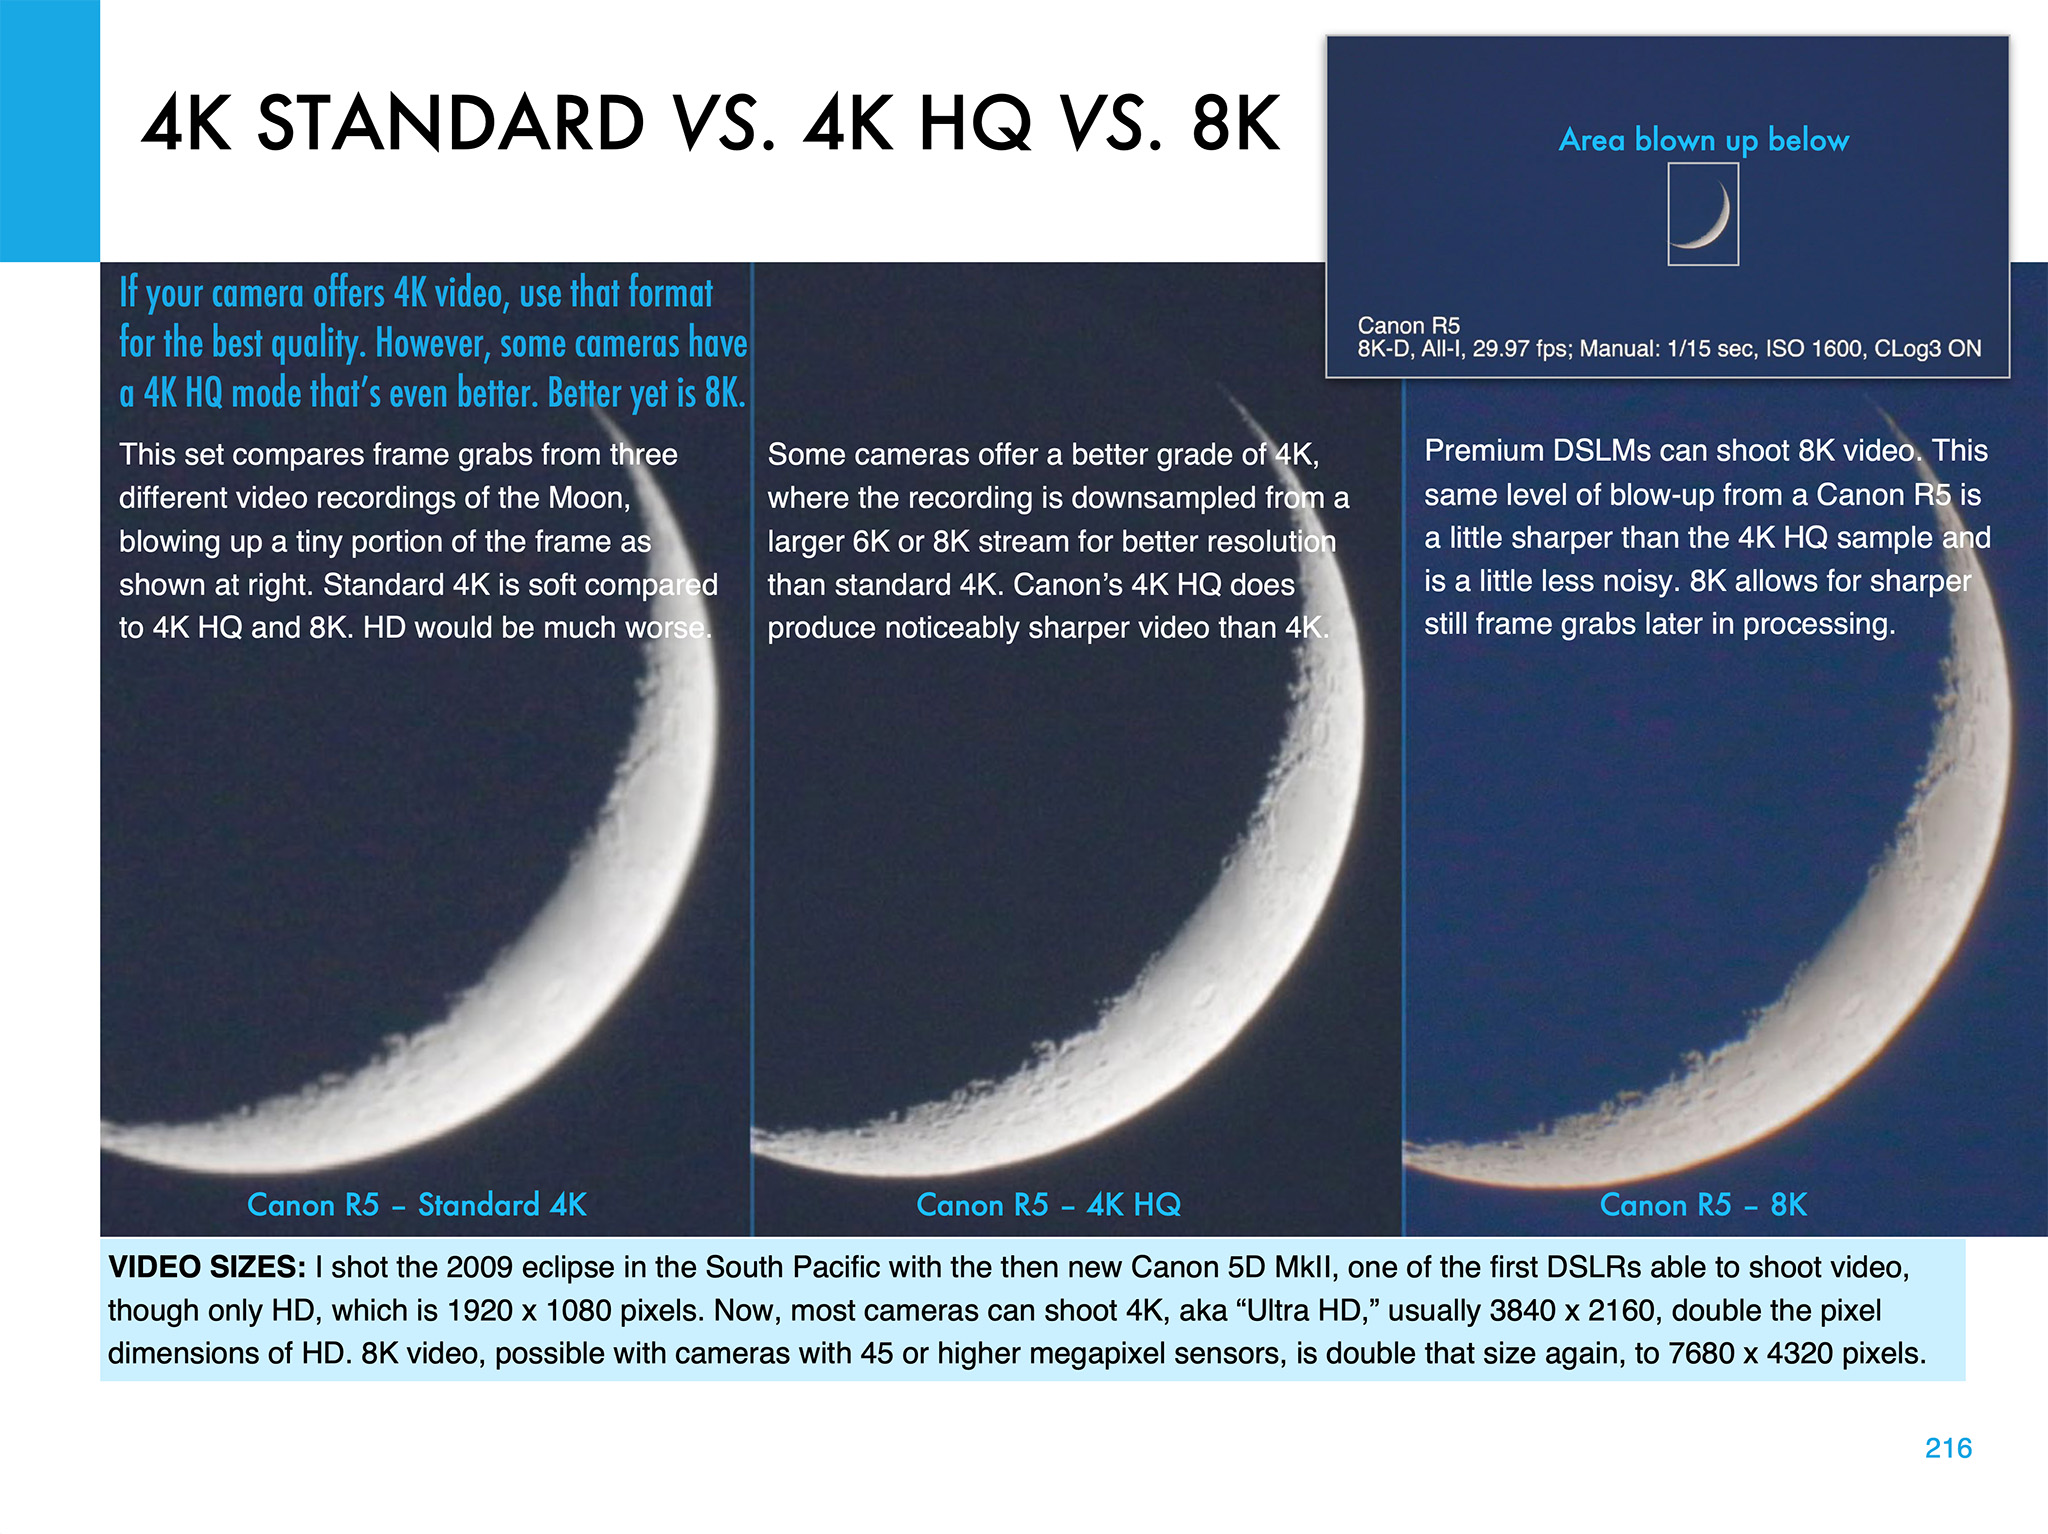
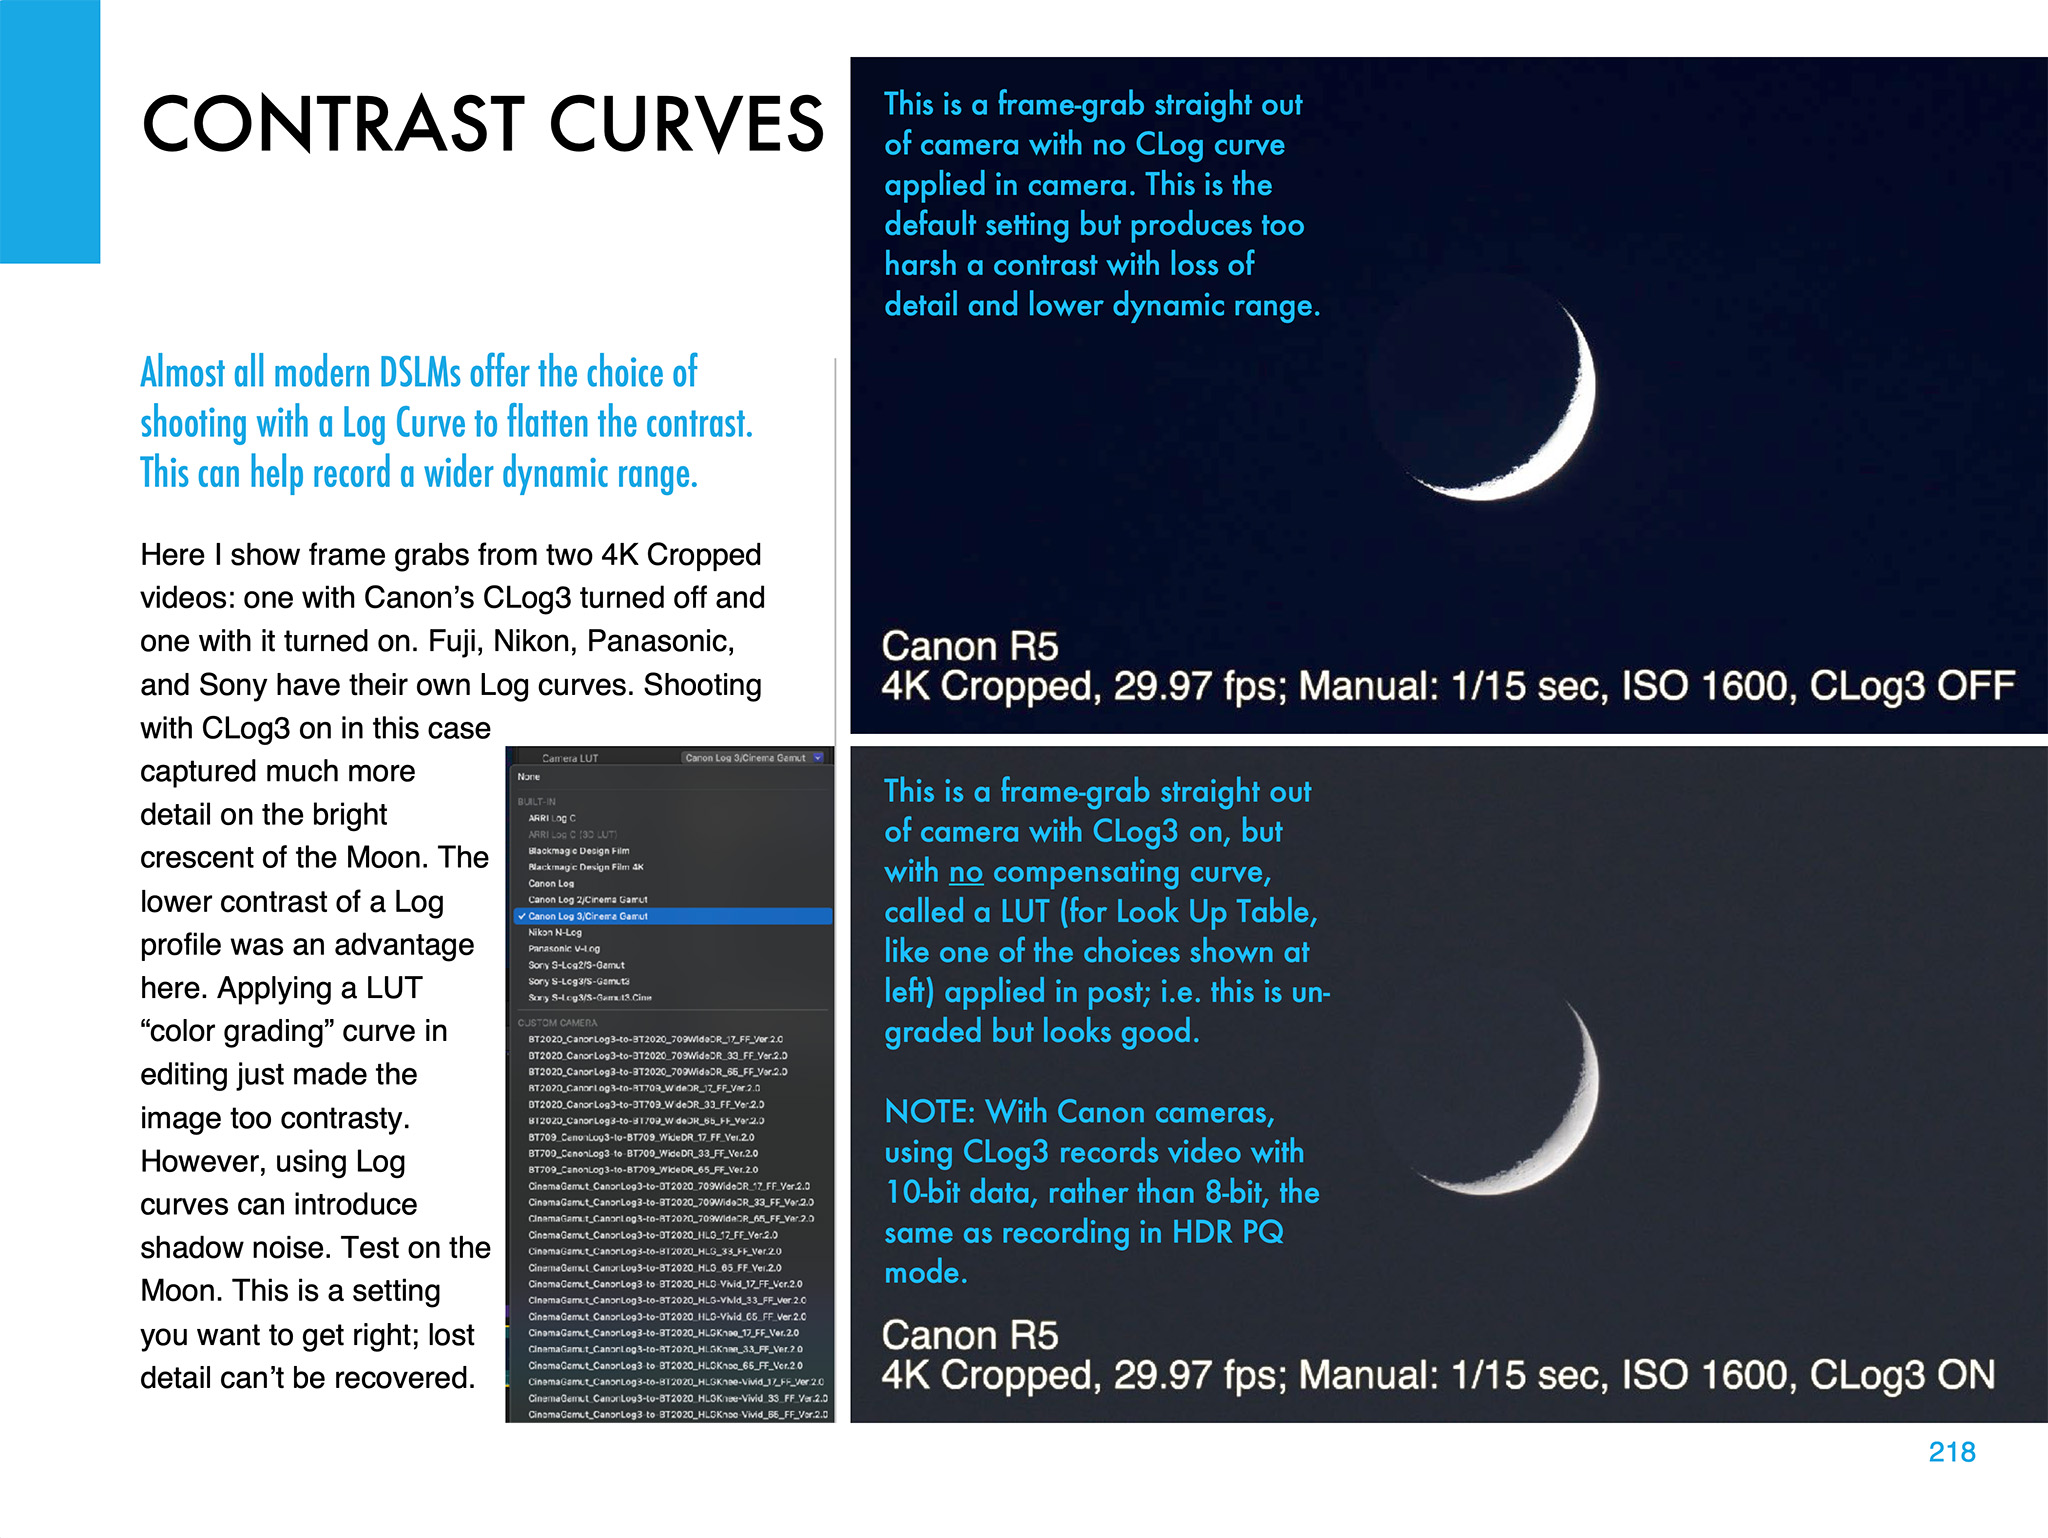
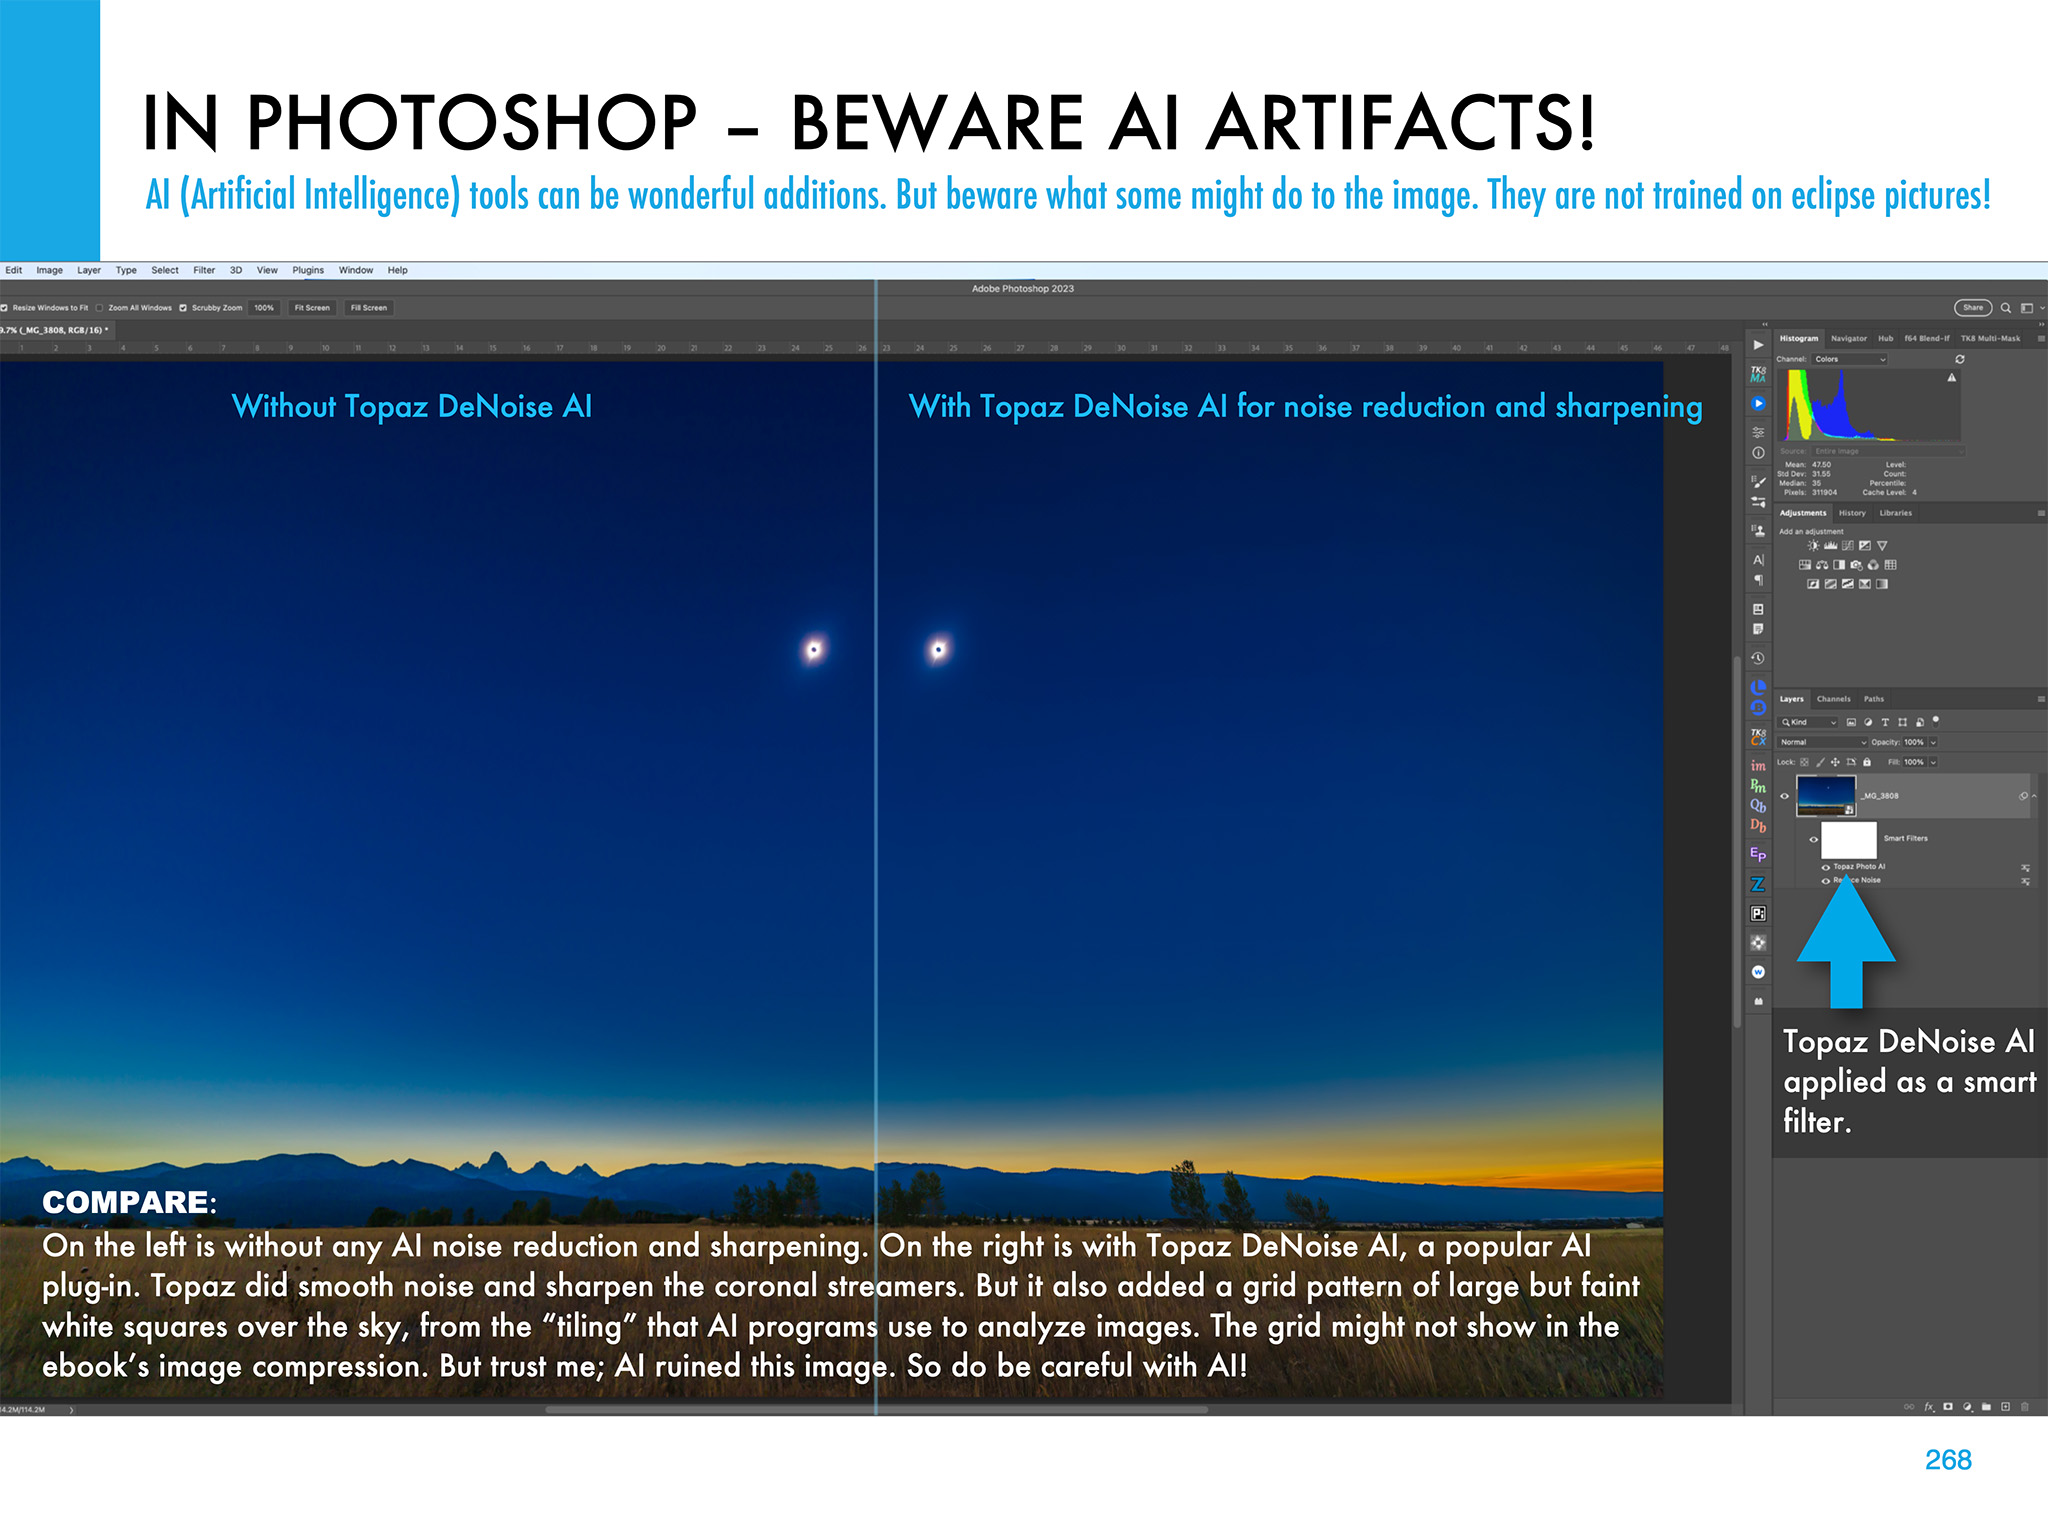

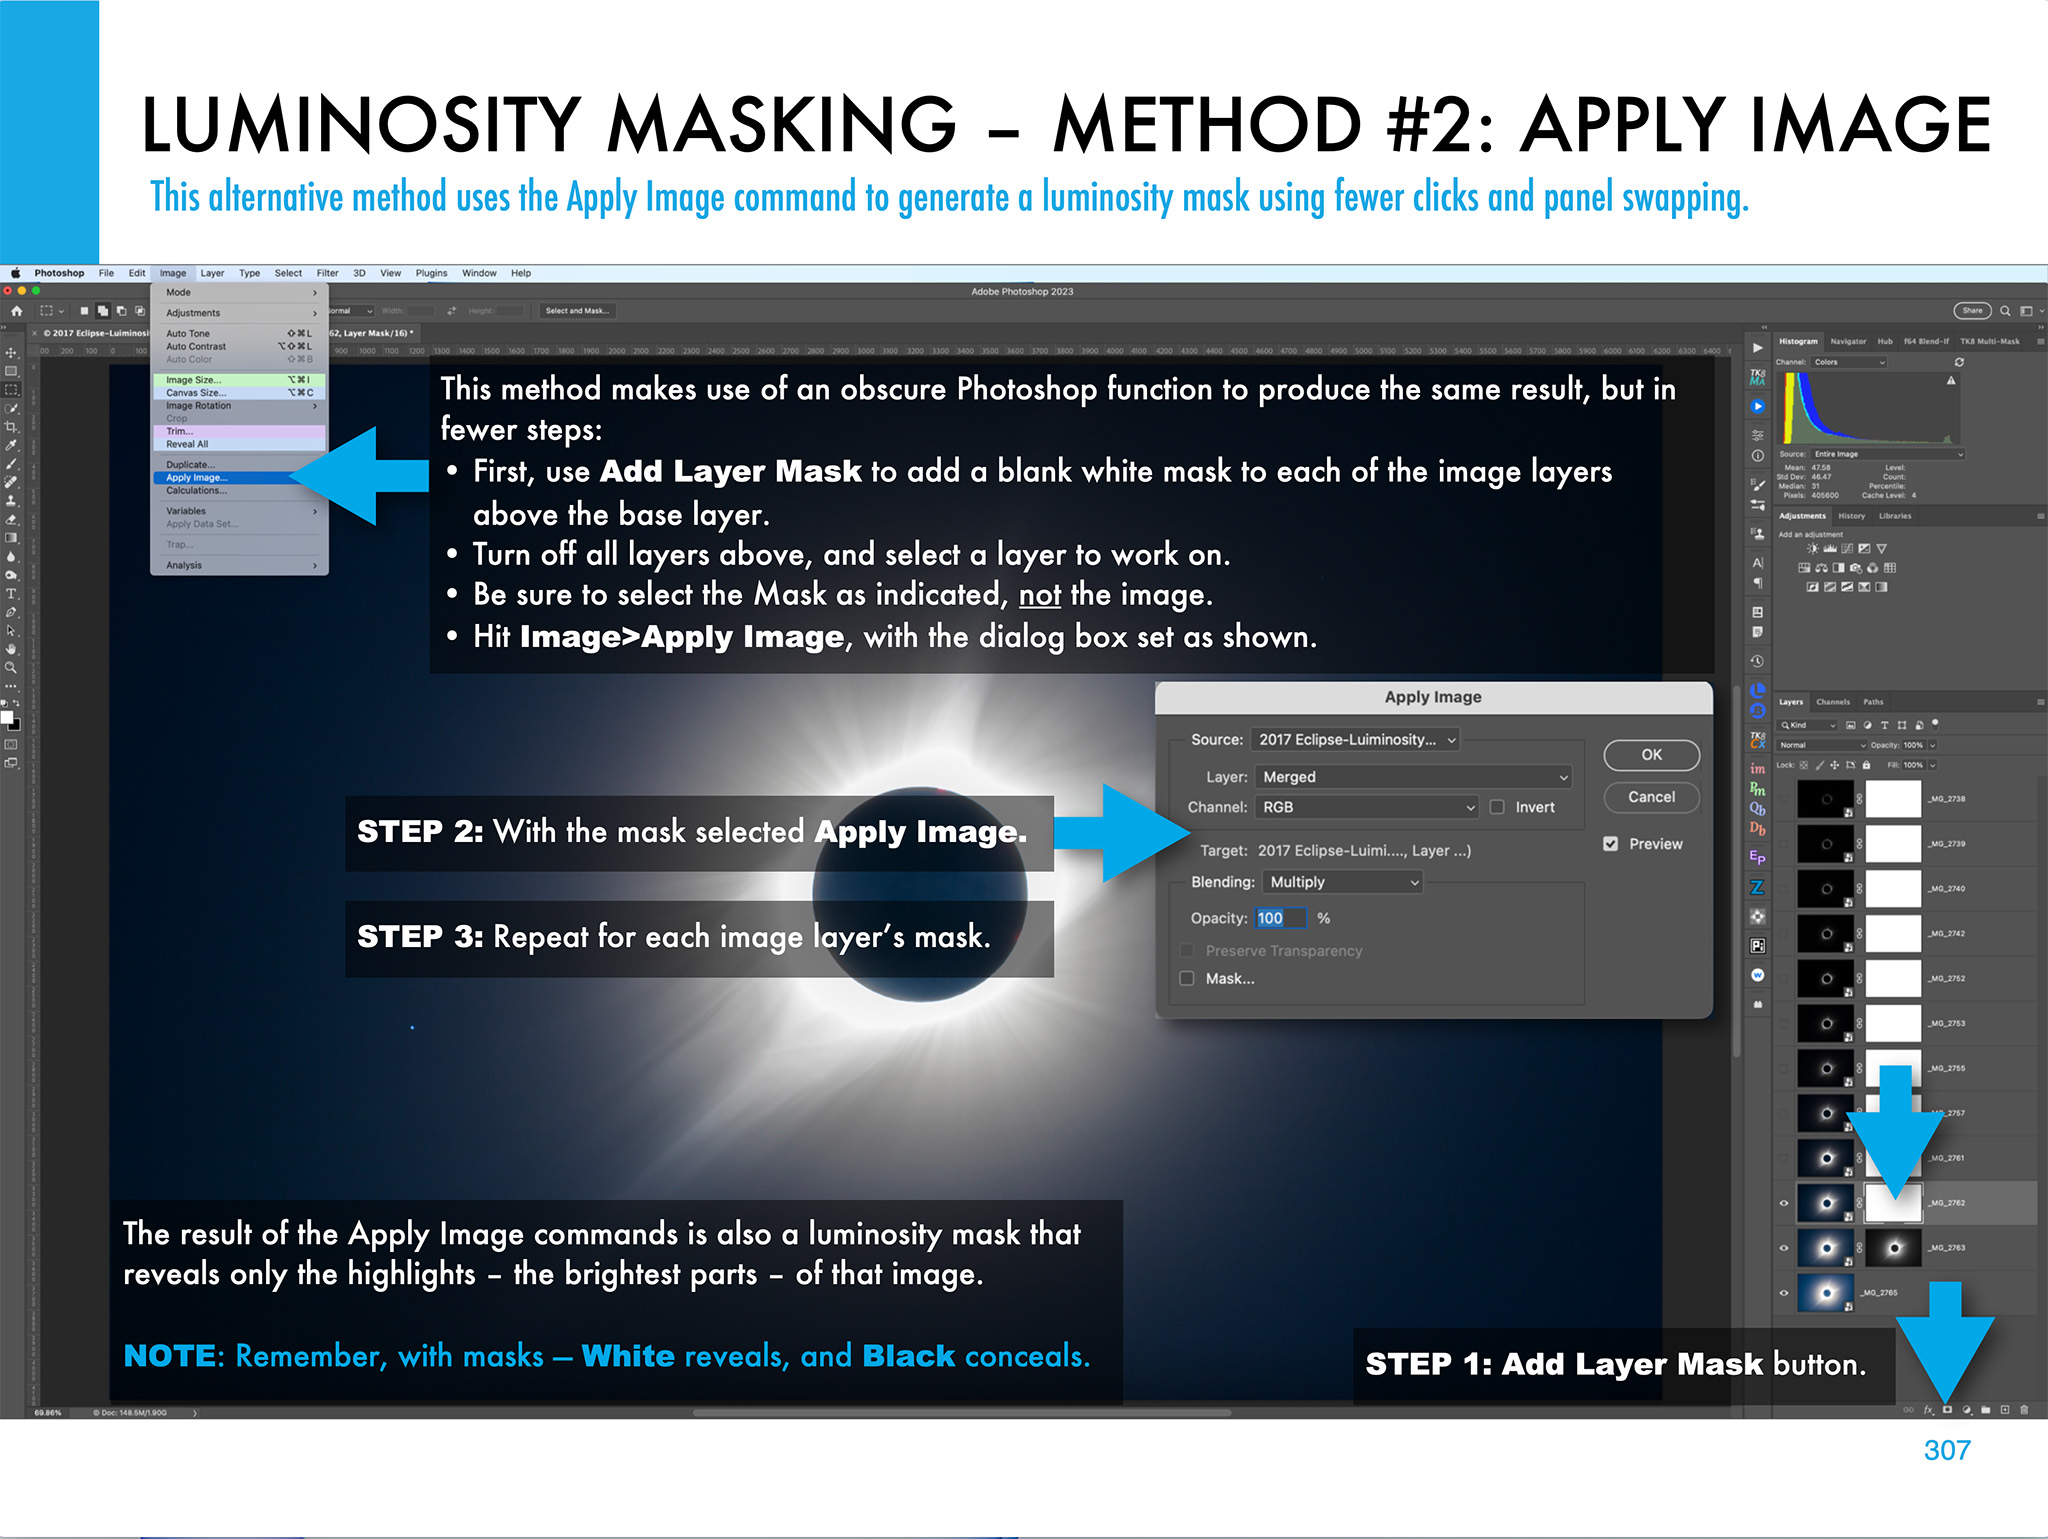
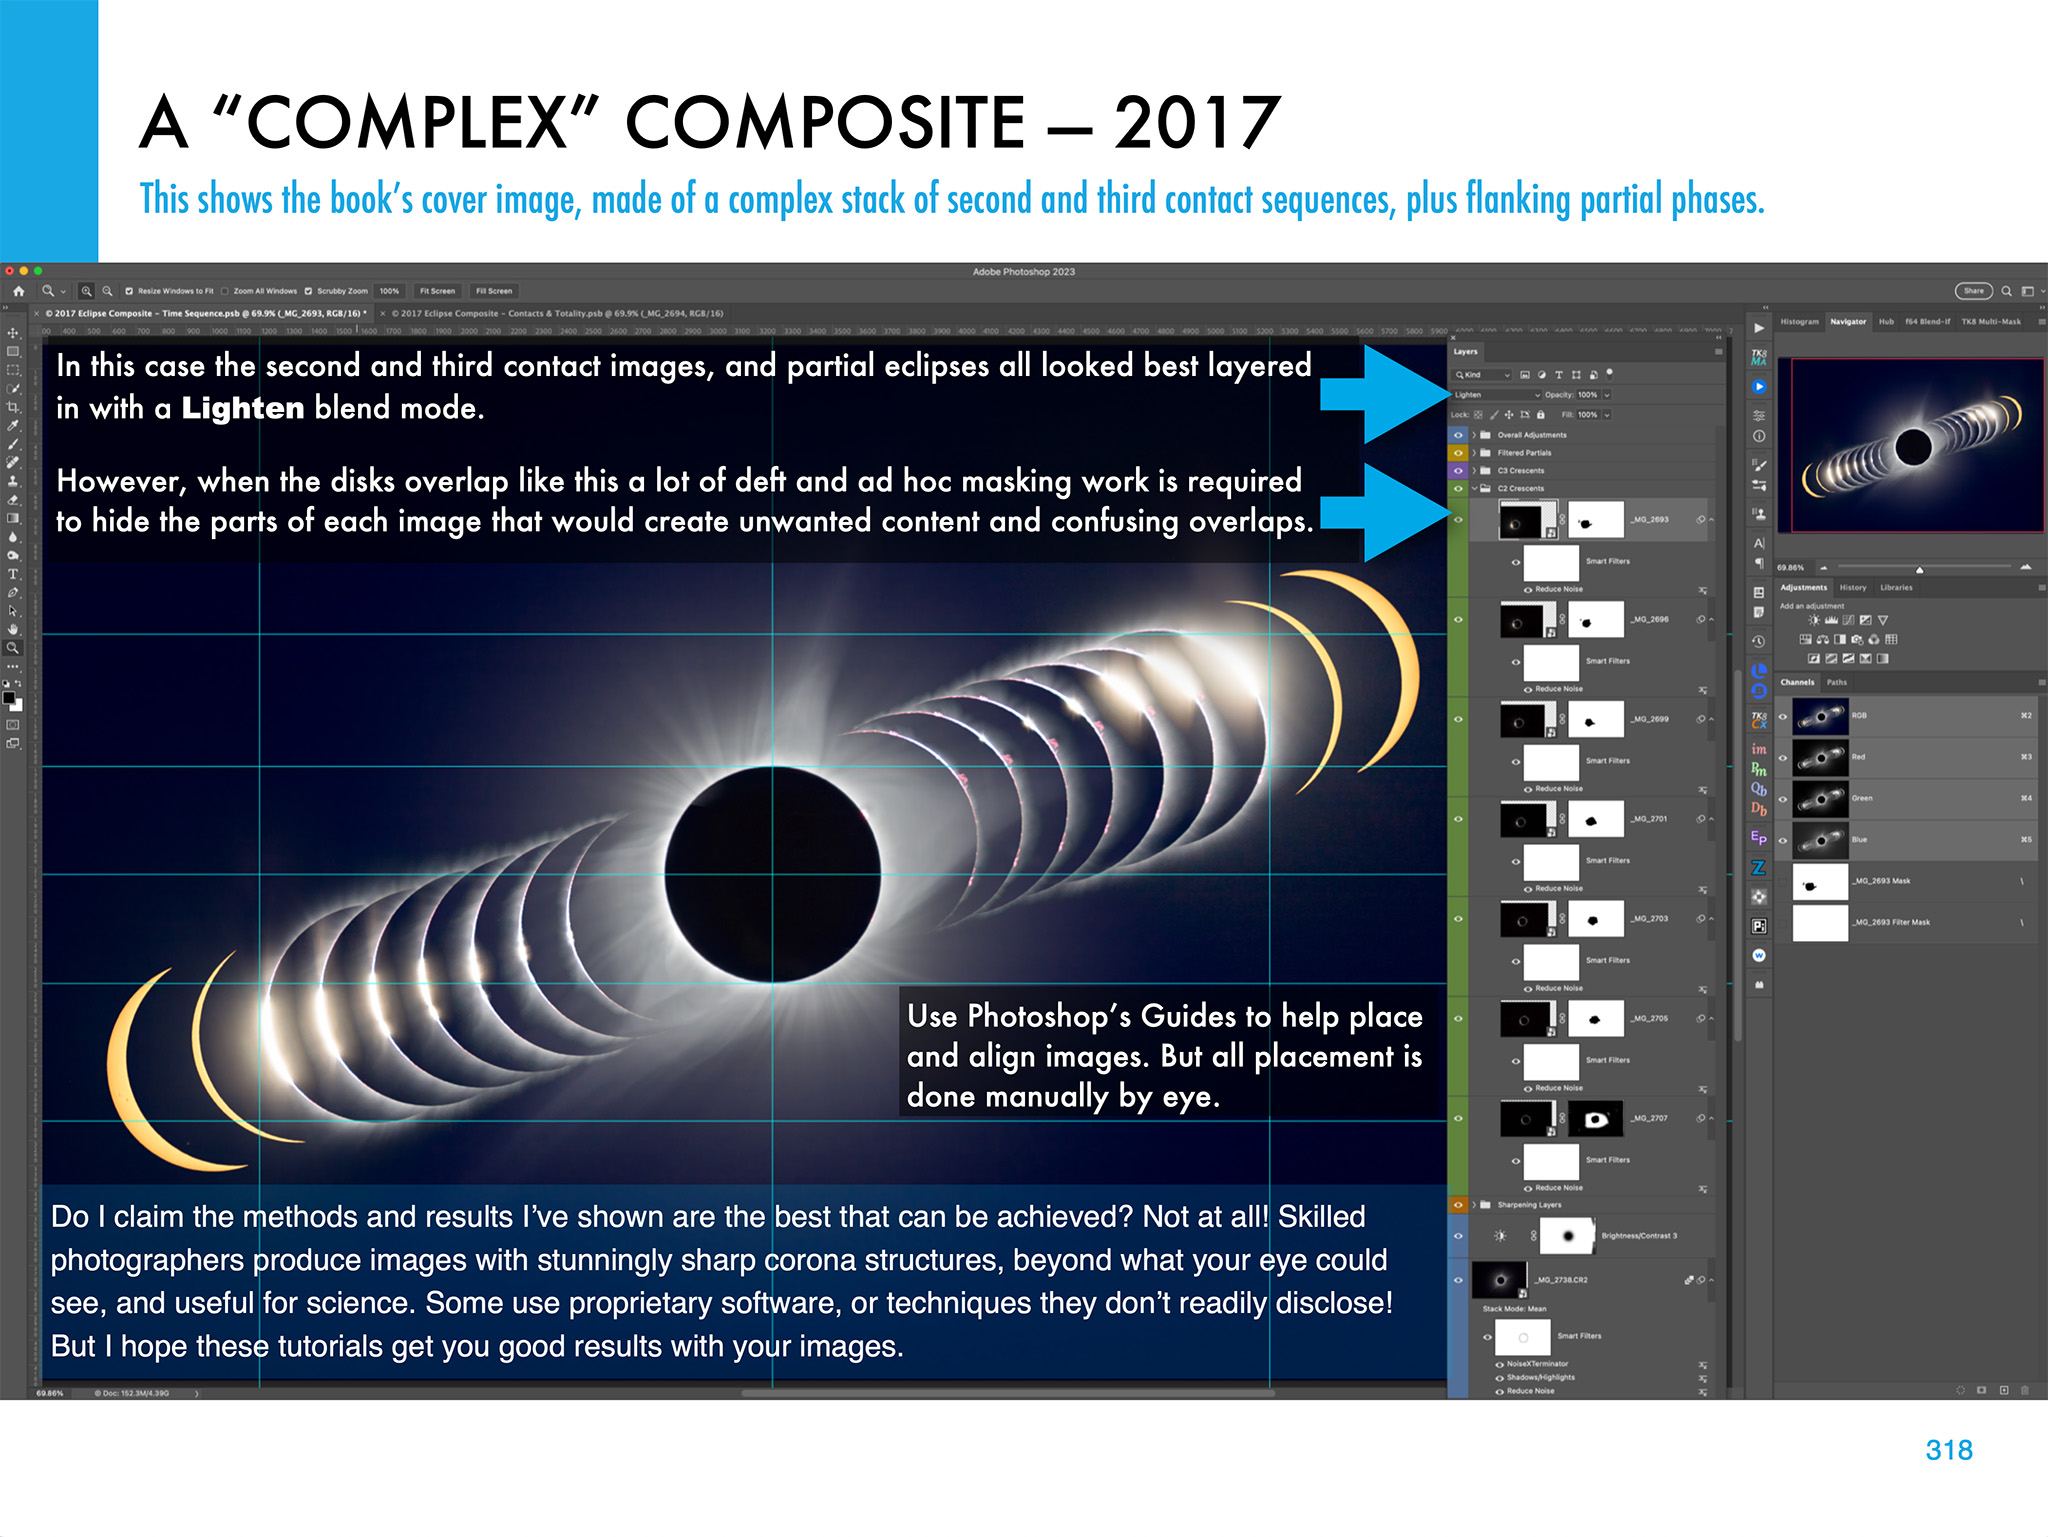
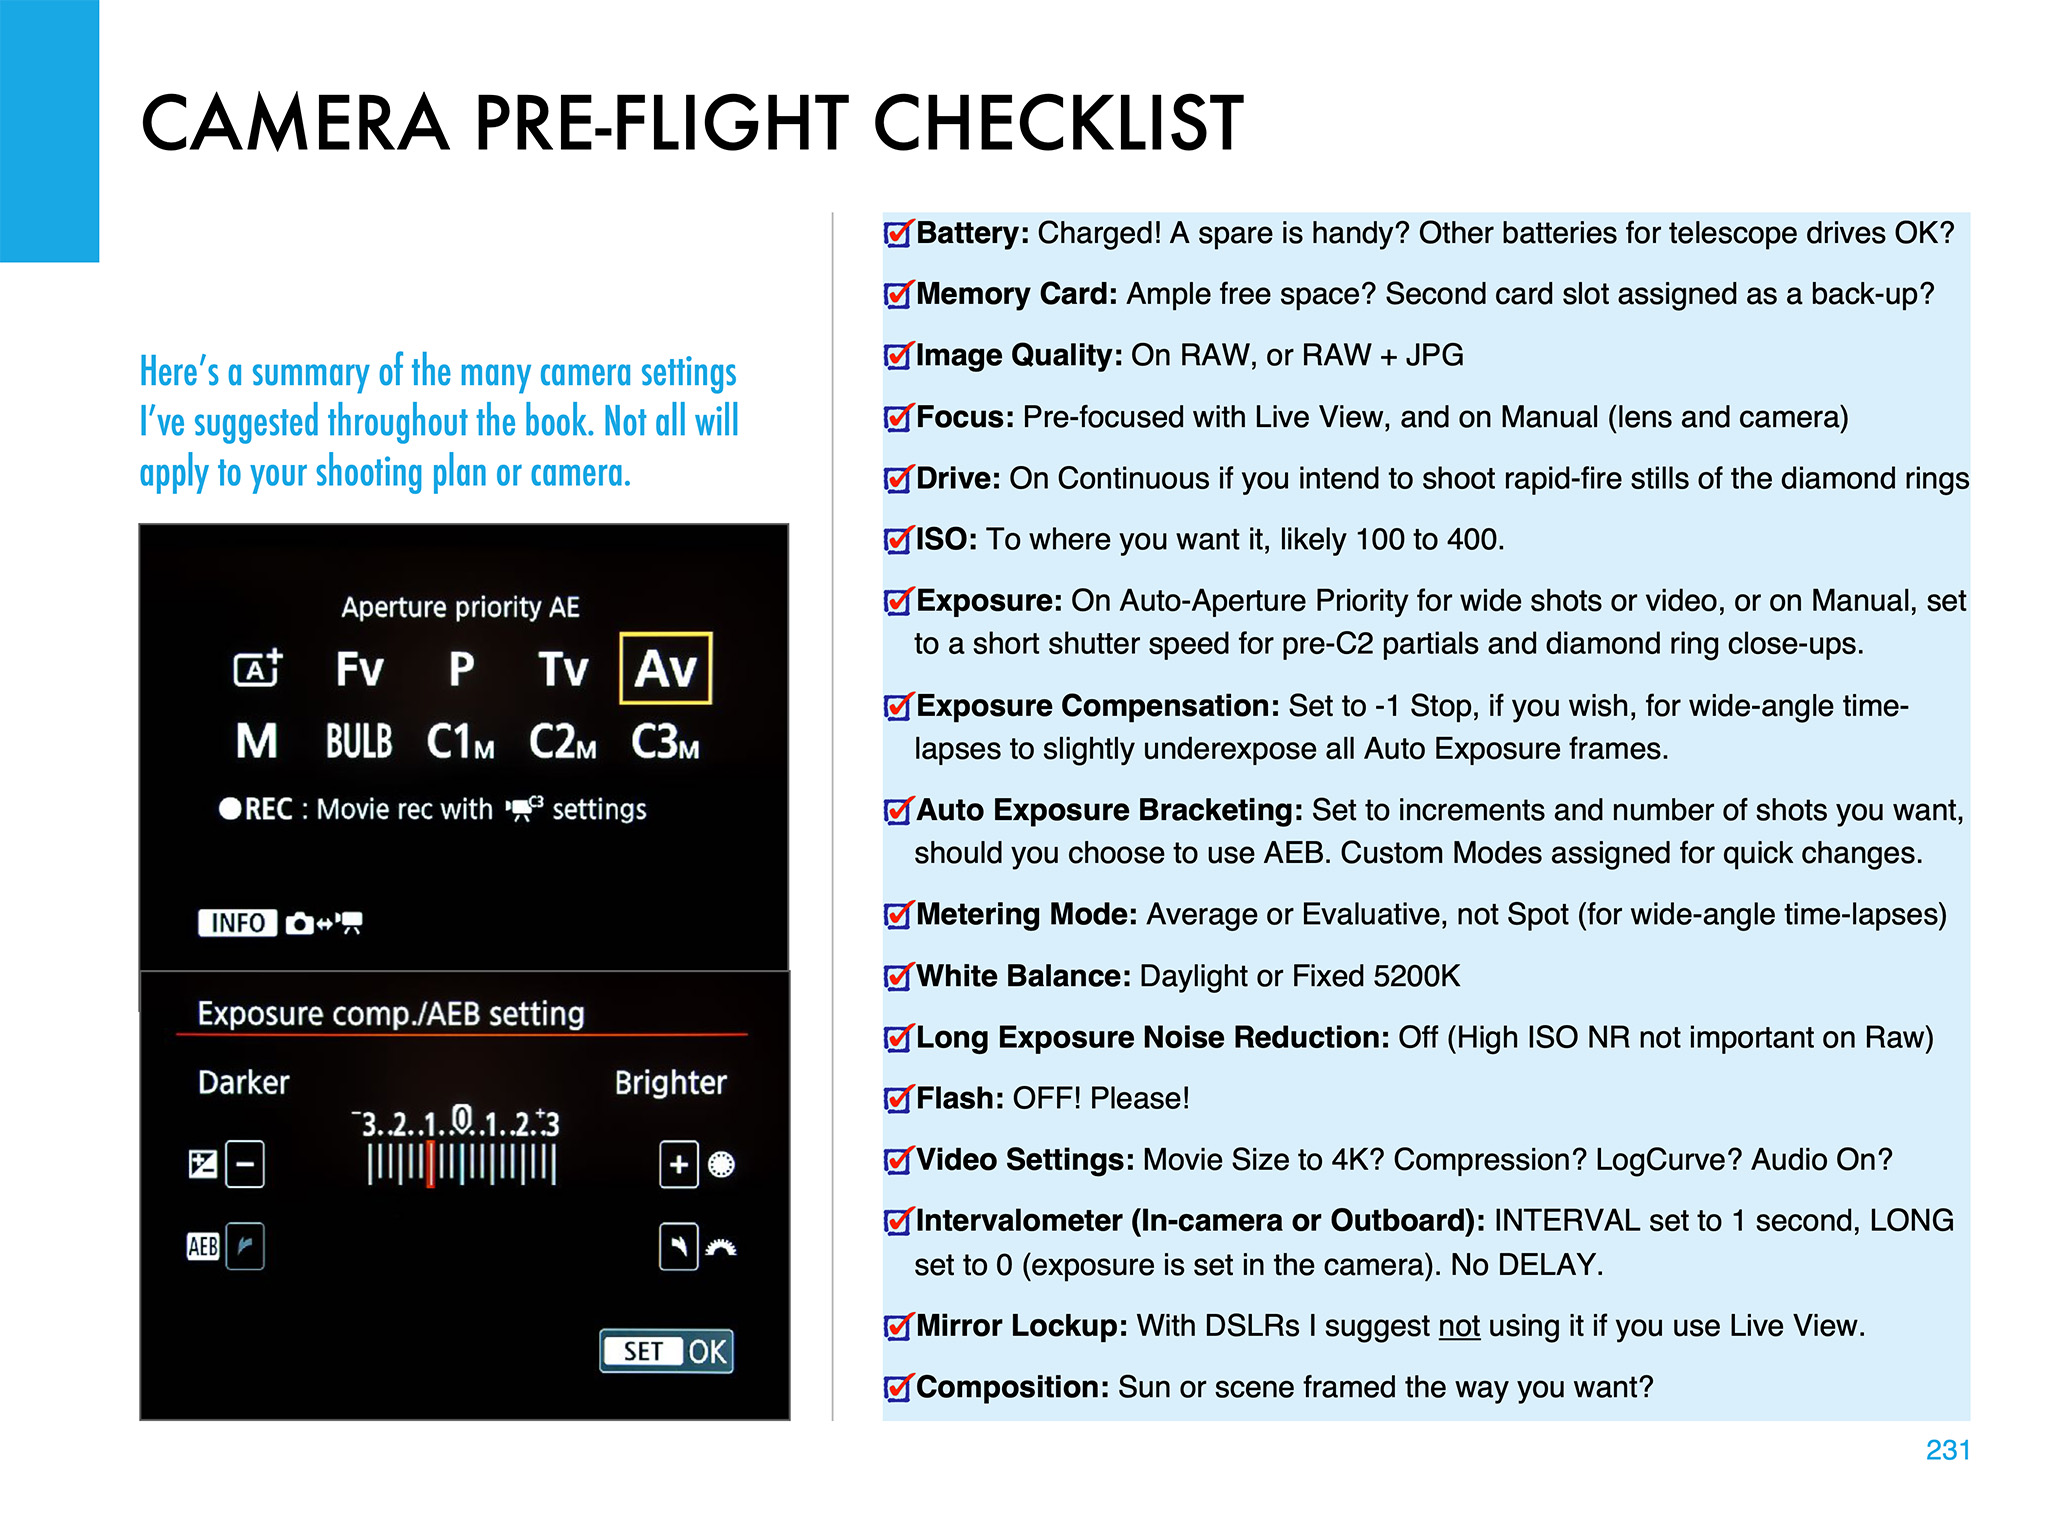


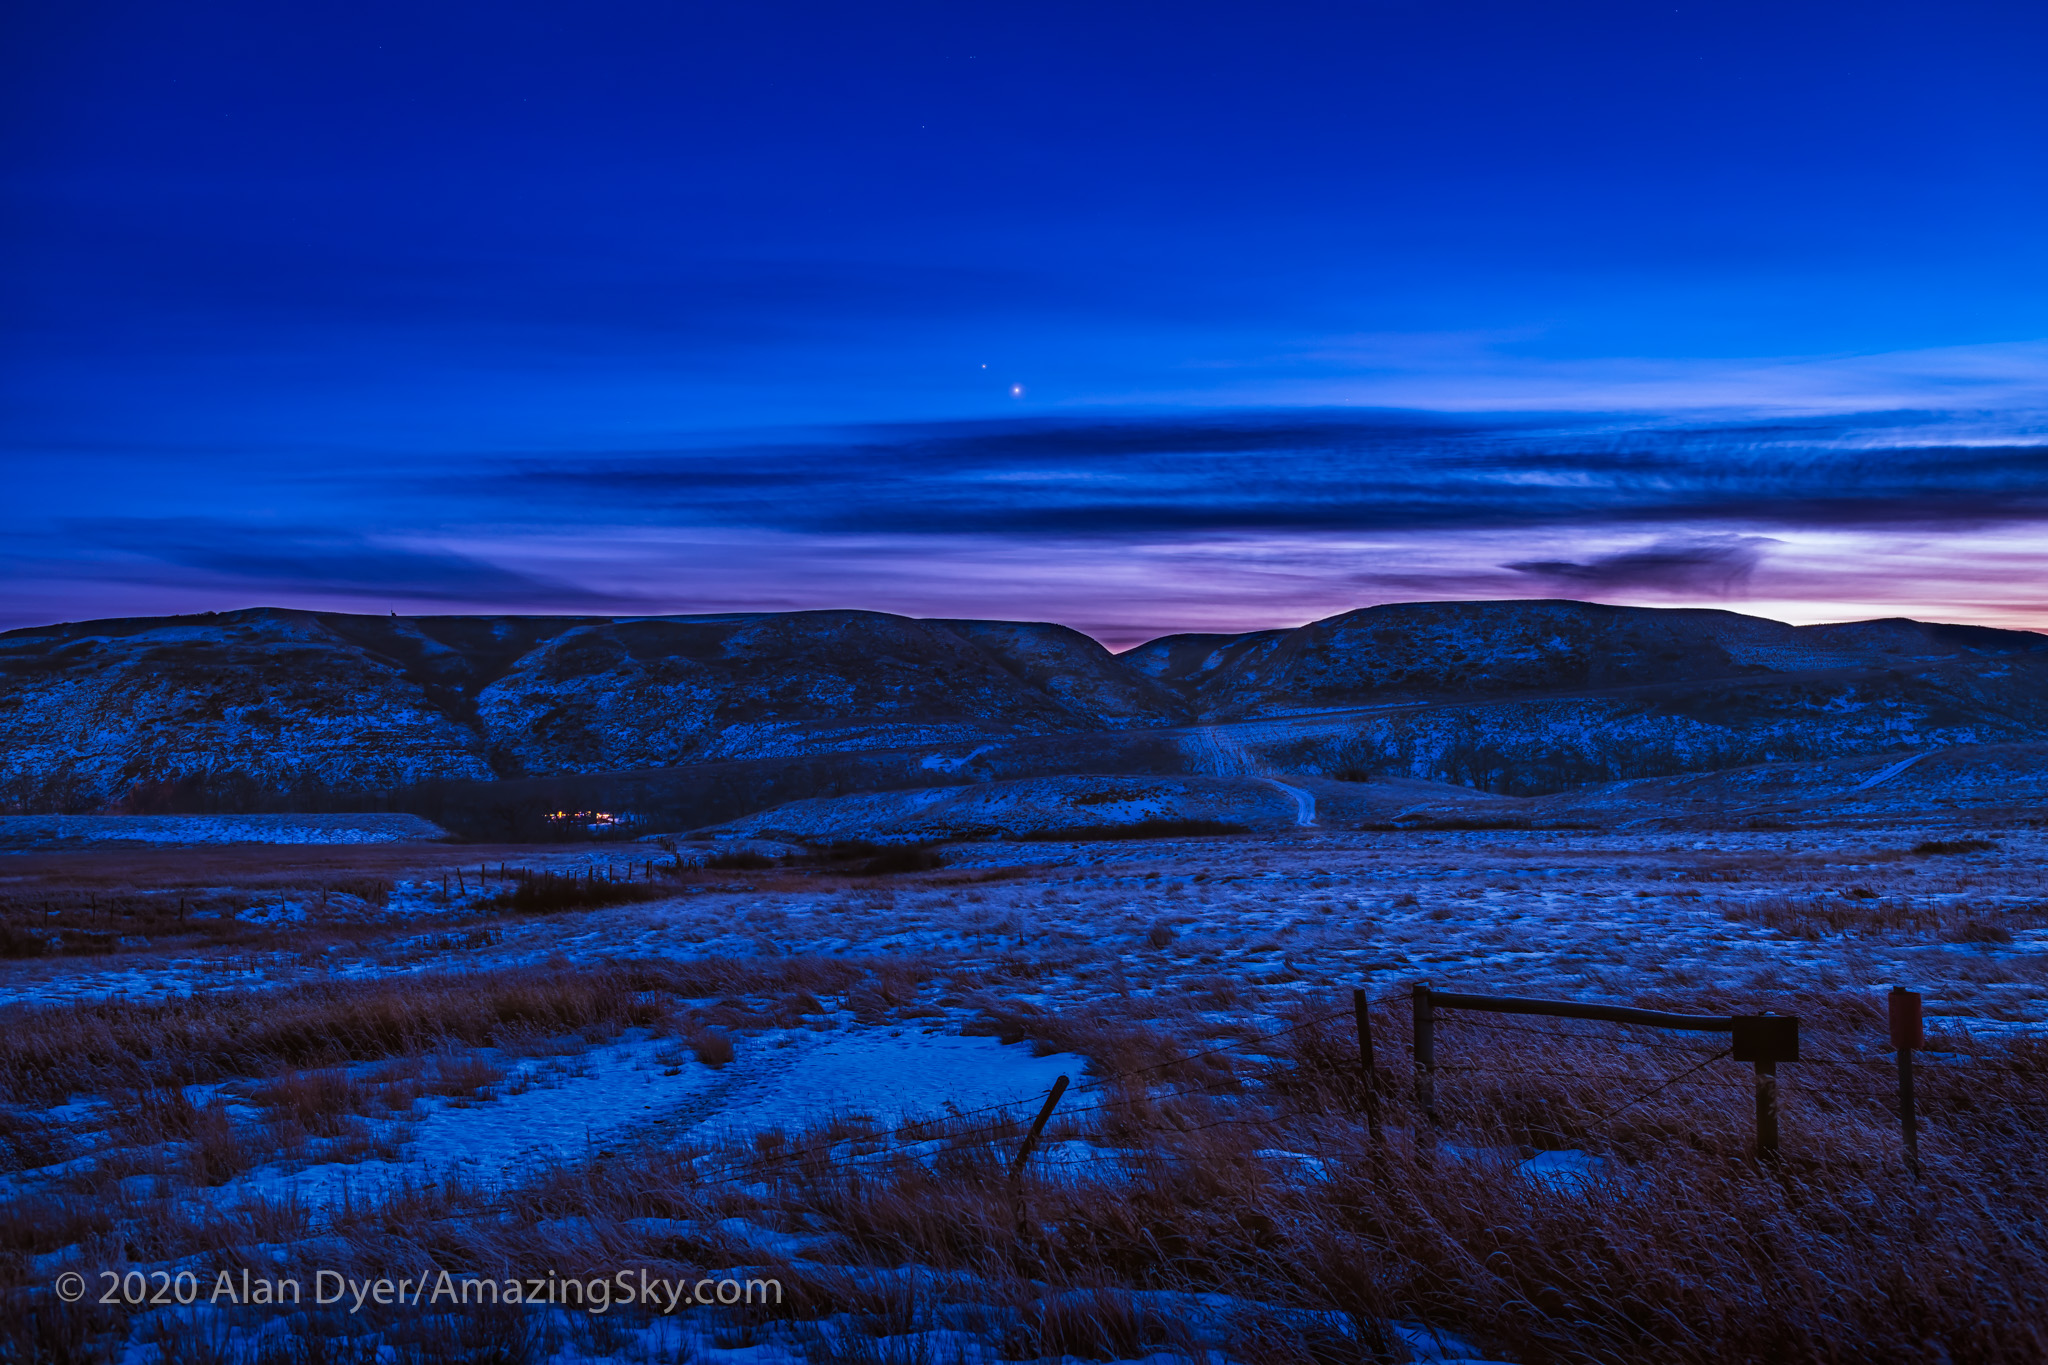
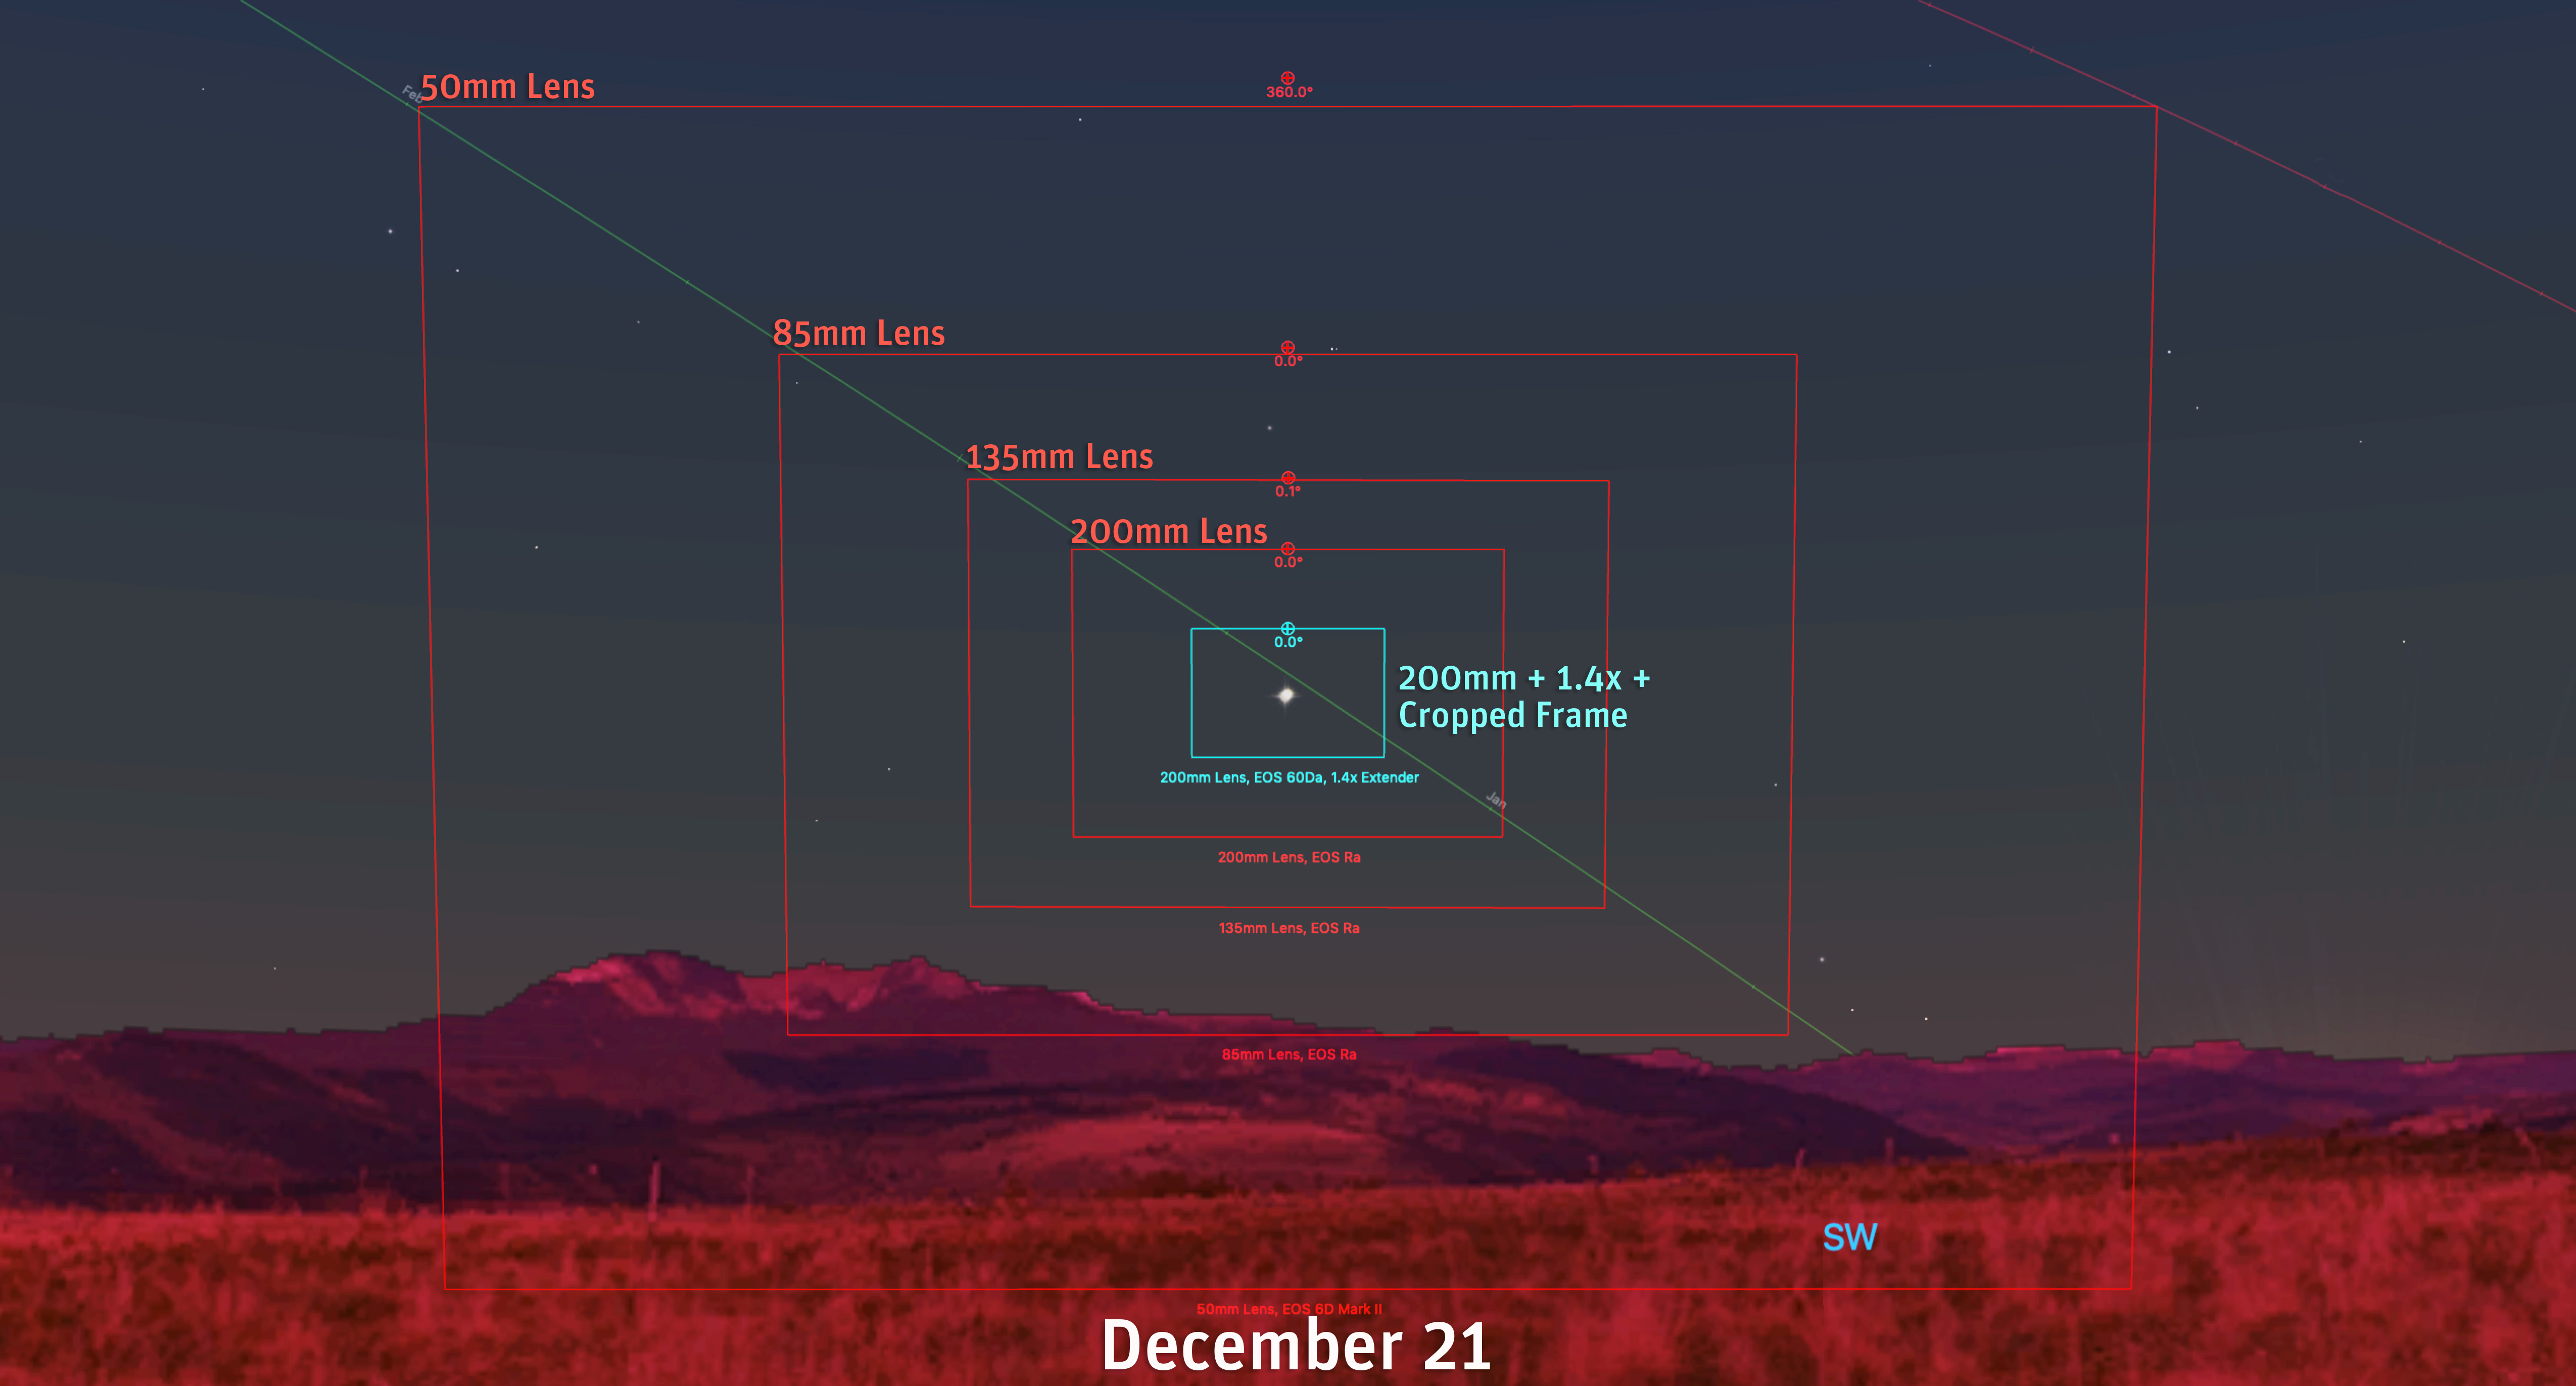
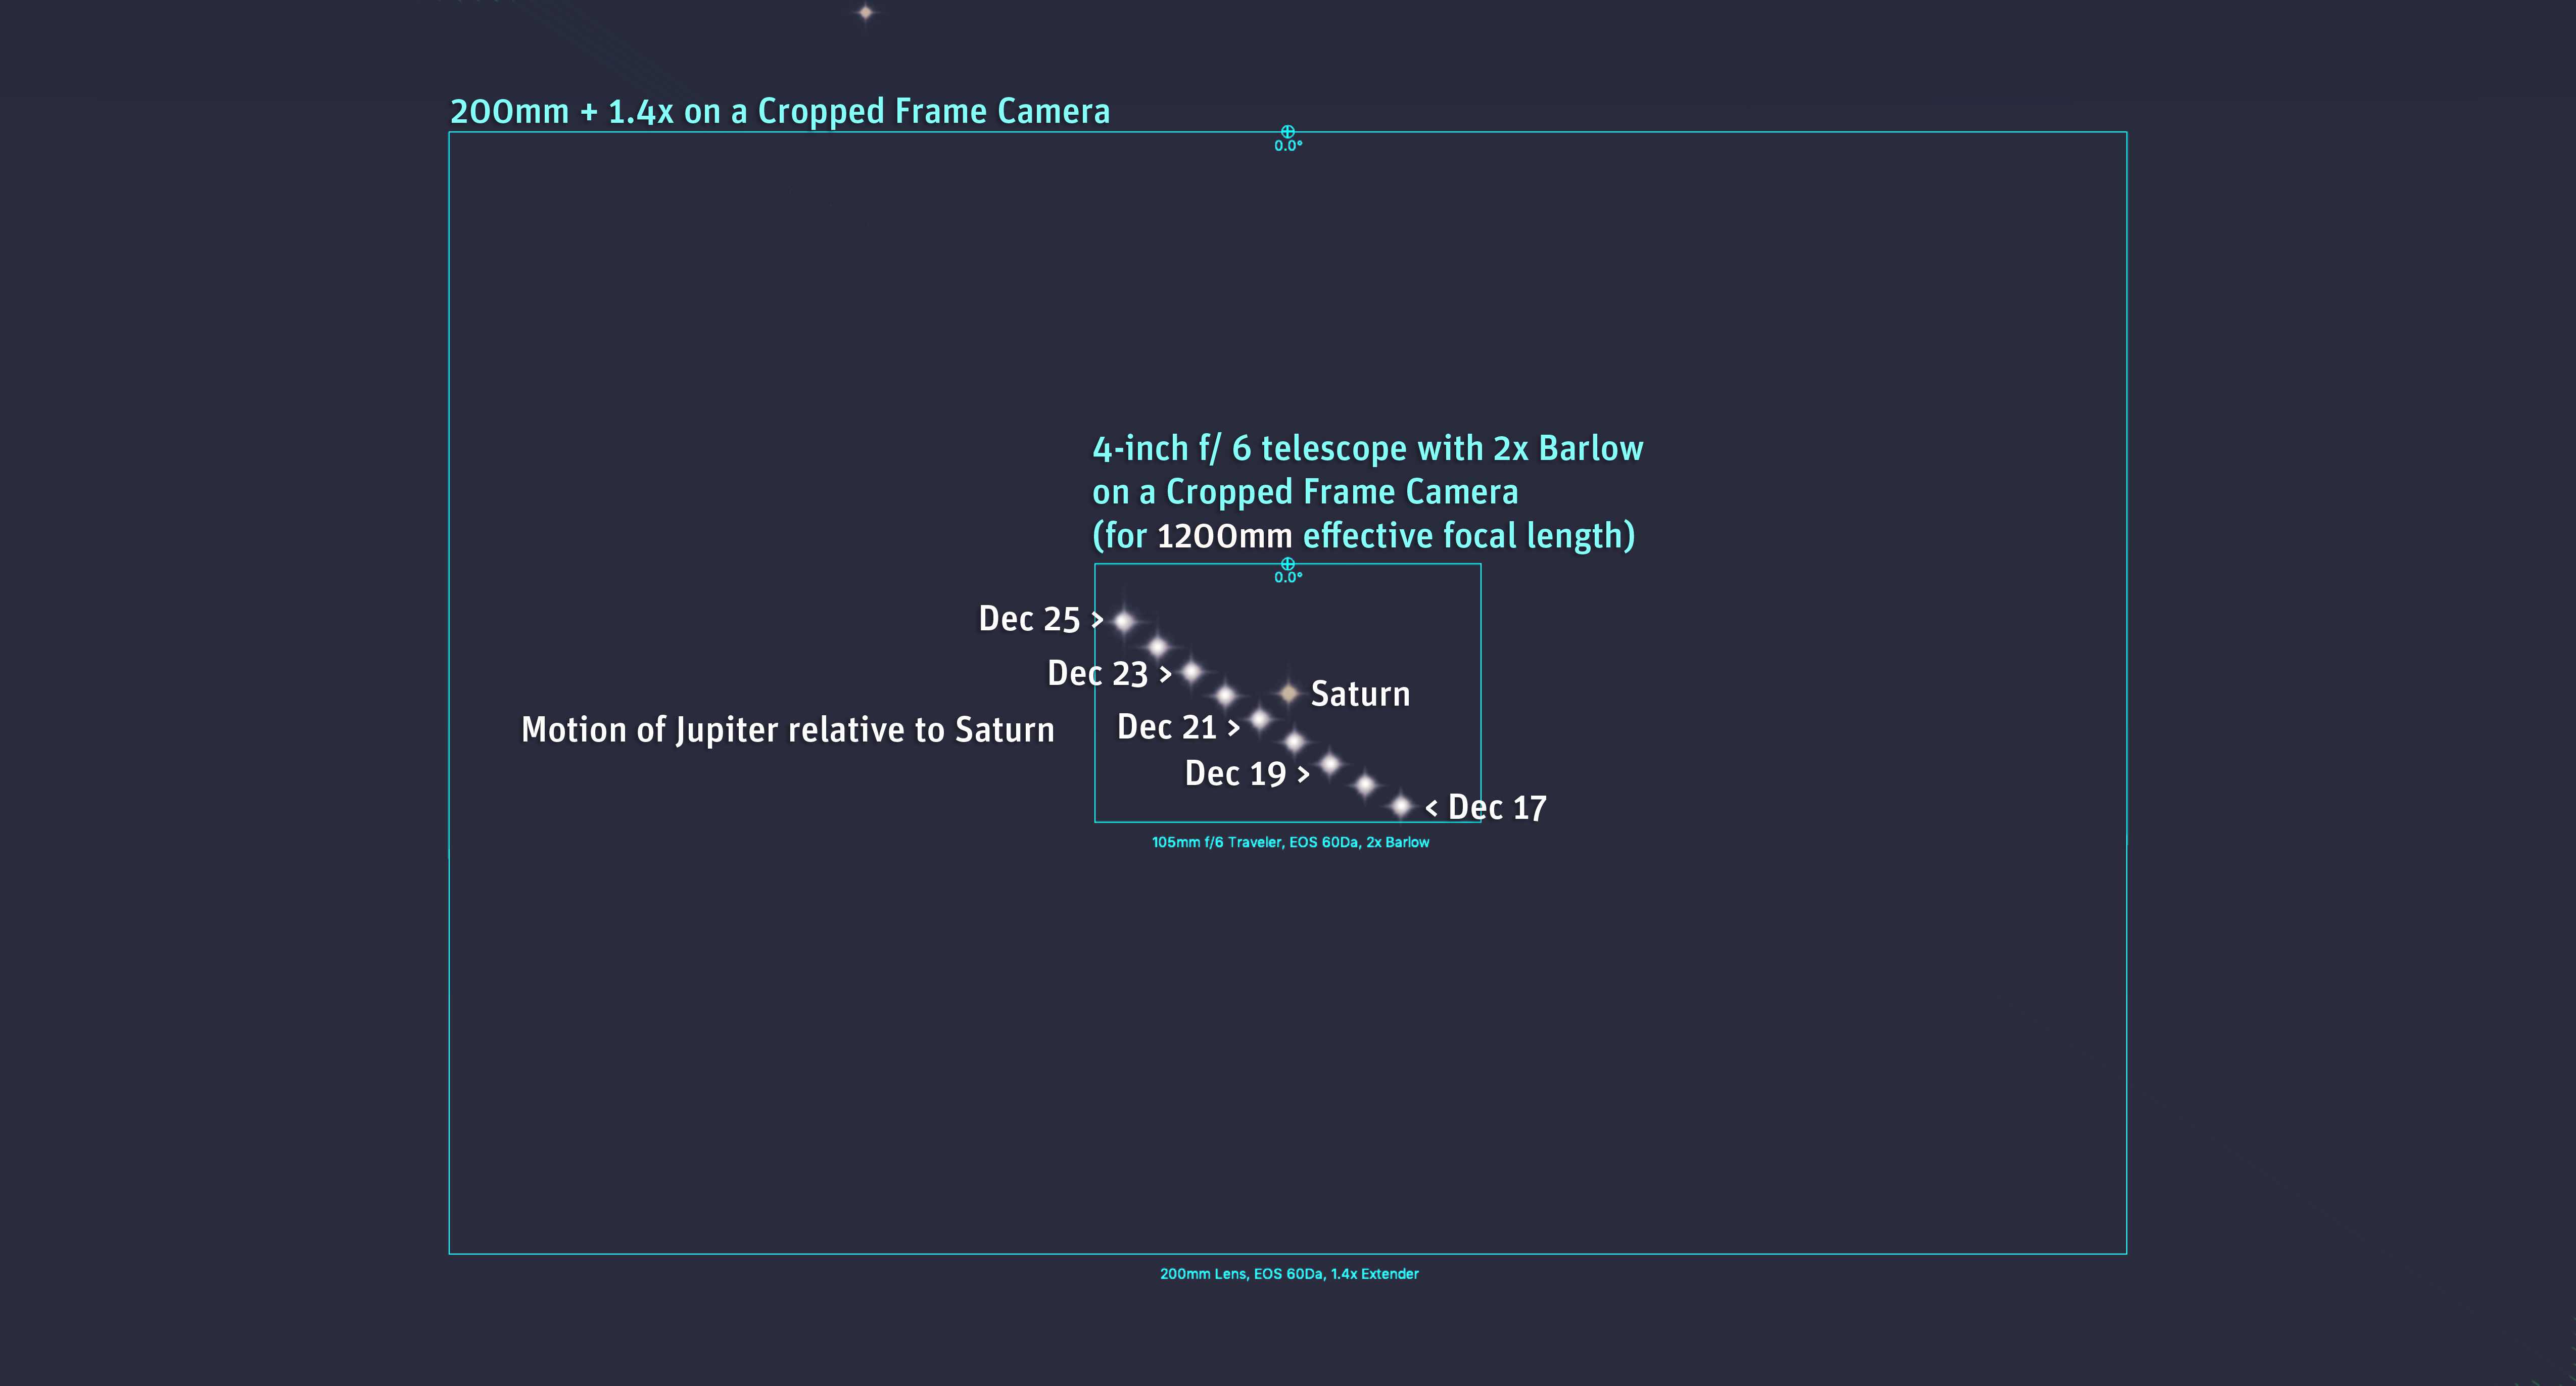


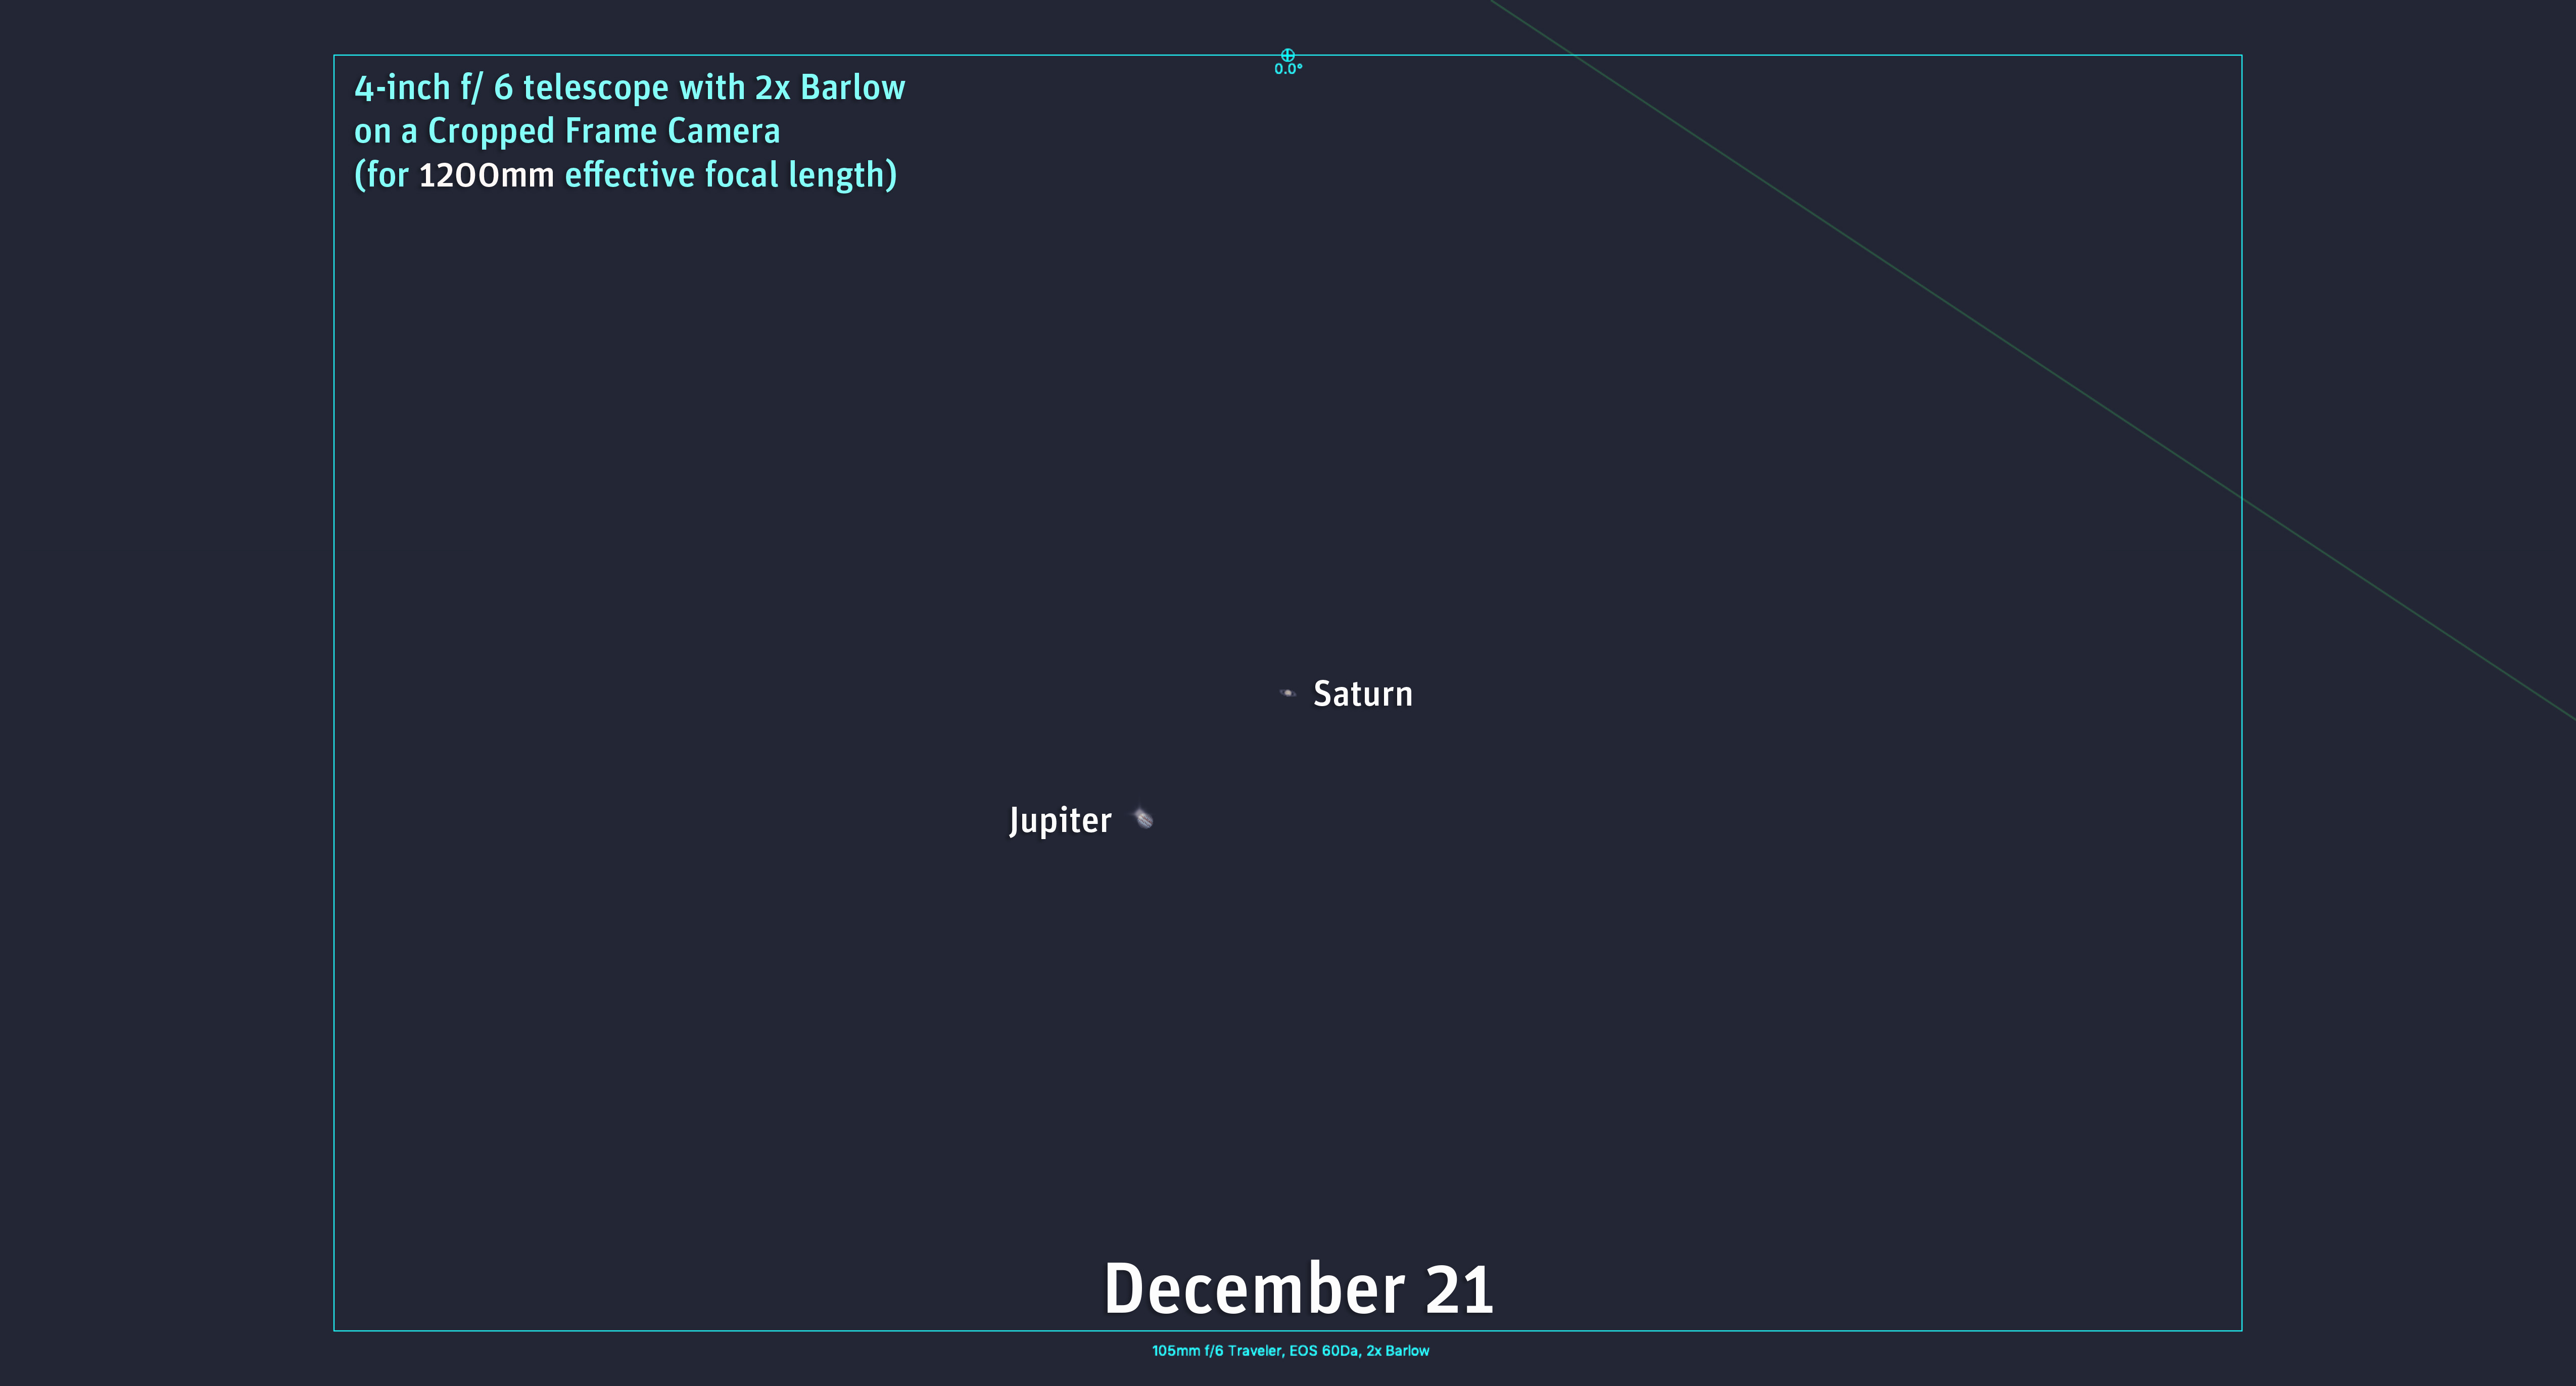

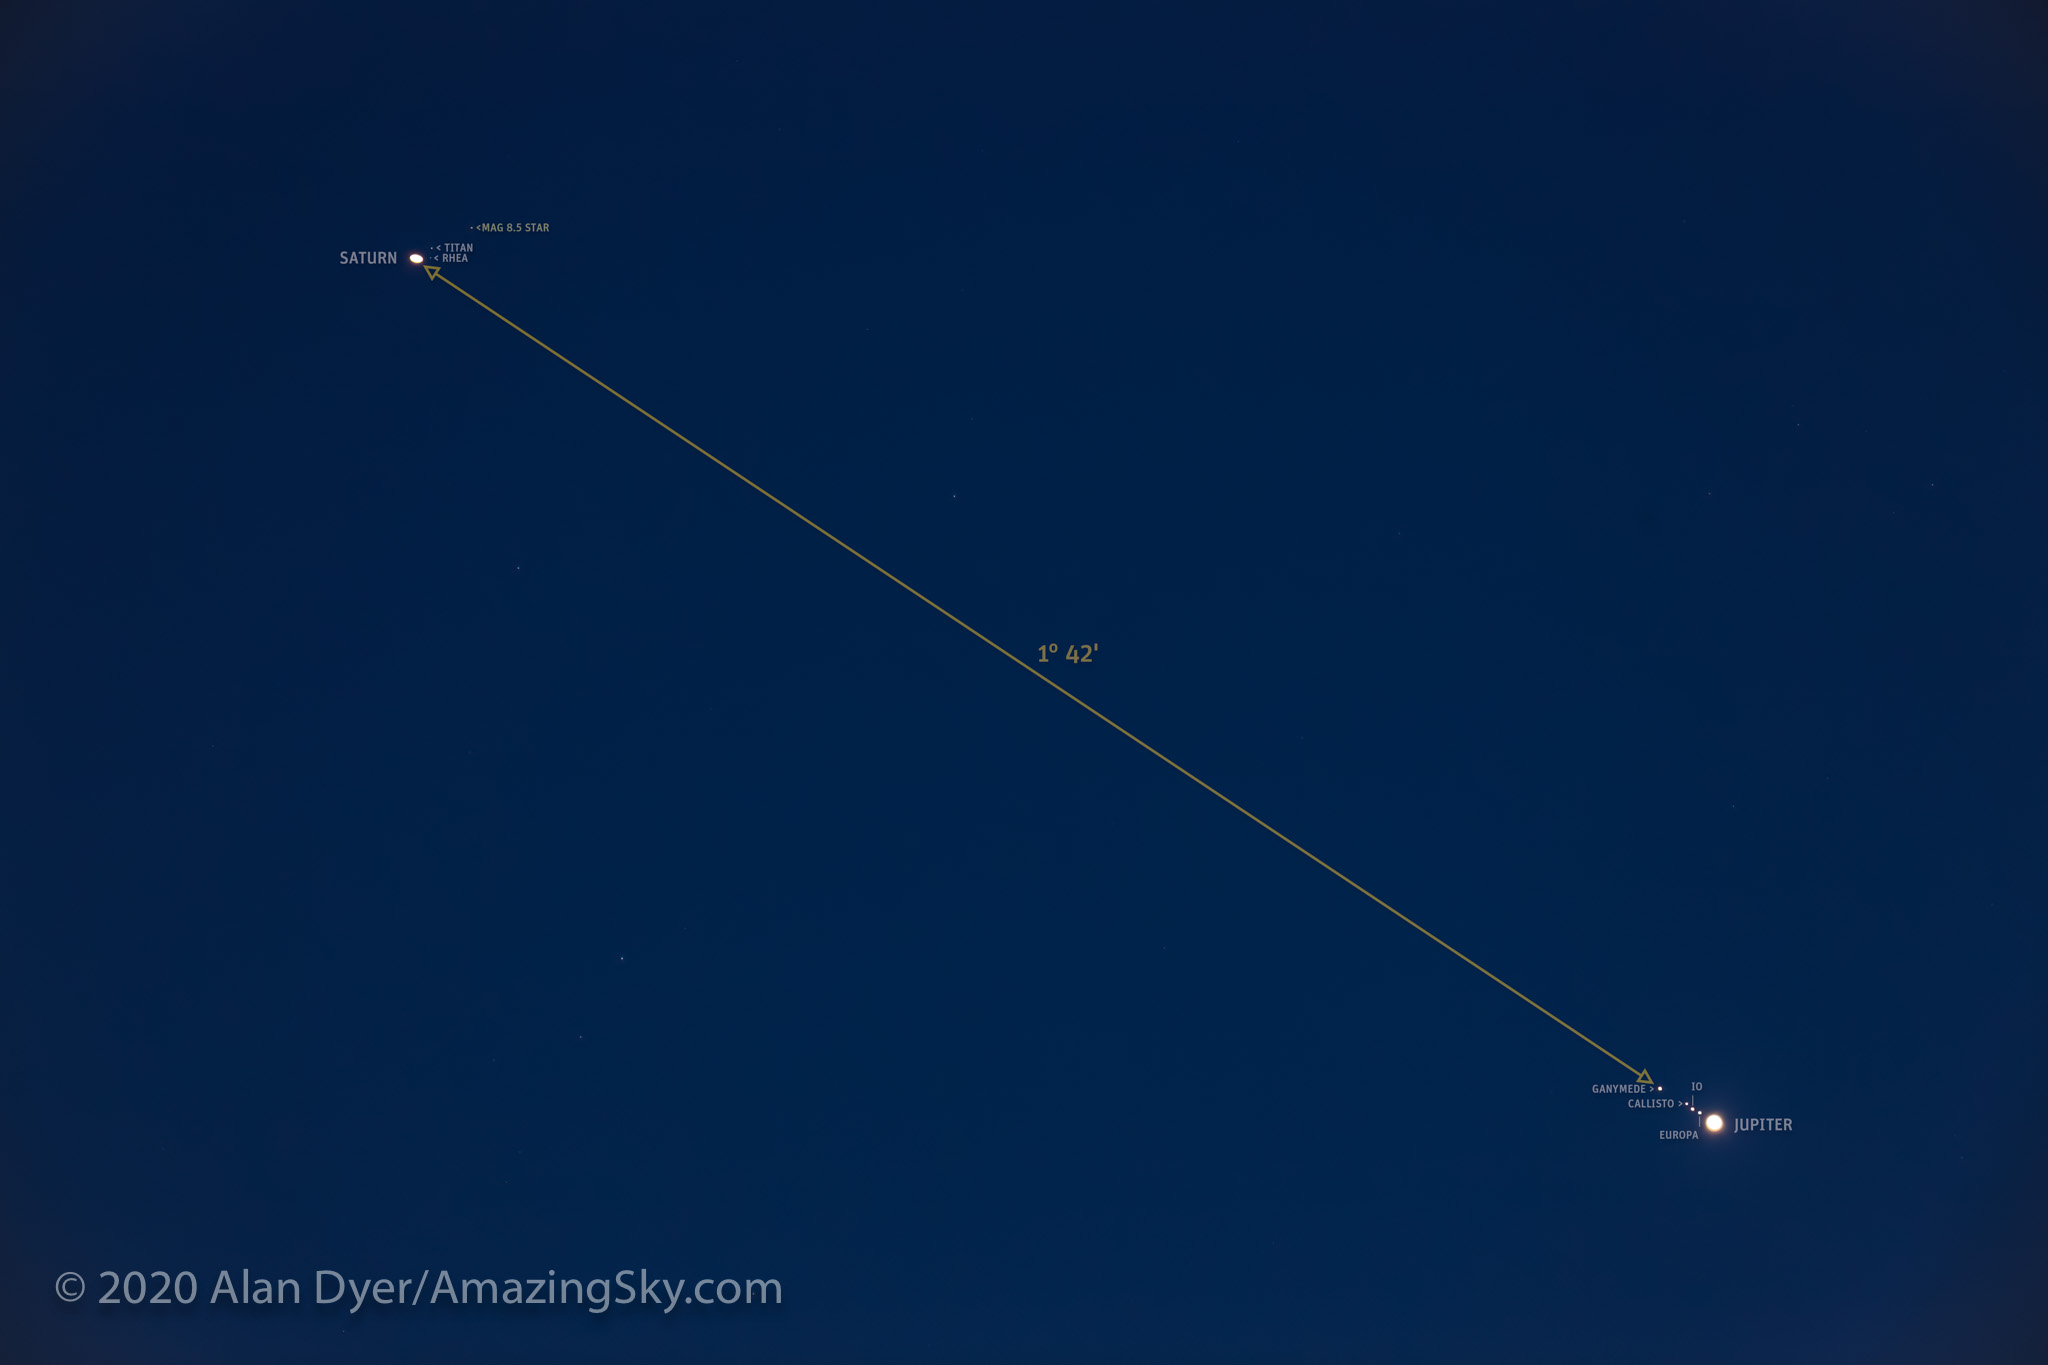
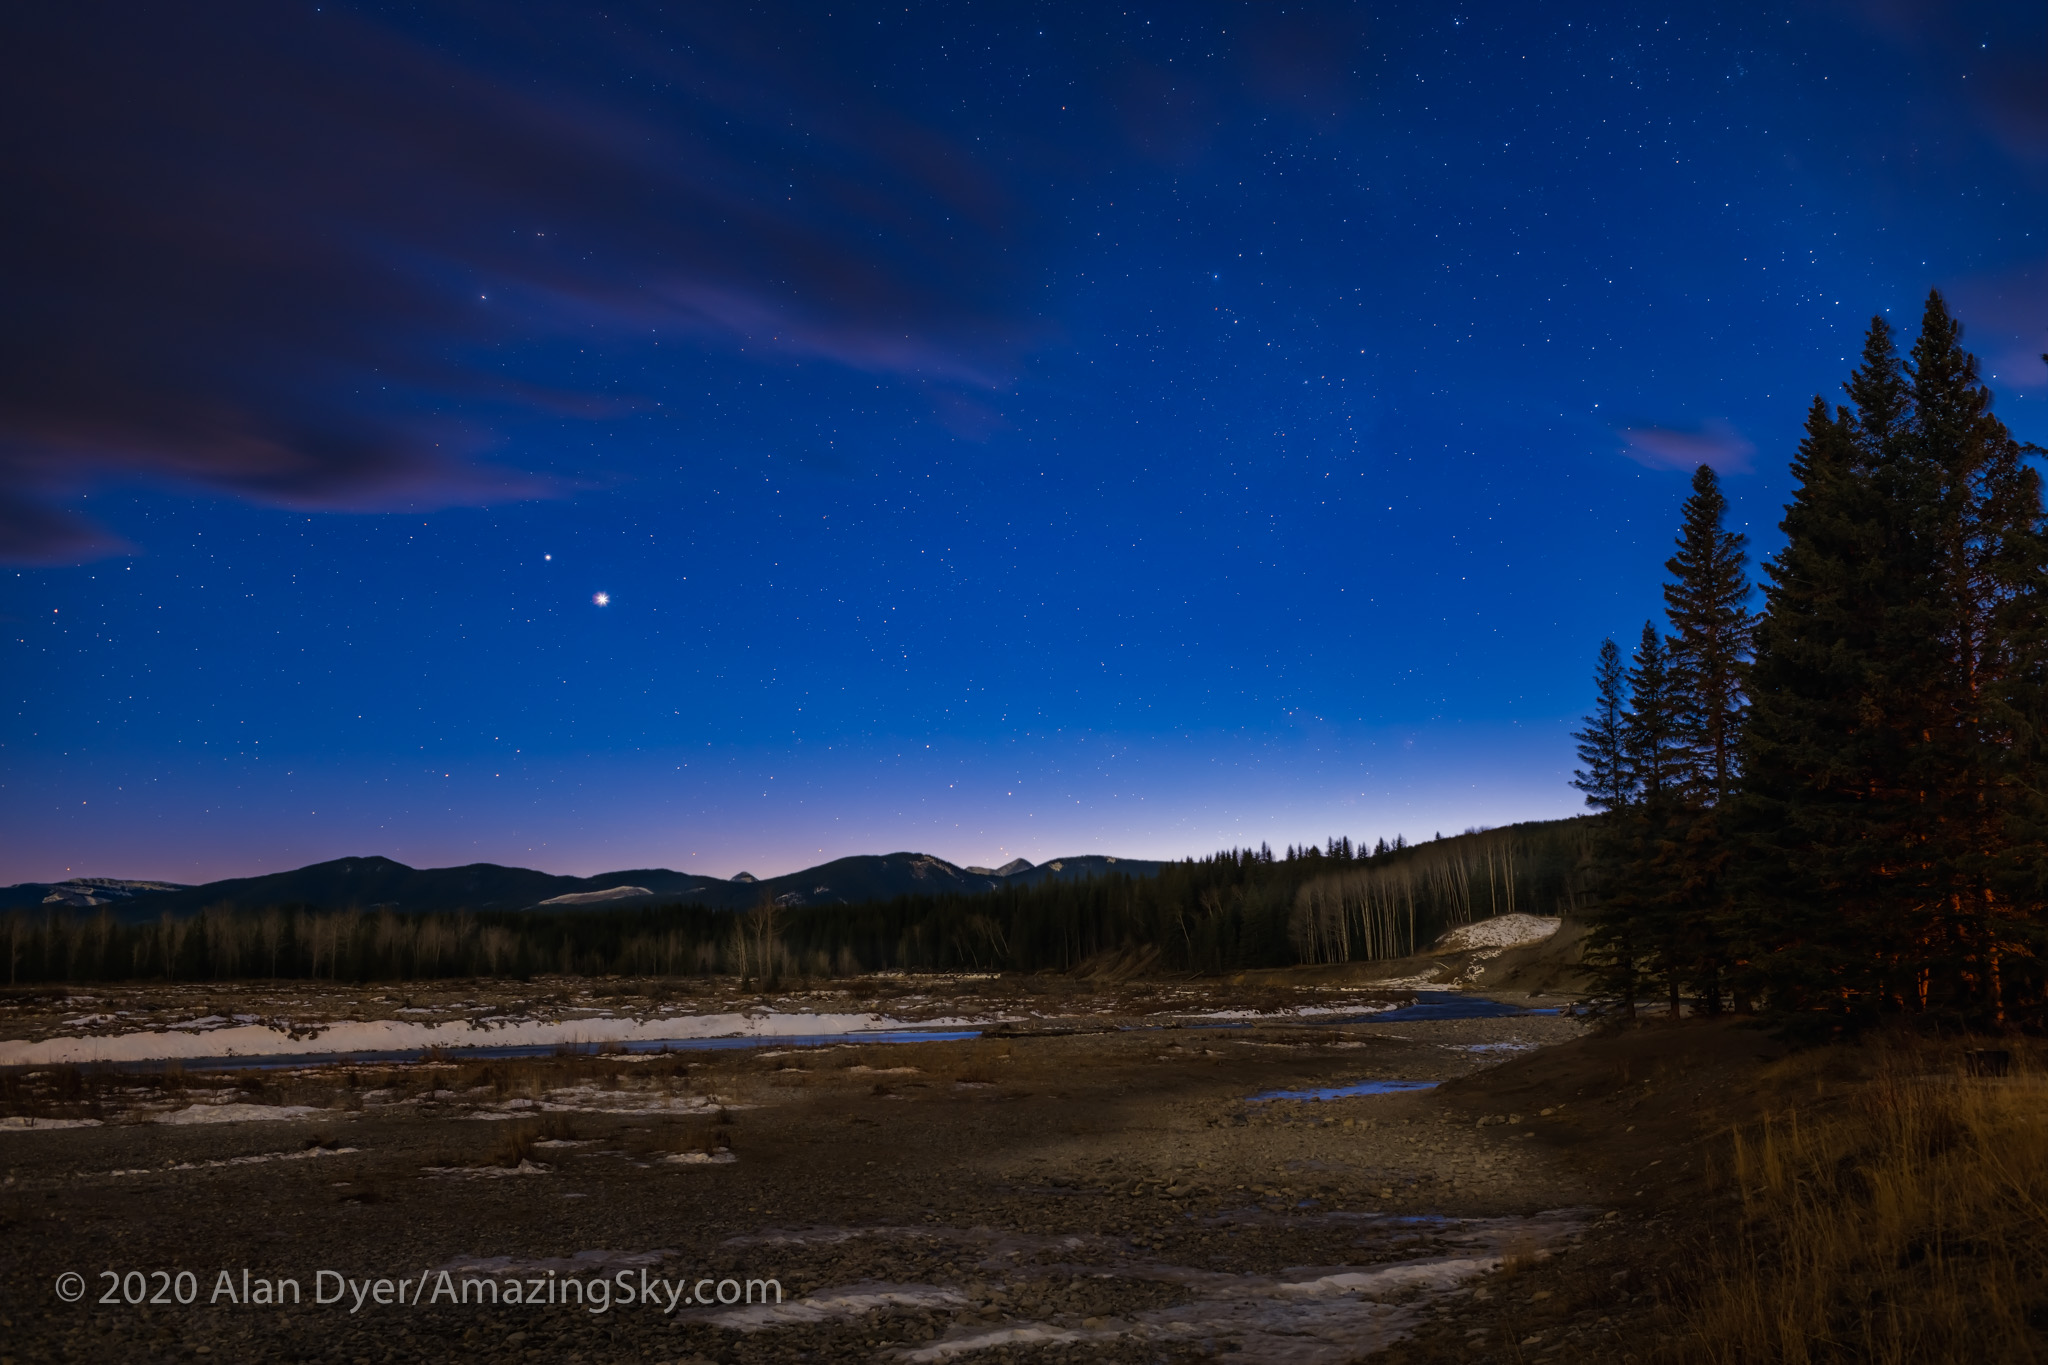

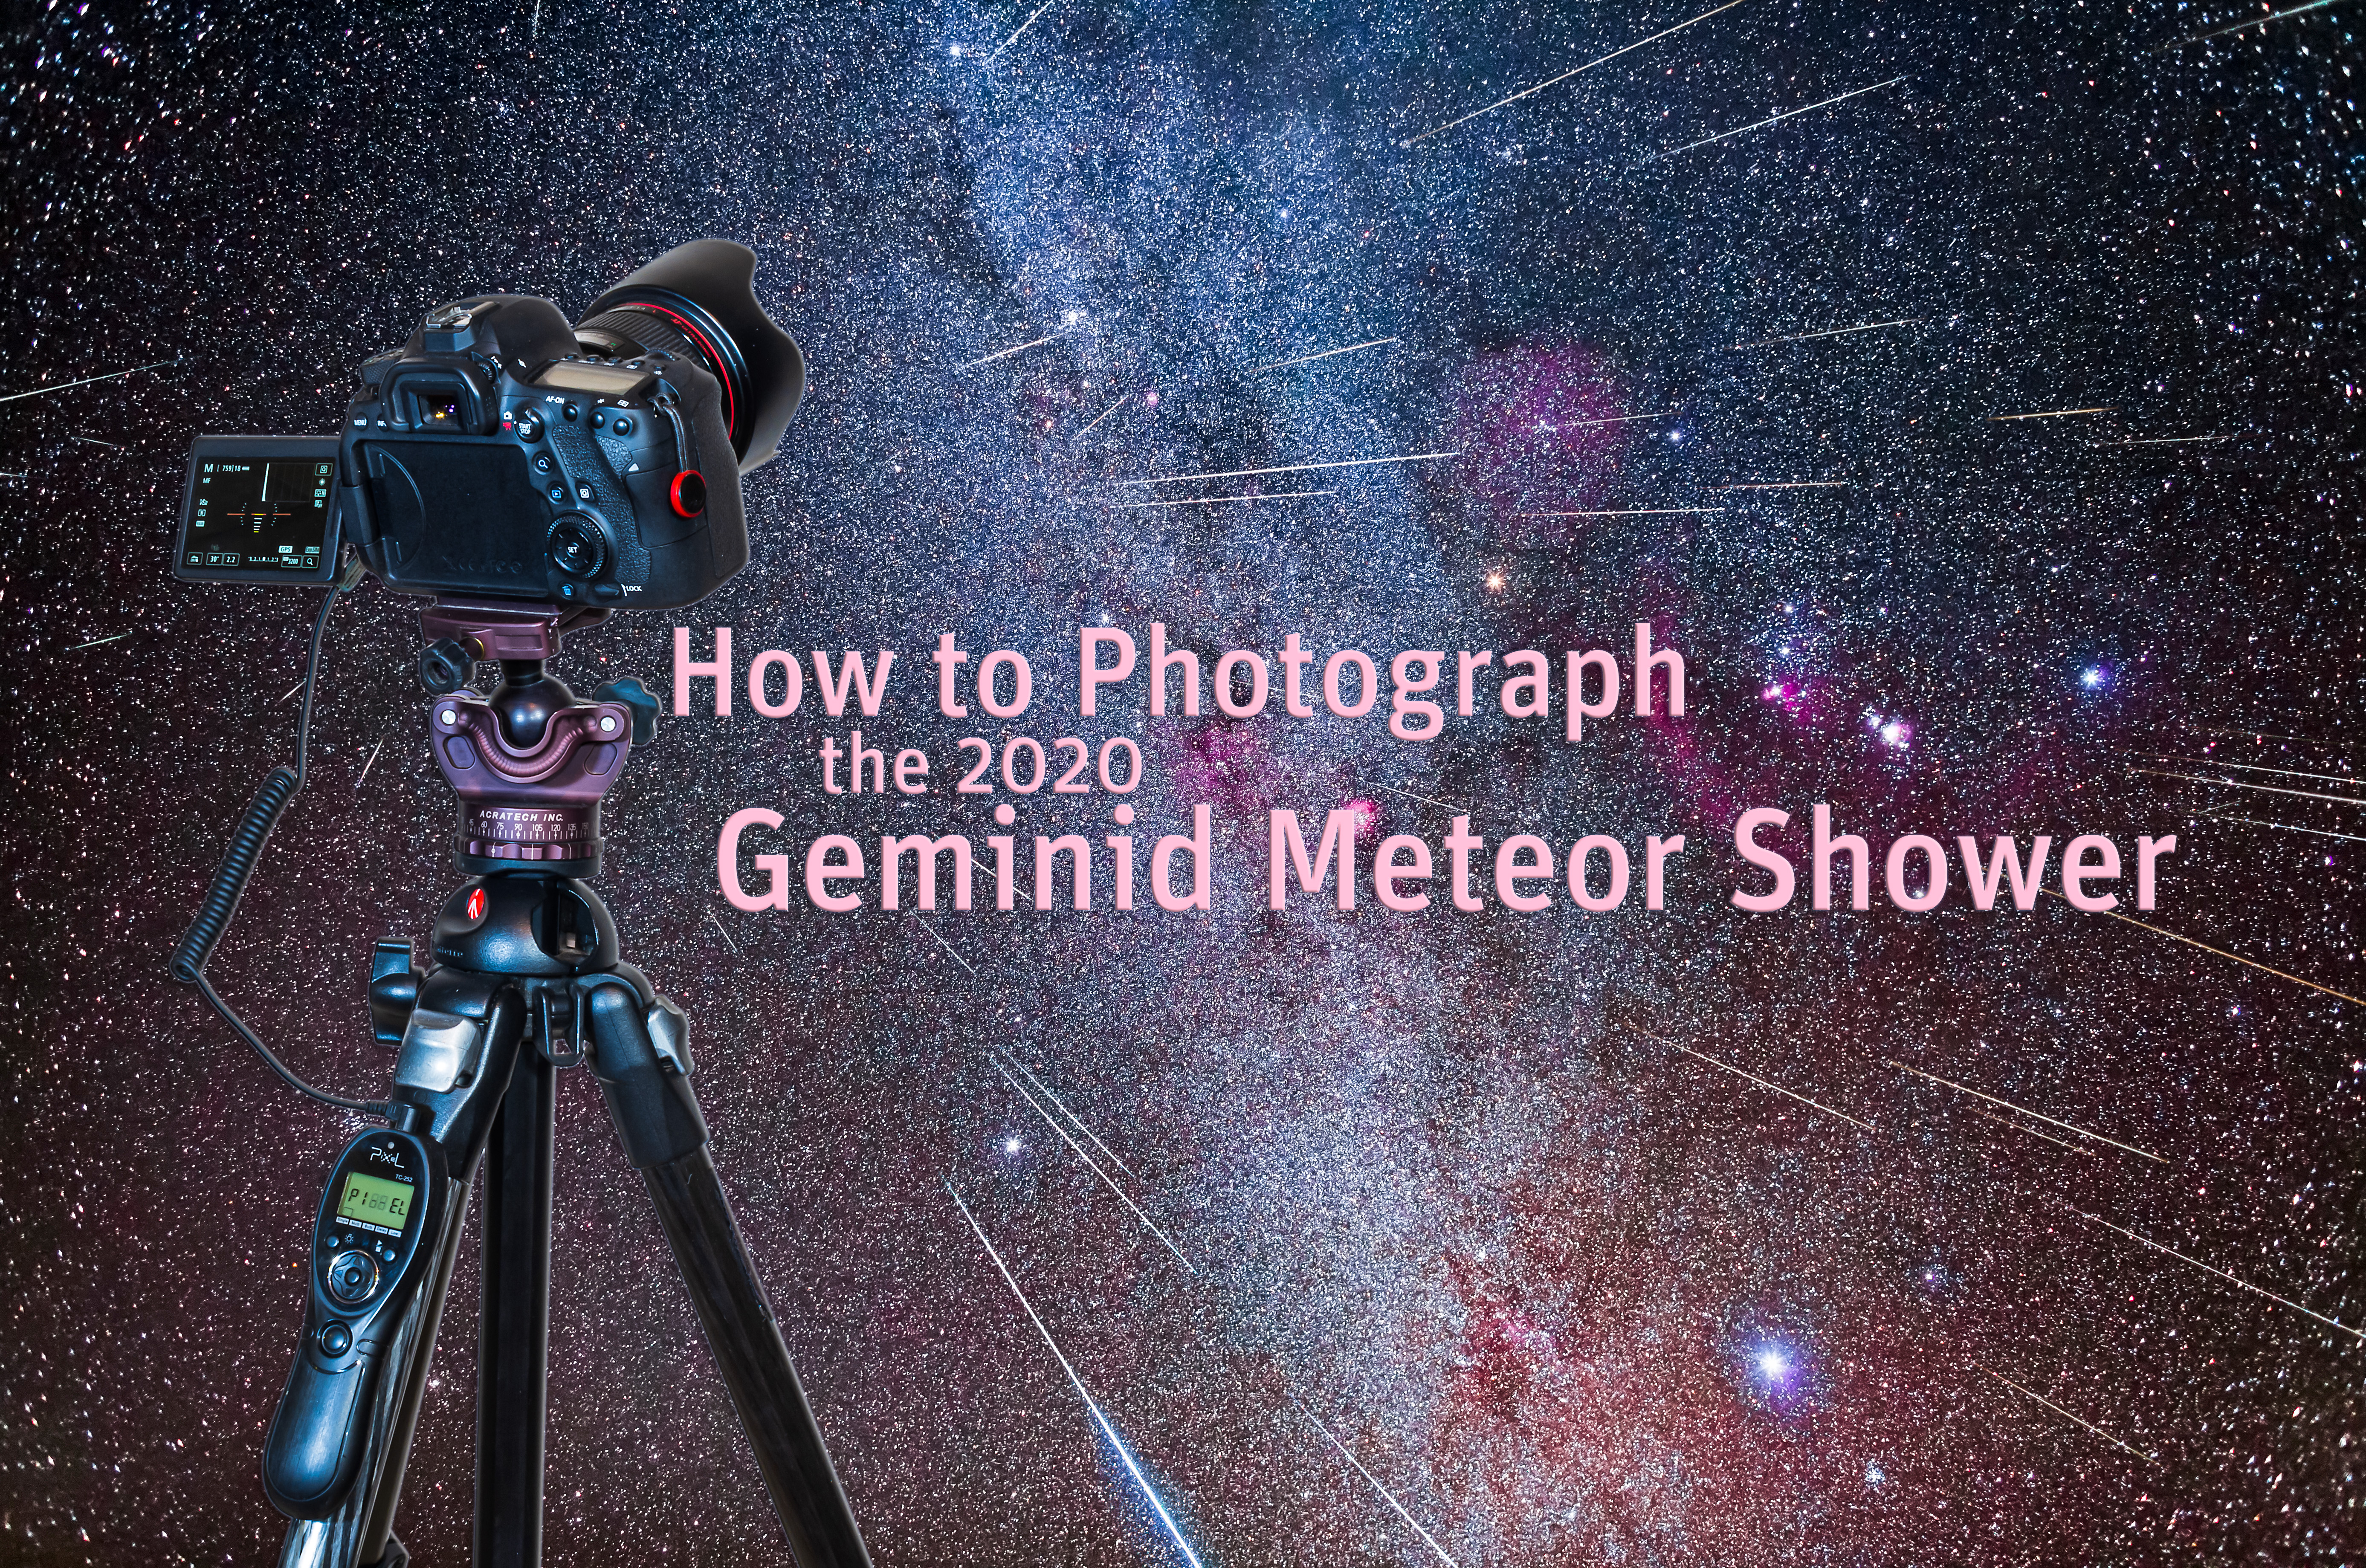
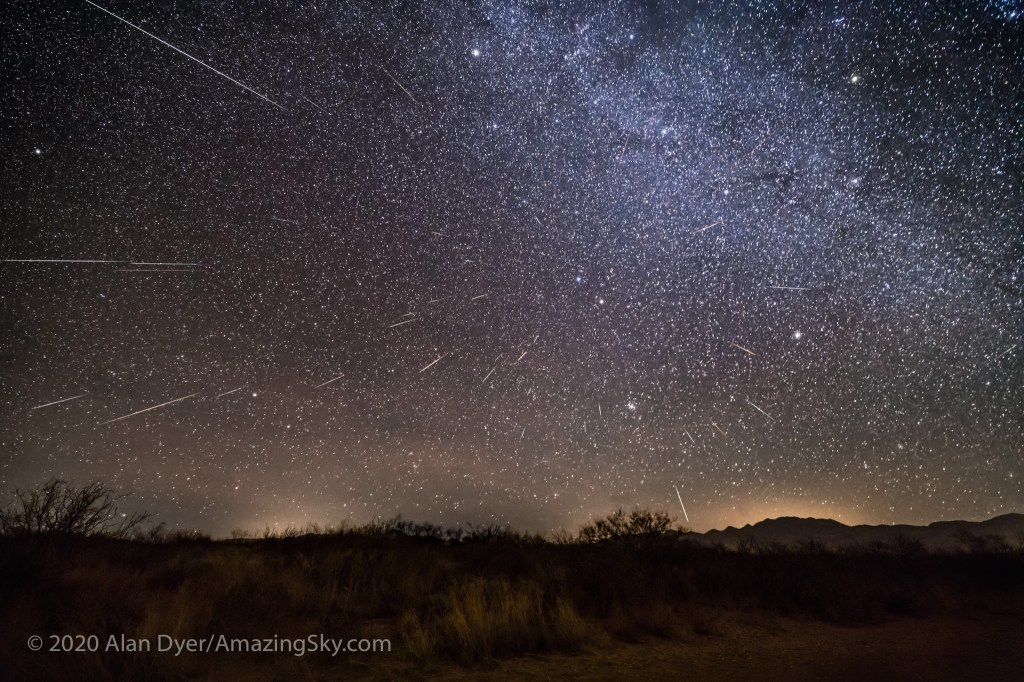
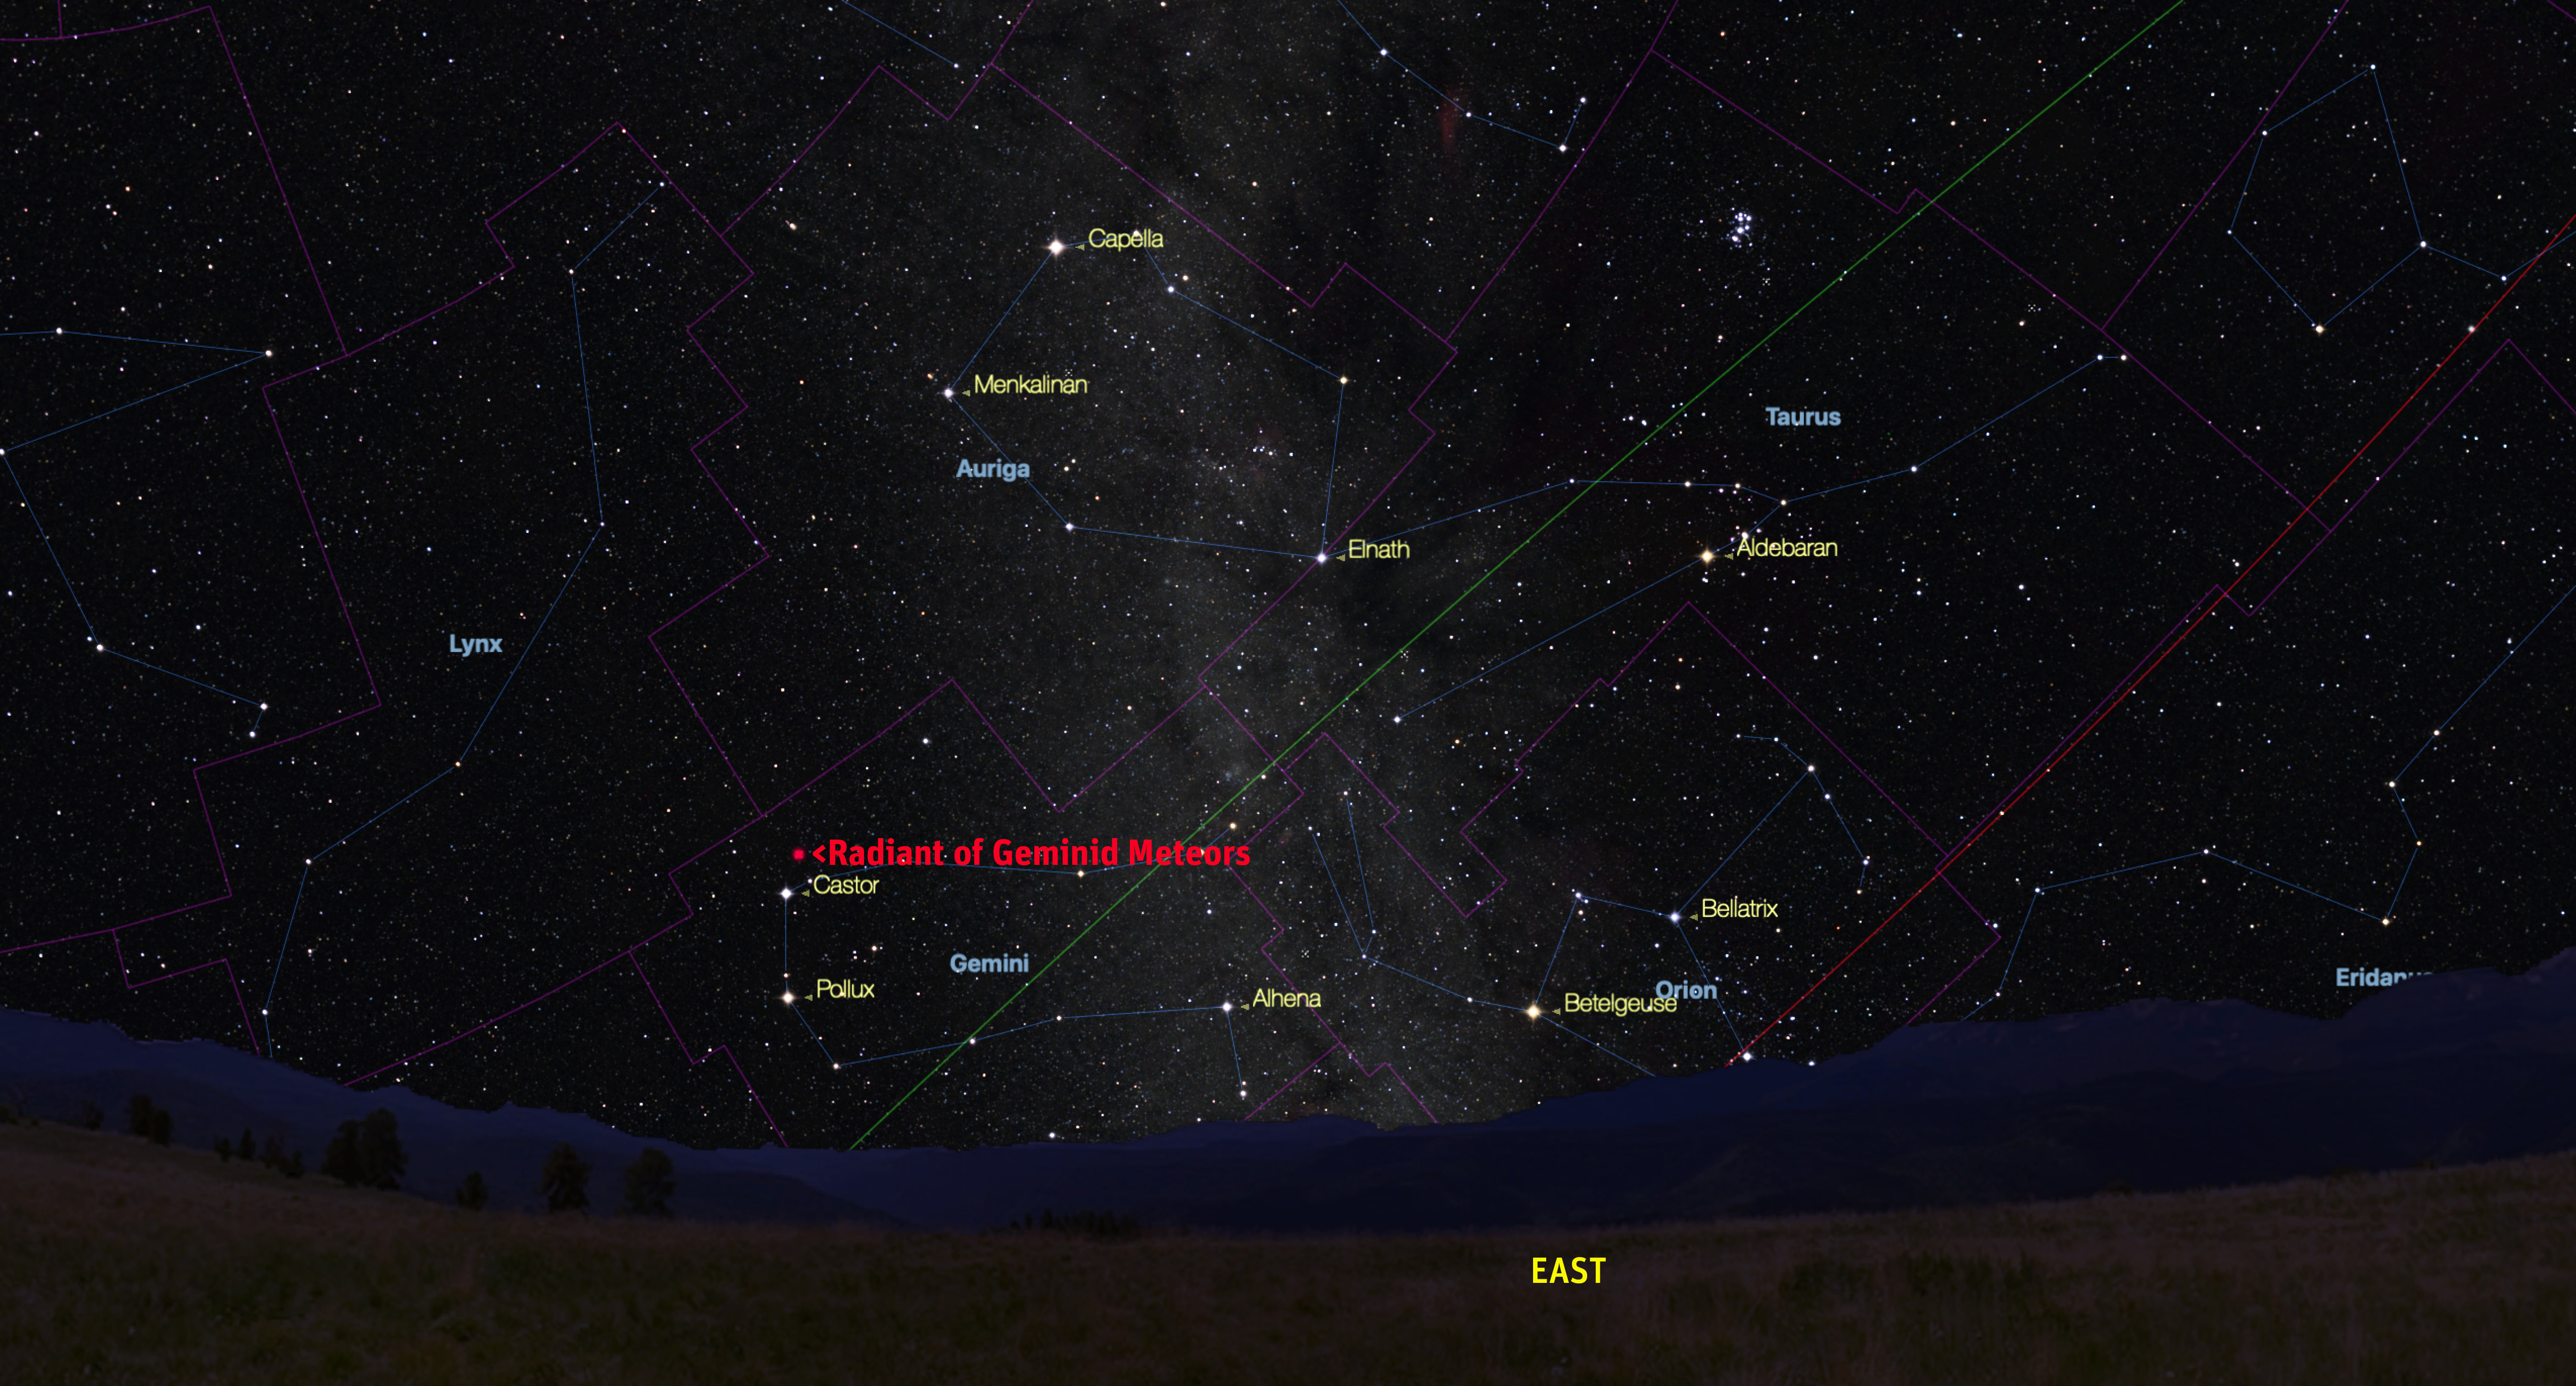
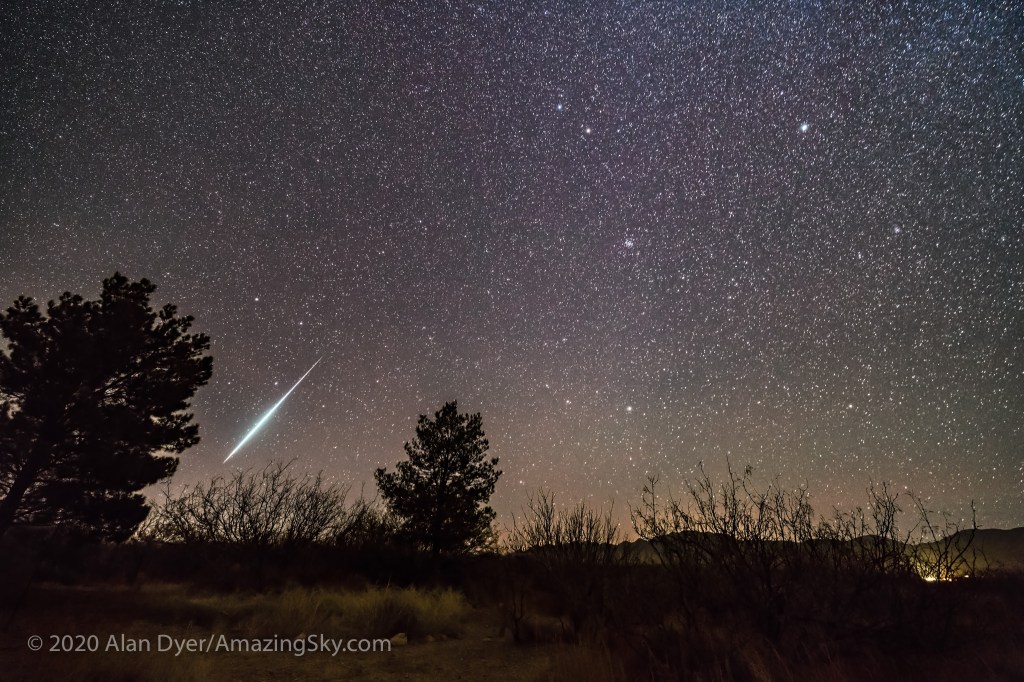
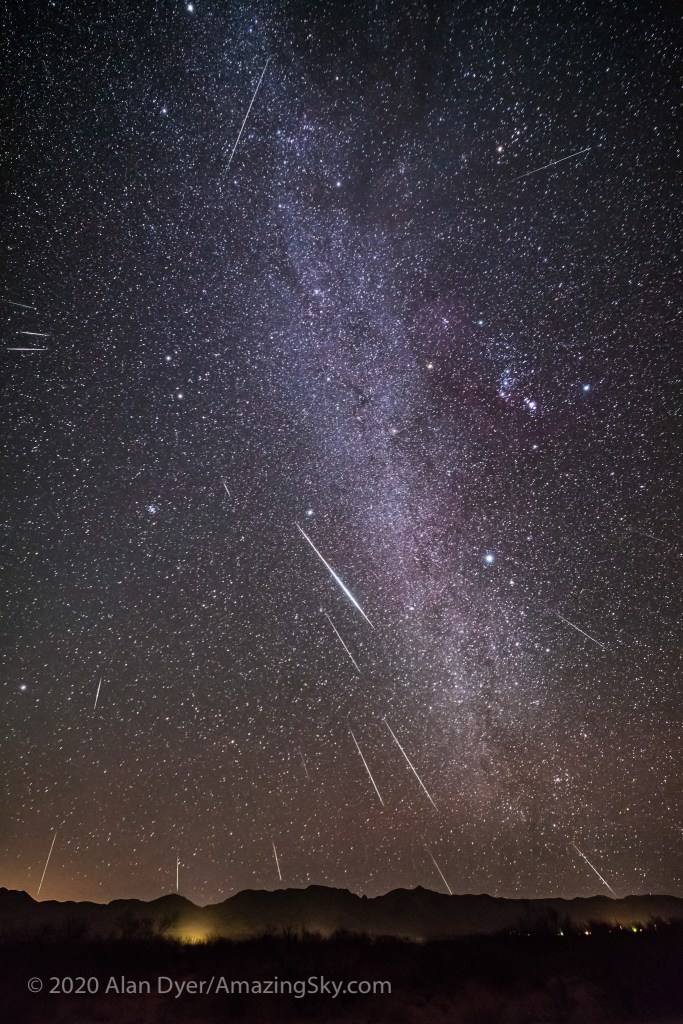
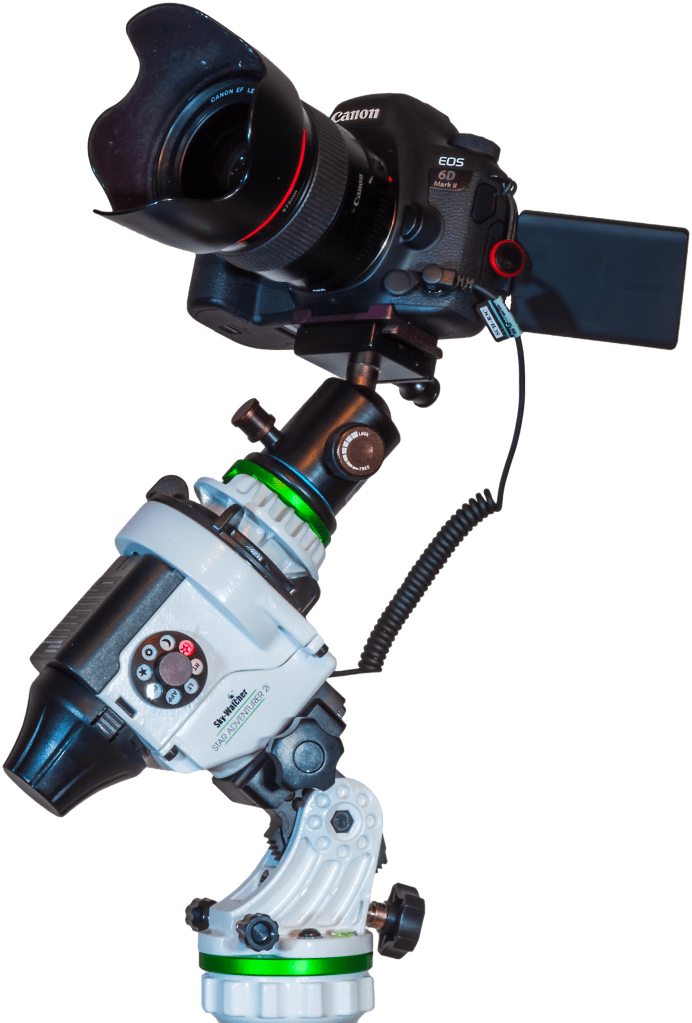
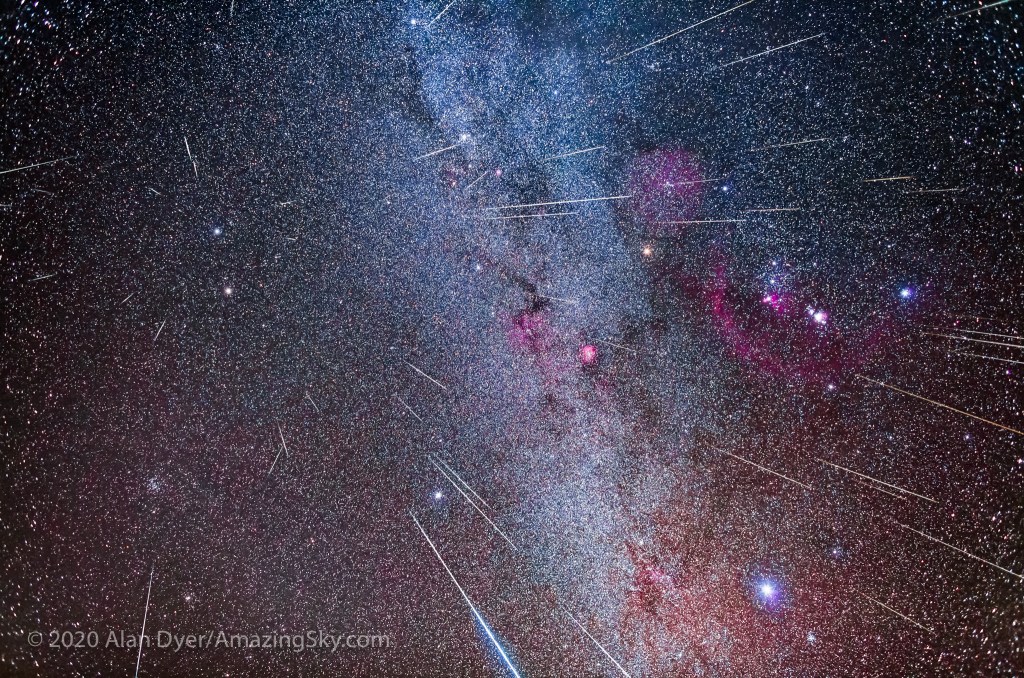
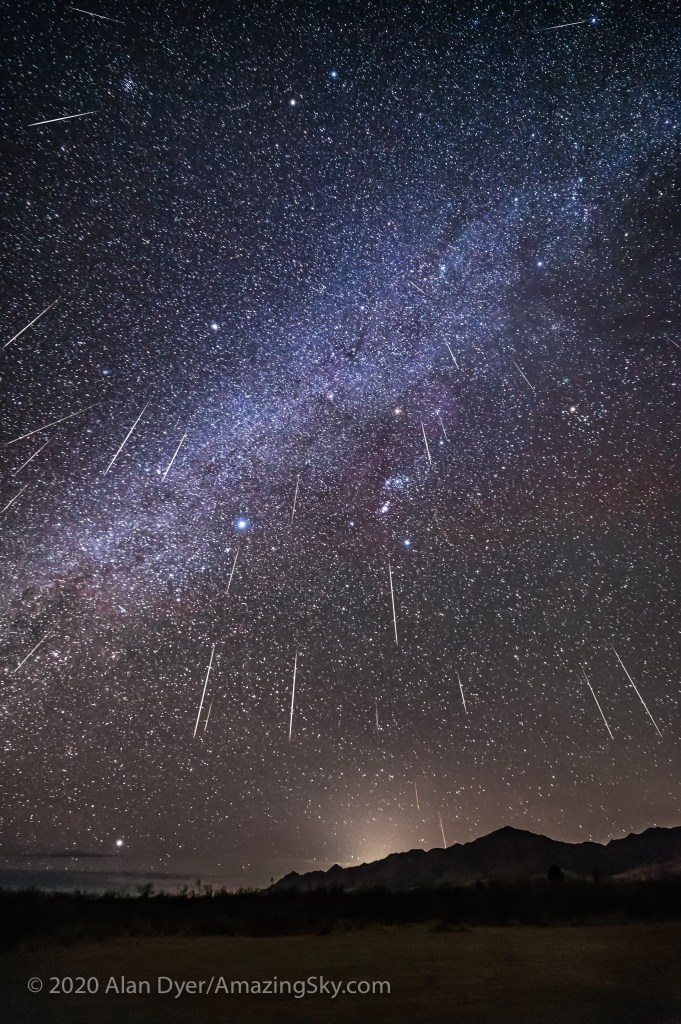
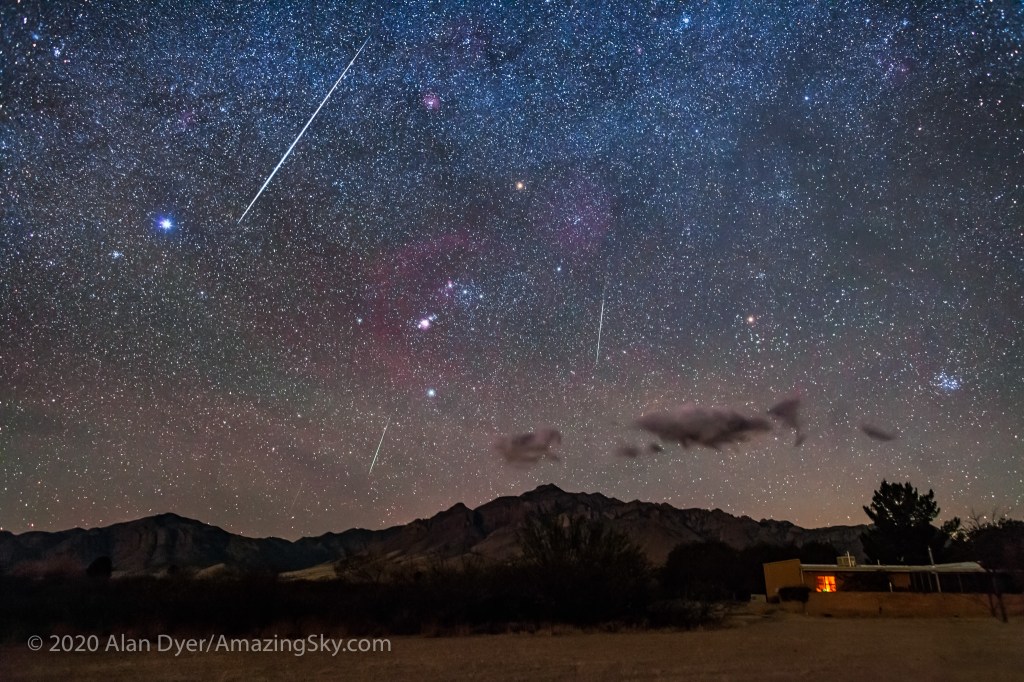
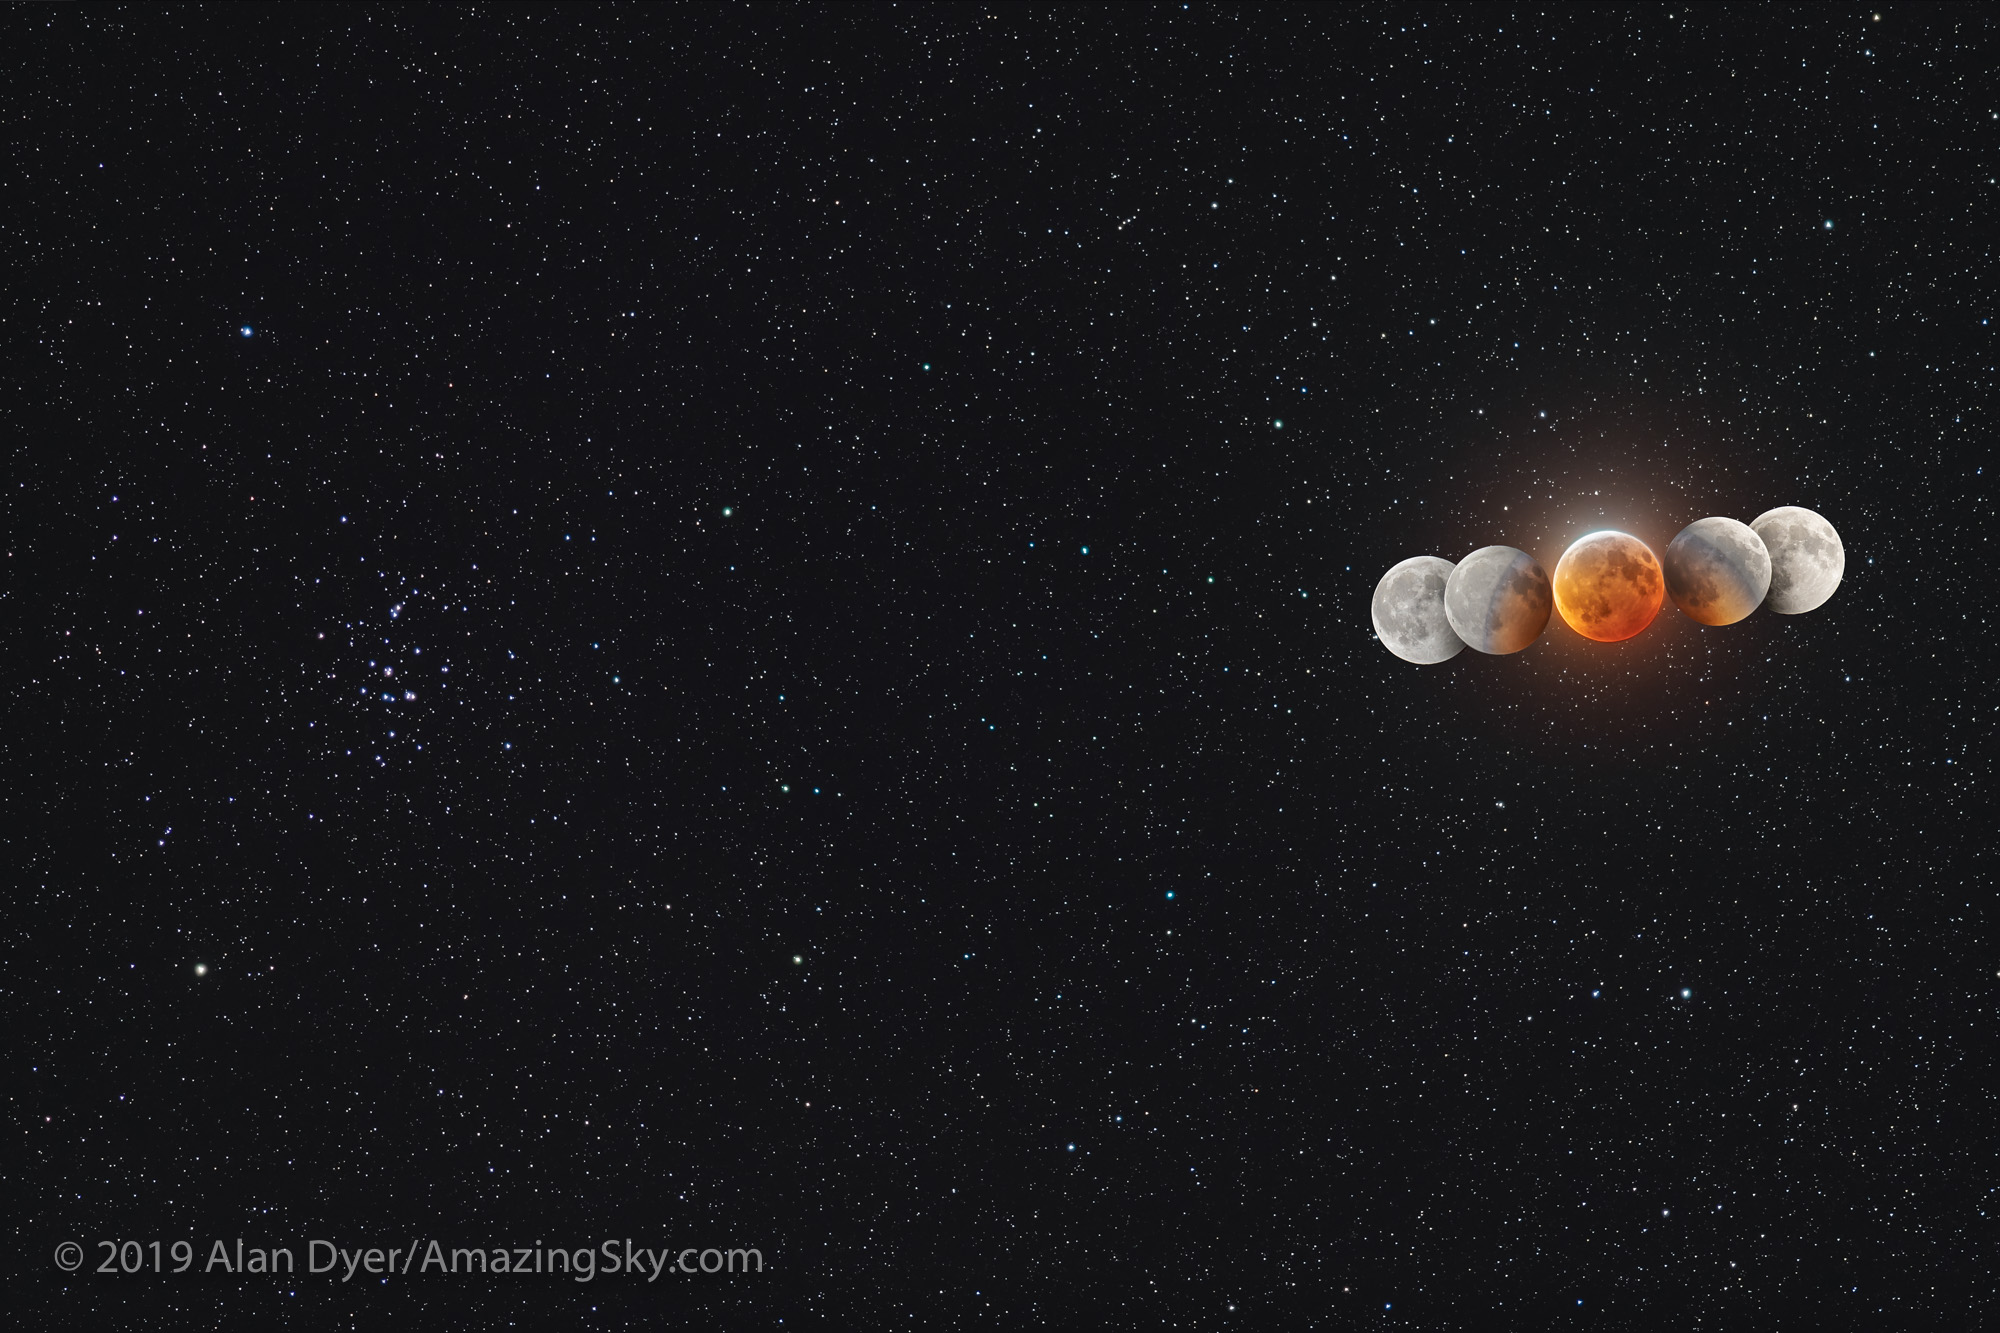
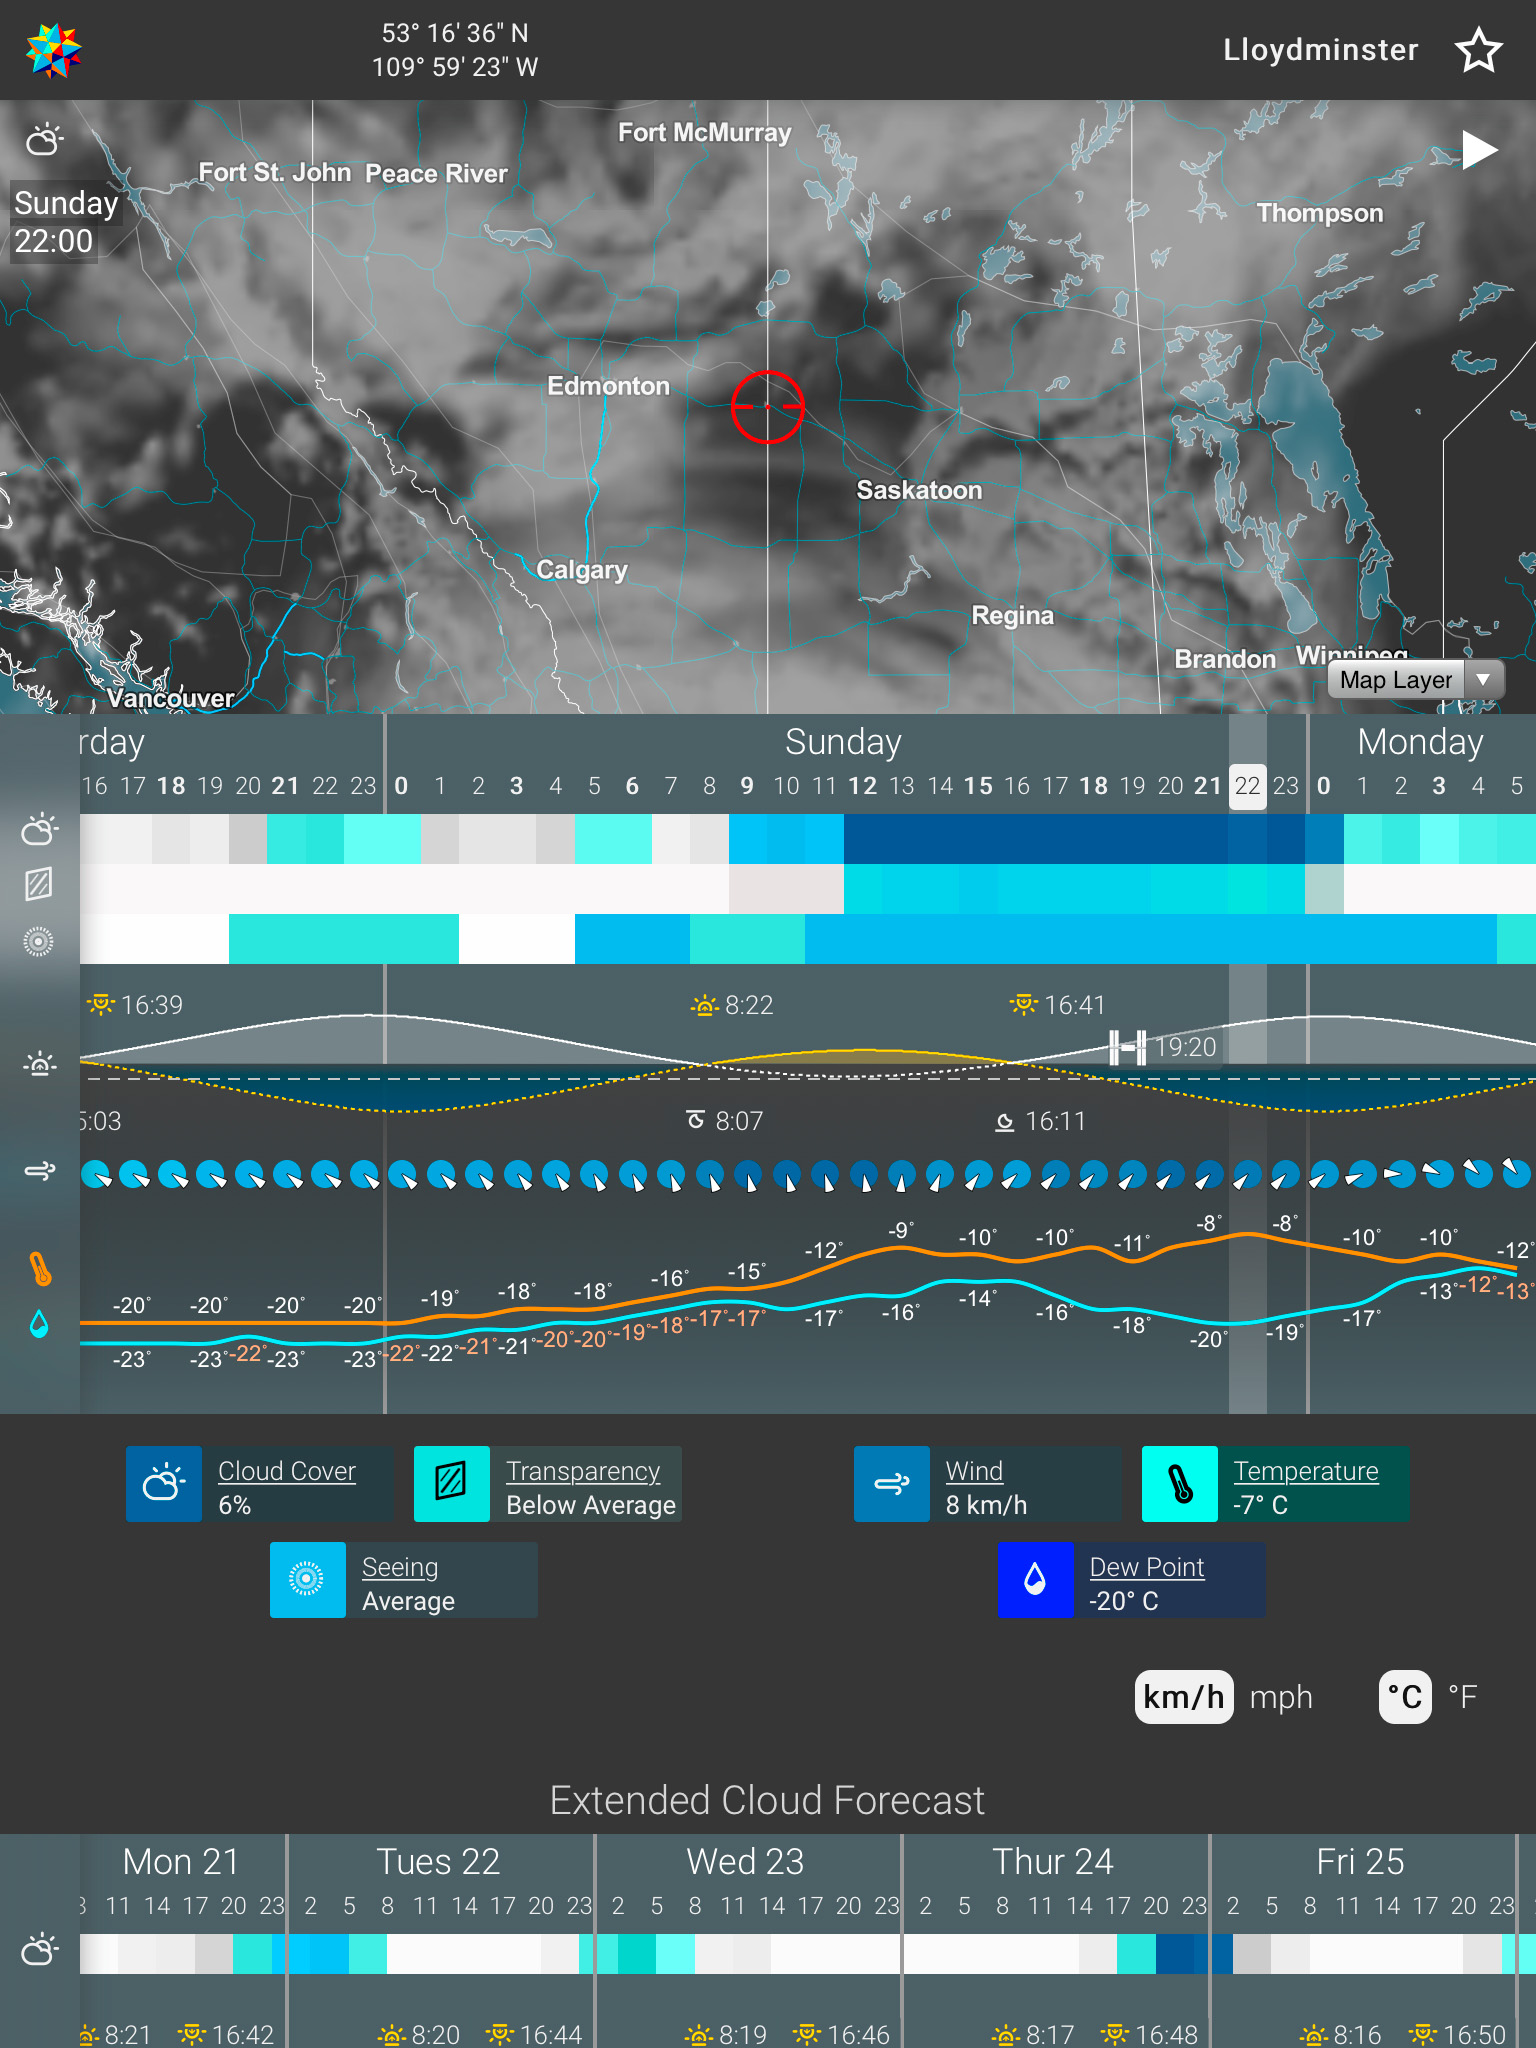
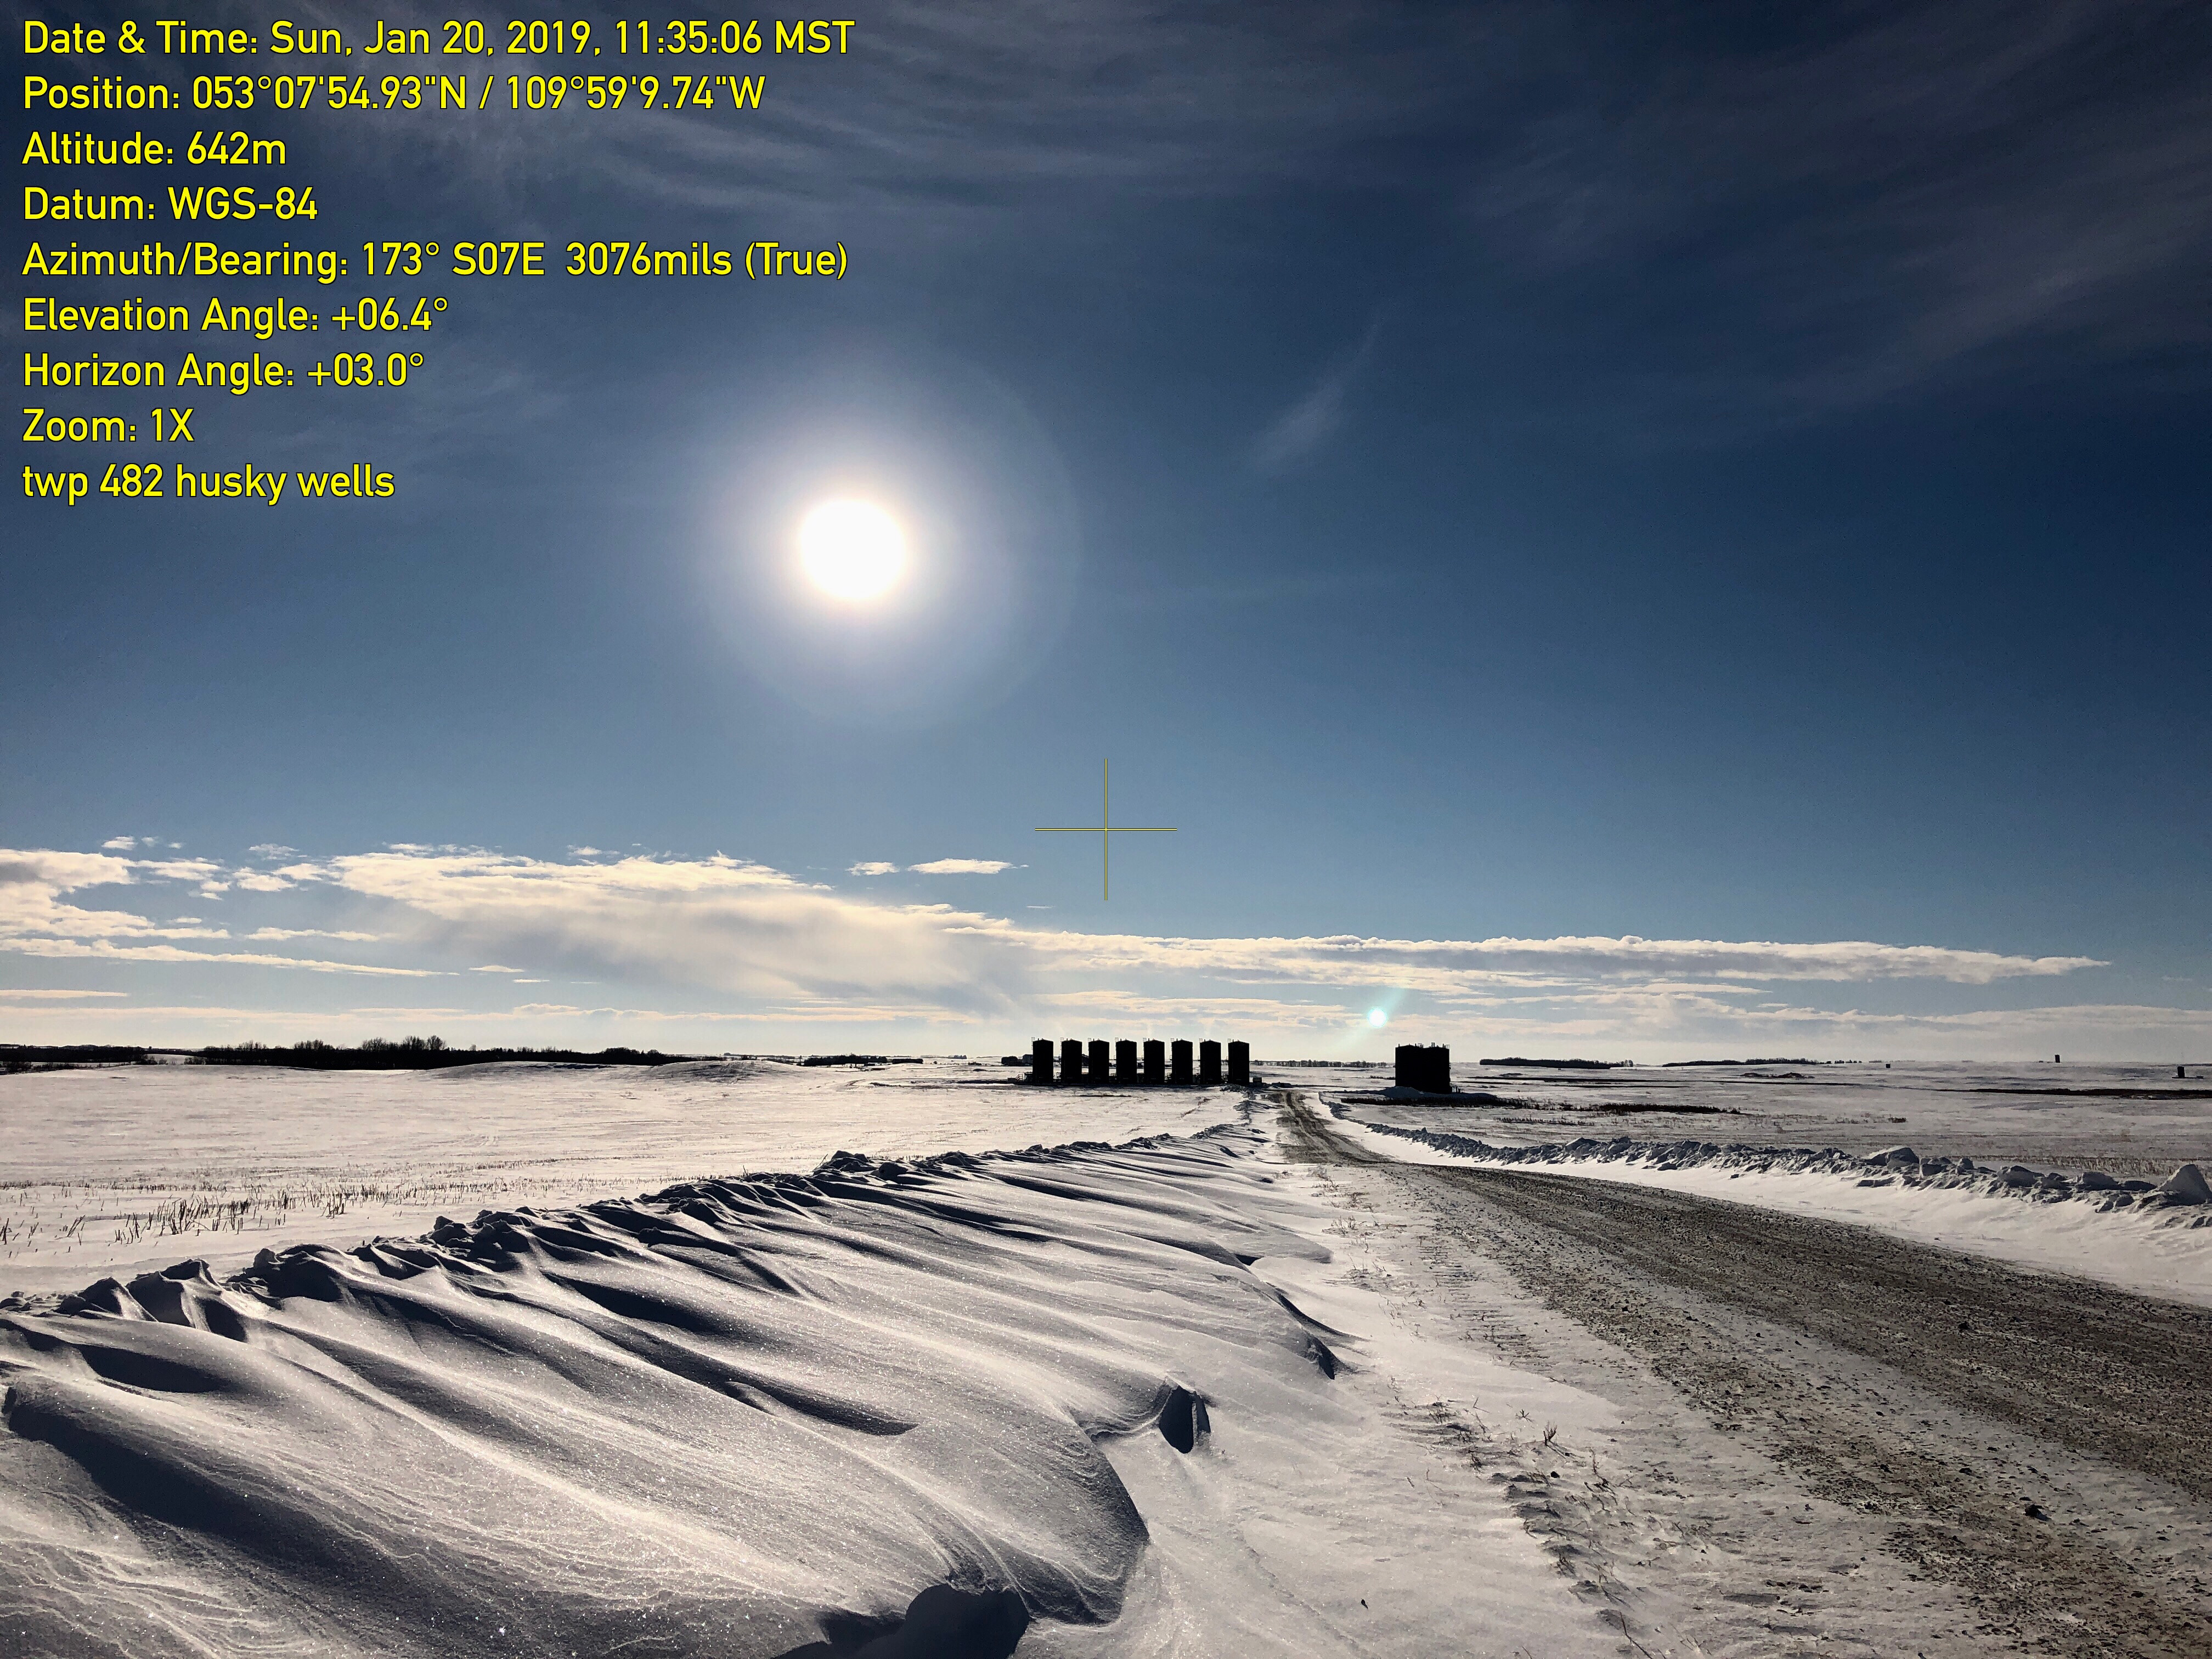


 On the evening of January 20 for North America, the Full Moon passes through the umbral shadow of the Earth, creating a total eclipse of the Moon.