Astronomy author and photographer Alan Dyer presents amazing sky sights
Author: Alan Dyer
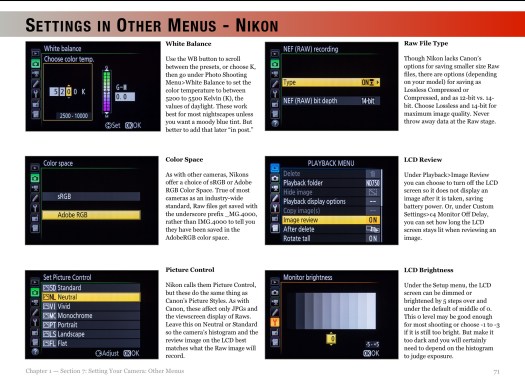
Alan Dyer is one of Canada’s best-known astronomy writers. He serves as a regular contributor to Sky & Telescope magazine.
He has co-authored several best selling guidebooks for amateur astronomers, including, with Terence Dickinson, "The Backyard Astronomer’s Guide." He published the eBook "How to Photograph and Process Nightscapes and Time-Lapses," available on the Apple Books Store, and as a PDF set from www.amazingsky.com.
Alan is a member of the exclusive The World at Night photography group (www.twanight.org).
As an amateur astronomer, his interests include astrophotography and deep-sky observing (he compiled some of the popular deep-sky observing lists in the annual RASC Observer's Handbook). Alan takes the opportunity as often as possible to visit the southern hemisphere to pursue both observing and photography under southern skies.
His other obsession, eclipse chasing, has taken him to every continent, chalking up 17 total solar eclipses. Asteroid 78434 is named for him.
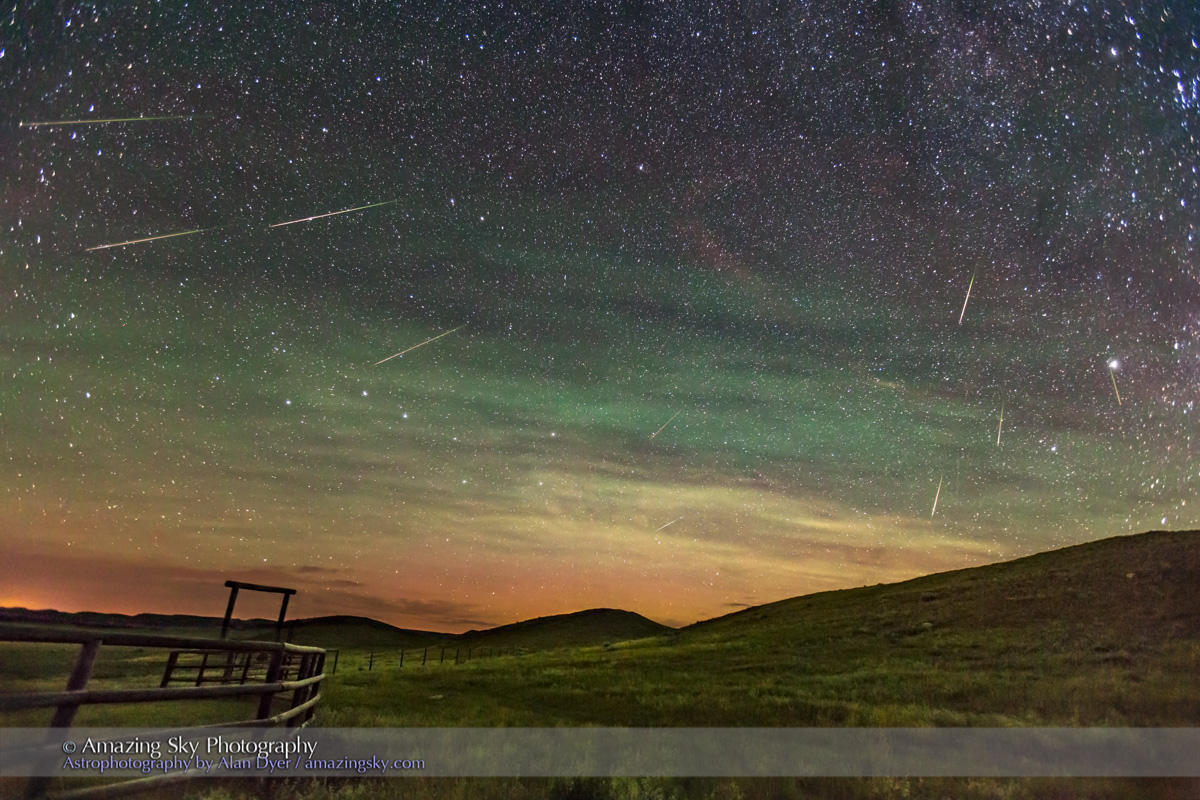
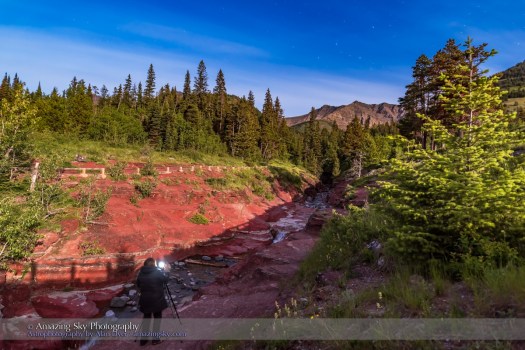
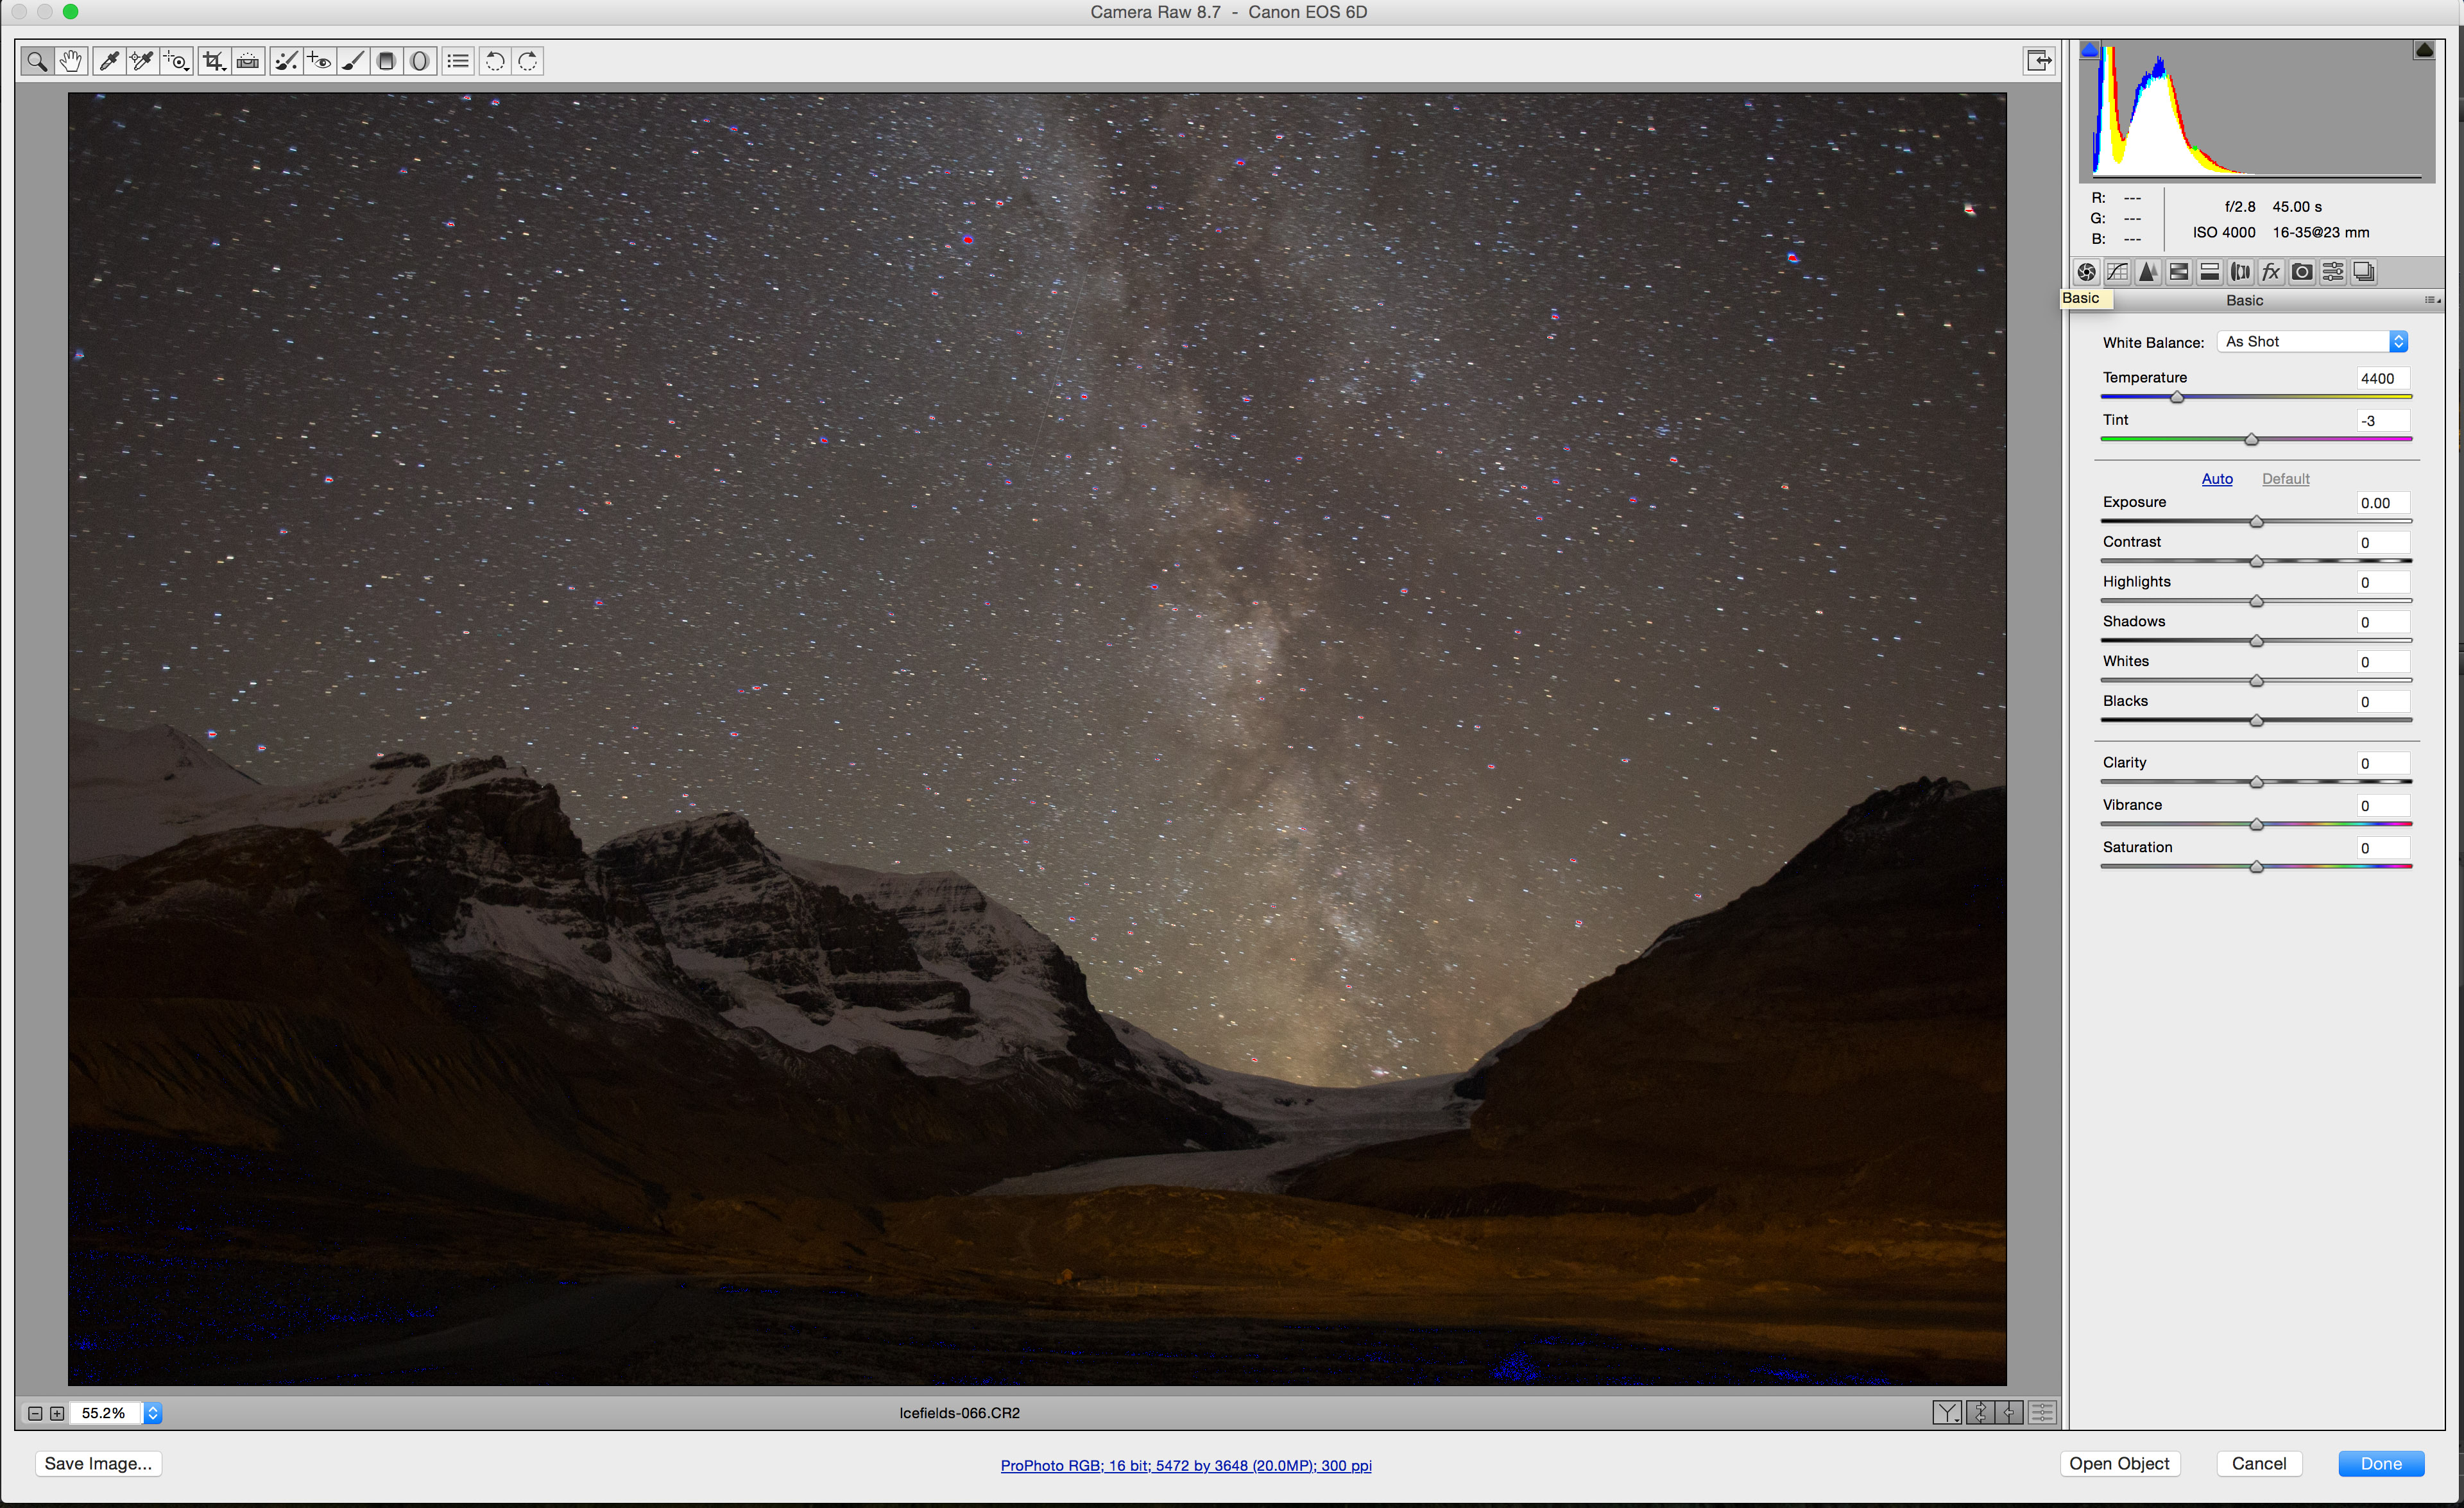
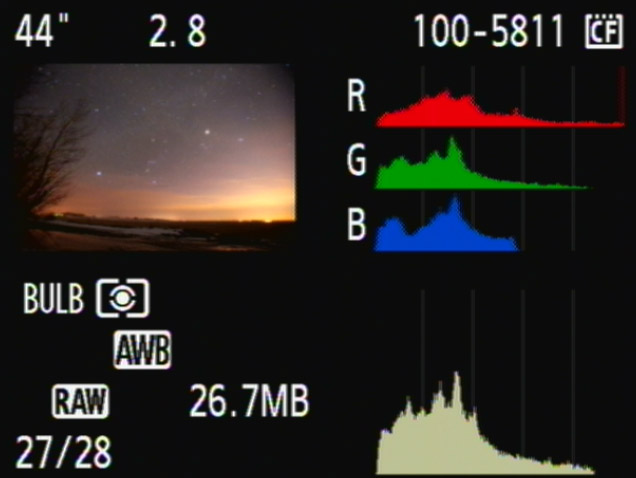
Following up on my earlier tests, I compare the new Canon 6D MkII camera to earlier Canon full-frame models in long, tracked exposures of the Milky Way.
A month ago I published tests of the new Canon 6D MkII camera for nightscape images, ones taken using a fixed tripod in which exposures usually have to be limited to no longer than 30 to 60 seconds, to prevent star trailing.
Despite these short exposures, we still like to extract details from the dark shadows of the scene, making nightscape images a severe test of any camera.
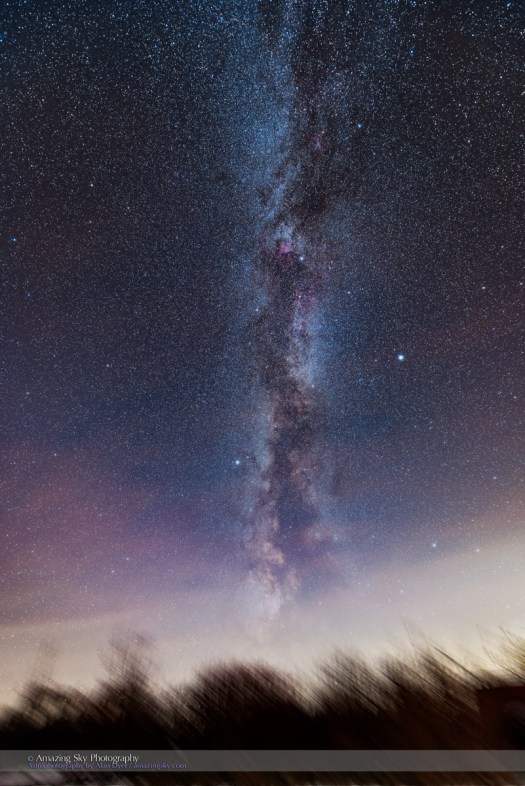
Here I test the 6D MkII for what, in many respects, is a less demanding task: shooting long exposures of deep-sky objects, the Milky Way in Cygnus in this case.
Why is this an easier task? The camera is now on a tracking mount (I used the new Sky-Watcher Star Adventurer Mini) which is polar aligned to follow the rotation of the sky. As such, exposures can now be many minutes long if needed. We can give the camera sensor as much signal as the darkness of the night sky allows. More signal equals less noise in the final images.
In addition, there are no contrasty, dark shadows where noise lurks. Indeed, the subjects of deep-sky images are often so low in contrast, as here, they require aggressive contrast boosting later in processing to make a dramatic image.
While that post-processing can bring out artifacts and camera flaws, as a rule I never see the great increase in noise, banding, and magenta casts I sometimes encounter when processing short-exposure nightscape scenes.
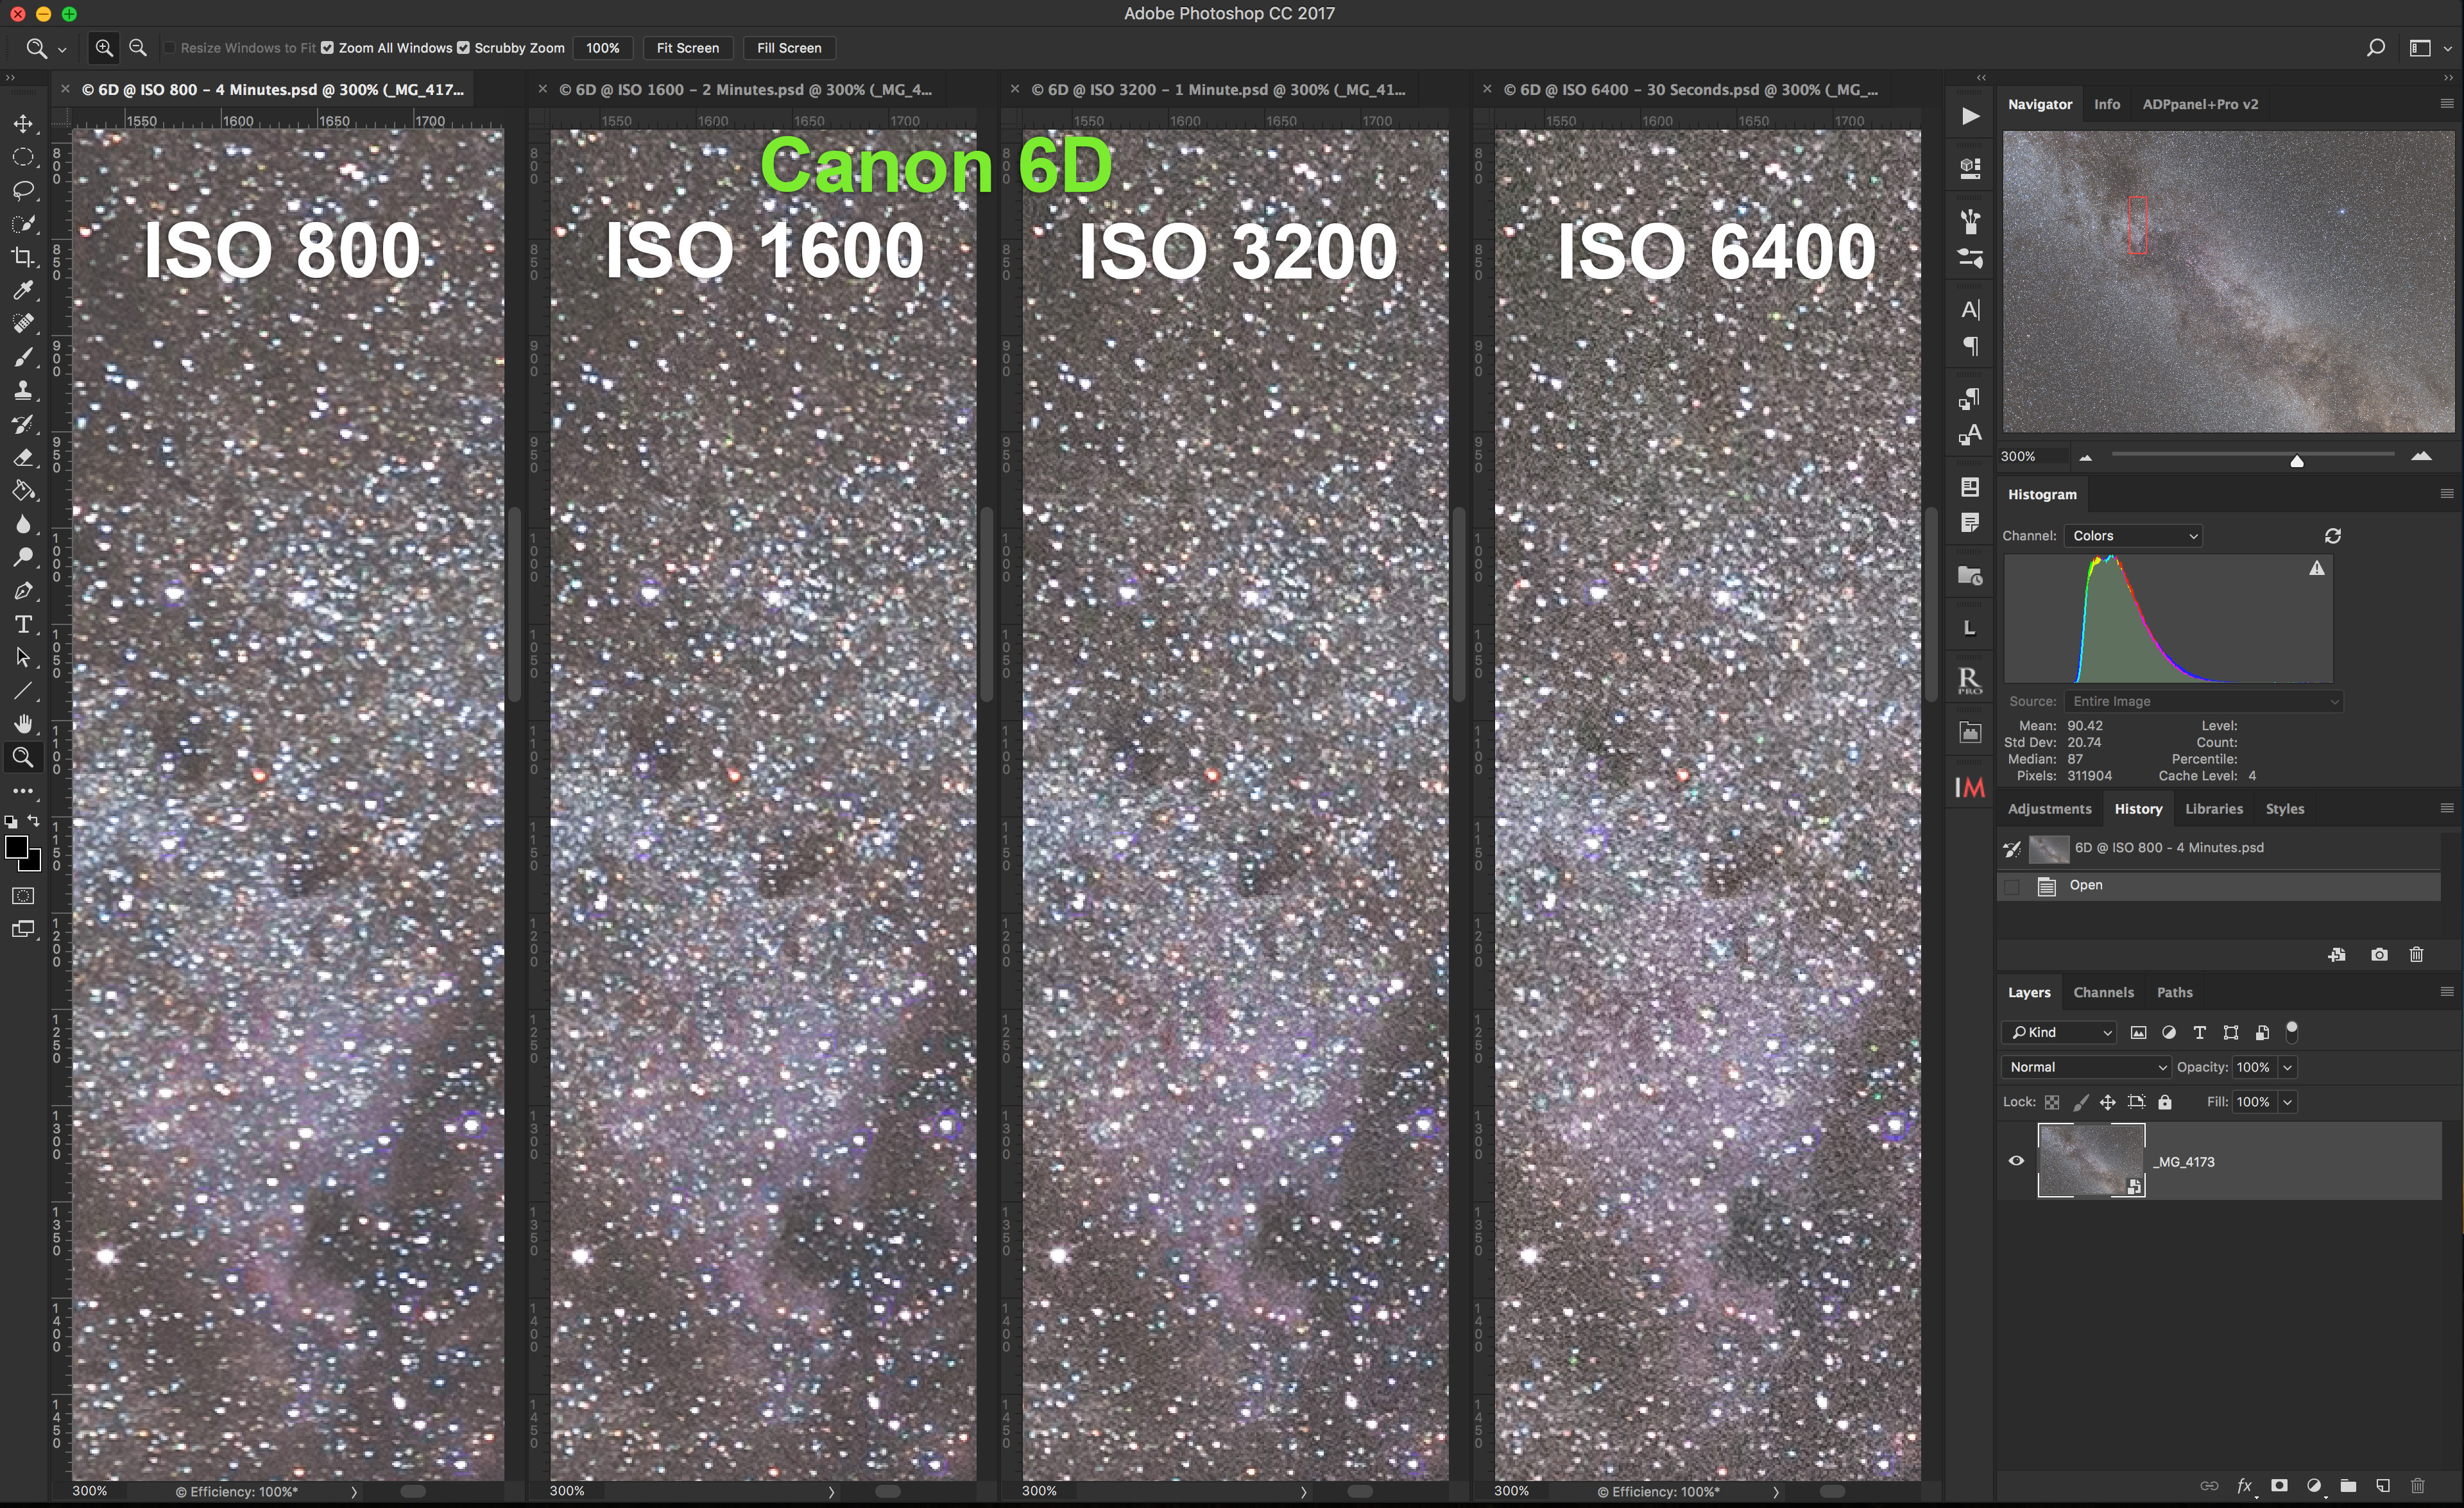
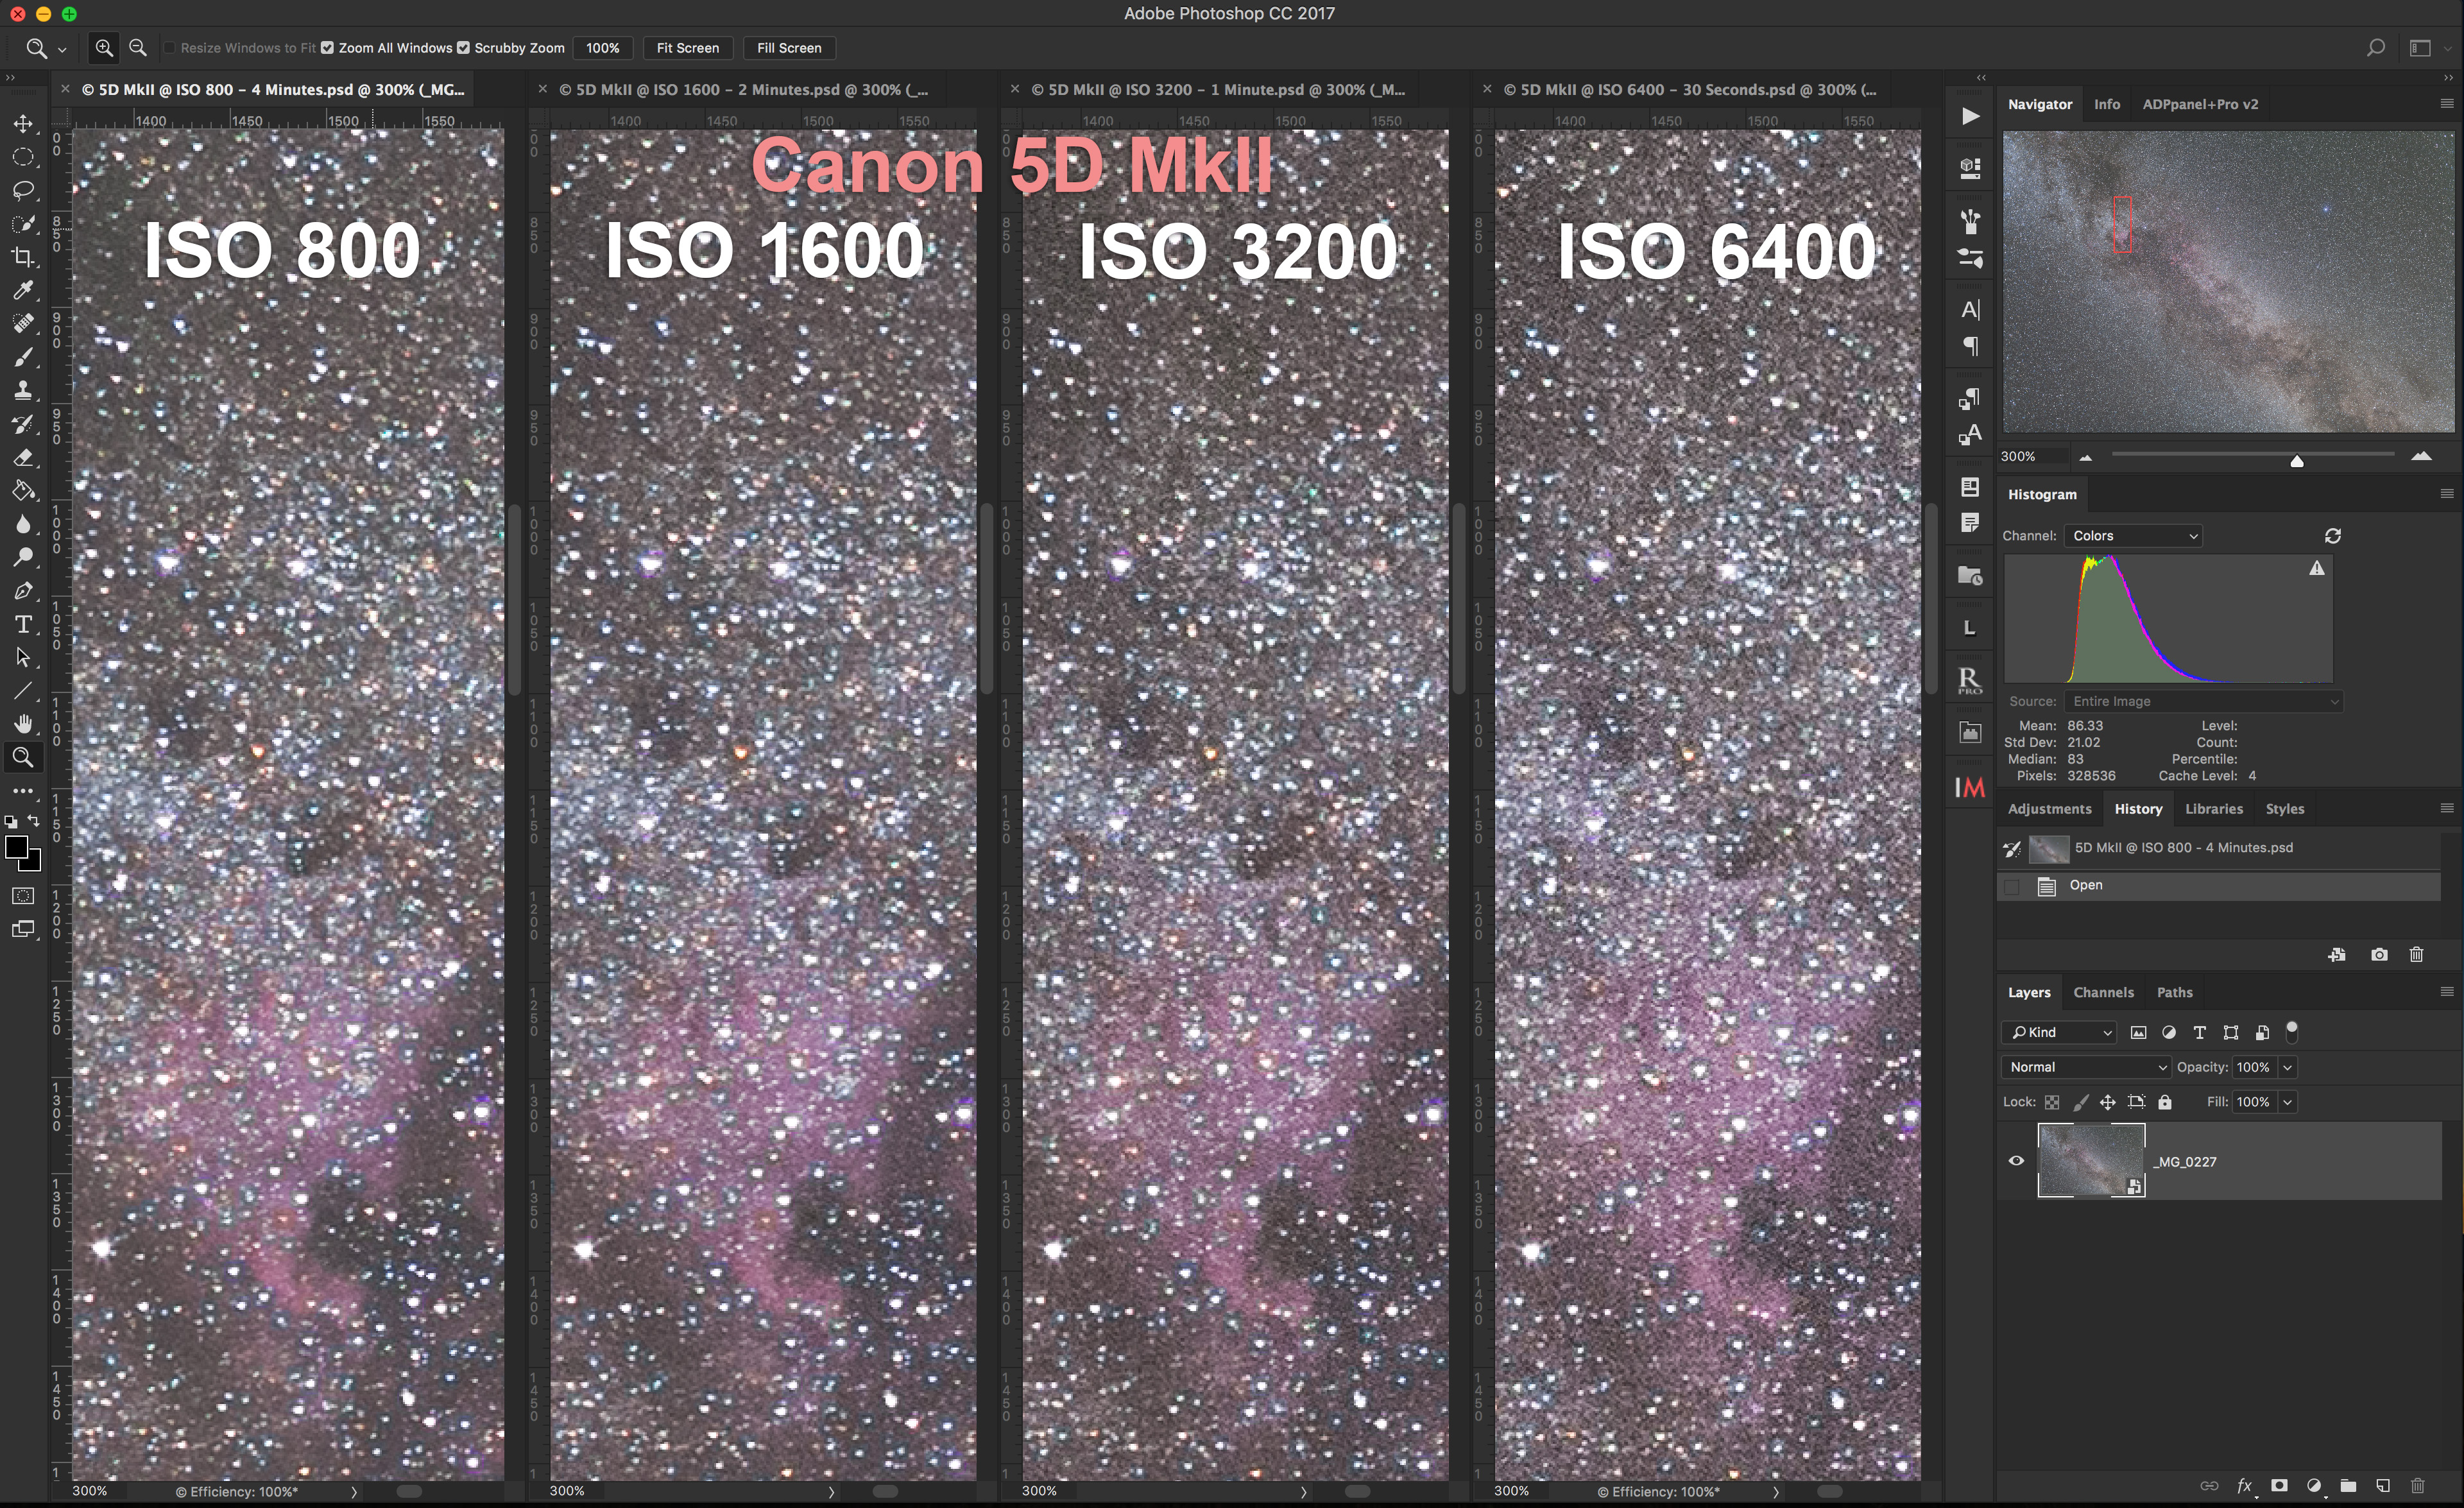
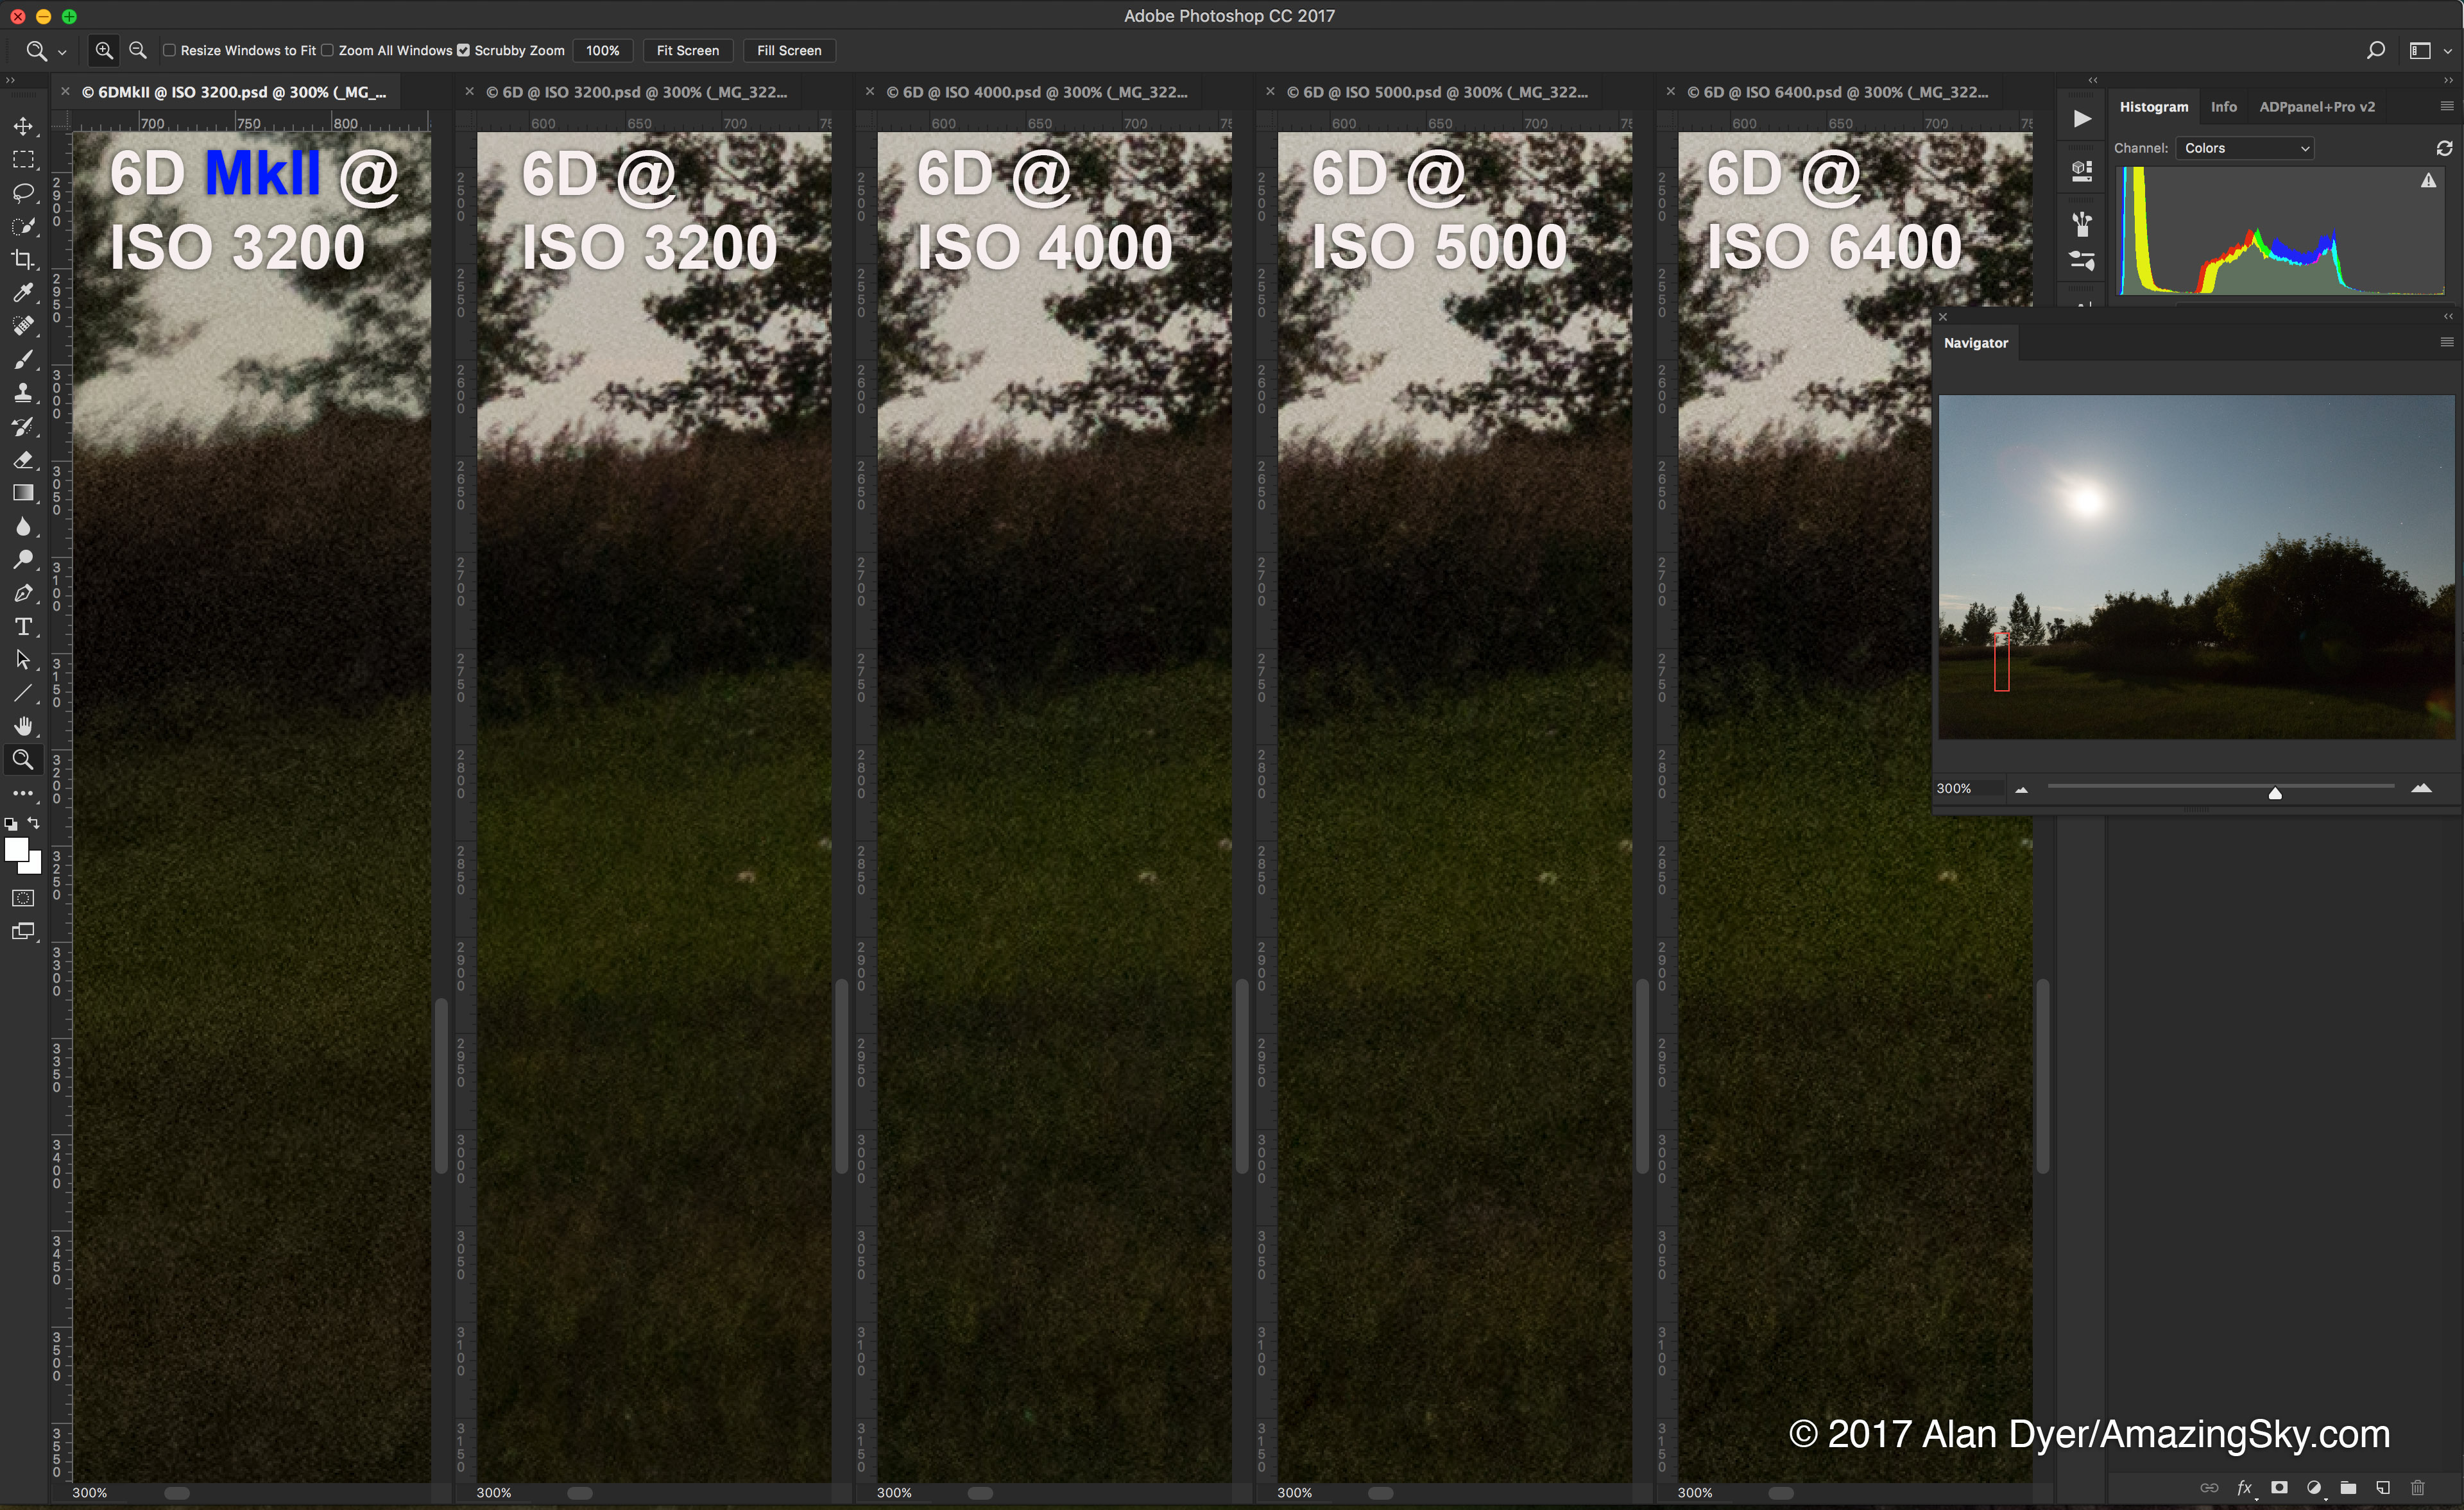
The Canon 6D MkII at four typical ISO speeds in tracked exposures. The original Canon 6D at four typical ISO speeds in tracked exposures. A Canon 5D MkII that has been filter-modified at four typical ISO speeds in tracked exposures.For this test, I shot the same region of sky with the same 35mm lens L-Series lens at f/2.2, using three cameras:
• Canon 6D MkII (2017)
• Canon 6D (2012)
• Canon 5D MkII (2008)
Note that the 5D MkII has been “filter-modified” to make its sensor more sensitive to the deep red wavelengths emitted by hydrogen gas, the main component of the nebulas along the Milky Way. You’ll see how it picks up the red North America Nebula much better than do the two off-the-shelf “stock” cameras. (Canon had their own factory-modified “a” models in years past: the 20Da and 60Da. Canon: How about a 6D MkIIa?)
I shot at four ISO speeds typical of deep-sky images: 800, 1600, 3200, and 6400.
Exposures were 4 minutes, 2 minutes, 1 minute, and 30 seconds, respectively, to produce equally exposed frames with a histogram shifted well to the right, as it should be for a good signal-to-noise ratio.
Noisy deep-sky images with DSLR cameras are usually the result of the photographer underexposing needlessly, often in the mistaken belief that doing so will reduce noise when, in fact, it does just the opposite.
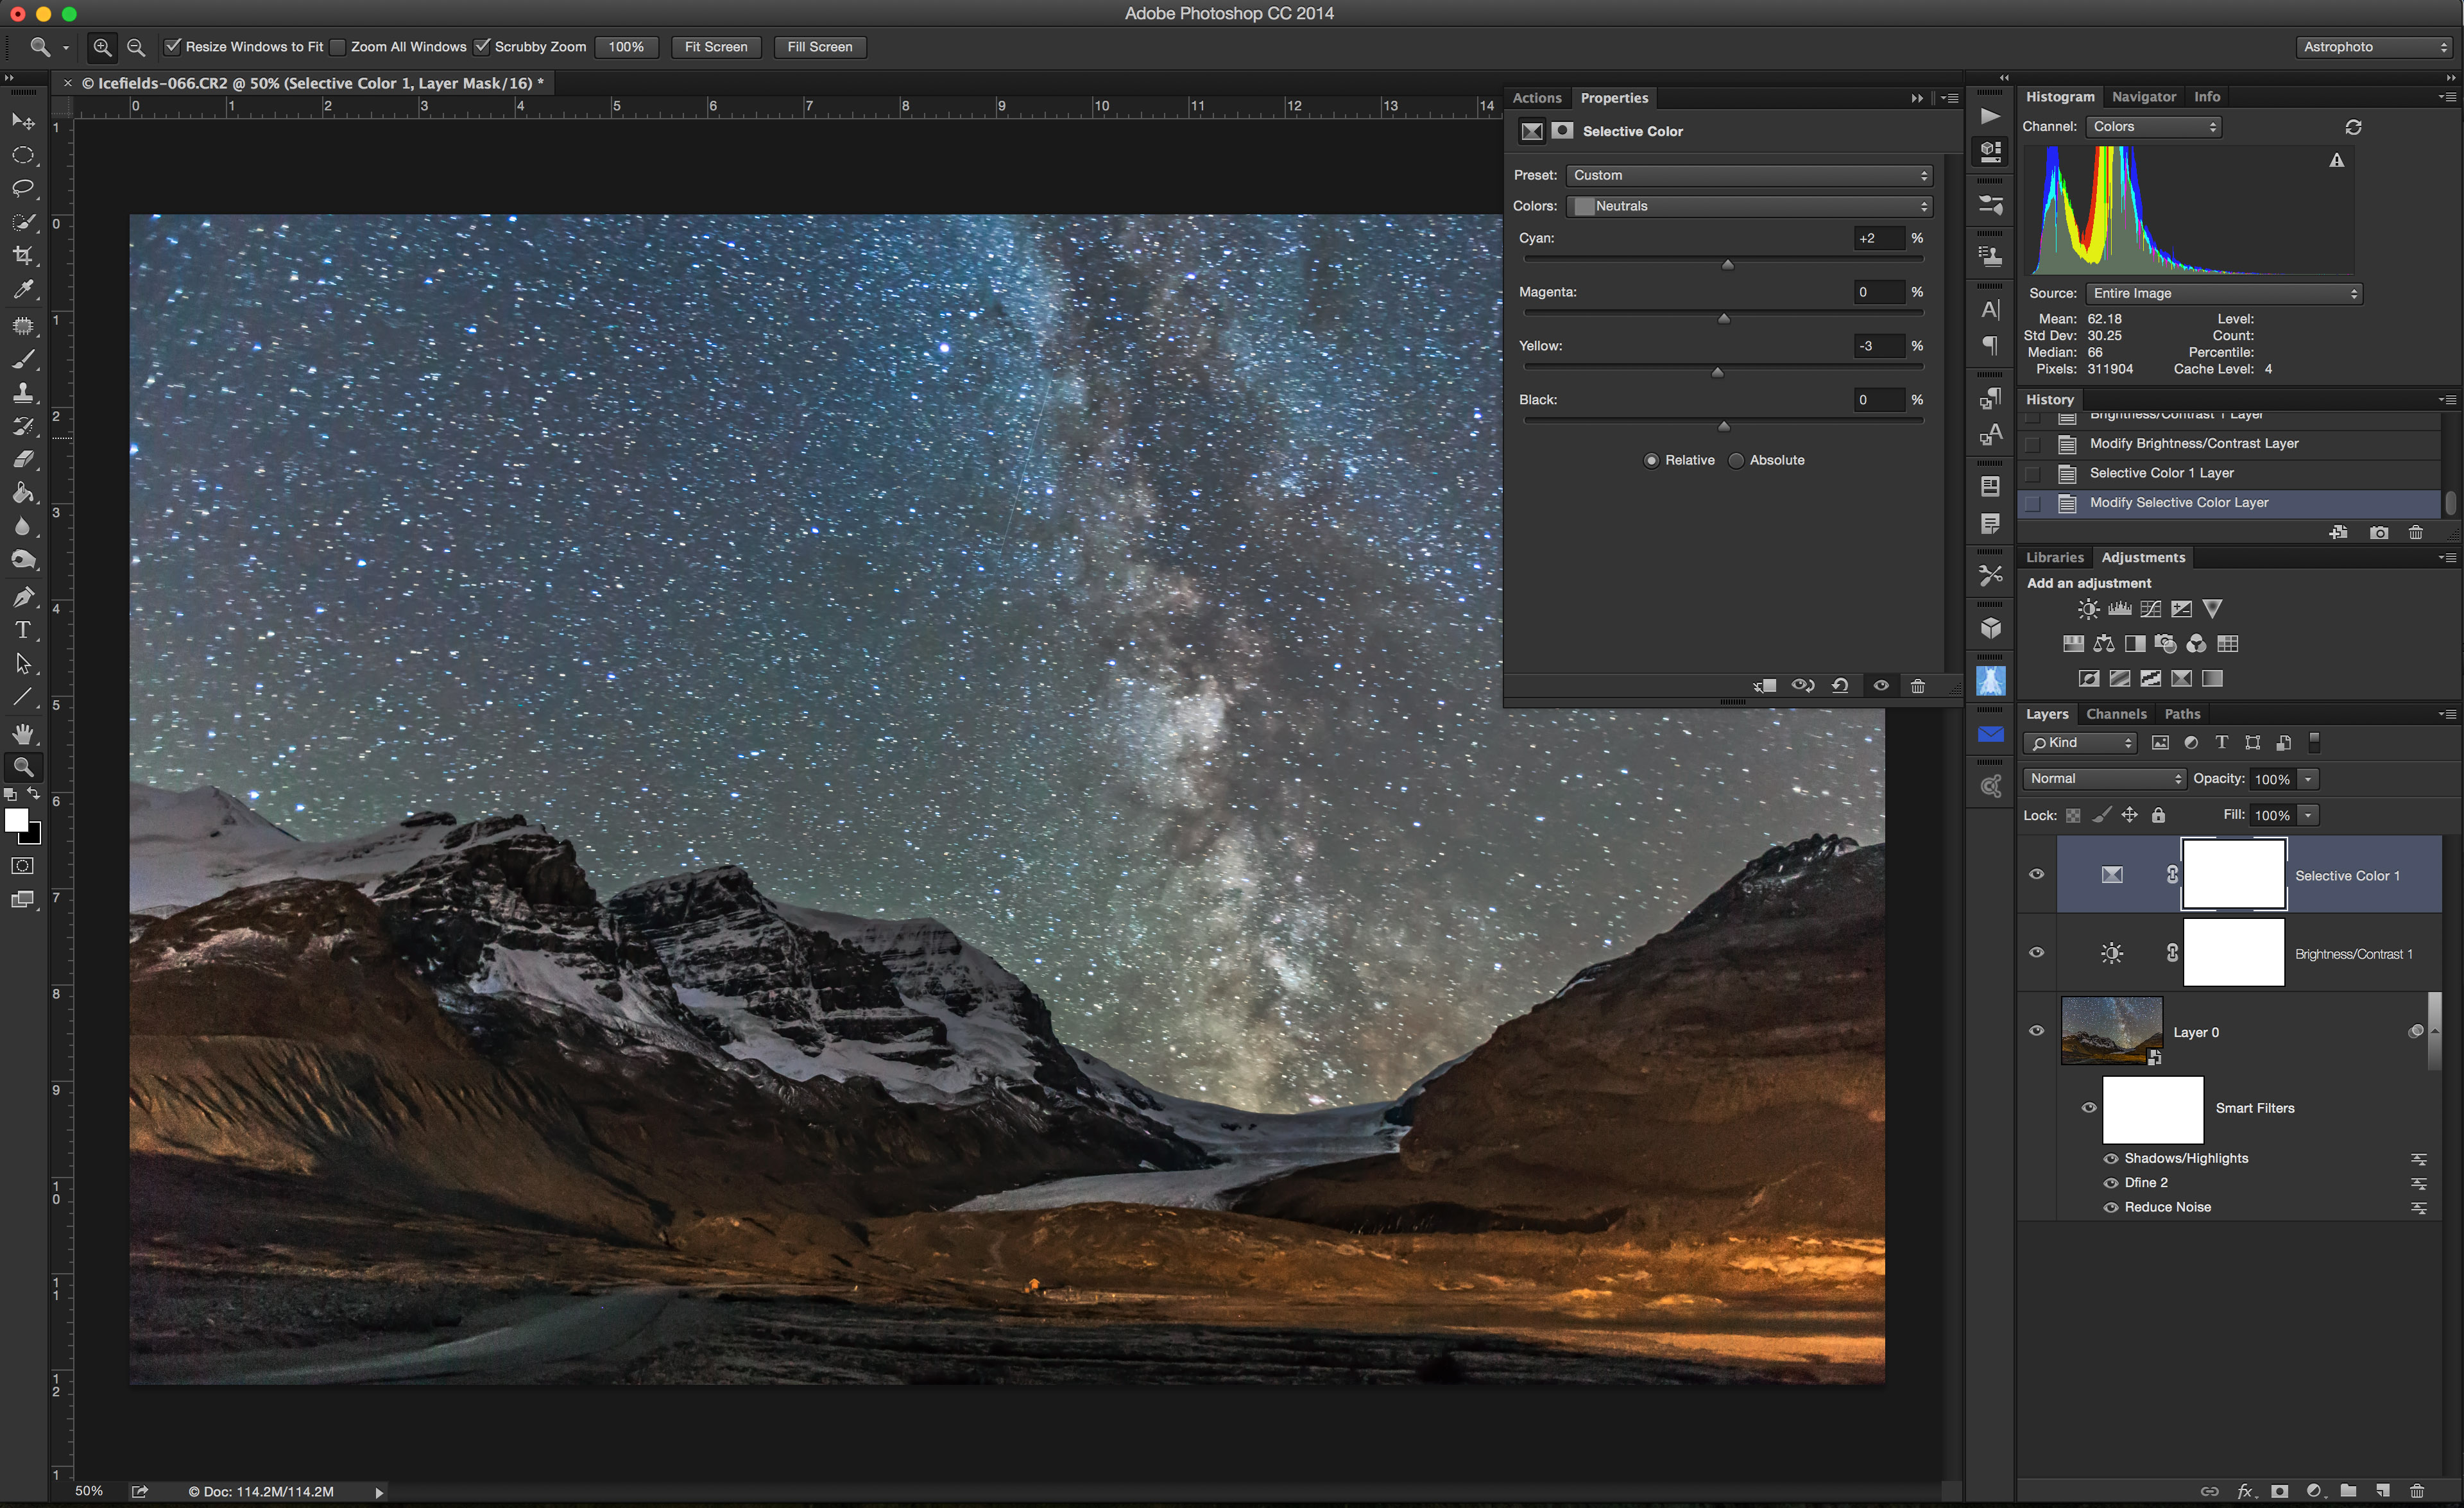
The above set of three images compares each of the three cameras at those four ISO speeds. In all cases I have applied very little processing to the images: only a lens correction, some sharpening, a slight contrast and clarity increase, and a slight color correction to neutralize the background sky.
However, I did not apply any luminance noise reduction. So all the images are noisier than what they would be in a final processed image.
Even so, all look very good. And with similar performance.
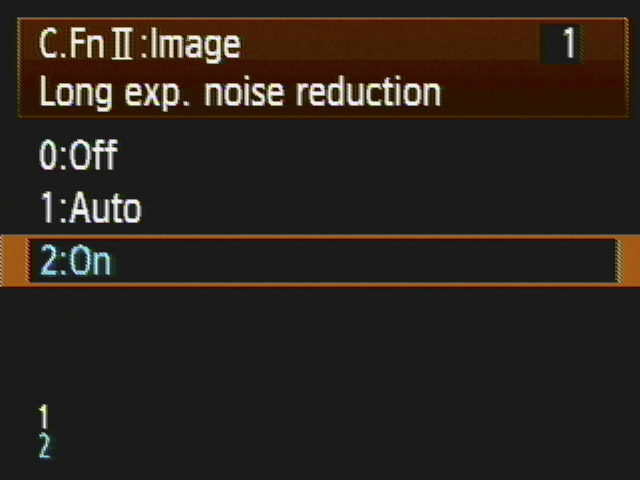
All frames were shot with Long Exposure Noise Reduction (LENR) on, for an automatic dark frame subtraction by the camera. I saw no artifacts from applying LENR vs. shots taken without it.
The 6D and 6D MkII perhaps show a little less noise than the old 5D MkII, as they should being newer cameras.
The 6D MkII also shows a little less pixelation on small stars, as it should being a 26 megapixel camera vs. 20 to 21 megapixels for the older cameras. However, you have to examine the images at pixel-peeping levels to see these differences. Nevertheless, having higher resolution without the penalty of higher noise is very welcome.
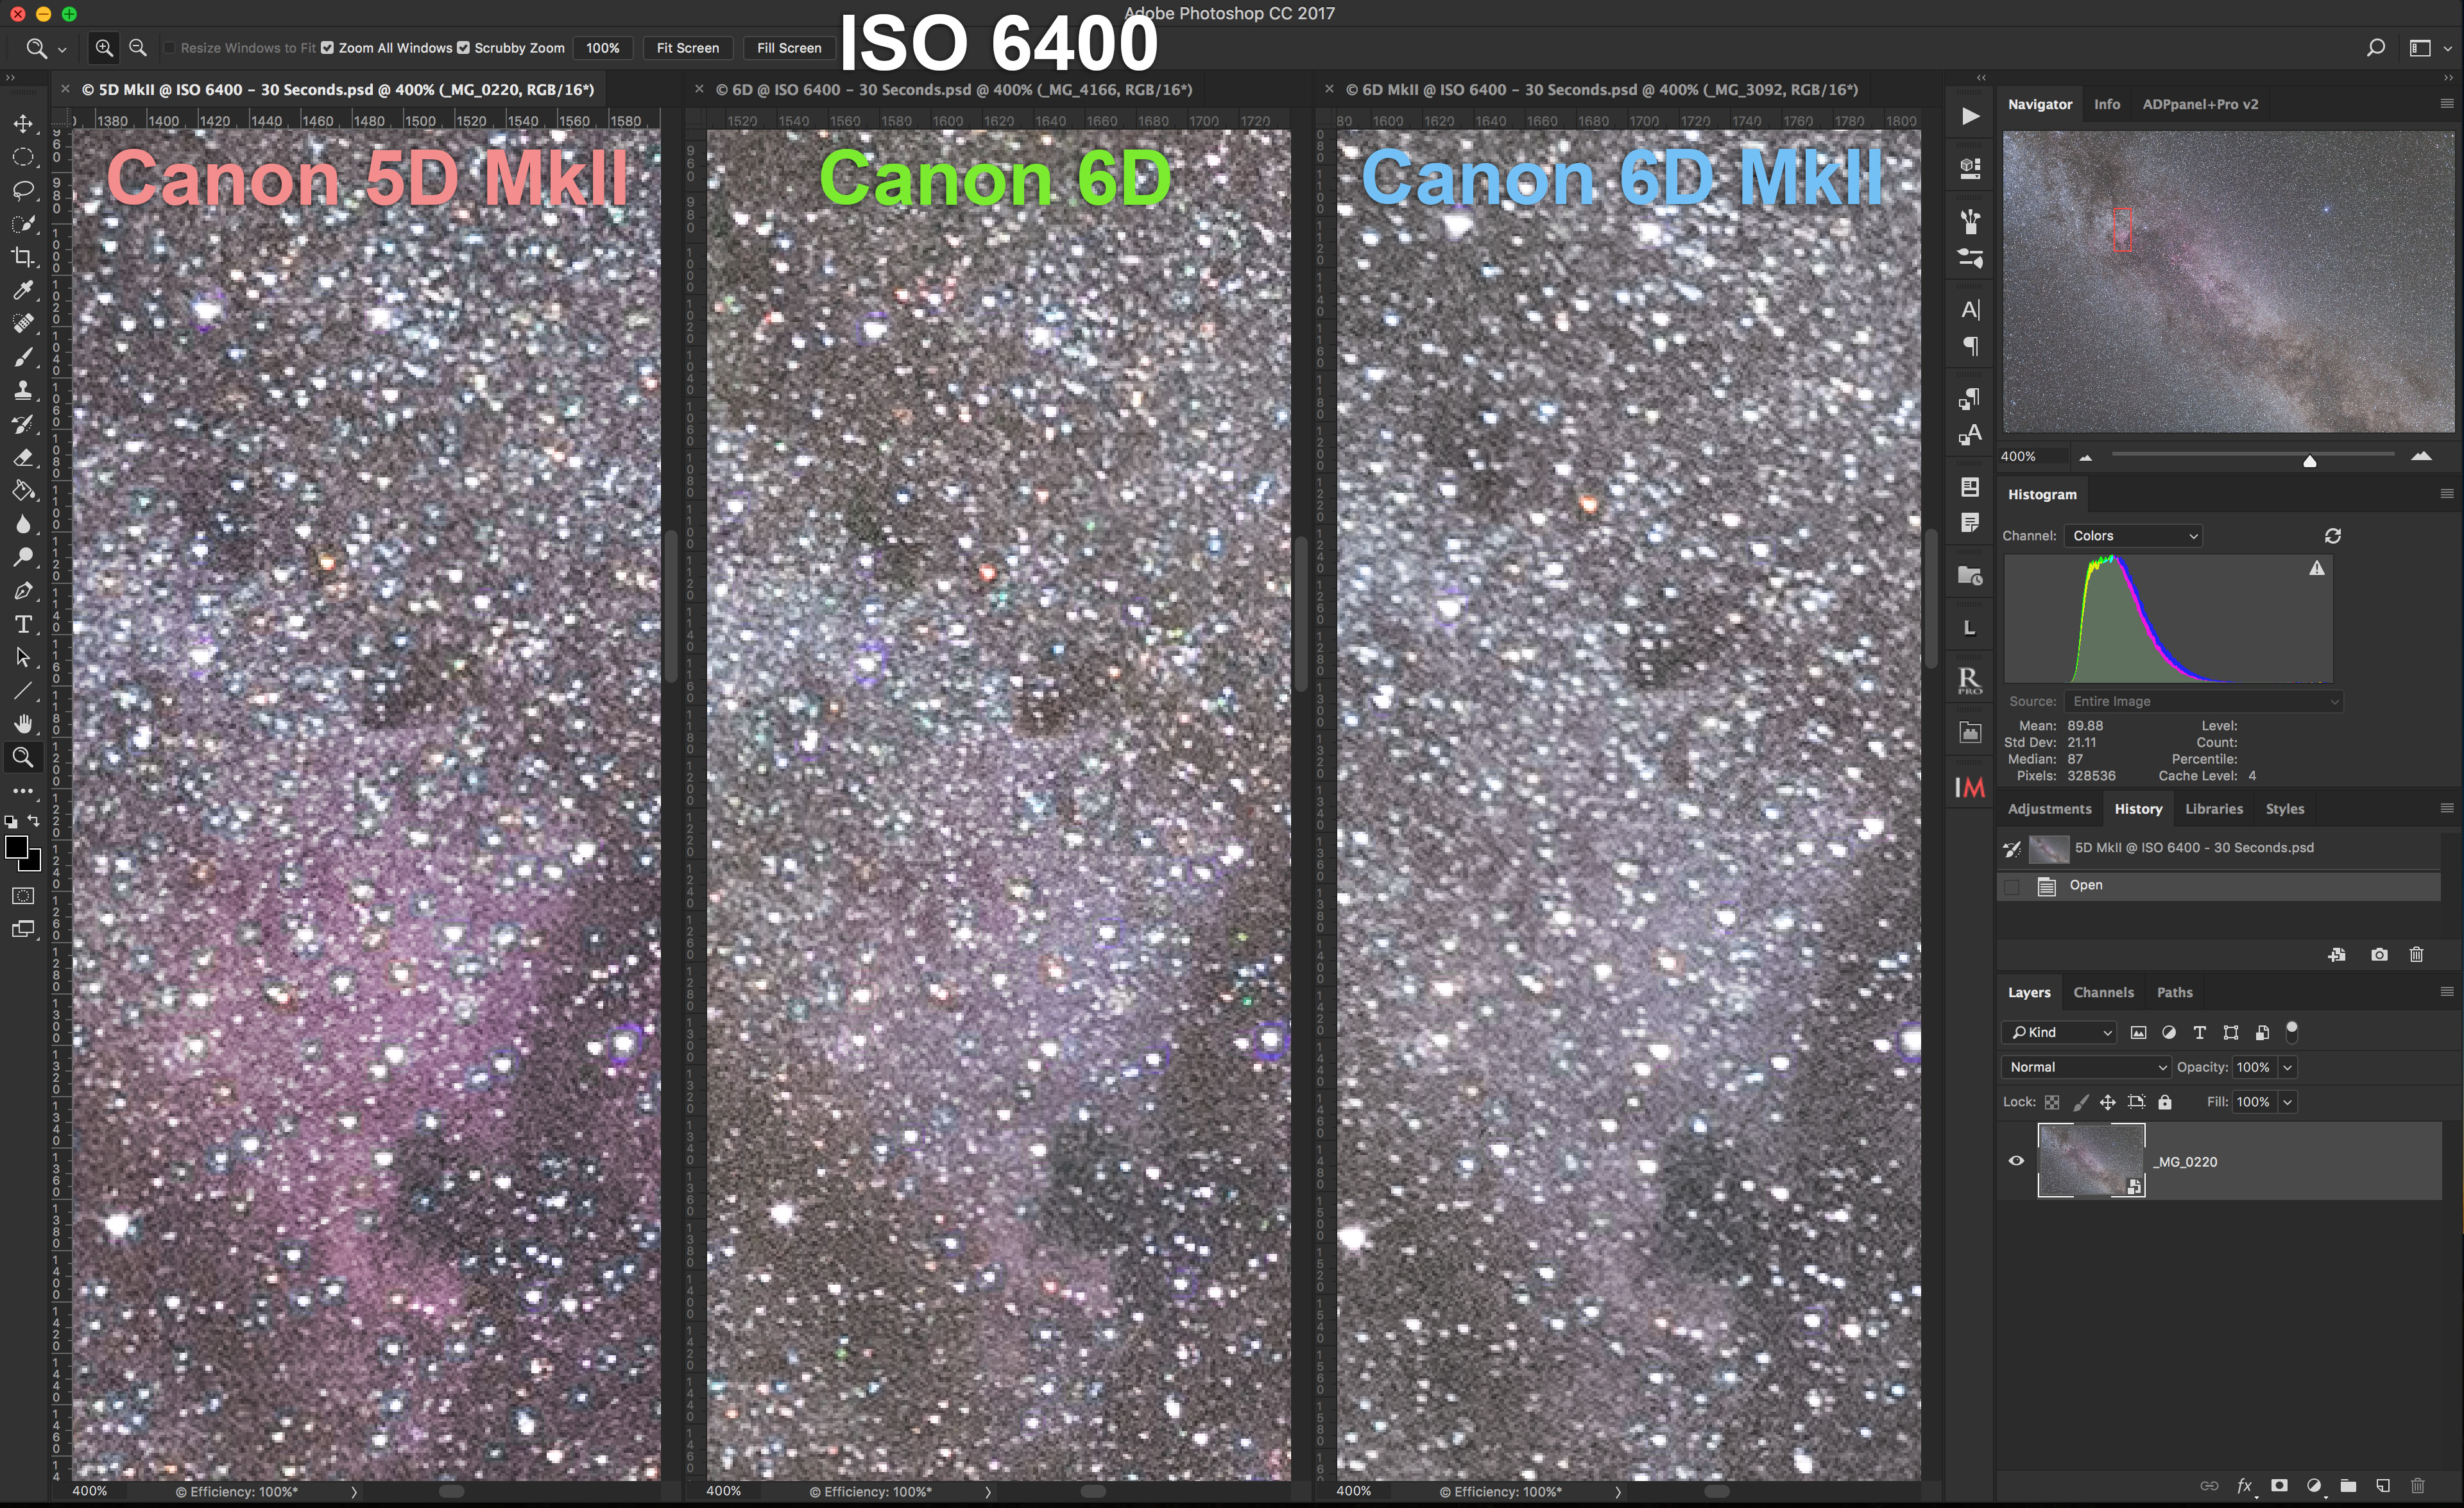
The three cameras compared at ISO 1600. Note the histogram and region of the frame we are examining up close. The three cameras compared at ISO 3200. Note the histogram and region of the frame we are examining up close. The three cameras compared at ISO 6400. Note the histogram and region of the frame we are examining up close.Above, I show images from the three cameras side by side at ISOs 1600, 3200, and 6400. It is tough to tell the difference in noise levels, the key characteristic for this type of astrophotography.
The new 6D MkII shows very similar levels of noise to the 6D, perhaps improving upon the older cameras a tad.
Because images are well-exposed (note the histogram at right), the 6D MkII is showing none of the flaws of its lower dynamic range reported elsewhere.
That’s the key. The 6D MkII needs a well-exposed image. Given that, it performs very well.
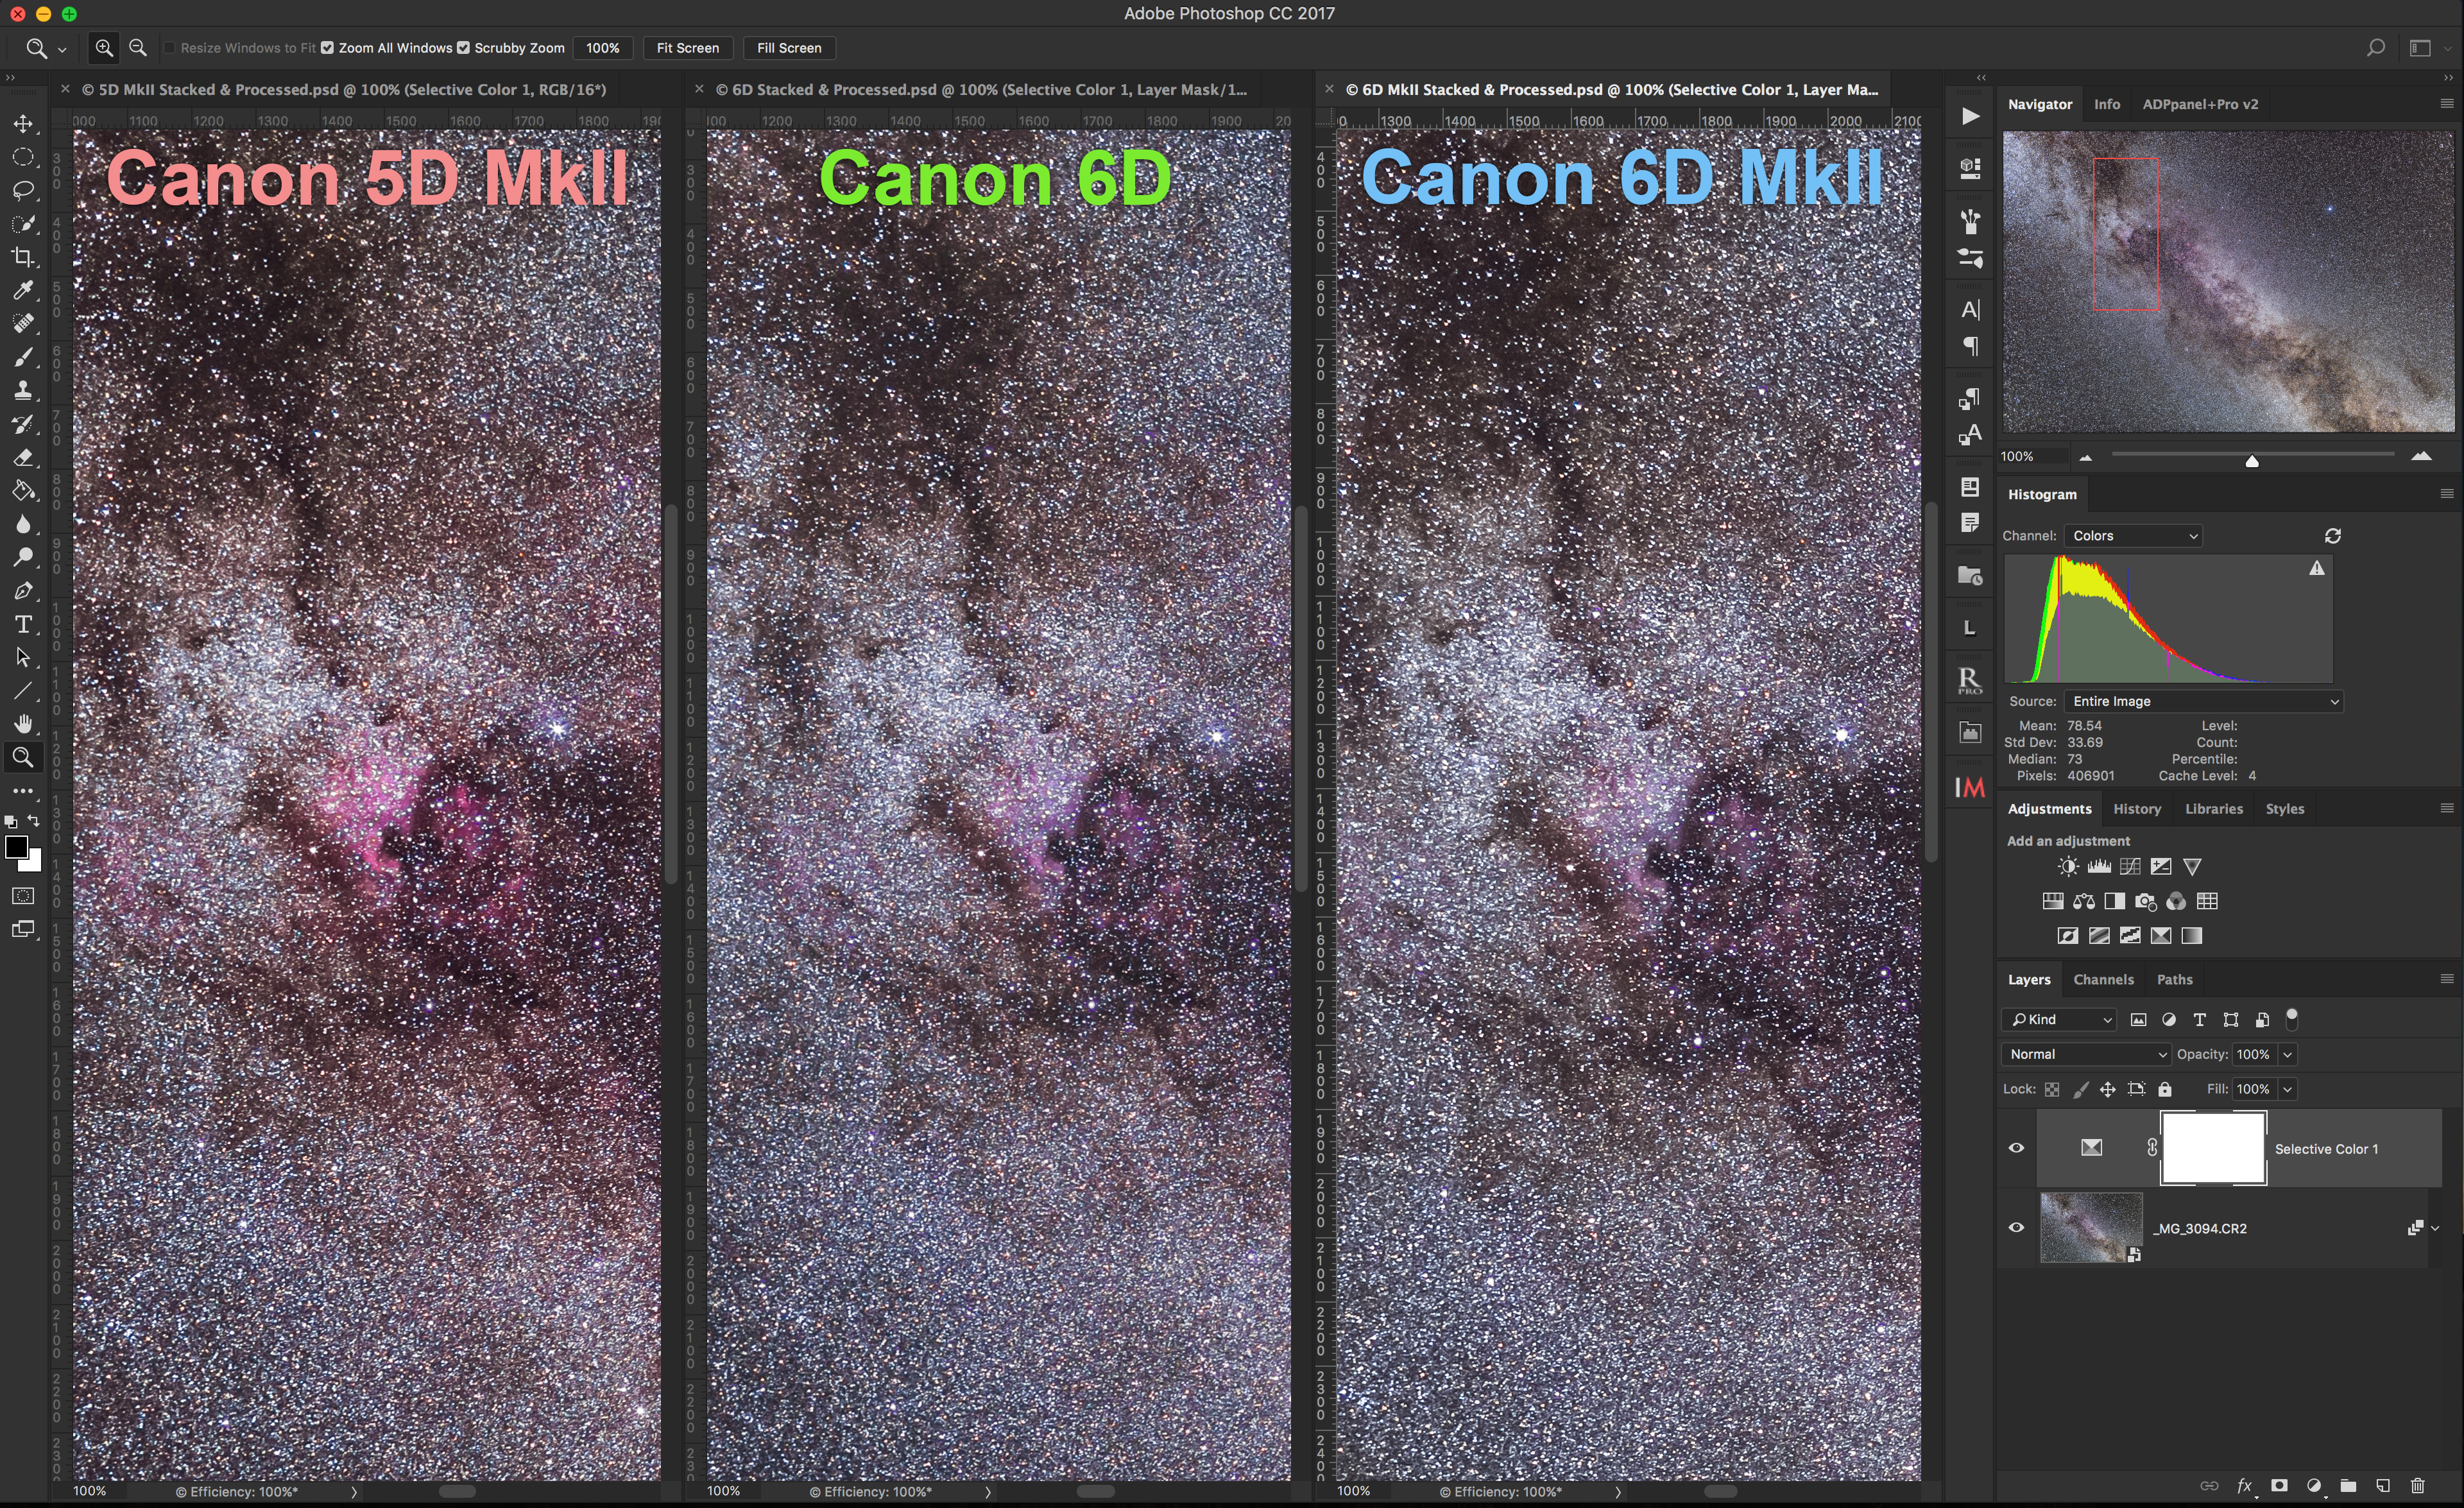
The three cameras in stacked and processed final images.This version shows the same images but now with stacked frames and with a typical level of processing to make a more attractive and richer final image. Again, all look good, but with the modified camera showing richer nebulosity, as they do in deep-sky images.
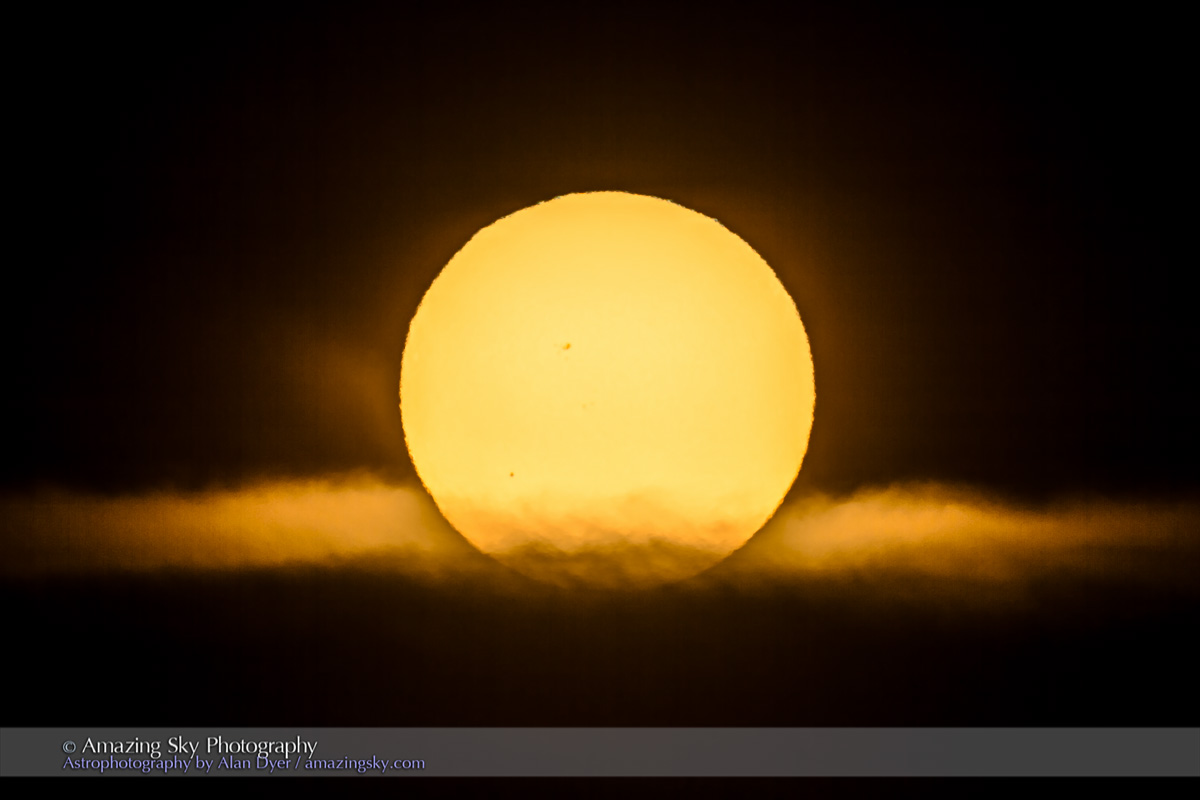
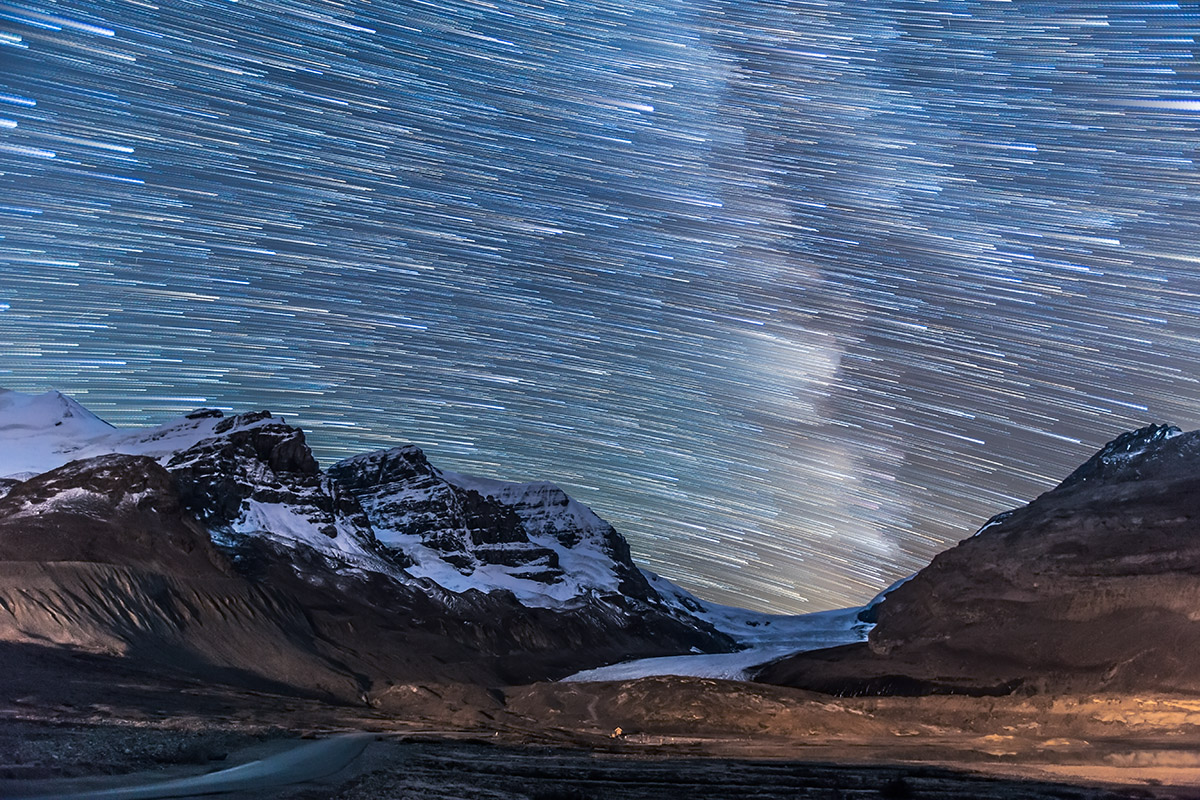
The lead image at the very top is a final full-frame image with the Canon 6D MkII.
As such, based on my initial testing, I can recommend the Canon 6D MkII (and plan to use it myself) for deep-sky photography.
Indeed, I’ll likely have the camera filter-modified to replace my vintage yet faithful 5D MkII for most of my deep-sky shooting. The 6D MkII’s tilting LCD screen alone (a neck, back, and knee saver when attached to a telescope!) makes it a welcome upgrade from the earlier cameras.
The only drawback to the 6D MkII for deep-sky work is its limited dark frame buffer. As noted in my earlier review, it can shoot only three Raw files in rapid succession with Long Exposure Noise Reduction turned on. The 5D MkII can shoot five; the 6D can shoot four. (A 6D MkIIa should have this buffer increased to at least 4, if not 8 images.)
I make use of this undocumented feature all the time to ensure cleaner images in long deep-sky exposures, as it produces and subtracts dark frames with far greater accuracy than any taken later and applied in post-processing.
I hope you’ve found this report of interest.
With the 6D MkII so new, and between smoky skies and the interference of the Moon, I’ve had only one night under dark skies to perform these tests. But the results are promising.
For more tips on deep-sky imaging and processing see my pages on my website:
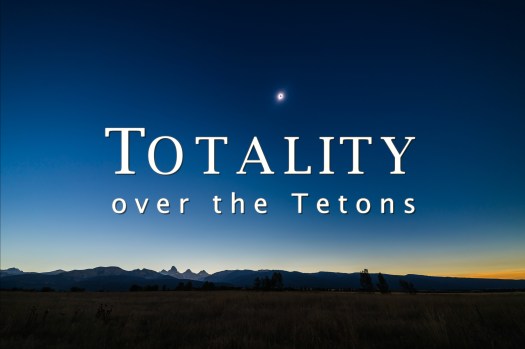
I present the final cut of my eclipse music video, from the Teton Valley, Idaho.
I’ve edited my images and videos into a music video that I hope captures some of the awe and excitement of standing in the shadow of the Moon and gazing skyward at a total eclipse.
Totality over the Tetons from Alan Dyer on Vimeo.
The video can be viewed in up to 4K resolution. Music is by the Hollywood session group and movie soundtrack masters, Audiomachine. It is used under license.
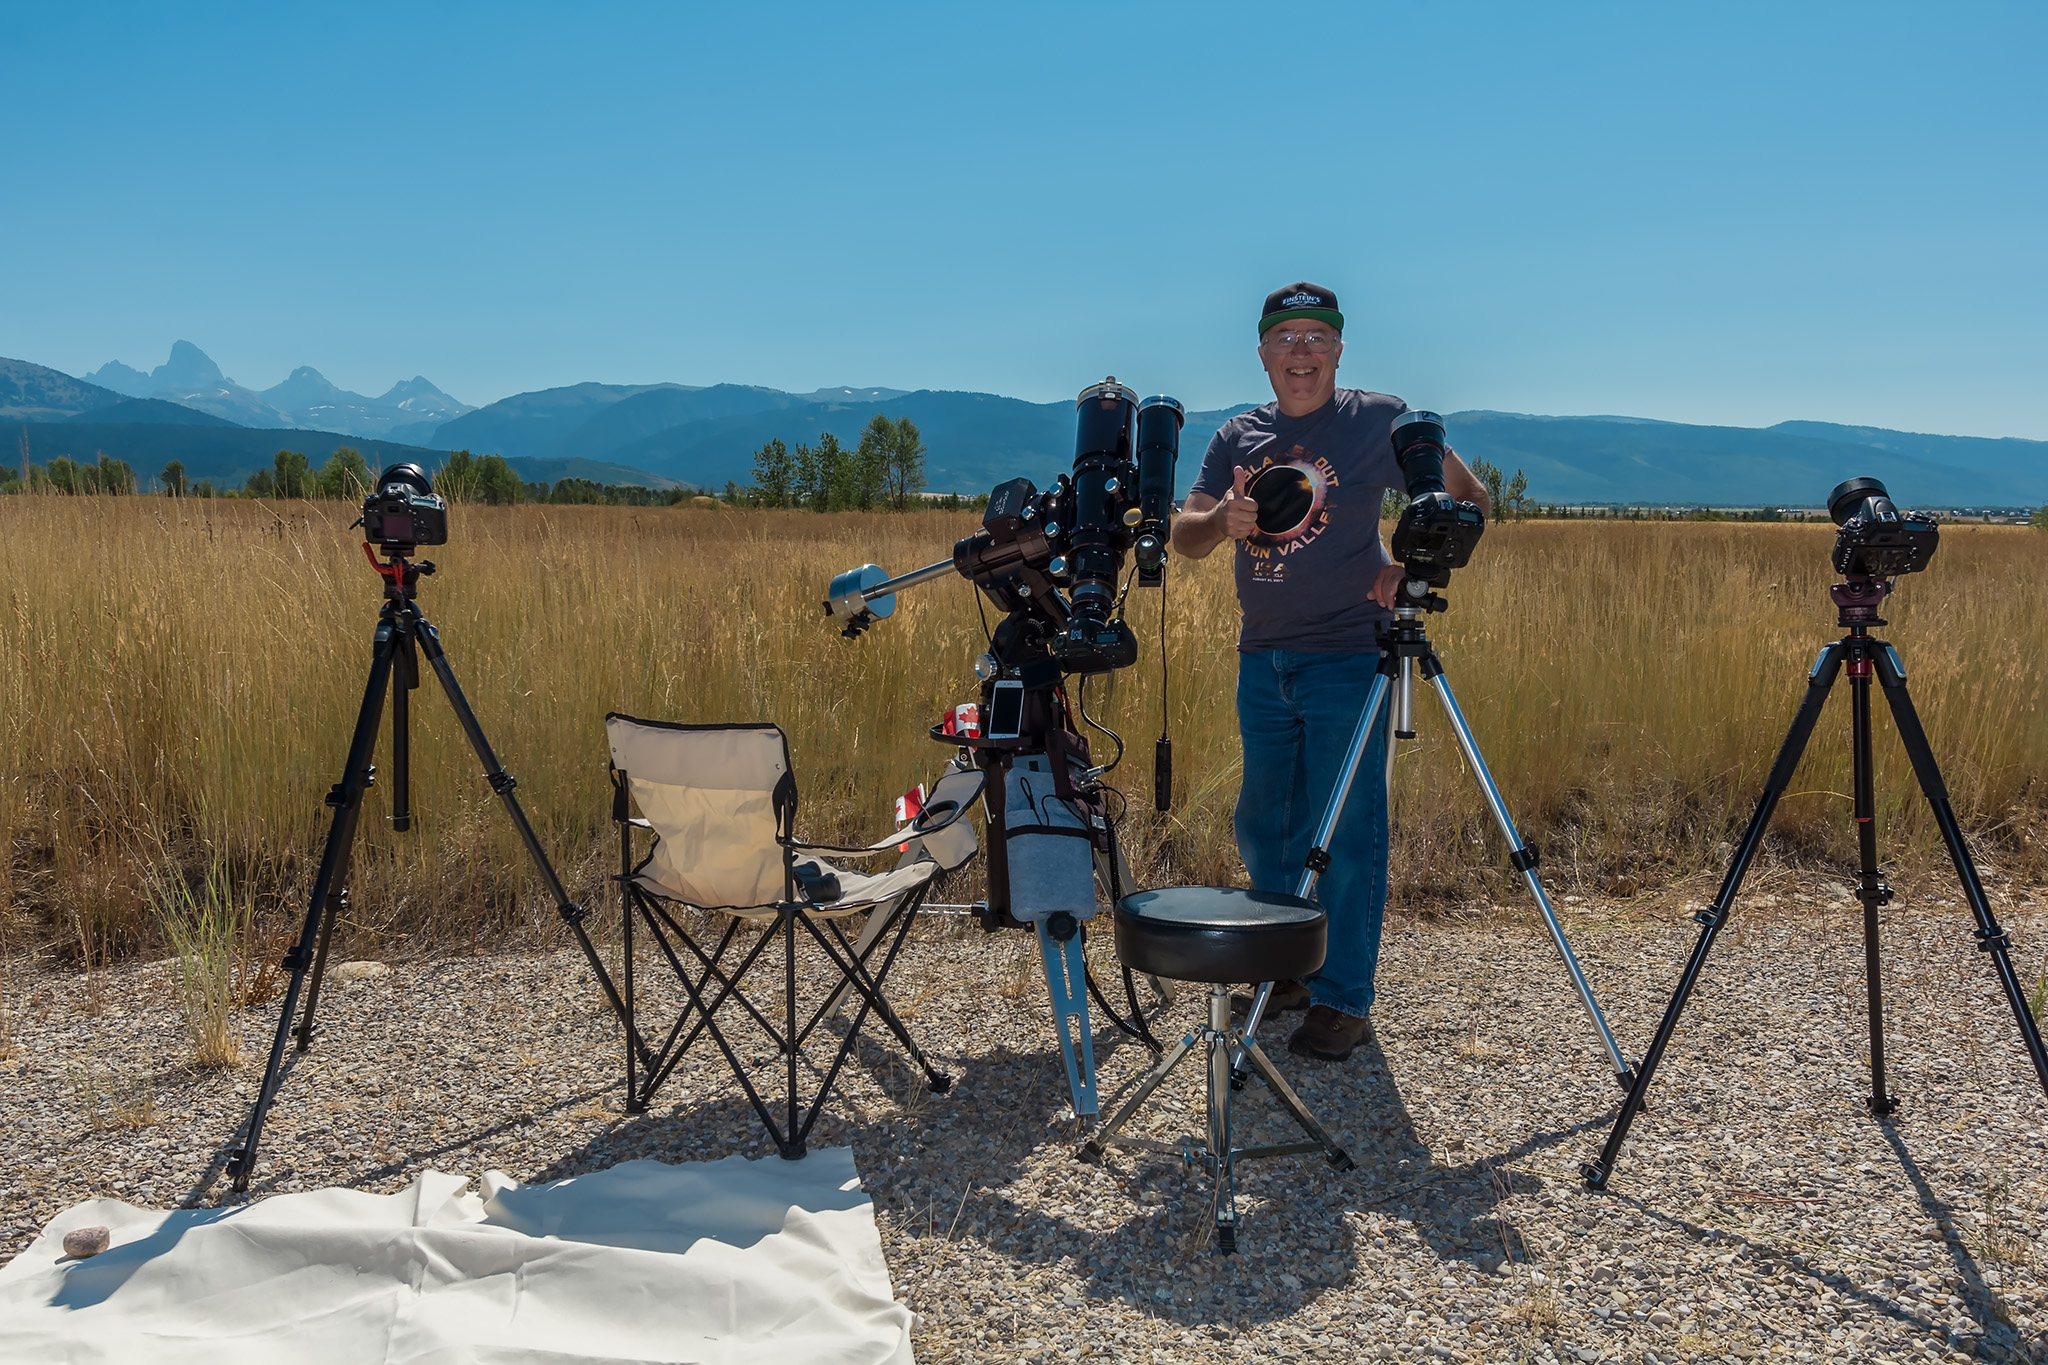
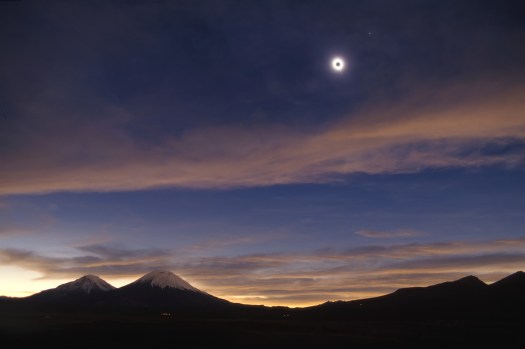
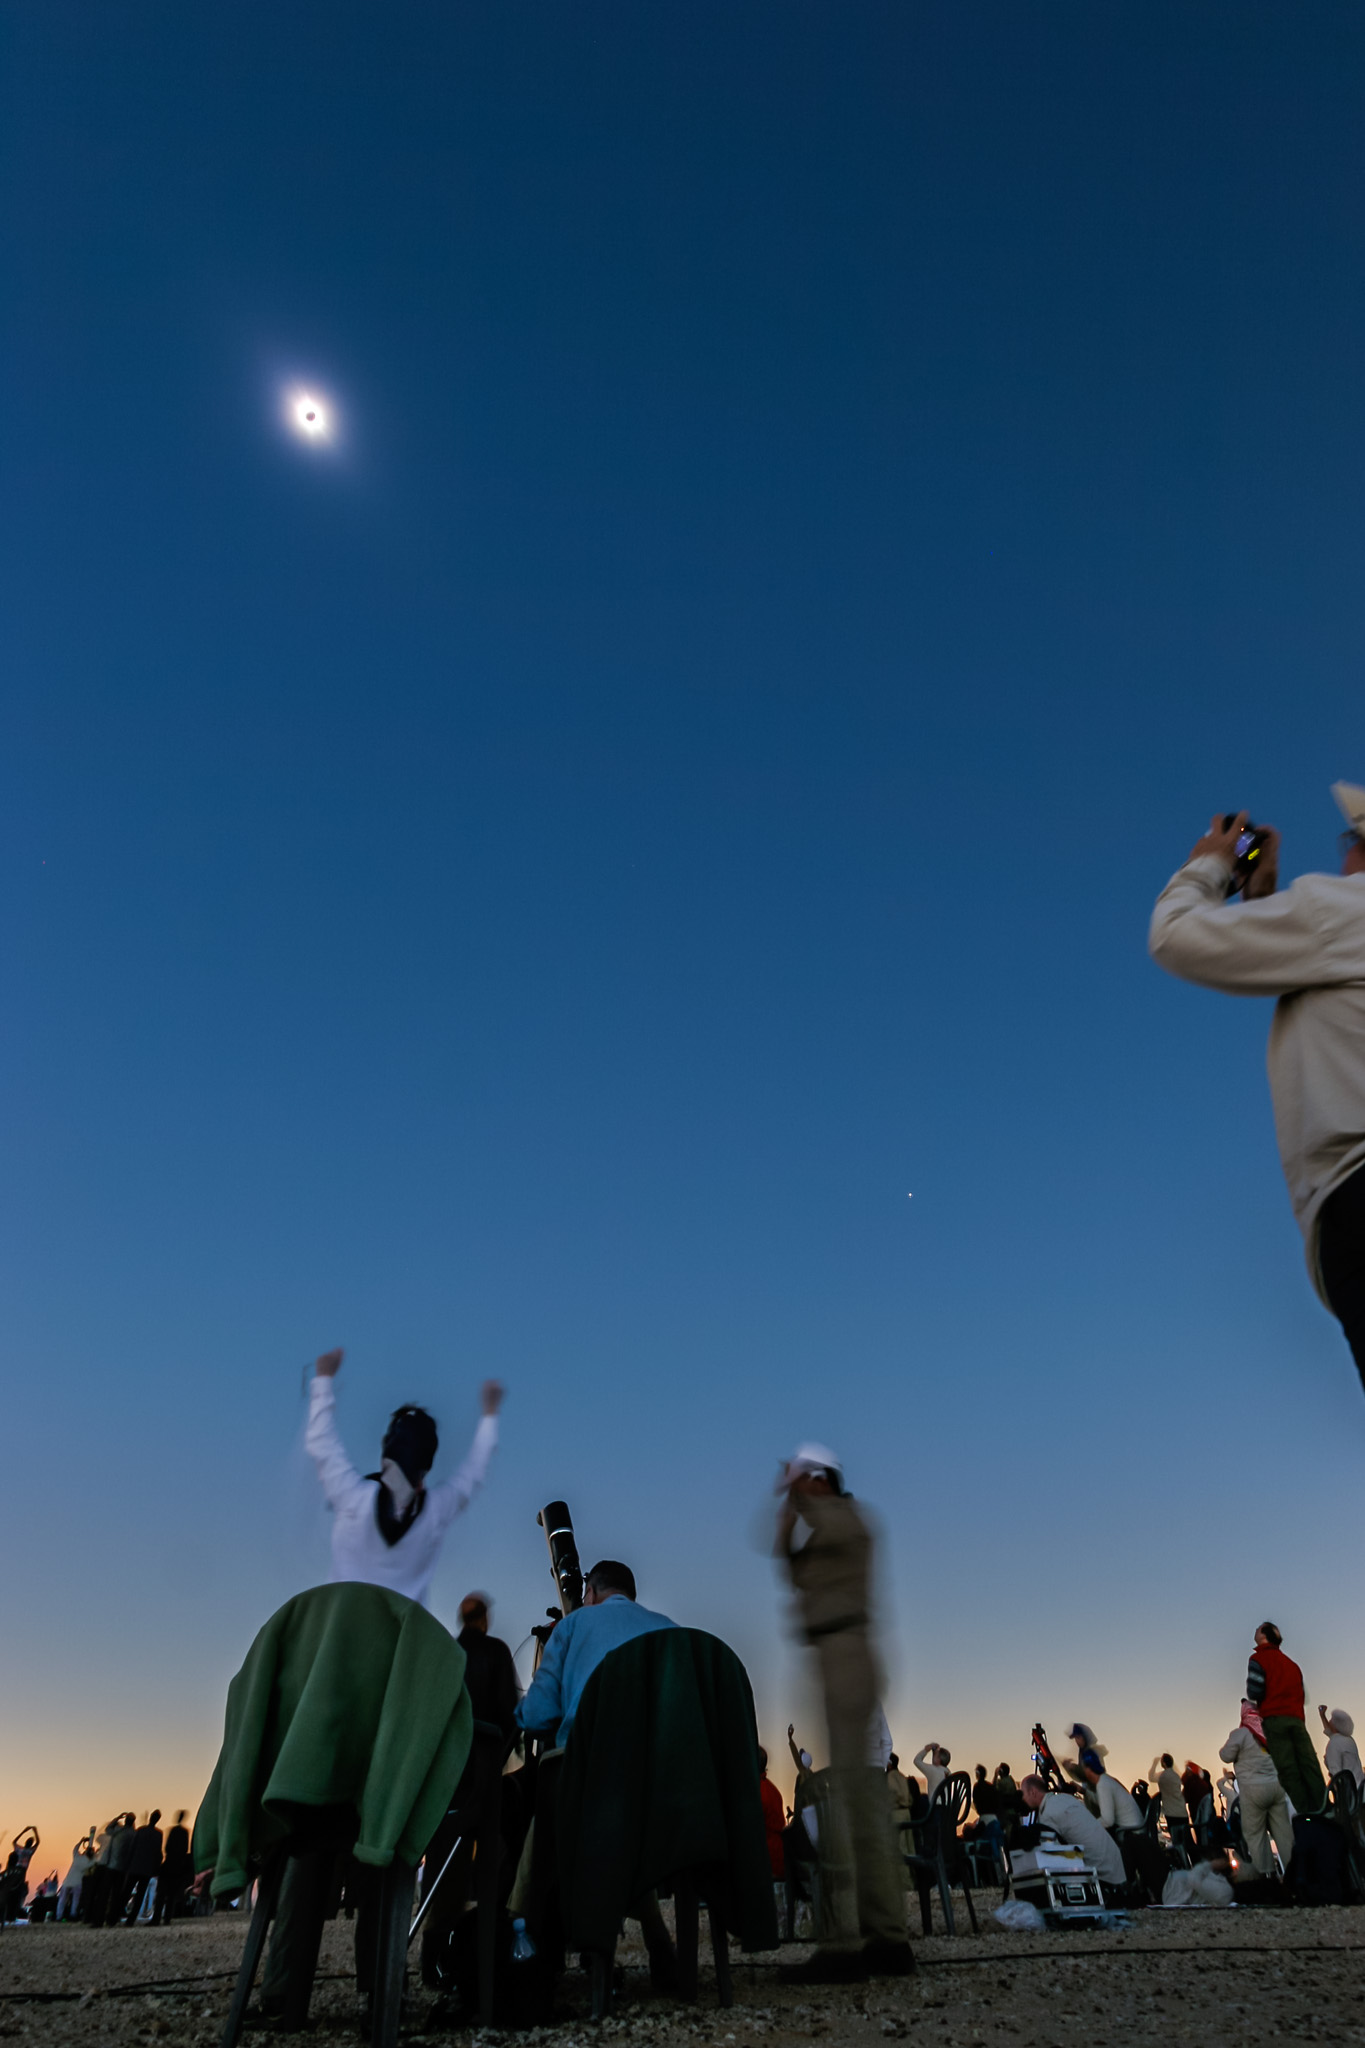
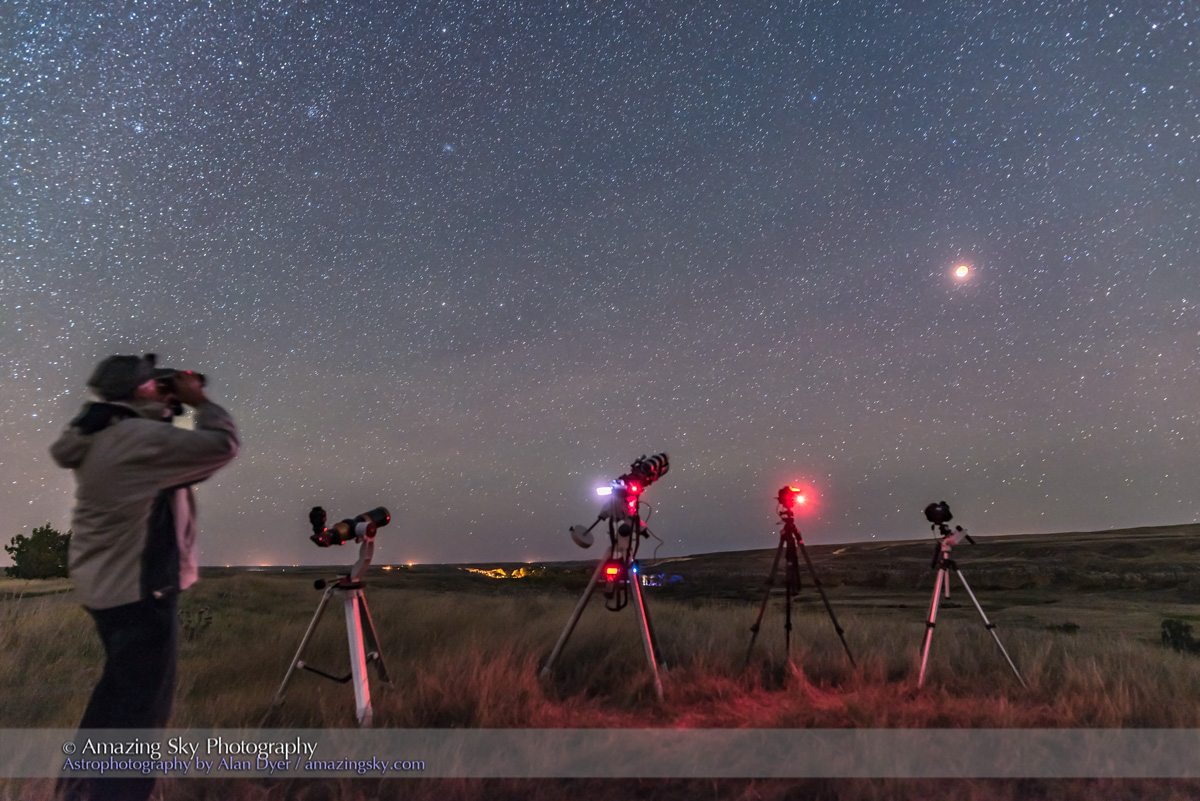
Me at the 2017 total solar eclipse celebrating post-eclipse with four of the camera systems I used, for close-up stills through a telescope, for 4K video through a telephoto lens, and two wide-angle time-lapse DSLRs. A fifth camera used to take this image shot an HD video selfie.Never before have I been able to shoot a total eclipse with so many cameras to capture the scene from wide-angles to close-ups, in stills, time-lapses, and videos, including 4K. Details on the setup are in the caption for the video on Vimeo. Click through to Vimeo.
I scouted this site north of Driggs, Idaho two years earlier, in April 2015. It was perfect for me. I could easily set up lots of gear, it had a great sightline to the Grand Tetons, and a clear horizon for the twilight effects. And I had the site almost to myself. Observing with a crowd adds lots of energy and excitement, but also distraction and stress. I had five cameras to operate. It was an eclipse experience I’ll likely never duplicate.
If you missed this eclipse, you missed the event of a lifetime. Sorry. Plain and simple.
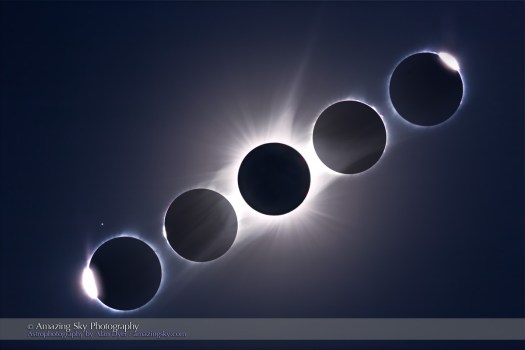
A composite of the 2017 eclipse with time running from left to right, depicting the onset of totality at left, then reappearance of the Sun at right. Taken with the 4-inch telescope shown above.If you saw the eclipse, and want to see more, then over the next few years you will have to travel far and wide, mostly to the southern hemisphere between now and 2024.
But on April 8, 2024 the umbral shadow of the Moon once again sweeps across North America, bringing a generous four minutes of totality to a narrow path from Mexico, across the U.S., and up into eastern Canada.
It will be the Great North American Eclipse. Seven years to go!
Thank you Idaho for providing the finest sky we could have hoped for on eclipse day.
After several days of predictions that went from good, to bad, to not so good, prompting worries about having to escape west to clearer skies, August 21 turned out to be wonderfully clear, both cloudless and smoke free.
My site was the one I had planned from a scouting trip in April 2015, off the West 5000 Road north of Driggs, Idaho. It had a sightline to the Tetons, a great horizon, and I could drive to it with my carload of gear, a rare opportunity.
I had never driven to any total solar eclipse before, allowing me to shoot with all the telescope and camera gear I could muster and handle. And I had the site almost all to myself, a first for any total solar eclipse.
Me at the 2017 total solar eclipse celebrating post eclipse with four of the camera systems I used, for close-up stills through a telescope, for 4K video through a telephoto lens, and two wide-angle time-lapse DSLRs. A fifth camera used to take this image shot an HD video selfie.
This was only the fourth eclipse out of the 16 I have been to that I shot though a telescope.
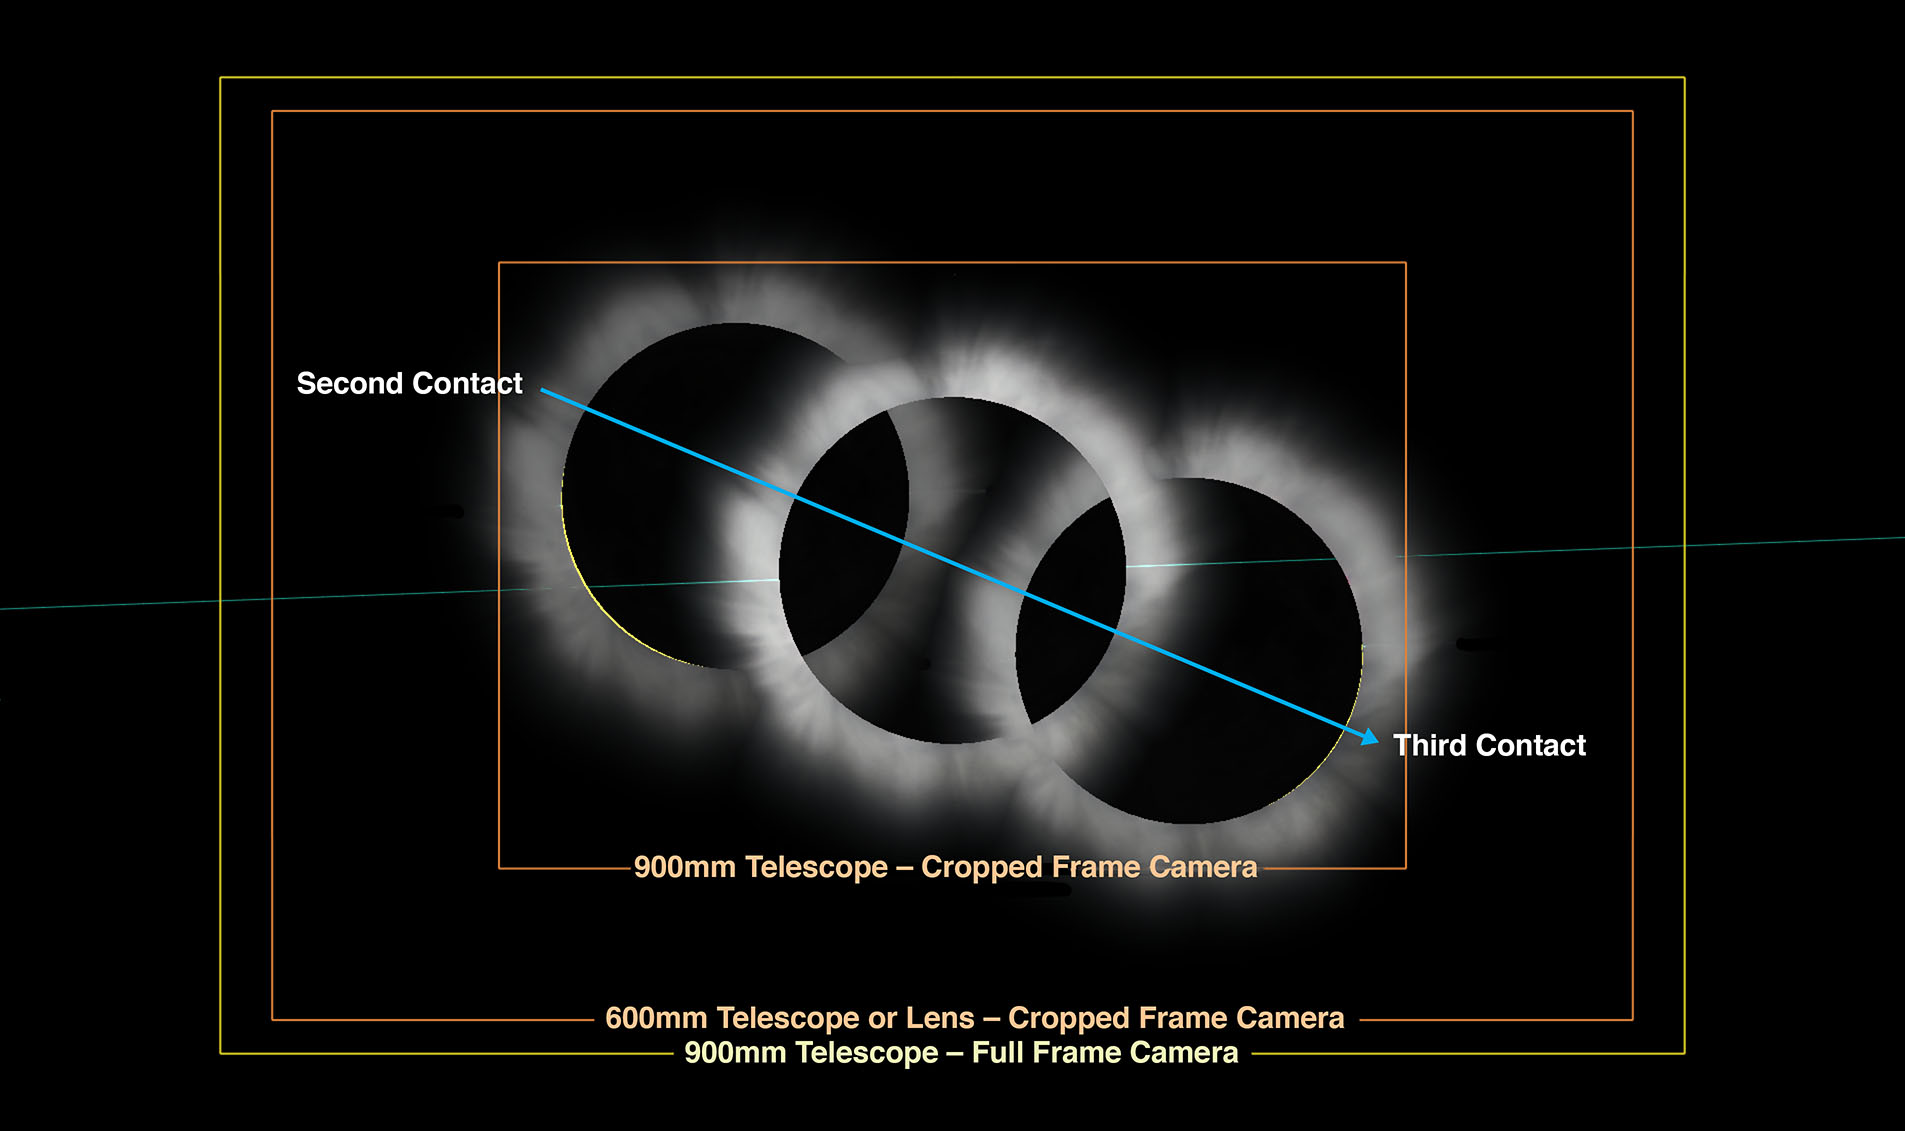
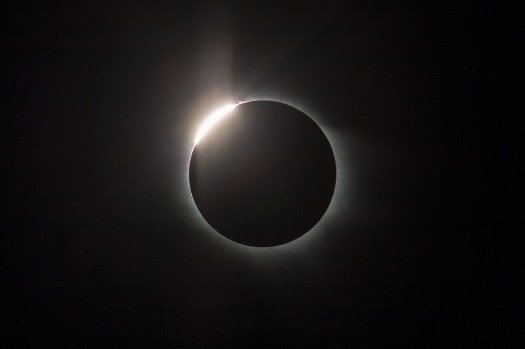
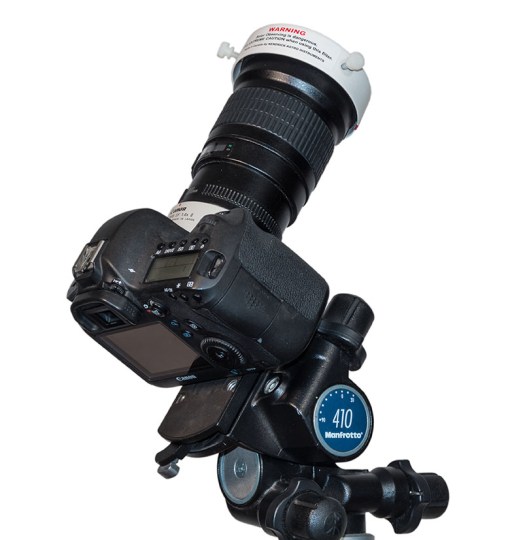
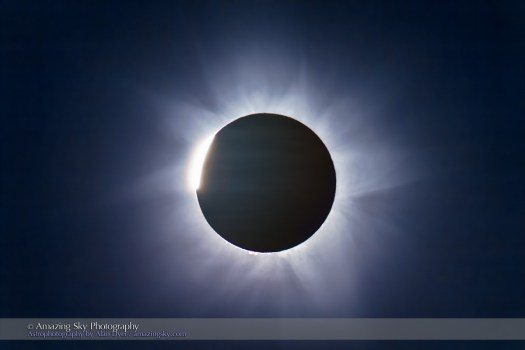
The lead image is a composite of second and third contact images with a blended exposure composite of totality, taken with the telescope shown here. However, this was the first time I’ve shot a total solar eclipse with an equatorial mount that was accurately polar aligned (at 5 a.m. that morning!) and tracking the Sun.
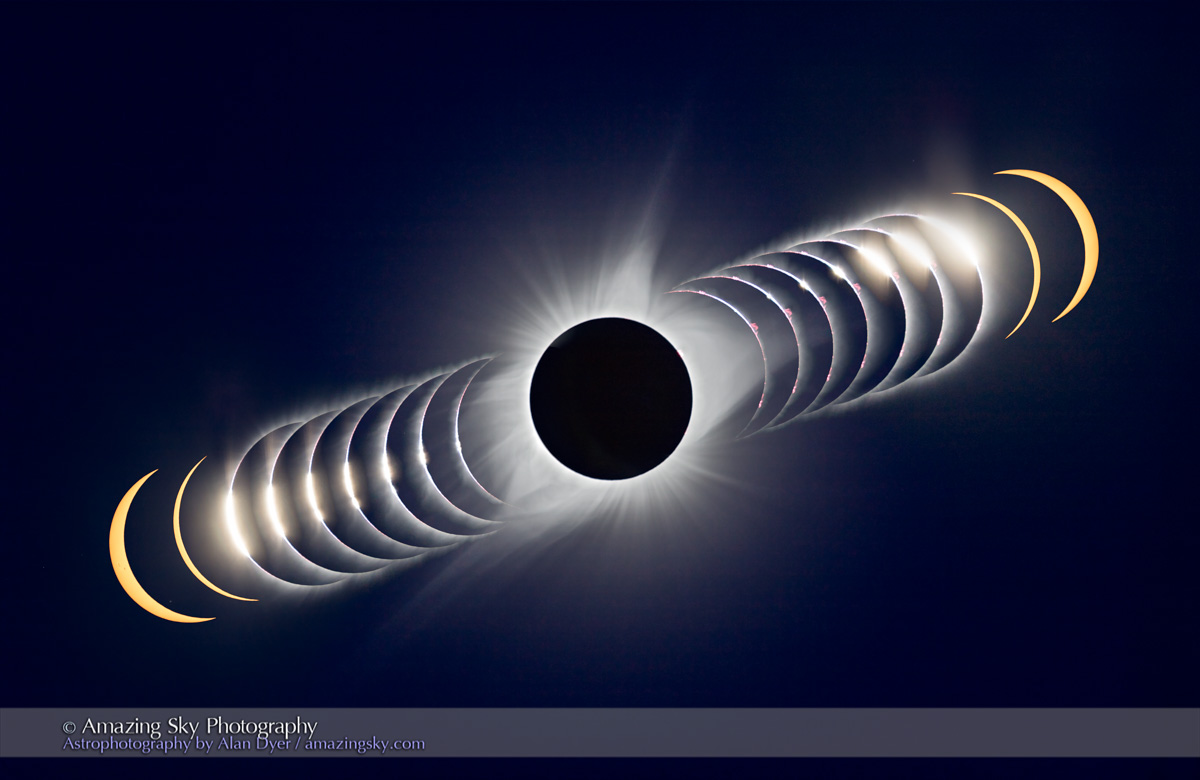
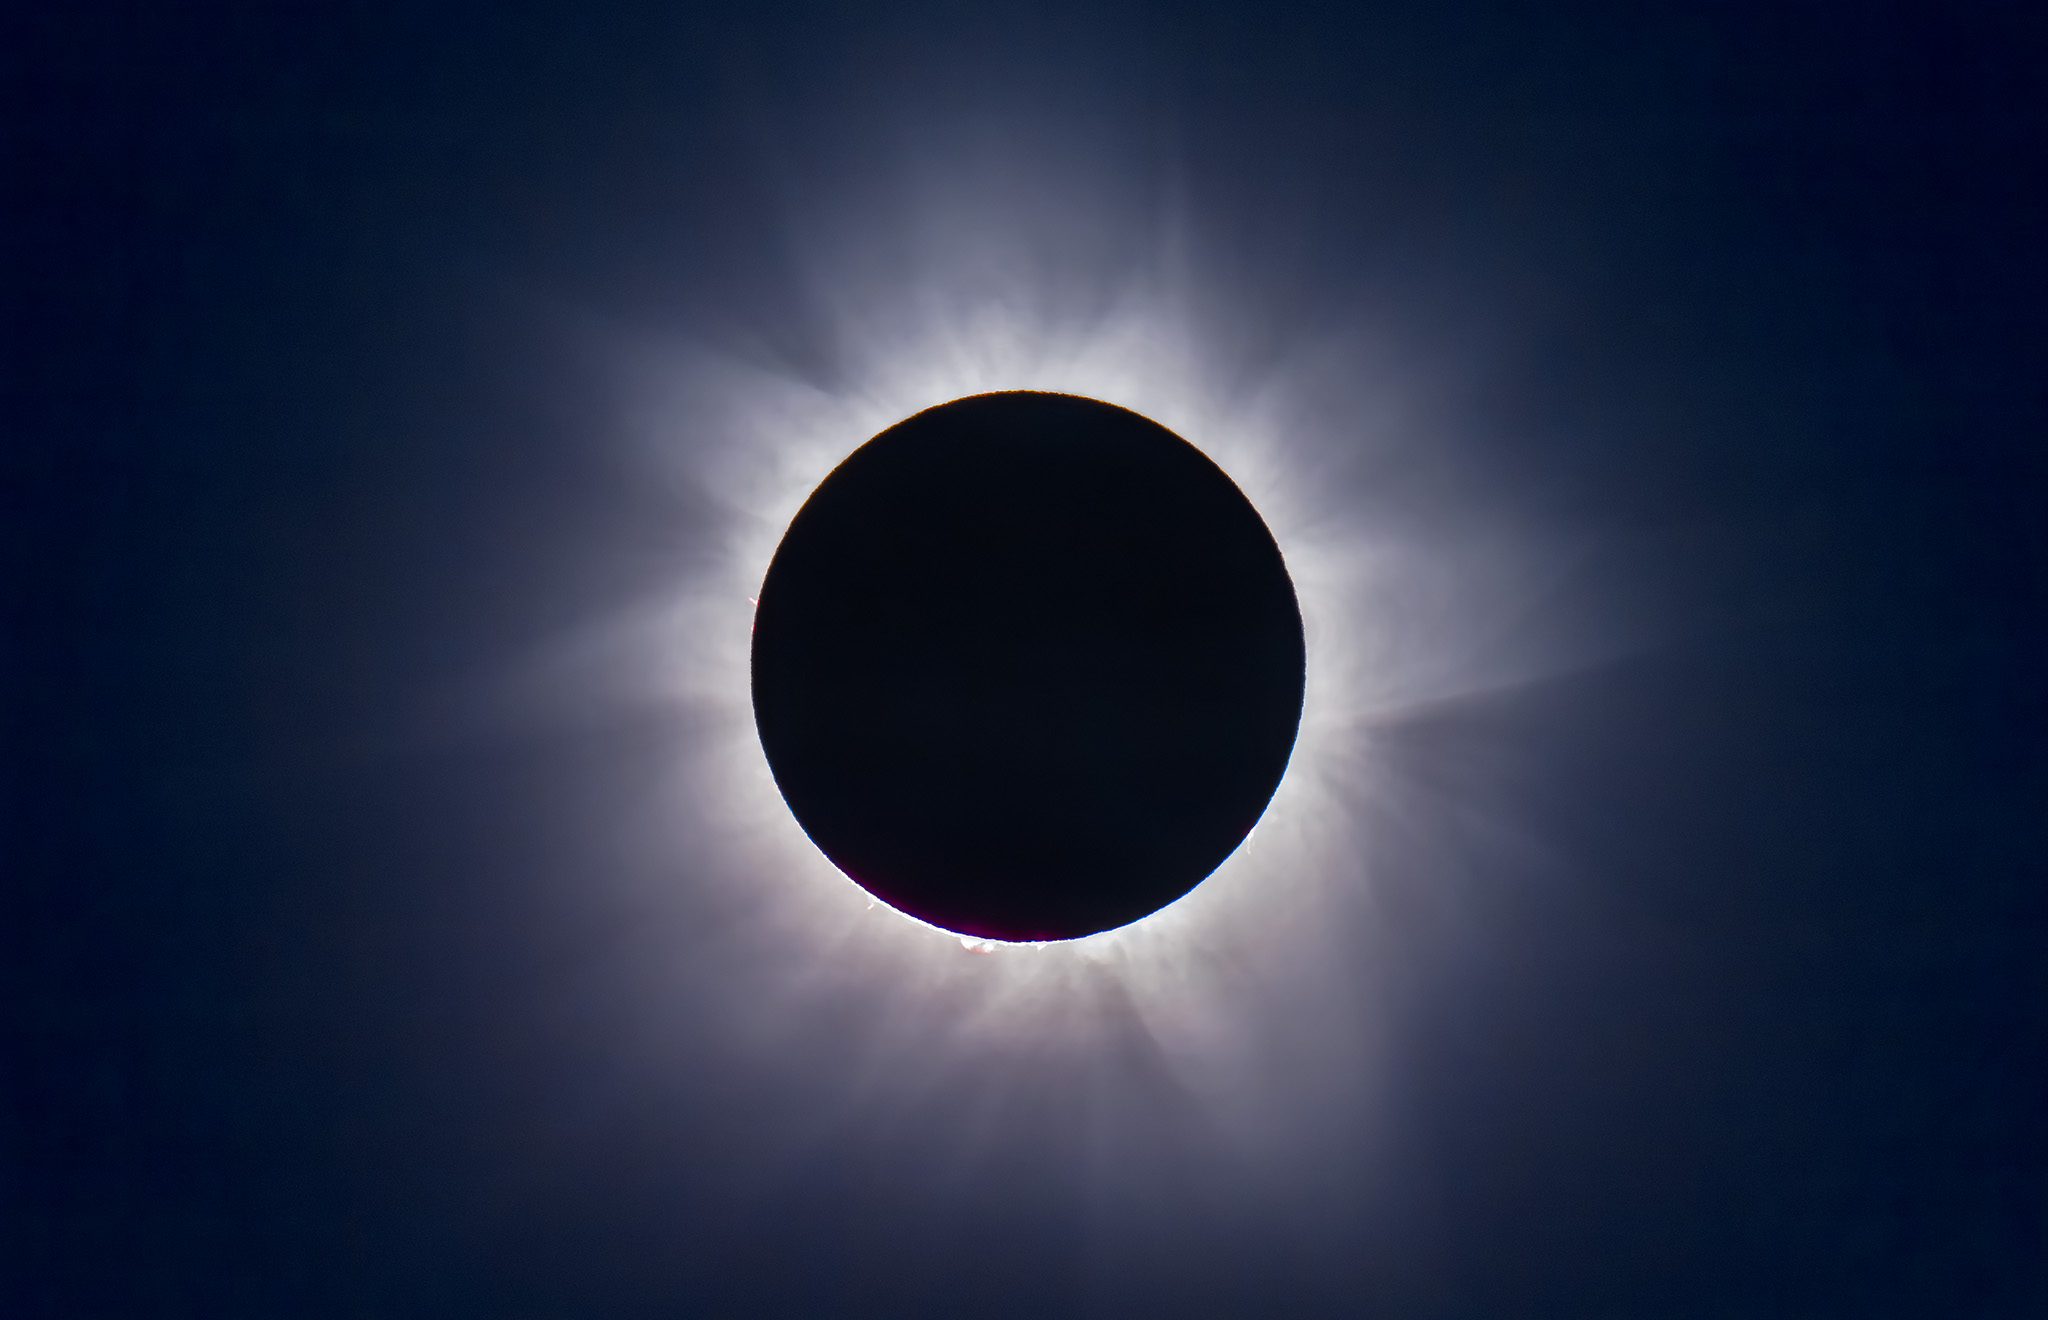
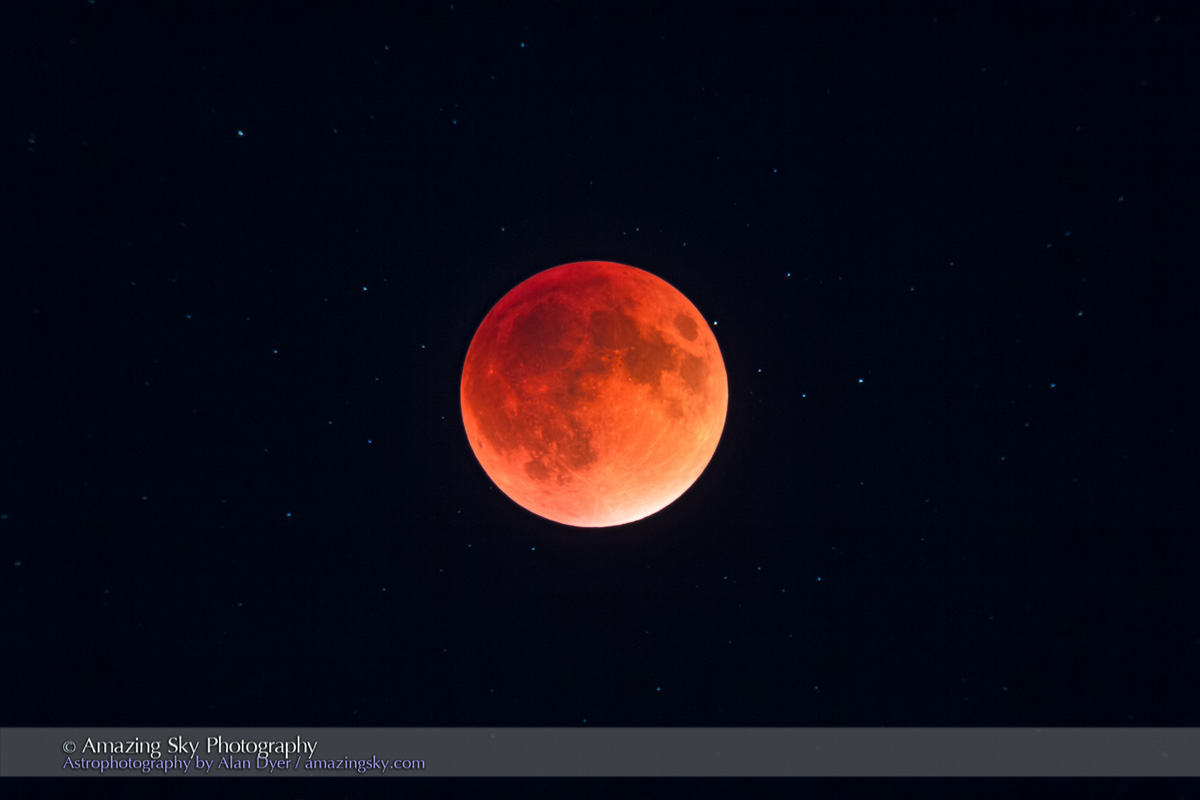
This is a composite of two images taken seconds apart: a 1/15th second exposure for the corona and a 1/1000 sec exposure for the prominences and chromosphere. Taken with the 106mm Astro-Physics apo refractor at f/5 and Canon 6D MkII camera at ISO 100. On the Mach One equatorial mount, polar aligned and tracking the sky.
This is a composite of a long exposure of totality with a short exposure of the third contact diamond ring just beginning to break out from behind the dark disk of the Moon, just before it overpowered the red prominences that lined the edge of the Sun that day. making for an amazing sight through binoculars or telescopes.
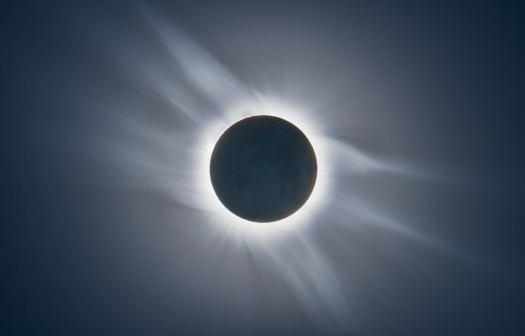
This is a composite of 7 images blended with luminosity masks applied using ADP Panel+ Pro extension for Photoshop. Adjustment layers of successively smaller High Pass filters were also added to bring out the coronal structure.
No single exposure can capture the huge range in brightness in the corona.
The image above is a blend of seven exposures, from 1/1000 second to 0.4 seconds, creating a view that better resembles what the eye saw – with the exception of the faint Earthshine on the Moon. It is so faint, I don’t think it is visible to the eye, but the camera picks it up.
Regulus is the star at left, with several other fainter stars in Leo also visible.
This is from a 700-frame time-lapse and is of second contact just as the diamond ring is ending and the dark shadow of the Moon is approaching from the west at right, darkening the sky at right. With the Canon 6D and 14mm SP Rokinon lens at f/2.5 for 1/10 second at ISO 100.
While I had a telescope at the ready inches from my eyes for just visual looks, as it so often is, the naked eye scene was so compelling I forgot to look through the telescope until the last few seconds of totality.
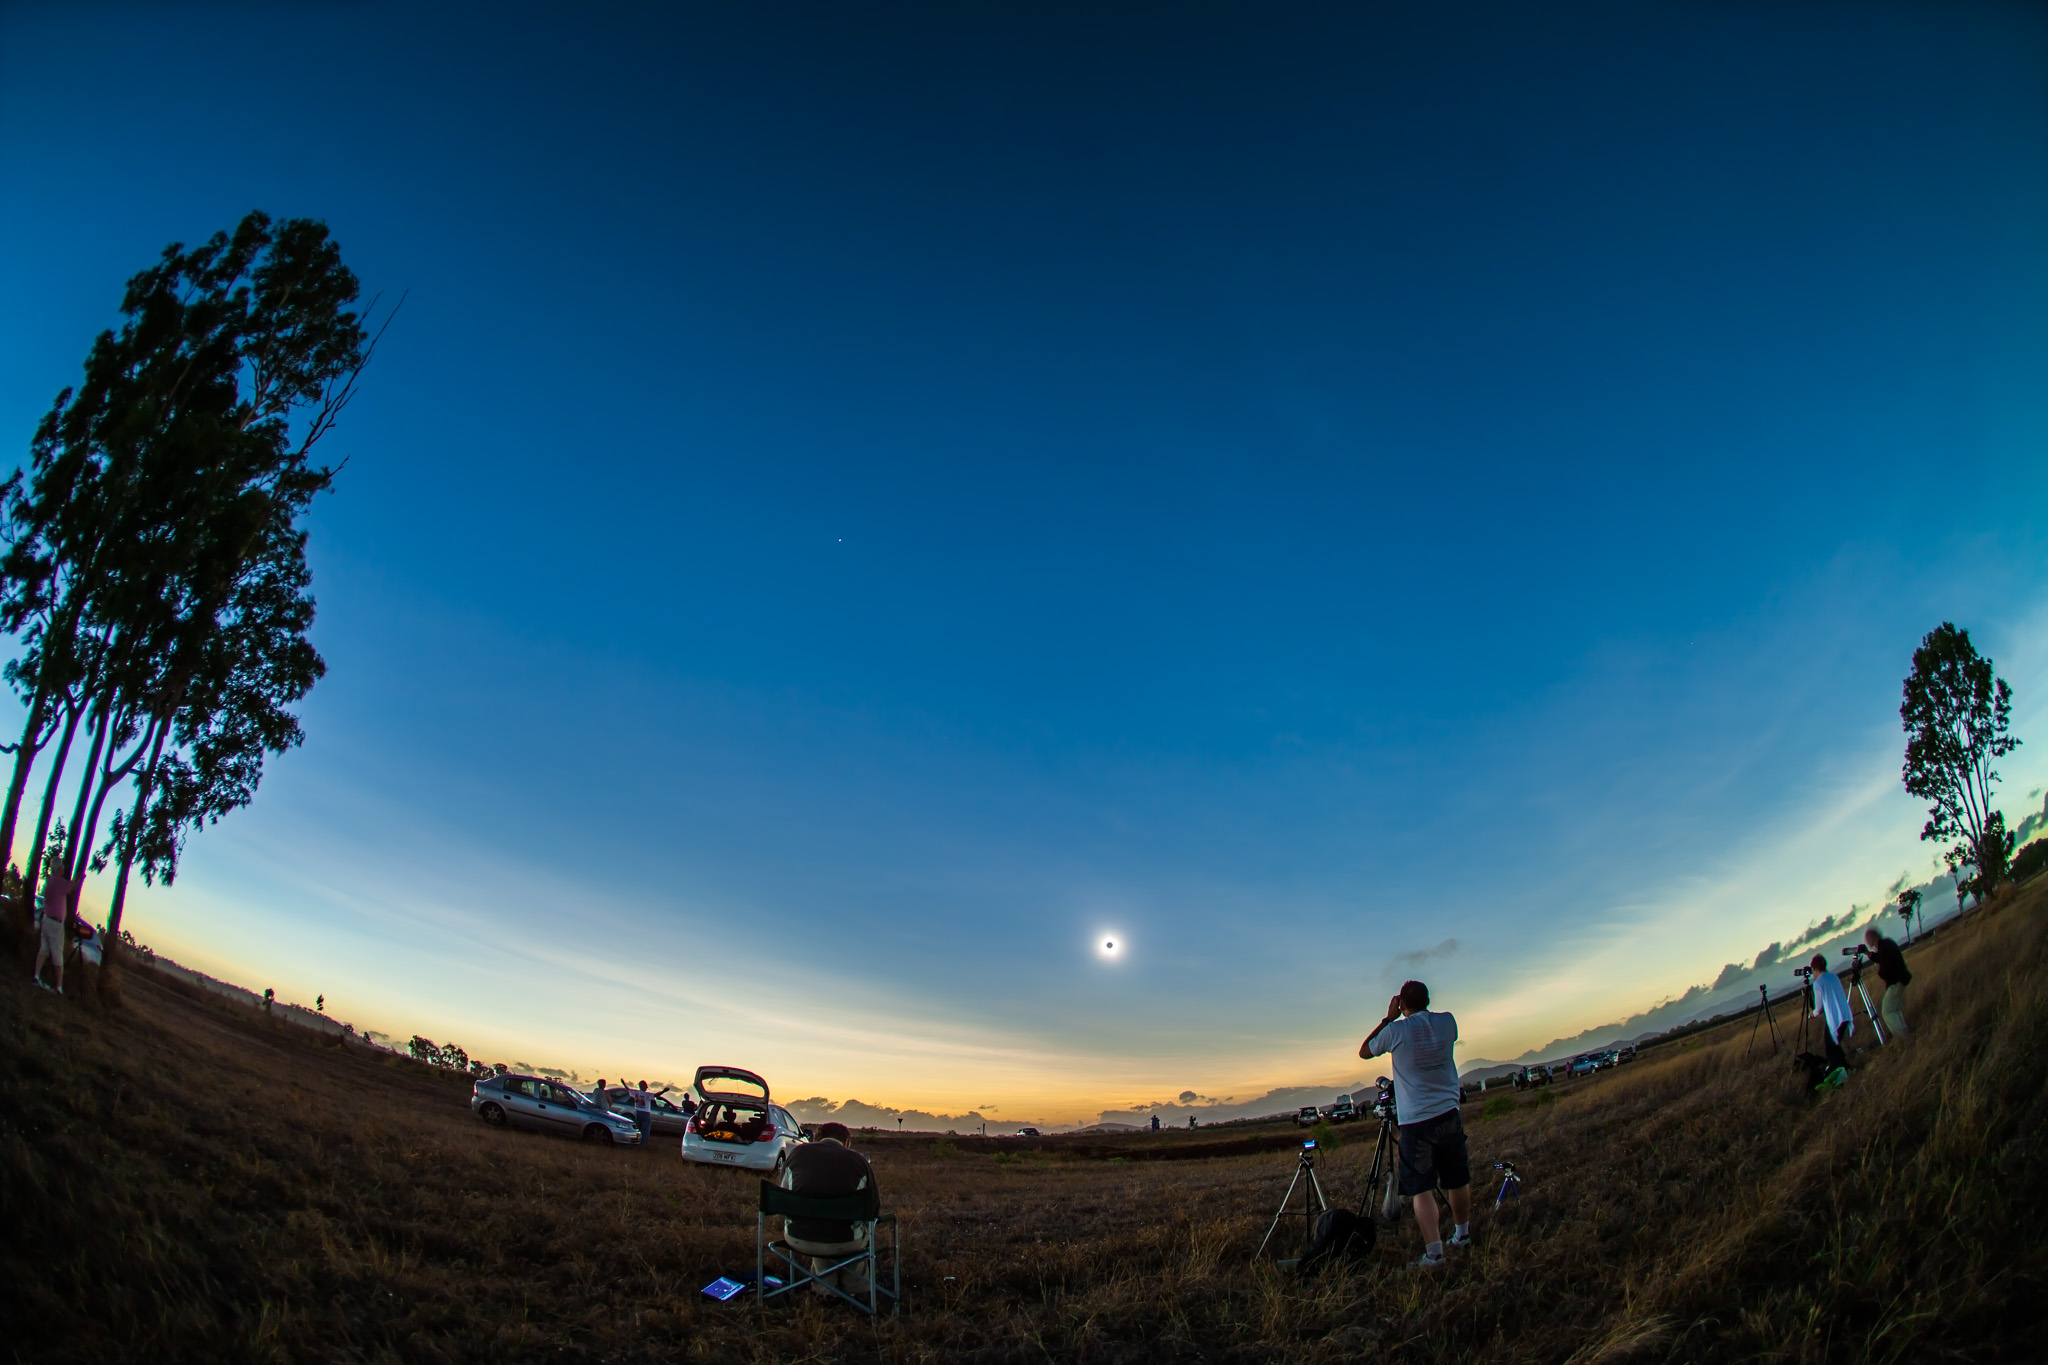
The scene above captures the wide view, of the eclipsed Sun over the Grand Tetons, as seen from the Idaho side. The dark blue at right is the shadow of the Moon.
I shot the wide scene with two cameras and wide-angle lenses for time-lapse sequences. I’ve compiled them into a short video here.
Moonshadows: Eclipse Sky Time-Lapses from Alan Dyer on Vimeo.
A more extensive music video is in the works.
For tips and techniques on how to process eclipse images, see my eBookon How to Photograph the Solar Eclipse. While most of the content is now past history, the chapter on processing images is more valuable than ever. The eBook is now just $2.99, on Apple, as a PDF, and on Amazon. Sorry for the shameless plug!
Thanks! It can now be cloudy for the next few months. It was clear when it needed to be!
In a technical blog I compare the new Canon 6D Mark II camera with its predecessor, the Canon 6D, with the focus on performance for nightscape astrophotography.
No pretty pictures in this blog I’m afraid! This is a blog for gear geeks.
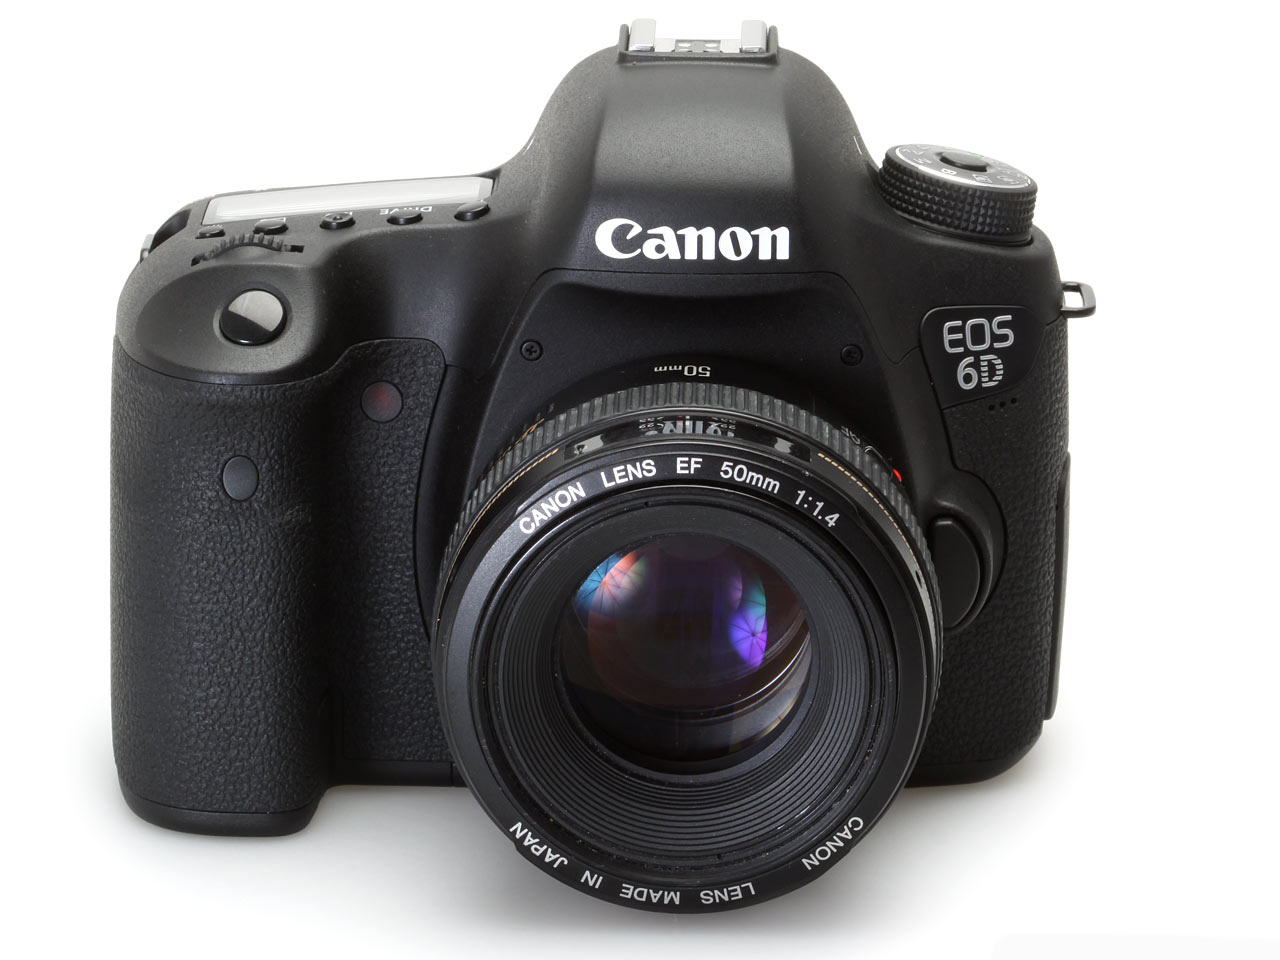
The long-awaited Canon 6D Mark II camera is out, replacing the original 6D after that camera’s popular 5-year reign as a prime choice among astrophotographers for all kinds of sky images, including nightscapes and time-lapses.
As all new cameras do, the 6D Mark II is currently fetching a full list price of $2000 U.S. Eventually it will sell for less. The original 6D, introduced in 2012 at that same list price, might still be available from many outlets, but for less, likely below $1500 US.
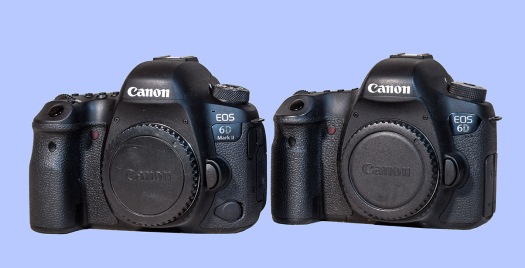
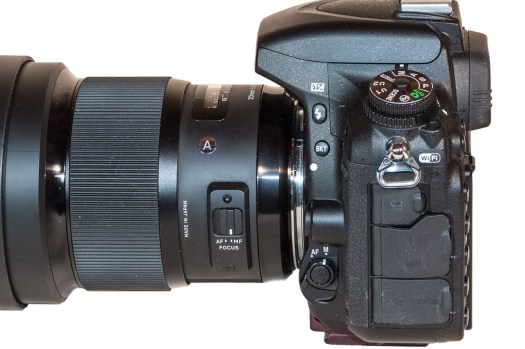
Shown on the left, above, the 6D Mark II is similar in size and weight to the original 6D.
However, the new Mark II offers 6240 x 4160 pixels for 26 megapixels, a bump up in resolution over the 5472 x 3648 20-megapixel 6D. The pixel pitch of the Mark II sensor is 5.7 microns vs. 6.6 microns for the 6D.
One difference is that the port for a remote release is now on the front, but using the same solid 3-pin N3 connector as the 6D and other full-frame Canons. That makes it compatible with all external controllers for time-lapse shooting.
TESTING FOR THE NIGHT
My interest is in a camera’s performance for long-exposure astrophotography, with images taken at high ISO settings. I have no interest in auto-focus performance (we shoot at night with focus set manually), nor how well a camera works for high-speed sports shooting.
To test the Mark II against the original 6D I took test shots at the same time of a high-contrast moonlit scene in the backyard, using a range of ISO speeds typical of nightscape scenes.
The comparisons show close-ups of a scene shown in full in the smaller inset screen.
COMPARING NOISE
The key characteristic of interest for night work is noise. How well does the camera suppress the noise inherent in digital images when the signal is boosted to the high ISO settings we typically use?
6D Mark II noise at 5 ISO speeds
This set shows the 6D MkII at five ISOs, from ISO 1600 all the way up to the seldom-used ISO 25,600, all shot in Raw, not JPG. In all cases, no noise reduction was applied in later processing, so the results do look worse than what processed images would.
Click or tap on all images to expand each image to full screen for closer inspection.
6D noise at 5 ISO speeds
This set shows the same range of ISOs with the original 6D. All were taken at the same aperture, f/2.8, with a 35mm lens. Exposures were halved for each successive bump up in ISO speed, to ensure equally exposed images.
Comparing the sets, the 6D MkII shows a much greater tendency to exhibit a magenta cast in the shadows at very high ISOs, plus a lower contrast in the shadows at increasing ISOs, and slightly more luminance noise than the 6D.
How much more noise the 6D MkII exhibits is demonstrated here.
6D MkII noise at ISO 3200 compared to 6D
To me, visually, the MkII presents about 1/2 stop, or EV, worse noise than the 6D.
In this example, the MkII exhibits a noise level at ISO 3200 (a common nightscape setting) similar to what the 6D does if set between ISO 4000 and 5000 – about 1/2 stop worse noise.
Frankly, this is surprising.
Yes, the MkII has a higher pixel count and therefore smaller pixels (5.7 microns in this case) that are always more prone to noise. But in the past, advances to the in-camera signal processing has prevented noise from becoming worse, despite increasing pixel count, or has even produced an improvement in noise.
For example, the 2012-vintage 6D is better for noise than Canon’s earlier 2008-era 5D MkII model by about half a stop, or EV.
After five years of camera development I would have expected a similar improvement in the 6D MkII. After all, the 6D MkII has Canon’s latest DIGIC 7 processor, vs. the older 6D’s DIGIC 5+.
Instead, not only is there no noise improvement, the performance is worse.
That said, noise performance in the 6D MkII is still very good, and better than you’ll get with today’s 24 megapixel cropped-frame cameras with their even smaller 4 micron pixels. But the full frame 6D MkII doesn’t offer quite as much an improvement over cropped-frame cameras as does the five-year-old 6D.
ISO INVARIANCY
In the previous sets all the images were well-exposed, as best they could be for such a contrasty scene captured with a single exposure.
What happens when Raw images are underexposed, then boosted later in exposure value in processing?
This is not an academic question, as that’s often the reality for nightscape images where the foreground remains dark. Bringing out detail in the shadows later requires a lot of Shadow Recovery or increasing the Exposure. How well will the image withstand that work on the shadows?
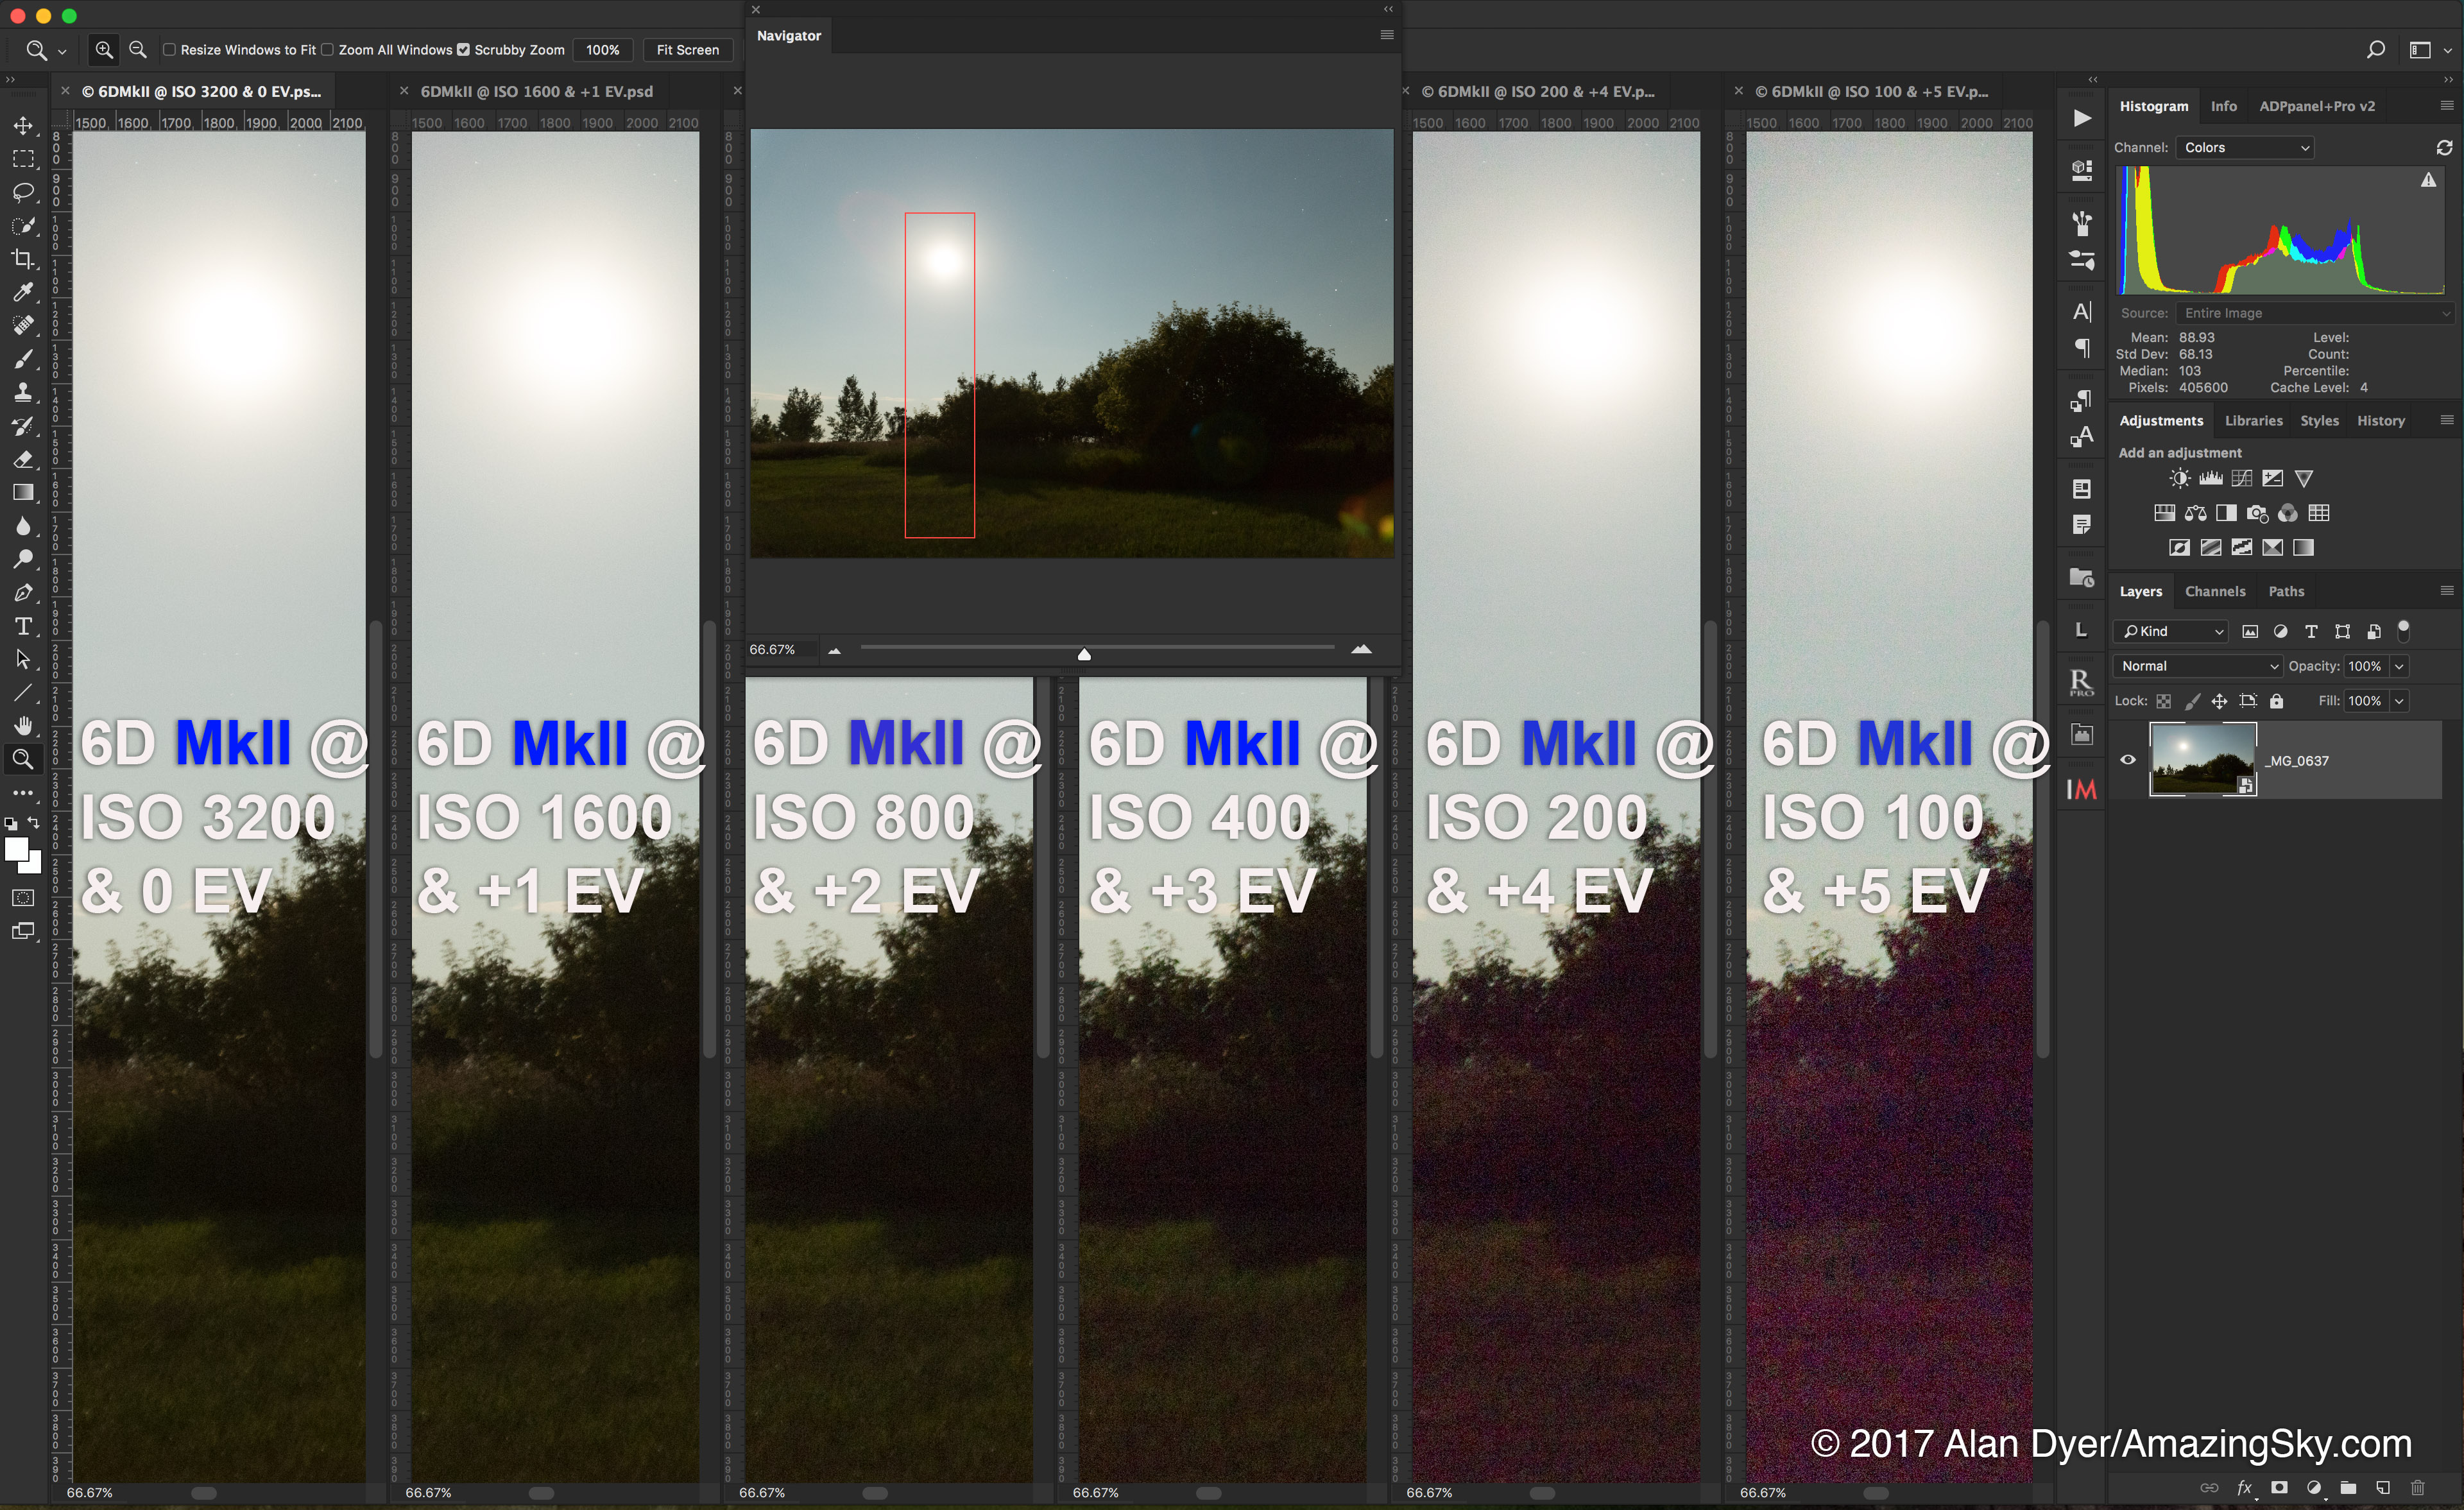
To test this, I shot a set of images at the same shutter speed, but at successively slower ISOs, from a well-exposed ISO 3200, to a severely underexposed ISO 100. I then boosted the Exposure setting later in Raw processing by an amount that compensated for the level of underexposure in the camera, from a setting of 0 EV at ISO 3200, to a +5 EV boost for the dark ISO 100 shots.
This tests for a camera’s “ISO Invariancy.” If a camera has a sensor and signal processing design that is ISO invariant, a boosted underexposed image at a slow ISO should look similar to a normally exposed image at a high ISO.
You’re just doing later in processing what a camera does on its own in-camera when bumping up the ISO.
But cameras that use ISO “variant” designs suffer from increased noise and artifacts when severely underexposed images are boosted later in Raw processing.
The Canon 6D and 6D MkII are such cameras.
6D Mark II ISO Invariancy
This set above shows the results from the 6D Mark II. Boosting underexposed shadows reveals a lot of noise and a severe magenta cast.
These are all processed with Adobe Camera Raw, identical to the development engine in Adobe Lightroom.
6D ISO Invariancy
This set above shows the results from the 6D. The older camera, which was never great for its lack of ISO Invariancy performance, is still much better than the new Mark II.
Underexposed shadows show less noise and discolouration in the 6D. For a comparison of the Canon 6D with the ISO Invariant Nikon D750, see my earlier Nikon vs. Canon blog from 2015. The Nikon performs much better than the 6D.
Effectively, this is the lack of dynamic range that others are reporting when testing the 6D MkII on more normal daytime images. It really rears its ugly head in nightscapes.
The lesson here is that the Mark II needs to be properly exposed as much as possible.
Don’t depend on being able to extract details later from the shadows. The adage “Expose to the Right,” which I explain at length in my Nightscapes eBook, applies in spades to the 6D MkII.
DARK FRAME BUFFER
All the above images were taken with Long Exposure Noise Reduction (LENR) off. This is the function that, when turned on, forces the camera to take and internally subtract a dark frame – an image of just the noise – reducing thermal noise and discolouration in the shadows.
A unique feature of Canon full-frame cameras is that when LENR is on you can take several exposures in quick succession before the dark frame kicks in and locks up the camera. This is extremely useful for deep-sky shooting.
The single dark frame then gets applied to the buffered “light frames.”
The 6D Mark II, when in either Raw or in Raw+JPG can take 3 shots in succession. This is a downgrade from the 6D which can take 4 shots when in Raw+JPG. Pity.
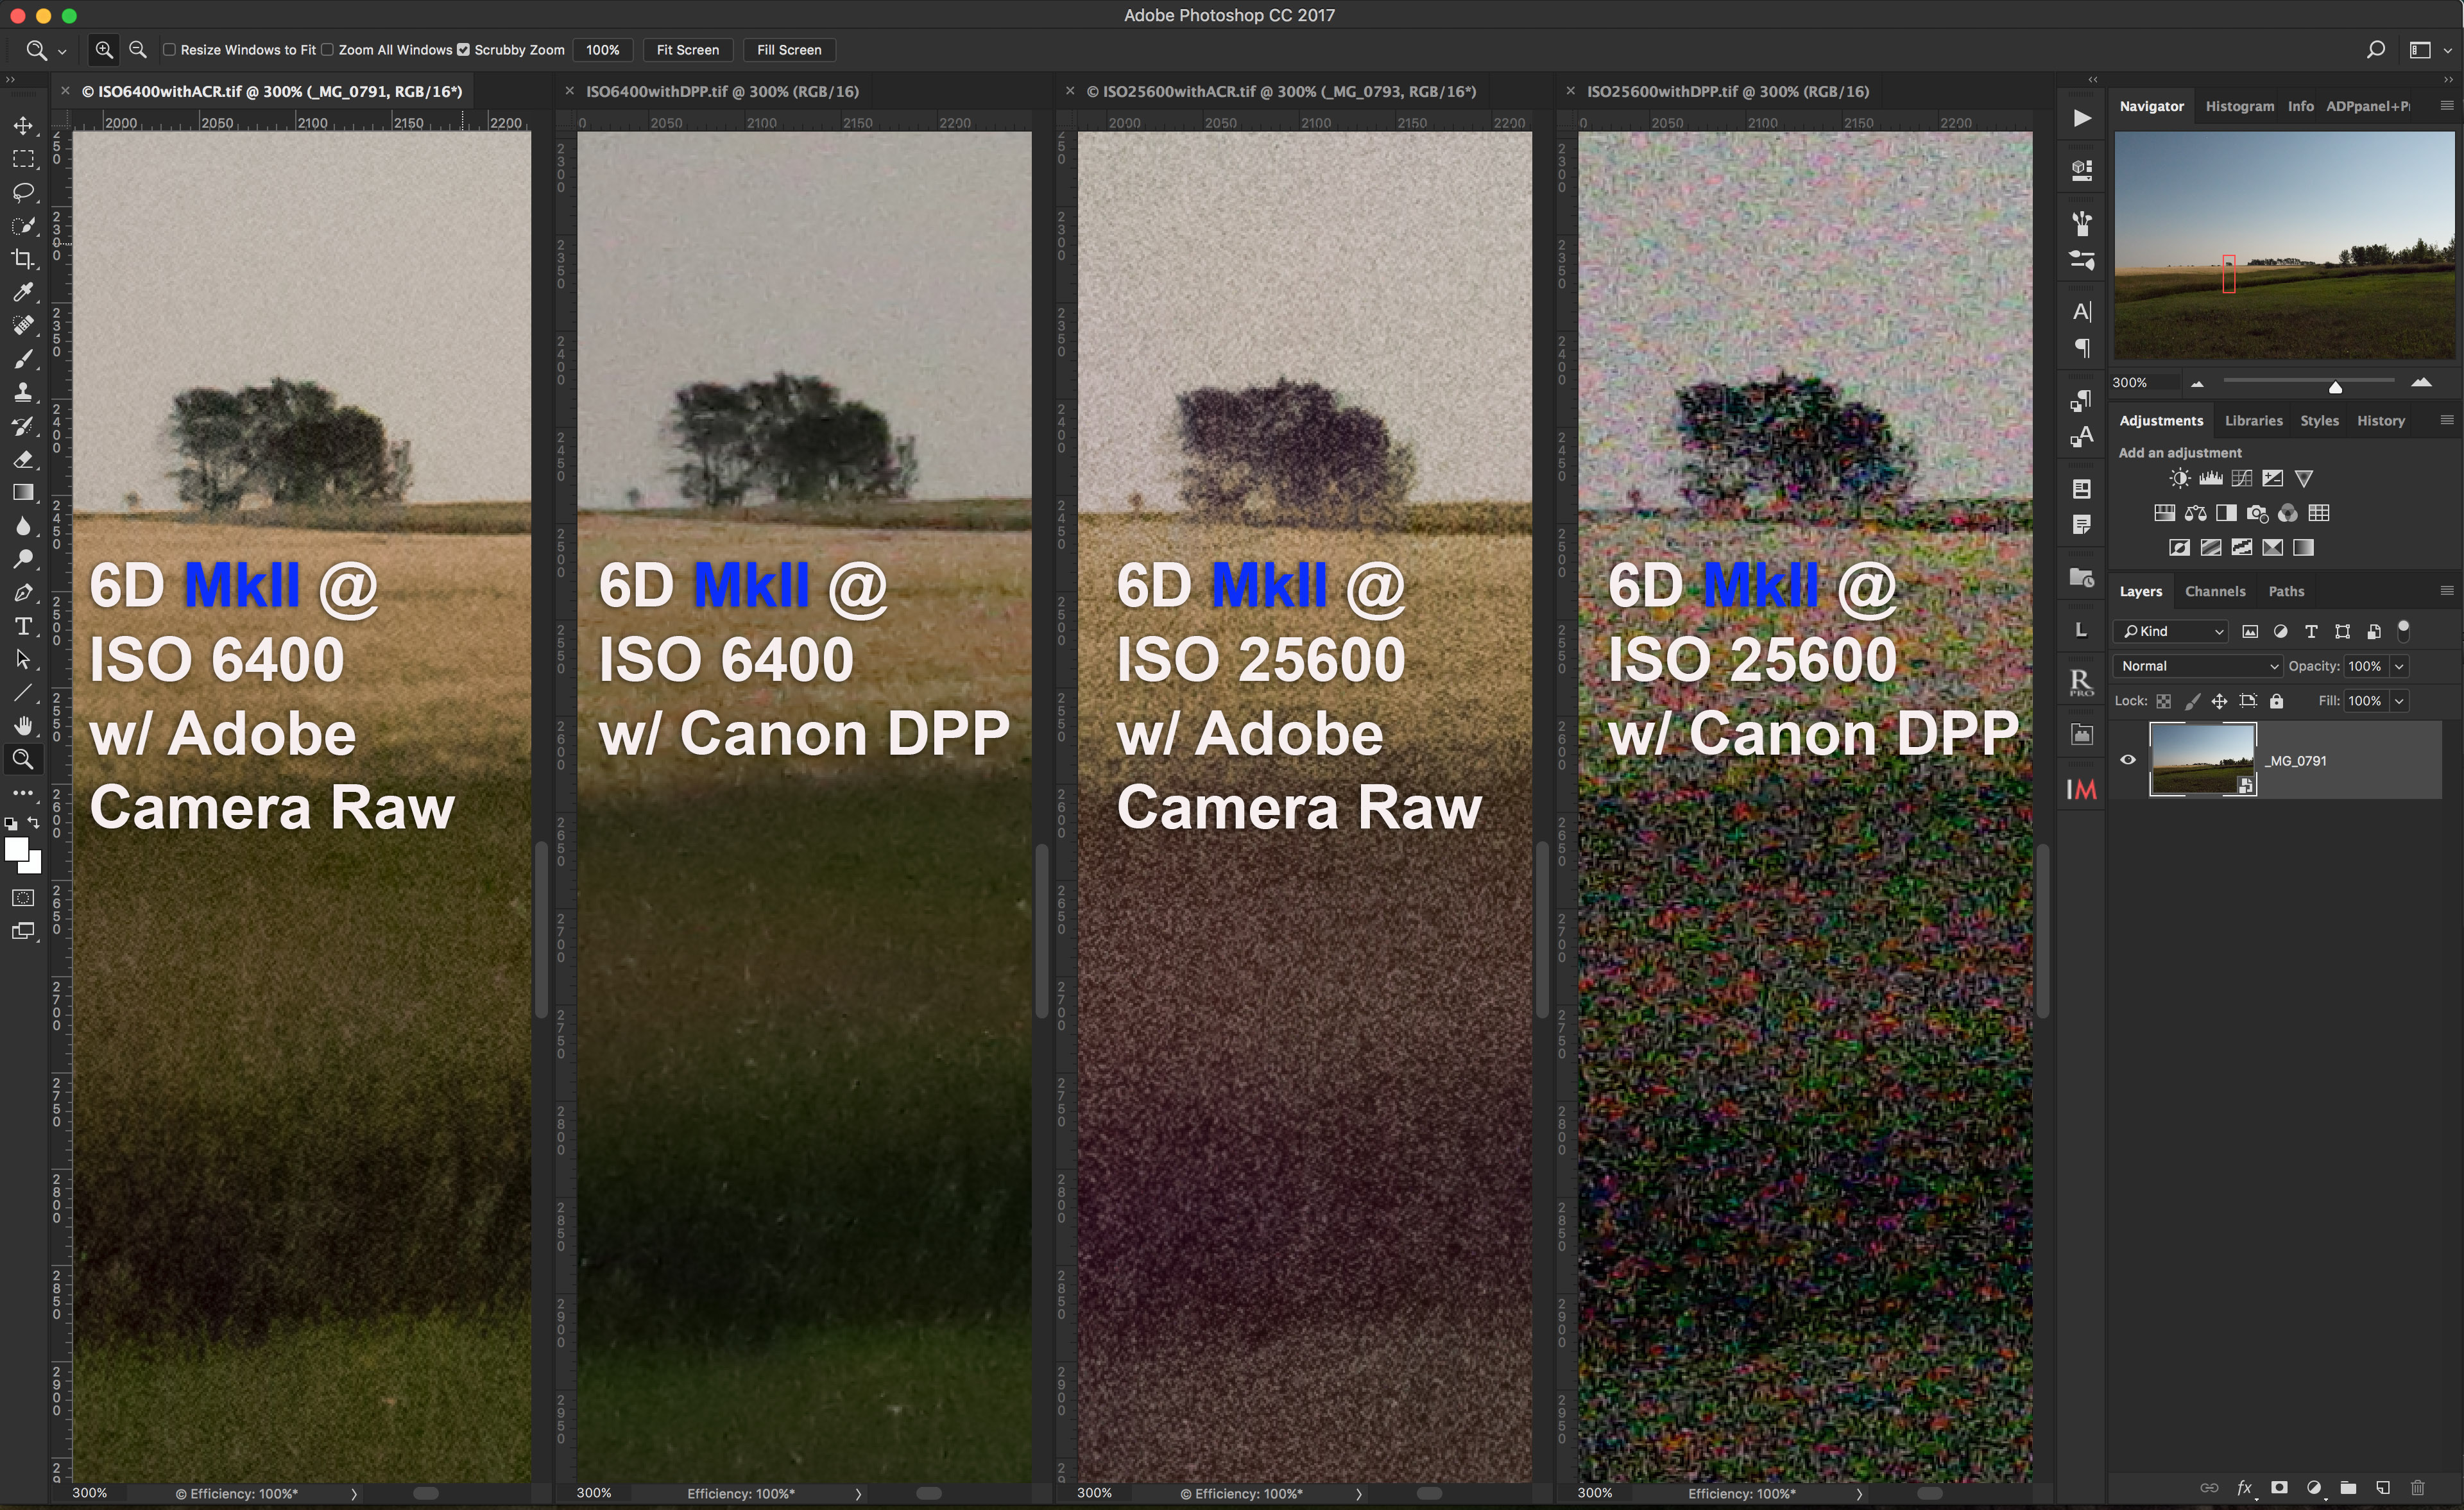
ADOBE CAMERA RAW vs. DIGITAL PHOTO PROFESSIONAL
My next thought was that Adobe Camera Raw, while it was reading the Mark II files fine, might not have been de-Bayering or developing them properly. So I developed the same image with both Raw developers, Adobe’s and Canon’s latest version of their own Digital Photo Professional (DPP).
ACR vs. DPP
Here I did apply a modest and approximately similar level of noise reduction to both images:
In ACR: Color at 25, Luminosity at 40, with Sharpness at 25
In DPP: Chrominance at 8, Luminosity at 8, with Sharpness at 2
Yes, DPP did do a better job at eliminating the ugly magenta cast, but did a much worse job at reducing overall noise. DPP shows a lot of blockiness, detail loss, and artifacts left by the noise reduction.
Adobe Camera Raw and/or Lightroom remain among the best of many Raw developers.
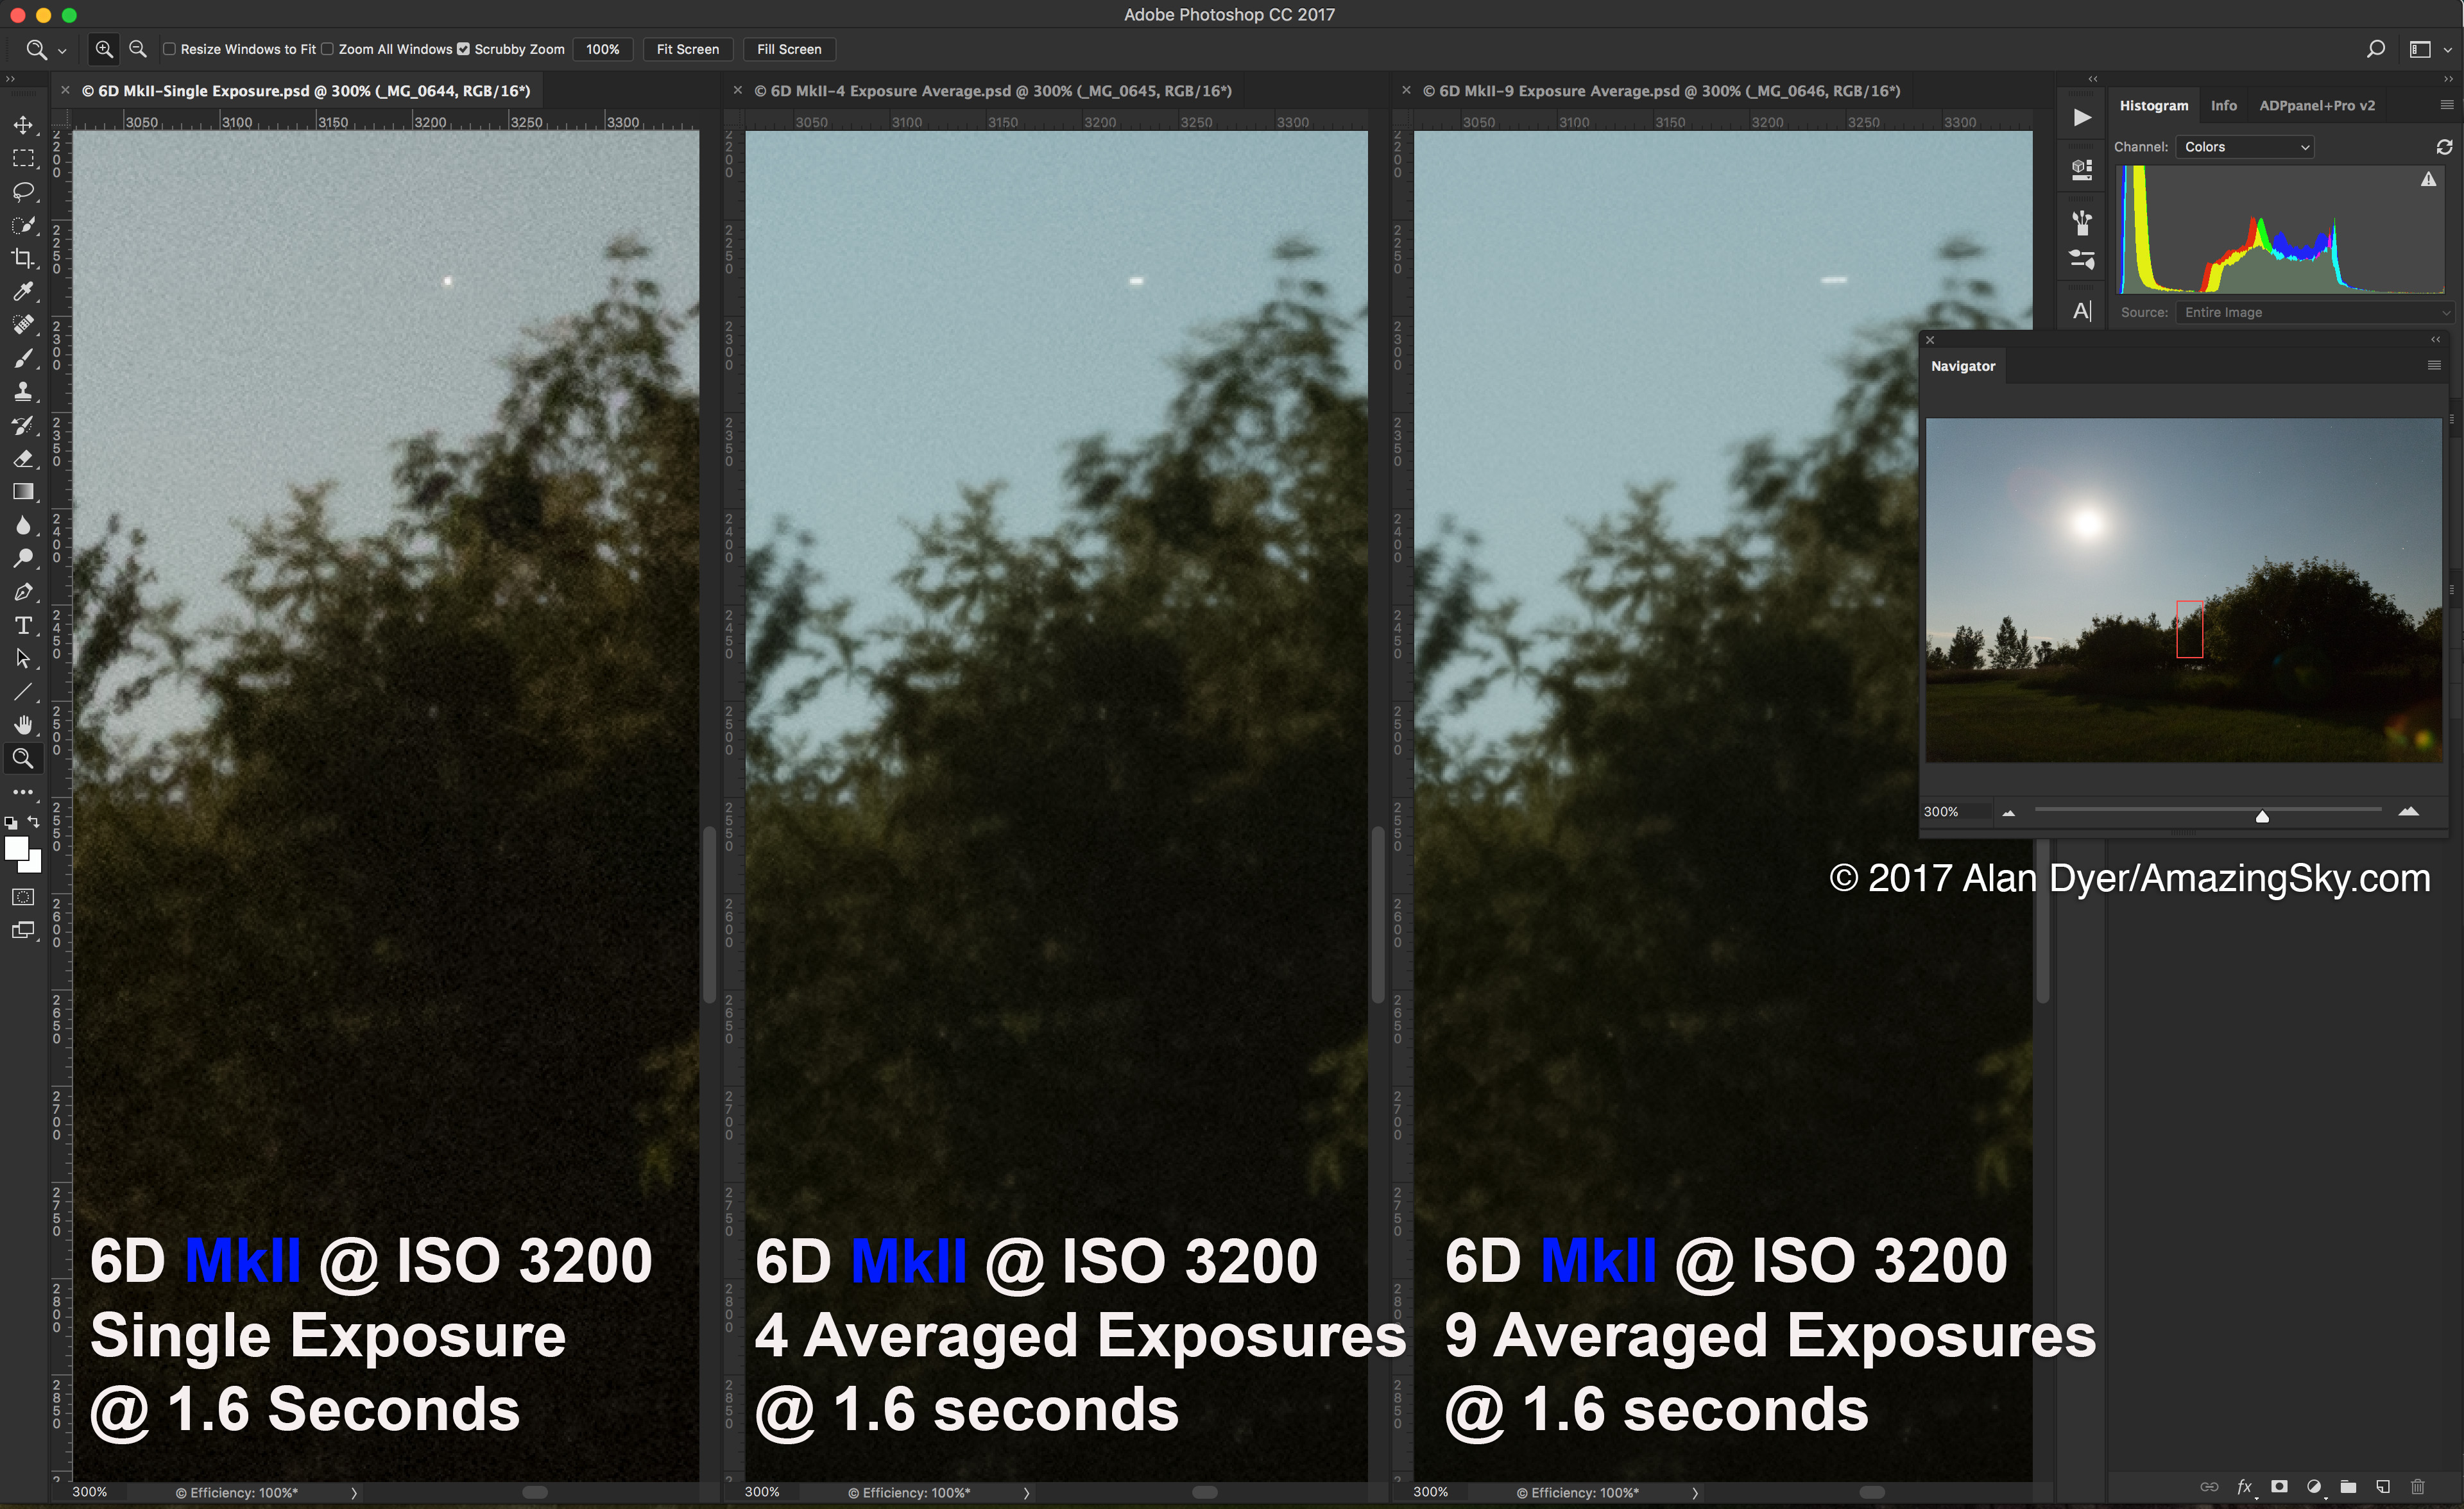
IMAGE AVERAGING
A new feature the 6D Mark II offers is the ability to shoot and stack images in-camera. It can either “Add” the exposure values, or, most usefully, “Average” them, as shown here.
6D Mark II Multiple Exposure screen
Other newer Canon DSLRs also offer this feature, notably the 7D MkII, the 5D MkIV, the 5Ds, and even the entry-level 80D. So the 6D MkII is not unique. But the feature was not on the 6D.
Here’s the benefit.
6D Mark II Averaging results
The left image is a single exposure; the middle is an average stack of 4 exposures stacked in camera; the right image an average stack of 9 exposures, the maximum allowed.
Noise smooths out a lot, with less noise the more images you stack. The result is a single Raw file, not a JPG. Excellent!
While this kind of stacking can be done later in processing in Photoshop, or in any layer-based program, many people might find this in-camera function handy.
Except, as you can see, the sky will exhibit star trails, and not as well defined as you would get from stacking them with a “Lighten” blend mode, as all star trail stacking routines use.
So this averaging method is NOT the way to do star trails. The Mark II does not offer the Brighten mode some other new Canons have that does allow for in-camera star trail stacking. Again, a pity in a camera many will choose for astrophotography.
Nevertheless, the Average mode is a handy way to create foreground landscapes with less noise, which then have to be composited later with a sky image or images.
OTHER FEATURES
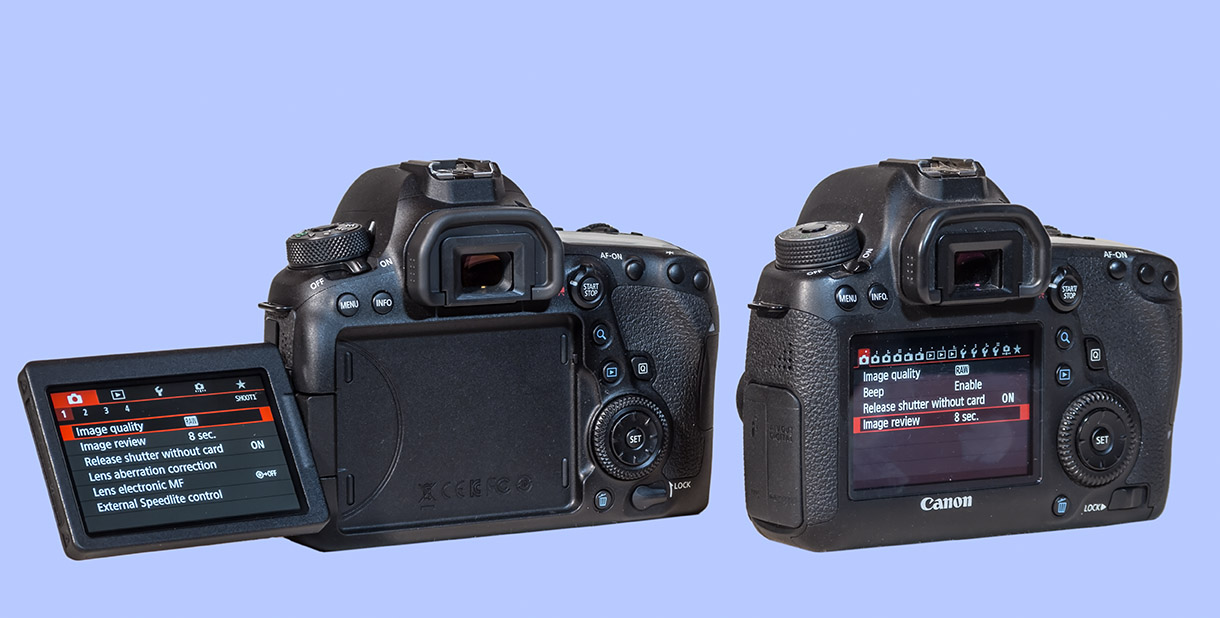
On the left, below, the Mark II has a nearly identical layout of buttons and controls to the 6D on the right. So owners of the older model will feel right at home with the Mark II. That’s handy, as we astrophotographers work in the dark by feel!
6D Mark II (left) and 6D rear views
Of course the big new feature, a first for Canon in a full-frame camera, is the Mark II’s fully articulated screen. It flips out, tilts, and even flips around to face forward. This is super-great for all astrophotography, especially when conducted by aging photographers with aching backs!
And the screen, as with the entry-level cropped-frame Canons, is a touch screen. For someone who hasn’t used one before – me! – that’ll take some getting used to, if only in just remembering to use it.
And it remains to be seen how well it will work in the cold. But it’s great to have.
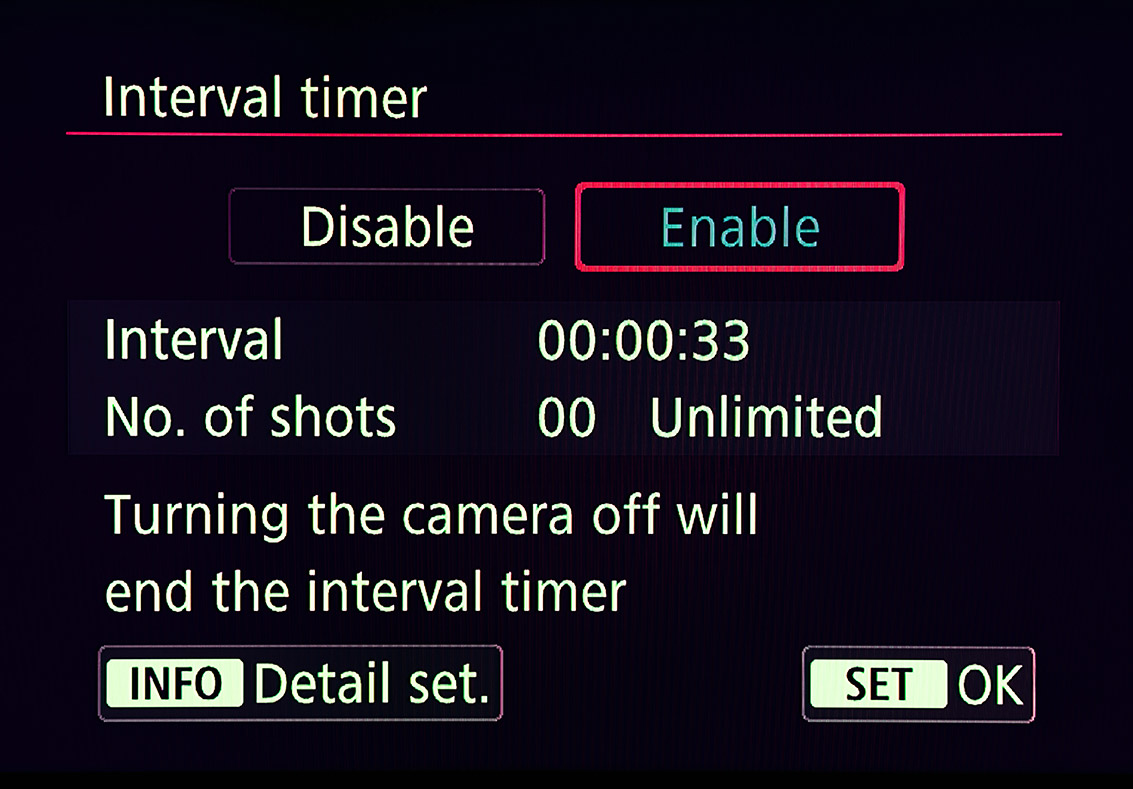
INTERVAL TIMER
Like other late-model Canon DSLRs, the 6D MkII has a built-in intervalometer. It works fine but is useable only on exposures with internally set shutter speeds up to 30 seconds.
6D Mark II Interval Timer screen
However, setting the Interval so it fires the shutter with a minimal gap of 1 second between shots (our usual requirement for night time-lapses) is tricky: You have to set the interval to a value not 1 second, but 2 to 3 seconds longer than the shutter speed. i.e. an exposure of 30 seconds requires an interval of 33 seconds, as shown above. Anything less and the camera misses exposures.
Why? Well, when set to 30 seconds the camera actually takes a 32-second exposure. Surprise!
Other cameras I’ve used and tested with internal intervalometers (Nikon and Pentax) behave the same way. It’s confusing, but once you are used to it, the intervalometer works fine.
Except … the manual suggests the only way to turn it off and stop a sequence is to turn off the camera. That’s crude. A reader pointed out that it is also possible to stop a time-lapse sequence by hitting the Live View Start/Stop button. However, that trick doesn’t work on sequences programmed with only a second between frames, as described above. So stopping a night time-lapse is inelegant to say the least. With Nikons you can hold down the OK button to stop a sequence, with the option then of restarting it if desired.
Also, the internal Intervalometer cannot be used for exposures longer than 30 seconds. Again, that’s the case with all in-camera intervalometers in other models and brands.
BULB TIMER
As with many other new Canons, the Mark II has a Bulb Timer function.
6D Mark II Bulb Timer screen
When on Bulb you can program in exposure times of any length. That’s a nice feature that, again, might mean an external intervalometer is not needed for many situations.
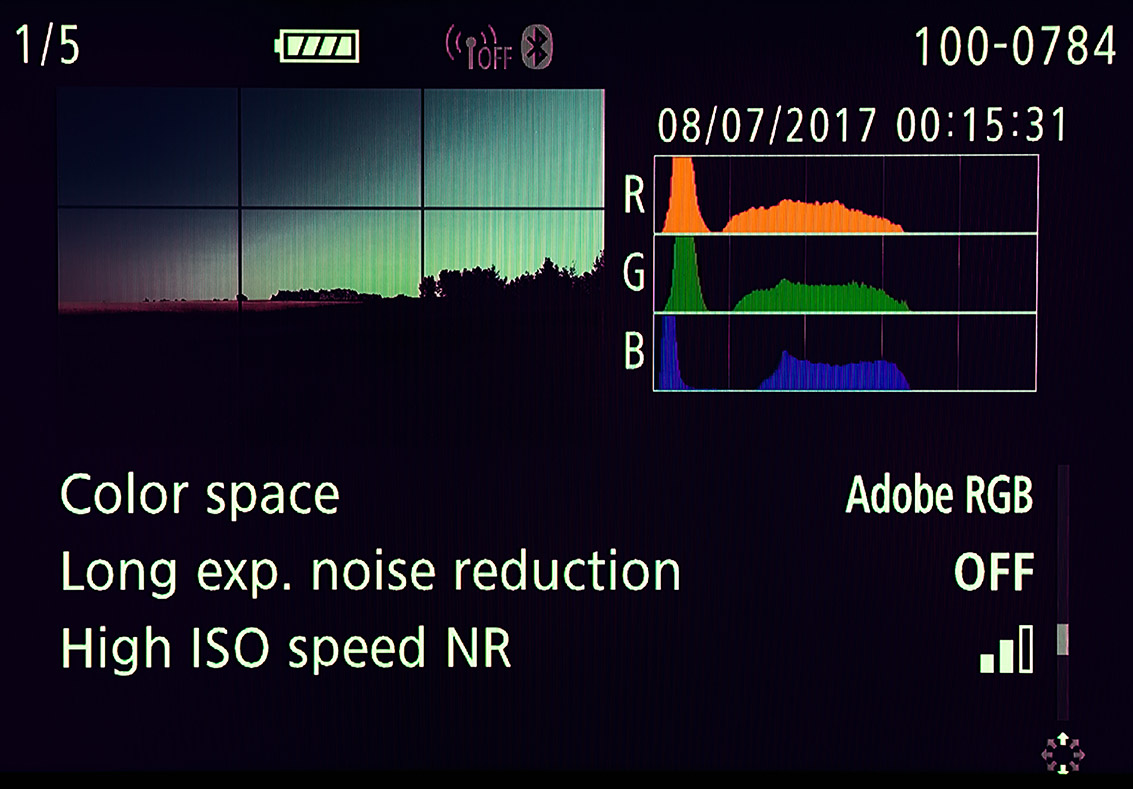
PLAYBACK SCREEN
A new feature I like is the greatly expanded information when reviewing an image.
6D Mark II Playback screen
One of the several screens you can scroll to shows whether you have shot that image with Long Exposure Noise Reduction on or not.
Excellent! I have long wanted to see that information recorded in the metadata. Digital Photo Professional also displays that status, but not Adobe Camera Raw/Lightroom.
CONCLUSION
While this has been a long report, this is an important camera for us astrophotographers.
I wish the news were better, but the 6D Mark II is somewhat of a disappointment for its image quality. It isn’t bad. It’s just that it isn’t any better than than the older 6D, and in some aspects is worse.
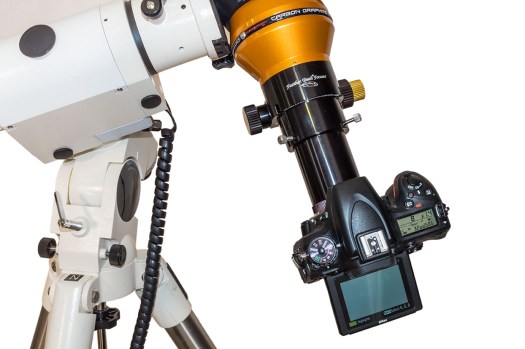
The 6D Mark II as part of the rig for shooting the total solar eclipse. The articulated screen will be very nice!
Canon has clearly made certain compromise decisions in their sensor design. Perhaps adding in the Dual-Pixel Autofocus for rapid focusing in Movie Mode has compromised the signal-to-noise ratio. That’s something only Canon can explain.
But the bottom-line recommendations I can offer are:
If you are a Canon user looking to upgrade to your first full-frame camera, the 6D Mark II will provide a noticeable and welcome improvement in noise and performance over a cropped-frame model. But an old 6D, bought new while they last in stock, or bought used, will be much cheaper and offer slightly less noise. But the Mark II’s flip-out screen is very nice!
If you are a current 6D owner, upgrading to a Mark II will not get you better image quality, apart from the slightly better resolution. Noise is actually worse. But it does get you the flip-out screen. I do like that!
If you are not wedded to Canon, but want a full-frame camera for the benefits of its lower noise, I would recommend the Nikon D750. I have one and love it. I have coupled it with the Sigma Art series lenses. I have not used any of the Sony a7-series Mirrorless cameras, so cannot comment on their performance, but they are popular to be sure.
However, I hope this review aimed specifically at nightscape shooters will be of value. I have yet to test the 6D Mark II for very long-exposure tracked deep-sky images.
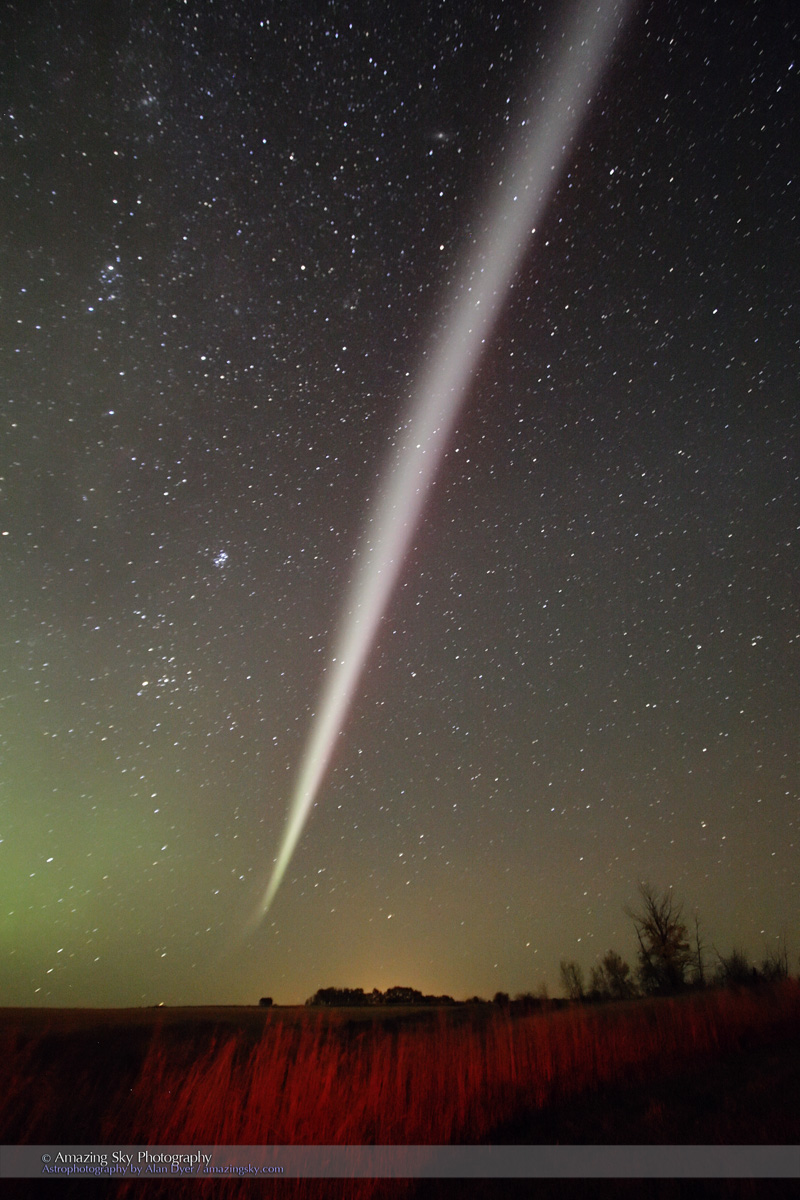
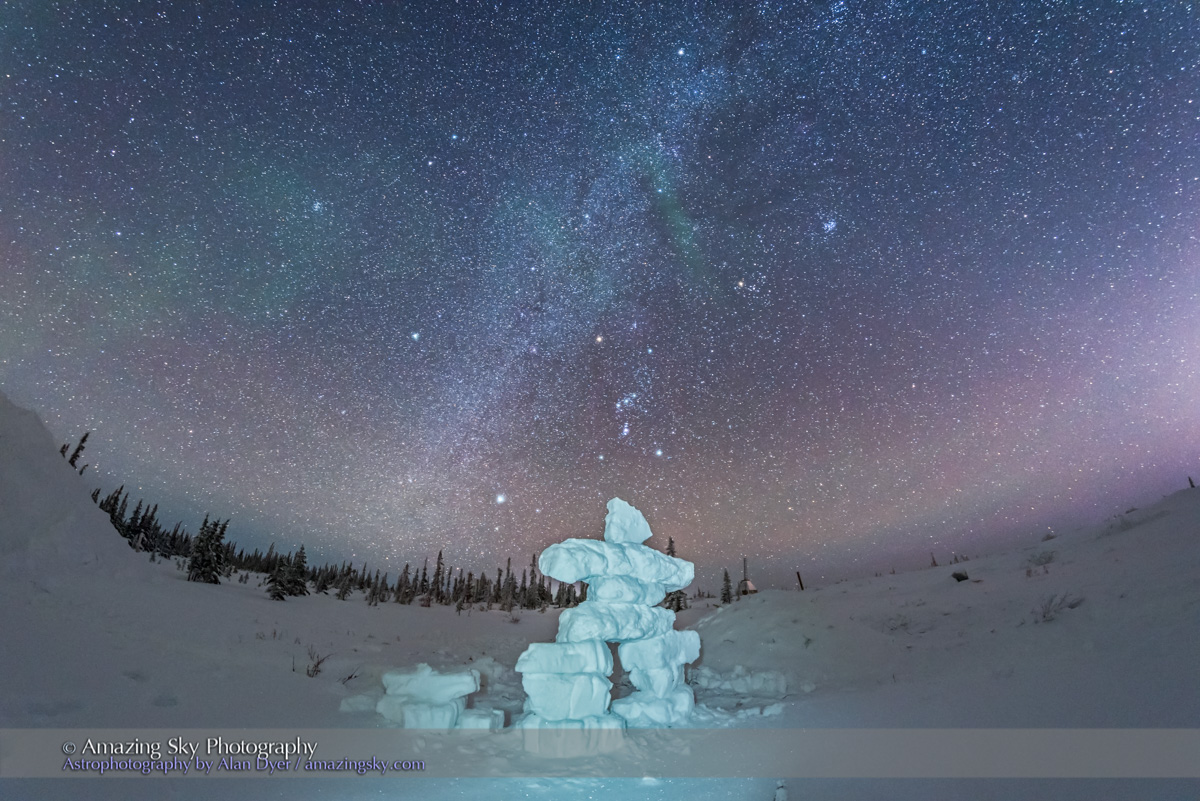
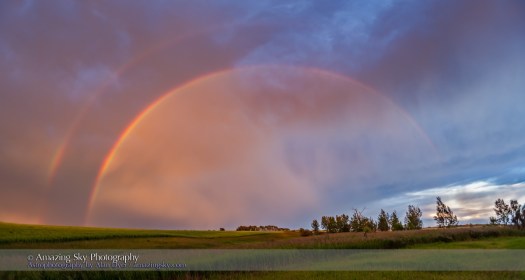
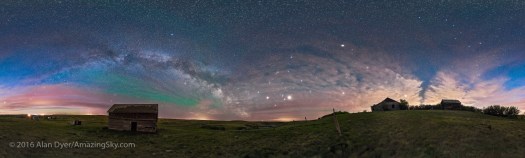
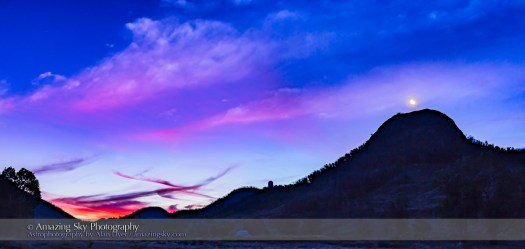
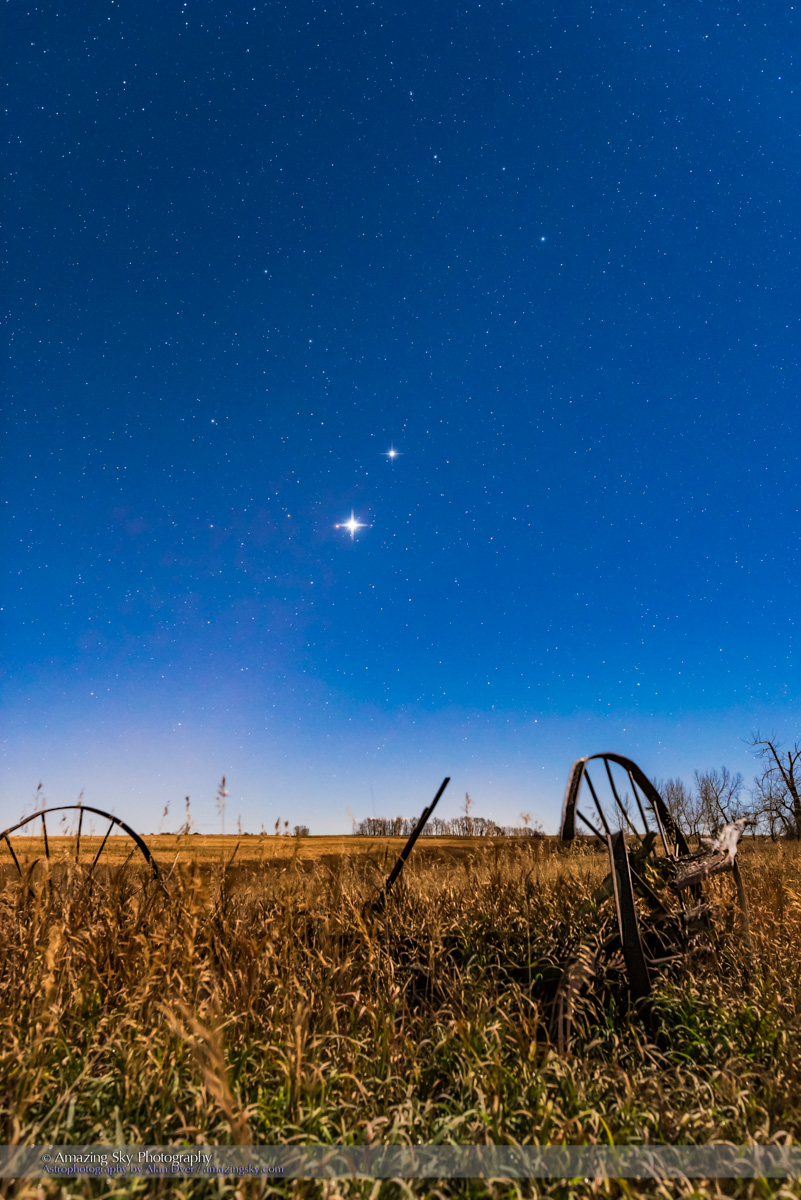
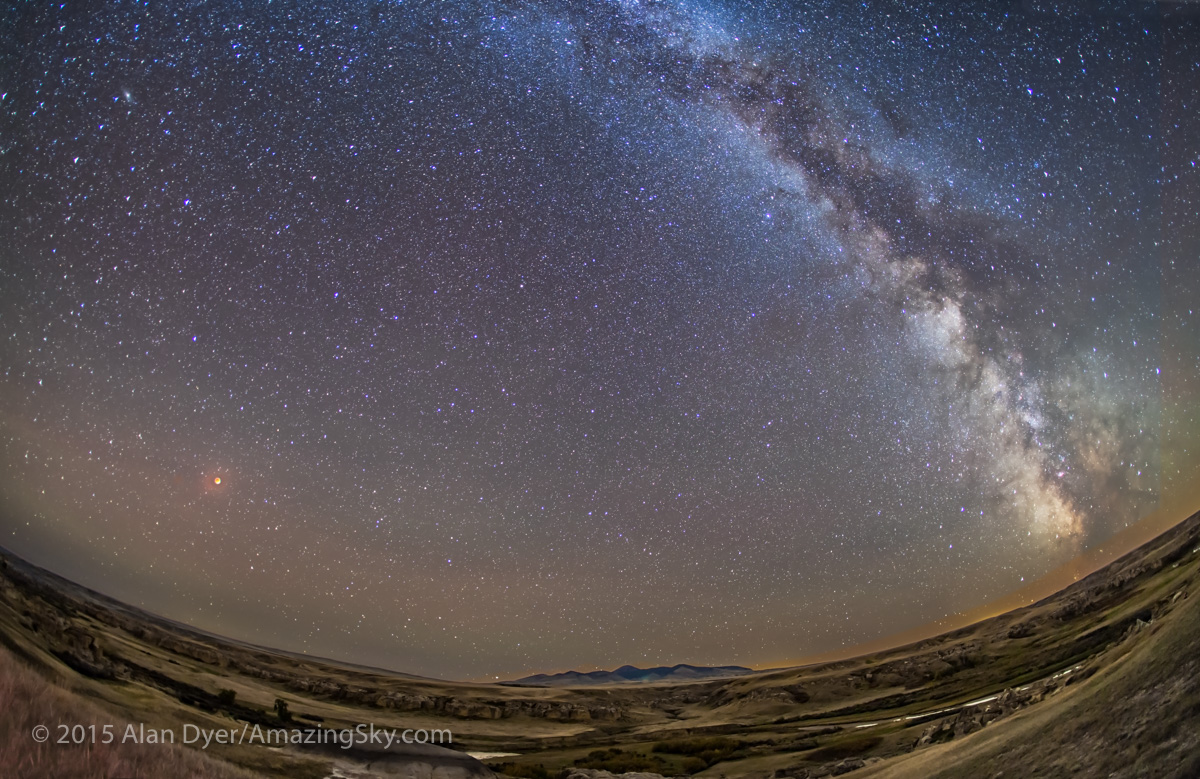
“No ocean of water in the world can vie with its gorgeous sunsets; no solitude can equal the loneliness of a night-shadowed prairie.” – William Butler, 1873
In the 1870s, just before the coming of the railway and European settlement, English adventurer William Butler trekked the Canadian prairies, knowing what he called “The Great Lone Land” was soon to disappear as a remote and unsettled territory.
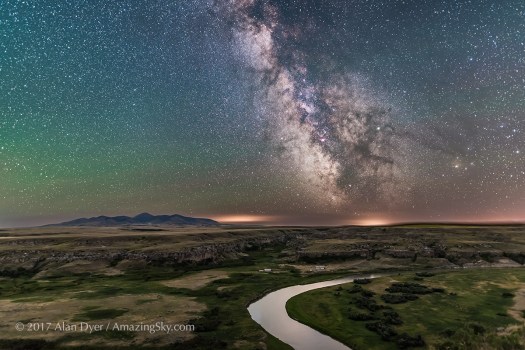
The quote from his book is on a plaque at the site where I took the lead image, Sunset Point at Writing-on-Stone Provincial Park.
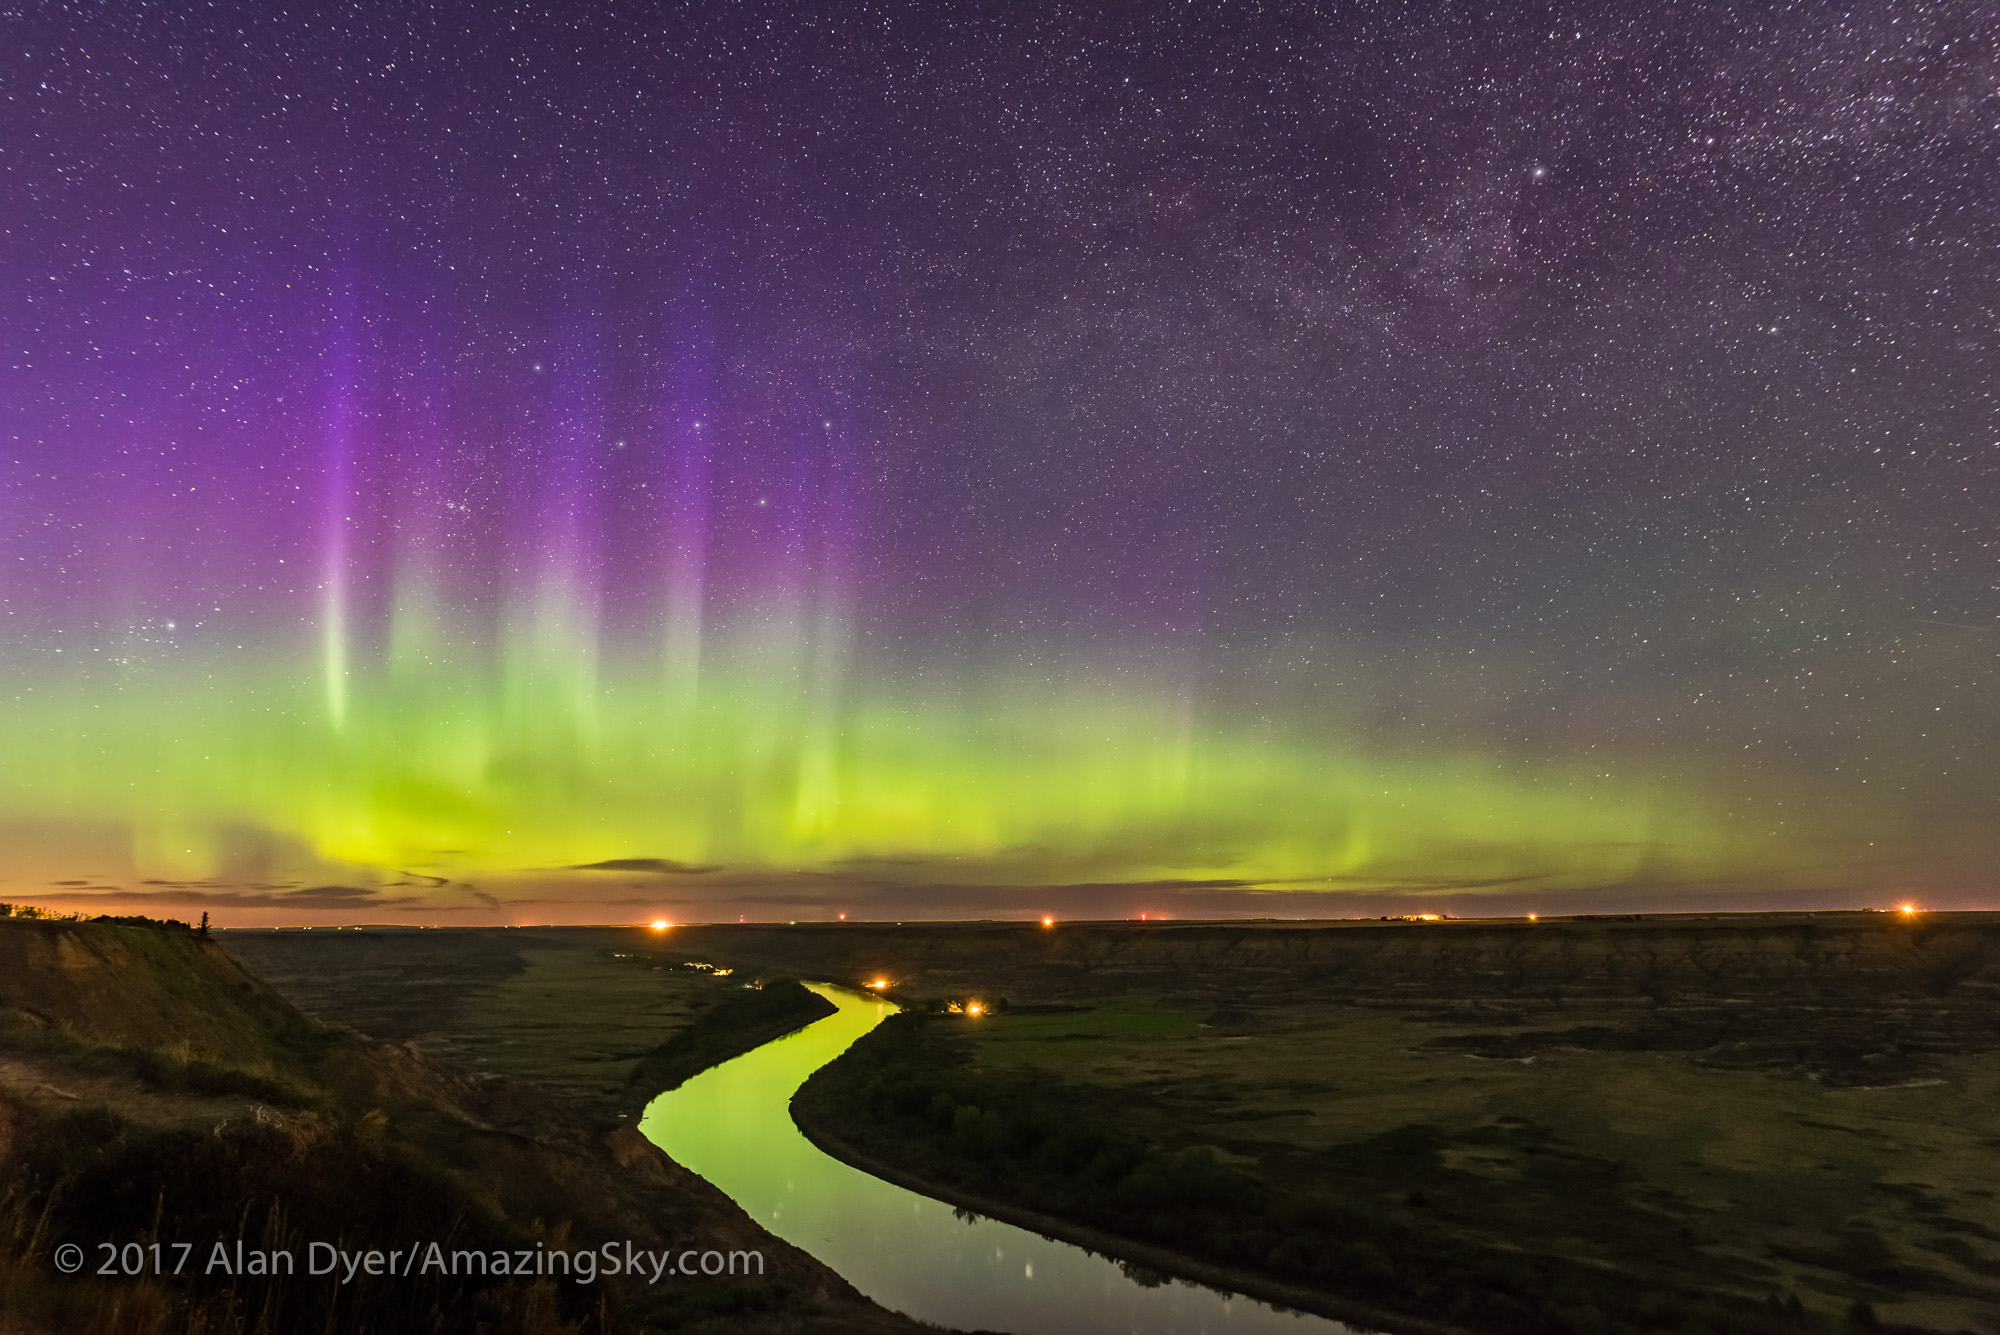
The night was near perfect, with the Milky Way standing out down to the southern horizon and the Sweetgrass Hills of Montana. Below, the Milk River winds through the sandstone rock formations sacred to the Blackfoot First Nations.
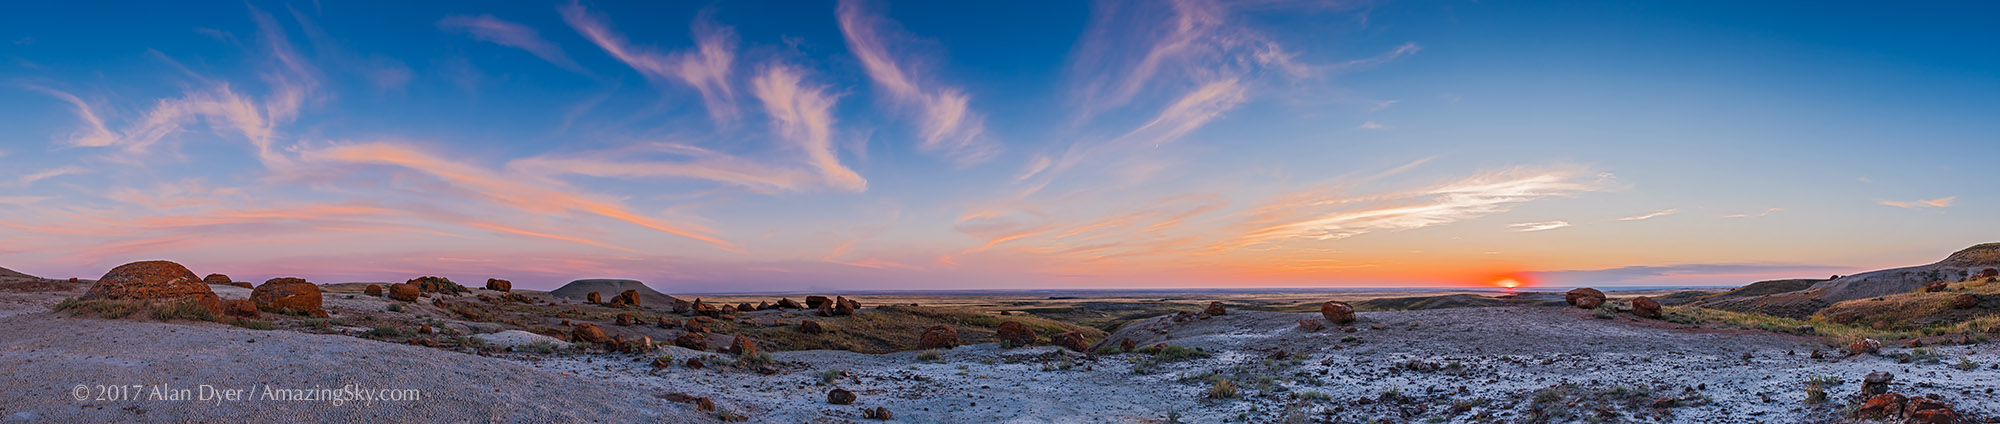
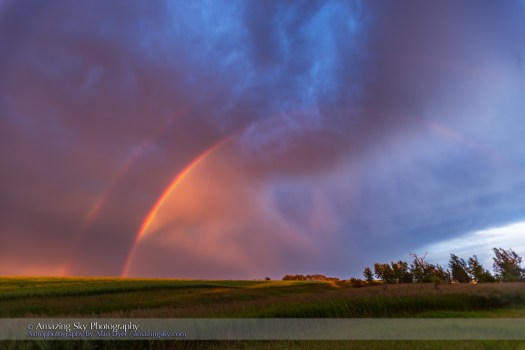
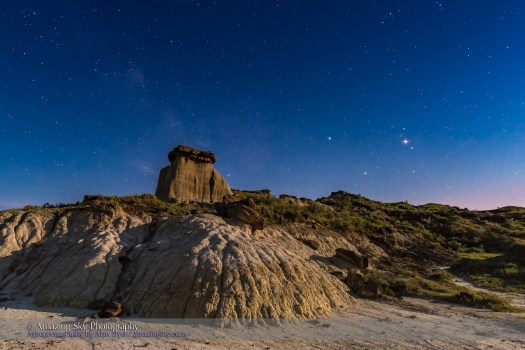
The next night (last night, July 26, as I write this) I was at another unique site in southern Alberta, Red Rock Coulee Natural Area. The sky presented one of Butler’s unmatched prairie sunsets.
This is “big sky” country, and this week is putting on a great show with a succession of clear and mild nights under a heat wave.
The waxing crescent Moon adds to the western sky and the sunsets. But it sets early enough to leave the sky dark for the Milky Way to shine to the south.
This was the Milky Way on Wednesday night, July 27, over Red Rock Coulee. Sagittarius and the centre of the Galaxy lie above the horizon. At right, Saturn shines amid the dark lanes of the Dark Horse in the Milky Way.
I’m just halfway through my week-long photo tour of several favourite sites in this Great Lone Land. Next, is Cypress Hills and the Reesor Ranch.
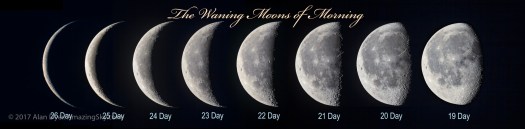
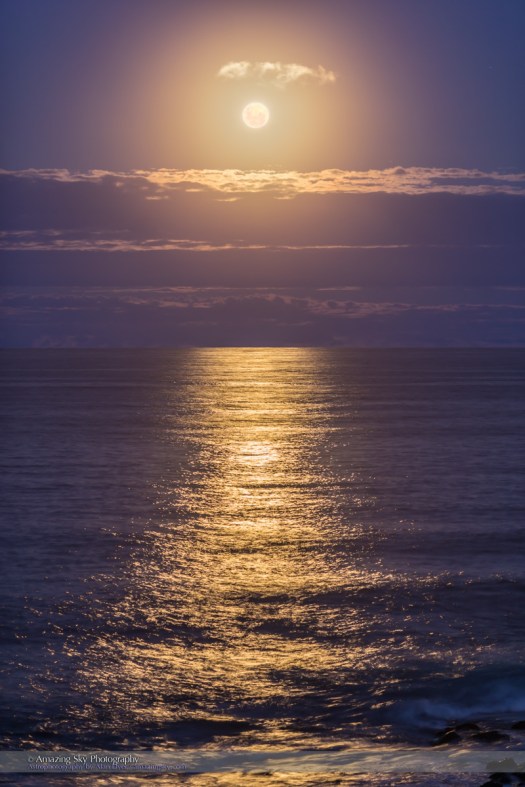
These are the Moons only insomniacs and night shift workers get to see. These are the waning Moons of morning.
For eight mornings I’ve been up at 4 a.m. each day to catch the early Moon and collect a series of images of its waning phases.
The result is above, a series that runs from right to left in time, from the 19-day-old waning gibbous Moon, to the 26-day-old thin crescent Moon.
I ordered them that way in the composite to reflect the direction the Moon moves across the sky. As it orbits Earth and wanes, the Moon moves from west to east, or right to left, in the sky from morning to morning, at least in the northern hemisphere.
A run of clear nights and mornings made the series possible. From Alberta, as dry as it is, too many cloudy nights make a consistent Moon phase series a challenge at best.
As it was I had to contend with smoke from forest fires in B.C. which reddened the Moon on the last few mornings, a tint I had to correct for the composite above. But here below, is what the Moon really looked like one morning.
The smoky orange Moon of July 17.
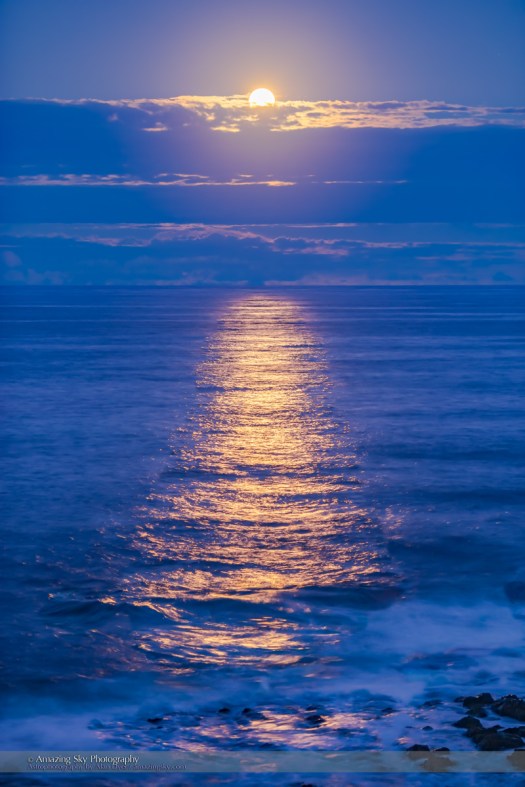
The last two Moons, at 25 and 26 days old (i.e. the number of days since the previous New Moon phase) exhibited the phenomenon known as Earthshine. You can see the night side of the Moon glowing gently with sunlight reflected first off the Earth.
Earthshine on the 25-day old Moon on July 20 at dawn.
Below, this was the Moon this morning, July 21, with it very low in the east amid the twilight sky.
Earthshine on the thin 26-day old Moon on July 21 at dawn.
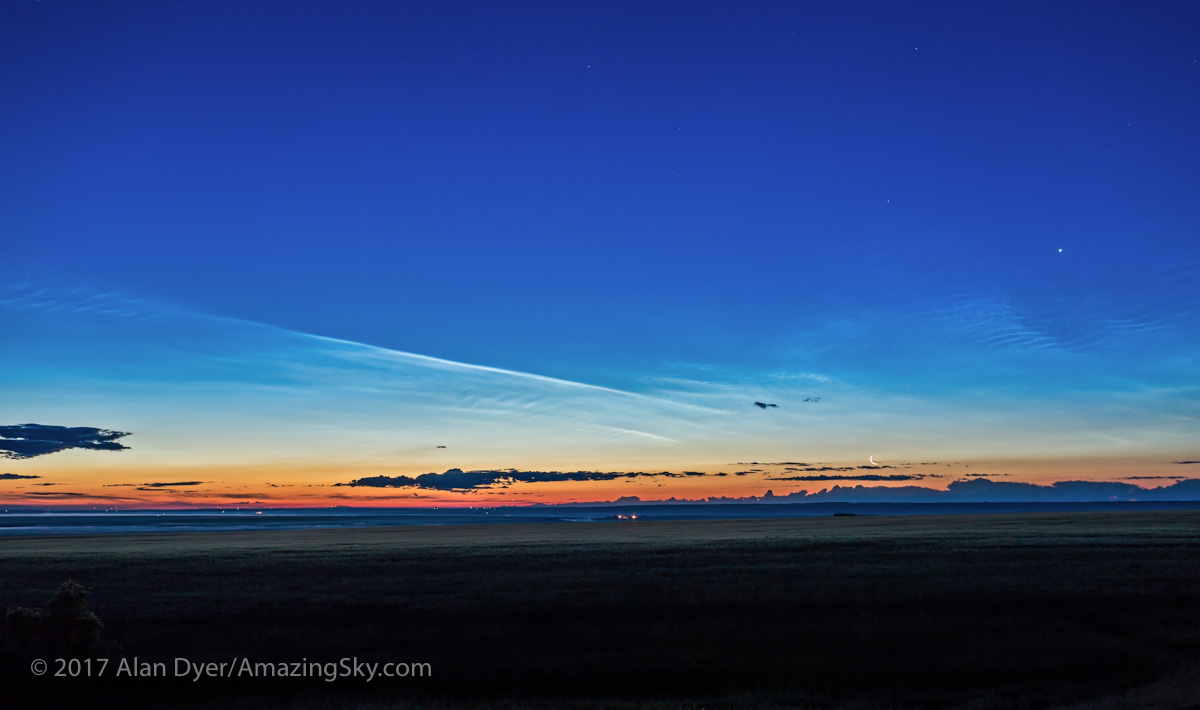
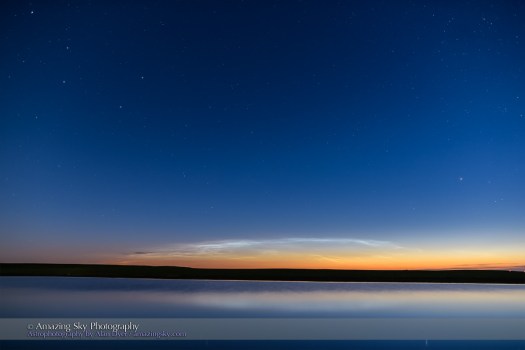
This final morning was exceptional. The smoke had cleared off, and when I got up at 4 a.m. (reluctantly!) for the last shoot I was greeted with the best display of noctilucent clouds I had seen in many years. They covered the northeast and eastern skies in a rare “grand display.”
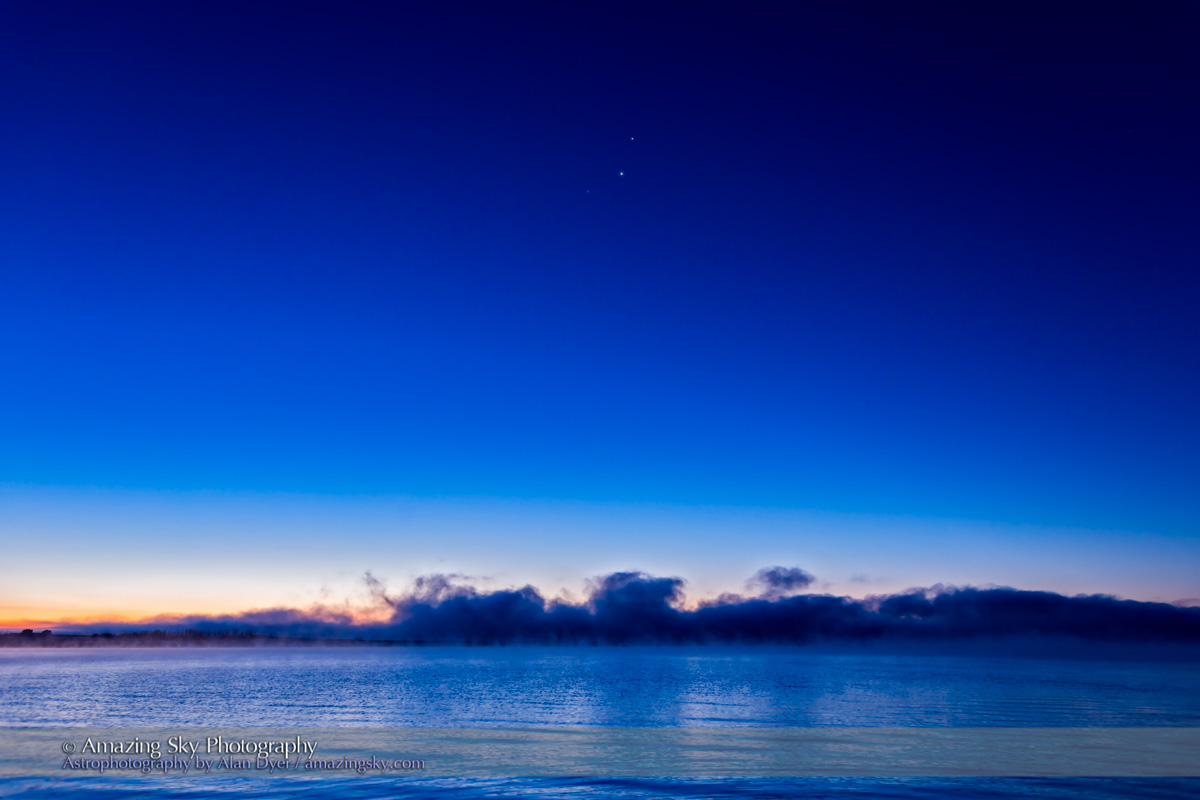
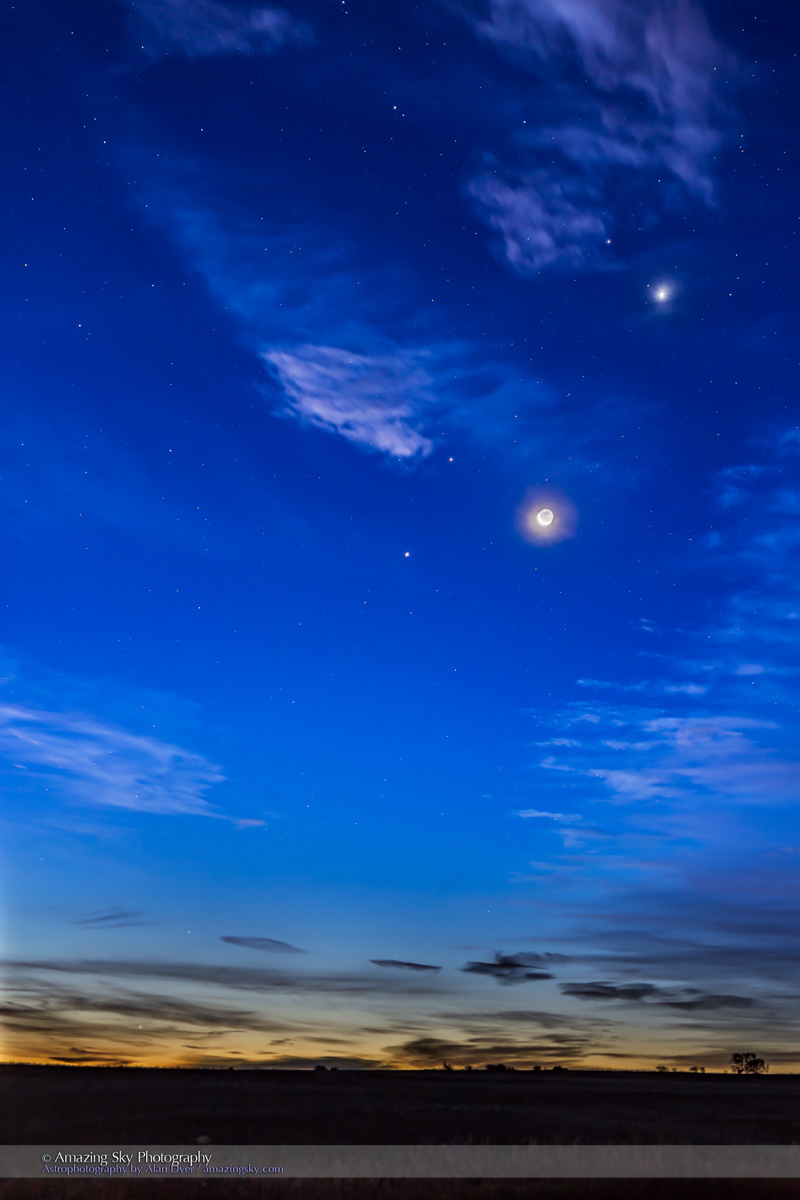
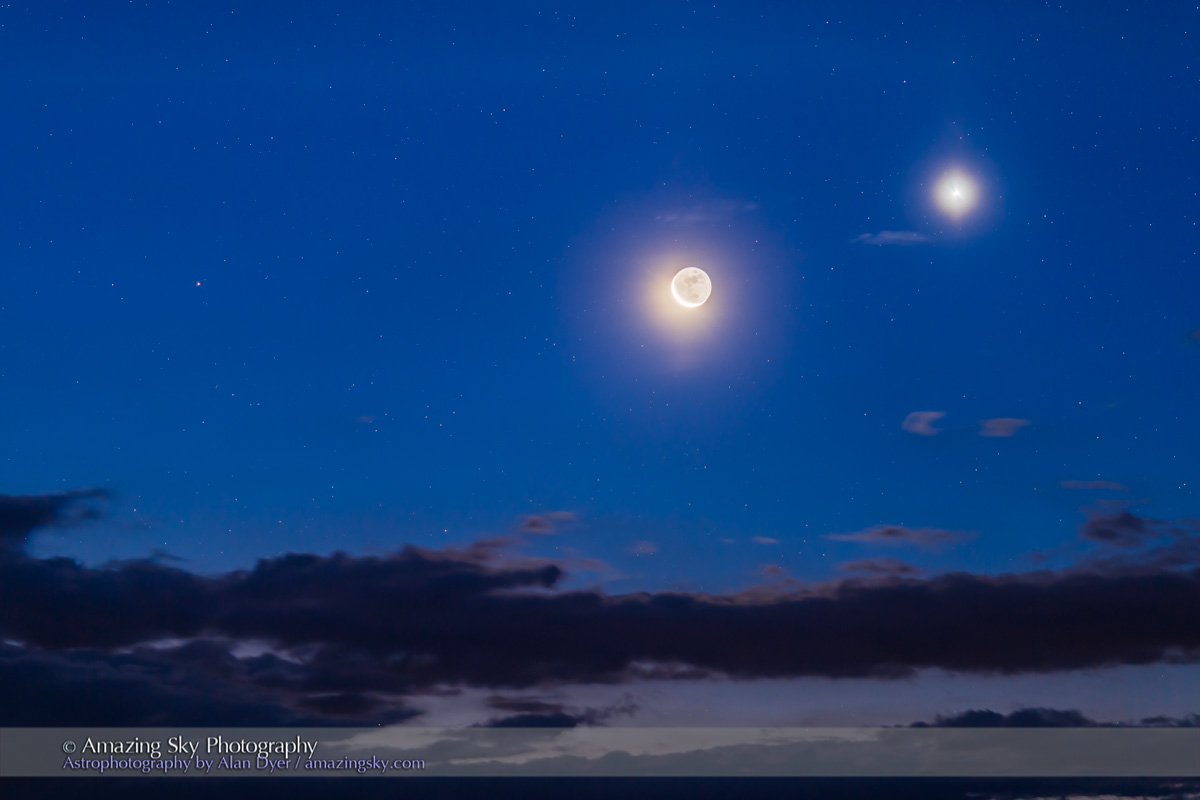
Noctilucent clouds with the Moon and Venus in the dawn sky, from southern Alberta, July 21, 2017.
The thin crescent Moon is just rising at right, with Venus bright as a “morning star” at far right. This was a sky certainly worth losing sleep over.
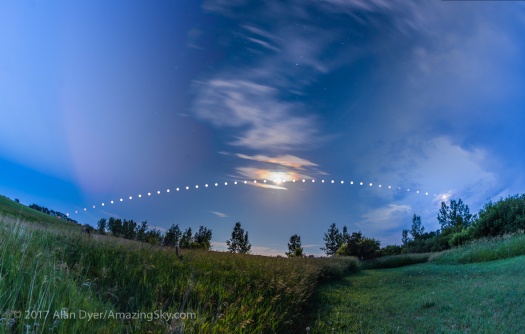
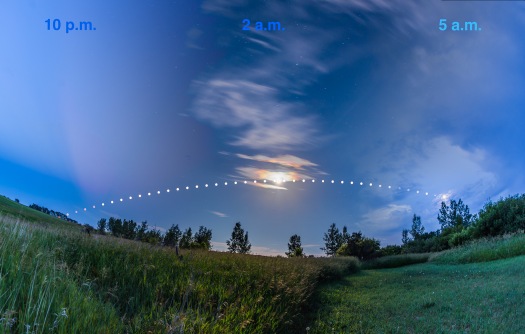
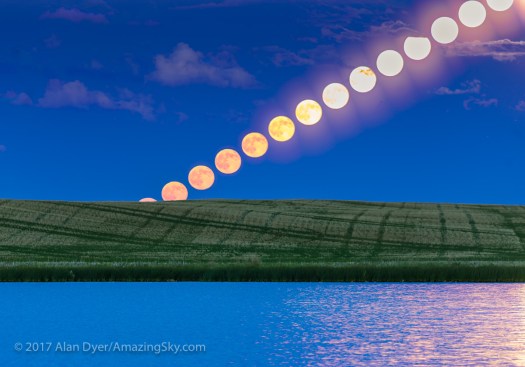
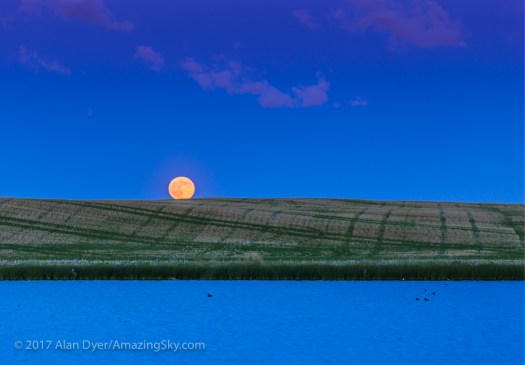
The summer Full Moon arcs low across the southern sky, mimicking the path of the winter Sun.
This is a project I had in mind for the last month, and hoped to capture at the July Full Moon. A clear, dry, and cooperative night provide the chance.
The still images are composites of 40 images of the Moon traveling across the sky from dusk to dawn, taken at 10-minute intervals. They are layered onto a blend of background images of the 10 p.m. dusk sky (left), 2 a.m. middle-of-the-night sky (middle), and 5 a.m dawn sky (right).
As a bonus, the 10 p.m. sky shows some dark crepuscular rays in the twilight, while at 2 a.m. the Moon was in light cloud and surrounded by iridescent colours. By 5 a.m. denser clouds were moving in to obscure the Moon.
I shot the still image composite (above) and time-lapse movie (below) to illustrate the low arc of a summer Full Moon. In summer (June or July) the Full Moon sits at a similar place near the ecliptic as does the Sun in winter near the December solstice.
From the northern hemisphere the low position of the winter Sun gives us the short, cold days of winter. In summer, the similar low position of the Full Moon simply gives us a low Full Moon! But it is one that can be impressive and photogenic.
The time-lapse movie uses all 400 frames of the moving Moon superimposed onto the same background sky images, but now dissolving from one to the other.
The movie is 4K in resolution, though can be viewed at a smaller resolution to speed up playback if needed.
For the technically minded:
The Moon disks in the time-lapse and still composite come from a series of short 1/15-second exposures, short enough to record just the disks of the bright Moon set against a dark, underexposed sky.
I took these shots every minute, for 400 in total. They are blended into the bright background sky images using a Lighten blend mode, both in Photoshop for the still image, and in Final Cut for the movie.
The background sky images are longer exposures to record the sky colours, and stars (in the case of the 2 a.m. image). They are blended with gradient masks for the still image, but dissolved from one to the other in the time-lapse movie.
I shot the frames with a 15mm full-frame fish-eye lens and Canon 6D, with the camera not moved during the 7-hour shoot.
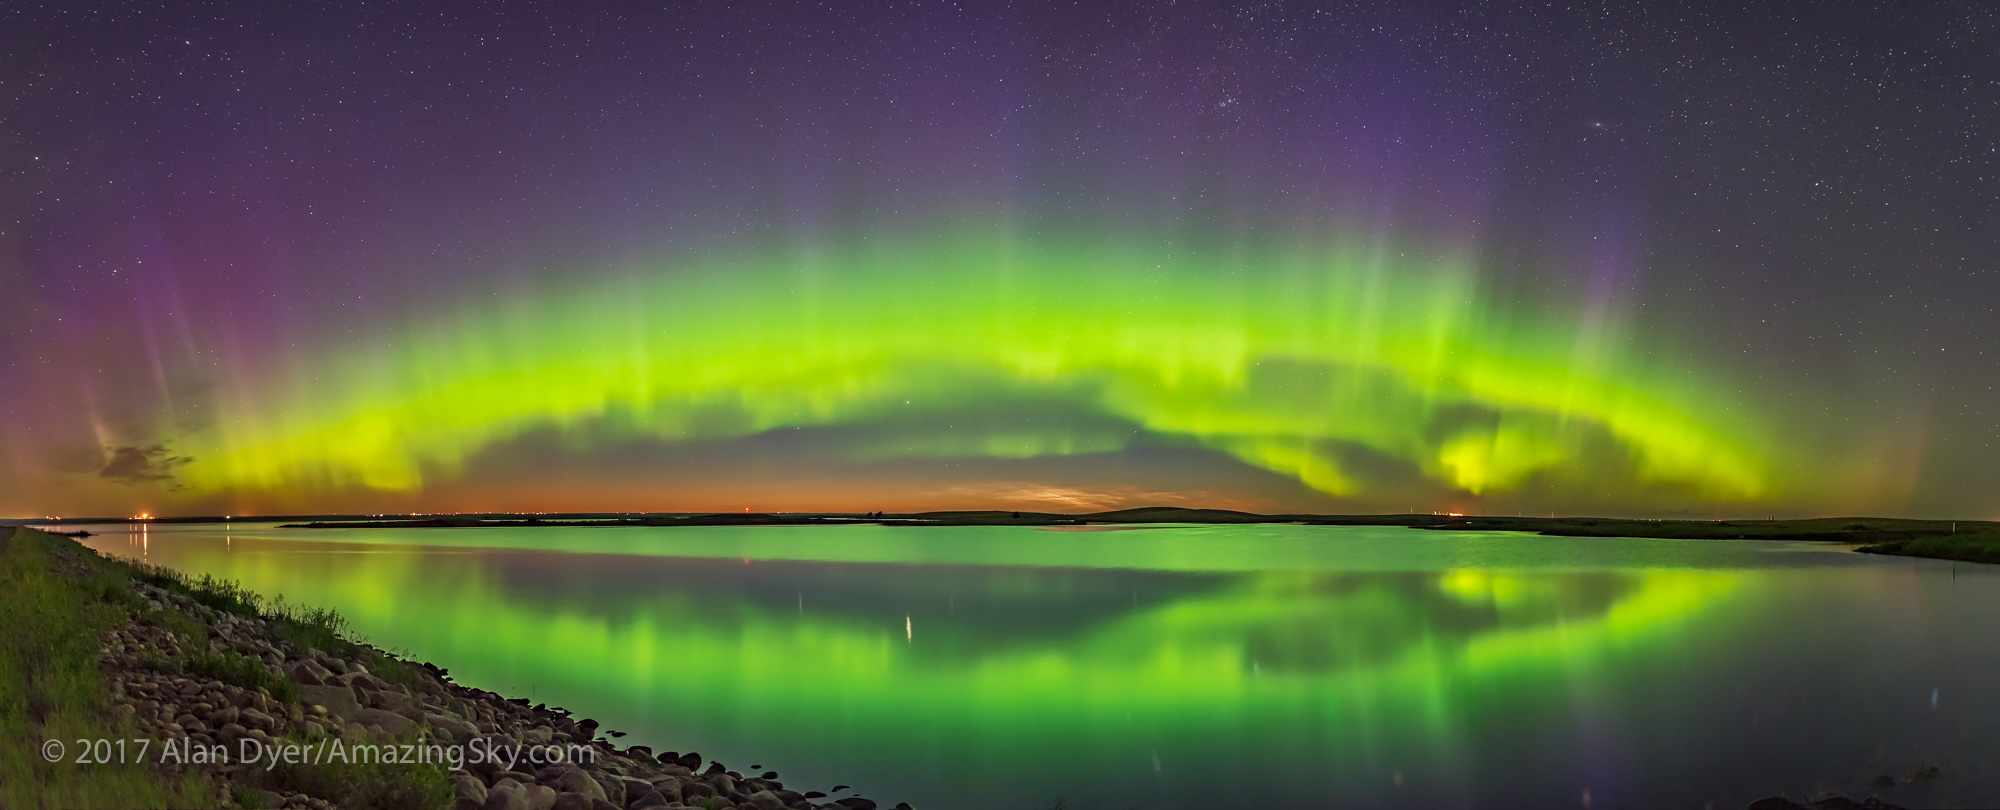
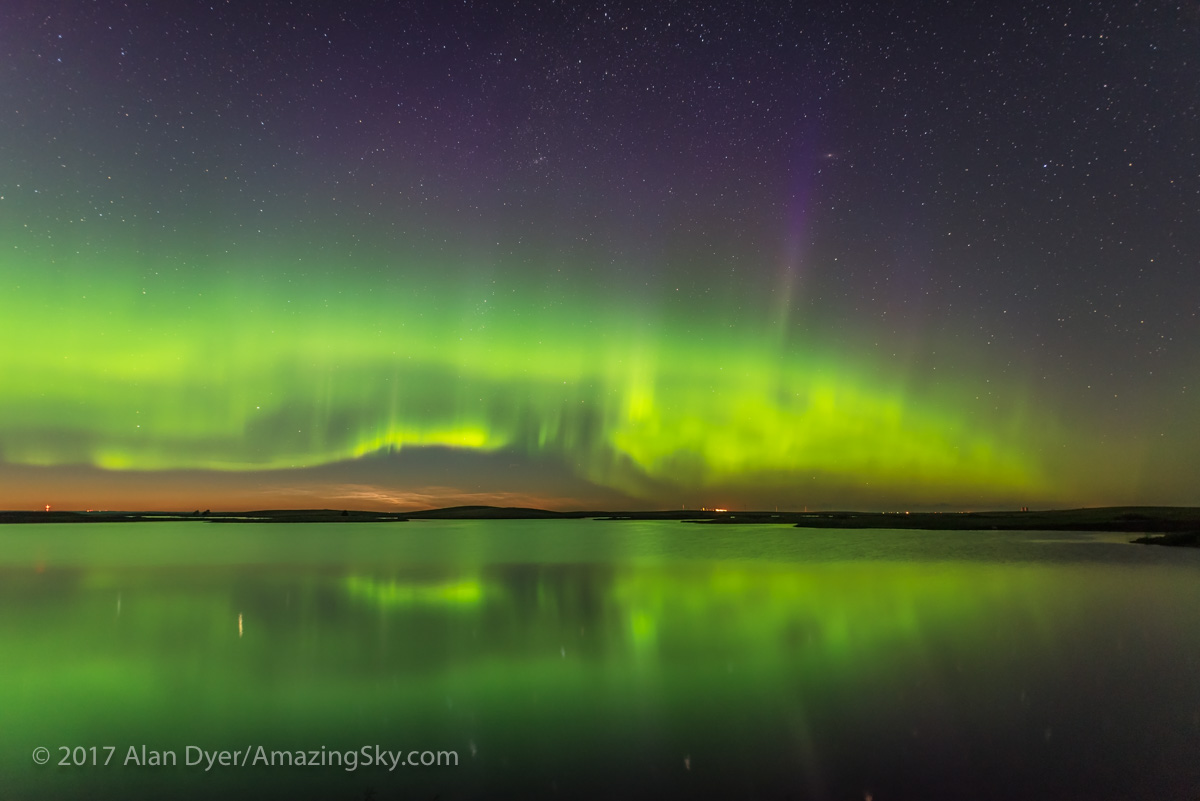
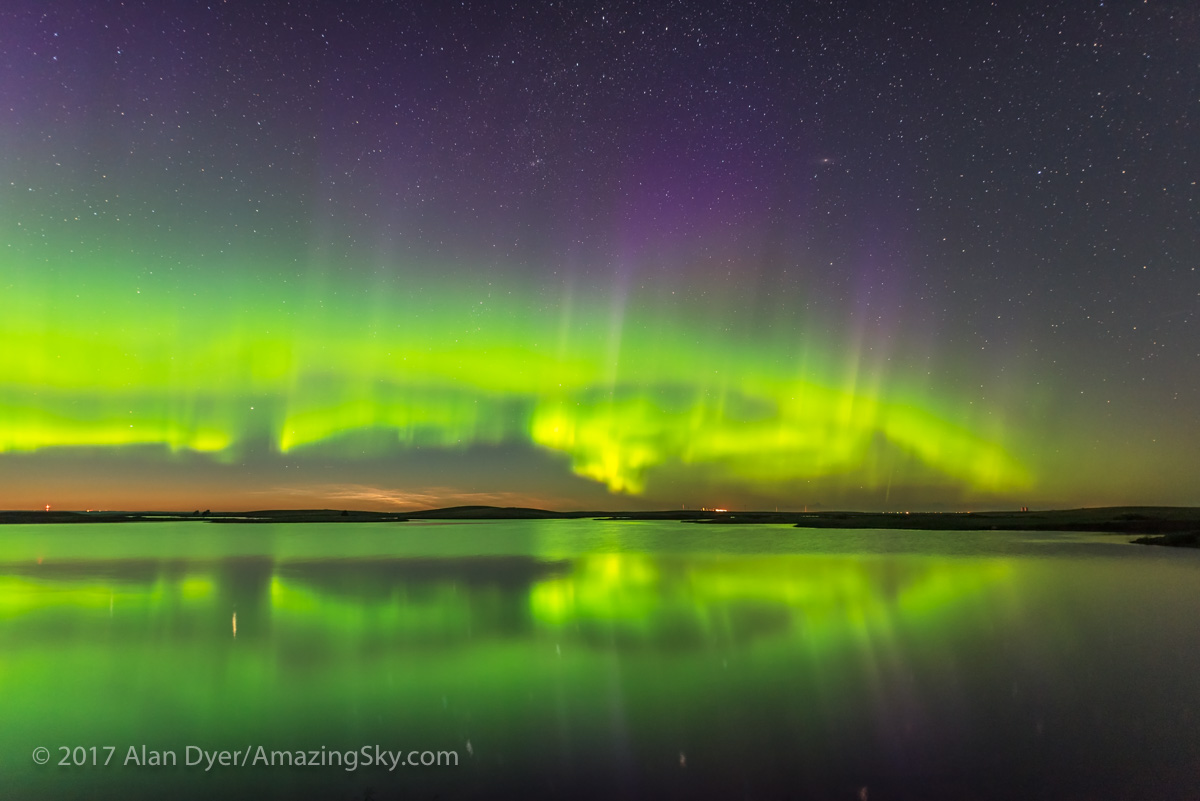
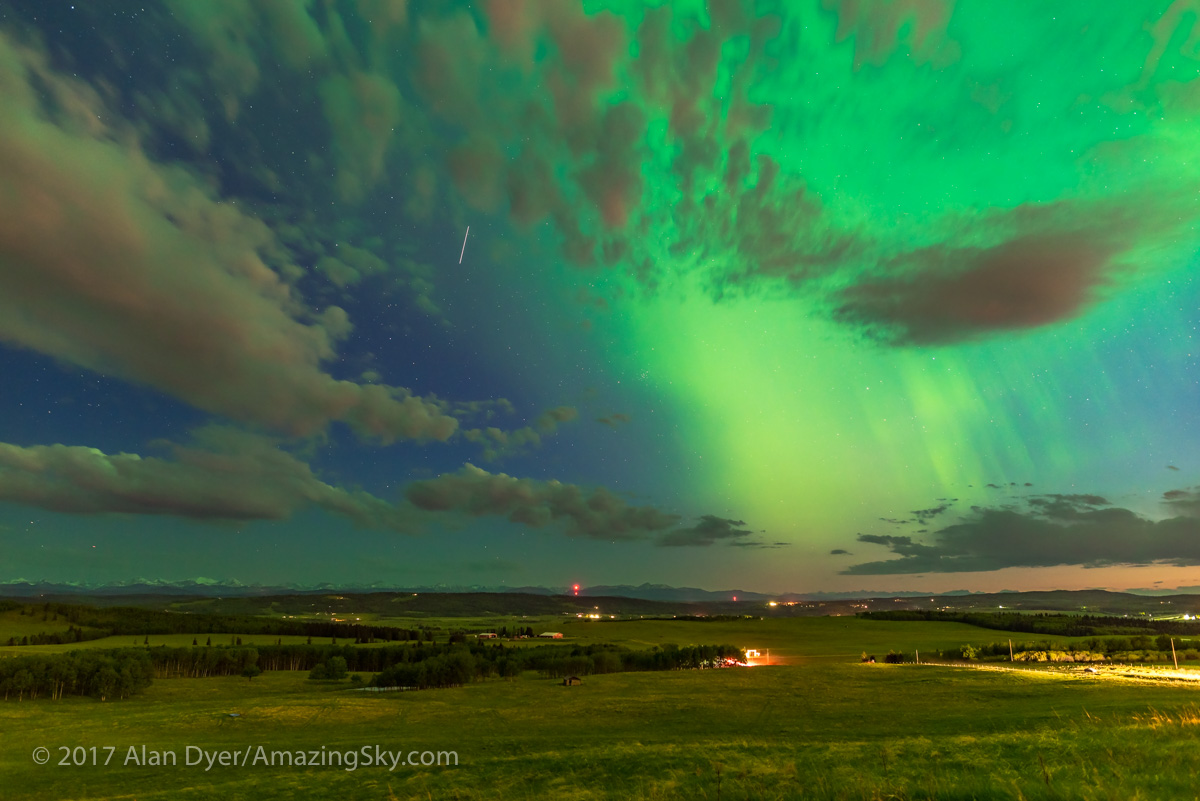
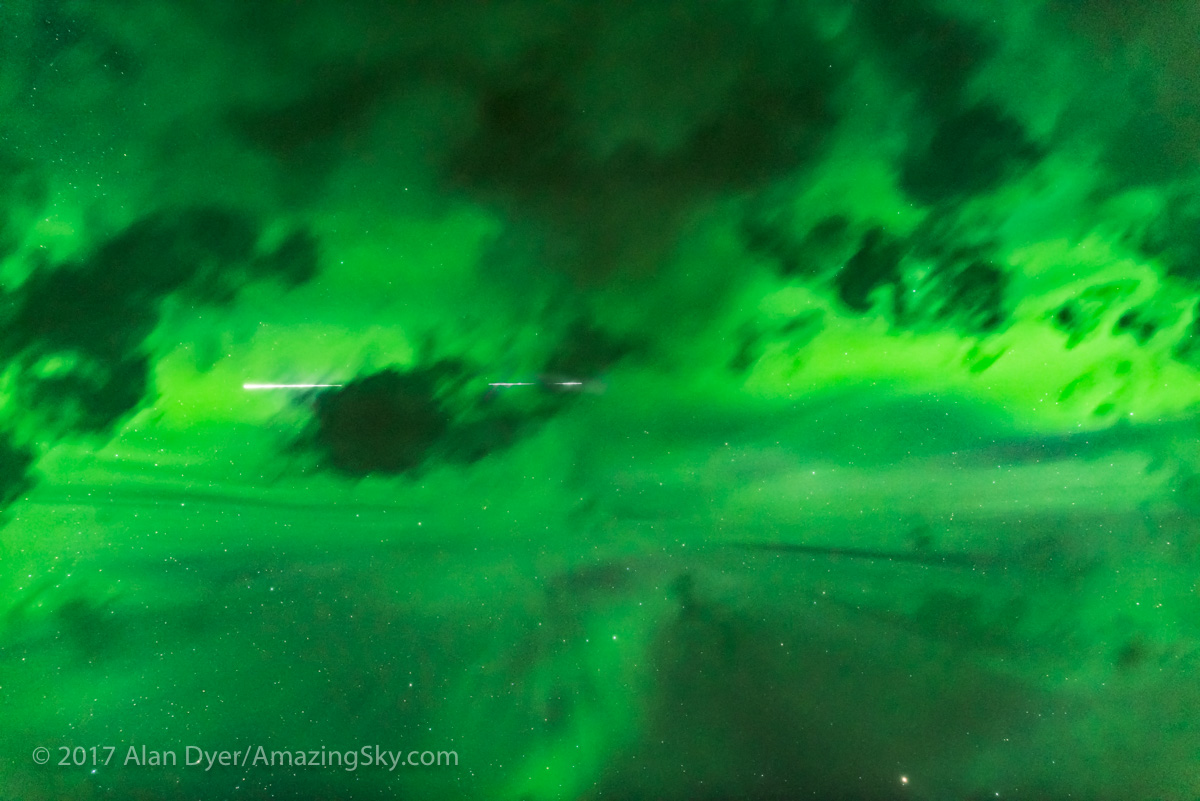
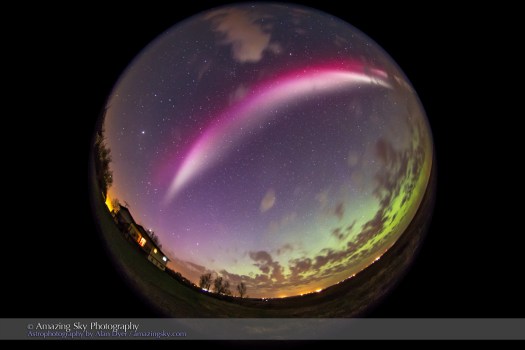
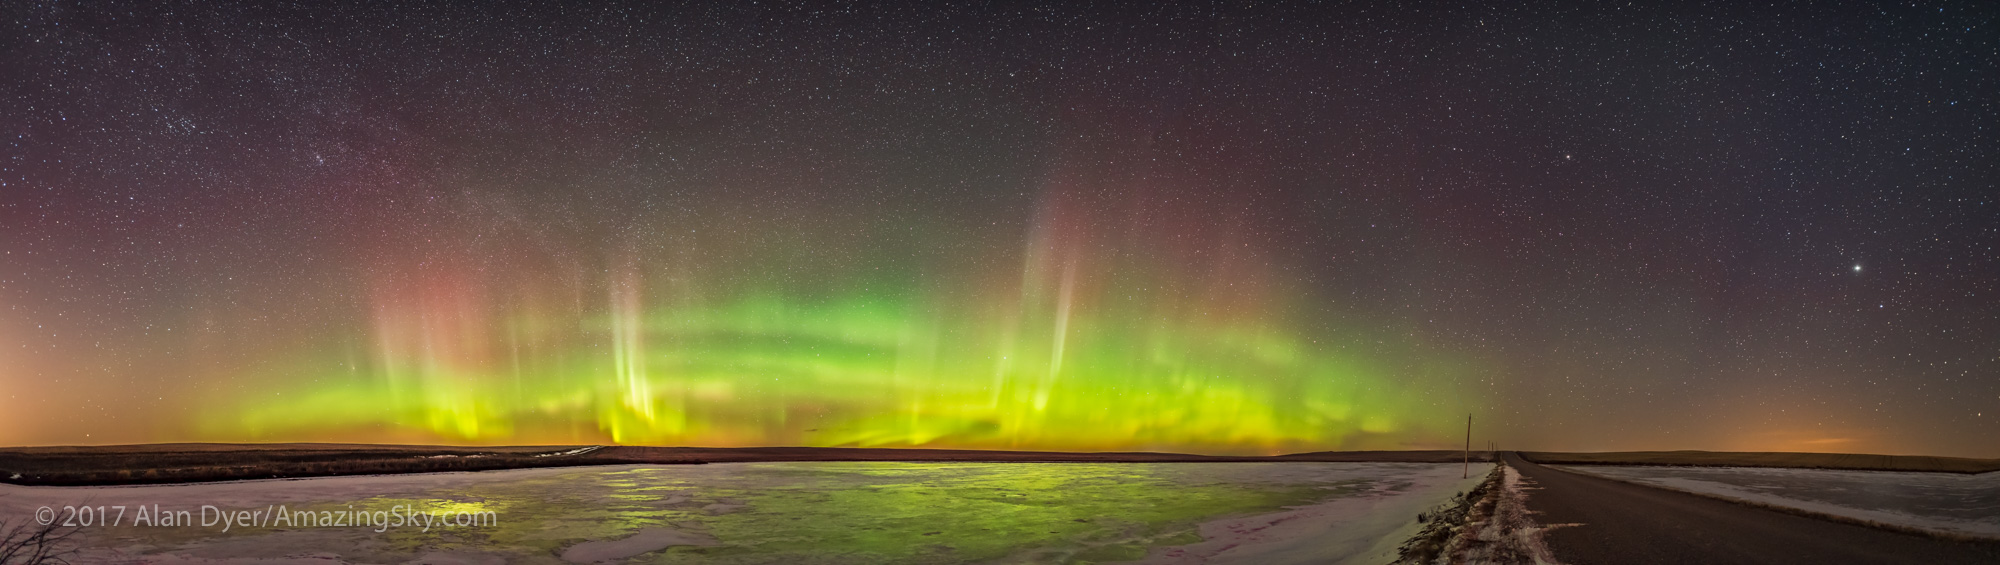
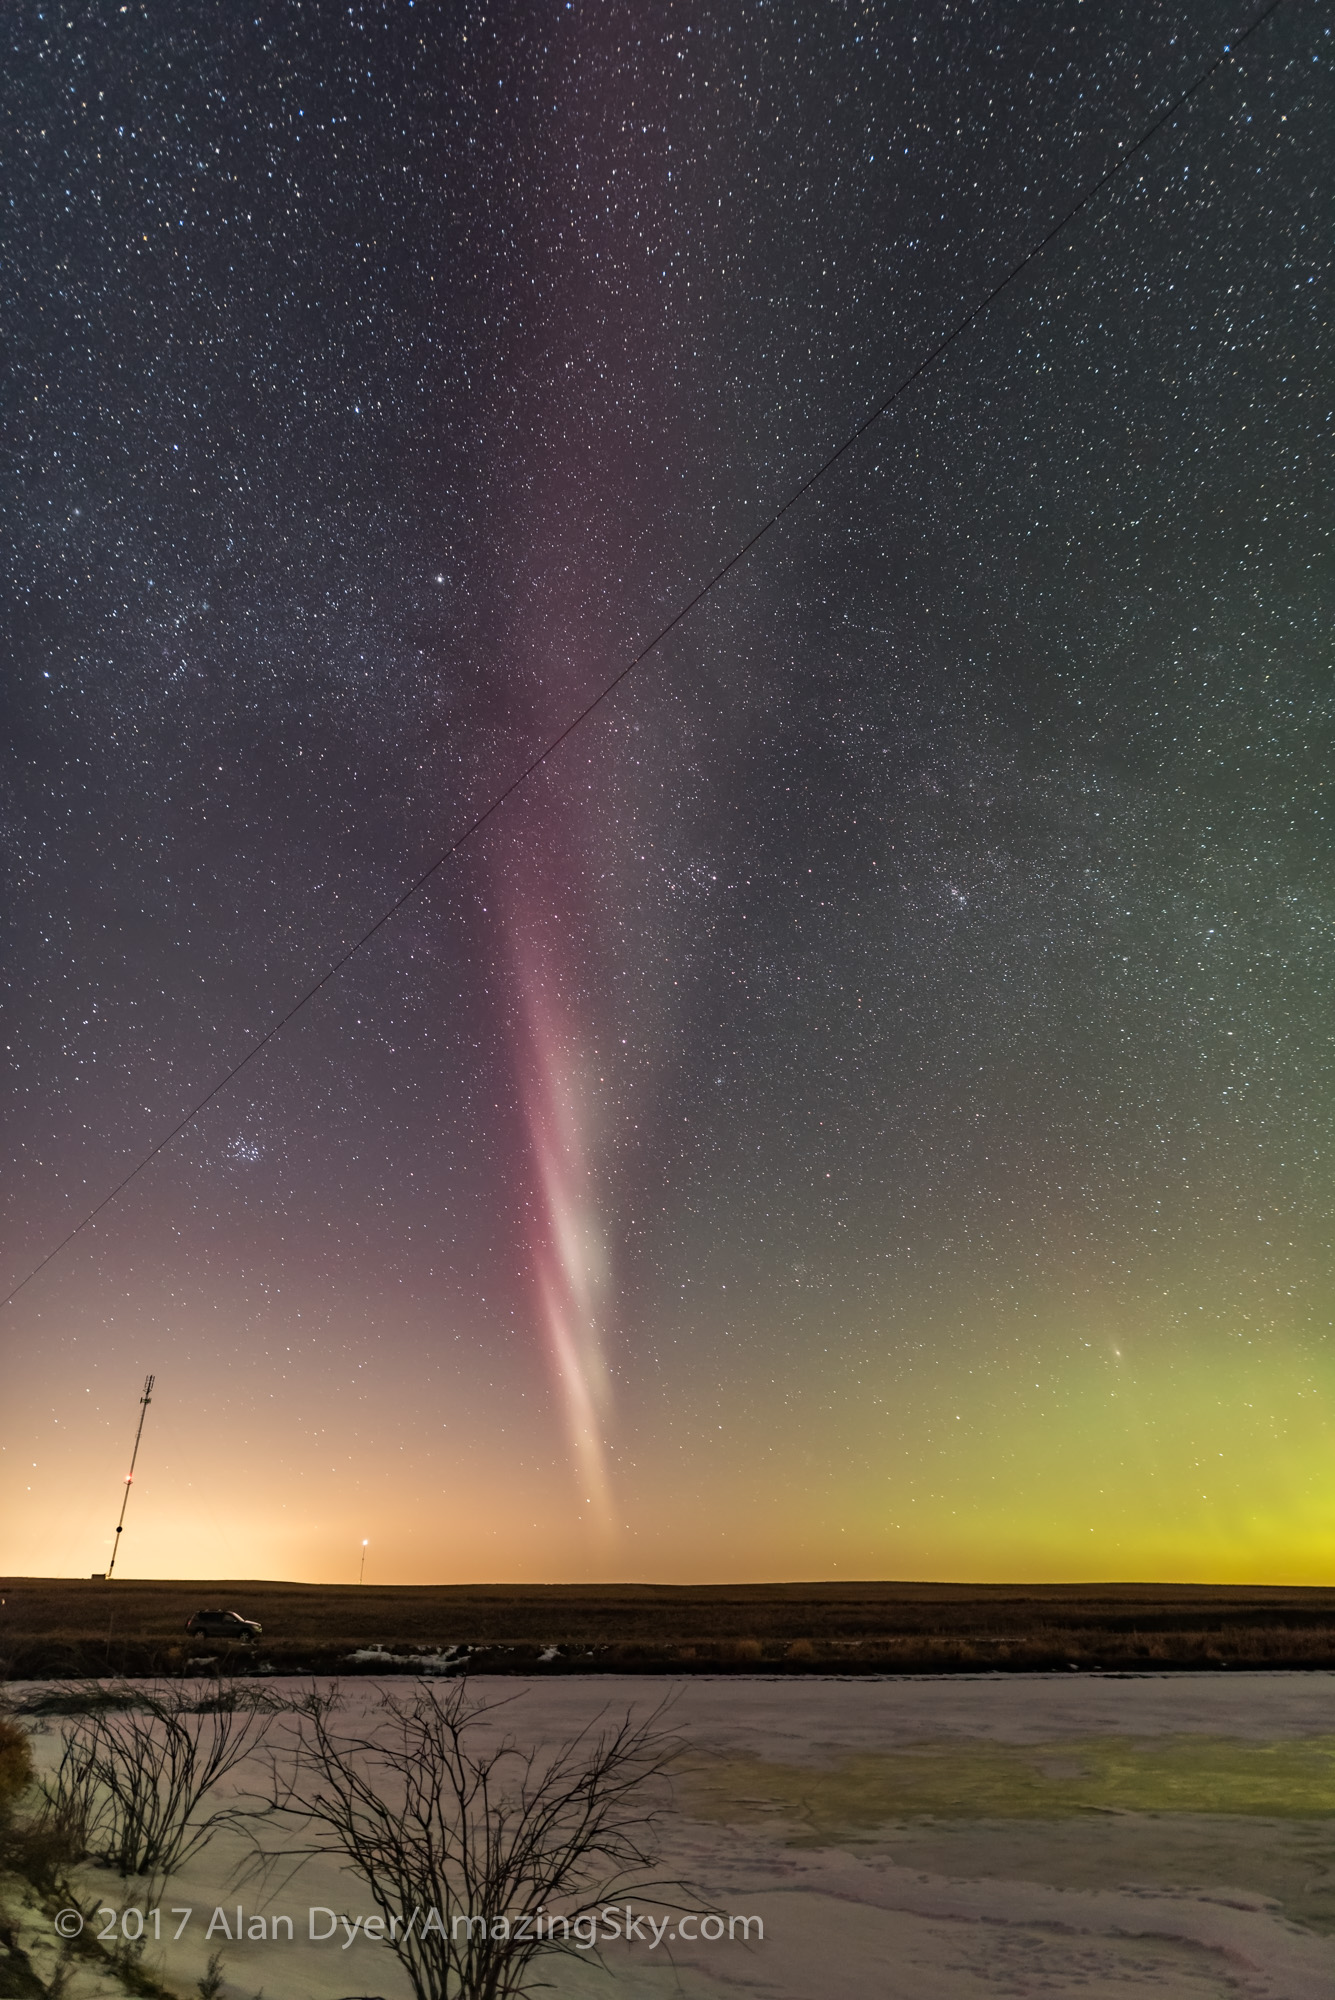
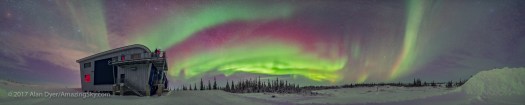
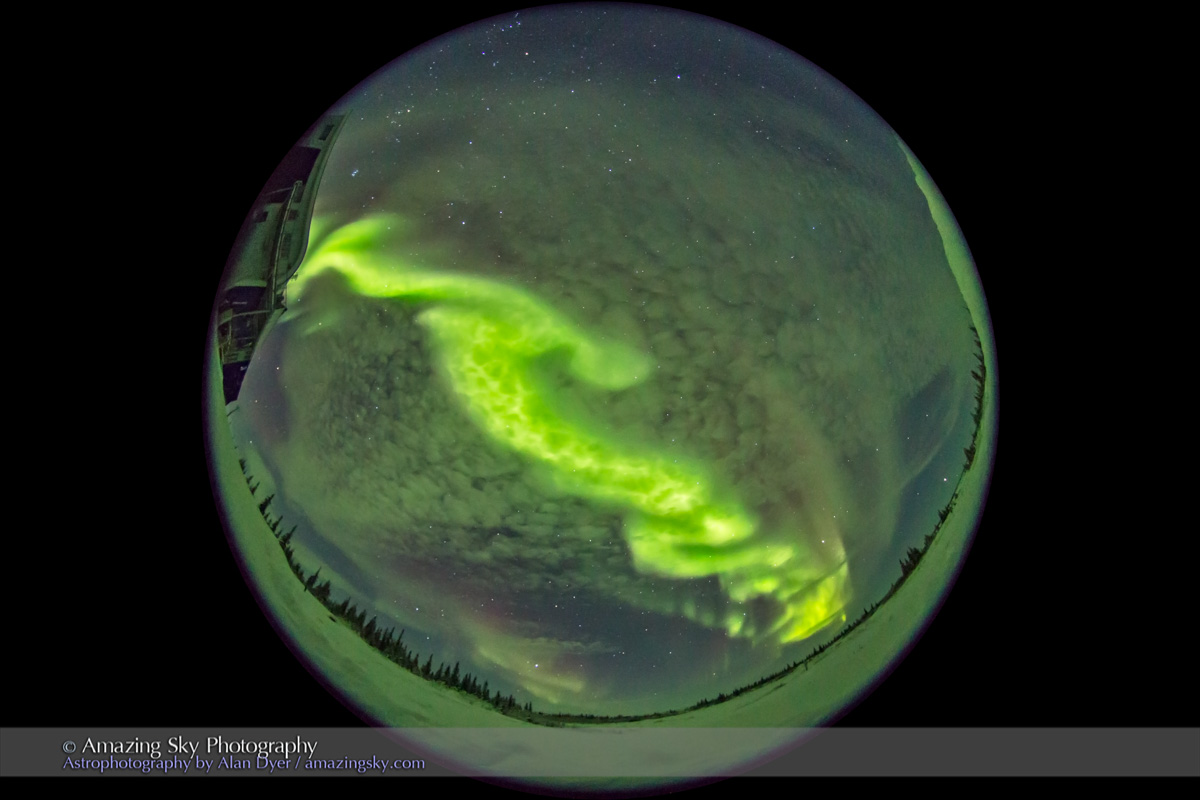
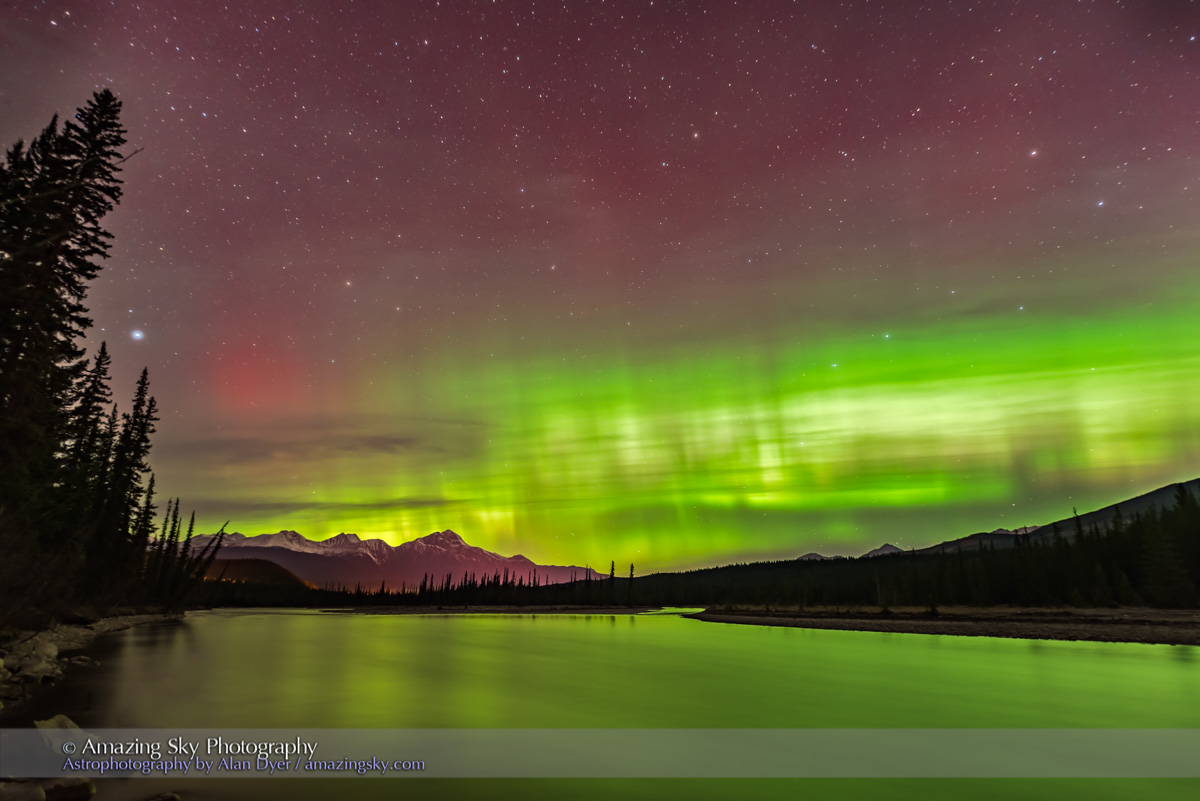
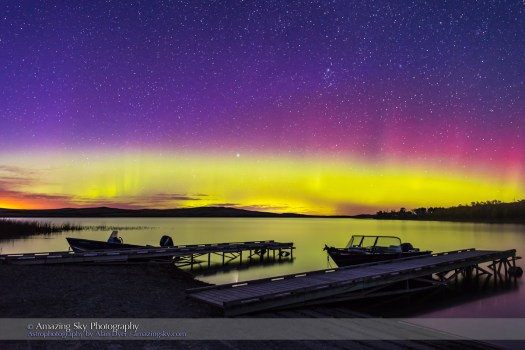
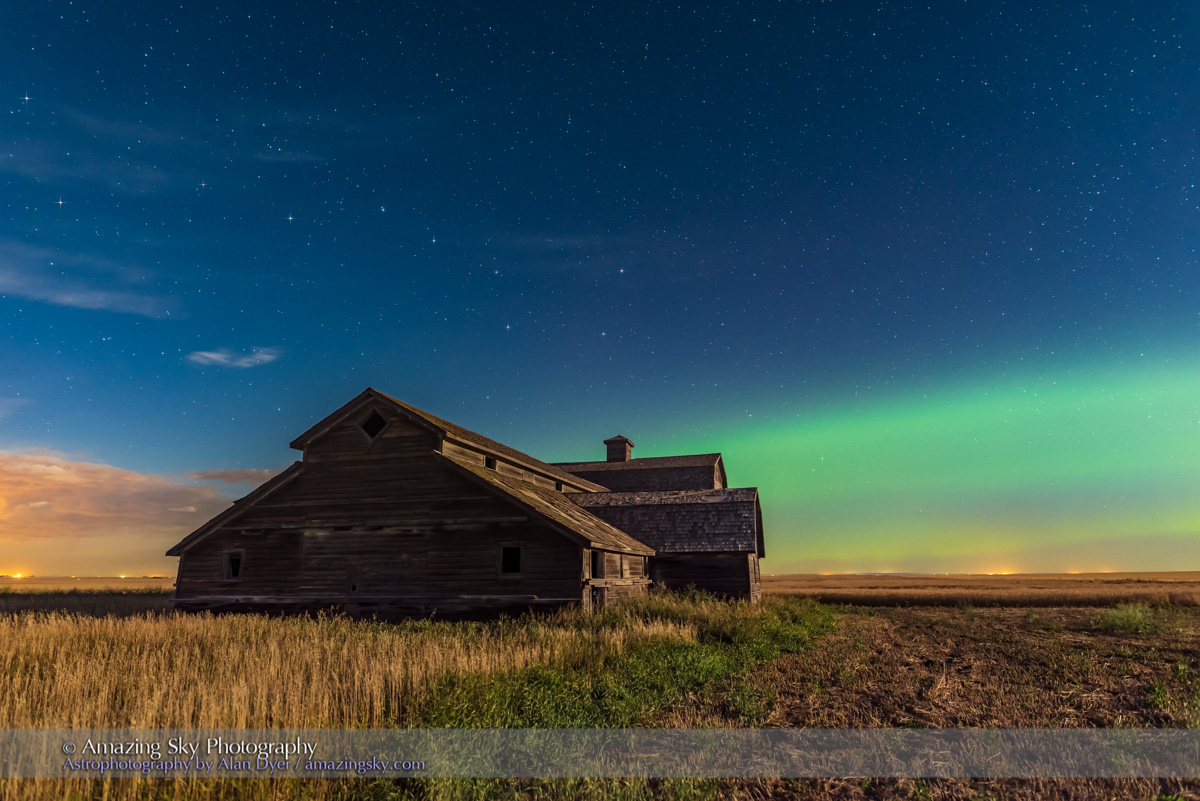
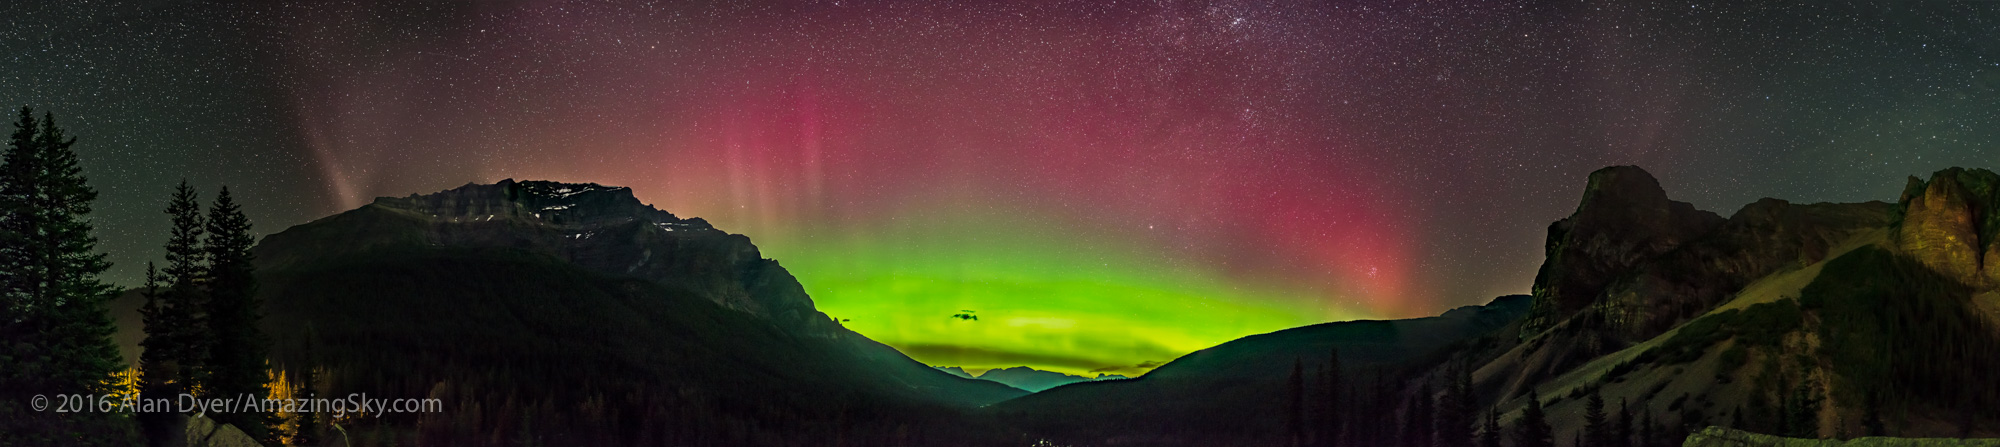
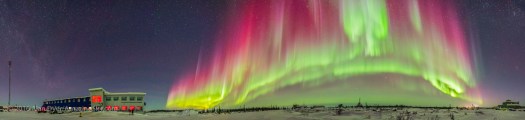
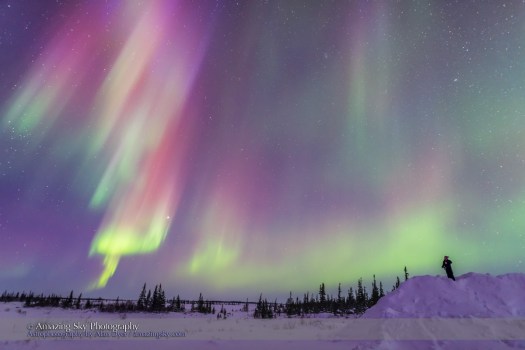
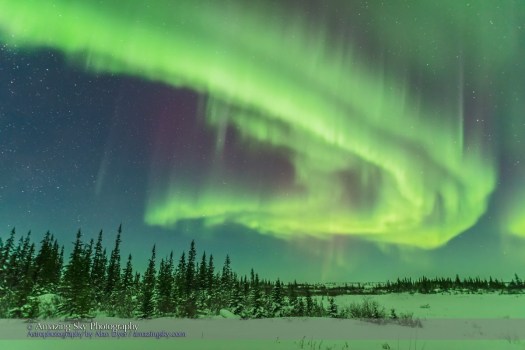
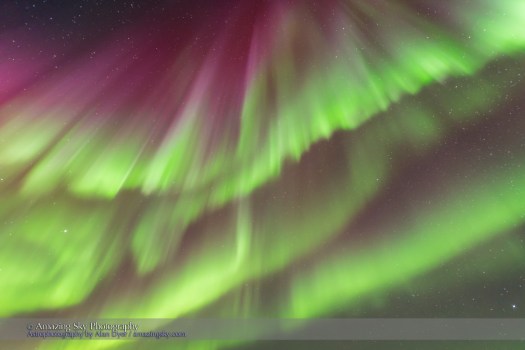
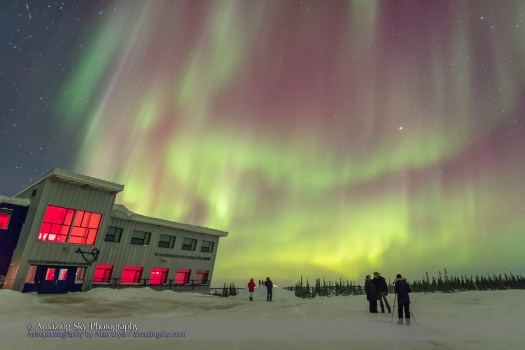
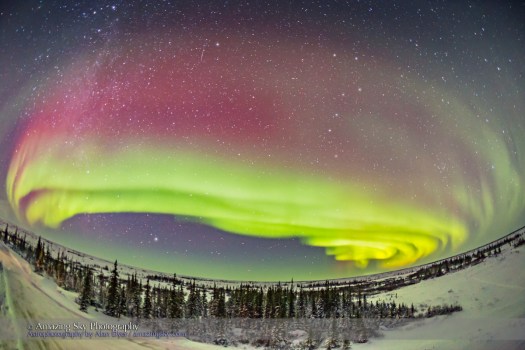
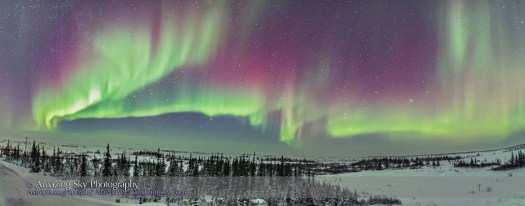
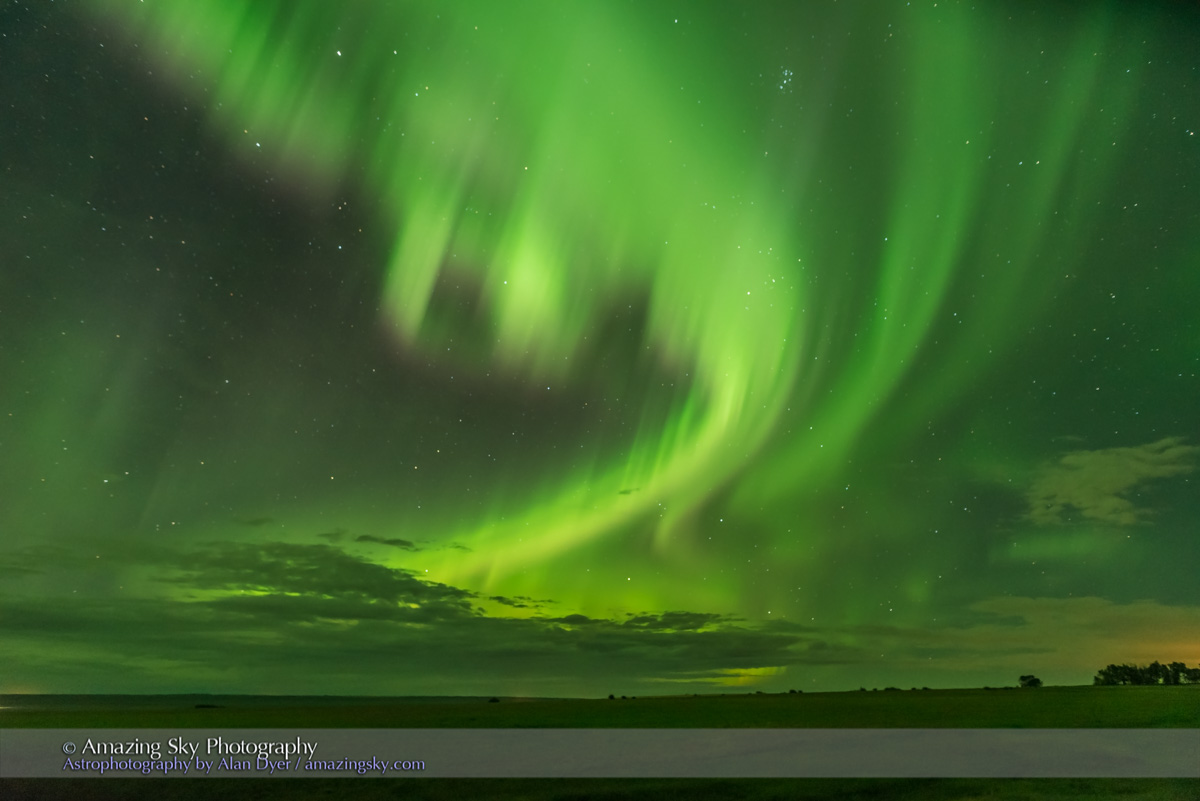
The Northern Lights dance in the solstice sky over a prairie lake.
This was a surprise display. Forecasts called for a chance of Lights on Saturday, June 24, but I wasn’t expecting much.
Nevertheless, I headed to a nearby lake (Crawling Lake) to shoot north over the water, not of the Lights, but of noctilucent clouds, a phenomenon unique to the summer solstice sky and our latitudes here on the Canadian prairies.
But as the night darkened (quite late at solstice time) the aurora began to appear in the deepening twilight.
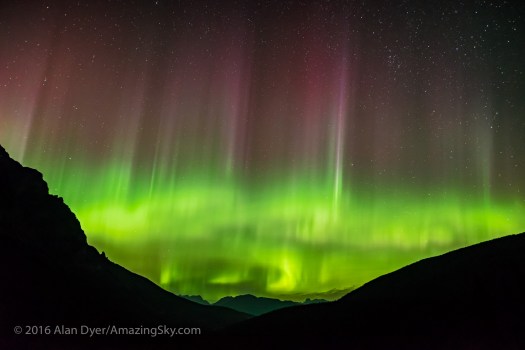
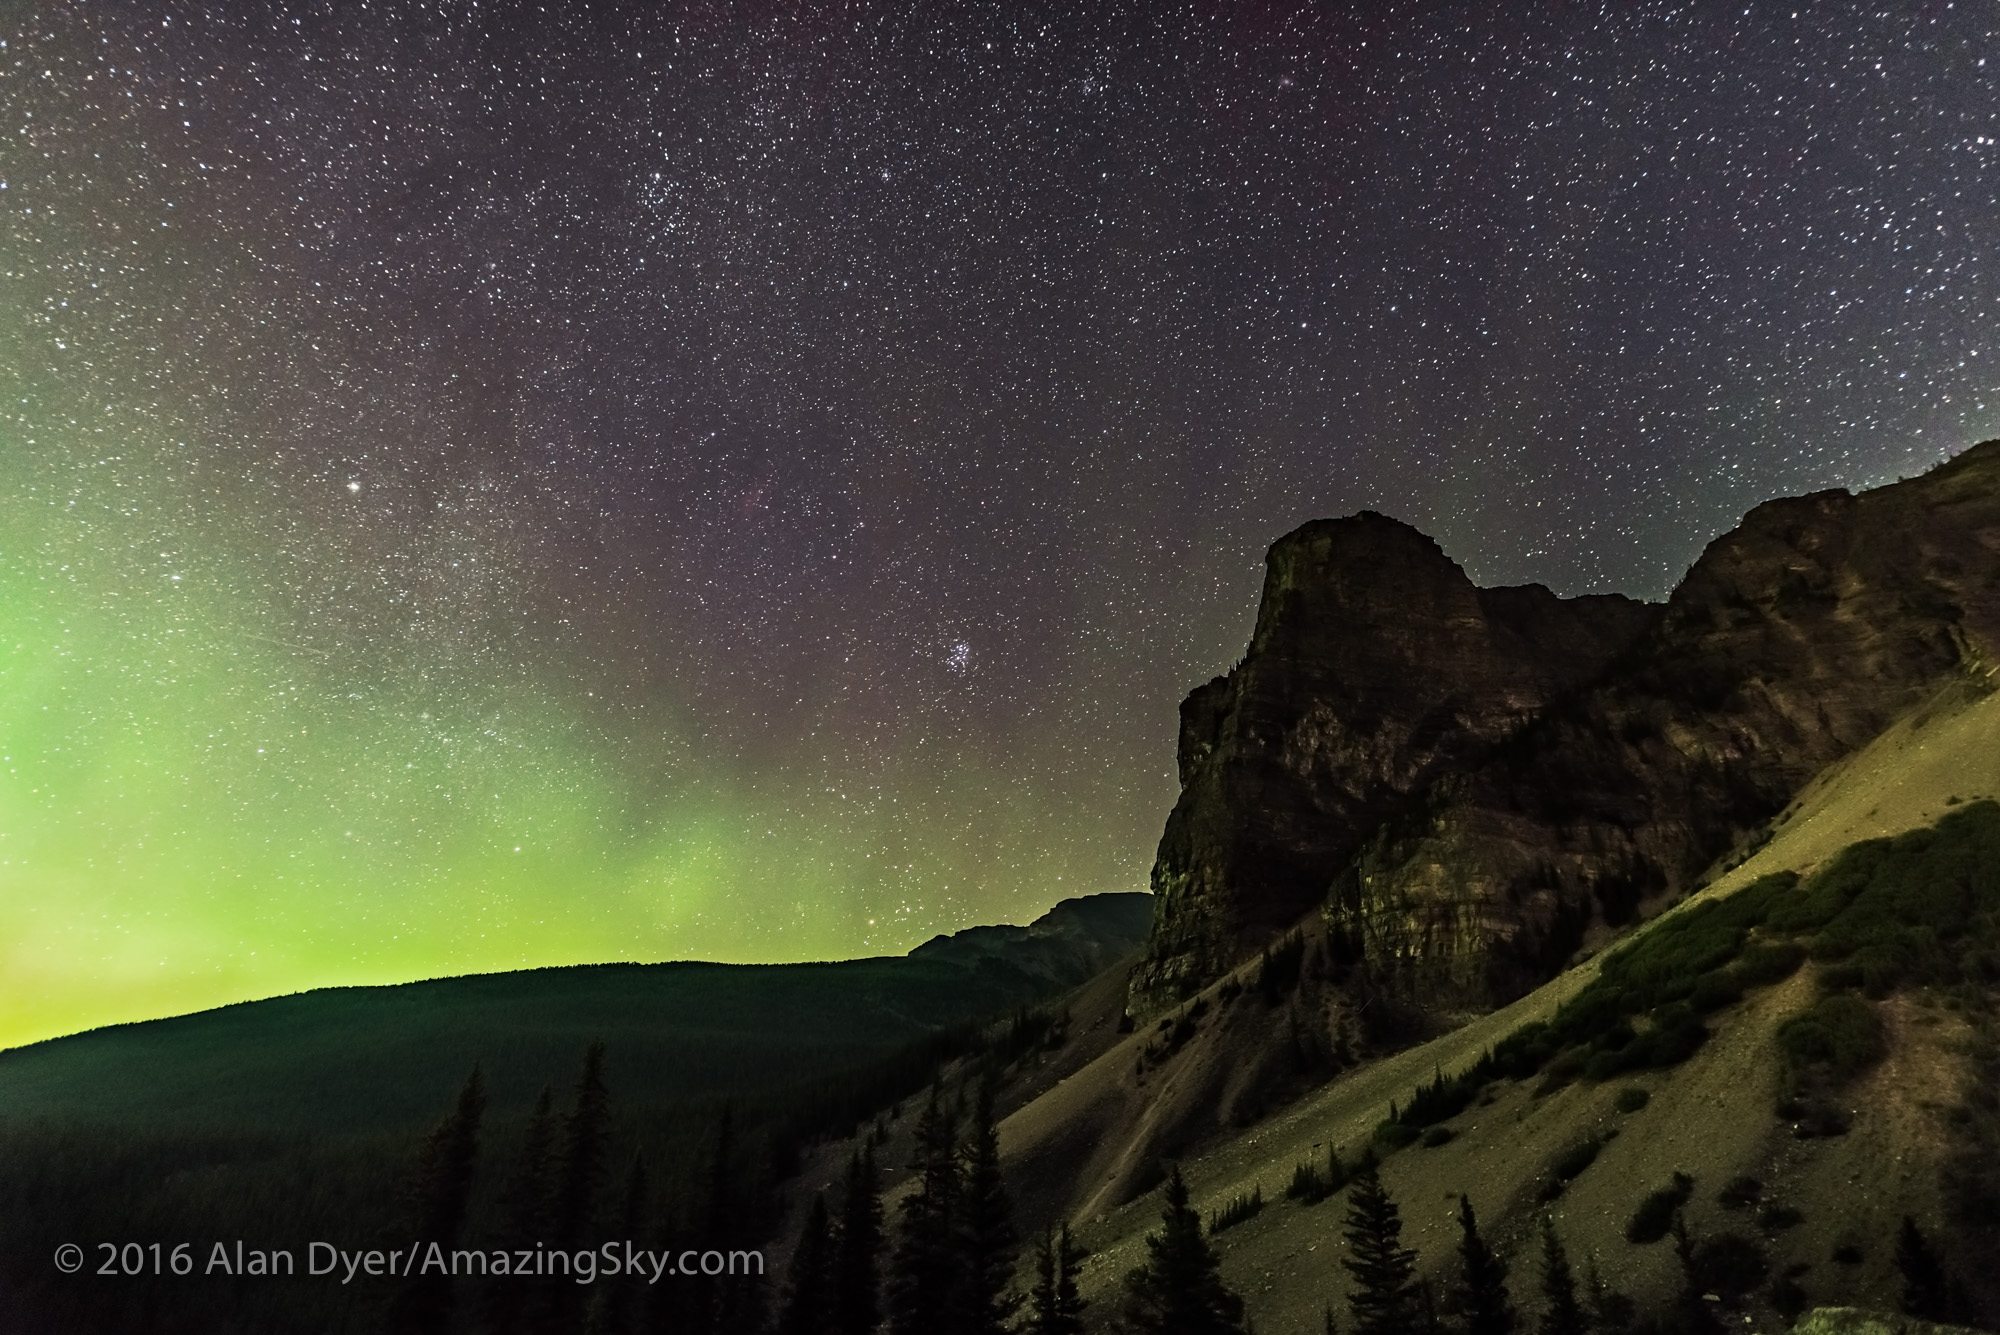
I started shooting and kept shooting over the next four hours. I took a break from the time-lapses to shoot some panoramas, such as the headline image at top, capturing the sweep of the auroral oval over the lake waters.
Just on the horizon you can see some noctilucent clouds (NLCs) as well – clouds so high they are lit by the Sun all night long. NLCs sit at the same height as the bottom of the auroral curtains. But they appear here lower and much farther away, which they likely were, sitting farther north than the auroral band.
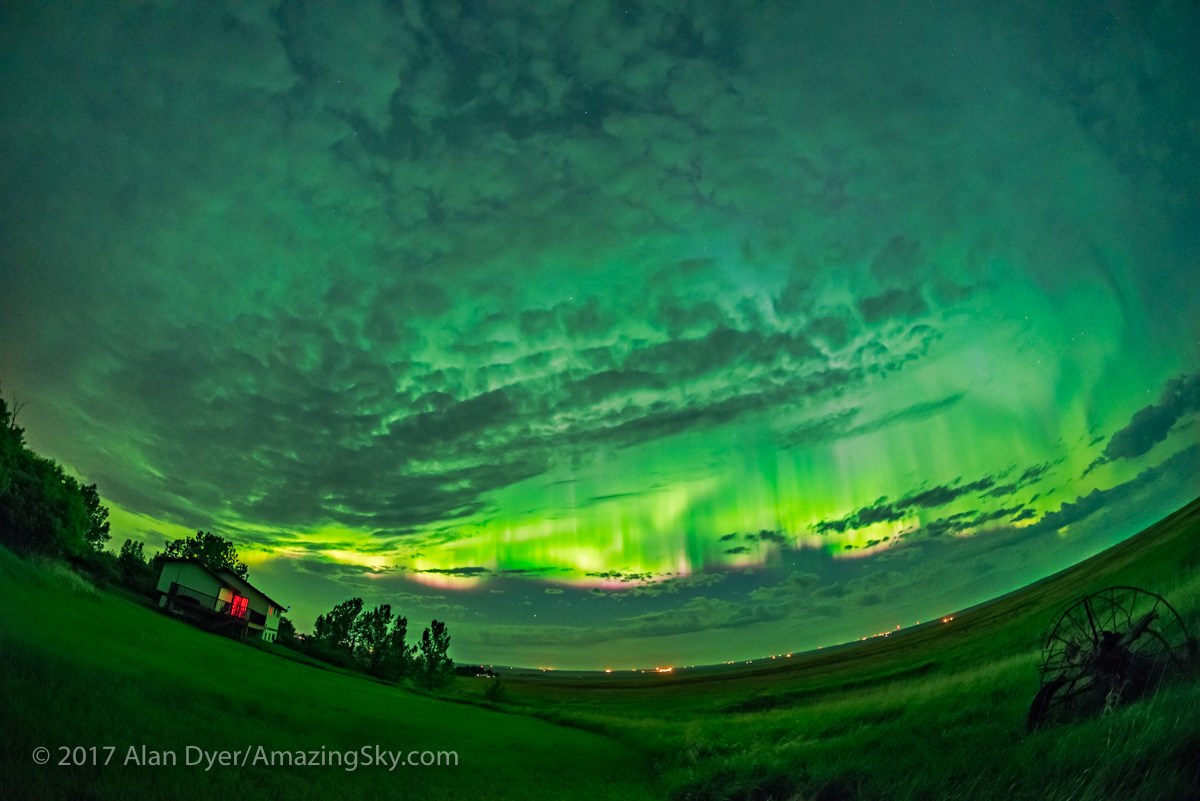
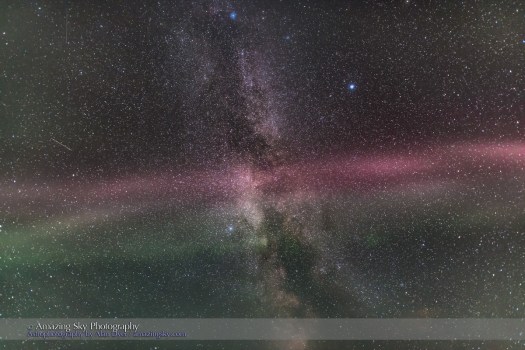
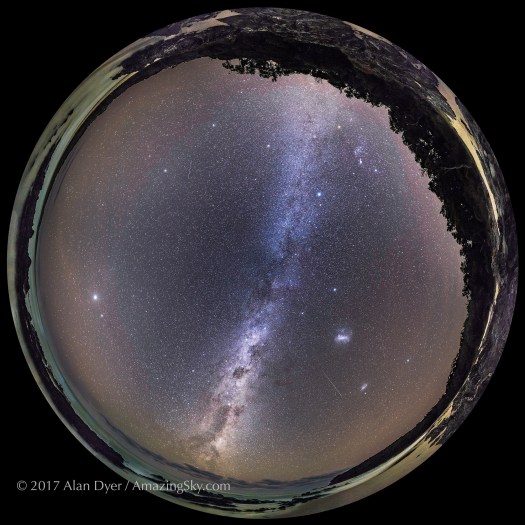
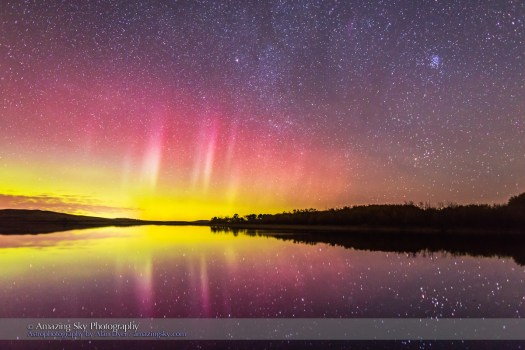
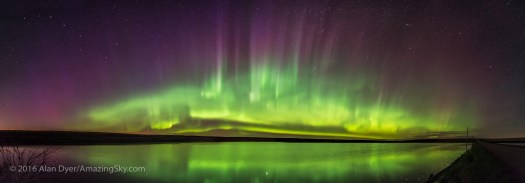
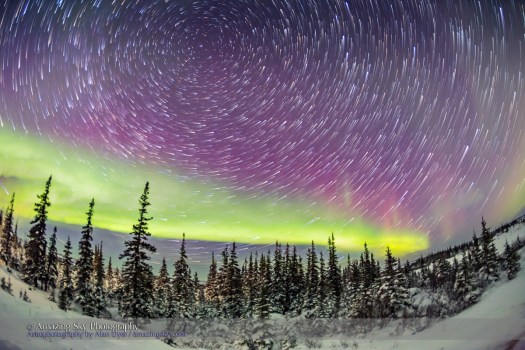
A 360° panorama of the aurora and Milky Way in the twilight sky of a summer solstice evening.
I also shot this 360° panorama (above) capturing the arc of the aurora and of the Milky Way. This is a stitch of 8 segments with a 14mm lens mounted in portrait mode.
I’ve assembled the several time-lapse sequences I shot into a short music video. Check it out on Vimeo here. Click through to the Vimeo page for more technical information on the video sequences.
As always click HD, and relax and enjoy the dancing lights over the calm waters of a prairie lake on a summer evening.
I present suggestions for how to ensure everything under your control will go well on eclipse day. The secret is: Practice, Practice, Practice!
The techniques I suggest practicing are outlined in my previous blog, Ten Tips for the Solar Eclipse. It’s prerequisite reading.
However, while you can read all about how to shoot the eclipse, nothing beats actually shooting to ensure success. But how do you do that, when there’s only one eclipse?
Here are my “Top 10” suggestions:
Total eclipse of the Sun, November 3, 2013 as seen from the middle of the Atlantic Ocean, from the Star Flyer sailing ship. I took this with a Canon 5D MkII and 16-35mm lens at 19mm for 1/40s at f/2.8 and ISO 800 on a heavily rolling ship.
Wide-Angle Shots – Shoot a Twilight Scene
The simplest way to shoot the eclipse is to employ a camera with a wide lens running on auto exposure to capture the changing sky colors and scene brightness.
Auto Exposure Check in Twilight
If you intend to shoot wide-angle shots of the eclipse sky and scene below, with anything from a mobile phone to a DSLR, practice shooting a time-lapse sequence or a movie under twilight lighting. Does your camera expose properly when set to Auto Exposure? If you are using a phone camera, does it have any issues focusing on the sky? How big a file does a movie create?
With Telephotos and Telescopes – Shoot the Filtered Sun
The toughest techniques involve using long lenses and telescopes to frame the eclipsed Sun up close. They need lots of practice.
Framing and Focusing
You’ll need to have your safe and approved solar filter purchased (don’t wait!) that you intend to use over your lens or telescope. With the filter in place, simply practice aiming your lens or telescope at the Sun at midday. It’s not as easy as you think! Then practice using Live View to manually focus on the edge of the Sun or on a sunspot. Can you get consistently sharp images?
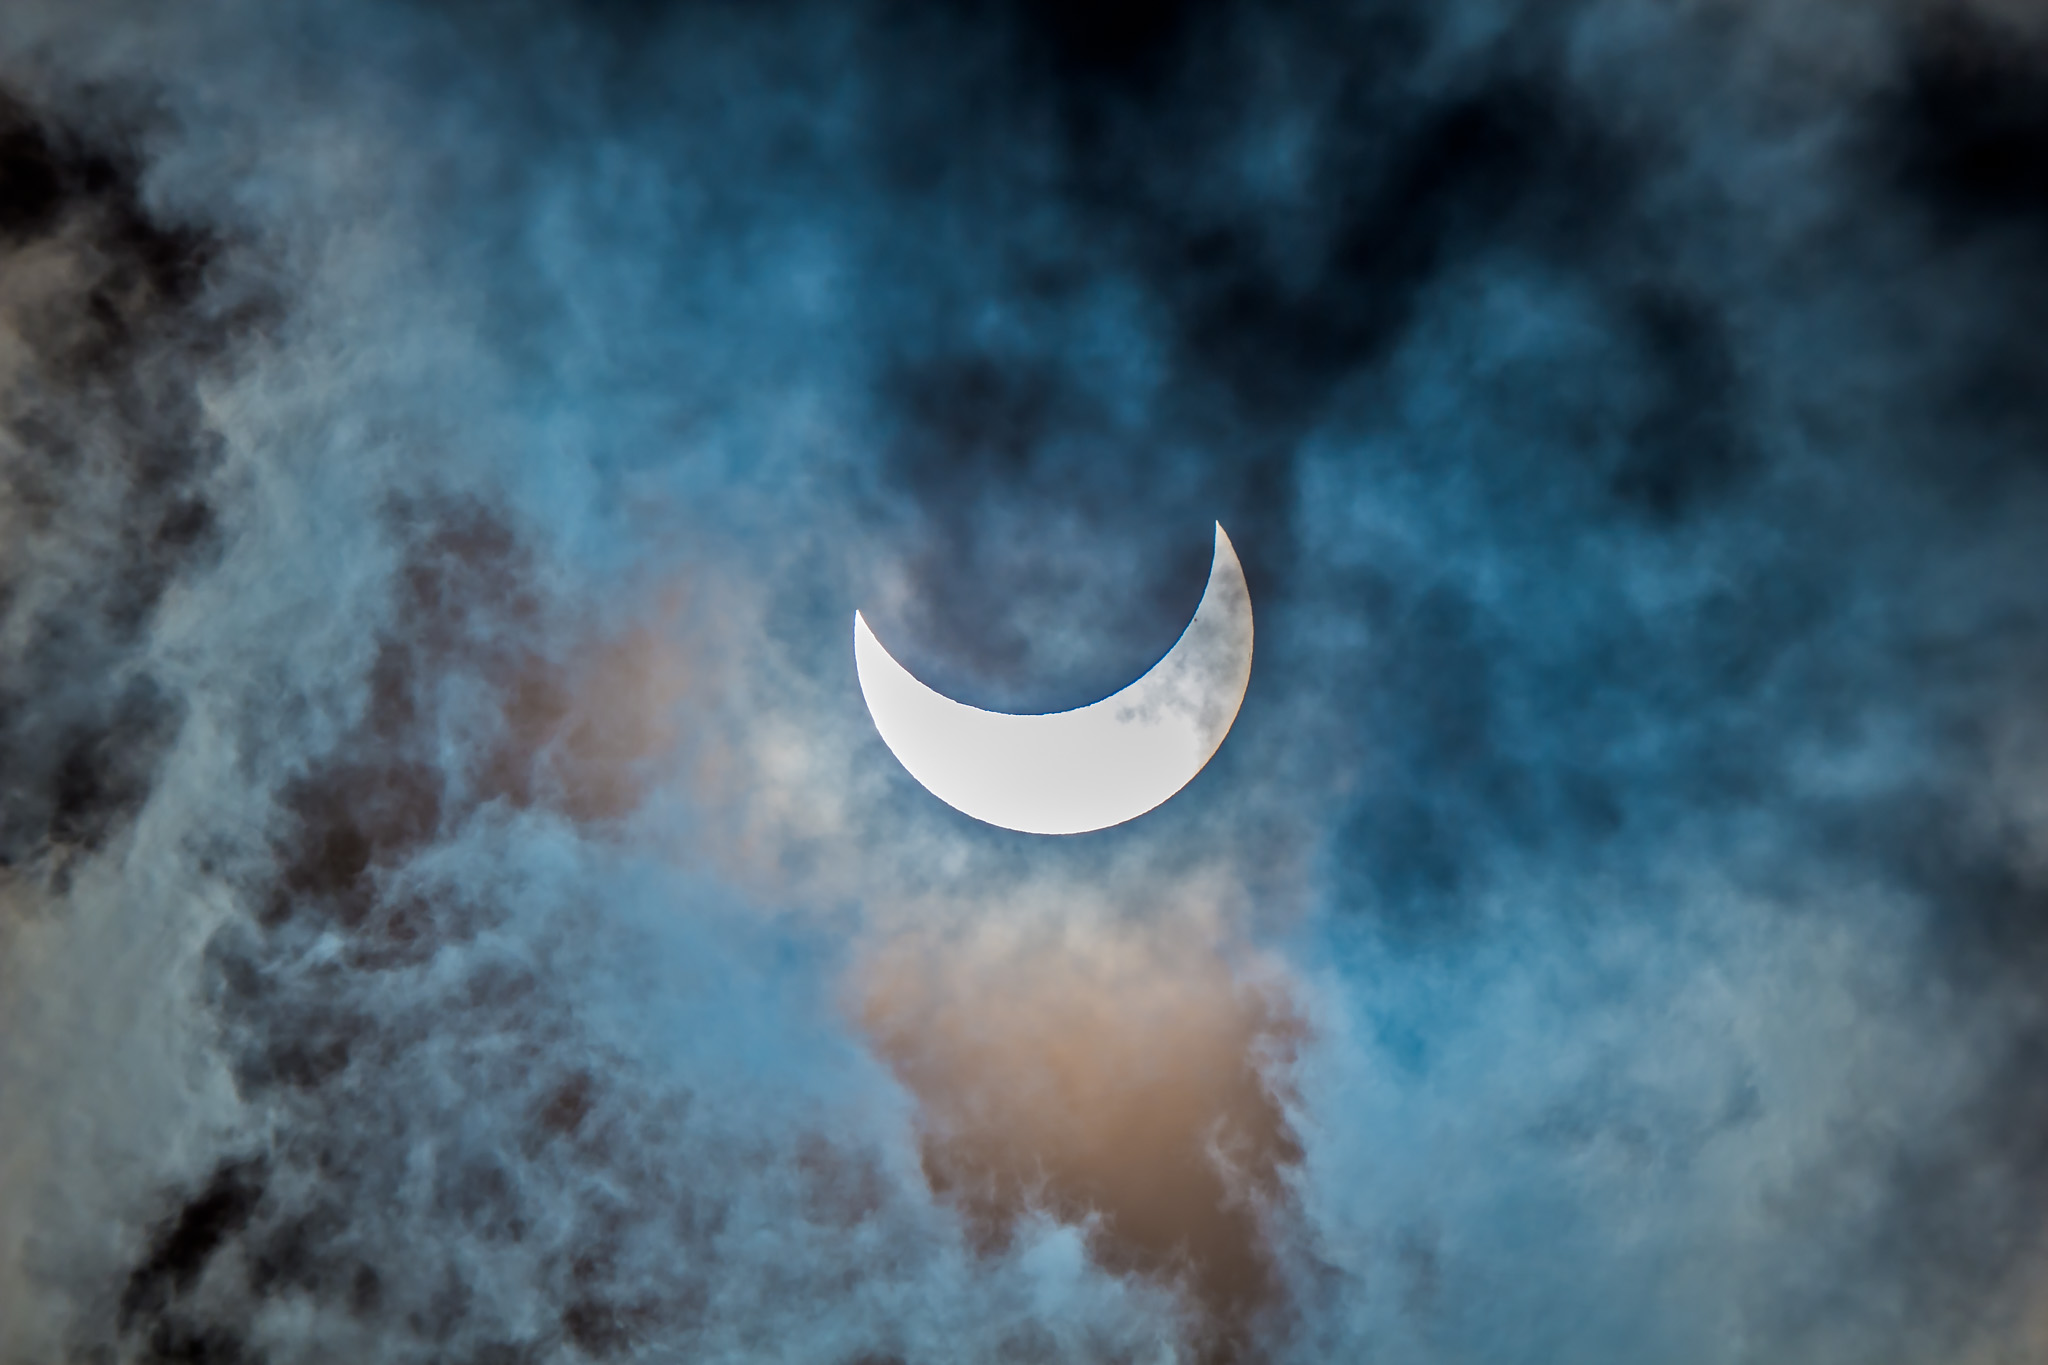
The partial eclipse of the Sun, October 23, 2014, shot through thin cloud, but that makes for a more interesting photo than one in a clear sky. Despite the cloud, this was still shot through a Mylar filter, on the front of telescope with 450mm focal length, using the Canon 60Da for 1/25 sec exposure at ISO 100.
Exposure Times
Exposures of the filtered Sun will be the same as during the partial phases, barring cloud or haze, as above, that can lengthen exposure times. Otherwise, only during the thin crescent phases will shutter speeds need to be 2 to 3 stops (or EV steps) longer than for a normal Sun.
Solar filters that clamp around the front of lenses are easier to remove than ones that screw onto lenses. They will bind and get stuck!
Filter Removal
With the camera aimed away from the Sun (very important!), perhaps at a distant landscape feature, practice removing the filter quickly. Can you do it without jarring the camera and bumping it off target? Perhaps try this on the Moon at night as well, as it’s important to also test this with the camera and tripod aimed up high.
Articulated LCD screens are a great aid for framing and viewing the eclipse in Live View when the camera is aimed up high, as it will be!
Ease of Use
With the Sun up high at midday (as it will be during the eclipse from most sites), check that you can still look through, focus, and operate the camera easily. Can you read screens in the bright daylight? What about once it gets darker, as in twilight, which is how dark it will get during totality.
The east-to-west motion of the sky will carry the Sun its own diameter across the frame during totality, making consistent framing an issue with very long lenses and telescopes.
Sun Motion
If you are using an untracked tripod, check how much the Sun moves across your camera frame during several minutes. For videos you might make use of that motion. For still shots, you’ll want to ensure the Sun doesn’t move too far off center.
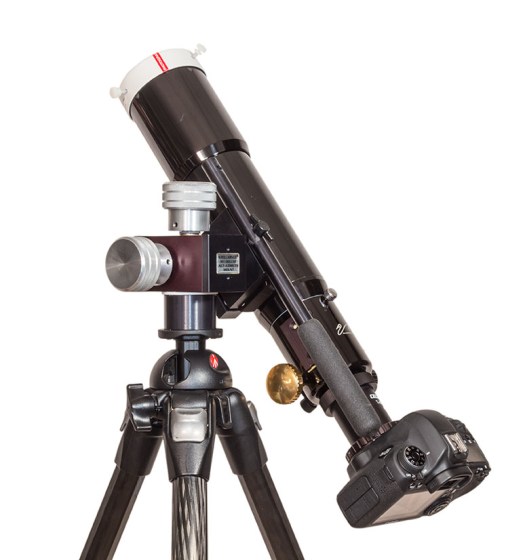
An equatorial mount like this is great but needs to be at least roughly polar aligned to be useful.
Aligning Tracking Mounts
If you plan to use a motorized equatorial mount capable of tracking the sky, “Plan A” might be to set it up the night before so it can be precisely polar aligned. But the reality is that you might need to move on eclipse morning. To prepare for that prospect, practice roughly polar aligning your mount during the day to see how accurate its tracking is over several minutes. Do that by leveling the mount, setting it to your site’s latitude, and aiming the polar axis as close as you can to due and true north. You don’t need precise polar alignment to gain the benefits of a tracking mount – it keeps the Sun centered – for the few minutes of totality.
The Full Moon is the same brightness as the Sun’s inner corona.
Telephotos and Telescopes – Shoot Full Moon Closeups
Exposure Check
Shoot the Full Moon around July 8 or August 7. If you intend to use Auto Exposure during totality, check how well it works on the Full Moon. It’s the same brightness as the inner corona of the Sun, though the Moon occupies a larger portion of the frame and covers more metering sensor points. This is another chance to check your focusing skill.
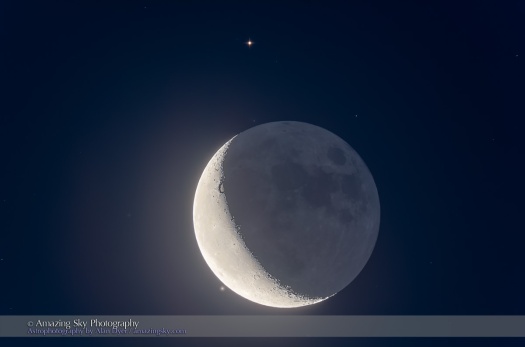
The crescent Moon has a huge range in brightness and serves as a good test object. Remember, the Moon is the same size as the Sun. That’s why we get eclipses!
Telescopes and Telescopes – Shoot Crescent Moon Closeups
Exposure Check
Shoot the waxing crescent moon in the evening sky during the last week of June and again in the last week of July. Again, test Auto Exposure with your camera in still or movie mode (if you intend to shoot video) to see how well the camera behaves on a subject with a large range in brightness. Or step through a range of exposures manually, from short for the bright sunlit crescent, to long for the dark portion of the Moon lit by Earthshine. It’s important to run through your range of settings quickly, just as you would during the two minutes of totality. But not too quickly, as you might introduce vibration. So …
Good focus matters for recording the fine prominences and sharp edge of the Moon.
Sharpness Check
In the resulting images, check for blurring from vibration (from you handling the camera), from wind, and from the sky’s east-to-west motion moving the Moon across the frame, during typical exposures of 1 second or less.
By practicing, you’ll be much better prepared for the surprises that eclipse day inevitably bring. Always have a less ambitious “Plan B” for shooting the eclipse simply and quickly should a last-minute move be needed.
However, may I recommend …
My 295-page ebook on photographing the August 21 total eclipse of the Sun is now available. See http://www.amazingsky.com/eclipsebook.html It covers all techniques, for both stills, time-lapses, and video, from basic to advanced, plus a chapter on image processing. And a chapter on What Can Go Wrong?! The web page has all the details on content, and links to order the book from Apple iBooks Store (for the best image quality and navigation) or as a PDF for all other devices and platforms.
For much more detailed advice on shooting options and techniques, and for step-by-step tutorials on processing eclipse images, see my 295-page eBook on the subject, available as an iBook for Apple devices and as a PDF for all computers and tablets.
I present my Top 10 Tips for photographing the August 21 total eclipse of the Sun.
If the August total eclipse will be your first, then you could heed the advice of many and simply follow “Tip #0:” Just don’t photograph it! Look up and around to take in the spectacle. Even then, you will not see it all.
However, you might see less if you are operating a camera.
But I know you want pictures! To help you be successful, here are my tips for taking great photos without sacrificing seeing the eclipse.
An iPhone in a tripod bracket and on a small tabletop tripod.
TIP #1: Keep It Simple
During the brief minutes of totality, the easiest way to record the scene is to simply hold your phone camera up to the sky and shoot. Zoom in if you wish, but a wide shot may capture more of the twilight effects and sky colors, which are as much a part of the experience as seeing the Sun’s gossamer corona around the dark disk of the Moon.
Better yet, use an adapter to clamp your phone to a tripod. Frame the scene as best you can (you might not be able to include both the ground and Sun) and shoot a time-lapse, or better yet, a video.
Start it 2 or 3 minutes before totality (if you can remember in the excitement!) and let the camera’s auto exposure take care of the rest. It’ll work fine.
That way you’ll also record the audio of your excited voices. The audio may serve as a better souvenir than the photos. Lots of people will have photos, but nobody else will record your reactions!
Just make sure your phone has enough free storage space to save several minutes of HD video or, if your camera has that feature, 4K video.
A wide shot of the 2006 eclipse in Libya with a high altitude Sun. 10mm lens on a cropped-frame Canon 20Da camera.
TIP #2: Shoot Wide With a DSLR
For better image quality, step up to this hands-off technique.
Use a tripod-mounted camera that accepts interchangeable lenses (a digital single lens reflex or a mirrorless camera) and use a lens wide enough to take in the ground below and Sun above.
Depending on where you are and the sensor size in your camera, that’ll likely mean a 10mm to 24mm lens.
By going wide you won’t record details in the corona of the Sun or its fiery red prominences. But you can record the changing sky colors and perhaps the dark shadow of the Moon sweeping from right to left (west to east) across the sky. You can also include you and your eclipse group silhouetted in the foreground. Remember, no one else will record you at the eclipse.
A sequence of shots of the 2012 eclipse from Australia, with a wide 15mm lens and camera on Auto Exposure showing the change of sky color.The total eclipse of the Sun, November 14, 2012, from a site near Lakeland Downs, Queensland, Australia. Shot with the Canon 5D Mark II and 15mm lens for a wide-angle view showing the Moon’s conical shadow darkening the sky and the twilight glow on the horizon. Taken near mid-eclipse.
TIP #3: Shoot on Auto Exposure
For wide shots, there’s no need to attend to the camera during the eclipse. Set the camera on Auto Exposure – Aperture Priority (Av), the camera ISO between 100 to 400, and your lens aperture to f/2.8 (fast) to f/5.6 (slow).
Use a higher ISO if you are using a slower lens such as a kit zoom. But shoot at ISO 100 and at f/2.8 if you have a wide lens that fast.
In Av mode the camera will decide what shutter speed to use as the lighting changes. I’ve used this technique at many eclipses and it works great.
An accessory intervalometer set for an interval of 1 second.
TIP #4: Let the Camera Do the Shooting
To make this wide-angle technique truly hands-off use an intervalometer (either built into your camera or a separate hardware unit) to fire the shutter automatically.
Once again, start the sequence going 3 to 5 minutes before totality, with the intervalometer set to fire the shutter once every second. Don’t shoot at longer intervals, or you’ll miss too much. Shutter speeds won’t likely exceed one second.
Again, be sure your camera’s memory card has enough free space for several hundred images. And don’t worry about a solar filter on your lens. It’ll be fine for the several minutes you’ll have it aimed up.
Out of the many images you’ll get, pick the best ones, or turn the entire set into a time-lapse movie.
A Nikon DSLR and lens set to Manual Focus.
TIP #5: Shoot on Manual Focus
Use Auto Exposure and an intervalometer. But … don’t use Auto Focus.
Switch your lens to Manual Focus (MF) and focus on a distant scene element using Live View.
Or use Auto Focus to first focus on something in the distance, then switch to Manual and don’t touch focus after that. If you leave your lens on Auto Focus the shutter might not fire if the camera decides it can’t focus on the blank sky.
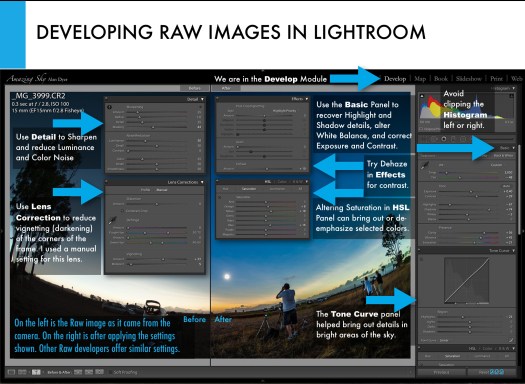
A comparison of a Raw image as it came from the camera (left) and after developing in Lightroom (right).
TIP #6: Shoot Raw
For demanding subjects like a solar eclipse always shoot your images in the Raw file format. Look in your camera’s menus under Image Quality.
Shoot JPGs, too, if you like, but only Raw files record the widest range of colors and brightness levels the camera sensor is capable of detecting.
Later in processing you can extract amazing details from Raw files, both in the dark shadows of the foreground, and in the bright highlights of the distant twilight glows and corona around the Sun. Software to do so came with your camera. Put it to use.
A 200mm telephoto and 1.4x Extender, with the camera on a sturdy and finely adjustable tripod head.
TIP #7: OK, Use a Telephoto Lens! But …
If you really want to shoot close-ups, great! But don’t go crazy with focal length. Yes, using a mere 135mm or 200mm lens will yield a rather small image of the eclipsed Sun. But you don’t need a monster 600mm lens or a telescope, which typically have focal lengths starting at 600mm. With long focal lengths come headaches like:
•Keeping the Sun centered. The Earth is turning! During the eclipse that motion will carry the Sun (and Moon) its own diameter across your frame from east to west during the roughly two minutes of totality. While a motorized tracking mount can compensate for this motion, they take more work to set up properly, and must be powered. And, if you are flying to the eclipse, they will be much more challenging to pack. I’m trying to keep things simple!
•Blurring from vibration. This can be an issue with any lens, but the longer your lens, the more your chances of getting fuzzy images because of camera shake, especially if you are touching the camera to alter settings.
An ideal focal length is 300mm to 500mm. But …
When using any telephoto lens, always use a sturdy tripod with a head that is easy to adjust for precise aiming, and that can aim up high without any mechanical issues. The Sun will be halfway, or more, up the sky, not a position some tripod heads can reach.
A re-processed version of a still frame of the total solar eclipse of November 14, 2012 taken from our site at Lakeland Downs, Queensland, Australia. This is a still frame shot during the shooting of an HD video of the eclipse, using the cropped-frame Canon 60Da and Astro-Physics Traveler 4-inch apo refractor telescope at f/5.8 (580mm focal length). The image is 1/60th second at ISO 100. This is a full-sized still not a frame grab taken from the movie.A sequence from a movie showing the camera adjusting the exposure automatically when going from a filtered view (left) to an unfiltered view of the diamond ring (right).
TIP #8: Use Auto Exposure, or … Shoot a Movie
During totality with your telephoto, you could manually step through a rehearsed set of exposures, from very short shutter speeds (as short as 1/4000 second) for the diamond rings at either end of totality, to as long as one or two seconds at mid-totality for the greatest extent of the corona’s outermost streamers.
But that takes a lot of time and attention away from looking. Yes, there are software programs for automating a camera, or techniques for auto bracketing. But if this is your first eclipse an easier option is to simply use Auto Exposure/Aperture Priority and let the camera set the shutter speed. Again, you could use an intervalometer to fire the shutter so you can just watch.
Don’t use high ISO speeds. A low ISO of 100 to 400 is all you need and will produce less noise. The eclipsed Sun is still bright. You don’t need ISO 800 to 3200.
Even on Auto Exposure, you’ll get good shots, just not of the whole range of phenomena an eclipsed Sun displays.
Or, once again and better yet – put your camera into video mode and shoot an HD or 4K movie. Auto Exposure will work just fine, allowing you to start the camera then forget it.
Place the Sun a solar diameter or two to the left of the frame and let the sky’s motion drift it across the frame for added effect. Start the sequence running a minute or two before totality with your solar filter on. Then just let the camera run … except …
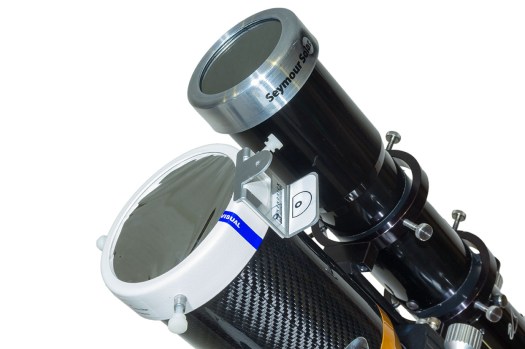
A small refractor telescope with a solar filter over the front aperture. That filter has to be removed for totality.
TIP #9: Remember to Remove the Filter!
You will need a safe solar filter over your lens or telescope to shoot the partial phases of the eclipse, and to frame and focus the Sun. This cannot be a photo neutral density or polarizing filter. It must be a filter designed for observing and shooting the Sun, made of metal-coated glass or Mylar plastic. Anything else is not safe and likely far too bright.
But you do NOT need the filter for totality.
Remove it … when?
The answer: a minute or so before totality if you want to capture the first diamond ring just before totality officially starts. Set a timer to remind you, as visually it is very difficult to judge the right moment with your unaided eye. The eclipse will start sooner than you expect.
If you have your camera on Auto Exposure, it will compensate just fine for the change in brightness, from the filtered to the unfiltered view.
But don’t leave your unfiltered camera aimed at the Sun. Replace the filter no more than a minute or so after totality and the second diamond ring ends.
The partial eclipse of the Sun, October 23, 2014, shot through a mylar filter, on the front of the 66mm f/7 apo refractor shown above (450mm focal length), using a cropped-frame Canon 60Da camera for 1/8000 second exposure at ISO 100. Focus on the sharp tips of the crescent Sun or a sunspot if one is present.
TIP #10: Focus!
Everyone worries about getting the “best exposure.” Don’t! You’ll get great looking telephoto eclipse close-ups with any of a wide range of exposures.
What ruins most eclipse shots, other than filter forgetfulness, is fuzzy images, from either shaky tripods or poor focus.
Focus manually using Live View on the filtered partially eclipsed Sun. Zoom up on the edge of the Sun or sharp tip of the crescent. Re-focus a few minutes before totality, as the changing temperature can shift the focus of long lenses and telescopes.
But you needn’t worry about re-focusing after you remove the filter. The focus will not change with the filter off.
Me in Libya in 2006 with my eclipse setup: a small telescope on an alt-azimuth mount.
TIP #1 AGAIN: Keep It Simple!
I’ll remind you to keep things simple for a reason other than giving you time to enjoy the view, and that’s mobility.
You might have to move at the last minute to escape clouds. Complex photo gear can be just too much to take down and set up, often with minutes to spare, as many an eclipse chaser can attest is often necessary. Keep your gear light, easy to use, and mobile. Committing to an overly ambitious and inflexible photo plan and rig could be your undoing.
By following both my “Ten Tips” advice blogs you should be able to get great eclipse images to wow your friends and fans, all without missing the experience of actually seeing … and feeling … the eclipse.
However … may I recommend …
My 295-page ebook on photographing the August 21 total eclipse of the Sun is now available. See http://www.amazingsky.com/eclipsebook.html It covers all techniques, for both stills, time-lapses, and video, from basic to advanced, plus a chapter on image processing. And a chapter on What Can Go Wrong?! The web page has all the details on content, and links to order the book from Apple iBooks Store (for the best image quality and navigation) or as a PDF for all other devices and platforms. Thanks! Clear skies on eclipse day, August 21, 2017.
For much more detailed advice on shooting options and techniques, and for step-by-step tutorials on processing eclipse images, see my 295-page eBook on the subject, available as an iBook for Apple devices and as a PDF for all computers and tablets.
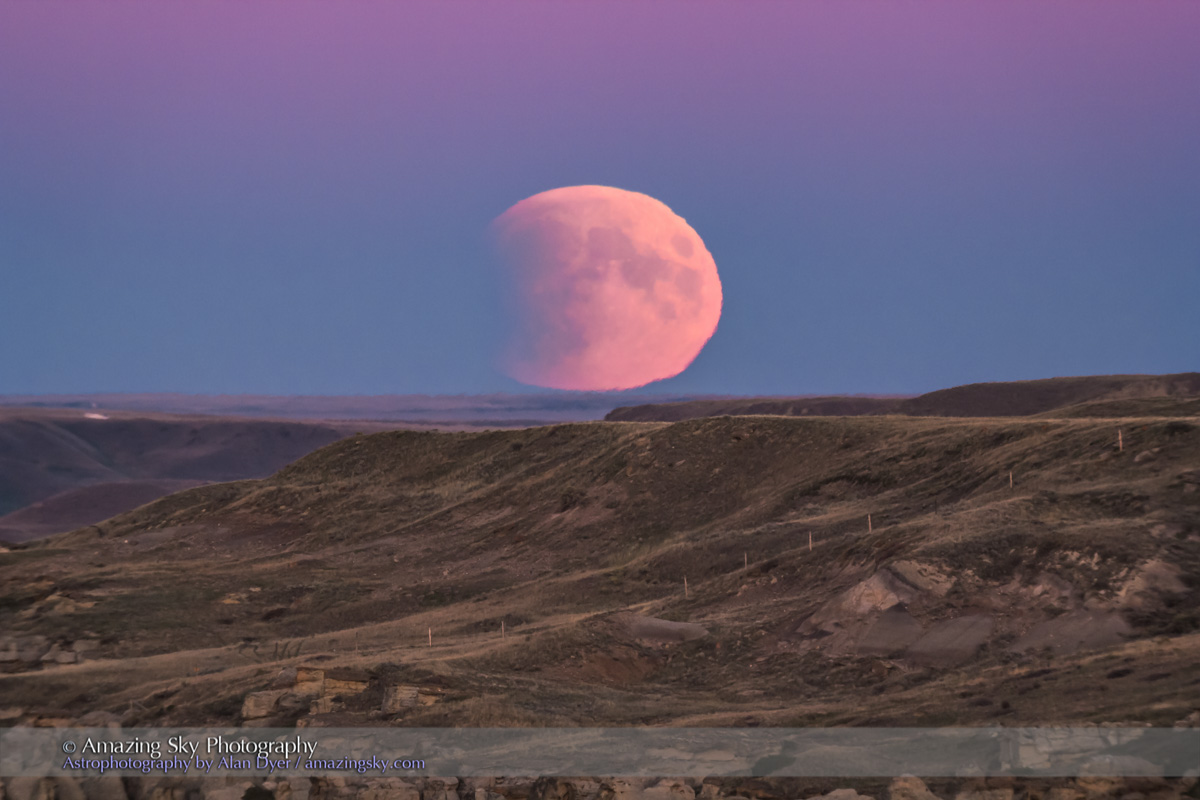
The Full Moon of June rose into a twilight sky over a prairie pond.
On June 9, the clouds cleared to present an ideal sky for capturing the rising of the so-called “Strawberry Moon,” the popular name for the Full Moon of June.
The lead image is a composite of 15 frames, taken at roughly 2.5-minute intervals and stacked in Photoshop with the Lighten blend mode.
The image below is a single frame.
The rising Full Moon of June, dubbed the “Strawberry Moon” in the media, as seen rising over a prairie pond in southern Alberta, on June 9, 2017. This is a single exposure stack, from a time-lapse sequence of 1100 frames, with images taken at two second intervals. Shot with the Canon 6D and 200mm lens.I set up beside a small local prairie pond, to shoot the moonrise over the water. Ducks enjoyed the view and a muskrat swam by at one point.
I shot over 1100 frames, at two-second intervals to create a time-lapse of the rising Moon, as it brightened and turned from yellow-orange (not quite strawberry pink) to a bright white.
Here’s the time-lapse vignette.
Click on HD for the best view.
While the Harvest Moon gets lots of PR, as this sequence shows any Full Moon can provide a fine sight, and look yellow, due to absorption of the blue wavelengths by the atmosphere as the Moon rises, or as it sets.
However, the timing can vary from Full Moon to Full Moon. This one was ideal, with it rising right at sunset. If the Moon comes up too late, the sky might have already darkened, producing too great a difference in brightness between the Moon and background sky to be photogenic.
But what of these Moon names? How authentic are they?
Who called this the Strawberry Moon? Native Americans? No. Or at best only one or two nations.
Check the site at Western Washington University at http://www.wwu.edu/depts/skywise/indianmoons.html and you’ll see there were an enormous number of names in use, assuming even this listing is authentic.
The names like “Strawberry Moon” that are popularized in the media today come from the American Farmers Almanac, and everyone – science writers and bloggers – ends up copying and pasting the same wrong, or at best misleading, information from the Almanac.
Search for “Strawberry Moon” or “Moon names” and you’ll find the same explanation repeated verbatim and unquestioned by many writers. Alas, the Almanac is not an authoritative source – after all, they were the source of a misleading definition of Blue Moon decades ago.
No one predicted this spectacle. But on May 27 the last-minute warnings went out to look for a fabulous show as night fell.
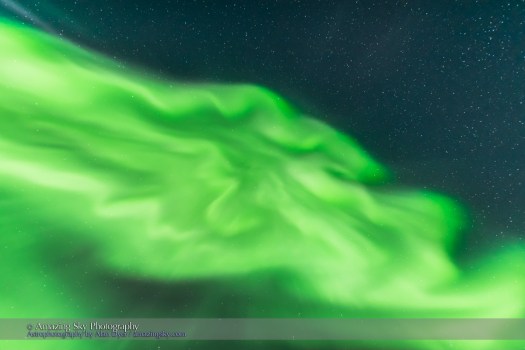
And what a show it was! As darkness fell the sky was lit with green curtains. After midnight the curtains converged at the zenith for that most spectacular of sky sights, a coronal burst.
As the night began I was at the Rothney Observatory helping out with the public stargazing night.
We saw the Space Station rise out of the west over the Rockies and pass through the Northern Lights.
It then headed off east, appearing here as the streak amid the Lights and light pollution of Calgary.
To continue to shoot the display I, too, decided to head east, to home. I should have gone west, to the mountains.
I drove through rain to get home, and missed the peak of the display, judging by images from others in the Rockies, and those to the north.
But as I got home clouds began to clear enough for a glimpse of the Space Station, on its next pass, flying overhead, again through the aurora. I wonder what the astronauts might have been seeing looking down.
From home, I caught another bright sub-storm outburst to the north, as the curtains suddenly exploded in brightness and rapid motion, with characteristic pink fringes at the bottoms, from nitrogen molecules.
What impressed me about this display was the smell! Yes, you see auroras and some claim to hear them. But this display is one I’ll remember for the springtime scent of lilacs in the night air as the Lights danced.
The Great Aurora of May 27 from Alan Dyer on Vimeo.
Here is a short music video of several time-lapse sequences I shot, of the sub-storm then post-storm subsidence into the patchy flaming and flickering effect that we often see at the end of a great display. And this was certainly one of them.
We southerners were treated to the class of display you usually have to travel north the Arctic and auroral oval to see.
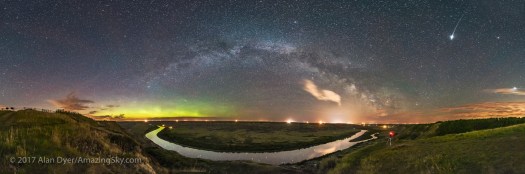
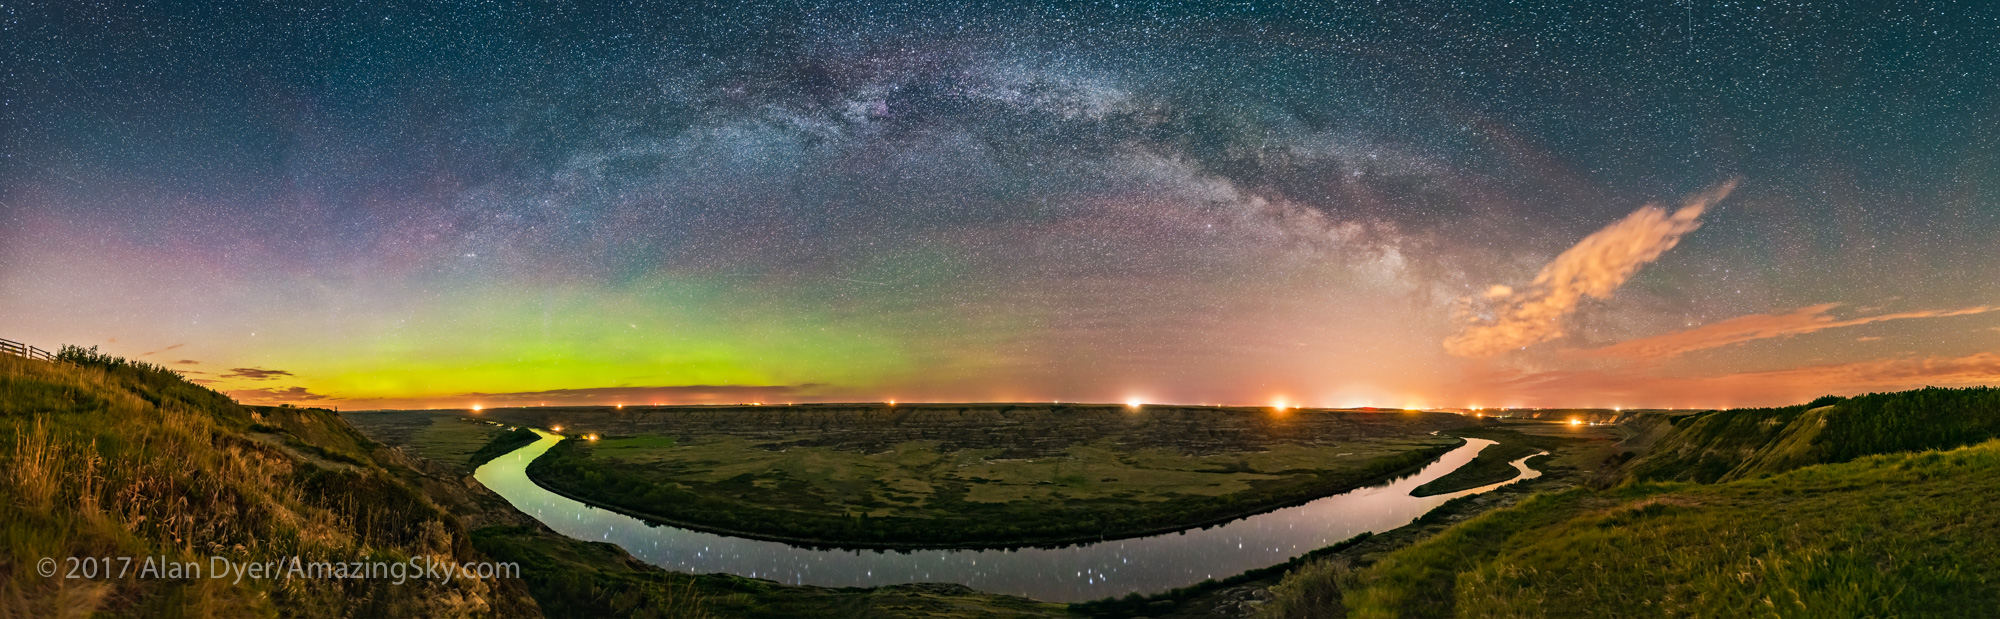
The arch of the Milky Way mirrors the sweep of the Red Deer River on a magical night in the Alberta Badlands.
Images of the Milky Way arching across the sky are now iconic. They are almost always assembled from individual frames stitched together to make a seamless panorama.
From the northern hemisphere, spring is the best season to shoot such a panorama as the Milky Way then remains confined to the eastern sky.
Later in summer, when the Milky Way passes directly overhead, panoramas are still possible, but the Milky Way looks distorted. The process of mapping a round sky onto a rectangular image, as I show here, inevitably stretches out the Milky Way near the zenith.
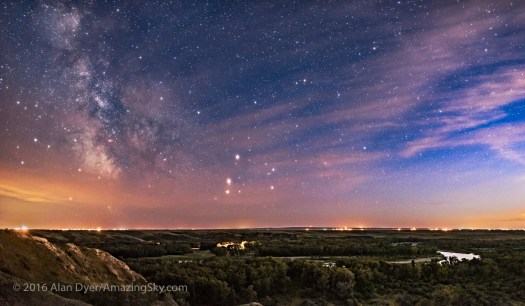
Last Saturday, in search of the Milky Way during prime panorama season, I set up for the night at Orkney Viewpoint overlooking the Red Deer River in the Alberta Badlands north of Drumheller. There, the river performs a grand curve through the valley below.
Above, the Milky Way, often described as a river of stars, sweeps in mirror-image fashion above the earthly river.
This is a stitch of 8 segments with the Sigma 20mm Art lens, in portrait mode, and Nikon D750. Each 30 seconds at f/2 and ISO 3200. Stitched with Adobe Camera Raw. Taken on a mild and moonless night, May 20, 2017.
The panorama above contains the reflection of stars – of the constellation of Delphinus in particular – in the smooth water on a windless night.
To the north at left, the Northern Lights put on a subtle show. While never spectacular to the eye, the camera records the aurora’s colour and forms that often elude the naked eye.
This is a stack of 4 x 15-second exposures for the ground to smooth noise, and one 15-second exposure for the sky, all with the 20mm Sigma lens at f/2.8 and Nikon D750 at ISO 3200. They were part of a 250-frame time-lapse.
The display was brightest early in the evening – that’s 11 p.m. now in May at my latitude.
The display then faded in intensity before I shot the two panoramas about 1 a.m., but the last few frames of the time-lapse show a final burst of colour from a lone curtain reflected in the river.
This is a stack of 84 x 15-second exposures for the ground to smooth noise, and one 15-second exposure for the sky, all with the 20mm Sigma lens at f/2.8 and Nikon D750 at ISO 3200. They were part of a 250-frame time-lapse.
This was a magical night indeed. And a rare one this spring with clouds more often the norm at night.
The next dark of the Moon coincides with summer solstice. So while the moonlight won’t interfere, critical for shooting the Milky Way, the glow of perpetual twilight at my latitude will. The Milky Way will be set in a deep blue sky.
By July’s dark of the Moon the Milky Way will be high overhead, making panorama arches tough to assemble. It looks like this might have been my one best night to capture such a scene this year. But it was a good one.
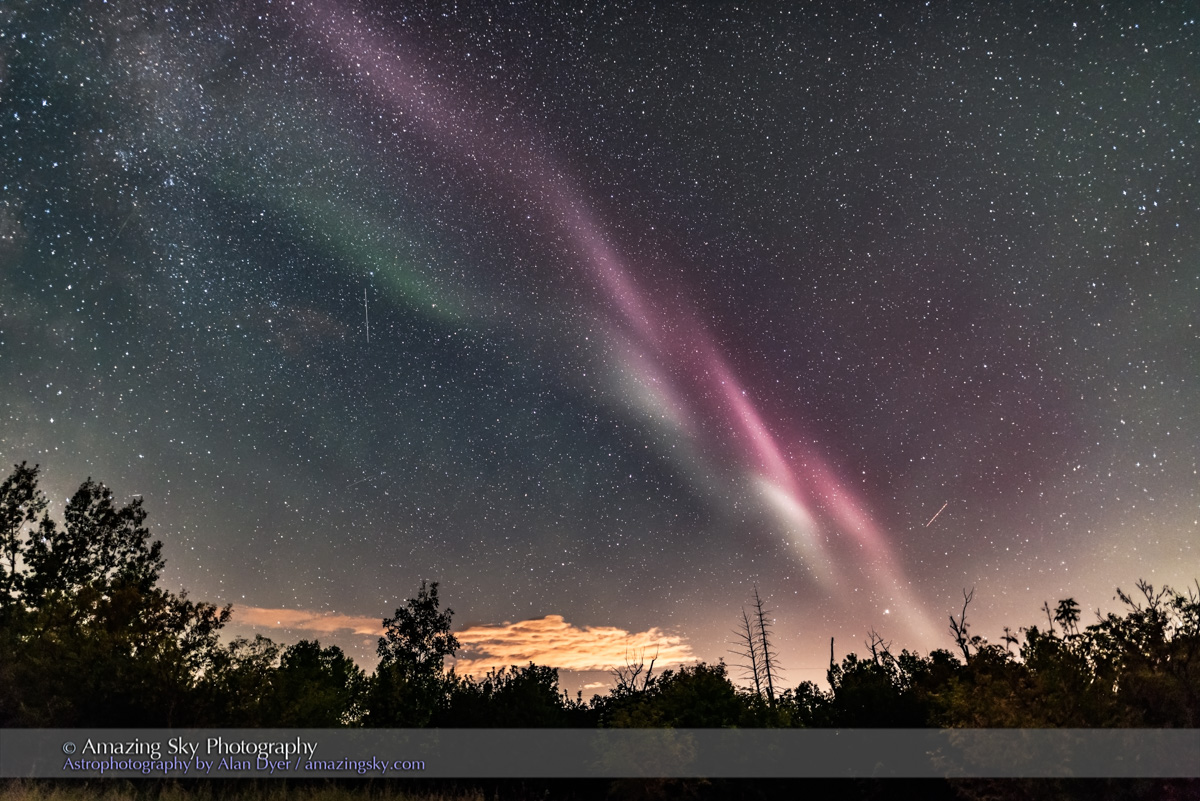
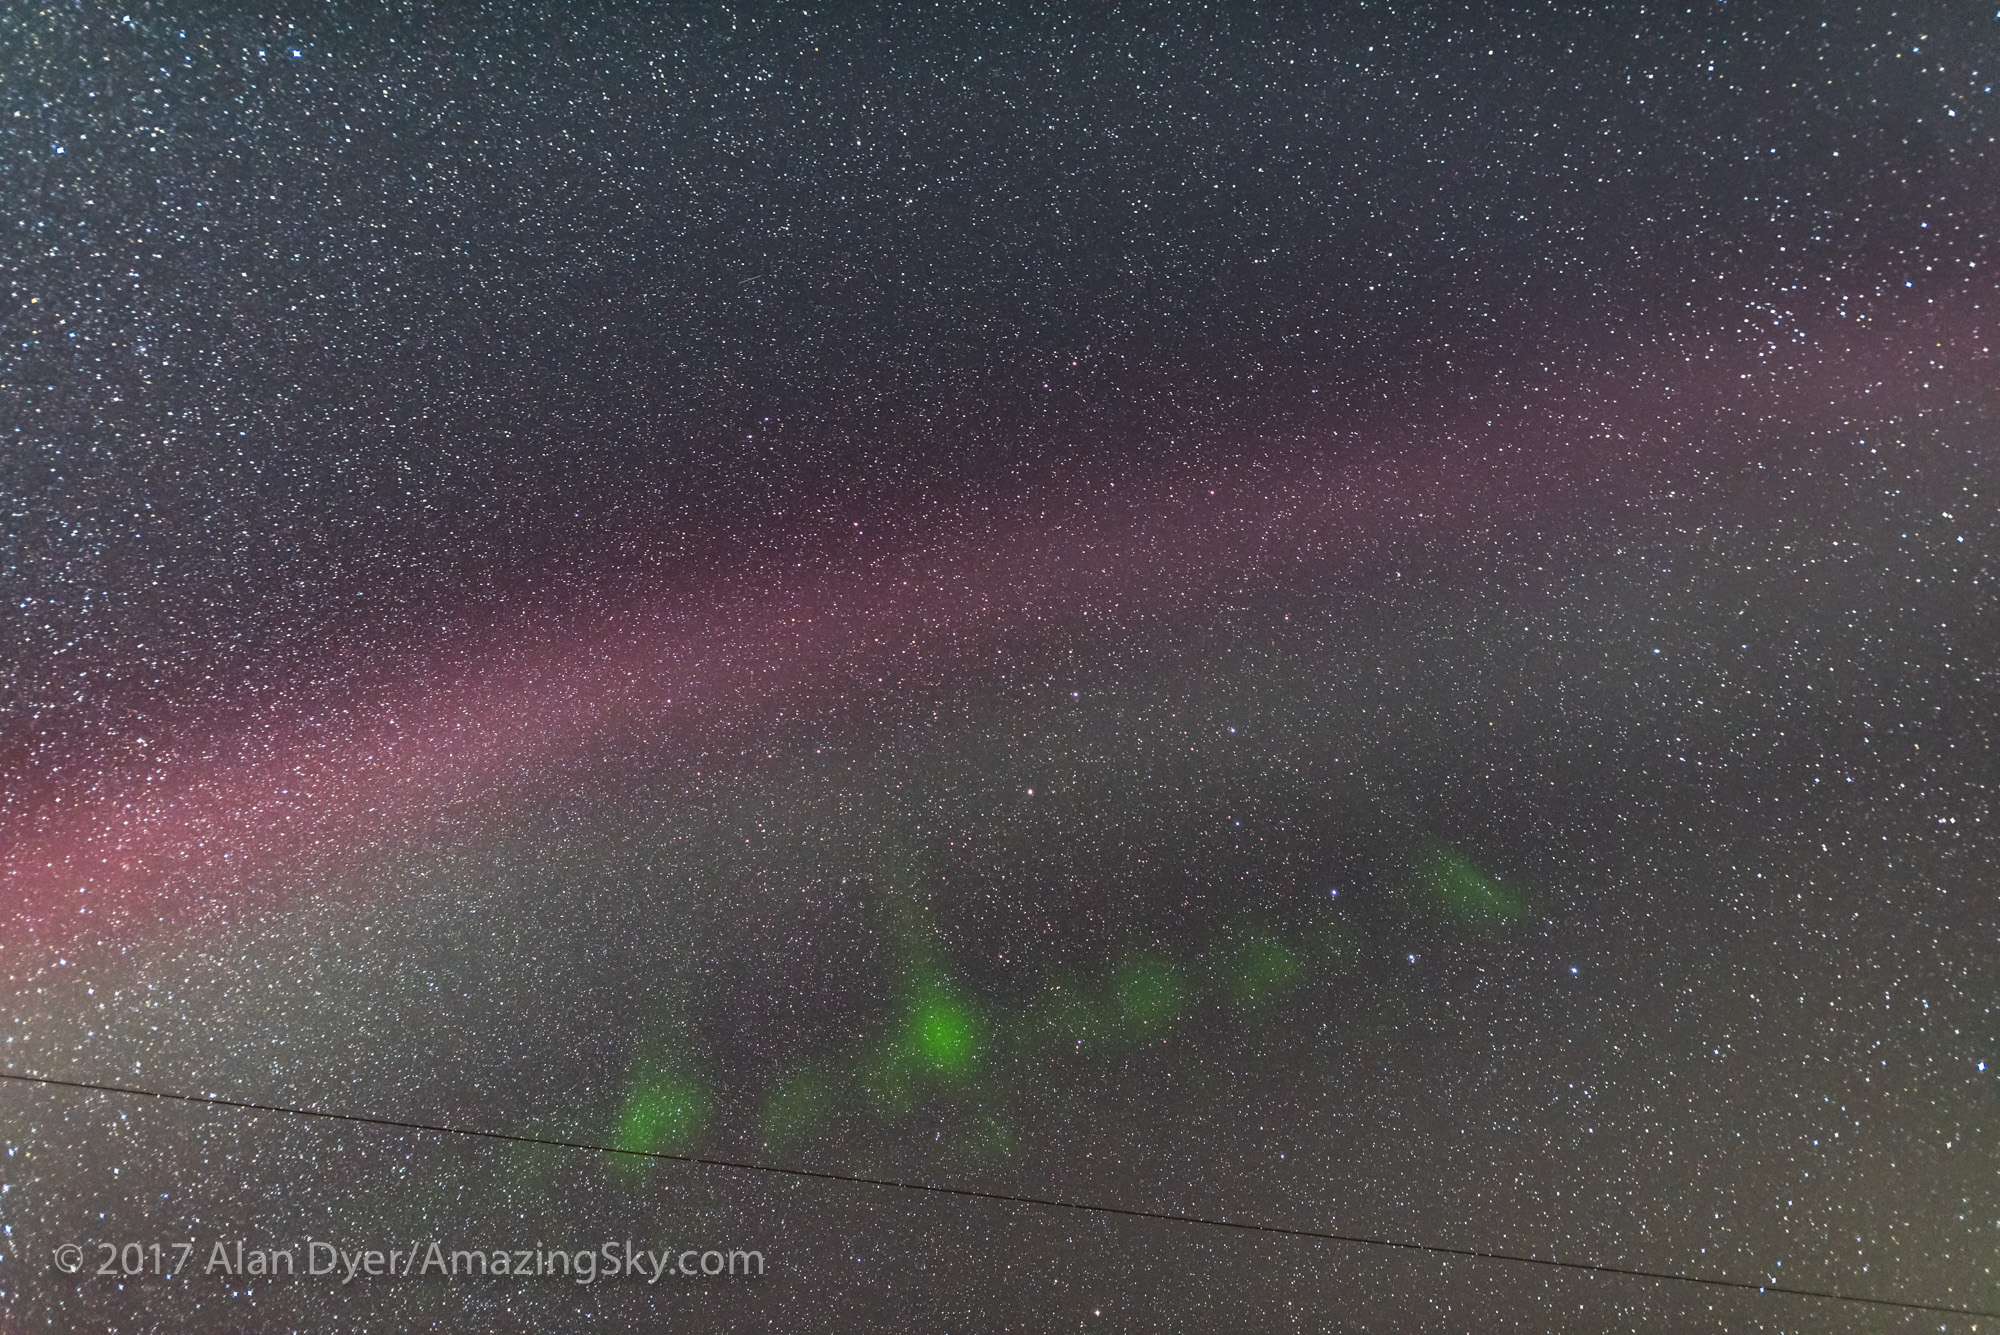
Stargazers in western Canada will have seen him – Steve, the odd auroral arc.
There’s been a lot of publicity lately about an unusual form of aurora that appears as a stationary arc across the sky, isolated from the main aurora to the north. It usually just sits there – motionless, featureless, and colourless to the eye, though the camera can pick up magenta and green tints.
We often see these strange auroral arcs from western Canada.
In lieu of a better name, and lacking a good explanation as to their cause, these isolated arcs have become labelled simply as “Steve” by the aurora chasing community (the Alberta Aurora Chasers Facebook group) here in Alberta.
In a gathering of aurora chasers at Calgary’s Kilkenny Pub, aurora photographer extraordinaire and AAC Facebook group administrator Chris Ratzlaff suggested the name. It comes from the children’s movie Over the Hedge, where a character calls anything he doesn’t understand “Steve.” The name has stuck!
The 270° panorama from March 2, 2017 shows Steve to the west (right) and east (left) here, and well isolated from the main aurora to the north.
This is the view of that same March 2, 2017 arc looking straight up, showing Steve’s characteristic gradient from pink at top though white, then to subtle “picket-fence” fingers of green that are usually very short-lived.
The view above is Steve from exactly 6 months earlier, on September 2, 2016. Same features. I get the impression we’re looking up along a very tall but thin curtain.
Another view of the September 2, 2016 Steve shows his classic thin curtain and gradation of colours, here looking southeast.
Looking southwest on September 2, 2016, Steve takes on more rippled forms. But these are very transient. Indeed, Steve rarely lasts more than 30 minutes to an hour, and might get bright for only a few minutes. But even at his brightest, he usually looks white or grey to the eye, and moves very slowly.
Here’s a classic Steve, from October 1, 2006 – a white featureless arc even to the camera in this case.
So what is Steve?
He is often erroneously called a “proton arc,” but he isn’t. True auroral proton arcs are invisible to the eye and camera, emitting in wavelengths the eye cannot see. Proton auroras are also diffuse, not tightly confined like Steve.
Above is Steve from August 5, 2005, when he crashed the Saskatchewan Summer Star Party, appearing as a ghostly white band across the sky. But, again, the camera revealed his true colours.
Steve Auroras in 2015 from Alan Dyer on Vimeo.
Here are a couple of time-lapses from 2015 of the phenomenon, appearing as an isolated arc overhead in the sky far from the main auroral activity to the north. I shot these from my backyard in southern Alberta. In both clips the camera faces north, but takes in most of the sky with a fish-eye lens.
In the first video clip, note the east-to-west flow of structure, as in classic auroras. In the second clip, Steve is not so well-defined. Indeed, his usual magenta band appears only briefly for a minute or so. So I’m not sure this second clip does show the classic Steve arc.
The origin and nature of Steve are subjects of investigation, aided by “citizen science” contributors of photos and videos.
Local aurora researcher Dr. Eric Donovan from the University of Calgary has satellite data from the ESA Swarm mission to suggest Steve is made of intensely hot thermal currents, and not classic electrons raining down as in normal auroras. He has back-acronymed Steve to mean Strong Thermal Emission Velocity Enhancement.
Learning more about Steve will require a unique combination of professional and amateur astronomers working together.
Now that he has a name, Steve won’t be escaping our attention any longer. We’ll be looking for him!
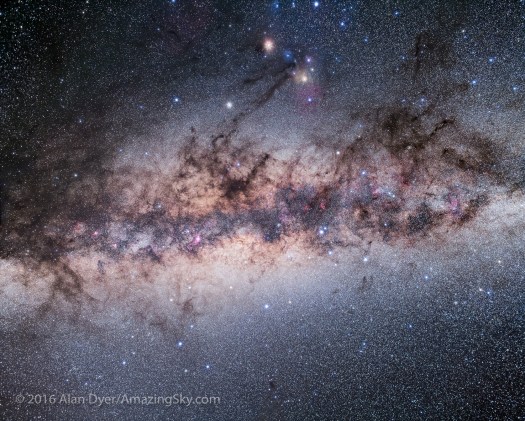
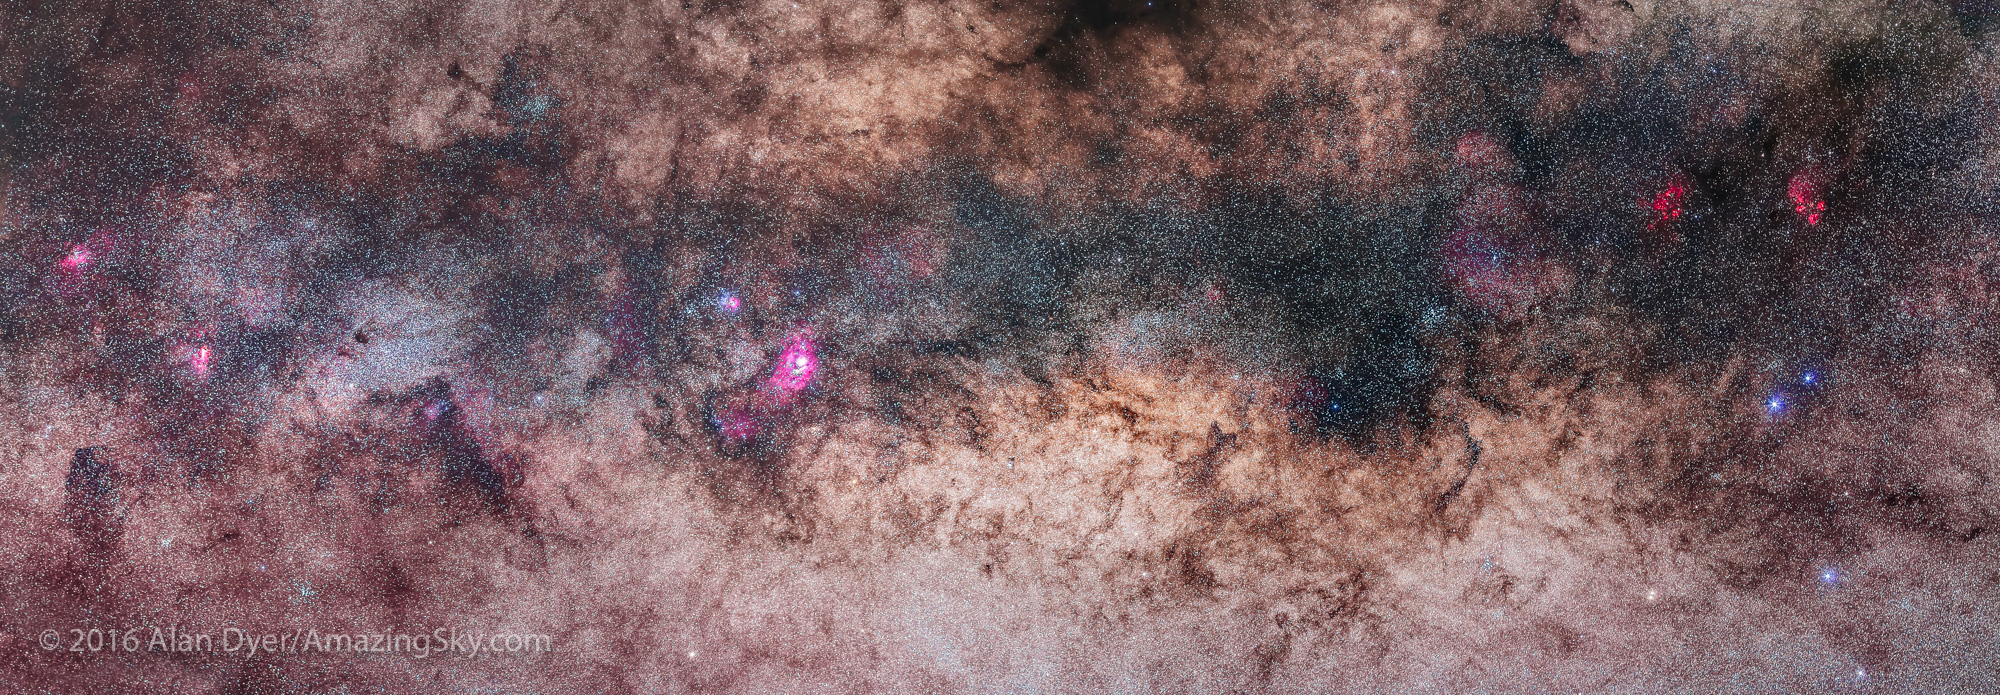
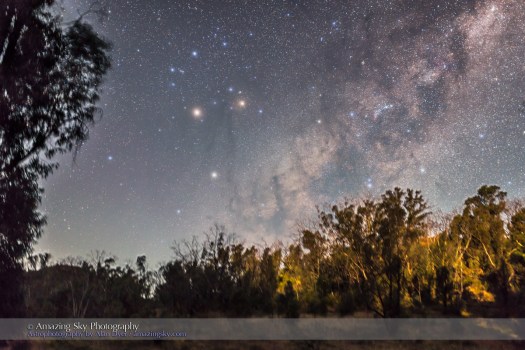
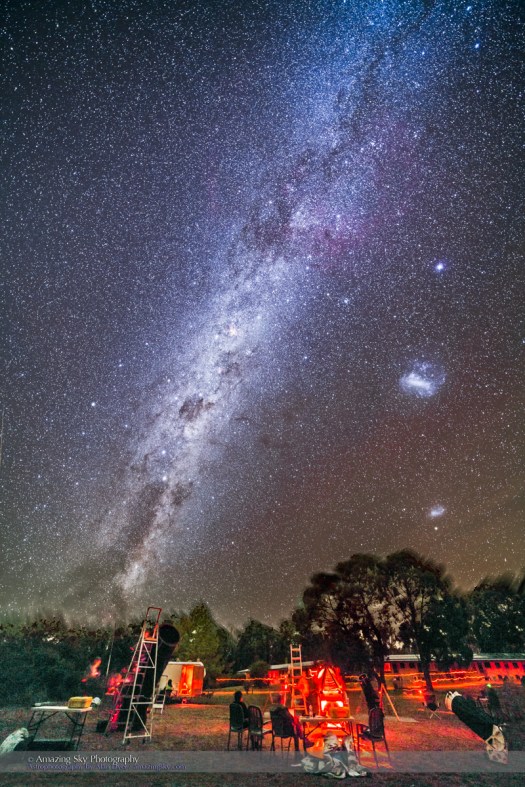
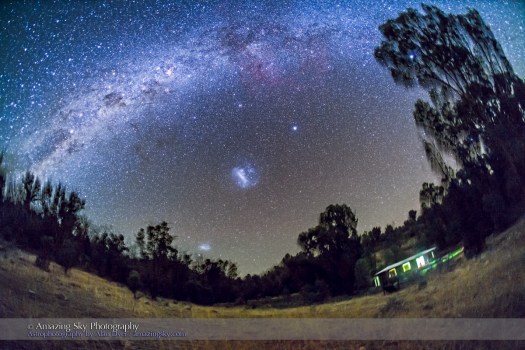
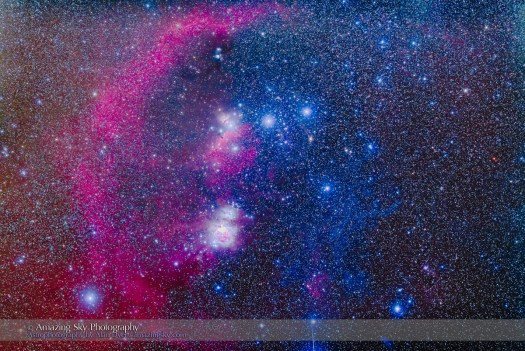
Deep in the southern Milky Way lies one of the most spectacular regions of sky.
Located about as far south in the Milky Way as it gets you find this wonderful region in Carina and Centaurus.
The Carina Nebula (NGC 3372) at upper right is one of the finest nebulas in the sky for binoculars or any telescope.
At lower left is the Running Chicken Nebula (IC 2948) (aka the Lambda Centauri Nebula). By contrast, this nebula is mostly a photographic target, and is a challenge to see with a small telescope. But can you see the Chicken here?
The small red and magenta nebulas at centre are called NGC 3603 and NGC 3576.
The blue Southern Pleiades star cluster (IC 2602) is at bottom right.
The Pearl Cluster (NGC 3766) is above the Running Chicken at left. The cluster IC 2714 is to the right of the Chicken amid dark nebulas.
The Gem Cluster (NGC 3324) is above and right of the Carina Nebula but small and unresolved here.
The Football Cluster (NGC 3532) is top centre, though partly lost amid the rich starfield.
All told, this is one of the best areas in the sky for deep-sky wonders. But you must travel south to see it, to at least 20° North latitude.
This is a mosaic of three segments, taken with the camera in portrait orientation, stitched with Photoshop to make a square framing of the area. Each segment was a stack of 4 x 2-minute exposures at f/2.8 with the 200mm Canon L-series lens and filter-modified Canon 5D MkII at ISO 2500.
I shot this mosaic earlier in April from my observing site at Coonabarabran, Australia.
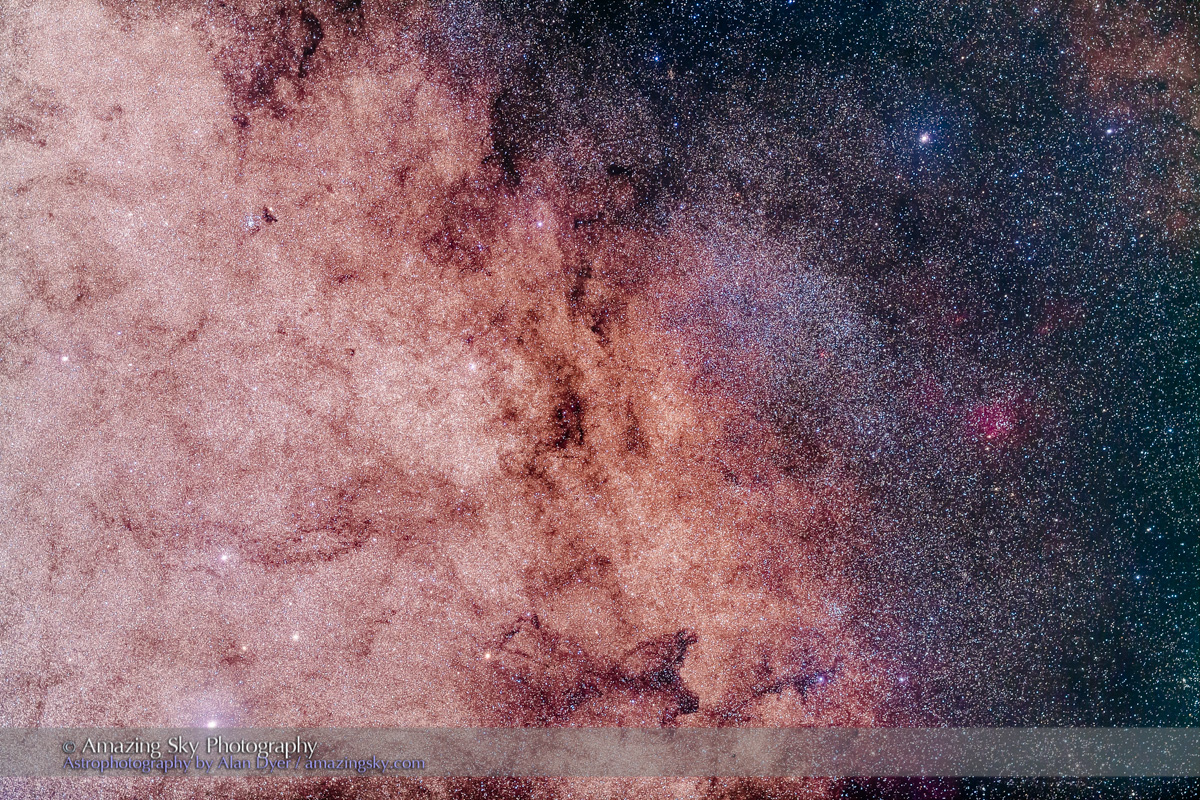
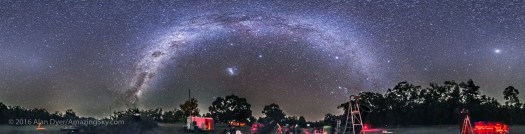
The latitude of 30° South is the magic latitude on Earth for seeing the Milky Way.
From that region of the world – southern Australia, central South America, southern Africa – the centre of the Galaxy passes overhead, and you see the view at top.
You see the galactic core glowing brightly at the zenith, and the arms of the Milky Way stretching off to the horizon on either side of the core – to Aquila at left, for the northern half of the Galaxy, and to Carina at right, for the southern half of the Galaxy. That area of the Galaxy is always below the horizon for viewers at northern latitudes.
The image below focuses in on just the southern portion of the Milky Way, framing what in Australia is called the “Dark Emu,” a constellation made of the dark lanes along the Milky Way, from his head at right in Crux, to his tail at left in Scutum.
This is the most amazing region of the Milky Way, and is worth the trip south of the equator just to see, by lying back and looking up. You can easily see we live in a vast Galaxy, and not in the centre, but off to one side looking back at the core glowing overhead.
I would say there are three sky sights that top the list for spectacle:
• A bright all-sky aurora
• A total solar eclipse
• and the naked eye view of the Galaxy with its centre overhead and its arms across the sky from horizon to horizon.
I’ve checked off two this year! One more to go in August!
From the southern hemisphere the Moon appears “upside-down” and higher each night in the northern sky as it waxes from crescent to Full.
These are scenes from the last week as the Moon rose higher into the evening sky as seen from Australia.
A northerner familiar with the sky would look at these and think these are images of the waning Moon at dawn in the eastern sky.
The “upside-down” waxing crescent Moon in the evening sky from Victoria, Australia, at Cape Conran, West Cape area, on the Gippsland Coast, at latitude 37° South. Earthshine lights the dark side of the Moon. This was March 31, 2017. The Moon lights a glitter path on the water. This is a single 1.3-second exposure at f/2 with the 85mm Rokinon lens, and Canon 5D MkII at ISO 400.
But no, these are of the waxing Moon (the phases from New to Full) with the Moon in the evening sky.
From the southern hemisphere the ecliptic – the path of the planets – and the path of the Moon arcs across the northern sky. So as the Moon waxes from New to Full phase it appears to the right of the Sun, which still sets in the west. The world still spins the same way down under!
So the Moon appears upside down and with the crescent phase the “wrong” way for us northerners.
A 240° panorama from 16 segments.
This panorama taken April 4 sweeps from northwest to southeast, but looks north at centre, to capture the scene at sunset of the waxing 8-day gibbous Moon in the northern sky as seen from the southern hemisphere.
The angle between the Sun and Moon is just over 90°, shown here by the angle between the right-angle arms of the wharf, pointed to the west at left, to the north at centre, and to the east at right.
The Sun has set just north of west, while the Moon sits 13° east of due north. The Earth’s shadow rises as the blue arc at far right to the east opposite the Sun.
A 240° panorama from 15 segments.
The next night, April 5, I shot this panorama from Philip Island south of Melbourne. Again, it shows the waxing gibbous Moon in the north far to the right of the setting Sun in the west (at left).
Getting used to the motion of the Sun and Moon across the northern sky, and the Moon appearing on the other side of the Sun than we are used to, is one of the challenges of getting to know the southern sky.
Things just don’t appear where nor move as you expect them to. But that’s one of the great delights of southern star gazing.
This post shows that same area of sky (here at top) also setting into the west. But that’s the only area of sky familiar to northern hemisphere stargazers.
Everything below Orion and Sirius is new celestial territory for the northern astronomer. Welcome to the fabulous southern hemisphere sky.
And to the autumn sky – From home it is spring. From here in the southern hemisphere summer is giving way to cool nights of autumn.
Straight up, at centre, is the faint Milky Way area containing the constellations of Puppis and Vela, formerly in the constellation of Argo Navis.
Below, the Milky Way brightens in Carina and Crux, the Southern Cross, where dark lanes divide the Milky Way.
At right, the two patches of light are the Large and Small Magellanic Clouds, satellite galaxies of our Milky Way.
The bright object at left is Jupiter rising over the Tasman Sea.
I shot this 360° panorama on March 31, 2017 from Cape Conran on the Gippsland Coast of Victoria, Australia, at a latitude of 37° South.
I’ve turned the panorama so Orion appears as we’re used to seeing him, head up and feet below. But here in the southern hemisphere the image below despicts what he looks like, as he dives headfirst into the west in the evening twilight.
The bright object here is the waxing crescent Moon, here in Taurus. Taurus is below Orion, while Sirius (the bright star at top) and the stars of Canis Major are above Orion.
This view above takes in more of Canis Major. Note the Pleiades to the right of the Moon.
Visiting the southern hemisphere is a wonderful experience for any stargazer. The sky is disorienting, but filled with new wonders to see and old sights turned quite literally on their heads!
As we celebrate the official arrival of spring in the Northern Hemisphere, we bid adieu to the stars of winter.
This was the scene last night from my backyard, of Orion and the surrounding constellations of the winter sky setting into the southwest in the early evening. Each night they will set sooner and sooner, even as the nights continue to grow shorter and the Sun sets later.
By late April Orion will be gone from our Northern Hemisphere sky — he hangs around until well into May for sites south of the equator.
A horizon-to-zenith panorama of the winter consellations on a March evening as they set into the southwest. Taken from home March 19, 2017. This is a panorama of 5 panels, each with the 20mm Sigma Art lens at f/2, and Nikon D750 at ISO 3200, for 25 seconds each. Stitched with Adobe Camera Raw.
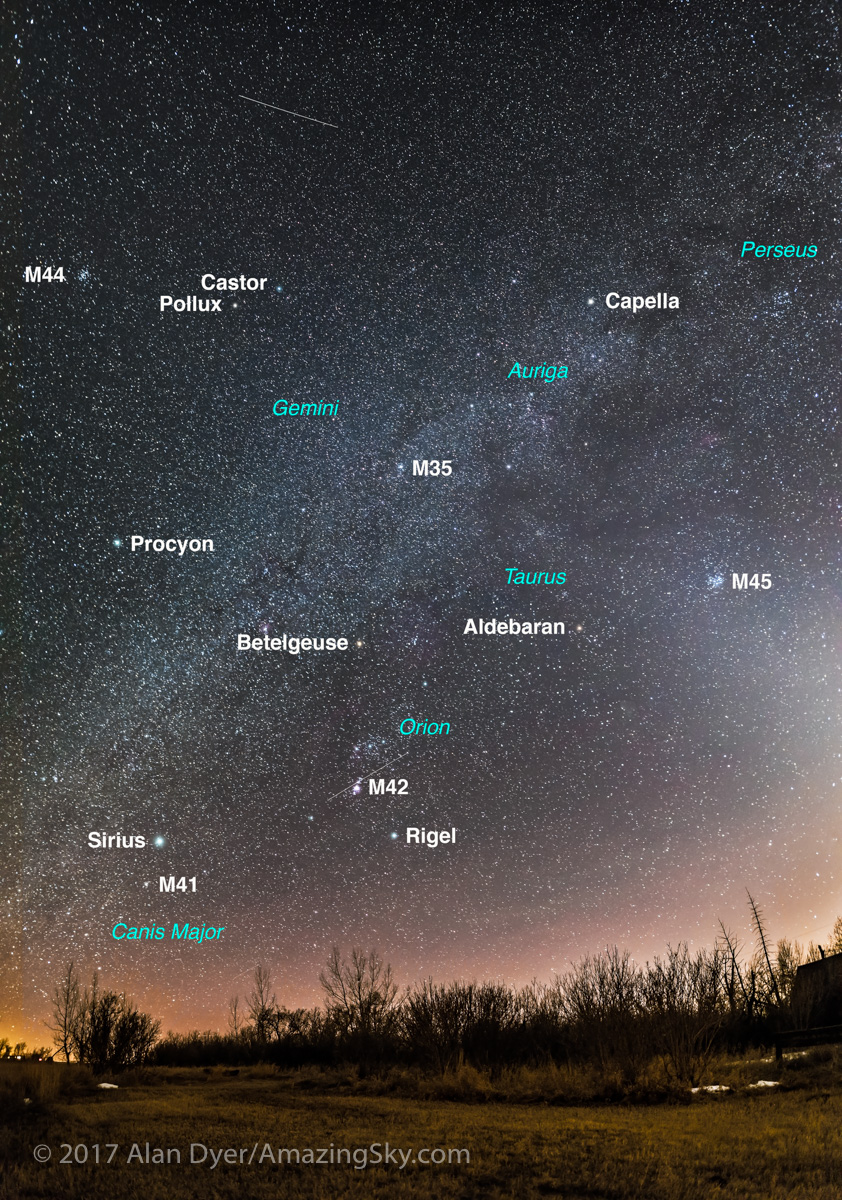
In this version I’ve labeled the main characters in this winter hunting scene – including some of the deep-sky “Messier” objects like M45, the Pleiades; M44, the Beehive star cluster; and M42, the Orion Nebula.
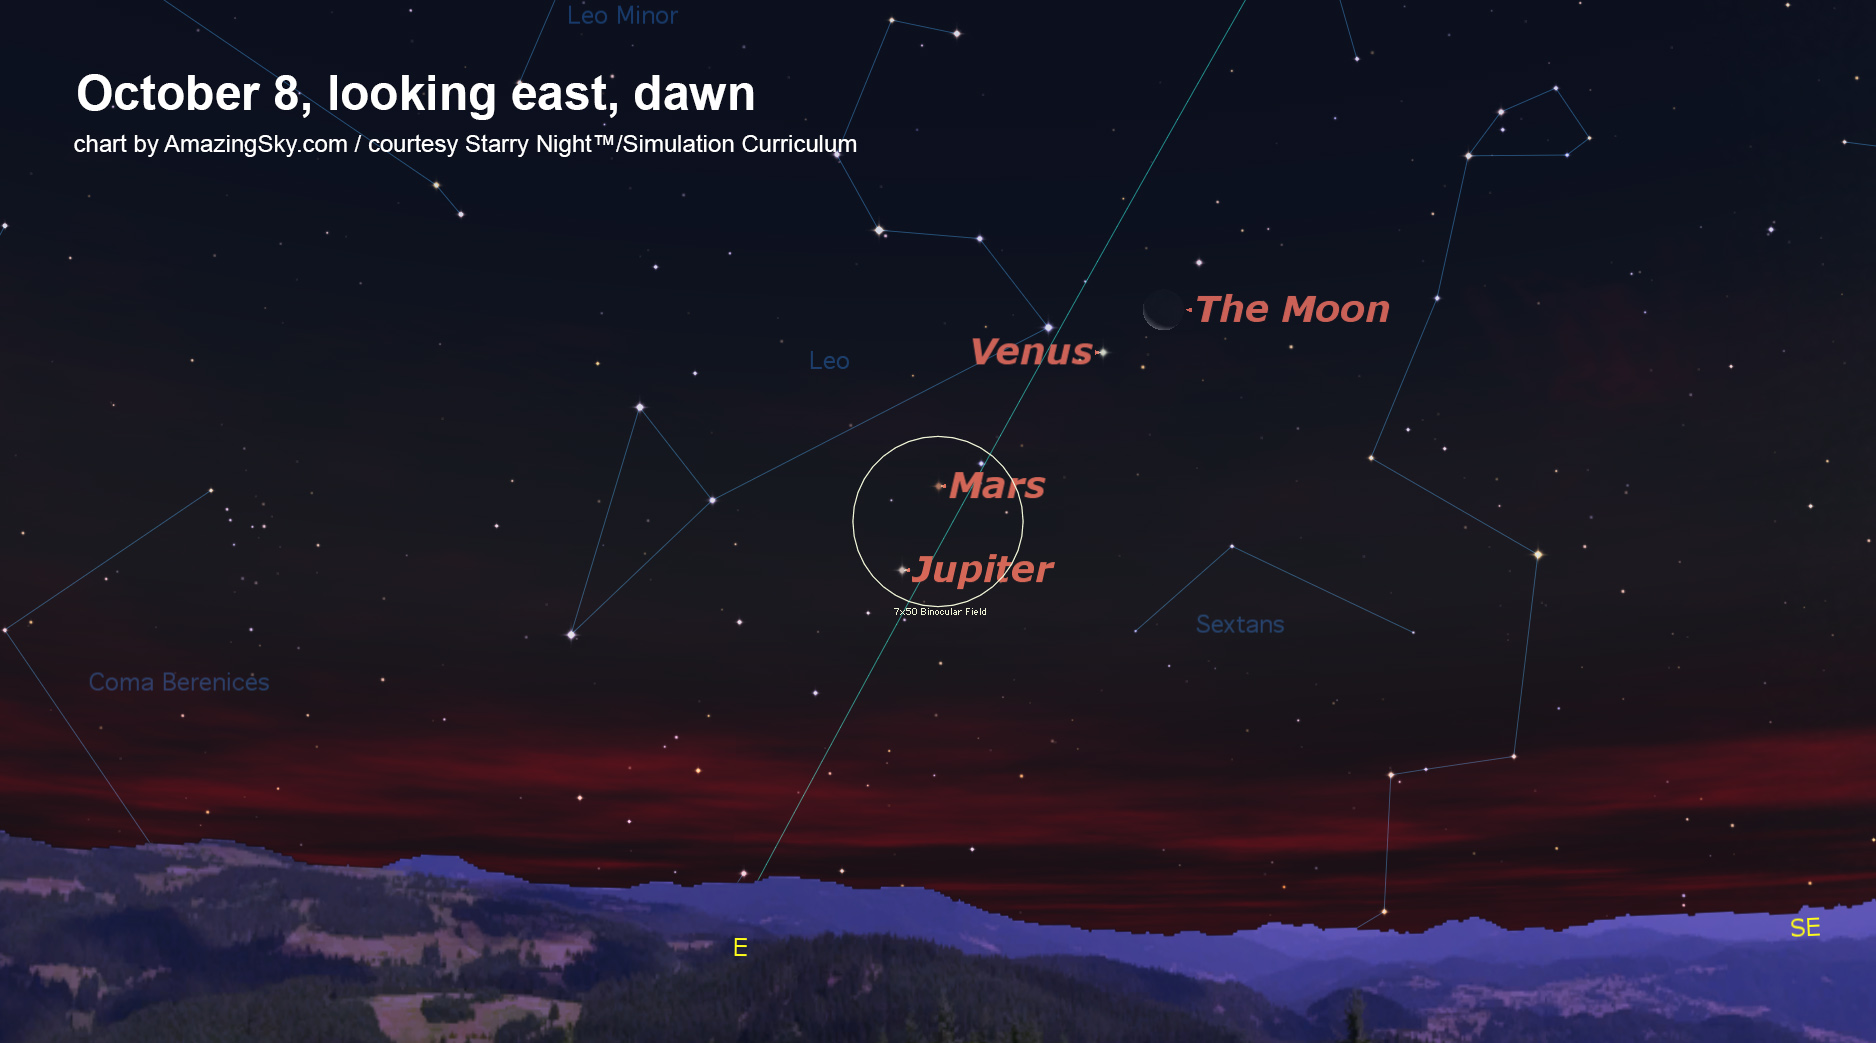
At the same time this year, we also say goodbye to Venus which has shone so brightly these last few months as an evening star. By this weekend, it will be lost from sight as it passes between Earth and the Sun.
Mercury (left) and Venus (right and bright) shinng low in the evening twilight, on March 19, 2017. Mercury was then 2 weeks before greatest elongation while Venus was a week before inferior conjunction. So Mercury was rising into the evening sky while Venus was rapidly descending. This is a 7-image HDR stack of exposures from 2.5 seconds to 1.6-second at ISO 200 with the Canon 6D and with the Sigma 50mm lens at f/4.
Meanwhile, Mercury is rising into view in the evening twilight, in its best evening showing of the year from northern latitudes. The view below is also from March 19, with Mercury to the left of brighter Venus.
Over the next two weeks, look low in the west for a bright star amid the twilight. Mercury appears farthest from the Sun on April 1, the date of its “greatest elongation.”
Having Mercury in our evening sky is a sure sign of spring.
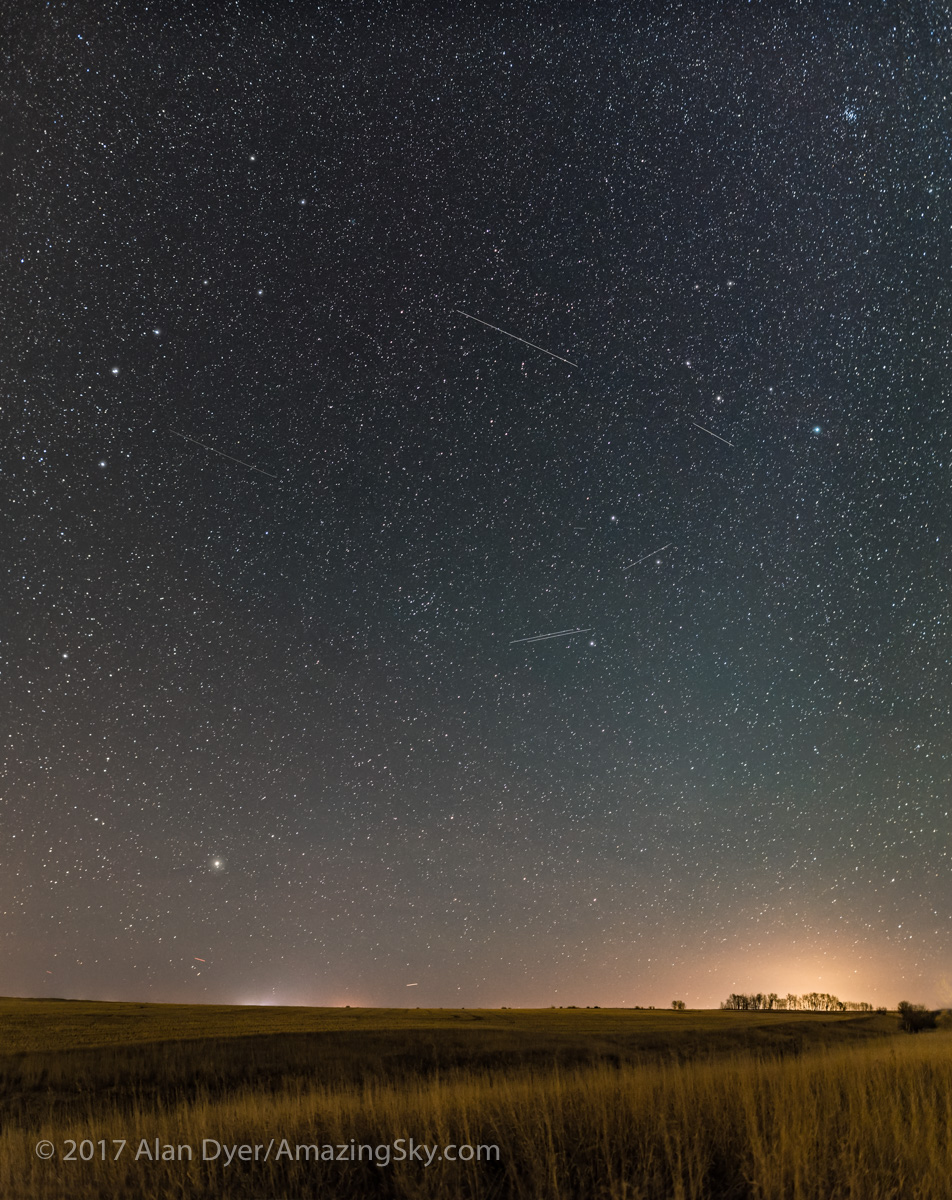
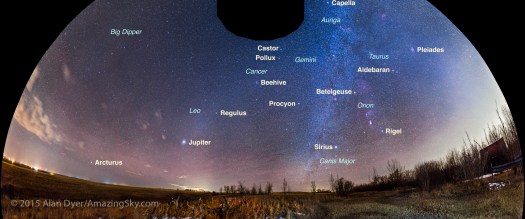
Leo rising in the east along with the northern hemisphere spring stars. Numerous satellite trails are visible. I didn’t clone them out. This is a vertical panorama of 4 frames, with the 20mm Sigma Art lens at f/2 and 25 seconds at ISO 3200 with the Nikon D750. Stitched with PTGui using Transverse Equirectangular projection.
Another sign of spring is Leo the lion.
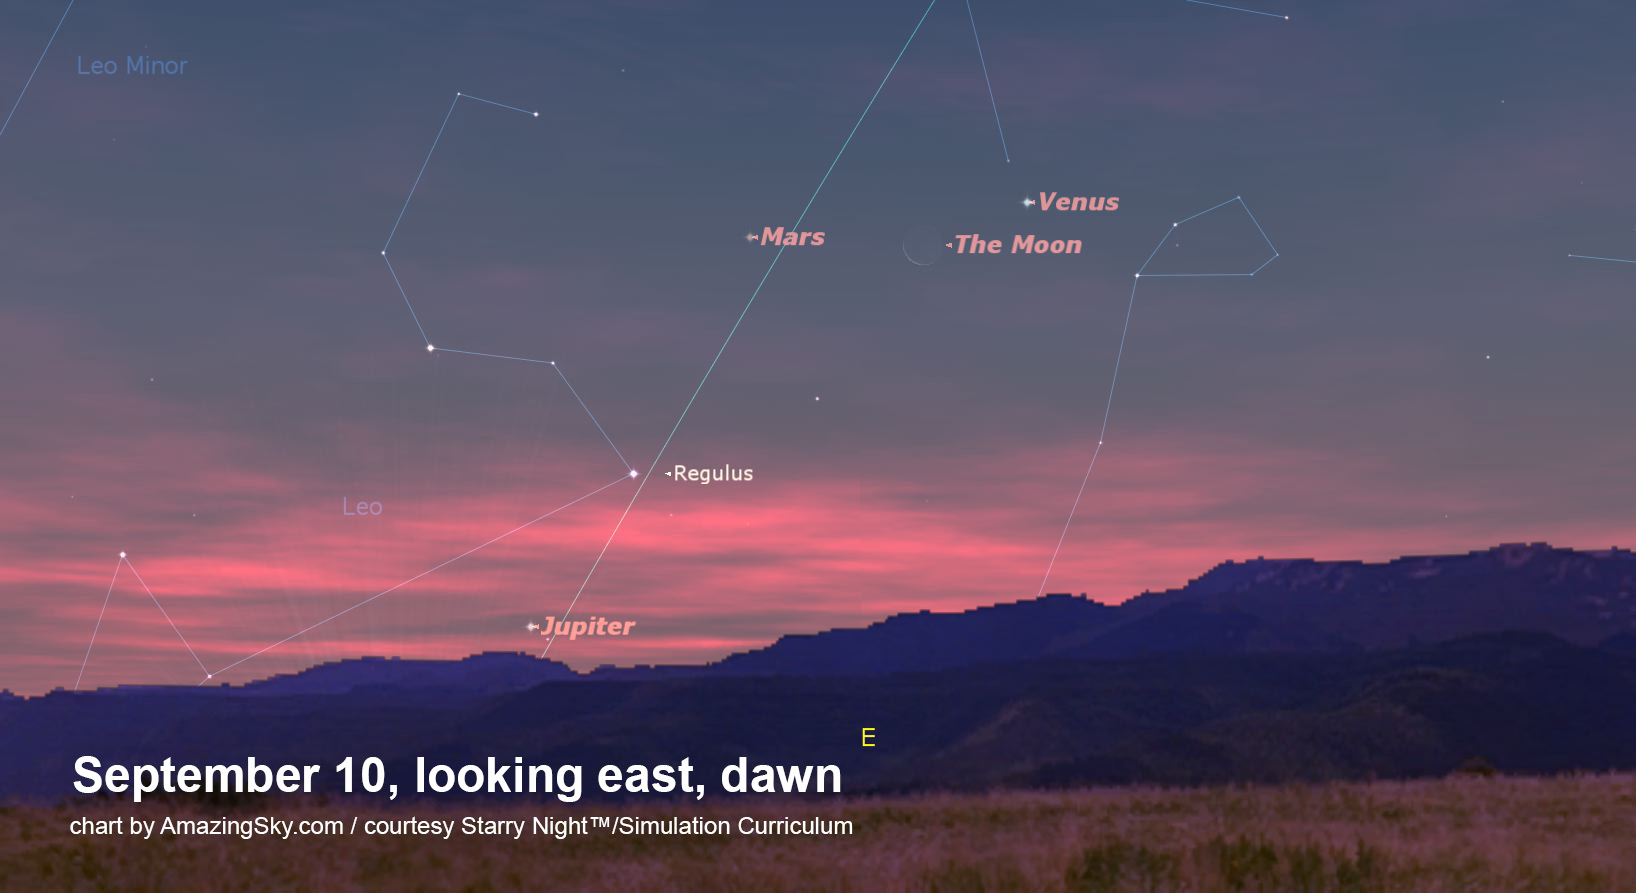
While Orion sets in the west, the stars of spring are rising in the east. The panorama above depicts the scene in the eastern sky these nights, as Leo rises below the Big Dipper.
The Big Dipper is at upper left, with its handle pointing down to Arcturus at bottom left. The Bowl of the Dipper points down to the right to Regulus and the stars of Leo.
Above Leo is the star cluster M44, the Beehive, in Cancer. Below Leo at centre is the star cluster Mel 111, the Coma Berenices star cluster near the North Galactic Pole.
It takes a dark spring night to see it well, but now lurking near Jupiter is a ghostly sky glow called Gegenschein.
This diffuse glow lies directly opposite the Sun. It is caused by sunlight reflecting off interplanetary dust particles in the outer solar system. They reflect light more effectively at the anti-Sun point where each dust particle is fully lit by the Sun.
Like the Sun, the Gegenschein moves around the sky along the ecliptic, moving about a degree from west to east from night to night. March and April provide good nights for seeing the Gegenschein as it then lies in an area of sky far from the Milky Way.
Even so, it is very subtle to the unaided eye. Look south at about 1 a.m. local daylight time.
However, this year, in early April the Gegenschein will be more difficult as it will then lie right on top of Jupiter, as that planet reaches its point opposite the Sun on April 7. Jupiter will then be superimposed on the Gegenschein.
The main image at top is a 7-image vertical panorama of the spring sky, from Corvus and Virgo above the horizon, up past Leo, into Ursa Major and the Big Dipper overhead. Spica lies below bright Jupiter, Arcturus in Böotes is at left, while Regulus in Leo is at right. The grouping of stars near centre is the Coma Berenices star cluster.
Earlier in the night, I shot the sky’s other main glow – the Milky Way, as the winter portion of the Milky Way around Orion set into the southwest.
But over in the west, at the right edge of the frame, is the Zodiacal Light, caused by the same dust particles that create the Gegenschein, but that are located in the inner solar system between us and the Sun.
We bid adieu to the winter Milky Way now. As it departs we are left with an evening sky without the Milky Way visible at all. As seen from northern latitudes it lies along the horizon.
But later in spring, late at night, we’ll see the summer Milky Way rising, beginning its seasons of prominence until late autumn.
In a winter of cloud, the skies cleared for a magical night in the Alberta Badlands.
Two weeks ago, on February 28, I took advantage of a rare and pristine night to head to one of my favourite spots in Dinosaur Provincial Park, to shoot nightscapes of the winter sky over the Badlands.
A spate of warm weather had melted most of the snow, so the landscape doesn’t look too wintery. But the stars definitely belong to winter in the Northern Hemisphere.
The main image above shows the winter Milky Way arching across the sky from southeast (at left) to northwest (at right). The tower of light in the west is the Zodiacal Light, caused by sunlight reflecting off dust particles in the inner solar system. It is an interplanetary, not atmospheric, effect.
This is a stitch of 6 segments with the 12mm Rokinon lens at f/2.8 for 30 seconds each, with the Nikon D750 at ISO 6400, mounted portrait. Stitched with PTGui.
Above, this 360° version of the scene records the entire sky, with the winter Milky Way from horizon to horizon. With a little averted imagination you can also trace the Zodiacal Light from west (right) over to the eastern sky (left), where it brightens in the diffuse glow of the Gegenschein, where dust opposite the Sun in the outer solar system reflects light back to us.
This is a stitch of 6 segments taken with the 12mm full-fame fish-eye Rokinon lens at f/2.8, all 30-second exposures with the Nikon D750 at ISO 6400. The camera was aimed portrait with the segments at 60° spacings. Stitched with PTGui using equirectangular projection with the zeith pulled down slightly.
A rectangular version of the panorama wraps the sky around from east (left), with Leo rising, to northeast (right), with the Big Dipper standing on its handle. I’ve added the labels in Photoshop of course.
This is a stack of 8 x 30-second exposures for the ground, mean combined to smooth noise, plus one 30-second exposure for the sky. All at f/2.2 with the Sigma 20mm Art lens and Nikon D750 at ISO 6400.
Here, in a single-frame shot, Orion is at centre, Canis Major (with Sirius) is below left, and Taurus (with Aldebaran) is at upper right. The Milky Way runs down to the south. The clusters M35, M41, M46 and M47 are visible as diffuse spots, as is the Orion Nebula, M42, below Orion’s Belt.
The late winter evening Zodiacal Light, from at Dinosaur Provincial Park, Alberta, February 28, 2017. This is a stack of 7 x 30-second exposures for the ground, mean combined for lower noise, plus one 30-second exposure for the sky, all at f/2 with the 20mm Sigma Art lens, and Nikon D750 at ISO 6400.
This is certainly my best shot of the evening Zodiacal Light from my area in Alberta. It is obvious at this time of year on moonless nights, but requires a site with little urban skyglow to the west.
It is best visible in the evening from northern latitudes in late winter and spring.
Here, Venus is just setting above the badlands landscape. The Andromeda Galaxy is at right, the Pleiades at left. The Milky Way runs across the frame at top.
There is a common belief among nightscape photographers that the Milky Way can be seen only in summer. Not so.
What they mean is that the brightest part of the Milky Way, the galactic centre, is best seen in summer. But the Milky Way can be seen in all seasons, with the exception of spring when it is largely absent from the early evening sky, but rises late at night.
The solar winds blew some fine auroras our way this past week.
Oh, that I had been in the North last week, where the sky erupted with jaw-dropping displays. I could only watch those vicariously via webcams, such as the Explore.org Northern Lights Cam at the Churchill Northern Studies Centre.
But here in southern Alberta we were still treated to some fine displays across our northern sky. The image below is from March 1, from my rural backyard.
A full-frame fish-eye lens image of the aurora on March 1 with curtains reaching up into the Big Dipper.
The Sun wasn’t particularly active and there were no coronal mass ejections per se. But a hole in the corona let a wind of solar particles through to buffet our magnetosphere, stirring up geomagnetic storms of Level 4 to 5 scale. That’s good enough to light our skies in western Canada.
A 160° panorama of the main auroral oval to the north on March 2 about 11:40 pm MST.
Above is the display from March 2, taken over a frozen pond near home. I like how the Lights reflect in the ice.
This night, for about 30 minutes, an odd auroral form appeared that we see from time to time at our latitudes. A wider panorama shows this isolated arc well south of the main auroral oval and forming a thin arc stretching across the sky from west to east.
A 220° panorama of the isolated arc to the west (left) and east (right) and the main auroral oval to the north.
The panorama above shows just the western and eastern portion of the arc. Overhead (image below) it looked like this briefly.
The overhead portion of the isolated arc at its peak.
Visually, it appeared colourless. But the camera picks up this isolated arc’s usual pink color, with a fringe of white and sometimes (here very briefly) a “picket-fence” effect of green rays.
The western portion of the isolated auroral arc at its peak.
This is the view of the isolated arc to the west. Erroneously called “proton arcs,” these are not caused by incoming protons. Those produce a very diffuse, usually sub-visual glow. But the exact nature of these isolated arcs remains a mystery.
As we head into solar minimum in the nest few years, displays of Northern Lights at lower latitudes will become less frequent. But even without major solar activity, last week’s displays demonstrated we can still get good shows.
The most spectacular sight the universe has to offer is coming to a sky near you this summer.
On August 21 the Moon will eclipse the Sun, totally!, along a path that crosses the continental USA from coast to coast. All the details of where to go are at the excellent website GreatAmericanEclipse.com.
If this will be your first total solar eclipse, you might want to just watch it. But many will want to photograph or video it. It can be easy to do, or it can be very complex, for those who are after ambitious composites and time-lapses.
To tell you how to shoot the eclipse, with all types of cameras, from cell phones to DSLRs, with all types of techniques, from simple to advanced, I’ve prepared a comprehensive ebook, How to Photograph the Solar Eclipse.
It is 295 pages of sage advice, gathered over 38 years of shooting 15 total solar eclipses around the world.
The book is filled with illustrations designed specifically for the 2017 eclipse – where the Sun will be, how to frame the scene, what will be in the sky, how the shadow will move, where the diamond rings will be, what lenses to use, etc.
Here are a few sample pages:
I cover shooting with everything from wide-angle cameras for the entire scene, to close-ups with long telephotos and telescopes, both on tripods and on tracking mounts.
I cover all the details on exposures and camera settings, and on focusing and ensuring the sharpest images. Most bad eclipse pix are ruined not by poor exposure but poor focus and blurry images – the Sun is moving!
A big chapter covers processing of eclipse images, again, from simple images to complex stacks and composites.
For example, I show how to produce a shot like this, from 2012, combining a short diamond ring image with a long-exposure image of the corona.
A final chapter covers “what can go wrong!” and how to avoid the common mistakes.
The ebook is available on the Apple iBooks Store for Mac and iOS devices. This version has the best interactivity (zoomable images), higher quality images (less compression), and easiest content navigation.
However, for non-Apple people and devices, the ebook can also be purchased directly from my website as a downloadable PDF, which has embedded hyperlinks to external sites.
I think you’ll find the ebook to be the most comprehensive guide to shooting solar eclipses you’ll find. It is up to date (as of last week!) and covers all the techniques for the digital age.
Many thanks, and clear skies on August 21, wherever you may be in the shadow of the Moon!
The Northern Lights once again performed beautifully from Churchill, Manitoba, making the sky dance with colours.
As I do each winter, I spent time in Churchill, Manitoba at the wonderful Churchill Northern Studies Centre, attending to groups of “aurora tourists” there to check an item off their bucket list – seeing the Northern Lights.
In the 30 years the courses have been presented only one group has ever come away not seeing the Lights. Well, make that two now. A bout of unseasonably warm weather in my first week brought clouds every night. Mild temperatures to be sure. But we want it to be -25° C! That’s when it is clear.
Our first clear night was very clear, affording us a wonderful view of the winter Milky Way before the Lights came out. Such a view is unusual from the North, as the Lights usually wash out the sky, which they did later this night. Even here, you can see some wisps of green aurora.
Normal temperatures didn’t return until week 2 of my stay. The second group fared much better, getting good displays on 4 of their 5 nights there, more typical of Churchill.
A few determined die-hards from Group 1 (here shooting the Lights) stayed on a couple of more nights, and were rewarded with the views they had come for. They were happy!
In the images here, at no time did the auroral activity exceed a level of Kp 3 (on a scale of 0 to 9) and was often just Kp 1 or 2. Farther south no one would see anything. But at latitude 58° N Churchill lies under the auroral oval where even on quiet nights the aurora is active and often spectacular.
In speaking to a Dene elder who presents a cultural talk to each of the CNSC groups, Caroline said that to the Dene of northern Canada their word for the Lights translates to “the sky is dancing.” Wonderful! It did for us.
The Auroras of Churchill from Alan Dyer on Vimeo.
This music video presents a montage of time-lapse movies I shot over four nights, from January 25 to 29, 2017. They provide an idea of what we saw under the dancing sky.
As usual, choose HD and enlarge to full screen to view the movie. Or go to Vimeo with the V button.
The crescent Moon rises into the western evening sky as 2016 ends, while Venus shines bright, and Orion rises into the east.
Getting clear skies is a rare treat of late, but these are images from two such nights this week. On December 30, the thin waxing Moon appeared in the colourful twilight of a winter night. Despite the clouds and the Moon’s low altitude, the dark side of the Moon is plainly visible illuminated by Earthshine.
Venus is now brilliant as an evening star in the southwest. Here is it over the old wood grain elevators at Mossleigh, Alberta, some of the few of these landmarks left standing on the prairies.
Fainter Mars shines above Venus and over the month of January, Venus will climb up to meet Mars by month’s end for a fine conjunction with the crescent Moon as well. Watch through January as Venus and Mars converge.
As the planets set into the southwest, Orion the Hunter rises into the east. Here it is over the Mossleigh elevators, illuminated by local lights.
After a year of work, the new edition of my Nightscapes and Time-Lapse ebook is on the e-shelves at the Apple iBooks Store.
In the two years since I first published this ebook, the field of nightscape shooting has enjoyed many changes, to equipment, software and techniques. Not to mention I’ve learned a lot!
All those changes are reflected in this new and expanded edition. It is 100 pages bigger – 500 pages now – than the first edition. It contains:
• 60 step-by-step image processing tutorials, all with current late-2016 software
• a dozen galleries of comparison “before-and-after” images
• 40 HD videos of time-lapse examples
• reviews of current equipment
• reviews of software, some very new – like this week! – to use in place of Adobe
• information on Nikon and Pentax cameras, as well as Canons
• In addition, many images can be tapped on to zoom up. And most text can now be enlarged in a Scrolling View for use on small-screen devices.
The previous 2014 edition garnered rave reviews, with readers calling it:
“Incredibly well put together and visually stunning.”
“Simply amazing! From hardware to software, it’s all covered. Alan Dyer got it right!”
and “It is a must-have resource for anyone doing nightscape and time-lapse photography.”
As with the first edition, I’ve designed the ebook to appeal to both amateur astronomers and landscape photographers by providing what I feel is the most comprehensive information available in any ebook on the hugely popular field of nightscape and time-lapse photography.
This isn’t a simple 50-page PDF pamphlet, as so many ebooks are. This is an extensive and detailed tutorial, with loads of interactive and multi-media content.
There’s loads of information on cameras and lenses
I’ve included information on setting Nikons and Pentaxes. Sony mirrorless camera will wait for the next edition!
I’ve added many new images, with lots of information on how to set cameras for many sky subjects.
The ever popular Milky Way gets its own chapter, with information on how to – and how NOT to – process the Milky Way.
I’ve included lots of information about new time-lapse gear, including some units, like the TimeLapse+ View bramping intervalometer that aren’t even available for general sale yet.
Lots of embedded HD videos illustrate time-lapse techniques. A book about shooting time-lapse movies ought to have time-lapse movies in it. Most don’t!
Step-by-step tutorials show you how to process with Lightroom, Camera Raw, Photoshop, and LRTimelapse (shown here), an essential tool for time-lapse work.
Tutorials cover still image processing, from the basics to advanced techniques such as masking and compositing. Stacking meteor showers and star trails? It’s all covered!
The size and media content of the ebook make it impossible to publish on Kindle/Amazon or Google Play/Android.
How to Photograph & Process Nightscapes and Time-Lapses is available worldwide exclusively through the Apple iBooks Store, for the iBooks app on Apple Macs, iPads and iPhones.
Owners of the original edition get the update for FREE! Just open iBooks on your Mac or iOS device and check Purchased and Updates.
For new buyers, the price remains unchanged: $24.99 US (prices vary with country due to exchange rates and local GST). The book is sold in every one of the 51 countries Apple sells into.
Enjoy! And do leave a review or star rating for the new edition at iTunes/iBooks Store.
My free Amazing Sky Calendar for 2017 is now available for download! Plan your astronomical year!
Once again, I have prepared a free 12-month Calendar listing loads of celestial events, Moon phases, highlighted space events, and with small charts to show what’s happening in the sky for the coming year. Plus a set of my favourite images from 2016.
The annual Dark Sky Festival in Jasper National Park ended with the best finale – dark skies, on a beautiful star-filled night.
On Saturday night, October 22, I left the final set of science talks in the Big Tent at the heart of the Festival and headed out down the Icefields Parkway for a night of shooting Jasper by starlight.
The lead image is of the winter stars, including the Pleiades, rising above Mt. Kerkeslin at Athabasca Falls.
The Pleiades star cluster and the other stars of Taurus rising above Mount Kerkeslin at Athabasca Falls, in Jasper National Park, Alberta, October 22, 2016. The sky is brightening with the rising waning Moon off frame at left. Some cloud adds star glows and hazy patches to the sky. This is a stack of 15 exposures, mean combined to smooth noise, for the ground and one exposure for the sky. All are 25 seconds at f/2 with the Sigma 20mm Art lens and Nikon D750 at ISO 6400.
I shot the image above moments later, from the usual viewpoint overlooking the Falls, reduced to a trickle in late autumn. Illumination is solely by starlight – no artificial and glaring light painting here.
The autumn constellations of Perseus, Cassiopeia and Andromeda over Mount Kerkeslin at the Athabasca River Viewpoint on the Icefields Parkway, in Jasper National Park, Alberta. The Andromeda Galaxy is at upper right. The Pleiades are just clearing the mountain top at lower right. Thin clouds add the natural glows around the stars. Illumination is from starlight. This is a stack of 8 exposures, mean combined to smooth noise, for the ground and one exposure for the sky, all 25 seconds at f/2 with the Sigma 20mm lens and Nikon D750 at ISO 6400.
Earlier in the night, I stopped at the Athabasca River Viewpoint and shot the autumn stars of Cassiopeia, Andromeda, and Perseus above Mt. Kerkeslin. The Pleiades are just appearing above the mountain ridge.
The autumn stars of the watery constellations of Capricornus, Aquarius, Piscis Austrinus, and Cetus over the Athabasca River and the peaks of the Continental Divide, from the Athabasca River Viewpoint (the “Goats and Glaciers” viewpoint) on the Icefields Parkway, Jasper National Park, Alberta. Thin cloud provides the natural glows around the stars. This is a stack of 8 exposures for the ground, mean combined to smooth noise, and one exposure for the sky, all 25 seconds at f/2 with the Sigma 20mm Art lens, and Nikon D750 at ISO 6400.
From that viewpoint I shot a scene looking south over the river and with the stars of Capricornus and Aquarius above the Divide.
The Milky Way over the region of Athabasca Pass, as seen from the highway viewpoint on the Icefields Parkway, in Jasper National Park, Alberta, Oct 22, 2016. The Milky Way here is the section through Aquila, with Altair at top and Mars bright above the peaks of the Continental Divide. This is a stack of 8 exposures, mean combined to smooth noise, for the ground and one exposure for the sky, all 25 seconds at f/2 with the Sigma 20mm lens, and Nkion D750 at ISO 6400.
At the start of the night I stopped at the viewpoint for Athabasca Pass far in the distance. The summer Milky Way was setting over the pass. This historic pass was used by David Thompson in the late 1700s and early 1800s as his route into B.C. to extend the fur trade across the Divide. Thompson writes in his Journal about one particularly clear night on the pass:
“My men were not at their ease, yet when night came they admired the brilliancy of the Stars, and as one of them said, he thought he could almost touch them with his hand.”
The night ended with a display of Northern Lights over the Athabasca River. What a superb night under the stars in Jasper!
The Northern Lights over the Athabasca River in Jasper National Park, Alberta, Canada, on October 22/23 at about 1:30 am. I shot this from an access point to the Athabasca River by the bridge on Highway 93 on the Icefields Parkway. Pyramid Mountain is at left near the town of Jasper. Vega is the bright star at left; the Big Dipper is at right. The image is a stack of 10 exposures for the ground, mean combined to smooth noise and to smooth the water, and one exposure for the sky and aurora. All 15 seconds at ISO 1600 at f2 with the Sigma 20mm lens and Nikon D750.
As a finale, here’s a music video collecting together still images and time-lapse movies shot this night, and on two other nights during the Dark Sky Festival, including at the big Lake Annette “Beyond the Stars” star party I spoke at.
Enjoy!
As usual, enlarge to full screen and go to HD for the best view.
I’m pleased to announce that after a year in production, our video tutorial series, Nightscapes and Time-Lapses: From Field to Photoshop, is now available.
It’s been quite a project! Over the last few years I’ve presented annual astrophoto workshops in conjunction with our local telescope dealer All-Star Telescope to great success.
However, we always had requests for the workshops on video. Attempts to video the actual workshops never produced satisfactory results. So we spent a year shooting in the field and in the studio to produce a “purpose-built” series of programs.
They are available now as a set of three programs, totalling 4 hours of instruction, for purchase and download at Vimeo at
For those wanting “hard copies” we will also be selling the programs on mailed USB sticks. See All-Star Telescope for info and prices. The downloaded version can also be ordered from there.
This series deals with the basics of capturing, then processing nightscape still images and time-lapse movies of the night sky and landscapes lit by moonlight and starlight.
Here’s the content outline:
Program 1 – Choosing Equipment (1 Hour)
• Tips for Getting Started • Essential Gear • Choosing A Camera • Photo 101 – Exposure Triangle • Setting Exposure • Expose to the Right • Setting a Camera – File Types • Photo 101 – Noise Sources • Setting a Camera – Noise Reduction • Setting a Camera – Focusing • Setting a Camera – Other Menus • Choosing Lenses • Choosing an IntervalometerSummary and Tips
Program 2 – Shooting in the Field (1 hour)
• Climbing the Learning Curve • Twilights • Astronomy 101 – Conjunctions • Shooting Conjunctions • Moonrises • Shooting Auroras • Astronomy 101 – Auroras • Photo 101 – Composing • Moonlit Nightscapes • Astronomy 101 – Where is the Moon? • Choosing a Location • Shooting the Milky Way • Astronomy 101 – Where is the Milky Way? • Astronomy 101 – Daily Sky Motion • Tracking the Sky • Shooting Star Trails • Shooting Time-Lapses • Calculating Time-Lapses • A Pre-Flight Checklist • Summary and Tips
Program 3 – Processing Nightscapes and Time-Lapses (2 hours)
• Workflows • Using Adobe Bridge – Importing and Selecting • Photo 101 – File Formats • Using Adobe Lightroom – Importing and Selecting • Adobe Camera Raw – Essential Settings • Adobe Camera Raw – Developing Raw Images • Adobe Lightroom – Develop Module • Adobe Photoshop – Introduction • Photoshop – Setup • Photoshop – Smart Filters • Photoshop – Adjustment Layers • Photoshop – Masking • Photoshop – Processing Star Trails & Time-Lapses • Stacking Star Trails • Assembling Time-Lapse Movies • Archiving • Summary & Finale
If this first introductory series is successful we may produce follow-up programs on more advanced techniques.
It was a perfect night at a dark site in southern Alberta. The Milky Way shone to the south and aurora danced to the north.
I had scouted out this location in June and marked it on my calendar to return in the fall when the centre of the Milky Way would be well-placed to the southwest.
The site is Police Outpost Provincial Park, named for the North West Mounted Police fort that once occupied the site, guarding Canada’s sovereignty in the late 1800s.
One result from the night of shooting is the opening image, the first frame from a time-lapse taken while deep blue twilight still coloured the sky. The main peak is Chief Mountain in Montana.
A fairly mild dispay of aurora in the darkening deep blue twilight over the lake at Police Outpost Provincial Park, in southern Alberta, on September 26, 2016, with the stars of Perseus rising, and with Capella low in the northeast at centre. This is a stack of 4 x 20 second exposures for the dark ground and water to smooth noise and one 20-second exposure for the sky, all with the 25mm Canon lens at f/2.8 and Canon 6D at ISO 2000.
To the north an aurora display kicked up over the lake. While it never got very bright, it still provided a photogenic show over the still waters.
A fairly mild dispay of aurora over the lake at Police Outpost Provincial Park, in southern Alberta, on September 26, 2016, with the stars of Auriga and Taurus rising, including the Pleiades at upper right. The Hyades in Taurus are the most prominent stellar reflections at lower right, in the still water this evening. Capella is the bright star above centre; Aldebaran is at right. This is a stack of 4 x 20 second exposures for the dark ground to smooth noise and one 20-second exposure for the sky and water, all with the 25mm Canon lens at f/2.2 and Canon 6D at ISO 3200.
The waters were calm on this windless night (rare for southern Alberta), and so reflected the stars and Northern Lights beautifully.
The Big Dipper reflected in the still waters of the lake at Police Outpost Provincial Park, in southern Alberta, on September 26, 2016, with an aurora to the north at right. Only in autumn can one shoot the Dipper reflected in the water in the evening sky, as it is then riding low along the northern horizon. This is from a latitude of 49° N where the Dipper is circumpolar. This is a stack of 4 x 25 second exposures for the dark ground to smooth noise and one 25-second exposure for the sky and water, all with the 25mm Canon lens at f/2.2 and Canon 6D at ISO 3200.
Here, the Big Dipper reflects in the lake as we look north to the Lights. The movie below compiles still images and two time-lapse sequences, of the Lights and Milky Way. The sounds are the natural sounds I recorded on site, as flocks of geese were getting ready to migrate and the owls hooted.
Enjoy! — As always, for the best view, enlarge to full screen or click through to Vimeo with the V button.
With the harvest in full swing, the aurora and Moon lit the fields on a clear September evening.
This night, September 19, showed prospects for a good display of Northern Lights, and sure enough as it got dark a bright, well-defined arc of Lights danced to the north.
I headed off to some photogenic spots near home, on the prairies of southern Alberta. By the time I got in place, the aurora had already faded.
However, the arc still photographed well and provided a great backdrop to these rural scenes. The rising Moon, then 3 days past full, lit the foreground. In the lead image, lights from combines and trucks working the field behind the bins are at left.
A diffuse arc of aurora and the rising waning gibbous Moon light the sky over the old barn near home at harvest time, September 19, 2016. The glows from Strathmore and Calgary light the clouds to the west at far left. The Big Dipper shines over the barn, with Capella and the stars of Perseus at right. The Pleiades are rising to the left of the Moon. This is a panorama of 5 segments, with the 20mm lens and Nikon D750. Stitched with ACR.
The image above was from later in the night, just down the road at a favourite and photogenic grand old barn.
The Big Dipper and a diffuse aurora over the old barn near home, in southern Alberta, on September 16, 2016. The waning gibbous Moon off camera at right provides the illumination. This is a stack of 4 exposures, averaged, for the ground to smooth noise and one exposure for the sky to keep the stars untrailed. All 13 seconds at f/2.8 with the Sigma 20mm lens, and ISO 1600 with the Nikon D750. Diffraction spikes on stars added with Noel Carboni’s Astronomy Tools actions.
Note the Big Dipper above the barn. A waning and rising Moon like this is great for providing warm illumination.
The time around equinox is usually good for auroras, as the interplanetary and terrestrial magnetic fields line up better to let in the electrons from the Sun. So perhaps we’ll see more Lights, with the Moon now gradually departing the evening sky.
On Friday night the Harvest Moon rose amid the arching shadow of the Earth.
This was the view on Friday, September 16 at moonrise on the Red Deer River. The view is from the Orkney Viewpoint overlooking the Badlands and sweeping curve of the river.
Above is the wide arch of the dark shadow of the Earth rising into the deepening twilight. Almost dead centre in the shadow is the Full Moon, the annual Harvest Moon.
Hours earlier the Moon passed through the shadow of our planet out at the Moon’s distance from Earth, creating a minor penumbral eclipse. No part of that eclipse, such as it was anyway, was visible from here.
But the alignment did place the Moon in the middle of our planet’s shadow projected into our atmosphere, as it does at every sunset and sunrise.
But it takes a very clear sky for the shadow to stand out as well as this in the darkening sky. I like how the curve of the shadow mirrors the curve of the river.
This is a marvellous spot for photography. I shared the site with one other photographer, at far right, who also came to capture the rising of the Harvest Moon.
The image is a 7-segment panorama with a 20mm lens, stitched with Adobe Camera Raw.
The aurora has been lighting up our skies a lot in recent nights, in a great sweeping arc across the northern sky.
It’s been a good week or so for Northern Lights, with several nights in a row of fine displays. These images are from one night, taken near home in southern Alberta, on September 2.
The lead image at top shows the display at its best, with the arc of curtains reflected in a nearby pond. The green curtains fade to shades of magenta as they tower into the high atmosphere, as one process of glowing oxygen giving off green light transitions to another emitting red light.
A 180° panorama of the Northern Lights exhibiting classic concentric ars across the north, with an isolated arc to the east at far right. This is a stitch of 10 segments, each 2-second exposures with the 20mm Sigma Art lens at f/1.6 and Nikon D750 at ISO 3200. Stitched with PTGui.A little later the curtains had changed form, into a more homogenous arc above a set of sharper curtains below that are farthest north. People in northern Alberta or the Northwest Territories would have been seeing these curtains dancing above them.
What we are seeing is the classic curving arc of the auroral oval, the ring of light created by electrons raining down into our atmosphere in roughly an oval sweeping across the continent and centred on the magnetic pole in the Canadian Arctic.
However, at right, you can see a odd detached bit of more southerly aurora, with a dominant red colour.
An isolated auroral arc to the east on September 2, 2016, shot from near home during a fine display with active curtains to the north at left. A single 8-second exposure with the 20mm lens at f/1.4 and Nikon D750 at ISO 3200.This is a closeup, showing the characteristic form of these odd “isolated arcs” — usually featureless, often thin, without much motion, and often red.
An isolated auroral arc to the west on September 2, 2016, shot from home during a fine display with active curtains to the north. A single 13-second exposure with the 20mm lens at f/1.4 and Nikon D750 at ISO 3200.Later, the arc had brightened and expanded to cross the sky. The above view is looking west from home, with the arc now displaying a mix of pink, white and green.
An isolated overhead auroral arc on September 2, 2016, shot from home during a fine display with active curtains to the north. The Summer Triangle stars stand out here due to high cloud fuzzing their images. A single 13-second exposure with the 20mm lens at f/1.4 and Nikon D750 at ISO 3200.Here, we are looking up the isolated arc, with the impression of it being a thin sheet seen at an angle, with the bottom green component being closest and the red top being highest and farthest away.
An isolated auroral arc to the southeast on September 2, 2016, shot from home during a fine display with active curtains to the north. This one displays the classic picket fence apperarance, with fingers of green aurora that moved along the band during a time-lapse of the scene. A single 13-second exposure with the 20mm lens at f/1.4 and Nikon D750 at ISO 3200.This is the view looking southeast to the strange aurora. For a time it broke up and displayed a “picket fence” formation. And it moved!
Just what these isolated arcs are is a mystery. They have been called “proton arcs,” under the assumption they are caused by incoming protons, not electrons. But while there are such things as proton arcs and auroras, they are diffuse and invisible to the eye and camera in normal visible light. So these features are not proton arcs.
Nevertheless, these odd arcs are not like the usual auroral curtains, and likely have a different origin. But just what is still the object of research. Images by amateur astronomers such as these can help in the study.
What a night this was – perfect skies over an iconic location in the Rockies. And an aurora to top it off!
On August 31 I took advantage of a rare clear night in the forecast and headed to Banff and Moraine Lake for a night of shooting. The goal was to shoot a time-lapse and stills of the Milky Way over the lake.
The handy planning app, The Photographer’s Ephemeris, showed me (as below) that the Milky Way and galactic centre (the large circles) would be ideally placed over the end of the lake as astronomical twilight ended at 10:30 p.m. I began the shoot at 10 p.m. as the sky still had some twilight blue in it.
I planned to shoot 600 frames for a time-lapse. From those I would extract select frames to create a still image. The result is below.
This is looking southwest with the images taken about 11:15 pm on August 31, 2016.The ground is illuminated by a mix of starlight, lights from the Moraine Lake Lodge, and from a display of aurora brightening behind the camera to the north. The starclouds of Scutum and Sagittarius are just above the peaks of the Valley of Ten Peaks. This is a stack of 16 images for the ground, mean combined to smooth noise, and one exposure for the sky, untracked, all 15 seconds at f/2 with the Sigma 20mm Art lens and Nikon D750 at ISO 6400. The frames are part of a 450-frame time-lapse.
As the caption explains, the still is a composite of one exposure for the sky and 16 in succession for the ground, averaged together in a technique to smooth noise. The camera wasn’t tracking the sky, so stacking sky images isn’t feasible, as much as I might like to have the lower noise there, too. (There are programs that attempt to align and stack the moving sky but I’ve never found they work well.)
About midnight, the Valley of Ten Peaks around the lake began to light up. An aurora was getting active in the opposite direction, to the north. With 450 frames shot, I stopped the Milky Way time-lapse and turned the camera the other way. (I was lazy and hadn’t hefted a second camera and tripod up the steep hill to the viewpoint.)
The lead-image panorama is the first result, showing the sweeping arc of Northern Lights over Desolation Valley.
The Northern Lights in a fine Level 4 to 5 display over Desolation Valley at Moraine Lake, Banff National Park, on the night of August 31/Sept 1. This is one frame from a 450-frame time-lapse with the aurora at its best. This is a 2-second exposure at f/2 with the Sigma 20mm Art lens and Nikon D750 at ISO 5000.
Still images shot, I began a time-lapse of the Lights, grabbing another 450 frames, this time using just 2-second exposures at f/1.6 for a rapid cadence time-lapse to help freeze the motion of the curtains.
The final movies and stills are in a music video here:
I ended the night with a parting shot of the Pleiades and the winter stars rising behind the Tower of Babel formation. I last photographed that scene with those same stars in the 1980s using 6×7 film.
The early winter stars rising behind the Tower of Babel formation at Moraine Lake, Banff National Park, with a bright aurora to the north at left. Visible are the Pleiades at centre, and Capella and the stars of Auriga at left. Just above the mountain are the Hyades and Taurus rising. At top are the stars of Perseus. Aries is just above the peak of Babel. The aurora in part lights the landscape green. This is a stack of 16 images for the ground, mean combined to smooth noise, and 1 image for the sky, untracked, all for 15 seconds at f/2.2 with the Sigma 20mm Art lens, and Nikon D750 at ISO 3200. All with LENR turned on.
In a summer of clouds and storms, this was a night to make up for it.
Saturn, Mars and the Milky Way appeared in the twilight over the Bow River.
I shot this scene on August 24 from the viewpoint at Blackfoot Crossing Historical Park, overlooking the Bow River. Mars appears between Saturn above and Antares below, in a line of objects west of the Milky Way.
The valley below is the traditional meeting place of the Blackfoot Nation, and the site of the signing of Treaty Seven between Chief Crowfoot and Colonel MacLeod of the North West Mounted Police in 1877.
The image is a panorama of two images, each 20-second exposures at f/2 and ISO 1600 with the 24mm lens. I shot them just prior to shooting time-lapses of the moving sky, using two cameras to create a comparison pair of videos, to illustrate the choices in setting the cadence when shooting time-lapses.
The movies, embedded here, will be in the next edition of my Nightscapes and Time-Lapse ebook, with the current version linked to below. The text explains what the videos are showing.
Choose Your Style
When shooting frames destined for a time-lapse movie we have a choice:
Shoot fewer but longer exposures at slower ISOs and/or smaller apertures.
OR …
Shoot lots of short exposures at high ISOs and/or wide apertures.
The former yields greater depth of field; the latter produces more noise. But with time-lapses, the variations also affect the mood of a movie in playback.
This comparison shows a pair of movies, both rendered at 30 frames per second:
Clip #1 was taken over 2 hours using 20-second exposures, all at ISO 2000 and f/2 with 1-second intervals. The result was 300 frames.
Clip #2 was taken over 1 hour using 5-second exposures also at f/2 and 1-second intervals, but at ISO 8000. The result was 600 frames: twice as many frames in half the time.
Clip #2 exhibits enough noise that I couldn’t bring out the dark foreground as well as in Clip #1. Clip 2 exhibits a slower, more graceful motion. And it better “time-resolves” fast-moving content such as cars and aircraft.
Which is better? It depends …
Long = Fast
The movie taken at a longer, slower cadence (using longer exposures) and requiring 2 hours to capture 300 frames resulted in fast, dramatic sky motion when played back. Two hours of sky motion are being compressed into 10 seconds of playback at 30 frames per second. You might like that if you want a dramatic, high-energy feel.
Short = Slow
By comparison, the movie that packed 600 frames into just an hour of shooting (by using short exposures taken at fast apertures or fast ISOs) produced a movie where the sky moves very slowly during its 10 seconds of playback, also at 30 frames per second. You might like that if you want a slow, peaceful mood to your movies.
So, if you want your movie to have a slow, quiet feel, shoot lots of short exposures. But, if you want your movie to have a fast, high-energy feel, shoot long exposures.
As an aside – all purchasers of the current edition of my ebook will get the updated version free of charge via the iBooks Store once it is published later this year.
I present a montage of time-lapses illustrating the motion of the sky in the Northern Hemisphere.
Any stargazer should be familiar with how the sky moves, with stars rising in the east and setting in the west.
From the northern hemisphere, when we look north we see the sky rotating counter-clockwise around the North Celestial Pole, near Polaris. As you’ll see in the video, even Polaris moves, though not much over the night. The stars that never set, but just move across the northern horizon, are the circumpolar stars.
When we look south we see the seasonal constellations, the ones that rise and set, and change over the seasons.
I shot the images for these sequences from southern Arizona, in early December 2015.
So the night starts with the summer stars setting in the west and the autumn stars dominating the sky. But then Orion and the winter stars rise and march across the sky over the night, setting before dawn, as the spring stars rise.
The south-looking movie is a dusk-to-dawn sequence. Note the Zodiacal Light in the west at right in the early evening, then reappearing in the east at left before dawn brightens the sky, and as Venus and the Moon rises.
Also note the moving bands of red and green airglow, a natural phenomenon of the upper atmosphere.
I posted a matching set of moviesin my previous blog post, shot from the Southern Hemisphere. But here’s the link to the movie.
Both sets of movies were shot from nearly identical latitudes – about 31°, but 31° N for Portal, Arizona and 31° S for Coonabarabran, Australia.
As such the Celestial Poles appear at equal altitudes above the horizon. And the angles that the stars rise and set at in relation to the horizon are the same.
But the direction they move is opposite. When looking 180° away from the Pole, the seasonal stars move from left to right in the Northern Hemisphere, but from right to left in the Southern Hemisphere.
Visitors from one hemisphere to the other are bound to get turned around!
Nothing amazes even the most inveterate skywatcher more than traveling to another hemisphere and seeing sky move. It moves the wrong way!
Whether you are from the southern hemisphere traveling north, or as I do, travel south from the Northern Hemisphere, watching how the sky moves can be disorienting.
Here I present a video montage of time-lapses shot last April in Australia, at the annual OzSky Star Party near Coonabarabran in New South Wales.
Select HD and Enlarge button to view at full screen at best quality.
You’ll see the sky set in the west but traveling in arcs from right to left, then in the next clip, rise in the east, again moving from right to left. That’s the wrong angle for us northerners.
Looking north you see the seasonal constellations, the ones that rise and set over a night and that change with the seasons. In this case, the night starts with Orion (upside-down!) to the north but setting over in the west, followed by Leo and bright Jupiter. The sky is moving from east to west, but that’s from right to left here. The austral Sun does the same thing by day.
Looking south, we see the circumpolar constellations, the ones that circle the South Celestial Pole. Only there’s no bright “South Star” to mark the pole.
The sky, including the two Magellanic Clouds (satellite galaxies to the Milky Way) and the spectacular Milky Way itself, turns around the blank pole, moving clockwise – the opposite direction to what we see up north.
I shot the sequences over four nights in early April, as several dozen stargazers from around the world revelled under the southern stars, using an array of impressive telescopes supplied by the Three Rivers Foundation, Australia, for us to explore the southern sky.
It was a great night for shooting meteors as the annual Perseids put on a show.
For the Perseid meteor shower I went to one of the darkest sites in Canada, Grasslands National Park in southern Saskatchewan, a dark sky preserve and home to several rare species requiring dark nights to flourish – similar to astronomers!
This year a boost in activity was predicted and the predictions seemed to hold true. The lead image records 33 meteors in a series of stacked 30-second exposures taken over an hour.
It shows only one area of sky, looking east toward the radiant point in the constellation Perseus – thus the name of the shower.
Extrapolating the count to the whole sky, I think it’s safe to say there would have been 100 or more meteors an hour zipping about, not bad for my latitude of 49° North.
A lone Perseid meteor streaking down below the radiant point in Perseus, with the sky and landscape lit by the waxing gibbous Moon, August 11, 2016. Perseus is rising in the northeast, Andromeda is at right, with the Andromeda Galaxy right of centre. Cassiopeia is at top. Taken from the 70 Mile Butte trailhead in Grasslands National Park, Saskatchewan.
The early part of the evening was lit by moonlight, which lent itself to some nice nightscapes scenes but fewer meteors.
The 2016 Perseid meteor shower, in a view looking north to the Big Dipper and with the radiant point in Perseus at upper right, the point where the meteors appear to be streaking from. This is a stack of 10 frames, shot over one hour from 1:38 a.m. to 2:37 a.m. CST. The camera was on the Star Adventurer tracker so all the sky frames aligned. The ground is from a stack of four frames, mean combined to smooth noise, and taken with the tracker motor off to minimize ground blurring, and taken at the start of the sequence. All exposures 40 seconds at f/3.2 with the 16-35mm lens and Canon 6D at ISO 6400.
But once the Moon set and the sky darkened the show really began. Competing with the meteors was some dim aurora, but also the brightest display of airglow I have even seen.
It was bright enough to be visible to the eye as grey bands, unusual. Airglow is normally sub-visual.
But the camera revealed the airglow bands as green, red, and yellow, from fluorescing oxygen and sodium atoms. The bands slowly rippled across the sky from south to north.
Airglow is something you can see only from dark sites. It is one of the wonders of the night sky, that can make a dark sky not dark!
TECHNICAL:
The lead image is stack of 31 frames containing meteors (two frames had 2 meteors), shot from 1:13 am to 2:08 a.m. CST, so over 55 minutes. The camera was not tracking the sky but was on a fixed tripod. I choose one frame with the best visibility of the airglow as the base layer. For every other meteor layer, I used Free Transform to rotate each frame around a point far off frame at upper left, close to where the celestial pole would be and then nudged each frame to bring the stars into close alignment with the base layer, especially near the meteor being layered in.
This placed each meteor in its correct position in the sky in relation to the stars, essential for showing the effect of the radiant point accurately.
Each layer above the base sky layer is masked to show just the meteor and is blended with Lighten mode. If I had not manually aligned the sky for each frame, the meteors would have ended up positioned where they appeared in relation to the ground but the radiant point would have been smeared — the meteors would have been in the wrong place.
Unfortunately, it’s what I see in a lot of composited meteor shower shots.
It would have been much easier if I had had this camera on a tracker so all frames would have been aligned coming out of the camera. But the other camera was on the tracker! It took the other composite image, the one looking north.
The ground is a mean combined stack of 4 frames to smooth noise in the ground. Each frame is 30 seconds at f/2 with the wonderful Sigma 20mm Art lens and Nikon D750 at ISO 5000. The waxing Moon had set by the time this sequence started, leaving the sky dark and the airglow much more visible.
The waning Moon shone near the bright star Aldebaran in the dawn sky.
This was a beautiful sight this morning, before dawn on July 29. The crescent Moon, its night side illuminated by Earthshine, shone just below the brightest star in Taurus.
We are currently in 3-year period when the Moon’s path is taking it near or in front of Aldebaran every month. However, most of these occultations or conjunctions are not well-timed for any particular location. And many involve the too-brilliant gibbous or full Moon.
But this morning the timing and Moon phase were perfect. From my longitude on Earth in Alberta, the Moon passed closest to the star just before the sky was getting too bright with dawn. Having them set against the deep blue twilight was perfect.
From farther east the Moon would not have appeared as close to Aldebaran as this before sunrise. From farther west the Moon and star would have appeared much lower in the sky at closest approach.
TECHNICAL:
For this image I shot 6 exposures, from 2 seconds for the Earthshine, twilight sky colour and stars, to 1/125th second for the bright crescent. I then stacked, aligned, and blended them together using luminosity masks – masks that hide or reveal parts of the image based on the brightness of the scene. You can see them in the Photoshop screen shot – Click on the image to enlarge it.
How do you create these masks?
• Turn off all the layers except the one you want to create a mask for.
• Go to Channels and Command/Control Click on the RGB Channel.
• That automatically selects all the highlights.
• Go back to the image layer and then hit the Add Mask button down at the bottom of the Layers panel (the rectangle with the black dot in it).
• Done. Repeat that for each image layer.
More traditional high dynamic range or “HDR” stacking left odd colour fringing artifacts and double images on the slowly moving Moon, despite applying what is called “de-ghosting” and despite using a mount tracking at the lunar rate. I tried merging the images with HDR, but it didn’t work.
A nifty Photoshop action from the Astronomy Tools set by Noel Carboni added the diffraction spikes.
I shot all images with the 130mm Astro-Physics refractor at f/6 and the Canon 60Da camera at ISO 400.
The sky presented a pyrotechnic display of light and colour in the sunset sky.
What a show tonight, July 18, as a thunderstorm lit the sky with bolts of lightning. As the storm retreated, the Sun broke through, ideal lighting for a rainbow. In this case I was able to capture the rainbow pierced by bolts of lightning. See below for tech details.
A little later, the sunlight got stronger and the rainbow grew to span the sky, in a beautiful display of a double rainbow lit by the red light of the setting Sun.
A double rainbow at sunset on July 18, 2016 after a pyrotechnic thunderstorm. The low Sun is providing the red lighting, with some shafts of sunlight and shadow converging to the anti-solar point. This is a 2-frame panorama with the 16-35mm lens at 16mm, stitched with Adobe Camera Raw.
As the beams of sunlight lit the clouds, it looked like the rainbow was on fire.
A double rainbow at sunset with the last rays of the setting Sun lighting the clouds and making the rainbow look like its on fire. A single image with the 16-35mm lens.
It has been a stormy start to summer in Alberta, but at times the sky has put on a stunning show. That was certainly the case tonight.
Technical on the Lightning and Rainbow shot at top:
This is a stack of 35 consecutive video frames taken with HD (1920 x 1080) resolution at 30 frames per second with the Canon 6D, and extracted as an image sequence with Photoshop, then processed in Adobe Camera Raw, then stacked with Russell Brown’s Stack-A-Matic into a smart object with maximum stack mode, to accumulate the frames taken over about 1 second into one still frame.
So I could have got this with a single 1-second exposure with the lens stopped way down and a ND filter, but my timing would have had to have been very, very lucky!
I am pleased to present my latest music video featuring Alberta Skies in motion, set to the music of Ian Tyson.
My 5-minute video features time-lapse imagery shot over the last three years in the plains, badlands, and mountains of Alberta.
Do click through to Vimeo and view in HD for the best quality.
The footage is set to the music of Alberta singer/songwriter Ian Tyson, and his superb rendition of Home on the Range. It is used by kind permission of Ian Tyson and Stony Plain Records. Thanks!
It was hearing Ian’s version of this song on CBC one day in 1992 when his album And Stood There Amazed came out that inspired me to move back to Alberta and the great landscapes of the west that I knew I wanted to capture.
Little did I know at the time how it was going to be possible in the 2000s to do it in time-lapse.
We achieved our funding goal on Kickstarter with 10 days to go.
Hurray! We made it to the top, with funding now secure to complete the production of our video tutorial series.
But the Kickstartercampaign doesn’t end now! You have until July 15 to back us, and get the videos at a big discount off the final retail prices when they are released later this year. So there’s still time to act and save!
A bright display of noctilucent clouds last night prompts me to remind northerners to look north at this prime season for night shining clouds.
Noctilucent clouds (NLCs) can be seen only in summer and are best in the few weeks before and after (mostly after) summer solstice. I shot all these images in the middle of the night. Indeed, the two images above and just below are from 3 am on the morning of June 27.
NLCs are high altitude clouds at the edge of space some 80 kilometres above the Earth, far above any normal weather clouds. Their height allows sunlight streaming over the pole to illuminate them all night long.
Noctilucent clouds at 3 am on June 27 over a prairie pond in southern Alberta. The NLCs were visible as an arc across the north for at least 2 hours and were still there as dawn twilight brightened at 3:30 am. This is looking due north with the bowl of the Big Dipper at upper left. Capella is at lower right. Shot with the 24mm lens.
Their cause is a mystery. They may form by water vapour condensing on meteoric dust particles.
They look luminescent, as if glowing on their own. But these are not auroras. They shine only by reflected sunlight.
And they have complex structures, with intricate waves and ripples.
A display of noctilucent clouds, the first good display of the season from my area of southern Alberta, on June 17/18. 2016. This is with a 105mm telephoto and the Nikon D750, and is the first frame of a 1000-frame time-lapse sequence. However, as the Sun dropped farther below the horizon the clouds did lose illumination and faded, from the top down.
And they move very slowly, as this time-lapse from June 17 shows.
Readers living at a latitude between 45° and 55° are best situated to see “NLCs.” From farther south the clouds will be below the horizon. From farther north the sky may be too bright with twilight and the angle of illumination wrong for optimum viewing.
Unlike auroras, there is no predicting when they might appear. Some nights when it is clear where you are, no NLCs appear. Perhaps that’s because of cloud much farther north blocking the path of light from the Sun on the other side of the planet to the clouds on our side of the Earth.
But by the end of July NLC season is coming to an end as the Sun drops farther below the northern horizon at night, and the nights get darker.
So over the next four weeks, look low in the north for night shining clouds.
On the night before the solstice Full Moon, the sky added a coloured halo around the Moon.
On June 19 I was at Waterton Lakes National Park, Alberta to teach a workshop on night photography, as one of the programs of the Park’s annual Wildflower Festival. The night proved hazy, but that added the attraction of an ice crystal halo around the Moon.
The lead image above is from Driftwood Beach, looking south across Middle Waterton Lake. Note Mars shining above the mountains at right.
Earlier in the night, at Red Rock Canyon, we watched the Moon rise in the twilight, then climb up the side of Mt. Blakiston. Here (below) it shines above the summit, surrounded by its hazy halo.
Lunar halo in a hazy sky at Red Rock Canyon, Waterton Lakes National Park, Alberta, with the Full Moon over Mt. Blakiston. This is a high-dynamic range stack of 6 exposures, to avoid the area around the Moon from blowing out too much while recorded detail in the dark foreground. All with the 20mm lens and Nikon D750.
The workshop participants made the best of the night, shooting the moonlit scene down the canyon, toward the north and Cassiopeia.
Nightscape photographer at a workshop I was presenting, shooting Red Rock Canyon in the moonlight at Waterton Lakes National Park, June 19, 2016. Cassiopeia is in the sky to the north. This is a single exposure for 13 seconds at f/2.8 and ISO 800 with the 20mm lens and Nikon D750.
And as here, shooting from the canyon footbridge, toward the very photogenic Anderson Peak, with Jupiter just above the peak.
A workshop group of photographers at Red Rock Canyon at Waterton Lakes National Park, Alberta, during the 2016 Wildflower Festival, June 19, 2016. Taken by the light of the Full Moon at solstice. Jupiter is the bright object behind Anderson Peak.
In keeping with the wildflower theme, I shot wild roses, Alberta’s provincial flower, in the moonlight, with Anderson Peak and stars in the distance.
Alberta wild roses in the moonlight with Anderson Peak in the background, at Red Rock Canyon, Waterton Lakes National Park, Alberta. Taken on Full Moon night June 19, 2016, at a workshop on nightscape imaging I was teaching as part of the Waterton Wildflower Festival. This is a single exposure at f/8 for 20 seconds at ISO 3200 with the 20mm lens and Nikon D750.
While we might like dark skies when going to places like Waterton, there are many magical options for photography when the Moon is shining.
Our video tutorial project is now live on Kickstarter!
For the last two years I’ve been involved in a project to produce a set of comprehensive video tutorials on how to shoot and process Nightscapes and Time-Lapses, to complement my ebook by the same name.
If you’ve not been able to attend my workshops – or even if you have! – these videos will provide you with all the information, and more, in a format you can review over and over.
We’ve shot all the field and studio footage, but to complete the production, we need your help. Back us on Kickstarterand we’ll be able to make the programs available this September, as downloads and on a shipped USB drive.
Our Kickstarter page has all the details. Early backers can purchase the tutorial programs now for as little as $55 – and that’s Canadian! – vs. $80 for the final retail price. The final programs will provide several hours of instruction, both in the field and at the computer.
If you have not participated in a Kickstarter campaign before, it is no risk. Nothing is charged to your credit card until and when the project is successfully funded after the 30-day campaign. If it isn’t successful, you are charged nothing.
Here’s our promo video describing the programs.
We have 30 days to make our goal. We invite you to join us in making our project a reality.
The nights were short and never fully dark, but early June provided a run of clear nights in the Rockies to enjoy Mars and the Milky Way.
Weather prospects looked good for a run of five nights last week so I took advantage of the opportunity to shoot nightscapes from Banff and, as shown here, in Yoho National Park across the Continental Divide in B.C.
The lead image above is a sweeping panorama at Emerald Lake, one of the jewels of the Rockies. Though taken at 1:30 a.m., the sky still isn’t dark, but has a glow to the north that lasts all night near summer solstice. Even so, the sky was dark enough to reveal the Milky Way arching across the sky.
The mountain at centre is Mt. Burgess, home of the famous Burgess Shale Fossils, an incredible collection of fossilized creatures from the Cambrian explosion.
The image is a panoramic stitch of 24 segments but cropped in quite a bit from the original, and all shot with an iPano motorized panning unit. Each exposure was 30 seconds at f/2.2 with the Sigma 24mm lens and Nikon D750 at ISO 4000. One short exposure of the lodge was blended in to reduce its light glare. The original, stitched with PTGui software, is 15,000 x 9,000 pixels.
The Milky Way over the side pond at Emerald Lake, Yoho National Park, BC., from the bridge to the Lodge. This is a stack of 8 x 25-second exposures for the foreground (mean combined to smooth noise), and one untracked exposure for the sky (to minimize trailing), all at f/2.8 with the Rokinon 14mm lens and Canon 6D at ISO 6400.
The view above, a single frame image, shows the view to the south as the Milky Way and galactic centre descend toward the horizon over the south end of the lake. Lights from the Lodge illuminate the trees.
Mars, at right, reflected in Emerald Lake at twilight in Yoho National Park, BC, June 7, 2016. This is a single 6-second exposure at f/3.2 with the Sigma 20mm lens and Nikon D750 at ISO 100.
The next night (above) I was at the same spot to shoot Mars in the deepening twilight, and reflected in the calm waters of Emerald Lake, with Cathedral Peak at left.
This is a vertical panorama of 4 segments, taken with the iPano unit, and with each segment a 30-second exposure at f/2.2 with the Sigma 24mm Art lens and Nikon D750 at ISO 4000. Stitched with Adobe Camera Raw.
Another multi-frame panorama, this time sweeping up from the horizon, captures Cassiopeia (the “W”) and the rising autumn constellations reflected in the lake waters.
Vega is at top, Deneb below it, while the stars of Perseus and Pegasus are just rising.
It was a magical two nights in Yoho, a name that means “wonderful!” Both by day and by night.
How many sources of skyglow can you pick out here?
There are at least five:
• the Milky Way (at left),
• green airglow (below the Milky Way),
• all too prevalent light pollution (especially reflected off the clouds coming in from the west at right),
• lingering blue twilight across the north (at left and right), common in May and June from my northern latitude,
• and even a touch of aurora right at the northern horizon at far left.
In this scene from May 28, the Milky Way arches over an abandoned pioneer farmstead from the 1930s and 40s near my home in southern Alberta.
Mars (very bright and in some clouds) and Saturn shine at lower centre, while Jupiter is the bright object in clouds at right just above the old house.
Arcturus is the brightest star here at upper right of centre, made more obvious here by shining through the clouds. The Big Dipper, distorted by the map projection used in the this panorama, is at upper right.
Technical: This is a 360° horizon to zenith panorama taken with the iPano motorized panning unit, using the 24mm lens at f/2.8 and Nikon D750 at ISO 6400, for a stitch of 28 panels, in 4 tiers of 7 segments each. Stitched with PTGui. South is at centre, north to either end. The original is 25,700 x 7,700 pixels.
Just after I shot the panorama I captured the International Space Station passing directly overhead in one of several passes this night.
The second Space Station pass of May 28/29, 2016, at 1:40 a.m., with cloud moving in adding the glows to all the stars. Taken with the 8mm fish-eye lens from home. The Big Dipper is high in the west at right. Mars is bright at bottom, to the south. Several other satellites are in the sky as well. This is a stack of 3 exposures, each 2.5-minutes with the camera on the Star Adventurer tracker.
At this time of year the ISS is lit all night by the Sun that never sets for the astronauts. We see the ISS cross the sky not once but several times in a night at 90-minute intervals.
While the sky near solstice is never dark at my latitude, it does have its compensations and attractions.
Mars is now shining brightly in the evening sky, as close and as bright as it has been since 2005.
Look southeast to south after dark and you’ll see a brilliant reddish “star.” That’s Mars, now at opposition, and retrograding slowly westward each night through Scorpius into Libra.
My image above captures Mars set in the entirety of the northern spring sky, complete with the arch of the Milky Way, twilight glows to the north (at left), some satellite trails …
… and Mars itself as the brightest object just right of centre shining above the landscape of Dinosaur Provincial Park.
Just to the left of Mars is Saturn, while below both is the star Antares in Scorpius, for a neat triangle of objects. Jupiter is the bright object in Leo at far right.
Technical: I shot the lead image on the evening of May 25. It is a 360° and horizon-to-zenith panorama stitched from 44 images, taken in 4 tiers of 11 panels each, shot with a motorized iOptron iPano mount. I used a 35mm Canon lens at f/2.8 for 30-second exposures with the Canon 6D at ISO 6400. I stitched the images with PTGui. The original image is a monster 32,500 pixels wide by 8,300 pixels high.
This is a stitch in Adobe Camera Raw of 9 segments, each with the Canon 35mm lens at f/5.6 and Canon 6D at ISO 800.
I shot the panorama above earlier in the evening, when Mars and Saturn were just rising in the southeast at left, and the sky to the northwest at right was still bright with twilight.
This shows the geometry of Mars at opposition. It lies opposite the Sun and is so rising at sunset and directly opposite the sunset point. The Sun, Earth and Mars are in a straight line across the solar system with Earth in the middle and as close to Mars as we get.
Actual date of opposition was May 22 but Earth is closest to Mars on May 30. That’s when it will look largest in a telescope. But to the unaided eye it appears as a bright red star.
This is a video 37 years in the making, compiling images and videos I’ve shot of total solar eclipses since my first in 1979.
Though I’ve “sat out” on the last couple of total eclipses of the Sun in 2015 and 2016, I’m looking forward to once again standing in the shadow of the Moon in 2017 – on August 21.
If you have not yet seen a total eclipse of the Sun, and you live in North America, next year is your chance to. It is the most spectacular and awe-inspiring event you can witness in nature.
I hope my video montage relays some of the excitement of being there, as the Moon eclipses the Sun.
As always, click HD and enlarge to full screen.
My montage features images and movies shot in:
• Manitoba (1979)
• Chile (1994)
• Curaçao (1998)
• Turkey (1999)
• Zimbabwe (2001)
• Australia (2002)
• Over Antarctica (2003)
• South Pacific near Pitcairn Island (2005)
• Libya (2006)
• Over Arctic Canada (2008)
• South Pacific near the Cook Islands (2009)
• Australia (2012)
• Mid-Atlantic Ocean (2013)
Out of the 15 total solar eclipses I have been to, only the 1991 and 2010 eclipses that I did go to are not represented in the video, due to cloud. Though we did see much of the 1991 eclipse from Baja, clouds intervened part way through, thwarting my photo efforts.
And I only just missed the 2010 eclipse from Hikueru Atoll in the South Pacific as clouds came in moments before totality. Of course, it was clear following totality.
Cameras varied a lot over those years, from Kodachrome film with my old Nikon F, to digital SLRs; from 640×480 video with a Sony point-and-shoot camera, to HD with a DSLR.
I shot images through telescopes to capture the corona and prominences, and with wide-angle lenses to capture the landscape and lunar shadow. I rarely shot two eclipses the same way or with the same gear.
I hope you enjoy the video and will be inspired to see the August 21, 2017 eclipse. For more information about that eclipse, visit:
Mars is approaching! It now shines brightly in the midnight sky as a red star in Scorpius.
You can’t miss Mars now. It is shining brighter than it has since 2005, and is about to come as close to Earth as it has in 11 years as well.
Mars is now approaching opposition, when the Earth comes closest to Mars, and the Sun, Earth and Mars lie along the same line. Opposition date is May 22. That’s when Mars shines at its brightest, at magnitude -2.1, about as bright as Jupiter. Only Venus can be a brighter planet and it’s not in our sky right now.
A week later, on May 30, Mars comes closest to Earth, at a distance of 75 million kilometres. That’s when the disk of Mars looks largest in a telescope. And you will need a telescope at high power (150x to 250x) to make out the dark markings, north polar cap, and bright white clouds on Mars.
Mars above Antares, with Saturn to the left, low in the south on May 13, 2016, in the moonlight of a waxing quarter Moon, from home in Alberta. This was one week before opposition and two weeks before closest approach, so Mars is particularly bright and red. However, from my latitude of 50° N Mars appears low in the south. This is a single 15-second exposure, untracked, at f/2.5 with the 35mm lens and Canon 6D at ISO 2000.
In these views, I show Mars shining as a bright reddish star low in my western Canadian sky. I shot the lead image from Dinosaur Provincial Park on May 16. The image just above was from my backyard the night before.
This week, Mars is passing between Beta and Delta Scorpii, two bright stars in the head of Scorpius, as the red planet retrogrades westward against the background stars.
Saturn shines to the east (left) of Mars now, with both planets shining above the red giant star Antares in Scorpius. In these photos they form a neat triangle.
Even without a telescope to magnify the view, it’ll be rewarding to watch Mars with the unaided eye or binoculars as it treks west out of Scorpius into Libra this spring and summer. It stops retrograding on June 30, then starts looping back into Scorpius, for a rendezvous with Antares and Saturn in late August.
This little compilation of time-lapse movies shows Mars, Saturn, and the rest of the sky, rising into the southeast and across the south on two nights this past week.
Be sure to explore Mars this month and next, whether by eye or by telescope. It’s the best we’ve seen it in a decade.
It’s next close approach in 2018 will be even better, though Mars will appear even lower in our northern sky.
On May 9, a last-minute chase into clear skies netted me a view of the rare transit of Mercury across the Sun.
The forecast called for typical transit weather – clear the day before, and clear the day after. But the day of the transit of Mercury? Hopeless at home in Alberta, unless I chanced the prospects of some clearing forecast for central Alberta.
As the satellite image below, for 8:30 a.m. MDT on May 9, shows, that clearing did materialize. But I headed west, as far west as I needed to go to be assured of clear skies – to central BC. Kamloops in fact.
I stayed at the Alpine Motel, got a great room as the end, and set up in the parking lot away from traffic. Not the most photogenic of observing sites, but I was happy! I had my clear skies!
I set up two telescopes, above: a 130mm refractor to shoot through, and an 80mm refractor to look through. Both with dense solar filters!
Both worked great. However, low cloud prevented me seeing the Sun as soon as it cleared the eastern hills. So this was my first good look, below, at the transit as the Sun rose above the clouds.
The May 9, 2016 transit of Mercury taken about half an hour after sunrise, as the Sun emerged from low horizon cloud. Taken from Kamloops, British Columbia, where the transit was well underway at sunrise. Mercury appears as the circular dot at lower left, with a sunpot group above centre. I shot this with the 130mm Astro-Physics refractor at f/6 prime focus with the Canon 60Da camera at ISO 100. Shot through a Kendrick white light solar filter. The low atltitude added much of the yellow colouration.
There it was – the fabled “little black spot on the Sun today.” Mercury is the dot at lower left, with a sunspot group at upper right. This was the first transit of Mercury since November 8, 2006. We see only about 13 Mercury transits a century, so in a lifetime of stargazing (the Sun is a star!) even the most avid amateur astronomer might see only a handful. This was only my third transit of Mercury.
The May 9, 2016 transit of Mercury taken about 45 minutes after sunrise, as the Sun emerged from low horizon cloud. I shot this with the 130mm Astro-Physics refractor at f/6 prime focus with the Canon 60Da camera at ISO 100. Shot through a Kendrick white light solar filter.
This was the view, above, a little later, as the Sun entered more assuredly clear skies. From about 7 a.m. PDT on, the Sun was in the clear most of the morning, with just occasional puffy clouds intervening now and then.
I shot still images every 30 seconds, to eventually turn into a time-lapse movie (after a ton of work hand registering hundreds of frames!).
But for now, I’ll be content with this composite of 40 frames, below, taken at 7-minute intervals. It shows the progress of Mercury across the Sun over the last 4.5 hours or so of the event, until egress at 11:38 a.m. PDT.
This motion is due to Mercury’s movement around the Sun. A transit is one of the few times you can easily see a planet actually orbiting the Sun.
For all images I used the 130mm f/6 Astro-Physics refractor with a 2X Barlow for an effective focal length of 1560mm and the Canon 60Da camera (at ISO 100) to yield an image size with the Sun just filling the frame. Exposures were 1/250th second through a Kendrick white light Mylar filter. Yellow colouration of the solar disk added in processing.
In this composite, the disks of Mercury are not all perfect dots. The wobbly seeing conditions distorted the images from frame to frame. But I used the actual images taken at that moment, rather than clone some perfect image across the disk to simulate the path.
To wrap up, here’s Mercury Transit: The Movie! I shot several HD and zoomed-in “crop mode” movies at the beginning of the transit and again at the final egress. Commentary is from me talking live into the camera mic as I was shooting the clips. Background noise is courtesy Pacific Drive and the Trans-Canada Highway!
Enjoy, and do enlarge to HD and full-screen for the best look.
The next transit of Mercury is November 11, 2019. If you are hoping for a transit of Venus, good luck. The next is not until December 10, 2117!
The sky and sea present an ever-changing panorama of light and colour from the view point of an Australian lighthouse.
Last week I spent a wonderful four nights at the Smoky Cape Lighthouse, in Hat Head National Park, on the Mid-North Coast of New South Wales. I was after panoramas of seascapes and cloudscapes, and the skies didn’t disappoint.
At sunset, as below, the sky to the east glowed with twilight colours, with the bright clouds providing a beautiful contrast against the darkening sky. The kangaroo at far right was an added bonus as he hopped into frame just at the right time.
A 270° or so panorama of the Smoky Cape Lighthouse near South West Rocks on Trial Bay, NSW, Australia, and in Hat Head National Park. This is a stitch of 12 segments, each a single 1.6-second exposure at f/8 with the 35mm lens in landscape orientation. Stitching with Adobe Camera Raw.
At sunrise, the Sun came up over the ocean to the east, providing a stunning scene to begin the day.
I shot this at dawn on April 28, 2016. This is a 7-section panorama with each section being a 5-exposure HDR stack, all stacked and stitched in Adobe Camera Raw.
The Smoky Cape Lighthouse was lit up for the first time in 1891. It was staffed for decades by three keepers and their families who lived in the cottages visible in the panoramas above. They tended to the kerosene lamps, to cleaning the lenses, and to winding the weight-driven clockwork mechanism that needed resetting every two hours to keep the reflector and lens assembly turning. By day, they would draw the curtains across to keep the Sun from heating up the optics.
The huge optical assembly uses a set of nine lenses, each a massive fresnel lens, to shot focused beams out to sea. The optics produce a trio of beams, in three sets.
Each night you could see the nine beams sweeping across the sky and out to sea, producing a series of three quick flashes followed by a pause, then another three flashes, the characteristic pattern of the Smoky Bay Light. Each lighthouse has its own flashing pattern.
Beams from the Smoky Cape Lighthouse in the twilight sky, beaming out beside the stars of the Southern Cross and the Pointers (Alpha and Beta Centauri) below, rising into the southeast sky in the deepening blue twilight. This is a single 0.6-second exposure at f/2.8 with the 35mm lens and Canon 6D at ISO 6400.
The lead photo, repeated above, shows the beams in the twilight, with the stars of the Southern Cross as a backdrop. Three beams are aimed toward the camera while the other two sets of beam trios are shooting away out to sea.
The image below shows the beam trio shining out over the water toward one of the dangerous rocks off shore.
The trio of beams from the Smoky Cape Lighthouse scanning across the sea and sky in an exposure shot as short as possible to freeze the beams. This is a single 1.6-second exposure at f/1.4 and ISO 12800, wide and fasrt to keep the beams from blurring too much.
The Lighthouse was converted to electricity in 1962, when staff was reduced. Then in the 1980s all lighthouses were automated and staff were no longer needed.
While we might romanticize the life of a lighthouse keeper, it was a lonely and hard life. Keepers were usually married, perhaps with children. While that may have lessened the isolation, it was still a difficult life for all.
Today, some of the cottages have been converted into rentable rooms. I stayed in the former house of the main light keeper, filled with memorabilia from the glory days of staffed lighthouses.
The Southern Cross, Crux, and the Pointer Stars, Alpha and Beta Centauri, above in the moonlight of the waning gibbous Moon before dawn, from the Smoky Cape Lighthouse looking southwest, on the coast of New South Wales, Australia. The Cape was named by James Cook in 1770 for the fires he saw on shore here. This is a single 5-second exposure at f/2.8 with the 35mm lens and Canon 6D at ISO 1000.
The image above takes in the Southern Cross over the moonlit beach in the dawn twilight.
The last image below is my final astrophoto taken on my current trip to Australia, a 360° panorama of the Milky Way and Zodiacal Light from the back garden of the Lighthouse overlooking the beach at Hat Head National Park.
A 360° panorama and from horizon to zenith of the southern sky and Milky Way from Smoky Cape and the grounds of the Lighthouse and Cottages. The panorama is a stitch of 9 segments, each shot with the 15mm full-frame fish-eye lens in portrait orientation, and at f/2.8 with the Canon 6D at ISO 3200. All exposures 1 minute, untracked on a tripod. Stitched in PTGui using equirectangular projection.
It’s been a superb trip, with over half a terabyte of images shots and processed! The last few blogs have featured some of the best, but many more are on the drives for future posts.
When visiting southern latitudes nothing disorients a northern hemisphere astronomer more than seeing our familiar Moon turned “the wrong way!”
With the Moon now dominating the night sky, my photo attention in Australia turns to it as my celestial subject.
It’s wonderful to see the Moon as a crescent phase in the evening sky, but now flipped around so it looks like the Moon we see from home up north when it is a waning crescent in the morning.
However, the lead image above actually shows the waxing crescent in the evening. It shines above the volcanic hills near Warrumbungles National Park, with the added silhouette of the dome of the Australian Astronomical Telescope, the largest optical telescope in Australia.
After a lifetime of seeing the Moon in its northerly orientation, seeing the austral Moon throws off your sense of time and direction. Are we looking west in the evening? Or east in the morning? The Moon just doesn’t make sense!
This is a two-exposure composite: a long exposure for the sky and ocean, and a short exposure for the disk of the Moon itself, to preserve some detail in the disk, specifically the mare areas to show the face of the Moon and not an overexposed white disk. Both with the 135mm telephoto and Canon 6D, from Woolgoolga, NSW.
Then there’s the Full Moon. It rises in the east, as does the Sun. But like the Sun, the “down under Moon” moves from right to left across the northern, not southern sky. And the familiar “Man in the Moon” figure is upside down, as seen above.
The photo above is from Friday night, and shows the Full Moon rising in the northeast over the Pacific Ocean.
The apogee Full Moon of April 22, 2016 rising over the Pacific Ocean and lighting the waters with a golden glitter path of reflected moonlight. I shot this from the Woolgoolga Headlands viewpoint, with the 135mm telephoto and Canon 6D. This is a high dynamic range stack of 5 exposures to compress the range in brightness. Even so, the Moon itself is still overexposed.
This “HDR” image above from earlier in the evening captures the golden glitter path of moonlight on the ocean waves. I photographed these Full Moon scenes from the Headlands viewpoint at Woolgoolga, a great spot for panoramic seascapes.
The Full Moon this night was the apogee Full Moon of 2016 – the smallest and most distant Full Moon of the year, the opposite of a “supermoon.”
This is a high dynamic range stack of 7 exposures to preserve the range in brightness between the bright sky and Moon, and the dark ground in the dim twilight.
Earlier in the week I was inland, high on the New England Tablelands in New South Wales. This image shows the waxing gibbous Moon in the evening twilight over Ebor Falls on the Guy Fawkes River, one of the few waterfalls on the famed Waterfall Way in New Soith Wales that has water flowing year round.
From southern latitudes the most amazing region of the sky shines overhead late on austral autumn nights.
There is no more spectacular part of the Milky Way than the regions around its galactic centre. Or at least in the direction of the galaxy’s core.
We can’t see the actual centre of the Galaxy, at least not with the cameras and telescopes at the disposal of amateur photographers such as myself.
It takes large observatory telescopes equipped with infrared cameras to see the stars orbiting the actual centre of the Milky Way. Doing so over many years reveals stars whipping around an invisible object with an estimated 4 million solar masses packed into the volume no larger than the solar system. It’s a black hole.
By comparison, looking in that direction with our eyes and everyday cameras, we see a mass of stars in glowing clouds intersected by lanes of dark interstellar dust.
The top image shows a wide view of the Milky Way toward the galactic centre, taking in most of Sagittarius and Scorpius and their incredible array of nebulas, star clusters and rivers of dark dust, all located in the dense spiral arms between us and the galactic core.
This is a mosaic of 6 segments, each segment being a stack of 4 x 3-minute exposures at f/2.8 with the 135mm Canon L-Series
Zooming into that scene reveals a panoramic close-up of the Milky Way around the galactic centre, from the Eagle Nebula in Serpens, at left, to the Cat’s Paw Nebula in Scorpius, at right.
This is the richest hunting ground for stargazers looking for deep-sky wonders. It’s all here, with field after field of telescopic and binocular sights in an area of sky just a few binocular fields wide.
The actual galactic core area is just right of the centre of the frame, above the bright Sagittarius StarCloud.
This is a stack of 5 x 5 minute exposures with the Borg 77mm f/4 astrograph and filter-modified Canon 5D MkII at ISO 1600, taken from Tibuc Cottage near Coonabarabran, NSW, Australia.
Zooming in again shows just that region of sky in an even closer view. The contrast between the bright star fields at left and the dark intervening dust at right is striking even in binoculars – perhaps especially in binoculars.
The visual impression is of looking into dark canyons of space plunging off bright plateaus of stars.
In fact, it is just the opposite. The dark areas are created by dust much closer to us, hiding more distant stars. It is where the stars are most abundant, in the dust-free starclouds, that we see farthest into the galaxy.
In the image above the galactic centre is at right, just above the small diffuse red nebula. In that direction, some 28,000 light years away, lurks the Milky Way’s monster black hole.
This is a stack of 5 x 6-minute tracked exposures with the 15mm fish-eye lens at f/4 and Canon 5D MKII at ISO 1600. The trees appear to be swirling around the South Celestial Pole at lower right above the Cottage.
To conclude my tour of the galactic centre, I back out all the way to see the entire sky and the Milky Way stretching from horizon to horizon, with the galactic centre nearly overhead in this view from 3 a.m. earlier this week.
Only from a latitude of about 30° South can you get this impressive view, what I consider one of the top “bucket-list” sights the sky has to offer.
Mars outshines his rival red star Antares in the heart of the Scorpion.
This was the view last night from my observing site in Australia, of red Mars shining near the red star Antares, whose very name means “rival of Mars.” But as Mars nears its closest approach to Earth next month it is already far brighter than Antares, easily winning the rivalry now.
The view takes in the head of Scorpius, one of the most colourful areas of the night sky when photographed in long exposures. Uniquely, Antares illuminates a nearby dust cloud with its light which is more yellow than red.
Other dust clouds reflect the blue light of hot young stars in this section of the Milky Way. Red nebulas are emitting their own light from glowing hydrogen.
The area around Antares is also streaked with lanes of dark dust that absorb light and at best appear a dull brown.
Mars reaches its closest point to Earth since 2005 on May 30. All through May and June Mars will shine as a brilliant red star near Antares. A telescope will provide the best view of the red planet we’ve had in a decade.
This is a stack of 4 x 3 minute exposures with the 135mm telephoto lens at f/2.8 and filter-modified Canon 5D MkII at ISO 1600, shot April 14, 2016 from Tibuc Cottage, Australia.
While you are in the area aim your telescope a little to the east to catch Saturn, also in the area, though technically over the border in the constellation of Ophiuchus the Serpent Bearer.
In the view above, Saturn is the bright “star” to the left of Mars. Saturn reaches its closest to Earth in early June. Its rings are now wide open and a spectacular picture postcard sight in any telescope.
This is a stack of 2 x 30-second exposures for the sky and ground, both tracked, plus a 30-second exposure through the Kenko Softon A filter to add the star glows to make the constellation pattern stand out. All with the 35mm lens at f/2 and Canon 6D at ISO 1600. Taken from Tibuc Cottage, Australia.
This final view shows Mars and Saturn rising with Scorpius in the moonlight from two nights ago. From my current latitude of 32° south, Scorpius comes up on his side.
Last week, northerners marvelled at the splendours of the southern hemisphere sky from a dark site in Australia.
I’ve attended the OzSky Sky Safari several times and have always come away with memories of fantastic views of deep-sky wonders visible only from the southern hemisphere.
This year was no exception, as skies stayed mostly clear for the seven nights of the annual star party near Coonabarabran, New South Wales.
About 35 people from the U.S., Canada and the U.K. attended, to take in views through large telescopes supplied by the Australian branch of the Texas-based Three Rivers Foundation. The telescopes come with the best accessory of all: knowledgeable Aussies who know the southern sky and are delighted to present its splendours to us visiting sky tourists.
Here are a few of the night scenes from last week.
The lead image above shows a 360° panorama of the observing field and sky from early in the evening, as Orion sets in the west to the right, while Scorpius rises in the east to the left. The Large Magellanic Cloud is at centre, while the Southern Cross shines to the upper left in the Milky Way.
This is a stitch of 8 panels, each with the 14mm Rokinon lens at f/2.8 and mounted vertical in portrait orientation. Each exposure was 2.5 minutes at ISO 3200 with the Canon 5D MkII, with the camera tracking the sky on the iOptron Sky Tracker. Stitched with PTGui software with spherical projection.
This panorama, presented here looking south in a fish-eye scene, is from later in the night as the galactic core rises in the east. Bright Jupiter and the faint glow of the Gegenschein are visible at top to the north.
Each night observers used the big telescopes to gaze at familiar sights seen better than ever under Australian skies, and new objects never seen before.
This is a stack of 4 x 5 minute exposures with the Rokinon 14mm lens at f/2.8 and Canon 5D MkII at ISO 1600, all tracked on the iOptron Sky Tracker, plus one 5-minute exposure untracked of the ground to prevent it from blurring. The trees are blurred at the boundary of the two images, tracked and untracked.
The Dark Emu of aboriginal sky lore rises above some of the 3RF telescopes.
This is a single untracked 13-second exposure with the 35mm lens at f/2 and Canon 6D at ISO 6400.
Carole Benoit from Calgary looks at the Orion Nebula as an upside-down Orion sets into the west.
This is a single untracked 10-second exposure with the 35mm lens at f/2 and Canon 6D at ISO 6400.
John Bambury hunts down an open cluster in the rich southern Milky Way near Carina and Crux.
This is a single 13-second untracked exposure with the 35mm lens at f/2 and Canon 6D at ISO 6400.
David Batagol peers at a faint galaxy below the Large Magellanic Cloud, a satellite galaxy to our Milky Way.
The Southern Cross, the iconic constellation of the southern sky, shines high in the south on austral autumn nights.
I’m in one of my favourite places, Australia, in particular at its self-proclaimed “astronomy capital,” Coonabarabran in New South Wales. Down the road from me is the Siding Spring Observatory.
But for 3 weeks I’m using my own telescope gear to observe and photograph the fabulous southern skies.
For part of my time here I’m attending the annual OzSky Star Party, a small and rather exclusive event for observers from around the world who come here to revel in celestial wonders visible only from southern latitudes.
The lead image at top is a 7-panel panorama of the star party in action, on the grounds of the Warrumbungles Mountain Motel, with a dozen or more large and premium telescopes set up for our use.
Overhead is the arch of the southern Milky Way, with the Southern Cross here at its highest about local midnight now in early April at the start of autumn. Below the Milky Way is the Large Magellanic Cloud, a companion galaxy to the Milky Way, itself a superb target for telescopes.
To the far right in the Milky Way is Sirius amid the gum trees, and the stars of Canis Major diving into the west. To the far left are the bright star clouds of Scorpius and Sagittarius rising in the east, bringing the glowing core of our Galaxy high into the austral sky. Bright Mars and Saturn shine in and around Scorpius.
This is a view of the Milky Way everyone should see – it is should be one of the top items on any amateur astronomer’s bucket list.
Circumpolar star trails over the OzSky star party near Coonabarabran, NSW, Australia, on April 3, 2016. This is a stack of 49 frames, each 45 seconds at f/2.8 with the 15mm fish-eye lens on the Canon 6D at ISO 4000. The ground comes from three frames in the sequence. Stacked with Advanced Stacker Plus actions using Streaks mode.
Here, above, I’ve stacked images from a time-lapse to create a star trail scene with the stars of the southern sky rotating about the blank South Celestial Pole. Again, the Southern Cross is at top.
The deep south Milky Way from Alpha and Beta Centauri (at left) to the False Cross in Vela and Carina (at right). This is a stack of 5 x 4 minute exposures at f/2.8 with the 35mm Canon L-series lens and filter-modified Canon 5D MkII at ISO 1000, with an additional similar exposure layered in taken through the Kenko Softon A filter to provide the star glows. Tracked on the iOptron Sky Tracker.
This view, above, focuses on the Milky Way of the deep south, from Vela to Centaurus, passing through Carina and Crux, with the bright Carina Nebula, the Southern Cross, and the dark Coal Sack front and centre.
A 3-panel mosaic of the Southern Cross, Crux, shot April 5, 2016 from Tibuc Cottage, Coonabarabran, NSW, Australia. This is a moasic of 3 panels, each a stack of 4 x 4-minute exposures with the Borg 77mm f/4 astrograph and filter-modified Canon 5D MkII at ISO 1600. Stacked and stitched in Photoshop.
Here I zoom into the Southern Cross itself, in a mosaic of 3 panels to cover the smallest constellation using a high-resolution astrograph, a 300mm f/4 lens. The Coal Sack is at lower left while numerous star clusters lie embedded within and around the Cross, including the famous “Jewel Box” at left, next to Beta Cruxis, aka Becrux.
The deep southern Milky Way arching across the sky, from Puppis and Vela at upper right, to Centaurus at lower left. The two Magellanic Clouds are at lower centre, with the Large Cloud at top. This is a stack of 5 x 1.5-minute exposures, all tracked on the iOptron Sky Tracker, at f/2.8 with the 15mm fish-eye lens, and Canon 5D MkII at ISO 3200. The ground comes from just one of the tracked exposures to minimize blurring. Taken from the Tibuc Gardens Cottage near Coonabarabran, NSW, Australia on March 30, 2016.
I shot the Crux mosaic from my cottage site at Tibuc Gardens, a superb dark sky site and home to a new cottage built after the devastating bush fires of 2013 which destroyed all the other cottages I had stayed at in previous years.
There’s much more to come, as I rapidly fill up my hard drive with time-lapses and deep-sky images of the southern sky. I already have several blogs worth of images processed or about to be. In the meantime, check my Flickr site for the latest images hot off the hard drive and uploaded as best my Oz internet connectivity allows.
My latest music video includes images, time-lapses and real-time videos of the Northern Lights shot in February and March 2016 in Churchill.
While I’ve posted my recent images of the aurora here and at many social media sites, all the videos I shoot take more work before they are ready to unveil to the public. Videos work best when set to music.
In this case, I’m very pleased to have received permission from EverSound Music to incorporate the music of one of my favourite artists, John Adorney, in my latest music video montage. The selection is If a Rose Could Speak, from his 2013 album The Wonder Well. It features vocals by Daya.
The video incorporates still images, as well as time-lapse sequences, and real-time videos of the Northern Lights.
The all-sky time-lapses are intended to be projected in digital planetarium theatres, recreating the scene on their 360° domes.
Please click on the V for Vimeo button to really see the video well. And select 1080p HD for the best image quality. And do share!
ABOUT THE VIDEO
I shot all scenes at the Churchill Northern Studies Centre, near Churchill, Manitoba, on the shore of Hudson Bay at a latitude of 58° North. Churchill’s location places it under the usual location of the auroral oval, providing spectacular displays of Northern Lights even on nights when locations to the south are seeing nothing.
I was at the CNSC to present sets of 5-night aurora viewing programs to guests from across North America. Click the link above for more details on their programs. The 2016 aurora season is over, but we’ll have more aurora programs in January and February of next year.
TECHNICAL
I shot all images with Canon 6D and Nikon D750 DSLR cameras, usually at ISO 3200. The fish-eye all-sky sequences were with a Sigma 8mm lens on the Canon, while most of the still images and other full-frame time-lapses were with the Sigma 20mm Art lens on the Nikon. For the “rapid-cadence” time-lapses I used 1- to 2-second exposures at an interval of one second.
The real-time video clips were with the Nikon – set to ISO 25600 – and the Sigma wide open at f/1.4. While these clips are prone to digital noise, they do record the fast movement and subtle colour of the aurora much as the eye saw it. See my earlier music video with real-time clips shot February 12 for more examples of these.
The all-sky sequences were processed through LRTimelapse v4 software, to handle the huge range in brightness of the Lights. Real-time video clips were processed in Photoshop with the Camera Raw filter.
Temperatures ranged from a bitter -35° C to just (!) -15° C on most nights.
I kept the long-duration, all-sky, time-lapse camera going by placing it in a Camera Parka (www.atfrostedlens.com) and inserting disposable hand warmer packs inside the insulated parka. It worked very well, making it possible to shoot for up to 3 hours. Without it, the battery died after an hour.
It was a night to remember, when the sky exploded with a jaw-dropping display of Northern Lights.
Warnings went out around the world and the aurora meters were hitting high numbers. By sunset we were charged up with high expectations of seeing the aurora in high gear dancing in the twilight. We were not disappointed.
From our location at the Churchill Northern Studies Centre near Churchill, Manitoba (latitude 58° North), we see aurora almost every clear night, even when indicators are low.
But this night, the Index was reading 7 on the scale of 0 to 9. I was afraid, after all the effort to come north to see the Lights, the Lights would abandon us and head south. Not so!
The night did start with the Lights in the south, as shown in the panorama image at top. It takes in a full 360°, with the aurora arcing from east to west across the southern sky in Orion. The north over the Centre is clear.
But the curtains soon moved back north and engulfed most of our sky for most of the rest of the night.
Participants in our aurora tour group took their aurora “selfies,” and just looked up in awe at one of nature’s great sky shows. When the last of the group turned in at 2:30 a.m. the Lights were still going.
What follows is a selection — just a few! — of the still shots I took. I also shot time-lapse sequences and real-time videos. All those will take more editing to turn them into a music video, still to come.
Enjoy!
A lone observer gazes skyward at the start of a wonderful aurora display on March 6, 2016, as the curtains begin to appear and dance in the deep blue twilight. This was at the Churchill Northern Studies Centre, Churchill, Manitoba.A lone observer gazes at an array of colourful curtains of aurora during an active display, March 6, 2016, with curtains in the evening twilight adding blue tints to the sky and tops of the curtains, as well as the greens and reds from oxygen. Curtains toward the horizon are more yellow due to atmospheric extinction. Jupiter is rising at left, then near opposition.Auroral curtains converge at the zenith in the evening twilight during a Kp Index 7 night of aurora in Churchill, Manitoba. Blue twilight adds the blue tints to the sky and curtains.Our group of Learning Vacations tourists enjoy the start of a fine display of Northern Lights at the Churchill Northern Studies Centre, March 6, 2016. As curtains appear to the east, another array of curtains shines to the west behind them with a strong purple tint lighting the sky and ground. The Andromeda Galaxy sits amid the curtains.Aurora watchers looking south to a bright curtain of Northern Lights while other curtains rippled behind them to the north. This was a fabulous all-sky display, March 6, 2016. The temperature was about -25° C.The green aurora lights the ground and snow green in a spectacular display March 6, 2016. This is looking northeast from the Churchill Northern Studies Centre, Churchill, Manitoba.A series of curtains of aurora, in a layered series across the sky, from the March 6, 2016 display in Churchill, Manitoba,The aurora over the Churchill Northern Studies Centre building, home to Arctic research and to many programs for tourists about northern ecology and science. The March Learning Vacations aurora tour group experienced a fabulous display this night, March 6, 2016.Some of our group of Learning Vacations aurora tourists outside the Churchill Northern Studies Centre enjoying the sky show on March 6, 2016 on a night with a Level 5 to 7 aurora.What do you see in the swirling patterns of aurora curtains at the zenith? They rapidly take many forms as they move about. This was the wonderful display of March 6, 2016.
I present a sweeping panorama of the winter and spring stars on a February night.
The lead image is a panorama I shot last Saturday, February 27 that takes in about 200° of sky from northeast to west, and nearly to the zenith. It encompasses most of the northern spring and winter stars and constellations.
I’ve added the labels to help you pick out the celestial highlights. The winter sky, containing Orion as the central constellation, is at right setting into the west. This area of sky contains a rich collection of bright stars and identifiable constellations.
The left side of the sky contains the spring constellations, now coming into view in the east. Note how that area of sky is sparsely populated by bright stars. You can see the Big Dipper, Regulus in Leo, and Arcturus rising at lower left.
The reason for the difference is the Milky Way – you can see it at right arcing up from the southern horizon passing by Orion and through Gemini, Taurus and Auriga. In that direction we are looking into the outlying spirals arms of our galaxy, toward rich areas of star formation.
To the east, at left, we are looking at right angles out of the plane of our spiral galaxy, toward the galactic North Pole, here just left of Leo. In that direction there are very few bright stars between us and the starless depths of intergalactic space. The spring sky is rather blank compared to the rich winter sky.
But you can see Jupiter, the brightest object in view here, and now prominent in the evening sky.
Note one other subtle glow just above Jupiter. That diffuse glow is the Gegenschein, caused by sunlight reflecting off interplanetary dust opposite the Sun in our solar system and in the plane of the ecliptic.
Jupiter is just east (left) of the Gegenschein here, as Jupiter was then just over a week before its date of opposition, March 8. By then the Gegenschein will have moved to superimpose right over Jupiter, as both then lie opposite the Sun.
I shot this scene from home on February 27, 2016, using the new iOptron iPano motorized “gigapan” unit, which I programmed to move and shoot 36 exposures with the Canon 5D MkII and 35mm lens, arranged in 4 rows high with 9 panels wide in each row from east to west. The result is a huge mosaic, 24,000 by 10,000 pixels.
Each exposure was 25 seconds at f/2 and at ISO 3200. The camera was not tracking the sky. I stitched the 36 segments with PTGui using its Spherical Fisheye projection. The image has black margins but I think the circular format is more suggestive of the spherical dome of the sky above and around you. But that’s me, a longtime planetarium show producer.
Next time I will shoot the zenith cap images as well!
My 10-minute video captures the Northern Lights in real-time video – no time-lapses here!
I hadn’t tried this before but the display of February 12, 2016 from Churchill, Manitoba was so active it was worth trying to shoot it with actual video, not time-lapse still frames.
I used very high ISO speeds resulting in very noisy frames. But I think the motion and colours of the curtains as they ripple and swirl more than overpower the technical limitations. And there’s live commentary!
Select HD and Enter Full Screen for the best quality.
Scenes have been edited for length, and I did not use all the scenes I shot in the final edit. So the scenes you see in the 10-minute video actually took place over about 20 minutes. But each scene is real-time. They show the incredibly rapid motion and fine structure in the auroral curtains, detail blurred in long multi-second exposures.
I used a Nikon D750 camera at ISO speeds from 12,800 to 51,200. While it is certainly very capable of shooting low-light video, the D750 is not optimized for it. A Sony a7s, with its larger pixels and lower noise, would have been a better camera. Next time!
The lens, however, was key. I used the new Sigma 20mm Art lens which, at f/1.4, is the fastest lens in its focal length class. And optical quality, even wide open, is superb.
The temperature was about -30 degrees C, with a windchill factor of about -45 C. It was cold! But no one in the aurora tour group of 22 people I was instructing was complaining. Everyone was outside, bundled up, and enjoying the show.
It was what they had traveled north to see, to fulfill a life-long desire to stand under the Northern Lights. Everyone could well and truly check seeing the aurora off their personal bucket lists this night.
For more information about aurora and other northern eco-tourism tours offered by the Churchill Northern Studies Centre, see churchillscience.ca
From Churchill, Manitoba the Northern Lights dance almost every night over the boreal forest.
This year, as in the last two years, I have traveled to the shores of a frozen Hudson Bay and to the town of Churchill, Manitoba to view and photograph the aurora borealis.
I’m instructing two tour groups at the Churchill Northern Studies Centre, one this week and one last week, in the science and sagas of the aurora and on how to shoot the Lights. The participants in the groups are fabulous, keenly interested and unfazed by the cold and wind.
From Churchill’s latitude of 58° N, we are under the main auroral oval almost every night. Even on nights with low official activity levels, as they were on all the nights I shot these images, we still get sky-filling displays.
Here’s a selection of still images from the last week of shooting, with clear skies on all but a couple of nights. There’s still room in our March sessions!
Circumpolar star trails and aurora over the boreal forest at the Churchill Northern Studies Centre, Churchill, Manitoba, on Feb 9, 2016. This is a stack of 250 frames shot over one hour (until the battery died) for a time-lapse but here stacked for a single image star trail using the Advanced Stacker Plus actions and Long Streaks effect. Each exposure was 15 seconds at f/2.8 with the 15mm lens and Canon 6D at ISO 6400.An all-sky aurora display of multiple curtains of aurora borealis over the boreal forest at the Churchill Northern Studies Centre, in Churchill, Manitoba, taken on Feb 5, 2016. The view is looking almost due north. Jupiter is at right. The Big Dipper is at centre frame. This is one frame from a 380-frame time-lapse sequence shot for digital dome projection in planetariums. This is a 20-second exposure at f/5 (stopped down by accident — should have been f/3.5) with the 8mm Sigma fish-eye lens and Canon 6D at ISO 3200. Temperature was -35° C. But no wind!Participants in the Arctic Skies tour and course observe and photograph the Northern Lights from the upper level observing deck at the Churchill Northern Studies Centre, Churchill, Manitoba on Feb 10, 2016, the first night of their tour. A Level 1 to 2 display provided a good first night show though with bitterly cold temperatures and wind chills of near -50° C. This is a single exposure of 8 seconds at f/1.4 with the 20mm Sigma Art lens and Nikon D750 at ISO 3200.The Northern Lights over the Churchill Northern Studies Centre on Feb 8/9, 2016 during a weak all-sky display. The arcs lay primarily in the south when the display was at its best this night. Orion and the Pleiades are just setting in the west over the town of Churchill. This is a 20 second exposure at f/2.8 with the 15mm full-frame fish-eye lens and Canon 6D at ISO 3200.A panorama across the northern horizon of the sweeping curtains of the aurora, taken from the observation deck of the Churchill Northern Studies Centre, Manitoba. I shot this on Feb 10, 2016 on the first night of the Arctic Skies tour group week. Vega is low in the north at left of centre, Arcturus is the bright star at right of centre. This is a 4-segment panorama, stitched with Adobe Camera Raw, with each segment 5 seconds at f/1.4 with the 20mm Sigma lens and Nikon D750 at ISO 3200.Curtains of the aurora looking northeast and east toward Leo rising (at upper right) and Jupiter (at right), over the boreal forest of the Hudson Bay Lowlands near Churchill, Manitoba, on Feb 5, 2016. This is a single frame from a 680-frame time-lapse. This is a 4-second exposure at f/1.4 with the Sigma 20mm Art lens and Nikon D750 at ISO 3200.Vertical curtains of aurora converging to the zenith overhead over the snowy boreal forest at the Churchill Northern Studies Centre, Churchill, Manitoba. I shot this Feb 4, 2016 on a night with temperatures of -35° C with a slight wind. The Big Dpper is at right. Exposure was 10 seconds at f/2.8 with the 15mm lens anf Canon 6D at ISO 3200.A lone figure gazes skyward at the aurora over the Churchill Northern Studies Centre, Churchill, Manitoba. I shot this Feb 4, 2016 on a night with temperatures of -35° C with a slight wind. Exposure was 13 seconds at f/2.8 with the 15mm lens anf Canon 6D at ISO 3200.A wide vertical portrait of the Northern Lights in the northern sky, with the stars of the Big Dipper and Polaris above centre. Shot from the upper deck of the Churchill Northern Studies Centre on a very windy night with wind chills of -50°, so standing in the wind to take this image was bitter! You grab a few images and retreat! This is a single 15-second exposure at f/2.8 with the 15mm lens and Canon 6D at ISO 3200.The February Arctic Skies tour group watching and photographing the aurora from the second floor deck of the Churchill Northern Studies Centre, where it is out of the wind, which this night was producing -50° C wind chills. This is a single 6-second exposure at f/2.8 with the 15mm lens and Canon 6D at ISO 6400.A self-portrait of me watching the Northern Lights from the upper deck of the Churchill Northern Studies Centre, looking south to the winter stars of Orion, Gemini and Auriga. This was Feb 11, 2016, a very windy, almost blizzard night with blowing snow and reduced visibility. However the aurora did appear through the haze and clouds. In the distance are the buildings of the old Churchill Rocket Range. This is a single 15-second exposure at f/2.8 with the 15mm lens and Canon 6D at ISO 3200.
Orion appears in his winter element, over snowscapes on crisp January nights.
A couple of clear-ish winter nights this past weekend allowed me to capture that most iconic of constellations, Orion, over snowy landscapes close to home here in Alberta.
At top, he rises over the famous Hoodoos near East Coulee, Alberta in the Red Deer River valley. Clouds moving in on Sunday night, January 10, added the photogenic glows around the stars, emphasizing their colour and brilliance.
Here, from a shot on Saturday, January 9, Orion appears down the end of my rural country Range Road, with Sirius, his companion Dog Star, following at his heels above the treetops and in some haze.
If this looks cold, it was – at minus 25° C. Though two hours later it was only -15° C and by morning it was 0° C. Winter in Alberta!
Both images are short exposures, 10 to 15 seconds, at f/2 or f/2.8 with the wonderful Sigma 24mm Art lens and my new favourite camera, the Nikon D750 at ISO 3200. In both cases the ground is from a stack of several exposures to smooth noise but the sky is from a single exposure to minimize star trailing.
The waning Moon joined Venus and Saturn on a cold winter dawn.
This was the scene this morning, January 6, as the waning crescent Moon met with Venus (bright, at centre) and Saturn (below and left of Venus) in the cold morning twilight.
The grouping appeared above the stars of Scorpius. Antares is just above the treetops.
The top image is with the Canon 60Da and 50mm lens.
The view below, with the 135mm telephoto and Canon 6D camera, is from a half hour earlier before the sky began to brighten with morning twilight.
The waning crescent Moon above Venus and Saturn (dimmer and below Venus) in the pre-dawn sky on January 6, 2016, taken from home on a cold winter morning at -20° C. This is a composite of a long exposure (8s) for the ground, a slightly shorter exposure (6s) for the sky, and shorter exposures for the Moon to avoid it being totally overexposed and to preserve the Earthshine. All with the 135mm lens and Canon 6D.
Venus passes very close to Saturn this weekend, with the two worlds appearing within a telescope field on the mornings of January 8 and 9. Get up early before sunrise and look southeast. Binoculars will provide a superb view.
Venus is hard to miss, but is now dropping lower each morning and will soon be gone from view as it ends its wonderful appearance as a morning star.
The Quadrantid meteors streaked out of the northern sky on a fine winter’s night.
The temperature was mild and skies clear in the early evening for the annual Quadrantid meteor shower. This is a prolific but short-lived shower with a brief peak. The cold and low altitude of its radiant point keeps this shower from becoming better known.
This was the first year I can recall shooting it. I had some success during a 2-hour shoot on January 3, from 9 to 11 pm MST.
The result above is a stack of 14 images, the best out of 600 shot that recorded meteors. The ground and sky comes from one image with the best Quad of the night, and the other meteor images were masked and layered into that image, with no attempt to align their paths with the moving radiant point.
However, over the 2 hours, the radiant point low in the north would not have moved too much, as it rose higher into the northern sky.
Most of the meteors here are Quads, but the very bright bolide at left, while it looks like it is coming from the radiant, it is actually streaking toward the radiant, and is not a Quadrantid. But oh so close! I left it in the composite for the sake of the nice composition!
Light clouds moving in added the natural star glows around the Big Dipper stars.
All frames were 10 seconds at f/2 with the 24mm lens and Nikon D750 at ISO 3200.
I present a horizon-to-zenith panorama of the pantheon of autumn constellations.
Yes, I know it’s winter, but as it gets dark each night now in early January the autumn stars are still front and centre. I took the opportunity during a run of very clear nights at home to shoot a panorama of the autumn sky.
It is a mosaic that sweeps up the sky and frames many related Greek mythological constellations:
• from the watery constellations of Aquarius, Pisces, and Cetus at the bottom near the horizon…
• to Pegasus and Aries in mid-frame…
• on up to Andromeda and Perseus at upper left…
• and finally Cassiopeia and Cepheus at the top of frame embedded in the Milky Way overhead. The Andromeda Galaxy, M31, is just above centre.
Here, I’ve labeled the participating constellations, though only a few, such as the “square” of Pegasus and the “W” of Cassiopeia, have readily identifiable patterns.
Most of these constellations are related in Greek mythology, with Princess Andromeda being the daughter of Queen Cassiopeia and King Cepheus, who was rescued from the jaws of Cetus the Sea Monster by Perseus the Hero, who rode on Pegasus the Winged Horse in some accounts.
Zodiacal Light brightens the sky at bottom right in Aquarius, and angles across the frame to the left.
TECHNICAL:
I shot this from home on a very clear night January 2, 2016 with the Zodiacal Light plainly visible to the naked eye.
This is a mosaic of 5 panels, each a stack of 5 x 2 minute exposures, plus each panel having another stack of 2 x 2 minute exposures blended in, and taken through the Kenko Softon filter to add the fuzzy star glows to make the constellations stand out.
All were shot with the 24mm Canon lens at f/2.8 and Canon 5DMkII at ISO 1600. All tracked on the AP Mach One mount.
All stacking and stitching in Photoshop CC 2015. Final image size is 8500 x 5500 pixels and 3.6 gigabytes for the layered master.
The New Year’s sky was filled with Northern Lights, a panorama of stars, and a comet at dawn.
It was a busy night for stargazing as 2015 turned to 2016. A fine display of Northern Lights kicked off the celebrations, as curtains danced in the east as Orion rose (below).
Toward midnight the Lights kicked up again, now with Jupiter (on the horizon) and Leo rising in the east (below).
I shot hundreds of frames for time-lapse sequences, and assembled them into a short music video. Click on the buttons to enlarge it to HD.
Just before midnight, while the second time-lapse was going and the aurora was still active, but before the Last Quarter Moon rose to light the sky, I shot a set of tracked images taking in the entire winter sky from horizon to well past the zenith.
That image is at top. It takes in the winter sky and northern winter Milky Way, from Canis Major just above the horizon, up past Orion, then on up to Perseus and Cassiopeia at top right.
It shows how Orion and Sirius, the night sky’s brightest star, stand nearly due south at midnight on New Year’s Eve.
Comet Catalina (C/2013 US10) near Arcturus in the constellation of Bootes, at pre-dawn on the morning of January 1, 2016, with the Last Quarter Moon nearby illluminating the sky. A long, faint ion tail is visible extending 2 to 3 degrees to the right while a brighter but stubby dust tail extends down to the south. Shot from home using the 200mm Canon telephoto and 1.4x extender at f/4.5 for a stack of 8 x 2-minute exposures at ISO 800 with the Canon 6D. Median combined stacked to eliminate satellite trails. The comet is slightly blurred due to its own motion in that time.The final show of the night, now before dawn on New Year’s Day 2016, was Comet Catalina sitting right next to the bright spring star Arcturus. The comet was visible in the moonlight as a fuzzy object next to brilliant Arcturus, but the photo begins to show its faint tails, just standing out in the moonlit sky.
The comet will become more visible later this month once the waning Moon exits the dawn sky, as Catalina is expected to remain a nice binocular comet for most of the month as it heads high into northern sky.
In a sweeping panorama, here is the entire northern hemisphere Milky Way from horizon to horizon.
This is the result of one of the major projects on my recent trek to Arizona and New Mexico – a mosaic of images shot along the Milky Way over several hours.
The goal is a complete 360° panorama of the entire Milky Way, and I’ve got most of the other segments in previous shoots from Alberta, Australia and Chile. But I did not have good shots of the northern autumn segments, until now.
The panorama sweeps from Cygnus (at top, setting in the western sky in the evening), across the sky overhead in Perseus, Auriga and Taurus (in the middle), and down into Orion, Canis Major, and Puppis (at bottom, low in the southern sky at midnight).
The view is looking outward to the near edge of our Milky Way, in the direction opposite the centre of our Galaxy. In this direction the Milky Way becomes dimmer and less defined. Notable are the many red H-alpha emission regions along the Milky Way, as well as the many lanes of dark interstellar dust nearby and obscuring the more distant stars.
However, a diffuse glow in Taurus partly obscures its Taurus Dark Clouds — that’s the Gegenschein, caused by sunlight reflecting off cometary dust particles directly opposite the Sun and marking the anti-solar point this night, by coincidence then close to galactic longitude of 180° opposite the galactic centre.
Here I provide a guided map of the mosaic. Orion is at lower right, while the Pleiades and Andromeda Galaxy lie near the right edge. The Andromeda Galaxy is the only thing in this image that is not part of the Milky Way.
The bright star Canopus is just rising at bottom, in haze. Vega and Altair are just setting at the very top. So the panorama sweeps from Altair to Canopus.
The sky isn’t perfect! Haze and airglow in our atmosphere add discolouration, especially close to the horizon. In my final 360° pan, I’ll use only the central portions of this panorama.
Now let’s put the horizon-to-horizon panorama into cosmic perspective…
In this diagram, based on art from NASA’s Spitzer Space Telescope Institute, I show my Northern Milky Way Panorama in perspective to the “big picture” of our entire Galaxy, using artwork based on our best map of how our Galaxy is thought to look.
We are looking in a “god’s eye” view across our Galaxy from a vantage point on the far side of the Galaxy.
Where we are is marked with the red dot, the location of our average Sun in a minor spiral arm called the Orion Spur.
The diagram places my panorama image in the approximate correct location to show where its features are in our Galaxy. As such it illustrates how my panorama taken from Earth shows our view of the outer portions of our Galaxy, from the bright Cygnus area at right, to Perseus in the middle, directly opposite the centre of the Galaxy, then over to Orion at left.
The panorama sweeps from a “galactic longitude” of roughly 90° at right in Cygnus, to 180° in Perseus, over to 240° in Orion and Canis Major at left.
In the northern autumn and early winter seasons we are looking outward toward the outer Perseus Arm. So the Milky Way we see in our sky is fainter than in mid-summer when we are looking the other way, toward the dense centre of the Galaxy and the rich inner Norma and Sagittarius arms.
Yet, this outer region contains a rich array of star-forming regions, which mostly show up as the red nebulas. But this region of the Milky Way is also laced with dark lanes of interstellar “stardust.”
The panorama is composed of 14 segments, most being stacks 5 x 2.5-minute exposures with the filter-modified Canon 5D MkII at ISO 1600 and 35mm lens at f/2.8.
The end segments near the horizons at top and bottom are stacks of 2 x 2.5-minute exposures.
Each segment also has an additional image shot through a Kenko Softon filter to add the star glows, to make the bright stars show up better.
The camera was oriented with the long dimension of the frame across the Milky Way, not along it, to maximize the amount of sky framed on either side of the Milky Way.
The camera was on the iOptron Sky-Tracker. I shot the segments for this pan from Quailway Cottage, Arizona on December 8/9, 2015, with the end segments taken Dec 10/11, 2015. I decided to add in the horizon segments for completeness, and so shot those two nights later when sky conditions were a little different.
Meteors from the Geminid shower rain over the dishes of the VLA radio telescope.
Sunday night was a prime night for the annual Geminid meteor shower, one of the best of the year. To capture it, I traveled to the Plains of San Agustin in the high desert of New Mexico.
It’s there that the National Radio Astronomy Observatory operates the 27 dishes of the Very Large Array radio telescope, one of the most photogenic – and photographed – astronomical facilities in the world.
I set up at a viewing point near the entrance, to look northwest over the dishes, arrayed that night, and all season, in its most compact configuration, with all the dishes clustered closest together.
It was an active meteor shower! One particularly bright meteor left a persistent “train” – a smoke trail that lasted over 15 minutes. It creates the fuzzy cloud around the meteor at right. The bright bolide is on two frames, as the shutter closed then opened again as the meteor was still flying! So its bright streak got cut in two. Pity!
I shot with two cameras. The image here is from one, using a 35mm lens to shoot 334 frames over 3 hours. Each exposure was 32 seconds at f/2 and at ISO 3200.
I’ve taken about two dozen of the frames, the ones with meteors, and stacked them here, with the sky and ground coming from one frame. The camera was not tracking the sky.
Bands of natural airglow and clouds illuminated by the lights of Albuquerque to the north add colour to the sky.
I would have shot for longer than three hours, but this was a very cold night, with a brisk wind and temperatures below freezing. A snowstorm had even closed some roads the day before. Three hours was enough on the high plains of San Agustin this night.
The sky of December contains an amazing array of bright stars and deep-sky delights.
At this time of year we peer out toward the edge of our Galaxy, in the direction opposite to what we see in July and August. Even though we are looking away from the centre of our Galaxy, the Milky Way at this time of year contains a stunning collection of sights – for the naked eye, binoculars or a telescope.
I can’t list them all here, but most are in the lead image above! The image is a mosaic of the northern winter Milky Way, including the brilliant stars and constellations in and around Orion the Hunter.
The Milky Way extends from Perseus in the north at top, to Canis Major in the south at bottom. Throughout the scene are dark lanes and dust clouds, such as the Taurus Dark Clouds at upper right.
The Milky Way is dotted with numerous red “hydrogen-alpha” regions of emission nebulosity, such as the bright Rosette Nebula at lower left and the California Nebula at upper right. The curving arc of Barnard’s Loop surrounds the east side of Orion. Orion is below centre, with Sirius, the night sky’s brightest star, at lower left.
The constellation of Taurus is at upper right and Gemini at upper left. Auriga is at top and Perseus at upper right.
There’s an unusually bright area in Taurus just right of centre in the mosaic which I thought might be an image processing artifact. No. It’s the Gegenschein – a glow of sunlight reflected off comet dust directly opposite the Sun.
Two highlights of this sky that are great regions for binoculars are the Hyades cluster in Taurus ….
The Hyades open star cluster in Taurus with the bright star Aldebaran, not a part of the cluster iteslf. The smaller and more distant cluster NGC 1647 is at left. This is a telephoto lens image taking in a field similar to binoculars, and is a stack of 5 x 2.5-minute exposures with the 135mm lens at f/2 and Canon 5D MkII camera at ISO 800, plus two other exposures taken through the Kenko Softon filter to add the star glows. Taken from Quailway Cottage on Dec 7, 2015 using the iOptron Sky-Tracker.
…and the Belt and Sword of Orion.
The Hyades – the face of Taurus – is one of the nearest and therefore largest open star clusters.
Orion the Hunter, who battles Taurus in the sky, contains the famous Orion Nebula, here overexposed in order to bring out the much fainter nebulosity in the region.
The magenta and blue arcs in the image below are photographic targets, but the bright Orion Nebula in Orion’s Sword is easy in binoculars, shining below the trio of his Belt Stars.
A mosaic of the Sword and Belt region of Orion the Hunter, showing the diverse array of colourful nebulas in the area, including: curving Barnard’s Loop, the Horsehead Nebula below the left star of the Belt, Alnitak, and the Orion Nebula itself as the bright region in the Sword. Also in the field are numerous faint blue reflection nebulas. The reflection nebula M78 is at top embedded in a dark nebula, and the pinkish NGC 2024 or Flame Nebula is above Alnitak. The bright orange-red star at far right is W Orionis, a type M4 long-period variable star. This is a 4-panel mosaic with each panel made of 5 x 2.5-minute exposures with the 135mm Canon L-series telephoto wide open at f/2 and the filter-modified Canon 5D MkII at ISO 1250. The night was somewhat hazy which added natural glows on the stars. No filter was employed here. The camera was on the iOptron Sky-Tracker for tracking but no guiding. Shot from outside Quailway Cottage near Portal, Arizona, Dec 7, 2015. All stacking and stitching performed in Photoshop CC 2015. Stacking done with median combine stack mode to eliminate geosat trails through the fields.
For us in the northern hemisphere, Orion and company are winter sights. But for those down under, in the southern hemisphere, this is the summer sky. So pardon the northern chauvinism in the title!
Either way, on a dark, moonless night, get out and explore the sky around Orion.
TECHNICAL:
I shot the segments for the main mosaic at top on a very clear night on December 5, 2015 from the Quailway Cottage at Portal, Arizona. This is a mosaic of 8 segments, in two columns of 4 rows, with generous overlap. Each segment was made of 4 x 2.5-minute exposures stacked with mean combine stack mode to reduce noise, plus 2 x 2.5-minute exposures taken through the Kenko Softon filter layered in with Lighten belnd mode to add the star glows. Each segment was shot at f/2.8 with the original 35mm Canon L-series lens and the filter-modified (by Hutech) Canon 5D MkII at ISO 1600, riding on the iOptron Sky-Tracker. All stacking and stitching in Photoshop CC 2015. The soft diffusion filter helps bring out the star colors in this area of sky rich in brilliant giant stars.
Comet Catalina sports two tails as it moves past Venus in the dawn sky.
This was the view this morning, December 9, from my site in Arizona, of Comet Catalina near Venus in the dawn sky. This is a telephoto lens shot that provides a view similar in size to what binoculars show.
However, the blue ion tail visible here stretching back several degrees is mostly a photographic target. Visually, just Catalina’s short, stubby dust tail at lower right is obvious.
The ion tail points away from the Sun, while the dust tail extends along the comet’s orbit, showing where the comet has been.
The view, both visually and photographically, of the comet will improve as it climbs higher into the eastern morning sky and as it moves away from the glare of Venus. The Moon is also now gone from the dawn, at least for the next couple of weeks.
The comet is dimmer than expected but should at least maintain this brightness for the next month or so.
Technical:
This is a stack of 5 x 90-second exposures, taken with the 135mm telephoto and 1.4x extender for a focal length of 190mm, at f/2.8 and with the Canon 5D MkII at ISO 1600, tracked on the iOptron Sky-Tracker. Two other exposures, of 15s and 1s, were blended in with luminosity masks to reduce the glare of Venus to a smaller size.
What a morning of sky sights, both before dawn and after sunrise.
December 7 – This was the prime day I came to Arizona to enjoy, to be better assured of clear skies. As it turned out this will likely be the cloudiest day of the week here, but skies were clear enough for a fine view of a conjunction and an occultation. The comet was a bonus.
This is a stack of 5 exposures: 30, 8, 2, 0.5 and 1/8s, blended with luminosity masks as HDR would not blend images with such a large range of brightness and content, with the shortest exposures having almost no content execept for two bright objects! The camera was on the iOptron Sky-Tracker to follow the sky and keep the sky targets stationary and aligned, thus the blurred foreground. All with the 135mm lens at f/2.8 and Canon 6D at ISO 400.
At 4 a.m. the waning crescent Moon rose accompanied by Venus, as the two worlds appeared in close conjunction in the pre-dawn sky. The view above captures the scene as the Moon and Venus rose over the Peloncillo Mountains of New Mexico. Comet Catalina is in this scene but barely visible.
This is a stack of 6 exposures: 30, 8, 2, 0.5, 1/8s and 1/30s, blended with luminosity masks as HDR would not blend images with such a large range of brightness and content, with the shortest exposures having almost no content execept for two bright objects! The camera was on the iOptron Sky-Tracker to follow the sky and keep the sky targets stationary and aligned. All with the 135mm lens at f/2.8 and Canon 6D at ISO 800.
An hour or so later, with the Moon and Venus higher and with skies a little less cloudy, I was able to capture this scene, above, that included Comet Catalina, as a tiny blue dot next to Venus and the Moon. But if I hadn’t labeled it, you wouldn’t know it was there! The comet is proving to be less wonderful than anticipated, and any cloud dims the view even more.
I had hoped for a superb scene of a bright comet next to the two brightest objects in the night sky. But comets do what comets do — surprise people with unexpected brightness (as Comet Lovejoy did last January) or with disappointing dimness … or by disappearing altogether, as Comet ISON did two years ago. I came here in December 2013, to this same location on the Arizona-New Mexico border, to catch ISON but no luck there at all!
This is a stack of 7 exposures from 10 seconds to 0.3 seconds at 1 stop intervals and blended with luminosity masks, to compress the huge range in brightness from the bright Moon and Venus, plus horizon sky, and the darker sky and sunrise clouds. All with the 35mm lens and Canon 6D.
Regardless of the comet, the conjunction of the Moon and Venus was stunning, about as good as such events get. Here’s the view, above, an hour later again, with the eastern sky brightening in the dawn twilight. The only thing that would have made this event even more spectacular is if the Moon had actually covered up Venus in this twilight sky. Not quite.
The occultation of Venus by the waning crescent Moon in the daytime on Monday, December 7 at 9:30 am local time. This is just about 3 minutes before the actual occultation as the advancing Moon is about to cover Venus on the bright limb of the Moon. This is a frame from a 100-frame time lapse. Unfortunately, as I shot this on my trip to Arizona, I did not have more focal length than the 135mm and 1.4x extender used here.
For the occultation itself, we had to wait until well after sunrise for an event in the blue daytime sky, at 9:30 a.m. local time.
All of North America got to see this fairly rare occultation of Venus by the Moon, albeit in the daytime. Nevertheless, the two objects are so bright, this was visible to the unaided eye, even with some cloud about. In binoculars it was wonderful.
To shoot it, all I had was a telephoto lens, so the image scale doesn’t do the event justice. But the image above provides a good impression of the binocular view, with Venus as a brilliant jewel on the “ring” of the Moon.
I got the comet but it isn’t what was hoped for – a faint fuzzball in binoculars.
This was Comet Catalina (aka C/2013 US10) in the dawn sky this morning, December 6, with the comet appearing as a fuzzy star below brilliant Venus in binoculars, and just revealing its two short tails in photos. It’s the cyan-colored object near the centre. Venus is the brilliant object.
This image is with a telephoto lens, and covers a little more of the sky than typical binoculars would show. I knew this would be a binocular comet at best, but it’s barely that. This is more a comet for telescopes.
But as the Moon departs the scene and the comet climbs higher the view may improve. Still, if you are pining for views of Comet Catalina and are stuck under cloudy winter skies at home, don’t be worried. You aren’t missing too much. Except …
The arch of the Milky Way in the northern autumn and early winter sky, from Arizona on December 5, 2015. The Milky Way extends from Aquila to the left, in the southwest to Cassiopeia at top right, to Perseus and Auriga at far right, in the northeast. I shot this from the Quailway Cottage near Portal, Arizona, latitude +32° N. The view is looking north toward the celestial pole. Polaris is just right of lower centre. This is a stack of 8 tracked exposures, each 3 minutes at f/2.8 with the 15mm lens and Canon 6D at ISO 1600, with the ground coming from one exposure to minimize blurring. The camera was on the iOptron Sky-Tracker.
This was the view of the autumn Milky Way from here in Arizona last night. Pretty impressive under nearly perfect sky conditions. And then there’s this …
Orion and the northern winter constellations and Milky Way setting at dawn over the Chiricahua Mountains of southwest Arizona, near Portal, AZ. The waning crescent Moon in the west provided the illumination in this dawn shot from December 6, 2015. Orion is just above the main peak at centre, with Sirius, in Canis Major, to the left and Aldebaran, in Taurus, to the right. The Pleiades are setting at right. The star cluster at top is the Beehive, M44, in Cancer. Bands of airglow add the red streaks. The site is the Quailway Cottage near Portal, Arizona. This is a stack of 4 x 2 minute exposures, tracked, at f/3.5 with the 15mm full-frame fish-eye lens and Canon 6D at ISO 1250, for the sky, and the same specs for 4 exposures, untracked for the ground. Each set was mean-combined stacked to reduce noise.
This was the winter Milky Way with Orion setting into the west over the Chiricahuas at dawn. Turn around from looking at the comet and this was the view. So who cares if the comet isn’t too great? There’s lots more to see and shoot. With no snow, no frost, no dew.
Cloud hid Comet Catalina but added a halo around the waning Moon, intersected by the line of the ecliptic.
I’m in Arizona, just inside the state line with New Mexico, on a quest to shoot Comet Catalina at dawn. Clouds prevented any view of the faint comet this morning but provided a fine consolation prize.
The waning crescent Moon was surrounded by an ice crystal halo, a rare sight around a thin Moon. The Moon was between Mars and Jupiter, heading toward a conjunction with Venus, below, on December 7.
The line of Venus, Mars, the Moon, and Jupiter, plus the stars Spica and Regulus defined the line of the ecliptic beautifully in the pre-dawn sky.
This is a stack of 4 exposures from long to short (8s to 1/2s) to encompass the great range in brightness and not overexpose the crescent Moon too much. Images were layered in Photoshop and masked with luminosity masks. Automatic HDR techniques did not work well as the shortest image was too dark for ACR to find content to register in Merge ot HDR, and in Photoshop the HDR Pro module left visible edge artifacts. The camera was on the iOptron Sky Tracker to follow the sky and register the sky for all the exposures, thus the slightly blurred ground. Taken with the Canon 6D and 15mm full-frame fish-eye lens.
It was a show of circles and lines, real and imagined, in the morning sky.
With luck, clouds will clear to reveal Comet Catalina, which is likely fainter and less spectacular than hoped. But such is the way of comets. Regardless of what the comet does, it is a good time to be in the desert southwest, typing this blog on a sunny front porch under blue desert skies.
A new comet is coming into our morning sky, for our binocular viewing pleasure.
Comet Catalina, aka C/2013 US10, has emerged from behind the Sun and is beginning to rise into our northern hemisphere dawn sky. The new comet promises to be visible in binoculars, but likely won’t be obvious to the unaided eyes.
On the morning of December 7 the comet sits within a binocular field of the waning crescent Moon which itself sits just above brilliant Venus. That in itself will be a remarkable view, best appreciated in binoculars, and a fine photogenic sight for the camera.
The close conjunction of the crescent Moon with Venus alone will be enough of an attraction on December 7, but the comet should add to the scene.
December 7 Venus Occultation
Even more, later in the day the Moon actually passes in front of, or “occults,” Venus in the daytime sky for most of North America.
That occultation happens in the morning for western North America and in the early afternoon for eastern North America. However, you’ll need a telescope to see it well, and very clear blue skies.
Use planetarium software (the free Stellarium program, for example, shown above, if you do not own astronomy software) to simulate the sky and provide the occultation times for your location. Zoom into the Moon and run time back and forth on December 7 to see when Venus goes behind the Moon and reappears. The screen shot above is for Calgary.
Back to the Comet
Comet Catalina was discovered in October 2013 at the Catalina Observatory in Arizona. The comet spent the last few months in the southern hemisphere sky, but is now coming north and into our sky, but at dawn.
It rises higher and higher each morning through December and into the new year. It may remain at fifth magnitude, bright enough to be easily visible in binoculars from a dark site, but likely not naked eye.
The chart above plots the comet at daily intervals, from December 4 to January 1. The comet is shown for December 15. Note that on the morning of January 1 it sits within a telescope field of the bright star Arcturus.
The distance from Earth to the comet decreases through December and early January, keeping the comet at a constant brightness even as it recedes from the Sun. We are closest to Catalina on January 17, at a far distance of 108 million km. But in late January the comet fades rapidly to become a telescope target.
To see Comet Catalina this month, get up 1 to 2 hours before sunrise and look southeast to east. But you will need dark skies to see it well. This will not be a good urban comet.
Nevertheless, as far as we know, this will be the best comet of 2016.
Last night I shot into the autumn Milky Way at the Heart Nebula.
I’m currently just finishing off a month of testing the new Nikon D810a camera, a special high-end DSLR aimed specifically at astrophotographers.
I’ll post a more thorough set of test shots and comparisons in a future blog, but for now here are some shots from the last couple of nights.
Above is the setup I used to shoot the image below, shot in the act of taking the image below!
The Nikon is at the focus of my much-loved TMB 92mm refractor, riding on the Astro-Physics Mach One mount. The mount is being “auto-guided” by the wonderful “just-press-one-button” SG-4 auto-guider from Santa Barbara Instruments. The scope is working at a fast f/4.4 with the help of a field flattener/reducer from Borg/AstroHutech.
I shot a set of 15 five-minute exposures at ISO 1600 and stacked, aligned and averaged them (using mean stack mode) in Photoshop. I explain the process in my workshops, but there’s also a Ten Steps page at my websitewith my deep-sky workflow outlined.
The Heart Nebula, IC 1805, in Cassiopeia, with nebula NGC 896 at upper right and star cluster NGC 1027 at left of centre. This is a stack of 15 x 5-minute exposures with the Nikon D810a as part of testing, at ISO 1600, and with the TMB 92mm apo refractor at f/4.4 with the Borg 0.85x field flattener. Taken from home Nov 29, 2015.
The main advantage of Nikon’s special “a” version of the D810 is its extended red sensitivity for a capturing just such objects in the Milky Way, nebulas which shine primarily in the deep red “H-alpha” wavelength emitted by hydrogen.
It works very well! And the D810a’s 36 megapixels really do resolve better detail, something you appreciate in wide-angle shots like this one, below, of the autumn Milky Way.
It’s taken with the equally superb 14-24mm f/2.8 Nikkor zoom lens. Normally, you would never use a zoom lens for such a demanding subject as stars, but the 14-24mm is stunning, matching or beating the performance of many “prime” lenses.
The Milky Way from Perseus, at left, to Cygnus, at right, with Cassiopeia (the “W”) and Cepheus at centre. Dotted along the Milky Way are various red H-alpha regions of glowing hydrogen. The Andromeda Galaxy, M31, is at botton. The Double Cluster star cluster is left of centre. Deneb is the bright star at far right, while Mirfak, the brightest star in Perseus, is at far left. The Funnel Nebula, aka LeGentil 3, is the darkest dark nebula left of Deneb. This is a stack of 4 x 1-minute exposures at f/2.8 with the Nikkor 14-24mm lens wide open, and at 24mm, and with the Nikon D810a red-sensitive DSLR, at ISO 1600. Shot from home, with the camera on the iOptron Sky-Tracker.
The D810a’s extended red end helps reveal the nebulas along the Milky Way. The Heart Nebula, captured in the close-up at top, is just left of centre here, left of the “W” forming Cassiopeia.
The Nikon D810a is a superb camera, with low noise, high-resolution, and features of value to astrophotographers. Kudos to Nikon for serving our market!
The summer Milky Way sets into the southwest on a late November night.
On Saturday, November 28, well into winter here in Alberta, the stars of the Summer Triangle and the summer Milky Way set into the southwest on a clear, though slightly hazy, late November night.
This is the last of the summer Milky Way, with the centre of the Galaxy now long gone, but the Summer Triangle stars remaining in the evening sky well into autumn. Glows from light pollution in the west light the horizon, in a quick series of images shot in my rural backyard.
In the Summer Triangle, Vega is at right, as the brightest star; Deneb is above centre, and Altair is below centre, farthest south in the Milky Way.
I shot this as a test image for the Nikkor 14-24mm lens, here wide-open at f/2.8 and at 14mm, where it performs beautifully, with very tight star images to the corners. It does very well at 24mm, too! This is astonishing performance for a zoom lens. It matches or beats many “prime” lenses for quality.
The camera was the 36-megapixel Nikon D810a, Nikon’s “astronomical DSLR” camera, also on test. Here it shows its stuff by picking up the red nebulas in Cygnus and Cepheus.
Thorough tests of both the camera and lens will appear later in the year. Stay tuned.
Do subscribe to my blog (click below) to get email notices of new entries.
For the even more technically-minded, this image is a stack, mean combined, of five 2-minute tracked exposures, at f/2.8 and ISO 800. The camera was on the iOptron Sky-Tracker. So the stars are not trailed but the ground is! I made no attempt here to layer in an untracked ground shot, as there isn’t much detail of interest worth showing, quite frankly.
At least not in the ground. But the Milky Way is always photogenic.
Orion ascends into the sky on a clear autumn night, with its stars drawing trails behind it as it rises.
Only on November nights is it possible to capture Orion rising in the evening sky. Here, I used the light of the waxing gibbous Moon to illuminate the landscape … and the sky, creating the deep blue tint.
The lead image above is an example of a star trail, a long exposure that uses Earth’s rotation to turn the stars into streaks across the sky. In the old days of film you would create such an exposure by opening the shutter for an hour or more and hoping for the best.
Today, with digital cameras, the usual method is to shoot lots of short exposures, perhaps no more than 20 to 40 seconds each in rapid succession. You then stack them later in Photoshop or other specialized software to create the digital equivalent of a single long exposure.
The image above is a stack of 350 images taken over 2.5 hours.
With a folder of such images, you can either stack them to create a single image, such as above, or string them together in time to create a time-lapse of the stars moving across the sky. The short video below shows the result. Enlarge the screen and click HD for the best quality.
For the still image and time-lapse, I used the Advanced Stacker Plus actions from StarCircleAcademyto do the stacking in Photoshop and create the tapering star trail effect. A separate exposure after the main trail set added the point-like stars at the end of the trails.
My tutorial on Vimeo provides all the details on how to shoot, then stack, such a star trail image…
… While this video illustrates how to capture and process nightscapes shot under the light of the Moon.
Learn the basics of shooting nightscape and time-lapse images with my three new video tutorials.
In these comprehensive and free tutorials I take you from “field to final,” to illustrate tips and techniques for shooting the sky at night.
At sites in southern Alberta I first explain how to shoot the images. Then back at the computer I step you through how to process non-destructively, using images I shot that night in the field.
Tutorial #1 – The Northern Lights
This 24-minute tutorial takes you from a shoot at a lakeside site in southern Alberta on a night with a fine aurora display, through to the steps to processing a still image and assembling a time-lapse movie.
Tutorial #2 – Moonlit Nightscapes
This 28-minute tutorial takes you from a shoot at Waterton Lakes National Park on a bright moonlit night, to the steps for processing nightscapes using Camera Raw and Photoshop, with smart filters, adjustment layers and masks.
Tutorial #3 – Star Trails
This 35-minute tutorial takes you from a shoot at summer solstice at Dinosaur Provincial Park, then through the steps for stacking star trail stills and assembling star trail time-lapse movies, using specialized programs such as StarStaX and the Advanced Stacker Plus actions for Photoshop.
As always, enlarge to full screen for the HD versions. These are also viewable at my Vimeo channel.
The morning planets are now strung out along the ecliptic, visualizing this line in the sky.
This was the view this morning, November 14, of the three dawn planets lined up along the ecliptic, with the stars Spica and Regulus also defining this imaginary line.
The ecliptic is the Earth’s orbital path around the Sun projected into the sky. So it is along this line that we see the Sun appear to move around the sky over a year. But it is also the path along which we find the seven other major planets – in this case, three of them: Venus, Mars and Jupiter.
These three worlds were clustered together in October, but are now spreading out along the ecliptic, as Venus drops lower but Mars and Jupiter climb higher.
The stars Spica and Regulus also lie along the ecliptic, where the Moon can occasionally pass in front of, or occult, these stars.
So the two stars and three planets are now nicely drawing the ecliptic line for us in the dawn sky. At this time of year, the ecliptic is also steeply angled above the eastern horizon.
The main image above is a stack of 4 x 20 second exposures for the ground, to smooth noise, and one 20-second exposure for the sky, all with the Nikon D810a at ISO 1000 and Nikkor 14-24mm lens at f/2.8 and at 14mm.
Venus (brightest), with dim Mars above it, then bright Jupiter, in a diagonal line across the dawn sky on November 14, 2015, with the Zodiacal Light barely visible in the brightening twilight sky. Arcturus is a left and Spica is just rising at centre. Corvus is just above the treetops at right. Spica, Venus, Mars and Jupiter more or less define the line of the ecliptic in the autumn morning sky here. This is a stack of 4 x 20 second exposures for the ground, to smooth noise, and one 20-second exposure for the sky, all with the Nikon D810a at ISO 1000 and Nikkor 14-24mm lens at f/2.8 and at 24mm
This image just above is with the same gear but with the lens at the 24mm setting to more tightly frame the planets.
Meanwhile, on the other side of the sky at dawn, Orion and his winter sky friends were setting into the west (image below).
Orion and the winter constellations setting over the old Farmhouse at home, in the dawn twilight on the morning of November 14, 2015. Canis Major and Sirius are at left; Taurus and Aldebaran and the Pleiades are at right. Procyon is at upper left. This is a stack of 4 x 20 second exposoures for the ground to smooth noise and one 20-second exposure for the sky, all with the Nikon D810a at ISO 1600 and 14-24mm Nikkor zoom lens at f/2.8.
All the images here are shot with the Nikon D810a camera and the amazing Nikkor 14-24mm lens, two items in hand this month for testing and review. A thorough test will appear in future blogs.
Of course, as wonderful as the gear is, it cannot extract the ecliptic line and labels from the sky – those are added in Photoshop!
In a “10 Steps” tutorial I review my tips for going from “raw to rave” in processing a nightscape or time-lapse sequence.
NOTE: Click on any of the screen shots below for a full-res version that will be easier to see.
In my preferred “workflow,” Steps 1 through 6 can be performed in either Photoshop (using its ancillary programs Bridge and Adobe Camera Raw) or in Adobe Lightroom. The Develop module of Lightroom is identical to Adobe Camera Raw (ACR for short).
However, my illustrations show Adobe Bridge, Camera Raw and Photoshop CC 2014. Turn to Photoshop to perform advanced filtering, masking and stacking (Steps 7 to 10).
To use Lightroom to assemble a time-lapse movie from processed Raw frames you need the third-party program LRTimelapse, described below. Otherwise, you need to export frames from Lightroom – or from Photoshop – as “intermediate” JPGs (see Step 6), then use other third party programs to assemble them into movies (Step 10B).
–
Step 1 – Bridge or Lightroom – Import & Select
Use Adobe Bridge (shown above) or Lightroom to import the images from your camera’s card.
As you do so you can add “metadata” to each image – your personal information, copyright, keywords, etc. As you import, you can also choose to convert and save images into the open and more universal Adobe DNG format, rather than keep them in the camera’s proprietary Raw format.
Once imported, you can review images, keeping the best and tossing the rest. Mark images with star ratings or colour labels, and group images together (called “stacking” in Bridge), such as frames for a panorama or “high dynamic range” set.
Always save images to both your working drive and to an external drive (which itself should automatically back up to yet another external drive). Never, ever save images to only one location.
–
Step 2 – Adobe Camera Raw or Lightroom – Basics
Open the Raw files you want to process. From Bridge, double click on raw images and they will open in ACR. In Lightroom select the images and switch to its Develop module.
In Adobe Camera Raw be sure to first set the Workflow Preset (the blue link at the bottom of the screen) to 16 bits/channel and ProPhoto RGB colour space, for maximum tonal range. This is a one-time setting. Lightroom defaults to 16-bit and the AdobeRGB colour space.
The Basics panel (the first tab) allows you to fix Exposure and White Balance. For the latter, use the White Balance Tool (the eyedropper, keyboard shortcut I) to click on an area that should be neutral in colour.
You can adjust Contrast, and recover details in the Highlights and Shadows (turn the latter up to show details in starlit landscapes). Clarity and Vibrance improves midrange contrast and colour intensity.
Use Command/Control Z to Undo, or double click on a slider to snap it back to zero. Or under the pull-down menu in the Presets tab go to Camera Raw Defaults to set all back to zero.
–
Step 3 – Adobe Camera Raw or Lightroom – Detail
The Detail panel allows you to set the noise reduction and sharpness as you like it, one of the benefits of shooting Raw.
Generally, settings of Sharpness: Amount 25, Radius 1 work well. Turn up Masking while holding the Option/Alt key to see what areas will be sharpened (they appear in white). There’s no need to sharpen blank, noisy sky, just the edge detail.
Setting Noise Reduction: Luminance to 30 to 50 and Color to 25, with others sliders left to their defaults works well for all but the noisiest of images. Luminance affects the overall graininess of the image. Color, also called chrominance, affects the coloured speckling. Turning the latter up too high wipes out star colours.
Turn up Color Smoothness, however, if the image has lots of large scale colour blotchiness.
Zoom in to at least 100% to see the effect of all noise reduction settings. Adobe Camera Raw and Lightroom have the best noise reduction in the business. Without it your images will be far noisier than they need to be.
–
Step 4 – Adobe Camera Raw or Lightroom – Lens Correction
Wide angle lenses, especially when used at fast apertures, suffer a lot from light falloff at the corners (called vignetting). There’s no need to have photos looking as if they were taken through a dark tunnel.
ACR or Lightroom can automatically detect what lens you used and apply a lens correction to brighten the corners, plus correct for other flaws such as chromatic aberration and lens distortion.
Use the Color tab to “Remove Chromatic Aberration” and dial up the Defringe sliders.
For lenses not in the database (manual lenses like the Rokinons and Samyangs will not be included, nor will any telescopes) use the Manual tab to dial in your own vignetting correction. This can take some trial-and-error to get right, but once you have it, save it as a Preset to apply in future to all photos from that lens or telescope.
I usually apply Lens Corrections as a first step, but sometimes find I have to back it off it as I boost the contrast under Basics.
–
Step 5 – Bridge or Lightroom – Copy & Paste
For a small number of images you could open them all, then Select All in ACR to apply the same settings to all images at the same time.
Or you can adjust one, then Select All and hit Synchronize.
Another method useful for processing dozens or hundreds of frames from a star trail or time-lapse set is to choose one representative image and process it. Then in Bridge choose Edit>Develop Settings>Copy Camera Raw Settings. If you are in Lightroom’s Library module, choose Photo>Develop Settings>Copy Settings.
With either program you can also right-click on an image to get to the same choices. Then select all the other images in the set (Command/Control A) and use the same menus to Paste Settings.
A dialog box comes up for choosing what settings you wish to transfer.
If you cropped the image (a good idea for images destined for an HD movie with a 16:9 aspect ratio), pick that option as well. In moments all your images get processed with identical settings. Nice!
–
Step 6 – Lightroom or Photoshop – Export
You now have a set of developed Raw images. However, the actual Raw files are never altered. They remain raw!
Instead, with Adobe Camera Raw the information on how you processed the images is stored in the “sidecar” XMP text files that live in the same folder as the Raw files.
In Lightroom’s case your settings are stored in its own database, unless you choose Metadata>Save Metadata to File (Command/Control S). In that case, Lightroom also writes the changes to the same XMP sidecar files.
To convert the images into final Photoshop PSDs, TIFFs or JPGs you have a couple of choices. In Lightroom go to the Library module and choose Export. It’s an easy way to export and convert hundreds of images, perhaps into a folder of smaller JPGs needed for assembling a time-lapse movie.
To do that from within Adobe Bridge, select the images, then go to Tools>Photoshop>Image Processor. The dialogue box allows you to choose how and where to export the images. Photoshop then opens, processes, and exports each image.
–
Step 7 – Photoshop – Smart Filters
For a folder of images intended to be stacked into star trails (Step 10A) or time-lapse movies (Step 10B), you’re done processing.
But individual nightscape images can often benefit from more advanced work in Photoshop. The next steps make use of a non-destructive workflow, allowing you to alter settings at any time after the fact. At no time do we actually change pixels.
One secret to doing that is to open an image in Photoshop and then select Layer>Smart Objects>Convert to Smart Object. Or go to Filter>Convert for Smart Filters.
OR … better yet, back in Adobe Camera Raw hold down the Shift key while clicking the Open Image button, so it becomes Open Object. That image will then open in Photoshop already as a Smart Object, which you can re-open and re-edit in ACR at any time later should you wish.
Either way, with the image as a Smart Object, you can now apply useful filters such as Reduce Noise, Smart Sharpen, and Dust & Scratches, plus third-party filters such as Nik Software’s Dfine 2 Noise Reduction, all non-destructively as “smart filters.” They can be re-adjusted or turned off at any time.
–
Step 8 – Photoshop – Adjustment Layers
The other secret to non-destructive processing is to apply adjustment layers.
Go to Layer>New Adjustment Layer, or click on any of the icons in the Adjustments panel. If that panel is not visible at right, then under the Window menu check “Adjustments.”
This panel is where you can alter the colour balance, the brightness and contrast, the vibrancy, and many other choices. I find Selective Color most useful for tweaking colour.
Curves allows you to bring up detail in dark areas. Levels allows setting the black and white points, and overall contrast.
The beauty of adjustment layers is that you can click on the layer’s little icon and bring up the dialog box for changing the setting at any time. You never permanently alter pixels.
The image adjustment “Shadows & Highlights” is also immensely useful, but appears as a smart filter, not as an adjustment layer. It’s one of the prime tools for creating images with great detail in scenes lit only by starlight.
–
Step 9 – Photoshop – Masks
The power of adjustment layers is that you can apply them to just portions of an image. This is useful in nightscapes where the sky and ground often need different processing.
To create a mask first select the region you want to work on. Try the Quick Selection Tool (found near the top of the Tool palette at left). Use it to brush across the sky, or the ground, so that the entire area is outlined by “marching ants.”
Use the Refine Edge option to tweak the selection by brushing across intricate areas such as tree branches.
Once you have an area selected, hit one of the Adjustments to add an adjustment layer with the mask automatically applied. Double click on the mask to tweak it: hit Mask Edge to clean up the edge, or turn up the Feather to blur the edge.
To apply the same mask to another adjustment layer, drag the mask from one layer to another while holding down the Option/Alt key.
Invert the mask (or select it and hit Command/Control I) to apply it to the other half of the image. Paint the mask with black or white brushes if you need manually alter it. Remember – black “conceals,” while white “reveals.”
When done, be sure to always save the image as a layered “master” .PSD file.
Never, ever flatten and save – that will wipe out all your non-destructive filters and adjustment layers.
If you need to save the image as a JPG for social mediia or emailing, then Flatten and Save As … Or use Photoshop’s File>Export>Export As .. function.
–
Stars setting in trails over the Athabasca Glacier and Columbia Icefields, Sept 14, 2014. The Milky Way is trailed at right. This is a stack of 100 exposures, composited with Advanced Stacker Plus actions in Photoshop, with the ground coming from a subset stack of 8 images to reduce noise. Each exposure, taken as part of a time-lapse sequence, was 45 seconds at f/2.8 with the 16-35mm lens at 23mm and Canon 6D at ISO 4000.
Step 10A – Photoshop or 3rd Party Programs – Stack for Star Trails
One popular way to shoot images of stars trailing in arcs across the sky is to shoot dozens or hundreds of well-exposed frames at a fairly high ISO and wide aperture, and at a shutter speed no longer than 30 to 60 seconds. You then “stack” the images to create the equivalent of one frame shot for many minutes, if not an hour or more. The image above is an example.
There are several ways to stack.
From within Photoshop CC (or using an Extended version of the older CS5 or CS6) one method is to go to File>Scripts>Statistics. In the dialog box, drill down to the images you wish to stack (put them all in one folder) and choose Stack Mode: Maximum, and uncheck “Attempt to Automatically Align.” The result is a huge (!) smart object. This method works best on just a few dozen images. In this case, you’ll need to use Layers>Flatten to reduce its size.
Other options for stacking hundreds of images include the free program StarStax (Windows and Mac), which requires a folder of “intermediate” TIFFs or JPGs. See Step 6 above.
The Advanced Stacker Actionsfrom Star Circle Academy are actions you install in Photoshop that work directly from Raw files to create some impressive effects. I use them and recommend them.
–
Step 10B – Photoshop or 3rd Party Programs – Assemble for Movies
The same folder of images taken for star trail stacking can also be turned into a time-lapse movie. Instead of stacking the images on top of one another in space, you string them together one after the other in time.
There are many methods for assembling movies. Free or low cost programs such as Quicktime 7 Pro, Time-Lapse Assembler, Sequence (a Mac program shown above), VirtualDub, or Time-Lapse Tool can do the job, all offering options for the final movie’s format.
Generally, an HD video of 1920×1080 pixels in the H264 format, or “codec,” is best, rendered at 15 to 30 frames per second.
Most movie assembly programs will need to work from a folder of JPGs of the right size, produced using one of the choices listed under Step 6: Export.
But … you can also use Photoshop to assemble a movie.
Choose the Window>Workspace>Motion to bring up a video timeline. Then File>Open to drill to your folder of processed and down-sized JPG files. Select one image, then check “Image Sequence.” Choose the frame rate (15 to 30 fps is best). Then go to File>Export>Render Video to turn the resulting file into a final H264 or Quicktime movie suitable for use in other movie editing programs.
–
Advanced Techniques: Using LRTimelapse
The workflow I’ve outlined works great when you can apply the same development settings to all the images in a folder. For star trail and time-lapse sequences shot once it gets dark and under similar lighting conditions that will be the case.
But if the Moon rises or sets during the shoot, or if you are taking a much more demanding sequence that runs from sunset to night, the same settings won’t work for all frames.
The answer is to turn to the program LRTimelapse (100 Euros for the standard version, and available in a free but limited trial copy). LRTimelapse works with either Lightroom or Bridge/Adobe Camera Raw.
To use it you process just a few selected “keyframes” – at least two, at the start and end of the sequence, and perhaps other frames throughout the sequence, processing them so each frame looks great. You read that processing data into LRTimelapse and, like magic, it interpolates your settings, creating a folder of images with every setting changing incrementally from frame to frame, something you could never do by hand.
It can then work with Lightroom to export the frames out to a video in formats from HD up to 4K in size. For serious time-lapse work, LRTimelapse is an essential tool.
–
Much, much more information and tutorials are included in my multimedia Apple eBook, linked to below.
But I hope this quick tutorial helps in providing you with tips to make your images and movies even better! If you found it useful, please feel free to share a link to this blog page through your social media channels. Thanks!
The waning crescent Moon joined the planet trio this morning for a fine sight in the dawn.
This was the scene on November 6 with the waning crescent Moon just below Jupiter, and those two worlds just above the pairing of bright Venus with dim red Mars.
On Saturday, November 7, the waning Moon will sit beside Venus for an even more striking conjunction.
The waning crescent Moon below Jupiter, with that pair of worlds above the pairing of Venus (bright) and red Mars (just above Venus), all in the dawn sky in Leo, November 6, 2015. The stars of Leo are above, including Regulus. This is a composite of 4 exposures: 15 seconds for the ground (to bring out detail there), 4 seconds for the sky (short enough to prevent star trailing), and 1 and 1/4 seconds for the Moon itself to prevent it from being totally blown out as a bright blob. All with the Nikon D750 at ISO 2000 and Sigma 24mm Art lens at f/4.5. Taken from home.
This meeting of the Moon with the planet trio more or less concludes the superb series of dawn sky conjunctions we’ve been enjoying over the last month.
The planets remain in the morning sky but now go their own ways as Mars and Jupiter climb higher, while Venus drops lower.
The gathering of planets at dawn is coming to an end as Venus meets Mars.
This was the view this morning from home in southern Alberta of the trio of planets in the moonlit morning sky.
Venus is the brightest, while dim red Mars shines just to the left of Venus. Jupiter is above the Venus & Mars pairing, with all the planets shining in Leo.
Mars and Venus will appear closest to each other on November 2 and 3. Then the group breaks apart as Venus descends but Mars and Jupiter climb higher.
But as they do so they are joined by the waning Moon, by then a thin crescent, on November 6, when the Moon shines near Jupiter, and November 7, when it joins Venus for a stunning dawn sky scene.
After that the morning planet dance comes to an end. But in two months, in early January, Venus will meet up with Saturn for a very close conjunction in the winter dawn sky on January 9.
This was the trio of planets at their best in the morning sky.
On the morning of October 28, Mars, Venus and Jupiter formed a neat isosceles triangle in the twilight. Venus, the brightest, was in the middle, with Mars below and Jupiter above. The grouping shone amid the stars of Leo, with its brightest star, Regulus, above the windmill in the lead image above. The rest of Leo lies above the planets.
To capture the scene I drove west at 5 am to a farmstead I had shot at before, in June, to capture Venus and Jupiter, also then in Leo near Regulus, but in the evening sky looking west. Click here for that blog post from mid-June.
This morning, the Moon, just past full as the annual Hunter’s Moon, shone in the west off camera lighting the landscape.
The dawn sky colours and the moonlit red barn made for a fine colour contrast.
After today, the planet configuration breaks up, as Venus descends to meet Mars on November 2 and 3, while Jupiter climbs higher. But another great morning sight awaits on November 7 when the waning crescent Moon will shine near the Venus-Mars pairing, with Jupiter above.
On the way home I stopped at fog-bound Lake MacGregor to capture the planets in a brightening dawn sky over the misty waters.
This morning the three planets lay just 4.5 degrees apart, close enough to frame in high-power binoculars.
We won’t see these three planets this close to each other in a darkened sky — as opposed to being so close to the Sun we really can’t see them — until November 21, 2111.
Skies were clear at dawn this morning for a fabulous view of the rare conjunction of three planets. And I could not have been at a more photogenic site.
This was the view before dawn on October 25, as brilliant Venus and dimmer Jupiter shone just a degree apart in the dawn sky. Mars, much fainter, shines just below the close duo. The three planets could easily be contained in a high power binocular field.
Not until November 2111 will these three planets be this close together again in a darkened sky.
Indeed, Venus could not have been higher, as it is just now reaching its maximum elongation from the Sun, placing it high in the eastern morning sky.
I shot from the shores of Lake Annette, site of one of the major events, the Friday star party, at the annual Jasper Dark Sky Festival which just concluded, in Jasper National Park, Alberta. The Festival celebrates the Park’s status as one of the world’s largest Dark Sky Preserves.
The hotels and restaurants were full with stargazers from around the world, making the Festival a huge success, both educationally and financially. I was honoured to be able to present some of the public and school talks.
But this dawn sky was a fine way to end a fabulous weekend of astronomy.
The image above is a panorama in the twilight, sweeping from the planets in the east, to the winter stars and constellations, including iconic Orion, in the south and southwest.
Earlier in the morning, before twilight began to brighten the sky, I shot another even wider panorama from the south shore of the lake.
In this and other photos, high haze adds the glows around the stars and planets naturally. No special effects filters here!
But Venus and Jupiter are so close and bright their images almost merge into one glow.
Here they are, with Mars below, shining in the dark sky over the Watchtower peak and over the misty waters of Lake Annette.
Keep an eye on the sky at dawn, as these three worlds will be close to each other for the next few mornings. See my earlier blog for details.
Four planets appear in the dawn sky outlining the morning ecliptic.
This morning, October 20, I was able to capture four planets in the morning sky, arrayed along the ecliptic.
From bottom to top they are: Mercury (just past its point of greatest elongation from the Sun), dim Mars, bright Jupiter, and very bright Venus (just 6 days away from its point of greatest elongation from the Sun). Above Venus is Regulus, in Leo.
I’ve added in the labels and the line of the ecliptic, rising steeply out of the east in the autumn dawn sky.
Of course, there is a fifth unlabelled planet in the scene, quite close in the foreground.
The image below is an unlabeled version.
Mercury will be disappearing from view very quickly now as it drops back down toward the Sun.
But over the next week the three higher planets will converge into a tight triangle just 4.5 degrees apart. We won’t see these three planets this close together in a darkened sky until November 2111.
TECHNICAL:
I shot the scene from home in southern Alberta. The image is a composite stack, with manually created masks (not an HDR stack), of 5 exposures, from 15 seconds to 1 second, to contain the range of brightness from the bright horizon to the dimmer star-filled sky higher up. All are with the 35mm lens and Canon 6D at ISO 800.
You might have already seen Venus shining brightly in the morning sky. And perhaps you’ve seen a slightly less bright object below it. That’s Jupiter.
But there’s a third, even dimmer planet accompanying Venus and Jupiter — reddish Mars. On the morning of Saturday, October 17 (chart above ⬆️) Mars and Jupiter pass just 1/2 degree apart, for a mismatched double “star” at dawn.
The planets put on an even better show in the following 10 days as all three converge to form a tight triangle of worlds in the morning sky.
On October 23 ⬆️, Venus, Mars and Jupiter appear in a close grouping just 4.5 degrees apart, close enough to each other to be easily contained in the field of typical binoculars, the circle shown in these charts.
Two mornings later, on October 25 ⬆️, Venus and Jupiter are at their closest apparent separation, just 1 degree apart, for a brilliant double “star” in the morning twilight. If you miss this morning, on the next morning, October 24, the two planets appear about the same distance apart as well.
By October 28 ⬆️, the three planets have switched positions, as Venus drops lower but Jupiter climbs higher. But they again appear in a triangle, 4.5 degrees wide.
The motion you’re seeing from day to day is due to a combination of the planets’ own orbital motions around the Sun, as well as our planet’s motion.
Keep in mind, the planets aren’t really close together in space. They lie tens, if not hundreds, of millions of kilometres apart. They appear close to each other in our sky because they lie along the same line of sight.
Do try to get up early enough — between 6 a.m. and 6:30 a.m. should do it — to look east to see the changing configuration of planets as they dance at dawn. Binoculars will provide the best view.
This is a rare sight! We won’t see these three planets this close to each other in a darkened sky until November 20, 2111!
The Moon appeared along with four planets in the dawn sky.
The sky was filled with planets this morning, as all four of the closest planets to the Sun appeared along the ecliptic in the morning sky. Plus there’s a fifth planet in the picture – Earth.
Here, the waning crescent Moon, lit by Earthshine, appears with four planets on the morning of October 9, 2015, with the planets from bottom left to top right:
• Mercury, just above the horizon between the low cloud bands, at lower left
• Jupiter, bright at centre
• Mars, reddish and above Jupiter
• Venus, brightest at upper right and in some thin cloud.
The bright star Regulus in Leo is above and to the left of Venus.
Above is an unlabeled version of the image.
TECHNICAL:
It’s a blend of four exposures: a long 4-second exposure for most of the sky and ground, plus shorter 2, 1, and 1/2 second exposures for the bright twilight area and around the Moon and Venus, to prevent those areas from being blown out. Blending is with masks, not HDR. All were shot with the Canon 6D at ISO 400 and 50mm Sigma lens at f/2.5.
The Moon, planets and Northern lights provided a wonderful show in the dawn sky.
What a superb scene this was. On October 8 the waning crescent Moon shone near Venus (brightest) and Regulus, with red Mars and bright Jupiter paired below.
If that wasn’t enough, as the wide-angle panorama below shows, the Northern Lights were also ending a night of performance, with an arc along the horizon and pulsing waves rising up the sky to the northeast near the planet grouping.
The panorama also sweeps right, to the south, to take in the winter Milky Way and constellations of Orion and Canis Major. Click on the image to bring it up full screen.
The Moon will appear near Mars and Jupiter on the morning of October 9, and then the three planets will begin to converge for a tight gathering for a few mornings around October 25.
Be sure to wake early for the dawn sky show that continues all this month!
Look east this week to see a wonderful conjunction of the waning Moon with three planets in the morning sky.
A great dance of the planets is about to begin in the dawn sky.
Venus, Mars and Jupiter are now all prominent in the eastern sky before sunrise, with Venus by far the brightest. Below it shines slightly dimmer Jupiter. But between those two brightest of planets shines dim red Mars.
The three planets are converging for a mutual close meeting in the third week of October, when from October 23 to 28 the trio of planets will appear within a binocular field of each other.
But this week, with the three planets still spread out along a line, the Moon joins the scene to start the planet dance. It shines near Venus on the morning of October 8 (as shown here). and then near Mars and Jupiter on October 9.
Look east between 5:30 and 6:30 a.m. local time. All the planets are easy to see with unaided eye even in the city, but binoculars will frame the Moon-Venus pairing on October 8 and the Moon-Mars-Jupiter trio on October 9.
My multiple-exposure composite shows the complete September 27, 2015 total lunar eclipse to true scale, with the Moon accurately depicted in size and position in the sky.
From my location at Writing-on-Stone Provincial Park in southern Alberta, Canada, the Moon rose in the east at lower left already in partial eclipse.
As it rose it moved into Earth’s shadow and became more red, while the sky darkened from twilight to night, bringing out the stars.
Then, as the Moon continued to rise higher it emerged from Earth’s shadow, at upper right, and returned to a brilliant Full Moon again, here overexposed and now illuminating the landscape with moonlight.
TECHNICAL
The disks of the Moon become overexposed in my composite as the sky darkened because I was setting exposures to show the sky and landscape well, not just the Moon itself. That’s because I shot these frames – and many more! – primarily for use as a time-lapse movie where I wanted the entire scene well exposed in each frame.
Indeed, for this still-image composite of the eclipse from beginning to end, I used just 40 frames taken at 5-minute intervals, selected from 530 I shot, taken at 15- to 30-second intervals for the full time-lapse sequence.
All were taken with a fixed camera, a Canon 6D, with a 35mm lens, to nicely frame the entire path of the Moon, from moonrise at lower left, until it exited the frame at top right, as the partial eclipse was ending.
In the interest of full disclosure, the ground comes from a blend of three frames taken at the beginning, middle, and end of the sequence, and so is partly lit by twilight and moonlight, to reveal the ground detail better than in the single starlit frame from mid-eclipse. Lights at lower left are from the Park’s campground.
The background sky comes from a blend of two exposures: one from the middle of the eclipse when the sky was darkest, and one from the end of the eclipse when the sky was now lit deep blue. The stars come from the mid-eclipse frame, a 30-second exposure.
MY RANT FOR REALITY
So, yes, this is certainly a composite assembled in Photoshop – a contrast to the old days of film where one might attempt such an image just by exposing the same piece of film multiple times, usually with little success.
However … the difference between this image and most you’ve seen on the web of this and other eclipses, is that the size of the Moon and its path across the sky are accurate, because all the images for this composite were taken with the same lens using a camera that did not move during the 3-hour eclipse.
This is how big the Moon actually appeared in the sky in relation to the ground and how it moved across the sky during the eclipse, in what is essentially a straight line, not a giant curving arc as in many viral eclipse images.
And, sorry if the size of the Moon seems disappointingly small, but it is small! This is what a lunar eclipse really looks like to correct scale.
By comparison, many lunar eclipse composites you’ve seen are made of giant moons shot with a telephoto lens that the photographer then pasted into a wide-angle sky scene, often badly, and pasted in locations on the frame that usually bear no resemblance to where the Moon actually was in the sky, but are just placed where the photographer thought would look the nicest.
You would never, ever do that for any other form of landscape photography, at least not without having your reputation tarnished. But with the Moon it seems anything is permitted, even amongst professional landscape photographers.
No, you cannot just place a Moon anywhere you like in your image, eclipse or no eclipse, then pass it off as a real image. Fantasy art perhaps. Fine. But not a photograph of nature.
Sorry for the rant, but I prefer accuracy over fantasy in such lunar eclipse scenes, which means NOT having monster-sized red Moons looming out of proportion and in the wrong place over a landscape. Use Photoshop to inform, not deceive.
I could not have asked for a more perfect night for a lunar eclipse. It doesn’t get any better!
On Sunday, September 27, the Moon was eclipsed for the fourth time in two years, the last in a “tetrad” of total lunar eclipses that we’ve enjoyed at six-month intervals since April 2014. This was the best one by far.
This is through the TMB 92mm refractor for a focal length of 500mm using the Canon 60Da at ISO 400 for 1/250 second.
The timing was perfect for me in Alberta, with the Moon rising in partial eclipse (above), itself a fine photogenic site.
In the top image you can see the rising Moon embedded in the blue band of Earth’s shadow on our atmosphere, and also entering Earth’s shadow on its lunar disk. This was a perfect alignment, as lunar eclipses must be.
For my earthly location I drove south to near the Montana border, to a favourite location, Writing-on-Stone Provincial Park, to view the eclipse over the sandstone formations of the Milk River.
More importantly, weather forecasts for the area called for perfectly clear skies, a relief from the clouds forecast – and which did materialize – at home to the north, and would have been a frustration to say the least. Better to drive 3 hours!
This was the second lunar eclipse I viewed from Writing-on-Stone, having chased clear skies to here in the middle of the night for the October 8, 2014 eclipse.
I shot with three cameras: one doing a time-lapse through the telescope, one doing a wide-angle time-lapse of the Moon rising, and the third for long-exposure tracked shots during totality, of the Moon and Milky Way.
This is a stack of 5 x 2-minute tracked exposures for the sky and 5 x 4-minute untracked exposures for the ground to smooth noise. The Moon itself comes from a short 30-second exposure to avoid overexposing the lunar disk. Illumination of the ground is from starlight. All exposures with the 15mm lens at f/2.8 and Canon 5D MkII at ISO 1600. The camera was on the iOptron Sky-Tracker.
That image is above. It shows the eclipsed Moon at left, with the Milky Way at right, over the Milk River valley and with the Sweetgrass Hills in the distance.
The sky was dark only during the time of totality. As the Moon emerged from Earth’s shadow the sky and landscape lit up again, a wonderful feature of lunar eclipses.
While in the above shot I did layer in a short exposure of the eclipsed Moon into the long exposure of the sky, it is still to accurate scale, unlike many dubious eclipse images I see where giant moons have been pasted into photos, sometimes at least in the right place, but often not.
Lunar eclipses bring out the worst in Photoshop techniques.
This is a single exposure taken through the TMB 92mm refractor at f/5.5 for 500 mm focal length using the Canon 60Da at ISO 400 for 8 seconds, the longest I shot during totality. The telescope was on the SkyWatcher HEQ5 mount tracking at the lunar rate.
Above is a single closeup image taken through the telescope at mid-totality. I exposed for 8 seconds to bring out the colours of the shadow and the background stars, as faint as they were with the Moon in star-poor Pisces.
I shot a couple of thousand frames and processing of those into time-lapses will take a while longer, in particular registering and aligning the 700 I shot at 15-second intervals through the telescope. They show the Moon entering, passing through, then exiting the umbra, while it moves against the background stars.
With the latest success, I’ve had my fill of lunar eclipses for a while. Good thing, as the next one is not until January 31, 2018, before dawn in the dead of winter.
With the mild night, great setting, and crystal clear skies, this “supermoon” eclipse could not have been better. It was a super eclipse.
On Sunday, September 27 the Moon undergoes a total eclipse, the last we’ll see until January 2018.
This is a sky event you don’t want to miss. Whether you photograph it or just enjoy the view, it will be a night to remember, as the Full Moon turns deep red during a total eclipse.
Note — For this article I’m giving times and sky directions for North America. For Europe the eclipse occurs early in the morning of September 28, as the Moon sets into the west. But for here in North America the timing could not be better. Totality occurs in the evening of Sunday, September 27 as the Moon rises into the east.
Courtesy Wikimedia Commons
ECLIPSE BASICS
A total lunar eclipse occurs when the Moon — and it can only be Full — passes through the shadow cast into space by Earth. The Sun, Earth and Moon are in near-perfect alignment.
All total eclipses of the Moon consist of 3 main parts:
• The initial partial eclipse occurs as the Moon slowly enters the dark central portion of our planet’s shadow, the umbra. This lasts about an hour.
• Totality begins as the entire disk of the Moon is within the umbra. For this eclipse, totality lasts a generous 72 minutes.
• Totality ends as the Moon emerges from the umbra to begin the final partial eclipse lasting another hour.
Courtesy Fred Espenak/EclipseWise.com – All times are Eastern Daylight. Subtract 1 hour for Central Daylight, 2 hours for Mountain Daylight, 3 hours for Pacific Daylight Time. Times apply for anywhere in that time zone.
WHERE TO SEE IT
All of North America, indeed most of the western hemisphere, can see this eclipse. In North America, the farther east you live on the continent the later in your evening the eclipse occurs and the higher the Moon appears in the southeast.
For example, in the Eastern time zone, totality begins at 10:11 p.m. EDT and ends at 11:23 p.m. EDT, with mid-totality is at 10:47 p.m. EDT with the Moon about 35 degrees up, placing it high in the southeast sky for southern Ontario, for example.
For me in the Mountain time zone, the total eclipse begins at 8:11 p.m. MDT and ends at 9:23 p.m. MDT, with mid-totality is at 8:47 p.m. MDT, with the Moon just 13 degrees up in the east from here in southern Alberta. From my time zone, and from most location in the Rocky Mountain regions, the Moon rises with the initial partial phases in progress.
This is the total eclipse of the Moon, December 10, 2011, taken from the grounds of the Rothney Astrophysical Observatory, near Priddis Alberta, and looking west to the Rockies. This is a 2 second exposure at ISO 800 with the Canon 5DMkII and Canon 200mm lens at f/4.
For locations on the west coast viewers miss most of the partial eclipse phase before totality. Instead, the Moon rises as totality begins, making for a more challenging observation. Viewers on the coast will need clear skies and a low horizon to the east, but the reward could be a beautiful sight and images of a red Moon rising.
Total eclipse of the Moon, December 20/21, 2010, taken from home with 130mm AP apo refractor at f/6 and Canon 7D at ISO 400. An HDR composite of 9 images from 1/125 second to 2 seconds, composited in Photoshop CS5. Taken at about 12:21 am MST on Dec 21, about 20 minutes before totality began, during the partial phase.
“SUPERMOON” ECLIPSE
This eclipse of the Moon is the last in a series of four total lunar eclipses that occurred at six-month intervals over the last two years. We won’t enjoy another such “tetrad” of total lunar eclipses until 2032-33.
But this eclipse is unique in that it also coincides with the annual Harvest Moon, the Full Moon closest to the autumnal equinox. Harvest Moons are known for their orange tint as they rise into what is sometimes a dusty autumn evening.
But what is making internet headlines is that this Full Moon is also the year’s “supermoon,” the Full Moon of 2015 that comes closest to Earth. In recent years these “perigee” Full Moons have been dubbed “supermoons.”
Call it what you will, it does make this Full Moon a little larger than usual, though the difference is virtually impossible to detect by eye. And it makes little difference to the circumstances or appearance of the eclipse itself.
Partial eclipse of the Moon at moonset, morning of June 26, 2010, at about 5:00 am. Shot with 200mm telephoto and 1.4x teleconvertor, for 1/15th sec at f/5 and ISO 100, using Canon 7D. From western North America the Moon will rise in partial eclipse like this on September 27.
HOW TO SEE IT
Just look up! You can enjoy the eclipse with the unaided eye, and even from within city limits.
Unlike eclipses of the Sun, the eclipsed Moon is perfectly safe to look at with whatever you wish to use to enhance the view. The best views are with binoculars or a telescope at low power.
Look for subtle variations in the red colouring across the disk of the Moon, and even tints of green or blue along the dark edge of the Earth’s advancing or retreating shadow during the partial phases.
If you can, travel to a dark site to enjoy the view of the stars and Milky Way brightening into view as the Full Moon reddens and the night turns dark.
HOW TO SHOOT IT
The total eclipse of the Moon, April 15, 2014 local time just after sunset from Australia. This is an 8-second exposure at f/2.8 with the 50mm lens on the Canon 60Da at ISO 800.
1. On A Tripod
The easiest method is to use a camera on a tripod, with a remote release to fire the shutter and prevent vibration from blurring the image. What lens you use will depend on how you wish to frame the scene and how high the Moon is in your sky.
Lens Choice
From eastern North America you’ll need a wide-angle lens (14mm to 24mm) to frame the eclipsed Moon and the ground below. The Moon will appear as a small red dot.
While you can shoot the Moon with longer focal lengths it takes quite a long lens (>300mm) to really make it worthwhile shooting just the Moon itself isolated in empty sky. Better to include a landscape to put the Moon in context, even if the Moon is small.
From western North America the lower altitude of the Moon allows it to be framed above a scenic landscape with a longer 35mm to 50mm lens, yielding a larger lunar disk.
From the west coast you could use a telephoto lens (135mm to 200mm) to frame the horizon and the eclipsed Moon as it rises for a dramatic photo.
Focusing
Use Live View (and zoom in at 10x magnification) to manually focus on the horizon, distant lights, or bright stars. The Moon itself my be tough to focus on.
Exposure Times
Exposures will depend on how bright your sky is. Use ISO 400 to 800 and try metering the scene as a starting point if your sky is still lit by twilight. Use wide lens apertures (f/4 to f/2) if you can, to keep exposures times as a short as possible.
The apparent motion of the Moon as the sky turns from east to west will blur the image of the Moon in exposures lasting more than a few seconds, especially ones taken with telephoto lenses.
The maximum exposure you can use before trailing sets in is roughly 500 / lens focal length.
Total eclipse of the Moon, December 20/21, 2010, taken with Canon 5D MKII and 24mm lens at f2.8 for stack of 4 x 2 minutes at ISO 800. Taken during totality using a camera tracker.
2. On a Tracker or Equatorial Mount
If you can track the sky using a motorized tracker or telescope mount, you can take exposures up to a minute or more, to record the red Moon amid a starry sky.
For this type of shot, you’ll need to be at a dark site away from urban light pollution. But during totality the sky will be dark enough that the Milky Way will appear overhead. Use a wide-angle lens to capture the red Moon to the east of the summer Milky Way.
The total eclipse of the Moon, October 8, 2014, the Hunter’s Moon, as seen and shot from Writing-on-Stone Provincial Park, Alberta. I shot this just after mid-totality in a single 15-second exposure at ISO 400 with the Canon 60Da, and with the 80mm apo refractor at f/6. It was mounted on the Sky-Watcher HEQ5 mount tracking at the lunar rate.
3. Through a Telescope
The most dramatic closeups of the eclipsed red Moon require attaching your camera body (with its lens removed) to a telescope. The telescope becomes the lens, providing a focal length of 600mm or more, far longer than any telephoto lens most of us own.
You’ll need the appropriate “prime focus” camera adapter and, to be blunt, if you don’t have one now, and have never shot the Moon though your telescope then plan on shooting with another method.
But even if you have experience shooting the Moon through your telescope, capturing sharp images of the dim red Moon demand special attention.
The telescope must be on a motorized mount tracking the sky, preferably at the “lunar,” not sidereal, drive rate. Focus on the Moon during the partial phases when it is easier to focus on the bright edge of the Moon.
Exposures during totality typically need to be 5 to 30 seconds at ISO 800 to 3200, depending on the focal ratio of your telescope. Take lots of exposures at various shutter speeds. You have over an hour to get it right!
The total lunar eclipse of April 4, 2015 taken from near Tear Drop Arch, in western Monument Valley, Utah. The mid-totality image is a composite of 2 exposures: 30 seconds at f/2.8 and ISO 1600 for the sky and landscape, with the sky brightening blue from dawn twilight, and 1.5 seconds at f/5.6 and ISO 400 for the disk of the Moon itself. Also, layered in are 26 short exposures for the partial phases, most being 1/125th sec at f/8 and ISO 400, with ones closer to totality being longer, of varying durations. All are with the 24mm lens and Canon 6D on a static tripod.
4. Time-Lapses
I’d suggest attempting time-lapses only if you have lots of experience with lunar eclipses.
Exposures can vary tremendously over the partial phases and then into totality. Any time-lapse taken through a telescope, or even with a wide-angle lens, will require a lot of manual attention to ensure each frame is well-exposed as the sky and Moon darken.
However, even if you do not get a complete set of frames suitable for a smooth, continuous time-lapse, selected frames taken every 5 to 10 minutes may work well in creating a multiple-exposure composite (as above), by layering exposures later in Photoshop.
Whatever method – or methods — you use, don’t get so wrapped up in fussing with cameras you forget to simply enjoy the eclipse for the beautiful sight it is.
This is the last total eclipse of the Moon anyone on Earth will see until January 31, 2018. So enjoy the view of the deep red Moon in the autumn sky.
Venus, now at its brightest as a morning star, shines amid the subtle glow of the Zodiacal Light.
This was the scene this morning, September 17, on a very frosty dawn at 5 a.m. from my backyard in southern Alberta.
Here, Venus shines nearly as bright as it can be, at magnitude -4.7, in the dawn sky as a brilliant “morning star.”
Venus appears amid the faint glow of the Zodiacal Light, sometimes called the “False Dawn,” stretching diagonally from the dawn horizon in the east, up and to the right, and reaching the Milky Way that runs vertically down the frame from top centre to bottom right.
Orion and the winter stars shine in the Milky Way, with Sirius above the trees at lower right.
The Beehive Cluster, M44, appears as the small group of stars above Venus. The Pleiades, M45, is at top right.
Mars is the brightest object left of Venus, with the bright star Regulus just below it and rising in the east. The stars of the Big Dipper are at far left at the edge of the frame.
The sky is beginning to brighten with the real glow of morning. It was a marvellous dawn sky delight.
Technical notes:
This is a stack of 4 x 2-minute exposures, tracked and mean-combine stacked, for the sky and 2 x 2-minute exposures, untracked and stacked, for the ground to minimize blurring in the starlit ground. The Canon 6D was on the iOptron Sky-Tracker, shooting at ISO 1250 with the 15mm full-frame fish-eye lens at f/3.5. The stacking with a mean combine stack mode smooths noise in both sky and ground.
Here are my top tips for shooting terrific still-image nightscapes … and time-lapse movies of the night sky.
1. Go for pixel size, not pixel count
When choosing a camera for night sky scenes, the most important characteristic is not number of megapixels. Just the opposite.
The best cameras are usually models with more modest megapixel counts. Each of their individual pixels is larger and so collects more photons in a given exposure time, yielding higher a signal-to-noise ratio – or lower noise, critical for night shooting.
Cameras with pixels (the “pixel pitch”) 6 to 8 microns across are best. Many high-megapixel cameras have tiny 4-micron pixels.
Large-pixel cameras are often the full-frame models, such as the Canon 5D MkIII and 6D, the Nikon D610, D750, and Df, and the Sony a7s and a7S II.
Many “cropped-frame” cameras are now 18- to 24-megapixel models with smaller, noise-prone pixels. They can certainly be used, but will require more care in exposing well at lower ISOs, and in processing to smooth out noise without blurring detail.
2. Learn to fly on manual
While DSLRs and Compact System Cameras have amazing automatic functions we use none of them at night.
Instead, we use the camera on Manual or Bulb, dialling in shutter speed, aperture and ISO speed manually. We also have to focus manually, using Live View mode to focus on a bright star or distant light.
Learn the tradeoffs involved: Increasing ISO sensitivity of the sensor keeps exposure times down but increases noise. Opening up the lens aperture to f/2 or f/1.4 also keeps exposures short but introduces image-blurring aberrations, especially at the frame corners.
To prevent stars from trailing due to the sky’s motion adhere to the “500 Rule:” the maximum exposure time is roughly 500 divided by the focal length of your lens.
3. Expose to the right
At night, always give the sensor plenty of signal.
Use whatever combination of shutter speed, aperture and ISO will provide a well-exposed image. The image “histogram,” the graph of number of pixels at each brightness level shown above, should never be slammed to the left.
It should be a well-distributed “mountain range” of pixels, extending well to the right. If the 500 Rule restricts your shutter speed, and your desire for sharp images across the frame demands you shoot at f/2.8 or even slower, then don’t be afraid to bump up the ISO speed to whatever it takes to produce a good histogram and a well-exposed image.
Noise will look far worse if you underexpose, then try to boost the image brightness later in processing. Expose to the right!
4. Shoot Raw!
Shoot Raw. Period.
When comparing Raw and compressed JPG versions of the same image, you can be fooled into thinking the JPGs look better (i.e. smoother) because of the noise reduction the camera has applied to the JPG that is beyond your control. However, that smoothing has also wiped out fine detail, like stars.
By shooting Raw you get to control whatever level of noise reduction and sharpening the image needs later in processing.
JPGs are also 8-bit images with a limited tonal range – or palette – in which to record the subtle gradations of brightness and colour present in our images.
Imported Raw files are 16-bit, with a much wider tonal scale and colour palette. That’s critical for all astrophotos when, even with a well-exposed image, many tonal values are down in the dark end of the range. Processing Raw images makes it possible to extract detail in the shadows and highlights.
Even when shooting a time-lapse sequence, shoot Raw.
5. Take dark frames (sometimes!)
LENR reduces noise.
It’s a topic of some debate, but in my experience it is always better to turn on the camera’s Long Exposure Noise Reduction (LENR) function when shooting individual nightscape images. Doing so forces the camera to take a “dark frame,” an exposure of equal length but with the shutter closed.
It records just the noise, which the camera then subtracts from the image. Yes, it takes twice as long to acquire an image, but the image is cleaner, with fewer noisy pixels.
This is especially true when shooting on hot summer nights (the warmer the sensor the higher the noise). That said, you cannot use LENR when shooting frames for star trail composites or time-lapse movies.
For those, the interval between images should be no more than 1 to 5 seconds. Using LENR would introduce unsightly gaps in the trails or jumps in the star motion in time-lapses.
As an alternative, it is possible to take separate dark frames at the end of the night by simply covering the lens and taking exposures of the same duration and at the same ISO as your “light frames.”
Some stacking software, such as StarStax and the Advanced Stacker Actions have places to put these dark frames, to subtract them from the stack later in processing.
6. Use fast lenses
A fast lens is your best accessory.
While the “kit zoom” lenses that come with many DSLRs are great for shooting bright twilight or Full Moon scenes, they will prove too slow for dark starlit scenes with the Milky Way.
In addition to exposing to the right and shooting Raw, the secret to great nightscapes is to shoot with fast lenses, usually “prime” lenses with fixed focal lengths. They are usually faster and have better image quality than zooms.
Your most-used lens for nightscape and time-lapse shooting is likely to be a 14mm to 24mm f/2 to f/2.8 lens.
Fortunately, because we don’t need (and indeed can’t use) autofocus we can live happily with low-cost manual lenses, such as the models made in Korea and sold under brands such as Rokinon, Samyang and Bower. They work very well.
7. Get to know the Moon & Milky Way
For many nightscape and time-lapse shoots, the Moon is your light source for illuminating the landscape.
When the Moon is absent, the Milky Way is often your main sky subject.
Knowing where the Moon will be in the sky at its various phases, and when it will rise (in its waning phases after Full Moon) or set (in its waxing phases before Full) helps you a plan a shoot, so you’ll know whether a landscape will be well lit.
Astronomy apps for desktop computers and mobile devices are essential planning aids. A good one specifically for photographers is The Photographer’s Ephemeris.
Knowing in what season and time of night the Milky Way will be visible is essential if you want to capture it. Don’t try for Milky Way shots in spring – it isn’t up!
8. Keep it simple to start
Don’t be seduced by the fancy gear.
Time-lapse imaging has blossomed into a field replete with incredible gear for moving a camera incrementally during a shoot, and for automating a shoot as day turns to night.
I explain how to use all the fancy gear in my ebook, linked to below, however … Great time-lapses, and certainly still-frame nightscapes, can be taken with no more than a DSLR camera with a good fast lens and mounted on a sturdy tripod. Invest in the lens and don’t scrimp on the tripod.
Another essential for shooting multi-frame star trails and time-lapses is a hardware intervalometer ($50 to $150).
9. Learn the intricacies of intervals
For time-lapses, an intervalometer is essential.
Mastering exposure and focus in still images is essential for great time-lapse movies because they are simply made of hundreds of well-exposed still frames.
But move to time-lapses and you have additional factors to consider: how many frames to shoot and how often to shoot them. A good rule of thumb is to shoot 200 to 300 frames per sequence, shot with an interval of no more than 1 to 5 seconds between exposures, at least for starry night sequences.
However, most intervalometers (the Canon TC-80N3 is an exception) define their “Interval” setting to mean the time from when the shutter opens to when it opens again. In that case, you set the Interval to be a value 1 to 5 seconds longer than the exposure time you are using. That’s also true of the intervalometer function Nikon builds into their internal camera firmware.
Test first!
10. Go to beautiful places
While the gear can be simple, great shots demand an investment in time.
By all means practice at home and at nearby sites that are quick to get to. Try out gear and techniques at Full Moon when exposures are short (the Full Moon is bright!) and you can see what you are doing.
But beautiful images of landscapes lit by moonlight or starlight require you to travel to beautiful locations.
When you are on site, take the time to frame the scene well, just as you would during the day. Darkness is no excuse for poor composition!
While shooting nightscapes and time-lapses can be done with a minimal investment in hardware and software, it does require an investment in time – time to travel and spend nights shooting at wonderful places under the stars.
Enjoy the night!
I cover all these topics, and much more, in detail in my ebook How to Photograph & Process Nightscapes and Time-Lapses. Click the link below to learn more.
The Northern Lights dance over the badlands of Dinosaur Provincial Park, a World Heritage Site.
Aurora alerts called for a fine display on Friday, September 11. Forewarned, I headed to one of my favourite shooting spots at Dinosaur Provincial Park, and aimed three cameras at the sky. It didn’t take long before the lights appeared, right on cue.
The display started out with lots of promise, but did fade after 12:30 a.m., just when it was supposed to be peaking in intensity. I let the cameras run for a while but eventually stopped the shutters and packed it in…
…But not before I captured this odd bit of aurora in the east, shown below, that appeared as an isolated and stationary band pulsing up and down in brightness, but with little movement.
I’ve seen these before and have never heard a good explanation of what process creates such an effect, with a patch of sky appearing to “turn on” and off.
You can see the effect at the end of the time-lapse compilation, linked below from Vimeo.
As usual, please enlarge to full-screen and watch in HD for the best quality.
Unfortunately, a patrolling park official checking on things, spoiled some frames with her truck’s headlights. It’s one of the hazards of time-lapse imaging.
As a final image, here are all the fish-eye lens frames stacked into one image, to create a single star trail showing the sky rotating about the celestial pole.
Each exposure was 20 seconds at f/3.5 with the Sigma 8mm lens and at ISO 6400 with the Canon 6D. The ground comes from a stack of 16 images taken early in the sequence turned into a smart object and mean combined with Mean stack mode, to average out and smooth noise. The sky comes from 198 exposures, Lighten stacked using the Advanced Stacker Actions from StarCircleAcademy.com.
It’s been a good week for auroras, with a promise of more to come perhaps, as we approach equinox, traditionally a good time for magnetic field lines to align, funnelling solar storm particles into our magnetosphere.
On the morning of September 10 the waning crescent Moon gathered near bright Venus and much dimmer but redder Mars (at left) in the dawn sky.
Venus and Mars have both moved into the morning sky, where they will begin a series of conjunctions with the Moon and with Jupiter, now just emerging from behind the Sun, over the next two months. This gathering is just the start of the dawn planet dance.
For the technically minded, this is a high-dynamic range stack of 5 exposures to accommodate the large range in brightness between the sky and Moon, and to preserve the earthshine on the “dark side of the Moon.”
I shot this with the Canon 6D and 135mm lens at f/2 and at ISO 800 in a set of 8, 4, 2, 1 and 0.5-second exposures, blended with HDR Pro in Photoshop using 32-bit mode of Adobe Camera Raw.
The lights came out and danced in my sky in the early morning hours.
The early warning signs weren’t calling for anything too impressive for a display last night, September 8/9, but the sky surprised us with a fantastic display of Northern lights.
I shot with one camera – it was very late, or very early! – but shot enough frames to create this short 1.5-minute music video.
I photographed the sequence with a single fixed-camera aimed east toward a bright auroral curtain, showing fast pulsing forms common to the later stages of a substorm. But then a new bright curtain sweeps in from the north and the display brightens even more in a new substorm. The display then fades.
The exposures were taken over an hour from 1:30 a.m. to 2:30 a.m. MDT. Each was a 2-second exposure with an interval of 2 seconds, shot with the Nikon D750 at ISO 3200 and Sigma 24mm lens at f/2, for a total of just over 850 frames.
Look east at dawn on September 10 to see the first in a series of planet dances in the dawn sky.
Earlier this year in spring we had Venus and Jupiter blazing in the evening western sky. Now, after a time of retreat behind the Sun, they are emerging to repeat their show together but in the dawn sky.
However, Venus and Jupiter won’t be close together until the end of October. Until then, Venus and Jupiter slowly converge in the dawn sky, but now accompanied by dimmer but redder Mars.
On the morning of September 10, look east before sunrise to see the waning crescent Moon shining between Venus and Mars. Binoculars will frame the Moon and Venus, or the Moon and Mars, but not all three at once.
If your horizon and sky are very clear you might spy Jupiter as well shining down below the trio in the bright morning twilight.
The real dawn dance begins in mid to late October, when first Mars, then Venus passes Jupiter, and all three worlds cluster in a tight triangle in the morning twilight.